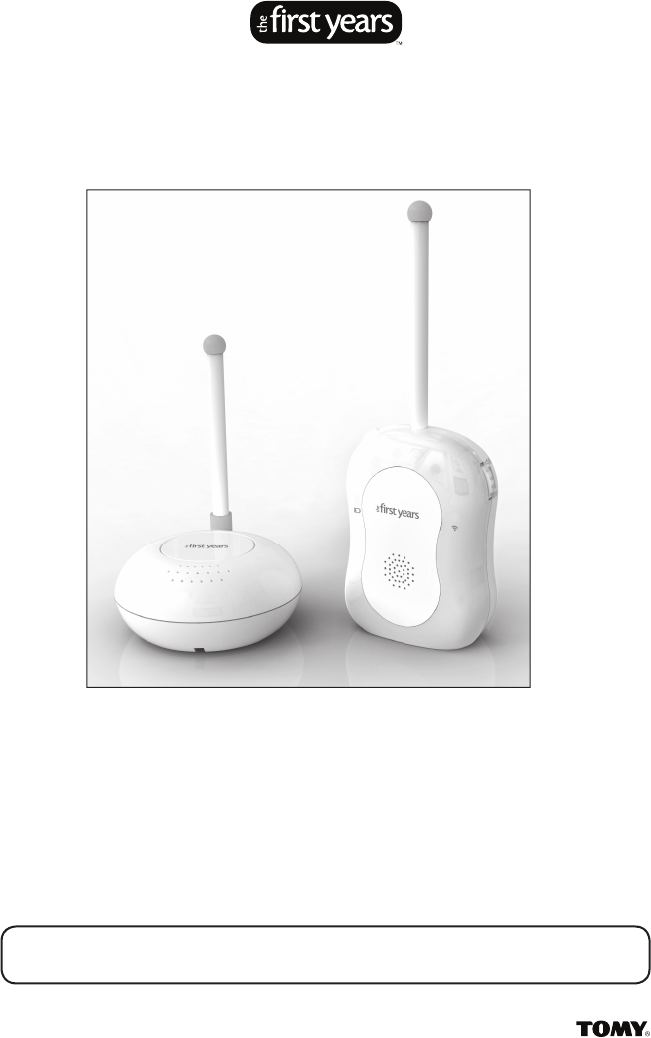
Tomy TFY7569P 2 PU Crisp and Clear Monitor User Manual Manual
TOMY International, Inc. 2 PU Crisp and Clear Monitor Manual
Tomy >
Manual

Before returning this product to the store for any reason,
please contact our Customer Care at
1-800-704-8697 or www.thefi rstyears.com
Often, we can provide helpful tips and instructions to resolve
your problem quickly over the phone.
Y7568, Y7569
Please retain this instruction sheet for future reference as it contains important information.
Crisp & Clear™
Audio Monitor
Check our website: www.thefi rstyears.com for the most up-to-date
instruction manual as well as tips and troubleshooting advice.
NOTE: Y7568 comes with one Child Unit, one Parent Unit, one Parent Unit antenna and two
AC adapters. Y7569 comes with one Child Unit, two Parent Units, two Parent Unit antennas
and three AC adapters. Except for setting up (and using) the second Parent Unit, instruc-
tions for both models are the same.

2 get ready for thefirstyears.com™
Crisp & Clear™ Audio Monitor
SAFETY INSTRUCTIONS
This symbol is intended to warn the user of potential safety hazards.
This symbol is intended to alert the user to a potential risk of
electric shock and other electrical safety issues.
WARNING:
• Strangulation Hazard-Children have STRANGLED
in cords. Keep cord out of the reach of children
(more than 3 ft (0.9m) away).
• The product is designed to assist in the monitoring of children, not as a
prevention for injury to or loss of a child.
• This product is not a substitute for proper adult supervision. All children
should be supervised at all times by responsible adults.
WARNING
Toreducetheriskofreorelectricalshock,donotopenthisproductor
expose the product to:
• Water and Moisture: This product should not be used near water,
for example, near a bathtub or sink, in a wet basement or near a
swimming pool.
• Heat: This product should be situated away from heat sources such as
radiators, heat registers, stoves, or other appliances that produce heat.
IMPORTANT
• The user should not attempt to service this product. Read all safety and
operating instructions before operating this product.
• Retain these instructions for future reference.
• Observe all warnings.
• Follow all operating instructions.

get ready for thefirstyears.com™ 3
English
• Do not tamper with the plug under any circumstances.
• Power Source – This product should be connected only to the power
supply provided.
• Cleaning —Before cleaning, be sure to unplug. Clean only as
recommended in these instructions.
• Object and Liquid Entry—Care should be taken so that objects do not
fall and liquids are not spilled into the enclosure through the openings.
• Damage or Malfunction—Please contact our Parent Service Center at
800-704-8697 if:
a. The power supply cord or plug has been damaged
b. Objects have fallen or liquid has been spilled into it
c. The product has been exposed to rain
d. The product does not appear to operate normally or exhibits a
marked change in its performance
e. The product has been dropped or the enclosure damaged.
Wall Mounting—The Child Unit should be mounted to a wall only as
recommended in these instructions.
WARNING
Do not mount the Child Unit in a location where the unit or the adapter cord
is within the child’s reach. To prevent injury, this apparatus must be securely
attached to the wall in accordance with the installation instructions.

4 get ready for thefirstyears.com™
Crisp & Clear™ Audio Monitor
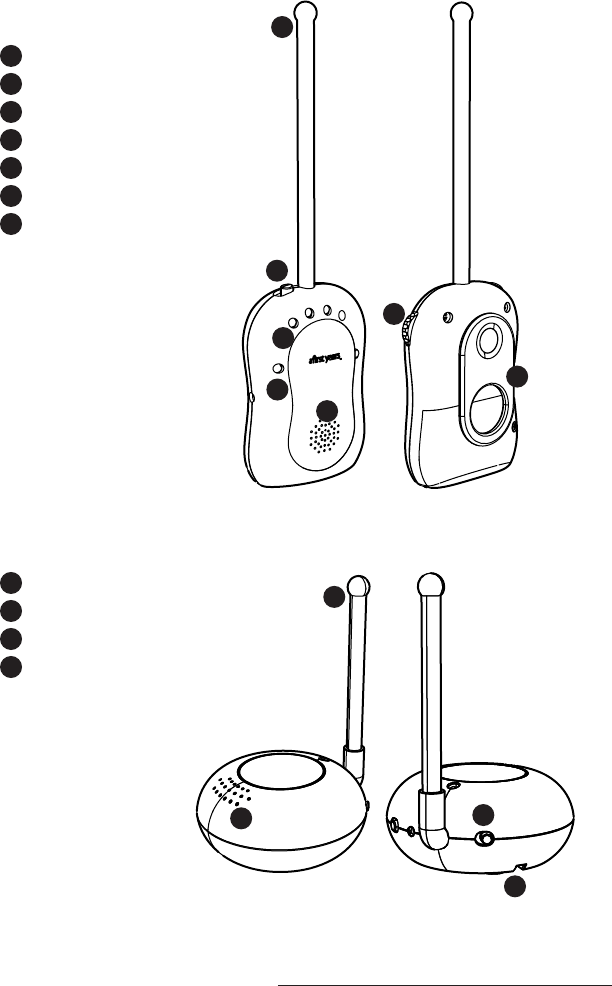
Parts Diagram
Parent Unit
High performance antenna
Low battery indicator
Sound level lights
Two channel A/B switch
High quality speaker
Volume and power switch
Belt clip
Child Unit
High performance antenna
Super sensitive microphone
Two channel A/B switch
Wall mount
1
8
2
9
3
10
4
5
6
7
1
8
10
11
27
6
5
4
3
11
9

get ready for thefirstyears.com™ 5
English
Quick Start Instructions
Please read the safety instructions on pages 2-3.
Set up the Parent Units
•ScrewtheantennaintotheParentUnit.
•Batterycompartmentislocatedonthebackofunit.Unscrewtoreleasecoverlock.
•InstallthreeAAbatteries.
•Or,plugoneoftheACadaptersprovidedintoeachParentUnit.
Set up the Child Unit
•Placetheunitnearyourchild(within6feet,butnocloserthan3feet).
•Positiontheantennastraightup.
•PlugintheACadapterprovided.
•SlidethechannelswitchtoAorB.
•PresstheON/OFFbuttontoturnontheunit.
Use the Monitor (Parent Unit)
•SlidethechannelswitchtothesamechannelastheChildUnit(AorB).
•Rotatethevolumedialtoturnonandadjusttodesiredvolumelevel.
•KeeptheParentUnitwithyouandkeepitpositionedupright.

6 get ready for thefirstyears.com™
Crisp & Clear™ Audio Monitor
Monitor Setup
Parent Unit(s)
To operate with batteries:
1. Screw the antenna into the Parent Unit.
2. Loosen screw to release the battery compartment cover. Then lift the cover o
(for easier access, rotate belt clip away from battery cover.)
3.InsertthreeAAbatteries.Positionthemsothe+and-contactsarealignedwiththe
corresponding contacts on the battery compartment. Make sure the ribbon is placed
under the batteries to allow assistance in removing.
4. Place cover back on battery compartment and secure it by tightening screw.
5.Whenit’stimetochangethebatteries,thepowerindicatorlightwillturnred.Replace
batteries with three new AA batteries at that time.
To operate with AC adapter:
InsertACadapterplugintothejackonthesideoftheunit,thenplugtheadapterintoan
electrical outlet.
CAUTION:
Always use the AC adapter supplied with this product. Do not use any other adapter.
Monitor could become damaged, and warranty would become void.
Child Unit
1. Position the Child Unit within approximately 6 feet of your child, but no closer than 3 feet.
WARNING:
Do not place Child Unit in crib or attach to crib.
(To prevent heat build-up, place on an open surface away from heat sources;
do not place in an enclosed space.)
2. Position antenna straight up as shown.
3.InserttheACadapterplugintothejackonthesideoftheunit,thenplugtheadapterinto
an electrical outlet.
For wall mounting (optional):
1.Securelyfastenone#8panheadwoodscrewonthewall(Forbestresults,usea3/4-inch
screw; mount in solid wood or use a screw wall anchor).
2. Leave the screw head protruding from the wall by at least 1/4-inch.
3. Press the adapter cord into the grooved channel on the back of the unit, making certain
to slide it under the holding clips.
4.Fitthescrewheadslot(onthebackoftheunit)overthescrewheadandslidetheunit
down to seat it firmly.
5. Position antenna to the side.
6. To test the unit is securely mounted, press on its edges.

get ready for thefirstyears.com™ 7
English
Monitor Use
1. Slide the channel A/B switch on the Child Unit to either A or B. Turn the unit on by
pressingtheON/OFFbutton.
2. TurntheParentUnitON/OFFbyrotatingthevolumeswitch.
3. Slide the channel selector switch on the Parent Units to the same channel as the
ChildUnit(AorB).FortheMonitortoworkproperly,bothunitsmustbesettothe
same channel.
4. Turn the volume dial on the Parent Units counter clockwise to the desired loudness
level.
5.KeepaParentUnitwithyou.Forbestreceptionkeepallunitsasnearuprightaspossible.
Range:
The range of the Monitor will vary with the surroundings. You may want to test its workable
range by walking through your house and yard and listening for the volume and clarity of
the sounds being transmitted.
Using belt clip:
Slide onto your belt or waistband. The belt clip can rotate away from the battery
compartment for easy access to batteries.
Changing channels:
Alwayskeepbothunitssettothesamechannel(AorB).Ifyouexperienceinterferenceor
static with one channel, switch to the other on both units.
Positioning antennas:
IftheChildUnitiswallmounted,antennashouldbetotheside.
Lights
Here’s how to interpret the lights on the Parent Units.
Power Indicator
Light is Green BothunitsareONandtheMonitorisreadytotransmitsound.
Light is Red BatteriesinParentUnitareweak.Replacewiththree
“AA” batteries.
Not Lit Unit is not receiving power
(See“Troubleshooting,”“Nopower”).
Three Quiet Sound Lights
No Lights Lit NosoundfromChildUnit(babyisquiet).
Lights are Green Quiet sounds (baby may be whimpering or talking).
One Loud Sound Light
Light is Red Loud sounds (baby may be crying or talking loudly).
Connectivity
Light is Green Units are connected and the Monitor is ready to transmit sound.
Replacing Batteries (Parent Units):
Removeoldbatteriesandsee“Tooperatewithbatteries”onpage6.
2
1
3
4

8 get ready for thefirstyears.com™
Crisp & Clear™ Audio Monitor
Problem Possible Cause Solution
Nopower Parent Units:
Unit is not turned on Turn the unit on
Batteries are dead Replacebatteriesorpluginadapter
(See “Monitor Setup" on page 6)
Child Unit:
Unit is not turned on PressON/OFFbutton
Adapter not plugged in Plug in adapter
Adapter plugged into outlet
which is turned o
Ifoutletiscontrolledbyawallswitch,
be sure switch is turned on
Hissing sound Parent Unit is turned on,
but Child Unit is o
Leave Child Unit plugged in
and turned on at all times (or if you
turn it o, turn o Parent Unit also)
StaticorInterference Units set to dierent channels Set both units to same channel
Appliances (fans, hair dryer,
or mixer for example) causing
interference
Try turning o any nearby appliances
or switching channels or moving the
monitors away from source of
interference
Cross talk from cordless
phone or some other nearby
transmitter
Try switching channels
Child Unit not receiving power Make sure adapter is plugged in and
outlet is receiving power
Batteries are low Replacebatteriesorpluginadapter
Troubleshooting

get ready for thefirstyears.com™ 9
English
Problem Possible Cause Solution
Noisyfeedback
(high-pitched “screech”)
Units too close together Be sure Parent Unit is at least
3 feet from Child Unit
Volume too high Lower volume setting on Parent Unit
Nosoundorveryweak
reception
Unit is getting little or no
power
Parent Unit:Replacebatteriesor
plug in adapter
Child Unit: Make sure adapter is
plugged in and outlet is receiving
power
Out of range Move Parent Unit closer to
Child Unit (and be sure Child Unit
is turned on)
Antenna is not vertical
or is covered
Be sure antenna is straight up and
not obstructed
Units are set to
dierent channels
Set both units to the same channel
Weak batteries ReplacebatteriesoruseACadapter
Volume is set too low Raisevolumesetting
Troubleshooting

10 get ready for thefirstyears.com™
Crisp & Clear™ Audio Monitor
WARNING
Keep batteries away from children. Parents are urged to exercise care in the
storage, use and disposal of all batteries.
To avoid battery leakage:
• Donotuserechargeablebatteries;
• Batteriesmustberemovedandinsertedunderadultsupervision;
• Non-rechargeablebatteriesarenottoberecharged;
• Batteriesaretobeinsertedwiththecorrectpolarity;
• Exhaustedbatteriesaretoberemovedfromtheunitanddisposedproperly;
• Supplyterminalsarenottobeshort-circuited;
• Dierenttypesofbatteries(e.g.alkaline,standardcarbon-zincorrechargeable)ornew
and used batteries are not to be mixed;
• Donotdisposeofbatteriesinre,mayexplodeorleak.
•Neveruseascrewdriveroranyothertooltoprybatteriesfromthecompartment,asthe
supply terminals could be short-circuited.
•DonotleavebatteriesintheMonitorforlongperiodsofnon-use.
Failuretofollowtheseinstructionsmaycausebatteriestomakepoppingsoundsandleak
batteryacid,whichcouldresultinpersonalinjury,aswellasdamagetotheMonitor.Ifbat-
tery leakage occurs, avoid all contact with battery acid, being especially careful to keep it
away from eyes and mouth. Should contact occur, wash any aected skin and clothing
thoroughly.
IMPORTANT:
• ALWAYS DISPOSE OF USED BATTERIES IN AN ENVIRONMENTALLY FRIENDLY
MANNER.
AlkalinebatteriesandNickelMetalHydridebatteries(Ni-LiorNi-Hydride),areclassied
asnon-hazardouswaste(exceptinCalifornia)andcanbeeitherdisposedofinthetrashor
e-recycledatalocalrecyclingcenter.Inordertondacenternearyou,gotowww.ehso.
com; using the search function, type in “Batteries” and select the Battery Disposal Guide for
Households.Thiswillprovidealinktonearbycentersbasedonzipcode.
To Clean Units
Wipe exterior surfaces with a clean, dry cloth.
Maintenance

get ready for thefirstyears.com™ 11
English
Note: This equipment has been tested and found to comply with the limits
foraClassBdigitaldevice,pursuanttoPart15oftheFCCRules.Theselimits
are designed to provide reasonable protection against harmful interference
in a residential installation. This equipment generates, uses and can radiate
radio frequency energy and, if not installed and used in accordance with the
instructions, may cause harmful interference to radio communications.
However, there is no guarantee that interference will not occur in a particular
installation.Ifthisequipmentdoescauseharmfulinterferencetoradioortelevision
reception, which can be determined by turning the equipment o and on, the user
is encouraged to try to correct the interference by one or more of the following
measures:
•Reorientorrelocatethereceivingantenna.
•Increasetheseparationbetweentheequipmentandreceiver.
•Connecttheequipmentintoanoutletonacircuitdierentfromthattowhich
the receiver is connected.
•Consultthedealeroranexperiencedradio/TVtechnicianforhelp.
ThisdevicecomplieswithPart15oftheFCCRules.Operationissubjecttothe
following two conditions: (1) this device may not cause harmful interference, and
(2) this device must accept any interference received, including interference that
may cause undesired operation.
ThesedevicescomplywithFCCandIndustryCanadaRFradiationexposurelimits
set forth for the general population. They must not be operated when co-located
with any other antenna or transmitter.
Caution:TomaintainthecompliancewiththeFCC’sandIndustryCanada’sRF
exposure guideline, place the child unit at least 20 cm (8 inches) from nearby
persons.
*ThisdevicecomplieswithRSS-310ofIndustryCanada.Operationissubjectto
the condition that this device does not cause harmful interference.
WARNING
ChangesormodicationstothisunitnotexpresslyapprovedbyTOMYcould
void the user’s authority to operate the equipment.
FCC
CAUTION: Any changes or modifications not expressly approved
by the party responsible for compliance could void the user s
authority to operate this equipment.
© TOMY
1111 W. 22nd Street
Oak Brook, IL 60523 U.S.A.
All Rights Reserved.
Made in China.
Y7568/Y7569 120919
Warranty
Our Limited Warranty and Warranty Period
When we use the terms “we,” “us” and “our,” we are referring to TOMY, and when we
use the terms “you” and “your” we mean the original end-user customer. Our products
are guaranteed to be free from defects in material and workmanship under normal and
intended use for a period of 90 days from the date of your purchase.
Repair/Replacement
Ifourproductfailstomeetourlimitedwarrantyduringthewarrantyperiod,wewill,atour
option, repair or replace the product free of charge.
What Our Limited Warranty
DoesNotCoverWeoerthislimitedwarrantyonlywhentheproductisusedbytheoriginal
end-user customer. We oer no other warranty. Additionally, while our warranty is excel-
lent,thereareotherlimitstoit.WeoerNOWARRANTYincasesofdamageintransit,
inadequate care, abuse, abnormal use, misuse, accidents, normal wear and tear, damage
due to environmental or natural elements, failure to follow product instructions, immersion
in water (except for products specifically identified by us in writing as intended for water
use), battery leakage or improper storage or maintenance of the products.
Disclaimer of Other Warranties
THEEXPRESSWARRANTIESINTHEPRECEDINGSECTIONAREEXCLUSIVEANDINLIEUOF
ALLOTHERWARRANTIES.However,totheextentapplicablelawdoesnotpermitdisclaim-
ers of certain implied warranties, such warranties are limited to the warranty period identi-
fied above. Some states and countries do not allow limitations on how long an implied
warranty lasts, so the above limitations may not apply to you.
Limitation on Damages
INNOEVENTSHALLWEBELIABLEFORINCIDENTAL,COMPENSATORY,PUNITIVE,
CONSEQUENTIAL,INDIRECT,SPECIALOROTHERDAMAGES.OURAGGREGATELIABILITY
WITHRESPECTTODEFECTIVEPRODUCTSISLIMITEDTOTHEMONIESPAIDTOUSFOR
THEDEFECTIVEGOOD.Somestatesandcountriesdonotallowtheexclusionorlimitation
of incidental, consequential or other damages, so the above limitation or exclusion may not
apply to you.
State Variations
This warranty gives you specific legal rights, and you may also have other rights which vary
based on state, province or country.
Contact Us
Ifyouhaveawarrantyclaimorrequest,anycustomercarequestions,pleasecontactviaour
website www.thefirstyears.com or call us at 1-800-704-8697.
Crisp & Clear™ Audio Monitor