Top Victory Electronics TV1505P LCD TV Monitor User Manual COVER
Top Victory Electronics (Taiwan) Co Ltd LCD TV Monitor COVER
Users Manual


2

IMPORTANT SAFETY INSTRUCTIONS
The present set had been designed and manufactured to assure personal safety. Improper use
can result in electric shock or fire hazard. The safeguards incorporated with the present unit will
protect you if you observe the following procedures when installation, operating and servicing.
The present unit is fully transistorized and does not contain any element that can be repaired by
user.
Read Before Operating Equipment
1. Keep these instructions.
2. Read all warnings.
3. Follow all instructions.
4. Do not use this apparatus near water.
5. Clean only with a dry cloth.
6. Do not block any of the ventilation openings. Install in accordance with the manufacturers
instructions.
7. Do not install near any heat sources such as radiators, heat registers, stoves, or other apparatus
(including amplifiers) that produce heat.
8. Do not defeat the safety purpose of the polarized or grounding type plug. A polarized plug has two
blades with one wider than the other. A grounding type plug has two blades and third grounding
prong. The wide blade or third prong is provided for your safety. When the provided plug does not fit
into your outlet, consult an electrician for replacement of the obsolete outlet.
9. Protect the power cord from being walked on or pinched particularly at plugs, convenience
receptacles, and the point where they exit from the apparatus.
10. Only use attachments/accessories specified by the manufacturer.
11. Use only with a cart, stand, tripod, bracket, or table specified by the manufacturer, or sold with the
apparatus. When a cart is used, use caution when moving the cart/apparatus combination to avoid
injury from tip-over.
12. The TV should be operated only from the type of power source indicated on the label. If you are not
sure of the type of power supplied to your home, consult your dealer or local power company.
13. Unplug this apparatus during lightning storms or when unused for long periods of time.
14. Refer all servicing to qualified service personnel. Servicing is required when the apparatus has been
damaged in any way, such as power-supply cord or plug is damaged, liquid has been spilled or
objects have fallen into apparatus, the apparatus has been exposed to rain or moisture, does not
operate normally, or has been dropped.
15. This product may contain mercury. Disposal of these materials may be regulated due to
environmental considerations. For disposal or recycling information, please contact your local
authorities or the Electronic Industries Alliance: www.eiae.org
3
16. Damage Requiring Service – The appliance should be serviced by qualified service personnel
when:
A. The power supply cord or the plug has been damaged; or
B. Objects have fallen, or liquid has been spilled into the appliance; or
C. The appliance has been exposed to rain; or
D. The appliance does not appear to operate normally or exhibits a marked change in
performance; or
E. The appliance has been dropped, or the enclosure damaged.
17. Tilt/Stability – All televisions must comply with recommended international global safety standards
for tilt and stability properties of its cabinets design.
y Do not compromise these design standards by applying excessive pull force to the front, or top,
of the cabinet, which could ultimately overturn the product.
y Also, do not endanger yourself, or children, by placing electronic equipment/toys on the top of
the cabinet. Such items could unsuspectingly fall from the top of the set and cause product
damage and/or personal injury.
18. Wall or Ceiling Mounting – The appliance should be mounted to a wall or ceiling only as
recommended by the manufacturer.
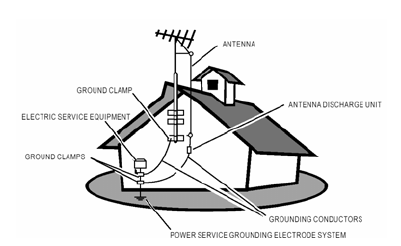
19. Power Lines – An outdoor antenna should be located away from power lines.
20. Outdoor Antenna Grounding – If an outside antenna is connected to the receiver, be sure the
antenna system is grounded so as to provide some protection against voltage surges and built up
static charges.
Section 810 of the National Electric Cord, ANSI/NFPA No. 70-1984, provides information with respect
to proper grounding of the mats and supporting structure grounding of the lead-in wire to an
antenna-discharge unit, size of grounding connectors, location of antenna-discharge unit, connection
to grounding electrodes and requirements for the grounding electrode. See Figure below.
EXAMPLE OF ANTENNA GROUNDING AS PER NATIONAL ELECTRICAL CODE
Note to the CATV system installer: This reminder is provided to call the CATV system installer’s attention
to Article 820-40 of the NEC that provides guidelines for proper grounding and, in particular, specifies that
the cable ground shall be connected to the grounding system of the building, as close to the point of
cable entry as practical.
22. Objects and Liquid Entry – Care should be taken so that objects do not fall and liquids are not
spilled into the enclosure through openings.
4

5
TABLE OF CONTENT
INSTRODUCTION
WELCOME / REGISTRATION OF YOUR TV-------------------------------------2
IMPORTANT SAFETY INSTRUCTIONS-------------------------------------------3
TABLE OF CONTENT------------------------------------------------------------------ 5
INSTALLATION
PRESENTATION OF THE LCD TV -----------------------------------------------6-7
SUPPLIED ACCESSORIES -----------------------------------------------------------8
REMOTE CONTROL OPERATION--------------------------------------------------9
INSTALLING LCD TV ON THE WALL --------------------------------------------10
GETTING STARTED ------------------------------------------------------------------11
OSD SETTING --------------------------------------------------------------------------12
CONNECT VIDEO RECORDER ---------------------------------------------------13
CONNECT CAMERA /CAMCORDER/ VIDEO GAME SET -----------------13
CONNECT DVD PLAYER ----------------------------------------------------------- 14
CONNECT DIGTAL SET TOP BOX -----------------------------------------------14
TV SET UP MENU
TV CHANNEL INSTALLATION -----------------------------------------------------15
CHANNEL EDIT ------------------------------------------------------------------------16
SLEEP TIMER---------------------------------------------------------------------------16
CLOSED CAPTION --------------------------------------------------------------------17
CHANNEL LOCK -------------------------------------------------------------------17-20
SOUND SET UP MENU ------------------------------------------------------21-22
PICTURE SET UP MENU ---------------------------------------------------23-24
PC SET UP MENU -------------------------------------------------------------25-26
GENERAL INFORMATION
TIPS ---------------------------------------------------------------------------------------27
CALL BEFORE SERVICE------------------------------------------------------------28
GLOSSARY -----------------------------------------------------------------------------29
PRODUCT SPECIFICATION----------------------------------------------------23-31
LIMITED WARRANTY-----------------------------------------------------------------32
THANK YOU VERY MUCH FOR CHOOSING THE LCD TV.
WE RECOMMEND THAT YOU TAKE A FEW MINUTES TO READ CAREFULLY
THROUGH THIS MANUAL BEFORE INSTALLING AND SWITCHING ON THE TV.
PLEASE KEEP THIS MANUAL IN A SAFE PLACE FOR YOUR FUTURE REFERENCE.
English

1
FOR YOUR SAFETY
Before operating the TV please read this manual thoroughly. This manual
should be retained for future reference.
FCC Class B Radio Frequency Interference Statement
WARNING: (FOR FCC CERTIFIED MODELS)
NOTE: This equipment has been tested and found to comply with the limits for
a Class B digital device, pursuant to Part 15 of the FCC Rules. These limits
are designed to provide reasonable protection against harmful interference in
a residential installation. This equipment generates, uses and can radiate
radio frequency energy, and if not installed and used in accordance with the
instructions, may cause harmful interference to radio communications.
However, there is no guarantee that interference will not occur in a particular
installation. If this equipment does cause harmful interference to radio or
television reception, which can be determined by turning the equipment off
and on, the user is encouraged to try to correct the interference by one or
more of the following measures:
1.Reorient or relocate the receiving antenna.
2.Increase the separation between the equipment and receiver.
3.Connect the equipment into an outlet on a circuit different from that to
which the receiver is connected.
4.Consult the dealer or an experienced radio/TV technician for help.
NOTICE
1. The changes or modifications not expressly approved by the party
responsible for compliance could void the user's authority to operate the
equipment.
2. Shielded interface cables and AC power cord, if any, must be used in
order to comply with the emission limits.
3. The manufacturer is not responsible for any radio or TV interference
caused by unauthorized modification to this equipment. It is the
responsibilities of the user to correct such interference.
As an ENERGY STAR Partner Envision Peripherals, Inc. has determined
that this product meets the ENERGY STAR guidelines for energy efficiency.
WARNING:
To prevent fire or shock hazard, do not expose the TV to rain or moisture.
Dangerously high voltages are present inside the TV. Do not open the cabinet.
Refer servicing to qualified personnel only.
6
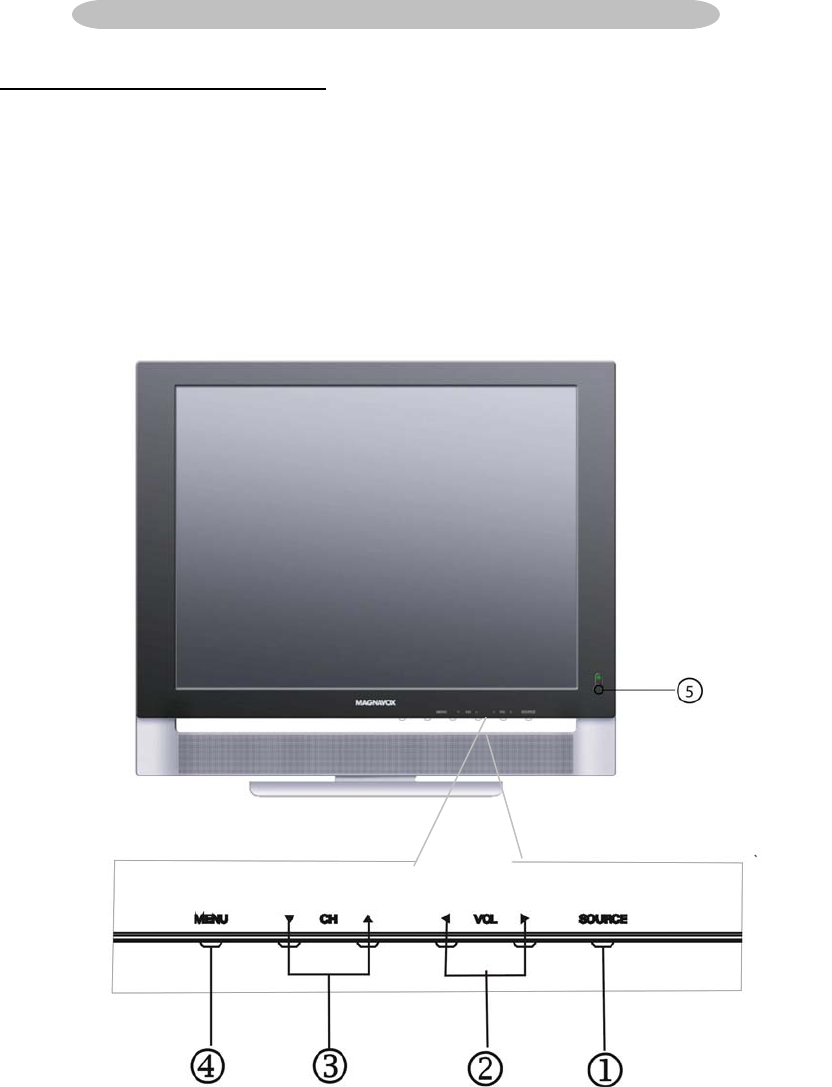
PRESENTATION OF THE LCD TV
▪ Front Panel Control Knobs
① Source Key Press to select your input source.
② < / > Key Press to confirm your function selection and adjust the volume
③ ٧ / ٨ Key Press to perform select function and TV channel
④ MENU Key Press to show the OSD menu and exit OSD menu at the TV.
⑤ Power Key Press to turn on or off the TV.
INSTALLATION
7
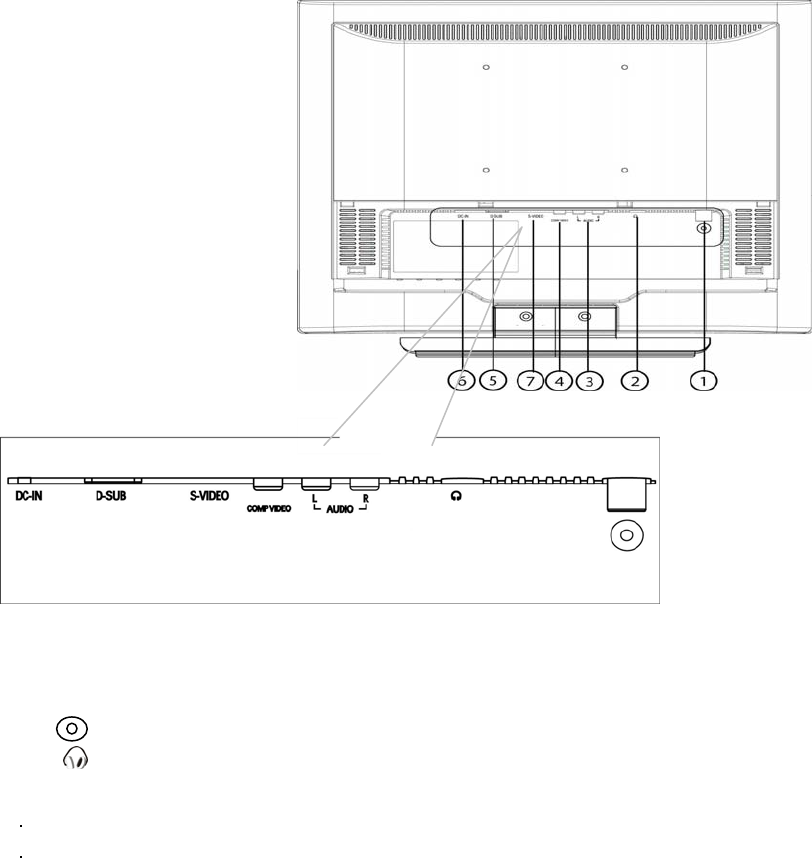
▪ Preparation
Remove the back plate at the back of the TV as shown on the illustration opposite. Lay the LCD TV with
the screen down on a table, as it will be easier to connect your peripheral equipment. Please take
precaution not to damage the screen.
①TV input
②Earphone jack
③Audio R/L Audio Right /Left Channel input
④COMP VIDEO AV Input
⑤D-SUB PC Input
⑥DC-IN 12V DC Power Input
⑦S-VIDEO S-VIDEO Input
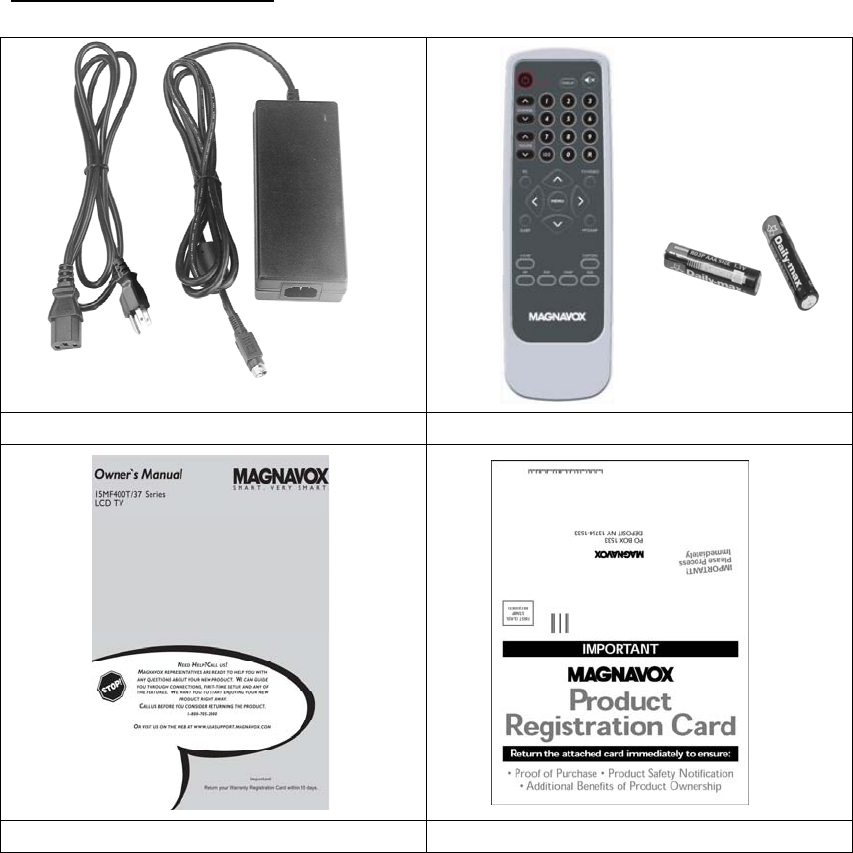
SUPPLIED ACCESSORIES
Power/ adapter Remote control
Owner’s Manual Warranty card
8
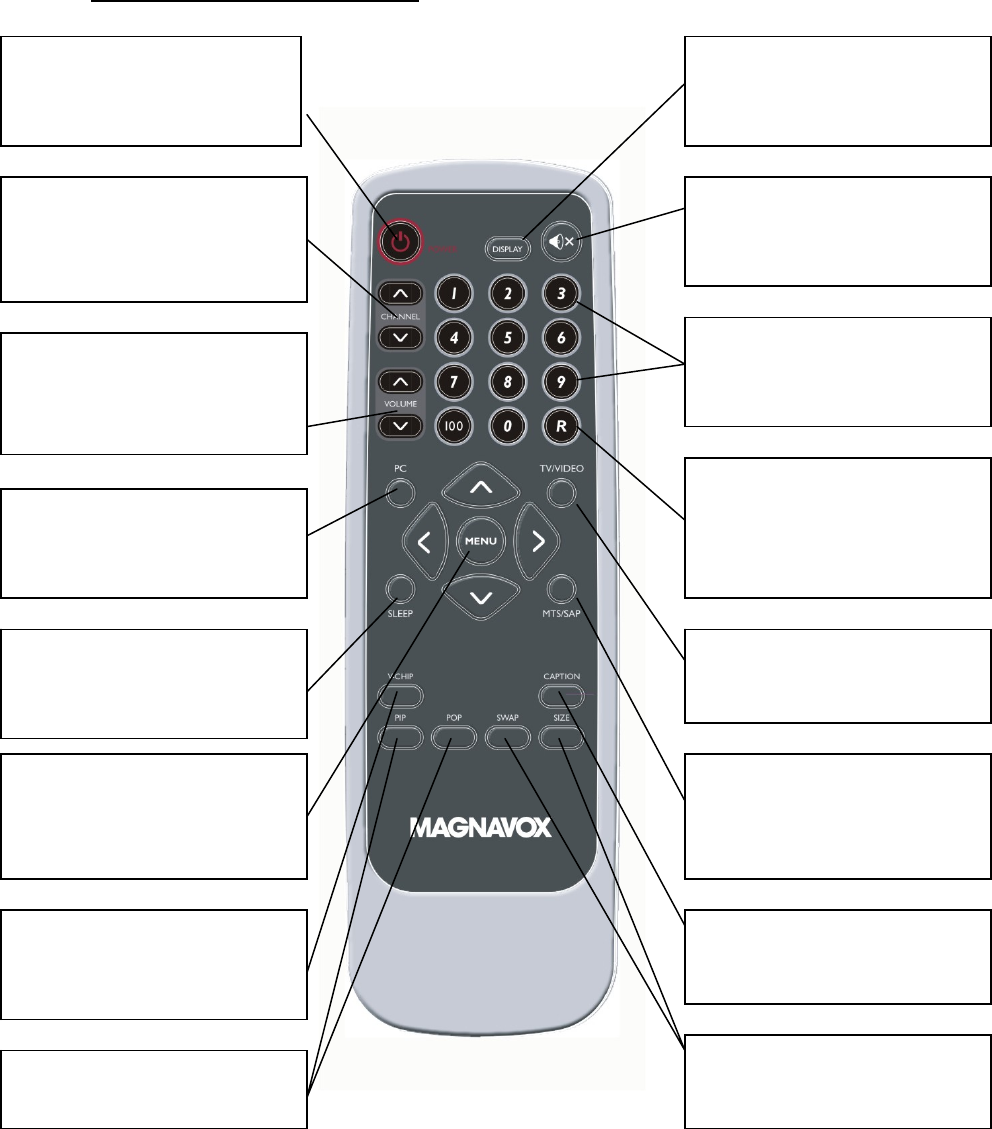
REMOTE CONTROL OPERATION
POWER button:
Press to turn on/off the TV
CHANNEL button
Press to adjust the channel up or
down.
VOLUME button
Press to adjust the sound level
PC button
Press to switch on your PC signal.
R button
Press to display the previously
selected TV channel
SLEEP button
Press to set the LCD TV to turn itself
off within a certain time.
V-CHIP button
Press this button to setup parental
control.
PIP/POP button
Not applicable
MUTE button
Press to eliminate or restore the LCD
TV sound
DISPLAY button
Press to "display” channel number on
the screen
Number button
Press to select TV channels
MENU button
Press repeatedly to display main
menu, and also exit OSD function
TV/VIDEO button
Select your video input source
MTS /SAP button
Press to select sound mode if available
with TV program: Mono, Stereo or SAP
SIZE/SWAP button
Not applicable
CAPTION button
Press to "activate" closed Caption.
9
10
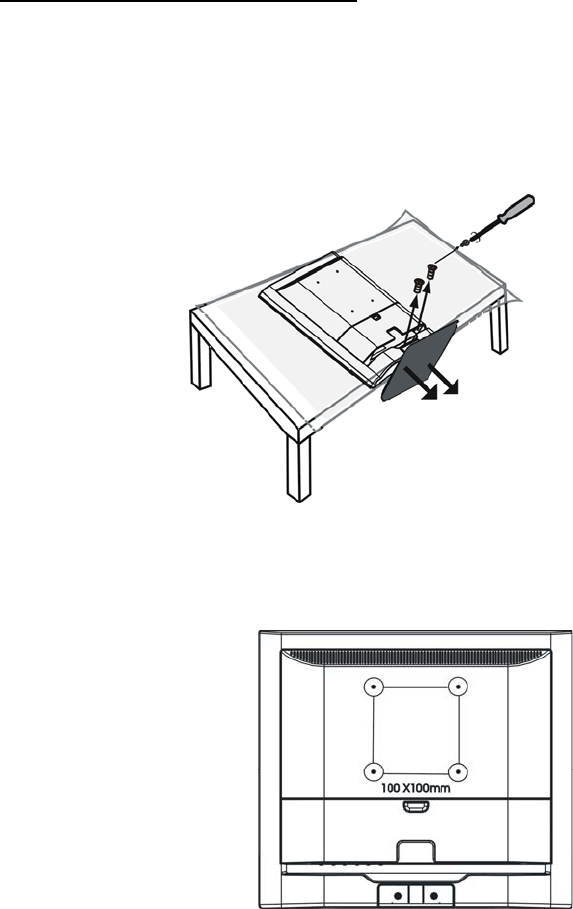
INSTALLING LCD TV ON THE WALL
Before you can install your LCD TV on the wall, you MUST first remove the base
using the steps below:
1. Place the set facing down on a flat surface with a protective sheet or cloth the TV.
2. Remove twos crews from the base, grasp the base and pull it out.
When installing the LCD TV on the wall, please consult a professional technician for proper installing.
The manufacture accepts no liability for installations not performed by professional technician.
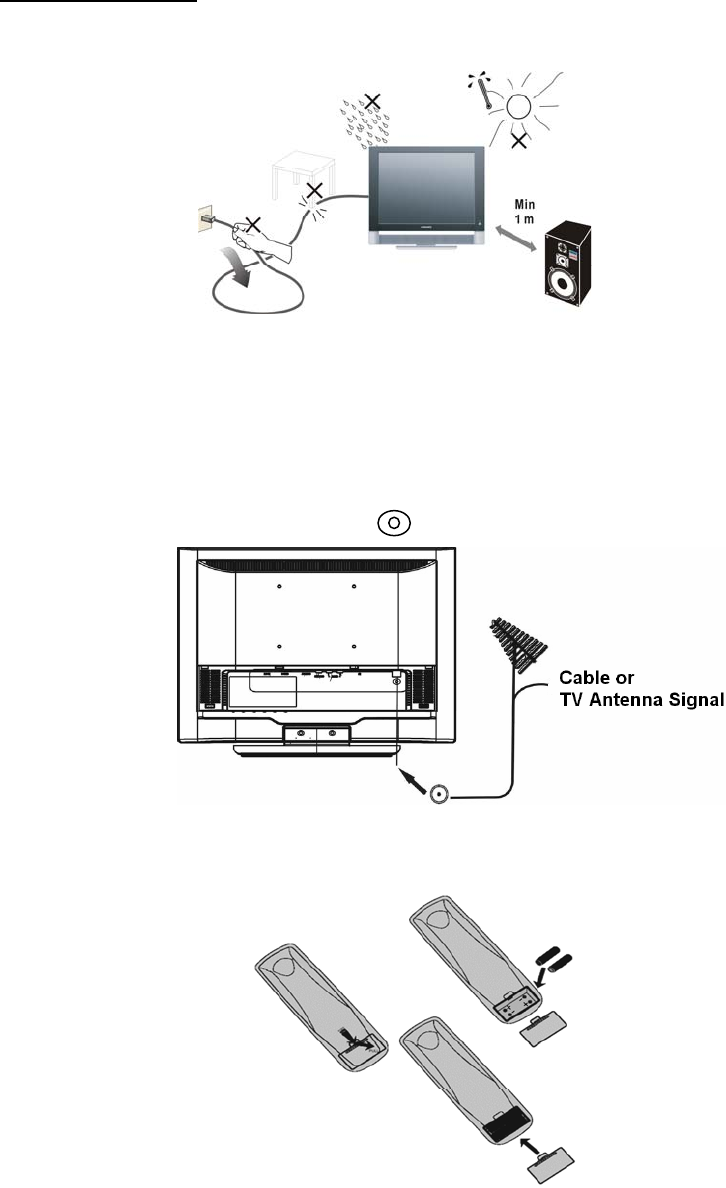
GETTING STARTED
1. Place the TV on a sturdy surface.
Note: Ensure that the TV is placed in a position to allow free flow of air. Do not cover the ventilation
openings on the back cover.
To prevent any unsafe situations, no naked flame sources, such as lighted candles, should be placed
on or in the vicinity.
Avoid heat, direct sunlight and exposure to rain or water. The equipment shall not be exposed to
dripping or splashing.
2. Connect the antenna to the TV jack on the rear of LCD TV
3. Battery Installation:
Remove the battery compartment lid. Place 2 AAA batteries in the remote.
4. Plug the DC adaptor into DC IN 12V jack on the LCD TV
Plug the power cable into an outlet and switch TV set on.
5. Press the power button to turn on the TV
6. Run the Auto Scan function to install your LCD TV channels(Refer to Page15)
11
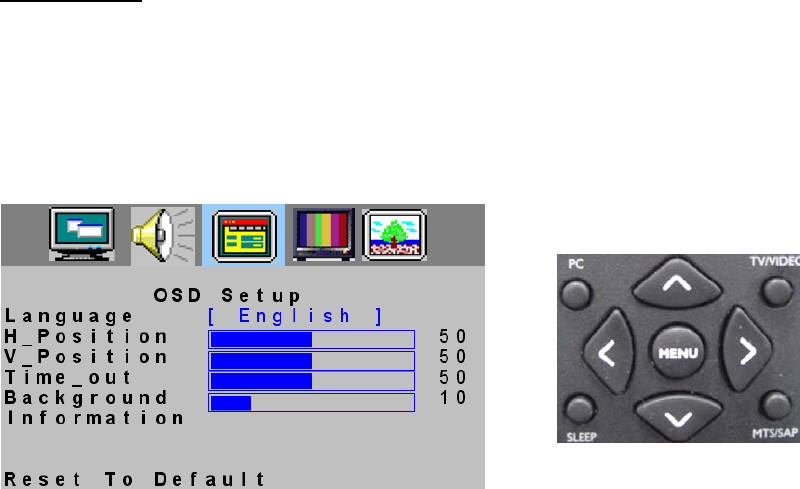
OSD SETTING
1. Press “MENU’’ key to open OSD menu
2. Press > or < key to select “OSD SETUP’’ option
3. Press ^ or v key to select submenu
OSD Setup
REMOTE CONTROL
▪ Language
1. Press ^ or v key to select “Language” option
2. Press > or < key to select language, there are three kinds of language to select :English、French、 and
Spanish
3. After adjustment, press “MENU” key to exit or press ^ or v key to adjust other options
▪ H_Position
1. Press ^ or v key to select “H Position” option
2. Press > or < key to adjust OSD horizontal position
3. After adjustment, press “MENU” key to exit or press ^ or v key to adjust other options
▪ V_Position
1. Press ^ or v key to select “V Position” option
2. Press > or < key to adjust OSD vertical position
3. After adjustment, press “MENU” key to exit or press ^ or v key to adjust other options
▪ Time_out
1. Press ^ or v key to select “Time out ” option
2. Press > or < key to adjust OSD display time
3. After adjustment, press “MENU” key to exit or press ^ or v key to adjust other options
▪ Background
1. Press ^ or v key to select “Background” option
2. Press > or < key to adjust OSD background
3. After adjustment, press “MENU” key to exit or press ^ or v key to adjust other options
▪ Information :This option can only be operated on PC signal source
1. Press ^ or v key to select “Information” option
2. Press > or < key then the screen will display the current input information
3. Press “MENU” key to exit information menu
12

CONNECT VIDEO RECORDER
How to connect:
1. Connect the antenna to VCR RF input
2. Connect the other RF cable from VCR output to TV input ; if you connect the VCR video
frequency to TV’s AV input connector, you will get the better quality of video and audio
3. TV’s AV input COMP VIDEO does not provide audio frequency, so you need to connect VCR audio
frequency output to TV’s audio frequency input AUDIO
If your VCR is equipped with S-VHS video port:
For improved picture quality, connect an S-Video cable with the S-VIDEO input on the TV instead of
connecting the VCR to the VIDEO port.
S-Video does not provide audio, audio cables must still be connected to provide sound
Watching VCR
1. If you use TV connection, select the TV channel search.
2. If you use AV connection, select AV
3. If you use S-Video connection. Select s-video
4. Insert videotape in the VCR and press the PLAY button
CONNECT CAMERA /CAMCORDER/ VIDEO GAME SET
1. Connect the video output port of Camera /Camcorder/ Video Game Set to the AV input of TV
2. Connect the left and right audio channels of Camera /Camcorder/ Video Game Set to the left and right
channels of audio input of TV
If your Camera /Camcorder/ Video Game Set is equipped with S-VHS video port:
For better quality picture, please connect the S-Video cable to the S-Video input of TV. Connect the left
and right channels of Camera /Camcorder/ Video Game Set to the left and right channels of audio input
of TV
How to play
If you use AV connection, please select AV;
If you use S-Video connection, please select S-VIDEO;
13

CONNECT DVD PLAYER
1. Connect the video output port of DVD player to the AV input port of TV
2. Connect the left and right audio channels of DVD to the left and right channels of audio input of TV
If your DVD player is equipped with S-VHS video port:
For better quality picture, please connect the S-Video cable to the S-Video input of TV. Connect the left
and right channels of DVD to the left and right channels of audio input of TV
How to play
If you use AV connection, please select AV;
If you use S-Video connection, please select S-VIDEO;
CONNECT DIGTAL SET TOP BOX
How to connect
1. Connect the video output port of Digital Set Top Box to the AV input of TV
2. Connect the left and right audio channels of Digital Set Top Box to the left and right channels of audio
input of TV
How to use
1. Select AV.
2. Turn on the DTV Set Top Box set.
Note: In case you notice scrolling images, wrong colors or no color, no picture or even
combinations of these, on your screen, check if the connections are done in the right way.
Check if the cable colors match with the Input connector colors.
14
TV SET UP MENU
1、 Press” MENU’’ key to open OSD menu
2、 Press > or < key to select “TV SETUP’’ option
3、 Press ^ or v to select submenu
Note: Air/Cable, Auto Scan, Current Program,Sleep Time option can only display on
TV Source
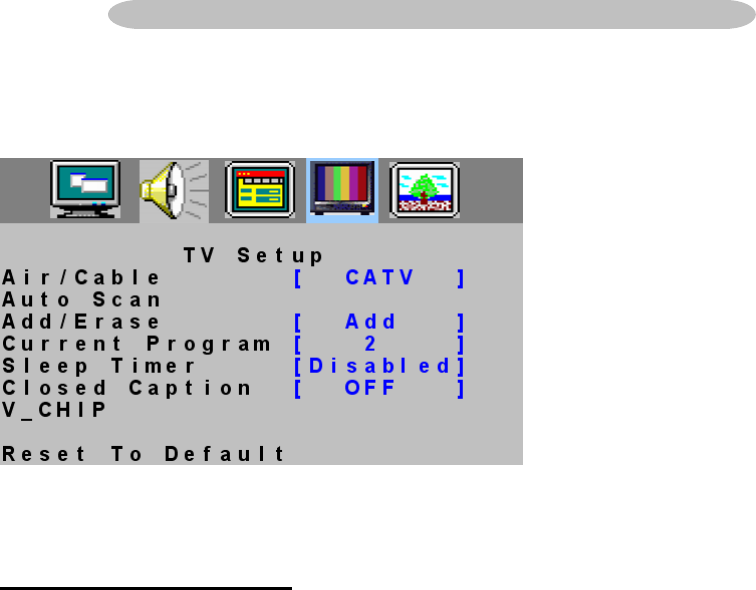
TV CHANNEL INSTALLATION
▪ AIR/Cable
1. Press” MENU’’ key to open OSD menu
2. Press > or < key to select “TV SETUP’’ option
3. Press ^ or v key to select “AIR/CATV” option
4. Press > or < key to select the automatic search system that your TV need, there are four options:
CATV: Community Antenna Television
AIR: Over the Air
HRC: Harmonically Related Carrier
IRC: Incrementally Related Carrier
5. Press “MENU” key to exit AIR/CATV menu or press ^ or v key to adjust other options
Note: Please run the auto scan function to set up the TV for the broadcast or cable channels available
in your area. If you do not run the auto scan function to set up the channels, your television may not
operate properly.
▪ Auto scan
Channel auto search and memorize all viewable channel.
1. Press“MENU’’ key to open OSD menu
2. Press > or < key to select “TV SETUP’’ option
3. Press ^ or v key to select “Auto scan” option
4. Press > or < key to select auto search.
Note: Please run the auto scan function to set up the TV for the broadcast or cable channels available
in your area. If you do not run the auto scan function to set up the channels, your television may not
operate properly.
15
CHANNEL EDIT
▪ Add/Erase
1. Press” MENU’’ key to open OSD menu
2. Press > or < key to select “TV SETUP’’ option
3. Press ^ or v key to select “Add/Erase” option
4. Press > or < key to select Add or Erase.
5. Press “MENU” key to exit Add/Erase menu or press ^ or v key to adjust other options
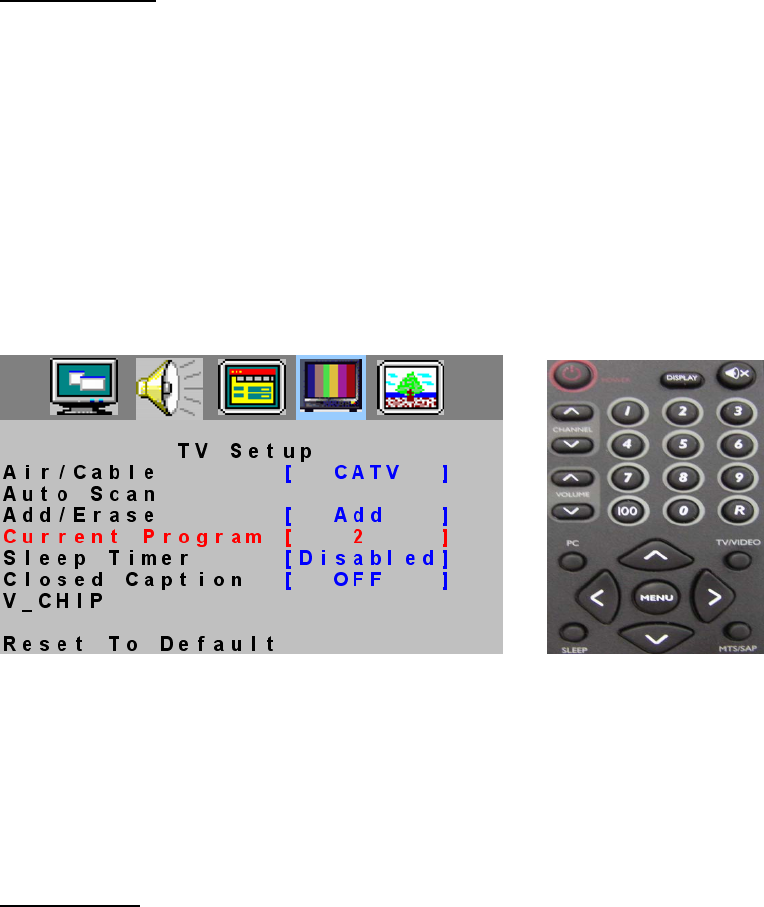
▪ Current Program
Current program is the channel set by the current TV, you can press “display” key to display the current
channel on the top right of the screen.
1. Press” MENU’’ key to open OSD menu
2. Press > or < key to select “TV SETUP’’ option
3. Press ^ or v key to select “Current program” option
4. Press > or < key to select the channel.
5. Press “MENU” key to exit Current Program menu or press ^ or v key to adjust other options
You can also press the digital keys 0-9/100 or channel ^ or v on the remote control to select channel
SLEEP TIMER
1. Press” MENU’’ key to open OSD menu
2. Press > or < key to select “TV SETUP’’ option
3. Press ^ or v key to select “Sleep Time” option
4. Press > or < key to select the sleep time that you need to set , you can select 30/60/90/120 minutes
sleep time.
5. Press “MENU” key to exit sleep time menu or press ^ or v key to adjust other options
Note: You can also press “SLEEP” on the remote control , the sleep time will display on the top right of
the screen.
16
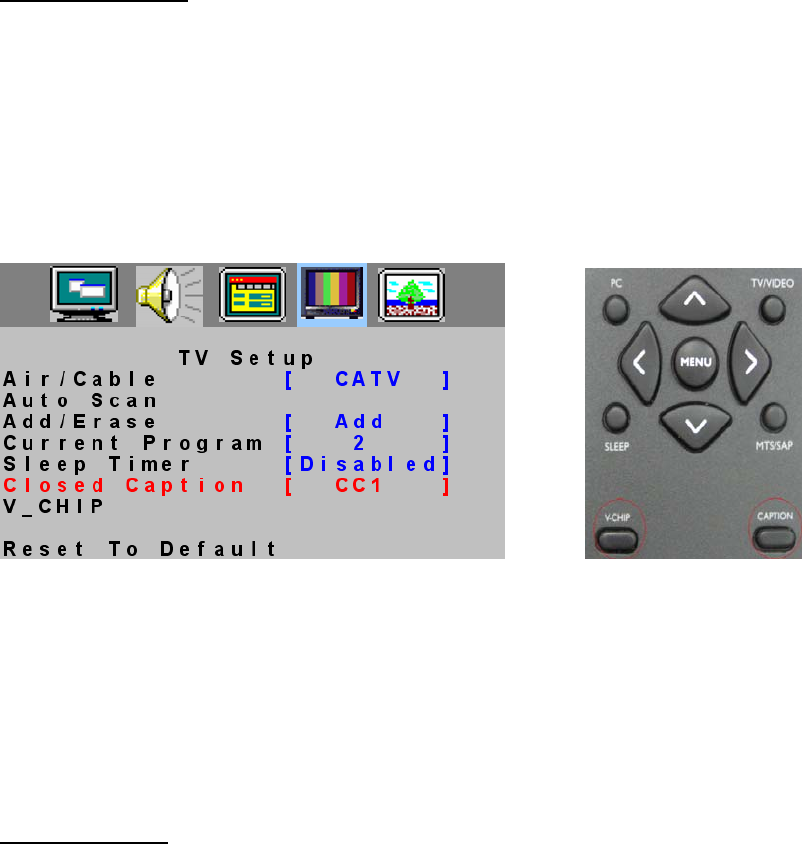
CLOSED CAPTION
1. Press” MENU’’ key to open OSD menu
2. Press > or < key to select “TV SETUP’’ option
3. Press ^ or v key to select “Closed caption” option
4. Press > or < key to set CC1~CC4 and TT1 and TT4.
5. Press “MENU” key to exit Closed Caption menu or press ^ or v key to adjust other options
You can also press “Caption” on the remote control, enter Closed Caption menu directly, then press step
4 to adjust.
Caption Mode: CC1~CC4
Dialogue (and descriptions) for the action on the captioned TV program shows on screen.
Text Mode: TT1~TT4
Often used for channel guide, schedules, bulletin board information for Closed Caption programs, news,
weather information or stock marker reports.
Not all Closed Caption modes are necessarily being use by a TV channel during the transmission of a
Closed Caption program.
CHANNEL LOCK
▪ V-Chip
It is the parental control function (V-chip). It is used to block program viewing based on the ratings by the
broadcaster. The default setting is to allow all programs to be viewed. Viewing can be blocked by the type
of program and by the categories chosen be blocked. It is also possible to block all program viewing for a
time period.
1. Press” MENU’’ key to open OSD menu
2 Press > or < key to select “TV SETUP’’ option
3. Press ^ or v key to select “V _Chip” option
4. Press > or < key to enter V _Chip password validation menu.
You can press V-CHIP key on the remote control to enter the menu directly.
17
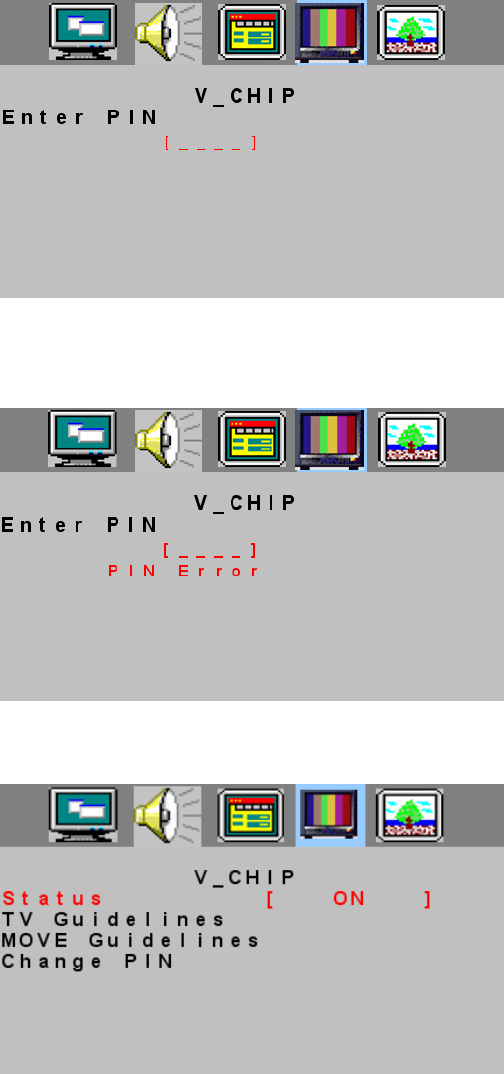
Press digital keys on the remote control; enter the password to go into V-CHIP control menu
(Default pass code for V-Chip: 0711 and should press twice time)
If your password is error, then the screen will display “PIN ERROR”.
5. After enter the V-CHIP menu, press ^ or v key to select, if you want to set V-CHIP, you need to set the
“status” on the condition of “ON”.
1) Press > or < key to select “Status’’ option
2) Press > or < key to select “ON’’ or “OFF”
6. TV Guideline Setting
1) Press ^ or v key to select “TV Guideline” option
2) Press > or < key to enter “TV Guideline” menu
3) Press ^ or v key to select block item.
4) Press > or < key to select U or B, selecting U means “Unlock”, selecting B means “Block”.
5) If the setting is OK, press “MENU” key to exit TV-Guideline menu.
18
7. Movie Guideline Setting
1) Press ^ or v key to select “Movie Guideline” option.
2) Press > or < key to enter Movie Guideline menu.
3) Press ^ or v key to select block item.
4) Press > or < key to select U or B, selecting U means “Unlock”, selecting B means “Block”.
5) If the setting is OK, press “MENU” key to exit Movie Guideline menu.
8. Change PIN
1) Press ^ or v key to select “Change PIN” option
2) Press > or < key to enter Change PIN menu.
3) Press digital keys on the remote control , then enter the new password.
4) Enter the new password again, if the setting is OK, the display information as below, then it will exit the
Change PIN menu automatically.
19
▪ Reset to Default
1. Press “MENU” key to open OSD menu.
2. Press > or < key to select any Setup options
3. Press ^ or v key to select “Reset to Default” option.
4. Press > or < key to reset.
Reset to Default is convenient for all settings in the user OSD to recall to factory default data.
Note: The reset to default function in each function item are the same under the signal source of
AV/TV/S-VIDEO.
When we select the Reset to Default in each function item under the PC signal source, it not
only recall all data to default data, but also have an adjustment automatically.
20

SOUND SET UP MENU
1. Press “MENU” key to open OSD menu.
2. Press > or < key to select “Audio Setup” option
3. Press ^ or v key to select submenu.
▪ Volume
1. Press “MENU” key to open OSD menu.
2. Press > or < key to select “Sound Setup” option.
3. Press ^ or v key to select “Volume” option
4. Press > or < key to adjust Volume data.
You can also press Volume ^ or v key and > or < key on the remote control to adjust volume.
5. Press “MENU” to exit or press ^ or v key to adjust others
▪ Bass
1. Press “MENU” key to open OSD menu.
2. Press > or < key to select “Sound Setup” option
3. Press ^ or v key to select “Bass” option.
4. Press > or < key to adjust Bass data.
5. Press “MENU” to exit or press ^ or v key to adjust others.
▪ Treble
1. Press “MENU” key to open OSD menu.
2. Press > or < key to select “Sound Setup” option
3. Press ^ or v key to select “Treble” option.
4. Press > or < key to adjust Treble data.
5. Press “MENU” to exit or press ^ or v key to adjust others.
▪ Balance
1. Press “MENU” key to open OSD menu.
2. Press > or < key to select “Sound Setup” option
3. Press ^ or v key to adjust “Balance” option.
4. Press > or < key to adjust “Balance” data.
5. Press “MENU” to exit or press ^ or v key to adjust others.
21
22
▪ Mute
1. Press “MENU” key to open OSD menu.
2. Press > or < key to select “Sound Setup” option
3. Press ^ or v key to select “Mute” option.
4. Press > or < key to select ON/OFF.
You can also press key on remote control to select mute,
after the selection you can adjust the volume or press to cancel the mute
5. Press “MENU” to exit or press ^ or v key to adjust others.
23
1. Press “MENU” key to open OSD menu.
2. Press > or < key to select “ Pc Setup” option
3. Press ^ or v key to select submenu.
Note: Picture Setup menu can only be selected under the signal source of AV/TV/S-VIDEO.
▪ Brightness
1. Press “MENU” key to open OSD menu.
2. Press > or < key to select “Picture Setup” option
3. Press ^ or v key to select “Brightness” option.
4. Press > or < key to adjust Brightness data.
5. Press “MENU” to exit or press ^ or v key to adjust others
▪ Contrast
1. Press “MENU” key to open OSD menu.
2. Press > or < key to select “ Picture Setup” option
3. Press ^ or v key to select “Contrast” option.
4. Press > or < key to adjust Contrast data.
5. Press “MENU” to exit or press ^ or v key to adjust others
▪ Hue
1. Press “MENU” key to open OSD menu.
2. Press > or < key to select “Picture Setup” option
3. Press ^ or v key to select “Hue” option.
4. Press > or < key to adjust Hue data.
5. Press “MENU” to exit or press key to adjust others.
▪ Saturation
1. Press “MENU” key to open OSD menu.
2. Press > or < key to select “Picture Setup” option
3. Press ^ or v key to select “Saturation” option.
4. Press > or < key to adjust Saturation data.
5. Press “MENU” to exit or press ^ or v key to adjust others.
PICTURE SET UP MENU
24
▪ Sharpness
1. Press “MENU” key to open OSD menu.
2 Press > or < key to select “Picture Setup” option
3. Press ^ or v key to select “Sharpness” option.
4. Press > or < key to adjust sharpness data.
5. Press “MENU” to exit or Press key to adjust others.
▪ Color Tone
1. Press “MENU” key to open OSD menu.
2. Press > or < key to select “Picture Setup” option
3. Press ^ or v key to select “Color Tone” option.
4. Press > or < key to select warm or cool color
5. Press “MENU” to exit or press ^ or v key to adjust others.
▪ Black Level
1. Press “MENU” key to open OSD menu.
2 Press > or < key to select “Picture Setup” option
3. Press ^ or v key to select “Black Level” option.
4. Press > or < key to adjust Black level data.
5. Press “MENU” to exit or press ^ or v key to adjust others.
25
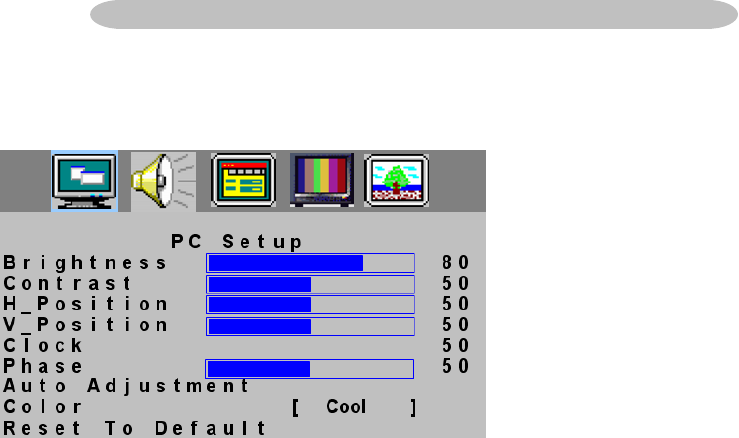
1. Press “MENU” key to open OSD menu.
2. Press > or < key to select “PC” option
3. Press ^ or v key to select submenu
Note: PC Setup menu can only be selected under the PC signal source
▪ Brightness
1. Press “MENU” key to open OSD menu.
2. Press > or < key to select “PC Setup” option
3. Press ^ or v key to select “Brightness” option.
4. Press > or < key to adjust Brightness data.
5. Press “MENU” to exit or press ^ or v key to adjust others.
▪ Contrast
1. Press “MENU” key to open OSD menu.
2. Press > or < key to select “PC Setup” option
3. Press ^ or v key to select “Contrast” option.
4. Press > or < key to adjust contrast data.
5. Press “MENU” to exit or press ^ or v key to adjust others.
▪ H_Position
1. Press “MENU” key to open OSD menu.
2. Press > or < key to select “PC Setup” option
3. Press ^ or v key to select “H_position” option.
4. Press > or < key to adjust H_Position data.
5. Press “MENU” to exit or press ^ or v key to adjust others.
▪ V_Position
1. Press “MENU” key to open OSD menu.
2. Press > or < key to select “PC Setup” option
3. Press ^ or v key to select “V_Position” option.
4. Press > or < key to adjust “V_Position” data
5. Press “MENU” to exit or press ^ or v key to adjust others.
PC SET UP MENU
26
▪ Clock
1. Press “MENU” key to open OSD menu.
2. Press > or < key to select “PC Setup” option
3. Press ^ or v key to select “Clock” option.
4. Press > or < key to adjust Clock data
5. Press “MENU” to exit or press^ or v key to adjust others.
▪ Phase
1. Press “MENU” key to open OSD menu.
2. Press > or < key to select “PC Setup” option
3. Press ^ or v key to select “Phase” option.
4. Press > or < key to adjust Phase data
5. Press “MENU” to exit or press ^ or v key to adjust others.
▪ Auto Adjustment
1. Press “MENU” key to open OSD menu.
2. Press > or < key to select “PC Setup” option
3. Press ^ or v key to select “Auto Adjustment” option.
4. Press > or < key to conduct Auto Adjustment, then PC will adjust automatically, if the adjustment is OK,
it will exit OSD menu automatically
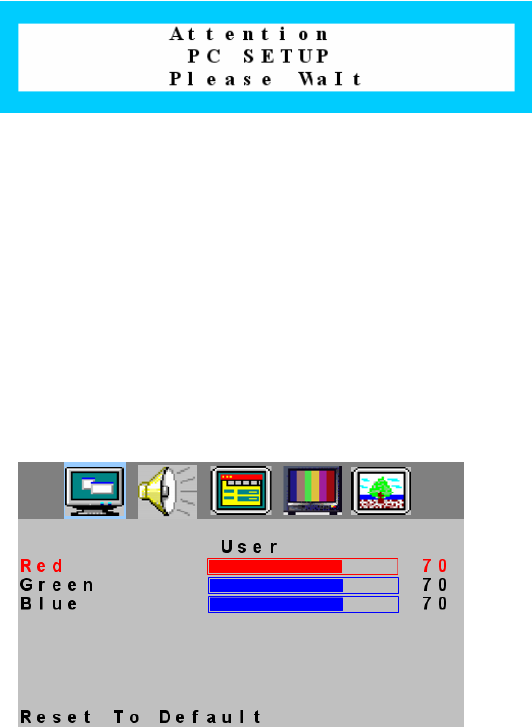
▪ Color
1. Press “MENU” key to open OSD menu.
2. Press > or < key to select “PC Setup” option
3. Press ^ or v key to select “Color” option.
4. Press > or < key to select Color
If you choose Color as User, you can adjust R/G/B according to your need
1) Press “MENU” key to enter User Color menu.
2) Press ^ or v key to select Red/Green/Blue option.
3) Press > or < key to adjust Red/Green/Blue data
4) Press MENU TO exit to Color menu
5) Press ^ or v key to select other adjustment items, then press MENU to exit

27
Tips
Care of the screen
Do not rub or strike the screen with anything hard as this may scratch, mar, or damage the screen
permanently.
Unplug the screen before cleaning the screen. Dust the TV by wiping the screen and the cabinet with a
soft, clean cloth. If the screen requires additional cleaning, use a clean, damp cloth. Do not use liquid
cleaners or aerosol cleaners.
Mobile telephone warning
To avoid disturbances in picture and sound, malfunctioning of your TV or even damage to the TV, keep
away your mobile telephone from the TV.
End of life directives
We are paying a lot of attention to produce environmentally friendly in green focal areas. Your new
receiver contains materials which can be recycled and reused.
At the end of its life specialized companies can dismantle the discarded receiver to concentrate the
reusable materials and to minimize the amount of materials to be disposed of.
Please ensure you dispose of your old receiver according to local regulations.
General Information

28
Before Call Service
Please make these simple checks before calling service. These tips may save you time and money since
charges for receiver installation and adjustments of customer controls are not covered under your
warranty.
Symptoms Items to Check and Actions to follow
“Ghost ” or double image *This may be caused by obstruction to the antenna due to high rise
buildings or hills. Using a highly directional antenna may inprove the
picture.
No power *Check that the TV’s AC power cord is plugged into the mains socket.
*Unplug the TV, wait for 60 seconds. Then re-insert plug into the mains
socket and turn on the TV again.
No picture *Check antenna connections at the rear of the TV to see if it is properly
connected to the TV.
*possible broadcast station trouble. Try another channel.
*Adjust the contrast and brightness settings.
*Check the Closed Captions control. Some TEXT modes could block the
screen.
Good picture but no sound *Check the cable connection
*Increase the VOLUME.
*Check that the TV is not muted; press the button on the remote control.
Good sound but poor color *Adjust the contrast, color and brightness settings.
Poor picture *Sometimes, poor picture quality occurs when having activated an
S-VHS camera or camcorder connected and having connected
another peripheral at the same time. In this case, please connect
power cords of other peripherals to a different power outlet.
Snowy picture and noise *Check the antenna connection
Horizontal dotted line *This may be caused by electrical interference (e.g. hairdryer, nearby
neon lights, etc.)
*Turn off the equipment.
Television not responding
to remote control
*Check whether the batteries are working. Replace if necessary
*Clean the remote control sensor lens on the TV.
*Use the buttons at the front of your TV.

29
GLOSSARY
Audio / Video Inputs
Located on the rear and the front of the receiver these connectors (RCA photo type plug) are used for the
input of audio and video signals. Designed for use with VCRs (or other accessories) in order to receive
higher picture resolution and offer sound connection options.
S-Video Input
Allow directly connection of high-resolution video sources, such as a Super VHS videocassette recorder,
Laser Disc player, etc. Provide improved picture resolution, sharpness, and clarity.
Composite Input
Allows direct connector of high-resolution video sources, such as DVD player, digital TV, etc, provides
improved picture resolution, sharpness and clarity.
Audio output
Provide sound output, it can be connected external speaker, and enhance the sound quality.
Menu
An on-screen listing of feature control shows on the TV screen which is available for user adjustments.
Multichannel Television sound (MTS)
The broadcast standard that allow stereo sound to be transmitted with the TV picture.
RF
Radio Frequency or modulated signal design used as the carrier for television broadcasts.
Second Audio Program (SAP)
Another or additional audio channel provided for in the Multichannel Television Sound (MTS) broadcast
standard. A monaural soundtrack included within the recorded or video signal (usually containing a
second language translation for the displayed program).
Sleep Timer
The function which you can set a time period after the TV turns off.

30
PRODUCT SPECIFICATION
15MF400T/37
Item Specification
Screen Size 15"
Aspect Ratio 4:3
Resolution 1024x768
Brightness 250cd/m² (typ.)
Contrast Ratio 400:1
Response Time 16ms
Viewing Angle left/right = 60°/60°
Up/down = 40°/60°
LCD Panel
Display Colors 16.7M
TV Tuner NTSC M
Color System NTSC
Sound System MTS + SAP
TV Function
Closed-Caption & V-chip Yes
Composite x1
S-Video x1
Closed-Caption & V-chip Yes
Video Input
Color System NTSC/PAL
Signal Analog
Horizontal Frequency (kHz) 31.5~60
Vertical Frequency (Hz) 56~75
Plug & Play DDC2B
Max. Resolution 1024x768 @ 75Hz
PC Input
Recommended Resolution 1024x768 @ 60Hz
Built-in Speakers 2x 2W (L/R)
Audio Output Headphone Output Yes (3.5mmφ)
Power Supply +12V DC Input
Adapter 100-240V AC, 50/60Hz
Power
Power Consumption (Max.)
Power on〈50W,
Off mode〈2W
De-interlacer 2D de-interlacer
Comb Filter Adaptive 4H Y/C Separation
Video Feature
3-2 Pull Down Recovery Yes
Wall Mount VESA 100mm x 100mm
Multi-Function Remote Yes
Sleep Timer Yes
Tilt Angle (front/back) 5°/15°
Other Features
OSD language English/French(Canadian type)/Spanish

31
with Stand (mm) 371.6mm x 346 mm x 147.5mm
without Stand (mm) 371.6mm x 324mm x 49.5mm
Dimension
Carton (mm) 434(W) x 407(D) x 192(L)
Net, kg 3.5kg
Weight Loose, including package 5.5kg
Accessory
Remote controller, Batteriesx2, AC Power adapter, QSG, power cord
User manual<English/French(Canadian type)>
(Including Limited Warranty <English only>),
32