Toshiba Client Solutions UPA3501WL PCI Express 802.11 b/g transceiver User Manual PMAD00077012 TecraM7 06Aug12
Toshiba Corporation PCI Express 802.11 b/g transceiver PMAD00077012 TecraM7 06Aug12
Contents
Revised TecraM7 Manual 2
151
Exploring Your Computer’s Features
Using PC Cards
5.375 x 8.375 ver 2.3
1Prepare the card for removal by right-clicking the Safely
Remove Hardware icon on the system tray and then
selecting the card or device you want to remove.
If the system is unable to prepare the card for safe
removal, a message will tell you to try again later. If the
card can be removed now, the system displays Safe to
Remove Hardware.
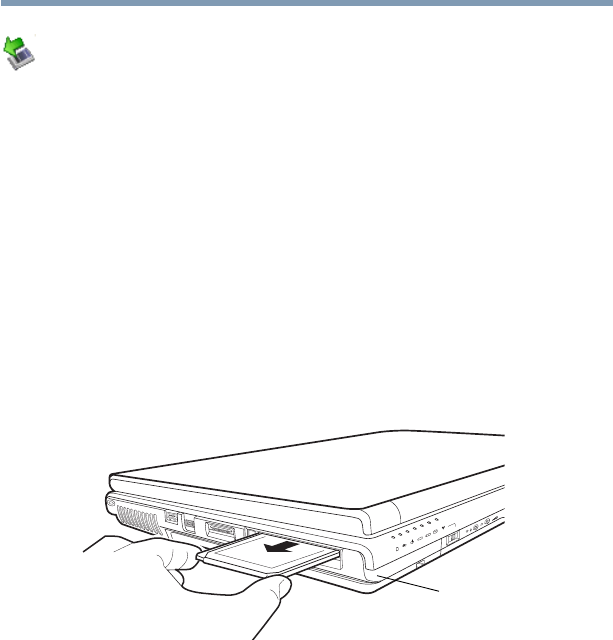
2Locate the PC Card eject button.
3Press the PC Card eject button once to pop it out slightly,
and push it in to remove the PC Card.
The PC Card ejects slightly from the slot.
4Grasp the edges of the PC Card and slide it out of the
slot.
(Sample Illustration) Removing a PC Card
Setting up a PC Card for your computer
Some PC Cards are ready to use as soon as you install them.
Others, such as hard disk cards, network cards, and SCSI
adapters, may need to be set up to work with your computer.
To set up your PC Card, refer to the documentation that came
with the card or refer to your operating system manual or
online Help.
PC Card
eject button
152 Exploring Your Computer’s Features
Using the Bridge Media Adapter Slot
5.375 x 8.375 ver 2.3
Using the Bridge Media Adapter Slot
(Available on certain models)
The Bridge Media Adapter slot (available on certain models)
supports the use of Memory Stick™, Memory Stick™ PRO,
Secure Digital™ (SD™), MMC™ (MultiMediaCard™), or
xD-Picture Card™ media. These media can be used with a
variety of digital products: digital music players, cellular
phones, PDAs, digital cameras, digital video camcorders, etc.
The Bridge Media Adapter slot may also support other types
of media. For a complete list of supported media, visit
Toshiba’s Web site at accessories.toshiba.com.
Do not use the Copy Disk function for this type of media. To
copy data from one media to another, use the drag-and-drop
feature of Windows.
Inserting memory media
The following instructions apply to all types of supported
media devices.
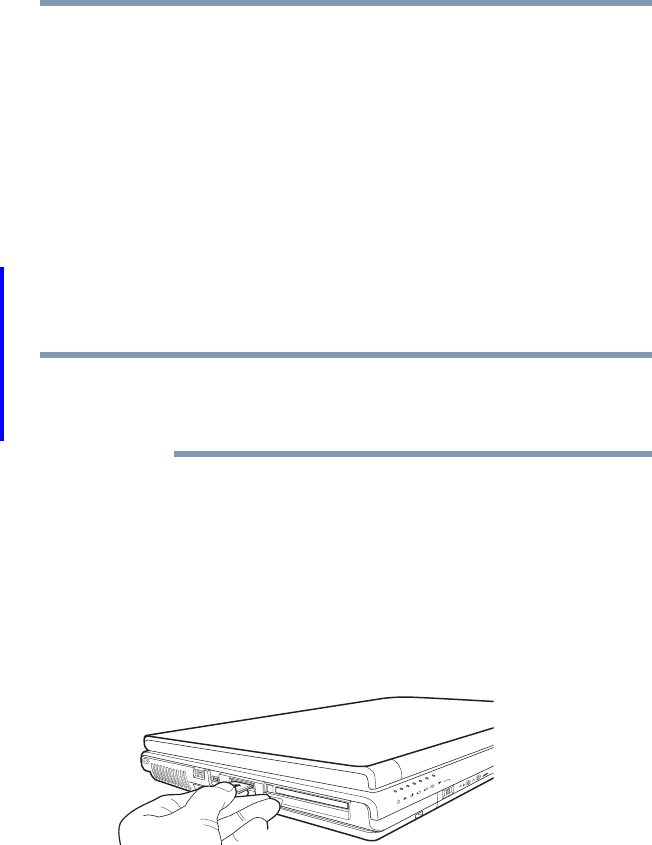
1Turn the media so that the contacts (metal areas) are face
down.
2Push the media into the adapter until it locks in place.
(Sample Illustration) Inserting memory media
NOTE
153
Exploring Your Computer’s Features
Using the Bridge Media Adapter Slot
5.375 x 8.375 ver 2.3
When inserting memory media, do not touch the metal
contacts. You could expose the storage area to static
electricity, which can destroy data.
Removing memory media
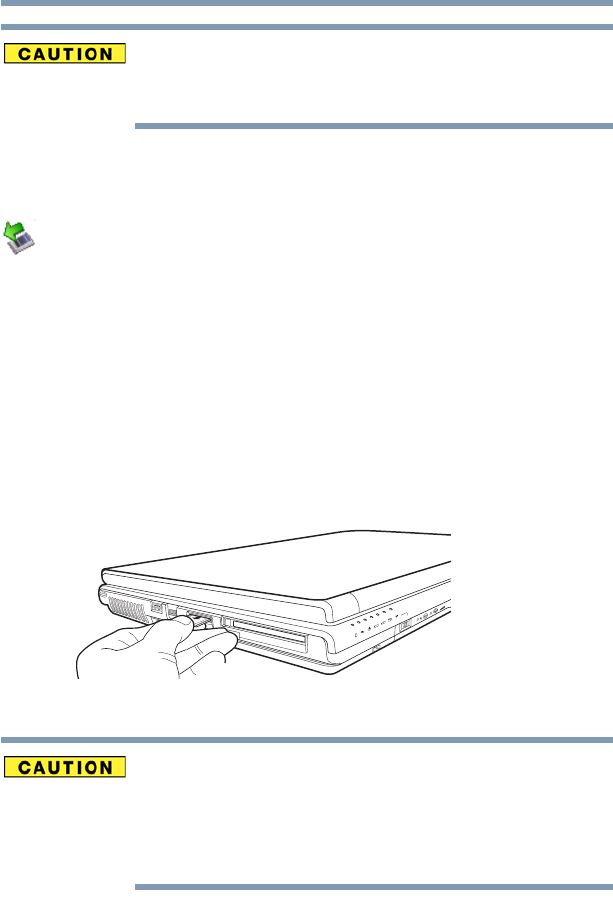
1Prepare the media for removal by right-clicking the
Safely Remove Hardware icon on the system tray and
then selecting the card or device you want to remove.
If the system is unable to prepare the media for safe
removal, a message will tell you to try again later. If the
media can be removed now, the system displays Safe to
Remove Hardware.
2Gently press the card inward to release it.
The card pops out slightly.
3Grasp the card and pull it straight out.
(Sample Illustration) Removing memory media
Do not remove memory media while data is being written or
read. Even when the Windows message “copying...”
disappears, writing to the media might still be in progress and
your data could be destroyed. Wait for the indicator light to go
out.

154 Exploring Your Computer’s Features
Using the i.LINK® port
5.375 x 8.375 ver 2.3
Using the i.LINK® port
(Available on certain models)
The i.LINK® port (available on certain models) on the left
side of the computer provides an extremely fast data transfer
rate.
In addition to high speed, the i.LINK® port also supports
isochronous data transfer (the delivery of data at a guaranteed
rate). This makes it ideal for devices that transfer high levels
of data in real-time, such as video devices.
As with USB ports, the i.LINK® port supports both Plug-and-
Play (automatic configuration) and hot swapping (the ability
to connect and disconnect devices while the computer is on).
Using an expansion device
The expansion port is used to connect your computer to an
expansion device. This is an excellent investment if you are
using your computer both in and out of the office.
When you return to your desk, you can then connect to your
network, print reports from your computer, or use a mouse
instead of your computer’s pointing device. Connecting
cables for each of these devices every time you return to the
office can be time-consuming.
With an expansion device, you can leave external devices
connected while you are using your computer away from
your desk. When you return, you can quickly connect your
computer and have immediate access to all the devices.
For more information, see the accessories information
package that comes with the device or visit
accessories.toshiba.com.

155
5.375 x 8.375 ver 2.3
Chapter 5
Toshiba Utilities
Your computer includes several utilities designed to help you
to reconfigure your system to best meet your individual
needs. Together, these allow you to ascertain certain system
details, set additional options, or change default options.
These utilities are described in this chapter.
❖TOSHIBA Assist
❖TOSHIBA Application Installer
❖Supervisor password
❖User password
❖TOSHIBA Password Utility
❖TOSHIBA PC Diagnostic Tool Utility
❖TOSHIBA HDD Protection Utility
❖Fn-esse®
❖TOSHIBA Hotkey Utility
❖TOSHIBA SD™ Memory Card Format Utility
❖TOSHIBA SD™ Memory Boot Utility
❖TOSHIBA Power Saver
❖Mouse Utility

156 Toshiba Utilities
TOSHIBA Assist
5.375 x 8.375 ver 2.3
❖Toshiba Hardware Setup
❖TOSHIBA Rotation Utility
❖Tablet and Pen Settings
❖Cross Menu Utility
❖TOSHIBA Tablet Access Code Utility
❖TOSHIBA Zooming Utility
❖TOSHIBA Button Controls
❖CD/DVD Drive Acoustic Silencer
❖TOSHIBA Accessibility
❖TOSHIBA Mobile Extension
❖Fingerprint Authentication Utility
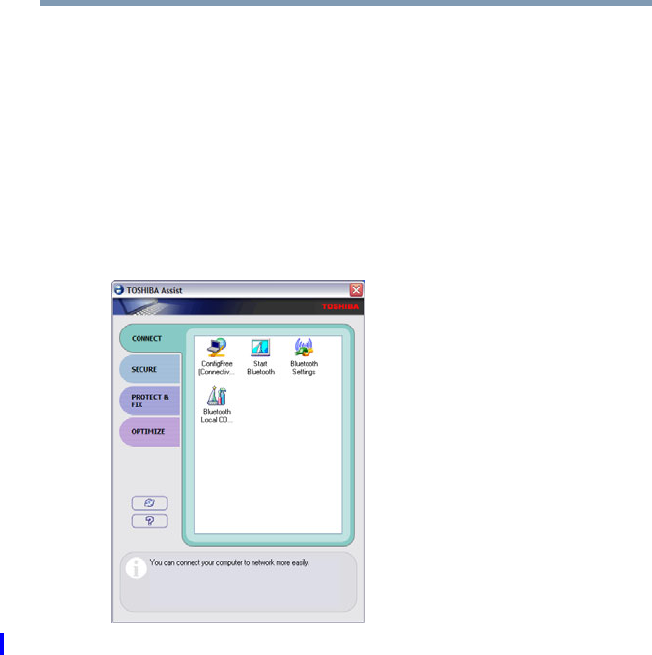
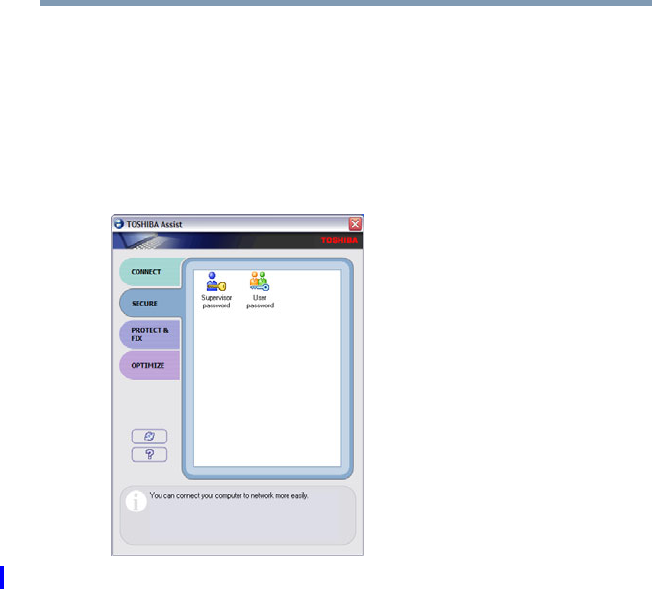
TOSHIBA Assist
The TOSHIBA Assist provides quick access to computer
functions and allows you to customize a range of computer
settings.
To access TOSHIBA Assist, do one of the following:
❖Double-click the TOSHIBA Assist shortcut icon on the
desktop.
❖Click Start, All Programs, Toshiba, Utilities, and then
TOSHIBA Assist.
The TOSHIBA Assist window appears.

157
Toshiba Utilities
TOSHIBA Assist
5.375 x 8.375 ver 2.3
(Sample Image) TOSHIBA Assist window
The TOSHIBA Assist offers four categories of options:
❖Connect
❖Secure
❖Protect & Fix
❖Optimize
158 Toshiba Utilities
TOSHIBA Assist
5.375 x 8.375 ver 2.3
Connect
The features available in this category are:
❖ConfigFree™ Connectivity Doctor
❖ConfigFree
❖Bluetooth® Settings
❖Bluetooth Local COM Settings
❖TOSHIBA Application Installer
(Sample Image) TOSHIBA Assist window – Connect tab
159
Toshiba Utilities
TOSHIBA Assist
5.375 x 8.375 ver 2.3
Secure
The features available in this category are:
❖User password
❖Supervisor password
❖TOSHIBA Password Utility
(Sample Image) TOSHIBA Assist window – Secure tab

160 Toshiba Utilities
TOSHIBA Assist
5.375 x 8.375 ver 2.3
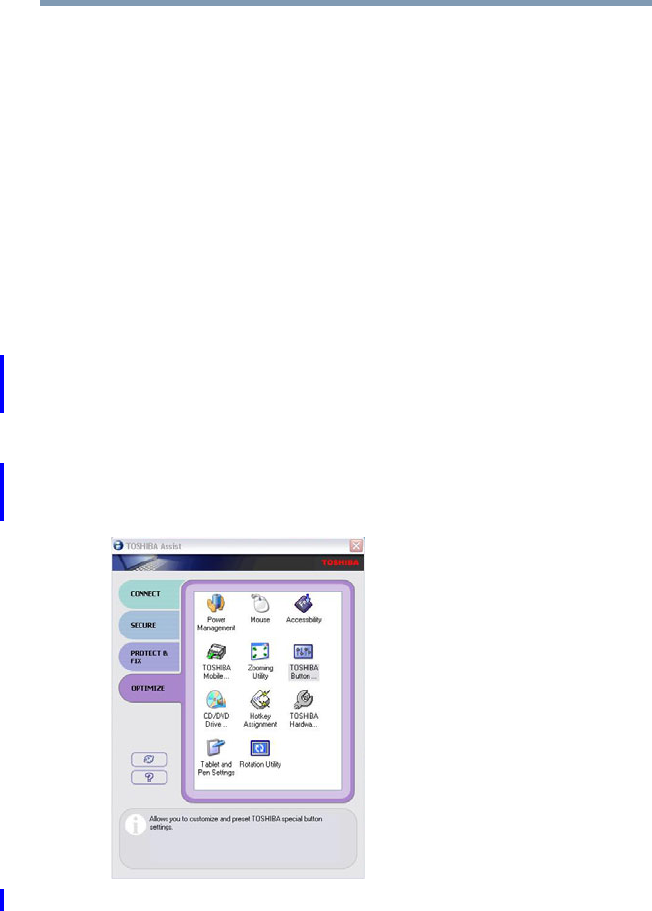
Protect & Fix
The features available in this category are:
❖TOSHIBA PC Diagnostic Tool Utility
❖TOSHIBA HDD Protection Utility
(Sample Image) TOSHIBA Assist window – Protect & Fix tab
161
Toshiba Utilities
TOSHIBA Assist
5.375 x 8.375 ver 2.3
Optimize
The features available in this category are:
❖Hotkey assignment using Fn-esse®
❖TOSHIBA Hotkey Utility
❖TOSHIBA SD™ Memory Card Format Utility
❖TOSHIBA SD™ Memory Boot Utility
❖TOSHIBA Power Saver
❖Mouse Utility
❖Toshiba Hardware Setup
❖TOSHIBA Zooming Utility
❖TOSHIBA Button Controls
❖CD/DVD Drive Acoustic Silencer
❖TOSHIBA Accessibility
❖Fingerprint Authentication Utility
(Sample Image) TOSHIBA Assist window – Optimize tab
162 Toshiba Utilities
TOSHIBA Application Installer
5.375 x 8.375 ver 2.3
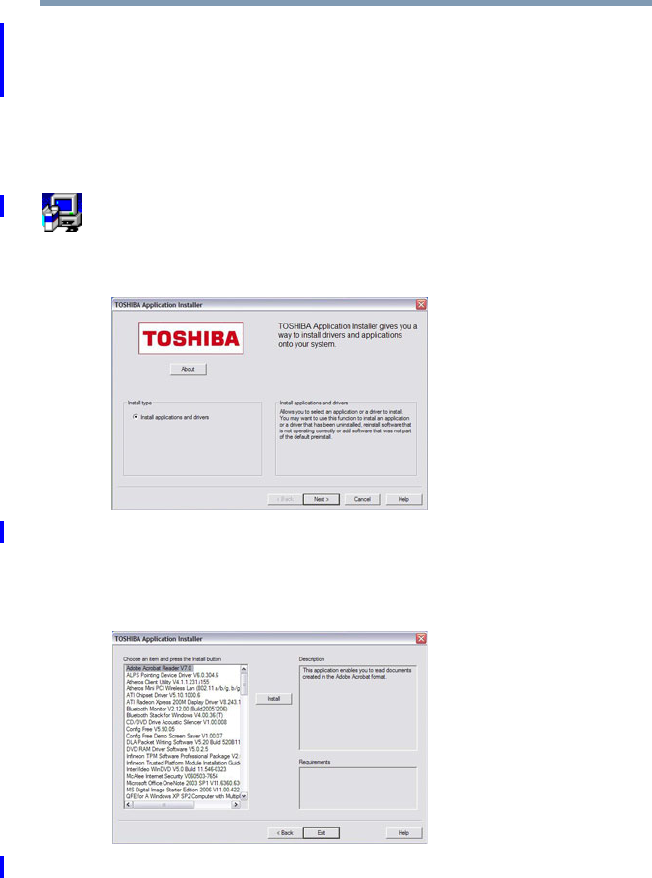
TOSHIBA Application Installer
The TOSHIBA Application Installer allows you to reinstall
the drivers and applications that were originally bundled with
your computer.
To reinstall drivers and applications:
1Double-click the TOSHIBA Application Installer icon
on the Windows® desktop.
2Click Next.
(Sample Image) TOSHIBA Application Installer screen
3Click the item(s) you want to install. To select multiple
items, hold down the Ctrl key as you make your selections.
(Sample Image) TOSHIBA Application Installer selection screen
4Click Install, then follow the on-screen prompts to
complete the installation process.

163
Toshiba Utilities
Setting passwords
5.375 x 8.375 ver 2.3
Setting passwords
Setting a password lets you walk away from your computer,
secure in the knowledge that nobody can access your files.
When you set a password, you must enter the password
before you can work on your computer again.
Toshiba supports several types of passwords on your
computer:
❖An instant password — Secures your open programs and
files when leaving the computer temporarily.
❖A power-on password — Prevents unauthorized users
from starting or restarting the computer.
❖A supervisor password — Prohibits unauthorized users
from accessing certain functions such as TOSHIBA
Hardware Setup. This is useful if more than one person
uses the computer.
A single user password supports the instant and power-on
password functions.
When setting up the various passwords, keep the following in
mind:
❖The user password can be set up under the supervisor
password.
❖The supervisor password must be set before the user
password, or the user password must be deleted and then
re-entered after the supervisor password is set.
Using an instant password
An instant password secures your system with a single
keystroke. Use this feature when you leave your desk for a
few minutes and do not want to turn off the computer.
To use an instant password, press Fn, then press F1. This
freezes the keyboard and TouchPad, and blanks the screen.
An instant password has no effect on an optional USB mouse
or trackball.

164 Toshiba Utilities
Setting passwords
5.375 x 8.375 ver 2.3
To unlock your system, press any key or touch the pointing
device and the Windows® Logon screen will appear. Select
your user name and enter your password, if any.
Setting a user password
To register a password for the power-on password functions:
1Click Start, All Programs, Toshiba, Utilities, and then
TOSHIBA Assist.
The TOSHIBA Assist window appears.
2On the left side, select Secure.
3Select the User Password icon.
4Click Set.
5Enter your password then enter it again to verify.
6Click Set.
7Click OK if you want to save the password to a text file
on a diskette or media of your choice, or click Cancel to
continue without saving the password to a text file.
8Click OK to exit.
Disabling a user password
To cancel the power-on password function:
1Click Start, All Programs, Toshiba, Utilities, and then
TOSHIBA Assist.
The TOSHIBA Assist window appears.
2On the left side, select Secure.
3Select the User Password icon.
4Click Delete.
5Follow the on-screen instructions to remove the user
password.
165
Toshiba Utilities
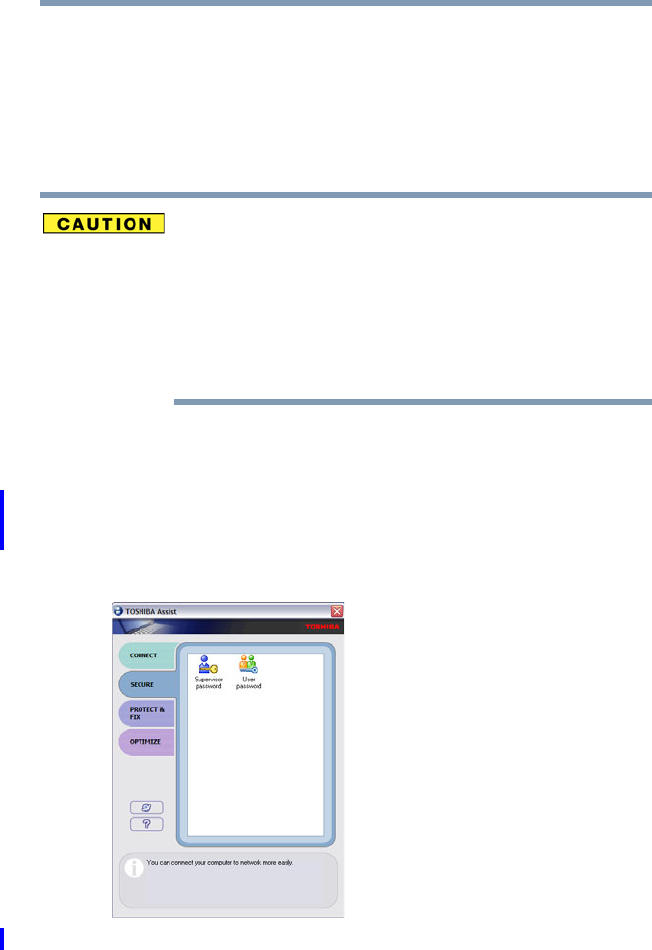
Using a supervisor or user password
5.375 x 8.375 ver 2.3
Using a supervisor or user password
A supervisor password prevents other users from changing
hardware configuration options.
Setting a supervisor password
If you choose to set a supervisor or user password, Toshiba
strongly recommends that you save your password in a
location where you can later access it should you not
remember it.
Toshiba is not responsible for any losses that may occur to
you, your organization or others as a result of the inability to
access the computer.
To register a password for the power-on password functions:
1Click Start, All Programs, Toshiba, Utilities, and then
TOSHIBA Assist.
The TOSHIBA Assist window appears.
2On the left side, select Secure.
(Sample Image) TOSHIBA Assist Security window

166 Toshiba Utilities
TOSHIBA Password Utility
5.375 x 8.375 ver 2.3
3Select the Supervisor Password icon.
4Click Set.
5Enter your password then enter it again to verify.
6Click Set.
7Click OK if you want to save the password to a text file
on a diskette or media of your choice, or click Cancel if
you do not want to save the password to a text file.
8Click OK to exit.
Deleting a supervisor password
To cancel the power-on password function:
1Click Start, All Programs, Toshiba, Utilities, and then
TOSHIBA Assist.
The TOSHIBA Assist window appears.
2On the left side, select Secure.
3Select the Supervisor Password icon.
4Click Delete.
5Follow the on-screen instructions to remove the
supervisor password.
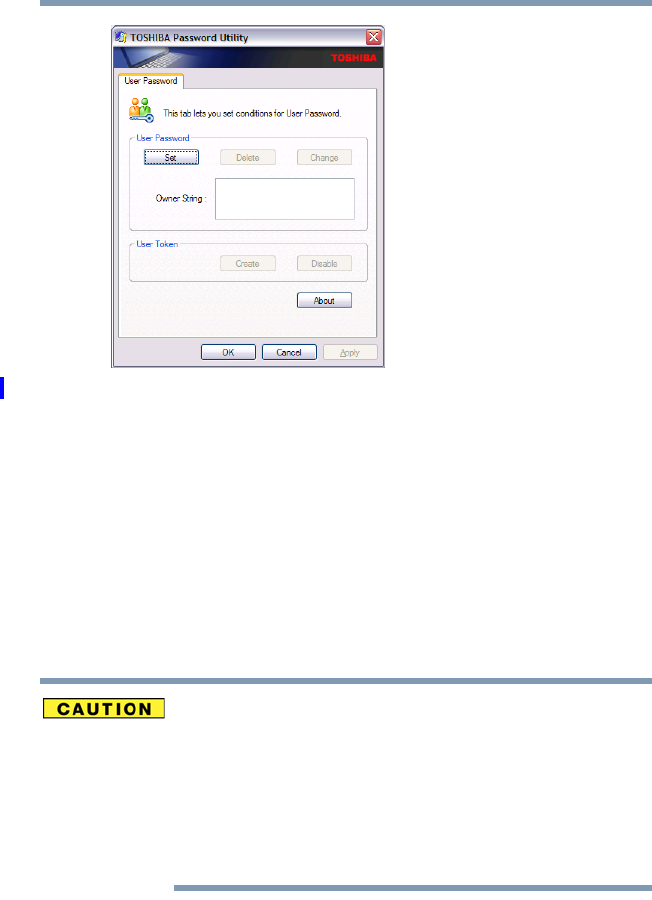
TOSHIBA Password Utility
The TOSHIBA Password Utility allows you to set a user-
level password in TOSHIBA Assist or in System Setup.
To use the TOSHIBA Password utility:
1Start TOSHIBA Assist.
2Click the Secure tab, then click the User Password icon.
The TOSHIBA Password Utility window appears.
167
Toshiba Utilities
TOSHIBA Password Utility
5.375 x 8.375 ver 2.3
(Sample Image) TOSHIBA Password Utility window
3Click Set.
4Enter a password, then enter it again to verify.
5Click Set.
6Click OK if you want to save the password to a text file
on a diskette or media of your choice. Click Cancel if
you do not want to save the password to a text file. This is
known as the password service diskette.
7Click OK to exit.
If you choose to set a supervisor or user password, Toshiba
strongly recommends that you save your password in a
location where you can later access it should you not
remember it.
Toshiba is not responsible for any losses that may occur to
you, your organization or others as a result of the inability to
access your computer.
168 Toshiba Utilities
TOSHIBA PC Diagnostic Tool Utility
5.375 x 8.375 ver 2.3
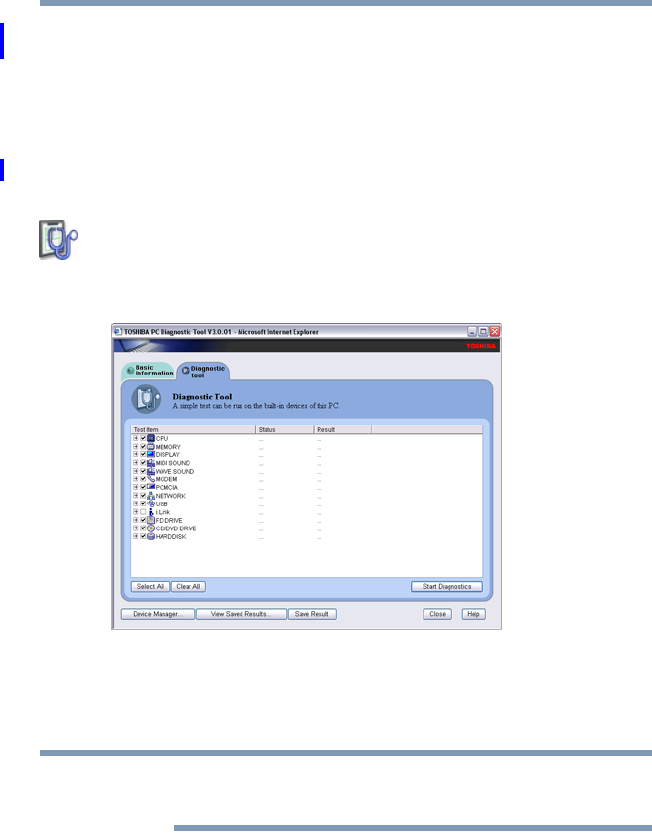
TOSHIBA PC Diagnostic Tool Utility
This utility can help diagnose problems with devices in your
computer. Refer to the online Help documentation within the
application for additional help.
To use the TOSHIBA PC Diagnostic Tool utility:
1Click Start, All Programs, Tos hi ba, Utilities, and then
PC Diagnostic Tool, or click the PC Diagnostic Tool
icon in the Protect & Fix tab of TOSHIBA Assist.
The PC Diagnostic Tool window appears.
(Sample Image) PC Diagnostic Tool window
2Select the devices that you would like to test by clicking
the check box that appears to the left of the device.
Click the + (plus) and - (minus) symbols to expand and
collapse the categories.
3Click Start Diagnostics when you are ready to begin the
tests.
NOTE
169
Toshiba Utilities
TOSHIBA HDD Protection Utility
5.375 x 8.375 ver 2.3
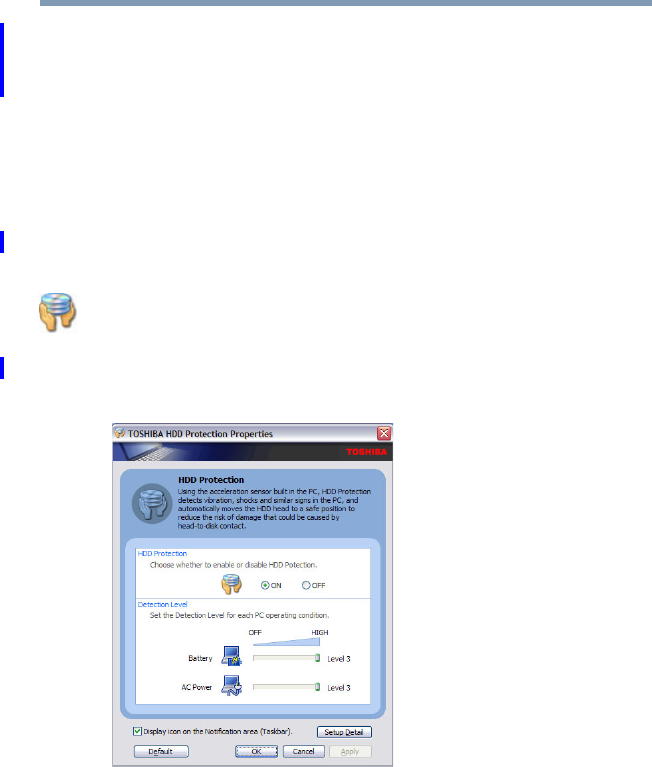
TOSHIBA HDD Protection Utility
The TOSHIBA HDD Protection utility controls your
computer’s hard disk drive (HDD) protection feature, which
parks the HDD whenever motion is detected on the computer.
Using this utility, you can enable or disable hard disk drive
(HDD) protection, and set the motion detector’s sensitivity
level for AC power and battery power operation.
To use the TOSHIBA HDD Protection utility:
1Click Start, All Programs, Tos hi ba, Utilities, and then
HDD Protection, or click the HDD Protection icon in
the Protect & Fix tab of TOSHIBA Assist.
The TOSHIBA HDD Protection Properties window
appears.
(Sample Image) HDD Protection Properties window
2Select ON to enable HDD protection, or select OFF to
disable HDD protection.
3Set the battery and AC power detection levels as desired.
4Click OK.
170 Toshiba Utilities
Fn-esse®
5.375 x 8.375 ver 2.3
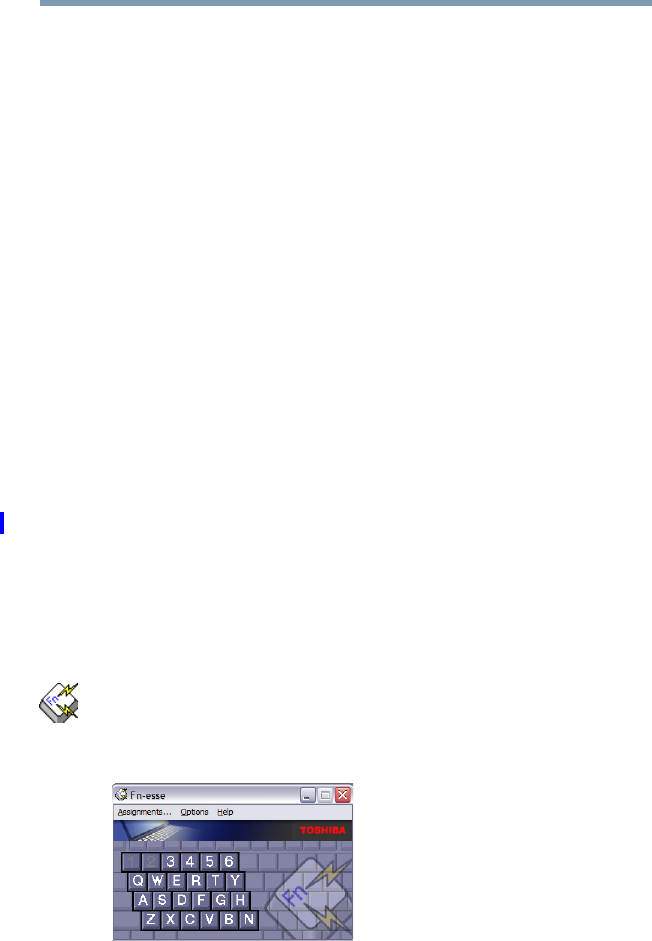
Fn-esse®
Desktop shortcuts and Toshiba’s Fn-esse program provide
quick ways to open programs, documents, and folders from
within any Windows® program without using the Start menu.
For more information on creating desktop shortcuts, refer to
the operating system documentation that came with your
computer.
This section describes how to use the Fn-esse program to
quickly access your programs and files.
With Fn-esse, you can assign an Fn key combination to:
❖Open a Windows® operating system program
❖Open a file in its associated program
❖Display a customized folder of programs and/or files
from which to choose
Fn-esse also has several keys, known as hot keys, that
perform preassigned operations. For more information, see
“Hot Keys” on page 255.
You can assign any key that is not associated with a hot key
or a keyboard overlay.
Starting Fn-esse®
Click Start, All Programs, Tos hi ba, Utilities, and then
Fn-esse, or click the Hotkey Assignment icon in the
Optimize tab of TOSHIBA Assist.
The Fn-esse keyboard appears.
(Sample Image) Fn-esse screen

171
Toshiba Utilities
Fn-esse®
5.375 x 8.375 ver 2.3
The keys are color-coded as follows:
❖Available keys are dark gray with white letters.
❖Assigned keys and keys associated with a popup list are
shown on the Fn-esse keyboard in the selected color.
❖Unavailable keys are light gray.
There are two ways to assign a key to open a program or
document:
❖Using drag-and-drop
❖Using the keyboard or pointing device
The method most often used is drag-and-drop.
Using drag-and-drop to assign a key
To assign a key to open a program or document:
1Start both Fn-esse and Windows® Explorer (or the
program supporting drag-and-drop).
2Resize the Explorer window so that you can see both the
Fn-esse keyboard and Explorer at the same time.
3In the Explorer window, highlight the program or
document file you wish to assign to a key.
4Click and hold the primary button as you drag the
highlighted item from Explorer to the key on the Fn-esse
keyboard which you are assigning to the item.
5Release the primary button.
Fn-esse displays the Add/Edit Command dialog box with
the Description, Command Line, and Working Directory
fields automatically completed.
6Click OK to close the Add/Edit Command dialog box
with your key assignment in place.
The program or document is now associated with the key
you just selected. To open the program or document, press Fn
plus the appropriate key from within any Windows®-based
program.

172 Toshiba Utilities
Fn-esse®
5.375 x 8.375 ver 2.3
Using the keyboard or pointing device to assign a key
To assign a key to open a program or document:
1Start Fn-esse.
2Perform one of the following:
❖Using the keyboard, press and hold the Fn key, then
press the desired assignment key.
❖Using the pointing device, move the cursor over the
desired key in the Fn-esse window and press the
secondary button.
The Assignment Type dialog box appears.
(Sample Image) Fn-esse assignment type dialog box
Follow the instructions in “Making a direct key assignment”
on page 172 or “Making a popup assignment” on page 173.
Making a direct key assignment
1Select Direct to display the Add/Edit Command dialog box.
2Enter the Description, Command Line, and Working
Directory for the new Fn-esse key assignment, or click
the Browse button to specify this information.
3Click OK.

173
Toshiba Utilities
Fn-esse®
5.375 x 8.375 ver 2.3
Making a popup assignment
1Select Popup to display the Application Explorer dialog box.
2Select the desired folder. The left side of the Application
Explorer window displays the folders in the All Programs
menu. The right side lists the programs and documents in
the folder. These are the items that will appear in the
popup list.
3To create a popup list with items from various folders, or
to pick only a few items from a folder, create a new folder
containing only the desired programs and documents. If
you are unsure how to do this, refer to your operating
system documentation.
4Click OK to associate the folder with the key you just
selected.
To open a popup list showing the items in that folder,
press Fn plus the appropriate key from within any
Windows®-based program.
Viewing existing key assignments
To view the existing key assignments, choose Assignments
from the Fn-esse keyboard. Fn-esse displays the Function Key
Assignments dialog box. This box lists all the key assignments
and the program or document to which each key is assigned.
To view items in a popup list, select the Expand popup lists
check box.
Changing or removing existing key assignments
On the Fn-esse keyboard, click the key you wish to change
with the secondary button.
Fn-esse displays the Assignment Type dialog box.
❖To change the key assignment, click Direct or Popup and
continue as if you were creating a new assignment.
❖To remove the key assignment, click Clear.
174 Toshiba Utilities
TOSHIBA Hotkey Utility
5.375 x 8.375 ver 2.3
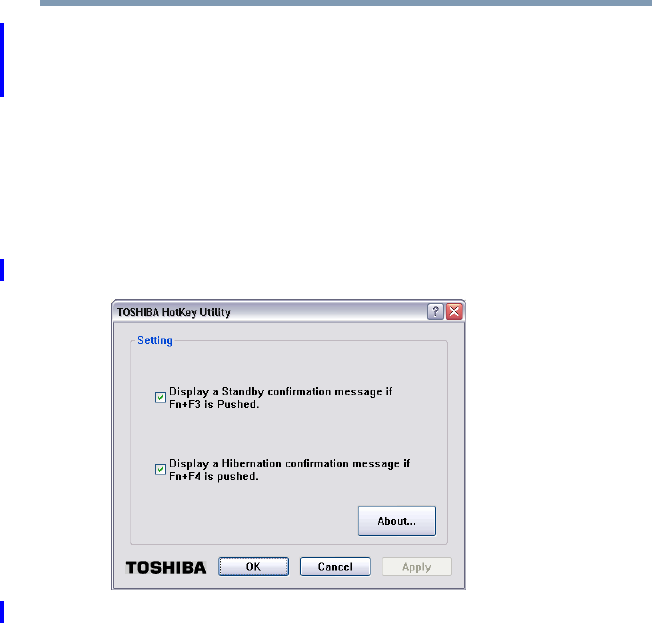
TOSHIBA Hotkey Utility
The TOSHIBA Hotkey utility allows you to receive a
confirmation message when you use the Hotkey combination
for Standby [Fn+F3] and Hibernation [Fn+F4].
To activate the Hotkey utility:
1Click Start, All Programs, Toshiba, Utilities, and then
Hotkey utility.
The TOSHIBA Hotkey window appears.
(Sample Image) TOSHIBA Hotkey Utility window
2Select the desired option(s).
3Click OK.
175
Toshiba Utilities
TOSHIBA SD™ Memory Card Format Utility
5.375 x 8.375 ver 2.3
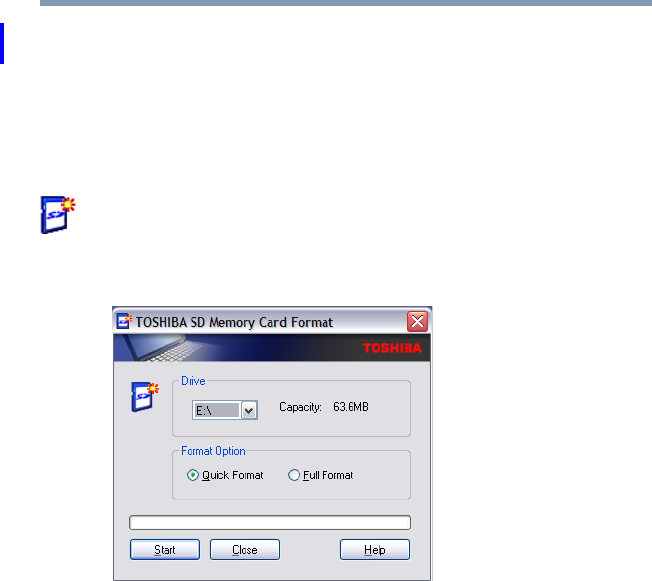
TOSHIBA SD™ Memory Card Format Utility
This utility is used to format SD™ cards used with the Bridge
Media Adapter slot.
To format an SD memory card using this utility:
1Click Start, All Programs, Toshiba, Utilities, and then
SD Memory Card Format, or click the SD Memory
Card icon in the Optimize tab of TOSHIBA Assist.
The SD Memory Card Format screen appears.
(Sample Image) SD Memory Card Format screen
2Select the drive corresponding to the SD memory card.
3Select the formatting option:
❖Quick Format
❖Full Format
4Click Start to begin formatting. The formatting progress
is displayed in the horizontal bar in the window.
5When formatting is completed, click Close to exit the
utility.
176 Toshiba Utilities
TOSHIBA SD™ Memory Boot Utility
5.375 x 8.375 ver 2.3
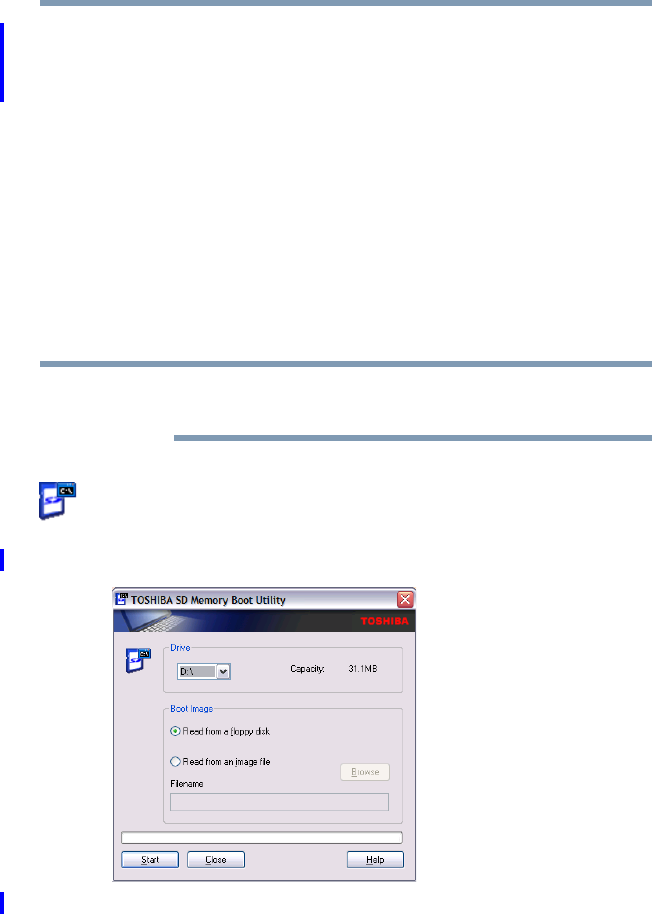
TOSHIBA SD™ Memory Boot Utility
The TOSHIBA SD™ Memory Boot Utility allows you to
create an SD card you can use to boot up your computer.
This utility also allows you to easily format SD Memory
Cards. Refer to the online Help documentation within the
application for any additional help.
To make a bootable SD card:
1Attach a USB floppy drive to your computer and insert a
bootable floppy disk.
2Insert the SD card.
Be sure to back up your data to external media before
performing this procedure as data on the drive may be lost.
3Click Start, All Programs, Toshiba, Utilities, and then
SD Memory Card, or click the SD Memory Card icon
in the Optimize tab of TOSHIBA Assist.
The TOSHIBA SD Memory Boot Utility screen appears.
(Sample Image) TOSHIBA SD Memory Boot Utility screen
NOTE

177
Toshiba Utilities
TOSHIBA SD™ Memory Boot Utility
5.375 x 8.375 ver 2.3
4Select the drive where the SD card is located.
5Select Read from a floppy disk.
6Click Start.
To create a bootable SD card with the Read from an image
file option, you need a third-party application.
Booting from a bootable SD card
To boot from a bootable SD card:
1Create a bootable SD card (see “TOSHIBA SD™
Memory Boot Utility” on page 176 for instructions).
2Verify that no floppy disk is installed in the optional
external floppy disk drive.
3Insert a bootable SD card into the SD card slot.
4Power on the computer.
5During the boot process, press the F12 key.
The system displays the Boot menu.
6Use the arrow keys to select the SD/Floppy icon.
7Press the Enter key.
NOTE
178 Toshiba Utilities
TOSHIBA Power Saver
5.375 x 8.375 ver 2.3
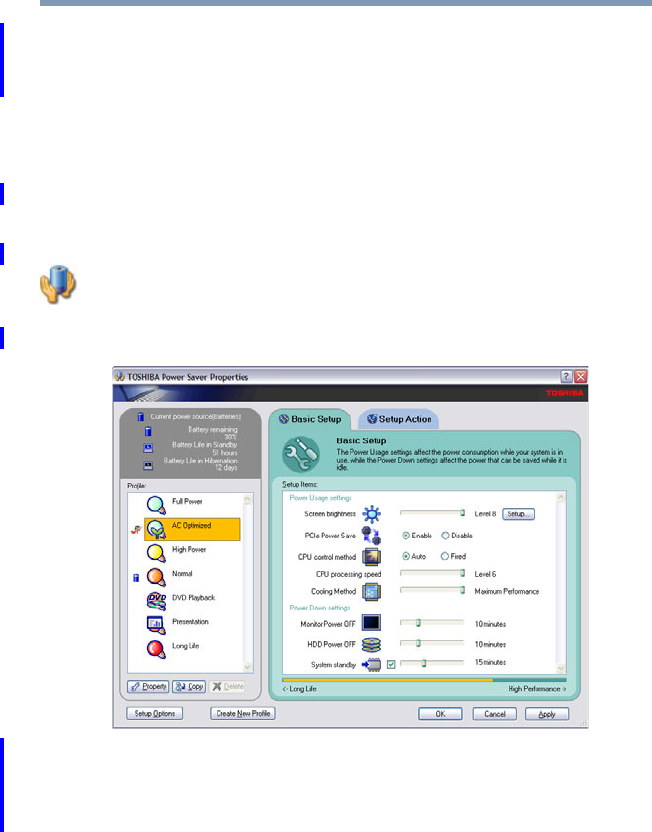
TOSHIBA Power Saver
The TOSHIBA Power Saver is used for power management,
enabling you to control your computer’s power usage,
regardless of the source, and use the many preset power
profiles, or create one yourself.
To access TOSHIBA Power Saver:
❖Click Start, Control Panel, Performance and
Maintenance, and then TOSHIBA Power Saver, or
click the Power Management icon in either the
Optimize tab of TOSHIBA Assist or in the system tray.
The TOSHIBA Power Saver Properties window appears.
(Sample Image) TOSHIBA Power Saver Properties window
The Profile panel on the left of the TOSHIBA Power Saver
Properties window shows the power profiles used to control
power usage for both AC power and battery power, as well as
the estimated battery life for each power profile mode.
The profiles shown in the Profile panel consist of the preset
power profiles that come with your computer, plus any
customized power profiles that you have created.

179
Toshiba Utilities
TOSHIBA Power Saver
5.375 x 8.375 ver 2.3
Preset Power Profiles
The preset power profiles are:
❖Full Power
❖AC Optimized
❖High Power
❖Normal
❖DVD Playback
❖Presentation
❖Long Life
These profiles cannot be deleted. It is not recommended to
change the settings of these profiles. If you need a custom
profile, create a new profile with the properties you require.
The DVD Playback profile applies only when a DVD program
is playing while running the computer on battery power.
Quickly creating a new power profile
1Highlight one of the preset profiles.
2Click Copy.
A new profile appears with the title “Copy of Name”
where Name is the title of the profile you copied.
3To rename the profile, click Property.
4Type the name for your new profile, and then click OK.
Customizing a power profile
1Select the profile to be customized in the Profile panel.
2Make the desired changes to the settings on the Basic
Setup tab and the Setup Action tab.
3Click Apply, then OK.
180 Toshiba Utilities
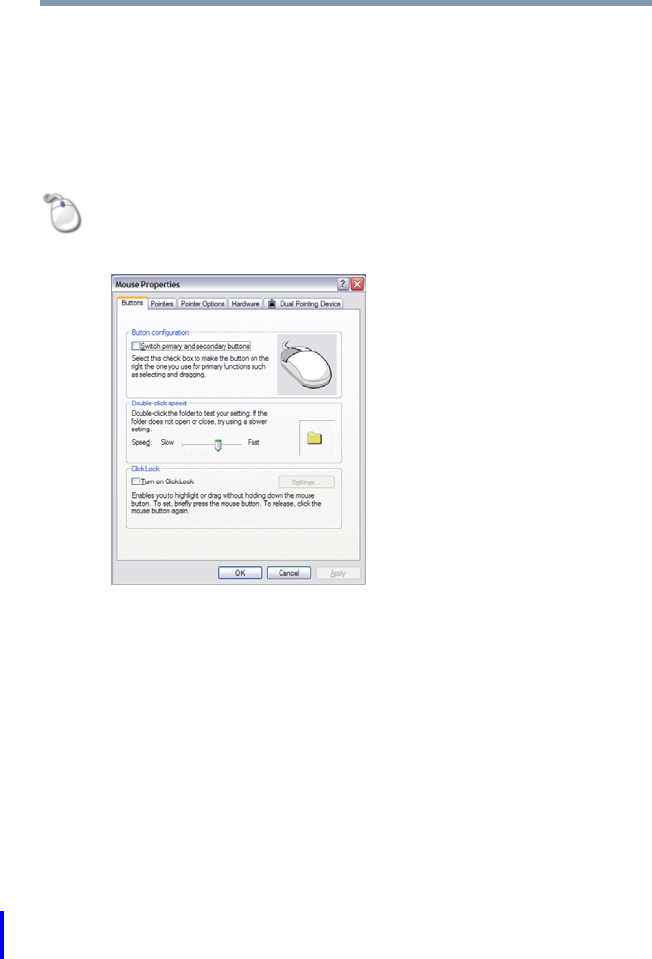
Mouse Utility
5.375 x 8.375 ver 2.3
Mouse Utility
The Mouse utility allows you to change your pointing device
or mouse settings.
To access the Mouse utility:
1Click Start, Control Panel, and then Mouse, or click the
Mouse icon in the Optimize tab of TOSHIBA Assist.
The Mouse Properties screen appears.
(Sample Image) Mouse Properties screen
The settings you can change are divided into these
categories:
❖Buttons
❖Pointers
❖Pointer options
❖Hardware
You may see additional categories depending on your
particular pointing device. For information on these
settings, see “Using the keyboard or pointing device to
assign a key” on page 172.
181
Toshiba Utilities
Toshiba Hardware Setup
5.375 x 8.375 ver 2.3
2Adjust the settings as desired, then click OK.
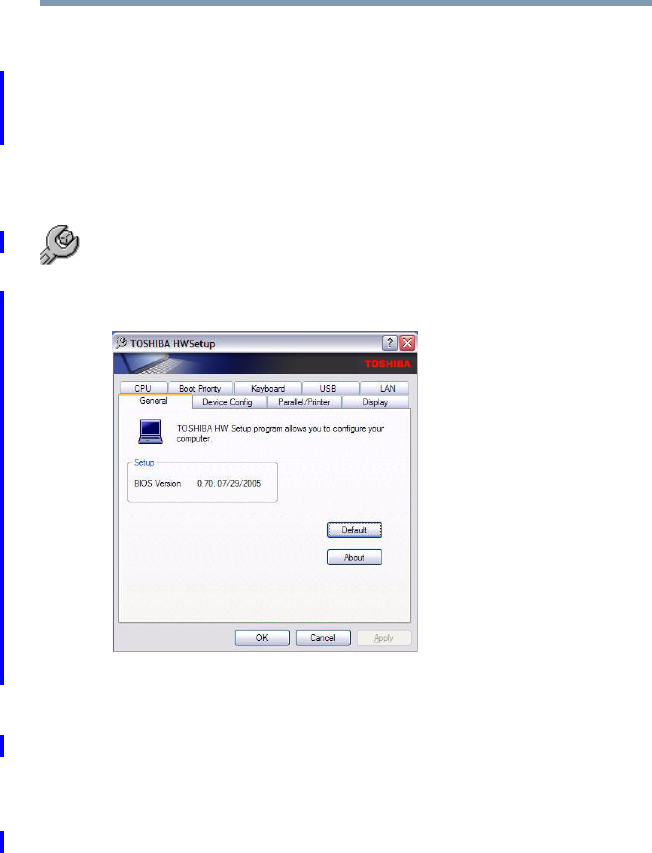
Toshiba Hardware Setup
Toshiba Hardware Setup is the Toshiba configuration
management tool available through the Windows® operating
system. To access it:
❖Click Start, All Programs, Toshiba, Utilities, Assist, or
click the Toshi ba Ha rdware Setup icon in the Optimize
tab of TOSHIBA Assist.
The Toshiba Hardware Setup screen appears.
(Sample Image) TOSHIBA Hardware Setup screen – General
tab options
The Toshiba Hardware Setup screen has the following tabs:
❖General—Allows you to view the current BIOS version
or change certain settings back to their default values
❖Device Config—Shows the Device configuration options

182 Toshiba Utilities
Toshiba Hardware Setup
5.375 x 8.375 ver 2.3
❖Display—Allows you to change various default settings
for the built-in LCD display
When the computer restarts, it remembers the last
configuration. If data does not appear on the display you are
using after starting in Standby Mode, press Fn + F5. For more
information, see “Directing the display output when you turn
on the computer” on page 69.
❖CPU—Allows you to enable or disable CPU frequency
switching modes
Dynamically Switchable—This mode is the default
setting for your computer, and automatically changes the
processing frequency and decreases voltage depending
on the power source:
❖AC Power—If your computer is connected to the AC
adaptor, the CPU frequency mode is set to high for
faster processing.
❖Battery Power—If your computer is running on
battery power, the CPU frequency mode is set to low
for slower processing. Switching the CPU to low
allows you to conserve power and extend the
operating time of your battery.
Always High—Sets the CPU speed to high when using
either the battery or the AC adaptor
Always Low—Sets the CPU speed to low when using
either the battery or the AC adaptor
NOTE

183
Toshiba Utilities
Toshiba Hardware Setup
5.375 x 8.375 ver 2.3
❖Boot Priority—Allows you to change the sequence in
which your computer searches the drives for the
operating system
You can also manually choose the Boot Priority by
sliding the power switch, then quickly pressing the F12
key, or the right or left arrow keys.
Select the boot device icon by pressing the right or left
arrow keys, then pressing the Enter key.
Since the system is a quick-booting system, you must press
the arrow keys immediately after sliding the power switch.
❖Keyboard—Allows you to configure an external
keyboard to emulate the Fn function key and access the
wake-on keyboard function
❖USB—Allows you to enable or disable USB Legacy
Emulation
❖LAN—Allows you to set networking functions
❖Button Setting—Lets you set the resume speed for
Standby mode. If you want to use the fast resume option,
be sure to connect the AC adaptor to the computer.
By changing any of the options that appear in the dialog
boxes and clicking Apply, you can reconfigure that function.
Any options that you change will become default settings
when you restart your system.
NOTE
184 Toshiba Utilities
TOSHIBA Rotation Utility
5.375 x 8.375 ver 2.3
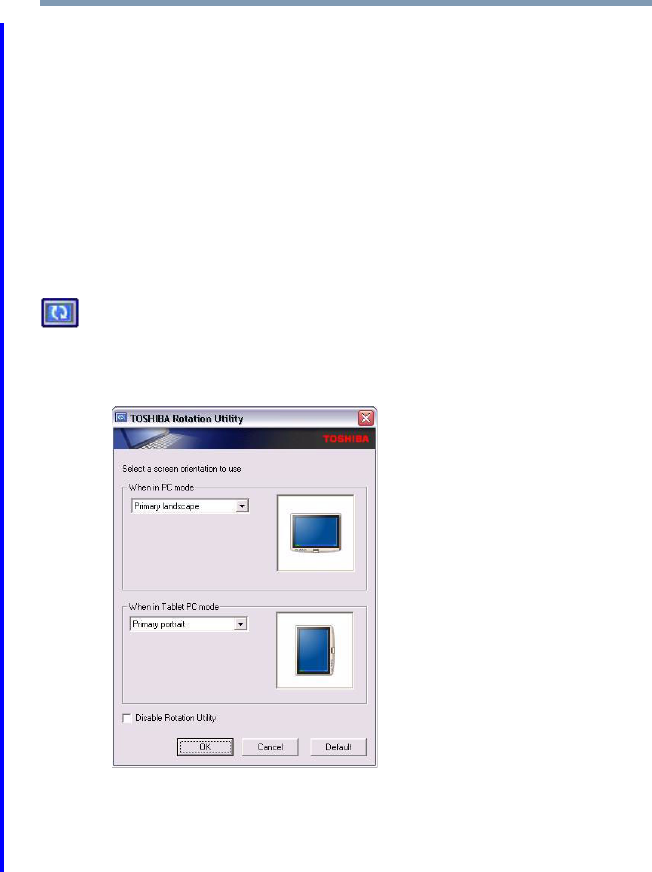
TOSHIBA Rotation Utility
The TOSHIBA Rotation utility allows you to change the
default setting of the display format (primary portrait) to
three other display formats:
❖Primary landscape
❖Secondary portrait
❖Secondary landscape
To access this utility:
1Click the Rotation Utility icon in the Optimize tab of
TOSHIBA Assist.
The Rotation Utility screen appears.
(Sample Image) TOSHIBA Rotation Utility screen
2Select a new display format for either PC mode or Tablet
PC mode.
185
Toshiba Utilities
Tablet and Pen Settings
5.375 x 8.375 ver 2.3
3Click OK.
Toshiba recommends that you use the TOSHIBA Rotation
Utility to change screen rotation options and settings for the
tablet feature Tablet and Pen Settings.
The Escape key, located between the Cross-Functional button
and the Windows Security button on the front of the display
can “lock” the display in its current display setting - landscape
or portrait.
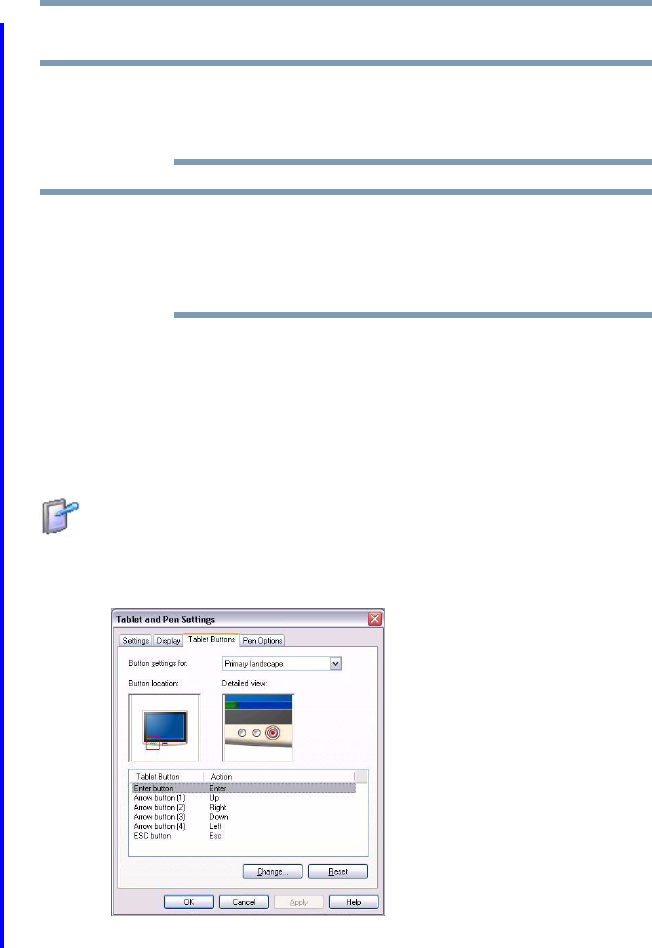
Tablet and Pen Settings
The Tablet and Pen Settings utility allows you to set various
options for using the tablet and pen.
To access this utility:
1Click the Tablet and Pen Settings icon in the Optimize
tab of TOSHIBA Assist.
The Tablet and Pen Settings screen appears.
(Sample Image) Tablet and Pen Settings window
NOTE
NOTE
186 Toshiba Utilities
Tablet and Pen Settings
5.375 x 8.375 ver 2.3
❖The Settings tab allows you to specify whether you
are left handed or right handed, and the menu
location.
❖While the Display tab can be used to change the
screen’s orientation and adjust screen brightness, it is
recommended that you use the TOSHIBA Rotation
Utility (see page 184) to change the screen’s
orientation, and the TOSHIBA Power Saver utility
(see page 178) to adjust screen brightness.
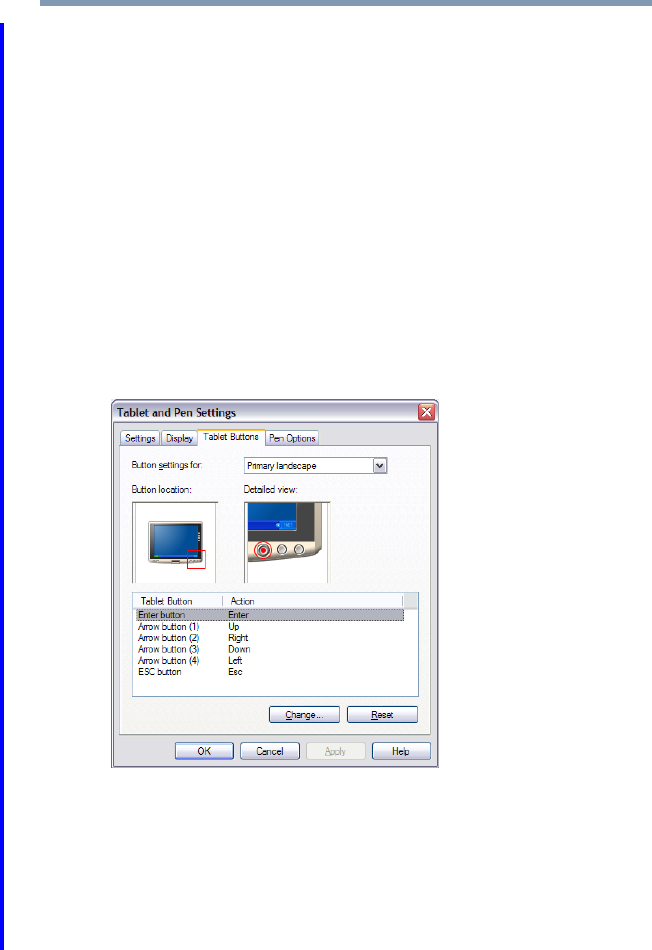
❖The Tablet Buttons tab allows you to specify an
action when a display system button is pressed. After
making your selections, click Change, choose an
Action, and then click OK.
(Sample Image) Tablet and Pen Settings Tablet Buttons tab
❖The Pen Options tab allows you to set various pen
options.
2Select the desired settings.
3Click OK.
187
Toshiba Utilities
Cross Menu Utility
5.375 x 8.375 ver 2.3
Cross Menu Utility
The Cross Menu Utility allows you to make Hot Key
assignments to launch applications, access Toshiba utilities,
or create your own custom menus.
To start the Cross Menu Utility:
1Press and hold the Cross-Functional button for two
seconds until the following screen displays.
(Sample Image) Cross Menu Utility screen
2Move the Cross-Functional button up or down to select a
menu.
3To select an item in a menu, move the Cross-Functional
button left or right until the icon is highlighted, then press
the Cross-Functional button.
188 Toshiba Utilities
Cross Menu Utility
5.375 x 8.375 ver 2.3
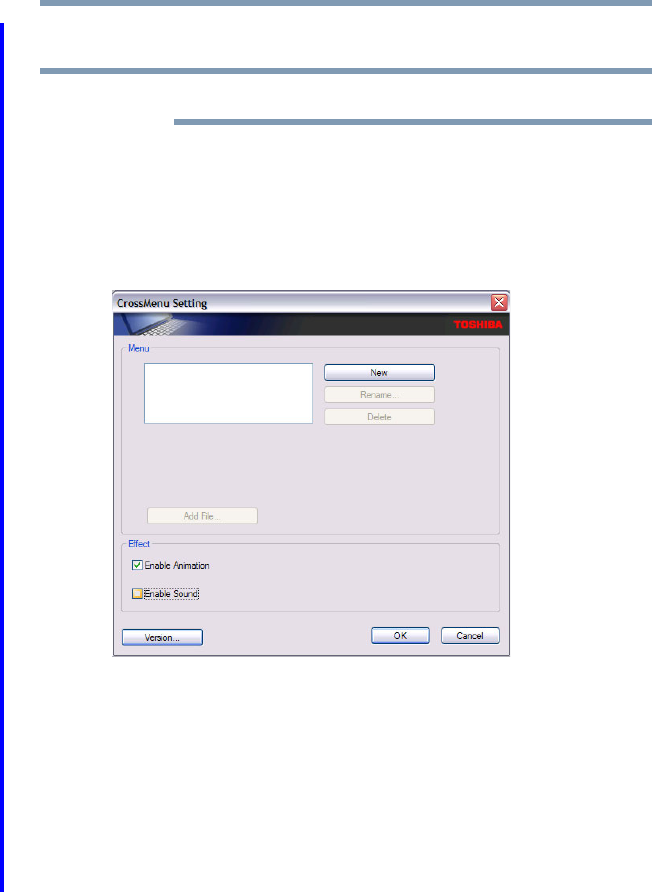
Creating a New Menu
You can add up to five menus.
To create a new menu:
1Click Start, All Programs, Toshiba, Tablet PC, and
then Cross Menu.
The Cross Menu Setting window appears.
(Sample Image) Cross Menu Setting window
2Click New.
3Click Add File.
4Browse for the application(s) you want to add to the
menu and click Open.
5When you have finished adding applications to the menu,
click OK.
NOTE
189
Toshiba Utilities
TOSHIBA Tablet Access Code Utility
5.375 x 8.375 ver 2.3
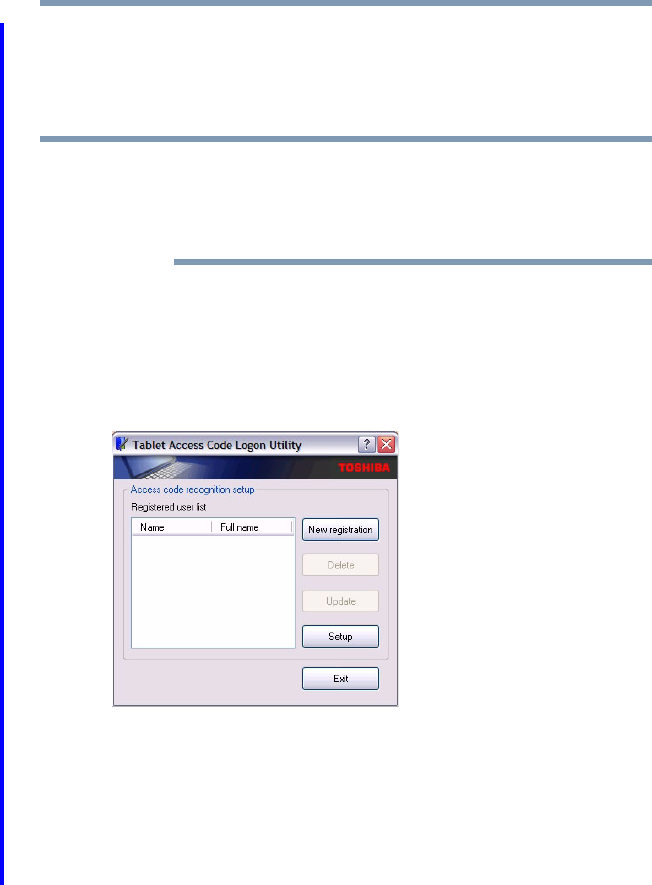
TOSHIBA Tablet Access Code Utility
This utility allows you to create and register an access code
controlling who can log onto the Windows® operating system.
When creating and registering an access code, you can choose
any character or symbol you want. The more unique or
complex the code that you create, the more secure. However,
be sure to create a code that you can easily remember.
To access the utility:
1Click Start, All Programs, Toshiba, Tablet PC, and
then Tablet Access Code Logon Utility.
The Tablet Access Code Logon Utility screen appears.
(Sample Image) TOSHIBA Tablet Access Code Logon Utility
screen
2To create an access code, click New Registration.
3Enter the requested information, then click Update.
4Click Exit when finished creating access codes.
NOTE
190 Toshiba Utilities
TOSHIBA Zooming Utility
5.375 x 8.375 ver 2.3
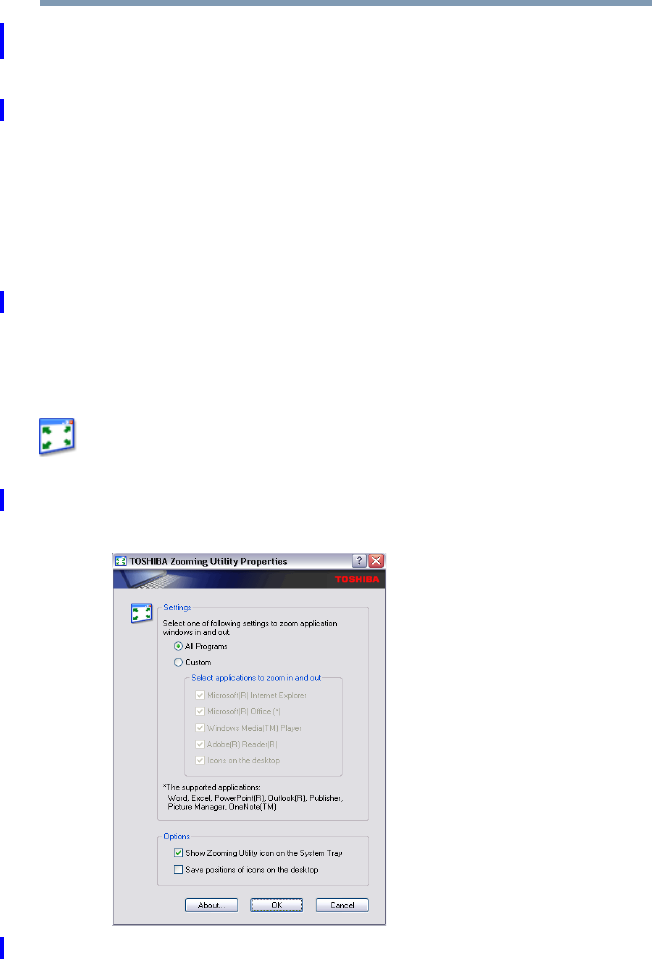
TOSHIBA Zooming Utility
This utility allows you to select which applications will work
with the zoom in/out hot keys (see “Hot Keys” on page 255).
You may select all applications or any subset of the
following:
❖Microsoft® Internet Explorer
❖Microsoft® Office
❖Windows Media® Player
❖Adobe® Acrobat® Reader®
❖Icons on the desktop
To access the Zooming utility:
1Click Start, All Programs, Toshiba, Utilities, and then
Zooming Utility, or click the Zooming Utility icon in
the Optimize tab of TOSHIBA Assist.
The TOSHIBA Zooming Utility Properties screen
appears.
(Sample Image) TOSHIBA Zooming Utility Properties screen
191
Toshiba Utilities
TOSHIBA Button Controls
5.375 x 8.375 ver 2.3
2Select the desired option(s).
3Click OK.
The zoom in and zoom out hot keys will now work with the
applications you selected.
To zoom in, hold down the Fn key and press 2; to zoom out,
hold down the Fn key and press 1.
For more information about how to use the TOSHIBA
Zooming utility, right click the icon in the Taskbar and
then click Help.
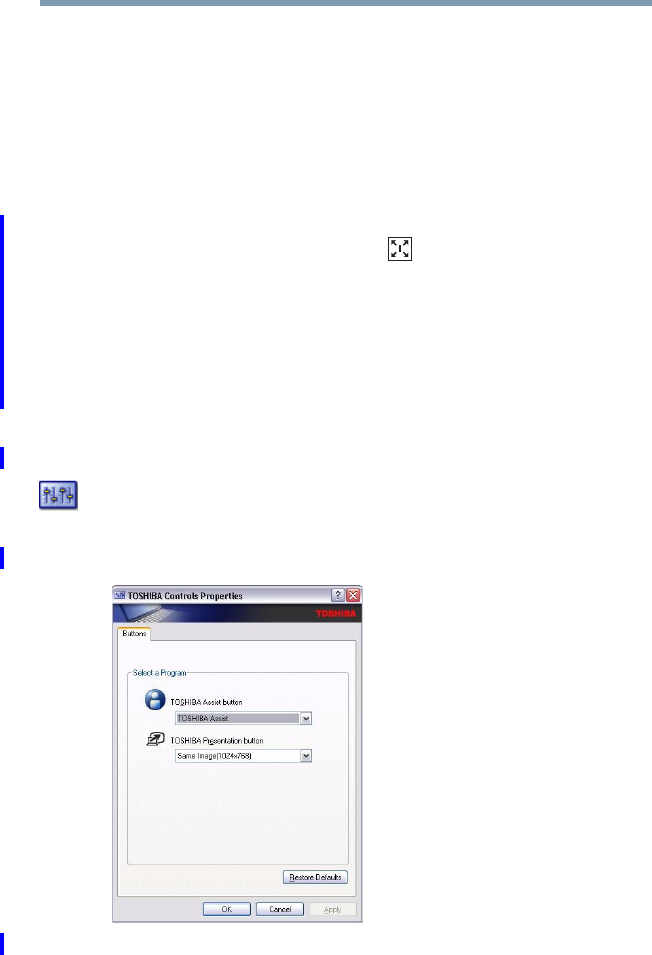
TOSHIBA Button Controls
The TOSHIBA Button Controls allow you to customize the
TOSHIBA Assist and TOSHIBA Presentation buttons. Those
buttons are located to the left of the keyboard.
To access TOSHIBA Button Controls:
1Click the Toshiba Button Control icon in the Optimize
tab of TOSHIBA Assist.
The TOSHIBA Controls Properties window appears.
(Sample Image) TOSHIBA Button Controls screen
192 Toshiba Utilities
CD/DVD Drive Acoustic Silencer
5.375 x 8.375 ver 2.3
2Select the button whose function is to be customized.
3Make the desired selections.
4Click Apply, then click OK.
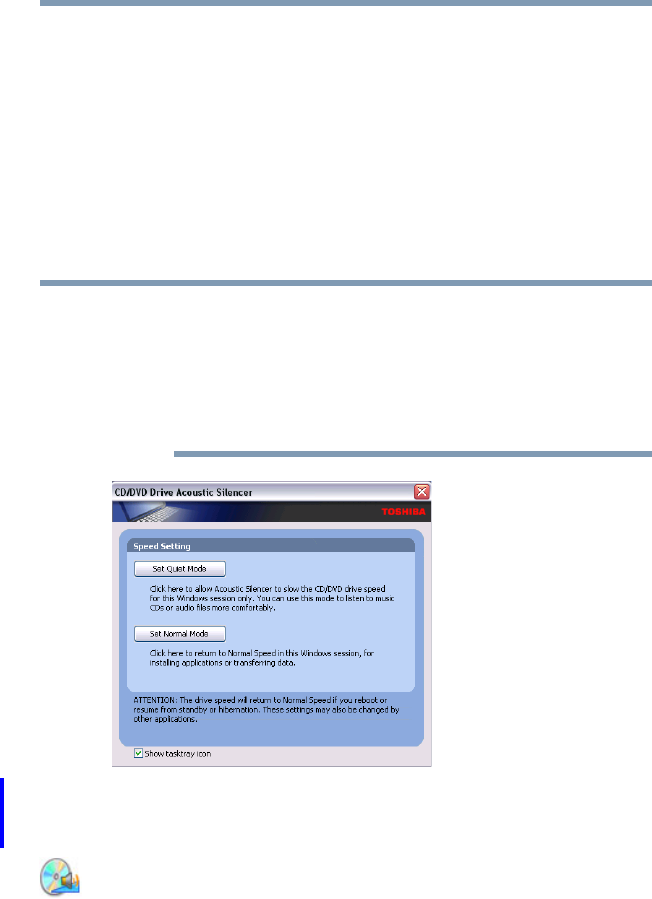
CD/DVD Drive Acoustic Silencer
This utility can slow the speed of your optical drive to make it
run more quietly. You can use this utility to make listening to
music CDs more enjoyable.
When you change the CD/DVD drive to “Quiet” mode, the
setting is only valid for the current Windows session. If you
shut down, restart, log off, or resume from hibernation, the
setting will revert back to Normal speed. The setting can also
be changed by CD burning software or other applications that
can set the drive speed.
(Sample Image) CD/DVD Drive Acoustic Silencer screen
To access the utility:
1Double-click the icon in the task tray, or click the CD/
DVD Drive Acoustic Silencer icon in the Optimize tab
of TOSHIBA Assist.
The CD/DVD Drive Acoustic Silencer screen appears.
NOTE
193
Toshiba Utilities
TOSHIBA Accessibility
5.375 x 8.375 ver 2.3
2Click Set Quiet Mode to make the drive run more slowly
and quietly for listening to music or audio files on a CD.
3Click Set Normal Mode to run the drive at normal speed
for transferring data.
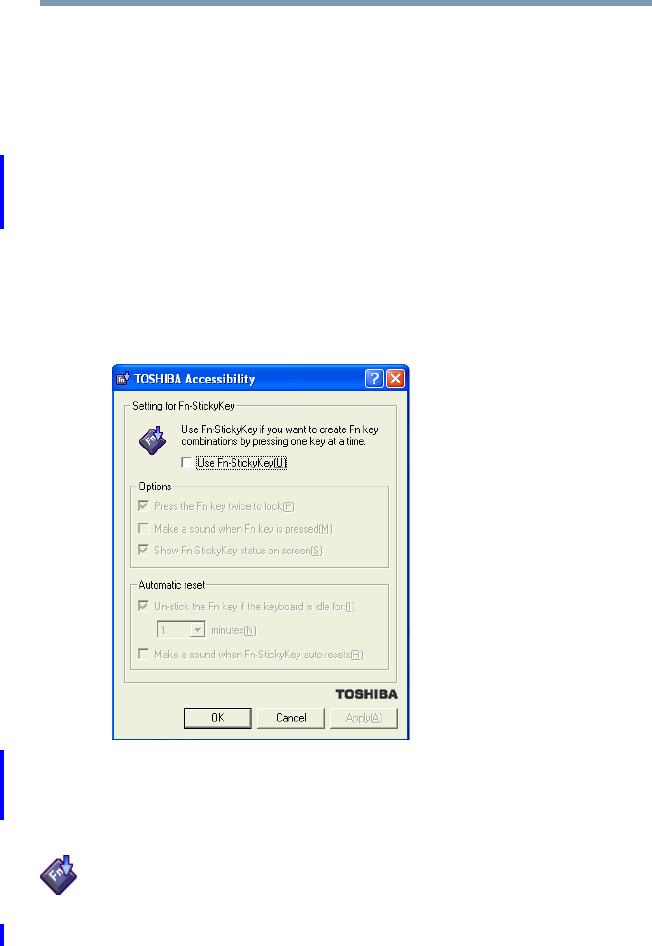
TOSHIBA Accessibility
The TOSHIBA Accessibility utility allows you to use the Fn
key to create a hot key combination with one of the function
keys without pressing the two keys simultaneously as is
usually required. Using Accessibility lets you make the Fn key
a sticky key, meaning you can press it once, release it, and
then press a function key to activate the hot key function.
(Sample Image) TOSHIBA Accessibility window
To use TOSHIBA Accessibility:
1Click Start, All Programs, Toshiba, Utilities, and then
Accessibility, or click the Accessibility icon in the
Optimize tab of TOSHIBA Assist.
The TOSHIBA Accessibility window appears.
194 Toshiba Utilities
TOSHIBA Mobile Extension
5.375 x 8.375 ver 2.3
2Check the Use Fn-StickyKey box.
3Put a check mark next to the desired option.
4Click OK.
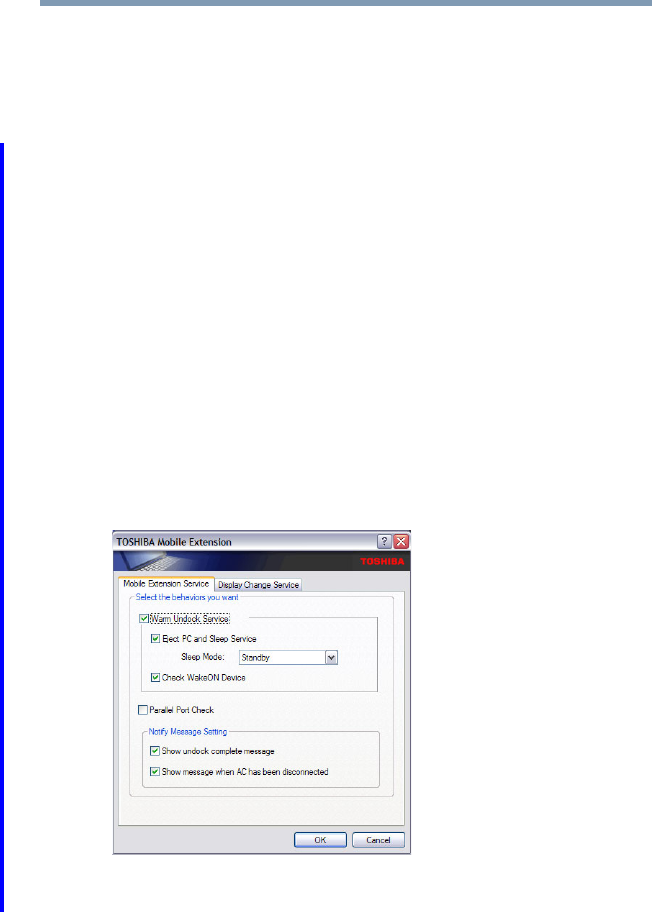
TOSHIBA Mobile Extension
To adjust the settings for docking or using the Express Port
Replicator, use the TOSHIBA Mobile Extension utility.
To use the TOSHIBA Mobile Extension utility:
1Click Start, Control Panel, Performance and
Maintenance, then TOSHIBA Mobile Extension.
The TOSHIBA Mobile Extension Service Configuration
dialog box appears.
2Under the Mobile Extension Service tab, you can select
behaviors to enable or disable, such as Warm Undock
Service and Notification Messages, by checking or
unchecking the appropriate box.
(Sample Image) TOSHIBA Mobile Extension Service tab
options
195
Toshiba Utilities
Fingerprint Authentication Utility
5.375 x 8.375 ver 2.3
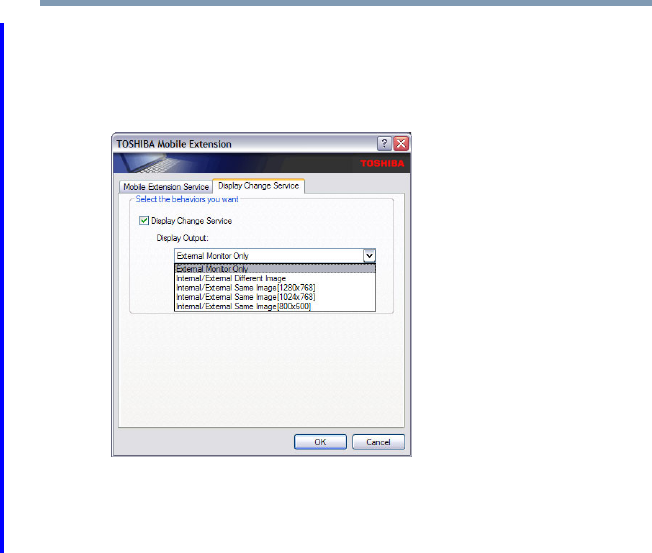
3Under the Display Change Service tab, you can set the
default display configuration you wish to use when
docking the system to the optional Express Port
Replicator.
(Sample Image) Display Change Service tab options
Fingerprint Authentication Utility
The fingerprint authentication utility (available on certain
models) can be used to replace the keyboard-based user/
BIOS password authentication system when booting up.
The fingerprint authentication utility can also be used for user
logon. The user’s fingerprint is read; if the system recognizes
the fingerprint, the user is automatically logged on.
Fingerprint utility limitations
Toshiba does not guarantee that the fingerprint utility
technology will be completely secure or error-free. Toshiba
does not guarantee that the fingerprint utility will accurately
screen out unauthorized users at all times. Toshiba is not
liable for any failure or damage that might arise out of the use
of the fingerprint software or utility.

196 Toshiba Utilities
Fingerprint Authentication Utility
5.375 x 8.375 ver 2.3
Fingerprint Enrollment
Use the Enroll or Edit Fingerprints wizard to enroll new
fingerprints or to update existing fingerprint samples.
It is recommended that you complete the Fingerprint tutorial
before starting fingerprint enrollment. The Fingerprint tutorial
shows how to achieve the highest quality fingerprint samples.
To enroll a new fingerprint:
1Click Start, All Programs, Protector Suite QL, and
then Control Center.
2Click the Fingerprints topic in the Control Center. Click
the Enroll or Edit Fingerprints wizard.
3Enter your credentials.
4Complete the Fingerprint tutorial.
5Click the button above the finger you want to enroll.
6Swipe your finger on the reader.
A sample will be created and indicated by a Fingerprint
icon.
7Repeat the previous step. Swipe the same finger on the
reader two more times to create two more samples.
8The final template will be created from these three
samples.
If you do not use a Windows password, you will be prompted
to define a new (non-empty) one. This is not necessary, but a
password improves the security of your software.
If your system supports power-on security, a Power-on button
is also displayed above each enrolled fingerprint. This button
is shown pressed by default, indicating that your fingerprint is
automatically added for power-on authentication.
NOTE
NOTE
197
Toshiba Utilities
Fingerprint Authentication Utility
5.375 x 8.375 ver 2.3
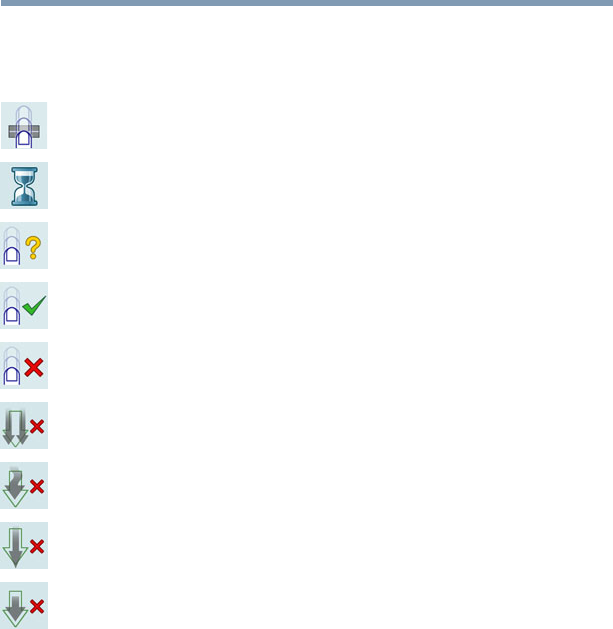
During fingerprint enrollment, the system displays icons as
prompts, notifications, and warnings. These icons and their
meanings are as follows:
❖Reader ready—the reader is waiting to read your
fingerprint. Swipe your finger when you are ready.
❖Reader busy—wait for the reader to complete its
operation.
❖Problem with operation—the reader could not read your
fingerprint. Swipe your finger again.
❖Operation succeeded—the reader successfully read or
verified your fingerprint.
❖Failed to verify the user—the fingerprint could not be
matched.
❖Error reading fingerprint—the finger was too far to the
left or right. Center your finger and swipe it again.
❖Error reading fingerprint—the movement was skewed.
Swipe your finger again in a straight line.
❖Error reading fingerprint—the movement was too fast.
Swipe your finger again at a slower speed.
❖Error reading fingerprint—the movement was too short.
Swipe your finger again using a longer motion.
Fingerprint Logon
The fingerprint utility enables logon to your computer using
fingerprints. During user enrollment, fingerprint samples are
saved and associated with the user’s Windows® user account.
When the user attempts to log on again, the user’s fingerprint
is read and compared with the user’s enrolled fingerprints; if
the fingerprint is recognized, user logon is completed.
The Fast User Switching feature of the Windows® operating
system is also supported. If user A is logged on and the
fingerprint utility verifies the fingerprint of user B (who is
already enrolled), the utility recognizes the fingerprint and
switches the users.

198 Toshiba Utilities
Fingerprint Authentication Utility
5.375 x 8.375 ver 2.3
If your system supports power-on security, existing
fingerprint samples can be used also for power-on
authentication.
Power-on Security
The power-on security feature prevents unauthorized access
to your computer when it is turned off by requiring the user to
pass fingerprint authentication. If fingerprint authentication
fails, the user will not be able to start the computer.
When power-on security is enabled, the system asks you to
authenticate your fingerprint. You have 40 seconds to swipe
your fingerprint.
If the authentication fails, the system tries again up to two
more times. If authentication fails after the third attempt, the
system shuts down.
Enabling Power-on Security
Options for power-on security are displayed only if your
computer supports this feature. In most configurations,
power-on security is enabled automatically after the first user
fingerprints are enrolled.
To disable/enable power-on security:
1Open the Control Center and go to Settings - Power-on
Security. (This wizard is displayed only if your system
supports power-on security.)
2Check the option Replace the power-on and hard drive
passwords with the fingerprint reader.

199
Toshiba Utilities
Fingerprint Authentication Utility
5.375 x 8.375 ver 2.3
Power-on security can be configured to operate with the
fingerprint logon feature. If a fingerprint used for power-on
security matches a fingerprint in an existing passport, the
corresponding user is logged on automatically without having
to enter the Windows® logon password.
Your hardware must support Power-on security to use the
single logon feature. You must have administrative privileges
to change settings.
To enable power-on security single logon:
1Open the Control Center and go to Settings - System
Settings.
2Select Logon.
3Check the Allow power-on security single sign-on
check box. (Logon support must be enabled for this
option to be accessible.)
Fingerprint Management
Fingerprints are stored in memory during enrollment. After a
fingerprint is enrolled, it is displayed with a power-on button
above it. The button appears “pressed in” by default,
indicating that the corresponding finger will be used for
power-on security. If you do not want to use a fingerprint for
power-on security but only for logon, click the Boot button to
delete the fingerprint from the fingerprint device memory.
The fingerprint device memory can typically hold up to 21
fingerprints. The number of slots remaining is displayed in
the enrollment wizard.
Control Center
The Control Center contains various functions for fingerprint
management and for setting up your fingerprint software.
Available options depend on the software status, used
hardware, and installed applications.
NOTE

200 Toshiba Utilities
Fingerprint Authentication Utility
5.375 x 8.375 ver 2.3
Fingerprints
❖Enroll or Edit Fingerprints—Runs the fingerprint
enrollment wizard. You can enroll/delete fingerprints for
the current user and, if power-on security is implemented,
control whether they are stored in the fingerprint device
memory. After you enroll your fingerprints, they are
associated with your user name and password. The next
time you log in, you can use your fingerprints instead of
your user name and password.
❖Delete—Deletes all fingerprints for the current user.
❖Import or Export User Data—Existing fingerprints can
be exported to a *.vtp file and imported back to your
fingerprint software. The *.vtp file is encrypted and
protected by a password that is defined during export.
Settings
❖System Settings—Opens the Settings dialog containing
various options for setting up the product. Most of these
settings can be modified only by administrators and
affect all users.
❖User Settings—Opens the User Settings dialog
containing user-specific options for setting up the
product.
❖Power-on Security—The memory of the fingerprint
device is limited (typical capacity is 21 fingerprints). You
can decide which fingerprints are present in the device
memory and can be used for verification on computer
startup, or create new fingerprints to be used only for
power-on authentication.
❖Fingerprint Storage Inspector—Opens the Fingerprint
Storage Inspector dialog where you can see the contents
of your fingerprint storage.

201
Toshiba Utilities
Fingerprint Authentication Utility
5.375 x 8.375 ver 2.3
Help
❖Introduction—Displays the Introduction dialog with
basic information about product features.
❖Tutorial—Runs the fingerprint tutorial which shows you
how to enroll your fingerprints. This tutorial is highly
recommended for first-time users of this technology. The
quality of enrolled fingerprints is extremely important for
your satisfaction with the product.
❖Help icon—Displays this help. The help files in other
languages (depending on your installation) are located in
the mui subfolder of your installation folder.
❖About icon—Displays version information.
Password Bank
The Password Bank stores registration and logon information
for Web sites and dialogs, helping to automate the task of
entering this information.
You enter the required information only once, during Web
page or dialog registration. When the window is displayed
again, all the data is entered automatically when you scan
your fingerprint on the reader. Registered Web pages can also
be accessed directly from the Biomenu.
Biomenu
Biomenu provides access to the utility’s features and settings.
It is available in several variants or skins. To view or select
other Biomenu skins, open the Control Center and select
Settings, User Settings.
Swipe your finger to open Biomenu. If fingerprint
verification is configured to invoke another action (e.g.,
display a registered page), press and hold the Shift key while
swiping your finger.

202 Toshiba Utilities
Fingerprint Authentication Utility
5.375 x 8.375 ver 2.3
The Biomenu contains the following menu options:
❖Lock computer—Locks your computer. Use the reader to
unlock the computer again.
❖Registered Sites—Displays a list of your Web pages
registered by Password Bank. To display and fill in a
registered page in your default Web browser, click it in
the list.
❖Register—Registers a new window (dialog or Web page).
❖Lock/unlock My Safe—Opens or closes My Safe folder.
❖Control Center—Displays Control Center.
❖Help—Displays this help file.
Registering a new Web page or dialog
You are logged on to the computer and want to register a new
Web page.
To create a new registration:
1Display a Web page you want to register.
2Fill in the data you want to replay the next time you
access this Web page.
3Use the reader to display the Biomenu.
4Select Register.
Password Bank recognizes pages containing a password field
and displays a hint that the page can be registered. These
hints can be turned off in the Settings dialog.
A wizard will assist you through your first registration.
Replaying a registered Web page or dialog
You are logged on to the computer and want to replay a
registered Web page.

203
Toshiba Utilities
Fingerprint Authentication Utility
5.375 x 8.375 ver 2.3
To replay a registration:
1Swipe your enrolled finger to display the Biomenu.
2Select Registered Sites.
3Select a page you want to display and replay, or simply
verify your fingerprint if the page is already displayed.
If you directly access a registered page from your browser
without using the Biomenu’s Registered Sites option,
Password Bank displays a hint that the page is registered and
can be replayed. These hints can be turned off in the
Password bank tab of the User Settings dialog.
Replaying registrations with multiple forms
Password Bank registers forms, not pages. If a page contains
several forms, each form requires a separate registration. If a
page contains several forms, replaying works as follows:
❖If only one form is registered for the page (regardless of
how many forms the page has), that registration is
replayed.
❖If the page has multiple registered forms, and one of the
registered forms is active, the active form is replayed.
❖If the page has multiple registered forms, but there is no
active form, all existing registered forms for the page are
displayed. You then select the one to be replayed.
Replaying a registered dialog
You are logged on to the computer and want to replay a
registered dialog.
To replay a registration:
1Display the dialog to be replayed.
2Use the reader.

204 Toshiba Utilities
Fingerprint Authentication Utility
5.375 x 8.375 ver 2.3
3Optional—If the hint for replaying dialogs is displayed,
confirm that you want to replay the registration.
4The registration is replayed.
Editing an existing registration
Sometimes it is useful to edit an existing registration. For
example, your company’s address may have changed and you
want to update your registrations.
To edit an existing registration:
1Click the Settings topic in the Control Center.
2Click User Settings. Verify your fingerprint.
3Select Registrations.
4Select a registration.
5Click Edit.
6Change the value of an item or delete the item.
7Select the Auto submit check box to submit the selected
registration automatically after replaying the registration.
A warning is displayed if you attempt to register a form
or dialog that may be incompatible or not work properly
with automatic submittal.

205
Toshiba Utilities
Fingerprint Authentication Utility
5.375 x 8.375 ver 2.3
Deleting a registration
You are logged on to the computer and want to delete an
existing registration.
To delete an existing registration:
1Click the Settings topic in the Control Center.
2Click User Settings. Verify your fingerprint.
3Select Registrations.
4Select a registration.
5Click Delete.
How to Delete the Fingerprint Data
Fingerprint data is stored in the non-volatile memory. If the
computer changes ownership, Toshiba recommends the
following procedure:
1Click Start, All Programs, Protector Suite QL, and
then Control Center.
The Protector Suite Software screen is displayed.
2Click Fingerprints then Delete.
3Click Settings then Fingerprint Storage Inspector.
The Fingerprint Storage Inspector screen is displayed.
4If other fingerprint data is still displayed on the list, hold
down the Control key and select each fingerprint until they
are all selected, then click Remove.
5Click OK to make the changes permanent.
6Check that all Fingerprint data was deleted on the
Fingerprint Storage Inspector screen.

206 Toshiba Utilities
Fingerprint Authentication Utility
5.375 x 8.375 ver 2.3
Care and maintenance of your fingerprint reader
Failure to follow these guidelines and/or procedures might
result in damage to the reader or cause reader failure, finger
recognition problems, or lower finger recognition success
rate.
❖Do not scratch or poke the reader with your nails or any
hard or sharp objects.
❖Do not press the reader with too much pressure.
❖Do not touch the reader with a wet finger or any wet
objects. Keep reader surface dry and free of water vapor.
❖Do not touch the reader with a soiled finger. Minute
foreign particles on a soiled or dirty finger may scratch
the reader.
❖Do not paste stickers or write on the reader.
❖Do not touch the reader with a finger or any object with
built-up static electricity.
Observe the following before you swipe your finger on the
reader, whether for fingerprint enrollment/registration or
recognition.
❖Wash and dry your hands thoroughly.
❖Remove static electricity from your fingers by touching
any metal surface. Static electricity is a common cause of
reader failures, especially during dry seasons such as
winter.
❖Clean the reader with a lint-free cloth. Do not use
detergent to clean the reader.
❖Avoid the following finger conditions for enrollment or
recognition as they may result in fingerprint enrollment
errors or a drop in the fingerprint recognition success
rate.
❖Soaked or swollen finger (e.g., after taking bath)
❖Injured finger
207
Toshiba Utilities
Fingerprint Authentication Utility
5.375 x 8.375 ver 2.3
❖Wet finger
❖Soiled or oily finger
❖Extremely dry skin condition on finger
Observe the following to improve the fingerprint recognition
success rate.
❖Enroll two or more fingers.
❖Enroll additional fingers if recognition failure occurs
often using enrolled fingers.
❖Check your finger condition. Changed conditions, such
as injured, rough, extremely dry, wet, soiled, dirty, oily,
soaked or swollen fingers, may lower the recognition
success rate. Also if the fingerprint is worn down or the
finger becomes thinner or fatter, the recognition success
rate may be lowered.
❖The fingerprint for each finger is different and unique.
Please ensure that only the registered or enrolled
fingerprint or fingerprints are used for identification.
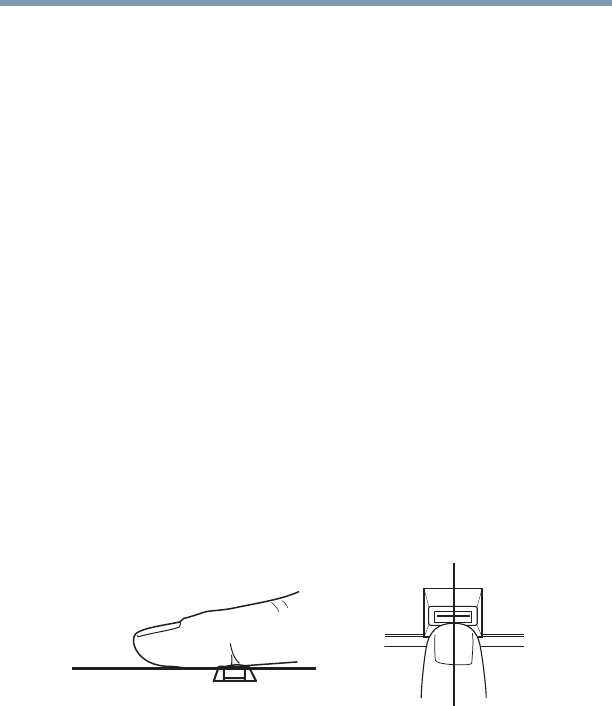
❖Check sliding position (see illustration below).
(Sample Illustration) Aligning the finger on the reader

208 Toshiba Utilities
Fingerprint Authentication Utility
5.375 x 8.375 ver 2.3
Fingerprint reader limitations
❖The fingerprint reader compares and analyzes the unique
characteristics in a fingerprint. However, there may be
instances where certain users are unable to register their
fingerprints due to insufficiently unique characteristics in
their fingerprints.
❖A warning message will be displayed when recognition is
abnormal or recognition is not successful within a fixed
duration.
❖The recognition success rate may differ from user to user.
❖Toshiba does not guarantee that this fingerprint
recognition technology will be error-free.
❖Toshiba does not guarantee that the fingerprint reader
will recognize the enrolled user or accurately screen out
unauthorized users at all times. Toshiba is not liable for
any failure or damage that might arise out of the use of
this fingerprint recognition software or utility.

209
5.375 x 8.375 ver 2.3
Chapter 6
If Something Goes
Wrong
Some problems you may encounter when using your
computer are relatively easy to identify and solve. Others
may require help from your network administrator or the
manufacturer of the software program.
This chapter aims to help you solve many problems by
yourself. It covers the problems you are most likely to
encounter.
If all else fails, contact Toshiba. You will find information on
Toshiba’s support services at the end of this chapter.
Problems that are easy to fix
Your program stops responding.
If you are working with a program that suddenly freezes all
operations, chances are the program has stopped responding.
You can exit the failed program without shutting down the
operating system or closing other programs.
To close a program that has stopped responding:

210 If Something Goes Wrong
Problems that are easy to fix
5.375 x 8.375 ver 2.3
1Press Ctrl, Alt, and Del simultaneously (once).
The Windows Task Manager window appears.
2Click the Applications tab.
If a program has stopped responding, the words “not
responding” appear beside its name in the list.
3Select the program you want to close, then click End
Task.
Closing the failed program should allow you to continue
working. If it does not, continue with the next step.
4Close the remaining programs one by one by selecting
the program name, then End Task.
To power off your computer, do one of the following:
If you are not connected to a domain server:
1Click Start, Turn off computer.
The Turn off computer window appears.
2Click Turn Off.
The computer turns off.
If you are connected to a domain server:
1Click Start, Shut down.
The Shut Down window appears.
2Select Shut down from the drop-down list.
3Click OK.
The computer shuts down completely.
Your program performs an illegal operation.
If you receive the message, “Your program has performed an illegal
operation,” close the window and continue working. If it
happens again, record the details of the message and consult
the software manufacturer.

211
If Something Goes Wrong
Problems when you turn on the computer
5.375 x 8.375 ver 2.3
To record the details:
1Click the Details button and select the text the operating
system displays.
The Details button displays information that the software
manufacturer needs to help you solve your problem.
2Press Ctrl + C to copy the text to the clipboard.
3Open Notepad (click Start, All Programs, Accessories
and then click Notepad).
4Press Ctrl + V to paste the details into Notepad.
5Add a paragraph break and type some notes describing
what you were doing when you received the message and
how the error can be reproduced.
6Save the file and refer to it when you contact the software
manufacturer.
Problems when you turn on the computer
These problems may occur when you turn on the power.
The computer will not start.
Make sure you attached the AC adaptor and power cord/cable
properly or installed a charged battery.
Slide and hold the power switch for at least 10 seconds.
If you are using the AC adaptor, check that the wall outlet is
working by plugging in another device, such as a lamp.
Verify that the computer is on by looking at the on/off
indicator. If the indicator is glowing, the computer is on.
If you are using an AC adaptor, verify that the computer is
receiving power from the external power source by looking at
the AC power light. If the indicator is glowing, the computer
is connected to a live external power source.

212 If Something Goes Wrong
Problems when you turn on the computer
5.375 x 8.375 ver 2.3
The computer starts but when you press a key nothing
happens.
Verify that the active program accepts text input. Try clicking
your mouse on an area where you can type text and try typing
again.
Your computer may be in Standby mode and have a software
or resource conflict. When this happens turning the power on
returns you to the problem instead of restarting the system.
To clear the condition, press Ctrl, Alt, and Del simultaneously.
Clearing the condition may get the computer running, but it
will not solve a resource conflict. Read the documentation
that came with the conflicting device and “Resolving a
hardware conflict” on page 217.
The computer is not accessing the hard disk or the
optional external diskette drive.
Your computer normally loads the operating system from the
hard disk. If you have a hard disk problem, you will not be
able to start the computer. Insert a system diskette into the
optional external diskette drive and press F12 when the
machine starts and use the arrow keys to select the boot-up
device.
The computer displays the WARNING RESUME FAILURE
message.
The computer was placed in Standby mode and the battery
has discharged. Data stored in the computer’s memory has
been lost. Data stored in the computer’s hard drive may not be
affected.
Always save your data even when you are using Standby. If
your battery fully discharges, information that has not been
saved will be lost. Your computer can be configured to warn
you when the battery is running low see “What to do when
the main battery runs low” on page 117.

213
If Something Goes Wrong
Problems when you turn on the computer
5.375 x 8.375 ver 2.3
If you are running on battery power, it is recommended that
you do not leave the computer in Standby mode for long
periods of time.
To charge the battery, leave the computer plugged into a live
wall outlet for several hours. For more information see
“Charging batteries” on page 112.
The computer displays the Non-System disk or disk error message.
Make sure there is no diskette in the optional external diskette
drive. If there is a diskette in the drive, remove it and press
any key to continue. If pressing any key does not work, press
Ctrl, Alt, and Del to restart the computer. For more information
see “The computer is not accessing the hard disk or the
optional external diskette drive.” on page 212.
The AC power light is blinking.
If the AC power light is blinking, try the following steps:
1Cut off power to the computer by disconnecting the AC
adaptor and removing the battery. The error condition
will be interrupted, and the AC power light will stop
flashing.
2Put the battery back into the computer. Do not connect
the AC adaptor. Try turning the computer on again.
If the computer starts normally, the AC adaptor may be
defective and will need to be replaced (see the Toshiba
Web site at accessories.toshiba.com).
If the AC power light starts flashing, remove the battery,
and continue with the steps below.
3Connect the AC adaptor to the computer. Leave the
battery out of the computer. Try turning the computer on
again.

214 If Something Goes Wrong
Problems when you turn on the computer
5.375 x 8.375 ver 2.3
If the computer starts normally, the battery may need
charging, may be depleted, or may be defective. Turn the
computer on, insert the battery, and then leave the
computer running for several hours, which will deliver a
slow, steady “trickle-charge” to the battery. Once the
battery has been trickle-charged, it may begin working
correctly again.
If the trickle-charging does not prove effective, visit the
Toshiba Web site at pcsupport.toshiba.com and see the
Support Bulletin Step-Charging the computer’s
battery (click the Ask Iris® link and search for the
support bulletin by name).
4Connect the AC adaptor to a different power outlet,
preferably in a different room. If the computer starts
normally, there may be a problem with the AC outlet
itself, or the voltage level available from it.
5Verify that the AC adaptor is the correct unit for your
computer model. The computer may not be able to start
from an AC adaptor that is rated for less current
(amperage) than the computer requires, even if the rated
voltage is correct, and the plug fits correctly in the DC-IN
socket. The labels on the bottom of the computer and the
AC adaptor show the specifications for voltage ("V") and
current ("A") for each device. The voltage level must
match exactly. The amperage rating of the AC adaptor
must be equal to or greater than that required by the
computer.

215
If Something Goes Wrong
The Windows® operating system is not working
5.375 x 8.375 ver 2.3
The Windows® operating system is not
working
Once you are familiar with the desktop and used to the way
the operating system responds to your work routine, you can
easily detect if the operating system is not working correctly.
For example:
❖The operating system fails to start after the Starting
Windows XP message appears.
❖The operating system takes a long time to start.
❖The operating system responds differently from the
normal routine.
❖The screen does not look right.
Unless a hardware device has failed, problems usually occur
when you change the system in some way such as installing a
new program or adding a device.
If you experience any of these problems, use the options in
the Startup menu to fix the problem.
Using Startup options to fix problems
If the operating system fails to start properly, you may have to
change your system’s configuration or verify the startup
procedure to fix the problem. To do this, use the options in
the Startup menu.
To open the Startup menu:
1Restart your computer.
2Press F8 when your computer starts and before Windows
starts loading.
The Windows® Advanced Options menu displays these
options:
❖Safe Mode

216 If Something Goes Wrong
The Windows® operating system is not working
5.375 x 8.375 ver 2.3
❖Safe Mode (with Networking)
❖Safe Mode (with Command Prompt)
❖Enable Boot Logging
❖Enable VGA Mode
❖Last known good configuration (your most recent
settings that worked)
❖Directory Services Restore Mode (Windows®
domain controllers only)
❖Debugging Mode
❖Start Windows® normally
❖Reboot
❖Return to OS Choices (menu)
See your Windows® documentation for further explanation.
If your computer is connected to a network, the Startup menu
may display different versions of Safe mode.
Internet problems
My Internet connection is very slow.
Many factors contribute to the speed with which you can surf
the Internet. They include: modem speed, telephone line
conditions, time of day (when everyone else is surfing, your
access can be slow) and popularity of the sites you are trying
to access. If accessing a particular site is very slow, try later.
My browser cannot find the URL address I typed in.
Make sure you separated the domain names of the address
with the forward slash (/). Check the spelling of each name
and the syntax of the address carefully. A single incorrect
letter or missed character will make it impossible for your
browser to locate the site.
NOTE

217
If Something Goes Wrong
Resolving a hardware conflict
5.375 x 8.375 ver 2.3
My browser cannot find a site I bookmarked.
The World Wide Web is constantly changing. A site you
bookmarked yesterday may not be available today or its
server may be down for temporary repair. Try again later.
The Windows® XP operating system can help you
If the operating system has started properly but you still have
a problem using your computer, the online Help can assist
you in troubleshooting the problem.
To access Windows® XP Help and Support:
1Click Start, then click Help and Support.
The Help and Support window appears.
2Then do one or both of the following:
❖In the search field, type in the topic for which you
need help and follow the on-screen instructions.
❖Click a problem you would like help with from the
listings and follow the on-screen instructions.
You can connect to Support Online by clicking Support from
the menu or by going to pcsupport.toshiba.com.
Resolving a hardware conflict
If you receive an error message telling you there is a device
driver conflict or a general hardware problem, try using
Windows® Help and Support to troubleshoot the problem
first.
For help on hardware conflicts:
1Click Start, then click Help and Support.
2Click the Hardware link in the window’s left pane.
A list of category links appear.

218 If Something Goes Wrong
Resolving a hardware conflict
5.375 x 8.375 ver 2.3
3Click the Fixing a hardware problem link.
4Choose from specific topics and follow the steps.
If there is still a problem, the operating system should display
a message that explains what the conflict is.
A plan of action
The smooth operation of the system depends on the
interaction of all devices, programs, and features. If the
system or one of its attached devices is not working,
resolving the problem can be time-consuming and frustrating.
The recommended procedure for getting multiple devices to
work together is to add and set up one device at a time. After
you add each device, test it to make sure it and all previously
connected devices work.
The device most recently connected to the system is the one
most likely to be causing a hardware conflict.
Resolving hardware conflicts on your own
Computer components need resources to accomplish a task.
A device, such as a disk drive or a modem, needs a channel to
the computer’s Central Processing Unit (CPU). It also needs a
direct channel to the computer’s memory to store information
as it works. These channels of communication are commonly
referred to as system resources.
Interrupt Request Channel
The channel to the CPU is called an Interrupt Request (IRQ)
because it interrupts what the processor is doing and requests
some of the processor’s time. If two or more devices use the
same IRQ, the processor does not know which device is
asking for attention. This causes a hardware conflict.

219
If Something Goes Wrong
Resolving a hardware conflict
5.375 x 8.375 ver 2.3
Direct Memory Access
The data required by a device is stored in a specific place or
address in memory called the Direct Memory Access (DMA).
The DMA provides a dedicated channel for adapter cards to
bypass the microprocessor and access memory directly. If
two or more devices use the same DMA, the data required by
one device overwrites the data required by the other, causing
a hardware conflict.
Plug and Play
With Plug and Play and the operating system, avoiding
hardware conflicts is easy. Plug and Play is a computer
standard that helps the system BIOS (basic input/output
system) and the operating system to automatically assign
system resources to Plug and Play-compliant devices. In
theory, if every device connected to the computer is Plug and
Play-compliant, no two devices will compete for the same
system resources. Plug in the device and turn on your
computer. The operating system is automatically set up to
accommodate the new device.
If you install an older (legacy) device that the operating
system cannot recognize, the operating system may have
difficulty assigning resources to it. As a result, a hardware
conflict can occur.
Resolving conflicts
There are several things you can do to resolve hardware
conflicts:
❖Get the most recent drivers from the manufacturer.
❖Disable the device.
For an older device, remove it from the computer.
❖Disable another system component and use its resources
for the new device. See “Fixing a problem with Device
Manager” on page 220.

220 If Something Goes Wrong
Resolving a hardware conflict
5.375 x 8.375 ver 2.3
❖Reconfigure the device so that its requirements do not
conflict. Refer to the device’s documentation for
instructions about changing settings on the device.
Fixing a problem with Device Manager
Device Manager provides a way to check and change the
configuration of a device.
Changing the default settings using Device Manager can
cause other conflicts that make one or more devices unusable.
Device Manager is a configuration tool for advanced users
who understand configuration parameters and the
ramifications of changing them.
Disabling a device
1Click Start, Control Panel, then click Performance and
Maintenance.
2Click the Administrative Tools icon.
3Double-click Computer Management, then click
Device Manager.
4Select the specific device from the device category. To
expand a device category, double-click the category.
5In the toolbar, look to the far right for an icon of a
monitor with a strike mark through a circle on the front.
This is the disable feature.
6Click the icon.
You are given the option of disabling the device.
7Click Ye s to disable the device or No to cancel.

221
If Something Goes Wrong
Resolving a hardware conflict
5.375 x 8.375 ver 2.3
Checking device properties
Device Manager provides a way to view the properties of a
device. Properties include the name of the manufacturer, the
type of device, the drivers installed, and the system resources
assigned to the device.
To check a device’s properties:
1Click Start, Control Panel, then click Performance and
Maintenance.
2Click the Administrative Tools icon.
3Double-click Computer Management, then click
Device Manager.
4To view the device(s) installed, double-click the device
type.
5To view the properties, double-click the device.
The operating system displays the Device Properties
dialog box, which provides an array of tabs. They may
include:
❖The General tab, which provides basic information
about the device.
❖The Resource tab, which lists resources assigned to
the monitor, optional external optical drive, optional
external diskette drive, and other power-using
functions. This tab does not appear if the device is
not using resources.
❖The Driver tab, which displays the drivers being
used by the device.
The tabs that appear in the dialog box vary from one
device to another. A Troubleshooting button is also
present.
6Click Troubleshoot...
A Help and Support window for that device appears.

222 If Something Goes Wrong
Resolving a hardware conflict
5.375 x 8.375 ver 2.3
For more information about Device Manager, refer to
Windows® XP online help.
Memory problems
Incorrectly connected or faulty memory modules may cause
errors that seem to be device-related. It is worthwhile
checking for these first:
1Click Start, Turn off computer.
2Click Turn Off.
The operating system shuts down and turns off the
computer automatically.
3Remove the memory module.
4Reinstall the memory module, following the instructions
in “Installing a memory module” on page 54, and making
sure the module is seated properly.
5Check for the error again.
6If the error recurs, remove the memory module entirely
and check for the error again.
If removing the memory module eliminates the error, the
memory module may be faulty. If the error recurs without
the memory module installed, the error is not caused by
the memory module.
TECHNICAL NOTE: You must have at least one memory
module installed for the computer to work.

223
If Something Goes Wrong
Resolving a hardware conflict
5.375 x 8.375 ver 2.3
Power and the batteries
Your computer receives its power through the AC adaptor and
power cord/cable or from the system batteries (battery,
optional high-capacity battery, and real-time clock (RTC)
battery). Power problems are interrelated. For example, a
faulty AC adaptor or power cord/cable will neither power the
computer nor recharge the batteries.
Here are some typical problems and how to solve them:
The AC power light does not come on when you plug in
the AC adaptor and power cord/cable.
Make sure the AC adaptor and power cord/cable are firmly
plugged into both the wall outlet and the computer.
If the AC power light still does not come on, check that the
wall outlet is working properly by plugging in a lamp or other
appliance.
The AC adaptor and power cord/cable work correctly,
but the battery will not charge.
The battery does not charge while the computer is consuming
full power. Try turning off the computer.
The battery may not be inserted correctly in the computer.
Turn off the computer, remove the battery, clean the contacts
with a soft dry cloth (if necessary) and replace the battery.
See “Removing the battery from the computer” on page 121.
The battery may be too hot or too cold to charge properly. If
you think this is the probable cause, let the battery reach
room temperature and try again.
If the battery has completely discharged, it will not begin
charging immediately. Leave the AC adaptor and power cord/
cable connected, wait 20 minutes and see if the battery is
charging.
If the battery light is glowing after 20 minutes, let the
computer continue charging the battery for at least another 20
minutes before you turn on the computer.

224 If Something Goes Wrong
Resolving a hardware conflict
5.375 x 8.375 ver 2.3
If the battery light does not glow after 20 minutes, the battery
may have reached the end of its useful life. Try replacing it.
The battery appears not to power the computer for as
long as it usually does.
If you frequently recharge a partially charged battery, it may
not charge fully. Let the battery discharge completely, then
try charging it again.
Check the power options using the Power Management
utility. Have you added a device, such as a PC Card or
memory module, that takes its power from the battery? Is
your software using the hard disk more? Is the display power
set to turn off automatically? Was the battery fully charged to
begin with? All these conditions affect how long the charge
lasts.
After a period of time, the battery will lose its ability to
perform at maximum capacity and will need to be replaced.
This is normal for all batteries. To purchase a new battery
pack, see your accessories information that shipped with your
computer, or visit the Toshiba Web site at
accessories.toshiba.com. Refer to this site often to stay
current on the most recent software and hardware options for
your computer, and for other product information.
For more information on maximizing battery power, see
“Charging batteries” on page 112.
Keyboard problems
If, when you type, strange things happen or nothing happens,
the problem may be related to the keyboard itself.
The keyboard produces unexpected characters.
A keypad overlay may be on. If the numlock light or cursor
control mode light is on, press Fn + F10 to turn off the cursor
control mode light, or Fn + F11 to turn off the numlock light.

225
If Something Goes Wrong
Resolving a hardware conflict
5.375 x 8.375 ver 2.3
If the problem occurs when both the keypad overlays are off,
make sure the software you are using is not remapping the
keyboard. Refer to the software documentation and check
that the program does not assign different meanings to any of
the keys.
You have connected an external keyboard and the
operating system displays one or more keyboard error
messages.
The keyboard you connected may be defective or
incompatible with the computer. Try using a different make
of keyboard.
Nothing happens when you press the keys on the
external keyboard.
You may have plugged the external keyboard in while the
computer was turned on. Using the computer’s TouchPad,
click Start, then either Shut Down or Turn off computer,
and then Restart the Computer. The computer will restart
and recognize the device.
Display problems
Here are some typical display problems and their solutions:
The screen is blank.
Display Auto Off may have gone into effect. Press any key to
activate the screen.
You may have activated the instant password feature by
pressing Fn and F1 simultaneously. If you have registered a
password, press any key, type the password and press Enter. If
no password is registered, press any key. The screen
reactivates and allows you to continue working.

226 If Something Goes Wrong
Resolving a hardware conflict
5.375 x 8.375 ver 2.3
If you are using the built-in screen, make sure the display
priority is not set for an external monitor. To do this, press Fn
and F5 simultaneously (once). If this does not correct the
problem, press Fn and F5 simultaneously again to return the
display priority to its previous setting.
HINT: Holding the Fn key and pressing the F5 key several
times will advance you through the display options.
If you are using an external monitor:
❖Check that the monitor is turned on.
❖Check that the monitor’s power cord/cable is firmly
plugged into a working power outlet.
❖Check that the cable connecting the external monitor to
the computer is firmly attached.
❖Try adjusting the contrast and brightness controls on the
external monitor.
❖Press Fn and F5 simultaneously to make sure the display
priority is not set for the built-in screen.
The screen does not look right.
You can change the display settings by clicking a blank area
of the desktop with the secondary control button, then
clicking Properties. This opens the Display Properties dialog
box. The Appearance tab of this dialog box allows you to
choose the colors for the screen. The Settings tab allows you
to choose the screen resolution.
The built-in screen flickers.
Some flickering is a normal result of the way the screen
produces colors. To reduce the amount of flickering, try using
fewer colors.

227
If Something Goes Wrong
Resolving a hardware conflict
5.375 x 8.375 ver 2.3
To change the number of colors displayed:
1Right-click in a blank area of the Windows® desktop.
2Click Properties, and then the Settings tab.
3Change the Colors option and click OK.
For more information see Windows® Help.
A message displays saying that there is a problem with
your display settings and that the adapter type is
incorrect or the current settings do not work with your
hardware.
Reduce the size of the color palette to one that is supported by
the computer’s internal display.
To change the display properties:
1Right-click in a blank area of the Windows® desktop.
The Display Properties window appears.
2Click Properties, then click the Settings tab.
3Adjust the screen resolution and/or color quality.
4Click OK.
The display mode is set to Simultaneous and the external
display device does not work.
Make sure the external monitor is capable of displaying at
resolutions of 800 x 600 or higher. Devices that do not
support this resolution will only work in Internal/External
mode, and not simultaneous mode.

228 If Something Goes Wrong
Resolving a hardware conflict
5.375 x 8.375 ver 2.3
Small bright dots appear on your TFT display when you
turn on your computer.
Small bright dots may appear on your screen display when
you turn on your computer. Your display contains an
extremely large number of thin-film transistors (TFT) and is
manufactured using high-precision technology. Any small
bright dots that may appear on your display are an intrinsic
characteristic of the TFT manufacturing technology. Over a
period of time, and depending on the usage of the computer,
the brightness of the screen will deteriorate. This is also an
intrinsic characteristic of the screen technology. When the
computer is operated on battery power, the screen will dim
and you may not be able to increase the brightness of the
screen while on battery power.
Disk drive problems
Problems with the hard disk or with a diskette drive usually
show up as an inability to access the disk or as sector errors.
Sometimes a disk problem may cause one or more files to
appear to have garbage in them. Typical disk problems are:
You are having trouble accessing a disk, or one or more
files appear to be missing.
Make sure you are identifying the drive by its correct name
(A: or C:).
Error-checking
Run Error-checking, which analyzes the directories, files and
File Allocation Table (FAT) on the disk and repairs any
damage it finds.
To run Error-checking:
1Click Start, then click My Computer.
2Right-click the drive you want to check.

229
If Something Goes Wrong
Resolving a hardware conflict
5.375 x 8.375 ver 2.3
3On the pop-up menu, click Properties.
The drive’s Properties box appears.
This feature is not available for CD/DVD drives.
4Click the Tools tab.
5Click the Check now button.
The Check Disk All Apps box appears.
6You can choose one or both options:
❖Automatically fix file system errors
❖Scan for and attempt recovery of bad sectors
7Click Start.
Error-checking tests and repairs the disk.
Your hard disk seems very slow.
If you have been using your computer for a long time, your
files may have become fragmented. Run Disk Defragmenter.
To do this, click Start, All Programs, Accessories, System
Tools, and then Disk Defragmenter.
Your data files are damaged or corrupted.
Refer to your software documentation for file recovery
procedures. Many software packages automatically create
backup files.
You may also be able to recover lost data using utility
software. Consult your network administrator.
Some programs run correctly but others do not.
This is probably a configuration problem. If a program does
not run properly, refer to its documentation and check that the
hardware configuration meets its needs.
NOTE

230 If Something Goes Wrong
Resolving a hardware conflict
5.375 x 8.375 ver 2.3
A diskette will not go into the optional external diskette
drive.
You may already have a diskette in the drive. Make sure the
drive is empty.
You may be inserting the diskette incorrectly. Hold the
diskette with the hub side facing down, and insert it so that
the metal head window cover goes into the drive first.
The metal cover or a loose label may be obstructing the path
into the drive. Carefully inspect the diskette. If the metal
cover is loose, replace the diskette. If the label is loose,
replace the label and try inserting the diskette again.
The computer displays the Non-system disk or disk error
message.
If you are starting the computer from a diskette, the diskette
in the drive does not have the files necessary to start the
computer. Replace it with a bootable diskette.
The drive cannot read a diskette.
Try another diskette. If you can access the second diskette,
the first diskette (not the drive) is probably causing the
problem. Run Error-checking on the faulty diskette (for
instructions see “Disk drive problems” on page 228).
Optical drive problems
You cannot access a disc in the drive.
If the optical drive is an external drive, make sure that the
drive’s cable is properly connected to the computer.
Make sure the tray that holds the CD or DVD is closed is
closed properly. Press gently until it clicks into place.
Open the tray and remove the disc. Make sure the tray is
clean. Any dirt or foreign object can interfere with the laser
beam.
231
If Something Goes Wrong
Resolving a hardware conflict
5.375 x 8.375 ver 2.3
Examine the disc to see if it is dirty. If necessary, wipe it with
a clean cloth dipped in water or a neutral cleaner.
Replace the disc in the tray. Make sure that the disc is lying
flat, label side up. Close the tray carefully, making sure it has
shut completely.
You press the disc eject button, but the drive tray does
not slide out.
Make sure the computer is connected to a power source and
turned on. The optical drive eject mechanism requires power
to operate.
Make sure a program is not accessing the drive and
preventing it from ejecting.
If you need to remove a disc and cannot turn on the computer
(for example, if the battery is completely discharged), use a
narrow object, such as a straightened paper clip, to press the
manual eject button. This button is in the small hole next to
the optical drive eject button on the face of the optical drive
tray.
Never use a pencil to press the manual eject button. Pencil
lead can break off inside the computer and damage it.
Some discs run correctly but others do not.
Check the type of disc you are using. The optical drive
supports the Digital Versatile Disc (DVD) formats DVD±R,
DVD±RW, and DVD RAM, plus the CD formats
CD-Recordable (CD-R) and CD-Rewritable (CD-RW).
If the problem is with a data CD or DVD, refer to the
software’s documentation and check that the hardware
configuration meets the program’s needs.

232 If Something Goes Wrong
Resolving a hardware conflict
5.375 x 8.375 ver 2.3
The disc will not come out of the drive when you click
the eject button on the screen.
Press the button on the optical drive itself. For additional
information see “You press the disc eject button, but the drive
tray does not slide out.” on page 231.
Sound system problems
No sound is coming from the computer’s speakers.
Adjust the volume control.
Try pressing Fn + Esc to see if volume mute is disabled.
If you are using external headphones or speakers, check that
they are securely connected to your computer.
The computer emits a loud, high-pitched noise.
This is feedback between the microphone and the speakers. It
occurs in any sound system when input from a microphone is
fed to the speakers and the speaker volume is too loud. Adjust
the volume control.
PC Card problems
PC Cards (PCMCIA-compatible) include many types of
devices, such as a removable hard disk, additional memory,
or a pager.
Most PC Card problems occur during installation and setup
of new cards. If you are having trouble getting one or more of
these devices to work together, several sections in this chapter
may apply.
Resource conflicts can cause problems when using PC Cards.
See “Resolving a hardware conflict” on page 217.

233
If Something Goes Wrong
Resolving a hardware conflict
5.375 x 8.375 ver 2.3
Card Information Structure
When you insert a PC Card into a slot, the computer attempts
to determine the type of card and the resources it requires by
reading its Card Information Structure (CIS). Sometimes the
CIS contains enough information for you to use the card
immediately.
Other cards must be set up before you can use them. Use the
Windows® XP PC Card (PCMCIA) Wizard to set up the card.
Refer to your Microsoft® documentation for more
information, or refer to the documentation that came with the
PC Card.
Some card manufacturers use special software called
enablers to support their cards. Enablers result in
nonstandard configurations that can cause problems when
installing the PC Card.
If your system does not have built-in drivers for your PC Card
and the card did not come with an operating system driver, it
may not work under the operating system. Contact the
manufacturer of the PC Card for information about using the
card under the operating system.
PC Card checklist
❖Make sure the card is inserted properly into the slot.
❖Make sure all cables are securely connected.
❖Occasionally a defective PC Card slips through quality
control. If another PCMCIA-equipped computer is
available, try the card in that machine. If the card
malfunctions again, it may be defective.

234 If Something Goes Wrong
Resolving a hardware conflict
5.375 x 8.375 ver 2.3
Resolving PC Card problems
Here are some common problems and their solutions:
The slot appears to be dead. PC Cards that used to work
no longer work.
Check the PC Card status:
1Click Start.
2Click My Computer icon with the secondary button,
then click Properties.
The System Properties dialog box appears.
3Click the Hardware tab.
4Click the Device Manager button.
5Double-click the PCMCIA adapter.
6Double-click the appropriate PC Card.
The operating system displays your PC Card’s Properties
dialog box, which contains information about your PC
Card configuration and status.
The computer stops working (hangs) when you insert a
PC Card.
The problem may be caused by an I/O (input/output) conflict
between the PCMCIA socket and another device in the
system. Use Device Manager to make sure each device has its
own I/O base address. See “Fixing a problem with Device
Manager” on page 220 for more information.
Since all PC Cards share the same socket, each card is not
required to have its own address.
235
If Something Goes Wrong
Resolving a hardware conflict
5.375 x 8.375 ver 2.3
Hot swapping (removing one PC Card and inserting
another without turning the computer off) fails.
Follow this procedure before you remove a PC Card:
1Double-click the Safely Remove Hardware icon on the
System tray.
2Select the item you wish to remove.
3Click Stop.
4Remove the device when prompted to do so.
5Click OK three times to close the Safely Remove
Hardware screen.
Never swap modules when the computer is in Hibernation or
Standby mode. This is known as “warm swapping” and is not
supported with this computer. For more information on
Hibernation and Standby modes see “Hibernation mode” on
page 76 and “Standby mode” on page 77.
The system does not recognize your PC Card.
Refer to the PC Card documentation.
Removing a malfunctioning card and reinstalling it can
correct many problems.
A PC Card error occurs.
Reinsert the card to make sure it is properly connected.
If the card is attached to an external device, check that the
connection is secure.
Refer to the card’s documentation, which should contain a
troubleshooting section.

236 If Something Goes Wrong
Resolving a hardware conflict
5.375 x 8.375 ver 2.3
Printer problems
This section lists some of the most common printer problems.
The printer will not print.
Check that the printer is connected to a working power outlet,
turned on and ready (on line).
Check that the printer has plenty of paper. Some printers will
not start printing when there are just two or three sheets of
paper left in the tray.
Make sure the printer cable is firmly attached to the computer
and the printer.
Run the printer’s self-test to check for any problem with the
printer itself.
Make sure you installed the proper printer drivers as shown in
“Setting up a printer” on page 73 or in the instructions that
came with the printer.
You may have connected the printer while the computer is on.
Disable Standby mode, turn off the computer, and turn off the
printer. Turn the printer back on, make sure it is online, and
then turn the computer back on.
Try printing another file. For example, you could create and
attempt to print a short test file using Notepad. If a Notepad
file prints correctly, the problem may be in your original file.
If you cannot resolve the problem, contact the printer’s
manufacturer.
The printer will not print what you see on the screen.
Many programs display information on the screen differently
from the way they print it. See if your program has a print
preview mode. This mode lets you see your work exactly as it
will print. Contact the software manufacturer for more
information.

237
If Something Goes Wrong
Resolving a hardware conflict
5.375 x 8.375 ver 2.3
Modem problems
This section lists common modem problems.
The modem will not receive or transmit properly.
Make sure the cable from the modem to the telephone line is
firmly connected to the computer’s modem port and the
telephone line jack.
Check the port settings to make sure the hardware and
software are referring to the same COM port. See
“Determining the COM port” on page 133.
Check the communications parameters (baud rate, parity, data
length and stop bits) specified in the communications
program. It should be set up to transmit at 300, 1200, 2400,
4800, 9600, 14400, 28800, 33600 bps (bits per second) or
higher. Refer to the program’s documentation and the modem
manual for information on how to change these settings.
The modem is on, set up properly but still does not
transmit or receive data.
Make sure the line has a dial tone. Connect a telephone
handset to the line to check this.
The other system may be busy or off line. Try making a test
transmission to someone else.
For more information regarding your system’s V.92 modem,
visit the Toshiba Web site at pcsupport.toshiba.com.
238 If Something Goes Wrong
Resolving a hardware conflict
5.375 x 8.375 ver 2.3
Wireless networking problems
This section provides general troubleshooting tips for
networking problems, specifically wireless (Wi-Fi) networking.
The terms and concepts used assume a basic understanding of
networks, and may be for more advanced users. If you need
assistance or if you are not familiar with the terminology,
please see Windows Help and Support or contact your
computer technician.
❖If your computer is equipped with an internal Wi-Fi
adapter, verify that the Wi-Fi antenna switch is on (the
Wi-Fi light will be lit).
To determine if your computer has an internal Wi-Fi adapter,
check the device list in Device Manager (part of the Windows
Control Panel). Some Toshiba models may have a Wi-Fi
antenna switch even though they do not have an internal Wi-Fi
adapter.
❖Verify that signal strength is good using the utility
provided with the Wi-Fi adapter.
❖If another computer is on the same network, verify that it
has network access, and can connect to the Internet. If,
for example, the other computer cannot browse to a
public Web site, the ISP’s (Internet Service Provider)
service may be disrupted.
❖Verify that the Service Set Identifier (SSID), or network
name, is correct—i.e., that it matches the SSID assigned
to the access point you are attempting to connect through.
SSIDs are case-sensitive. Toshiba provides a Client
Manager utility for setting and managing SSIDs.
NOTE
NOTE

239
If Something Goes Wrong
Resolving a hardware conflict
5.375 x 8.375 ver 2.3
❖Check the Control Panel’s Device Manager to verify that
the Wi-Fi adapter is recognized by Windows®, and that
the driver is loaded. Carefully note any error messages—
these will be very helpful if you should confer with a
support technician at a later time.
❖Verify that the network connection is configured to obtain
its Internet Protocol (IP) address dynamically:
1Click Start, Control Panel.
2Double-click Network Connections.
3Right-click the name of your wireless network
connection, then click Properties.
4Select Internet Protocol (TCP/IP), then click
Properties.
5Select Obtain an IP address automatically.
6Click OK, then click Close.
❖Use IPCONFIG to verify that the computer has a useful
IP address—one other than the private address of
169.254.xxx.xxx assigned by Windows.
❖Click Start, then click Run...
❖Enter Cmd and press Enter.
❖Enter IPCONFIG /ALL and press Enter.
❖The IP address for each active network adapter will
be displayed.
❖Connect your computer directly to your router or
broadband modem, by plugging a standard CAT5
Ethernet patch cable (sold separately) into your
computer's RJ45 Ethernet port. If your connection
problem disappears, the problem lies in the Wi-Fi part of
your network.

240 If Something Goes Wrong
Resolving a hardware conflict
5.375 x 8.375 ver 2.3
❖Use the PING command to verify a connection to the
gateway at 192.168.1.1 (a default gateway for most
wireless routers).
❖Click Start, then click Run...
❖Enter Cmd and press Enter.
❖Enter PING 192.168.1.1 at the command prompt,
and press Enter.
❖If “Request Timed Out” or another error message
appears in response, then the problem is probably
Wi-Fi-related.
❖If you have enabled any security provisions (closed
system, MAC address filtering, Wired Equivalent Privacy
[WEP], etc.), check the access point vendor's Web site for
recent firmware upgrades. Problems with WEP keys, in
particular, are frequently addressed in new firmware
releases.
Special considerations for Windows XP
Wired Equivalent Privacy (WEP) encryption is not
enabled on the wireless access point.
When you install a wireless access point device, Windows XP
checks whether WEP encryption is enabled on the device. If
it is not enabled, Windows XP adds the device to its list of
available wireless networks, but does not create a wireless
connection using the device, since the connection would not
be secure. You can still, however, use the access point. To use
an access point without WEP encryption, follow these steps:
1Right-click the Wireless Network icon in the System
Tray (far-right portion of the Windows Taskbar).
2Click View Available Wireless Networks.

241
If Something Goes Wrong
DVD operating problems
5.375 x 8.375 ver 2.3
3Select Allow me to connect to the selected wireless
network, even though it is not secure.
4Windows XP will now try to establish a wireless
connection.
The Windows XP wireless management facility does not
work.
If you are using an external Wi-Fi adapter (a PC Card, USB
adapter, or other variety), check if the adapter comes with its
own management utility. If it does, the utility may be
disabling the Windows XP wireless management facility, in
which case you must use the adapter's management utility. If
the documentation that accompanies the adapter does not
provide enough information to determine if this is the case,
contact that vendor's support group for further advice.
DVD operating problems
If you experience a problem playing DVDs, you may be able
to fix the problem yourself.
For general problems playing a DVD title, try the following
steps:
1Verify that the disc is in a format that the drive supports.
2Ensure that the disc is properly inserted in the drive tray.
3Ensure that the Display properties are not True Color
(24-bit). If it is set to 24-bit color, there may be a video
format error. To verify your display settings:
aClick Start, Control Panel, Appearance and
Themes, and double-click Display.
bClick the Settings tab and ensure that the Color
Palette is set to High Color (16-bit).
cIf it is not set to High Color, change the settings to
16-bit color and click OK.

242 If Something Goes Wrong
DVD operating problems
5.375 x 8.375 ver 2.3
4Clean the disc and try again.
A dirty drive can also cause audio problems. If you have
tried several discs and all fail, consider sending your
drive to an authorized service provider to get it cleaned.
5Verify that your computer recognizes your optical drive
by double-clicking the My Computer icon on the
desktop. The optical drive should appear in the list.
6See “Checking device properties” on page 221 for
instructions on using Device Manager to view the optical
drive properties.
7Check the Toshiba Web site for new information on
optical drives and their operation.
A blank screen appears while watching a DVD-ROM
movie or title.
Disable the Shut off Monitor feature in the Display Properties
using the following steps:
1Right-click in a blank area of the Windows® desktop.
2Click Properties.
3Click the Screen Saver tab.
4Deselect Shut off Monitor.
Jumping video lines appear around the DVD-ROM
video window.
To change the screen’s display resolution:
1Click Start, Control Panel.
The Control Panel window appears.
2Click Appearance and Themes, and double-click the
Display icon.
The Display Properties dialog box appears.
3Click the Settings tab.

243
If Something Goes Wrong
DVD operating problems
5.375 x 8.375 ver 2.3
4Next to the words Desktop Area, move the slider to a
lower setting, such as 800 x 600 or 640 x 480.
5Click OK.
DVD titles, games, or applications appear distorted.
Having Stretch enabled when your video resolution is set to
640 x 480 or 800 x 600 can cause distortion. To disable
Stretch, follow the instructions below:
1Right-click the Desktop, select Properties.
2Select the Settings tab.
3Select the Advanced Flat Panel tab.
4Click Disable Display Stretch Feature.
5Click OK.
The screen saver runs while you are watching a movie or
title.
If the screen saver is enabled, it runs on top of any movie or
title you are watching. To disable the screen saver:
1Click Start, Control Panel.
The Control Panel window appears.
2Click Appearance and Themes, and double-click the
Display icon.
The Display Properties dialog box appears.
3Click the Screen Saver tab.
In the Screen Saver list, the current screen saver is
highlighted.
4Click the down arrow at the right of the current screen
saver name.
A list of screen savers displays.
5Click and hold the up arrow by the list or move the slide
to the top.

244 If Something Goes Wrong
Develop good computing habits
5.375 x 8.375 ver 2.3
6Click None.
7Click OK.
Develop good computing habits
Save your work frequently.
You can never predict when your computer will lock, forcing
you to close a program and lose unsaved changes. Many
software programs build in an automatic backup, but you
should not rely solely on this feature. Save your work! See
“Computing tips” on page 88 for instructions.
On a regular basis, back up the information stored on
your hard disk.
Here are some ways you can do this:
❖Copy files to diskette.
❖Copy files to an external storage device.
❖Connect a CD/DVD to the system and use specialized
software to copy everything on the hard disk to a
CD/DVD.
❖Connect your computer to the office network and copy
files to your network partition.
Some people use a combination of these methods, backing up
all files to tape weekly and copying critical files to diskette on
a daily basis.
If you have installed your own programs, you should back up
these programs as well as your data files. If something goes
wrong that requires you to reformat your hard disk and start
again, reloading all your programs and data files from a
backup source will save time.

245
If Something Goes Wrong
Develop good computing habits
5.375 x 8.375 ver 2.3
Read the user’s guides.
It is very difficult to provide a fail-safe set of steps you can
follow every time you experience a problem with the
computer. Your ability to solve problems will improve as you
learn about how the computer and its software work together.
Get familiar with all the user’s guides provided with your
computer, as well as the manuals that come with the
programs and devices you purchase.
Your local computer store or book store sells a variety of self-
help books you can use to supplement the information in the
manuals.
Data and system configuration backup in Windows XP
Windows XP offers some easy-to-use features for backing up
your Windows settings and your data—documents and other
important files. Take advantage of these features to protect
yourself from much more difficult and time-consuming
restoration procedures, and to safeguard your valuable data
from loss.
Saving system configuration with Restore Points
The System Restore feature of Windows XP quickly creates
Restore Points—‘snapshots’ of your Windows
configuration—and saves them for later recall. If you
experience problems after installing some new hardware or
software, you can easily select a previously established
Control Point to ‘turn back the clock,’ restoring Windows to
the state it was in just prior to the installation. This is much
easier and more effective than uninstalling the hardware or
software, which often leaves behind unwanted files and
settings. It is also easy to undo a Restore Point selection, if
you change your mind.
Follow these steps to create a Restore Point using the System
Restore utility:
1Click Start, and then Help and Support.

246 If Something Goes Wrong
Develop good computing habits
5.375 x 8.375 ver 2.3
2Under Pick a Task, click Undo changes to your
computer with System Restore.
3Click Create a restore point, and then click Next.
4In the Restore point description field, enter a name that
is descriptive enough to be easily understood in the
future, such as “Before installing Brand X Accounting
app.” Then click Create.
5Windows creates the Restore Point and automatically
stamps it with the current date and time.
Then, at a later time, you can re-establish your Windows
configuration using the saved Restore Point. To do this:
1Click Start, and then Help and Support.
2Under Pick a Task, click Undo changes to your
computer with System Restore.
3Click Restore my computer to an earlier time, then
click Next.
4A calendar will be presented, showing a month at a time.
Each date for which a Restore Point has been set will be
marked as bold. When a boldfaced date is clicked, a
description of the Restore Point will appear in a list to the
right.
This list may contain Restore Points that you did not create.
Restore Points labeled System Checkpoint were automatically
created by Windows XP. Other Restore Points may have been
created automatically by applications when they were installed.
5Select the desired Restore Point from the list, and then
click Next.
6Your Windows configuration will now be restored to the
state it was in when the chosen Restore Point was created.
NOTE

247
If Something Goes Wrong
Develop good computing habits
5.375 x 8.375 ver 2.3
Backing up your data to CDs with Windows XP
The most valuable component of your computer system is the
data that you create and store on its hard drive. Since
problems with either hardware or software can make the data
inaccessible or even destroy it, the next most valuable
component of your computer system may be a recent backup
of your data.
Fortunately, Windows XP offers a convenient way to back up
your important data files to CDs, a relatively high-capacity
storage media. No additional software is required. Most of
the CD and DVD drives built into recent Toshiba portable
computer models can write to (or ‘burn’) as well as read from
CDs. External CD and DVD writers are also widely available.
Follow these steps to back up files in the My Documents
folder to one or more CDs:
1Put a blank CD-R (CD-recordable) disc into the
computer’s CD or DVD drive.
2A menu of options will appear. Select Open writable
CD folder using Windows Explorer, and click OK.
3A Windows Explorer window will open for the blank
CD. This window will be referred to as “the CD
window.”
4Open a second Windows Explorer window by clicking
Start, then My Computer.
5In this second window, browse to the files you wish to
back up. Click the down-pointing arrow at the upper-right
of the window (to the left of the Go button) to see a list of
locations that includes My Documents—a likely
location of your data.
6Drag and drop folders or individual files from this
window into the CD window. If the files do not
immediately appear in the CD window, press F5 (or click
View, Refresh) to prompt Windows to display them.

248 If Something Goes Wrong
Develop good computing habits
5.375 x 8.375 ver 2.3
Documents and other data files that you create as you work are
typically stored in the My Documents folder. You may also
wish to back up other important data files stored elsewhere on
your hard disk drive, for example:
❖E-mail files and settings—for Outlook, Outlook Express,
or other e-mail applications. Visit the vendors’ Web sites
(www.microsoft.com, for example) for detailed
instructions.
❖Newsgroup files and settings—for Outlook Express or
other newsgroup readers. Visit the vendors’ Web sites for
detailed instructions.
❖Other data files. If you do not find an application’s data
files in any of the folders within the My Documents folder,
check the application’s options or preferences settings to
discover the locations of the files.
7When you have finished copying files to the CD window,
click File, Write these files to CD.
8A CD Writing Wizard will appear, prompting for a name
for the CD. You may accept the default name, or enter a
new (more descriptive) name. Click Next to continue.
9The CD Writing Wizard will now write the selected files
to the CD. It is best not to use the computer for any other
tasks during this operation, to avoid interrupting the
process.
10 Finally, click Finish.
The CD will be ejected. It should contain all of the files
you have selected, but you may easily verify this by
placing the CD back into the drive, and viewing the list of
files.
NOTE

249
If Something Goes Wrong
Develop good computing habits
5.375 x 8.375 ver 2.3
Favorites (bookmarks) for Internet Explorer
Follow these steps to back up your Favorites for Internet
Explorer (ver 5.0 or newer):
1In Internet Explorer, click File, Import and Export.
2The Import/Export Wizard will appear. Click Next.
3Click Export Favorites, Next. (To restore the Favorites
to the hard disk drive later you would select Import
Favorites from this list.)
4A list of your Favorites folders will appear, with the top-
level Favorites folder selected (highlighted). Click Next
to back up all of your Favorites, or select a particular
Favorites folder to back up, then click Next.
5In the Export Favorites Destination window, use the
Browse button to browse to the My Documents folder.
Click Save in the Select Bookmark file window, and then
click Next.
6Click Finish. The message “Successfully exported
favorites” should appear.
7Follow the steps above for backing up files from the My
Documents folder to a CD.
Each CD has room for 650-700 megabytes of data. Follow
this same set of steps any number of times to back up any
number of files to as many CDs as is required to hold them.
Windows XP also includes a Backup utility, though it does
not directly support writing to CDs. For more information,
click Start, Help and Support, or start the Backup utility by
clicking Start, All Programs, Accessories, System Tools,
Backup.

250 If Something Goes Wrong
Develop good computing habits
5.375 x 8.375 ver 2.3
General tips for installing hardware and software
Here are a few tips to help ensure safe and easy installation of
new hardware (printers, pointing devices, external hard drives,
DVD writers, scanners, etc.) and software (applications like
Microsoft Office and Adobe® Photoshop®, or utility software
such as special toolbars for your web browser).
❖Create a Restore Point (refer to “Saving system
configuration with Restore Points” on page 245). Before
installing anything, use the System Restore utility to set a
Restore Point (see the section titled Restore Points). If
anything goes wrong, you will then be able to easily
restore Windows to the state it was in prior to the
installation, undoing any changes that the installation
process introduced.
❖Back up your critical data (see “Backing up your data to
CDs with Windows XP” on page 247).
❖Have your factory Restore/Reconfiguration CD(s) on
hand in case you need any files from them.
❖Do not guess—follow directions carefully! It is often
necessary to run an installation utility first—before
connecting a new hardware item to the computer. If the
device is connected first, it may be very difficult to
complete the installation successfully. Always carefully
follow the installation instructions that accompany the
hardware or software.
❖Restart Windows. Always restart Windows after each
installation, even if the installation utility does not
prompt you to do so. This will ensure that the installation
is completed, and will clean up anything that the
installation utility left behind.

251
If Something Goes Wrong
If you need further assistance
5.375 x 8.375 ver 2.3
❖Do one installation at a time. If you have several new
items to add to your computer system, install just one at a
time, creating Restore Points immediately before each
successive installation. This will make it much easier to
determine the origin of any new problems. For best
results, follow this sequence:
1Back up critical data.
2Create a Restore Point.
3Install one item of hardware or software.
4Restart Windows.
5Use the new hardware or software for a while,
noting any new problems. Make sure that your
critical applications (e-mail, business applications,
etc.) are working correctly, and verify that
important devices are still functioning.
6For each additional hardware or software item,
repeat these steps, starting at step 1 if any of your
critical data has changed, or starting at step 2 if no
critical data has changed.
If you need further assistance
If you have followed the recommendations in this chapter and
are still having problems, you may need additional technical
assistance. This section contains the steps to take to ask for
help.
Before you contact Toshiba
Since some problems may be related to the operating system
or the program you are using, it is important to investigate
other sources of assistance first.
Try the following before you contact Toshiba:
❖Review the troubleshooting information in your
operating system documentation.

252 If Something Goes Wrong
If you need further assistance
5.375 x 8.375 ver 2.3
❖If the problem occurs while you are running a program,
consult the program’s documentation for troubleshooting
suggestions. Contact the software company’s technical
support group for their assistance.
❖Consult the dealer from whom you purchased your
computer and/or program. Your dealer is your best source
for current information.
For the complete detailed specifications for your computer,
visit pcsupport.toshiba.com. Go to the Tech Support Center,
select your particular model from the list and go to the
Detailed Specifications for that model.
For the number of a Toshiba dealer near you in the United
States, call: (800) 457-7777.
Contacting Toshiba
If you still need help and suspect that the problem is hardware-
related, Toshiba offers a variety of resources to help you.
Toshiba’s Technical Support Web site
For technical support, or to stay current on the most recent
software and hardware options for your computer, and for
other product information, be sure to regularly check the
Toshiba Web site at pcsupport.toshiba.com.
Toshiba voice contact
Before calling Toshiba, make sure you have:
❖Your computer’s serial number
❖The computer and any optional devices related to the
problem
❖Backup copies of your Windows® operating system and
all other preloaded software on your choice of media
❖Name and version of the program involved in the
problem along with its installation media

253
If Something Goes Wrong
Other Toshiba Internet Web sites
5.375 x 8.375 ver 2.3
❖Information about what you were doing when the
problem occurred
❖Exact error messages and when they occurred
For technical support, call the Toshiba Global Support
Centre:
Within the United States at (800) 457-7777
Outside the United States at (949) 859-4273
Other Toshiba Internet Web sites
Toshiba’s worldwide offices
toshiba.com Worldwide Toshiba corporate site
computers.toshiba.com Marketing and product
information in the USA
accessories.toshiba.com Accessories information in the
USA
www.toshiba.ca Canada
www.toshiba-Europe.com Europe
www.toshiba.co.jp/index.htm Japan
http://servicio.toshiba.com Mexico and all of Latin America
Australia
Toshiba (Australia) Pty. Limited
84-92 Talavera Road
North Ryde NSW 2113
Sydney
Australia
Canada
Toshiba Canada Ltd.
191 McNabb Street
Markham, Ontario
L3R - 8H2
Canada
France
Toshiba Systèmes (France) S.A.
7, Rue Ampère; B. P. 131
92800 Puteaux Cédex
France
Germany
Toshiba Europe GmbH
Leibnizstraße 2
D-93055 Regensburg
Germany

254 If Something Goes Wrong
Toshiba’s worldwide offices
5.375 x 8.375 ver 2.3
For more information on additional Toshiba worldwide
locations, please visit: www.toshiba.co.jp/index.htm.
Italy
Centro Direzionale Colleoni
Palazzo Perseo
Via Paracelso 10
20041, Agrate Brianza
Milano, Italy
Japan
Toshiba Corporation, PCO-IO
1-1, Shibaura 1-Chome
Minato-Ku, Tokyo, 105-8001
Japan
Latin America and Caribbean
Toshiba America Information
Systems
9740 Irvine Blvd.
Irvine, California 92618
USA
800-457-7777 (within the US)
949-859-4273 (outside of the US -
this call may incur long-distance
charges)
Mexico
Toshiba de México S.A. de C.V.
Sierra Candela No.111, 6to. Piso
Col. Lomas de Chapultepec.
CP 11000 Mexico, DF.
Spain
Toshiba Information Systems
(España) S.A.
Parque Empresarial San Fernando
Edificio Europa, 1a Planta
Escalera A
28831 (Madrid) San Fernando de
Henares
Spain
United Kingdom
Toshiba Information Systems
(U.K) Ltd.
Toshiba Court
Weybridge Business Park
Addlestone Road
Weybridge, Surrey KT15 2UL
United Kingdom
United States
Toshiba America Information
Systems, Inc.
9740 Irvine Boulevard
Irvine, California 92618
United States
The Rest of Europe
Toshiba Europe (I.E.) GmbH
Hammfelddamm 8
D-4-1460 Neuss
Germany
255
5.375 x 8.375 ver 2.3.2
Appendix A
Hot Keys
Hot keys are keys that, when pressed in combination with the
Fn key, turn system functions on and off. Hot keys have a
legend on the key indicating the option or feature the key
controls.
Volume Mute
Fn +
This hot key enables/disables volume mute on
your computer.
When volume mute is enabled, no sound will
come from the speakers or headphones.

256 Hot Keys
Password security
5.375 x 8.375 ver 2.3.2
Password security
Without a password
The Fn + F1 key combination turns off the display and
activates instant security. Using the pointing device or any
key will make the display’s content reappear, if no password
is set for the current user.
With a password
The Fn + F1 key combination turns off the display and
activates instant security.
If you set a blank screen saver, pressing the Fn + F1 key
combination to activate instant security will cause the screen
to go blank. Using the pointing device or any key will make
the display’s content reappear. The Windows® operating
system log-on screen will appear, prompting you for a
password. After typing in the password for the current user,
press Enter.
To activate the password feature:
1Click Start, Control Panel, and then Appearances and
Themes.
2Click one of the following:
❖Choose a screen saver in the “Pick a task” section
❖Display in the “or pick a Control Panel icon” section
The Display Properties window appears.
3If you clicked Choose a screen saver, the Screen Saver
tab has already been selected. If it is not selected, click
the Screen Saver tab.
Fn + This hot key blanks the display.

257
Hot Keys
Password security
5.375 x 8.375 ver 2.3.2
4Click the On resume, password protected check box.
5Click OK.
Maintaining security when the battery is not fully charged
When the battery is not fully charged (even if the computer is
operating on AC power) your display may reappear
automatically after a short time. To protect your desktop, you
must set up a screen saver with a password before activating
the password feature.
To set up a password with a screen saver, go to Windows
online Help for instructions:
1Click Start, and then Help and Support.
2In the Search field, type password screen saver.
3Press Enter.
4Click the Protect your files with a screen saver
password link located under the suggested topics.
Follow the steps listed in the Windows online Help to set up
your password-protected screen saver.
To ensure the password protection is activated after pressing
Fn + F1 (to activate instant security), wait ten seconds before
walking away from the computer.
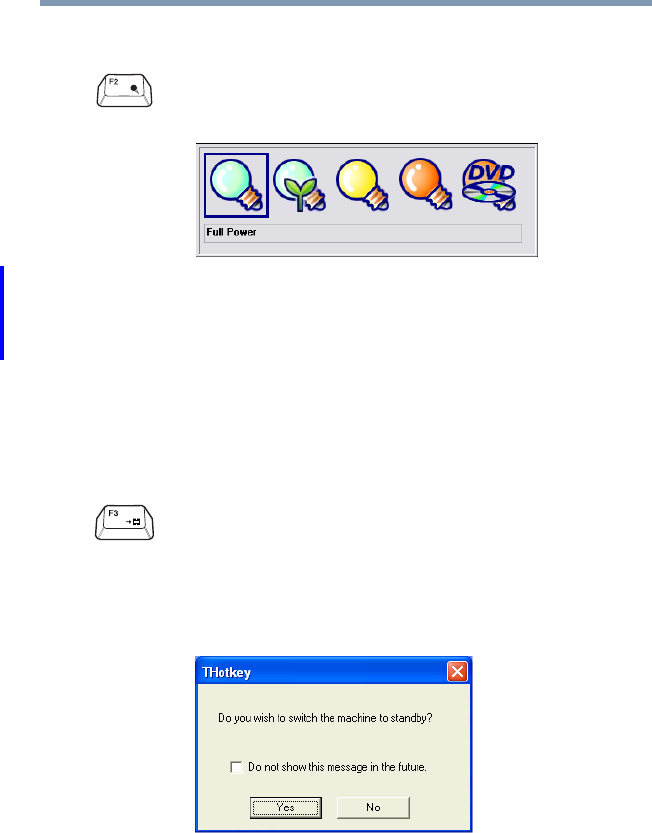
258 Hot Keys
Power profile
5.375 x 8.375 ver 2.3.2
Power profile
Standby mode
Fn + This hot key displays the power profile pop-up
window and cycles through the power profiles.
(Sample Image) Power profiles
The properties of each power profile are set in the
TOSHIBA Power Saver utility. For more
information, see “TOSHIBA Power Saver” on
page 178.
Fn + This hot key places the computer into Standby
mode.
A message box displays by default to confirm that
the computer is entering Standby mode. You can
choose not to display this message box.
(Sample Image) Sample Standby confirmation box
For more information about Standby mode, please
see “Using and configuring Standby mode” on
page 82.
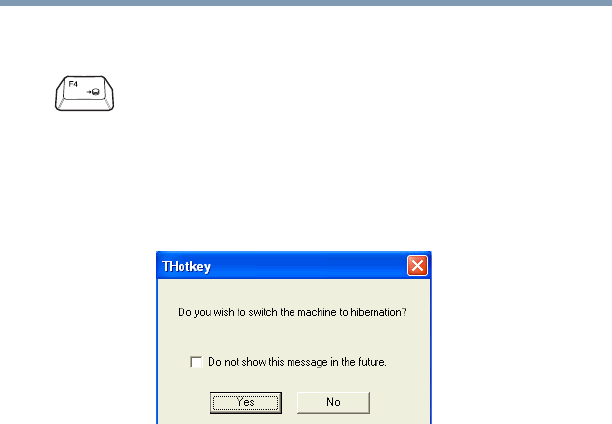
259
Hot Keys
Hibernation mode
5.375 x 8.375 ver 2.3.2
Hibernation mode
Fn + This hot key places the computer into Hibernation
mode.
If Hibernation mode is enabled (the default) a
message box displays by default to confirm the
computer is entering Hibernation mode. You can
choose not to display this message box.
(Sample Image) Hibernation confirmation box
If Hibernation mode is disabled, this hot key will
not respond. For more information on Hibernation
mode, see “Using and configuring Hibernation
mode” on page 80.
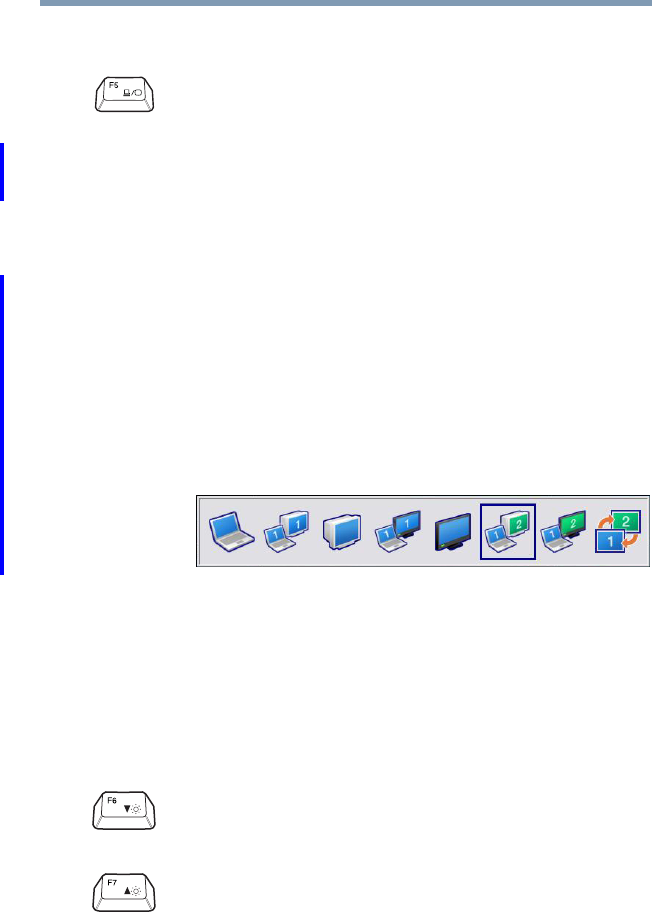
260 Hot Keys
Display modes
5.375 x 8.375 ver 2.3.2
Display modes
Display brightness
Fn + This hot key cycles through the power-on display
options.
The display modes are:
❖Built-in display only
❖Built-in display and external monitor
simultaneously
❖External monitor only
❖TV and built-in display
❖TV only
❖Primary and CRT
❖Dual Mode display
❖Swap image display
(Sample Image) Display options window
To use a simultaneous mode, you must set the
resolution of the internal display panel to match
the resolution of the external display device.
Fn + This hot key decreases the screen brightness.
Fn + This hot key increases the screen brightness.
261
Hot Keys
Disabling or enabling wireless devices
5.375 x 8.375 ver 2.3.2
Disabling or enabling wireless devices
Disabling or enabling the TouchPad
Fn + This hot key enables/disables the optional wireless
devices installed in your computer.
The wireless modes are:
❖All disabled—Disables both the Bluetooth®
and Wi-Fi modules.
❖Wi-Fi enabled—Enables just the Wi-Fi
module.
❖Bluetooth enabled—Enables just the
Bluetooth module.
❖All enabled—Enables both Bluetooth and
Wi-Fi.
Fn + This hot key enables/disables the TouchPad.
For more information on using the TouchPad, see
“Disabling or enabling the TouchPad™” on
page 67.
(Sample Image) Disable and enable TouchPad
windows
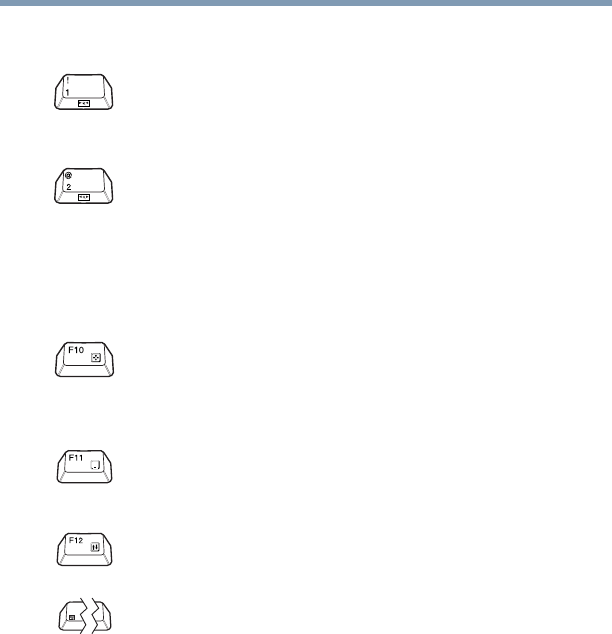
262 Hot Keys
Zooming applications in/out
5.375 x 8.375 ver 2.3.2
Zooming applications in/out
Keyboard hot keys
Fn + This hot key turns the Zooming utility to zoom-out.
For more information, see “TOSHIBA Zooming
Utility” on page 190.
Fn + This hot key turns the Zooming utility to zoom-in.
For more information, see “TOSHIBA Zooming
Utility” on page 190.
Fn + This hot key turns the cursor control overlay on
and off.
Fn + This hot key turns the numeric overlay on and off.
Fn + This hot key turns the scroll lock feature on and
off.
Fn +
[Space bar]
This hot key switches screen resolution.
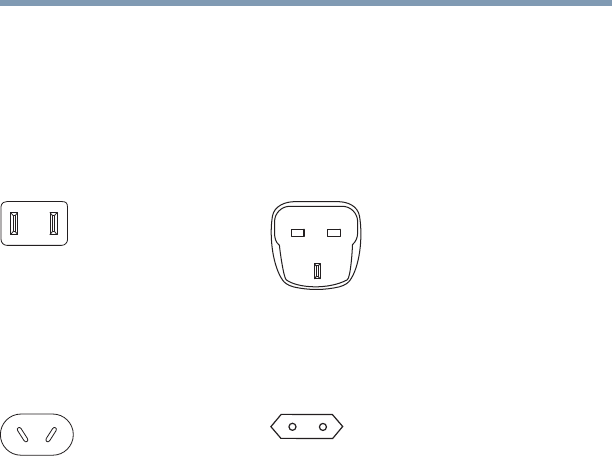
263
5.375 x 8.375 ver 2.3
Appendix B
Power Cord/Cable
Connectors
Your notebook computer features a universal power supply
you can use worldwide. This appendix shows the shapes of
the typical AC power cord/cable connectors for various parts
of the world.
USA and Canada
UL approved
CSA approved
United Kingdom
BS approved
Australia
AS approved
Europe
VDA approved
NEMKO approved

264
5.375 x 8.375 ver 2.3
Appendix C
Using ConfigFree™ with
your Toshiba Computer
All references to Bluetooth® in this appendix are applicable
only if Bluetooth is available on your system.
ConfigFree™ is a set of utilities that makes it easy to control
communication devices and network connections.
ConfigFree also lets you identify communication problems
and create profiles for easy switching between locations and
communication networks.
For more information on using ConfigFree, see the ConfigFree
online Help.
The ConfigFree utilities include the following:
❖Connectivity Doctor—The Connectivity Doctor utility is
used to analyze network connections and fix networking
problems with your notebook computer. For more
information, see “Connectivity Doctor” on page 267.
NOTE
NOTE

265
Using ConfigFree™ with your Toshiba Computer
Getting Started
5.375 x 8.375 ver 2.3
❖Search for Wireless Devices—The Search for Wireless
Devices utility searches for wireless LAN and Bluetooth®
devices used in the neighborhood, and displays
information about them on a virtual map. For more
information, see “Search for Wireless Devices” on
page 270.
❖Profile Settings—The Profiles utility lets you switch
between network configurations. For more information,
see “Profile Settings” on page 276.
❖ConfigFree SUMMIT—The ConfigFree SUMMIT utility
is used to connect with other ConfigFree users for file
sharing. For more information, see “ConfigFree
SUMMIT” on page 280.
ConfigFree also includes a screen saver that you can
customize by adding identifying text to devices. Click
Options on the Connectivity Doctor screen to access the
screen saver option.
Getting Started
This section contains information about the ConfigFree main
screen, and how to start and set up ConfigFree.
For more detailed information on setting up and using
ConfigFree, see the Help File included in the application.
Starting ConfigFree
To start ConfigFree, be sure the computer has a wired or
wireless connection. Then perform any of the following
steps:
❖Click Start, All Programs, Toshiba, Networking, and
then ConfigFree.
❖Double-click the ConfigFree icon on the Taskbar.

266 Using ConfigFree™ with your Toshiba Computer
Getting Started
5.375 x 8.375 ver 2.3
❖Press the TOSHIBA Assist button (if applicable to your
system) to open the TOSHIBA Assist, and then click the
ConfigFree icon.
❖Click the ConfigFree icon on the Taskbar, and then
click the desired utility.
If your computer is not connected to a network, the ConfigFree
icon on the Taskbar is displayed with an “X.”
When you start a search for wireless devices, ConfigFree
Launcher displays on your computer desktop. You can then
click the appropriate icon on the Launcher to start the desired
ConfigFree utilities.
(Sample Image) ConfigFree Launcher
ConfigFree Launcher can be set to hide from view when it is
not in use. When this setting is active (set the ConfigFree
Launcher to Auto-hide mode), you can re-display ConfigFree
Launcher by moving the mouse cursor to the right of the
screen.
NOTE
Bluetooth®
Wireless LAN
Connectivity Doctor
Profiles
SUMMIT
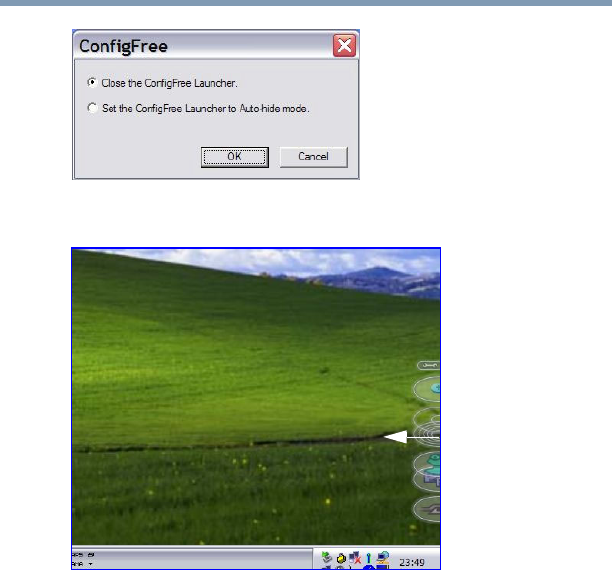
267
Using ConfigFree™ with your Toshiba Computer
ConfigFree Utilities
5.375 x 8.375 ver 2.3
(Sample Image) ConfigFree Launcher Auto-hide mode setting
(Sample Image) ConfigFree Launcher coming back into view
ConfigFree Utilities
Connectivity Doctor
The Connectivity Doctor lets you analyze your network
connections and fix network connection problems. Using
Connectivity Doctor, you can view detailed network
information by simply moving the mouse pointer.

268 Using ConfigFree™ with your Toshiba Computer
ConfigFree Utilities
5.375 x 8.375 ver 2.3
The Connectivity Doctor works with the following network
devices:
❖Wired and wireless network devices
❖Routers, hubs, and bridges
❖Access points
The Connectivity Doctor displays the following information:
❖WEP (Used, not Used)
❖Wired connection line (link speed)
❖Wireless connection line (signal strength and link speed)
❖Location of wireless communication switch (identified
with a yellow arrow)
❖Status of wireless communication switch (on or off)
(Sample Image) Connectivity Doctor screen
Moving the mouse pointer over a wired or wireless network
device icon displays information about the device, such as its
IP address, subnet mask, and MAC address. A wireless
network device also shows information such as the network
SSID and the device’s Wired Equivalent Privacy (WEP) key
settings.
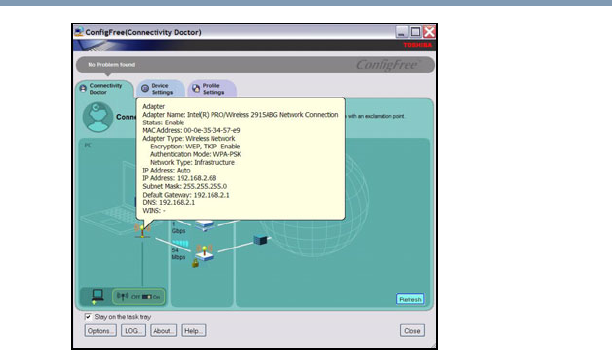
269
Using ConfigFree™ with your Toshiba Computer
ConfigFree Utilities
5.375 x 8.375 ver 2.3
(Sample Image) Viewing device information
If a problem or potential problem is detected, in most cases, a
screen automatically displays showing you the possible cause
and solution for the problem.
A triangle containing an exclamation point also appears on
the Connectivity Doctor screen, and an orange frame
describes the relevant location. You can also view the
possible cause and solution for the problem by clicking the
exclamation point. If multiple triangles display, you can
toggle between each of their cause and solution information
screens by clicking its exclamation point.
For example, if the connection to a wireless network cannot
be established because the wireless communication switch is
turned off, the problem description screen will normally
display automatically when you start the Connectivity
Doctor, and an exclamation point will appear next to the
wireless communication switch.

270 Using ConfigFree™ with your Toshiba Computer
ConfigFree Utilities
5.375 x 8.375 ver 2.3
The following checkboxes and buttons are provided on the
Connectivity Doctor screen:
Search for Wireless Devices
The Search for Wireless Devices utility searches for wireless
LAN and Bluetooth® devices currently used in the
neighborhood, and displays information about them on a
virtual map.
To search for wireless devices:
1Click the icon in the system tray.
2Click Search for Wireless Devices.
Stay on the
task tray
When checked, the ConfigFree icon
resides in the system tray.
Options Displays ConfigFree setting screen.
Log Lets you create a diagnostic log, view a
history of log files, or delete the history.
Log files are saved as CFhtmlxxxxx.htm,
where xxxxx is the creation date and time.
The logs reside in the folder: C:\Docu-
ments and Settings\username\Local Set-
tings\Temp
About Displays the version of Connectivity
Doctor.
Help Displays online Help.
Close Closes the Connectivity Doctor screen.
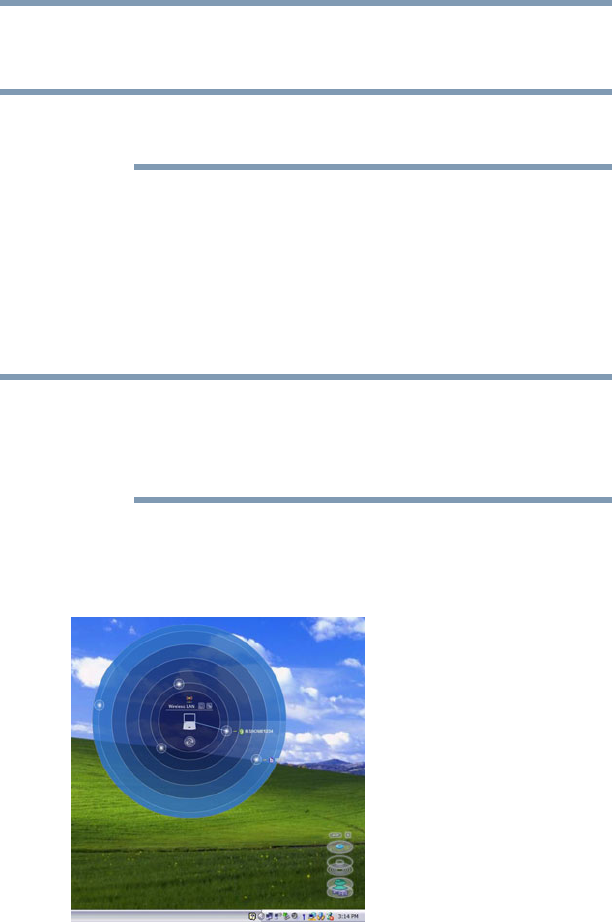
271
Using ConfigFree™ with your Toshiba Computer
ConfigFree Utilities
5.375 x 8.375 ver 2.3
A virtual map appears with a graphical representation of the
wireless devices that have been detected.
Search for Wireless Devices can also be started from the
ConfigFree Launcher.
For Wi-Fi networks, the intensity of a signal is displayed in
five levels or “bands.” The signal from the connected access
point is displayed in the bands surrounding the computer icon
at the center of the map. The closer to the center, the stronger
the connection. Placing the pointer over the displayed “point
of light” shows detailed information about the wireless
device.
The wireless device shown near the center of the map is not
necessarily near your notebook computer. If a wireless device
located a distance away also has a strong signal, it appears
near the center of the map as well.
The Search for Wireless Devices feature identifies if a device
is IEEE 802.11a, b, or g. It also includes an option to display
hidden access point availability.
(Sample Image) Viewing Wi-Fi devices
NOTE
NOTE

272 Using ConfigFree™ with your Toshiba Computer
ConfigFree Utilities
5.375 x 8.375 ver 2.3
Creating a new wireless connection
This feature is only supported on systems running Windows
XP SP2.
To add a new wireless connection to an Access Point:
1Open the Search for Wireless Devices option from
ConfigFree Launcher.
2Drag and drop the device you want to connect to the
computer icon at the center of the map. The Wireless
Settings screen appears.
(Sample Image) Dragging a device to the Access Point
NOTE
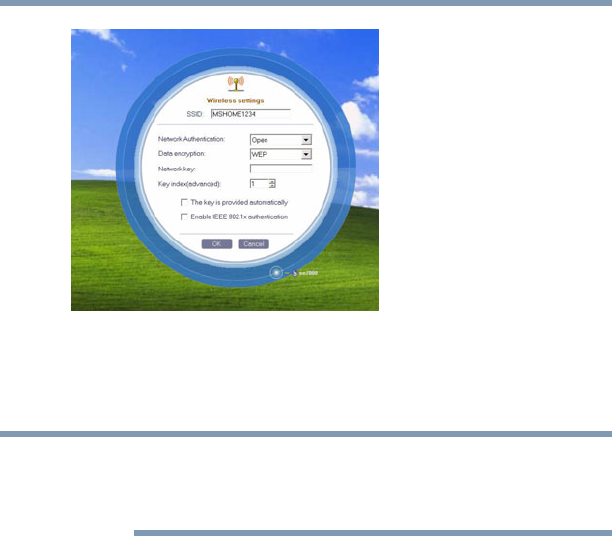
273
Using ConfigFree™ with your Toshiba Computer
ConfigFree Utilities
5.375 x 8.375 ver 2.3
(Sample Image) Wireless settings screen
3Enter the SSID/WEP information and connect to the
device.
After the Access Point is set up and added to the connection
list, the system displays the Connection screen rather than the
Wireless settings screen.
Creating a detected device wireless connection
The following screen shows an example of Bluetooth®
devices that are detected using the Search for Wireless
Devices option. Moving the mouse cursor over a device icon
displays information about the device.
NOTE
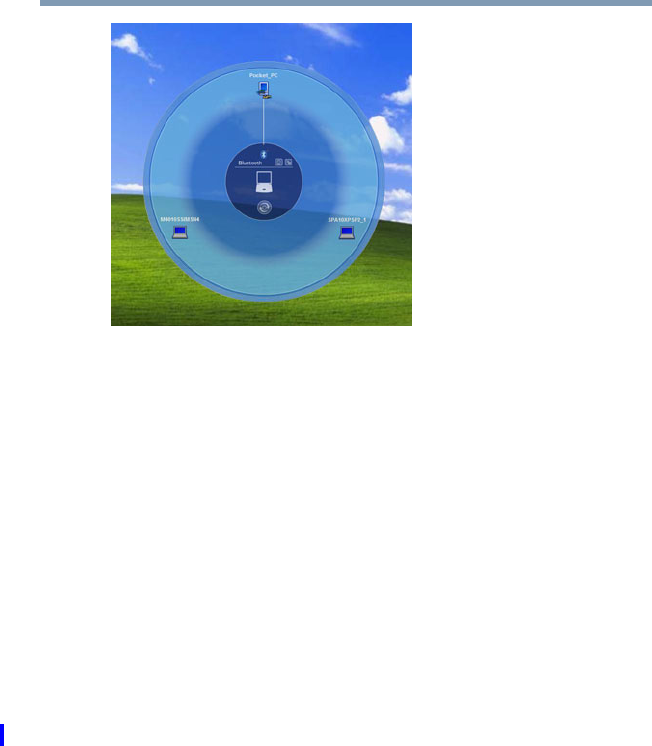
274 Using ConfigFree™ with your Toshiba Computer
ConfigFree Utilities
5.375 x 8.375 ver 2.3
(Sample Image) Viewing Bluetooth® devices
You can connect to devices shown on the Bluetooth® map:
1Drag and drop the device you want to connect to the computer
icon at the center of the map.
2Configured devices are automatically connected. Devices
not yet configured launch the Add New Connection
Wizard, where you can configure and connect to the device.
Transferring files using Bluetooth®
There are several ways to use Bluetooth® to send files to other
devices.
To select the device using the Bluetooth® radar screen:
❖Open the Bluetooth® radar screen.
❖Drag and drop the file directly onto the icon for that
Bluetooth® device.
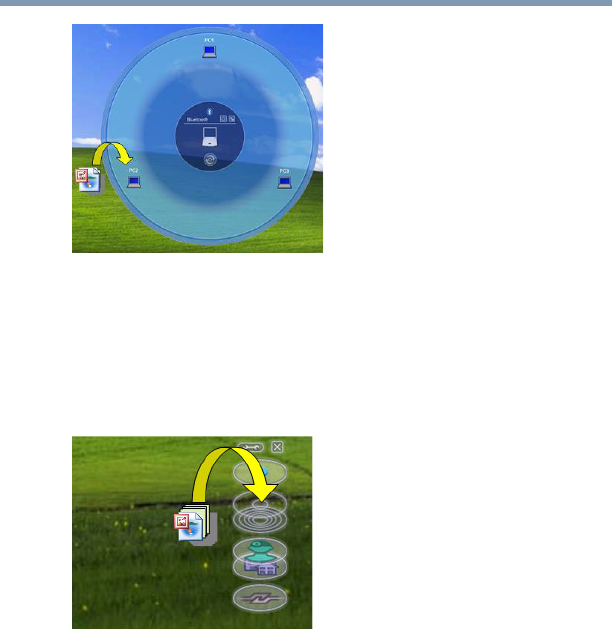
275
Using ConfigFree™ with your Toshiba Computer
ConfigFree Utilities
5.375 x 8.375 ver 2.3
(Sample Image) Dragging the file to the Bluetooth® device
icon
To be prompted for the device:
1Drag and drop the file to the Bluetooth® radar icon on the
ConfigFree Launcher.
(Sample Image) Dragging the file to the Bluetooth® radar
icon
Or, you can right-click the file and select Send to Bluetooth
Devices.
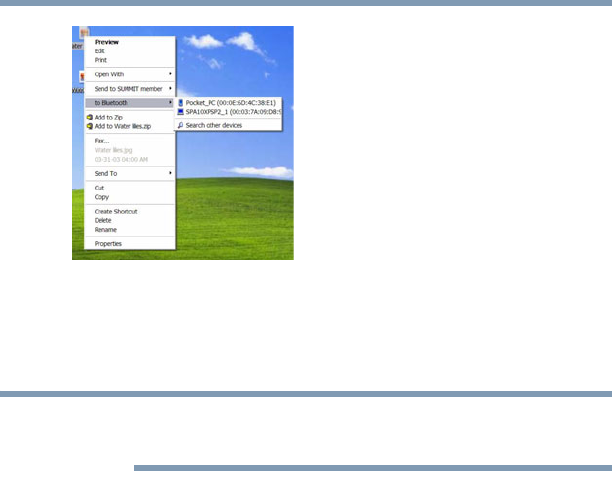
276 Using ConfigFree™ with your Toshiba Computer
ConfigFree Utilities
5.375 x 8.375 ver 2.3
(Sample Image) Selecting Send to Bluetooth® Devices option
2Choose a file recipient.
3Click Send.
During a file transfer, connecting and disconnecting to the
selected device will occur automatically.
Disconnecting from a Bluetooth® device
To disconnect from a Bluetooth® device:
1Place the cursor on top of the connected line. The icon
changes to a pair of scissors.
2Click to disconnect from the device.
Profile Settings
The Profile Settings utility lets you save network settings in
“profiles.” ConfigFree profiles are useful for easily switching
network settings and devices.You can switch network settings
simply by selecting the profile with the desired settings.
If you visit a client company occasionally, for example, you
can set up a profile to match that environment and connect to
the network. Similarly, users who access networks in the
office and at home can set up profiles to handle these
networking environments.
NOTE

277
Using ConfigFree™ with your Toshiba Computer
ConfigFree Utilities
5.375 x 8.375 ver 2.3
A profile contains the currently configured network settings
on the computer, as well as information about any network
devices. The following settings can be saved (or “captured”)
in a profile:
❖Internet settings—includes LAN settings (proxy server
settings) and the address of a home page that opens
automatically when Internet Explorer starts
❖Devices—lets you enable or disable settings of wired and
wireless network devices, infrared devices, and set the
power status of Bluetooth® antennas
❖TCP/IP settings—includes DHCP, IP address, subnet
mask, default gateway, DNS server, and WINS server
settings
❖Personal firewall settings for Internet connections
❖Dial-up connection settings for the default connection
❖File and printer sharing settings
❖Printer settings for the default printer
❖Bluetooth® Security Level (for example, high or medium)
To create a profile:
1Click the icon in the system tray.
2Move the pointer to Profile.
3Click Add. The Add Profile screen appears.
4Select Capture and click OK. The Add Profile screen
appears.
5Enter the name of the profile you want to create.
6Enter any optional comments, if desired.
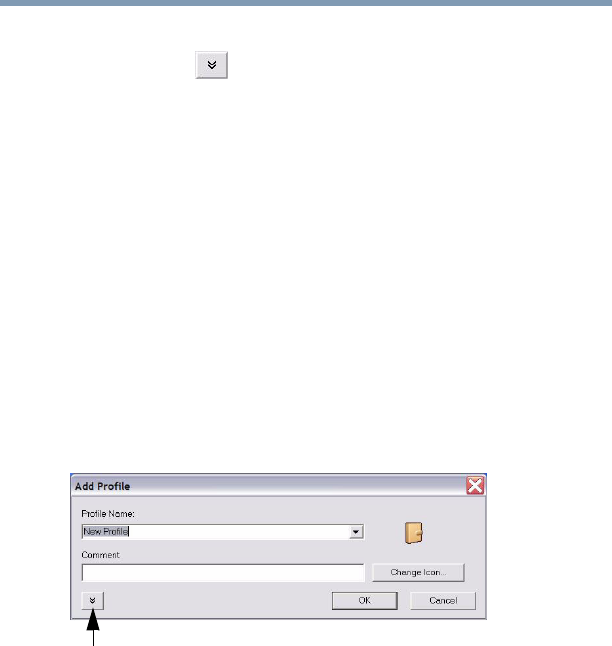
278 Using ConfigFree™ with your Toshiba Computer
ConfigFree Utilities
5.375 x 8.375 ver 2.3
7Click Change Icon and select an icon for this profile.
8Click the icon at the bottom of the screen to display
more capture options.
9Under Captured Items, select the items you want to
capture for this profile.
10 If connecting with a wireless network, select the desired
Auto Switch Settings. (These options are unavailable if
wireless devices have been disabled.)
11 Under Execute this program after switching, click the
Browse button and select the program, file, or Web site
URL that is to start after switching to this profile.
For example, to have Internet Explorer start in the Windows
operating system after switching profiles, type:
C:\Program Files\Internet Explorer\IEXPLORE.EXE
12 Click OK.
(Sample Image) Add Profile screen
Press to show more capture options

279
Using ConfigFree™ with your Toshiba Computer
ConfigFree Utilities
5.375 x 8.375 ver 2.3
(Sample Image) Expanded Add Profile screen
The online Help provides real-world examples of setting up
profiles for different networking environments.
After you set up one or more profiles, you can check their
settings and fine-tune them as necessary. Profiles can also be
imported and exported. This feature is useful when
transferring profile settings to other computers. For more
information about modifying, importing, and exporting
profiles, refer to the online Help.
NOTE
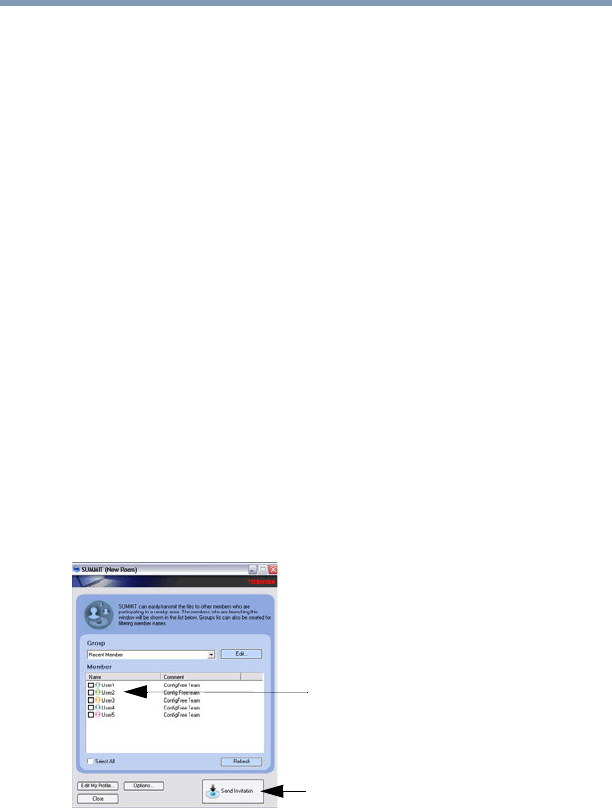
280 Using ConfigFree™ with your Toshiba Computer
ConfigFree Utilities
5.375 x 8.375 ver 2.3
ConfigFree SUMMIT
The ConfigFree SUMMIT utility is a convenient way to share
files with other users and to transfer files between your
computers at home and at work. This utility is faster and
more dependable than sending the files via email.
Use this utility, which handles files regardless of size, to
distribute presentations, reports, or music files to meeting
attendees or to users at different locations.
The SUMMIT utility uses the following types of connections:
❖Wireless LAN via Access Point
❖Wireless LAN via Ad Hoc
❖LAN (same subnet)
❖Bluetooth® PAN/LAP
❖Cross cable (Ethernet or Gbit Ethernet)
To host a ConfigFree SUMMIT, click the SUMMIT icon on
the ConfigFree Launcher, select the users that you want to
attend the SUMMIT meeting, and send them an invitation.
(Sample Image) Inviting users to SUMMIT meeting
When a user joins the SUMMIT, their icon appears on the
SUMMIT table.
Select users
Send invitations
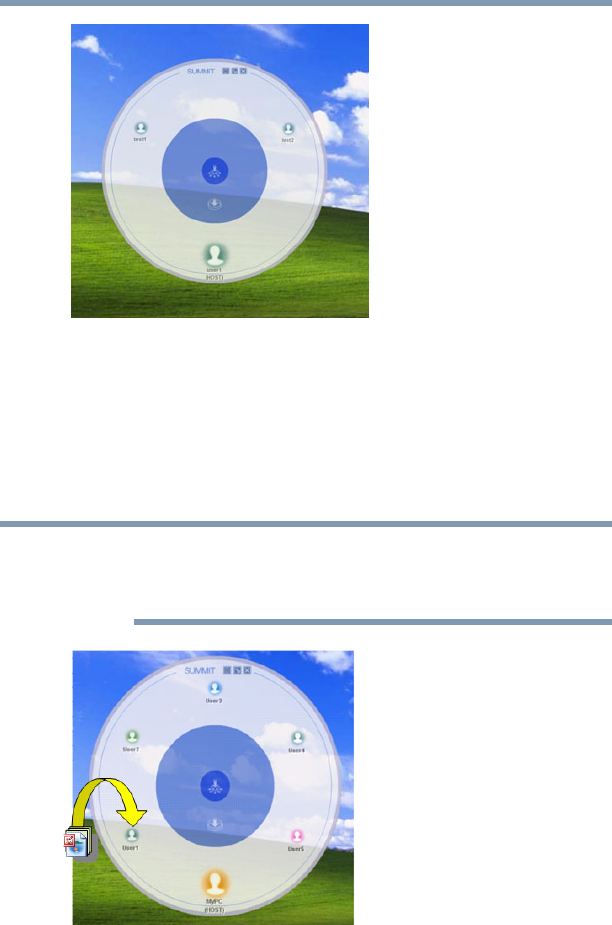
281
Using ConfigFree™ with your Toshiba Computer
ConfigFree Utilities
5.375 x 8.375 ver 2.3
(Sample Image) Users attending SUMMIT meeting (user
icons appear on SUMMIT table)
Files can be shared with one user or all users attending the
meeting.
❖To share a file with one user, drag and drop the file on the
user’s icon.
Only the SUMMIT Host (the initiator) can share files with
multiple users by this method. SUMMIT users can share a file
with only one other user.
(Sample Image) Sharing a file with one user
NOTE
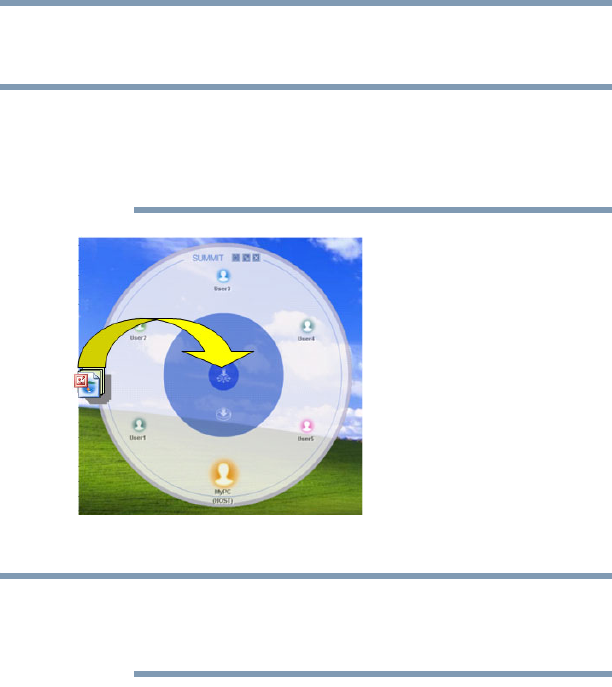
282 Using ConfigFree™ with your Toshiba Computer
ConfigFree Utilities
5.375 x 8.375 ver 2.3
❖To share a file with all users, drag the file to the center of
the SUMMIT table where users can access it as desired.
If you are the Host of the summit, and drag a file to the center
of the SUMMIT table, it will automatically be sent to all
SUMMIT users who can then accept or decline the file as
desired.
(Sample Image) Sharing a file with all users
Participating users must be connected by LAN, wireless LAN,
or Bluetooth® (PAN). Firewall software may prevent
ConfigFree SUMMIT from working.
NOTE
NOTE

283
Using ConfigFree™ with your Toshiba Computer
ConfigFree Utilities
5.375 x 8.375 ver 2.3
Using ConfigFree SUMMIT
To host a ConfigFree SUMMIT:
1Click the icon in the system tray.
2Click SUMMIT. Other users appear on the SUMMIT
main window.
SUMMIT can also be started from the ConfigFree Launcher.
3Select the appropriate users and invite them to the
SUMMIT meeting. As users join the SUMMIT, their
icons appear on the SUMMIT table.
4Use drag and drop to share documents with SUMMIT
users:
❖To share a file with one user, drag the file to the user’s
icon.
❖To share a file with all users, drag the file to the center of
the summit table.
There are other ways to send files to users.
To send files to all SUMMIT users:
1Right-click the file and select Send to SUMMIT Devices.
2Click Send.
To send files to a user without creating a SUMMIT meeting:
1Drag and drop the file to the Wireless radar icon on the
ConfigFree Launcher.
2Right-click the file and choose a file recipient.
3Click Send.
An Access Point may not always be available. To find out
how to use Quick Connect to launch ConfigFree Summit, see
“Direct Link Toshiba Device” on page 286.
NOTE

284 Using ConfigFree™ with your Toshiba Computer
ConfigFree Utilities
5.375 x 8.375 ver 2.3
Quick Connect
The Quick Connect feature includes two options:
❖Toshiba Wireless Projector. Switches the Wireless LAN
connection to connect to a Toshiba Wireless Projector
❖Direct Link Toshiba Device. Launches ConfigFree
SUMMIT
Toshiba Wireless Projector
The Quick Connect feature switches the Wireless LAN
connection to connect to a Toshiba Wireless Projector. Once
the projector utility is installed, launching the Quick Connect
utility automatically opens the Wireless Data Projector
Application. There you can configure how you would like to
use the projector.
To connect to a Toshiba Wireless Projector:
1Click the icon in the system tray.
2Use the pointing device to select the Toshiba Wireless
Projector (DPJ), then click Connect.
Launching Quick Connect prevents you from using the
network to connect to a Toshiba Wireless Projector when the
wireless LAN Configuration is set to Ad Hoc. If you are
connected to an access point, the connection is broken and re-
established later.
To review the current Toshiba Wireless Projector settings and
change them if necessary:
1Click the icon in the system tray.
2Use the pointing device to select the Toshiba Wireless
Projector (DPJ), then click Settings. The Quick
Connect properties dialog box appears.
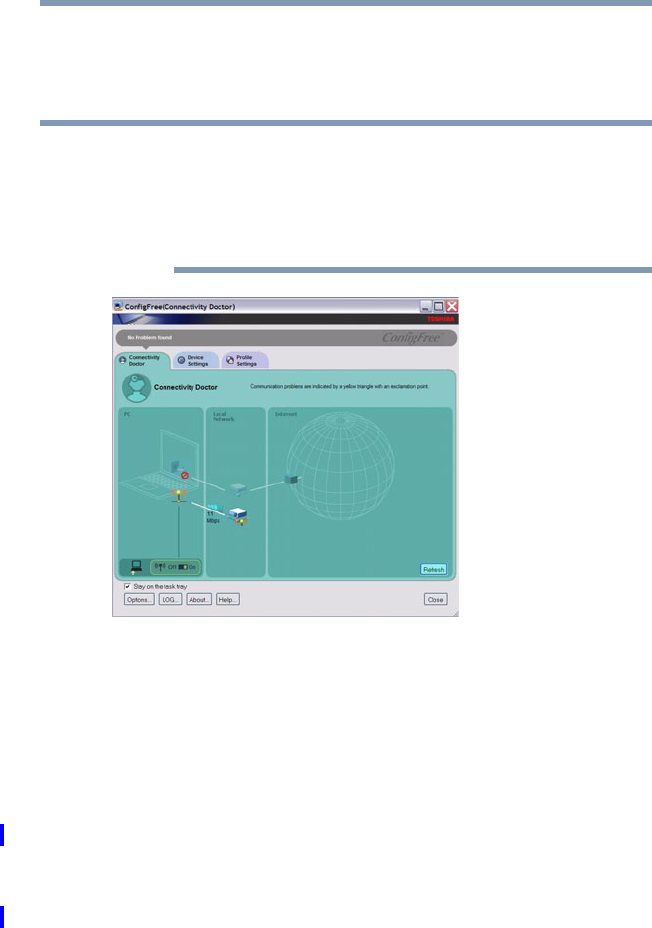
285
Using ConfigFree™ with your Toshiba Computer
ConfigFree Utilities
5.375 x 8.375 ver 2.3
3Complete the settings. Refer to the online Help if
necessary.
4Click OK.
Because the wireless LAN’s default connection setting is for
Ad Hoc mode, the Toshiba Wireless Projector will not connect if
the projector is set to Infrastructure mode. If this occurs, you can
change the wireless LAN’s connection setting to Infrastructure
mode to match the settings on the projector.
(Sample Image) Projector icon when connected with Quick
Connect
If the wireless mode for the wireless setting is set for 5 GHz
(802.11a), Quick Connect changes this mode to 2.4 GHz
(802.11b) and then connects to the projector.
The wireless LAN configuration returns to the settings that
were last used before the Quick Connect function was started:
❖If the Toshiba Wireless Projector utility is closed
❖If you select Toshiba Wireless Projector (DPJ) from the
ConfigFree tray menu (this disconnects the wireless LAN
connection)
NOTE
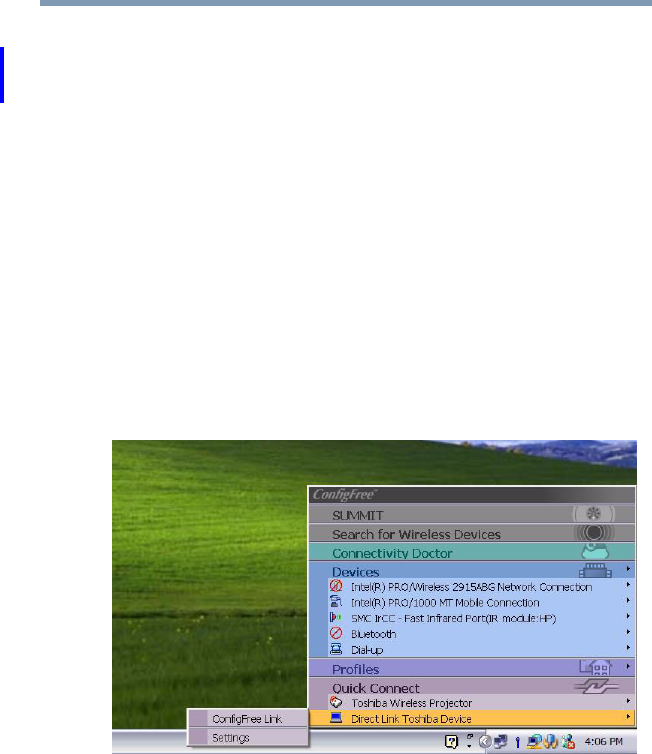
286 Using ConfigFree™ with your Toshiba Computer
ConfigFree Utilities
5.375 x 8.375 ver 2.3
❖If you select a profile from the ConfigFree tray menu or
when you disable a wireless device
❖If you close ConfigFree
Direct Link Toshiba Device
When Access Point is not available, use the Direct Link
Toshiba Device feature to connect your computer in Ad Hoc
(peer-to-peer) mode and use the Summit feature.
To use this feature:
1Display the ConfigFree menu.
2Select the ConfigFree Link option from the Direct Link
Toshiba Device submenu. This action switches the
computer’s wireless network setting to Ad Hoc mode,
and launches the SUMMIT feature.
(Sample Image) Using the Direct Link Toshiba Device feature

287
Using ConfigFree™ with your Toshiba Computer
Using the Automatic Switch
5.375 x 8.375 ver 2.3
Using the Automatic Switch
The Automatic Switch feature allows the computer to
automatically switch profiles the next time it is powered on.
This feature is particularly useful if you want your computer
to automatically switch from the network configuration you
use in your office to the one you use at home.
The Auto Switch feature contains options for automatically
switching between wired and wireless devices. With these
options, the computer automatically switches to a wireless
LAN network when the cable of the wired LAN network is
removed from the computer. When the cable is reconnected,
the connection to the wired LAN is re-established.
To use the Automatic Switch feature:
1Right-click the icon in the system tray.
2Click Auto Switch. The Auto Switch dialog box appears.
3Check Enable Wireless when cable disconnect occurs.
4Click OK.
If your computer is connected to multiple wireless LAN
devices, the Auto Switch (SSID) feature is disabled. To enable
this feature, only one wireless LAN device can be used.
NOTE

288 Using ConfigFree™ with your Toshiba Computer
Semi-Automatic Switch Feature
5.375 x 8.375 ver 2.3
Semi-Automatic Switch Feature
The Semi-Automatic feature alerts you when the computer
connects to a Service Set Identifier (SSID) stored in a profile,
When the computer connects to the designated SSID, a
notification window appears. You can then click this window
to connect using the settings specified in the profile.
To use the Semi-Automatic Switch feature:
1Right-click the icon in the system tray.
2Click Auto Switch. The Auto Switch dialog box appears.
3Select the Auto Switch (SSID) tab.
4Select the profile to be automatically selected when the
SSID is detected, then click Add. The profile is moved to
the List of target SSIDs and profiles.
5Repeat the previous step for each additional profile you
want to select.
6Select Automatically switch profiles when connected
to this SSID.
7Check Automatically switch profile when connected to
this SSID.
8Click OK.
The computer is now configured to use the Semi-Automatic
Switch feature. When the computer connects to an SSID in a
profile, a display notification window appears. You can then
click Switch on the window to switch profiles. You can also
set the option for having the switch be automatic without the
need for a notification.
Several profiles can be defined for a single SSID. In this case,
several notification windows are displayed. By clicking these
windows, you can switch to the profile for that location.
NOTE

289
5.375 x 8.375 ver 2.3
Glossary
TECHNICAL NOTE: Some features defined in this glossary
may not be available on your computer.
Acronyms
The following acronyms may appear in this user’s guide.
AC alternating current
BIOS basic input/output system
bps bits per second
CD compact disc
CD-ROM compact disc read-only memory
CD-RW compact disc rewrite memory
CMOS complementary metal-oxide semiconductor
COM1 communications port 1 (serial port)
COM2 communications port 2 (serial port)
CPU central processing unit
DC direct current

290 Glossary
5.375 x 8.375 ver 2.3
DMA direct memory access
DIMM dual inline memory module
DOS disk operating system
DPI dots per inch
DSTN dual supertwist nematic
DVD digital versatile (or video) disc
DVD-ROM digital versatile (or video) disc read-only memory
ECP enhanced capabilities port
EPROM erasable programmable read-only memory
FAT file allocation table
FCC Federal Communications Commission
FIR fast infrared
GB gigabyte
HDD hard disk drive
HTML Hypertext Markup Language
IEEE Institute of Electrical and Electronics Engineers
I/O input/output
IRQ interrupt request
ISP Internet service provider
KB kilobyte
LAN local area network
LCD liquid crystal display
LPT1 line printer port 1 (parallel port)
LSI large-scale integration
MB megabyte
MIDI Musical Instrument Digital Interface
PC personal computer
PCI Peripheral Component Interconnect
PCMCIA Personal Computer Memory Card International
Association

291
Glossary
5.375 x 8.375 ver 2.3
RAM random access memory
RFI radio frequency interference
ROM read-only memory
RTC real-time clock
SCSI small computer system interface
SDRAM synchronous dynamic random access memory
SRAM static random access memory
SVGA super video graphics adapter
TFT thin film transistor
USB universal serial bus
URL uniform resource locator
WA N wide area network
www World Wide Web
Terms
The following terms may appear in this user’s guide.
Aactive-matrix display — A liquid crystal display (LCD) made from an
array of liquid crystal cells using active-matrix technology. Also
known as a “TFT display,” in its simplest form there is one thin film
transistor (TFT) for each cell. This type of display works well with
notebook computers because of its shallow depth and high-quality
color. Active-matrix displays are viewable from wider angles than
most passive-matrix displays.
adapter — A device that provides a compatible connection between two
units. For example, the computer’s internal display adapter receives
information from the software and translates it into images on the
screen. An adapter can take a number of forms, from a
microprocessor to a simple connector. An intelligent adapter (one
that is capable of doing some processing) may also be called a
controller.
alternating current (AC) — The type of power usually supplied to
residential and commercial wall outlets. AC reverses its direction at
regular intervals. Compare direct current (DC).

292 Glossary
5.375 x 8.375 ver 2.3
application — A computer program that you use to perform tasks of a
specific type. Applications include word processors, spreadsheets,
and database management systems. See also program.
Bbackup — A copy of a file, usually on a removable disk, kept in case the
original file is lost or damaged.
basic input/output system (BIOS) — See BIOS.
baud rate — The speed at which a communication device, such as a
printer or modem, transmits information. Baud rate is the number of
signal changes per second (not necessarily the same as bits per
second). See also bits per second.
BIOS (basic input/output system) — Basic instructions, stored in read-
only memory (ROM), containing the information the computer
needs to check hardware and load the operating system when you
start up the computer.
bits per second (bps) — A way of measuring the speed at which
information is passed between two devices. This is the basic unit of
measure used in modem communications, and is similar, but not
identical, to the baud rate. See also baud rate.
boot — To start the computer. The term “boot” originates from bootstrap
program (as in “pulling itself up by its bootstraps”), a program that
loads and initializes the operating system. See also reboot.
boot disk — See system disk.
boot priority (startup sequence) — The order in which the computer
accesses its disk drives to locate the startup files. Under the default
startup sequence, the computer looks for the startup files in the
diskette drive before checking the hard disk.
bus — An electrical circuit that connects the central processing unit
(CPU) with other parts of the computer, such as the video adapter,
disk drives, and ports. It is the pathway through which data flows
from one device to another. See also bus speed, frontside bus.
bus speed — The speed at which the central processing unit (CPU)
communicates with the other parts of the computer.

293
Glossary
5.375 x 8.375 ver 2.3
Ccache — A section of very fast memory in which frequently used
information is duplicated for quick access. Accessing data from
cache is faster than accessing it from the computer’s main memory.
See also CPU cache, L1 cache, L2 cache.
CD — An individual compact disc. See also CD-ROM.
CD-ROM (compact disc read-only memory) — A form of high-
capacity storage that uses laser optics instead of magnetic means for
reading data. See also CD. Compare DVD-ROM.
central processing unit (CPU) — The chip that functions as the “brain”
of the computer. It takes information from outside sources, such as
memory or keyboard input, processes the information, and sends the
results to another device that uses the information.
character — Any letter, number, or symbol you can use on the
computer. Some characters are non-printing characters, such as a
paragraph break in a word-processing program. A character
occupies one byte of computer storage.
chip — A small piece of silicon containing computer logic and circuits
for processing, memory, input/output, and/or control functions.
Chips are mounted on printed circuit boards.
click — To press and release the pointing device’s primary button
without moving the pointing device. In the Windows® operating
system, this refers to the pointing device’s left button, unless
otherwise stated. See also double-click.
color palette — A set of specified colors that establishes the colors that
can be displayed on the screen at a particular time.
compatibility — The extent to which computers, programs, or devices
can work together harmoniously, using the same commands,
formats, or language as another.
configuration — (1) The collection of components that make up a single
computer system. (2) How parts of the system are set up (that is,
configured).
controller — A device that controls the transfer of data from a computer
to a peripheral device and vice versa. For example, disk drives,
monitors, keyboards, and printers all require controllers.

294 Glossary
5.375 x 8.375 ver 2.3
CPU — See central processing unit (CPU).
CPU cache — A section of very fast memory residing between the CPU
and the computer’s main memory that temporarily stores data and
instructions the CPU will need to execute commands and programs.
See also cache, L1 cache, L2 cache.
cursor — A symbol that indicates the current position on the screen. The
shape of the cursor varies, depending on the program you are using
and what you are doing.
Ddefault — The setting selected by a program when the user does not
specify an alternative setting.
device — A component attached to the computer. Devices may be
external (outside the computer’s case) or internal (inside the
computer’s case). Printers, disk drives, and modems are examples of
devices.
device driver — A program (called a “driver”) that permits a computer
to communicate with a device.
dialog box — An on-screen window displayed by the operating system
or a program giving a direction or requesting input from the user.
direct current (DC) — The type of power usually supplied by batteries.
DC flows in one direction. Compare alternating current (AC).
direct memory access (DMA) — A dedicated channel, bypassing the
CPU, that enables direct data transfer between memory and a
device.
directory — See folder.
disable — To turn a computer option off. See also enable.
disc — A round, flat piece of material, designed to be read from and
written to by optical (laser) technology, and used in the production
of optical discs, such as CDs and DVDs. Compare disk.
disk — A round, flat piece of material that can be magnetically
influenced to hold information in digital form, and used in the
production of magnetic disks, such as diskettes and hard disks.
Compare disc. See also diskette, hard disk.

295
Glossary
5.375 x 8.375 ver 2.3
disk drive — The device that reads and writes information and programs
on a diskette or hard disk. It rotates the disk at high speed past one or
more read/write heads.
diskette — A thin, flexible disk in a protective jacket that stores
magnetically encoded data. Diskettes can be removed from the
computer and come in two sizes: 5.25-inch and 3.5-inch. Your
computer uses 3.5-inch diskettes. See also double-density diskette,
high-density diskette.
document — Any file created with an application and, if saved to disk,
given a name by which it can be retrieved. See also file.
double-click — To press and release the pointing device’s primary
button rapidly twice without moving the pointing device. In the
Windows® operating system, this refers to the pointing device’s left
button, unless otherwise stated.
double-density diskette — A 3.5-inch diskette that can hold up to
720 KB of information (half the capacity of a high-density diskette).
See also diskette, high-density diskette.
download — (1) In communications, to receive a file from another
computer through a modem or network. (2) To send font data from
the computer to a printer. See also upload.
drag — To hold down the mouse button while moving the cursor to drag
a selected object. In the Windows® operating system, this refers to
the left mouse button, unless otherwise stated.
driver — See device driver.
DVD — An individual digital versatile (or video) disc. See also DVD-
ROM.
DVD-ROM (digital versatile [or video] disc read-only memory) — A
very high-capacity storage medium that uses laser optics for reading
data. Each DVD-ROM can hold as much data as several CD-ROMs.
Compare CD-ROM.
Eemulation — A technique in which a device or program imitates another
device or program.
enable — To turn on a computer option. See also disable.

296 Glossary
5.375 x 8.375 ver 2.3
executable file — A computer program that is ready to run. Application
programs and batch files are examples of executable files. Names of
executable files usually end with a .bat or .exe extension.
expansion device — A device that connects to a computer to expand its
capabilities. Other names for an expansion device are port expander,
port replicator, docking station, or network adapter.
extension — See file extension.
external device — See device.
Ffile — A collection of related information, saved on disk with a unique
name. A file may be a program, information used by a program, or a
document. See also document.
file allocation table (FAT) — The section of a disk that keeps track of
the location of files stored on the disk.
file name — A set of characters that uniquely identifies a file within a
particular folder. It consists of two parts: the actual name and the file
name extension. See also file extension.
file extension — The three characters following the period (pronounced
“dot”) at the end of a file name. The extension indicates the type of
file. Examples are .exe for program files and .hlp for help files. See
also file name.
folder — Also called directory. A container for organizing files saved to
a disk. A folder is symbolized on screen by a graphical image (icon)
of a file folder. A folder can contain files and other folders.
format — (verb) To prepare a blank disk for use with the computer’s
operating system. Formatting creates a structure on the disk so the
operating system can write information to the disk or read
information from it.
frontside bus — The primary pathway (bus) between the CPU and the
computer’s main memory. Also called “system bus.” See also bus.
function keys — The keys labeled F1 through F12, typically located on
the keyboard. Their function is determined by the operating system
and/or individual programs.

297
Glossary
5.375 x 8.375 ver 2.3
Gground — A conductor to which all components of an electric circuit are
connected. It has a potential of zero (0) volts, is connected to the
earth, and is the point of reference for voltages in the circuit.
Hhard disk — A storage device composed of a rigid platter or platters that
can be magnetically coded with data. Hard disks hold much more
information than diskettes and are used for long-term storage of
programs and data. The primary (or only) hard disk in a computer is
usually fixed, but some computers have secondary hard disks that
are removable. By default, the hard disk is referred to as drive C.
hardware — The physical components of a computer system. Compare
software.
Hibernation — A feature of many Toshiba notebook computers that
saves to the hard disk the current state of your work, including all
open files and programs, when you turn the computer off. When
you turn on the computer again, your work is returned to the same
state it was when the computer was turned off. See also Standby,
Suspend.
high-density diskette — A 3.5-inch diskette that holds 1.44 MB of data.
See also diskette.
hot key — (1) A feature in which certain keys in combination with the
Fn key can set system options or control system parameters, such as
the battery save mode. (2) A key or combination of keys that
activates a memory resident program.
hot swapping — The ability to add or remove devices from a computer
while the computer is running and have the operating system
automatically recognize the change.
Iicon — A small image displayed on the screen that represents a function,
file, or program.
interlaced — A method of refreshing a computer screen, in which only
every other line of pixels is refreshed. Interlaced monitors take two
passes to create a complete screen image. Compare non-interlaced.
internal device — See device.

298 Glossary
5.375 x 8.375 ver 2.3
Internet — The decentralized, world-wide network of computers that
provides electronic mail, the World Wide Web, and other services.
See also World Wide Web.
Kkeyboard shortcut — A key or combination of keys that you use to
perform a task instead of using a pointing device such as a mouse.
LL1 (level one) cache — Memory cache built into the processor to help
improve processing speed. See also cache, CPU cache, L2 cache.
L2 (level two) cache — Memory cache installed on the motherboard to
help improve processing speed. It is slower than L1 cache and faster
than main memory. See also cache, CPU cache, L1 cache.
LAN (local area network) — A group of computers or other devices
dispersed over a relatively limited area and connected by a
communications link that enables any device to interact with any
other on the network.
liquid crystal display (LCD) — A type of display that uses a liquid
substance between two transparent electrode panels. When an
electric current passes through the electrodes, the molecules in the
liquid form a crystalline pattern that polarizes the light passing
through it. A filter over the electrodes permits only non-polarized
light to pass to the surface of the display, creating light and dark
pixels.
load — To move information from a storage device (such as a hard disk)
into memory for processing.
local area network — See LAN.
logical drive — A section of a disk that is recognized by the operating
system as a separate disk drive. A system’s logical drives may differ
from its physical drives. For example, a single hard disk drive may
be partitioned into two or more logical drives.
Mmemory — Typically refers to the computer’s main memory, where
programs are run and data is temporarily stored and processed.
Memory can be volatile and hold data temporarily, such as RAM, or
it can be nonvolatile and hold data permanently, such as ROM. A
computer’s main memory is RAM. See RAM, ROM.
microprocessor — See central processing unit (CPU).

299
Glossary
5.375 x 8.375 ver 2.3
MIDI (Musical Instrument Digital Interface) — A standard for
connecting musical instruments, synthesizers, and computers. The
MIDI standard provides a way of translating music into a form
computers can use, and vice versa.
modem — Short for “modulator/demodulator.” A device that converts
information from digital to analog, and back to digital, enabling
information to pass back and forth between digital computers and
analog telephone lines.
motherboard — The computer’s main circuit board that contains the
processor, memory, and other primary components.
MS-DOS prompt — See system prompt.
multi-function drive — A DVD drive that can read and write to CD and
DVD media.
multimedia — A combination of two or more media, such as sound,
animation, and video in a computer program or presentation.
Musical Instrument Digital Interface — See MIDI.
Nnetwork — A collection of computers and associated devices that are
connected by communications facilities. A network allows you to
share data and peripheral devices, such as printers, with other users
and to exchange electronic mail.
non-interlaced — A method of refreshing a computer screen, in which
each pixel of every line is refreshed as the electron beam scans
across and down the screen. Compare interlaced.
non-system disk — A disk for storing programs and data that cannot be
used to start the computer. Compare system disk.
Oonline — Available through the computer. Online may refer to
information being read from your own computer’s hard disk, such
as online documentation or online Help, or to information coming
from another company on a company network or the Internet.
operating system — A set of programs that controls how the computer
works. Examples of operating systems are the Windows®XP Tablet
PC Edition and Windows® XP Home operating systems.

300 Glossary
5.375 x 8.375 ver 2.3
optical drive — A drive which reads plastic coated discs on which
information is recorded digitally and uses a laser to read data, music,
or videos.
Ppalette — See color palette.
parallel — Processes that occur simultaneously. In communications, it
means the transmission of more than one bit of information at a
time. On your computer, the parallel port provides a parallel
communications interface between the computer and an appropriate
device. Most modern printers are parallel. Compare serial.
password — A unique string of characters entered by a user to verify his
or her identity to the computer or the network.
PC Card — A credit-card-sized expansion card designed to increase the
capabilities of notebook computers. PC Cards provide functions
such as modem, fax/modem, hard disk drive, network adapter,
sound card, or SCSI adapter.
peripheral — Any device, such as a printer or joystick, that is attached
to the computer and controlled by the computer’s CPU.
pixel — Short for “picture element.” The smallest dot that can be
produced on a screen or printer.
Plug and Play — Generally, refers to the computer’s ability to
automatically configure itself to work with peripheral devices.
When capitalized, refers to a standard that, when followed by a
device manufacturer, allows a computer to configure itself
automatically to work with the device.
pointing device — Any device, such as the TouchPad or a mouse, that
enables you to move the cursor on the screen.
port — A socket on the computer where you plug in a cable for
connection to a network or a peripheral device.
processor — See central processing unit (CPU).
program — A set of instructions that can be executed by a computer.
The general classes of programs (also called software) are operating
system, application, and utility. See also operating system,
application, utility.

301
Glossary
5.375 x 8.375 ver 2.3
properties — The attributes of an object or device. For example, the
properties of a file include the file’s type, size, and creation date.
RRAM (random access memory) — Volatile memory that can be
written to as well as read. Volatile here means that information in
RAM is lost when you turn off your computer. This type of memory
is used for your computer’s main memory. See also memory.
Compare ROM.
random access memory — See RAM.
read-only memory — See ROM.
reboot — See boot, restart.
removable disk — A disk that can be removed from a disk drive. A
diskette is one example of a removable disk.
resolution — A measure of the sharpness of the images that can be
produced by a printer or displayed on a screen. For a printer,
resolution is expressed in dots per inch (dpi). For a screen, it is
expressed as the number of pixels available horizontally and
vertically.
restart — Synonymous with reboot. To reset the computer by reloading
the operating system without turning the computer off. See also
boot.
RJ11 — A modular connector used on most U.S. telephone systems and
direct-connect modems. The RJ11 connector is a 6-wire connector.
ROM (read-only memory) — Non-volatile memory that can be read
but not written to. Non-volatile here means that information in ROM
remains whether or not the computer is receiving power. This type
of memory is used to store your computer’s BIOS, which is
essential instructions the computer reads when you start it up. See
also BIOS, memory. Compare RAM.
Sselect — To highlight or otherwise specify text, data, or graphics with the
intent to perform some operation on it.
serial — Processes that occur one at a time. In communications, it means
the transmission of one bit at a time sequentially over a single
channel. On your computer, the serial port provides a serial interface
between the computer and an appropriate device. Compare parallel.

302 Glossary
5.375 x 8.375 ver 2.3
shortcut — See keyboard shortcut.
software — See program. Compare hardware.
Standby — A feature of some Windows® operating systems that allows
you to turn off the computer without exiting your open applications
and to continue from where you left off when you turn the computer
on again.
Suspend — A feature of some Windows® operating systems that allows
you to turn off the computer without exiting your open applications
and to continue from where you left off when you turn the computer
on again.
system disk — A diskette that contains the operating system files needed
to start the computer. Any diskette can be formatted as a system
disk. A system disk is also called a “bootable disk” or a “startup
disk.” Compare non-system disk.
system prompt — The symbol (in the MS-DOS® operating system,
generally a drive letter followed by a “greater than” sign) indicating
where users are to enter commands.
TToshiba tablet pen — The writing instrument used with the tablet. It is
stored on the right side of the computer.
TFT display — See active-matrix display.
Uuniversal serial bus (USB) — USB is a serial bus that supports a data
transfer rate of up to 480 Mbps (480 million bits per second). USB
can connect up to 127 peripheral devices through a single all-
purpose USB port. USB allows hot swapping of peripherals. See
also bus, hot swapping, serial.
upload — To send a file to another computer through a modem or
network. See also download.
USB — See universal serial bus (USB).
utility — A computer program designed to perform a narrowly focused
operation or solve a specific problem. Utilities are often related to
computer system management.

303
Glossary
5.375 x 8.375 ver 2.3
VW Web — See World Wide Web.
Wi-Fi — A registered trademark term of the Wi-Fi Alliance that stands
for Wireless Fidelity, and is another term for the communication
protocol to permit an Ethernet connection using wireless
communication components.
World Wide Web (www) — The worldwide network of Web sites
linked together over the Internet. A user of the Web can jump from
site to site regardless of the location of the computer hosting the site.
See also Internet.

304
Index
A
AC adaptor 47
AC power
connecting adaptor 49
accessories
docking solutions 154
memory 54
adding memory 54
adjusting recording quality 143
Alt keys 91
audio
recording
sounds 142
audio features 142
B
backing up files 89
battery
alarms 117
changing 121
charge indicator light 49, 114
charge not lasting 224
charging 47, 50
conserving power 118
disposal 127
low charge 117
monitoring power 49, 114
not charging 223
power profile 258
power profile hot key 120
real-time clock (RTC) 111
removing 121
BIOS Setup
see Toshiba Hardware Setup
Bridge Media Adapter
inserting memory media 152
removing memory media 153
button
power 56
start 131
switch 53
C
CD
playing an audio 104
CD, using 100
CD/DVD
creating 106
channels
DMA 219

305
Index
5.375 x 8.375 ver 2.3
IRQ 218
character keys 90
charging the battery 50
checking device properties 221
click 67
communications
network connection 136
set up 132
system resources 218
compact disc positioning 103
compact discs
handling 104
inserting 102
removing 107
compact disk drive
using 100
computer
caring for 86
cleaning 86
moving 86
non-system disk or disk error
message 213
not accessing disk drives 212
running on battery power 109
setting up 44
warning resume failure message
212
computer lock 87
computing tips 88
connecting to a power source 47
connection
set up 136
control buttons 67
Ctrl keys 91
D
desktop
creating new icon 130
major features 130
desktop exploration 129
desktop icons 130
Device Manager 220
checking properties 221
disabling a device 220
devices
keyboard 71
mouse 71
Disk Defragmenter 229
disk drive
corrupted/damaged data files 229
missing files/trouble accessing a
disk 228
running slow 229
diskette drive
cannot insert a diskette 230
cannot read a diskette 230
connecting 74
external, connecting 74
display
does not look normal/flickers 226
external monitor not working 227
screen is blank 225
display device
external 69
display output settings 69
display, external
adjusting 71
disposal information 25
disposing of used batteries 127
DMA (Direct Memory Access) 219
double-click 67
DVD player
general problems 241
DVD, using 100
E
environment
computer-friendly 40
error messages
device driver conflict 217

306 Index
5.375 x 8.375 ver 2.3
general hardware problem 217
non-system disk or disk error
213, 230
problem with display settings/
current settings not working
with hardware 227
program has performed an illegal
operation 210
warning resume failure 212
Error-checking 228
Ethernet LAN port 137
expansion capability 154
exploring the desktop 129
external
monitor
not working 227
mouse 71
external diskette drive
connecting 74
external display, adjusting 71
F
FAT (File Allocation Table) 228
file extensions 98
file, backing up 89
files
backing up 99
printing 99
restoring 100
saving 96
fingerprint
authentication 195
enrollment 196
Fn keys 91
Fn-esse
change/remove key assignments
173
starting 170
Fn-esse program 170
assigning a key 170
using drag-and-drop 171
function keys 91
H
hardware conflicts 217
resolving 219
headphones
using 143
Help and Support
Windows XP 217
Hibernation mode 76
configuring 80
starting again from 82
hot key
display brightness 260
display modes 260
Hibernation mode 259
keyboard overlays 262
password security 256
power profile 258
Standby mode 258
volume mute 255
zooming 262
hot key power profile 120
Hotkey utility 174
http 139
I
i.LINK port 154
icon 130, 131
desktop 131
Internet Explorer 131
moving to desktop 130
recycle bin 131
safety 37
Windows Media Player 131
installation
memory module 54
installing
memory modules 54
mouse 71
instant passwords, using 163

307
Index
5.375 x 8.375 ver 2.3
Internet
bookmarked site not found 217
connecting to 139
features 141
slow connection 216
surfing 140
uploading and downloading files
141
URL address not found 216
using 138
Internet Explorer icon 131
Internet Service Providers 139
IRQ (Interrupt Request) 218
ISPs 139
J
jack
RJ-11 135
K
key assignment
viewing existing 173
key assignments
changing or removing existing
173
keyboard
character keys 90
function keys 91
hot keys 262
not working 212
overlay keys 92
troubleshooting 224
using 90
Windows special keys 92
keyboard, external 71
keyboard, full-size 90
L
lock
computer, using 87
M
main battery
removing 121
memory
adding 54
problem solving 222
memory module
installation 54
microphone 142
modem
connecting to telephone line 134
determining COM port 133
problem solving 237
resetting port to default settings
133
upgrading 133
monitor 69
connecting 69
not working 226
mouse
installing 71
serial 71
mouse utility 180
N
network
accessing 136
Dial-Up Networking Wizard 136
networking
wireless 137
O
opening the display panel 51
optical drive
problems 230
troubleshooting 230
other documentation 38
overlay keys 92
P
password
deleting a supervisor 166
disabling a user 164
supervisor

308 Index
5.375 x 8.375 ver 2.3
set up 165
types 163
passwords
instant, using 163
setting 163
PC Card
checklist 233
CIS (Card Information Structure)
233
computer stops working 234
configuring 151
errors 235
hot swapping fails 235
inserting 150
not recognized 235
problem solving 232, 234
removing 150
setting up 151
Plug and Play 219
port
COM 133
Ethernet LAN 137
RGB 69
power
computer will not start 211
connecting cable to AC adaptor
48
cord/cable connectors 263
energy-saving features 109
problem solving 223
turning on 53
power button 56
Power Management 178
power profile
hot key 120
power profiles 118
power source 47
connecting 48
power switch 53, 144
powering down
using Hibernation 80
using Standby 82
precautions 41
primary button 67
printer
connecting 72
problem solving 236
printing a file 99
problem solving
AC power 223
accessing disk drives 212
battery charge does not last 224
battery not charging 223
cannot insert diskette in drive 230
cannot read a diskette 230
changing display properties 227
checking device properties 221
computer hangs when PC Card
inserted 234
computer will not power up 211
contacting Toshiba 251, 252
corrupted/damaged data files 229
Device Manager 220
disabling a device 220
disk drive is slow 229
display is blank 225
external display not working 227
external monitor 226
faulty memory 222
hardware conflict 217, 218, 219
high-pitched noise 232
illegal operation 210
Internet bookmarked site not
found 217
Internet connection is slow 216
keyboard
not responding 212
missing files/trouble accessing a
disk 228
modem not receiving or

309
Index
5.375 x 8.375 ver 2.3
transmitting 237
no sound 232
non-system disk or disk error
213, 230
PC Card 232
checklist 233
error occurs 235
hot swapping fails 235
not recognized 235
slot appears dead 234
power and batteries 223
printer 236
program not responding 209
program not working properly
229
screen does not look right/flickers
226
Startup options 215
system resources 218
URL address not found 216
warning resume failure 212
Windows XP not working 215
program, starting 93
programs
not running correctly 229
projector 69
connecting 69
R
real-time clock (RTC) battery 111
recording
sound files 142
recording quality 143
recording sounds 142
recycle bin icon 131
registering computer 46
removing
main battery 121
RJ-11 jack 135
rotating screen 84
Run dialog box 95
running the computer on battery power
109
S
safety
computer 128
disposing of batteries 127
icons 37
precautions 41
saving files 96
screen
blank 225
does not look normal/flickers 226
rotating 84
secondary button 67
set up communications 132
setting up
adding memory 54
computer 44
setting up a connection 136
sound
problem solving 232
sounds
recording 142
speakers
using external 143
Standby mode 77
hot key 258
starting again from 83
start button 131
starting a program 93
Run dialog box 95
Windows Explorer 94
Windows Start menu 94
starting up the computer
from Shut down 80
from Standby 83
Startup menu
problem solving 215
supervisor password, deleting 166

310 Index
5.375 x 8.375 ver 2.3
supervisor password, set up 165
system tray 132
T
Tablet and Pen Settings 185
tablet mode
using 84, 144
tablet pen
using 84, 148
Taskbar 132
telephone line
connecting to modem 134
television
adjusting display 71
Toshiba
registering computer 46
worldwide offices 253
TOSHIBA Assist 156
TOSHIBA Button Controls 191
Toshiba Hardware Setup 181
Toshiba online resources 108
Toshiba tablet pen 147
using 148
Toshiba utilities 155
traveling tips 128
troubleshooting
DVD player
general problems 241
external keyboard 225
keyboard 224
keypad overlay 224
optical drive 230
turning on the computer 53
turning on the power 53
U
user password, disabling 164
using a file extension 98
using tablet mode 84, 144
using the tablet pen 84, 148
utilities
Power Saver 178
V
video projector
adjusting display 71
W
warranty
limited warranty 39
Web 139
Web sites 252
Wi-Fi
wireless networking 137
Windows Explorer 94
Windows Media Player 104
Windows Media Player icon 131
Windows operating system desktop
129
Windows Start menu 94
Windows XP
Help and Support 217
problem solving 215
wireless networking 137
Wizards
Dial-Up Networking Wizard 136
World Wide Web 139
www 139