Toshiba TEC GN1060 Wireless LAN Module User Manual GN 1060 OM EN R
Toshiba TEC Corporation Wireless LAN Module GN 1060 OM EN R
UserManual.wiki
>
Toshiba TEC
>
GN1060 User Manual
>
Users Manual
Contents
1.
Users Manual
2.
Host Users Manual
Users Manual
Navigation menu
Upload a User Manual
Namespaces
Wiki Guide
HTML
PDF
Info
Views
User Manual
Discussion / Help
Navigation

![1 SETTING UP WIRELESS NETWORK Setting Up the Infrastructure Mode 15Setting Up the Infrastructure ModeThe wireless settings can be operated from the Control Panel of this equipment.When setting up the equipment for the wireless network in the Infrastructure Mode, follow the steps below.1. Select the network type P.15 “Select network type”2. Specify the SSID P.18 “Specify SSID”3. Select the security mode P.21 “Select security mode”Select network typeFirst access the WIRELESS SETTING screen from the ADMIN menu from the Touch Panel Display to select the network type for the wireless network.If you are not sure what network type to select, see the following section to determine the network type first. P.12 “Determine the network type”1Press the [USER FUNCTIONS] button on the control panel to enter the User Functions menu.2Press the [ADMIN].The ADMINISTRATOR PASSWORD screen is displayed.3Press the [PASSWORD].The input screen is displayed.4Enter the administrator password and press the [OK].The ADMIN menu is displayed.](https://usermanual.wiki/Toshiba-TEC/GN1060.Users-Manual/User-Guide-1349730-Page-18.png)
![1 SETTING UP WIRELESS NETWORK16 Setting Up the Infrastructure Mode5Press the [WIRELESS SETTINGS].The WIRELESS SETTINGS menu is displayed.6Press the [WIRELESS SETTINGS].The WIRELESS SETTINGS screen is displayed.It may take a time to display the WIRELESS SETTINGS screen.7Press the [ON] and press the [NEXT].The NETWORK TYPE screen is displayed.](https://usermanual.wiki/Toshiba-TEC/GN1060.Users-Manual/User-Guide-1349730-Page-19.png)
![1.SETTING UP WIRELESS NETWORKSetting Up the Infrastructure Mode 171 SETTING UP WIRELESS NETWORK8Press the [INFRASTRUCTURE] and press the [NEXT].9The SSID SETTINGS screen displayed.Continue to the procedure for specifying the SSID. P.18 “Specify SSID”](https://usermanual.wiki/Toshiba-TEC/GN1060.Users-Manual/User-Guide-1349730-Page-20.png)
![1 SETTING UP WIRELESS NETWORK18 Setting Up the Infrastructure ModeSpecify SSIDWhen you select the Infrastructure Mode for the network type, you can specify the SSID by selecting the available network list or manually entering the SSID. P.18 “Selecting the SSID from the available network list” P.19 “Entering the SSID manually”If you are not sure how the SSID must be specified, see the following section to determine the SSID. P.13 “Determine the SSID”Selecting the SSID from the available network listThis equipment can search the available SSID automatically from the wireless network. Then you can select the SSID from the list.1Press the [AVAILABLE NETWORK].The AVAILABLE NETWORK screen is displayed.2Select the SSID that this equipment will connect and press the [OK].The screen returns to the SSID SETTINGS screen.yThe available network may not displayed according to the communication environmental conditions.yIf the desired SSID is not displayed, please specify the SSID manually. P.19 “Entering the SSID manually”yThis Wireless LAN supports only channel 1 to 11. This equipment cannot connect the Access Point that uses the other channel than these channels. Please make sure to set the channel between 1 to 11 in the Access Point.](https://usermanual.wiki/Toshiba-TEC/GN1060.Users-Manual/User-Guide-1349730-Page-21.png)
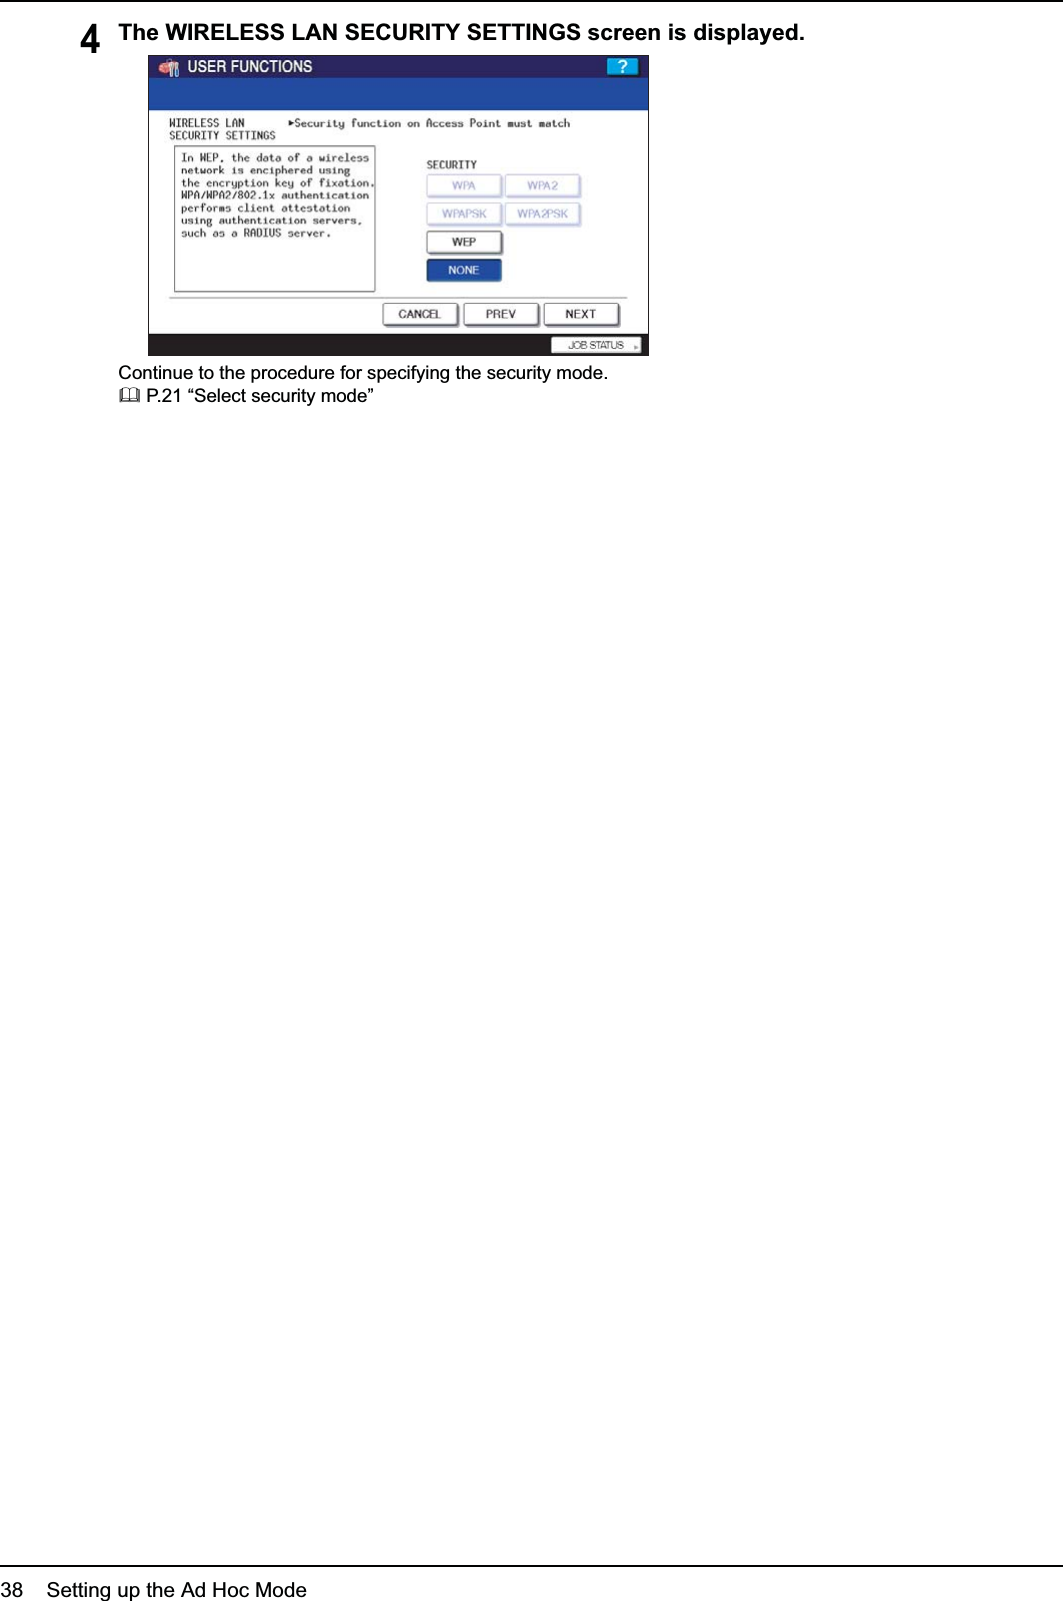
![1.SETTING UP WIRELESS NETWORKSetting Up the Infrastructure Mode 191 SETTING UP WIRELESS NETWORK3Press the [NEXT].4The WIRELESS LAN SECURITY SETTINGS screen is displayed.Continue to the procedure for specifying the security mode. P.21 “Select security mode”Entering the SSID manually1Press the [SSID].The letter entry screen is displayed.](https://usermanual.wiki/Toshiba-TEC/GN1060.Users-Manual/User-Guide-1349730-Page-22.png)
![1 SETTING UP WIRELESS NETWORK20 Setting Up the Infrastructure Mode2Enter the SSID using the keyboard and digital keys and press the [OK].The screen returns to the SSID SETTINGS screen.3Press the [NEXT].4The WIRELESS LAN SECURITY SETTINGS screen is displayed.Continue to the procedure for specifying the security mode. P.21 “Select security mode”](https://usermanual.wiki/Toshiba-TEC/GN1060.Users-Manual/User-Guide-1349730-Page-23.png)
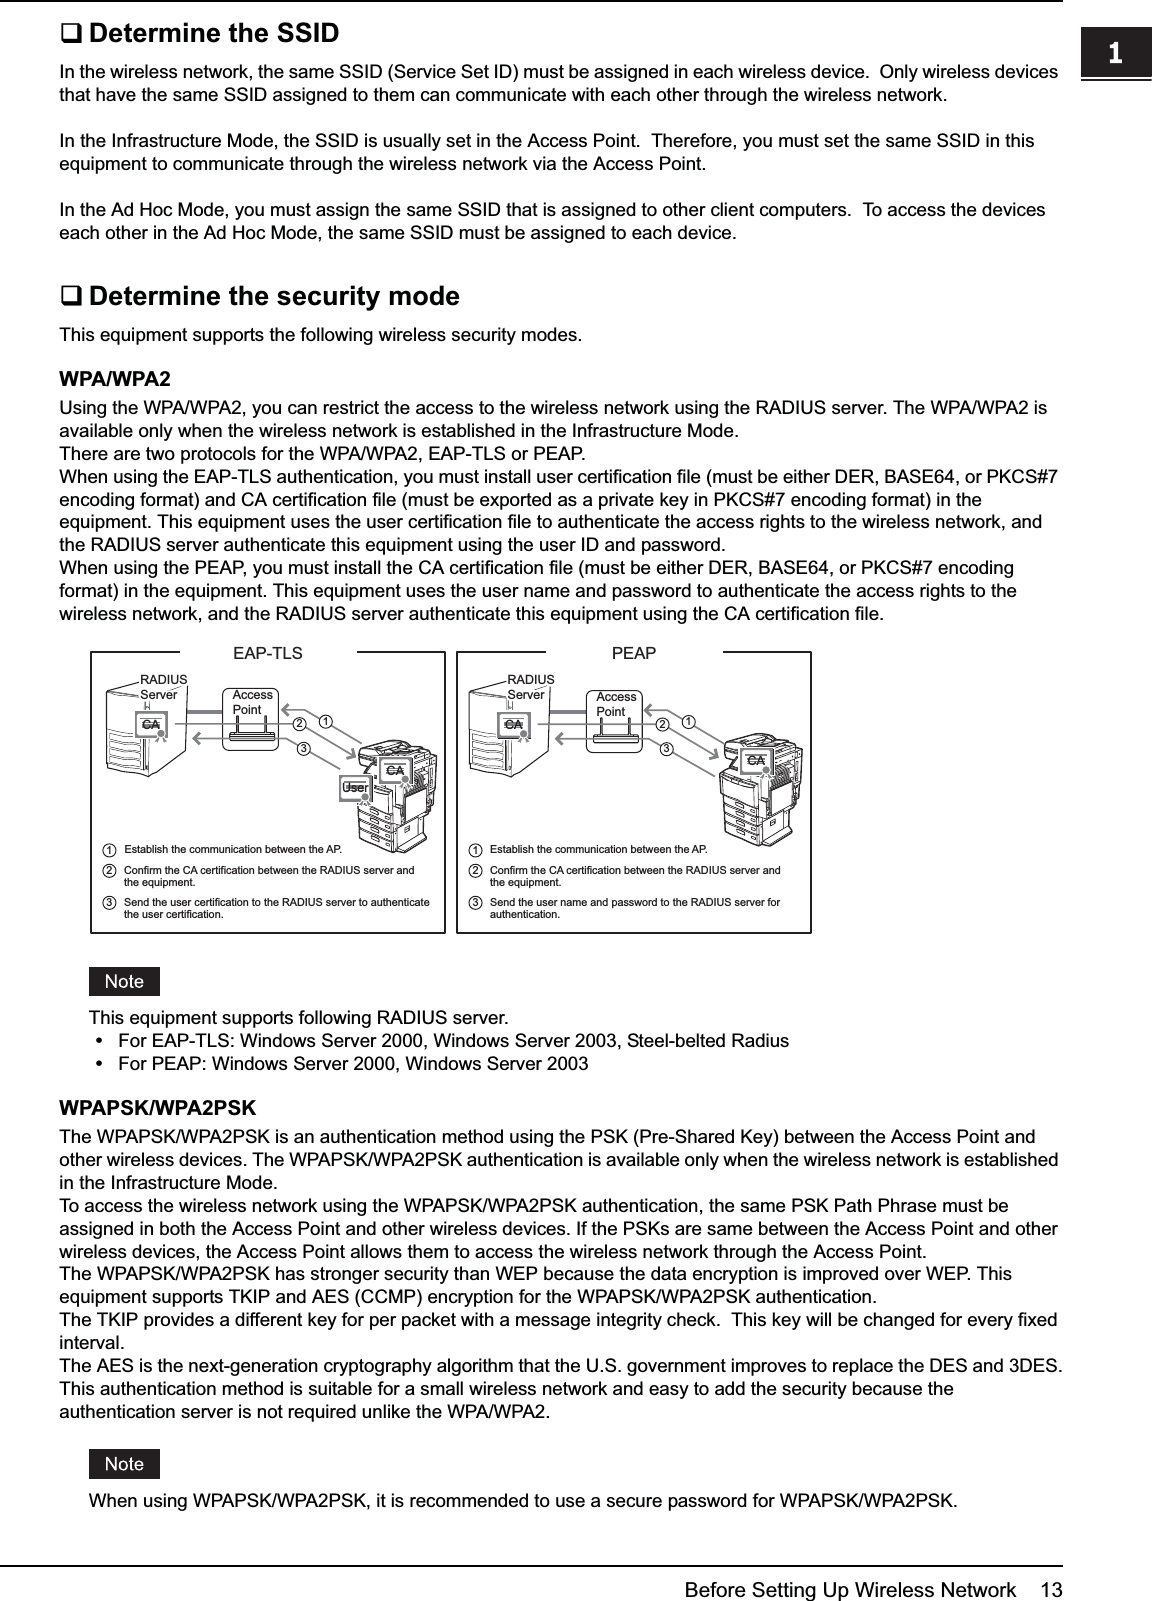
![1.SETTING UP WIRELESS NETWORKSetting Up the Infrastructure Mode 211 SETTING UP WIRELESS NETWORKSelect security modeAfter specifying the SSID, you must select the security mode for your wireless network.The procedure to configure the security mode varies depending on the security mode that you select. P.21 “Selecting WPA/WPA2 security mode with EAP-TLS protocol” P.25 “Selecting WPA/WPA2 security mode with PEAP protocol” P.28 “Selecting WPAPSK/WPA2PSK security mode” P.30 “Selecting WEP security mode” P.32 “Selecting no security mode”If you are not sure what security mode to select, see the following section to determine the security mode. P.13 “Determine the security mode”Selecting WPA/WPA2 security mode with EAP-TLS protocolUsing the WPA/WPA2 with the EAP-TLS protocol, you must install user certification file and CA certification file in the equipment. This equipment uses the user certification file to authenticate the access rights to the wireless network, and the RADIUS server authenticate this equipment using the CA certification file.When using the WPA/WPA2 with the EAP-TLS protocol, you must install the CA certification file and user certification file in the equipment using TopAccess first. For instructions on how to install the CA certification and user certification files using TopAccess, refer to TopAccess Guide.1Press the [WPA] or [WPA2] and press the [NEXT].The AUTHENTICATION SETTINGS screen is displayed.When the [WPA] or [WPA2] is selected, TKIP or AES(CCMP) can be selected.](https://usermanual.wiki/Toshiba-TEC/GN1060.Users-Manual/User-Guide-1349730-Page-24.png)
![1 SETTING UP WIRELESS NETWORK22 Setting Up the Infrastructure Mode2Press the [EAP-TLS] and press the [NEXT].The WIRELESS AUTHENTICATION (EAP-TLS) screen is displayed.Setting PMK cacheWhen the [WPA2] is selected in step 1, the PMK cache can be switched to ON or OFF. When the [WPA] is selected, the item for setting PMK cache is not displayed.3Press the [EAP USER NAME].The letter entry screen is displayed.4Enter the EAP user name using the keyboard and digital keys and press the [OK].The screen returns to the WIRELESS AUTHENTICATION (EAP-TLS) screen.In the EAP USER NAME, enter the user name in “User Name@FQDN” format.Example: wlanuser@toshiba.com](https://usermanual.wiki/Toshiba-TEC/GN1060.Users-Manual/User-Guide-1349730-Page-25.png)
![1.SETTING UP WIRELESS NETWORKSetting Up the Infrastructure Mode 231 SETTING UP WIRELESS NETWORK5Press the [NEXT].The WIRELESS AUTHENTICATION - USER CERTIFICATION screen is displayed.6Specify the following items and press the [NEXT].yENCRYPTION BETWEEN AP AND STA.Select the encryption type that is used for the communication between Access Point and this equipment.[TKIP] — Select this to use TKIP encryption. The TKIP provides a different key for per packet with a message integrity check. This key will be changed for every fixed interval.[AES(CCMP)] — Select this to use AES encryption. The AES is the next-generation cryptography algorithm that the U.S. government improves to replace the DES and 3DES.When WPA or WPA2 is selected for the security mode, only [TKIP] or [AES(CCMP)] can be selected.The encryption intensity between each encryption is:AES(CCMP) > TKIP](https://usermanual.wiki/Toshiba-TEC/GN1060.Users-Manual/User-Guide-1349730-Page-26.png)
![1 SETTING UP WIRELESS NETWORK24 Setting Up the Infrastructure Mode7Confirm the settings and press the [FINISH].The shutdown screen is displayed.If you want to change the settings, press the [PREV] to move back to the screen that you want to change and then repeat the operation.8Press the [YES] to shutdown the equipment.The wireless settings apply after restarting the equipment.](https://usermanual.wiki/Toshiba-TEC/GN1060.Users-Manual/User-Guide-1349730-Page-27.png)
![1.SETTING UP WIRELESS NETWORKSetting Up the Infrastructure Mode 251 SETTING UP WIRELESS NETWORKSelecting WPA/WPA2 security mode with PEAP protocolUsing the WPA/WPA2 with the PEAP protocol, you must install the CA certification file in the equipment. This equipment uses the user name and password to authenticate the access rights to the wireless network, and the RADIUS server authenticate this equipment using the CA certification file.When using the WPA/WPA2 with the PEAP protocol, you must install the CA certification file in the equipment using TopAccess first. For instructions on how to install the CA certification using TopAccess, refer to TopAccess Guide.1Press the [WPA] or [WPA2] and press the [NEXT].The AUTHENTICATION SETTINGS screen is displayed.When the [WPA] or [WPA2] is selected, TKIP or AES(CCMP) can be selected.2Press the [PEAP] and press the [NEXT].The WIRELESS AUTHENTICATION (EAP-TLS) screen is displayed.Setting PMK cacheWhen the [WPA2] is selected in step 1, the PMK cache can be switched to ON or OFF. When the [WPA] is selected, the item for setting PMK cache is not displayed.](https://usermanual.wiki/Toshiba-TEC/GN1060.Users-Manual/User-Guide-1349730-Page-28.png)
![1 SETTING UP WIRELESS NETWORK26 Setting Up the Infrastructure Mode3Enter the following items and press the [NEXT].y[EAP USER NAME]Press this to enter the EAP user name that is used for the authentication.In the EAP USER NAME, enter the user name in “User Name@FQDN” format.Example: wlanuser@toshiba.comy[EAP PASSWORD]Press this to enter the EAP password that is used for the authentication.y[RETYPE PASS]Press this to enter the EAP password again that you enter in the EAP PASSWORD field.When pressing each button, the letter entry screen is displayed. Enter the value using the keyboard and digital keys, and press the [OK] to set the entry.4Specify the following items and press the [NEXT].yENCRYPTION BETWEEN AP AND STA.Select the encryption type that is used for the communication between Access Point and this equipment.[TKIP] — Select this to use TKIP encryption. The TKIP provides a different key for per packet with a message integrity check. This key will be changed for every fixed interval.[AES(CCMP)] — Select this to use AES encryption. The AES is the next-generation cryptography algorithm that the U.S. government improves to replace the DES and 3DES.When WPA or WPA2 is selected for the security mode, only [TKIP] or [AES(CCMP)] can be selected.The encryption intensity between each encryption is:AES(CCMP) > TKIP](https://usermanual.wiki/Toshiba-TEC/GN1060.Users-Manual/User-Guide-1349730-Page-29.png)
![1.SETTING UP WIRELESS NETWORKSetting Up the Infrastructure Mode 271 SETTING UP WIRELESS NETWORK5Confirm the settings and press the [FINISH].The shutdown screen is displayed.If you want to change the settings, press the [PREV] to move back to the screen that you want to change and then repeat the operation.6Press the [YES] to shutdown the equipment.The wireless settings apply after restarting the equipment.](https://usermanual.wiki/Toshiba-TEC/GN1060.Users-Manual/User-Guide-1349730-Page-30.png)
![1 SETTING UP WIRELESS NETWORK28 Setting Up the Infrastructure ModeSelecting WPAPSK/WPA2PSK security modeThe WPAPSK/WPA2PSK is an authentication method using the PSK (Pre-Shared Key) between the Access Point and other wireless devices.To access the wireless network using the WPAPSK/WPA2PSK authentication, the same PSK Path Phrase must be assigned in both the Access Point and other wireless devices. If the PSKs are same between the Access Point and other wireless devices, the Access Point allows them to access the wireless network through the Access Point.1Press the [WPAPSK] or [WPA2PSK] and press the [NEXT].The WIRELESS ENCRYPTION WPA-PSK screen is displayed.2Enter the following items and press the [NEXT].yWIRELESS ENCRYPTION TYPESelect the encryption type for the PSK.[TKIP] — Select this to use TKIP encryption. The TKIP provides a different key for per packet with a message integrity check. This key will be changed for every fixed interval.[AES(CCMP)] — Select this to use AES encryption. The AES is the next-generation cryptography algorithm that the U.S. government improves to replace the DES and 3DES.y[PSK PASS PHRASE]Press this to enter the PSK Pass Phrase. The PSK is created by using the this pass phrase. You must enter the same pass phrase that is set in the Access Point. The PSK Pass Phrase must be between 8 to 63 characters long.When pressing the [PSK PASS PHRASE], the letter entry screen is displayed. Enter the value using the keyboard and digital keys, and press the [OK] to set the entry.](https://usermanual.wiki/Toshiba-TEC/GN1060.Users-Manual/User-Guide-1349730-Page-31.png)
![1.SETTING UP WIRELESS NETWORKSetting Up the Infrastructure Mode 291 SETTING UP WIRELESS NETWORK3Specify the following items and press the [NEXT].yTRANSMIT POWERSelect the low transmit power if you want to limit the area that the wireless communication is enabled. If you do not have to limit the area, select [100%].yTRANSMIT RATESelect the transmit data capacity for wireless communication. If you do not have to specify the fixed rate, select [AUTO]. When [AUTO] is selected, this equipment will use appropriate rate depending on the condition.Generally select [AUTO]. The communication may fail unexpectedly if you select a static transmit rate.4Confirm the settings and press the [FINISH].The shutdown screen is displayed.If you want to change the settings, press the [PREV] to move back to the screen that you want to change and then repeat the operation.5Press the [YES] to shutdown the equipment.The wireless settings apply after restarting the equipment.](https://usermanual.wiki/Toshiba-TEC/GN1060.Users-Manual/User-Guide-1349730-Page-32.png)
![1 SETTING UP WIRELESS NETWORK30 Setting Up the Infrastructure ModeSelecting WEP security modeThe WEP is a data encryption method using the WEP key between the Access Point and other wireless devices. Compared with WPA/WPA2 and WPAPSK/WPA2PSK, the WEP is less security. If the wireless network is configured in the Infrastructure Mode and the Access Point supports WPA/WPA2 or WPAPSK/WPA2PSK, it is recommended to use WPA/WPA2 or WPAPSK/WPA2PSK rather than WEP.1Press the [WEP] button and press the [NEXT].The WIRELESS ENCRYPTION - WEP screen is displayed.2Enter the following items and press the [NEXT].yWEP ENCRYPTIONSelect the bit length of the WEP key.yKEY ENTRY METHODSelect the character code for the WEP key.y[WEP KEY]Press this to enter the WEP key.The maximum length of WEP key varies depending on the WEP Encryption and Key Entry Method.When pressing the [WEP], the letter entry screen is displayed. Enter the value using the keyboard and digital keys, and press the [OK] to set the entry.64 bit 128 bit 152 bitHEX: 10 26 32ASCII: 5 13 16](https://usermanual.wiki/Toshiba-TEC/GN1060.Users-Manual/User-Guide-1349730-Page-33.png)
![1.SETTING UP WIRELESS NETWORKSetting Up the Infrastructure Mode 311 SETTING UP WIRELESS NETWORK3Specify the following items and press the [NEXT].yTRANSMIT POWERSelect the low transmit power if you want to limit the area that the wireless communication is enabled. If you do not have to limit the area, select [100%].yTRANSMIT RATESelect the transmit data capacity for wireless communication. If you do not have to specify the fixed rate, select [AUTO]. When [AUTO] is selected, this equipment will use appropriate rate depending on the condition.Generally select [AUTO]. The communication may fail unexpectedly if you select a static transmit rate.4Confirm the settings and press the [FINISH].The shutdown screen is displayed.If you want to change the settings, press the [PREV] to move back to the screen that you want to change and then repeat the operation.5Press the [YES] to shutdown the equipment.The wireless settings apply after restarting the equipment.](https://usermanual.wiki/Toshiba-TEC/GN1060.Users-Manual/User-Guide-1349730-Page-34.png)
![1 SETTING UP WIRELESS NETWORK32 Setting Up the Infrastructure ModeSelecting no security modeYou can also set no security for wireless access.If you do not set no security, anyone how knows the SSID can connect to the wireless network. Therefore, it is recommended to set the security if it is possible.1Press the [NONE] and press the [NEXT].The TRANSMIT POWER and RATE SETTING screen is displayed.2Specify the following items and press the [NEXT].yTRANSMIT POWERSelect the low transmit power if you want to limit the area that the wireless communication is enabled. If you do not have to limit the area, select [100%].yTRANSMIT RATESelect the transmit data capacity for wireless communication. If you do not have to specify the fixed rate, select [AUTO]. When [AUTO] is selected, this equipment will use appropriate rate depending on the condition.Generally select [AUTO]. The communication may fail unexpectedly if you select a static transmit rate.](https://usermanual.wiki/Toshiba-TEC/GN1060.Users-Manual/User-Guide-1349730-Page-35.png)
![1.SETTING UP WIRELESS NETWORKSetting Up the Infrastructure Mode 331 SETTING UP WIRELESS NETWORK3Confirm the settings and press the [FINISH].The shutdown screen is displayed.If you want to change the settings, press the [PREV] to move back to the screen that you want to change and then repeat the operation.4Press the [YES] to shutdown the equipment.The wireless settings apply after restarting the equipment.](https://usermanual.wiki/Toshiba-TEC/GN1060.Users-Manual/User-Guide-1349730-Page-36.png)
![1 SETTING UP WIRELESS NETWORK34 Setting up the Ad Hoc ModeSetting up the Ad Hoc ModeThe wireless settings can be operated from the Control Panel of this equipment.When setting up the equipment for the wireless network in the Infrastructure Mode, follow the steps below.1. Select the network type P.34 “Select network type”2. Specify the SSID P.37 “Specify SSID”3. Select the security mode P.39 “Select security mode”Select network typeFirst access the WIRELESS SETTING screen from the ADMIN menu from the Touch Panel Display to select the network type for the wireless network.If you are not sure what network type to select, see the following section to determine the network type first. P.12 “Determine the network type”1Press the [USER FUNCTIONS] button on the control panel to enter the User Functions menu.2Press the [ADMIN].The ADMINISTRATOR PASSWORD screen is displayed.3Press the [PASSWORD].The input screen is displayed.4Enter the administrator password and press the [OK].The ADMIN menu is displayed.](https://usermanual.wiki/Toshiba-TEC/GN1060.Users-Manual/User-Guide-1349730-Page-37.png)
![1.SETTING UP WIRELESS NETWORKSetting up the Ad Hoc Mode 351 SETTING UP WIRELESS NETWORK5Press the [WIRELESS SETTINGS].The WIRELESS SETTINGS menu is displayed.6Press the [WIRELESS SETTINGS].The WIRELESS SETTINGS screen is displayed.7Press the [ON] and press the [NEXT].The NETWORK TYPE screen is displayed.](https://usermanual.wiki/Toshiba-TEC/GN1060.Users-Manual/User-Guide-1349730-Page-38.png)
![1 SETTING UP WIRELESS NETWORK36 Setting up the Ad Hoc Mode8Press the [AD HOC] and press the [NEXT].You can specify the between 1 to 11 for the channel. However, if there is a channel that has already been used for Ad Hoc network, use the same channel.9The SSID SETTINGS screen displayed.Continue to the procedure for specifying the SSID. P.18 “Specify SSID”](https://usermanual.wiki/Toshiba-TEC/GN1060.Users-Manual/User-Guide-1349730-Page-39.png)
![1.SETTING UP WIRELESS NETWORKSetting up the Ad Hoc Mode 371 SETTING UP WIRELESS NETWORKSpecify SSIDWhen you select the Ad Hoc Mode for the network type, you can specify the SSID by entering the SSID manually.If you are not sure how the SSID must be specified, see the following section to determine the SSID. P.13 “Determine the SSID”1Press the [SSID].The letter entry screen is displayed.2Enter the SSID using the keyboard and digital keys and press the [ENTER] button.The screen returns to the SSID SETTINGS screen.3Press the [NEXT].](https://usermanual.wiki/Toshiba-TEC/GN1060.Users-Manual/User-Guide-1349730-Page-40.png)
![1.SETTING UP WIRELESS NETWORKSetting up the Ad Hoc Mode 391 SETTING UP WIRELESS NETWORKSelect security modeAfter specifying the SSID, you must select the security mode for your wireless network.The procedure to configure the security mode varies depending on the security mode that you select. P.39 “Selecting WEP security mode” P.41 “Selecting no security mode”yIf the Ad Hoc Mode, only WEP or NONE can be selected for the security mode.yIf you are not sure what security mode to select, see the following section to determine the security mode. P.13 “Determine the security mode”Selecting WEP security modeThe WEP is a data encryption method using the WEP key between the Access Point and other wireless devices.1Press the [WEP] and press the [NEXT].The WIRELESS ENCRYPTION - WEP screen is displayed.2Enter the following items and press the [NEXT].yWEP ENCRYPTIONSelect the bit length of the WEP key.yKEY ENTRY METHODSelect the character code for the WEP key.y[WEP KEY]Press this to enter the WEP key.The maximum length of WEP key varies depending on the WEP Encryption and Key Entry Method.When pressing the [WEP KEY button, the letter entry screen is displayed. Enter the value using the keyboard and digital keys, and press the [OK] to set the entry.64 bit 128 bit 152 bitHEX: 10 26 32ASCII: 5 13 16](https://usermanual.wiki/Toshiba-TEC/GN1060.Users-Manual/User-Guide-1349730-Page-42.png)
![1 SETTING UP WIRELESS NETWORK40 Setting up the Ad Hoc Mode3Select the transmit power and press the [NEXT].Select the low transmit power if you want to limit the area that the wireless communication is enabled. If you do not have to limit the area, select [100%].4Confirm the settings and press the [FINISH].The shutdown screen is displayed.If you want to change the settings, press the [PREV] to move back to the screen that you want to change and then repeat the operation.5Press the [YES] to shutdown the equipment.The wireless settings apply after restarting the equipment.](https://usermanual.wiki/Toshiba-TEC/GN1060.Users-Manual/User-Guide-1349730-Page-43.png)
![1.SETTING UP WIRELESS NETWORKSetting up the Ad Hoc Mode 411 SETTING UP WIRELESS NETWORKSelecting no security modeYou can also set no security for wireless access.If you do not set no security, anyone how knows the SSID can connect to the wireless network. Therefore, it is recommended to set the security if it is possible.1Press the [NONE] and press the [NEXT].The TRANSMIT POWER and RATE SETTING screen is displayed.2Select the transmit power and press the [NEXT] button.Select the low transmit power if you want to limit the area that the wireless communication is enabled. If you do not have to limit the area, select [100%].3Confirm the settings and press the [FINISH] button.The shutdown screen is displayed.If you want to change the settings, press the [PREV] to move back to the screen that you want to change and then repeat the operation.](https://usermanual.wiki/Toshiba-TEC/GN1060.Users-Manual/User-Guide-1349730-Page-44.png)
![1 SETTING UP WIRELESS NETWORK42 Setting up the Ad Hoc Mode4Press the [YES] to shutdown the equipment.The wireless settings apply after restarting the equipment.](https://usermanual.wiki/Toshiba-TEC/GN1060.Users-Manual/User-Guide-1349730-Page-45.png)
![1 SETTING UP WIRELESS NETWORK Disabling Wireless Network 43Disabling Wireless NetworkWhen you enable the wireless network, the on-board NIC (Network Interface Card) will be disabled.If you want to connect the equipment to wired network via the on-board NIC, you must disable the wireless network.1Press the [USER FUNCTIONS] button on the control panel to enter the User Functions menu.2Press the [ADMIN].The ADMINISTRATOR PASSWORD screen is displayed.3Press the [PASSWORD] button.The input screen is displayed.4Enter the administrator password and press the [OK].The ADMIN menu is displayed.5Press the [WIRELESS SETTINGS].The WIRELESS SETTINGS menu is displayed.](https://usermanual.wiki/Toshiba-TEC/GN1060.Users-Manual/User-Guide-1349730-Page-46.png)
![1 SETTING UP WIRELESS NETWORK44 Disabling Wireless Network6Press the [WIRELESS SETTINGS].The WIRELESS SETTINGS screen is displayed.7Press the [OFF] and press the [NEXT].The NETWORK TYPE screen is displayed.8Press the [FINISH].The shutdown screen is displayed.9Press the [YES] to shutdown the equipment.The wireless settings apply after restarting the equipment.](https://usermanual.wiki/Toshiba-TEC/GN1060.Users-Manual/User-Guide-1349730-Page-47.png)

![2 APPENDIX Troubleshooting 47TroubleshootingWhen Error Messages are DisplayedIf any error messages are displayed on the touch panel, see the following table to troubleshoot the problems for the Wireless LAN.When Cannot Connect to TOSHIBA MFPWhen you cannot connect to this equipment, reboot it *. If you still cannot, check the following requirements:yThe user certificate is not expired.yThe access point settings and network settings are correctly set.* Press and hold the [POWER] button for at least 1 second to shutdown the equipment and then press it again.Error Message TroubleshootingBad certificate Unsupported certificate is installed. Reinstall the appropriate certificate. This equipment supports md5RSA and sha1RSA certificate only.Bad record mac SSL Key exchange failed. Turn the power OFF and then ON to restart the equipment.Certificate expired The certificate has been expired. Make sure that the time is set correctly or whether the certificate is expired.Certificate revoke The certificate has been revoked. Ask your network administrator.Certificate unknown The installed CA certificate cannot work as server certificate. Make sure to install a correct CA certificate.Decompression failure This equipment does not support the SSL compression. Please disable the SSL compression on the RADIUS server.Handshake failure Unsupported encryption may be set on the server. Make sure to use the supported encryption method.Illegal parameter Unsupported version of the TLS protocol may be used. Make sure to use the supported version of the TLS protocol.No certificate No certificate is installed or you do not specify the certificate file name. Make sure to install the certificate and specify the certificate file name correctly.Peer error certificate Installed CA certificate cannot verify the server certificate in the RADIUS server. Make sure to install a correct CA certificate.Peer error no certificate The RADIUS server operates the communication with the certificate using the TLS protocol.Peer no cipher The RADIUS server requests the unsupported encryption for this equipment.Peer error unsupported certificate typeThis equipment uses the certificate that the RADIUS server does not support.Peer unexpected message The RADIUS server sends the message that is not TLS standard. Confirm the settings on the RADIUS server.Unknown remote error type The RADIUS server sends the alert message of illegal TLS.Unsupported certificate This equipment uses the certificate that the RADIUS server does not support.Unknown ca Installed CA certificate cannot verify the server certificate in the RADIUS server. Make sure to install a correct CA certificate.Unable to connect Ask the administrator.](https://usermanual.wiki/Toshiba-TEC/GN1060.Users-Manual/User-Guide-1349730-Page-50.png)