Toshiba TEC GN4020 Wireless LAN with Bluetooth USB Adapter User Manual 08 user s manual
Toshiba TEC Corporation Wireless LAN with Bluetooth USB Adapter 08 user s manual
Contents
- 1. Users Manual
- 2. User manual
Users Manual

1.PREPARATION
Components 13
1 PREPARATION
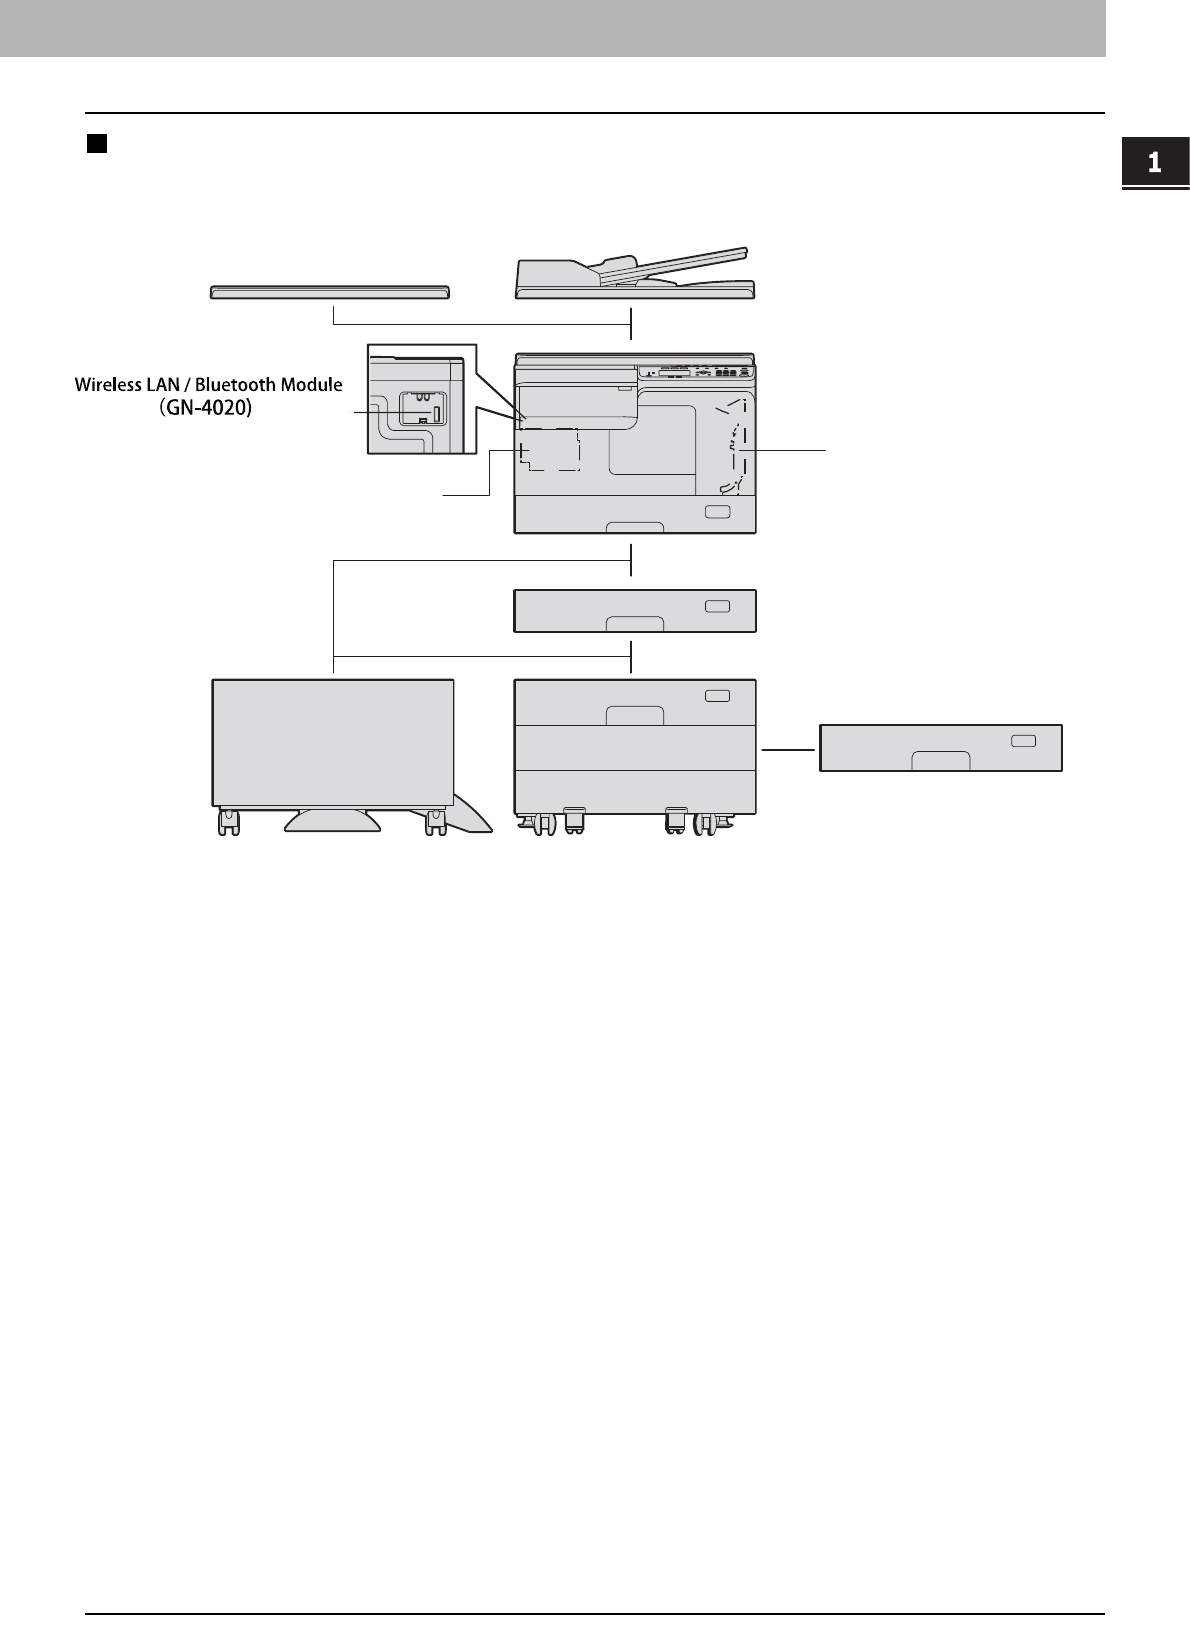
Configuration of options
The available options are listed below. Contact your service technician or service representative for details.
Main body
Automatic Duplexing Unit
(MD-0106)
Reversing Automatic
Document Feeder
(MR-3027)
Platen Cover
(KA-2507PC)
Wireless LAN Module
(GN-1080)
Fax Kit
(GD-1330)
Paper Feed Unit
(MY-1043)
Drawer Module
(MY-1044)
Paper Feed Pedestal
(KD-1039)
Desk
(MH-2507)
Wir
r
e
l
e
s
s
LAN Module
(
G
N
-
1
0
8
0
)
W
W
W
W
i
r
ir
r
e
l
e
s
s
L
A
N
reless LAN
N
M
o
d
u
l
e
N Module
W
i
r
r
e
l
e
s
s
L
(
G
N
-
(GN-
Components
1.PREPARATION
Preparation 1 - Turning Power ON 19
1 PREPARATION
Saving energy when not in use - Energy saving mode -
To reduce power consumption, the equipment automatically enters into the energy saving mode when a specified period
of time has passed since its last use.
Types of energy saving mode
Low power mode: “SAVING ENERGY” appears on the LCD screen.
The equipment automatically enters into low power mode when a specified period of time elapses.
Sleep mode: The LCD screen is turned off and only [ENERGY SAVER] is lit.
The equipment enters into sleep mode when a specified period of time elapses or the [ENERGY
SAVER] button is pressed.
When “Status Monitor” is running, the equipment does not enter into the sleep mode. If you want to enable the
sleep mode, exit it out.
P.74 “Status Monitor”
This equipment does not enter sleep mode when the Wireless LAN Module is installed.
The timers for “AUTO POWER SAVE” and “SLEEP MODE” have been set respectively as the factory default settings.
You can change them in the “USER FUNCTIONS” menu.
P.135 “User Functions Menu List”
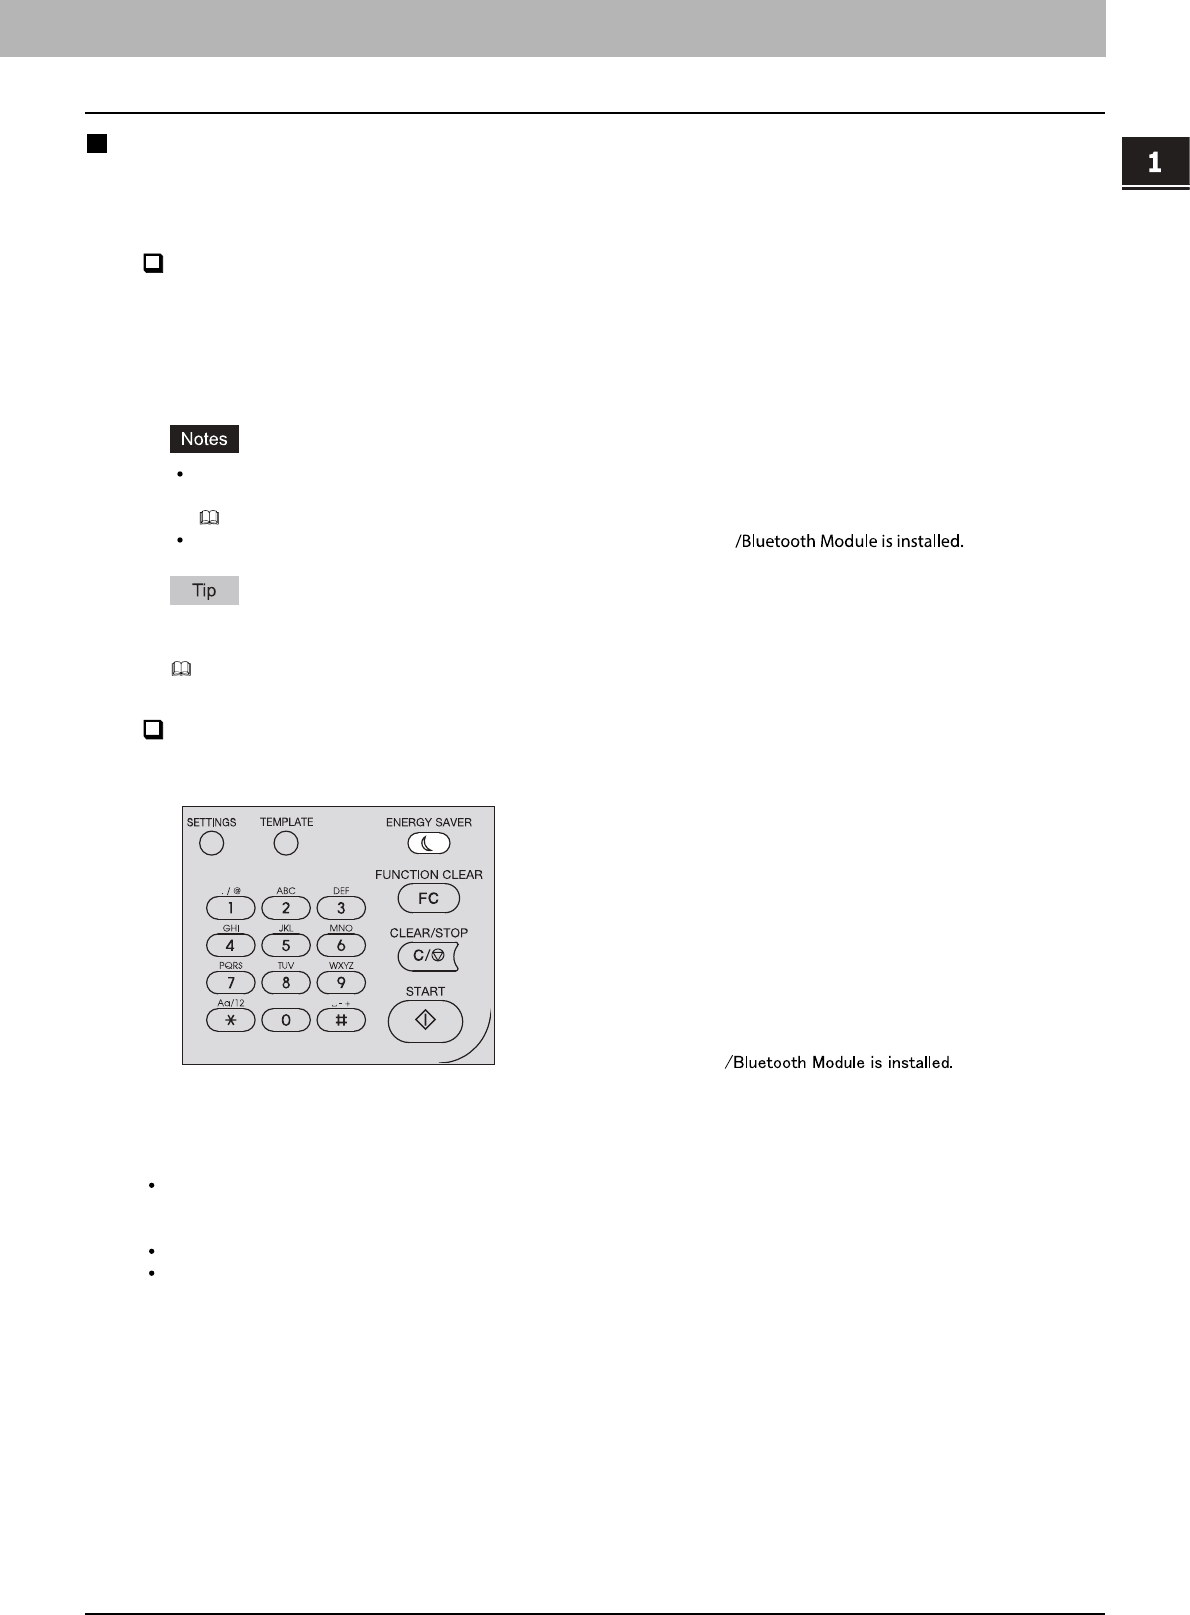
To turn the equipment into the energy saving mode (Sleep mode) manually
Press [ENERGY SAVER].
Canceling conditions for energy saving mode
The energy saving mode is canceled under the following conditions.
When [ENERGY SAVER], [START], [COPY], [SCAN], or [FAX] on the control panel is pressed.
- For the low power mode: Press [ENERGY SAVER], [START], [COPY], [SCAN], or [FAX]
- For the sleep mode: Press [ENERGY SAVER]
When printing or scanning is performed from a PC connected with this equipment.
When fax data is received.
is installed.
5 VARIOUS FUNCTIONS
User Functions Menu List 135
User Functions Menu List
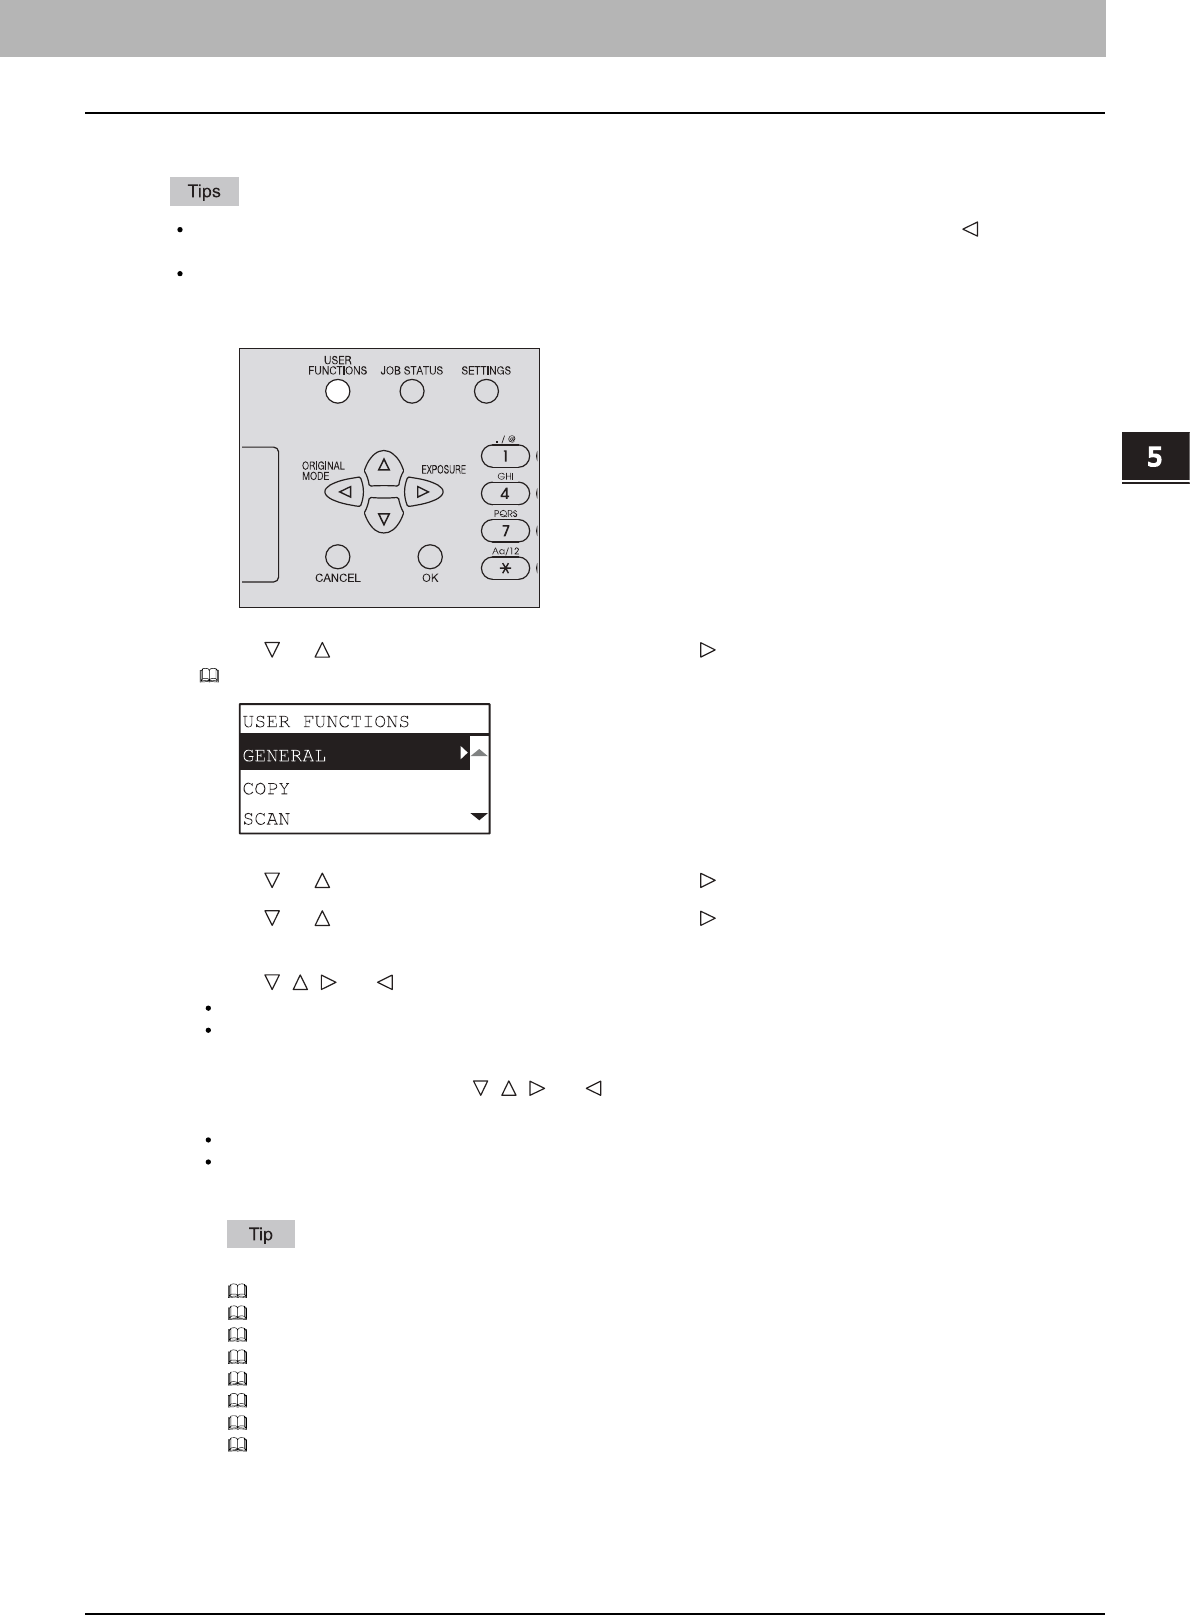
Before you start operating the “USER FUNCTIONS” menu, learn the general procedure below.
Press [CANCEL] to exit from the setting without making any changes. You can also exit with the button if it is
active.
Press [CLEAR/STOP] to delete a character. Keep pressing [CLEAR/STOP] for a second to clear all characters.
1
Press [USER FUNCTIONS].
2
Press or to scroll the menu, and then press to enter the function menu.
P.136 “User functions menu items”
3
Press or to scroll the menu, and then press to select the function.
4
Press or to scroll the menu, and then press to select the settings for each
function.
5
Press , , , or to select a setting, and then press [OK].
Continues to the next step if the selected setting has more options or values.
Exits from the menu if the selected setting has no more options or values. At this point, the operation is
complete.
6
Make option settings with , , , or , or enter characters using the digital keys, and
then press [OK].
Repeat this step if the selected setting has more options or values.
Exits from the menu if the selected setting has no more options or values. At this point, the operation is
complete.
The options or values vary depending on the function.
P.138 “GENERAL”
P.140 “COPY”
P.141 “SCAN”
P.141 “LIST”
P.142 “WIRELESS SETTING”
P.143 “ADDRESS BOOK”
P.143 “DRAWER”
P.143 “INFORMATION”
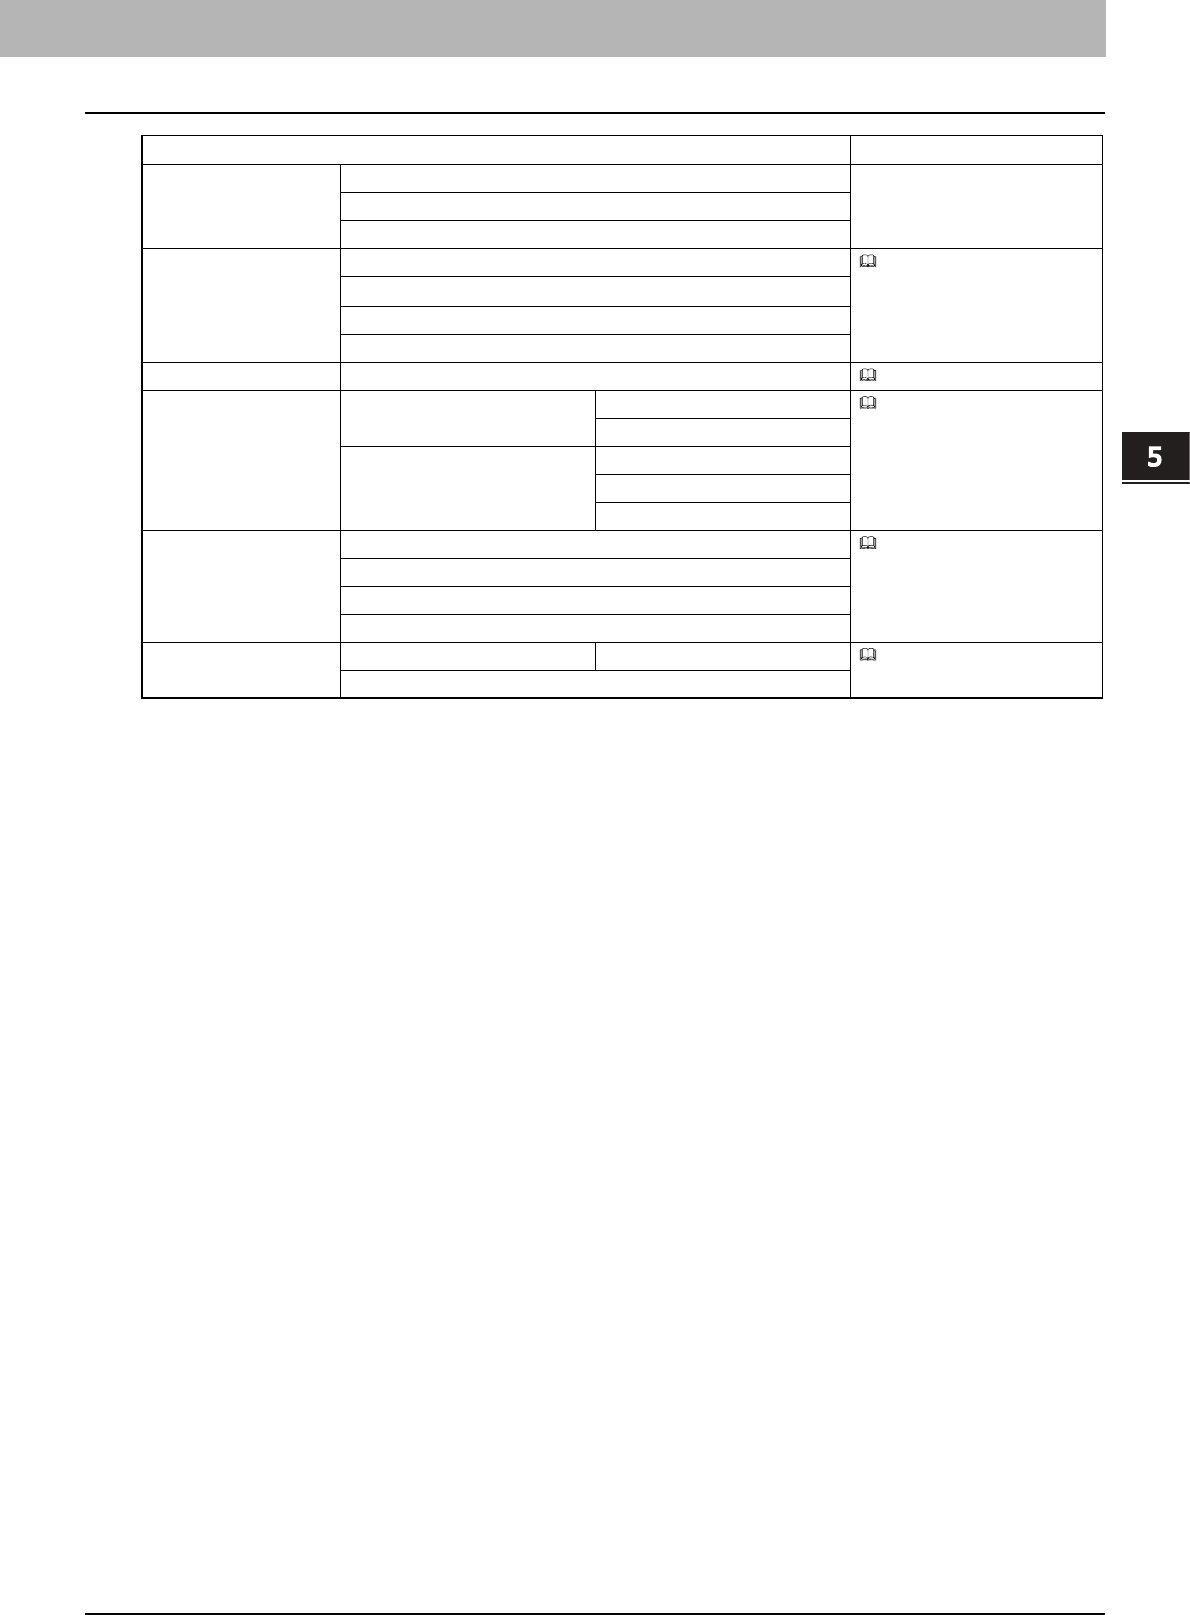
5.VARIOUS FUNCTIONS
User Functions Menu List 137
5 VARIOUS FUNCTIONS
REPORT SETTING AUTO JOURNAL For details of the fax settings,
see the Fax Guide.
MEMORY TX
MULTI TX
LIST ADDRESS BOOK P.141 “LIST”
FUNCTION
COUNTER
DEPARTMENT
WIRELESS SETTING - P.142 “WIRELESS SETTING”
ADDRESS BOOK E-MAIL SINGLE NUMBER P.143 “ADDRESS BOOK”
GROUP NUMBER
PHONE BOOK SPEED DIAL
GROUP DIAL
ONE TOUCH
DRAWER DRAWER 1 P.143 “DRAWER”
DRAWER 2
DRAWER 3
DRAWER 4
INFORMATION COUNTER TOTAL COUNTER P.143 “INFORMATION”
TONER REMAIN
Menu Functions Reference Pages
5 VARIOUS FUNCTIONS
142 User Functions Menu List
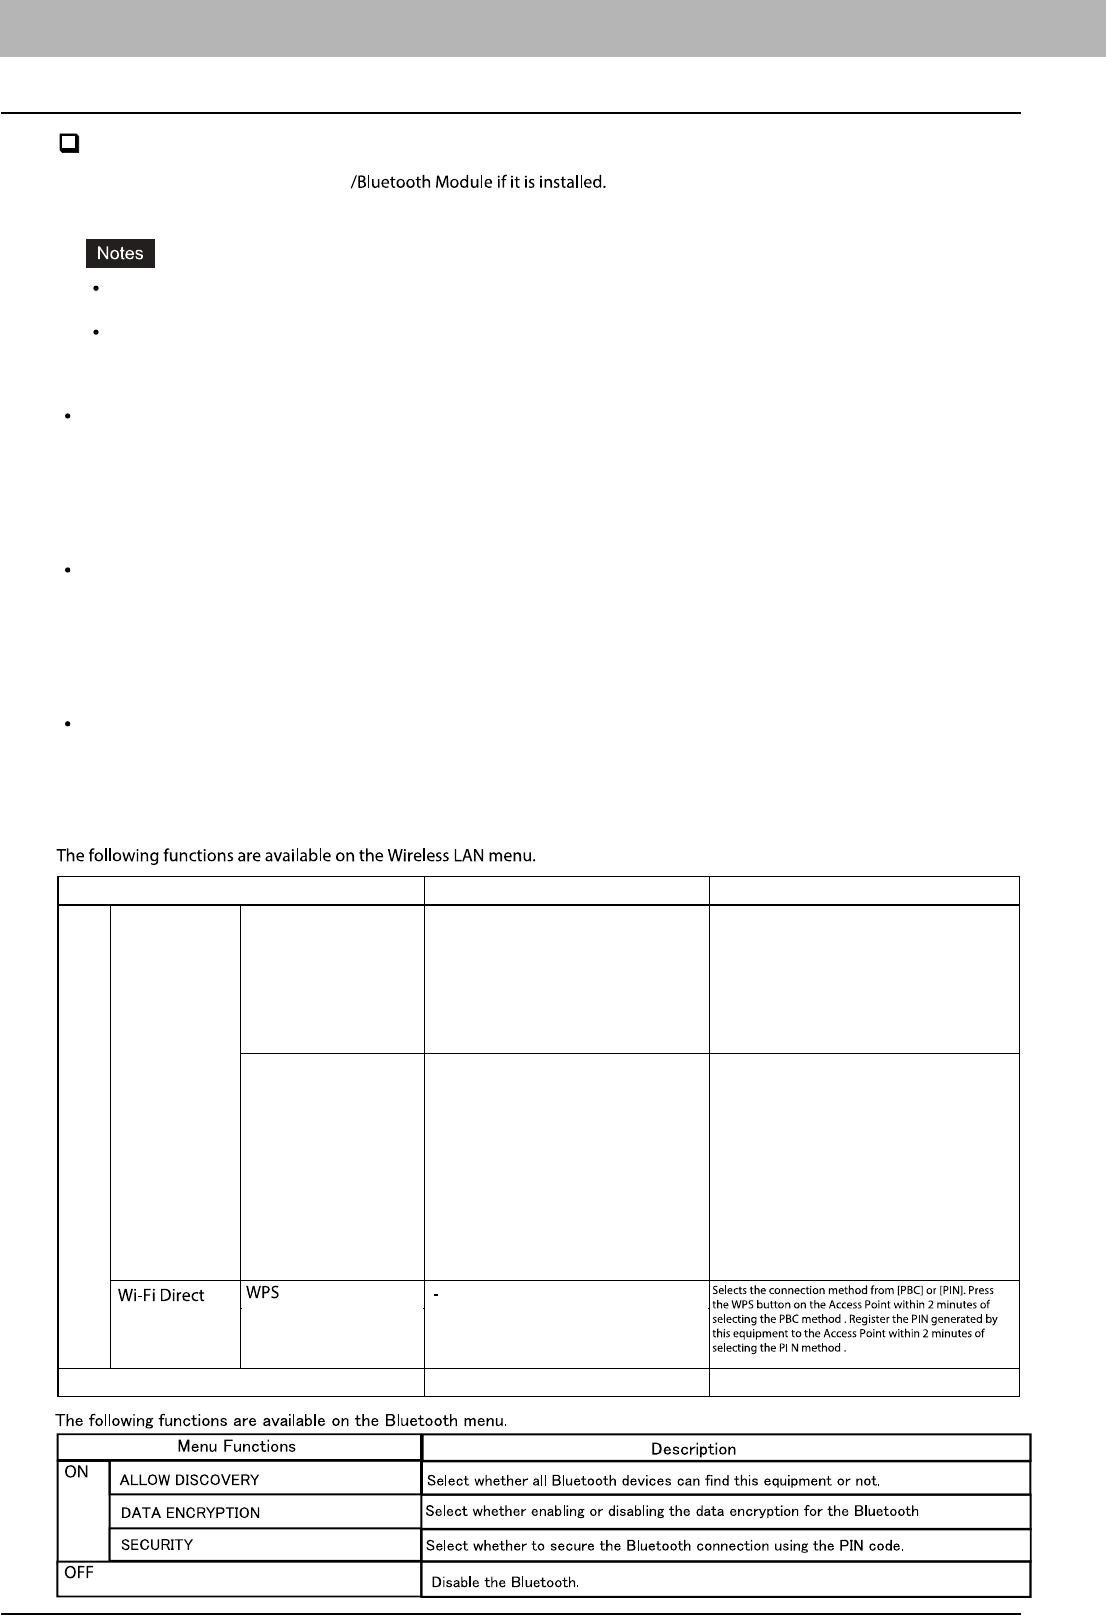
WIRELESS SETTING
You can configure the Wireless LAN Module if it is installed.
Select Infrastructure Mode or Ad Hoc Mode to specify the security mode.
If you do not set no security, anyone knows how the SSID can connect to the wireless network. Therefore, it is
recommended to set the security if it is possible.
Once the WIRELESS SETTING (except WPS) has been set up, exit from USER FUNCTIONS menu by pressing
[CANCEL] or [USER FUNCTIONS] button. When “APPLY AND REBOOT?” message appears, select “YES”, and
then press [OK]. The equipment is automatically rebooted and the WIRELESS SETTING is applied.
WPS
WPS is a standard to allow easy wireless LAN configurations. This equipment supports Push Button Configuration and
PIN methods.
The Push Button Configuration method completes the configuration by transmitting the ESSID and encryption key to
the wireless LAN device as you press the button on the Access Point.
Whereas the PIN method completes the configuration by transmitting the ESSID and encryption key to the wireless
LAN device as you register the PIN generated by the wireless LAN device to the Access Point.
WPA2-PSK, WPA2/WPA-PSK
WPA2 and WPA2/WPA-PSK are authentication methods using the PSK (Pre-Shared Key) between the Access Point
and other wireless devices.
To access the wireless network using the WPA2-PSK or WPA2/WPA-PSK authentication, the same PSK passphrase
must be assigned in both the Access Point and other wireless devices. If the PSKs are same between the Access
Point and other wireless devices, the Access Point allows them to access the wireless network through the Access
Point.
WEP
WEP is a data encryption method using the WEP key between the Access Point and other wireless devices.
WEP is less secure compared with WPA2 and WPA2/WPA-PSK. If the wireless network is configured in the
Infrastructure Mode and the Access Point supports WPA2-PSK or WPA2/WPA-PSK, it is recommended to use
WPA2-PSK or WPA2/WPA-PSK rather than WEP.
The following functions are available on the “WIRELESS SETTING” menu.
Menu Functions Settings Description
ON INFRASTRUCT
URE
WPS - Selects the connection method from
[PBC] or [PIN]. Press the WPS button on
the Access Point within 2 minutes of
selecting the PBC method. Register the
PIN generated by this equipment to the
Access Point within 2 minutes of selecting
the PIN method.
SSID/SECURITY - WPA2-PSK, WPA2/WPA-PSK:
Specify the passphrase after selecting
AES if you are using WPA2-PSK, or after
selecting TKIP+AES if you are using
WPA2/WPA-PSK.
WEP:
Selects the WEP encryption and key
entry method, and then enter the WEP
key.
NONE:
Sets no security for wireless access.
AD HOC AUTO - At first, select the channel setting method.
Next, selects the WEP encryption and
key entry method, and then enter the
WEP key.
MANUAL -
OFF - Disables the wireless network.
8.Appendix
Specifications of Options 171
8 Appendix
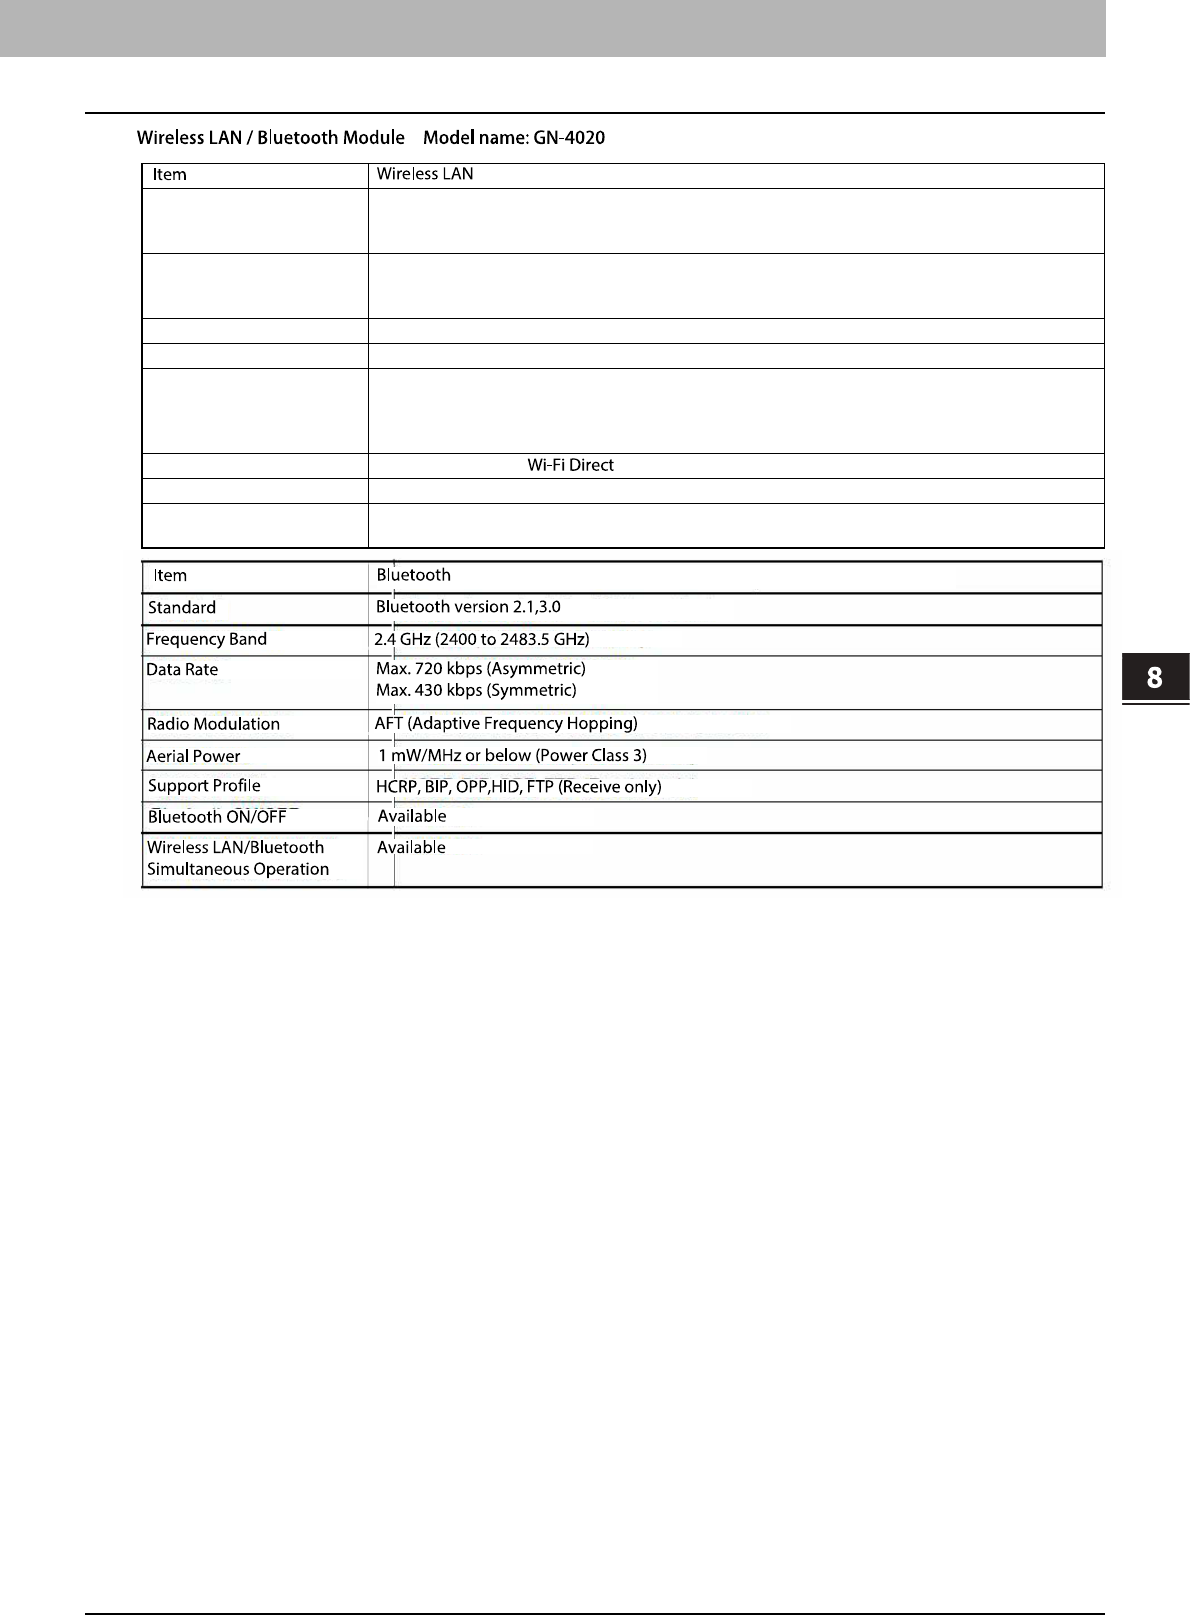
Wireless LAN Module
FAX Unit
For detail specifications, see the following manual.
Fax Guide
TOSHIBA-recommended paper is used for the values above. Specifications and appearance are subject to change
without notice in the interest of product improvement.
Model name GN-1080
Transmission Format IEEE 802.11b/g/n standard
Direct Sequence Spread Spectrum (DSSS)
Orthogonal Frequency Division Multiplexing (OFDM)
Data Transmission Speed IEEE 802.11b: 11, 5.5, 2, 1 Mbps
IEEE 802.11g: 54, 48, 36, 24, 18, 12, 9, 6 Mbps
IEEE 802.11n: MSC0-15 (HT20/40)
Access Method CSMA/CA
Wireless Category Low-power data transmission system
Security Static WEP
Key Length: 40 bit, 104 bit
WPA2: PSK(AES(CCMP))
WPA2/WPA mixed: PSK(AES(CCMP)+TKIP)
Operation Mode Infrastructure Mode, Ad Hoc Mode, WPS2.0 PBC or PIN method
Wireless ON/OFF Available
Wired LAN/Wireless LAN
Simultaneous Operation
Not Available
Model name GD-1330
7