Toshiba 20A44 User Manual COLOR TV Manuals And Guides L0502589
TOSHIBA Direct View/Digital 26 and under TV Manual L0502589 TOSHIBA Direct View/Digital 26 and under TV Owner's Manual, TOSHIBA Direct View/Digital 26 and under TV installation guides
User Manual: Toshiba 20A44 20A44 TOSHIBA COLOR TV - Manuals and Guides View the owners manual for your TOSHIBA COLOR TV #20A44. Home:Electronics Parts:Toshiba Parts:Toshiba COLOR TV Manual
Open the PDF directly: View PDF ![]() .
.
Page Count: 32
÷
TOSHIBA
3M91301A-E COVER 1 _ 13/2/04, 2:05
÷
÷
Dear Customer,
Thank you for purchasing this Toshiba TV. This manual will
help you use the many exciting features of your new TV.
Before operating the TV, pJease read this manuaJ
completely, and keep it nearby for future reference.
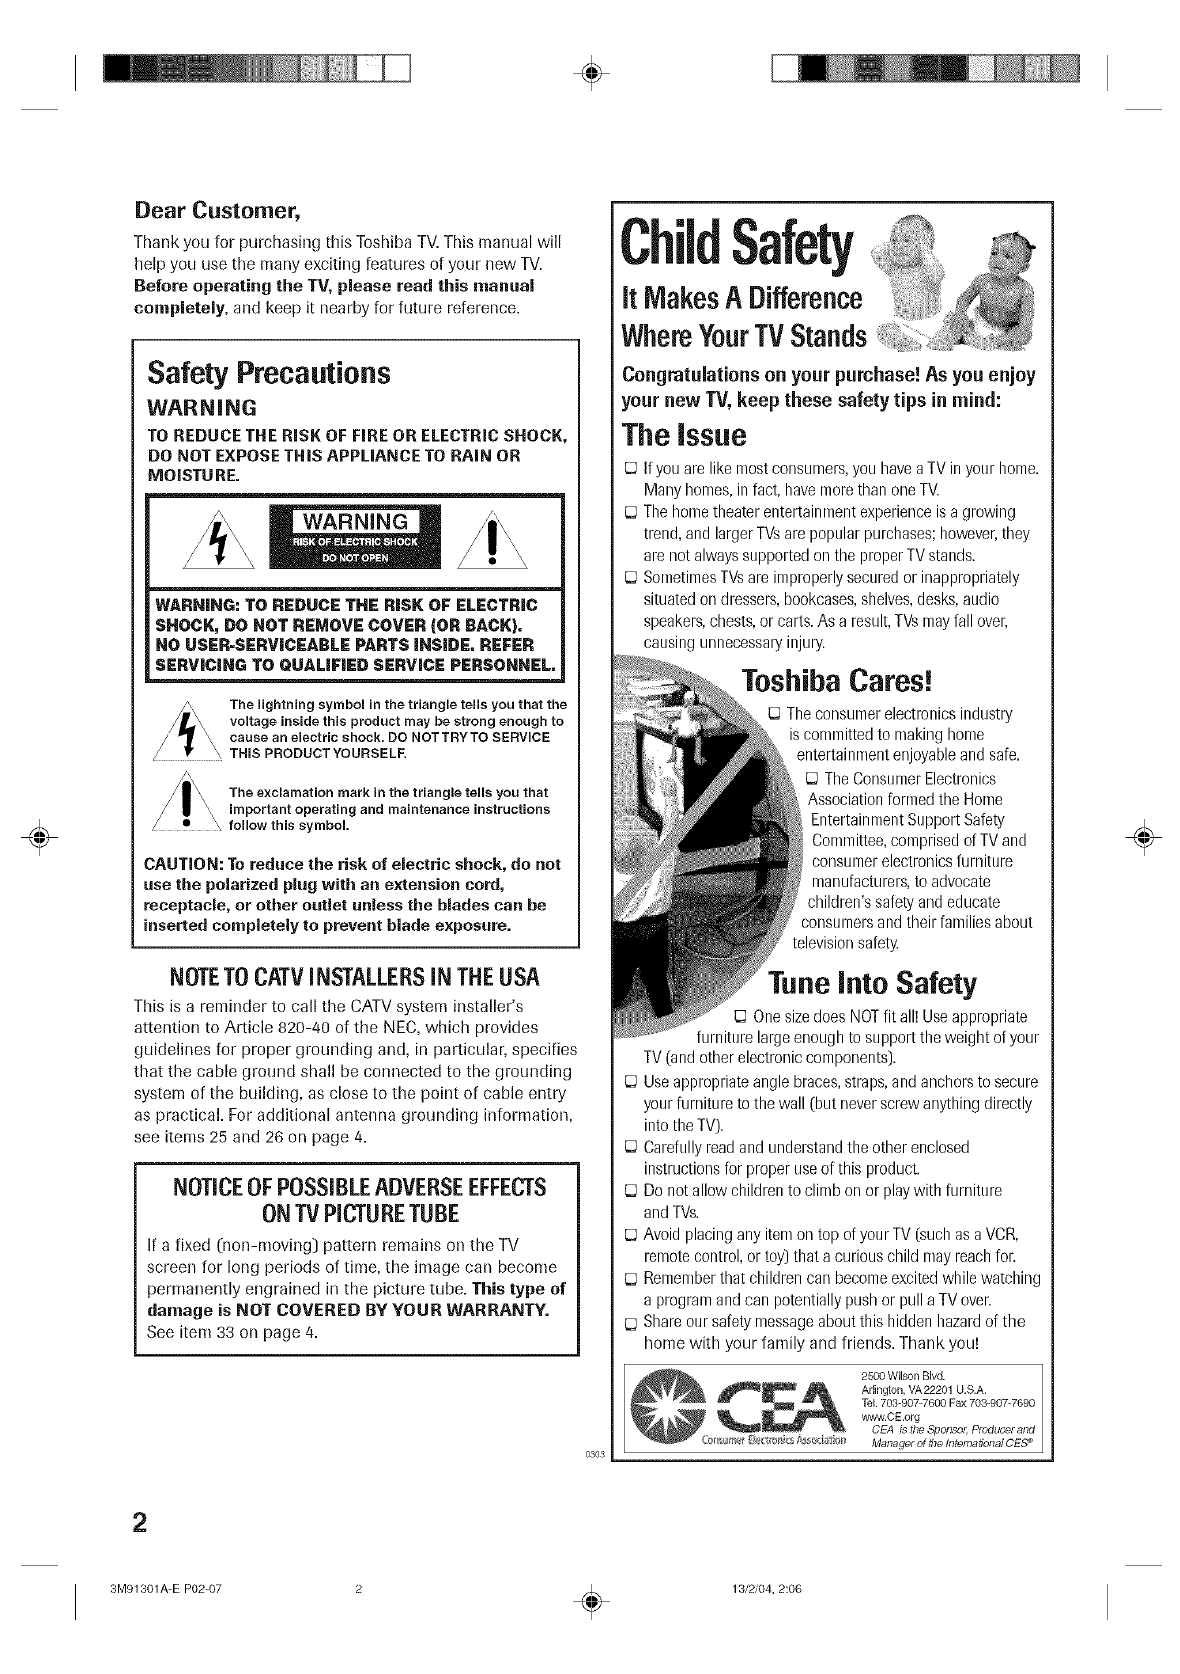
Safety Precautions
WARNING
TO REDUCE THE RiSK OF FiRE OR ELECTRIC SHOCK,
DO NOT EXPOSE THIS APPLIANCE TO RAIN OR
MOISTURE.
WARNING
WARNING: TO REDUCE THE RISK OF ELECTRIC
SHOCK, DO NOT REMOVE COVER (OR BACK),
NO USER-SERVICEABLE PARTS INSIDE, REFER
SERVICING TO QUALIFIED SERVICE PERSONNEL,
/Lt_ The lightning symbol in the triangle tells you that the
voltage inside this product may be strong enough to
/I r \ cause an electric shock. DO NOTTRYTO SERVICE
THIS PRODUCT YOURSELF.
The exclamation mark in the triangle tells you that
important operating and maintenance instructions
follow this symbol.
CAUTION: To reduce the risk of electric shock, do not
use the polarized plug with an extension cord,
receptacle, or other outlet unless the blades can he
inserted completely to prevent blade exposore.
NOTETO CATVINSTALLERSIN THEUSA
This is a reminder to call the CATV system installer's
attention to Article 828-/40 of the NEC, which provides
guidelines for proper grounding and, in particulah specifies
that the cable ground shall be connected to the grounding
system of the building, as close to the point of cable entry
as practical. For additional antenna grounding information,
see items 25 and 26 on page 4.
NOTICEOFPOSSIBLEADVERSEEFFECTS
ONTV PICTURETUBE
If a fixed (non-moving) pattern remains on the TV
screen for long periods of time, the image can become
permanently engrained in the picture tube. This type of
damage is NOT COVERED BY YOUR WARRANTY.
See item 33 on page/4.
0303
Safety
It MakesADifference
WhereYourTV Stands
Congratulations on your purchase! As you enjoy
your new TV, keep these safety tips in mind:
The issue
If you are like most consumers, you have a TV in your home.
Many homes, in fact, have more than one TV.
The home theater entertainment experience is a growing
trend, and larger TVsare popular purchases; however, they
are not always supported on the proper TV stands.
Sometimes TVsare improperly secured or inappropriately
situated on dressers, bookcases, shelves, desks, audio
speakers, chests, or carts. As a result, TVs may fall over,
causing unnecessary injury.
ToshibaCares!
The consumer electronics industry
is comnfitted to making honle
entertainment enjoyable and safe,
[J The Consumer Electronics
Association formed the Home
Entertainment Support Safety
Committee, comprised of TV and
oonsunler electronics furniture
manufacturers, to advocate
children's safety and educate
consumers and their families about
television safety.
Tune into Safety
One size does NOT fit all! Use appropriate
furniture large enough to support the weight of your
TV (and other electronic components).
Use appropriate angle braces, straps, and anchors to secure
your furniture to the wall [but never screw anything directly
into the TV).
Carefully read and understand the other enclosed
instructions for proper use of this product.
Do not allow children to climb on or play with furniture
and TVs.
Avoid placing any item on top of your TV [such as a VCR,
remote control, or toy) that a curious child may reach fun
Remember that children can become excited while watching
a program and can potentially push or pull a TV oven
Share our safety message about this hidden hazard of the
home with your family and friends. Thank you!
2500 Wilson Blvd.
Arlington, VA22201 U.S.A.
TeL 703=907-7600 Fax 703-907-7690
_'w.C E.orb
CEA is the Sponso# Producer and
Manager of file Intema#onal CE5e
÷
2
3M91301A-E P02-07 ÷13/2/04, 2:06
÷
÷
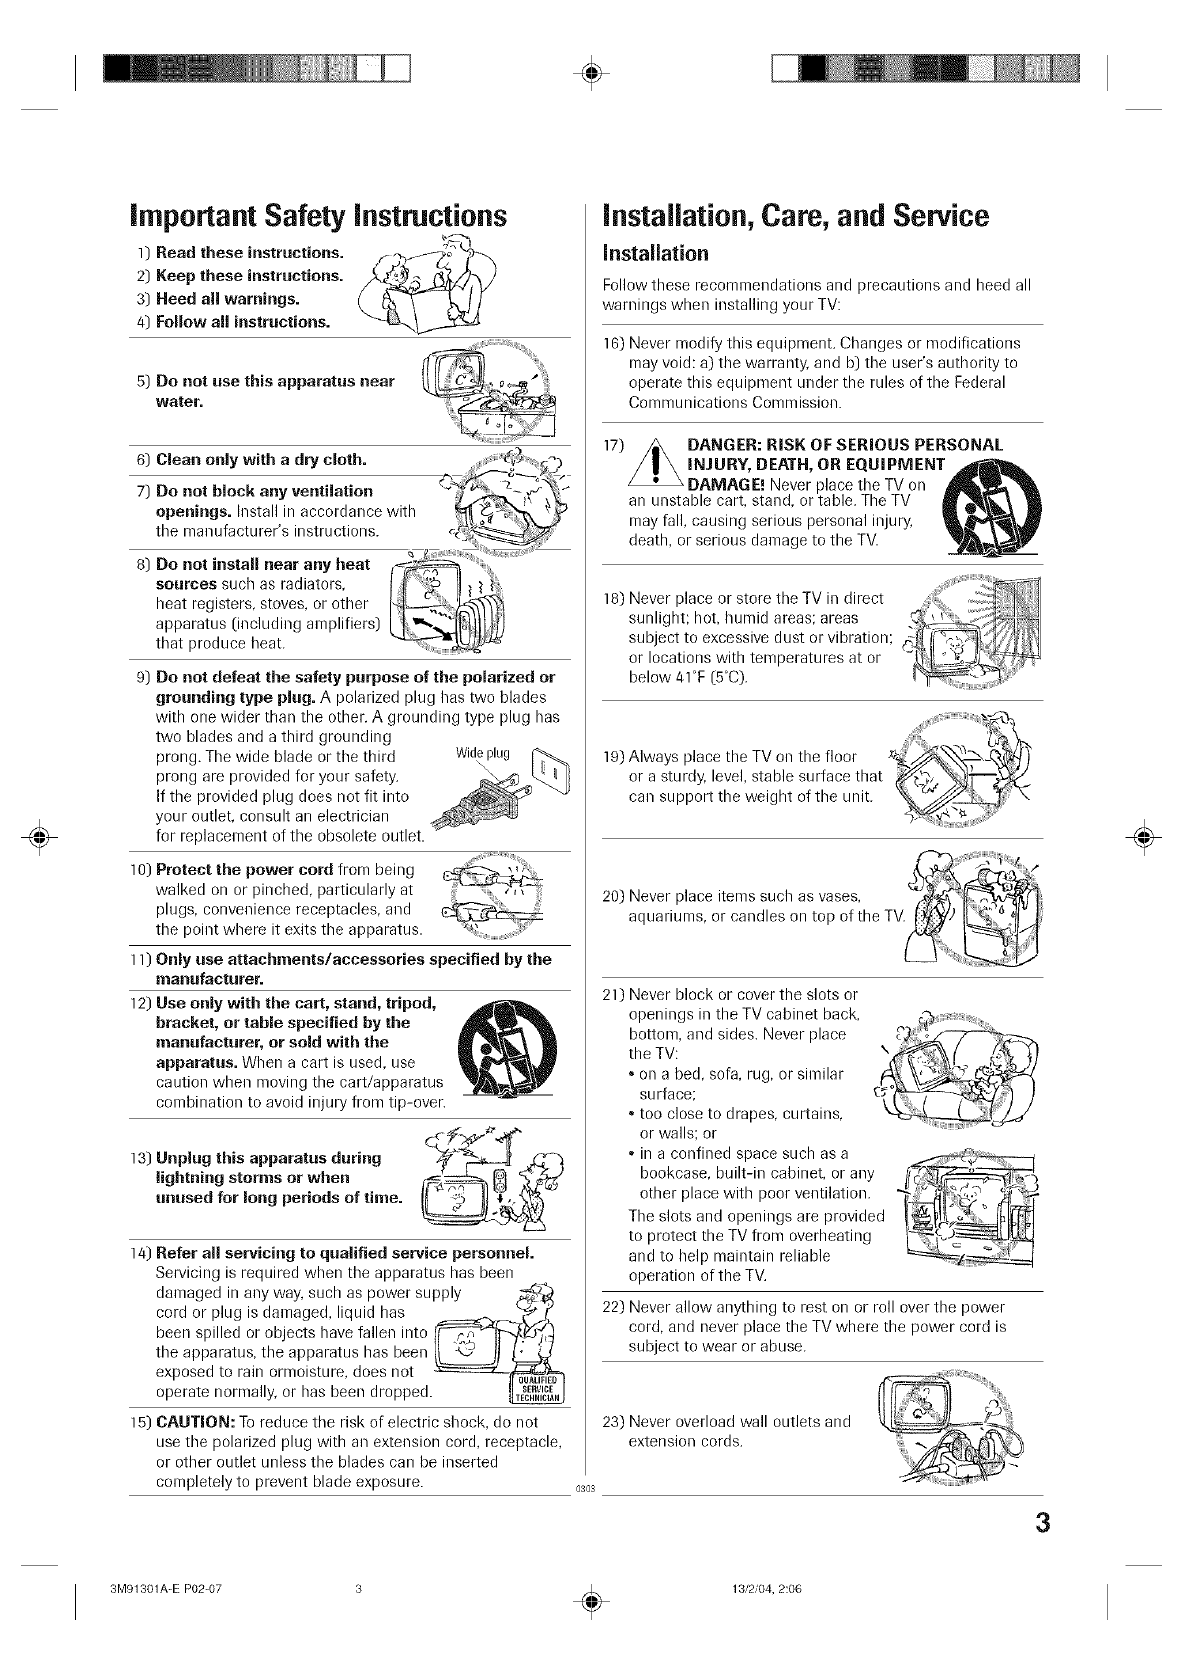
important Safety instructions
]) Read these instructions, f_/_f _t
2] Keep these instructions. __)
3) Heed all warnings.
4) Follow all instructions.
5) Do not use this apparatus near
water.
6) Clean only with adry cloth.
7) Do not block any venfilafion 4
openings. Install in accordance with
tile manufacturer's instructions, c,
8) Do not instan near any heat
sources such as radiators,
heat registers, stoves, or other
apparatus (including amplifiers)
that produce heat.
9) Do not defeat the safety purpose of the polarized or
grounding type plug. A polarized plug has two blades
with one wider than the other. A grounding type plug has
two blades and a third grounding
prong. The wide blade or the third Wide
prong are provided for your safety.
If the provided plug does not fit into
your outlet, consult an electrician
for replacement of the obsolete outlet.
10) Protect the power cord from being
walked on or pinched, particularly at
plugs, convenience receptacles, and
the point where it exits the apparatus.
11) Only use attachments/accessories specified by the
manufacturer.
] 2) Use only with the cart, stand, tripod,
bracket, or tame specified by the
manufacturer, or sold with the
apparatus. When a cart is used, use
caution when moving the cart/apparatus
combination to avoid injury from tip-oven
13) Unplug this apparatus during
lightning storms or when
unused for long periods of time.
] 4) Refer all servicing to qualified service personnel.
Servicing is required when the apparatus has been
damaged in any way, such as power supply _:_
cord or plug is damaged, liquid has ======___.)._:'_/_
been spilled or objects have fallen into I_._,j
the apparatus, the apparatus has been _!
exposed to rain ormoisture, does not -===:=:=z:.__
operate normally, or has been dropped._
15) CAUTION: To reduce the risk of electric shock, do not
use the polarized plug with an extension cord, receptacle,
or other outlet unless the blades can be inserted
completely to prevent blade exposure. 0303
installation,Care, and Service
installation
Follow these recommendations and precautions and heed all
warnings when installing your TV:
16) Never modify this equipment. Changes or modifications
may void: a) the warranty, and b] the user's authority to
operate this equipment under the rules of the Federal
Communications Commission.
]7) DANGER: RiSK OF SERIOUS PERSONAL
iNJURY, DEATH, OR EQUIPMENT
DAMAGE! Never place tile TV on
an unstable cart, stand, or table. The TV
may fall, causing serious personal injury,
death, or serious damage to the TV.
18) Never place or store the TV in direct _''" ""' "'' :""......
sunlight; hot, humid areas; areas .__
subject to excessive dust or vibration; .
or locations with temperatures at or
below 41°F (5°C). ....
HHHHHr_JJiiiiiH_I,,N
]9) Always place the TV on the floor _'--'_,
or a sturdy, level, stable surface that Y/_, _ -
can support the weight of the unit _:_
£
20) Never place items such as vases, _w.,d__
aquariums, or candles on top of the TV. ti_)
:ii
2]) Never block or cover the slots or
openings in the TV cabinet back,
bottom, and sides. Never place
the TV:
•on a bed, sofa, rug, or similar
surface;
•too close to drapes, curtains,
or walls; or
•in a confined space such as a
bookcase, built-in cabinet, or any
other place with poor ventilation.
The slots and openings are provided
to protect the TV from overheating
and to help maintain reliable
operation of the TV.
22) Never allow anything to rest on or roll over the power
cord, and never place the TV where the power cord is
subject to wear or abuse.
_==L-z/
23) Never overload wall outlets and
extension cords.
3
÷
3M91301A-E P02-07 ÷13/2/04, 2:06
÷
÷
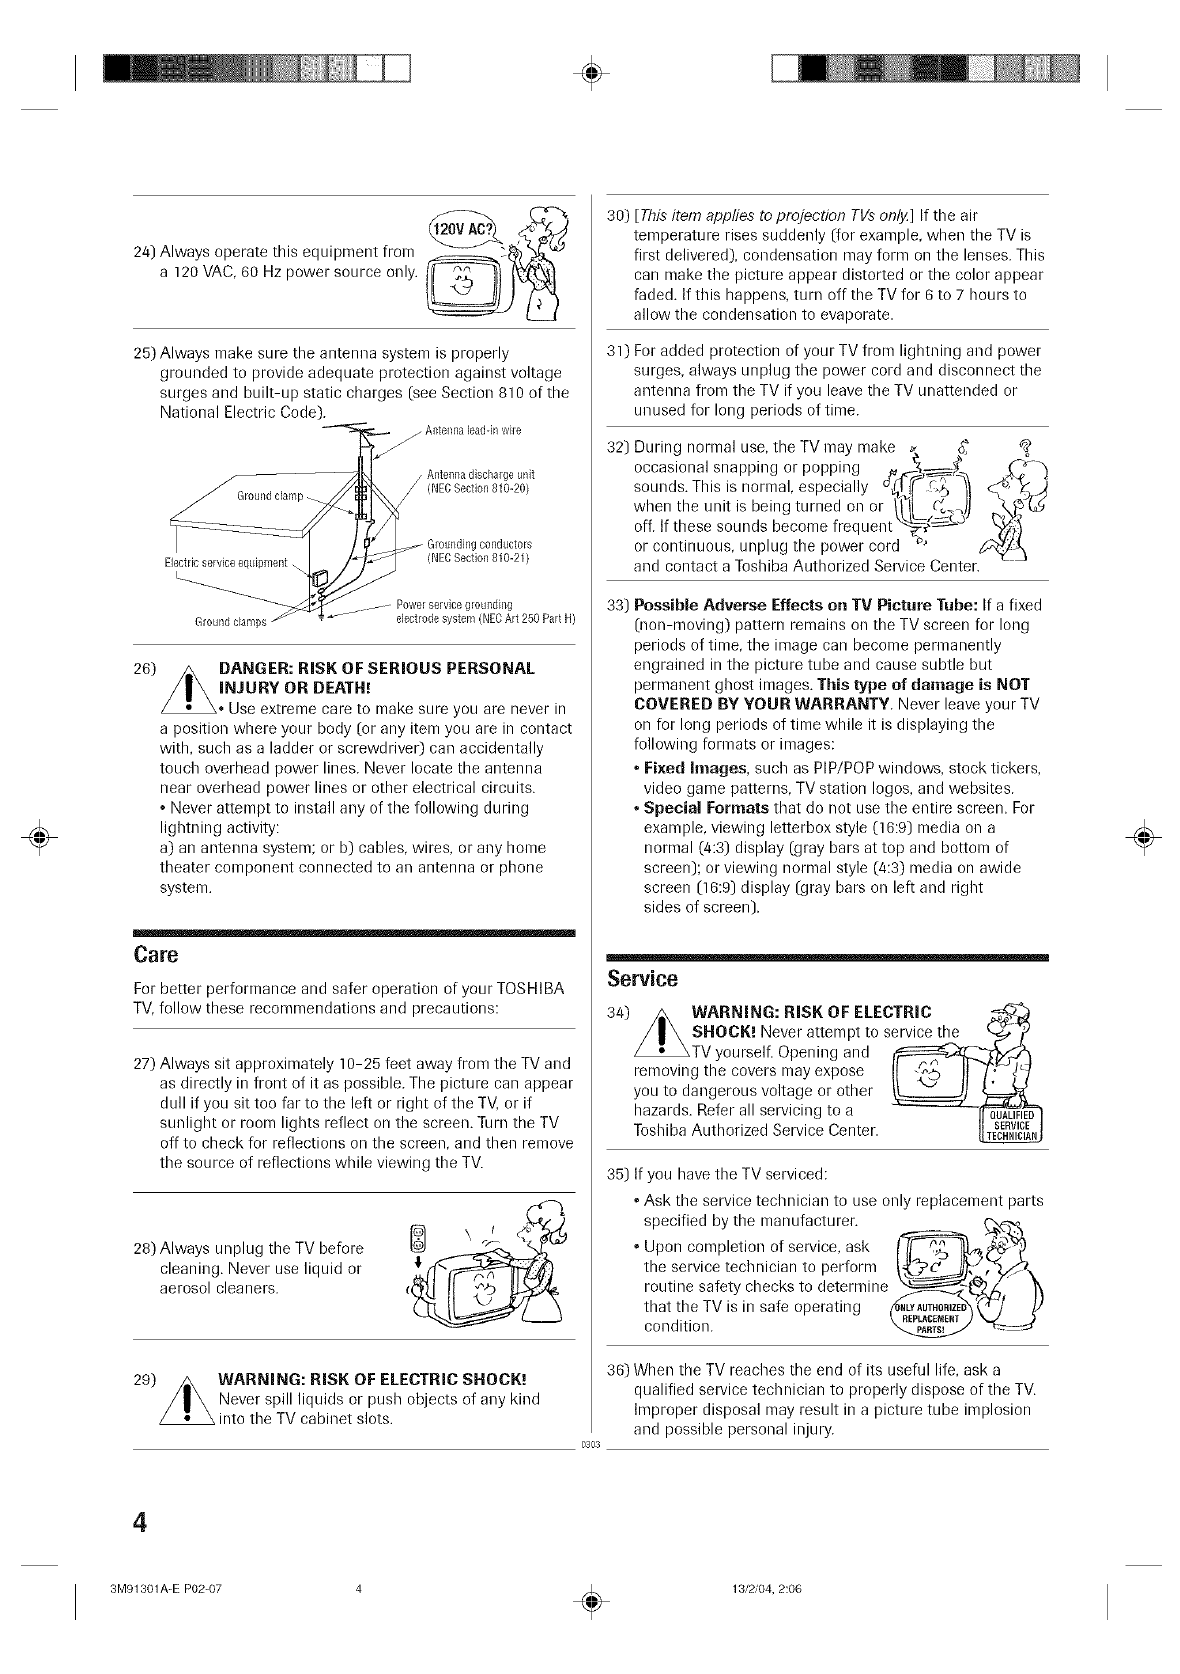
24) Always operate this equipment from
a 120 VAC, 60 Hz power source only.
25) Always make sure the antenna system is properly
grounded to provide adequate protection against voltage
surges and built-up static charges (see Section 810 of the
National Electric Code).
Electric service equipment.
Ground clamps
conductors
(NEOSection 810-21)
Power selvioe groundh/g
dectrode system (NEC Art 250 Part H)
26) /_ DANGER: RiSK OF SERIOUS PERSONAL
/I\ INjuRYoRDEAr.:
_* Use extreme care to make sure you are/lever in
a position where your body (or any item you are in contact
with, sucb as a ladder or screwdriver) can accidentally
toucb overhead power lines. Never locate the antenna
near overhead power lines or other electrical circuits.
• Never attempt to install any of the following during
ligbtning activity:
a) an antenna system; or b) cables, wires, or any hon)e
theater component connected to an antenna or phone
system.
Care
For better performance and safer operation of your TOSHIBA
TV, follow these recommendations and precautions:
27) Always sit approximately 10-25 feet away from the TV and
as directly in front of it as possible. The picture can appear
dull if you sit too far to the left or right of the TV, or if
sunlight or room ligbts reflect on the screen. Turn the TV
off to check for reflections on the screen, and then remove
the source of reflections while viewing the TV.
28) Always unplug the TV before
cleaning. Never use liquid or
aerosol cleaners.
29) WARNING: RISK OF ELECTRIC SHOCK._
Never spill liquids or pusb objects of any kind
into the TV cabinet slots.
30) [This item applies to projection TVs onlj_] If the air
temperature rises suddenly [for example, when the TV is
first delivered), condensation may form on the lenses. This
can make tbe picture appear distorted or the color appear
faded. If this happens, turn off the TV for 6 to 7 hours to
allow the condensation to evaporate.
31) For added protection of your TV from lightning and power
surges, always unplug the power cord and disconnect the
antenna from the TV if you leave the TV unattended or
unused for long periods of time.
32) During normal use, the TV may make _. %" _8
occasional snapping or popping .. _ _-
• • • c_( r_
sounds. This is normal, especially _.,_.¢r._5 _-_ ° -_
when the unit is being turned on or /_IL ('_'_,)l
off. If these sounds become frequent L_, #_-_-LJ
or continuous, unplug the power cord #'
and contact a Tosbiba Authorized Service Center.
33) PessiMe Adverse Effects on TV Picture Tube: If a fixed
(con-moving) pattern remains on the TV screen for long
periods of time, the intage can become permanently
engrained in the picture tube and cause subtle but
permanent gbost images. This type of damage is NOT
COVERED BY YOUR WARRANTY. Never leave your TV
on for long periods of time while it is displaying the
following formats or images:
• Fixed Images, sucb as PiP/POP windows, stock tickers,
video game patterns, TV station Iogos, and websites.
• Special Formats that do not use the entire screen. For
example, viewing letterbox style (16:9) media on a
normal (4:3) display (gray bars at top and bottom of
screen); or viewing normal style (4:3) media on awide
screen (16:9) display (gray bars on left and rigbt
sides of screen).
0303
Service
34) WARNING: RiSK OF ELECTRIC
SHOCK. I Never attempt to service tf_e _
TV yourself. Opening and _r/_
removing the covers n/ay expose I[ _."_ II _]
you to dangerous voltage or other _ ti==_
hazards. Refer all servicing to a __.ED_
Tosbiba Authorized Service Center.
35) If you have the TV serviced:
•Ask the service tecbnician to use only replacement parts
specified by the manufacturer, t'_
•Upon completion of service, ask _:_ '"
the service tecbnician to perform
routine safety checks to determine
that the TV is in safe operatingconditiorl. __)
36) When the TV reacbes the end of its useful life, ask a
qualified service tecbnician to properly dispose of the TV.
Improper disposal may result in a picture tube implosion
and possible personal injury.
÷
4
3M91301A-E P02-07 ÷13/2/04, 2:06
÷
FEATURES
181 Channel Tuner - The tuning system is capable of receiving all 68 VHF/UHF standard broadcast channels that
are available in your area. When operating on a cable system, it can tune to the standard VHF channel frequencies
plus up to 113 cable channel frequencies. The actual number of channels received depends upon channel
reception in your area or your cable system.
On-screen 3 Language Display -This TV can display the on-screen language in English, Spanish or French.
Sleep Timer - Operable from the remote control, the TV can be programmed to turn off automatically (from 10 to
120 minutes, in 10-minute increments).
Memory Back Up - This system prevents loss of memorized channel selections in case a power interruption to the
TV should occur.
V-Chip -The V-Chip function can read the rating of a TV program or movie content if the program is encoded with
this information. V-Chip will allow you to set a restriction level. (designed to work with the U. S. V-Chip system only)
Picture Control Adjustments - The on-screen display allows precise remote control adjustment of BRIGHTNESS,
CONTRAST, COLOR, TINT and SHARPNESS.
Closed Captioned Decoder - Displays closed captions or text on-screen (when available).
Stereo/SAP Reception - This TV is designed to receive stereo and second audio program (SAP) broadcasts
where available.
Lock feature - This feature has three functions, LOCKING CHANNELS, LOCKING VIDEO INPUT and SETTING
THE GAME TIMER.
. Programmable ON Timer -Allows you to automatically turn on the TV at a set time.
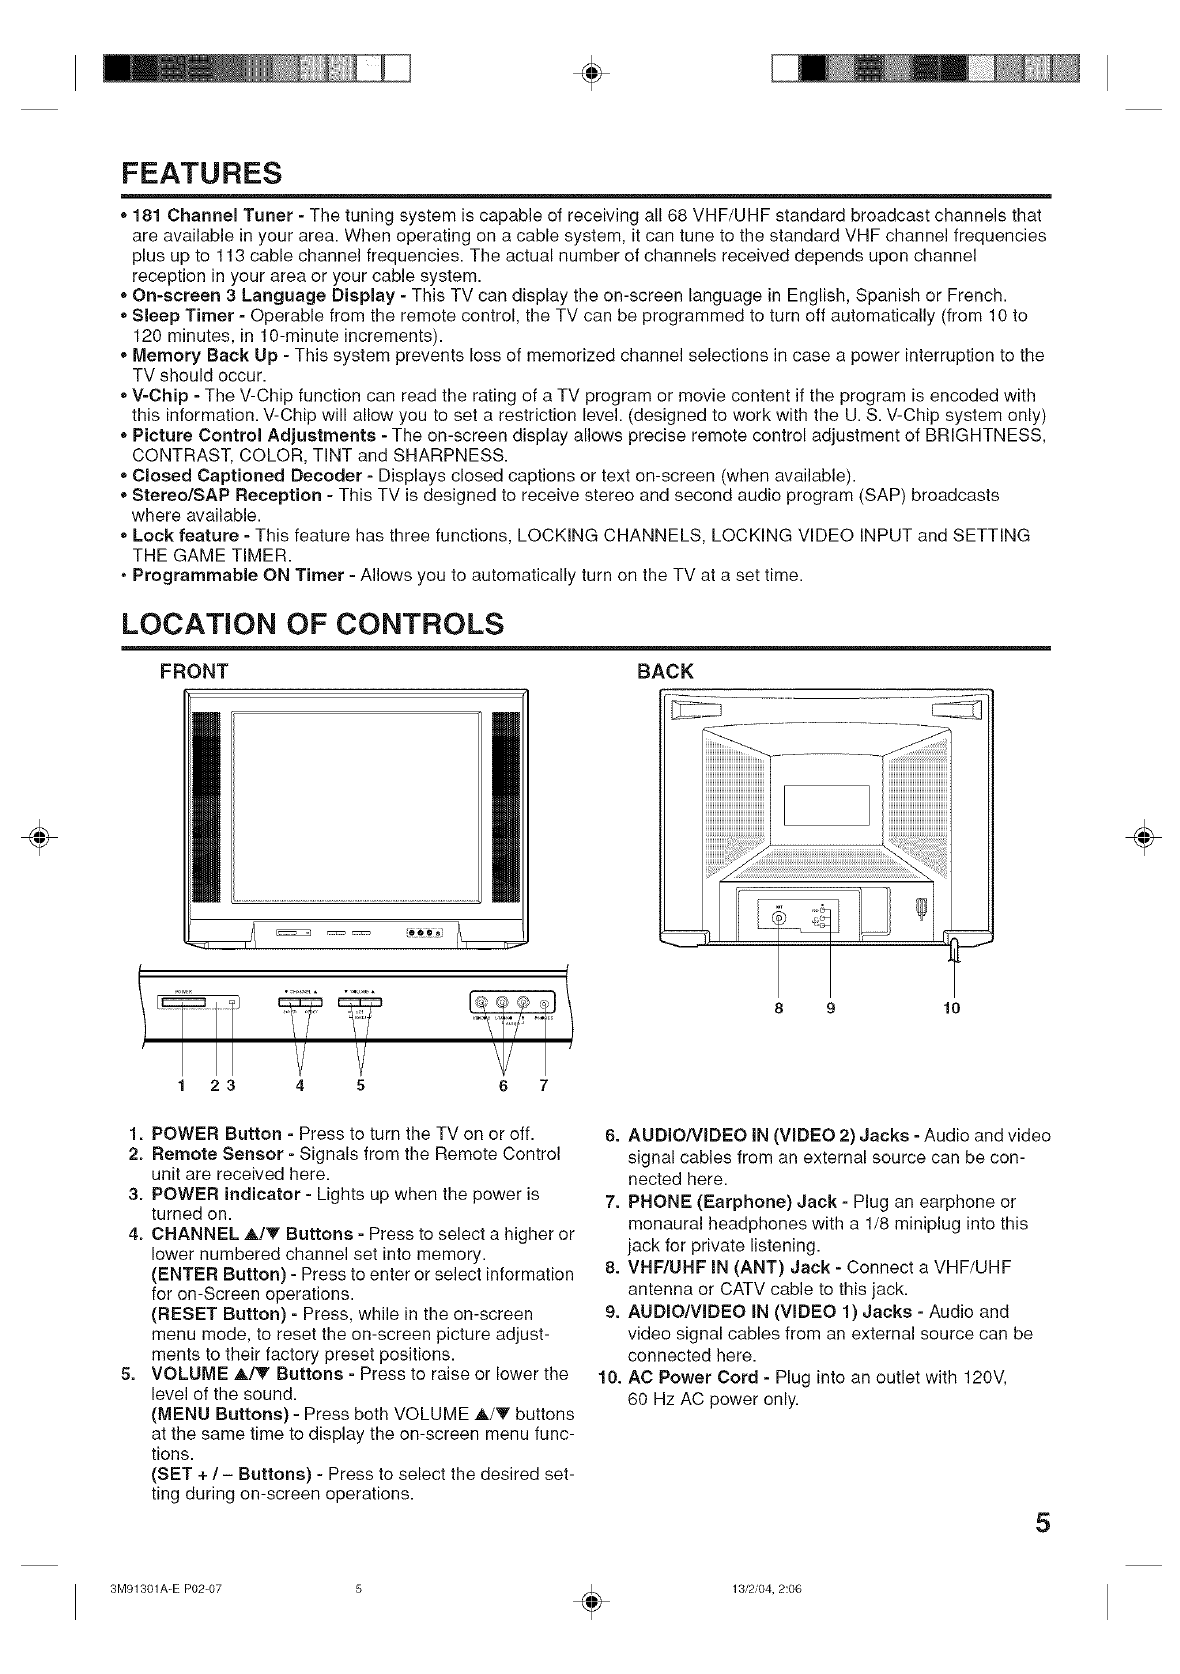
LOCATION OF CONTROLS
FRONT BACK
÷
23 4 5 6 7
1. POWER Button - Press to turn the TV on or off.
2. Remote Sensor - Signals from the Remote Control
unit are received here.
3. POWER indicator - Lights up when the power is
turned on.
4. CHANNEL ,A,/V Buttons - Press to select a higher or
lower numbered channel set into memory.
(ENTER Button) - Press to enter or select information
for on-Screen operations.
(RESET Button) - Press, while in the on-screen
menu mode, to reset the on-screen picture adjust-
ments to their factory preset positions.
5. VOLUME A/V Buttons - Press to raise or lower the
level of the sound.
(MENU Buttons) - Press both VOLUME A/V buttons
at the same time to display the on-screen menu func-
tions.
(SET + /- Buttons) - Press to select the desired set-
ting during on-screen operations.
8 9 10
6. AUDIO/VIDEO IN (VIDEO 2) Jacks - Audio and video
signal cables from an external source can be con-
nected here.
7. PHONE (Earphone) Jack - Plug an earphone or
monaural headphones with a 1/8 miniplug into this
jack for private listening.
8. VHF/UHF IN (ANT) Jack - Connect a VHF/UHF
antenna or CATV cable to this jack.
9. AUDIO/VIDEO IN (VIDEO 1) Jacks - Audio and
video signal cables from an external source can be
connected here.
10. AC Power Cord - Plug into an outlet with 120V,
60 Hz AC power only.
5
÷
3M91301A-E P02-07 ÷13/2/04, 2:06
÷
÷
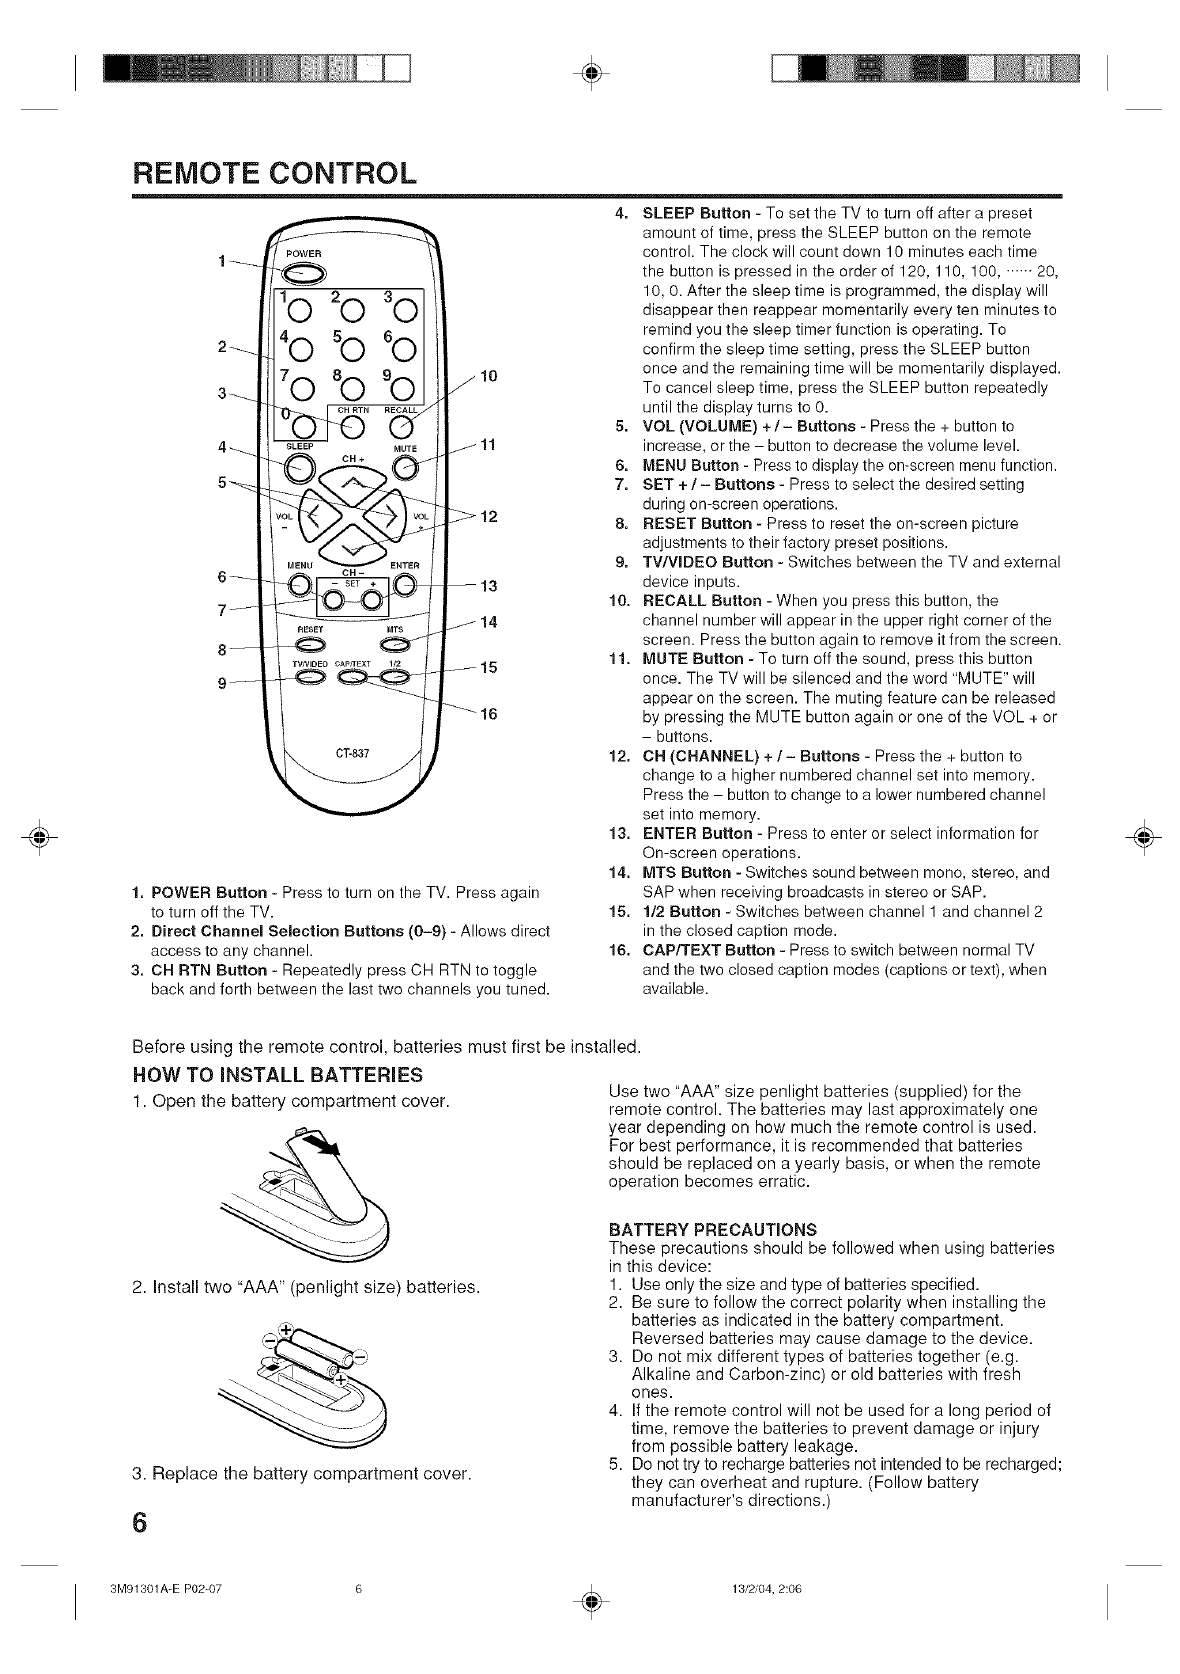
REMOTE CONTROL
4. SLEEP Button - To set the TV to turn off after a preset
10
1. POWER Button - Press to turn on the TV. Press again
to turn off the TV.
2. Direct Channel Selection Buttons (0-9) - Allows direct
access to any channel.
3. CH RTN Button - Repeatedly press CH RTN to toggle
back and forth between the last two channels you tuned.
amount of time, press the SLEEP button on the remote
control. The clock will count down 10 minutes each time
the button is pressed in the order of 120, 110, 100, ...... 20,
10, 0. After the sleep time is programmed, the display will
disappear then reappear momentarily every ten minutes to
remind you the sleep timer function is operating. To
confirm the sleep time setting, press the SLEEP button
once and the remaining time will be momentarily displayed.
To cancel sleep time, press the SLEEP button repeatedly
until the display turns to 0.
5. VOL (VOLUME) +/- Buttons - Press the + button to
increase, orthe - button to decrease the volume level.
6. MENU Button - Press to display the on-screen menu function.
7. SET + /- Buttons - Press to select the desired setting
during on-screen operations.
8. RESET Button - Press to reset the on-screen picture
adjustments to their factory preset positions.
9. TWVIDEO Button - Switches between the TV and external
device inputs.
10. RECALL Button - When you press this button, the
channel number will appear in the upper right corner of the
screen. Press the button again to remove it from the screen.
11. MUTE Button - To turn off the sound, press this button
once. The TV will be silenced and the word "MUTE" will
appear on the screen. The muting feature can be released
by pressing the MUTE button again or one of the V©L + or
- buttons.
12. CH (CHANNEL) +/- Buttons - Press the + button to
change to a higher numbered channel set into memory.
Press the - button to change to a lower numbered channel
set into memory.
13, ENTER Button - Press to enter or select information for
On-screen operations.
14. MTS Button - Switches sound between mono, stereo, and
SAP when receiving broadcasts in stereo or SAP.
15. 1/2 Button - Switches between channel 1 and channel 2
in the closed caption mode.
16. CAPfrEXT Button - Press to switch between normal TV
and the two closed caption modes (captions or text), when
available.
÷
Before using the remote control, batteries must first be installed.
HOW TO iNSTALL BATTERIES Use two "AAA" size penlight batteries (supplied) for the
remote control. The batteries may last approximately one
year depending on how much the remote control is used.
For best performance, it is recommended that batteries
should be replaced on a yearly basis, or when the remote
operation becomes erratic.
1. Open the battery compartment cover.
2. Install two "AAA" (penlight size) batteries.
3. Replace the battery compartment cover.
6
BATTERY PRECAUTIONS
These precautions should be followed when using batteries
in this device:
1. Use only the size and type of batteries specified.
2. Be sure to follow the correct polarity when installing the
batteries as indicated in the battery compartment.
Reversed batteries may cause damage to the device.
3. Do not mix different types of batteries together (e.g.
Alkaline and Carbon-zinc) or old batteries with fresh
ones.
4. If the remote control will not be used for a long period of
time, remove the batteries to prevent damage or injury
from possible battery leakage.
5. Do not try to recharge batteries not intended to be recharged;
they can overheat and rupture. (Follow battery
manufacturer's directions.)
3M91301A-E P02-07 ÷13/2/04, 2:06
÷
÷
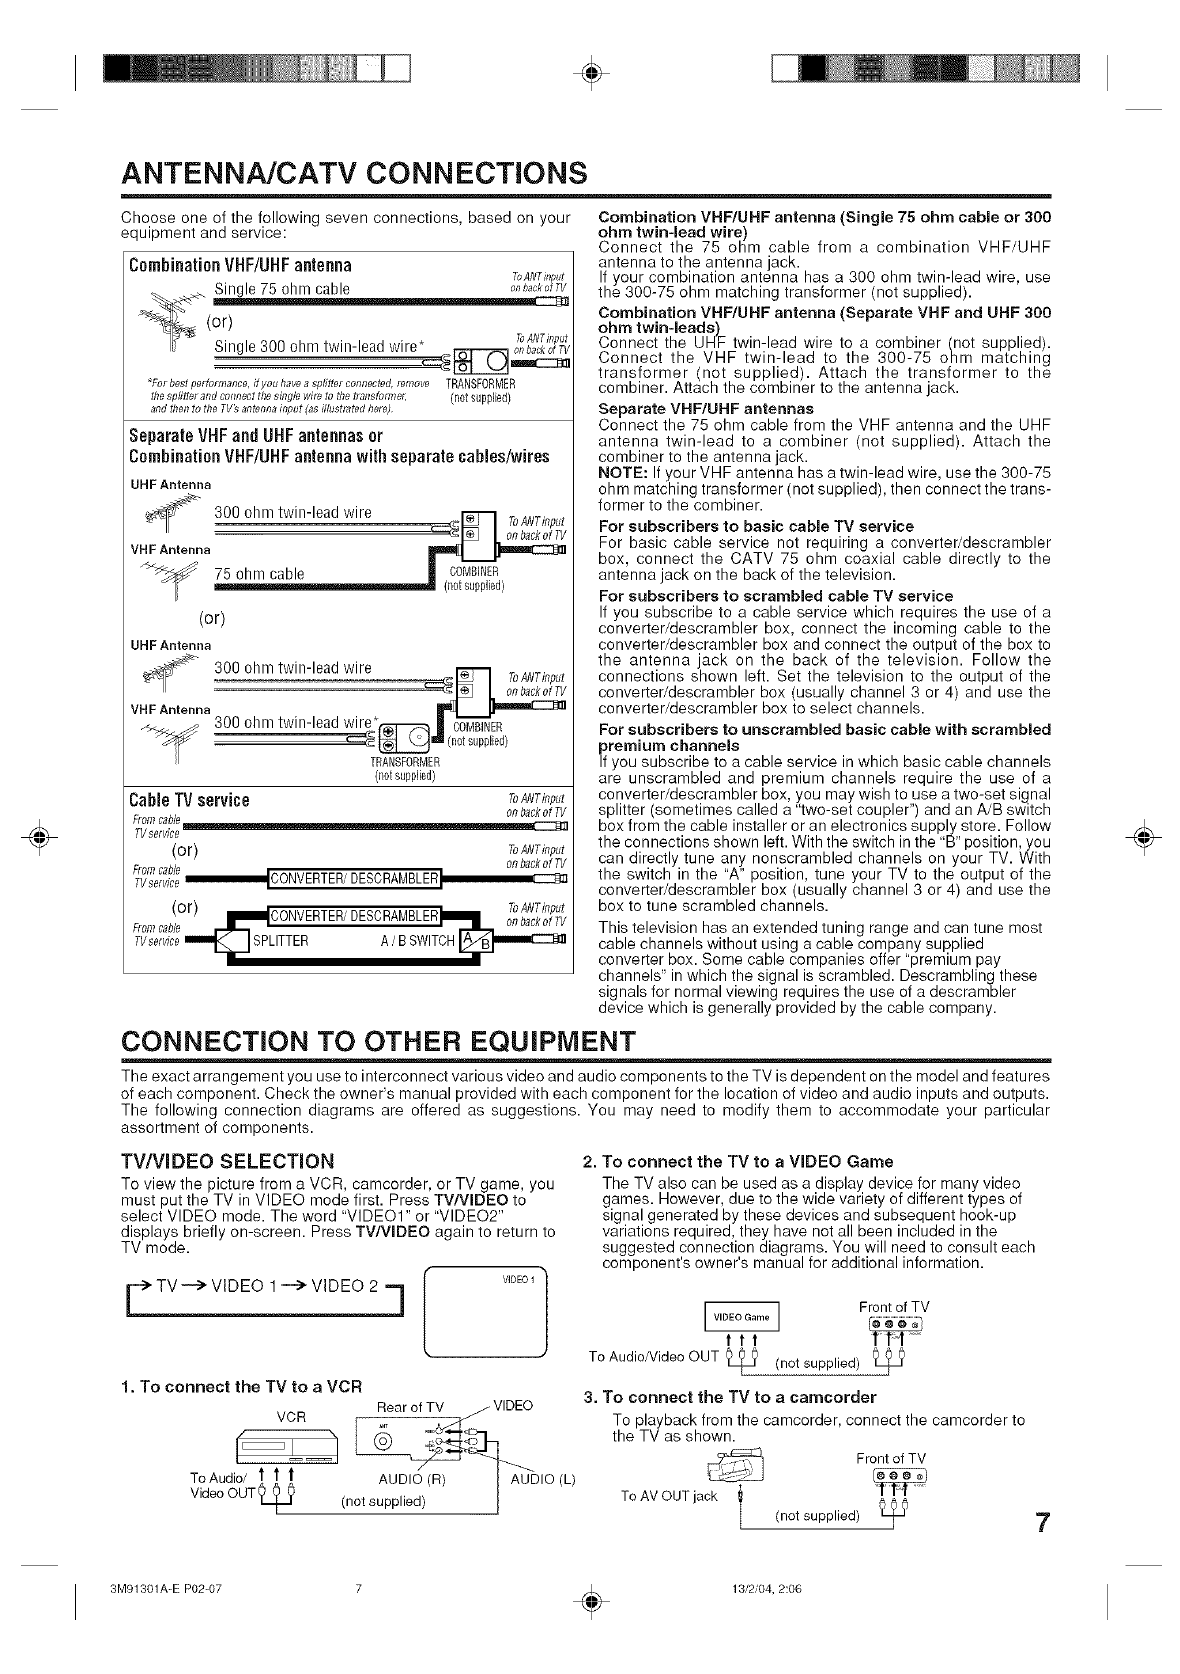
ANTENNA/CATV CONNECTIONS
Choose one of the following seven connections, based on your
equipment and service:
CombinationVHF/UHFantenna
Single 75 ohm cable
(or)
ToANTinput
Single 300 ohm twin-lead wire* _ onbackotTV
*For best perforrnance, #you havea splitter connected, fernove TRANSFORMER
the splitter and comiectthe single wire to the ttansfomTec (riot supplied)
and then to the TV_ antenna input (as illustrated here)
Separate VHFand UHF antennas or
Combination VHF/UHFantenna with separate cables/wires
UHF Antenna
_ 300 ohm twin-lead wire __=_ ToANTklput
VHF Antenna
75 ohm cable | COMBINER
(netsupplied)
(or)
UHF Antenna
_r_ 300 ohm twin-lead wire
............................................................................................=:_1_ I ToANTklput
VHFAntenna _
300 ohm twin-lead wire*_J CT_R
_ (n0t supplied)
TRANSFORMER
(notsupplied)
Cable TV service ToANTklput
(or) ToANTinput
onbackofTV
FromTvserviceCable_CONVERTER/DESCRAMBLER I
(or) ToANTi,,put
mNICONVERTER/DESCRAMBLER)Nm _,,_,o__ _
From cable _'/'_ .........
TVservicem_fJSPLlTTER A BSWITCHI_____r._mmmmc::z:3_J
Combination VHF/UHF antenna (Single 75 ohm cable or 300
ohm twin-lead wire)
Connect the 75 ohm cable from a combination VHF/UHF
antenna to the antenna jack.
If your combination antenna has a 300 ohm twin-lead wire, use
the 300-75 ohm matching transformer (not supplied).
Combination VHF/UHF antenna (Separate VHF and UHF 300
ohm twin-leads)
Connect the UHF twin-lead wire to a combiner (not supplied).
Connect the VHF twin-lead to the 300-75 ohm matching
transformer (not supplied). Attach the transformer to the
combiner. Attach the combiner to the antenna jack.
Separate VHF/UHF antennas
Connect the 75 ohm cable from the VHF antenna and the UHF
antenna twin-lead to a combiner (not supplied). Attach the
combiner to the antenna jack.
NOTE: If your VHF antenna has a twin-lead wire, use the 300-75
ohm matching transformer (not supplied), then connect the trans-
former to the combiner.
For subscribers to basic cable TV service
For basic cable service not requiring a converter/descrambler
box, connect the CATV 75 ohm coaxial cable directly to the
antenna jack on the back of the television.
For subscribers to scrambled cable TV service
If you subscribe to a cable service which requires the use of a
converter/descrambler box, connect the incoming cable to the
converter/descrambler box and connect the output of the box to
the antenna jack on the back of the television. Follow the
connections shown left. Set the television to the output of the
converter/descrambler box (usually channel 3 or 4) and use the
converter/descrambler box to select channels.
For subscribers to unscrambled basic cable with scrambled
premium channels
If you subscribe to a cable service in which basic cable channels
are unscrambled and premium channels require the use of a
converter/descrambler box, you may wish to use a two-set signal
splitter (sometimes called a "two-set coupler") and an A/B switch
box from the cable installer or an electronics supply store. Follow
the connections shown left. With the switch in the "B" position, you
can directly tune any nonscrambled channels on your TV. With
the switch in the "A" position, tune your TV to the output of the
converter/descrambler box (usually channel 3 or 4) and use the
box to tune scrambled channels.
This television has an extended tuning range and can tune most
cable channels without using a cable company supplied
converter box. Some cable companies offer "premium pay
channels" in which the signal is scrambled. Descrambling these
signals for normal viewing requires the use of a descrambler
device which is generally provided by the cable company.
CONNECTION TO OTHER EQUIPMENT
The exact arrangement you use to interconnect various video and audio components to the TV is dependent on the model and features
of each component. Check the owner's manual provided with each component for the location of video and audio inputs and outputs.
The following connection diagrams are offered as suggestions. You may need to modify them to accommodate your particular
assortment of components.
TV/VIDEO SELECTION
To view the picture from a VCR, camcorder, or TV game, you
must put the TV in VIDEO mode first. Press TV/WDEO to
select VIDEO mode. The word "VIDEO1" or "VIDEO2"
displays briefly on-screen. Press TV/WDEO again to return to
TV mode.
v,oeo-] [VlDEOI/ Front of TV
Jttt
To Audio/Video OUT _ (not supplied) t_
2. To connect the TV to a VIDEO Game
The TV also can be used as a display device for many video
games. However, due to the wide variety of different types of
signal generated by these devices and subsequent hook-up
variations required, they have not all been included in the
suggested connection diagrams. You will need to consult each
component's owner's manual for additional information.
1. To connect the TV to a VCR
VCR Rear of TV _ VIDEO
TOdAU_T; _ _ AUD,(_(R) _ AU-D,O(L}
(not supplied) !
3. To connect the TV to a camcorder
To playback from the camcorder, connect the camcorder to
the TV as shown.
Front of TV
r_
ToAMOUT jack
(not supplied) _7
÷
3M91301A-E P02-07 ÷13/2/04, 2:06
÷
÷
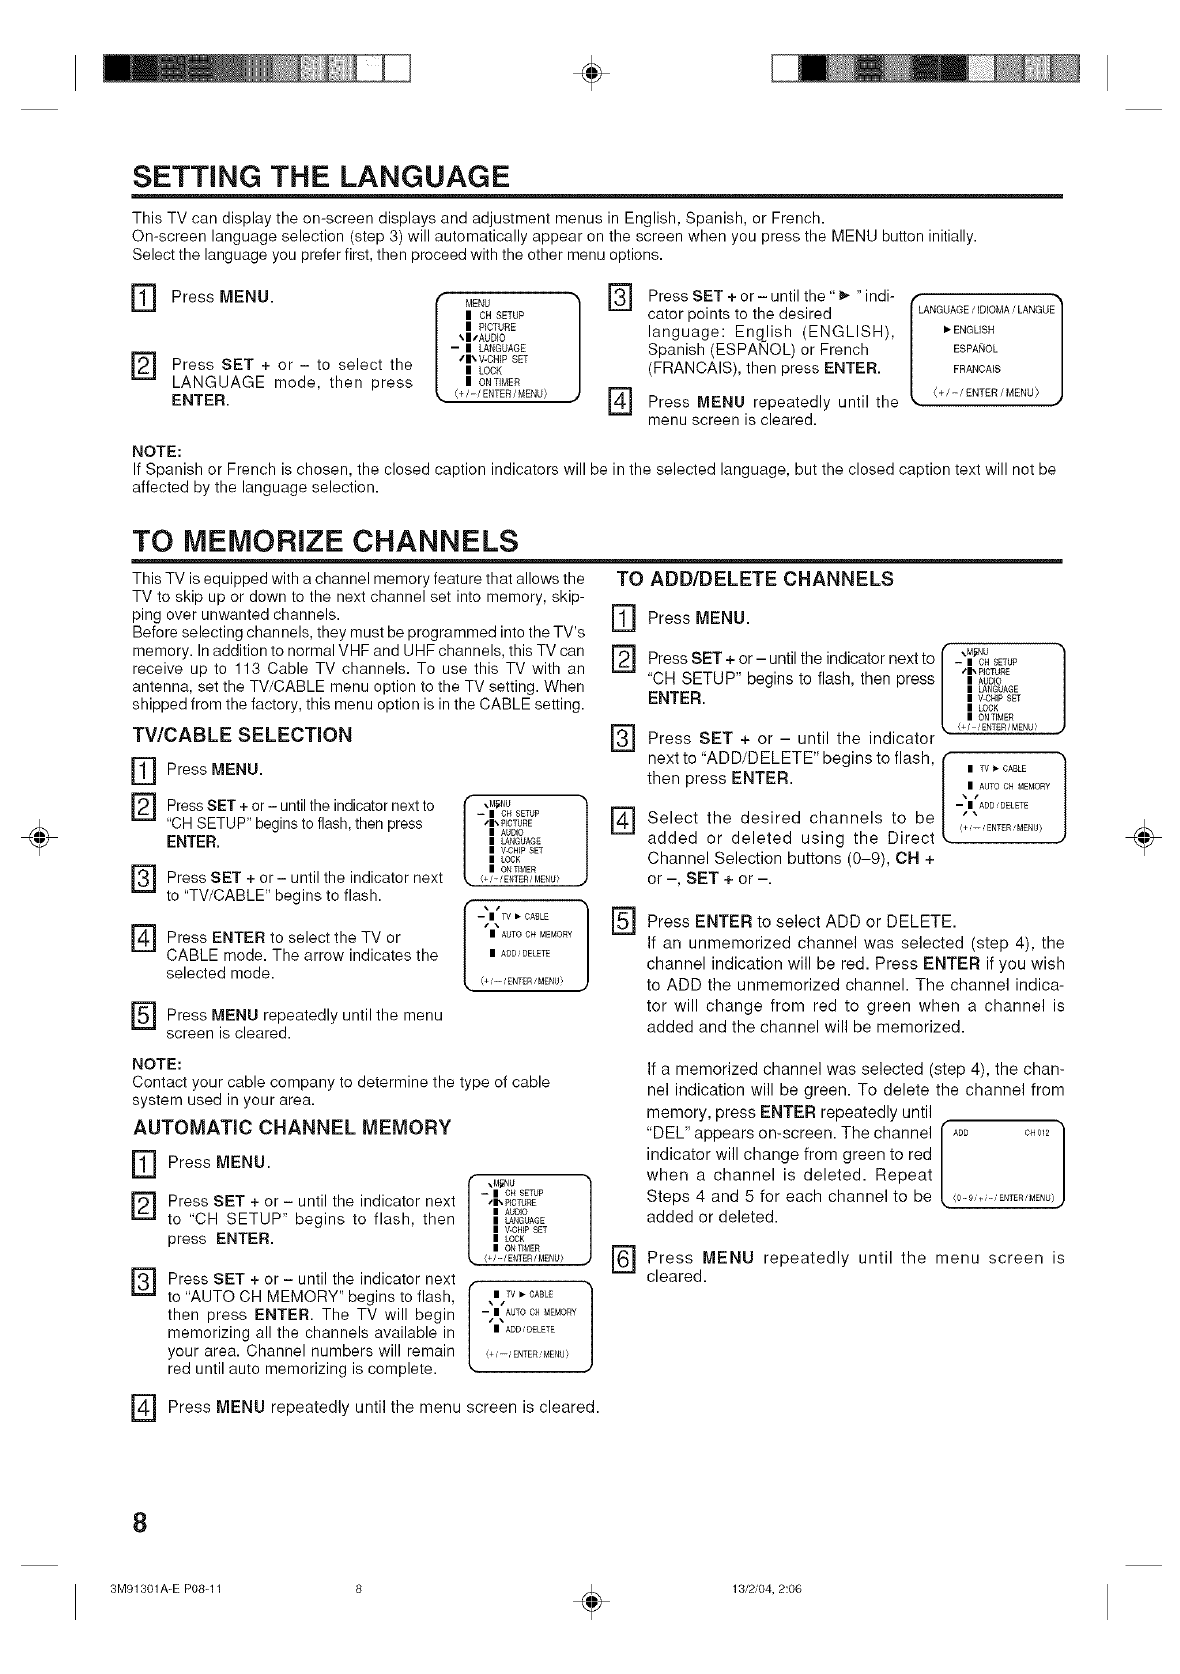
SETTING THE LANGUAGE
This TV can display the on-screen displays and adjustment menus in English, Spanish, or French.
On-screen language selection (step 3) will automatically appear on the screen when you press the MENU button initially.
Select the language you prefer first, then proceed with the other menu options.
] Press MENU. [ MENU
I CH SETUP
| PICTURE
_|/AUDJO
-- | LANGUAGE
] Press SET to select the tr, V-CH_PSET
+ or i| LOCK
LANGUAGE mode, then press I ONTIMER
_, (+/-/ENTER/MENU}
ENTER.
[]
[]
Press SET + or - until the" _,-"indi-
cator points to the desired
language: English (ENGLISH),
Spanish (ESPANOL) or French
(FRANCAIS), then press ENTER.
Press MENU repeatedly until the
menu screen is cleared.
LANGUAGE/IDIOMA/LANGUE
_*ENGLISH
ESPANOL
FRANCAIS
+/-/ENTER/MENU}
NOTE:
If Spanish or French is chosen, the closed caption indicators will be in the selected language, but the closed caption text will not be
affected by the language selection.
TO MEMORIZE CHANNELS
This TV is equipped with achannelmemoryfeaturethatallowsthe TO ADD/DELETE CHANNELS
TV to skip up or down to the next channel set into memory, skip- IT]
ping over unwanted channels.
Before selecting channels, they must be programmed into the TV's
memory. In addition to normal VHF and UHF channels, this TV can
receive up to 113 Cable TV channels. To use this TV with an L.£J
antenna, set the TV/CABLE menu option to the TV setting. When
shipped from the factory, this menu option is in the CABLE setting.
TV/CABLE SELECTION
] Press MENU.
] Press SET + or - until the indicator next to [ ,_,u
-- I OH SETUP
"CH SETUP" begins to flash, then press "_TURE
I AUDIO
ENTER. | _.GUAGE
| V-CHI£ SET
|LOCK
] | ON _ME£
Press SET + or - until the indicator next {+'-'ENTE£/MENU}
tO "TV/CABLE" begins to flash.
[-- | TV _ CABLE
[_ ""
Press ENTER to select the TV or | AUTOOHMEMORY
CABLE mode. The arrow indicates the | ADDDELETE
selected mode. i+.'--.'ENTER'MENU_
] Press MENU repeatedly until the menu
screen is cleared.
[]
[]
[]
Press MENU.
I _.M_NU
Press SET + or - until the indicator next to - | CHSETUP
lib PICTURE
"CH SETUP" begins to flash, then press | At_o_o
| LANGUAGE
ENTER. | V.OHIPSET
| LOCK
| ON TIMER
e/ /ENTER/MENU}
Press SET + or - until the indicator
next to "ADD/DELETE" begins to flash,
then press ENTER.
Select the desired channels to be
added or deleted using the Direct
Channel Selection buttons (0-9), CH +
or -, SET + or -.
\I AUTO CH MEMORY
-tI ADD_DELETE
(+_--_ ENTER_MENU)
Press ENTER to select ADD or DELETE.
If an unmemorized channel was selected (step 4), the
channel indication will be red. Press ENTER if you wish
to ADD the unmemorized channel. The channel indica-
tor will change from red to green when a channel is
added and the channel will be memorized.
NOTE:
Contact your cable company to determine the type of cable
system used in your area.
AUTOMATIC CHANNEL MEMORY
] Press MENU.
] -- IOH SETUp
Press SET + or - until the indicator next ,t,_CTURE
I AUtO
to "CH SETUP' begins to flash, then | _,GUAGE
I V-CHIPSET
press ENTER. | LOCK
| ON TIMER
<+/-/ENTER/MENU_
] Press SET + or - until the indicator next f
to "AUTO CH MEMORY" begins to flash, / |Tv, CABLE /
then press ENTER. The TV will begin [ -| AUTOCHMEMO_¥]
memorizing all the channels available in | ADD,DELETE
your area. Channel numbers will remain e,--,ENTER_MENU!
red until auto memorizing is complete.
] Press MENU repeatedly until the menu screen is cleared.
If a memorized channel was selected (step 4), the chan-
nel indication will be green. To delete the channel from
memory, press ENTER repeatedly until
"DEL" appears on-screen. The channel f ADD CH0_2]
indicator will change from green to red [ J
when a channel is deleted. Repeat
Steps 4 and 5 for each channel to be <O-_,+,-,E"TER,'ME"U)
added or deleted.
] Press MENU repeatedly until the menu screen is
cleared.
÷
8
3M91301A-E P08-11 ÷13/2/04, 2:06
÷
÷
TV OPERATION
[]
[]
[]
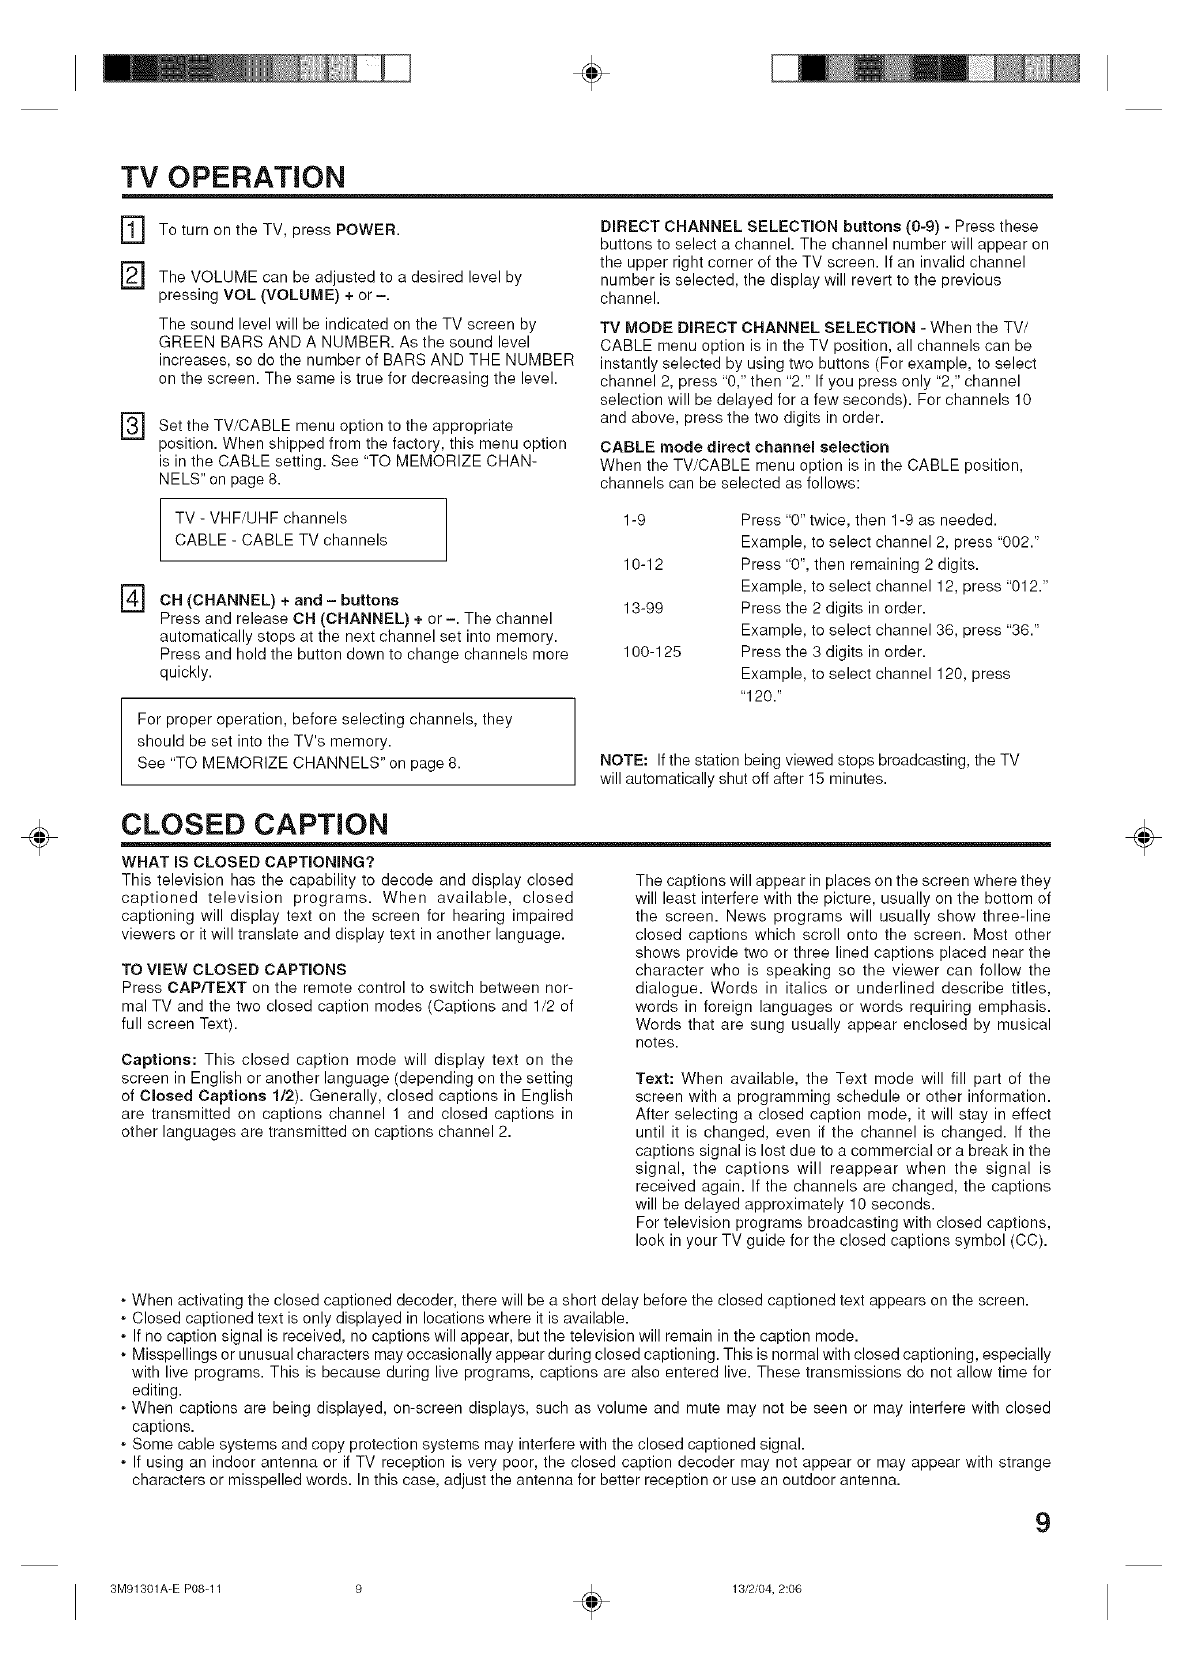
To turn on the TV, press POWER.
The VOLUME can be adjusted to a desired level by
pressing VOL (VOLUME) + or -.
The sound level will be indicated on the TV screen by
GREEN BARS AND A NUMBER. As the sound level
increases, so do the number of BARS AND THE NUMBER
on the screen. The same is true for decreasing the level.
Set the TV/CABLE menu option to the appropriate
position. When shipped from the factory, this menu option
is in the CABLE setting. See "TO MEMORIZE CHAN-
NELS" on page 8.
DIRECT CHANNEL SELECTION buttons (0-9) - Press these
buttons to select a channel. The channel number will appear on
the upper right corner of the TV screen. If an invalid channel
number is selected, the display will revert to the previous
channel.
TV MODE DIRECT CHANNEL SELECTION - When the TV/
CABLE menu option is in the TV position, all channels can be
instantly selected by using two buttons (For example, to select
channel 2, press "0," then "2." If you press only "2," channel
selection will be delayed for a few seconds). For channels 10
and above, press the two digits in order.
CABLE mode direct channel selection
When the TV/CABLE menu option is in the CABLE position,
channels can be selected as follows:
TV - VHF/UHF channels
CABLE - CABLE TV channels
] CH (CHANNEL) + and - buttons
Press and release CH (CHANNEL) + or -. The channel
automatically stops at the next channel set into memory.
Press and hold the button down to change channels more
quickly.
For proper operation, before selecting channels, they
should be set into the TV's memory.
See "TO MEMORIZE CHANNELS" on page 8.
1-9
10-12
13-99
100-125
Press "0" twice, then 1-9 as needed.
Example, to select channel 2, press "002."
Press "0", then remaining 2 digits.
Example, to select channel 12, press "012."
Press the 2 digits in order.
Example, to select channel 36, press "36."
Press the 3 digits in order.
Example, to select channel 120, press
"120."
NOTE: If the station being viewed stops broadcasting, the TV
will automatically shut off after 15 minutes.
CLOSED CAPTION
WHAT IS CLOSED CAPTIONING?
This television has the capability to decode and display closed
captioned television programs. When available, closed
captioning will display text on the screen for hearing impaired
viewers or it will translate and display text in another language.
TO VIEW CLOSED CAPTIONS
Press CAP/TEXT on the remote control to switch between nor-
mal TV and the two closed caption modes (Captions and 1/2 of
full screen Text).
Captions: This closed caption mode will display text on the
screen in English or another language (depending on the setting
of Closed Captions 1/2). Generally, closed captions in English
are transmitted on captions channel 1 and closed captions in
other languages are transmitted on captions channel 2.
The captions will appear in places on the screen where they
will least interfere with the picture, usually on the bottom of
the screen. News programs will usually show three-line
closed captions which scroll onto the screen. Most other
shows provide two or three lined captions placed near the
character who is speaking so the viewer can follow the
dialogue. Words in italics or underlined describe titles,
words in foreign languages or words requiring emphasis.
Words that are sung usually appear enclosed by musical
notes.
Text: When available, the Text mode will fill part of the
screen with a programming schedule or other information.
After selecting a closed caption mode, it will stay in effect
until it is changed, even if the channel is changed. If the
captions signal is lost due to a commercial or a break in the
signal, the captions will reappear when the signal is
received again. If the channels are changed, the captions
will be delayed approximately 10 seconds.
For television programs broadcasting with closed captions,
look in your TV guide for the closed captions symbol (CC).
÷
• When activating the closed captioned decoder, there will be a short delay before the closed captioned text appears on the screen.
• Closed captioned text is only displayed in locations where it is available.
• If no caption signal is received, no captions will appear, but the television will remain in the caption mode.
• Misspellings or unusual characters may occasionally appear during closed captioning. This is normal with closed captioning, especially
with live programs. This is because during live programs, captions are also entered live. These transmissions do not allow time for
editing.
• When captions are being displayed, on-screen displays, such as volume and mute may not be seen or may interfere with closed
captions.
• Some cable systems and copy protection systems may interfere with the closed captioned signal.
• If using an indoor antenna or if TV reception is very poor, the closed caption decoder may not appear or may appear with strange
characters or misspelled words. In this case, adjust the antenna for better reception or use an outdoor antenna.
9
3M91301A-E P08-11 9 _ 13/2/04, 2:06
÷
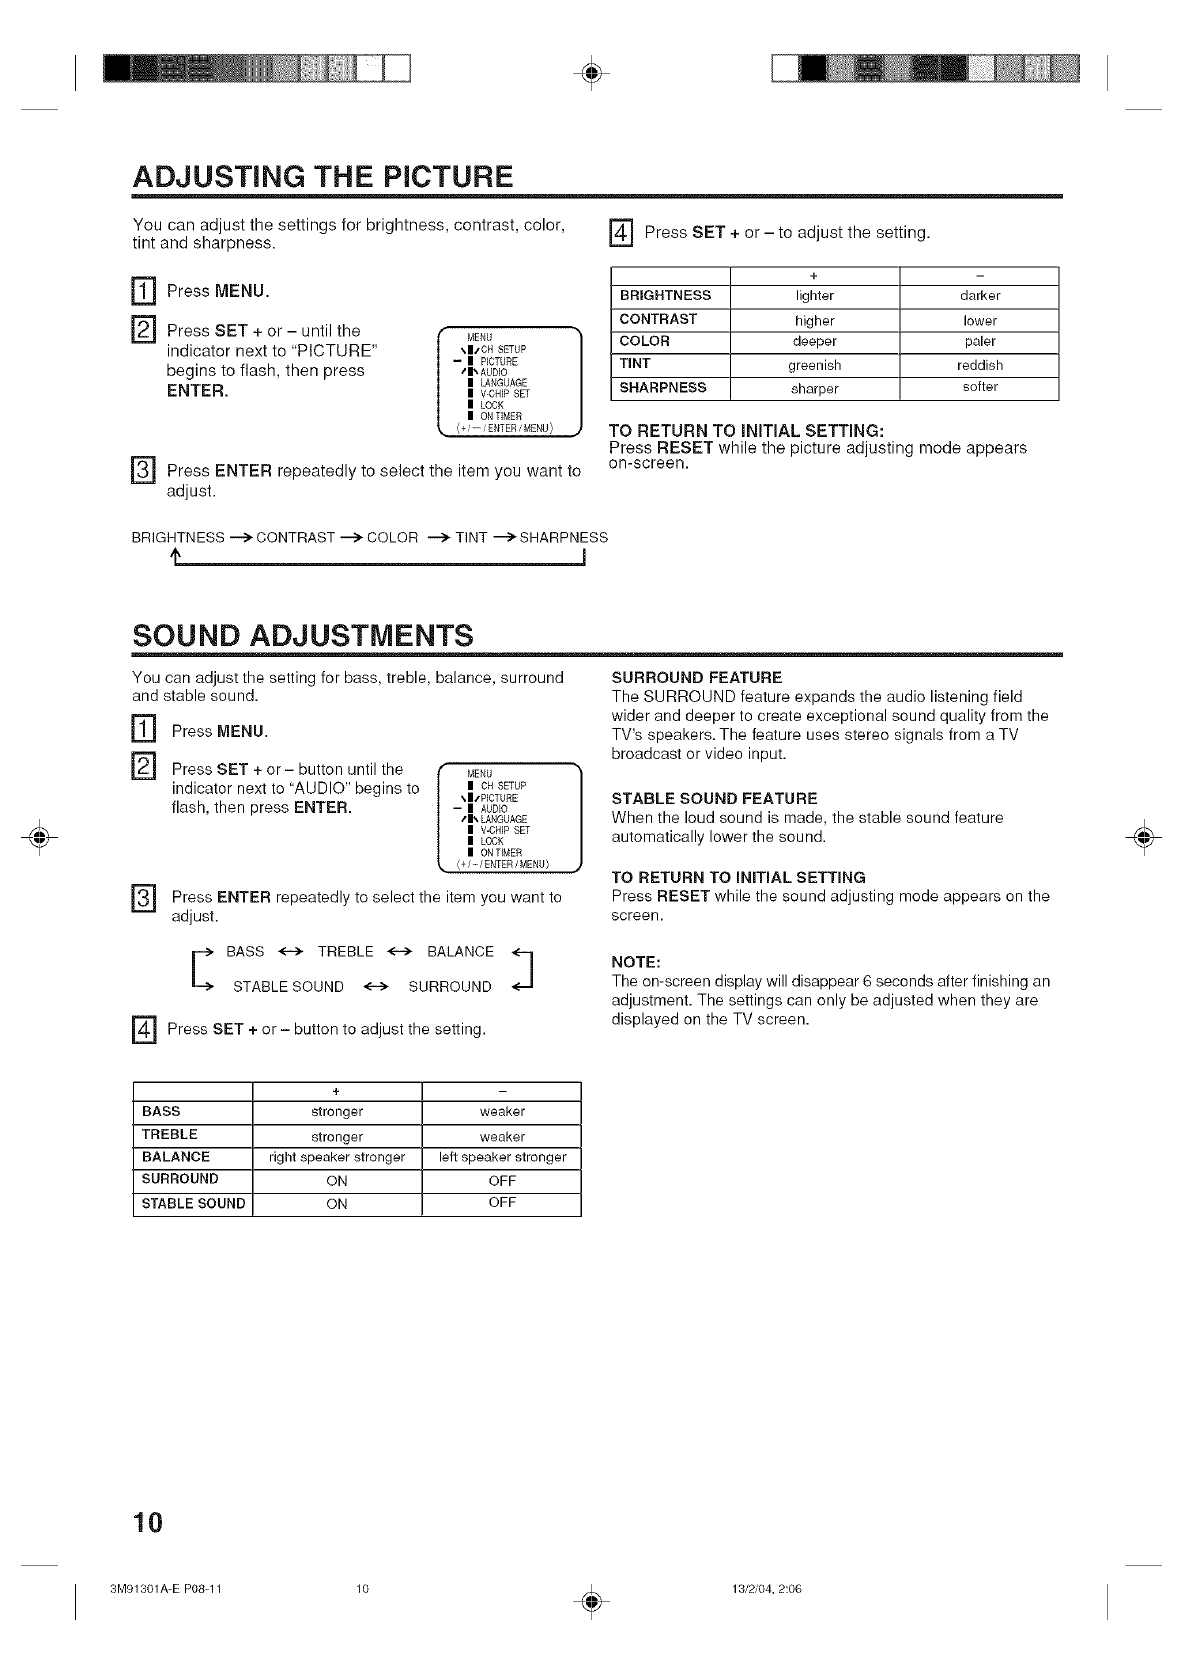
ADJUSTING THE PICTURE
You can adjust the settings for brightness, contrast, color,
tint and sharpness. ] Press SET + or - to adjust the setting.
r_ Press MENU.
] Press SET + or - until the
indicator next to "PICTURE"
begins to flash, then press
ENTER.
MENU
_.11t"CH SETUP
-- II PICTURE
tll_ AUDIO
II LANGUAGE
II V-CHIP SET
II LOCK
II ON TIMER
(+i--iENTERiMENU)
] Press ENTER repeatedly to select the item you want to
adjust.
+
BRIGHTNESS lighter darker
CONTRAST higher lower
COLOR deeper paler
TINT greenish reddish
SHARPNESS sharper softer
TO RETURN TO INITIAL SETTmNG:
Press RESET while the picture adjusting mode appears
on-screen.
BRIGHTNESS --> CONTRAST --> COLOR --> TINT "_> SHARPNESS
÷
SOUND ADJUSTMENTS
You can adjust the setting for bass, treble, balance, surround
and stable sound.
] Press MENU.
] Press SET + or- button until the
indicator next to "AUDIO" begins to
flash, then press ENTER.
MENU
ii CH SETUP
\II/PICTURE
-- ii AUDEO
41_ LANGUAGE
ii V-CHIP SET
ii LOCK
ii ON TEMER
<+/-/ENTER/MENU}
] Press ENTER to select the item want to
repeatedly you
adjust.
SURROUND FEATURE
The SURROUND feature expands the audio listening field
wider and deeper to create exceptional sound quality from the
TV's speakers. The feature uses stereo signals from a TV
broadcast or video input.
STABLE SOUND FEATURE
When the loud sound is made, the stable sound feature
automatically lower the sound.
TO RETURN TO INITIAL SETTING
Press RESET while the sound adjusting mode appears on the
screen.
BASS <.i> TREBLE _ BALANCE
STABLESOUND <--> SURROUND
] + or-adjustthesetting.
Press SET button to
NOTE:
The on-screen display will disappear 6 seconds after finishing an
adjustment. The settings can only be adjusted when they are
displayed on the TV screen.
÷
+
BASS stronger weaker
TREBLE stronger weaker
BALANCE right speaker stronger left speaker stronger
SURROUND ON OFF
STABLE SOUND ON OFF
10
3M91301A-E P08-11 ÷13/2/04, 2:06
÷
÷
SELECTING STEREO/SAP BROADCASTS
You can listen to high-fidelity stereo sound with the Multi-channel
TV Sound (MTS) feature. MTS can also transmit a second audio
program (SAP) containing a second language or other audio
information.
When the TV receives a stereo or SAP broadcast, the word
STEREO or SAP appears on-screen every time the TV is turned
on, the channel is changed, or RECALL is pressed.
The MTS feature is not available in the VIDEO mode.
You can leave your TV in STEREO mode because it will
automatically output stereo or monaural sound, depending on
the broadcast type. If the stereo sound is noisy, select MONO to
reduce the noise. The word STEREO or SAP is displayed in
light blue when the TV receives the signal.
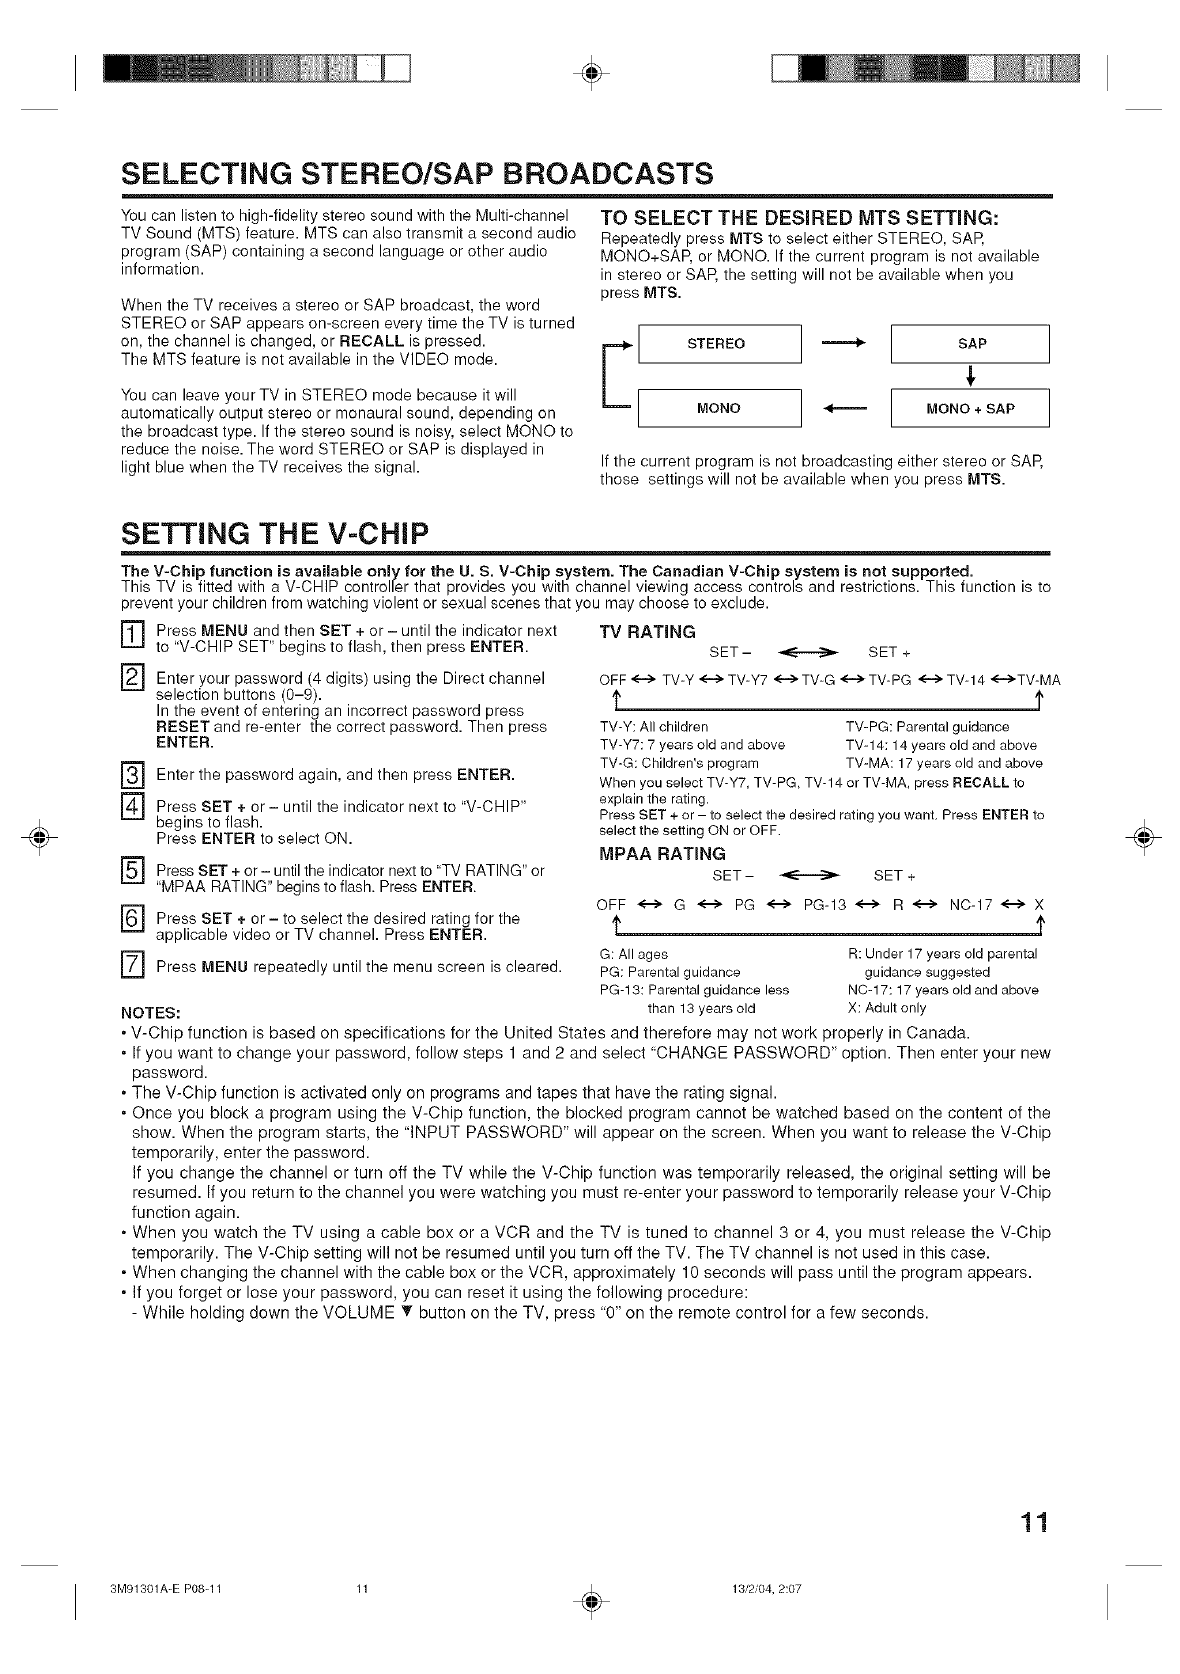
TO SELECT THE DESIRED MTS SETTING:
Repeatedly press MTS to select either STEREO, SAP,
MONO+SAP, or MONO. If the current program is not available
in stereo or SAP, the setting will not be available when you
press MTS.
E[ SAP
[ ]
o°o ] --- [ ]
If the current program is not broadcasting either stereo or SAP,
those settings will not be available when you press MTS.
SETTING THE V-CHIP
The V-Chip function is available only for the U. S. V-Chip system. The Canadian V-Chip system is not supported.
This TV is fitted with a V-CHIP controller that provides you with channel viewing access controls and restrictions. This function is to
prevent your children from watching violent or sexual scenes that you may choose to exclude.
[]
[]
Press MENU and then SET + or- until the indicator next
to "V-CHIP SET" begins to flash, then press ENTER.
Enter your password (4 digits) using the Direct channel
selection buttons (0-9).
In the event of entering an incorrect password press
RESET and re-enter the correct password. Then press
ENTER.
] Enter the and then ENTER.
password again, press
] Press SET + or - until the indicator next to "V-CHIP"
begins to flash.
Press ENTER to select ON.
] Press SET + or - until the indicator next to "TV RATING" or
"MPAA RATING" begins to flash. Press ENTER.
] Press SET + or - to select the desired rating for the
applicable video or TV channel. Press ENTER.
] Press MENU repeatedly until the menu screen is cleared.
NOTES:
TV RATING
SET- _ SET +
OFF<--> TV-Y <-i> TV-Y7 <-i>TV-G <-->TV-PG <-"_ TV-14 <-i>TV-MA
t
TV-Y: Allchildren TV-PG: Parental guidance
TV-Y7:7 years old and above TV-14:14 years old and above
TV-G: Children's program TV-MA: 17 years old and above
When you select TV-Y7,TV-PG, TV-14 or TV-MA, press RECALL to
explain the rating.
Press SET + or - to select the desired rating you want, Press ENTER to
select the setting ON or OFF.
MPAA RATING
SET - _ SET +
OFF <--> G <--> PG <--> PG-13 <---> R <---> NC-17 <--> X
t
G: All ages R: Under 17 years old parental
PG: Parentalguidance guidance suggested
PG-13: Parentalguidance less N0-17:17 years old and above
than 13 years old X: Adult only
• V-Chip function is based on specifications for the United States and therefore may not work properly in Canada.
• If you want to change your password, follow steps 1 and 2 and select "CHANGE PASSWORD" option. Then enter your new
password.
• The V-Chip function is activated only on programs and tapes that have the rating signal.
• Once you block a program using the V-Chip function, the blocked program cannot be watched based on the content of the
show. When the program starts, the "INPUT PASSWORD" will appear on the screen. When you want to release the V-Chip
temporarily, enter the password.
If you change the channel or turn off the TV while the V-Chip function was temporarily released, the original setting will be
resumed. If you return to the channel you were watching you must re-enter your password to temporarily release your V-Chip
function again.
• When you watch the TV using a cable box or a VCR and the TV is tuned to channel 3 or 4, you must release the V-Chip
temporarily. The V-Chip setting will not be resumed until you turn off the TV. The TV channel is not used in this case.
• When changing the channel with the cable box or the VCR, approximately 10 seconds will pass until the program appears.
• If you forget or lose your password, you can reset it using the following procedure:
- While holding down the VOLUME T button on the TV, press "0" on the remote control for a few seconds.
÷
11
3M91301A-E P08-11 11 _ 13/2/04, 2:07
÷
÷
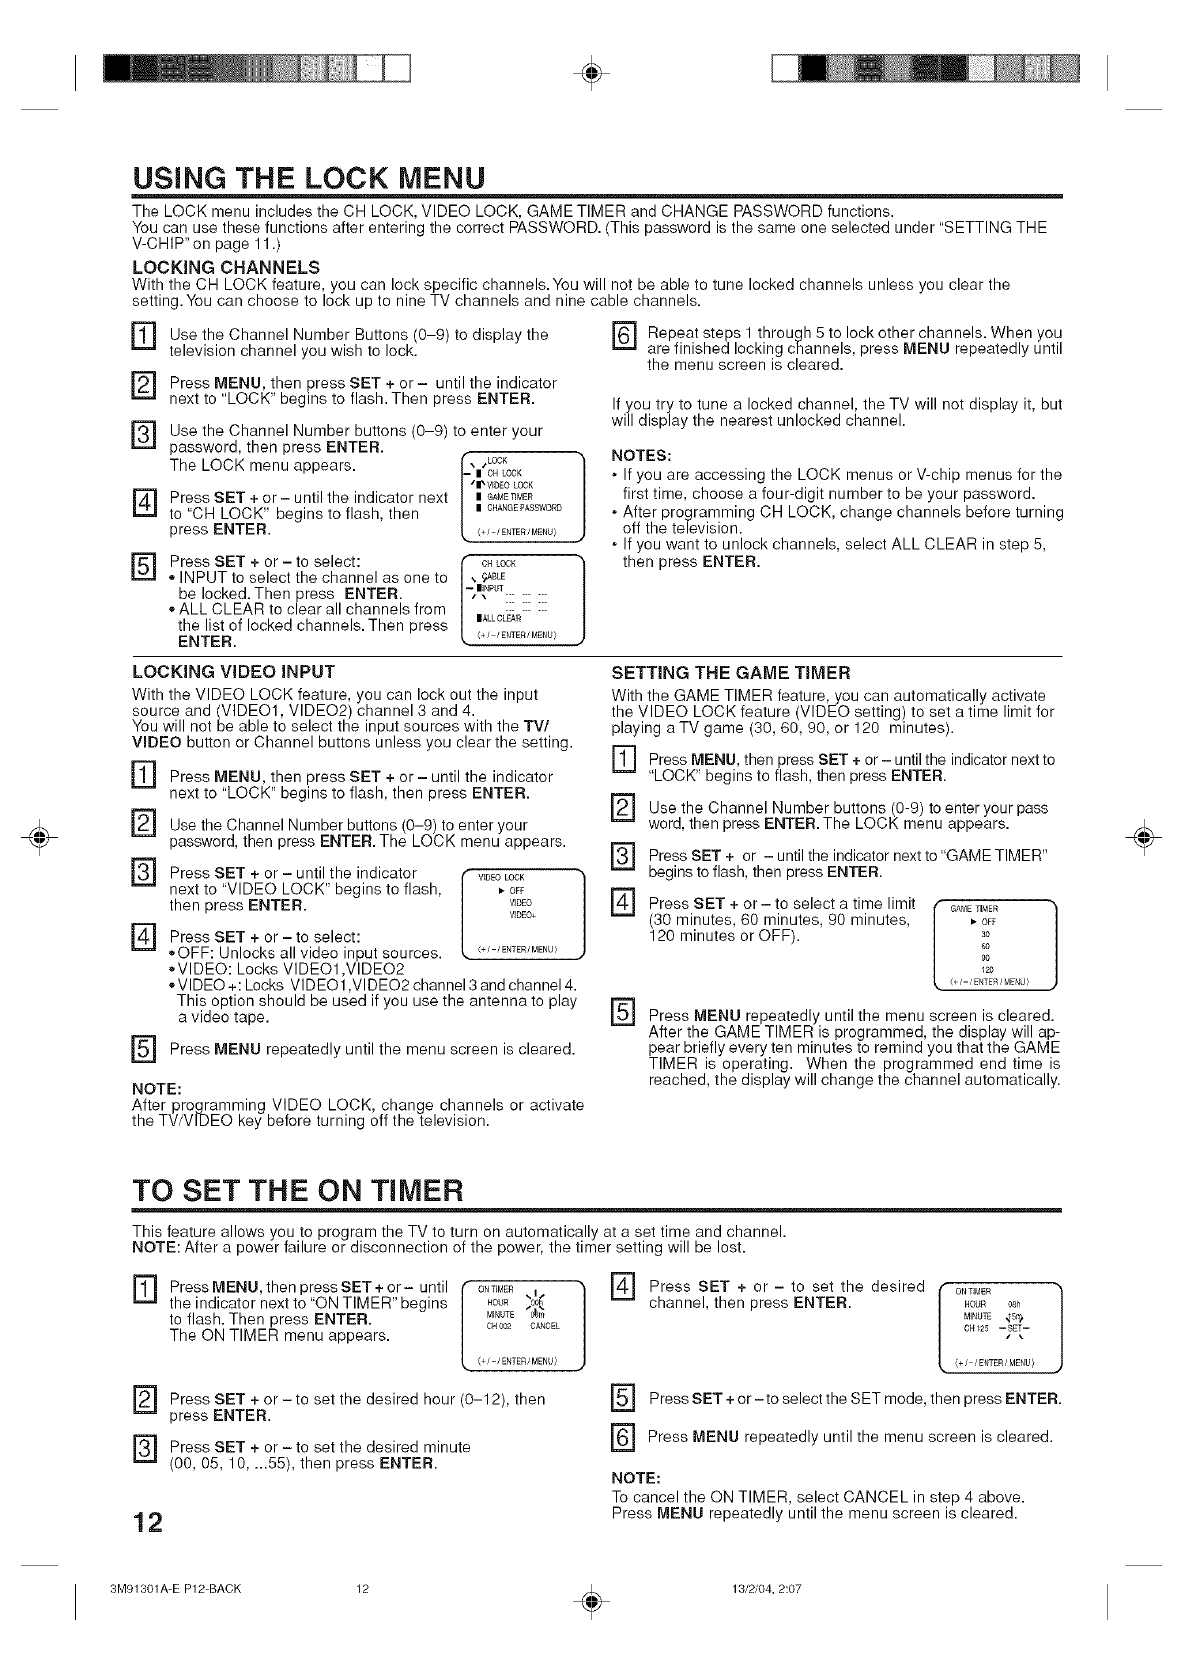
USING THE LOCK MENU
The LOCK menu includes the CH LOCK, VIDEO LOCK, GAME TIMER and CHANGE PASSWORD functions.
You can use these functions after entering the correct PASSWORD. (This password is the same one selected under "SETTING THE
V-CHIP" on page 11 .)
LOCKING CHANNELS
With the CH LOCK feature, you can lock specific channels.You will not be able to tune locked channels unless you clear the
setting.You can choose to lock up to nine TV channels and nine cable channels.
] Use the Channel Number Buttons to the
(0-9) display
television channel you wish to lock.
[]
[]
[]
[]
Press MENU, then press SET + or -until the indicator
next to "LOCK" begins to flash. Then press ENTER.
Use the Channel Number buttons (0-9) to enter your
password, then press ENTER.
The LOCK menu appears, r_, ,LOCK
| OH LOCK
"|" VIDEOLOCK
Press SET + or - until the indicator next | G_ET_MER
to "CH LOCK" begins to flash, then | CHANGE_ASSWO_D
press ENTER. (+/-/ENTE£/MENU>
Press SET + or -to select: i" cHLOCK
" INPUT to select the channel as one to |, _BLE
be locked. Then press ENTER. I*-z|_ NPUT .........
[
,, ALL CLEAR to clear all channels from |_Lc_< ......
the list of locked channels. Then press
ENTER. <+//ENTE£/MENU>
[_ Repeat steps 1 through 5 to lock other channels. When you
are finished locking channels, press MENU repeatedly until
the menu screen is cleared.
]
]
If you try to tune a locked channel, the TV will not display it, but
will display the nearest unlocked channel.
NOTES:
• If you are accessing the LOCK menus or V-chip menus for the
first time, choose a four-digit number to be your password.
• After programming CH LOCK, change channels before turning
off the television.
If you want to unlock channels, select ALL CLEAR in step 5,
then press ENTER.
LOCKING VIDEO iNPUT
With the VIDEO LOCK feature, you can lock out the input
source and VIDEO1, VIDEO2) channel 3 and 4.
You will not be abe to se ect the nput sources w th the TV/
VIDEO button or Channel buttons unless you clear the setting.
] Press MENU, then press SET + or - until the indicator
next to "LOCK" begins to flash, then press ENTER.
[]
[]
[]
[]
Use the Channel Number buttons (0-9) to enter your
password, then press ENTER. The LOCK menu appears.
Press SET + or -until the indicator ,f WDEOLOCK h
next to "VIDEO LOCK" begins to flash, L ,-OFF J
then press ENTER. WDEO
WDEO+
Press SET + or - to select:
,,OFF: Unlocks all video input sources. <+_/ENTER/MENU/
,,VIDEO: Locks VIDE01 ,VIDE02
,,VIDEO+: Locks VIDE01 ,VIDE02 channel 3 and channel 4.
This option should be used if you use the antenna to play
a video tape.
Press MENU repeatedly until the menu screen is cleared.
NOTE:
After programming VIDEO LOCK, change channels or activate
the TV/VlDEO key before turning off the television.
SETTING THE GAME TIMER
With the GAME TIMER feature, you can automatically activate
the VIDEO LOCK feature (VIDEO setting) to set a time limit for
playing a TV game (30, 60, 90, or 120 minutes).
] Press MENU, then press SET + or - until the indicator next to
"LOCK" begins to flash, then press ENTER.
] (0-9) to enter your pass
Use the Channel Number buttons
word, then press ENTER. The LOCK menu appears.
[]
[]
Press SET + or - until the indicator next to "GAME TIMER"
begins to flash, then press ENTER.
Press SET + or- to select a time limit (GAMETIMER
(30 minutes, 60 minutes, 90 minutes, L • OFF J
120 minutes or OFF). so
60
90
120
{ _/- /ENTER /MENU }
] Press MENU repeatedly until the menu screen is cleared.
After the GAME TIMER is programmed, the display will ap-
pear briefly every ten minutes to remind you that the GAME
TIMER is operating. When the programmed end time is
reached, the display will change the channel automatically.
÷
TO SET THE ON TIMER
This feature allows you to program the TV to turn on automatically at a set time and channel.
NOTE: After a power failure or disconnection of the power, the timer setting will be lost.
[] Press MENU, then SET + or- until
press
the indicator next to "ON TIMER" begins
to flash. Then press ENTER.
The ON TIMER menu appears. ONT]ME£ _ I 1
HOUR 00(
MINUTE O_m
CHO02 CANCEL
(+/-/ENTER/MENU)
] Press SET to set the desired hour then
+ or (o-12),
press ENTER.
] Press SET + or - to set the desired minute
(00, 05, 10, ...55), then press ENTER.
12
] + or -to set
Press SET the desired
channel, then press ENTER. HOUR 08h
MINUTg _S_)
0_4125 -- SET--
{+/ /ENTER/MENU/
F_ Press SET + or-to select the SET mode, then press ENTER.
[_ Press MENU until the is cleared.
repeatedly menu screen
NOTE:
To cancel the ON TIMER, select CANCEL in step 4 above.
Press MENU repeatedly until the menu screen is cleared.
3M91301A-E P12-BACK ÷13/2/04, 2:07
÷
÷
TROUBLESHOOTING GUIDE
Before requesting service, please refer to the following chart for the symptom and possible solution.
"SYMPTOMS POSSIBLE SOLUTIONS
• Make sure the power cord is plugged in.
TV does not • Try another AC outlet.
operate. • Power is off; check fuse or circuit breaker.
• Unplug unit for an hour, then plug it back in.
• Station or CATV experiencing problems;
tune to another station.
Poor sound • Check sound adjustments (VOLUME and
or no sound. MUTE).
• Check for sources of possible interference.
Poor picture
or no picture.
Poor
reception on
some
channels.
Poor color or
no color.
Picture
wobbles or
drifts.
• Station or CATV experiencing problems; tune
to another station.
• Make sure channels are set into memory.
• Check antenna or CATV connections; adjust
antenna.
• Check for sources of possible interference.
• Check picture control adjustments.
• Press CAP/TEXT to turn off the closed
caption mode.
• Station or CATV experiencing problems; tune
to another station.
• Make sure channels are set into memory.
• Station is weak; adjust antenna to receive
desired station.
• Check for sources of possible interference.
• Station or CATV experiencing problems; tune
to another station.
• Make sure channels are set into memory.
• Check picture control adjustments.
• Check antenna or CATV connection. Adjust
antenna.
• Station or CATV experiencing problems; tune
to another station.
• Make sure channels are set into memory.
• CATV company is scrambling signal.
, Adjust antenna. .,#
rSYMPTOMS POSSIBLE SOLUTIONS
• Check all CATV connections.
• Set TV/CABLE menu option to the CABLE
No CATV mode.
reception. • Station or CATV system problems; try
another station.
Horizontal or
diagonal bars "Check antenna connections; reorient antenna.
• Check for sources of possible interference.
on screen.
No reception
above
channel 13.
No Remote
operation.
TV shuts off.
Closed -
Caption is not
activated.
Black box on
screen.
Display is not
shown in
_your language.
• Make sure TV/CABLE menu option is in the
appropriate mode.
• If using antenna, check UHF antenna
connections.
• Batteries are weak, dead or inserted
incorrectly.
• Remote is out of range; move closer to TV
(within 15 feet).
• Make sure Remote is aimed at sensor.
• Confirm there are no obstructions between
the Remote and the TV.
• Make sure the power cord is plugged in.
• No broadcast on station tuned.
• Sleep Timer is set.
• Power interrupted.
• TV station experiencing problems or program
tuned is not closed captioned. Try another
channel.
• Check CATV connection or VHF/UHF
antenna, reposition or rotate antenna.
• Press CAP/TEXT to turn on the closed caption
decoder.
• Press CAP/TEXT to turn off the closed
caption mode.
• Select proper language in the menu options.
SPECIFICATIONS
120V, 60Hz
90 Watts
Type 20 (508mm diagonal)
2.5 + 2.5 Watts
2 inches (51mm) x 4-11/16 inches (119 mm) Full Range, 8 ohm x 2
181 Channel, Quartz PLL Frequency Synthesized
Infrared, Direct Access, 2 x AAA batteries (supplied)
VHF 2-13
UHF 14-69
CATV 01-97 (5A)-(A-3)
98-99 (A-2)-(A-1)
14-22 (A)-(I)
23-36 (J)-(W)
37-65 (AA)-(FFF)
66-125 (GGG)-(125)
75 Ohm (VHF/UHF) Coaxial Input
Video: 1.0 Vp-p 75 ohm
Audio: 300 mV, 47k ohm
Width: 23-1/4 inches (590mm)
Height: 17-9/16 inches (446.5mm)
Depth: 19-3/8 inches (492mm)
46.3 Ibs (21.0 kg)
AC Power Input:
AC Power Consumption:
Picture Tube:
Audio Power Output Rating:
Speaker:
Tuner Type:
Remote Control:
Receiving Channels:
Antenna Input Impedance:
Input:
Dimensions:
Weight:
ACCESSORY
Remote Control with two size "AAA" batteries
Design and specifications are subject to change without notice.
13
÷
3M91301A-E P12-BACK 13 _ 13/2/04, 2:07
÷
÷
Limited United States Warranty
For 24" FST PURE ®and All Smaller Television Models
Toshiba America Consumer Products, L.L.C. ("TACP") makes
the following limited warranties to original consumers in the
United States. THESE LIMITED WARRANTIES EXTEND TO
THE ORIGINAL CONSUMER PURCHASER OR ANY PERSON
RECEIVING THIS TELEVISION AS A GIFT FROM THE
ORIGINAL CONSUMER PURCHASER AND TO NO OTHER
PURCHASER OR TRANSFEREE.
PRODUCTS PURCHASED IN THE U.S.A. AND USED IN
CANADA ARE NOT COVERED BY THESE WARRANTIES.
PRODUCTS PURCHASED IN CANADA AND USED IN THE
U.S.A. ARE NOT COVERED BY THESE WARRANTIES.
Limited Ninety (90) Day Warranty on Labor*
TACP warrants this television and its parts against defects in
materials or workmanship for a period of ninety (90) days after
the date of original retail purchase. DURING THIS PERIOD,
TACP WILL, AT TACP'S OPTION, REPAIR OR REPLACE A
DEFECTIVE PART WITH A NEW OR REFURBISHED PART
WITHOUT CHARGE TO YOU FOR PARTS OR LABOR. YOU
MUST DELIVER THE ENTIRE TELEVISION TO AN AUTHOR-
IZED TACP SERVICE STATION. YOU MUST PAY FOR ALL
TRANSPORTATION AND INSURANCE CHARGES FOR THE
TELEVISION TO AND FROM THE SERVICE STATION.
Limited One (1) Year Warranty on Parts*
TACP further warrants the parts in this television against defects
in materials or workmanship for a period of one (1) year after the
date of original retail purchase. DURING THIS PERIOD, TACP
WILL, AT TACP'S OPTION, REPAIR OR REPLACE A DEFEC-
TIVE PART WITH A NEW OR REFURBISHED PART WITHOUT
CHARGE TOYOU FOR THE PART, PROVIDED THAT IF A
DEFECTIVE PART IS REPAIRED OR REPLACED AFTER
NINETY (90) DAYS FROM THE DATE OF ORIGINAL RETAIL
PURCHASE, YOU MUST PAY ALL LABOR CHARGES IN-
VOLVED IN THE REPAIR OR REPLACEMENT. YOU MUST
DELIVER THE ENTIRE TELEVISION TO AN AUTHORIZED
TACP SERVICE STATION. YOU MUST PAY FOR ALL TRANS-
PORTATION AND INSURANCE CHARGES FOR THE TELEVI-
SION TO AND FROM THE SERVICE STATION.
Limited Two (2) Year Warranty on Picture Tube*
TACP further warrants the picture tube in this television against
defects in materials or workmanship for a period of two (2) years
after the date of original retail purchase. DURING THIS PERIOD,
TACP WILL, AT TACP'S OPTION, REPAIR OR REPLACE A
DEFECTIVE PICTURE TUBE WITH A NEW OR REFURBISHED
PICTURE TUBE WITHOUT CHARGE TO YOU, EXCEPT THAT
IF A DEFECTIVE PICTURE TUBE IS REPAIRED OR REPLACED
AFTER NINETY (90) DAYS FROM THE DATE OFTHE ORIGI-
NAL RETAIL PURCHASE, YOU MUST PAY ALL LABOR
CHARGES INVOLVED IN THE REPAIR OR REPLACEMENT.
YOU MUST DELIVER THE ENTIRE TELEVISION TO AN
AUTHORIZED TACP SERVICE STATION. YOU MUST PAY FOR
ALL TRANSPORTATION AND INSURANCE CHARGES FOR
THE TELEVISION TO AND FROM THE SERVICE STATION.
Rental Units
The warranty for rental units begins with the first rental or thirty
(30) days from the date of shipment to the rental firm, whichever
comes first.
*Commercial Units
Televisions sold and used for commercial purposes have a limited
ninety (90) day warranty for all parts, labor and picture tube.
Owner's Manual and Demographic Card
You should read this owner's manual thoroughly before
operating this television.You should complete and mail the
enclosed Demographic card within ten days after you, or the
person who has given you this product as a gift, purchased this
television. This is one way to enable TACP to provide you with
better customer service and improved product. Failure to return
the Demographic card will not affect your rights under this
warranty.
14
Your Responsibility
THE ABOVE WARRANTIES ARE SUBJECT TO THE FOLLOW-
ING CONDITIONS:
(1) You must provide your bill of sale or other proof of
purchase.
(2) All warranty servicing of this television must be made by
an Authorized TACP Service Station.
(3) Warranties from TACP are effective only if the television is
purchased and operated in the U.S.A. or Puerto Rico.
(4) Labor service charges for set installation, setup, adjust-
ment of customer controls and installation or repair of
antenna systems are not covered by these warranties.
Reception problems caused by inadequate antenna
systems are your responsibility.
(5) Warranties extend only to defects in materials or workman-
ship as limited above and do not extend to any television
or parts which have been lost or discarded by you or to
damage to television or parts caused by misuse, accident,
Acts of God, such as lightning or fluctuations in electric
power, improper installation, improper maintenance or use
in violation of instructions furnished by TACP; or to units
which have been modified or had the serial number
removed, altered, defaced or rendered illegible.
Row to Obtain Warranty Services
If, after following all of the operating instructions in this manual
and checking the section "Troubleshooting", you find that service
is needed:
(1) To find the nearest TACP Authorized Service Station:
For televisions purchased in the United States, visit
TACP's web site at www.toshiba.com/tacp, or call toll free
1-800-631-3811.
(2) Present your bill of sale or other proof of purchase to the
Authorized Service Station. You must deliver the entire
television to an Authorized TACP Service Station. You
must pay for all transportation and insurance charges for
the television to and from the Service Station.
i For additional information, visit TACP's web site:
www.toshiba.com/tacp.
ALL WARRANTIES IMPLIED BY THE LAW OF ANY STATE OF
THE U.S.A., INCLUDING THE IMPLIED WARRANTIES OF
MERCHANTABILITY AND FITNESS FOR A PARTICULAR
PURPOSE, ARE EXPRESSLY LIMITED TO THE DURATION OF
THE LIMITED WARRANTIES SET FORTH ABOVE. WITH THE
EXCEPTION OF ANY WARRANTIES IMPLIED BY THE LAW OF
ANY STATE OF THE U.S.A. AS HEREBY LIMITED, THE FOREGO-
ING WARRANTY IS EXCLUSIVE AND IN LIEU OF ALL OTHER
WARRANTIES, GUARANTEES, AGREEMENTS AND SIMILAR
OBLIGATIONS OF TACP WITH RESPECT TO THE REPAIR OR
REPLACEMENT OF ANY PARTS. IN NO EVENT SHALL TACP BE
LIABLE FOR CONSEQUENTIAL OR INCIDENTAL DAMAGES.
No person, agent, distributor, dealer or company is authorized to
change, modify or extend the terms of these warranties in any
manner whatsoever. The time within which action must be com-
menced to enforce any obligation of TACP arising under this
warranty or under any law of the United States or of any state
thereof is hereby limited to 90 days from the date you discover or
should have discovered, the defect. This limitation does not apply to
implied warranties arising under the law of any state of the U.S.A.
THIS WARRANTY GIVES YOU SPECIFIC LEGAL RIGHTS, AND
YOU MAY ALSO HAVE OTHER RIGHTS WHICH MAY VARY
FROM STATE TO STATE IN THE U.S.A. SOME STATES OF THE
U.S.A. DO NOT ALLOW LIMITATIONS ON HOW LONG AN
IMPLIED WARRANTY LASTS, WHEN AN ACTION MAY BE
BROUGHT, OR THE EXCLUSION OR LIMITATION OF INCIDEN-
TAL OR CONSEQUENTIAL DAMAGES, SO THE ABOVE LIMITA-
TIONS OR EXCLUSIONS MAY NOT APPLY TO YOU UNDER
SUCH CIRCUMSTANCES.
FST PURE _ is a registered trademark of Toshiba America Con-
sumer Products, LLC.
÷
3M91301A=E P12=BACK ÷13/2/04, 2:07
÷
÷
Limited Canada Warranty
For 24" FST PURE ®and All Smaller Television Models
Toshiba of Canada Limited ("TCIZ') makes the following limited
warranties to original consumers in Canada. THESE LIMITED
WARRANTIES EXTEND TO THE ORIGINAL CONSUMER
PURCHASER OR ANY PERSON RECEIVING THIS TELEVI-
SION AS A GIFT FROM THE ORIGINAL CONSUMER PUR-
CHASER AND TO NO OTHER PURCHASER OR TRANS-
FEREE.
PRODUCTS PURCHASED IN THE U.S.A. AND USED IN
CANADA ARE NOT COVERED BY THESE WARRANTIES.
PRODUCTS PURCHASED IN CANADA AND USED IN THE
U.S.A. ARE NOT COVERED BY THESE WARRANTIES.
Limited Ninety (90) Day Warranty on Labor*
TCL warrants this television and its parts against defects in
materials or workmanship for a period of ninety (90) days after
the date of original retail purchase. DURING THIS PERIOD,
TCL WILL, AT TCtZS OPTION, REPAIR OR REPLACE A
DEFECTIVE PART WITH A NEW OR REFURBISHED PART
WITHOUT CHARGE TO YOU FOR PARTS OR LABOR. YOU
MUST DELIVER THE ENTIRE TELEVISION TO AN AUTHOR-
IZED TCL SERVICE STATION. YOU MUST PAY FOR ALL
TRANSPORTATION AND INSURANCE CHARGES FOR THE
TELEVISION TO AND FROM THE SERVICE STATION.
Limited One (1) Year Warranty on Parts*
TCL further warrants the parts in this television against defects
in materials or workmanship for a period of one (1) year after
the date of original retail purchase. DURING THIS PERIOD,
TCL WILL, AT TCtZS OPTION, REPAIR OR REPLACE A
DEFECTIVE PART WITH A NEW OR REFURBISHED PART
WITHOUT CHARGE TO YOU FOR THE PART, PROVIDED
THAT IF A DEFECTIVE PART IS REPAIRED OR REPLACED
AFTER NINETY (90) DAYS FROM THE DATE OF ORIGINAL
RETAIL PURCHASE, YOU MUST PAY ALL LABOR CHARGES
INVOLVED IN THE REPAIR OR REPLACEMENT. YOU MUST
DELIVER THE ENTIRE TELEVISION TO AN AUTHORIZED
TCL SERVICE STATION.YOU MUST PAY FOR ALL TRANS-
PORTATION AND INSURANCE CHARGES FOR THE
TELEVISION TO AND FROM THE SERVICE STATION.
Limited Two (2) Year Warranty on Picture Tube*
TCL further warrants the picture tube in this television against
defects in materials or workmanship for a period of two (2)
years after the date of original retail purchase. DURING THIS
PERIOD, TCL WILL, AT TCL'S OPTION, REPAIR OR RE-
PLACE A DEFECTIVE PICTURE TUBE WITH A NEW OR
REFURBISHED PICTURE TUBE WITHOUT CHARGE TO
YOU, EXCEPT THAT IF A DEFECTIVE PICTURE TUBE IS
REPAIRED OR REPLACED AFTER NINETY (90) DAYS FROM
THE DATE OF THE ORIGINAL RETAIL PURCHASE, YOU PAY
ALL LABOR CHARGES INVOLVED IN THE REPAIR OR
REPLACEMENT. YOU MUST DELIVER THE ENTIRE
TELEVISION TO AN AUTHORIZED TCL SERVICE STATION.
YOU MUST PAY FOR ALL TRANSPORTATION AND INSUR-
ANCE CHARGES FOR THE TELEVISION TO AND FROM
THE SERVICE STATION.
Rental Units
The warranty for rental units begins with the first rental or thirty
(30) days from the date of shipment to the rental firm, which-
ever comes first.
*Commercial Units
Televisions sold and used for commercial purposes have a
limited ninety (90) day warranty for all parts, labor and picture
tube.
Owner's Manual
You should read this owner's manual thoroughly before
operating this television.
Your Responsibility
THE ABOVE WARRANTIES ARE SUBJECT TO THE FOL-
LOWING CONDITIONS:
(1) You must provide your bill of sale or other proof of
purchase.
(2) All warranty servicing of this television must be made by an
Authorized TCL Service Station.
(3) The warranties from TCL are effective only if the televi-
sion is purchased in Canada from an authorized TCL
dealer and operated in Canada.
(4) Labor service charges for set installation, setup, adjust-
ment of customer controls and installation or repair of
antenna systems are not covered by these warranties.
Reception problems caused by inadequate antenna
systems are your responsibility.
(5) Warranties extend only to defects in materials or work-
manship as limited above and do not extend to any
television or parts which have been lost or discarded by
you or to damage to television or parts caused by misuse,
accident, Acts of God, such as lightning or fluctuations in
electric power, improper installation, improper mainte-
nance or use in violation of instructions furnished by TCL;
or to units which have been modified or had the serial
number removed, altered, defaced or rendered illegible.
How to Obtain Warranty Services
If, after following all of the operating instructions in this manual
and checking the section "Troubleshooting," you find that
service is needed:
(1) To find the nearest TCL Authorized Service Station visit
TCI's web site at www.toshiba.ca
(2) Present your bill of sale or other proof of purchase to the
Authorized Service Station.You must deliver the entire
television to an Authorized TCL Service Station.You must
pay for all transportation and insurance charges for the
television to and from the Service Station.
i For additional information, visit TCL's web site:www.toshiba.ca
ALL WARRANTIES IMPLIED BY THE LAW OF ANY PROV-
INCE OF CANADA, INCLUDING THE IMPLIED WARRANTIES
OF MERCHANTABILITY AND FITNESS FOR A PARTICULAR
PURPOSE, ARE EXPRESSLY LIMITED TO THE DURATION
OF THE LIMITED WARRANTIES SET FORTH ABOVE. WITH
THE EXCEPTION OF ANY WARRANTIES IMPLIED BY THE
LAW OF ANY PROVINCE OF CANADA AS HEREBY LIMITED,
THE FOREGOING WARRANTY IS EXCLUSIVE AND IN LIEU
OF ALL OTHER WARRANTIES, GUARANTEES, AGREE-
MENTS AND SIMILAR OBLIGATIONS OF TCL WITH RE-
SPECT TO THE REPAIR OR REPLACEMENT OF ANY
PARTS. IN NO EVENT SHALL TCL BE LIABLE FOR CONSE-
QUENTIAL OR INCIDENTAL DAMAGES.
No person, agent, distributor, dealer or company is authorized
to change, modify or extend the terms of these warranties in
any manner whatsoever. The time within which action must be
commenced to enforce any obligation of TCL arising under this
warranty or under any law of Canada or of any province
thereof, is hereby limited to 90 days from the date you discover
or should have discovered, the defect. This limitation does net
apply to implied warranties arising under the law of any
province of Canada.
THIS WARRANTY GIVESYOU SPECIFIC LEGAL RIGHTS,
AND YOU MAY ALSO HAVE OTHER RIGHTS WHICH MAY
VARY FROM PROVINCE TO PROVINCE IN CANADA. SOME
PROVINCES OF CANADA DO NOT ALLOW LIMITATIONS ON
HOW LONG AN IMPLIED WARRANTY LASTS, WHEN AN
ACTION MAY BE BROUGHT, OR THE EXCLUSION OR
LIMITATION OF INCIDENTAL OR CONSEQUENTIAL DAM-
AGES, SO THE ABOVE LIMITATIONS OR EXCLUSIONS MAY
NOT APPLY TO YOU UNDER SUCH CIRCUMSTANCES.
FST PURE' is a registered trademark of Toshiba America
Consumer Products, L.L.C. 15
÷
3M91301A-E P12-BACK ÷13/2/04, 2:07

÷
÷ ÷
TOSHIBA AMERICA CONSUMER PRODUCTS= L,L,C.
Head Office
82 Totewa Road, Wayne, NJ 07470
National Service Division
1420B Toshiba Drive, Lebanon, TN 37087
TOSHIBA OF CANADA LiMiTED
191 McNabb Street
Markham, Ontario L3R 8H2
TEL.: (905) 470-5400
Service Centers:
TORONTO: 191 McNABB STREET,
MARKHAM, ONTARIO, L3R 8H2, CANADA
TEL.: (905) 470-5400
MONTREAL: 18050 TRANS CANADA, KIRKLAND,
QUEBEC, H9J-4A1, CANADA
TEL.: (514) 390-7766
VANCOUVER: 22171 FRASERWOOD WAY,
RICHMOND, B.C., V62 1J5, CANADA
TEL.: (004) 303-2500
PRINTED IN THAILAND TOSHIBA
3M91301A=E P12=BACK ÷13/2/04, 2:07
÷
IIIIIIIIIIIIIIIIIIIIMIIIIMIIIIII
3M91301A-F COVER ÷13/2/04, 2:07
Chef client,
Merci d'avoir achet_ ce t616viseur TOSHIBA. Ce manuel
vous aidera _ utiliser les possibilit6s nombreuses et
vari6es de votre nouveau t616viseur. Avant d'allumer
votre t_l_vJseur, veuJnez life ce manuel en entJer.
Gardez-le _ port6e de la main pour pouvoir le consulter
I'avenir.
Cons|goesde s curit
AVERTISSEN! ENT
POUR REDUIRE LE RISQUE D'INCENDIE OU DE CHOC
ELECTRIQUE, N'EXPOSER CET APPAREIL NI A LA
PLUIE NI A UHUMIDITE.
AVERTISSEMENT
AVERT|SSEMENT : POUR REDU|RE LES R|SQUES
DE CHOC ELECTRIQUE, NE PAS RETIRER LE
PANNEAU ARR|#RE. LE T|#LI_V|SEUR NE
CONTIENT PAS DE PIECES REPARABLES PAR
L'UTiL|SATEUR. S'ADRESSER A UN CENTRE DE
SERVICEAGRee.
Le symbole de la foudre duns le triangle indique que la
tension a Finterieur du televiseur peut _tre suffisamment
|levee pour provoquer un choc electrique. NE PAS
ESSAYER DE RI_PARER LETLeLEViSEUR SOi-MLeME.
Le point d'exclamation darts le triangle estun symboie
qui precede des instructions de fonctionnement et
d'entretien importantes.
ATTENTION : Pour r_duire le risque de choc
_lectriqne, n'otilisez pas la fiche polar|she avec nn
cordon d'extension, on r_ceptacle oo toot| notre
prise _lectrique & me|as qne los lames poisseot _tre
ins_r_es compl_tement pour _viter I'e×position des
lames.
AViS AUX INSTALLATEURSDE
CABLODISTRIBUTIONAUX
Cet avis rappelle, fl I'attention des installateurs de syst_mes
de cablodistribution, I'article 820-40 du NEC (code
_lectrique national des Etats-Unis) qui fournit des conseils
pour une raise _ la terre correcte et qui pr6conise en
part|culler que la mine _ la terre du cable dolt 6tre reli6e
au syst_me de mise a la terre de I'immeuble, aussi pros
que possible du point ou le cable entre dans I'immeuble.
Pour de plus arrlples informations sur la mise a la torte de
I'antenne, consulter los alin_as 25 et 26 _ la page 4.
AViS SUR LESEFFETSNi_FASTES
POTENTIELSPOURLETUBEiMAGE
Si one image fixe 0rnmobile) reste _ 1'6cran du
tQI6viseur pendant des p6riodes prolong6es, il |st
possible que cette image se grave d6finitivement sur le
tube. Ce genre de dornmage N'EST PAS COUVERT
PAR LA GARANT|E. Consulter I'alin6a 33 a la page 4.
3303
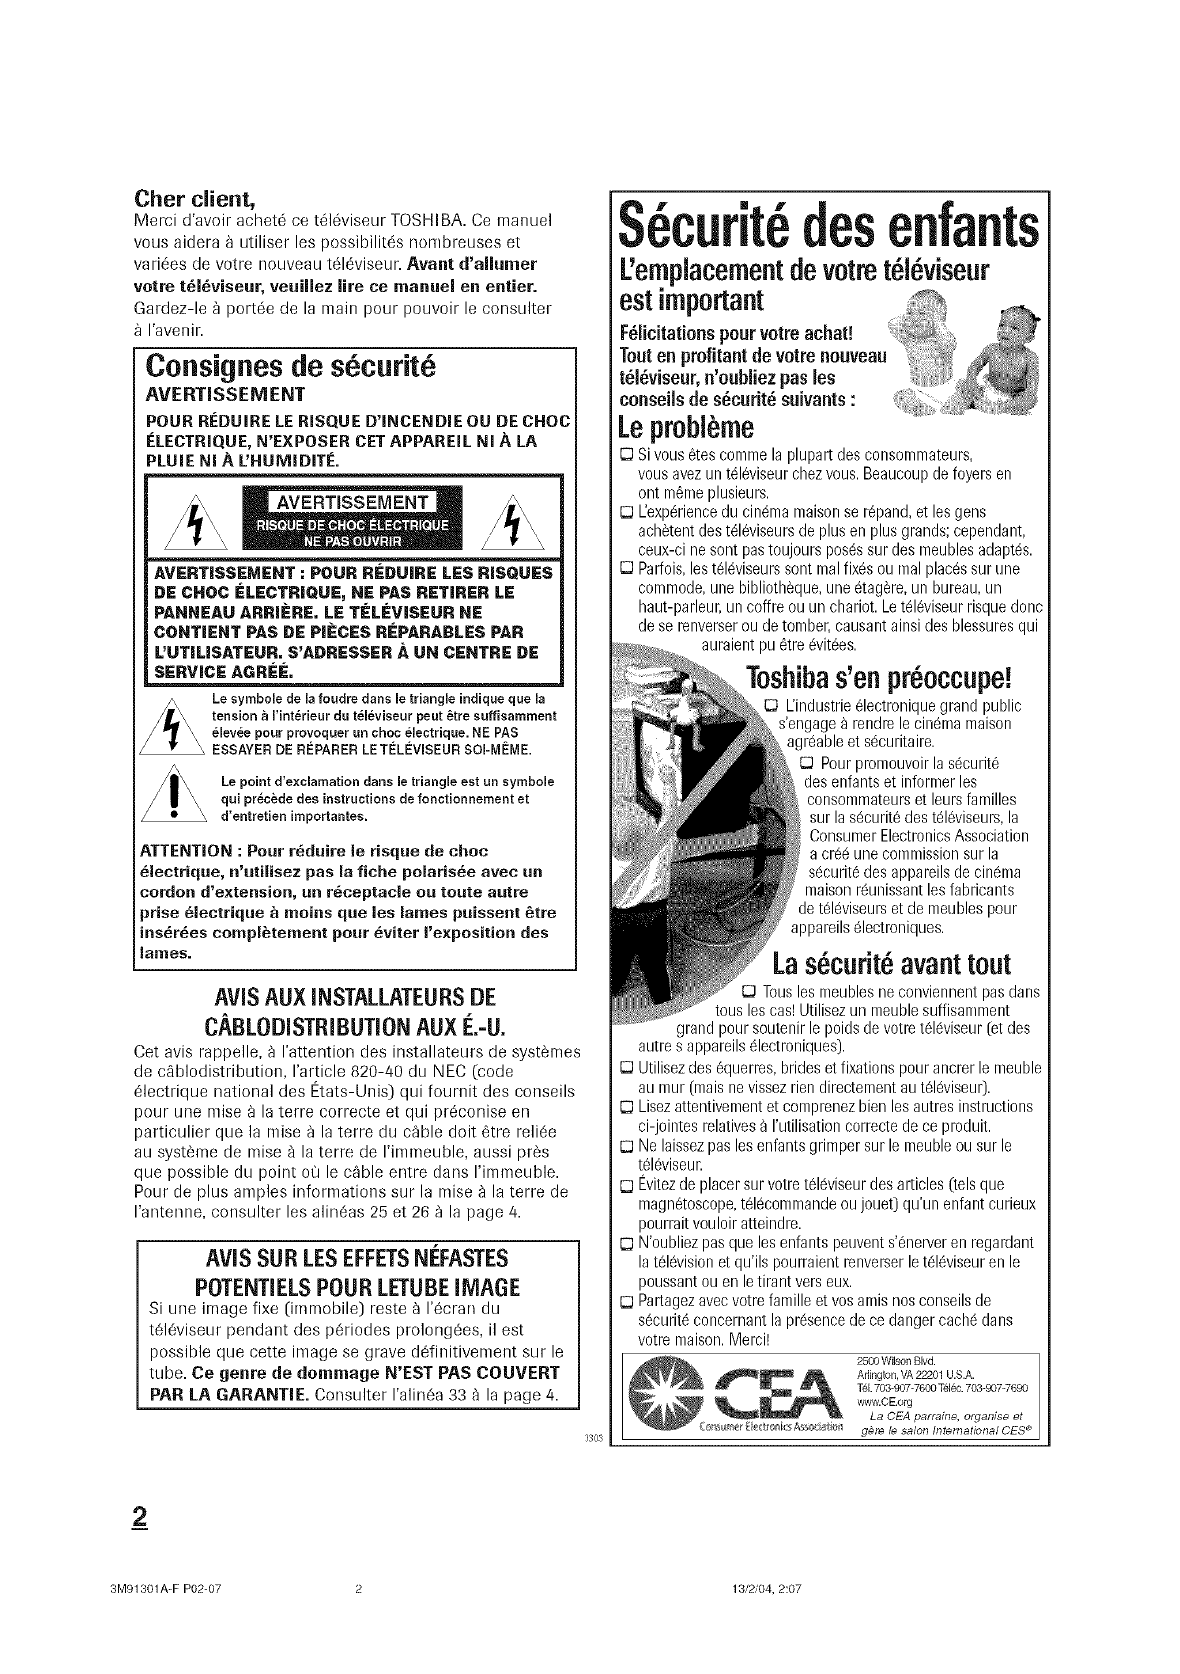
S curit desenfants
L'emplacementdevotret l viseur
Lepr0bl me
[D Sivous _tes comme la plupart des consommateurs,
vous avez un t_l_viseur chez vous. Beaucoup de foyers en
ont m_me plus|ours.
E3 L'exp_rience du cinema maison se r@and, et los gens
ach_tent des t_l_viseurs de plus en plus grands; cependant,
ceux-ci ne soot pastoujours pos_s sur des meubles adapt_s.
E3 Parfois, les t61_viseurs sont mal fixes ou mal places sur une
commode, une biblioth_que, une _tag_re, un bureau, un
haut-parleur, un coffre ou un chariot. Le tel_viseur risque donc
de se renverser ou de tomb|r, causant ainsi des blessures qui
auraient pu _tre _vit_es.
-|
Toshibas'enpreoccupe.
L'industrie _lectronique grand public
s'engage _ rendre le cin6ma maison
agr6able et s6curitaire.
E3 Pour premouvoir la s6curit6
des enfants et informer los
consommateurs et leurs families
sur la s6curit6 des t616viseurs,la
Consumer Electronics Association
a cr66 une commission sur la
s6curit_,des appareils de cin6ma
maison r6unissant los fabricants
de t616viseum et de meubles pour
appareils 61ectroniques.
Las curit avanttout
E3 Tousles meubles ne conviennent pas dans
tousles cos! Utilisez un meuble suffisamment
grand pour soutenir le poids de votre t_16viseur (et des
autre s appareils 61ectroniques}.
E3 Utilisez des 6querres, brides et fixations pour ancrer le meuble
au mur 0nais ne vissez rien directement au t616viseu0.
[D Lisez attentivement et comprenez bien los autres instructions
ci-jointes relatives _ rutilisation correcte de ce produit.
E3 Ne laissez pas los enfants grimper sur le meuble ou sur le
t61_viseur.
[D Evitezde placer sur votre t_l_viseur des articles (tels que
magn6toscope, t616commande ou jouet} qu'un enfant curJeux
pourrait vouloir atteindre.
[D N'oubliez pas que los enfants peuvent s'6nerver en regardant
la t616vision et qu'ils pourraient renverser le t616viseuren le
poussant ou en le tirant vers eux.
E3 Partagez avec votre faro|lie et vos antis nos conseils de
s6curit6 concernant la presence de ce danger cach6 dons
votre maison. Merci!
2500 Wilson Blvd.
Arlington, VA22201 U.S.A.
Tel.703907-7600 T_l_c.703-9077690
wwwICEIOrg
La CEA parraine, organ|s| et
_<_:_rs As_,_a_r_I g@re le salon International CES _
2
3M91301A-F P02-07 2 13/2/04, 2:07
instructionsimportantessurlasecurit6
1) Lire ces instructions.
2) Conserver ces instructions.
3) Observer tous les avertissements.
4) Suivre routes les instructions.
5) Ne pas utUiser cet appareU
proximit_ d'eau.
6) Nettoyer seuiemeot avec un chiffon sec.
7) Ne pas bloquer les ouvertures
d'aeration. Installer selon los instructions
du fabricant.
8) Ne pas installer pres d'une source de
chaleur telle qu'un radiateur, une bouche
d'air clraud, une cuisini_re ou tout autre
appareil (.ycompris los anrplificateurs)
produisant de la chaleur.
9) Ne pus contoureer le dispositif de s6curit6 que repr_seote
la fiche polaris6e ou la fiche avec raise _ la terre.
Une fiche polarisee poss_de une lanre plus Lamelag(
large que I'autre. Une fiche avec raise a \
la terre possede deux lames et une broclre
de nrise _ la terre. La lame large et la broche
de nrise _ la terre sont prevues pour la
securit6 de I'utilisateur. Si la fiche
fournie ne va pas dans la prise, consulter un electricien qui la
renlplacera par une prise aux nornles actuelles.
i
10) Proteger le cordon d'alimeutation de
fa_on ace qu'il ne soit ni 6crase, ni coinc6,
surtout prSsdes fiches, des blocs nrultiprises
et du point de sortie de I'appareil.
11) N'utiliser que des accessoires sp6cifi6s par le fabricant.
12) Utiliser le t_l_viseur uniquement avec le chariot,
le meuble, le tr6pied, le support ou la table,
recommand_s par le fabricaut ou veodus
avec I'appareiL En cas d'utilisation d'un
chariot, faire bien attention en deplagant
I'ensemble chariot/appareil pour eviter des
blessures dues au renverselrrent.
13)D brauchercotoppore,pe.da.,
losorages_lectriquesouIorsqu', _
n'est pas utilis_ pendant uue
p6riode prolong6e. _' _
14) Pour tout service apr_s-veote, consulter un
techuicien de service ogre& II faut faire r@arer _':_
I'appareil Iors de tout donrmage, par _:==_,_-/.,.
exenrple si le cordon d'alimentation ou t_._FJ_,-!
la prise a 6t6 endomnlag6, si un objet _ tp==_
ou un liquide a penetr6 a I'interieur de __
I'appareil, ou si I'appareil a 6t8 expos6 _ la pluie ou a
I'humidite, s'il est tonrbe ou s'il fonctionne anonr]alenrent,
15) ATTENTION : Pour rSduire le risque de choc 61ectrique,n'utilisez
pas la fiche polarisee avec un cordon d'extension, un receptacle
ou toute autre prise electrique _ moins que les lames puissent
8tre inserees conrpletement pour 6viter I'exposition des lanres.
installation,entretienetserviceapres-vente
installation
Suivre ces recomnrandations et precautions et observertous los
avertissements Iors de I'installation du televise[Jr:
16) Nejamais modifier cet equipement. Tout changenrent ou toute
modification pout annuler : a) la garantie, et b) le droit de
I'utilisateur de se servir de eet appareil, selon les rSgles de la
Comnrission federale des communications des Etats-Unis (FCC).
17) /_ DANGER :RISQUE DE BLESSURES GRAVES
/II \OU MORTELLES, OU D ENDOMMAGEMENT
DU NIATERIEL! Nejamais placer le
telSviseur sur un chariot, un nreuble ou une
table instable. Le tSIeviseur pourrait tomber
et causer des blessuresgraves ou mortelles
ou 6tre gravement endonrmage.
18) Nejamais placer nJentreposer le televiseur :, _iiii:]
directenrent _ la lunriere du soleil ou dans
un endroit chaud, humide, poussiereux ou
expose _ des vibrations importantes ou
des temperatures inferieures _ 5 °C (41 °F).
19)Toujours placer le televiseur par terre
ou sur une surface solide, de niveau
et stable, capable de soutenir le poids
de I'appareil.
20) Nejamais placer d'objets tels que des
vases, des aquariums ou des bougies
sur le televiseur.
21) Nejamais boucher ni couvrir les fentes ou orifices places
I'arri_re, dans la partie inferieure et sur les cotes du televise[Jr.
Nejamais placer le televiseur :
• sur un lit, un sofa, un tapis ou
toute autre surface semblable;
•trop pros des draperies, des
rideaux ou des nrurs;
•dans un espace clos tel qu'une
bibliotheque, un meuble encastre
ou tout autre endroit ne pernrettant
pas une aeration adequate.
Los fentes et orifices sont destines
assurer la ventilation du televise[Jr de
mani_re _ ce qu'il fonctionne sans
anomalie et ne soit pas expose _ une temperature excessive.
22) Le cordon d'alinrentation dolt 6tre achenrin6 de fa_on _ ne pas
6tre ecrase ni coince; ne janrais placer le televiseur dons un
endroit or3le cordon d'alinrentation risque d'etre us6 ou maltrait&
03O3
23) Ne pas surcharger los prises ni los
rallonges.
3
3M91301A-F P02-07 3 13/2/04, 2:07
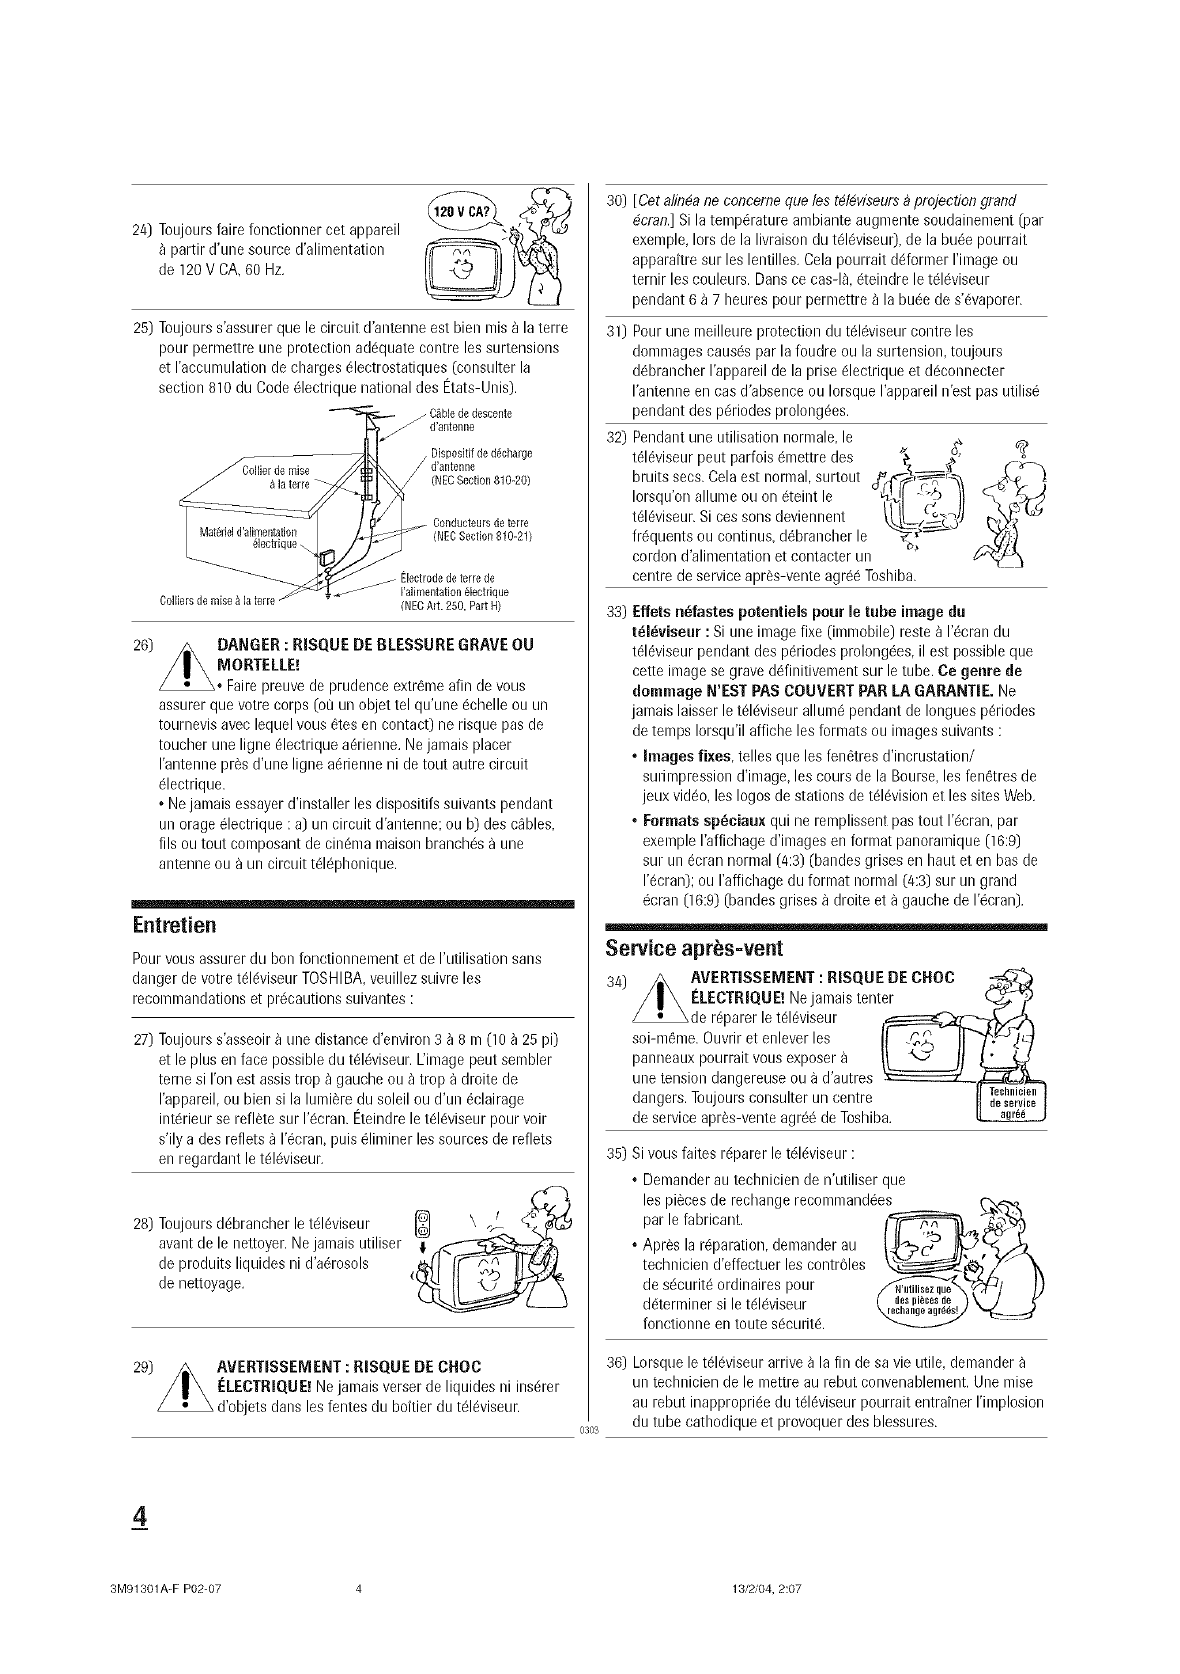
24) Toujours faire fonctionner cot appareil
partJr d'une source d'alJmentation
de 120V CA, 60 Hz.
25) Toujours s'assurer que le circuit d'antenne est bien mis _ la terre
pour permettre une protection ad6quate contre los surtensions
et raccumulation de charges 61ectrostatiques (consulter la
section 810 du Code 61ectrique national des Etats-Unis).
/C_ble de descente
d'antelllle
d'antenne
(NEC Section 810-20)
Oonducteursdeterre
(NECSection810-21)
26)
Colliers de raise &la terre
Electrode de terre de
I'alimentatJon 61ectrique
(NEC Art. 250, Part H)
DANGER : RISQUE DE BLESSURE GRAVE OU
MORTELLE!
Faire preuve de prudence extrGme afin de vous
assurer que votre corps (ot_un objet tel qu'une 6chelle ou un
tournevis avec lequel vous 6tes en contact) ne risque pas de
toucher une ligne 61ectrique adrienne. Ne jamais placer
rantenne pros d'une ligne aGrienne ni de tout autre circuit
61ectrique.
• Nejamais essayer d'installer les dispositifs suivants pendant
un orage 61ectrique :a) un circuit d'antenne; ou b) des cables,
fils ou tout composant de cindma maison branchGs a une
antenne ou a un circuit tdl@honique.
Entretien
Pour vous assurer du bon fonctionnement et de I'utilisation sans
danger de votre tGIdviseurTOSHIBA, veuillez suivre les
recommandations et prdcautions suivantes :
27) Toujours s'asseoir _ une distance d'environ 3 _ 8 m (10 _ 25 pi)
et le plus en face possible du tdlGviseur.L'image pout sembler
terne si ron est assis trop _ gauche ou _ trop a droite de
I'appareil, ou bien si la lumiSre du soleil ou d'un 6clairage
intdrieur se reflete sur 1'Gcran.Eteindre le tGIdviseur pour voir
s'ily a des reflets _ 1'Gcran,puis 61iminer los sources de reflets
en regardant le tGIGviseur.
28) Toujours ddbrancher le tdlGviseur
avant de le nettoyer. Ne jamais utiliser
de produits liquides ni d'aGrosols
de nettoyage.
29) _ AVERTISSEMENT: RISQUE DE CHOC
/|\ELECTRIQUE! Rejamais verser de liquides ni insdrer
d'objets dans les fentes du boftier du tGIGviseur.
0303
30) [ Cet alin#a ne concerne que los t#14viseursDprojection grand
4cran.] Si la tempdrature ambiante augmente soudainement (par
exemple, Iors de la livraison du tGIGviseur),de la huge pourrait
apparaitre sur les lentilles. Cela pourrait ddformer rimage ou
ternir les couleurs. Dans ce cas-I& 6teindre le tGIGviseur
pendant 6 _ 7 heures pour permettre _ la buGede s'dvaporer.
31) Pour une meilleure protection du tdlGviseur contre los
dommages causGspar la foudre ou la surtension, toujours
dGbrancherI'appareil de la prise 61ectrique et dGconnecter
I'antenne en cas d'absence ou Iorsque I'appareil n'est pas utilis6
32)
pendant des pGriodes prolongdes.
Pendant une utJlJsatJonnormale, le
tdlGviseur pout parfois 6mettre des
bruits secs. Cela est normal, surtout
Iorsqu'on allume ou on 6teint le
tGIGviseur.Si cos sons deviennent
frGquents ou continus, dGbrancher le
cordon d'alJmentation et contacter un
centre de service apr_s-vente agr66 Toshiba.
33) Effets n_fastes poter|tieJs pour le tube image du
tdldviseur : Si une image fixe (immobile) reste _ I'_crandu
t61dviseurpendant des p6riodes prolong_es, il est possible que
cette image se grave d6finitivement sur le tube, Ce genre de
dommago N'EST PAS COUVERT PAR LA GARANTIE. Ne
jamais laisser le tGIdviseur allum_ pendant de Iongues pGriodes
de temps Iorsqu'il affiche les formats ou images suivants :
•Images fixes, telles que les fenGtres d'incrustation/
surimpression d'image, les cours de la Bourse, les fenGtres de
jeux video, los Iogos de stations de tdlGvisionet les sites Web.
•Formats spbciaux qui ne remplissent pas tout I'_cran, par
exemple I'affichage d'images en format panoramique (16:9)
sur un 6cran normal (4:3) (bandes grises en haut et en bas de
1'Gcran);ou I'affichage du format normal (4:3) sur un grand
_cran (16:9) (bandes grises _ droite eta gauche de I'_cran).
Service aprbs=vent
AVERTISSEMENT :RISQUE DE CNOC .,_
I'-:/EgTRIQUElNejamaistenter
_de r@arer e td 6vseur
soi-m_me. Ouvrir et enlever los I! ._, IF'_,I_/_-_
panneauxpourraitvousexposer
une tension dangereuse ou a d'autres _==:=:::::::zL___
dangers. Toujours consulter un centre II _'_'_,i_' I
de service apr_s-vente agr_6 de Toshiba.
35) Si vous faites rdparer le tdldviseur :
• Demander au technicien de n'utiliser que
los pi_ces de rechange recommand_e C-2_R._&-_''' . ,.
par le fabricant. -_ '
• Apr_s la r@aration, demander au
technicien d'effectuer les contr_31es
de s_curit6 ordinaires pour _,_/_/ _)
ddtem]iner sile tdl_viseur
fonctionne en toute sGcuritd.
36) Lorsque le tdlGviseurarrive _ la fin de sa vie utile, demander
un technicien de le mettre au rebut convenablement. Une raise
au rebut inappropriGe du tGIdviseur pourrait entrainer rimplosion
du tube cathodique et provoquer des blessures.
4
3M91301A-F P02-07 4 13/2/04, 2:07
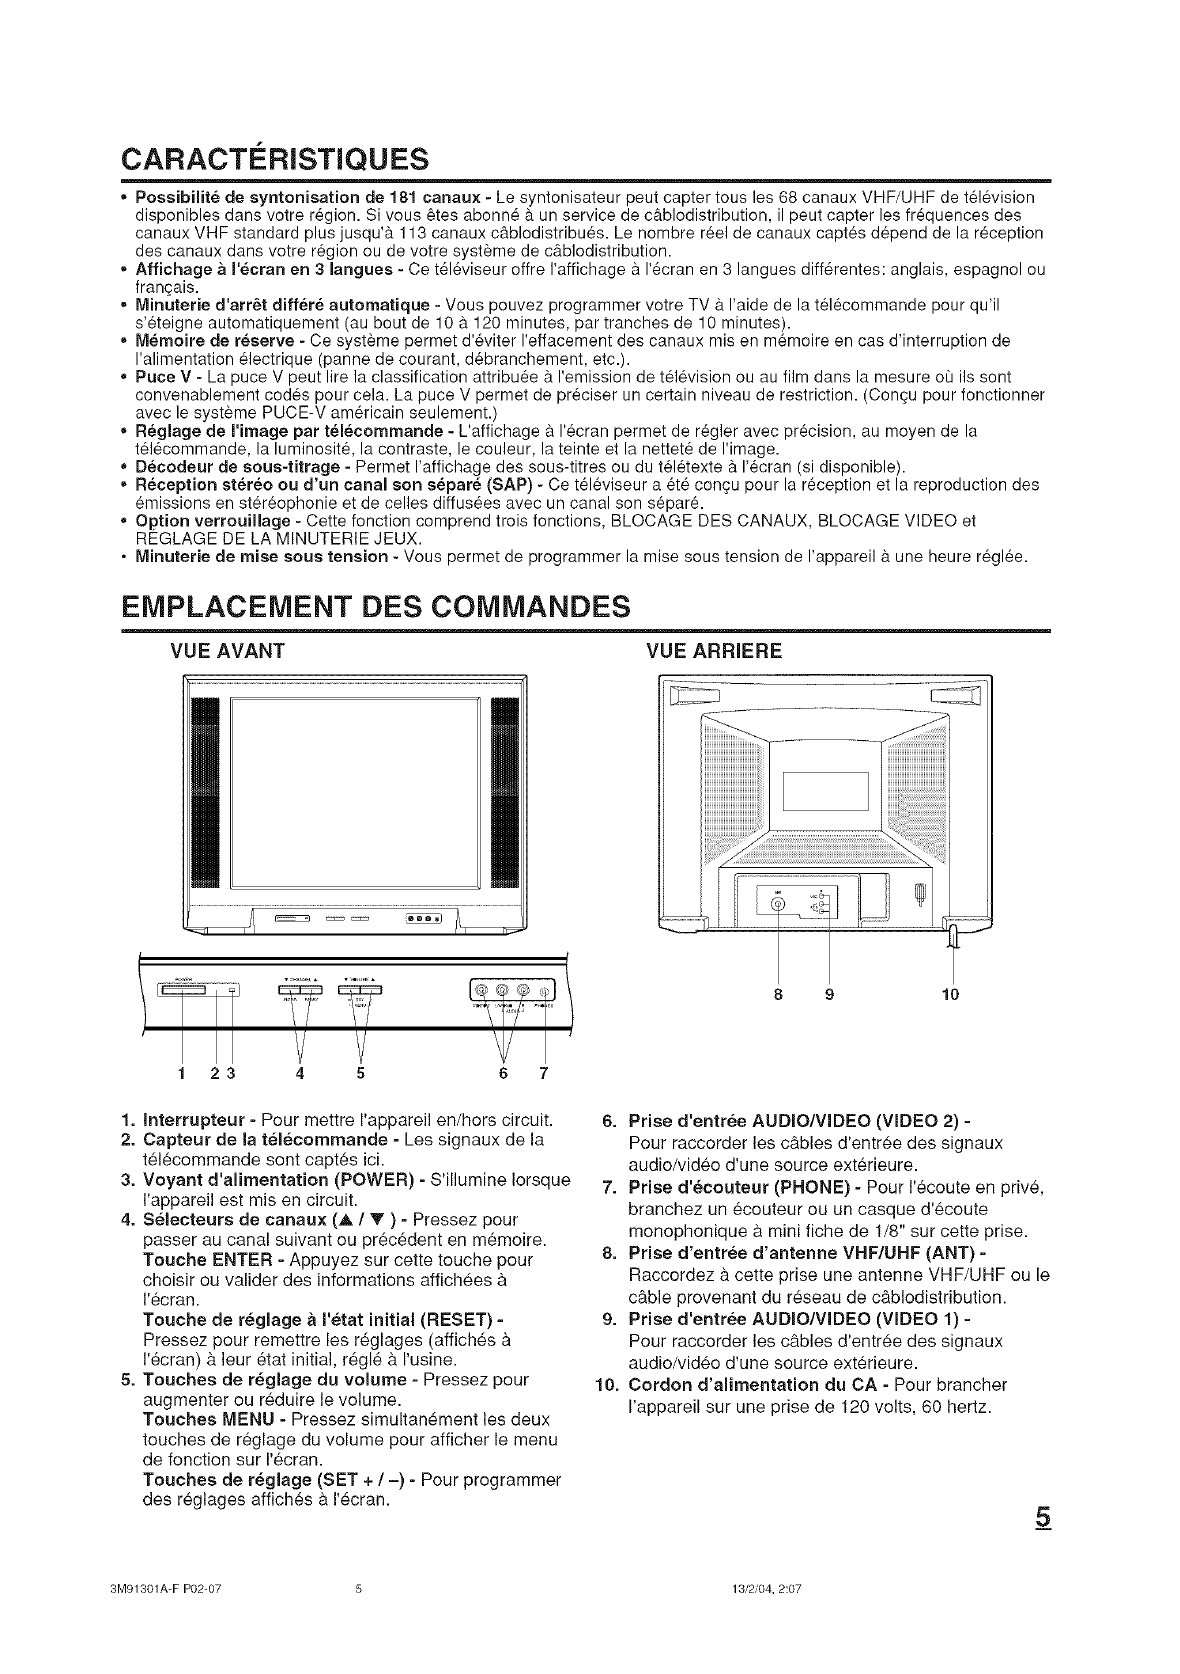
CARACTERISTIQUES
,, Possibilit6 de syntonisation de 181 canaux - Le syntonisateur peut capter tousles 68 canaux VHF/UHF de t616vision
disponibles dans votre r6gion. Si vous _tes abonn6 9. un service de c&blodistribution, il peut capter les fr6quences des
canaux VHF standard plus jusqu'& 113 canaux cg.blodistribu6s. Le hombre r_el de canaux capt6s d6pend de la r6ception
des canaux dans votre r_gion ou de votre syst_me de c9.blodistribution.
Affichage a I'ecran en 3 langues - Ce t61_viseur offre I'affichage 9. I'_cran en 3 langues diff@entes: anglais, espagnol ou
frangais.
Minuterie d'arr6t diff6r6 automatique - Vous pouvez programmer votre TV & I'aide de la t_16commande pour qu'il
s'6teigne automatiquement (au bout de 10 & 120 minutes, par tranches de 10 minutes).
Memoire de reserve - Ce syst_me permet d'6viter I'effacement des canaux mis en m6moire en cas d'interruption de
I'alimentation 61ectrique (panne de courant, d6branchement, etc.).
,, Puce V - La puce V peut lire la classification attribu6e 9. I'emission de t616vision ou au film dans la mesure ot_ ils sont
convenablement cod6s pour cela. La puce V permet de pr6ciser un certain niveau de restriction. (Congu pour fonctionner
avec le syst_me PUCE-V am6ricain seulement.)
,, R_glage de I'image par telecommande - L'affichage 9. 1'6cran permet de r6gler avec precision, au moyen de la
t616commande, la luminositY, la contraste, le couleur, la teinte et la nettet6 de I'image.
,, D_codeur de sous-titrage - Permet I'affichage des sous-titres ou du t_16texte 9. 1'6eran (si disponible).
• Reception stereo ou d'un canal son separ6 (SAP) - Ce t616viseur a 6t6 con cu pour la r_ception et la reproduction des
6missions en st@6ophonie et de celles diffus6es avec un canal son s6par6.
,, Option verrouillage - Cette fonction comprend trois fonctions, BLOCAGE DES CANAUX, BLOCAGE VIDEO et
REGLAGE DE LA MINUTERIE JEUX.
• Minuterie de raise sous tension - Vous permet de programmer la mise sous tension de I'appareil 9. une heure r6gl_e.
EMPLACEMENT DES COMMANDES
VUE AVANT VUEARRIERE
123 4 5 6 7
1. Interrupteur -Pour mettre I'appareil en/hors circuit.
2. Capteur de la telecommande = Les signaux de la
tel6commande sont capt,s ici.
3. Voyant d'alimentation (POWER) -S'illumine Iorsque
I'appareil est mis en circuit.
4. Selecteurs de canaux (A /V ) - Pressez pour
passer au canal suivant ou pr6c_dent en m_moire.
Touche ENTER - Appuyez sur cette touche pour
choisir ou valider des informations affichees &
1'6cran.
Touche de reglage aI'etat initial (RESET) -
Pressez pour remettre les reglages (affiches &
1'6cran) & leur _tat initial, regl_ & I'usine.
5. Touches de r_glage du volume -Pressez pour
augmenter ou reduire le volume.
Touches MENU - Pressez simultanement les deux
touches de r_glage du volume pour afficher le menu
de fonction sur I'ecran.
Touches de r_glage (SET + /-) - Pour programmer
des reglages affich_s & I'ecran.
8 9 10
6. Prise d'entree AUDIO/VIDEO (VIDEO 2) =
Pour raccorder les c&bles d'entree des signaux
audio/video d'une source ext_rieure.
7. Prise d'_couteur (PHONE) -Pour I'_coute en privY,
branchez un _couteur ou un casque d'_coute
monophonique & mini fiche de 1/8" sur cette prise.
8. Prise d'entree d'antenne VHF/UHF (ANT) -
Raccordez & cette prise une antenne VHF/UHF ou le
c&ble provenant du reseau de c&blodistribution.
9. Prise d'entree AUDIO/VIDEO (VIDEO 1) =
Pour raccorder les c&bles d'entree des signaux
audio/video d'une source ext_rieure.
10. Cordon d'alimentation du CA -Pour brancher
I'appareil sur une prise de 120 volts, 60 hertz.
5
3M91301A-F P02-07 5 13/2/04, 2:07
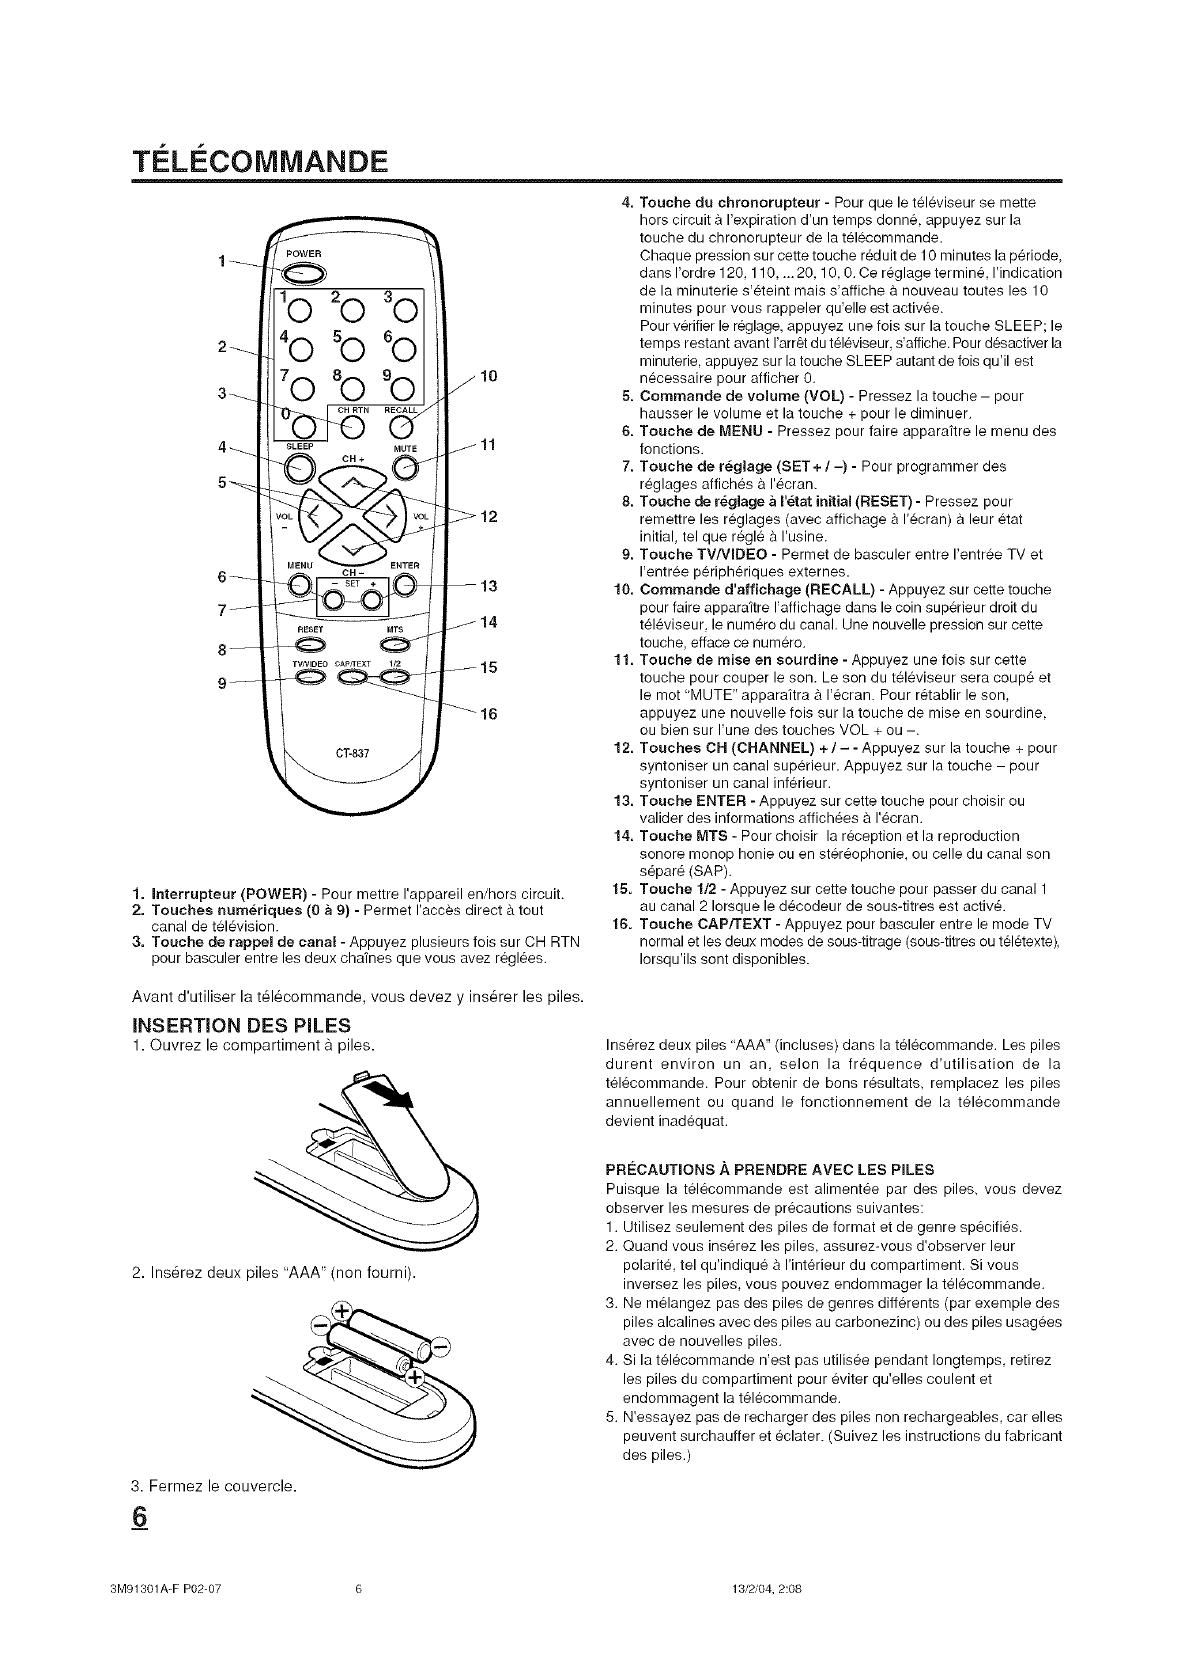
TC:Li COMMANDE
10
1. Interrupteur (POWER) - Pour mettre I'appareil en/hors circuit.
2. Touches num_,riques (0 a 9) - Permet I'acces direct & tout
canal de television.
3. Touche de rappel de canal - Appuyez plusieurs lois sur CH RTN
pour basculer entre les deux chafnes que vous avez reglees.
4. Touche du chronorupteur - Pour que le televiseur se mette
hors circuit & I'expiration d'un temps donne, appuyez sur la
touche du chronorupteur de la telecommande.
Chaque pression sur cette touche reduit de 10 minutes la periode,
dans I'ordre 120, 110, ... 20, 10, 0. Ce reglage termine, I'indication
de la minuterie s'eteint mais s'affiche a nouveau toutes les 10
minutes pour vous rappeler qu'elle est activee.
Pour verifier le reglage, appuyez une fois sur la touche SLEEP; le
temps restant avant I'arret du televiseur, s'affiche. Pour desactiver la
minuterie, appuyez sur la touche SLEEP autant de lois qu'il est
necessaire pour afficher 0.
5. Commande de volume (VOL) - Pressez la touche - pour
hausser le volume et la touche + pour le diminuer.
6. Touche de MENU - Pressez pour faire apparaftre le menu des
fonctions.
7. Touche de r_glage (SET +/-) - Pour programmer des
reglages affiches a I'ecran.
8. Touche de r_,glage a I'_tat initial (RESET) -Pressez pour
remettre les reglages (avec affichage & I'ecran) a leur etat
initial, tel que regle & I'usine.
9. Touche TV/VIDEO - Permet de basculer entre I'entree TV et
I'entree peripheriques externes.
10. Commande d'affichage (RECALL) - Appuyez sur cette touche
pour faire apparaitre I'affichage dans le coin superieur droit du
televiseur, le numero du canal. Une nouvelle pression sur cette
touche, efface ce numero.
11. Touche de mise en sourdine - Appuyez une fois sur cette
touche pour couper le son. Le son du televiseur sera coupe et
le mot "MUTE" apparaitra & I'ecran. Pour retablir le son,
appuyez une nouvelle fois sur la touche de mise en sourdine,
ou bien sur I'une des touches VOL + ou -.
12. Touches CH (CHANNEL) +/- - Appuyez sur la touche + pour
syntoniser un canal superieur. Appuyez sur la touche - pour
syntoniser un canal inferieur.
13. Touche ENTER - Appuyez sur cette touche pour choisir ou
valider des informations affichees a I'ecran.
14. Touche MTS - Pour choisir la reception et la reproduction
sonore monop honie ou en stereophonie, ou celle du canal son
separe (SAP).
15. Touche 1/2 - Appuyez sur cette touche pour passer du canal 1
au canal 2 Iorsque le decodeur de sous-titres est active.
16. Touche CAP/TEXT - Appuyez pour basculer entre le mode TV
normal et les deux modes de sous-titrage (sous-titres ou teletexte),
Iorsqu'ils sont disponibles.
Avant d'utiliser la t61ecommande, vous devez y insurer les piles.
INSERTION DES PILES
1. ©uvrez le compartiment & piles.
2. Ins_rez deux piles "AAA" (non fourni).
3. Fermez le couvercle.
Inserez deux piles "AAA" (incluses) dans la telecommande. Les piles
durent environ un an, selon la frequence d'utilisation de la
telecommande. Pour obtenir de bons resultats, remplacez les piles
annuellement ou quand le fonctionnement de la telecommande
devient inadequat.
PRO:CAUTIONS A PRENDRE AVEC LES PILES
Puisque la telecommande est alimentee par des piles, vous devez
observer les mesures de precautions suivantes:
1. Utilisez seulement des piles de format et de genre specifies.
2. Quand vous inserez les piles, assurez-vous d'observer leur
polarite, tel qu'indique & I'interieur du compartiment. Si vous
inversez les piles, vous pouvez endommager la telecommande.
3. Ne melangez pas des piles de genres differents (par exemple des
piles alcalines avec des piles au carbonezinc) ou des piles usagees
avec de nouvelles piles.
4. Si la telecommande n'est pas utilisee pendant Iongtemps, retirez
les piles du compartiment pour eviter qu'elles coulent et
endommagent la telecommande.
5. N'essayez pas de recharger des piles non rechargeables, car elles
peuvent surchauffer et eclater. (Suivez les instructions du fabricant
des piles.)
_6
3M91301A-F P02-07 6 18/2/04, 2:08
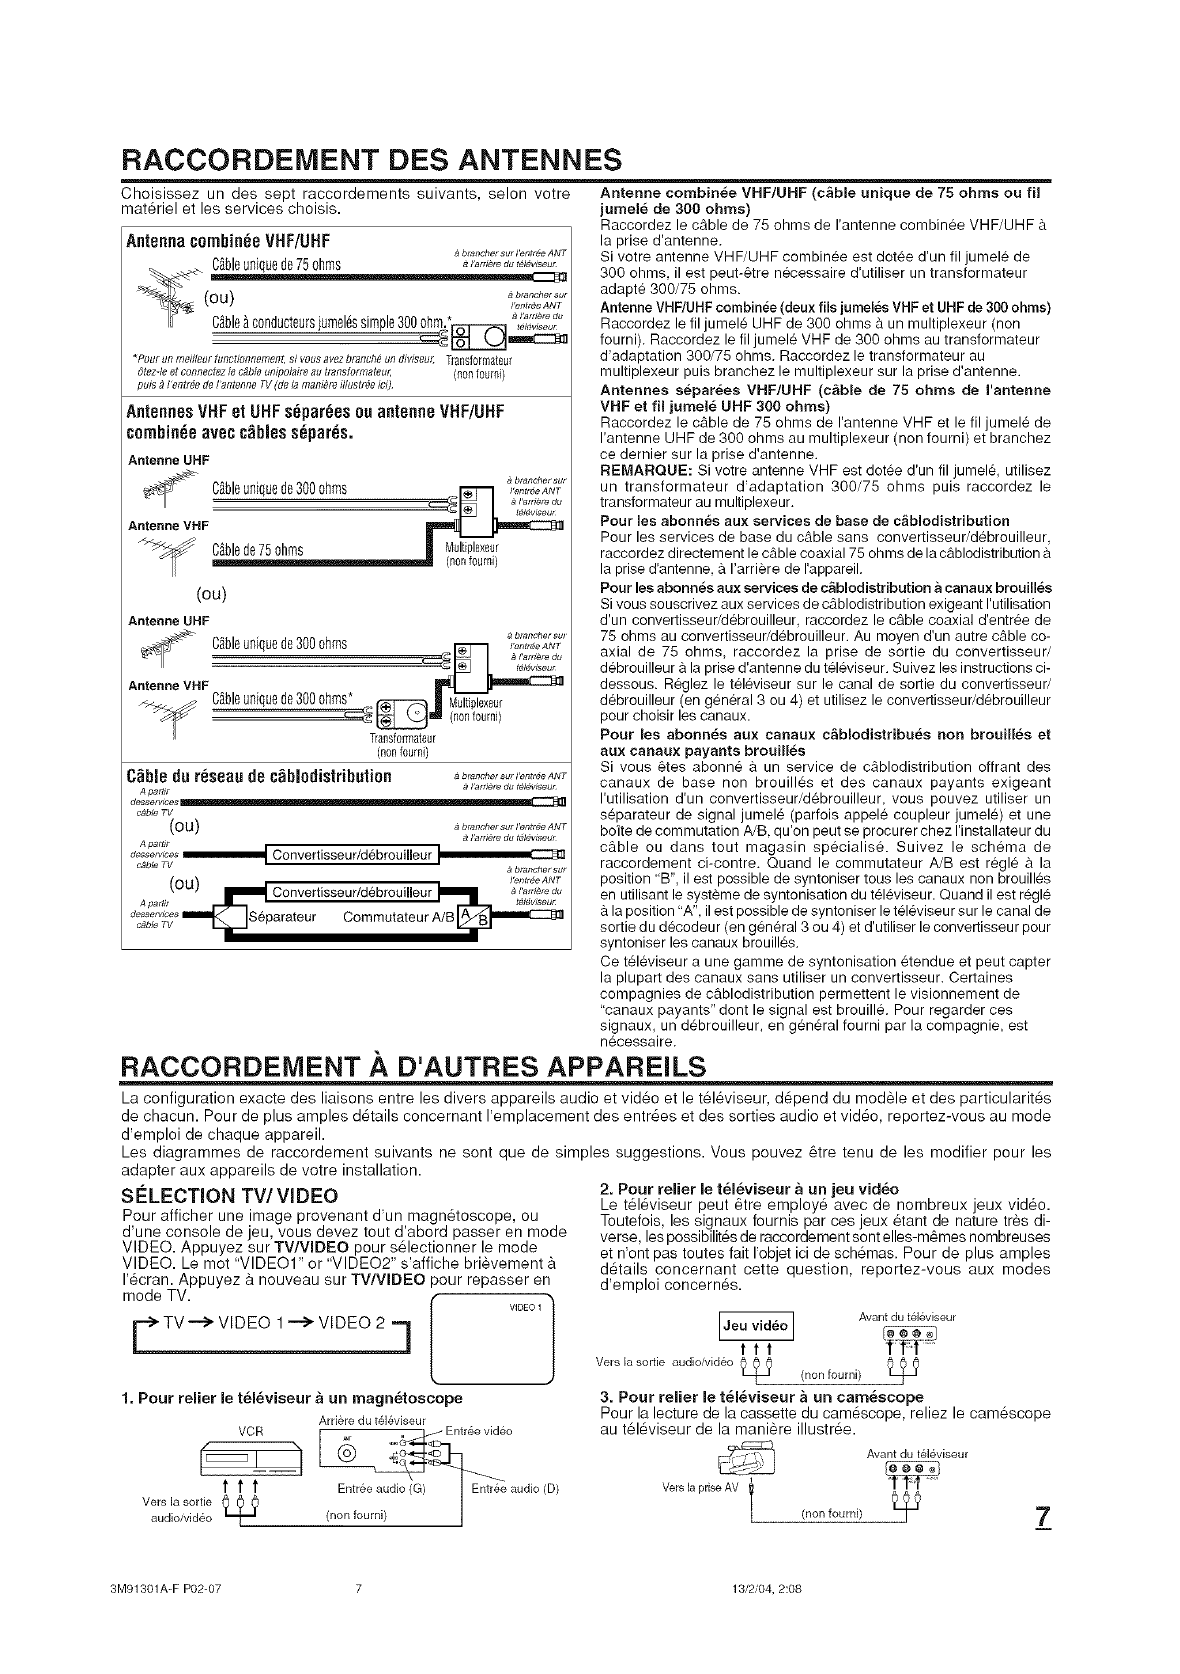
RACCORDEIVlENT DES ANTENNES
Choisissez un des sept raccordements suivants, selon votre
mat6riel et les services choisis.
Antennacombin_eVHF/UHF brancher sur I'enttee ANT
C_bleunique de 75 ohms a_'a,rJ_,o_.,_v_....
(ou) _,o_h.....
I"entr_e ANT
..... ,_ I'arrJ_re du
Cablea c0nducteurs;umeles simple300 ohm. _ ,_,_ ....
*Pourunmedleurtunctionflement,si vousavezbranch#,undiviseur,Transforrnateur
Otez-leet connecrezlec#bteunipolaireau#ans[omlateur; (nonfourni)
puis_I'entrdedeI'antenneTV(delamania}_illustraeici)
AntennesVHFel L!HFs6par6esasantenneVNF/UHF
cnmhin_eavecc_biess_par_s.
Antenne UHF
a brancher sur
Cgbleunique de 300 ohms _,o,_t,o_ANT
_'" _ J'arfiere du
Antenne MHF
CAblede 75 ohms II Multiplexed
(nonf0umi)
(ou)
Antenne UHF
a btancher sut
I'entt_e ANT
C_bleunique de 300 ohms :_._ __"€'_ _"
Antenne VHF Cfibleunique de 300 0hms*., _! Multiplexeui
-c:':':_ _ (nonfourni)
Transformateur
(nonfoum0
C_bJedu r6seaude c_biedistributien ab'_''"'_r"_'_'A_T
A partlr 9 I'arnere du t#l#wseu_
desserwces
c,_ble TV
( O U ) _ brancher sur l'eetree ANT
A P attlt a I'ameto du tdlewseu_
d:_i::,,_,_ IIIIIIIIIIIIIIIIIIm_ Convertisseur/debrouigeur I btancher sur
OU I'entreeANT
!_ Convertisseur/debrouigeur _ _l'.r._,ed.
A partit _t_lgwseu_
dc,ble A/B A__ ..._. a6'parateur Cemmutateur
Antenne combin_e VHF/UHF (c_ble unique de 75 ohms ou fil
jumel_ de 300 ohms)
Raccordez le cable de 75 ohms de I'antenne combinee VHF/UHF &
la prise d'antenne.
Si votre antenne VHF/UHF combin_e est dotee d'un fil jumele de
300 ohms, il est peut-_tre n_cessaire d'utiliser un transformateur
adapte 300/75 ohms.
Antenne VHF/UHF combin_e (deux fils jumeles VHF et UHF de 300 ohms)
Raccordez le fil jumele UHF de 300 ohms & un multiplexeur (non
fourni). Raccordez le fil jumele VHF de 300 ohms au transformateur
d'adaptation 300/75 ohms. Raccordez le transformateur au
multiplexeur puis branchez le multiplexeur sur la prise d'antenne.
Antennes separees VHF/UHF (c_ble de 75 ohms de I'antenne
VHF et fil jumel_ UHF 300 ohms)
Raccordez le cable de 75 ohms de I'antenne VHF et le fil jumele de
I'antenne UHF de 300 ohms au multiplexeur (non fourni) et branchez
ce dernier sur la prise d'antenne.
REMARQUE: Si votre antenne VHF est dotee d'un fil jumel& utilisez
un transformateur d'adaptation 300/75 ohms puis raccordez le
transformateur au multiplexeur.
Pour ies abonn_s aux services de base de c_biodistribution
Pour les services de base du cable sans convertisseur/debrouilleur,
raccordez directement le cable coaxial 75 ohms de la c_blodistribution
la prise d'antenne, a I'arriere de rappareil.
Pour les abonn_s aux services de c&blodistribution a canaux brouilles
Si vous souscrivez aux services de cAblodistribution exigeant I'utilisation
d'un convertisseur/d_brouilleur, raccordez le c_ble coaxial d'entree de
75 ohms au convertisseur/debrouilleur. Au moyen d'un autre c&ble co-
axial de 75 ohms, raccordez la prise de sortie du convertisseur/
d_brouilleur a la prise d'antenne du t_leviseur. Suivez les instructions ci-
dessous. Reglez le televiseur sur le canal de sortie du convertisseur/
debrouilleur (en general 3 ou 4) et utilisez le convertisseur/d_brouilleur
pour choisir les canaux.
Pour les abonn6s aux canaux c_blodistribu_,s non brouilles et
aux canaux payants brouill_s
Si vous _tes abonne a un service de cAblodistribution off rant des
canaux de base non brouilles et des canaux payants exigeant
I'utilisation d'un convertisseur/debrouilleur, vous pouvez utiliser un
separateur de signal jumele (parfois appele coupleur jumele) et une
boite de commutation A/B, qu'on peut se procurer chez I'installateur du
c_ble ou dans tout magasin specialise. Suivez le schema de
raccordement ci-contre. Quand le commutateur A/B est regl_ & la
position 'B", il est possible de syntoniser tousles canaux non brouilles
en utilisant le systeme de syntonisation du televiseur. Quand il est regl_
la position "A", il est possible de syntoniser le t_l_viseur sur le canal de
sortie du d_codeur (en general 3 ou 4) et d'utiliser le convertisseur pour
syntoniser les canaux brouilles.
Ce t_leviseur a une gamme de syntonisation etendue et peut capter
la plupart des canaux sans utiliser un convertisseur. Certaines
compagnies de c_blodistribution permettent le visionnement de
"canaux payants" dont le signal est brouille. Pour regarder ces
signaux, un debrouilleur, en g_n_ral fourni par la compagnie, est
necessaire.
RACCORDEMENT .&,D'AUTRES APPAREILS
La configuration exact÷ des liaisons entre les divers appareils audio et video et le t_leviseur, d_pend du modele et des particularit_s
de chacun. Pour de plus amples d6tails cencernant I'emplacement des entr_es et des sorties audio et video, reportez-vous au mode
d'emplei de chaque appareil.
Les diagrammes de raccordement suivants ne sont que de simples suggestions. Veus pouvez 6tre tenu de les modifier pour les
adapter aux appareils de votre installation.
S#LECTION TW VIDEO
Pour afficher une image provenant d'un magn_toscepe, ou
d'une console de jeu, vous devez tout d'abord passer en mode
VIDEO. Appuyez sur TV/WDEO pour s_lectionner le mode
VIDEO. Le mot "VIDEO1" or "VIDEO2" s'affiche brievement
I'_cran. Appuyez a nouveau sur TWWDEO pour repasser en
mode TV. [ V,D_OI}
F TV--> VIDEO 1--> VIDEO 2 q
1. Pour relier le t_l_viseur _ un magn_toscope
Ard&redu t_l_viseur
VCR . Entree vid&o
t t t Entree aud_ I Entree audio (D)
VerSaudioivid_olasortie _ (non fourni) ]1
2. Pour relier le t_l_viseur a un jeu video
Le t_16viseur peut 6tre employ_ avec de nombreux jeux video.
Toutefois, les signaux fournis par ces jeux 8tant de nature tr&s di-
verse, les possibilit_s de raccordement sent elles-m&mes nombreuses
et n'ont pas toutes fait I'objet ici de schemas. Pour de plus amples
d_tails concernant cette question, reportez-vous aux modes
d'emploi concern6s.
Avantdu t&l&viseur
ttt
Vers,a o iooo ioi i eo /nonfourni/
/ /
3. Pour relier le t_l_viseur a un cam_scope
Pour la lecture de la cassette du cam_scope, reliez le cam_scope
au t_l_viseur de la maniere illustr_e.
Avantdu t&l_v[seur
3M91301A-F P02-07 7 13/2/04, 2:08
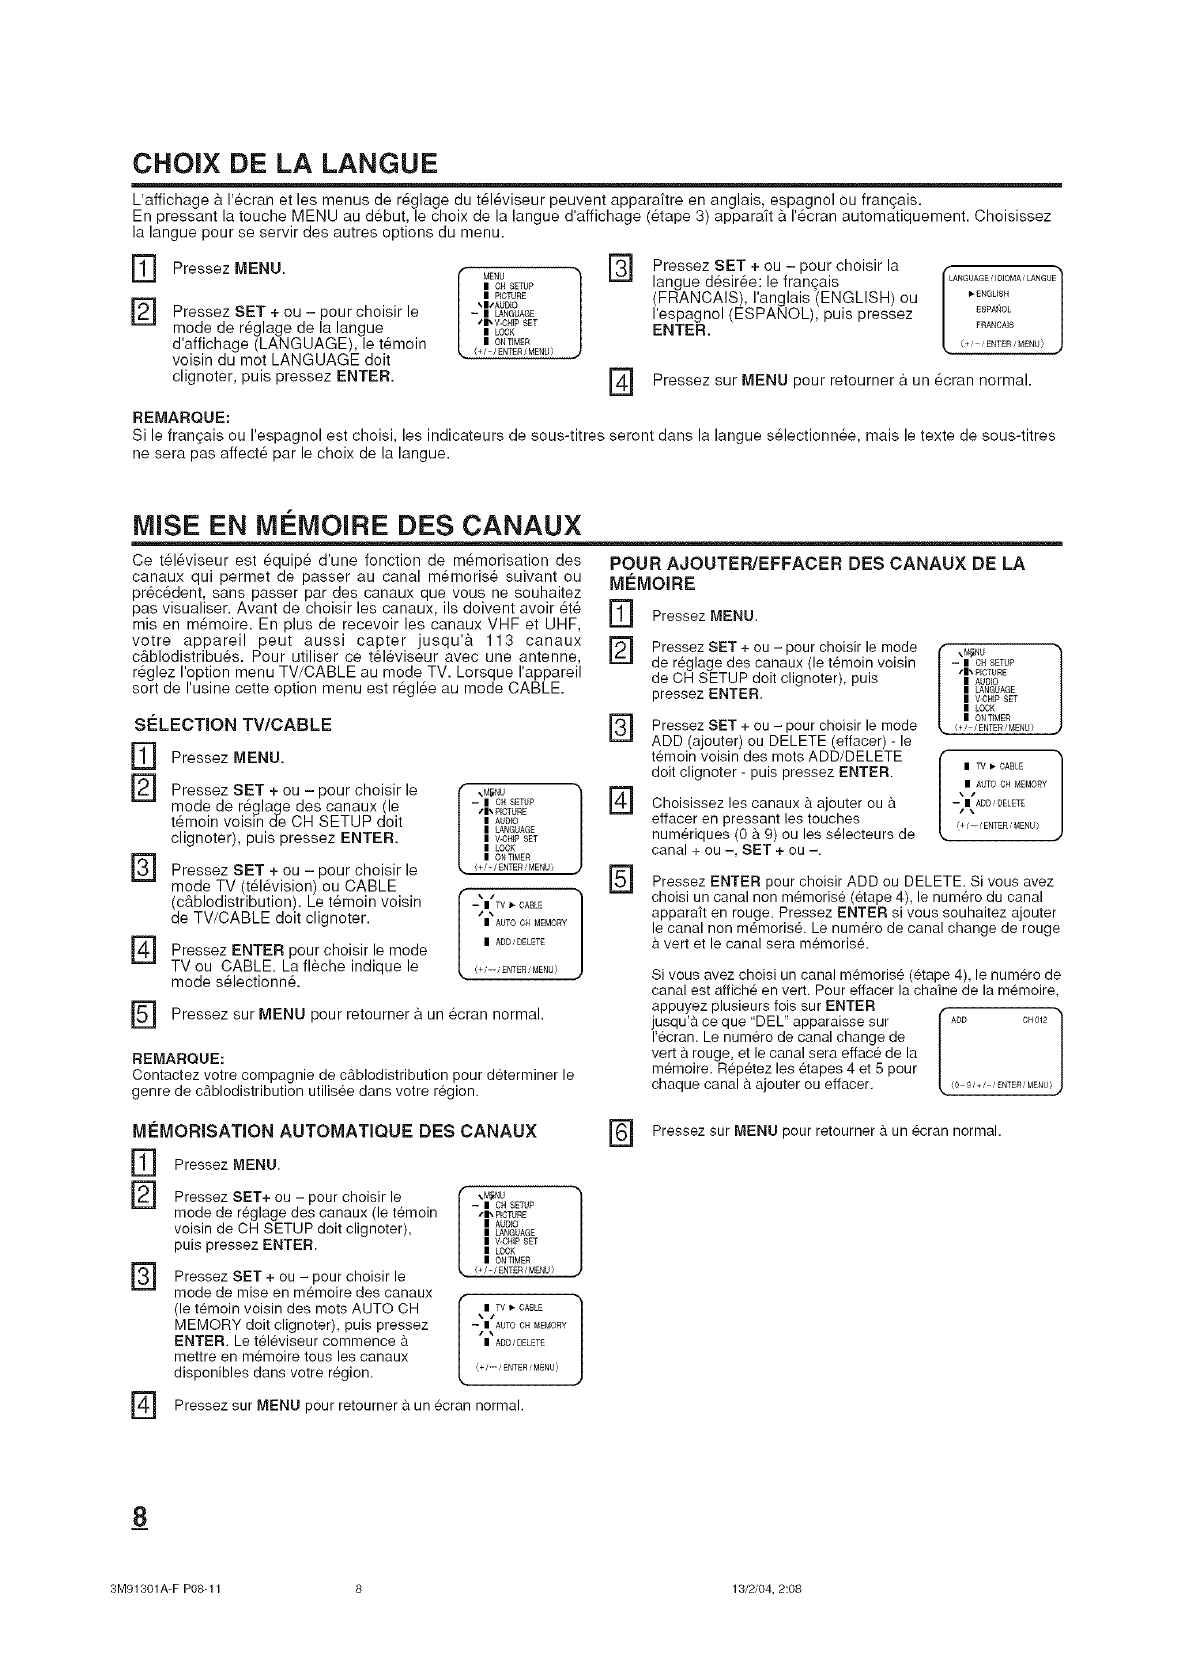
CHOIX DE LA LANGUE
L affichage 9, I'ecran et les menus de r_glage du t_l_viseur peuvent apparaitre en anglais, espagnol ou fran_ais.
En pressant la touche MENU au d_but, le choix de la langue d'affichage (_tape 3) appara_t 9, r_cran automatiquement. Choisissez
la langue pour se servir des autres options du menu.
OPressezOENU[MNU]OpO RECSE
] \ISAUDIO
Pressez SET + ou - pour choisir le - iaNGUAGE
mode de r_glage de la langue ,I,V.OH_P=LOCKSET
d'affichage (LANGUAGE), le t_moin mONT_MER
(+/ /ENTER/MENU)
voisin du mot LANGUAGE doit
clignoter, puis pressez ENTER. []
Pressez SET + ou - pour choisir la
langue d_sir_e: le franqais
(FRANCAIS), ranglais (ENGLISH) ou
respagnol (ESPANOL), puis pressez
ENTER.
LANGUAGE, IOIOMA, LANGUE
I_ ENGLISH
ESpNtOL
FRANCA]S
(+ ENTER MENU)
Pressez sur MENU pour retourner 9. un 6cran normal.
REMARQUE:
Si le francais ou respagnol est choisi, les indicateurs de sous-titres seront dans la langue s_lectionn_e, mais le texte de sous-titres
ne sera pas affect6 par le choix de la langue.
MISE EN MI:!:MOIRE DES CANAUX
Ce t_16viseur est _quip_ d'une fonction de m_morisation des
canaux qui permet de passer au canal m6moris_ suivant ou
pr_c6dent, sans passer par des canaux que vous ne souhaitez
pas visualiser. Avant de choisir les canaux, |Is do|vent avoir _t_
mis en m6moire. En plus de recevoir les canaux VHF et UHF,
votre appareil peut aussi capter jusqu'9, 113 canaux
c&blodistribuSs. Pour utiliser ce t_l_viseur avec une antenne,
r_glez roption menu TV/CABLE au mode TV. Lorsque rappareil
sort de rusine cette option menu est r_gl6e au mode CABLE.
S¢:LECTION TV/CABLE
[]
[]
[]
[a
Pressez MENU.
Pressez SET + ou - pour choisir le
mode de r_glage des canaux (le
t_moin voisln de CH SETUP doit
clignoter), puis pressez ENTER.
Pressez SET + ou - pour choisir le
mode TV t616vision) ou CABLE
(c&b od str but on). Le t_mo n vo s n
de TV/CABLE doit clignoter.
Pressez ENTER pour choisir le mode
TV ou CABLE. La fleche indique le
mode s61ectionn&
POUR AJOUTER/EFFACER DES CANAUX DE LA
MEMOIRE
[]
[]
Pressez MENU.
Pressez SET + ou - pour choisir le mode
de reglage des canaux (le temoin voisin
de OH SETUP doit clignoter), puis
pressez ENTER.
] Pressez SET + ou - choisir le mode
pour
ADD (ajouter) ou DELETE (effacer) - le
temoin voisin des mots ADD/DELETE
\M_NU ]
-- I OH SETUP r_
SI\ PICTURE
I AUDIO
ILANGUAGE
IV-CH_PSET
ILOCK
IONTIMER
/+!-/ENTE£ !MENUi []
I 1
--t|TV _ CABLE
| AUTO ¢H _O_¥
| A_ _D_L_T_
1+_--_ _NT_U_
r_ Pressez sur MENU pour retourner 9,un ecran normal.
REMARQUE:
Contactez votre compagnie de cAblodistribution pour determiner le
genre de cAblodistribution utilisee dans votre region.
doit clignoter - puis pressez ENTER.
Choisissez les canaux & ajouter ou
effacer en pressant les touches
numeriques (0 & 9) ou les s_lecteurs de
canal + ou -, SET + ou -.
I _M_NU l
-- IOH SETUP
sl\ PICTURE
IAUDIO
ILANGUAGE
IV-CHIP SET
|LOCK
| ONT]ME£
/+! /ENTE£!MENU/
| AUTO OH MEMORY
_i÷_-- _ENTER_MENU/
Pressez ENTER pour choisir ADD ou DELETE. Si vous avez
choisi un canal non memorise (etape 4), le numero du canal
apparait en rouge. Pressez ENTER si vous souhaitez ajouter
le canal non memoris& Le numero de canal change de rouge
& vert et le canal sera memorise.
Si vous avez choisi un canal memorise (_tape 4), le numero de
canal est affich_ en vert. Pour effacer la chaine de la memo|re,
appuyez plusieurs lois sur ENTER f
jusqu'a ce que 'DEL" apparaisse sur |A_D cH0_2
I'ecran. Le numero de canal change de [
vert a rouge, et le canal sera efface de la
m_moire. Rep_tez les etapes 4 et 5 pour
chaque canal a ajouter ou effacer. <0_,+.,'_TEm_E_U!•
MleMORISATION AUTOMATIQUE DES CANAUX
] Pressez MENU.
] Pressez SET+ ou - pour choisir le
mode de reglage des canaux (le temoin
voisin de OH SETUP doit clignoter),
puis pressez ENTER.
[]
Pressez SET + ou - pour choisir le
mode de mise en m_moire des canaux
(le temoin voisin des mots AUTO OH
MEMORY doit clignoter), puis pressez
ENTER. Le televiseur commence
mettre en memo|re tous les canaux
disponibles dans votre r_gion.
-- I OH SETUP
•11_ PICTJRE
I AUDIO
ILANGUAGE
IV-CHIP SET
|LOCK
| ON T_MER
(+/-/ENT£R /MENU)
--|\AUTO _ M_I_O_¥
| A_ _D_L_T_
_i÷_-_ £NT_ _MENUI_
Pressez sur MENU pour retourner a un ecran normal.
] Pressez sur MENU pour retourner & un _cran normal.
8
3M91301A-F P08-11 8 13/2/04, 2:08
FONCTIONNEMENT DU Ti L¢:VISEUR
[]
D
[]
Pressez I'interrupteur (POWER) pour mettre I'appareil
en circuit.
R_glez le volume au niveau d_sir6 en pressant VOL
(volume) + ou -.
Le niveau du son sera indiqu_ _ I'_cran par des barres
vertes. Au fur eta mesure que le volume augmente, le
nombre de barres augmente 9.1'6cran et vice versa.
Choisissez I'option du menu TV/CABLE qui convient. Au
moment de quitter I'usine, le r_glage CABLE est
s_lectionn& Reportez-vous & "MISE EN MEMOIRE DES
CANAUX" 9. la page 8.
TV - Canaux VHF/UHF
CABLE - Canaux cg.blodistribu_s
[_ Touches de s_lection de canaux (OH) +/-
Pressez et rel&chez CH (canaux) + ou -. L'appareil passe
autematiquement au prochain canal mis en m_moire.
Pressez et gardez la touche enfonc_e pour changer plus
rapidement de canal.
Avant de choisir les canaux, ils doivent avoir _te mis dans la
m_moire du tSI6viseur. Voyez la section sur la "MISE EN
MEMOIRE DES CANAUX" 9. la page 8.
S_lection directe des canaux (touches 0 a 9)
Utilisez ces touches pour choisir directement un canal. Le
numSro du canal choisi apparaft dans le coin sup@ieur droit de
I'_cran. Si vous choisissez un num@o de canal invalide,
I'appareil revient au canal pr6c_demment syntonis&
S_lection directe des canaux de t_l_vision
Quand le s_lecteur de mode TV/CABLE est r_gl6 au mode
"TV', tous les canaux peuvent _tre capt6s en pressant deux
touches. Par exemple, pour choisir le canal 2, pressez d'abord
"0" puis "2". Si seulement la touche "2" est press_e, la s61ection
sera retardee de quelques secondes. Pour choisir un canal
sup@ieur a 9, pressez les deux touches, dans I'erdre.
S_lection directe des canaux c&blodistribu_s
Quand le s61ecteur de mode TV/CABLE est regle au mode
"CABLE", les canaux peuvent 6tre syntonises de la fagen suivante:
1-9
10-12
13-99
100-125
Pressez deux fois la touche 0, puis 1 9. 9, selon le
cas. Par exemple, pour le canal 2, pressez "002".
Pressez d'abord la touche 0 puis les deux autres
touches. Par exemple, pour le canal 12, pressez "012".
Pressez les deux touches, dans I'ordre.
Par exemple, pour le canal 36, pressez "36".
Pressez les trois chiffres, dans I'ordre.
Par exemple, pour le canal 120, pressez "120".
REMARQUE: Le t616viseur passe automatiquement hors circuit
15 minutes apr_s la fin des _missions de la station de t_levisien
syntonis_e.
SOUS-TITRAGE
QUE SIGNIFIE SOUS-TITRAGE?
Ce t_16couleur a la capacit_ de d6coder et d'afficher les
_missions t_16vis_es avec sous-titres. Si disponible, ces
_missions affichent un texte sur I'_cran pour les t618spectateurs
sourds ou malentendants, ou traduisent et affichent le texte en
une autre langue.
POUR VOIR LES SOUS-TITRES
Appuyez sur CAP/TEXT sur la t_l_commande pour commuter
entre le mode de t_l_vision normale et les deux modes de seus-
titrage: sous-titre (Caption) et texte sur demi-ecran (Text 1/2 of
Full Screen).
Sous-titres (CAPTION): Ce mode fait apparaftre le texte 9.
I'_cran en anglais ou en une autre langue (suivant le r_glage du
sSlecteur 1/2). En g_n_ral, les emissions 9. sous-titres anglais
sont transmises au canal 1 et les _missions a sous-titres en
une autre langue sont transmises au canal 2. Les sous-titres
apparaissent en g_n@al au bas de I'_cran, pour avoir le moins
d'interf@ence possible avec Hmage.
Lorsqu'il s'agit du journal t_16vis6, trois lignes du texte de
nouvelles apparaissent normalement a I'ecran. La plupart des
autres 8missions offrent deux ou trois lignes de sous-titres pres
de la personne qui parle afin que le t_l_spectateur puisse
suivre facilement le dialogue.
Les roots soulign_s ou en italique indiquent des titres, des mots
en langue _trangere ou des mots qui doivent _tre accentu_s. Les
mots chant_s sont en g_n6ral entour_s de notes musicales.
Texte (TEXT): Si disponible, le mode Texte affichera une grille
des programmes ou autres informations sur une partie de
I'_cran. Quand vous choisissez le mode de sous-titrage, il
demeure activ_ jusqu'& ce que vous le changiez, m_me si vous
changez de canal. Si le signal de sous-titrage est perdu, a cause
d'une annonce t_l_vis_e ou une interruption de transmission, les
sous-titres r_apparaissent quand le signal est re£u de nouveau.
Quand vous changez de canal, les sous-titres apparaissent
environ 10 secondes plus tard.
Dans les guides d'_missions t_l_vis_es, celles 9. sous-titrage
sont en g_n_ral suivies du symbole "CC" (CLOSED
CAPTIONED).
Quand vous choisissez le mode sous-titrage, les sous-titres apparaissent a I'_cran au bout d'environ 10 secondes.
• Le texte du sous-titrage ne s'affiche que s'il est disponible.
• Si aucun signal de sous-titrage n'est re,u, les sous-titres n'apparaissent pas mais le t_leviseur reste en mode de sou-titrage.
• Des fautes d'orthographe ou des caracteres insolites apparaissent padois pendant le sous-titrage. C'est tout 9.fait normal, surtout si
I'_mission est en d_rect, car alors les sous-titres sont cr_s en direct et il n'y a pas assez de temps pour les v@ifier.
• En mode de sous-titrage, I'affichage du volume ou de la mise en sourdine peut ne pas @revisible ou peut interf@er avec les sous-titres.
• Certains systemes de c&blodistribution ou de protection anticopie peuvent inted_rer avec le sous-titrage.
Si vous utilisez une antenne int@ieure ou si la r_ception est mauvaise, le texte ou sous-titre peut ne pas appara_tre ou appara_tre avec des
fautes ou des caract_res insolites. Dans ce cas, changez la position de I'antenne ou utilisez une antenne ext@ieure.
9_
3M91301A-F P08-11 9 13/2/04, 2:08
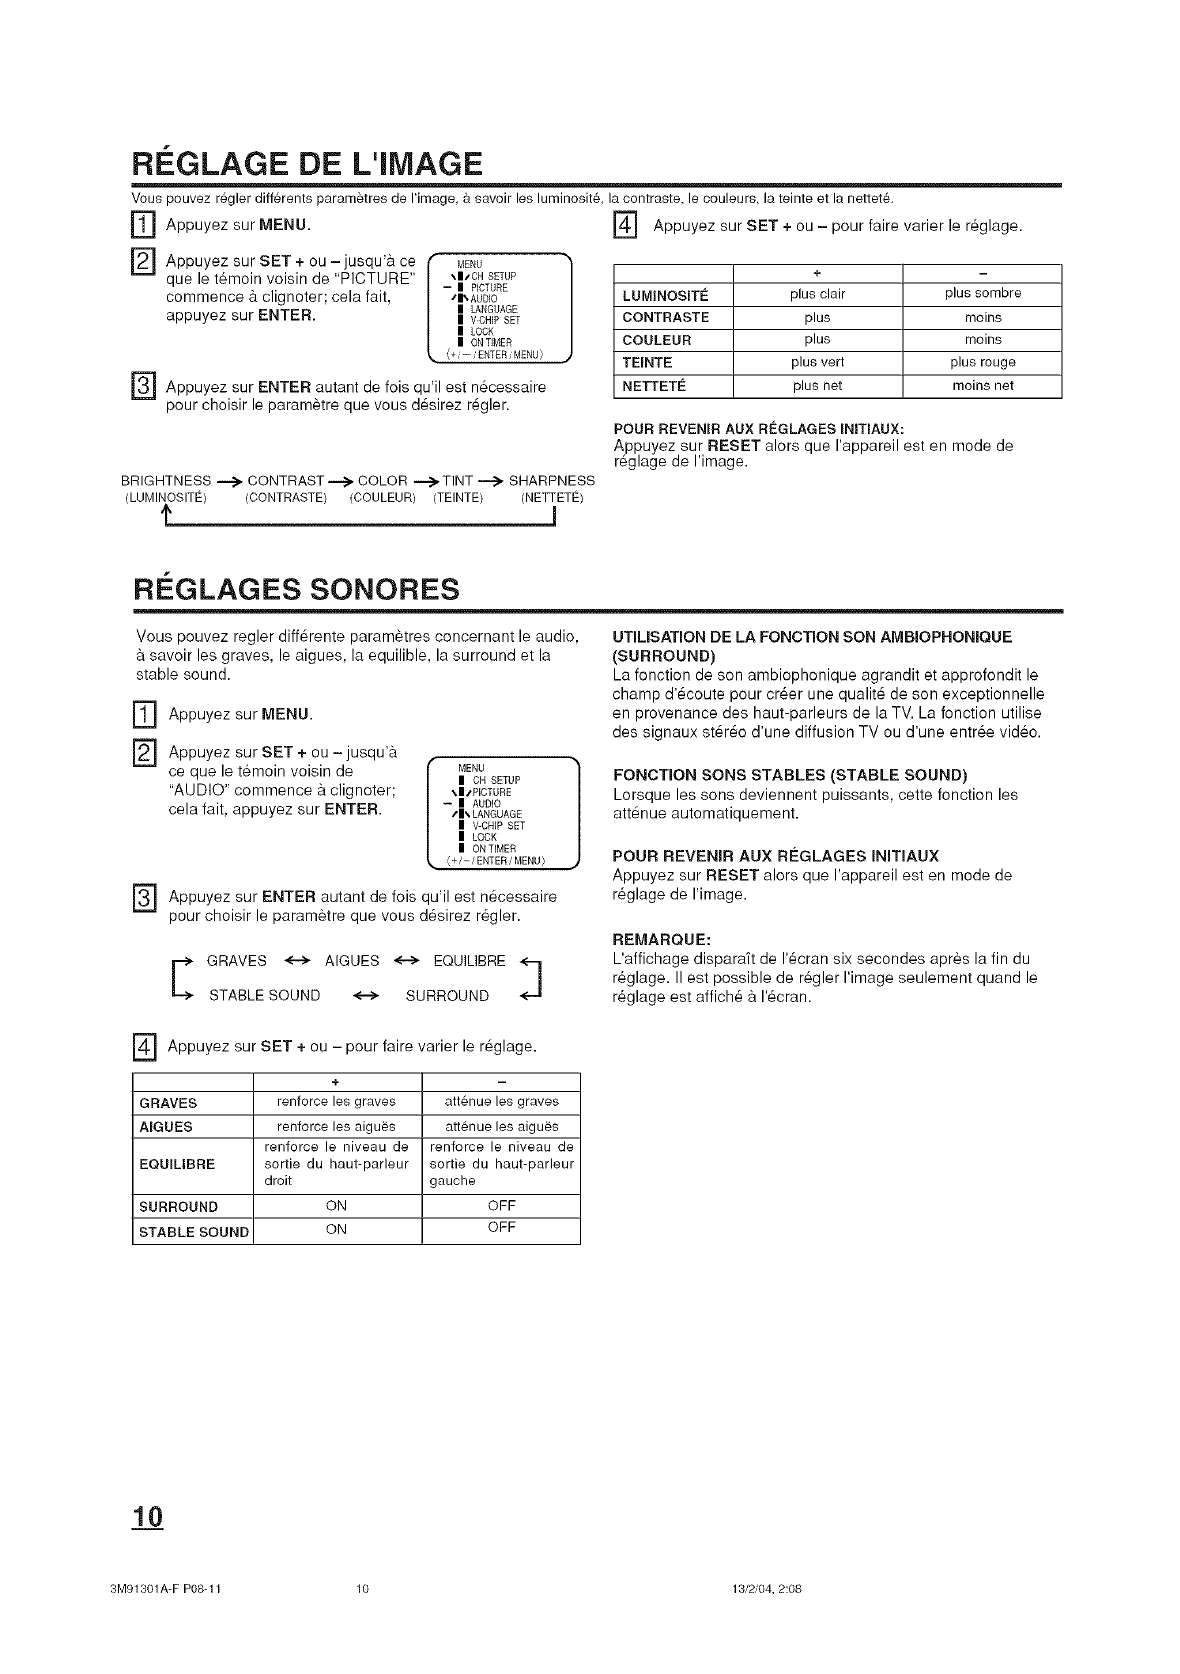
REGLAGE DE L'IMAGE
Vous pouvez r6gler diff6rents param_tres de I'image, & savoir les luminosit& la contraste, le couleurs, la teinte et la nettet&
IT] Appuyez sur MENU.
[]
[]
Appuyez sur SET + ou - jusqu'a ce
que le t_moin voisin de "PICTURE"
commence & clignoter; cela fait,
appuyez sur ENTER.
MENU
\ITCH SETUP
-- I PICTURE
tl_ AUDIO
I LANGUAGE
I V-CHIP SET
ILOCK
I ON TIMER
{+ /-- /ENTER /MENU )
] Appuyez sur SET + ou - pour faire varier le r_glage.
Appuyez sur ENTER autant de fois qu'il est n_cessaire
pour choisir le paramatre que vous d6sirez r6gler.
BRIGHTNESS _ CONTRAST-.-_ COLOR .......->-TINT_ SHARPNESS
(LUMIN/DSITE) (CONTRASTE) (COULEUR) (TEINTE) (NETrETE)
f_ 1
+
LUMINOSETI_ plus clair plus sombre
CONTRASTE plus moins
COULEUR plus moins
TEINTE plus vert plus rouge
NETTETI_ plus net moins net
POUR REVENERAUX REGLAGES ENITIAUX:
Appuyez sur RESET alors que I'appareil est en mode de
r6glage de I'image.
RI=GLAGES SONORES
Vous pouvez regler diff6rente param_tres concernant le audio,
savoir les graves, le aigues, la equilible, la surround et la
stable sound.
] Appuyez sur MENU.
["_ Appuyez sur + ou - jusqu'a
SET
ce que le temoin voisin de
"AUDIO" commence a clignoter;
cela fait, appuyez sur ENTER.
MENU
IOH SETUP
\IsPICTURE
-- IAUDIO
tl_ LANGUAGE
IV-CHIPSET
I LOCK
I ONTIMER
{+/-/ENTER/MENU}
["_ Appuyez sur ENTER autant de fois qu'il est n6cessaire
pour choisir le parametre que vous d6sirez r_gler.
E RAVES <--> AIGUES <--> EQUILIBRE
STABLE SOUND <--> SURROUND
UTIUSATION DE LA FONCTION SON AMBJOPHONIQUE
(SURROUND)
La fonction de son ambiophonique agrandit et approfondit le
champ d'6coute pour crier une qualit6 de son exceptionnelle
en provenance des haut-parleurs de la TV. La fonction utilise
des signaux st6r6o d'une diffusion TV ou d'une entree video.
FONCTION SONS STABLES (STABLE SOUND)
Lorsque les sons deviennent puissants, cette fonction les
att6nue automatiquement.
POUR REVENIR AUX RI_GLAGES INITJAUX
Appuyez sur RESET alors que I'appareil est en mode de
r_glage de Hmage.
REMARQUE:
L'affichage dispara_t de 1'6cran six secondes apres la fin du
r_glage. II est possible de r_gler I'image seulement quand le
r_glage est affich6 a I'_cran.
] Appuyez sur SET + ou - pour faire varier le r6glage.
+
GRAVES renforce les graves attenue les graves
AIGUES renforce les aigu_s att6nue les aigu_s
renforce le niveau de renforce le niveau de
EQUELIBRE sortie du haut-parleur sortie du haut-parleur
droit gauche
SURROUND ON OFF
STABLE SOUND ON OFF
3M91301A-F P08-11 10 13/2/04, 2:08

S¢:LECTION DES i MISSIONS STi Ri O/SAP
Vous pouvez _couter un son st6r_o haute-fid_lit_ gr&ce & la
fonction MTS (Son multi-canaux). Le systeme MTS peut
_galement transmettre un programme secondaire audio (SAP),
contenant une deuxieme langue et d'autres informations audio.
Lorsque le t_l_viseur recoit une _mission en st_r_o ou en SAP,
le terme "STEREO" ou "SAP" apparaft a I'_cran a chaque fois
que vous allumez la television, que vous changez de cha_ne
ou que vous appuyez sur RECALL.
La fonction MTS (son multi-canaux) n'est pas disponible en
mode VIDEO.
Vous pouvez laisser votre tSI6viseur sur la position STEREO
pour pouvoir sortir automatiquement des _missions en stereo
ou en mono, scion le type d'6missions. Si le son est trop fort
en st_r_o, s_lectionnez MONO pour r_duire le bruit. Le terme
"STEREO" ou "SAP" est affich6 en bleu clair Iorsque le
t_l_viseur regoit le signal.
POUR SI_LECTIONNER LES R_:GLAGES MTS
SOUHAIT_:S:
Appuyez plusieurs fois sur MTS pour s_lectionner STEREO,
SAP, MONO+SAP, ou MONO. Si programme en cours de
visualisation n'est pas disponible en st6r6o ou SAP, les
r_glages ne seront pas disponibles Iorsque vous appuyez sur
MTS.
E St6r_ophonie
Monophonic
Canal son separe
<=== Monophonie +
Cana son separ6
Si le programme en cours n'est pas transmis en st_r_o ou en
SAP, ces r_glages ne sont pas valides Iorsque vous appuyez
sur MTS.
UTILISATION DE LA PUCE V
La fonction de Puce Vest disponible seulement pour le systeme de Puce V ("V-Chip") am_ricain. Le systeme canadien de
Puce V n'est pas supportS.
Ce t_l_viseur est _quip_ d'une puce V qui vous offre un contr61e et une restriction de visualisation des certains canaux. Cette fonction est
destin_e a empacher les enfants de regarder des scanes de violence ou erotiques si vous d_sirez les interdire.
] Appuyez sur MENU puis sur SET + ou -pour choisir
I'option V-CHIP SET, puis appuyez sur ENTER.
] Tapez le mot de passe a I'aide des touches de s_lection
directe des canaux. En cas d'erreur, appuyez sur RESET.
Cela fait, appuyez sur ENTER.
F_ Saisissez 9. nouveau le mot de passe, puis appuyez sur
ENTER.
] Appuyez sur + ou - pour I'option
SET choisir V-CHIP.
Appuyez sur ENTER pour choisir ON.
] Appuyez sur SET + ou - pour choisir I'option TV RATING ou
MPAA RATING. Appuyez sur ENTER.
] Appuyez sur + ou - pour preciser
SET le niveau qui dolt &tre
utilise pour la video ou le canal de television. Appuyez sur
ENTER.
] Pressez sur MENU pour retourner 9. un _cran normal.
REMARQUES:
. II est possible que ce dispositif ne fonctionne pas avec les @_issions
reseaux du cable au Canada.
TV RATING
SET - _ SET +
OFF <-->TV-Y <-->TV-Y7 <-->TV-G <-->TV-PG <-_TV-14 <'-->TV-MA
TV-Y: Toue lee enfants TV-PG: Assistance des parents
TV-Y7: Enfante de plus de 7 ans TV-t 4: Adolescents de plus de 14 ans
TV-G: Programme pour enfants TV-MA:Adolescents de plus de t 7 ans
Dans le cas de TV-Y7, TV-PG, TV-]4 et TV-MA,appuyez eur RECALL
pour connakre le niveau. Utilisez SET + eu - pour e_lectionner la valour
voulue. Appuyez eur ENTERpour cheisir OFF.
MPAA RATING
SET - _ SET +
OFF <--> G <--> PG <--> PG-13 <--> R<--> NC-17 <-->X
G: Tousles &ges
PG: Assistance parentale
PG-13: Assistance parentale,
moins de 13 ans
R: Moins de 17 ans, assistance
parentale conseillSe
NC-17: Plus de 17 ans
X: Adultes uniquement
canadiennes ou les _missions americaines transmises par les
. Si vous souhaitez changer le mot de passe, suivez les _tapes 1 et 2 et choisissez I'option "CHANGE PASSWORD", puis entrez un
nouveau mot de passe.
. La puce V ne joue son r61e que vis-&-vis des emissions et des enregistrements sur cassette qui portent le codage appropri_ definissant le
niveau.
. Apres avoir interdit une emission grace a la puce V, cette emission ne peut pas _tre regardee. Au moment ou elle commence, la mention
"INPUT PASSWORD" s'affiche sur I'ecran. Pour regarder I'emission, tapez le mot de passe.Si vous changez de canal, ou bien mettez le
televiseur hors service puis en service alors que le mot de passe a ete tape, les restrictions li_es au reglage de niveau reprennent toute leur
force.
. Si vous changez les canaux en utilisant un magnetoscope ou un selecteur de c_ble, pendant que le televiseur reste sur le canal 3 ou 4, la
puce V-Chip fonctionne diff@emment. Quand vous entrez votre mot de passe pour mettre hors service temporairement le blocage d'un
canal, vous mettez completement hors service la puce V-Chip pour toutes les stations. Pour remettre en service la puce V-Chip, mettez le
televiseur hors tension puis de nouveau sous tension.
. Certains selecteurs de c_ble possedent une fonction de retard, et dans certains cas, il peut prendre jusqu'_. 10 secondes pour que le
programme apparaisse apres I'entr_e du mot de passe.
. Si vous oubliez ou perdez votre mot de passe, vous pouvez le reglez de nouveau de la maniere suivante:
- Maintenez VOLUME _" sur I'unite principale, press_ et appuyez en m_me temps sur la touche '9" de la telecommande pendant quelques
secondes.
1_3.1
3M91301A-F P08-11 11 13/2/04, 2:08
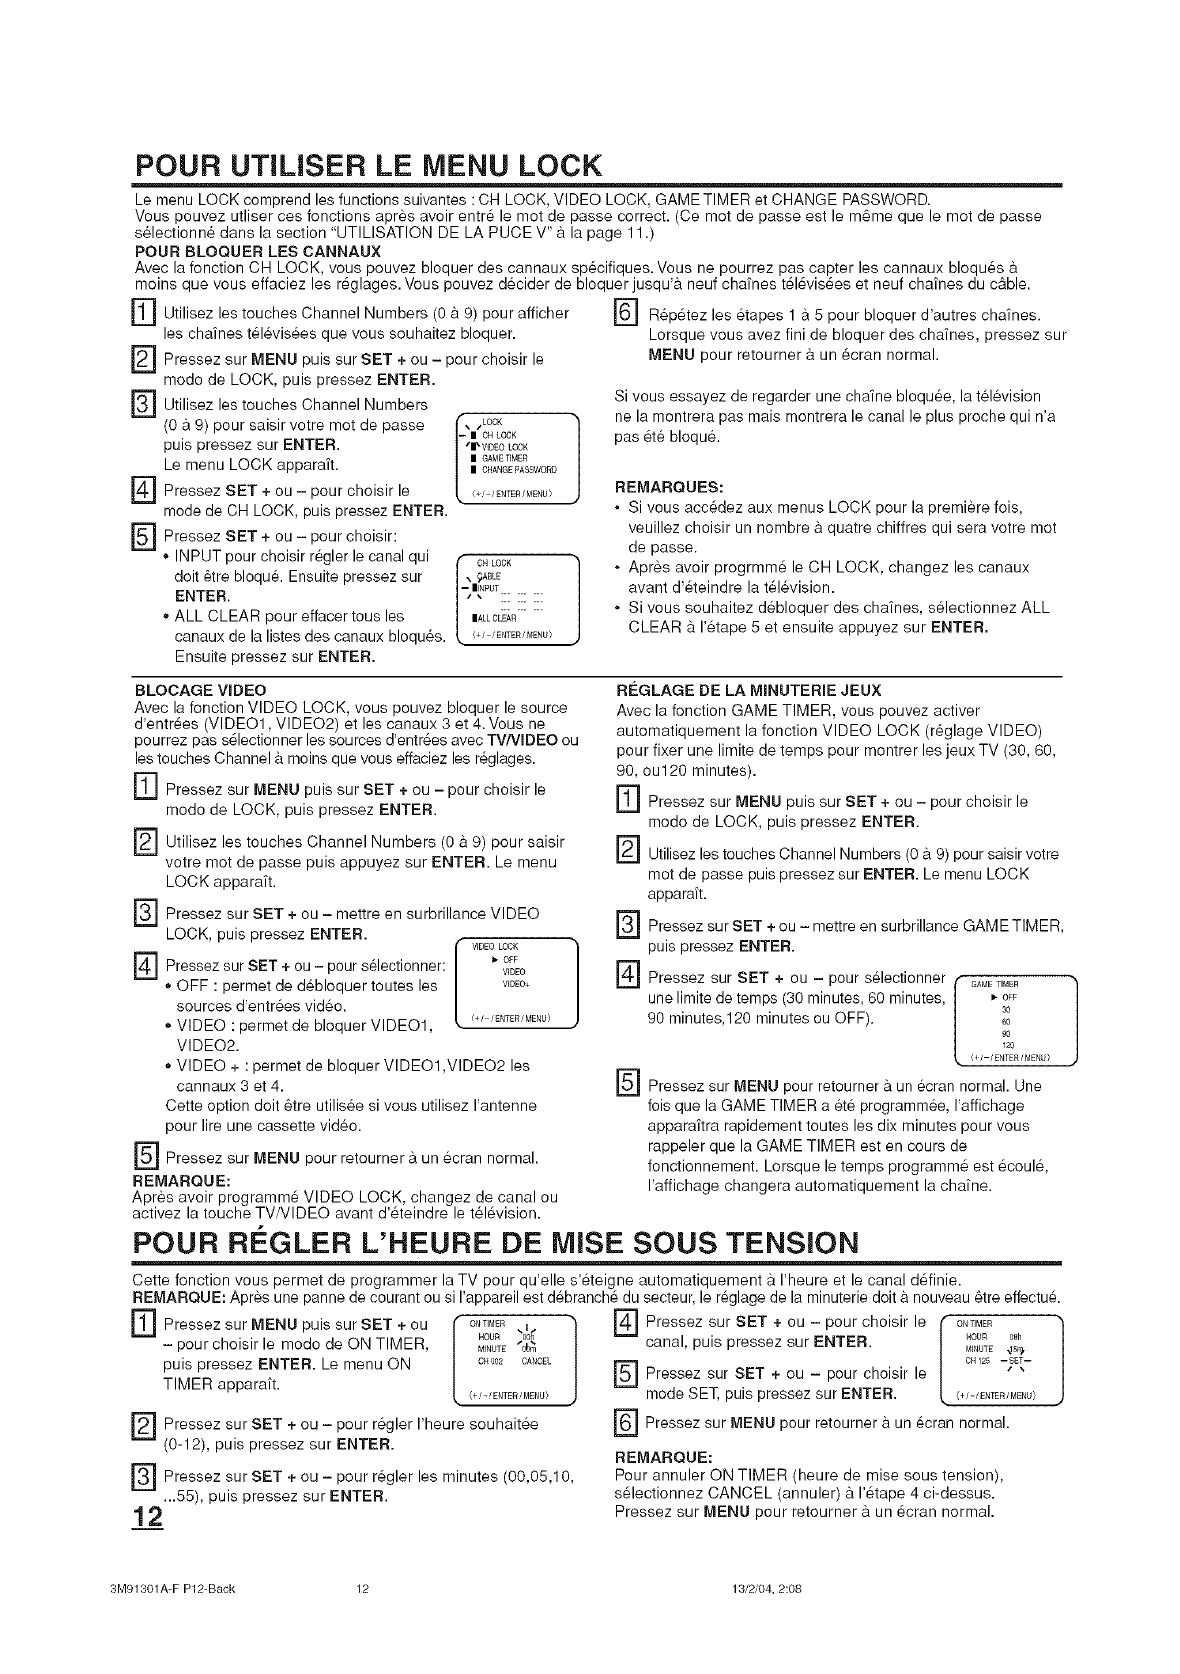
POUR UTlUSER LE MENU LOCK
Le menu LOCK comprend les functions suivantes : CH LOCK, VIDEO LOCK, GAME TIMER et CHANGE PASSWORD.
Vous pouvez utliser ces fonctions apr6s avoir entr6 le mot de passe correct. (Ce mot de passe est le m6me que le mot de passe
s61ectionn6 dans la section "UTILISATION DE LA PUCE V" 9. la page 11 .)
POUR BLOQUER LES CANNAUX
Avec la fonction CH LOCK, vous pouvez bloquer des cannaux sp6cifiques. Vous ne pourrez pas capter les cannaux bloqu6s 9.
moins que vous effaciez les r6glages. Vous pouvez decider de bloquer jusqu'9, neuf chafnes t616vis6es et neuf chafnes du c&ble.
rf] Utilisez les touches Channel Numbers (0 & 9) pour afficher
les cha_nes t616vis6es que vous souhaitez bloquer.
Pressez sur MENU puis sur SET + ou - pour choisir le
[]
[]
[]
[]
modo de LOCK, puis pressez ENTER.
Utilisez les touches Channel Numbers
(0 & 9) pour saisir votre met de passe
puis pressez sur ENTER.
Le menu LOCK appara_t.
Pressez SET + ou - pour choisir le
mode de CH LOCK, puis pressez ENTER.
Pressez SET + ou - pour choisir:
• INPUT pour choisir regler le canal qui
doit 6tre bloqu& Ensuite pressez sur
ENTER.
,, ALL CLEAR pour effacer tousles
canaux de la listes des canaux bloqu6s.
Ensuite pressez sur ENTER.
\wLOCK 1
-- I OH LOCK
Sl_ VIDEO LOCK
I GAblETIMER
I CHANGE13ASSWORD
<+/-/ENTER /M£NU)
,, 0LL°CK]
] R6p6tez les 6tapes 1 a 5 pour bloquer d'autres cha_nes.
Lorsque vous avez fini de bloquer des cha'ines, pressez sur
MENU pour retourner 9. un 6cran normal.
Si vous essayez de regarder une chafne bloquee, la television
ne la montrera pas mais montrera le canal le plus proche qui n'a
pas ete bloqu&
REMARQUES:
• Si vous acc6dez aux menus LOCK pour la premiere fois,
veuillez choisir un nombre 9. quatre chiffres qui sera votre mot
de passe.
• Apres avoir progrmm6 le CH LOCK, changez les canaux
avant d'6teindre la t616vision.
• Si vous souhaitez debloquer des cha_nes, s61ectionnez ALL
CLEAR 9. 1'6tape 5 et ensuite appuyez sur ENTER.
BLOCAGE VIDEO
Avec la fonction VIDEO LOCK, vous pouvez bloquer le source
d'entr6es (VIDEO1, VIDEO2) et les canaux 3 et 4. Vous ne
pourrez pas s61ectionner les sources d'entr_es avec TV/VIDEO ou
les touches Channel 9. moins que vous effaciez les r_glages.
F] Pressez sur MENU puis sur SET + ou - pour choisir le
modo de LOCK, puis pressez ENTER.
F_ Utilisez les touches Channel Numbers 9. saisir
(0 9) pour
votre mot de passe puis appuyez sur ENTER. Le menu
LOCK apparaft.
FS-J Pressez sur SET + ou - mettre en surbrillance VIDEO
LOCK, puis pressez ENTER.
] sur + ou - pour
Pressez SET selectionner: VIDEO
', OFF : permet de debloquer toutes les V_DEO+
sources d'entr6es vid6o.
,, VIDEO : permet de bloquer VIDEO1, <+/'ENT£R/MENU)
VIDEO2.
,, VIDEO + : permet de bloquer VIDEO1 ,VIDEO2 les
cannaux 3 et 4.
Cette option doit 6tre utilis6e si vous utilisez I'antenne
pour lire une cassette video.
] Pressez sur MENU pour retourner 9.un 6cran normal.
REMARQUE:
Apres avoir programm6 VIDEO LOCK, changez de canal ou
activez la touche TV/VlDEO avant d'6teindre le t616vision.
REGLAGE DE LA MINUTERIE JEUX
Avec la fonction GAME TIMER, vous pouvez activer
automatiquement la fonction VIDEO LOCK (r6glage VIDEO)
pour fixer une limite de temps pour montrer les jeux TV (30, 60,
90, ou120 minutes).
r_ Pressez sur MENU puis sur SET + ou - pour choisir le
modo de LOCK, puis pressez ENTER.
F_ Utilisez les touches Channel Numbers (0 9.9) pour saisir votre
mot de passe puis pressez sur ENTER. Le menu LOCK
apparaft.
F_ Pressez sur SET + ou - mettre en surbrillance GAME TIMER,
puis pressez ENTER.
] Pressez sur SET + ou - pour selectionner GAMETIMER
r-
unelimite de temps (30 minutes, 60 minutes, | _-OFF
90 minutes,120 minutes ou OFF). l 6o3°
90
120
O/-/ENTER/MENU>
[_ Pressez sur MENU pour retourner 9. un ecran normal. Une
fois que la GAME TIMER a ete programmee, I'affichage
apparaitra rapidement toutes les dix minutes pour vous
rappeler que la GAME TIMER est en cours de
fonctionnement. Lersque le temps programm6 est 6coul6,
I'affichage changera automatiquement la chafne.
POUR REGLER L'HEURE DE MISE SOUS TENSION
Cette fonction vous permet de programmer la TV pour qu'elle s'6teigne automatiquement 9. I'heure et le canal d6finie.
REMARQUE: Apres une panne de courant ou si I'appareil est d6branch6 du secteur, le r6glage de la minuterie doit a nouveau 6tre effectu&
[9
[]
ra
Pressez sur MENU puis sur SET + ou _ o,_1_ ,i _}
HOUR o0_
- pour choisir le modo de ON TIMER, l MINUTE 0_m
puis pressez ENTER. Le menu ON c_00_ cA_c_
TIMER apparaft. <+/-/ENTER/MENU/
Pressez sur SET + ou - pour r6gler I'heure seuhait6e
(0-12), puis pressez sur ENTER.
Pressez sur SET + ou - pour r6gler les minutes (00,05,10,
...55), puis pressez sur ENTER.
E] Pressez sur SET + ou Ipour choisir le I" ONTIM_
canal, puis pressez sur ENTER. L _ou_ 0_ J
MINUTE _Sll_
] OH 125 --SET--
Pressez sur SET + ou - pour choisir le " "
mode SET, puis pressez sur ENTER. (+/-/ENTER/MENU>
r_ Pressez sur pour retourner un
MENU ecran normal.
REMAROUE:
Pour annuler ON TIMER (heure de mise seus tension),
s61ectionnez CANCEL (annuler) 9. 1'6tape 4 ci-dessus.
Pressez sur MENU pour retourner 9. un 6cran normal.
3M91301A-F P12-Back 12 13/2/04, 2:08
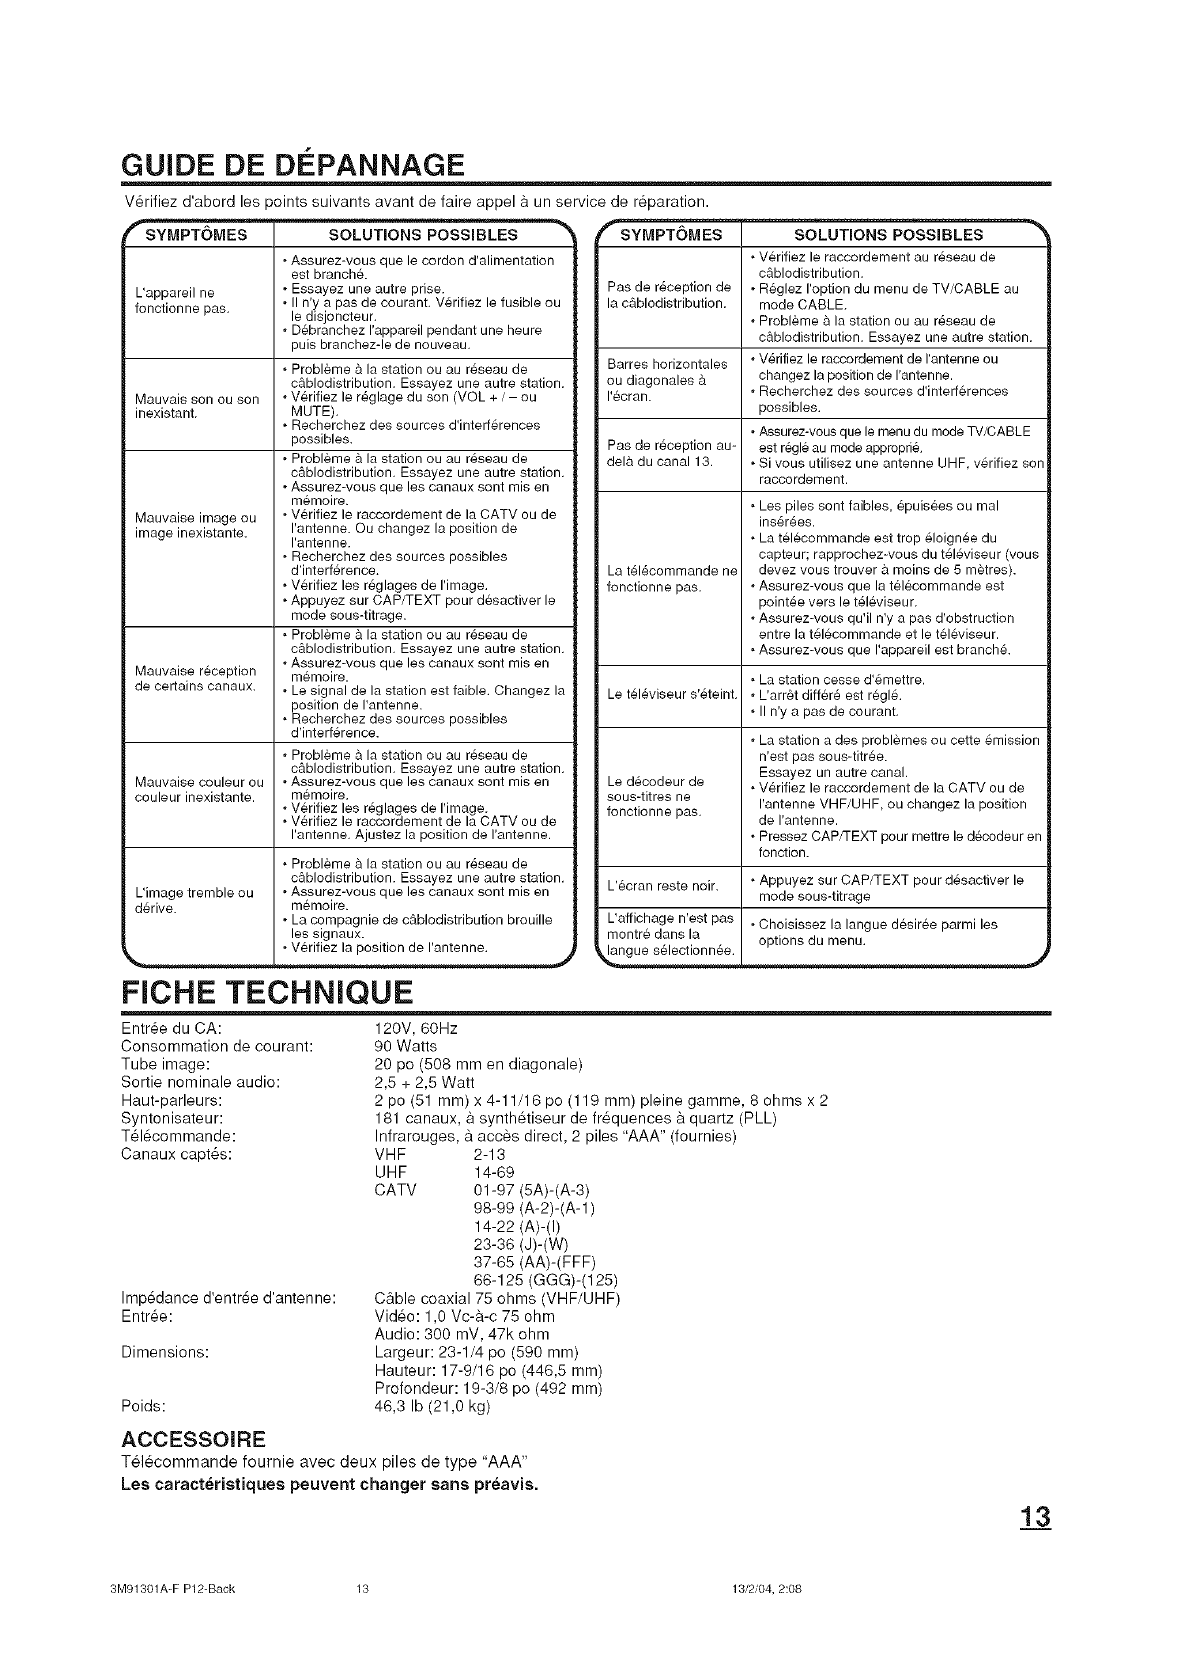
GUIDE DE D¢:PANNAGE
V_rifiez d'abord les points suivants avant de faire appel a un service de r_paration.
L'appareil ne
fonctionne pas.
Mauvais son ou son
inexistant.
Mauvaise image ou
image inexistante.
Mauvaise reception
de certains canaux.
Mauvaise couleur ou
couleur inexistante.
, Assurez-vous que le cordon d'alimentation
est branch&
•Essayez une autre prise.
II n'y a pas de courant. V6rifiez le fusible ou
le disjoncteur.
Debranchez I'appareil pendant une heure
puis branchez-le de nouveau.
Probleme & la station ou au r6seau de
c&blodistribution. Essayez une autre station.
Verifiez le r6glage du son (VOL + / - ou
MUTE).
, Recherchez des sources d'interf6rences
possibles.
, Probleme & la station ou au r6seau de
c&blodistribution. Essayez une autre station.
Assurez-vous que les canaux sont mis en
memoire.
Verifiez le raccordement de la CATV ou de
I'antenne. Ou changez la position de
I'antenne.
, Recherchez des sources possibles
d'interf6rence.
, Verifiez les r6glages de I'image.
, Appuyez sur CAP/TEXT pour desactiver le
mode sous-titrage.
, Probleme & la station ou au r6seau de
c&blodistribution. Essayez une autre station.
Assurez-vous que les canaux sont mis en
memoire.
Le signal de la station est faible. Changez la
position de I'antenne.
, Recherchez des sources possibles
d'interf6rence.
Probleme a la station ou au r6seau de
c&blodistribution. Essayez une autre station.
Assurez-vous que les canaux sont rnis en
m6moire.
Verifiez les r6glages de I'image.
, Verifiez le raccordement de la CATV ou de
I'antenne. Ajustez la position de I'antenne.
, Probleme & la station ou au r6seau de
c&blodistribution. Essayez une autre station.
L'image tremble ou , Assurez-vous que les canaux sont mis en
d6rive, memoire.
La compagnie de c&blodistribution brouille
les signaux.
•V@ifiez la position de I'antenne. .j
FICHE TECHNIQUE
4_
SYMPTOMES SOLUTIONS POSSIBLES
Verifiez le raccordement au r6seau de
c&blodistribution.
Pas de r6ception de •R_,glez I'option du menu de TV/CABLE au
la c&blodistribution, mode CABLE.
•Probleme & la station ou au r6seau de
c&blodistribution. Essayez une autre station.
Barres horizontales •V6rifiez le raccordement de I'antenne ou
ou diagonales & changez la position de I'antenne.
I'ecran. •Recherchez des sources d'interferences
possibles.
Assurez-vous que le menu du mode TV/CABLE
Pas de r6ception au- est r6gle au mode appropri&
del& du canal 13. , Si vous utilisez une antenne UHF, v6rifiez son
raccordernent.
La t616commande ne
fonctionne pas.
=Les piles sent faibles, epuis6es ou mal
ins6r6es.
, La tel6commande est trop 61oign6e du
capteur; rapprochez-vous du t616viseur (vous
devez vous trouver & moins de 5 m_tres).
Assurez-vous que la telecommande est
point6e vers le t61eviseur.
Assurez-vous qu'il n'y a pas d'obstruction
entre la t61ecommande et le televiseur.
, Assurez-vous que I'appareil est branch&
=La station cesse d'6mettre.
Le t616viseur s'6teint. •L'arr&t differ6 est regl&
II n'y a pas de courant.
Le dScodeur de
sous-titres ne
fonctionne pas.
L'ecran reste noir.
L'affichage n'est pas
montre dans la
_a_ngue s_lec!ionn_e I
•La station a des problemes ou cette 8mission
n'est pas sous-titr6e.
Essayez un autre canal.
, Verifiez le raccordement de la CATV ou de
I'antenne VHF/UHF, ou changez la position
de I'antenne.
, Pressez CAP/TEXT pour mettre le decodeur en
fonction.
, Appuyez sur CAP/TEXT pour d6sactiver le
mode sous-titrage
•Choisissez la langue desiree parmi les
options du menu.
Entree du CA:
Consommation de courant:
Tube image:
Sortie nominale audio:
Haut-parleurs:
Syntonisateur:
T_l_commande:
Canaux capt.s:
Imp6dance d'entr6e d'antenne:
Entree:
Dimensions:
Poids:
120V, 60Hz
90 Watts
20 pc (508 mm en diagonale)
2,5 + 2,5 Watt
2 pc (51 ram) x 4-11/16 pc (119 ram) pleine gamme, 8 ohms x 2
181 canaux, a synth6tiseur de fr_quences a quartz (PLL)
Infrarouges, a acces direct, 2 piles "AAA" (fournies)
VHF 2-13
UHF 14-69
CATV 01-97 (5A)-(A-3)
98-99 (A-2)-(A-1)
14-22 (A)-(I)
23-36 (d)-(W)
37-65 (AA)-(FFF)
66-125 (GGG)-(125)
Cable coaxial 75 ohms (VHF/UHF)
Video: 1,0 Vc-a-c 75 ohm
Audio: 300 mV, 47k ohm
Largeur: 23-1/4 pc (590 ram)
Hauteur: 17-9/16 pc (446,5 ram)
Profondeur: 19-3/8 pc (492 ram)
46,3 Ib (21,0 kg)
ACCESSOJRE
T_l_commande fournie avec deux piles de type "AAA"
Les caract_ristiques peuvent changer sans preavis.
3M91301A-F P12-Back 13 13/2/04, 2:08
Garantie iimit6ee arn6ricaine
Pour tous les modeles FST PURE ®24 pc. et moins
Toshiba America Consumer Products, LLC. ("TACP") donnent les
garanties limitees suivantes.
CES GARANTIES LIMITEES SONT ACCORDEES A I'ACHETEUR
INITIAL DE CE PRODUlT OU ATOUTE PERSONNE EAYANT REOU
EN CADEAU DE I'ACHETEUR INITIAL OU D'UN CESSIONNAIRE.
LES PRODUITS ACHETES AUX E-U ET UTILISC:SAU CANADA NE
SONT PAS COUVERTS PAR CETTE GARANTIE.
LES PRODUITS ACHETES AUX CANADA ET UTILISES AUX E.-U.
NE SONT PASCOUVERTS PAR CETTE GARANTIE.
Garantie limit_e de g0 jours sur la main d'oeuvre*
TACP garantissent ce t616viseur et ses pieces contre vices de
mat6riaux ou de fabrication pendant une p6riode de quatre-vingt-
dix (90) jours a compter de la date d'achat au dStail. PENDANT
CETTE PI_RIODE_ TACP D¢:CIDERA S'ILY A LIEU DE
Rt_PARER OU D'ECHANGER TOUT TELEVlSEUR OU PIECE
DI2FECTUEUX CONTRE UN NOUVEAU OU REMIS EN ETAT
GRATUITEMENT. VOUS DEVEZ LIVRER CE T¢:L¢:VlSEUR A
UN CENTRE DE SERVICE TACP AGRI_¢:. LES FRAIS DE
TRANSPORT ET D'ASSURANC DE IJAPPAREIL DE ET AU
CENTRE DE SERVICE AGRI2¢: SONT _, VOTRE CHARGE.
Garantie limit_e d'un an (1) sur les pi_ces*
TACP garantie en outre les pieces de ce tel6viseur contres les
vices de materiaux ou de fabrication pendant une periode d'un (1)
an a compter de la date de I'achat au detail. PENDANT CETTE
PC:RIODE, TACP D¢:CIDERA S'ILY A LIEU DE RI2PARER OU
D'¢:CHANGER TOUT T¢:LEVlSEUR OU PI¢:CE D¢:FECTUEUX
CONTRE UN NOUVEAU OU REMIS EN €:TAT,GRATUITEMENT:
Sl UNE PI¢:CE D¢:FECTUEUSE DOlT ¢:TRE REMPLAC¢:E
APR¢:S LES QUATRE-VlNGT-DIX (90) JOURS ,A,COMPTER DE
LA DATE D'ACHAT AU De:TAIL INITIAL, VOUS DEVREZ PAYER
LES FRAIS DE MAIN D'OEUVRE, LI¢:S AU REM-PLACEMENT
DE LA PI¢:CE. VOUS DEVEZ LIVRER LE TELEVlSEUR A UN
CENTRE DE SERVICE TACP AGR¢:¢:. LES FRAIS DE TRANS-
PORT ET D'ASSURANCE DE LAPPAREIL DE ET AU CENTRE
DE SERVICE AGR¢:¢: SONT _, VOTRE CHARGE.
Garantie lirnit_e de deux (2) ans sur tube _cran*
TACP garantie en outre le tube ecran de ce t61eviseur contres les
vices de materiaux ou de fabrication pendant une periode de deux
(2) ans a compter de la date de I'achat au detail. PENDANT
CETTE PC:RIODE, TACP D¢:CIDERA S'ILY A LIEU DE
REPARER OU D'ECHANGER LE TUBE ¢:CRAN DEFECTUEUX
CONTRE UN NOUVEAU OU REMIS EN ETAT, GRATUlTEMENT.
Sl UN TUBE ¢:CRAN D¢:FECTUEUX DOlT ETRE REMPLAC¢:
APR¢:S LES QUATRE-VlNGT-DIX (90) JOURS ,A,COMPTER DE
LA DATE D'ACHAT AU De:TAIL INITIAL, VOUS DEVREZ PAYER
LES FRAIS DE MAIN D'OEUVRE, LI¢:S AU REMPLAOEMENT
DE LA PI¢:CE. VOUS DEVEZ LIVRER LE TELEVlSEUR A UN
CENTRE DE SERVICE TACP AGR¢:¢:. LES FRAIS
DETRANSPORT ET D'ASSURANCE DE EAPPAREIL DE ET AU
CENTRE DE SERVICE AGR¢:E SONT A VOTRE CHARGE.
Location d'appareils
La garantie pour des appareils Iou_s commence a la premiere
location ou trente (30) jours _ compter de la date de livraison
par la compagnie de location, selon ce qui arrive le premier.
*Appareils a usage commercial
T_16viseurs vendus et utilis6s a des fins commerciales ont une
garantie limit6 de 90 jours pour toutes pieces, main d'oeuvre et
tube _cran.
Mode d'emploi et carte identifieatriee
Vous devez lire attentivement le mode d'emploi avant d'utiliser
ce tSl_viseur. II est conseill6 de remplir et de renvoyer la carte
identificatrice inclue dans les dix (10)jours qui suivent I'achat
du t61_viseur ou sa r_ception comme cadeau. Ceci permettra 9.
TACP de vous fournir un service am_lior6 et de meilleurs
produits. Le non renvoi de cette carte n'affectera n'affectera pas
vos droits pr6vus dans la garantie.
14
Vos reeponsabilit_s
LES GARANTIES CI-AVANT SONT SUJETTES AUX CONDI-
TIONS SUIVANTES:
(1) Vous devez fournir votre re_cu d'achat ou toute autre
preuve de I'acquisition.
(2) Tousles services sous garantie pour ce t_16viseur doivent
6tre effectu_s par une Centre de Service TACP agr6_.
(3) Les garanties pour les 12tats-Unis sont effectives seulement
si le t61_viseur a 6t6 achet6 et utiis_ aux ¢:tats-Unis ou 9.
Puerto Rico.
(4) Les frais de main d'oeuvre pour I'installation, le r6glage des
commandes et 'installation de syst&me d'antenne ne sont
pas couverts par cette garantie. Nous ne sommes pas
responsables des problemes de r_ceptionprovenant de
systemes d'antenne inad6quats.
(5) Les garanties ne couvrent que les vices de mat_riaux ou de
fabrication, tel que mentionn6 ci-avant. Elles ne concernent
pas un t61eviseur ou une pi&ce perdu ou _gar6 par vous ou
out t61_viseur ou piece endommage par une erreur
d'utilisation, un un accident, des d6g_ts caus6s par la
foudre, des fluctuations de tension, une mauvaise installa
tion, un entretien inad6quat ou une utilisation violant les
explication fournies; torisation de TACP ou les t_16viseurs
ou pieces dont le num_ro de s6rie a 6t_ supprim6, alt_r6 ou
rendu illisible:
Pour obtenir les services sous garantie
Apres avoir suivi les _tapes de d6pannage de votre mode
d'emploi, vous avez besoin de service :
(1) Pour trouver le centre de service TACP agr_6 le plus pr6t :
Pour les t_16viseurs achet6s aux Etats-Unis, visitez le site
web de TACP a www.toshiba.com/tacp, ou appelez le
1-800-631-3811.
(2) Pr6sentez votre facture d'achat ou autre preuve d'achat 9.
un centre de service agr_& Vous devez livrer le t_16viseur
au complet a un centre de service TACP agr_& Les frais
de transport et d'assurance du t_16viseur de et au centre de
service agr6_ sont _ votre charge.
Pour plus d'information, visitez le site web TACP:
www.toshiba.comftacp J
TOUTES LES GARANTIES IMPLICITES DE DROIT DE TOUS LES
ETATSDES ETATS-UNIS,Y COMPRIS LES GARANTIES
IMPLICITES DE QUALITE MARCHANDE ET D'ADAPTATION A UNE
FIN PARTICULIERE, SONT LIMITEES EXPRESSEMENT ,_ LA
DUREE DES GARANTIES LIMITEES ENONCEES CI-DESSUS.
SAUF POUR CE QUI EST DES GARANTIES IMPLICITES DE DROIT,
TELLES QUE LIMITEES PAR LES PRESENTES, LA GARANTIE QUI
PRECEDE REMPLACERA TOUTES LES AUTRES REMPLACEMENT
DE PIECES. EN AUCUN CAS, TACP NE SERA TENU
RESPONSABLE DE DOMMAGES INDIRECTS OU ACCESSOIRES.
Aucune personne, agent, distributeur, concessionnaire ou compagnie
n'est autorise a changer, modifier ou prolonger les termes de ces
garanties de quelque fagon que ce soit. Toute procedure visant
faire ex_cuter une obligation quelconque de TACP en vertu de cette
garantie ou de toute Ioi des Etats-Unis ou d'un des etats, dolt 6tre
entamee dans les quatre-vingt-dix (90) jours suivant la date ou vous
decouvrez ou devriez avoir decouvert la d6fectuosit& Cette limitation
ne s'applique pas aux garanties implicites de droit.
CETTE GARANTIE VOUS ACCORDE DES DROITS LEGAUX PRECIS
ETVOUS POUVEZ DISPOSER D'AUTRES DROITS QUI VARIENT
D'UN ETAT,&,IZAUTRE. CERTAINS ETATS NE PERMETTENT PAS
DE LIMITATION DE LA DUBEE DES GARANTIES IMPLICITES OU DU
DROIT DE PRESCRIPTION D'ACTION, NE LEXCLUSION OU LA
LIMITATIONDES DOMMAGES INDIRECTS OU ACCESSOIRES. IL SE
PEUT DONC QUE LES DISPOSITIONS PRECEDENTES NE
S'APPLIQUENT PASDANS VOTRE CAS.
FST PURE :_est une marque enregistr6e de Toshia America
Products L.L.C.
3M91301A-F P12-Back 14 13/2/04, 2:08

Garantie iirnit e canadienne
Pour tous les rnodeles FST PURE ®24 pc. et moins
Toshiba du Canada Limit_e (TCL) donne les garanties limit_es.
suivantes. CES GARANTIES LIMITEES SONT ACCORDEES A
IJACHETEUR INITIAL DE CE PRODUIT OU _, TOUTE
PERSONNE L'AYANT RECU EN CADEAU DE L'ACHETEUR
INITIAL OU D'UN CESSIONNAIRE.
LES PRODUITS ACHETI_S AUX E-U ET UTILISES AU
CANADA NE SONT PAS COUVERTS PAR CETTE GARANTIE.
LES PRODUITS ACHETES AUX CANADA ET UTILISES AUX
E.-U. NE SONT PAS COUVERTS PAR CETTE GARANTIE.
Garantie limit_e de 90 jours sur la main d'oeuvre*
TCL garantissent ce t_l_viseur et ses pieces centre vices de
mat_riaux ou de fabrication pendant une p6riode de quatre-vingt-
dix (90) jours a compter de la date d'achat au d_tail. PENDANT
CETTE Pt_RIODE, TCL DI_CIDERA S'ILY A LIEU DE R¢:PARER
OU D'EOHANGER TOUT TELEVlSEUR OU PIECE
DI2FECTUEUX CONTRE UN NOUVEAU OU REMIS EN ETAT
GRATUITEMENT. VOUS DEVEZ LIVRER CE T¢:LEVlSEUR ,_
UN CENTRE DE SERVICE TCL AGREE. LES FRAIS DE
TRANSPORT ET D'ASSURANC DE IJAPPAREIL DE ET AU
CENTRE DE SERVICE AGR¢:E SONT ,ikVOTRE CHARGE.
Garantie limit_e d'un an (1) sur les pi_ces*
TCL garantie en outre les pieces de ce televiseur contres les
vices de materiaux ou de fabrication pendant une periode
d'un (1) an a compter de la date de I'achat au detail. PENDANT
DETTE PERIODE, TCL DECIDERA S'IL Y A LIEU DE REPARER
OU D'ECHANGER TOUTT¢:LEVlSEUR OU PIECE
DEFECTUEUX CONTRE UN NOUVEAU OU REMIS EN ETAT,
GRATUITEMENT:
SI UNE PIECE DEFECTUEUSE DOlT ETRE REMPLAC¢:E
APRES LES QUATRE-VlNGT-DIX (90) JOURS/_, COMPTER DE
LA DATE D'ACHAT AU DETAIL INITIAL, VOUS DEVREZ PAYER
LES FRAIS DE MAIN D'OEUVRE, LI¢:S AU REM-PLACEMENT
DE LA PIECE. VOUS DEVEZ LIVRER LE TELEVlSEUR A UN
CENTRE DE SERVICE TDL AGREE. LES FRAIS DE TRANS-
PORT ET D'ASSURANCE DE IZAPPAREIL DE ET AU CENTRE
DE SERVICE AGRE¢: SONT _, VOTRE CHARGE.
Garantie limit_e de deux (2) ans sur tube _cran*
TCL garantie en outre le tube ecran de ce televiseur contres les
vices de materiaux ou de fabrication pendant une periode de
deux (2) ans& compter de la date de I'achat au detail. PENDANT
DETTE PERIODE, TCL DECIDERA S'ILY A LIEU DE R¢:PARER
OU D'ECHANGER LE TUBE ECRAN DEFECTUEUX CONTRE
UN NOUVEAU OU REMIS EN €:TAT,GRA-TUITEMENT. SI UN
TUBE ECRAN DI2FECTUEUX DOlT ETRE REMPLAC¢: APRES
LES QUATRE-VlNGT-DIX (90) JOURS A COMPTER DE LA
DATE D'ADHAT AU DETAIL INITIAL, VOUS DEVREZ PAYER
LES FRAIS DE MAIN D'OEUVRE, LIES AU REMPLACEMENT
DE LA PIECE. VOUS DEVEZ LIVRER LE TELEVlSEUR A UN
CENTRE DE SERVICE TCL AGREE. LES FRAIS
DETRANSPORT ET D'ASSURANOE DE EAPPAREIL DE ET AU
CENTRE DE SERVICE AGREE SONT A VOTRE CHARGE.
Location d'appareils
La garantie pour des appareils Iou_s commence a la premiere
location ou trente (30) jours _ compter de la date de livraison
par la cempagnie de location, selon ce qui arrive le premier.
*Appareils a usage commercial
T_16viseurs vendus et utilis_s a des fins commerciales ont une
garantie limit_ de 90 jours pour toutes pieces, main d'oeuvre et
tube ecran
Mode d'emploi
Vous devez lire attentivement le mode d'emploi avant d'utiliser
ce t_16viseur.
Voe reeponsabilit_e:
LES GARANTIES CI-AVANT SONT SUJETTES AUX CONDI-
TIONS SUIVANTES:
(1) Vous devez fournir votre recu d'achat ou toute autre preuve
de I'acquisition.
(2) Tousles services sous garantie pour ce t_leviseur doivent
atre effectu_s par un centre de service TCL agr6&
(3) Le garanties pour le Canada sont effectives seulement si le
t_l_viseur a _t_ achet_ d'en marchand autoris_ et utilis_ au
Canada.
(4) Les frais de main d'oeuvre pour I'installation, le r_glage des
commandes et I'installation de systeme d'antenne ne sont
pas couverts par cette garantie. Nous ne sommes pas
responsables des problemes de r6ceptionprovenant de
systemes d'antenne inadequats.
(5) Les garanties ne couvrent que les vices de mat_riaux ou de
fabrication, tel que mentionn8 ci-avant. Elles ne concernent
pas un t616viseur ou une piece perdu ou _gar8 par vous ou
tout t616viseur ou piece endommag_ par une erreur
d'utilisation, un un accident, des d_g&ts causes par la
foudre, des fluctuations de tension, une mauvaise installa
tion, un entretien inad_-quat ou une utilisation violant les
explication fournies; torisation de TCL ou les t_16viseurs ou
pieces dont le num_ro de s_rie a 6t_ supprim_, alt_r6 ou
rendu illisible.
Pour obtenir les services sous garantie
Apres avoir suivi les _tapes de d_pannage de votre mode
d'emploi, vous avez besoin de service :
(1) Pour trouver le centre de service TCL agr6_ le plus pr6t
visitez le site web de TCL & www.toshiba.ca
(2) Pr_sentez votre facture d'achat ou autre preuve d'achat
un centre de service agr6& Vous devez livrer le t61eviseur
au complet a un centre de service TCL agr_& Les frais de
transport et d'assurance du t_16viseur de et au centre de
service agr6_ sent a votre charge.)
Pour de I'information additionnelle, visitez le site
web de TCL: www.toshiba.ca
TOUTES LES GARANTIES IMPLICITES DE DROIT DE
TOUTES LES PROVINCES DU CANADA, Y COMPRIS LES
GARANTIES IMPLICITES DE QUALITE MARCHANDE ET
D'ADAPTATION A UNE FIN PARTICULIERE, SONT LIMITEES
EXPRESSC:MENT A LA DURC:E DES GARANTIES LIMIT¢:ES
ENONCEES CI-DESSUS. SAUF POUR CE QUI EST DES
GARANTIES IMPLICITES DE DROIT, TELLES QUE LIMITEES
PAR LES PRESENTES, LA GARANTIE QUI PRO:CEDE
REMPLACERA TOUTES LES AUTRES REMPLACEMENT DE
PIECES. EN AUCUN CAS, TCL NE SERATENU
RESPONSABLE DE DOMMAGES INDIRECTS OU
ACCESSOIRES.
Aucune personne, agent, distributeur, concessionnaire ou
compagnie n'est autoris_ _ changer, modifier ou prolonger les
termes de ces garanties de quelque facon que ce soit. Toute
procedure visant a faire exScuter une obligation quelconque de
TCL en vertu de cette garantie ou de toute Ioi du Canada ou
d'une des provinces, doit _tre entam6e dans les quatre-vingt-
dix (90) jours suivant la date or] vous d_couvrez ou devriez
avoir d_couvert la d_fectuosit_. Cette limitation ne s'applique
pas aux garanties implicites de droit.
CETTE GARANTIE VOUS ACCORDE DES DROITS LEGAUX
PRECIS ET VOUS POUVEZ DISPOSER D'AUTRES DROITS
QUI VARIENT D'UN ETAT ,_ EAUTRE. CERTAINS ETATS NE
PERMETTENT PAS DE LIMITATION DE LA DUREE DES
GARANTIES IMPLICITES OU DU DROIT DE PRESCRIPTION
D'ACTION, NE L'EXCLUSlON OU LA LIMITATION DES
DOMMAGES INDIRECTS OU ACCESSOIRES. IL SE PEUT
DONC QUE LES DISPOSITIONS PR¢:CEDENTES NE
S'APPLIQUENT PAS DANS VOTRE CAS.
FST PURE" est une marque enregistr_e de Toshia America
Products L.L.C.
3M91301A-F P12-Back 15 13/2/04, 2:08
TOSHIBA AMERICA CONSUMER PRODUCTSj L=L=C=
Head Office
82 Totowa Road, Wayne, NJ 07470
National Service Division
1420B Toshiba Drive, Lebanon, TN 37087
TOSHIBA OF CANADA LiMiTED
t91 McNabb Street
Markham, Ontario L3R 8H2
TEL.: (905) 470-5400
Service Centers:
TORONTO: 191 McNABB STREET,
MARKHAM, ONTARIO, L3R 6H2, CANADA
TEL.: (905) 470-5400
MONTREAL: 16050 TRANS CANADA, KIRKLAND,
QUEBEC, H9J-4A1, CANADA
TEL.: (514) 390-7766
VANCOUVER: 22171 FRASERWOOD WAY,
RICHMOND, B.C., V62 1J5, CANADA
TEL.: (604) 303-2500
Imprime en ThaYlande TOSHIBA
3M91301A-F P12-Back 16 13/2/04, 2:08
