Toshiba 23HLV85 User Manual LCD TV/DVD Manuals And Guides L0601278
TOSHIBA TV/VCR or DVD Combo Manual L0601278 TOSHIBA TV/VCR or DVD Combo Owner's Manual, TOSHIBA TV/VCR or DVD Combo installation guides
User Manual: Toshiba 23HLV85 23HLV85 TOSHIBA LCD TV/DVD - Manuals and Guides View the owners manual for your TOSHIBA LCD TV/DVD #23HLV85. Home:Electronics Parts:Toshiba Parts:Toshiba LCD TV/DVD Manual
Open the PDF directly: View PDF ![]() .
.
Page Count: 52
TOSHIBA E: ENGLISH
F: FRAN(_AIS
S: ESPAI_OL
Dear Customer,
Thank you for purchasing this Toshiba LCD TV/DVD Combination.
This manual will help you use the many exciting features of your
new TV/DVD Combination. Before operating the TV/DVD
Combination, please read this manual completely, and keep
it nearby for future reference.
Safety Precautions
WARNING: TO REDUCE THE RISK OF FIRE OR
ELECTRIC SHOCK, DO NOT EXPOSE THIS APPLIANCE
TO RAIN OR MOISTURE.
lING
WARNING: TO REDUCE THE RISK OF ELECTRIC
SHOCK, DO NOT REMOVE COVER (OR BACK).
NO USER-SERVICEABLE PARTS INSIDE. REFER
SERVICING TO QUALIFIED SERVICE PERSONNEL.
The lightning symbol in the triangle tells you that the
voltage inside this product may be strong enough to
cause an electric shock, DO NOTTRY TO SERVICE
THIS PRODUCT YOURSELF.
The exclamation mark in the triangle tells you that
important operating and maintenance instructions
follow this symbol.
WARNING
To prevent injury, this apparatus must be securely attached to
the floor/wall in accordance with the installation instructions.
(See item 20 on page 4.)
WARNING: This product contains a laser beam. Do not
attempt to stare at the beam through the DVD disc tray or the
ventilation openings. Staring directly at the beam may cause
permanent damage to your eyesight.
NOTETO CAW INSTALLERS
This is a reminder to call the CATV system installer's attention
to Article 820-40 of the NEC, which provides guidelines for
proper grounding and, in particular, specifies that the cable
ground shall be connected to the grounding system of the
building, as close to the point of cable entry as practical. For
additional antenna grounding information, see items 25 and 26
on page 4.
Location of the required Marking
The rating sheet and the safety caution are on the rear of the
unit.
FCC Declaration of Conformity Compliance
Statement (Part 15):
The Toshiba 23HLV85 LCD Color Televisions comply with
Part 15 of the FCC rules.
Operation is subject to the following two conditions: (1) this
device may not cause harmful interference, and (2) this device
must accept any interference that may cause undesired
operation.
The party responsible for compliance to these rules is:
Toshiba America Consumer Products, L.L.C.
82 Totowa Rd. Wayne, NJ 07470.
Ph: (973) 628-8000
Note: This equipment has been tested and found to comply with
the limits for a Class B digital device, pursuant to Part 15 of the
FCC rules. These limits are designed to provide reasonable
protection against harmful interference in a residential
installation. This equipment generates, uses, and can radiate
radio frequency energy and, if not installed and used in
accordance with the instructions, may cause harmful
interference to radio communications. However, there is no
guarantee that interference will not occur in a particular
installation. If this equipment does cause harmful interference to
radio or television reception, which can be determined by
removing and applying power to the equipment, the user is
encouraged to try to correct the interference by one or more of
the following measures:
- Reorient or relocate the receiving antenna.
- Increase the separation between the equipment and the
receiver.
- Connect the equipment into an outlet on a circuit different from
that to which the receiver is connected.
- Consult the dealer or an experienced radio/TV technician for
help.
CAUTION: Changes or modifications to this equipment not
expressly approved by Toshiba could void the user's authority
to operate this equipment.
CAUTION:
THIS DIGITAL VIDEO PLAYER EMPLOYS A LASER SYSTEM.
TO ENSURE PROPERUSE OFTHIS PRODUCT,PLEASE READ
THIS OWNER'S MANUAL CAREFULLY AND RETAIN FOR
FUTURE REFERENCE.SHOULD THE UNIT REQUIRE
MAINTENANCE, CONTACT AN AUTHORIZED SERVICE
LOCATION.
USE OF CONTROLS, ADJUSTMENTS OR THE
PERFORMANCE OF PROCEDURES OTHERTHAN THOSE
SPECIFIED HEREIN MAY RESULT IN HAZARDOUS
RADIATION EXPOSURE.
TO PREVENT DIRECT EXPOSURE TO LASER BEAM, DO NOT
TRY TO OPEN THE ENCLOSURE. VISIBLE LASER RADIATION
MAY BE PRESENT WHEN THE ENCLOSURE IS OPENED. DO
NOTSTARE INTO BEAM.
CERTIFICATION: COMPLIES
WITH FDA RADIATION
PERFORMANCE STANDARDS,
21 CFR SUBCHAPTER J.
2
ChildSafety
It MakesADifference
iX' .... ....
WhereYourTVStands ......
Congratulationson your purchase!As you enjoy
your new TV, keep these safety tips in mind:
The Issue
_3 If you are like most consumers, you have a TV in your home.
Many homes, in fact, have more than one TV.
The home theater entertainment experience is a growing
trend, and larger TVs are popular purchases; however, they
are not always supported on the proper TV stands.
_3 Sometimes TVsare improperly secured or inappropriately
situated on dressers, bookcases, shelves, desks, audio
speakers, chests, or carts. As a result, TVs may fall over,
causing unnecessary injury.
Toshiba Cares!
Theconsumerelectronicsindustry
iscommittedto makinghome
entertainmentenjoyableandsafe.
TheConsumerElectronics
Associationformedthe Home
EntertainmentSupportSafety
Committee,comprisedof TVand
consumerelectronicsfurniture
manufacturers,to advocate
children'ssafetyand educate
consumersandtheir familiesabout
televisionsafety.
TuneInto Safety
_3 One size does NOT fit all! Use appropriate
furniture large enough to support the weight of your
TV (and other electronic components).
Use appropriate angle braces, straps, and anchors to secure
your furniture to the wall (but never screw anything directly
into the TV).
Carefully read and understand the other enclosed
instructions for proper use of this product.
_3 Do not allow children to climb on or play with furniture
and TVs.
Avoid placing any item on top of your TV (such as a VCR,
remote control, or toy) that a curious child may reach for.
Remember that children can become excited while watching
a program and can potentially push or pull a TV over.
_3 Share our safety message about this hidden hazard of the
home with your family and friends. Thank you!
2500 Wilson Blvd.
Arlington, VA 22201 U.S.A.
Tel. 703-907-7600 Fax703-907-7690
www.CE.org
CEAis the Sponsor,Producerand
M3nager of the International CE_ _
ImportantSafety Instructions
Readtheseiustr.ctious.
2) Keep these instructions,
3) Heed all warnings.
4) Follow all instructions.
5) Do not use this apparatus near water.
6) Clean only with dry cloth.
7) Do not block any ventilation openings. Install in
accordance with the manufacturer's instructions.
8) Do not install near any heat sources such as radiators,
heat registers, stoves, or other apparatus (including
amplifiers) that produce heat.
9) Do not defeat the safety purpose of the polarized or
grounding type plug. A polarized plug has two blades
with one wider than the other. A grounding type plug has
two blades and a third grounding Wideplug
prong. The wide blade or the third
prong are provided for your safety.
If the provided plug does not fit into
your outlet, consult an electrician
for replacement of the obsolete outlet.
1O)Protect the power cord from being
walked on or pinched, particularly at
plugs, convenience receptacles, and
the point where they exit from the
apparatus.
11) Only use attachments/accessories specified by the
manufacturer.
12) Use only with the cart, stand, tripod,
bracket, or table specified by the
manufacturer, or sold with the
apparatus. When a cart is used, use
caution when moving the cart/apparatus
combination to avoid injury from tip-over.
13) Unplug this apparatus during
lightning storms or when
unused for long periods of
time.
1/4)Refer all servicing to qualified service personnel.
Servicing is required when the apparatus has been
damaged in any way, such as power-supply cord or plug is
damaged, liquid has been spilled or objects have fallen
into the apparatus, the apparatus has been exposed to
rain or moisture, does not operate normally, or has been
dropped.
14a) CAUTION: If the TV is dropped and the cabinet or
enclosure surface has been damaged or the TV does not
operate normally, take the following precautions:
• ALWAYSturn off the TV and unplug the powercord to avoid
possibleelectric shock orfire.
• NEVERallowyour body to come in contact with any broken
glass or liquid from the damagedtelevision. The LCDpanel
insidethe TVcontains glassand a toxic liquid. If the liquid
comes in contact with your mouth or eyes,or your skin is cut by
broken glass,rinse the affected areathoroughly with water and
consult your doctor.
• ALWAYScontact a servicetechnician to inspect the TV anytime
it has been damaged or dropped.
3
15) The apparatus shall not be exposed to dripping or
splashing and that no objects filled with liquids, such as
vases, shall be placed on the apparatus.
16) CAUTION: To reduce the risk of electric shock, do not use
the polarized plug with an extension cord, receptacle, or
other outlet unless the blades can be inserted completely
to prevent blade exposure.
Installation,Care, and Service
Installation
Follow these recommendations and precautions and heed all
warnings when installing your TV:
17) Never modify this equipment. Changes or modifications
may void: a) the warranty, and b) the user's authority to
operate this equipment under the rules of the Federal
Communications Commission.
18) /=_, DANGER: RISK OF SERIOUS PERSONAL
INJURY, DEATH, OR EQUIPMEN- .dl_'mk
DAMAGE! Never place the TV 6)
on an unstable cart, stand, or table.
The TV may fall, causing serious personal
injury, death, or serious damage to the TV.
19) Never place or store the TV in direct sunlight; hot, humid
areas; or areas subject to excessive dust or vibration.
Sturdytie (asshortaspossible)
20) Always place the TV
on the floor or a sturdy, Clip
level, stable surface
that can support the
weight of the unit.
To secure the TV,
use a sturdy tie from
the hooks on the rear TVsi& Clip TVtop
of the TV pedestal to a wall, pillar, or other immovable
structure. Make sure the tie is tight, secure, and parallel to
the floor.
21) Never expose the apparatus to dripping or splashing liquid
or place items such as vases, aquariums, any other item
filled with liquid, or candles on top of the TV.
22) Never block or cover the slots
or openings in the TV cabinet
back, bottom, and sides.
Never place the TV:
• on a bed, sofa, rug, or
similar surface;
• too close to drapes, a
curtains, or walls; or
• in a confined space such as a bookcase, built-in cabinet,
or any other place with poor ventilation.
The slots and openings are provided to protect the TV
from overheating and to help maintain reliable operation
of the TV.
23) Never allow anything to rest on or roll over the power
cord, and never place the TV where the power cord is
subject to wear or abuse (5 inches for the DVD slot side).
24) Never overload wall outlets and extension cords.
4
25) Always operate the TV with
a 100-240 V AC, 60Hz power source \v 100-240VA0
only.
26) Always make sure the antenna system is properly
grounded to provide adequate protection against voltage
surges and built-up static charges (see Section 810 of the
National Electric Code).
.Antenna lead-in wire
Ground clam
Antenna discharge unit
/(NECSection 810-20)
Electricservice equipment
Grounding conductors
(NECSection 810-21)
Ground clamps
grounding
electrodesystem (NECArt 250 Part H)
27)/2, DANGER: RISK OF SERIOUS PERSONAL
INJURY OR DEATH!
•Use extrerne care to rnake sure you are never in
a position where your body (or any item you are in contact
with, such as a ladder or screwdriver) can accidentally
touch overhead power lines. Never
locate the antenna near overhead
power lines or other electrical
circuits.
• Never attempt to install any of the
following during lightning activity:
a) an antenna system; or b) cables, wires, or any home
theater component connected to an antenna or phone
system.
Care
For better performance and safer operation of your TOSHIBA
TV, follow these recommendations and precautions:
28) If you use the TV in a room whose temperature is 32 °F (0 °C)
or below, the picture brightness may vary until the LCD
warms up. This is not a sign of malfunction.
29) Always unplug the TV before _,
cleaning. Wipe the display
panel surface gently using only
a soft cloth (cotton, flannel,
etc.). A hard cloth may damage
the surface of the panel. Avoid
contact with alcohol, thinner,
benzene, acidic or alkaline solvent cleaners, abrasive
cleaners, or chemical cloths, which may damage the
surface. Do not spray volatile compounds such as
insecticide on the cabinet. This may cause a discoloration
or damage the cabinet.
30) WARNING: RISK OF ELECTRIC SHOCK!
Never spill liquids or push objects of any kind
into the TV cabinet slots.
31)Whileit isthundering,donottouchtheconnectingcables
orapparatus.Failuretofollowthisinstructionmayresultin
electricshock.
32)ForaddedprotectionofyourTVfromlightningandpower
surges,alwaysunplugthepowercordanddisconnectthe
antennafromtheTVifyouleavetheTVunattendedor
unusedforlongperiodsoftime.
33)Duringnormaluse,theTVmaymakeoccasionalsnapping
orpoppingsounds.Thisisnormal,especiallywhenthe
unitisbeingturnedonoroff.Ifthesesoundsbecome
frequentorcontinuous,unplugthepowercordand
contactaToshibaAuthorizedServiceCenter.
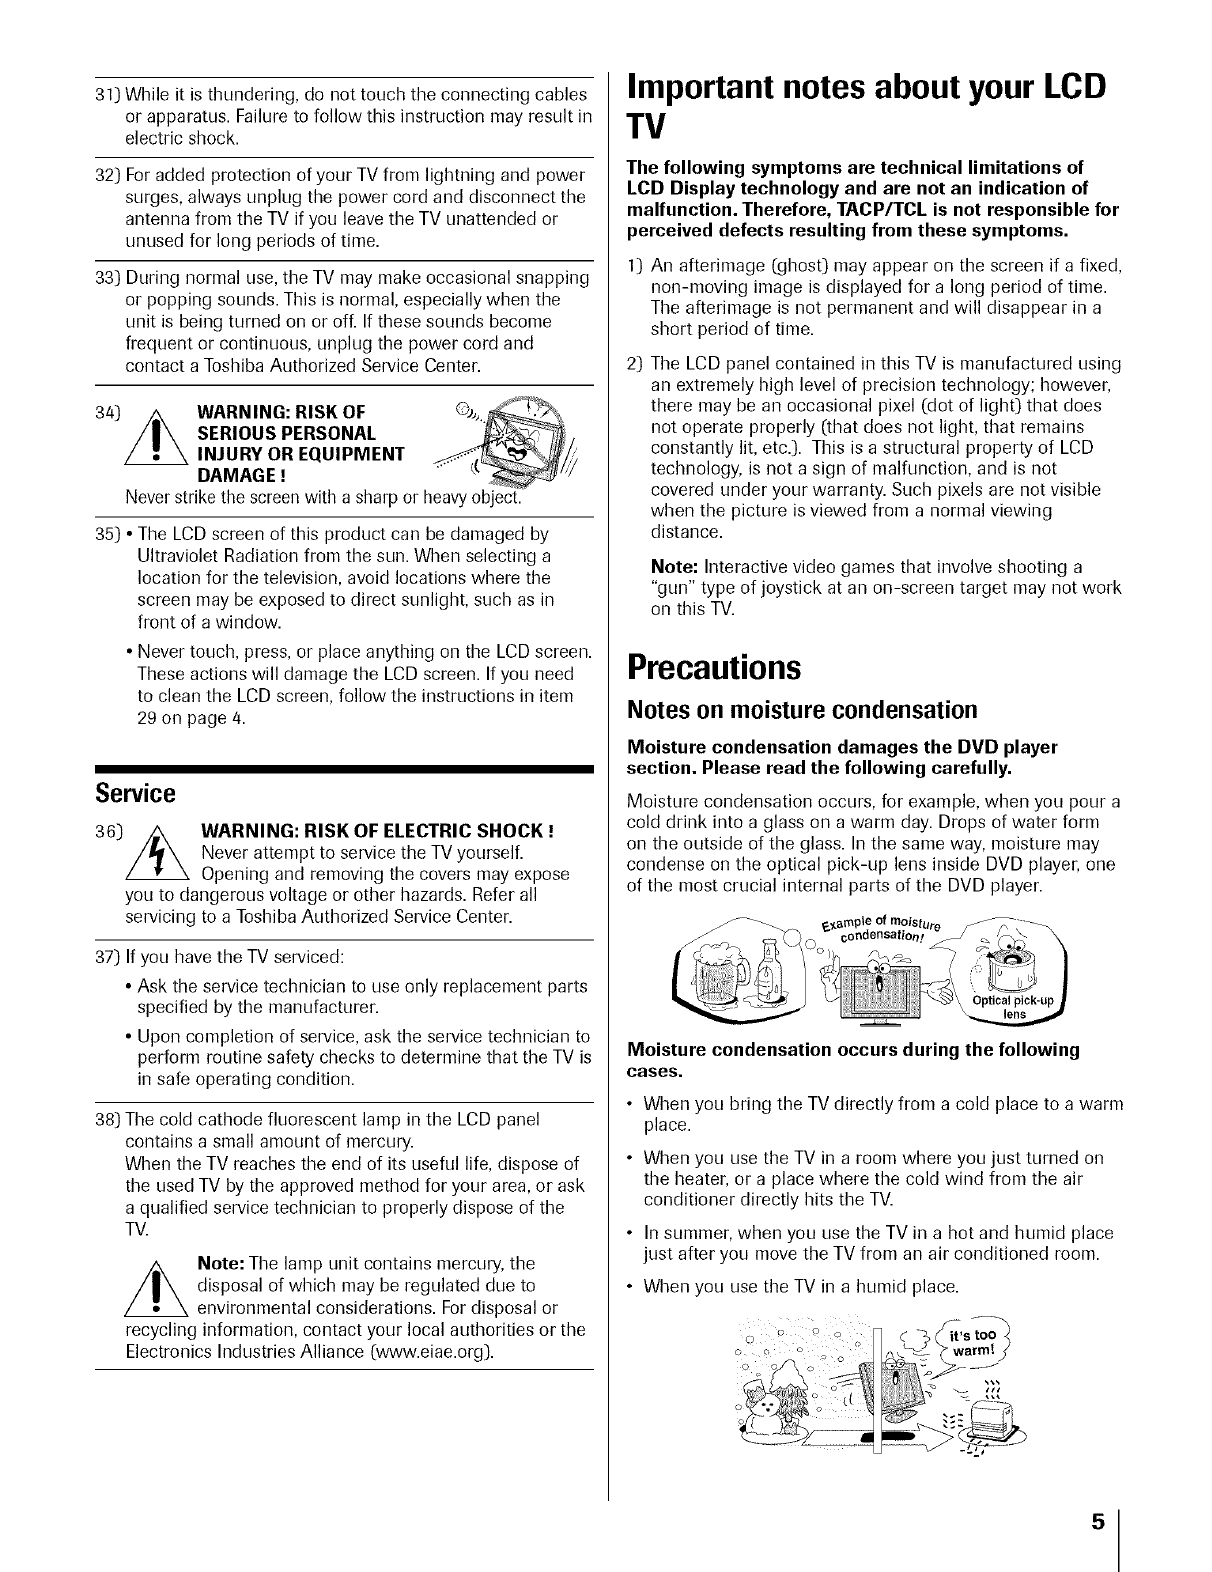
34)/2, WARNING: RISK OF
SERIOUS PERSONAL
INJURY OR EQUIPMENT
DAMAGE !
Never strike the screen with a sharp or heavy object.
35) •The LCD screen of this product can be damaged by
Ultraviolet Radiation from the sun. When selecting a
location for the television, avoid locations where the
screen may be exposed to direct sunlight, such as in
front of a window.
• Never touch, press, or place anything on the LCD screen.
These actions will damage the LCD screen. If you need
to clean the LCD screen, follow the instructions in item
29 on page 4.
Service
36) ,_, WARNING: RISK OF ELECTRIC SHOCK !
Never attempt to service the TV yourself.
Opening and removing the covers may expose
you to dangerous voltage or other hazards. Refer all
servicing to a Toshiba Authorized Service Center.
37) If you have the TV serviced:
• Ask the service technician to use only replacement parts
specified by the manufacturer.
• Upon completion of service, ask the service technician to
perform routine safety checks to determine that the TV is
in safe operating condition.
38) The cold cathode fluorescent lamp in the LCD panel
contains a small amount of mercury.
When the TV reaches the end of its useful life, dispose of
the used TV by the approved method for your area, or ask
a qualified service technician to properly dispose of the
TV.
///_ Note: The lamp unit contains mercury, the
disposal of which may be regulated due to
environmental considerations. For disposal or
recycling information, contact your local authorities or the
Electronics Industries Alliance (www.eiae.org).
Important notes about your LCD
TV
The following symptoms are technical limitations of
LCD Display technology and are not an indication of
malfunction. Therefore, TACP/TCL is not responsible for
perceived defects resulting from these symptoms.
1) An afterimage (ghost) may appear on the screen if a fixed,
non-moving image is displayed for a long period of time.
The afterimage is not permanent and will disappear in a
short period of time.
2) The LCD panel contained in this TV is manufactured using
an extremely high level of precision technology; however,
there may be an occasional pixel (dot of light) that does
not operate properly (that does not light, that remains
constantly lit, etc.). This is a structural property of LCD
technology, is not a sign of malfunction, and is not
covered under your warranty. Such pixels are not visible
when the picture is viewed from a normal viewing
distance.
Note: Interactive video games that involve shooting a
"gun" type of joystick at an on-screen target may not work
on this TV.
Precautions
Notes on moisture condensation
Moisture condensation damages the DVD player
section. Please read the following carefully.
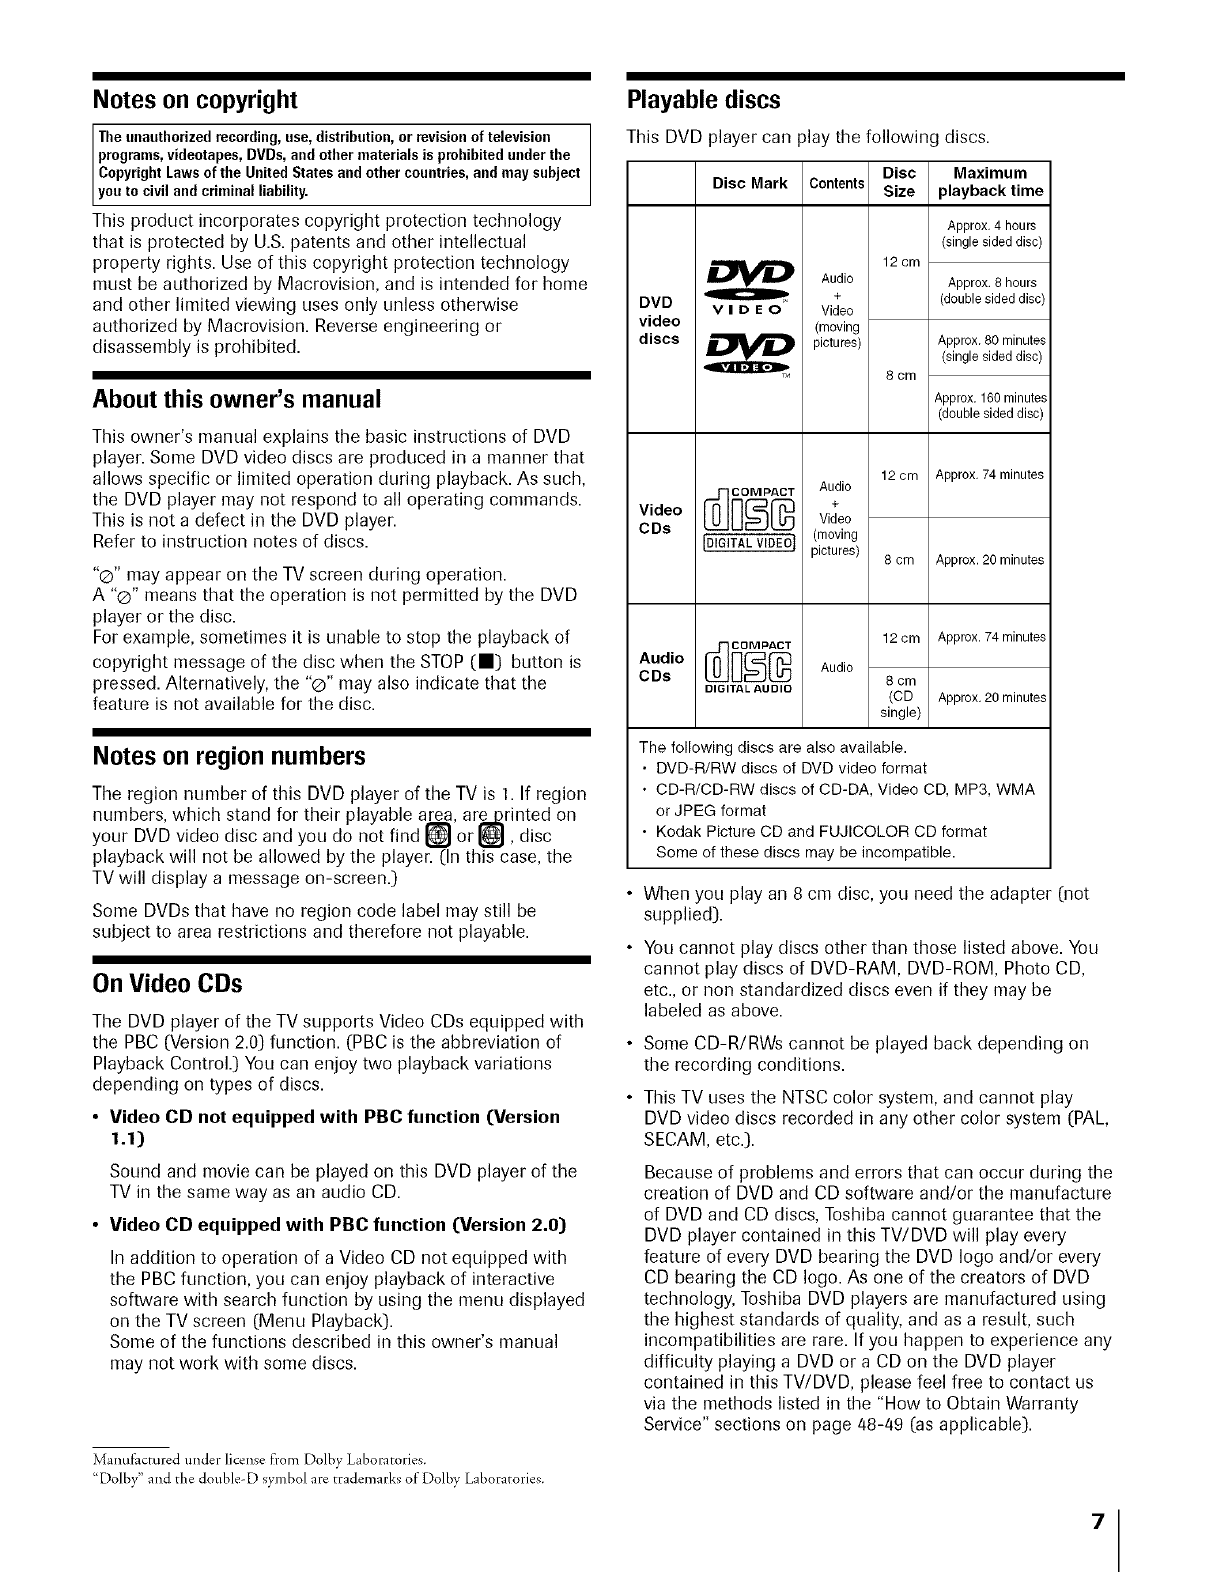
Moisture condensation occurs, for example, when you pour a
cold drink into a glass on a warm day. Drops of water form
on the outside of the glass. In the same way, moisture may
condense on the optical pick-up lens inside DVD player, one
of the most crucial internal parts of the DVD player.
Moisture condensation occurs during the following
cases.
• When you bring the TV directly from a cold place to a warm
place.
• When you use the TV in a room where you just turned on
the heater, or a place where the cold wind from the air
conditioner directly hits the TV.
In summer, when you use the TV in a hot and humid place
just after you move the TV from an air conditioned room.
• When you use the TV in a humid place.
5
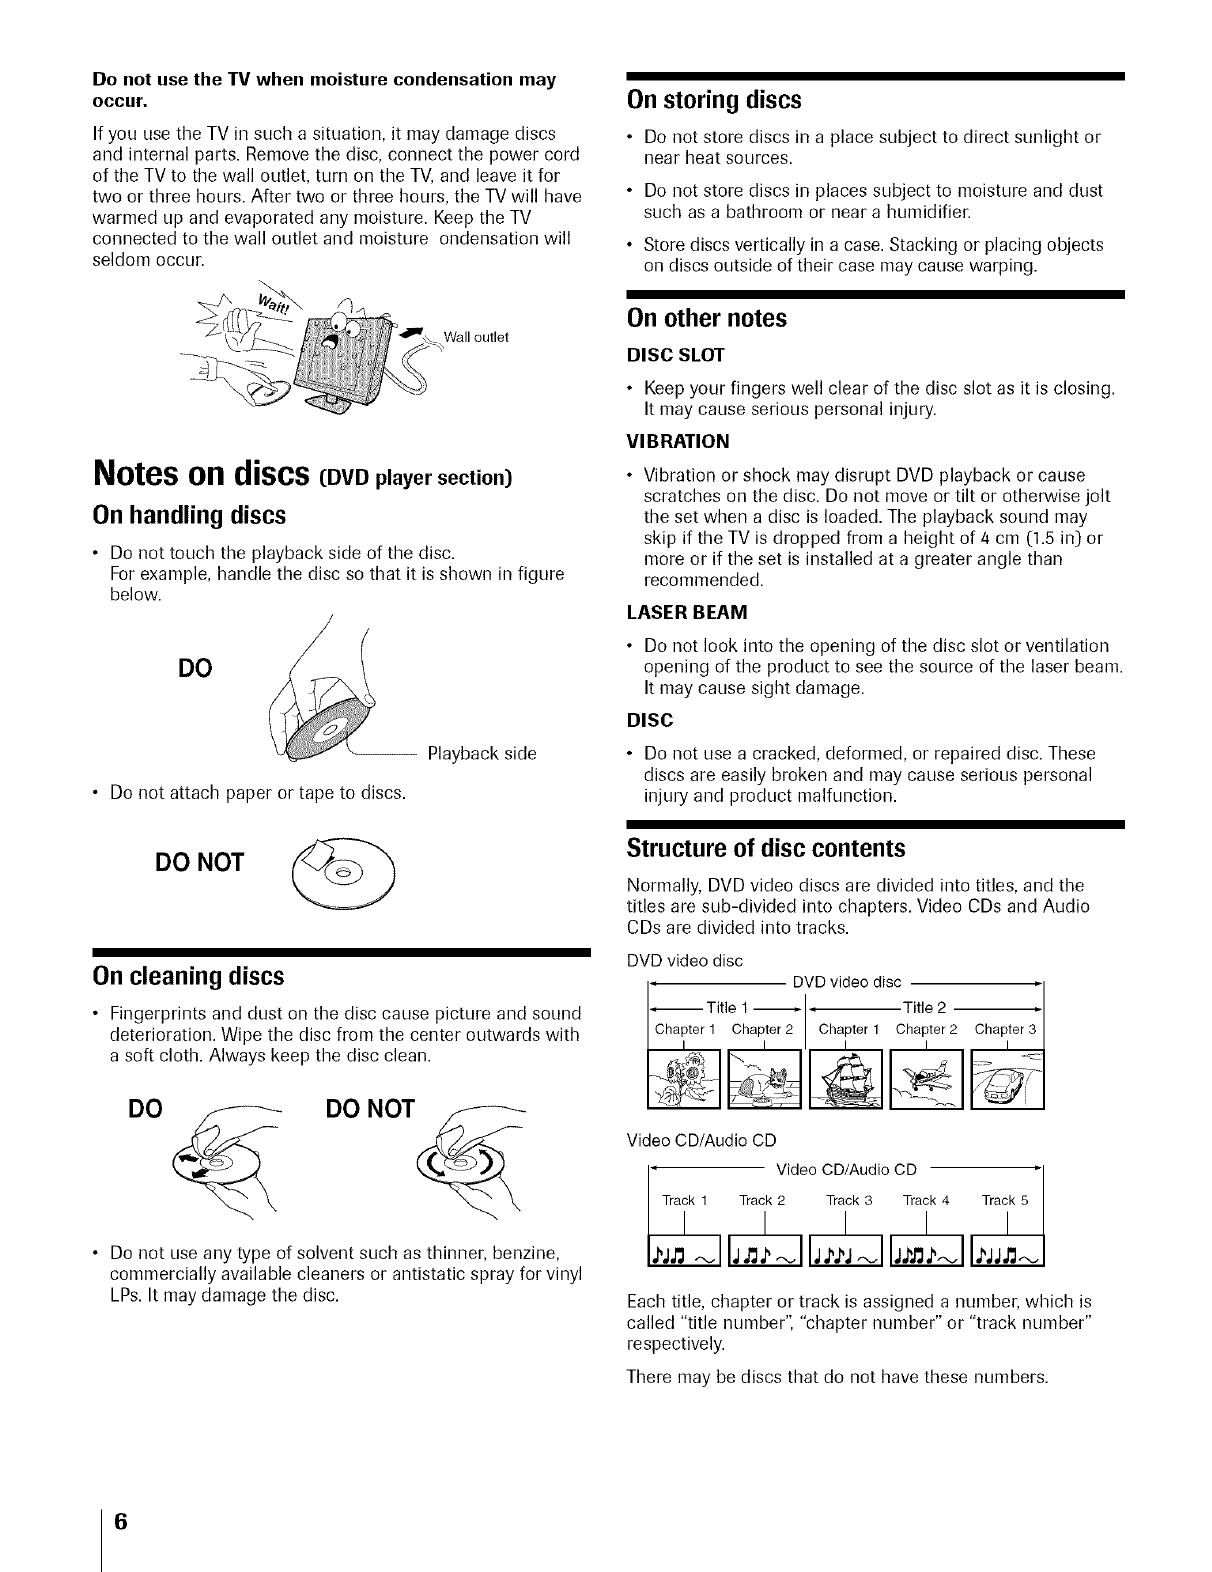
Do not use the TV when moisture condensation may
occur.
If you use the TV in such a situation, it may damage discs
and internal parts. Remove the disc, connect the power cord
of the TV to the wall outlet, turn on the TV, and leave it for
two or three hours. After two or three hours, the TV will have
warmed up and evaporated any moisture. Keep the TV
connected to the wall outlet and moisture ondensation will
seldom occur.
Notes on discs(DVD player section)
On handling discs
• Do not touch the playback side of the disc.
For example, handle the disc so that it is shown in figure
below.
DO
Playback side
• Do not attach paper or tape to discs.
DO NOT
On cleaning discs
• Fingerprints and dust on the disc cause picture and sound
deterioration. Wipe the disc from the center outwards with
a soft cloth. Always keep the disc clean.
DO DO NOT
• Do not use any type of solvent such as thinner, benzine,
commercially available cleaners or antistatic spray for vinyl
LPs. It may damage the disc.
On storing discs
• Do not store discs in a place subject to direct sunlight or
near heat sources.
Do not store discs in places subject to moisture and dust
such as a bathroom or near a humidifier.
• Store discs vertically in a case. Stacking or placing objects
on discs outside of their case may cause warping.
On other notes
DISC SLOT
Keep your fingers well clear of the disc slot as it is closing.
It may cause serious personal injury.
VIBRATION
• Vibration or shock may disrupt DVD playback or cause
scratches on the disc. Do not move or tilt or otherwise jolt
the set when a disc is loaded. The playback sound may
skip if the TV is dropped from a height of 4 cm (1.5 in) or
more or if the set is installed at a greater angle than
recommended.
LASER BEAM
Do not look into the opening of the disc slot or ventilation
opening of the product to see the source of the laser beam.
It may cause sight damage.
DISC
Do not use a cracked, deformed, or repaired disc. These
discs are easily broken and may cause serious personal
injury and product malfunction.
Structure of disc contents
Normally, DVD video discs are divided into titles, and the
titles are sub-divided into chapters. Video CDs and Audio
CDs are divided into tracks.
DVD video disc
• DVD video disc -/
Title 1 _ • Title 2 ÷/
i Chapter1 ChaPlter2 I Chapter1 Chapter2 ChaPlter3
Video CD/Audio CD
' Video CD/Audio CD
Traik 1 Traik 2 Traik 3 Track 4I Track 5I
Each title, chapter or track is assigned a number, which is
called "title number", "chapter number" or "track number"
respectively.
There may be discs that do not have these numbers.
6
Notes on copyright
Theunauthorizedrecording,use,distribution,orrevisionoftelevision
programs,videotapes,DVDs,andothermaterialsisprohibitedunderthe
CopyrightLawsof theUnitedStatesandothercountries,andmaysubject
youto civ andcr mna iabiity.
This product incorporates copyright protection technology
that is protected by U.S. patents and other intellectual
property rights. Use of this copyright protection technology
must be authorized by Macrovision, and is intended for home
and other limited viewing uses only unless otherwise
authorized by Macrovision. Reverse engineering or
disassembly is prohibited.
About this owner's manual
This owner's manual explains the basic instructions of DVD
player. Some DVD video discs are produced in a manner that
allows specific or limited operation during playback. As such,
the DVD player may not respond to all operating commands.
This is not a defect in the DVD player.
Refer to instruction notes of discs.
"Q" may appear on the TV screen during operation.
A "Q" means that the operation is not permitted by the DVD
player or the disc.
For example, sometimes it is unable to stop the playback of
copyright message of the disc when the STOP (11) button is
pressed. Alternatively, the "Q" may also indicate that the
feature is not available for the disc.
Notes on region numbers
The region number of this DVD player of the TV is 1. If region
numbers, which stand for their playable area, are_i2rinted on
your DVD video disc and you do not find [] or [], disc
playback will not be allowed by the player. (In this case, the
TV will display a message on-screen.)
Some DVDs that have no region code label may still be
subject to area restrictions and therefore not playable.
On Video CDs
The DVD player of the TV supports Video CDs equipped with
the PBC (Version 2.0) function. (PBC is the abbreviation of
Playback Control.) You can enjoy two playback variations
depending on types of discs.
• Video CD not equipped with PBC function [Version
1.1)
Sound and movie can be played on this DVD player of the
TV in the same way as an audio CD.
•Video CD equipped with PBC function [Version 2.0)
In addition to operation of a Video CD not equipped with
the PBC function, you can enjoy playback of interactive
software with search function by using the menu displayed
on the TV screen (Menu Playback).
Some of the functions described in this owner's manual
may not work with some discs.
Playable discs
This DVD player can play the following discs.
Disc Maximum
Disc Mark Contents Size playback time
12cm
Approx. 4 hours
(single sided disc)
Audio Approx. 8 hours
+ (double sided disc)
DVD v I D E 0 Video
video (moving
discs _ pictures) Approx. 80 minutes
(single sided disc)
8 cm
Approx. 160 minutes
(double sided disc)
Audio
cDsVide° _o_P@ +Video
(moving
[DIGITAL VIDEO pictures)
12 cm Approx. 74 minutes
8 cm Approx. 20 minutes
12 cm Approx. 74 minutes
Audio _o_@
CDs Audio 8 cm
DIGITAL AUDIO (CD Approx. 20 minutes
single)
The following discs are also available.
• DVD-R/RW discs of DVD video format
• CD-R/CD-RW discs of CD-DA, Video CD, MP3, WMA
or JPEG format
• Kodak Picture CD and FUJICOLOR CD format
Some of these discs may be incompatible.
When you play an 8 cm disc, you need the adapter (not
supplied).
You cannot play discs other than those listed above. You
cannot play discs of DVD-RAM, DVD-ROM, Photo CD,
etc., or non standardized discs even if they may be
labeled as above.
Some CD-R/RWs cannot be played back depending on
the recording conditions.
This TV uses the NTSC color system, and cannot play
DVD video discs recorded in any other color system (PAL,
SECAM, etc.).
Because of problems and errors that can occur during the
creation of DVD and CD software and/or the manufacture
of DVD and CD discs, Toshiba cannot guarantee that the
DVD player contained in this TV/DVD will play every
feature of every DVD bearing the DVD logo and/or every
CD bearing the CD logo. As one of the creators of DVD
technology, Toshiba DVD players are manufactured using
the highest standards of quality, and as a result, such
incompatibilities are rare. If you happen to experience any
difficulty playing a DVD or a CD on the DVD player
contained in this TV/DVD, please feel free to contact us
via the methods listed in the "How to Obtain Warranty
Service" sections on page 48-49 (as applicable).
Manut_/ctured under license fi:om Dolby Laboratories.
"Dolby" and the double-D symbol are trademarks of Dolby Laboratories.
7
Introduction .............................. 9
Welcome to Toshiba .............................................. 9
Supplied accessories ......................................................... 9
Connecting the power cord ...................................... 9
Exploring your new TV ................................................. 10
Rear terminal cover ........................................ 11
Cable chnnper. .............................................. 11
Adjusting the TV viewing angle .............................. 1]
Connecting your IV .................................. 12
Connecting an antenna o1"cable TV ......................... 12
Connecting a VCR ............................................. 13
Connecting a cable converter box ............................ 13
Connecting a cable converter box and a VCR ................ 13
Connecting a DVD player with ColorStream ®
(component video) and a VCR ..................................... 14
Connecting a DTV recdver/set-top box with
ColorStream c*(component video) and a VCR ............... 15
Connecting an HDMI TM or a DVI device to die
HDMI input ................................................................. 16
Connecting an audio system .......................................... 17
Connecting a digital audio system .................................. 17
Connecting a camcorder ................................................ 17
Connecting a personal computer (PC) ........................... 18
Using the remote control ...................................... 19
Learning about the remote control ................................. 19
Installing the remote control batteries ............................ 20
Remote control effective range ................................... 20
Setting up your IV .................................................. 21
Learning about the menu system ................................... 21
Changing the on-screen display language ....................... 22
Adding channds m the TV's memory ............................ 22
Programming &annals automatically ...................... 22
Adding and erasing channels manually .................... 23
Changing &annals ........................................................ 23
Progranmfing your favorite channds .............................. 23
Using the TWs features ......................................... 24
S_vitching between two channels using Channd
Return ........................................................................... 24
Using the Blue screen feaure ......................................... 24
Sdecting the video input source ..................................... 24
Viewing the wide-screen picture foriuas ........................ 25
Sdecting the picture dze ......................................... 25
Natural picture dze ................................................. 25
TbeaterWide l picture size ..................................... 26
TbeaterWide 2 picture size ..................................... 26
TbeaterWide 3 picture size ..................................... 26
Full picture dze ................................................... 26
Using the V-Chip menu ........................................ 27
V-Chip rating and categories ................................... 27
V-Chip blocking (Parental control) setup ............. 28
Adjusting rile picture ............................................ 29
Selecting tile picture mode .................................. 29
Adjusting tile picture quality ................................... 29
Using the dosed caption feature ..................................... 30
To turn oil or offthe Closed Caption feature .......... 31
Using the Panel bck f'catttre ................................... 3 ]
Setting the deep timer .......................................... 31
Adjusting the sound .................................................... 32
Muting the sound .......................................... 32
Selecting stereo/SAP broadcasts .......................... 32
Using the WOW surround sound feature ............. 33
Sdecting the sound mode ....................................... 33
Adjusting the sound quality ................................. 34
Using the StableSound ®feature ........................ 34
Udng the PC setting feature ..................................... 35
Udng the Game Mode feature ....................................... 36
Using the Aura off feature .............................................. 36
Displaying on-screen infbrmation .................................. 36
Understanding the last mode iuemo® feature ............... 36
DVD Playback ............................................................... 37
Learning about the remote contrd .......................... 37
DVD & VCD Operation .................................... 38
DVD Menu options .......................................................... 40
MP3/WMA files Playback options .......................... 42
Audio CD Playback options .................................... 43
JPEG file viewing options ...................................... 43
Appendix ................................................................... 45
Specifications ..................................................... 45
Troubledlooting ....................................................... 46
Limited United States _q/rranty ..................................... 48
Linfited Canada Warranty .............................................. 49
Index ............................................... 50
8
Introduction
Welcome to Toshiba
Thank you for purchasing this Toshiba LCD TV/DVD combination.
The goal of this manual is to guide you through setting up and
operating your Toshiba TV as quickly as possible.
The model and serial numbers are on the back of your TV. Write
these numbers in the space provided on the front cover of this manual
for your records.
Instructions in this manual are based on using the remote control.
You also can use the controls on the TV if they have the same name as
those referred to on the remote control.
Please read all the safety and operating instructions carefidly, and keep
this manual for future reference.
liE==
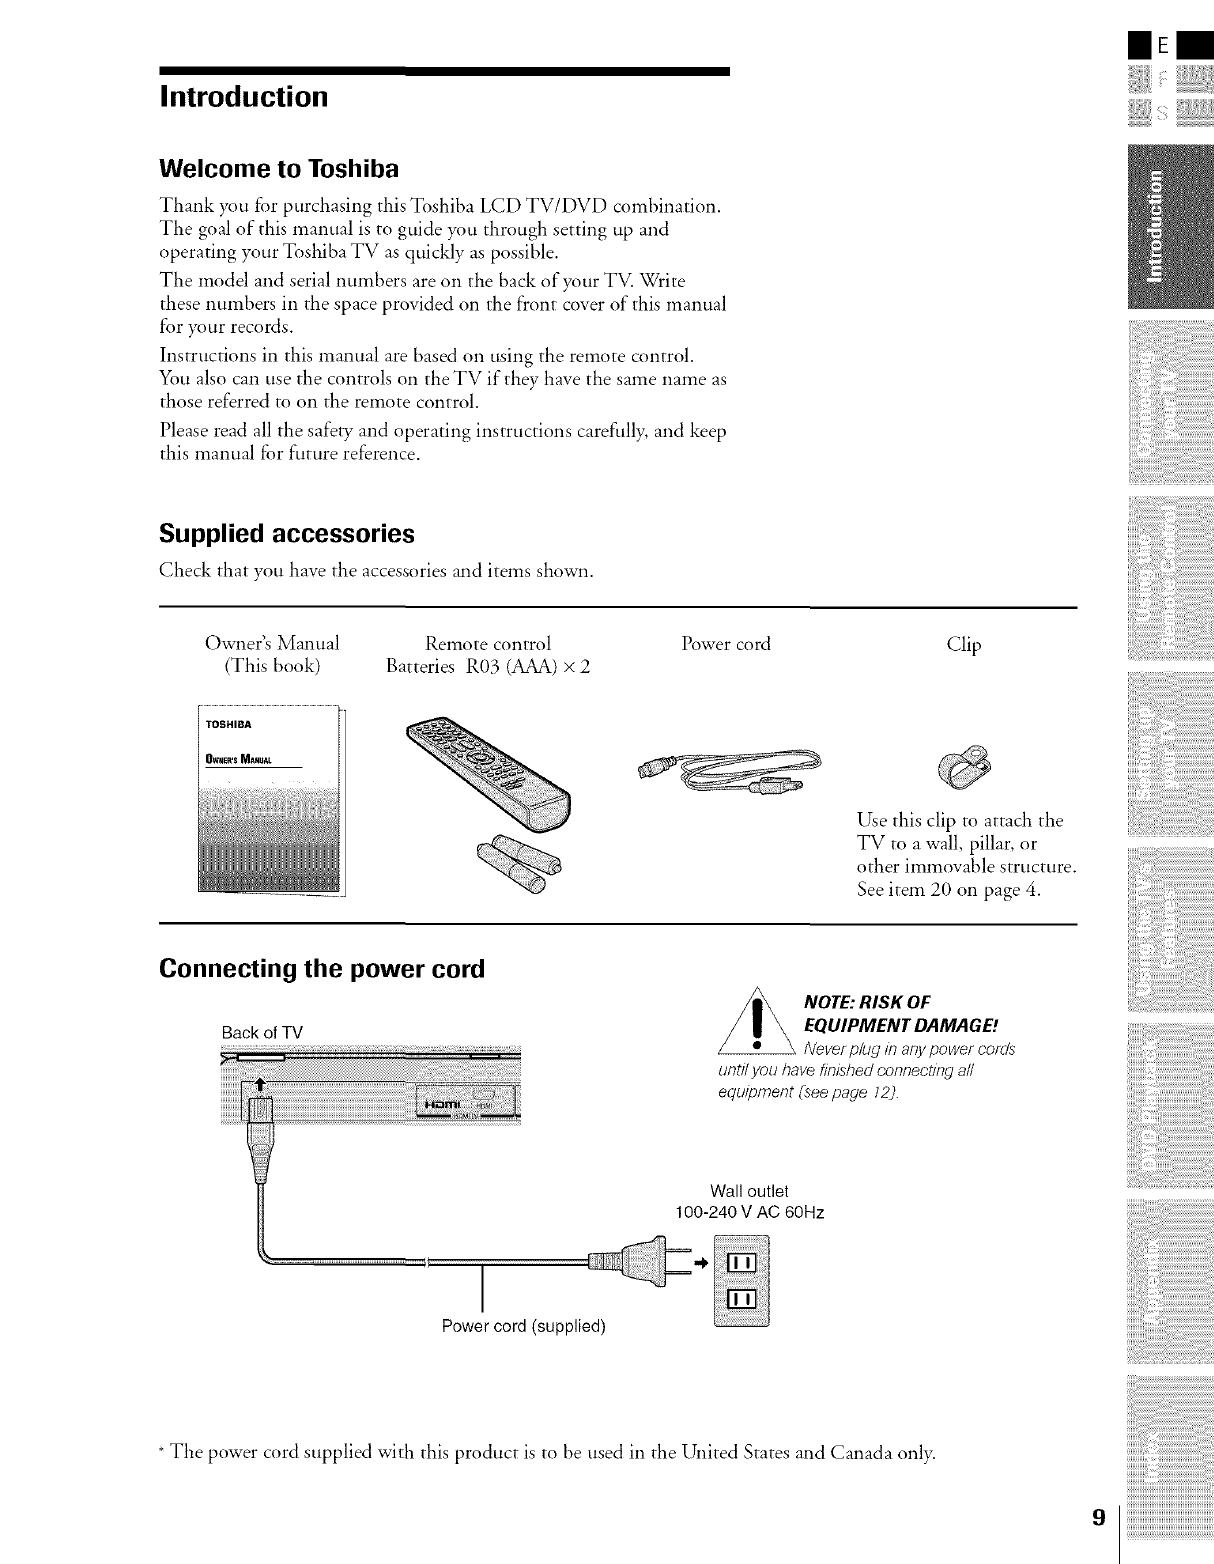
Supplied accessories
Check that you have the accessories and items shown.
Owner's Manual Remote control Power cord
(This book) Batteries R03 (AAA) x 2
.........................................................................................
OW.eR'SM._.uA_.
Clip
Use this clip to attach the
TV to a wall, pillar, or
other immovable structure.
See item 20 on page 4.
Connecting the power cord
Backof TV
NOTE: RISK OF
EQUIPMENT DAMAGE!
Never plug/h any power cords
until you have finished connecting all
equipment (seepage 12).
Wall outlet
100-240 V AC 60Hz
.............!!
Power cord (supplied)
*The power cord supplied with this product is to be used in the United States and Canada only.

Exploring your new TV
_m can operate your TV by using the buttons on the top panel or the
remote control. The A/V terminals f'or connecting other equipment to
your TV are on the back panel and side panel (see illustrations below).
Also see "Connecting your TV" on pages 12-18.
Top panel
VOLUME- + TVNIDEO STOP• EJECT_
POWER CHANNEL
v,%
Remote control
Left side terminals TV front
Headphone
jack
VIDEO-2
IN
DVD
disc slot
Remote sensor
Power indicator
Back
Terminal cover remove,
(see page 11)
Power cord clamper
RGB/PC AUDIO OUT
IN ANT IN
HDMITM IN PC AUDIO IN VIDEO-1 IN SPDIF
(ColorStream HD) (digital audio out)
10
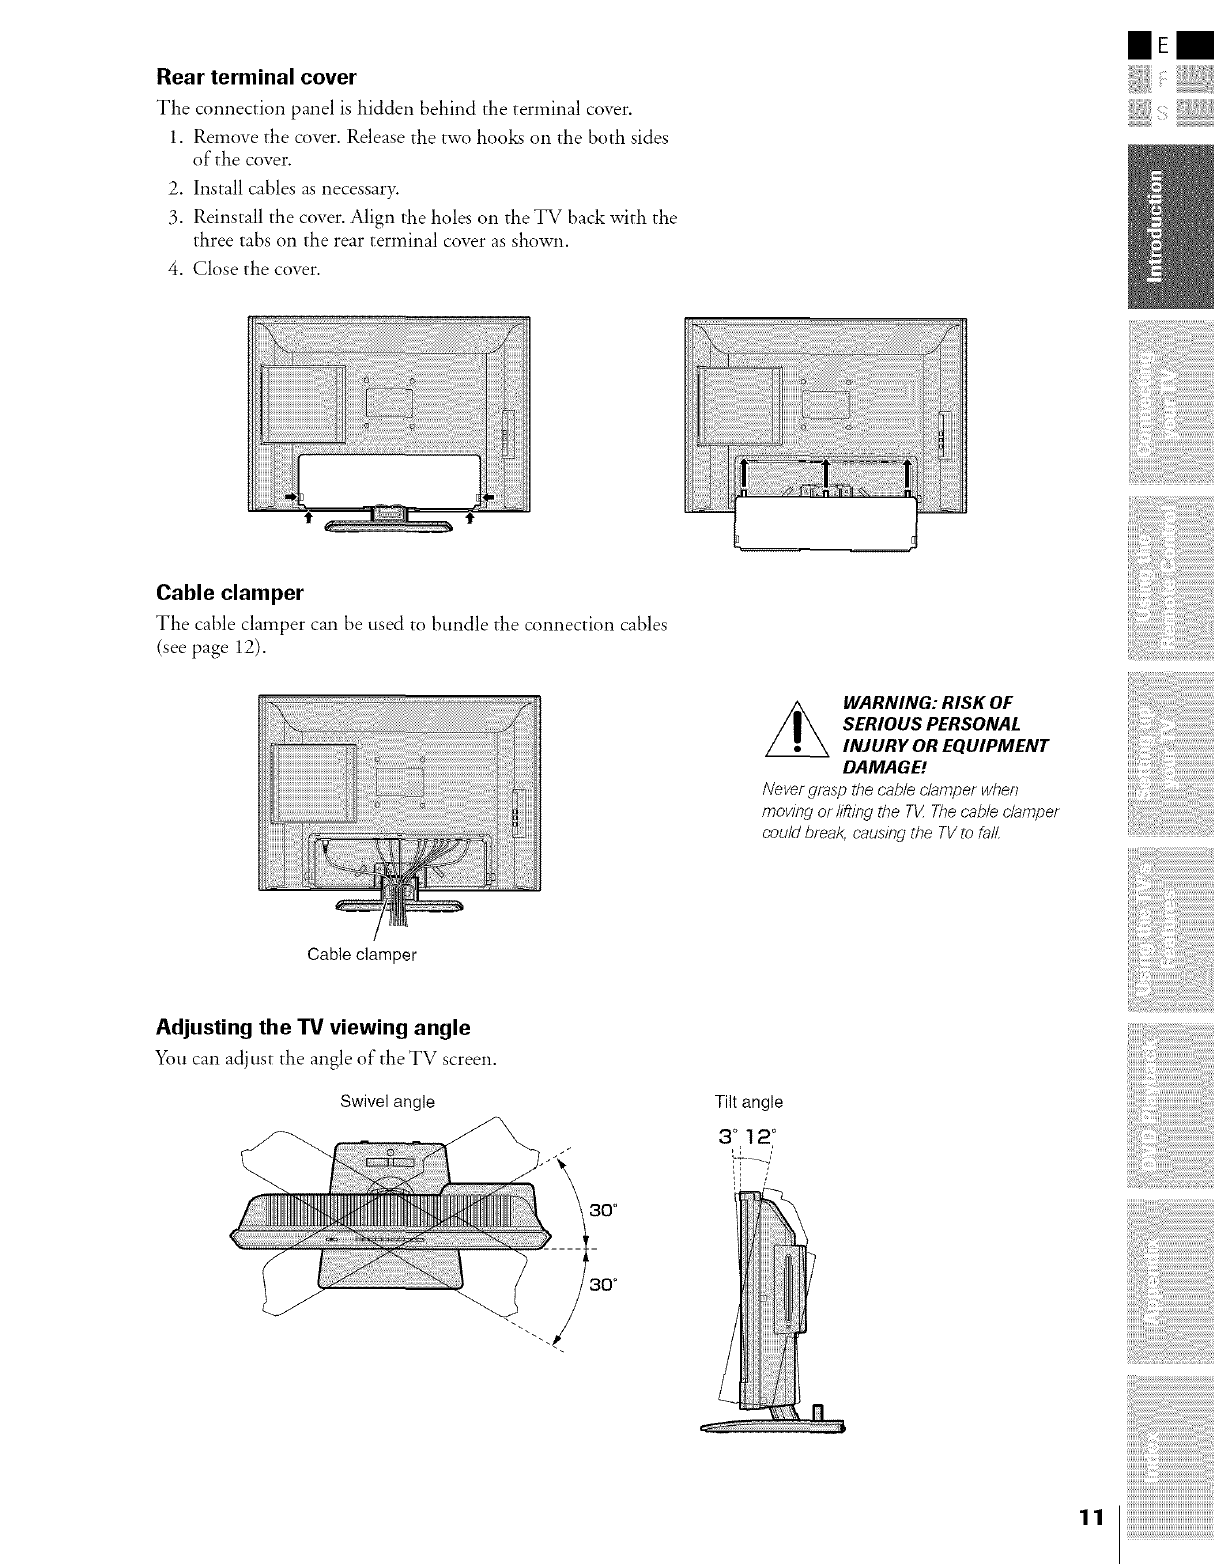
Rear terminal cover
The connection panel is hidden behind the terminal cover.
1. Remove the cover. Release the two hooks on the both sides
of the cover.
2. Install cables as necessary.
3. Reinstall the cover. Align the holes on the TV back with the
three tabs on the rear terminal cover as shown.
4. Close the cover.
IIEII
Cable clamper
The cable clamper can be used to bundle the connection cables
(see page 12).
Cable clamper
WARNING: RISK OF
SERIOUS PERSONAL
INJURY OR EQUIPMENT
DAMAGE!
Nevergrasp the cable clamper when
moving or lifting the TIZThe cable clamper
could break, causing the TVto fall.
Adjusting the "IV viewing angle
You can adjust the angle of the TV screen.
Swivel angle Tilt angle
3°12 °
30 °
f-
30 °
Connecting your TV
Note: All required cables,if notprovided withyour other devices,canbe
purchased at many electrenicsaccessorysuppliers.
•Coaxial (F-type) cable is used for connecting your antenna, cable TV
service, and/or cable converter box to the ANT 75 _ RF input on your
TV.
• Standard A/V cables (composite video) usually come in sets of three,
and are for use with video devices with standard audio and standard
(composite) video output. These cables (and the related inputs on your
TV) are typically color-coded according to use: yellow for video, red
for stereo right audio, and white for stereo left (or mona) audio.
• S-video cable is for use with video devices with S-video output.
Separate audio cables are required for a complete connection.
Note: An S-video cableprovides better picture performance than a
standard (composite] video cable.
•Component video cables come in sets of three and are fi_)ruse with
video devices with component video output. These cables are typically
color-coded red, green, and bhle. (ColorStream ®is Toshiba's brand of
component video.) Separate audio cables are required for a complete
connection.
Note: Component video cablesprovide better picture performance tban a
standard(composite] videoor S-video cable.
•HDMI cable is for use with devices with uncompressed HDM1 (high-
definition muhimedia inter£me) video and compressed audio output.
HDMI cable delivers digital audio and video in its native format (see
page 16). This cable carries both video and audio information;
therefore, separate audio cables are not required for a complete
connection.
Note: HDM! cable providesbetter picture performance tban a standard
(composite) videoor S-video cable.
•Mini D-sub 15-pin cable is for use with a personal computer with an
analog RGB (15-pin) output. A separate audio cable is required for a
complete connection.
• Optical audio cable is for connecting receivers witt_ PCM (pulse-code
modulation) optical audio input to the TV's SPDIF (digital audio out)
terminal. See page 17.
Connecting an antenna or cable TV
This connection allows you to watch TV programs or basic cable
channels.
From Antenna or Cable
Back of TV
43:0
Coaxial(antenna)cable
StandardAN cables(red/white/yellow)
S-videocable
Componentvideocables
HDMIcable
MiniD-sub15-piecable
Audiocable
Opticalaudiocable
_OTE: RISK OF
EQUIPMENT DAMAGE!
Never plug in any power cords
untll you bave finished connecting all
equipment.
12
Connecting a VCR
This connection allows you to watch local channels and video
programs, play or record on the VCR while watching TV, and record
from one channel while watching another channel.
Stereo VCR
From Cable
Box or
Antenna
Back of TV
Note:
/f you have amono VCR, connect L to VCR
Audio OUTusing only one audio cable.
ff you have a VCR with S-video, use an
S-video cable (in the S-video jacks) instead of
a standard video cable.
The TV side panel can be used to connect a
VCR with S-video.
IIEm
Connecting a cable converter box
Tiffs connection allows you to watch basic and premium cable channels.
Tune the TV to channel 3 or 4 (whichever channel is vacant in your
area), and use the converter box to change channels.
Back of TV
From Cable
Note:
When you use a converter box witt_your TV,
the remote control will not operate some
features, such as favorite channel
programming or channel return.
Connecting a cable converter box and a VCR
This connection allows you to watch and record basic and premmm
cable channels, as well as watch videotapes. Set the TV signal source
to Videol (page 24). Tune the VCR to channel 3 or 4 (the same
channel as the converter box output switch), and use the cable
converter box to change channels.
Stereo VCR
From Cable
Back of TV
Note:
When you use a converter box with your TV,
tt_e remote control will not operate some
features, such as favorite channel
programming or channel return.
ff you have a mono VCR, connect L to VCR
Audio OUTusing only one audio cable.
ff you have a VCR with S-video, use an
S-video cable (in the S-video jacks) instead of
a standard video cable.
The TVside panel can be used to connect a
VCR with S-video.
The unauthorized recording, use,
distribution,or revision of television
programs,videotapes, DVDs,and other
materials isprohibited under the
Copyright Laws of the United States and
other countries, and maysubject you to
civil and criminal liability.
13
NNNNN_i!_i!_i!_i!_i!_i!_i!_i!_i!_i!_i!_i!_i!_i!_i!_i!_i!_i!_i!_i!_i!_i!_i!_i!_i!_i!_i
iiiiiiiiiiiiiiiiiiiiiiiiiiiiiiiiiiiiiiiiiiiiiii
iiiiiiiiiiiiiiiiiiiiiiiiiiiiiiiiiiiiiiiiiiiiiiiiii_
i!i!i!i!i!i!i!i!i!i!i!i!i!i!i!i!i!i!i!i!i!i!i!i!i!i!i!i!i!i!i!i!i!i!i!i!i!i!i!i!i!i!i!i!i!i!i!i!i!i!i
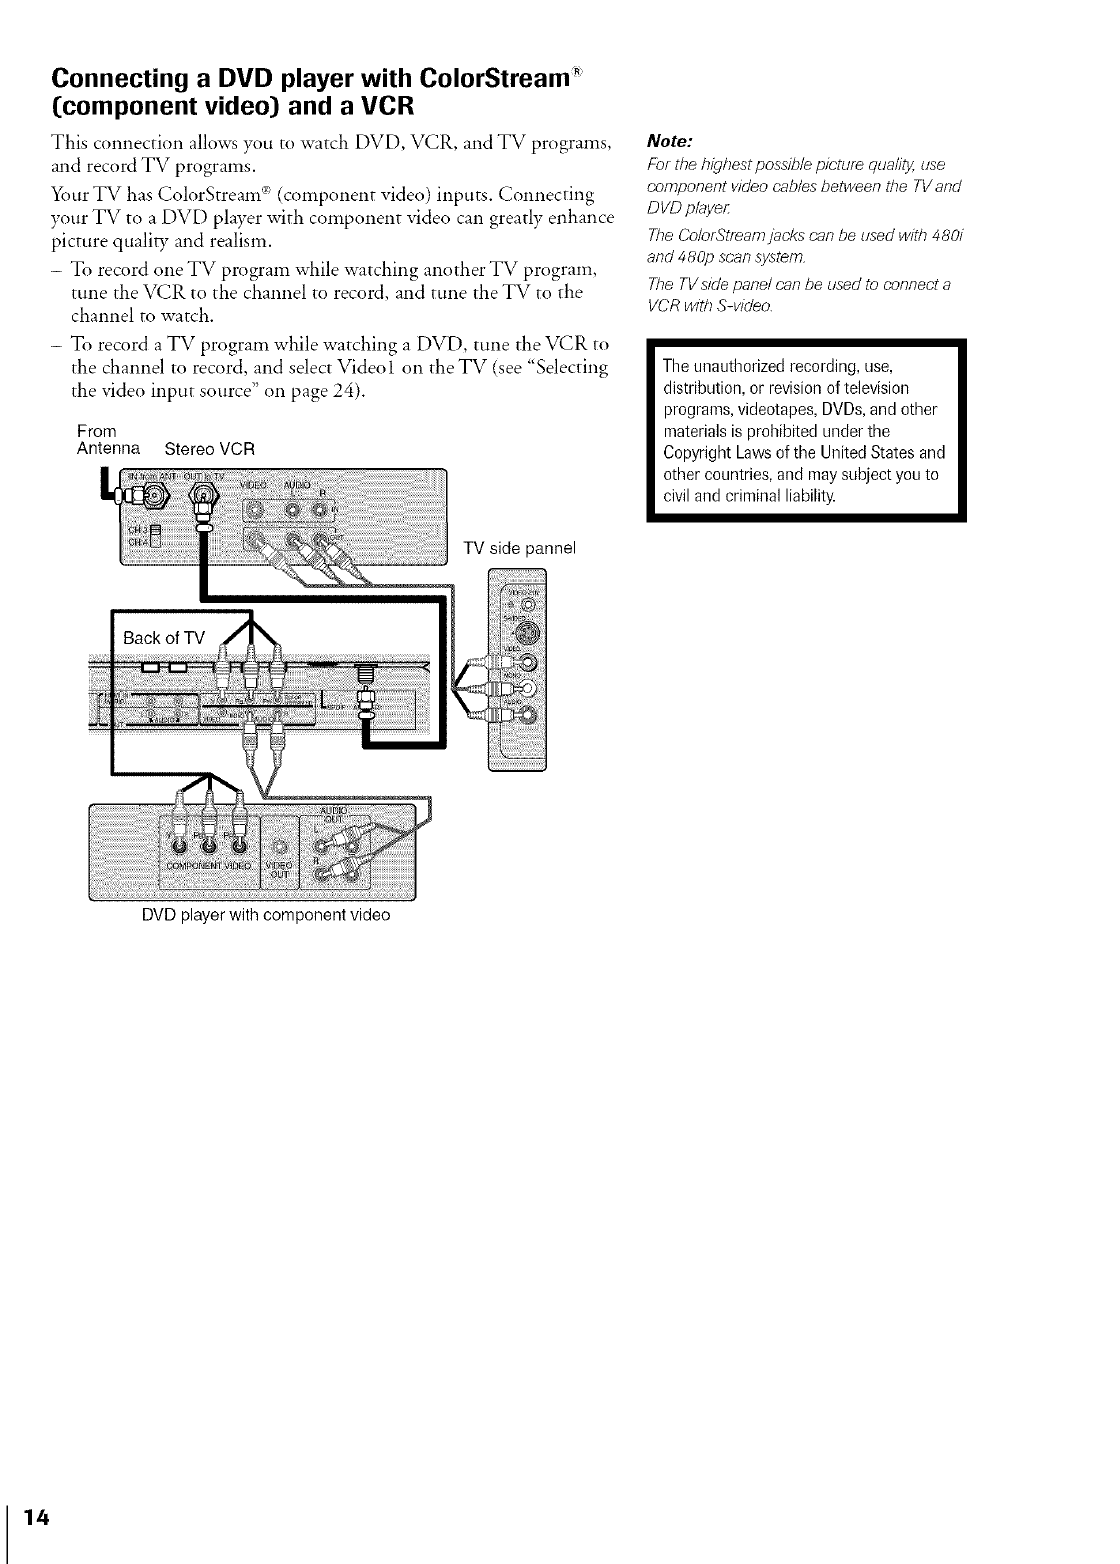
Connecting a DVD player with ColorStream _
Ccomponent video) and a VCR
This connection allows you to watch DVD, VCR, and TV programs,
and record TV programs.
X_)urTV has ColorStream _)(component video) inputs. Connecting
your TV to a DVD player with component video can greatly enhance
picture quality and realism.
- To record one TV program while watching another TV program,
tune the VCR to the channel to record, and tune the TV to the
channel to watch.
- To record a TV program while watching a DVD, tune the VCR to
the channel to record, and select Videol on the TV (see "Selecting
the video input source" on page 24).
From
Antenna Stereo VCR
TV side pannel
Note:
For the highest possible picture quality, use
component video cables between the TV and
DVD player:
The ColorStfeam jacks can be used with 480i
and 480p scan system.
The TVside panel can be used to connect a
VCR with S-video.
Theunauthorized recording, use,
distribution, or revision of television
programs,videotapes,DVDs,and other
materialsis prohibited under the
Copyright Lawsof the United States and
other countries, and maysubject you to
civil and criminal liability.
DVD player with component video
14
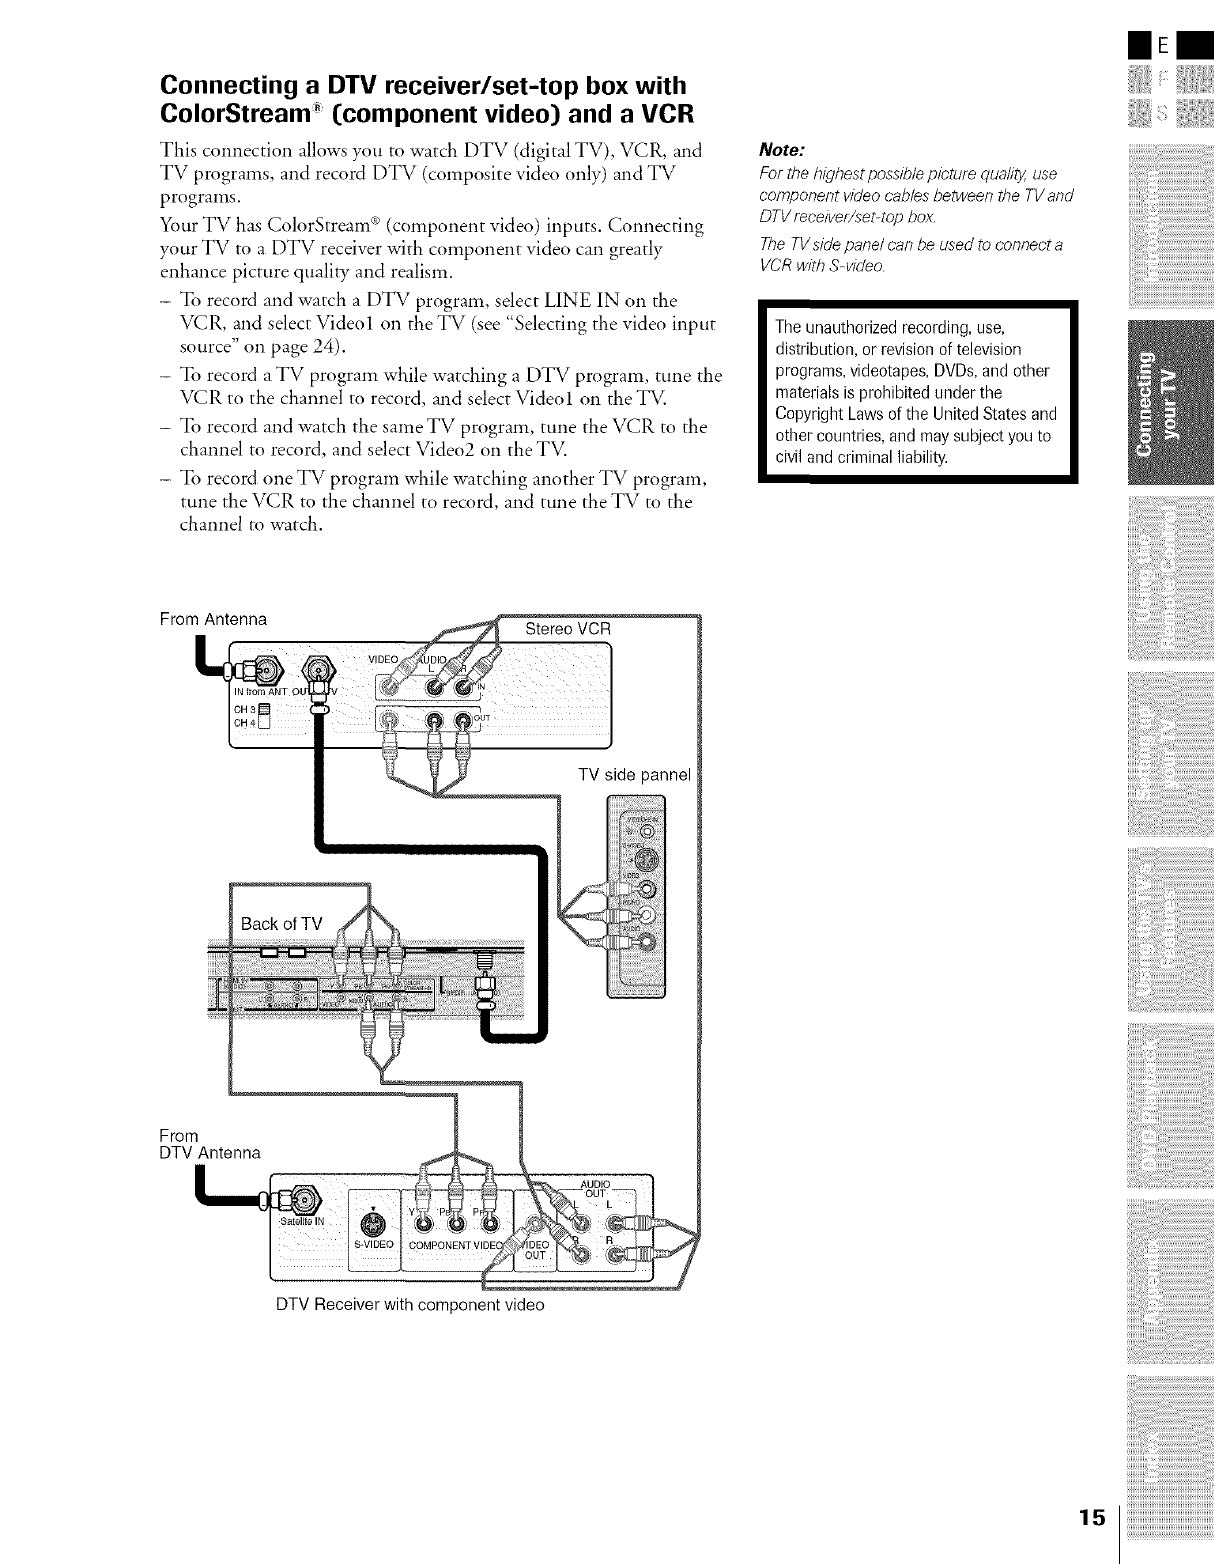
Connecting a DTV receiver/set-top box with
ColorStream Ccomponent video) and a VCR
This connection allows you to watch DTV (digital TV), VCR, and
TV programs, and record DTV (composite video only) and TV
programs.
Your TV has ColorStream _3(component video) inputs. Connecting
your TV to a DTV receiver with component video can greatly
enhance picture quality and realism.
- To record and watch a DTV program, select LINE IN on the
VCR, and select Videol on the TV (see "Selecting the video input
source" on page 24).
- To record a TV program while watching a DTV program, tune the
VCR to the channel to record, and select Videol on the TV.
- To record and watch the sameTV program, tune the VCR to the
channel to record, and select Video2 on the TV.
- To record one TV program while watching another TV program,
tune the VCR to the channel to record, and tune the TV to the
channel m watch.
Note:
For ttle highest possible picture quali_ use
component video cables between the TV and
DTV receiver/sebtop box.
The TVside panel can be used to connect a
VCR with S-video.
The unauthorized recording, use,
distribution, or revision of television
programs,videotapes, DVDs,and other
materials is prohibited under the
Copyright Laws of the United States and
other countries, and may subject you to
civil and criminal liability.
IIEm
From Antenna Stereo VCR
TV side pannel
From
DTV Antenna
DTV Receiver with component video
AUDIO
!!!!!!!!!!__' iiiiiiiiiiiiiiiiiiiiiiii
NNNNNI_IIIIIIIIIIIIIIIIIIIIIIIIIIIIIIIIIIIIIIIIIIIIIIIIIIIIIIIIIiii
iiiiiiiiii_,_,,,,,,iiiiiiiiiiiiiiiiiiiiiiiiii_
iiiiiiiiiiiiiiiiiiiiiiiiiiiiiiiiiiiiiiiiiiiiiii
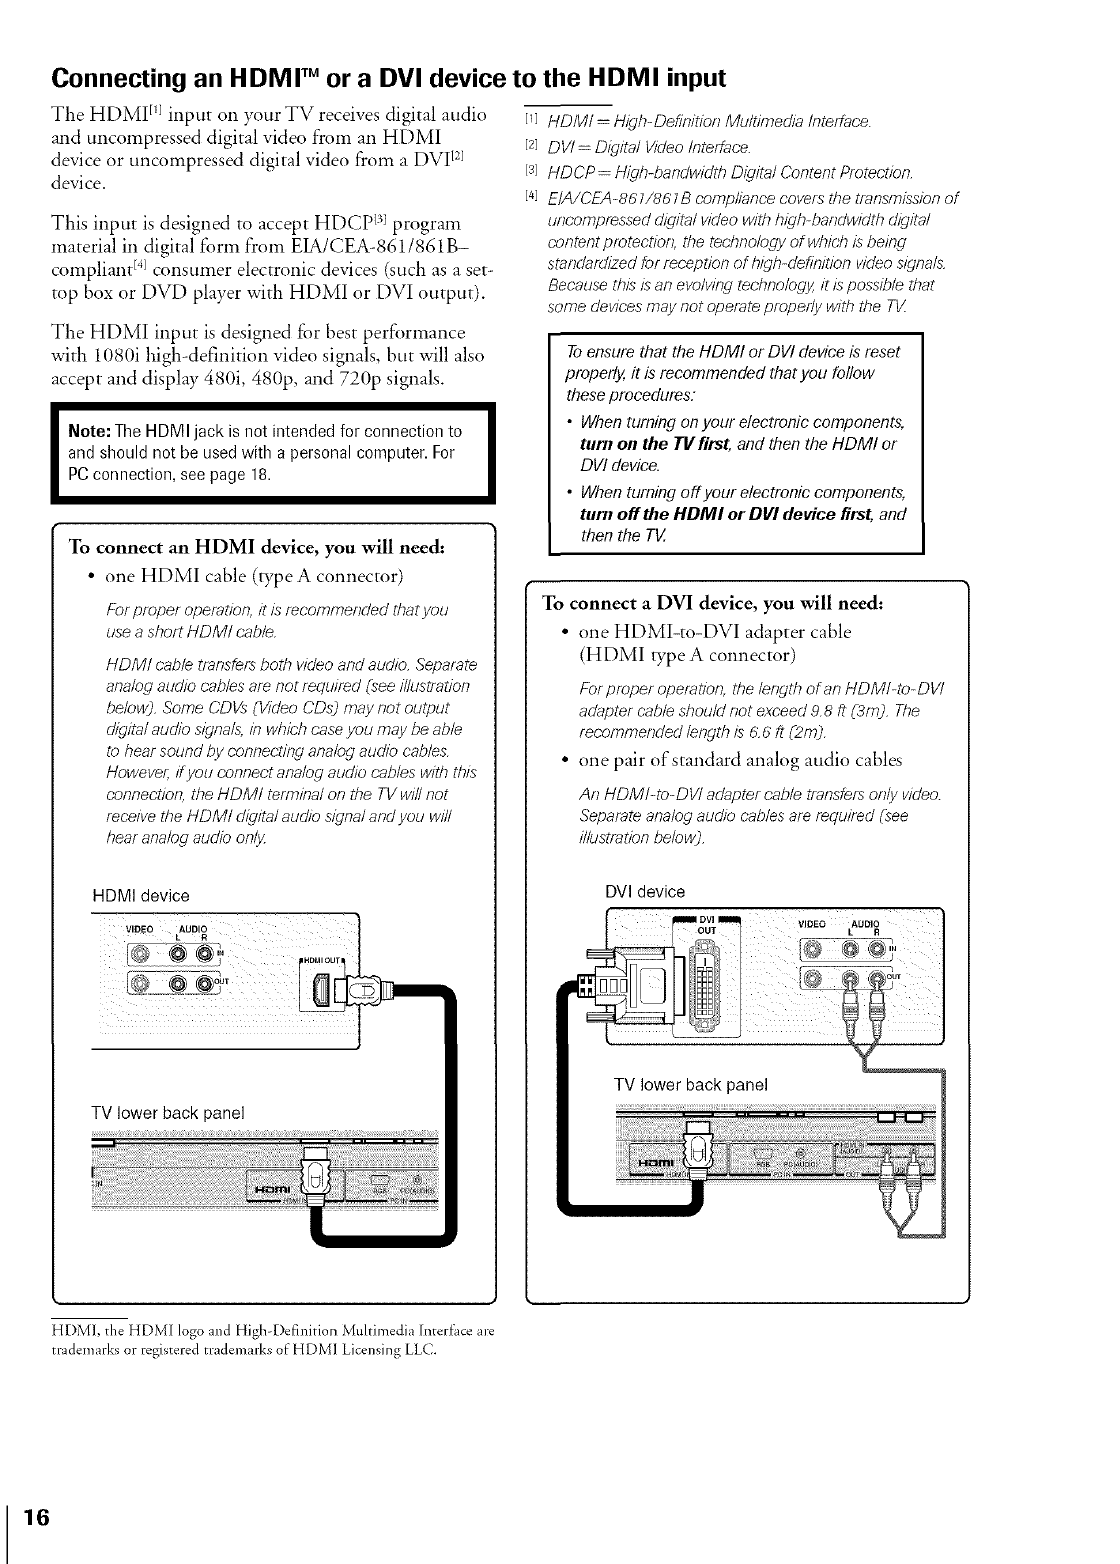
Connecting an HDMI TM or a DVl device to the HDMI input
The HDMI rlJinput on your TV receives digital audio
and uncompressed digital video from an HDMI
device or uncompressed digital video from a DVI t2]
device.
This input is designed to accept HDCP 131program
material in digital form from EIA/CEA-8611861 B-
compliant E4]consumer electronic devices (such as a set-
top box or DVD player with HDMI or DVI output).
The HDMI input is designed for best performance
with 1080i high-definition video signals, but will also
accept and display 480i, 48%, and 720p signals.
Note: The HDMI jack is not intended for connection to
and should not be used with a personal computer. For
PC connection, see page 18.
To connect an HDMI device, you will need:
• one HDMI cable (type A connector)
Forpreper operation, it isrecommended thatyou
usea short HDMI cable.
HDM/ cable transfers both video and audio. Separate
analog audio cables are not required (see illustration
below). Some CDVs (Video CDs) may not output
digital audio signals, in which case you may be able
to hear sound by connecting analog audio cables.
However, if you connect analog audk) cables with this
connection, the HDMI terminal on the TV will not
receive the HDMt d/_qitalaudio signal and you will
hear analog audio onl3z
HDMI device
TV lower back panel
[q HDM/= High-Def/bition Multimedia Interface.
[2] DV! =Digital Video Interface.
[3] HDCP= High-bandwidth DIgital Content Pretection.
[4] E/A/CEA-861/861B compliance covers the transmission of
uncompressed digital video with twh-bandwidth digital
content protection, the technology of which is being
standardized for reception of high-definition video signals.
Because this is an evolving technology, it is possible that
some devices may not operate preperly with the TH
To ensure that the HDMI or DVI device is"reset
properly, it is recommended that you follow
these procedures:
•When turning on your electronic components,
turn on the TV first, and then the HDMI or
DVI device.
• When turning offyour electronic components,
turn off the HDMI or Dill device first, and
then the TV.
To connect a DVI device, you will need:
• one HDMI-to-DVI adapter cable
(HDMI type Aconnector)
Forproper operation, the lengthof an HDM/-to-DV/
adapter cable should not exceed9.8 ft (3m). The
recommended length is 6.6 ft (2m).
• one pair of standard analog audio cables
Art HDM!-to-DVI adaptercable transfersonly video.
Separateanalog audio cablesare required (see
illustrationbelow).
DVl device
TV lower back panel
HDMI, the HDMI logo and High-Definition Multimedia Interf;acc are
trademarks or registered trademarks of"HDMI Licensing LLC.
16
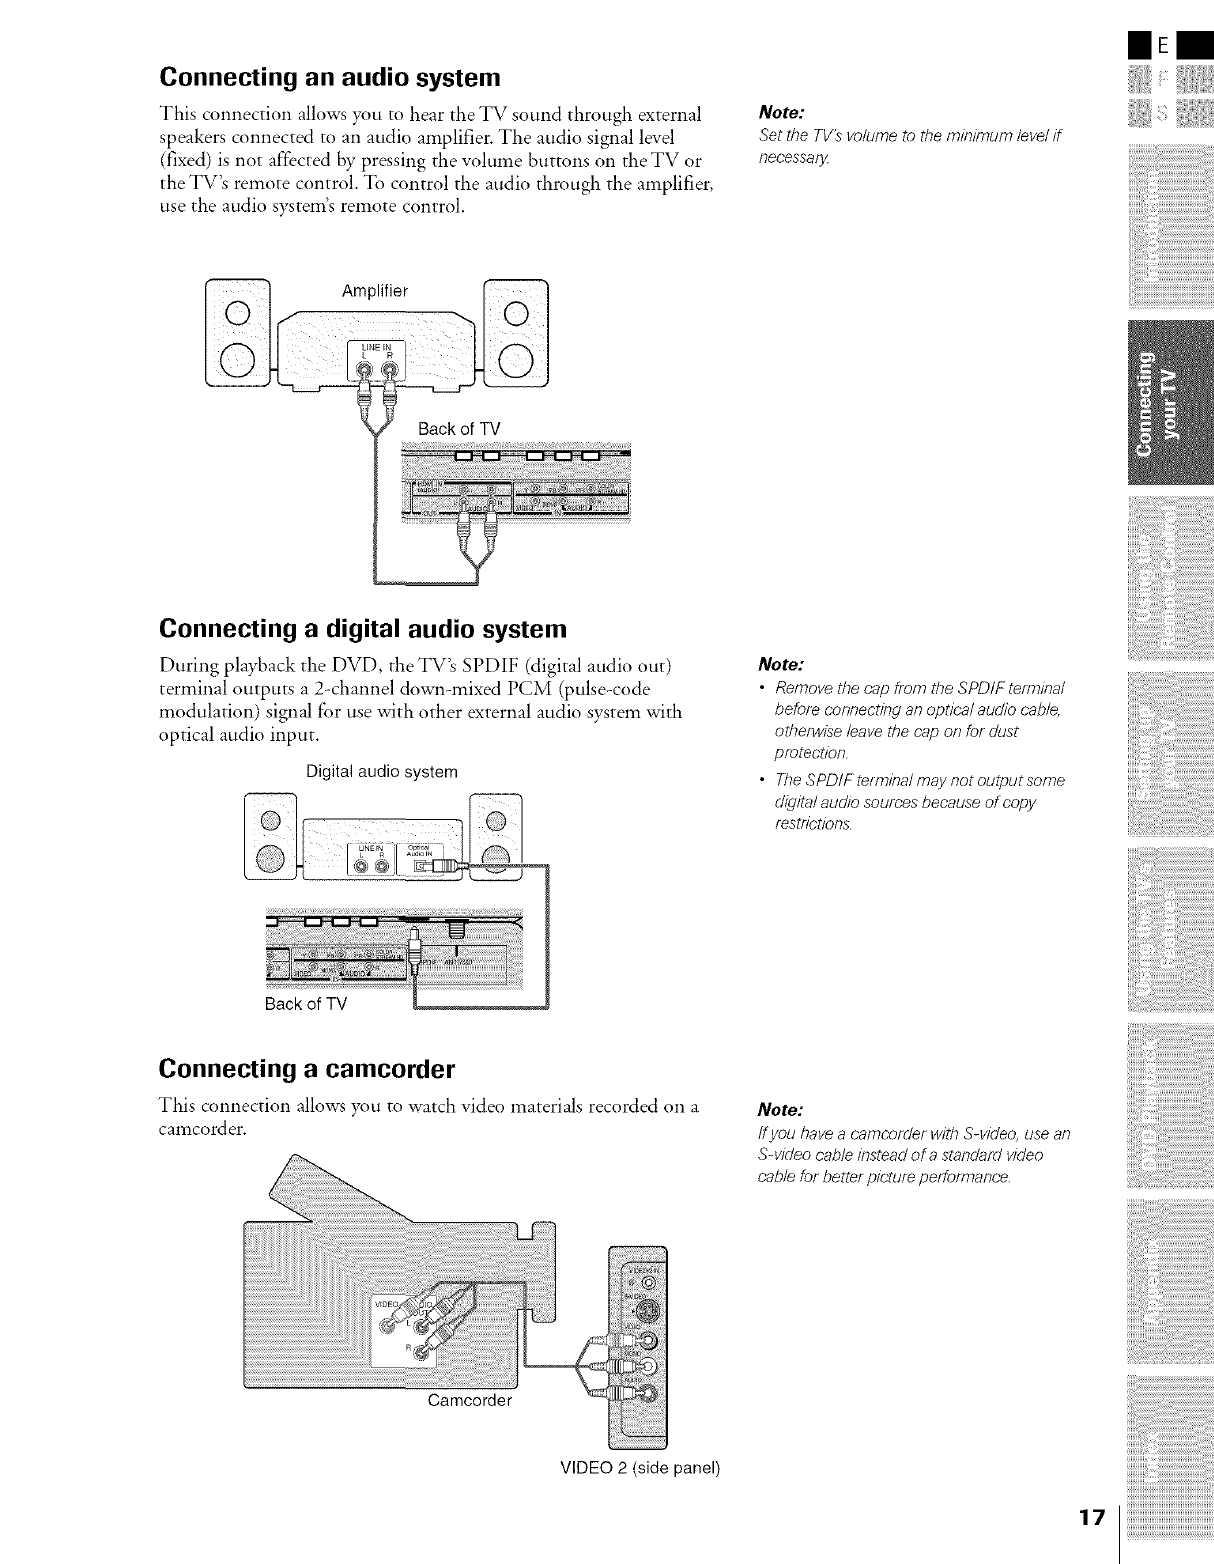
Connecting an audio system
This connection allows you to hear the TV sound through external
speakers connected to an audio amplifier. The audio signal level
(fixed) is not affected by pressing the vohnne buttons on the TV or
the TV's remote control. To control the audio through the amplifier,
use the audio system's remote control.
Note:
Set the TV's volume to the minimum/eve/if
r?ecessaly
mEg
Amplifier [_
Connecting a digital audio system
During playback the DVD, the TV_s SPDIF (digital audio out)
terminal outputs a 2-channel down-mixed PCM (pulse-code
modulation) signal for use with other external audio system with
optical audio input.
Digital audio system
Note:
•Remove the cap from the SPD/F terminal
before connecting an optical audio cable,
otben/vise leave the cap on for dust
protection.
• The SPDIF terminal may not output some
d/_qitalaudio sources because of copy
restrictions.
Back of TV
Connecting a camcorder
This connection allows you to watch video materials recorded on a
camcord er.
Camcorder
VIDEO 2 (side panel)
Note:
/f you /?ave a carbcorder with S-video, use at?
S-video cable instead of a standard video
cable for better picture performance.
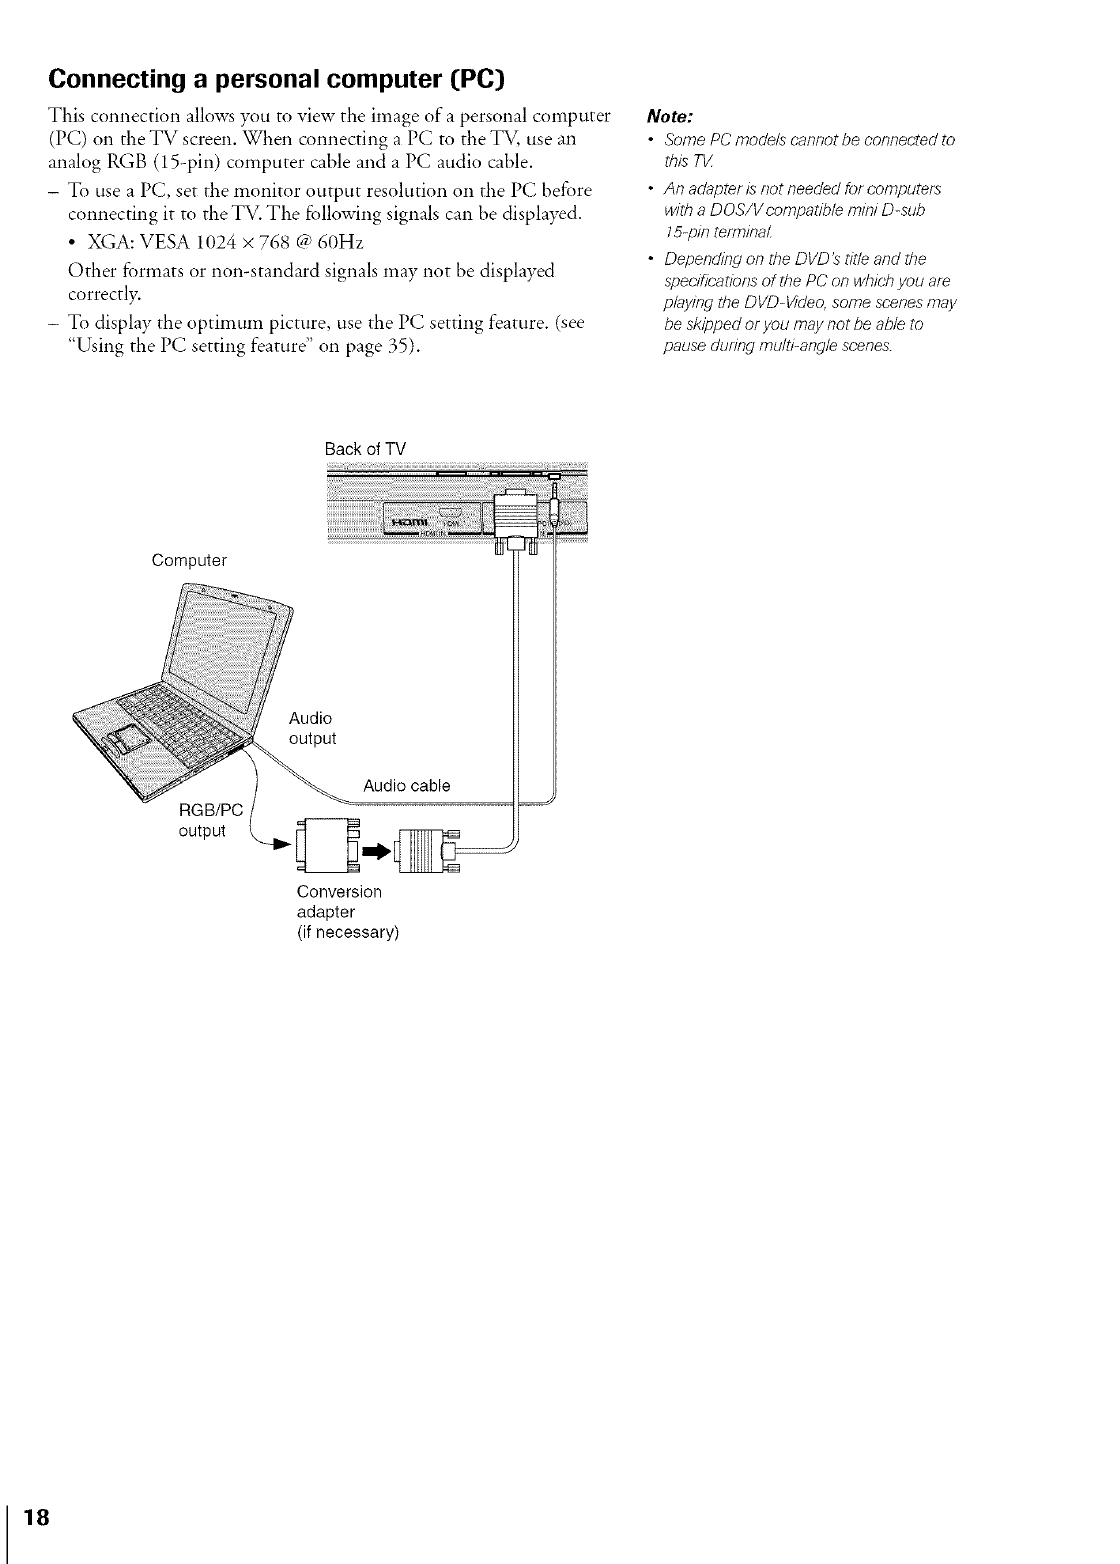
Connecting a personal computer [PC}
This connection allows you to view the image of a personal computer
(PC) on the TV screen. When connecting a PC to the TV, use an
analog RGB (15-pin) computer cable and a PC audio cable.
- To use a PC, set the monitor output resolution on the PC before
connecting it to the TV. The following signals can be displayed.
• XGA: VESA 1024 × 768 @ 60Hz
Other formats or non-standard signals may not be displayed
correctly.
- To display the optimum picture, use the PC setting feature. (see
"Using the PC setting feature" on page 35).
Note:
•Some PC models cannot be connected to
this TV
• An adapter is not needed for computers
with a DOS/Vcompatible mini D-sub
15-pin terminal
• Depending on the DVD's title and the
specifications of the PC on which you are
playing the DVD-VIdeo, some scenes may
be skipped or you may not be able to
pause during multi-angle scenes.
Computer
RGB/PC
output
Audio
output
Backof TV
Audio cable
Conversion
adapter
(if necessary)
iiii i ii ii!ii!ii!ii!ii!ii!ii!i;! i!ii!i,i
B
18
Using the remote control
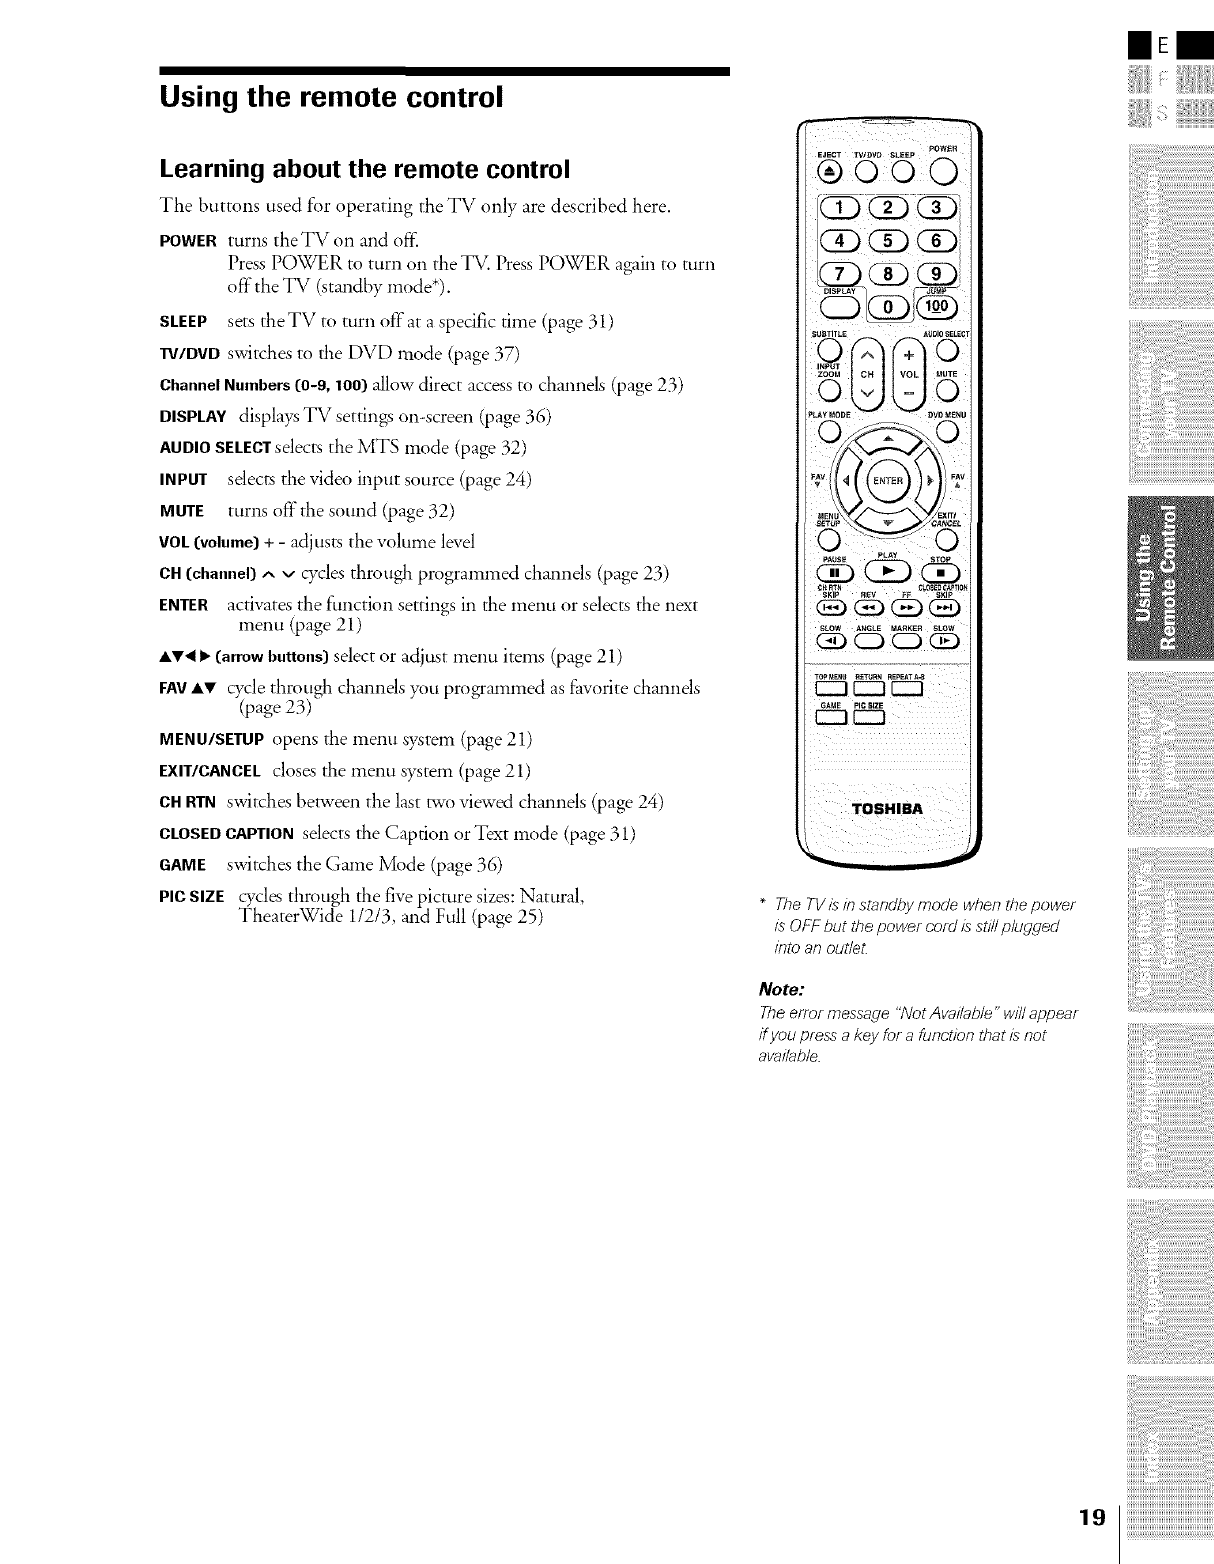
Learning about the remote control
The buttons used for operating the TV only are described here.
POWERturns theTVon and off:
Press POWER to turn on the TV. Press POWER again to turn
off"the TV (standby mode*).
SLEEP sets theTV to turn off'at a spedfic time (page 31)
W/DVD switches to the DVD mode (page 37)
ChannelNumbers (0-9, 1OO)allow direct access to channels (page 23)
DISPLAYdisplays TV settings on-screen (page 36)
AUDIOSELECTselects the MTS mode (page 32)
INPUT sdects the video input source (page 24)
MUTE turns off"the sound (page 32)
VOL(volume}+ - adjusts the volume level
CH (channel) ^vcycles through programmed channds (page 23)
ENTER activates the function settings in the menu or selects the next
menu (page 21)
A_'< I_(arrowbuttons}select or adjust menu items (page 21)
FAYAV cycle through channds you programmed as favorite channds
(page 23)
MENU/SETUPopens the menu system (page 21)
EXIT/CANCELcloses the menu system (page21)
CH RTNswitches between the last two viewed channels (page 24)
CLOSEDCAPTIONselects the Capdon or Text mode (page 31)
GAME switches the Game Mode (page 36)
Pie SIZE cycles through the five picture sizes:Natural,
TheaterWide 11213,and Full (page 25) *The TVis/n standby mode when the power
/s OFF but the power cord/s still plugged
/bto an outlet.
Note:
The error message "Not Available" will appear
if you press a key for a function that is not
availab&
IIEm
NNNNN_i!_i!_i!_i!_i!_i!_i!_i!_i!_i!_i!_i!_i!_i!_i!_i!_i!_i!_i!_i!_i!_i!_i!_i!_i!_i!_i
iiiiiiiiiiiiiiiiiiiiiiiiiiiiiiiiiiiiiiiiiiiiiii
iiiiiiiiiiiiiiiiiiiiiiiiiiiiiiiiiiiiiiiiiiiiiiiiii_
!iiiiiiiiiiiiiiiiiiiiiiiiiiiiiiiiiiiiiiiiiiiiiiiii'
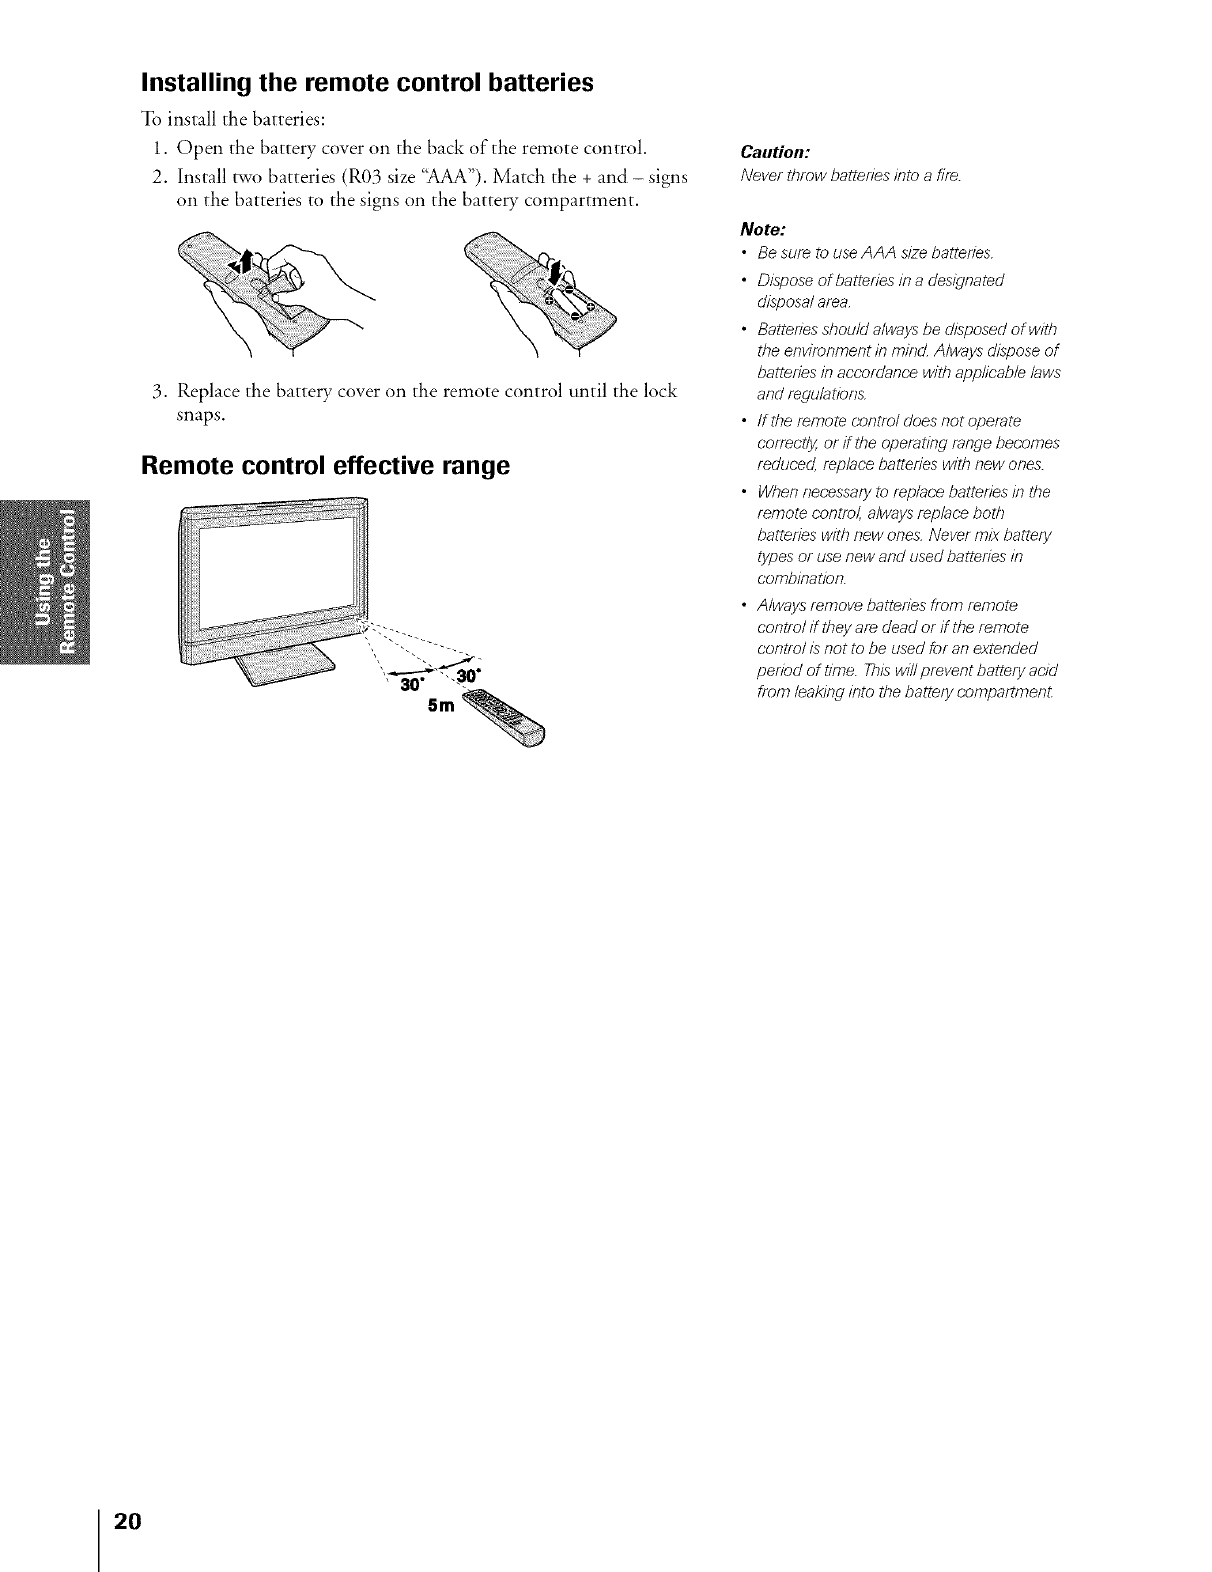
Installing the remote control batteries
To install the batteries:
1. Open the battery cover on the back of the remote control.
2. Install two batteries (R03 size '_AA"). Match the + and - signs
on the batteries to the signs on the batte W compartment.
3. Replace the battery, cover on the remote control until the lock
snaps.
Remote control effective range
Caution:
Never throw batteries into a fife..
Note:
•Be suf_ to use AAA size batteries.
• Dispose of batteries in a designated
disposal area.
• Batteries should always be disposed of with
the environment in mind. Always dispose of
batteries in accordance with applicable laws
and regulatiens.
• ffthe remote control does not operate
correctly, or if the operating range becomes
reduced, replace batteries with new ones.
• When necessary to replace batteries in the
remote control, always replace both
batteries with new ones. Never mix battery
types or use new and used batteries in
combinatien.
• Always remove batteries from remote
control if they af_ dead or if the remote
control is not to be used for an extended
period of tifbe. This will prevent battery acid
from leaking into the battery compartmen_
20

Setting up your TV
Learning about the menu system
After you have installed the batteries, you will need to set some
preferences on the TV by using the menu system. _u can access the
menu system using the buttons on the TV or remote control.
1. Press MENU to display the menu system.
2. Press • or • to select a menu.
3. Press ENTER, and then press • or • to select all item.
4. Press ENTER, and then press • or • to select or adjust a setting.
5. Press ENTER to save your menu settings.
To return to the previous menu, press EXIT/CANCEL.
To close the menu system, press MENU.
liE==
Ptcture mode
Contrast
B_tghtness
Cok
SharPness
Sound moue
Bass
Treble
Balance
StableSour_c
B_ue scree
ENTER
,&V< 1_
EXIT/CANCEL
MENU
Note:
The PC mode is seleetab/e only when the TV
is in PC input mode and active picture is on-
screen (see "Selecting the video input source"
on page 24).
21
NNNNN_i!_i!_i!_i!_i!_i!_i!_i!_i!_i!_i!_i!_i!_i!_i!_i!_i!_i!_i!_i!_i!_i!_i!_i!_i!_i!_i
iiiiiiiiiiiiiiiiiiiiiiiiiiiiiiiiiiiiiiiiiiiiiii
IIIIIIIIIIIIIIIIIIIIIIIIIIIIIIIIIIIIIIIIIIIIIIIIIL
i!i!i!i!i!i!i!i!i!i!i!i!i!i!i!i!i!i!i!i!i!i!i!i!i!i!i!i!i!i!i!i!i!i!i!i!i!i!i!i!i!i!i!i!i!i!i!i!i!i!i
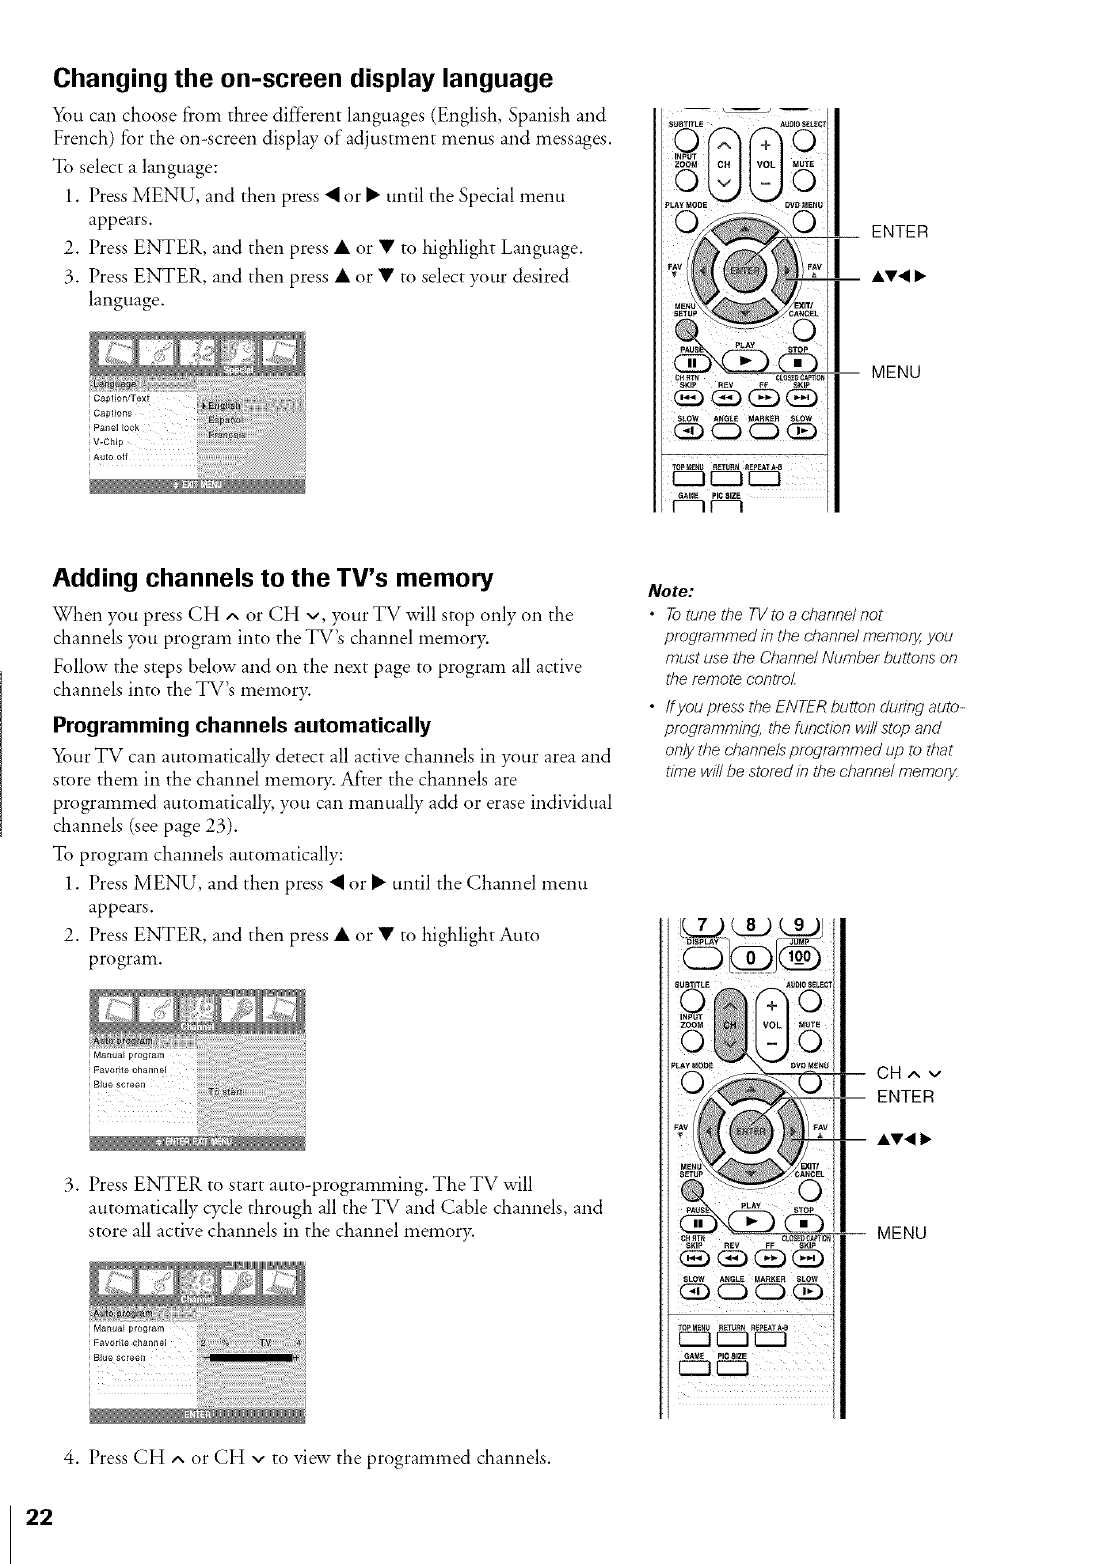
Changing the on-screen display language
_m can choose from three different languages (English, Spanish and
French) for the on-screen display of adjustment menus and messages.
To select a language:
1. Press MENU, and then press • or • until the Special menu
appears.
2. Press ENTER, and then press • or • to highlight Language.
3. Press ENTER, and then press • or • to select your desired
language.
;Ut_TITLEINP_UT (/_ _AUDO EC!
_ ENTER
0L00;,#,,001
,&v< 1_
IMENU
Adding channels to the TV's memory
When you press CH ^ or CH v, your TV will stop only on the
channels you program into the TV's channel memory.
Follow the steps below and on the next page to program all active
channels into the TV's memory.
Programming channels automatically
_)ur TV can automatically detect all active channels in your area and
store them in the channel memo U. After the channels are
programmed automaticall> you can manually add or erase individual
channels (see page 23).
To program channels automatically:
1. Press MENU, and then press • or • until the Channel menu
appears.
2. Press ENTER, and then press • or • to highlight Auto
program.
3. Press ENTER to start auto-programming. The TV will
automatically cycle through all the TV and Cable channels, and
store all active channels in the channel memory.
Note:
•To tune the TV to a channel not
programmed in the channel memory,, you
must use the Channel Number buttons on
the remote control.
• ffyou press the ENTER button during auto-
programming, the function will stop and
only the channels programmed up to that
time will be stored in the channel memory
Ca^v
ENTER
,&v< 1_
MENU
4. Press CH ^ or CH vto view the programmed channels.
22
Adding and erasing channels manually
After you have automatically programmed the active channels into
the TV's channel memor> you can manually add or erase specific
channels.
To add or erase channels:
1. Press MENU, and then press • or • until the Channel menu
appears.
2. Press ENTER, and then press • or • to highlight Manual
program.
3. Press ENTER, and then press • or • to select a channel you
want to add or erase.
4. Press •, and then press • or • to select Memory (add) or Erase.
The current channel is added to Memory or erased from the
channel list.
Changing channels
To change to a specific channel (programmed or unprogrammed):
Press the Channel Number buttons (0-9 and 100).
For channels 100 and higher, press the 100 button, and then the
next two numbers. For example, to select channel 125, press
100,2, 5.
To change to the next programmed channel:
Press CH *,,or CH v on the TV or remote control.
Programming your favorite channels
You can preset up to 8 of your t_vorite channels using the Favorite
Channel Programming feature. Because this feature scans through
only your t_vorite channels, it allows you to skip other channels you
do not normally watch.
To program your favorite channels:
1. Press MENU, and then press • or • until the Channel menu
appears.
2. Press ENTER, and then press • or • to highlight Favorite
channel.
3. Press ENTER to display the Favorite Ch. menu.
TV top panel
li!!!!!!!!!!!!!!!!!!!!!!!!!!!!!!!!!!!!!!!!l
CHANNEL v ^
-- Channel
Number
iSLOW ANGL_ MARKER SLOW
CHAr
ENTER
MENU
IIEII
4. Press • or • to select the first f'avorite channel position.
5. Press • or • to set the desired channel number for the first
favorite channel position.
6. Repeat steps 4 and 5 to program other channels.
To select your favorite channels:
Repeatedly press FAV • or • on the remote control.
Using the TV's features
Switching between two channels using
Channel Return
The Channel Return feature allows you to switch between two
channels without entering an actual channel number each time.
To switch between two channels:
1. Select the first channel you want to view.
2. Select a second channel using the Channel Number buttons
(0-9, 100).
3. Press CH RTN. The previous channel will be displayed.
Each time you press CH RTN, the TV will switch back and forth
between the last two channels that were selected.
Using the Blue screen feature
With the Blue screen function On, the screen will automatically turn
blue and the sound will be muted when no signal is received.
To turn on the Blue screen feature:
1. Press MENU, and then press • or • until the Channel menu
appears.
2. Press ENTER, and then press • or • to highlight Blue screen.
3. Press ENTER, and then press • or • to select On.
Note: If the Blue screen appears repeatedly because of poor signal
strength, select Off in step 3.
Auto program
Manua_ program
Favorite channel
!u_Tr_E _UD_ECT
TOFMEN_ RETURN REPEATA4
CZ_CZZDEZZ]
TOSHIBA
INPUT
CH RTN
Selecting the video input source
Press INPUT on the remote control or press TV/VIDEO on theTV top
pand to view a signal from another device connected to your TV, such as
a VCR or DVD player. _fi)ucan sdect Video 1 (including ColorStream),
Video2, PC or HDMI depending on which input jacks are used for
connecting the devices (see "Connecting your TV" on page 12).
[V,deolI--I V, eo2I--I PC
q'TVchanne'l l.OM I
TV top panel
I
TVNIDEO
24
Viewing the wide-screen picture formats
You can view 480i, 480p, 720p, and 1080i format programs in a
variety of picture sizes--Natural, TheaterWide 1, TheaterWide 2,
TheaterWide 3, and Full.
The way the image displays in any of the picture sizes will vary
depending on the f'ormat of the program you are viewing. Select the
picture size that displays the current program the way that looks best
to you.
iii_iiiiii!i!i!
480i yes yes yes yes yes
480p yes yes yes yes yes
720p yes* no no no no
1080i yes* no no no no
* Full picture size
Selecting the picture size
Repeatedly press PIC SIZE on the remote control to select the desired
picture size, as described below and on the next page.
I..........................................
Natural picture size
• The image is displayed close to its originally formatted
proportion. Some program formats will display with side bars
and/or bars at the top and bottom.
Naturalpicturesize example:The way theimagedisplayswill vary
dependingon the format of the programyou are currentlywatching.
6A_E PIC 81ZE
PIC SIZE
mEN
i i ! !i!i ii ii ii ii ii ii ii ii ii ii ii ii ii ii ii ii ii ii ii ii ii ii ii ii ii ii ii ii ii ii ii ii ii ii ii ii ii ii ii ii ii ii ii ii ii i
Conventional picture on a
conventional TV screen Conventional picture in Natural size
on your wide-screen TV
(continued on next page)
NNNNN)_:_i!_i!_i!_i!_i!_i!_i!_i!_i!_i!_i!_i!_i!_i!_i!_i!_i!_i!_i!_i!_i!_i!_i!_i!_i!_i!_i
iiiiiiiiiiiiiiiiiiiiiiiiiiiiiiiiiiiiiiiiiiiiiii
))))))))))))))))))))))))))))))))))))))))))))))))))_
TheaterWide 1picture size (For 4:3 format programs)
• The picture is non-uniformly
enlarged--the center of the
picture remains close to its
original proportion, but the left
and right edges are stretched
wider to fill the screen.
• A small part of the picture at
the top and bottom is hidden.
43
TheaterWide 1 picture size example
TheaterWide 2 picture size (For Letter box programs)
• The entire picture is uniformly
enlarged--it is stretched the (_ 0 0
same amount both wider and
taller (retains its original (_ (_ (_
proportion).
• Part of the picture at the top
and bottom is hidden.
TheaterWide 2 picture size example
TheaterWide 3 picture size (For Letter box programs with
subtitles)
• The picture is stretched wider
to fill the width of the screen,
but only slightly stretched
taller.
• A small part of the picture at
the top and bottom is hidden.
©O©
O©©
IASOOSFC_ I
43
mABCDEFG .......................... •
TheaterWide 3 picture size example
Full picture size (For 16:9 format programs)
•Ifyou arereceiving a 4:3 format ] ]
program, the picture is stretched O O O
I I
wider toflllthewidthofthe O O O
screen, but not stretched taller. Fq
• None of the picture is hidden.
Note:
Using these functions to change the
picture size 0.e., changing the height/
width ratio) for any purpose other than
your private viewing may be prohibited
under the Copyright Laws of the United
States and other countries, and may
subject you to civil and criminal liability.
Full picture size example
26
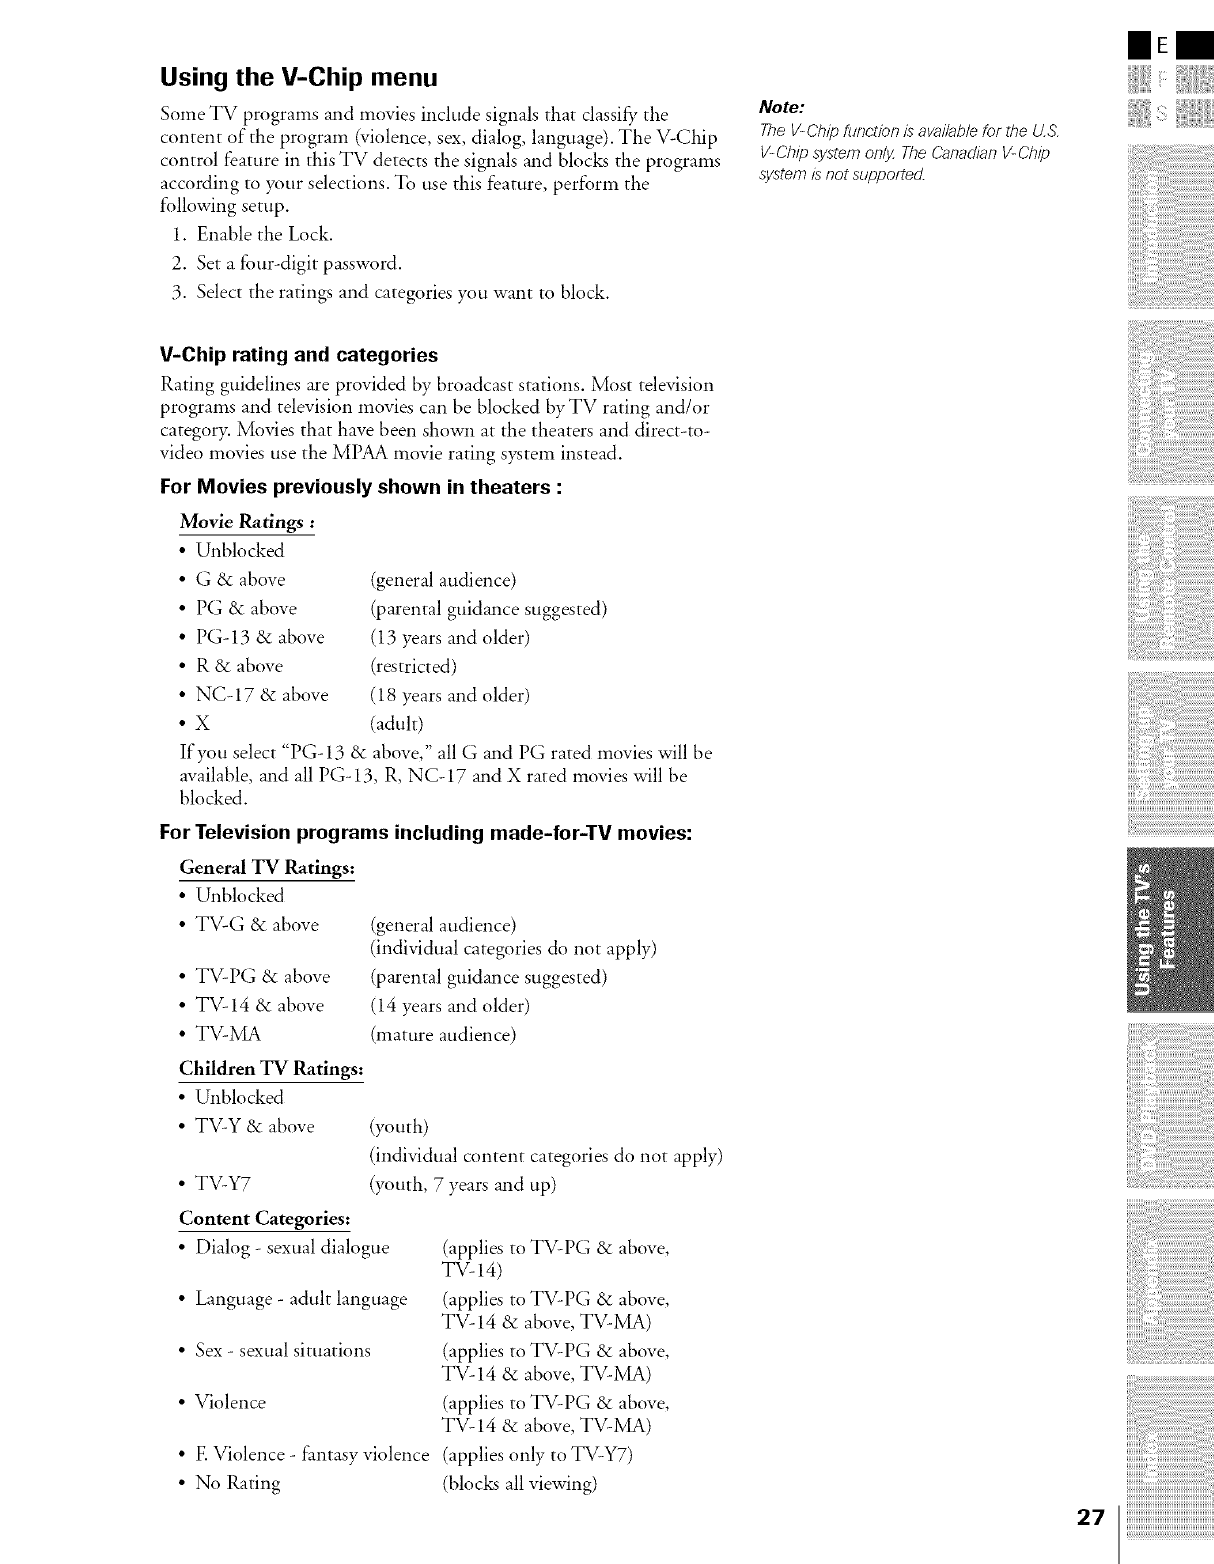
Using the V-Chip menu
Some TV programs and movies include signals that classify the
content of the program (violence, sex, dialog, language). The V-Chip
control feature in this TV detects the signals and blocks the programs
according to your selections. To use this feature, perf'orm the
following setup.
1. Enable the Lock.
2. Set a four-digit password.
3. Select the ratings and categories you want to [)lock.
Note:
The V-Chip hJnct/on is aVal/ab/e for the U.S.
V-Chip system only The Canadian V-Chip
system is not supported.
IIEm
{
V-Chip rating and categories
Rating guidelines are provided by broadcast stations. Most television
programs and television movies can be blocked by TV rating and/or
category. Movies that have been shown at the theaters and direct-to-
video movies use the MPAA movie rating system instead.
For Movies previously shown in theaters :
Movie Ratings :
• Unblocked
• G & above
• PG & above
• PG-13 &above
• R & above
• NC-17 &above
.X
(general audience)
(parental guidance suggested)
(13 years and older)
(restricted)
(18 years and older)
(adult)
If you select "PG-13 & above," all G and PG rated movies will be
available, and all PG-13, R, NC-17 and X rated movies will be
[)locked.
For Television programs including made-for-TV movies:
General TV Ratings:
• Unblocked
• TV-G &above
• TV-PG &above
• TV-14 &above
• TV-MA
Children TV Ratings:
• Unblocked
• TV-Y &above
• TV-Y7
Content Categories:
• Dialog - sexual dialogue
• Language - adult language
• Sex - sexual situations
• Violence
• E Violence - fantasy violence
• No Rating
(general audience)
(individual categories do not apply)
(parental guidance suggested)
(14 years and older)
(mature audience)
(youth)
(individual content categories do not apply)
(youth, 7 years and up)
(applies to TV-PG &above,
TV- 14)
(applies to TV-PG &above,
TV-14 &above, TV-MA)
(applies to TV-PG &above,
TV-14 &above, TV-MA)
(applies to TV-PG &above,
TV-14 &above, TV-MA)
(applies only to TV-Y7)
(blocks all viewing)
ii i ! !i!i ii ii ii ii ii ii ii ii ii ii ii ii ii ii ii ii ii ii ii ii ii ii ii ii ii ii ii ii ii ii ii ii ii ii ii ii ii ii ii ii ii ii ii ii ii i
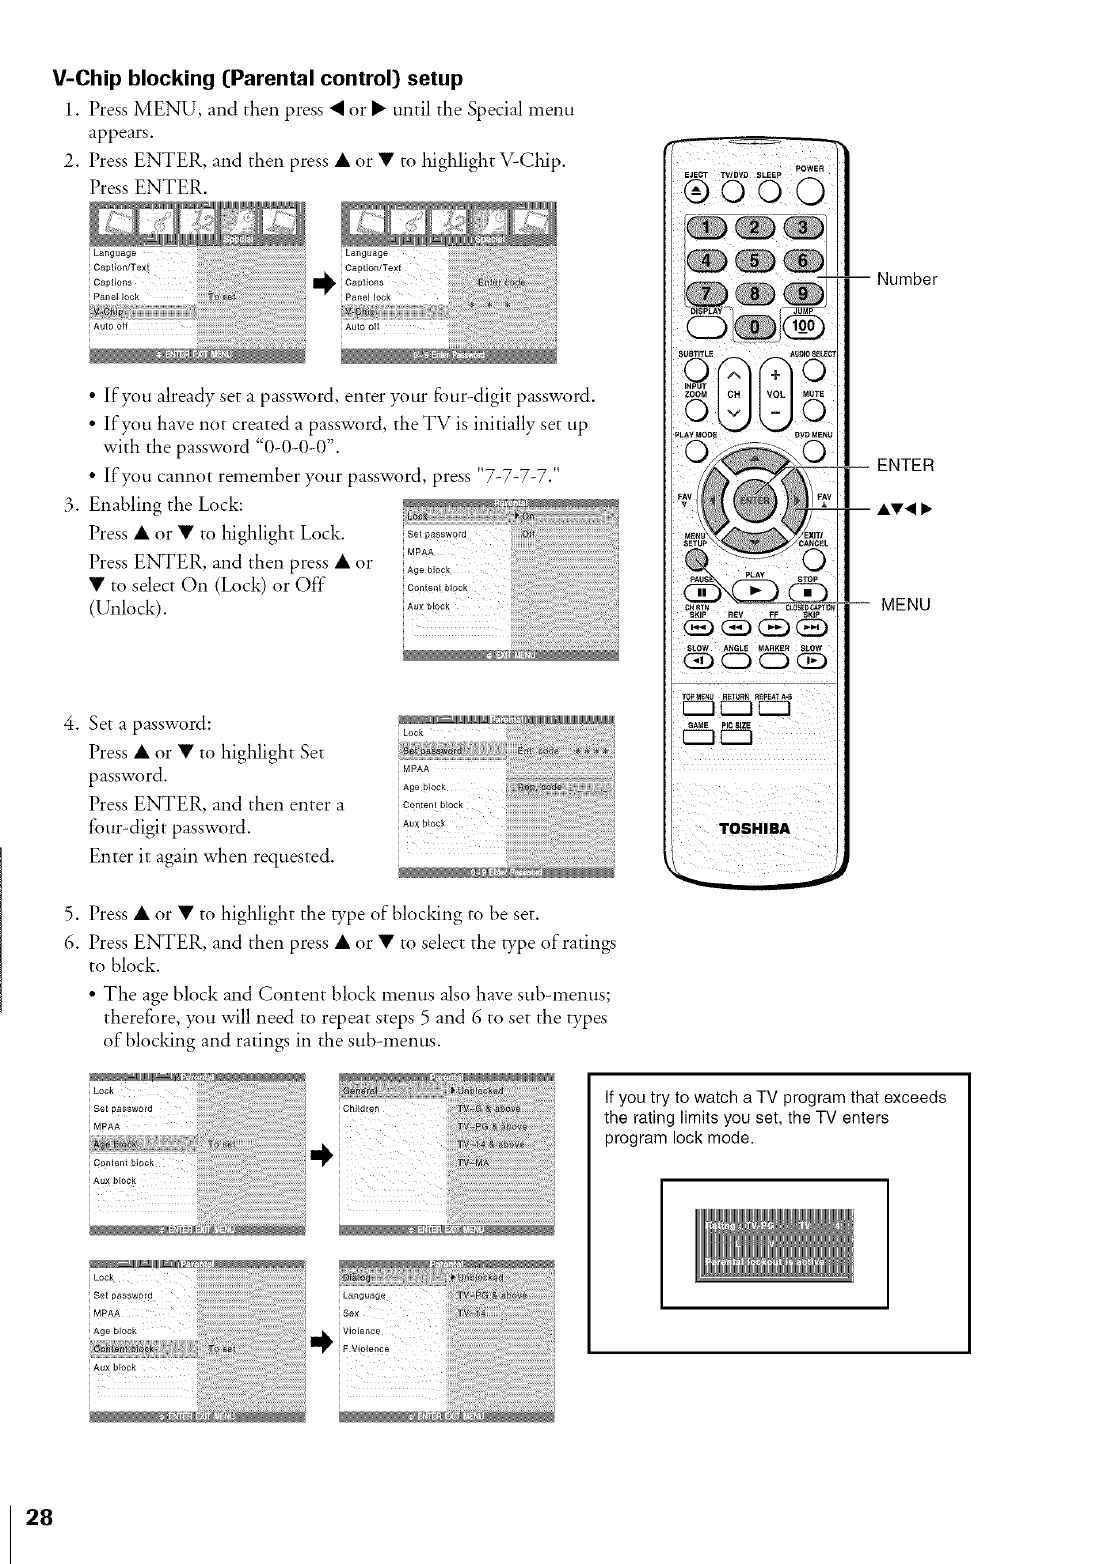
V-Chip blocking [Parental control) setup
1. Press MENU, and then press <or • until the Special menu
appears.
2. Press ENTER, and then press • or • to highlight V-Chip.
Press ENTER.
Lan00 00
Caption/Text
c_ptEon_ I1_ c_pt_on_
Panel _ock _ Panel lock
Auio o_i Auto off
•If you already set a password, enter your four-digit password.
• If you have not created a password, the TV is initially set up
with the password "0-0-0-0".
• If you cannot remember your password, press "7-7-7-7."
Enabling the Lock:
Press • or • to highlight Lock. so_p......d
MPAA
Press ENTER, and then press • or Aoeb_o_k
• to select On (Lock) or Off" c ........b,00k
(Unlock). _x_oo_
.Set a password:
Press • or • to highlight Set
password.
Press ENTER, and then enter a
four-digit password.
Enter it again when requested.
i Lock i!!!!!!!!{!!__i!_i{{iiiii{{iiiiiiiiiiiiiiii_{l]!!!]i)!!!!!!!!!!!}::!}_{{_;_;_!i;i__{
MPAA
5. Press • or • to highlight the type of blocking to be set.
6. Press ENTER, and then press • or • to select the type of ratings
to block.
• The age block and Content block menus also have sub-menus;
therefore, you will need to repeat steps 5 and 6 to set the types
of blocking and ratings in the sub-menus.
_oo_
Set password
MPAA
Content N_ck
Aux bbck
iLock
i MPAA
Age block
-- Number
ENTER
MENU
If you try to watch a TV program that exceeds
the rating limits you set, the TV enters
program lock mode.
28

Adjusting the picture
Selecting the picture mode
You can select your desired picture type from four picture modes:
Dynamic, Standard, Movie, or Memory.
Dynamic
Standard
Movie
Memory
Bright and dynamic picture (factory setting)
Standard picture.,setting (factory setting)
Movie-like picture setting (factory setting)
Your personal preference
To select the picture mode:
1. Press MENU, and then press • or •
until the Picture menu appears.
2. Press ENTER, and then press • or
• to highlight Picture mode.
3. Press ENTER, and then press • or
• to select the mode you prefer.
_ _T/_
Adjusting the picture quality
You can adjust the picture quality to your personal preferences,
including the contrast, brightness, color, sharpness, and tint.
Contrast lower higher
Brightness darker lighter
Color paler deeper
Sharpness softer sharper
Tint reddish greenish
To adjust the picture quality:
1. Press MENU, and then press • or •
until the Picture menu appears.
PEcture mode
2. Press ENTER, and then press • or
• until the item you want to adjust B,L_,_,,o,_
Co_or
is highlighted.
3. Press ENTER.
4. Press • or • to adjust the level.
Note:
/f you select one of the factory-set picture
modes (Dynamic, Standard, or Movie) and
then adjust a picture quality setting (for
example, increase the contrasO, the picture
mode automatically changes to Memory in
the Picture menu.
ENTER
• v< 1,
CLOUD CAPTIO_
SLOW ANGtE _ARK_R SLOW
MENU
Note:
Tocontinue adj_lsting the other items, press •
or •/?_ step 4.
IIEm
{:
iiii{!i:¸1ii;i;i;i;i;i;i;ii_i_iii_____i;i;i;i;i;i;i;i;i;i;i;i;i;i;i;i;i;i;i;i;i;_
ii i ! !i!i ii ii ii ii ii ii ii ii ii ii ii ii ii ii ii ii ii ii ii ii ii ii ii ii ii ii ii ii ii ii ii ii ii ii ii ii ii ii ii ii ii ii ii ii ii i
The Picture qualities you adjusted can be saved in the TV_s Memory.
29
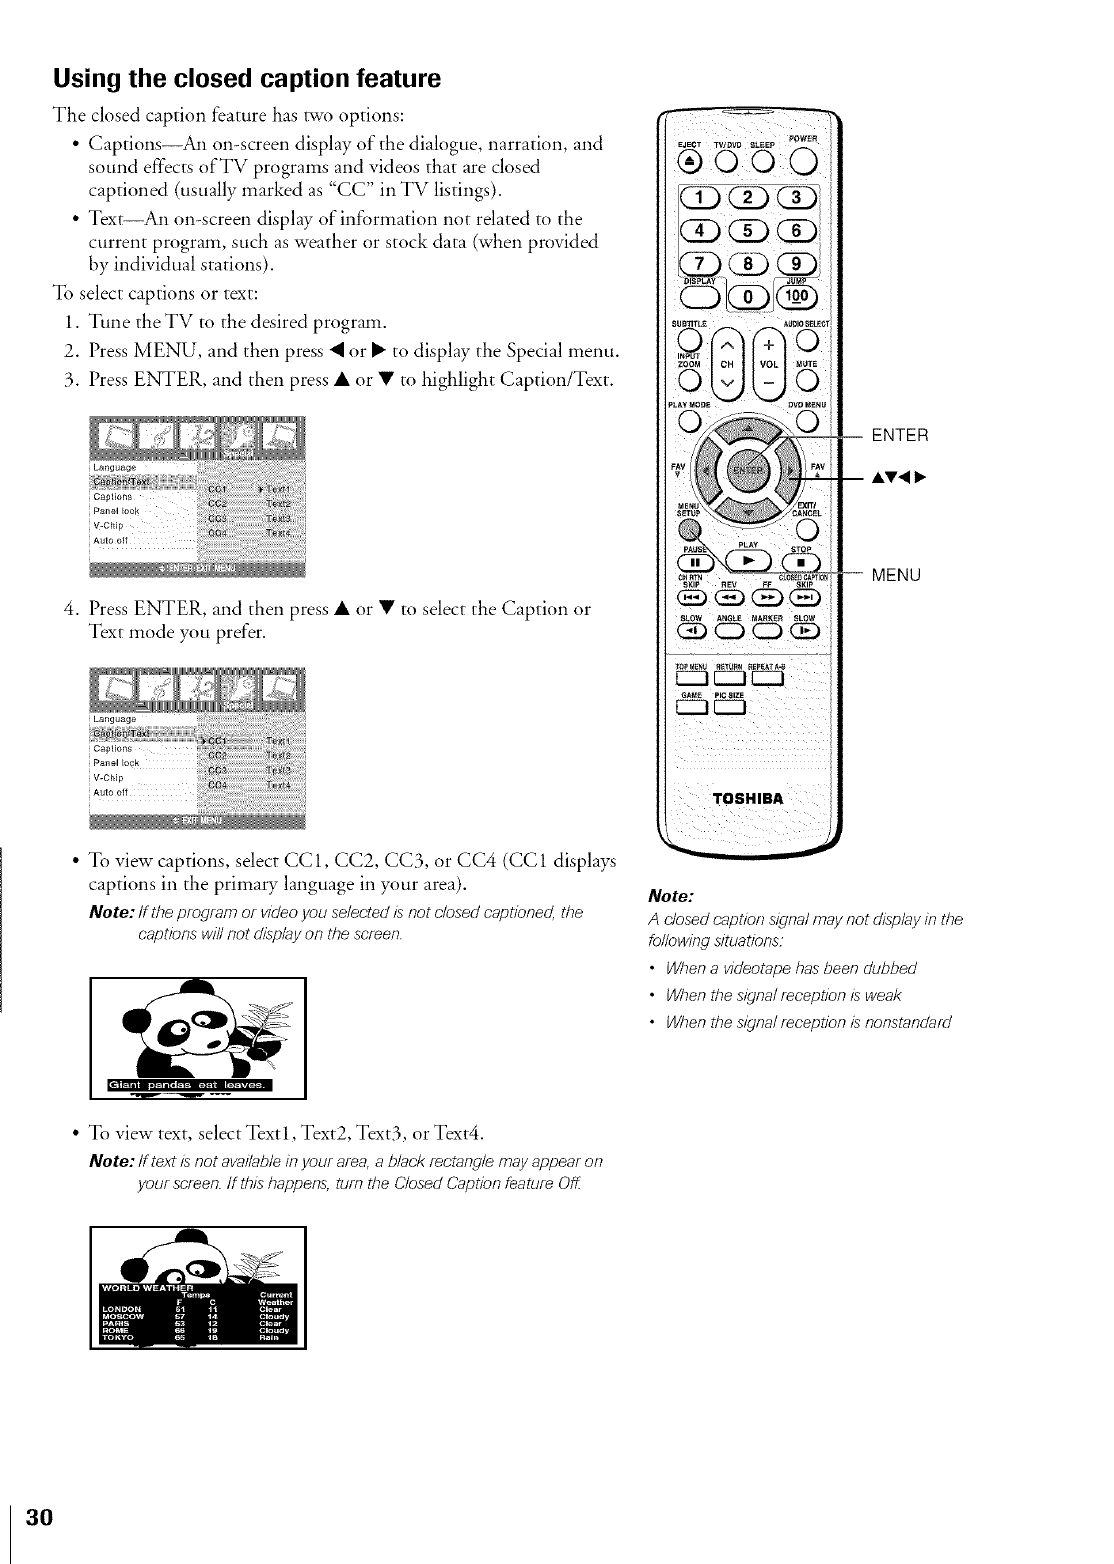
Using the closed caption feature
The closed caption feature has two options:
• Captions_ on-screen display of the dialogue, narration, and
sound effects of TV programs and videos that are closed
captioned (usually marked as "CC" in TV listings).
• Text An on-screen display of information not related to the
current program, such as weather or stock data (when provided
by individual stations).
To select captions or text:
1. Tune the TV to the desired program.
2. Press MENU and then press • or • to display the Special menu.
3. Press ENTER, and then press • or • to highlight Caption/Text.
4. Press ENTER, and then press • or • to select the Caption or
Text mode you prefer.
• To view captions, select CC1, CC2, CC3, or CC4 (CC1 displays
captions in the primary language in your area).
Note: If tt_e program or video you selected is not closed captioned, tt_e
captions will not display on the screen.
• To view text, select Textl, Text2, Text3, or Text4.
Note: If text is not avaffable k_ your area, a black rectangle may appear on
your screen. If this happens, turn the Closed Caption feature Off
EJECT TV/OVD SLEEP
SLO'a A_I_LE MI_KER
(_ CD C23
TOSHIBA
MENU
Note:
A closed caption sfgnal may not display in the
following situations:
•When a videotape has been dubbed
• When the signal reception is weak
• When the signal reception is nonstandard
30
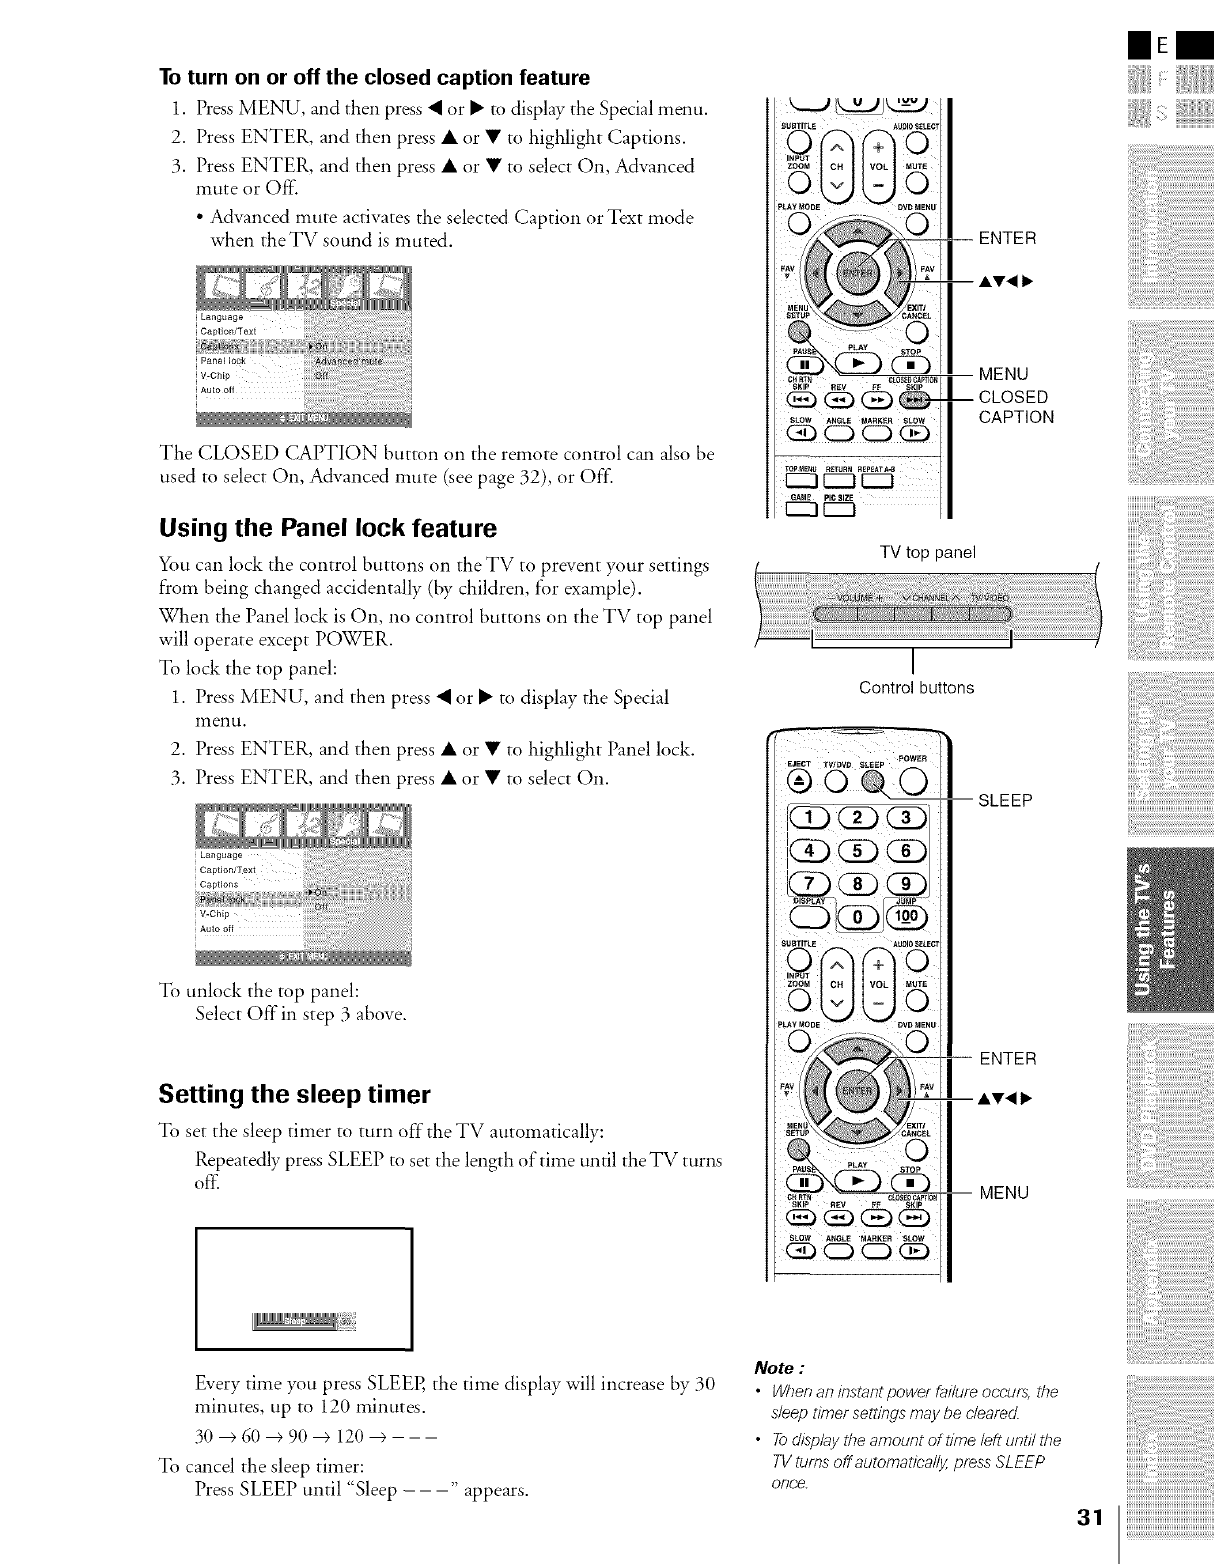
To turn on or off the closed caption feature
1. Press MENU, and then press <or • to display the Special menu.
2. Press ENTER, and the**press • or • to highlight Captions.
3. Press ENTER, and the**press • or • to select On, Advanced
mute or Off:
• Advanced mute activates the selected Caption or Text *node
when the TV sound is muted.
The CLOSED CAPTION button on the remote control can also be
used to select On, Advanced mute (see page 32), or Off:
Using the Panel lock feature
You cat* lock the control buttons on the TV to prevent your settings
from being changed accidentally (by children, f'or example).
When the Panel lock is On, no control buttons on the TV top panel
will operate except POWER.
To lock the top panel:
1. Press MENU, and the**press • or • to display the Special
inenu.
2. Press ENTER, and the**press • or • to highlight Panel lock.
3. Press ENTER, and then press • or • to select On.
To unlock the top panel:
Select Off in step 3 above.
Setting the sleep timer
To set the sleep timer to turn off"the TV automatically:
Repeatedly press SLEEP to set the length of time until theTV turns
ore
Every ume you press SLEEP, the time display will increase by 30
minutes, up to 120 minutes.
30+60+90+ 120+---
To cancel the sleep timer:
Press SLEEP until "Sleep --- appears.
_AUO_EGT
PUT
ZOOM _UT_
TV top panel
I
Control buttons
SLEEP
MENU
Note :
•When an instantpower failure occurs, the
sleep timer settings may be cleared.
• Todisplay the amount of time left until the
TV turns off automatically, press SLEEP
once.
31
IIEm
iiii{!i:¸1ii;i;i;i;i;i;i;ii_i_iii_____i;i;i;i;i;i;i;i;i;i;i;i;i;i;i;i;i;i;i;i;i;_
ii i ! !i!i ii ii ii ii ii ii ii ii ii ii ii ii ii ii ii ii ii ii ii ii ii ii ii ii ii ii ii ii ii ii ii ii ii ii ii ii ii ii ii ii ii ii ii ii ii i

Adjusting the sound
Muting the sound
Press MUTE to temporarily turn off the sound. While the sound is
off, the screen will display "_ Mute" in the lower left corner.
When you select "MUTE" mode, the closed caption feature is
automatically activated. To deactivate this feature, deactivate MUTE.
This feature works only when the closed caption mode is set to
Advanced mute. See "Using the closed caption feature" on page 30 for
more information.
Selecting stereo/SAP broadcasts
The multi-channel TV sound (MTS) feature allows you to listen to
high-fidelity stereo sound while watching TV. MTS can also transmit
a second audio program (SAP) containing a second language, music,
or other audio information (when provided by individual stations).
When the TV receives a stereo or SAP broadcast, the word "ST.SAP",
"Stereo" or "SAP" appears on-screen every time the TV is turned on,
the channel is changed, or DISPLAY is pressed.
The MTS feature is not available when the TV is in Video mode.
To listen to stereo sound:
Repeatedly press AUDIO SELECT to select Stereo.
You can leave your TV in Stereo mode because it will
automatically output the _Tpe of sound being broadcast (stereo or
monaural).
If the stereo sound is noisy, select Mono to reduce the noise.
To listen to SAP (if available):
Press AUDIO SELECT repeatedly to select SAP.
(_iii i i i
E E T POWER
0
...... _ DO ,.,
-S)
......
SLOW ANGkE _tA_!I(_R SLOW
_CDCD_
GAME PmSIZE
_EZ_
TOSHIBA
DISPLAY
-- AUDIO
SELECT
-- MUTE
You will hear the station's second audio program (if available)
from the speakers, while viewing the original program's picture.
32
Using the WOW surround sound feature
WOW surround widens and deepens audio listening field to deliver
exceptional sound from the TV's speakers. The feature uses stereo
signals from a TV broadcast or video input.
To activate the WOW feature:
1. Select Stereo *node (see '%electing stereo/SAP broadcasts" on
page 32).
2. Press MENU, and the**press • or • until the Sound menu
appears.
3. Press ENTER, and then press • or • to highlight Sound *node.
4. Press ENTER, and then press • or • to select WOW.
Treble
Stab
Selecting the sound mode
You can select your desired sound type from six sound modes:
WOW, Flat, Hall, Theater, News, or Me*nor>
To select the sound *node:
1. Press MENU, and then press • or • until the Sound menu
appears.
2. Press ENTER, and the**press • or • to highlight Sound *node.
3. Press ENTER, and the**press • or • to select the *node you
prefer.
3,; _.
WOW
Flat
Hall
Theater
News
Memory
see above
flat sound ( factory setting )
a concert hall filled with a rich warm sound
( factory setting )
a movie theater filled with a dynamic sound
( factory setting )
news/dialogue { factory setting )
your personal preference
WOW, SRS and (1) symbol are trademarks of SRS Labs, Inc.
WOW technology is incorporated under license f}om SRS Labs Inc.
Note:
ff thebroadcast ismonaural, the WOW sound
effect willnot work.
ENTER
AV<
SKIP REV FF
GAME PIC SIZE
{ZZI CZZ]
MENU
Note:
/f you select one of the factory-set audio
modes CWOW, Flat, Hall, Theater; or News )
and then change a sound quality setting (for
example, increase the bass), the sound mode
automatically change to Memory mode.
33
IIEm
iiii{!i:¸1ii;i;i;i;i;i;i;ii_i_iii_____i;i;i;i;i;i;i;i;i;i;i;i;i;i;i;i;i;i;i;i;i;_
ii i ! !i!i ii ii ii ii ii ii ii ii ii ii ii ii ii ii ii ii ii ii ii ii ii ii ii ii ii ii ii ii ii ii ii ii ii ii ii ii ii ii ii ii ii ii ii ii ii i
Adjusting the sound quality
_m can change the quality of your TV's sound by adjusting the bass,
treble, and balance.
To adjust the sound quality:
1. Press MENU, and then press • or • until the Sound menu
appears.
2. Press ENTER, and then press • or • to highlight the item you
want to adjust.
3. Press ENTER.
4. Press • or • to adjust the level.
• • makes the sound quality weaker or increases the balance in
the left channel, depending on the item selected.
• • makes the sound quality stronger or increases the balance in
the right channel, depending on the item selected.
Note:
Tocontinueadjusting theotheritems, press•or•in step 4.
Using the StableSound" feature
When the signal source is changed, the StableSound feature limits the
highest volume level to prevent extreme changes in volume (for
example, to prevent the sudden increase in volume that often happens
when a TV program switches to a commercial).
To turn on the StableSound feature:
1. Press MENU, and then press • or • until the Sound menu
appears.
2. Press ENTER, and then press • or • to highlight StableSound.
3. Press ENTER, and then press • or • to select On.
iENTER
MENU
To turn off the StableSound feature:
Select Offin step 3 above.
34
Using the PC setting feature
You can adjust the horizontal/vertical picture position, clock (to
minimize vertical stripes on the screen), and phase (to remove
horizontal noise and sharpen the picture).
You can auto-configure and reset these settings.
1. Confirm a PC is connected (see "Connecting a personal
computer (PC)" on page 18).
2. Repeatedly press INPUT on the remote control (or press TV/
VIDEO on theTV top panel) to select PC input mode. (See
"Selecting the video input source" on page 24.)
3. Press MENU, and then press • or • until the PC menu appears.
4. Press ENTER, and then press • or • to select an item.
5. Press Enter.
6. Press • or • to make the appropriate adjustments.
• H-position/V-position
Adjusts picture left/right and up/down. The adjustment range
is 0-100. (The adjustable range may vary depending on the
input mode.)
• Clock
Minimizes any vertical bars or stripes appearing on the screen
background. The ad ustment range is 0-100. (The adjustable
range may vary, depending on the input mode.)
• Phase
Reduces (or minimizes) any horizontal noise and clears tip or
sharpens the character images. The range adjustment is 0-100.
(The adjustable range may vary depending on the input mode.)
• Aura Configure
Automatically adjusts the screen position, clock, and phase.
(The displayed image will disappear for a few seconds while
auto-configuration is in progress.)
TV top panel
TVNIDEO
iii ii /ii
..... .....
ii Q::)(i)
CD CD
_SU_TiTL_ AU_C_I
t-Jo I INPUT
ENTER
AV,_
...............................................................777
PCSZE
MENU
IIEm
ii i ! !i!i ii ii ii ii ii ii ii ii ii ii ii ii ii ii ii ii ii ii ii ii ii ii ii ii ii ii ii ii ii ii ii ii ii ii ii ii ii ii ii ii ii ii ii ii ii i
• Reset
Returns to the defimlt settings programmed at the factory. The
values in the Reset f'unction cannot be modified.
Using the Game Mode feature
x_m can use the (;aisle Mode feature for shorter fhme delays when
playing a video game requiring split-second timing between the on-
screen display and input from the controller (such as music creation
and high-action gaines).
To turn on Game Mode:
Press GAME. The TV will switch to the Game Mode when the on-
screen display closes.
Note:
If you adjust thevolumeormakeanyotheradjustments thatcausea menu
oron-screencontrolpanel to display, theGameMode willbe temporarily
suspended untiltheon-screen display closes.
To turn off"(;aisle Mode:
You can change the video input in any of the following ways:
• pressing INPUT.
• changing the channel using the Number buttons or CH ^ v.
Using the Auto off feature
When the Auto off feature is set to On, the TV will automatically turn
itself off"after approximately 15 minutes if it is tuned to a vacant
channel or a station that completes its broadcast for the da> This
feature does not work when the Blue screen mode is set to Off:
To activate the Auto off"feature:
1. Press MENU, and then press • or • until the Special menu appears.
2. Press ENTER, and then press • or • to highlight Auto off:
3. Press ENTER, and then press • or • to Select On.
To deactivate the Auto off"feature:
Select Off in step 3 above.
Displaying on-screen information
Press DISPLAY to display the fbllowing information on-screen:
• Channel number or Video mode selected
• Stereo or SAP audio status
I
CH RTN CLOSED CAPTIO_
s_ow AN_LE MA_KER SLOW
-J
GAME PIG SIZE
c-n
TOSHIBA
DISPLAY
CH^v
INPUT
ENTER
=,v< I_
MENU
GAME
Understanding the last mode memory feature
If the power is cut offwhile you are viewing the TV, the Last Mode
Memory feature turns on the TV automatically when the power is
resupplied.
If the power is going to be off"for a long time and you are going to be
away from your TV, unplug the power cord to prevent the TV from
turning on in your absence.
36
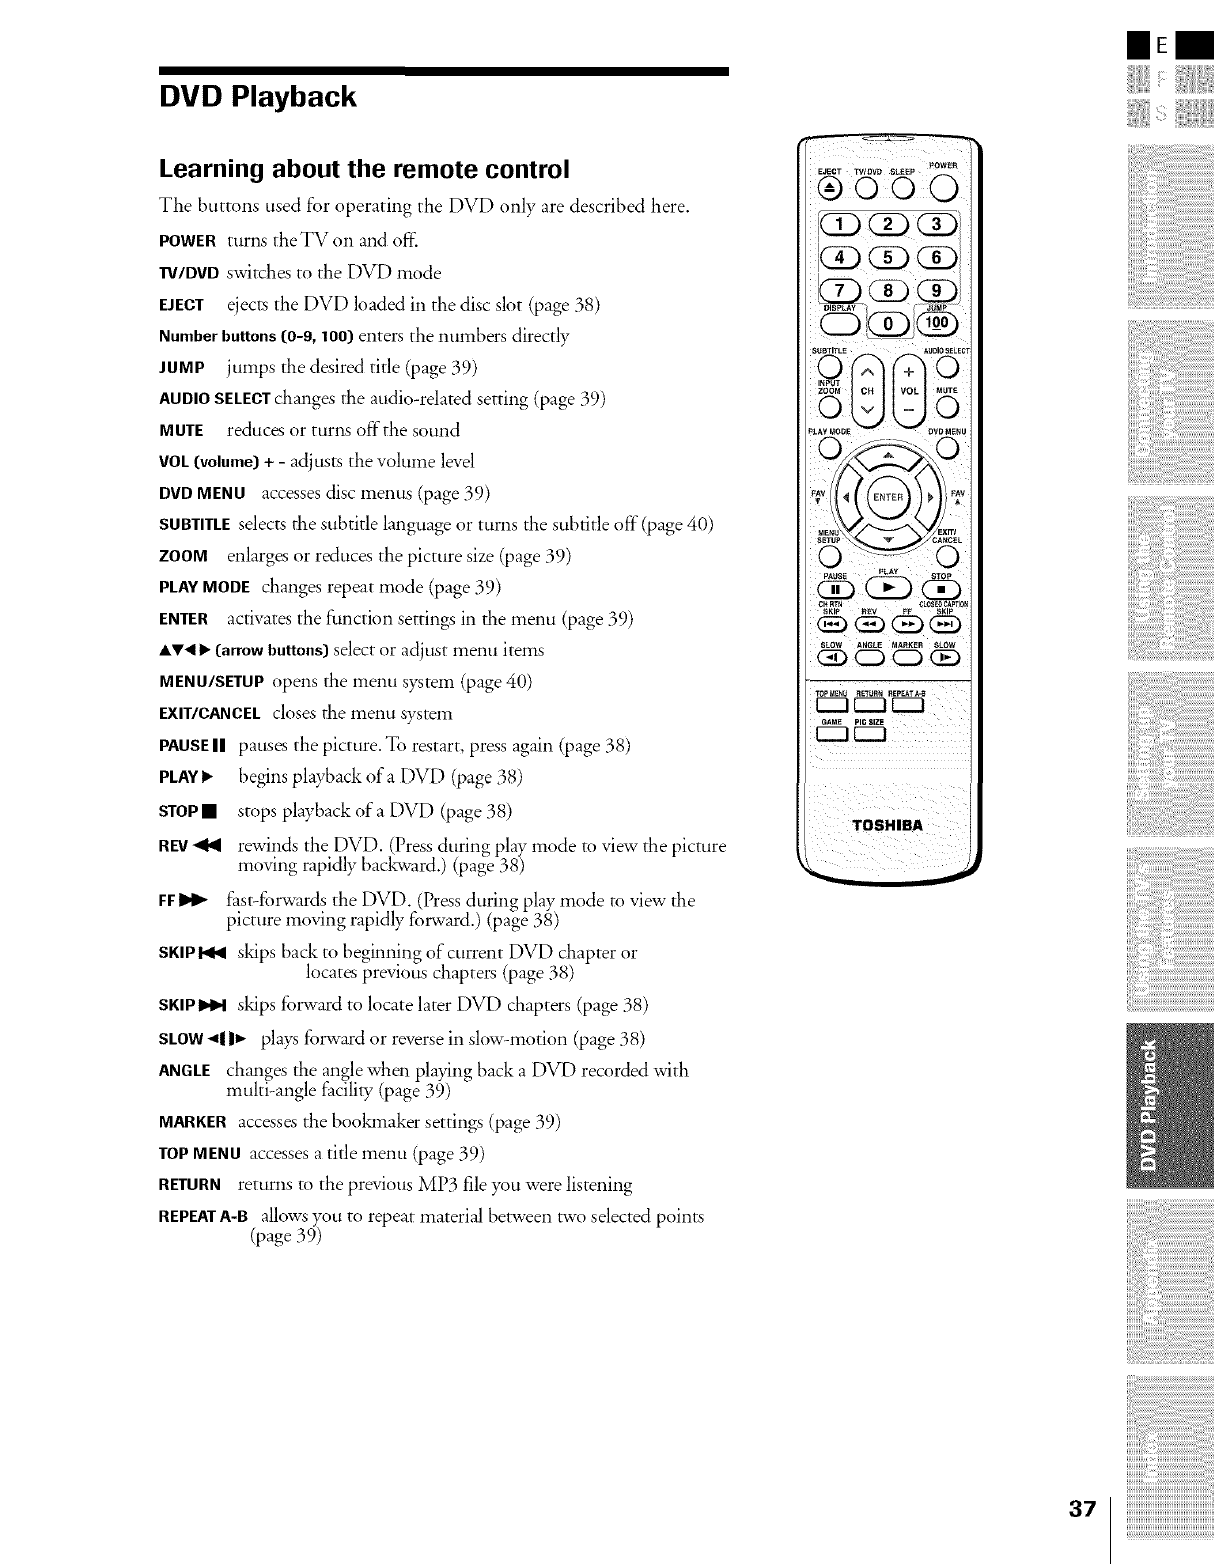
DVD Playback
Learning about the remote control
The buttons used for operating the DVD only are described here.
POWERturns theTVon and off:
TV/DVDswitches to the DVD *node
ELECT ejects the DVD loaded in the disc slot (page 38)
Numberbuttons (0-9, 1OO)enters the numbers directly
.lUMP jumps the desired tide (page 39)
AUDIOSELECTchanges the audio-related setting (page 39)
MUTE reduces or turns offthe sound
VOL(volume)+ - adjusts the volume level
DVDMENU accesses disc menus (page 39)
SUBTITLEselects the subtitle language or turns the subtitle off"(page 40)
ZOOM enlargm or reduces the picture size (page 39)
PLAYMODE changes repeat *node (page 39)
ENTER activates the fimction settings in the menu (page 39)
AV< b"(arrowbuttons)select or adjust menu items
MENU/SETUPopens the menu system (page 40)
EXIT/CANCELcloses the menu system
PAUSEI| pausm the picture. To restart, press again (page 38)
PLAY!,. begins playback of a DVD (page 38)
STOP• stops playback of a DVD (page 38)
REV_ql rewinds the DVD. (Press during play *node m view the picture
moving rapidly backward.) (page 38)
FFIPI_ fast-forwards the DVD. (Press during play *node m view the
picture moving rapidly forward.) (page 38)
SKIP_ skips back to beginning of current DVD chapter or
locatm previous chapters (page 38)
SKIPI_IH skips fbrward to locate later DVD chapters (page 38)
SLOW4! 1_ plays forward or reverse in slow-motion (page 38)
ANGLE changes the angle when playing back a DVD recorded with
multi-angle facility (page 39)
MARKERaccessm the bookinaker settings (page 39)
TOPMENUaccesses a tide menu (page 39)
RETURNreturns m the previous MP3 file you were listening
REPEATA-B allows you to repeat material between two selected points
(page 39)
37
IIEm
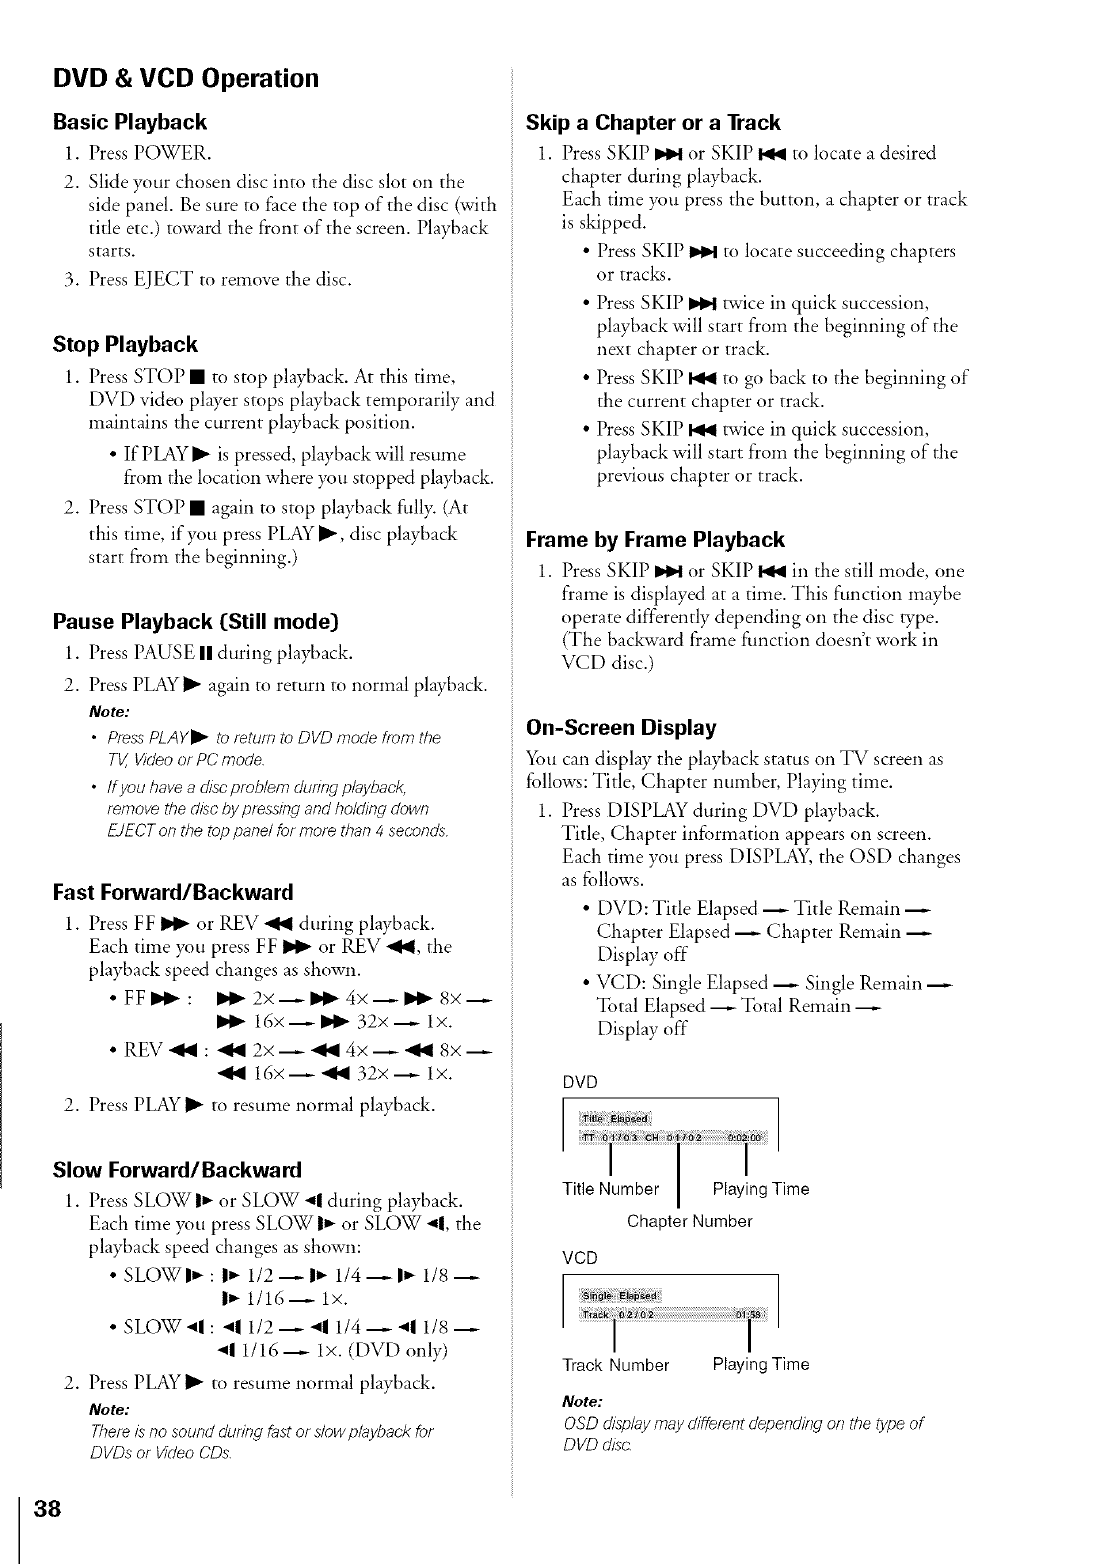
DVD & VCD Operation
Basic Playback
1. Press POWER.
2. Slide your chosen disc into the disc slot on the
side panel. Be sure to f'ace the top of the disc (with
title etc.) toward the f}ont of the screen. Playback
starts.
3. Press EJECT to remove the disc.
Stop Playback
1. Press STOP • to stop playback. At this time,
DVD video player stops playback temporarily and
maintains the current playback position.
• If PLAY _ is pressed, playback will resume
from the location where you stopped playback.
2. Press STOP • again to stop playback fully. (at
this time, if you press PLAY I1_, disc playback
start from the beginning.)
Pause Playback [Still mode)
1. Press PAUSE II during playback.
2. Press PLAY I1_again to return to normal playback.
Note:
•Press PLAYJI_ to return to DVD mode from the
TV, Video or PC mode.
• ffyou havea discproblemduringplayback,
removethediscby pressing and holding down
EJECTonthetop panel formorethan4seconds.
Fast Forward/Backward
1. Press FF _ or REV _ during playback.
Each time you press FF _ or REV 411, the
playback speed changes as shown.
• FF _1_ : IPI_ 2x _ IPl_ 4x _ I_1_8x _
_1_ 16x _ _1_ 32x _ Ix.
• REV _1_ : ,ql_ 2x _ ,41_ 4x _ ,ql_ 8x _
16x_ _ 32x_ Ix.
2. Press PLAY I1_to resume normal playback.
Slow Forward/Backward
1. Press SLOW I_ or SLOW "_1during playback.
Each time you press SLOW I_ or SLOW "11,the
playback speed changes as shown:
• SLOW I_ : I=- 112 _ |=- 114 _ I="1/8
|_- 1116 _ Ix.
• SLOW .,If : .q| 112 _ "11114 _ "N 118
"111116 _ lx. (DVD only)
2. Press PLAY I1_to resume normal playback.
Note:
There is no sound during fast or slow p/ayback for
DVDs or Vl?leo CDs.
Skip a Chapter or a Track
1. Press SKIP _ or SKIP I_ to locate a desired
chapter during playback.
Each time you press the button, a chapter or track
is skipped.
• Press SKIP _ to locate succeeding chapters
or tracks.
• Press SKIP _ twice in quick succession,
playback will start from the beginning of the
next chapter or track.
• Press SKIP I_ to go back to the beginning of
the current chapter or track.
• Press SKIP I_ twice in quick succession,
playback will start from the beginning of the
previous chapter or track.
Frame by Frame Playback
1. Press SKIP _ or SKIP I_l in the still mode, one
frame is displayed at a time. This flmction maybe
operate differently depending on the disc type.
(The backward frame fimction doesn't work in
VCD disc.)
On-Screen Display
_t* can display the playback status on TV screen as
follows: Title, Chapter number, Playing time.
1. Press DISPLAY during DVD playback.
Title, Chapter information appears on screen.
Each time you press DISPLAY, the OSD changes
as follows.
• DVD: Title Elapsed _ Title Remain
Chapter Elapsed _ Chapter Remain
Display off"
• VCD: Single Elapsed _ Single Remain
Total Elapsed _ Total Remain
Display off"
DVD
]'I /
Title Number Playing Time
Chapter Number
VCD
I /
Track Number Playing Time
Note:
OSD display may different depending on the type of
DVD disc
38
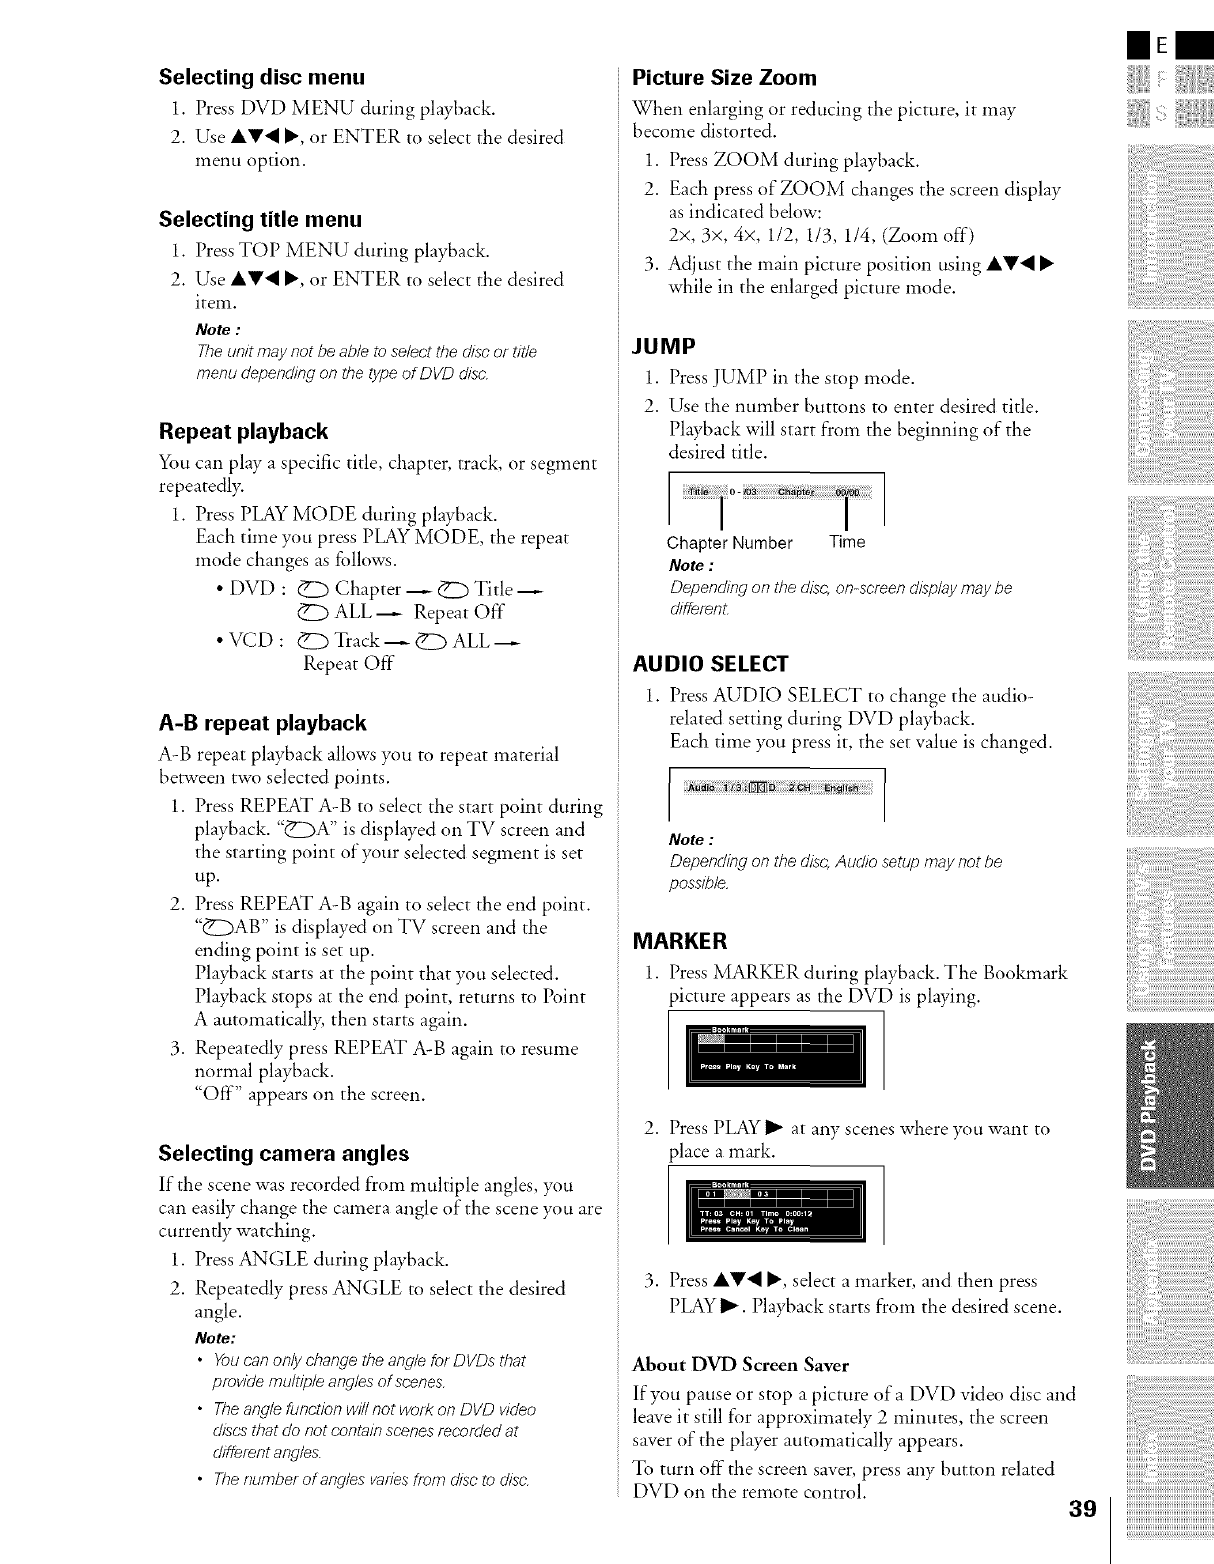
Selecting disc menu
1. Press DVD MENU during playback.
2. Use AV" •, or ENTER to select the desired
menu option.
Selecting title menu
1. Press TOP MENU during playback.
2. Use _,!" •, or ENTER to select the desired
item.
Note :
The unit may not be able to select the disc or title
menu depending on the type of DVD disc
Repeat playback
You can play a specific title, chapter, track, or segment
repeatedly.
1. Press PLAY MODE during playback.
Each time you press PLAY MODE, the repeat
mode changes as follows.
• DVD : (_) Chapter _ _ Title
_73 ALL _ Repeat Off"
• VCD : (_3 Track _ _ ALL
Repeat Off"
A-B repeat playback
A-B repeat playback allows you to repeat material
between two selected points.
1. Press REPEAT A-B to select the start point during
playback. "_3A" is displayed on TV screen and
the starting point of your selected segment is set
tip.
2. Press REPEAT A-B again to select the end point.
"_3AB" is displayed on TV screen and the
ending point is set up.
Playback starts at the point that you selected.
Playback stops at the end point, returns to Point
A automatically, then starts again.
3. Repeatedly press REPEAT A-B again to resume
normal playback.
"Off" appears on the screen.
Selecting camera angles
If the scene was recorded from multiple angles, you
can easily change the camera angle of the scene you are
currently watching.
1. Press ANGLE during playback.
2. Repeatedly press ANGLE to select the desired
angle.
Note:
•You can only change the angle for DVDs that
provide multiple angles of scenes.
• The angle function will notwork on DVD video
discs that do not contain scenes recorded at
different angles.
• The numberofangles varies from disc to disc
Picture Size Zoom
When enlarging or reducing the picture, it may
become distorted.
1. Press ZOOM during playback.
2. Each press of ZOOM changes the screen display
as indicated below:
2×, 3x, 4×, 112, 113, 114, (Zoom off')
3. Adjust the main picture position using _,_'_ •
while in the enlarged picture mode.
JUMP
1. Press JUMP in the stop mode.
2. Use the number buttons to enter desired title.
Playback will start from the beginning of the
desired title.
Chapter Number Time
Note :
Depending on the disc, on-screen display may be
different.
AUDIO SELECT
1. Press AUDIO SELECT to change the audio-
related setting during DVD playback.
Each time you press it, the set value is changed.
Note :
Depen&bg on the disc, Audio setup may not be
possiMe.
MARKER
1. Press MARKER during playback. The Bookmark
picture appears as the DVD is playing.
2. Press PLAY I_ at any scenes where you want to
place a mark.
3. Press AV< •, select a marker, and then press
PLAY I_. Playback starts from the desired scene.
About DVD Screen Saver
If you pause or stop a picture ofa DVD video disc and
leave it still for approximately 2 minutes, the screen
saver of the player automatically appears.
To turn off"the screen saver, press any button related
DVD on the remote control. 39
IIEII
1:
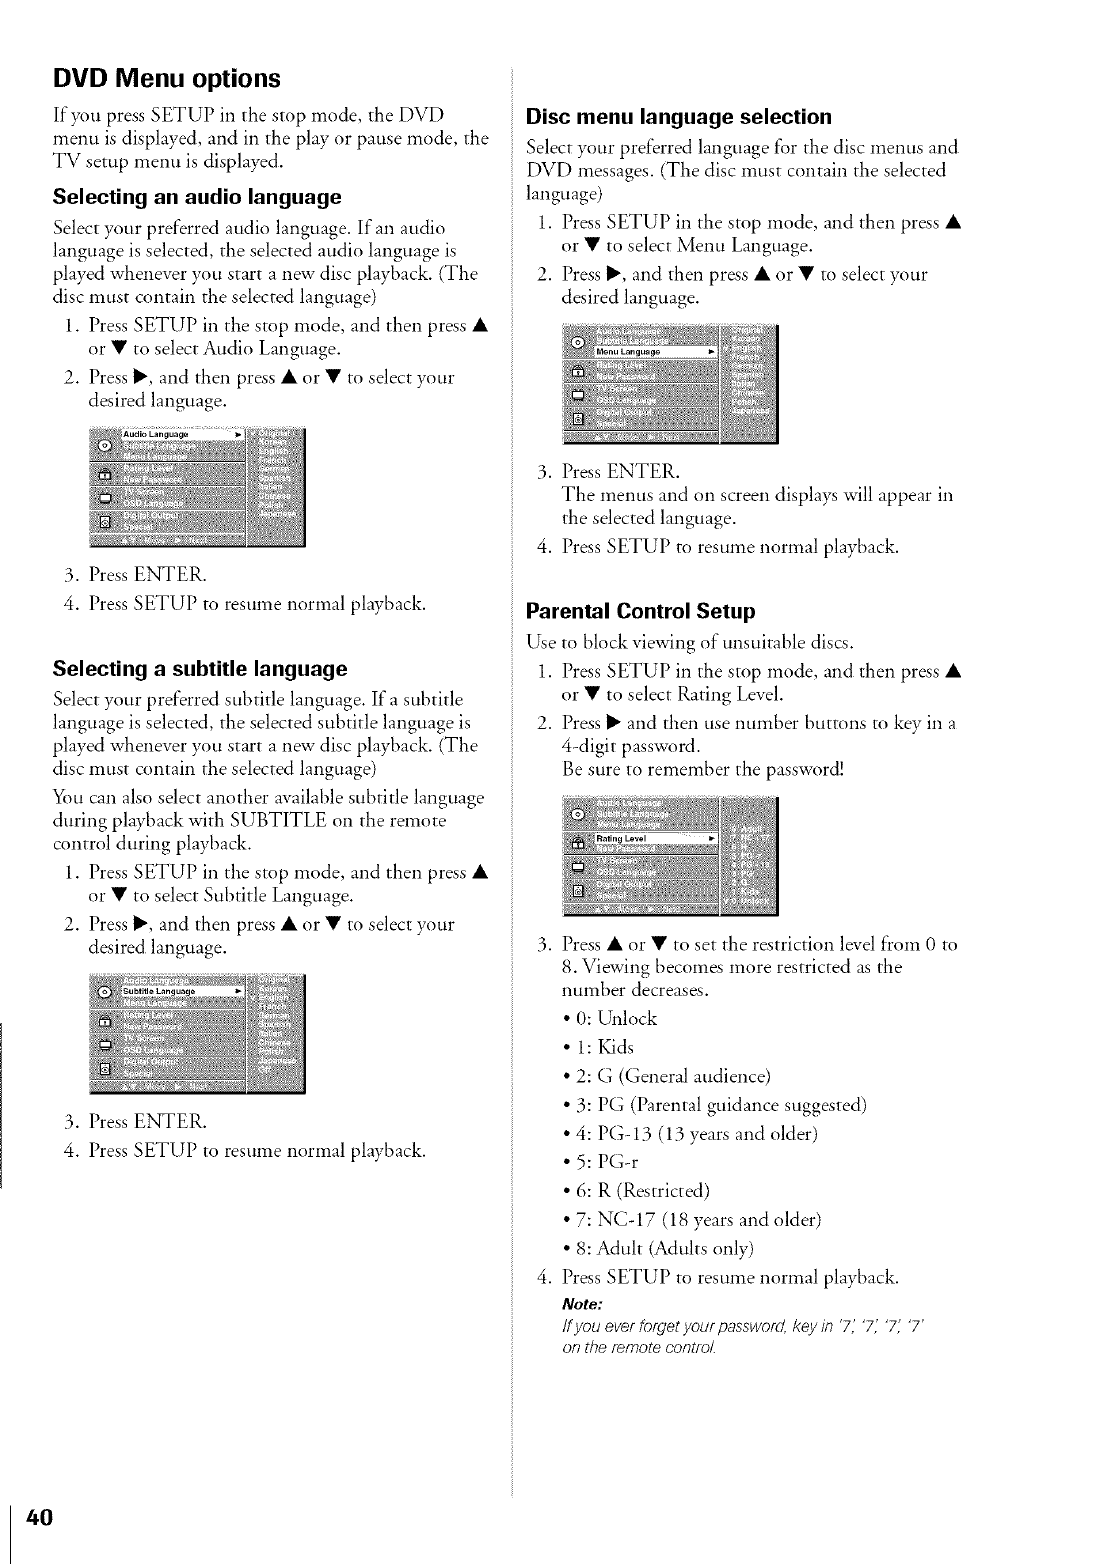
DVD Menu options
If you press SETUP in the stop mode, the DVD
menu is displayed, and in the play or pause mode, the
TV setup menu is displayed.
Selecting an audio language
Select your preferred audio language. If an audio
language is selected, the selected audio language is
played whenever you start a new disc playback. (The
disc must contain the selected language)
1. Press SETUP in the stop mode, and then press •
or • to select Audio Language.
2. Press •, and then press • or • to select your
desired language.
Audio Language
3. Press ENTER.
4. Press SETUP to resume normal playback.
Selecting a subtitle language
Select your preferred subtitle language. If a subtitle
language is selected, the selected subtitle language is
played whenever you start a new disc playback. (The
disc must contain the selected language)
Ybu can also select another available subtitle language
during playback with SUBTITLE on the remote
control during playback.
1. Press SETUP in the stop mode, and then press •
or • to select Subtitle Language.
2. Press •, and then press • or • to select your
desired language.
3. Press ENTER.
4. Press SETUP to resume normal playback.
Disc menu language selection
Select your preferred language for the disc menus and
DVD messages. (The disc must contain the selected
language)
1. Press SETUP in the stop mode, and then press •
or • to select Menu Language.
2. Press •, and then press • or • to select your
desired language.
3. Press ENTER.
The menus and on screen displays will appear in
the selected language.
4. Press SETUP to resume normal playback.
Parental Control Setup
Use to block viewing of unsuitable discs.
1. Press SETUP in the stop mode, and then press •
or • to select Rating Level.
2. Press • and then use number buttons to key in a
4-digit password.
Be sure to remember the password!
.
.
Press • or • to set the restriction level from 0 to
8. Viewing becomes more restricted as the
number decreases.
• O:Unlock
• 1: Kids
• 2: G (General audience)
• 3: PG (Parental guidance suggested)
• 4:PG-13 (13 years and older)
• 5: PG-r
• 6: R (Restricted)
• 7:NC-17 (18 years and older)
• 8: Adult (Adults only)
Press SETUP to resume normal playback.
Note:
If you ever forget your passworc/, key in '7_ '7j '7_ '7'
on the remote control.
40
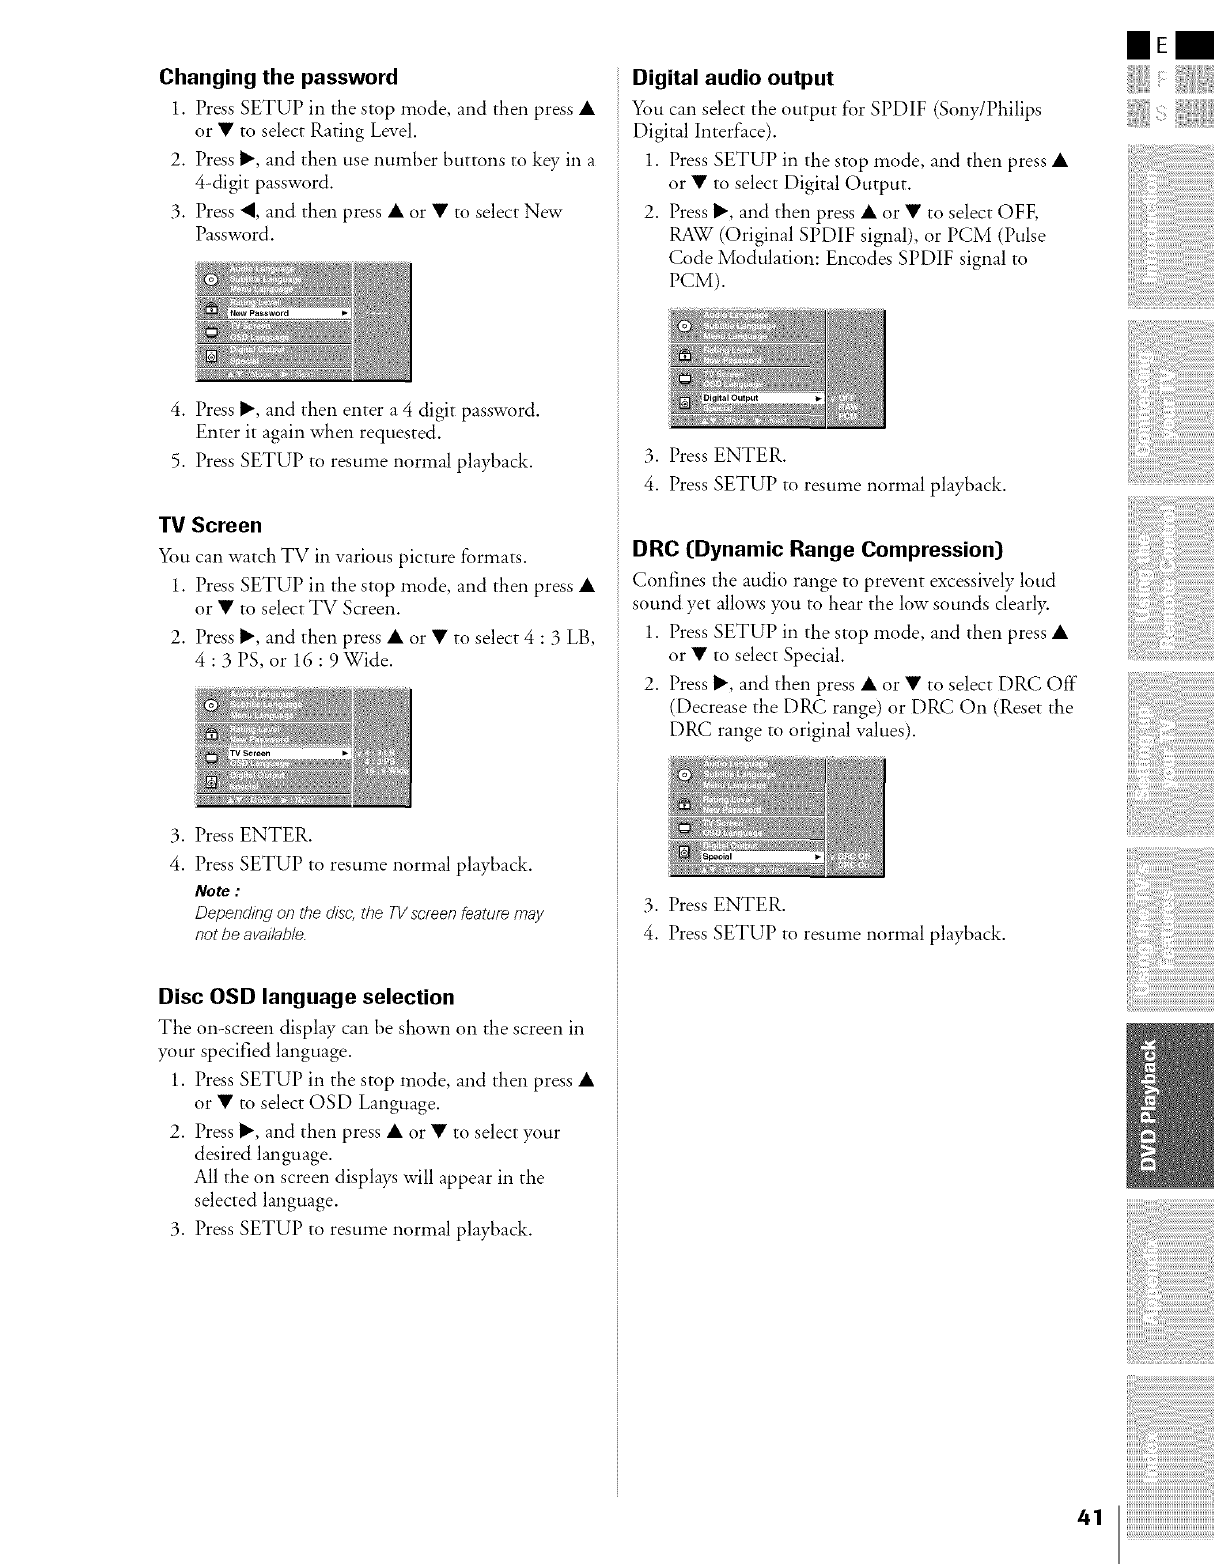
Changing the password
1. Press SETUP in the stop mode, and then press •
or • to select Rating Level.
2. Press I_, and then use number buttons to key in a
4-digit password.
3. Press "4, and then press • or • to select New
Password.
4. Press I1_,and then enter a 4 digit password.
Enter it again when requested.
5. Press SETUP to resume normal playback.
TV Screen
You can watch TV in various picture formats.
1. Press SETUP in the stop mode, and then press •
or • to select TV Screen.
2. Press I1_,and then press • or • to select 4 : 3 LB,
4 : 3 PS, or16 : 9 Wide.
3. Press ENTER.
4. Press SETUP to resume normal playback.
Note :
Depending on the disc,the TVscreenfeatuf_ may
not be available.
Disc OSD language selection
The on-screen display can be shown on the screen in
your specified language.
1. Press SETUP in the stop mode, and then press •
or • to select OSD Language.
2. Press I_, and then press • or • to select your
desired language.
All the on screen displays will appear in the
selected language.
3. Press SETUP to resume normal playback.
Digital audio output
You can select the output for SPDIF (Sony/Philips
Digital Interface).
1. Press SETUP in the stop mode, and then press •
or • to select Digital Output.
2. Press I1_,and then press • or • to select OFE
RAW (Original SPDIF signal), or PCM (Pulse
Code Modulation: Encodes SPDIF signal to
PCM).
3. Press ENTER.
4. Press SETUP to resume normal playback.
DRC [Dynamic Range Compression)
Confines the audio range to prevent excessively loud
sound yet allows you to hear the low sounds clearl>
1. Press SETUP in the stop mode, and then press •
or • to select Special.
2. Press I1_,and then press • or • to select DR(-: Off"
(Decrease the DR(: range) or DR(-: On (Reset the
DRC range to original values).
ispeeial
3. Press ENTER.
4. Press SETUP to resume normal playback.
41
IIEm
{:
M P3/WMA files Playback options
MP3/WMA Files Playback
1. When inserted, the MP3 menu screen appears
automatically depending on the MP3 disc's fblder
(directory) structure as shown to the below.
2. Press • or • to find desired folder and then press
ENTER.
3. Press • or • to find the desired MP3 title and
then press ENTER.
Stop/Pause Playback
Stop Playback
Press STOP • to stop playback.
Pause Playback
1. Press PAUSE II during playback.
2. Press PLAY I_ again to return to normal
playback.
Repeat playback
_t* can play a specific track repeatedly.
1. Press PLAY MODE during playback.
Each time you press PLAY MODE, the repeat
mode changes in the following order:
(_]3Track _ (_)ALL _ Off"
A-B repeat playback
A-B repeat playback allows you to repeat material
between two selected points.
1. Press REPEAT A-B to select the start point
during playback. "(_Z)A" is displayed on TV
screen and the starting point of your selected
segment is set tip.
2. Press REPEAT A-B again to select the end point.
"(_3AB" is displayed on TV screen and the
ending point is set tip.
Playback starts at the point that you selected.
Playback stops at the end point, returns to Point
A automatically, then starts again.
3. Repeatedly press REPEAT A-B until "Off"
appears on the screen to resume normal playback.
Playable files
MP3/WMA disc compatibility with this player is
limited as follows:
•Playable discs: CD-ROM, CD-R, CD-RW
•Sampling Frequency: 44,1 kHz, 48 kHz
•Bit rate: WMA: 48 kbps - 192 kbps(CBR)
MP3:32 kbps - 320 kbps (CBR)
•CD physical fbrmat: Mode 1
• File system: ISO9660, UDF without interleave
• File name: File names are limited to eight characters
or less and must incorporate "MP3" or
"WMA" extension.
e.g."********.MP3", "********.WMA"
File names cannot contain special
characters such as "?!><+*}{"[@]:;\/.," etc.
• File size: Less than 50 bytes
• Total number of files: Less than 650
• WMA codec version: V2, V7, VS, V9 (Stereo sound
only)
42
Audio CD Playback options
On-Screen Display
You can display the Track, and Playback time status on
the TV screen.
1. Press DISPLAY during CD playback.
Track information appear on screen. Each time
you press DISPLAY, the OSD changes as follows:
Single Elapsed _ Single Remain
Total Elapsed _ Total Remain
Track Number Playing Time
Stop Playback
1. Press STOP •to stop playback. At this time the
DVD video player stops playback temporarily and
maintains the current playback position.
• If PLAY I_ is pressed, playback will resume
from the location where you stopped playback.
2. Press STOP • again to stop playback fully. (at
this time if you press PLAY I_, disc playback
starts from the beginning.)
Pause Playback (Still mode)
1. Press PAUSE II during playback.
2. Press PLAYP'_ again to return to normal
playback.
Fast Forward/Backward
1. Press FF _ or REV 411 during playback.
Each time you press FF I_ or REV "_I, the
playback speed changes as shown.
• FWD _1_ : _1_ 2x _ _- 4x _ _ 8×
_ 16×_32x.
• REV 411 : _,9 2x _ -_ 4x _ ._ 8x
_ 16×_32×.
2. Press PLAY_ to resume normal playback.
Repeat playback
You can play a specific track repeatedly:
1. Press PLAY MODE during playback.
Each time you press PLAY MODE, the repeat
mode changes as indicated:
d-__3Track_ _3ALL _ Repeat Off
Skip Tracks
1. Press SKIP _ or SKIP I_ to locate a desired
track during playback.
Each time you press the button, the unit skips to
the next/previous track.
A-B repeat playback
A-B repeat playback allows you to repeat material
between two selected points.
1. Press REPEAT A-B to select the start point during
playback. "_)A" is displayed on TV screen and
the starting point of your selected segment is set
tip.
2. Press REPEAT A-B again to select the end point.
"(_3AB" is displayed on TV screen and the
ending point is set tip.
Playback starts at the point that you selected.
Playback stops at the end point, returns to Point
A automatically, then starts again.
3. Repeatedly press REPEAT A-B again to resume
normal playback. "Off" appears on the screen.
JPEG file viewing options
As a JPEG file is loaded, the table of contents appears
on the TV screen. 16 slide show transition modes are
available.
Picture Selection
1. Press • or • to select the desired picture.
The selected JPEG file appears on the right side of
the screen.
2. Press ENTER to enlarge the JPEG file to fill the
screen.
3. Press PLAY P'_ again to start slide show mode.
Press STOP • to return to the menu.
Note:
If you press ENTER wi_ile playing a JEPG disc,the
picture slide show starts.
Picture transition modes
1. Press • or • to select the desired picture, and
then press PLAY I_ to start the slide show.
2. Press EXIT/CANCEL to stop the slide show.
Image Rotation
Press • or • to rotate a picture. There are 2 modes to
rotate picture:
• • : invert.
• • : mirror
43
IIEm
Image Zoom
1. Press ZOOM and use FF _1_ or REV <1'11to see
the zoom mode at 50% _ 200%.
2. Adjust the picture position using AV" • while
in the enlarged picture mode.
To exit Zoom mode, press ZOOM one more
time.
3. Press STOP • to return to the menu.
Repeat playback
You can show JPEG files repeatedly.
1. Press PLAY MODE during playback. Each time
you press PLAY MODE, the repeat mode changes
as indicated:
Repeat One _ Repeat All _ Repeat Off"
JPEG files compatibility
Discs and pixels whose compatibility with this player
has been confirmed by TOSHIBA are as follows.
Kodak Picture CD
JPEG disc compatibility with this player is limited as
follows:
•Playable discs: CD-ROM, CD-R, CD-RW
• File system: ISO9660, UDF without interleave
• File name: File names are limited to eight characters
or less and must incorporate "JPG"
extension.
e.g."********.JPG"
File names cannot contain special
characters such as "?!><+*}{"[@]:;\/.," etc.
• File size: Less than 10M bytes
• File format: BASELINE, PROGRESSIVE
• Resolution: Baseline JPG: 3072 × 2048
Progressive JPG:
width*(height + 128) < 3300000
Files with size < 20M bytes.
44
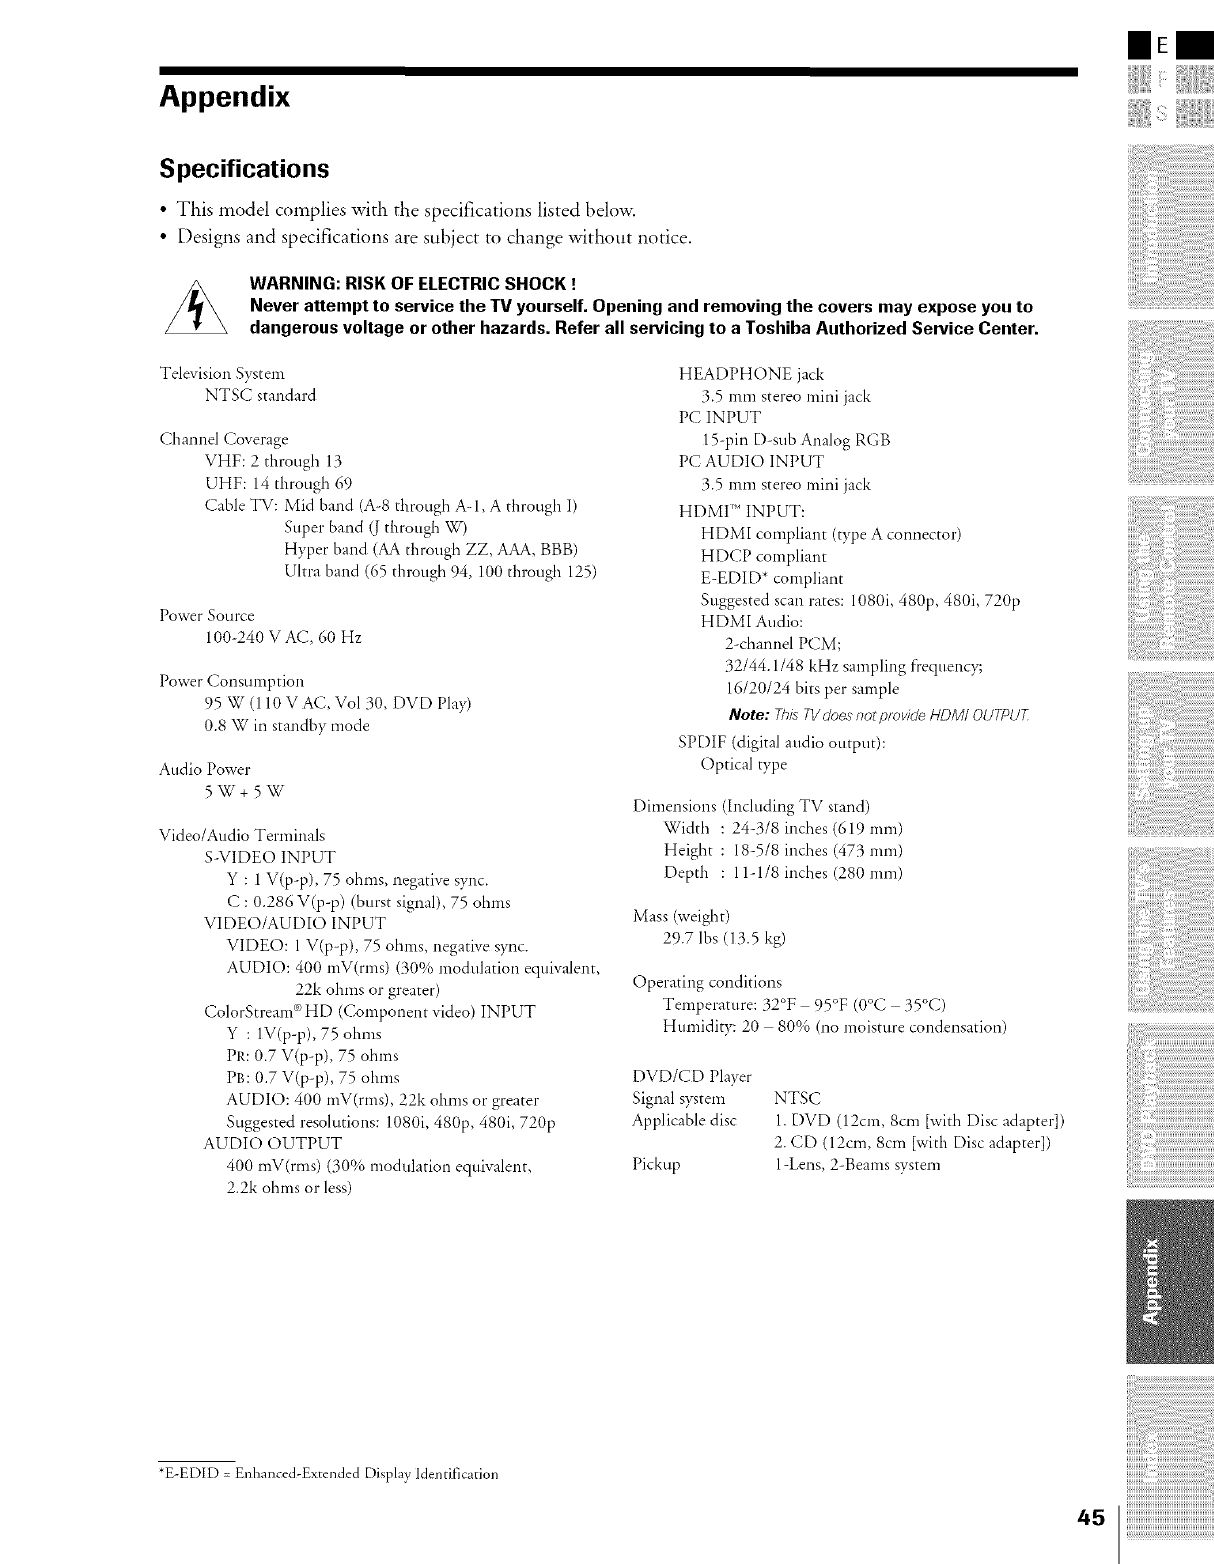
Appendix
Specifications
•This model complies with the specifications listed below.
• Designs and specifications are subject to change without notice.
WARNING: RISK OF ELECTRIC SHOCK !
Never attempt to service the TV yourself. Opening and removing the covers may expose you to
dangerous voltage or other hazards. Refer all servicing to a Toshiba Authorized Service Center.
Television System
NTSC standard
Channel Coverage
VHF: 2 through 13
UHF: 14 through 69
Cable TV: Mid band (A-8 through A-I, A through I)
Super band (J through W)
Hyper band (AA through ZZ, AAA, BBB)
Ultra band (65 through 94, 100 through 125)
Power Source
100-240 V AC, 60 Hz
Power Consumption
95 _r (110 V AC, Vol 30, DVD Pay)
0.8 W in standby mode
Audio Power
5 W + 5 W
Video/Audio Terminals
S-VIDEO INPUT
Y: 1 V(p-p), 75 ohms, negative sync.
C : 0.286 V(p-p) (burst signal), 75 ohms
VIDEO/AUDIO INPUT
VIDEO: 1V(p-p), 75 ohms, negative s)_c.
AUDIO: 400 mV(rms) (30% modulation equivalent,
22k ohms or greater)
ColorStream _)HD (Component video) INPUT
Y: IV(p-p), 75 ohms
PR: 0.7 V(p-p), 75 ohms
PB: 0.7 V(p-p), 75 ohms
AUDIO: 400 mV(rms), 22k ohms or greater
Suggested resolutions: 1080i, 480p, 480i, 720p
AUDIO OUTPUT
400 mV(rms) (30% modulation equivalent,
2.2k ohms or less)
HEADPHONE jack
3.5 mm stereo mini jack
PC INPUT
15-pin D-sub Analog RGB
PC AUDIO INPUT
3.5 I][li_11stereo mini jack
HDMI :" INPUT:
HDMI compliant (type A connector)
HDCP coinpliant
E-EDID* coinpliant
Suggested scan rates: 1080i, 480p, 480i, 720p
HDMI Audio:
2-channel PCM;
32144.1148 kHz sampling frequency;
16120/24 bits per sample
Note: ThisTVdoesnotprovideHDM/ OUTPU7_
SPDIF (digital audio output):
Optical type
Dimensions (Including TV stand)
Width : 24-318 inches (619 nlill)
Height : 18-5/8 inches (473 mm)
Depth : 11-118 inches (280 Inm)
Mass (weight)
29.7 lbs (13.5 kg)
Operating conditions
Temperature: 32°F 95°F (0°C 35°C)
Humidity: 20 80% (no inoisture condensation)
DVD/CD Player
Signal system
Applicable disc
Pickup
NTSC
1.DVD (12cm, 8cm [with Disc adapter])
2. CD (l 2cm, 8cm [with Disc adapter])
1-Lens, 2-Beams system
IIEm
*E-EDID = Enhanced-Extended Display Identification

Troubleshooting
Before calling a service technician, please check the following table f'or a possible cause of the symptom and
some solutions.
Symptom
TV will not turn on
No picture, no sound
No sound, picture OK
Poor picture, sound OK
Poor reception of broadcast channels
Black box appears on the screen
Unable to select a certain channel
Multiple images
Poor color or no color
No stereo or SAP sound from a kamwn MTS
broadcast
The top panel buttons do not operate
The remote control does not operate
Solution
• Make sure the power cord is plugged in, then press
POWER.
• The remote control batteries may be dead. Replace
the batteries.
• Check the antenna/cable connections.
• The sound may lyemuted. Press VOL + -.
• The station may have broadcast difficulties. Try
another channel.
• Make sure the MTS feature is set properly.
• Check the antenna connections.
• The station may have broadcast difficulties. Try
another channel.
• Adjust the Picture menu.
• The station may have broadcast difficulties. Try
another channel.
• Check the antenna connections.
• The closed caption feature may be set to one of the
Text modes (Textl, Text2, Text3, or Text4). Turn
closed captioning Off:
• The channel may be erased with the Manual
programming feature.
• The station may have broadcast difficulties. Try
another channel.
• Antenna reception may be poor. Use a highly
directional outdoor antenna.
• The station may have broadcast difficulties. Try
another channel.
• Adjust the Tint and/or Color in the Picture menu.
• Make sure the MTS feature is set properly.
Check the Panel lock feature.
Remove all obstructions between the remote control
and the remote control sensor in the TV.
The remote control batteries may lyedead. Replace
the batteries.
46
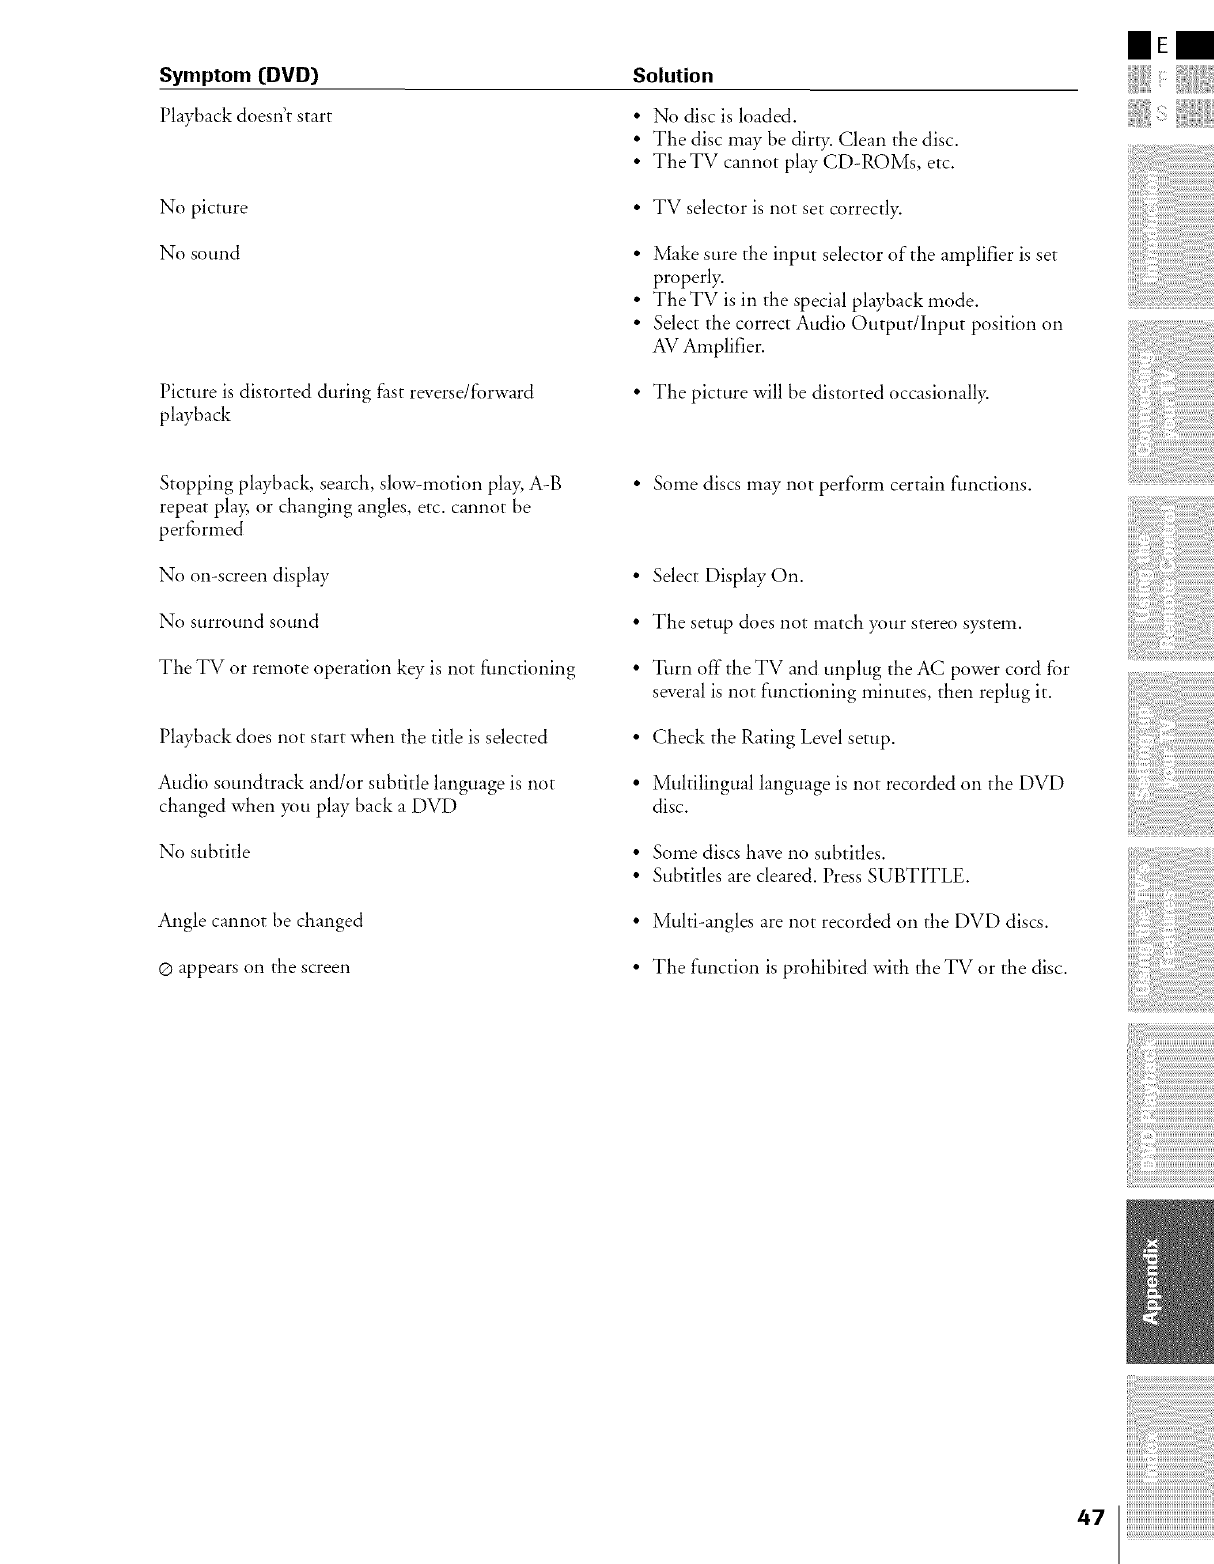
Symptom (DVD)
Playback doesn't start
No picture
No sound
Picture is distorted during firstreverse!forward
playback
Solution
•No disc is loaded.
• The disc may lyedirty. Clean the disc.
• TheTV cannot play CD-ROMs, etc.
• TV selector is not set correctly.
• Make sure the input selector of the amplifier is set
properl>
• TheTV is in the special playback mode.
•Select the correct Audio Output/Input position on
AV Amplifier.
• The picture will lyedistorted occasionally.
IIEm
Stopping playback, search, slow-motion play, A-B
repeat play, or changing angles, etc. cannot lye
perfi_rmed
No on-screen display
No surround sound
The TV or remote operation key is not fimctioning
Playback does not start when the title is selected
Audio soundtrack and/or subtitle language is not
changed when you play back a DVD
No subtitle
Angle cannot lye changed
® appears on the screen
• Some discs may not perform certain functions.
• Select Display On.
• The setup does not match your stereo system.
• Turn off"the TV and unplug the AC power cord for
several is not functioning minutes, then replug it.
• Check the Rating Level setup.
•Multilingual language is not recorded on the DVD
disc.
• Some discs have no subtitles.
•Subtitles are cleared. Press SUBTITLE.
• Multi-angles are not recorded on the DVD discs.
• The function is prohibited with the TV or the disc.
Limited United States Warranty
for 23" LCD TVs and 23" LCD TV/DVD Combinations ["LCD Product[s)')
Toshiba America Consumer Products, L.L.C. C'TACP") makes the
following limited warranties to original consumels in the United
States. THESE LIMITED WARRANTIES EXTEND TO THE
ORIGINAL CONSUMER PURCHASER OR ANY PERSON
RECEIVING THIS LCD PRODUCT AS A GIFT FROM THE
ORIGINAL CONSUMER PURCHASER AND TO NO OTHER
PURCHASER OR TRANSFEREE.
LCD PRODUCTS PURCHASED IN THE U.S.A. AND USED
ANYWHERE OUTSIDE OF THE U.S.A., INCLUDING, WITHOUT
LIMITATION, CANADA AND MEXICO, ARE NOT COVERED BY
TH ESE WARRANTIES.
LCD PRODUCTS PURCHASED ANYWHERE OUTSIDE OF THE
U.S.A., INCLUDING, WITHOUT LIMITATION, CANADA AND
MEXICO, AND USED IN THE U.S.A., ARE NOT COVERED BY
TH ESE WARRANTIES.
Limited One (1) Year Warranty on Parts and Labor
TACP warrants this LCD Product and its parts against defects in
materials or workmanship for a period of one C1)year after the
date of original retail purchase. DURING THIS PERIOD, TACP
WILL, AT TACP'S OPTION, REPAIR OR REPLACE A DEFECTIVE
PART WITH A NEW OR REFURBISHED PART WITHOUT
CHARGE TO YOU FOR PARTS OR LABOR.
Rental Units
The warranty for LCD Product rental units begins on the date of
the first rental or thilty (30) days after the date of shipment to
the rental firm, whichever comes first.
Limited Warranty for Commercial Units
TACP warrants LCD Products that are sold and used for
commercial purposes as follows: all parts are warranted against
defects in materials or workmanship for a period of ninety (90)
days after the date of original retail purchase. DURING THIS
PERIOD, TACP WILL AT TACP'S OPTION, REPAIR OR
REPLACE A DEFECTIVE PART WITH A NEW OR
REFURBISHED PART WITHOUT CHARGE TO YOU.
Owner's Manual and Product Registration Card
Read this owner's manual thoroughly before operating this LCD
Product.
Complete and mail the enclosed ploduct registration cald or
register your LCD Product online at
www.tacp.toshiba.com/service as soon as possible. By
registering your LCD Product you will enable TACP to bring you
new products specifically designed to meet your needs and help
us to contact you in the unlikely event a safety notification is
required tinder the U.S. Consumer Product Safety Act. Failure to
complete and return the product registration card does not
diminish your warranty rights.
Your Responsibility
THE ABOVE WARRANTIES ARE SUBJECT TO THE
FOLLOWING CONDITIONS:
(1) You must retain your original bill of sale or provide other
proof of purchase.
(2) All warranty servicing of this LCD Product must be
performed by an Authorized TACP Service Station.
(3) The warranties from TACP are effective only if this LCD
Product is purchased and operated in the Continental U.S.A.
or Puerto Rico.
(4) Labor service charges for set installation, setup, adjustment
of customer controls, and installation or repai_ of antenna
systems are not covered by this warranty. Reception
problems caused by inadequate antenna systems,
misaligned satellite dishes, cable television distribution,
VCRs, DVD players/recorders, personal computer level IEEE
1394 devices, and any other connected signal source device
ale your responsibility.
(5) Warranties extend only to defects in materials or
workmanship as limited above, and do not extend to any
LCD Product or parts that have been lost or discarded by
you or to damage to the LCD Roduct or parts caused by
fires, misuse, accident, Acts of God (such as lightning or
fluctuations in electric power), improper installation,
improper maintenance, or use in violation of instructions
furnished by TACP; use or malfunction through simultaneous
use of this LCD Product and connected equipment; or to
units that have been modified or had the serial number
removed, altered, defaced, or rendered illegible.
How to Obtain Warranty Service
If, after following all of the operating instructions in this manual
and reviewing the section entitled "]]oubleshooting," you find
that service is needed:
(1) To find the nearest TACP Authorized Service Station, visit
TACP's website at www.tacp.toshiba.com/service or
contact TACP's Consumer Solution Center toil free at 1 800
575 5469.
(2) You must present your original bill of sale or other proof of
purchase to the TACP Authorized Service Station. You must
deliver the entile LCD Product to a TACP Authorized Service
Station. You must pay for all transportation and insurance
charges for the LCD Product to and from the TACP
Authorized Service Station.
For additional information, visit TACP's website:
www.tacp.toshiba.com
ALL WARRANTIES IMPLIED BYTHE LAW OF ANY STATE OF
THE U.S.A., INCLUDING THE IMPLIED WARRANTIES OF
MERCHANTABILITY AND FITNESS FOR A PARTICULAR
PURPOSE, ARE EXPRESSLY LIMITED TO THE DURATION OF
THE LIMITED WARRANTIES SET FORTH ABOVE. WITH THE
EXCEPTION OF ANY WARRANTIES IMPLIED BY THE LAW OF
ANY STATEOF THE U.S.A. AS HEREBY LIMITED, THE
FOREGOING WARRANTY IS EXCLUSIVE AND IN LIEU OF
ALL OTHER WARRANTIES, GUARANTEES, AG REEM ENTS,
AND SIMILAR OBLIGATIONS OF TACP WITH RESPECTTO
THE REPAIR OR REPLACEMENT OF ANY PARTS. IN NO
EVENT SHALL TACP BE LIABLE FOR CONSEQUENTIAL OR
INCIDENTAL DAMAGES (INCLUDING, BUT NOT LIMITED TO,
LOST PROFITS, BUSINESS INTERRUPTION, OR
MODIFICATION OR ERASURE OF RECORDED DATA CAUSED
BY USE, MISUSE OR INABILITY TO USE THIS LCD
PRODUCT).
No person, agent, distributor, dealer, or company is authorized to
change, modify, or extend the terms of these warranties in any
manner whatsoever. The time within which an action must be
commenced to enforce any obligation of TACP arising under the
warranty or under any statute or law of the United States or any
state thereof is hereby limited to ninety (90) days from the date
you discover, or should have discovered, the defect. This
limitation does not apply to implied warranties arising under the
law of any state of the U.S.A.
THIS WARRANTY GIVES YOU SPECIFIC LEGAL RIGHTS AND
YOU MAY ALSO HAVE OTHER RIGHTS WHICH MAY VARY
FROM STATETO STATE IN THE U.S.A. SOME STATESOF THE
U.S.A. DO NOT ALLOW LIMITATIONS ON THE DURATION OF
AN IMPLIED WARRANTY, WHEN AN ACTION MAY BE
BROUGHT, OR THE EXCLUSION OR LIMITATION OF
INCIDENTAL OR CONSEQUENTIAL DAMAGES. THEREFORE,
THE ABOVE PROVISIONS MAY NOT APPLY TO YOU UNDER
SUCH CIRCUMSTANCES.
48
Limited Canada Warranty
for 23" LCD TVs and 23" LCD TV/DVD Combinations C'LCD Product(s)")
]bshiba Canada Limited, ("TCE') makes the following limited
warranties to original consumers in Canada. THESE LIMITED
WARRANTIES EXTEND TO THE ORIGINAL CONSUMER
PURCHASER OR ANY PERSON RECEIVING THIS LCD
PRODUCT AS A GIFT FROM THE ORIGINAL CONSUMER
PURCHASER AND TO NO OTHER PURCHASER OR
TRANSFEREE.
LCD PRODUCTS PURCHASED IN CANADA AND USED
ANYWHERE OUTSIDE OF CANADA, INCLUDING, WITHOUT
LIMITATION, THE U.S.A. AND MEXICO, ARE NOT COVERED
BY TH ESE WARRANTI ES.
LCD PRODUCTS PURCHASED ANYWHERE OUTSIDE OF
CANADA, INCLUDING, WITHOUT LIMITATION, THE U.S.A.
AND MEXICO, AND USED IN CANADA ARE NOT COVERED
BY TH ESE WARRANTI ES.
Limited One [1) Year Warranty on Parts and Labour
TCL warrants this LCD Product and its parts against defects in
materials or workmanship for a period of one (1} year after the
date of original retail purchase. DURING THIS PERIOD, TCL
WILL, AT TCES OPTION, REPAIR OR REPLACE A DEFECTIVE
PART WITH A NEW OR REFURBISH ED PART WITHOUT
CHARGE TO YOU. YOU MUST DELIVER THE ENTIRE
TELEVISION TO AN AUTHORIZED TCL SERVICE DEPOT YOU
MUST PAY FOR ALL TRANSPORTATION AND INSURANCE
CHARGES FOR THE TELEVISION TO AND FROM THE
SERVICE DEPOT.
Rental Units
Tile warranty for LCD Product rental units begins on the date of
the first rental or thirty (30) days after the date of shipment to
the rental firm, whichever comes first.
Limited Warranty for Commercial Units
TCL warrants LCD Products that are sold and used for
commercial purposes as follows: all parts are warranted against
defects in materials or workmanship for a period of ninety (90}
days after the date of original retail purchase. DURING THIS
PERIOD, TCL WILL AT TCI_S OPTION, REPAIR OR REPLACE A
DEFECTIVE PART WITH A NEW OR REFURBISHED PART
WITHOUT CHARGE TO YOU. YOU MUST DELIVER THE
ENTIRE TELEVISION TO AN AUTHORIZED TCL SERVICE
DEPO]_ YOU M UST PAY FOR ALL TRANSPORTATION AN D
INSURANCE CHARGES FOR THE TELEVISION TO AND FROM
THE SERVICE DEPOT.
Owner's Manual and Product Registration
Read this owner's manual thoroughly before operating this LCD
Product.
Register your LCD Product online at www.toshiba.ea as soon
as possible. By registering your LCD Product you will enable TCL
to bring you new products specifically designed to meet your
needs and help us to contact you in the unlikely event a safety
notification is required. Failure to register your LCD Product does
not diminish your warranty rights.
Your Responsibility
THE ABOVE WARRANTIES ARE SUBJECT TO THE
FOLLOWING CONDITIONS:
(1} You must retain your original bill of sale or provide other
proof of purchase.
(2} All warranty servicing of this LCD Product must be made by
an Authorized TCL Service Depot.
(3} The warranties from TCL are effective only if this LCD
Product is pulchased in Canada from an authorized TCL
dealer and operated in Canada.
(4) Labour service chages for set installation, setup, adjustment
of customer controls, and installation or repair of antenna
systems are not covered by this warranty. Reception
problems caused by inadequate antenna systems,
misaligned satellite dishes, cable television distribution,
VCRs, DVD players/recorders, personal computer level IEEE
1394 devices, and any other connected signal source device
ale your responsibility.
(5} Warranties extend only to defects in materials or
workmanship as limited above, and do not extend to any
LCD Product or parts that have been lost or discarded by
you or to damage to the LCD Product or parts caused by
fires, misuse, accident, Acts of God (such as lightning or
fluctuations in electric power), improper installation,
improper maintenance, or use in violation of instructions
furnished by TCL; use or malfunction through simultaneous
use of this LCD Product and connected equipment; or to
units that have been modified or had the serial number
removed, altered, defaced, or rendered illegible.
How to Obtain Warranty Service
If, after following all of the operating instructions in this manual
and reviewing the section entitled "Troubleshooting," you find
that service is needed:
(1} ]b find the nearest TCL Authorized Service Depot, visit TCUs
web site at www.toshiba.ea.
(2) You must include the original bill of sale (or a copy thereo0 or
other proof of purchase along with the entire LCD Product to
the Authorized Service Depot. You are responsible for all
inbound transportation and insurance charges for the LCD
Product to the Authorized Service Depot.
For additional information, visit TCL's website:
www.toshiba.ca
ALL WARRANTIES IMPLIED BY THE LAW OF ANY PROVINCE
OF CANADA, INCLUDING THE IMPLIED WARRANTIES OF
MERCHANTABILITY AND FITNESS FOR A PARTICULAR
PURPOSE, ARE EXPRESSLY LIMITED TO THE DLJRATION OF
THE LIMITED WARRANTIES SET FORTH ABOVE. WITH THE
EXCEPTION OF ANY WARRANTIES IMPLIED BY THE LAW OF
ANY PROVINCE OF CANADA AS HEREBY LIMITED, THE
FOREGOING WARRANTY IS EXCLUSIVE AND IN LIEU OF
ALL OTHER WARRANTIES, GUARANTEES, AGREEMENTS,
AND SIMILAR OBLIGATIONS OF TCL WITH RESPECT TO THE
REPAIR OR REPLACEMENT OF ANY PARTS. IN NO EVENT
SHALL TCL BE LIABLE FOR CONSEQUENTIAL OR
INCIDENTAL DAMAGES (INCLUDING, BUT NOT LIMITED TO,
LOST PROFITS, BUSINESS INTERRUPTION, OR
MODIFICATION OR ERASU RE OF RECORDED DATA CAUSED
BY USE, MISUSE, OR INABILITY TO USE THIS LCD
PRODUCT}.
No person, agent, distributor, dealer, or company is authorized to
change, modify, or extend the terms of these warranties in any
manner whatsoever. The time within which an action must be
commenced to enforce any obligation of TCL arising under the
warranty or under any law of Canada or any province thereof is
hereby limited to ninety (90} days from the date you discover, or
should have discovered, the defect. This limitation does not apply
to implied warranties arising under the law of any province of
Canada.
THIS WARRANTY GIVES YOU SPECIFIC LEGAL RIGHTS AND
YOU MAY ALSO HAVE OTHER RIGHTS WHICH MAY VARY
FROM PROVINCE TO PROVINCE IN CANADA. SOME
PROVINCES OF CANADA DO NOT ALLOW LIMITATIONS ON
THE DURATION OFAN IMPLIED WARRANTY, WHEN AN
ACTION MAY BE BROUGHT, OR THE EXCLUSION OR
LIMITATION OF INCIDENTAL OR CONSEQUENTIAL
DAMAGES. THEREFORE, THE ABOVE PROVISIONS MAY NOT
APPLY TO YOU UNDER SUCH CIRCUMSTANCES. [0305]
49
IEI
rir,_ iiiiiiiiiiiiiiiiiiiiiiiiiiiiiiiiir
iiiiiiiiBi_iiiiiiiiiiiiiiiiiiiiiiii
rrrrrlriilxlrrrrrrrrrrrrrrrrrrrr
iiiiiiiiiiiiiiiiiiiiiiiiiiiiiiiiiiiiiiiiiiiiiii
iiiiiiiiiiiiiiiiiiiiiiiiiiiiiiiiiiiiiiiiiiiiiiiiii_
Index
AB
ANGLE button ......................................................................39
Antenna cables {[coaxial] .................................................12
AUDIO SELECTbutton .............................................32, 39
Audio system connection .................................................17
Auto Configure .....................................................................35
Auto off ....................................................................................36
A/V cables ..............................................................................12
Back of the TV ......................................................................10
Blue screen ............................................................................24
C
Cable converter box connection ...................................13
Camcorder connection ......................................................17
CH .-. v buttons ..................................................................23
CH RTN button .....................................................................24
Channel Number buttons ................................................23
Channel programming
Automatic programming .............................................22
Memory/Erase .................................................................23
Closed caption ......................................................................30
ColorStream _ connection ...........................................14,15
Component video cables ..................................................12
DE
Digital audio system connection ...................................17
DISPLAY button ....................................................32, 36, 38
DRC..........................................................................................41
DTV receiver connection ..................................................15
DVD connection ...................................................................14
DVD MENU button ...........................................................39
EJECTbutton .........................................................................38
FGHIJ
FAVA_' button .....................................................................23
Favoritechannels ................................................................23
FF_ button ........................................................................38
Front of the TV......................................................................10
Full {[picture sized.................................................................25
GAME button ........................................................................36
HDM I connection ................................................................16
INPUT button ........................................................................24
JPEG ........................................................................................44
JUMP button .........................................................................39
I_MN
Language selection ............................................................22
Last mode memory .............................................................36
MARKER button ..................................................................39
Menu system .........................................................................21
MP3 ...........................................................................................42
MTS ...........................................................................................32
MUTE button .........................................................................32
Natural {[picture sized.........................................................25
P
Panel lock ...............................................................................31
PAUSE || button ..................................................................38
PC connection ......................................................................18
PC setting ...............................................................................35
PIC SIZE button ...................................................................25
Picture adjustments
Picture mode ....................................................................29
Picture quality ..................................................................29
Picture size.............................................................................25
PLAY I_ button ....................................................................38
PLAY MODE button ...........................................................39
POWER button .....................................................................19
R
Remote control
Battery installation .........................................................20
Learning about the buttons ........................................19
REPEATA-B button ...........................................................39
RETURN button ...................................................................37
REV_ button ....................................................................38
S
S-video cables ......................................................................12
SAP sound ..............................................................................32
Set-top box ............................................................................15
SETUP button ........................................................................40
SKIP _ _ button ...........................................................38
Sleep timer .............................................................................31
SLOW 41 I_ button .............................................................38
Sound mode selection .......................................................33
Sound quality adjustments ..............................................34
Specifications ........................................................................45
StableSound _........................................................................34
Stereo sound .........................................................................32
STOP• button ....................................................................38
SUBTITLE button .................................................................40
T
TheaterWide _picture .........................................................25
TOP MENU button .............................................................39
Troubleshooting ..................................................................46
TV/DVD button .....................................................................37
V
V-Chip
Age block ...........................................................................28
Aux block ...........................................................................28
Content block ...................................................................28
M PAA ..................................................................................28
Password ............................................................................28
VCD ..........................................................................................38
VCR connection ...................................................................13
VOL button .............................................................................19
W
Warranty ..........................................................................48, 49
WMA ........................................................................................42
WOWTM surround .................................................................33
Z
ZOOM button ......................................................................39
50


TOSHIBA AMERICA CONSUMER PRODUCTS, L. L. C.
HEAD OFFICE:82 TOTOWA ROAD, WAYNE, NEW JERSEY 07470, U.S.A.
NATIONAL SERVICE DIVISION:1420B TOSHIBA DRIVE, LEBANON, TN. 37087, U.S.A.
TOSHIBA OF CANADA LTD.
HEAD OFFICE/191 McNABB STREET MARKHAM, ONTARIO L3R 8H2, CANADA TEL: (905) 470-5400
SERVICE CENTERS:
TORONTO: 191 McNABB STREET MARKHAM, ONTARIO L3R 8H2, CANADA TEL: (905) 470-5400
MONTREAL: 18050 TRANS CANADA, KIRKLAND, QUEBEC, H9J-4A1, CANADA TEL:(514)390-7766
VANCOUVER: 22171 FRASERWOOD WAY, RICHMOND, B.C. V6W 1J5, CANADA TEL: (604) 303-2500
ColorStream and StableSound are registered trademarks of Toshiba America Consumer Products, L.L.C.
TOSHIBA
_72742113
