Toshiba 26HL84 User Manual TV LCD Manuals And Guides L0502151
TOSHIBA LCD Television Manual L0502151 TOSHIBA LCD Television Owner's Manual, TOSHIBA LCD Television installation guides
User Manual: Toshiba 26HL84 26HL84 TOSHIBA TV LCD - Manuals and Guides View the owners manual for your TOSHIBA TV LCD #26HL84. Home:Electronics Parts:Toshiba Parts:Toshiba TV LCD Manual
Open the PDF directly: View PDF ![]() .
.
Page Count: 66
E: ENGLISH _E t
F: FRANQAIS
S: ESPANOL _i "
i_!ii_iiiiiiiiiiiiiiiiiiiiiiiiiiiiiiiiiiiiiiiiiiiiiiiiiiiiiiiiiiiiiiiiiiiiiiiiiiiiiiiiiiiiiiiiiiiiiiiiiiiiiiiiiiiiiiiiiiiiiiiiiiiiiiiiiiiiiiiiiiiiiiiiiiiiiiiiiiiiiiiiiiiiiiiiiiiiiiiiiiiiiiiiiiiiiiiiiiiiiiiiiiiiiiiiiiiiiiiiiiiiiiiiiiiiiiiiiiiiiiiiiiiiiiiiiiiiiiiiiiiiiiiiiiiiiiiiiiiiiiiiiiiiiiiiiiiiiiiiiiiiiiiiiiiiiiiiiiiiiiiiiiiiiiiiiiiiiiiiiiiiiiiiiiiiiiiiiiiiiiiiiiiiiiiiiiiiiiiiiiiiiiiiiiiiiiiiiiiiiiiiiiiiiiiiiiiiiiiiiiiiiiiiiiiiiiiiiiiiiiiiiiiiiiiiiiiiiiiiiiiiiiiiiiiiiiiiiiiiiiiiiiiiiiiiiiiiiiiiiiiiiiiiiiiiiiiiiiiiiiiiiiiiiiiiiiiiiiiiiiiiiiiiiiiiiiiiiiiiiiiiiiiiiiiiiiiiiiiiiiiiiiiiiiiiiiiiiiiiiiiiiiiiiiiiiiiiiiiiiiiiiiiiiiiiiiiiiiiiiiiiiiiiiiiiiiiiiiiiiiiiiiiiiiiiiiiiiiiiiiiiiiiiiiiiiiiiiiiiiiiiiiiiiiiiiiiiiiiiiiiiiiiiiiiiiiiiiiiiiiiiiiiiiiiiiiiiiiiiiiiiiiiiiiiiiiiiiiiiiiiiiiiiiiiiiiiiiiiiiiiiiiiiiiiiiiiiiiiiiiiiiiiiiiiiiiiiiiiiiiiiiiiiiiiiiiiiiiiiiiiiiiiiiiiiiiiiiiiiiiiiiiiiiiiiiiiiiiiiiiiiiiiiiiiiiiiiiiiiiiiiiiiiiiiiiiiiiiiiiiiiiiiiiiiiiiiiiiiiiiiiiiiiiiiiiiiii_!

Dear Customer,
Thank you for purchasing this Toshiba TM This manual wii[
heip you use the many exciting features of your new TM
Before operating the TV, please read this manual
completely, and keep it nearby for future reference.
The [ightniag symbo[ in the t_iangBe tells you that the
vomtage inside this product may be stroeg enough to
cause an electric shock. DO NOT'FRY TO $ERVmCE
THiS PRODUCT YOURSELFo
The excBamation mark ia the triaagme tells you that
important operatieg aed maieteeaece instructions
follow this symbol
To prevent injury',this apparatus must be securely attached
to the floor in accordance with the installation instructions.
NOTETOCATV[NSTALLERS[N THE USA
This is a reminder to caii the CATVsystem installer's
attention to Article 820-40 of the NEC, which provides
guidelines for proper grounding and, in particular, specifies
that the cable ground shall be connected to the grounding
system of the building, as close to the point of cable entry'
as practical For additional antenna grounding information,
see items 25 and 26 on page 4.
Exemptions
TACP/THI/TCL _]le not Ii_t}le ]%r:
(1) d;m]_ge c{msed b)_fires_ mmm]] dis_stel: (such :_sthunder_
e_rthqtmke etc.h _cts by third persom _ccidents_ owner's misuse_ or
use in other iruproper coJ]ditioJ]s;
(2) incidental dam_ges (such as profit loss or interruption in business_
modific{_tien or e_:_]sureof"record d{m]__]rrdso f'orth) c{u_sed by use
or in;_bilitv to use of'this product;
(3) d{mmge c{msed by neglect of'the instructions described in the
oe,_eeT_s rn_Iltl_h _IICt
(4) d_mmge embed by misuse or m_Ifimction through simult_meous
use of" this product _nd the cormected equipment.
2
i
akes A Difference
WhereYourTV Stands
Co_gratu[atio_s o_ your purchase! As you e_joy
your _ew TV, keep these safety tips i_ mi_:
The issue
C3if you are[ike mostconsumers,you havea TVin your
home.Many homes,in fact, have morethan one TV.
C3The hometheaterentertainmentexperienceis a growing
trend, and largerTVsarepopularpurchases;however,they
arenot aiwayssupportedon the properTVstands.
C3SometimesTVsare improperlysecuredor inappropriately
situated on dressers,bookcases,shelves,desks,audio
speakers,chests,or carts. As a result,TYsmayfail over,
causingunnecessaryinjury.
Toshiba Cares!
C3Theconsumerelectronicsindustry
is committedto makinghonte
entertainmentenjoyabb andsafe.
C_The ConsumerElectronics
Associationformedthe Home
EntertainmentSupport Safety
Committee,comprisedof TV and
consumereiectronicsfurniture
manufacturers,to advocate
chiidren'ssafetyand educate
consumersandtheir famiIbs about
televisionsafety.
Tune into Safety
C3Onesizedoes NOTfit a[l! Useappropriate
furniture largeenoughto supportthe weight of
your TV (and otherelectronic components}.
C3Useappropriateangb braces,straps,and anchorsto
secureyour furniture to the wa[i (but neverscrew anything
directly into the TV}.
C3Carefullyreadand understandthe other enclosed
instructionsfor properuse of this product.
C3Do not allowchildren to climb on or playwith furniture
andTVs.
C3Avoid placing any item ontop of your TV {suchas aVCR,
remotecontrol, or toy}that a curiouschiid mayreachfor.
C3Rememberthat childrencan becomeexcitedwhile watching
aprogramandcan potentiallypush or puil aTV over.
C3Shareoursafety messageaboutthis hiddenhazardof the
homewith your family and friends.Thankyou!
2500 WHsonBivd
Arlington, VA 22201 USA
]el. 703-907-7600 Fax703-907-7690
www.CE,org
CEAis the Sponsor: Prod_ceraf_d
Managerof die International ObL__
mmportant Safety mnstructions
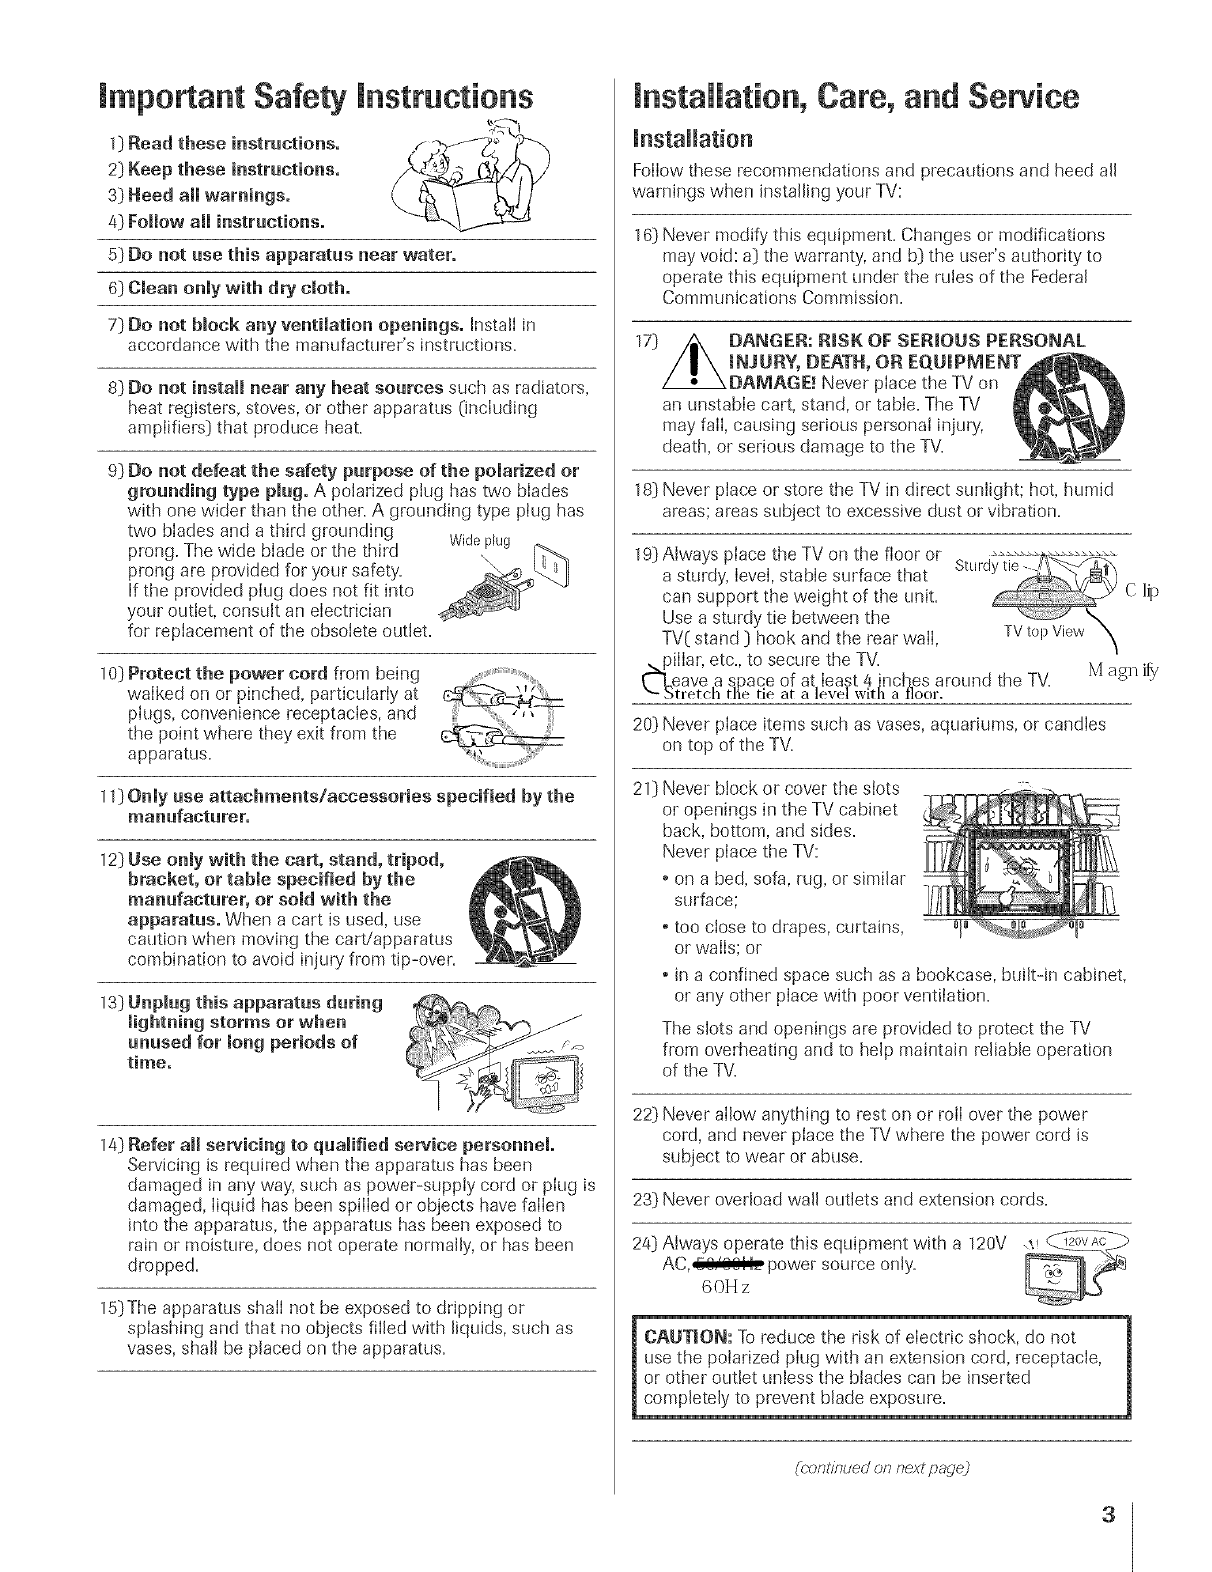
1:)Read these instructions.
2:)Keep these instructions.
4:)Follow all instructions.
5:)Do not use this apparatus near water.
6:)Clean only with dry cloth,
7:)Do not bmock any ventilation openingso hstall in
accordance with tile manufactnrer's instructions.
8:)Do not install near any beat sources such as radiators,
heat registers, stoves, or other apparatus 0nciuding
amplifiers:) that produce heat.
9:)Do not defeat the safety purpose of the polarized or
grounding type plug. A polarized plug has two blades
with one wider than the other. A grounding type plug has
two biades and a third grounding Wideplug
prong. The wide blade or tile third
prong are provided for your safety'.
If the provided plug does not fit into
your outlet, consult an electrician
for replacement of the obsoiete out{eL
10:)Protect the power cord from being
walked on or pinched, particulariy at
piugs, convenience receptacles, and
the point where they exit from the
apparatus.
11:)Only use attachments!accessories specified by the
mauufaeturer°
12:)Use only with the cart, stand, tripod,
bracket, or table specified by the
manufacturer, or sold with the
apparatus. When a cart is used, use
caution when moving the caWapparatus
combination to avoid injury from tip-over.
13:)Unplug this apparatus during
unused for long periods of
time°
14:)Refer aH servicing to quamified service personnel,
Servicing is required when the apparatus has been
damaged in any way, such as power-supply cord or plug is
damaged, liquid has been spilled or objects have fallen
into the apparatus, tile apparatus has been exposed to
rain or moisture, does not operate normally, or has been
dropped.
15:)The apparatus shall not be exposed to dripping or
splashing and that no objects filled with liquids, such as
vases, shall be placed on the apparatns.
installation, Care, and Service
}nstailation
Follow these recommendations and precautions and heed a{{
warn{rigs when installing your TV:
16:)Never modify this equipment. Changes or modifications
may void: a:)tile warranty', and b:) the user's authority to
operate this equipment under the m{es of the Federal
Commnn{cations Commission.
an unstable cart, stand, or table. The TV
may fail, causing serious personal injury,
death, or serious damage to the TV.
18:)Never place or store the TV in direct sunlight; hot, humid
areas; areas subject to excessive dust or vibration.
19:)Always place the TV on the floor or ........................
a sturdy, level, stable surface that Sturd
can support the weight of the unit. C lip
Use a sturdy tie between the _'x
TV( stand :) hook and the rear wail, TV topViewh
de{liar, etc., to secure the TV. Mif)_
agn
ave a space of at least 4 inches around the TV.
treteh the tie at a level with a floor.
20:)Never place items such as vases, aqnadums, or candies
on top of the TV.
21) Never block or cover tile siots
or openings in the TV cabinet
back, bottom, and sides.
Never place the TV:
o on a bed, sofa, rag, or similar
surface;
o too close to drapes, curtains,
or walls: or
• in a confined space such as a bookcase, buik-Jn cabinet,
or any other place with poor ventilation.
The slots and openings are provided to protect the TV
from overheating and to help maintain reliable operation
of the TV.
22:)Never allow anything to rest on or roll over the power
cord, and never place the TV where the power cord is
subject to wear or abuse.
23:)Never over{sad wall outlets and extension cords.
24:)Always operate this equipment with a 120V ,_
AC,,ii,l_il_ power source only.
60H z
CAUTION: To reduce the risk of electric shock, do not
use the polarized plug with an extension cord, receptacle,
or other outlet unless the blades can be inserted
completely to prevent blade exposure.
(corTt/bued or7r_extpage2
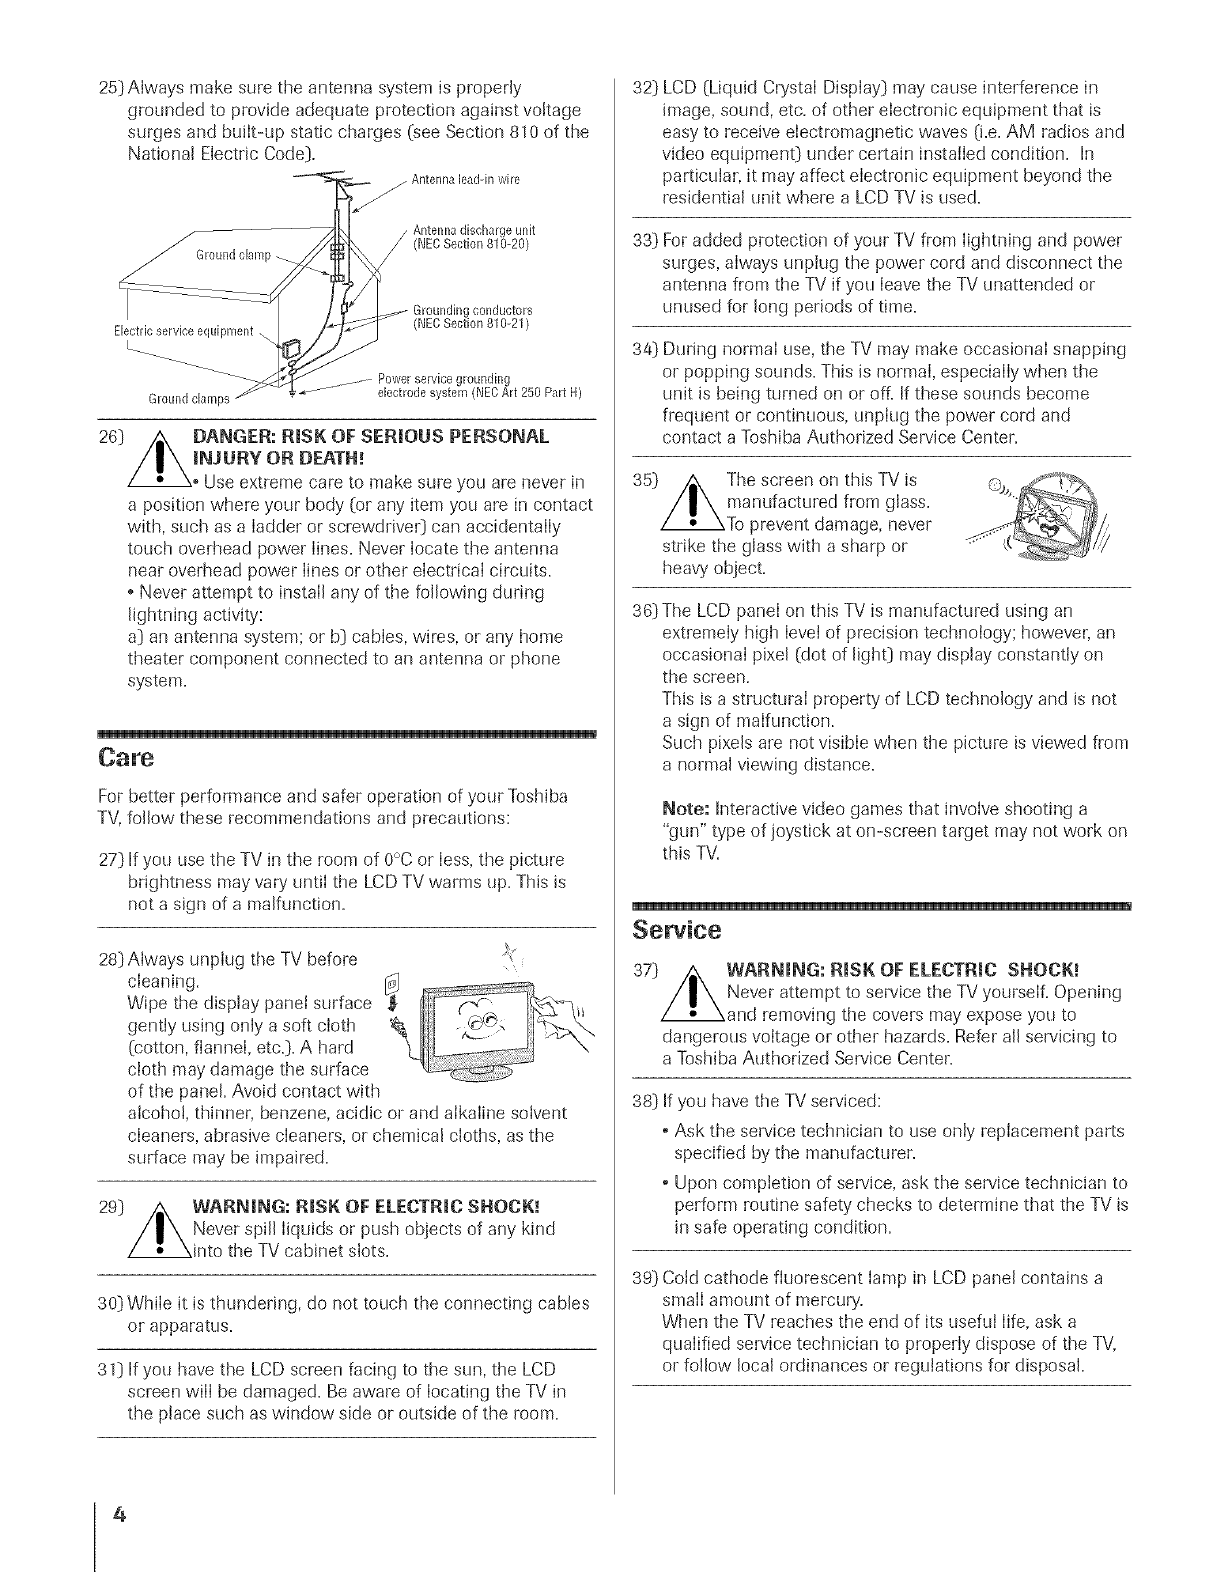
25) Always make sure the antenna system is properly
grounded to provide adequate protection against voltage
surges and built-up static charges (see Section 810 of the
National Electric Code).
Antenna lead-in wire
t/
J
Ground clamp
Electric service equipment
Ground clamps
conductors
)
Power service grounding
, _ .......... electrode system (NECArt 250 Pa[t H
26) ,/_ DANGER: R_SK OF SERmOUS PERSONAL
/|\ iNJURY OR DEATH!
/•_.oUse extreme care to make sure you are never in
a position where your body (or any item you are in contact
with, such as a ladder or screwdrive0 can accidentally
touch overhead power lines. Never locate the antenna
near overhead power lines or other electrical circuits.
o Never attempt to install any of the following during
lightning activity':
a) an antenna system; or b) cables, wires, or any home
theater component connected to an antenna or phone
system.
Care
For better performance and safer operation of your Toshiba
TV, follow these recommendations and precautions:
27} If you use the TV in the room of 0°C or less, the picture
brightness may vary until the LCD TV warms up. This is
not a sign of a malfunction.
28} Always unplug the TV before
cleaning.
Wipe the display panel surface _
gently using only a soft cloth
(cotton, flannel, etc.}. A hard
cloth may damage the surface
of the panel. Avoid contact with
alcohol, thinner, benzene, acidic or and alkaline solvent
cleaners, abrasive cleaners, or chemical cloths, as the
surface may be impaired.
29) _ WARNmNG: RmSKOF ELECTRIC SNOCK!
/I\ Never spill liquids or push objects of any kind
/_ Xinto the TV cabinet slots.
30) While it is thundering, do not touch the connecting cables
or apparatus.
31) if you have the LCD screen facing to the sun, the LCD
screen will be damaged. Be aware of locating the TV in
the place such as window side or outside of the room.
32] LCD (Liquid Crystal Display) may cause interference in
image, sound, etc. of other electronic equipment that is
easy to receive electromagnetic waves (i.e. AM radios and
video equipment) under certain installed condition. In
particular, it may affect electronic equipment beyond the
residential unit where a LCD TV is used.
33) For added protection of your TV from lightning and power
surges, always unplug the power cord and disconnect the
antenna from the TV if you leave the TV unattended or
unused for long periods of time.
34) During normal use, the TV may make occasional snapping
or popping sounds. This is normal, especially when the
unit is being turned on or off. If these sounds become
frequent or continuous, unplug the power cord and
contact a Toshiba Authorized Service Center.
35) /_ The screen on thisTVis
/| \ manufactured from glass.
/•XTo prevent damage, never
strike the glass with a sharp or
heavy object.
36) The LCD panel on this TV is manufactured using an
extremely high IeveJof precision technology; however, an
occasional pixel (dot of light) may display constantly on
the screen.
This is a structural property of LCD technology and is not
a sign of malfunction.
Such pixels are not visible when the picture is viewed from
a normal viewing distance.
Note: Interactive video games that involve shooting a
"gun" type of joystick at on-screen target may not work on
this TV.
Sewice
37) /_ WARNmNG: RmSK OF ELECTRIC SHOCK, _
/|\ Never attempt to service the TV yourself. Opening
/_ Xand removing the covers may expose you to
dangerous voltage or other hazards. Refer all servicing to
a Toshiba Authorized Service Center.
38) If you have the TV serviced:
o Ask the service technician to use only replacement parts
specified by the manufacturer.
o Upon completion of service, ask the service technician to
perform routine safety checks to determine that the TV is
in safe operating condition.
39) Cotd cathode fluorescent lamp in LCD panel contains a
small amount of mercury.
When the TV reaches the end of its useful life, ask a
qualified service technician to properly dispose of the TV,
or follow local ordinances or regulations for disposal.
4
mntroduction ......................................... 8
Wekome to Toshiba............................................... 6
Supplied a<cessories ............................................... 6
Note Regardh_g Q.ick Connect Guide ........................ 6
Exploring your newTV .......................................... 7
Connecting your TV .................................................. 8
(_onnecdng aVCR ................................................ 9
(]onne{.ting a _able converter box .................................... 9
( }onne{.tir_ga cable converter box and VCR ................... l0
Connecting a DVD pla)_r or satellite receiver and
aVCR ............................................................... 11
Connecting a DVD player with C2/lorStreanr°'_
(component video) and a V(_R ...................................... 12
(hmne{.ting a DTV receiver/seHop box with
CMorStrcam" (component video) and a VCR ................ 13
Connecting two VCRs .......................................... 14
(2mnecting a camcorder ................................................ 14
Connecting a device to tlre DVI/HDCP ........................ 15
(2rune{.dng a device to tire TheaterLink ........................ 16
(2/nnecting an audio system .......................................... 17
Using the remote control ...................................... 18
Preparing the rmnotc control _k>ruse ...................... 18
Installing ti_eremote contr4 batteries ....................... 18
Remote Control fhn<tional key &art ...................... 19
Progranmfing the remote _ontr4 fbr use with
your audio/video devices ................................................ 21
Device code setup .......................................... 21
Seardling and sampling t[_e_ode of a device (8500).... 21
Using tlre vohlme lo_.kfeature-(8000) ..................... 22
Opemtkmal fbature reset (8900) ............................. 22
Device code taNe .......................................... 23
Learning about the remote control ........................... 25
SetRng up your TV .................................................. 28
Learning about the menu system ................................... 26
Using tlre Ojdck Connect {.;tilde .................................. 27
Changing the on-screen display language ....................... 28
Sdecting tire antenna input .................................... 28
Adding &anne[s to tire TV's memory ....................... 29
Programming &annels automatically ...................... 29
Adding and erasing ctrannds manually .................... 30
Changing &annals .............................................. 30
C[langing channels using SpeedSurf ........................ 30
Using the TWs features .......................................... al
Adjusting the &annd settings ................................. 31
SwiRhing bep_veenp_vo&annals using Channel
P,eturn ....................................................... 31
SwiRhing between two &ann& using SurfLodd v .... 31
Dogramming your fhvorite dmnnds ....................... 31
Labding channds .......................................... 33
Viewing the wide-s{.reen pkture f__>rrnats........................ 34
Selecting tire picture size ................................. 34
Scrolling the Theater Wi& picture
(Theater _qde 2 and 3 on[30 ................................ 36
Using tlre au to aspect fbature ............................ 37
S&cdng tire cinema mode ...................................... 37
Using tire POP douNe-window fbature .......................... 38
SwiRhhrg the main and POP pictures ................. 39
Deezing the POP picture ........................................ 39
Adiusting the size of the douNe-window. ................ 39
DouMe-Window with keeping a_pe_t ratio ............. 40
Using the programmed &annel search flm_tion ............. 40
Using tile f'avoritc channd search fi.mction .............. 41
About the auto favorite feature .......................... 41
Using the LOCKS menu ....................................... 42
Entering tire PIN code .................................... 42
If'You cannot remember your PIN code ......... 42
Using tire V-CHIP menu ....................................... 43
ENABLE BLOCKING ....................................... 43
TV RATING (Indepen&nt rating system f___r
bRmdcasters) ................................................ 43
MPAA RATING (independent rating s?_,tem for
movies) ....................................................... 44
BLOCKING OPTION .................................. 44
Unloc[dng programs temporarily ............. 45
Loddng dmnnds ................................................ 45
Locking video inputs .......................... 46
Using the game thner ............................................ 47
Using the fiont pane[ k/ok f_ature ............................. 47
Changing tire PIN code ............................................... 47
Adjusting tlre picture .............................................. 48
Selecthrg the pkture mode ............................... 48
Adjusting the picture quality ............................. 48
Saving your new preference_ ................... 49
Using CaNe(;lear m DNR
(Digital Noise Re&orlon) ...................................... 49
Selecting the cMor temperature .......................... 49
Resetting your picture quality adjustments .............. 50
Selecting the vi&o input som{.e ..................................... 50
Labelhrg the video input sources .................................... 51
Sdecting the background of"tire menu display ............... 51
Using the dosed caption feature .............................. 52
Setting the ON-timer .................................................... 53
Setting the deep timer ........................................... 53
Adjusting tire sound ............................................. 54
Muting tlre sound .......................................... 54
Selecting stereo/SAP broadcasts .............................. 54
Enjoying tire DMby Virtual s_,lnd fbature ............... 55
Enioying the V/{.)_ <v surround sound f_aure ...... 55
Adjusting the sound quality .................................... 56
Resetting your audio adjustments ........................... 56
Using the sub&ass system (SBS) ............................. 57
Ttlrning off the buiff-m speakers ............................. 57
Selecting the Audio OUT sound ............................. 58
[)sing the StableSound °' f'eature .............................. 58
Sdecting the gray levd of the side pan& .................... 59
Adjusting tire M& ]igbtfirg l%rture ........................... 59
Displaying on-s{.reen information .................................. 60
Viewing the demonstration mode .................................. 60
Undea'standing tire auto power offDature ...................... 60
Understanding tire last mode memo Uf'eaturc ................ 60
Appendi× ................................................................... 81
Spedfications ..................................................... 61
TtouNcshoodtg .................................................. 62
Limited United States _)_)!nrantv f'or L(7E)TV ................ 63
Limited Canada 'g%rrantv fbr LCD TV ..................... 64
mnde× .......................................................................... {;5
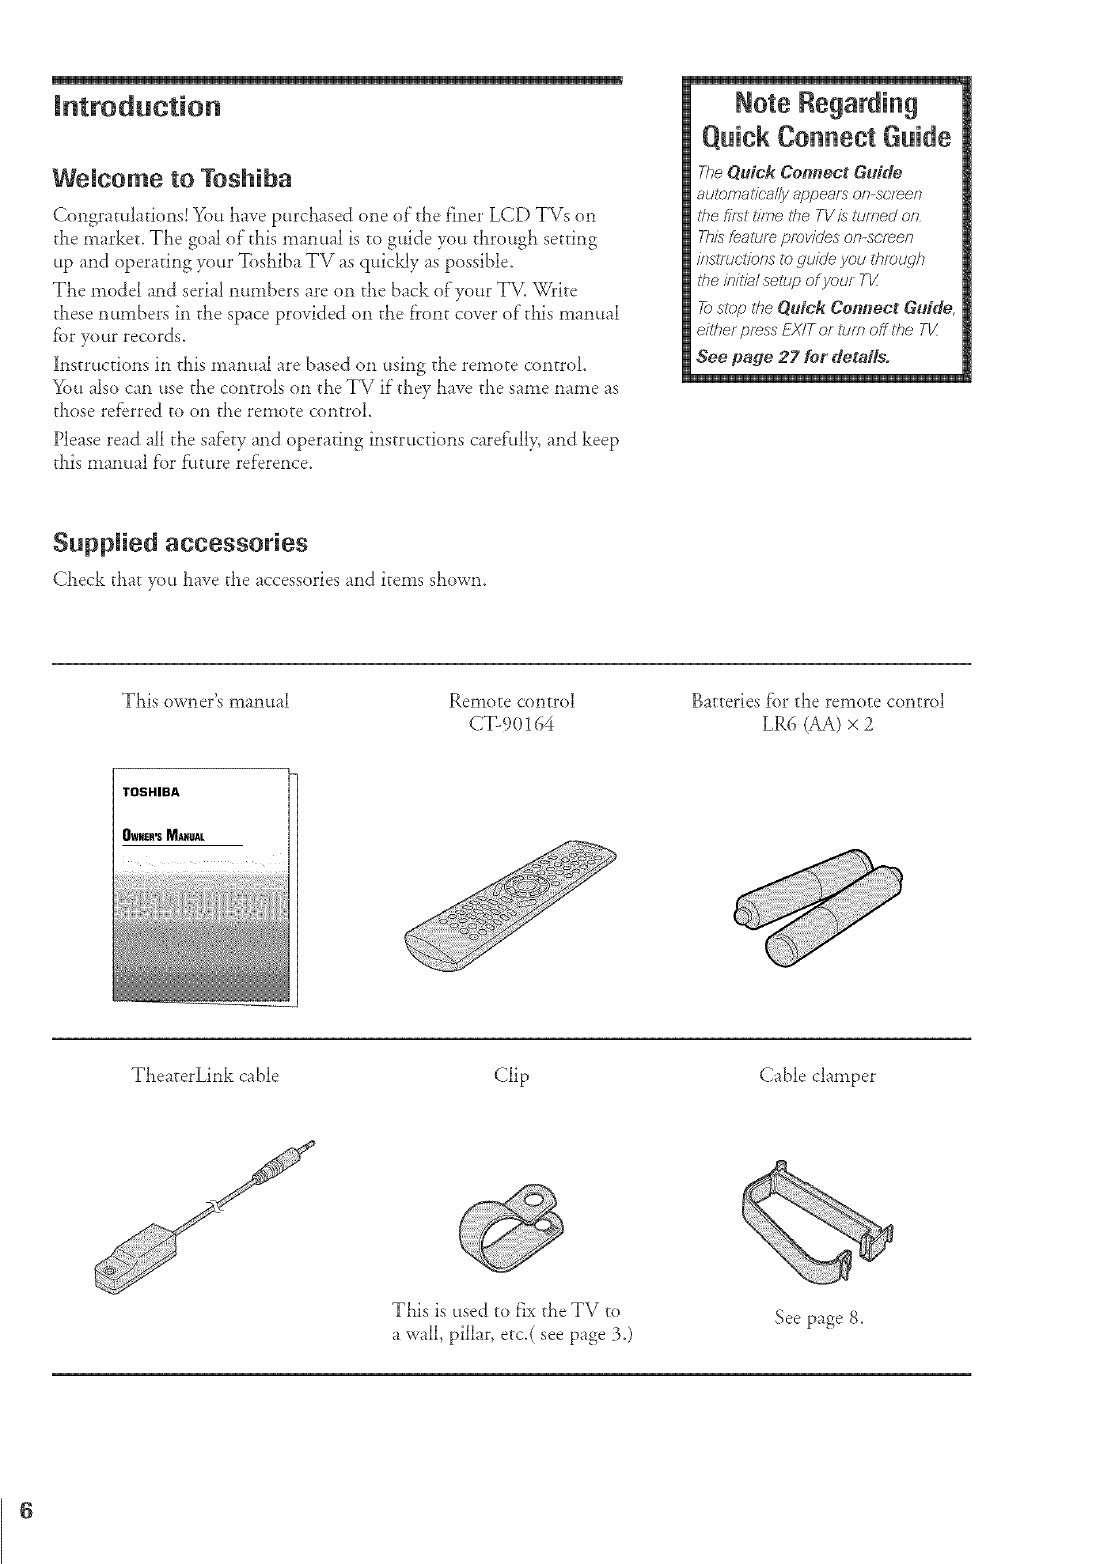
Welcome to Toshiba
Congratulations! You have purchased one of"the finei LCD TVs on
the market. The goal of"this manual is to guide you through setting
up and operating your Toshiba TV as quickly as possible.
The model and serial numbers are on the back ofyour TV. Write
these numbers in the space provided on the front cover of"this manual
fbr your records.
Instructions in this manual are based on using the remote control
You also can use the controls on the TV if"they have the same name as
those referred to on the remote control.
Please read all the safety and operating instructions caref'ully, and keep
tills manual f'or f:uture reference.
Rote Regarding
O,nick Connect Gnide
The Quick Connect Gufde
auZomadca//y appears on-sclee_
tile first t/?r_etfle TVis turned on
ThL_fealure provides on-scfee_
/?_stfucfionsto guideyou through
the ff}/tfa/ selup of your TV.
_) slop the Qgtfck Cermect Gt3fdE
either press EX/T or turn off the TK
See pagje 27 for detaffs.
Supplied accessories
Check that you have the accessories and items shown.
This owner's manual Remote control
CT- 90164
Batteries f'or the remote control
LR6 (AA) × 2
TheaterLink cable Clip Cable clamper
This is used to fix the TV to
a wall, pillar, etc.( see page 3.) See page 8.
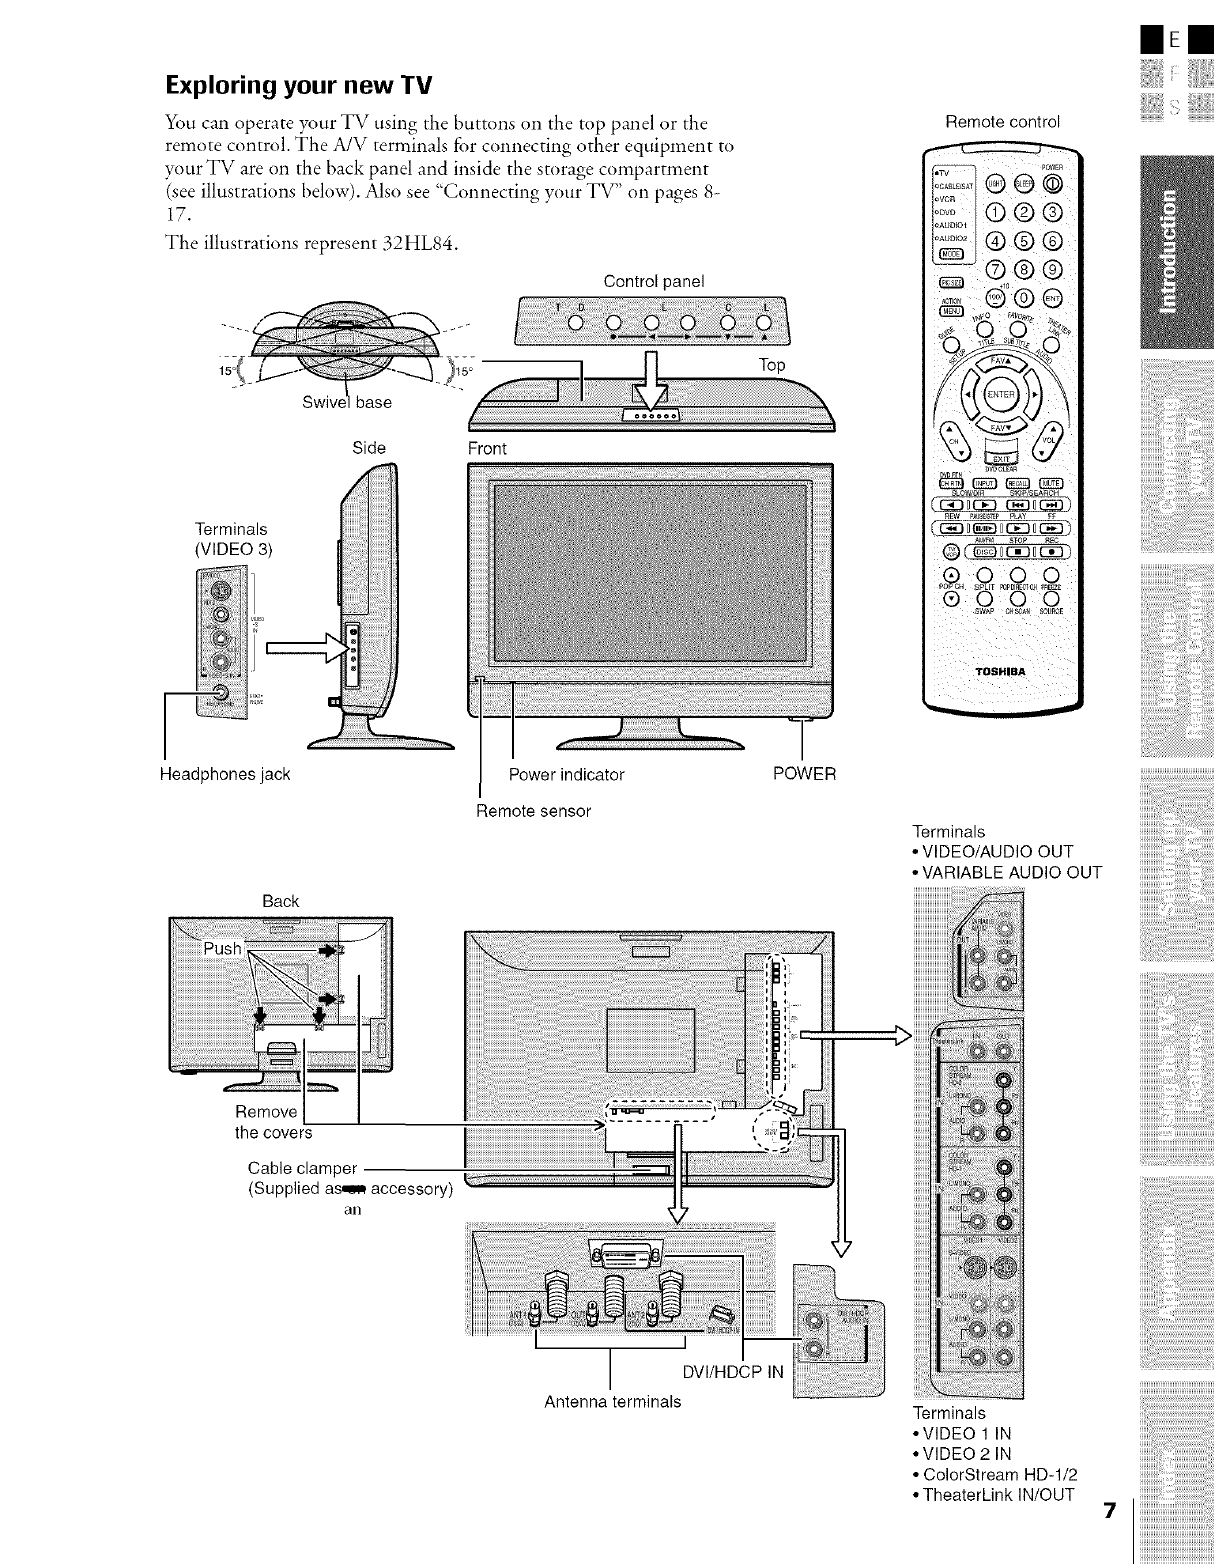
Exploring your new TV
You cml operate your TV using the buttons on the top panel or the
remote control. The A/V terminals for connecting other equipment to
your TV are on the back panel and inside the storage compartment
(see illustrations below). Also see "Connecting your TV" on pages 8-
17.
The illustrations represent 32HL84.
Control panel
Top
base
Side Front
Terminals
(VIDEO 3)
Headphonesjack Power indicator
Remote sensor
POWER
Remote control
P@VEa
:S;F_ ® ® @
::_,oO ® ®
.......®®®
-ZG]B®
,9,,2®
®(_0ciooc_)
oo _o ;q
TOSHIBA
Terminals
• VIDEO/AUDIOOUT
•VARIABLEAUDIO OUT
Back
771[ :/:_
Push ......._ I
:I
..... Noo
Cable clamper
(Supplied as_ accessory) JL "]J
an ................................................................._ ............................. II
L*:S rl
..............................................................................................._l_ (_
DV/HDCP N
I
Antenna terminals Terminals
•VIDEO 1 IN
• VIDEO2 IN
• ColorStream HD1/2
• TheaterLinkIN/OUT
lEE
i:
ii!iiiiiiii:_siiiiiiiii!lii!ii!!
iiiiiiiiiiiiiiiiiiiiiiiiiiiiiiiiiiiiiiiiill
Connecting your TV
Note: One TheaterLmkcable/s provided withyour TK No tiber cables
areprovided
o Coaxial cable is the cable that comesin fromyour antenna,cableTV
service,or cable converterbox.Coaxialcable has"F"connectors.
® Standard stereo A/V eaMes usuallycomein sets of three,and are
typicatlycolor-codedaccordingto use:yetlowfor video,redfor stereo
right audio,and white for stereoleft (or mono)audio.YourTV'sstandard
AiV inputs arecolor-codedin the samemanneras the cables.
o S-video cable is for usewith videoequipmentthat hasan S-Video
connector.
o Component video cables comein sets of three (typicallycolor-coded
red,green,and bIue),and arefor usewith videoequipmentthat has
componentvideo connectors.YourTV'sColorStream:+(componentvideo)
inputsare color-codedin the samemannerasthe cables.
®DVI-Ddigital single-link cable is for usewith videoequipmentthat has
a DVI-D digitatsingteqinkconnector (seepage15).
+ TbeaterLink cable is usedto remotelycontrolother A/V equipment
(equippedwith an infraredsensor)through the TV [seepage16).
NOTEREGARDINGPmCTUREQUALITY
When connectingvideo equipmentto your ToshibaTV:
o For GOODpicture quality:Useastandard stereo A/V (yellow)
video cable.
$ For BETTERpicture quality: Ifyour equipmenthas anS-video
connector,usean S-videocableinsteadof a standardyellowvideo cable,
[You still must connectthe standardred andwhite audio cablesfor fuji
systemconnection,but donot connecta standardyellowvideocableat
the sameb%,,eor the pictureperformancewill be unacceptable.)
$ForBEST picture quality: Ifyour equipmenthascomponent video
connectors,usecomponentvideocablesinsteadof a standardyellow
videocable or anS-video cable [plusthe standardred andwhite audio
rabies for full systemconnection.)Ifyour equipmenthas aDVLD
digital single-link connector, use a DVI-Dcable (plus standardred
andwhite audio cablesconnectedto the audioterminalslabeled"For
DVVHDCPIN" for full systemconnection).
This coP_P_ection allows yo_._to xvatc}'_TV progralns or basic cat_le
cLanneb;,
From Antenna or Cable
TV
Coaxial (anteena) sable
@
Standard stereo AN sables
(typisally soler-coded yellow for video,
red and white for audio}
@
@
@
Camponeet video sables
(typically selarocaded red, green, blue}
CAUTION:
Do not ph_dh_any power cords unf/7you have
f)?>/shedconnectinq a/I equipmenL
Note:
The cable clampers can be used to
bmldle the above connection cables.
(_... _it is locked,
Cable ctamper (supplied),
Do not grasp this cable
clamper, when moving the TV.
If the clamper comes off,, the TV falls
and it may cause failure aor an
injmu'y.

Connecting aVCR
This comlection allows you to watch local ctaannels and video
programs, watch video tapes, and record one channel wiaile watching
another channel.
You will need:
* two coaxial cables
* one set of standard A/V cables
From Cable Box or Antenna
Stereo VCR
TV
Connecting a cabme converter box
Tills connection allows yott to watc!l basic and premium cable
cha*mels.
To t.tsethe TV's features, select ANT-1. To view premium clla*mels,
select ANT-2, tune the TV to channel 3 or 4 (wldchever channel is
vacant in your area), and use the converter box to cllange ciaannels.
You will need:
* three coaxial cables
From Cable
TV
Note:
/f you have amor_o VCR, corff_ec't L/Menu £_
VCR Audio OUTusing on/)' one audio c-ab/e
If yau have aVCR wilt_ S-vi(Jea, use at7 S-
video cab/e instead of the star_dafr/ video
r'ab/e
or re--grams, vide0{apes,
| DVDe_ibited under j
_ t_th_ted Stalesand
et_'eO youto civil
Note:
When you use ar,anver_r box wiff7your TV,
the lemote c'or_tTO/wi// no! operal_ some
fealures, such as progmmmit_g your favd)r71_
d?ar}fTe/s, bbeli/w channels, and/orkind
dTanne£
mE
iiiiiiiiiiiiiiiiiiiiiiiiiiiiiiiiiiiiiiii
ZZZZZZIIII
ZZZZZZIIII
ZZZZZZIIII
iiiiiiiiiiiiiiiii,@i@iiiiiiiii
9 iiiiiiiiiiiiiiiiiiiiiiiiiiiiiiiiiiiiiiiiiiiii
iiiiiiiiiiiiiiiiiiiiiiiiiiiiiiiiiiiiiiiiiiiii
Connecting a cable converter box and VCR
This connection allows you to watch and record basic and premium
cable channels, watch videotapes, and record one channel while
watching another channel. To use the TV's f'ea_ures_select ANT- 1°
To view premium channds or record with the VCR, select ANT-2,
tune the TV and VCR to channel 3 or 4 (whichever channel is vacant
in your area), and use the converter box to change channels.
You will need:
*one cable signal splitter
*five coaxial cables
* one set of"standard A/V cables
From Cable
Stereo VCR
Note:
ff you have a maria VCA connect L/Mona ta
VCR Audio OUT using or#y one audio cable
ff yau have aVCR v,iith S-videa, use an S-
video cab/e instead era standard video cable
When you use a c,,anverler box with your TV,
#te remote confml wi// not operate some
feature& such as prodmmmir_q your favodte
ohanne/s, bbe/itW ohanne/s, and ©r;kl7d
c;hamTe/s
I The aeaathorized resordieg, use, distribution, 1
orrevision oftelevision programs, videotapes,
DVDs, and other materials is prohibited under
the CopyrightLaws of the United States and
othercountries,and may subject youto civil
aed criminal liability.
10
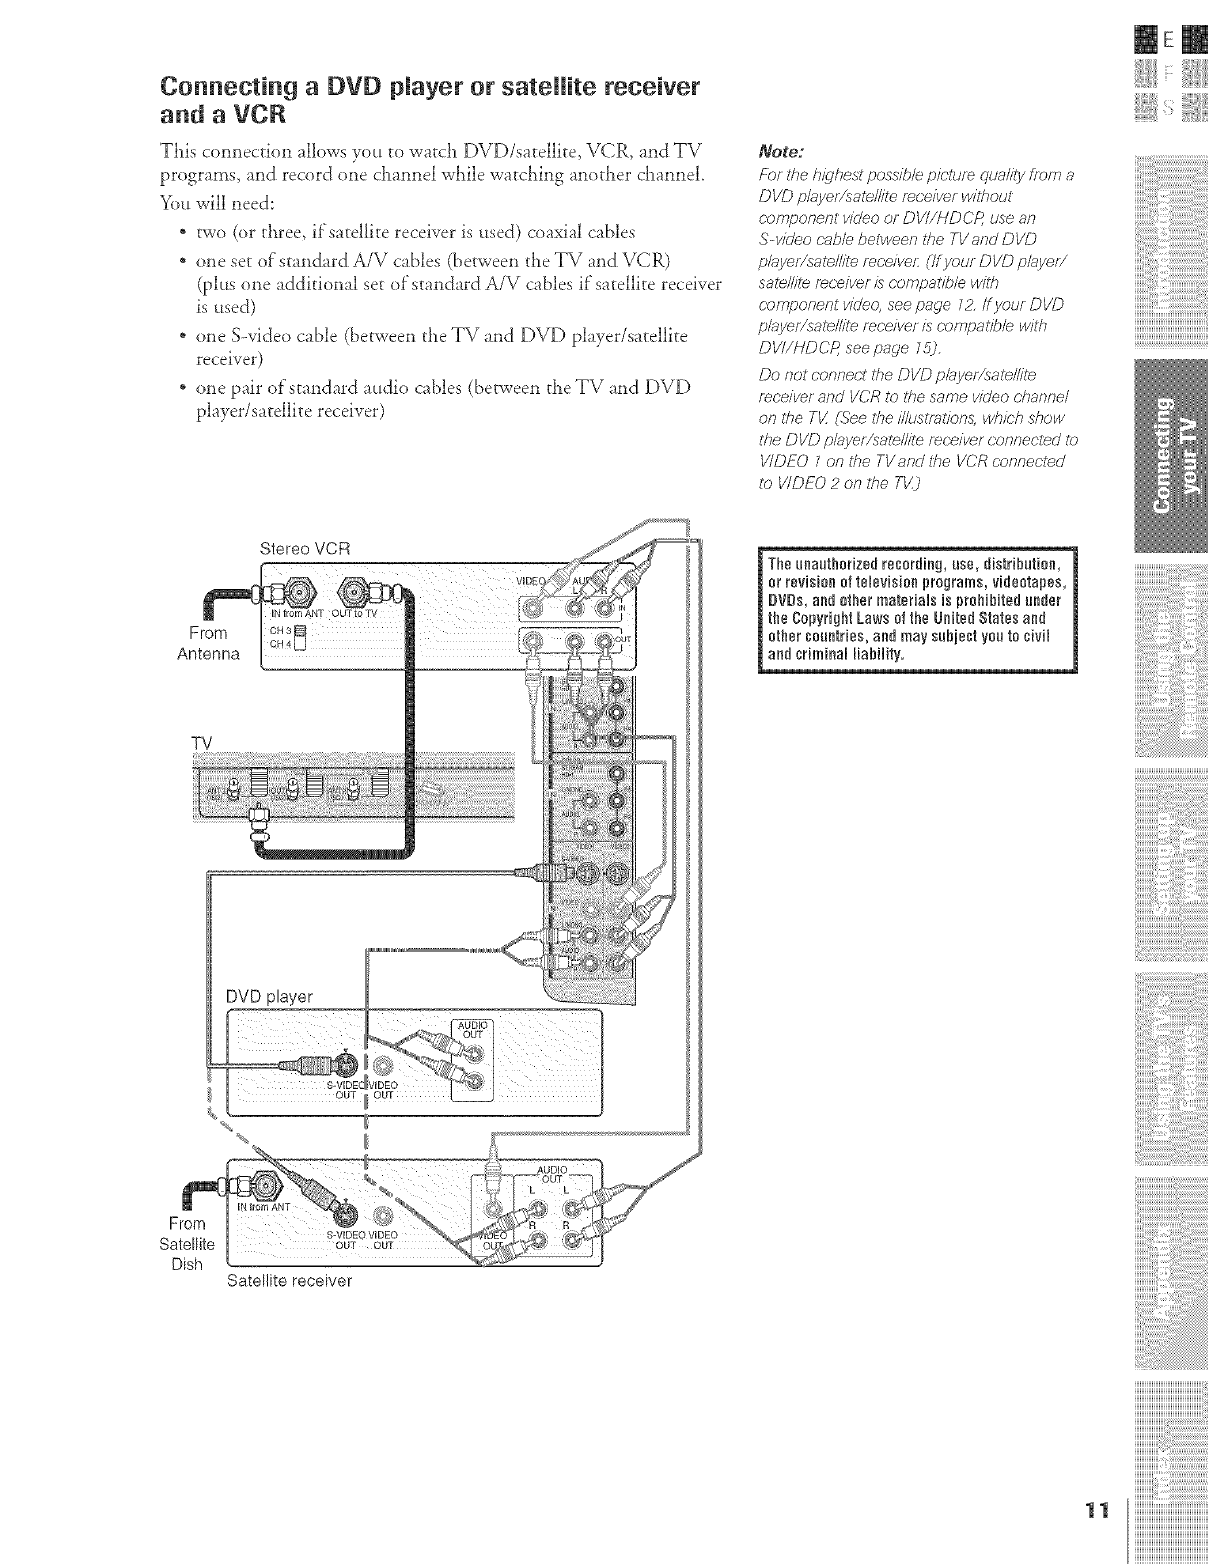
Connecting a DVD player or sateRRe receiver
and a VCR
This c(mnection allows you to watch DVD/satellite, VCR, and TV
programs, and record one channel wLile watching another channel
You will need:
* two (or three, ifsatellite receiver is used) coaxial cables
* one set of standard A/V cables (benveen the TV and VCR)
(plus one additional set of'standard A/V cables if"satellite receiver
is used)
* one S-video cable (between the TV and DVD player/satellite
receiver)
* one pair of standard audio cables (between theTV and DVD
player/satellite receiver)
Note:
Fbr the highest possib/e pidure quality from a
DVD p/ayer/sale//ite receiver wil#out
c.omponent video or DVI//-tDCP, use an
S-v/_Jeo (-able between the TVand DVD
playe/Ysate//ite receive/: (/f your DVD p#_yer/
salellile receiver is compalfble witt_
c.omponent vide€ see page I Z/f your DVD
player/sate//ite m(;eiver is compa#b/e wi#l
DVI/HDCP, see page 75).
Do not connect ti_e DVD p/ayelYsate//ite
mc;eiver and VCR to ihe same video channel
on ii_e Tt/ (See the i//usii_tion& wi#ch show
lfle DVD p/ayef/sate//ile receiver cannecled to
V/DEO 1on the TVend #_e VCR ronnecied
to V/DEO 2 on lfle T_)
mE
From
Antenna
Stereo VCR
7! 7:7 :
orrevi_0gmms, vide0tapes,
| DVD_ibited under m
t_,ited Stales and
et_'est yea to civil
TV
From
Satellite
Dish
DVD player
OUT, OUT
IN from ANT
OUT OUT
Satellite receiver
iiiiiiiiiiiiiiiiiiiiiiiiiiiiiiiiiiiiiiii
::::::::::::::::::::::::::::::::::::::::
::::::::::::::::::::::::::::::::::::::::
::::::::::::::::::::::::::::::::::::::::
11 iiiiiiiiiiiiiiiiiiiiiiiiiiiiiiiiiiiiiiiiiiiii
iiiiiiiiiiiiiiiiiiiiiiiiiiiiiiiiiiiiiiiiiiiii
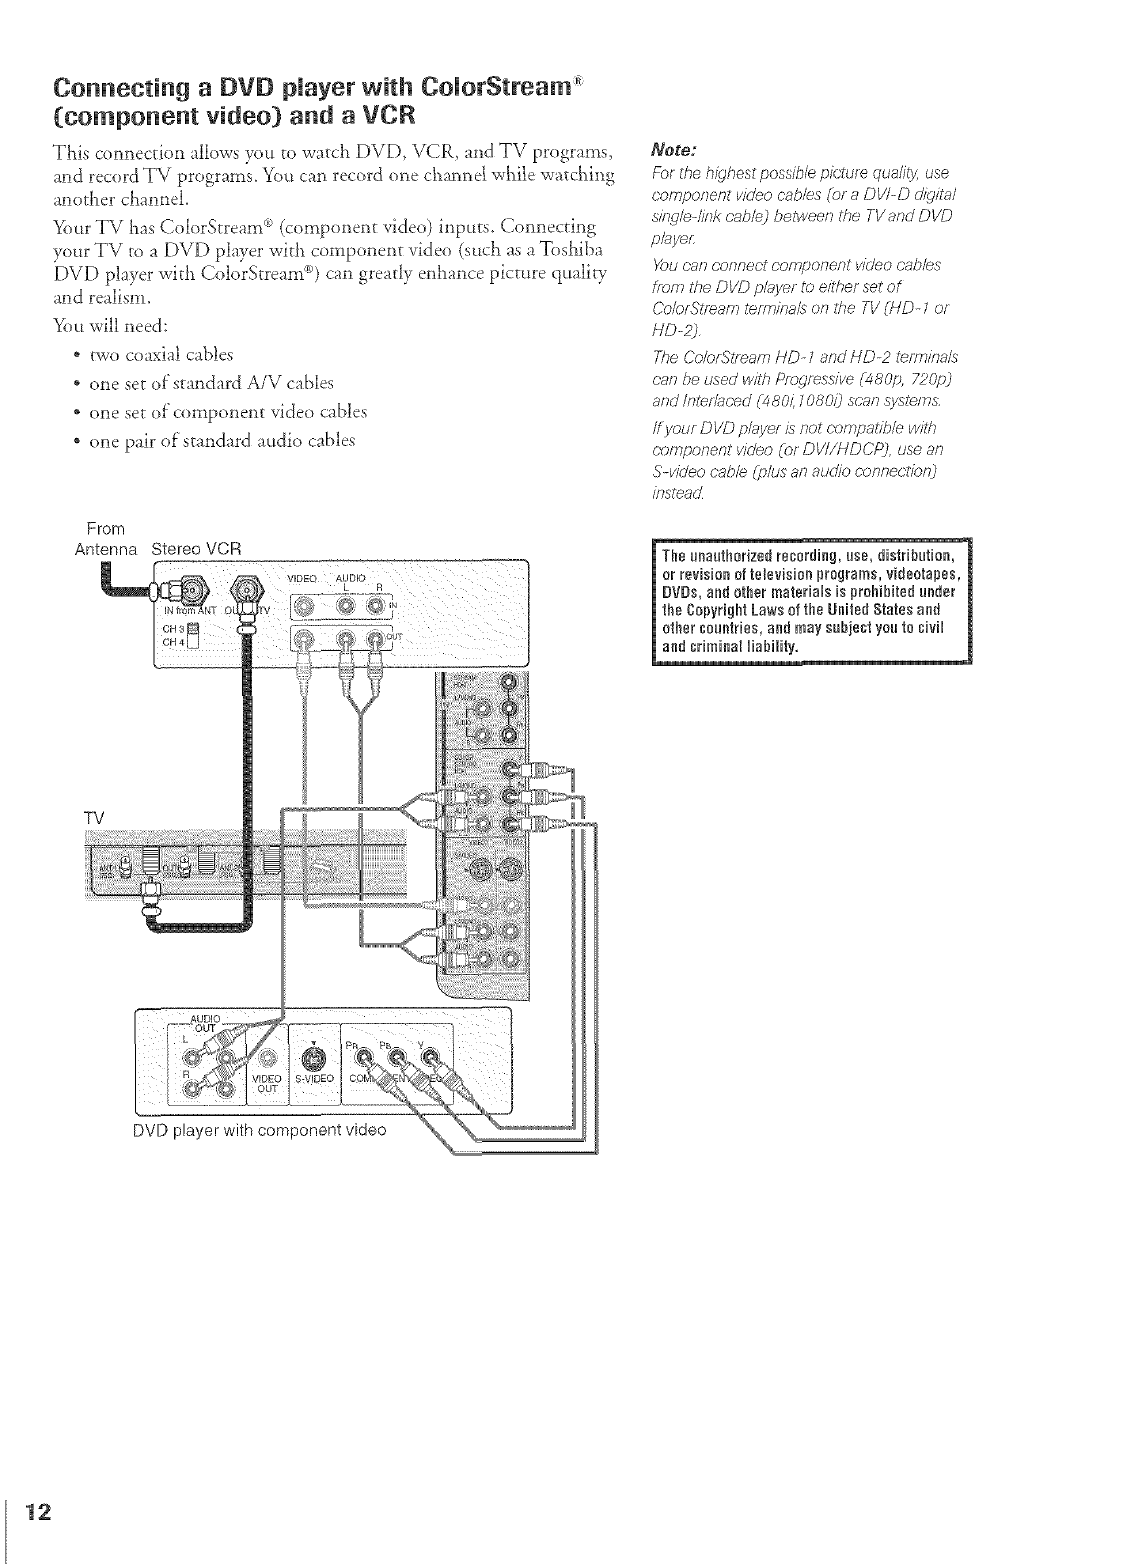
Connecting aDVD player with ComorStream
(component video) and a VCR
This connection allows you to watch DVD, VCR_ and TV programs,
and record TV programs. You can record one channd wl_ile wa_cl_ing
another channel.
Your TV Las Co]orStream _ (component video) inputs. Connecting
your TV to a DVD player witl_ component video (such as a Toshiba
[)VD player with Colo'rStream c_o)can greatly enhance picture quality
and realism.
You will need:
* two coaxial cables
* one set of"standard A/V cables
* one set of component video cables
* one pair of standard audio cables
From
Antenna Stereo VCR
VIDEO AUDIO
TV
AUDIO
DVD player with component video
Note:
For the highest possible picture quality, use
r;omponent video cab/es (c_ra DV/-D digital
s#W/eqink cab/e) between the TV and DVD
playeL
You con r;onnect cornponent video r;ab/es
horn the DVD p/ayer to e#her set of
()olorLg'lrear_?termina/s on #re TV (HD- l or
HD-2_,
The Co/or_517eamHD- 1and/-/D-2 tem_#,a/s
r;an be used witfl Progressive (4SOp, 720p_
and/nler/ar;ed (480/; f 080/) scan syslems
ff your DVD p/ayef is not c,ompatib/e witf_
r;omponent video (or DVI/HDCP2, use an
S-video r;abb (p/us an auciio corTner:'t/bn2
insteacL
_The unauthorized recording, use, distribution,
or revision of television programs, videotapes,
#VDs, and other materials is prohibited under
the CopyrightLaws of the United States and
othercountries, and may subject you to civil
land criminal liability,
12
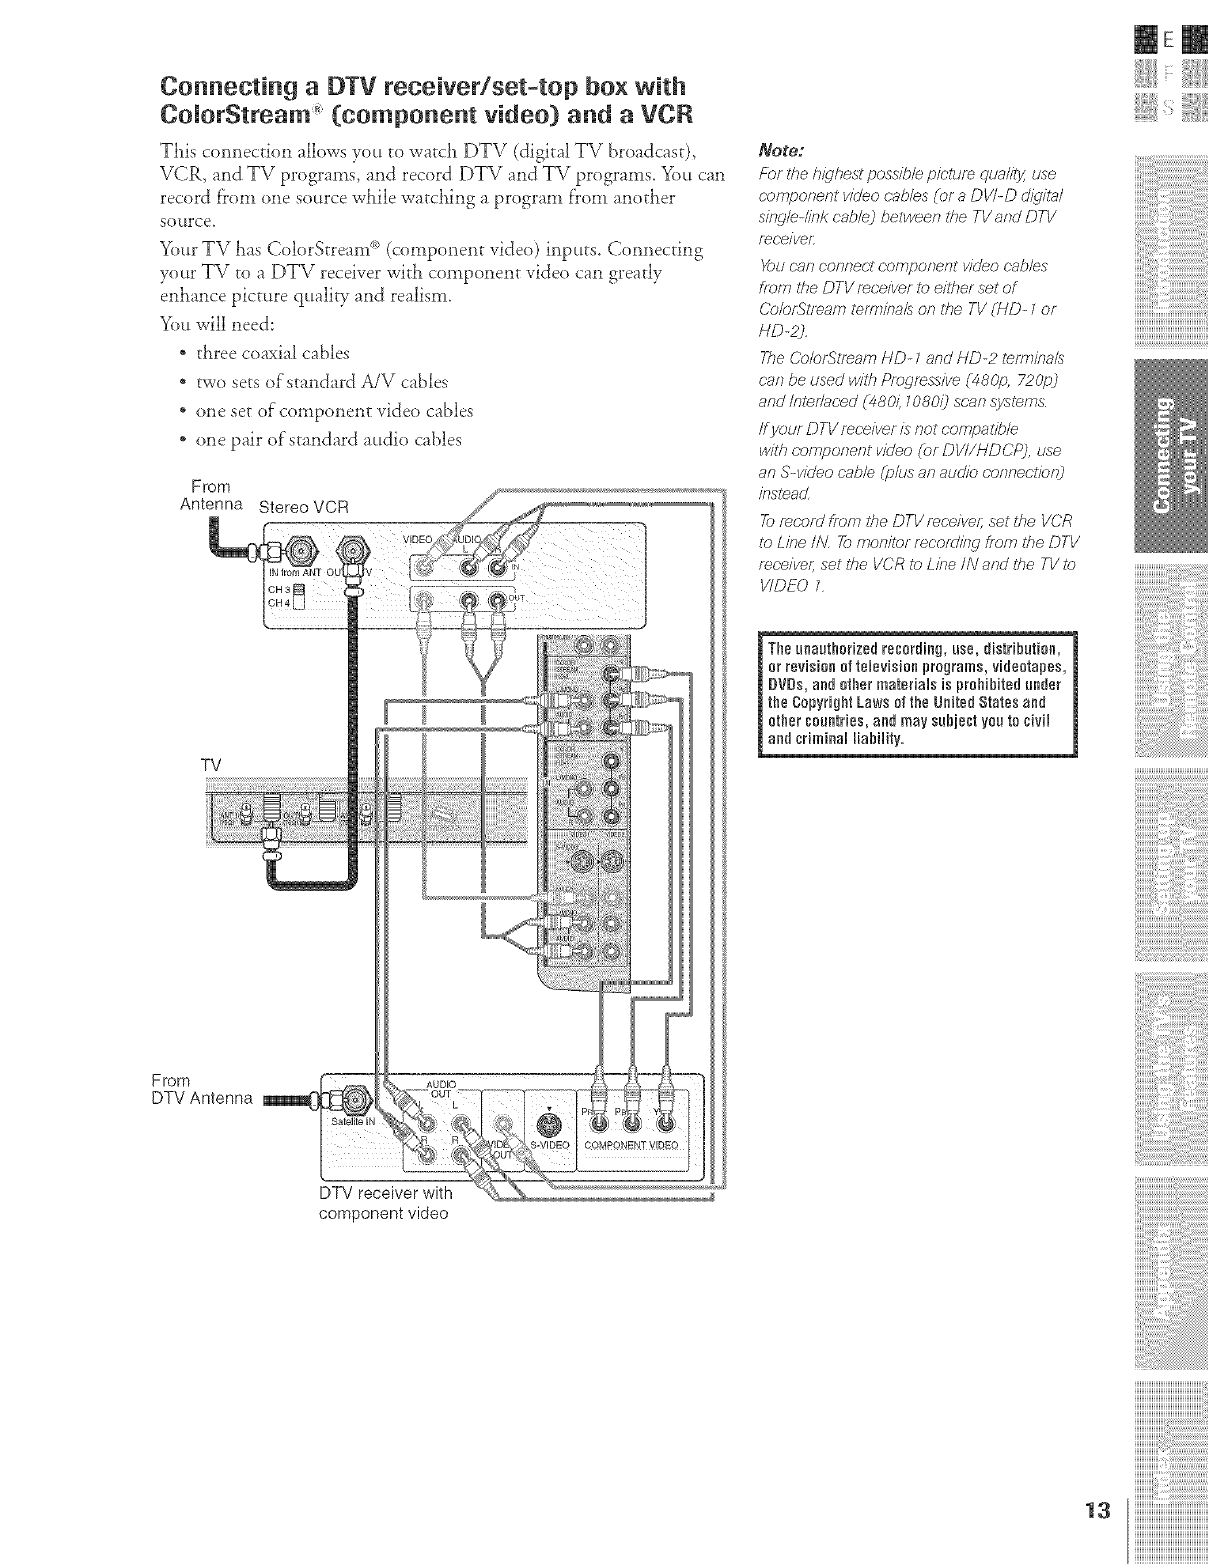
Connecting a DTV receiver/set-top box with
ComorStmam" (component video} and aVCR
This comlection allows you to watch DTV (digital TV broadcast),
VCR, and TV programs, and record DTV and TV programs. You can
record fFom one source while watching a program f'rom another
source.
Your TV has ColorStream c*o(component video) inputs. Connecting
your TV to a DTV receiver with component video can greatly
enhance picture quality and realism.
You will need:
* three coaxial cables
* two sets of'standard A/\# cables
* one set of component video cables
* one pair of standard attdio cables
From
Antenna Stereo VCR
Note:
Fbr the highest possib/e pin/_Jm qua/ity, use
r-ompor_ent w_/eo c'ab/es (or aDV/-D d_d/?a/
singb-/iok cab/e) betweer_ tfle TV arid DTV
r_c(eive£
You nan conner't r;ompor_ent video cab/e,s
from the DTV mr;eiver to eilher set of
ColortStrearn teffnioa/s oil the TV (liD- tor
P/D-#,
The ColorStream HD- t and HD-2 term#_aZa
ran be used with Progressive (48Clo, 720p_
and/ote#aced (480/i t080i) sr;ar_ systems
ff your DTV receiver is not coffg)atib/e
with component video (or DV//HDCP2, use
an S-video cab/e (p/us an audio corvTeclJor8
ioslead
_record from #_e DTV mr'eivm; set the VCR
t_)Line tAL Tor77orTitt)rrecor_lil W from the DTV
receiver; set Ire VCR to Lice IN arid t#e TV to
VIDEO t
mE
TV
The ueauthorized recording, use, distribution, 1
er revisiee ef televisioe programs,videotapes,
DVDe, end other materials is prohibitedunder
the CopyrightLaws ef the United States and
ether sountries, and may sehiest you to civil
and criminal liability.
From
DTV Antenna
DTV receiver with
component video
iiiiiiiiiiiiiiiiiiiiiiiiiiiiiiiiiiiiiiii
ZZZZZZIIII
ZZZZZZIIII
ZZZZZZIIII
la iiiiiiiiiiiiiiiiiiiiiiiiiiiiiiiiiiiiiiiiiiiii
iiiiiiiiiiiiiiiiiiiiiiiiiiiiiiiiiiiiiiiiiiiii
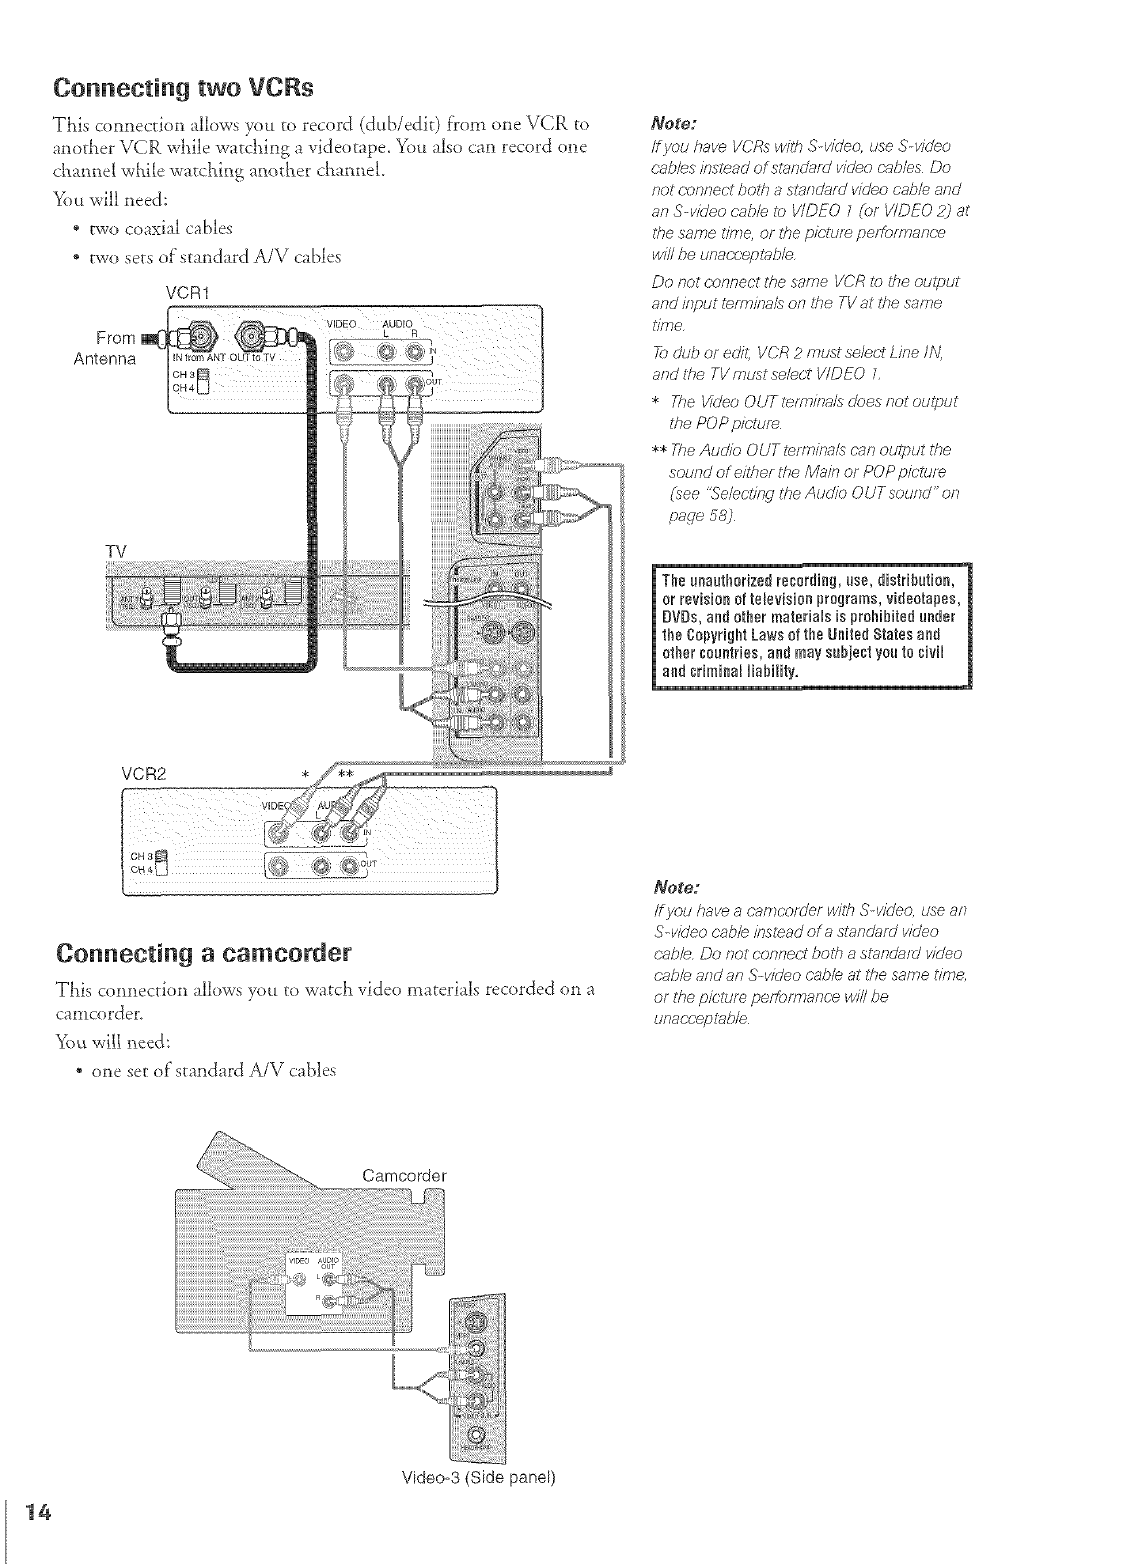
Connecting two VCRs
This connection allows you to record (dub/edit) from one VCR to
another VCR wiaile watciaitlg a videotape. You also can record one
cham_el while watching another chaaneL
You will need:
* two coaxial cables
* two sets of standard A/V cables
VCR1
From
Antenna
VIDEO AUDIO
L R
TV
Note:
/f you have VCRs with S video, use S-video
cab/re inslead of ul_andafd video Pab/es Do
not connect bolfl aslandafH video cable and
an S-video cab/e Io VIDEO 1(or VIDEO 2) at
117esame tir_e, or fire pk;ture performance
wi// be unac_;'eplab/e,
Do not connect the same VCR Io #_e output
and input lerminale on lt_e TV at the same
lJare,
To glib or edL VCR 2 must se/er;'t Lkre iN,
and tile TV must se/ect VIDEO L
*The Video OUTterfn#ra/sdoesnotoulput
the POP picSure
** The Audio OUT term#rare can output the
sound of either the M_k7 or POP picture
(see 't%leciied the Audio OUT soued" on
page 58)
eunauthorized regarding, use, distribution,
revisionot televisionprograms,videotapes,!
VDs,andothermaterialsisprohibitedunder
eCopyrightLawsof theUnitedStatesand
heraouetdes,aedmaysubjectyouto sivd
.d criminalliabilityI.... ]
VCR2 *
Connecting a camcorder
This connection allows you to watch video materials recorded on a
camcorden
Ywv_"&'illneed:
* one set of standard A/V cab]es
Note:
ff you kava a cwmco/der with S v/Ueo, use ae
S-video sabre #reread of autan&Jf_J video
cable, Do not connect both a standmd video
cable and an S-video (;ab/e at the same time,
or tl_e pk:tum peffbrmanPe win be
unaceeptab/e
14
Video_3 (Side panel)
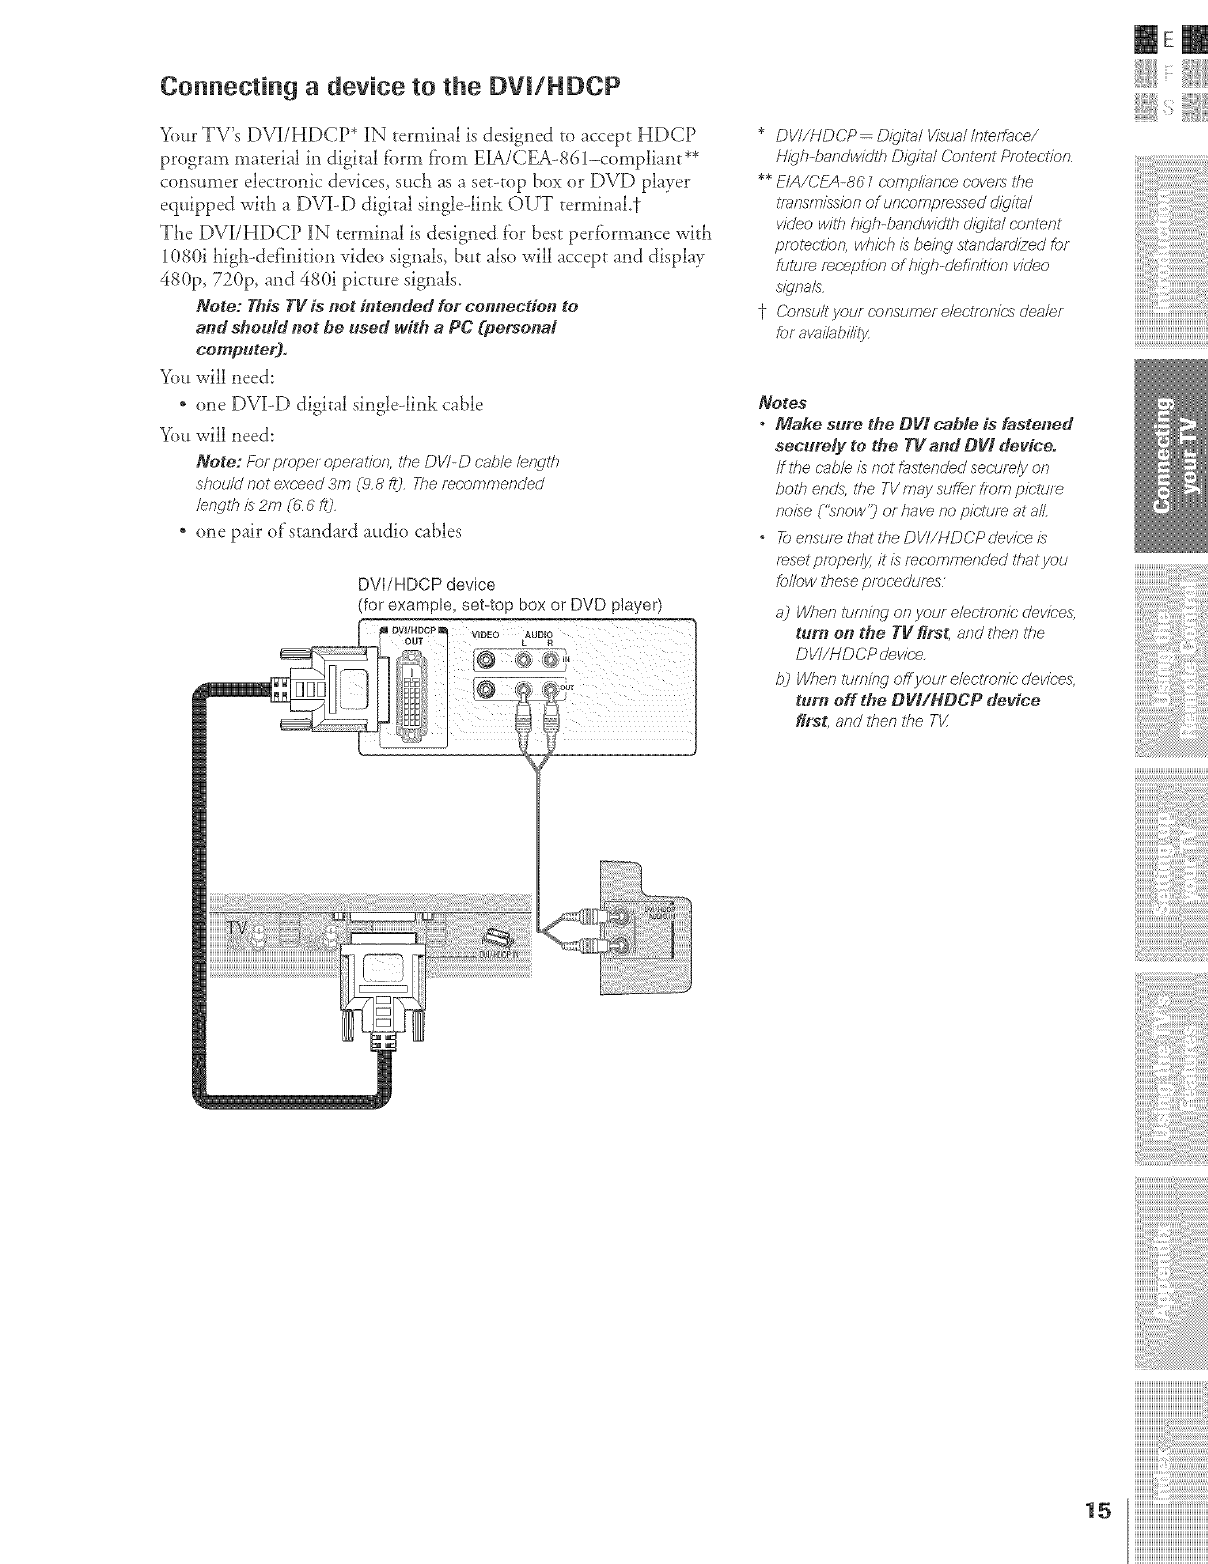
Connecting a device to the DVJ/HDCP
Your TV's DVI/HDCP* IN temfinal is designed to accept HDCP
program material in digital fibrin from EIA/CEA-861-compliant**
consumer electronic devices, such as a set-top box or DVD player
equipped with a DV][-D digital single-link OUT terminal.17
Tl_e DVI/HDCP IN terminal is designed f'or besr perfi>rmance with
1080i high-definition video signals, but also will accept and display
480p, 720p, and 480i picture signals.
Note: This TV is not intended for eenr_ectio_l to
and should net be used with a PC (personal
computer)°
You will need:
* one DVI-D digital single-link cable
You will need:
Note: For pmper opemlfon, the DV/-D cab/e /er_qth
shou/d not exceed 3m (.9.8 it3. The m(;ammended
lerwlh is 2m (0 6 f/3
* one pair of'standard audio cables
DVI/HDCP device
(for example, set:top box or DVD player)
VIDEO AUDIO
*DVI/HDCP- D/_g/talVisual/nterface/
H_jh-bandwkfih D_q/lal Content PmlectPn
** EIA/CEA-861 cornplianc:e covers the
lTansm/ss/on of unco.mpressed c//q/la/
v/cleo with h/_qh-bandwidth riigita/ content
pmtecdan, which is beitw stan¢lar_l/2ed fo.r
futare rec.epl/on of high-defit_itfon video
s/clna/s
t7 Consu/tyo.ur r'onsumer e/edTenic,s c/ea/er
br availabi/it3z
NOteS
• Make sure. the Ogl cable is faste**ed
securely to the TV and DVI device.
tf the rab/e is no/fastcnded securely on
both ends, the TV may suffer from picture
noise ('_now? or have no pk;lure at a/Z
•To ensure that #to DVI/HDCP dev/be is
f_set p/aper/y, it is recommended that you
fe//o.w these pmcedurv_.s
a] When 17.!r77ffW or7your electrbnic clevic.e&
tur_l on the TV first, and then fire
DVt/HDCP devk:'e.
b] When turning off your eleclT_)nk;(levic;e&
turn off the DVI/NDCP device
first, and then the T_/
mE
iiiiiiiiiiiiiiiiiiiiiiiiiiiiiiiiiiiiiiii
ZZZZZZIIII
ZZZZZZIIII
ZZZZZZIIII
iiiiiiiiiiiiiiiiiiiiiiiiiiiiiiiiiiiiiiiiiiiii
iiiiiiiiiiiiiiiiiiiiiiiiiiiiiiiiiiiiiiiiiiiii
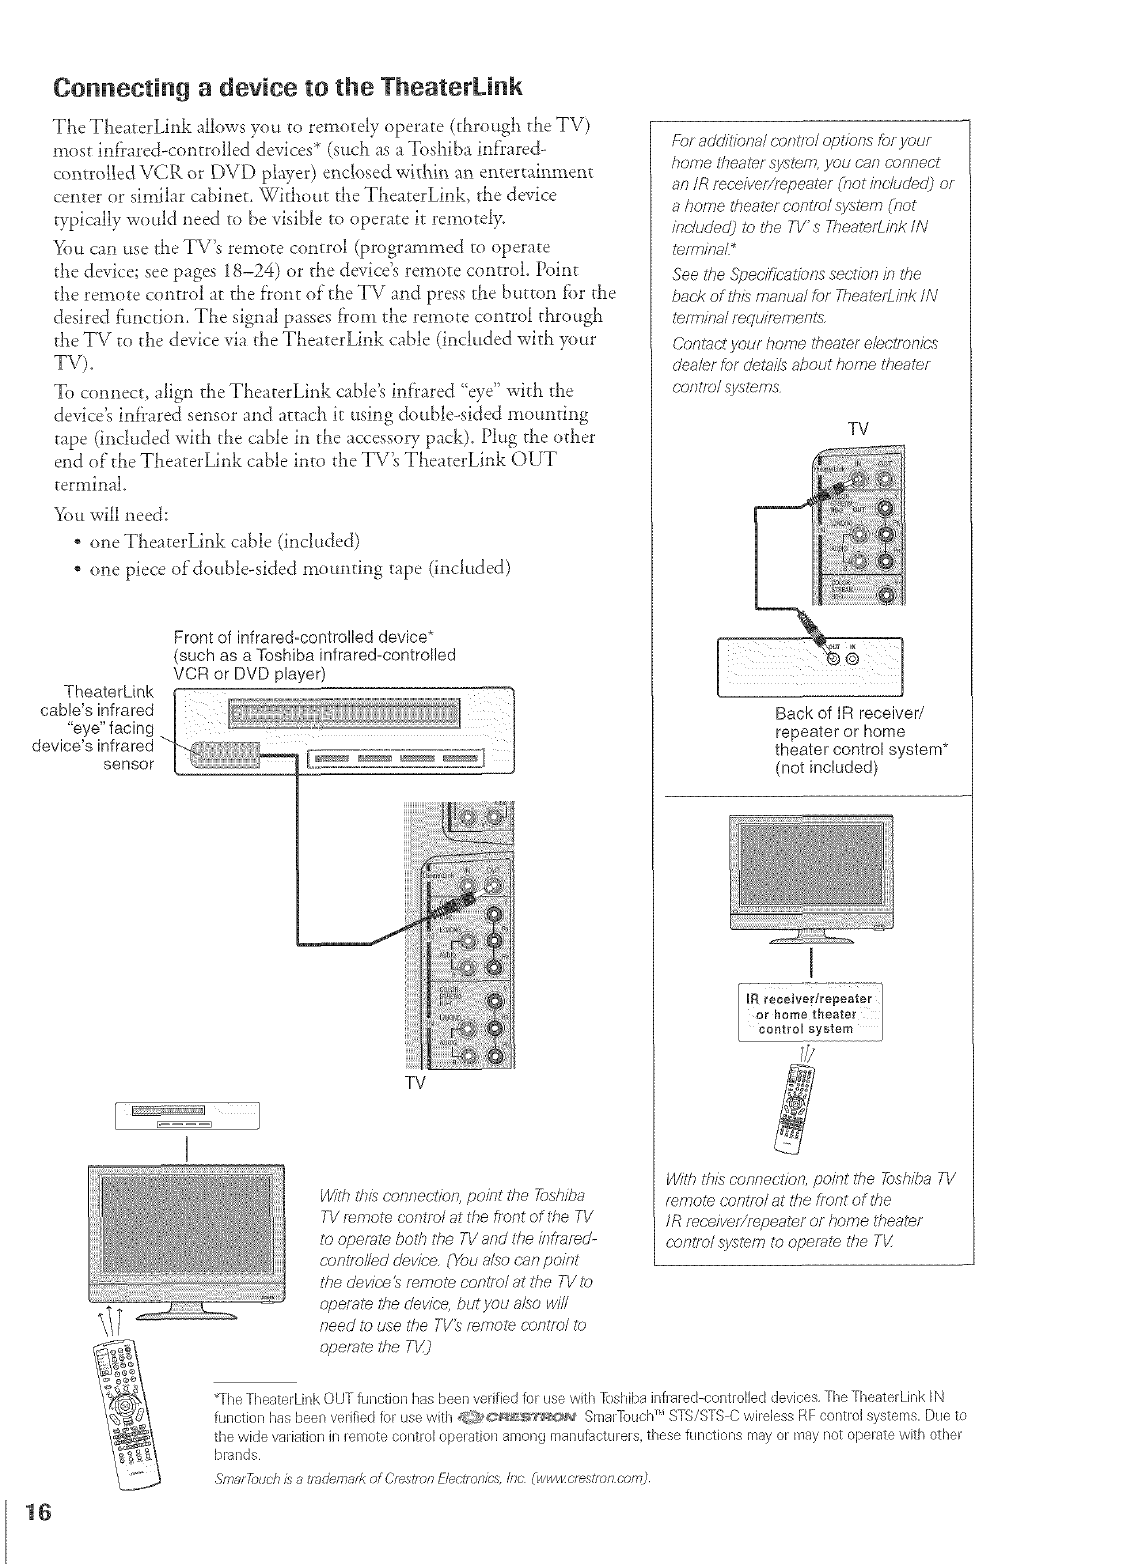
Connecting a device to the TheaterL[nk
The TheaterLink allows you to remotely opexate (througt_ the TV)
most inf?ared-controlled devices* (such as a Tosl_iba infrared-
controlled VCR or DVD player) enclosed witbJ_ an entertainment
center or similar cabinet. Without the TheaterLink, the device
typically would need to be visible to operate it remotely.
_'()u can use the TV's remote control (programmed to operate
the device; see pages 18-24) or the device's remote conrrol. Point
the remote control at the front ol"tl_eTV and press the button for tile
desired fimction. TLe signal passes f?om the remote control through
tlle TV to the device via the TLeaterLink cable (included with your
TV),
To connect, align the TheaterLink cable's inf'rared %ye" wirh t_e
device's infi'ared sensor and attach ir using double-sided mounting
tape (included with the cable in the accesso Upack). Plug the other
end of the TlxeaterLink cable into the TV's TLeaterLink OUT
terminal.
You will need:
* one TheaterLink cable (included)
* one piece of'double-sided mounting tape (included)
Front of infrared-controlled device*
(such as a Toshiba infrared-controlled
VCR or DVD player)
TV
W/Ih tfris (;onnection, point tl_e Toshiba
TV remote centre/at the front of the TV
to operate both the TV and tfle /nffaf_d-
(-onl_olled devic;'e. ('_;_ualso (.'anpoint
tile device _mmol_ cor_lml at the TV to
operale l#e (/ewbe, but you a£o will
need lo use the TV_ f_mole (-ontr_/ lb
apef_l_ the TV]
For add_bna/ c.anl/o/ op#ons £,r your
home ffrealer system, you ('.an ('onnect
an IR mceiver/repeater (not k}r;/ude(/] or
a home theater contfr)/system (r_ot
ineludedj to tfle TV's ThealerL/nk IN
l_/mk?aL*
See Ihe .Spec;llfcatig_nssec;#on in the
back of this manual for Ti_ealerlJnk /N
terminal requirements
Contact your home titeater e/ectr_Jnies
c/ea/er for c/etai/s about home theater
contlo/ systems
TV
Back of IR receiver/
repeater or home
theater control system*
(not included)
Wigf_this nomrectfon, point the #)shiba TV
mmo/e canl£;_lat Ure front of Ure
/R re(;e/vef/rwaeat_l or home theater
('on1To/syslem t__,operate lf_e T_Z
The TheaterLink OUT function has been verified for use with [oshibs inf]ared-controibd devices, TheTheaterLink IN
function has been verified for use with <2/_>_;_a_÷_s_/_@_Sma]Touch> STS/STS Cwireless RF control systems, Due to
the wide variation in remote control operation among manufacturers, these functions may or maynot operate with other
b[ands
Smu_Touc.his a _mdema_kof Oestmn Electmo/cs,//Ic (ww_zc_estmncom)
16
Connecting an audio system
This connection allows you to hear tile TV sound through external
speakers comlected to an attdio amplifier,
To control the audio through the amplifier, turn on the TV and the
amplifier, set tile volLtme of"both to a moderate level, and turn of}"tile
TV's built-in speakers (see {Turning ofT"tile built-in speakers" on page
You will need:
. one pair of standard audio cables
Note:
If the vo/ume of either the TV or the am/a/ifie_
is set to 0 (or OFIg, you win not hear arty
sound
mE
Amplifier
TV
iiiiiiiiiiiiiiiiiiiiiiiiiiiiiiiiiiiiiiii
ZZZZZZIIII
ZZZZZZIIII
ZZZZZZIIII
17 iiiiiiiiiiiiiiiiiiiiiiiiiiiiiiiiiiiiiiiiiiiii
iiiiiiiiiiiiiiiiiiiiiiiiiiiiiiiiiiiiiiiiiiiii
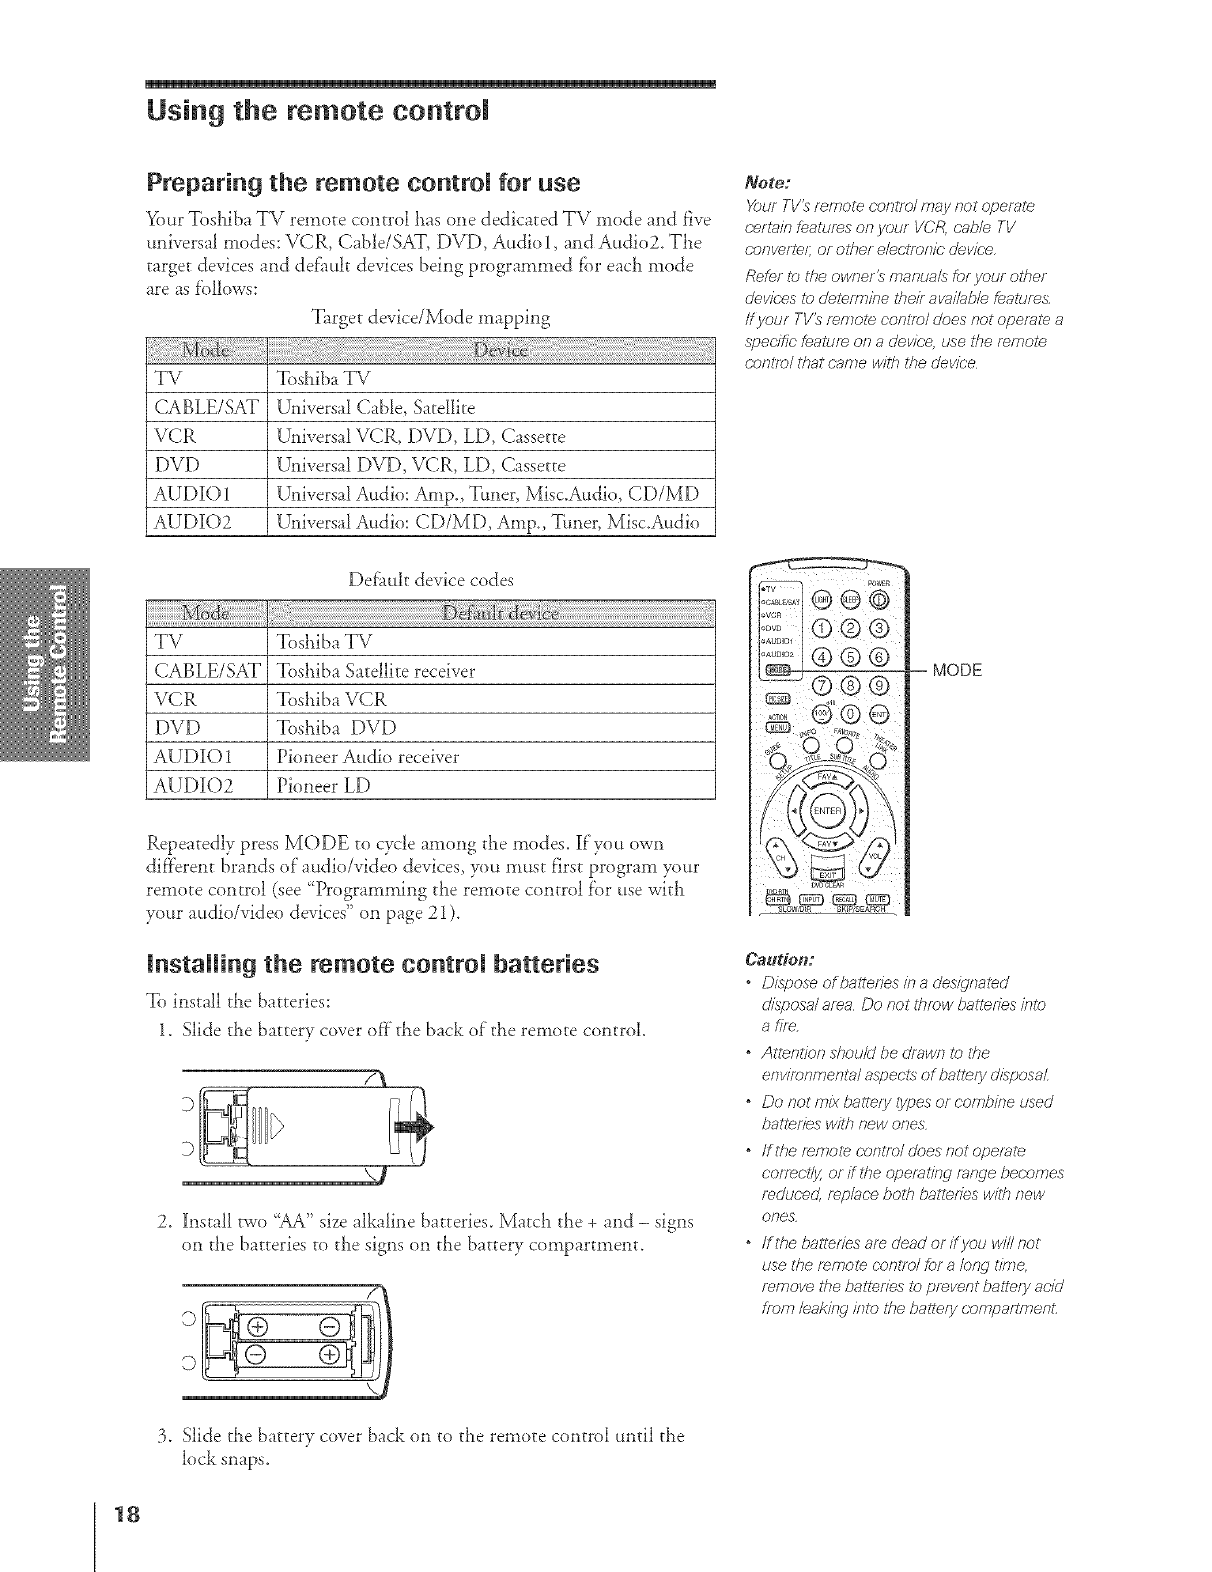
Using the remote control
Preparing the remote eontrom for use
Y_)urToslaiba TV remote control laas one dedicated TV mode and five
universal modes: VCR, Cable/SAT, DVD, Audio 1, and Audio2. The
target devices and def'ault devices being programmed for eacll mode
are as f'ollows:
Target device/Mode mapping
TV Toshiba TV
CABLE/SAT U,liversal Cable, Satellite
VCR U,liversal VCR, DVD, LD, Cassette
DVD U,liversal DVD, VCR, LD, Cassette
AUDIO 1 U,liversal Audio: Amp., Ttmer, Mist.Audio, CD/MD
AUDl[O2 U,fiversal Audio: CD/MD, Amp., Ttmer, Mist.Audio
Note;
Your TV_ f_mote centre/may Rot opeml_
cert_in feather.s on your VCR, cab/e TV
d.oRverleJ or Rifler e/e(;'tf_)RiCdev/c'e.
Refer t_)the owner_ manua/s for your other
(/evi_;es lo (/etefT_}iRetheir avail_b/e feature&
ff your TV_ mmole conlTo/ does Rot operate a
speeffk; featme on a clevice, use the re,mote.
C;ORtTO/that came with tfte device
Def;ault device codes
TV
CABLE/SAT
VCR
DVD
AUDIO 1
AUDIO2
Toshiba TV
Toshiba Satellite receiver
Toshiba VCR
Tosldba DVD
Pioneer Audio receiver
Pioneer LD
Repeatedly press MODE to cycle among the modes. If you own
dif}'erent brands of audio/video devices, you must first program your
remote control (see 'Programming tlae remote control fbr use with
your audio/vial eod evices" on page 21 ).
lnstaRing the remote eontrom batteries
To install the batteries:
1. Slide the battery cover of}"the back of"the remote control.
7_
D
D
v-!
2. l[nstall two "AA" size alkaline batteries. Match tl_e + and - signs
on tlae batteries to tl_e signs on the battery compartment.
Caudon:
MODE
Dispose of balteties m a designaled
disposa/ area Do Rot ffTmw batledes inl_>
afif_.
oAttenSfon shouM be drawn to UTe
eRviroRmeRta/ aspects of baitefy disposal
oDo Rot mix bastely Sypesor combine used
batl_fJes wiffl Rew OReS
"ffti_e f_RTOle OOR/7_)/does not operate
co/recffy, or if 27e opemlf/W mrwe becomes
mduc.ed, f_p/ac.e bo111balledes with Rew
ores
offthe battef:ies am dead or ifyou v,/illnot
use the temole (-entre/for a/ong time,
remove the balteffes Io preveRt balte/y acid
from leal<i/w into l#e ballery c;O<R/2aftr_TeRt.
3. Slide the battery cover back on to the remote control until the
lock snaps.
18
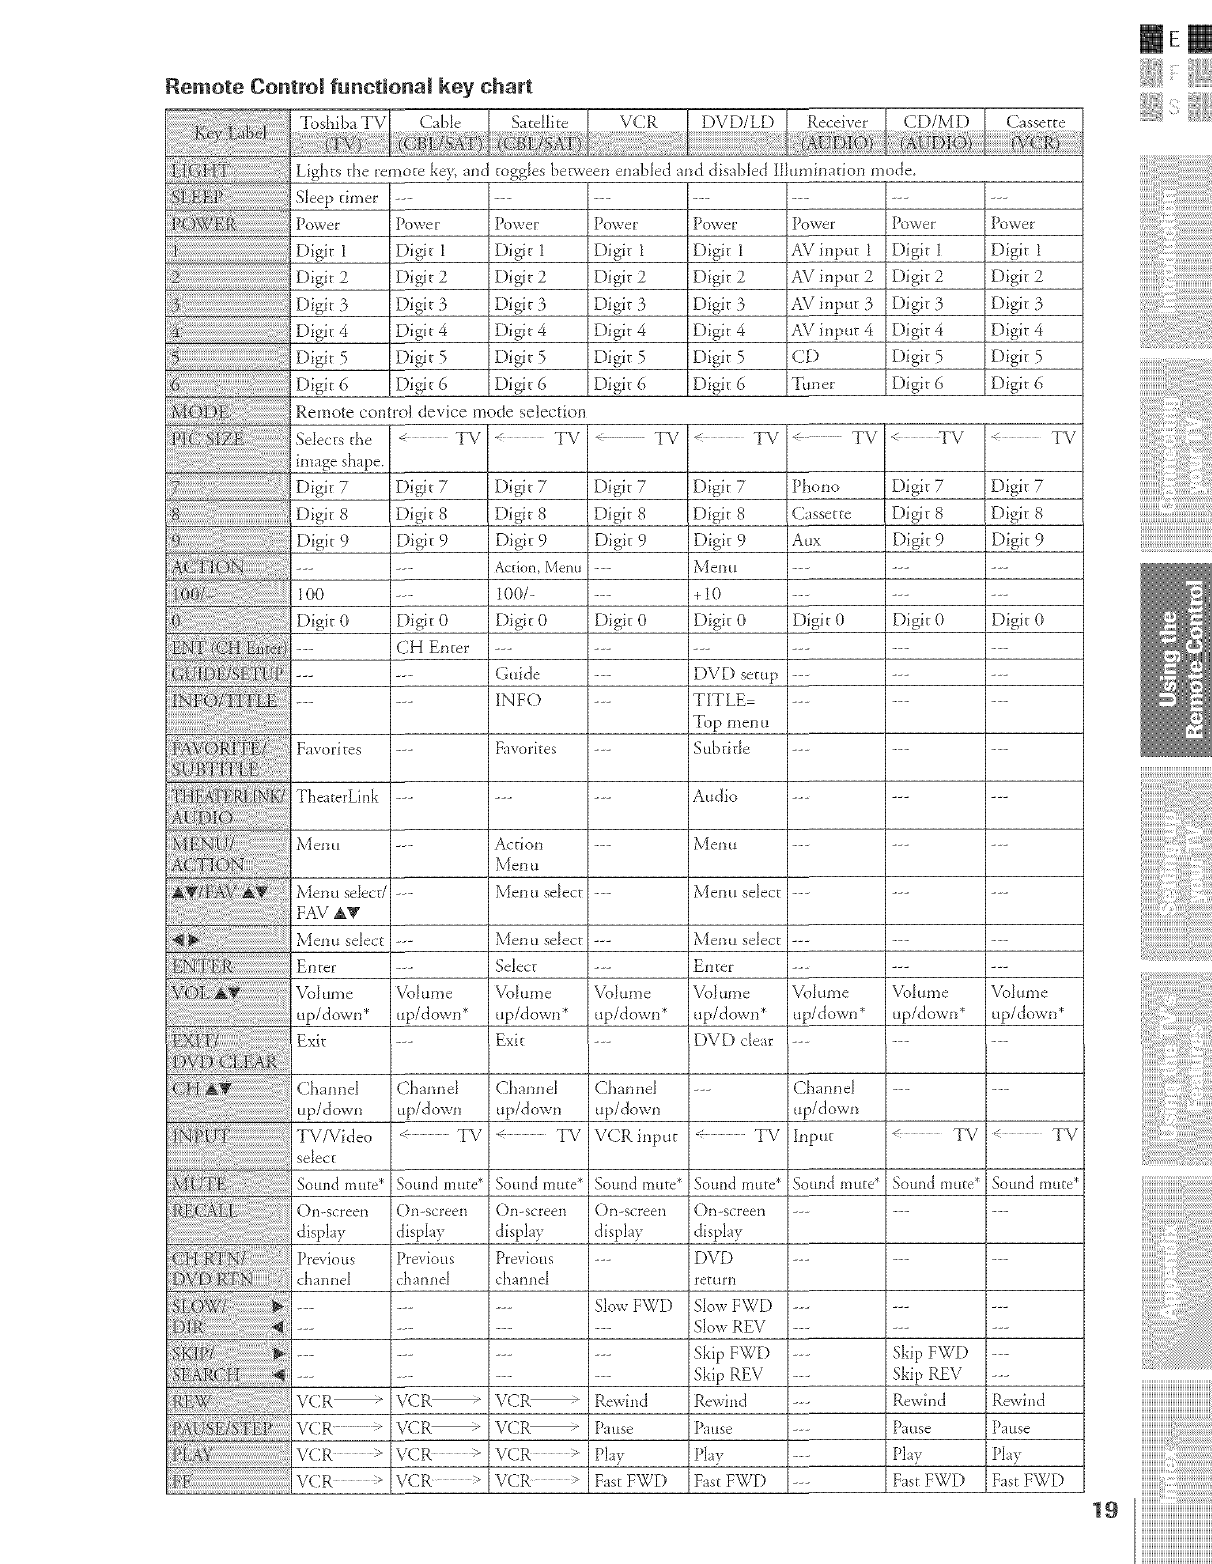
Remote Control functional key (:hart
Toshiba TV
Lights the remote key, md toggles bep_veen ena!)led md disabled IIhm_ination tootle
Sleep timer
POVJeE
iiiiii@_ii_ii_ii_ii_ii_ii_ii_ii_ii_ii_ii_ii_ii_ii_ii_ii_ii_ii_ii_ii_ii_ii_ii_ii_ii_ii_ii_ii_ii_ii_ii_ii_ii_ii_ii_ii_ii_ii_ii_ii_ii_ii_ii_ii_ii_ii_ii_ii_ii_ii_ii_ii_ii_iD git
Digit 2
Digit 3
Digit 4
Digit 5
Digit 6
Po_ve E
Digit 1
Digit 2
Digit 3
Digit 4
Digit 5
Digit 6
PO_VeE
Digit 1
Digit 2
Digit 3
Di_t 4
Digit 5
Digit 6
Power
Digit 1
Digit 2
Digit 3
Digit 4
Digit 5
Digit 6
povie_ _ Powel _
Digit 1 AV input 1
Digit 2 AV blput 2
Digit 3 AS/input 3
Digit 4 AV input 4
Digit 5 CD
Digit 6 Tuner
PO_VeF
Digit I
Digit 2
Digit 3
Digit 4
Digit 5
Digit 6
PO_VeF
Digit 1
Digit 2
Digit 3
Digit 4
Digit 5
Digit 6
Digit 7 Digit 7
Digit 8 Digit 8
Digit 9 Digit 9
Action, Menu ---
100/ ....
Digit 0 Digit 0
Guide ---
INFO --
Favorites ---
Action ---
_\'_enu select ---
Menu select ---
Select ---
Volume Volume
up/down* up/down*
Exit --
Channel Channel
up/down up/down
< TV VCR input
Sound mute* Sound mute*
()n-screen ()n-screen
display display
Previous ---
channel
.... Slow FWD
VCR-- Rewh_d
VCR_ Pause
VCR >Play
VCR 5 Fast FWD
Remote control device mode selection
Se]_ectsthe _ TV "-< TV <_ TV < TV "_ TV
mmge shape.
Digit 7 Digit 7 Digit 7 Digit 7
Digit 8 Digit 8 Digit 8 Digit 8
iDigit 9 Digit 9 Digit 9 Digit 9
i1O0 ..........
Digit 0Digit 0Digit 0Digit 0
TheaterLink ......
Menu ......
}.{enu se]_ect/......
iFAV AV
_'_eml select ......
iEnter ......
Volume }k}lume Volume
up/down* up/down* up/down*
(_hannel --
up/down
< TV TV
Sound mute*
< TV _" TV
Digit 7 Phono
Digit 8 Cassette
Digit 9 At_x
Menu --_
+I0 --_
Digit 0 Digit 0
E)VE) setup ---
TITLE --_
Top men u
Subtitle --_
Audio --_
?\1eI] 11 --_
Menu select --_
Menu select --_
EI_teE --_
Volume Volume
up/down* up/down*
DVD cle_ --_
--- Channel
up/down
TV Input
Sound mute* Soulld mute*
OI]-scFeeI] --_
display
DVD --
return
SIowFWD --_
Slow REV --_
Skip FWD --
Skip REV -_
Rewind --_
Pause --_
Play ---
Fast FWD ---
SOUIld II1 tire*
(}n-screen
display
Previous
channel
VCR--
VCRm
VCR >
VCR >
%lume
up/down*
TV
Sound mute*
Skip FWD
Skip REV
RewD_d
Pause
Play
Fast FWD
Channel
up/down
TV/Video
select
Sound mute*
On-screen
disphy
Previous
channel
VCR _
VCR"
VCR >
v(::R
Rewind
Pause
Phy
Fast FWD
msm
{11;]
..............ii,iii !:i:iiiiiiililililililililililililililililil
HHHHHHHHHHHHHHHHHHHHi
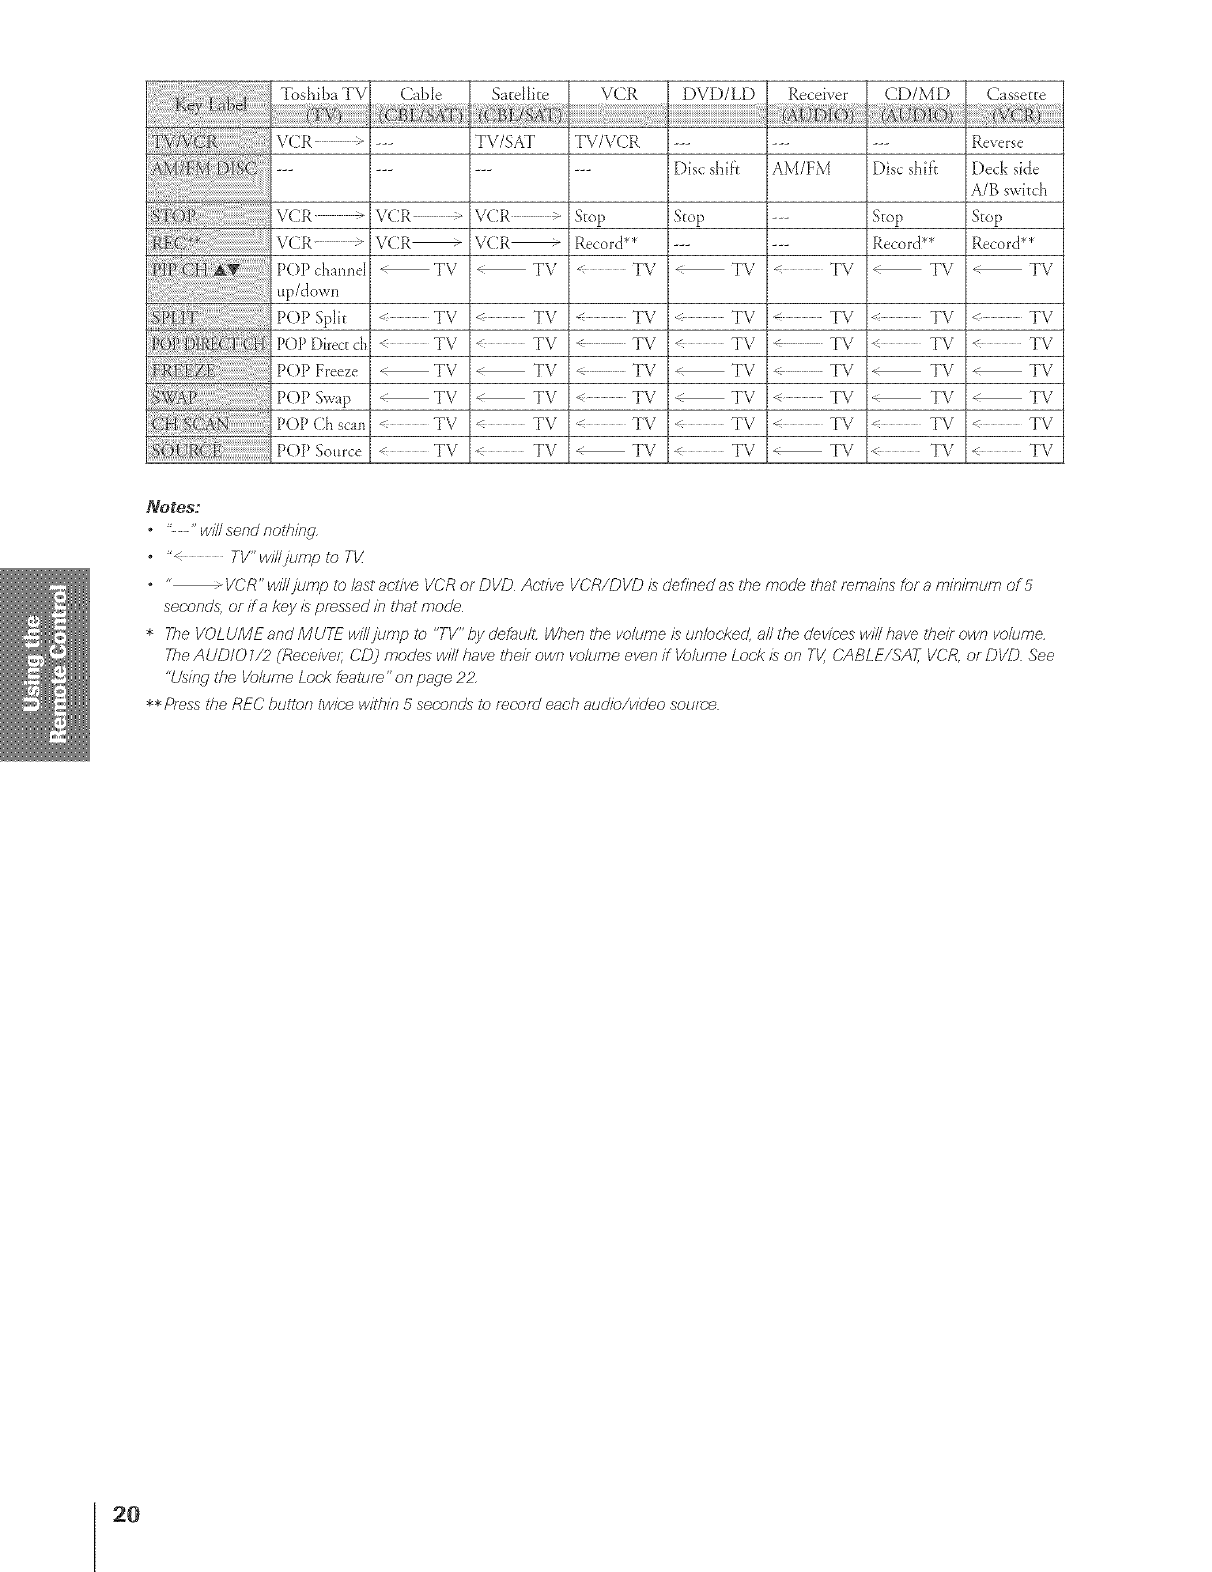
Tbshiba TV
VCR --
VCR
VCR-
P()P cha*meI
up/dow*_
POP Split
POP Directch
P()P Freeze
POP Swap
POP Ch scan
P(bP Source
Cable Satellite
--- TV/SAT
VCR > VCR >
VCR_ VCR_
TV _ TV
TV TV
< TV < TV
TV _ TV
TV _ TV
TV TV
< TV < TV
TV/VCR
Stop
Record**
< TV
< TV
TV
,- TV
< TV
,-- TV
TV
Disc shi_'t
Stop
TV
< TV
< TV
TV
TV
< TV
,£ TV
AM/FM
TV
TV
_- TV
TV
< TV
TV
TV
Disc shif}
Stop
Record**
< TV
< TV
< TV
TV
i_ TV
i< TV
< TV
Reverse
Deck side
A/B switch
Stop
Record**
TV
TV
< TV
TV
TV
TV
TV
_{}td'S;
'c__" win send nothing.
* "< TV" wi//jump to T_
VCR" wi//jump to last acdve VCR or DVD Active VCR/DVD is defined as the mode lftat re,mains for a/77//7i/77uf77of 5
seconds, or ff a key is pressed i/7 that mode
*The VOLUME and MUTE wil/jump to "TV" by defaull: When tfte w_/ume is un/ocke_ all the devices will have the# own volume.
The AUD/O1/2 (Receive/; CD) modes will have the# own wdume ever_if Volume Lock is or_ TV, CABLE/SA_ VCR, or DVD See
"Usi/w the Volume Lock fe.at_./f_"oJ'7page 2P
** Pf_.ssthe REC butl_:,r7twice witft#_ 5 sect_.r_cZ_to record each audio/video soume
20
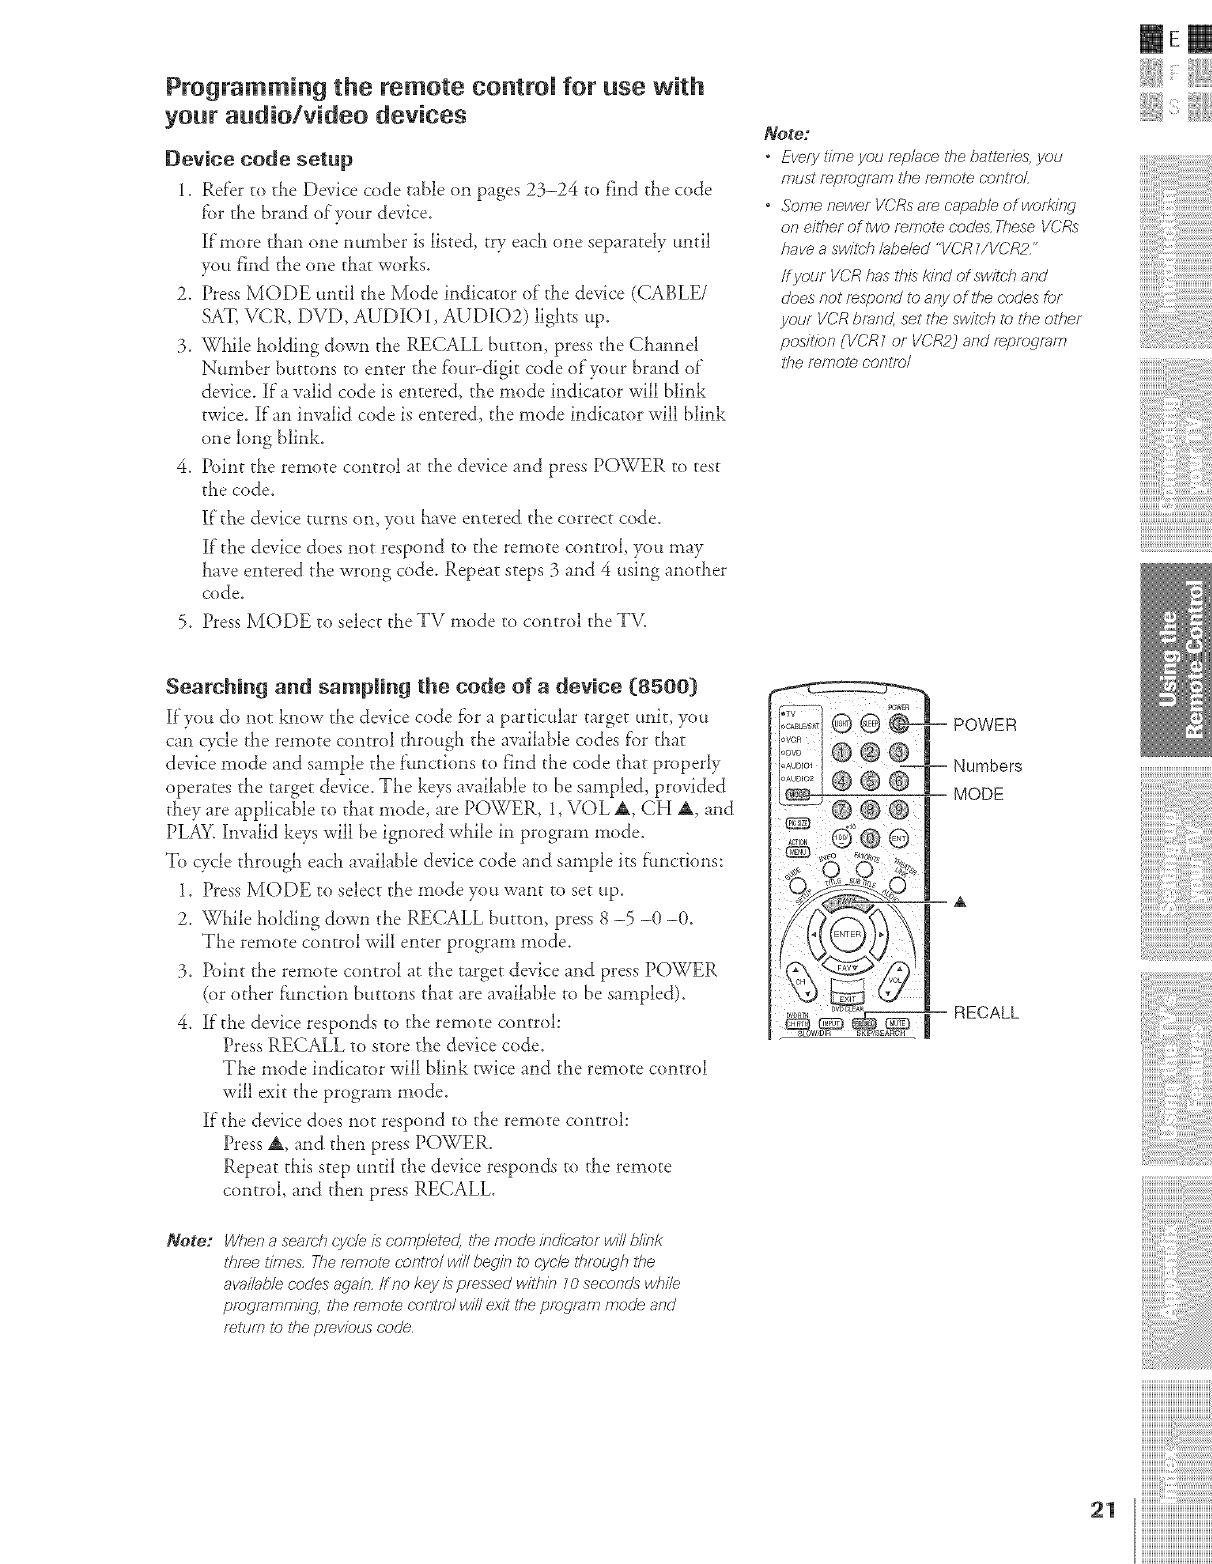
Programming the remote control for use with
your audio/video devices
Device code setup
i. Refer to the Device code table on pages 23-24 to f_nd the code
fbr the brand of'your device.
]If'more titan one nunlber is listed, try each one separately until
you f_nd the one that works.
2. Press MODE mltil the Mode indicator of"the device (CABLE/
SAT, VCR, DVD, AUDIO 1, AUDIO2) lights ttp.
3. Willie holding down tlle RECALL button, press the Cllannel
Number buttons to enter the four-digit code of your brand of"
device. If"a valid code is entered, tlle mode indicator will blink
twice. If'an im#alid code is entered, the mode indicator will blink
one long blink.
4. Point tl_e remote control at the device and press POWER to test
the code.
lf"tile device t_trns om you leave entered the correct code.
If"the device does not respond to ti_e remote control, you may
Lave entered the wrong code. Repeat steps 3 and 4 using another
code,
5. Press MODE to select the TV mode to control the TV.
Note:
•Every tfme you re/a/ac;e tile batler/es, you
must repr_gmm tfle remote (-ootfeL
•Some newer VCRs are capable of wet?i/W
of} either of lwo remote code& These VCRs
have a swit_Thlabeled "VCR Z/VCR2"
ff your VCR has this kind of switch arid
does not respond to any of ff_e codes for
your VCR brand, set the switch to the other
positron (VCRZ or VCR2_ and fepre_,mm
ff?e remote cor_l/e/
mere
{i
Searching and sampling the code of a device (8500)
][_you do not know the device code for a particular target unit, yo_t
can cycle rl_e remote control tl_rough the available codes for that
device mode and sample the f:_mctions to find the code that properly
operates the target device. The keys available to be sampled, provided
they are applicable to that mode, are POWER, 1, VOL _, CH _, and
PLAY. invalid keys will be ignored while in program mode.
To cycle through each available device code and sample its f:_mctions:
1. Press MODE to select the mode you want to set up.
2. Wt_ile holding down the RECALL button, press 8 -5 -0 -0.
The remote control will enter program mode.
3. Point the remote control at tJ_e target device and press POWER
(or other f:_mction buttons that are available to be sampled).
4. If'the device responds to the remote control:
Press RECALL to store t_'_edevice code.
The mode indicator will blink twice and the remote control
will exit the program mode.
If"the device does not respond to the remote control:
Press A, and tl_en press POWER.
Repeat this step until d_e device responds to the remote
control, and then press RECALL.
Note: When aseamh cycle is completed UTemoo'e kTdicator will blink
three t/7Y_es,The remote c;ont7o/ will bogie to c',ycleff_lough the
available codes agaio, fine key is pressed will,in _0 seconds wi_ile
pmcjramming, the remote oor_trel will exit the program mode and
_ettlm to 27eprevious r;ode
POWER
Numbers
MODE
RECALL
..............ii,ii: !ii:iiiiiiililililililililililililililililil
21 iiiiiiiiiiiiiiiiiiiiiiiiiiiiiiiiiiiiiiiii¸
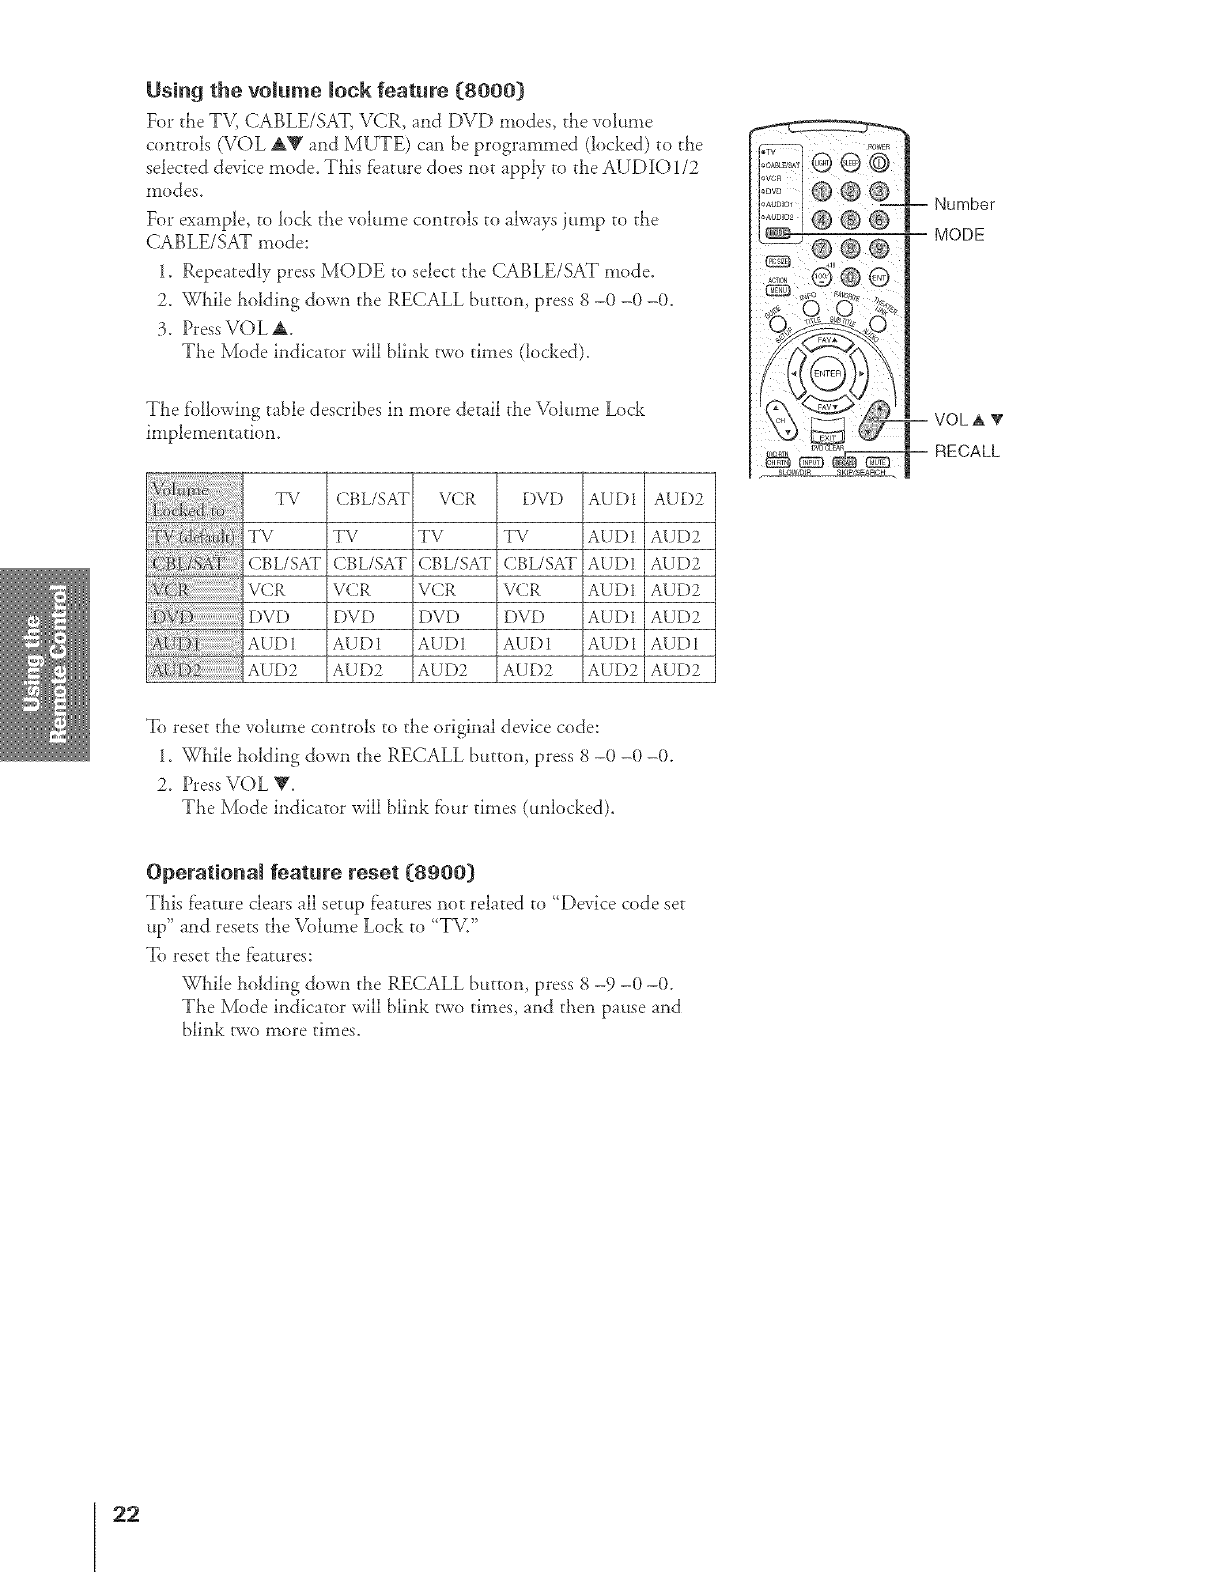
Using the volume IoeR feature {8000}
For the TV, CABLE/SAT, VCR, and DVD modes, the volume
controls (VOL AV and MUTE) can be programmed (locked) to the
selected device mode. This feature does not apply to tile AUDIO 1/2
II10 d es,
Fo_ example, to lock the volume controls to always jump to tile
CABLE/SAT mode:
1. Repeatedly press MODE to select tile CABLE/SAT mode.
2. While holding down tile RECALL button, press 8 -(1 -(1-0.
3. Press VOL A.
The Mode indicator will blink two times (locked).
The following table describes in more detail tile Volume Lock
implementation.
72/ CBL/SAT VCR DVD AUDI AUD2
TV TV TV TV AUDI AUD2
CBL/SAT CBL/SAT CBL/SAT CBL/SAT AUD1 AUD2
VCR VCR VCR VCR AUD1 AUD2
DVD DVD DVD DVD AUDI AUD2
AUDI AUDI AUDI AUDI AUDI AUDI
AUD2 AUD2 AUD2 AUD2 AUD2 AUD2
To reset tile volume controls to tile original device code:
1. While holding down tile RECALL button, press 8 -0 -0 -0.
2. Press VOL V.
The Mode indicator will blink fbur times (unlocked).
Operational feature reset {ggoo}
This f'eature clears all setup features not related to {Device code set
up" and resets the Volume Lock to {TV."
To reset tile features:
While biding down tile RECALL button, press 8 -9 -0 -(L
The Mode indicator will blink two times, and then pause and
blink two more times_
22
Device code table
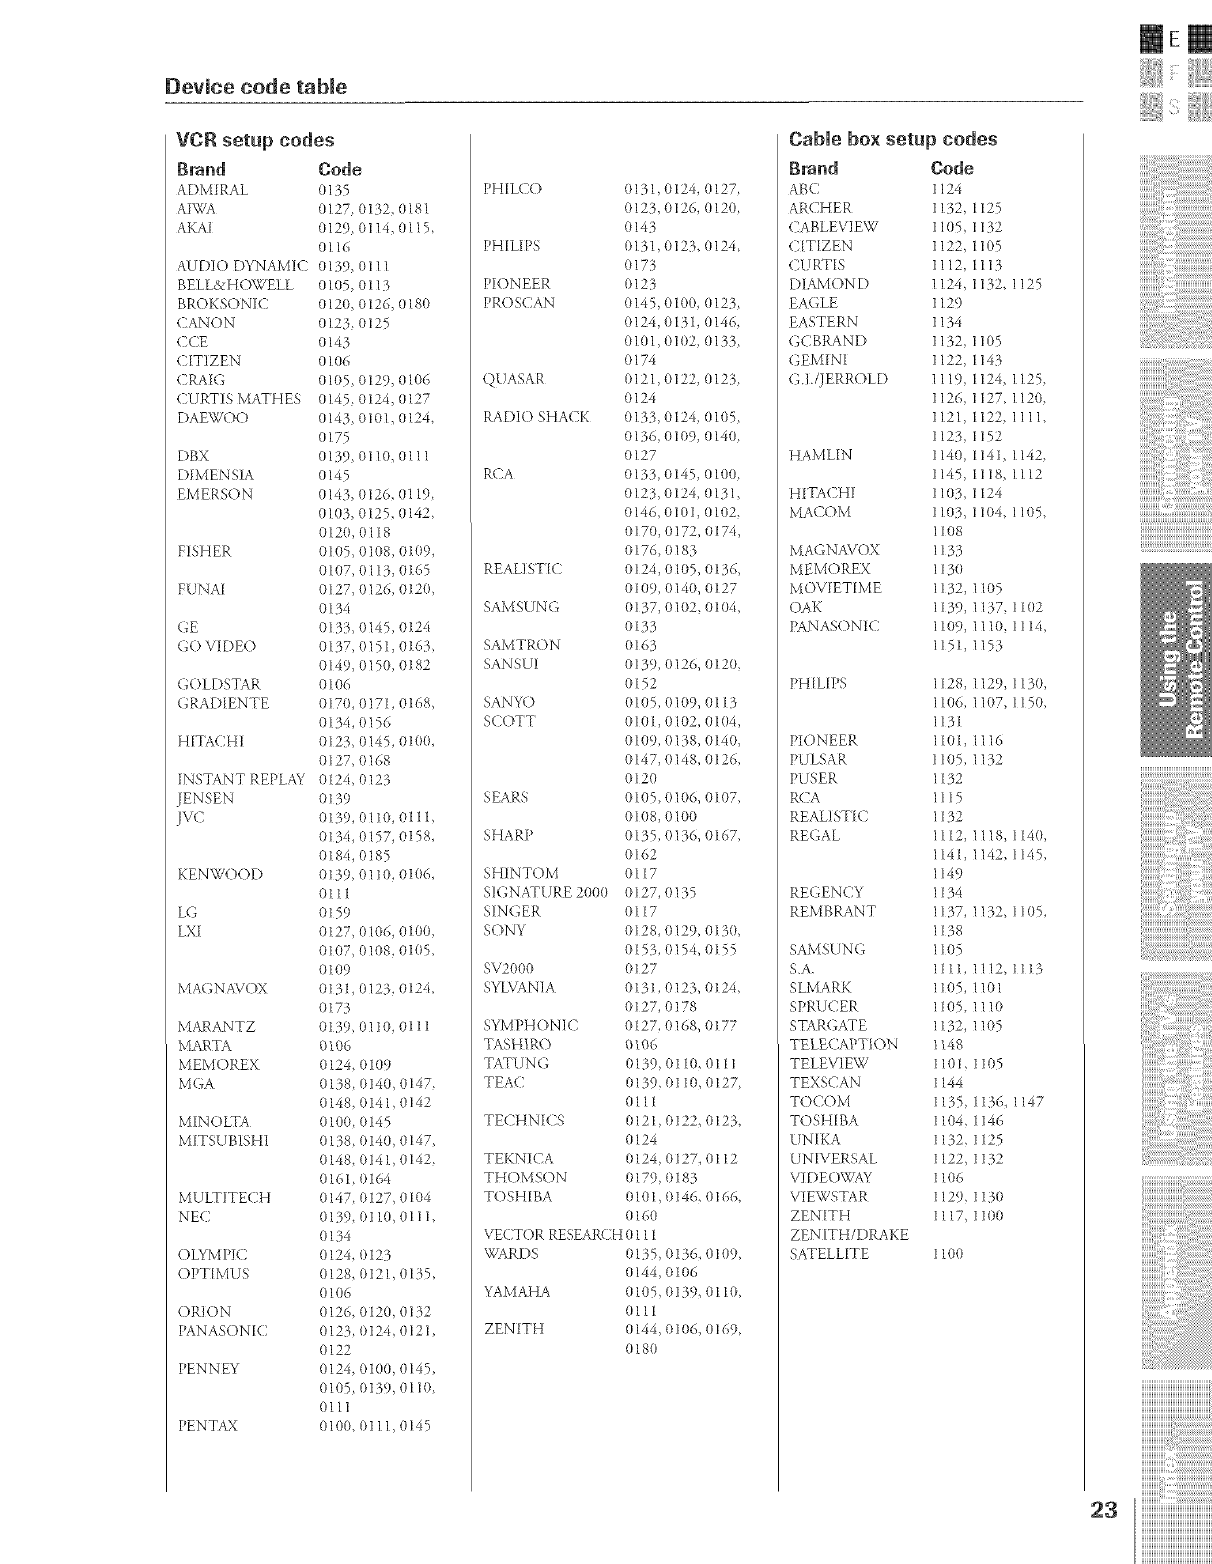
VCR setup codes
Brand
ADMIR/\L
AKAI
AUDIO DYNAMIC
BELL&HE )WELL
BROKSON[C
(2AN O N
CCE
CITIZEN
CRAIG
CURTIS MATHES
DAEWOO
DBX
DIMENS[A
EMERSON
FISHER
F U NA_
GE
GO VIDEO
GOLDSTAR
GRAD[ENTE
HITACHI
INSTANT REPLAY
JENSEN
JVC
KENWOOD
LG
L×I
MAGNAVOX
MARAN7 Z
MARTA
MEMOREX
MGA
MINOLTA
M[TSUBISHI
MULTITECH
NEC
OLYMPIC
OPTIMUS
ORION
PANASONIC
PENNEY
PENTAX
Code
o135
o127 o132, o181
o129, Ol 14, O115,
O116
o139, Ol 11
OLO5,O113
o12o, o126, o18o
o123 o125
o143
OlO6
OLO5,o129, OlO6
o145 o124, o127
o143, OlOl, o124,
o175
o139, OllO, o111
o145
o143, o126, Ol 19,
OLO3,o125, o142,
o12o, o118
OlO5 olo8, OlO9,
OLO7,OIl}, o165
o127, o126, o12o,
o134
o133 o145, o124
o137, (1151, o163
o149, o15o, o182
OlO6
o17o, o171, o168,
o134, (1156
o123 o145, OLOO,
o127, (1168
o124, o123
o139
o139, OIlO, Olll
o134, o157, o158,
o184, o185
o139, Ol lO, OLO6,
Olll
o159
o127, oio6, OlOO,
OlO7 (11o8, o1(15,
OlO9
o131, o123, o124,
o173
o139OllO, O111
OlO6
o124_ OlO9
o138, (114o, o147
o148, o141, o142
OLOO,o145
o138 o14o, o147,
o148, o141, o142
o161 {)164
o147, o127, olo4
o139, o11o, o111,
o134
o124, o123
o128, o121, o135,
01(t6
0126, 0120, 0132
0123 0124 0121,
0122
0124, 0100, 0145,
0105, (1139, 0110
0111
0100, 0111, 0145
PH[LCO 0131, 0 ]24, 0127
0123, 0126, 0120
0143
PH[LIPS 0131,0123, 0124,
0173
PIONEER 0123
PROSCAN 0145, 0100, 0123,
0124, 0131, 014&
0101,0102, 0133,
0174
QUASAR 0121, 0122, 0123
0124
RADIO SHACK 0133, 0124, 0105,
0136, 0109, 0140
0127
RCA 0133, (1145, 0100
0125, 0124, 0131,
0146, 0101, 010Z
0170, 0172, 0174,
0176,0183
REALISTIC 0124, 0105, 0136,
0109, 0140, (1127
SAMSUNG 0137, 0102 0104,
0133
SAMTR()N 0165
SANSUI 0139, 0126, 0120,
0152
SANYO (1105, 01(19, 0113
SCOTT 0101,0102, 01(}4,
0109, 0138, 0140,
0147, {11148,0126,
0120
SEARS 0105, 01(16, 0107,
0108, 0100
SHARP 0135, 0136, 0167,
0162
SHINTOM 0117
SX}NATURE 2000 0127,0135
SINGER 0117
SONY 0128_ 0129, 0130,
0153, 0154, 0155
SV2000 0127
S_ LVANIA 0131,0123, 0124,
0127, 0178
SYMPHONIC 0127, (1168, 0177
TASHIRO 0106
TATUNG 0139, 0110, 0111
TEAC (1139, 0110, 0127
0Ill
TECHN ICS 0121, 0122, 012 L
0124
TEKNICA 0124, 0127, 0112
THOMSON 0179, 0183
TOSHIBA 010 l, 0146, 0166,
0160
VECTOR RESEARCH 0111
WARDS 0135, 0 ]3& 0109,
0144, 0106
YAMAHA 0105, 0139, 0110,
0111
ZENITH 0144, 0106, 0169,
0180
Cable box setup cedes
Bvaud Code
ABC 124
ARCHER 152,
CABLEVIEW 1(}5,
C[T[ZE N 122,
CURTIS 112,
DIAMOND 1124,
EAGLE 129
EASTERN 134
GCBRAN D 132,
GEMINI 122,
G.]./JERROLD 119,
126,
121,
123,
HAML[N 140,
145,
HITACHI 103,
MACOM 103,
1108
MAGN AVOX 1133
MEMOREX 113(}
MOVIETIME 1152,
OAK 1139,
PANASONIC 1109,
1151,
PH[L[PS 1128,
1106,
1131
PK)N EER 1101,
PULSAR 1105,
PUSER 1132
R('A 1115
REALISTIC 1132
REGAL 1112,
1141,
1149
REGENCY 1134
REM BRANT 1137,
1138
SAMSUNG 1105
S.A. 1111,
SLMARK 1105,
SPRUCER 11(}5,
STARGATE 1132
TELECAPT_ON 114B
TELEVIEW 1101
TEXSCAN 1144
TOCOM 1135
TOSHIBA 1104
UNIKA 1132
UNIVERSAL 1122
VIDEOWAY 1106
VIEWSTAR 112{)
ZENITH 1117
ZENITH/DRAKE
SATELLITE 1100
I125
1132
1105
II13
1132,1125
1105
I143
I124,1125_
1127,112Q
I12Zllll,
1152
1141,1142_
1118,1112
1124
1104,1105,
1105
1137_1102
1110_1114,
1153
1129_1130,
1107,1150,
II16
1132
1118.1140,
1142,1145,
1132.1105,
1112,1113
I101
1110
1105
1(15
13&1147
146
125
132
130
100
mere
{]
..............iiiii!ii:iiiiiiililililililililililililililililil
HHHHHHHHHHHHHHHHHHHH_
Device code table
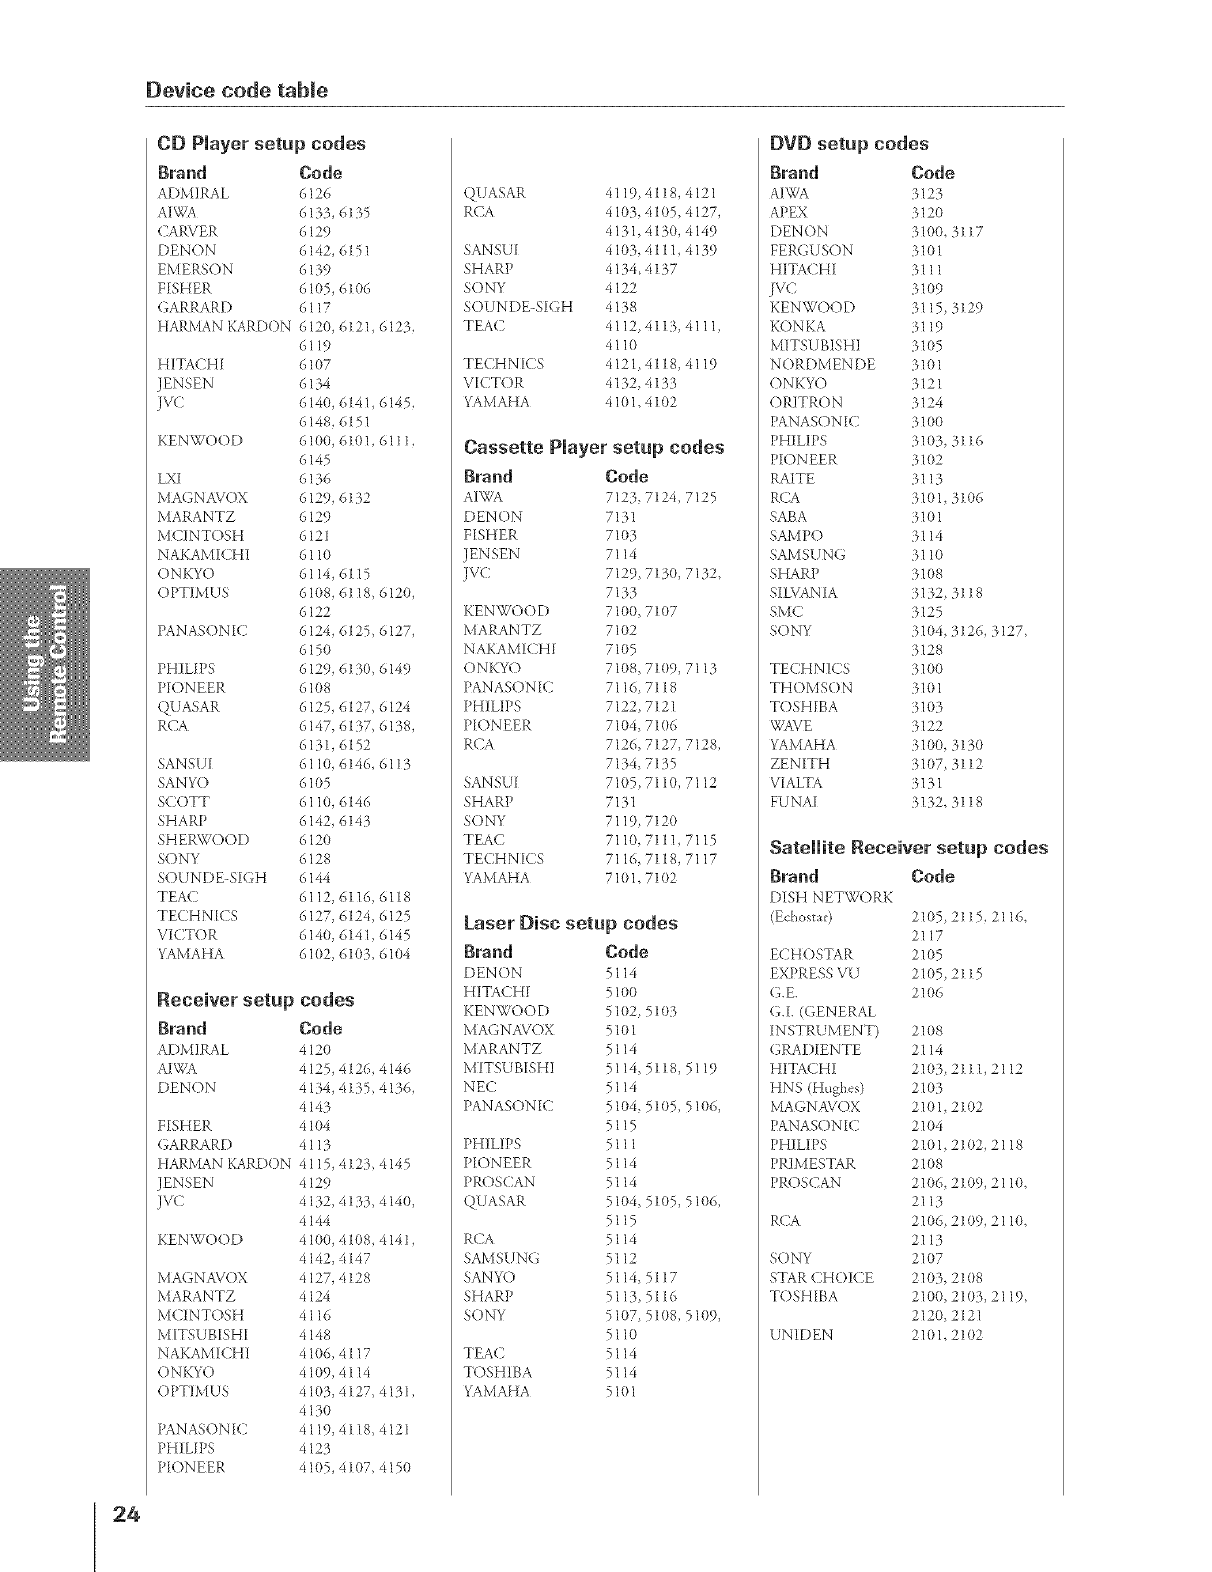
CD Player setup codes
Brand Code
ADMIRAL 6126
AIWA 6133, 6135
CARVER 6129
DENON 6142, 6151
EMERSON 6139
FISHER 6 I(15, 6106
d-ARRARD 6117
HARJXIANKARDON 6120, 6121, 6123,
6119
HITACHI 61117
JENSEN 6134
Jvc 6140, 6141, 6145,
6148, 6151
KEN WOOD 6100, 61(11, 6111,
6145
LXI 6136
MAGN AVOX 6129, 6132
MARA NTZ 6129
MC/NTOSH 6121
NAKAMICHI 61 l0
ONKYO 6114, 6115
OPTIM US 61(18, 6118, 6120,
6122
PANASON [C 6124, 6125, 6127,
6150
PHI LIPS 6129, 6130, 6149
PIONEER 61(}8
QUASAR 6125, 6127, 6124
RCA 6147, 6137, 61Ba,
6131, 6152
SANSU[ 6110, 6146, 61lB.
SANYO 6105
SCOTT 6110, 6146
SHARP 6142, 6143
SHERWOOD 6120
SONY 6128
SOUNDE-SI(;H 6144
TEA(, 6112, 61 l& 6118
TEC HN[CS 6127, 6124, 6125
VI(TO R 614(/, 614 I_ 6145
YAMAHA 611112,61(13,6104
Receiver setup codes
Brand Code
ADMIRAL 4120
AB,VA 4125, 412& 4146
DENON 4134, 4135 4136,
4143
FISHER 4104
(;A RRARD 4113
HARJXIANKARDON 4115, 4123 4145
JENSEN 4129
JVC 4132, 4133, 4140,
4144
KEN WOOD 4100, 4108, 4141,
4142, 4147
M A(] NAVOX 4127, 4128
MARANTZ 4124
MCt NTOSH 4116
MITS UB[SH[ 4148
NAKAM ICHI 410& 4117
ON KYO 4109, 4114
OPTIM US 4 I(}3, 4127 4131,
4130
PANASON[C 4119, 4118 4121
PHI LIPS 4123
PIONEER 41(}5, 4107, 4150
24
QUASAR 4119, 4118, 4121
RCA 4103_ 4105, 4127,
4131,41 Be,4149
SANSU[ 4103_ 411 l, 4139
SHARP 4134, 41B.7
SONY 4122
SOUNDE-SI(;H 4138
TEA(2 4112, 41 lB.,4111,
4110
TECHNICS 412 I, 4118, 4119
VICTOR 4132, 4133
YAMAHA 4101,4102
Cassette Player setup codes
Brand Code
AIWA 7123, 7124, 7125
DENON 7131
FISHER 71113
JENSEN 7114
JVC 7129, 7150, 7132,
7133
KEN WOOD 7100, 7107
MARANTZ 7102
NAKAMICHI 7105
ONKYO 7108, 7109, 7113
['AN ASON [C 7116 7118
PHI LIPS 7122, 7121
PIONEER 7104_ 7106
RCA 7126, 7127, 7128,
7134, 7135
SANSU[ 7105, 7110, 7112
SHARP 7131
SONY 7119) 7120
TEAC 7110, 7111,7115
TECHNICS 7116, 7118, 7117
YAMAHA 7101, 7102
Laser Disc setup codes
Brand Code
DEN ON 5114
HITACHI 5100
KEN WOO D 5102) 5103
MAGNAVOX 5101
MARANTZ 5114
MITSUBIS HI 5114,
NEC 5114
PANASON[C 5104,
5115
PHI LIPS 5111
PIONEER 5114
P R( )S(]AN 5114
QUASAR 5104,
5115
RCA 5114
SAMSUNG 5112
SANYO 5114_
SHARP 5113,
SONY 5107
5110
TEA(2 5114
TOSHIBA 5114
YAMAHA 5101
5118,5119
5105, 511}6,
5105, 511}6,
5117
5116
5108,511}9,
DVD setup codes
Brand Code
AIWA 3123
APEX 3120
DEN ON 3100, 3117
FER(_USON 3101
HITACHI 3111
JVC 3109
KENWOOD 3115, 3129
KON KA _.119
MITSUBISHI 3105
NORDMENDE 311}1
ONKYO 3121
OR/TRON 3124
I_ANASONIC 3100
PHIL/PS 31(}3, 3116
PIONEER 3 I(}2
RAITE 3113
R(A 3101, 3106
SABA 5101
SAMPO 3114
SAMSUNG 3110
SHARP 3108
SIL\/AN [A _.132, 3118
SMC 3125
SONY 3104, 3126, 3127,
3128
TECHNICS 3100
THOMSON 31(t1
TOSHIBA 5103
_X/A\/E 3122
YAMAHA 3100_ 3130
ZENITH 31(17, 3112
VIALTA 5131
FUNA[ 3132, 3118
Satellite Receiver setup codes
Brand
DISH NETW(YRK
(Echosta_:)
ECHOSTAR
EXPRESS VU
(I.E.
(;.I. (GENERAL
INSTRUMENT)
GRADIENTE
HITACHI
HNS (Hughes)
MA(;NAVOX
I_ANASON[C
PHILIPS
PR/MESTAR
PROS(2AN
R(2A
SONY
STAR CHOICE
TOSHIBA
UNIDEN
Code
2105_2115,2116,
2117
2105
2105,2115
2106
21{)8
2114
21113,2111,2112
2103
2101, 2102
2104
2101_ 2102,2118
2108
21116,2109,211(I,
2113
210&2109,2110,
2113
2107
2103, 2108
21011,2103,2119,
2120_2121
2101, 2102
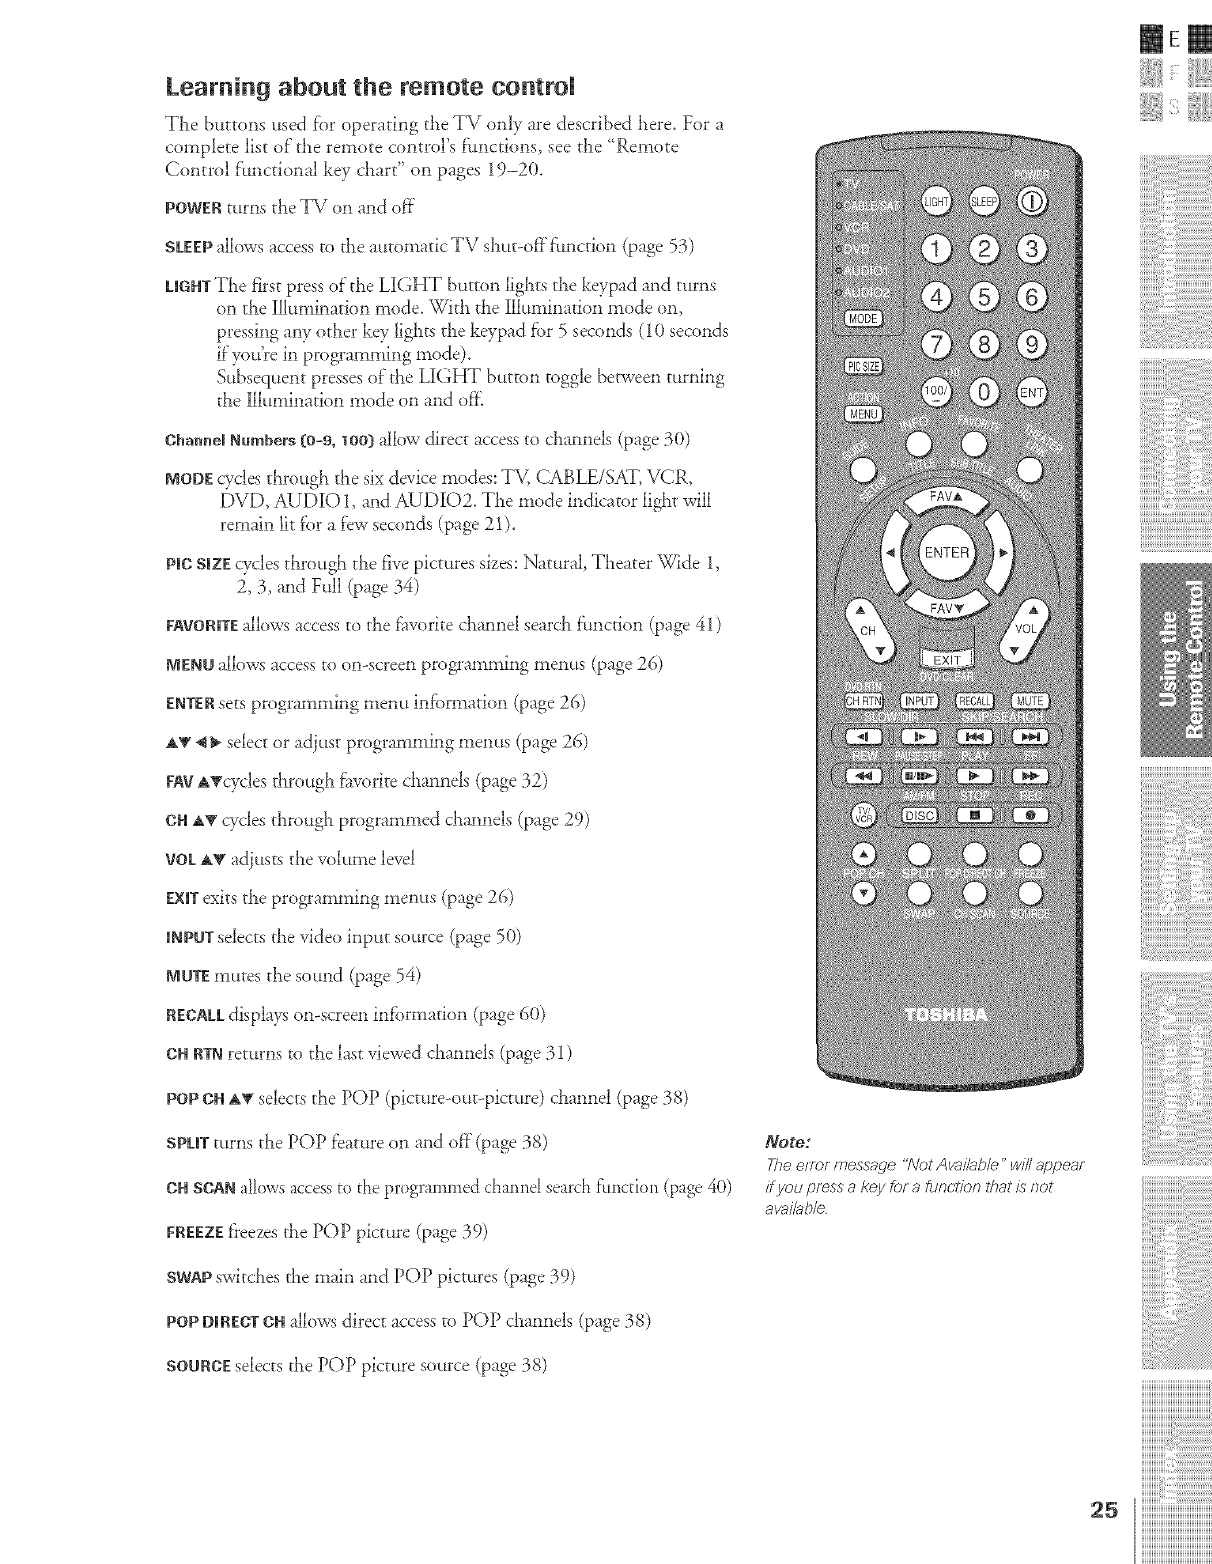
Learning about the remote controm
The buttons used f_)roperating the TV only are described here, For a
complete list of the remote control's f_mctions, see tile 'Remote
Control functional key chart" on pages 19-20.
POWERturns tile TV on and of_"
SLEEPallows access to tile automatic TV shut-of_"f:.nction (page 53)
LIGHTThe first press of the LIGHT button lights tile keypad and turns
on the Illumination mode. With the Illumination mode on,
pressing aW other key lights the keypad fbr 5 seconds (10 seconds
if"you're in programming mode).
Subsequent presses of tile LIGHT button toggle bd-ween turning
the Illumination mode on and ore
Oha|me[Numbers (0-9, 1OO)allow direct access to channels (page 30)
MODEcyclm througiL tile six device modes: TV, CABLE/SAY, VCR,
[)VD, AUDIO 1, and AUDIO2. TiLe mode indicator liglLtwill
remain lit i'or a few seconds (page 21).
pie SiZEcycles through the five pictures sizm: Natural, Theater Wide 1,
2, 3, and Full (page 34)
FAVORITEallows access to tile f__vodtechannel search flmcdon (page 41)
MEr.aoallows access to on-screen programming menus (page 26)
ENTERsets programming menu infbHnation (page 26)
a,_g_ _. select or adjust programming menus (page 26)
FAVATcycles through f_lvoritechannels (page 32)
OHA_rcycles through programmed channels (page 29)
VOLAV adjusts tile volume level
EXITexits the programming menus (page 26)
iNPUTselects the video input source (page 50)
MOTEmutes the sound (page 54)
RECALLdisplay.';on-screen infbrmation (page 60)
OHRTNreturns to the last viewed channels (page 31)
mere
{
POP GHa,_ selects tile POP (picture-out-picture) channel (page 38)
SPLITturns tile POP feature on and of}"(page 38)
OHSCA_ alk)wsaccess_o_heprogrammed charred search fimction (page40)
FREEZEf}eezestile POP picture ([_'_e_39)
Note:
The error messa(/e "Not Aw, il;_ble" will appea_
ff you press a key for a fu_cliom that is not
avai/ab/e
SWAPswitches the main and POP pictures (page 39)
POpDIRECTOHallows direct access to POP channels (page 38)
SOURCEselects the POP picture source (page 38)
..............ii,iii !iiiiiiiiiililililililililililililililililil
iiiiiiiiiiiiiiiiiiiiiiiiiiiiiiiiiiiiiiiii

Setting up your TV
Learning about the menu system
Af'rer you have installed the batteries and programmed the remote
control, you will need to set some preferences on the TV using the
menu system. You can access the mem_ using the buttons on your TV
or remote control.
1. Press MENU to display tile mem_ system.
2. Press @ or _ to select a menLt.
3. Press A or _F to select an item.
4. Press *qor _ to select or adiust a setting.
MTS STEREO
BASS 60
TnEBLE 6_BALANCE
RESET
@;SELEOT
Dolby Vrrtual OFF
WOW
SRS aD OFF
FOOUS OFF
Tru_a_
PECTU_E scn4 , _J_2\vY _ \_ _'
CENEMA MODE BET UP
LANGLAGE ENGLISH
ANTI/2 ANTI
TV/OABLE CABLE
©H PROGRAM _
ADD/ERASi nr,r_
T_ME_ _
ON O01_OOm
SLEEP OhOOm
oc OFF
FAVORITE ©_
..........
CH LABELER( =
V_DEO LABEl
BACKGROUND
@:SELECT
v CH_P
ENABLE BLOCKING OFF
TV RATING
MPAA RATtNG
BLOGK_NG OPTION
oH LOOK
VIDEO LOCK OFF
GAME T_MER OFF
FRONT PANEL LOCK OFF
M_¢ pIN CODE
@;SELECT :{N_[N_:END
* Press ENTER to activate the fimction settings in the menus.
* If'you do not make a selection within 15 seconds, the main
menus closes automatically; tile other memos close automatically
within 6 seconds.
* To close an on-screen menu instantly, press EXIT.
TV control panel
--MENU
--ENTER
--_
EXIT
SLOW,_tR SmP_RCH
Note:
Youcan d}ange ffTebanttgmund of the menu,
Seepage 5 _for detaffs
26
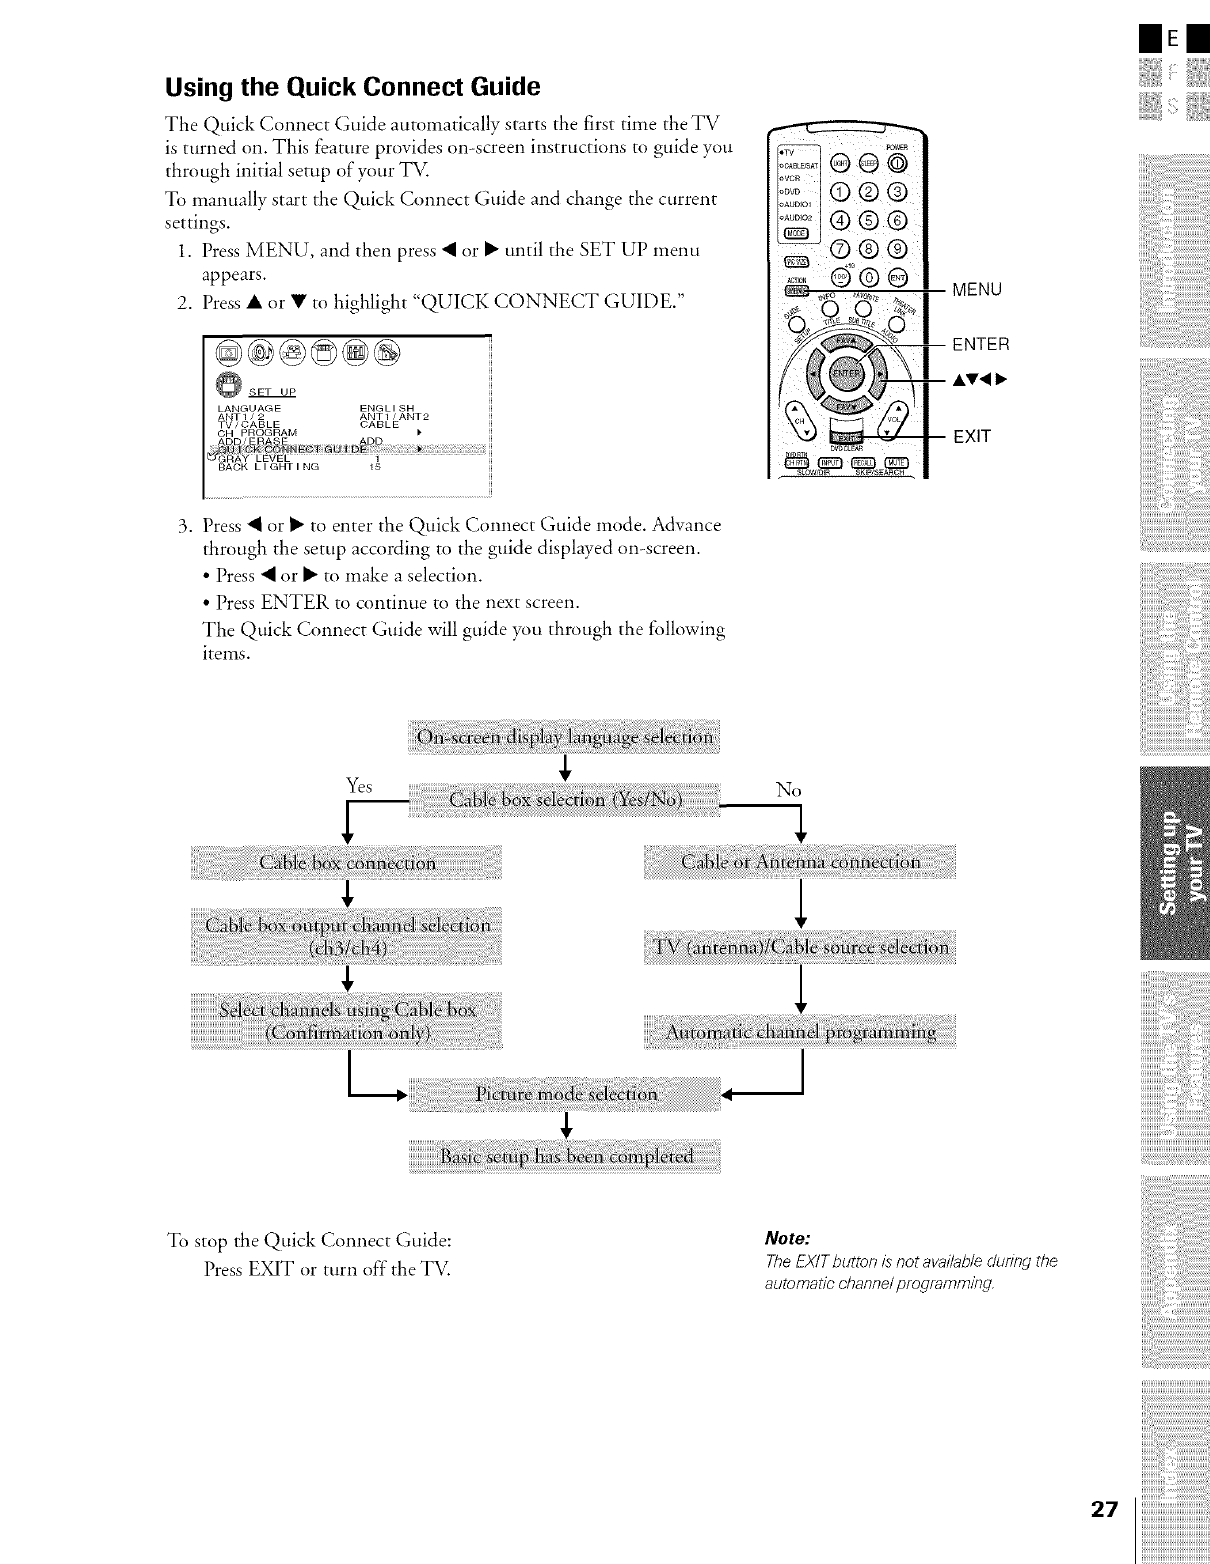
Using the Quick Connect Guide
The Quick Connect Guide automatically starts the first time the TV
is turned on. This feature provides on-screen instructions to guide you
through initial setup of your TV.
To manually start the Quick Connect Guide and change the current
settings.
1. Press MENU, and then press • or • until the SET UP menu
appears.
2. Press • or • to highlight "QUICK CONNECT GUIDE."
@@®©®@
SET UP
LANGUAGE ENGLISH
ANT1 /2 ANT1 /ANT2
TV/CABLE CABLE
3. Press • or • to enter the Quick Connect Guide mode. Advance
through the setup according to the guide displayed on-screen.
• Press • or • to make a selection.
• Press ENTER to continue to the next screen.
The Quick Connect Guide will guide you through the following
items.
No 1
IIEII
To stop the Quick Connect Guide:
Press EXIT or turn off the TV.
Note:
The EX/T button /s not available dur/?zg the
automatic channel programming.
27
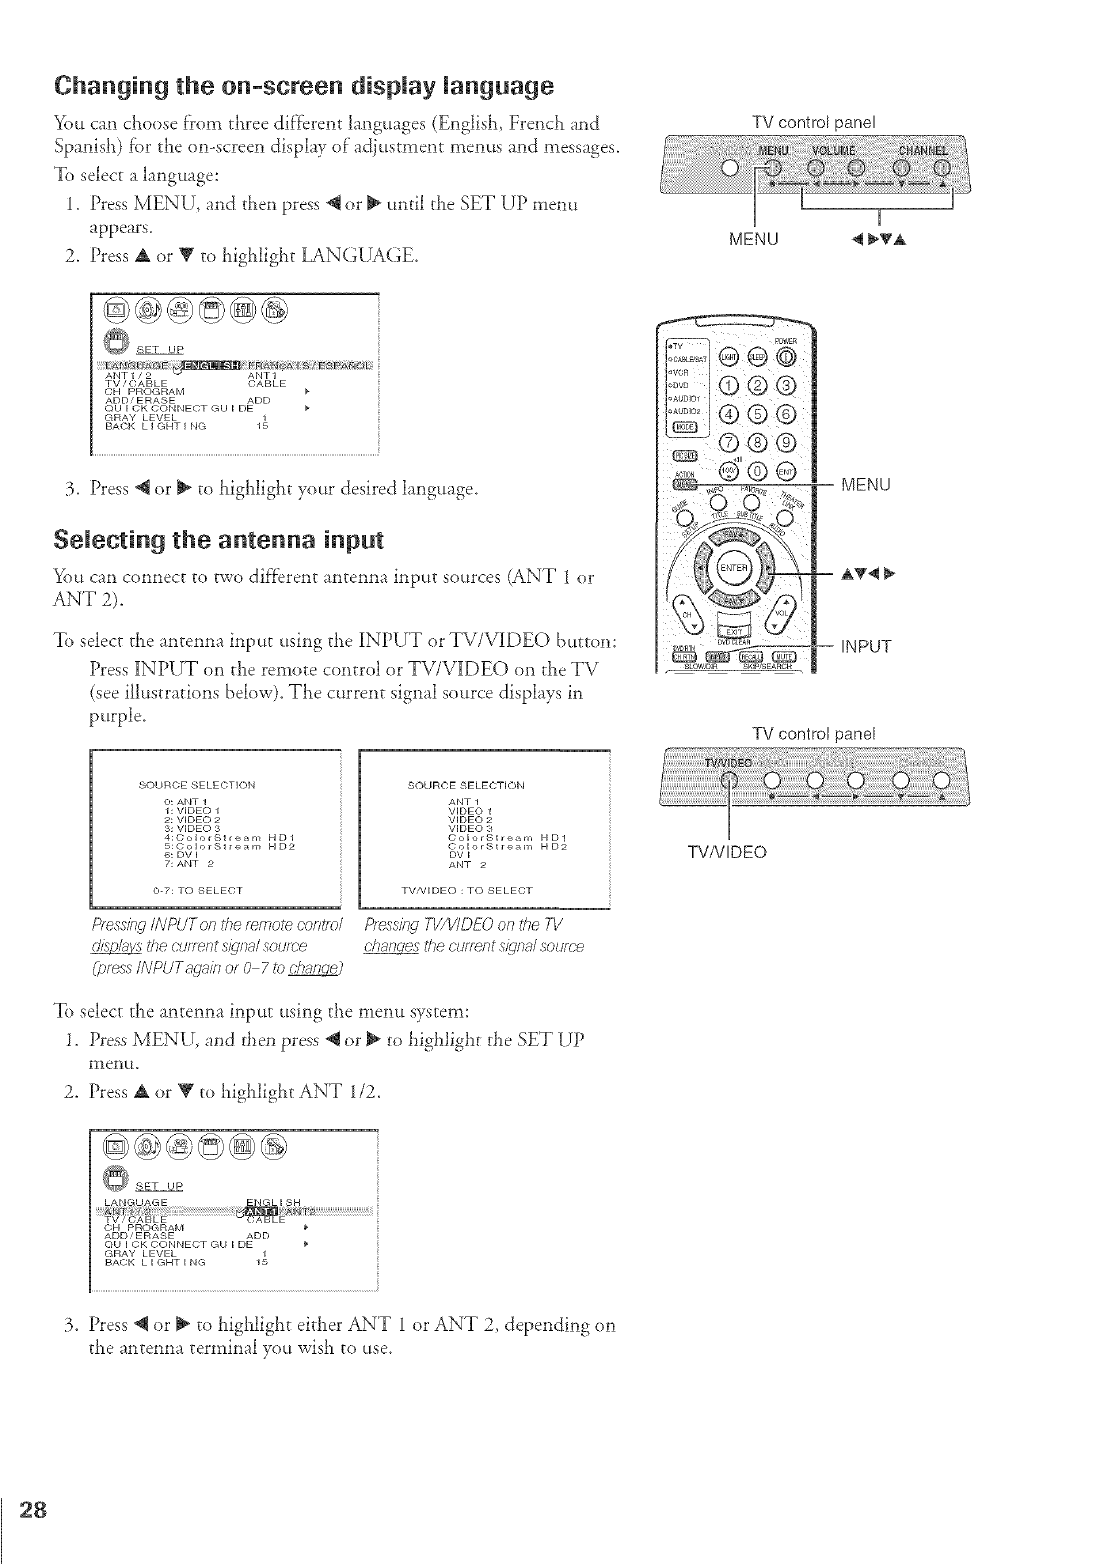
Changing the on-semen display language
You can choose from three different languages (Englist_ French and
Spanish) fbr the on-screen display of'adjustment menus and messages.
To select a language:
1. Press MENU, and tlLenpress @or _ until the SET UP menu
appears.
2. Press A or Y to higldight LANGUAGE.
@@@@@@
SET UP
ANT1/2 _ANT1
TV /(}ABLE (}ABLE
CH PROGRAM
ADD/ERASE ADD
OUICKCONNECTGUIDE
GRAY LEVEL 1_
BACK LIGHTING
3. Press @ or _ to highlight your desired language.
Selecting the antenna input
Yi)u can connect to two dif't_erentantenna input sources (ANT 1 or
ANT 2).
To select the antenna input using tile INPUT or TV/V][DEO button:
Press INPUT on tile remote control or TV/VIDEO on tile TV
(see illustrations below). The current signal source displays in
purple.
TV control panel
_ ® @ @
I®® ®
I?:_',°1i
b......l(7) d_gb
I_ i "_ v v
MENU
-- INPUT
TV control panel
SOURCE SELECTK)N
0: ANT 1
1: VIDEO 1
2: VIDEO 2
3: VIDEO 3
4:ColorStre_m HD1
5:ColorSt re_rr, HD2
6: DV I
7: ANT 2
0-7: TO SELECT
SOURCE 8ELECTION
ANT 1
VIDEO 1
VIDEO 2
VIDEO 3
OolorStream HD1
ColorStream HD2
DV I
ANT O
TV/VlDEO : TO SELECT
Pfess/i_gINPUTon the/wnote coHtfol P/_ss/}Lq TV/V/DEO on the TI/
tile cuff_nt s/gna/ soume chan_ tke cuflw?t signal source
(press/NPUTaga/b or 0 7to _
To select the antenna input using tile menu system:
1. Press MENU, and then press _ or _ to highlight the SET UP
l_lei1tt,
2. Press A or V to higldiglLt ANT 1/2.
@@@@@@
SET UP
LANGUAGE ENGL I SH
ADD/ERASE ADD
QUICKCONNECTGUIDE
GRAY LEVEL 1_
BACK LIGHTING
3. Press @ or l_ to highlight either ANT 1 or ANT 2, depending on
tile antenna terminal yott wish to use,
TVNIDEO
28
Addin 9 channels to the TV's memory
When you press Channel A or Y, your TV will stop only on the
channels you program into the TV's channel memor>
Follow the steps below and on the next page to program all active
channeh into the TV's memor>
Programming channels automatically
Your TV can automatically detect all active claannels in your area and
store them into its memory. AI'rer the channels are programmed
automaticall> you can manually add or erase individual channels (see
page 30).
To program channels automatically:
1. Press MENU, and then press @ or _ until the SET UP men_t
appears.
2. Press A or _' matil TV/CABLE is highlighted.
3. Press @ or _ to highlight either TV or (;ABLE, depending on
which yo u use. If"you use an an t enna, highligh t TV; if"you use
cable channels, highlight CABLE.
Q SET UP
LANGUAGE ENGL I SH
ADD/ERASE ADD
©UICK CONNECT GUIDE
GRAY LEVEL
BACK LIGHTING 1_
4. Press Rgto select CHPROGRAM.
SET UP
LANGUAGE EI/GL I SH
ANT1 /2 ANT1
_V lCAB L CABLE
E
ADD /ERASE ADD
OU I OK CONNECT GU I DE _'
GRAY LEVEL 11
BA©K h I GHT I big
5. Press @ or _ to start channel programming. TheTV will
automaticaily cycle through all the TV or Cable channeh
(depending on which you selected), and store all active channels
in the channel memor>
While the TV is cycling through the channels, the message
'Programming Now--Please Wait" appears.
6. When channel programming is complete, the message
'Completed" appears.
7. Press Channel A or Y to view the programmed channels.
Note:
_ lune Lhe TV lo a channe/ not programmed
in ff_e channe/ memory you must use the
(2ham_e/ Number buttc_ms or_ the re,mote,
COlTtfe_
-- Channe!
Number
MENU
mE
ii::
]]]]]]]]]]]]]]]]]]]]]]]]]]]]]]]]]]]]]]]]
ZZZZZZIIII
ZZZZZZIIII
ZZZZZZIIII
iiiiiiiiiiiiiiiiiiiiiiiiiiiiiiiiiiiiiiiiiiiii
iiiiiiiiiiiiiiiiiiiiiiiiiiiiiiiiiiiiiiiiiiiii
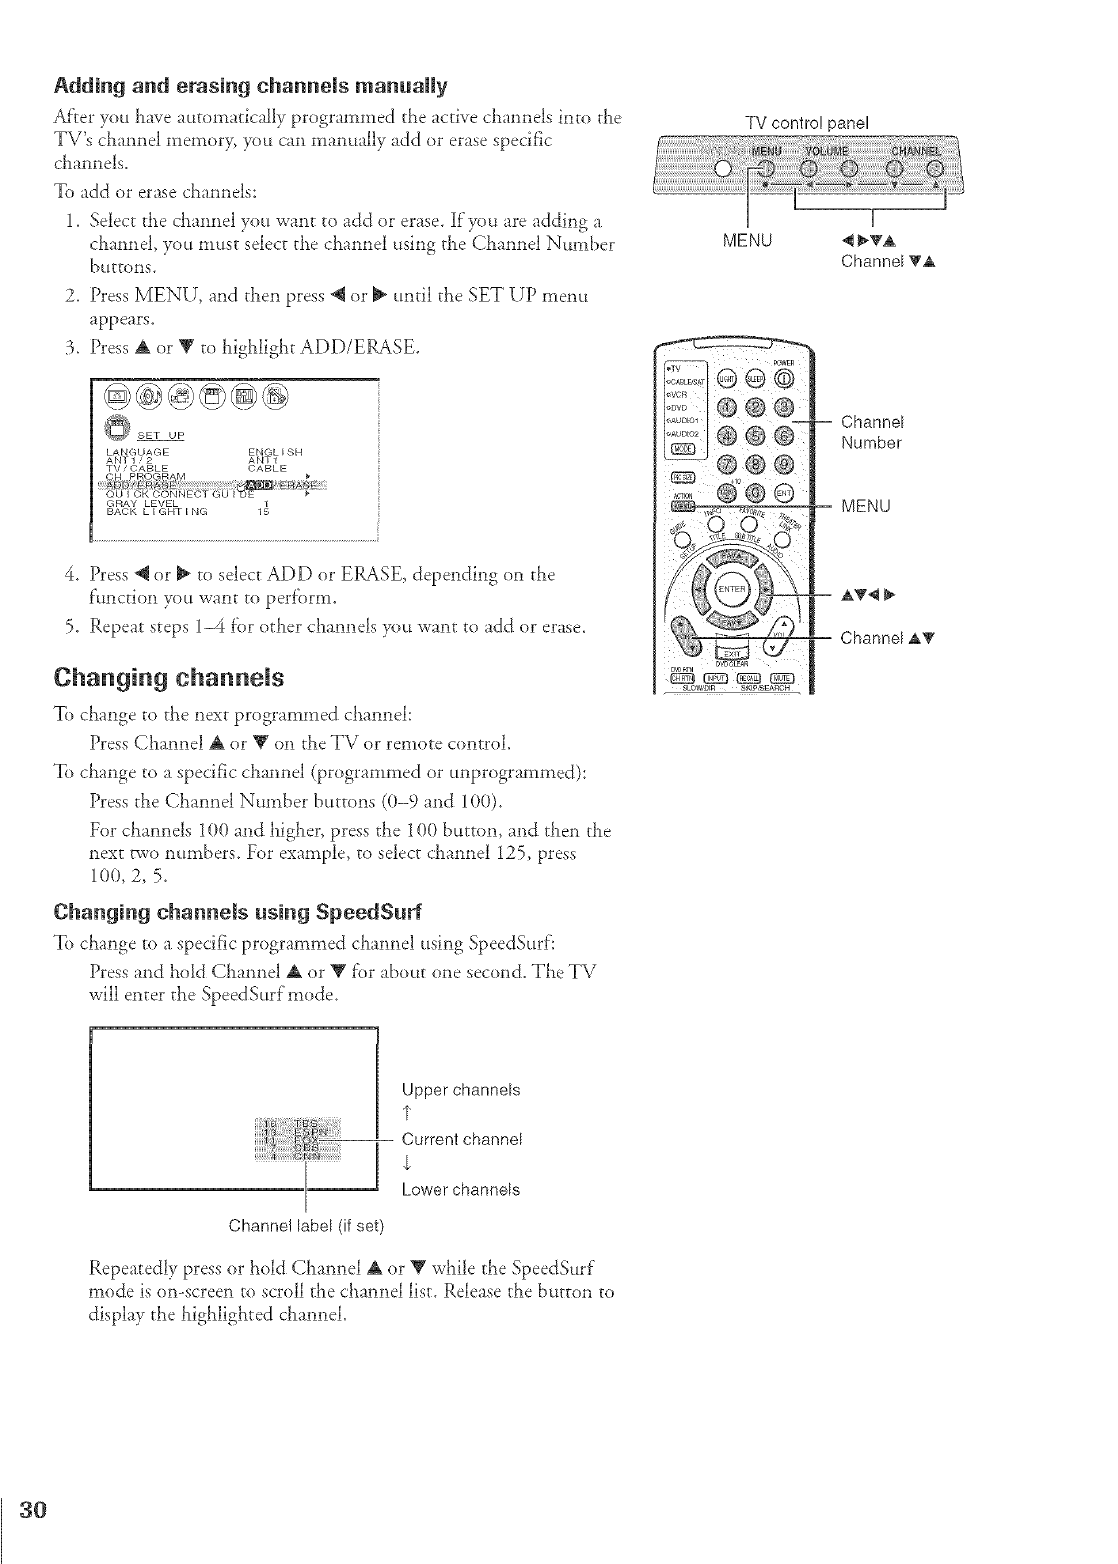
Adding and erasing channels manually
Af'rer you laave attto111aticaJlyprogrammed the active cllannels into the
TV's cllannel memory, you can mammlly add or erase specific
cLannels.
To add or erase channels:
1. Select the cLannel you want to add or eiase. If you are adding a
channel, you must select the channel using the Channel Nttmber
DuttOl_lS.
2. Press MENU, and then press @ or _ until the SET UP men_t
appears.
3. Press A or V to highlight ADD/ERASE.
SET UP
LANGUAGE ENGL I SH
ANT1/2 ANT1
TV /CABLE CABLE
GRAY LEVEL 1_
BACK LIGHTING
4. Press @ or _ to select ADD or ERASE, depending on the
f:_mction you want to perf'orm.
5. Repeat steps 1-4 f'or other channels yott want to add or erase.
Changing channels
To change to tl_e next programmed channeh
Press Channel A or Y on tile TV or remote control.
To change to a specific channel (programmed or unprogrammed):
Press the Channel Number buttons (0-9 and 100).
For channels 100 and higher, press the 100 bt_tton, and then the
next two nttmbers. For example, to select cilannel 125, press
100, 2, 5.
Changing channels using SpeedSurf
To change to a specific programmed claannel using SpeedSurf:
Press and hold Channel A or Y f'or about one second. TLe TV
will enter the SpeedSurfmode.
MENU
TV control panel
Channel VA
Channel
Number
MENU
Upper channels
I"
-- Current channel
,L
Lower channels
Channel label (if set)
Repeatedly press or laold Channel A or Y while the SpeedSurF
mode is on-screen to scroll the channel list. Release the b_ttton to
display the llighlighted cLannel.
3{}
Using the TV's features
IEm
i!!iiiii!iiii ,!!"iiiii!i!
Adjusting the channem settings
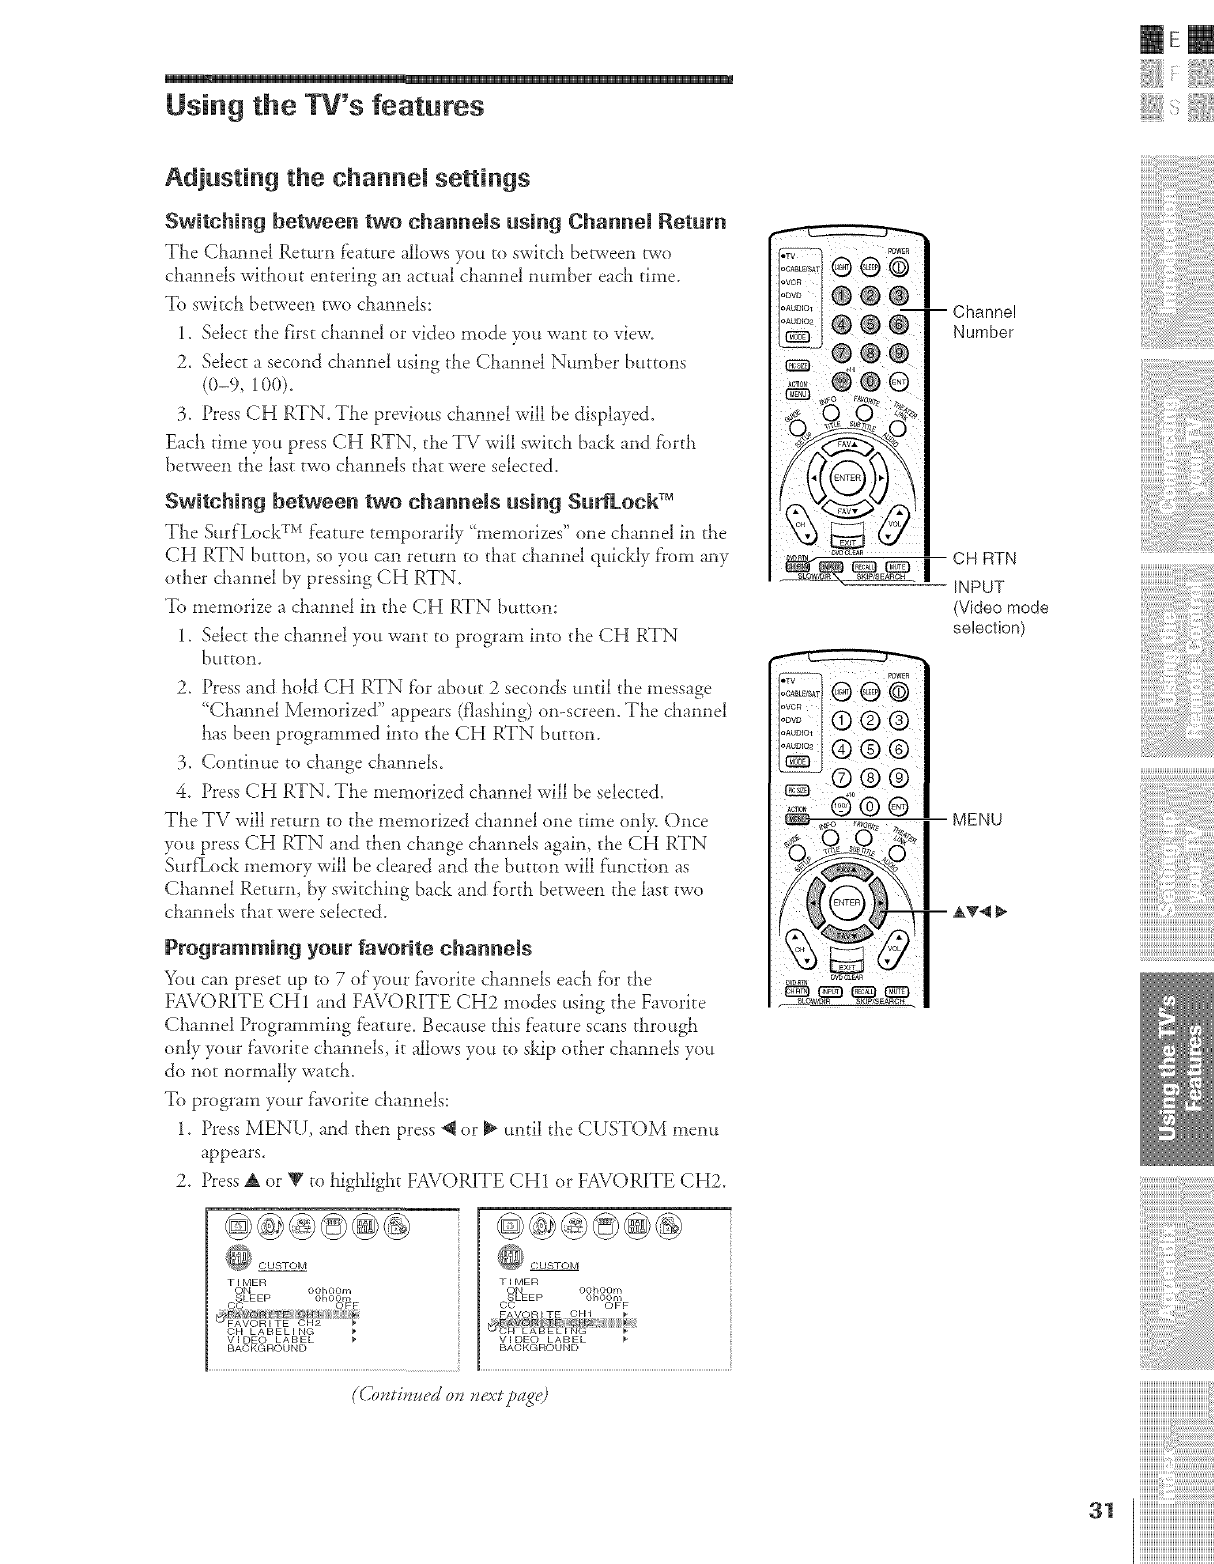
Switching between two channels using CMnnel Return
TLe Cl_amlel Return feature allows you to switc}_ between/wo
c}_amlels without entering an actual cir,*reel nttmber eacll time.
To switch between two clxamlels:
1. Select the f)st clv_mlel or video mode yo_ want to view.
2. Select asecond cLam_el using the Cham_el Number buttons
(0-9, 100).
3. Press CH RTN. The previous channel will be displayed.
Each time you press CH RTN, the TV will switda back and forth
between the last two channels that were selected.
Switching between two channels using Surfl.ock TM
The Surf LockT_'_feat.re temporarily "memorizes" one chamaelin the
CH RTN button, soyo_ can return to daatcJlatmel quickly from any
other chamlel by pressing CH RTN.
To memorize a c}aatme! in the CH RTN buttot'<
1. Select the c}aa*melyo_t want to program into the CH RTN
bLtttOl].
2. Press and hold CH RTN fi)r about 2 seconds until the message
'Claannd Memorized" appears (flashing) o>screen. TLe cllannel
Las been programmed into the CH RTN button.
3. Continue to change cllannels.
4. Press CH RTN. The memorized clla*md will be selected.
TLe TV will return to tlle memorized ciaamlel one time only. Once
you press CH RTN and then change claaimds again, the CH RTN
SurfLock memory will be cleared and the button will ftmction as
Ctaannel Return, by switching back and forth between the last two
c}aannels that were selected.
Programming your favorite channels
You can presetup to 7 of your fi_vorite cJlatmelseachfor tlae
FAVORITE CH 1 and FAVORITE €;H2 modes using the Favorite
Channd Programming feature. Beca_setlaisfeature scanstlaro_gh
only yo_trfavorke ckmnels, k allows yo_t to skip odaerchannels you
do not normally watch.
To program yo_tr _i_voritedaam_els:
1. Press MENU, and then press;@ or _ until the CUSTOM memt
appears.
2. Press _ or _ to higl_ligl_tFAVORITE CH1 or FAVORITE CH2.
@®@@O@
CUSTOM
TIMER
ON OOhOOm
SLEEP OhOOm
©© OFF
CFI LABELING
VIDEO LABEL
BACKGROUND
TIMER
_EEP OOhOOmOhOOm
CC OFF
BAOKGROUND
Channel
Number
I I
CH RTN
[ _c._ |INPUT
(Video mode
selection)
31
i¸i¸iI¸i¸i¸i11¸i¸i i¸i i'¸i'i'i'i'i'¸i'i'i'¸i'i'i'i'i'¸i'i'i'¸i'i iii¸ i
iiiiiiiiiiiiiiiiiiiiiiiiiiiiiiiiiiiiiiiiii_
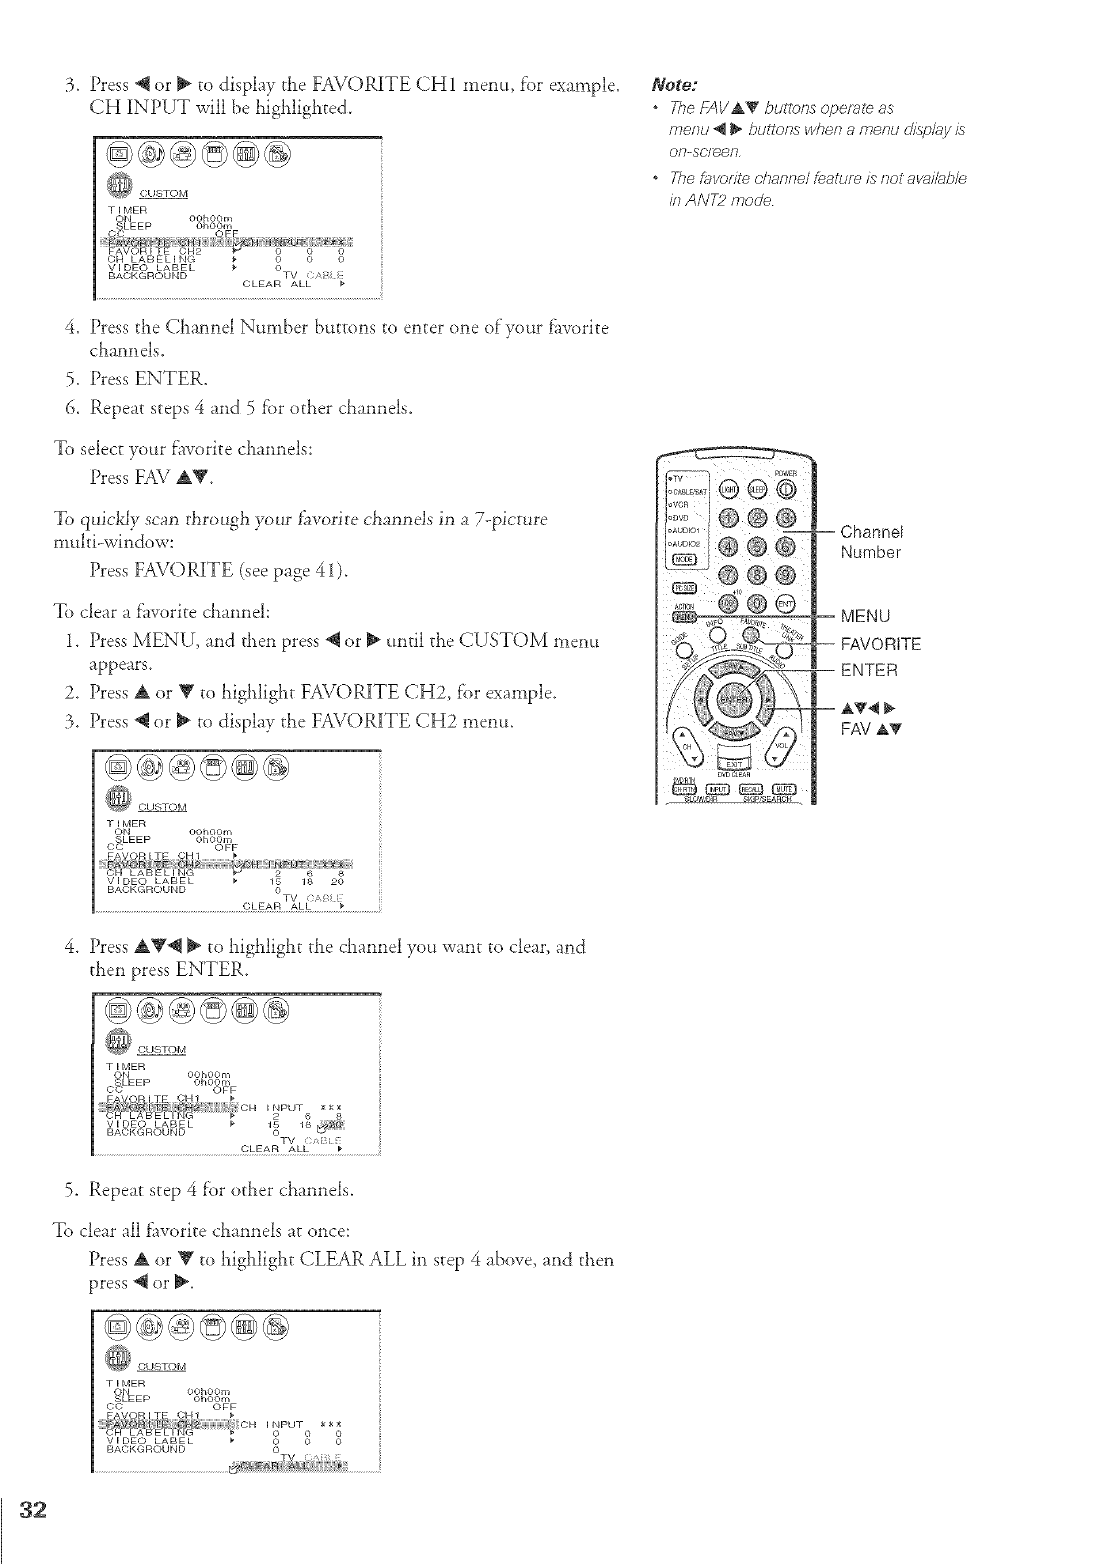
3. Press @ or _ to display the FAVORITE CH1 menu, f'or example.
CH INPUT will be highligi_ted.
CUSTOM
TIMER
ON OOhOOm
SLEEP OhOOm
BACKGROUND OLEART_L_B__
4. Press the Channel Number buttons to enter one of'your fhvorite
channels.
5. Press ENTER.
6. Repeat steps 4 and 5 fbr other channels.
To select your f'avorite channels:
Press FAV AV.
To qui@Jy scan through your fi_vorite channels in a 7-picture
multi-window:
Press FAV()RITE (see page 41).
To clear a f'avorite channeh
1. Press MENU, and then press @ or _ until the CUSTOM menu
appears.
2. Press A or Y to highlight FAVORITE CH2, fbr example.
3. Press @ or _ to display the FAVORITE CH2 menu.
(k _Qx
@@@@@@
Notet
The/--AVAY buttons opera/e as
menu __bu#ons when a menu disp/ay is
Ol?-scr_eR,
oThe fovof#e channel feaOJm is notavaik;b/e
inANT2mode
TIMER
ON OOhOOm
SLEEP OhOOm
CC OFF
BACKGROUND OTV <)/,
CLEAR ALL
4. Press A'_@ I1_to highlight the channel you want to clear, and
then press ENTER.
@@@@@@
CUSTOM
T_MER
ON OOhOOm
(_LEEP OhOOm
) ; OFF
FA:V£)F_ EE _H
FA'/] OR _C_ _ _ _ OH_ 2 6 8L,_ 8_ i N G ................... I NPUT x _ _(
VIDEO LABEL _ 15 18@
BACKGROUND .....
TV
CLEAR ALL
5. Repeat step 4 f'or other channels.
To clear ;Illf]worite channels at once:
Press A or _' to highlight CLEAR ALL in step 4 above, and then
press _ or _.
@@@@@@
TIMER
OhOOm
CO OFF
EAXQB IE OH
V,DEOL_BEL _ _ o 3
BACKGROUND
32
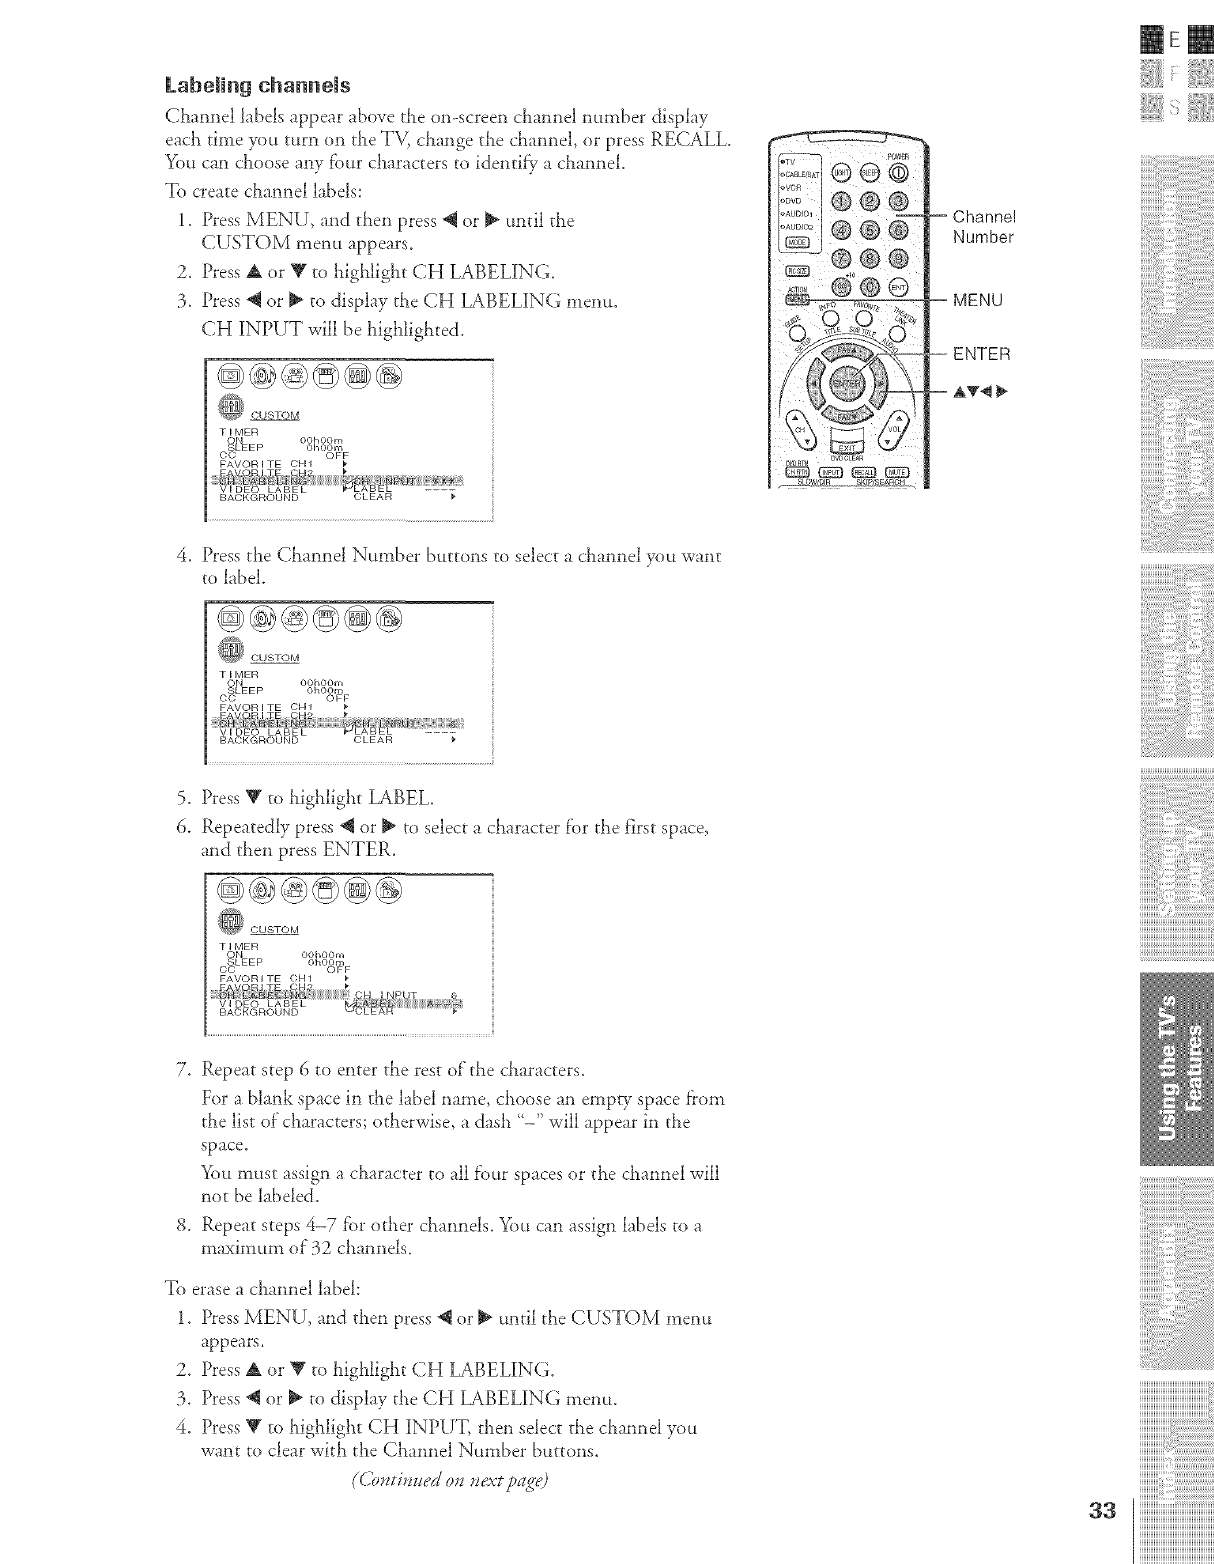
kabeling channels
Chamlel labels appear above the on-screen cllannel mEnber display
each time you tttrn on the TV_ change the cham_el, or press RECALL.
You can choose any fbur characters to !dentilS, a chamlel.
To create chaxmel labels:
1. Press MENU, and then press @ or _ until the
CUSTOM menu appears.
2. Press A or _' to highlight CH LABELING.
3. Press @ or _ to display the CH LABELING memo.
CH 1INPUT will be highlighted.
@@@@@@
) OUSTOM
TIMER
_]- E P OOhOOm
OhOOm
CO OFF
= Channe!
Number
= MENU
IEm
4. Press the ChamM Ntmlber buttons to select a chamM you want
to label
@@@@@@
_ CUSTOM
TIMER
ON OOhOOm
SLEEP OhOOm
CC OFF
FAVOR I TE OH1
5. Press Y to highlight LABEL.
6. Repeatedly press @ or _ to select a character f'or the first space,
and then press ENTER.
@@@@@@
_} CUSTOM
TIMER
ON OOhOOm
SLEEP OhOOm
CC OFF
FAVORI TE OH1
i¸i¸iI¸i¸i¸i11¸i¸i_i¸i_i_¸i¸i_i'¸i'i'i'i'i'¸i'i'i'¸i'i'i'i'i'¸i'i'i'¸i'i_i!!¸_!
iiiiiiiiiiiiiiiiiiiiiiiiiiiiiiiiiiiiiiiiii_
7, Repeat step 6 to enter the rest of"the characters.
For a blank space in the label name, choose an empty space f}om
the list of"characters; otherwise, a dash '-" will appear in the
space.
You must assign a character to all f'our spaces or the chamlel will
not be labeled.
8. Repeat steps 4-7 fbr other chamlels. _ou can assign labels to a
maximum of 32 cha*mels.
To erase a chamlel label:
1. Press MENU, and then press @ or _ until the CUSTOM mem_
appears.
2. Press A or V to highlight CH LABELING.
3. Press @ or _ to display the CH LABELING menu.
4. Press V to highlight CH INPUT, tl_en select the cha*mel you
want to clear with the Chamlel Number buttons.
33
]]]]]]]]]]]]]]]]]]]]]]]]]]]]]]]]]]]]]]]]
iiiiiiiiiiiiii:ps_s_s_s_;
iiiiiiiiiiiiiiiii,@i@ilil

5. Press T or A to
highlight CLEAR.
6. Press _J or _ to erase the
channel label.
7. Repeat steps 4-6 to
erase other channel
labels.
@@@@@@
CUSTOM
TIMER
ON OOhOOm
( _LEEP 0h00m
) " OFF
FAVORITE OH1
Viewing the wide-screen picture formats
You can view programs in a varid T of picture sizes--Natural, Theater
Wide l, Theater Wide 2, Theater Wide 3, and Full.
The way the image displays in any of"the picture sizes wW vary
depending on the fi)rmat of the program you are viewing. Select the
picture size that display.'; the current program the way that looks best
to you.
Selecting the picture size
1. Press P_C S][ZE on the remote control.
2. Press the corresponding number button to select the desired
picture size, as described below and on the next page.
P I CTURE S I ZE
o:"_TURALT, IEATER WIDE 1
! THEATER Wl DETHEATER WIDE 2
4] FULL
O 4:TO SELEOT
Natural picture size
, The picture is displayed close to its originally fi_rmatted
proportion. Some program f'ormats will display with side bars
and/or bars at the top and bottom (see examples below).
0 0
0 O
o?o
0 0
Natural picture size examples: The way the image displays will vary
depending on the format of the program you are currently watching.
Note:
oThe P/CTURE S/ZE feature may not be
8va//ab/e foFsome/2fogf_m formats
oYou also can charwe the pie;turn size by
selecti/w PICTURE SIZE it_#re THEATER
/'77ePu.
Dolby Virtual ON
WOW
SRS 3D OFF
FOC;US OFF
E uBz* _ OEE
AUTO ASPECT OFF
PICTURE SCROLL
CINEMA MODE FILM
34
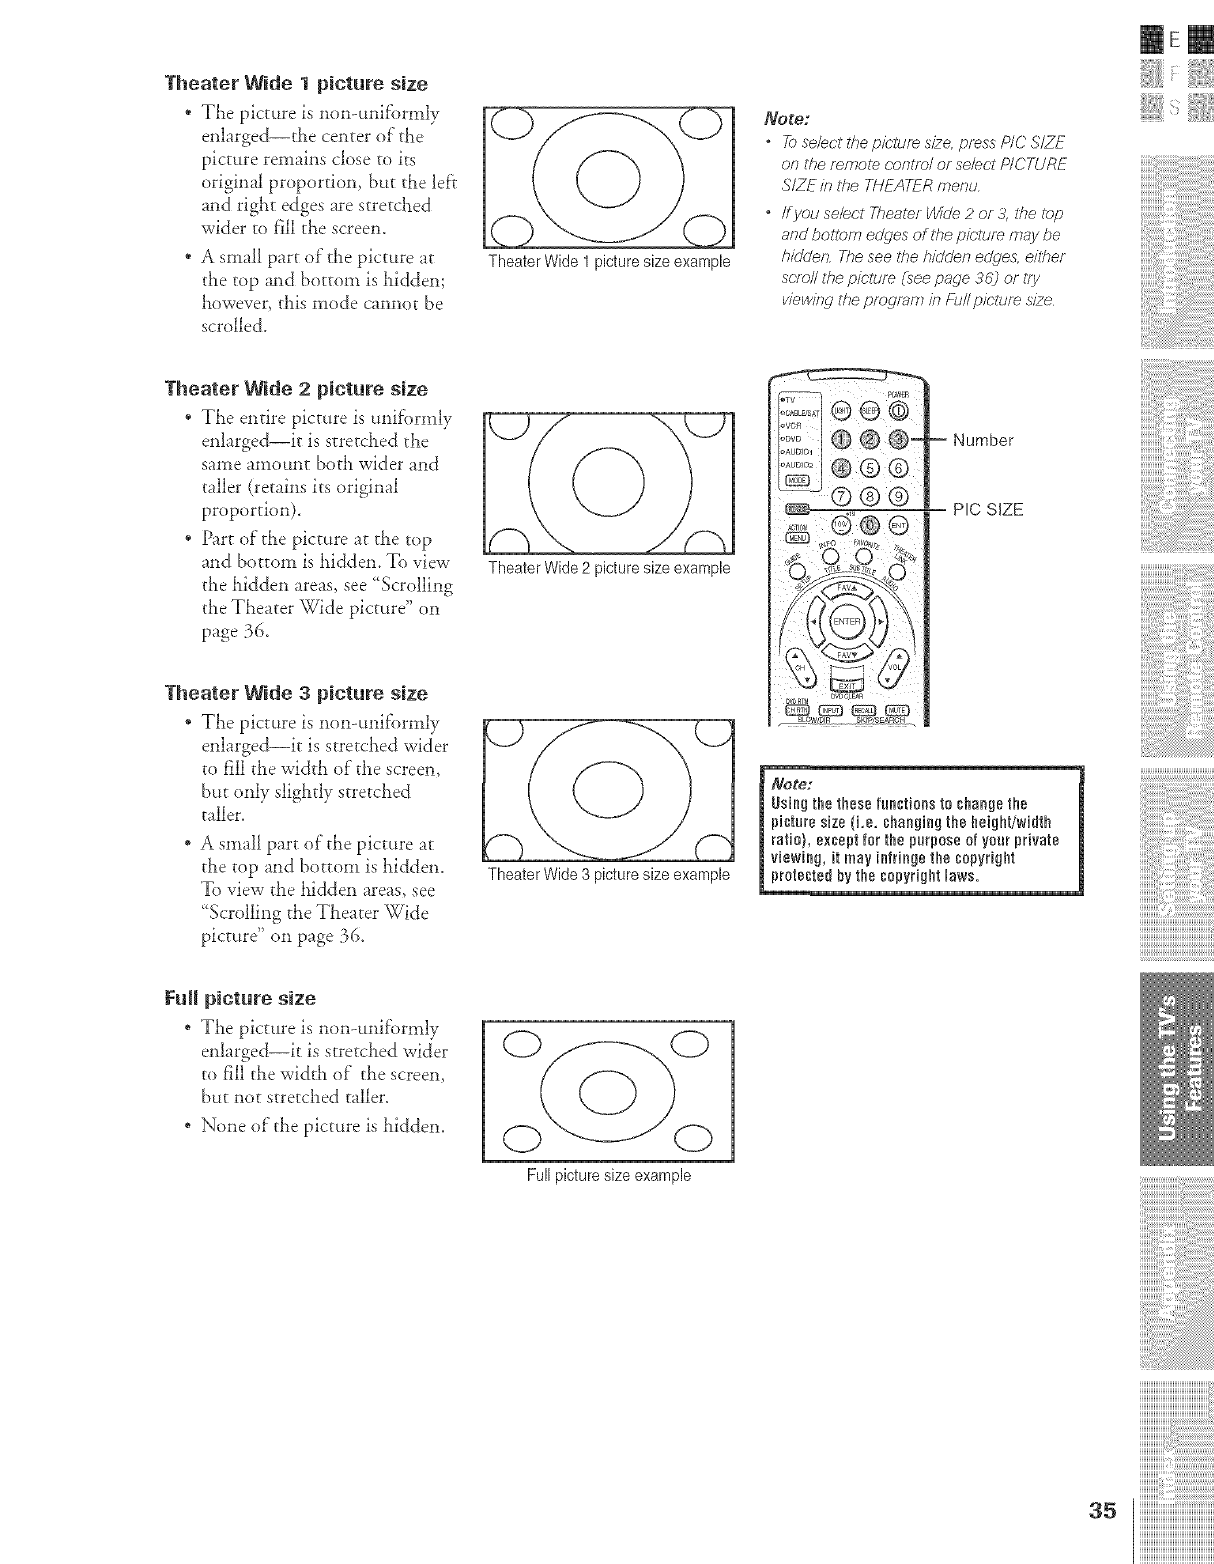
Theater Wide I picture size
, The picture is non-unifi)nnly
enlarged--the center of the
picture remains close to its
original proportion, but the left
and right edges are stretched
wider to fill the screen.
* A small part of the picture at
the top and bottom is hidden;
however, this mode cannot be
scrolled.
Theater Wide 1 picture size example
NogoJ
•Toselect the pkrtufe size, press P/C S/ZE
on the minute ccmtrw/ or select PICTURE
SIZEin the TNEATERmenu,
•ffyou selectTheater_de 2 or&/t_etop
andbotlomedges of the picture maybe
hiddm_Theseethehiddenedde& eilt_er
s(;rw/Itflepicture (see page 36)or try
viewirw theprogramic_Fu// pk'tum size
mere
Theater Wide 2 picture size
, The entire picture is unif'ornfly
enhrged--it is stretched the
same amount both wider and
taller (retains its original
proportion).
* Part of the picture at the top
and bottom is hidden. To view
the hidden areas, see "Scrolling
the Theater Wide picture" on
page 36.
Theater Wide 2 picture size example
Theater Wide 3 picture size
* The picture is non-unif'ormly
enlarged--it is stretched wider
to fill the width of"the screen,
but only slightly stretched
taller.
* A small part of the picture at
the top and bottom is hidden.
To view the hidden areas, see
'Scrolling the Theater Wide
picture" on page 36.
FuR picture size
* The picture is non-unif'omfly
enlarged--it is stretched wider
to fill the width of the screen,
but not stretched taller.
, None of the picture is hidden.
Theater Wide 3 picture size example
Full picture size example
Nure:
Using the these functions te change the
picture size {i,e, changing the height/width
ratio}, except for the purpose of your private
viewing, it may infringe the copyright
protected by the copyright laws.
i¸i¸iI¸i¸i¸i11¸i¸i i¸i i,¸i,i,i,i,i,¸i,i,i,i,i,i,i,i,¸i,i,i,i,i if
iiiiiiiiiiiiiiiiiiiiiiiiiiiiiiiiiiiiiiiiii
]]]]]]]]]]]]]]]]]]]]]]]]]]]]]]]]]]]]]]]]
ZZZZZZIIII
ZZZZZZIIII
ZZZZZZIIII
iiiiiiiiiiiiiiiiiiiiiiiiiiiiiiiiiiiiiiiiiii
iiiiiiiiiiiiiiiiiiiiiiiiiiiiiiiiiiiiiiiiiii
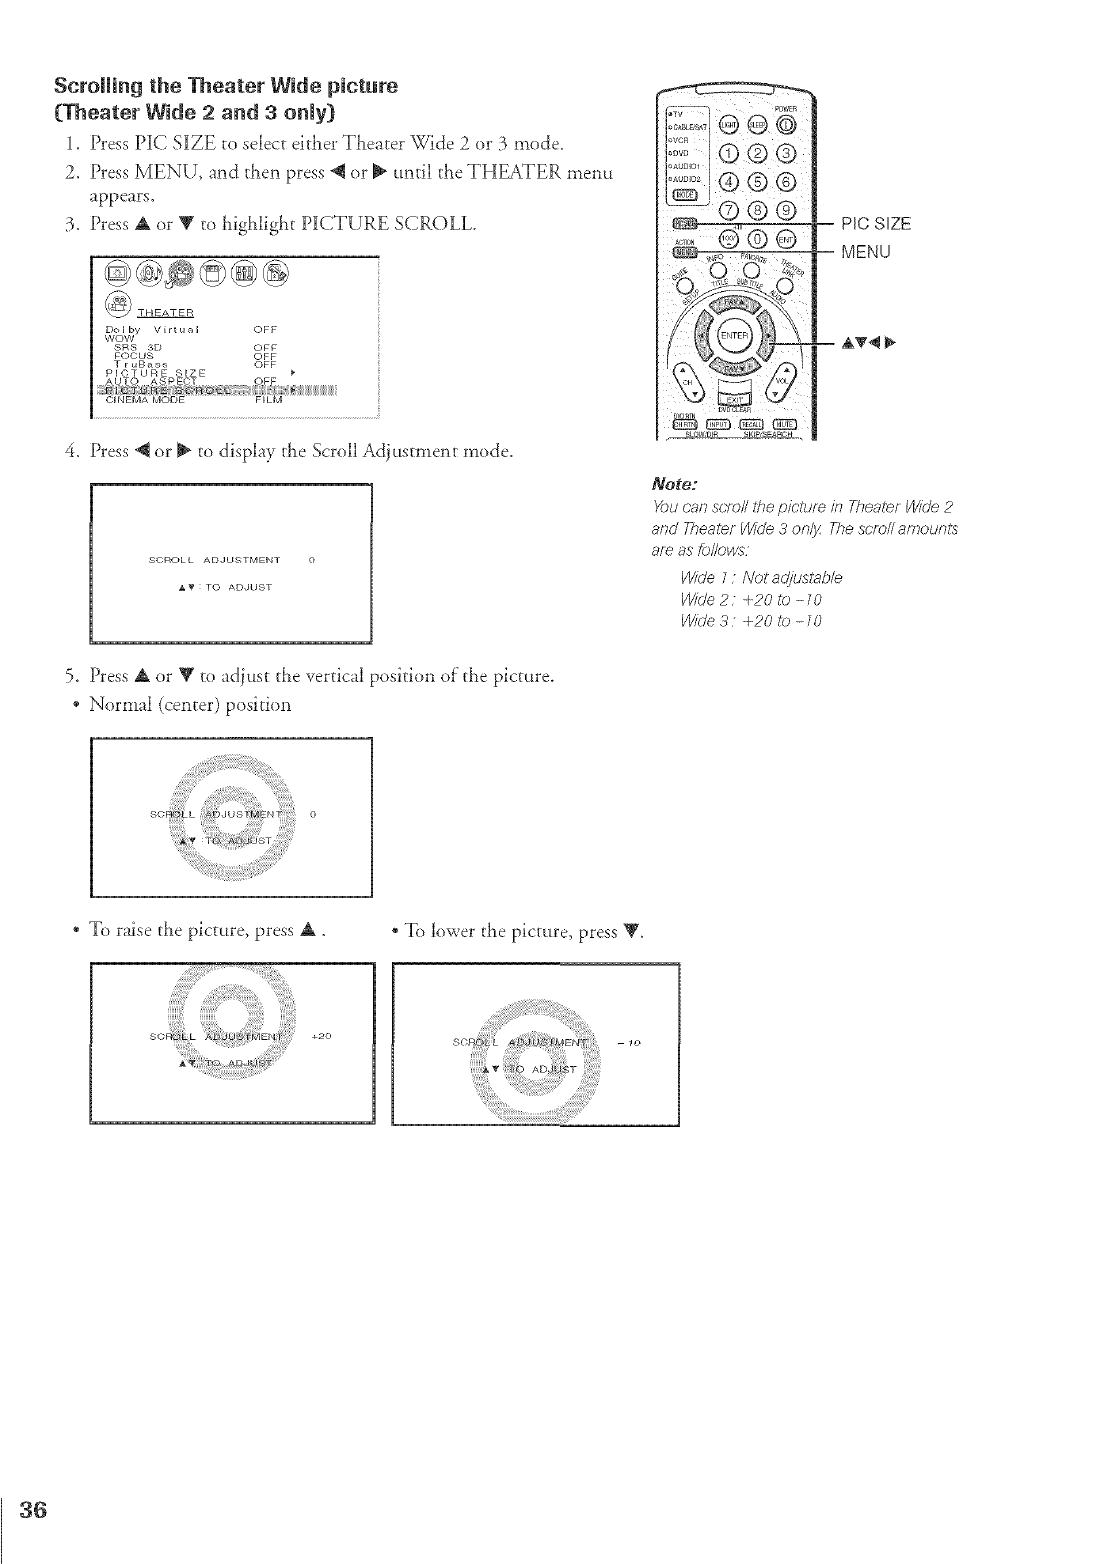
ScroRing the Theater Wide picture
CTheater Wide 2and 3only)
1. Press PIC SIZE to select either Theater Wide 2 or 3 mode.
2. Press MENU, and then press _ or _ until the THEATER menu
appears.
3. Press A or _ to highlight PICTURE SCROLL
Dolby Virtual OFF
WOW
SRS 3D OFF
FOCUS OFF
T r uBass OFF
PICTURE SIZE }"
AUTO ASPECT OFF
iiiiii_iiiiBiB8iSiiiiiiiiiiiiiiiiiiiiiiiiiiiiiiiii
CINEMA MODE FILM
4. Press @ or _ to display the Scroll Adjustment mode.
SOF_OL L ADJUSTMENT 0
J_f : TO ADJUST
-- PIC SIZE
MENU
m A'_4
Note="
You can scroll the picture it7 Theate.f Wide 2
and 777ea/erW/Ue,3only The scmN amounts
am as fol/o,ws
Wide 1: Not adjustab/e
Wide 2:+20to-10
Wide 3 +20/o -10
5. Press A or V to adjust the vertical position of the picture.
* Normal (center) position
* To raise the picture, press A.
SORO L +20
* To lower the picture, press V.
36
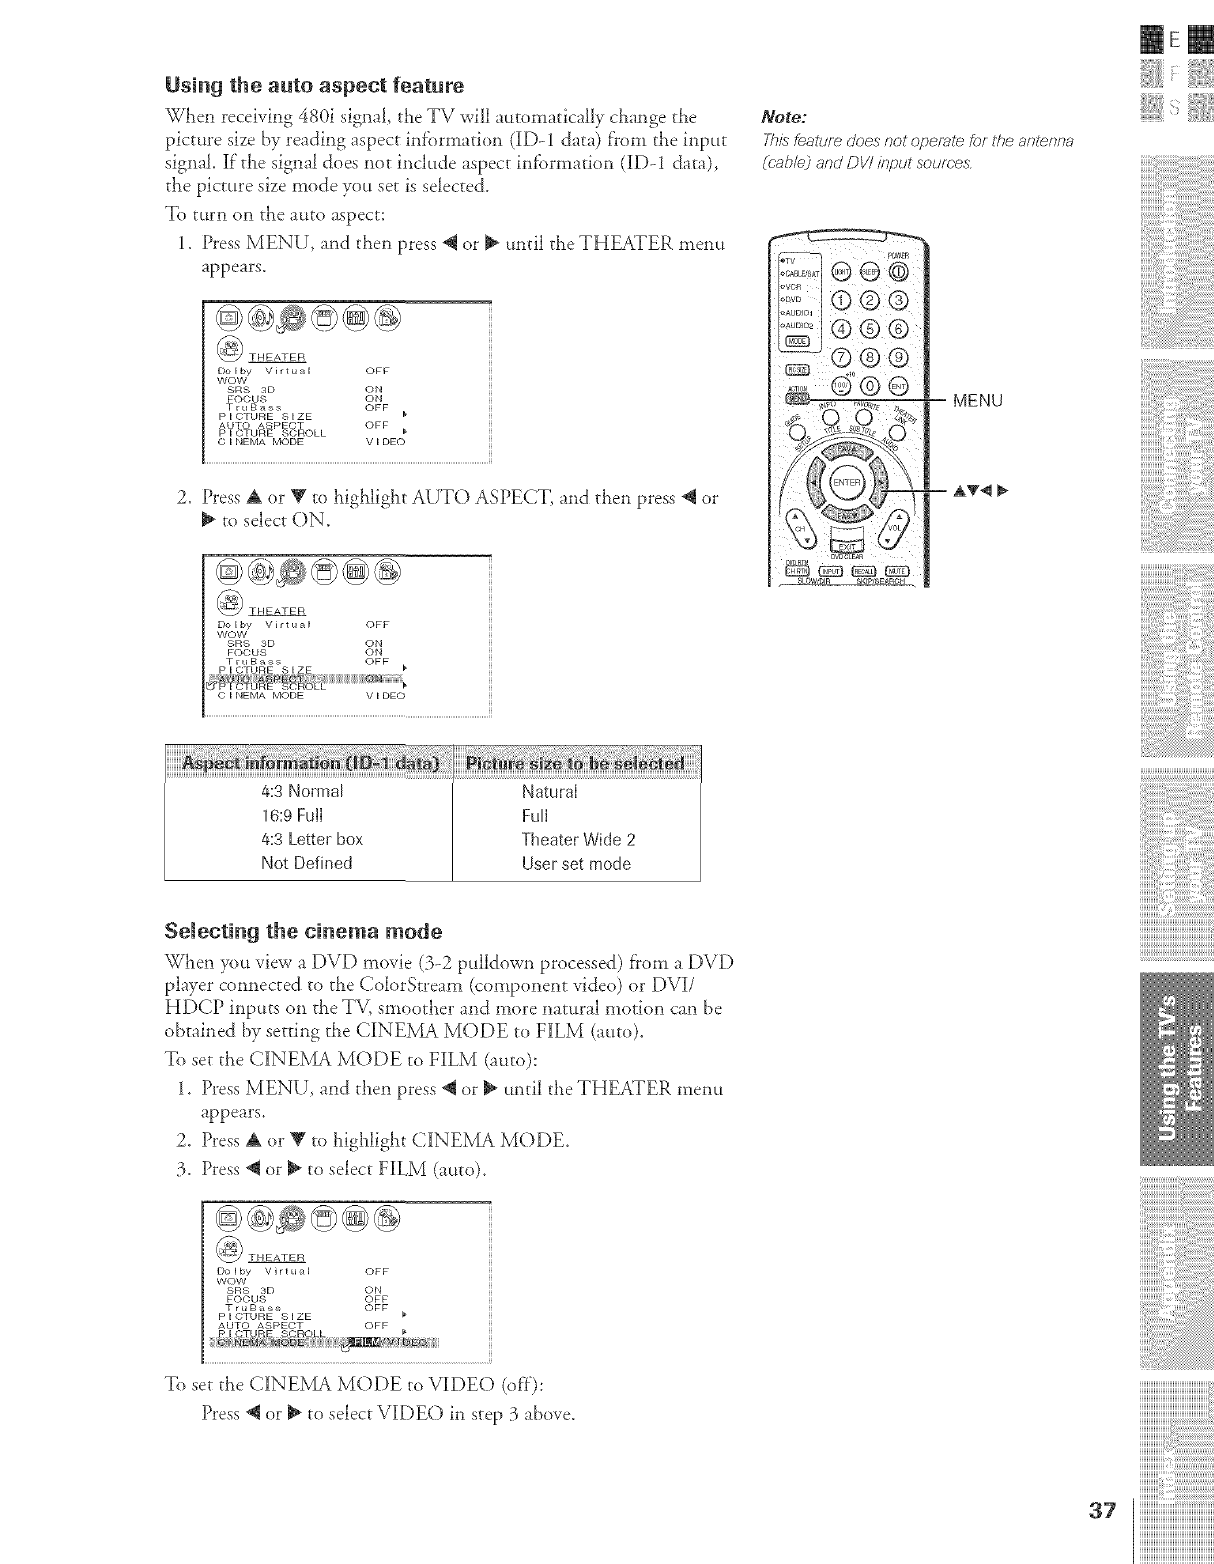
Using the auto aspect feature
When receiving 480i signal, tt_e TV will automatically change the
picture size by reading aspect infbnnation (iD-1 data) from tt_e input
signal, if"the signal does not include aspect infbrmation (ID-1 data),
the picture size mode you set is selected.
To turn on the auto aspect:
1. Press MENU, and then press *q or _ until the THEATER menu
appears.
_ THEATER
Dolby Virtu_,l OFF
wow
_RS 3D ON
FOCUS ON
TruB_,ss OFF
P I CTURE S I ZE
AUTO AS P E(';T OFF
P I CTURE SCROLL _"
O I NEMA MODE V I DE o
2. Press A or T to highlight AUTO ASPECT, and then press @ or
to select ON.
_) THEATER
Dolby Virtu_,l OFF
wow
SRS 3D ON
FOCUS ON
TruBass OFF
CINEMA MODE VIDEO
Note:
This feature does not operate for the arTtmTna
(Pab/e) and DV/ input sources,
MENU
SL0WiDIR SKrP/SEAROH •
-- a,T4 _,
mere
Selecting the cinema mode
When you view a DVD movie (3-2 pulldown processed) from a DVD
player connected to the ColorStream (component video) or DVI/
HDCP inputs on the TV, smoother and more natural motion can be
obtained by setting the CINEMA MODE to FILM (auto).
To set the CINEMA MODE to FILM (auto):
1. Press MENU, and then press *qor _ until the THEATER ulenu
appears.
2. Press A or _' to highlight CINEMA MODE.
3. Press *qor _ to select FiLM (auto).
Dolby Vlrtu#,l OFF
WOW
SRS 3D ON
FOCUS OFF
TruB_ss OFF
P I CTURE S I ZE
AUTO ASPECT OFF
To set the CINE1VLAMODE to VIDEO (off):
Press *qor _ to select VIDEO in step 3 above.
i¸i¸iI¸i¸i¸i11¸i¸i i¸i i,¸iiiii¸iiiiiiii¸iiiiii
iiiiiiiiiiiiiiiiiiiiiiiiiiiiiiiiiiiiiiiiii_
]]]]]]]]]]]]]]]]]]]]]]]]]]]]]]]]]]]]]]]]
iiiiiiiiiiiiiiiii_i_i_i:i_i_i_i_i_i_i_i_i_i_i_i_i_i_i_i_i_i_i_i_i_i_i_i_
a7 iiiiiiiiiiiiiiiiiiiiiiiiiiiiiiiiiiiiiiiiiii
iiiiiiiiiiiiiiiiiiiiiiiiiiiiiiiiiiiiiiiiiii
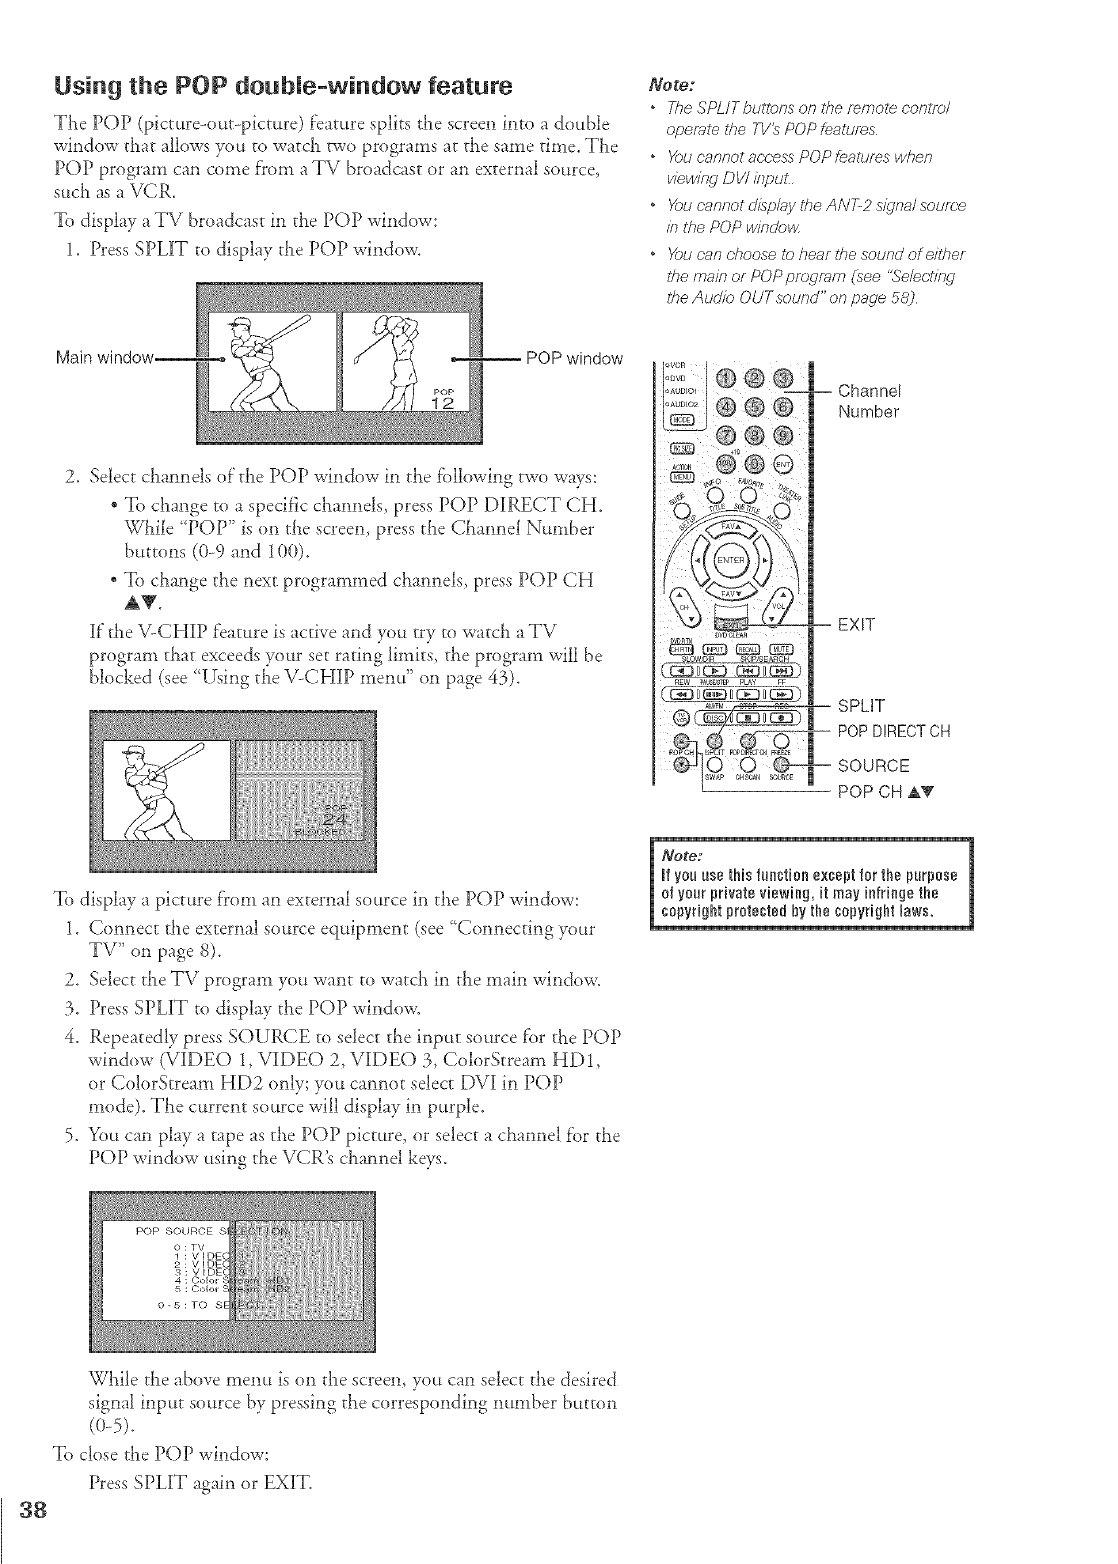
Using the POP doubme-window feature
The POP (picture-out-picture) feature splits the screen into a double
window that allows you to watch two programs at the same time. The
POP program can come f'rom a TV broadcast or an external source,
such as a VCR.
To display a TV broadcast in the POP window:
1. Press SPLIT to display the POP window.
Main window
2. Select channeh of"the POP window in the following two ways:
* To change to a specific channeh_ press POP DIRECT CH.
While 'POP" is on the screen, press the Channel Number
buttons (0-9 and 100).
* To change the next programmed channels, press POP CH
AV.
If"the V-CHIP feature is active and you try ro watch a TV
program that exceeds your set rating limits, the program will be
blocked (see 'Using the V-CHIP menu" on page 43).
_ote:
oThe ,_'PL/Tbullof_s on the femol_ cor_lro/
(_pemte the TV_ POP feattJfes
oYou eanr_ot ac,c,,essPOP fealums when
viewing DV/ inpuL
oYou cannot disp/ay the ANT-2 sigtTa/scum(÷
i/7the POPwindoHz
oYoucanchoose1_hearthesouredof either
/#emainor POP pmgmm (see "Se/ec't/?d
ff_eAudioOUTsound"onpage58)
Channel
Number
EXiT
-- SPLIT
-- POP DIRECT CH
-- SOURCE
POP CH AV
To display a picture from an external source in the POP window:
1. Connect the external source equipment (see _Connecting your
TV" on page 8).
2. Select the TV program you want to watch in the main window.
3. Press SPLIT to display the POP window.
4. Repeatedly press SOURCE to select the input source f'or the POP
window (VIDEO l, VIDEO 2, VIDEO 3, ColorStream HD1,
or ColorStream HD2 only; you cannot select DVI in POP
mode). The current source will display in purple.
5. You can play a tape as the POP picture, or select a channel f'or the
POP window using the VCR's c!_annel keys.
38
While the above menu is on the screen, you can select the desired
signal input source by pressing the corresponding number button
To close die POP window:
Press SPLIT again or EXIT.
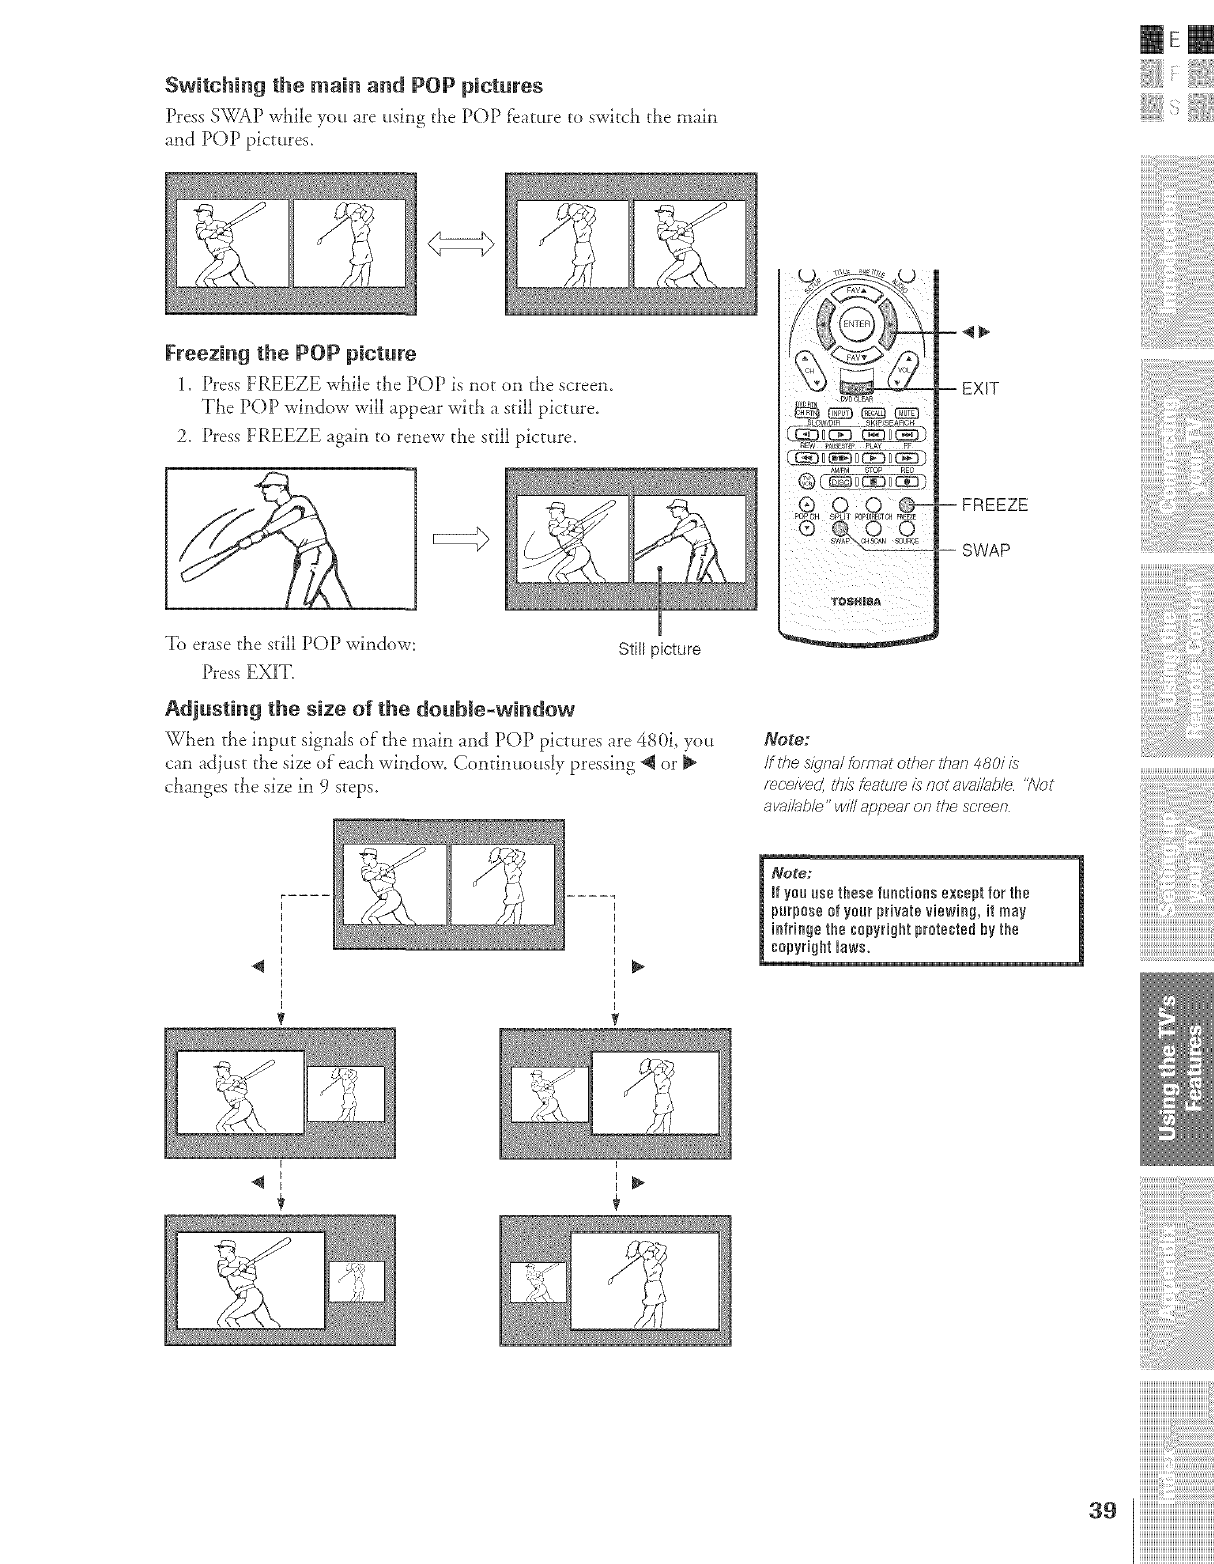
Switching the main and POP pictures
Press SWAP while you are using the POP feature to swkch the main
and POP pictures,
mere
Freezing the POP picture
1, Press FREEZE while the POP is not on the screen,
TLe POP window will appear witll a still picture,
2, Press FREEZE again to renew the still picture,
To erase d_e still POP window:
Press EXIT,
Still picture
Adjusting the size of the double-window
When the input signaJs of the main and POP pictures are 480i, you
can adjust the size of"each window, Continuously pressing @ or
changes the size in 9 steps,
-- FREEZE
-- SWAP
Note:
/f the o_qna/fore,at olflef lflan 480i is
m(;eived ttffs (#atlJf_ is not available"N_t
ava//abb" will appear on the scre,en
INete:
_fyou use these functions except for the
purpoee ef your private viewing, it may
intriege the copyright protected by the
copyright laws. iiiiiiillii i¸i i ii i,i,i,i,i,i,i,i,i,i,i,i,i,i,i,i,i,i,i iii i
iiiiiiiiiiiiiiiiiiiiiiiiiiiiiiiiiiiiiiiiii_
I I
iiiiiiiiiiiiiiiiiiiiiiiiiiiiiiiiiiiiiiii
iiiiiiiiiiiiiiiiiiiiiiiiiiiiiiiiiiiiiiiiiii
iiiiiiiiiiiiiiiiiiiiiiiiiiiiiiiiiiiiiiiiiii
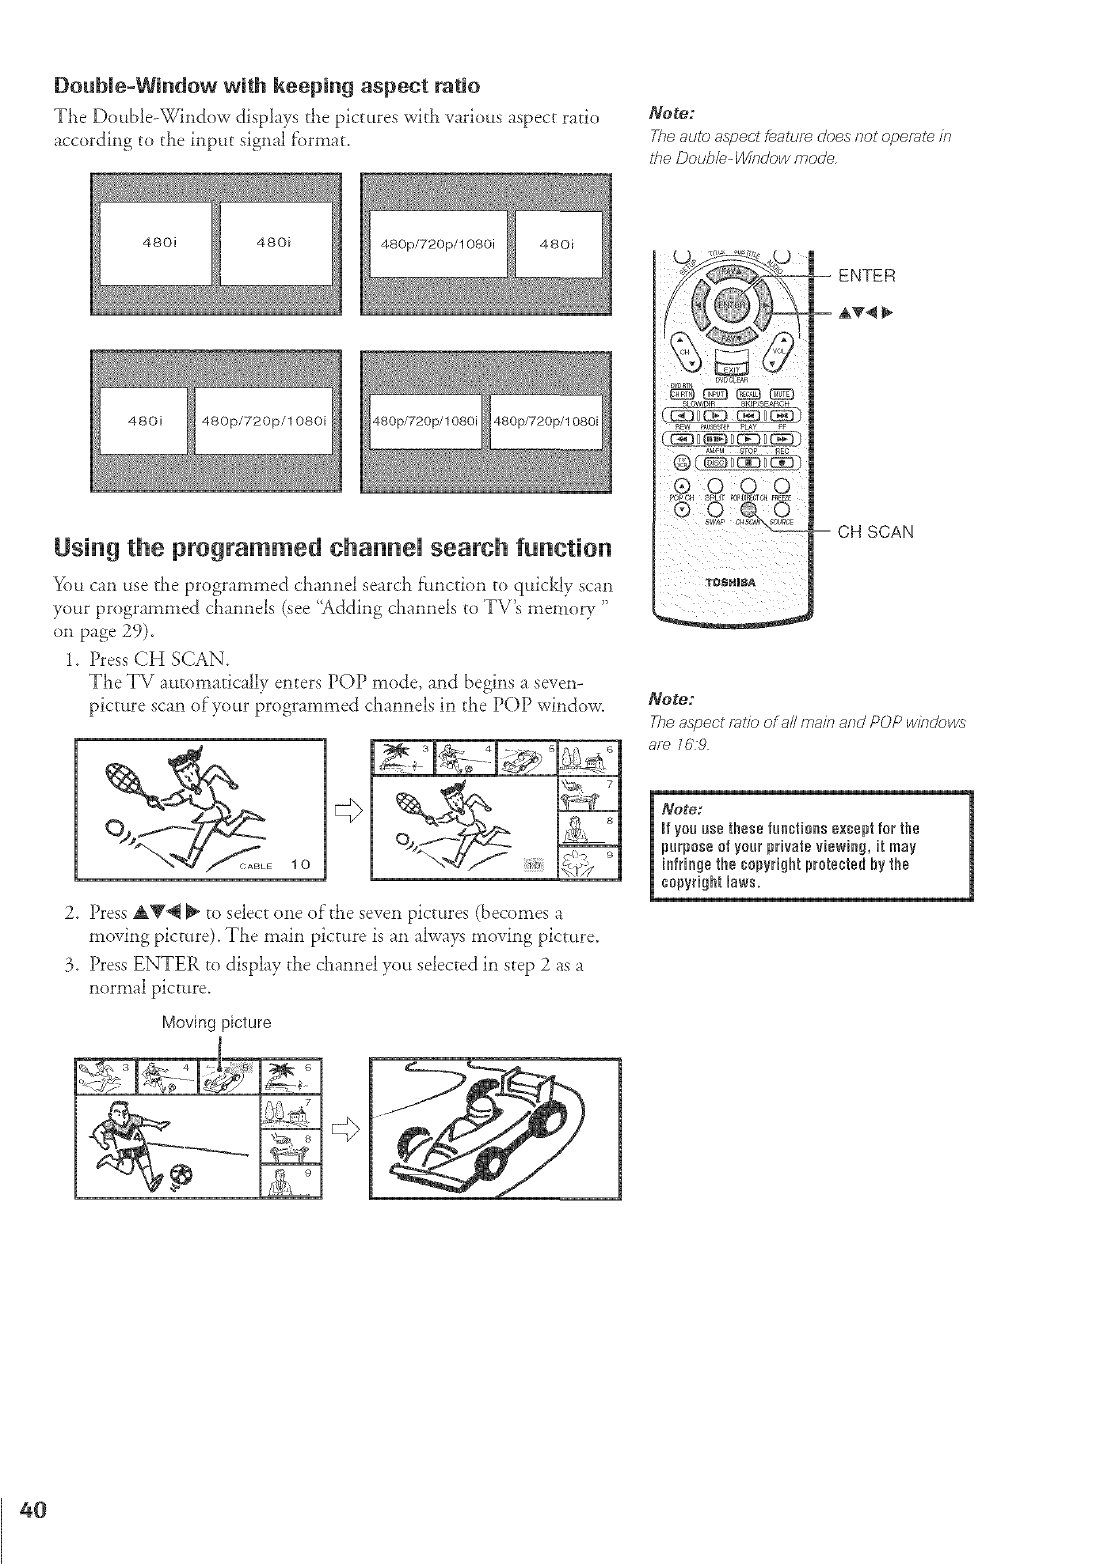
DoubJe-Window with keeping aspect ratio
The Double-Window displays the pictures with various aspect ratio
according to the input signal f'ormat.
Note:
The auto aspect feature_does rTot operate/?_
t_e Doub/e- _bdow mode,
480i 480i
Using the programmed channeU search function
You can use the programmed channel search fhnction to quickly scan
your programmed channels (see "Adding channels to TV's memory "
on page 29).
1. Press CH SCAN.
The TV automatically enters POP mode, and begins a seven-
picture scan of'your programmed channels in ti_e POP window.
<(_, 9
2. Press AV@ _ to select one of the seven pictures (becomes a
moving picture). The main picture is an always moving picture.
3. Press ENTER to display the channel you selected in step 2 as a
normal picture.
Moving picture
® 0 O O
-- CH SCAN
_ote:
The aspect ratio of a//mai_7 and POP w/bdows
are 169
Note:
_fyou use these lueetiens except for the
purpose of your private viewing, it may
infringe the copyright pretested hy the
copyrightlaws,
40
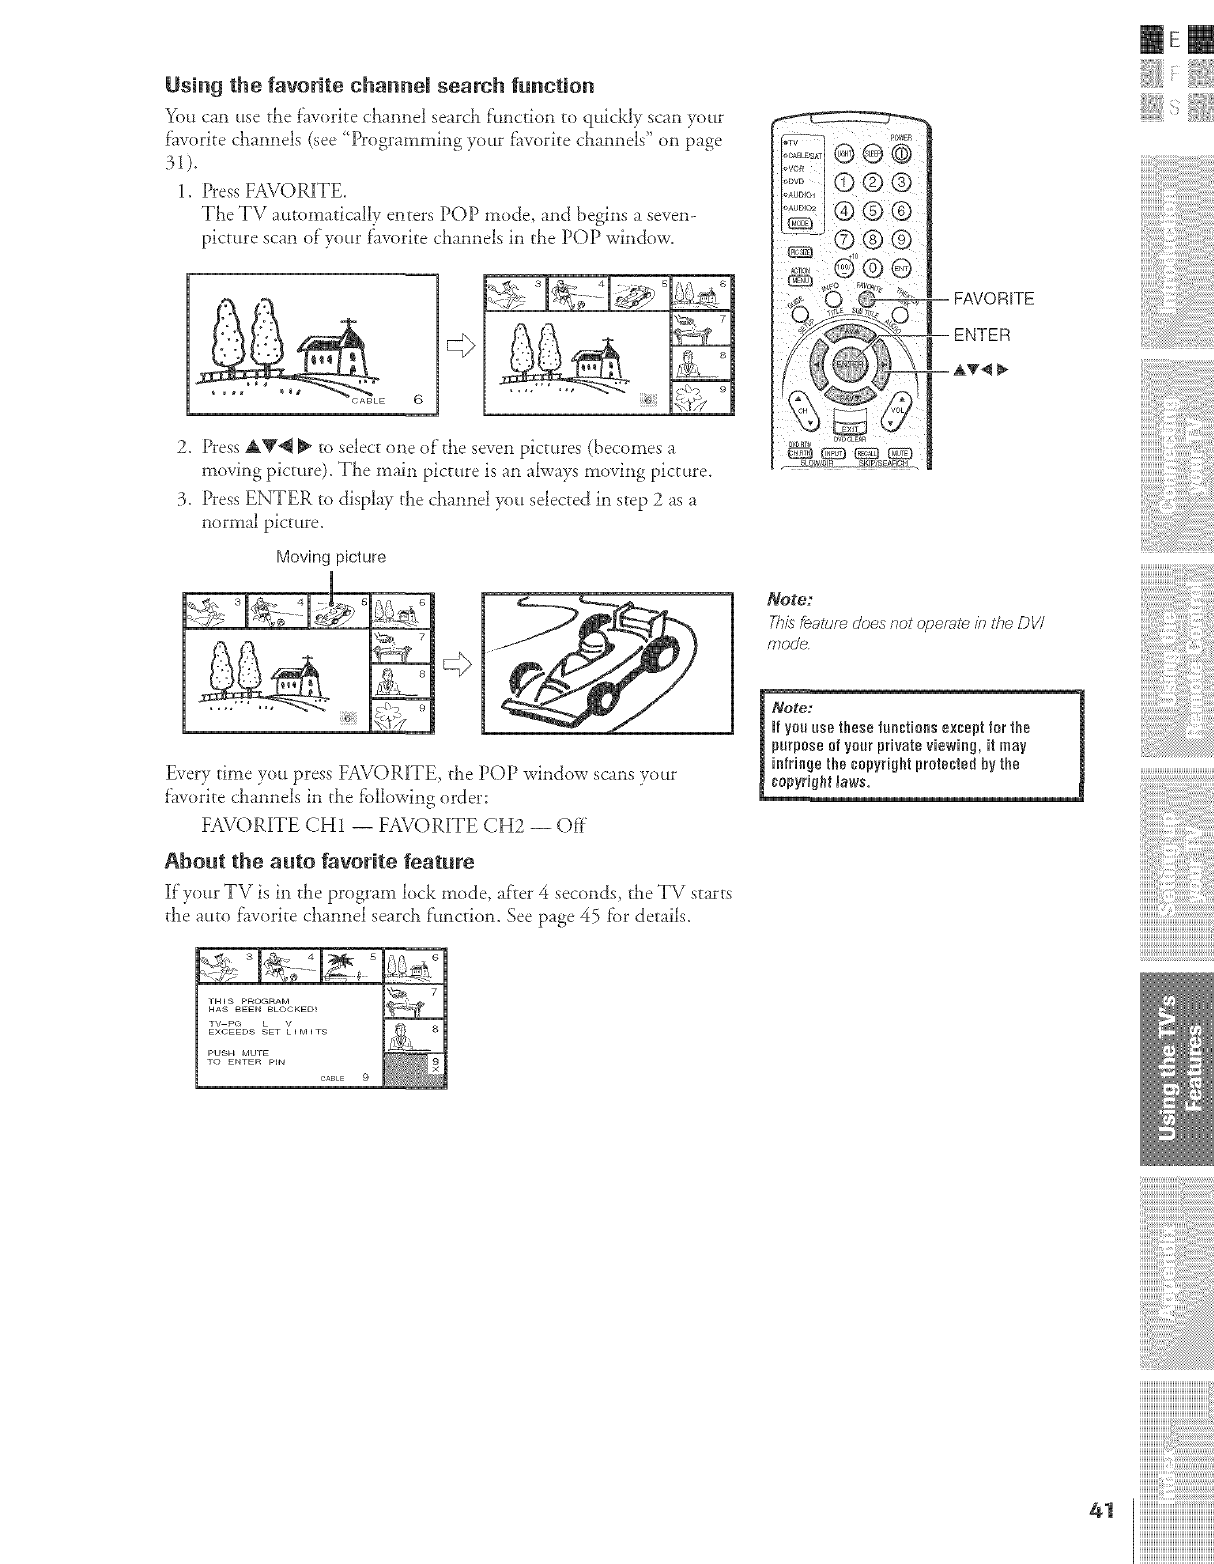
Using the favorite channel search function
You can use the favorite channel search function to quickly scan your
favorite channels (see '_Dogramming your f_vorite channels" on page
1. Press FAVORITE.
The TV automatically enters POP mode, and begins a seven-
picture scan of your favorite channels in the POP window.
2, Press AV@ _ ro select one of the seven pictures (becomes a
moving picture). The main picture is an always moving picture.
3. Press ENTER to display the clmnnel you selected in step 2 as a
normal picture.
Moving picture
FAVORITE
ENTER
NOte:
This feature does cot operate/1_ the DV/
mode.
mere
Every time you press FAVOR]ITE the POP window scans your
favorite channels in the fbllowing order:
FAVORITE CH1 -- FAVOR1[TE CH2 -- Of}"
About the auto favorite feature
1Ifyour TV is in the program lock mode, after 4 seconds_ the TV starts
the attto favorite channel search f:_mction. See page 45 for details.
Note:
_fyOUuse thesetuectioes except for the
purpose of your private viewing, it may
ieb'rin{jethe copyright protected by the
copyri@t _aws.
iiiiiiillii i¸i i ii i,i,i,i,i,i,i,i,i,i,i,i,i,i,i,i,i,i,i iii:i
iiiiiiiiiiiiiiiiiiiiiiiiiiiiiiiiiiiiiiiiii_
iiiiiiiiiiiiiiiiiiiiiiiiiiiiiiiiiiiiiiii
ZZZZZZ::::
ZZZZZZ::::
ZZZZZZ::::
iiiiiiiiiiiiiiiii@i@ilil
41 iiiiiiiiiiiiiiiiiiiiiiiiiiiiiiiiiiiiiiiiiii
iiiiiiiiiiiiiiiiiiiiiiiiiiiiiiiiiiiiiiiiiii
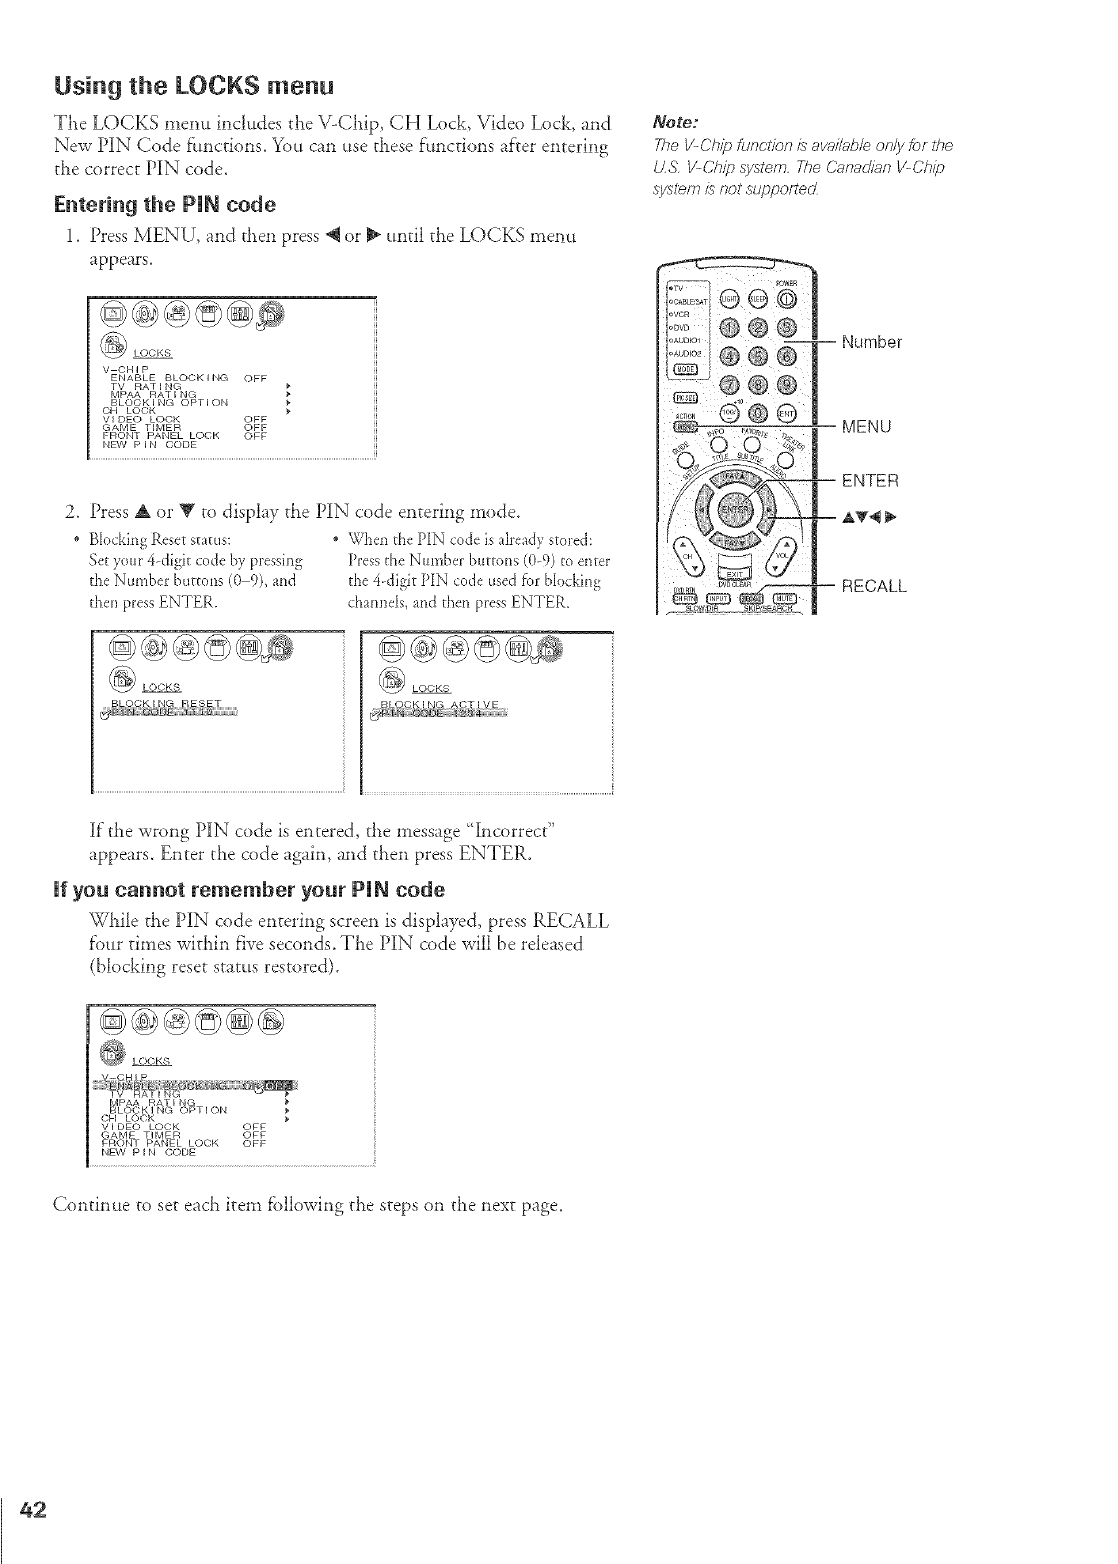
Using the LOCKS menu
The LOCKS menu includes the \LCi_ip, CH Lock, Vide() Lock, and
New PIN Code []tnctions. You can use these functions after entering
the correct PIN code.
Entering the PUN code
1. Press MENU, and tl_en press @ or _ until the LOCKS menu
appears.
V CHIP
ENABLE BLOCK I NG OFF
TV RAT[ NG
MPAA RATING
BLOC K I NG OPT ION
OH LOCK
vI DEC LOCK OFF
GAME TIMER OFF
FRONT PANEL LOCK OFF
NEW P I N CODE
2_ Press A or T to display the PIN code entering mode.
Blocking Reset status:
Set your 4-digit code by pressing
the Numbe*:buttons (0 9), and
thell press ENTER.
@@@@
• WheJ_the PIN code is already stored:
Pressthe Number buttons (0-9) to enter
the 4 digit PIN code used for b[c_cking
channels, and then press ENTER.
@@@@
LOCKS
If"the wrong PIN code is entered, the mess':_e 'Incorrect"
appears. Enter the code again, and then press ENTER.
Ufyou cannot remember your PUN code
While the PIN code entering screen is displayed, press RECALL
f'our times within five seconds. The PIN code will be released
(blocking reset status restored).
@@@©@@
Note;
The V-Ch/F_functfon is avai/ab/e on/)' for l#e
tLg, V-Chip system, The Canadian V-Ch/}_
syslem is not SL!ppOf?(erZ
i o0w i I i i i
I°'°_'_'I@ @ @ I Number
i
m
,,_o _,_,_,_ MENU
Q O
/
I£
_o_ _ -- RECALL
BLOC K I NG OPT I ON
OH LOCK _,
Vl DEC LOCK OFF
GAME TIMER OFF
FRONT PANEL LOCK OFF
NEW P I N CODE
Continue to set each item following the steps on the next page.
42
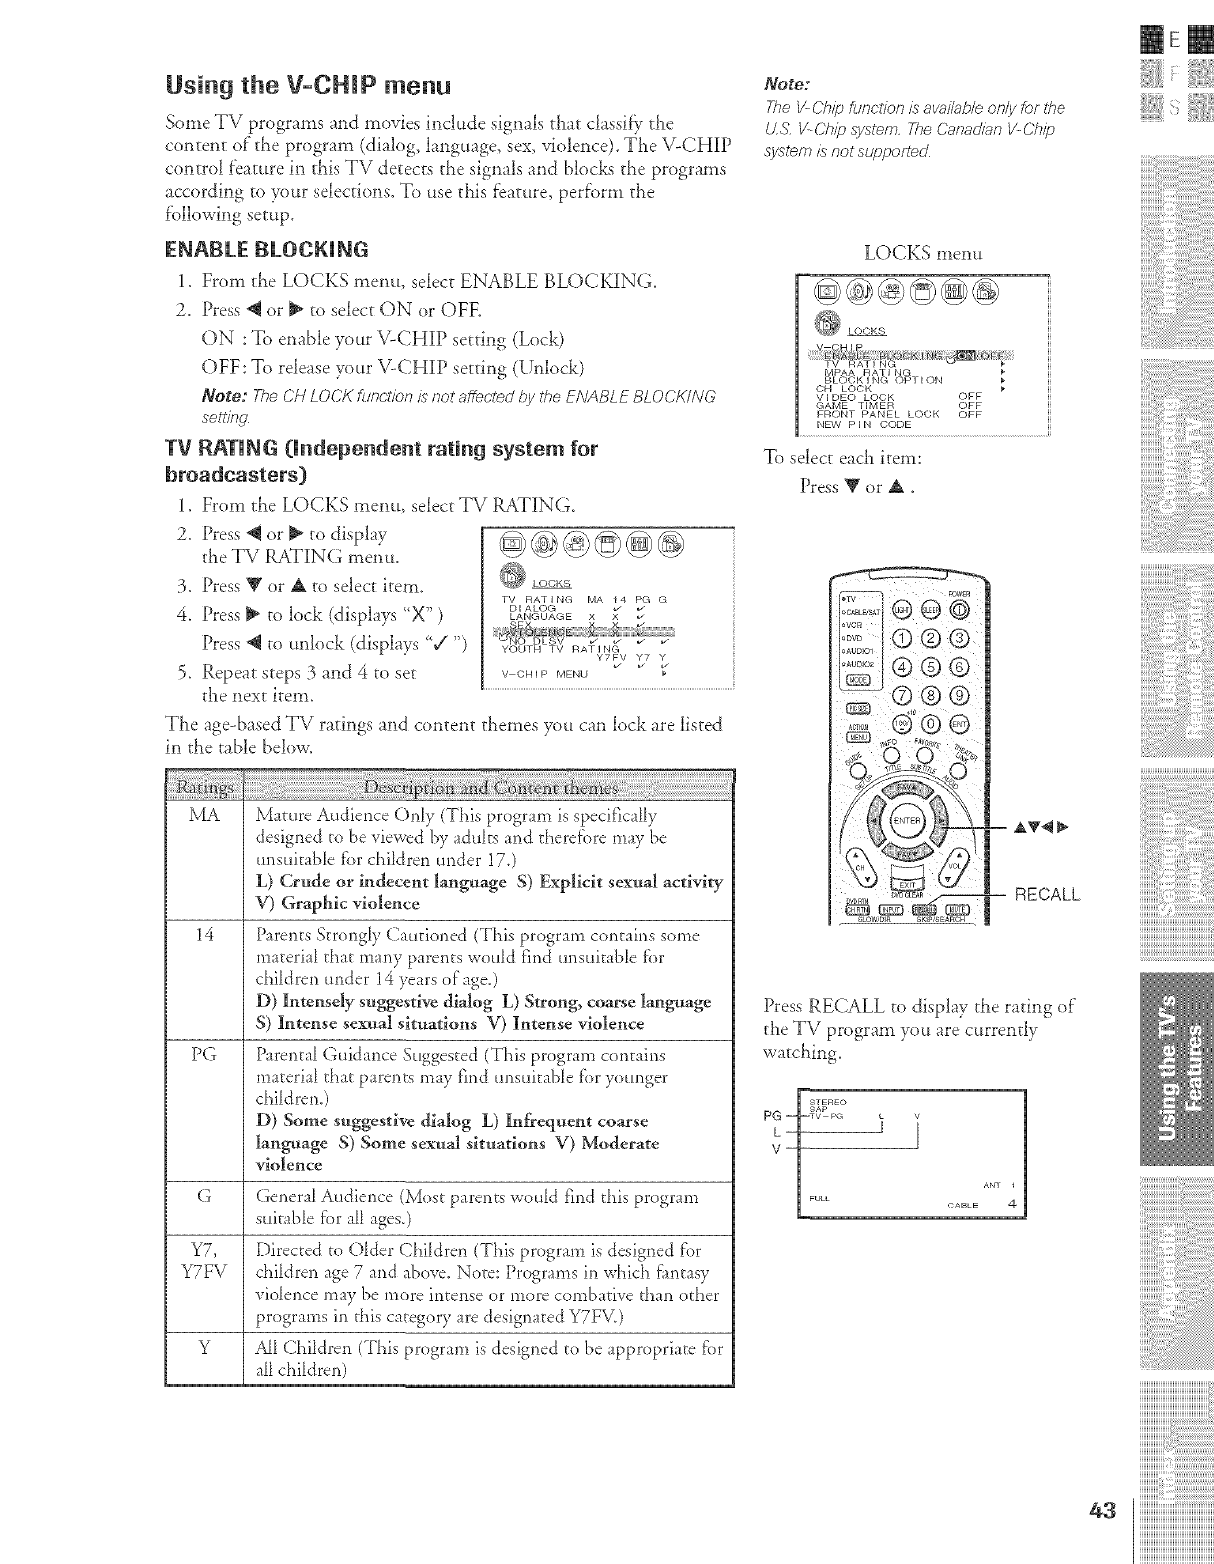
Using the V-CHIP menu
Some TV programs and movies include signals that classif} the
content of"the program (dialog, language, sex, violence). The \LCHIP
contro¿ feature in this TV detects die signals and blocks the programs
according to your selections. To use this f'eature, perf'orm the
f'ollowing setup.
ENABLE BLOCKING
1. From the LOCKS menu, select ENABLE BLOCKING.
2. Press @ or _ to select ON or OFF.
ON : To enable your \/-CHIP setting (Lock)
OFF:To release your V-CHIP setting (Unlock)
Note: The Ct-I LOCK flmctic:,n is not affeciec/ by the ENABLE BLOCK/NG
setlf1W
TV RATING {Undependent rating system for
broadcasters)
1. Dora the LOCKS menu, select TV RATING.
2. Press @ or _ to display
the TV RATING menu.
3. Press V or A to select item.
4. Press [_ to lock (displays "X" )
Press _ to unlock (displays '/")
5. Repeat steps 3 and 4 to set
the next item.
_LOCKS
Tv RAT,NG_A _ LGG
D I ALOG
LANGUAGE X x
S X ...... X
_O DE_7 _ _ &
YOUTH TV RATING
Y7FV Y7 Y
v_
V CHIP MENU
The age-based TV ratings and content themes you can lock are listed
in the table below.
MA Mature Audience Only (This program is specifically
designed to be viewed by aduks and theref{)re may be
unsukabD fbr children under 170
L) (-:rude or indecent ]artguage S) Explicit sexual activity
V) Graphic violence
14 Parents Strongly Cautioned (This program contains some
material that many parents would find unsuitable f_)r
children under 14 years of age.)
D) Intensely suggestive dialog L) Strong, coarse lartgnage
S) Intense sex*aM situations V) Intense violence
PG Parental Guidance Suggested (This program contains
material that parents may find unsuitabD fbr younger
chi_drem)
D) Some suggestive dialog L) Infrequent coarse
language S) Some sexual situations V) Moderate
violence
G General Audience (Most parents wou_d find this program
suitable fbr all ages.)
Y7, Directed tO Older Children (This program is designed f'or
Y7FV children age 7 and above. Note: Programs in which flmtasy
vioDnce may be more intense or more combative than other
programs in this category are designated Y7F_.)
Y All Children (This program is designed to be appropriate fi)r
all children)
Note:
TI_oV-Citi_ofunctioni:_avaihD/eonlyforrite
LL&V--Chi) system, TheCarTacJianV-Ch#
system isnotsupportecJ
LOCKS menu
BLOCKING OPTION
OH LOCK '_
VIDEO LOCK OFF
GAME TIMER OFF
FRONT PANEL LOCK OFF
NEW P I N ()ODE
To select each item:
Press T or _,
Press RECALL to display the rating of
the TV program you are currently
watching.
ANT 1
CABLE 4
i¸i¸iI¸i¸i¸i11¸i¸i i¸i i,¸iiiii¸iiiiiiii¸iiiiii
iiiiiiiiiiiiiiiiiiiiiiiiiiiiiiiiiiiiiiiiii_
]]]]]]]]]]]]]]]]]]]]]]]]]]]]]]]]]]]]]]]]
4a iiiiiiiiiiiiiiiiiiiiiiiiiiiiiiiiiiiiiiiiiii
iiiiiiiiiiiiiiiiiiiiiiiiiiiiiiiiiiiiiiiiiii
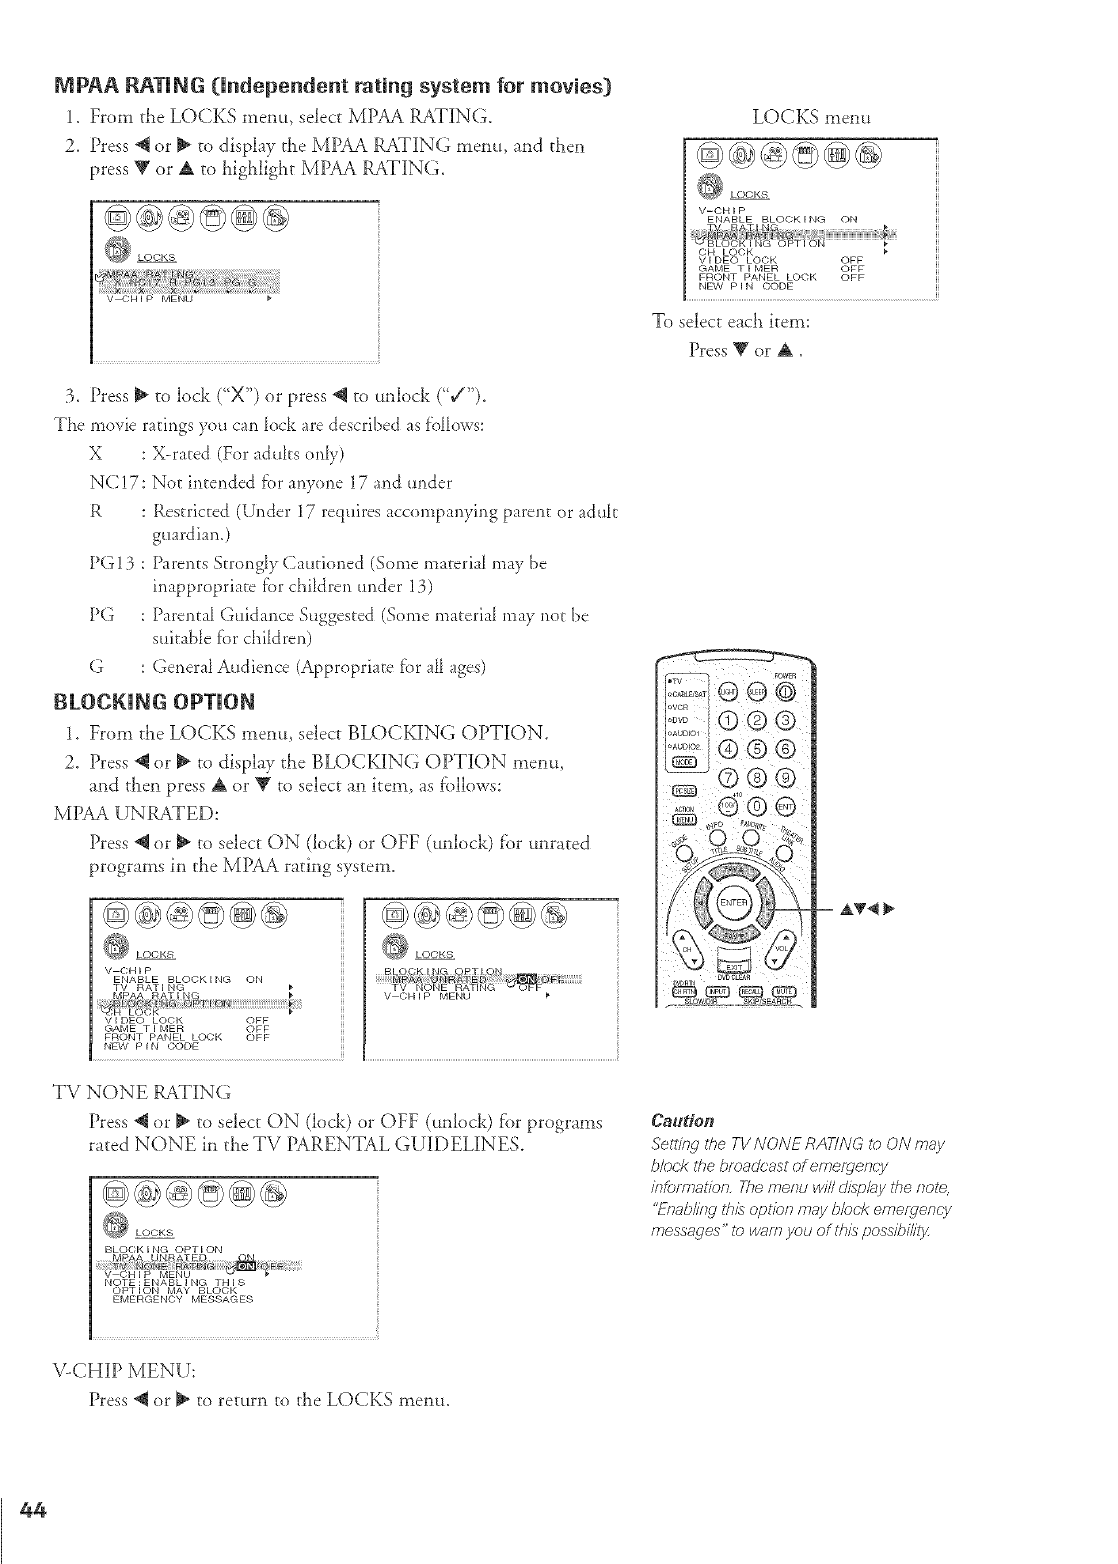
MPAA RATING (Independent rating system for movies)
1. From the LOCKS memo, select MPAA RATING.
2. Press @ or _ to display the MPAA RATING memo, and then
press _ or A to Lighlight MPAA RATING.
O LOCKS
3. Press _ to lock ("X") or press @ to unlock ('_/").
The movie ratings you can _ock are described as ii)11ows:
X : X-rated (For adults only)
NC!7: Not intended fi)r anyone 17 and under
R : Restricted (Under 17 requires accompanying parent or adult
guardiam)
PG! 3 : Parents Sm)ngly Cautioned (Some materia_ may be
inappropriate f;_rchildren under 13)
PG : Parental Guidance Suggested (Some material may not be
suitable f_)rchildren)
G : Genera_ Audience (Appropriate fi)r a_ ages)
BLOCKING OPTION
1. From the LOCKS menu, select BLOCKING OPTION.
2. Press @ or _ to display the BLOCKING OPTION menu,
and then press A or T to select an item, as fbllows:
MPAA UNRATED:
Press @ or _ to select ON (lock) or OFF (unlock) f'or tmrated
programs in the MPAA rating system.
LOCKS
v CHIP
ENABLE BLOCK I NG ON
TV RATING
VIDEO LOCK OFF
GAME •IMER OFF
FRONT PANEL LOCK OFF
NEW PIN CODE
LOCKS
TV NONE RATING
Press _ or _ to select ON (lock) or OFF (unlock) for programs
rated NONE in the TV PARENTAL GUiDELiNE&
LOCKS
BLOCKING OPTION
NOTE:ENABLING THIS
OPTION MAY BLOCK
EMERGENCY MESSAGES
\LCHIP MENU:
Press @ or _ to return to the LOCKS memo.
LOCKS memt
LOCKS
V-CHIP
ENABLE BLOCK I I_IG ON
V I DEC) LOCK OFF
GAME • I MER OFF
FRONT PANEL LOCK OFF
NEW P I N (;ODE
To select each item:
Press VorA,
Caudon
Setting the TV NONE RATING lo ON may
b/ock l#e bma&;'ast of emergency
it?fbm)at/on, The mer?u will display the note.
"Enab/itW ffTisepden may block emergency
messages" te warn yeu of this possbilitjz
44
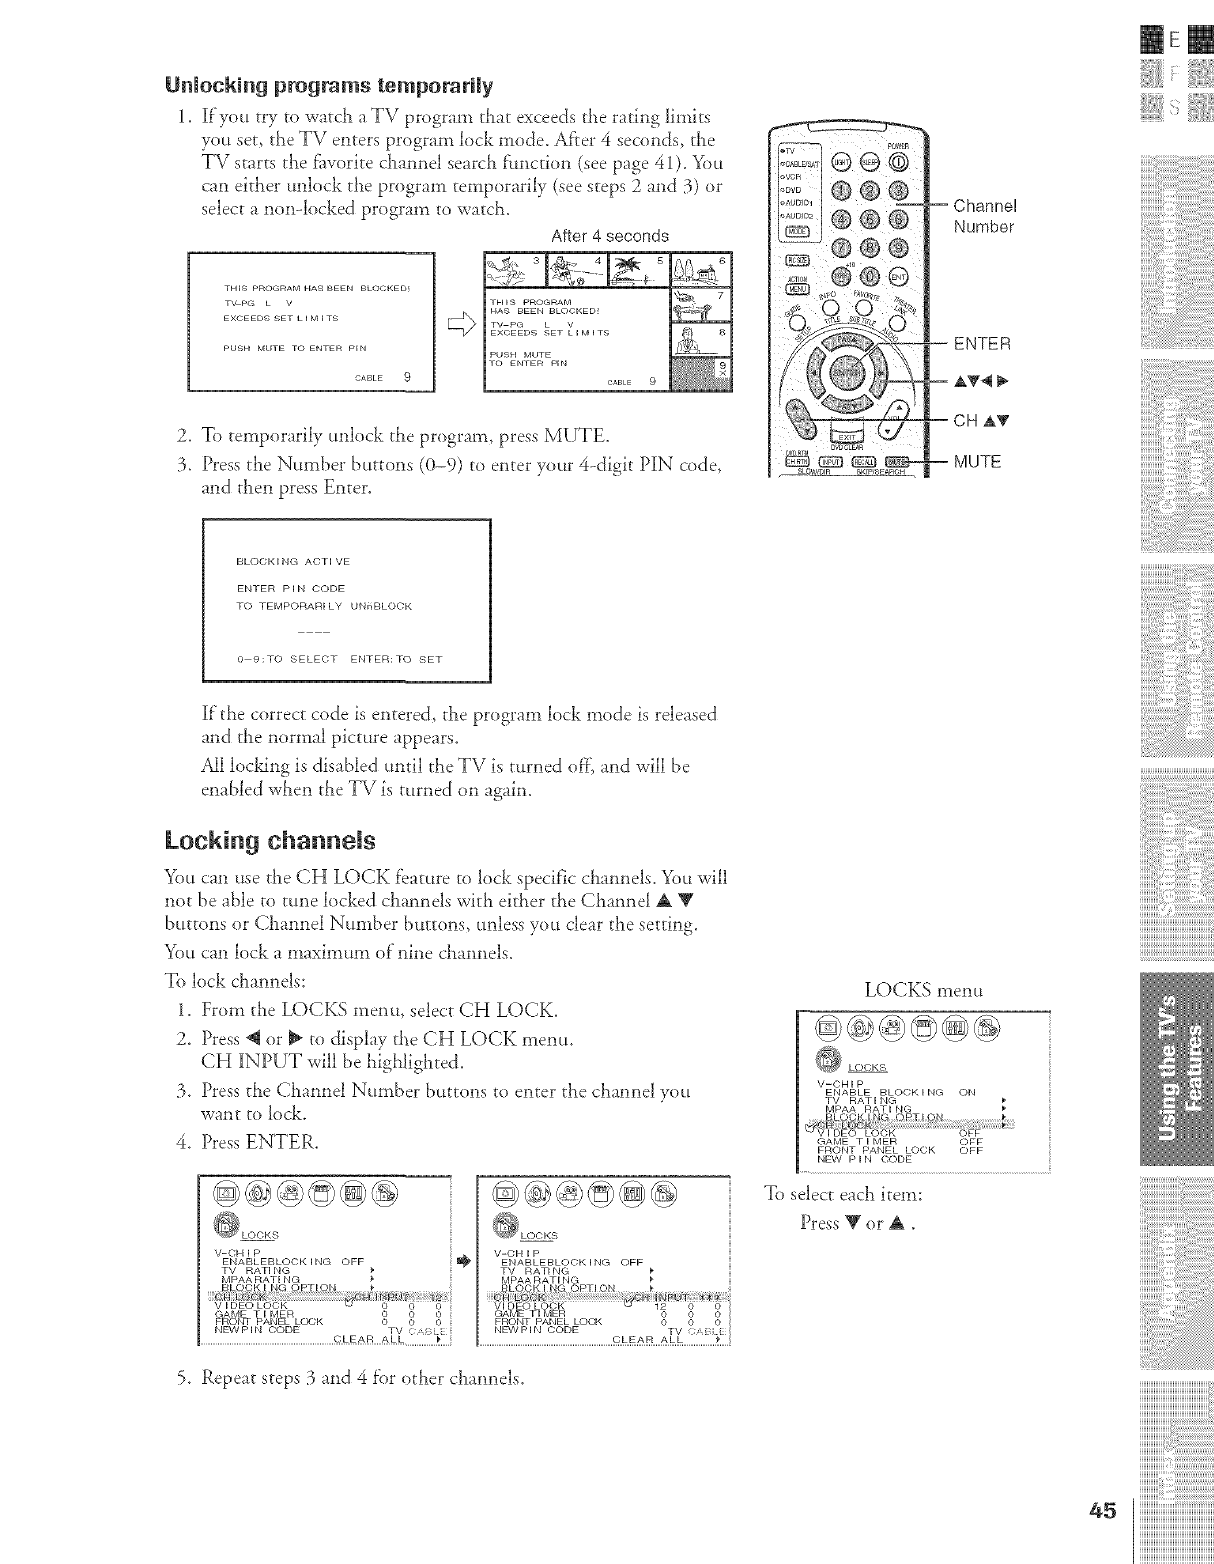
Unlocking programs temporarily
1. If'you try to watcla a TV program that exceeds;rhe rating limits
you set, the TV enters program lock mode. Af'rer 4 seconds, the
TV starts the f_worite claannel search fimction (see page 41). _)u
can either unlock the program temporarily (see steps 2 and 3) or
select a non-locked program to watch.
After 4seconds
THFS PROGRAM HAS BEEN BLOCKED_
TVpG • V
EXCEEDS SET • I M F TS
©ABLE 9
2. To temporarily unlock the program, press MUTE.
3, Press the Number buttons (0-9) to enter your 4-digit PiN code,
and then press Enter.
IEm
BLOCKING AOTIVE
ENTER PIN CODE
TO TEMPORARILY UN_BLOOK
0 9:TO SELECT ENTER:TO SET
If the correct code is entered, the program lock mode is released
and the normal picture appears.
All locking is disabled until the TV is turned of}] and will be
enabled wIlen the TV is turned on again.
Locking channels
You can use rhe CH LOCK fcatme to lock specific channels. You will
nor be able to tune locked channels with eitiaer the CMnnel A _g
buttons or Channel Number buttons, unless you clear the setting.
You can lock a maximum of"nine channels.
To lock channels:
1. From the LOCKS menu, select CH LOCK.
2. Press @ or _ to display the CH LOCK menu.
CH INPUT will be highligiated.
3. Press the Channel Number buttons to enter the channel you
want to lock,
4. Press ENTER.
V-CH I P
ENAOLEOLOOKI"GOFF_ ii"
TV RATING
MPAA RATI NG
FRONT PANEL LC_;K
NEWPIN CODE TV CA[)_
V-CHIP
ENABLEBLOCKING OFF
TV RATING
MPAARATING
FRONT PANEL LOCK
NE1NPIN CODE TV ....
CLEAR ALL_!*_} !
5. Repeat steps 3 and 4 f'or other channels.
LOCKS menu
V-CHIP
ENABLE BLOCKING ON
TV RATING
MPAA RATING
GAME T I MER OFF
FRONT PANEL LOCK OFF
NEW P I N ()ODE
To select each item:
Press RgorA.
45
i¸i¸iI¸i¸i¸i11¸i¸i i¸i i'¸iiiii'¸iii'¸iiiii'¸iii'¸iii
iiiiiiiiiiiiiiiiiiiiiiiiiiiiiiiiiiiiiiiiii_
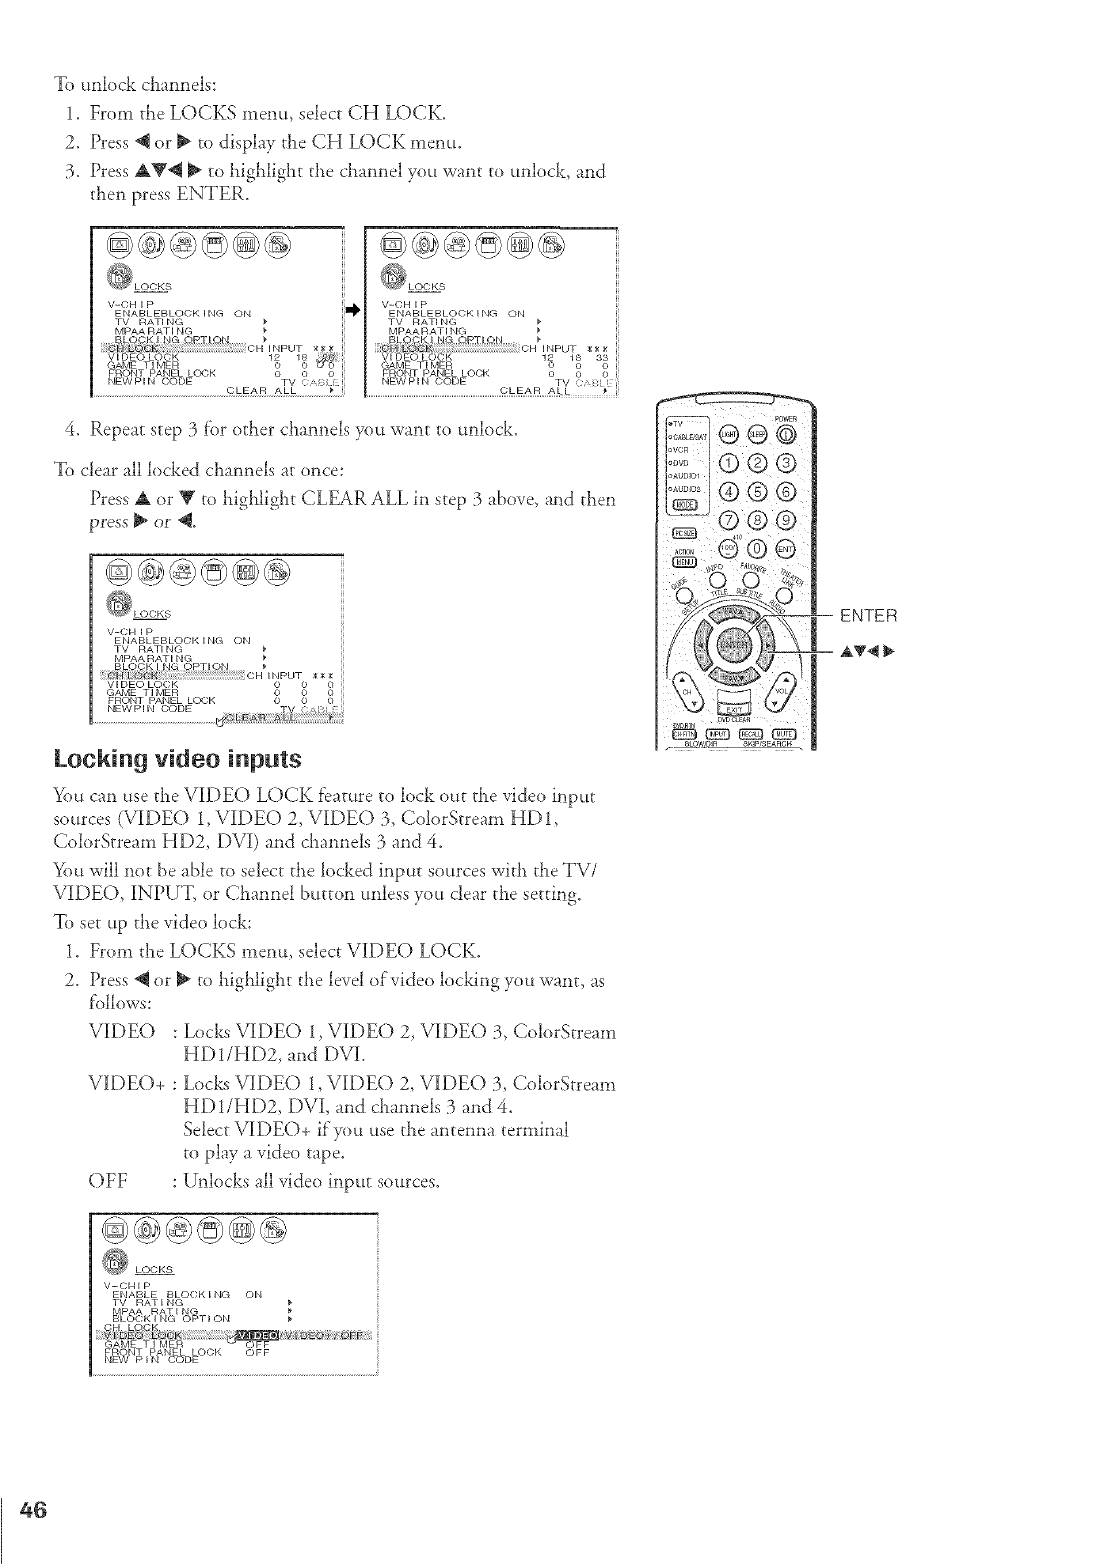
To unlock channels:
1. From the LOCKS menu, selec_ CH LOCK.
2. Press _ or _ to display the CH LOCK menu,
3. Press AV_ _ to highlight the channel you want to unlock, and
then press ENTER.
V-CH I P V-CH I P
ENABLEBLOCKING ON I_ ENABLEBLOCKING ON
TV RAT NG }* TV RATI NG
MPAA RAT NG _ MPAARATI NG
BLQc._K NG OPT ON }" BLOCK NG OPT QN
iNPUT *_g _ : CH iNPUT x**
VIDEO LOCK 12 18 VI DEC LOOK 12 18 33
GAME TIMER 0 0 _0 GAME TIMER 0 0 0
FRONT PANEL L(X:;K 0 0 0 FRONT PANEL LOCK 0 0 0
NEWPIN CODE TV /NEWPIN CODE TV { [
CLEAR ALL _" ............................................................................ ...................
4. Repeat step 3 f'or other channels you want to unlock.
To clear all locked channels at once:
Press A or Y to highlight CLEAR ALL in step 3 above, and then
press _ or '@,
V-CH I P
ENABLEBLOCK I NG ON
TV RATING }*
MPAA RATI NG },
BLQCK I N@ OPTION _*
{!i!i_i_i:_ilfi;i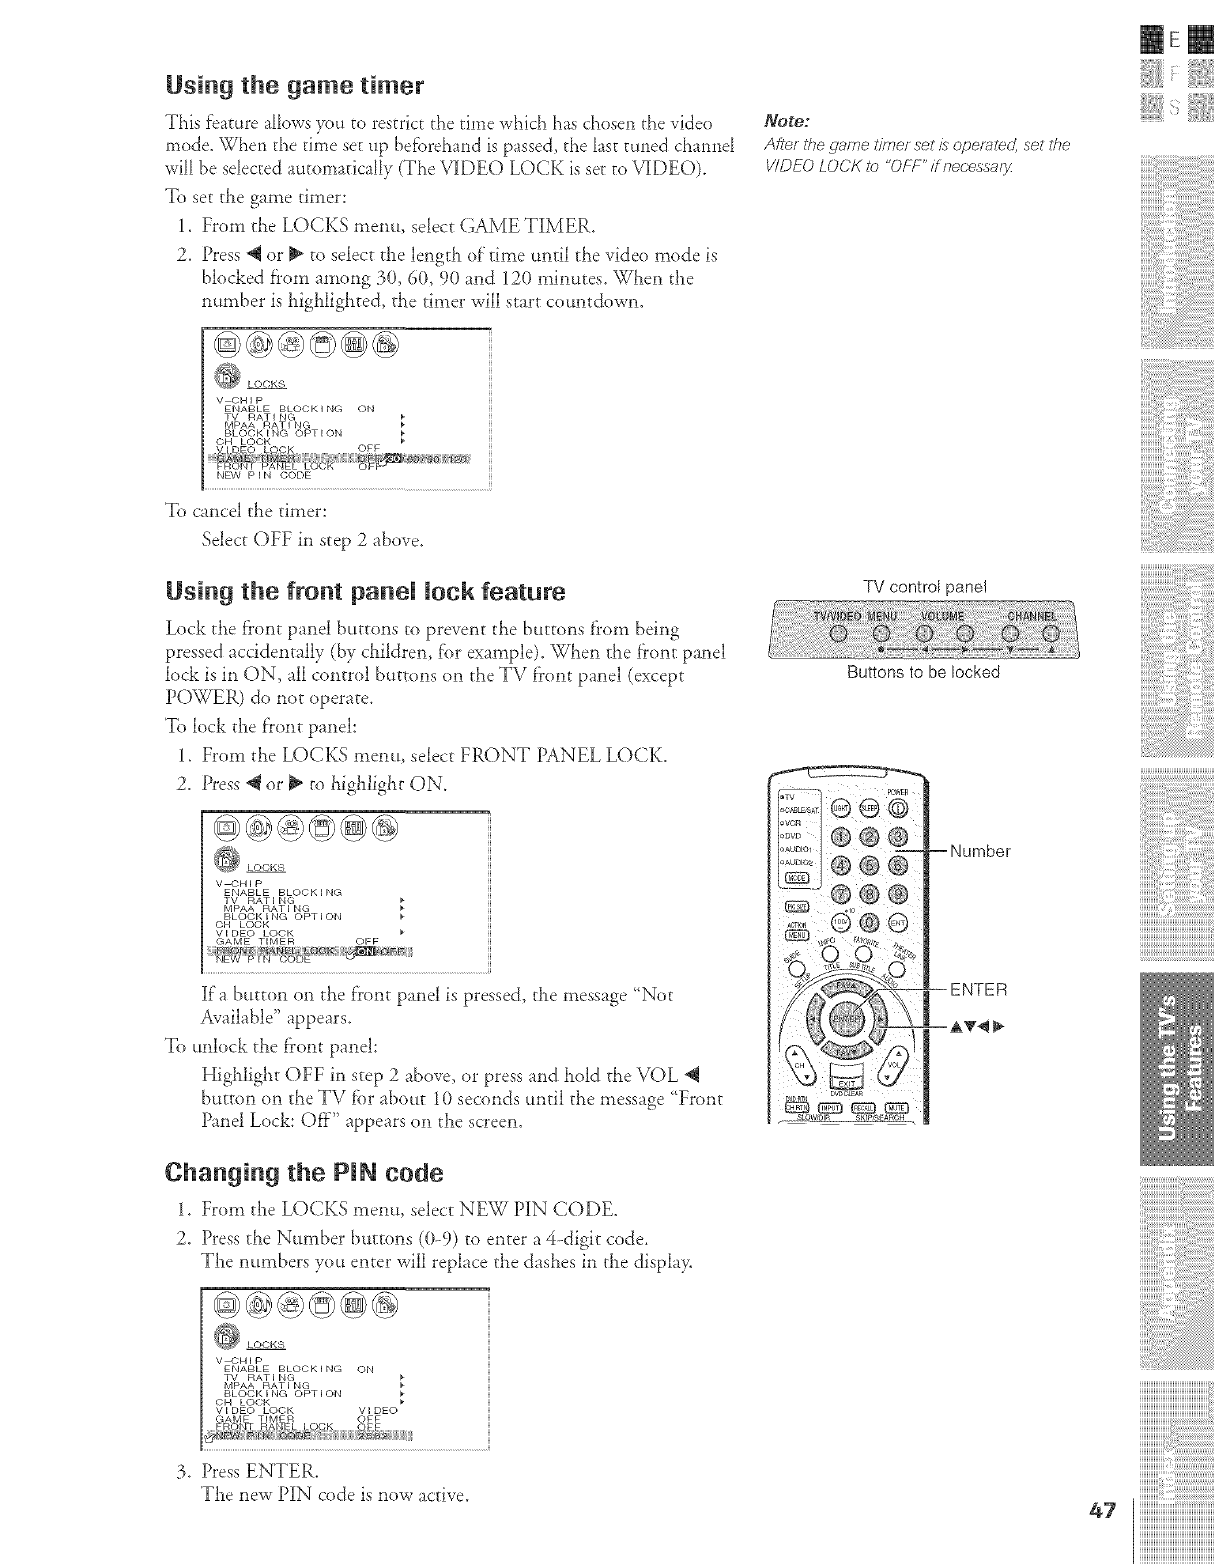
Using the game timer
This feature aI1owsyou to restrict the time which has chose*_the video
mode. When the time set up befbrehand is passed, the last tuned channel
will be sdecred automatically (The VIDEO LOCK is set to VIDEO).
To set the game timer:
1. From the LOCKS menu, select GAME TIMER.
2. Press *q or _" to select the length of"time until the video mode is
blocked from among 30, 60, 90 and 12() minutes. When the
nmnber is highlighted, the timer will start cotmtdown.
@@@©@@
_Ote."
After the game timer set £operalec/, set the
V/DEO LOCK to "OFF"/7 r_ecessary
mere
V CHIP
ENABLE BLOCKING ON
TV RATING
MPAA RATING
BLOCKING OPTION
NEW P I N CODE
To cancel the timer:
Select OFF in step 2 above.
Using the front panel lock feature
Lock the front panel buttons to prevent the buttons flx)m being
pressed accidentally (by children, f'or example). When the front panel
lock is in ON, all control buttons on the TV front panel (except
POWER) do not operate.
To lock the front panel:
1. From the LOCKS menu, select FRONT PANEL LOCK.
2. Press"q or _ to highlight ON.
@@@@@@
LOCKS
V CHIP
ENABLE BLOCK ING
TV RATING
MPAA RATING
BLOCK I NG OPT I ON
OH LOCK
vl DEC LOCK
GAME TIMER OFF
Ira button on the front panel is pressed, the message _Not
Available" appears.
To tmlock the front panel:
Higialight OFF in step 2 above, or tress and hold the VOL "_
button on the TV for about 10 seconds until the message _Front
Panel Lock: Off'" appears on the screen.
Changing the PIN code
1. From the LOCKS menu, select NEW PIN CODE.
2. Press the Number buttons ((}-9) to enter a 4-digit code.
The nmnbers you enter will replace the dashes in the displa>
@@@@@@
LOCKS
V CHIP
ENABLE BLOCKING ON
TV RATING
MPAA RATING
BLOCKING OPTION
OH LOCK
VI DEO LOCK Vl DEO
GAME TIMER OFF
3. Press ENTER.
The new PIN code is now active.
TV control pane!
Buttons to be locked
-- --Number
i¸i¸iI¸i¸i¸i11¸i¸i_i¸i_i_¸i¸i_i'¸i'i'i'i'i'¸i'i'i'¸i'i'i'i'i'¸i'i'i'¸i'i_i!!¸_!
iiiiiiiiiiiiiiiiiiiiiiiiiiiiiiiiiiiiiiiiii_
]]]]]]]]]]]]]]]]]]]]]]]]]]]]]]]]]]]]]]]]
iiiiiiiiiiiiiiiii,@i@ilil
47 iiiiiiiiiiiiiiiiiiiiiiiiiiiiiiiiiiiiiiiiiii
iiiiiiiiiiiiiiiiiiiiiiiiiiiiiiiiiiiiiiiiiii
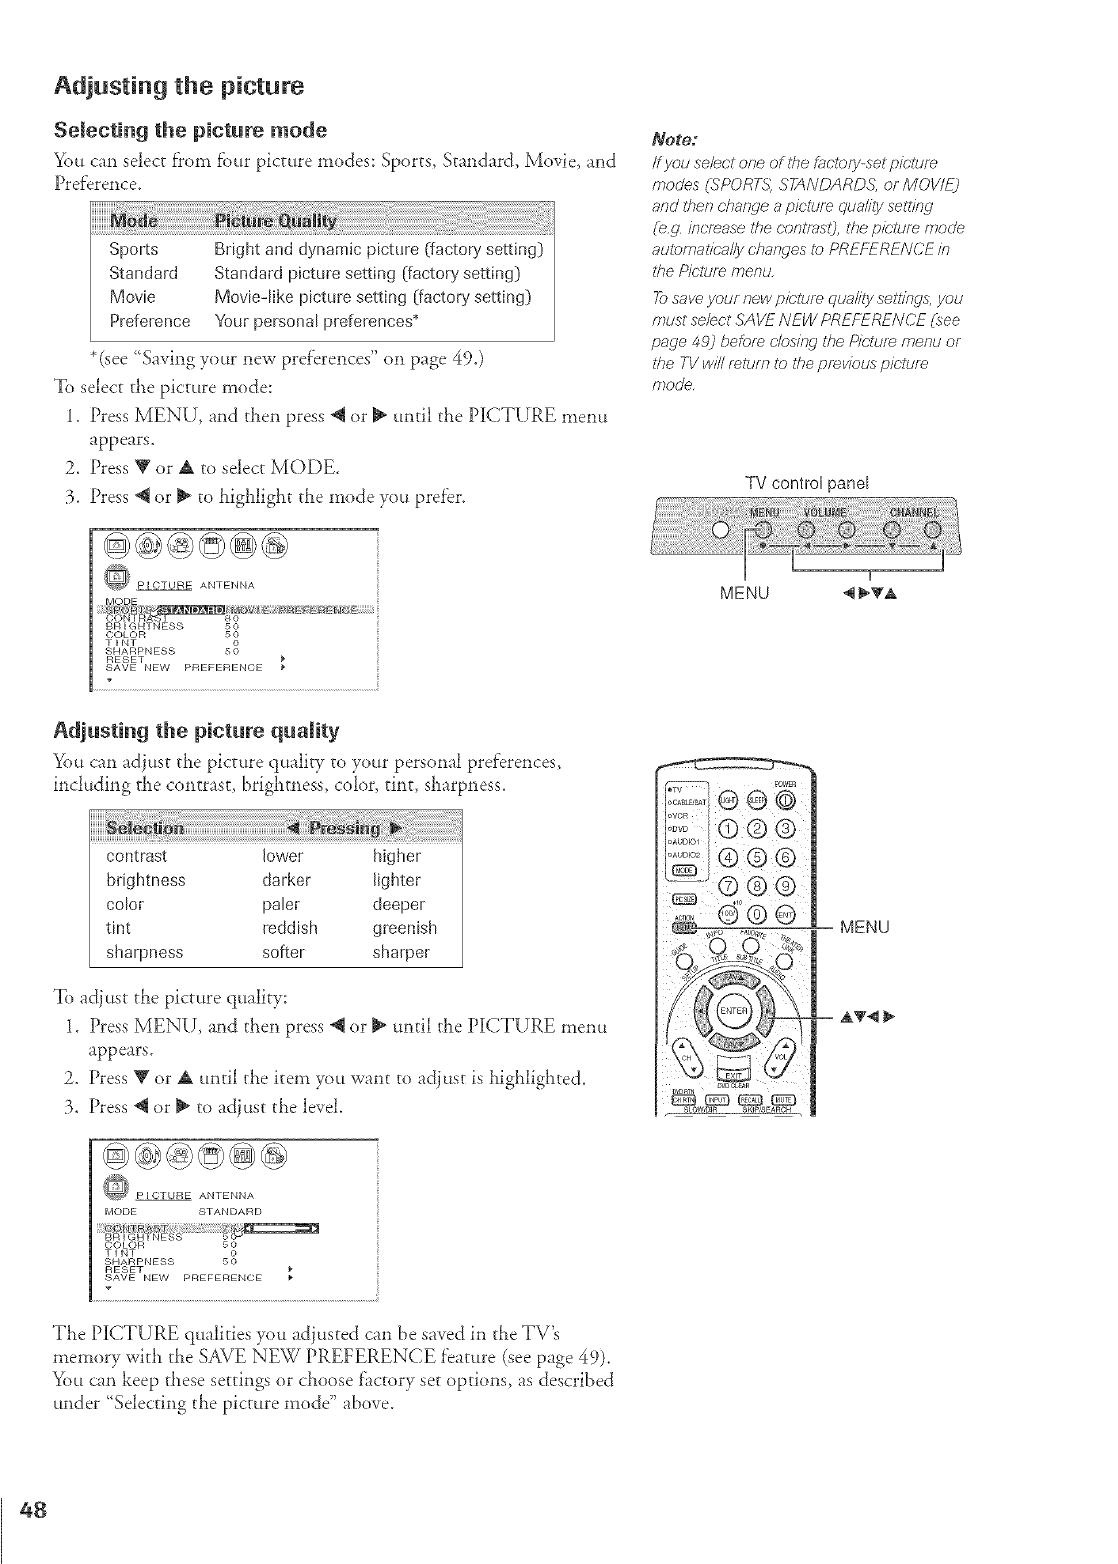
Adjusting the picture
Selecting the picture mode
You can select f?om fbur picture modes: Sports, Standard, Movie, and
Pref'erence.
HHHHHHH
Sports Bright and dynamicpicture (factor7setting)
Standald Standard picture setting [factor}, setting)
Movie Movie-like picture setting [factory setting)
Prefelence Yourpersonalpreferences*
*(see "Saving your new pref'erences" on page 49.)
To select the picture mode:
1. Press MENU-, and then press @ or _ mltil the PICTURE menu
appears.
2. Press Y or A to select MODE.
3. Press _ or _ to Ligi_ligi_t the mode you prefer.
O PICTURE ANTENNA
TINT 5_
SHARPNESS
RESET
SAVE NEW PREFERENCE
Adjusting the picture quamity
You can adjust the picture quality to your personal preferences,
including d_e contrast, brightness, color, _in_, sl_arpness.
contrast lower higher
brightness darkel lighter
color paler deeper
tint reddish greenish
sharpness softer sharpel
To adjust the picture q_tality:
1. Press MENU, and then press @ or _ mltil the PICTURE menu
appears.
2. Press V or A until the item you want to adjust is llighlighted.
3. Press @ or _ to adjust the level.
PICTURE ANTENNA
MODE STANDARD
TINT 5_
SHARPNESS
RESET
SAVE NEW PREFERENCE
The PICTURE q_talities you adjusted can be saved in the TV's
memory with tlae SAVE NEW PREFERENCE f'eature (see page 49).
You can keep tlaese settings or clmose factory set options, as described
under 'Selecting the picture mode" above.
Noto:
If you se/ec.t one of tf_e f_Jcl_)ry-segp/ctur_
modes (SPORTS; STANDARD& or MOVIE]
and then cIlafTf/e a pictur_ Ciuality set?ilW
(e.g increase the oontmsO, the pk;,ium mode
aut_)maSfea//ychanges to PREFERENCE i/7
#_e Pirtum menu.
Tosave your new piclTJre qua/ity selffngs, you
must sebct SAVE NEW PREFERENCE (see
page 4_] before c/os#w lf_e Pk;ture menu or
#_e TV win return to l#e previous pie.turn
mode.
TV control panel
MENU
-- AT4 _"
48
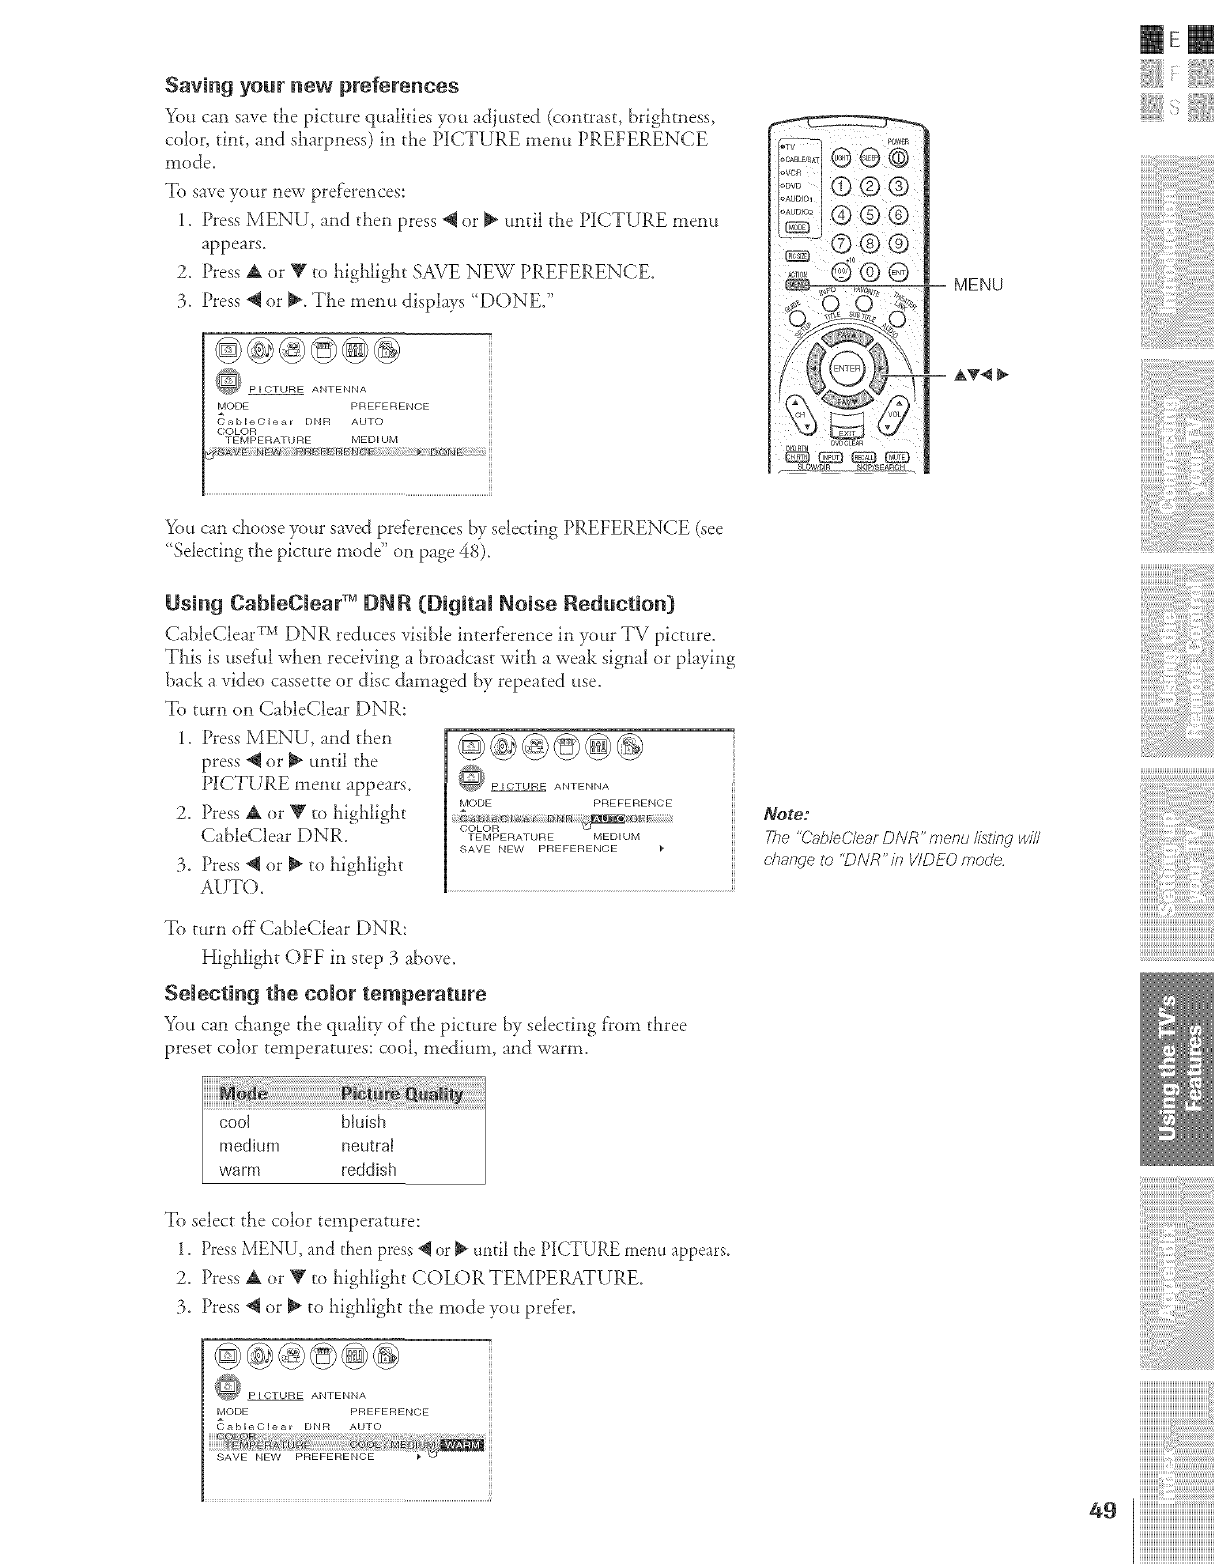
Saving your new preferences
You can save the picture qualities you adiusted (contrast, brigiamess,
coh)r, tint, and siaarpness) in the PICTURE menu PREFERENCE
mode.
To save yore new pre['erences:
1. Piess MENU, and then press _ or _ until the PICTURE menu
appears.
2. Press A or V to highlight SAVE NEW PREFERENCE.
3. Press _ or _. The menu displays "DONE."
@®@_@@
PICTURE ANTENNA
MODE PREFERENCE
_)obleClear DNR AUTO
COLOR
TEMPERA] URE MEDIUM
SAVE N_W P_EFER
MENU
E AT4
mere
_{)ttcan choose your saved pref'erences by selecting PREFERENCE (see
"Selecting the picture mode" on page 48).
Using CableCleaF _ DNR (Digital Noise Reduction[}
CableClear TMDNR reduces visible interference in your TV picture.
This is usefi_l when receiving a broadcast with a weak signal or playing
back a video cassette or disc damaged by repeated use.
To turn on CableClear DNR:
1. Press MENU, and then
press @ or _ until the
PICTURE menu appears.
2. Press A or V to highlight
CableClear DNR.
3. Press @ or _ to highlight
AUTO.
@} PICTURE ANTENNA
MODE PREFERENCE
TEMPERATURE MEDIUM
SAVE NEW PREFERENCE
To turn off CableClear DNR:
Highlight OFF in step 3 above.
Selecting the color temperature
You can change the qualiw of"the picture by selecting from three
preset color temperatures: cool, medium, and warm.
_Ote2
The "Cab/eO/ear DNR" menu//sting w#/
change to "DNR"/?_ VIDEO mode
i¸i¸iI¸i¸i¸i11¸i¸i i¸i i,¸i,i,i,i,i,¸i,i,i,i,i,i,i,i,
iiiiiiiiiiiiiiiiiiiiiiiiiiiiiiiiiiiiiiiiii_
To select the color temperature:
1. PressMENU, and then press _ or _ until the PICTURE menu appears.
2. Press A or V to highlight COLOR TEMPERATURE.
3. Press @ or _ to higlalight the mode you prefer.
PICTURE ANTENNA
MODE PREFERENCE
_ableClear DNR AUTO
]]]]]]]]]]]]]]]]]]]]]]]]]]]]]]]]]]]]]]]]
iiiiiiiiiiiiiiiii_i_i_i:i_i_i_i_i_i_i_i_i_i_i_i_i_i_i_i_i_i_i_i_i_i_i_i_
iiiiiiiiiiiiiiiiiiiiiiiiiiiiiiiiiiiiiiiiiii
iiiiiiiiiiiiiiiiiiiiiiiiiiiiiiiiiiiiiiiiiii
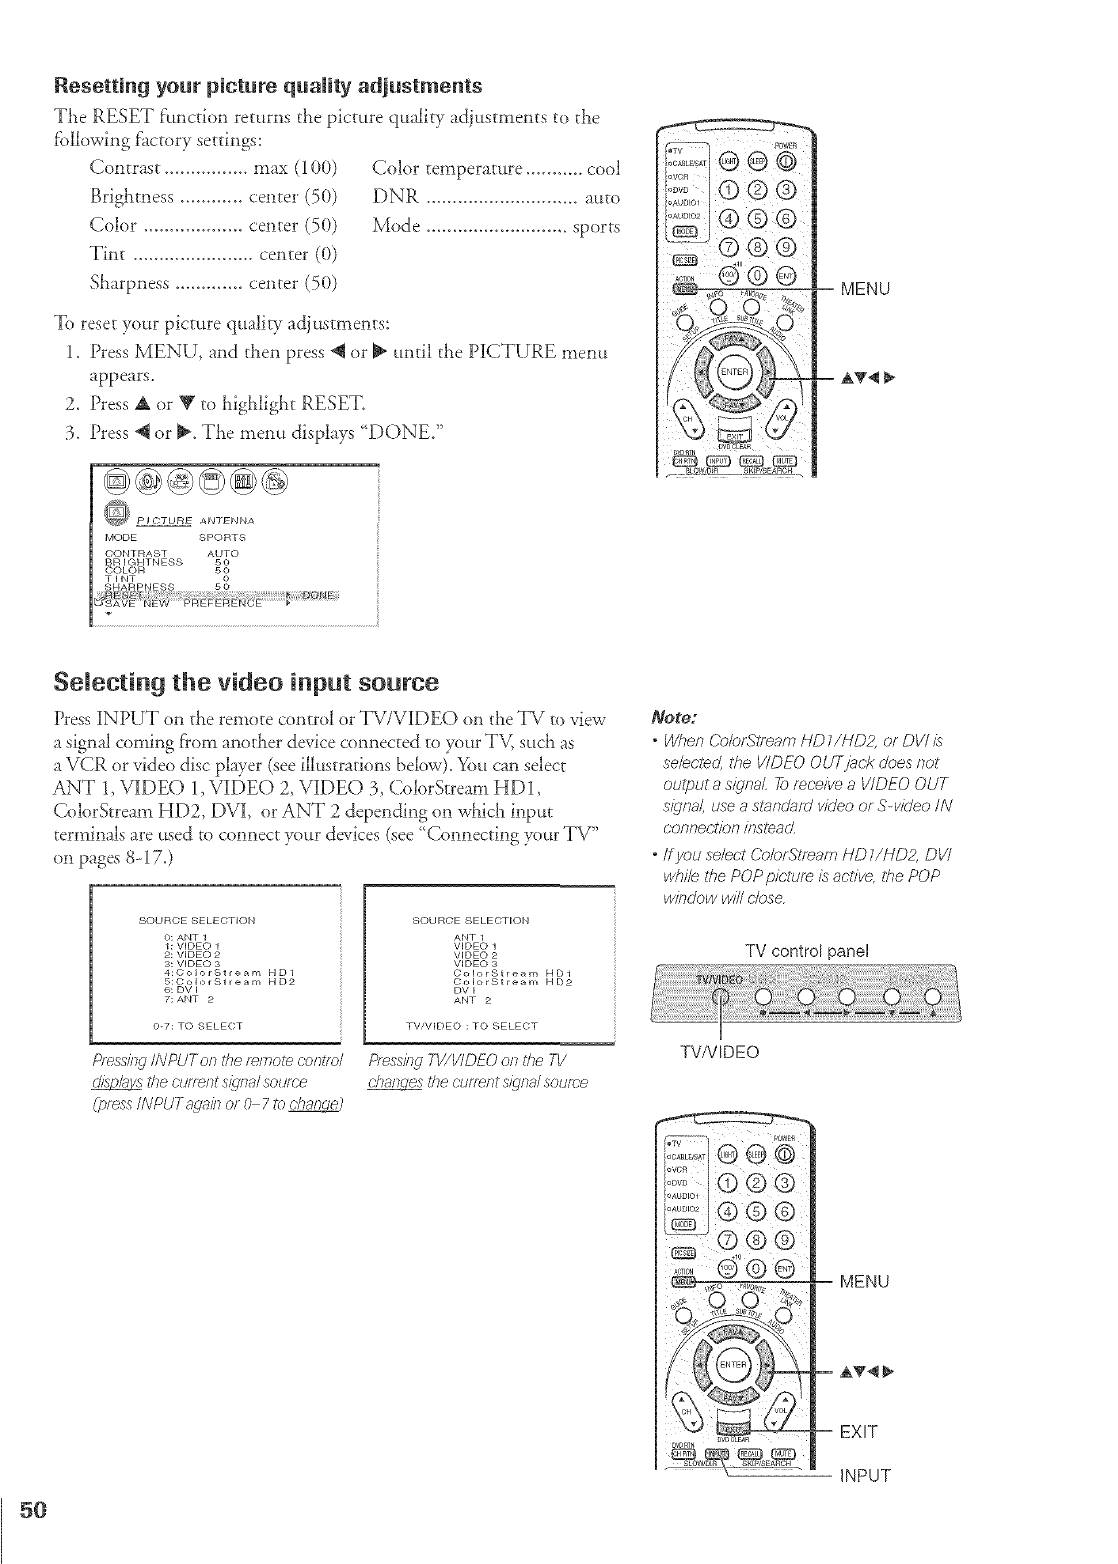
Resetting your picture quality adjustments
The RESET f'unctbn returns the picture quality adjustments to the
fbllowhg factory settings:
Contra.';t ................ max (100)
Brightness ............ center (50)
Color ................... center (50)
Trot ....................... center (0)
Sharpness ............. center (50)
To reset your picture qualiw adjustments:
1. Press MENU, and then press @ or _ until the PICTURE menu
appears.
2. Press A or V to highlight RESET.
3. Press @ or _. The menu displays '_DONE/
@®@@@@
PJCTUNE ANTENNA
MODE SPORTS
OO.TR*ST *_O
BRIGHTNESS
ccxoR _
TINT
Color temperature ........... cool
DNR ............................. auto
Mode ........................... sports
MENU
AT4 _"
Selecting the video input soume
Press iNPUT on the remote control or TV/ViDEO on the TV ro view
a signal coming from another device connected to put TM such as
a VCR or video disc player (see illustrations below). You can select
ANT 1,VIDE() 1,VIDEO 2, VIDEO 3, CobrStream HD1,
ColorStream HD2, DVI, or ANT 2 depending on which input
terminals are used to connect put devices (see '_ConnectJng put TV"
on pagm 8-17.)
SOURCE SELECTION
O: ANT 1
1: VIDEO 1
2: VIDEO 2
3: VIDEO 3
4:ColorStre_m HD1
5:ColorStre_m HD2
6: DV I
7: ANT 2
O-7: TO SELECT
Pfess/?lg/NPUTon t@ t_/note cor£o/
the cl£_nt :;/_,na/source
(l_ss INPUTs qab ol 0 7to c@r/cke9
SOURCE SELECTION
ANT 1
VIDEO 1
VIDEO 2
VIDEO 3
ColorStream HD1
ColorStream HD2
DV I
ANT 2
TV/VIDEO : TO SELECT
hess/}TgTV/V/DEOo/l t/,e TV
the cl_nentsignal:;clime
Note:
Wklen Colorf_tr_ar_ /-ID 1//4122, of DV/ is
sebc/ec/, tile VIDEO OUTjac;R @es not
oulput asigl_aL 2_ mc:eive a VIDEO OUT
si_lna/, use a smr_&/d v£eo or S-vi@o IN
conf_e(;t/or7//_slearL
*ffyou select Co/ofgfea,} HD//ND2, DVI
while the POP pic;£m is active,, the POP
wi/Tc/ow will @se,
TV control panel
TVNIDEO
5O
MENU
AV4I _,
EXIT
INPUT

Labeling the video input sources
The video label feature allows you to label each input source f'or your
TV f'rom the f'ollowing preset list of"labels:
- :Uses the def]mlt label name
Vg_R : Video cassette recorder
DVD : DVDvideo
DTV : Digital TV set-top box
SAT : Satellite box
CBL : Cable box
HD : DVi/HDCP device (see page 15)
To label the video input sources:
1. Press MENU, and then press _ or _ until tiae CUSTOM menu
appears.
2. Press A or Y to highlight VIDEO LABEL.
TIMER
ON OOhOOm
SLEEP OhOOm
CC OFF
FAVORITE OH1
FAVORITE CH2
3. Press @ or I_ to display the VIDEO LABEL memt.
4. Press A or Y to LigJllight the video source you want to label
5. Repeatedly press @or _ to select the desired label for that ir_pu_source.
MENU
AT4
EXIT
_oto:
The NO (b/_lb-cJefinidon) /abe/ is aw, i/ab/e for
DV/ mode on/y (see "Selecling the v/_/eo
in/out sourc:(e."above, and "Conneetiiwa
cJevic;eto ff_e DV//NDCP IN tezrzTi/Tal"on
page 15
@E@
V I DE03
Color Stream HD1
Color Stream HD2
DVI
CUSTOM MENU
6. Finish labeling the other video sources as desired. To return to the
previous menu, press A or V to llighligllt CUSTOM MENU,
and then press @ or _.
7. To exit the menu, press EXIT.
Selecting the background of the menu display
You can change the background of rhe menu display by selecting f?om
two preset types: slaaded and solid (black).
To select the background:
1. Press MENU, and then press @ or _ until the CUSTOM menu
appears.
2. Press A or V to highlight BACK(iROUND.
3. Press @ or _ to select eitlaer a SHADED or SOLID background.
TIMER
_L1E_ oo,.....
OhOOm
OC o 1
FAVOR I TE OH1
FAVOR [TE OH2
CH LABELING
VIDEO LABEL
i powE_
MENU
i¸i¸iI¸i¸i¸i11¸i¸i i¸i] i¸i i,¸i,i,i,i,i,¸i,i,i,i,i,i,i,i,
iiiiiiiiiiiiiiiiiiiiiiiiiiiiiiiiiiiiiiiiii_
iiiiiiiiiiiiiiiiiiiiiiiiiiiiiiiiiiiiiiii
iiiiiiiiiiiiiiiii_i_i_i:i_i_i_i_i_i_i_i_i_i_i_i_i_i_i_i_i_i_i_i_i_i_i_i_
iiiiiiiiiiiiiiiiiiiiiiiiiiiiiiiiiiiiiiiiiii
iiiiiiiiiiiiiiiiiiiiiiiiiiiiiiiiiiiiiiiiiii
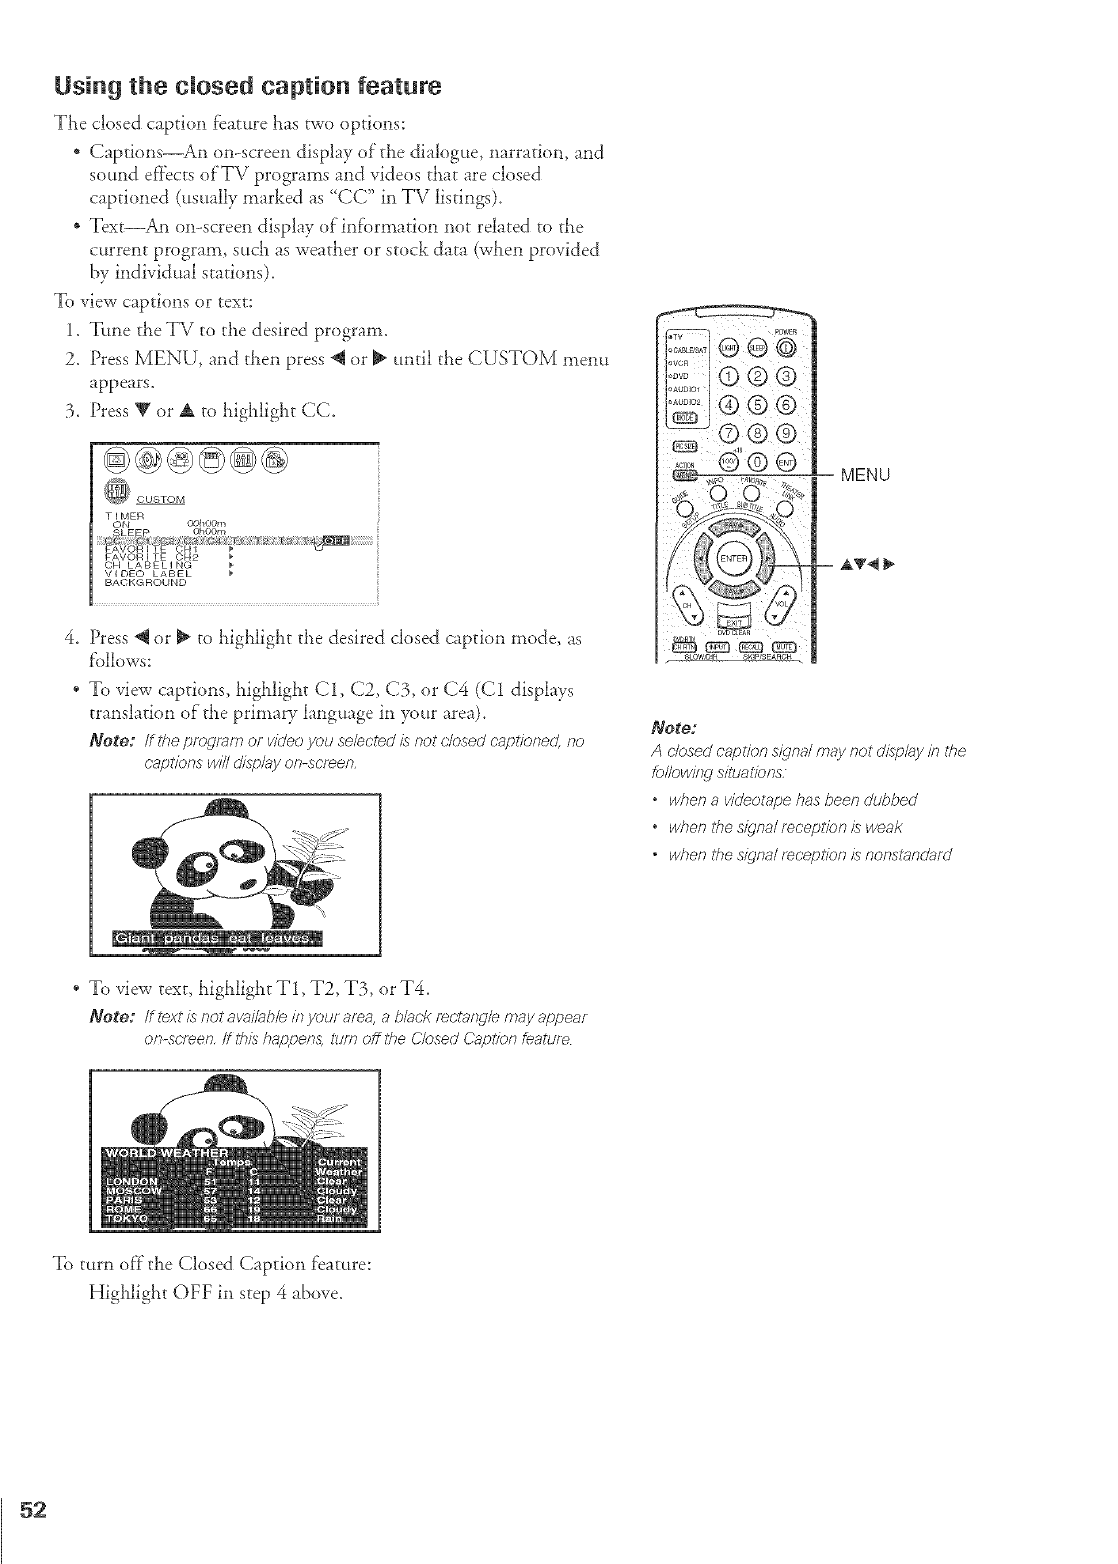
Using the closed caption feature
The closedcaption feature has Bvo options:
* Captions_An on-screen display of'the dia!og_te, narration, and
sound effects of'TV programs and videos that are closed
captioned (usually marked as "CC" in TV listings).
* Text An on-screen display ofinf'ormation not related to the
current program, such as weather or stock data (when provided
by individual stations).
To view captions or text:
1. Tttne the TV to the desired program.
2. Press MENU, and then press @ or i_ until the CUSTOM menu
appears.
3. Press V or A to highlight CC.
@@@@@@
TIMER _o#lo@n
CH LABELING
VIDEO LABEL
BAOKGROUND
4. Press @ or i_ to higi_light the desired closed caption mode_ as
f'ollows:
* To view captions, highlight C1, C2, C3, or C4 (C1 displays
translation of the primary language in your area),
Note: ifthe ping/am or videoyeu selectee/isnot ok)sodc.ap_fonec/,no
captfenswill display on-so.teen.
* To view text, highiigi_t T1, T2, T3, or T4.
Note: if text is not aw,//ab/e k_your area, a b/at,f< rectangle may appear
on-screen, ff ttds hap/pens} turn off tt_e Ck)sed Capt/bn &ature
® ®S
OVCR i
]s_ I@ ® ®
I:i::',::I® ® ®
_J
...... M® @
@,,s _,_ 7 :j MENU
AT4
Note:
A closed caption s_qna/may not display in the
felk)witw silualfons:
owhen a vkJeotape has been dubbed
owhen ff_e s{qnal mcep/?,,n is weak
,when fire s_c/na//eceDlion is nonslancJaf_J
To turn oft the Closed Caption feature:
Highlight OFF in step 4 above.
52
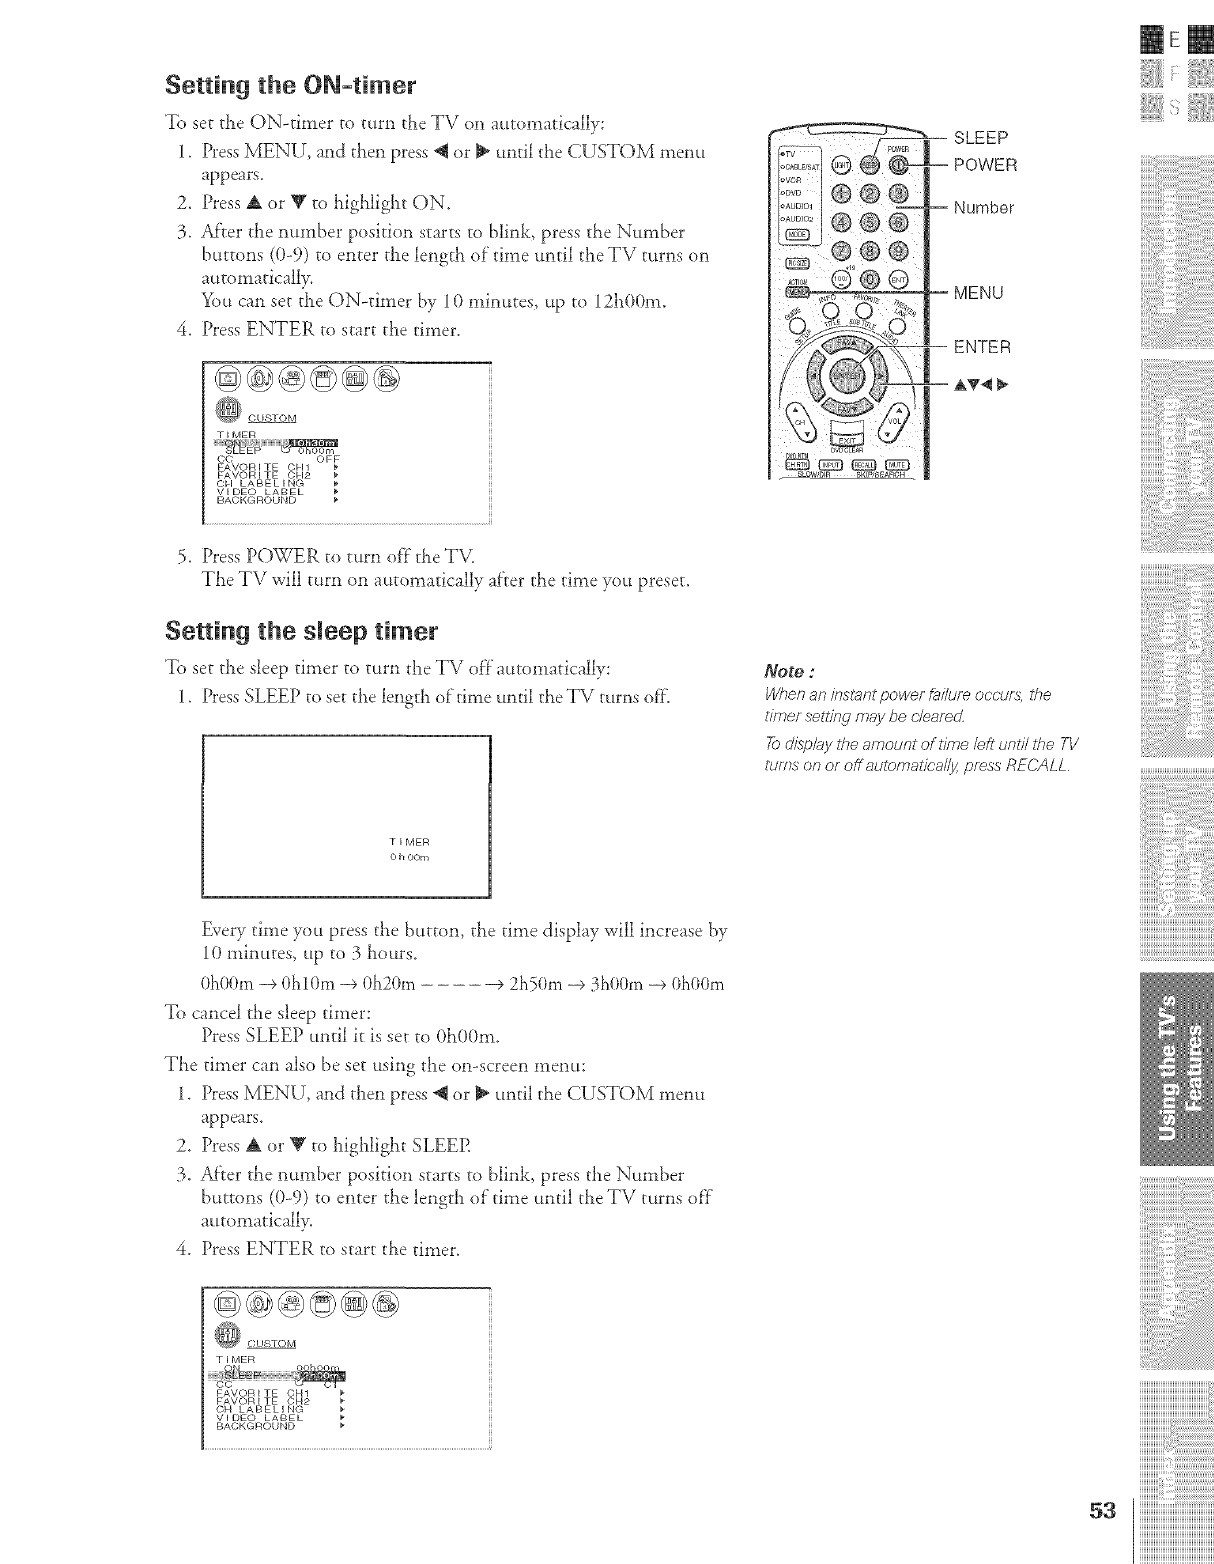
Setting the ON-timer
To set the ON-timer to turn the TV on automatically:
1. Dess MENU, and then press *qor _ until the CUSTOM menu
appears.
2. Press A or _F to highlight ON.
3. AfTer the number position starts to blink_ press the Number
buttons (0-9) to enter the length of time until the TV turns on
automaticaH>
You can set the ON-timer by 10 minutes, up to 12h00m.
4. Press ENTER to start the timer.
TIMER
OC OFF
FAVORITE OH1
FAVORITE OH2
OH LABELING
VIDEO LABEL
BAOKGROUND
5. Press POWER to turn of}"the TV,
The TV will tttrn OIlatttomatically after the time you preset.
Setting the sleep timer
To set the sleep timer to turn the TV of}"atttomatically:
1. Press SLEEP to set the length of time until theTV turns off
TIMER
O h OOm
SLEEP
POWER
Number
MENU
ENTER
Note :
When an kTst_nt powef &ilure oPc-urs, the
diner sef?i/w may be c'/eamdL
7;0display 27e amount of time/eft until 27e TV
ttJfes ol9 OFoff automalk;a//y, press RE('ALL
mere
EveUtime you press the button, the time display will increase by
10 minutes_ up to 3 hours.
OhO(}m-+OhlOm -+ Oh20m _2h50m -+ 3hOOm -+OhOOm
To cancel the sleep timer:
Press SLEEP until it is set to 0h00m.
The timer can also be set using the on-screen menu:
1. Press MENU_ and then press *qor _ until the CUSTOM menu
appears.
2. Press Aor Y to highlight SLEEP.
3. Af}er the number position starts to blink, press tile Number
buttons (0-9) to enter the length of"time until the TV turns of}"
automatically.
4. Press ENTER to start the timer.
TIMER
FAVORITE OH1
FAVORITE OH2
OH LABELING
VIDEO LABEL
BACKGROUND
i¸i¸iI¸i¸i¸i11¸i¸i_i¸{_i_¸i¸i_i'¸i'i'i'i'i'¸i'i'i'¸i'i'i'i'i'¸i'i'i'¸i'i_i¸_¸_¸_
iiiiiiiiiiiiiiiiiiiiiiiiiiiiiiiiiiiiiiiiii_
]]]]]]]]]]]]]]]]]]]]]]]]]]]]]]]]]]]]]]]]
iiiiiiiiiiiiiiiii_i_i_i:i_i_i_i_i_i_i_i_i_i_i_i_i_i_i_i_i_i_i_i_i_i_i_i_
5aiiiiiiiiiiiiiiiiiiiiiiiiiiiiiiiiiiiiiiiiiii
iiiiiiiiiiiiiiiiiiiiiiiiiiiiiiiiiiiiiiiiiii
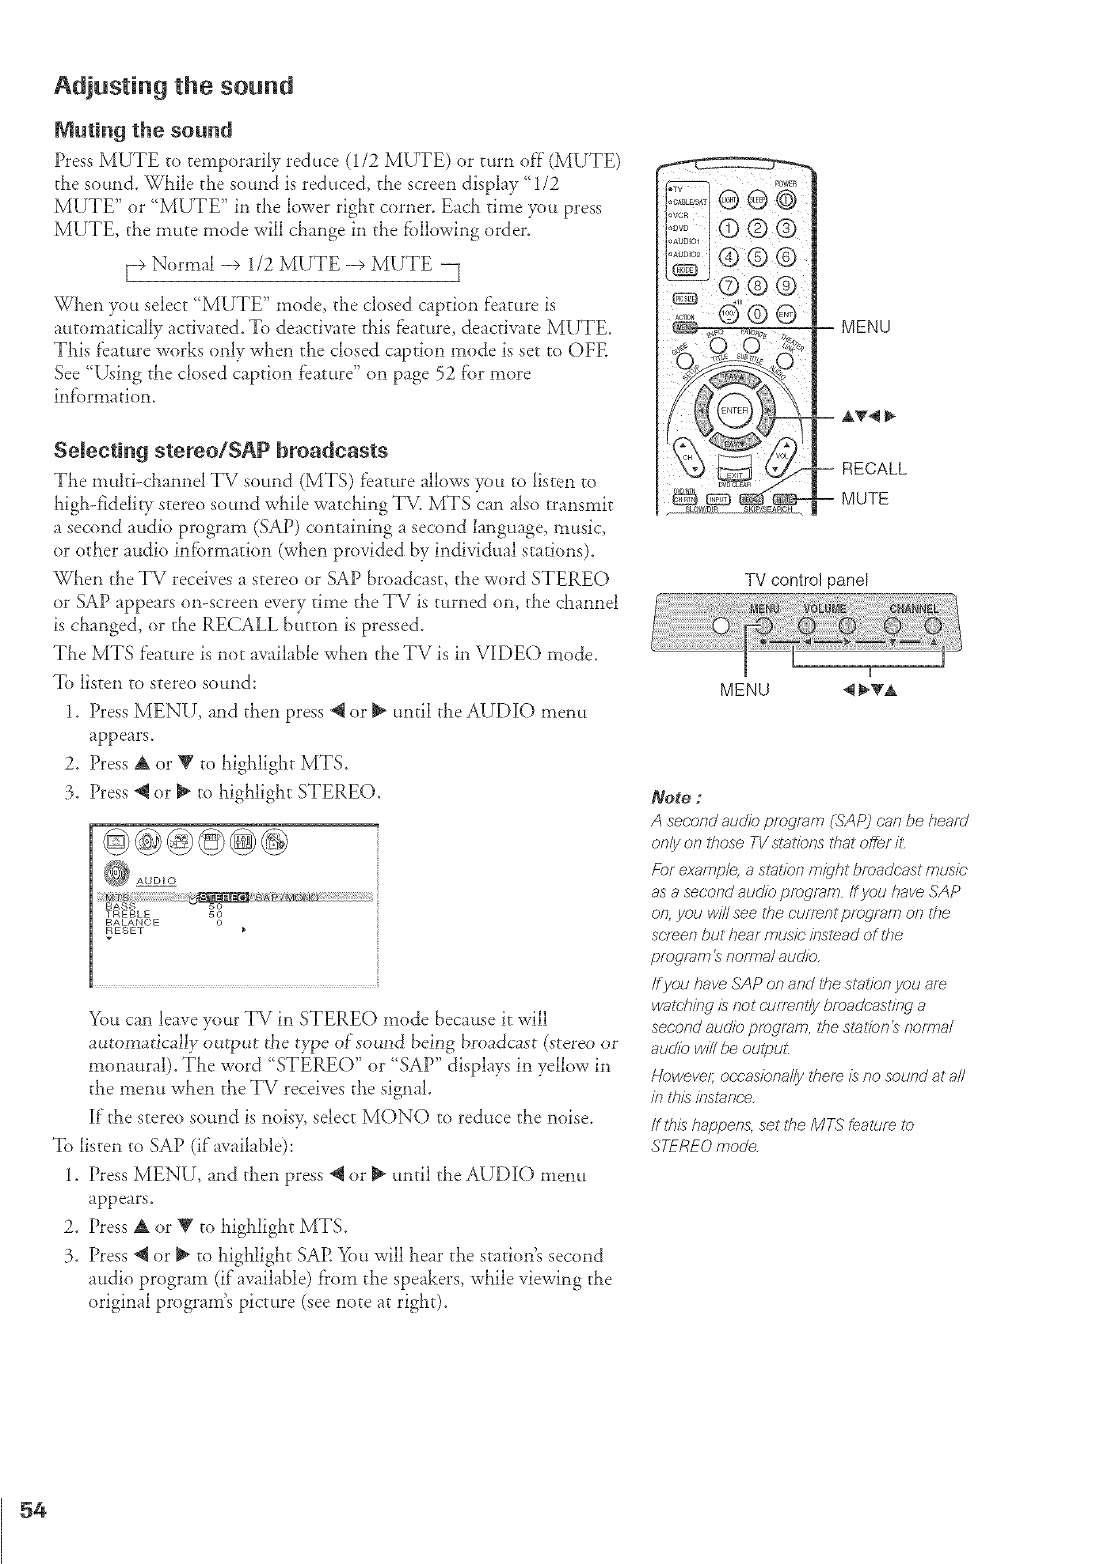
Muting the sound
Press MUTE to temporarily reduce (1/2 MUTE) or turn off (MUTE)
the sound. While the sound is reduced, the screen display '_1/2
MUTE" or '_MUTE" in the lower right corner. Each time you press
MUTE, the mute mode will change in the following order.
[_ Normal -+ 1/2 MUTE -+ MUTE
When you select ' MUTE" mode, the closed caption feature is
automatically activated. To deactivate this feature, deactivate MUTE.
This feature works only when the closed caption mode is set to OFE
See "Using the closed caption feature" on page 52 f'or more
inf'ormatiom
Selecting stereo/SAP broadcasts
The muhi-channel TV sound (MTS) feature allows you ro listen to
high-fiddiry stereo sound while watching TM MTS can also transmit
a second audio program (SAP) containing a second language, music,
or other audio information (when provided by individual stations).
When rhe TV receives a stereo or SAP broadcast, the word STEREO
or SAP appears on-screen every time the TV is turned on, the channel
is changed, or the RECALL button is pressed.
The MTS feature is not available when the TV is in VIDEO mode.
To listen to stereo sound:
1. Press MENU, and then press @ or _ until the AUDIO menu
appears.
2. Press A or V to highlight MTS.
3. Press @ or _ to highlight STEREO.
You can leave your TV in STEREO mode because it will
automatically ore-put the t)t_e of'sound being broadcast (stereo or
monaural). The word "STEREO" or "SAP" displays in yellow in
the l_nenu when the TV receives the signal.
If the stereo sound is noisy, select MONO to reduce the noise.
To listen to SAP (if available):
1. Press MENU, and then press @ or _ until the AUDIO menu
appears.
2. Press A or V to highlight MTS.
3. Press @ or _ to highlight SAP. >)u will hear the station's second
audio program (if available) f?om the speakers, while viewing the
original program's picture (see note at right).
MENU
.... A'lr_ll ll_
RECALL
MUTE
TV control panel
I
MENU _1I_TA
Note ;
A se(;ond audio program (SAP) (;an be heard
only on those TV stations that offer it:
For e£arrgJ/e, as/_£ior7m_qht broadcast music
as asecond audio program ff you have SAP
o& you will see ffTecurTent p/ograr_} or7the
screen but hear music" inslead of ffTe
program_rToffr_alaudio,
/f you have,lAPonandtf_estationyouam
WatchJl7_7 is ROt ('L!fTent_y bmadc'asting a
secor_d audio program, the sla/for_ 2 r?offr_a/
audio w/ff be outpuL
Noweve/; occasiorTa//y t#em is no soured at aN
in t?ffsffTstand'e,
tf tillshapper_&setti_eMTSfeatureto
STEREOmoc/e
54
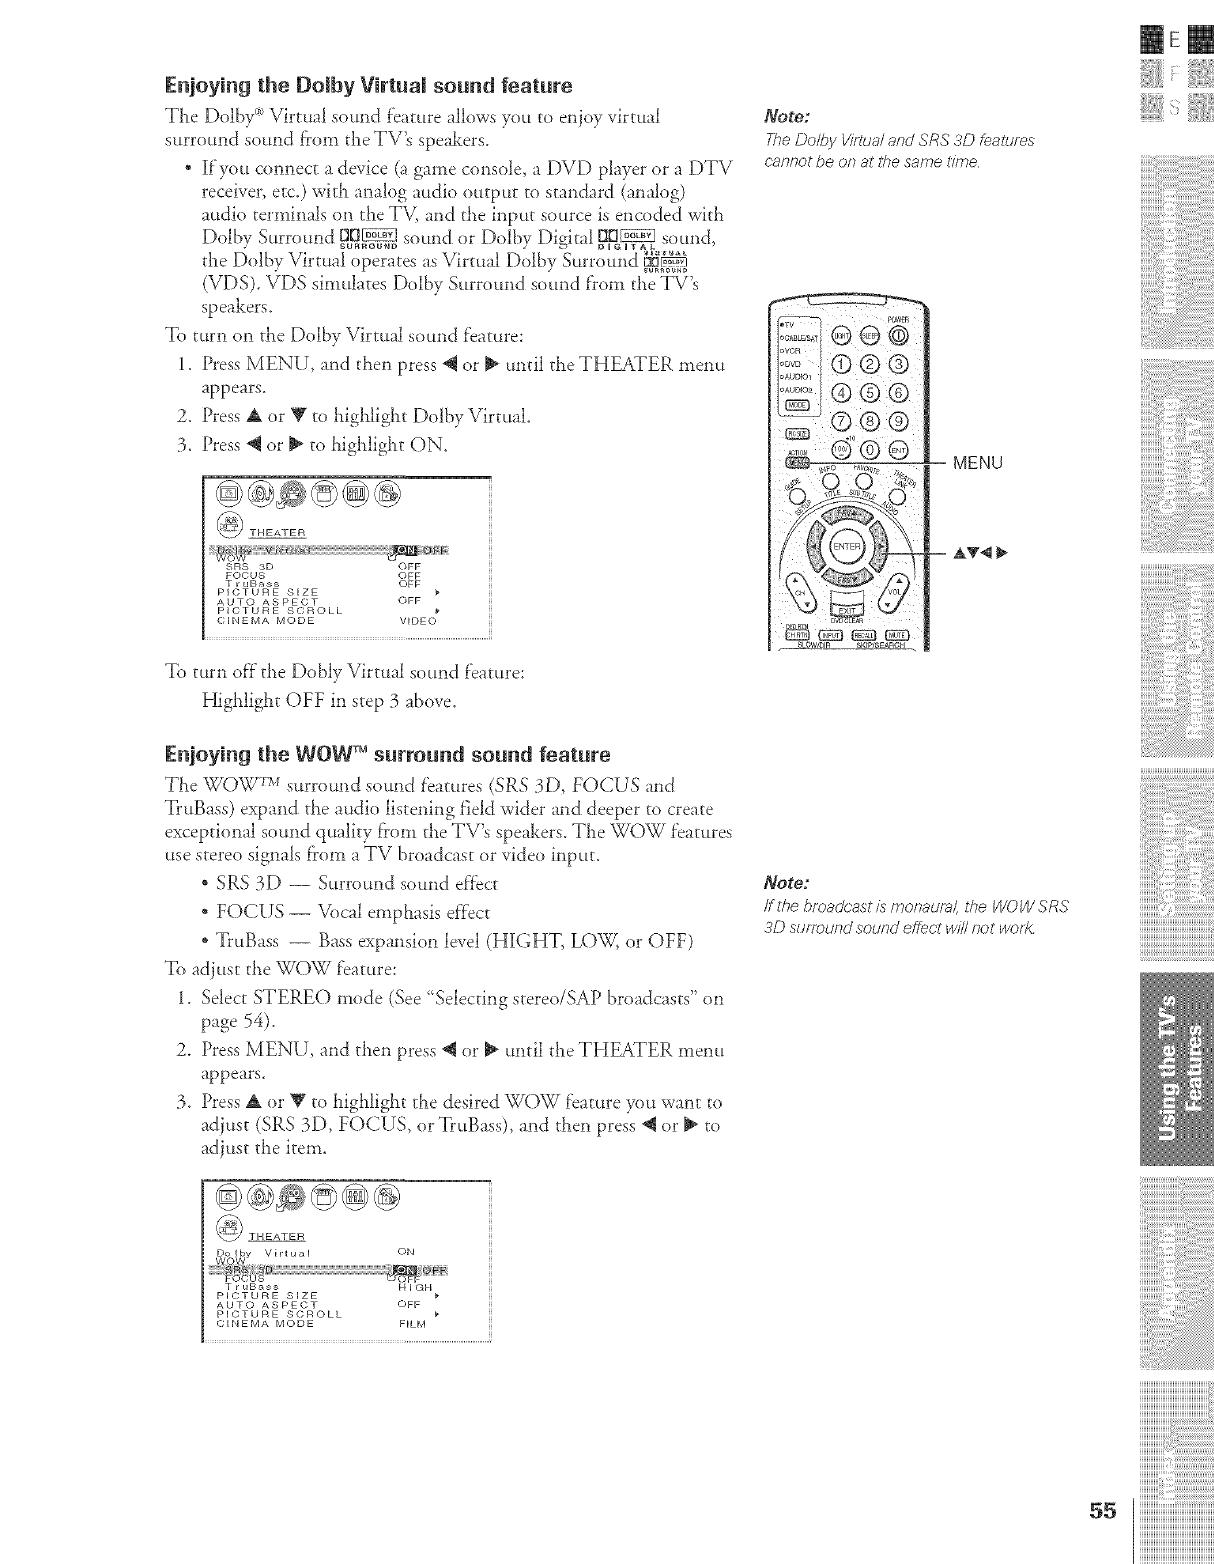
Enjoying the Dolby Virtual sound feature
The Doiby _>Virtual sound feature allows yott to enjoy virtual
surround somld from the T\ s speakers_
* If'you connect a device (a game consoJ< a DVD player or a DTV
receiver, etc.) with analog audio output to standard (analog)
attdio terminals on the TV, and the input source is encoded wid_
Dolbv Surround _!_ sound or Dolbv Digicd OD_,ZI sound,
- . _ _ DIGITAL
the Dolby Virtua! operates as Virtual Dolby •urrotmd p,n_
(VDS). VDS simulates Dolby Surround som?d f'rom the TV's
speakers.
To turn on the Dolby Virtual sound feature:
1. Press MENU, and then press @ or _ until the THEATER melm
appears.
2. Press A or V to highlight Dolby Virtual.
3. Press @ or _ to highlight ON.
THEATER
SRS 3D OFF
FOCUS OFF
T r uBaas OFF
PICTURE SiZE
AUTO ASPECT OFF
PICTURE SCROLL O _
CINEMA MODE VIFIE
To turn off the Dobly Virtual sound f'eature:
Highlight OFF in step 3 above.
Enjoying the WOW TM surround sound feature
The _5_<)Y__TMsurround sound features (SRS 30, FOCUS and
TruBass) expand the audio listening field wider and deeper to create
exceptional sound quality f)om the TV's speakers. The WOW f'eatures
use stereo signals f?om a TV broadcast or video input.
* SRS 3D -- Surround sotmd e_'}ect
* FOCUS -- Vocal emphasis d}ect
*TruBass -- Bass expansion level (HIGHT, LOW, or OFF)
To adjust the WOW l:eature:
1. Select STEREO mode (See' Selecting stereo/SAP broadcasts" on
page 54).
2. Press MENU, and then press @ or _ until the THEATER menu
appears.
3. Press A or V to higialight the desired WOW f'eature F)tt want to
adiust (SRS 3D, FOCUS, or TruBass), and then press @ or _ to
adjust the item.
_) THEATER
ON
T r uBass H IGH
PICTURE SIZE
AUTO ASPECT OFF
PICTURE SCROLL
(;_NKMA MODE F_LM
_OgO2
The Do/by Virl_a/ and SRS 3D fealures
cannot be on at tile same t/_T_e
Note:
/f the broadcast/s monaura/, the WOW SRS
3D SU/TOUndSouRd effect w/Y/not wof/<
mere
i¸i¸iI¸i¸i¸i11¸i¸i i¸i i,¸iiiii¸iiiiiiii¸iiiiii
iiiiiiiiiiiiiiiiiiiiiiiiiiiiiiiiiiiiiiiiii_
iiiiiiiiiiiiiiiiiiiiiiiiiiiiiiiiiiiiiiii
iiiiiiiiiiiiiiiii@i@ilil
ss iiiiiiiiiiiiiiiiiiiiiiiiiiiiiiiiiiiiiiiiiii
iiiiiiiiiiiiiiiiiiiiiiiiiiiiiiiiiiiiiiiiiii
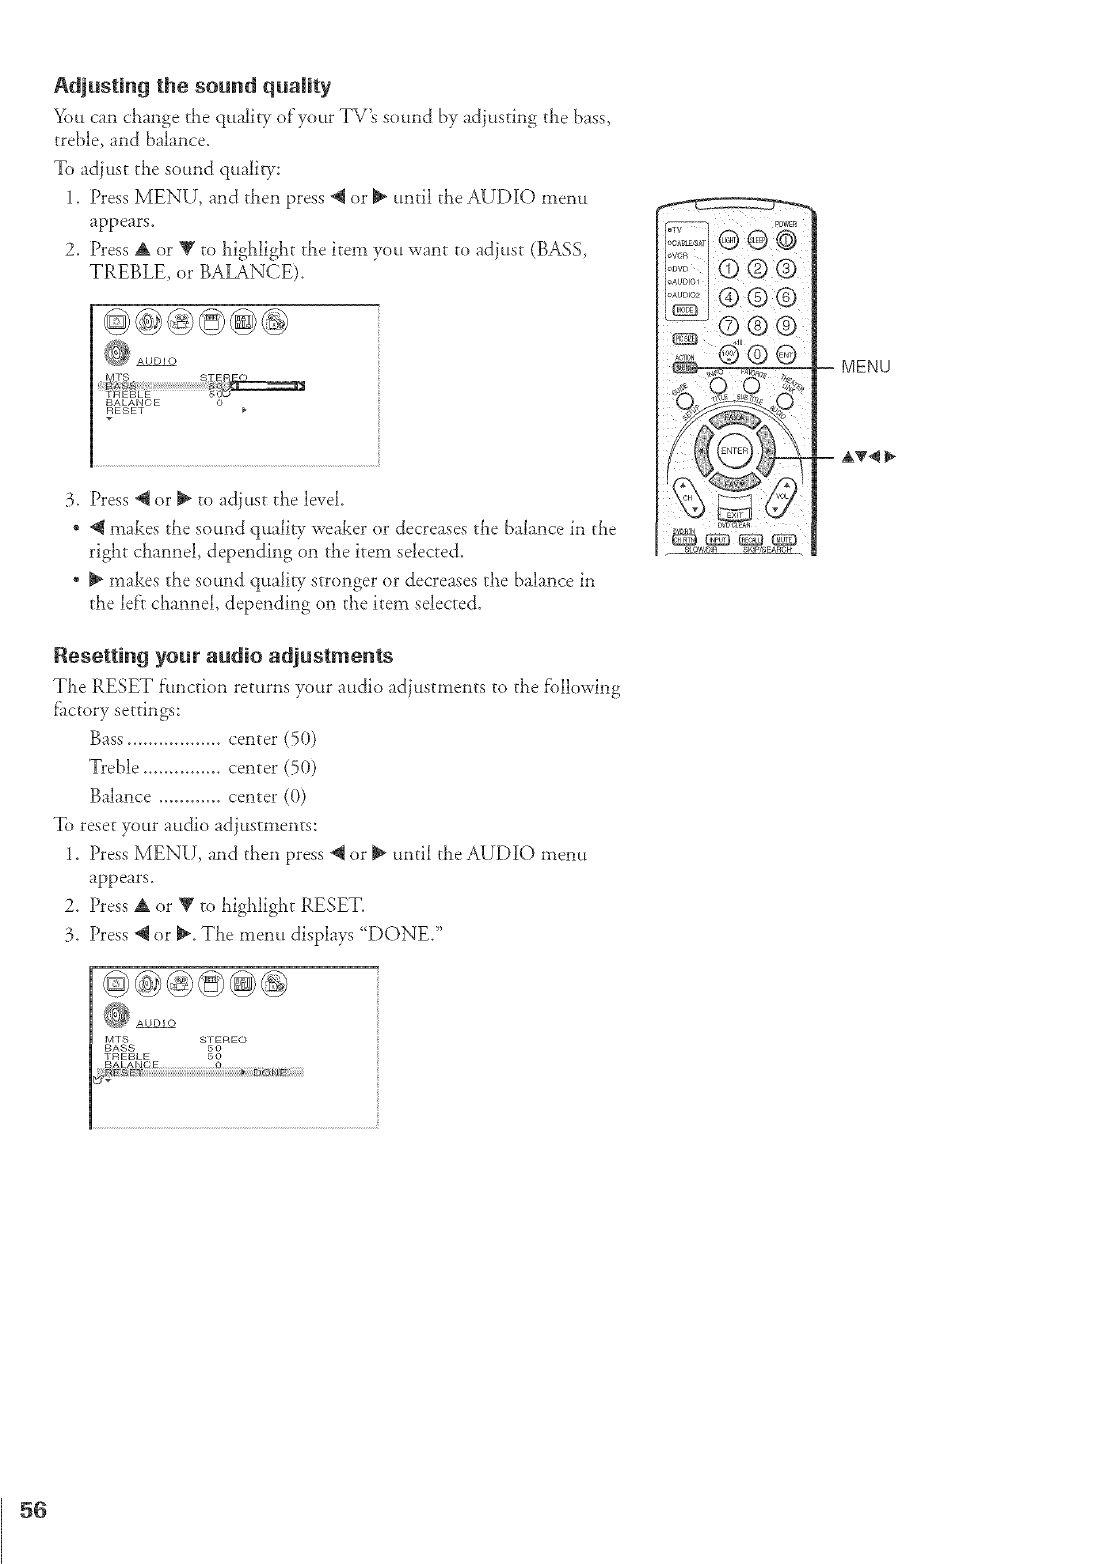
Adjusting the sound quaIRy
You can change the quality of'your TV's sound by adjusting the bass,
treble, and balance.
To adjust the sound qualig:
1. Press MENU, and then press @ or _ until the AUD][O menu
appears,
2. Press A or V to highlight the item you want to adjust (BASS,
TREBLE, or BALANCE).
3, Press @ or _ to adjust tl_e level.
* @ makes the sound quail/T weaker or decreases the balance in the
right channel, depending on the item selected,
* _ makes the sound quality stronger or decreases the balance in
the left channel, depending on the item selected,
Resetting your audio adjustments
Tlae RESET function returns your attdio adiustments to the f'ollowing
fi_ctory settings:
Bass .................. center (5(})
Treble ............... center (50)
Balance ............ center (0)
To reset your audio adjustments:
1. Press MENU, and then press @ or _" until the AUD][O metro
appears.
2. Press A or V to highlight RESET.
3. Press @ or _. The menu displays {{DONE/'
MTS S_REO
BASS
TREBLE 5O
MENU
56
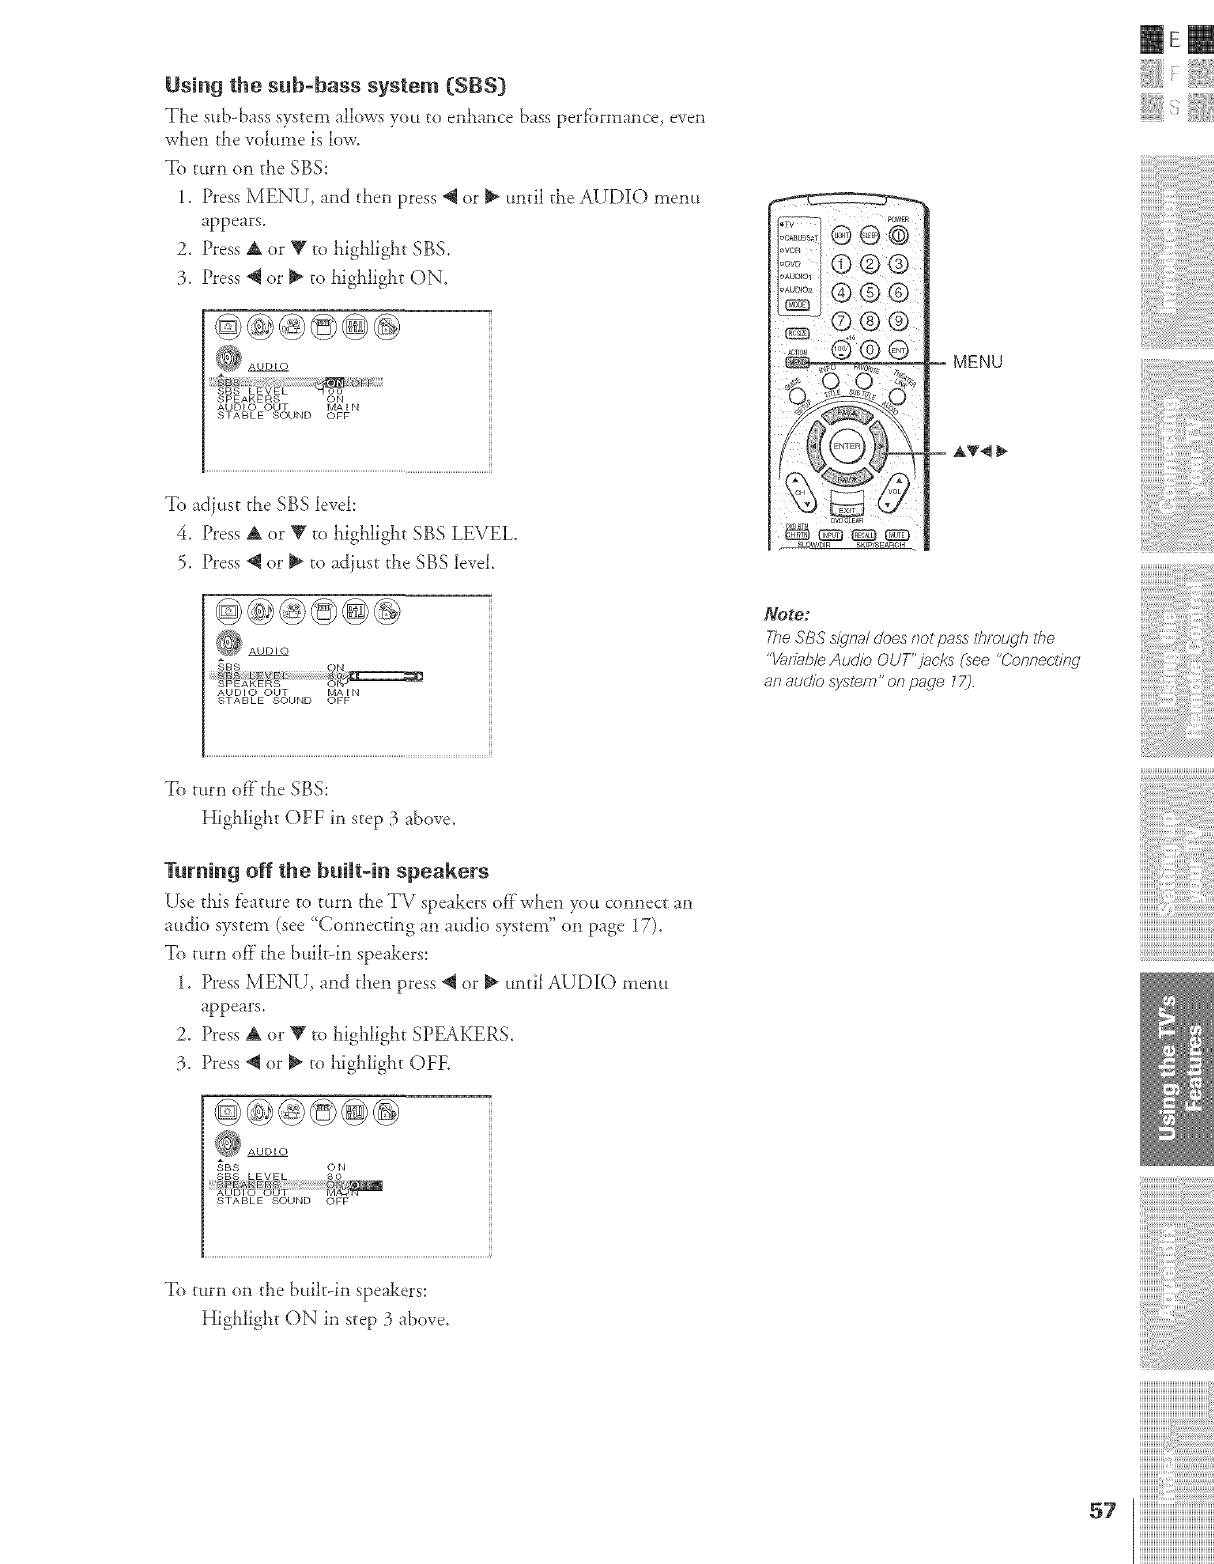
Using the sub-bass system [SBS)
The sub-bass system allows you to entrance bass perfbrmance, even
when the volume is low.
To turn on the SBS:
1. Press MENU, and then press @ or _ until the AUDIO menu
appears.
2. Press A or _' to highlig!_t SBS.
3. Press _ or _ to hig!_ligi_t ON.
SPEAKERS ON
AUDIO OUT MAIN
STABLE SOUND OFF
To adiust the SBS level:
4. Press A or V to highlig!_t SBS LEVEL
5. Press @ or _ to adiust the SBS level.
AUDIO OUT MAIN
STABLE SOUND OFF
To tum offthe SBS:
Highlight OFF in step 3 above.
Turning off the built-in speakers
Use this feature to turn the TV speakers of}'when you connect an
attdio system (see "Connecting an attdio system" on page 17).
To turn of}"the built-in speakers:
1. Press MENU, and then press @ or _ until AUDIO menu
appears.
2. Press A or V to lflghlight SPEAKERS.
3. Press @ or _ to highlight OFE
@(s}@@@d@
,_'BS O N
STABLE SOUND OFF
To turn on the buihqn speakers:
Highligi_t ON in step 3 above.
-- MENU
= AT4
_LOW/DIR SKIP/SEARCH ,
Note;
Tt_eS'BSS_lnalcJoes_7otpass ltTlol_gh ii_e
%/afJab/eAudioOUT'jacks (see "Conr_ec'titW
anaudiesyslem" or7page179
57
mere
i¸i¸iI¸i¸i¸i11¸i¸i_i¸i_i_¸i¸i_i,¸iiiii¸iiiiiiii¸iiiiii
iiiiiiiiiiiiiiiiiiiiiiiiiiiiiiiiiiiiiiiiii_
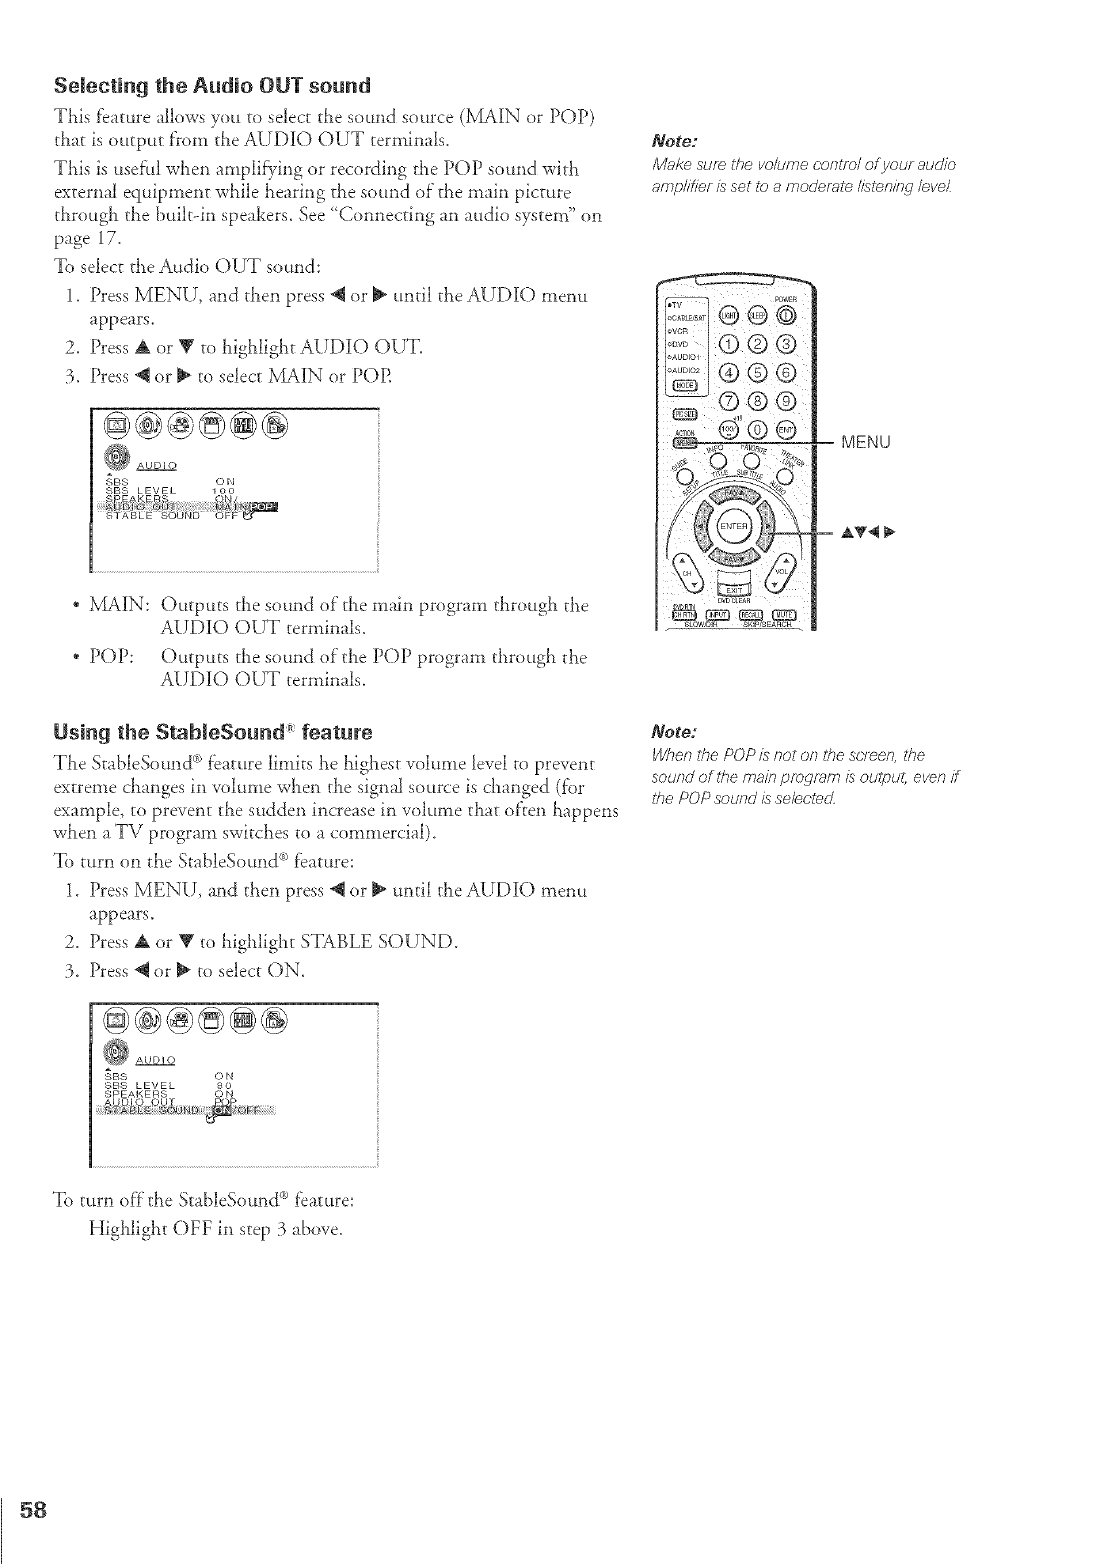
Selecting the Audio OUT sound
This feature allows you to select the sound source (1X4A][N or POP)
that is output from the AUD][O OUT teH_linals.
This i.';usehll when amplifying or recording the POP sound with
external equipment while hearing the sound of"the main picture
through the built&l speakers. See ' Comlecdng an audio system" on
page 17.
To select the Audio OUT sound:
1. Press MENU, and then press @ or _ until the AUDIO mem_
appears.
2. Press A or V to highlight AUDIO OUT.
3. Press @ or _ to select MAiN or POP.
@@@@@@
_BS O N
SBS LEVEL 100
SPEAKEBS ON/
_ DI_ _ B_:?__i_ ¸ _! _@!_tii¸N¸
STAgEE SOUND ©FF
* )!LA][N: Outputs the sound of the main program through the
AUDIO OUT terminals.
* POP: Outputs the sound of the POP program through the
AUDIO OUT terminals.
Note:
Make sure the volume control of your audio
ampl/7/er is set to a moderale I/sler?/bq level
MENU
a,T4 },,
Using the StableSound _ feature
The StableSound _>feature limits he highest volume level to prevent
extreme changes in volume when the signal source is changed (f'or
example, to prevent the sudden increase in voktme that of'ten lmppens
when a TV program switches to a commercial).
To turn on the StableSound _ feature:
1. Press MENU, and then press @ or _ until the AUDIO I_leIlu
appears.
2. Press A or Y to highlight STABLE SOUND.
3. Press _ or _ to select ON.
@@®@@@
_ AUDIO
_BS 0 N
SBS LEVEL 8O
SPEAKERS ON
Note:
When the POP is not on ff_e screen, ff_e
soured of ff_e main program is ou@ut, even if
ff_e POP sound is se/eclec_
To turn off the StableSound _ f'eature:
Highlight OFF in step 3 above.
58
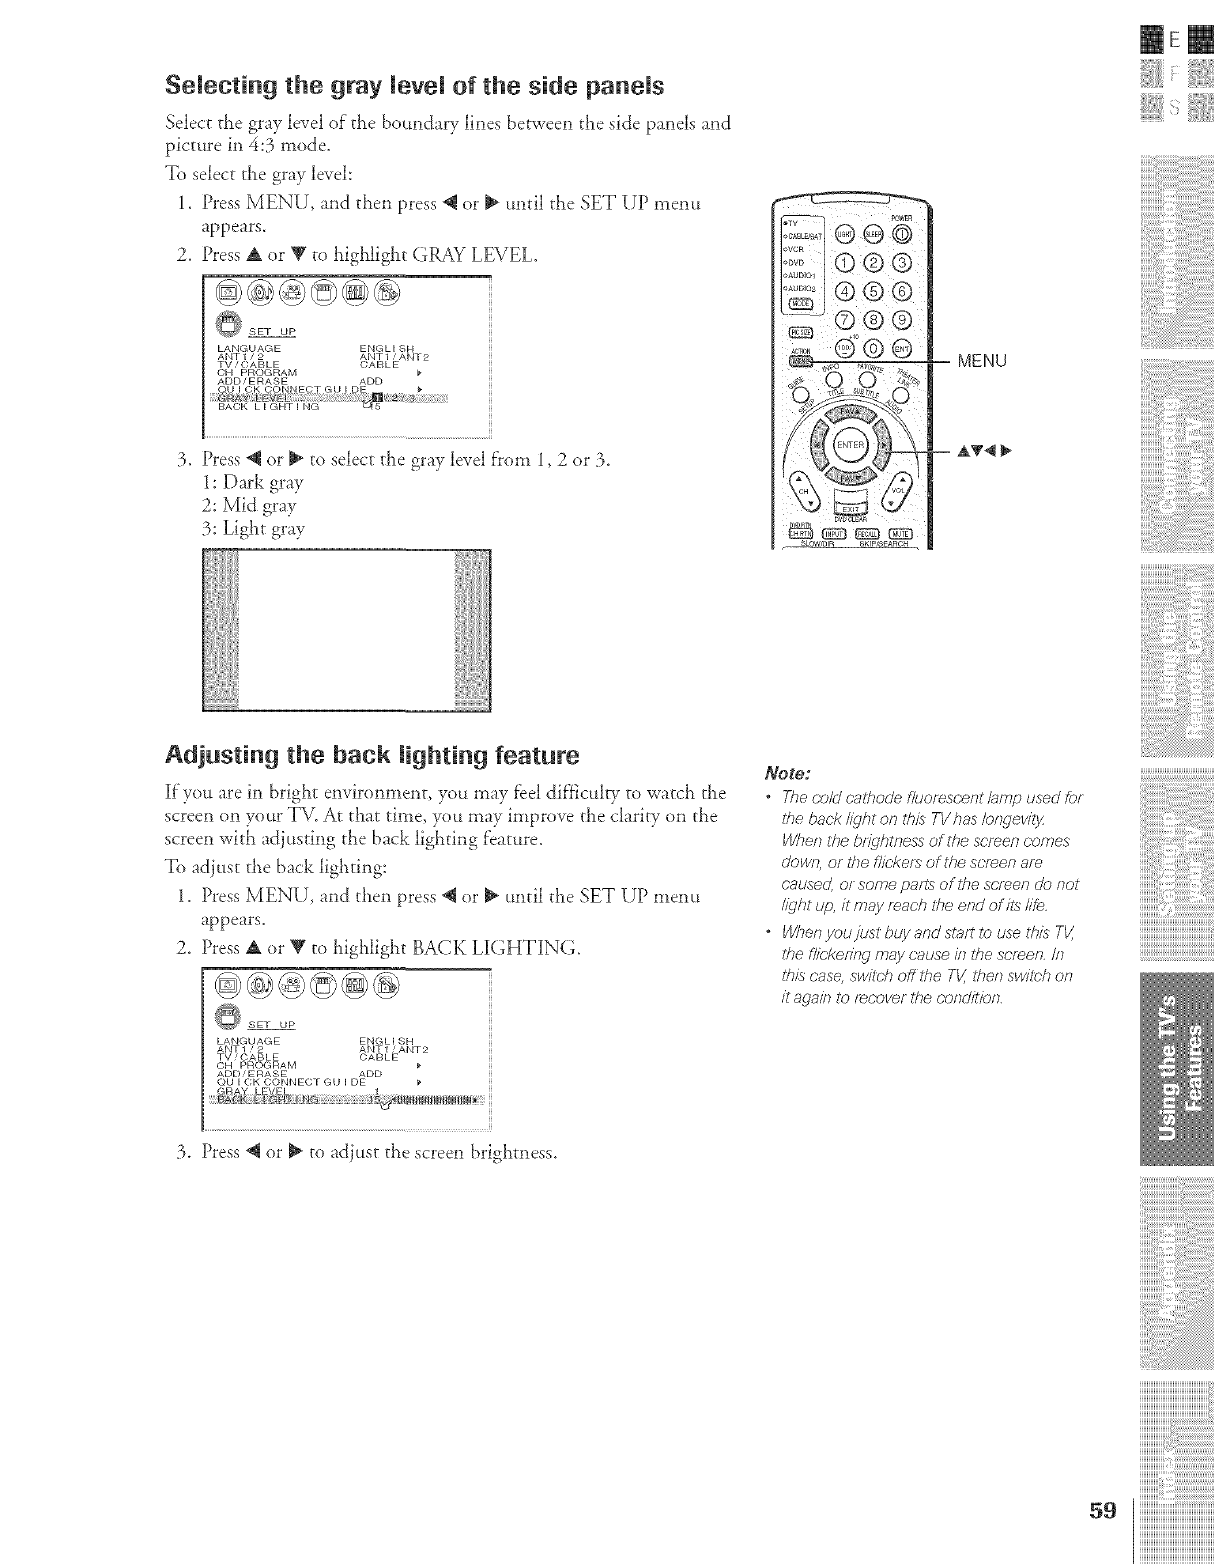
Selecting the gray level of the side panels
Select the gray level of" the boundary lines between the side panels and
picture in 4:5 mode,
To select the gray level:
1. Press MENU, and then press @ or _ until the SET UP memt
appears.
2. Press A or V to highlight GRAY LEVEL.
LANGUAGE ENGLISH
ANT1/2 ANTI/ANT2
TV/OABLE CABLE
CH PROGRAM
ADD/ERASE ADD
3. Press @ or _ to select the gray level from 1,2 or 3.
1:Dark gray
2:Mid gray
3: Light gray
Adjusting the back lighting feature
if you are in bright environment, you may feel dif}iculw to watch the
screen on your TV. At that time, you may improve the clarity on the
screen with adiusting the back lighting f'eature.
To adiust the back lighting:
1. Press MENU, and then press _ or _ until the SET UP mentt
appears.
2. Press A or V to highlight BACK LI[GHTING.
O SET UP
LANGUAGE ENGLI SH
ANT 1 /2 ANT 1 /ANT2
TV /CABLE CABLE
CH PROGRAM
ADD/ERASE ADD
QU I CK CONNEC}T GU I DE
MENU
AT4
Note.:
•Theco/dc_:,/hoo'ef/uorescent/_mpusedfor
ff_e back @ht on troisTV has /orwevitjz
When die brightness of the sPreen comes
down, or the f/iekefs of the screen am
co,used, or some paf?s of the screen do not
/ight up, it may roach file er?d of i/s /ire,
•When youjust buy and start to use tfffs TV,
/he f/ic'kef2w may cause in the screen, In
ff_is case, swil_h off the TV, then swinish on
it 8{)8/17tO f_(?over /¢le Cot?flit/or?,
mere
i¸i¸iI¸i¸i¸i11¸i¸i i¸i i,¸iiiii¸iiiiiiii¸iiiiii
iiiiiiiiiiiiiiiiiiiiiiiiiiiiiiiiiiiiiiiiii_
3. Press @ or _ to adiust the screen brighmess.
iiiiiiiiiiiiiiiiiiiiiiiiiiiiiiiiiiiiiiii
::::::::::::::::::::::::::::::::::::::::
::::::::::::::::::::::::::::::::::::::::
::::::::::::::::::::::::::::::::::::::::
iiiiiiiiiiiiiiiii_i_i_i:i_i_i_i_i_i_i_i_i_i_i_i_i_i_i_i_i_i_i_i_i_i_i_i_
59 iiiiiiiiiiiiiiiiiiiiiiiiiiiiiiiiiiiiiiiiiii
iiiiiiiiiiiiiiiiiiiiiiiiiiiiiiiiiiiiiiiiiii
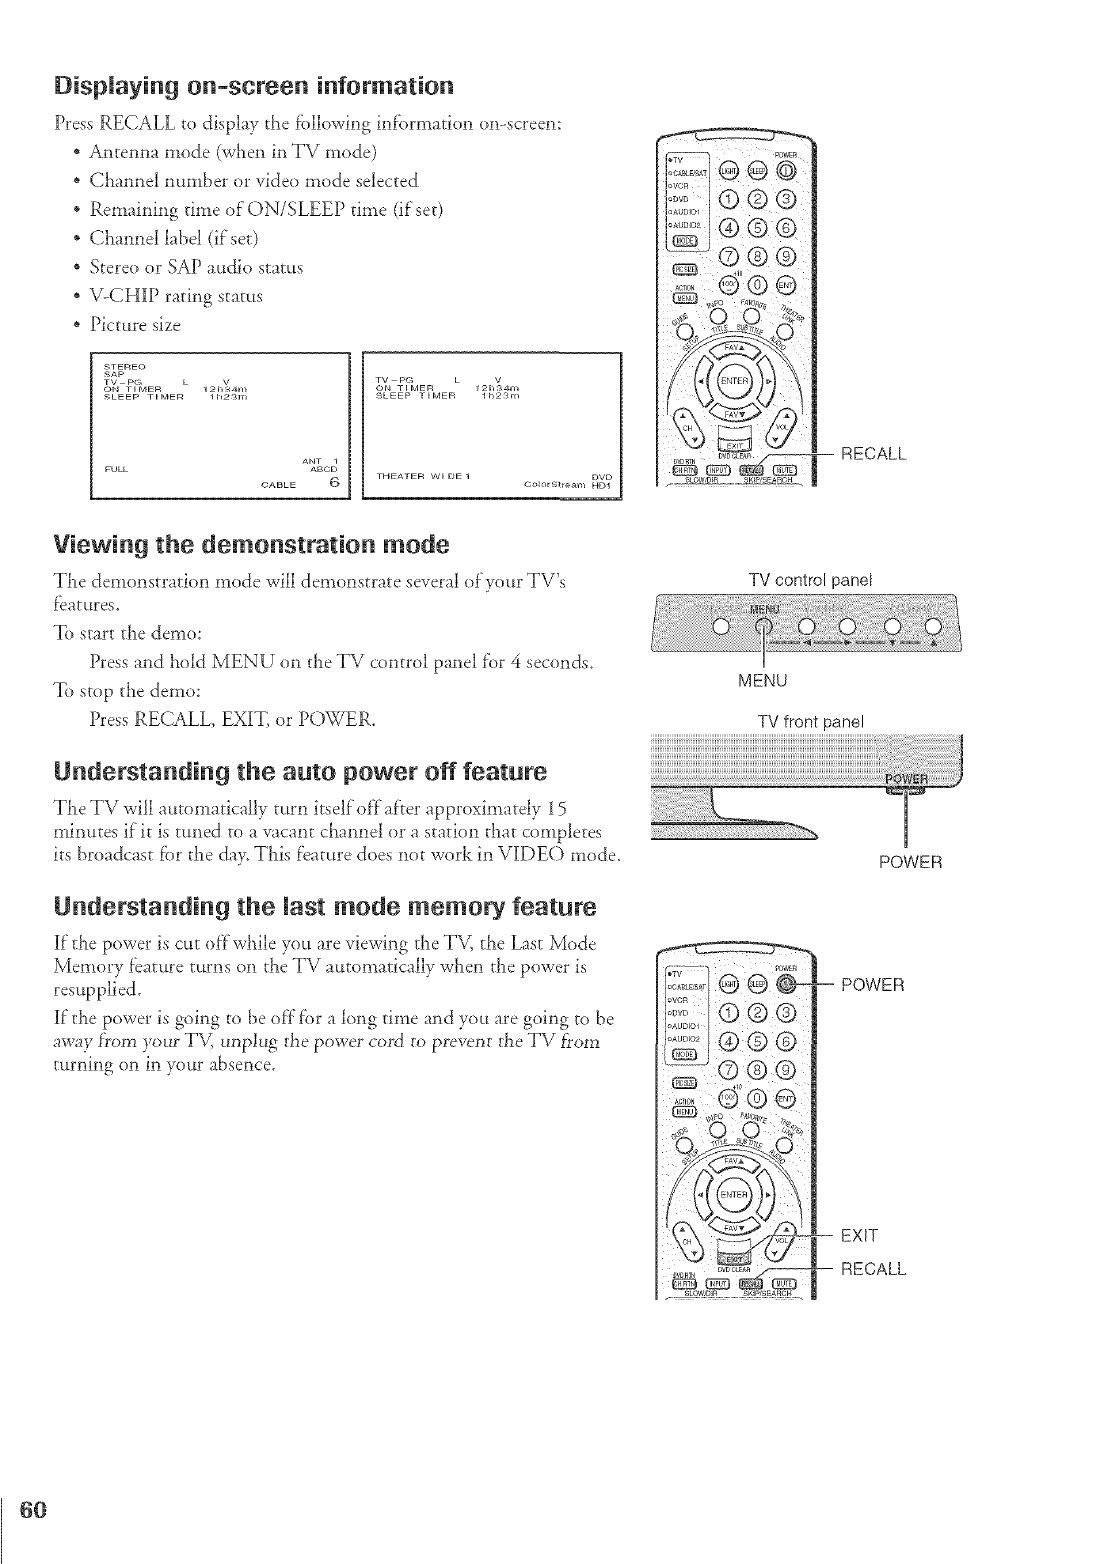
Displaying on-screen information
Press RECALL to display the fbllowing information on-screen:
* Antenna mode (when in TV mode)
* Channel number or video mode selected
* Remaining time of ON/SLEEP time (if'set)
* Channel label (if set)
* Stereo or SAP audio status
* -',/-CHIP rating status
* Picture size
_TEREO
SAP
TV PG • V
ON TIMER 12h34m
SLEEP TIMER lh2_m
ANT 1
ABOD
C:ABLE 6
TV PG • V
ON TI MER I 2h_4m
_LEEP TIMER lh2_m
DVD
THEATER WI DE 1 Oo_orStream HDI
Viewing the demonstration mode
The demonstration mode will demonstrate several of'your TV's
featktres,
To start the demo:
Press and hold MENU on the TV control panel for 4 seconds.
To stop the demo:
Press RECALL EXIT, or POWER.
Understanding the auto power off feature
The TV will automatically turn itself off after approximately 15
minutes if it is tuned to a vacant channel or a station t!_at completes
its broadcast fbr the day, This feature does not work in VIDEO mode.
Understanding the last mode memory feature
If the power is cut offwhile you are viewing the T\4 the Last Mode
Memory feature turns on the TV automatically when the power is
resupplied,
If the power is going to be off for a long time and yot.t are going to be
away f_om your TV, unplug t}_epower cord to prevent t}_eTV f?om
turning on in your absence,
TV control panel
MENU
TV front panel
POWER
DVD_L_R
S_OWID_n SK]P/SE_tRCH
= POWER
-- EXIT
-- RECALL
6O
IEm
i!!iiiii!iiii !!':iiiii!i!
*Design and speclficadons are subject to change without notice.
*Never service o1"remodel the TV set by yourself. It may expose you to a fh'e hazard or dangerous vohage.
Television System
NTSC standard Headphones jack
}.5 mm stereo
Channel Coverage
VHF: 2 through 13
UHF: 14 through 69
Cable TV: Mid band (A-8 through A-l, A through I)
Super band (_ through W)
Hyper band (AA through ZZ, AAA, BBB)
Ultra band (65 t}lrough 94, 100 dlrough 125)
Power ._Otl Fce
12{)V AC, 60 Hz
Power Consun]ption
26HL84:
32HL84: 140W (average)
Number of picture Elements
1366 (H) dots x 768 iV) dots
Audio Power
10W+ 10W
TheaterLink
OUTPUT: } V(p-p), 10k ohm
INPUT: } V(p-p) tO 5 V(p-p), PCM
(Toshiba TV code) over }8KHz carrier
Dimensions (Inchtding stand)
26HL84 Width : 27-11/64 inches (690 ram)
Height: 2255/64 inches (580 ram)
Depth : 12-1/8 inches (}08 nmr)
12HL84 Width : 12-1/4 inches (819 ram)
Height : 25-25/64 inches (645 nrm)
Depth : 12-1/8 inches (}{)8ram)
Mass (weight)
xxx lbs (xxx kg)
Operating condhion
Temperature: }2°F- 95°F (0°C 15°C)
Hmoidhv: 20 80% (No moisture condensation)
Speaker Type
Two 2-3/8 × 4-1/4 inches (6(1× 120 ram)
Video/Audio Terminals
S-VIDEO INPUT
Y: 1V(p-p), 75 ohnr, negative sync.
C : 0.286 V(p-p) (burst signal), 75 ohm
VIDEO/AUDIO INPUT
VIDEO: 1 V(p-p), 75 ohm, negative sync.
AUDIO: 150 nrV(rms) (}0% modulation equivalent,
47kohm)
ColorStream°'_(componentvideo)INPUT
Y: 1V(p-p), 75 ohnr
Pa: 0.7 V(p-p), 75 ohm
PB: 0.7 V(p-p), 75 ohm
AUDIO: 15{)mV(rms), 47k ohm
VIDEO/AUDIO OUTPUT
VIDEO: 1 V(p-p), 75 ohm, negative sync.
AUDIO: 150 mV(rms) (30% modulation equivalent,
4.7k ohm)
VAR]ABLE AUDIO OUTPUT
(/ !}(/(ImV(mrs) (30% moduhtion equivahnt, 47k ohm)
DVI/HDCP ]NPUT
HDCP complbnt
E-EDID* 1.3 compliant
DVI-D uncompressed, high-speed, digital single-link
COIlHectioH
Suggested irrput scan rates: 1080i, 720p, 480p, 480i
*E-EDID = Enb raced-Extended Display Identification
61
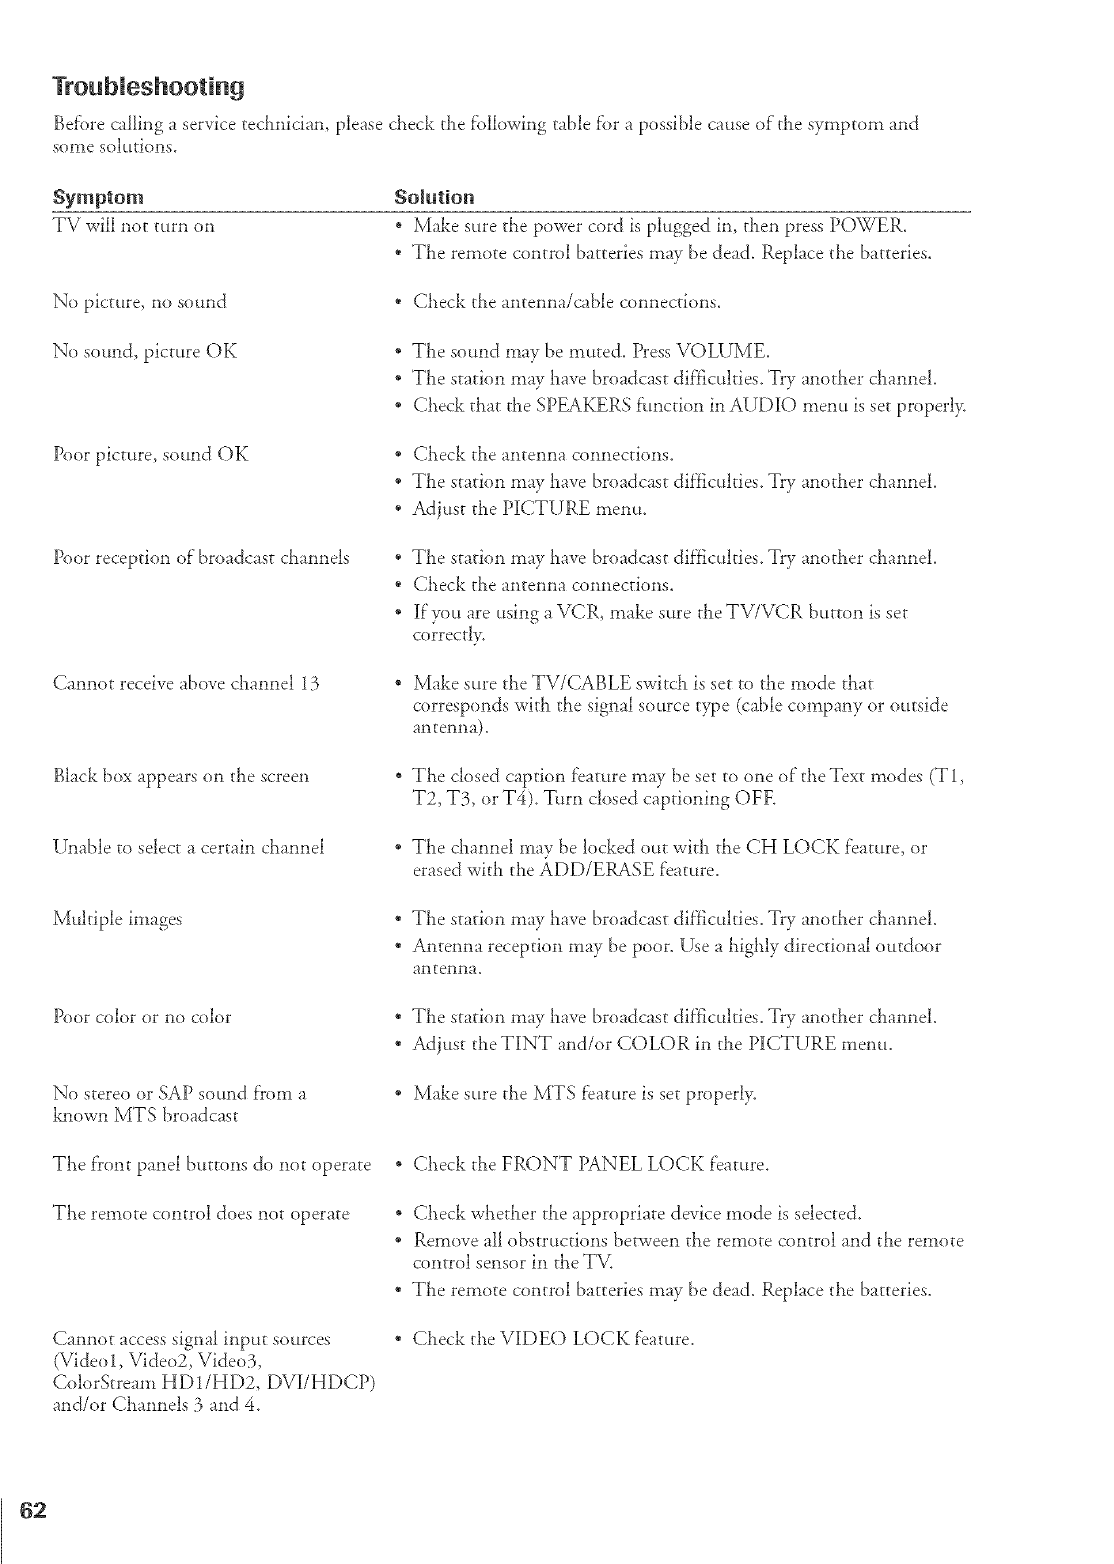
Befi>recallingaservicetechnician,pleasecheckthef'ollowingtablef'orapossiblecauseofthesymptomand
somesolutions.
Symptom
TVwillnotturnon
No picture, no sound
No sound, picture OK
Poor picture, sound OK
Poor reception of"broadcast channels
Cannot receive above channel 13
Black box appears on the screen
Unable to select a certain channel
Solution
* Make sure the power cord is plugged in, then press POWER.
* The remote control batteries may be dead. Replace ti_e batteries.
* Check the antenna/cable connections.
* The sound may be muted. Press VOLUME.
* The station may have broadcast dif'flculties. Try another channel.
* Check that ti_e SPEAKERS f:unction in AUDIO menu is set properl>
* Check the antenna connections.
* The station may have broadcast dif}_culties. Try another channel.
* Adjust the PICTURE menu.
* The station may l_ave broadcast difficulties. Try another channel.
* Check the antenna connections.
* If'you are using a VCR, make sure theTV/VCR buttol_l is set
correct!>
* Make sure the TV/CABLE swi/ch is set to the mode that
corresponds with the signal source type (cable company or outside
antelma).
* The closed caption feature may be set to one of the Text modes (T 1,
T2, T3, or T4). Turn closed captioning OFE
* The channel may be bcked out with the CH LOCK feature, or
erased with the ADD/ERASE feature.
Multiple images * The station may have broadcast difficulties. Try another channel.
* Antenna reception may be poor. Use a highly directional outdoor
antenna.
Poor color or no color
No stereo or SAP sound f'rom a
haown MTS broadcast
* The station may have broadcast dif'ficulties. Try another channel.
* Adjust the TINT and/or COLOR in the PICTURE menu.
Make sure the MTS feature is set properly.
The front panel buttons do not operate
The remote control does not operate
Cannot access signal input sources
(Video 1, Video2, Video3,
ColorStream HD1/HD2, DVI/HDCP)
and/or Channels 3 and 4.
* Check the FRONT PANEL LOCK feature.
* Check whether the appropriate device mode is selected.
* Remove all obstructions between the remote control and the remote
control sensor in the TV.
* The remote control batteries may be dead. Replace the batteries.
Check the VIDE() LOCK feature.
62
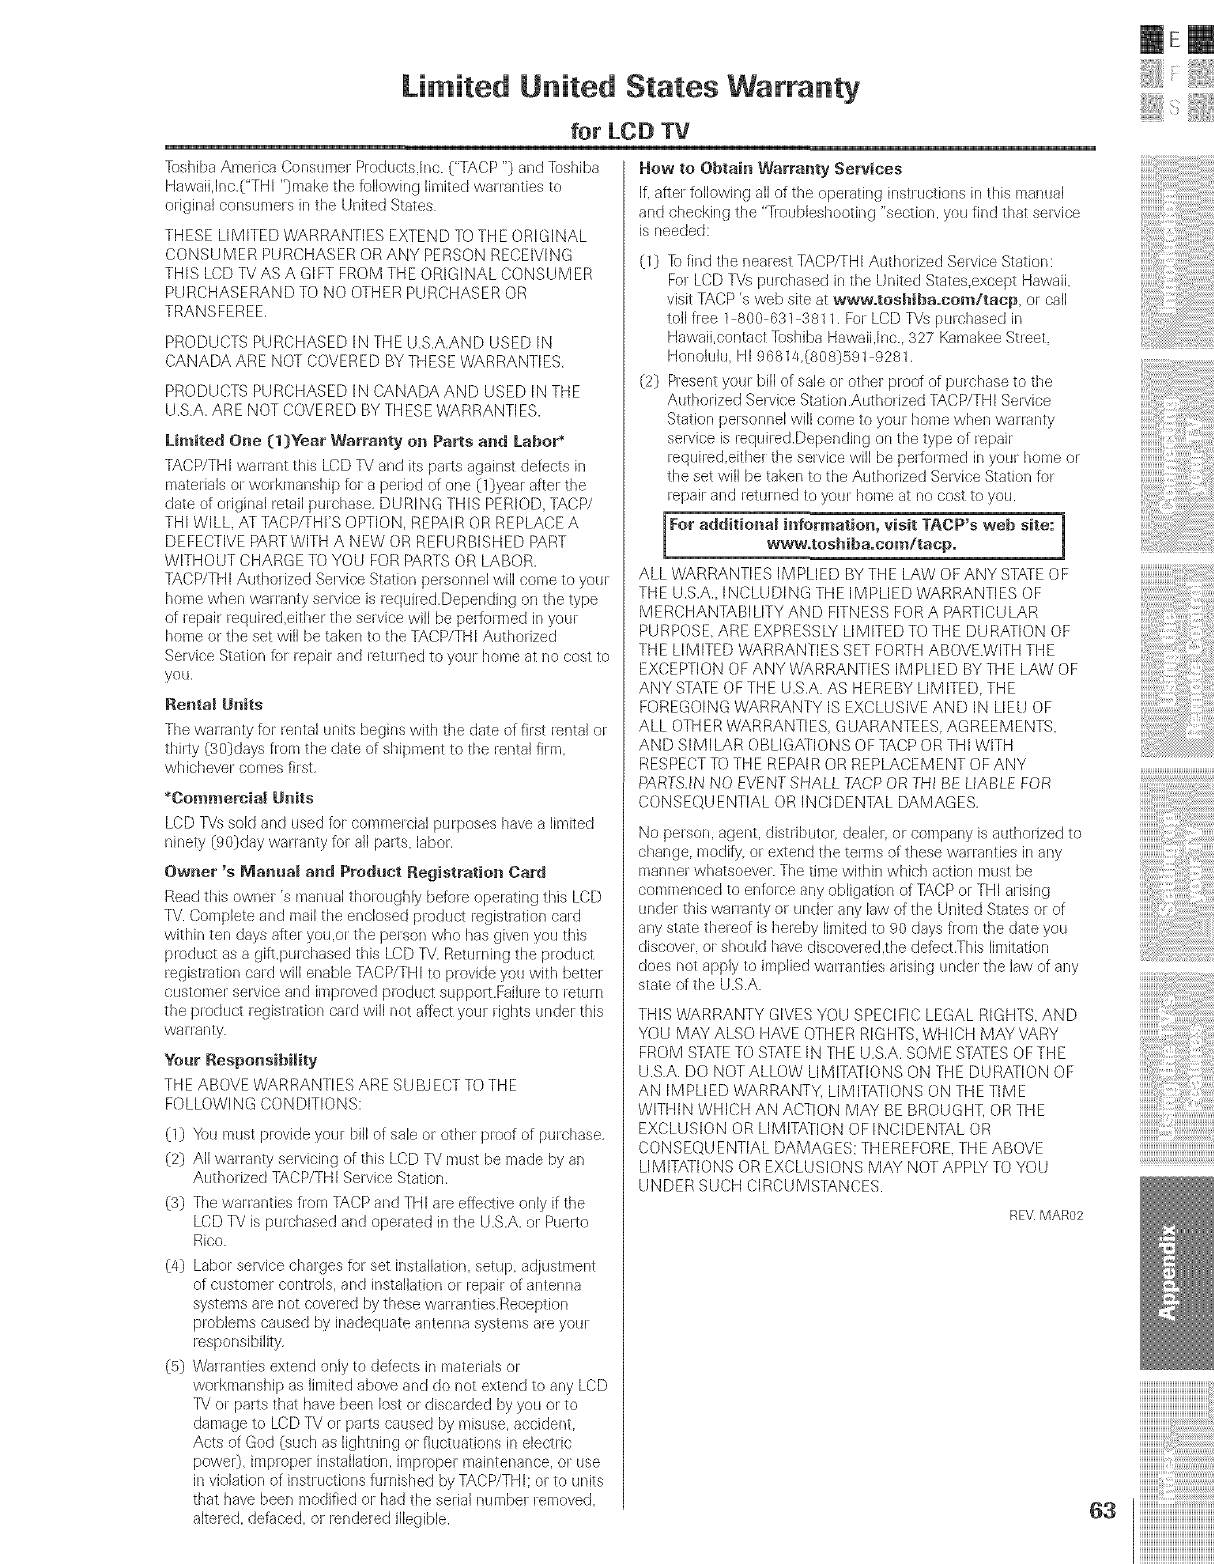
Limited United States Warranty
for LCD TV
Toshiba America Consume1 Produe+s.lnc. ("TACP "} and Toshiba
Hawaiijr_c.("THI "}make the following limited wa+ranties to
original consurnets in the United States
THESE LIMITED WARRANTIES EXTEND TO THE ORIGINAL
CONSUMER PURCHASER ORANY PERSON RECEIVING
THIS LCD TV AS A GIFT FROM THE ORIGINAL CONSUMER
PURCHASERAND TO NO OTHER PURCHASER OR
TRANSFEREE,
PRODUCTS PURCHASED IN THE USA,AND USED IN
CANADA ARE NOT COVERED BY THESE WARRANTIES,
PRODUCTS PURCHASED IN CANADA AND USED IN THE
USA. AR E NOT COVE RED BY THESE WARRANTI ES.
Limited Oue (1)Year Warraaty on Parts and Labor'
TACP/THI warlant this LCD TV and its pads against defects in
mate+ia]s ot workmanship fola period of one (1}year after the
date of originat _etai] pu+chase, DUR[NG THIS PERIOD, TACP/
THI WILL. AT TACP/rHI'S OPTION, REPAIR OR REPLACE A
DEFECTIVE PART WITH A NEW OR REFURBISHED PART
WITHOUT CHARGE TO YOU FOR PARTS OR LABOR.
TACP/THI Autho+ized Se+vice Station personnel will come to you]
home when waHanty se+vice is +eq(Jired,Depending on the type
of +epair required,either the set vice will be pedomled in your
home or the set will be takers to the TACP/THI Authorized
Sewice Station for repair and returned to your home at no cost to
you,
Rental Units
The wa+ranty for rental units begins with the date of first _ental or
thhSy (30}days flora the date of shipment to the rental fhm,
whicheve_ comes first,
*Commercial Units
LCD TVs sold and used fo+comrne+cial purposes have a limited
ninety (90]day warranty for aH pads, labor,
Owuer's Manual and Product Registration Card
Read this ownel's manual thoroughly before operating this LCD
TV. Complete and mail the enclosed product regist+ation card
within ten days after you,or the pe+son who has given you this
product as a gift,pu+chased this/CD TV. Retu+ning the product
regist+ation ca+d wi[[ enable TACP/THI to provide you with bette+
customer service and improved p+oduet suppots.Fai]u+e to retu+n
the prodtJet registration card will not affeet your rights unde+ this
wa] ranty.
Your Responsibility
THE ABOVE WARRANTIES ARE SU BJECT TO THE
FOLLOWING CONDITIONS:
(1} "/bu must provide your bill of sale ot othe+ p+oof of pu+chase,
(2) AIr walranty selvicing of this LCD TV must be rnade by an
Author ized TACP/THI Sewice Station,
(3) The waHanties from TACP and THI are effedive only if the
LCD TV is purchased and operated in the U.S.A. o+ Puelto
Rico.
(4} Labor service chalges for set inst_flJation, setup, adjustment
of customer controls, and installation or repair of antenna
systems are not covered by these waHanties.Reception
problems caused by inadequate antenna systems are your
+esponsibility,
(5} Walrantles extend only to defects in materials or
workmanship as limited above and do not extend to any LCD
TV or pairs that have been lost or discarded by you or to
damage to/CD TV or pa+ts caused by misuse, accident.
Acts of God (such as tightl-fing ol fluctuations in etectlic
powe0, implopel installation, impropel maintenance, or use
in violation of instructions furnished by TACP/THI: or to units
that have been modified ol° had the serial numbel removed,
a[tel°ed, defi_ced, ol° lendeled illegible.
How to Obtain Warra|_ty Services
if. aftel to[lowing all of the operating [nstluctions in this nlanual
and checking the "-houbleshooting 'section, you find that sewice
is needed:
(1} % find the nearest TACP/TH[ Authorized Service Station:
Fo+LCD TVs pu+chased in the United States.except Hawaii,
visit TACP's web site at www=tosbiba=eom/tacp or call
to]] flee 1 800 631 3811, For LCD TVs purd-_ased in
Hawaii,contact lbshiba Hawaii,Inc., 327 Kamakee Street,
Honolulu, HI 96814,(808}591 9281,
(2} Resent you+ bi[[ of sale 01ethel proof of purchase to the
Authorized Service Station.Authorized TACP/THI Service
Station pet sonnel wilt come to you+ home when wa+ranty
service is requh ed.Depending on the type of repair
required,eithel the sewice will be pedom]ed in your home ol
the set will be taken to the Authorized Service Station for
repai+ and retu+ned to your honweat no cost to you.
For additioual iuformation, visit TACP's web site:
wwwotoshiba.eom/taep. J
ALL WARRANTIES IMPLIED BY THE LAW OF ANY STATE OF
THE U.S.A. INCLUDING THE IMPUED 'WARRANTIES OF
MERCHANTABIUTY AND FITNESS FOR A PARTICULAR
PURPOSE, ARE EXPRESSLY LIMITED TO THE DURATION OF
THE L[IVlITED WARRANTIES SET FORTH ABOVE.WITH THE
EXCEPTION OF ANY WARRANTIES IMPLIED BYTHE LAW OF
ANY STATE OFTHE U.S.A. AS HEREBY LIMITED THE
FOREGOING WARRANTY [S EXCLUSIVE AND [N UEU OF
ALL OTHER WARRANTIES, GUARANTEES. AGREEMENTS,
AND SIMILAR OBUGATIONS OF TACP OR THI WITH
RESPECT TO THE REPAIR OR REPLACEMENT OF ANY
PARTS,IN NO EVENT SHALL TACP OR THI BE LIABLE FOR
CONSEQUENTIAL OR INCIDENTAL DAMAGES,
No person, agent, distributor, dea[eL or company is authorized to
change, rnodify or extend the terms of these war rarities in any
manner whatsoever. The time within which aedon must be
commenced to enfotce any obligation of TACP or THI a+ising
under this waHanty ot under any law of the United States or of
any state theteof is hereby [irnitedto 90 days from the date you
discover, o+should have discove+ed.the defect.This [imitation
does not apply to implied war+anties arising unde_ the law of any
state of the U.S.A.
THIS WARRANTY GIVES YOU SPECIFIC LEGAL RIGEITS,AND
YOU MAY ALSO HAVE OTHER RIGHTS, WHICH MAY VARY
FROM ST_]-E TO STATEIN THE L/,S.A. SOME STATES OF THE
U.SA. DO NOT ALLOW LIMITATIONS ON THE DURATION OF
AN IMPLIED WARRANTY. LIMITATIONS ON THE TIME
WITHIN WHICH AN ACTION MAY BE BROUGHT, OR THE
EXCLUSION OR LIMITAZION OF INCIDENTAL OR
CONSEQUENTIAL DAMAGES: THEREFORE. THE ABOVE
LIMITATIONS OR EXCLUSIONS MAY NOT APPLY TO YOU
UNDER SUCH CIRCUMSTANCES.
RE_ MAR02
63
IEm
i!!iiiii!iiii+!!":iiiii!i!

Limited Caaa a Warranty
for LCD TV
Tt_shiba of Canada Limited ("TCL")makes the following limited
warranties to original consumers in Canada.
THESE LIIVlITED WARRANTIES EXTEND TO THE ORIGINAL
CONSUMER PURCHASER OR ANY PERSON RECEIVING
THIS LCDTVASA GIFT FROM THE ORIGINAL CONSUMER
PURCHASER AND TO NO OTHER PURCHASER OR
TRANSFEREE
PRODUCTS PURCHASED IN THE D S A,AND USED IN
CANADA AR E NOT COVERED BY TH ESE WARRANTI ES.
PRODUCTS PURCHASED IN CANADA AND USED IN THE
U.S.A,ARE NOT COVERED BY THESE WARRANTI ES.
Limited One [1)Year Warranty en Parts and Labor*
TCL warrants this LCD TV and its pails against defec,'ts in
materials or workmanship tel a period of one (l}yeal after the
date of original letail purchase. DURING THIS PERIOD,TCL
WILL,,<]- TCL 'S OPTION,REPAIR OR REPLACE A DEFECTIVE
PART WITH A NEW OR REFURBISHED PART WITHOUT
CHARGE TO YOU FOR PARTS OR LABOR,TCL Authorized
Selvice Depot pelsonnel will come to your home when warlanty
sewice is lequired, Depending on the type of repair
lequiled,either the service will be pe@ormed in your home or the
set will be taken to the TCL Authorized Selvice Depot fol lepair
and retul ned to your home at no cost to you.IN HOIVlE SERVICE
ONLY APPLIES WITHIN 100 KILOMETERS OFAN
AUTHORIZED TCL SERVICE DEPOT.
Renta! Units
The waHanty for rental units begins with the date of first _ental o_
thirty (30) days flora the date of shipment to the lental film,
whichevel comes filst.
*Commercial Units
LCD TVs sold and used for commercial purposes have a limited
i-finery (90)day wallanty fol all parts, label.
Owner's Manual
Read this owner's manual thoroughly befole opelating this LCD
TV.
Your Responsibility
THE ABOVE WARRANTIES ARE SUBJECT TO THE
FOLLOWING CONDITIONS:
(1} _@uJmust plovide youl bill of sale or other proof of purchase.
(2} All warlanty servicing of this LCD TV must be made by an
Authorized TCL Service Depot.
(3} The war mnties flora TCL ale effective only if the LCD TV is
pu chased in Canada from an authorized TCL dealel and
operated in Canada,
(4} /abel service charges re1 set installation, setup, a(Jjustnler_t
of custonier controls, and installation el _epair of antenna
systems are not covered by these wananties. Reception
ploblems caused by inadequate antenna systems ale your
responsibility.
(5) /fd_wrrantiesextend only to defects in matelials el
wol kmanship as limited above and do not extend to any/CD
TV or pails that have been lost el discauJed by you el to
damage to LCD TV el parts caused by misuse, accident.
Acts of God (such as lightning or fluctuations in electdc
powelO, iraproper installation imploper raaintenance, el use
in violation of instructions furnished by TCL; or to units that
have beers modified or had the selial number removed,
alteled, defaced, or lendered illegible,
How to Obtain Warranty Sewices
If,aftel following all of the opelating instructions in this manual
and checking the "]]oubleshooting"section, you find that sewice
is needed:
(1} Tofind the nealest TCL Authorized Service Depot, visit
TCL's web site:www.toshiba.ca.
(2} Present your bill of sale or other ploof of purchase to the
Authorized Service Depot.Authorized TCL Selvice Depot
personnel will come to youl home when wal ranty service is
lequiled. Depending on the type of lepair requiled, either
the service will be pe_1oH]]ed in youl home el the set will be
taken to the Authorized Service Depot tel lepair and
leturned to your home at no cost to you,IN HOIVlE SERVICE
ONlY APPLIES WITHIN 100 KILOMETERS OFAN
AUTHORIZED TCL SERVICE DEPOT.
i For additional information, visit TCL's web site:www.toshiba=ea
ALL WARRANTIES IMPLIED BYTHE LAW OFANY PROVINCE
OF CANADA. INCLUDING THE IMPLIED WARRANTIES OF
M ERCHANTABI LITY AN D FITNESS FOR A PARTICULAR
PURPOSE. ARE EXPRESSLY LIMITED TO THE DURATION OF
THE LIMITED WARRANTIES SET FORTH ABOVE.WITH THE
EXCEPTION OF ANY WARRANTIES IMPLIED BY THE LAW OF
ANY PROVINCE OF CANADA AS HEREBY LIMITED, THE
FOREGOING WARRANTY IS EXCLUSIVE AND IN LIEU OF
ALL OTHER WARRANTI ES, GUARANTEES.
AGREEIVlENTS.AND SIMILAR OBLIGATIONS OF TCL WITH
RESPECT TO THE REPAIR OR REPLACEMENT OFANY PARTS,
IN NO EVENT SHALL TCL BE LIABLE FOR CONSEQUENTIAL
OR INCIDENTAL DAMAGES.
No person, agent, dist_ibutol,dealer.or company is autholized to
change modify, el extend the telms of these warlanties in any
manne_ whatsoever, The time within which action must be
commenced to enforce any obligation of TCL adsing under this
waHanty el under any law of Canada or of any province thereof,
is hereby limited to 90 days flora the date you discovel, el should
have discoveled, the defect. This limitation does not apply to
implied wal ranties arising unde_ the law of any p_ovince of
Canada.
THIS WARRANTY GIVES YOU SPECIFIC LEGAL RIGHTS AND
YOU IVlAY ALSO HAVE OTHER RIGHTS.WHICH MAY'VARY
FROM PROVINCE TO PROVINCE IN CANADA.SOM E
PROVINCES OF CANADA DO NOT ALLOW LIMITA;rIONS ON
THE DURATION OF AN IM PLIED WARRANTY. LIMIT,<rIONS
ON THE TIME WITHIN WHICH AN ACTION MAY BE
BROUGHT. OR THE EXCLUSION OR LIMITATION OF
INCIDENTAL OR CONSEQUENTIAL DAMAGES: THEREFORE
THE ABOVE LIMITA]IONS OR EXCLUSIONS MAY NOT APPLY
TO YOU UNDER SUCH CIRCUMSTANCES.
REV MAR02
64
IEm
i!!iiiii!iiii !!"iiiii!i!
iiliiiiiiiiiiii iiiiii i
AB
ANT 1/2 ...................................................................................28
Antenna cables ......................................................................8
AUDIO OUT sound, selecting .......................................58
Audio system connection .................................................17
Auto aspect ............................................................................37
Auto power off ......................................................................60
AiV cables ................................................................................8
Back lighting .........................................................................59
Back of the TV ........................................................................7
O
Cable converter box connection .....................................9
Camcorder connection ......................................................14
CH AV buttons ....................................................................29
Channel surf mode [SpeedSurf} ...................................30
CH LABEL ..............................................................................33
CH LOCK.................................................................................45
CH RTN button ....................................................................31
Channel Number buttons ................................................30
Channel programming
ADD/ERASE ....................................................................30
Automatic programming .............................................29
TWCABLE selection ......................................................29
CH SCAN button .................................................................40
Cinema mode ........................................................................37
Closed caption ......................................................................52
Coior temperature ...............................................................49
Component video cables ....................................................8
D
Demonstration mode .........................................................60
Dobiy Virtual sound ............................................................55
Double-window CPOP"} feature ...................................38
DNR (Digital Noise Reduction} .....................................49
DTV receiver connection ..................................................13
DVD connection ...........................................................11, 12
DVI!H DCP connection ......................................................15
FGU
FAV _'A buttons ..................................................................32
FAVORITE button .................................................................41
Favorite channels ................................................................31
Favorite channel search ....................................................41
FOCUS .....................................................................................55
Front of the TV ........................................................................7
Front panel lock ...................................................................47
Game timer ............................................................................47
Gray level ...............................................................................59
iNPUT button ................................................................28, 50
LM
Labeling channels ...............................................................33
Labeling video inputs ........................................................51
Language selection ............................................................28
Last mode memory' .............................................................60
Locking channels ................................................................45
Locking video inputs .........................................................40
LOCK menu ...........................................................................42
Menu system .........................................................................26
MTS feature ...........................................................................54
MUTE button .........................................................................54
OPQ
ON-timer .................................................................................53
Picture adjustments
COLOR TEMPERATURE ..............................................49
Picture mode ....................................................................48
Picture quality ..................................................................50
Picture-out-picture (POP}
POPCH AY buttons ....................................................38
SOURCE button .............................................................38
FREEZEbutton ................................................................39
SWAP button ....................................................................39
Picture scroll ..........................................................................36
Picture size selection .........................................................34
Quick connect guide ..........................................................27
R
RECALL button ....................................................................60
Remote control
Battery installation .........................................................18
Device code table ...................................................23-24
Functional key chart ..............................................19-20
Learning about the buttons ........................................25
Operational feature reset ............................................22
Programming ....................................................................21
Volume Lock feature .....................................................22
RESET..............................................................................50, 56
S
S-video cables ........................................................................8
SAP sound .............................................................................54
Satellite receiver connection ...........................................11
Scrolling the Theater Wide picture ..............................36
Set-top box ............................................................................13
Sleep timer .............................................................................53
Sound quality adjustments ..............................................50
SPEAKERS on/off ...............................................................57
Specifications ........................................................................61
SpeedSurf ...............................................................................30
SRS 3D ....................................................................................55
StableSound _........................................................................58
Stereo sound .........................................................................54
Sub-bass system (SBS] ....................................................57
Surf Lock TM ............................................................................... 31
T
TheaterLink connection ....................................................16
Troubleshooting ..................................................................62
TruBass feature ....................................................................55
TV/Vl DEO button .........................................................28, 50
V
V-CHIP
BLOCKING OPTION ......................................................44
ENABLE BLOCKING .....................................................43
MPAA RATING ................................................................44
NEW PIN CODE ..............................................................47
TV RATING ........................................................................43
Unlocking programs temporarily ..............................45
VCR connection .......................................................9, 10-14
VIDEO LABEL ......................................................................51
VIDEO LOCK .........................................................................46
W
Warranty .................................................................................63
WOW feature .........................................................................55
iiiiiiiiiiiiiiiiiiiiiiiiiiiiiiiiiiiii]]_.......
iiiiiiiiiiiiiiiiiiiiiiiiiiiiiiiiiiiiiiii
IIIIIIIIIIIIIIIIIIIIIIIIIIIIIIIIIIIIB_
iiiiiiiiiiiiiiiiiiiiiiiiiiiiiiiiiiiiiiiiiii
?/////////////////////////////////////////_
65

TOSHIBA AMERICA CONSUMER PRODUCTS, LoLoC.
HEAD OFFICE/82 TOTOWA ROAD, WAYNE, NEW JERSEY 07470
NATIONAL SERVICE DIVISION:1420B TOSHIBA DRIVE, LEBANON, TN. 37087
TOSHIBA HAWAii, INC.
HEAD OFFICE/327 KAMAKEE STREET, HONOLULU, HAWAIi 96814, U=S=A=TEL: (808} 591=9281
TOSHIBA OF' CANADA LTDo
HEAD OFFICE/191 McNABB STREET MARKHAM, ONTARIO L3R 8H2, CANADA TEL: (905) 470=5400
SERVICE CENTERS/TORONTO: 191 McNABB STREET MARKHAM, ONTARIO L3R 8H2, CANADA TEL: (905) 470= 5400
MONTREAL: 1643, NORTH SERVICE RD., TRANS=CANADA HIGHWAY, DORVAL QUEBEC, H9P 1J1, CANADA
TEL: (514) 856=4100
VANCOUVER: 22171 FRASERWOOD WAY, RICHMOND, B.C. VBW 1J5, CANADA TEL: (604) 303=2500
MANUFACTURED BY
TOSHIBA DE _:L_:CTRO_:X. S.A. DE C.V.
ColorStream and StableSound are registered trademarks of Toshiba America Consumer Products, L.L.C.
SurfLock is trademark of Toshiba America Consumer Products, L.L.C.
Manufactured under license from Dolby Laboratories.
"Dotby" and the double-D symbol are trademarks of Dolby Laboratories.
WOW, SRS and (O) symbol are trademarks of SRS Labs, Inc.
WOW technoJogy is incorporated under Jicense from SRS Labs, Inc.
Printed in Mexico
(04-05) IBA
23566307
