Toshiba 43AX60 User Manual Projection Manuals And Guides L0806880
TOSHIBA Projection/Digital 42 and above TV Manual L0806880 TOSHIBA Projection/Digital 42 and above TV Owner's Manual, TOSHIBA Projection/Digital 42 and above TV installation guides
User Manual: Toshiba 43AX60 43AX60 TOSHIBA Projection - Manuals and Guides View the owners manual for your TOSHIBA Projection #43AX60. Home:Electronics Parts:Toshiba Parts:Toshiba Projection Manual
Open the PDF directly: View PDF ![]() .
.
Page Count: 54
Important Information Precautions
WARNING
TO REDUCE THE RISK OF FIRE OR ELECTRIC SHOCK, DO
NOT EXPOSE THIS APPLIANCE TO RAIN OR MOISTURE.
WARNING
WARNING: TO REDUCE THE RISK OF
ELECTRIC SHOCK, DO NOT REMOVE
COVER (OR BACK). NO USER-
SERVICEABLE PARTS INSIDE. REFER
SERVICING TO QUALIFIED SERVICE
PERSONNEL.
The lightning symbol in the triangle tells you that the
voltage inside this product may be strong enough to
cause an electric shock. DO NOT TRY TO SERVICE
THIS PRODUCT YOURSELF.
The exclamation mark in the triangle tells you that
important operating and maintenance instructions
follow this symbol.
CAUTION
TO PREVENT ELECTR/( SHO( K, DO NOT USE THIS
POI ARIZED PLUG WITH AN EXTENSION CORD
RECEPTACLE OR OTHER OUTI.ET UNLESS THE
I'RONGS CAN BE FULIX INSERTED INTO THE
OUTLET TO PREVENT ANY EXPOSURE OF THE
PRONGS ON THE POLARIZED PLUG.
ATTENTION
I'OUR PREVEN[R LES CHO(_S ELECTRIQUES NE PAS
UTILISER CFTFTE FICHE POIARISEE AVEC UN
PROLONGATEUR, UNE PRISE DE COURANT OU UNE
AUTRE SORTIE DE ( OURAN_I, SAUF SI LES LAMES
PEUVENT ETRE INSERt'S }, FOND SANS EN LAISSER
AIJCIJNE PARTIE }, DECOUVERI[
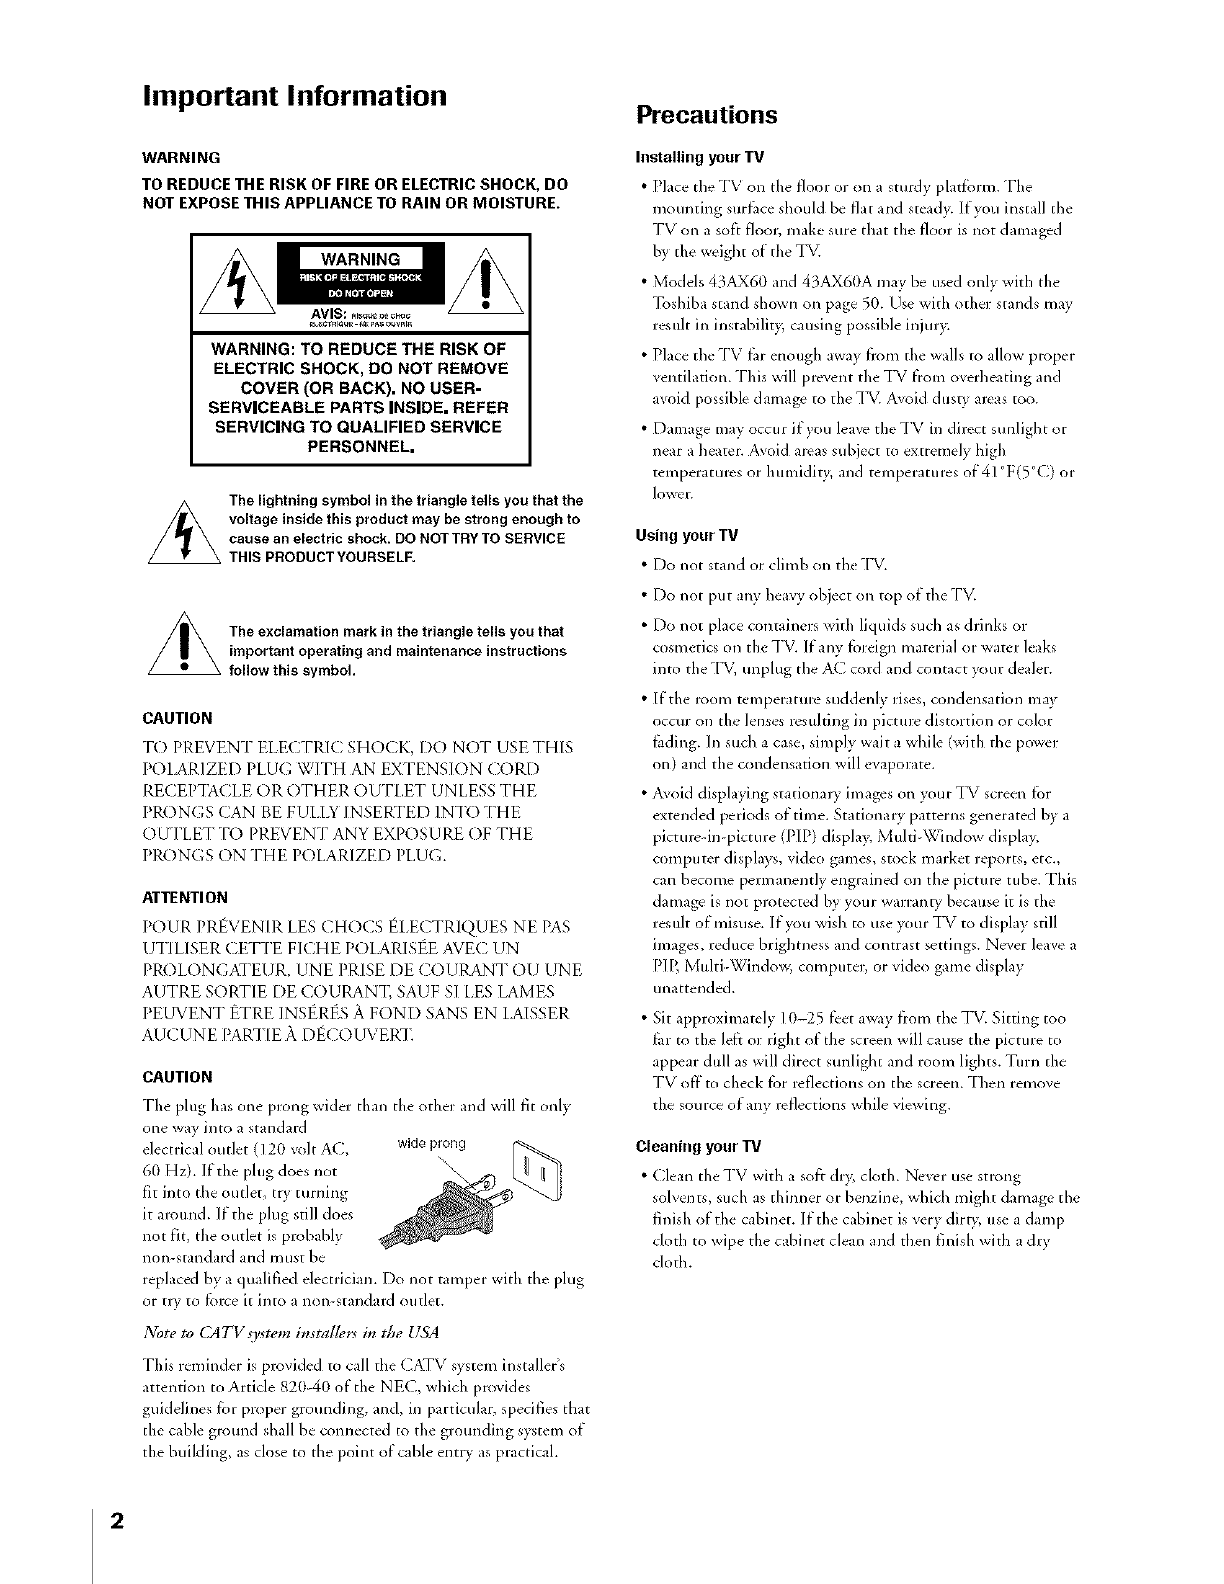
CAUTION
[File plug has one prong wider than tile other and will fit only
one way into a standard
electrical outlet (120 volt AC, wide prong
60 Hz). If the plug does not \
fit into the outlet, tly turning
it alound. If'the plug still does
not fit, tile outlet is probably
non-standard and must be
replaced by a qualified electrician. Do not tamper with the plug
or tlv to t_lve it into a non-standald outlet.
Note to (,_TV.wwm in_talle*:_i1_the USA
This reminder is provided to call the CATV system installer's
attention to Article 820-40 of the NEC, which provides
guidelines for proper grotmdillg, and, in particular, specifies that
the cable ground shall be connected to the glounding system of
tile building, as close to the point of cable ent Uas practicah
Installing your TV
• Place the TV on tile floor or on a sturdy platfi_rm. "Pile
mounting slirf_ce should be flat and stead),. If you install the
TV on a soft floor, make sure that the floor is not damaged
by the weight of the TV.
• Models 43AX60 md 43AX60A may be used onl) with the
Toshib _stand shown on page 50. Use ,aith other stands may
result in illstabilitv causing possible injur)<
• Pllce the TV fi_renough awl t fi'om tile walls to allow proper
_entilation. This will prevent tile TV from overheating md
avoid possible damage to the TV. Avoid dust_ aleas too.
• Damage may occur if you leave the TV in direct sunlight or
near a heate_. Avoid areas subject to e×tremely high
temperatules or humidity, and temperatules of 4] °F(5°C) or
Iowe_.
Using your TV
• Do not stand or climb ou the TV.
• Do not put ;ill) heavy object on top of tile TV_
• Do not place containers with liquids such as drinks or
cosmetics on tile TV. If any fi)reign material or water leaks
into the [1_ unplug the AC cord and contact your dealer.
• If the room temperatm'e suddenly rises, condensation may
occur on the lenses resulting in picttu_ distortion or color
fliding. In such acase, simply wait awhile (with the power
on) and the condensation will evaporate.
• Avoid displaying stationary images on your TV screen f[_r
extended periods of time. Stationary patterl*s generated b) a
picmre-in-pictule (PIP) displa> Multi-\_mdow display,
computer displays, video games, stock market reports, etc.,
can become permanently engrained on tile pictmv tube. This
damage is not protected by your warranty because it is tile
result of misuse. If you wish to use your TV to display still
images, reduce brighmess and contrast settings. Never leave a
PIP, Multi-Window, computer, or vide() game display
unattended.
• Sit approximately 10-25 t_et ax<ly from the TV. Sitting too
t_lrto tile left or right of the screen will cause tile picture to
appeal: dull as will direct sunligfit and i:oom lights. Turn the
TV <)If"to check fi_r reflection s on the screen. Then remove
the source of any leflections while viewing.
Cleaning your IV
• Clean theTV with a soft dry, cloth. Never use smmg
solvents, such as thim/er or benzine, which might damage the
finish of the cabinet. If the cabinet is very dirg, use a damp
cloth to wipe tile cabinet clean and then finish with a dry
cloth.
2
Introduction ................................................................ 4
Welcome to Toshlba ......................................................... 4
E ploring your new TV ................................................... 4
Connecting your IV .................................................. 5
(- olmecting a VCR .......................................................... 5
Connecting a cable converter box .................................... 6
(onnecting a cable converter box and a V(R .................. 6
(onnecting a DVD/satellite receiver and a VCR .............. 7
Connecting a I)VI) with ColorStream c_and a VCR ......... 7
( onnecting t_vo V(_Rs ..................................................... 8
( onlmcting a camcorder .................................................. 9
Connecting an audio system ............................................ 9
Connecting an A/V Ivceiver ........................................... 10
Using the remote control ...................................... 11
Prepaling tile remote contlol t_l: use .............................. 11
Installing the remote control batteries ............................ 11
R_mote (ontrol fimctional key chart ............................. 12
Programming the lemote control f[_r use with your
audio/video devices ........................................................ 14
Device code setup ................................................... 14
Searching and sampling the code of a device (991) ..... 14
V_ri_dng the device code (990) ............................... 15
Using the Volmne Lock fbatmv (993) ..................... 15
Operational f_atttre Reset (980) .............................. ] 5
Device code table .................................................... 16
Learning about the remote control ................................. 20
Setting up your TV .................................................. 21
Learning about the naentl s!stem ................................... 21
Changing the on-screen display language ....................... 22
Selecting tile antenna input ............................................ 22
Using theTV/VIDEO button oil theTV .............. 22
Adding channels to theTV's memory ............................ 23
Ploglamming channels atttomatically ...................... 23
Adding and erasing channels manually .................... 24
Changing channels ........................................................ 24
Adj usting tile color convergence ..................................... 24
Using the TV's features .......................................... 26
Adjusting tile channel settings ........................................ 26
Switching between two channels ............................. 26
Programming your t_vorite channels ....................... 26
Labeling channels ................................................... 27
Watching picture-in-picture (][qP) .................................. 29
Switching the main and small pictmvs .................... 30
Changing the position of tile snlall picture .............. 30
Flvezing the small picture ....................................... 30
Using Multi-Window tbature ......................................... 30
Using the preview fimction ..................................... 31
Using tile f_rorite fimction ..................................... 31
Using the strobe fimction ........................................ 31
Using the I£)CKS menu ............................................... 32
Entering the PIN code ............................................ 32
Using the V-CHIP menu ............................................... 33
ENABLE BLOCKING .......................................... 33
TV RKFING
(Independent rating system fbr broadcasters) .......... 33
MPAA RATIN(', (Independent rating system for
movies) ................................................................... 34
BLOCKING OPT/ON .......................................... 34
Unlocking plograms temporarily ............................ 35
Locking channels ........................................................... 35
Locking video inputs ..................................................... 36
Changing the PIN code ................................................. 36
Adjusting the picture ..................................................... 37
Selecting tile pictmv mode ...................................... 37
Adjusting the picture quality ................................... 37
Saving new preference ............................................. 38
Using the flesh tone fbattne ..................................... 38
Using the noise reduction t_atttre ............................ 38
Selecting the color temperature ............................... 39
Resetting your picture adjustments ......................... 39
Watching video input .................................................... 40
Selecting tile video label ................................................. 40
Using the closed caption f_'ature ..................................... 41
Setting the sleep timer .................................................... 42
Setting the clock ............................................................ 42
Adjusting tile sound ....................................................... 43
Muting the sotmd ................................................... 43
Selecting stereo/SAP broadcasts .............................. 43
Using tile surround sound t_ature ........................... 44
Adjusting the sound quality .................................... 45
Resetting your audio adiustments ........................... 45
Using the Sub-Bass System (SBS) ............................ 46
Turning off'the built-il_ speakers ............................. 46
Selectillg the Audio OUT sound ............................. 47
Using the StableSound _" t_'ature .............................. 47
Selectillg the background of tile menu display ............... 48
Displaying on-screen il/t[_rmatioll .................................. 48
Viewing the demonstration mode .................................. 48
Understanding tile auto power off'f_ature ...................... 49
Understanding tile last mode memory feature ................ 49
Appendix ................................................................... 50
Sp_'cificatkms ................................................................. 50
_l]:oubleshootin g............................................................. 51
Limited United States _larranD ..................................... 52
Index .......................................................................... 53
3
Introduction
Welcome to Toshiba
Congratulations! You have purchased one of the finest projection TVs
on the market. The goal of this manual is to guide you through
setting tip and operating your Toshiba TV as quickly as possible.
This manual applies to models 43AX60, 43AX60A, 50AX60, and
50AX60A. Before you start reading, check vour model number by
looking at the rear of the TV.
Instructions in this manual are based on using the remote controh
You can also use the controls on the TV if they have the same name as
those on the remote control.
Please read all the safeD_and operating instructions carefully, and keep
the manual for flmkre reference.
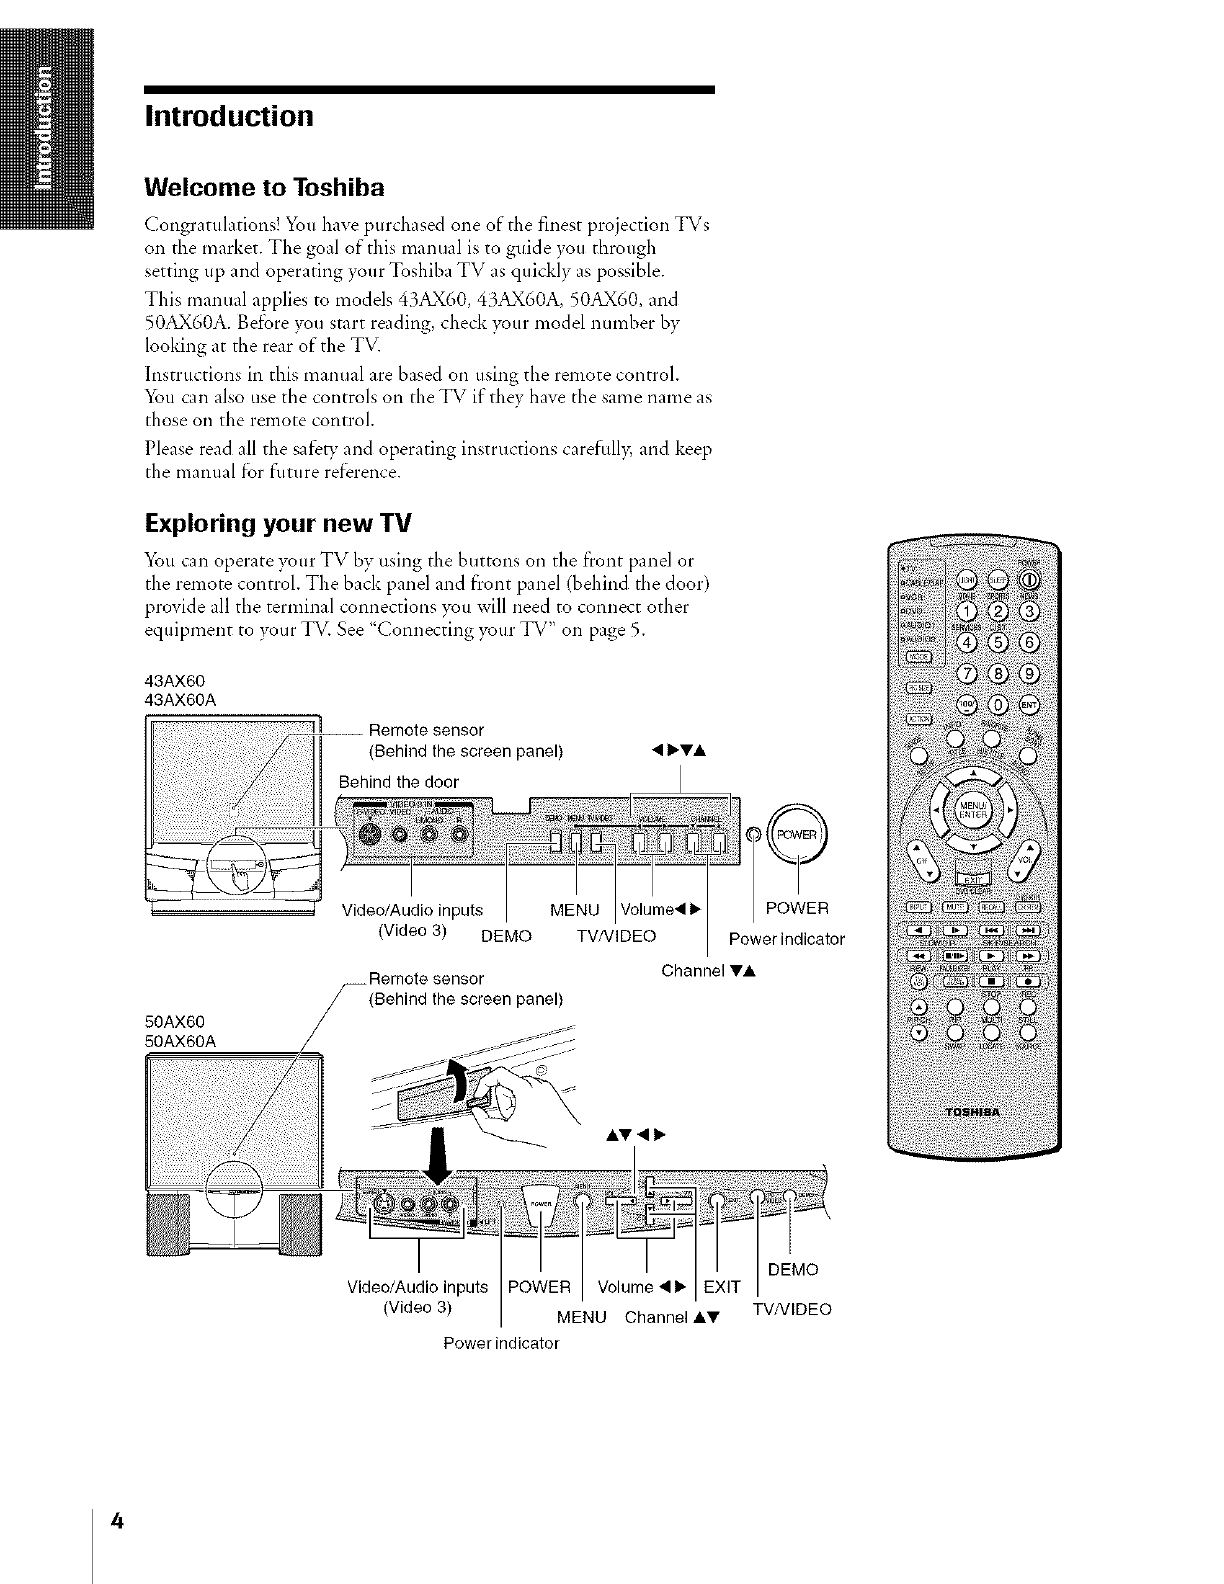
Exploring your new TV
You can operate your TV by using the buttons on the front panel or
the remote control. The back panel and front panel (behind the door)
provide all the terminal connections you will need to connect other
equipment to >_ur TV. See "Connecting your TV" on page 5.
43AX60
43AX60A
Remote sensor
(Behind the screen panel) • IbTA
Video/Audio inputs
50AX60
50AX60A
MENU Volume_ I_
(Video 3) DEMO TV/VlDEO Power indicator
__ Remote sensor
(Behind the screen panel)
Channel V&
Video/Audio inputs Volume • I_
(Video 3) MENU Channel AV
Power indicator
DEMO
TV/VIDEO
4
Connecting your TV
If you haven't connected electronic equipnlent before, or you have
been frustrated in the past, you may wish to read this section. (Cables
are not supplied.)
• A coaxial cable is the standard cable that comes in flom }_ur
antenna or cable converter box. Coaxial cables use "F"
connectors,
•Audio and video cables are usually color coded according to use:
yellow for video and red and white for audio. The red audio cable
is for the stereo fight channel, and the white audio cable is for
the stereo (or mono) left channeh Ifvou look at the rear panel of
the TV, you will see that the terminals are color coded in the
same manner as the cables.
•S-video cables provide better picture performance. S video cables
can only be used with S-video compatible components.
• ColorStream ®cables come in sets of three and provide the best
picture performance.
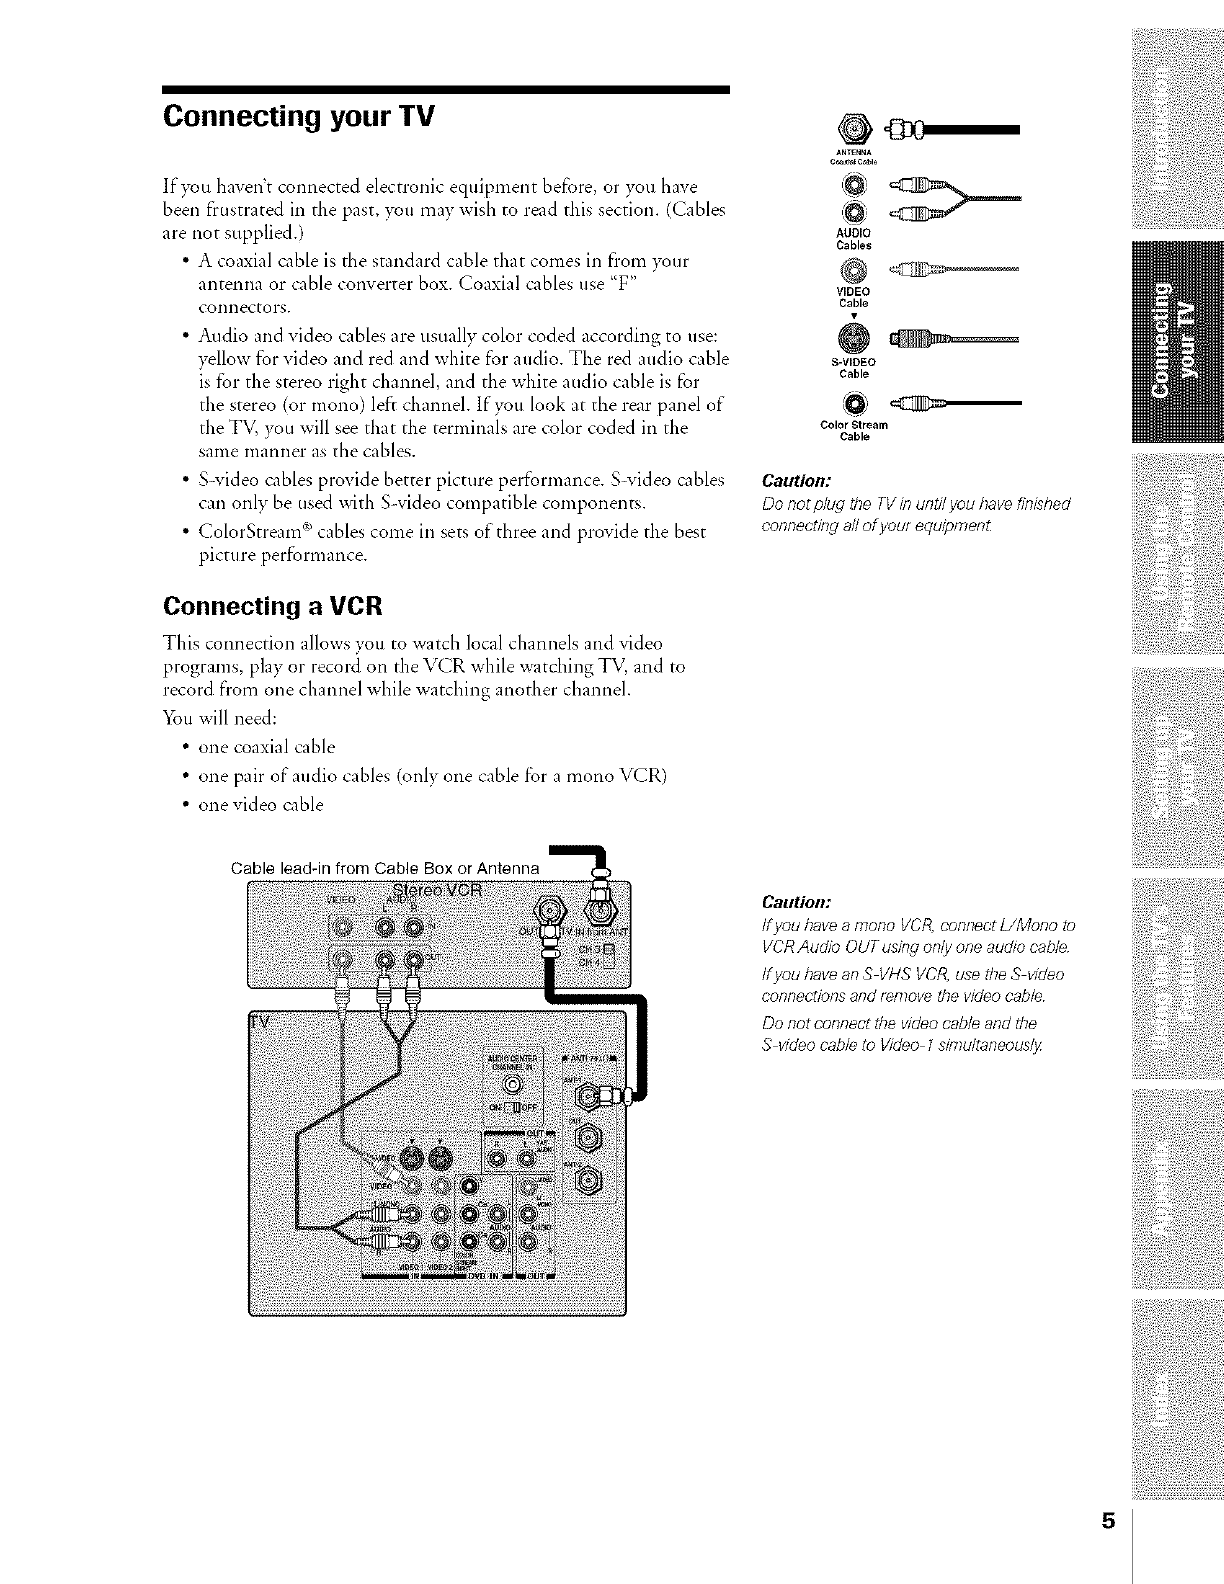
Connecting a VCR
This connection allows you to watch local channels and video
programs, play or record on the VCR while watching TV, and to
record from one channel while watching another channeh
You will need:
• one coaxial cable
• one pair of audio cables (only one cable for a mono VCR)
• onevideo cable
ANI_NNA
AUDIO
Cables
VIDEO
Cable
÷
S-VIDEO
Cable
Color Stream
Cable
Caution:
Do not plug the TVin until you bavefJ?_ished
connectieg allof you/equ_omen£
Cable lead-in from Cable Box or Antenna
CallUon:
ff you bave a mono VCR,connect L/Mono to
VCRAudio OUTusing only one audio cable
ff you bave anS VHS VCR,use tbe S video
connections and remove the video cable
Do not connect the videocable and tbe
S videocable to Video 1simultaneously
5
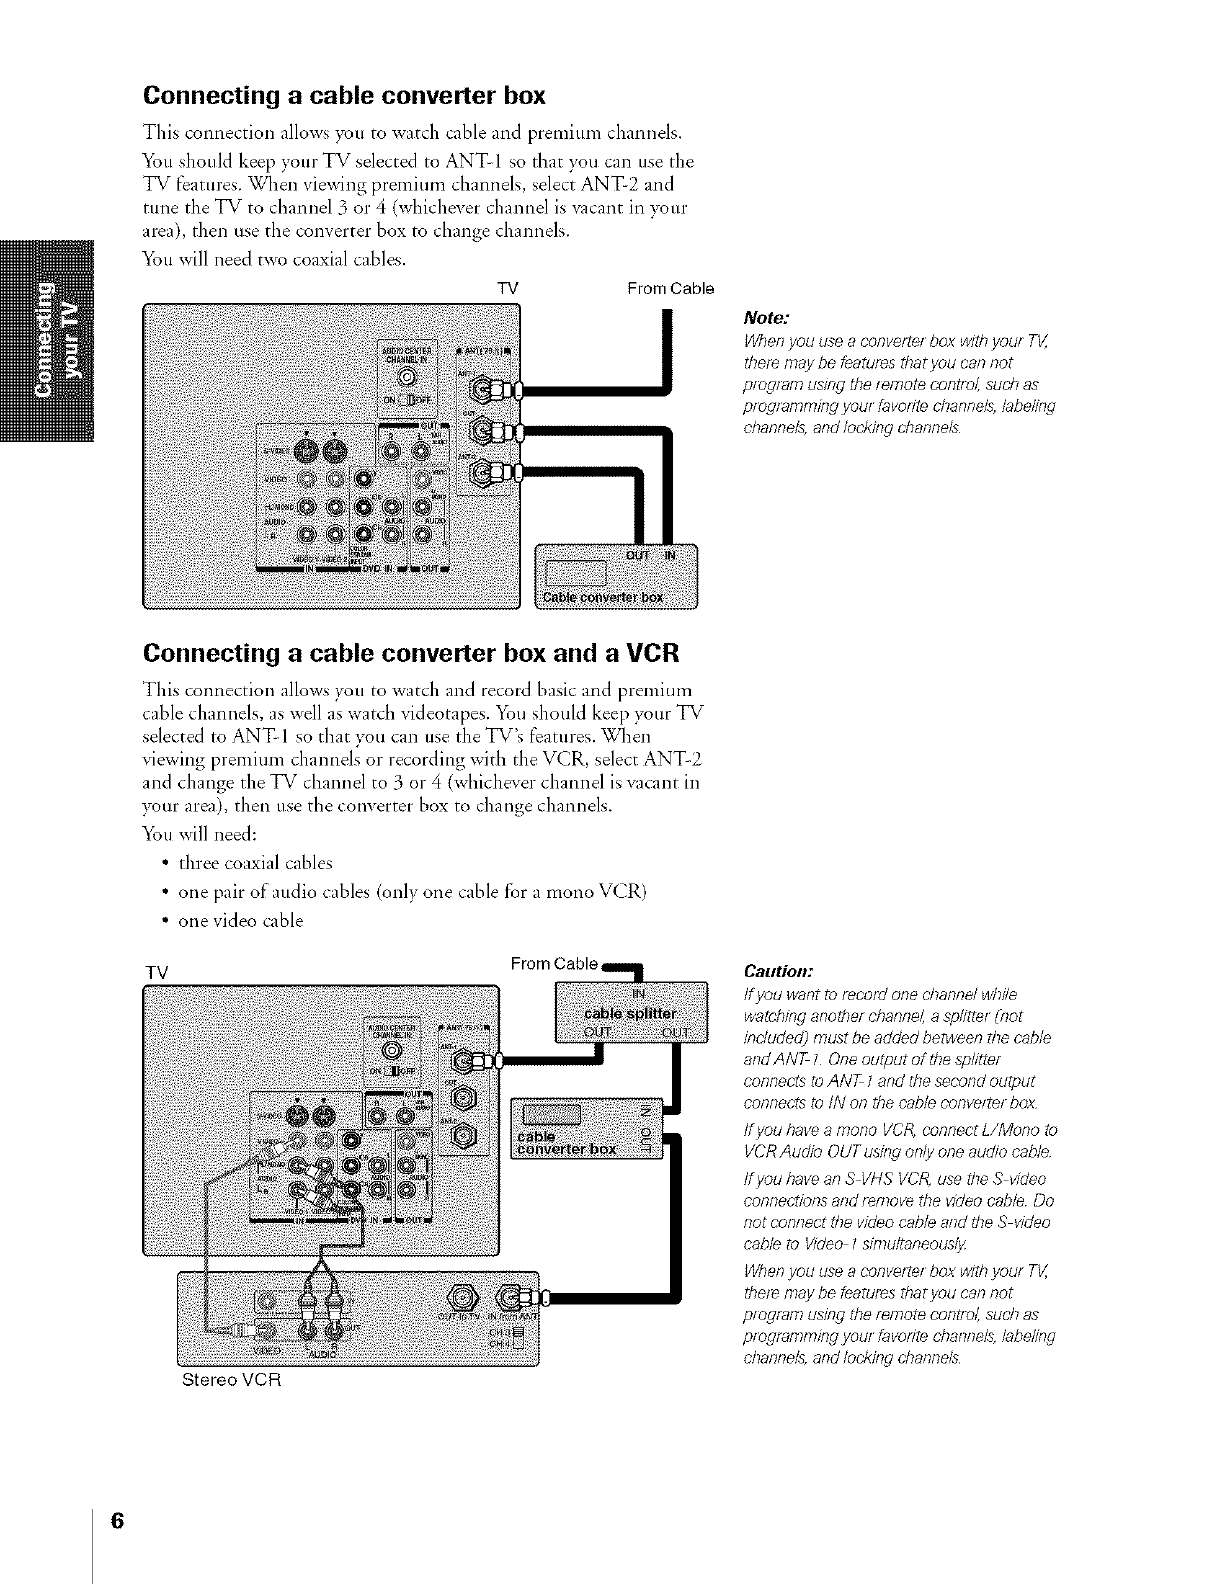
Connecting a cable converter box
This connection allows you to watch cable and premium channels.
You should keep your TV selected to ANTI so that you can tlse the
TV features. When viewing premium channels, select ANT-2 and
tune the TV to channel 3 or 4 (wbiches'er channel is ,_acant in your
area), then use the converter box to change channels.
You will need two coaxial cables.
TV From Cable
INote:
lichenyou use a conve/te/ box with your 71/,,
tber_ maybe featu/_s thatyou can not
ping/am using the remote con/m/, sucb as
pro/lamming you/favorite channels,labeling
channels,and locking cbannels
Connecting a cable converter box and a VCR
This connection allows you to watch and record basic and premium
cable channels, as well as watch videotapes, x*_tlshould keep your TV
selected to ANT-I so that you can use the TV's f'eatures. When
viewing premium channels or recording with the VCR, select ANT2
and change the TV channel to 3 or 4 (wbiches'er channel is vacant in
your area), then use tbe converter box to change channels.
5%u will need:
•three coaxial cables
• one pair of"attdio cables (only one cable for a mono VCR)
• one video cable
TV From Cable
Stereo VCR
CaeUon:
ff you wantto record one d?annd wb#e
watehing anotbel d}anne/, a sp/itte/ (not
included] must be added between/be cable
andANT tOneoutput of the splitter
connects toANT 1and dTesecond output
connects to iN on the cable conve/ter box
If you bave amono VCR,connect L/Mono to
VCRAudio OUT using only one audio cable
ff you bave an S VHS VCR,use tbe S video
connections and remove the video cable Do
not connect the videocable and the S video
cable to Video 7simultaneously
Whenyou use a converte/ box witb you/ TV,
tbe/e may be features thatyou can not
pie/ram using the/emote control, sud_ as
programming youl favodte abanne& labeling
d}anne/s, and locking d}annels
6
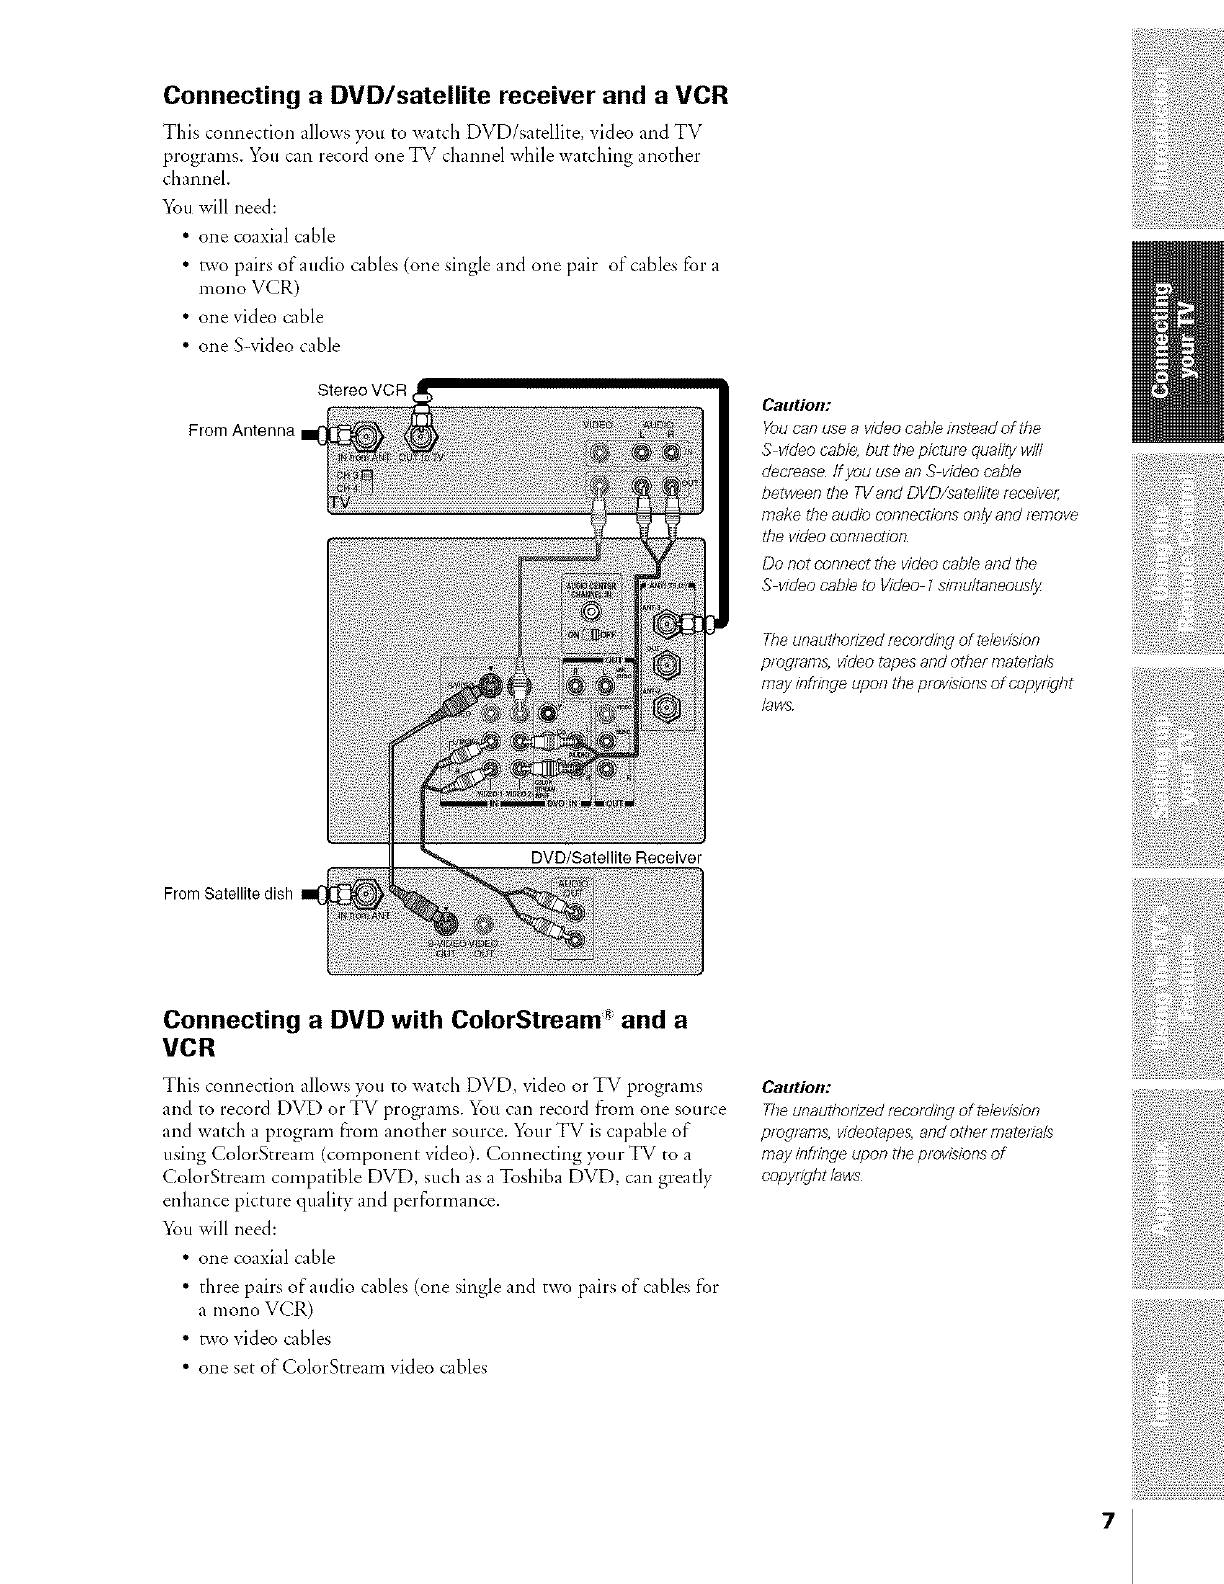
Connecting a DVD/satellite receiver and a VCR
This connection allows you to watch DVD/satellite, video and TV
programs. You can record one TV channel while watching another
channel.
You will need:
• one coaxial cable
• two pairs of audio cables (one single and one pair of cables for a
mono VCR)
• one video cable
• one S-video cable
Stereo VCR
From Antenna
From Satellite dish
DVD/Satellite Receiver
Connecting a DVD with ColorStream _and a
VCR
This connection allows you to watch DVD, video or TV programs
and to record DVD or "FV programs. You can record from one source
and watch a program from another source. Your TV is capable of
using ColorStream (component video). Connecting your TV to a
ColorStream compatible DVD, such as a Toshiba DVD, can greatly
enhance picture quality and performance.
You will need:
• one coaxial cable
• three pairs of audio cables (one single and two pairs of cables for
a mono VCR)
• _vo video cables
• one set of ColorStream video cables
CalltiOll:
Youcanusea videocableinsteadof the
S videocab/e,but thepicturequalitywin
decreaseIfyouuseanS videocable
betweenthe TVandDVD/sate//iter_ceive_
maketheaudioconnectionsonlyand_move
the videoconnection
Do notconnectthevideocableandthe
S videocableto Video1simu/taneous/y
Theunauthorized/_cording of television
program& videotapes and other matefla/s
may infringe upon the provisionsof cot_yright
bws
Caution:
Theunauthorizedr_cording of television
pmglams, videotape&and other materials
may infiTngeupon the provisionsof
copyright bws
7
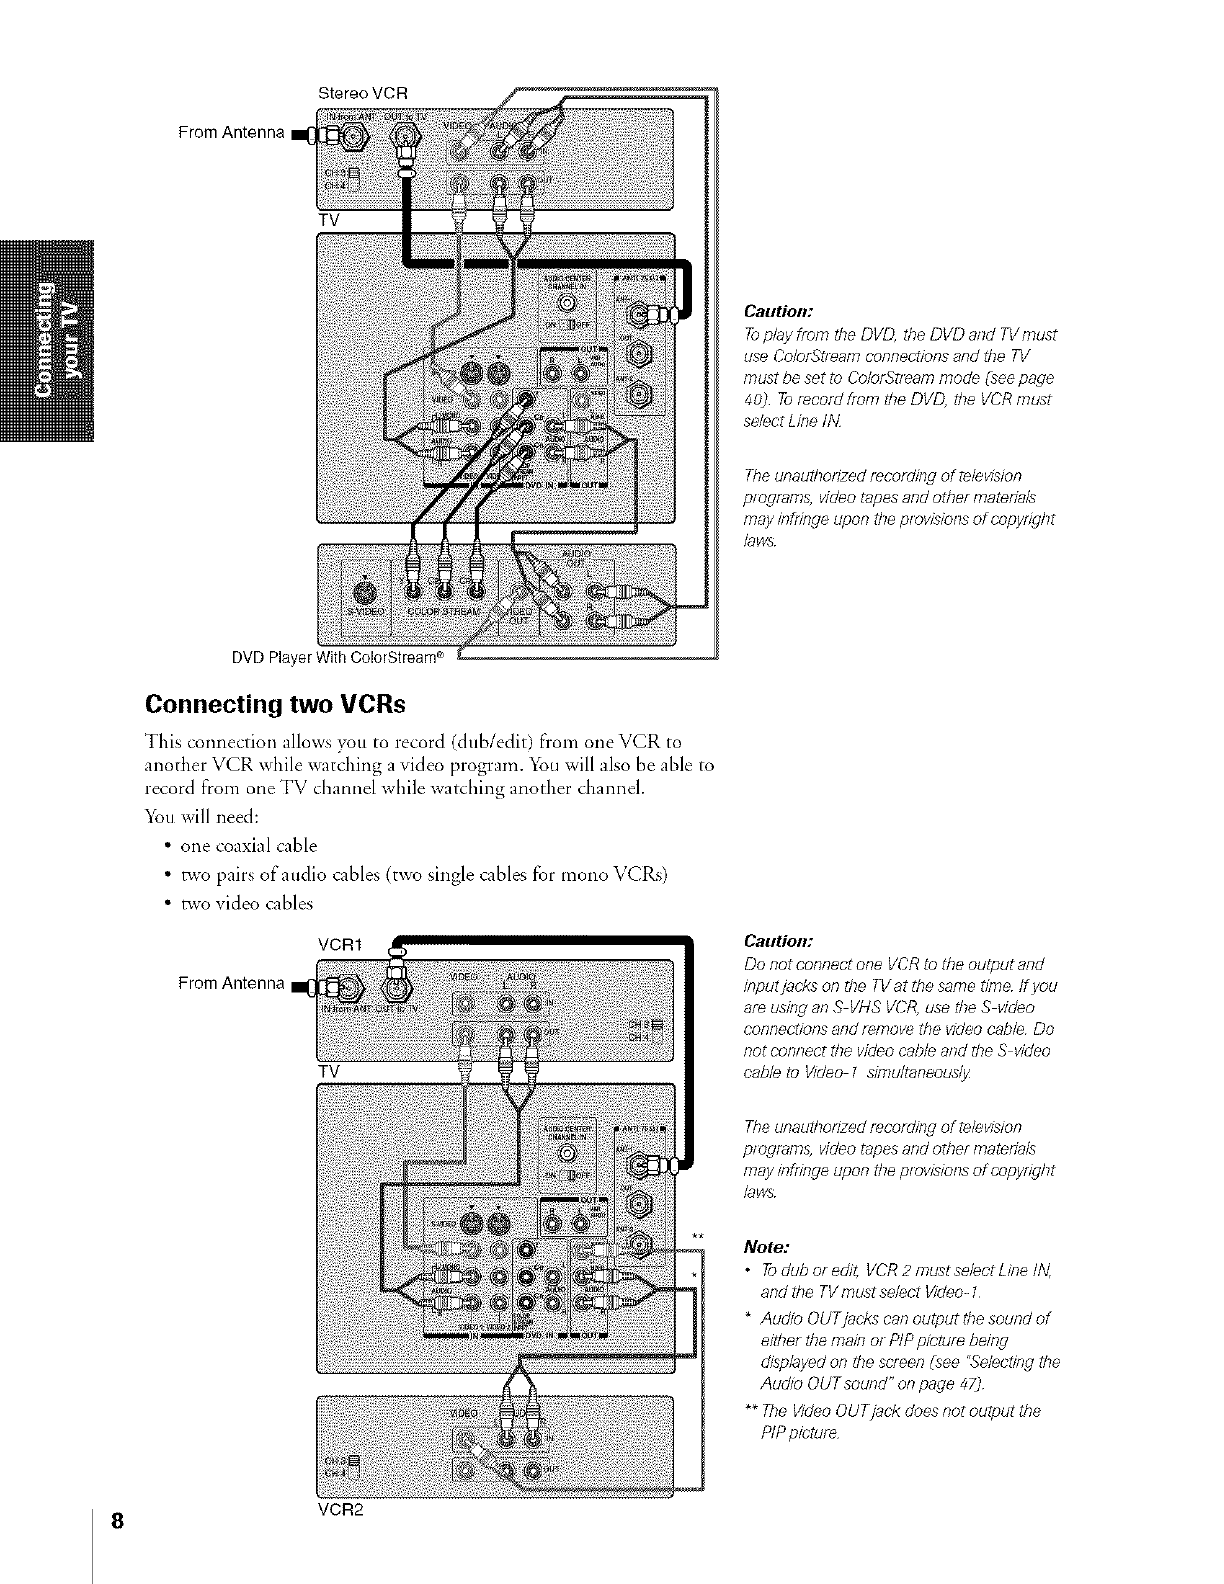
Stereo VCR
From Antenna
TV
Caution:
Toplay from the DVD, the DVD and TVmust
use ColorStreamconnectionsand the TV
must be set to ColorSti_am mode (seepage
40) Tor_cord fmm the DVD, the VCRmust
selectLine IN
Theunauthorizedrecording of television
programs, videotapes and othel materTa/s
may infringe upon the provisionsof copyright
bws
DVDPlayerWith ColorStream÷
Connecting two VCRs
This connection allows you to record (dub/edit) from one VCR to
another VCR while watching a video program. You will also be able to
record from one TV channel while watching another channel.
_%u will need:
• one coaxial cable
• two pairs of audio cables (two single cables for mono VCRs)
• two video cables
VCR1
From Antenna
TV
CautiOll:
Do not connect one VCRto the output and
inputjacks on the TVat the same time ff you
are usieg an S VHS VCR,use theS video
connections and remove the video cable Do
not connect the videocable and the S video
cable to Video Isimultaneously
Theunauthorizedrecording of television
programs, videotapes and othel materTa/s
may infringe upon the provisionsof copyright
bws
Note:
•Todub or edit, VCR2 must selectLine IN,
and the TVmust select Video-1
*Audio OUTjacks can output the sound of
either the main or PIPpieture being
displayedon the screen _see°Selectingthe
Audio OUTsound" on page 47)
** The VideoOUTjack doesnot output the
PIPpicture
VCR2
8
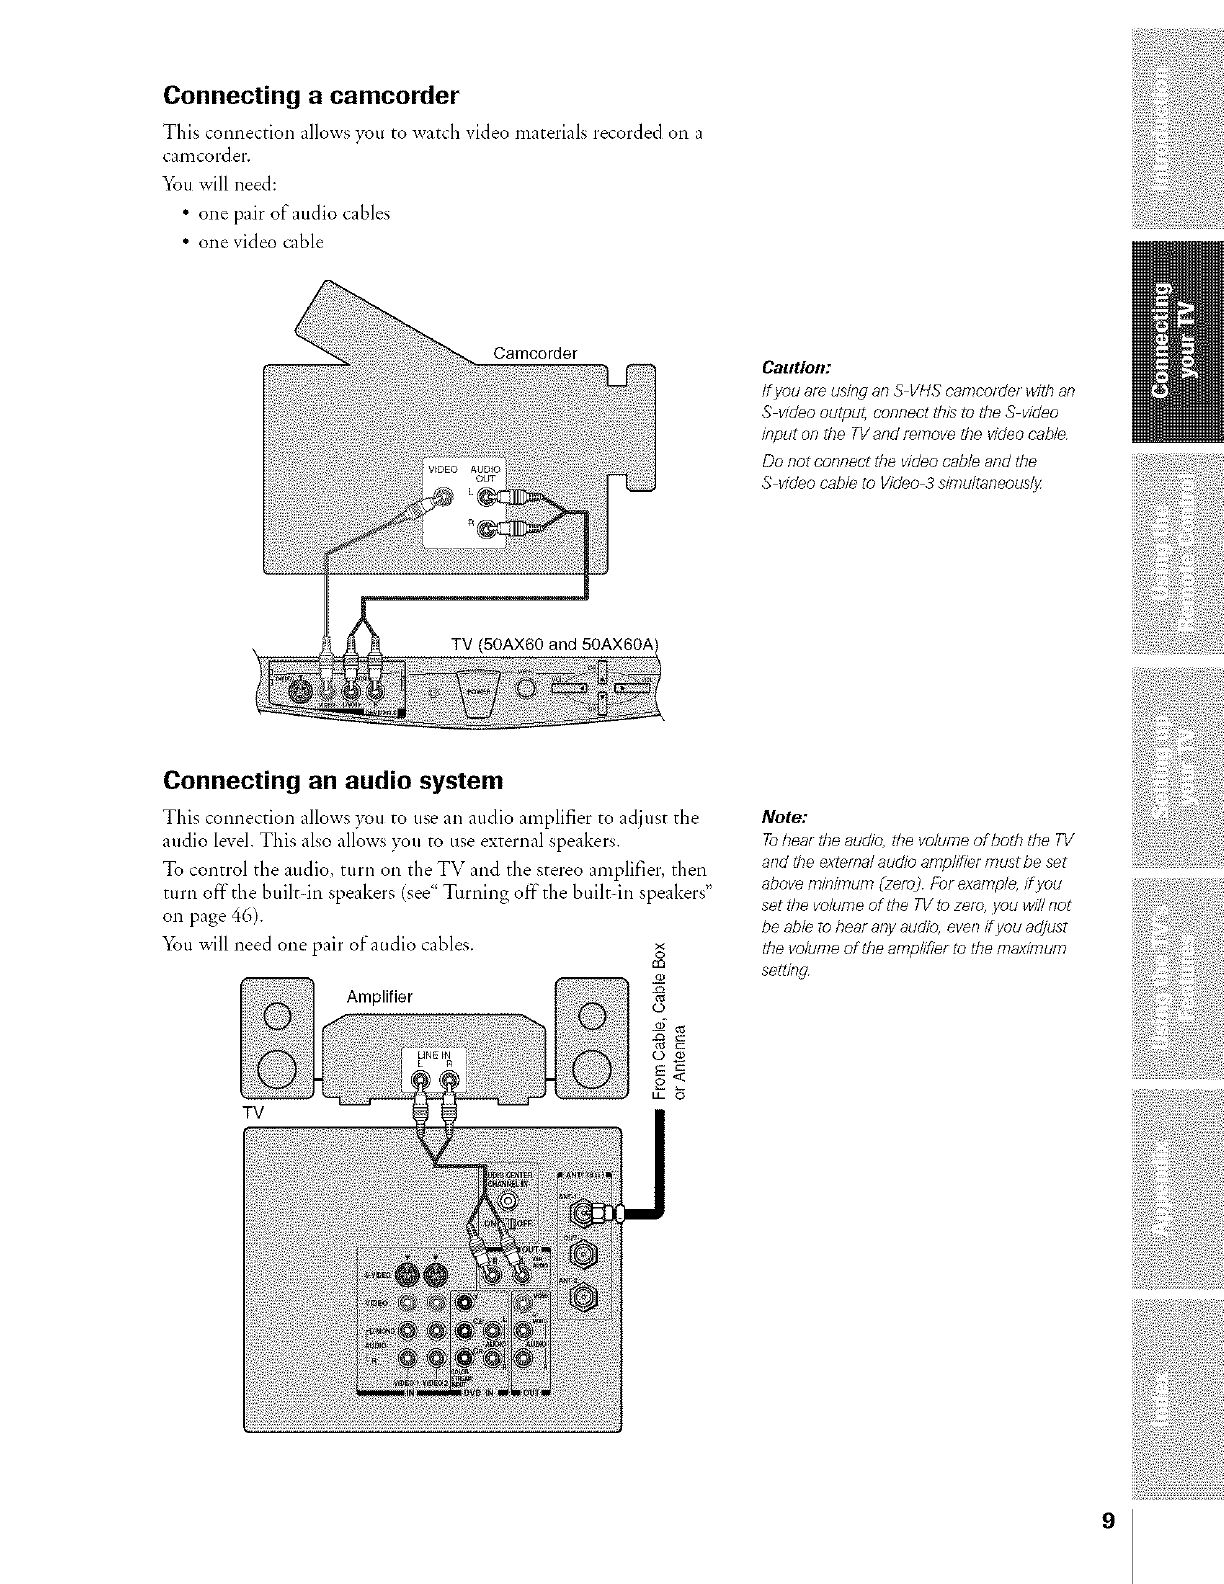
Connecting a camcorder
This connection allows you to watch video materials recorded on a
carncord eF,
You will need:
• one pair of audio cables
• one video cable
CaeUoe:
ff you are usingan S VI-/Scamcorder witb an
S videooutpu{ connect this to the Svideo
input on tbe TVand remove the videocable
Do not connect the videocable and the
S videocable to Video 3 simultaneously
Connecting an audio system
This connection allows you to use an audio amplifier to adiust the
audio level. This also allows )_tl to use external speakers.
To control the audio, turn on the TV and the stereo amplifier, then
turn off-the built in speakers (see <`Turning off" the built=in speakers"
on page 46).
You will need one pair of audio cables, g
co
Amplifier
TV
Note:
Tobear tbe audio, tbe volume of both tbe TV
and tbe externalaudio amplifier must be set
aboveminimum Czero)Fer example,ifyou
set the volume of the TV to zero, you winnot
be able to bear anyaudio, evenif you adjust
&e volumeof tbe amplifier to the maximum
setting
9
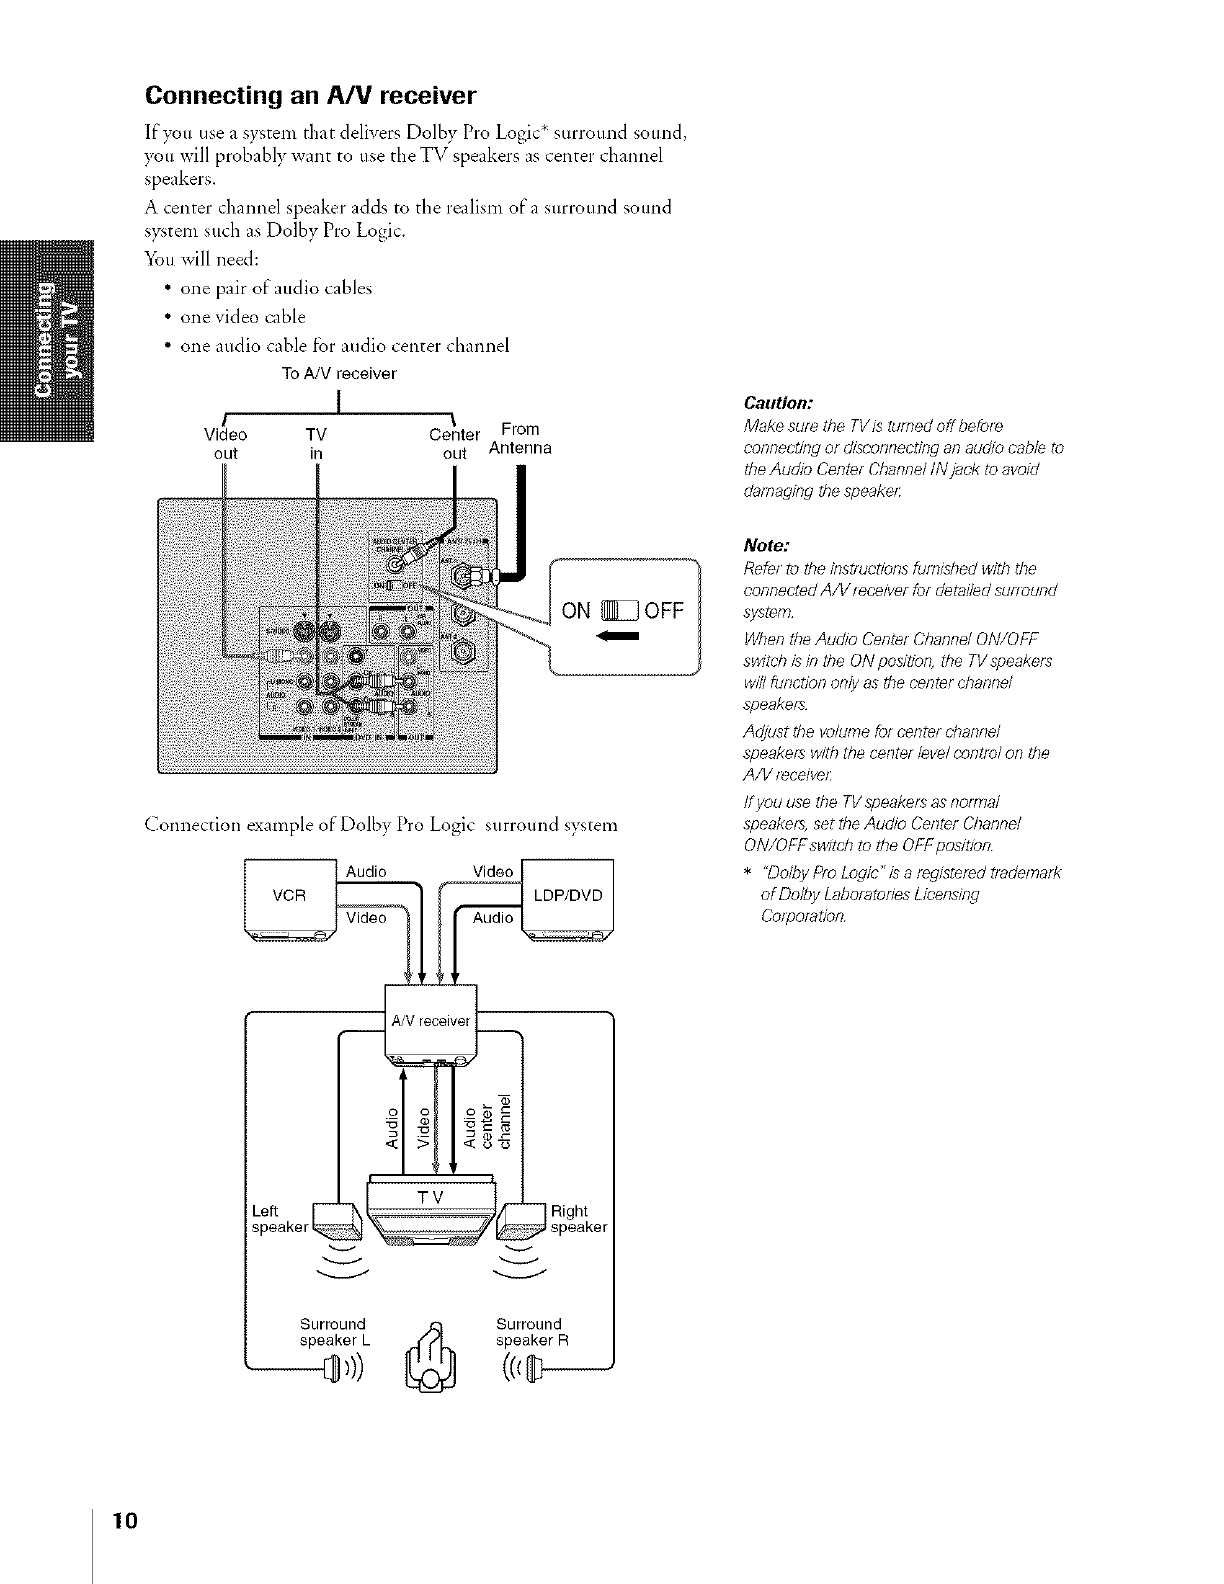
Connecting an A/V receiver
If you use a system that delivers Dolby Pro Logic* surround sound,
you will probably want to use tbe TV speakers as center channel
speakers.
A center channel speaker adds to tbe realism of a surround sound
system sttch as Dolby Pro Logic.
You will need:
• one pair of audio cables
• one video cable
• one audio cable for audio center channel
To A/V receiver
1
I\
Video TV Center From
out in out Antenna
Connection example of Dolby Pro Logic surround system
Audio Video
A/Vreceiver
TV |
•NlgnI
Caution:
Make sure d_eTVis turned offbetor_
connecting oJdisconnecting an audio cable to
the Audio Center ChannelIN jack to avoid
damaging the speaker:
Note:
Refer to the instructions furnished with the
connectedA/V r_ceiver for detailedsurround
system
WhentheAudio Center Channel ON/OFF
switch b b the ON position, the TVspeaker_
winfunction only as the center channd
speakers
Adjust the volume for center channel
speakers with the center bve/ control on the
A/V r_cdvel:
ff you use the TVspeakels asnorrnd
speakers,set theAudio Center Channel
ON/OFF switch to the OFFposition
*"Dolby Pro Logic"is a I_gistel_d tl_,derT_al?
of De/byLabomtolies Licensing
Colporation
Surround _ Surround
speaker L speaker R
10

Using the remote control
Preparing the remote control for use
Yotu" Toshiba remote control has one dedicated TV mode and 5
universal modes: VCR, Cable/SAT, DVD, Audio 1, and Audio2. The
target devices and dei_ault devices being programmed for each mode
are as follows:
TV
CABLE/SAT
VCR
DVD
AUDIOI
AUDIO2
Target device/Mode mapping
Toshiba TV
Universal Cable, Satellite
Universal VCR, DVD, LD, Cassette
Universal DVD, VCR, LD, Cassette
Universal Audio: Amp., Tuner, Mist.Audio, CD/MD
Universal Audio: CD/MD, Amp., Tuner, Mist.Audio
Note:
Thisi_mote contm/_ functionsmay of may
not operate your audio/video devices
Refe[ to tbe owne['s manualssupplied witb
the devicesto see wbicb featuresare
available In addition, the odg[na/contro//e[s
may bave featuresnot avaffab/eon this iemote
cont[oZ If you would like to continue _ouse
these features,you may wantto use the
odgina/remote controZ
TV
CABLE/SAT
VCR
DVD
AUDIOI
AUDIO2
DelCaultdevice codes
Toshiba TV
Toshiba Satellite receiver
Toshiba VCR
Toshiba DVD
Pioneer Audio receiver
Pioneer LD
The Mode selection button, when pressed, cycles among each mode.
If>_u own different brands ofaudio/video de,'ices, you first have to
program your remote control. (See "Programming the remote control
for use with audioNideo devices" on page 14.)
Installing the remote control batteries
To install the hatteries:
1. Slide the battery cover off the back of the remote control.
F\
'-I
2. Install two 'IAA" size alkaline batteries. Match the + and - signs
on the batteries to the signs on the battery compartment.
3. Slide the battery cover back on to the remote control until the
lock snaps.
Caution:
•Disposeofyou[bagedesinadesignated
disposala[ea Do not tb[_w your barrettes
intoa f#e
•Donotmtxbattelytypesolcombineused
batteries with new ones
• Remove dead batteries immediately to
prevent hat,ely acid from leaking into tbe
battely compaltmen_
• Batte[ylife expectancyis about one yeal
with normal use ff you do [}atintend to use
the [_mote control for a long time,,remove
the battedes
11
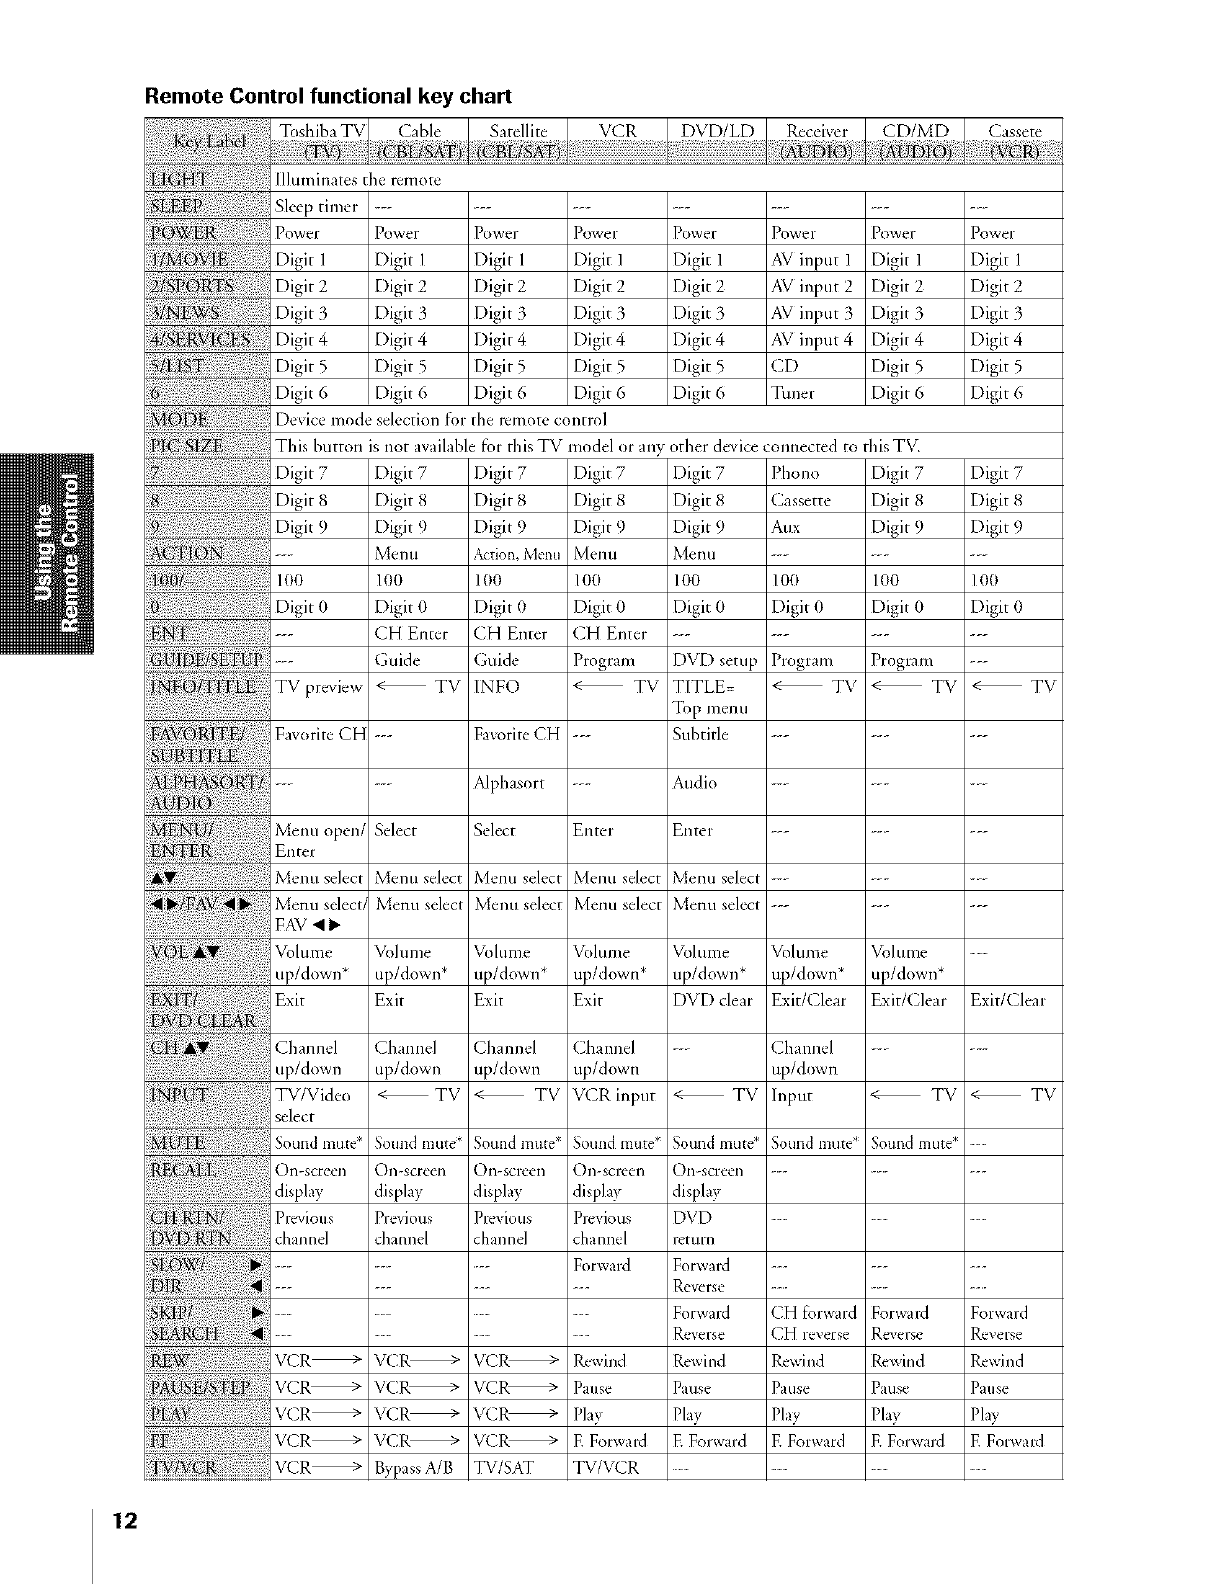
Remote Control functional key chart
llhmllnates the remote
Sleep timer -....................
Power Power Power Power Power Power Power Power
Digit 1 Digit I Digit I Digit 1 Digit 1 AViuput 1 Digit 1 Digit 1
Digit 2 Digit 2 Digit 2 Digit 2 Digit 2 AVinput 2 Digit 2 Digit 2
Digit _ Digit 3 Digit 3 Digit 3 Digit 3 AViuput 3 Digit 3 Digit 3
Digit 4 Digit 4 Digit 4 Digit 4 Digit 4 AVinput 4 Digit 4 Digit 4
Digit 5 Digit 5 Digit 5 Digit 5 Digit 5 CD Digit 5 Digit 5
Digit 6 Digit 6 Digit 6 Digit 6 Digit 6 Tuner Digit 6 Digit 6
Device mode selectiou fknthe remote coutrol
This button is not availablefor thls TV model or an other device connected to thls TV.
Digit 7 Digit 7 Digit 7 Digit 7 Digit 7 Phono Digit 7 Digit 7
Digit 8 Digit 8 Digit 8 Digit 8 Digit 8 Cassette Digit 8 Digit 8
Digit 9 Digit 9 Digit 9 Digit 9 Digit 9 Aux Digit 9 Digit 9
:--- w.nt, M -nt, Menu .........
1O0 1O0 1O0 1O0 1O0 ]O0 1O0 ]O0
Digit 0 Digit 0 Digit 0 Digit 0 Digit 0 Digit 0 Digit 0 Digit 0
--- CH Enter CH Enter CH Ente,.............
:,:DE;Ti,--- Guld, erog ,mD\'DsetupProgramProgm ---
TVpreview < TV INFO < TV TITLE= < TV < TV _ TV
Top nlel-t tl
F_vorlte CE --- F_orlte CH --- Subtitle ...........
RT ...... pl, ,. ort--- at,dlo .........
asDi { :{{
Menu open_ Select Select Enter Enter .......
Enter
Melm select Melm select Menu select Menu select Menu select .........
J_enu select Menu select Menu select Menu select Menu select ...........
FAV•
Volunle Volume Vohlme Vohune Volmne Volume \rolun/e ---
up/down* up/down* up/down* up/down* up/down* up/down* up/down*
Exit Exit Exit Exit DVD clear Exit/Clear Exit/Clear Exit/Clear
Channel Channel Channel Channel --- Ch mnel ......
up/down up/down up/down up/down up/down
TV/Video < TV < TV VCR input < TV Input < TV < TV
select
Sound mute* Soundmute_ S,ound mute* Soundmute* Sound mute* Soundmute_ Sound mute* ---
On-screen On-screen On-screen On-screen On-screen ...........
display display display display display
Previous Previous Prexious Previous DVD .........
channel chmnel channel channel return
.......... Forward Forward .........
......... Reverse ...............
............. Forward CH fbrward Forward Forward
......... Reverse CH reverse Reverse Reverse
VCR_ VCR_ \/CR_ Rewind Revdnd Revdnd Rewind Revdnd
VCR_ VCR_ VCR_ Pause Pause Pause Pause Pause
VCR_ VCR_ VCR_ Pla) Phv Phy Ph) Pla)_
VCR_ VCR_ VCR_ E Forward E Folward E Forward E Forward E Fol_'ard
T-VTVC : : VCR_ BypassA/B TV/SAT TV/VCR ...............
12
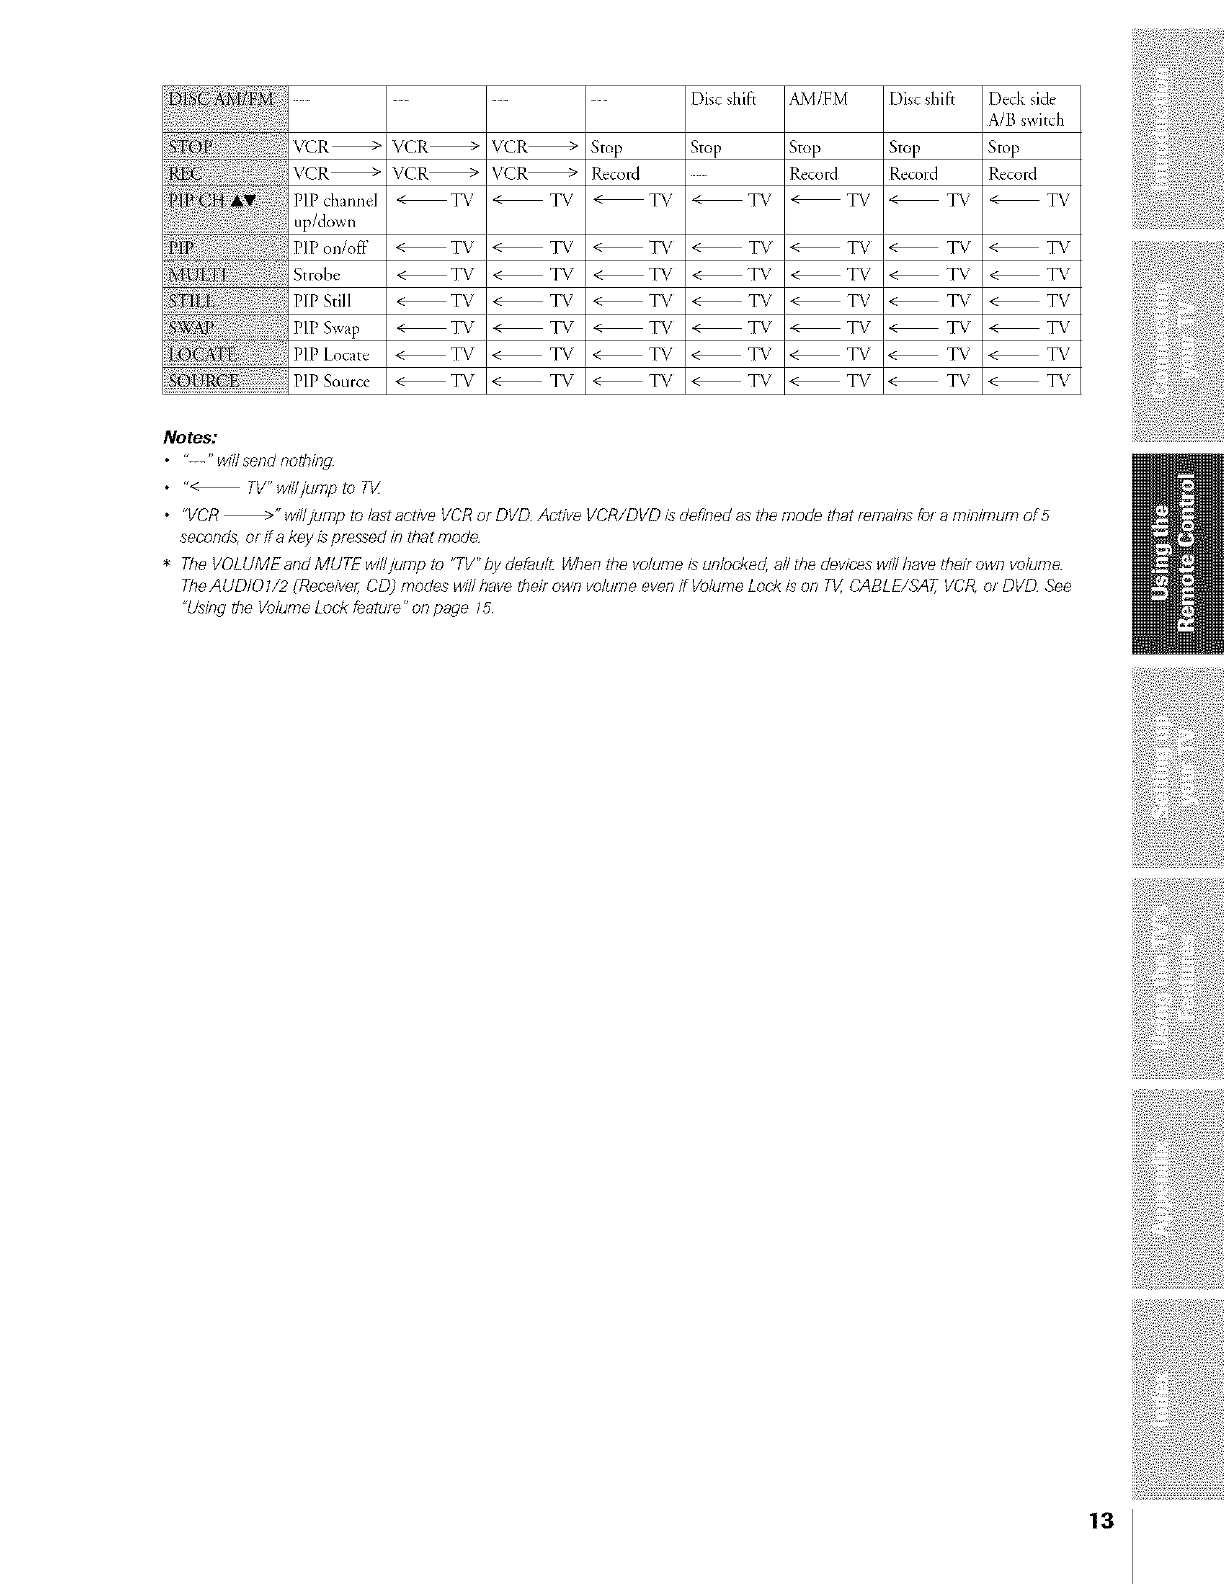
............... Disc shift AM/FM Disc shift Deck side
{{ {{ {: { { A/Bswitch
VCR_ VCR_ VCR_ Stop Stop Stop Stop Stop
VCR _ VCR_ VCR_ Record ...... Record Record Record
P]P channel < TV < TV < TV < TV < TV < TV < TV
up/down
PlPon/off < TV < TV < TV < TV < TV < TV < TV
Strobe < TV < TV < TV < TV < TV < TV < TV
PlPStill < TV < TV < TV _TV < TV < TV < TV
P]PSwap < TV < TV < TV < TV < TV < TV < TV
PiP Locate < TV < TV < TV < TV < TV _ TV _ T\ /
g RC {: P]PSourct- < TV < TV < TV < T\ < TV < T\ < TV
Notes:
•"---" will send nothing
•"< TV"willjump to Tg
• "VCR_" wil/jump to last active VCRol DVD Active VCR/DVD is defined as the mode that lemains fol a minimum of 5
seconds,or ira key is pressed in that mode
*The VOLUMEand MUTE willjump to "TV"by detau/£ When the volume is unlocked,all the deviceswinhave theil own volume
TheAUDIO 1/2 (Receiver;CD) modes will/}ave their own volume even if VolumeLocl_is on TV,CABLE/SAT,VCR,oJDVD See
"Usingthe VolumeLoek featule"on page 15
13
Programming the remote control for use with
your audio/video devices
Device code setup
1. Refer to the Device code table on pages 16-19 to find the number
that corresponds to the brand name of your device.
If more than one number is listed, try each one separately until
you find tbe one that works.
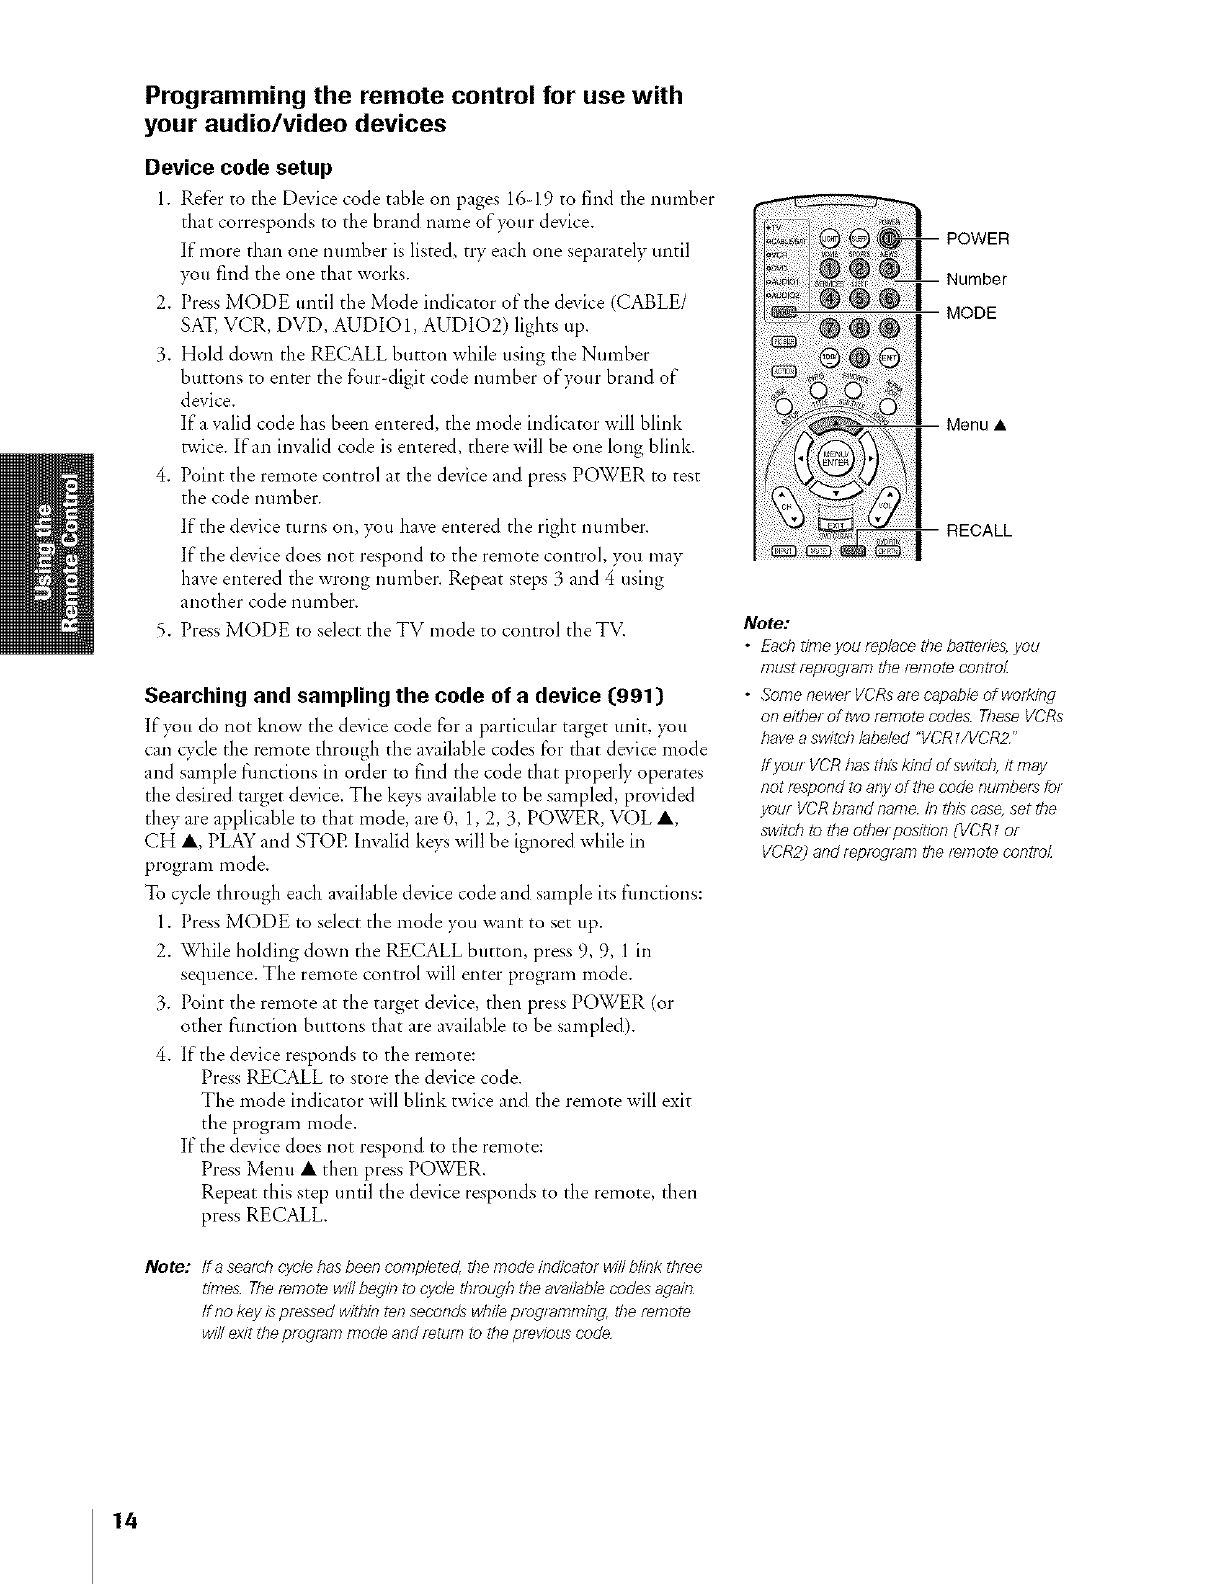
2. Press MODE until tbe Mode indicator of the device (CABLE/
SAT, VCR, DVD, AUDIO 1, AUDIO2) lights up.
3. Hold down the RECALL button wbile using the Number
buttons to enter tile four digit code number of your brand of
device.
If a valid code has been entered, the *node indicator will blink
twice. If an invalid code is entered, there will be one long blink.
4. Point tile remote control at the device and press POWER to test
the code number.
If the device turns on, ?_u have entered the right number.
If the device does not respond to the remote control, you may
have entered the wrong number. Repeat steps 3 and 4 using
another code number.
5. Press MODE to select theTV mode to control the TV.
Searching and sampling the code of a device ([991}
If you do not know the de_'ice code for a particular target unit, }_u
can cycle the remote through the available codes _or that de_'ice mode
and sample functions in order to find the code that properly operates
the desired target device. Tbe keys available to be sampled, provided
they are applicable to tbat mode, are 0, 1,2, 3, POWER, VOL A,
CH A, PLAY and STOE Invalid keys will be ignored wbile in
program mode.
To cycle through each available device code and sample its fimctions:
1. Press MODE to select the mode you want to set up.
2. While holding down the RECALL button, press 9, 9, 1 in
sequence. The remote control will enter program mode.
3. Point the remote at *be target device, then press POWER (or
other flmction buttons that are available to be sampled).
4. If*be device responds to the remote:
Press RECALL to store the device code.
The mode indicator will blink twice and the remote will exit
the program mode.
If the device does not respond to the remote:
Press Mere= • then press POWER.
Repeat this step until the device responds to the remote, tben
press RECALL.
Note: ff a seard} cycle hasbeen completed, *bemode indicator wi//b/ink three
times Theremote wi// begin to cycle through the availablecodes again
ff no key ispressed witbin ten seconds wbi/eprogramming, the remote
will exit*he program mode and return to theprevious code
POWER
Number
MODE
Menu •
RECALL
Note:
•Ead_time you rep/ace *bebatteries,you
must t_ptogt_m the I_mote contro_
• Somenewer VCRsaf_ capable of working
on either of two remote codes TheseVCRs
/}avea switcb labeled "VCRZ/VCR2 _
ffyouf VCR basthis kind of switch,it may
not i_spond to any of *becode numbers for
your VCRbrand name le tbis case,set the
switch to the other position (VCR[or
VCR2) and fepfogf_m the/_mote controZ
14
Verifying the device code {990)
Use this feature to yetiS, the codes for your other devices. The
number of blinks after pressing the 1,2, 3, and 4 buttons is the
4 digit code set up for that mode.
Example: To veri_ the VCR code is 0385:
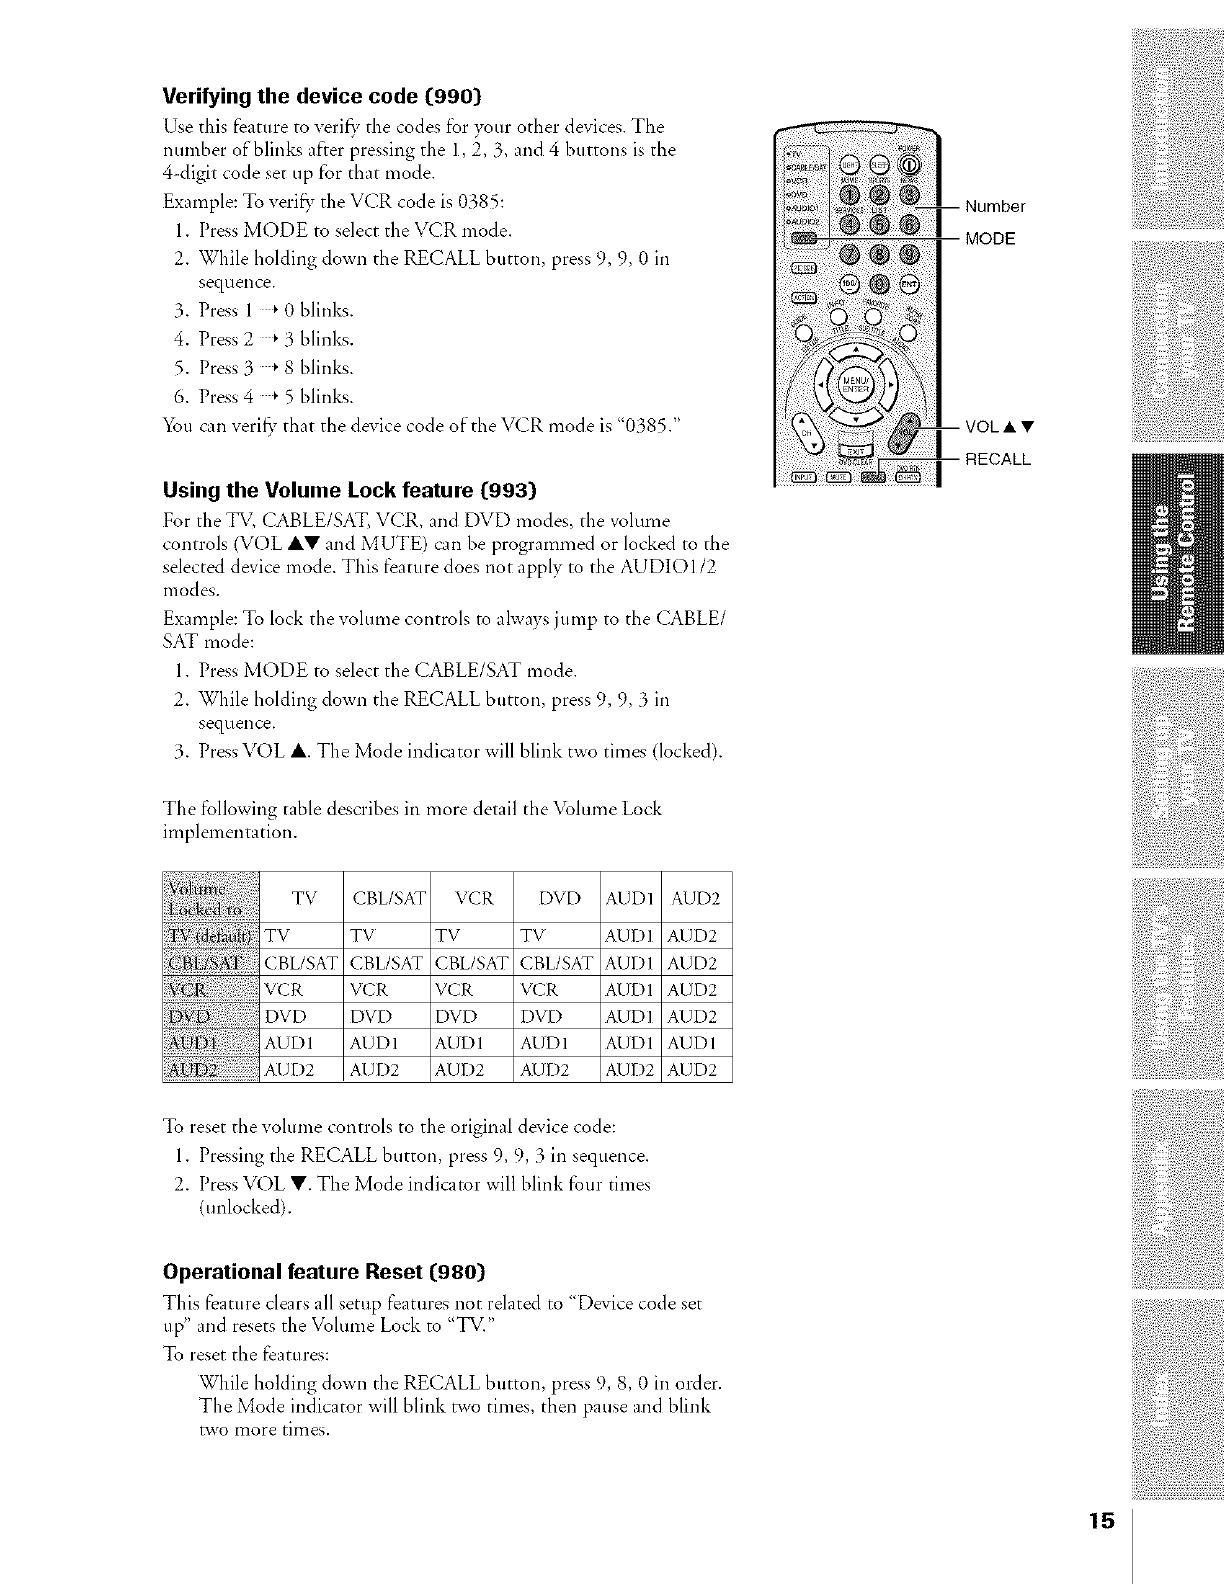
1. Press MODE to select the VCR mode.
2. While holding down the RECALL button, press 9, 9, 0 in
sequence.
3. Press 1 _ 0 blinks.
4. Press 2 _ 3 blinks.
5. Press 3 _ 8 blinks.
6. Press 4 _ 5 blinks.
You can veri_ Tthat the device code of the VCR mode is "0385."
Using the Volume Lock feature {993)
For the TV, CABLE/SAT, VCR, and DVD modes, the volume
controls (VOL AV and MUTE) can be programmed or locked to the
selected device mode. This feature does not apply m the AUDIOI/2
modes.
Example: To lock the volume controls m always jump to the CABLE/
SAT mode:
1. Press MODE to select the CABLE/SAT mode.
2. While holding down the RECALL button, press 9, 9, 3 in
sequence.
3. Press VOL A. The Mode indicator will blink two times (locked).
Number
@@1 "-- NODE
C2£
The following table describes in more detail the _lume Lock
implementation.
TV CBL/SAT VCR L)VD AUD] AUD2
TV TV TV TV AUD1 AUD2
CBL/SAT CBL/SAT CBL/SAT CBL/SAT AUD1 AUD2
VCR VCR VCR VCR AUDI AUD2
DVD DVD DVD DVD AUD] AUD2
AUDI AUD] AUDI AUD] AUDI AUDI
U][7) £ AUD2 AUD2 AUD2 AUD2 AUD2 AUD2
To reset the volume controls to the original device code:
1. Pressing the RECALL button, press 9, 9, 3 in sequence.
2. Press VOL V. The Mode indicator will blink four times
(unlocked).
Operational feature Reset {980)
This feature clears all setup features not related to "Device code set
tip" and resets the Volume Lock to "TV."
To reset the features:
While holding down the RECALL button, press 9, 8, 0 in order.
The Mode indicator will blink two times, then pause and blink
two more times,
15
16
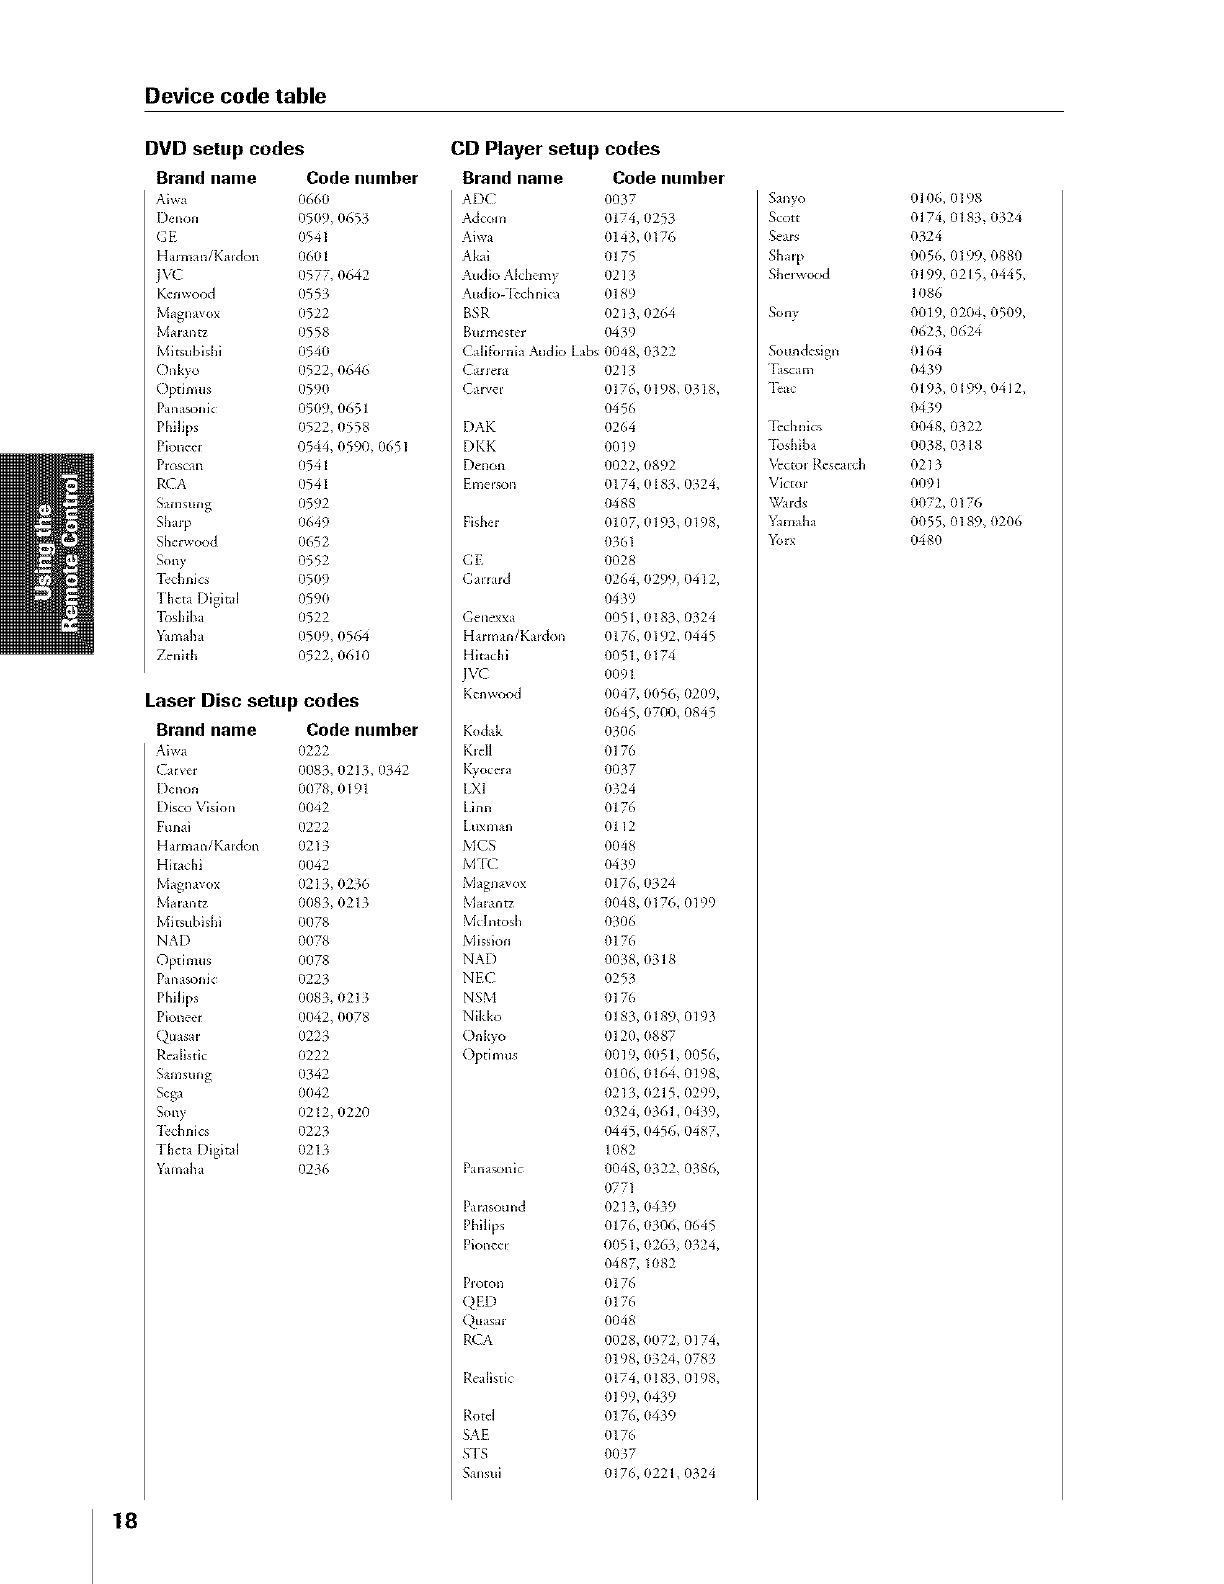
Device code table
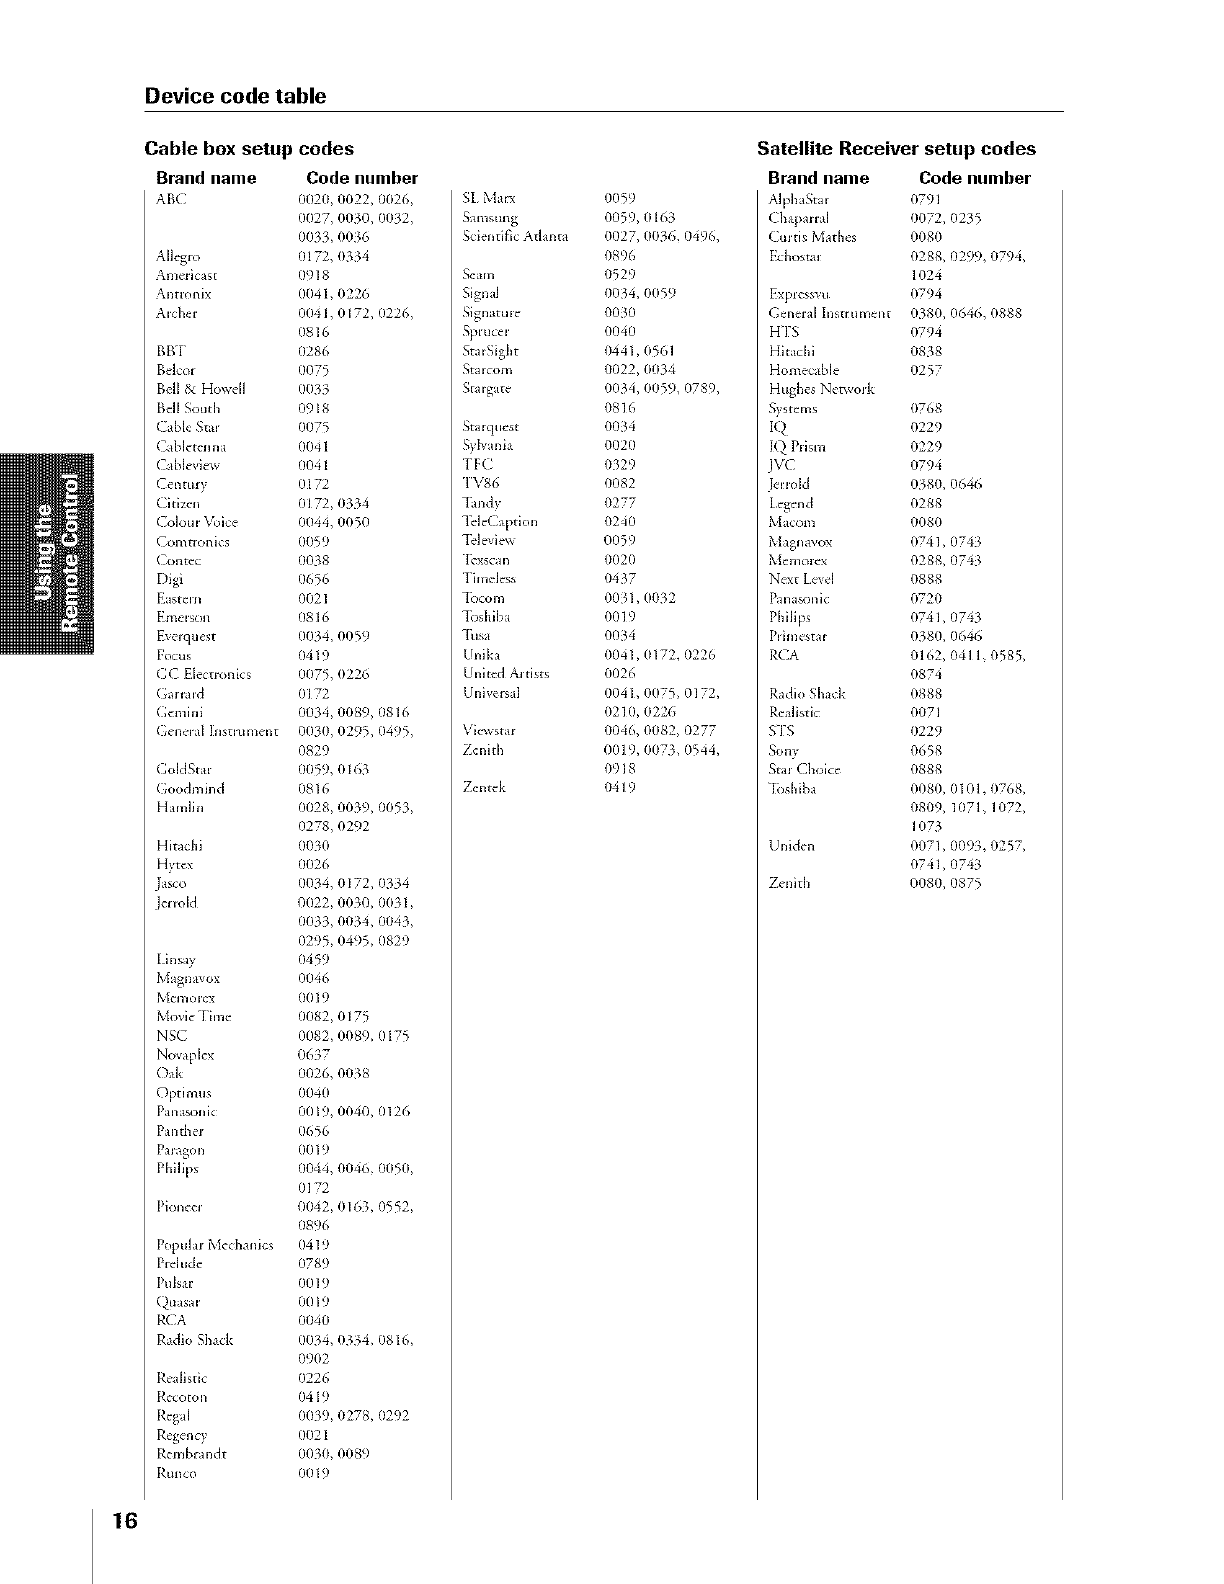
Cable box setup codes
Brand name Code number
AB( O020, 0022, 0026,
0027, 0030, 0032,
0033, 00_6
Allegro 0172, 0334
Anmlcast 0918
Antromx 0041, 0226
Aicber 0041, 0172, (1226,
(1816
BBT 0286
Belcor 0075
Bell & Howdl 0033
Bell Soudl 0918
Cable Sml 0075
Cabbtemla (1041
Cablevlm_ 0041
Century 0172
Cidzcn 0172, 0334
Co]ore Voice 0(144,(1050
Comtronlcs (1059
( ont_c 0038
Digl 0656
E _stem 0021
Eme=son 0816
E.elqtaest 0034, 0059
Focus 0419
CC Elecnonlcs 0(175,0226
Ga.ald 0172
Gcml.i 0034, 0089, (1816
(Chela[ hlstltunent 0030, 0295, 0495,
0829
ColdStar 0059, 0163
(oodmind 081(,
Hamlin 0028, 0039, 0053,
0278, 0292
Hitachi 0030
Hytex 0026
Jasco 0034, 0172, 0334
enoid 0022, 0030, 0(131,
0033, 0034, 0043,
0295, 0495, 0829
Jnsay 0459
Magnavox 0046
Memorex 0019
Movb Thne 0082, (1175
NSC 0082, 0089, 0175
Novaplex 0637
Oak 0026, 0(138
Optlmus 0040
Panason k 0019, 0040, 0126
l?antheJ 0656
Paragon 0019
Phlllps 0044, 0046, 0050,
0172
Plo:_eel 0042, 0163, 0552,
0896
PopulaJ MechaMcs 0419
Prd ude 0789
Pulsar 0019
Q0asal 0019
RCA 0040
Radio Shack 0034, 0334, 0816,
0902
Realistic 0226
Rccoron 0419
Regal 00_9, (1278, (1292
Regency 0021
Rembrandt 0030, 0089
Run co 0019
SI_Marx
Samsung
Scientific Atlanta
Scare
Signal
Signatme
Sprucer
StaiSight
StaJcom
Sraig_te
StaJqtmst
Sylv mla
I'F(
7V86
]hndy
TdeCaptlon
]_']evlexx
]%xscan
Fhndcss
3bcom
3bshlba
]hsa
Unika
Unlt_d Aitisrs
Unlver_al
VicwstaJ
Zenith
Zentek
0059
0059, 0163
0027, 0036, 0496,
0896
0529
0034, 0059
0030
0040
0441,0561
0022, 0034
0034, 0059, 0789,
0816
O034
0020
0329
0082
0277
0240
0059
0020
0437
0031,0O32
0019
0034
0041, (1172, (1226
0026
0041, 0075, 0172,
0210, 0226
0046, 0082, 0277
0019, 0073, 0544,
0918
0419
Satellite Receiver setup codes
Brand name Code number
AJphaSta= 0791
(bapamd 0072, 0235
<mils Mathes 0080
Fd,ostar 0288, 0299, 0794,
1024
Fzpressvu 0794
( €hera[ Instrument 0380, 0646, 0888
HTS 0794
Hitachi 0838
Homecabie 0257
Hughes NetwoJk
S_sterns 0768
IQ 0229
IQ PJlsm 0229
IVC 0794
erJold 0380, 0646
Legend 0288
Macom 0(18(I
Magnavox 0741,0743
Memorex 0288, 0743
Next [evd 0888
Panasonk 0720
Phillps 0741,0743
Pdnlestal 038(I, 0646
RCA (1162,041 1, 0585,
0874
Radio Shack 0888
Realistic 0(171
STS 0229
Sony 0658
StaJ Cboice 0888
"Ibshiba 0080, 010 h 0768,
08(19, 1(171, 1(172,
1073
Uniden 0071,0093, 0257,
0741,0743
Zenith 0080, 0875
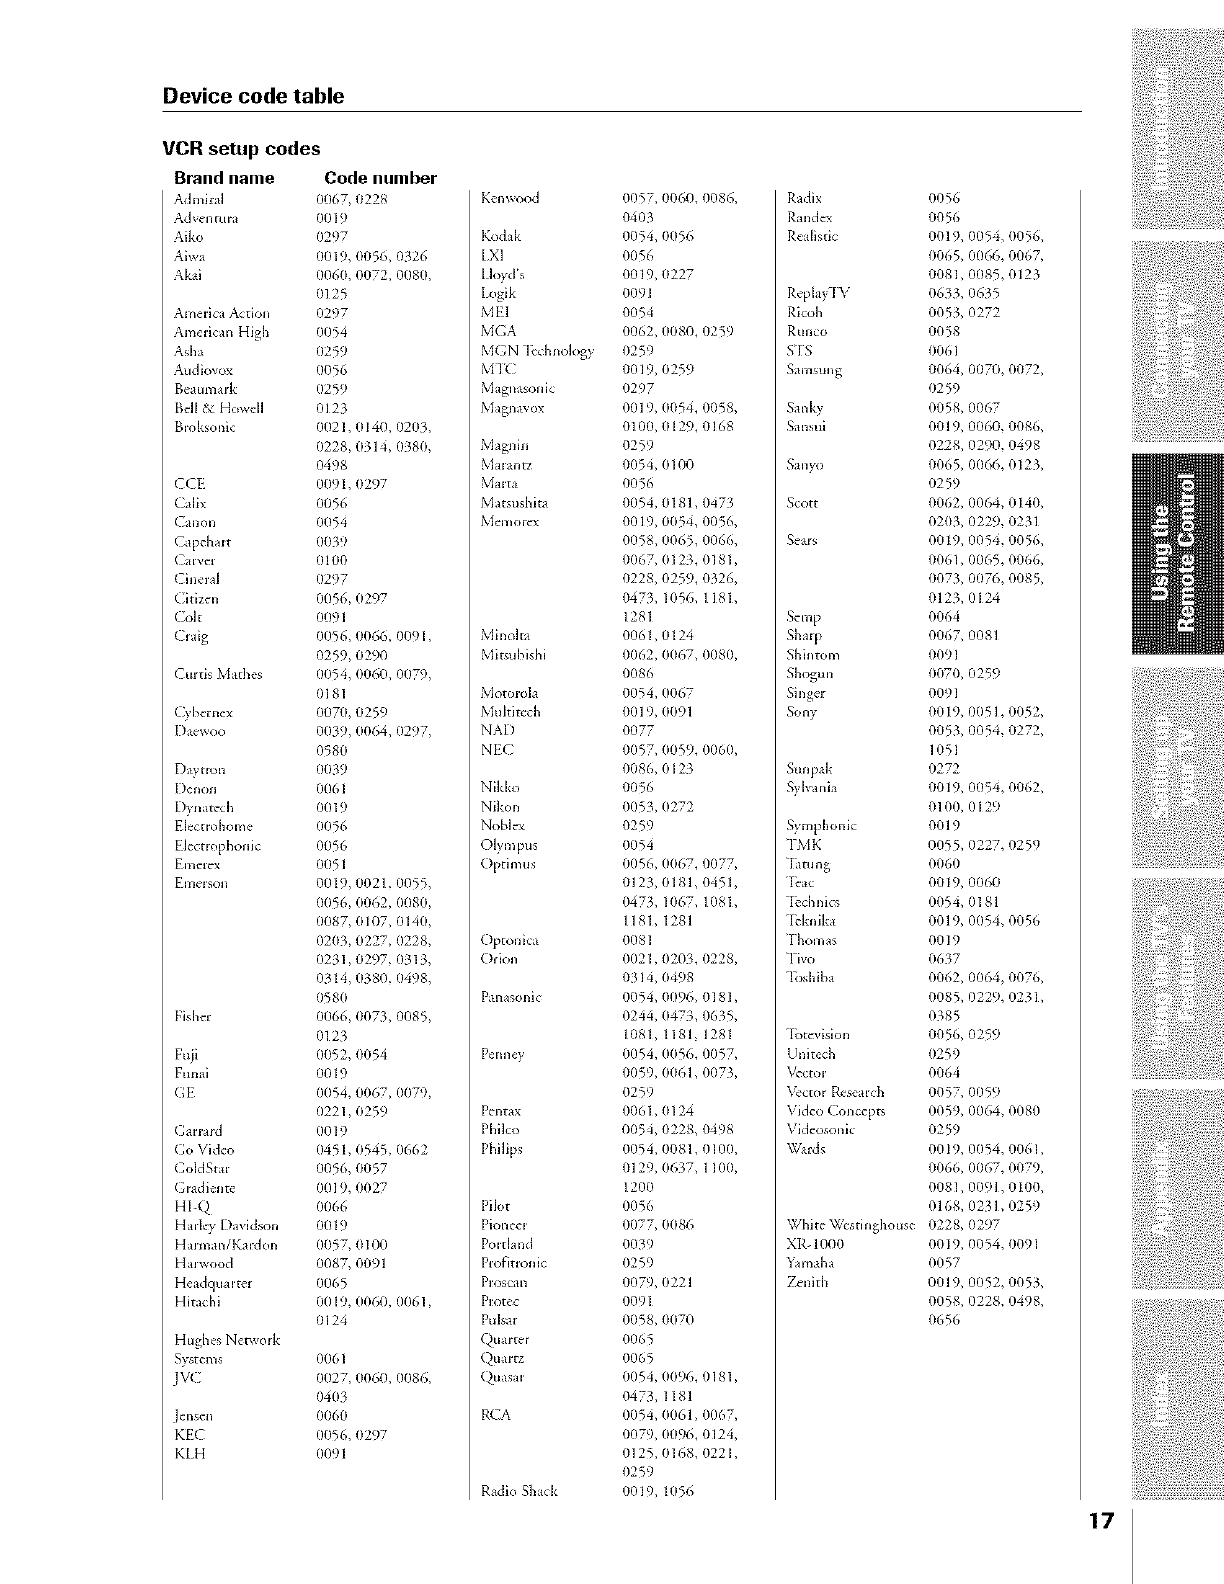
Device code table
VCR setup codes
Brand name Code number
AdmJlal 0067, 0228
Adw'n mla 111119
Aiko 0297
Aiwa (11119,0056 {}32(,
Akal 0060, 0072, 0080,
0125
America Action 0297
American High 0054
Asha (1259
AtMiovox (1056
BeaumaJk 0259
Ball & HowdI 0123
Bwksonlc 0(121, 0140, 0203,
0228, 0314, (1380,
0498
CCE 0(191, 0297
Calls 0056
Carton 0054
Capch;ut 003q
Carver (1100
Cinm'al 0297
(- idz_n 0056, 0297
Colt 0091
Galg 0056, 0066, 0091,
0259, 0290
Curds Mathes 0054, 0060, 0079,
0181
Cvberncx 0070, 0259
I)aewoo 0039, 0064, 0297,
0580
E)avtB-m 0039
I)enon 0061
Du];_tcch 0019
EIcct=ohom{ (}056
Elecn ophonlc 0056
Emclex 0051
EmeJson 0019, 0021,0055,
0056, 0062, 0080,
0087, (1107, 0140,
0203, 0227, (1228,
0231,0297, (1313,
0314, 0380, 0498,
0580
Fisher 0066, 0073, 0085,
0123
Fuil 0052, 0054
Funal 0019
G[ 0(}54, 0067, (}079,
0221,0259
Garrard 0019
Go Vi&'o 0451, 0545 0662
GoldStar 0056, 0057
G=adi_ntc 0019, 0027
HI-Q 0066
Hadev Davldson 0019
Ham_an/Kardon 0057, 0100
HaJwood 0087, 0091
Headqualtcr 0065
Hitachi 0019, 0060, 0061,
0124
Hughes NetwoJk
S_,stems 0061
JVC 0(127, (1060, (1086,
0403
0060
KE:( 0056, 0297
KLH 0091
Kenwood
Kodak
iX1
lloyd's
Logik
MEI
M(A
MGN -lichnok)gy
M'I(
Magnasonic
Magnavox
Magnin
Maiantz
MaJta
Matsushlm
J_'morex
Minolm
Mitsublshl
Motorola
Muldtcch
NAD
NtC
Nikko
Nikon
Nobl_
Olym pus
Opdmus
Optomca
Orlon
Panasonic
Penncy
Pentax
Philco
Philips
Pilot
PkmeeJ
PoMand
Profitronic
Proscan
Protec
Pulsar
Quarter
Q)uasal
RCA
Radio Shack
0057, 0060, 0086,
0403
0054, 0056
0056
0019, (}227
0091
0054
0062, 0080, 0259
0259
0019, 0259
(}297
0019, (1054, (1058,
0100, 0129, 0168
0259
0054, 0100
0056
0054, 0181,0473
0019, 0054, 0056,
0058, 0065, 0066,
0067, 0123, 0181,
0228, 0259, 0326,
0473, 1056, 1181,
1281
0061,0124
0(162, 0(167, 0(180,
0086
0054, (1067
0019, 0091
0077
(}057, 0059, 0060,
0086, 0123
0056
0053, 0272
0259
0054
0056, 0067, 0077,
0123, 0181, 0451,
0473, 1067, 1081,
1181, 1281
0081
0021, 0203, 0228,
(1_ 14, (1498
(1054, 0(196, 0181,
0244, 0473, 0635,
1081, 1181, 1281
0054, 0056, 0057,
0059, 0(}61, 0(}73,
0259
0061, (}124
(1054, 0228, 0498
0054, 0081,0100,
0129, 0637, 1100,
1200
0056
0077, 0086
0039
0259
(1079, 0221
(1091
0058, 0070
0065
0065
0054, 0096, 0181,
0473, 1181
0054, (1061, 0067,
0079, 0096, (1124,
0125, 0168, 0221,
0259
0019, 1056
Radix
Randex
ReaIisdc
Repla}-[V
Ricoh
RLIliCO
SIS
Samsung
Sank}
Sanafi
Sanyo
Scott
SeAls
Setup
ShaJp
Shintom
Shogun
Singer
Sony
Stmpak
S}Ivania
Symphonic
TM K
"Ihmng
Dac
"Dchnics
"Dkmka
l'homas
Tivo
Toshiba
"IStevlsion
Unk¢ch
Vector
\_'cto r R_search
Video Concept_
Videosonlc
Wards
White Wcsd nghouse
XR° 1000
Yamaha
Zenkh
0056
(1056
(1019, 0054,
0065, 0066,
0081,0085,
0633, 0635
(1053, 0272
0058
0061
(}064, 0070,
0259
0058, 0067
0(119, 0060,
0228, 0290,
0065, 0066,
0259
OO62, 0064,
O203, 0229,
0019, 0054,
0061,0065,
0073, 0076,
0123,0124
0064
0067, 0081
0091
0070, 0259
0091
0019, 0051,
0053, 0054,
1(}51
(}272
0019, 0(154,
0] 0(1, (1129
0019
0(}55, 0227,
006(}
0019, 0060
0054, 0181
0019, 0054,
0019
0637
0(}62, 0064,
0085, 0229,
0385
0O56, 0259
0259
0(164
(1057, 0059
0059, 0064,
0259
0019, 0054,
0066, 0067,
0081,0091,
0168, 0231,
0228, 0297
0019, 0054,
0057
(1(119, 0052,
OO58, 0228,
0656
0056,
0067,
0123
0072,
(1086,
0498
0123,
(1140,
0231
0056,
0066,
0085,
0052,
0272,
0(162,
0259
0056
0076,
0231,
0080
006 I,
0079,
0100,
0259
0091
0053,
(1498,
17
Device code table
DVD setup codes
Brand name Code number
Aiw,_ 0660
Denon 0509, 0653
GF 11541
Hammn/K*_rdon 0601
JVC 0577, 0642
Ke._ood 0553
Magnavox 0522
Maiantz 0558
Mitsublshl 0540
Onkyo 0522, 0646
Optlmus 0590
Panasonk 0509, 0651
Philips 0522, 0558
Pioneer 0544, 059(I, 0651
Proscan (1541
RCA 0541
Samsung 0592
Sharp 0649
Sherwood 0652
Sony 0552
T_+chnic_ 0509
"1hera Diglml 0590
"]bshlba (}522
_2unaha 0509, 0564
Zenith 0522, 0610
Laser Disc setup codes
Brand name Code number
Aiwa 0222
Carw'r 0083, 0213, 0_42
I)¢non 0078, 0191
Disco Vision 0042
Funal 0222
Harman/Kardon 0213
Hitachi 0042
Magnavox 0213, (1236
Malantz 0083, 0213
Mitaublshl 0078
NAD 0078
Optlnms 0078
Panasonk 0223
Philips 0083, 021_
Pkmeer 0042, 0078
Q0asaE 0223
Realistic 0222
Samsung 0342
Sega 0(142
Sony 0212, 0220
]_'chnlcs 0223
Theta Diglml 0213
Yamaha 0236
CD Player setup codes
Brand name Code number
AD( 0037
Adcom 0174, 0253
Aiwa O]43, 0176
Akal (1175
Audlo Alchemy 0213
Audlo--l\'ch nica 0189
BSR 0213, 0264
Btirmestel 0439
Callfomla Audio Labs 0048, 0322
( aneJa 0213
Carver 0176, 0198, 0318,
0456
DAK O264
DKK 0019
Denon 0022, (1892
Emelson 0174, 0183, (1324,
0488
Fisher 0107, 0193, 0198,
0361
CE 0028
(Jan ud 0264, 0299, 0412,
0439
(]enexxa 0051,0183, 0324
Halman/Kaldon 0176, 0192, 0445
Hitachi 0051,0174
JVC 0091
Kenwood 0047, 0056, 0209,
(1645,0700, 0845
Kodak 0306
KJell 0176
Kyocera 0037
LX[ 0324
[.inn 0l 76
[ uxman 01 12
MCS 0048
M_[C 0439
Magnavox 0176, 0324
Maiantz 0048, 0176, 0199
Mclnrosh 0306
Mission 0176
NAD 0(138,(1318
NEC 0253
NSM (1176
Nikko 0183, 0189, 0193
Onkyo 0120, 0887
Optimus 0019, 0051, 0056,
0106, 0164, 0198,
0213, 0215, 0299,
0324, 0361,0439,
0445, (1456, (1487,
1082
Panasonic 0048, 0322 0386,
0771
Pa=asound 0213, 0439
Philips 0176, 0_06, (1645
Pioneer 0051, 0263 0324,
0487, 1082
PIoton 0176
QED 0176
Quasar 0048
RCA (1028,0072 0174,
0198, 0324, (1783
Reallstic 0174, 0183, 0198,
0199, 0439
Rotd 0176, (1439
SAE 0176
STS 0037
Sansul 0176, 0221, 0324
Sallyo
Scott
SgalS
Sha=p
Shelwood
Sony
Soundesign
E_scam
Tvac
"Ik-chnics
"Ibshlba
\&cto= Research
Victm
_X/aJds
}_maha
Yorx
0106, 0198
0174, 0183, 0324
0324
0056, 0199, 0880
0199, 0215, 0445,
1086
0019, (1204, (15(19,
0623, 0624
0164
0439
0193, 0199, 0412,
0439
0048, 0322
0038, 0318
0213
0091
(1072, 0176
(1055, 0189, 0206
0480
18
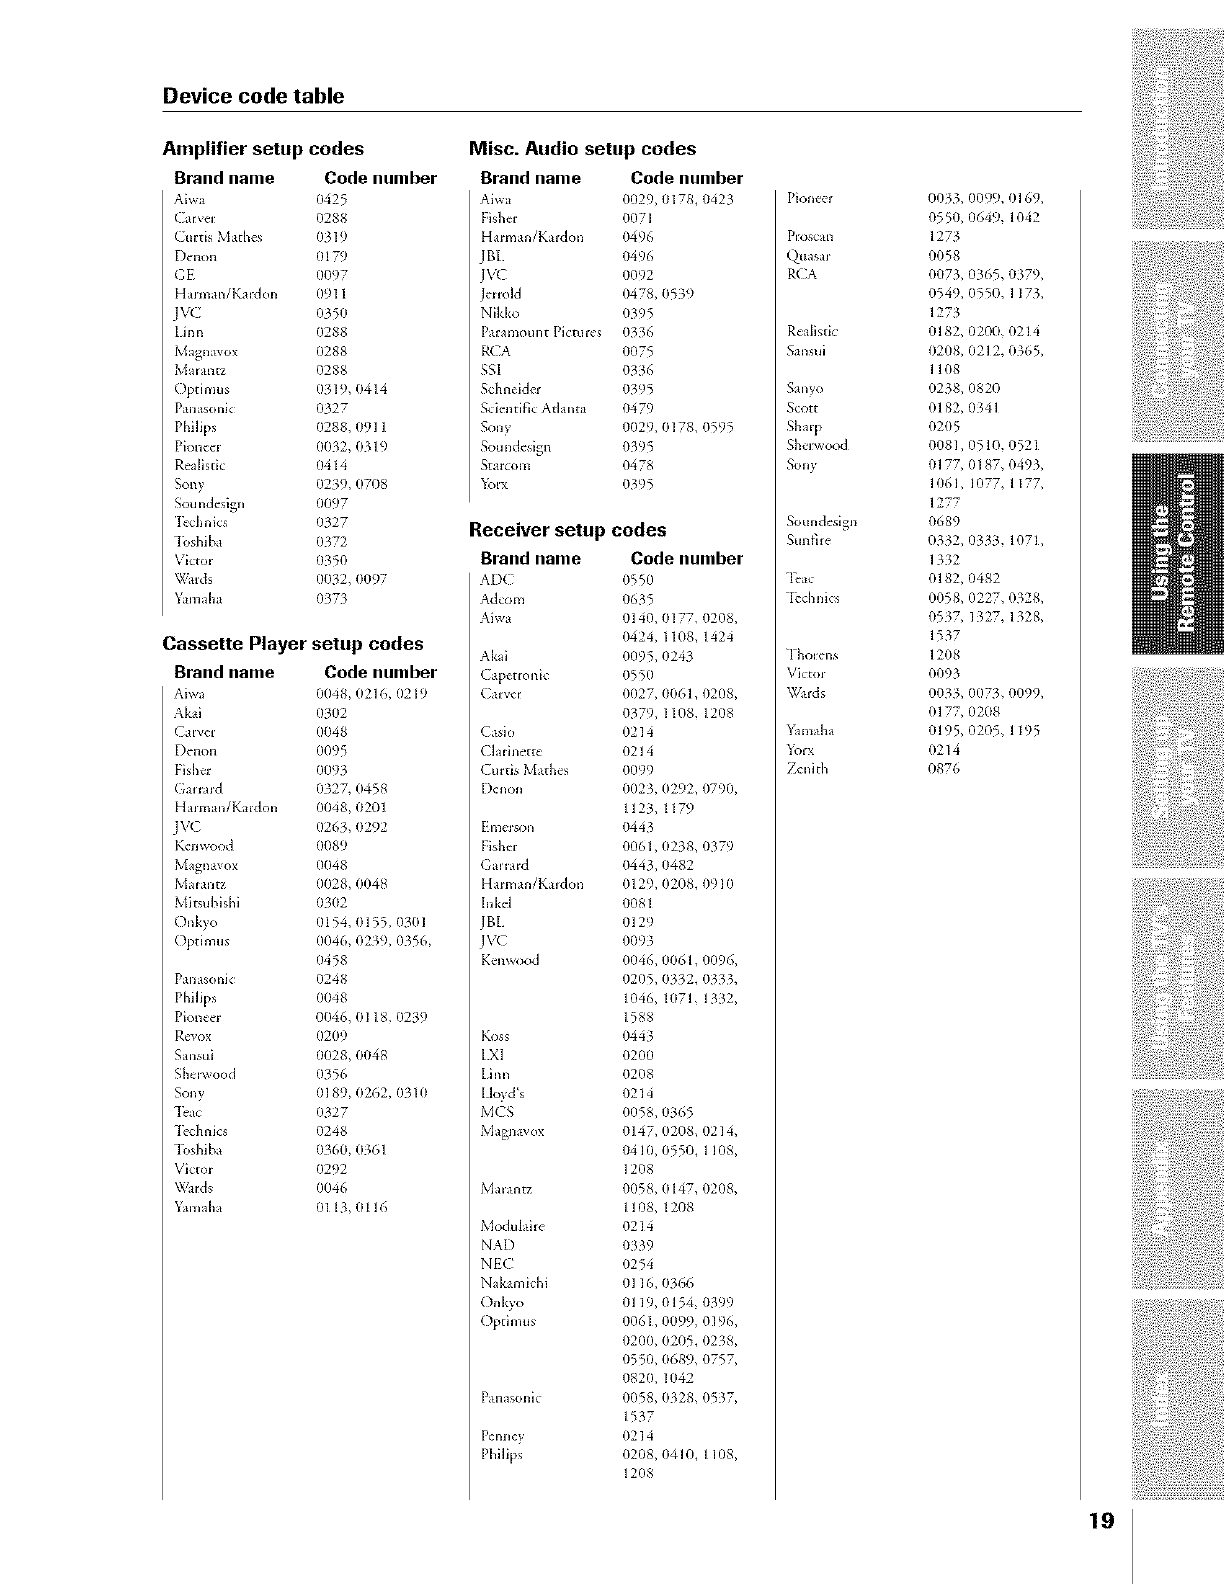
Device code table
Amplifier setup codes
Brand name Code number
Aiwa 0425
(_ _ver 0288
(ui6s Mathes 0319
Denon 0179
GE 0097
H umm/Kardon 0911
WC 0350
Linn 0288
Magn wo-_ 0288
Mamn_ 0288
()pd mus 0_19, 0414
PaiHsonk 0327
Philips 0288, 0911
PioneeJ 0032, 0319
Realistic 0414
Sony 0239, 0708
Soundcslgn 0097
Dchni{s 0327
]_Mfiba 0372
Vicro_ 0350
WaRts 0032, 0097
Yamdm 0373
Cassette Player setup codes
Brand name Code number
Aiw_ 0048, 0210, 0219
Akai 0302
C_lvci 0048
Denon 0095
Fisher 0093
([ alHld 0327, 0458
H uman/Klidon 0048, 0201
l\% 0263, 0292
K,'nwood 0089
Nhgnavox 0048
Mamnt/ 0028, 0048
Mitsublshl 0302
Onkyo (1154,0155 0301
Opdmus 0046, 0239, 0356,
0458
PaiHsonk 0248
Philips 0048
Pioneel 0046, 0118, 0239
Revox 0209
Sansui 0028, 0048
She=_ood (}356
Sony 0189, 0262, 0310
1}*c 0327
]_'chnlcs 0248
]2Mfib _ 0360, 0361
Victol 0292
\VaMs 0046
_amaha 0113, (1116
Misc. Audio setup codes
Brand name Code number
Aiwa 0029, 0178, 0423
Fish_ 0071
H uman/K_Mon 0496
JBL 0496
JVC 0092
ell:old 0478, 05_9
Nikko 0395
Pa.m]ount Pictures 0336
RCA 0075
SSI 03_6
Schneldel 03/5
Scien6fk Admta 0479
Sony 0029, 0178, 0595
Soundesign 0395
Starcom 0478
_)lx 0395
Receiver setup codes
Brand name Code number
AD( 0550
Adorn 0635
Aiwa 0140, 0177. 0208,
0424, 1108, 1424
Ak_i 0095, 0243
(apenonic 055(}
C_rvvr 0027, 006h 0208,
0379, 1108, 12(18
C_sio 0214
Chdnetre 0214
Curtis £hthes 0099
I)¢non 0023, 0292, 0790,
1123, 1179
Emelson 0443
Fisher 0061, 0238, 0379
GaHwd 0443, 0482
H umm/KaMon 0129,0208,0910
Inkel 0081
IBt. 0129
1\'(2 009_
Kenwood 0(}46, 0061,0096,
0205, 0332, 0333,
1046, 1(171, 13_2,
1588
l<oss 044_
LXI 0200
Lim_ 0208
Llo?d_s 0214
MCS 0058, 0365
M _gn wox 0147, 0208, 0214,
0410, 0550, 1108,
1208
Mamnt7 0058, 0147, 0208,
1108, 1208
Moduhile 0214
NAD 0_39
NEC 0254
N &amlchl 0116, 0366
Onkyo 0119, 0154 0399
Opd mus 0061, 0099 0196,
0200, 0205, 0238,
0550, 0689, 0757,
0820, 1042
Pan_soni 0058, 0328, 0537,
1537
Pem]ey 0214
Philips 0208, 0410, 1108,
1208
(_lasar
RCA
Realistic
Sansul
Sanyo
Scott
Sharp
Sherwood
Sony
Soundeslgn
Sunfire
T{ac
"Dchnics
Thorens
Victol
Wards
Yamaha
Zenith
0033, 0099, 0169,
055(I, (1649, 1042
1273
0058
0073, 0_65, 0_79,
0549, 0550, 1173,
1273
0182, 0200, 0214
02(}8,0212, 0365,
1108
0238, 0820
0182, 0341
0205
0081,0510, 0521
0177, 0187, 0493,
1061, 1077, 1177,
1277
0689
0332, (1333, 1071,
1332
0182, (1482
(1058, 0227, 0328,
0537, 1327, 1328,
1537
1208
0093
0033, 0073, 0099,
0177, 0208
0195, 0205, 1195
0214
0876
19
20
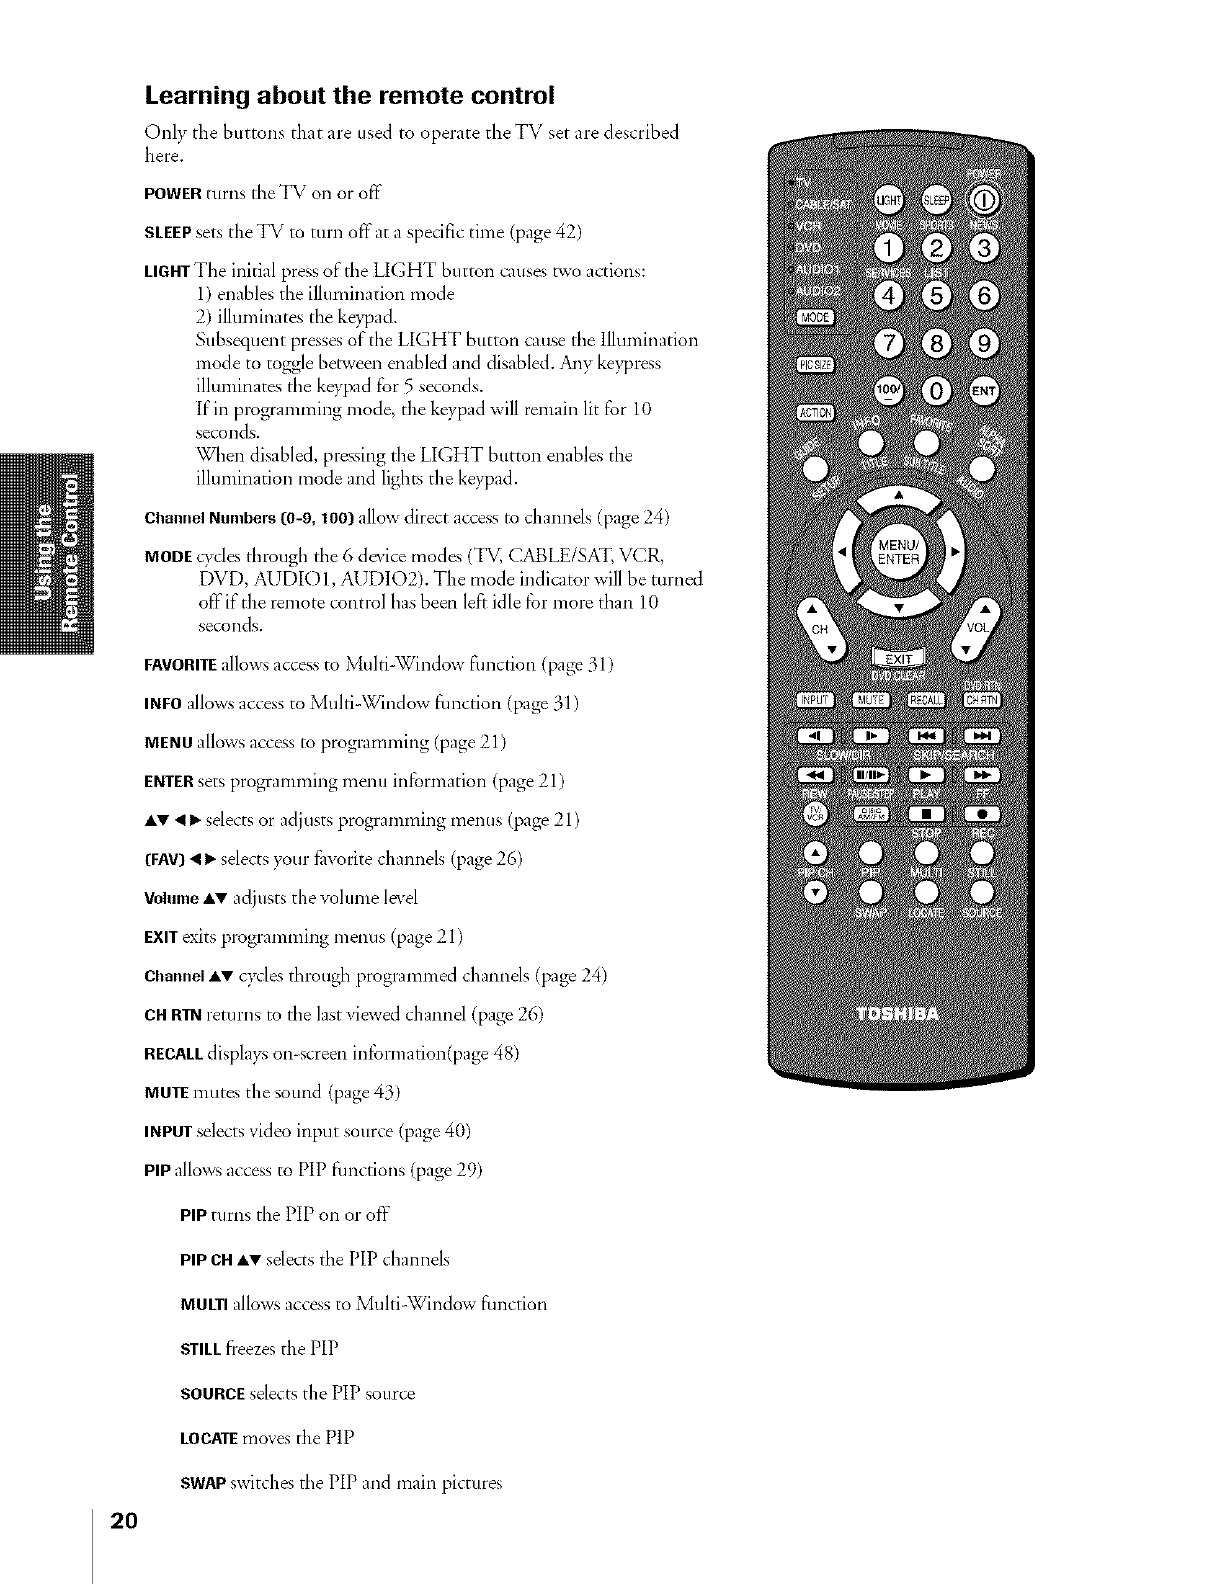
Learning about the remote control
Only tbe buttons that are used to operate the TV set are described
here,
POWERturns the TV on or off"
SLEEPsets the WV to turn off at a specific time (page 42)
LIGHTTbe initial press of the LIGHT button causes two actions:
1) enables the illumination mode
2) illuminates the keypad.
Subsequent presses oftbe LIGHT button cause the llluminavion
mode to toggle between enabled and disabled. Any keypress
illuminates the keypad for 5 seconds.
If in programming mode, the keypad will remain lit for 10
seconds.
Wben disabled, prexsing die LIGHT button enables the
illumination mode and ligbts the keypad.
Channel Numbers [0-9, 100] allow direct access m channels (page 24)
MODEcycles througb the 6 device modes (TV, CABLE/SAT, VCR,
DVD, AUDIO1, AUDIO2). The mode indicator will be turned
off'if the remote control bas been left idle for more than 10
seconds.
EAVORffEallows access to Multi-Window function (page 31)
INEOallows access to Multi "W'mdowfunction (page 31)
MENUallows access m programming (page 21)
ENTERsets programming menu information (page 21)
A_' !I_selects or adjusts programming menus (page 21)
[FAY]'<I_selects your favorite channels (page 26)
Volume=,_' adjusts the volume level
EXITexits programming menus (page 21)
ChannelA_' c?,<-lesthrough programmed channels (page 24)
CRRTNreturns m the last viewed channel (page 26)
RECALLdisplavs on-screen information(page 48)
MUTEmutes the sound (page 43)
INPUTselects video input source (page 40)
PIPallows access to PIP fimctions (page 29)
PIPturns the PiP on or off
PIPCHl,_' selects the PIP cbannels
MULTIallows access to Multi-Window function
griLL freezes the PIP
SOURCEselects the PIP source
LOCATEmoves the PiP
SWAPswitches the PIP and main pictures
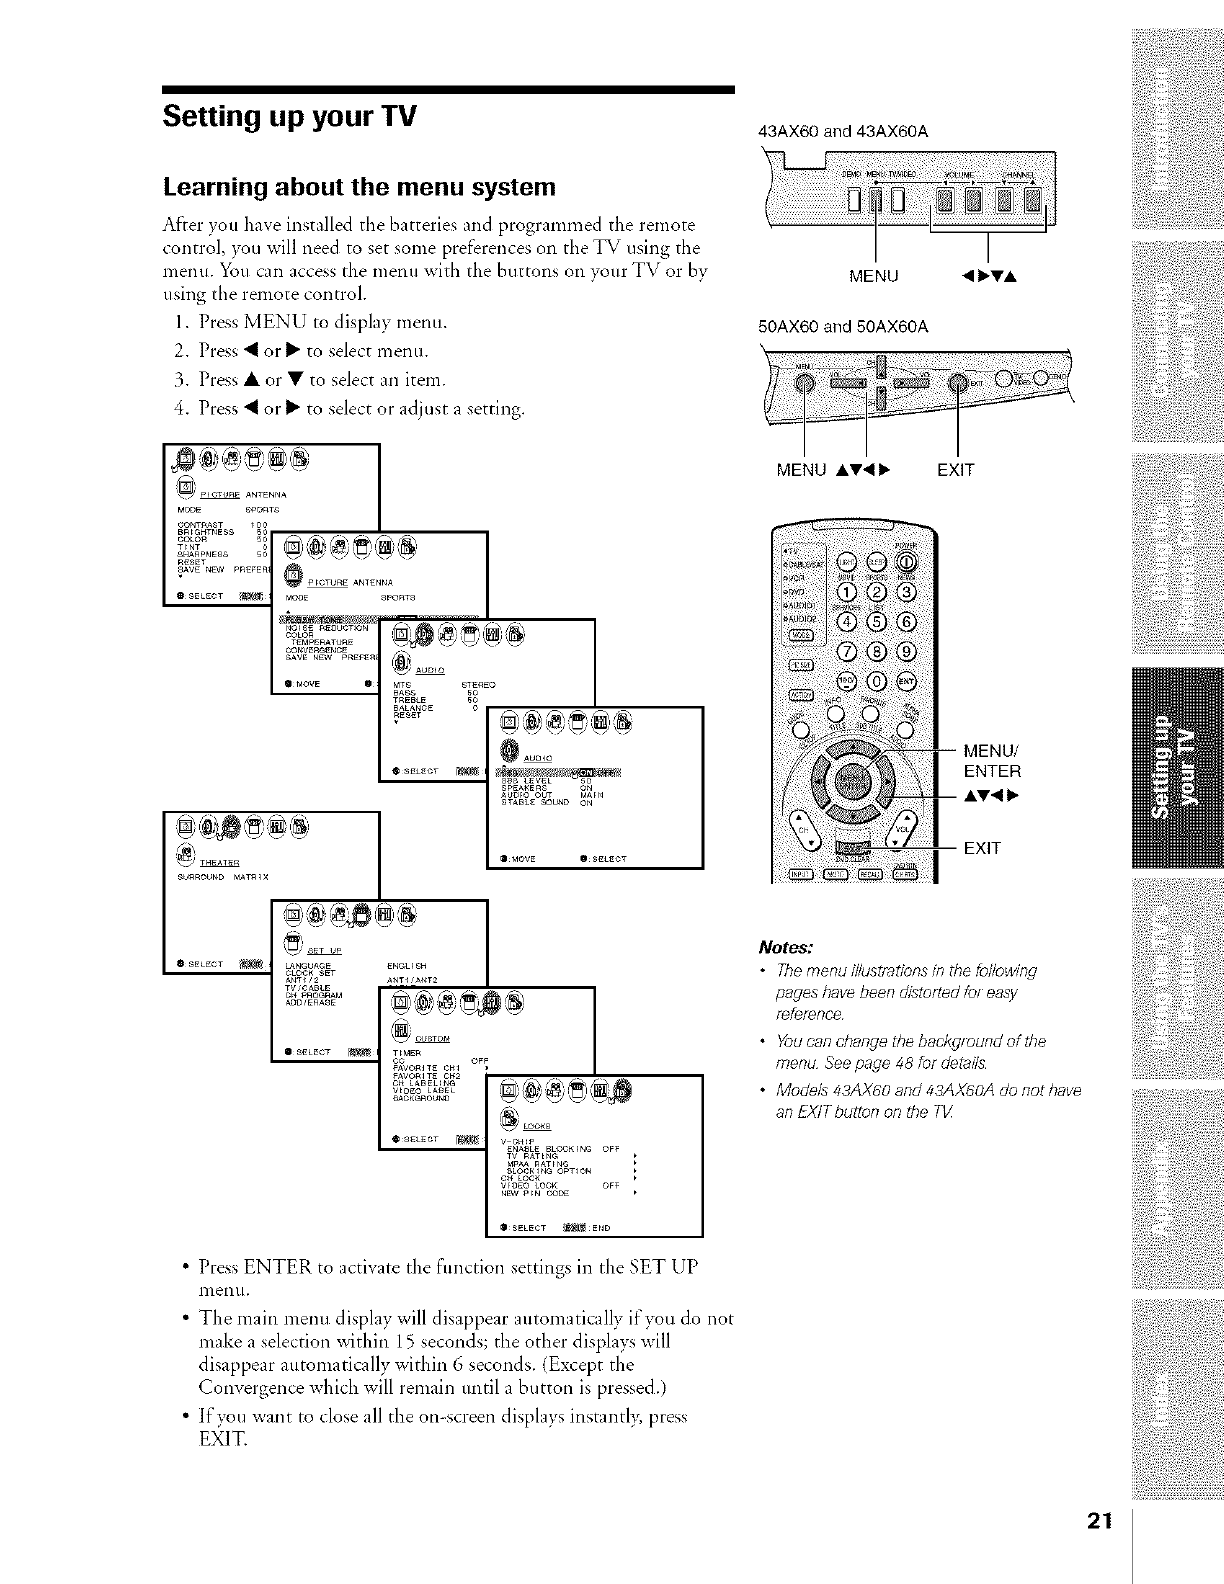
Setting up your TV 43AX60 and 43AX60A
Learning about the menu system
After you have installed the batteries and programmed the remote
control, >_u will need to set some preferences oi1 the TV using the
menu. You can access the ment] with the buttons on your TV or by
using the remote control.
1. Press MENU to display menu.
2. Press _ or _ to select menu.
3. Press • or • to select an item.
4. Press _ or _ to select or adjust a setting.
MENU • IbVA
50AX60and 50AX60A
\
_PrOTURE ANTENNA
MCDE SPORTS
TEMPERATURE
¢_VEReENCE 14_
SAW N[W PRE_ER
AUDIO
QMOW 0 MT8 STERgO
BASS 50
T_EBLE 5_
BALANCE
_ESET
_AUmO
@SELECT _
_UUFO OUT MAFN
STABLE 80UND ON
_MOW _SEL_¢T
MODE _PORTS
COLOR
T_NT
RESET
SAVE a_w PREF
@SELECT
@BELECT_ _NGUA_E
OLOCK SET
TWCABLE
O_ pROGF_M
AOO/ERASE
QBELECT _
ENGLISH
ANT_A_T2
¢C OF_
FAVOmT_ C_I
FAVOmT_ C_2
C_ LABEL_H_
V_O_O LABEL
BAOKGROUNO
@8_L[GT _ V OH_P
1ENABLE BLOCKING OFF
TV RATING
_LOCKING OPTION _
¢H LOCK
WO_O LOOK OF_
NEW piN _ODI_ k
@SELECT _END
•Press ENTER to activate the flmction settings in the SET UP
l_lentt,
•The main menu display will disappear automatically if you do not
make a selection within 15 seconds; the otber displays will
disappear atttomatically within 6 seconds. (Except the
Convergence which will remain until a button is pressed.)
• If you want to close all the on-screen displays instantly, press
E>:]T.
MENU A_•I_ EXIT
MENU/
ENTER
EXIT
Notes:
•Themenu illustrationsin #_efo//owin_
pages have been distorted for easy
f_fel_nce
•Youeanchaogetbebackgfoundoftbe
menu Seepage 48 for details
• Models 43/,)(60 and 48AX60A do not/}ave
an EXITbutton on the Ti/
21
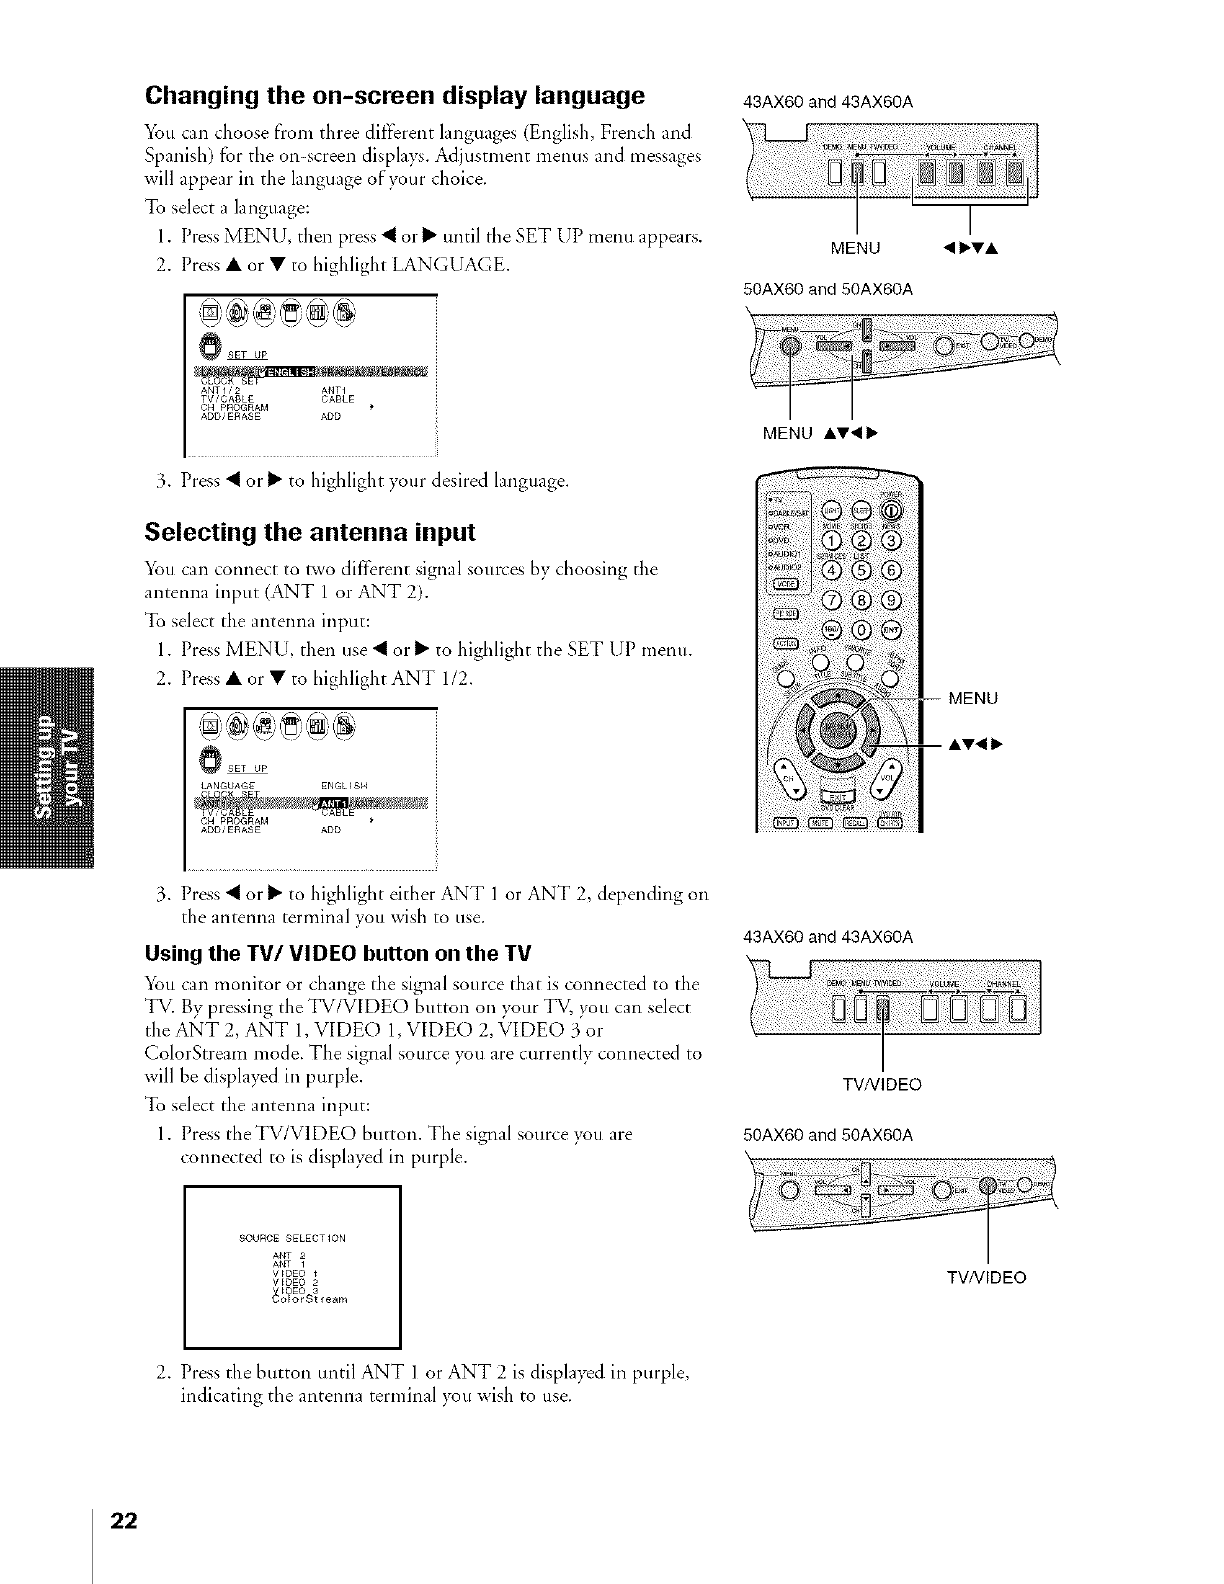
Changing the on-screen display language
You can choose fiom three different languages (English, French and
Spanish) for the on-screen displays. Adjustment menus and messages
will appear in the language of your choice.
To select a language:
1. Press MENU, then press _ or I_ until the SET UP mentl appears.
2. Press • or • to highlight LANGUAGE.
_SET UP
ANTI/2 ANTI
TViCABLE CABLE
CN PROGRAM
ADD/ERASE ADD
3. Press "_ or I_ to highlight your desired language.
Selecting the antenna input
_%u can connect to two different signal sources hv choosing the
antenna input (ANT 1 or ANT 2).
To select the antenna input:
1. Press MENU, then use "_ or l_ to highlight the SET UP menu.
2. Press • or • to highlight ANT 1/2.
43AX60 and 43AX60A
MENU • II_VA
50AX60 and 50AX60A
MENU AV•Ib
_SET UP
LANGUAGE ENGL_SN
ADD/ERASE ADD
3. Press _ or I_ to highlight either ANT 1 or ANT 2, depending on
the antenna terminal you wish to use.
Using the TV/VIDEO button on the TV
_btt can monitor or change the signal source that is connected to the
TV. By pressing the TV/VIDEO button on your TV, you can select
the ANT 2, ANT 1, VIDEO 1, VIDEO 2, VIDEO 3 or
ColorStream mode. The signal source you are currently connected to
will be displayed ira purple.
To select the antenna input:
1. Press theTV/VIDEO button. The signal source you are
connected to is displaved in purple.
43AX60 and 43AX60A
TV/VlDEO
50AX60 and 50AX60A
\
8OURCE SELECTION
ANT
WDE©
VIDEO
EO 3
TV/VlDEO
2. Press the button until ANT 1 or ANT 2 is displayed ira purple,
indicating the antenna terminal you wish to use.
22
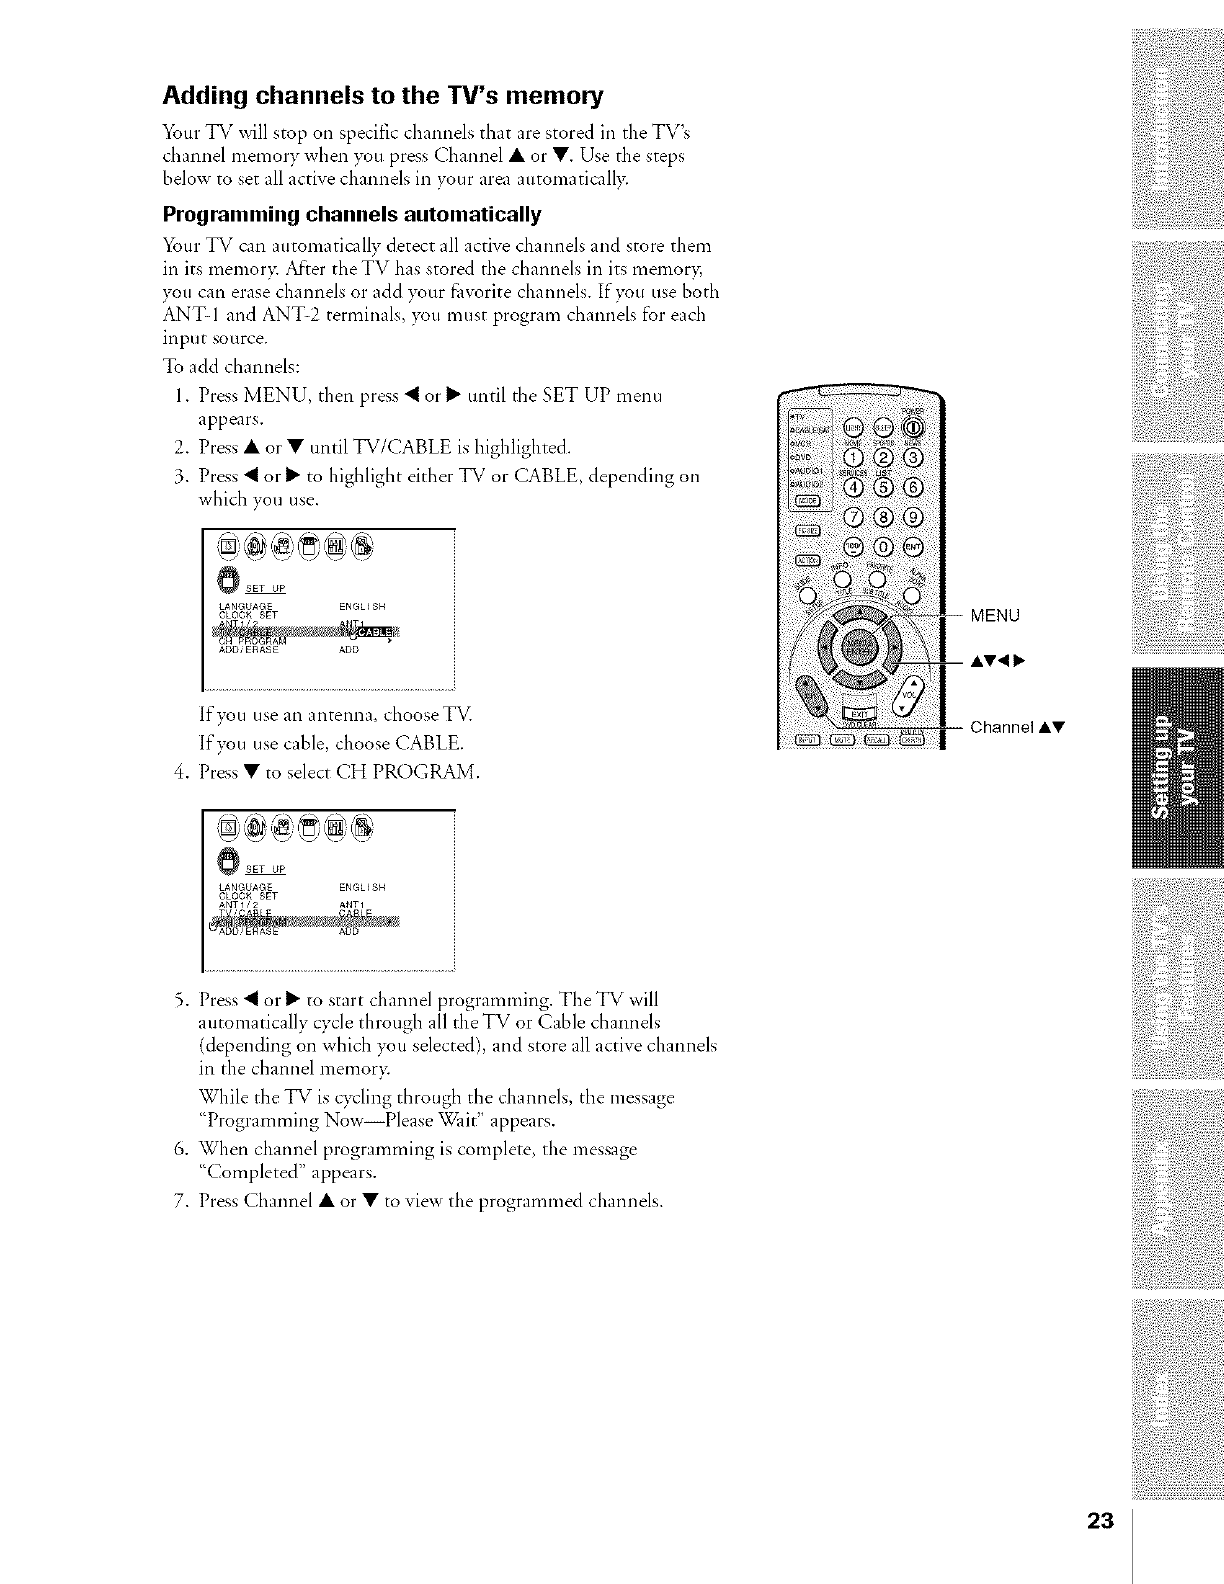
Adding channels to the TV's memory
Your TV will stop on specific channels that are stored in the TV's
cbannel memory when you press Channel • or •. Use the steps
below to set all active channels in your area automatically.
Programming channels automatically
Your TV can automatically detect all active channels and store them
in its memor?c After the TV has stored the channels in its memory,
you can erase channels or add }_ur favorite channels. If you use both
ANT1 and ANT-2 terminals, you must program channels for each
input source.
To add channels:
1. Press MENU, then press _ or I1_until the SET UP menu
appears.
2. Press • or • until TV/CABLE is highlighted.
3. Press _ or I1_to highlight either TV or CABLE, depending on
which you use.
_SET UP
LANGUAGE ENGL_SN
CLOCK SET
ADD/ERASE ADD
If you use an antenna, choose TV.
If you use cable, choose CABLE.
4. Press • to select CH PROC, RAM.
MENU
Channel AV
_£ET UP
LANGUAGE ENGLISH
CLOCK SET
ANTIi2 ANTI
5. Press _ or I_ to start channel programming. The TV will
automatically cycle througb all the TV or Cable channels
(depending on which 3_u selected), and store all active channels
In the channel memor>
While the TV is cycling through the channels, the message
"Programming Now--Please Wait" appears.
6. When channel programming is complete, the message
"Completed" appears.
7. Press Channel • or • to view the programmed channels.
23
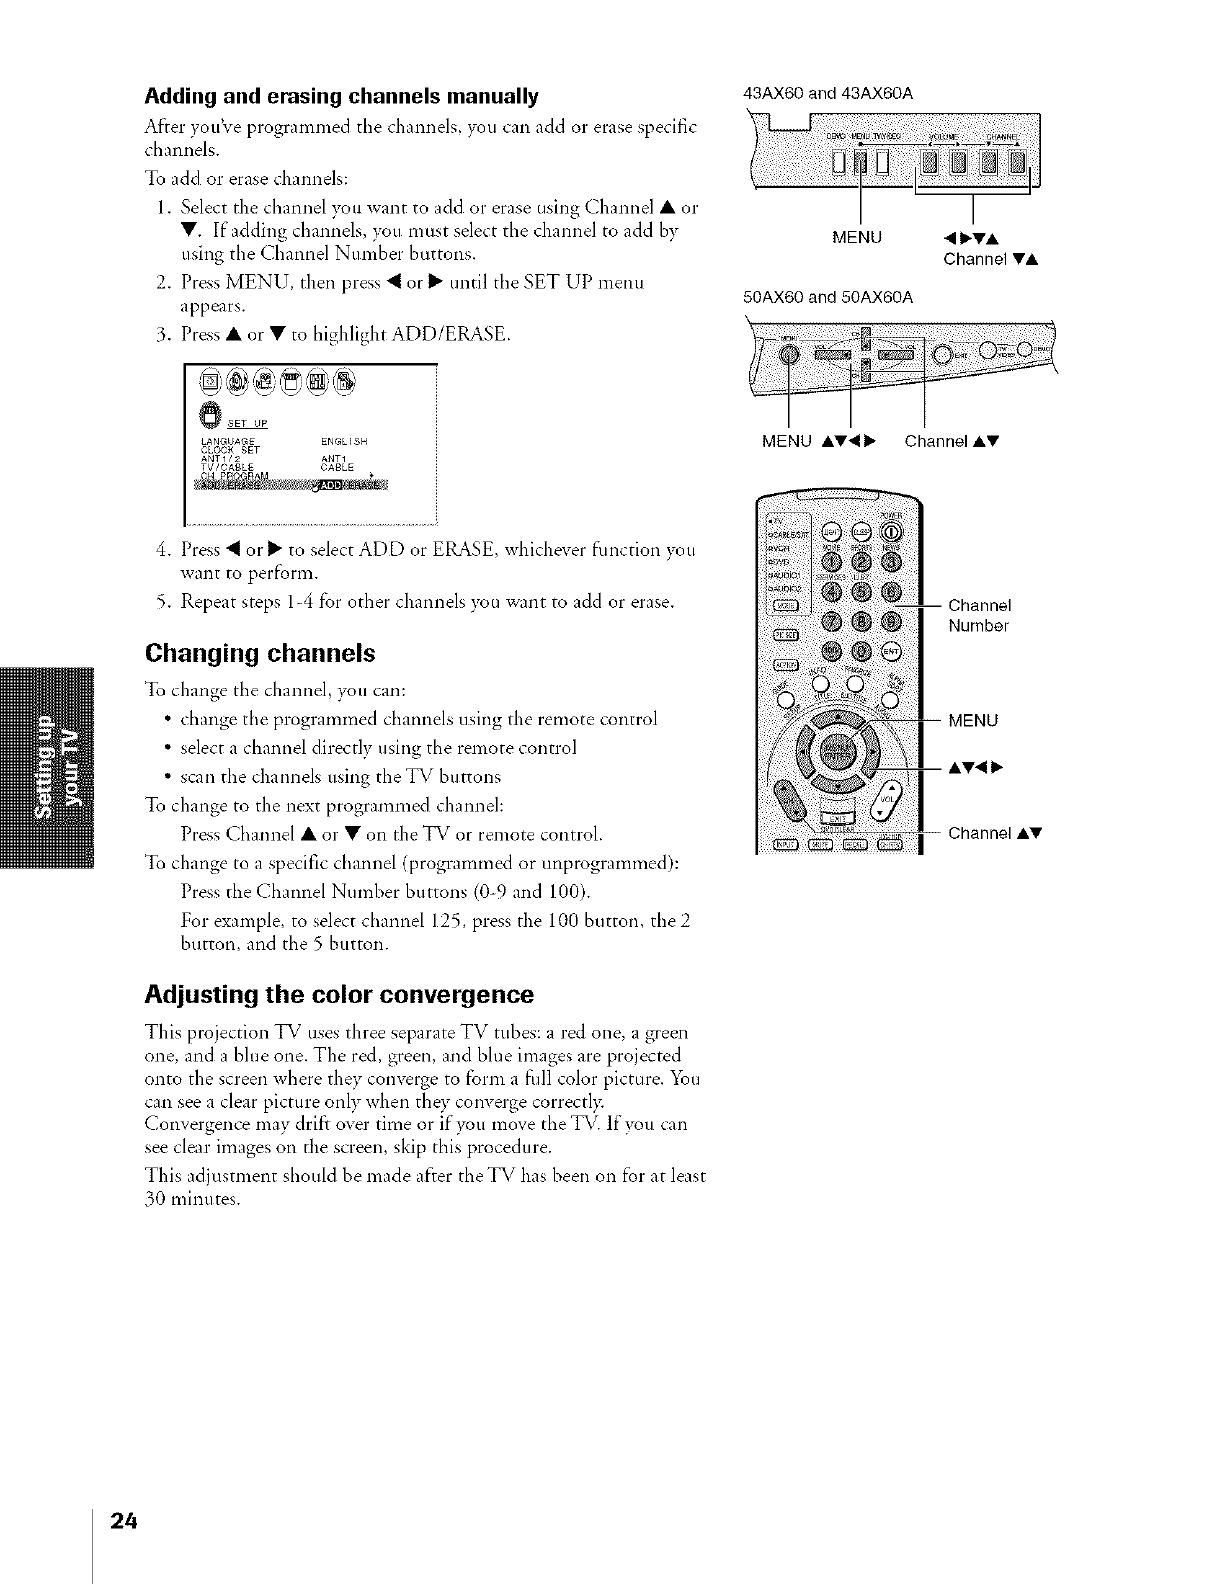
Adding and erasing channels manually
After you\'e plogramnled the channds, VOUcan add o1 erase specific
channels.
To add or erase channels:
l. Select the channel you want to add or erase using Channel • or
• . If adding channels, VOtltiltlst select the channel to add by
using the Channel Number buttons.
2. Press MENU, then press _ or 1_ until the SET UP menu
appears.
3. Press • or • to highlight ADD/ERASE.
43AX60 and 43AX60A
MENU
50AX60and 50AX60A
\
• IbTA
Channel V&
_SET UP
LANGUAGE ENGLESN
CLOCK SET
ANT%'2 ANTI
TVICABLE OABLE
MENU AT•_ Channel ,&V
4. Press 4or 1_ to select ADD or ERASE, whichever function VOU
want to perform.
5. Repeat steps 14 for other channels VOUwant to add or erase.
Changing channels
To change the channel, you can:
• change the programmed channels using the remote control
• select a channel directl v using the remote control
• scan the channels using theTV buttons
To change to the next programmed channel:
Press Channel • or • on the "IV or remote control.
To change to a specific channel (programmed or unprogrammed):
Press the Channel Number buttons (0-9 and 100).
For example, to select channel 125, press the 100 button, the 2
button, and the 5 button.
Adjusting the color convergence
This projection TV uses three separate TV tubes: a red one, a green
one, and a blue one. The red, green, and blue images are projected
onto the screen where they converge to form a fiJll color picture. You
can see a clear picture only when the v converge correctl?:
Convergence may drift over time or if you move the TV. If you can
see clear images on the screen, skip this procedure.
This adjustment should be made after the TV has been on for at least
30 minu tes.
24
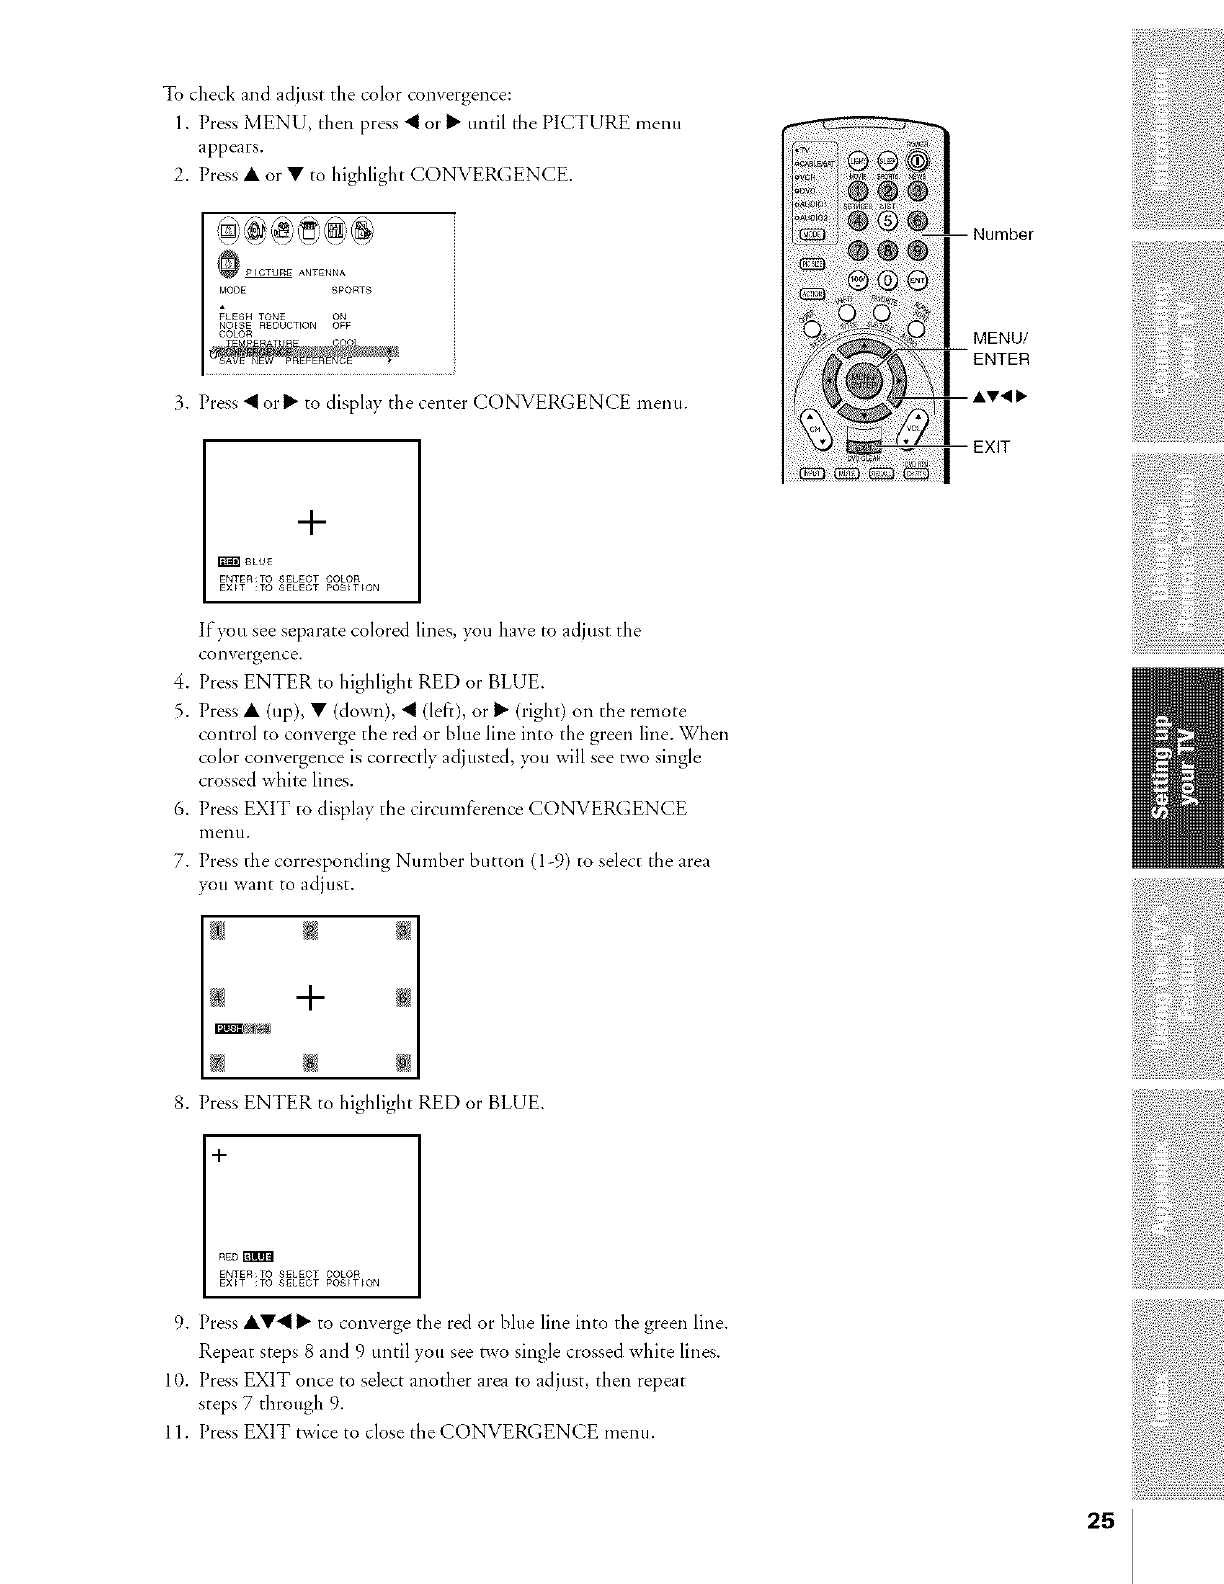
To check and adjust the color convergence:
1. Press MENU, then press "_ or I_ until the PICTURE menu
appears.
2. Press • or • to highlight CONVER(;ENCE.
MOOE SPORTS
FLESH TONE ON
N©ESE REDUCTION OFF
COLOR
3. Press _ o1"I_ to display the center CONVERGENCE menu.
+
_BLUE
ENTER;TO SELECT C©L©R
E×_T ;TO SELECT POS_T_ON
If you see separate colored lines, ?_u have to adjust the
convergence.
4. Press ENTER to highlight RE[) or BLUE.
5. Press • (up), • (down), "_ (left), or 1_ (right) on the remote
control to converge the red or blue line into the green line. When
color convergence is correctly adjusted, you will see two single
crossed white lines.
6. Press EXIT to display the circumference CONVERGENCE
Illentl.
7. Press the corresponding Number button (1-9) to select the area
you want to adjust.
+
8. Press ENTER to highlight RED or BLUE.
4-
RED r_IITr_
ENTER:TO SgLECT COLOR
EXiT ;TO SELECT POS_T_ON
9. Press ••41_ to converge the red or bhle line into the green line.
Repeat steps 8 and 9 until you see two single crossed white lines.
10. Press EXIT once to select another area to adjust, then repeat
steps 7 through 9.
11. Press EXIT twice to close the CONVERGENCE menu.
25
Using the TV's features
Adjusting the channel settings
Switching between two channels
You can switch between two charmels without entering an actual
channel number each time.
To switch between two channels:
1. Select the first channel vou want to view.
2. Select a second channel with the Channel Number buttons (0-9,
100).
3. Press CH RTN. The previous channel will be displayed.
Each time }_tl press CH RTN, the TV will switch back and forth
between the two channels.
Programming your favorite channels
You can preset up to 9 of your favorite channels each for FAVORITE
1 and FAVORITE 2 modes using the Favorite Channel Programming
feature. Because this feature scans through only your favorite channels
it allows you to skip other channels you do not normally watch.
To program your f:avorite channels:
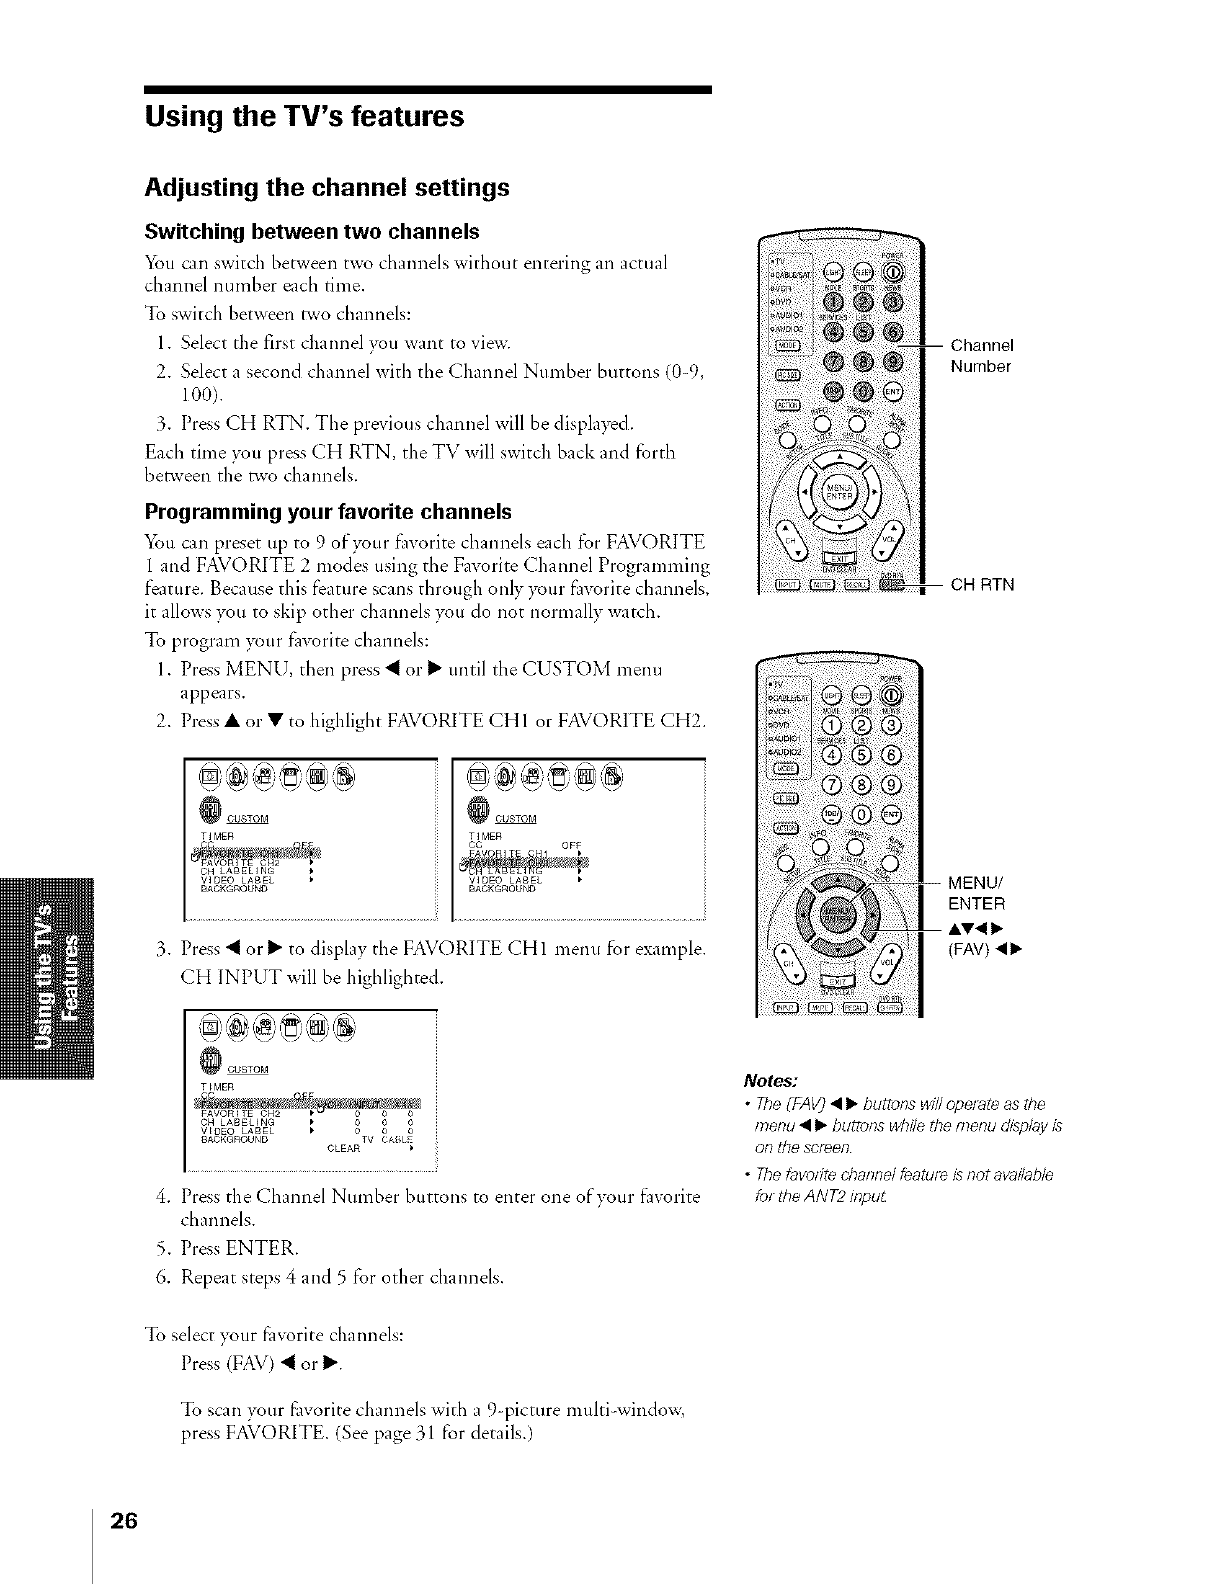
1. Press MENU, then press _ or I_ until the CUSTOM menu
appears.
2. Press • or • to highlight FAVORITE CHI or FAVORITE CH2.
_CUSTOM
TIMER
CH LABELING
VIDE© LABEL
BACKGR©UNO
_CU_TOM
TIMER
CC OFg
BACKGROUND
3. Press "_ or I_ to display the FAVORITE CH 1 menu for example.
CH INPUT will be highlighted.
_i_ i; ........i?_<){i?¸¸¸¸G_II_ ¸7¸¸¸....
--Channel
Number
CH RTN
= MENU/
ENTER
-- ,&V< Ib
(FAV) _1I_
T_MER
_ACKGROUND CLEAR TV CA_L_
4. Press the Channel Number buttons to enter one of your f]worite
channels.
5. Press ENTER.
6. Repeat steps 4 and 5 for other channels.
Notes:
•The_FAV_< I_ buttons wi//operate as the
menu <I_ bu_ons while the menu displayis
oRthe Sol_eR
• Thefavoflte cilaf?f?dfeatdf_ is not ava#ab/e
#.;rthe ANT2 inpua
To select your favorite channels:
Press (FAV) "_ or I_.
To scan your favorite channels with a 9-picture multi-window,
press FAVORITE. (See page 31 for details.)
26
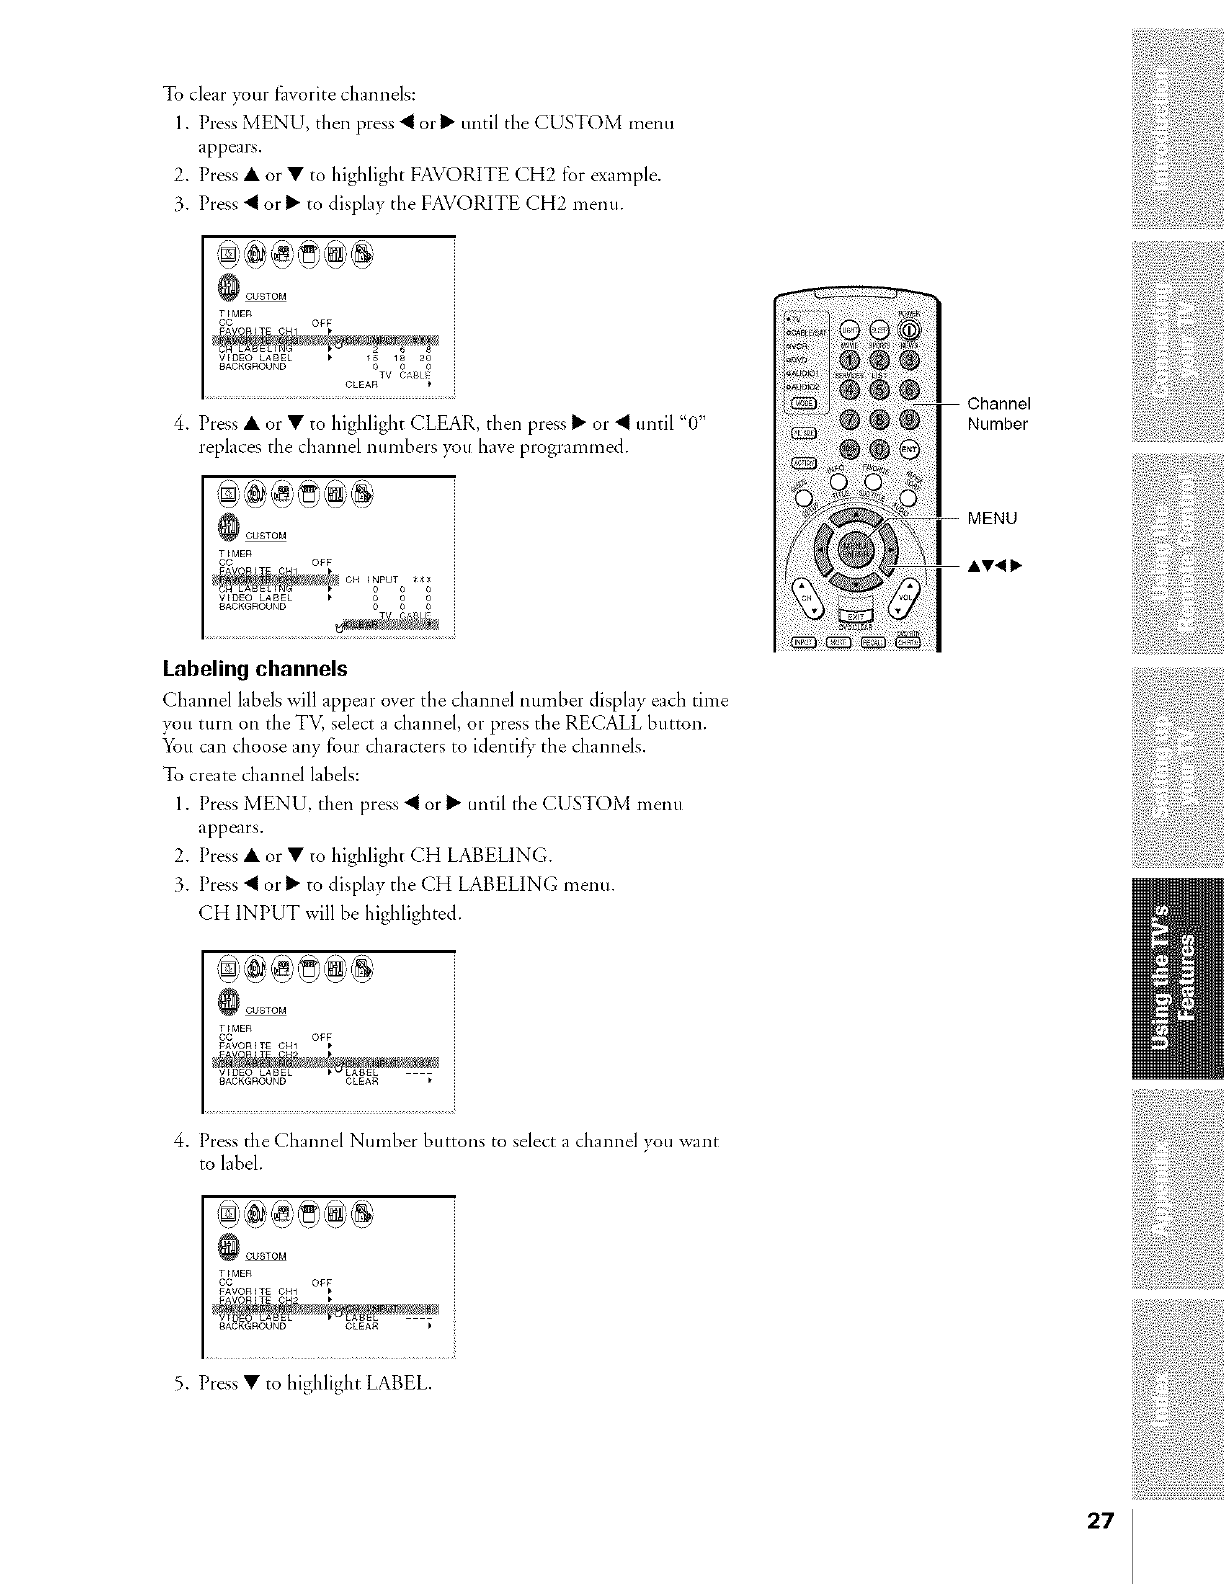
To clear your l:avorite channels:
1. Press MENU, then press "_or I_ until the CUSTOM menu
appears.
2. Press • or • to highlight FAVORITE CH2 for example.
3. Press "_or I_ to display the FAVORITE CH2 metro.
T_MER
CG OFF
0 0
BACKGROUND 0TV CAB[_
CLEAR
4. Press • or • to highlight CLEAR, then press 1_ or _ until "0"
replaces the channel numbers you have programmed.
T_MER
¢G OFF
VIDEO LABEL _ 0 0 0
BAGKGROUND 0 0 0
Labeling channels
Channel labels will appear over tile channel number display each time
you tttrn on the TV, select a channel, or press the RECALL button.
You can choose any four characters to identify tile channels.
To create channel labels:
1. Press MENU, then press _ orl_ until tile CUSTOM menu
appears.
2. Press • or • to highlight CH LABELING.
3. Press _ or _ to display the CH LABELING menu.
CH INPUT will be highlighted.
T_MER
CG Ogg
FAV©R[TE CHI P
4. Press the ChannelNumber buttons to select a channel you want
to label.
T_MER
FAVORITE C_1
5. Press • to highlight LABEL.
27
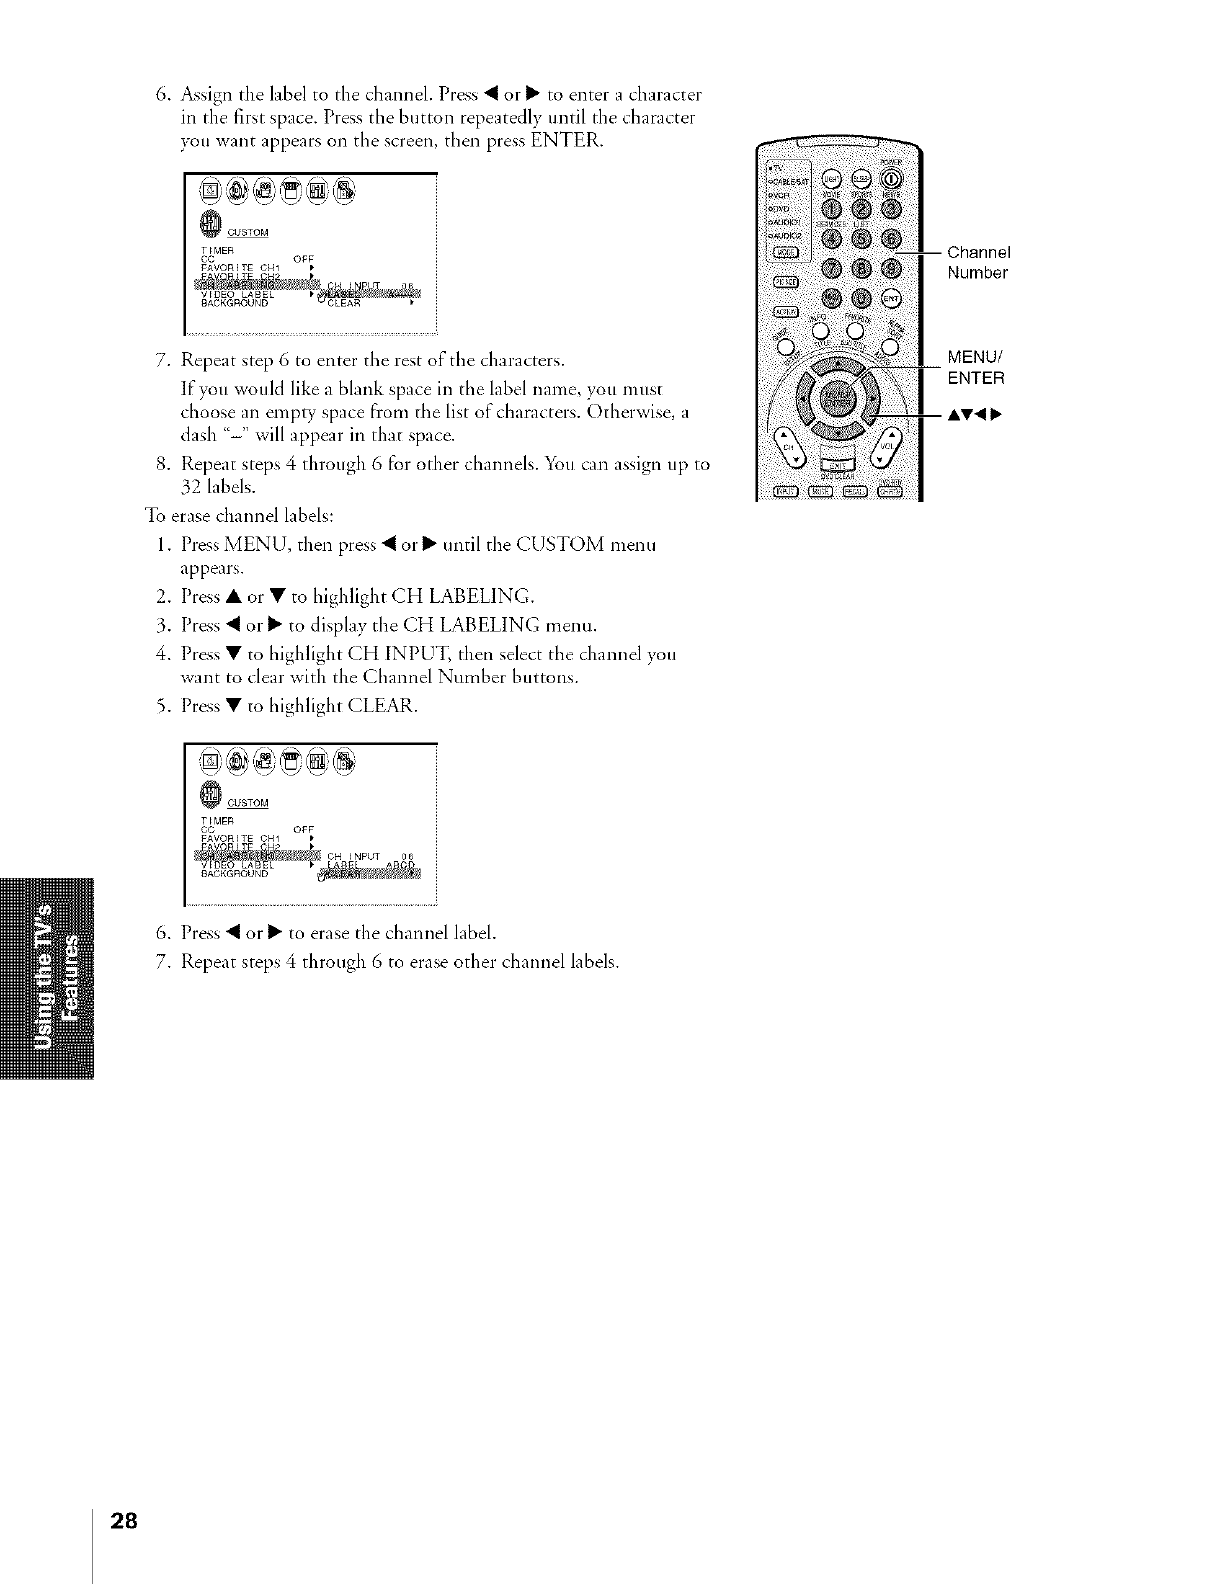
6. A_sign the label to the channel. Press _ or I_ to enter a character
in the first space. Press tile button repeatedly until the character
you want appears on the screen, then press ENTER.
T_MER
CC OgF
FAVORETE CNI P
7. Repeat step 6 to enter the rest of the characters.
If you would like a blank space in the label name, you must
choose an empty space tCromthe list of characters. Otherwise, a
dash "-" will appear in that space.
8. Repeat steps 4 through 6 for other channels. You can assign up to
32 labels.
To erase channel labels:
1. Press MENU, then press _ or I_ until the CUSTOM menu
appears.
2. Press • or • to highlight CH LABELING.
3. Press _ or 1_ to display the CH LABELING menu.
4. Press • to highlight CH INPUT, then select the channel you
want to clear with the Channel Number buttons.
5. Press • to highlight CLEAR.
:a a
;-- Channel
Number
MENU/
ENTER
-- ,AV_ Ib
T_MER
CC OgF
FAVORETE CNI P
6. Press _ or I_ to erase the channel label.
7. Repeat steps 4 through 6 to erase other channel labels.
28
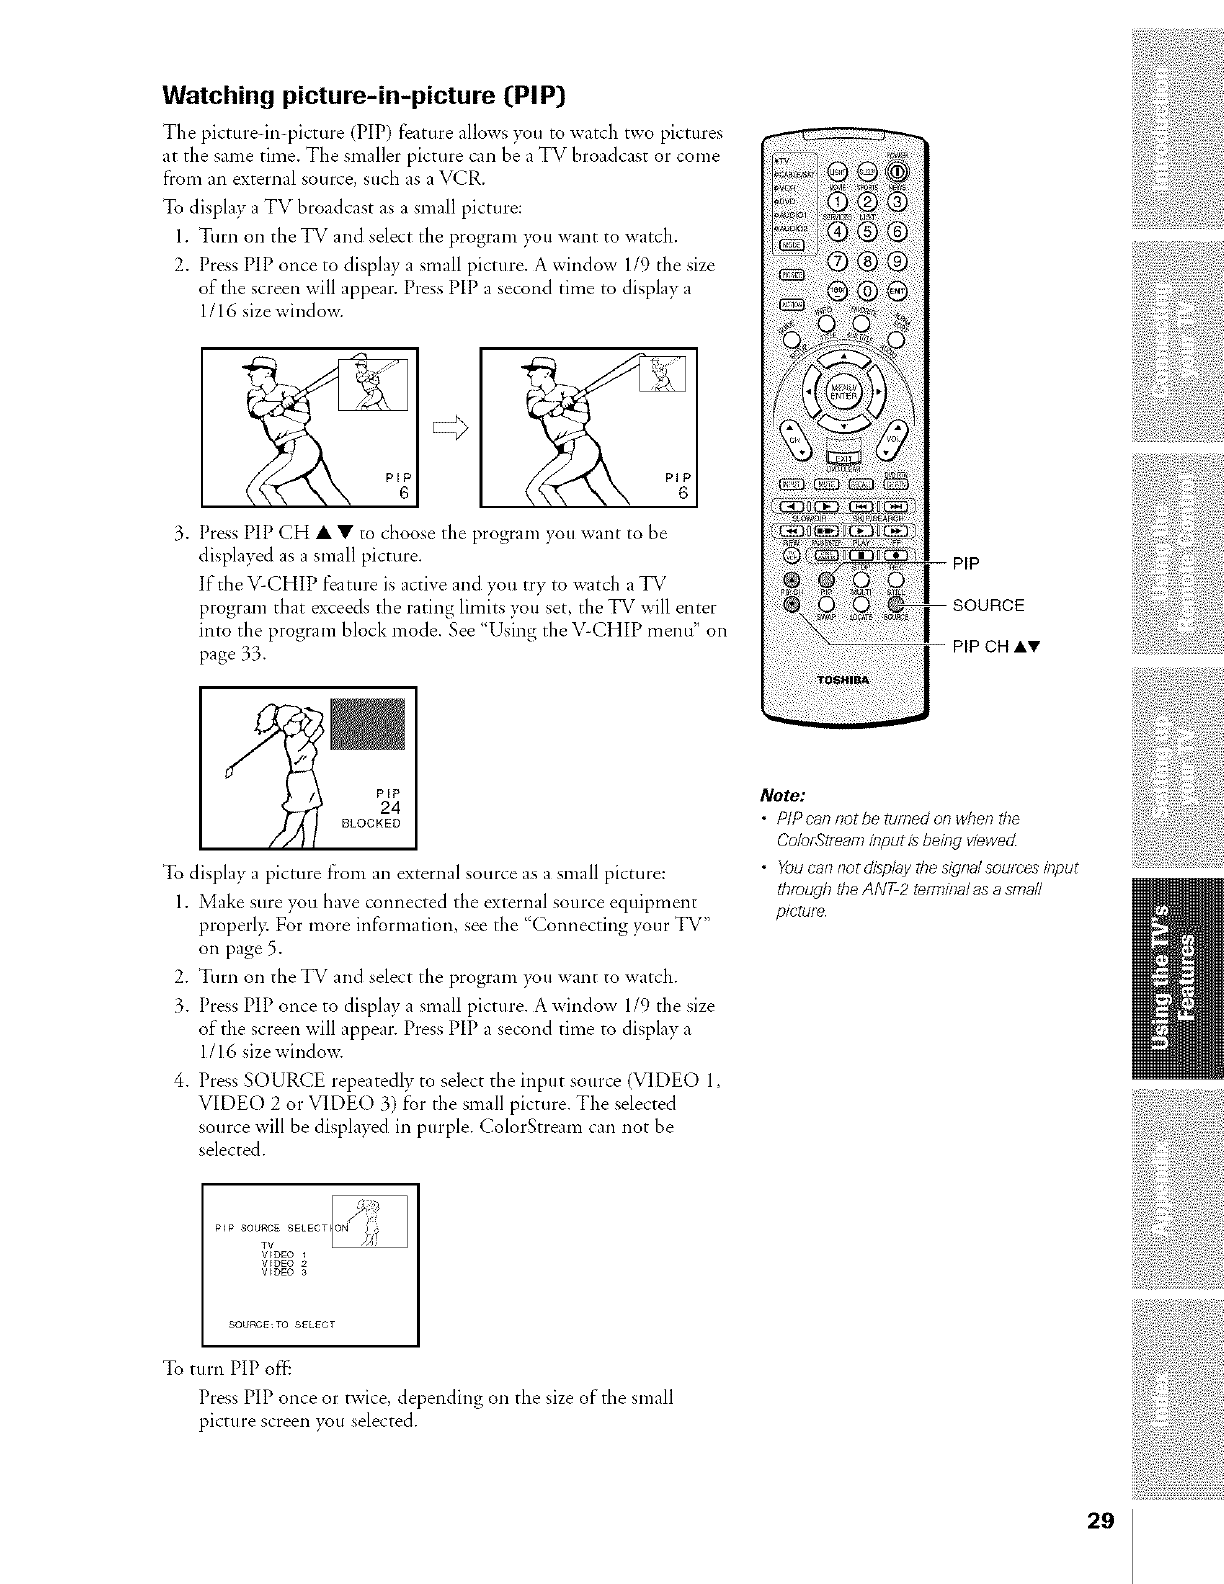
Watching picture-in-picture (PIP)
The picturedn-picture (PIP) feature allows you to watch two pictures
at the same time. Tbe smaller picture can be a TV broadcast or come
l°rom an external source, sucb as a VCR.
To display a TV broadcast as a small picture:
1. Turn on the TV and select the program you want to watch.
2. Press PiP once to display a small picture. A window 1/9 the size
of the screen will appear. Press PIP a second time to display a
1/16 size window.
3. Press PIP CH • • to choose the program you want to be
displayed as a small picture.
If the VCHIP feature is active and you try to watch a TV
program that exceeds the rating limits you set, the TV will enter
into the program block mode. See "Using the VCHIP menu" on
page 3_. PIP CH &V
PiP
24
BLOCKED
To display a picture from an external source as a small picture:
1. Make sure you have connected the external source equipment
properl> For more information, see the "Connecting your TV"
on page 5.
2. Turn on the TV and select the program you want to watch.
3. Press PiP once to display a small picture. A window 1/9 the size
of the screen will appear. Press PIP a second time to display a
1/16 size wind ow.
4. Press SOURCE repeatedly to select tbe input source (VIDEO 1,
VIDEO 2 or VIDEO 3) for the small picture. The selected
source will be displayed in purple. ColorStream can not be
selected.
Note:
•PIPcan not be turned on when the
Co/orStreaminput is being viewed
•Youesn not display the signalsourcesinput
through the ANT2 te_Tz#na/as a small
plctuye
V_DEO
VEDEO
V_DEO 3
SOURCE: TO SELECT
To turn PIP off..
Press PIP once or twice, depending on the size of the small
pictu re screen you selected.
29
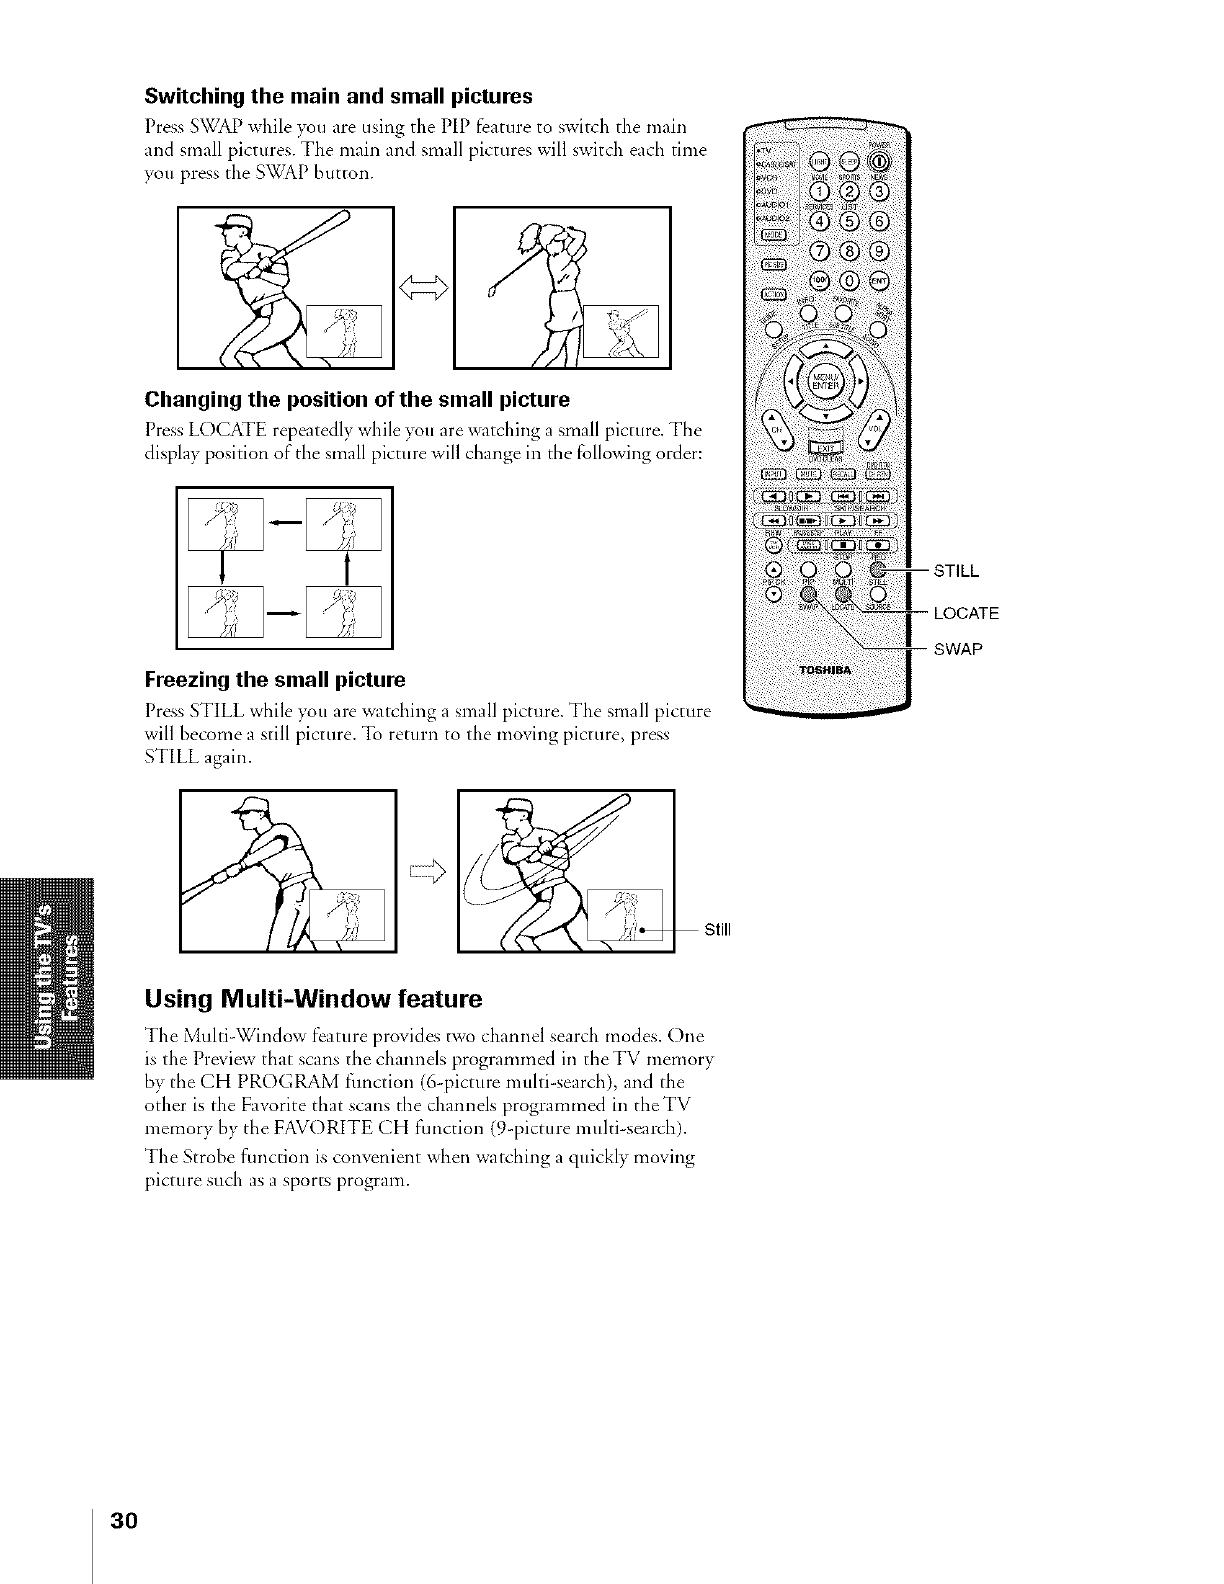
Switching the main and small pictures
Press SWAP while )_u are using the PIP feature to switch the main
and small pictures. The main and small pictures will switch each time
you press the SWAP button.
Changing the position of the small picture
Press LOCATE repeatedly while )_u are watching a small picture. The
display position of the small picture will change in the following order:
Freezing the small picture
Press STILL while )_u are watching a small picture. The small picture
will become a still picture. To return to the moving picture, press
STILL again.
LOCATE
SWAP
Using Multi-Window feature
The Multi-Window feature provides two channel search modes. One
is the Prep'levythat scans the channels programmed in the TV memory
by the CH PROGRAM fimction (6-picture multi search), and the
other is the Favorite that scans the channels programmed in the TV
memory by the FAVORITE CH fimction (9-picture multi-search).
The Strobe function is convenient when watching a quickly moving
picture such as a sports program.
3O
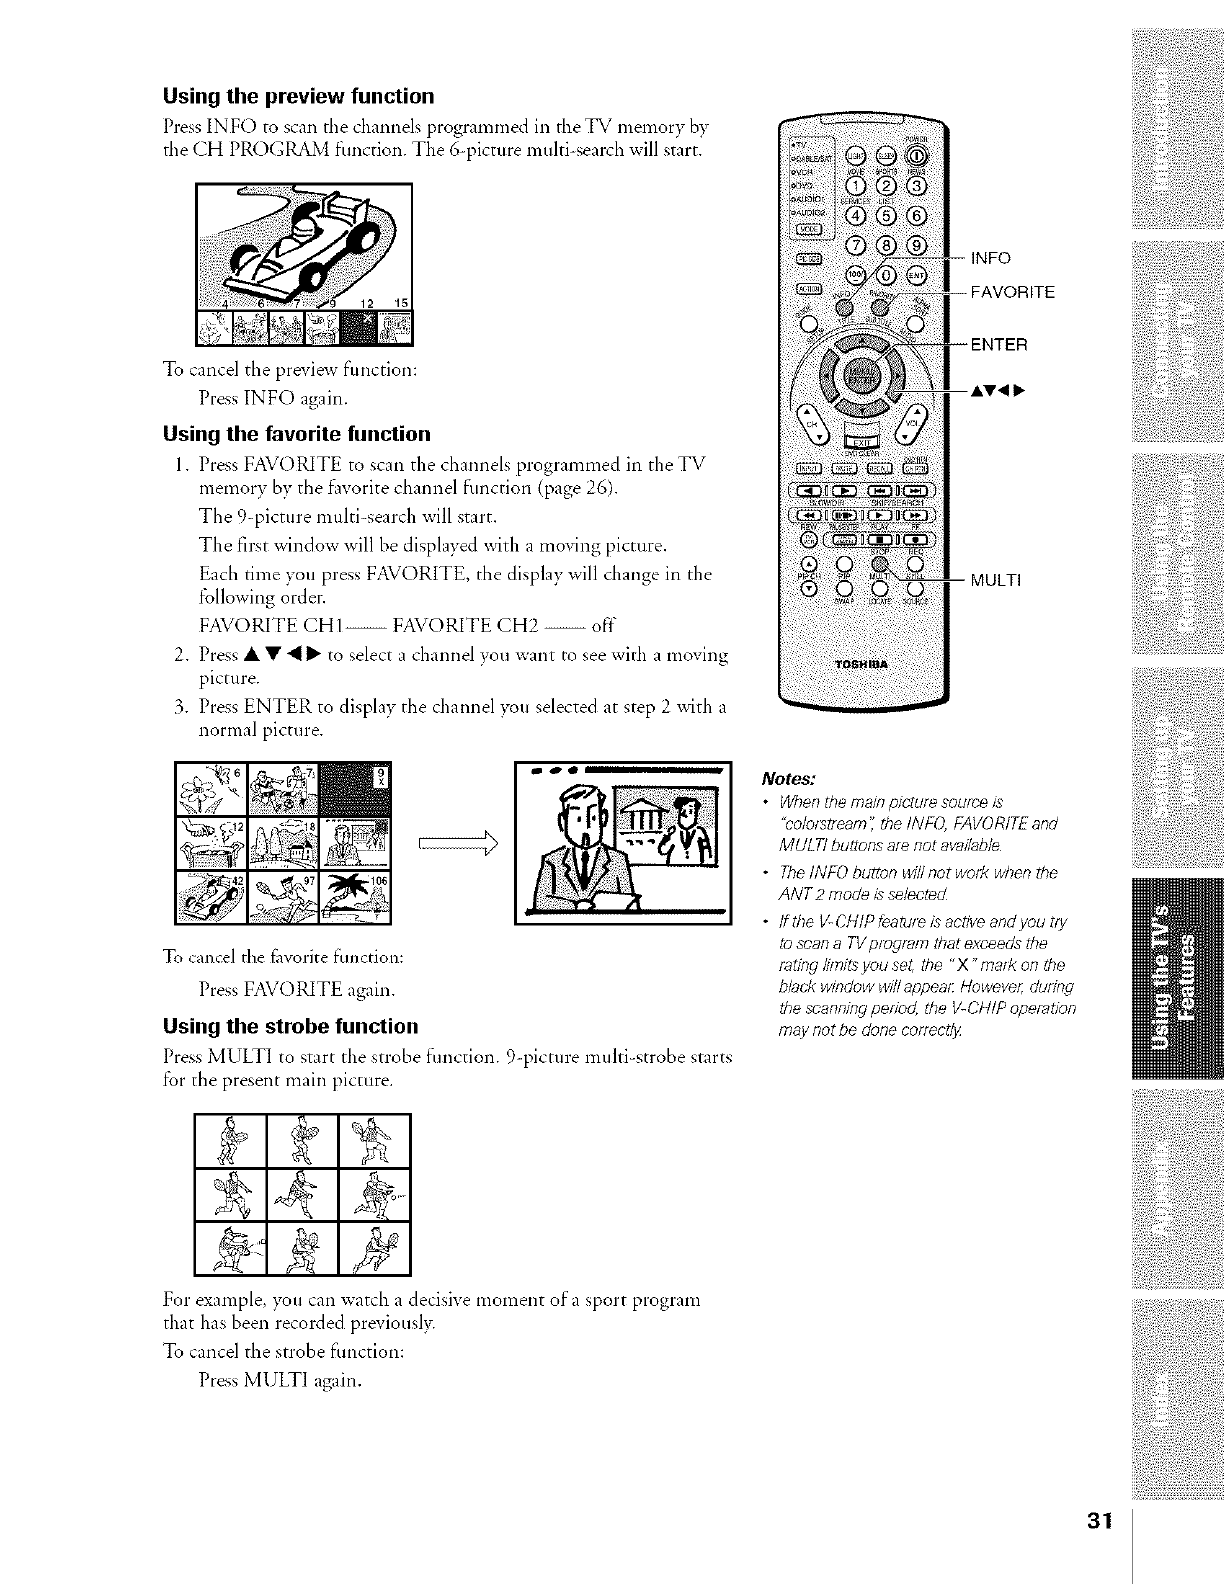
Using the preview function
Press INFO to scan the channels programmed in the TV memory by
the CH PROGRAM function. The 6 picture multi-search will start.
To cancel the preview function:
Press INFO again.
Using the favorite function
1. Press FAVORITE to scan the channels programmed in the TV
memory by the l:avorite channel function (page 26).
The 9 picture multi-search will start.
The first window will be displayed with a moving picture.
Each time you press FAVORITE, the display will change in the
following order.
FAVORITE CHI-- FAVORITE CH2 -- off"
2. Press • • "_I_ to select a channel you want to see with a moving
picture.
3. Press ENTER to display the channel you selected at step 2 with a
normal picture.
"gal 6
To cancel the favorite fimctiom
Press FAVORITE again.
Using the strobe function
Press MULTI to start the strohe function. 9 picture multi-strobe starts
for the present main picture.
-- FAVORITE
-- ENTER
-- MULTI
Notes:
•Whenthe main picture sourceis
"co/of_tleam",the INFO, FAVORITEand
MULTI buttons af_ not available
• TheINFO button wi/Inotwof2 wben the
ANT2 mode is se/ectec_
• ffthe V-CHIPfeatuf_bactiveandyoutry
to scan a TVpzogzamthat exceeds the
rating/#nits you set, the "X "mad< on the
black window willappeal: HoweveJ;during
tbe scanningperiod, the V-CHIP operation
may not be done cerT_cdy
4
For example, you can watch a decisive moment of a sport program
that has been recorded previously.
To cancel the strobe fimction:
Press MULTI again.
31
Using the LOCKS menu
The LOCKS menu includes the V-CHIR CH Lock, Video Lock and
New PIN Code f\mctions. You can use these functions after entering
the correct PIN code.
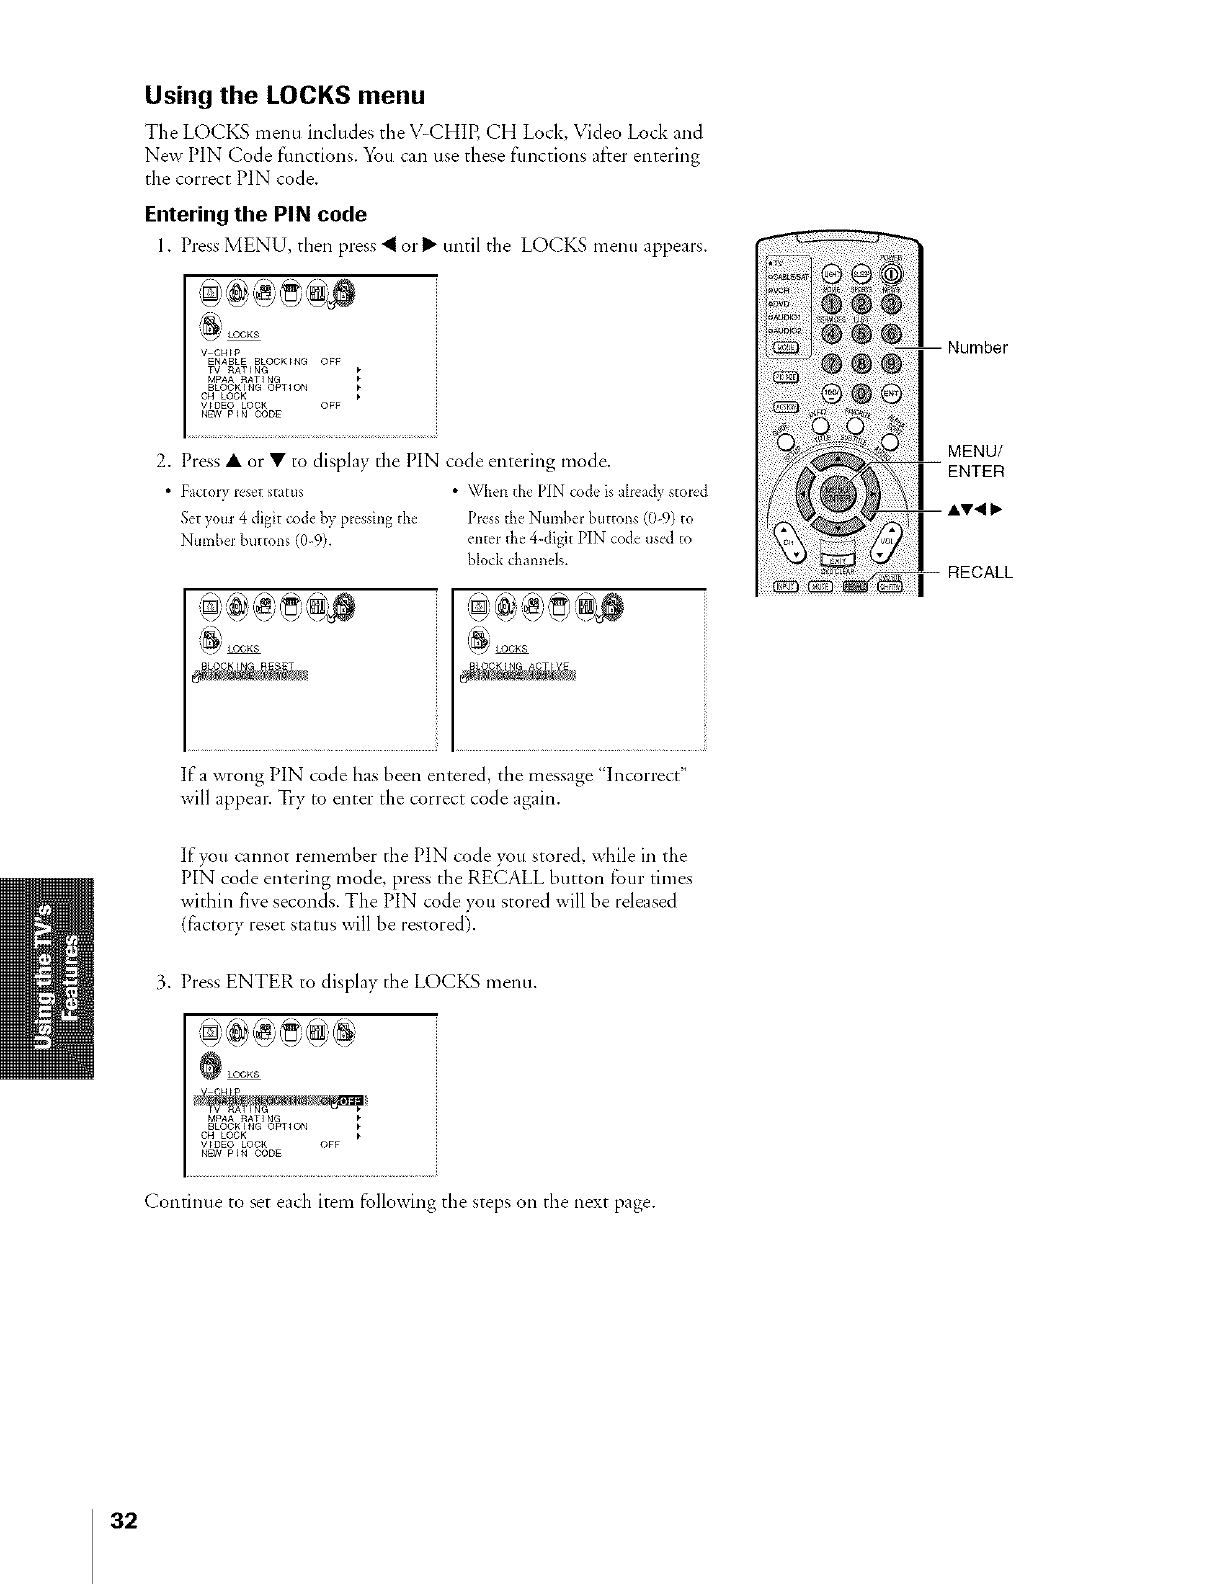
Entering the PIN code
1. Press MENU, then press "_ o1"I_ until tile LOCKS menu appears.
V CH_P
ENABLE BL©CK_NG ©gg
TV RATING
MPAA RATING
BL©CKENG ©PTION
CH LOCK
V_OE© LOCK OFF
NEW pIN CODE
2. Press • or • to display the PIN code entering mode.
• Factory reset status • When the PIN code is already stored
Set your 4 digit _ode by pressing the Press the Number buttons (0-9) to
Number buttons (0-9). enter the @digit PIN code used to
blockdxannels.
If a wrong PIN code has been entered, the message "Incorrect"
will appear. Try to enter the correct code again.
If you cannot remember the PIN code you stored, while in the
PIN code entering mode, press the RECALL button four times
within five seconds. The PIN code you stored will be released
(factory reset status will be restored).
3. Press ENTER to display the LOCKS menu.
_L©¢KS
CH LOCK
V_DEO LOCK OFF
NEW plN CODE
Continue to set each item following the steps on the next page.
32
Using the V-CHIP menu
Some TV programs and movies include signals tMt classify the
content of the program (violence, sex, dialog, language). The VCHIP
control feature in this TV detects the signals and blocks the programs
according to your selections. To use this feature, perform the
following setup.
ENABLE BLOCKING
1. From the LOCKS menu, select ENABLE BLOCKING.
2. Press 4 orl_ to select ON or OFE
ON : To enable your setting (Lock)
OFF: To release your setting (Unlock)
Note: TheCHLOCKfunctionisnotaffectedwiththisselection
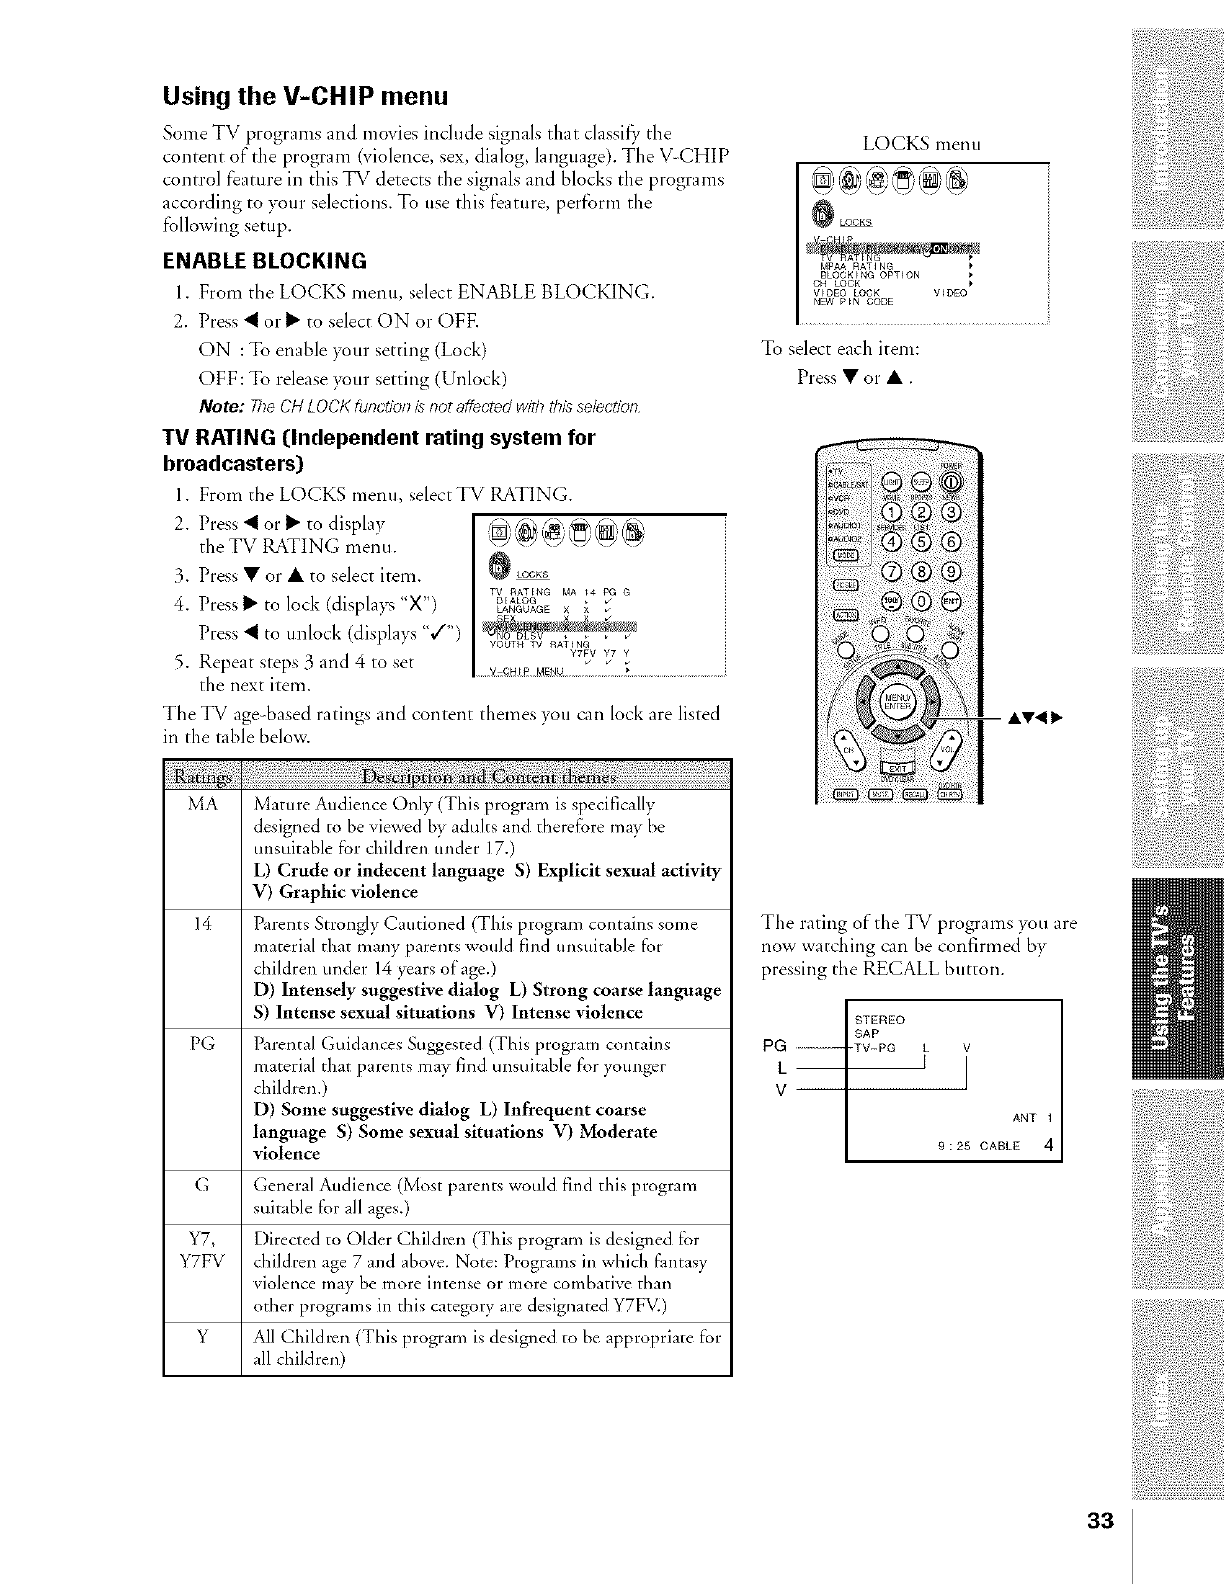
TV RATING ([Independent rating system for
broadcasters)
l. From the LOCKS menu, select TV RATING.
2. Press _ or I_ to display
the TV RATING menu.
3. Press • or • to select item.
4. Press 1_ to lock (displa)<_"X")
Press _ to unlock (displays ",/")
5. Repeat steps 3 and 4 to set
the next item.
_LOCKS
TV RATENG MA _4 PG G
DIALOG •
LANGUAGE × X v
Y©UTH TV RATING
YTFV Y7 Y
vv_
The TV age based ratings and content themes you can lock are listed
in the table below.
LOCKS menu
_LOCKS
BLOCKING OPTION
CH _OCK
V_OEO LOCK V_DEO
NEW p_N CODE
To select each item:
Press•or•.
MA Mature Audience Only (This program is specifically
designed to be viewed hy adults and therefore may be
unsuitable _r children under 17.)
L) Crude or indecent language S) Explicit sexual activity
V) Graphic violence
14 Parents Strongly Cautioned (This program contains some
material that many parents would find unsuitable for
childreu under 14 years of age.)
D) Intensely suggestive dialog L) Strong coarse language
S) Intense sexual situations V) Intense violence
PG Parental Guidances Suggested (This program contains
material that parems may find unsuitable for younger
children.)
D) Some suggestive dialog L) Infrequent coarse
language S) Some sexual situations V) Moderate
violence
G General Audience (Most parents would find this program
suitible for all ages.)
Y7, Directed to Older Children (This program is designed for
Y7FV dlildren age 7 and above. Note: Programs in whirl1 fantasy
violence may be more intense or more combative than
oilier programs in dlis category are design lted Y7FV.)
YAll Children (This program is designed to be appropriate for
,11children)
The rating of the TV programs you are
now watching can be confirmed by
pressing the RECALL button.
Re ....
L
V
STEREO
SAP
-TV-PG LV
ANT 1
9 : 25 CABLE 4
33
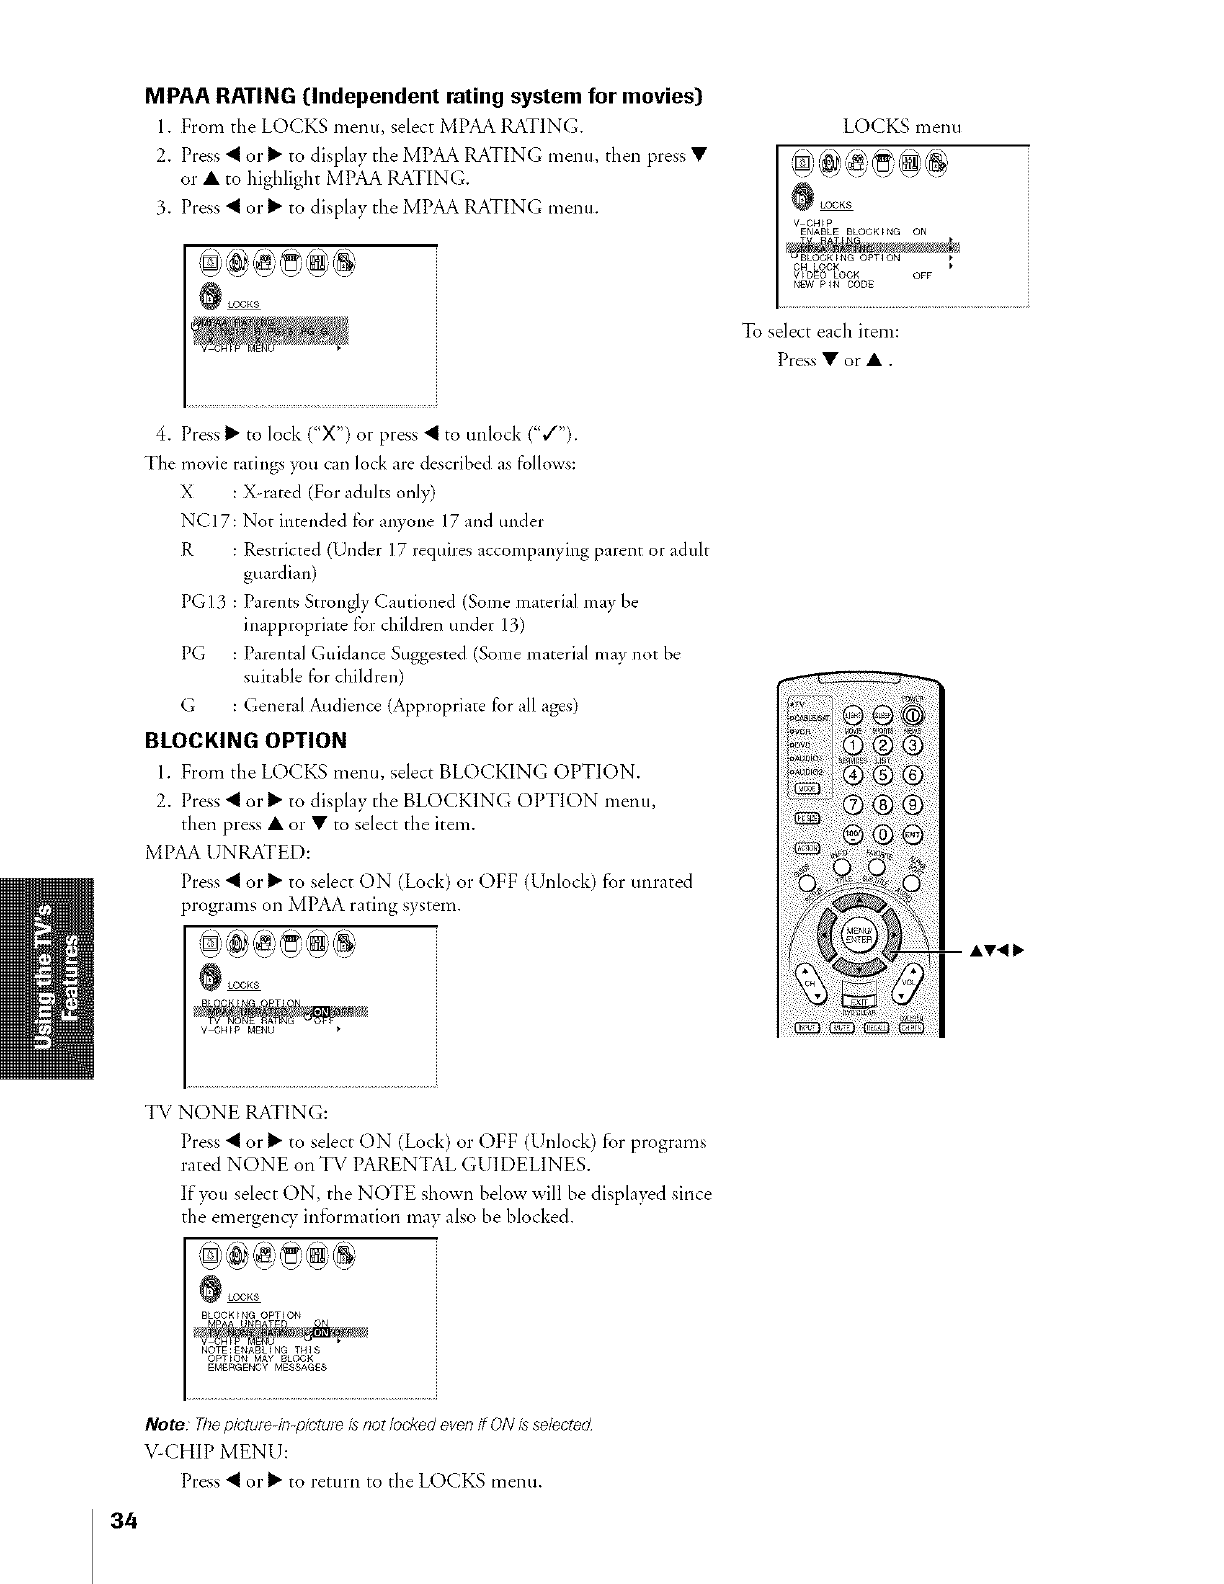
MPAA RATING ([Independent rating system for movies)
1. From tbe LOCKS nlenu, select MPAA RATING.
2. Press _ or I_ to display the MPAA RATING menu, then press •
or • to higblight MPAA RATING.
3. Press _ or 1_ to display the MPAA RATING menu.
LOCKS menu
_LOOKS
V CH_P
ENABLE BLOCKING ON
V_DEO LOCK OFF
NkncV pIN OODE
To select each item:
Press•or•.
4. Press I_ to lock ("X") or press _ to unlock ("¢'").
The movie ratings you can lock are described as follows:
X : X-rated (For adulrx only)
NCI7: Not intended for aiiyone 17 and under
R : Restricted (Under 17 requires accompanying parent or adult
guardian)
PG 13 : Parents Strongly Cautioned (Some material may be
inappropriate for childlvn under 13)
PG : Parental Guidance Suggested (Some material may not be
suitable for children)
G : General Audience (Appropriate for all ages)
BLOCKING OPTION
1. From tbe LOCKS menu, select BLOCKING OPTION.
2. Press _ or I_ to display the BLOCKINC OPTION ntenu,
then press • or • to select the item.
MPAA UNRATED:
Press _ or I_ to select ON (Lock) or OFF (Unlock) for unrated
programs on MPAA rating system.
_LOCK8
.... ® ®
-- &y< Ib
TV NONE RATING:
Press _ or _ to select ON (Lock) or OFF (Unlock) for programs
rated NONE on TV PARENTAL GUIDELINES.
If you select ON, the NOTE shown below will be displayed since
the emergency intormation may also be blocked.
_LOCK_
BLOCKING OPTION
NOTE:ENABLiNG THIS
OPTION MAY BLOCK
EMERGENCY MESSAGES
Note Thepictule4r>p/ctul_/snotlockedeven/f ON/sselectecL
VCHIP MENU:
Press _ or 1_ to return to the LOCKS menu.
34
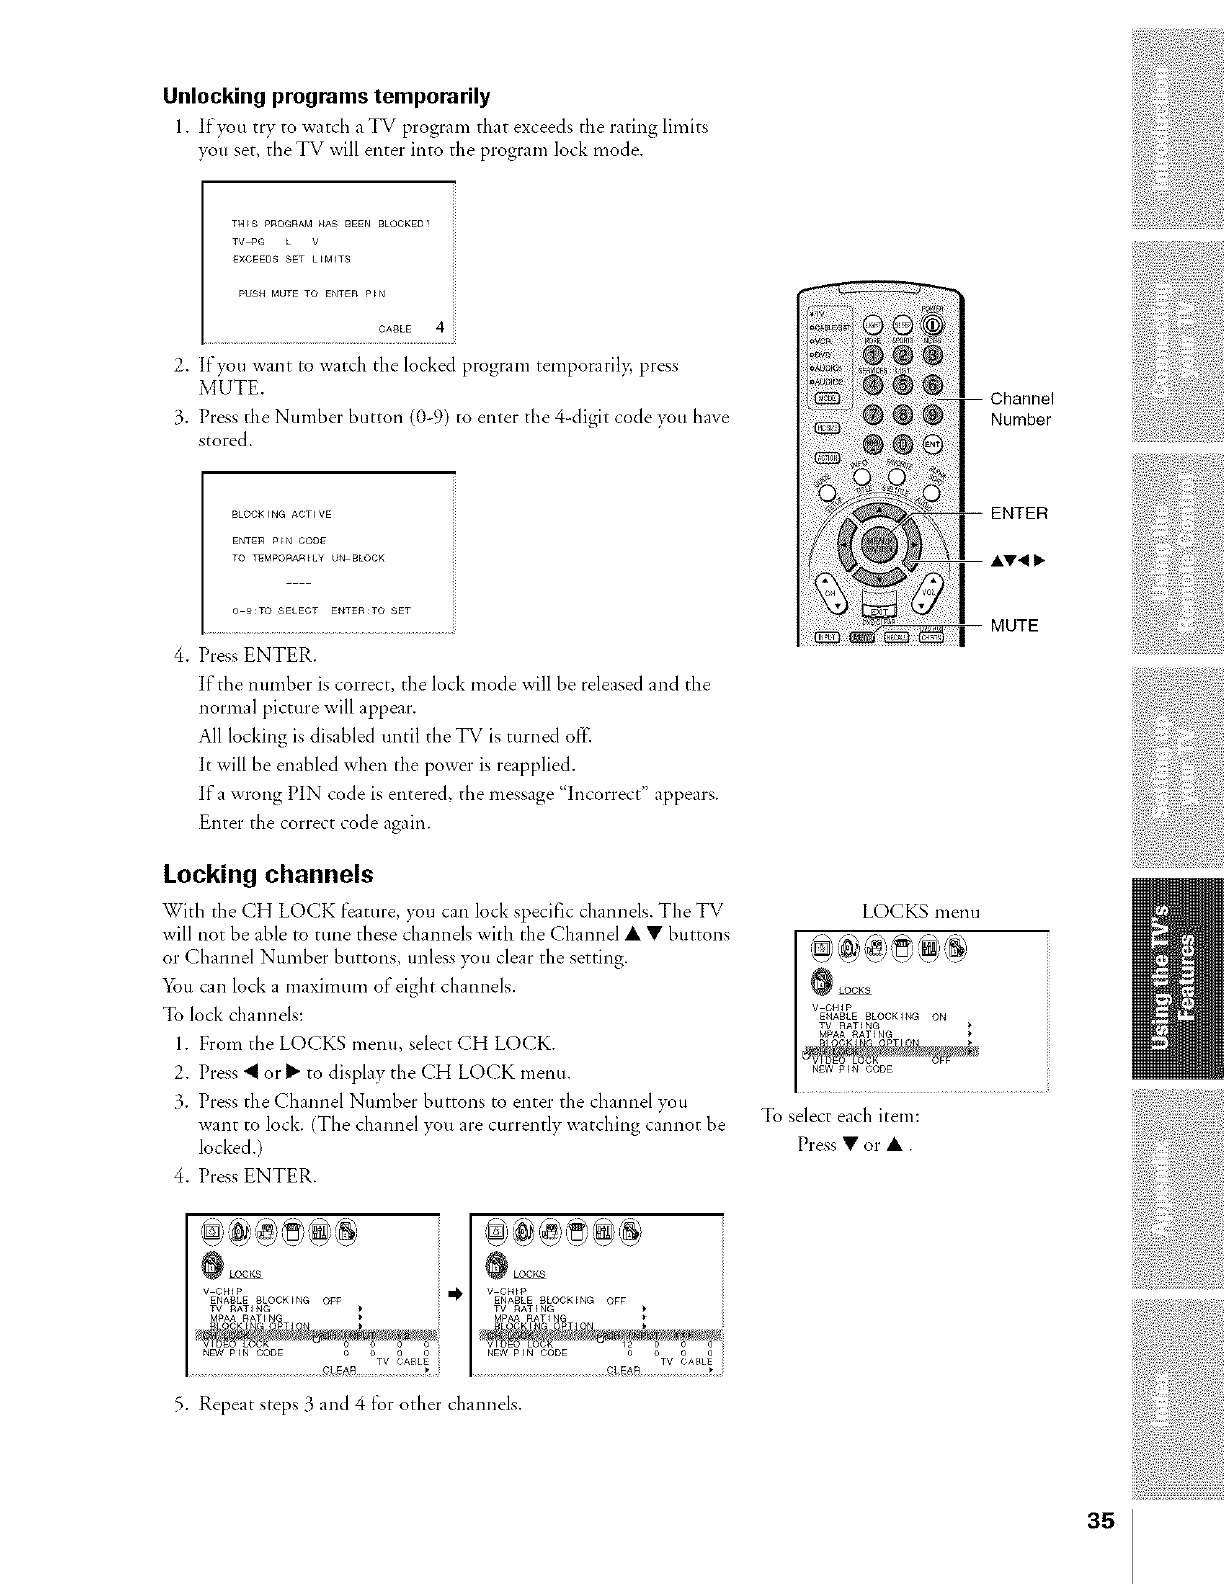
Unlocking programs temporarily
1. If you try"to watch a TV program that exceeds the rating limits
you set the TV *viii enter into the program lock mode.
TN_S pROGRAM HAS BEEN BLOCKEO!
TV-PG LV
E×CEEDS SET L_M_TS
PUSH MUTE TO ENTER P_N
CABLE 4
2. If you want to watch the locked program temporarily, press
M[JTE.
3. Press the Number button (0-9) to enter the 4-digit code you have
stored.
BLOCKING ACTIVE
ENTER P_N COOE
TO TEMPORARELY Ut,LBLOCK
0 9:TO SELECT ENTER:TO SET
4. Press ENTER.
If tbe number is correct, the lock mode will be released and the
normal picture will appear.
All locking is disabled until the TV is turned off.
It will be enabled when the power is reapplied.
If a wrong PIN code is entered, the message "Incorrect" appears.
Enter the correct code again.
Locking channels
With the CH LOCK feature, you can lock specific channels. The TV
will not be able to tune these channels with the Channel • • buttons
or Channel Number buttons, unless )_u clear the setting.
You can lock a maximum of eight channels.
To lock channels:
1. From the LOCKS menu, select CH LOCK.
2. Press _ or I_ to display the CH LOCK menu.
3. Press the Channel Number buttons to enter the channel you
want to lock. (The channel, ou are currently watching cannot be
locked.)
4. Press ENTER.
LOCKS menu
_LOCK$
V CH_P
ENABLE BLOCKING ON
TV RATING
MPAA RATING ii
NEW piN CODE il
To select each item:
Press • or •.
_LOCKS
v cH_p ii_'
ENABLE 9LOCKING OFg
TV RATING
MPAA RATING
_LOCKS
V CH_P
ENABLE BL©CK_NG OFF
TV RATING
MPAA RATING
5. Repeat steps 3 and 4 for other channels.
35
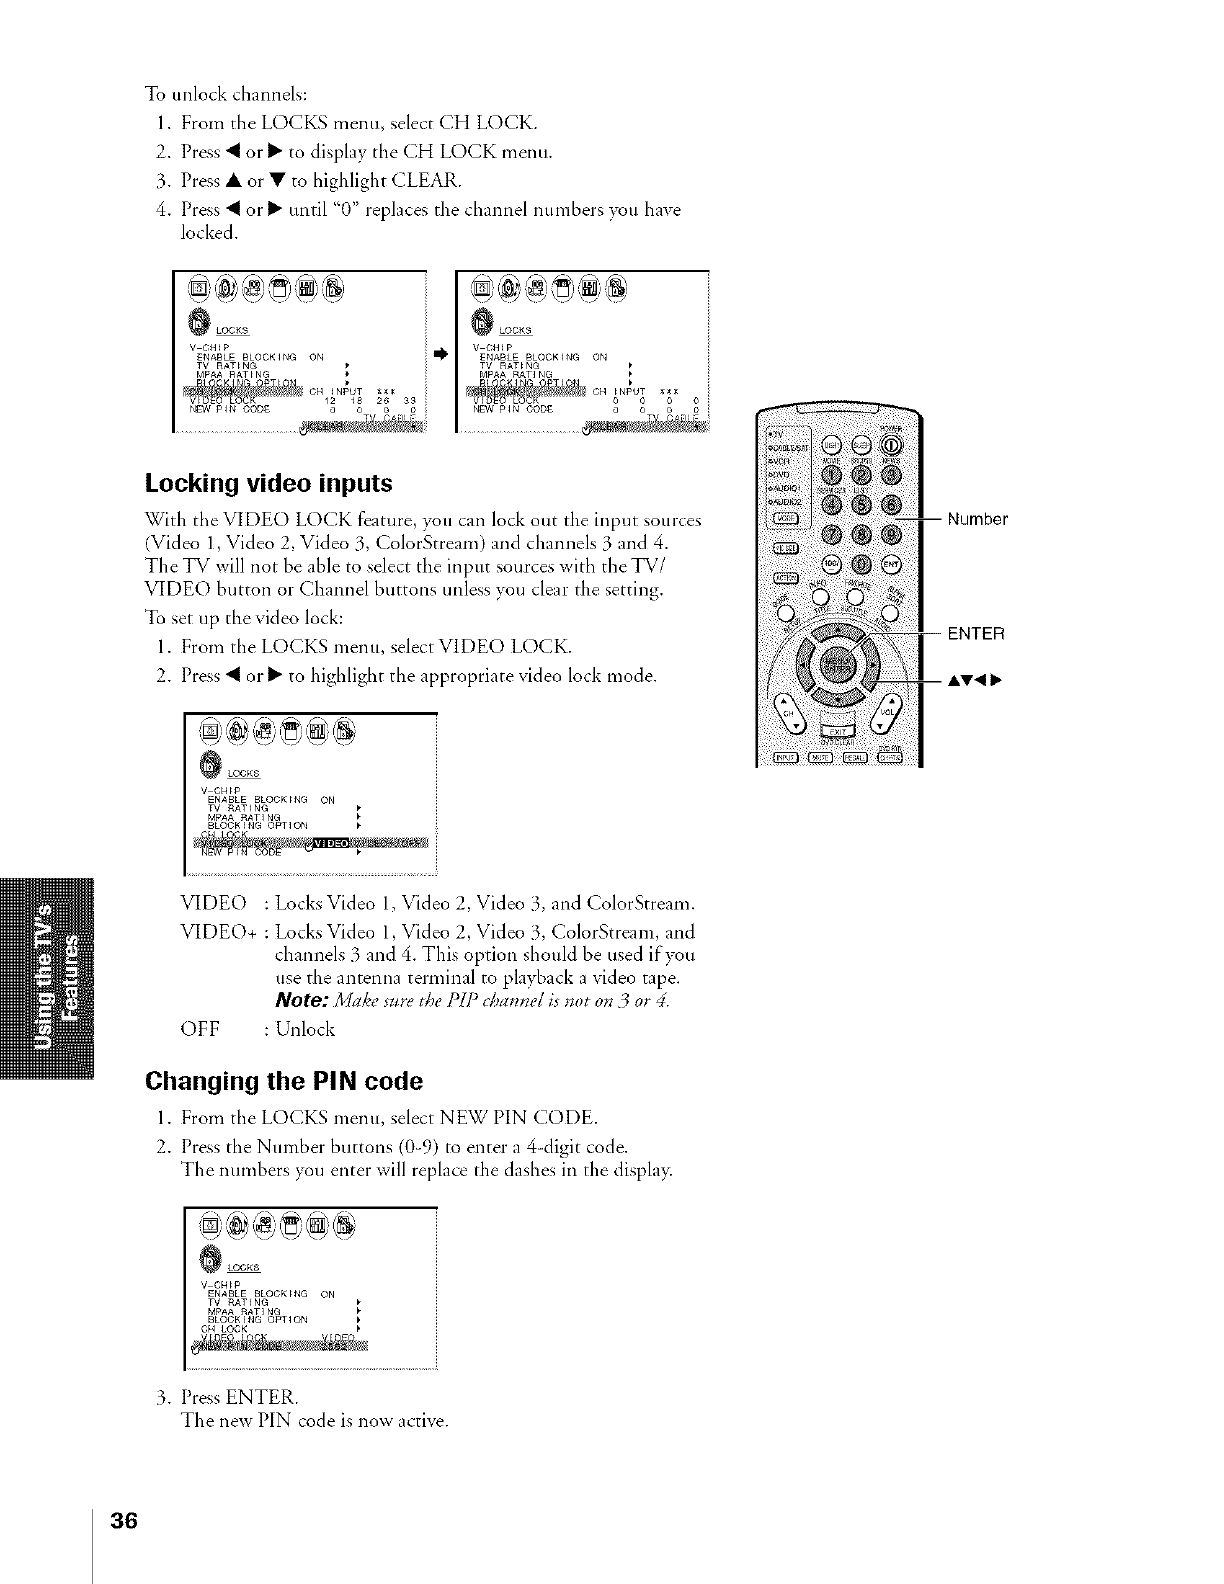
To unlock channels:
1. From the LOCKS menu, select CH LOCK.
2. Press "_ or 1_"to display the CH LOCK menu.
3. Press • or • to highlight CLEAR.
4. Press "_ or I_"until "0" replaces the channel numbers you have
locked.
_LOCRS
V CN_P
ENABLE BLOCKING ON
TV RATING
MPAA RATING
, CN _NPUT _
12 _8 26 33
NEW P_N C©DE
_LOCRS
i_ V CH_B
ENABLE BLOCKING ON
TV RAT_ NG
MPAA RATJ NG
C14 _NPUT
0 0
NEW p_N C©DE
Locking video inputs
With the VIDE() LOCK feature, you can lock out the input sources
(Video 1, Video 2, Video 3, ColorStream) and channels 3 and 4.
The TV will not be able to select the input sources with the TV/
VIDEO button or Channel buttons unless )_tl clear the setting.
To set up the video lock:
1. From the LOCKS menu, select VIDEO LOCK.
2. Press _ orl_" to highlight the appropriate video lock mode.
_LOCKS
V CH_P
ENABLE BLOCKING ON
TV RATING
MPAA RATING
iilii! iii !iii i ili ii
-- Number
VIDEO : LocksVideo 1 Video 2, Video 3, and ColorStream.
VIDEO+ : Locks Video l, Video 2, Video 3, ColorStream, and
channels 3 and 4. This option should be used if you
use the antenna terminal to playback a video tape.
Note: Make s_re the PIP ch_mnd is not on 3 or 4.
OFF : Unlock
Changing the PIN code
1. From the LOCKS menu, select NEW PIN CODE.
2. Press the Number buttons (0-9) to enter a 4 digit code.
The numbers you enter will replace the dashes in the displa>
_OCK8
V CH_P
ENABLE BL©CK_NG ON
TV RATING
MPAA RATING
BL©CKING ©_TION
CH LOCK
3. Press ENTER.
The new PIN code is now active.
36
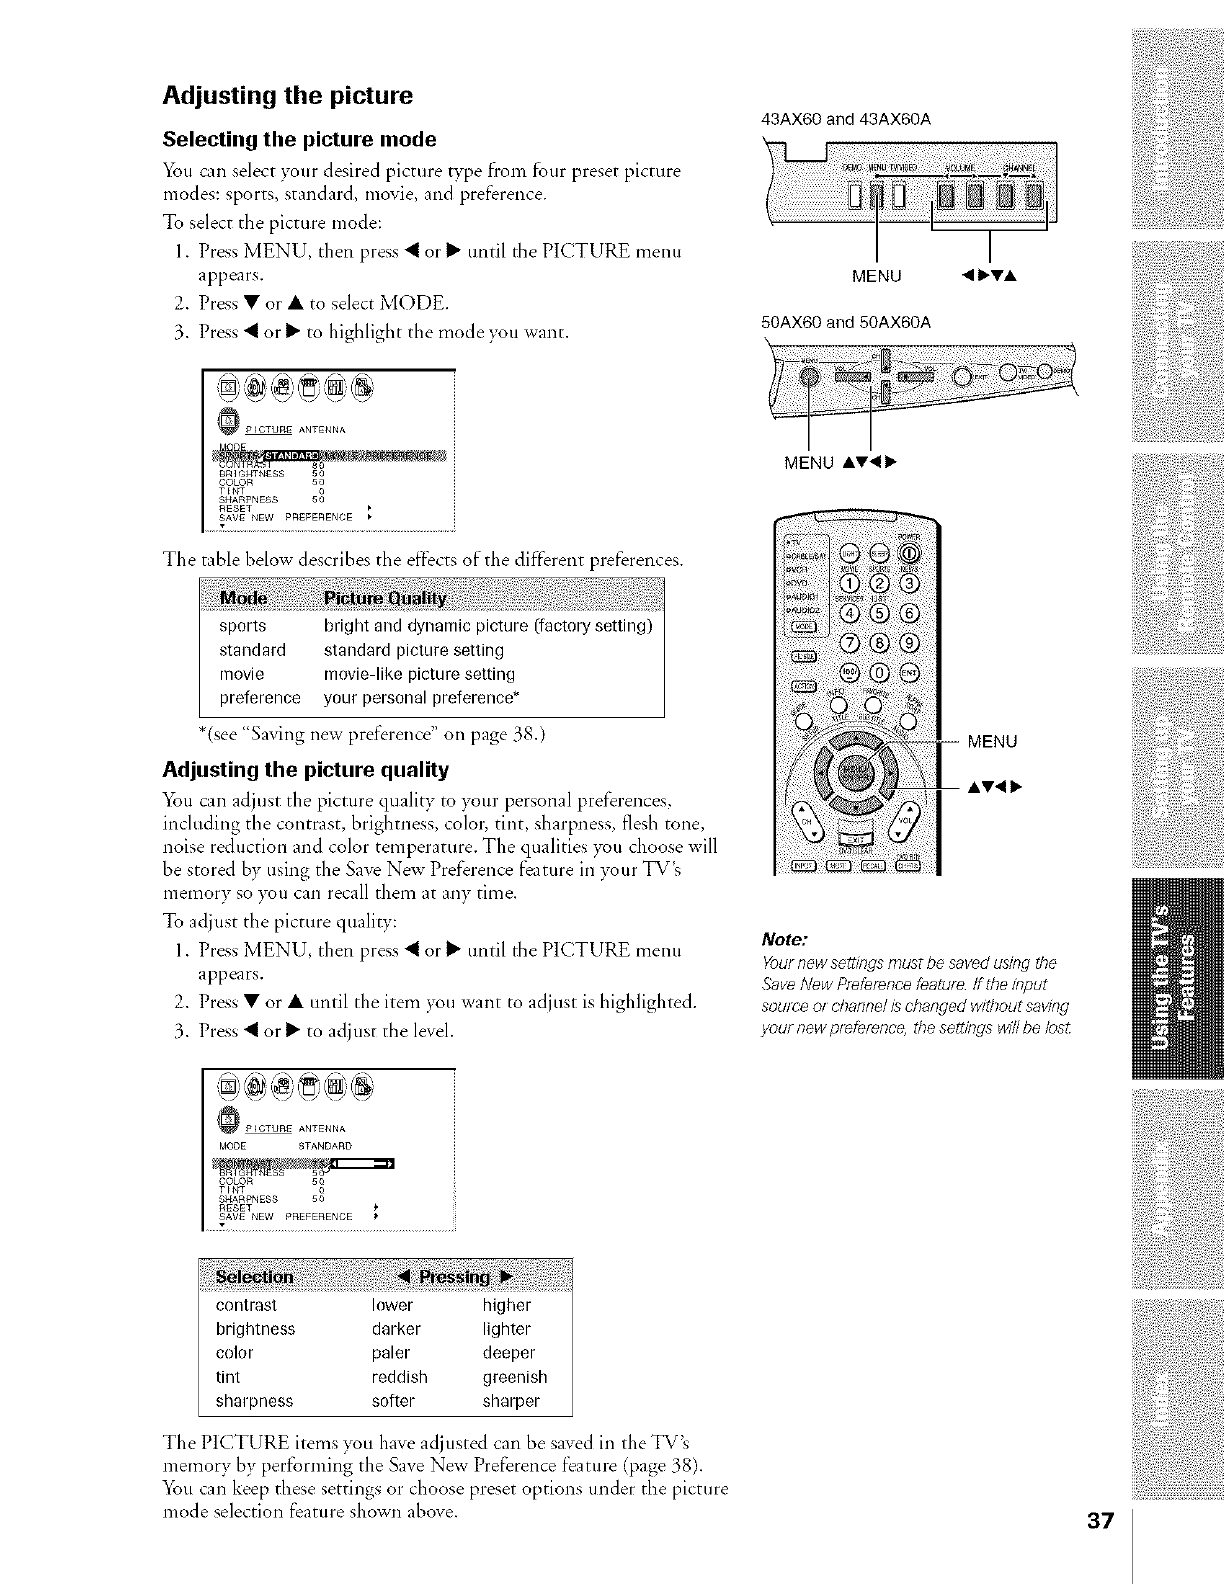
Adjusting the picture
Selecting the picture mode
You camselect your desired picture type from four preset picture
modes: sports, standard, movie, and preference.
To select the picture mode:
1. Press MENU, then press "_ or I_ until the PICTURE menu
appears.
2. Press • or • to select MODE.
3. Press "_ or I_ to highlight the mode you want.
43AX60 and 43AX60A
MENU
50AX60 and 50AX60A
\
•I_vA
TENT 5_
SHARPNESS
RESET
SAVE NEW PREgERENCE
The table below describes tile effects of the different preferences.
MENU AV•Ib
*(see "Saving new preference" on page 38.)
Adjusting the picture quality
You can adiust the picture quality to your personal preferences,
including the contrast, brightness, color, tint, sharpness, flesh tone,
noise reduction and color temperature. The qualities you choose will
be stored by using the Save New Preference feature in )_ur TV's
memory so you can recall them at any time.
To adjust the picture quality:
1. Press MENU, then press _ or I_ until the PICTURE menu
appears.
2. Press • or • until the item )_u want to adjust is highlighted.
3. Press _ or I_ to adjust the level.
Note:
Yournew settings must be saved using the
,SaveNew Preferencefeature ff the input
source or d?anne/b changed without saving
your new preference, the settings w///be lost
MOOE STANDARD
RgSET
SAVE NEW PREFERENCE
contrast lower higher
brightness darker lighter
color paler deeper
tint reddish greenish
shatpness softer sharper
The PICTURE items )_u have adjusted can be saved in the TV's
memory by performing the Save New Preference feature (page 38).
Volt can keep these settings or cboose preset options under the picture
mode selection feature shown above. 37
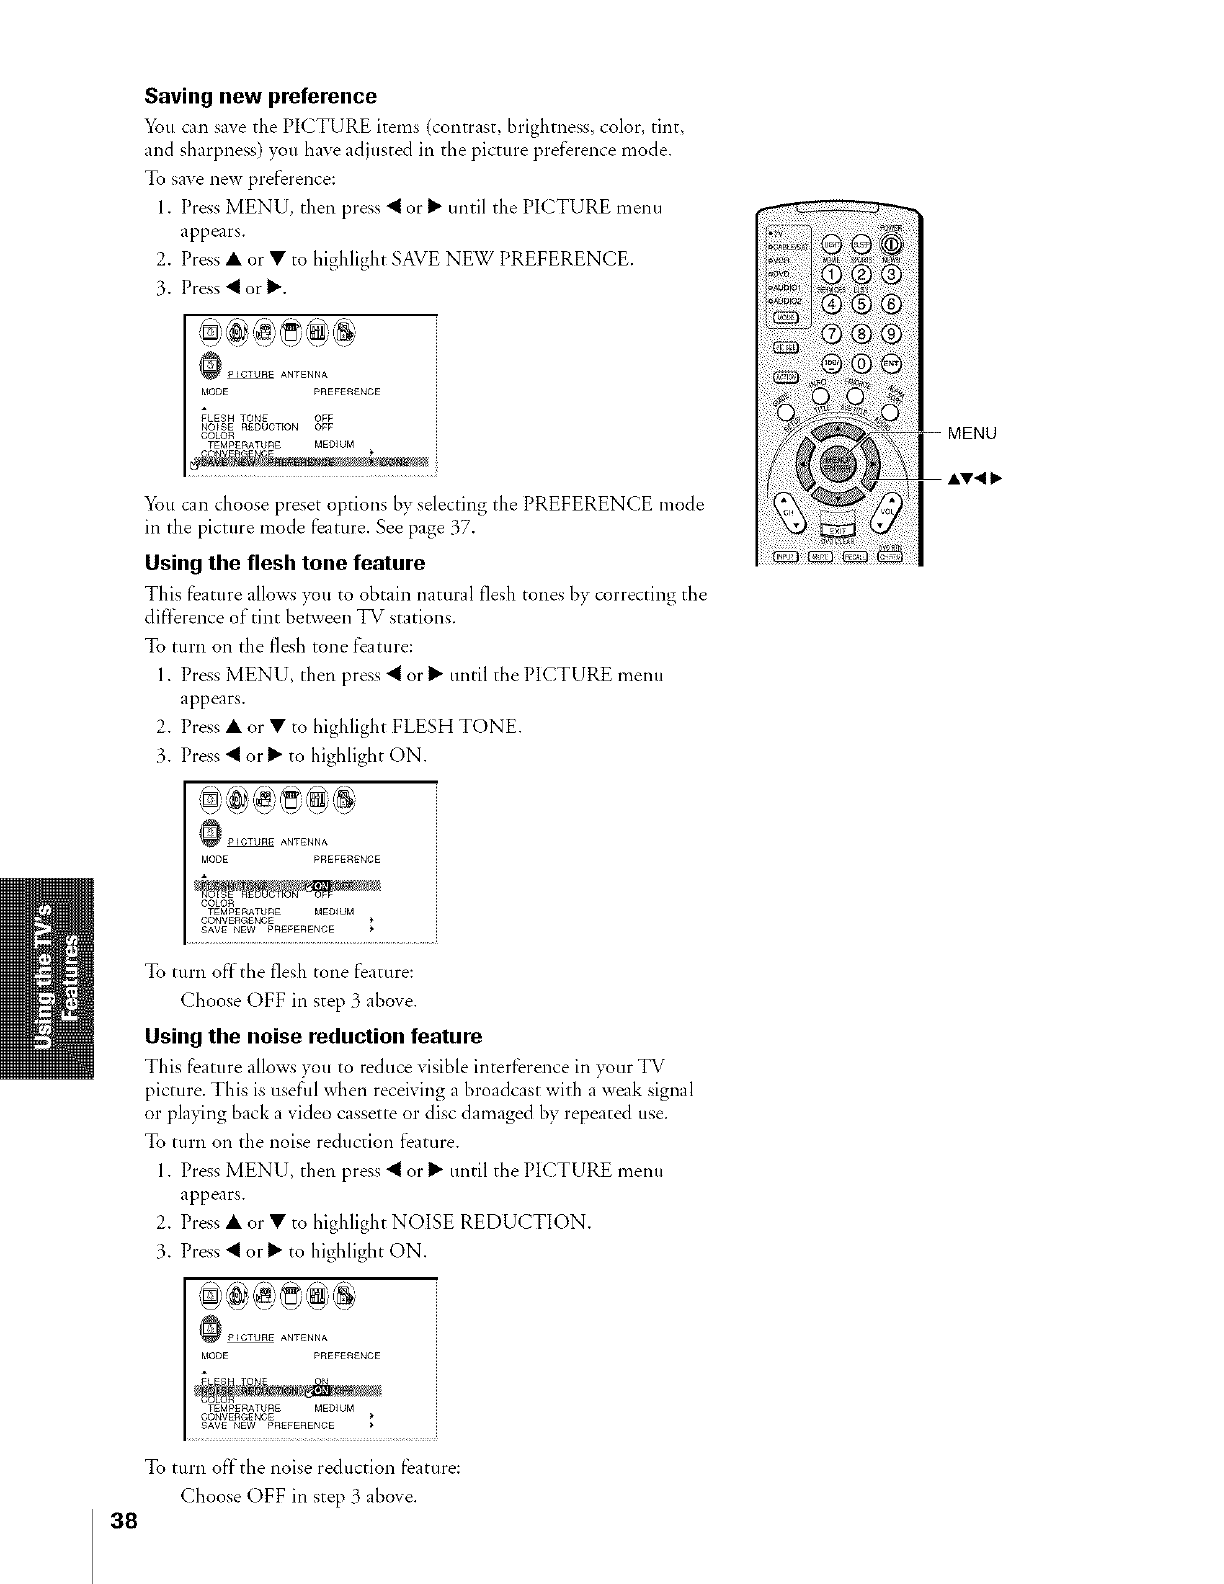
Saving new preference
You can save the PICTURE items (contrast, hrightness, color, tint,
and sharpness) you have adjusted in the picture preference mode.
To save new preference:
1. Press MENU, then press _ or 1_ until the PICTURE menu
appears.
2. Press • or • to highlight SAVE NEW PREFERENCE.
3. Press _ or 1_.
MODE PREFERENCE
FLESH T©NE OFF
NO_gE R£DUCTION OFF
COLOR
TEMPERATUR£ MEOIUM
You can choose preset options by selecting the PREFERENCE mode
in the picture mode feature. See page 37.
Using the flesh tone feature
This feature allows you to obtain natural flesh tones by correcting the
difference of tint between TV stations.
To turn on the flesh tone feature:
1. Press MENU, then press _ or I_ until the PICTURE menu
appears.
2. Press • or • to highlight FLESH TONE.
3. Press _ or I_ to highlight ON.
MODE PREFERENCE
COLOR
TEMPERATUR£ MEDIUM
CONVERGENCE
SAVE NEW PR£gERENCE
To turn off the flesh tone feature:
Choose OFF in step 3 above.
Using the noise reduction feature
This feature allows you to reduce visible interference in }_ur TV
picture. This is useful when receiving a broadcast with a weak signal
or playing back a video cassette or disc damaged by repeated use.
To turn on the noise reduction feature.
1. Press MENU, then press _ or I_ until the PICTURE menu
appears.
2. Press • or • to highlight NOISE REDUCTION.
3. Press _ or I_ to highlight ON.
MOOE PREFERENCE
TEMPgRATUR£ MEDIUM
CONVERGENCE
SAVE NEW PREFERENCE
To turn off the noise reduction feature:
Choose OFF in step 3 above.
38
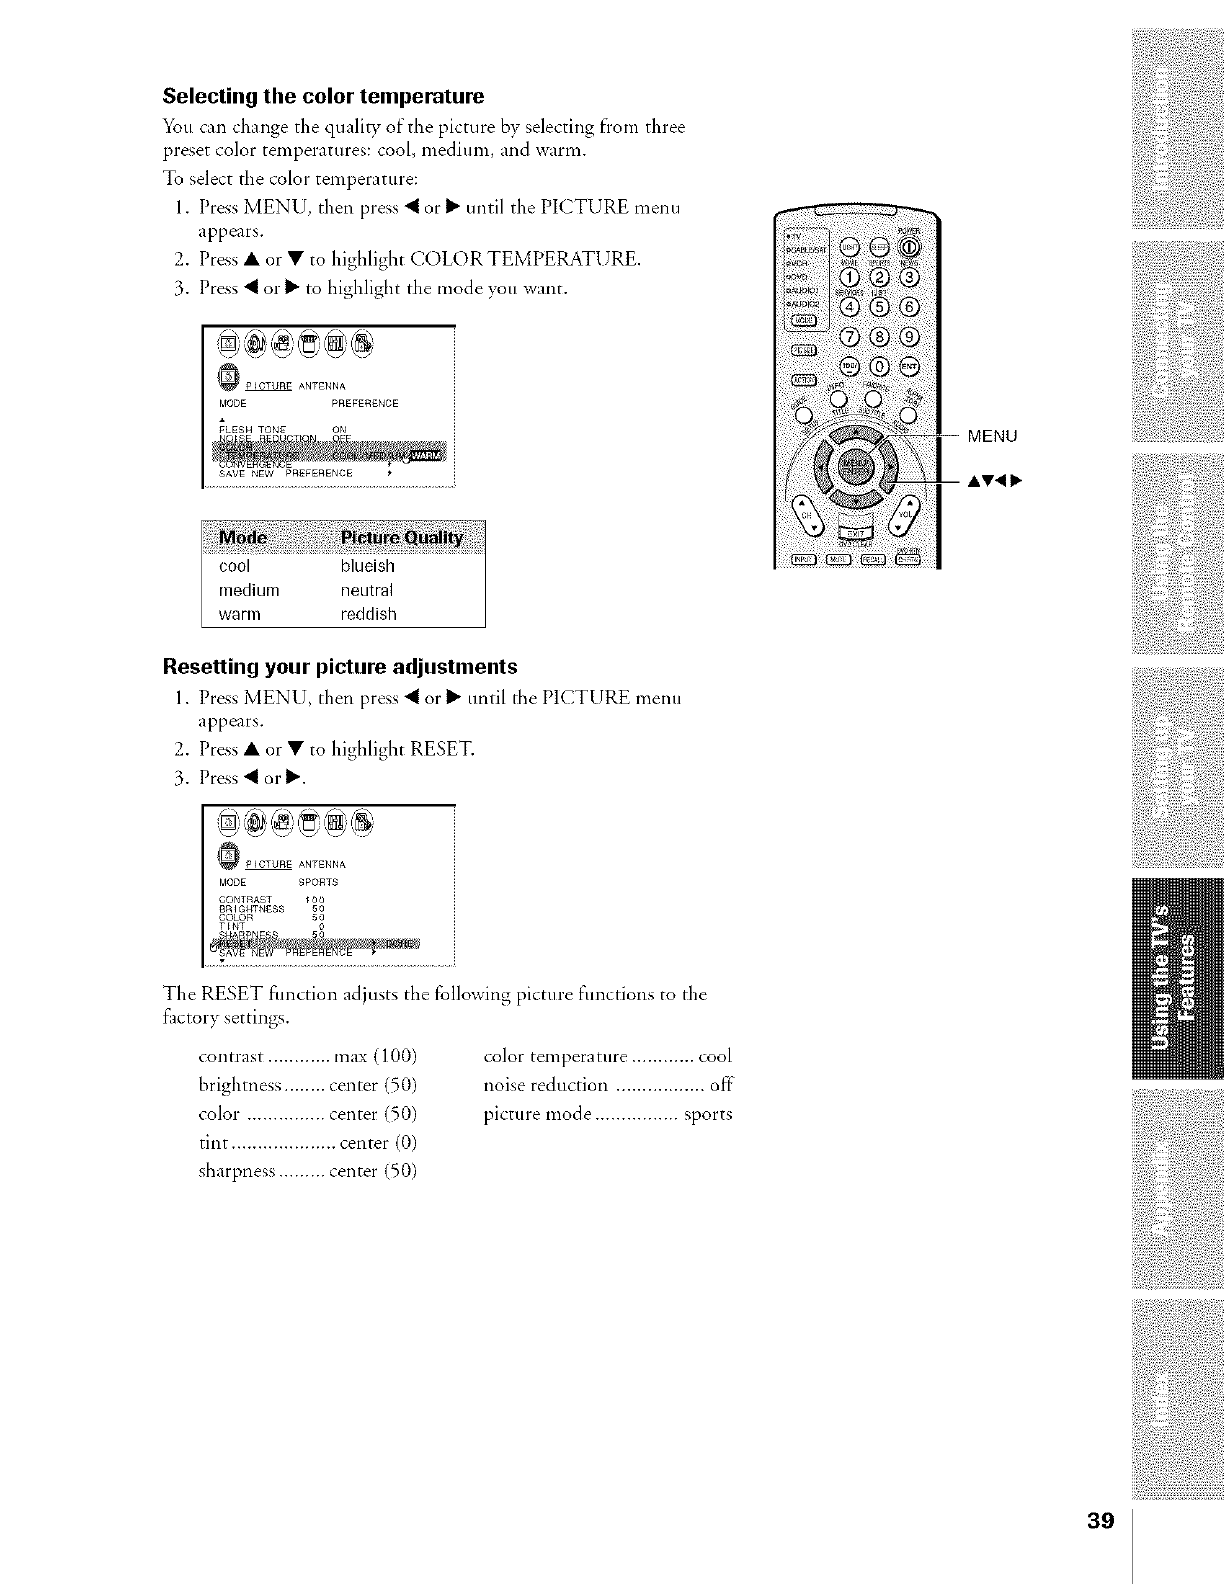
Selecting the color temperature
You can change the qual[_" of" the picture by selecting from three
preset color temperatures: cool, medium, and warm.
To select the color temperature:
l. Press MENU, then press _ or I1_until the PICTURE menu
appears.
2. Press • or • to highlight COLOR TEMPERATURE.
3. Press _ or 1_ to highlight the mode you want.
MODE pREFERENCE
FLESH TONE ON
Resetting your picture adjustments
1. Press MENU, then press <or I_ until the PICTURE menu
appears.
2. Press • or • to highlight RESET.
3. Press _ or 1_.
MODE SPORTS
CONTRAST _00
BRIGHTNESS 5O
C©LOR 5O
TINT
.....7....................................................................................
The RESETfimction adiusts the following picture fllnctions to the
_actory settings.
contrast ............ max (100)
brightness ........ center (50)
color ............... center (50)
tint .................... center (0)
sharpness ......... center (50)
color temperature ............ cool
noise reduction ................. off"
picture mode ................ sports
39
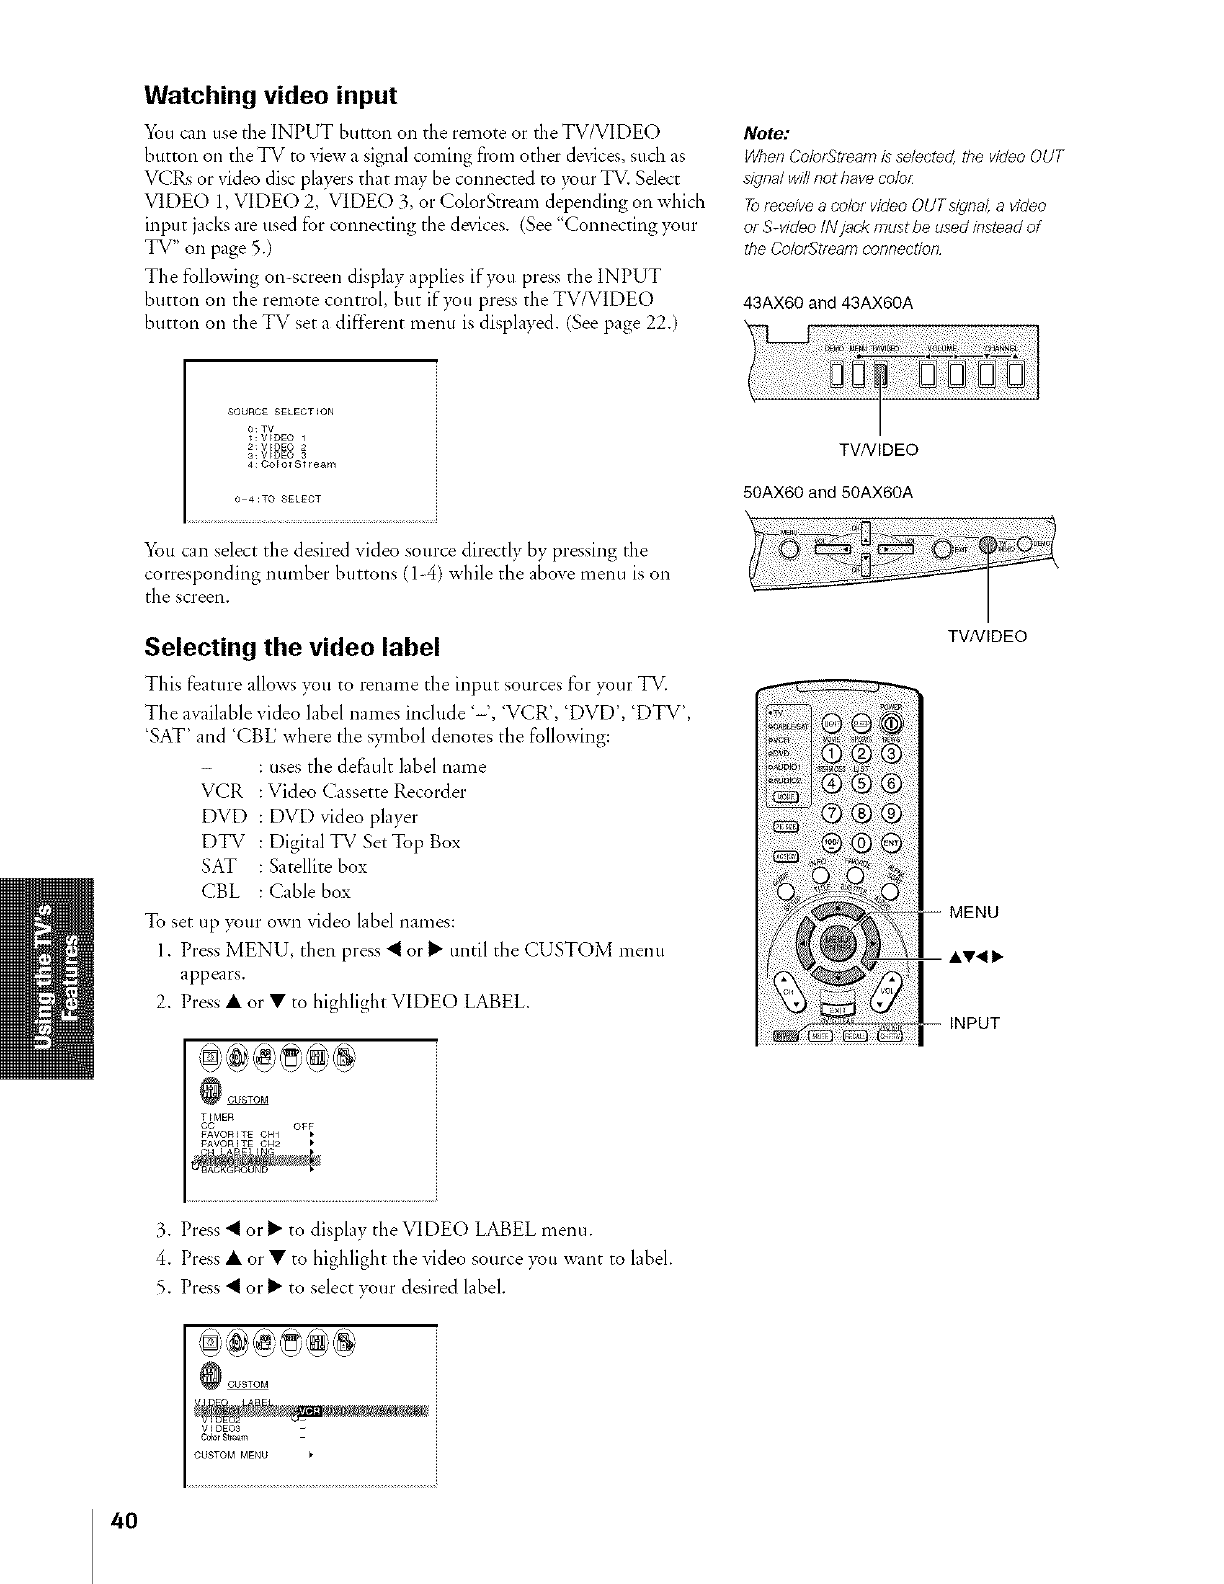
Watching video input
You can use the INPUT button on the remote or the TV/VIDEO
button on the TV m view a signal coming fiom other devices, such as
VCRs or video disc plavers that may be connected to your T_L Sdect
VIDEO 1, VIDEO 2, VIDE() 3, or ColorSneam depending on which
input jacks are used for connecting the devices. (See "Connecting your
TV" on page 5.)
The following on-screen display applies if you press the INPUT
button on the remote control, but if you press the TV/VIDEO
button on the TV set a different menu is displayed. (See page 22.)
Note:
WhenCo/orStreamis se/ecte_ the v/deeOUT
signalwill not have co/or:
Toreceive a color video OUTsigna/, a video
or Swideo INjack must be used instead of
the Co/orStreamconnection
43AX60 and 43AX60A
SOURCE SELEOT_ON
0; TV
_:V_DEO 1
2;VIDEO
3;V_DEO
4:Colo_St_eam
0 4:TO SELECT
You can select tile desired video source directly by pressing the
corresponding number buttons (14) while the above tnentl is on
the screen.
Selecting the video label
This feature allows >_u to rename the input sources for your TV.
The available video label names include '-', 'VCR', 'DVD', 'DTV',
'SAT' and 'CBL' where the s_nbol denotes the following:
- : uses the default label name
VCR : Video Cassette Recorder
DVD : DVD video player
DTV : Digital TV Set Top Box
SAT :Satellite box
CBL : Cable box
To set up your own video label rlames:
1. Press MENU, then press _ or _ until the CUSTOM menu
appears.
2. Press • or • to highlight VIDEO LABEL.
TVNIDEO
50AX60and 50AX60A
\
TV/VlDEO
T_MER
¢C OgF
FAVORITE CHI
FAV©mTE CH2
3. Press <or _ to display the VIDEO LABEL menu.
4. Press • or • to highlight the video source you want to label.
5. Press _ or I1_to select your desired label.
40
V _DEO3
¢0br Stream
CUSTOM MENU

6. Finish labeling the other video sources as desired. To return to the
previous merm, press • or • to highlight CUSTOM MENU,
then press _ or 11_.
To exit the menu, press EXIT.
Using the closed caption feature
5_u have two options with the closed caption feature: captions or text.
A caption is a printed version of the dialogue, narration and/or sound
effects oLraTV program. Text is information not related to the
program that appears on half of the TV screen (if"available in your
area).
To view captions or text:
1. Select the desired program. The captioned programs are usually
marked in }_ur local TV listing as "CC."
2. Press MENU, then press _1 orb" until the CUSTOM nlentl
appears.
3. Press • or • to highlight CC.
CH LABELkNG
VIDEO LABEL
BACKGROUND
4. Press _ or I1_to highlight the closed caption mode.
•Select C1, C2, C3, or C4 to view captions. Select CI for
translation of the primary language in your area.
•Select TI. T2, T3, or T4 to view Text.
Note:
Adosed caption signalmay not be decoded
in tbe followingsituations
• when a videotape basbeen dubbed
•when the signalreception is weak
•when the sifTna/receptionis nonstandard
Whenyou d_oose a closed captioned d_anne/
and the textmode, the textscreen always
appea_ When tbere isno signal,boweve_
the textscreen willnot displaytextd_aracters
To turn offthe closed-caption feature:
Select OFF in step 4.
41
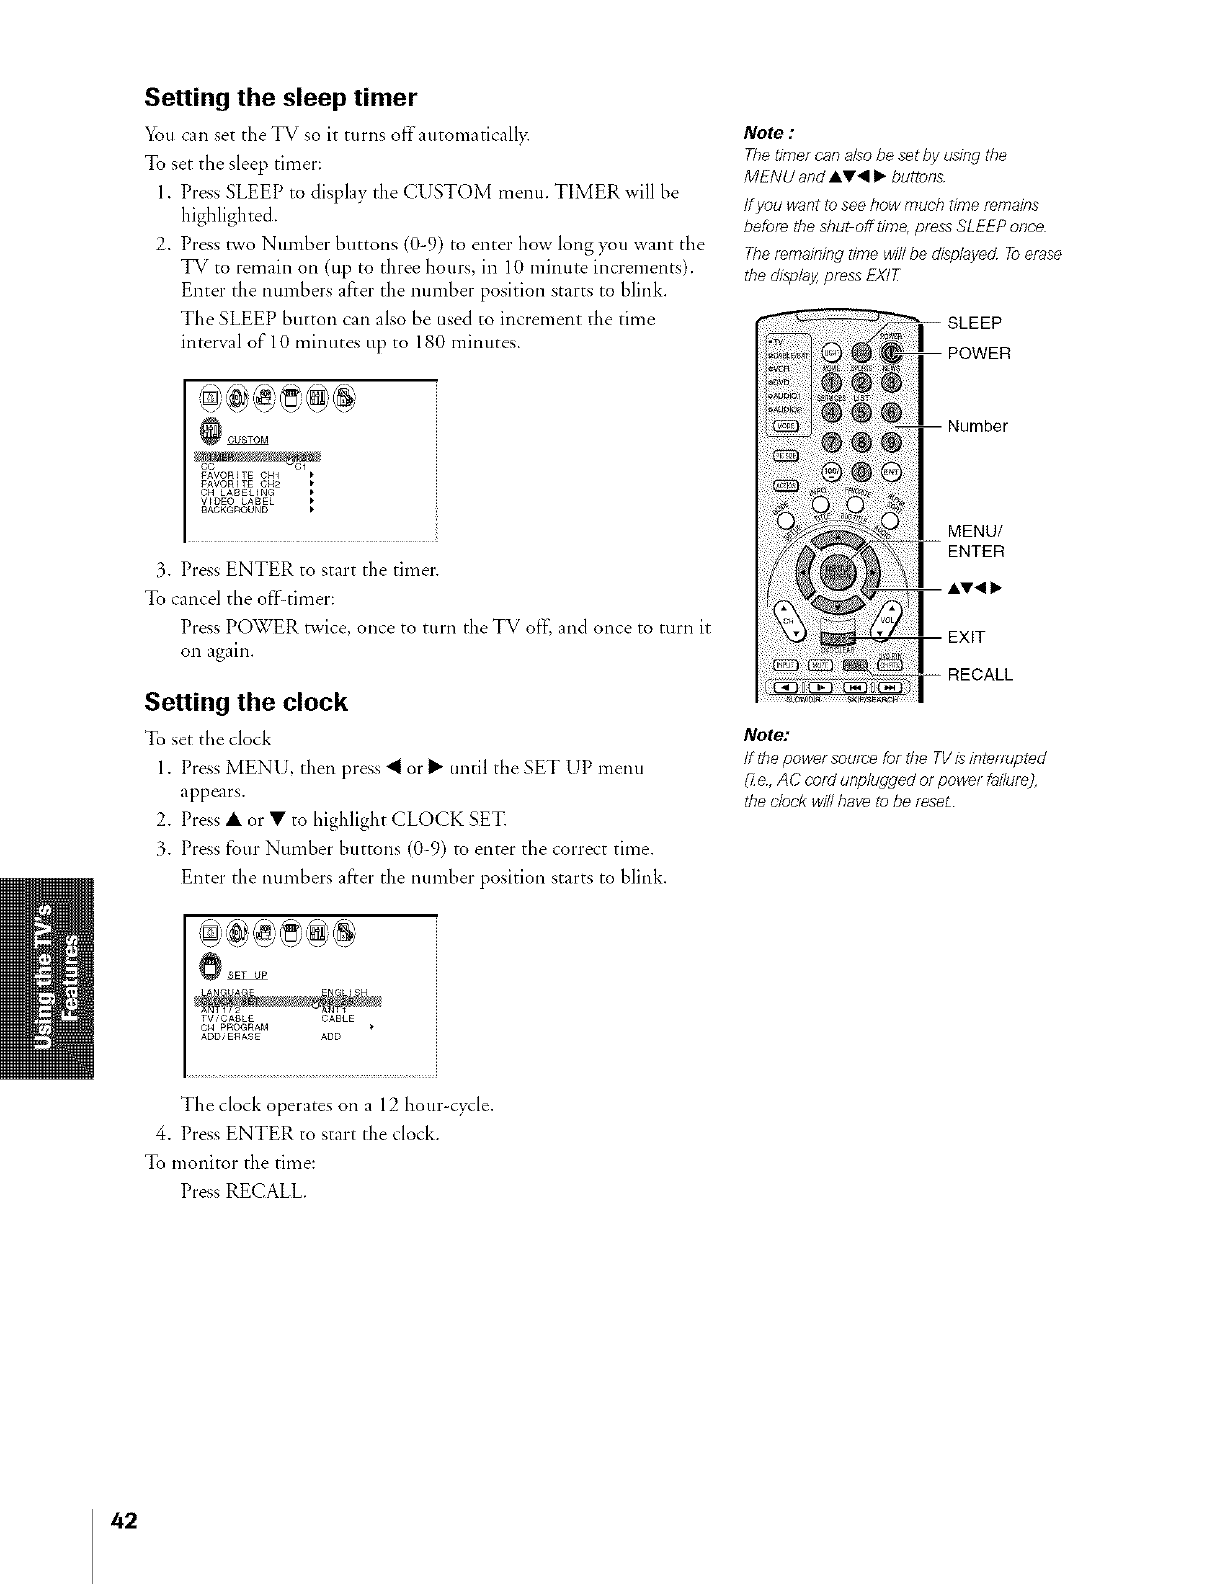
Setting the sleep timer
You can set the TV so it turns of}'automaticall}_
To set the sleep timer:
1. Press SLEEP to display the CUSTOM menu. TIMER will be
highlighted.
2. Press two Number buttons (0-9) to enter how long )_u want the
TV to remain on (up to three hours, in 10 minute increments).
Enter the numbers after the number position starts to blink.
The SLEEP button can also be used to increment the time
interval of 10 minutes tip to 180 minutes.
gAVORETE C_1
FAVORITE GH2
CH LABEUNG
VkDEO LABEL
BACKGROUND
3. Press ENTER to start the timer.
To cancel the off:timer:
Press PO_VER twice, once to turn the TV of}, and once to turn it
on again.
Setting the clock
To set the clock
1. Press MENU, then press _ or 1_ until the SET UP menu
appears.
2. Press • or • to highlight CLOCK SET.
3. Press four Number buttons (0-9) m enter the correct time.
Enter the numbers after the number position starts to blink.
Note :
Thetimel canalso be set by using the
MENU and AV< I_ buttons
ff you wantto seehow much time remains
befo_ the shuboff time,press SLEEP once
The f_maining time will be displayed Toerase
the display,press EXIT
MENU/
Note:
if/he power sou_e for the TV/s/nterT_pted
_Ze, AC cold unplugged or power failure),
the c/ee/_will have to be reseL
_$ET UP
TViCABLE CABLE
CH PROGRAM
ADD/ERASE ADD
The clock operates on a 12 hou>cvcle.
4. Press ENTER to start the clock.
To monitor the time:
Press RECALL.
42

Adjusting the sound
Muting the sound
Press MUTE to temporarily turn offthe sound. While the sound is
off; the screen will display the word MUTE in the lower right-hand
corner. To restore the sound, press MUTE again.
When you press the MUTE button, you automatically activate the
closed caption feature. To deactiv:tte this feature, press the MUTE
button again. This feature only works wllen the closed caption mode
is set to off" See "Using the closed caption feature" on page 41 for
more information.
Selecting stereo/SAP broadcasts
You can enjoy watching TV while you listen to high fidelity stereo
sound with the Multi-channel TV Sourld (MTS) feature. MTS can
also transmit a second audio program (SAP) containing a second
language or other audio informatiorl (if available ira your areal.
When the TV receives a stereo or SAP broadcast, the word STEREO
or SAP appears on the screen every time the TV is turned orl, the
charmel is changed, or the RECA[.L button is pressed.
The MTS feature is not available while in the VIDEO mode.
To listen to stereo sound:
1. Press MENU, then press _ or I1_until the AUDIO menu
appears.
43AX60 and 43AX60A
MUTE
-- RECALL
50AX60 and 50AX60A
\
MTS MONO
BASS
TREBLE
BALANCE
RESET
i{
.................................. !{
2. Press • or • to highlight MTS.
3. Press _ or I_ to highlight STEREO.
_ AUO_O
You should leave }_ur TV set to STEREO so you can
automatically receive stereo or monaural sound, depending on
the broadcast n_pe. If the stereo somad is noisy, select MONO to
reduce the noise. The word STEREO or SAP is displayed ira
yellow when the TV receives the signah
To listen to a second audio program:
l. Press MENU, then press _ or I_ until the AUDIO menu
appears.
2. Press • or • to highlight MTS.
3. Press _ or I1_to highlight SAE You will hear only the second
audio program from the speakers.
MENU AV< IP"
® ® ......
-- MENU
_,,.,,
Note:
A second audio p_og_am(SAP) canbe beard
only on tbose TVstations that offer it.
ff you bave the SAP featur_ on, and tbe
station tbe TVIs cutTent/ytuned to isIn SAP
mode but is not CUrTentlyplaying a second
audio program, you will be able to see tbe
picture but may not hear sounc_ff this occurs,
tUIT_the SAP featureoff
43
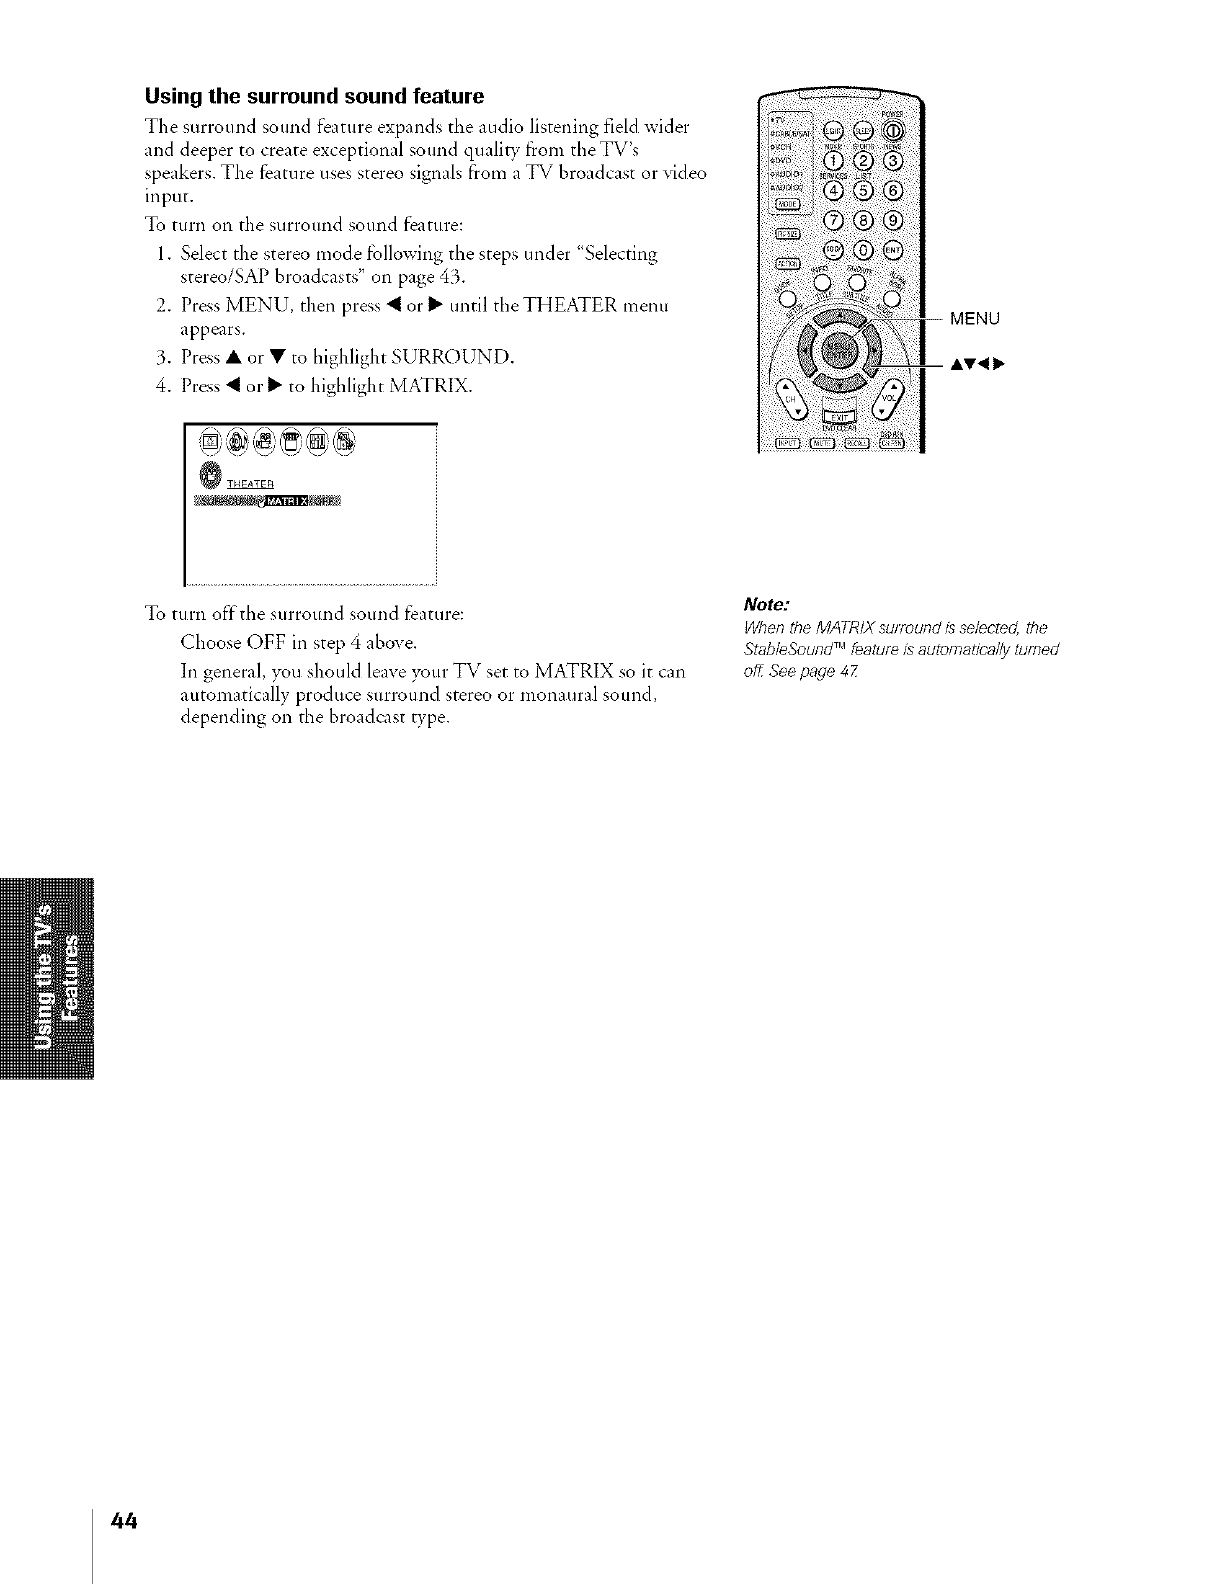
Using the surround sound feature
The surround sound feature expands tile audio listening f_eld wider
and deeper to create exceptional sound quali_/from the mV's
speakers. The feature uses stereo signals from a TV broadcast or video
input.
To turn on the surround sound feature:
1. Select the stereo mode following the steps under "Selecting
stereo/SAP broadcasts" oil page 43.
2. Press MENU, then press <or _ until the THEATER menu
appears.
3. Press • or • to highlight SURROUND.
4. Press < or _ to highlight MATRIX.
To turn offthe surround sound feature:
Choose OFF in step 4 above.
In general, vou should leave your TV set to MATRIX so it can
automatically produce surround stereo or monaural sound,
depending on the broadcast type.
Note:
When the MATRIXsul_ound is selected,the
Stab/eSoundTM featureis automatically turned
off Seepage 47
44
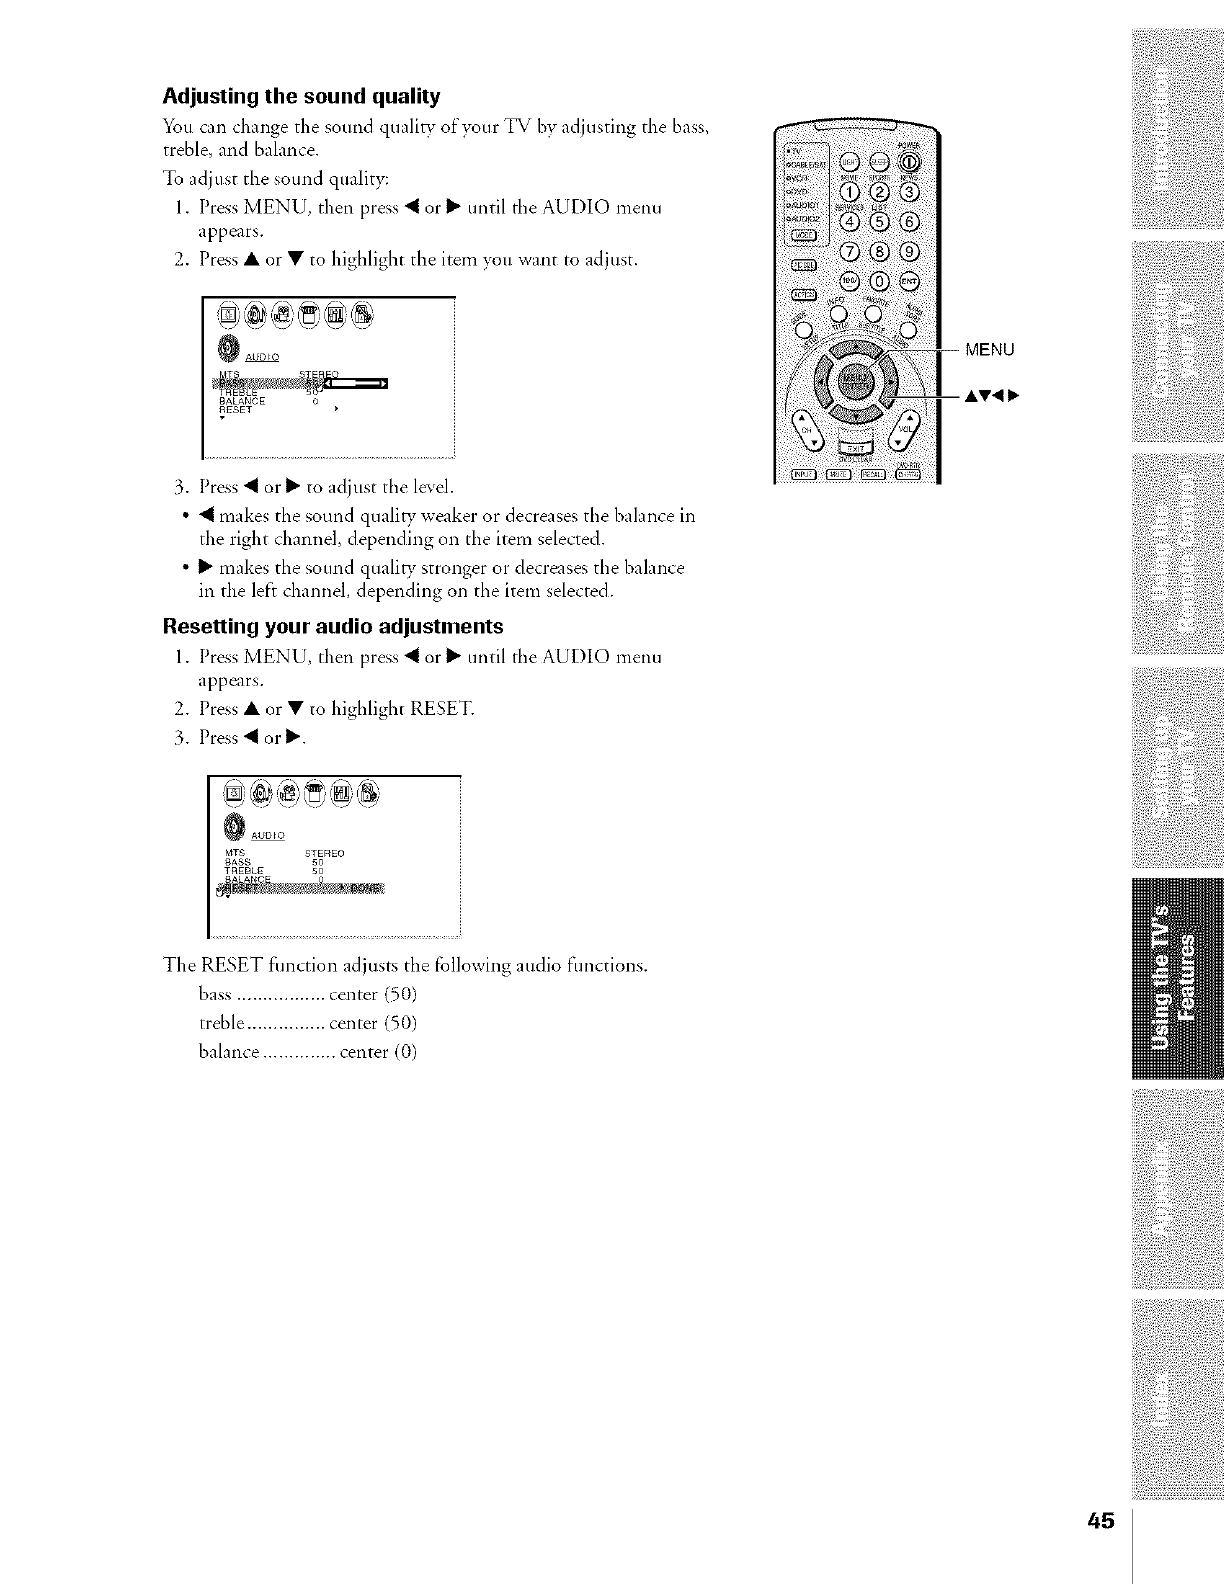
Adjusting the sound quality
You can change the sound quality- of your TV bv adjusting the bass,
treble, and balance.
To adjust the sound quality:
1. Press MENU, then press _ or_ until the AUDIO menu
appears.
2. Press • or • to higblight the item you want to adiust.
_AUD_O
3. Press _ orl_ to adjust the level.
•_ makes the sound quali_ weaker or decreases the balance in
the right channel, depending on the item selected.
• _ makes the sound quali_ stronger or decreases tbe balance
in the left channel, depending on the item selected.
Resetting your audio adjustments
1. Press MENU, then press _ or_ until the AUDIO menu
appears.
2. Press • or • to higblight RESET.
3. Press _ or _.
iii_!i_!_ _i!!(_!iI
! !ii
i !i!ii
_AUD_O
MTS
9ASS
The RESET fimction adjusts tbe following audio fimctions.
bass ................. center (50)
treble ............... center (50)
balance .............. center (0)
45
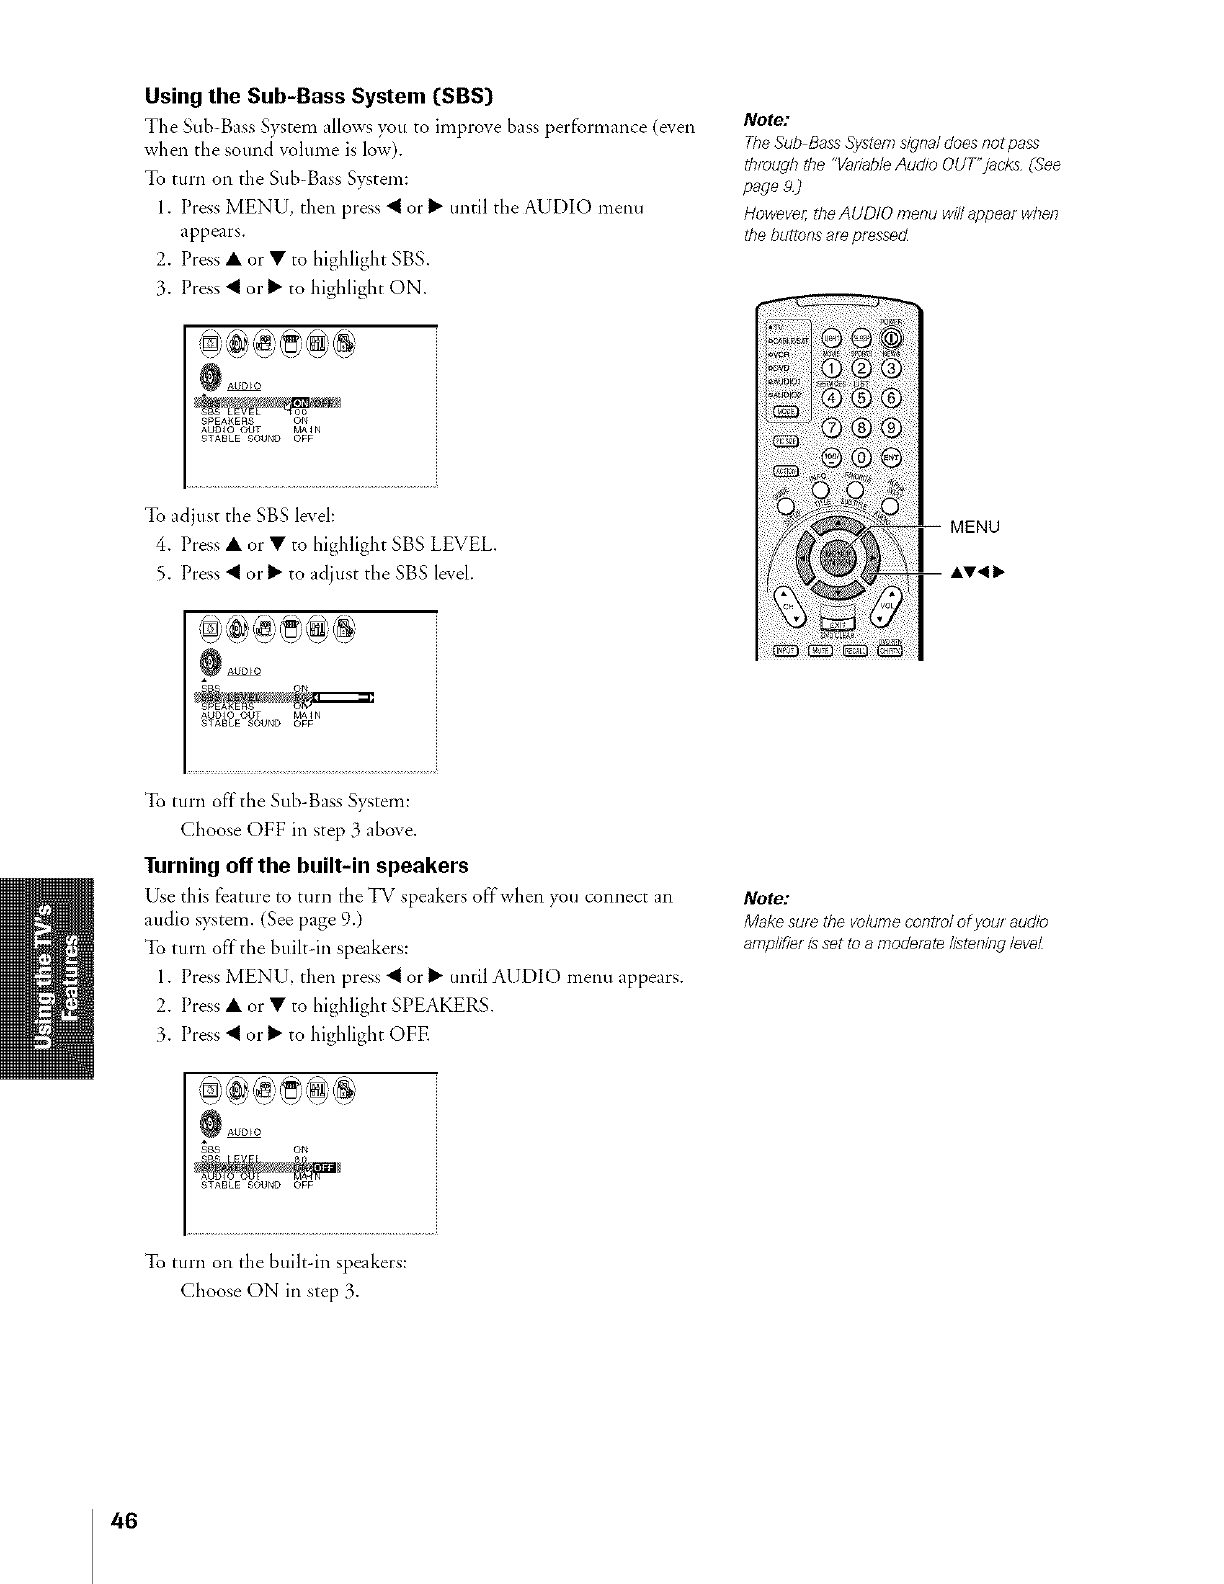
Using the Sub-Bass System (SBS)
The Sub-Bass System allows you to improve bass performance (even
when the sound volume is low).
To turn on the Sub-Bass System:
1. Press MENU, then press _ orl_ until the AUDIO menu
appears.
2. Press • or • to highlight SBS.
3. Press < or _ to highlight ON.
Note:
TheSub Bass Systemsignaldoes not pass
&_ough the "Variab/eAudio OUT'jacks (See
page 2)
Howevel; theAUDIO menu wi//appear when
the buttons ai_ pressecZ
_AUD_O
SPEARERS ON
AUDIO OUT MA_N
STABLE 9OUHD OFF
To adjust the SBS level:
4. Press • or • to highlight SBS LEVEL
5. Press < orb" to adjust the SBS level.
_AUD_O
AUDIO OUT MA_N
STABLE SOUND OFF
To turn off'the Sub-Bass System:
Choose OFF in step 3 above.
Turning off the built-in speakers
Use this feature to turn the TV speakers off when you connect an
audio system. (See page 9.)
To turn off'the builtdn speakers:
1. Press MENU, then press < or _ until AUDIO inenu appears.
2. Press • or • to highlight SPEAKERS.
3. Press < or _ to highlight OFE
Note:
Make sure the volume con_m/ofyoul audio
amplifiel isset to a moderate listeningleveZ
8TABLE SOUND OFF
To turn on the builtdn speakers:
Choose ON in step 3.
46
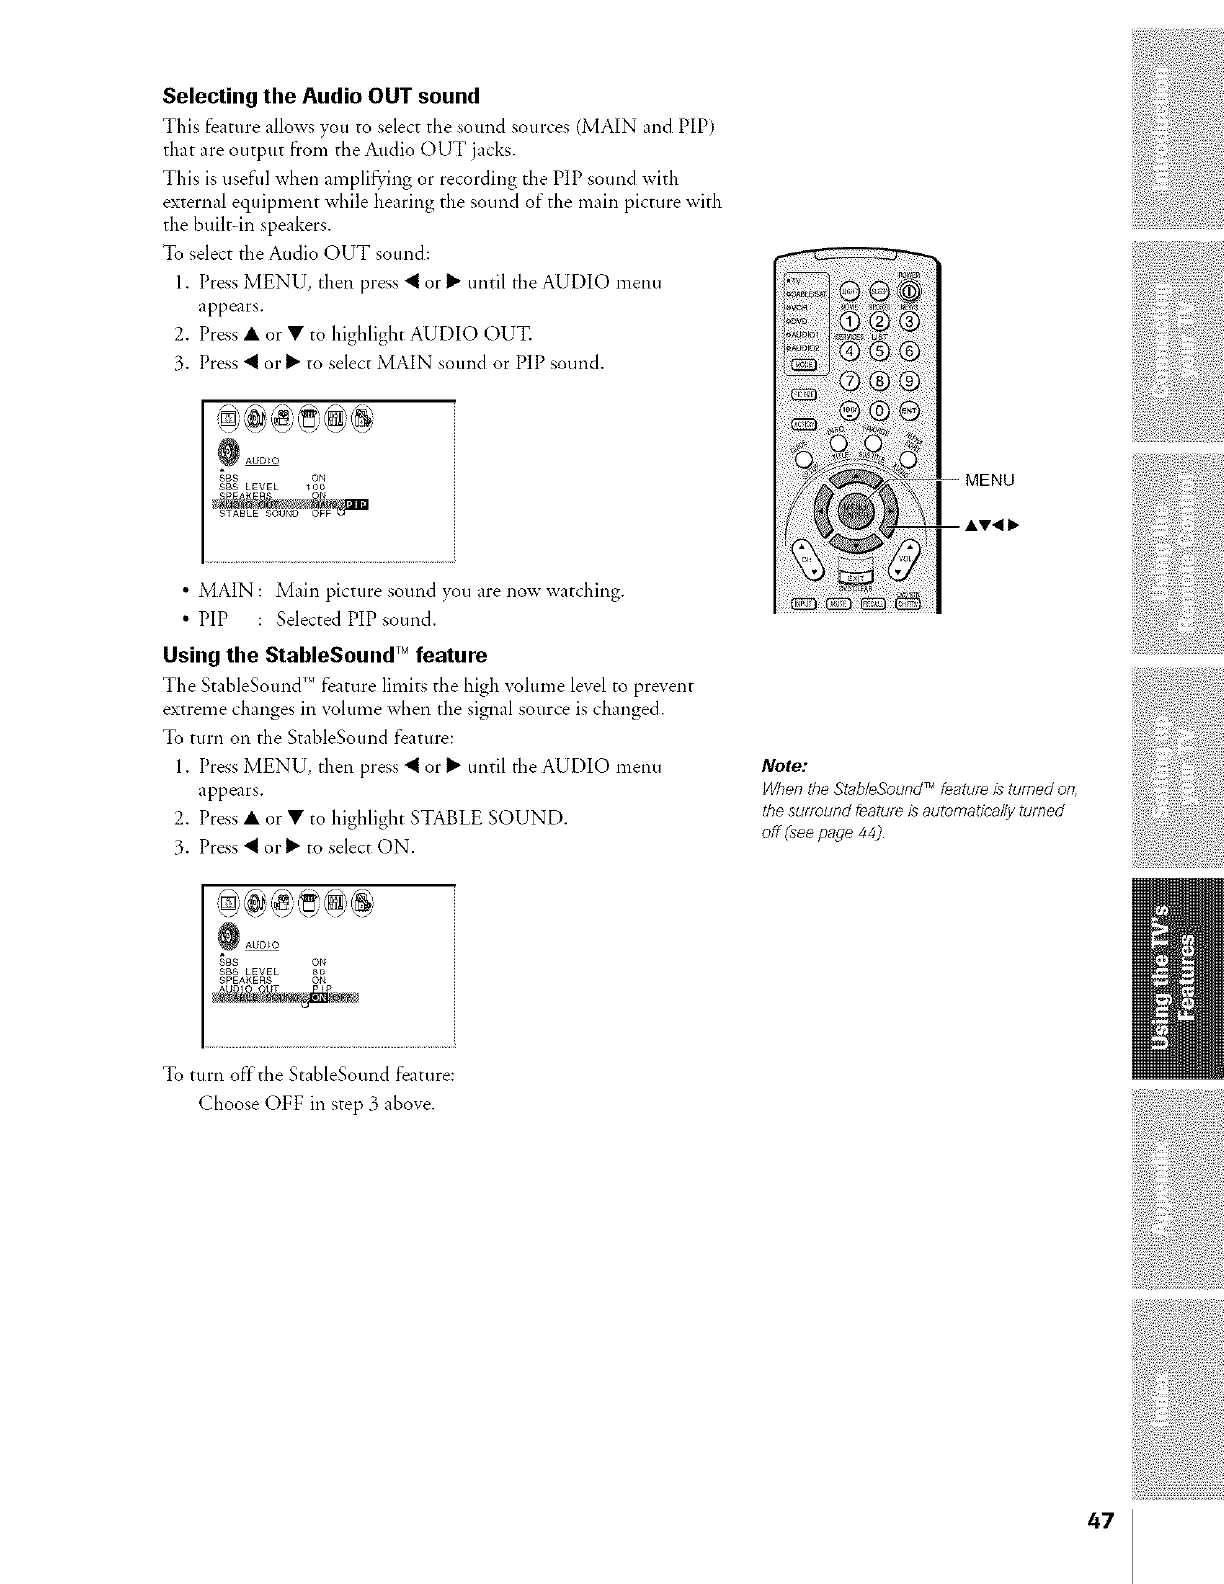
Selecting the Audio OUT sound
This feature allows you to select the sound sources (MAIN and PIP)
that are output from the Audio OUT jacks.
This is useful when ampli_'ing or recording the PIP sound with
external equipment while hearing the sound of"the main picture with
the built in speakers.
To select tile Audio OUT sound:
1. Press MENU, then press _ orb" until tile AUDIO menu
appears.
2. Press • or • to highlight AUDIO OUT.
3. Press < or 1_ to select MAIN sound or PIP sound.
_AUD_O
$B$ ON
$B$ LEVEL _00
•MAIN : Main picture sound you are now watching.
• PiP : Selected PIP sound.
Using the StableSound TM feature
The StableSound'" feature limits the high volume level to prevent
extreme changes in volume when the signal source is changed.
To turn on the StableSound feature:
1. Press MENU, then press < orb" until tile AUDIO menu
appears.
2. Press • or • to highlight STABLE SOUND.
3. Press < or 1_ to select ON.
-MENu
Note:
Whenthe Stab/eSoundTM feature isturned on,
the surround teatuf_ is automatica//y turned
off I_eepage 44)
_A_D_O
$8S LEVEL 8O
SPEAKERS ON
To turn off'the StableSound feature:
Choose OFF in step 3 above.
47
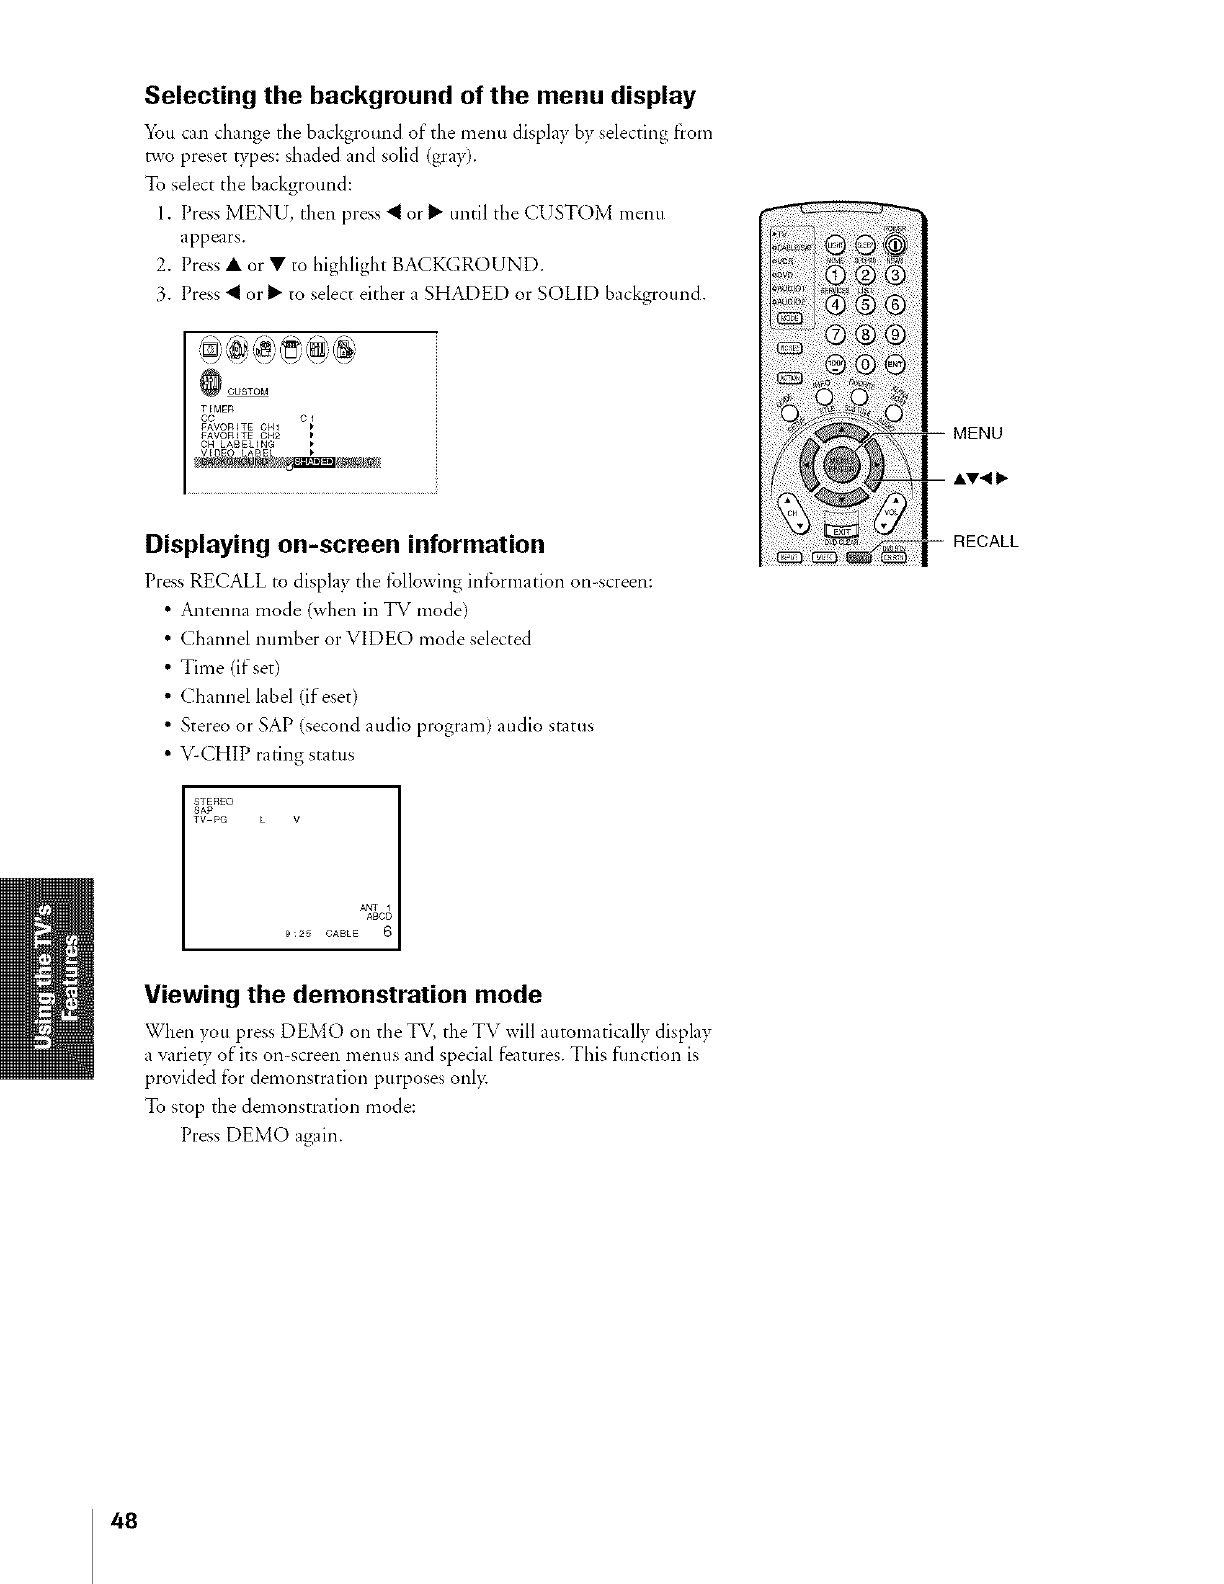
Selecting the background of the menu display
You can change the background of"the menu display by selecting from
two preset types: shaded and solid (gray).
To select the background:
1. Press MENU, then press _ or 1_ until the CUSTOM ment]
appears.
2. Press • or • to highlight BACKGROUND.
3. Press _ orl_ to select either a SHADED or SOLID background.
TEMER
CC C 1
FAVORITE CNI
FAVORITE CH2
CN LABELING P
Displaying on-screen information
Press RECALL to display the tbllowing intbrmation on-screen:
Antenna mode (when in TV mode)
Channel number or VIDEO mode selected
Time (if set)
Channel label (if eset)
Stereo or SAP (second audio program) audio status
VCHIP rating status
STEREO
SAP
TV PG LV
_ _i;;414ili<!i_¸._i!
MENU
AV_
RECALL
ANT 1
AgCD
9:25 CABLE 6
Viewing the demonstration mode
When you press DEMO on the TV, the TV will automatically display
a variety of its on-screen inenus and special features. This fimction is
provided for demonstration purposes onl>
To stop the demonstration mode:
Press DEMO again.
48
Understanding the auto power off feature
The TV will automatically turn itself offafter approximately 15
minutes if it is tuned to a wmant channel or to a station completes its
broadcast for the day. This feature does not work in VIDEO mode.
Understanding the last mode memory feature
If the power is cut off while you are viewing the TV, the Last Mode
Memory feature turns the TV on automatically when the power is
resupplied.
If the power is going to be of}'tor a long time and you are going to be
away from >_ur TV, unplug the power cord to prevent the TV from
turning on in _ur absence.
49
Appendix
Specifications
Tdcvision SI'St_m
Chamlel Coverage
Podgier Sou roe
NTSC standard
VHF: 2 through ] 3
UHF: 14 through 69
Cable TV: Mid band (A-8 through A-l, A through I)
Super band (] through _,V)
Hyper band (AA through ZZ, AAA, BBB)
Ultra band (65 through 94, 100 through 125)
] 20 V AC, 60 Hz
Power Consumption
A_Jdio Power
43AX60A: 143 W (average)
50AX60A: 141 W (average)
14W+ 14W
Speaker Type 4_AX60/A: Two 4-3/4 inches (12 cm) round
50AX60LA: Two 6-1/4 inches (16 cm) round
Video/Audio Terminals
Dimensions
Mass
Supplied Accessories
Optional TV Stand
S-VIDEO INPUT
Y2INPUT: 1 V(p.p), 75 ohm, negative sync.
C-INPUT: 0.286 V(p-p) (bin:st signal), 75 ohm
VIDEO/AUDIO INPUT
VIDEO: 1V(p.p), 75 ohm, negative sync.
AUDIO: 150 mV(rms) (30% modulation equivalent, 47 kohm)
ColorStream ®(component video) INPUT
Y: IV(p-p),75 ohm
CR: 0.7 V(p-p), 75 ohm
CB: 0.7 V(p-p), 75 ohm
AUDIO: 150 mV(rms), 47 kohm
VIDEO/AUDIO OUTPUT
VII)EO: 1 V(p-p), 75 ohm, negative s)'nc.
AUDIO: 150 mV(rms) (30% modulation equivalent, 4.7 kohm)
VARIABLE AUDIO OUTPUT
0-300 mV(rms) (30% modulation equivalent, 4.7 kohm)
AUDIO CENTER CHANNEL INPUT
300 mV(rms) (30% modulation equivalent, 10 kobm)
43AX60/A: Width 37-3/4 inches (959 ram)
Height 42-112 inches (1,080 ram)
Depth 18-7/16 indies (468 ram)
50AX60/A: Width 42-1/4 h_ches (1,073 ram)
Height 50-5/8 inches (1,286 ram)
Depth 20-13/16 inches (529 ram)
43AX60/A: 133 Ibs (60.5 kg)
50AX60/A: 217 Ibs (98.6 kg)
Remote Control with 2 size "AA" alkaline batteries
43AX60/A: ST4316
50AX60/A: --
Design and specifications are subject to change without notice.
50
Troubleshooting
Before calling a service technician, please check tbe following table for a possible cause of the problem and
some solutions.
Problem
TV will not turn on
No picture, no sound
No sound, picture OK
Poor sound, picture OK
Poor picture, sound OK
Poor reception of broadcast cbannels
Cannot receive above channel 13
Black box appears on the screen
Unable to select a certain channel
Solution
•Make sure the power cord is plumed in, then press POWER.
• The remote control batteries may be dead. Replace the batteries.
• Check the antenna/cable connections.
• The sound may be muted. Press VOLUME.
• The station may have broadcast difficulties. Try another cbannel.
• Check that the SPEAKERS fimction in AUDIO menu is properly set.
• The station may have broadcast difficulties. Try another cbannel.
• Check the antenna connections.
• The station may have broadcast difficulties. Try another cbannel.
• Adjust the PICTURE menu.
• The station may have broadcast difficulties. Try another cbannel.
• Check the antenna connections.
• If you are using a VCR, make sure tbe TV/VCR button is set
correctly:
• Make sure TV/CABLE is set to the mode that corresponds to the
signal source type (that is, cable company or outside antenna).
• Captioning may be turned on.
• The channel may be locked out with the CH LOCK feature, or
erased with the ADD/ERASE feature.
Multiple images • The station may have broadcast difficulties. Try another channel.
• Antenna reception may be poor. Use a highly directional outdoor
antenna.
Poor color or no color
No stereo or SAP sound l°rom a
known MTS broadcast
• The station may have broadcast difficulties. Try another cbannel.
• Adjust the TINT and/or COLOR in the PICTURE menu.
• Make sure the MTS feature is set properly:
Remote control does not operate • Check whetber the appropriate device mode is selected.
• There may be an obstruction between the remote control and the
remote control sensor. Remove the obstruction and retry the remote
control.
• The remote control batteries may be dead. Replace the batteries.
51
Limited United States Warranty
]_shiba America Consumer Pwducts, Inc. ("TACP') md Toshiba Ha_all Inc. ("THF) make tile fi)llo_ing limited wanantles. These limited
wa.andes c×tend to the odglnal consumel pmchasel o= any person =cceivhlg this set as a gift fiom the odgina[ consumel pmchasel and to no othel
pmchaser or nansfcree,
Limited One (1) Year Warranty
TACP and I'HI waJrant this pJoduct and ira parts against def¢_ts in
materials or workmanship _J a period of one (1) year after the da_ of
orlglnal ,_tail purchase. During dlis period, "EACP and THI will repair
or replace a d_dve part, at their option, with a new or JeBlJl)islled
part, without char_ to you. ]_CP/I'HI Authorized Service Station
personnd will come to _ur home when _aJral]ty service is required.
I])ep_l_diJlgon th_ _pe of,vpah ¸ required, the service will eid_er be
per_rmed in you r home or the set will be taken to tl_eT_CP/THI
authorized servic_ station fi)r repair and returned to your home at no
cost to you.
Limited Two (2) Year Warranty of Picture Tube
TACP and THI fu=thm warrant thr' plctu=_ tube in this pwduct against
defvcts in materials m workmanship for a pmlod of two (2) ycaJs afteJ
the date of odgina[ =etai[purchase. [)uring this pedod, "FACP and THI
will Jepah or replace a defective pkture robe at thdJ opdon, with a nm_
ol leflubished plcmre tube, without cha:ge wyou, except that Ka
defective plctme tube is replaced atter one (1) year flora the date of the
oiigina] retail purdlase, you pay labor chalges involved in the
replacement.
Rental Units
The wa.:anty fo= =ental unlt_ begins with the' first =entai o= thim' (30)
d_s h_m the date of shlpment to the rental firm, whlch_wer comes
_rst,
Commercial Units
PJoducta sold and used flu commercial use have a limited ninety (9(I)
day warranty _r all parts, labor and picture tube.
How to Obtain Warranty Service
Owner's Manual and Demographic Card
"l_)ushould read this owneFa manual tho=oughly before operafing this
product. _u should complete and mall the ench)sed D_mographlc card
within ten days after you, or the person who has given you this product
as a gift, purchased this p:_duct. ]'his is one way to enabie'I_CP/THI
to pro_ideyou with better customer service and hnproved products.
Failure to retunl the Demographic card wlil not affect your rights under
thls wal tar ry.
Your Responsibility
The above x_anandes a_e subject to the following condldons;
(1) _u must retain your blil of sale or provide other proof of
purchase.
(2) All warranw servicing of this product must be made by an
Authorlr_d ]_CP/THI Service Stadon.
(3) These warranties are et}_'cdveonly if the product is pmchased and
operated h_the [ JS.A. o=Puerto Rico.
(4) Labor service cha_ges fcu set installation, set up, adjustment of
customer controls and installation o= =epah of antenna systems are
not covered by this warr mr> Reception pwblems caused by
inadequatr antc=ma s)stems a=eyour =esponsibliltv.
(5) Wauanties extend only to defects in materials o_workmanship as
llmlted above and do not ext¢nd to any pwduct or pa_ts xvhicl_
have been lost o_discarded by }_luor to damage to products o_
pa=t_caused by misuse, accident, danlage caused by Arts of God,
such as lightning o_ fluctuations in electric power, impwpe_
installation, imprope= maintenance or use ill violation of
instructions fimfished by us; or to units which have been
modified o_ had the sedal numbe_ removvd, alters'd, defaced o_
_ende_cd illegible.
If afte_folk)wing all of tile operating insu uctlons in this manual and checking d_esection "BEFORE CALLIN(; SERVICE PERSONNEL,"
you find that service is needed:. In tile Col|thlental United States call:
(1) Call the TACP toil flee number 1800631 3811 afro=you find a defective
prod uct or part to find the neaJ_st TOSHIBA Authorlzcd Service S_tlon.
(2) Please p_c_'nt your bill of sale or othe_ p:oof to the Aud_odzed Service' Station
'_.udloriz_d ERCP/THI se_wlccstation pe_sonnd will come to }%mrhome
_dlvn _ananty service is _vqubed. [)ependlng on the type of =vpah requi_d,
the service will ekhe_ be per_m_ed in your home or the set x_ilibe taken to the
T_(P/]HI Authoilz_'d se=vlce station fill =epai=and I:emrnvd to yore home at
no cost to you," Toshiba Hawaii,Inc.327 Kamakee Street, H0noMu,
Hawaii 96814 (808) 591 8377
Allwalrandes implied by state law. including tile implied wanandes of merchantability and fitness for a pa_tlcula_ purpose, a_eexpressly limited to
the duradon of the llmitcd wa=randes set fi_rtll above. With tl_e exception of any _anandes imphed b} StAte_aw as hereby Ih_itcd, the fi)regolng
wanant 5is exclusive and in lleu of all othe_ wanantles, guarantees, agreement_ and simiLr obligations of mamffactme_ or selh with =espect to the
_epai: o_ replacement of any part_. In no evvnt shall Ta.CP or "IHI be liable fo= consequential or incldent.d damages.
No person, agent, dlstributo_, dealer or company is authofir_d to change, modi_ o_e×tend tile terms of these wan:andes in any manne_ whatsoever.
The time within which action must be commenced to entree any obligation of'I_CP or THI arising under this wananw or under any state, or
law of the United States o_ any state thereof, is hereby limked to 90 days flora the date 7,_ti discover o_shotdd have dlscove_M, the defect. This
llmkadon does not apply to impiled wanandcs adsing under state Jaw
This wa:ranty gives you specific legal dght_ and you may also haw od_e_ dght_ which may vary fiom state m st,_t< Some stat_s d<_ not allow
limitation on how long an implied wananw las_. when all action may be brought, or the e×chaslon or llmi_don of inclden_l or consequential
dama_s, so th_ above provisions m_ not apply to you.
ATTENTION CANADIAN CONSUMERS:
Canadian constlmers ale requested to complete the special Canadian "Warranty Registlation Form" enclosed, and
forward this completed form with a copy of hill of sale to TOSHIBA OF CANADA to '*Register and Validate" their
warranty.
Products purchased in the U.S.A.and used in Canada are,not covered by these warranties.
Products Purchased in Canada and used in the U.S,A.are not covered by these warranties.
REV. 09-01
52
Index
A
A/V receiver connection ...................................................l 0
ANT 1/2 ...................................................................................22
Antenna cables ......................................................................5
Audio cables ...........................................................................5
AUDIO OUT sound, selecting ........................................47
Audio system connection ...................................................9
Auto power off ......................................................................49
B
BACKGROUND selection ................................................48
C
Cable box connection ..........................................................6
Camcorder connection ........................................................9
CH LABEL ..............................................................................27
CH LOCK .................................................................................35
CH RTN button .....................................................................26
Channel Number buttons ................................................24
Channel programming
ADDIERASE .....................................................................24
Automatic programming .............................................23
TV/CABLE selection ......................................................23
Channel • • buttons ........................................................24
Clock setting .........................................................................42
Closed caption ......................................................................41
ColorStream cables ..............................................................5
Convergence adjustment .................................................24
Color temperature ...............................................................39
g
DEMO button ........................................................................48
Demonstration mode .........................................................48
DVD connection .....................................................................7
FI
(FAV_• I_ buttons ...............................................................26
FAVORITEbutton .................................................................31
FAVORITECH ........................................................................26
Front of the TV ........................................................................4
INFO button ...........................................................................31
IN PUT button ........................................................................40
LM
Language selection ............................................................22
Last mode memory .............................................................49
Locks menu ...........................................................................32
Menu system .........................................................................21
MTS feature ...........................................................................43
MULTI button ........................................................................31
Multi-Window feature
Preview function .............................................................31
Favorile function .............................................................31
Strobe function ................................................................31
MUTE button .........................................................................43
P
Picture adjustments
COLOR TEMPERATURE ..............................................39
FLESHTONE ....................................................................38
NOISE REDUCTION ......................................................38
Picture mode ....................................................................37
Picture quality ..................................................................37
Picture in Picture (PIP)
LOCATEbutton ................................................................30
PlP button ..........................................................................29
PiP CH • • buttons ......................................................29
SOURCE button ..............................................................29
STILL button ....................................................................30
SWAP button ....................................................................30
R
RECALL button ....................................................................48
Remote control
Battery installation .........................................................11
Device code table ...........................................................16
Functional key chart ......................................................12
Learning about the buttons ........................................20
Operational feature Reset ...........................................15
Programnling ....................................................................14
Searching and sampling the code ...........................14
Verifying the device code ............................................15
Volume Lock feature .....................................................15
RESET..............................................................................39, 45
S
SAP sound ..............................................................................43
Satellite receiver connection .............................................7
SLEEP button ........................................................................42
Sound quality adjustments ..............................................45
SPEAKERS on!off ...............................................................46
Specifications ........................................................................50
STABLE SOU ND ..................................................................47
Stereo sound .........................................................................43
Sub-Bass System .................................................................46
Surround sound ..................................................................44
S-video cables ........................................................................5
T
TIMER ......................................................................................42
Troubleshooting ..................................................................51
TV!Vl DEO button .................................................................22
V
V-CHIP
BLOCKING OPTION ......................................................34
ENABLE BLOCKING .....................................................33
MPAA RATING ................................................................34
NEW PIN CODE .............................................................36
TV RATING ........................................................................33
Unlocking programs ......................................................35
VCR connection .................................................................5-8
Video cables ............................................................................5
VIDEO LABEL ......................................................................40
VIDEO LOCK .........................................................................36
W
Warranty ..................................................................................52
53

TOSHIBA AMERICA CONSUMER PRODUCTS, INC.
HEAD OFFICE/82 TOTOWA ROAD, WAYNE, NEW JERSEY 07470
NATIONAL SERVICE DIVISION/1420B TOSHIBA DRIVE, LEBANON, TN 37087
TOSHIBA HAWAII, INC.
HEAD OFFICE/327 KAMAKEE STREET, HONOLULU, HAWAII 96814, US+A+ TEL: (808) 591-8377
TOSHIBA OF CANADA LTD.
HEAD OFFICE/191 McNABB STREET MARKHAM, ONTARIO L3R 8H2, CANADA TEL: (905) 470-5400
SERVICE CENTERS/TORONTO: 191 McNABB STREET MARKHAM, ONTARIO L3R 8H2, CANADA TEL: (905) 470+ 5400
MONTREAL: 1643, NORTH SERVICE RD+, TRANS+CANADA HIGHWAY, DORVAL QUEBEC, HgP 1J1, CANADA
TEL: (514) 856-4100
VANCOUVER: 22171 FRASERWOOD WAY, RICHMOND, B.C. V6W 1J5, CANADA TEL: (604) 303-2500
MANUFACTURED BY
TOSHIBA AMERICA CONSUMER PRODUCTS, INC.
ColorStrearn is a registered trademark and StableSound is a trademark of Toshiba America Consumer Products, Inc.
TOSHIBA
PRINTED IN USA
(00-11) B 23563956A
