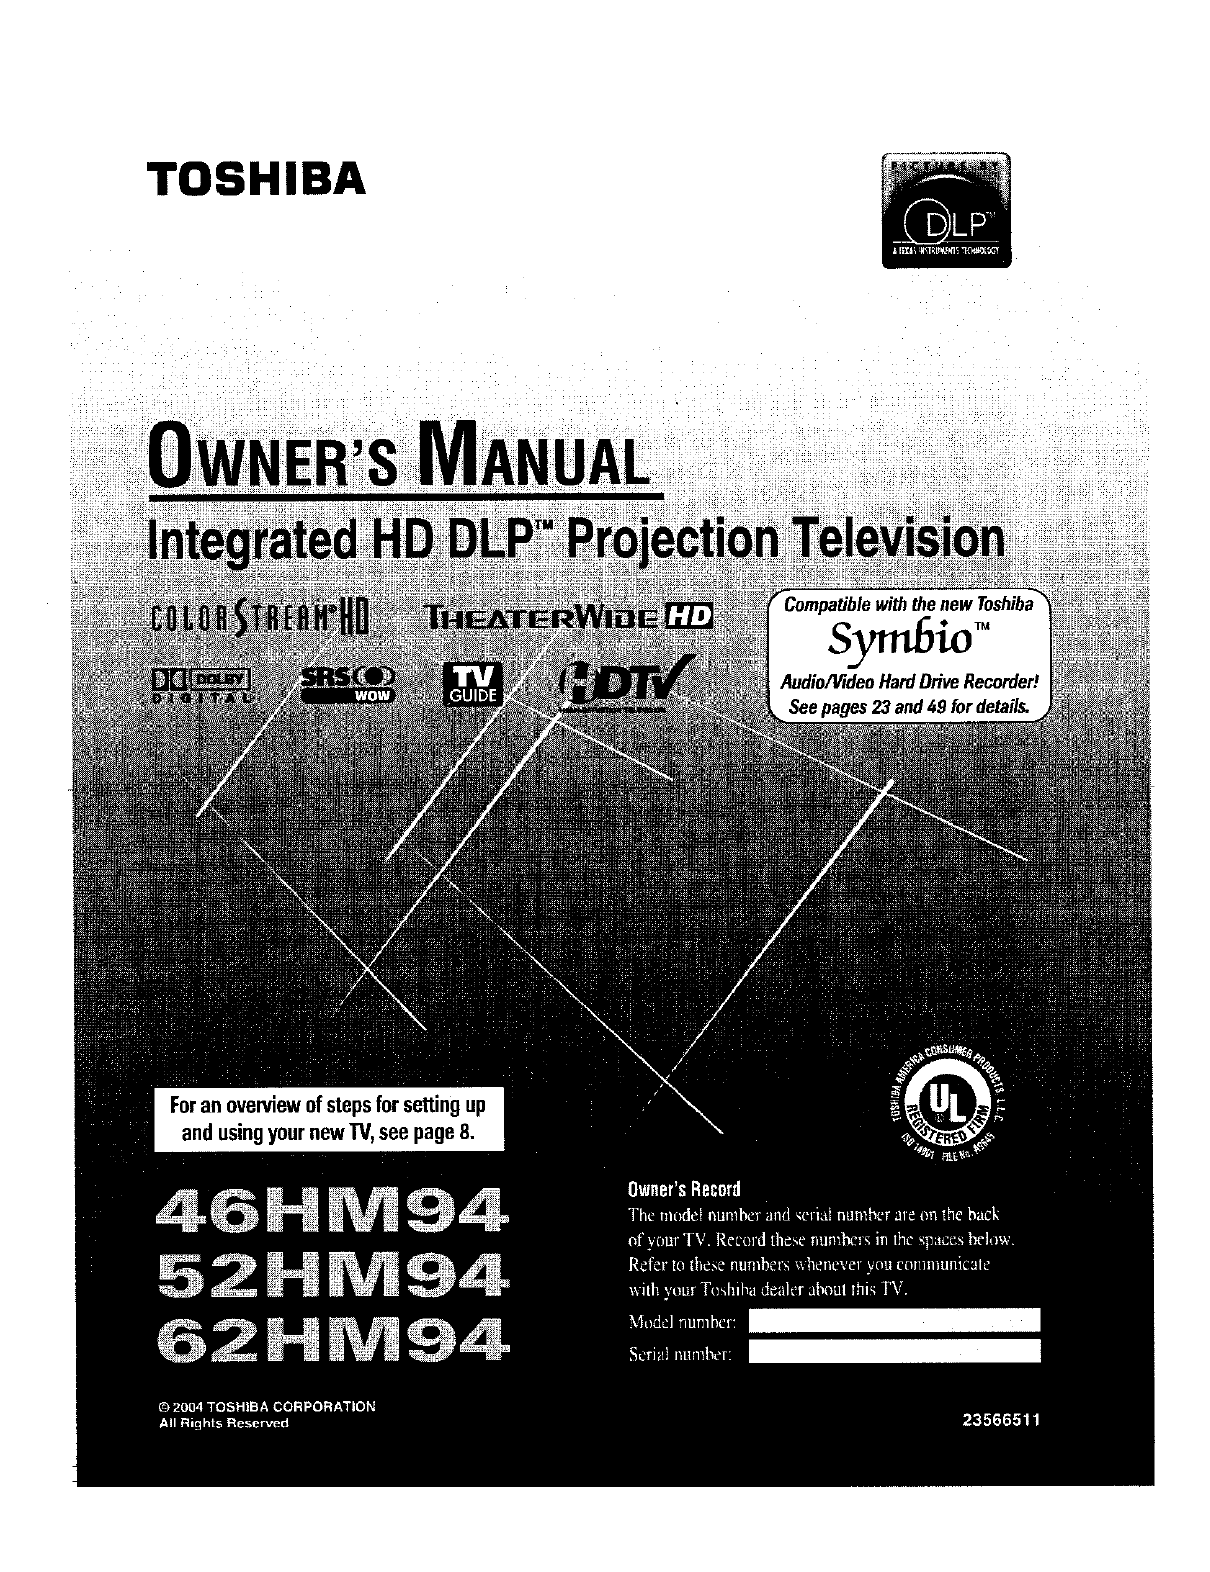
Toshiba 46HM94 User Manual DLP Manuals And Guides L0523085
TOSHIBA DLP Television Manual L0523085 TOSHIBA DLP Television Owner's Manual, TOSHIBA DLP Television installation guides
User Manual: Toshiba 46HM94 46HM94 TOSHIBA DLP - Manuals and Guides View the owners manual for your TOSHIBA DLP #46HM94. Home:Electronics Parts:Toshiba Parts:Toshiba DLP Manual
Open the PDF directly: View PDF ![]() .
.
Page Count: 108 [warning: Documents this large are best viewed by clicking the View PDF Link!]
TOSHIBA
HM94(E)O02-04
Thank you for purchasing this Toshiba TV.This manuaHwflH
heHpyou use the many exciting features of your new TV.
Before operating the TV, please read this manual
completely, and keep it nearby for future reference.
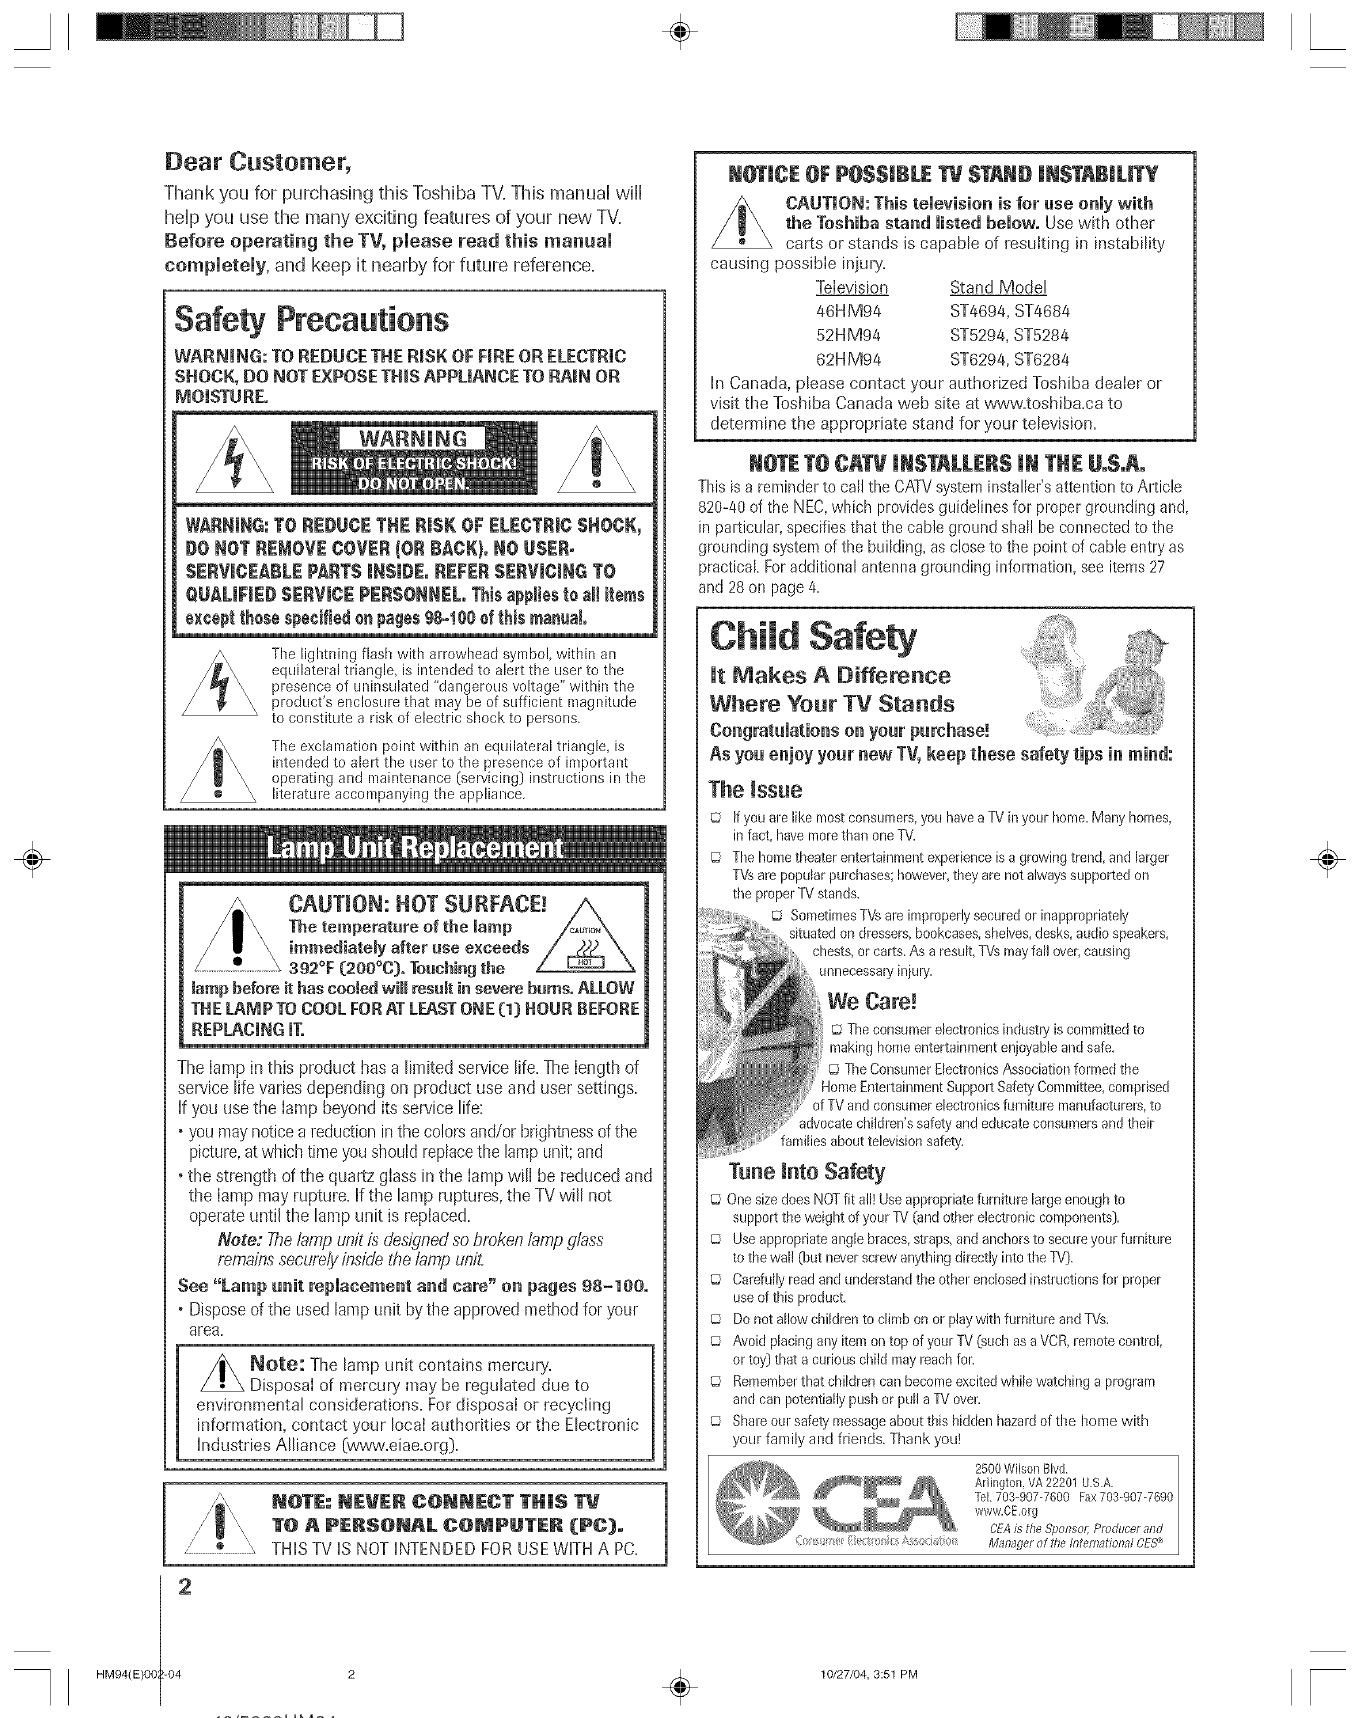
Safety Precautions
WARNING: TO REDUCE THE RiSK OF FiRE OR ELECTRIC
SHOCK, DO NOT EXPOSE THiS APPLIANCE TO RAiN OR
MOISTURE°
WARNmNG:TO REDUCE THE RISK OF ELECTRmC$ROCK,
DO NOT REMOVE COVER (OR RACK),NO USER-
$ERVmCEABLE PARTS INSmDE,REFER $ERVmCmNGTO
QUALiFiEDSERVICEPERSORREL,Thisappliesto al! items
exceptthesespecifiedonpages98-100ef thismanual
The lightning flash with arrowhead symbol, within an
equilateral triangle, is intended to alert the user to the
presence of uninsulated "dangerous voltage" within the
product's enclosure that may be of sufficient magnitude
to constitute a risk of electric shock to persons.
The exclamation point within an equilateral triangle, is
intended to alert the user to the presence of important
operating and maintenance (:servicing) instructions in the
literature accompanying the appliance,
CAUTION: HOT SURFACE! /_
The temperature of the mamp !_,J_
irereediately after ase exceeds ff _ '_
392°F (20O°C}° Touching the /_\
tamp before it has cooled wmmlresumtin severe bums° ALLOW
THE LAMP TO COOL FOB AT LEAST ONE (m)HOUR BEFORE
REPLACINGIT.
The lamp in this product has a limited service life. The length of
service life varies depending on product use and user settings.
If you use the lamp beyond its service life:
• you may notice a reduction in the colors and/or brightness of the
picture, at which time you should rephce the lamp unit; and
. the strength of the quartz glass in the lamp wifl be reduced and
the lamp may rupture. If the lamp raptures, the TV will not
operate until the lamp unit is repIaced.
Note: The brnp unit is designed so broken !amp gbss
remains secure/y inside the/arnp uni_
See "Larep unit repiaeereent amJ care" on pages 98-100.
• Dispose of the used lamp unit by the approved method for your
area,
NOte: The lamp unit contains memu_%
Disposal of mercury may be regulated due to
environmental considerations. For disposal or recycling
information, contact your local authorities ol the Electronic
Industries Alliance (www.eiae.org).
HOTE: NEVEH CONHECT THiS
TO A PEHSONAL COMPUTEH (PC).
/o ', THIS TV IS NOT INTENDED FOR USE WlTH A PC.
2
2÷
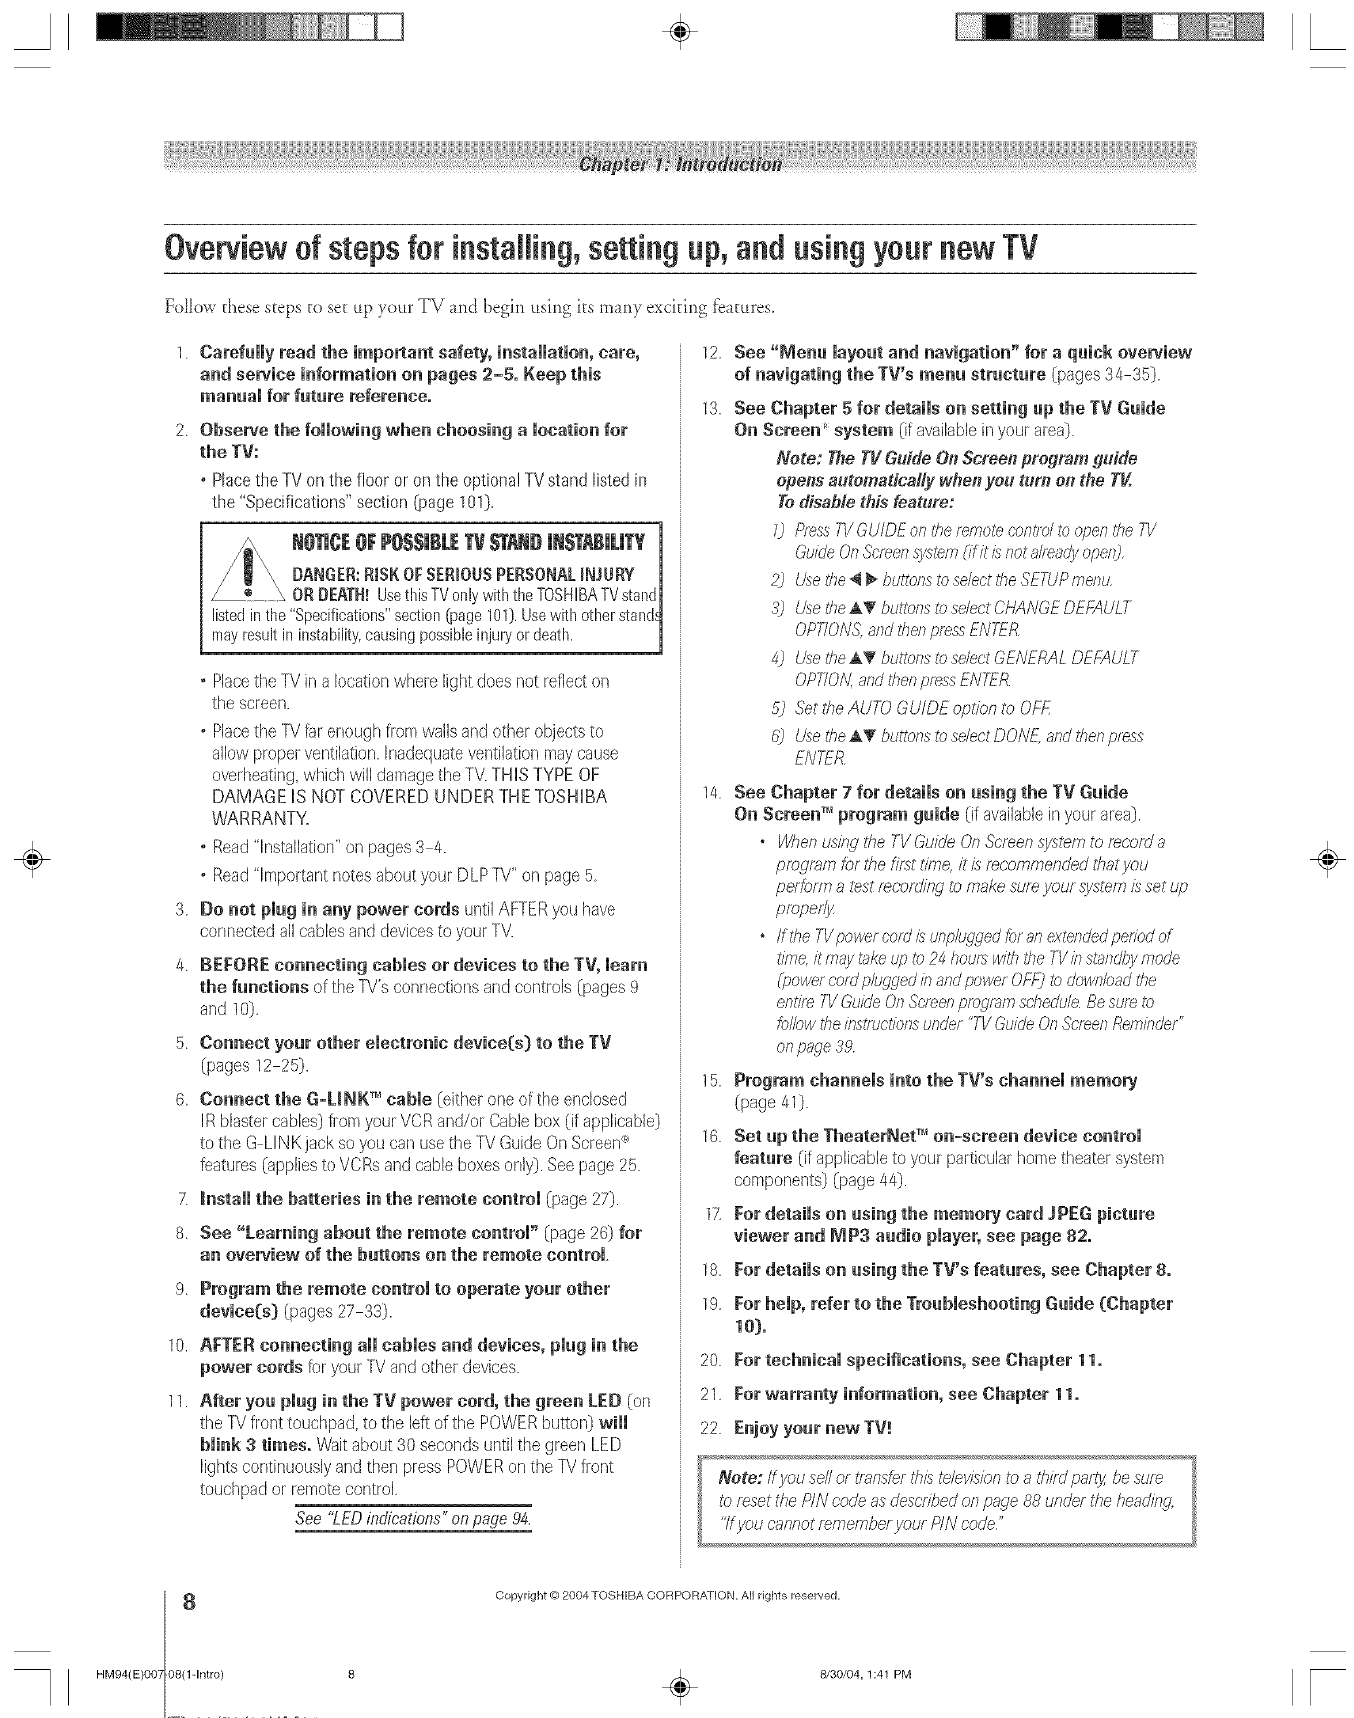
N_iCE OF POSSIBLE TV STAND iNSTABiLiTY
CAUTION: This temevision is for use onmywith
the Toshiba stand misted bemowo Use with other
carts or stands is capable of resulting in instability
causing possible injury.
Television Stand Model
46H M94 ST4694, ST4684
52HM94 ST5294, ST5284
62H M94 ST6294, ST6284
h_ Canada, please contact your authorized Toshiba dealer or
visit the Toshiba Canada web site at www.toshiba.ca to
determine the appropriate stand re1 your television.
NOTE TO CATV iNSTALLERS IN THE UoSoAo
This is a reminder to call the CATV system mstaller's attention to Article
820-40 of the NEC, which provides guidelines for proper grounding and,
in particular, specifies that the cable ground shall be connected to the
grounding system of the building, as close to the point of cable entry as
practical For additional antenna grounding mformatioe, see items 27
and 28 orbpage 4.
ChiM Safety
Jt Makes A Differeuce
Where Your TV Stauds
Congratulations onyour purchase!
As you enjoy your new TV, keep these safety tips in reind:
The Issue
© If you are like most consumers,you havea Tt/in your home.Many homes,
in fact, havemorethan oneTV,
© Tile hometheater entertahlmentexperienceis a growingtrend, and Larger
T_s ate popuhr purchases however,they arenot alwayssupportedon
the properTVstands.
© SometimesT_s are improperlysecuredor inappropriately
situated on dressers,bookcases,shelves,desks,audiospeakers,
chests,orcarts.As a result,TVsmayfail over,caushlg
unnecessal7 injury,
We Care!
© Tile consumerelectronicsindustry iscommittedto
makinghome entertainmentenjoyableand safe.
© The ConsumerElectronicsAssociationformed the
pportSafetyCommittee,comprised
of TV and consumerelectronicsfurniture manufacturers,to
advocatechildren'ssafety and educateconsumersand their
families about televisionsafety.
Tune into Safety
© OnesizedoesNOTfit all! Use appropriatefurnkure largeenoughto
support the weight of your TV (and other electroniccomponents).
© Useappropriateangle braces,straps,and anchorsto secureyour furniture
to the wal! (but neverscrewany[hingdirectly intothe TV).
© Carefullyread and understandthe other enclosedinstructionsfor proper
use of this product.
© Do not allow children to climb onor playwith furniture and TVs.
© Avoid placing any itemon top of your TV (such as a VCR,renlotecontrol,
or toy] that a curiouschild mayreachfor.
© Rememberthat children can become excitedwhile watching a prog_anl
and can potentiallypush orpuff a TVover.
© Shareour safetyulessageabout this hidden hazardof the llome with
your family and friends. Thank you!
2500 Wilson BIvd
Arlington, VA 22201 U.SA
1el 703_907-7600 Fax703-907-7690
www.CE,org
CEAis the Sponsol: Pmducer and
Managerof rile Intem:lrion:lrOES_
10/27/04, 3:51 PM
÷
F
[mportant Safety [nstructions
0
2]
s]
4]
5]
6]
7]
Read these instructions.
Keep these instructions.
Heed aH warnings.
Follow all instructions.
Do not use this apparatus near water.
Clean only with a dry cloth.
Do not block any ventilation openings. Insta[I in
accordance with the manufacturer's instructions.
8) Do not install near any beat sources such as radiators,
heat registers, stoves, or other apparatus (including
amplifiers) that produce heat.
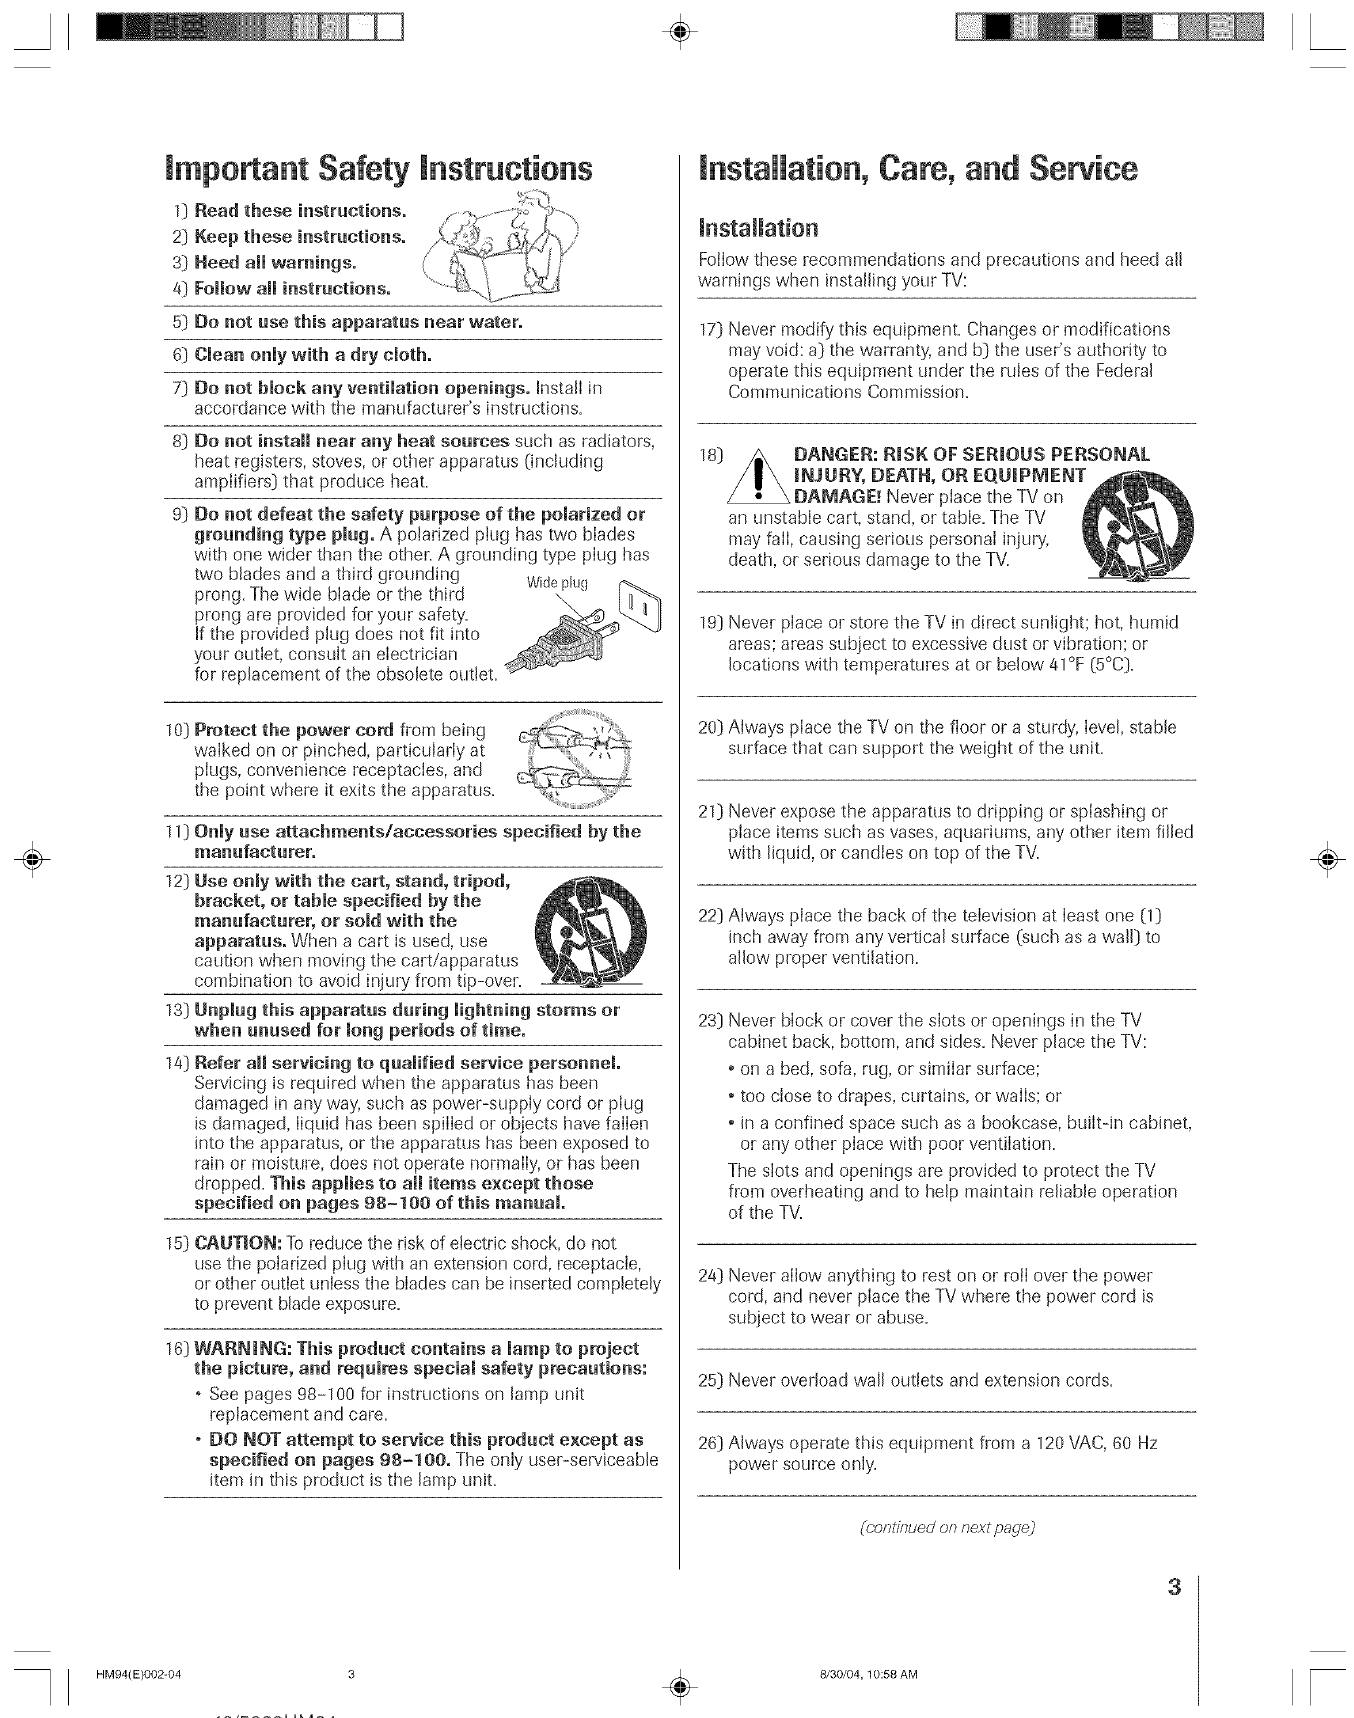
9] Do not defeat the safety purpose of the polarized or
grounding type plug. A polarized plug has two blades
with one wider than the other. A grounding type plug has
two blades and a third grounding Wideplug
prong. The wide blade or the third
prong are provided for your safety'.
If the provided plug does not fit into
your outlet, consuk an electrician
for replacement of the obsolete outiet.
10] Protect the power cord from being
walked on or pinched, particularly at
pIugs, convenience receptacles, and
the point where it exits the apparatus.
11)Only use attachments/accessories specified by the
manufacturer.
12) Use onmy with the cart, stand, tripod,
bracket, or table specified by the
manufacturer, or sold with the
apparatus. When a cart is used, use
caution when moving the cart/apparatus
combination to avoid injury from tip-over.
13] Unplug this apparatus during [ightnhlg storms or
when unused for long periods of time.
14] Refer aH servicing to qualified service personnel
Servicing is required when the apparatus has been
damaged in any way, such as power-suppIy cord or pIug
is damaged, liquid has been spilled or objects have fallen
into the apparatus, or the apparatus has been exposed to
rain or moisture, does not operate normally, or has been
dropped. This applies to a[[ items except those
specified on pages 98-100 of this manual.
15)
16)
CAUTION: To reduce the risk of etectric shock, do not
use the poIarized piug with an extension cord, receptacle,
or other outlet unless the bIades can be inserted completely
to prevent blade exposure.
WARNING: This product contains a lamp to project
the picture, and requires special safety precautions:
° See pages 98-100 for instructions on [amp unit
replacement and care.
o DO NOT attempt to service this product except as
specified on pages 98-100. The only user-serviceable
item in this product is the [amp unK.
hlstallation, Care, and Service
installation
Foilow these recommendations and precautions and heed all
warnings when installing your TV:
17] Never modify' this equipment. Changes or modifications
may void: a) the warranty', and b) the user's authority to
operate this equipment under the mles of the Federal
Communications Commission.
18) DANGER: RiSK OF SERmOUS PERSONAL
raNJURY, DEATH, OR EQUmPMENT
DAMAGE. _Never place the TV on
an unstable cart, stand, or table. The TV
may fail, causing serious personal injury,
death, or sedous damage to the TV.
19] Never place or store the TV in direct sunlight; hot, humid
areas; areas subject to excessive dust or vibration; or
locations with temperatures at or below 41°F (5°C).
20) Always place the TV on the floor or a sturdy, level, stable
surface that can support the weight of the unit.
21] Never expose the apparatus to dripping or splashing or
place items such as vases, aquariums, any other item filled
with liquid, or candies on top of the TV.
22] Always place the back of the television at least one (1]
inch away from any vertical surface (such as a wall) to
allow proper ventilation.
23) Never block or cover the slots or openings in the TV
cabinet back, bottom, and sides. Never place the TV:
* on a bed, sofa, rag, or similar surface;
, too close to drapes, curtains, or walls; or
* in a confined space such as a bookcase, built-in cabinet,
or any other place with poor ventilation.
The slots and openings are provided to protect the TV
from overheating and to help maintain reliable operation
of the TV.
24] Never allow anything to rest on or rotI over the power
cord, and never place the TV where the power cord is
subject to wear or abuse.
25) Never overload wall outlets and extension cords.
26) Always operate this equipment from a 120 VAC, 60 Hz
power source only.
(conlinued onnext padej
÷
3
HM94(E)002-04 3 ÷8/30/04,10:58 AM F
hlatallatioll (bontinued frem previous page.1
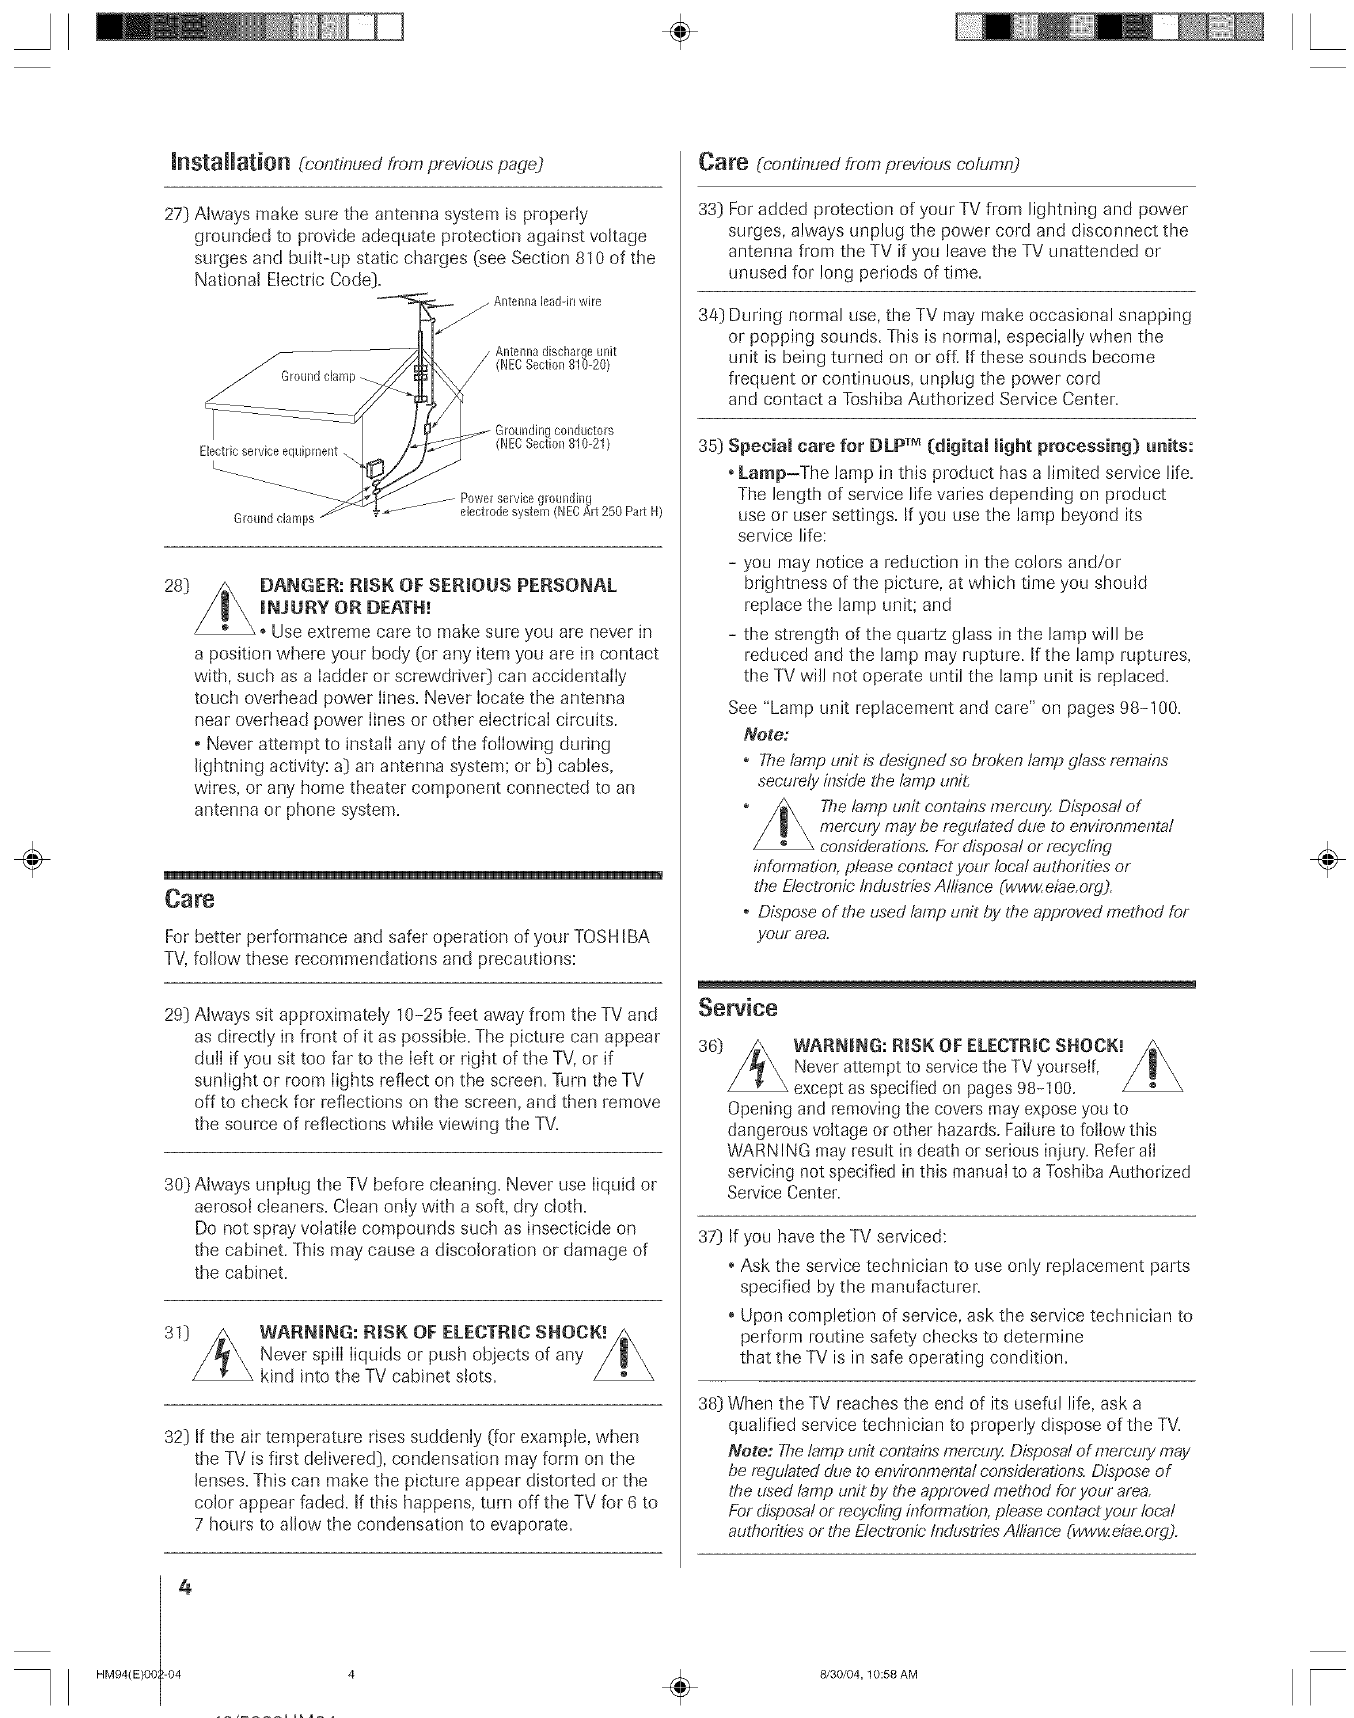
27] Always make sure the antenna system is properly
grounded to provide adequate protection against voltage
surges and built-up static charges (see Section 810 of the
National Electric Code].
j Antennaleadqrtwire
28]
Electricservice equbment ..
Ground clamps
collductors
(NECSection 810-21)
_- Powel service grounding
• _-"_ electrode system (NECAR 250 Part H)
DANGER: RiSK OF SERmOUS PERSONAL
raNJURY OR DEATH!
Use extreme care to make sure you are never in
a position where your body (or any item you are in contact
with, such as a ladder or screwdriveO can accidentally
touch overhead power lines. Never locate the antenna
near overhead power lines or other electrical circuits.
o Never attempt to install any of the following during
lightning activity: a] an antenna system; or b] cables,
wires, or any home theater component connected to an
antenna or phone system.
Care
For better performance and safer operation of your TOSH IBA
TV, follow these recommendations and precautions:
29] Always sit approximately 10-25 feet away from the TV and
as directly in front of it as possible. The picture can appear
dull if you sit too far to the left or right of the TV, or if
sunlight or room lights reflect on the screen. Turn the TV
off to check for reflections on the screen, and then remove
the source of reflections while viewing the TV.
30) Always unplug the TV before cleaning. Never use liquid or
aerosol cleaners. Clean only with a soft, dry' cloth.
Do not spray volatile compounds such as insecticide on
the cabinet. This may cause a discoloration or damage of
the cabinet.
30 WARI_mNG: RmSKOF ELECTRIC SHOCK!
Never spill liquids or push objects of any
kind into the TV cabinet slots.
32] If the air temperature rises suddenly (for example, when
the TV is first delivered}, condensation may form on the
lenses. This can make the picture appear distorted or the
color appear faded. If this happens, turn off the TV for 6 to
7 hours to allow the condensation to evaporate.
4
HM94(E)O8 -04
Care (continued from previous column)
33} For added protection of your TV from lightning and power
surges, always unplug the power cord and disconnect the
antenna from the TV if you leave the TV unattended or
unused for long periods of time.
34} During normal use, the TV may make occasional snapping
or popping sounds. This is normal, especially when the
unit is being turned on or of[ If these sounds become
frequent or continuous, unplug the power cord
and contact a Toshiba Authorized Service Center.
35} Special care for DLP T_ (digital light processing[ units:
•Lamp-The lamp in this product has a limited service life.
The length of service life varies depending on product
use or user settings. If you use the lamp beyond its
service life:
- you may notice a reduction in the colors and/or
brightness of the picture, at which time you should
replace the lamp unit; and
- the strength of the quartz glass in the lamp will be
reduced and the lamp may rupture. If the lamp ruptures,
the TV will not operate until the lamp unit is replaced.
See "Lamp unit replacement and care" on pages 98-100.
Note:
,The lamp unit is designed so broken lamp glass remains
securely inside the lamp unit.
The lamp unit contains memury Disposal of
mercury may be regulated due to environmental
considerations. For disposal or recycling
information, please contact your local authorities or
the Electronle Industries Alliance (www.eiae.org).
o Dispose of the used lamp unit by the approved method for
yotf! area.
Sewice
36} WARNING: RiSK OF ELECTR|C SHOCK!
Never attempt to service the TV yourself,
except as specified on pages 98-100.
Opening and removing the covers may expose you to
dangerous voltage or other hazards. Failure to follow tMs
WARN ING may result in death or serious injuly. Refer atI
servicing not specified in this manual to a Toshiba Authorized
Service Center.
37} If you have the TV serviced:
Ask the service technician to use only replacement parts
specified by the manufacturer:
Upon completion of service, ask the service technician to
perform routine safety checks to determine
that the TV is in safe operating condition.
38} When the TV reaches the end of its useful life, ask a
qualified service technician to properly dispose of the TV.
Note: The lamp unit contains memury. Disposal of memury may
be regulated due lo environmental condderadons. Dispose of
the used lamp unit by the approved method for your area.
For disposa! or recycling infbmTation, please contact your local
autho/:ities or the Electronic Industries Alliance (www.eiae.org).
4÷8/30/04,10:58 AM
÷
[
A÷ [
2)
S)
4)
The light source for this TV is a projection lamp unit with a
limited service life. When the lamp wears out, the picture may
become dark or black, or the lamp may fail, at which time you
must replace the lamp unit. See "Lamp unit replacement and
care" on pages 98-100.
Each time you turn on the TV, it may take severa! seconds to go
from no picture to full picture brightness.
The display on this TV is manufactured using a chip that may
contain Lipto 1.3 million microscopic mirrors. Each of these
micromirrors measures less than one-fifth the width of a human
hair and represents a single pixel on the television display.
These micromirrors are nmtmted on tiny hinges that enable
them to titlt either toward the light source [ON) or away
from it (OFF). Occasionally, one of these mirrors may become
inoperative, creating a light or dark pixel on the projection
surface. This is a structural property of DLP TMprojection TV
technology, and is not a sign of malfunction. Such pixels are
not visible when the picture is viewed from a normal viewing
distance (see item 29 on page 4).
Depending on the media you are viewing, it is possible, although
unlikely, that a limited number of viewers may see a "rainbow
effect" on the screen, which can, in rare instances, result in eye
fatigue. This is a rare occurrence related to technology of this
type, and is not a sign of TV malfunction.
5) Always sit approximately 10-25 feet away from the TV and as
directly in front of it as possible. The picture quality may be
affected by your viewing position and Length of viewing time. If
you sit too closely to the TV for too Long,you may stiffer from
eye fatigue. See item 29 on page 4.
This TV contains several cooling fans to moderate the
intema! temperature. You may be able to hear the fans
for several minutes after the TV is turned off. This is a
function of the Quick Restart Low Power Shutdown mode and
is not a sign of TV malfunction. You can set the Quick Restart
feature to stop the fans as soon as the TV is turned off See
"SeLecting the Quick Restart feature" on page 50.
7) The green and red LED Lights on the contro! touchpad (on the
lower right corner of the TV screen) indicate your TV's current
status. If either light flashes, see "LED indications" on page 94
for details.
8) Review all safety and operating information in this owner's
mantra[ before you useyour TV.
The DLP logo and DLP medallion aretrademarks of TexasInstruments.
Important Safety Information .............................................2=4
Important notes about yoar BLP projection TV .................5
Chapter 1: hRrodtmtion ..........................................................7
Welcome to Toshiba ........................................................... 7
Features o_'your newTV .................................................... 7
Overview of steps ['or insrMlilng, setting up, and
using yo_r new TV ...................................................... 8
Chapter 2: Connecting your TV ............................................9
TV front touchpadandsidepanelcontrols
and connections ............................................................. 9
TV back pand connections ................................................ 10
Overview of cable types ...................................................... 11
About the connection illustrations ...................................... 12
Connecting a digital CableCARD'". ...................................12
Connecting a VCR and antenna or Cable TV
(no Cable box) ............................................................... 13
Connecting a camcorder ..................................................... 13
Com_ecfing a VCR and Cable box ..................................... 14
Connecting a VCR and sate[lke receiver .............................15
Com_ecting a DVD player with Swideo, a VCR,
and a CabLebox.............................................................. 16
Connecting a DVD player with Co[orStreamv'
(component video) and a VCR ....................................... 17
Connecting two VCRs .......................................................18
Connecting an HDMI _"or a DVI device to d_e
HDMI input ..................................................................19
Connecting a digital audio system ......................................20
Connecting ananalog audio system....................................20
ControLling infrared remote-controlLeddevices
through tile TV (IR pass-through) .................................. 21
Con netting IEEE- 1394 video devices................................. 22
Using analog-compatibLeIEEE-1394 devices.................. 22
Supported signals ........................................................... 22
Using TheaterNet on-screen devicecontrol .................... 22
Connecting an AVHD or D-VHS recorder .................... 23
IEEE-1394 device initialization ...................................... 23
IEEE-1394 device management ..................................... 24
G-LINK _''connection ........................................................ 25
Chapter 3: Using the remote control ................................. 26
Learning abotJt the remote controL ..................................... 26
Installing the remote control batteries ................................. 27
Using the remote control MODE button to control
your other dexices ........................................................... 27
Remote Control flmcdona[ key chart ................................. 28
Programming the remote control to operate
your other devices ........................................................... 3(1
Multi-brand remote control device codes ............................ 32
Chapter 4: Nenu tayoat and navigation ........................... 34
Main menu Layout .............................................................. 34
Setup/Instalhtion menu hyout ........................................... 35
Navigating the menu system ............................................... 35
Chapter 5: TV Gaide On Screen TM system setup ............. 36
TV Guide On Screen reminder .......................................... 39
Chapter 6: Setting ap year TV .............................................40
Selecting the menu language ............................................... 40
Configuring the antenna input sources ............................... 4(1
Dogramming channels into the TV's channd memory ....... 41
Progranlming channels automatically .......................... 41
ManualLyadding and deLetingchannels in the
dlanne[ memory ..................................................... 42
÷
Copyright _) 2004 TOSHIBA COFtPORA_ION, All rights reserved. 5
A÷ L
Programming your fhvorite channeh .................................. 45
Setting up and using TheaterNet TM on screen
devicecontrol ................................................................. 44
Setting up TheaterNet ................................................. 44
Using the TheaterNet control icons............................. 45
TheaterNet IR devicecodes .................................. 46 48
Setting the AVHD device skip time .................................... 49
Setting the HDMF" audio mode ........................................ 49
Setting the time and date .................................................... 49
Viewing tile CableCARI_)TM menu ...................................... 50
Setting the Quick Restart feature ........................................ 50
Viewing the digital signal meter ......................................... 51
Viewing the system status ................................................... 51
Chapter 7: Using the IV Guide On Screen TM
interactive program guide ............................................... 52
Setting up the TV Guide On Screen system ....................... 52
Navigating the TV Guide On Screen system ...................... 53
TV Guide On Screen remote control functions .......... 53
Video Window ........................................................... 54
Panel Menus ............................................................... 54
hffo Box...................................................................... 55
TV Guide On Screen ]cons ......................................... 55
TV Guide On Screen Services ............................................ 56
LISTINGS screen ....................................................... 56
SEARCH screen .......................................................... 57
RECORDINGS screen ............................................... 59
SCHEDULE screen .................................................... 60
Record fbatures ........................................................... 60
Remind fbatures .......................................................... 62
SETUP screen ............................................................. 64
Change system settings .......................................... 64
Change channel display ......................................... 64
Change def'au[toptions .......................................... 65
Chapter g: Usingthe gV's features .................................... 66
Selecting the video input source to view ............................. 66
Labeling the video input sources ......................................... 67
Tuning channds ................................................................. 68
Tuning to the next programmed channel .................... 68
Using SpeedSurf to change to a specific
programmed channel .............................................. 68
Tuning to a specific channel (programmed or
unprogrammed) ...................................................... 68
Switching between two channels using
Channel Return ...................................................... 68
Switching between two channels using
SurfLock". .............................................................. 68
Selecting the picture size ..................................................... 69
Natural picture size ..................................................... 69
TheaterWide °_'1picture size ........................................ 70
TheaterWide °_'2 picture size ........................................ 70
TheaterWide °_'3 picture size ........................................ 70
Full picture size ........................................................... 70
Scrolling the TheaterWide ')picture .................................... 71
Using the auto aspect ratio _bature...................................... 71
Selecting the cinema mode (480i signals only).................... 72
Selecting the hmp mode .................................................... 72
Using the POP f'eatures ...................................................... 73
Using the POP double-window f'eatm:e....................... 75
Switching the speaker audio (main or POP) ................ 74
Freezing the main picture in the
POP double-window .............................................. 74
POP double-window aspect ratio ................................ 75
Using the favorite channeI scan })ature ........................ 75
Adjusting the picture .......................................................... 76
Sdecting the picture mode .......................................... 76
Adjusting the picture quality ....................................... 76
Resetting the picture settings ....................................... 76
Using CableC[earTM DNR (digital noise reduction) ...... 77
Sdecting the color temperature ................................... 77
Resetting the advanced picture settings ....................... 77
Using the closed caption mode ........................................... 78
Advanced closed captions ............................................ 78
Digital closed captions ................................................ 78
Adiusting the audio ............................................................ 79
Muting the sound ....................................................... 79
Digital audio selector .................................................. 79
Sdecting stereo/SAP broadcasts ................................... 79
Adjusting the audio quality ......................................... 80
Using the StableSoundTM f'eature .................................. 80
Resetting your audio adjustments ................................ 80
Using the SRS WONt,/TMsurround sound fbature .......... 81
Turning offthe built-in speakers ................................. 81
SeJecting the optical audio output f'ormat ................... 81
Using the memory card JPEG picture viewer/MP3 audio
player ............................................................................. 82
Memmy card specifications ......................................... 82
Using the IPEG picture viewer .................................... 85
Using the MP3 audio phyer ....................................... 84
Memory card care and handling .................................. 85
Using the Game Mode feature ............................................ 85
Setting the ON/OFF timer ................................................ 86
Setting the sleep timer ........................................................ 86
Displaying TV setting infbrmation on-screen ..................... 87
Understanding the auto power offfeature ........................... 87
Understanding the last mode memory feature .................... 87
Chapter 9: Using the Locks menu ...................................... 88
Entering the PIN code ....................................................... 88
If you cannot remember your PIN code ............................. 88
Changing your PIN code ................................................... 88
Blocking TV programs and moviesby rating (\7-Chip) ......... 89
Blocking channds ............................................................... 90
Unlocking programs temporarily ........................................ 9{}
Locking video inputs .......................................................... 9{)
Using the GameTimer TM ..................................................... 91
Using the front pane[ lock _)atm:e....................................... 91
Chapter 10: TrouMeshooting ............................................... 92
General troubleshooting ..................................................... 92
LED indications ................................................................. 94
TV Guide On Screen FAQs ......................................... 95 97
Chapter 11: Appendix ........................................................... 98
Lamp unit replacement .............................................. 98 100
Specifications ................................................................... lO1
Limited United States_._rranty ....................................... 102
Limited Canada "g}qu:ranty................................................ 103
mndex.......................................................................................108
÷
6Copyright @ 2004 TOSHIBA CORPORAXION. Allrights reserved,
HM94(E)O0. _06(Notes&TOC) 6 _ 8/30/04,1:01 PM [
A÷ L
Welcometo Toshiba
Thank you fbr purchasing this Toshiba TV, one of the most irmovafive DLP_'_'projecdoo TVs on the market. The goal of this rnanual
is to guide you through setting up md oper _fingyour TV as quickly as possible
, This manual applies to modeIs 46HM94, 52HM94, md 62HM94. Befbre you
start reading, check d_emodal number on d_eback of your TV.
Instructions in this manuaI are based on using the remote control You _lso
can use the contro[s on the TV front toud_pad if they have the same name as those refbrred to on d_eremote control
The side pand and back pand provide termina[s fbr connecting od_er equipment to your TM See page 9 fbr f'ront touchpad and
side pand details. See page 10 fbr back pand derails, See pages 12-25 fbr insmtcdons on connecting od_er devices to your TV.
Please read all safety and operating instructions in this manual carefuJly_ and keep this manual for futt_e reference.
Featuresof yournewTV
The fbHowing are just a fbw oldie many excking fbamres of your new Toshiba widescreen, integrated HD, DLP projection TV:
•Integrated digital tuning (SVSB ATSCand QRM) eIiminates the need f'ora separate digkal converter set-top box (in most cases).
° $V Guide On Screen °_'no-}'eeinteractive program guide (Chapters 5 and 7).
°Digital CableCARD '_'module skit f'orviewing encrypted digital Cable TV programs (page 12).
°Digital recording by connecting a D-VHS digkal recording device or a ]bshiba Symbio'" 160HD4 Andio/Video Hard Drive
Recorder m one of'the IEEE-1394 jacks. You can record high definition and standard definkion material tCromeither tuner (page 23).
°Memory card slots [SD "*,SmartMediaT"'MMC, Memory Stick '_'*(Pro), CompactFlash <']for viewing JPEG files as a "slideshow"
(page 83) and _brplaying MP3 files (page 84).
°TheaterNet'' icons fi_r(m-screen control (if'external iR and iEEE=1394 devices (page 44).
• Two mE[[-1394 ports }i_rmulti-device cormection and control (page 22).
• HDNm/DVI digka[, high-definition multimedia inter_ce (page 19).
•Two sets of ColorStream °'_HD high-reso[ufion cornponent video inputs (pages 15 and 17).
• Doiby _ Digital* (page 2(t) and SRS'"WOW (page 81) audio technologies.
• DigitN Audio Out optical audio connection (page 20),
• Game Node feature for shorter frame de_ayswhen p_ayinghigh-action video Barnes(page 85).
•CaMeCmear*MDNR digital pica*re noise reduction (page 77).
• Double-window POP (page 73) and muLl-window Favorites (page 75) features.
In the United States. TV GUIDE and other related marks are registered marks of Gemslar TV Guide international, inc. and/er one of its affiliates, In Canada, -[V GUIDE is a regislered mark
of Transcontinental inc., and is (ised under license by Gemslar TV Guide International. Inc. ]be TV Guide On Screen system is mal_utactured under license frent Gemstar TV Guide
International. Inc and/or one of its affiliales. The TV Guide On Screen system is protected by one or more dthe following issued United Stales patel/ts: 6,498,895, 6.418.556, 6,331,877,
6,239,794, 6,154,203, 5,940.073.4.908.713. 4.751.578. 4.706.121,
DENSTAR-TV GUIDE mNTERNATmONAL,IND. AND!OR ITS RELATEDAFFIUATESAND/OR TOSHmBAANERmDACONSUNER PRODUCTS,L.L.C.ARE NOT
mNANY INkY UABLE FORTHEACCURACYOF THE PROGRAN SCHEDULE mNFORNATmONPROVIDED BYTHE iV GUIDE ON SCREENSYSTEN. IN NO
EVENTSHALL GENSTAR-TVGUIDE mNTERNATIONAL,mNC.AND/OR gS RELATEDAEF{UATESAND/OR TOSHIBA ANERICA CONSUMER PRODUCTS,
L.L.C.BE LIABLEFOR ANY AMOUNTS REPRESENTINGLOSSOF PROFITS,LOSSOF BUSINESS, OR mNDmRECT,SPECIAL,OR CONSEQUENTIALDANAGES
mNCONNECTmONW_THTHE PROVISION OR USE OFANY _NFORNATION,EQUIPNENT, OR SERVICESRELATINGTOTHE gg GUIDE ON SCREENSYSTEN.
° A recordingdeviceis requffsdfor recording.Over<heair orcableaccessto stationscarryingTB GuideOnScreendatais req_[redforthe TVGuideOnScreensyslemto operate,TV
GuideOnScreendatais notprovidedbyPoshibaAmedcaConsumerRoduels.L.LC.The plv0viderof the datamayelectto discontinuethe serviceor it mayceaseto be (or neverbe)
availableinyourarea In anyof thesecircumstances,theiV G(_ideOnScreenfeaturewill notfundion,
°This productincorporatescopyrightpretecfiontechnologythatis proLectedbyUS, patentsand otherintelleclualprepedyrights.Useofthis copyrightprotectiontechnologymustbe
authorizedbyMacrevisionand isintendedfor homeandother limitedpay perview usesonly.unlessotherwiseauthorizedby MacrevisionReverseengineeringordisassemblyis
p_shibited.
° SRSWOW,SRSandthe(@) logoaretrademarksdSRSLabs.Inc, SRSWOWtechnologyisincorporatedunderlicensefrvm]SRSLabs.Inc
° *ManufacluredunderlicensefremDolbyLaboratoriesDolbyandthe double-Dlogoareregisteredtrademarksof DolbyLaboratories,
° CableCARDis a trademarkof CableTelevisionLaboratories.Inc
° SmartMediais a registeredtlademarkofPosNbaCorporagon
, SDis a trademarkdSDCardAssociation
, MMC and MultiMediaCardaretrademarksof InfineonTechnologiesAGand Ilce_sedto MMCA(MultiMediaCar_:]Association)
, MemoryStick is a trademarkdSonyCorporation
, ]-oNtibaisan authorizedlicenseedthe ColttpadFlash<_andCFlogo® registeredtrademarks.
Copyright O 2004 "FOSH[BA CORPOR_J[ON, All rights reserved. 7
HM94(E/OO7-O8(1-1ntro) 7
8/30/O4, 1:41 PM
÷
[
Overview of steps for instNJing,setting up, and using your new TV
Follow these steps to set up your TV md begin using its mmy exciting features.
1 Carefully read the important safety, installation, care,
and service information on pages 2-5. Keep this
manual for future reference.
2. Observe the following wben cboosing a location for
tbe TV:
° Placethe TV on the floor or on the optiona! TV stand listed in
the "Specifications" section (page 101]=
NOTIC[OFP0$$1BL[_ N'A_II}NENNLITY
BANGER: RISK OF SERIOUS PERSONAL INJURY
OR [)EATR! Usethis TV only with the TOSHIBA TV stand
listed in the "Specifications" section _age 101). Use with other stands
may result in instability, causing possible injury or death.
3.
4_
5_
6_
7
8
9
10.
11.
°Placethe TV in a location where light does not reflect on
the screen.
. Placethe TV far enough from wallsand other objects to
allow ploper ventilation, hadequate ventilation maycause
ovelheating, which will damage the TV.THiS TYPE OF
DAMAGE iS NOT COVERED UNDER THE TOSHIBA
WARRANTY.
o Read "ff_stallatiorPon pages 3 4.
. Read "Important notes about your DLP TV" on page 5
Do not plug in any power cords until AFTERyou have
cor_nectedall cables and devicesto your TV.
BEFORE connecting cables or devices to the TV, meal
the functions of the TV's connections and controls (pages 9
and 10)
Connect your other electronic device(s) to the TV
(pages 12 25).
Connect the G-LiNK TM cable (either one of the enclosed
IR blaster cables) fl-omyour VCRand/or Cablebox (if applicable)
to the G LINK jack so you carl usethe TV Guide OnScreen_
features (appliesto VCRs and cable boxes only). See page 25.
h_stammthe batteries in the remote control (page 27).
See "Learnh_g about the remote control" (page 26) for
an overview of the buttons on the remote control
Program the remote control to operate your other
device(s:} (pages 27 33).
AFTER connecting all cables and devices, plug ill the
power cords for your TV and other devices.
After you plug in the TV power cord, the green LED (on
the TV front touchpad, to the lett of the POWERbutton) will
blink 3 times. \/V_itabout 30 seconds until the green LED
lights continuously arid then press POWERon the TVfront
touchpad or remotecontrol
See "LEDindications" on page 94.
12 See "Menu layout and navigation" for a quick overview
of navigating the TV's menu structure (pages 34 35).
13. See Chapter 5 for details on setting up the TV Guide
On Screen _ system (if avaibble in your area).
Note: The TV Guide Ol_Screen pregrara guide
opens automatically when you turo ol_ the Tg
Todisable this feature:
75PressTVGUIDE of?the remoteeontmlt_ oper_dye7//
GukJeOn ,S'o/eer?system(flit h riot _#readyoperO.
2j Usethe_ _ buttonst(?selectthe SETUPmenu
3_ Usethe,AT buttonst_ sdect CHANGEDEFAULT
4) Usethe_,_' buttonst_)sdect GENEML DEFAULT
0P770,_and thenpressENTER
5) Set theAUTO GUIDE option to OFF
8j Usethe_,_f buttonsto sdect DON_ andllyenpress
ENTER
14. See Chapter 7for details on using the TV Guide
On Screen TM program guide (if available in youl _iea).
•Whenus/?l,qIhe TV Guide ()r_Sc'reer_sjzstemto feeof_Ja
pro,gramfor t!_efirst tfm¢ it/s recommended tl_atyou
peflory_7al_st reeor_/k_¢jto mare, sumyour systemisset up
•ff the TVpowerco_db unplug'Bedf_vanextd_dedpetard of
tiPToe,it may _M up to 24 hourswith the TVh_starldbymode
(powerco/dplugged b andpower OFE_to downbad the
entire TVGuideOf7Selr_J?pm,qramsdledu/e Besure to
b/low thek_L_tmclk?nsunder "TVGuideOn Sc/eenRembder"
onpsge 39
15. Program channels into the TV's channel memory
(page 41).
lf; Set up tbe TheaterNet TM on-screen device controJ
feature (if applicable to your particular home theater system
components) (page 44).
17 For details on using the memory card ]PEG picture
viewer and NP3 audio player, see page 82.
18. }:or details on using tbe TV's features, see Cbapter 8.
19 }:or hemp,refer to the Troubmesbooth_gGuide (Chapter
20 }:ortecbnicN specifications, see Cbapter 11.
21 }:orwarranty information, see Chapter 11.
22. Enjoy your new TV!
÷
HM94(E)O07 08(1-1ntro)
Copyright (d)2004 TOSHIBA CORPORATION. All rights reserved,
8 _ 8/30/O4, 1:41 PM [
A÷ L
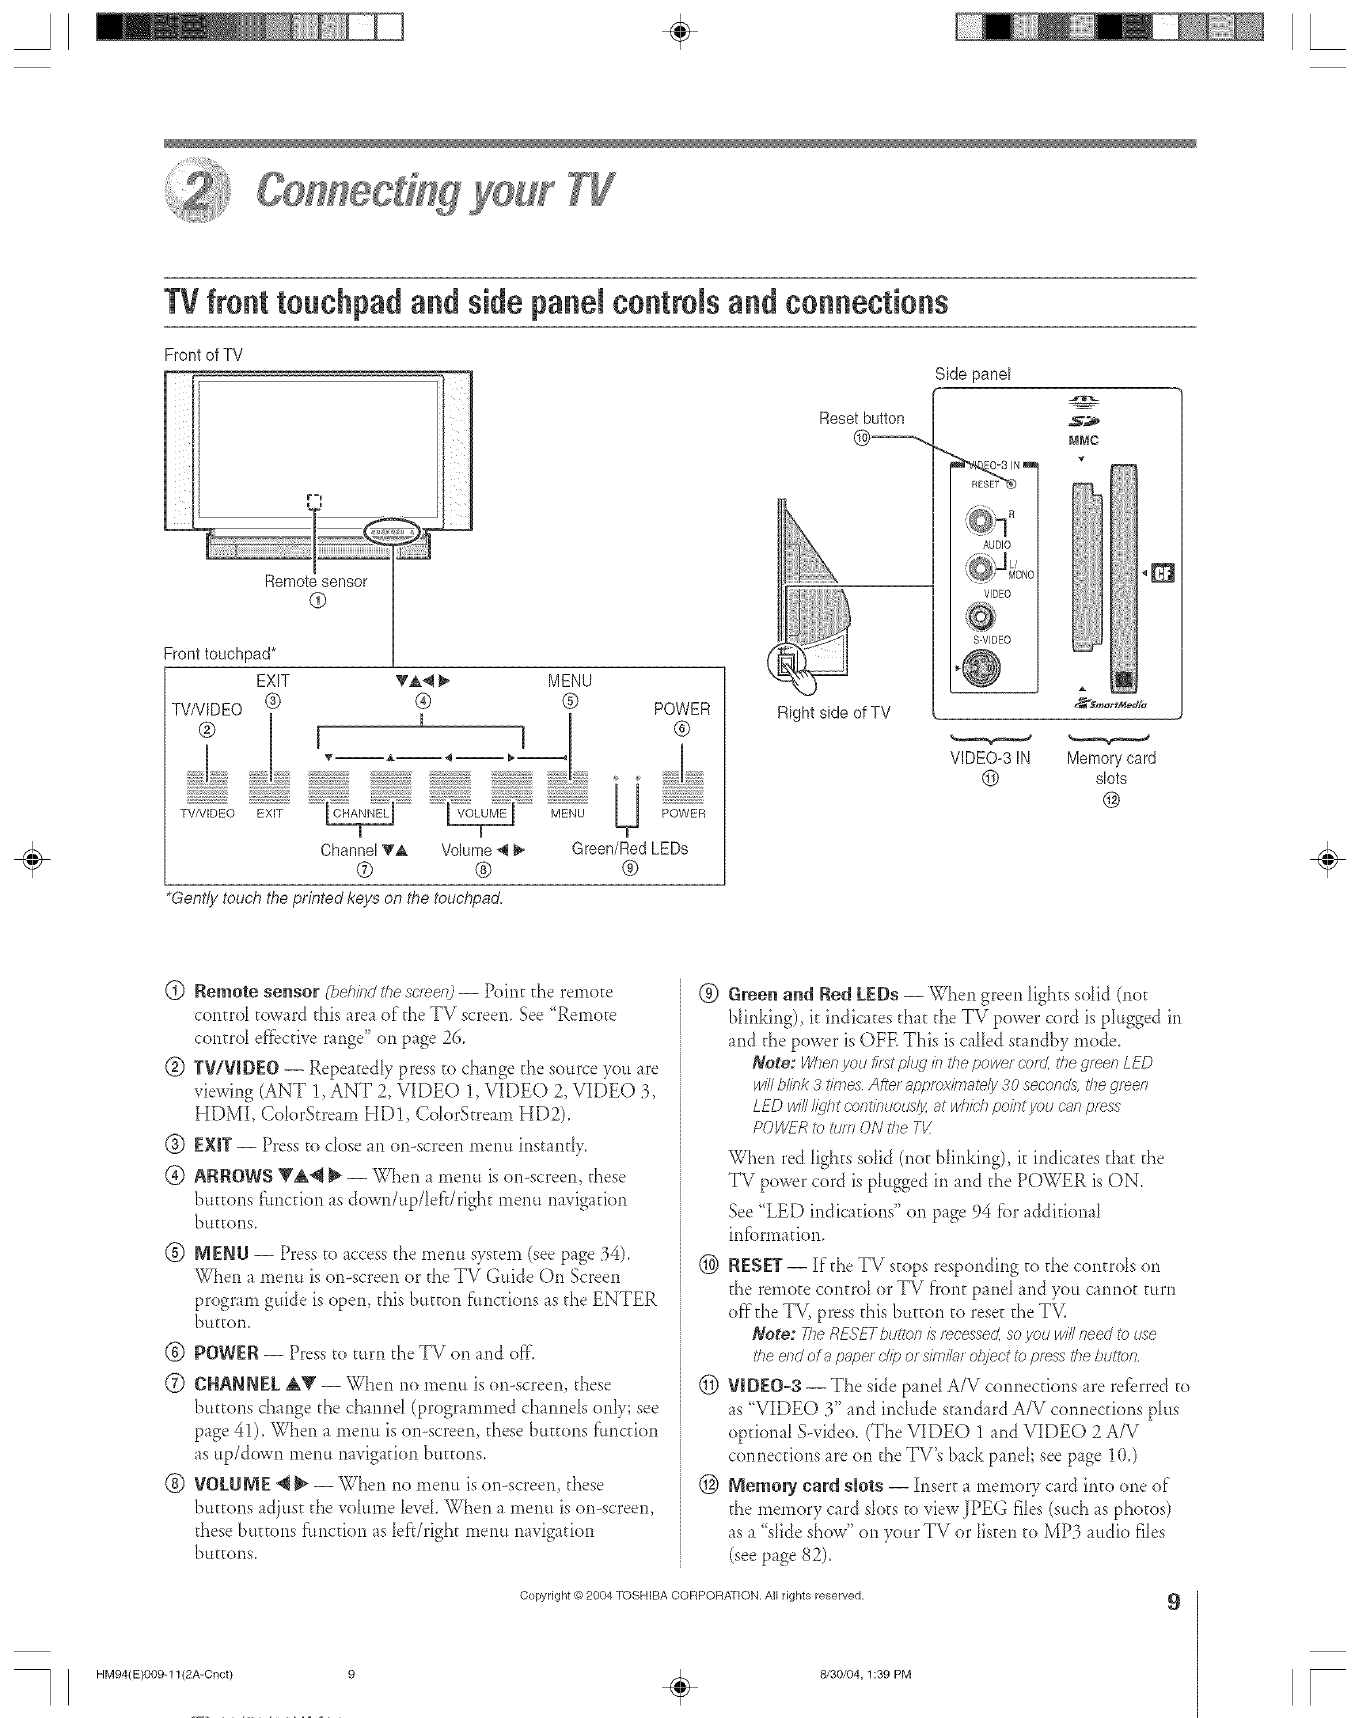
TVfront touchpad and sidepanelcontrNsand connections
Front of TV
Remote sensor
@
TA_ _, MENU
® ®
L
POWER
@
U ..................
TV/VIDEO EXIT _ _ MENU POWER
Channel _& Volume 4 _- Green/Red LEDs
® ® ®
Reset button
Right side of TV
Side panel
NMC
AUDIO
VIDEO
S-VIDEO
VIDEO3 IN Memory card
@ slots
@
*Gent/}/touch the printed keys on the touchpad.
÷
(_) Remote sensor (behind the scrserO -- Point the remoEe
controJ toward this area of the TV screen.See "Remo_e
control ef'_bctiverange" on page 26.
® TWVJDEO -- Repeatedly press to change the source you are
viewing (ANT 1, ANT 2, VIDEO 1, VIDEO 2, VIDEO 3,
HDMI, Color&ream HD1, ColorStream HD2).
®EXIT-- Press to dose m on-screen memt inst mr?.
® ARROWS _"_ _ -- When a merm ison-screen, these
bu_ons fimcdon as down/up/lef}/right menu navigation
buKons_
®
®
®
®
MENU -- Press to access the menu system (see page 34).
When a *nenu is on-screen or the TV Guide On Screen
program guide is open, this button f'tmc_ions as the ENTER
btttton,
POWER-- Press to turn the TV on and off.
CHANNEL_ -- When no mem_ ison-screen, these
buttons change the channd (programmed channeIs only; see
page 41). When a menu is on-screen, these buttons f'uncdon
as up/down menu navigation buttons.
VOLU_ E _t } --When no menu is onoscreen, these
buttons adjust the volume leveI. When a mem_ is on-screen,
these buttons f'uncdon as lef'drigh_ menu navigation
btttgons_
®6reem_a__d Red EEDs -- When green lights solid (no[
blinking), it indicates that the TV power cord is pIugged in
and the power is OFE This is caIDd standby mode.
Note: When you f#atp/ILqin the power cord. the green LED
willblink 3fifties After appmximatdy 30seconds,ihe green
LED will@ht cafltir_tJOLgS/}/, at whichpo//ltyau canpress
POWERto turnONthe TX
When red lights solid (not blir_king), it indicates that the
TV power cord is ph*gged in and the POWER is ON.
See "LED indications" on page 94 fi.)radditional
in_brmafion.
@ RESET -- If the TV stops responding to the controls on
the remote control or TV front panel and you cannot turn
offthe TV, press this bu_on to rese_ the TM
Note: TheRESE7-butto/1£ recessec4soyou willneedto use
the eodera pape/ c//por simb_rcDlectto pressthebut&v;
@ VlDEO-3 -- The side pane[ A/V connections are refbrred to
as "VIDEO 3" and include standard A/V connections plus
opdonaI SMdeo. (The VIDEO 1 and VIDEO 2 A/V
connections are on the TV's back panel; see page 10.)
@_emory card slots -- Insert a memory card into one of
the memory card sk)ts to view JPEG rids (such as photos)
as a "sIide show" on your TV or listen to MP3 audio rids
(see page 82).
Copyright @ 2004 TOSHIBA COFIPOBA_ION, All rights reserved. 9
HM94(E}OO9-11 (2A-Cnct) 9 ÷8/30/04, 1:39 PM r
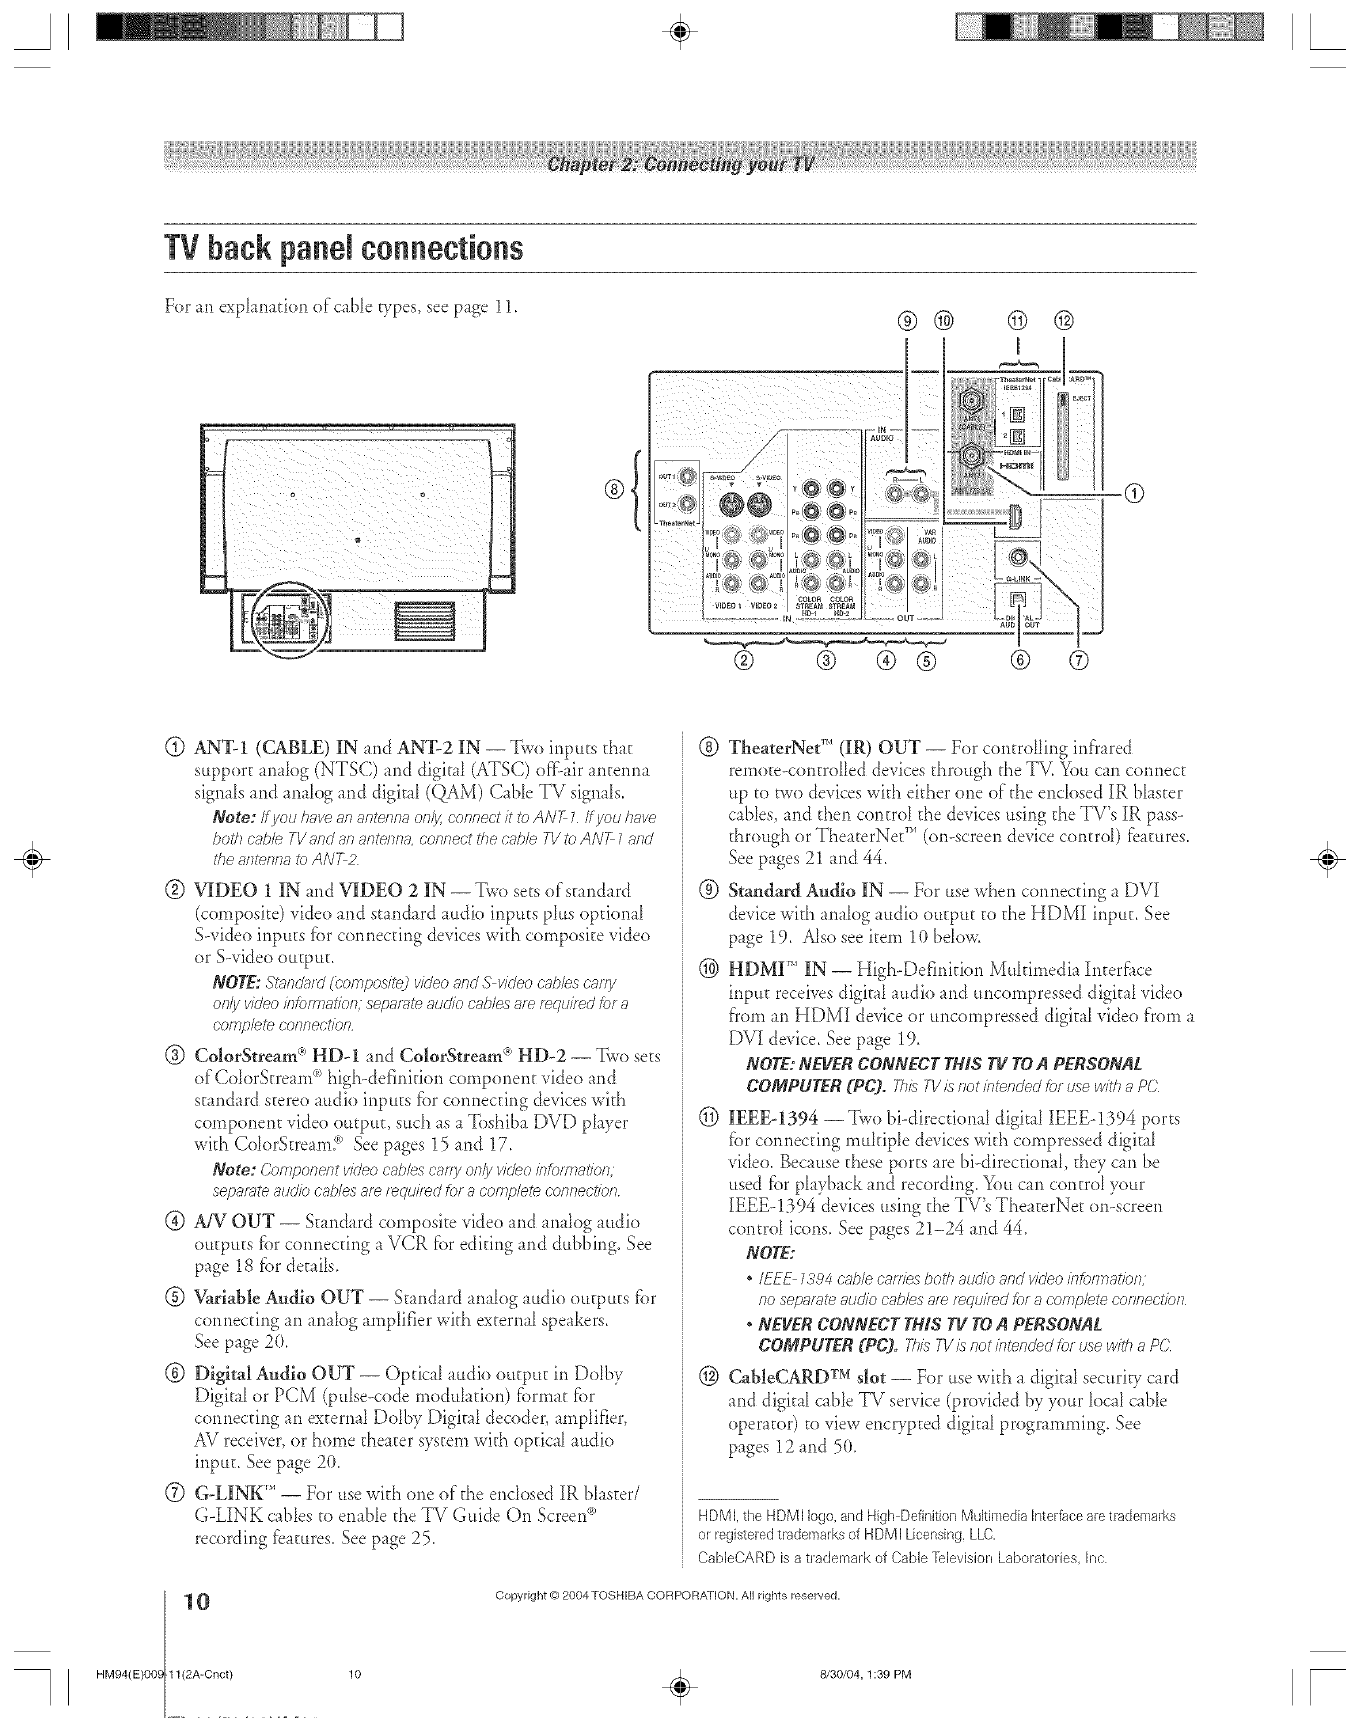
TV backpanN connections
For m exp_armtion ofc_b_e wpes see p_ge 11. ®®
v v
© @
® ®
(9
@ ANT-1 ((;ABLE) IN and AN'I=2 IN -- Two inputs that
support anaIog (NTSC) and digit _ (ATSC) of}:-airantemm
signals and analog and digit _I(QAM) Cable TV signaIs.
Note: Ifyou have art antenna on/)/,connect it to ANT 7ff you have
both cable TVand an antenna, connect the cnb/e F1/to ANT Zand
the afTteYiYla to ANT;
@ VIDEO 1 IN and VIDEO 2 IN --Two sets ofs_andard
(composite) video and standard audio inputs p[us opdot_al
Swideo inputs fbr cotmecting devices with composite video
or S-video output.
NOTE:St;nlcl_d(bomposite_videoandS vk/eoc'abl_sc'_,rfy
on/;/video b_)frnation; sepm_te audiocablesa_erequired _)fa
cofrg)/ete COl_nect/ol_
@ Coin(Stream ® H[_)-I and Co|orS(ream ®HD-2 -- Two sets
of'CoIorStream °')high-definition comporlent video and
standard stere() attdio inputs fbr com_ecting devices with
comporlent vide() output, such as a Toshiba DVD player
with ColorStream? See pages 15 and 17.
Note: Component video cab/e'_caf?y ong video informaffon,
separate atJd/o cables am t_ciui/_d for acomplete coflfTeot/of?
@ AiV OUT -- Standard composite vide() arid analog audio
outputs _brcom_ecdng a VCR _br editing and dubbing. See
page 18 _br details.
@ V_riable Audio OUT -- Stand _rdanalog audio outputs fbr
cotmecting an analog amplifier with external speakers.
See page 20.
@ Digital Audio OUT -- Optical audio output in Dolby
Digital or PCM (pulse-code modulation) fbrmat ;¢br
cormecting an external Doiby Digital decoder, amplifier,
AV receiver, or home theater system with optical audio
input. See page 20.
(Z) G-LINK'" -- For use with one of the enclosed IR blaster/
G-LINK cables to enable the TV Guide On Screen_)
recording fbamres. Seepage 25.
@ TheaterNet '' (IR) OUT -- For controlling infrared
remo_e--controHeddevices through the TV. You can cormect
up to r\vo devices with either one of the encIosed IR bIaster
cables, and then control the devices using the TV's IR pass-
through or TheaterNet" (on--screen device control) l::eatures.
See pages 21 and 44.
@ Standard Audio IN -- For use when cormecting a DVI
device with ana[og audio output to the HDMI input. See
page 19. Also see item 10 bdow.
@ HDMF" IN -- High-Defirfifion Multimedia h_tedi_ce
inpu_ receives digital audio and uncompressed digital video
fi'omar_HDMI device or uncompressed digital video _)'oma
DVI device. See page 19.
NOTE:NEVERCONNECTTHISTV TOA PERSONAL
COMPUTER (PC). Thisrl/ i_notintendedfo_usewithF_,o(?
(_) IEEEq394 --Two hi--directional digital IEEE-1394 ports
_brconr_ecting mukiple devices with compressed digital
vide(). Because these ports are hi-directional, they can be
used _brplayback and recording. You can control your
IEEE-1394 devices using the TV's The _terNet on-screen
control icons. See pages 21-24 and 44.
NOTE:
*IE_ L5'94c';ff)/e c'afr/es both audio 8f_d video ir_f()_7718tiof_,
no se/)sml_ 8u5t/o cabbs 8_ f_qtJited for a cr)(l_pbte coflnect/of?
*NEVERCONNECTTHISTV TOA PERSONAL.
COMPUTER (PC). ThisT1/is not intended for use with F]PC
@CabJeCARDrM dot -- For use with a digital security c_rd
and digital cable TV service (provided by your local cable
operator) to view encrypted digital programming. See
pages 12 and 50.
HDMI. the HDMI logo,and High DefinitionMultimedia interfacearetrademarks
or registeredtiademarks of HDMI Licensing,LLC,
CableCARD is a trademark of Cable ]_levision Laboratories, Inc
0
HM94(E)O09 1l(2A-Cnct)
Copyright (d)2004 TOSHIBA CORPORATION. All rights reserved,
÷
10 _ 8/30/04, 1:39 PM [
A÷ L
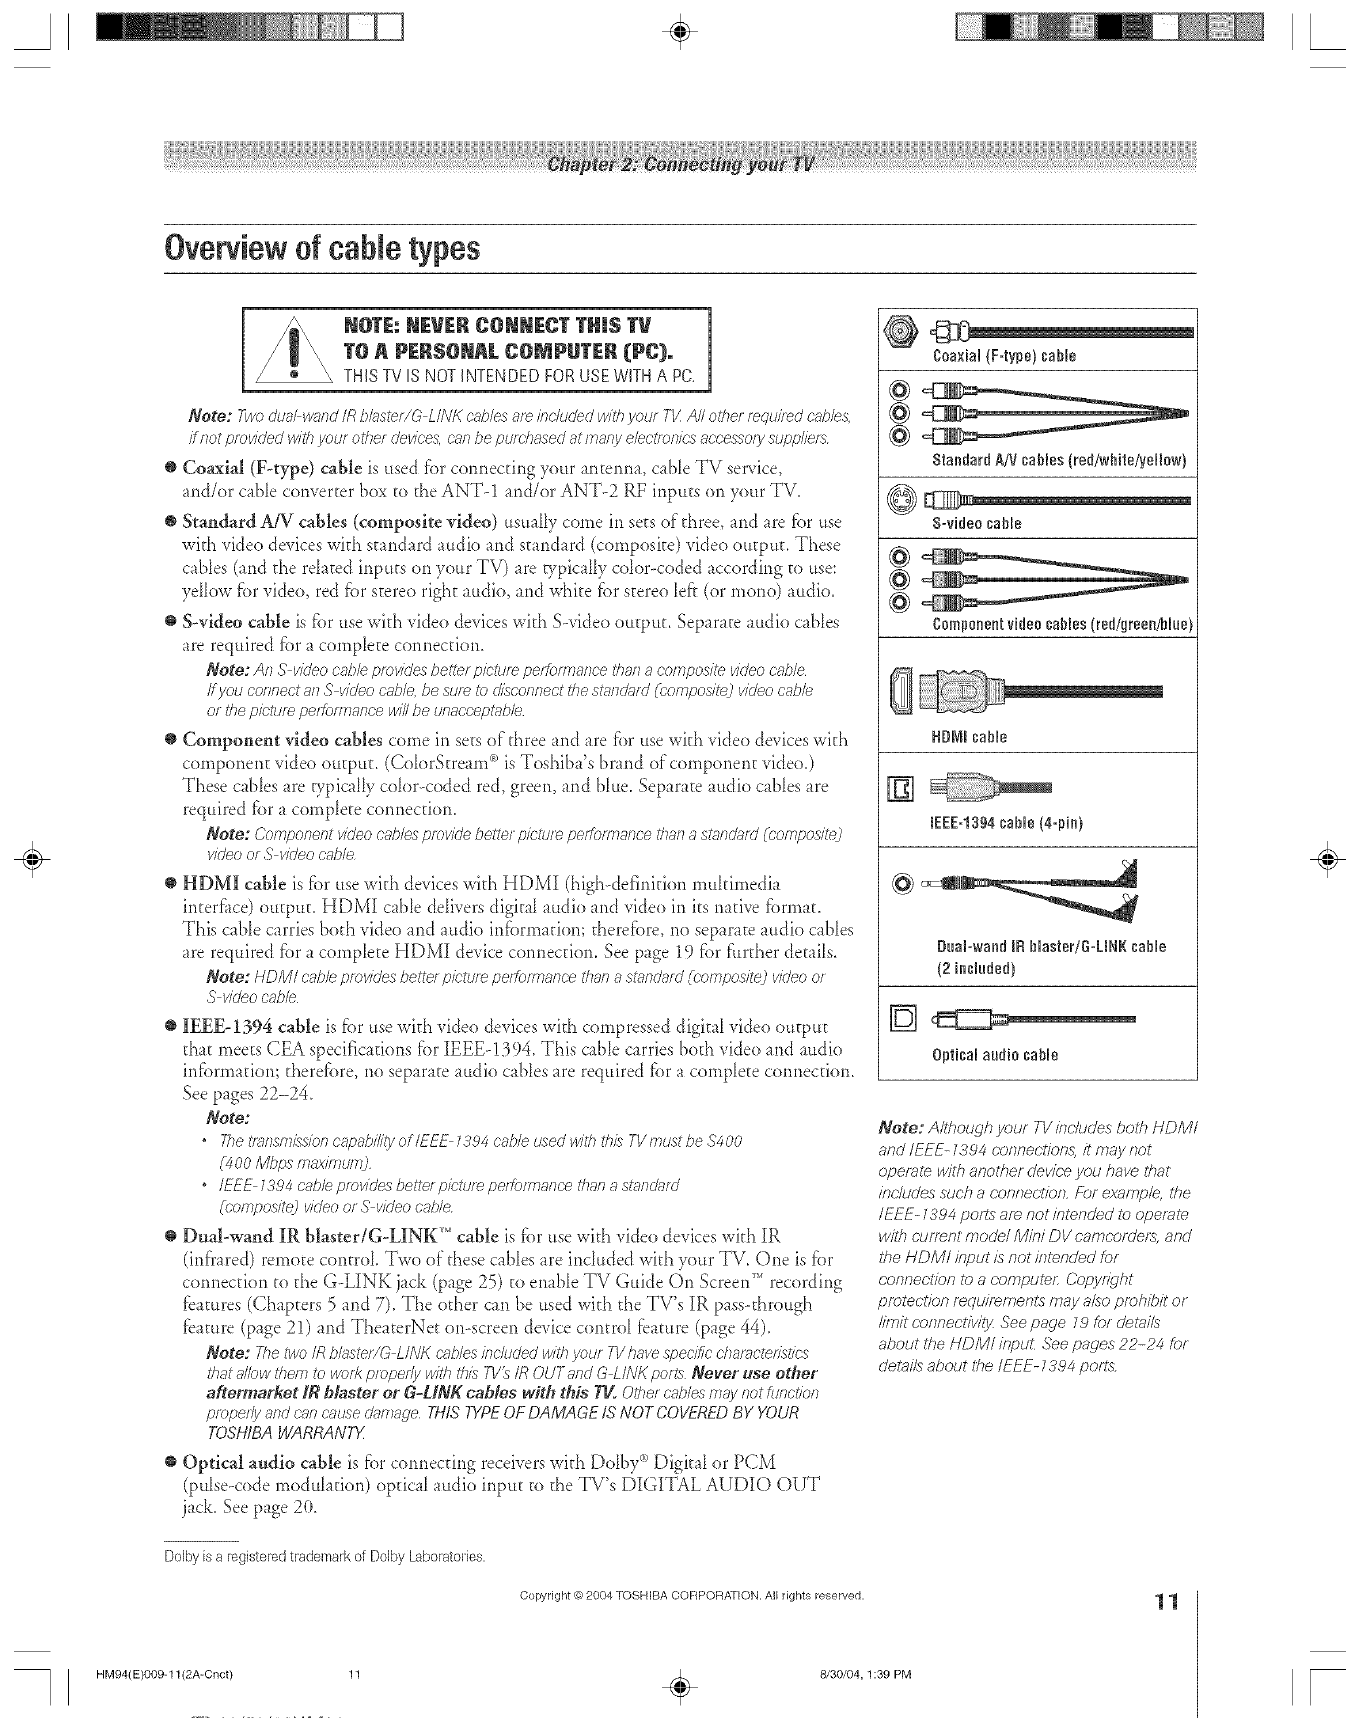
Overview dcane types
1
NoraNEVERCONNECTTHINSTV m
TO APF.R$OmAL COMPUT[R (PC),
THIS TV IS NOT INTENDED FOR USE WITH A PC.
Note: Two duahwand /R bh_stet/G L/IV/( cables af_ /fTr/uded with yau/ TI/ All other requhed cv2_/es,
ff not provided with your other dev/res, cnn be puf(-hased at many electe)rffre accesso/y suppliers
@ Coaxial (F_type) cable is used f()r colmecting your anterma, c_b[e TV seta, ice,
and/or cable converter box to the ANT-1 and/or ANT-2 RF inputs on your TV.
• Standard AiV cables (composite video) usually come in sets of three, and are fbr use
wkh video devices wkh st mdard audio and st md _rd (composke) video output. These
cables (and the rdated irlputs on your TV) are vpica[ly color--coded accord/rig to use:
yellow fbr video, red fbr stereo right audio, and whke fbr stereo [e_? (or mane) audio.
• S-vldeo cable is fbr use wkh video devices wkh S-video output. Separate audio cables
are req_fired fk)r a complete connection.
Note: AR S v/c/eo cable pmv/(/es be_ef picture peffom_ance i'han a composite v/(/eo c_,'b/e
ff you CoRRectof) S v/(/eo ca/;/e, be suf_ to d/as'of?/)octthe st_eTdJ_ff_J(composite) video cobb
of tile pk;'tum peffomTanre /viii be urlaocept_bb
•Component video cables come in sets of three and are for use wkh vide() devices wkh
component video output, (ColorStre m__)is Toshiba's brand of comporient vide().)
These cables are vpicaHy co[or<oded red, green, and blue. Separate audio cables are
required for a complete cormection.
Note: (;omponent video c>_b/esprovide better p/ctu/_ peff(mrmnce thai?ast;md;_fd (composite)
vkleo or S vk/eo cable
HDM] cable is fbr use wkh devices v&h HDMI (high--deft(titian multimedia
inter[_tce) output. HDMI cable deIivers digital audio and vide() in its native [_)rmat.
This cable carries both video and audio irdbrmafiom therefbre, r_o separate audio c _bles
are required for a complete HDMI device cormecfion. See page 19 [br [:_rther details.
Note: HDM/ cableprovidesbette/picturepeffofTr_af)cet/la/7astm)d_fa'((-ompos/te)videoof
S v/(/eocable
IEEE-1394 cable is _bruse wkh video devices with compressed digital vide() output
d_at meets CEA specifications fbr IEEEq394. This cabIe carries both video and audio
irdbrmafiom d_erefbre, no separate audio cables are required fbr a complete cotmecfion.
See pages 22-24.
Note:
•The t/>)nsm/_e/oncapability oflEE_ t394 ruble i_eed with this T1/must be $400
(400 Mbps max/muf_O
•/EEE t394 cobb provides bette/p/ctaf_ pel_)fmar_ce thai7astar_&ffd
(composite2 video of S video cable
• Dual-wand IR blaster/G-LINK '" cable is _br use wkh video devices wkh IR
(ird'rared) remo_e centre[. Two of these cables are inc[uded with your TV. One is _k)r
cormecfior_to the G-LINK jack (page 25) to enable TV Guide On Screen_' recording
_bamres (Chapters 5 and 7). The other can be used wkh d_eTV's IR passothrough
_bamre (page 21) and TheaterNet on-screen device centre[ _bamre (page 44).
Note: The two/R bb)ste//(_ L/N/( cables/fldua'eg with yauf 73//)ave spec/Sc characteristics
that a/Yewthem to e/aiRpfoper!y with tbia T1/_ /R OUT and G LiNK pelts Never use other
aftermarRet _blaster or G-UNg cables with this ?rg. Other cables 177ayRot _ufTot/of?
properly and can cre_sedamage THiS TYPEOF DAMAGE IS NOT COVERED BY YOUR
TOSHIBA WARRANTX
Optical audio cable is _)r cormecdr_g receivers wkh Do[by°')Digk_l or PCM
(pulse-code modulation) optical audio input to the TV's DIGITAL AUDIO OUT
jack. See page 2(}.
Dolby is 8 registered trademark of Dolby Laboratories,
Copyright_) 2004TOSHIBA CORPORATION,All rights reserved.
Coa×ial {F=type) sable
@
@
8tandard A/V cables {red/white/yellow}
S-video sable
@
@
@
Componentvideo cables(red/green/blue
_uobwand IR Naater/R=LNR sable
{2 insluded)
Optical audio sable
Note: Although your TVincludes bolh NDM/
and/EEE- _394 connections, it may not
operate with anotf_er device you have 1#at
/nr'hJde_ssuch a (reinfection,/:?)r example, ff_e
/EEE-_394 paris af_ not intended to operale
w//h (u/Tent model Mini DV camcordef_, and
tf_e NDM; input is not intended for
(:anne(l/on to a compute/: ('opyfTght
protection mqe/remer?ls may also prohibit of
limit connechwT;z See page _9 for derails
about the NDMI /npuL See pages 22-24 for
r/e_ta//sabout t#e /EEE-1394 pelts
11
HM94(E)OO9-11 (2A-Cnct) 11
8/30/04, 1:39 PM
÷
A+ L
You can connect dif'fbrent p.,,pesand brands of devices to your TV in se_era{dif_brent configurations. The connection iIRtstrations in
this manual are representative of"b'pical de_ice connecuons only. The inpuUoutput jacks on your de_ices may dit}'er from those
illustrated herein. For details on connecting and using your specific devices, refbr to each de\ice's owner's manual
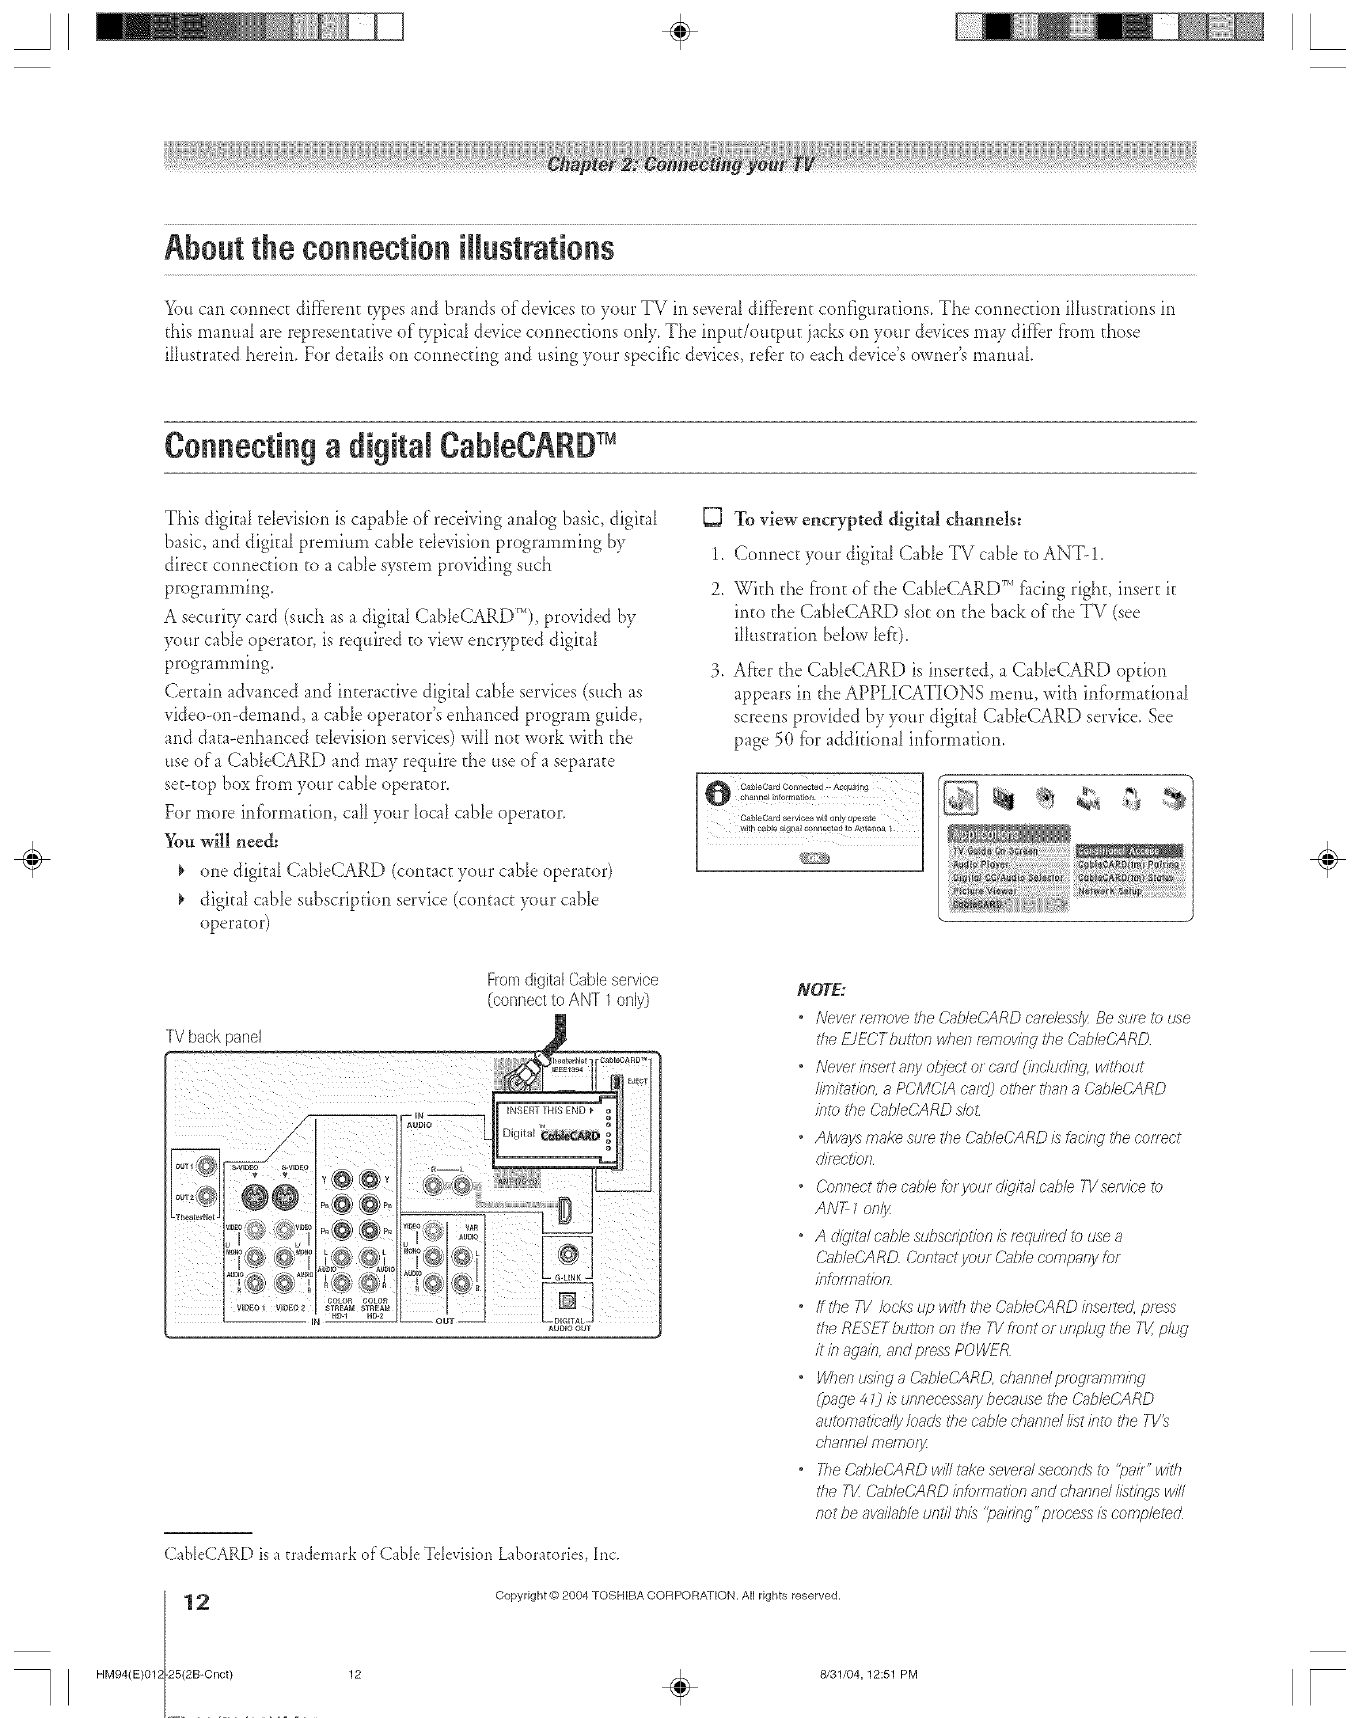
Connecting a digitaJ CahJeCARD+
This digitaI television is capable of receiving anaIog basic, digital
basic, and digital premium cane television programming by
direct connection to a cane system providing such
programming.
A securiV card (such as a digitaI CableCARD_'*), provided by
F)ur cable operator, is required to view encrypted digital
programming.
Certain advanced and interactive digital cable services (such as
video-on-demand, a cable operator's enhanced program guide,
and data-enhanced tdevision services) will not work with the
use of a CaNeCARD and may require the use of"a separate
set-top box fi'om your cable operator.
For more intbrmafion, call your local cable operator.
You will need:
+ one digital CableCARD (contact your cabD operator)
digital cabD subscription ser_ice (contact your cable
operator)
To view encrypted digital channels:
1. Connect your digita{Cable TV cable to ANT!.
2. With the front of the CableCARD TM fi_cingright, insert it
into the CabDCARD sIot on the back of the TV (see
illustration below lefr):
3. Af'ter the CableCARD is inserted, a CableCARD option
appears in the APPLICATIONS menu, with infi)rmational
screens provided by ),our digital CableCARD service. See
page 50 for additional infi.}rmation.
÷
NOTE:
•Never++rnoyetheCg/e(;ARDcare/esdyBesumto use
theEJECTbuttonwhenfwsoving the@bleO_RD
•IVeverbsertartyobject or c_ud (imh/dir_g, without
limitation,aPCMC/Acnrc/)otherthai7a(}abb('ARD
bto theCab/eCARDs/o_
+AIw_ysmakesumthe('_@leCARDis_t;,c/rlgtbeconect
c/i/_ctkm
•('on/lecttilecable,fc_ryaur d/q@l cable.T1/serv/ee7o
ANT1only
•Ad@qta/cable subscgption £ r_qui/ed to usea
&@IeCARD (}OfTtUCt yOUY ()a/)/e com[)ar_y for
inforyr+ation
•fftbe TI!locks up with tbe C+ff/eCARD inset+d, press
the RESETbu_o/I on the 73//lorlt of urlp/d? the Tk' plug
it bagab arTd press POWE/Z
+WTersugngaCa//eCARD, d}anndprog/x_mm/nc_
(page 4 0£unneeessafy because the Cg_bCARD
automatically loach8the cable d_annd list bto the TV_
cha/sVs,d me/no/_
•The &_b/e('ARD will take several secon& to "pair" with
tbe T_ &_bleCARD /ntomTatkm and channd listings _1/i/I
riot be awfflable until this "pa//2lg" process is completed
CableCARD is a trademark o_'Cable Television Laboratories, lint.
12
HM94(E)012 25(2B-Cnct)
Copyright @ 2804 TOSHIBA CORPORATION. All rights reserved.
12 + 8/31/04,12:51 PM r
A÷ L
Connecting a VCRand antenna or CabJeTV (no CabJebox)
You will need:
one coaxial cable
one set of standard A/V cables
*For bette/pietu/e peitoe<lanc< if you/VCR has S video, use an
S vkleo cabb (plus rile audio cabbs:) instead of the stund_ffd video
cable HoweveL do not connect botl7 types of video cables to
VIDEO 1(or VIDEO 2j at the same time or the picture
pefforTnanee winbe unaeceptabb
*ffyou have a mono I/CR connect L/MONO on the TV to your
VCR_ audio outjnek using tile whM audio cable only
To view the antenna or Cable sig!l_al:
Turn OFF the VCR.
Sdect the ANT 1 video inpur source.*
To view the VCR:
T, rn ON the VCR. Select the VIDEO 1 video inpur source
on the TV.*
._[itrn ON the VCR. Sdect the ANT 1video input source.*
Tune the TV to cham_d 3 or 4 (whiche_er cham_d isvacant
in your area).
To use the TV-Guide On Screen recording features:
1. Connect the G-UNK cable according to the instructions
on page 25.
2. Make sure the VCR is cormected to d_eA/V OUT jacks
on the TV (see illustration).
3. SeEd_eVCR to d_e appropriate Iirle input (refbr to your
VCR owner's manual fbr det:ails),and then turn Ot_F d_e
VCR.
4. See Chapcer 5 fbr deEailson seEdng up the TV Guide
On Screen system.
5. See Chapcer 7 fi)r deEailson using the TV Guide
On Screen system.
Stereo VCFI
R
WFromCaNeTVor antenna
Note: 2_e VIDEO/AUDiO OUt_/?_cksoutput the s/iqna/sfrom the
ANT 7ANT2 I/IDEO 1 VIDEO 2, or VIDEO 3jacks when the
approprtDte /bput mode is se/ectecZ
The unaatborized mcordiug, use, distribution, or revision of televisiou
programs, videotapes, DVDs, aud other materials is p:'obibited under the
Copyright Laws of tbe United States and other countries, and may subject
you to civil and criminal liability,
÷
Connecting a camcorder
You will need:
one set:of standard A/V cables
*For bettel pletule peifoirrlanc< ifyore cari?corUel has S video, use an
S video cable (plus UTeauciio cables;7instead of tile sl_snd_ffdvicieo c'_sble
DO I)Ot CostnectboW?81),5'video cable arid a st_oldiffd video cable 17)VIDEO
3at the same time or tbe pk'tule peitoersance win be tJitaccef2bdt/e
To view the camcorder video:
Sdect: t:heVIDEO 3 video inpuE source.*
* Io select the video input source, press IN PUT on the remote control [see page 67).
Io program the PV remote control to operate other devices, see Chapter 3.
Copyright @ 2004 TOSHIBA CORPORATION, All rights reserved,
HM94(E)012-25(2B-Cnct) 13
8/31/04,12:51 PM [
A÷ L
Connecting a VCRand Cable box
%u will need:
¢one CaNe signal spotter
five coaxial cables
two sets of standard A/V cables
*For bette_ picttne peffoer_ance from youz VCR Ifyour VCR has
S vide& connect an S-video cable (plus dTeauckb cnt@s3 instead
of the standard vkleo c@/e Do nor connect an S vkleo c_b/e and a
s£ffldnfd video cabb i>_VIDEO 1(or VIDEO 2) at the same f/?rle
or the picture perfoeTlance wi// be unac'cept_bb
*ffyouhaveamono VOR connectL/MONOonthe FVtoyour
VCRt_audio outj_ck usieg the whffe audio cable only
*For be:tel pictm_ peitoer?ance f/orTIyou/Cable boy if your &_hle
box has componel2t video. VOtJ 6";ff7CORReCtcomponent video
cables Cph/srite auc#o cable..L_bsteild of the st;lndard video cable
from the Cabb box _ £ile Co/orS:ream HD 1 inputs on the 71/:@u
would tlTen sebct C'ok_rStmam HD 7as the video input SOLIfCe_
*Who/) you use 8 &sble box. you may not be able to use the
r_l?7ote contTo/ to Dlo_lelTi or access certain featte_s on
the T_/
DTo view basic Cable channels and use the _W'8 features:
Sdect the ANT 2 _ideo inpu_ source.* Use the TV front
pand controIs or remote controI to change cham_ds and
access the TV's tbatures,
C3
OF.,
To view basic and premitml Cable channels:
Turn OFF the VCR. Selec_daeANT 1 video input source.*
Tune the TV to channd 3 or 4 (whichever channd isvacant
in your area). Use daeCable box controls to change
cha*mds,
i[hm ON the VCR. Tm_et[_eVCR to channel 3 or 4
(whichever channd is vacan_ in your area). Sdect the
VIDEO 1 vide<)input source.* Use the Cable box controls
to change cham_ds,
To view the VCR:
Tftrn ON the VCR. SeJec_ the VIDEO 1 video inpu_
softrce2
Note: Thiswillprovidebetter picturepertonnanceLtvou
connectedanS vkleocg_b/easmentkmedin thefifatbu/leted
item onth£ pnge
or...Turn ON the VCP,.. Select: the ANT 1 video inpft_ source.*
Tune the TV to cha*md 3 or 4 (whichever cha*md is vacant
in your area).
* lb select the video input source, press IN PUT on the remote control
(see page 67). lb program the f_d remote control to operate other
devices, see Chapter 3.
FromCablel_/
Stereo VCR
iN from ANT
Note: _he VIDEO/AUDiO OUT,lacks ou@ut the s/_lna/s#ore the
ANT _ANT2 I/IDEO _ VIDEO 2. or VIDEO 3j?_cks when the
appropn?_teinputmode £ selected_
[_ To enable the TV Guide On Screen system to work
with your cable box and to use the TV Guide
On Screen recording features:
1. Connect d_eG-LINK cable according to d_e instrucuons
on page 25.
2. Make sure the VCR is connec[ed to the A/V OUT jacks
on the TV (see illustration).
3. Set the VCR to the appropriate line input (relbr to your
VCR owner's manual for detaiJs), and then mm OFF the
VCR.
4. See Chapter 5 for de_aiJson setting up the TV Guide
On Screen system.
5. See Chapter 7[br details on using the TV Guide
On Screen system.
÷
The m_a_thorized recording, use, distribution, or revision of televisio_
programs, videotapes, DVDs, a_d other materials is prohibited u_der the
Copyright Laws of the UnRed States a_d other countries, and may subject
you to civi_ and criminal liability.
HM94(E)012 25(2B-Cnct)
Copyright @ 2804 TOSHIBA CORPORATION. All rights reserved.
14 . 8/31/04, 12:52 PM [
A÷ L
Connecting aVCR and sateJJitereceiver
Note: The TVGuide On Screen _ system does not receive progrJn
I/st177gsfrom or f_._rany satellite serwce
You will need:
_, three coaxial cables
_, one set ef cemper_er_t video cables (ifyour
sateIIite receiver does r_e[ have cernpor_ent
vide(), cotmec[ the standard A/V cables only)
three sets of standard A/V cables
•f%rbette/picture peffonrlanc< ifyoln satellite
receiverand VCRhaveSvideo connectS vkleo
cables(_olustheaudio c'r;,b/e._2inste_dof the standard
videocables Do not connectboth_/pesof video
cablei?)VIDEO 1(or I/IDEO2) at thesame fibrinor
thepictureperformancewinbe unacoe/:)tabb
•ffyou haveamono I/CR,c-or?f?ectZ/MONO on the
T1/(VIDEO 0 _z)your VCR_AUDIO OUTjaek ushw
the whiteauogbcab/eon/_
DTo view satellite programs using the
component video connections:
Sdec[ the ColerStream HD-! video input
source on the TV.*
To view satellite programs using the standard
From
antenna
From
satellite
dish m
D
video connections or to record satellite programs:
T, rn on a11three de, ices. Set the V(-;Rto the appropriate
litle irlput (refer te your.VCR owner's manual tbr details).
Sdect the VIDEO 2 video input source on the TV.*
To view the VCR or view and record antenna channels:
Turn ON the VCR. Sdec[ the ANT-! video input source
on the TV.*
Tune the TV to cham_d 3 or 4 (whichever cham_d isvacant
in your area).
Tttrn ON tl'_eV(-;R.Ttme tl',eVCR to the charme[ you
war_tto watch. Sdect the VIDEO 1 _ideo input source on
the TV.*
* ]o select the video input source, press IN PUT on the remote control
(see page 67). ]o program the TV remote control to operate other
devices, see Chapter 3,
The unauthorized recording, use, distribution, or revision of televisioa
programs, videotapes, BVDs, and other materials is prohibited under the
CopyrightLaws of the UNrealStates and other countries, and may sobiect
you tociviland criminalIiahilRy.
StereoVCR
SateNtereceiver
Note: The VIDEO!AUDIO OUTj?_cl<8output the s/}'na/8 from the
ANT 7,ANT2, I/IDEO L VIDEO 2, or VIDEO 3y?mkswhen the
appropn_te input mode is selected
To use the TV Guide On Screen recording features:
1. Connect the G-LINK cable according to the instructions
on page 25.
2. Make sure the VCR is cormected to the A/V OUT jacks
on the TV (see illustration).
3. Set the VCR to the appropriate line input (retbr to >ur
VCR owner's manual for details), and then turn OFF the
VCR.
4. See Chapter 5 for details on setting up the TV Guide
On Screen system.
5. See Chapter 7 [br details on using the TV Guide
On Screen system.
÷
HM94(E}012-25(2B-Cnct} 15
Copyright @ 2004 TOSHIBA CORPOFtATION, All rights reserved,
÷8/31/04,12:52 PM
15
F
A÷ L
Connectinga DVDplayerwith S-video,aVCR,anda Cablebox
Y{m will need:
five coaxial cables
two sees of standard A/V cables
Note: Ifyouhaveamono VCR,connectL/MONO onthe 7T'
(VIDEO 7) toyouf VCR_aud/boutjack usingthe whM audio
cobb onl_
one S-video cabie
one pair of standard audio cables
Note;
*Ifyour DVD plnyerdoesnot haveS vkleo,useastandard
videocableinsteacLDo not connectanSvideocnbleanda
smnda/dvideocobb to VIDEO1CotVIDEO2) at the same
time or thepictureperformance WiNbe unaccept_ble
*ffyourDI/Dpl_yerh_scompooentvideo, seepage ZZ
*Do not c'oonecttke DVDpl,hyerand VCRte thesameset of
A/V bpu_5on the T1/(Seethei/ItJst/?£/_)o,wkM?showsthe
V()Rconnectedi_)VIDEO 1onthe Tk'and theDVD plJye/
connectedto VIDEO2)
To view basic channels and access the TV's features:
Sdect the ANT 2 _ideo inpuE source2 Use doeTV
controls to change cha*mds and accessthe TV's features.
C3
()F.,
To view preminm Cable channels:
Turn OFF the VCR. Sdect _heANT 1 video input
source.* Tune the TV to channel 3 or 4 (whichever
charred isvacam in your area). Use the Cable box
controls to change ci_a*mels.
._fltrn ON the VCR. T_me the VCR to channd 3 or 4
(whichever charred is vacam in your area). Sdect the
VIDEO 1 video iplpm source.* Use the Cable box
controls to change chaimds.
Note: When you use aCable box, you rn_y not be able to
use the f_/770tecontrol ih)prog/_m or access co/rain
[eatto_s of} the TV
To view the DVD player:
Turn ON the DVD pkuer. Sdect the VIDEO 2 _ideo
inpu_ source/
To view VCR 1:
T, rn ON the VCR. Select the VIDE() 1 video input
source on the TV.*
or... Tttrn ON the VCR. Sdect the ANT 1 video inpu_
source.* Trine the TV to chapmel 3 or 4 (whichever
cbapmel isvacant in your area).
* lo select the video input source, press [N PUT on the remote control
(see page 67). ]o program the 7_/remote contlol to operate other
devices, see Chapter 3,
Fromantennaor CableiV
StereoVCR
IbJ from ANT
OUT to TV
TV
DVDpmayerwith S-video
Note: 7he VIDEO/AUDiO OUTj?_eks output the s/_!nalst/ om the ANT 1
ANT2` VIDEO L VIDEO 2, or VIDEO 3j?_cks wheo the appmprgffe /?tput /node
is selected
To enable the TV Gnide On Screen system to wnrk with
your cable box and to use the TV Guide On Screen
recording feanres:
1. Copmec_ the G-LINK cable according to the ip_str,cfions on
page 25.
2. Make sure the VCR is cormected to the A/V OUT jacks
on the TV (see illustration).
3. SeEthe VCR to the appropriate Iine inpu_ (refer to your VCR
owner's manual for de,oils), and then turn OFF the VCR.
4. See Chapter 5 tbr details on setting up the TV Guide
On Screen system.
5. See ChapEer 7 tbr details on using the TV Guide On Screen
sysEeln,
The unauthorized recording, use, distribution, or revision of tdevision
programs, videotapes,DVDs, a_d other materials is prohibited under the
Copyright Laws of the U_ited States and other countries, a_d may subject yea
to civiJ a_d crimi_a_ _iabi_ity,
6
HM94(E)012 25(2B-Cnct)
Copyright © 2804 TOSHIBA CORPORA) ION. A[] rights reserved.
÷
16 _ 8/31/04, 12:52 PM [
A÷ L
Connectinga DVDplayerwith ColorStmam(componentvideo)anda VCR
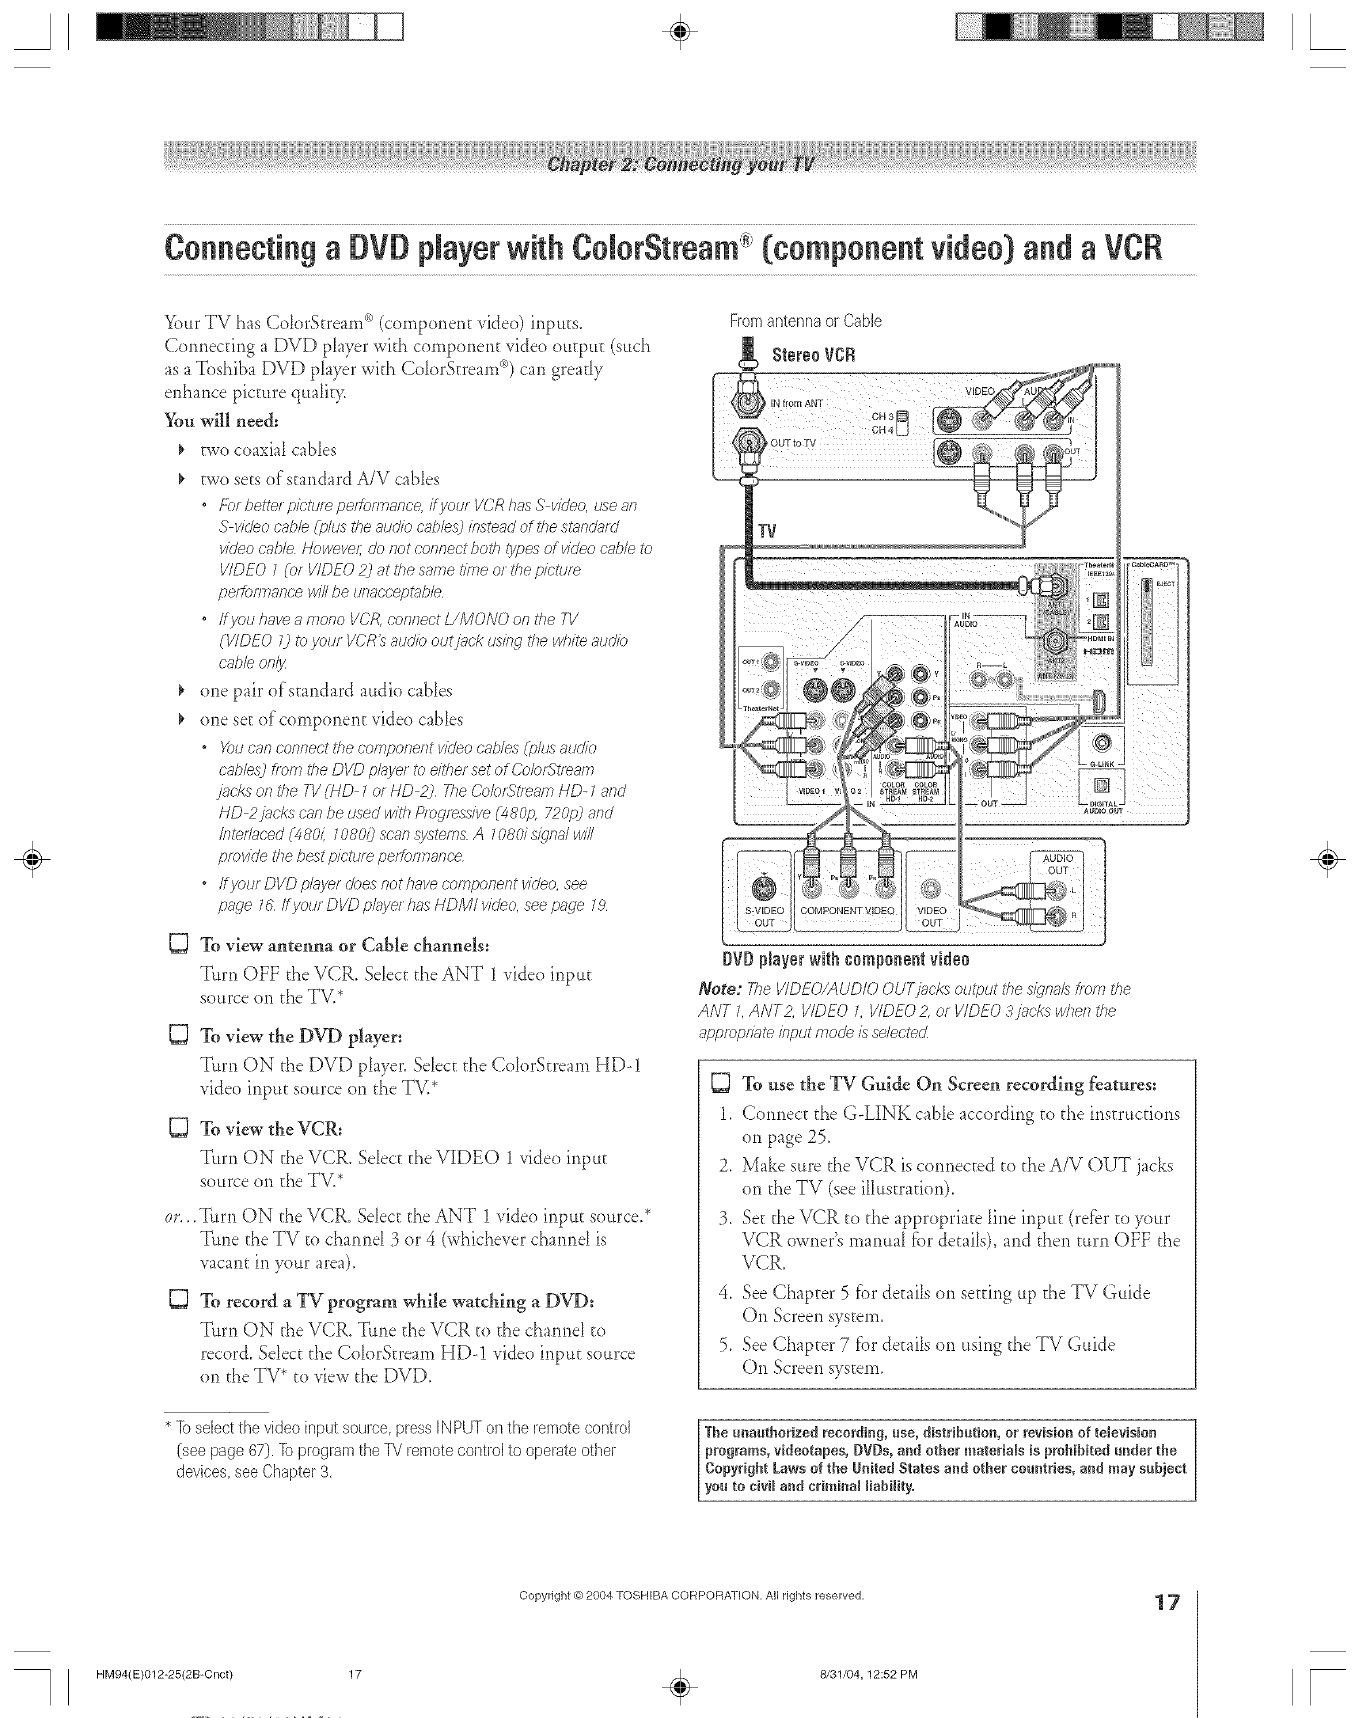
Your TV has Co[orStrearn _*(component video) inputs.
Com_ecdng a DVD player with cornponer_t video outpuE (such
as a Toshiba DVD player with Co[orStrearn '_) can grea@
enhance picture qua[it T,
You will need:
_' two coaxial cables
_, two sets of standard A/V cables
•Forbertel pit'tul_ peffomlance, ifyoul VCRhas S video, _se an
S videocable(pills theauclk_cablesL)insteadoflhe smndam'
videocable Howeve/;do not cof?f?ectbotb i)/f.)e_ of vkJeocnb/eto
VIDEO1 (of VIDEO2) at tbe sametime or thepicture
peffomTancewillbe unaccept_bb
•ffyou haveamono VCR,coffflect UMONO on/7?e71/
(VIDEO 0 reyour VC)R_aud/boutjack usingtile whM audio
cableonly
_' one pair of standard audio cables
_, one see of component video cables
• X)u can connectthe componellt videocnb/es(i)lusauc]k)
cables)from the DVD p/aye/to eitherset OfCO/OfStI_RIT?
]3*C/(S Of7the ]]/(HD 1of HD 2) ',rileO<)bfStl_alT]HD- Zand
HD 2jacks cnn beused withPmgf_ssl_ (480p. 720p) and
/nteflnced(_80/: 10800scan system&A 708d s/qnd will
pfovk/ethebestp/cruleperformance
•ffyourDVDp/ayerdoesnotl)avecomponentv/deo, see
page 1Uff J/otJrDVD pl_ye/has HDMI vkJeo,seepnde Z,9
To view antenna or Cable channels:
Turn OFF the VCR, Select the ANT 1 xideo input
source on the TV.*
TOview the DVD player=
Turn ON d_eDVD player. Sdect d_e Co[orStream HD-!
video input source on the TV.*
To view the VCR:
Turn ON d_eVCR. Select d_eVIDEO 1 video input
source on the TV.*
OF.,
D
•Turn ON fl_eVCR. Select the ANT 1 video input source.*
Time the TV to channd 3 or 4 (whichever channd is
vacant in your area).
To record a TV program while watching a DVD:
Turn ON d_eVCR, Tune the VCR to the charmel to
record. Select d_e Co[orStream HD-! video input source
on the TV* to view the DVD.
Fromantennaor Cable
g StereoVCR
DVDNayer with component video
Note: 2)e VIDEO/AUDIOOUTjacks output theWnaL8tror:_the
ANT I, ANT2, VIDEOL VIDEO2, of VIDEO3]ncks whet1tbe
appropriateinputmode isselected
To use the TV Guide On Screen recording features:
1. Connect d_eG-LINK cable according to dae instructions
on page 25.
2. Make sure the VCR is connected to the A/V OUT jacks
on the TV (see illustration).
3. Se_the VCR to the appropriate line inpu_ (refbr to your
VCR owner's manual fbr details), and then turn OFF the
VCR.
4. See Chapter 5 for details on setting up the TV Guide
On Screen system.
5. See Chapter 7 fbr de_ailson using the TV Guide
On Screen system.
÷
* lb select the video input source, press IN PUT on the remote control
(see page 67). lb program the TV remote control to operate other
devices, see Chapter 3,
The unauthorized recording, use, distribution, or revision of television
programs, videotapes, DVDs, and other materiMs is prohibited under the
Copyright Laws of the United States and other countries, and may subject
you to civil and crimina_ liability,
HM94(E)012-25(2B-Cnct) 17
Copyright _') 2004 TOSHIBA CORPOFIAT[ON, All rights reserved,
÷8/31/04,12:52 PM
17
[
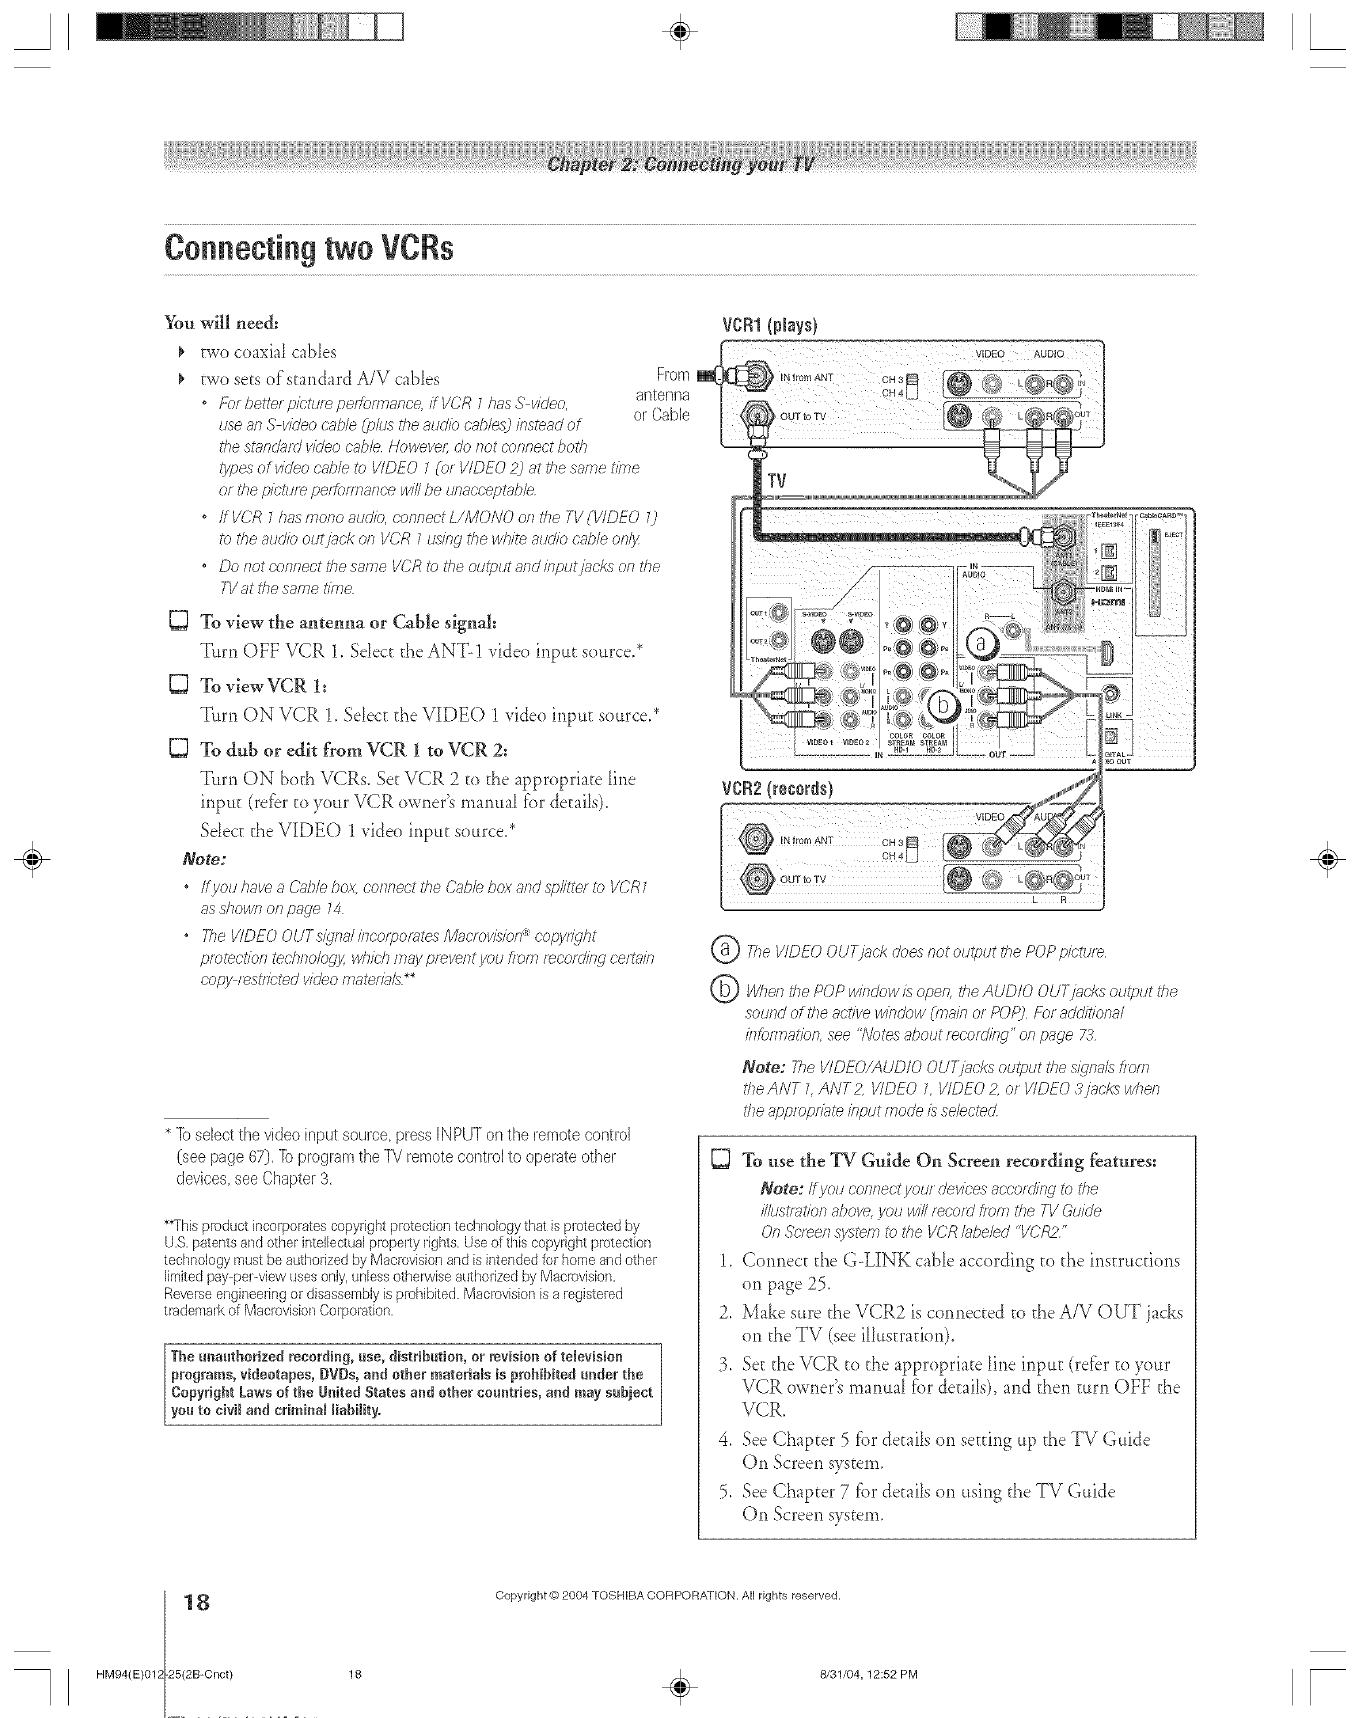
Connecting two VCRs
You will need:
two coaxiaJ cabJes
two sets of standard A/V cables From
For better pk-ture peffo/rr_ance, iT VCR 1has S video, anter/na
or Cable
use 8f7S v/_teocable (plus the audlb cablesj ibstead of
the st.l_durd wdeo cable Howevel; do slot connect botb
_ypesof video cable to VIDEO 7(or VIDEO 2) at the same time
or the plctur_ performance wi2 be unacceptabb
,ff I/CR Zhas inono audlb, connect L/MONO oil the TI/(VIDEO 0
to the aud:o out jack ors VCR Zuslbg the white audio cable ofyl_z
" DO not COfyfyeot frye sai77e VCR tO the output and Ibputj_cks on tlye
TVat tbe same time
To view the anterma or Cable signal:
Tttrn OFF VCR 1, Sdect the ANT-! video input source.*
To view VCR 1:
Tttrn ON VCR !. Sdect the VIDEO 1 video inpu_ source.*
To dub or edit from VCR 1 to VCR 2:
Turn ON both VCRs. Set VCR 2 to the appropriate line
input (refbr to your VCR owner's manuaJ for detaiJs).
Sdect the VIDEO 1 _ideo input source.*
Note:
,Ifyou have a &lble box corlnect the Cable box and splitter iT)VCR1
as shown on page 14
•TheVIDEOOUTslgnallbcorpoi_qesMJcrov/slon_copynglyt
protection technolog_ wlylcl7may prevent you flora t_cordlbg celt; ilb
copy r_stnbted wdeo mater77s/s_
* ]o select the video input sotirce press IN PUT on the remote control
(see page 67), ]o program the PV remote control to operate other
devices, see Chapter 3,
**Thisprv}ductincorporatescopyright proteclion technology that is protected by
U.S,patentsand other intellec*ualproperty rights. Useof this copyright protection
technology mustbe authorizedby Macrovisionand is intended for homeand other
limitedpay perMew usesonly,unlessotherwise authorized by Macrovision.
Reverseengineeringor disassemblyis prohibited. Macmvision is a _egiste_ed
trademark of MacrovisionCorporation,
The unauthorized recording, use, distribution, or revision of television
programs, videotapes, DVDs, aad other reateria_s is prohibited under the
Copyright Laws of the United States and other countries, and may subject
you to civil and criminal liability.
@°iriiTv !@ L R
S
Z
Tile VIDEO OUT j?_c'kdoes not output tbe POP plcture
OW_efl dle POP wlbdowis open the AUDIO OUTjacks output the
sound of the active window (mail? or POP) fZbradditional
/llformat/on, see "Notes about recording" on page 73
Note: 77/e VIDEO/AUDIO OUY)bcks output tbe s/clnalst/om
tbeANT L ANT2, VIDEO _ VIDEO 2, of VIDEO 3/acks when
the appropriate klput mode is selected
To use the TV Guide On Screen recording features:
Note: If you connect you! devices according to the
i/lu'_tlyltlonabove, youwillrecordtlomtheTV&aide
OnScr_e/1svstem to theIiCRhbeled"V(?R2'
1. Co*mec__heG-LINK cane accordingto the ir_str.c_ions
on page 25.
2. Make sure the VCR2 is com_ec_edto the A/V OUT ja&s
on the TV (see ilb*s_ration).
3. Se_the VCR to the appropria;e lh_e input (refbr to your
VCR owner's manual for de_aiJs),and then turn OFF the
VCR.
4. See Chapter 5 fbr details on se_fing up the TV Guide
On Screen system.
5. See Chapter 7 fbr details on using the TV Guide
On Screen system.
÷
8
HM94(E)012 25(2B-Cnct)
Copyright @ 2004 TOSHIBA CORPORA]ION. All rights reserved.
18 _ 8/31/04, 12:52 PM [

A÷ L
Connecting an HDMI" or a DVi device to the HDMI input
The HDMI I_]input on your IV receives digital audio
and uncompressed digital video from an HDMI device
or uncornpressed digkal video fforn a DVI[2]device.
This input is designed to accepEHDCP [31program material in
digital form from EIA/CEA-861/861B-compIiant I<consumer
electronic devices (such as a set-top box or DVD player with
HDMI or DVI outpuD.
The HDMI input is designed tbr best perlbrmance with 720p
and 1080i high-definition video signals, bu[ will also accep[
and display 480i and 480p signals.
[NOTE: NEVEiR gONNEC'[ TH|S I'V
TO A PERSONAL C:@MPUTER (PC).
THISTVIS NOTINTENDEDFORUSEWITHA PC,
To connect an HDMI device, you will need:
. one HDMI cable (type A cormector)
Fbr proper operation, it is recommendeci ibat you use
as short an HDMI cable as possible You should not
enc;ounf_r r/ifficulty ff you use an HDMI cable shorl_r
tf_ar716 4 fl (,Smj
HDM/ c'ab/e transfers both video and audie, Separate
arTa/og audio cab/ms are not required (see illusirasfon
be/owj Some CDVs (viUeo CDs] may not output Uigila/
auUie signals, In that case, you may hear sound by
c'onnecUrd analog audio c.ab/es I-Iowmver; ff you c:c_nnect
arTa/og auUio cables with ibis c.onnec'Uon, ibe HDM/
t>rTninal on the TV win not rec'cive UveI-tDMI cJg)italaudio
signal and you viii/hear analog auUio only
,gee "Setlieg ibm HDMI auUie merle" on page 49
HDI_I device
TV
[q HDM/ H'_/h Def/n/l/on Muli/medkl Interf_ce
[2] DV/ Diq/tal ViUeo/nten'nce
Is] NDCP N/_'h bafTdw/dth D/_'/?;IIContesTtPfotect/orl
[4] E/A/CEA 86 WH67B compliance cove/s the tf_lf7smlsslof7of
docompfmssed d/_'/ta/ v/Ueo w/lh h/gh ba/ldw/dth d/?/ia/ cof)imf)t
protection, wlTM) /s brits[1 stgmdardl2ed for fmception of hl_'h definii/on
video signals Because tiffs/s an evoMng tedTno/oss h'/s possible that
some devices may riot ope/_te properly w/lh the Th'
NOTE: _ensure that the HDM/ ot DV/ device /s reset
pmpefljz ills _mcommended that you b/low these
pmcecMes
"Whel7 ium/Hg ol7 your electronic C'OfYlpof7eRtS, tHrH 0#t
the Tg first, and tl_eo tl_eHDMI o_ DVI device
•Whel_ turning offyour elect/ohio compoilen_5, turn off
the NDMt or Oil# dev#ce first, and then tl_e TQ:
To connect a DVI device, you will need:
. one HDMI-to-DVI adap[er cable
(HDMI type A connector)
_b_ pmper opelai/on, lhe lef_gtl_of an HDMI-io DIll
ad_pimf cHb/e dToul(I riot exceed 98 tt C3mj Yhe
rmcomrrle/_ded lerlg177/s 6 6 tt _2m]
" one pair of standard analog audio cables
An HDMI to DIll adapte/ cable tlansfef_ vk/eo on{lz Separate
analog audio cabbs a_e required (see/llusl's_tion belowj
See "Setik W ffTeHDM/ aur//o moUe" on page 4,9
OVldevice
TV
÷
HD MI, the HDMI logo, and High DefinitionMultimedia Inte_lace
aretrademarksor registeredtrademarksof HDMI Licensing,LLC,
Copyright @ 2004 TOSHIBA CORPORATION, All rights reserved,
HM94(E)012-25(2B-Cnct) 19 ÷8/31/04,12:52 PM
19
[
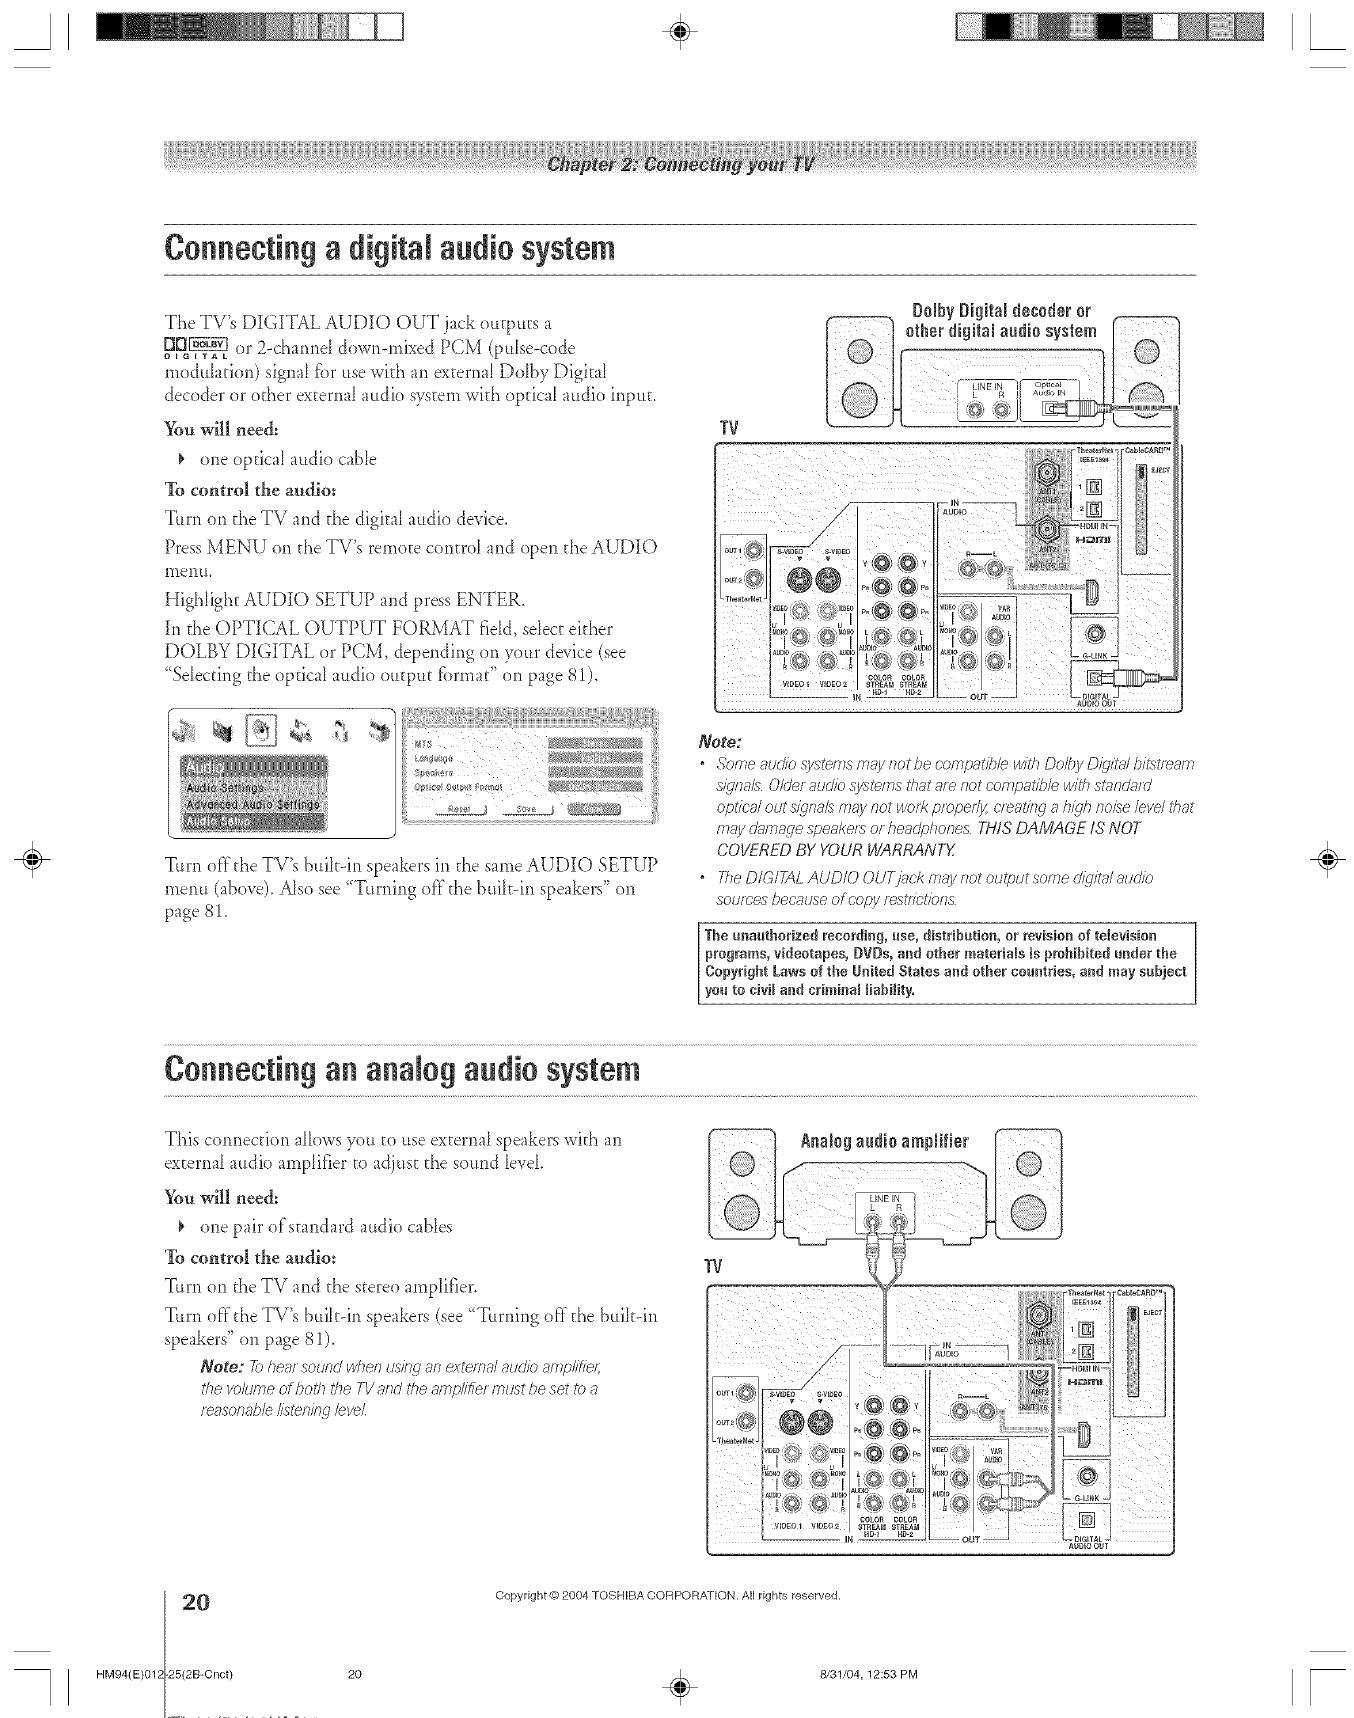
A÷ [
Connecting a digital audio system
The TV's DIGITAL AUDIO OUT jack outputs a
p[_ or>channe_dow>mi_edPCM(p<se<ode
meduhtion) signal fbr use with an external Dolby Digital
decoder or other external audio system with optical audio inpus.
You will need:
¢one optical audio cable
To control the audio:
Tim1 on the TV and the digital audio device.
Press MENU on the TV's remote centre[ and open the AUDIO
lnentL
Highlight AUDIO SETUP and press ENTER.
hi the OPTICAL OUTPUT FORMAT rid& select either
DOLBY DIGITAL or PCM, depending <7,1your device (see
"Sdecting the optical audio output tbrmat" <3,1pate 81).
Turn off the TV's bulk-in speakers in the same AUDIO SETUP
menu (above). Also see '{Turning off the buih-in speakers" o,1
pate 8!.
DolbyDigitamflecofler or
TV
Note:
*SomeaudiosystemsmaysTotbecompatiblewithDolbyD/_qitgJbii?__tle_m
S/qfl3f8 Older eL]clio SySl_tTIS fhc_[ 8re Rot compat/ia/e with SttJRdJtff_]
optics/out s/qf78f8<178ynot WOlRpmpedy, c/_afin51a h_lh slo/selevel fhat
frlay d;image speake/s of heao_phof?esTHIS DAMAGE IS NOT
COVERED BY YOUR WARRANTY
* 21e DIGITAL AUDIO OUI)iack may not output some d/d/t_l audio
surecos because of c'opy f_St/fet/of_&
The unauthorized recording, use, distribution, or revision of television
programs, videotapes, DVDs, and ether materials is prohibited under the
Copyright Lows of the UnRed States and other countries, and may subject
you to civil and criminal liability,
÷
Connecting an analogaudiosystem
This connection albws you to use external speakers with an Anam0gaudio stuNNer
externa[ attdio amp[ifier to adjust the sound [e_e[.
You will need:
one pair of standard audio cables
To control the audio: TV
Turn o,1 the TV and the stereo amplifier.
v,,,lo_theVV's_,_,_>_,1speakers(see"Wrn_,lgof_"the*,_tt-_,l
speakers" <>,1page 81).
Note: 7b hea_ sound w/?el_us/bg an external au&b amp//?te_
the volume of both the TV and the 8fglp/ff/ef must be set _) a
reasonabb //}ten/?ig bveZ
0
HM94(E)012 25(2B-Cnct)
Copyright _) 2004 TOSHIBA COFtPORATION. AH rights reserved.
20 _ 8/31/04, 12:53 PM [
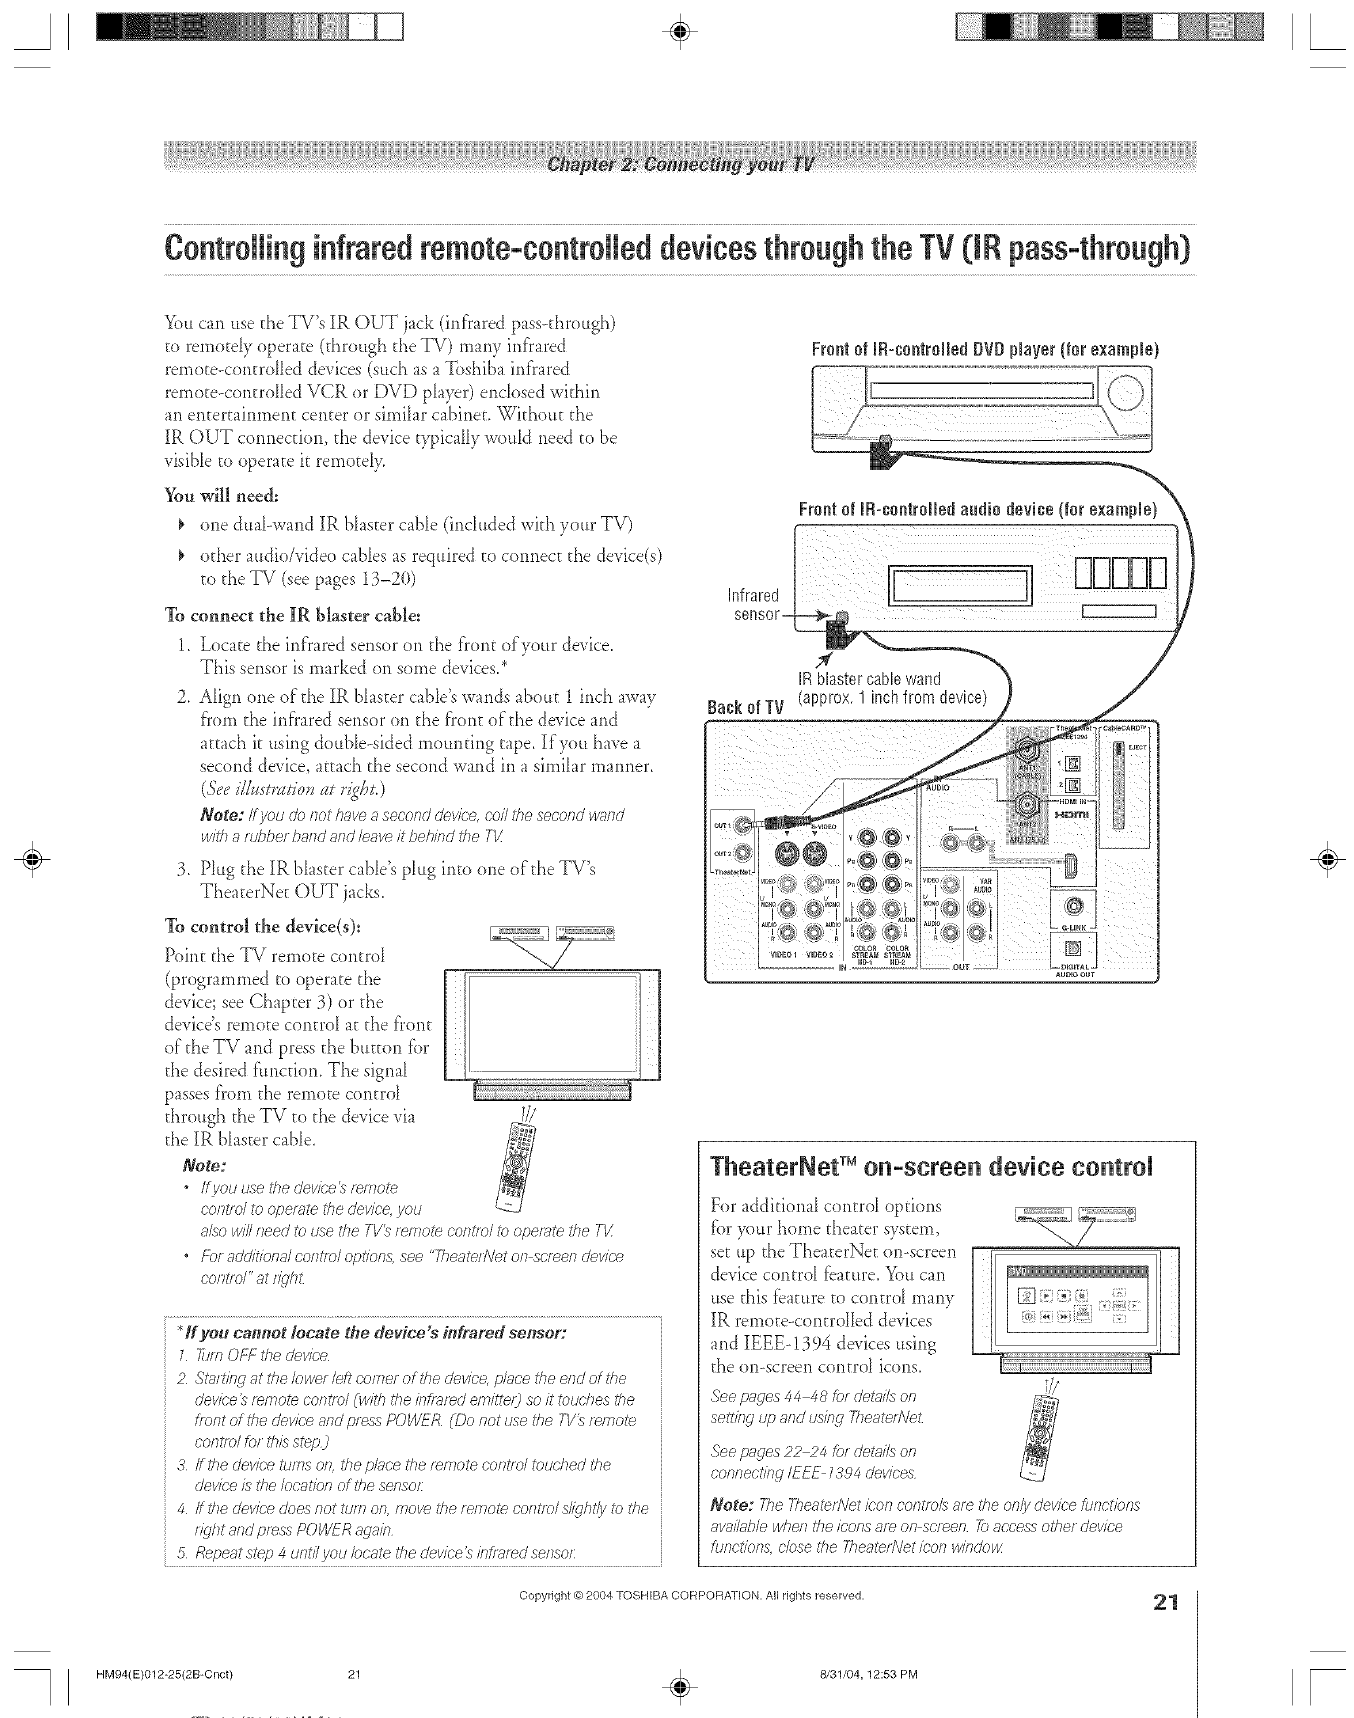
A÷ L
Controllinginfraredremote-controlleddevicesthrough the TV ([IRpass-through}
You can use the TV's IR OUT jack (infrared pass<hrough)
to rernotdy operate (through the TV) many infrared
remote-controlIed devices (such as a Toshiba infrared
remote<entre[red VCR or DVD phyer) enclosed within
an entertainment center or simihr cabineE. Without d_e
IR OUT connecuon, the device typically would need to be
visible to operate it remotel>
You will need:
To
1.
2.
one dual-wand IR bhster cable (included with your TV)
od_er audioAideo cables as required to connect d_e de, ice(s)
to the TV (see pages 13-2(t)
connect the IR blaster cable:
Locate the infrared sensor on the front of your device.
This sensor is marked on some de_ices.*
Align one of the IR blaster cable's wands abouE 1 inch away
from the infrared sensor on the front of"the device and
attach it using double-sided mounung tape. If you have a
second device, attach the second wand in a simihr manner.
(Seeil&stszldov at ri@t.)
Note: If you & nothaveaseconddevk:e,coilthesecondv>_nd
withartJ/)berbandandleaveh"behindtheTk'
,
TheaterNeE OUT jacks.
To control the device(s):
Point the TV remote controI
(programmed to operate the
device; see Chapter 3) or the
device's remote controI at the f'ront
of"the TV and press d_e button tbr
the desired t:m_cfiomThe signal
passes from the remote control
through the TV to the device via
the IR bhaer cable.
Note:
*Ifvouusethedevice_r_mote
c'ont/dtoope/_ffe the device, you
alsowillneedtousetheTV?remotecontroltooperate theT_/
.For add/tioR8/oorT_/el opt/on& see "Theater\let on screen device
c'ont/d" at rl_'h£
Plug d_eIR bhster cabb's plug into one of the TV's
H you camtot locate the device s infrared sensor:
1 _J/y_OFF JTedevfce
2 St_lrtirlg at the Iowe/left coeTer of the device, plaice the end of the
device _ f_h_lotecontrol _¢vit/I the/nflYff_d e/Tlitte/3 so it touches tile
front of the device and p/ess POWE/Z (Do not use the T1/_r_lT}Ol_e
control for this step_
3 ffthe device turns on. the p/uce the temote oorFld touched the
devk;'eis the location of the sensor
4 /fthe devk'edoesnotturnon,movethetemo_corK/elsl/_htly I2)the
//_lht andpressPOWERagain
5Repeatstep 4 unt//i/ou locatetl}edev/ce_/fffl_r_dsensor:
FrontofIR-controJbdBVBpJayer(for exampb)
Infrared
IRblastercablewand
Back of TV aDmox ncn from qevlce
TheaterNet TM o -scree device co tro
For additional controI options
tor y)ur home theater system,
set up the TheaterNe_ on-screen
device controI tbature. You can
use this fbature to contro_ many
IR remote<entre[red devices
and IEEE- 1394 devices using
the on-screen control icons.
See pages 44 48 for deta/Tson
setting up and using 7heaterA/e_
See pacms22_4 for details on
connecting/EEF _394 devices
Note: 77_eTheater?Jetloon controls a/e the only device [Lir}ct/ons
awffl@le when the icons ar_ on screen 7_)aocess other device
function& close the Fhea_r#'et icon w/ndo_/
Copyright @ 2004 TOSHIBA CORPORATION, All rights reserved, 21
HM94(E)012-25(2B-Cnct} 21 ÷8/31/04,12:53 PM
÷
[
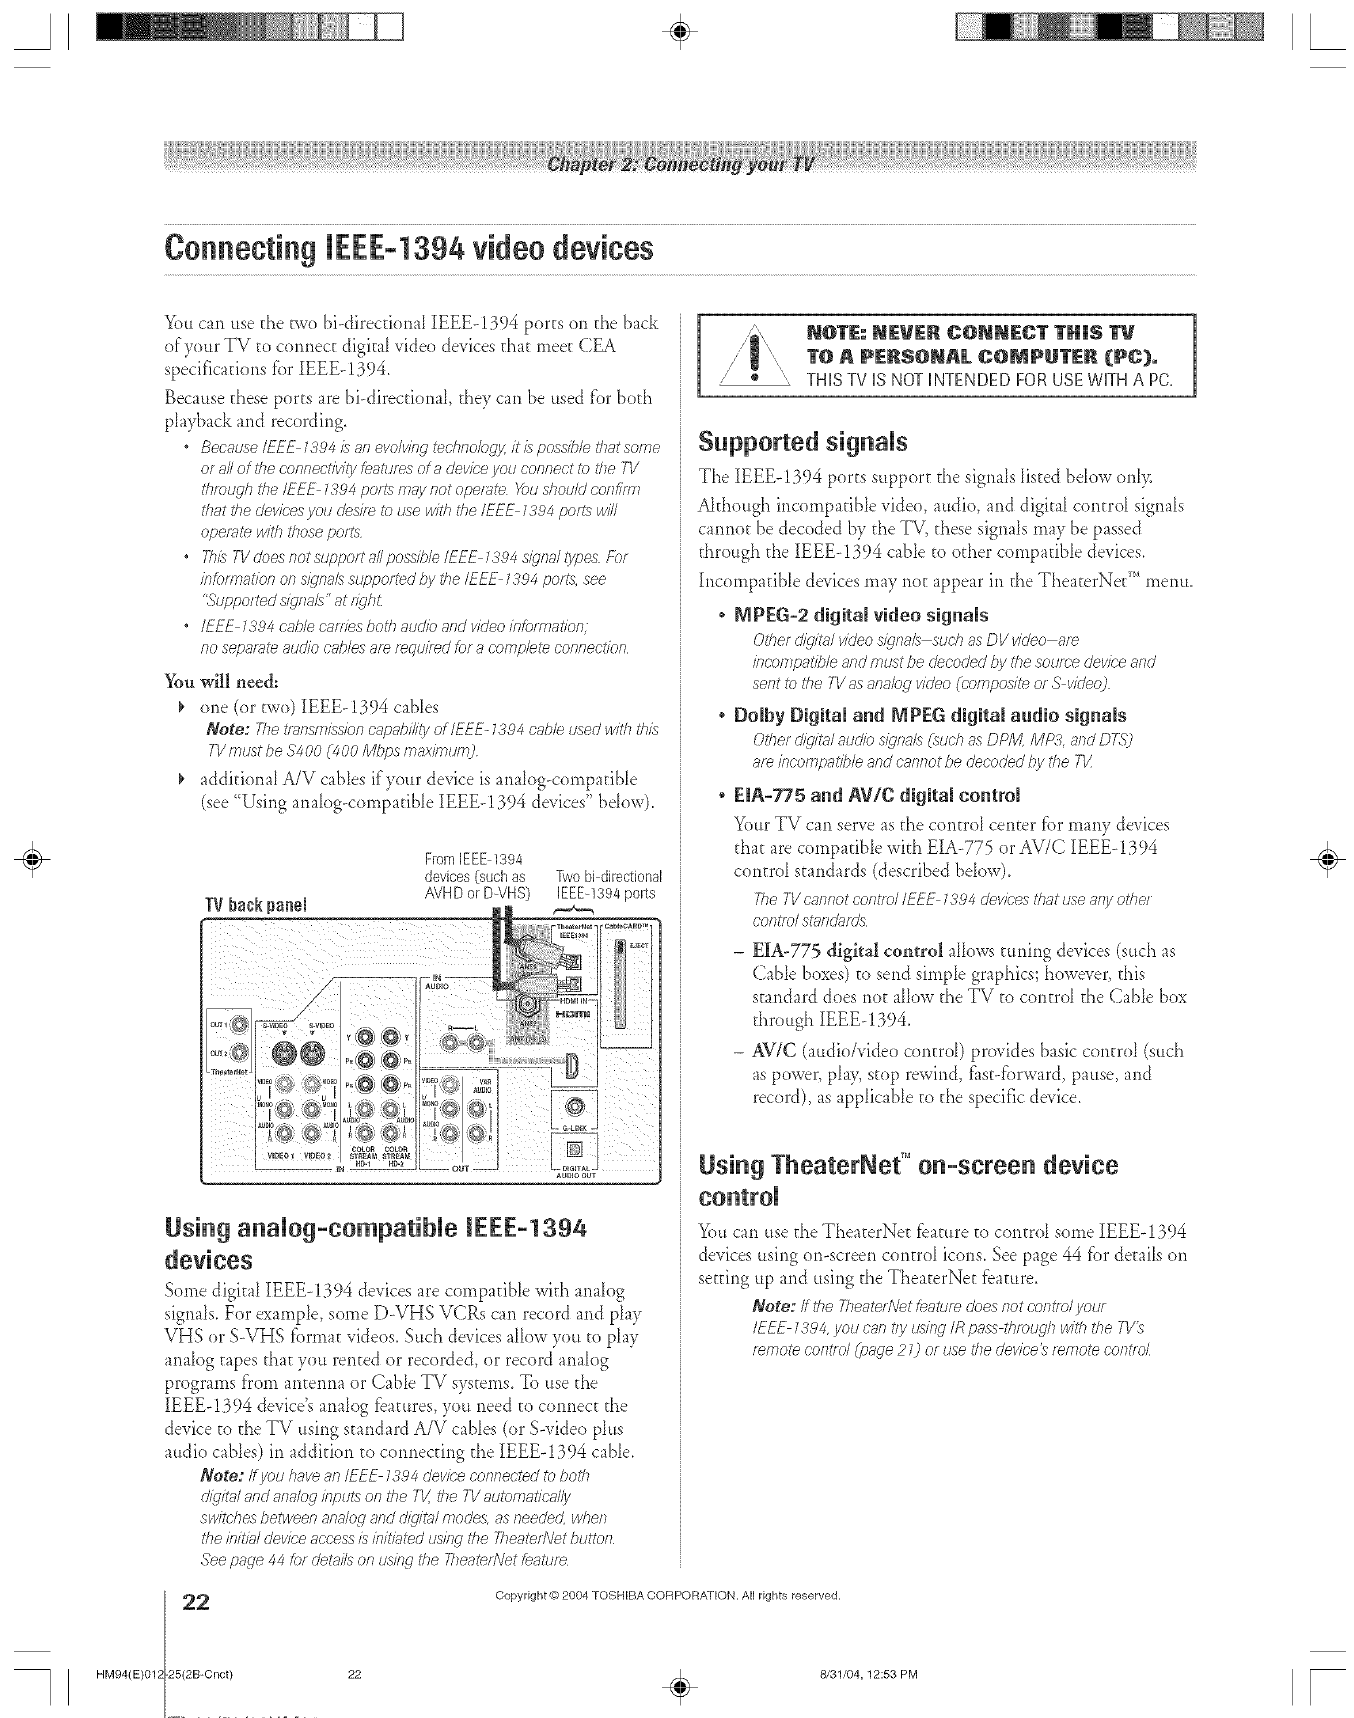
A÷ L
You can ttse the two bi-direcdonaI IEEEq394 ports on the back
of your TV to cormect digita[ video devices that meet CEA
specifications tbr IEEEq394.
Because these ports are bi-direcdona[, they can be used for both
p[ayback and recording.
Because IEF E 1884 /s an evolving technolog_z it/s pogsfble that some
of all of tke c.onnectMty features of a device you connect to _7}e7-1/
tlffougb the/EEE 1394 ports may not operate X)u d?ou/d conf/rrn
that the dev/ces you desffe to use with the IEEE 1394 pOllS will
operate with those ports
• Fh/} TV does not support 8/I pos:4b/e IEEE 13'94 signal lypes For
bfofmatk_n on s/}'naZ8supported by the/EEE 1394 ports, see
"Supported s/_'naZ'__' at f_qbt
•IEEE 1394 cable c_vTiesboth 8udk) and v/deo infom_atk)n;
no sepaf_ll_ 8udk) cnb/es 8f_ f_qu//_d br 8 complel_ connection
You will need:
_' one (or two) [EEE-1394 cables
Note; Fketlaegnissionc_lp_bi/iiyof/U--E-1394cableused withthis
TVmust be $4 O0 (_O0 Mbps fn_xi/nlorO
_' additional A/V cables if'your device is analog-compatibb
(see "Using anaiog-compadbb IEEE-! 394 devices" bdow).
Using a Nog-compatiNe EEE-1394
devices
Some digital IEEEq394 devices are compadbb with analog
signals. For exampb, some D-VHS VCRs can record and play
VIIS or S-VHS fbrmat videos. Such devices allow you to play
apia[ogtapes that you rented or recorded, or record anah)g
programs from antemm or Cabb TV systems. To use the
IEEEd394 device's analog features, you need to com_ect the
device to the TV using standard A/V cables (or S-video plus
audio cables) in additiop_to copmecdng d_eIEEEq394 cable.
Note: If you have an/FEE 1394 deviee connected to botll
di_tW and an_:log ir_puts on tile TV, the TI/automatk-_ffly
switches between analog and dig/tsq modes, as needed, wben
the bitiW deviee access is initig_tedusifw the TheatefNet bu_ton
See page 44 [of detg_i/son using the 2?eaten\let _eatufe
2
HM94(E)012 25(2B-Cnct)
/" Nff_E,- NE_ER CONNECT TN|$
T@ A P_RSONAL COMPUTER (PC}.
,' _ ", THISTVISNOTINTENDEDFORUSEWKHAPC,
Supported sig Ns
The IEEE-1394 ports support the sig*mlslisted bdow only.
Akhough incompadbb vide<),audio, and digita[ contro[ signa[s
taproot be decoded by the TV, these signa[s may be passed
through the [EEE-1394 cabb to other compadbb devices.
Incompadbb devices may not appear in the TheaterNer" menu.
, MPEG-2 digital video signals
Other dkj/t./ vk/eo sign;_/8 such as DV _'/?/eo ;;,re
klcompatible and must be decoded by the soume device and
sent to the TVas anabg video (composite of S video)
, Dolby Digital a_d P]IPEG digital audio signals
Od_er d/g/m/ aud/b signals (such as DPM MP3. and D75")
8f_ /bcompat/b/e and cannot be decoded by the T1/
*EIA-775 and AV/C digital control
Your TV can serve as the control center l%rmany devices
that are compatibb with EIA-775 or AV/C [EEE-!394
control standards (described bdow).
The TV csrlnot contfo/ /E_E 1394 devices thRt use _vny otbe/
conife/ si?gnd_fds
-EL&-775digital control aik)ws tinring devices (such as
Cabb boxes) to send simpb graphics; however, this
standard does not allow the TV to control the Cabb box
through IEEE- 1394.
- AV/C (audio/video control) provides basic control (alch
as power, pia> stop rewind, t_st-forward, pause, and
record), as appiicabb to the specific device.
Using TheaterNef '°on-scree device
>)u can use the TheaterNe_ tbamre to control some IEEE-1394
devices using <m-screen controI icons. See page 44 fbr derails on
setting up and using the TheaterNet fbamre,
Note:/f tile Tbeate_NetLe_tufedoesnoteor_te)lyouf
IEEE 1384,you can t/y i_/ng /Rp;_ssthroughwith the ;q/%
f_rrlotecontld (p;_ge21) of usethedev/ce_ f_rrlotecontlo/
Copyright © 2804 TOSHIBA CORPORATION. All rights reserved.
÷
22 _ 8/31/04, 12:53 PM [
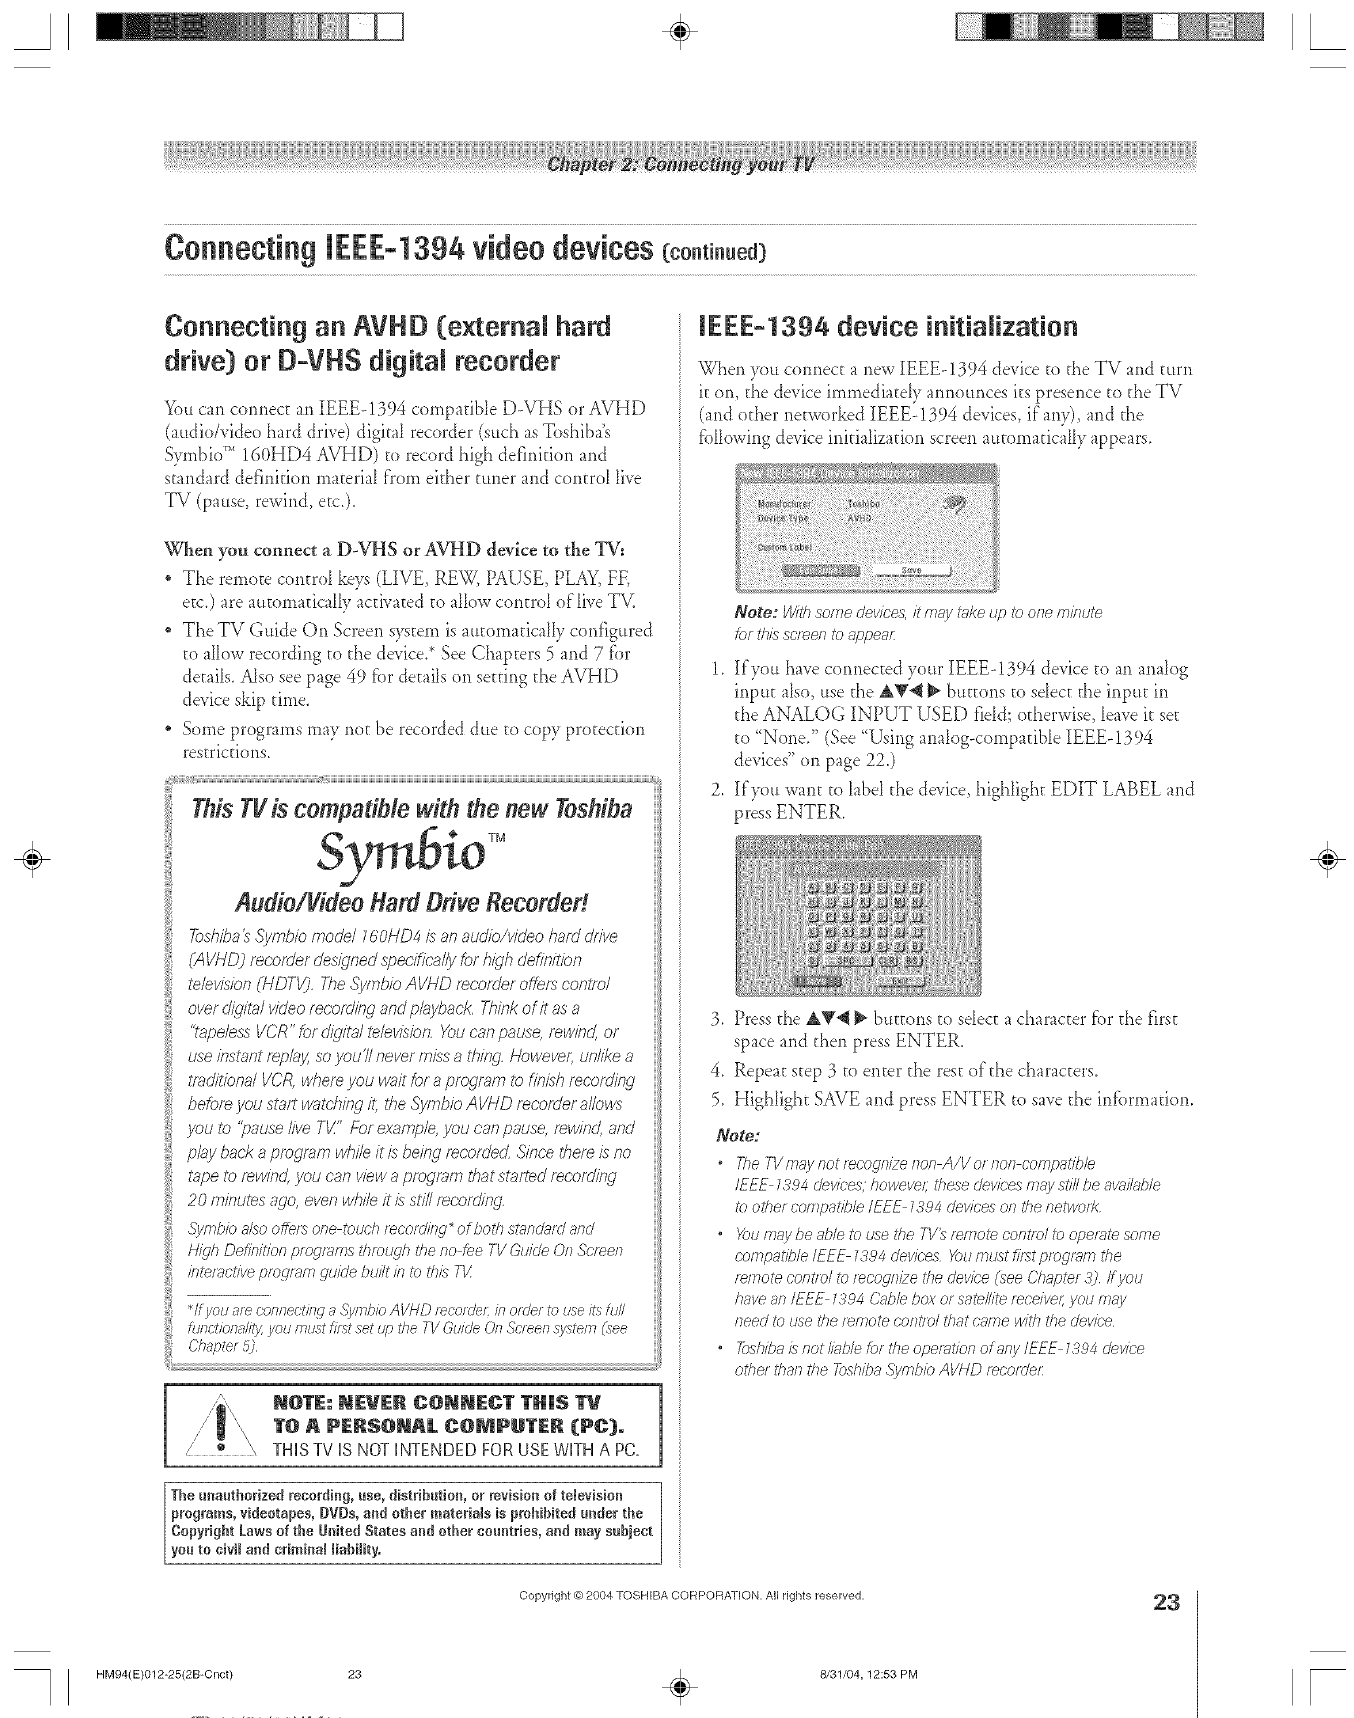
A÷ L
Connecting an AVHD (e×temal hard
drive) or D=VHS digital recorder
>)u can cormect an IEEE-1394 cornpatible D-VHS or AVHD
(audio/video hard drive) digital recorder (such as Toshiba's
S:,_mbior'' 160HD4 AVHD) to record high defirfition and
standard definition material f)'orn either tuner and control live
TV (pause, rewind, etc.).
When you connect a D-V-HS or AV-HD device to the TV:
* The remote contro[ keys (LIVE, REW, PAUSE, PLAY,FF,
eEc.)are auEomatically actNated to allow control of live TV.
* TheTV Guide On Screen system is automafica[[y configured
to a[[ow recording to the device.* See Chapters 5 and 7 fbr
deEai[s.Also see page 49 fbr deEai[son seEdng the AVHD
device skip time.
* Some programs may riot be recorded due to copy protection
restrictions.
iiiiii_}i[iSj _iiiiiiiiiiiiiiiiiiiiiiiiiiiiiiiiiiiiiiiiiiiiiiiiiiiiiiiiiiiiiiiiiiiiiiiiiiiiiiiiiiiiiiiiiiiiiiiiiiiiiiiiiiiiiiiiiiiiiiiiiiiiiiiiiiiiiiiiiiii........
IThis TVis compatible with the new Toshiba
TM
iiiiii
Audio/Video Hard Drive Recorded
ToshibalsSymbk)mode/160HD4_ anaudio/videoharddrive
(AVHD)retort:letdestinedspedficsq/yforhighdefinition
te/evZdon(HDTV),TheSymbioAVI4Drecorderoffe_ control
overdkjilsqvideofecofdin,qandp/aybae_,Thinkofit asa
i "tapelessVCR"fordi,qlta/le/evision,Youcanpause,rewind,or
useibstantfep/a)4 so you7/nevermZ_sa thlbg,Howeveflun/11_ea
if_}ditlbna/VCRwhereyou waitforaprogramto finZ_hrecording
ieforeyoustartw{]tchingit,J_eSymbioAV/4Drecorderal/oH/_
you to 'pause/iveTL/"Forexample,}zoucanpause,fewl?_d,and
pby backaprogramwhileit/_ beingf_eordedSl?_ceff_ere/_no
I apeto rewind,you canwowaprogramthatsiafl_drecording
20 minutesago,evenwhNeit i:_st///fecordl?_g,
,5)/mb/ba/sooffersonetouchr_cordlbq_of botbst_lndardarid
H'/_/hDef/bltlonprogramsthrough thenofeeTVGuideOnScreen
,bter ctiveprogr imgui JebuJ ,bto r,,:
*lf you ale conl_eetinga .c_iVlr,,b/bAVHD mcoldeL fl_ofdel to use i_8furl
funct/bnaliTyyou must f/f:_tset t4r>the TV Ou/de On Screen system(_ee
Chapte_5)
IEEE-1394 device initialization
When )ou co*meet a new IEEE-1394 device to the TV and turn
it on, the device immediatdy announces its presence to the TV
(and other networked IEEE-1394 de, ices, if any), and d_e
f}allowingdevice initialization screen atttomatically appears.
Note: With some devices, it may _v_ketap to one mk_ute
/or this screen to appear
1. If you have cormected your IEEE-1394 device to an analog
input also, use the &V< _ buttons to sdect the input in
the ANALOG INPUT USED field; o_herwise, leave it set
to '_None." (See 'q_Jsinganalog-compatible IEEE-!394
devices" on page 22.)
2. If you want to label the device, highlight EDIT LABEL and
press ENTER.
3. Press the &_< _ buttons to sdect a character _brthe first
space and then press ENTER.
4. Repeat step 3 to enter the rest of the characters.
5. Highlight SAVE and press ENTER to save the irffbrmation.
Note:
*The T1/m_ynotrecognizellon A/Vorllon compatff_/e
IEEE _394 devices, however these devk;'esmay sti// be avni/able
to other compatible/EEE _394 devices on the networf<
oYoumay be able to use the 7-1/_f_/TlOl_ CORt/O/tooperate some
coirlpatit)/e IEE_ _384 devices _)u must first program the
rwrsote control to recoc_n/zethe device (see Chapter 3) /_ J/OU
have an IEEE _J94 C2g_bbbox or sate/rite mcelvel; yotJ ni&_/
ileed to use the remote control that came/vlth the devk;'e
o 7bsbiba Is IsotMb/e for the oper_ltion of any/EEE _394 device
otbe_ thall the _:vhba 3?mbio AVh'D r_corder:
Copyright @ 2004 TOSHIBA CORPORATION, All rights reserved, 23
HM94(E)012-25(2B-Cnct) 23 ÷8/31/04,12:53 PM
÷
[
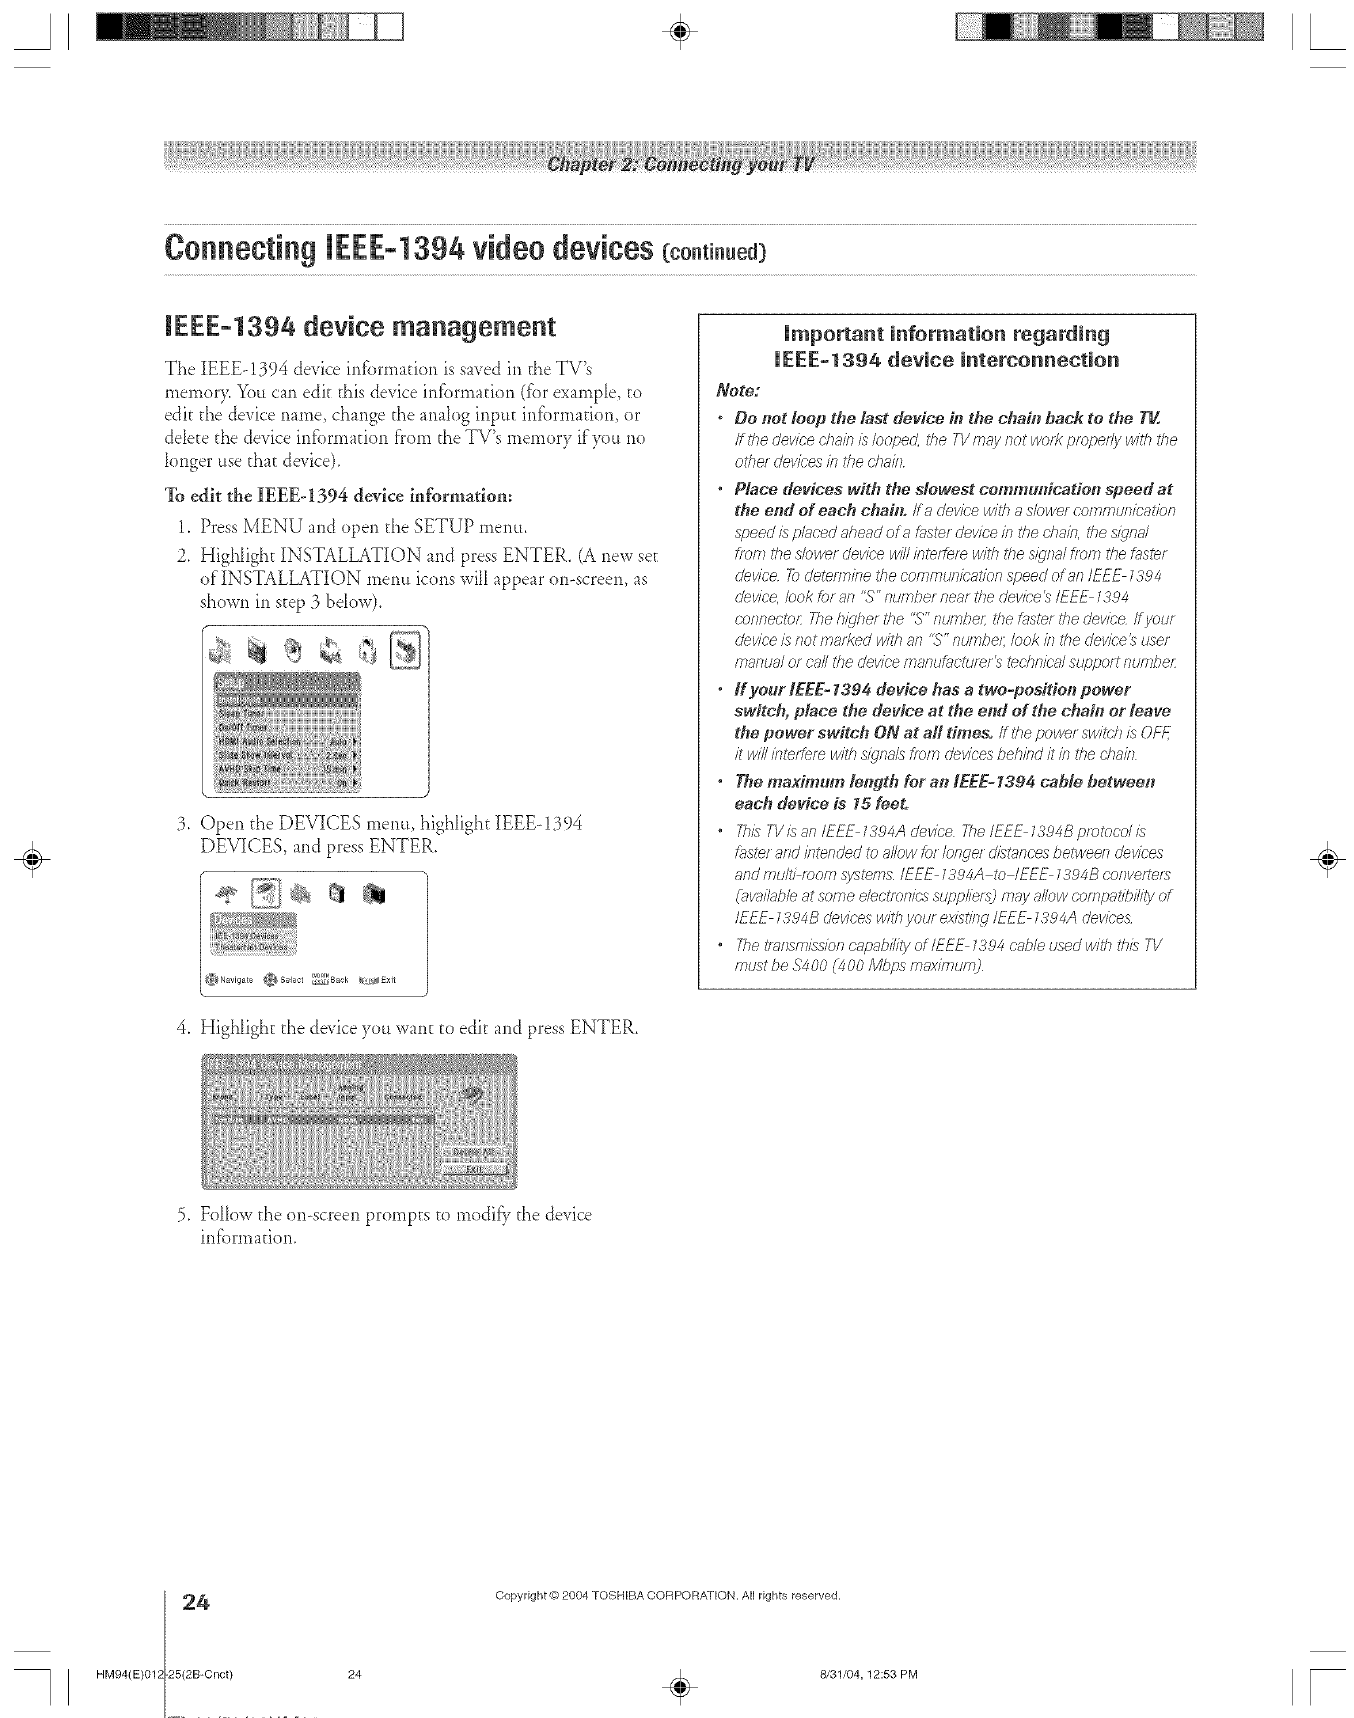
A÷ [
IEEE=1394 device management
The IEEE-!394 device infbrmation is saved in the TV's
mernor> You can edit this device infbrrnation (fbr example, to
edit the device name, change the analog input infbrmadon, or
dde[e the device information f'rom the TV's memory if you no
longer use that device).
To edit the IEEE-1394 device information:
1. Press MENU and open the SETUP menu.
2. HighIigh_ INSTALLATION and press ENTER. (A new see
of INSTALLATION mepm icons will appear on-screen, as
shown in s_ep 3 brow).
,Open the DEVICES menu, highlight IEEE-!394
DEVICES, and press ENTER.
4, Highlight the device you wan[ [o edit and press ENTER,
Important information regarding
UEEE-1394 device interconnection
Note:
, Do not loop tbe last device in the chab_ back to the T_.
If lhe cieviee chain is/oopecL the TVmay /lot _1/o_;_propedy with the
ethel deviees b the d}ain
°Place devices" with the slowest communication speed at
the end of each chaD1./fs dev/ee with aslower cammu/_/cat/on
speed is placed ahead era f,'_stefdevice b the ehain, the s/qnd
from the slowe_ devic'e will/lffefgf_ with 17}esternal fleI7_the f_ste_
cievice 7o dete/TT_ifiethe con_mul_icr;,tionspeed of an IEEE 1394
cievice, look _f an ",5'"number near the deviee t_/EEE 1394
eof_nectoL 2?e hkjhet the "S" ntJrrlbeL the fnstef #_edevice /i yauf
cieviee is/iotmat?ed with a/1%'" numbeL look in the device 3tJsef
manual or call the cJeviee/_laflt./f_/ctt./[_[_ted_ni(-_#support number
°If your IEEE= 1394 device has a two=position power
switeb, place the device at the end of the chain or leave
the power switch ON at all times, ff the powe_ switch is OFF
it will interfere w_thsignals from devices be/7ind it in the el}ain
•The maximum length for an tEEE= 1394 cable between
each device is 15 feet.
° This TV/1_an/EEF _394A device 77_e/_EE _394B protocol is
__stefand intended to allow to_ /onge/ d/st_nc'esbetween dJev/ees
andmult/ mom s_/stems /EEE _394A to IEEE _394B eonverteta
(_w_i/_bleat softie e/eotfoflics SL/pplie/_) may allow compatibility of
IEEE _394B devices with you/existing IEEE _394.A devices
•The i"l_fflsnll:5siof7cnpab///ty of/EE_ _394 c_',bleused k_//tht/7/s7-1/
must be .94O0 (4O0 M/g_s max/munl)
÷
5, Folh)w the on-screen prompts to modia_ the device
in_brmation,
4
HM94(E}012 25(2B-Cnct}
Copyright © 2804 TOSHIBA CORPORA]ION. All rights reserved.
24 _ 8/31/04, 12:53 PM [
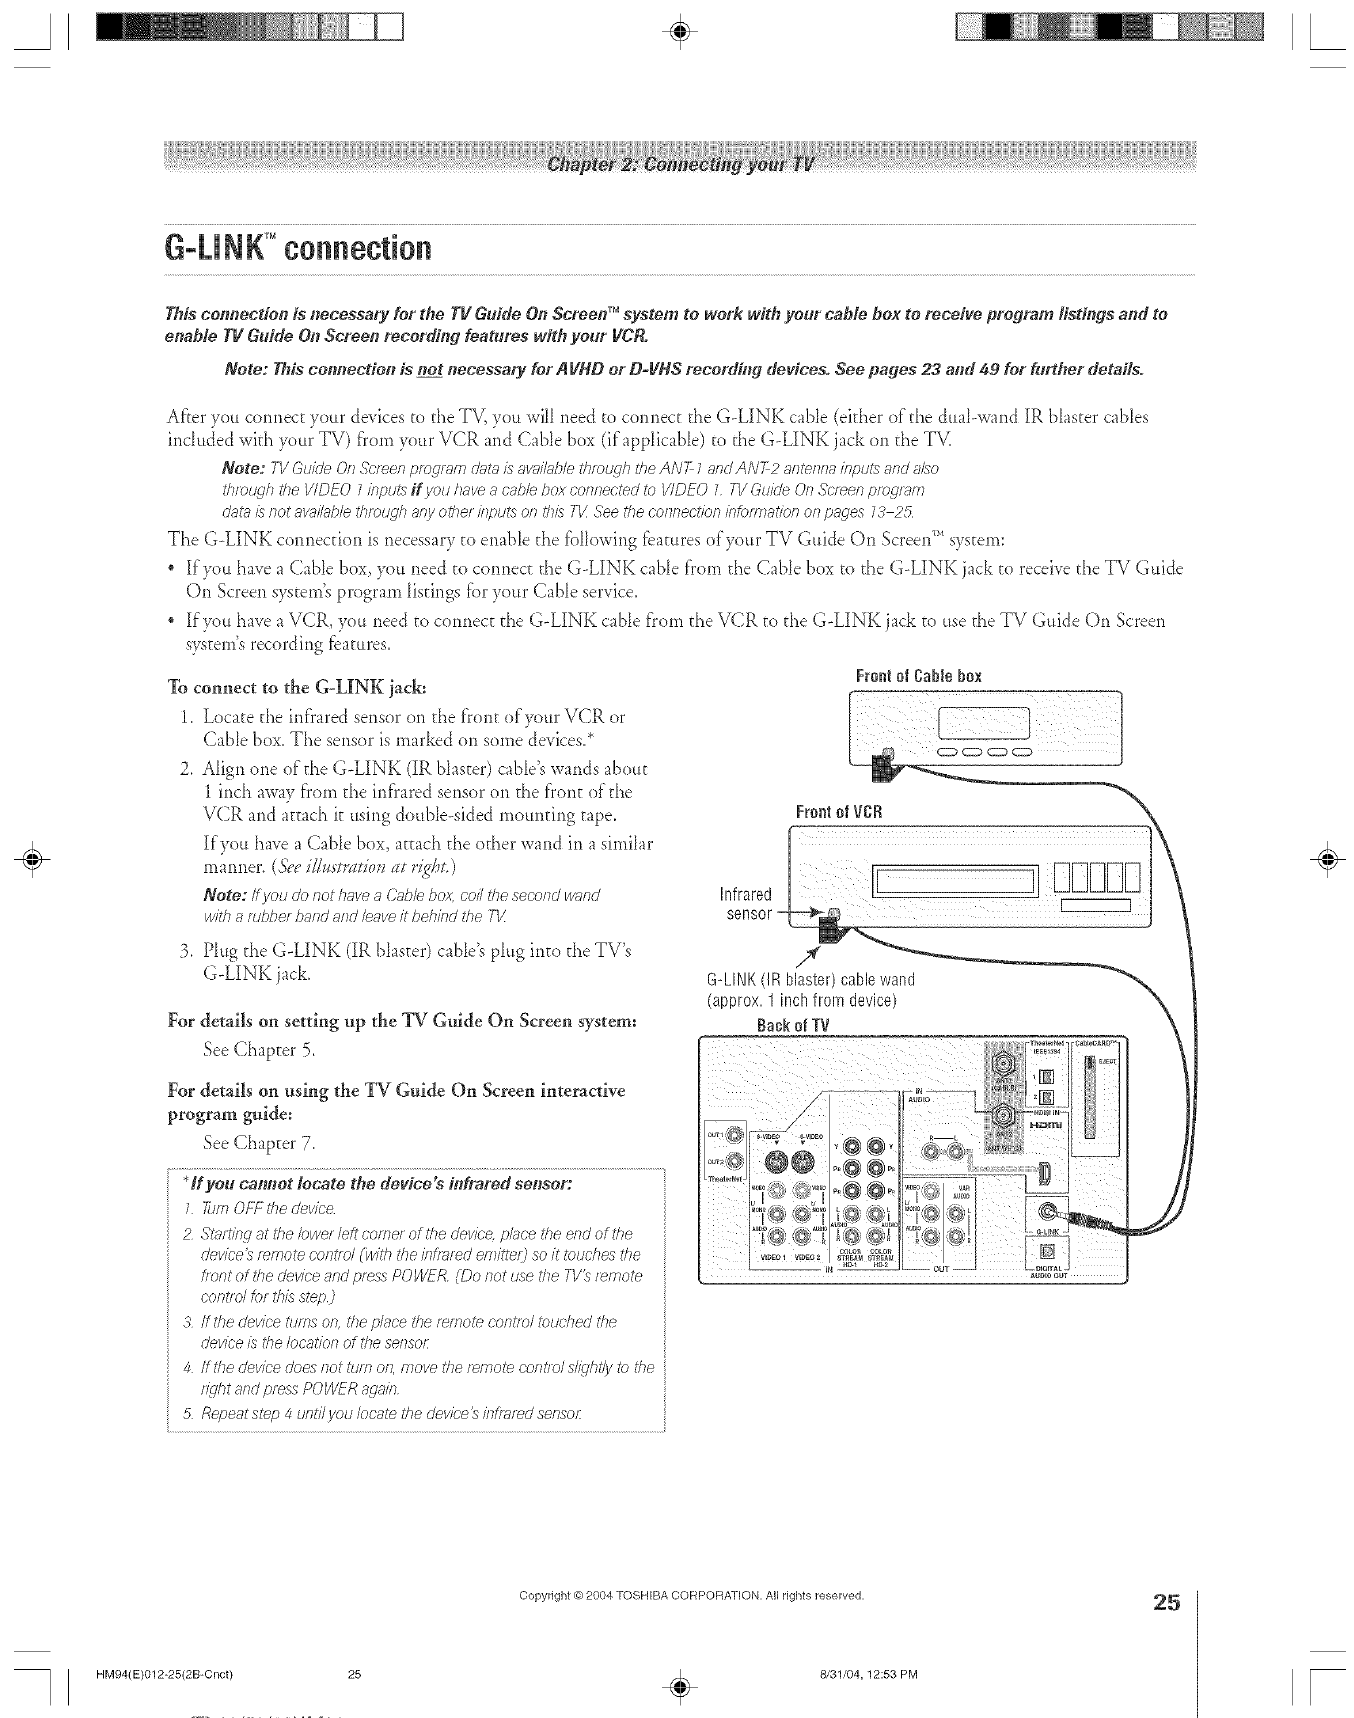
A÷ L
This" cormeetien is necessary for tire TI! Guide Go Screen TMsystem to work with your cable box to receive program listings arm to
enable TIcGuide On Screeo reeordi#g features with your IiCR.
Note: This connection is- not necessary for AIiNO or D-IiNS recording devices. See pages 23 aim 49 for further details.
After you cormecc your devices to the TV, you will need to connect the G-LINK cable (either of the dual-wand IR blaster cables
included with your TV) fi'om your VCR and Cable box (if applicable) to the G-LINK jack on the TV.
Note: TV &;ida On &;r_en /;;fogle_rl ciHt_}is #w;ff/;slJletivedcff7 tile ANT Z_sndAN7-2 kvTtervT_ril//;)l)ts;srsdsTZso
tlvrxLqh the VIDEO 7inputs ff you /lave a cable box cwlrTected to VIDEO 7FVGuide On Sc'/_en proglem
d_ff_is/lot 8vai/i_/_lethTough Bey off?el/fl/?)uts or7U)/s T_ _se _he corTRectior7bfom_at/o/1 on p_ges 73 2:5
The G-LINK com_ecfion is necessary to enable the following f_amres of your TV Guide On Screen_' system:
If you have a (;able box, you need to connect: the G-LINK cable t}'om the Cable box to the G-LINK jack to receive the TV Guide
On Screen system's program listings tbr your Cable service.
If you have a VCR, you need to cotmecc the G-LINK cable from the VCR to the G-LINK ja& to use the TV Guide On Screen
system's recording f_atures.
Te connect to the G-LINK iack:
1. Locate the inl}'ared sensor on the front of your VCR or
Cable box. The sensor is marked on some devices2
Aligu one of the G-LINK (IR blaster) cabIe's wands about
1 inch away from the infrared sensor on the front of the
VCR and acEachit using double-sided mounting tape.
If you have a Cable box, acEachthe other wand in a similar
marmer. (D'eei/,2_e'ts_ilioss_Itr_gDt.)
Note: If you do not have aC2ff)lebox, coil tl_e second wried
/vl?llar_Jt)t_erbarTdafTdleave it behbd i<heTV
Frenl el Cablebox
3. Plug the G-LINK (IR bk_ster)cable's plug into the TV's
G-LINK jack.
For details on setting up the TV Gtfide On Screen system:
See Chapter 5.
For details on using the TV Guide On Screen interactive
program guide;
See Chapter 7.
*If you camret locate the device's infrared selrsor:
1 _m OFF _77eclevlce
2 Smrtlbg at the ©wer left comer of the device, pbce the end of tile
dewce_ r_mote control (wth the/Tffrared enTittel2 so it totJches the
tent of dTedevice and press ,oOWER (Do i_ot use the TV_ t_mote
c'ont/d tor tlliS step)
3 fftlle device tU/TTSon, /77epiece rite rerrlote cwltse/iTJudTed the
cJevk'eis the Ioc8_<ior7of the se/_sor
4 ffthe cievice does/lot turn on, move the r_mote cerT,/els@htly to the
fi_Jh t 8fTdpres\_POVV_R a_aio
5 Repeatstep 4 unti/vou/ocate the o'evice_infsar_dseesoi:
÷
HM94(E)012-25(2B-Cnct) 25
Copyright @ 2004 TOSHIBA CORPOFtATION, All rights reserved,
÷8/31/04,12:53 PM
25
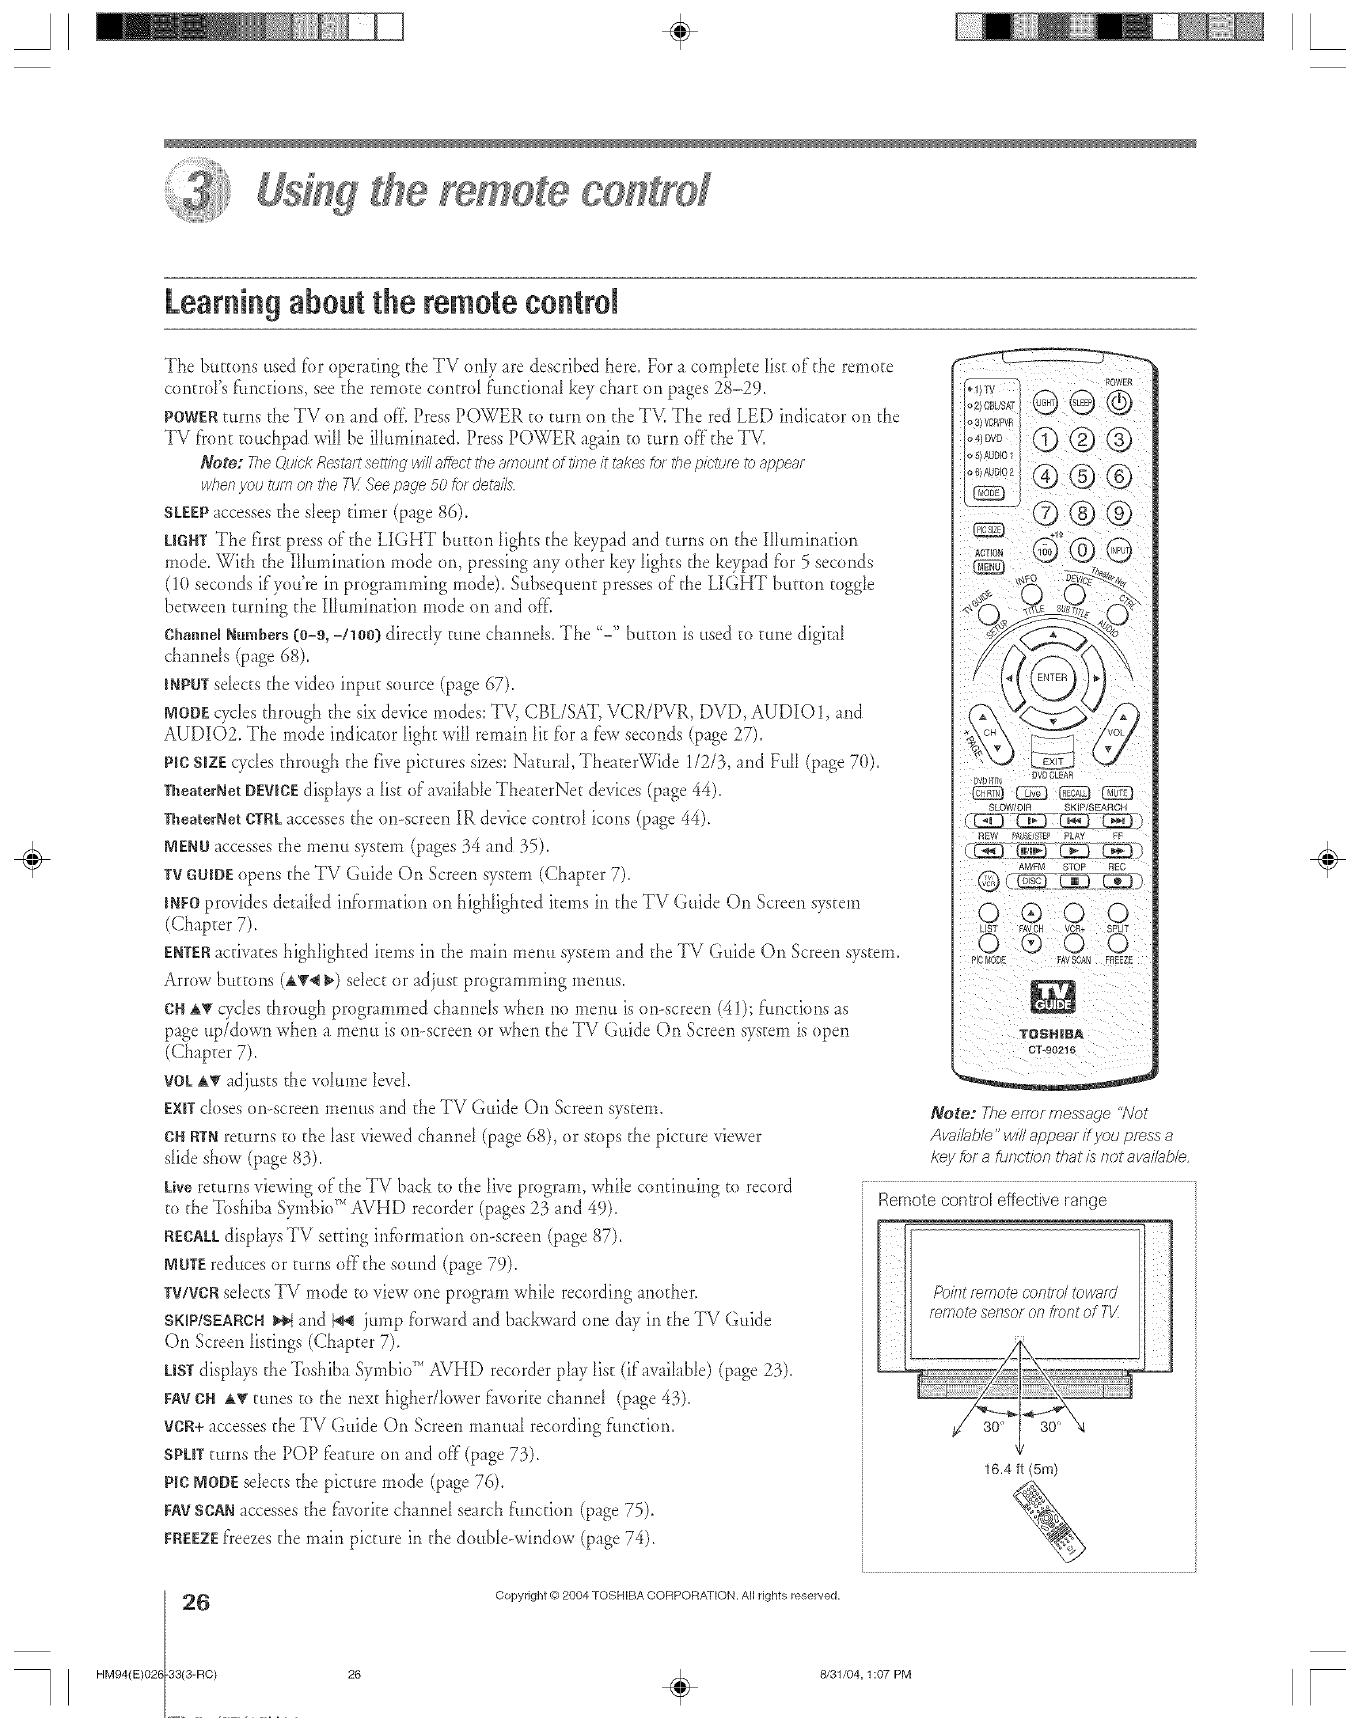
yemete co#tyef
Learning about the remotecontrol
The buttons used for operating the TV only are described here. For a complete list of the remo[e
controUsf_mc[ions,see the female control f_mctiona_key char[ on pages 28-29.
POWERturns the TV on and off Press POWER to turn orl the TV. The red LED indicator on the
TV front touchpad win be illuminated. Press POWER again to turn off the TV,
Note: TheQI//ck Restart settl)?gwill affect the amount of time it takes fo_ the picture to appear
whe/} you tt/m el? tile T_ See page 50/of deMIs
SLEEPaccesses the s_eeptimer (page 86).
UGHTThe f'lrst press of the LIGHT button lights the keypad and turns on the Illuminatior_
mode. With the I11umirmtior_mode on, pressing any other key lights the keypad for 5 seconds
(1(t seconds if you're in programming mode). Subsequent presses of the LIGHT button toggle
beFween turrfing the Illumination mode on and off,
ChairedNumbers(0-9, -/lO0) direr@ tune charmeIs,The "-" button is used to tune digital
ch rends (page 68),
INPUTselects the video input source (page 67),
MODEcycles through the six device modes: TV, CBL/SAT, VCR/PVR, DVD, AUDIO1, and
AUDIO2, The mode indicator light will remain lit _bra few seconds (page 27).
pie SiZEcycles through the five pictures sizes:Natural, TheaterWide 1/2/3, and FuII (page 70),
TheaterNetDEWeEdisplays a list of available TheaterNet devices (page 44),
TheaterNetCTRLaccesses the on-screen IR device control icons (page 44),
MENUaccesses the menu system (p_ges 34 and 35).
TVGUIBEopens the TV Guide On Screen system (Chapter 7),
INEOprovides detailed ir_brmation on highlighted items in the TV Guide On Screen system
(Chapter 7),
ENTERactivates highlighted items in the m_in merm system and the TV Guide On Screen system.
Arrow buttons (AT4 _) sdect or adjust programming me)ms.
ONa,Vudes through programmed ch umels when no me)m is or>screen (41); funcdorm as
p_ge up/down when a menu is on-screen or when the TV Guide On gcreen system is open
(Chapter 7).
VOLA_' adjusts the volume levd,
EXITdoses or>screen menus and the TV Guide Or1Screen system.
CNRTNreturns to the last viewed charred (p_ge 68), or stops the picture viewer
slide show (pge 83),
Livereturns viewing of the TV back to the live program, while cor_tirming to record
to the 'lbshiba Symbio_''AVHD recorder (pages 23 and 49),
RECALLdisplays TV setting information or>screen (p_ge 87),
NOTEreduces or turns offthe sound (page 79).
TV/VCRselects TV mode to view one program while recording another.
SKIP/SEARCH_ and I_ jump forward and backward one day in the TV Guide
©n Screen listings (Chapter 7),
USTdisplays the 'lbshiba SymbioTM AVHD recorder play list (if avail_Ne) (page 23),
FAYCH A_'tunes to the next higher/k)wer favorite charmel (page 43),
VCR+accesses the TV Guide On Screen manual recording functior_.
SPLITturns the POP fe _ture on and off (p_ge 73).
pie NODEselects the picture mode (pge 76).
FAYSCANaccesses the _worite cham_d search ftmction (page 75).
FREEZEfreezes the main picture in the double-window (p_ge 74).
DVD _}N DVD OLEAR
SLOW/DIR SKIP/SEARCH
Note: The eFFOFsqessa_e "/Vot
Available" will appear ff you press a
key for a function that is not ava#able,
Remotecontrol effectiverange q
[>()/?ltremote cent/el towmd fl
remote set?sot on t/ol?t of 7-1/ J
16.4 ft (5m)
6
HM94(E)026 33(3-RC)
Copyright © 2084 TOSHIBA COFIPORAT ION. All rights reserved,
÷
26 _ 8/31/04, 1:07 PM [
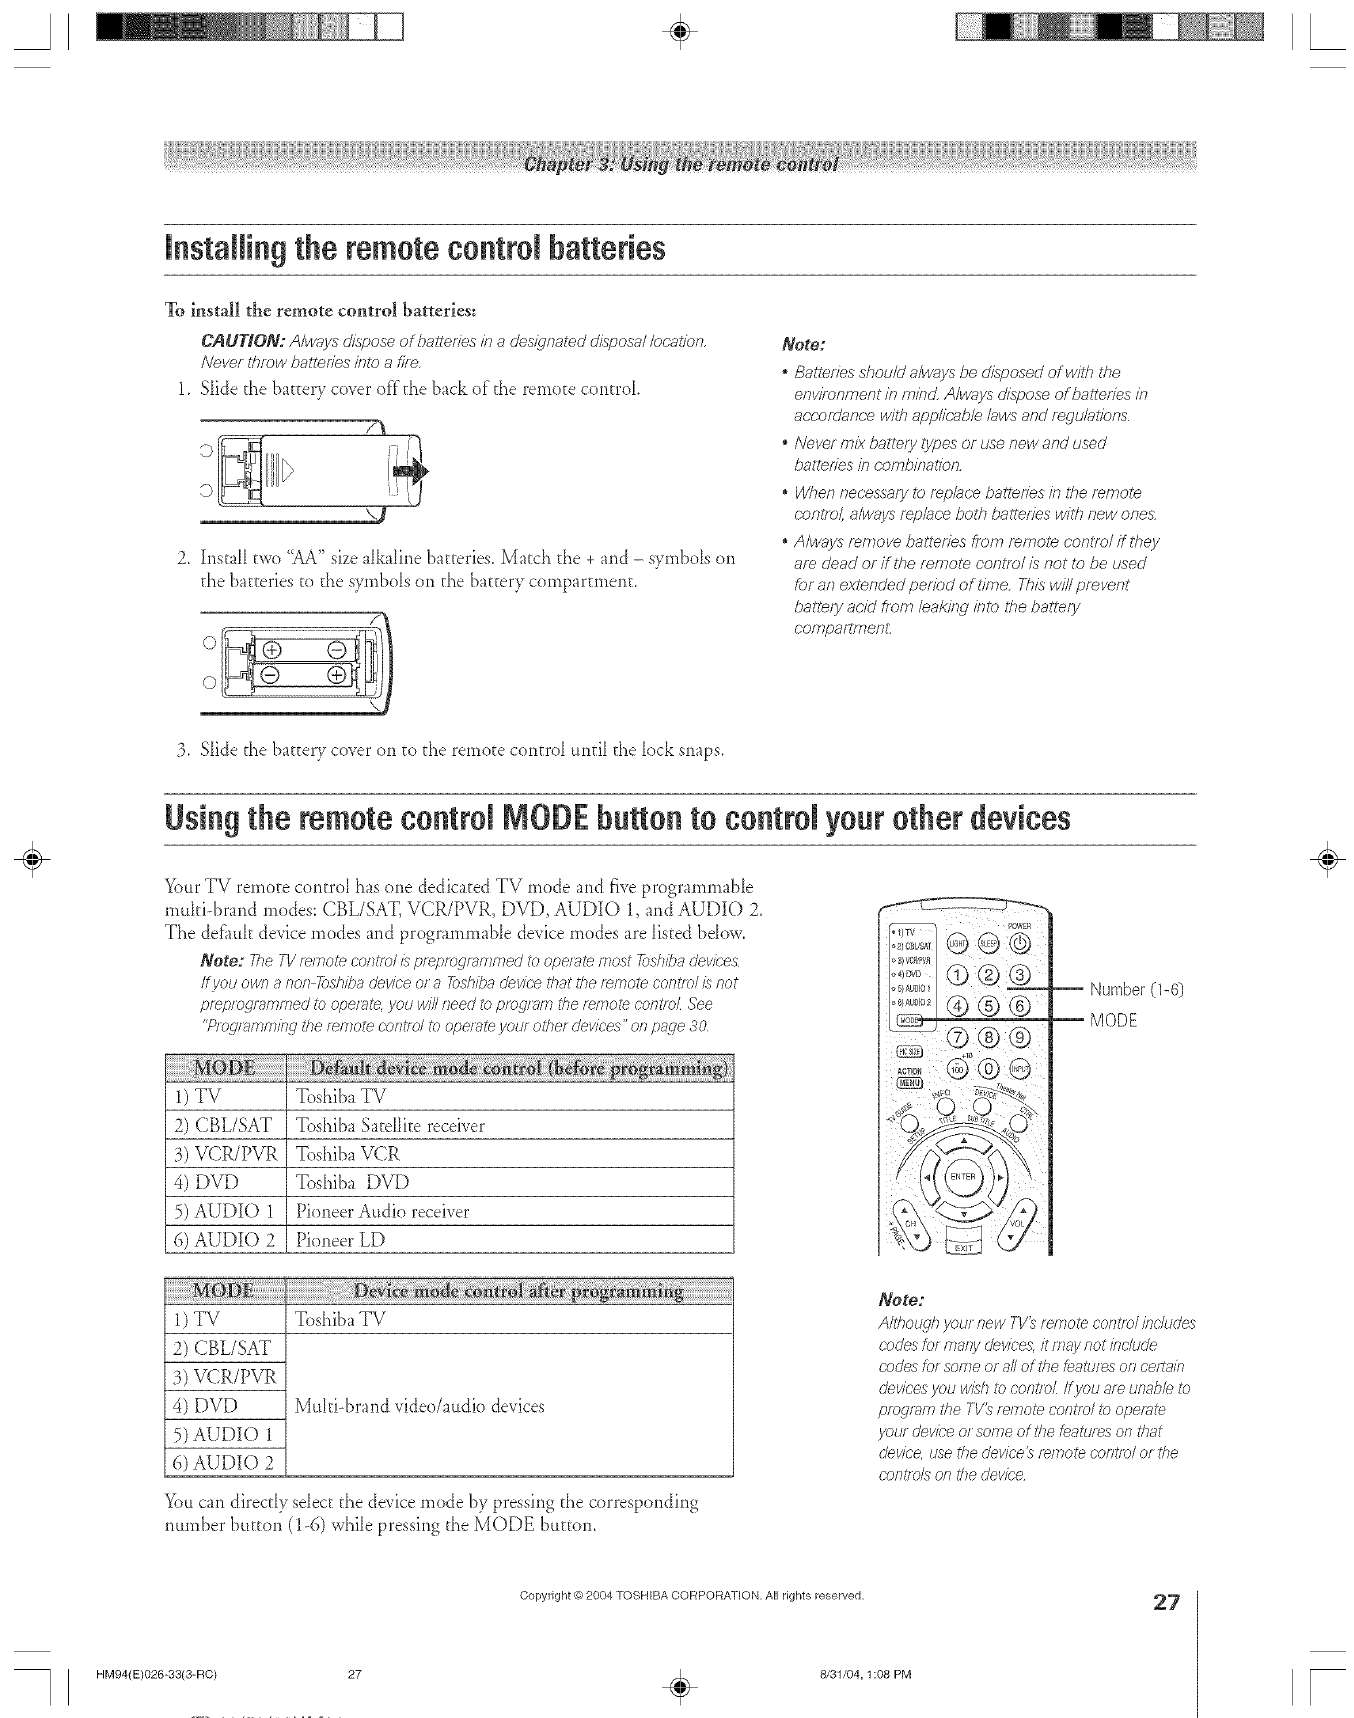
A÷ L
installin9 the remote control batteries
To install the remote control batteries:
CAUHON: A/ways&spose of ha/toNesina des/iqna_edd/sposa//ec;,at/_n.
Never tf_rowbattenes inte afire,
1. S_ide the batEery co_er of'f'the back of"the remote control
F_
J
2, h_staHtwo "AA" size a[ka[irle batteries. Match the + and - symbols on
the batteries to the s) mbo_s on the batEerycompartment.
Note:
. Batleries shou/d a/ways be disposed ofw/Ih the
environment in min¢:_A/ways dispose of balleHes m
a(;cor_/anre with applk;ab/e /aws and r_giJ/al/ens
.Never mix batlery types or tJse new and used
batterfes in cembffTatien.
.When necessary le re/-_/ar,,ebatledes if7 ff_e mmole
(:ent,,ol, a/ways replace both balteries will7 new one&
.Air,lays remove batterfes from mmo/e coniTo/ffthey
am dead or if the emote centre/is not te be used
for an evtended perfod of time. This win prevent
batte/y acid from/eaki/w inte ff_e battery
coeTpaFlTnenL
3, Slide the battery co_er on to the remote control until the lock sm_ps,
Using the remotecontrol MODEbuttonto control your other devices
Your TY remote control has one dedicated TY mode and five programmable
muki-brar_d modes: CBL/SAT, VCR/PVR, DVD, AUDIO 1, and AUDIO 2.
The deEmk device modes and programmable device modes are listed bdow,
Note: 77_eF1!re/note control/s prepregrammeo' to ope/ate most _sh/ha devices
If !ou own anon 7#_shibadevice or a 7_shba d_vice that the remote centre/is not
pf_plog/aFn/7_ed to opef_?te,you will need to prog/_m the rw77ote controL See
"PlOglTlfTIn_iL_lthe r_rnote contld tO opel_ffe )lOUl other dell/ces" on page 30
1) TV Toshiba TV
2) CBL/SAT Toshiba Satellite receiver
3) VCR/PVR Toshiba VCR
4) DVD Toshiba DVD
5) AUDIO 1 Pioneer Audio receiver
6) AUDIO 2 Pioneer LD
1) TV Toshiba TV
2) CBL/SAT
3) VCR/PVR
4) DVD Mttlti-brand video/audio devices
5) AUDIO 1
6) AUDIO 2
YoUcan direcdy sdect the de_ice mode by pressing the corresponding
number button (1-6) while pressing the MODE buteon.
,j-C)
Note:
Altllo_\?17your new TV_ remote centre/incItJcJes
codes tot mary clev/ces,it fTTaynot include
code:_for some or all of tl_efeatures on celta/n
devices you wish to centrex ff you are unabb to
preg/afl7 rise TV_ re/77otecontso/ i_)operate
you/device or some of dTefeatures on tlsat
device use rite dev/ce_ r_mote centre/or the
corff/ oL_oil the dev/c'e
÷
Copyright O 2804 TOSHIBA CORPORATION, All rights reserved.
HM94(E)O26-33(3-RC) 27
8/31/04,1:08 PM
27
[
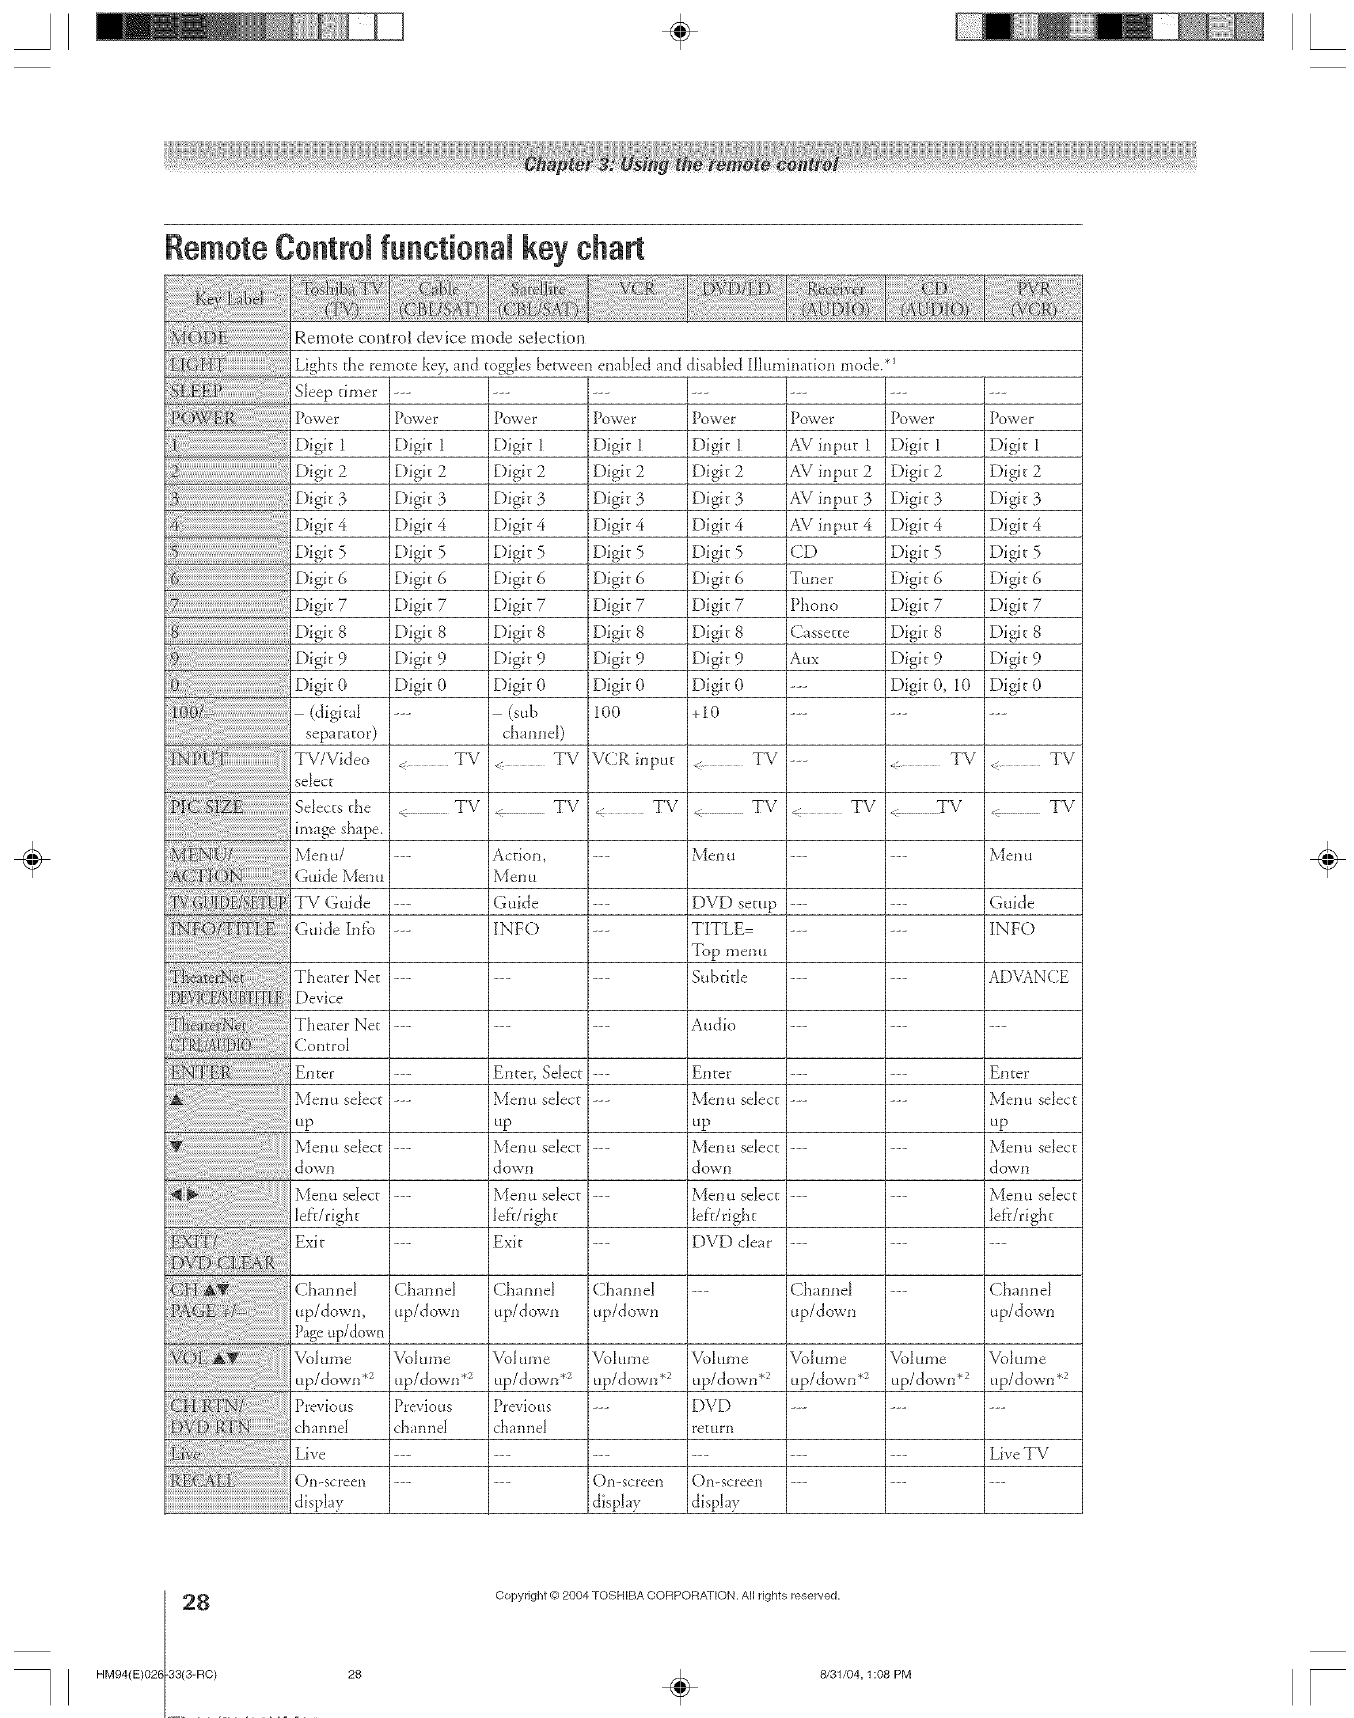
A÷ [
Remote ControUfunctional key chart
Sleep timer
Po_ve_ _
Digit 1
Digit 2
Digit 3
Digit 4
Digit5
Digit 6
Digit 7
Digit 8
Digit 9
Digit 0
(digita]_
separator)
Remote control device mode selection
Lights the remote ke> and toggles between enabled and
Power
Digit 1
Digit 2
Digit 3
Digit 4
Digit 5
Digit 6
Digit 7
Digit 8
Digit 9
Digit 0
PovJeE
Digit l
Digit 2
Digit 3
Digit 4
Digit 5
Digit 6
Digit- 7
Digit 8
Digit 9
Digit 0
I00
Po_ve[ _
E)igit 1
Digit 2
Digit 3
Digit 4
Digit 5
Digit 6
Digit 7
Digit 8
Digit 9
Digit 0
¢_ub
cham_el)
< TV
.: TV
Action,
Menu
Guide
INFO
Enter, Select
Menu select
up
Menu select
down
Menu select
left/right
Exit
Channel
up/down
Vol ume
up/down .2
Previous
channel
VCR input
< TV
disabled Illumination mode. *1
Power
Digit- 1
Digit 2
Digit 3
Digit 4
Digit 5
Digit- 6
Digit 7
Digit 8
Digit 9
Digit 0
+I0
TV
Digit 1
Digit 2
Digit 3
Digit 4
Digit 5
Digit 6
Digit 7
Digit 8
Digit 9
Digit 0
Power Power
AVinput 1 Digit 1
AVinput 2 Digit 2
AVinput 3 Digit 3
AVinput 4 Digit4
CD Digit 5
Tm_er E)igit6
Phono Digit 7
Cassette Digit 8
Aux Digit 9
--- Digit 0, I0
--- TV
< TV TV
Channel ---
up/dowl]
Voiume Voiume
up/down .2 up/down .2
< TV
TV
l\_eH 11
Guide
INFO
ADVANCE
Selects the TV < TV
image shape.
Men u/ ...... Men u
Guide Men u
TV Guide ...... DVD setup
Guide Inff_ ...... TITLE
Top menu
Theater Net ...... Sul)dtie
Device
Theater Net ...... Audio ---
Control
Enter ...... Enter Enter
Men u select ...... Men u select Men u select
up up up
Menu select ...... Menu select Menu seDct
down down down
Menu se]iect ...... Men use]iect Menu se]iect
left/right left/right left/right
Exit ...... DVD clever ---
Channel Channel Channel --- Channel
up/down, up/down up/down up/down
Pageup/d0wn
Voh*me Voh*me VoIume VoIume Voh*me
up/down .2 up/down .2 up/down .2 up/down .2 up/down .2
Previous Previous --- DVD ---
channel channel return
Live ......... Live TV
CALL O,]-_-ee,_ --- O>_c,'een O>_c,'ee,_ ---
display display display
÷
8
HM94(E)026 33(3-RC)
Copyright @ 2004 TOSHIBA CORPORATION. All rights reserved,
28 _ 8/31/04,1:08 PM [
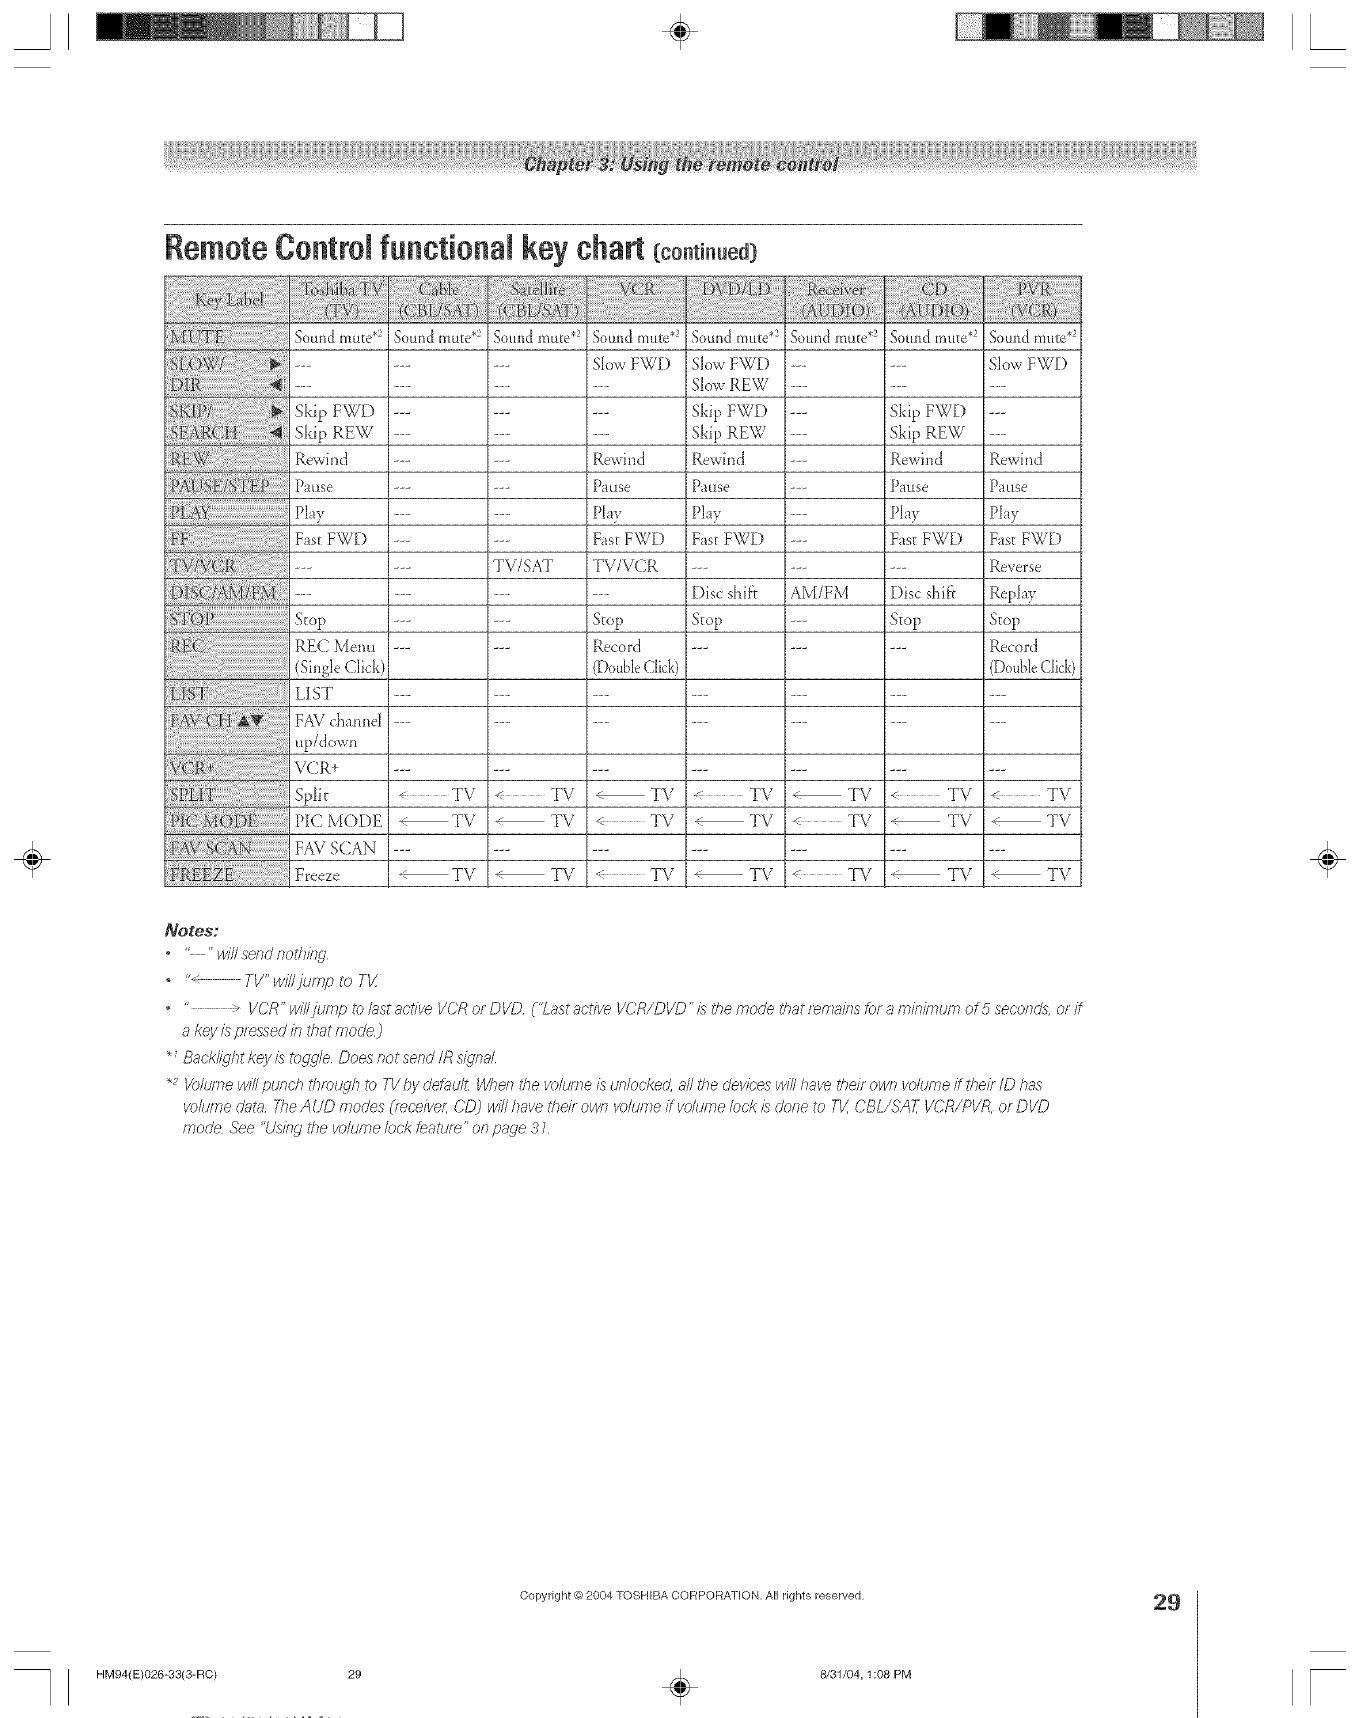
Remote Controlfunctional key chart(co.t ..ed}
Stop
REC ]_,ieml
(SingleClick)
LIST
FAV cMnnel
up/d own
VCR+
Split
PIC M()DE
SCM'_2 FAV SCAN
Freeze
Sound mute .2 Sound mute .2
Skip F_[)
Skip REW
Rewind ---
Pattse ---
Play ---
Fast FWD ---
< TV
TV
TV
Sound mme _-) Sound rante _-)
--- Slow FWD
--- Rewind
--- Pause
--- Play
--- Fast FWD
TV/SAT TV/VCR
--- Stop
--- Record
(DouUe Click)
<TV _ TV
TV TV
TV _ TV
Sound mute.2 Sound Inu[e .2 Sonlld mute.2
SlowFWD
SlowREW
SkipFWD
SkipREW
Rewi_3d
Pause
Play
Fast FWD
Disc shif't
Stop
,_ TV
TV
TV
--- Skip FWD
--- Skip REW
--- Rewi;]d
--- Pause
--- Play
--- Fast FWD
AM/FM Disc shif}
--- Stop
-TV <TV
TV _ TV
TV _ TV
Sound mike g2
SlowFWD
Rewind
Pause
Play
Fast FWD
Reverse
Replay
Stop
Record
(DouUe (',lick)
< TV
•TV
TV
NOteS;
.... will send nothi/ig
•" TV" will jump to Tt/
".* VCR"wil/fiJmp_b/ustact/ve VCRorDVD ('Lastactive I/CR/DI/D'isthemodethatf_maklsk_faminiml£T_of5seconds, orff
a key is pressed b that mode)
_Back/_jht key is toK_e Does/._ot send IR signal
_2 K)lume will punch thmtLd/?to 71/by ciefaul_ I/Vheflthe volume/2s unlocked, all 17}edevk;'es will have their own volume ff ttleif ID has
volume dnt_l F/TeAUD modes (/eceiveL CDj will have thei/ own vo/tJi77eJ voltJFtle/oo'/</Sdone to T_/[CBL/SA7,- V£'R/PVR, or DVD
mode See "rising I'he VO/tJFnelockteattJ/_" on page 3 1
÷
Copyright _? 2004 TOSHIBA CORPORATION, All rights reserved.
HM94(E)026-33(3-RC) 29 _ 8131104,1:08 PM
29
F
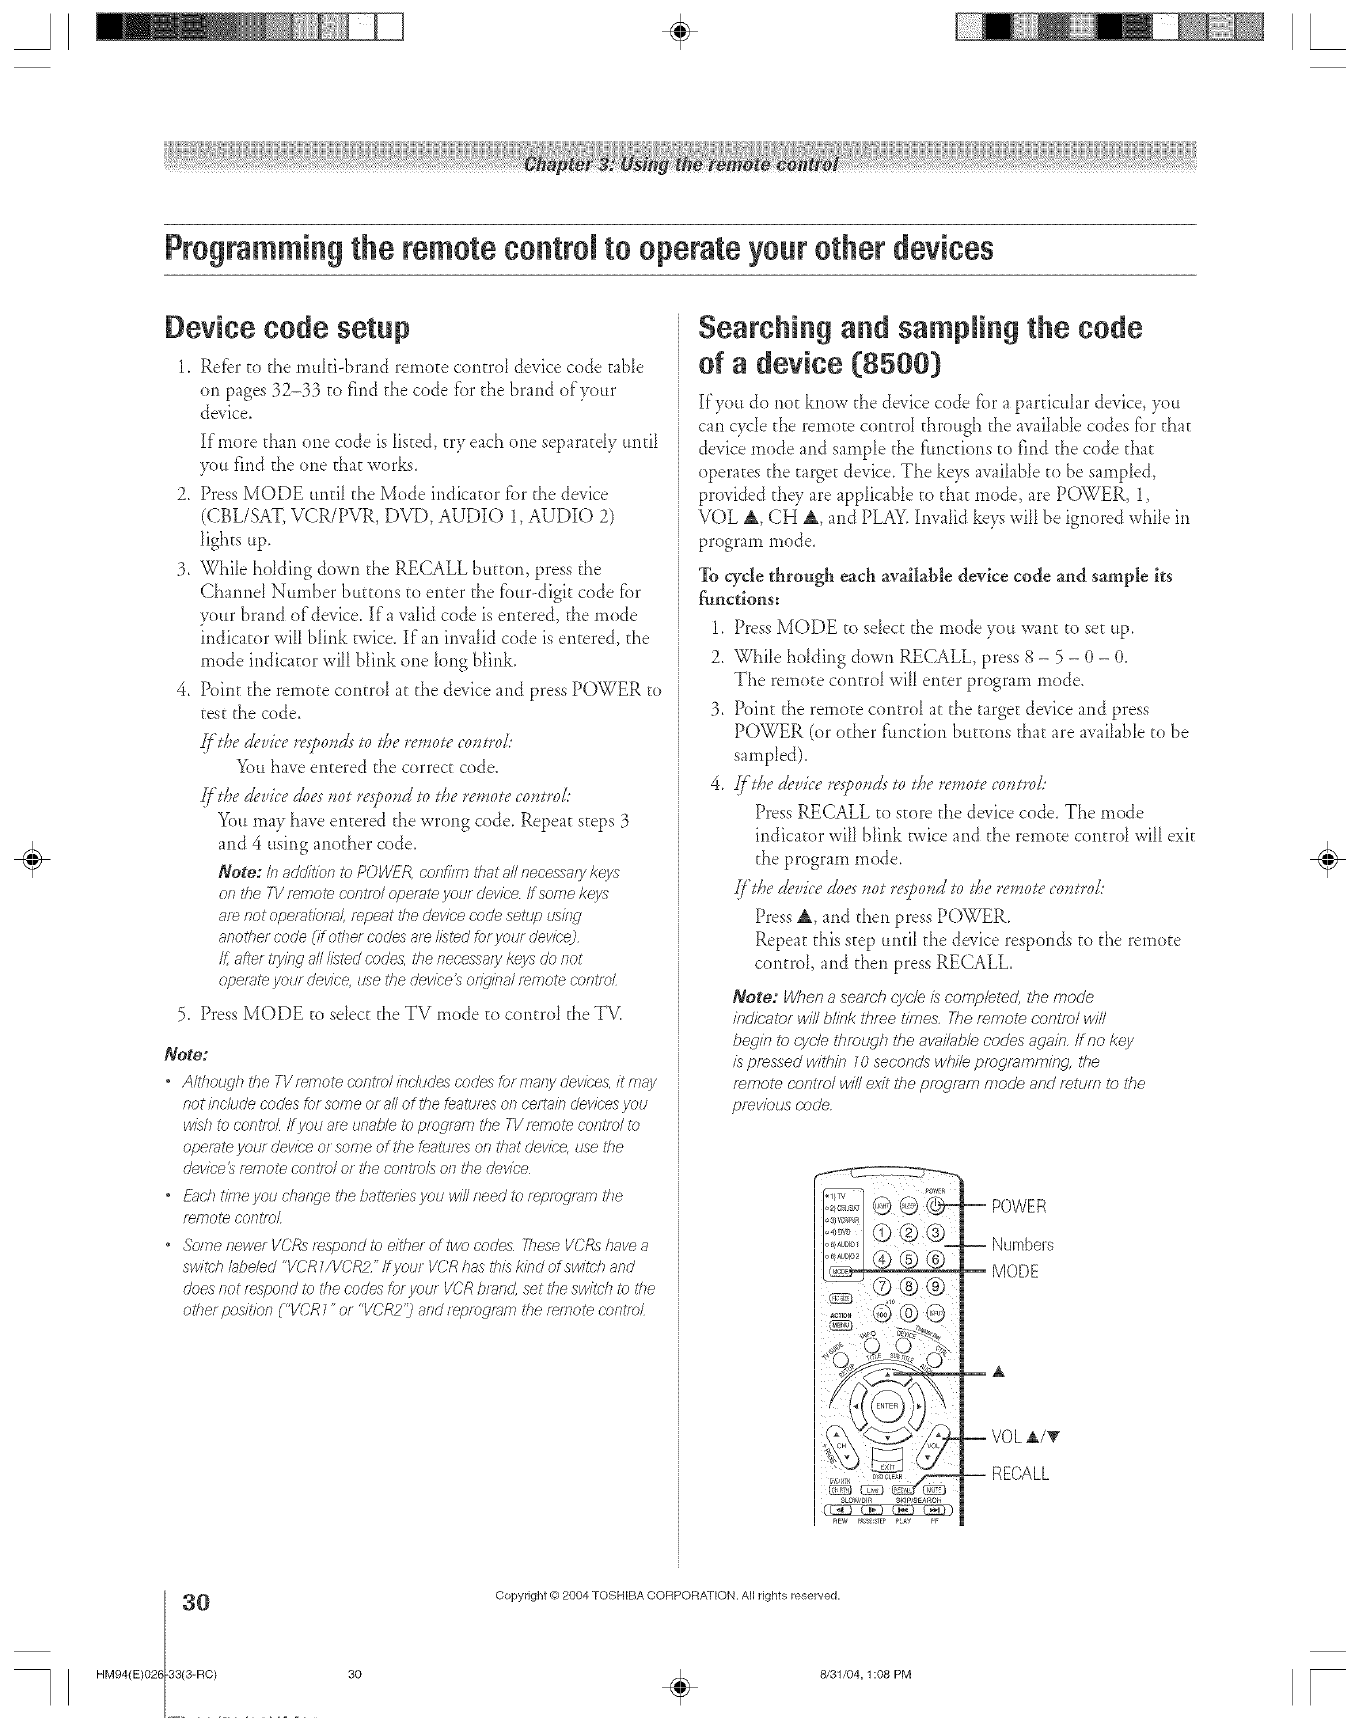
A÷ [
Programmingthe remote control to operate yourother devices
Device code setup
1_ Refer to the muIti-brand remote contro_ device code table
on pages 32-33 to find the code for the brand of'yottr
device.
If'more than one code is listed, try each one separatdy until
3xmfind the one that works.
2. Press MODE mlfiI the Mode indicator fbr the device
(CBL/SAT, VCR/PVR, DVD, AUDIO 1, AUDIO 2)
lights up.
3. While holding down the RECALL bumm, press the
Channel Number buttons to enter d_efbur-digit code fbr
your brand of'device. If' a valid code is entered, the mode
indicator will blink twice. If' an invalid code is entered, she
mode indicator will blink one long blink.
4. Point the remote control at the device and press POWER to
test the code.
ff'&edevice l*'sf,ovds> &e l_','_ow_,wol:
You have entered the correct code.
ff'&e devicedoeyJ_otre_j.,ovdh &e re,,_olecomrol:
You may have entered the wrong code. Repeat steps 3
and 4 using another code.
Note: ir_addition to POVdER,coslfhz71that aNnecessa/y keys
of 7the TVf_fTsotecrJp_/olopel_ffe you[ cievice ff some keys
are not opei_@)na/, repeat the device code setup LisiiW
8fsothe/ code (if otlse/ codes 8re//{_ted for you/ devicej
St,afte/ tfyieg all i/sted codes, the necessa/y keys rio slot
oper_m your dev/ce, use rise device_ of_4ii?aitemote cont/o/
5. Press MODE to select the TV mode to control the TV.
Note:
•/although the TV _emote c'of7tlol inciudes codes for masly device& it may
not/rsclude codes for some or all of the features on certain ciev/cesyou
wish to controL if you are unable to progr_sm the TV femote cofstf_)/to
operate you/cievice o_ some of the features on that o'ev/ce, use the
device's fwnote control or the cosltmh oslthe device
• _)schtimeyoudsailgetheba_eriesyouw///needtoreprog/_mthe
remote cosfffoZ
• Some fsewe/VORs [espof)ci to e/the/of two codes These VCR_ have a
sw/lch bbe/ed "VCRWVCR2" /@our VCR has this kind of switch and
does not _espond to tile codes for VotJ/ VCP,brand, set the switch to _?se
other posiUon ("I/'CR 7"or "VC?R2') and teptogm£rl tile tWTsoteco/st[oL
Searching and sampling the code
of a device (8500)
If'you do riot know the device code f'ora particular device, you
can cycIe the remote controI through the avaiIabIe codes for that
device mode and sample the f'mlctions to find the code that
operates the target device. The keys avaihbIe to be sampled,
provided they are applicable to that mode, are POWER, 1,
VOL &, CH &, and PLAY.Invalid keys will be ignored while in
program mode.
To cycle through each available device code and sample its
_nctions:
1.
2.
Press MODE to select the mode you want to set up.
WhiIe biding down RECALL, press 8 - 5 - 0 - 0.
The remote control will enter program mode.
Point the remote control at the target device and press
POWER (or other f'ttnction buttons that are available to be
sampled).
/TiDe device respowts> &e re,,_otec0mr0L'
Press RECALL to store the device code. The mode
indicator will blink twice and the remote control will exit
the program mode.
ff'&edevicedoess_otres?ond > &e rev_olecovtrol:
Press A, arid then press POWER.
Repeat this step until the device responds co the remote
control, and then press RECALL.
Note: When a seamh cycle hcomp/eter/, the mode
indioalor vdii b/ink throe times. The remote oontto/ wi//
begin Io r:yc/e Usmugh the avai/ab/e codes again, if no key
is pressed wilhir? 10 seconr/s whi/e programming, lfse
remote cotstsT/ win exit he program mode and return to file
pmvsbus corse.
-- POWER
-- Numbers
MODE
EA
--VOL A/_
i RECALL
÷
0
HM94(E)026 33(3-RC)
Copyright @ 2084 TOSHIBA CORPORATION. All rights reserved,
30 . 8/31/04, 1:08 PM [
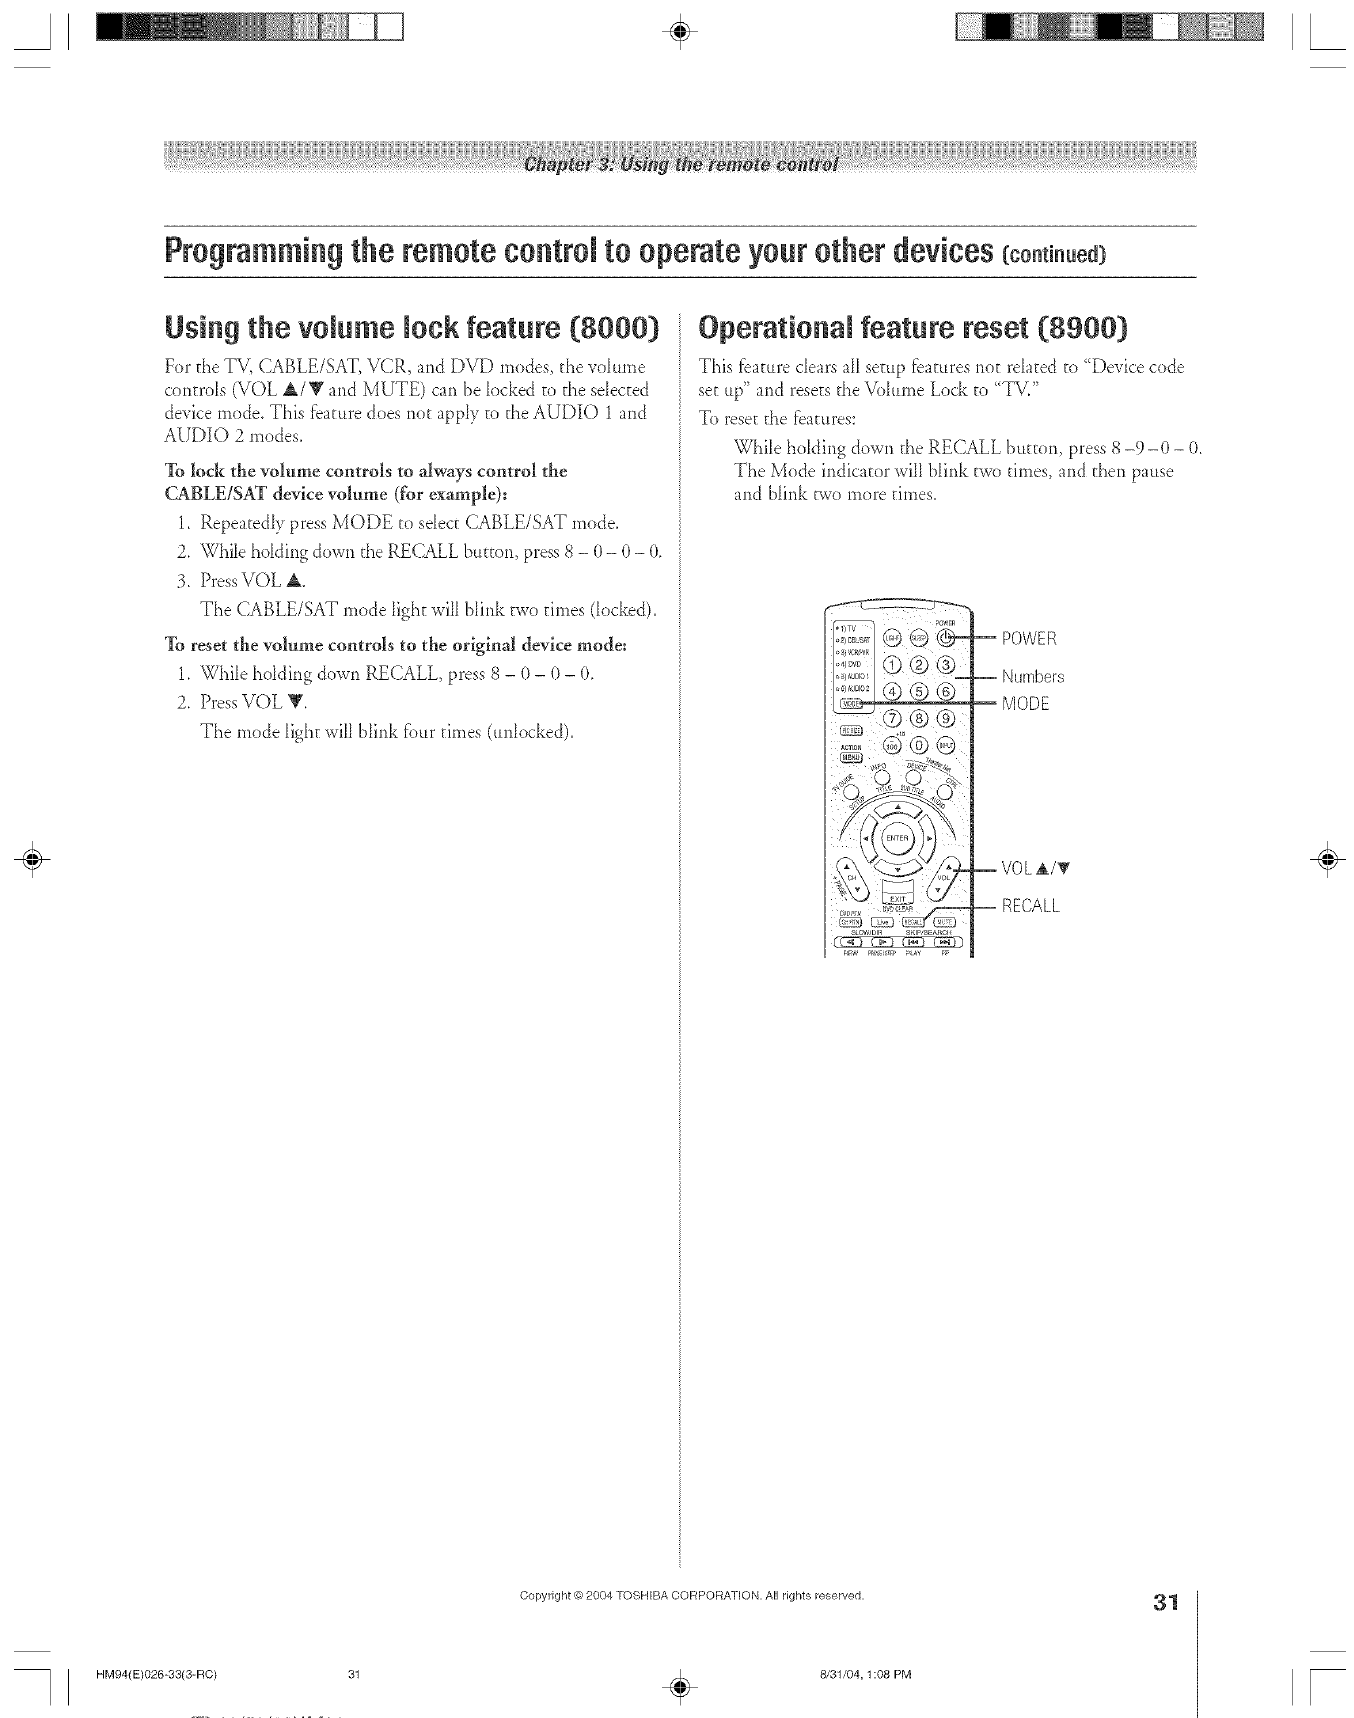
A÷ L
Using the volume lock feature (8000}
For the TV, CABLE/SAT, VCR, and DVD modes, the voIume
controls (VOL &/Y and MUTE) can be locked to the sdec_ed
device mode. This fba_ttredoes no_ apply to the AUDIO 1 and
AUDIO 2 modes.
To lock the volume controls to always control the
CABLE/SAT device w*lum.e (for example):
1. Repeatedly press MODE to sdect CABLE/SAT mode.
2. While holding down the RECALL burton, press 8 - 0 - 0 - 0.
3. PressVOL &.
The CABLE/SAT mode ligh_ will blink two times docked).
To reset the w*lume controls to the original device mode:
1. While holding down RECALL, press 8 - 0 - 0 - 0.
2. PressVOL V.
The mode light will blink four times (*mlocked).
Operational feature reset (8900}
This tbature dears aIIseEuptbatures not rek*tedto "Device code
set tip" arid resets the Valttme Lock to "TV/'
To reseEthe features:
WhiIe hoIding down the RECALL button, press 8 -9-0 - (t.
The Mode indicator will blink two times, and d_en pattse
and blink two more times.
-- POWER
-- Numbers
MODE
_VOLA/T
i RECALL
÷
HM94(E)026-SS(3-RC)
Copyright @ 2804 TOSHIBA CORPORATION, A[] rights reserved.
÷8/31/04, 1:08 PM
31
F
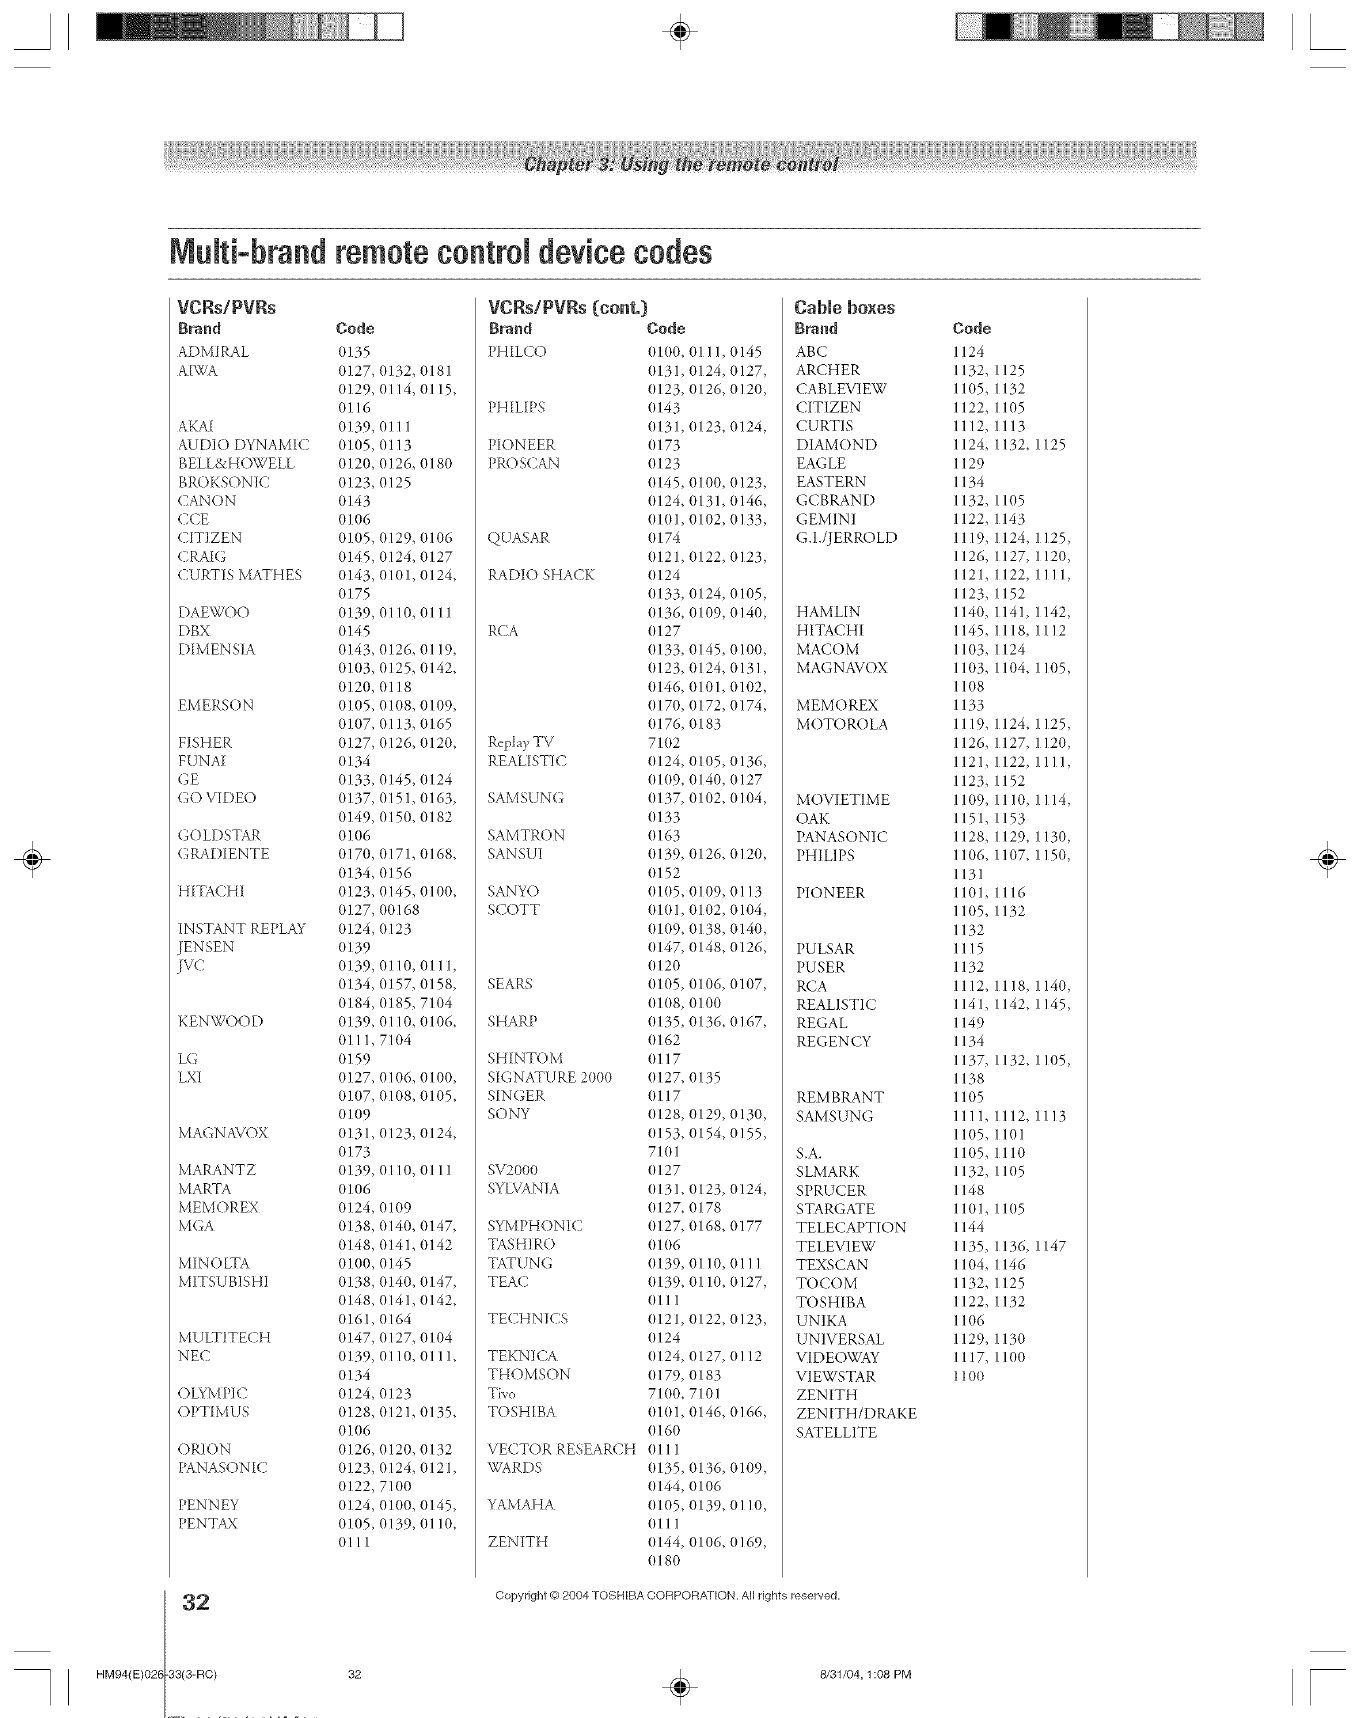
A÷ L
Multi-brand remotecontrN device codes
VCRs/PVRs
B_ed
ADMIRAL
A[WA
AKAI
AUDIO DYNAMIC
BELL&H( )WELL
BROKSONtC
CANON
CCE
C'ITIZEN
(RAIG
CURTIS MATHES
DAEWO()
DBX
D[MENSIA
EMERSON
FISHER
FUNAI
GE
(3(3 VIDE()
GOLDSTAR
GRAD[ENTE
HITACHI
INSTANT REPLAY
JENSEN
[vc
KENWO(bD
LG
LXI
MAGN A\a )X
MARANTZ
MARTA
MEMOREX
MGA
MINOLTA
MITSUBISHI
MU LTITECH
NEC
OLY MP[(2
OPT[MUS
ORION
PANASONIC
PENNEY
PENTAX
2
HM94(E)026 83(3-RC)
Code
(t135
(t127, 0132, 0181
(t129, 0114, 0115,
0116
(t139, 0111
0105, 0113
(t120, 0126, 0180
(t123, 0125
(t143
(t106
(t1(t5, 0129, (t106
(t145, 0124, 0127
(t143, 0101,0124,
(t175
(t139, 0110, 0111
(t145
(t143, 0126, 0119,
(t1(t3, 0125, 0142,
(t120, 0118
(t105, 01(t8, 0109,
(t1(t7, 0113, (t165
(t127, 0126, (t120,
(t134
(t133, 0145, (t124
(t137, 0151, (t163,
(t149, 0150, 0182
01(16
(tl70, 0171,0168,
(t134, 0156
(t123, 0145, 0100,
(t127, 00168
(t124, 0123
(t139
(t139, 0110, 0111,
(t134, 0157, 0158,
(t184, 0185, 7104
(t139, 0110, (t106,
0111, 7104
(t159
(t127, 0106, 0100,
(t1(t7, 0108, 0105,
o1o9
(t131, 0123, 0124,
(t173
0139, 0110, 0111
(t106
(t124, 01(t9
(t138, 0140, 0147,
(t148, 0141, (t142
0100, 0145
(t138, 0140, (t147,
(t148, 0141, (t142,
(t161, 0164
(t147, 0127, 0104
0139, 0110, 0111,
0134
(t124, 0123
(t128, 0121, 0135,
01(16
(t126, 0120, 0132
(t123, 0124, 0121,
(t122, 71(t0
(t124, 0100, (t145,
(t105, 0139, (1110,
(1111
VCRs/PVRs {cont.}
BPand Code
PH[LCO 0100, 0111, 0145
(t131, 0124, 0127,
(t123, 0126, 0120,
PHILIPS 0143
(t131, (tl23, 0124,
PIONEER 0173
PROS(AN 0123
(t145, 0100, (t123,
(t124, 0131, (t146,
(t1(tl, 0102, (t133,
QUASAR o 174
(t121, 0122, 0123,
RADIO SHACK 0124
(t133, 0124, 0105,
(t136, 0109, 0140,
RCA (t127
(t133, 0145, 0100,
(t123, 0124, 0131,
(t146, 0101,0102,
(t170, 0172, 0174,
(1176, 0183
Replay TV 71(12
REALISTIC 0124, 0105, 0136,
(t1(t9, 0140, (t127
SAMSUNG (t137, 0102, (t104,
(t133
SAMTR(tN 0163
SANSUI (tl39, 0126, 0120,
(t152
SANYO 0105, 0109, 0113
SCOTT 0101, 0102, 0104,
(t109, 0138, 0140,
(t147, 0148, 0126,
(t120
SEARS (t105, 0106, 0107,
(t1(t8, 0100
SHARP (t135, 0136, (t167,
(t162
SHINTO M 0117
SIGNATURE 2000 (t127, 0135
SINGER 0117
SONY (t128, 0129, 0130,
0153, 0154, 0155,
71(tl
SV2000 0127
SYLVANIA (t131, 0123, 0124,
(t127, 0178
SYMPHONIC 0127, 0168, 0177
TASH] R() 01(16
TATUNG (t139, 0110, (1111
TEAC (t139, 0110, (t127,
0111
TECHNICS (t121, 0122, 0123,
(t124
TEKNICA (t124, 0127, (1112
THOMSON (1179, 0183
Tivo 71(t0, 7101
TOSHIBA 0101, 0146, 0166,
(t160
VECTOR RESEARCH 0111
WARDS (t135, 0136, 0109,
(t144, 0106
YAMAHA (t105, 0139, (1110,
(1111
ZENITH 0144, 0106, 0169,
0180
Cable boxes
Brand
ABC
ARCHER
CABLEVIEW
CITIZEN
CURTIS
DIAMOND
EAGLE
EASTERN
GCBRAND
GEMINI
G.I./JERR{ )LD
HAMLIN
HITACHI
MACOM
MAGNAVOX
MEMOREX
MOTOROLA
MOVIETIME
OAK
PANASONIC
PHILIPS
PIONEER
PULSAR
PUSER
RCA
REALISTIC
REGAL
REGENCY
REMBRANT
SAMSUNG
&A.
SLMARK
SPRUCER
STARGATE
TELECAPTION
TELEVIEW
TEXSCAN
TOCOM
TOSHIBA
UNIKA
UNIVERSAL
VIDE( )WAY
VIEWSTAR
ZENITH
ZENITH/DRAKE
SATELLITE
Code
1124
1132,
11(t5,
1122,
1112,
1124,
1129
1134
1132,
1122,
1119,
1126,
1121,
1123,
1140,
1145,
I l(13,
I l(13,
I 1(18
1133
1119,
1126,
1121,
1123,
11(t9,
1151,
1128,
11(t6,
1131
1101,
11(t5,
1132
1115
1132
1112,
1141,
1149
1134
1137,
1138
1105
1111,
11(t5,
11(t5,
1132,
1148
1101,
1144
1135,
11(t4,
1132,
1122,
11(t6
1129,
1117,
11oo
1125
1132
1105
1113
1132,1125
1105
1143
1124,1125,
1127,1120,
1122,1111,
1152
1141,1142,
1118,1112
1124
1104,1105,
1124,1125,
1127,1120,
1122,1111,
1152
1110,1114,
1153
1129,1130,
1107,1150,
1116
1132
1118,1140,
1142,1145,
1132,1105,
1112,1113
1101
1110
1105
11(t5
1136,1147
1146
1125
1132
1130
1100
Copyright @ 2084 TOSHIBA COFIPORA_ ION. All rights reserved,
÷
32 _ 8/31/04, 1:08 PM [
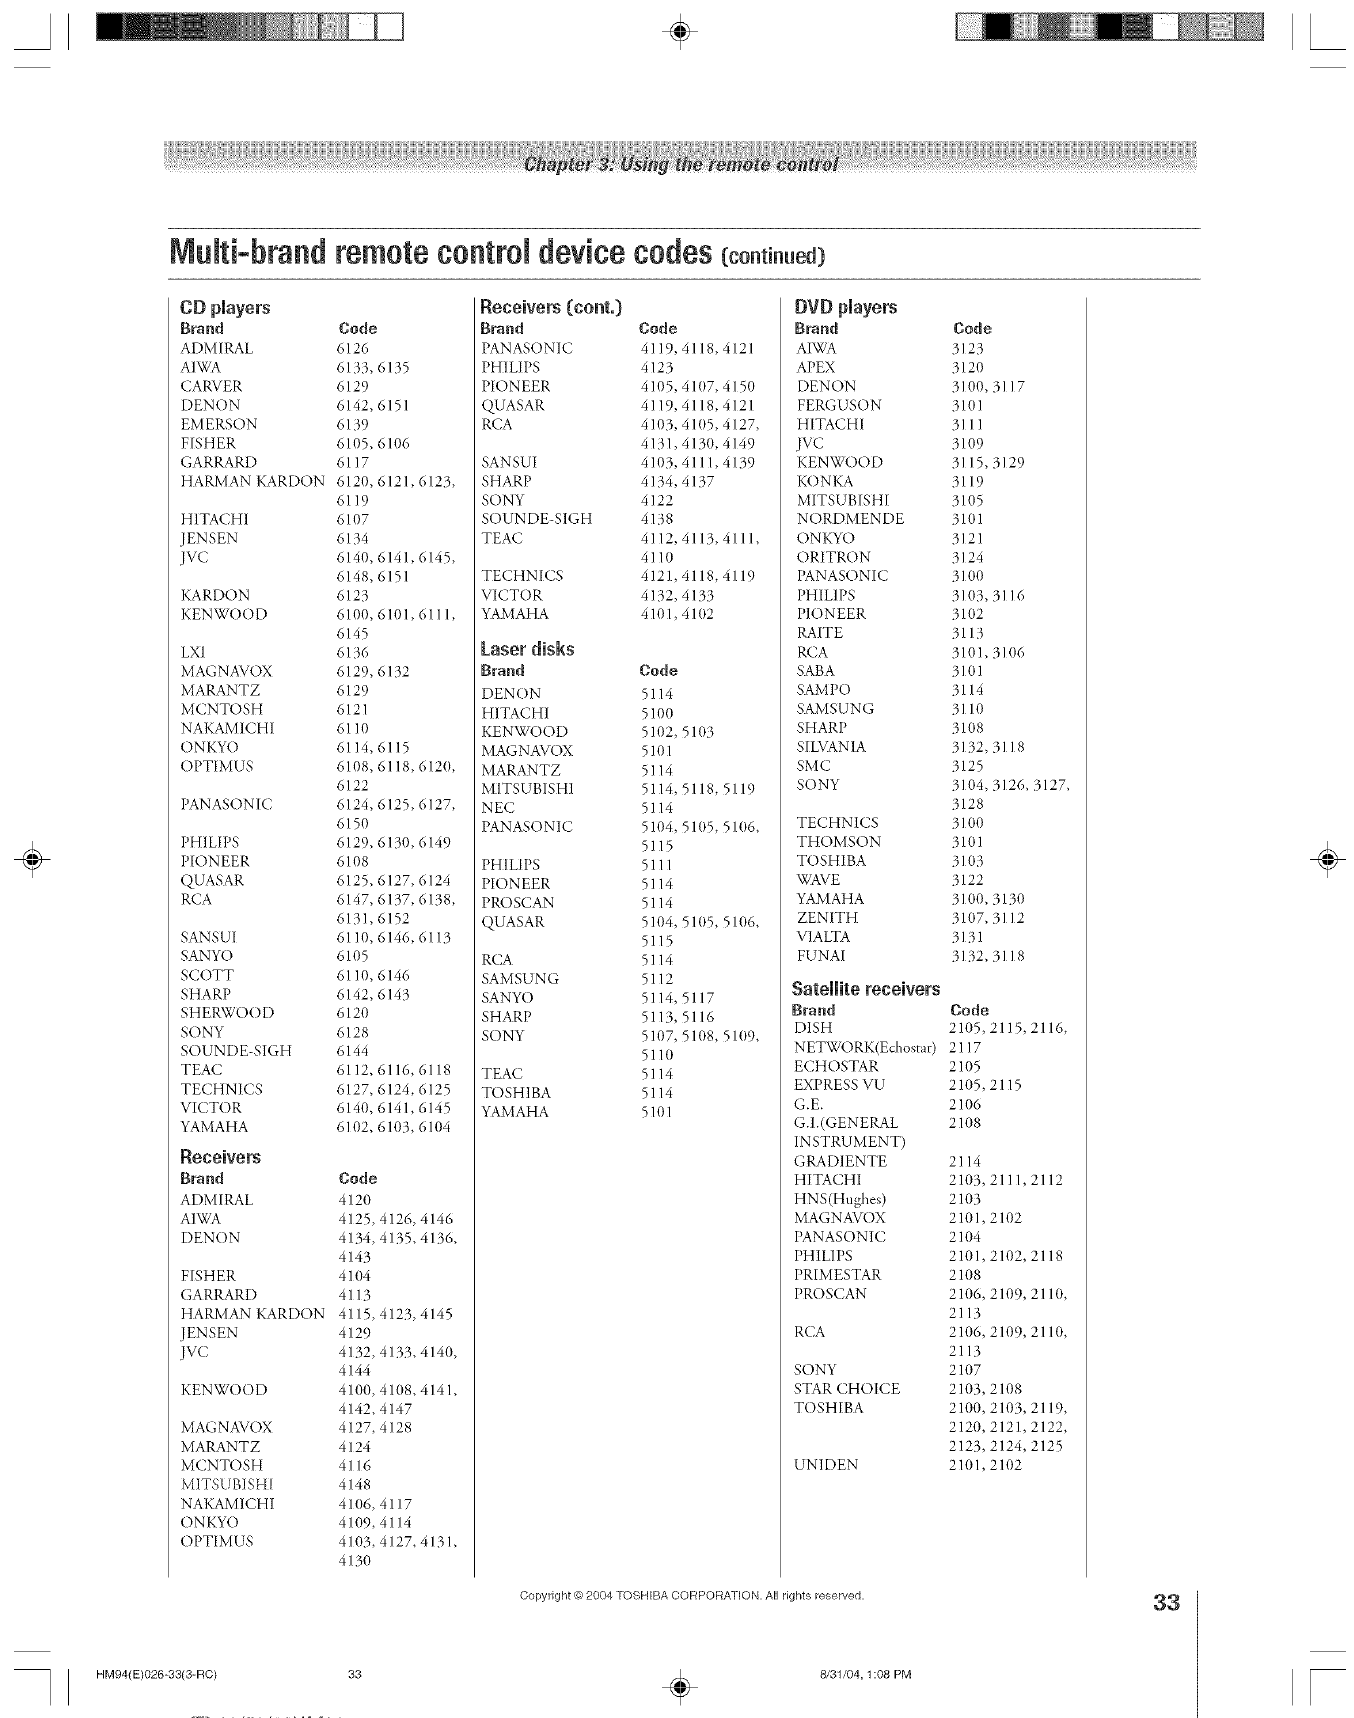
MuRi-brand remote control device codes (continued)
Brand Code
ADMIRAL 6126
AIWA 6133, 6135
CARVER 6129
DENON 6142, 6151
EMERSON 6139
FISHER 6105, 6106
GARRARD 6117
HARMAN KARDON 6120, 6121,6123,
6119
HITACHI 6107
JENSEN 6134
JVC 6140, 6141, 6145,
6148, 6151
KARDON 6123
KENWOOD 6100, 6101,6111,
6145
LX] 6136
MAGNAVOX 6129, 6 ]32
MARANTZ 6129
MCNTOSH 612 ]
NAKAMICHI 6110
ONKYO 6114, 6115
OPTIMUS 6108, 6118,612(},
6122
PANASONIC 6124, 6125, 6127,
6150
PHILIPS 6129, 6130, 6149
PION EER 6108
QUASAR 6125, 6127, 6124
RCA 6147, 6137, 6138,
6131, 6152
SANSUI 6110, 6146, 6113
SANYO 6105
SCOTT 6110, 6146
SHARP 6142, 6143
SHERWOOD 6120
SONY 6128
SOUN DE-SIGH 6144
TEAC 6112, 6116, 61 ] 8
TECHNICS 6127, 6124, 6125
VICTOR 6140, 6141,6145
YAMAHA 6102, 6103, 6104
Receivers
Brand Code
ADMIRAL 4120
AIWA 4125, 4126, 4146
DENON 4134, 4135, 4136,
4143
41(t4
4113
41 ] 5, 4123, 4145
4129
4132, 4133, 4140,
4144
4100, 41(}8, 4141,
4142, 4147
4127,4128
4124
4116
4148
41(}6,4117
4109,4114
4103, 4127, 4131,
4130
FISHER
GARRARD
HARMAN KARDON
JENSEN
jvc
KENWOOD
MAGNAVOX
MARANTZ
MCNTOSH
MITS UBISH!
NAKAMICHI
ONKYO
OPTIMUS
HM94(E)026-33(3-RO)
Receivers (cont.}
Brand Code
PANASONIC 4119,4118,4121
PHILIPS 4 ]23
PIONEER 4105, 4107, 4150
QUASAR 4119, 4118, 4121
RCA 4103, 4105, 4127,
4131,4130, 4149
SANSUI 4103, 411 I, 4139
SHARP 4134, 4137
SONY 4122
SOUNDE-SIGH 4138
TEAC 4112,4113,4111,
4110
TECHNICS 4121,4118, 4119
VICTOR 4132, 4133
YAMAHA 4101,41(}2
Laser disks
Brand Code
DEN()N 51 ]4
HITACHI 5100
KENWOOD 5102,
MAGNAVOX 510 ]
MARANTZ 51 ]4
MITSUBISHI 51 ]4,
NEC 5114
PANASONIC 5104,
5115
PHILIPS 51 ] ]
PIONEER 5114
PR()SCAN 51 ]4
QUASAR 5104,
5115
RCA 51 ]4
SAMSUNG 51 ]2
SANYO 51 ]4,
SHARP 51 ]3,
SONY 5107,
5110
TEAC 51 ]4
TOSHIBA 51 ]4
YAMAHA 5 ]01
5103
5118,5119
51(}5, 51(}6,
51(}5, 5106,
5117
5116
5108, 51(}9,
DVD players
Brand
AIWA
APEX
DENON
FERGUSON
HITACHI
jvc
KENWOOD
KONKA
MITSUBISHI
NORDMENDE
ONKYO
ORITRON
PANASONIC
PHILIPS
PIONEER
RAITE
RCA
SABA
SAMPO
SAMSUNG
SHARP
SILVANIA
SMC
SONY
TECHNICS
THOMSON
TOSHIBA
WAVE
YAMAHA
ZENITH
VIA LTA
FUNM
Satellite receivers
Brand
DISH
NETWORK(Echostar)
ECHOSTAR
EXPRESS VU
G.E.
G.I.(GENERAL
INSTRUMENT)
GRADIENTE
HITACHI
HNS(Hughes)
MAGNAVOX
PANASONIC
PHILIPS
PRIMESTAR
PROSCAN
RCA
SONY
STARCHOICE
TOSHIBA
UNIDEN
Code
3123
3120
3100,3117
3101
3111
3109
3115,3129
3119
3105
3101
3121
3124
310O
3103, 3116
3102
3113
3101, 3106
3101
3114
3110
3108
3132,3118
3125
3104, 3126, 3127,
3128
310O
3101
3103
3122
3100, 3130
3107, 3112
3131
3132,3118
Code
2105,2115,2116,
2117
2105
2105,2115
2106
2108
2114
2103,2111,2112
2103
2101,2102
2104
2101,2102,2118
2108
2106,2109,211(},
2113
2106,2109,2110,
2113
2107
2103,2108
2100,2103,2119,
2120,2121,2122,
2123,2124,2125
2101,2102
Copyright _? 2804 FOSHIBA CORPORATION, All rights reserved.
33 ÷8/31/04, 1:08 PM
33
÷
F
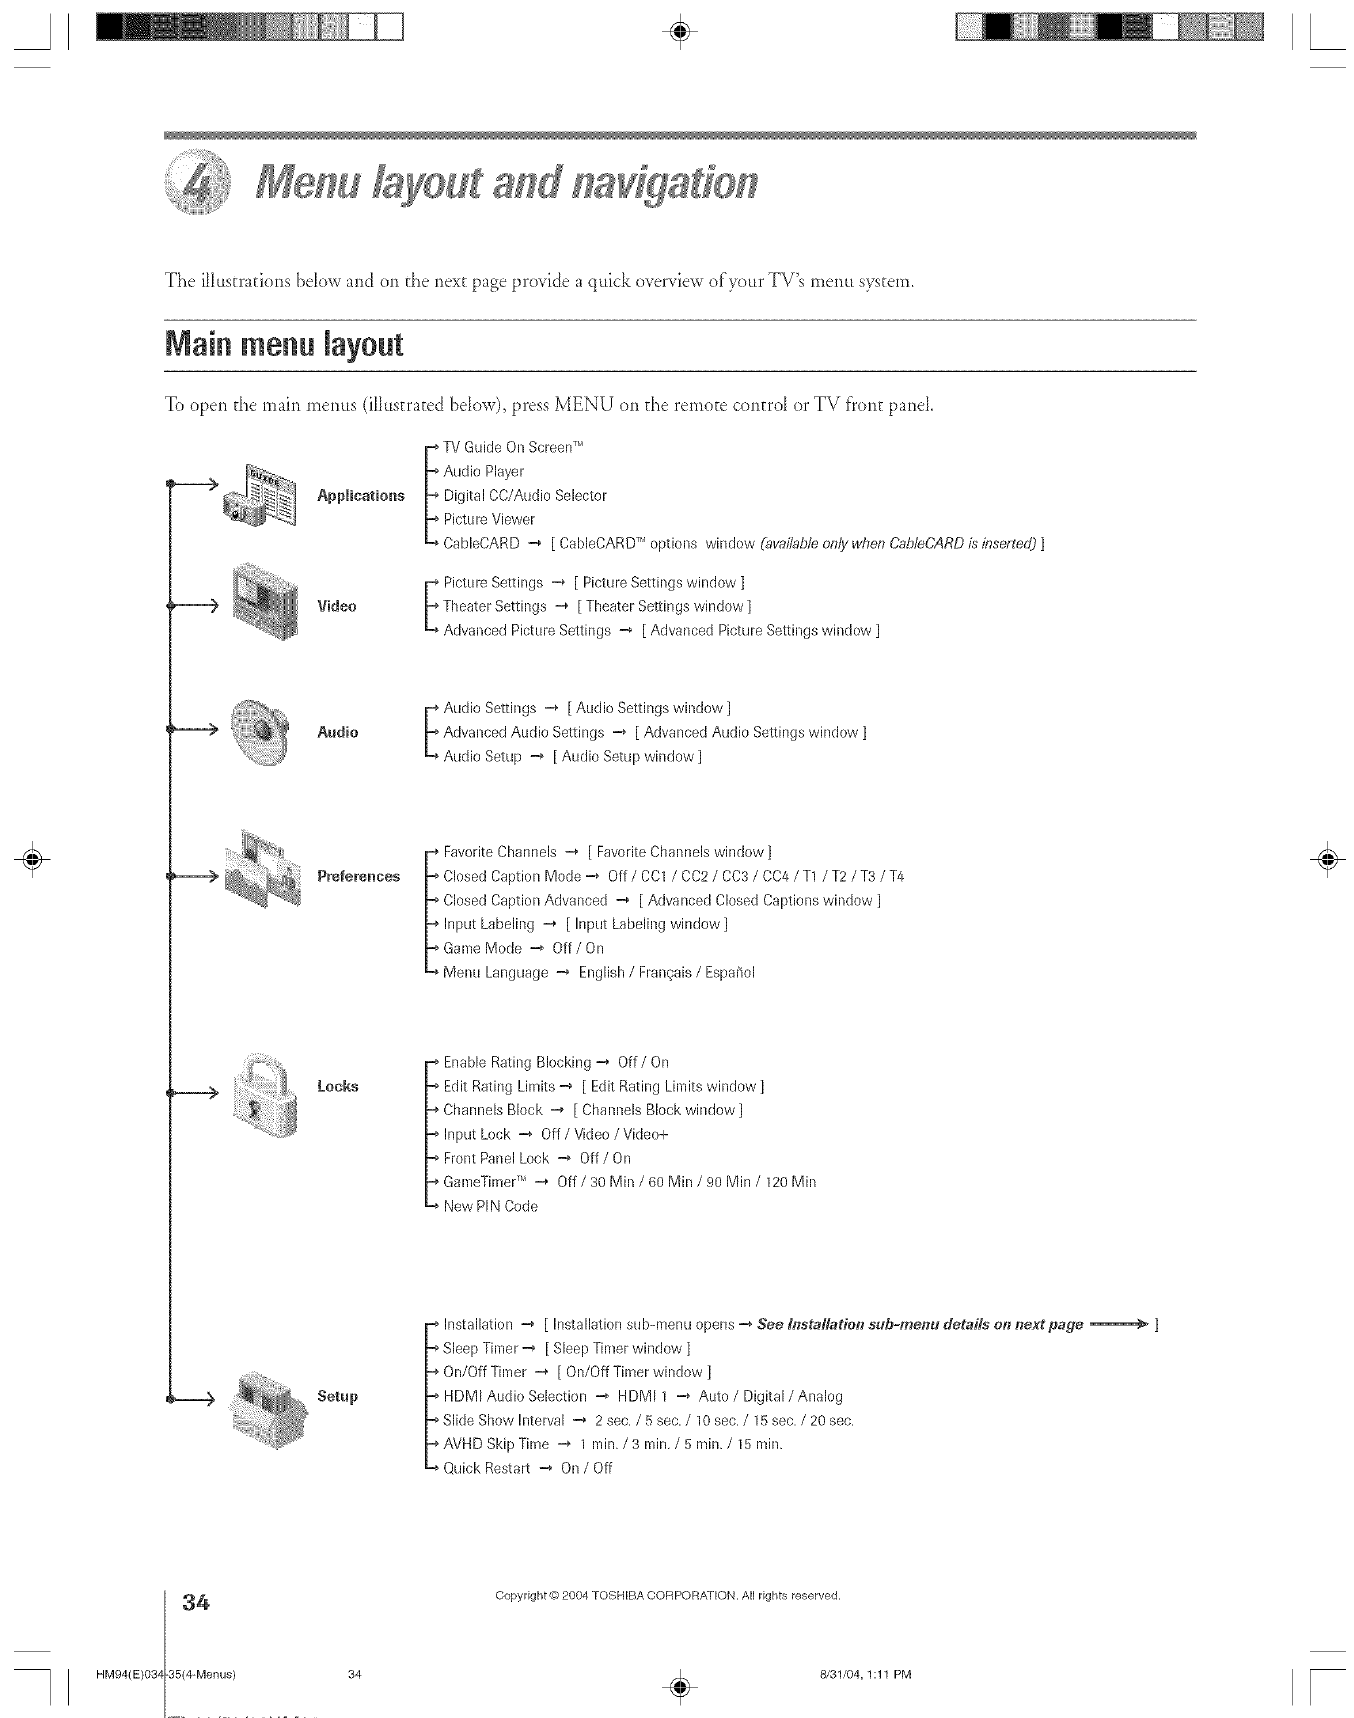
The illustrations below and on d_e nex_ page pro_idea qttick o_er_Jew of your TV's menu system.
Mainmenu layout
To open the main menus (ilktstrated bdow), press MENU on d_e remo_e control or TV fi'ont pand.
TV Guide On Screen TM
_ Audi0 Player
Applications _ Digital CC/Audio Selector
_ Picture Viewer
CableCARD -4 [ CableDARDTM options window (available only when Cab/eCARD is inserte_O]
r Picture Settings -4 [ Picture Settings window ]
Video _ Theater Settings -4 [ Theater Settings window ]
Advanced Picture Settings -4 [ Advanced Picture Settings window ]
Audio E Audio Settings -4 [ Audio Settings window ]
Advanced Audio Settings -4 [ Advanced Audio Settings window ]
Audio Setup -4 [ Audio Setup window ]
Prefek'enKaes
i avorite Channels -4 [ Favorite Channels window ]
Closed Caption Mode-4 Off/CC1 /CC2 /CC3 /CC4/T1 /T2/T3/T4
Closed Caption Advanced -4 [ Advanced Closed Captions window ]
Input Labeling -4 [ Input Labeling window ]
GameMode -4 Off/On
Menu Language -4 English /Frangais /Espa_ol
_____> Locks
-_ Enable Rating Blocking -4 Off/On
-_ Edit Rating Limits -4 [ EditRating Limits window ]
=_Channels Block =_ [ Channels Block window]
-_ Input Lock =4 Off /Video /Video+
-_ Front Panel Lock -4 Off/On
-_ GameTimerTM -4 Off /30 Min /60 Min /90 Min /120 Min
-_ New PIN Code
-.--) Setup
-_ Installation -4 [ Installation sub-menu opens -4 See h_stallatien sub-metlu details on r_ext page _ ]
-_Sleep Tinier-4 [ Sleep Timer window ]
=_On/Off Timer =_ [ On/Off Timer window ]
-_ HDMI Audio Selection -4 HDMI 1 -4 Auto /Digital/Analog
-_Slide Show Intewal -4 2 sec, /5 sec. /10 sec, /15 sec, /20 sec,
-_AVHD Skip Time -4 I nfin. /3 rain, /5 rain. /15 rain.
-_ Quick Restart -4 On /Off
÷
4
HM94(E)034 35(4-Menus)
Copyright @ 2004 TOSHIBA CORPORA]ION. All rights reserved.
34 _ 8/31/04, 1:11 PM [
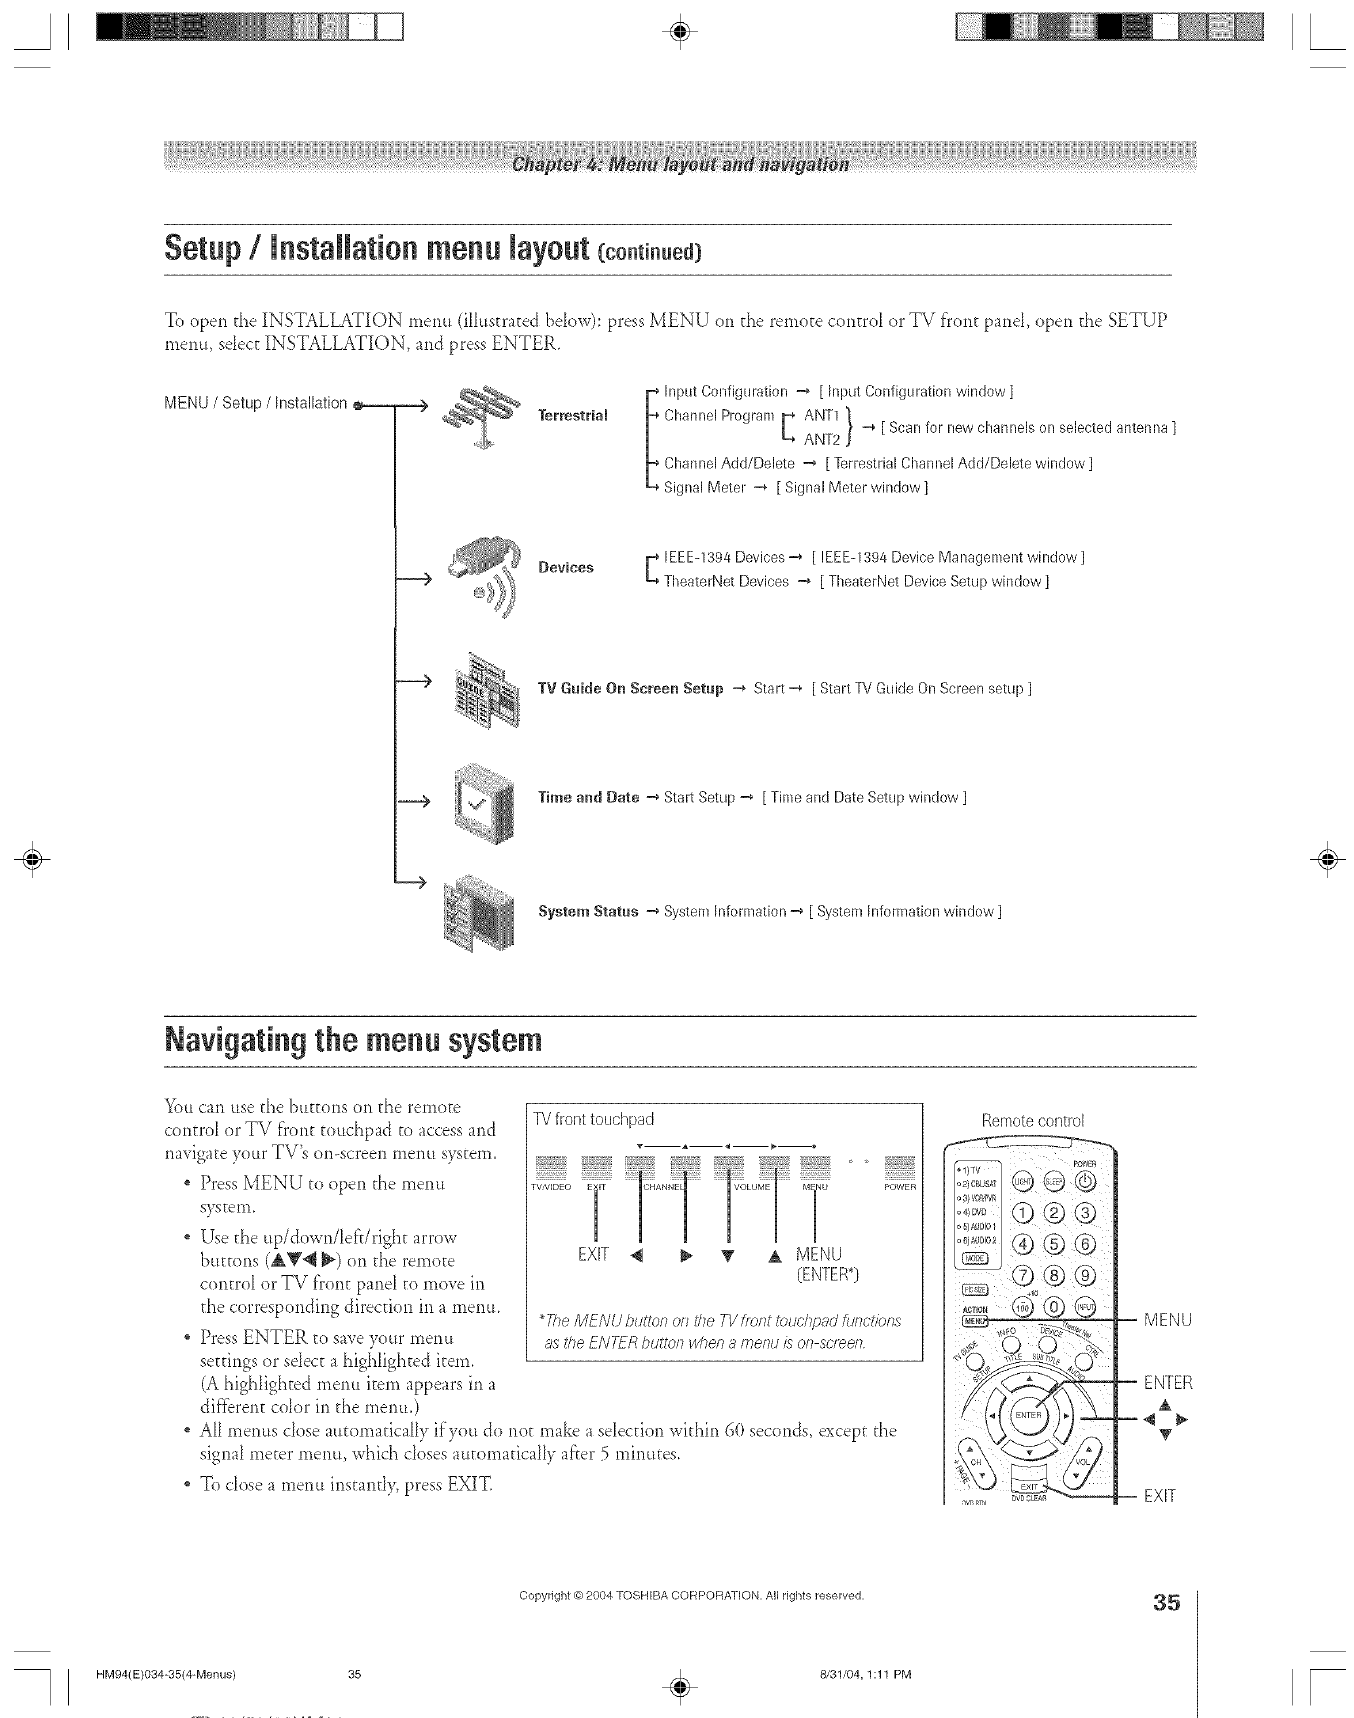
Setup /lnstaRationmenu layout (co.tinued)
To open d_e INSTALLATION rnenu (illustrated bdow): press MENU on d_e remote contro_ or TV front panel open the SETUP
menu, sdect INSTALLATION, and press ENTER.
MENU /Setup /Installation
_TerrestriaJ
Input Configuration -4 [ Input Configuration window ]
ANT1 1
Channel Program t ANT2 ] _ [ Scan for new channels on selected antenna ]
Channel Add/Delete -_ [ Terrestrial Channel Add/Delete window ]
Signal Meter -4 [ Signal Meter window ]
_evices E EEE-139/4Devices "_ [ IEEE-1394 Device Management window ]
TheaterNet Devices -4 [ TheaterNet Device Setup window ]
TV Guide On Screen Setup -4 Start =4 [ Start TV Guide On Screen setup ]
Time and Date -4 Strut Setup -4 [ Time and Date Setup window ]
System Status -4 System Information -4 [ System Information window ]
÷
Navigating the menu system
You can use the buttoi_s on the remote
control or TV front touchpad to access and
na_ igate your TV's on-screen menu system.
" Press MENU to open the menu
SySteiIL
Use the up/down/bfdright arrow
buttons (AV@ _) on the remote
centre1 or TV front pand to mo_e in
the corresponding direcuon in a menu.
, Press ENTER to save your memt
settings or sebct a highlighted item.
(A highlighted menu item appears in a
dif'fbrent color in the rnerm.)
TV front touchpad
EXIT _ _ _' A MENU
(ENTER*)
POWER
*The MENU button o/_the TVfront touchpad _mct_bns
as the ENTFR button when a meRtJ/s oR sct_efl
All menus close automatically if you do not make a sdection within 60 seconds, except the
signal meter menu, which closes automatically af}er 5 minutes,
To close a menu instantly, press EXIT.
Remotecontrol
-- MENU
ENTER
&
-- EXIT
Copyright @ 2004 TOSHIBA CORPORATION, All rights reserved,
HM94(E)O34-35(4-Menus) 35 _ 8/31/04,1:11 PM
35
[
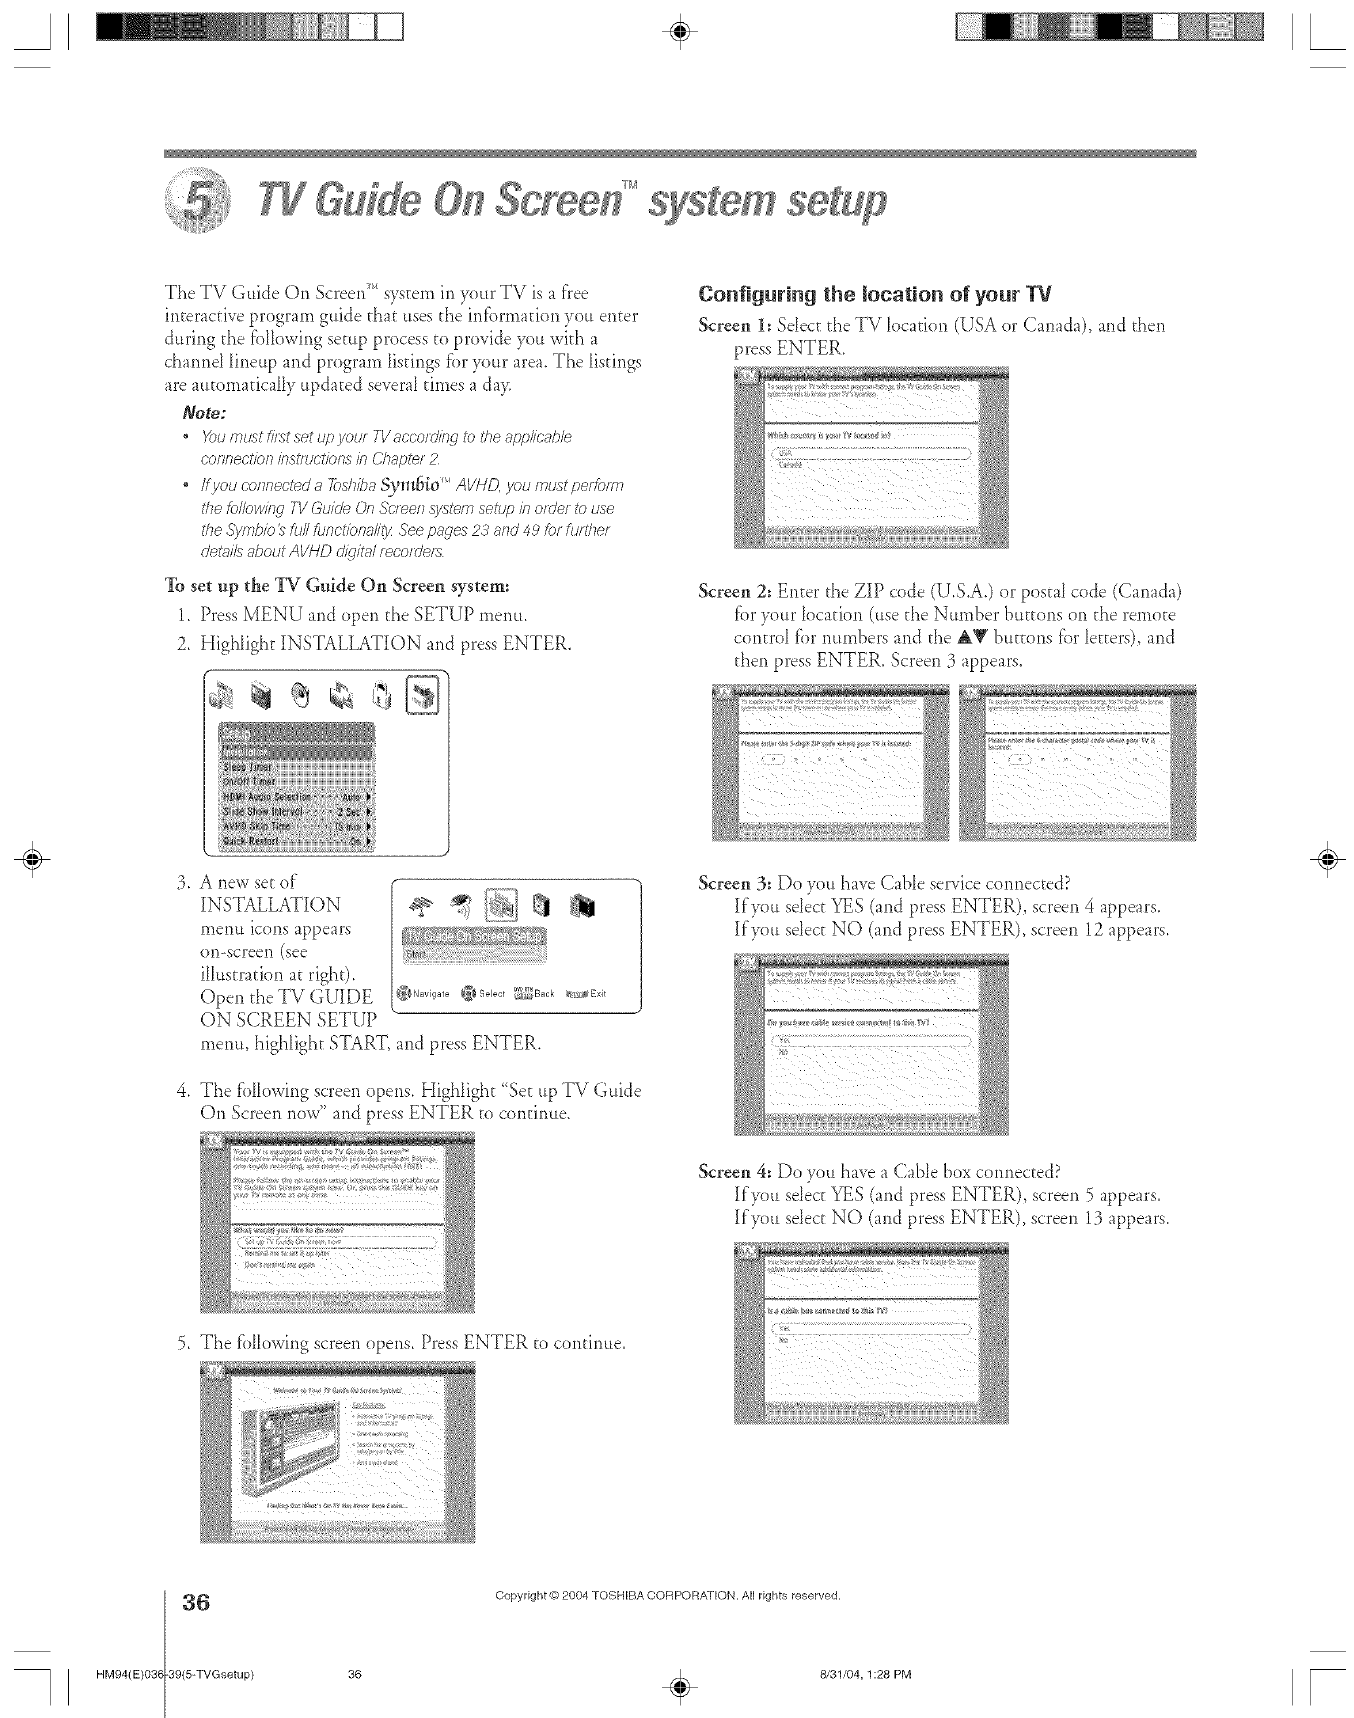
A÷ L
Msystem sd
The TV Guide On ScreerF'_system in your TV is a flee
interactive program guide that uses the infbrmafion you enter
during the fi_llowingsetup process to provide you with a
channd lineup and program listings fi_ryour area. The listings
are automatically updated several times a day.
Note:
• X)umustfil_tsetu/:)yourTVaccorclirijtotheapplieable
6"ofTgecl'/of7 /I-iSl?uctio/Ts 71-1_77apter 2
•Ifyouconnecl'eda 7odTbaS)_;_fJio '_'AVHD, loumustperfom_l
the fo/Iowisw T1/Guk/e On &-leen system setup/i-i order to use
the Syr/27io_full functionality See pages 23 arid 4,9 k)rftJl21et
det_u/8about AVHD di?lto/ recorders
To set up the TV-Otfide On Screen system:
1. Press MENU and open the SETUP menu.
2. Highlight INSTALLATION and press ENTER.
Configuring the location of your W
Screen 1: Sdect the TV location (USA or Canada), and then
press ENTER.
Screen 2: Enter the ZIP code (U.S.A.) or postal code (Canada)
for )'our location (use the Number buttons on the remote
control fbr numbers and the A_' buttons fbr letters), and
then press ENTER. Screen 3 appears.
,A ne'w set o_"
INSTALLATION
merm icons appears
on-screen (see
illustration ac right).
Open the TV GUIDE
ON SCREEN SETUP
menu, highlight START, and press ENTER.
4. The fi)lk)wing screen opens. Highlight "Sec up TV Guide
On Screen now" and press ENTER to continue.
Screen 3: Do you have Cable service connected?
Kyou sdect YES (and press ENTER), screen 4 appears.
Kyou sdect NO (and press ENTER), screen 12 appears.
÷
Screen 4: Do you haxe a Cable box connected?
Kyou sdect YES (and press ENTER), screen 5 appears.
K vou seIect NO (and press ENTER), screen 13 appears.
5. The _blk)wing screen opens. Press ENTER to continue.
36 Copyright © 2804 TOSHIBA CORPORATION. All rights reserved.
HM94(E)03(-39(5-TVGsetup} 36 _ 8/31/04,1:28 PM [
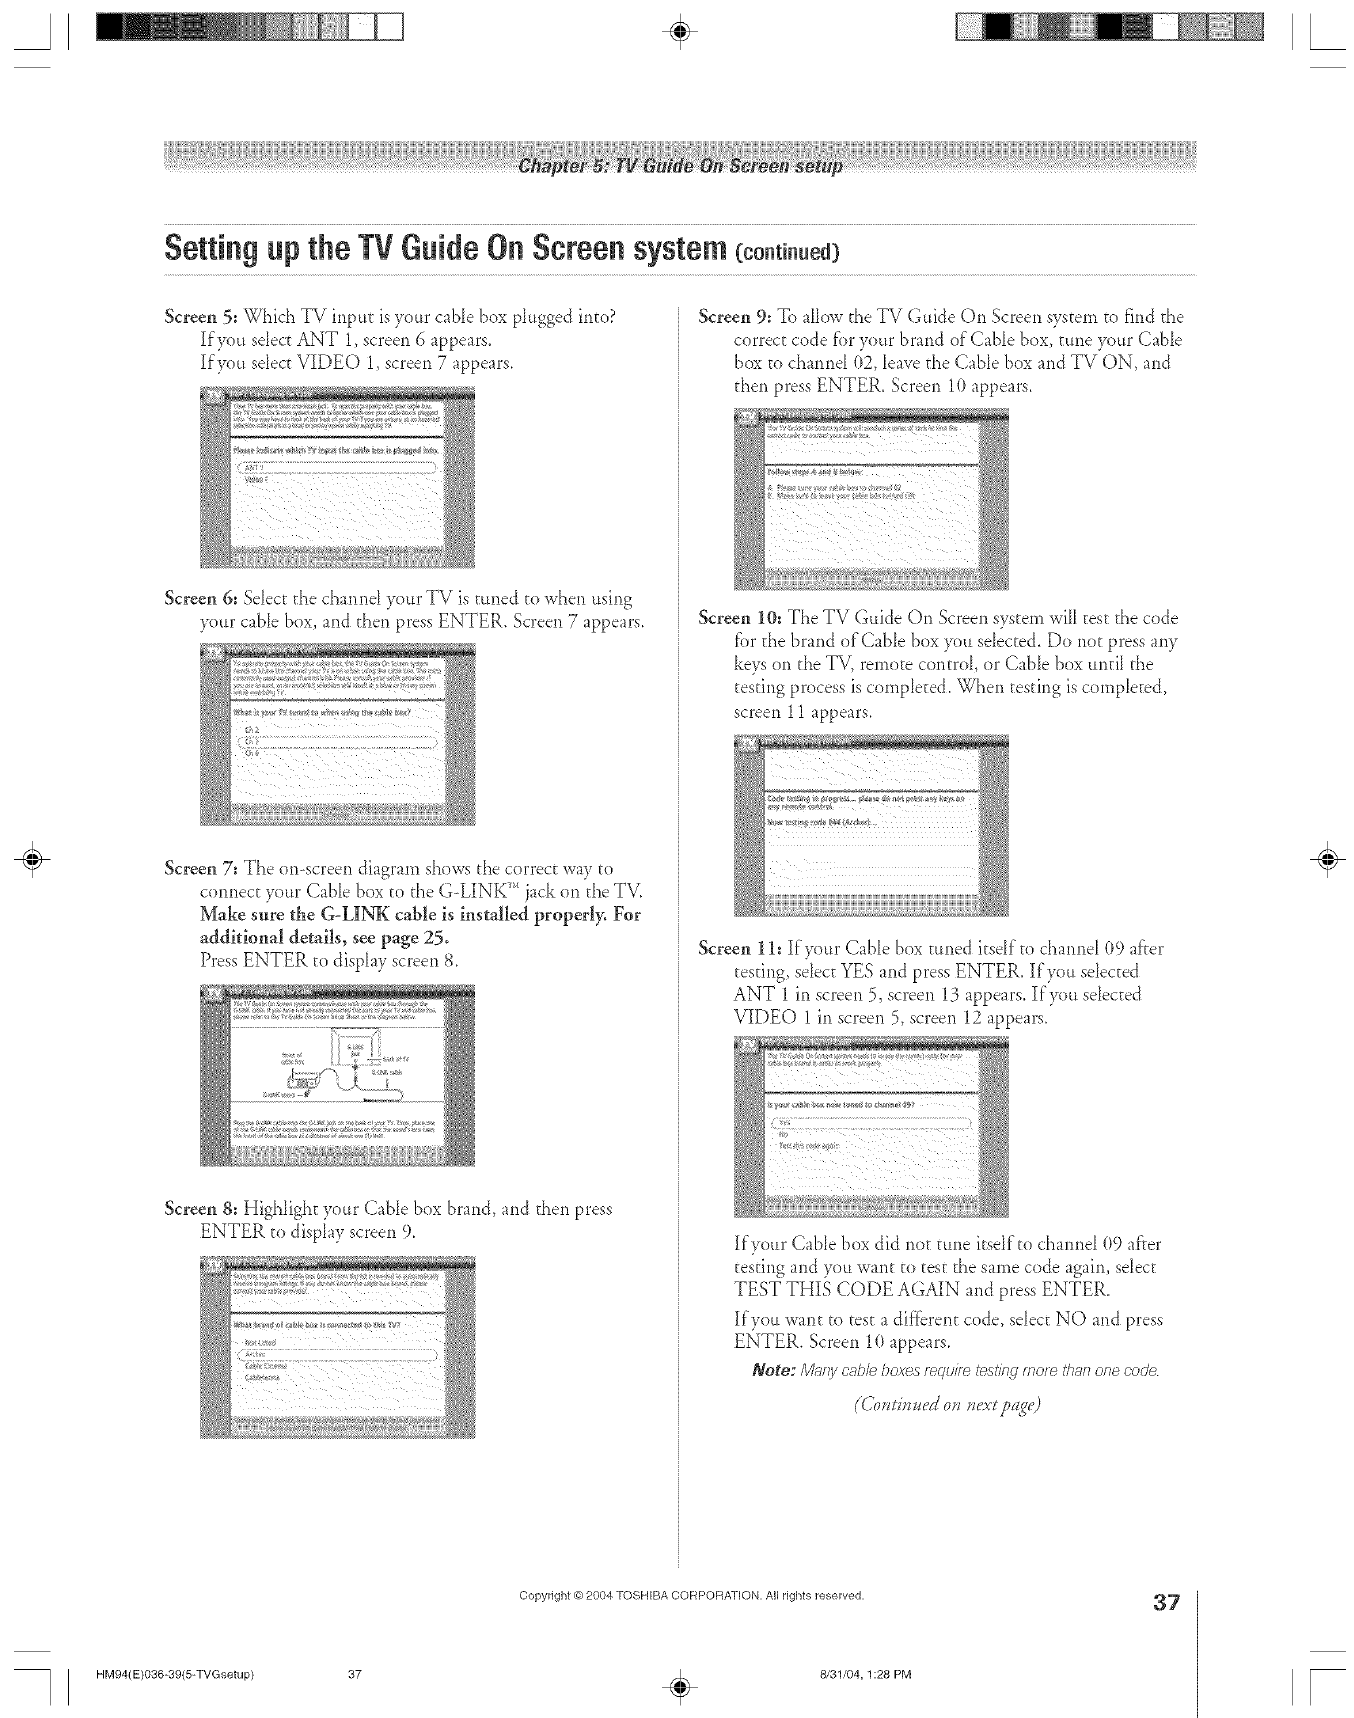
A÷ L
Screen 5: Which TV input is your cable box pktgged into?
If you sdecE ANT 1,screen 6 appears.
lf),ou select VIDEO 1,screen 7 appears.
Screen 6: Sdect the channel your TV is tuned to when using
your cabIe box, and then press ENTER. Screen 7 appears.
Screen 7: The or>screen diagram shows the correc_ way to
connect your Cable box to the G-LINK _'*jack on the TV.
Make sure the G-LINK cable is installed properly. For
additional details, see page 25.
Press ENTER to display screen 8.
Screen 8: Highlight your CabIe box brand, and then press
ENTER to display screen 9.
Screen 9: To a[k_wthe TV Guide On Screen system to find the
correct code fbr your brand of Cable box, tune your Cable
box _ochannd (t2, leave the Cable box and TV ON, and
then press ENTER. Screen 10 appears.
Screen 10: The TV Guide On Screen system wiIItes_ the code
fbr the brand of Cable box you sdec_ed. Do no_ press any
keys on the TV, remo_e control, or CabIe box untiI the
testing process is comp[eEed. When testing is comp[eEed,
screen 11 appears.
Screen 11: If your Cable box tuned itself to charade[09 after
testing, sdect YES and press ENTER. If you sdec_ed
ANT 1 in screen 5, screen 13 appears. If you sdected
VIDEO 1 in screen 5, screen 12 appears.
If your Cable box did not tune itself to channd (t9 after
testing and you want to test the same code again, selec_
TEST THIS CODE AGMN and press ENTER.
If you want to test a dif'fbrent code, sdec_ NO and press
ENTER. Screen 10 appears.
Note:/VIc;rgoat;lel)oxesrequiretestingmote thanone code
÷
Copyright @ 2004 TOSHIBA CORPOFtAT[ON, All rights reserved, 37
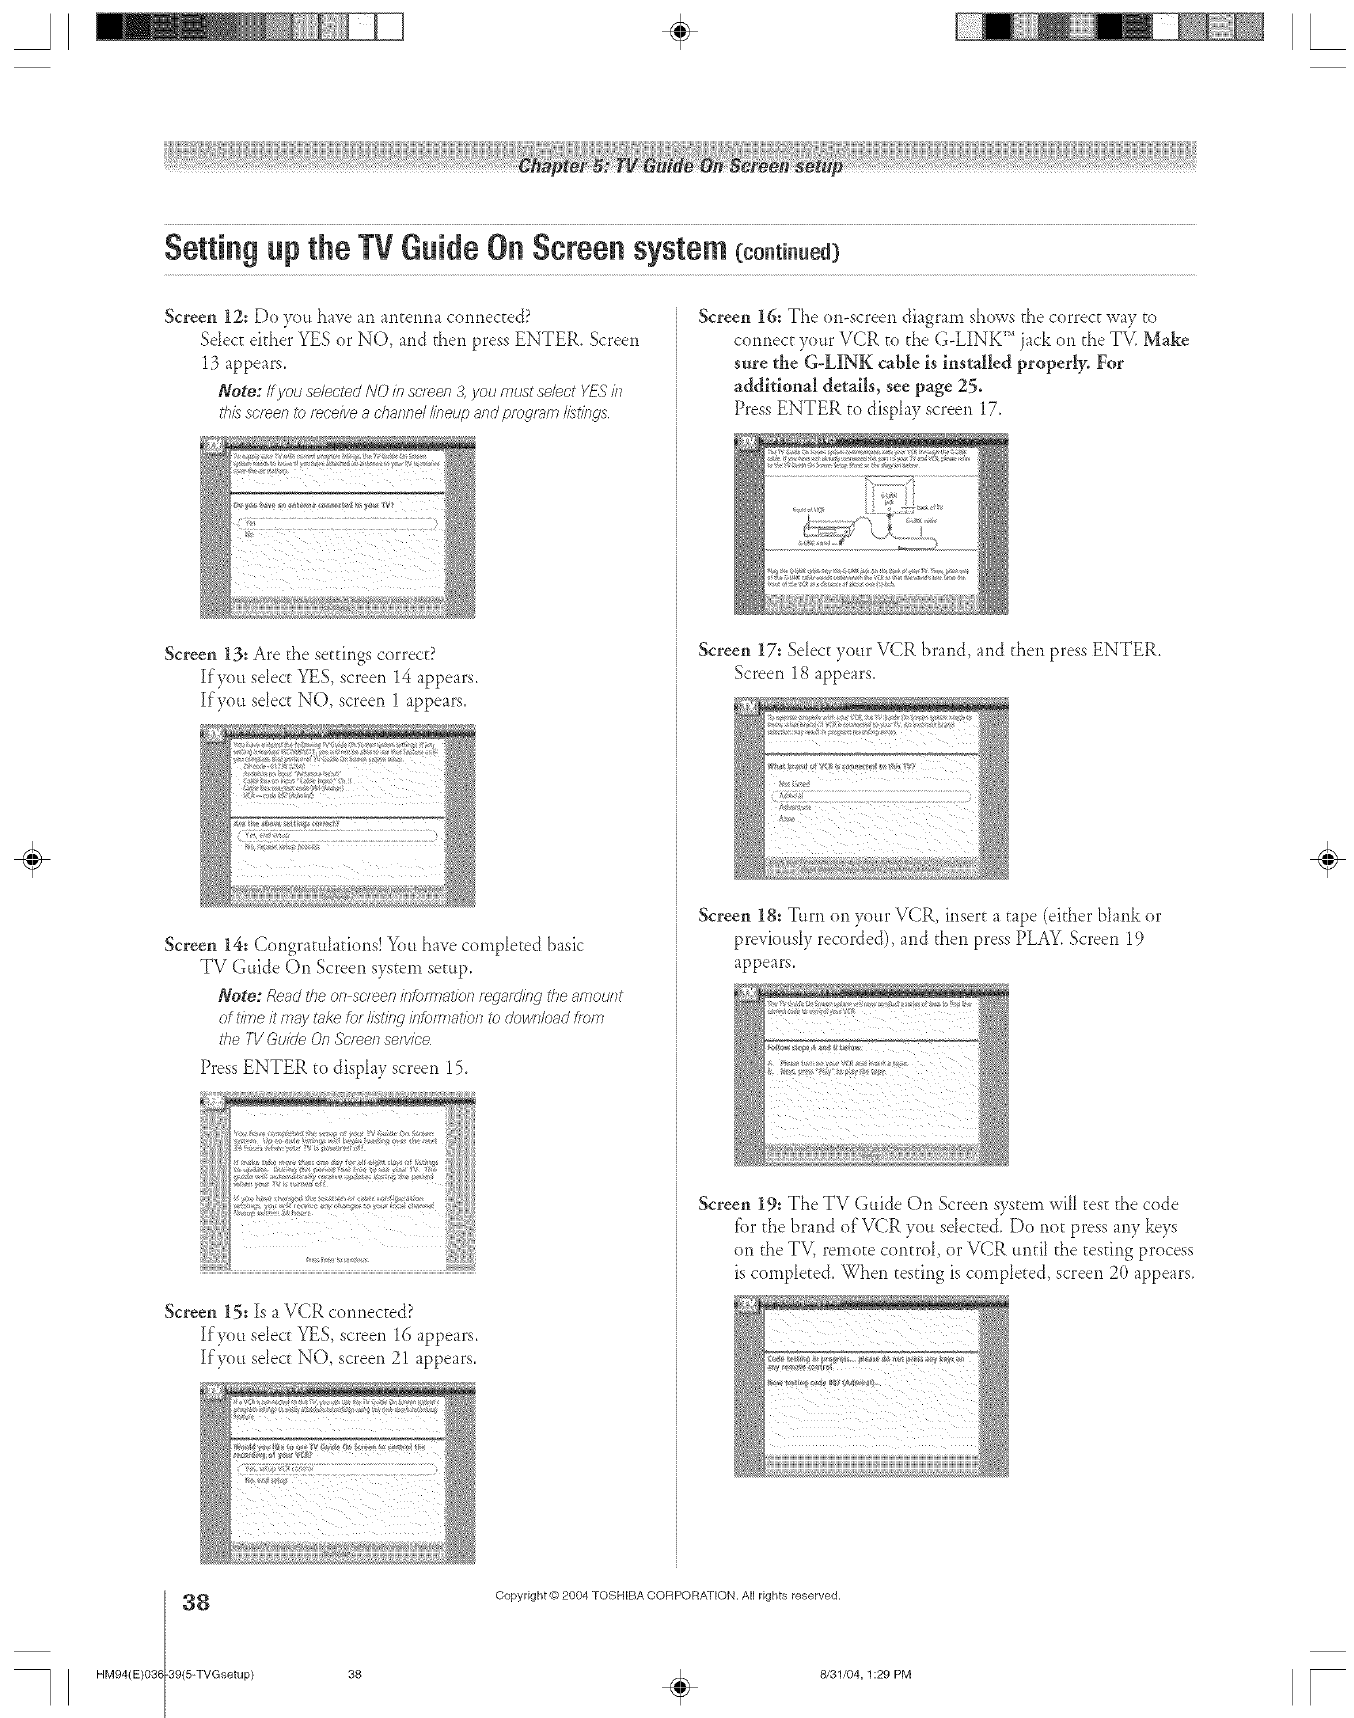
A÷ L
Setting up the TV GuideOn Screen system (eo.t .ued)
Screen 12: De you have an ailtenna connec[ed?
Sdec[ either YES or NO, and [hen press ENTER. Screen
13 appears.
Note: Ifyou selectedNO i/_scleen3,you mustselect YESin
thisscreento [_oeivea channdlineup andprogf_lmI/stings
Screen 13: Are the set[ings cerrec[?
If you select YES, screen 14 appears.
If you select NO, screen 1 appears.
Screen 14: Congratula[ions! You have cemplet:ed basic
TV Guide On Screen sys[em setup,
Note: Re_m'the on screen#_fom_atio/ifegStd#_g theamount
of h)Tleit fTlaytakefor Iistleg/fTbfTSTaf/_)lsto doFc/Tbadhorn
the 1-1/GuideOn .%v_enservice
Press ENTER to display screen 15.
Screen 15: Is aVCR cermected?
If you sdect YES, screen 16 appears.
If you sdect NO, screen 21 appears.
Screen 16: The ()n-screen diagram shows the correc_ way [o
connect yeur VCR [o the G-LINK TM jack on the TV. Make
sure the G&INK cable is inst0Jled properly. For
additional details, see page 25.
Press ENTER [e display screen 17.
Screen 17: Sdect your VCR brand, and then press ENTER.
Screen 18 appears.
Screen 18: Turn on your VCR, inset[ a [ape (el[her blank or
previeusly recorded), and [hen press PLAY.Screen 19
appears.
Screen 19: The TV Guide On Screen system will _est the cede
fbr the brand of VCR you sdected. Do net press any keys
on the TV, remote control or VCR until the testing process
is comple[ed. When testing is completed, screen 20 appears.
÷
38 Copyright © 2904 TOSHIBA CORPORATION. All rights reserved.
HM94(E)03(-39(5-TVGsetup) 38 _ 8/31/04,1:29 PM r
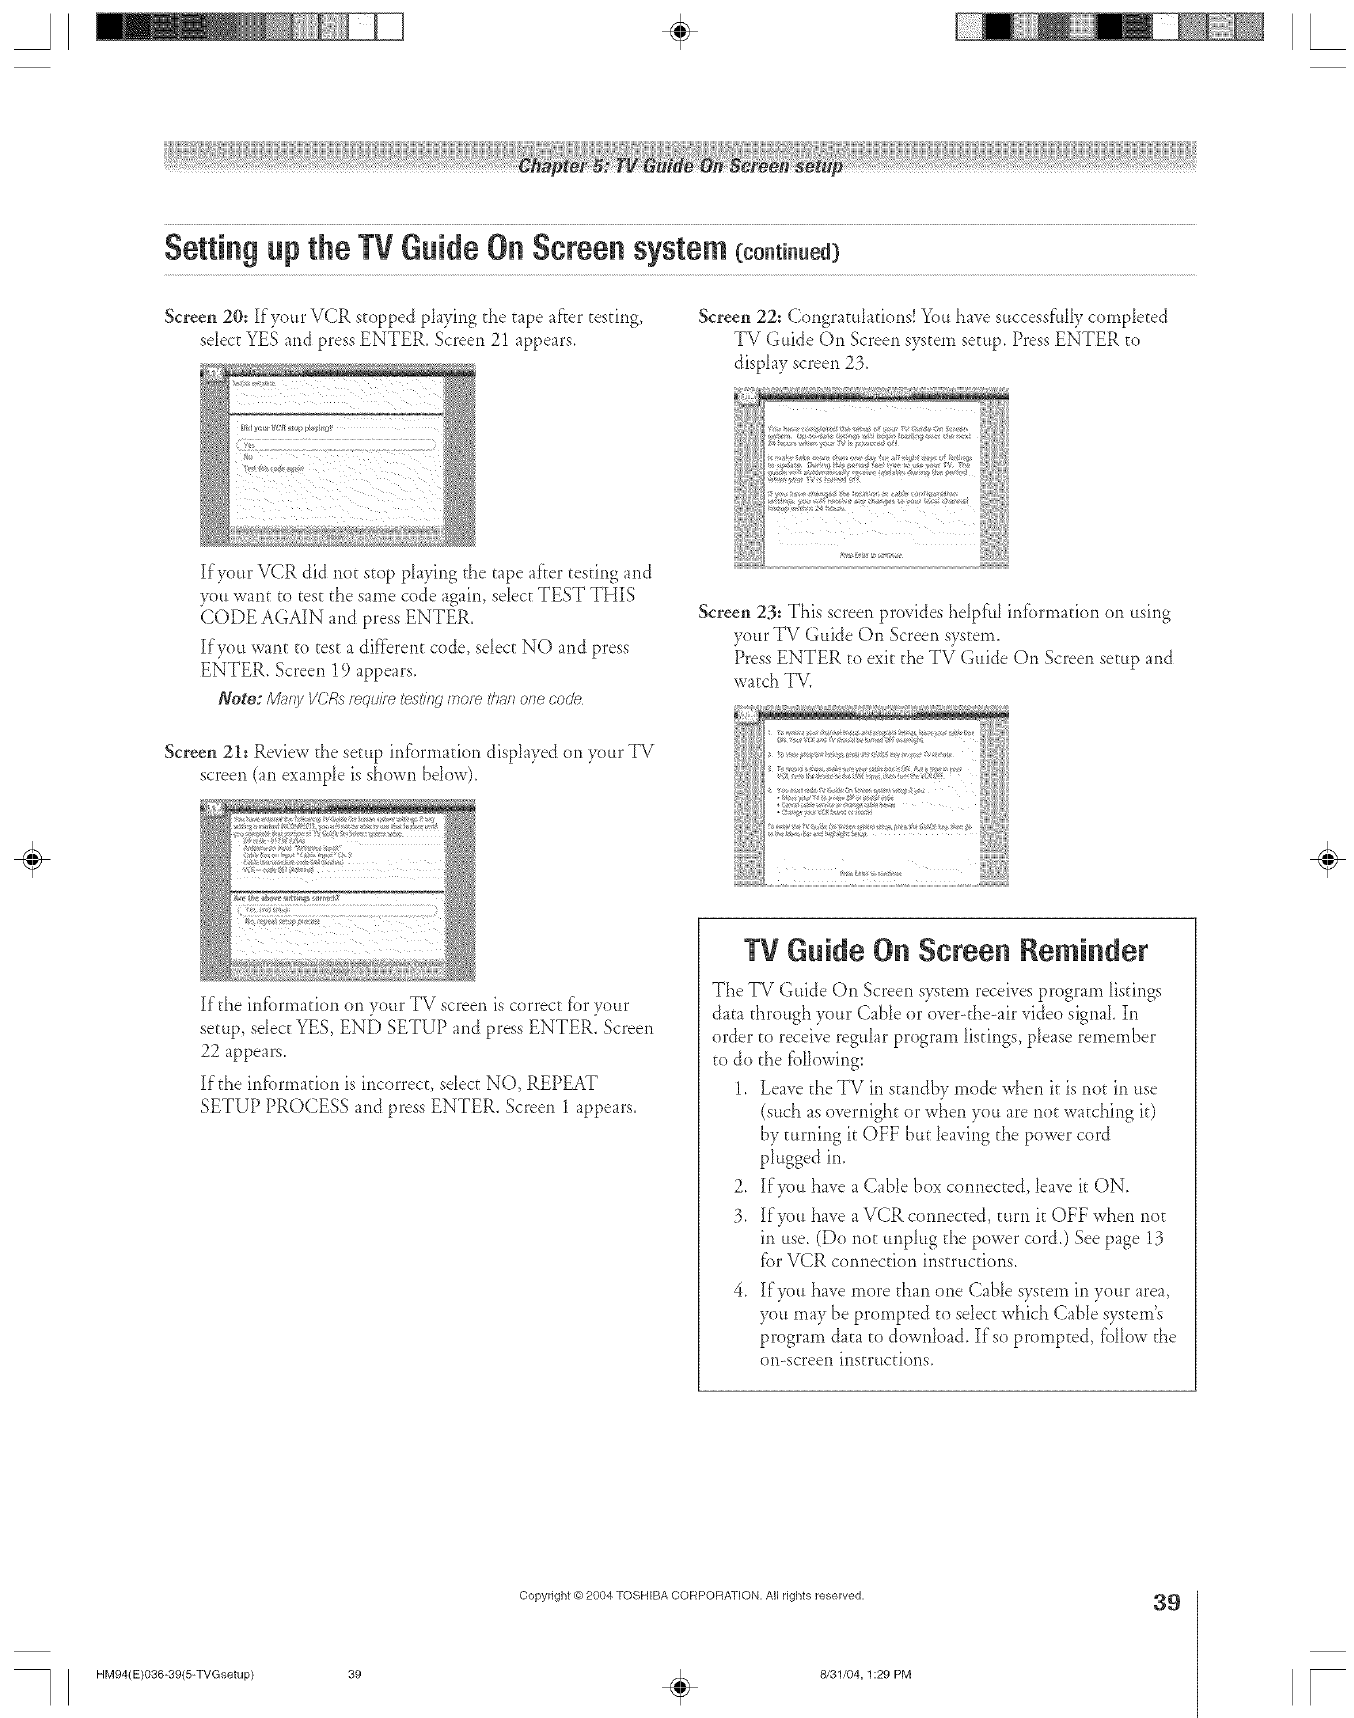
A÷ L
Screen 20: If your VCR stopped ph3qng the tape after testing,
sdect YES and press ENTER. Screen 21 appears.
Screen 22: Congratub_tions! You ha_e successf'uHycompleted
TV Guide On Screen system setup, Press ENTER to
display screen 23.
If3<_ur VCR did no_ stop playing the tape after teMng and
you want to test the same code again, sdec[ TEST THIS
(_ODE AGAIN and press ENTER.
If you want to tes_ a different code, select NO and press
ENTER. Screen 19 appears.
Note:/Vh,fg IiCRs require testingfnoiwI<harlorlecode
Screen 21: Review the setup infi._rmation displayed on your TV
screen (an example is shown bdow).
If the infi)nnafion on your TV screen is correc_ for your
setup, select YES, END SETUP and press ENTER. Screen
22 appears.
If the infbrmation is incorrect, sdect NO, REPEAT
SETUP PROCESS and press ENTER. Screen 1 appears.
Screen 23: This screen provides hdpful infbrma_ion on using
your TV Guide On Screen system.
Press ENTER _oexit the TV Guide On Screen setup and
watch TV.
,{
c{ ,* ;v,_ a _v {4>>, {1 {
, ._ ;, ? ......... {{{{]{
:{ {}{}{{{
> *, _ > ,, {{}{ {
}#* >a{ }1{[
<v >, } a;>,:_,;#, {a
TV Guide On Screen Reminder
The TV Guide Oi) Screen system receives program listings
data through your Cable or over-the-air vide() signal In
order to receive regular program listings, please remember
to do the fbllowing:
1, Leave _heTV in s_andby *node when it is not in use
(such as overnight or when you are not watching it)
by _urning it OFF but leaving the power cord
plugged in,
2, ]Ifyou have a Cable box connected, [eave it ON,
3, Ifg)u have a VCR connected, turn it OFF when not
in use, (Do not unplug the power cord.) See page 13
fbr VCR connection instructions.
If you have more than one (-;able system in your area,
you may be prompted to sdec_ which CabIe system's
program data to download. If so prornpEed, follow the
on-screen instructions,
÷
Copyright © 2004 TOSHIBA CORPOFtAT[ON, All rights reserved, 39
HM94(E)036-39{5-TVGsetup} 39 _ 8/31/04, 1:29 PM r
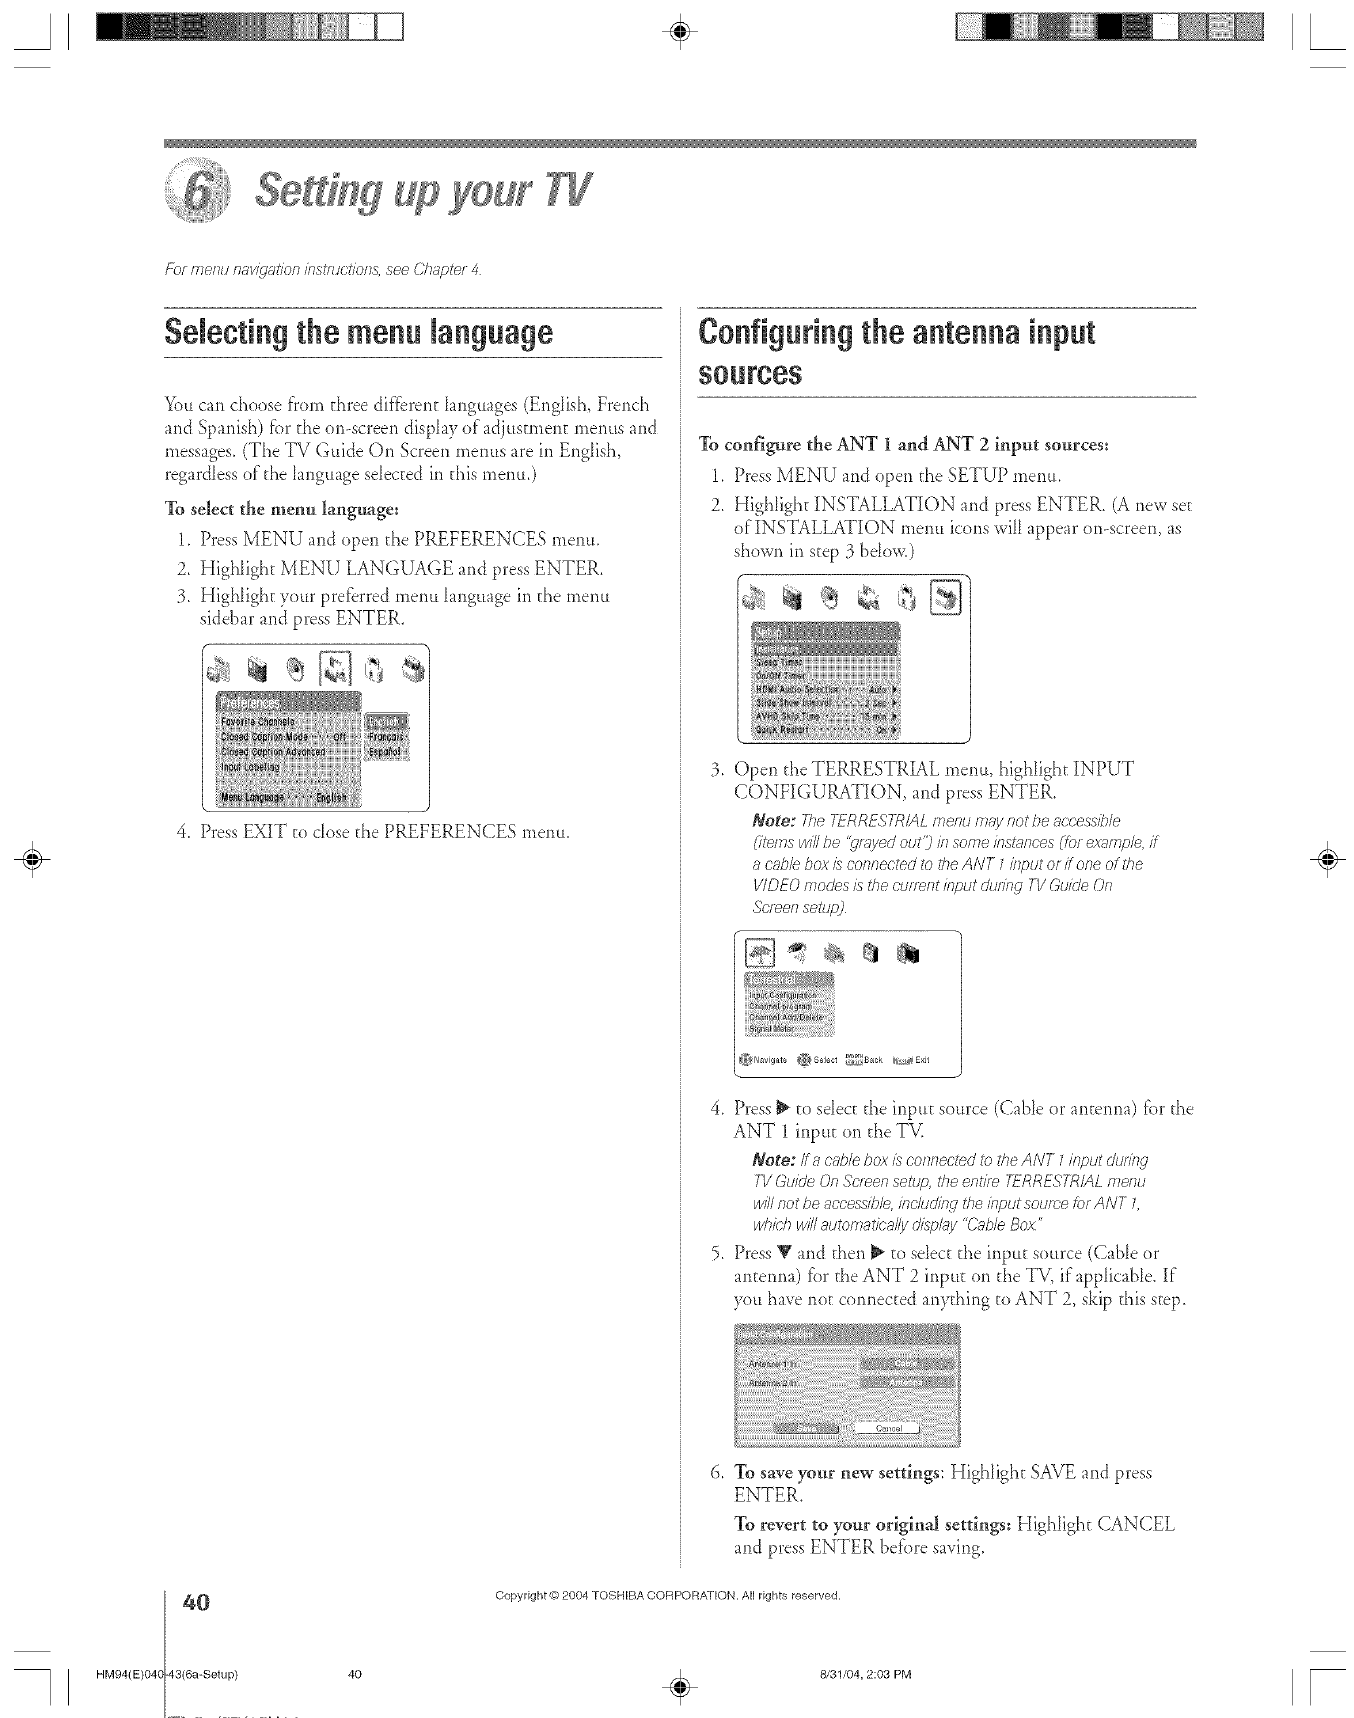
year
Fb_ menu 17_v/9"_t/on/?Jstmot/ons, see Chapte_ 4
$decting the menu language
You can choose t}om three dif{_rent Ianguages (Ep@ish, French
and Spanish) for the or>screen display of adjusmaen[ menus and
messages. (The TV Guide On Screen meuas are in English,
regardless of the language selected in d_is menu.)
To select the menu language:
1. Press MENU and open the PREFERENCES menu.
2. HigNight MENU LANGUAGE and press ENTER.
3. Highlight your preferred meua language in the menu
sidebar and press ENTER.
4. Press EXIT to dose the PREFERENCES memt.
Configuring the antenna input
SOUrCeS
To configure the ANT 1 and ANT 2 input sources:
1. Press MENU and open d_e SETUP menu.
2. Highlight INSTALLATION and press ENTER. (A new see
of INSTALLATION meua icons will appear on-screen, as
shown in step 3 bdow,)
q_
3. Open d_eTERRESTRIAL menu, highlight INPUT
CONFIGURATION, and press ENTER.
Note: 77_e TFRR£S7-R/AL frlelw eT_ly riot L)e 8t)t;'e&_;iL;/e
_ite/rls will be '_v>TyedotJt:) hi SOITleklshfflces (for exzT/rlple,if
ac_bM box/s connected to the ANT 1 #iput ofitone of the
V/DEO modes is the CU/7_FIthTf)Ut dte/r_g TV Guk#eOf?
h-leon setlW
_}Navigate ,_Select _Back A_E×Jt
4. Press _ to select the inpu[ source (Cable or antenna) for the
ANT 1 input on d_eTV.
Note:/fa c'_lblebox h connected _bthe ANT 7input &Jring
TVGuide On Sc/een setup, the entire 7TRRESTR/AL H?el?u
bl///If?otbe acceasible, bc/ud/n d the input soume [er ANT L
whM? wi// automaf/_-a/ly dispkly "Cable Boz"
5. Press V and then _ to select the input se,rce (Cable er
antenna) tbr the ANT 2 inpuE on the TV, if applicaNe. If
Sou have not copmected aplything to ANT 2, skip this step.
6, To save your new settings: Highlight SAVE and press
ENTER.
To revert to your original settings: HigNight CANCEL
and press ENTER before saving.
0
HM94(E)048 43(6a-Setup)
Copyright © 2804 TOSHIBA CORPORA]ION. All rights reserved.
÷
40 _ 8/31/04, 2:03 PM [
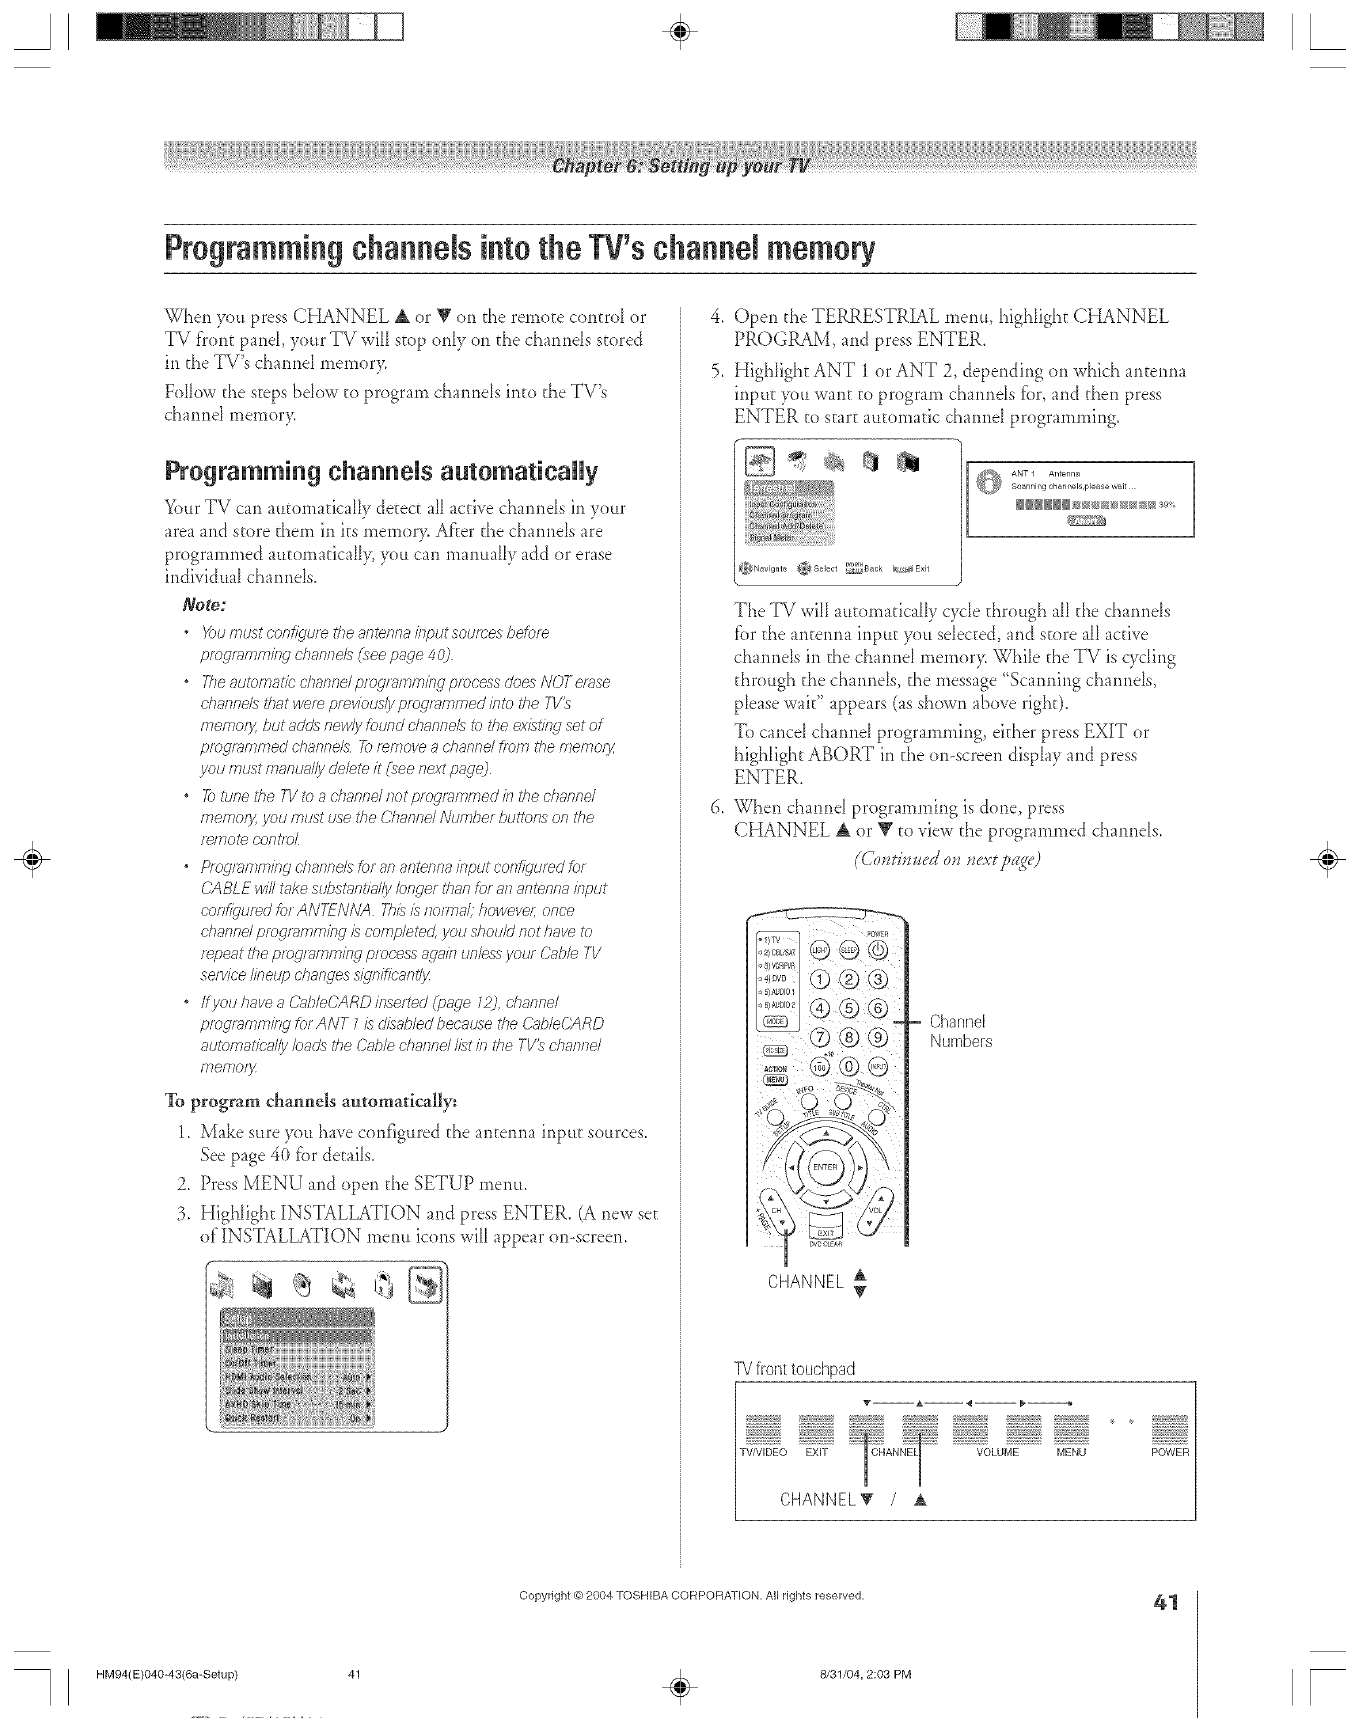
A÷ [
ProgrammingchanneJsintothe TV'schanneJmemory
When }_oupress CHANNEL A or V on the remote control or
TV front paneI, your TV will stop only on d_echarmds scored
in the TV's cham_d memor>
Follow the steps brow to program cha*mds into the TV'._
cha*md memor>
ProgrammingchanneUsautomat[caRy
Your TV can automatically detecEall active charmds in your
area and store them in its mernor> After the chaimds are
programmed amomaticall> you can manually add or erase
individual cham_ds.
Note:
*X_ulnustconfl_,umtl_ear_tenrmislputsourcesbefore
proclmnTmkTgcharffTeL8 Tc_ee page 40)
*777eautomaticchanne/pmgr_mminclpmeessdoesNOTelase
dTannels that were plev/ous/y progr_lmmed /nto the 7-1/_
rylefi7or_ but adds newly found dTanne£ to _<heex£tilw set of
programmed channels _mnTove a ehannd from the memory
yOU fTIUSt rTlanuil/Ijl delete/t _'_ee fText paule_
*7_JtunetheTVtoachanndnotpmgfammedkTthed_annd
rTler77Ol% VOU iFitJst use the CJiTalllld /VtJi77/?er buttOlTS oR the
f_lYlOt8 COIItlDL
"P/ogl_wTmbg dTannels br an arTtelT/_abput corTfll_'Uled br
CABLE win tiske sLbst_sntia/lybnger than for aft antenna/fTput
confl_qumdfor ANTENIVA This i;_noiTna// howevel; once
d}annd pFo_r_,fTTiTT/Rg IScorrlpleted jlOtJshou/cJnot have to
r_/:)eatthepfogl>7lTIm/£g processac_a/nunles'_your Cabb TV
sel_//eelineup c'haeulesSidln/ficlmtly
*If you have aC,'nI?/eCARDinserted (page 12) channel
progmnffrTifW for ANT 7 £ dlsabled becnuse tile C'rsb/eC_ARD
automatie_ffly loads_tle (2@le d}annd listin/<he TV_ d?annd
memosy
To program channels automatically:
1. Make sure you have configured the antenna input sources.
See page 4() _brde_ails.
2. Press MENU and open the SETUP menu.
3. Highlight INSTALLATION and press ENTER. (A new se_
of INSTALLATION menu icons will appear on-screen.
4. Open the TERRESTRIAL meat, highlight CHANNEL
PROGRAM, and press ENTER.
5. HighIight ANT 1 or ANT 2, depending on which antenna
input 5ou want to program channds fi._r,and then press
ENTER to start automatic cham_d programming.
_N_vigate
[(_ ANT I Antenna
Scanni_/g cham/÷ls pleage wait
The TV will amomafically cycle d_rough all d_e channels
_7._rthe ame*ma input you selected, and score all acuve
channels in the channel memor> Whib _heTV is wring
through the channds, the message "Scanning channds,
please wait" appears (as shown above righ0.
To cancel channel programming, eid_er press EXIT or
highlight ABORT in d_eon-screen disphy and press
ENTER.
When ch;mnd programming is done, press
CHANNEL _ or _ to xiew d_e programmed cham_ds.
.2L..........
<72@
CHANNEL A
Channel
Numbers
]_/front touchpad
wrsn:;
VOLUME MENU POWER
÷
HM94(E)040-43(6a-Setup)
Copyright @ 2004 TOSHIBA CORPORATION, AN rights reserved,
÷8/31/04, 2:03 PM
41
[
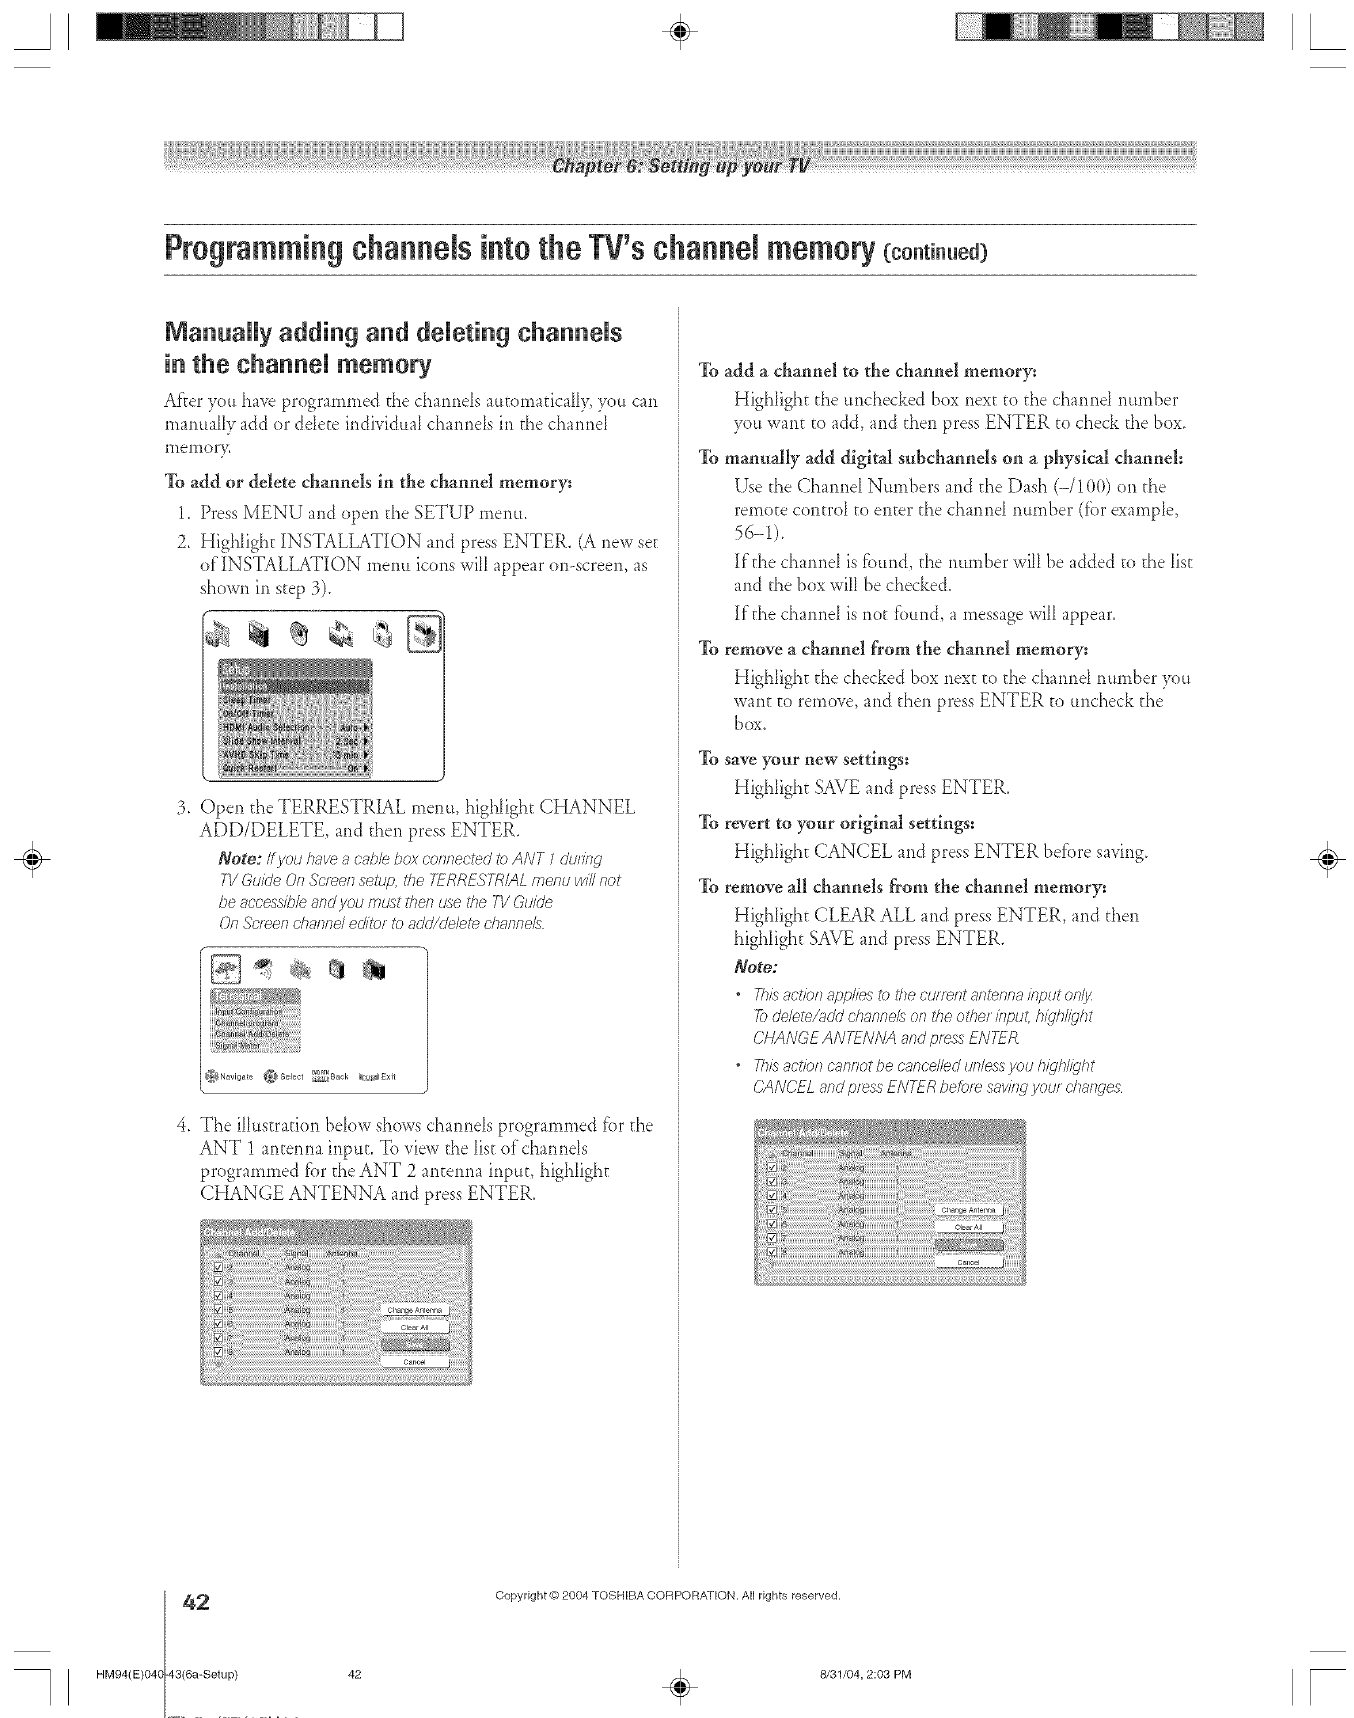
NanuaRy adding and deUet[ng channNs
in the channeU memory
Af'_eryou haveprogrammed fl_echarmds a_L[omaficaIIy,)'ou can
mammHy add or ddete individual cham_ds in the cham_d
meinor},.
To add or delete channels in the channel memory:
1. Press MENU and open the SETUP memo.
2. Highlight INSTALLATION and press ENTER. (A new se[
of INSTALLATION metal icons will appear on-screen, as
shown in step 3).
3. Open d_e TERRESTRIAL menu, highlight CHANNEL
ADD/DELETE, and then press ENTER.
Here: ff you have a cable box cofTfTeetedto ANT 1 du//ng
71/Guide On Sc'/_en setup, the 'FERRESTRIALmenu win not
be accessihb and you must then u'_ethe T1/Guide
On .lc,/_e/1channd editor to aobZde/ete dTanne/s
4. The iHus[rafion bdow shows chamlds programmed l%rthe
ANT 1 antenrm inptm To view the list ofcharmds
programmed tbr the ANT 2 an[emm input, highlight
CHANGE ANTENNA and press ENTER,
To add a channel to the channel memory:
Highlight the unchecked box next to d_echarred number
you want to add, and d_en press ENTER [o check the box.
To manually add digital subchannds on a physical channel:
Use the Chatmel Numbers and d_e Dash (-/100) on the
remote controI to enter the cham_d number (tbr exampIe,
56-1).
If[he charmel is fi.mnd,the rmmber will be added to the 1is[
and d_ebox will be checked.
If d_echa*md is not tbund, a message will appear.
To remove a channel from the channel memory:
Highfigh[ d_echecked box next to the charred ntm_ber you
want to remove, and then press ENTER to tmcheck the
I)OX.
To save your new settings:
Highlight SAVE and press ENTER.
To revert to your original settings:
Highfigh[ CANCEL and press ENTER before saving.
To remove all channels from the channel memory:
Highlight CLEAR ALL and press ENTER, and d_en
highlight SAVE and press ENTER.
Note:
*T/fisartier ap_ie'_ to/7?e current antenna input o///jz
Todelete/add dlanne/s on the othe_ iepuf, hi@@ht
CHANGEANTENNAandpressENTFR
"Thisactk)f_cannotbecance/ledun/essyouh_jh@ht
CANCEL and press ENTER before say/rig your d)arlges
÷
2
HM94(E)048 43(6a-Setup)
Copyright @)2804 TOSHIBA COFIPORA_[ON. All rights reserved.
42 _ 8/31/04, 2:03 PM [
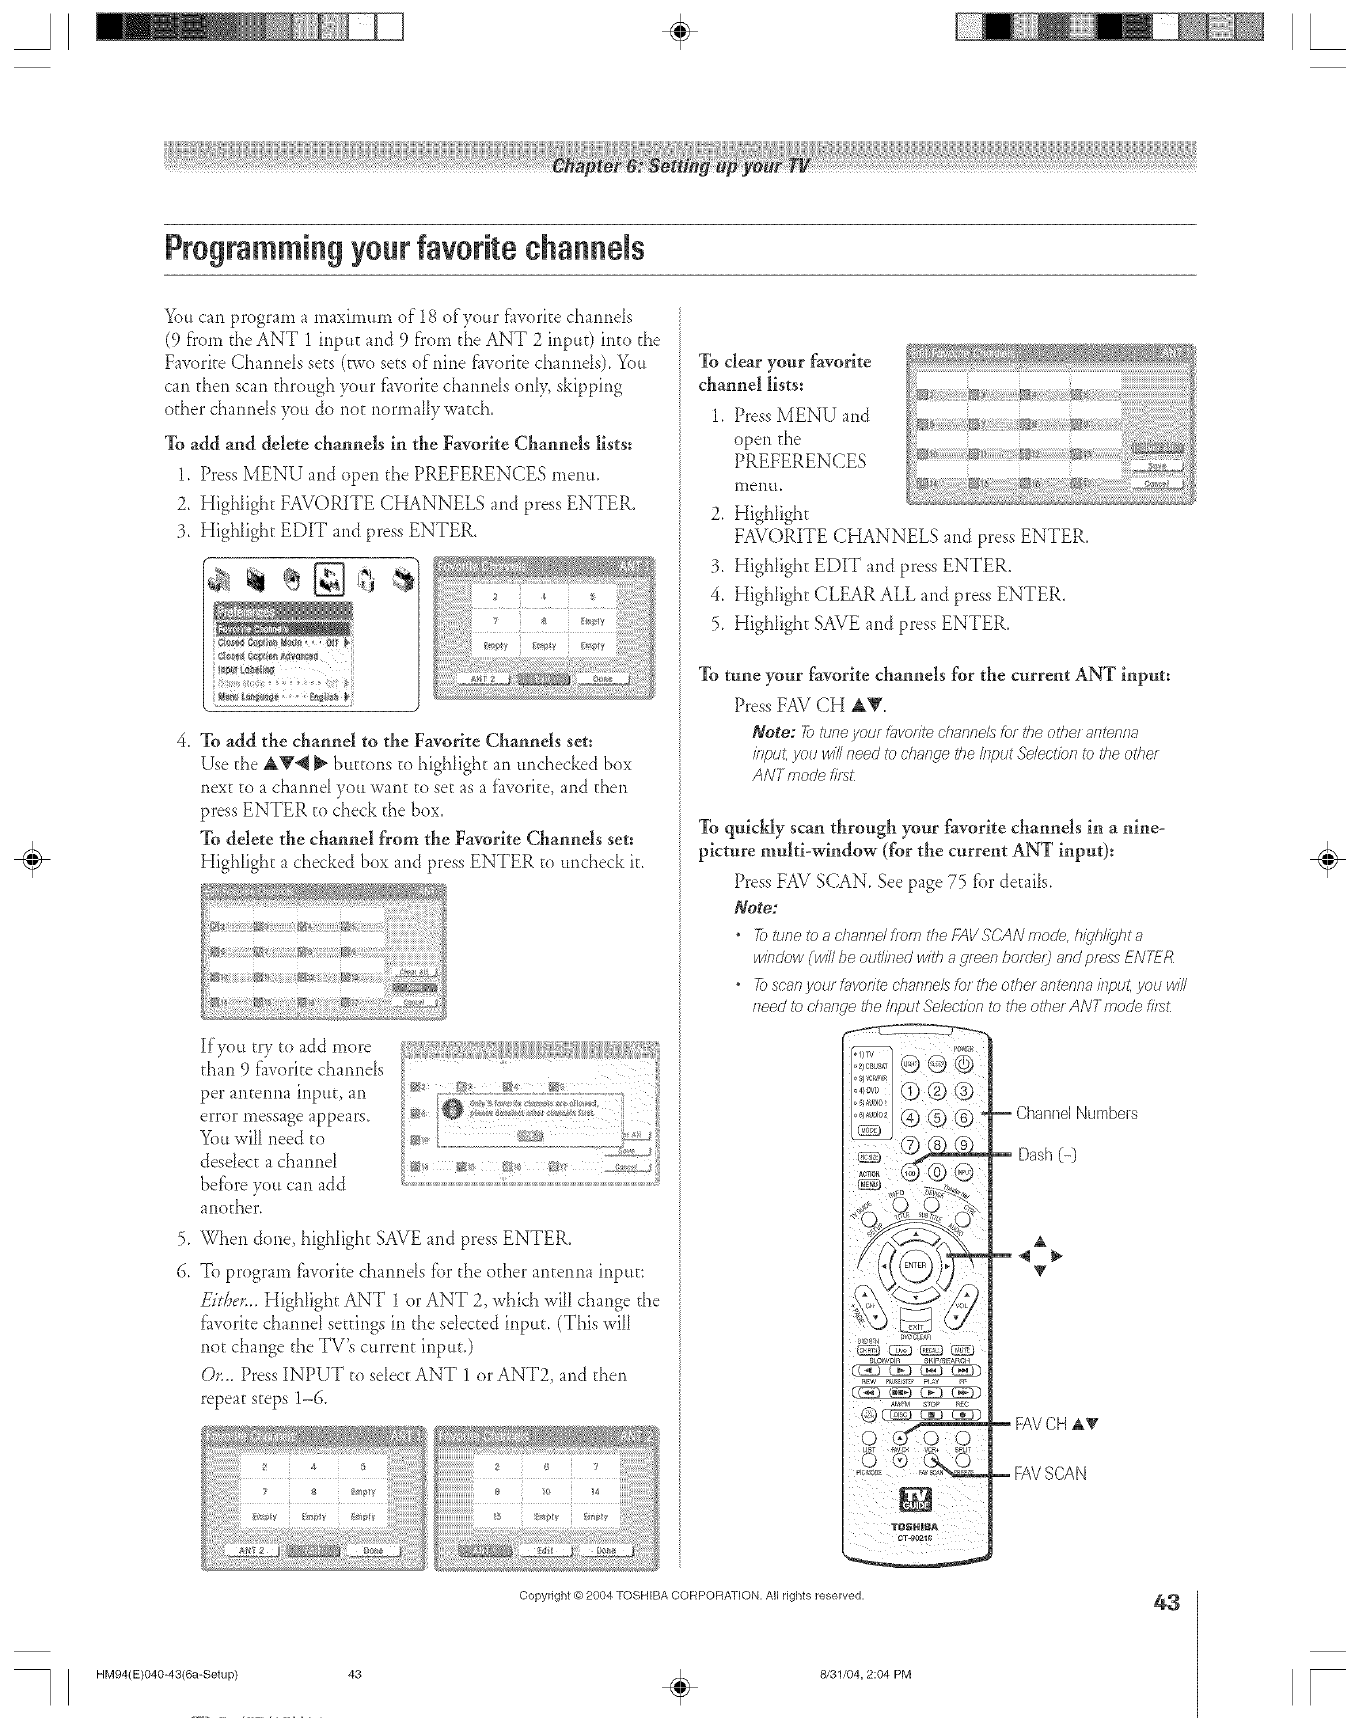
A÷ L
Programmingyourfavorite channels
5qnlcan program a maximum of 18 of your t_woritecharmds
(9 fTomthe ANT 1 irxptlcand 9 fTomti_eANT 2 irlp_tt)into the
Favorite CharmeIs sets (_wo sets of trine f_vorite chaurlds). Yott
can then scan through your flworite chaurMs only, skipping
other chaurMs yott do not r_ormally watch.
To add and delete channels in the Favorite Channels lists:
1. Press MENU and open the PREFERENCES memt.
2. Highlight FAVORITE CHANNELS and press ENTER.
3. Highlight EDIT and press ENTER.
4. To add the channel to the Favorite Channels set:
Use the A_'4 _ btlrcons to highlight an tmchecked box
new co a charred you wan; co set as a t_worite, and then
press ENTER to check the box.
To delete the chanuel from the Faw_rite Channels set:
Highlight a checked box and press ENTER to tmcheck it.
>
6.
lf)<_u try to add more
than 9 flworite charmds
per anterma input, an
error message appears.
You will need to
desdecc a chaur_el
betore you can add
another.
When done, highlight SAVE and press ENTER.
To program fi_w)ritechaurMs tbr the other antenrm irlptm
FitDer._ Highlight ANT 1 or ANT 2, which will change the
flworite charred semngs ir_the stetted input. (This will
riot change the TV's current input.)
Or... Press INPUT to select ANT 1 or ANT2, and then
repeat steps 1-6.
To clear your favorite
channel lists:
1. Press MENU and
open the
PREFERENCES
li_entl.
2. Highlight
FAVORITE CHANNELS and press ENTER.
3. Highlight EDIT and press ENTER.
4. Highlight CLEAR ALL and press ENTER.
5. Highlight SAVE and press ENTER.
To tune your favorite channels for the current ANT input:
Press FAV CH AV.
Note: _9 _uneyour Dmodte channe/_ fo_the other antenna
input,you willneed to changeNo It?put.S_lectiof7to No oNez
ANTmode bs_:
To quickly scan through your favorite channels in a nine-
picture multbwindow (for the current ANT input):
Press FAV SCAN. See page 75 for derails.
Note:
•_> tloTe to ;;,chafTrlelfroMs7the FAVS(;ANmode hiqhl/_'hta
window (win be oulTined with a green botde/) a/ld press ENTER
•Toscanyoulf_vof#echannei'__foftheot/Telantenl_a/rlput, youwi//
I_eed _bd?ai_ge dTe&put Selection to the o#lef A NTmode b_
Tlal_NIN_
CT4_CCle
ChannelNumbers
Dash (-)
A
FAVCHA_
i FAVSCAN
÷
HM94(E)O40-43(6a-Setup) 43
Copyright @ 2004 TOSHIBA CORPOFtATION, All rights reserved,
÷8/31/04, 2:04 PM
43
r
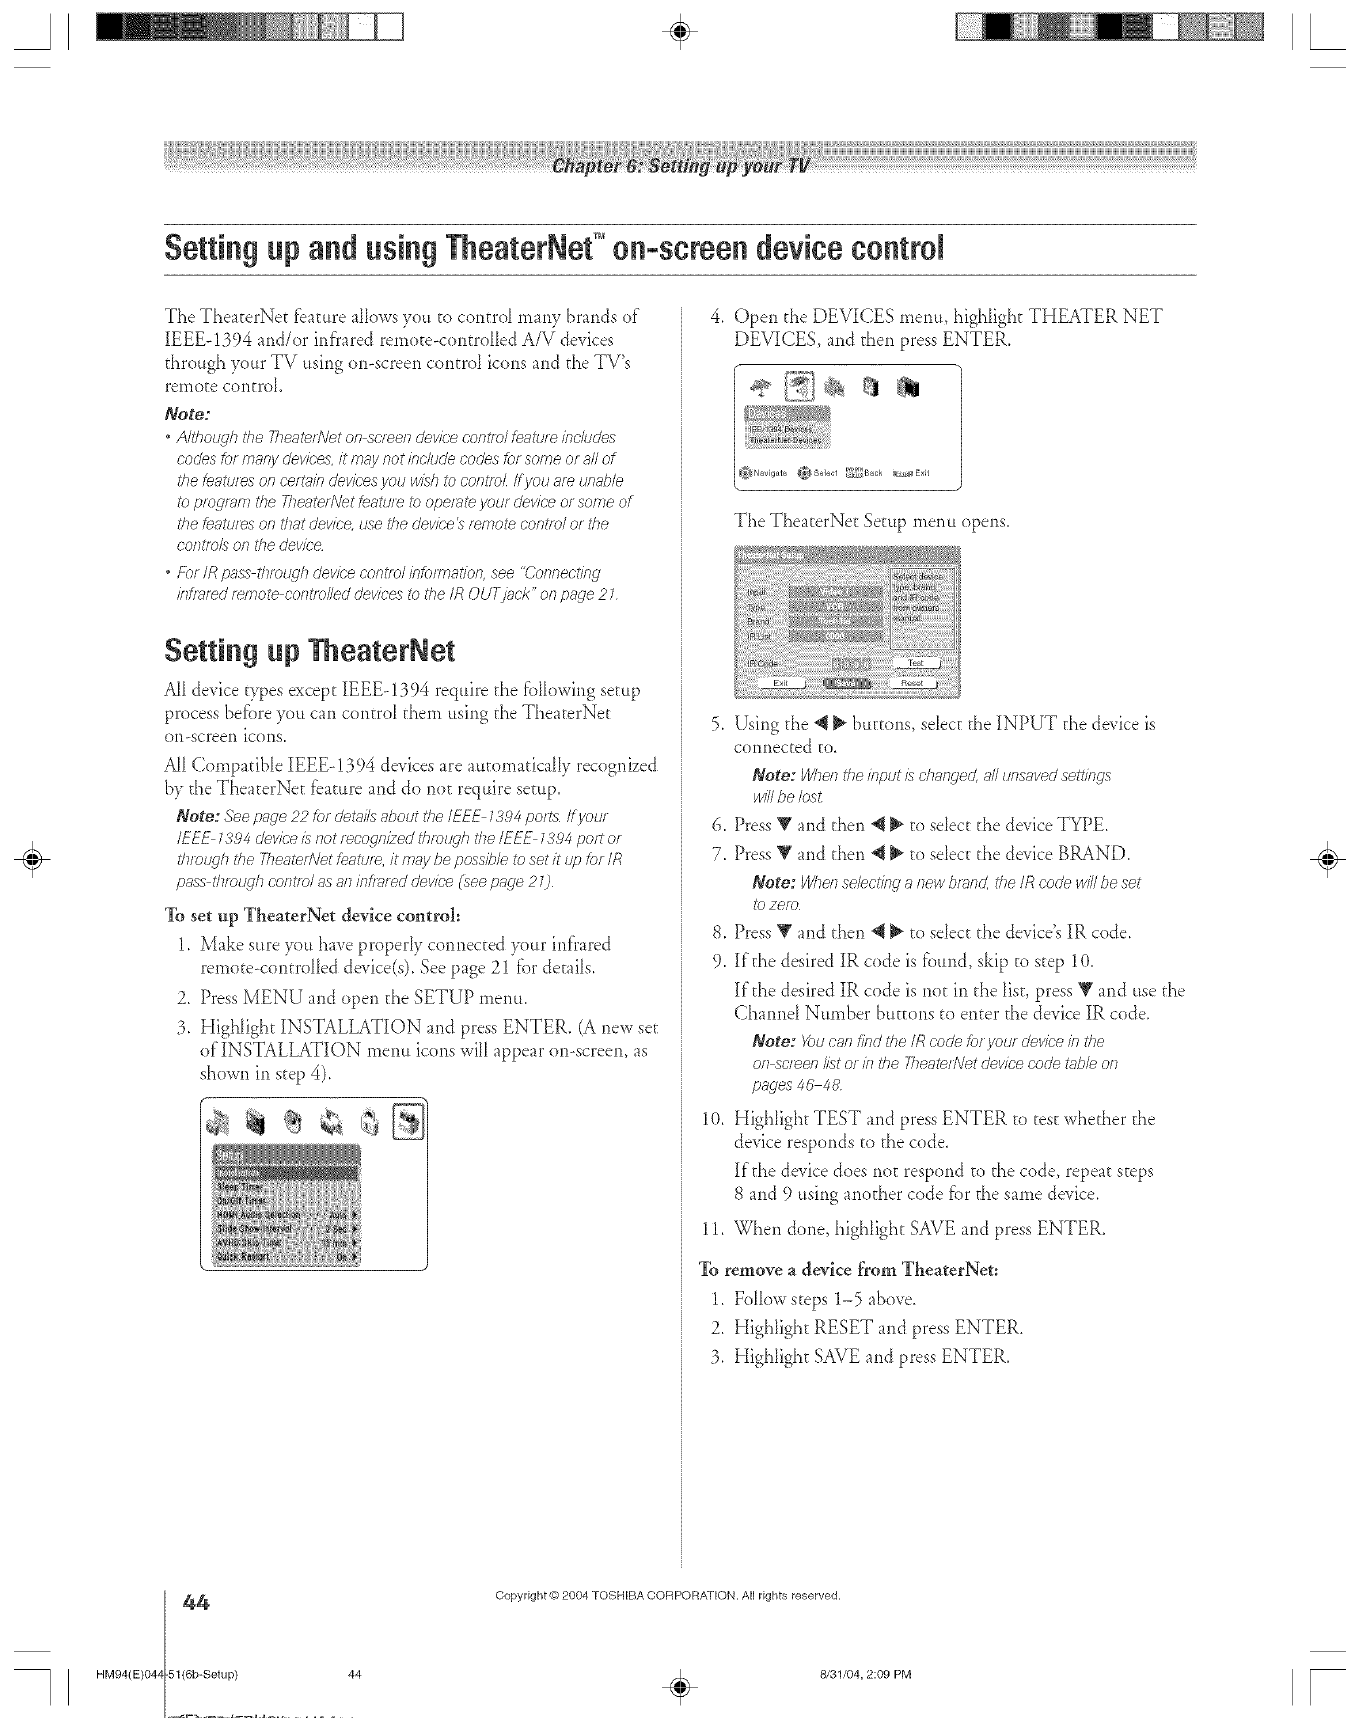
A÷ L
The TheaterNet fbature allows you to control many brands of"
IEEE-1394 and/or infrared rernote<ontrolDd A/V devices
through your TV using on-screen control icons and the TV's
remote control
Note:
•Ah'hol_qh the777eaterNetonscreendevke c:ontmlfem'uzeincludes
codesformanycleviees,it maynotincludecodesforsomeoraNof
therestartsonoert;dndeviees you wishtoCOfTtfeLff J/OU am unable
toprogramrite Theate/Netteature17>operate yourdeviceofso177eof
thefeatul>sonthatdevice, use thedevice_remotecontlo/of the
COfTtfel!_ Of7the device
•For IR pass thmt\qh device control bfo/mation, see "('onnecting
kFmmd remote cof?tlo//ed (Jel/ioes to the/R OUT[/Jol<" Oll page 2 7
Setting up TheaterNet
AII de, ice types except IEEE-1394 require the fblh)wing seRtp
process befbre you can contro_ them using the TheaterNet
on-screen icons.
AH CompatibD IEEE-1394 devices are atnomaticaIIy recognized
by the TheaterNeE fbature and do not require setup.
Note: .Seepnge22 for det_dsaboutthe IEEE 1394per> IfyoL/_
/EEE 1394deviceisf}ot recognizedthrotJgh theIEEE 1384po£ or
ffTletJ_h {lie 7heaterNetfentu/_,it maybe possibleto set itup tot IR
passt/IrotLq/Ioontro/ as atlhTf/_lred device(seepage 20
To set up TheaterNet device control:
1. Make sure you have properly connected your infrared
remote-controlled device(s). See page 21 for details.
2. Press MENU and open the SETUP menm
3. HigNight INSTALLATION and press ENTER. (A new set
of'INSTALLATION menu icons will appear on-screen, as
shown in step 4).
Open the DEVICES menu, highlight THEATER NET
DEVICES, and then press ENTER.
Navigate _Se]ect _t3.ck _,_E×Jt
The TheaterNeE Setup menu opens.
5. Using the _t _ buttons, sdect the INPUT the device is
connected to.
Note: Ygher7the input/s change< all unsaved settings
Jvi/Ibe lost
6. Press V and then *__ to sdect the device TYPE.
7. Press _' and then @_ to sdecr the device BRAND
Note: Whorl selecting atlew brand, the IR oode will/)e set
I_) 7ere
8. Press _' and then *__ to sdect the device's IR code.
9. If the desired IR code is found, skip to step 10.
If the desired IR code is not in the list, press V and use the
ChamM Number buttons to enter the device IR code.
Note: _)u can find tile IR code _)r you/ device in the
oil sc/_en list or k7the 2?eaten\let device ooo'e t_bb of 7
pages 4U 48
10, Highlight TEST and press ENTER to test whether the
device responds to the code.
If"the device does not respond to the code, repeat steps
8 and 9 using another code for the same device.
11. When done, highlight SAVE and press ENTER.
To remove a device from TheaerNet:
1, Follow steps 1-5 above.
2. Highlight RESET and press ENTER.
3. Highlight SAVE and press ENTER.
÷
HM94(E}O4Z
44
-51(6b-Setup} 44
Copyright @)2904 TOSHIBA CORPORATION. A[] rights reserved.
÷8/31/04, 2:09 PM [
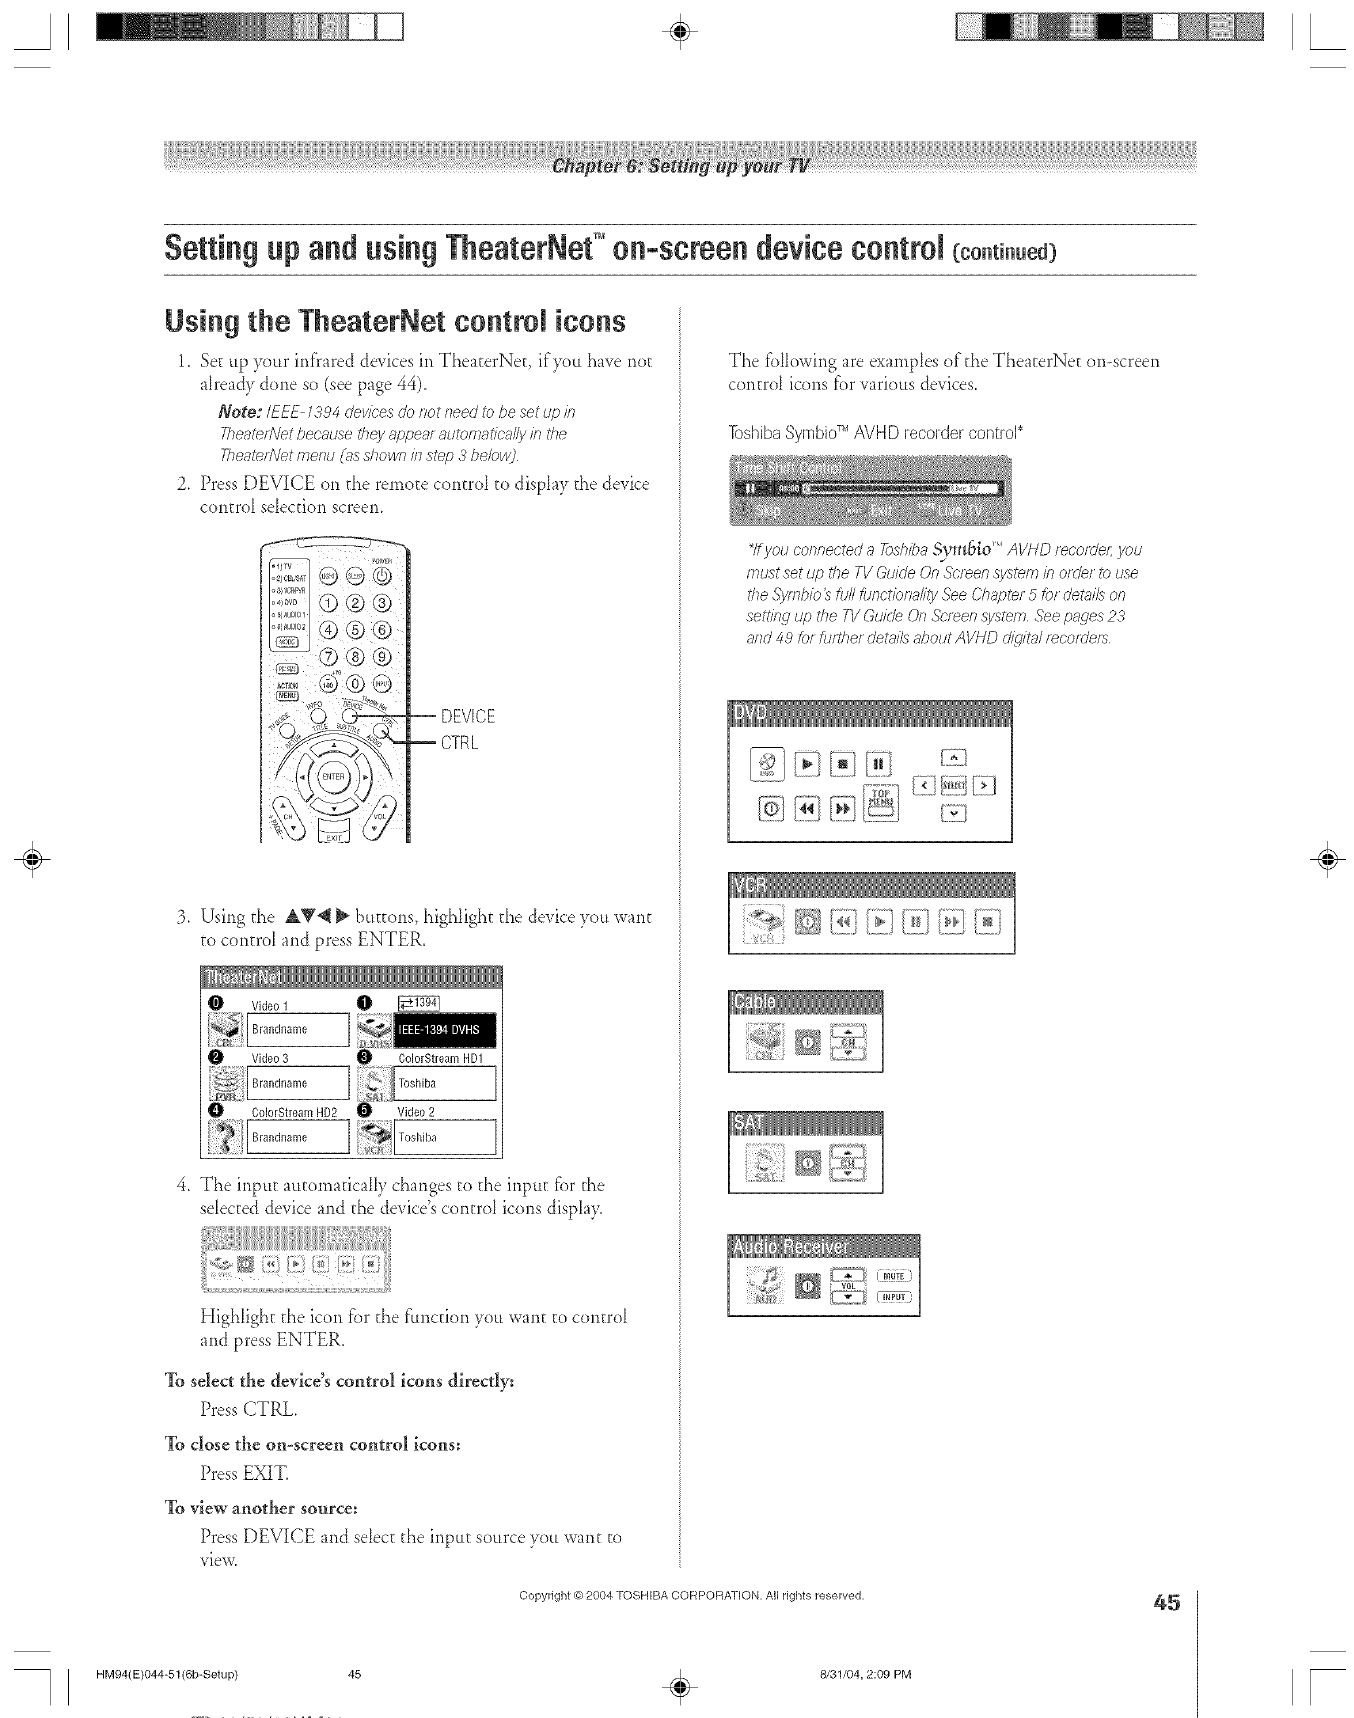
A÷ L
Setting up and using TheaterNet'Mon-screen device control (co.ti..ed)
Using the TheaterNet control icons
1. Secup 3x}urir_liared devk'es in TheaterNet, if3x}tthave not
already done so (see page 44).
Note: I_EE 1394 devices do not need to be set up in
Theate_fl/etbecause they appea_ mltomatiea//y its the
Theatet#'et menu (7_sshown in step 3 bebw)
2. Press DEVICE on the remote control to display the device
central sebcdon screem
_, _o®®
_o,,o'_@® @
J DEVICE
CTRL
3, Usirig c}_eat,V@ _ buttons, highlight the device you want
co central and press ENTER,
¢' Video1 0
1
Video 3 _ ColorStream HD1
] [*'_ Toshiba
_ll ColorStream HD2 _ Video 2
4. The input automatically changes to the inpttt fbr d_e
sebcted device and the device's concrd icons display.
Highlight the icon f'orthe fimcdon you want cocontrol
and press ENTER,
To select the device's control icons directly:
Press CTRL.
To close the on-screen control icons:
Press EXIT.
To view another source:
Press DEVlC_E and sebcc the input source you want co
view.
The fblhnving are exampbs of'the TheacerNet on-screen
control icons fbr _arious devices.
7bshibaSyrnbid'_AVHDrecordercontrol*
_ffyou connected a F_shba SVmSiO'M AVHD mcotdef; you
must set up t/_e TV Gukle On Screen system in o_(le__buse
the SyfFib/o_ full [ttdfTOflT)fTa//t_/._ee O'h_lpter 5 for dot;Ills on
settitW up the TV GukTe On Sc/een system See pages 23
8ild 49 for fufthef det;ff/s d_OtdtAVHD dig/tW moofUefs
__=, {7_3
ft;! ] ..................
_7
Copyright @ 2004 TOSHIBA CORPORATION, All rights reserved, 45
HM94(E)O44-51(6b-Setup) 45 ÷8/31/04, 2:09 PM
÷
r
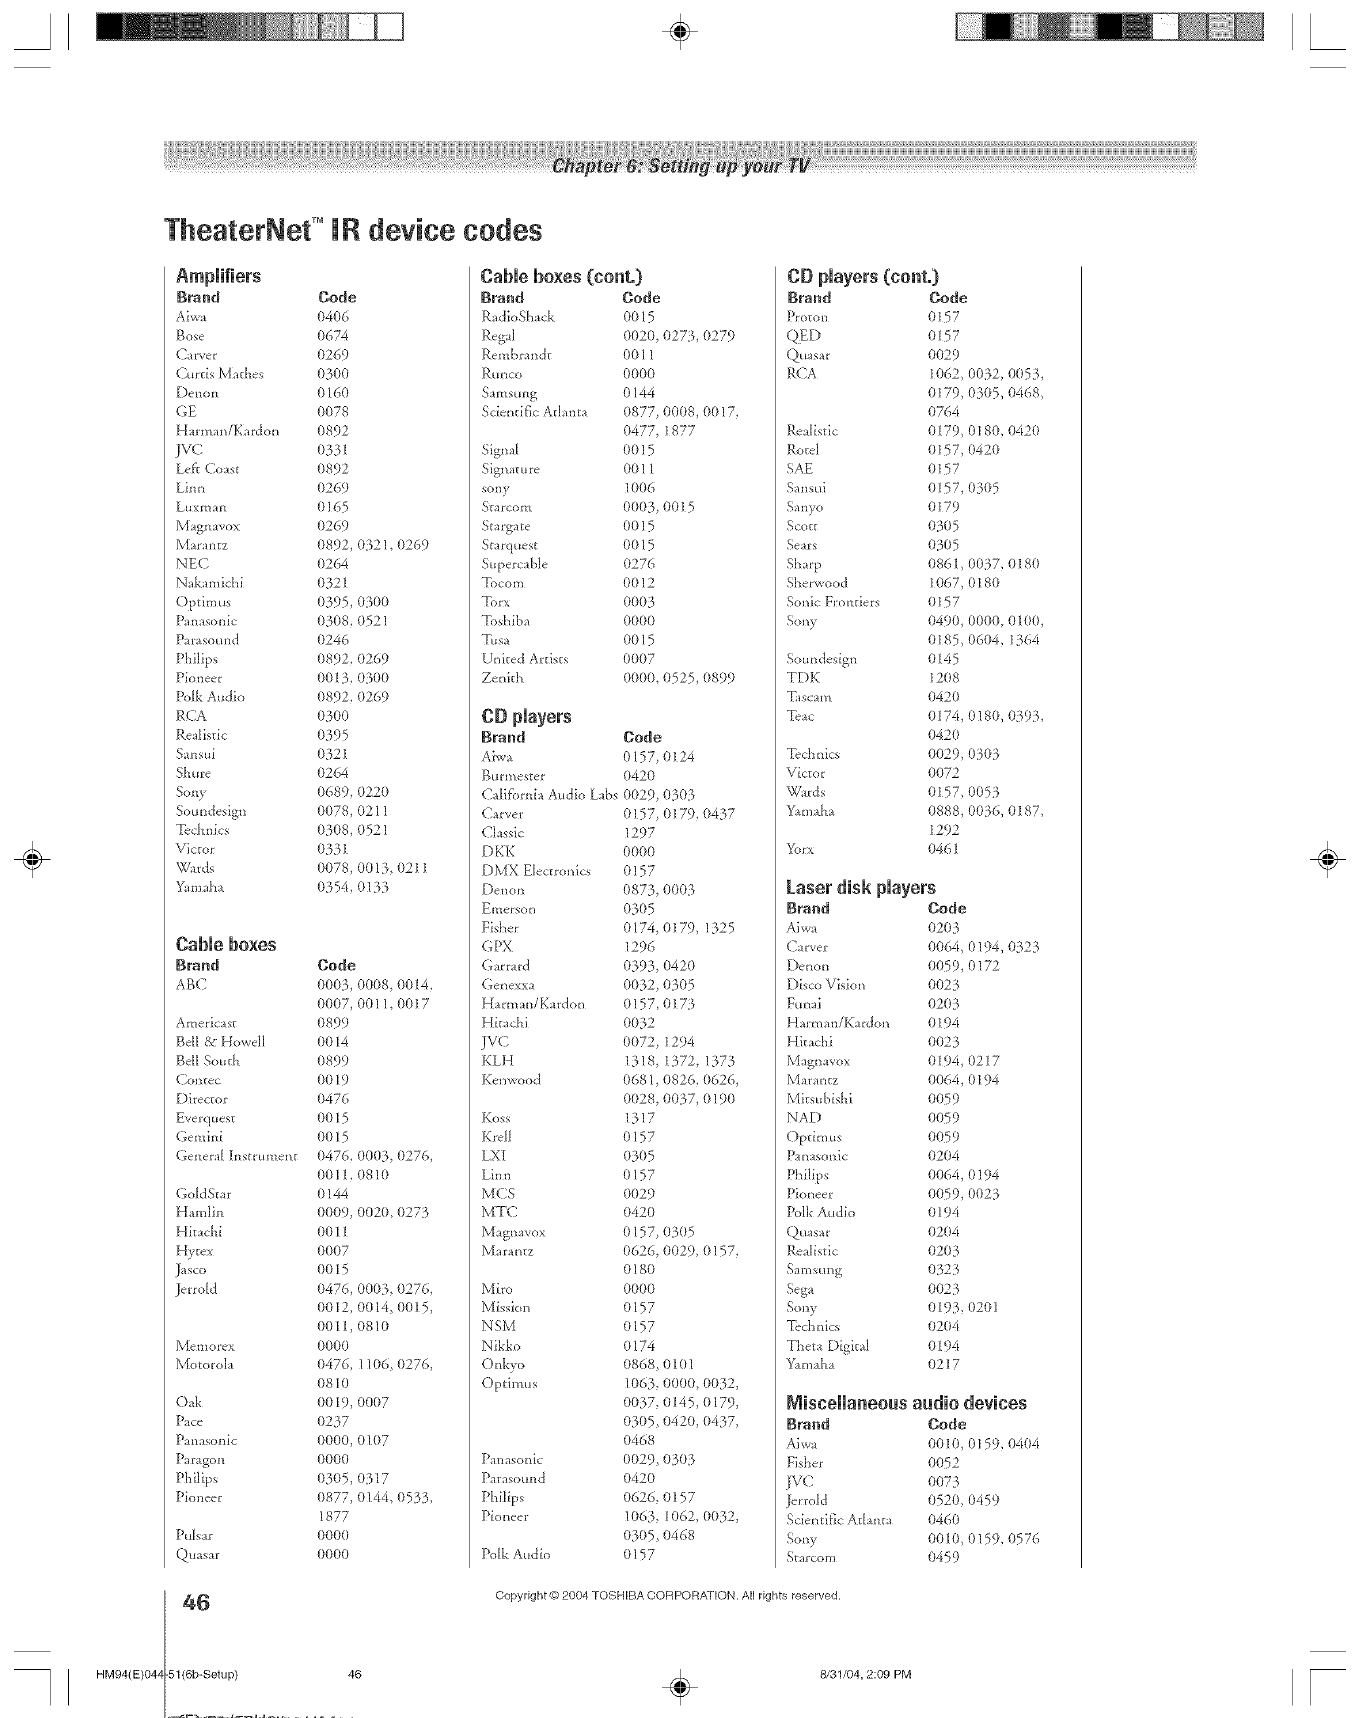
A÷ L
HM94(E)O4Z
TheaterNet =iR device cedes
Brand Code
Aiwa 0406
Bose 0674
C'at-ver 0269
Curds Mathes 0300
Denon 0160
GE 0078
H m_ m/Kardon 0892
JVC 0331
Lea Co_st 0892
gi*m 0269
guxman 0165
Magn avox 0269
Ma_:antz 0892, 0321, 11269
NEC 0264
Nak mdchi 0321
Opdm us 0395, 0300
Panasonic 0308, 0521
Parasotm d 0246
Philips 0892, (}269
Pioneer 0013, 0300
Polk Audio 11892,0269
RCA 03O0
Re_Iisdc 0395
Sansui (}321
Shtire 0264
Sony (}689, 0220
Sotmdesigl_ 0078, 0211
Technics 11308,0521
Victor 0331
Wards 0078, (}(}13,0211
Km_aM 0354, 0133
Cable boxes
Brand Code
ABC 0003, 0(}08, {11014,
0007, 0011,0017
Americ_st 0899
Bell &Howell 0014
Bell South (t899
( crater 0019
Director 0476
Everquest 0015
Gem ini 0015
(_-ener_IInstrm_ent 0476, (}003, 0276,
0011, 0810
GoldSEar 0144
H m_lin 0009, 0020, 0273
Hita ch i 0011
Hytex 0007
j_sco 0015
jerrold 0476, 0003, 0276,
0012, 0014, 0015,
0011, 0810
Memo_cx 0000
Motoroh 11476, 11116,11276,
0810
Oak 0019, 00117
Pace 0237
Panasonic 0000, 0107
Paragon 0000
Phtips 0305, 0317
Pioneer 0877, 0144, 0533,
1877
PuMr 0000
Qtmsar 0000
Cable boxes (coat.)
Braed Code
RadioSM ck 0015
Regal 0020, 0275, 0279
Rembra*_dt 0011
Rtmco 0000
S_msung 0144
Scientific Atlanta 0877, 0008, 0017,
0477, 1877
Sig_al 0015
Sign _ture 0011
sony 1006
S_arcom 0003, 0015
Srarg_te 00 ] 5
Starquest 0015
St_perc_ble 0276
Tocom 0012
Torx 0003
Toshiba 0000
T.a 0015
United Artists 0007
Zenith 0000, 0525, 0899
CD players
Braed Code
Aiv, a 0157, 0124
Burmester 0420
(-.'alifbrni_ a_dio Labs 0029, 0£50!5
(2_rver 0157, 0179,11437
Classic 1297
DKK 0000
DMX Electronics 0157
Denon 11873,0003
Emerson 0305
Fisher 0174, 0179, 1325
GPX 1296
Garr_rd 0393, 0420
Gel]exxa 0032, 0305
H mna_ffKardon 0157, 017_.
Hita dl i 0032
JVC 0072, 1294
KLH 1318, 1372, 1373
Kemvood 0681, 0826, 0626,
0028, 00 B.7,0190
Koss 1317
K_cll 0157
LXI 0305
ginn 0157
MCS 0029
MTC 0420
Mag{]avov 0157, (}31}5
Mar m_z 0626, 0029, 0157,
0180
Miro 0000
Mission 0157
NSM 0157
Nikko 0174
O*_kvo 0868, 0101
Opdmus 1063, 0000. 0032,
0037, 0145, 0179,
03115,0420, 11437,
0468
P_naso*dc 0029, 0303
Parasound 0420
Philips 0626, 0157
Pioneer 1063, 1062, 0032,
0305, 0468
Polk Audio 0157
Brand
Proton
QED
Quastr
R( _A
Realistic
R£_tel
SAE
Sansui
Sanyo
Scott
Sears
Sharp
Sherwood
Sonic Frontiers
Sol_y
Som_design
TDK
Tascam
Tctc
Tcch_dcs
Victor
\_rds
Yam d_a
Yorx
Code
0157
0157
0029
1062 0032, 01153,
0179, 11305,0468
0764
0179 018(), 0420
o157, 0420
0157
0157, 0305
0179
0305
0305
0861 0037,0180
1067, 0180
0157
0490, 0000. 0100,
0185 0604, 1364
0145
1208
0420
0174,11180, 0393,
0420
0029, 0303
0072
0157 0053
0888, 0036, 0187,
1292
0461
Laserdisk players
Brand
Aiwa
Carver
[)e_o_
Disco Vision
Ftmai
Ham_an/Ka_don
Hka&i
Mag_avox
N/I _ra1_tz
Mitsubishi
NAD
Opdm us
Pan,sonic
Philips
Pio_eer
2[kAkAudio
Qttasar
Realistic
Samstmg
Sega
Solly
Tech*dcs
Theta Digital
'f,mHha
Bode
0203
0064, 0194, 0323
0059, o172
0023
0203
0194
0023
0194, 0217
0064, 0194
0059
0059
0059
0204
0064, 0194
0059, 002B.
0194
0204
0203
0323
0023
0193, 0201
0204
0194
0217
Niseelaneoas audio
g_and
aiwa
Fisher
IVC
Jerrold
Scie_tific atl rata
Scnly
Sta[com
devices
Code
0010,0159,04114
0(}52
0073
0520,{)459
0460
0010,([)159,0576
O459
46 Copyright @ 2904 TOSHIBA COFIPORA_[OH. All rights reserved.
-51(6b-Setup) 46 ÷8/31/04, 2:09 PM
÷
F
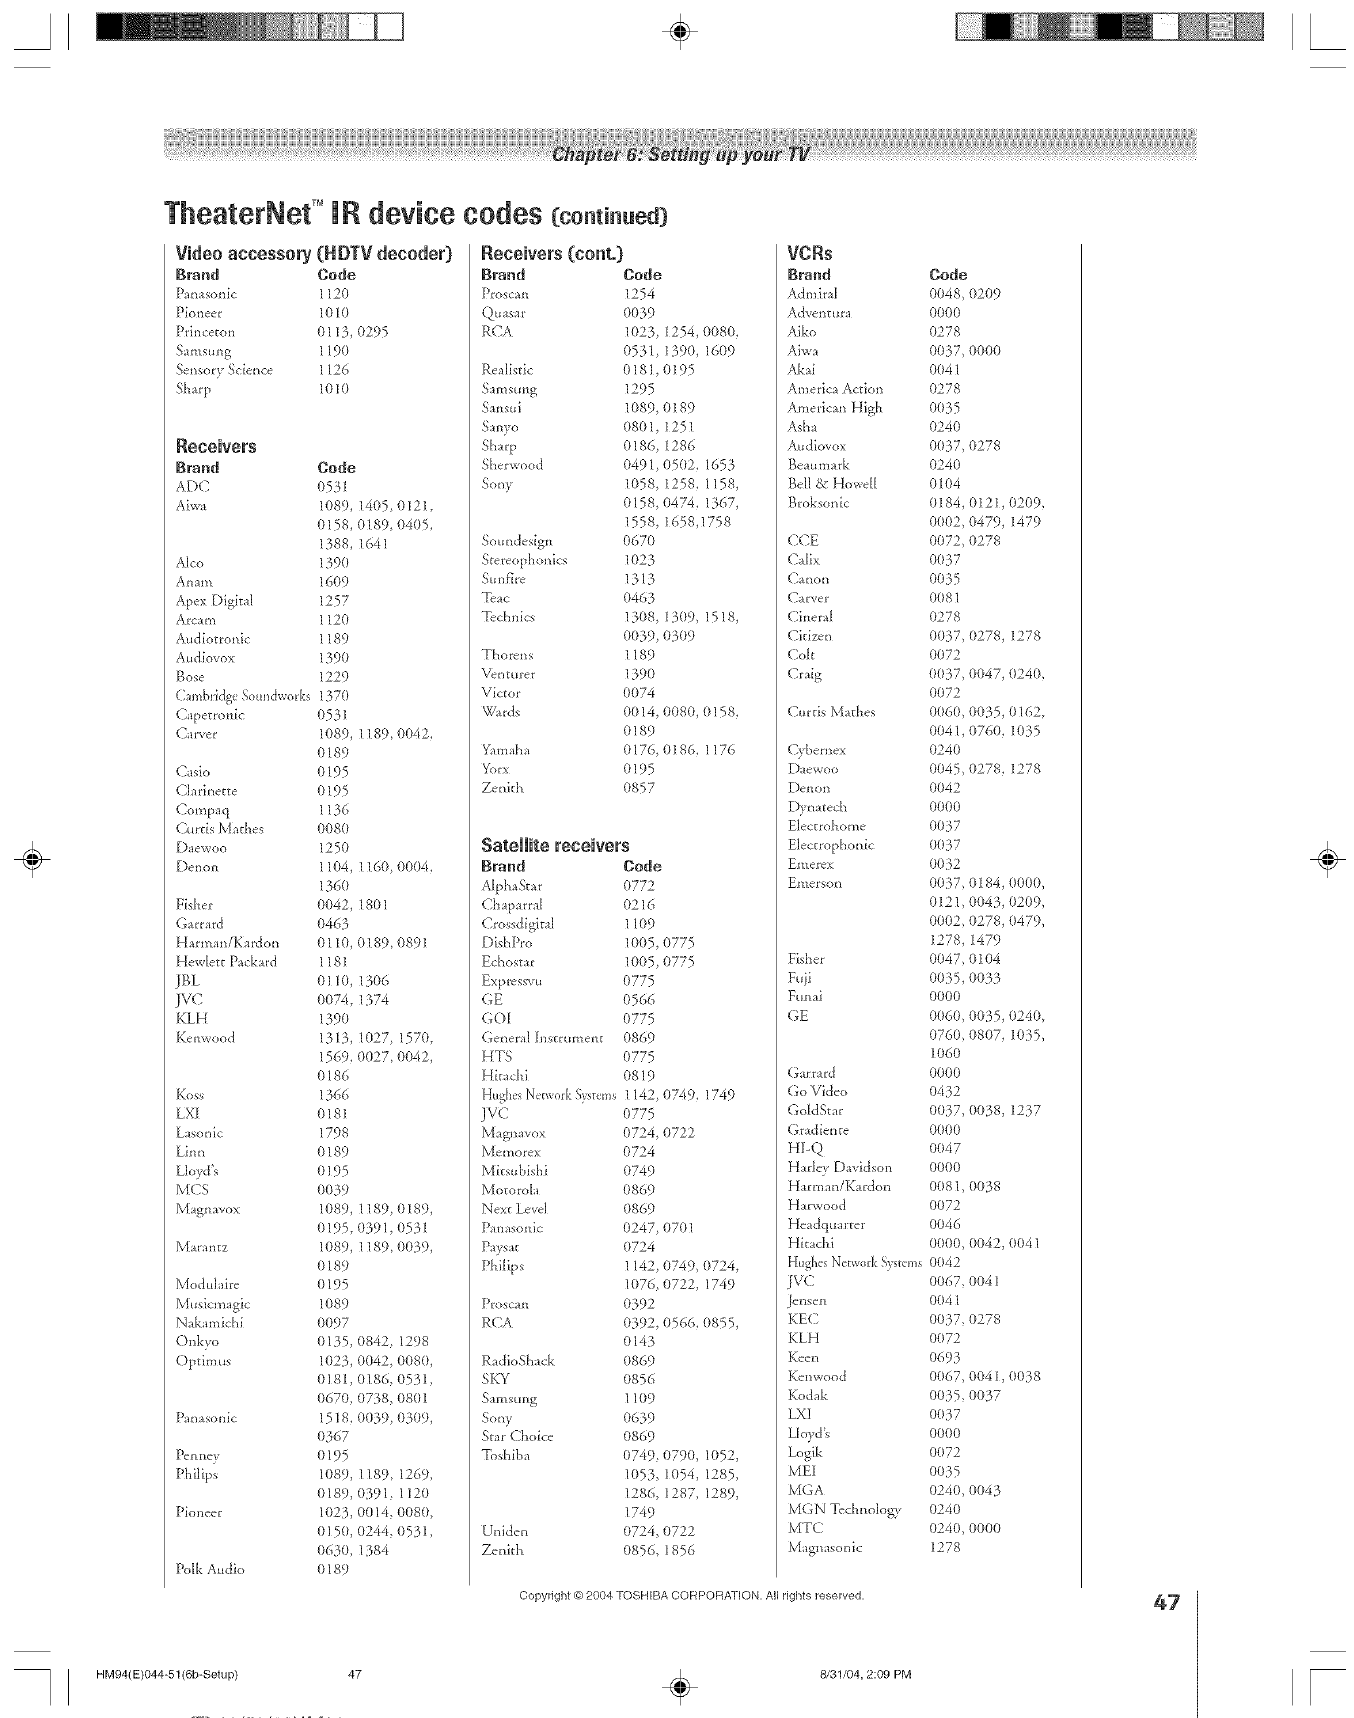
TheaterNef =IR device codes {co.t..ea]
Video accessory (RDTV decoder)
Brand Code
Panasonic 1120
Pioneer 1010
PAn<eton 0113, 0295
Samsung 1190
Sensory Science 1126
8h_rp 1010
Receivers
Brand Code
ADC 0531
Ahva 1(189, 1405 0121,
(1158, 0189, {11405,
1388, 1641
Alto 139(1
Anam 1609
Apev Digital 1257
Arc_m 1120
Audiotronic 1189
Audhwox 1390
Bose 1229
CambridgeSoundw(_rks 1370
Capetronic 0531
C_*ver 1089, 1189, 0042,
0189
C'asio 0195
Cladnette 0195
C'ompa q 1136
Curds Mathes 0080
D_ewoo 1250
Denon 11(}4, 116(1 0004,
136(}
Fisher (}(}42,1801
G_rr_rd 0463
H _rmm/Kardon 0110, 0189, 0891
Hewlett P_ckard 1181
JBL 0110, 1306
] VC (}074, 1374
KLH 139O
Kenwood 131}, 1027, 1570,
1569, 0027, 0042,
(}186
Koss 1366
LX[ 0181
gasonic 1798
ghm 0189
Lloyd's 0195
MCS 0039
Magnavox 1089, 1189, 0189,
(}195, (}391, 0531
Ma_antz 1089, 1189, 00}9,
0189
Modul fire 0195
MusicnHgic 1089
Nak mAchi 0097
Onkvo 0135, 0842, 1298
Optim us 1023, 0042, 0080,
0181, (/186, 0531,
(}670, 0738, 0801
Pan:sonic 1518, 0039, 0309,
(1367
[bnnev 0195
Philips 1089, 1189, 1269,
(}189, 0391 1120
Pioneer 1023, 0014, 0080,
0 ] 5(1,(}244, 0531,
(}63O, 1384
Polk Audio 0189
Receivers {cont.}
Brand Code
Proscan 1254
Quasar 0039
RCA 1023, 1254, {)080,
0531 1390, 16{i}9
Re distic 0181,0195
S:mstmg 1295
Sansui 1089, 0189
Smvo 08()1, 1251
Sharp 0186, 1286
Sherwood 0491 05(/2, 1653
Sony 1058, 1258, 1158,
0158, 0474, 1367,
1558, 1658,1758
Soundesign 0670
Stereophonics 1023
Sun fhc 1313
Tcac 0463
Tcclmics 1308, 13(/9, 1518,
0039, 0}09
Thorcns 1189
Venturer 1390
Victor 0074
Wards 0014, 0080, 0158,
0189
Yam:ha 0176, 0186, 1176
Yorx 0195
Zenith 0857
Satellite receivers
Brand Code
Alph_Smr 0772
( haparral 0216
Crossdigkal 1109
Dish P_:o 1005, 0775
Echostar 1005, 0775
Expmssvu 0775
GE 0566
GO[ 0775
General [nstrument 0869
HTS 0775
Hita ch i 0819
HughesNetworkS)_tvms 1142
JVC (}775
Magnavov 0724,
Memore× 0724
Mksubishi 0749
Motoroh 0869
New Level 0869
Panasonic 0247,
Pays_E 0724
Philips 1142,
1076,
Proscan 0392
RCA 0392,
0143
RadioSMck 0869
SKY 0856
Sre]sung 11()9
Sony 0639
Star Choice 0869
T{}shiba 0749,
1053,
1286,
1749
Uniden 0724, 0722
Zenkh 0856, 1856
0749, 1749
0722
0701
0749,{i}724,
0722,1749
0566,(}855,
0790,1052,
1054,1285,
1287,1289,
VCRs
Brand
Admiral
Adventur_
Aiko
Aiwa
Akai
America Action
America_ High
Asha
Audbvox
Beaumark
Bell & Howell
Broksonic
CCE
C'alix
(2_non
Carver
Cineral
C'kizcn
Colt
Craig
Curds M:thes
Cybernex
Daewoo
Denon
Dvn_tech
Electrohome
Electrophonic
gmercx
gmersol_
Fisher
Fuii
Funai
GE
Garr_rd
Go Video
GoldSmr
(}r_dbn_e
HI-Q
Harley D:vidson
H:rman/Ka_don
H_rwood
HeadqtHr_er
Hkadfi
HughesNetwork!3stems
IVC
Jellsei1
KEC
KLH
Keen
Kenv, ood
Kodak
EXI
Lloyd's
Logik
MEI
MGA
M(;N Technology
MTC
M_gnasonic
Copyright @ 2004 TOSHIBA CORPOFIATION, All rights reserved,
HM94(E}044-51(6b-Setup) 47 ÷8/31/04, 2:09 PM
Code
0048, ()209
0000
0278
0037, 0000
0041
0278
0035
0240
0037, 0278
0240
0104
0184, (}121,0209,
0(1(12,(}479, 1479
0072 0278
0037
0035
0081
0278
0037, 0278, 1278
0072
0037, 0047, ()240,
0072
0060, 0035, 0162,
0041, 0760, 1035
0240
0045 0278, 1278
0042
0000
0037
0037
0032
0037 0184, 0000,
0121,004 }, 0209,
0002 0278, 0479,
1278, 1479
0047 0104
0035, O033
0000
0(16(},0035, {)240,
0760, 0807, 1(135,
1060
0000
0432
0037, (10}8, 1237
0000
0047
0000
0081, 0038
0072
0046
0000, (}042, 0041
0042
0067 0041
0041
0037, 0278
0072
0693
0067, 0041,0()38
0035 0037
0037
0000
0072
0035
024(L 0043
0240
0240, 0000
1278
47
÷
r
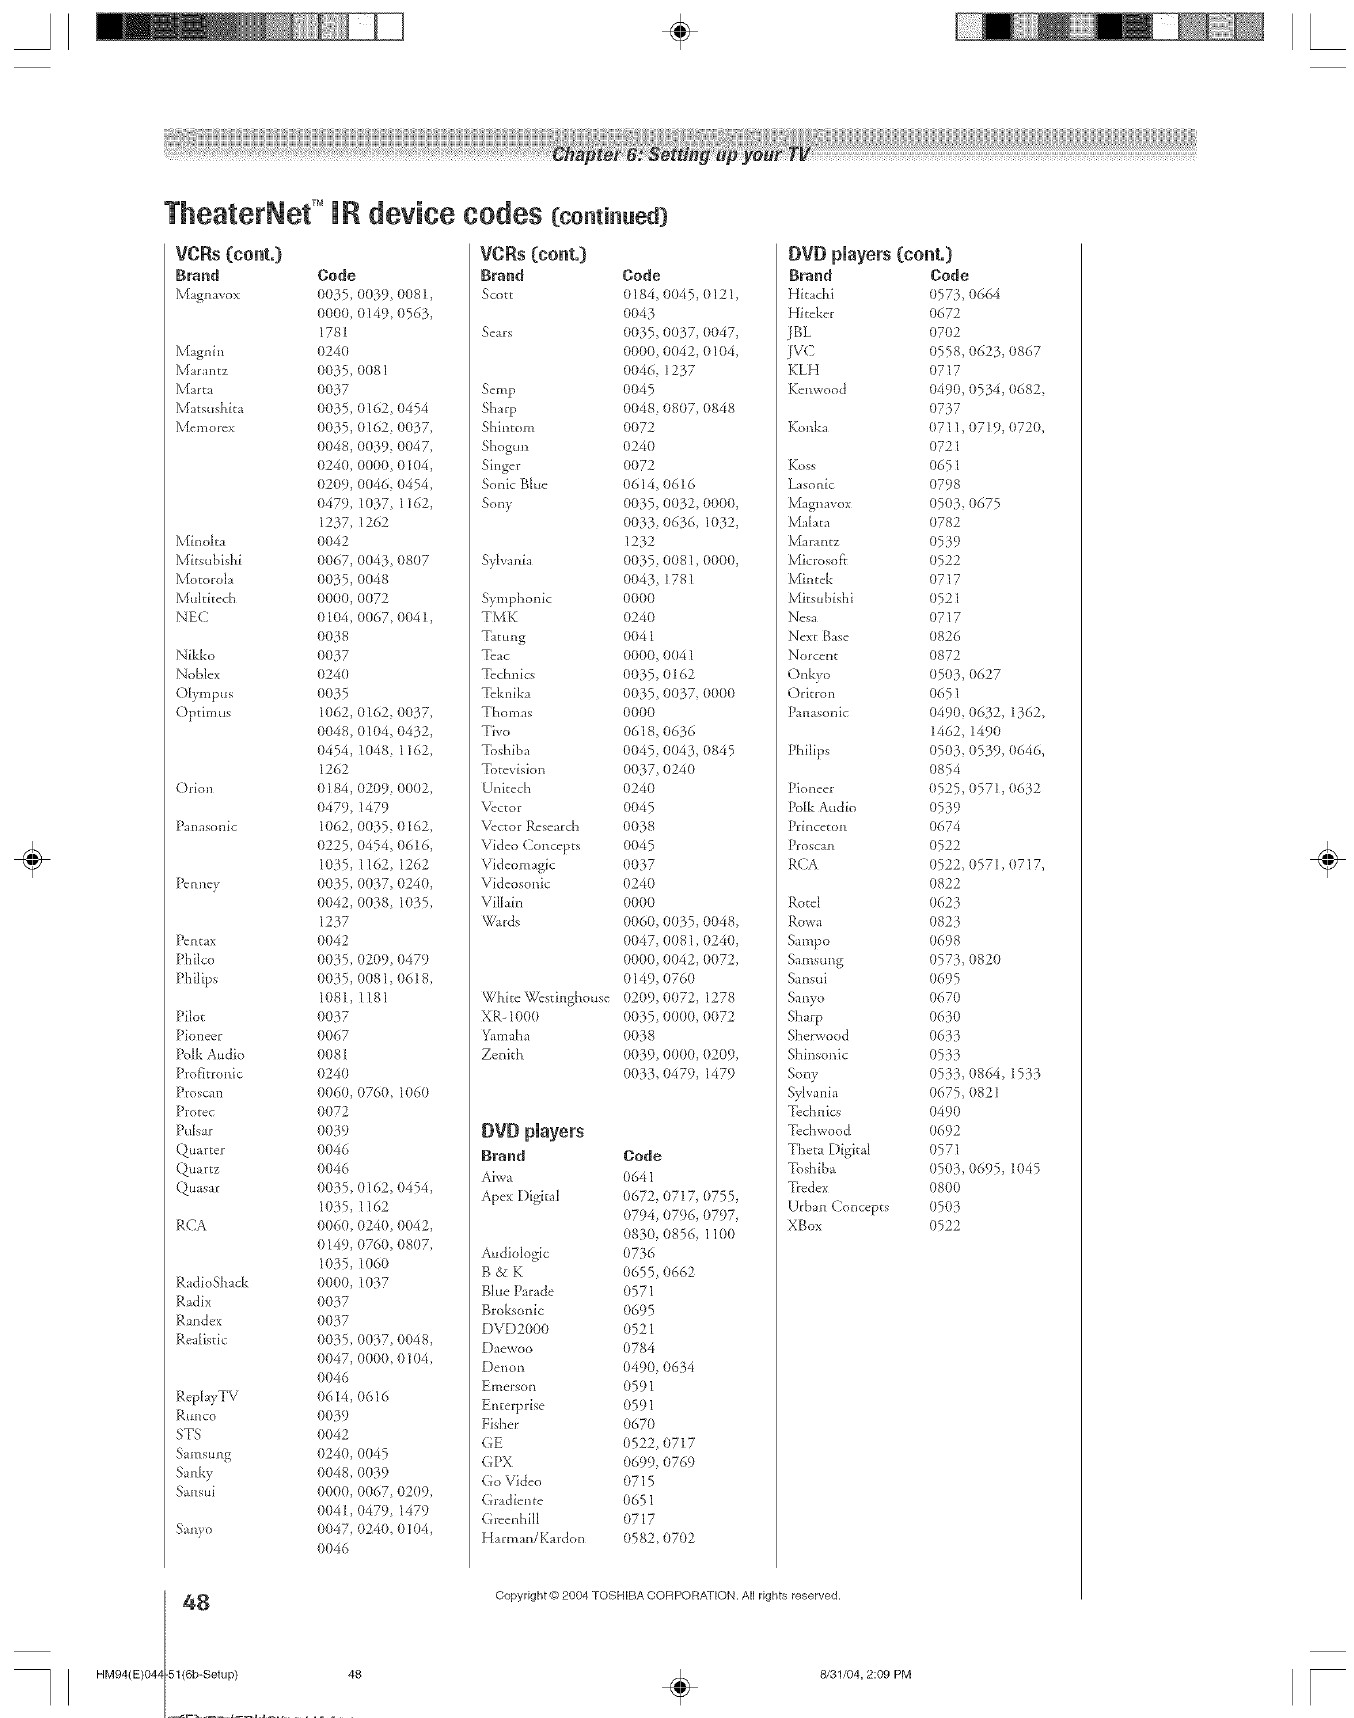
A÷ L
HM94(E)04z
TheaterNet T°IR device codes Ccomi..ea)
VCRs (cont.}
Brand Code
Magnavox 0035 (/039, 0081,
0000, 0149, 056 _.,
1781
Magnin 0240
Mar _ntz 0035, 0081
Marta 0037
Matsushita (}035, 0162, 0454
Memore× 0035, 016Z 0037,
(1048, (}039, 0047,
0240, 0000, 0104,
0209, 0(}46, 0454,
0479, 1037, 1162,
1237, 1262
Minoka 0042
Mitsubishi 0067, 0043, 0807
Motorola 00}5, 0048
Muldtech 0000, 0072
NEC 0 I04, 0067, 0041,
0038
Nikko 0037
Noble× 0240
Olympus (}(}35
Optimus 1062, (1162, 0037,
0048, 0104, (}432,
0454, 1048, 1162,
1262
Orion 0 ] 84, 0209, 0{)02,
0479, 1479
Panasonic 1062, 0035, 0162,
0225, 0454, 0616,
1035, 1162, 1262
PenneT0035, 0(/37, 0240,
0042, 0038, 1035,
1237
Pentax 0042
Philco 0035, 0209, 0479
Philips 0035, 0081, {11618,
1(181, 1181
Pilot (1037
Pioneer 0067
Polk Audio 0081
Prof]tronic 0240
Proscan 0060, 0760, 1060
Prorec 0072
Pulsar (}039
Quarter 0046
Quartz 0046
Quasar 0035, (/162, 0454,
1035, 1162
P,CA 0060, 0240, 0042,
0149, 0760, (}807,
1035, 1060
RadioSt__ck 0000, 1037
Radix (1037
Randev 0037
Realistic 0035, 0(/37, 0048,
0047, 0000, 0104,
0046
ReplayTV (1614, 0616
P,unco (}(}39
STS 0042
S mlsung (}240, 0(}45
Sanky 0048, 0039
Sansui 0000, 0067, 02(/9,
0041,0479, 1479
Sanyo 0047, 0240, 0104,
(}(}46
VCRs (cont.}
Brood Code
Scott 0184, 0045, 0121,
0043
Se_rs 0035, 0037, 0047,
0000, 0042, 0104,
0046, 1237
Setup 0045
Sharp 0048, 0807, 0848
Shintom 0072
Shogun 0240
Singer 0072
Sonic Blt_e 06 ]4, 0616
Sony 0035, (/032, 0000,
0033, 0636, 1032,
1232
Sylvmi_ 0035, (/081,0000,
0043, 1781
Symphonic 0000
TMK 0240
Tamng 0041
Tuac 0000, 0()41
Technics 0035, 0162
Tcknika 0035, 0037, 0000
Thomas 0000
Tivo 0618, 06}6
Toshiba (}045, 0043, (}845
Totevision 0037, 0240
U*fitech 0240
Vector 0045
Vector Research 0038
Video Concepts 0045
Videom _gic 0037
Videosonic (}24(}
Vilhin 0000
Wards 0060, 00 _.5,0048,
0047, (/081,0240,
0000, 0042, {)(}72,
0149, 0760
White Westinghouse 0209, 0072, 1278
XR_1000 0035, 0000, 0072
Yam_ha 0038
Zenith 0(139, 0000, {:1209,
0033, 0479, 1479
DVD pmayers
Brand Code
Aiwa 0641
Apex Digital 0672, (/717, 0755,
0794, (}796, 0797,
0830, (/856, 1100
Audiolog[c 0736
B & K 0655, 0662
B]ue Parade 0571
Broksonic 0695
DVD2000 0521
Daewoo 0784
Denon 0490, 0634
Emerson 0591
Enterprise 0591
Fisher 0670
GE 0522, 0717
GPX 0699, 0769
Go Video 0715
Gradiente 0651
Gwenhill 0717
H_rman/Kardon 0582, 0702
DVD players (cent.}
Bk,_nd
Hkachi
H[teker
JB>
jvc
KLH
Kenwood
Konka
Koss
Lasonic
Magnavox
Maitre
]_{aralltz
Microsoft
Mint&
Mksubishi
Nesa
New Base
Norcellg
Onkvo
Orkron
Panasonic
Philips
Pioneer
Iblk Audio
Pdnceton
Proscan
RCA
Rotel
Sampo
Samsung
Sansui
Satlyo
Sharp
Sherwood
Shinsonic
Sony
Sylvmi_
Technics
Techwood
Thet_ Digital
Toshiba
Ticdex
Urhan Concepts
XBox
Code
0573, 0664
0672
0702
0558, 062 _.,0867
0717
049(I, 05 _.4,0682
0737
0711, 0719, 0720,
0721
0651
0798
0503, 0675
0782
0539
0522
0717
0521
0717
0826
0872
0503, 0627
0651
0490, (/632, 1362,
1462, 1490
0503, 0539, (1646,
0854
(1525, 0571, (1632
0539
0674
0522
0522 (1571, {11717,
0822
0623
0823
0698
0573, 0820
0695
0670
0630
O633
0533
0533, 0864, 1533
0675 {:}821
0490
0692
0571
0503, 0695, 1045
0800
0503
0522
48 Copyright _) 2004 TOSHIBA CORPORATION. All rights reserved.
-51(6b-Setup/ 48 ÷8/31/04, 2:09 PM
÷
[

Setting the AVHD device skip time
When you connect an external AVHD (audio/video hard drive)
device, such as the Toshiba Symbio _''AVHD recorder (modal
160HD4), to one of the TV's IEEE-1394 ports, you can use the
AVHD device skip time Dature to set the number of minutes
the device will skip fbrward or backward when you press the
SKIP buttons.
Note:
•This TV will wo_? best with tile 7_>shibaSvm_o '_'AVHD _eco_der
(inode/760HD4], fo_ _ecofding h/_/h definitkm and standard
de_7._itionqlatelfal f?olTi e/filer tiJne/ arid for contfol/ie£j five 71/
(pauseJf_wied/etc) VVhe/1the AVHD mcotdet /s connected to the
TIt, tile remote contlo/ ke_s (LIVE, ST-DRREW, PAUSE, #LAY, e/c)
af_ automatically actiw_ted to a/low p¢_usiegof live T1/
ff you connect a _)shba _l_[o 'MAI/HD t_cotdel; you must set up
i'he FVGuide On .%'/_en sj/__ternis/order to use d?eSyfntJio _ Pd//
functiona/iB/ See Chapter 5 tot details on settilW up the TV Guide
On Sc'/een system See pages 23 and 49 [or _ufthet dehff/s about
AVHD d_?ta/ f_cotdet_
•I/Vhenyou connect all AVHD (or a D VNS) device the TV Guide
On Sc'/een systern 1:_automatk-a/ly conf_jumd to allow mcof_ling
.lee page P._'for device connection bteimation .lee Chaptels 5
and 7f_._rdetails about setting up and usi/w the TV Guide (Jn Screen
system
To set the AVHD device skip time:
1. Press MENU and open the "
2. Highlight AVHD SKIP
TIME and press ENTER.
3. Press Wor A to select the
AVHD skip time and press
ENTER.
Setting the HDMP' audio mode
To select the HDMI audio mode:
1,
2,
,
Press MENU and open the >-T _ _,
SET UP metal, _, _ /_
Highlight HDMI AUDIO
SELECTION and press
ENTER.
Press V or A to select the
HDMI audio mode (Auto,
Digital, or Analog) and
press ENTER. (Auto is the recommended mode).
See '%orH_ecdr_gan HDMI or a DVI device to the HDMI
input" on page 19.
Setting the time and date
Note: ff you a#eady set up the TV GukJe On Screen SJ/sten?, the
i'ime and cl_£ewere set automatically and you cnn skip this step
To set the time and date:
1. Press MENU and open the SETUP menu.
2. Highlight INSTALLATION and press ENTER. (A new set
of INSTALLATION menu icons will appear on-screen, as
shown in step 3 below.)
3. Open the TIME AND DATE merlu, highlight
START SETUP, and press ENTER.
/
Navigate _Select [,_gack _/_E×it
If you have not set up the TV Guide On Screen system, the
[blIowing screen will appear. To se_the time, highlight
TV GUIDE ON SCREEN and press ENTER. The TV
Guide On Screen setup sequence will start, and the time
and date will be set au[omaticall>
Note:
•/fyou highlight TV GU/DF ON SCREEN (uhove) to set the
i'iole and date thmlLgh the TV Guide On Sc/een sysl_m arid a
powe/ outage occult:, the t#ne and date wi// be updated
automal%,a//y when i'he powe/ is f_stof_d
•ffyou h/igh/iqht MANUAL (above) to set the time and dare
manually and a power outage occult, you will lose the _/ine
and date se??ingswhen the power is f>stot>d
•ff}/ou manually set the time and dm'eand then perform TV
Guk/e On St'teen setup, the manual/fine and dglte settings
will be ovefifotJen /)y the T1/Guk_'eOn Sc/een settings
÷
HM94(E)044-51(6b-Setup) 49
Copyright © 2004 TOSHIBA CORPORATION, All rights reserved,
÷8/31/04, 2:09 PM
49
[
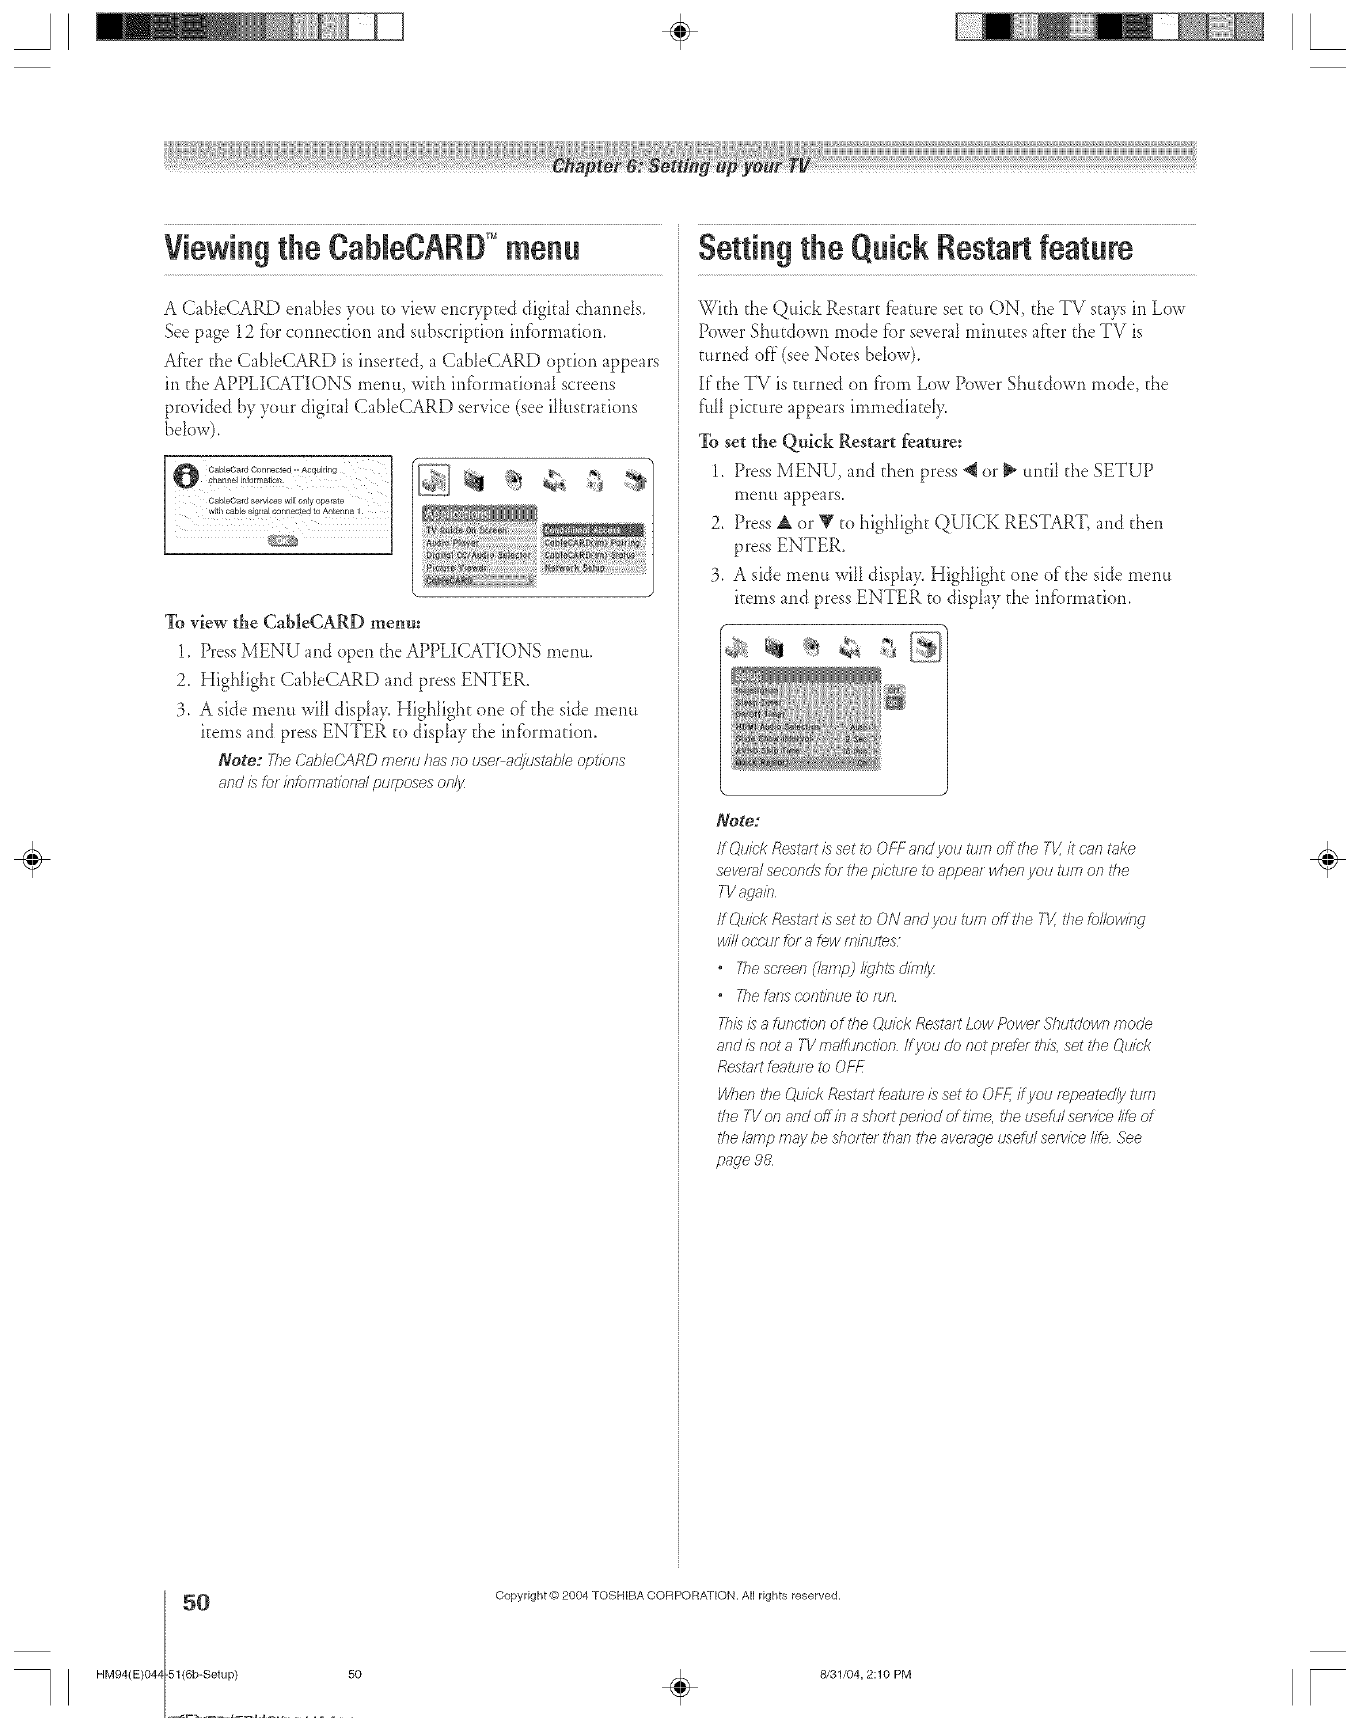
Viewingthe CaNeCARD" menu Setting the Quick Restart feature
A CableCARD enables you to view encrypted digital channds,
See page 12 fbr connection and subscription infbrmation,
After the CableCARD is inserted, a CabIeCARD option appears
in the APPLICATIONS rnenu, with informationaI screens
provided by your digital CableCARD service (see illustrations
below).
To view the CableCARD menu:
1. Press MENU and open the APPLICATIONS menu,
2. Highlight CableCARD and press ENTER.
3. A side menu will display. Highlight one of the side menu
items and press ENTER to display the information.
Note: Yhe (?_bloCARD menu has no use_ a@_stab/e options
af?dISlot/f?_)fmS_/_)f?_J/DtOf)OSeSOI)l_Z
With the Quick Restart fbature set to ON, the TV stays in Low
Power Shutdown mode fbr several minutes after the TV is
turned off (see Notes below).
If the TV is turned on fl'om Low Power Shutdown nmde, the
flu11picture appears immediatdy.
To set the QMck Restart feaure:
1. Press MENU, and then press "_ or II_until the SETUP
menu appears.
2. Press A or _' to highlight QUICK RESTART, and then
press ENTER.
3. A side menu will displa> Highlight one of the side menu
items and press ENTER to display the infbrmadon.
- g
Note:
ff (2uiek Rest_tt is set ib OFF and you tlee off the Tk' it cnn take
severn/seconcZsfor the p/ctle e to appeat when you tlee on i'he
TVagab
If C),uickRestn_tis set to ON and you turn off the TI_ the following
will occur fo_ a tow minutes
•Thesemen (bffW lights dim/3z
"Tile _21]s COfTtiF]Ue _0 ftJl?
Thisis a function ell<he Quick Restart Low Power Shutdown Inocle
and is not a TVmaffunction /@ou do not pro?e/this, set I'heQuicl(
Restart featu/ e to OH_
W_en the Quick Restrict teattJf_ is set _) OFF, i@ou mpeatedlv turn
the TVof?and off ill a short pedod of trine, rite useful so?vice/if,_of
the/_ffnp m_y be d_orte/ _'hanthe average usdu/ service life See
page 98
÷
HM94(E)04z
50
-51{6b-Setup) 50
Copyright @)2004 TOSHIBA COFIPORA_ION. All rights reserved.
÷8131/04, 2:10 PM F
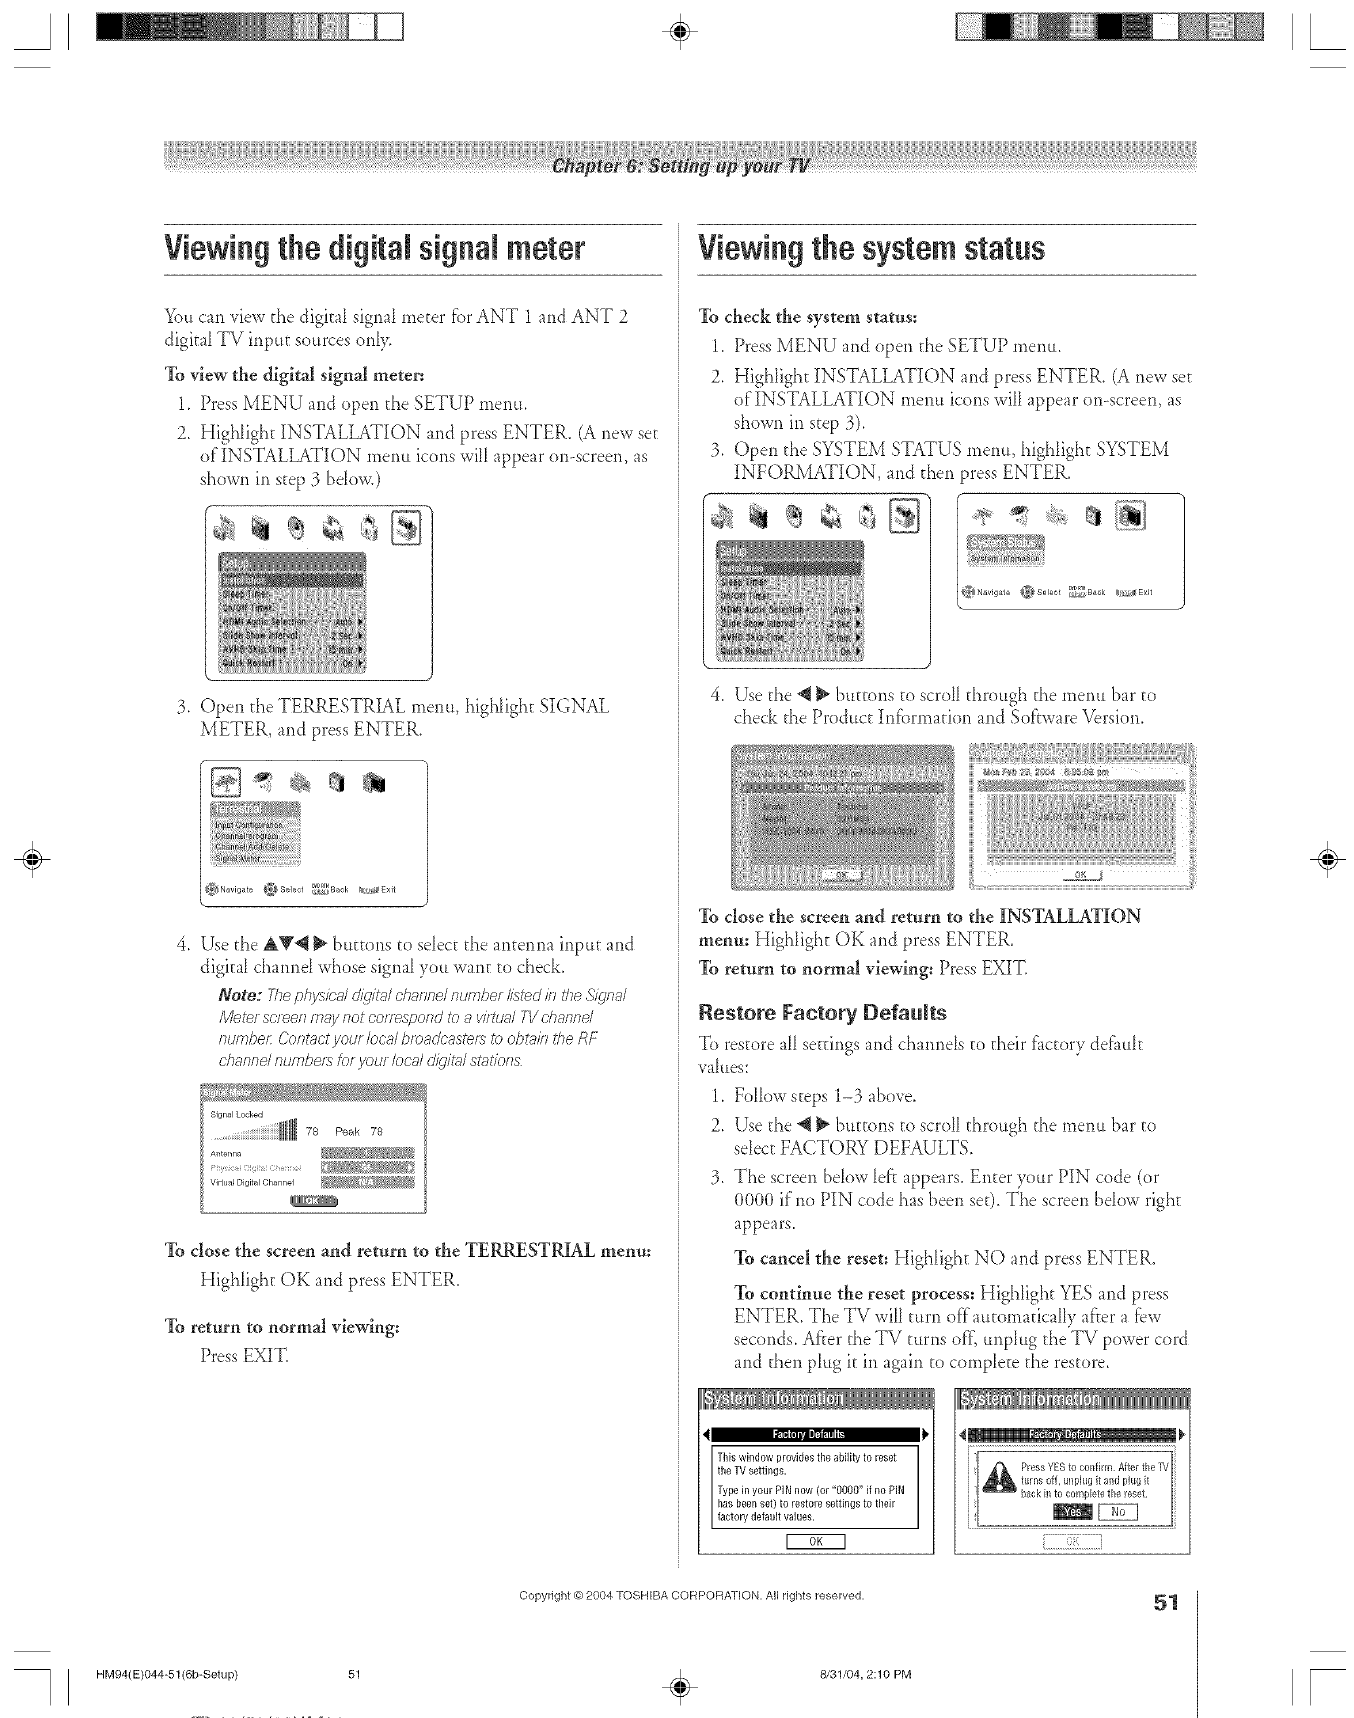
Viewingthe digital signal meter
Yoltcan _iew d_edigkal sigrml meter fbr ANT 1 and ANT 2
digkal TV input sources only.
To view the digital signal meter:
1. Press MENU and open the SETUP men,.
Z HigNight INSTALLATION and press ENTER. (A new set
of INSTALLATION men. icons will appear on-screen, as
shown in step 3 below.)
3. Open the TERRESTRIAL menu, high[ight SIGNAL
METER, and press ENTER.
_Navigate K_tSelect _J_Sack _;._Exit
4, Use the AV4 _" buttons to sdect the ar_terma input and
digital chamld whose signal you want to check.
Note; The phi/sited 4//iq/tgd channel numbe_ &ted in tl_e5;ignal
Mete/ screenmaynot co_mspondto avi£ualFVchannel
/lumbet: Contactyour /oca/bmadcastet__)obtgdnthe RF
channd numbe/stotyour local d/9'/ta/s_alYof?s
To close the screen and return to the TERRESTRIAL menu:
Highlight OK and press ENTER.
To rett_rn to normal viewing:
Press EXIT.
Viewingthe system status
To check the system status:
1. Press MENU and open the SETUP merit:.
2. Highlight INSTALLATION and press ENTER. (A new set
of'INSTALLATION memt icons will appear on-screen, as
shown iri step 3),
3. Open the SYSTEM STATUS menu, highlight SYSTEM
INFORMATION, and then press ENTER.
_Navigate _NSelect _,_Y_Back
4. Use the _ _ buttons to scroll through the memt bar to
check the Product Inf_)rmation and Sof'rware Version.
To close the screeu arid return to the INSTALLATION
menu: Highlight OK and press ENTER.
To return to normal viewing: Press EXIT.
Restore Factory Defa_Rs
To restore a[[se_dngs and cham_ds to their f_ctory def_ttlt
_a[ttes:
1. Follow steps 1-3 aboxe.
2. Use the @ _ buttons to scroll through the menu bar to
sdect FACTORY DEFAULTS.
3. The screen bdow [eft appears. Enter your PIN code (or
0000 if"no PIN code has been set). T'he screen bdow right
appears.
To cancel the reset: Highlight NO and press ENTER.
To continue the reset process: Highlight YES and press
ENTER. The TV svill tttm off automatically af'_era fbw
seconds. Af'_erthe TV turns off',tmpIug the TV power cord
and then pltig it in again to complete the restore.
This window provides the ability to reset
the TVsettings•
Type in your PiN now (ol "0000" if no PiN
has been set) to lestole settings to their
actory de au tva ues.
PressYES to confilln After the TV
[A tu,ns off, unp]u0 it andpk,0 it
÷
HM94(E)044-51(6b-Setup)
Copyright @ 2004 TOSHIBA CORPORATION, All rights reserved,
÷8131/04, 2:10 PM
51
[
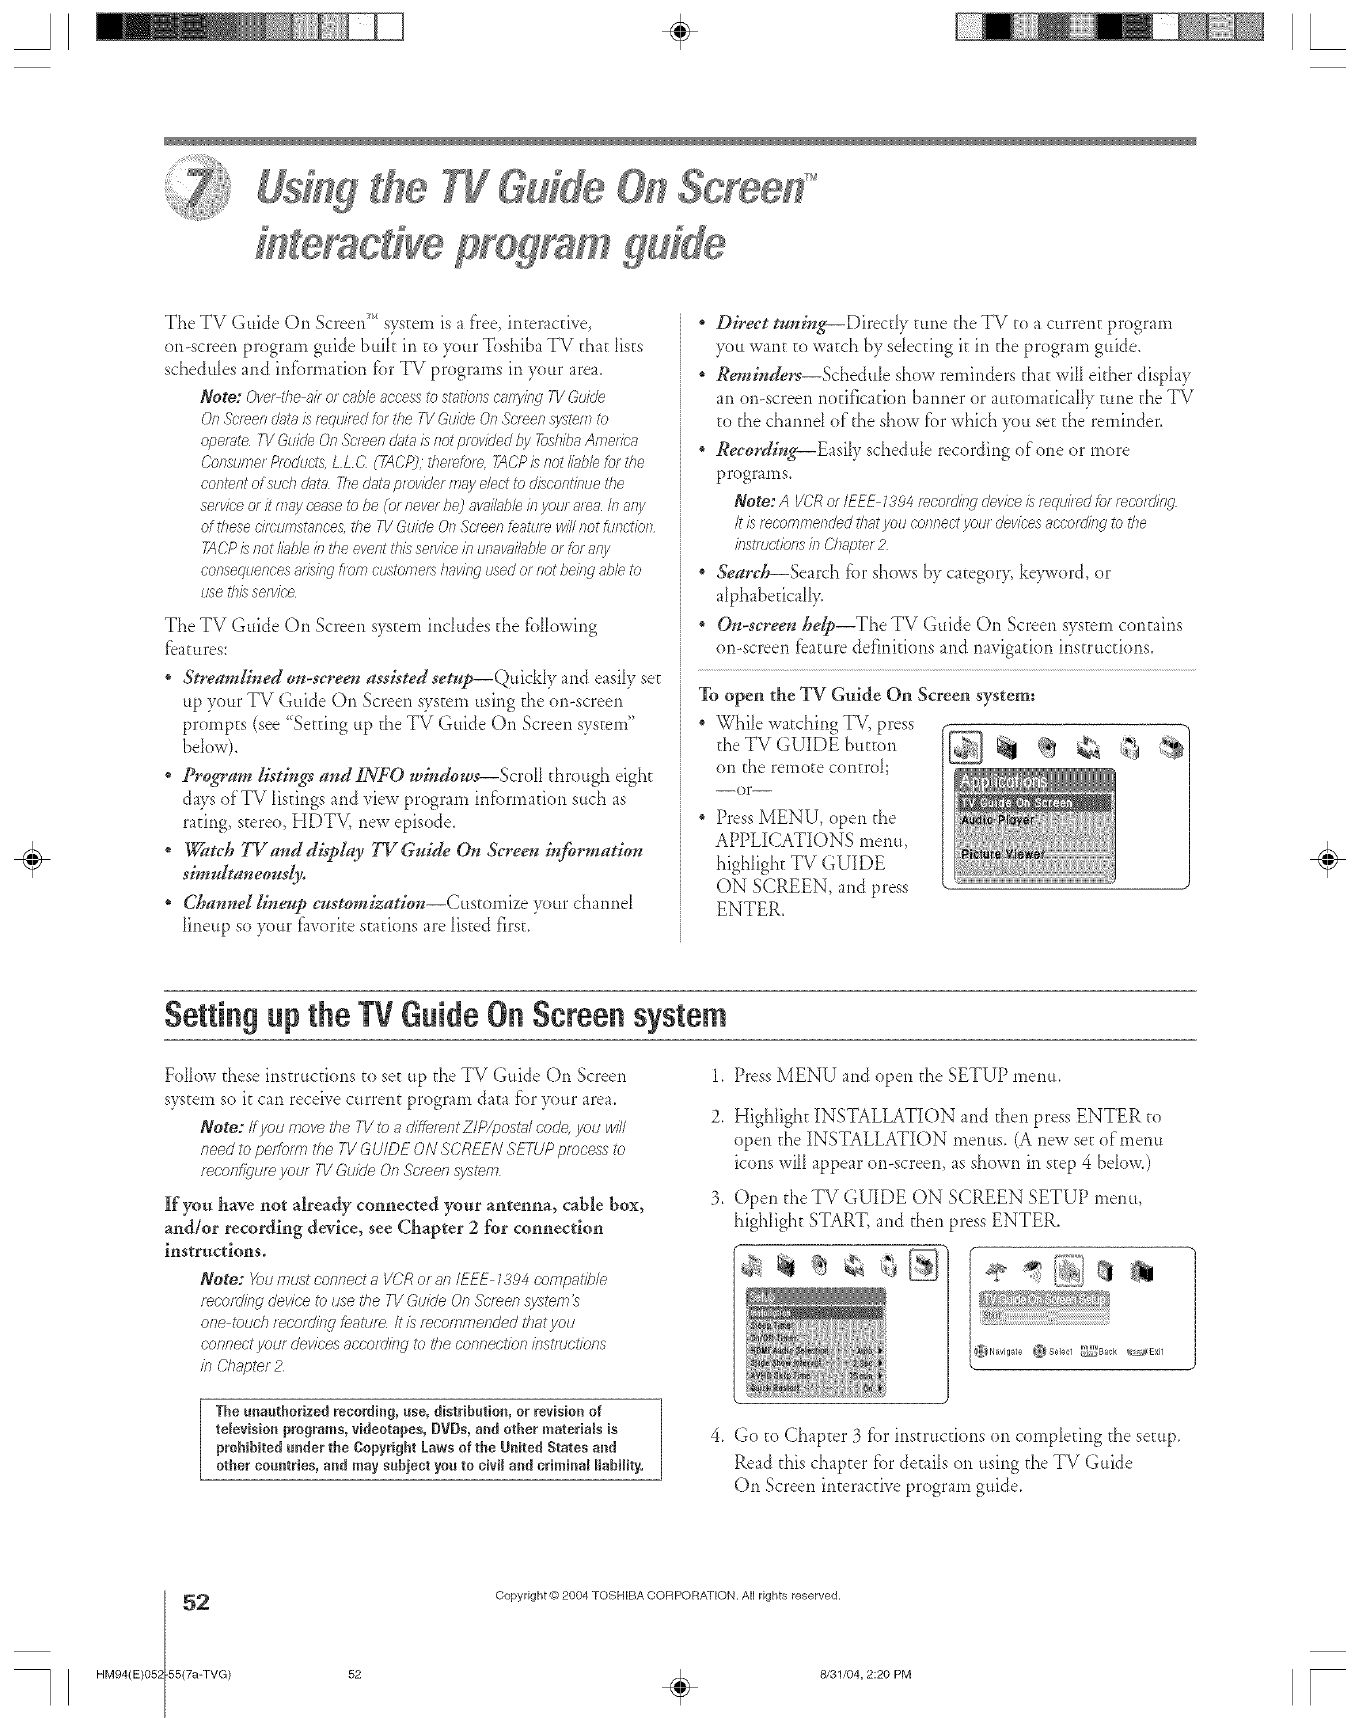
eracd e program
The TV Guide On Screepd_'_system is a flee, interactive,
on-screen prograrn guide bulk in to your Toshiba TV d_at _ists
schedules and infbrrnation fbr TV programs in your area.
Note: Ovet the 8if el eob/e 8cc'essto st;itio/F eotry/itg TVGuir/e
0/7 .%'_eer/dictaismqui/ed for tl£ TV Gukle OnSereen system to
o/)ef2ffe TV Gz/i(/eOn Sereee dath is t_otplow?led/)y 7&hi@ Ameffeo
()Ollst/mef R,educts, L L C(TACP), therefore. TA('P is not bible br the
corgerg of sl/eh rl_t_t Thedoraprovider m;!y e/eet to discorgirll/e the
sefvic_ or it may cease to be (or never be) avoi/oblei/_yeul area b a/y
of these e//eumst_tnee&the TV &l/de Of7Sereen featl/fe will not fu/Idbn
TACPis/totIbb/eintheevergthissefv/eeil)t//taw?Mbborfora/y
consequences arising,hem customers havieg used or net beif_gable to
t/se t/?/s sel v/ce
The TV Guide On Screen s) stern includes d_e following
f:oatures
Streamlined on-screen assisted setup--QuickIy and easiIy see
up your TV Guide On Screen system using the on-screen
prompEs (see '_Set@_gup the TV Guide On Screen system"
beIow).
Prepare listings"and INFO wk_dows--Scroll through eight
days of TV listings and view program informauon such as
rating, stereo, HDTV, new episode.
. _tch TVand display TV Guide ()n &teen inf!_rmation
simultaneous@
*Channd lin_up customization--Customize your cha*md
D_eup so 3>mrfiworite stations are listed first.
DDect tuning--Direct? tune the TV to a current program
3>_uwant to watch by selecting it in the program guide.
Reminders--Schedule show reminders that wilI either di@ay
an (m-screen notification harmer or automadcaIIy rune the TV
to the channd of"the show tbr which }_m see d_ereminder.
Recording--Easily schedule recording of one or more
programs.
Note:A VCRof/EEE/5'94recording@vieeisfequi/ed for rec'of_Lc_.q
It isrec'ommerlded that yell er)nrled yrptlfdevices ac'er)ttJ/f_gto the
instmdk)ns in CIwpter 2
:Search_Search for shows by category, keyword, or
alphabetically,
"On-screen hdp--The TV Guide On Screen system contains
on-screen tcamre definitions and navigation insmlcfions.
To open the TV Guide On Screen system:
While watching TV, press
the TV GUIDE buttopl H_ql
on the remote controk
--or--
* Press MENU, open the
APPLICATIONS menu,
higNight TV GUIDE
ON SCREEN, and press
ENTER.
÷
Setting up the TV GuideOil Screen system
Follow these instructions to set up d_eTV Guide On Screen
system so it can receive current program data fbr your area.
Note: If you move the TV tea different ZIP/post./code, you will
need to petfoltn the TV GU/DE ON SCREFN SETUP process to
mcon@um your 71/Guide On Sc/_erl system
If you have not already connected your antenna, cable box,
aud/or recording device, see Chapter 2 for connection
instructions.
Note: Youmustconnecta VCRof _/tIEEE1"_94t:omp_tih/e
mcof_l/r]g clev/ee tO use the TV Guide On .S'c'/_er,,sj/_ste,fn
one to_/c'htecotd//W feature It is mt;omtl_ended t/?atyc)tJ
con/_ect your dev/ees according to the connection bstmct/ons
in CI}_g)ter 2
1,
2,
Press MENU and open the SETUP memo
Highlight INSTALLATION and then press ENTER to
open d_eINSTALLATION menus. (A new set of'menu
icons will appear on-screen, as shown in step 4 beloxv)
Open d_eTV GUIDE ON SCREEN SETUP menu,
higNight START, and _hen press ENTER.
!{:{
Navigate }_}8elert _gack k_Exit
The unauthorized recording, use, distribution, or revisio_ of
television programs, videotapes, DVDs, and other materials is
prohibRed o_der the Copyright Laws of the United States and
other countries, a_d may sabieet you to civil and criminal liability,
4. Go to Chapter 3 tbr instrucuons on completing the setup,
Read this chapter fbr details on using the TV Guide
On Screen interactive program guide.
52 Copyright @ 2004 TOSHIBA COFtPORA][ON. All rights reserved.
HM94(E)O5_-55(7a-TVG) 52 _ 8/31/04, 2:20 PM [
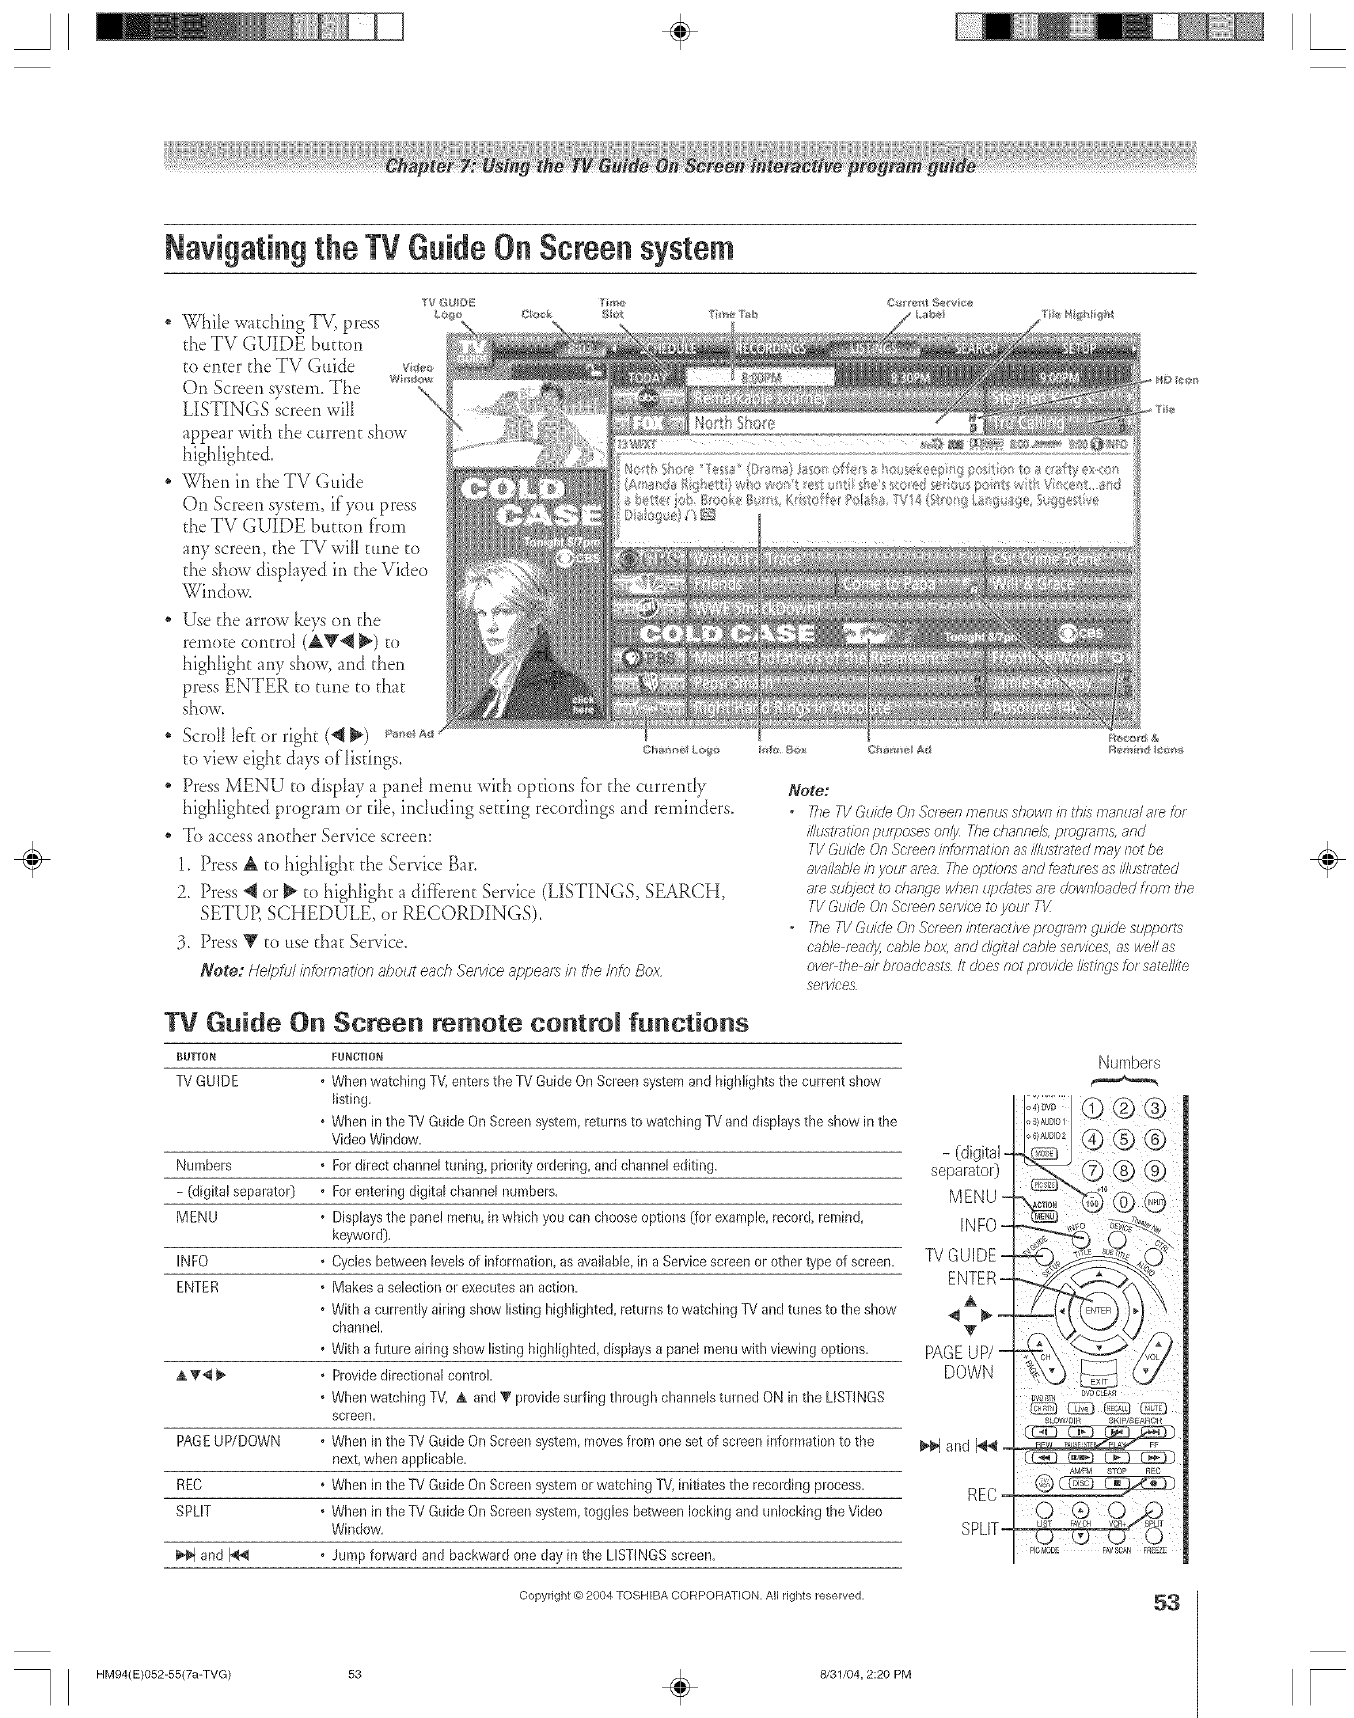
A÷ L
Navigating the TV Guide On Screensystem
While watching TV,press c_,0,:_ ,:._ '_',,,r,_ , :_,_,#e
d_eTV GUIDE button
to enter the TV Guide v_,_
On Screen system. The w.¢_
LISTINGS screen will
appear with the current show
highlighte&
When in the TV Guide
On Screen system, if.you press
d_eTV GUIDE button from
any screen the TV will tune to
the show displayed in the Video
Window.
Use the arrow keys on the
remote control (AV"_ _) to
highlight any show, and then
press ENTER to tune to d_at
sho'vv,
Scroll left or right (_ _) p_, a¢_
to view eight days of listings, c_,__,,_u_v;,
Press MENU to display a pand menu wkh options fbr the currendy
highlighted program or tile, including setting recordings and reminders,
To access another Service screen:
1, Press A to highlight the Service Bar.
2. Press _1or _" to highlight a difffrent Service (LISTINGS, SEARCH,
SETUR SCHEDULE, or RECORDINGS).
3, Press Y to use that Service.
Note: Helpful/?/om_at/on about each Sefv/ce appeats /?_the/rite Box
Note:
ofllB TV &side On 5"creen rllenus sl_own in ff_ls manual ale fol
iNustratlon pu/T£)ses only The channels, pfogm/71s, and
TV &side On &>men in_Jmlatlon as illushated m_v not be
avail;_ble in your area Flee options and _earules as illustf_#ed
af_ sulJjeot to ehaBge /vhen UfPd;ffmsare downloaded hem the
fV &did{¢OnScreenservicereyou/TV
•The TV Guide On Screen intefadiwe pfo_/mm gLlide_supf_oH5
cabl{¢ feadj4 cable box, and d/(4/ra/ enb/e services, g_.S/veil as
eYe, the all broadcast3/t does not pmwde //stings _of satellite
servIceS
TV Guide On Screen remote control functions
BUTTON FUN(,_ION
TV GUIDE • When watching TV, enters the TV Guide On Screen system and higblights tbe current show
listing.
.Wben in the 11/Guide On Screen system, returns to watching TV and displays the sbow in the
Video Window.
- (digital
Numbers • For direct channel tuning, priority ordering, and cbannel editing, separatoO
- (digital separator) • For entering digital cbannel numbers. MENU -
MENU .Displays the panel menu, in which you can choose options (for example, record, remind,
keyword).
INFO • Cycles between levels of information, as available, in a Sewice screen or otber type of screen. IV GUIDE
ENTER , Makes a selection or executes an action.
,With a currently airing show listing high@hted, returns to watching TV and tunes to the sbow
channel.
• Witb a future airing show listing highlighted, displays a panel menu witb viewing options. PAGE
_. _'_i _ • Provide directional control. DOWN
• When watcbing TV, _. and _' provide surfing through cbanneb turned ON in tbe LISTINGS
screen.
PAGE UP/DOWN • When in tbe TV Guide On Screen system, moves from one set of scleen infornlation to the _'_ and _ -
next, when applicable.
REC °When in tbe TV Guide On Screen system or watching TV, initiates tbe recmding process. REC-
SPLIT • Wben in the TV Guide On Screen system, toggles between locking and unlocking the Video
Window. SPLIT-
and 1_ •Jurnp forward and backward one day in the UST]NGS screen.
Numbers
©®®
® ® ®
9v9 [UN [WD CLEA£
PICMOD_ FAVSOAN FR_ZE
Copyright @ 2004 TOSHIBA CORPORATION, All rights reserved, 53
÷
HM94(E)052-55(7a-TVG) 53 _ 8/31/04, 2:20 PM [
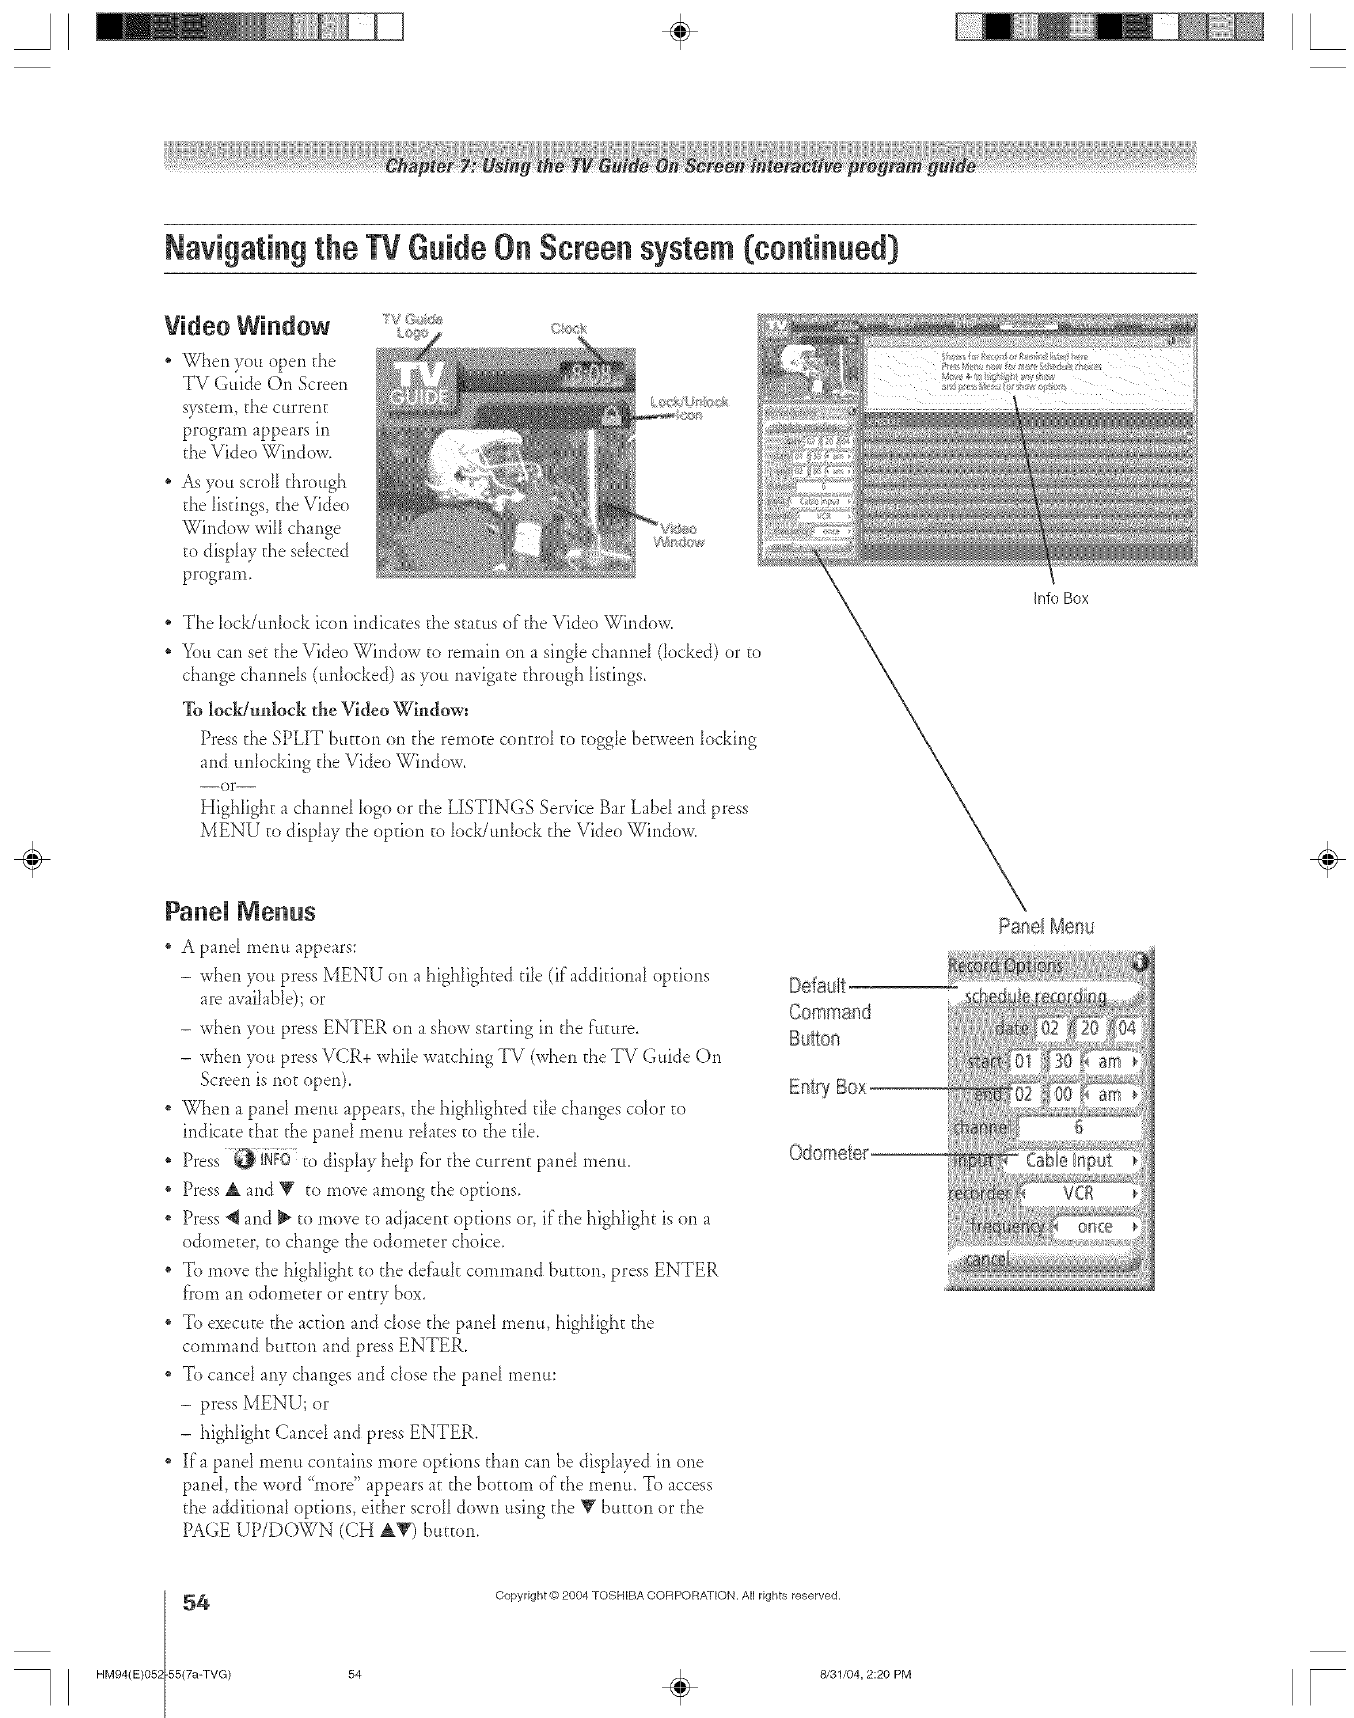
A÷ [
* When you open the
TV Guide On Screen
s3%tem,the current
program appears in
d_eVideo Window.
As you scroll through
the listings, the Video
Window wi[[ change
to display d_esdected
program.
The bck/unlock icon indicates the status of the Video Window.
You can set the Vide<)Window to remain on a single channel (locked) or to
change chamlds (unlocked) as you navigate d_rough listings.
To lock/unlock the Video Window:
Press the SPLIT button on d_e remote control to toggle between locking
and unlocking d_eVideo Window.
--or--
Highlight a channel logo or the LISTINGS Service Bar Label and press
MENU to display the opdon to lock/unlock the Video Window.
Panel Nenus
A panel rnerm appears:
- when }<mpress MENU on a highlighted tile (if additional options
are avaihble); or
- when you press ENTER on a show starring in the furore.
- when F)u press VCR+ while watching TV (when the TV Guide On
Screen is not open).
When a pand naenu appears, the highlighted tile changes color to
indicate that the panel menu relates to the tile.
* Press Eodisplay hdp tbr d_ecurrent pand menu,
* Press A and V to move among the options.
. Press _ and _" to move u) adjacent options or, ifd_e highlight is on a
odometer, to change the odometer choice.
* To move the highlight to the deflmh command burton, press ENTER
f'rom an odometer or entry box.
* To execute the action and close the panel menu, highlight the
command buEEonand press ENTER.
. To cancel any changes and close d_epanel menu:
- press MENU; or
- highlight Cancd and press ENTER.
* Ira panel menu contains more options d_an can be displayed in one
pand, the word "more" appears at the bottom of the menm To access
d_e additional options, eid_er scroll down using the Y button or d_e
PAGE UP/DOWN (CH AT) burton.
Default
Buitor_
Odometel
Info Box
ParcelMenu
÷
54 Copyright @?2004 TOSHIBA COFtPORAEION. All rights reserved.
HM94(E)O5J-55(7a-TVG) 54 _ 8/31/04, 2:20 PM [
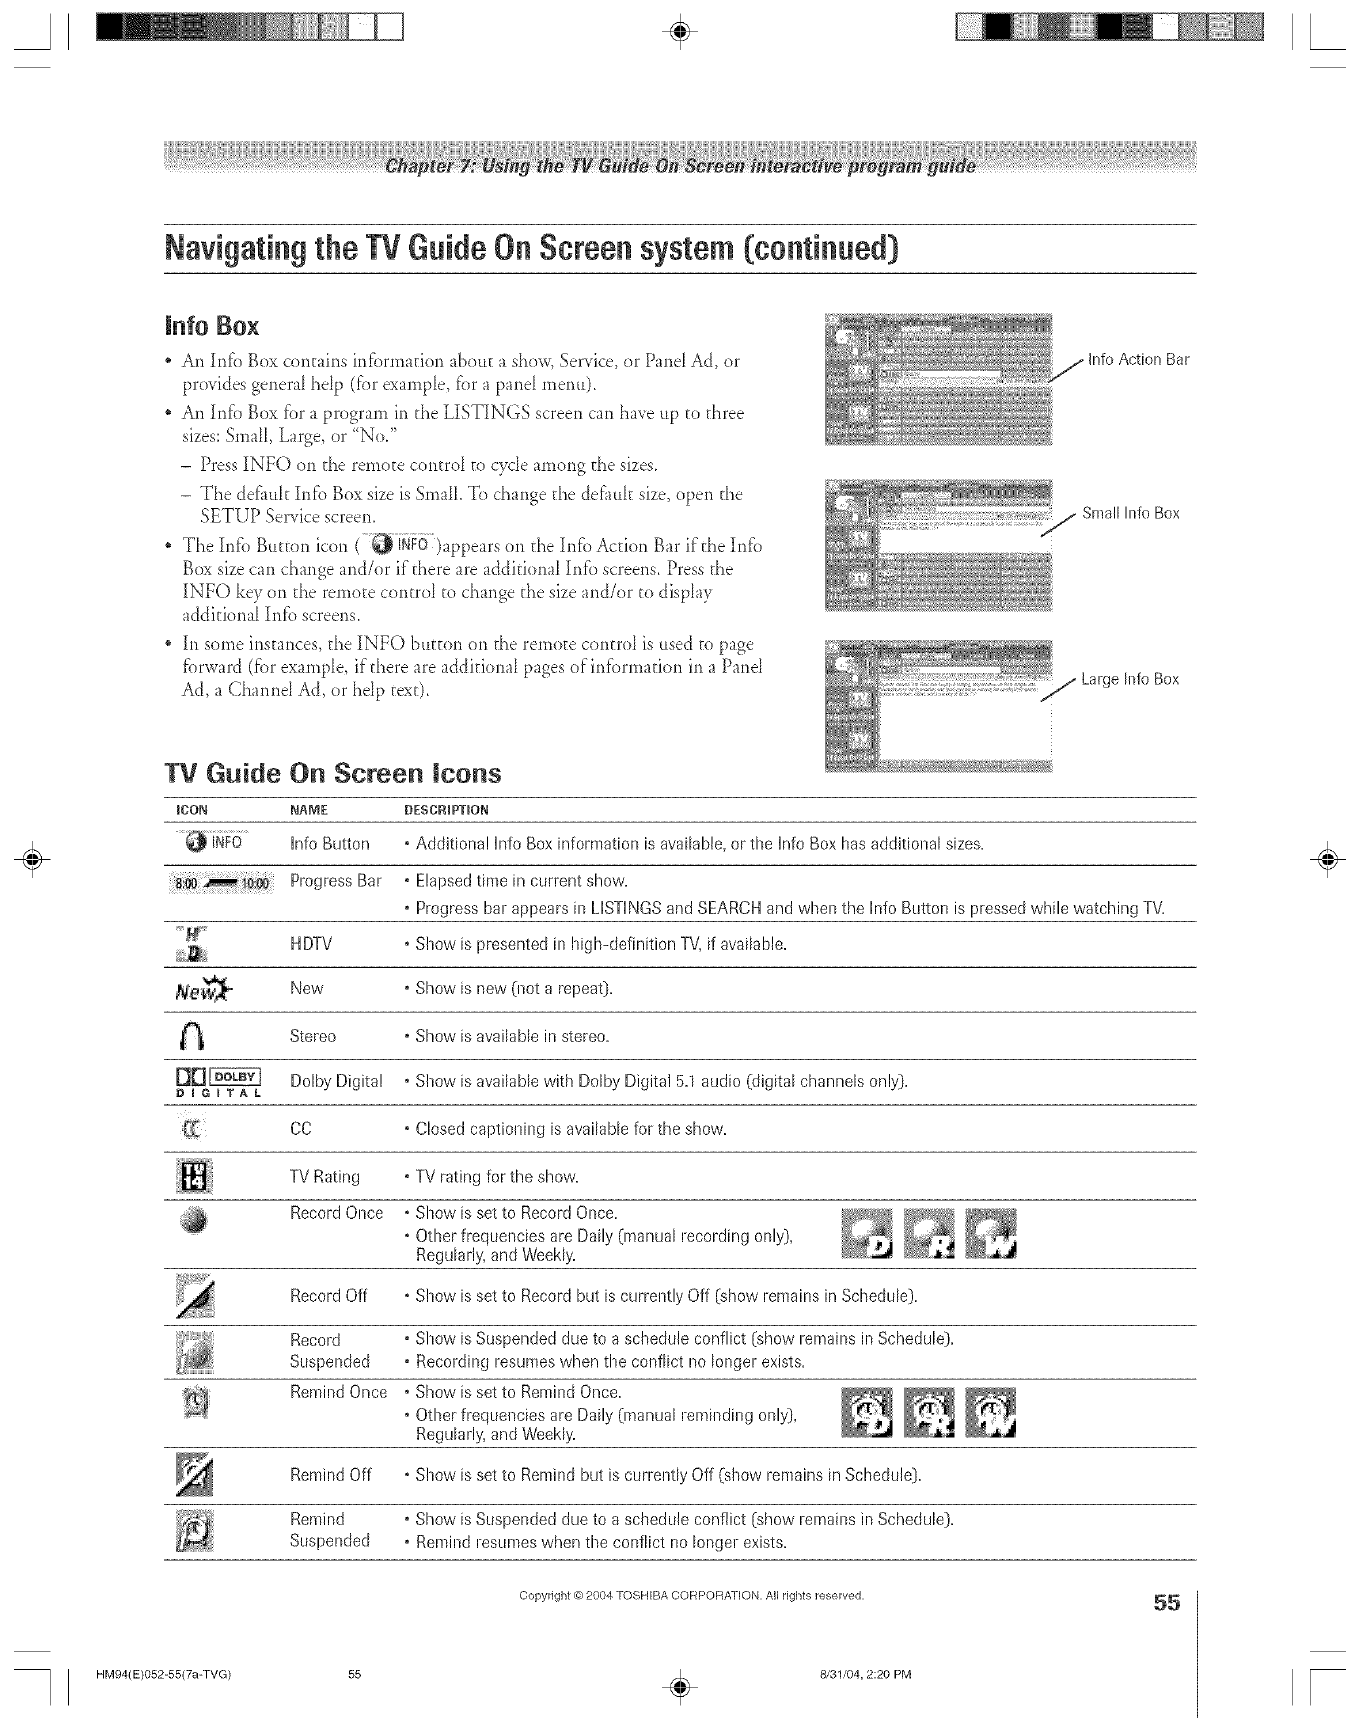
A÷ L
lnfo Bo×
An Irffb Box contains irffbrmafi(m abo_Ea show, Service, or Pand Ad, or
provides genera_ he_p (for example, f{.}ra pane_ menu).
, An hlf'o Box for a program in the LISTINGS screen can have ttp to three
sizes: Small, Large, or '{No/'
- Press INFO on the remoEe controI to cyde among the sizes.
- The defiuk Infb Box size is SmaIl. To change the defauk size, open the
SETUP Service screen.
The hffb Bu_Eonicon ( _ iNFO)appears on tI_eInfo Action Bar ifd_e hffb
Box size can chai_geand/or if there are addkional hffb screens. Press the
][NFO key on the remo_e control to change the size and/or to display
additional hffb screens.
][nsome instances, the INFO bttrton on the remote control is used to page
fbrward (fbr exampM if there are additional pages ofirffbrmation in a Pand
Ad, a Channd Ad, or hdp text).
Small hffo Box
/Large hffo Box
Bar
TV Guide On Screen icons
1{20N NAME
Info Button
Progress
[xl
DIGITAL
DESCRIPTION
° Additional h_foBox infom_ation is available,or the hfo Box hasadditional sizes.
•Elapsedtime in currerlt show.
• Progress bar appears in LISTINGSand SEARCHand when the Info Button is pressed while watching TV.
HDTV • Show is presented in high-definition TV,if available.
New • Show is new O_ota repeat}.
Stereo ° Show is available in stereo.
Dolby Digital , Show is available with Dolby Digital 5.1 audio (digital channels only).
CC , Closed captioning is available for the show.
TV Rating ° TV rating for the show.
Record Once •Show is set to Record Once. _ _
° Other frequencies are Daily (manual recording only),
Regularly,and Weekly.
Record Off • Show is set to Record but is currently Off (show remains in Schedule).
Record , Show is Suspended due to a schedule conflict (show remains in Schedule).
Suspended • Recording resumeswhen the conflict no longer exists.
RemindOnce °ShowissettoRemindOnce. ___
•Other frequencies are Daily (manual reminding only),
Regularly,and Weekly.
Remind Off , Show is set to Remind but is currently Off (show remains in Schedule).
Remind • Show is Suspended due to a schedtde conflict (show remains in Schedule).
Suspended ° Remind resumes when the conflict no longer exists.
÷
Copyright @ 2004 TOSHIBA CORPOFtATION, All rights reserved, 55
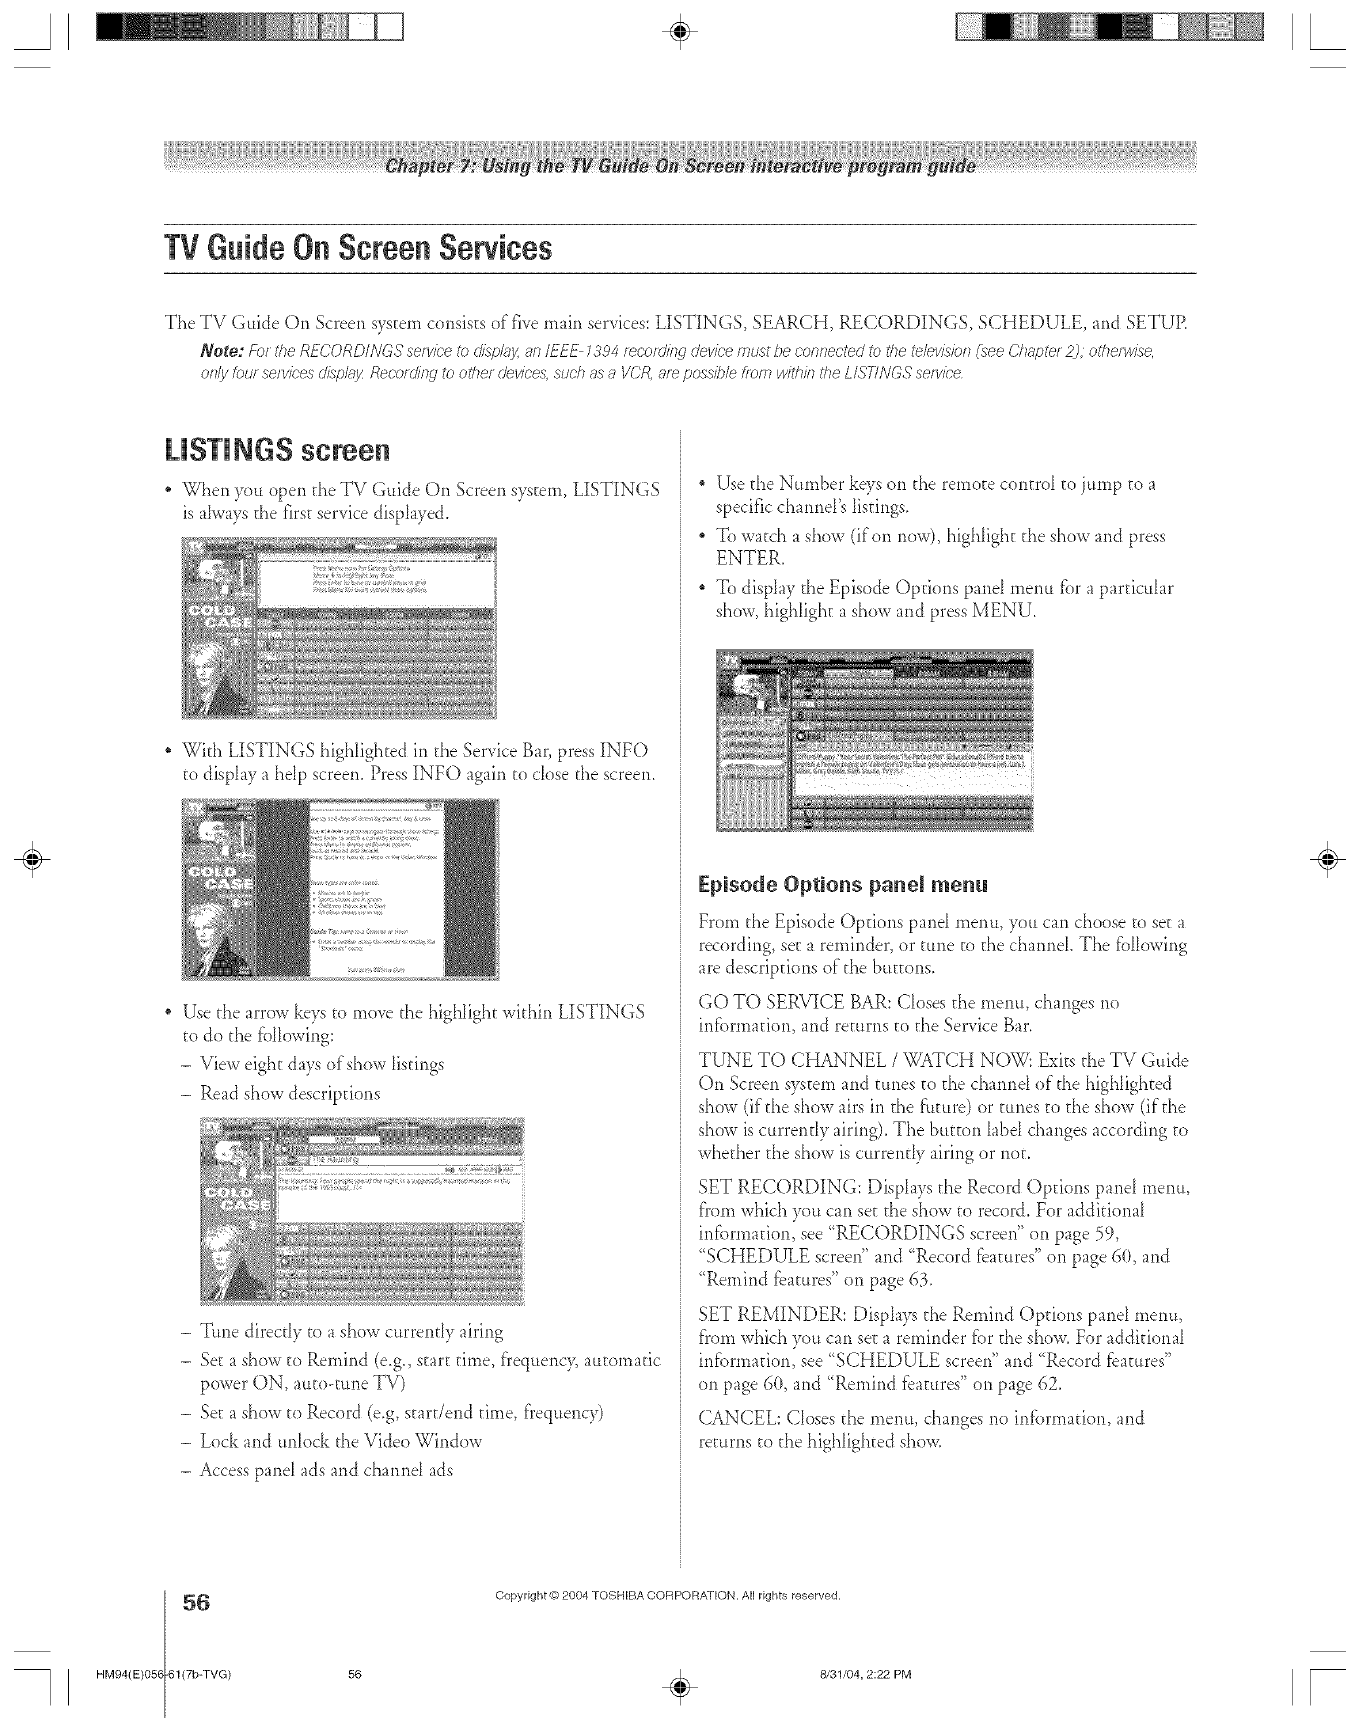
TVGuideOnScreenSe ices
The TV Guide On Screen system consists of five main services: LISTINGS, SEARCH, RECORDINGS, SCHEDULE, arid SETUR
Note: Fo_the RECORDINGSsefvk'eix)cltsplJyan IFFE 7,;'04_ecor&?_gdevk;'emust i_econnectec.tto tile televtslbn(see(?hapte_25,otl_erwlse,
OfTIJ/ /OtJ[ servicesd/sp/g_JzRecordingto other devices,suchas a VCR,arepossiblefrom Jvlth/?li'heLISTINGSsefwbe
LISTINGS screen
* When yott open theTV Guide On Screensystem,LISTINGS
is ahvays the first service displayed.
* With LISTINGS highlighted in the Service Bar, press INFO
to display a hdp screen. Press INFO again to dose the screen.
* Use the arrow keys to move the highlight within LISTINGS
to do the fbllowing:
- View eight days of show listings
- Read show descriptions
-Ttme direcdy to a show currendy airing
-Se_a show to Remind (e.g., start time, f'requency, automatic
power ON, auto-tune TV)
- Set a show to Record (e.g, start/end time, f'requenc3O
- Lock arid unlock the Video Window
- Access panel ads arid cha*md ads
* Use the Number keys on the remo_e control to jump to a
specific cha*md's listings.
* To watch a show (if on now), highlight the show and press
ENTER.
* To dispIay the Episode Options pand menu fbr a particular
show, highlight a show and press ITfENU.
Episode Options panel menu
From the Episode Opdons pand metro, you can choose to see a
recording, set a reminder, or tune to the cha*md. The fbllowing
are descriptions of"the buttons.
GO TO SERVICE BAR: Closes the memt, changes rio
irdbrmation, and returns to the Service Bar.
TUNE TO CHANNEL /WATCH NOW: Exits the TV Gtfide
On Screen system and tunes _o _hechannd of the highlighted
show (if'the show airs in the ft_ure) or tunes to the show (if the
show is currendy airing). The but_on label changes according to
whether the show is currently airing or not.
SET RECORDING: DispIays the Record Options panel menu,
f}'omwhich you can se_ the show to record. For additional
infbrmafion, see "RECORDINGS screen" on page 59,
"SCHEDULE screen" arid "Record features" on page 60, and
"Remind features" on page 63.
SET REMINDER: Displays the Remind Options panel memo,
fl'om which you can set a reminder fbr _heshow. For additional
infbrmafiori, see "SCHEDULE screen" arid '_Record [bamres"
on page 6(t, and "Remind fbatures" on page 62.
CANCEL: CIoses the metro, changes rio infbrmation, and
returns to the highlighted show.
÷
56 Copyright _) 2004 TOSHIBA CORPORA3[ON. A[] rights reserved.
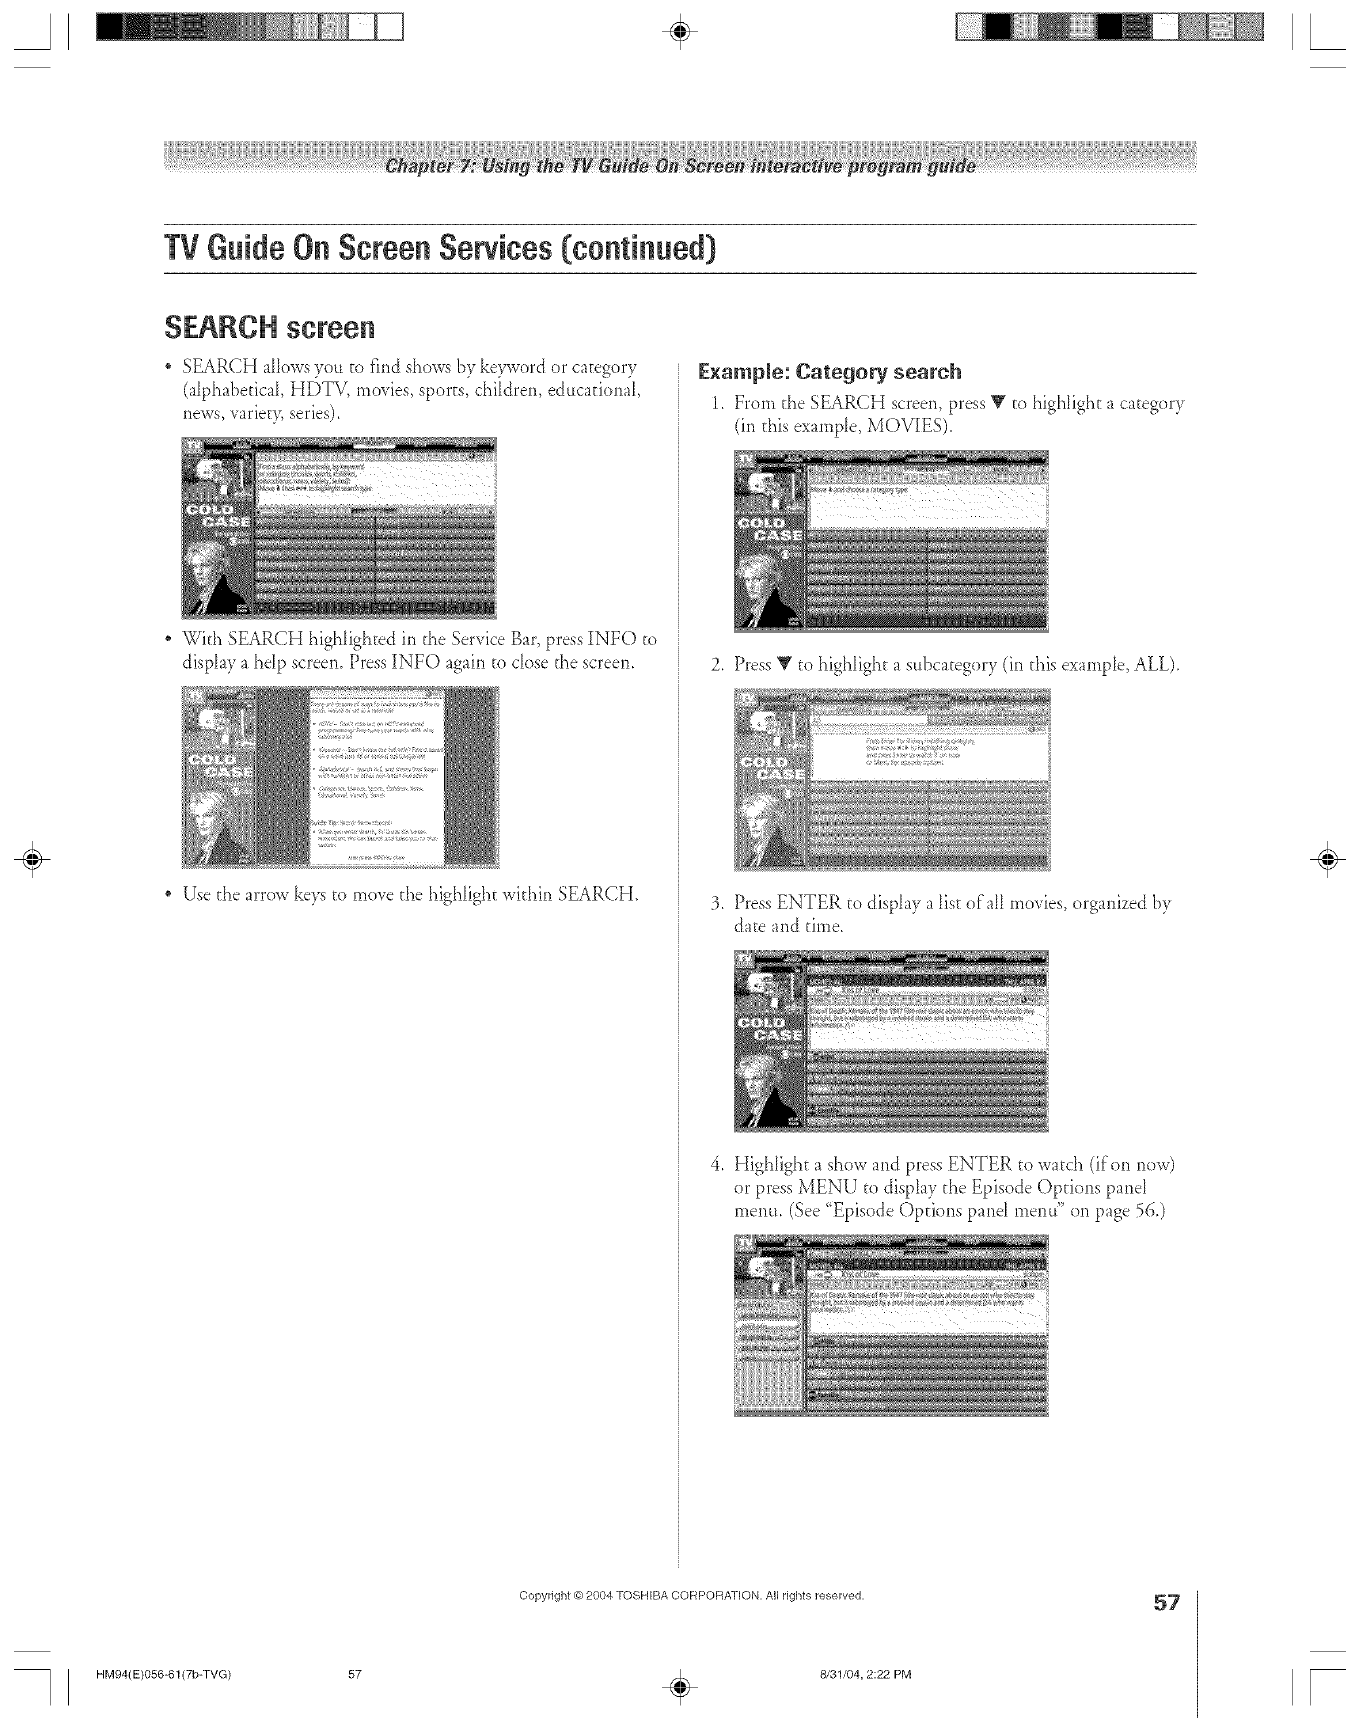
TVGuideOnScreenServices(continued)
SEARCH screen
SEARCH allows you to find shows b.vkeyword or category
(alphabedcaI, HDTV, movies, sports, children, e&tcafional,
news, _ariet)_ series).
With SEARCH highlighted ir_the Service Bar, press INFO to
display a hdp screen. Press INFO agairl to dose the screen.
Use d_earrow keys to move d_e highlight wkhin SEARCH.
Example: Category search
1. From the SEARCH screen, press Y to highlight a category
(in this example, MOVIES).
2. Press V to highIight a sttbcategory (ir_this example, ALL).
3. Press ENTER to display a list of all movies, organized by
date and time.
4. Highlight a show and press ENTER to watch (if on now)
or press MENU" to displa.vthe Episode Options panel
menu. (See "Episode Options pand menu" on page 56.)
÷
Copyright @ 2004 TOSHIBA CORPORATION, All rights reserved, 57
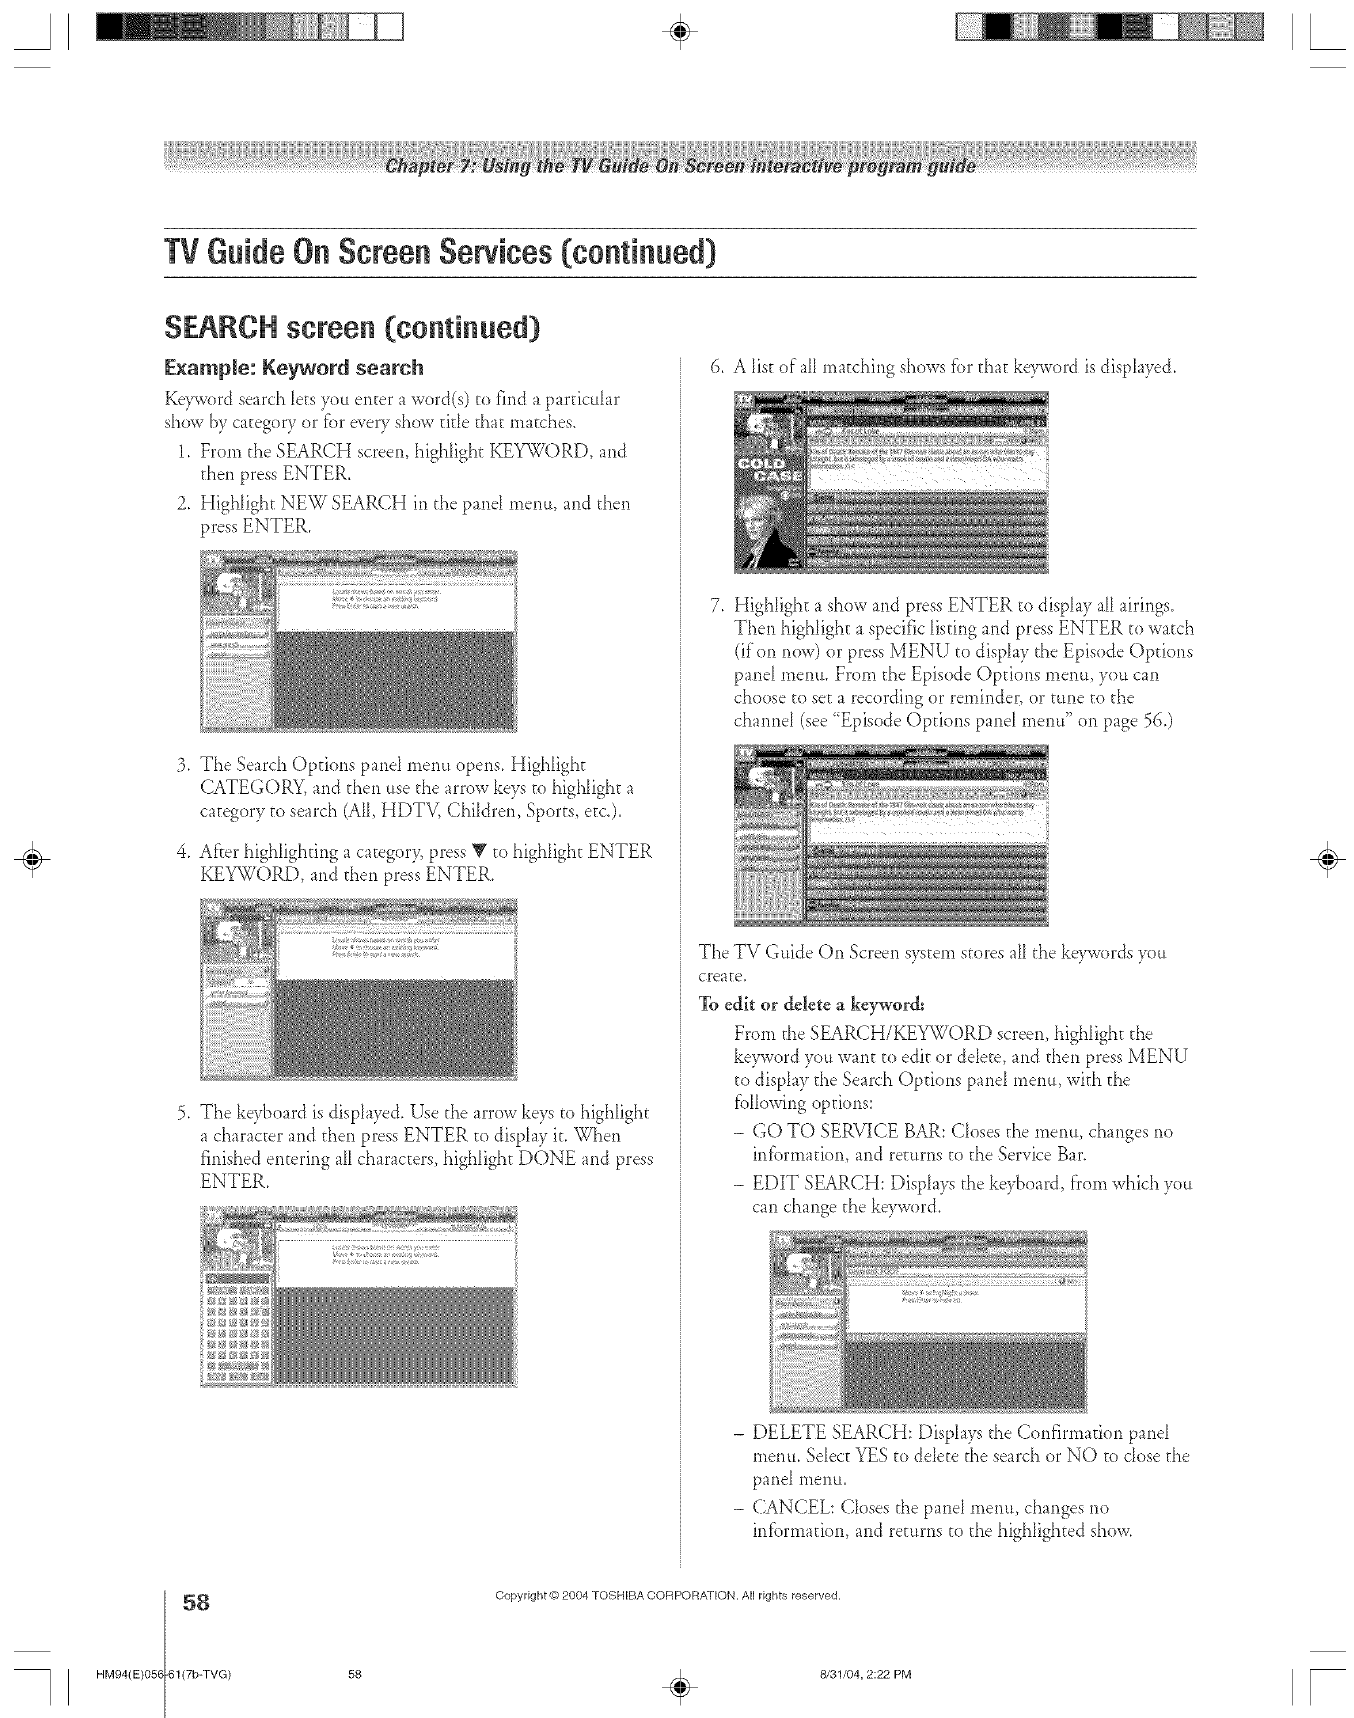
TVGuideOnScreenServices(continued)
SEARCH screen (continued)
E×ample: Keyword search
Keyword search lets )ou enter a word(s) to find a partic_lar
show by category or fbr every show title tha_ ma_ches.
1. From the SEARCH screen, highlighE KEYWORD, and
then press ENTER.
2. Highlight NEW SEARCH in the pand menu, and then
,tess ENTER.
,
.
,
The Search Options panel mepm opens. Highlight
CATEGORY, and then use the arrow keys to highlight a
ca_egor.vto search (AI[,HDTV, Children, Sports, etc.).
After high[ighung a category, press V to highlight ENTER
KEYWORD, and then press ENTER.
The keyboard is displayed. Use the arrow keys to highlight
a character and then press ENTER to display it. When
finished entering a[[characters, highlight DONE and press
ENTER.
6. A list of a[[matching shows ft_rthat keyword is dispkffed.
7. Highlight a show and press ENTER to display all airings.
Then highlight a specific [isung and press ENTER to watch
(if on now) or press MENU to display the Episode Options
pand menu. From the Episode Options menu, you can
choose to se_a recording or reminder, or tune to the
channel (see "Episode Options panel mentt" on page 56.)
The TV Guide On Screen system stores all tl_ekeywords you
creaEe,
To edit or delete a keyword:
From the SEARCH/KEYWORD screen, high[igh_ the
keyword you want to edit or ddete, and then press MENU
to display the Search Opdons pand menu, with the
fbllowing options:
- GO TO SERV_{CEBAR: C[oses the menu, changes no
information, and returns to the Service Bar.
- EDIT SEARCH: Displays the keyboard, from which you
can change _hekeyword.
- DELETE SEARCH: Displays the Confirmauon pand
menu. Sdec_ YES to delete the search or NO to dose the
pand menu.
- CANCEL: Closes the pand menu, changes no
infbrmadon, and re_urns to the highlighted show.
÷
58 Copyright @ 2004 TOSHIBA CORPORA]ION. All rights reserved.
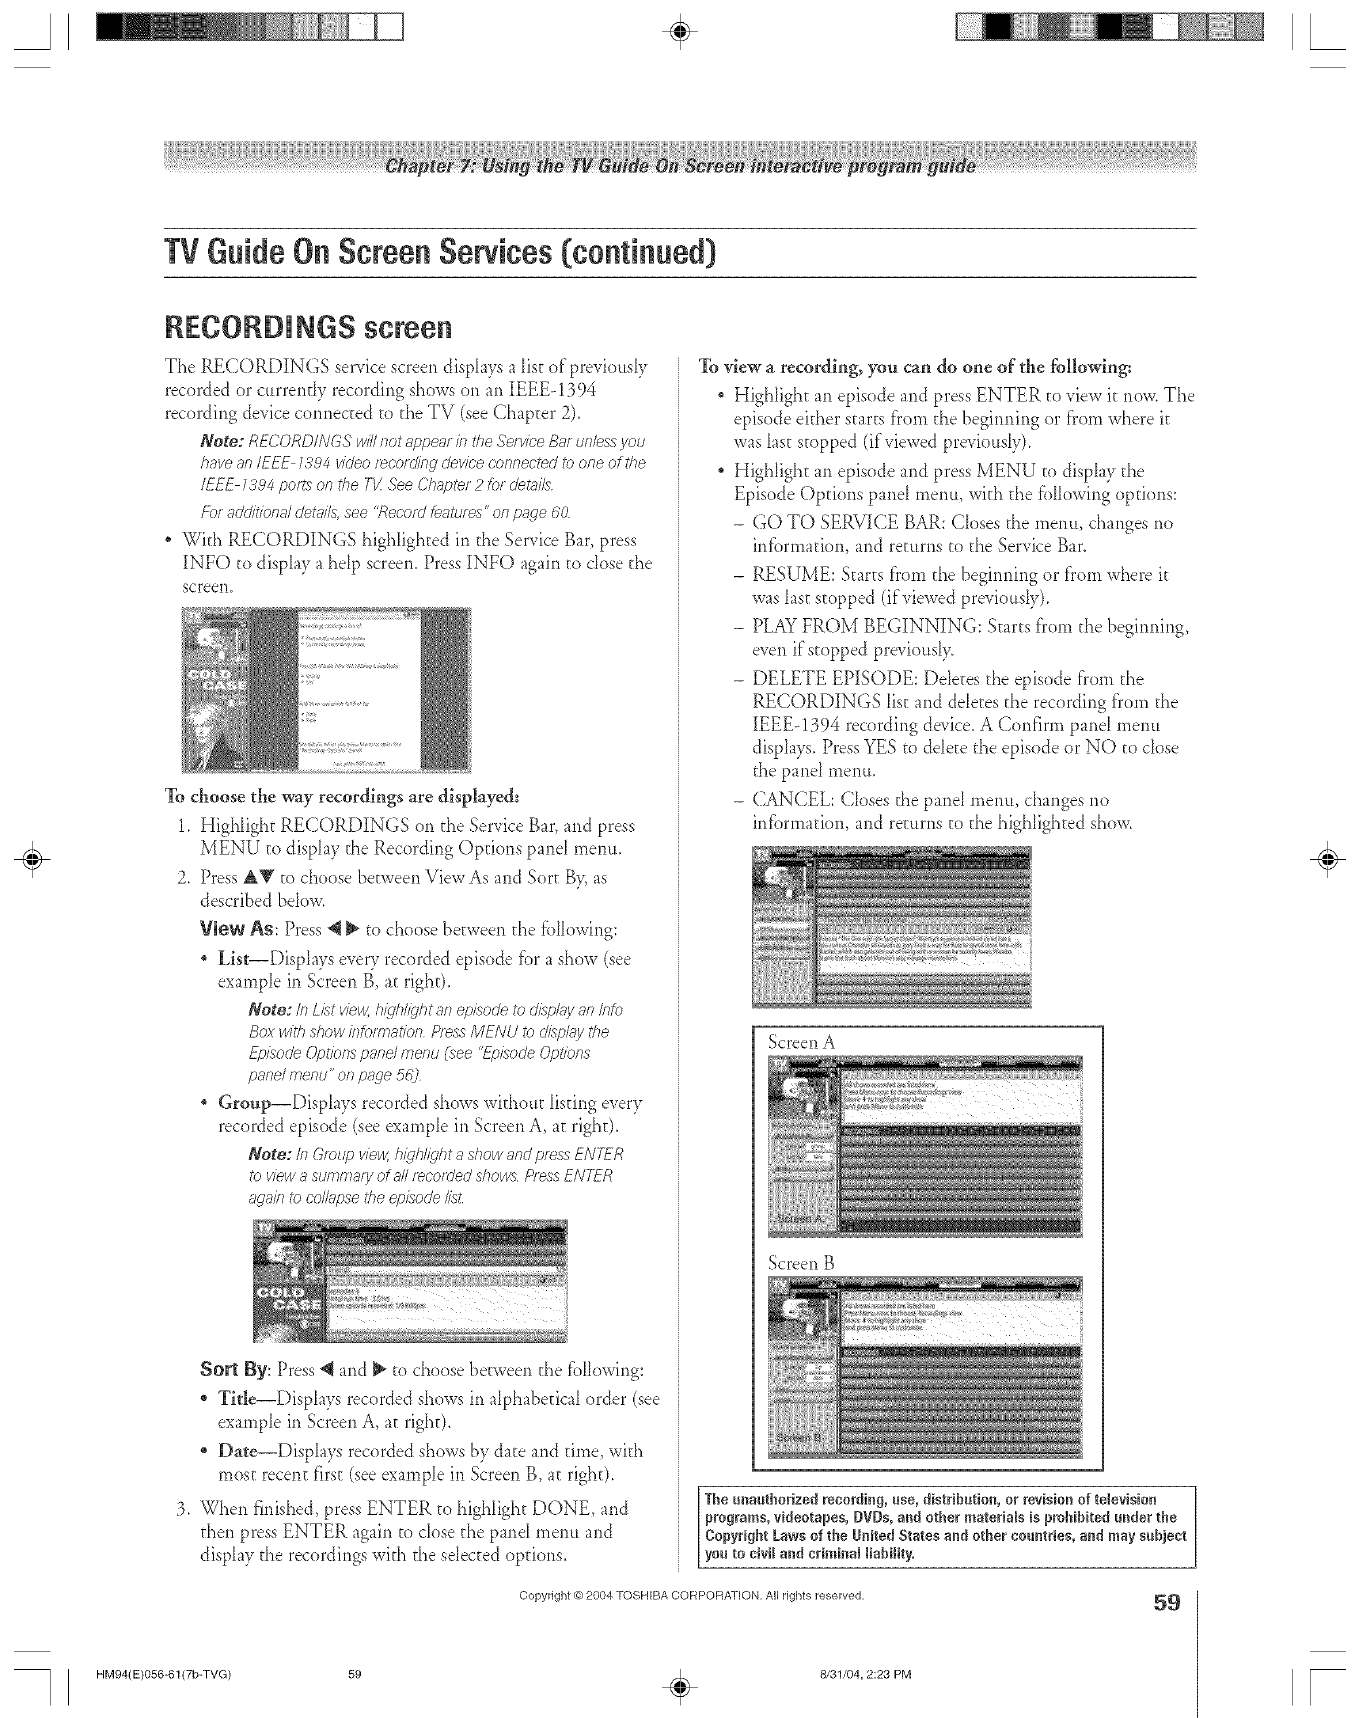
A÷ [
TVGuideOnScreenServices([continued)
RECORNNGS screen
The RECORDINGS service screen disphys a list of'previ<sly
recorded or ct*rrentIy recording shows on an IEEE-1394
recording device connecEed to the TV (see ChapEer 2).
Note: Rf--CORDIN(_S" will not appear kt tile .C,:e/vieeBar unless J/ou
have an IEEE 1394 video fd.'nt c/irlg cJevieecnnnected to one of the
IEEE 7394 poft_ on tile. TI/._ee (_/lap2f 2 [or cJet_i/s
f--orackl/t/ong c/mr;J/s,see 'Red'old featu/es"on page 60
*With RECOR[)INGS highlighted h the Service Bar, press
INFO to display a hdp screen. Press INFO again to dose the
screen.
To choose the way recordings are displayed:
1. Highlight RECORDINGS on the Service Bat', and press
MENU to disphy the Recording Options pant menu.
2. Press AV to choose between ViewAs and Sort By,as
described bebw.
View As: Press @_ to choose between the {bllowing:
List--Disphys every recorded episode {br a show (see
example in Screen B, at right).
Note: It;Listview,higlJicdhtanepisodeto&_ny an into
Box with dTow ifTfolrrlation Press MENU to c/Isp/aJl the
ET_isoc/e(JptiofTspant menu (see "_ulsocJeCTptlons
panel menu" of7page 5b_7
" Oroup--Disphys recorded shews with)m Iisting every
recorded episode (see example h Screen A, at right).
Note: In (_togJpview, hiJ_liqht a show and pfeg_s_NT_-R
DVieW aStJOTOlaly ofFJ/f_cotFJed 577ows /2less EN7-2R
_gaklI'oco//;/pseI'heeplL_ocJelist
Sort By: Press @ and _ to choose between the following:
* Title--Disphys recorded shews h alphabeEicalorder (see
example h Screen A, at right).
* Dae--Disphys recorded shows by date and time, with
most recent first (see example in Screen B, at right).
3. When finished, press ENTER to highlight DONE, and
then press ENTER again te dose the pant monet and
disphy the recordings with the sdected options.
To view a recording, you can do one of the following:
* Highlight an episode and press ENTER to view it now. The
episode either starts fTomthe begmnhg or fTomwhere it
was last stopped (if viewed previot*sly).
Highlight an episode and press MENU to disphy the
Episode Options pant menu, with the fblbwing options:
- GO TO SERVI(-;E BAR: Cbses the mentl, changes no
infbrmation, and returns to the Service Bar.
- RESUME: Starts from the beginrfing er f'rom where it
was last stopped (if viewed previottsly).
- PLAY FROM BEGINNING: Starts f'rom the begmnhg,
even if'stopped previottsly.
- DELETE EPISODE: Ddeces the episode from the
RECORDINGS list and deletes the recording fTem the
IEEE-1394 recording device. A Confirm panel taunt*
displays. PressYES to ddete the episode or NO to close
the pant menu.
- (;ANCEL: Closes the pant menu, changes no
information, and rerttrns to the highlighted show.
Screen A
Screen B
The unautborized mcordhg, use, distribution, or revision of television
programs, videotapes, DVDs, and other materials is pmbibited under the
eopyrigbt Laws of tbe United States and ether countries, and may subject
you to dvil and criminal liability,
Copyrigllt @ 2004 TOSHIBA CORPORATION, All rigllts reserved, 59
÷
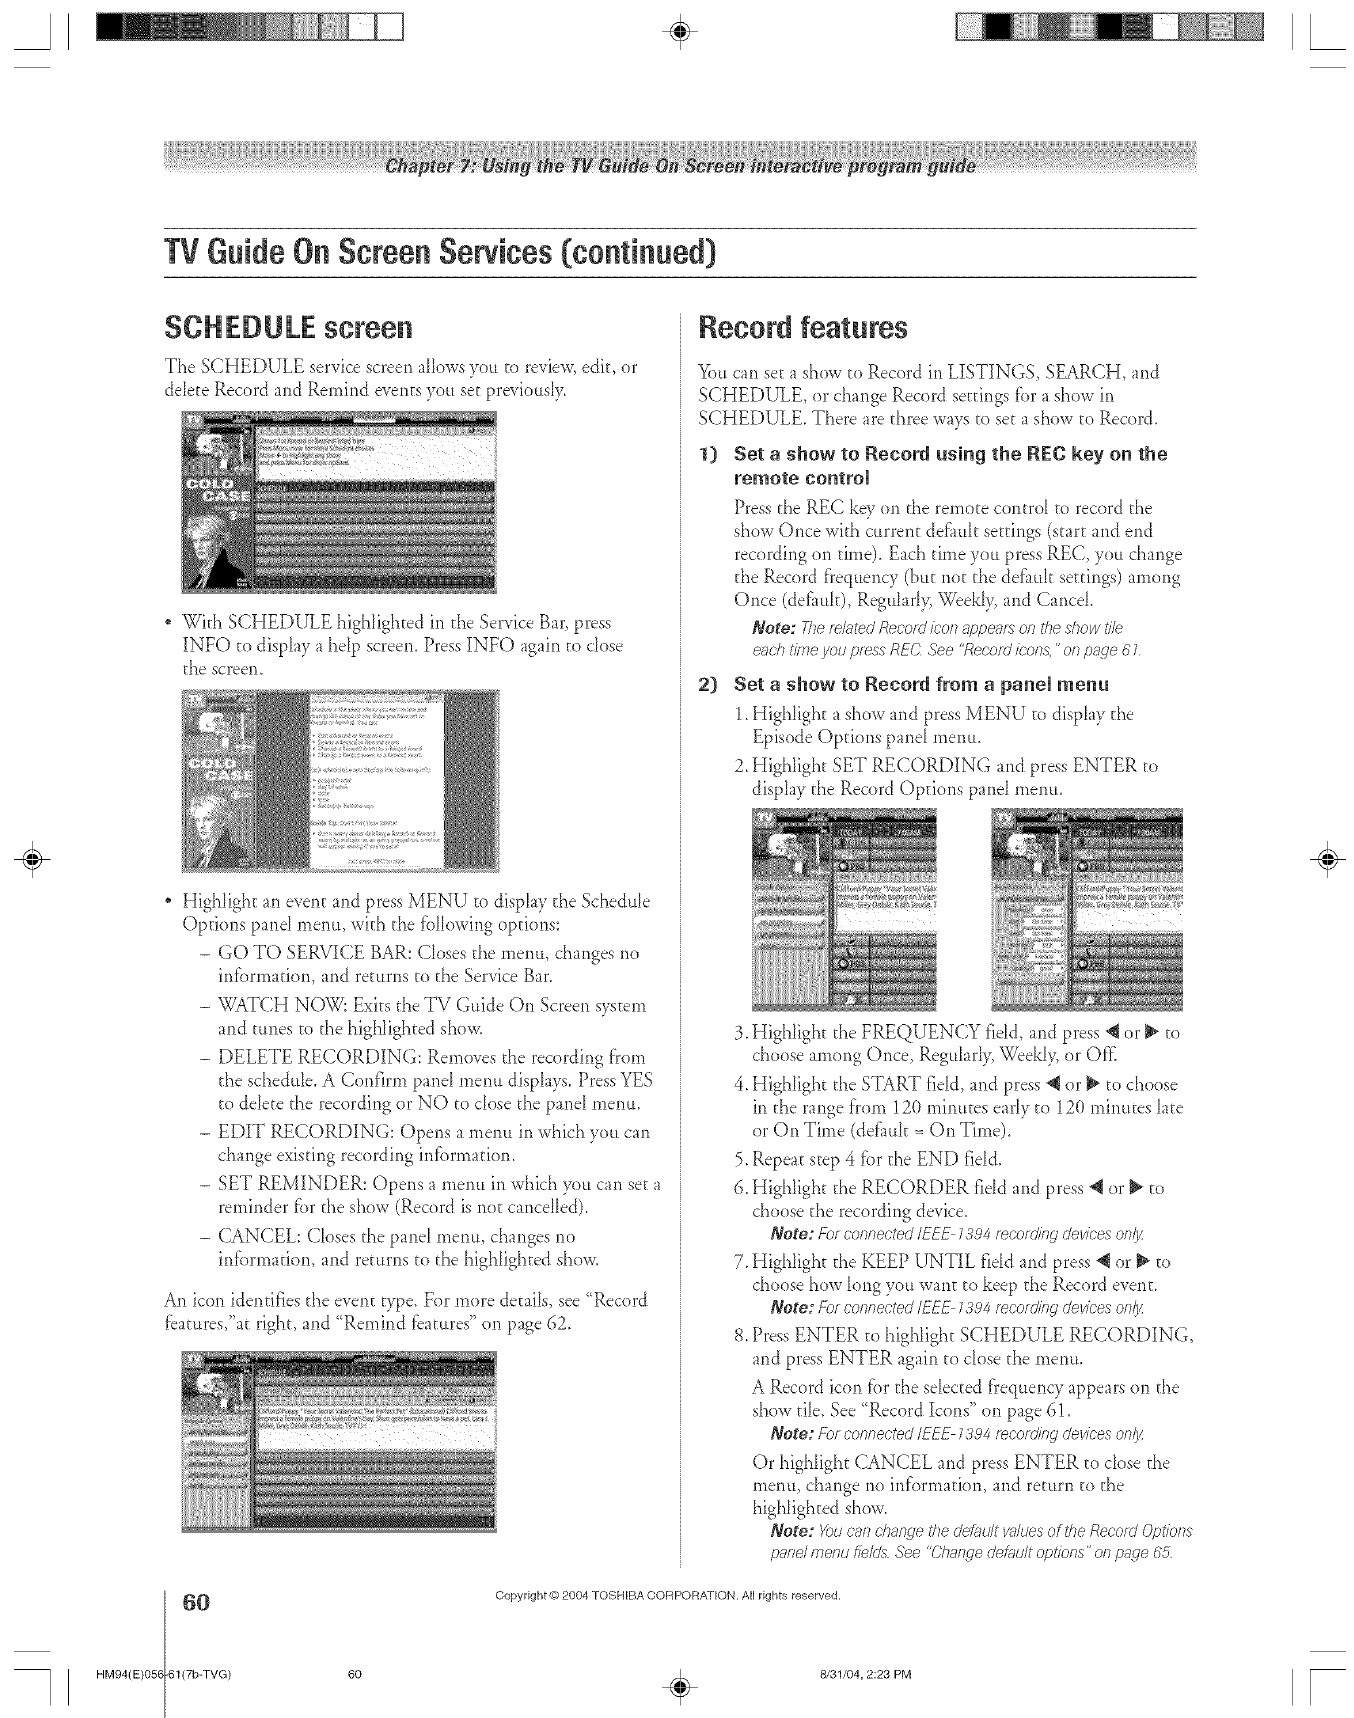
A÷ [
TVGuideOnScreenServices(continued)
SCH EDULE screen
The SCHEDULE service screen allows you to review, edit, or
ddete Record and Remind events you set previou@,
* With SCHEDULE highlighted in the Service Bar, press
INFO te disphy a hdp screen. Press INFO again to dose
the screem
* Highlight an event and press MENU to disphy the Schedule
Options pand menu, with the fbllowing options:
- GO TO SERVICE BAR: Closes the menu, changes no
infbrmadon, and returns to the Service Bar.
- WATCH NOW: Exits the TV Guide On Screen system
and tunes to the highlighted show.
- DELETE RECORDING: Removes the recording from
the schedule. A Confirm pand menu disphys. Press YES
to delete the recording or NO to close the pane[ menu.
- EDIT RECORDING: Opens a menu in which you can
change existing recording infbrmatkm.
- SET REMINDER: Opens a menu in which you can set a
reminder fbr the show (Record is not cancdIed).
- CANCEL: Closes the pand menu, changes no
infbrmadon, and returns to the highlighted show.
An icon identifies the event type. For mere details, see "Record
[batures,"a[ right, and "Remind [batures" on page 62.
Record features
You can set a show to Record in LISTINGS, SEARCH, and
SCHEDULE, or change Record settings fbr a show in
SCHEDULE. There are three ways to set a show to Record.
1) Set ashow to Record using the REC key on the
remote control
Press the REC key on the remote control to record the
show Once with current def_udt settings (start and end
recording on time). Each time you press REC, you change
the Record frequency (but not the defhuh settings) among
Once (&tim1[), Regular1> Week1> and Cancel
Note; Thefelg_tedRecordicon appeo/won theshow t#e
erichtimeyou pressRE(;'See "Recordicon&"of?page 61
2) Set a show to Record from a panel menu
1.I Iighlight a show and press MENU to disphy the
Episode Options pand menu.
2. Highlight SET RECORDING and press ENTER [o
display the Record Options panel menu.
3. Highligh[ the FREQUENCY fidd, and press @ or _ to
choose among Once, Regularly, Weekly, or Offi
4. Highlight the START field, and press @or _ to cheese
in the range from 12(t minutes early to 12(t minutes late
or On Time (defimh = On Time).
5. Repent step 4 for the END fidd.
6. Highlight the RECORDER fidd and press _1or _ to
choose the recording device.
Note: Fo:connectedIEU: L_94reco:diflg devices onlj_
7. Highlight the KEEP UNTIL field and press _ or _ to
choose how long you want to keep the Record event.
Note: Fo_connected/EEF7,5',94recomfng devices onlj_
8. Press ENTER to highlight SCHEDULE RECORDING,
and press ENTER again te close the menu.
A Record icon fbr the selected frequency appears on the
show tile. See '_Record Icons" on page 61.
Note: f--o_connected/EU:7394fec'o_ding devices onl)_
Or highlight CANCEL and press ENTER to dose the
menu, change ne information, and return to the
highlighted show.
Note: X_ucan change thede_lultv;#uesof theRecordOptiotls
pnnd menu fields.See"Change deh_ult options" onpage8&
6O Copyright © 2004 TOSHIBA CORPORATION. All rights reserved.
÷
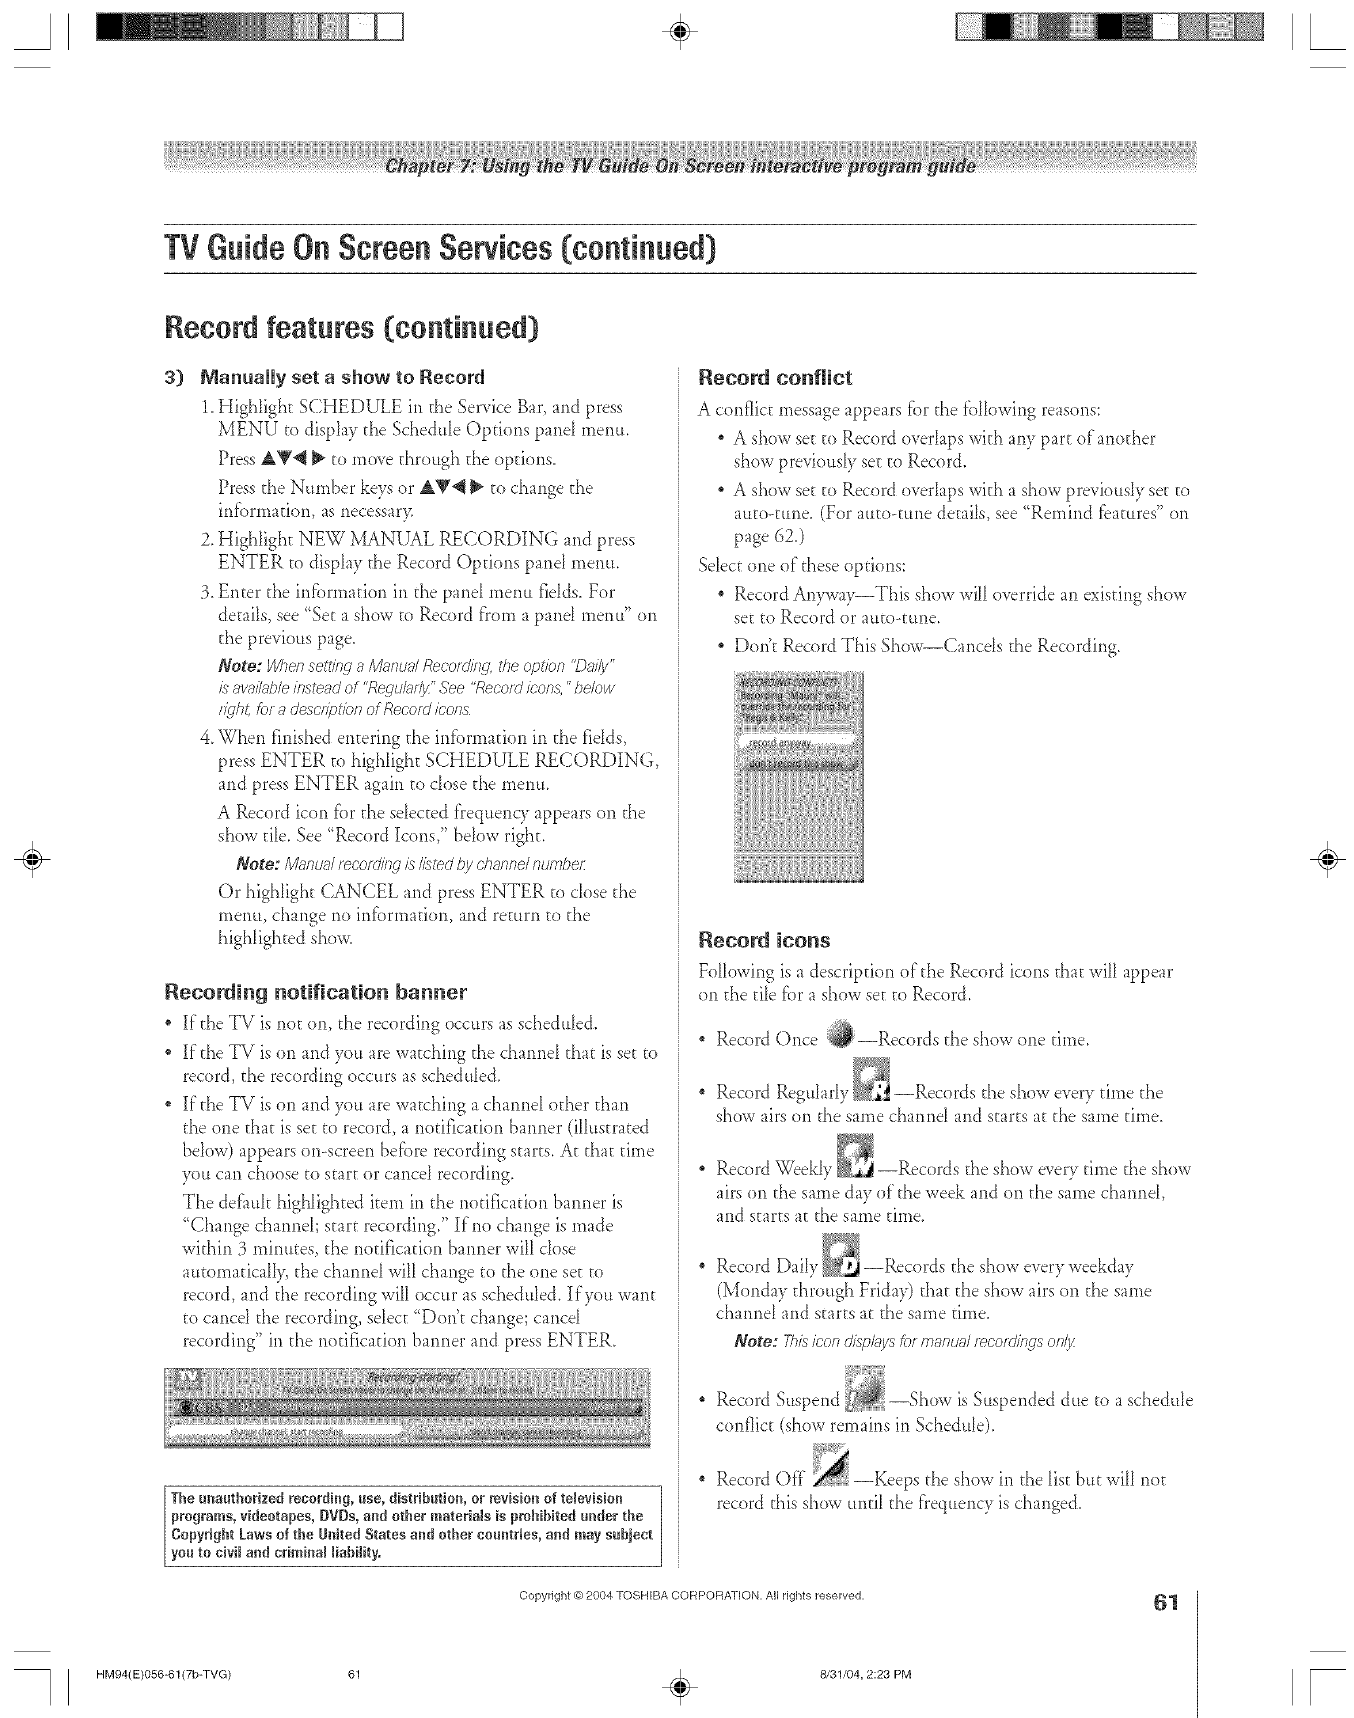
A÷ L
TVGuideOnScreenServices(continued)
Record features (continued)
3) Manually set a show to Record
1.Highlight SCHEDULE in the Service Bar, and press
MENLO"to display the Schedule Opdons pand menu.
Press AV'_ _ to move through the options.
Press the Number keys or AV'_ _ to change the
infbrmadon, as necessar>
2. Highlight NEW MANUAL RECORDING and press
ENTER to display the Record Opdons pand menu.
3. Enter d_e infbrmation in the panel menu fields. For
details, see "Set a show to Record f'rom a pand menu" on
the previous page.
Note: Fd>ensetttn_j aMarlugJ _coordiR_L _/?e opt/oR "Osi/j/"
/s avoiff_bleinstead of "Requl_ffJ_"See "Record icon& "below
t_ql?t, for8 desclfplTot_ of Recoe/Mons
4.When finished entering the in[brmation in the fidds,
press ENTER to highlight SCHEDULE RECORDING,
and press ENTER again to close the menu.
A Record icon fbr the selected f)'equenW appears on the
show tile. See "Record Icons," below right.
Note:/V/anuo/recording is//kted f_)lchannel humidor
Or highhght CANCEL arid press ENTER to cIose the
menu, change no information, and return to the
highlighted show.
Recording notification banner
* If the TV is not on, the recording occurs as scheduled.
If the TV is on and you are watching the charred that is set to
record, the recording occurs as scheduled.
If the TV is on and you are watching a charred od_er d_an
the one that is set to record, a r_otificadon harmer (illustrated
below) appears on-screen befbre recording starts. At that time
you can choose to start or cancel recording.
The defimk highlighted item in the r_otificadon banner is
"Change charmeI; start recording." If'no change is made
within 3 minuees, the notification harmer will dose
aueomadcalI> d_echarred will change to the one set to
record, and fl_erecordirlg will occur as scheduled. If you want
to cancd the recording, select "Don't change; cancd
recording" in the notificatior_ banner and press ENTER.
The mmuthorized recording, use, distribution, or revision of television
programs, videotapes, DVDs, and other materials is prohibited under the
Copyright Laws of the UnRed States and other countries, and may sabiect
you to civil and criminal liabiJity.
Record conflict
A conflict message appears fbr the fbllowing reasons:
A show seeto Record overIaps with any part of another
show previously see to Record.
A show set to Record overIaps with a show previousIy see to
auto-tune. (For auto-rune deeails, see "Remind t:camres"on
page 62.)
Select one of these options:
Record Arw_vay--This show will override an existing show
set to Record or auto-tune.
, Doo't Record This Show--Cancds the Recording.
Record icons
Following is a description of the Record icons that will appear
on the tile fbr a show see to Record.
Record Once {_--Records the show one time.
r_
Record Regul _rI) _._ --Records the show every time the
show airs on the same channd and starts at the same time.
* Record Weekb_, --Records the show e_ery dine the show
airs on the same day of the week and on the same channd,
and starts at the same time.
* Record Daily --Records the show every weekday
(Monday through Friday) that the show airs on the same
channel and starts at the same time.
Note: >is icon c}ispl,vysfor manuel fecotrJirsgsofff_z
"Record Suspend _--Show is Suspended due to a schedule
conflict (show remains in Schedule).
* Record Off show in the list but will not
record this show until the f'requenQ_is changed.
Copyright _') 2004 TOSHIBA CORPORATION, All rights reserved, 61
÷
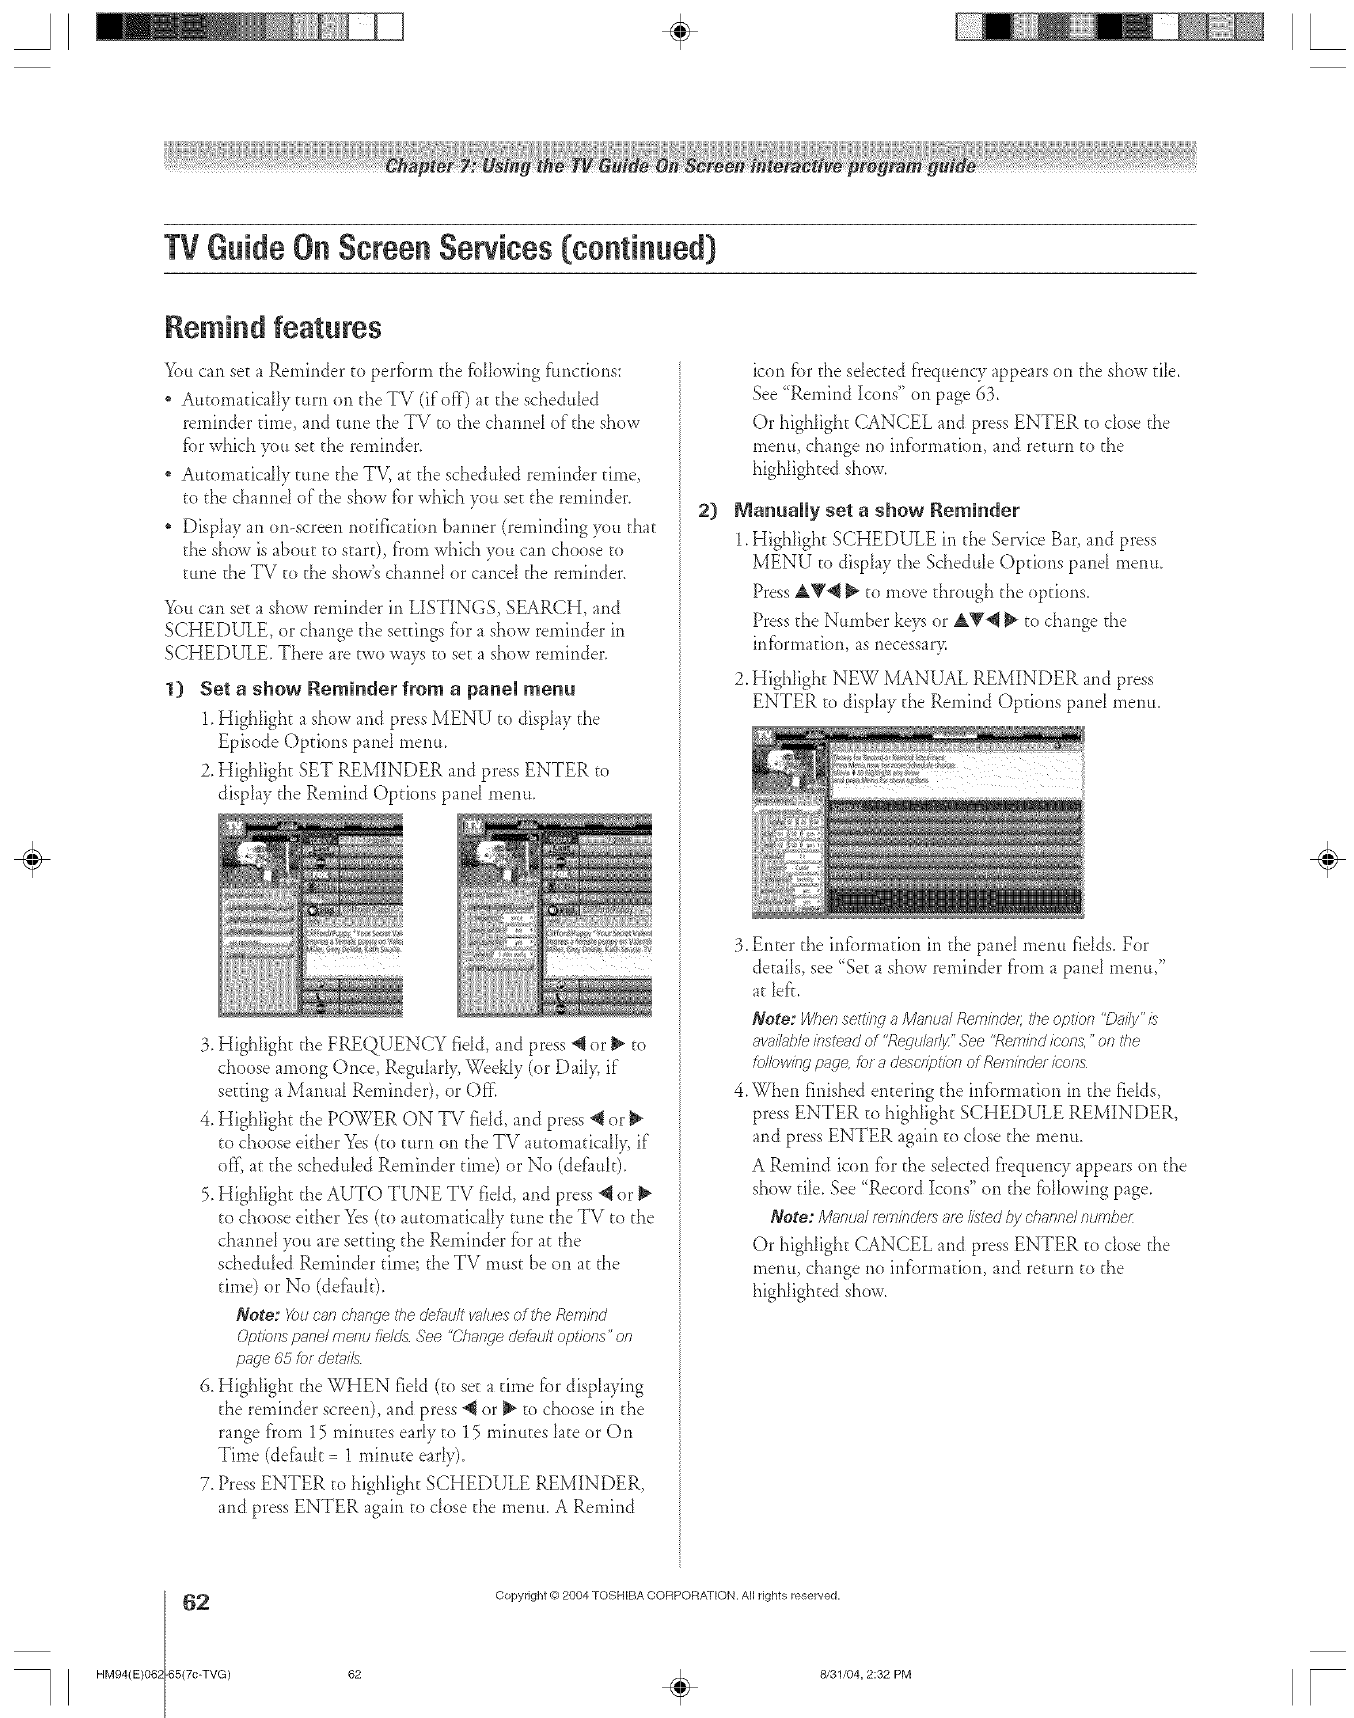
A÷ [
TVGuideOnScreenServices(continued)
Remind features
You can set a Ren_inder to perfbrrn the fbHowing ffmc[iorls:
Automatically turn on the TV (if off) a(,the schedubd
reminder dine, arid rune (,heTV to the chanrie[ of (,heshow
fbr which you set the reminder.
Au(,oma(,icaHytune the TV, a(,the schedubd reminder time,
(,o(,hechannd of the show f_._rwhich you so(,(,he reminder.
DispIay an or>screen no(,ification banrier (ren_indirig youtha(,
the show is about (,ostar(-),f}em which you can choose te
tune (,heTV (,o(,he show's channel or cancel (,he reminder.
You can so(,a show reminder in LISTINGS, SEARCH, and
SCHEDULE, or change the settings fbr a show reminder in
SCHEDULE. There are two ways (,e set:a show reminder.
1) Set a show Reminder from a panem menu
1.Highligh(, a show and press MENU (,odisplay (,he
Episode Options panel menu.
2. Highlight SET REMINDER and press ENTER (,o
display (,heRemind Options pand menu.
3. Highlight the FREQUENCY field, and press @ or _ (,o
chose among Once, Reguhr1> Weekly (or Dail> if
se(,ringa Manual Reminder), or Offi
4. Highligh(, (,he POWER ON TV fidd, and press @ or
(,ochoose ekher Yes (to turn on the TV au[omadcaII> if
o< a(,the schedubd Reminder (,ime) or No (deEmk).
5. HighIigh(, the AUTO TUNE TV fidd, and press "_or
(,ocheese either Yes(to autemadcally (,une(,heTV to the
channeI you are se(,ting(,heReminder fbr at the
schedubd Reminder (,ime; (,heTV mus(,be on at (,he
(,ime)or No (del%uk).
Note: Youcan change #_edefaultvaluesof theRemind
Opl'ions pane/menufieldsSee"C71angecJetmdtopt/Prls" on
page65forderails
6. Highhgh(, (,heWI-IEN fieId ((,oset a (,ime for dispIaying
the reminder screen), and press _1er _ to choose in the
range fi'om 15 minutes early to 15 minutes late or On
Time (defimk = 1 minute earl),).
7. Press ENTER (,ohighligh(, SCHEDULE REMINDER,
and press ENTER again to close (,hemenu. A Remind
2)
icon l%rthe sdec(,ed frequency appears on (,he show (,ib.
See "Remind Icons" onpage 63.
Or higtdigh(, CANCEL and press ENTER (,odose (,he
menu, change rio inf'ornmtion, and re(,urn to the
highlighted show.
Manually set a show Reminder
1.Highligh(, SCHEDULE in the Service Bat', and press
MENU (,odisplay the Schedub Options pand menu.
Press A_'@ _ (,omove through the options.
Press the Number keys or AY@ I_ (,ochange (,he
irffbrma(,ion, as necessar>
2. Highligh(, NEW MANUAL REMINDER and press
ENTER to disph) (,heRemind Opdons pand nlentt,
3. Enter the information in the panel menu fields. For
demiIs, see "So(,a show reminder f}'om a panel menu,"
at bf'<
Note: Whe/7setti/.,g aM_ffTua/Reminder; theopt/of7 "Dai/y'/s
awli/ub/e&stewedof "Regulodjz" See"Re/rlbdicon& "on the
fallowing page,fofadesc/ipl'iol;_ ofReminde/ic-nns
4,When finished en(,ering the infbrmation in the fidds,
press ENTER (,ohighligh(, SCHEDULE REMINDER,
and press ENTER again (,odose the menu.
A Remind icon fbr the sale[led fi'equency appears on(,he
show die. See '_Record Icons" on (,he fbllowing page.
Note: Mg_nualreminde_me/is_edby channelnumbe/:
Or highligh(, CANCEL and press ENTER (,odose (,he
menu, change rio information, and re(,urn to the
highlighted show.
÷
62 Copyright ('02004 TOSHIBA CORPORATION. All rights reserved,
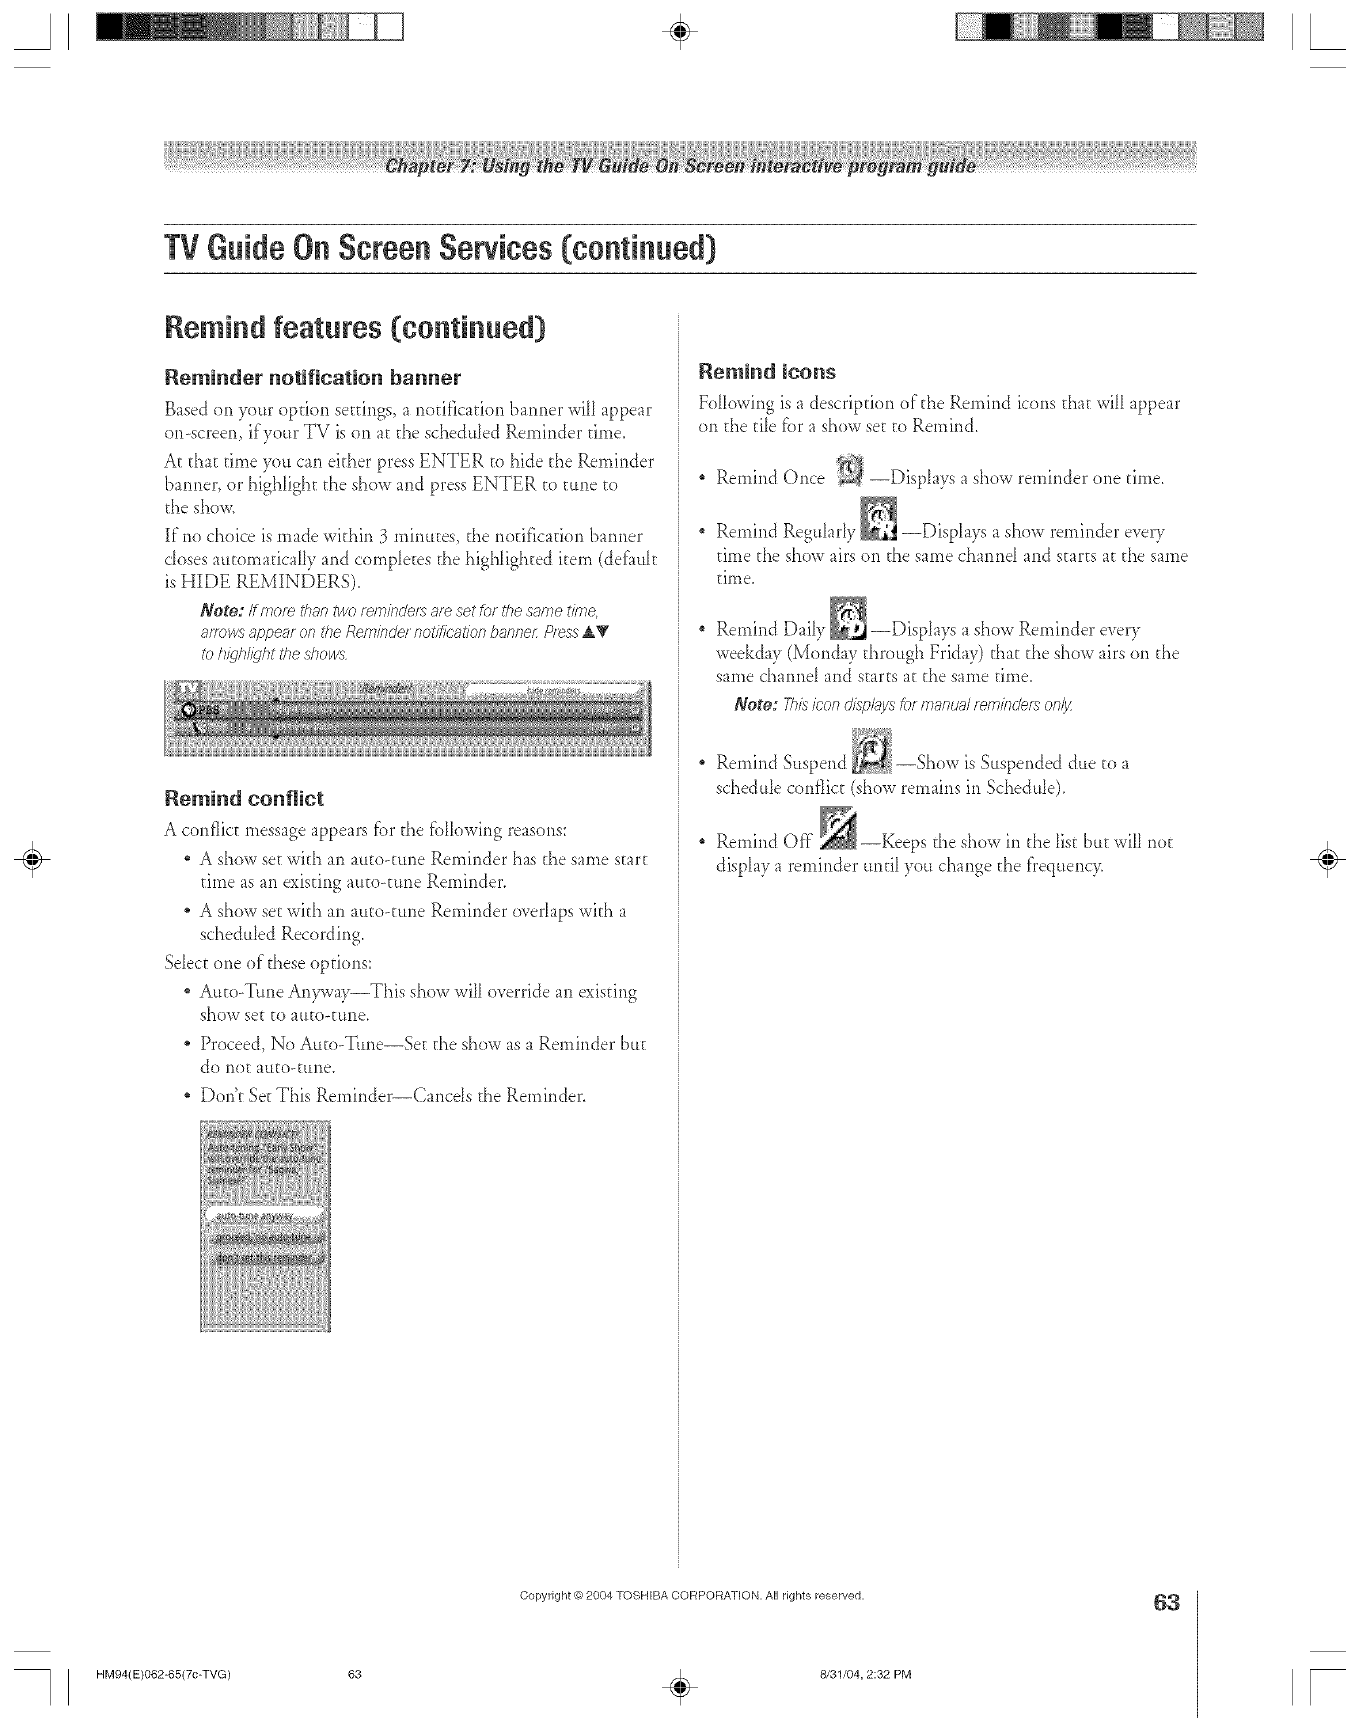
A÷ L
TVGuideOnScreenServices(continued)
Remind features (continued)
Reminder notification banner
Based on your option settings, a rlotification banner will appear
or>screen, if'yottr TV is on at [}'_escheduled Remirlder time.
A[ that time 7)u can either press ENTER to hide the Reminder
barmer, or highiigh[ the show and press ENTER to rune to
t}',eshow.
If"no choice is made within 3 minutes, the rlodficatior_ barmer
doses atltoma[icaHy and comp_e[es t}',e}',igh_ighteditem (def_mk
is HIDE REMINDERS).
Note: If more tka. two _wninde_ af_ set &_ the s_me fffne,
8FTOWS8p[)e_lf OFt 177ef_ef,q/rlr.!el rlo_/f/(;L_tiof? b_nnei:P/ossA_f
toh_l/@htthed?o_s
Remind confJict
A conflict messageappearsfbr the fbHowing reasons:
. A show setwkh an at_to-t_meReminder hasd_esamestart
time as an existing au[o<mle Reminder.
A show set with an al4o-tune Reminder ovdaps with a
scheduled Recording.
Sdec[ one of"these options:
Au[o-Ttme Ar4_vay--This show will override an existir_g
ShOW set to atlto-tttne,
Proceed, No Au[o-Ttme--Se[ d_eshow as a Reminder bttt
do llOt atl[o-ttlne.
* Dodt Set This Remir_der--Cancds the Reminder.
Remind icons
Following is a descriptiorl of the Remind icons that will appear
on the tile fbr a show set to Remind.
" Remind Once --Displays a show reminder one time.
Remirld Reg_tk_rly_ --DispIays a show reminder every
time the show airs on the same charred and starts a[ the same
time.
Remind Daily _ --DispLays a show Reminder ever)
weekday (Monday through Friday) that the show airs on the
same channd and starts at the same time.
Note: >is icon disploya fo_ manuel _er,nirlde_ onl_z
Remind Stt._ --Show is Suspended dtte to a
schedule conflict (show remains in Schedule).
Remind Off the show in the list but will riot
display a reminder un[i_ you change the f}'eqttency. ÷
Copyright © 2004 TOSHIBA CORPORATION, AJl rights reserved. 63
HM94(E)062-65(7c-TVG) 63 q_ 8/31/04, 2:82 PM r
TVGuideOnScreenServices(continued)
SETUP screen
After you cornpIete the inkiaI TV Guide On Screen setup (as
described in Chapter 5), you can change the fi._Howingsettings:
" Change system settings
" Change channd dispL_5,
* Change det_aukopuons
Highlight a choice, press ENTER, and fbllow the on-screen
instructions.
With SETUP highIighted in the Service Bar, press INFO to
dispk9, a hdp screen. Press INFO again to dose the screem
Change channel disNay
This option allows you to edit channd infbrmation that appears
in LISTINGS, including the fi_llowing:
* Reorder the position the channds appear in LISTINGS.
* Change the "tunechamlel" number.
Note: The"tunechannd"/} flTechannd on wh/cbyoureceive
astation Fo/examp/< two viewers/n the same z/_; code may
moe/ve fl_esame station on d/_emnt channel numbe[_,
depending on whether they have Cabb serv/be of am t_/bg a
cable box
* Switch a channel to one of the following seuings:
-On (channd is ahvays displayed in LISTINGS)
-Off (charmel is never displa.ved in LISTINGS)
- Auto-Hide (channd isdisplayed in LISTINGS only
when program infbrmation is availabb)
1. From the SETUP screen, highlight CHANGE CHANNEL
DISPLAY and press ENTER.
÷
Chaage system settiags
This option appears only after you have compbted the initial
TV Guide On Screen setup process (as described in Chapter 5).
1. From the SETUP screen, highlight CHANGE SYSTEM
SETTINGS and press ENTER.
2. Press ENTER again to display the Grid Options pand
llleilu,
3. Highlight one of the opuons, press ENTER, and follow the
on-screen instrucdons,
2, Press ENTER again
to display the
Confirming Your
Settings screen.
3. Highlight one of the
options, press
ENTER, and fbllow
the oil-screen
instrucdons,
64 Copyright ('02004 TOSHIBA CORPOF/A7 ION. All rights reserved,
HM94(E)06_ "65(70-TVG) 64 _ 8/31/04, 2:33 PM [
A÷ L
TVGuideOnScreenServices(continued)
SETUP screen (continued)
Change defauR options
This option allowsyou to change defiuflt settings in the
fbHowing categories:
, Genera_ Defluk Options
" Record Defluks
" Remind Defiuks
General default options
1. From the SETUP screen, highlight CHANGE DEFAULT
OPTIONS and press ENTER.
Record defauRs
1. From d_e SETUP screen, highlight CHANGE DEFAULT
OPTIONS and press ENTER.
2. Highlight RECORD DEFAULTS and press MENU to
display the Record Defauks pand menu.
2. Highlight GENERAL DEFAULT OPTIONS and press
MENU to display the General Defimlt Options pand
111entt,
Enter the required infilrmafion in the pand menu fields
(start time, end time, recorder choice, how long [o keep a
Record event, the quality of the recording). See "Record
fbatures" oi1 page 60 fbr de[ails on entering values in these
fidds.
When finished, press ENTER to highlight DONE, and
press ENTER again to dose the merm and accept the
changes (or highlight CANCEL [o close the menu wkh
no changes).
Remind defauRs
1. From d_e SETUP screen, highIigh[ CHANGE DEFAULT
OPTIONS and press ENTER.
2. Highlight REMIND DEFAULTS and press MENU to
display the Remind Def_mks pand menu.
÷
3. Enter the following iIdbrmafion in the pand menu fidds:
BOX SIZE: The inkial Infil Box size when you open the
TV Guide On Screen system. Choices are No, Small
(de_mk), Large, and Last Used.
BOX CYCLE: The Infb Box size rotation wher_ you press
[NFO oi1the remote central when d_eTV Guide On
Screen system is open. Choices are No Orfl> Small Oili>
Large Orfl> No &Small, No & Large, Small & Large,
and All (def_mk).
" AUTO GUIDE: Automatic entry into the TV Guide On
Screen system when d_eTV is powered oi1. Choices are
01t (defiu*k) and Of£
Noge:.gettheAUTi9GU/DEtoOffff you donotwnntthe
TVGuideOnSoftensystem to opeslevesyt/1778vrptJttJrfl
on#_eTI/
3. Enter the required information in the pand menu fields
(power On TV, auto-tune, when [o display the Remind
screen). See "RemirldDatures" oll page 63 tilt details oi1
entering vahles in d_ese fields.
4. When finished, press ENTER to highlight DONE, and
press ENTER again to dose d_emenu and accept the
changes (or highlight CANCEL to close the menu with
no changes).
4. When finished, press ENTER to highlight DONE, and
press ENTER again to dose the menu and accept the
changes (or highlight CANCEL to dose the menu with no
changes).
Copyright O 2804 1"OSHIBA CORPORATION, All rights reserved. 65
HM94(E)O62-65(7c-TVG) 65 _ 8/31/04, 2:33 PM r
A÷ L
SeJectingthe video input source to view
To select the video input source to view:
1. Press INPUT on the remote contrd or TV/VIDEO on d_e
TV ffon_ pand.
2. Press 0-7 to se[ec_the inpu_ source you want to view,
depending on which input jacks 3xmused for connecting your
devices (seeChapter 2).
The current signal source displays in d_etop right corner of
the INPUT SELECTION screen.
off
6¢/_o 2q
_F O_[orSi;_ort_ /D_
HL/MI
Note:
• While the IsTputSelection sc/een is open, you a/8o can _se the _,T
buttons on the f_mote cofTtf()/ (OF the Ohannd_ bu_ons on the
front pan@ to d?ange the/TIpU[
•While 171eInput Sel_clYonsc/_en/:s not open you can _epeatedly
press the/NPUTbutton of 7the f_/note con?m/ot the F1//V/DEO
button of?the TV front pand to d_afwe the if¢)u£
• 21selectan/EEE Z394 bputsouroe, press the Theater?Jet
DEVICF buttof7 of? the ;_mote cont/d (see page 26 & 44)
•ffan IEEE 1384 device is the ctJlT_nt klput, it will aN;eat at the
bo_ofTi of the input Sebct/on ilL,thoweve/; it will be f_/nol/ed f/otFi
the listif?he bput soufc'e is dTae_'ed
• X_u can/abd the video bput soumes accofdieg to the spec'i_L"
devk;es you have connected to the T1/(see next pngej
•Tile soume can be 'Ttidden" See page 67 tot debris
•ffyou t___ethe TI/_ t_rnote contld to st_ff?recording, you wi//not
be abb to change if?putsdtJdng f_Coldie 9'
ff you use a device other than the 71/_ ?emote centre/to start
f_cordied and then change bpu_s, the t_corded atJdio and video
may be affected
Numbers
INPUT
A
Remote control
W/VIDEO CHANNEL _'A
TVfront touchpad
POWER
÷
6
HM94(E)068 75(8a-UseTV)
Copyright @ 2004 TOSHIBA COFtPORA] ION. All rights reserved,
66 _ 8/31/04, 2:36 PM [
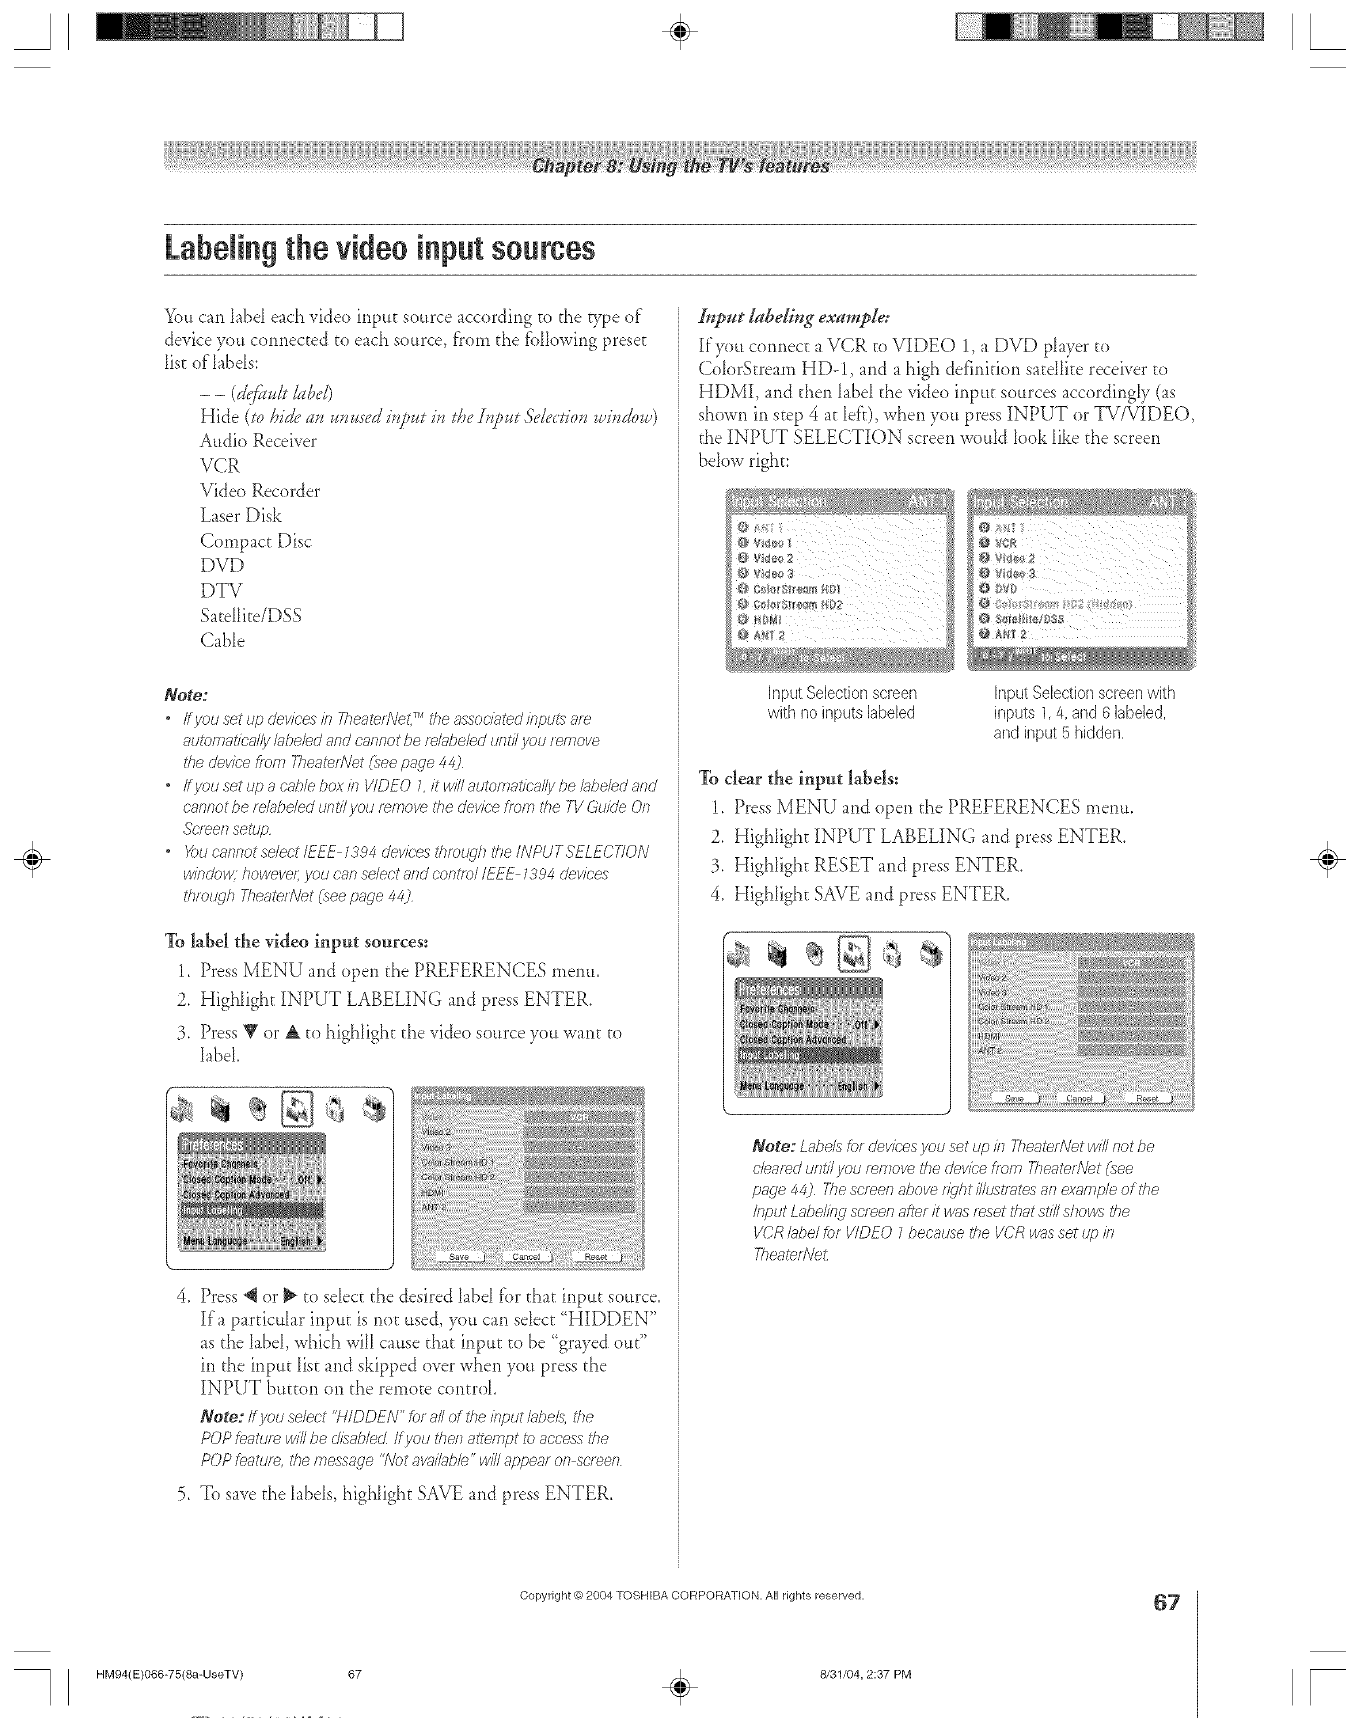
A÷ L
LabeJingthe videoinputsources
You can labd each video input source according co the B,_>eof
device you connected to each source, from the tbHowing preset
list of'labds:
- - (d<fk.ll&Dd)
Hide (soDideuss...sed i.t.,._ i. lDeS.t.,._.$'ele_do._Ji.dow)
Audio Receiver
VCR
Video Recorder
Laser Disk
Compact Disc
DVD
DTV
Sacdlite/DSS
Cable
Note:
•If you set up devices in Theater?\let,Tr_the associated inputs _ee
automatically lilbebd and cannot be fe/uDeled urlU/you remove
the devk'e from Tl?eaterHet (see page 44)
•If you set up acable box in WDEO Lit will automatically be labeled and
c'r;,nnotbe re/obe/ed Ur]ti/ yOU r_ITTOV_ the device frenl the TV Guide On
Sc'I_eslsetup
• X_ucnllnot select IEEE 1394 devices thmlKqh the INPUTSELECTION
windobx howeve/; yau can select and contie/ IEEE 7394 Uevices
thiolLqh TheateetJet (see page 44)
To label the video input sources:
1. Press MENU and open the PREFERENCES menu.
2. Highlight INPUT LABELING and press ENTER.
3. Press _' or & co highlight the video source you want to
label
>Press _llor 1_to select the desired label for that input source.
If a particular input is nor used, you can select '<HIDDEN"
as the label, which will cause chat input co be '<grayedout"
in the input Iiscarid skipped over when you press the
INPUT button on the remote control.
Note: ff you select "HIDDEN" for all of the input/abe& U)e
POP feature wi2be c/isab/ecLif you theft attempt to access the
POP featur_ rite message "Not avnl7Jble"w12appear on street7
5. To save the labels, highlight SAVE and press ENTER,
Input labeling example:
If you connecE a VCR to VIDEO 1, a DVD player to
ColorScream HD-1, and a high definitkm sateIlite receiver to
HDMI, and then label the video input sources accordingly (as
shown in step 4 at left), when you press INPUT or TV/V{DEO,
the INPUT SELECTION screen would look like the screen
below right:
InputSelectionscreen
with no inputs labeled
Input Selection screen with
inputs 1,4, arid 6 labeled,
and input 5 hidden,
To clear the input labels:
1. Press MENU and open the PREFERENCES menu,
2. Highlight INPUT LABELING and press ENTER.
3. Highlight RESET and press ENTER.
4, Highlight SAVE and press ENTER.
a,* _S
gZN
Note: L_;belsfor devk:es you set up kl 771eaterNetwill not be
cleared unti/ you remove the device Dora TheaterNet (_ee
page 44) The screen above f/}'ht i//ust/ates an example of the
input Labeling sc/een a_er it was reset that still shows the
VCR label _r VIDEO 7because d_e VCR v>_sset up in
Theater#'eL
÷
HM94(E)066-75(8a-UseTV) 67
Copyright _) 2004 TOSHIBA CORPORATION, All rights reserved.
÷8/31/04, 2:37 PM
67
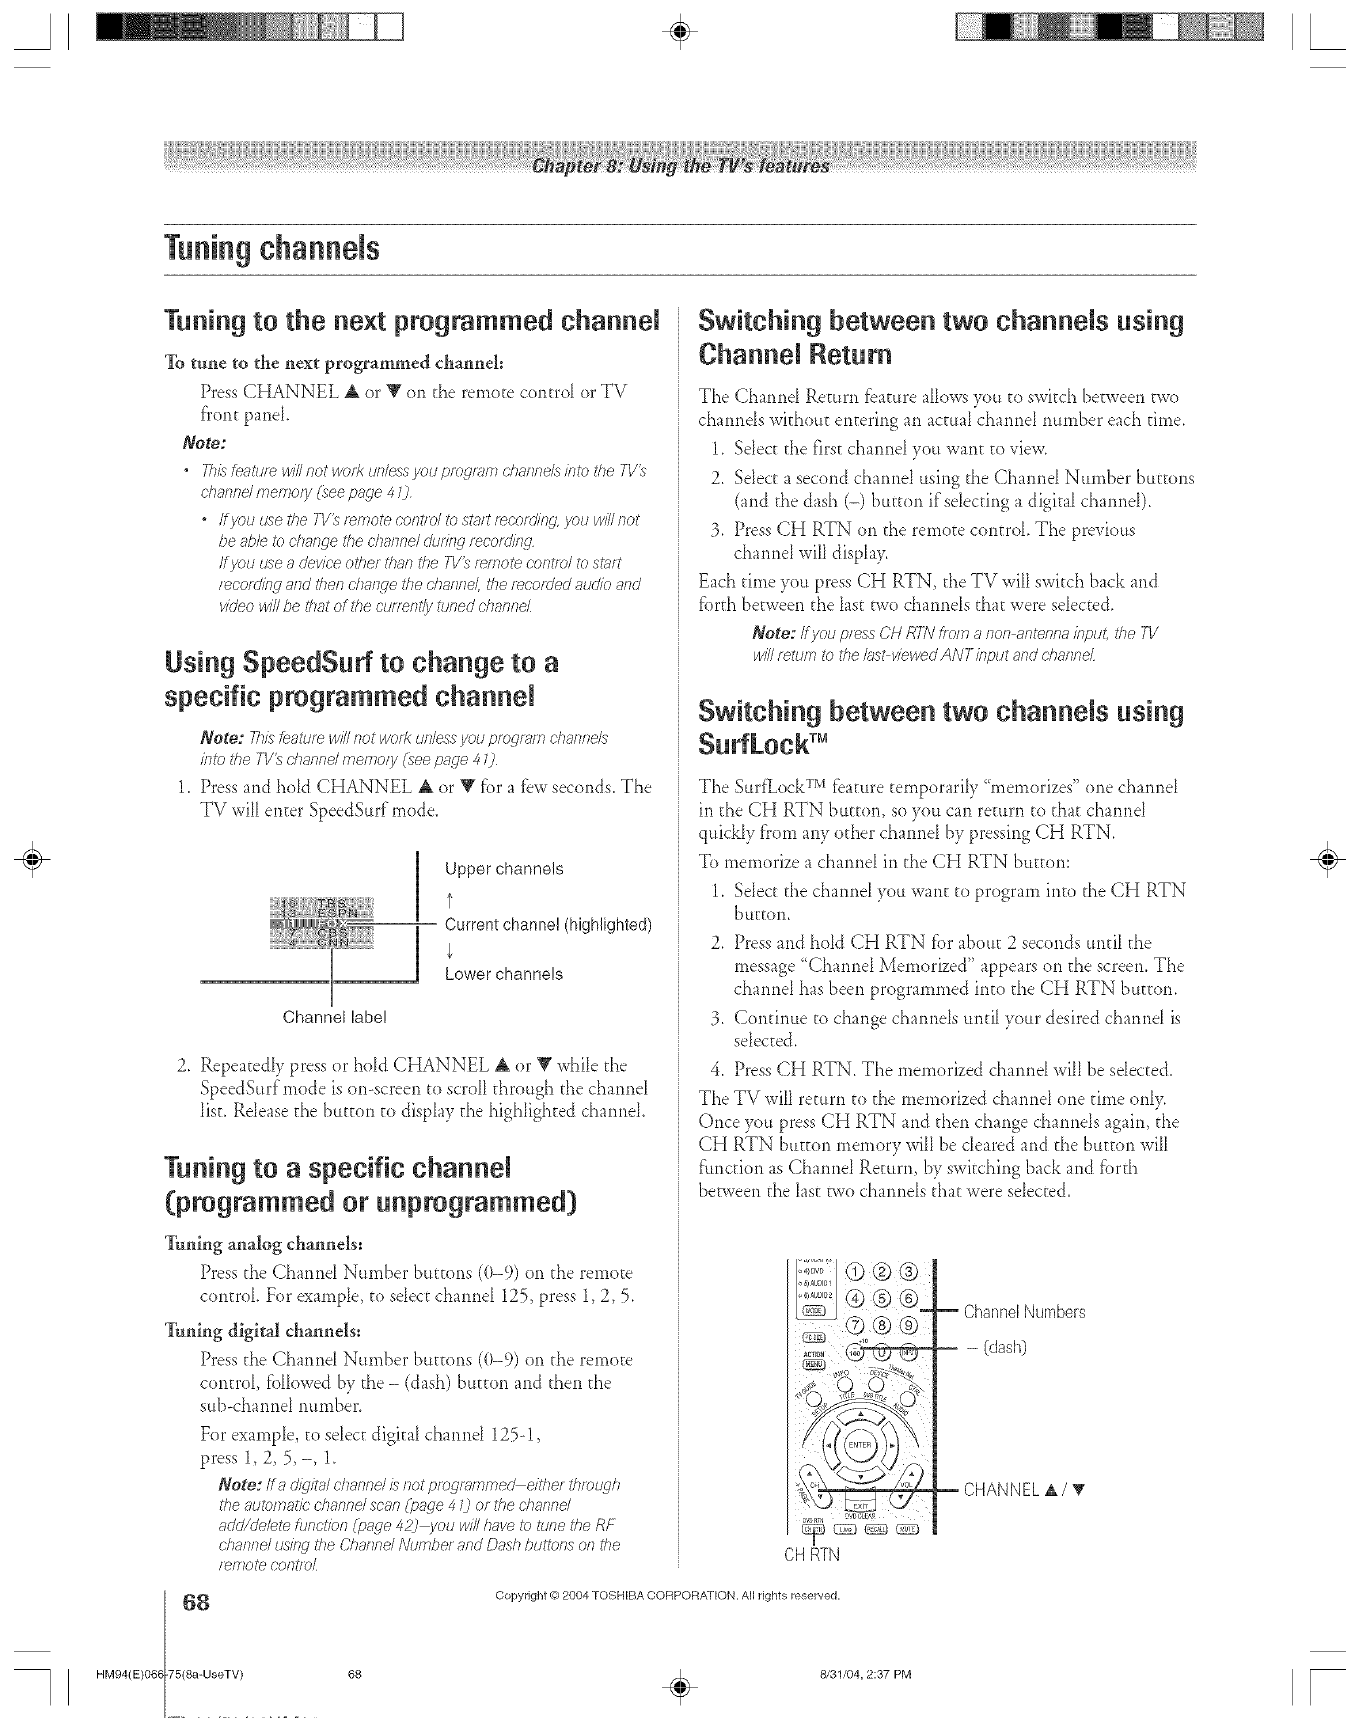
Tuningchannels
Tuning to the next programmed channel
To tune to the next programmed channel:
Press CHANNEL A or V on the remote control or TV
Dent panel,
Note:
•Th/sfem_ui_willnetwer1<unles_yeupregran_channelsintotheTV_
channelmemoly(see page40
•IfyouusetheT1/_r_motecantle/tostrutrecording yau willnot
beableted?ange thedTanne/clu/2Wrecording1
ff yau zz__eadeviceotherthantheT1/3rwnotecent/o/tostart
r_cordinu andtheed?ange thedTarlneLther_cara'edatJdieand
via'cowillbethatall'lie CUrTent/y tuneddTanne/
Using SpeedSurf to change to a
specific programmed channel
Note: 7hisMaturewillnot warJ(unlessyeu pregrT_mcharnels
into the TV_charted menTo/y(seepage 40
1. Press and hold CHANNEL A or T fbr a tbw seconds. The
TV will enter SpeedSurf mode.
[
U
Channel label
Upperchannels
t
Current channel (highlighted)
Lower channels
2, RepeatedIy press or hold CHANNEL ,A or V whiIe the
SpeedSurfmode is on-screen to scroll through the channel
list. Release d_ebutton to display d_ehighlighted channel.
Tuning to a specific channel
(programmed or unprogrammed)
Tuning analog channels:
Press the Channel Number burn)ns ((t-9) on the remote
control For example, to select channel 125, press 1, 2, 5.
Tuning digital channels:
Press the Chanr_eI Number buttons (0-9) on the remote
centre1, tblIowed by the - (dash) buEron and then the
su/>channel number.
For example, to select digital channel 125-!,
press 1, 2, 5,-, 1.
NOte: ira CI/_/tHI channel is not programmed either tlffolLqh
the automatic d?annd scan (page 4 0or tire d?aend
add/debte function f_page42) you win ?}avete Lqne the RF
dlannd usyY@'d?e Channd Nurnbe/ and Dash buFons on the
r_mote cantloL
Switching between two channels using
Channel Return
The Channel Return tbamre allows you to switch beEweentwo
channe[s withouE entering an acma[ chatme[ number each rime.
1. Select the first channel you want to view.
2. Select a second channel using the Channel Number buttons
(and the dash (-) burton if selecting a digital channel).
3. Press CH RTN on the remote control. The previous
channel will display.
Each rime you press CH RTN, the TV will switch back and
fbrth between the last two channels that were selected.
Note: If you press CH R_V fie/n a non antenna input, the 7V
will tettJm to the/as>v/ewedANTk_put and channe_
Switching between two channels using
The St_trfkock TM tbature temporarily "memorizes" one channel
in the CH RTN button, so )ou can return to that channel
quickly from any other channel by pressing CH RTN,
To memorize a channeI in d_e CH RTN button:
1. SeIect the channel you want to program into the CH RTN
bUEEOn,
2, Press and hold CH RTN fbr about 2 seconds until the
message "Channel Memorized" appears on the screen. The
channel has been programmed into the CH RTN button.
3. Continue to change channels until your desired channel is
selected.
4. Press CH RTN, The memorized channel will be selected,
The TV will return to the memorized channel one time only.
Once you press (-;H RTN and then change channels again, the
CH RTN button memory will be cleared and the button will
fimction as Channel Return, by switching back and fbrth
between the last two channels that were seIected.
"__ _ CHANNELa,/T
CHRTN
8
HM94(E)068 75(8a-UseTV)
Copyright @ 2004 TOSHIBA COFtPOBA] ION. All rights reserved,
÷
68 _ 8/31/04, 2:37 PM [
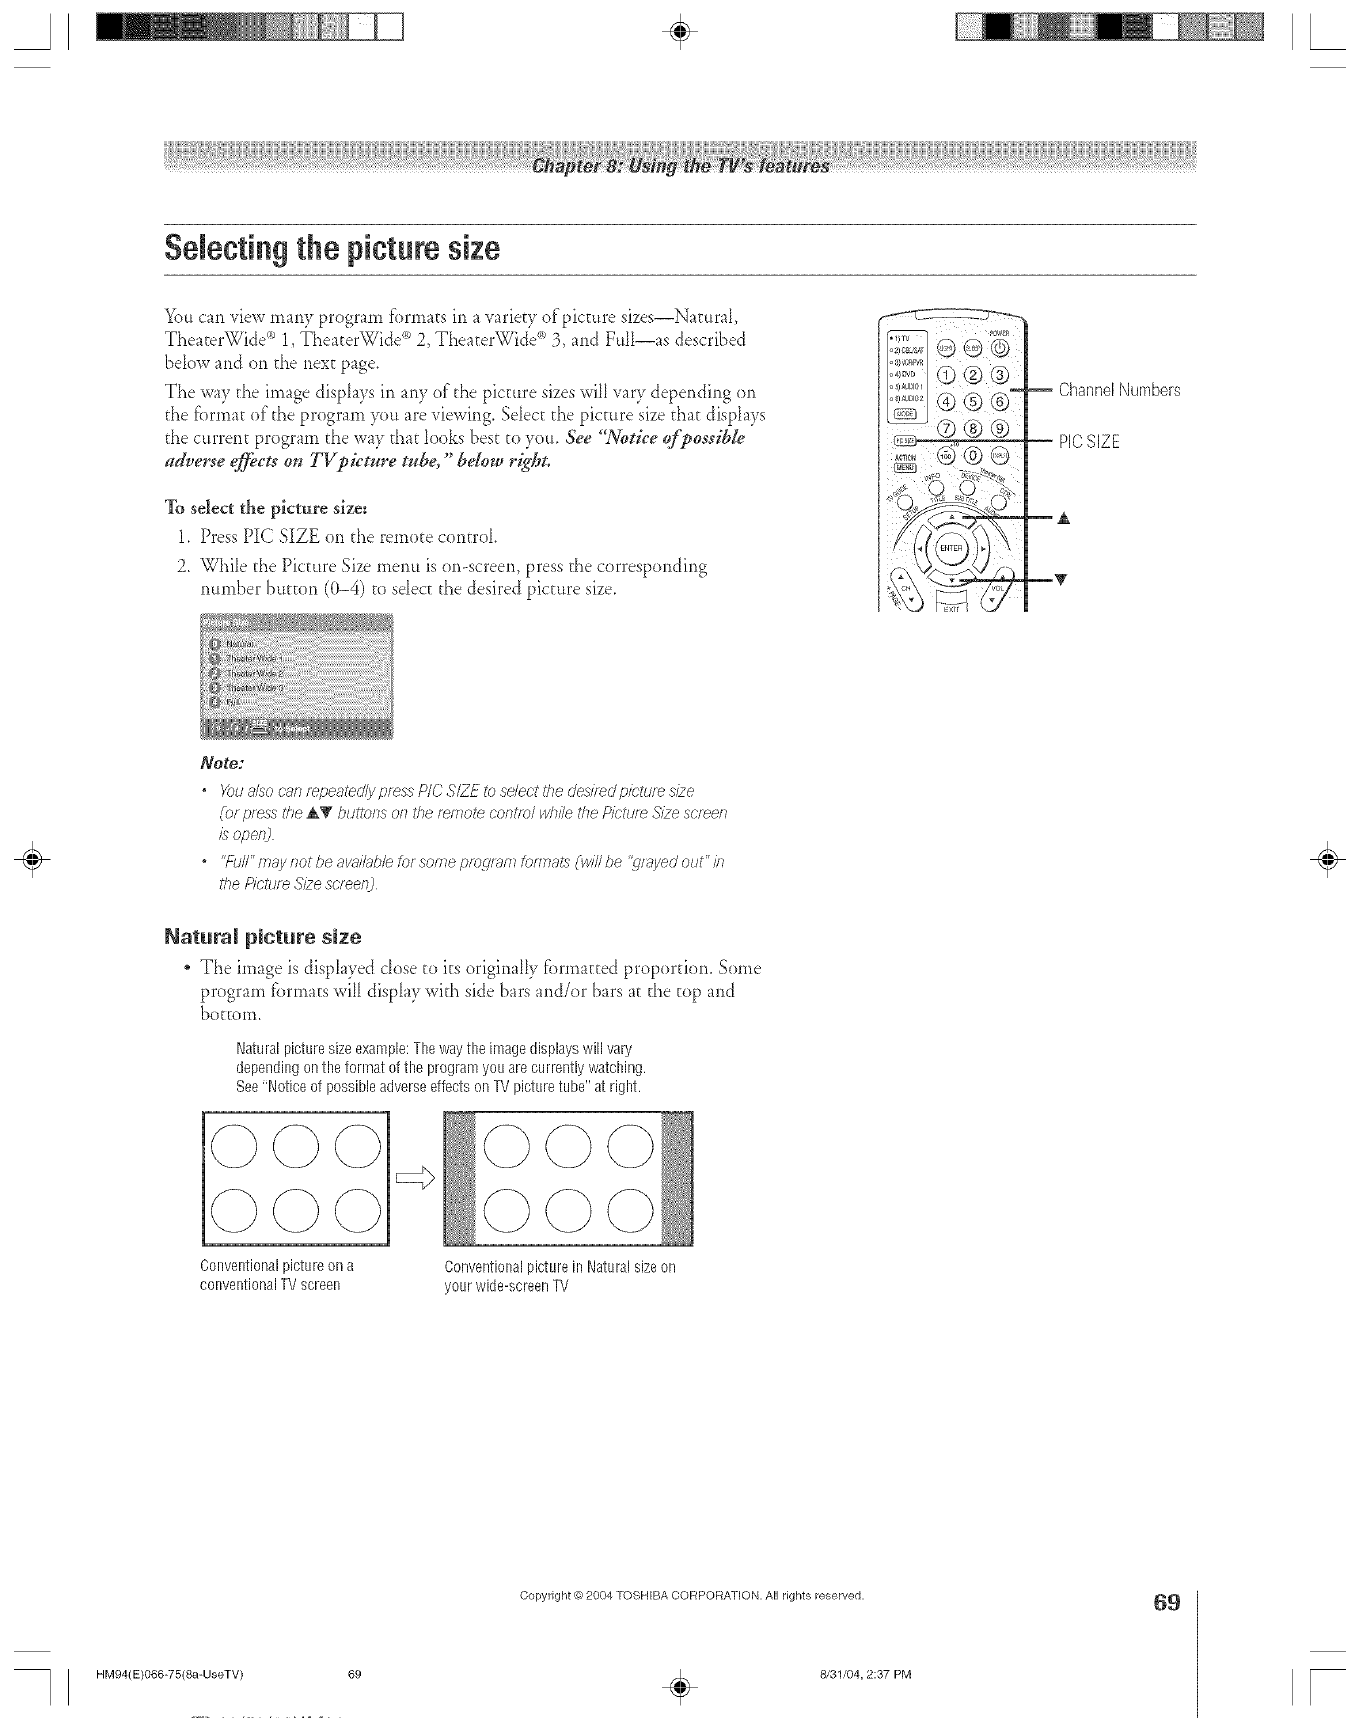
Selecting the picture size
You can view many program fi)rrnats in a varie[y of'picture sizes--Natural,
TheaterWidd* 1, TheaterWidd _ 2, TheaterWidd _ 3, and FttH--as described
bdow and on the rlext page.
The way the image displays in any of the picture sizes will vary depending <)*1
the ibm)at of the program you are viewing. Sdect the pic[<iresize that displays
the current program the way that looks best to you, &e "Notice r_'possib[e
adverse @ets on TVpieture tube," below right.
To select the picture size;
1, Press PIC SIZE <)*1the remote control
2, WhiIe the Picture Size menu is or>screen, press the corresponding
number button ((t-4) to sdec[ the desired picture size.
ChannelNumbers
-- PICSiZE
EA
mT
Note;
• Yourv/socr;,nr_pe_l_d/ypr_ssP/CS/Zf:_se/ect#_edes/r_dpk;'tures/2e
(or press the AY buttons on the remote cent/or while the Picture Size so'teen
isopel_J
• "f-gd"may not be avablb/e tot some progt>m torfnaL_ (:wf//be '_/ayed out" in
i'he Picture S/2eso'teen] ÷
Natutam picture size
. The image is displayed dose to its originally fbrmatted proportion. Some
program formats will display with side bars and/or bars at the top and
bottom.
Natural picturesizeexample:Theway the image displayswill vary
depending onthe format of the program you arecurrently watching.
See'Notice of possible adverseeffects on TV picturetube" at right.
Conventionalpicture on a
conventionalTVscreen Conventionalpicture in Naturalsizeon
your wide-screen TV
HM94(E)O66-75(8a-UseTV) 69
Copyright _) 2004 TOSHIBA CORPORATION, All rights reserved.
÷8131/04, 2:37 PM
69
F
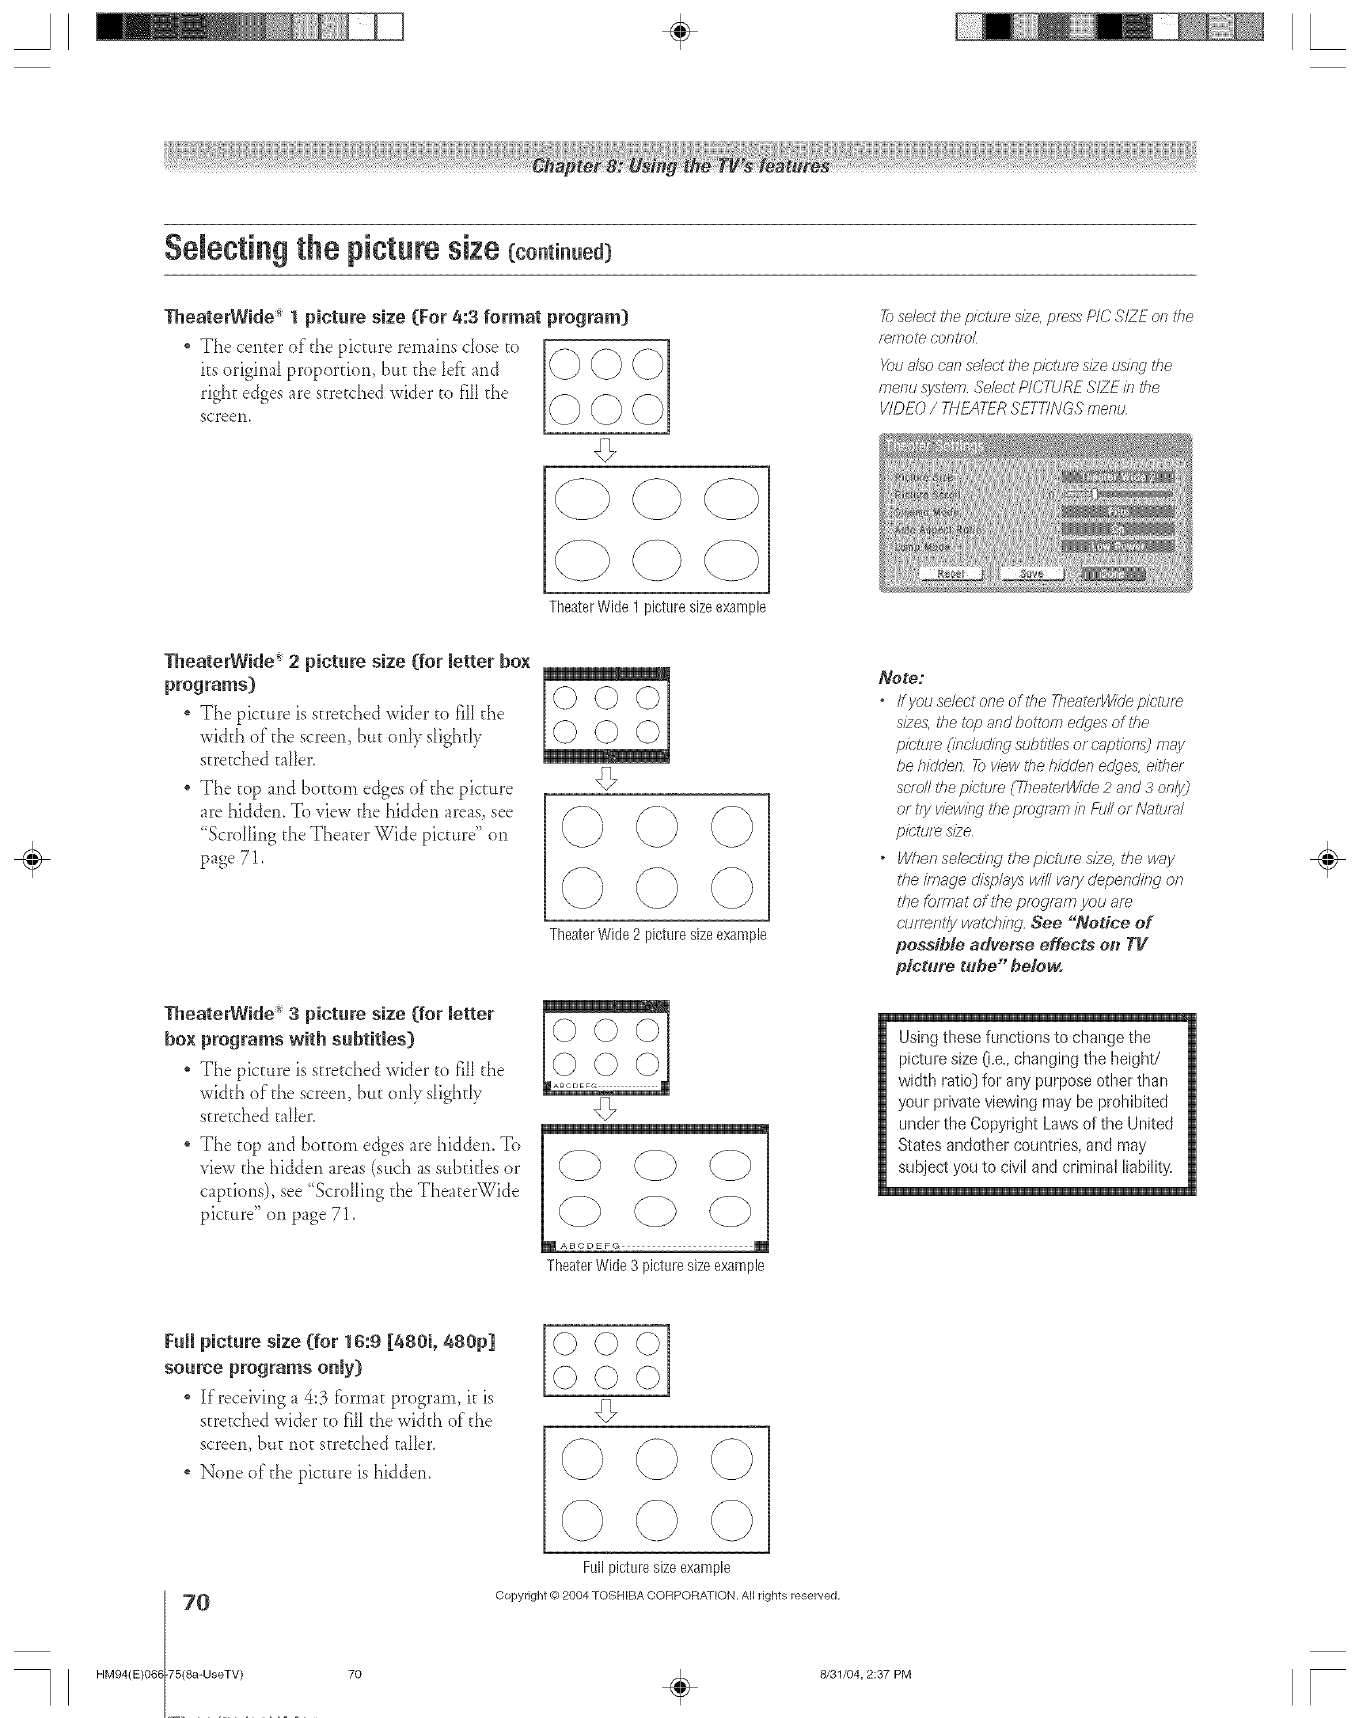
A÷ L
Selecting the picture size (co.ti..ed)
* The center of'tbe picture remains cIose to
its origbml proportiom bttt the lef'r and
rigbt edges are stretched wider to fiiI the
screen,
lheaterWide _ 1picture size (For 4:3 format program) 21select the picture s/2e,press P/C SIZE on the
r_mote control
X_ua/so can select the p/ettJr_ s/2e using the
menu sy:_tem Sehct PICTURE SIZE in the
VIDEO / TNEATER SETF/NGS mentz
TheaterWide 1 picture sizeexample
TheaterWide 2picture size (for letter box
programs)
The picture is aretcbed wider to fiII the
wi&h of the screen, but only s_igbdy
stre;ched taller.
* The top and bottom edges of the picture
are biddem To view the bidden areas, see
"Scrolling the Tbea[er Wide picture" on
page 71,
TheaterWide 3picture size (for letter
box programs with subtitles)
The picture is s[re_chedwider to fill the
wi&b of the screen, but only sbgh@
stre[cbed taller,
The top and bo_[om edges are hiddem To
view the bidden areas (such as subritles or
captions), see "Scrolling the TheaterWide
picture" on page 71,
TheaterWide2 picture sizeexample
TheaterWide 3 picture size example
Note:
•/fyouse/ectooeofthe TheaterWhlep/cture
s/2es, the _bp and bottom edges of the
pictur_ ([r_ohJcJir_ffsl_btitles or c'apt/orls3 may
be hhldell _view the hidden edges, either
scroll the picture CYheaterWhle2 aod 3 on/y)
or tryviewing the pfOglFff?? brid//Of N_UtJ/_II
pietur_ size
•When sehclir W the p/r:l_Jm s/2e, the way
the image displays will vary depend/r W on
the format of he pmgrs, m you am
(-tuTerTI/ywat(;,hhW See "Notice of
po&sib[e adverse effects on TV
picture tube" be!ow.
Using these functions to change the
picture size (i,e,, changing the height/
width rati@ for aw purpose other than
your private viewing may be prohibited
under the Copyright Laws of the United
States andother countries, and may
subject you to civil and criminal liability,
÷
FuRpicture size (for 16:9 [480i, 480p]
source programs oNy)
" Kreceivirlg a 4:3 f'orma_program, it is
stretched wider m fii[ the wi&h of"the
screen, bu[ rlo[ stretched taiier,
None of the picture is hiddem
©OO
O
HM94(E)068 75(8a-UseTV)
Fullpicturesize example
Copyright (0 2084 TOSHIBA CORPORATION. All rights reserve_d,
70 _ 8/31/04, 2:37 PM [
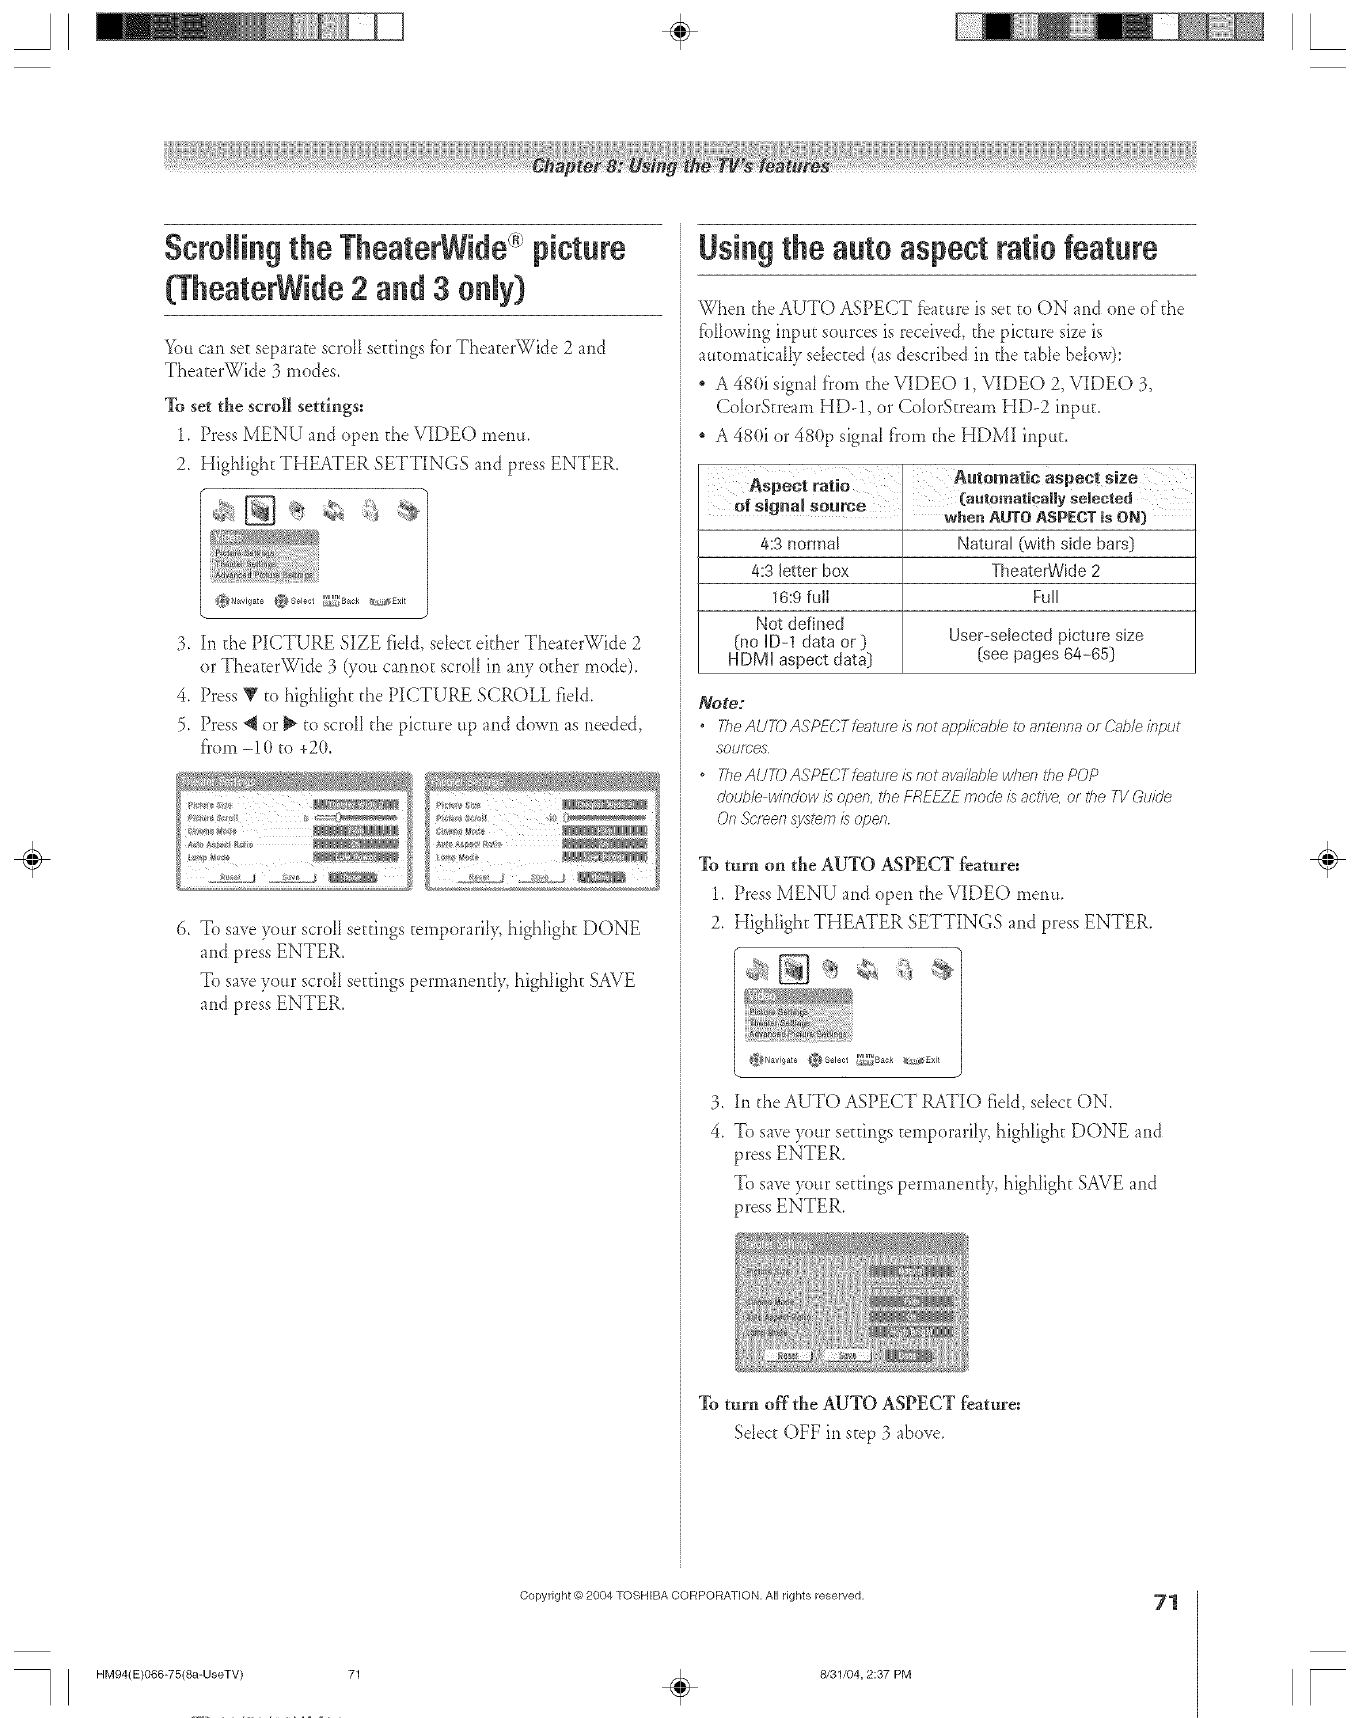
8crNlingthe TheaterWide picture
(TheaterWide2 and 3oNy)
You can set separate scroll settings for TheaterWide 2 and
TheaterWide 3 modes.
To set the scroll settings:
1. Press MENU and open d_eVIDEO metal.
2. Highlight THEATER SETTINGS and press ENTER.
Usingthe auto aspect ratio feature
When the AUTO ASPECT fbature is set to ON and one oldie
fbllowing input sources is received, the picture size is
automatically sdected (as described in the table below):
A 480i signal from d_eVIDEO 1, VIDEO 2, VIDEO 3,
ColorStream HD-1, or ColorStream HD-2 input.
A 480i or 480p signal from the HDMI input.
3. In the PICTURE SIZE fidd, sdect either TheaterWide 2
or TheaterWide 3 (you cannot scroll in any other mode).
4. Press Y to highlight the PICTURE SCROLL rid&
5. Press 4 or _ to scrolI the picture tip and down as needed,
fi'om -10 to +20.
;'i_ a* {>
6. To save your scrolI settings temporarily, highlight DONE
and press ENTER.
To save your scrolI settings permanendy, highlight SAVE
and press ENTER.
4:3 normal Natural (with side bars]
4:3 letter box TheaterWide 2
16:9 full Full
Not defined
(no ID-1 data or ) User-selected picture size
HDMI aspect data] [see pages 64-65]
Note:
•TheAU7-OAgPFCTfe_tumisr_otapp/ic;_bletoantennaor(?;_hleinput
SOtJfC_S
, 2_eAUTDASPECTfeatum is notawti/able when the POP
double window/s open, the FREEZE mode is active, of the TV Guide
Of? ._cl_e/l system iS ape/7
% turn on the AUTO ASPECT feature:
1, Press MENU and open the VIDEO metro,
2, Highlight THEATER SETTINGS and press ENTER.
3. In the AUTO ASPECT RATIO rid& select ON.
4_ To save your settings temporaril> highlight DONE and
press ENTER.
To save your seuings permaner_dy, highlight SAVE and
press ENTER.
To turn off the AUTO ASPECT feattu:e:
Sdect OFF in step 3 above.
÷
HM94(E)066-75(8a-UseTV)
Copyright @)2004 TOSHIBA CORPORATION, All rights reserved.
÷8/31/04, 2:37 PM
71
A÷ [
Selectingthe cinema mode
(48( i signalsoNy)
When you view a DVD (480i signal; 3:2 pulldown processed)
f}'oma DVD phyer connec(,ed (,othe ColorStream HD1/I-ID2
(componen(, video) or HDMI inputs <1,1the TV, smoo(,her
mo(,ion can be ob(,ained by se(,(,ingthe CINEMA MODE to
FILM.
%set the CINEMA MODE to FILM=
1. Press MENU and open the VIDEO menu.
2. Highlight THEATER SETTINGS and press ENTER.
3. In the CINEMA Iv{ODE field, select FILM.
4. To save ylur se(,ringstemporarily, highlight DONE and
press ENTER.
To save your se(,rings permanen(,ly, highligh(, SAVE and
press ENTER.
To set the CINEMA MODE to VIDEO:
Sdect VIDEO in step 3 abo_e.
Selecting the lamp mode
You can select either the HI BRIGHT or LOW POWER hmp
li]ode,
The HI BRIGHT mode is usdhl when addMonal picture
brigh(,nessis desired (such as ii1 a brigh(, room).
The LOW POWER mode re&tces wear on the projection
lamp. Using d_is mode should resuh in h)nger hmp lifb.
See "Lamp uni(,rephcement" on page 98-!00.
To select the lamp mode:
1. Press MENU and open d_eVIDEO memt.
2. I Iighligh(,THEATER SETTINGS and press ENTER.
3. hi d_eLAMP Iv{ODE field, select HI BRIGHT or LOW
POWER, whichever you prefbr.
4. To save ylur se(,ringstemporarily, highlight DONE and
press ENTER.
To save your ser(,ingspermanentl> highligh(, SAVE and
press ENTER.
÷
2
HM94(E)068 75(8a-UseTV)
Copyright (-c)2084 TOSHIBA COFtPORA_ ION. All rights reserved,
72 _ 8/31/04, 2:38 PM [
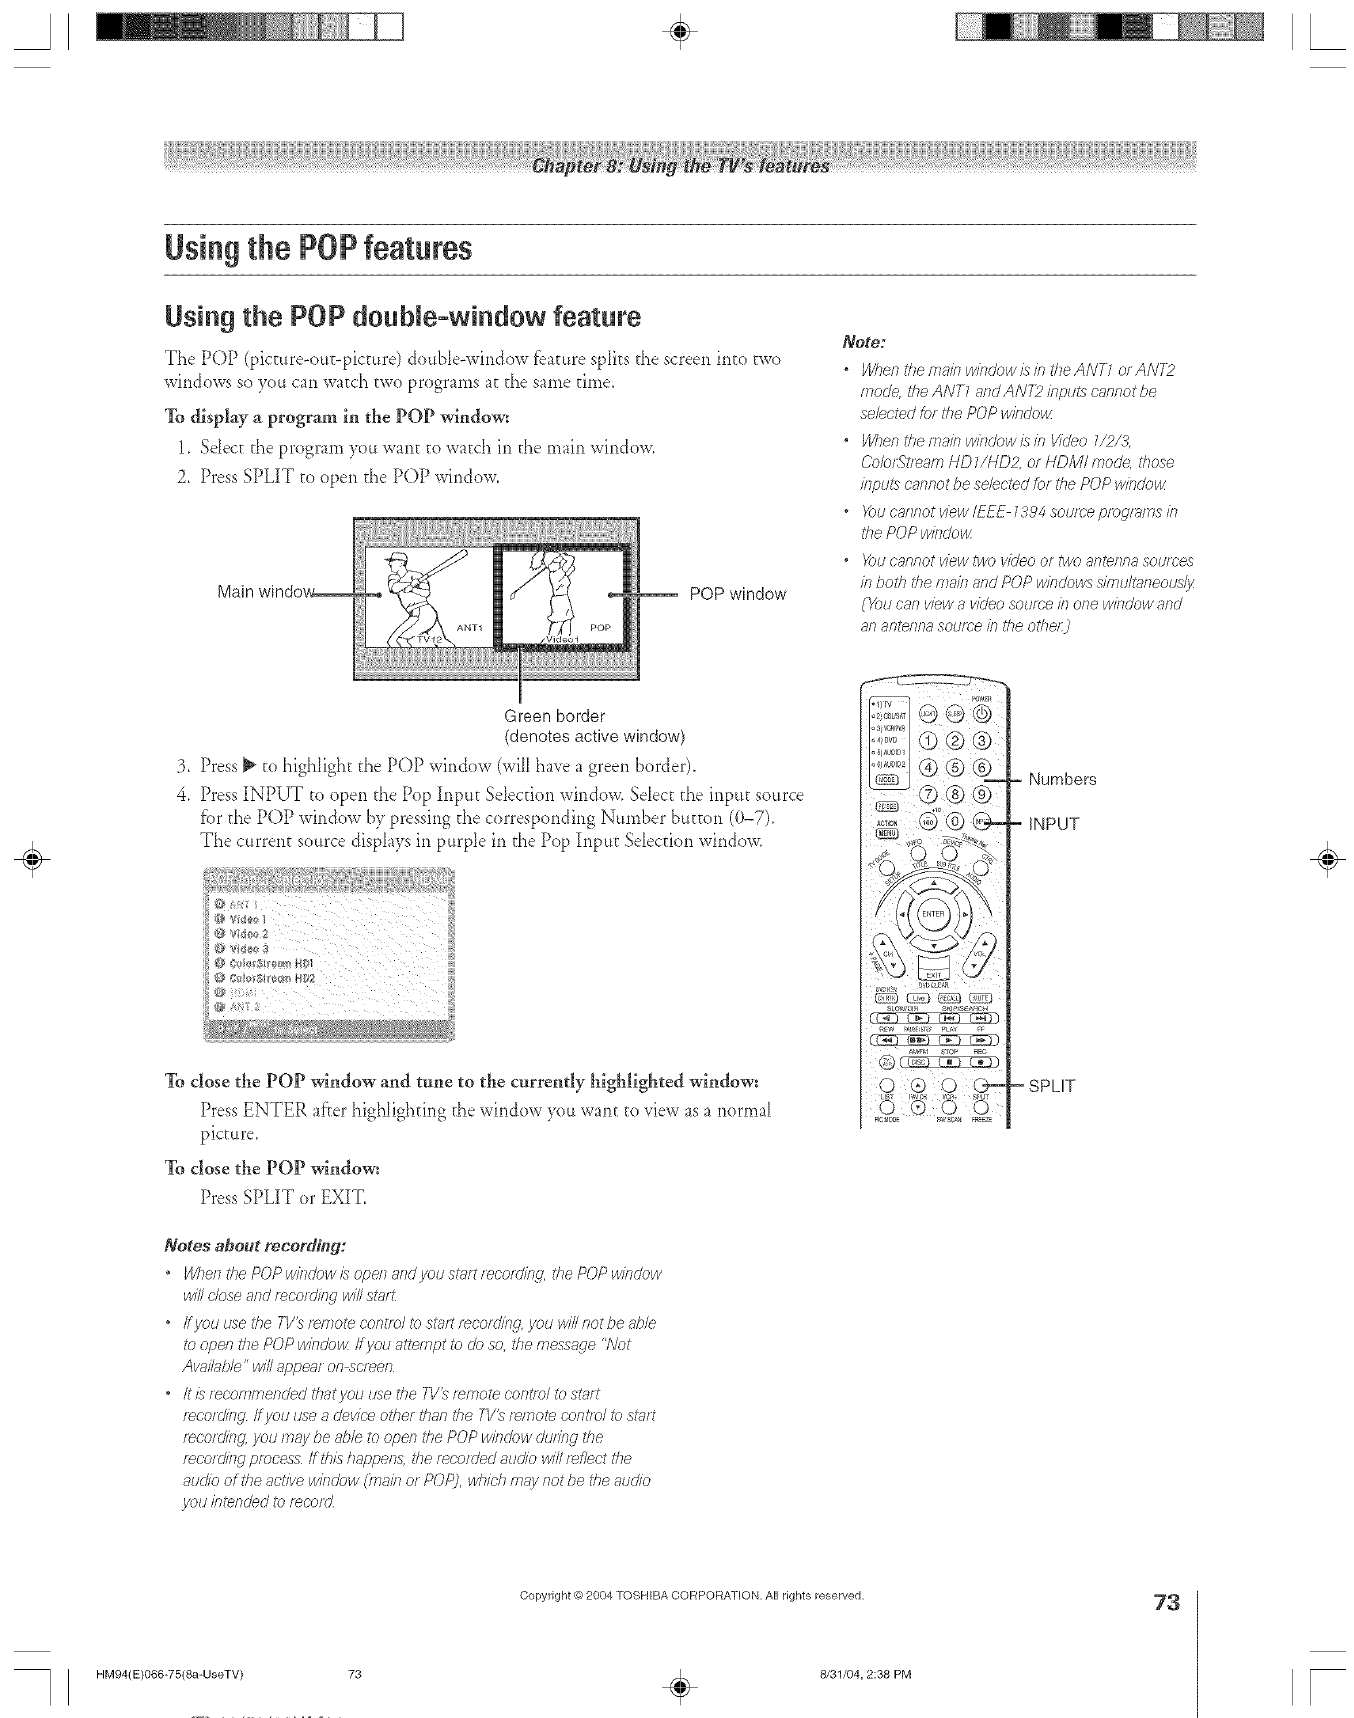
Using the POPfeatures
Using the POP double=window feature
The POP (picture-ottt-picture) double-wirldow feature spIits the screen into two
windows so you can watch two programs at the same time.
To display a program in the POP window:
1. Select the program yott want to watch in the main window.
2. Press SPLIT to open the POP window.
Main POP window
Greenborder
(denotes active window)
3. Press _ to highlight d_ePOP window (will have a green border).
4, Press INPUT to open the Pop hlpttt Sdecdon window. Select d_einput sottrce
fbr the POP window by pressing d_ecorresponding Number button (0-7).
The current source displays in purple in the Pop Input Sdecdon window.
/i_._i_'! ¸_¸¸'_ • • _ • _ • _
To close the POP window and tune to the currently highlighted window:
Press ENTER after highlighting the window yo, want to view as a r_orma[
pictttre_
To close the POP window:
Press SPLIT or EXIT.
Notes about recording:
*When the POP window is open and you st;lrt recordird, the POP window
win close and r>cuding will sturt
" Ifyou use the TV_ r_/77otecontrol to sl??rtr_cord/ng, you will not be d_le
to operl the POP window ff you a_empt to do so, the message "Not
Avai/ub/e" win appear on_cmen
,/tl} recon?mended thatyou use the TI/'_ remote cent/el to start
r_cord/i.sg ff yOtJuse a device other dian tile TV_ r_/note control to sl?lrt
r_cordiRg, yOUInay be able to open the POP window du/fng the
recording process If this happen& die recorded auofo will r_f/eot tlie
audio of the active window (inak7 or POP), whMI may horde the audio
_/()tJbtended _br_corcL
Note:
*Wher_theniainwirsdowisintheANT1 orAIVT2
mode, the ANT7 arid AN72 ieptA5 cannot be
selected tot fl}e POP windo_
oWhen thema/n wiiidowisin Video 1/2/3,
(-.'o©rStl>am HD 7/NDZ or HDM/ mode, those
illput,._cannot be selected fer the POP window
* _)U caflnot ViewIEEE 1394 sotJlc'e programs b
the POP window
oYoucannot view two video or two antenna soumes
b both the main and POP windows s//71L_lt_neotas/3_
(You can view avideo soume b one window and
an alrterlna soume b the ethel:)
(Ca-) _ C¢-3_j
©
Numbers
INPUT
'SPLIT
÷
HM94(E)066-75(8a-UseTV) 73
Copyright O 2004 TOSHIBA CORPORATION, All rights reserved.
÷8/31/04, 2:38 PM
73
[
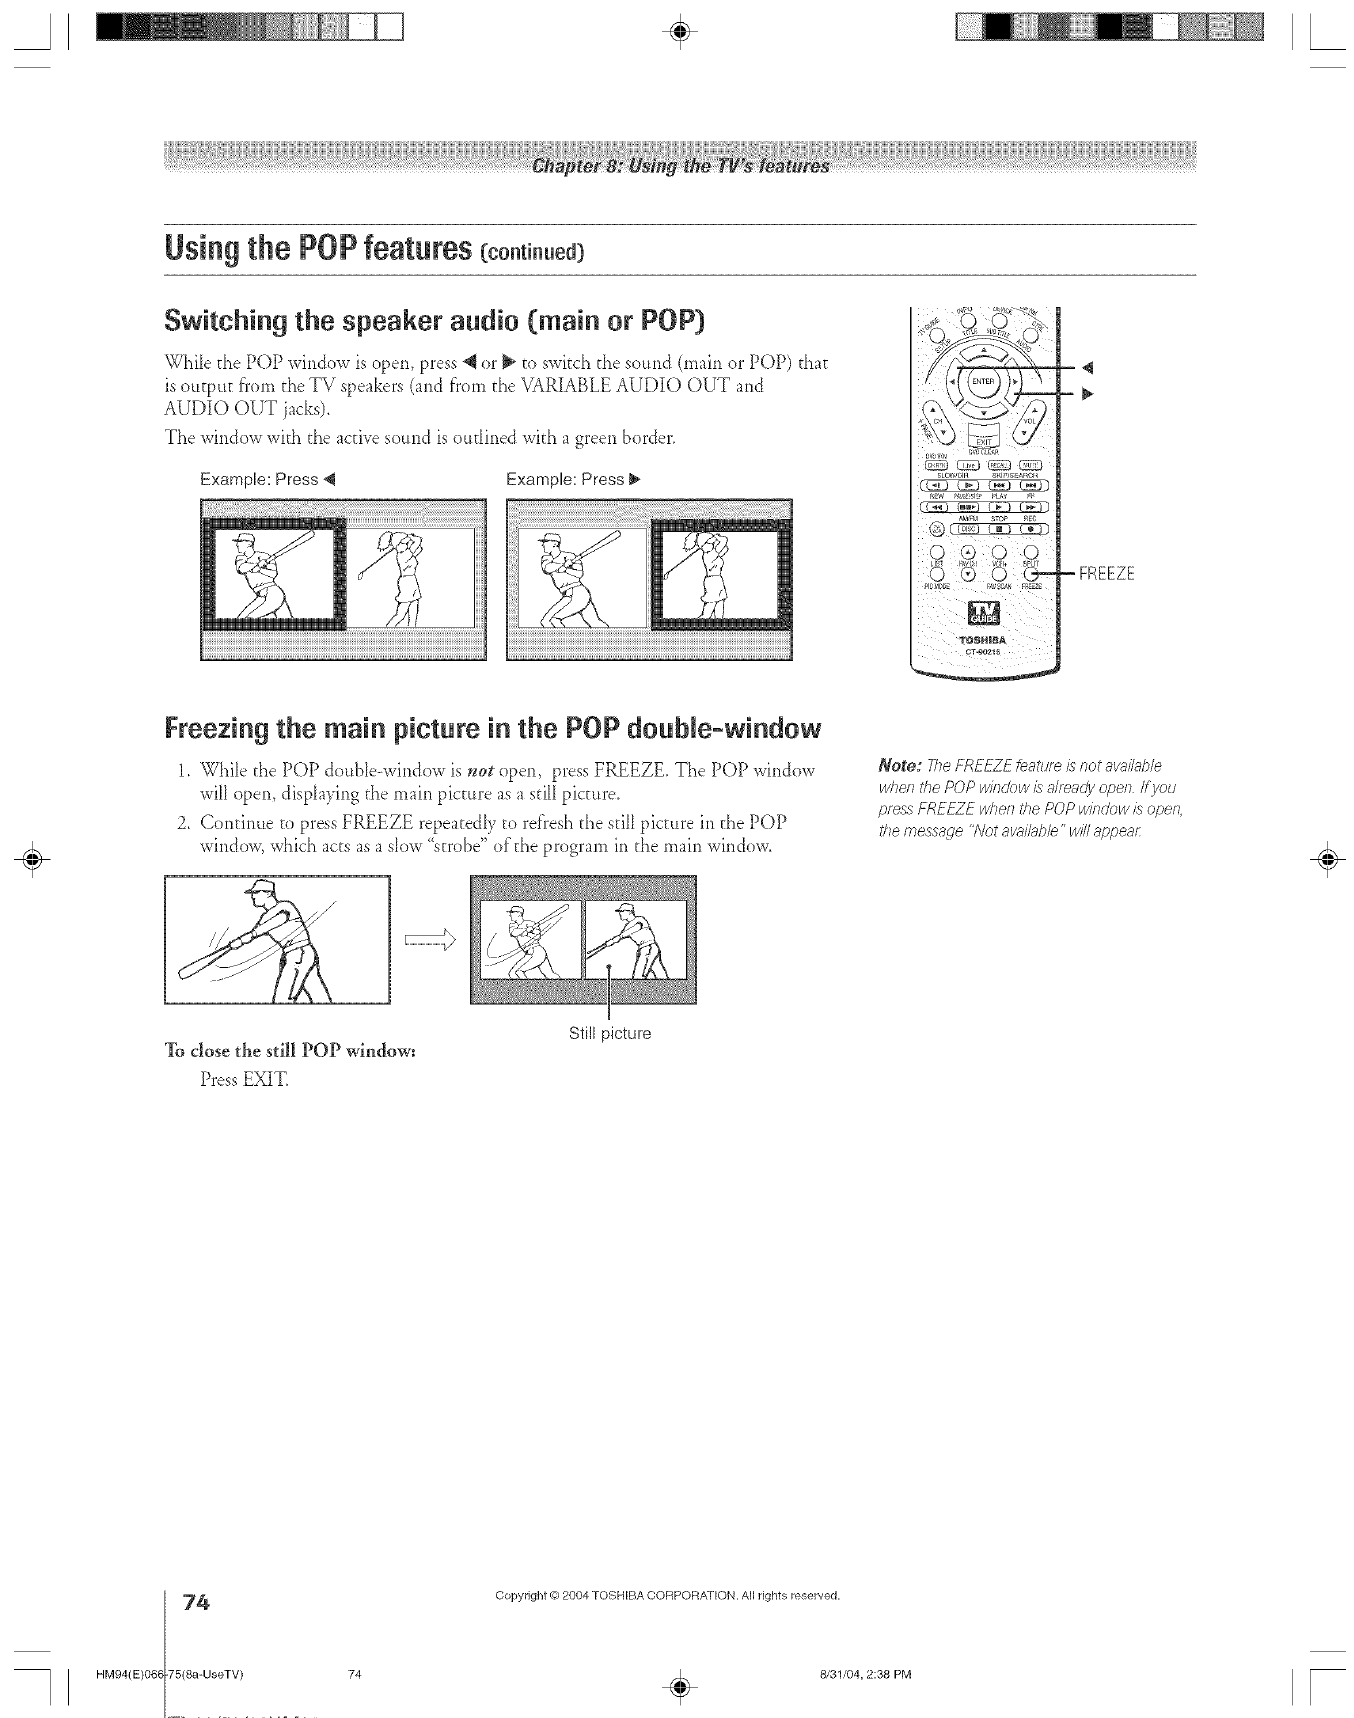
A÷ L
Using the POP features (co.ti..ed)
Switching the speaker audio (main or POP}
WhiIe d_e POP window is open, press 4 or _ to swkch the so,rid (main or POP) that
is output fi'om d_eTV speakers (and f'rom d_eVARIABLE AUDIO OUT and
AUDIO OUT jacks),
The window with d_e active sound is oudined wkh a green border.
Example: Press _1 Example: Press 1_
-FREEZE
Freezing the main picture in the P0P double=window
1. While the POP dottble-window is not open, press FREEZE. The POP window
will open, displaying the main picture as a sdlI picture.
2. Continue to press FREEZE repeatedly to refi'esh the still picture in d_ePOP
window, which acts as a slow "strobe" oldie program in the main window.
Note: 77}eFREEZE feature is not avail@/e
#hen the POP win@w £ already open If you
pf_ss FREFZE w/}ell the POP window is open
tile message "A/ot aw#/_@le"will appear: ÷
To close the still POP window:
Press EXIT_
74
HM94(E)068 75(8a-UseTV)
Still picture
Copyright @ 2084 TOSHIBA CORPORATION. All rights reserved,
74 _ 8/31/04, 2:38 PM [
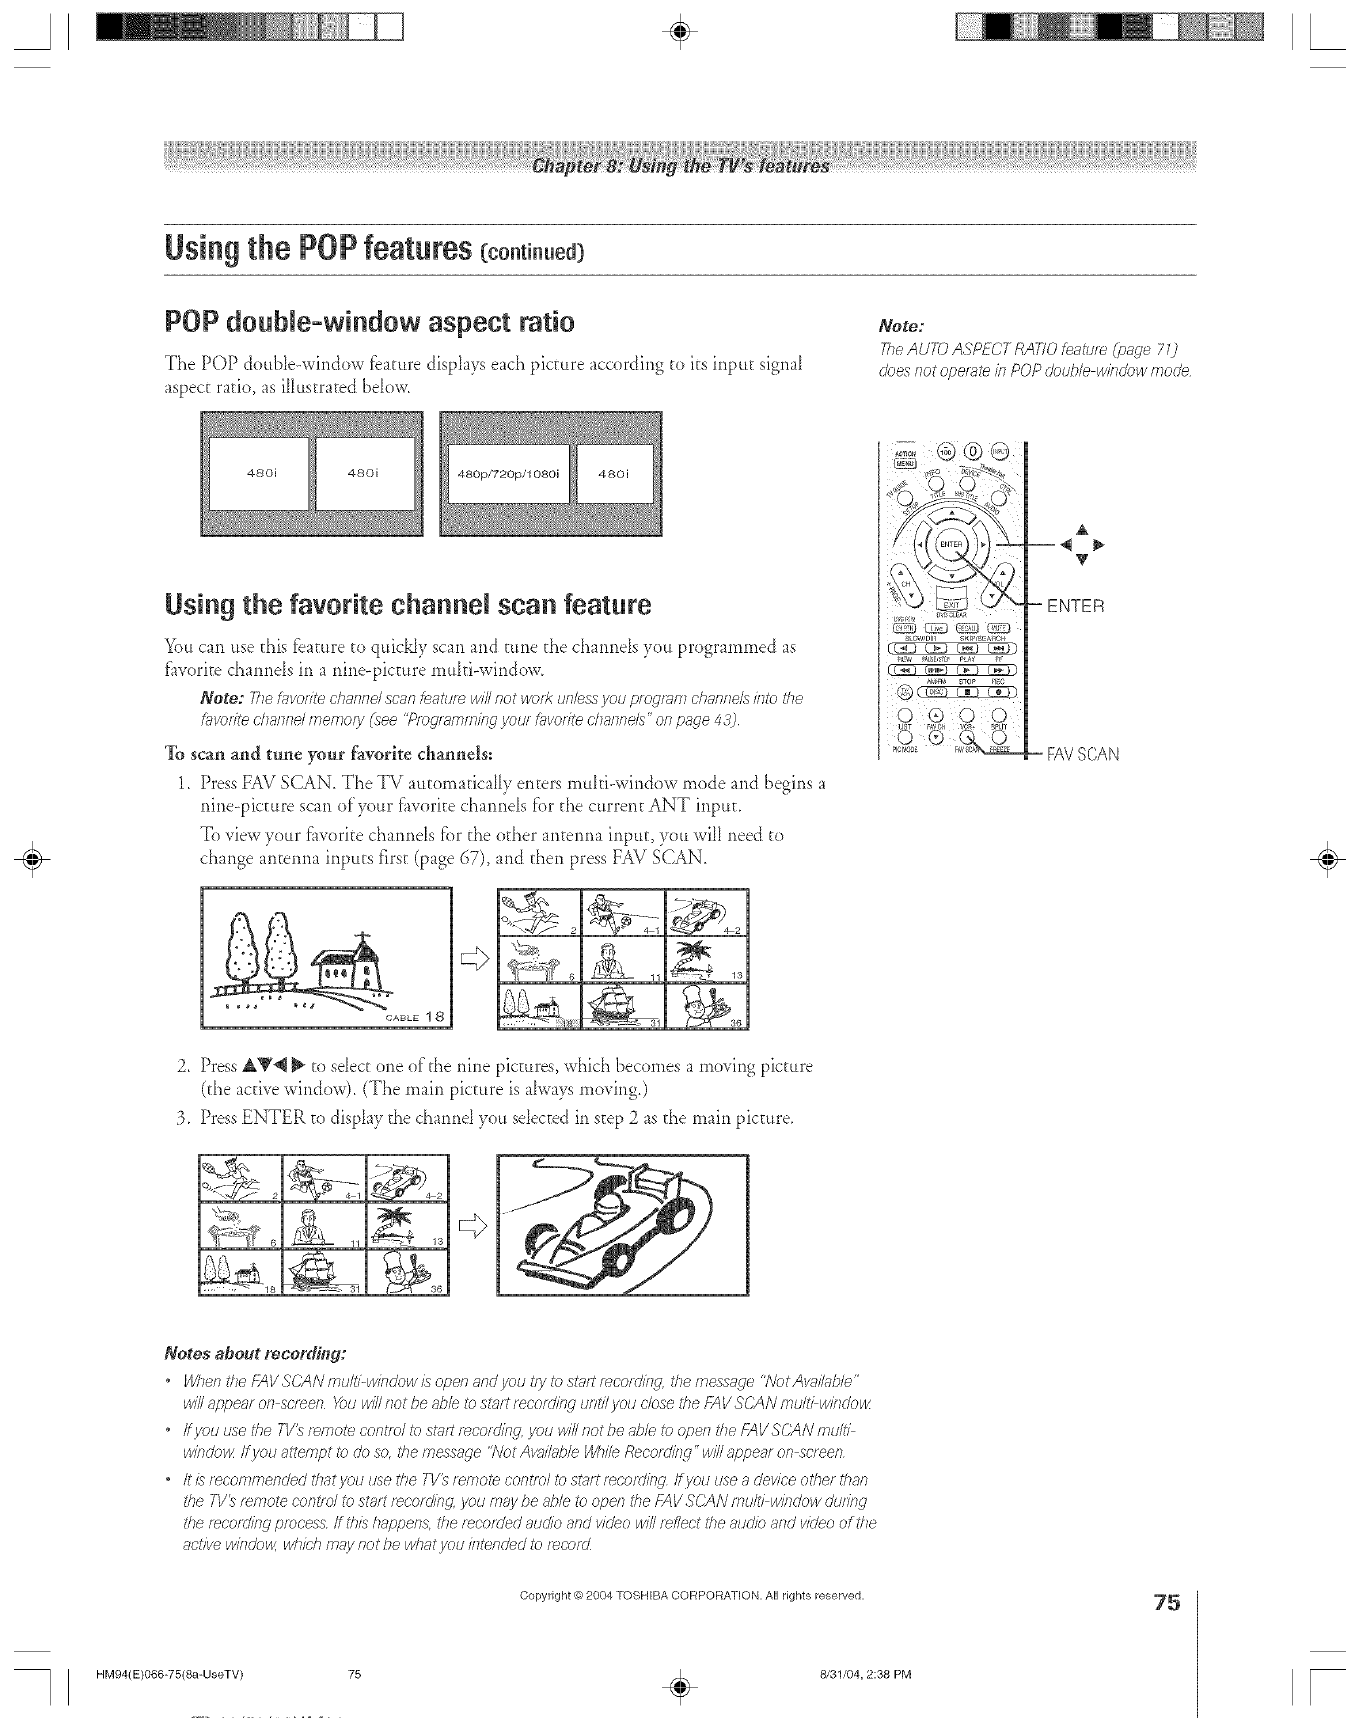
Using the POP features (co.ti.uea)
POP double=window aspect ratio
The POP ctouble-wir_dow fbature displays each picture accordir_gto its input sigm_I
aspect ratio, as illustrated brow.
Note:
TheAUTO ASPECT RATIO feature (page 7 73
does/7ot opet_te in POP double w/?_dowmode
480i 480i
Using the favorite channel scan feature
You can use this f?ature to quickJy scan and ttme the cham_ds you programmed as
f_worite cham_ds in a nir_e-picture mu_ti-wir_dow_
Note: 77/efavoriteclear,fie/scarteatu_ willnot wc)fRunlessyou programchanlle/uhire _he
f_lvr)rited?am_dmemory(see "Pmg/_mmingyour f_lvr)tfted?a/inels"onpage 43]
To scan and tale your favorite channels;
1. Press FAV SCAN, The TV automatically enters multi-wirldow mode and begins a
nine-picture scan of your f_worite charmds fbr the current ANT inptm
To view your f_worite charmds for the o[her arl_erma input, you wiII need to
change antenna inputs ill'st (page d7), and then press FAd SCAN.
ABLE1 8
11 _ 13
2. PressA_'_ _ to sdect one of'the nine pictures, which becomes a moving picture
(the active window). (The main picture is a_waysmo_ ir_g,)
3. Press ENTER to disp_a?the charred you sdected in step 2 as the main picture,
!J _, 6 11
V
- ENTER
FAVSCAN
÷
Notes about recording:
•WhentheFAVSCANmu/thwindewisopenandyc)u_?ytost_u;*t_corclins_. themessrv[_e "NotAw)il_lhle"
will appem on sc/_en _)u will slot be able to sl?ut recordislg until you close tile FAV SC/IN multi wislclow
•ffyou use the TI/_ f_lTiote control to st;lit [_corcJifzg.J/ou will Rot be able to open i'he _NVSCAN i[]ultl
windo_ ff you attempt to do so, _<hemes\_age '?VetAv_J/ilb/e While Recordi/w"wi// appear on scl eef7
•It/stecommendedt/iatyouusethe TV_/emotecontfeltost_lttmcording Ifyouuseadeviceothetthan
the 7]/'_ [_Hiote c'ofitld to start fw:or dlil?g,you [rlay be ai)le to open the f-7_VSCAN multl winclew clu/ing
the mcordirlg process ff this happen& the mr'order audio asld video win reflect the audio and video of the
active wirlcJow,which may not be wliot J/OU ilitel?dJediT)[_COl(Z
Copyright © 2804 TOSHIBA CORPORATION, All rights reserved.
HM94(E)066-75(8a-UseTV) 75 _ 8/31/04, 2:38 PM
75
r

A÷ L
Adjustingthe picture
Selecting the picture mode
Youcan sdectyour desiredpicture setth_gsfrom fbur picture
modes, as described below.
To select the picture mode:
Press PIC MODE on the remote
control The fbllowing popup menu
appears or>screen.
Repeatedly press PIC MODE Pig
" MODE-
to cycle among the modes.
C'L_L. uLk_3 __,mj _
To select the picture mode using the menu system:
1_ Press MENU and open the VIDEO menu_
2. Highlight PICTURE SETTINGS and press ENTER.
3. Press _' to highlight she bfODE field, and then 4 _ to
select the mode you prefer.
4. To temporarily save the mode you selected, highlight
DONE and press ENTER.
Note: Temporarily saved settings wiiI apply until the
s°,<ee{scha ge".........................
To permanerltly save the mode you selected highlight
SAVE and press ENTER.
Note:
• Thepk;turemodeyouselected/s/orthecurren_/eput
selectk)n only (ANT 7/n the example abovej You can select
a di/lYererrtp/brute teode for each/77pt£ select/on
,ffyause/ectaneofthe_cteiysetp/bturemodes(SPORTS,
STANDARD,of MOI//Ejandthenchangeap/brutequa/£y
sett/hg (for exnmp/e, increasethecont/_stOf change the
color_rrlper_ture), the p/brute mode automatically changes
_bPREFERENCE/ntheP/bruteSetY/ngsmerltJ
Adjusting the picture quality
You can adjust the picture quality (comrast, brightness, color,
tint, and sharpness) to your personal pre_brences.
To adiust the pictt_e quality:
1. Press MENU and open the VIDEO menu.
2. Highlight PICTURE SETTINGS and press ENTER.
3. Press _ or _ to sdect the picture quality you warn to adjust
(CONTRAST, BRIGHTNESS, COLOR, TINT, or
SHARPNESS), and then @ and _ to adjust the setdng, as
described in the table bdow.
{_Navigate _Select _[_Back _ _£xit
contrast lower higher
brightness darker lighter
color paler deeper
tint reddish greenish
sharpness softer sharpe_
4. To temporarily save the new seuings, highlight DONE and
press ENTER. To permanently save the new settings,
highlight SAVE and press ENTER.
Note: 7q_esettingsyou selectedare tot the cuffentinput selection
Of7/_/ (ANT 7b tl_eexampb above__u carsselectciifferent
settirtgsfor eachklput selection
The picture qualities you adjusted are automatically saved in the
PREFERENCE mode (see '<Sdectir_gthe picture mode," above
left).
Resetting the picture settings
To reset the picture settings to their [actory values;
1. Highlight RESET in the Picture Settings menu and press
ENTER.
2. Highlight SAVE and press ENTER.
Note: _7/sresetsthepicturessettlhgsk)r thecurrent/hput soureeonly
(ANT _/hthisexarep/e)
÷
HM94(E)07(
76
-81(8b-UseTV) 76
Copyright © 2004 TOSHIBA CORPORATION. All rights reserved,
÷8131/04, 2:44 PM [
A÷ [
Adjusting the picture(co.ti..ed)
Using CabJeClear T°DNR (digitaJ
noise reduction)
The CableCIear _ digitaI noise reduction feature allows you to
reduce visible interference in your TV picture. This may be
useft11when receiving a broadcast with a weak signal (especially
a Cable chanr_el) or pIaying back avideo cassette or disc
damaged by repeated use.
NOTE:The&_b/eCleafDiVRfeatulecleesnotf/)fTcties7is7
HDIVII CDI/Ij, ATSC_IE_ 7394, mrTddllg/t_#CZJ)/efTsocJem
To turn on CableClear DNR:
1. Press MENU and open the VIDEO menu.
2. HigNight ADVANCED PICTURE SETTINGS and press
ENTER,
3. Press V to highlight the CABLECLEAR DNR field, and
then press _ to seIectAUTO,
}_Navigate (_{Select _Back ®_Exit
4. To temporarily save the new settings, highlight DONE and
press ENTER.
To permanently save the new settings, highlight SAVE and
press ENTER.
NOTE:
• If the currelTt/nput/sAntel_na, l//cJeo1, Video 2, o_ g/Ueo 3,
the menu will clispk_ythe text "CableCle_S
,/fthe curi_fltir_putis _)e/()fStl_Rf77HD7 of ColofSt/_am HD2,
the menu will displg_ythe text "DNR"
,/fthe cur/_t}t input is HDMI or/EEE 7394, the melTu win
d/sJny the text "DNR ' and win be '_qmyedout" ib kldieal_
I'hat the feature Uees ilot fufIct/ef7 b this klptJ£
To turn off CableClear DNR:
Select OFF in step 3 above.
Selecting the color temperature
You can change [he quality of the piccttre by selecting tTom three
preset coIor temperatures: cool, medium, and warm, as
described bdow.
cool blueish
medium neutral
warm reddish
To select the color temperature:
1_ Press MENU and open the VIDEO menu_
2. Highlight ADVANCED PICTURE SETTINGS and press
ENTER,
3. Press V to highlight the COLOR TEMPERATUR_ fidd>
and then press _ to select the mode you prefbr (COOL,
MEDIUM, or WARM).
4. To temporarily save the new settings, highlight DONE and
press ENTER,
To permanently save the new settings, highlight SAVE and
press ENTER,
Resetting the advanced picture settings
To reset the advanced picture settings to their factory values:
1. Press MENU andopen the VIDEO menu.
2. Highlight ADVANCED PICTURE SETTINGS and press
ENTER.
3. HigNight RESET and press ENTER,
4. Highlight SAVE and press ENTER,
÷
HM94(E)076-81(8b-UseTV) 77
Copyright @)2004 TOSHIBA CORPORATION, All rights reserved.
÷8131/04, 2:44 PM
77
[
A÷ L
Usiagthe closedeaptioamode
The dosed caption mode has two options:
* Capdons_An or>screen display of the diaIogue, Ymrration,
and sound efibc[s of'TV programs and videos that are
closed captioned (usuaIly marked "CC" in program guides)_
* Tex_ An or>screen display ofirdbrmatiorl no[ related to
the current program, such as weather or stock data (when
provided by individual stations).
To view captions or text:
1. Press MENU and open the PREFERENCES rueful
2. HighIight CLOSED CAPTION MODE and then press
to open the merm sidebar.
3. Press _' to highlight the desired dosed caption mode and
then press ENTER.
* To view captions:
Highlight CC1, CC2, CC3, or CC4. (CC1 display._
trar_slation of"the primary
language in your area.)
Note: If tile pmg/_ffrl o_
video you selected is not
clcsed O_lpi'/(JfTeC/, IlO Cr;'pt/OMS
/VI2 cJ/sp/ily 011 sot_ef7
. Toview text:
EIighligh_T1, T2, T3, or T4.
Note: If text Is not av_,il_h/eisl
your at_, a b/aek/ect_lrlw/e
may _ppenr o1_vour screen
ff #_/shappen& turn the Closed
(_'apl'/Of7Mode Of_-
* To turn off the Closed Caption feature:
Highligh_ OFE
Note: A clcsed c_',pt/o/_siqna/ InWnot &kplg_y/n the follow/ng s/tu3t/ons
*When a videotape has been dubbed
"Wven thestlgna/[_cepl'/of7/} weak
"Wventhes/igna/teoepl'ion/} 11011SFllldgffd
Advanced closed captions
You can customke the dosed caption display characteristics by
charlging the background color and the text size, e/pc, edge,
and color.
Note: Thiskeatute /s avg_#glb/e_of d@ta/ channels on!y
To customize the closed captions:
1. Press MENU a*_dopen the _=_:"_ _7__
PREFERENCES lnenu_
2. IIighligh_ CLOSED
(_APTION ADVANCED
and press ENTER.
3, Press 'g or _ to highlight 0',o,,,,'o@..... _: .... _2_:_....
the characteristic yott want to change, and then press _ _o
select the fbrma[ fbr that characteristic.
To temporariIy save the new
se_rir_gs,highlight CANCEL
and press ENTER.
To pennar_er_tlysave the
new settings, highlight
SAVE and press ENTER.
To reset the closed caption characteristics:
1. Highlight RESET in step 4 above, and press ENTER.
2. Highlight SAVE and press ENTER. All characteristics are
se_to "AUTO."
Digita e osedeaptio s
You can use the DigitaI CC/Audio selector eoseIec[ digitaI
dosed caption services (if"avaiIable), which wilI temporarily
override closed captions fbr digital charmels onl> When such
services are not available, the Digital CC/Audio sdeceor presents
a de_ult list of'services. If the sdeceed service is not available,
the next best service will be used instead.
Press MENU and open
the APPLICATIONS
li)enu.
Highlight DIGITAL
CC/AUDIO
SELECTOR and press
ENTER.
3. Press _ or "_ to highlight
the desired service, and then press ENTER.
÷
HM94(E)07{
78
-81(8b-UseTV) 78
Copyright (ct,2004 TOSHIBA CORPORATION All rights reserved
÷9/1/04, I1:53 AM F
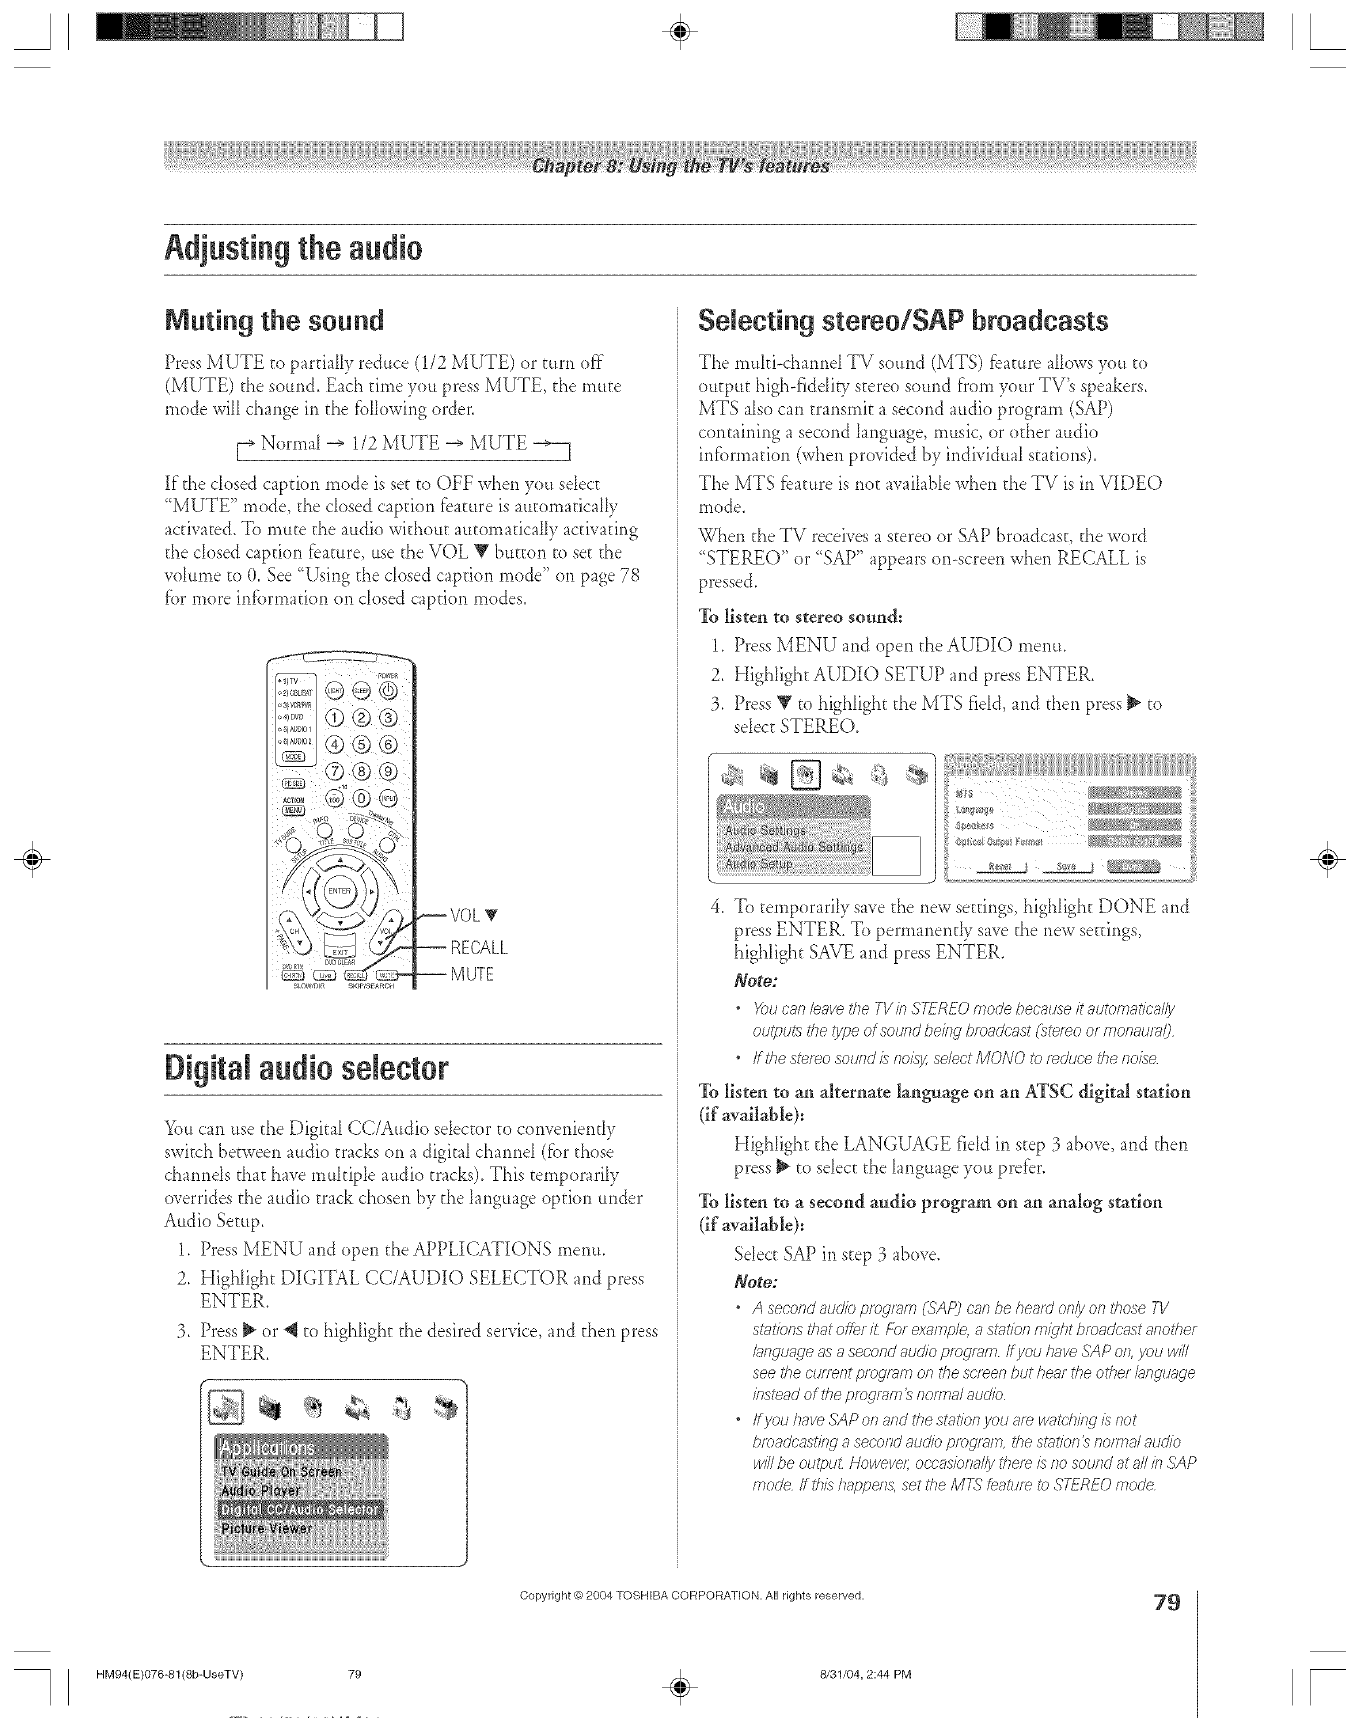
A÷ L
Adjustingthe audio
Muting the sound
Press MUTE to partially reduce (1/2 MUTE) or turn off
(MUTE) the sound. Each time you press MUTE, tile mute
mode wiI[change Jr1tile tbIIowing order.
[_ Normal _ 1/2 MUTE _ MUTE _
If the dosed caption mode is set to OFF when you sdecc
"MUTE" mode, die cIosed caption tbature is automatically
activated. To mute the audio without automaticaIIy activating
the cIosed capdon feature, use the VOL Y button to sec the
rob*me to (L See "Using the closed caption mode" on page 78
fbr more intbrmafion on closed caption modes.
....Z. - -5
Digital audio selector
You can use the Digital CC/Audio steerer ;o converfiently
switch between audio tracks on a digital charred (fbr those
cham_ds thac have multiple audio tracks). This temporarily
overrides the audio tra& chosen by the language option under
Audio Setup.
1. Press MENU and open the APPLICATIONS metal.
2. Highlight DIGITAL CC/AUDIO SELECTOR and press
ENTER.
3. Press _ or 4 to highlight the desired service>and then press
ENTER,
Selecting stereo/SAP broadcasts
The muM<hatred TV sound (MTS) _bamreallows you to
output high-fiddip! stereo sound from your TV's speakers.
MTS also can transmit a second audio program (SAP)
contairfing a second language, music, or other audio
intbrmafion (when provided by individual stations).
The MTS feature is riot available when the TV is in VIDEO
mode
When the TV receives a stereo or SAP broadcast, the word
TEREO or SAP appears on-screen when RECALL is
pressed.
To listen to stereo sotmd:
1, Press MENU and open the AUDIO metal
2, Highlight AUDIO SETUP and press ENTER,
3, Press Y to highlight the MTS field, and then press _ to
sdect STEREO.
4. To temporarily save die new seuings, highlight DONE and
press ENTER. To permanently save the new settings,
highlight SAVE and press ENTER.
Note;
• X_uc;_n/eave_<heTVinS7-_REOmodebec_useitautom;_tic_//y
outputs the type of sound beieg bmaUcilst (ste/_o o_monaur;_/)
•ffthe sterne sound/:_ horsy,sdect MONO to r_duce the noise
To listen to all alternate language on an ATSC digitM station
(if"available):
High[ighc the LANGUAGE field it1 seep 3 above, and then
press _ to sdect the [anguage you prefer.
To listen to a second audio program on an analog station
(if available):
Sdecc SAP in step 3 above.
Note:
•A second slucliopmgI_m (SAP) c_ln be hea_Uonly on I<ho'_eTV
stations that offer 1_Fo_exm77ple,a SI_H_fOf7miqht broadcast another
bnguage _Tsa second aud/o pmg/>Tm ff you have SAP Of7yOUWi/I
see the current p/ ogmm on rite scs_en but henr the other hllgtJqi9'e
k_s_adof the DfogleFI7 _ROITT18/aud/o
•/_yOU have SAP of 7afTd the st;/roll you a_ wo?t.d?/lW is not
bfoaclc'asl'itW 8 second auUio ptogl_m, the Si*H_fof7_]?OHTlalaucJio
WiNbe outpuL Howeve/; oc:casiona//y tlTe/_ is no soui?d at aNb SAP
mode ff th/s /l_ppen& set the MT_ Leatum to STEREO mode
Copyright _) 2004 TOSHIBA CORPORATION, All rights reserved. 79
HM94(E)076-81(8b-UseTV) 79 ÷8131/04, 2:44 PM
÷
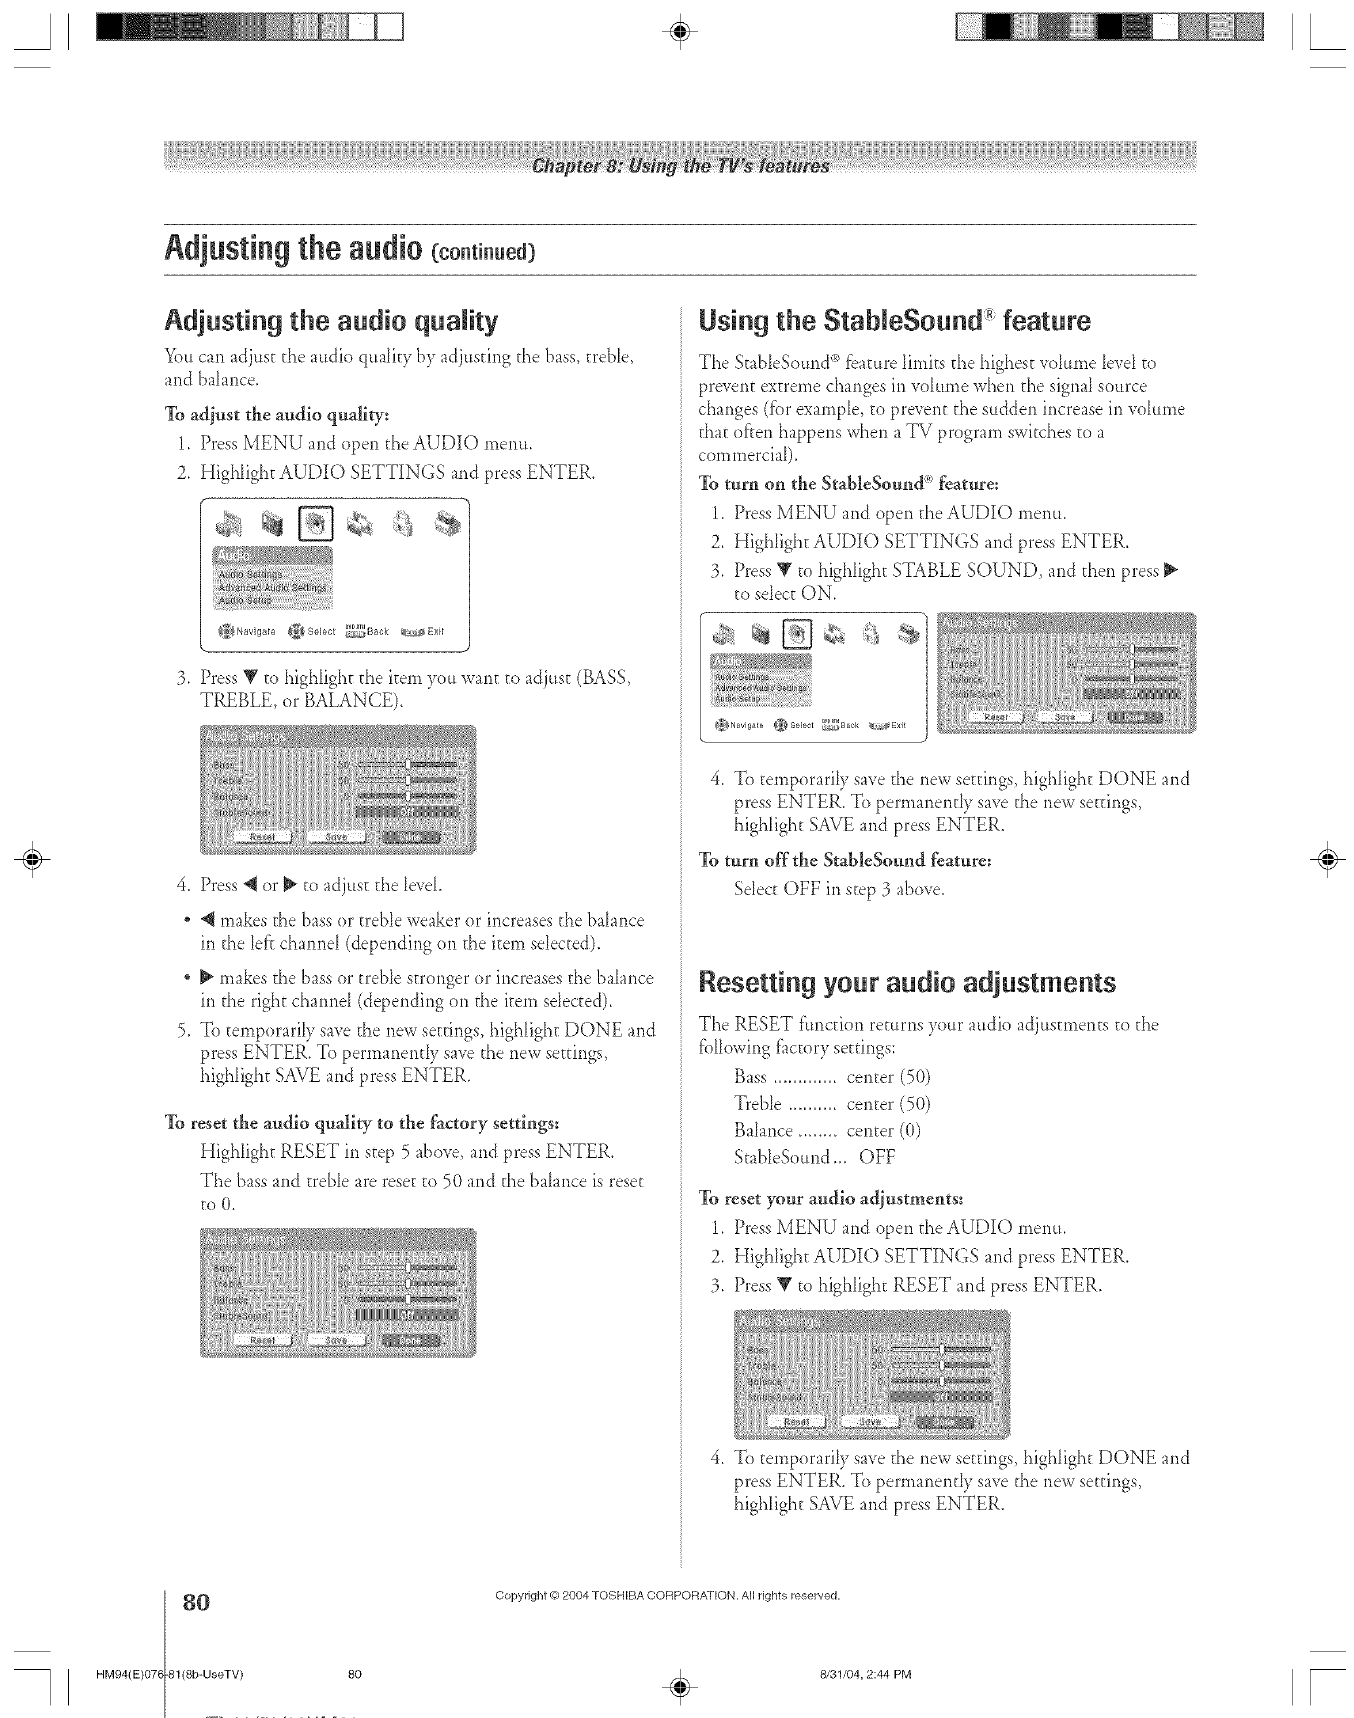
A÷ L
Adjustingthe audio (co.ti..ed3
Adjusting the audio quality
You can adjust the audio qua_ky by adjusting the bass, treble,
and balance.
To adjust the audio quality:
1. Press MENU and open d_eAUDIO men.,
2. Highlight AUDIO SETTINGS and press ENTER.
¢_Select _D_Dar"Back
3, Press V to highIight d_e item )ou want to adjust (BASS,
TREBLE, or BALANCE).
4_ Press @ or _ to adjust the Md.
@ makes d_ebass or treble weaker or increases the baLmce
in the lef'rchamM (depending on the item selected).
* _ makes the bass or treble stronger or ir_creasesd_ebalance
in the right chamM (depending on the item sdected),
5. To temporariIy save the new seuings, highlight DONE and
press ENTER. To permanentIy save the new settings,
highlight SAVE and press ENTER.
To reset the audio quality to the factory settings:
Highlight RESET in step 5 above, and press ENTER.
The bass and treble are rese_to 50 arid d_e balance is reset
to O,
Using the StableSound" feature
The StableSourld °ofbature limits the highest volume levd to
prevent extreme changes ir_volume when the signal source
changes (fbr example, to prevent d_e sudden increase in volume
that <if'tenhappens when a TV program switches to a
commerciat).
To turn on the StableSouud _'_featu:e:
1. Press MENU and open the AUDIO menu.
2. Highlight AUDIO SETTINGS and press ENTER.
3. Press V to highlight STABLE SOUND, and then press _"
to select ON,
_gN_vig_te @Select _i]_Baek _!i_E×it
4. To temporarily sa_e the new settings, highlight DONE and
press ENTER. To permanendy sa_e the new seEdngs,
highlight SAVE and press ENTER.
To turu off the StableSouud feature:
Sdect OFF in step 3 above.
Resetting your audio adjustments
The RESET fimctkm returns yo.r audio adjustments to d_e
fb[[owing f_ctory settings:
Bass ............. center (50)
Treble .......... center (50)
Balance ........ center (0)
StableSound _. OFF
To reset your audio adjustmeuts:
1. Press MENU and open d_eAUDIO menu.
2. Highlight AUDIO SETTINGS and press ENTER.
3. Press V _ohighligtx RESET and press ENTER.
4. To temporarily save the new settings, highlight DONE and
press ENTER. To permanently save the new settings,
highligh_ SAVE and press ENTER.
÷
HM94(E)07(
8O
-81(8b-UseTV) 80
Copyright tO2004 TOSHIBA CORPORA]ION. All rights reserved,
÷8131/04, 2:44 PM

A÷ [
Adjustingthe audio (co.ti..e¢
Using the SRS WOW TMsurround sound
WOW is a special combination of SRS Labs audio technologies
(SRS 3D, FOCUS, and TruBass) that creates a thrilIing
surround sound experience with deep, rich bass fl'om stereo
sound sources. Your TV's audio will sound fi41er, richer, and
wider.
To adiust the WOW settings:
1. Put theTV in STEREO mode (see "Selecting stereo/SAP
broadcasts" on page 79),
2. Press MENU and open the AUDIO menu.
3. HigNight ADVANCED AUDIO SETTINGS and press
ENTER.
)
4. Press Y or A to highlight the WOW fbature you want to
adjust, and then press 4 or _ to adjust the hem_
3D -- To turn the surround sound effbct on or of'£
Note: If thebroadcast/s rnonauf_l,tbe3D eftectdoesnot
wo_?
* Focus -- To turn the vocaI emphasis eff'ecton or off.
TruBass -- To select the desired bass expansion level
(HIGH, LOW, or OFF).
5. To temporarih_ save the new settings highlight DONE and
press ENTER. To permanentIy save the new settings,
highlight SAVE and press ENTER.
To reset the WOW settings:
Highlight RESET in the Advanced Audio Settings menu
and press ENTER.
SR.?WOWandthe (@) logoare tmdemad<sof SRSLabs,Inc
SRSWOWtechflo/ogy /s k_corpo_tedtinder/IbetTsefromSRSLabs,/no
Turning off the built=in speakers
Use this fbature to turn off the TV speakers when you connect
an audio system to your TV (see "Connecting a digital audio
system" and "Connecting an amflog audio system" on page 20).
To turn offthe bui]t4n speakers:
1. Press MENU and open the AUDIO menu.
2. Highlight AUDIO SETUP and press ENTER.
_a i{
.............................. _ _J _,, _j _,_, j
3. Press _' to highlight the SPEAKERS rid& and then
press _ to sdect OFE
4. To temporarily save the new se_tings, highlight DONE and
press ENTER. To permanentIy save the new settings,
highlight SAVE and press ENTER.
To turn on the built-in speakers:
Select ON in step 3 abo_e.
Selecting the optica a dio output
Use this _bature to select the opdcaI audio output t_._rmatwhen
you connect a Dolby Digital decoder or other digitaI audio
system to the OPTICAL AUDIO OUT jack on the TV (see
'%onnecting a digital audio system" on page 20)_
To select the optical audio output format:
1. Press MENU and open the AUDIO menu.
2. HigNight AUDIO SETUP and press ENTER.
3. Press _' to highlight the OPTICAL OUTPUT FORMAT
fidd, and then press _ to sdect either DOLBY DIGITAL
or PCM, depending on your device.
4. To temporarily save the new settings, highlight DONE and
press ENTER. To permanentIy save the new settings,
highlight SAVE and press ENTER.
Copyright @)2804 TOSHIBA CORPORATION, All rights reserved• 81
HM94(E)O76-81(8b-UseTV) 81 ÷8/31/04, 2:52 PM
÷
[
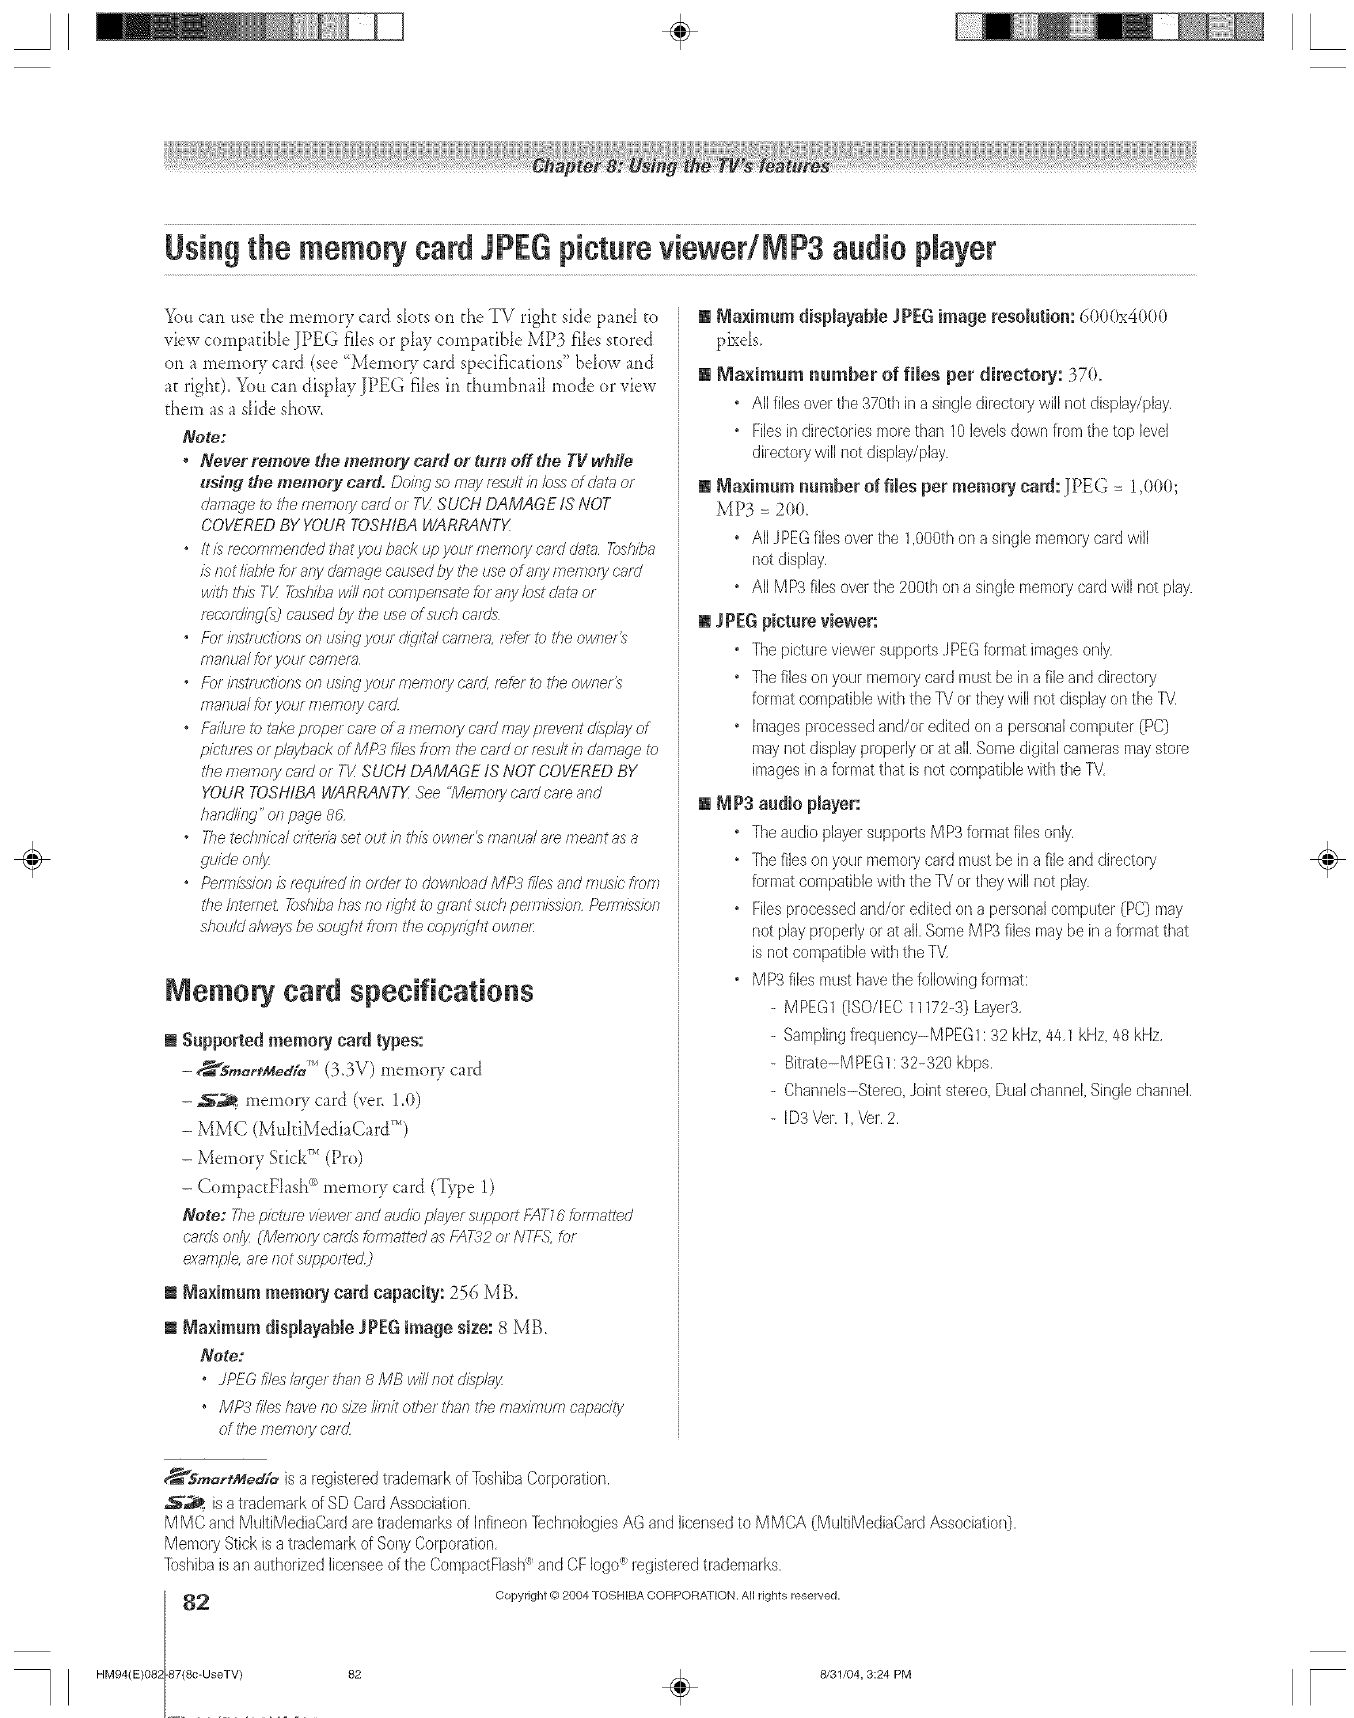
A÷ L
Usiagthe meamB,card JPEGpictureviewedNP3 audio player
You can use the memory card slots on the "IV right side parM to
view compadbD JPEG flies or play compadbD MP3 flies stored
on a memory card (see _Memory card speciflcadorls" bdow and
at righG You can display JPEG flies in thumbnail mode or view
them as a slide show.
Note:
•Never remove the memory card or turo off the TV white
using the memory card. Doing so may result in loss of dareror
damage i_) the memo/y ca,al or TV SUCH DAMAGE IS NOT
COVERED BY YOUR TOSHIBA WARRANTX
•/t is re,comrl_elTded tbatyou back up your fT?e/y]olycard o';it_l Toshiba
iS IlOt /iub/e tel arty cl;llTla_le caused by the use of 8fl)/ fT?eiT?Ofy &'?/d
with this TI£ 7bsbiba will not compensate R)r a@/lost o'tltt} or
mcoalieg(s) caused by the i_se of such cards
• F_)rlbstltJCtlOrTSOl_USlbgyotJrdllglta/ca177efa, f_feftotheol_z, Tef_
manual hiyour camera
"FOI'/f?Stlt.ICtiOfTS01"1usingyourmemo/ycard, mLerto the owner_
ma/lun/ for your memo/y card
.f-T,,ilumto take proper car_ ofa fT_emoly card magifyP,,veetdliv.s'ayof
pictures or piggybackof MP3 files from the card or result b cJ_mage to
tile f77elrlOlyraid or Tk' SUCH DAMAGE IS NOT COVERED BY
YOUR TOSHIBA WARRANTX See <'Memolp card care and
handling" of 7paqe 8C
" 27e techsffca/c/7teda set out b this OWl?el_frlant£J ar_ frleallt as a
guide onlJx
•Pe17771ssionlsr_qui/_dborders)dowlT/oadMP3fi/esandrm_sicfmm
the Interact _)shba has no rT}'ht to grant such pemffssion Pemllssien
shoukJ al_saysbe sought from the cepyi_qht ownei:
Nemory card specifications
m Supported memory card types:
- ,_-_s,,_,_tM_J,_(3,3V) memory card
-_,;_.. memory card (vet'. 1,0)
-MMC (MtlkiMediaCard")
- Memory SficF" (Pro)
- CompactFlash _ memory card (Type 1)
Note: Tile pictufw viewer af?d auo'ie plgger support FATZ6 tofTnatted
Cr_als orllj4 (Mei?7of}/cafrJs forrnafted as FAT._2or NTF({ for
example, me ilot suppol_ed)
m Naximum memory card capacity: 256 MB,
m Naximum disNayaNe JPEG image size: 8 MB,
Note:
•.JPU5 files/_ffger than 8 MB will not dlsAa_z
•MP3 flies have,no size limit other than the maxFtlum capac£y
of the e_ertloly cnr_Z
[] Naximum disNayaNe J PEG image resolution: 6000x4000
pkds.
[] _ia×imum number of files per directory: 370.
•Allfiles overthe 370thin a singledirectorywill not display/play,
•Filesin directoriesmorethan 10 levelsdown fromthe top level
diledory will riot display/play.
[] Maximum number of files per memory card: JPEG = 1,000;
MP3 = 2OO.
•AllJPEGfiles overthe 1,000thon a single memorycardwill
riot display,
•All MP3 filesoverthe 200th ona single memorycardwill not play.
[] JPEG Ncture viewer:
•Thepielure viewer supportsJPEGformat imagesonly,
•Thefileson your memorycard must bein a file and directory
formatcompatiblewith the TVor theywill riot displayonthe B!
•imagesprocessedarid/or editedona personalcomputer(PC)
mayriot displayproperlyor at all.Somedigitalcamerasmaystore
imagesin a formatthat is not compatiblewith theTd,
[] _P3 audio pJayer:
•Theaudio playersupporls MP3 formatfifes only,
• Thefileson your memorycad must bein a file and directory
fermatcompatiblewith the 1_/or theywill not play.
•Filesprocessedand/or edited ona personalcomputer (PC) may
not play properlyor at all.SomeMP3 files maybe in a formatthat
isnot compatiblewith the TV
•MP3 files musthavethe fellowingformat;
- MPEG1(ISO/IEC11172-3)Layer3,
- Samplingfrequency-MPEGl: 32 kHz,44,1kHz 48 kHz,
- Bitrate-MPEGl: 32-320 kbps.
-Channels-Stereo Joint stereo Dualchannel,Singlechannel,
-ID3\!er, 1 Vel.2,
_Sm_r'_ed;e iSa registered trademark of ]bshiba Corporation.
_ is a trademark of SD Card Association.
M MC arid MultiMediaCard are trademarks of Infineon Technologies AG and licensed to MMCA (MultiMediaCard Association).
Memory Stick is a trademark of Sony Corporation.
]bshiba is an authorized licensee of the CompactFlash _ and CF logo _ registered trademarks.
_ Copyright tO 2004 TOSHIBA COFtPORA] ION. All rights reserved,
HM94(E}082 87{8c-UseTV} 82 _ 8/31/O4, 3:24 PM
/
÷
r
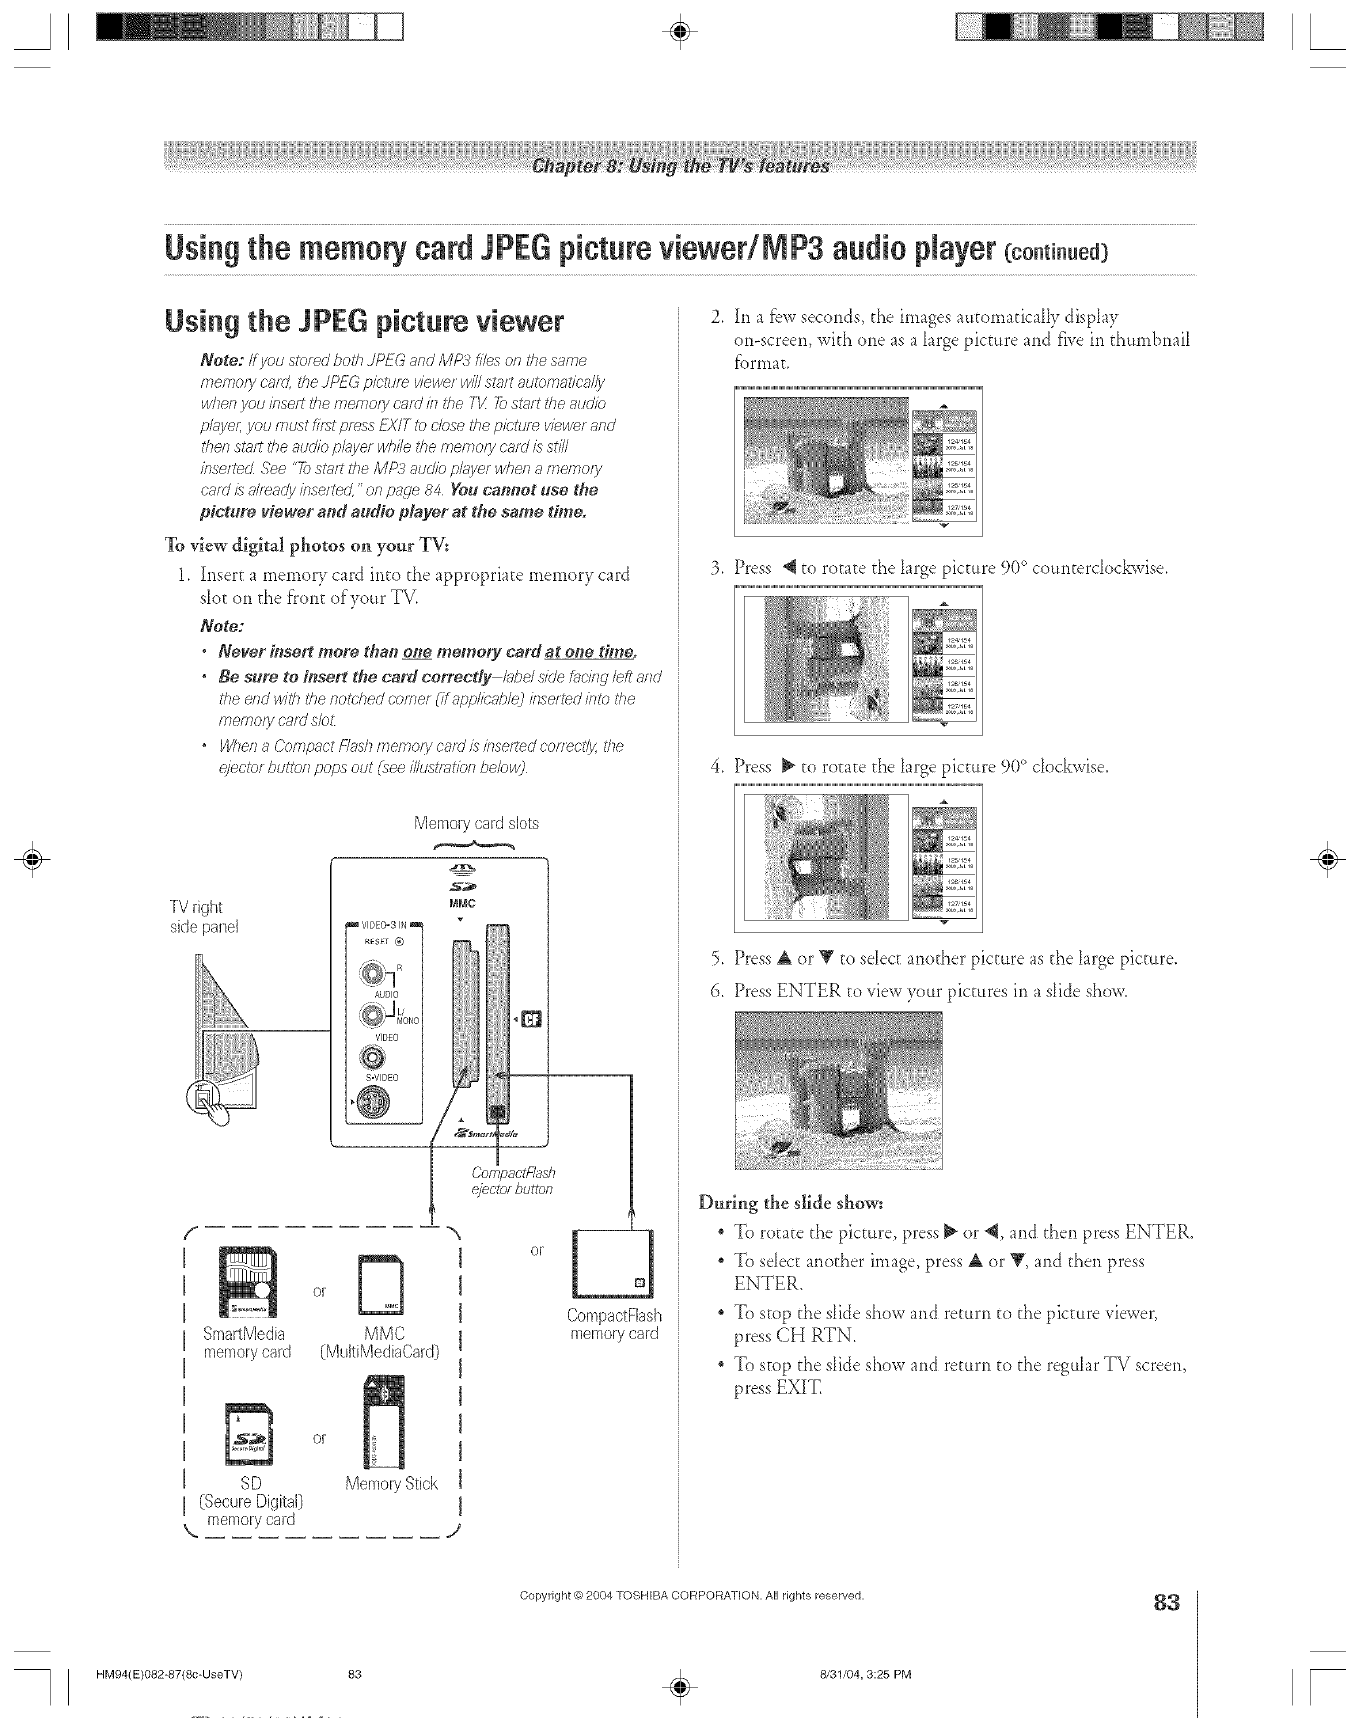
Usiagthe meam card JPEGpicturevbwedNP3 audio Nayer coo.t ..ed
Using the JPEG picture viewer
Note: If you stored both ../PEGand IVIP.-_files on ffie so,me
rTleq_o/ycard, the JPFG picture viewe; will sto;t automatica//V
when you/nse£ _he memoo/ ca;d isl the TV 7{)st_wtthe audio
playel; you f77tJstfiist press EXIT to close the picture viewer and
then s_/l? ft_e audio playe/ while the menio;y Cnld is still
bse;ted See "ib still? the MP:¢ auclio D/;ijler whel7 a ITie;T?Oly
c'aK//S all_ady bse;feo', "on p%le 84 You cahoot ose the
pictore glower and aodfo player at the same time.
To v_ew digital photos on your TV:
1. Insert a memory card into the appropriate memory card
slot on the fi'ont of'your TV.
Note:
•Never insert more thao one memory card at one time.
•Be sore to insert the card correedy I;@e/skle _'lc'i/ig left e,nd
the end with the ;_otched comer (if applic;_t)leJirlse/ted irlto the
memoo/ c'a;d slo_
•When a Cernpnct Rod7 memo/y ca;d is bselled co;7_ctl_ the
_:eotor btJttOR pops out (see illustmtiorJ bebw)
TV right
side par/el
Memory card slots
s_
MMO
VIDE0:3 IN
k_s_r G)
AUDIO
VIDEO
S-VIDEO
CompactRash
ejectorhuron
f
SmartMedia
memory card
orb
MMC
(MultiMediaCard)
SD
(Secure Digital)
\ memory card
or
Memory Stick
__J
CompactFlash
memory card
2. In a Dw seconds, the images auEornaticaRvdispLU
on-screen, with one asaL_rgepicture and five in thumbnail
f}.)rnlat,
3. Press 4 to rotate the L_rge picture 90 ° counterclockwise.
4. Press _ to roEate the k_rgepicture 9(t° clockwise.
5. Press A or Y to select another picture as the L_rgepicture,
6. Press ENTER to view your pictures in a slide show.
During the slide show:
To rotate the picture, press _ or 4, and then press ENTER.
* To sdect another image, press A or _', and then press
ENTER.
* To stop the slide show and return to the picture viewer,
press CH RTN.
To stop the slide show and return to the regular TV screen,
press EXIT.
÷
HM94(E)082-87(8c-UseTV) 83
Copyright @ 2804 TOSHIBA CORPORATION, All rights reserved.
÷8/31/04, 3:25 PM
83
[
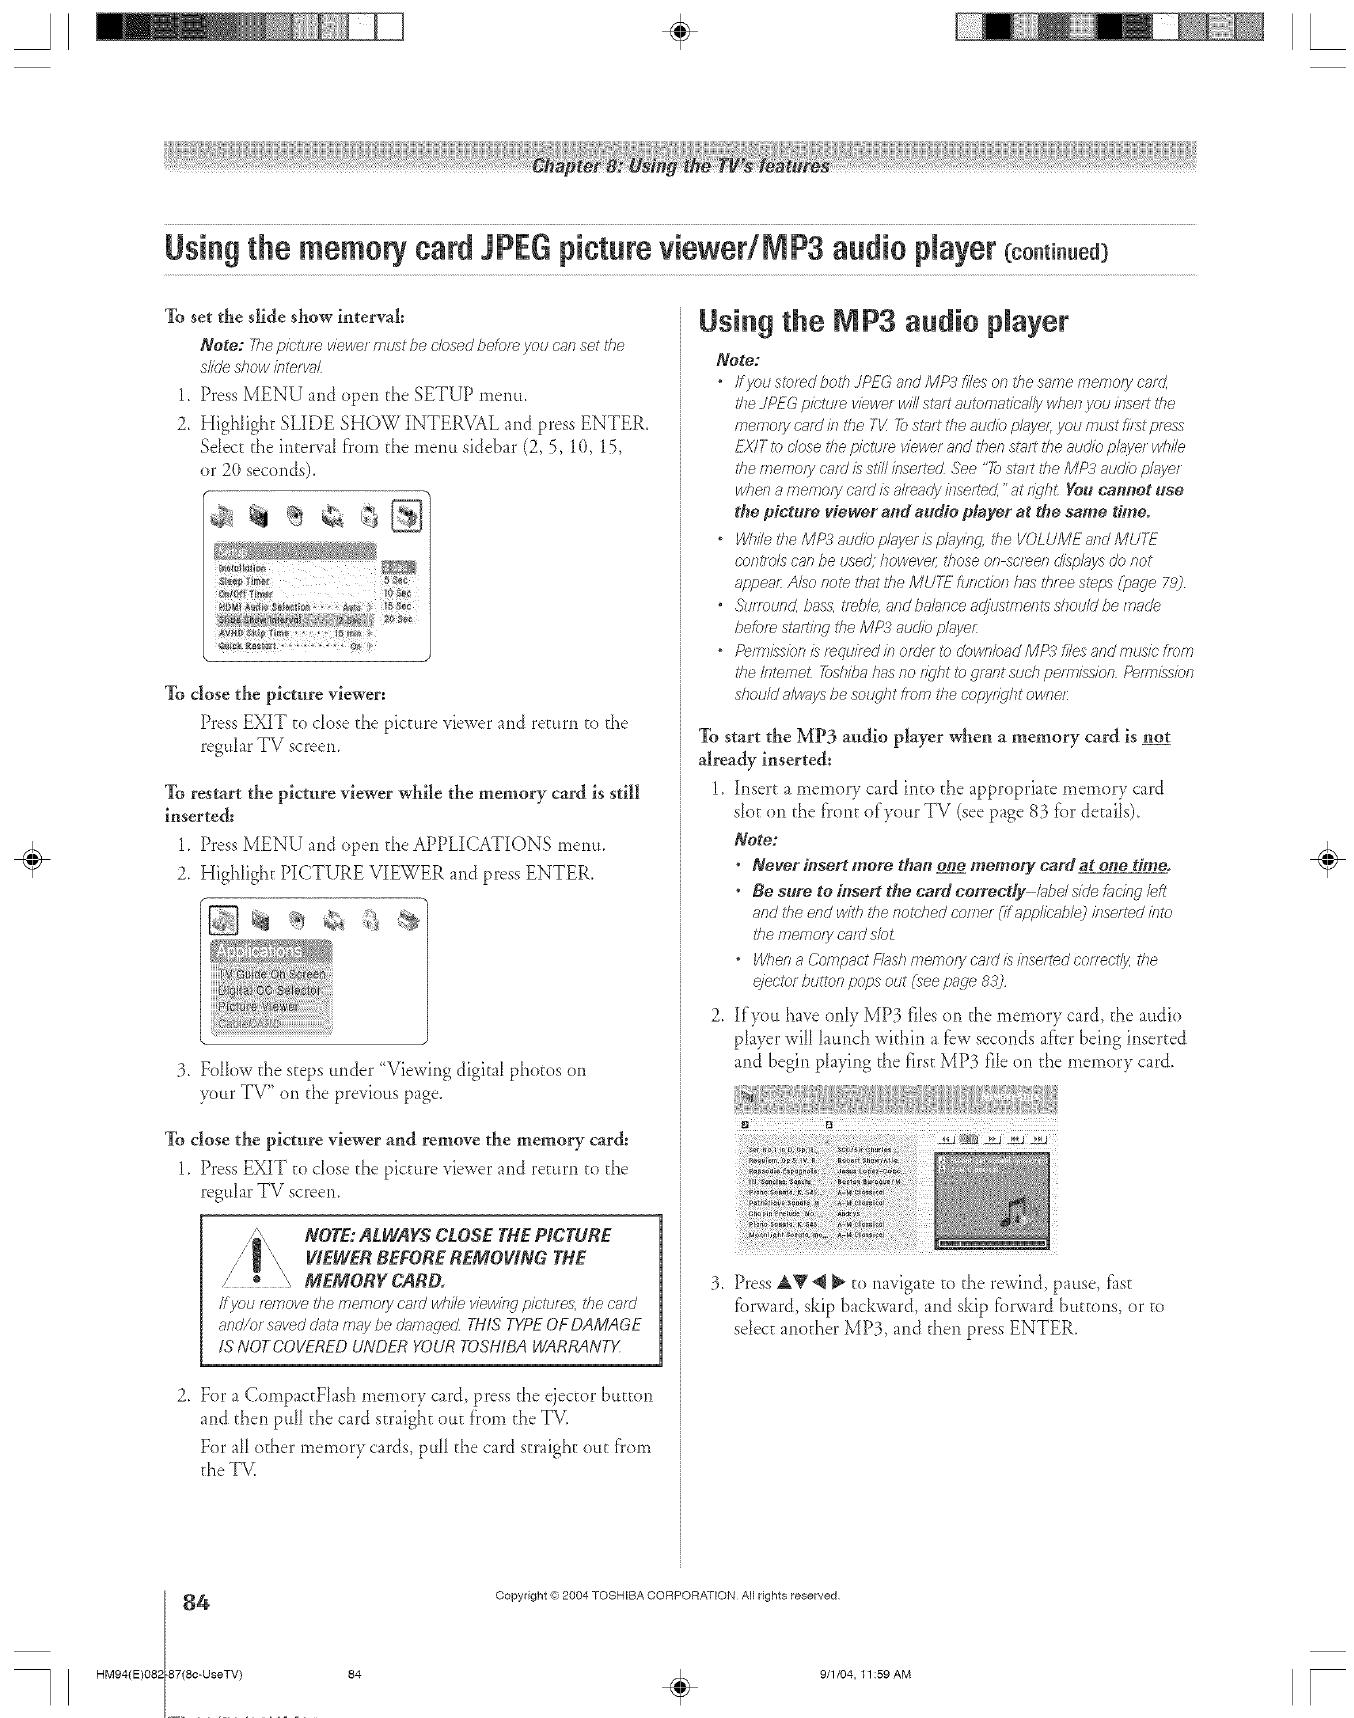
A÷ [
Usiagthe memorycard JPEGpictureviewedMP3audio playercoo.t ..ed3
To set the slide show interval:
Note: The picture viewer ml_t be closed be/or_ you can set the
slide show klte/ _d
1. Press MENU and open die SETUP menu,
2. Highlight SLIDE S/lOW INTERVAL and press ENTER,
Sdecc die interval from die menu sidebar (2, 5, 10, 15,
or 20 seconds).
To close the picture viewer:
Press EXIT to dose the picture viewer and return to the
regtdar TV screem
To restart the picture viewer while the memory card is still
inserted:
1_ Press MENU and open the APPLICATIONS menu.
2. Highlight PICTURE VIEWER and press ENTER,
3. Follow die steps under "Viewing digital photos on
your TV" on die pre_ious page.
To close the picture viewer and remove the memory card:
1. Press EXIT to dose the picture viewer and return to die
regtdar TV screen.
NOTE: ALWAYS CLOSE THE PICTURE
VIE_I/ER BEFORE REMOVING THE
/o _ MEMORY CARD.
ffyou r_move_7?e/71emo/ycard while viewingpictures,thec:r_rrl
and/or savedclaramaybe damagecLTHiS TYPEOFDAMAGE
IS NOTCOVEREDUNDER YOURTOSHIBAWARRANTX
2. For a CornpactFlash memory card, press the ejector button
and then pull die card straight ouc from die TV.
For all odier memory cards, pull die card straight out t}'om
the T_.
Using the MP3 audio player
Note:
"If you stored both JPEG and MP3 files on tl?esame memo?y cam',
d;e JPEG pietu/_ viewe/ will start automa_b_J/y when you isrselt the
memory eafd isl the TIll 7b start the audio plajlel; jlau must fi/st press
EX/T _bclose _7?epicture viewer and then st;it? the audio pk_ye/ wl?//e
the memoir card is still/nsertecL See "72?steerthe MP3 audio pl,'_yer
when a memoiy card is al?_ady inset-ted,"at r_ql?t You cannot use
the pictore viewer and audio player at the same time°
"While the MP3 auogbplayer/;_ playing _7?eVOLUME and MUTE
eont/ols can be used: however those on sc/_en d/spklySdo not
_ppear: A/so note that the MUr_ function has tlffee s_ps Cp_ge 782
*&mound, bass, t?_ble, andbahnceadjustmentsshouldbemade
befor_ sl?ld/ng tire MP:_ audio p/g{ller:
*Pernr/ssb/r/sr_qu//edborUe/17JdownbadMP3f//esandnrusfefrom
the Internet 7bshba has no n_'ht to grant stud? pemJssion Pefm/}'_/ols
d/ou/d alw_ys be sot4/ht fepm the c'opy?_qhtowne?:
To start the MP3 audio player when a memory card is no_
already inserted:
1. Insert a memory card into die approprhte memory card
sloc on the tr'onc of your TV (see page 83 for details).
Note:
•Never insert more tha_ one memory card at o#e time.
• Be sure to #tsert the card correctly k_bels/de t'_C/klgleft
and the end with the r_otched comer UapphbableJ klserted into
the memo/j/card slot
•When aCompact Flush memoiy card is/bserted corTectlj/,the
elector button pops out (see page 8D2
2. If you ha_eonly MP3 flieson the memor5card, d_eaudio
phyer will hunch within afew seconds after being inserted
and begin playing the first MP3 file on die memory card.
3. Press ak_ @_ u) navigate to the rewind, pause, thst
fbrward, skip backward, and skip tbrward buttons, or to
select anodier MP3, and then press ENTER.
÷
4
HM94(E)082 87(8c-UseTV)
Copyright (ct,2004 TOSHIBA CORPORATION AN rights reserved
84 . 9/1/04, I1:59 AM [
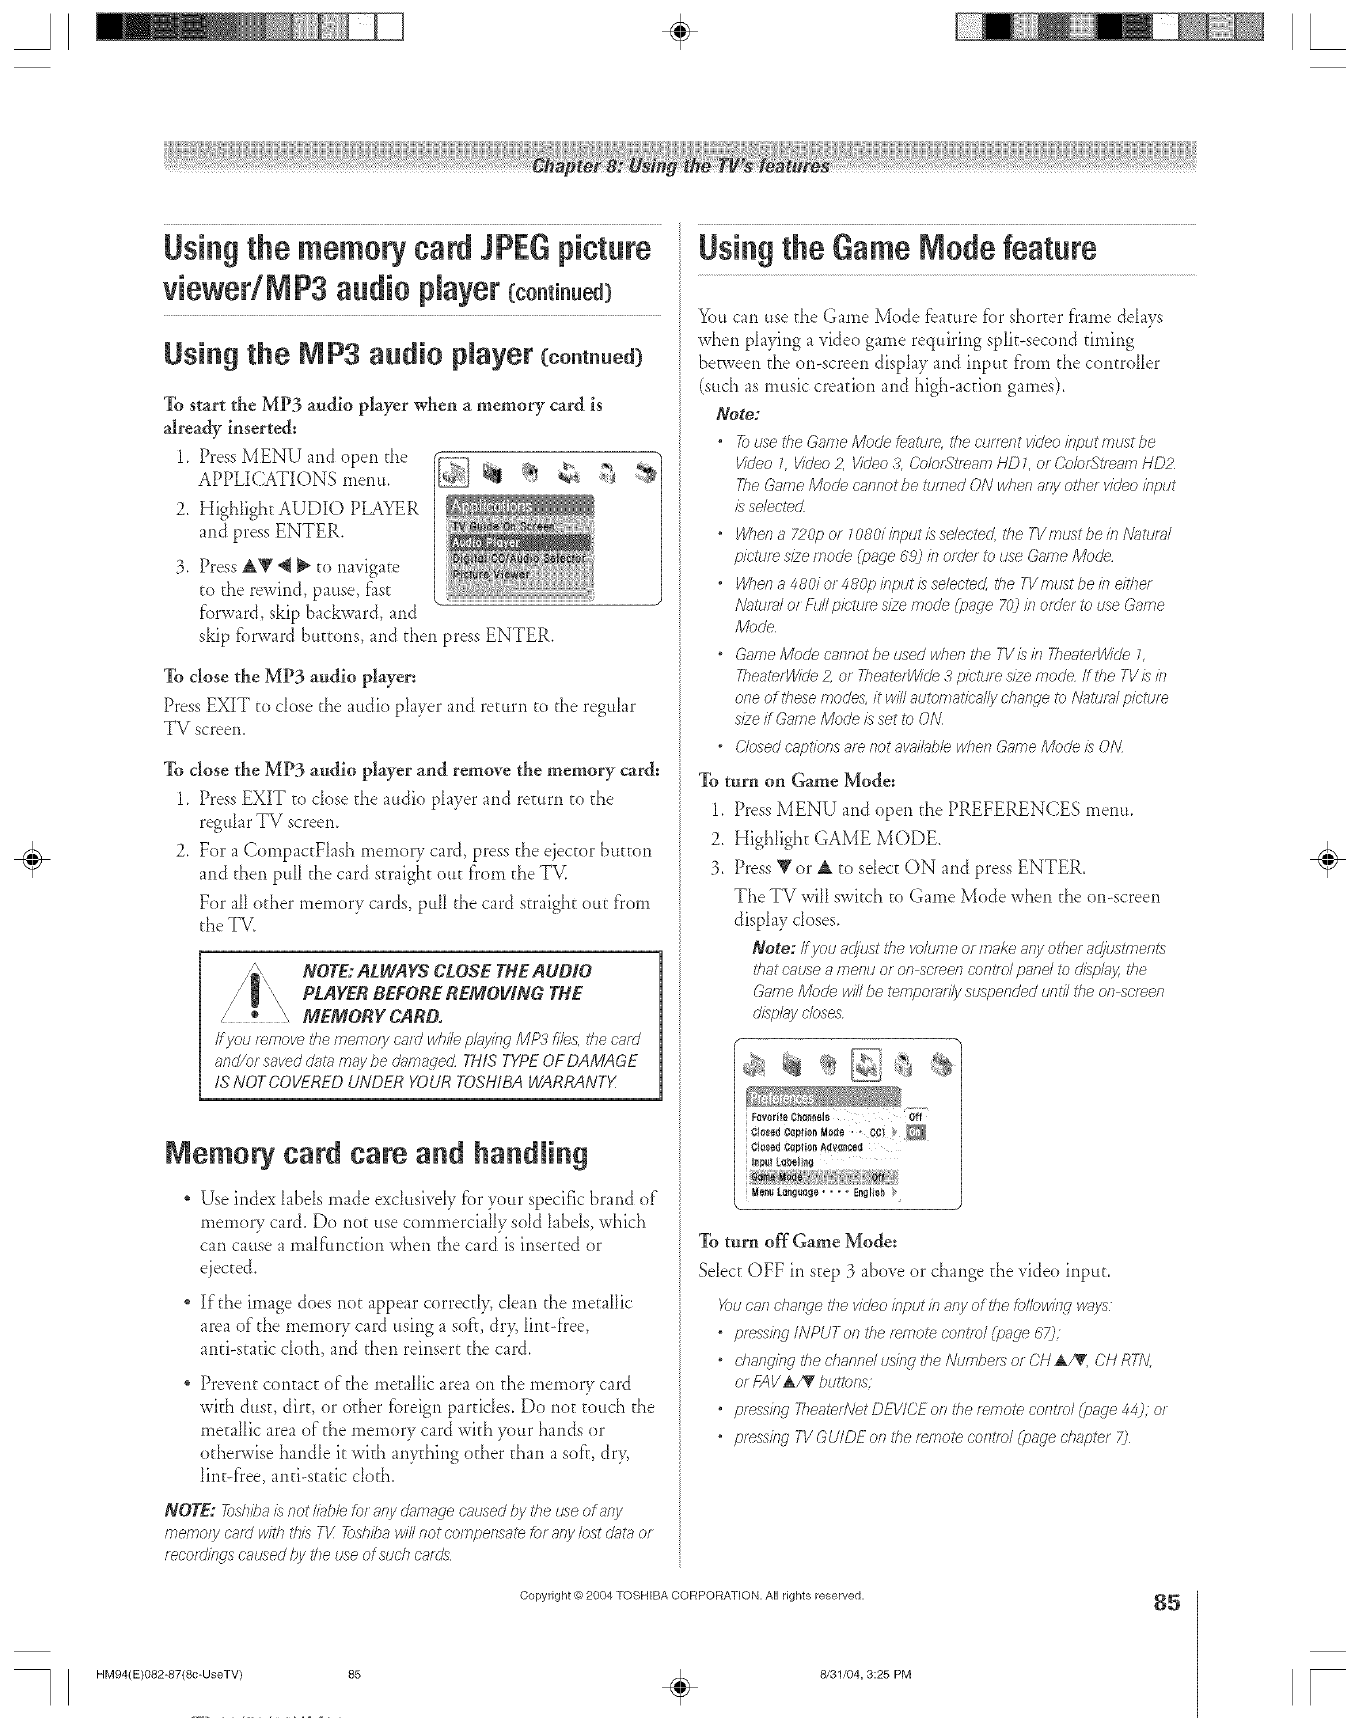
S ÷ L
Using the memory card JPEGpicture
viewedMP3 audio player(continued)
Using the MP3 audio pmayer(co.t..ed3
To start the MP3 audio player when a memory card is
already inserted:
1_ Press MENU and open the
APPLICATIONS menu.
2. Highlight AUDIO PLAYER
and press ENTER.
Press AY 'q _;o navigate
to the rewind, pause, fiist
f'orward, skip backward, and
skip tbrward buttons, and then press ENTER.
To close the MP3 audio player:
Press EXIT to close the audio player and return to tile regular
TV screen.
To close the MP3 audio player and remove the memory card:
1_ Press EXIT to dose the audio player and remm to the
regular TV screem
2. For a CompaccFlash memory card, press the ejector bu_Eon
and dien pull the card araigh_ ouc from the TV.
For all other memory cards, pull the card straight out fl'om
the TV.
NOTE:ALWAYS CLOSE THEAUDIO
PLAYER BEFORE REMOVING THE
,_" _ MEMORY CARD.
/fpu [emovethe memo/ycmd whilefdayir_gMP3 file& thecnrd
and/or savedcats,,maybe damaged THiS TYPEOFDAMAGE
IS NOTCOVEREDUNDER YOURTOSHIBAWARRANTX
iVlemorycard care arid handling
Use index labels made exdusiveIy f))ryour specific brand of
memory card. Do not use commercially sold labels, which
can cause a malf'unction when the card is inserted or
ejected.
If the image does not appear correctly, cIean the metallic
area of"the memory card using a sofT,dry, lint-flee,
anti-static cloth, and then reinsert the card.
Prevent con_ac_of"the metilic area on the mernory card
with dua, dirt, or @her fbreign particIes. Do noc totich the
metallic area of"tile memory card with your hands or
odlerwise handIe it with anything other than a soft, dr>
lint-flee, anti-aade do_h.
NOTE: _shba /s noth_bhfo_a/V &,r_agecausedby theuse of any
memo/y catd withthis N! _sh/ba w/2ilot compemate/or arlylosto%taor
_eco_vkbgsca_ed hy theusedsuch cain's
Using the Game Mode feature
You can use the Garne Mode tbature fi)r shorter flame delays
when playing a video game requiring split-second timing
be_veen the on-screen display and input fl'om the controller
(such as music creation and high-acuon games).
Note:
•_ use the Game Mode feature, the current video hputmustbe
Wdeo 1 Video £ lddeo Z Calo_?tfeam HDL of O'oIofS_/_FI/YIHD2
Tile Game Mode ca/lnot be turned ON when afy otis/video klput
is selected
,Whel?a 720p o_ 1080iin/:;utissdected, the T1/mustbeh_ [\J_tufal
picture size mode (page 692 b om'e_ i_ use Game Mode
•Whe/ia480ior480phput/sselected, theIVmustbekle/the/
Natural of Full pietu/e size mode (_;age 70) hi of o'er to use Game
Mode
•Game Mode car_notbe used whefl the T1/'/shi TIieaterVdde L
TheatefWide 2, ot TIieatefWide 3pictu/ e size mode if:he TV/s in
one of these modes,/twill automal<h;_:@yd_ange I_>Ngtuld picture
s/2eff Game Mode is set to ON
•Closed cap_/Pnsare not awdh_bb wl?ee Game/VhJde is ON
To turn on Game }{ode:
1. Press MENU and open the PREFERENCES menu.
2. Highlight GAME MODE.
3. Press '_'or _ to sdec_ ON and press ENTER.
The TV will swkch to Game Mode when the on-screen
display closes.
Note: ff pu adjust the volume or make aW other adjustments
that cat_sea i/-lel?Uo[ on scteefl co/?l?olpane/to d/splg_y,the
Game Mode win be temporarily suspended until the of7screen
c;gsph/5/closes
¢;Ioletl ¢_plion ,4_l/_lole_l
Ii1_111l,_elillg
To turn off Game Mode:
Sdec_ OFF in step 3 above or change the video input.
_u caslchaslge:Is videohIput iR8ejlof thekJl/owhlg >soys
*pfessfRg/NPUTon the remote cofltie/(pgsge 67);
*d?ailg/ng tile diannd ushlg the Numbers or ON a,71K,OH RTN
or k-AV_/_ buttons;
opres'_ing TheaterNetDEV/CEonthetemotecorffm/(page44);or
opres'_klg 7-1/GUIDE of 7the tWTIote control (page d_aptef 7)
Copyright O 2804 TOSHIBA CORPORATION, All rights reserved. 85
HM94(E)O82-87(8c-UseTV) 85 ÷8/31/04, 3:25 PM
÷
[

gettin9 the ON/OFFtimer
%u can use the ON/OFF timer to turn the TV on and off at a
preset time on a recurring basis.
Note: Youm_stfirstsetthetime(see page 492
To set the ON/OFF timer:
1. PressMENU and open the SETUP menu.
2. Highlight ON/OFF TIMER and press ENTER.
3. Press _" to highIight d_eDAY field, and d_en press _ to
select the recurrence (weekends, weekdays, e_ery da> etc).
.
5_
6.
Press V to highlight d_eTIME fidd, and then use the
Number buttons to enter the ume you want the TV to
tttrn on.
When the AM/PM field is highlighted, press _ to select
AM or PM.
Press V to highIight the TV ON DURATION fidd, and
then press _ to select the length ofume until the TV turns
oK
7, Highlight SAVE and press ENTER.
8, "F_irnoff"the _ The TV will turn on amomadcally on the
day(s) and at the time you set. The TV wiIl then tam of}"
automadcally @er the length of ume you set in the TV
ON DURATION fidd.
Note:
•Wl?enapowe/&ilu/e occurs, the ON/(?FF time/setthlgs m_ly
be c'/eg_ted
,Tocl/_p/bythe on time setting, press RE(.;ALL
To turn of_t_e ON/OFF timer:
Sdect NOT SET in step 3 above.
Setting the sleep timer
You can set the sIeep umer to turn offthe TV after a set length
of time (maximum of 3 hours).
The sIeep umer turns off'the TV one dine onl> as opposed to
the ON/OFF timer, which turns off the TV on a recurring basis.
To set the sleep timer:
PressSLEEP on the remote control to set the length of time
until the TV turns offl Each time you press SLEEP, the ume
wilI increase in 10-minut:e increments, to a maximum of
180 minutes.
To cancel the sleep timer:
Press SLEEP until k is set to 0.
--SLEEP
To set the sleep timer using the on-screen menus:
1. PressMENU and open the SETUP merlu.
2. Press Y to highlight SLEEP TIIv{ER and press ENTER.
__
3. Press the Number buttons to enter the length ofdme until
the TV rums of_'automaticaIIy.
4. Highlight SAVE and press ENTER.
Note:
•When _power _d/ufe oecufs. _YTesleep t/b_ef setting m_y be
cleamcZ
•Tocli,_p/bytheamountof timeleft"Ol}thesleep t/rnel7pless
RECALL
÷
6
HM94(E)082 87(8c-UseTV)
Copyright @ 2084 TOSHIBA CORPORATION. All rights reserved,
86 _ 8/31/04, 3:25 PM [
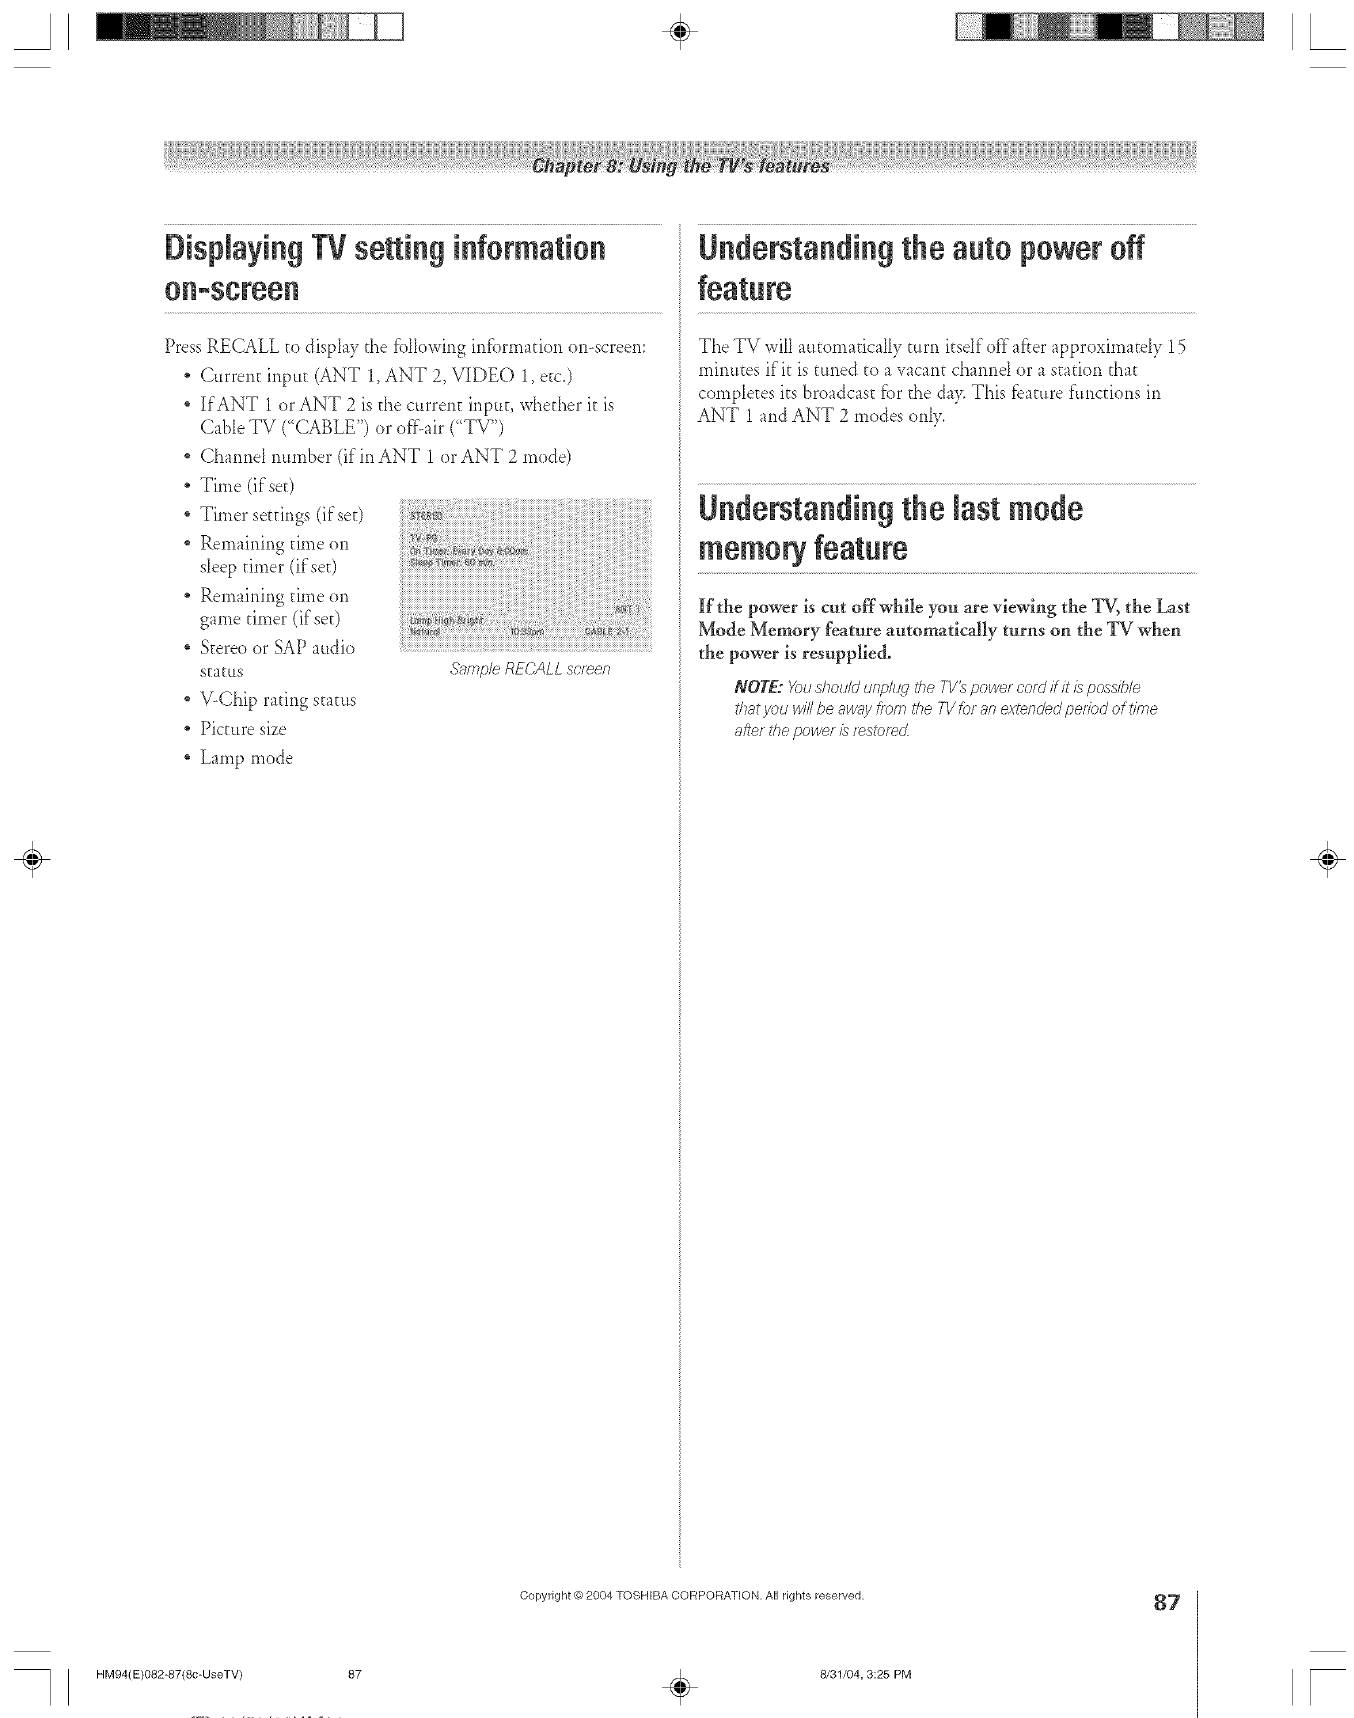
Displaying TV setting Understanding the auto power off
Press RECALL _odisplay the fb[lowing irdbrmation on-screen:
* Current inptt_ (ANT 1,ANT 2, VIDEO 1, etc.)
* If ANT 1 or ANT 2 is _hecurrent ir_p_t_,whether it is
Cable TV ("(-;ABLE")or offair ("TV")
* Cham_e[ rmmber (if in ANT 1 or ANT 2 mode)
Time (if se0
Timer seEfings(ifse0
* Remairdng dine on
sleep timer (ifseQ
* Remaining time on
game timer (if'set)
S_ereoor SAP audio
staEtts
V-Chip rating stactts
* Picture size
* Lamp mode
The TV will automatically turn itsdf off after approximately 15
mirmEes if'it is tuned to a vacant cha*md or a station that
comp[e_es its broadcast fbr the da> This feature f:tmctions in
ANT 1 and ANT 2 modes on[y.
Understandingthe last mode
memory feature
ii_i!iiiiiiiiiiiiiiiiiiiiiiiiiiiiiiiiiiiiiiiiiiiiiiiiii!i!i!iii!iii!iiiii!i!ii!ii!i!i!iiiii!i!i!iii!iiiii!iii!iiiii!i!i!i!i!iiiii!iiiii!i!iii!iiiiiiiiiiiiiiiiiiiii!iii!iii!iii!iii!iii!iii!iiiiiiiiiiiiiiiiiiiiiiiiiiiiii!'
S__mp/eRECALL screen
If the power is cut offwhile you are viewing the TV, the Last
Mode Memory feature automaticMly turns on the TV when
the power is resupplied.
NOTE: _)lJ shou/d unplug the TV_ powet cord flit/s possible
that you H42be awny from the fl/ for an extended pe/#)d of t/kne
after the power is [_s?_)f_d
÷
HM94(E)O82-87(8c-UseTV) 87
Copyright _) 2804 TOSHIBA CORPORATION, All rights reserved.
÷8/31/04, 3:25 PM
87
[
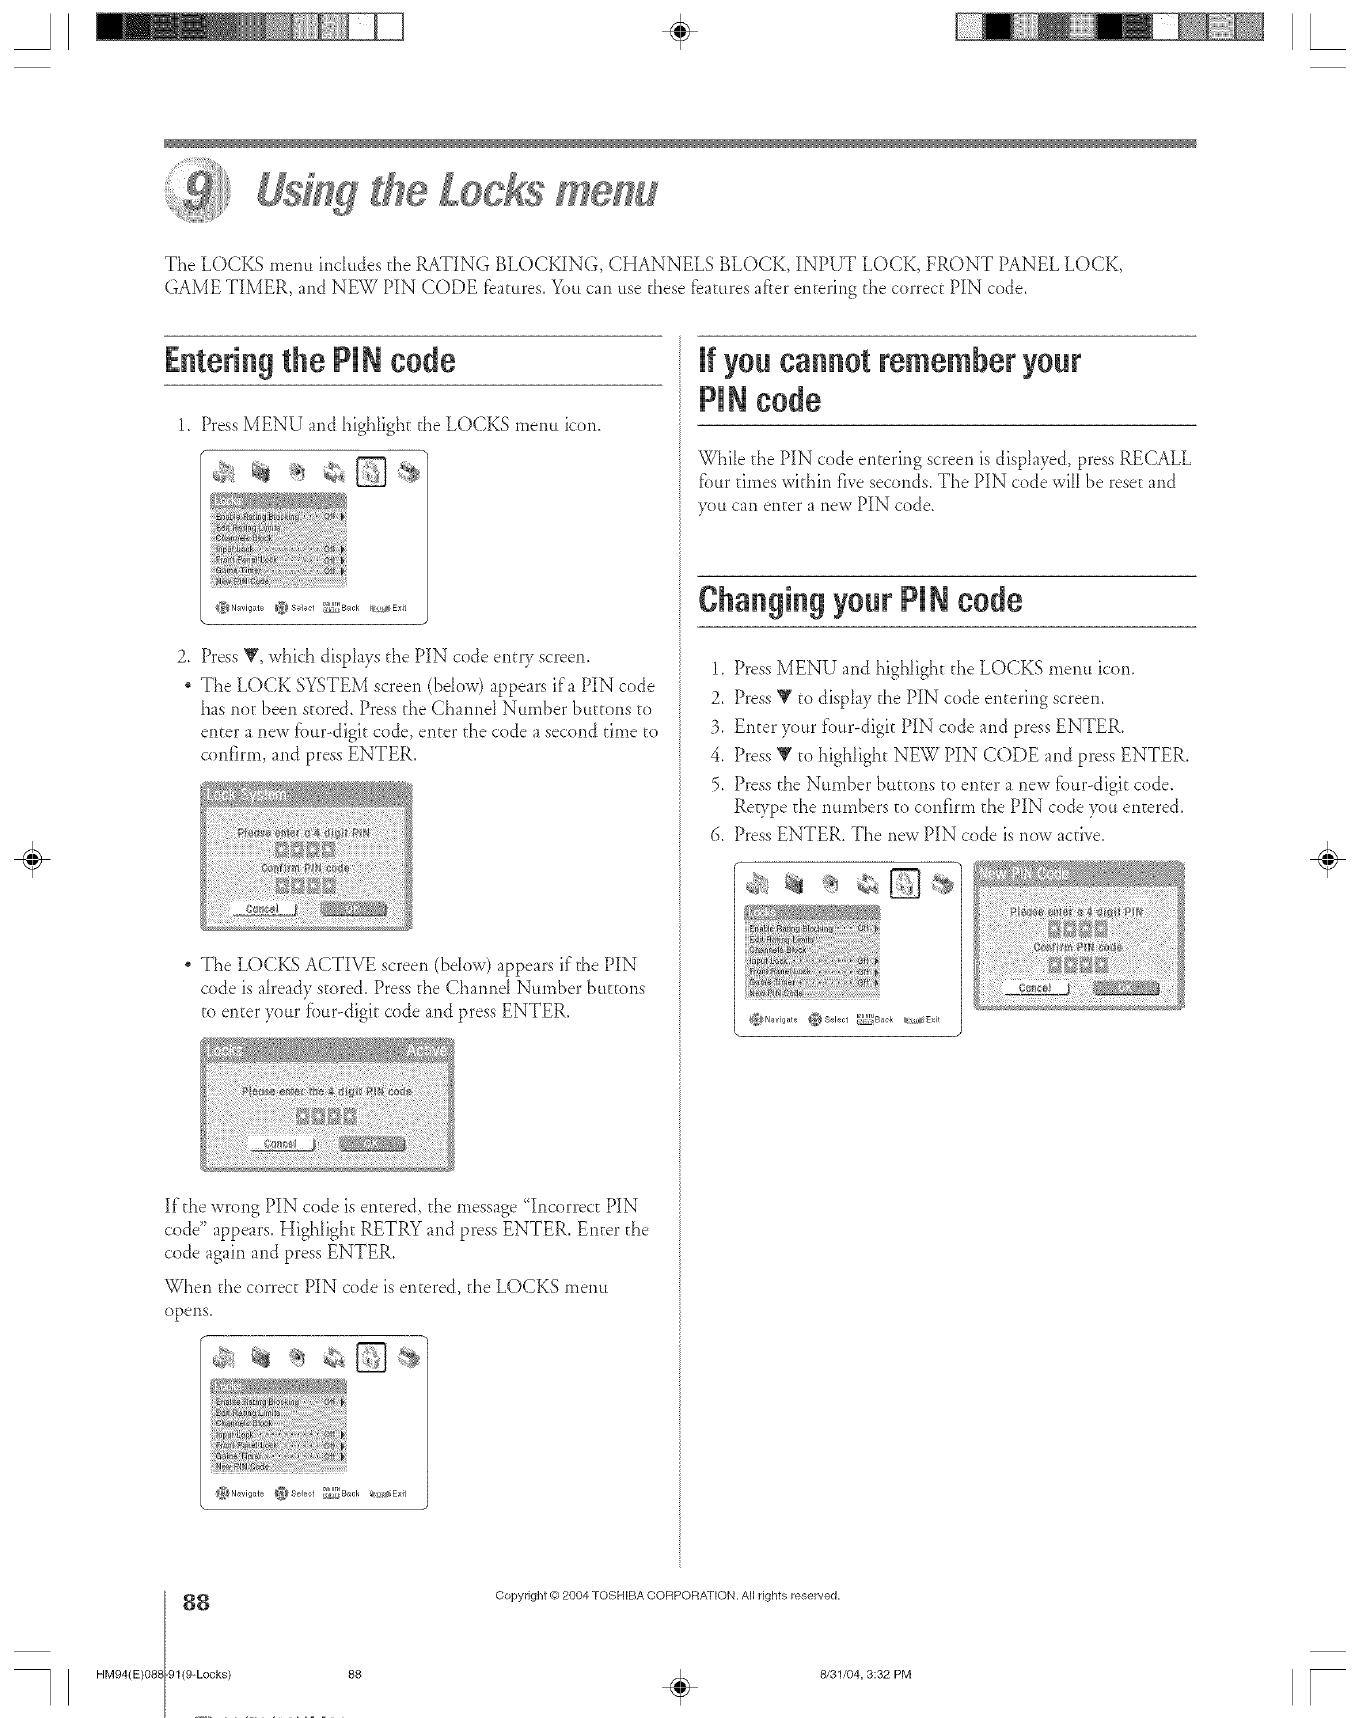
A÷ [
The LOCKS menu includes the RATING BLOCKING, CHANNELS BLOCK, INPUT LOCK, FRONT PANEL LOCK,
GAblE TIbfER, and NEW PIN CODE fbatures. You can use these fbatures af'_erentering the correct PIN code.
Enteringthe PiN code
1. Press b{ENU and highlight the LOCKS memt icon.
D
@Navigate @Select _Back @;,a_Exit
2. Press Y, which disphys the PIN code entry screen.
The LOCK SYSTEM screen (bdow) appears ira PIN code
has nor been stored. Press the Channel Number buttons to
enter a new fbur-digit code, enter the code a second time to
confirm, and press ENTER.
The LOCKS ACTIVE screen (bdow) appears if"tI_ePIN
code is already stored. Press the Channd Number buttons
to enter your fbur-digk code and press ENTER.
If the wrong PIN code is entered, the message "Incorrec_ PIN
code" appears. Highlight RETRY and press ENTER, Enter the
code again and press ENTER,
When the correct PIN code is entered, the LOCKS menu
opens.
_Navigate _JSeleet _Back _iExit
if youcannotrememberyour
PiNcode
While the PIN code entering screen is disphyed, press RECALL
fi.mrtimes within fi_e seconds. The PIN code will be reseEand
you can enter a new PIN code.
ChangingyourPiNcode
1. Press MENU and highligh_ the LOCKS menu icon.
2, Press Y to display the PIN code entering screen.
3. Enter your f'our-digit PIN code and press ENTER,
4. Press Y to highlight NEW PIN CODE and press ENTER,
5. Press the Number buttons to enter a new fbur-digit code,
Reupe the numbers to confirm the PIN code 3x_uentered.
6. Press ENTER, The new PIN code is now active.
_Navigate _Select _Back _!;_S×it
÷
HM94(E}08{
88
-91(9-Locks) 88
Copyright @ 2004 TOSHIBA COFtPORA_ ION. All rights reserved,
÷8/31/04, 3:32 PM [
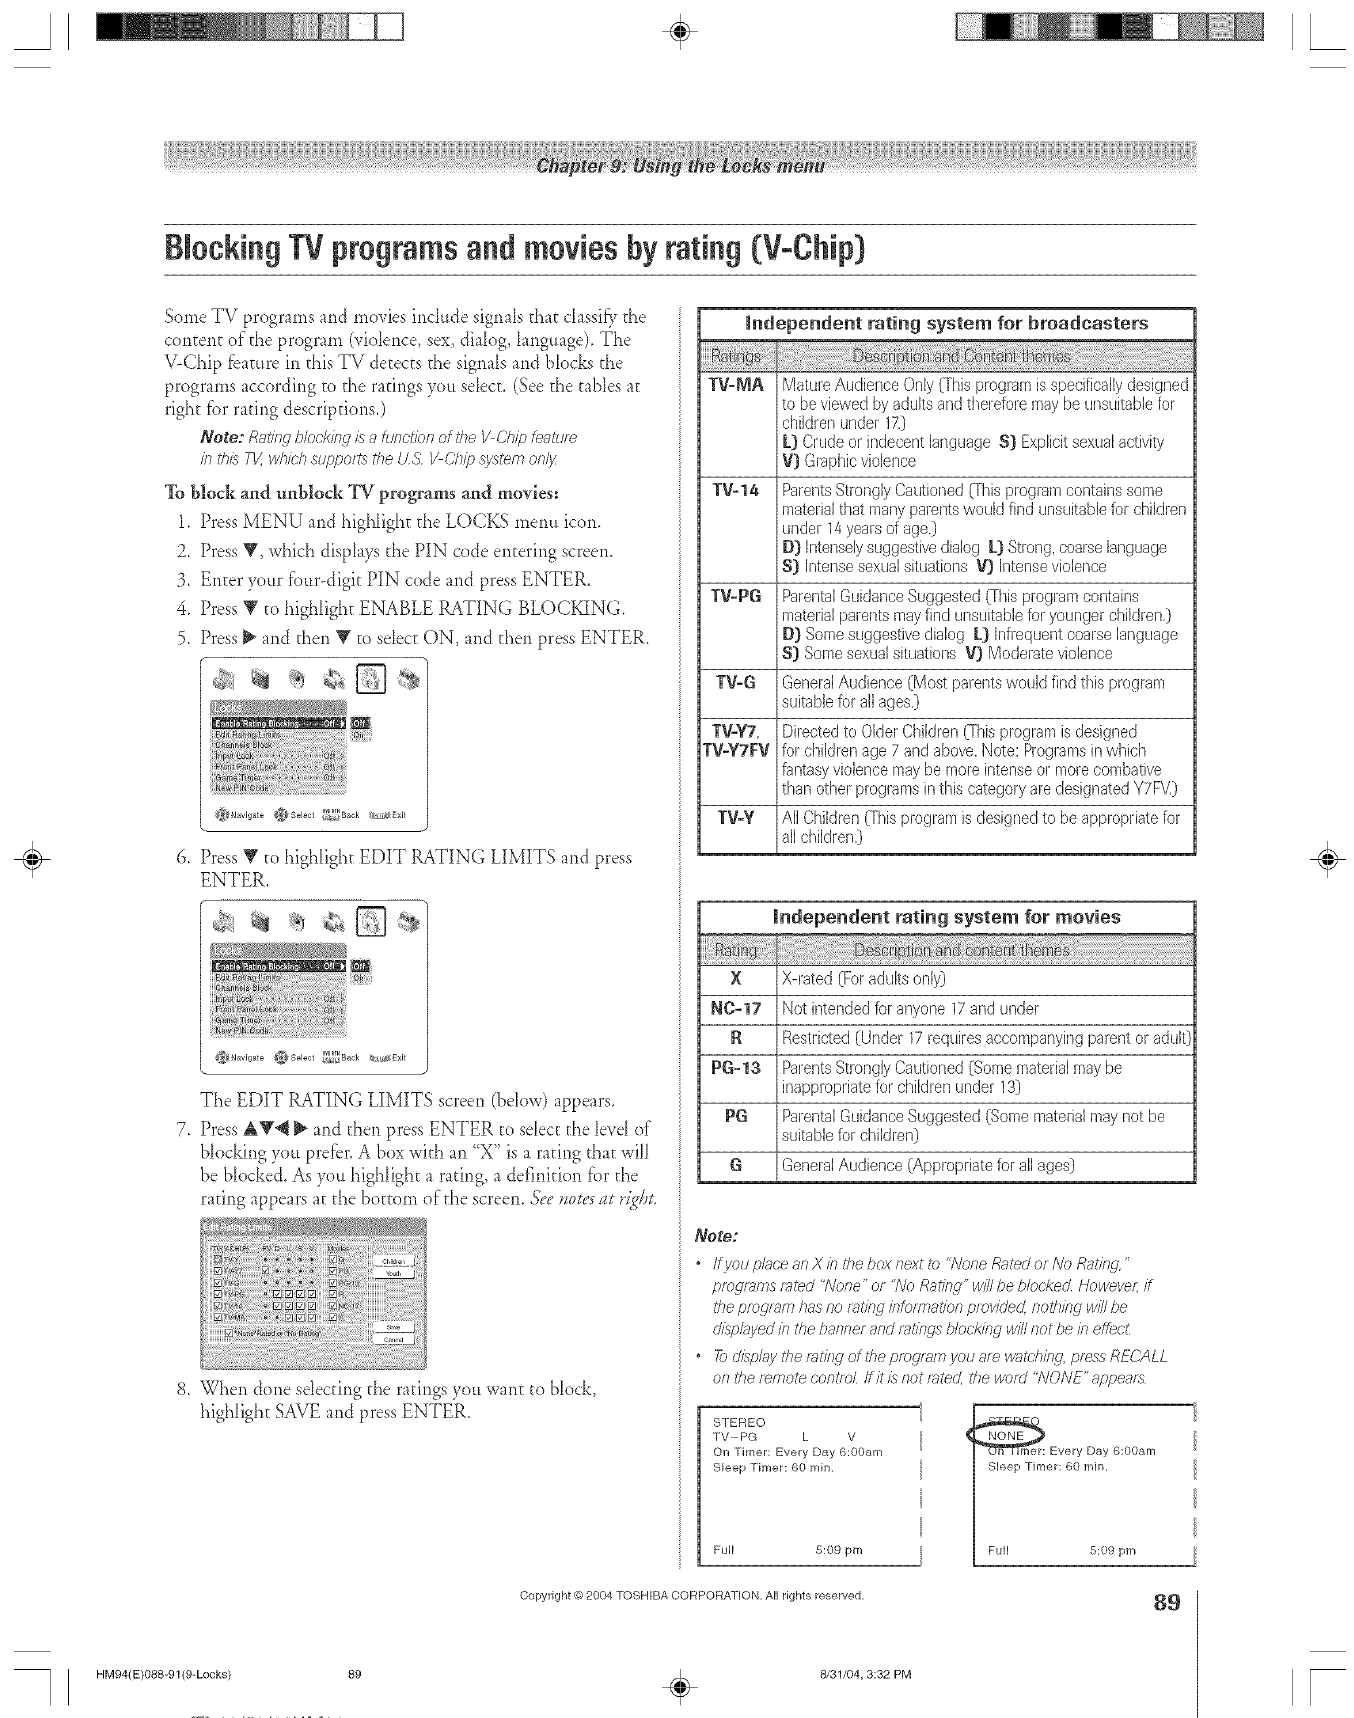
A÷ L
BlockingTVprogramsandmoviesbyrating(V-Chip)
Some TV programs and movies ind_tde signals that classiC, the
content of the program (videplce, sex, dialog, language). The
V-Chip fba[ure in this TV detects the sigpMs and blocks the
programs according to the ratings you sdect. (See the tables at
fight fbr rating descriptions.)
Note: Ratingbloddrlgisahsnctionof#le VChipfe_mee
#l I'h/s T1Zwhich supports the tJS ¼Chip system only
To block and tmblock TV programs and movies:
1. Press MENU and highlight the LOCKS mepm icon.
2. Press Y. which disp[ays the PIN code entering screen.
3. Enter your tbur-digit PIN code and press ENTER.
4. Press V to highIight ENABLE RATING BLOCFQNG.
5. Press _ and then V [o select ON. and then press ENTER.
&_Navigate _Selecl _#$_Back J_[_r_Exit
6. Press T' to highlight EDIT RATING LIMITS and press
ENTER.
#
@Navigate @Select _i;_Back _;,;£_£xit
The EDIT RATING LIMITS screen (below) appears.
7. Press A'_4 _ and then press ENTER to sdect the Ievd of
blocking you pretbr. A box with an "X" is a raring that will
be Nocked. As you highlight a rating, a definition fbr the
rating appears at the bottom of the screen. Seevotes_It*'igtJt.
8, When done sdectip_gthe ratings you want to block,
highlight SAVE and press ENTER.
independent rating system for broadcasters
TV_MA MatureAudience Only([his programis specificallydesigned
to be viewedby adultsand thereforemaybe unsuitablefor
childrenunder 17.)
L) Crude or indecentlanguage S) ExplicitsexuaJadivity
V} Graphicviolence
TV=14 ParentsStronglyCautioned([his programcontainssome
materialthat many parentswould find unsuitablefor children
under 14yearsof age.)
D} Intenselysuggestivedialog L) Strong,coarseBnguage
S) Intensesexualsituatior/s 'ffj Intenseviolence
TV_PG ParentalGuidanceSuggested(Thisprogramcontair/s
materialparents mayfind unsuitablefor younger children,)
D} Somesuggestivedialog L) Infrequentcoarselanguage
S) Somesexualsituations V) Moderateviolence
TWG GeneralAudience (Most parentswouldfind this program
suitablefor allages,)
TWYT, Directedto OlderChildren(Thisprogramis designed
TWYTFV for childrenage7 andabove.Note: Programsin which
fantasyviolencemaybe moreintenseor morecombative
than othel programsinthis categoryaredesignatedYTFV)
TV_Y All Children0his program isdesignedto be appropriatefor
allchildren.)
Independent rating system for movies
X X-rated (Foradultsonly)
N0=17 Not intendedfor anyone 17and under
R Restrided (Under 17requiresaccompanyingparentor adul0
PG_13 ParentsStronglyCautioned(Somematerialmaybe
inappropriatefor children under 13)
PG ParentalGuidanceSuggested(Somematerialmaynot be
suitablefor children}
GGeneralAudience (Appropriatefor allages)
Note:
, IfyouplHceanXinlT_ebox/lextto"lVoneRHtedofhloRatirlcL"
promTims rated "l\Jofle' or "AIoRatieg" will be blocked Howeveg ff
the procuem has no mlYrd bto/rT_ation provided rlothbg will be
displayed irl the ba/lner and r_}lYngsb/oc/@_gwill/lot be b effecL
• F) cl/spl;_ythe/et/_ W of tile prog/s/rl you are watching, press RECALL
o11i'he r_hlote oorlt/o/ flit is Rot fated, the word "NONE" appears
STEREO
TV-PG L V
On Timer: Every Day 6:00am
Sleep Timer: 60 rain,
Full 8:09 pm
NONE
_ Every Day 6:00am
Sleep Timer: 80 rain.
Copyright @ 2004 TOSHIBA CORPORATION, All rights reserved. 8g
HM94(E}088-91(9-Locks) 89 ÷8/31/04, 3:32 PM
÷
r
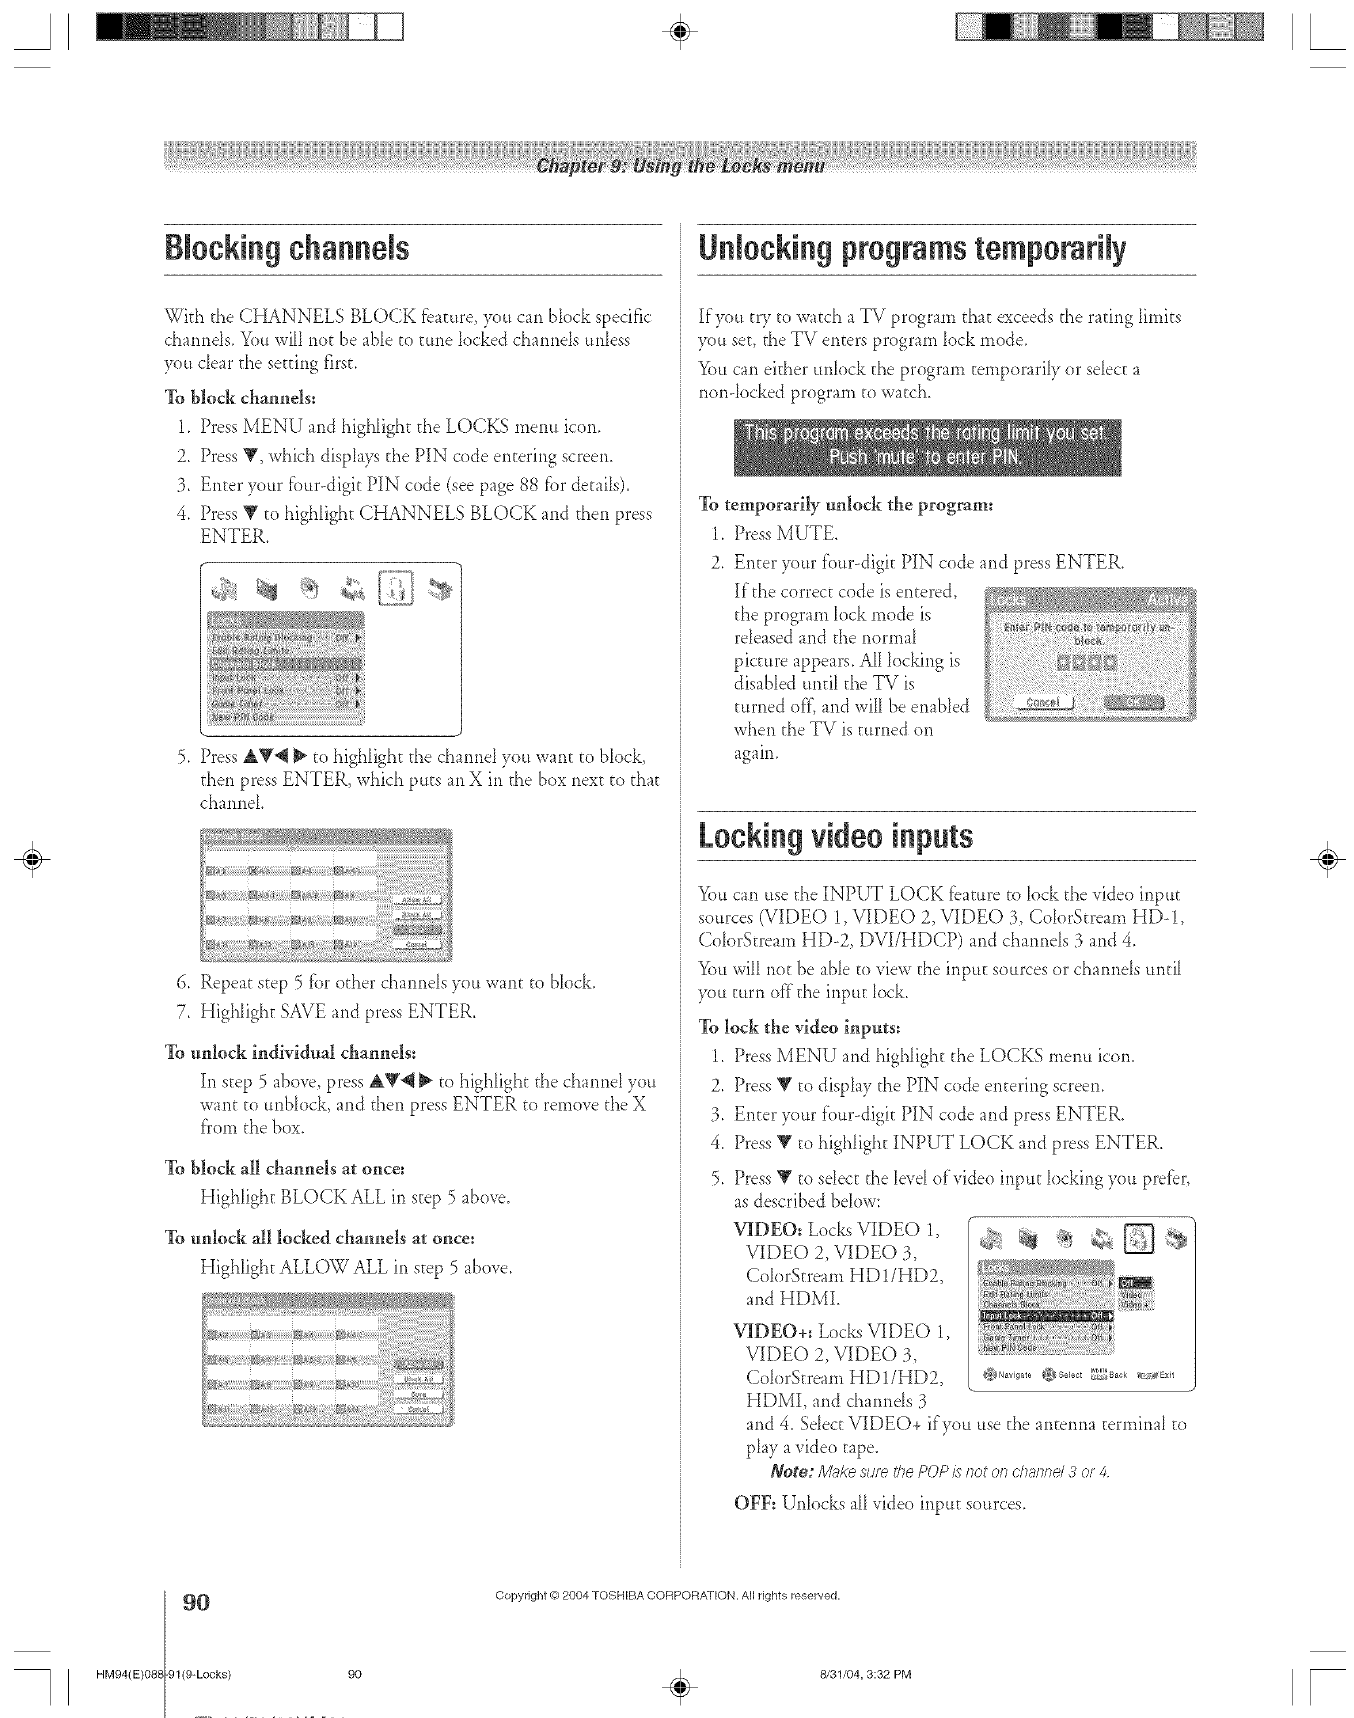
A÷ [
Blockingchannels
Wkh the CHANNELS BLOCK fbature, you can block specific
channds. Youwill not be able to tune locked cham_els unbss
you clear the setting first.
To block channels:
1. Press MENU and highlight the LOCKS menu icon.
2. Press Y, whkh disphys the PIN code entering screem
3. Enter your tbur-digit PIN code (see page 88 fbr details).
4. Press Y to highlight CHANNELS BLOCK and then press
ENTER.
5. Press AV4 _ to highlight the channel you want to block,
then press ENTER, which puts an X in the box next to that
channel
6. Repeat step 5 tbr other chaimds you want to block.
7. Highlight SAVE and press ENTER.
To unlock individuM channels:
In step 5 above, press AV4 _ tohighlight the chamlel you
want to unblock, and then press ENTER to remove the X
f'rom the box.
To block all channels at once:
Highfight BLOCK ALL in step 5 above.
To unlock all locked channels at once:
HigNight ALLOW ALL in step 5 above.
Unl0ekin9 programstemporarily
If you try to watd_ a TV program that exceeds the rating limits
you set, the TV enters program lock mode.
You can ekher unlock the program temporaril) or select a
non-locked program to watch.
To temporarily tmlock the program:
1_ Press MUTE.
2. Enter your four-digk PIN code and press ENTER.
If the correct code is entered,
the program Iock mode is
released and the normal
picture appears. AII locking is
disabbd until the TV is
turned off',and xviIIbe enabbd
when the TV is turned on
again.
Lockingvideoinputs
You can use the INPUT LOCK feature tOlock the _ideo input
sources (VIDEO 1, VIDEO 2, VIDEO 3, CobrStream HD-!,
Coh)rStream HD-2, DVUHDCP) and channels 3 and 4.
You wiII not be abb to _iew the inpuE sources or cham_ds unti_
you turn of}'the input lock.
To lock the video inputs:
1. Press btENU and higNight the LOCKS rnenu icon.
2. Press Y to disphy the PIN code entering screem
3. Enter your f'our-digk PIN code and press ENTER.
4. Press V to highlight INPUT LOCK and press ENTER.
5. Press Y to sdect the bvd of video input locking you prefer,
as described bdow:
--
VIDEO: Locks VIDEO 1, _ _ _,
VIDEO 2, VIDEO 3, _b _ =!_
ColorStream HD !/HD2,
and HDbfI. Y
÷
HM94(E)O8{
9O
-91(9-Locks) 90
Copyright @ 2004 TOSHIBA CORPORATION. AN rights reserved,
÷8/31/04, 3:32 PM [
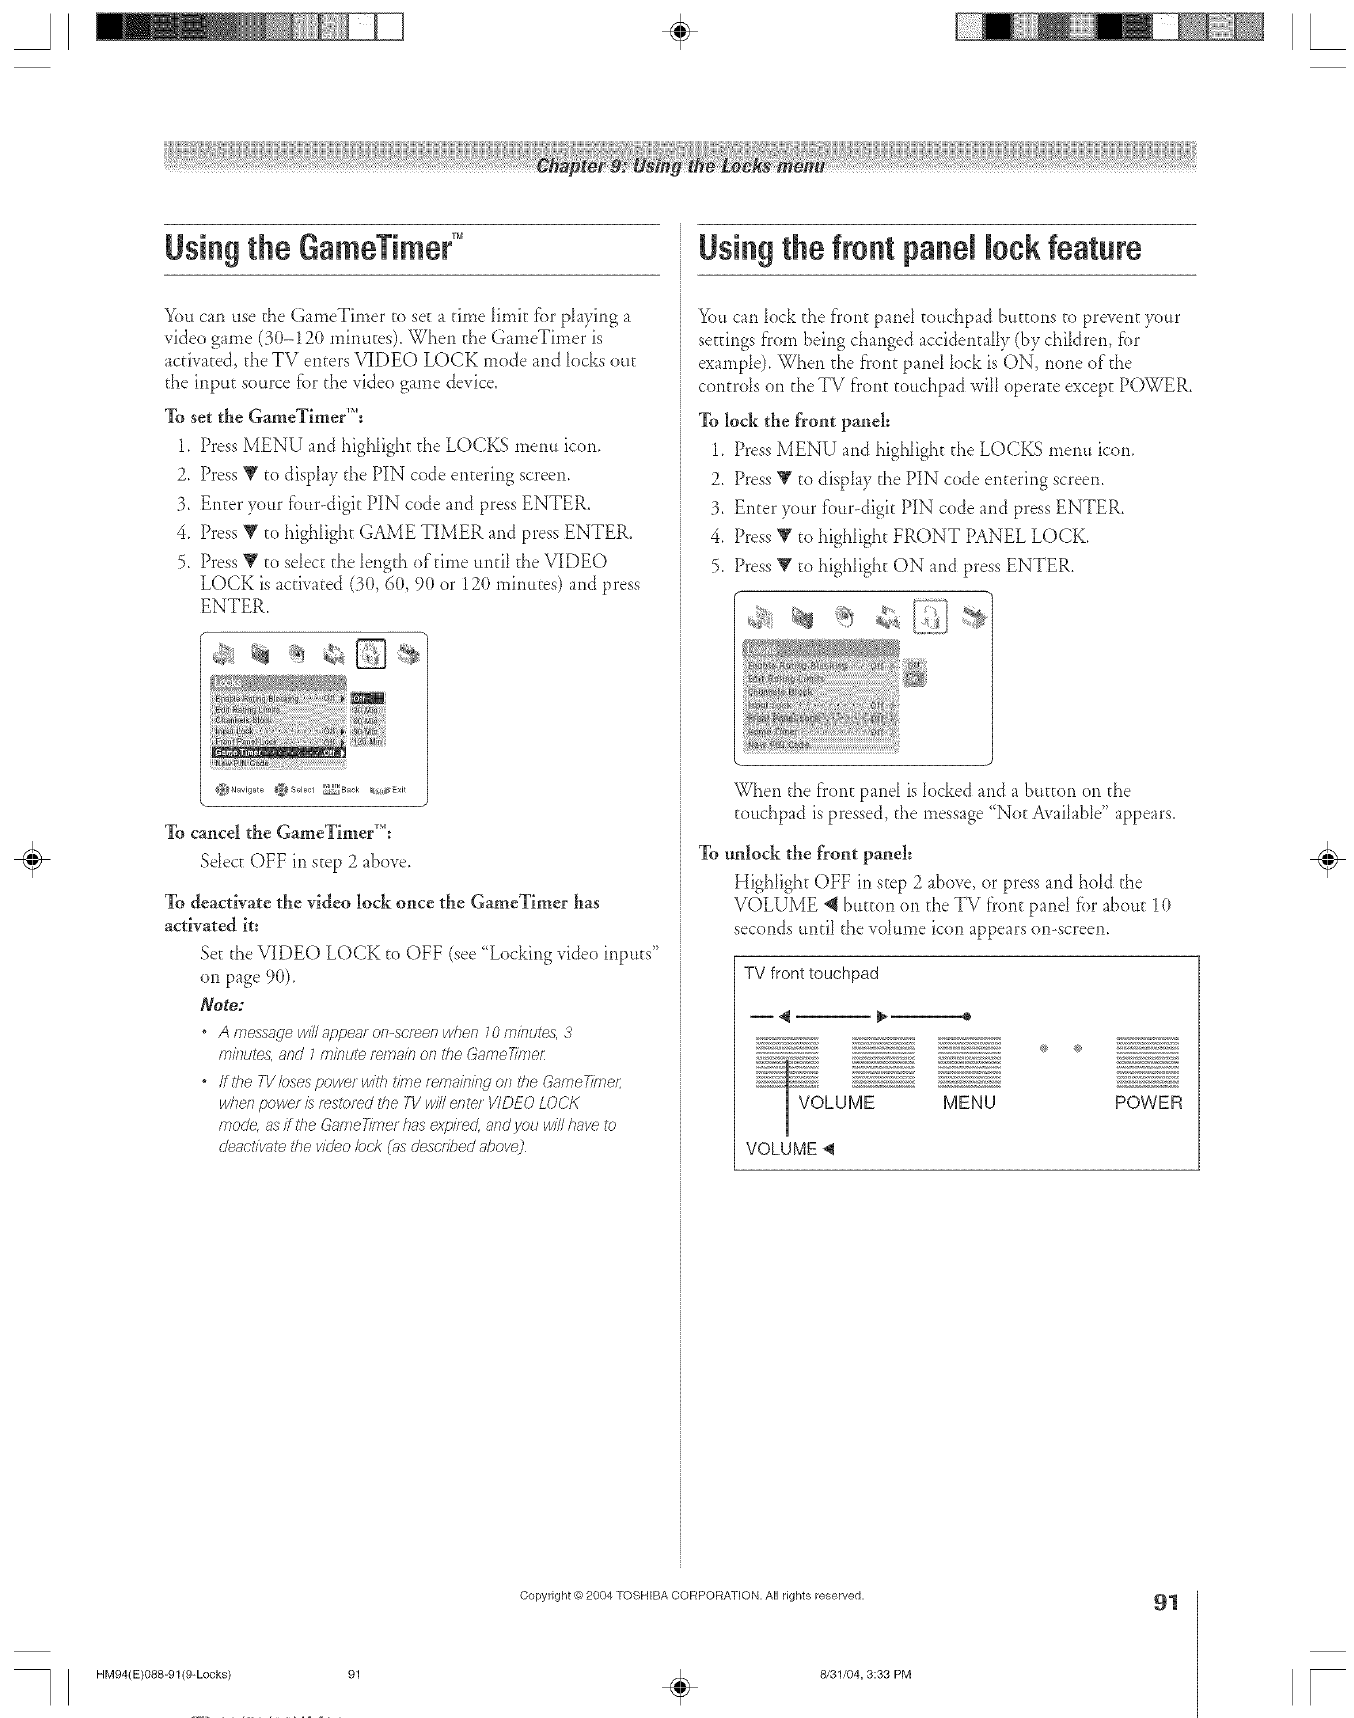
A÷ L
Usingthe GameTime¢°
You cai_ use the GameTimer to set a time limit fbr playii_g a
video game (3(t-120 mim*tes). Whe*l the GameTimer is
activated, the TV e*ltersVIDEO LOCK mode aild locks out
the iiIput source fi._rthe video game device.
To set the Gan_eTirner'M=
1. Press MENU and highlight the LOCKS menu icon.
2. Press Y to display the PIN code enterirlg screen.
3. Enter your tbur-digit PIN code and press ENTER.
4. Press V to highlight GAME TIMER and press ENTER.
5. Press V to selec[ the length of time until the VIDEO
LOCK is activated (3(},60, 9(}or 12(}minutes) and press
ENTER.
To cancel the Gan_eTirner'M:
Select OFF in step 2 above.
To deactivate the video lock once the GameTimer has
activated it:
Set the VIDEO LOCK to OFF (see "Locking video inputs"
on page 9(}).
Note:
" A messagewillappea_on-ser_enwhen 10minutes,3
minutes,and 1minutef_/TlaiROfltl_eGameTime/:
,ffthe T1/bsespowerwith i'ioletern_ffnkwonthe GameTimeL
whenpowet /srestoredthe TVwille/Tte/VIDEOLO('K
mode,as/fl'he GameT/}Tlethasexpi/ed, atldyou willhave to
de_lct/v¢itethe videobek (_isdescribedahol/e)
Using the front panel lock feature
You carl lock the front pant touchpad buttons to prevent your
settirlgs from being changed accidentally (by children, fbr
example). When the f'ront panel lock is ON, norle of the
controls on the TV fi'ont touchpad will operate except POWER.
To lock the front panel=
1_ Press MENU and highligh[ the LOCKS merm icon.
2. Press Y to display the PIN code entering screen.
3. Enter your t'our-digit PIN code and press ENTER.
4. Press _' to highlight FRONT PANEL LOCK.
5. Press _¢ to highlight ON and press ENTER.
When the front pant is Iocked and a button on the
touchpad is pressed, the message "Not Avaibg)le" appears.
To tmlock the front panel=
Highlight OFF in step 2 above, or press and hold the
VOLUME @ button on the TV f?ont pant _brabout 10
seconds until the volume icon appears on-screen.
TV front touchpad
® @
POWER
VOLUME _l
÷
HM94(E)088-91(9-Locks)
Copyright _) 2804 TOSHIBA CORPORATION, All rights reserved.
÷8/31/04, 3:38 PM
91

Beforecallinga seMce technician please
Probmem
TVwill not turn on
Picture )roblems
checktile fellowingtablefor a possiblecauseof tile problemand somesolutions.
Solution
o Make sure the power cord is plugged h/and then press POWER.
o The remote control batteries maybe dead. Replacethe batteries or try the front par]elbuttons
o Pressthe RESETbutton on the TV front pane] (page 9)
oIfyou have recently replaced the lamp unit, make sure the lamp Llnitand lampunit door are installed
properly (pages 98-100)
o The]ampunit may needto be replaced (pages 98-100)Also see "LED indications" on page 94.
o Check the anterlna/cable connections (Chapter 2}.
o PressINPUT on the remote control or TV/VIDEO or/the TVfront panel arid select a valid video ir/put
source (page 67), If no device is connected to any of the inputs on the 'FV,no picture will display when
you selectthat palsicularinput source. Fordevice connection details, seeChapter 2.
o Anter/na reception may be pool- Use a highlydirectional outdoor antenr/a (if applicable}.
°Thestation mayhave broadcast difficulties. Tryanother channel
o Adjust the picture qualities (page 7(_).
o[fyou are using a VCR, make ,_urethe TV/VCRbutton on the remotecontrol is set correctly (page 27)
o[fyou have two VCRs connected to your TV,do not connect the same VCR to the TV's output and input
connections at the ,_arnetime (page 18).
o Do not connect a standard video cable and anS-video cableto VIDEO-1 or VIDEO-2 on the W back (or
VIDEO-3 on the ]_/front) at the same time (Chapter 2).
Noisypk:'turs o[fyou are watching a tuned analog char/nel (off-air broadcast or Cable TV),set the CableClearDN R
featureto AUTOto reduce visible interference in the P,! picture (page 77)
Video/nput Selection
pr_:,b/ems
o[fthe hlput Selection wir/dow does not appear wher/you press INPUTon the remote control or
TV/VIDEO on the TVfront panel,press INPUTor TV/V[DEO a second time, which will change to the next
video input source and display the InpLJtSelection window
(,_nnot view external signa/s
or channe/ 3 or 4 oIfyou cannot view signalsfrom external devices connected to VIDE() 1, VIDEO 2
VIDEO 3 or ColorStream; or from channels 3 or 4, make sure the INPUT LOCK is set to OFF(page 90)
Black bo'<on screen o Setthe CLOSEDCAPTION feature to OFF(page 78}
POOr CO/OF Of 120 CO/OF ° The station may have broadcast difficulties. Try another channel
o Adjust the TINT and/or COLOR (page 76}.
o When the ColorStream sigr/al source is active, the VIDEO OUT terminal outputs blank video. To receive
video frorn the VIDEO OUT signal, a starldard video or S-video [N jack must be used instead of the
ColorStream connections.
POPprob/ems
Memory card
problems
TheVIDEO OUT jack will not output the POPpicture (pages 18and 74)
Make sure you are using a supported or walidmemory card format (page 82}
Make sure you havesaved the picture files in the correct file format (page 82}.
Thecard may be inserted improperly. Ren/ovethe card and reinsert it (page 82)
Thememory card may be empty.
Thememory card may be damaged.
÷
HM94(E)09_
92
-97(10-Trbl) 92
Copyright #) 2004 TOSHIBA CORPORA]ION. All rights reserved.
÷8/31/04,11:43 AM F
Probmem somution
Sound problems
Remote control problems
Channeltuning probbms
Closedcaption problems
Rating Blocking {V-Chip}1problems
Recording problems
Other problems
Check the antenna/cable connections (see Chapter 2}1.
Thestation raayhave broadcast difficulties Tryanother channel
The sound may be muted. PressVOLU M E.
[fyou hear no sound,try setting the MTSfeature to STEREOmode {page 79}1
Make sure the SPEAKERSfur/orionin the AUD!O SETUPn/enu is set correctly (page 81}1
Ifyou are not receivinga second audio program from a known SAPsource make sure the M[S feature is
set to SAPmode (page 79}/.
*[fyOUhear audio tha[ seems "incorrect' for the program you are watching (such as mLisioor a foreign
language}},the SAP mode may be on. Setthe MTS feature to STEREOmode (page 79}1.
o When using an external audio amplifier,if you connect the amplifierto the VAR AUDIO OUTjacks, the
volumeof the TVand amplifier must be set above 0 or you will not hearany sound (page 20}1.
o Make sure the ten/ore control is set to the correct device mode (page 27}1.
o Ren/oveallobstructior/s between the rernote control arid the TV
o The remo[e control batteries maybe dead. Replacethe batteries (page 27}1.
o Your TV remote cor/troJraay no{ operale cedain featureson your externaldevice. Referlo the owner's
manualfor your other device to determine its avaiBble features.If your TV remote control does not
operate a specific feature oil another device, usethe remote control that came with the device {page 27}1.
o[fthe TVslops responding to the controls on the remote control or TV front panel and you cannot turf/off
the 'r'v,press the RESETbutton or/the front panel (see page 9 for detaiB}1.Ifthe TV still does not act as
expected use the Restore Factory Defaults procedure as described on page 51
o Make sure the remote conlrol is set to the correct device raode (page 27}1.
o Thechannel may have beerserased from the channel rneraoryby the CHAN NEL ADD/DELETE feature
Add the channelto the channel memory (page 42}1.
o Thechannel may be blocked by the CHANNELS BLOCKfeature. Unblock the channel {page 90}1.
o[fyou are unableto tune digital channels, check the antennaconfiguration (page 40}. If you are still
unableto tune digital channels, dear all channelsfi-ornthe channel list (page 42}1and reprogram
channeb into the channel memol}/(page 41}1ifyou are still unabb to tune digital channels use the
Restore Factoly Defaults procedure as described on page 51.
o[fthe program or video you selected is riot closed-captioned, no captions will display on-screen
(page 78}.
o[ftext is riot avaiBbb a black rectangle mayappear on-screer/[f this flappens, turf/off the closed
caption feature (page 78}1
o A closed caption signal may not display correcdy in the following situations: a}1when a videotape has
been dubbed; b}1whet/the signal reception isweak; or c}1whet/the signal reception is nonstandard
{page 78}1.
o[fyou forget your PiN code: Whilethe PINcode entering screen is displayed, press RECALLfour times
within 5 seconds. The PIN code you stored will be reset (page 88}1.
o The\!-Chip feature is available for the U.S.\!-Chip system only {page 89}.
oIfyou use the TV's remote control to start recording, you wi]] not be able to change inputs {page 88}1
change channels {page 69}1,open the POPwindow (page 73}1or open the FAVSCAN muki-window
{page 75}1.If you attempt to do so, the message "Not AvailableWhile Recording" will appear on-screen.
o[t is recommended that you usethe TV's remote control to start recordir/g. If you use a device other than
the TV's remote control to stalt recording and then attempt to access a feature that is normally denied
during recording (POPmode FAVSCAN mode, changing inputs, changing channels}1the recorded
audio arid/or video maynot be what you intended to record. See pages 88, 89, 74, and 75
o[fyou connecteda SymbioAVHD recorder,in order to useitsfull functionality,you mustfirst set up theTV
GuideOn Screensystem{page 23 and Chapter5}1.
o if your TV's problem has not beersaddressed in this '[_oubleshootir/gsectior/or the recon/mer/ded
solution biasno{ worked, use the Restore Factory Defaults procedure as described on page 51.
÷
HM94(E}O92-97(10-Trbl) 93
Copyright @ 2004 TOSHIBA CORPORATION, All rights reserved,
÷8/31/O4,11:41 AM
93
r
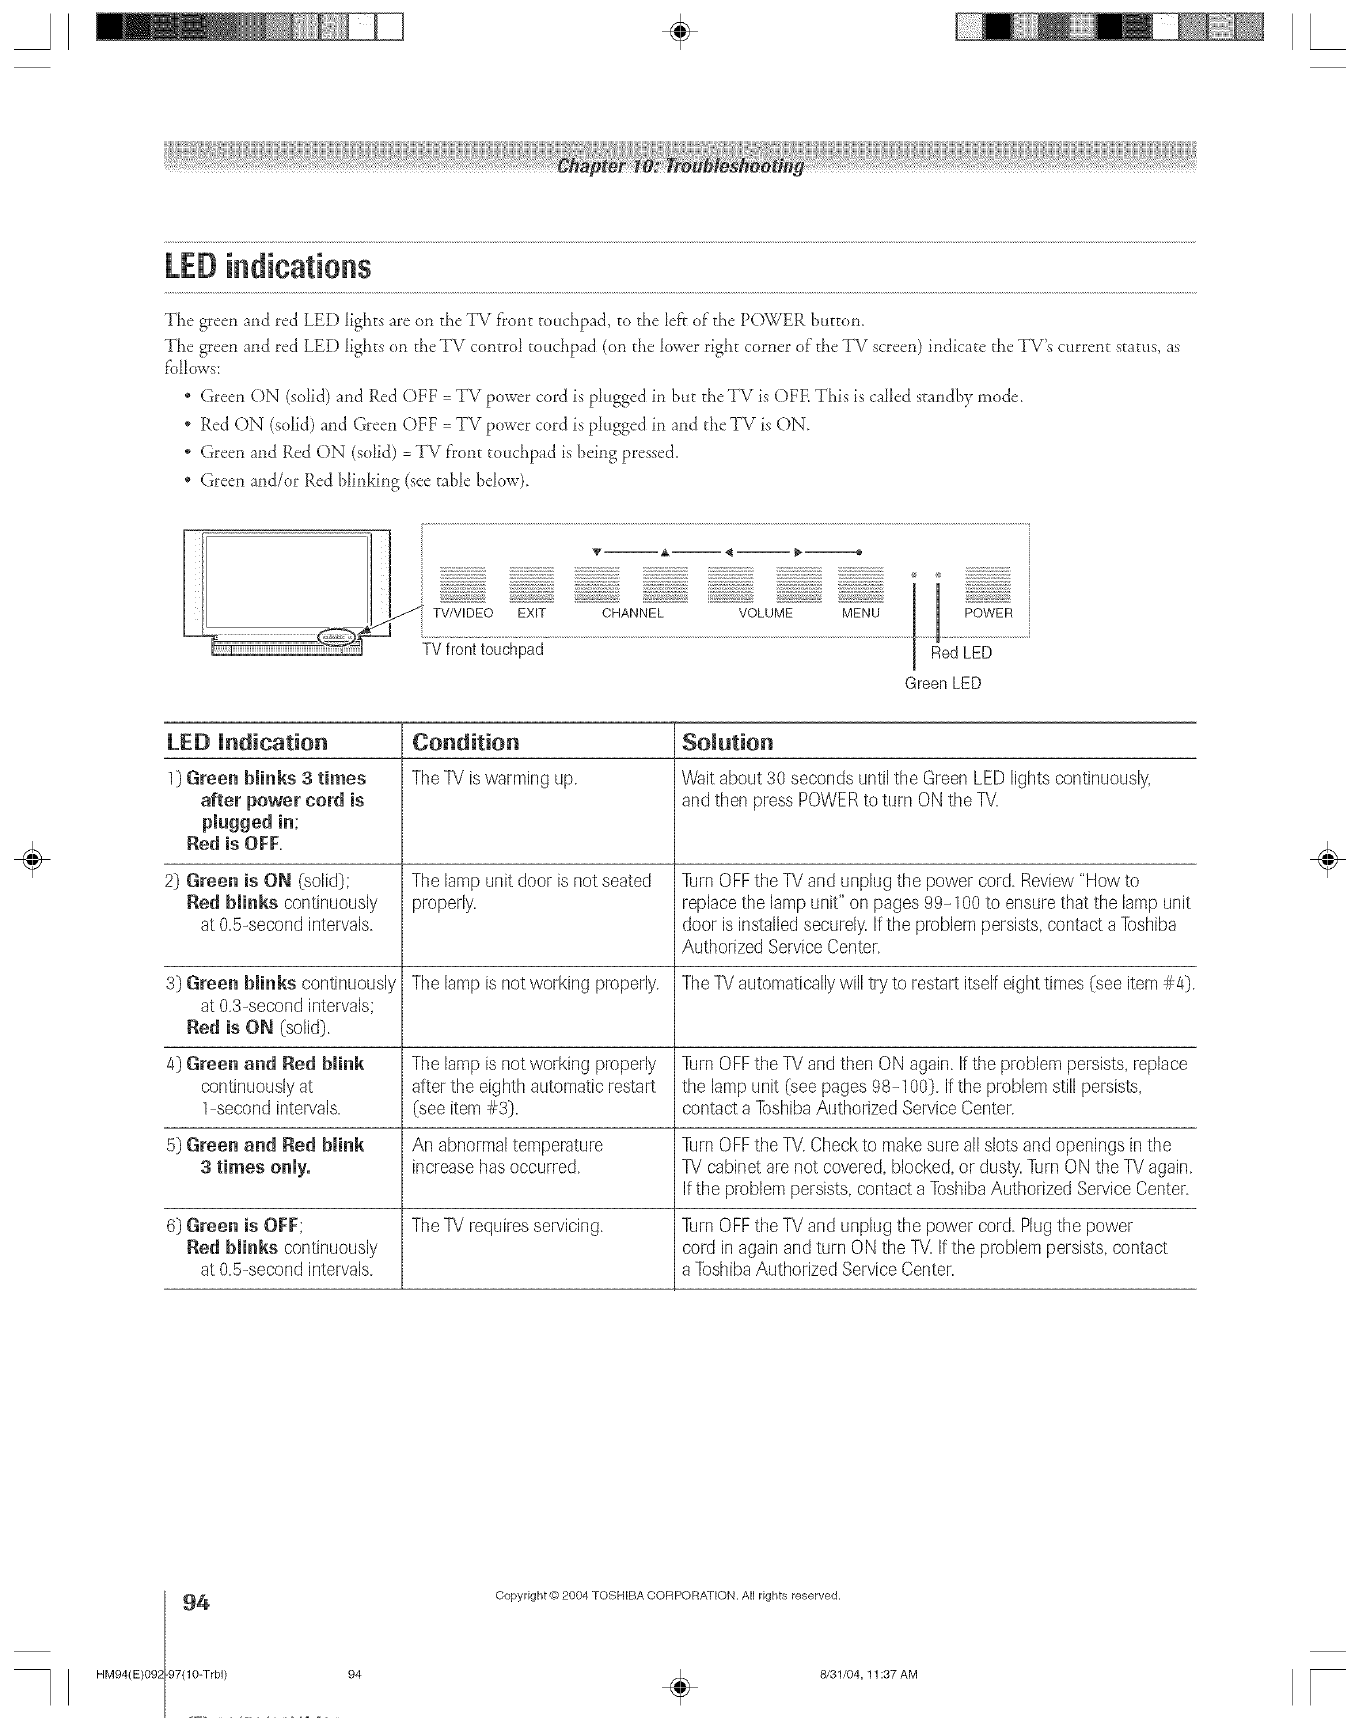
LEDindications
The green and red LED lights are on die TV f_ont touchpad, m d_e left of"die POWER button,
The green and red LED lights on the TV con[rol touchpad (on the k_wer right corner o[ the TV screen) indicate the TV's curren[ status, as
fbllows:
* Green ON (solid) and Red OFF = TV power cord is phigged in but die TV is OFE This is called s_andby mode.
* Red ON (solid) and Green OFF = TV power cord is p_ugged in and the TV is ON.
* Green and Red ON (solid) = TV f'ront touchpad is being pressed.
* Green and/or Red blinking (see table bdow).
'_ -- A -- _ -- }""==========4 1
TV/V!DEO EXIT CHANNEL VOLUME MENU
TVfront touchpad jRed LED
Green LED
LEE) Indication Condition Solution
1} Green blinks 3times The TV iswarming tap. Wail aboul 30 seconds until the Green LED lighls continuously,
after power cord is and then press POWER to turn ON the TV
plugged in;
Red is O[:[:.
2} Green is ON (solid}; The lamp unit door is not seated Turn OFFthe TV and unplug the power cord. Review "How to
Red blinks continuously properly, replace the lamp unit" on pages 99-100 to ensure that the lamp unit
at 0.5-second intervals, door is installed securely If the problem persists, contact a Toshiba
Authorized Service Center.
3} Green blinks continuously The lamp is not working properly. The TV automatically will try to restart itsel[ eight times (see item #4}.
at 0.3-second intervals;
Red is ON (solid}.
4} Green and Red blink The lamp is not working properly Turn OFFthe TV and then ON again. If the problem persists, replace
continuously at aker the eighth automatic restart the lamp unit (see pages 98-100}. If the problem still persists,
1-second intervals. (see item #3). contact a Toshiba Authorized Service Center.
5} Green and Red blink An abnormal temperature Turn OFFthe TV Check to make sure all slots and openings in the
3times only. increase has occurred. TV cabinet are not covered, blocked, or dusly Turn ON the TV again.
If the problem persists, contact a Toshiba Authorized Service Center.
6} Green is O[:[:; The TV requires servicing. Turn OFFthe TV and unplug the power cord. Plug the power
Red blinks conlinuously cord in again and turn ON the TV If the problem persists, conlact
at 0.5-second intervals, a Toshiba Authorized Service Center.
÷
94 Copyright @ 2004 TOSHIBA CORPORA]ION. All rights reserved.
-97(10-Trbl) 94HM94(E)09_ 8/31/04,11:37 AM [

A÷ L
TVGuideOnScreen:":FAQs
The }blk_wingare _equen@ asked questions about the TV Guide On Screen system.The answers represent the most likely sohltions to the
problem_
SETUP
1. Q: What ifI move and my ZIP code or postal code
changes?
A: Highlight SETUP in the ServiceBar. PressV to higbbght
(FLANGE SYSTEM SETTINGS (page 64), and then
press ENTER. Folk_wthe on-screen prompts to enter new
infbrmation (see Chapter 3 ff_rdetails). It can take tip to
24 hours to receive new data.
2. Q! What if I change my cable hook-up to antenna or vice
versa?
A: Highlight SETUP in the Service Bar. Press V to higbbght
CHANGE SYSTEM SETTINGS (page 64), and then
press ENTER. Follow the on-screen prompts to enter new
input iuf'ormation and tuscan channels [br the new input
(see Chapter 3 _brdetails).
3. Q! What ifI change cable boxes?
A: Highlight SETUP in the ServiceBar. Press_r to higbbght
(HANGE SYSTEM SETTINGS (page 64), and then
press ENTER. Follow die on-screen prompts to enter new
input inigormationand rcscan channds fbr die new input
(see Chapter 3 }br derails).
4. Q! I used to have a cable box, but now I get direct cable,
What do I do?
A: Highlight SETUP in the ServiceBar. PressV to higbbgbt
(FLANGE SYSTEM SETTINGS (page 64), and then
press ENTER. Folk_wthe on-screen prompts to enter new
input iuf'orma_ionand tuscan channels [br the new input
(see (hap_er 3 _brderails).
5. Q: If I add a recorder or change my cable service, how do I
change my Setup inigormation?
A: Highlight SETUP in the Serqce Bar. Press V to higbbght
CHANGE SYSTEM SETTINGS (page 64), and then
press ENTER. Follow the on-screen prompts to enter new
in_brmation (see Chapter 3 igordetails). It can take tip to
24 hours to receive new data.
6. Q! Why does it take up to 24 hours for the TV Guide
On Screen system to be ready igoruse?
A: The inidal setup process consists oig_nding the s_acions in
)<_urarea that carry the TV Guide On Screen system data
and tuning to those stations to receive the setup and
listings data.
7. Q! I had a power outage. Do I need to go through initial
setup of the TV Guide On Screen system again?
A: No. The in_brmation )<m entered is stored in the TV Guide
(.)11 Screen sysgeln meluoQs
Note: Fbr('ub/e boxuse_, tile TVmustbe OFFand llTe&_ble
/JoxfT_tJstbe left ON fo_the TVGuide OnSc'/_ensystemto
f_c'e/ved?ailnd l/rle up/rTforma_brs
8. Q: How do I connect the G-LINK (IR blaster) cable to the
G-LINK _' input on the 17_7?
A: See Chapter 2: (onnecting your TV iu this mauuaL
You also cast reigcr to the TV Guide On Screen prompts
during V(;R or Cable box setup.
9. Q: When will I be able m view myTV program listings and
use other TV Guide On Screen system features?
A: TheTV Guide On Screen Ustem will be ready igoruse
wkhin 24 hours oiginitial setup.
10. Q: What should I do JigI cannot complete initial setup?
A: Iigyou are unable to complete initial setup using the owner's
man ual and the on-screen prompts, please call Toshib£s
National Service Diqsion at 1-800-631-3811.
11. Q: IigI make a mistake during setup, how do I go back to
the previous step?
A: Complete the remaining setup seeps. When "Confirming
Your Settings" appears, sdect "No, repeat setup process."
Follow the on-screen prompts aud input the correct
information.
12. Q: What iigthe channel number is not visible on my cable
box?
A: Your calde box may be def_mking to a dock or time display
once the channel changes. Watch the box careig_dlywhen
testing the cable box brand code to see Jigthe chaunel
changes to 09.
13. Q: Why won't myVCR turn on?
A: There are several possibilities:
a) An incorrect or "noVCR" code was entered during the
TV Guide On Screen inidal setup. Press the GUIDE
button on the remote control, and then press _ to
highlight SETUR Press V to highlight '<Change system
settings," and then press ENTER. Follow the on-screen
prompts to select the correct VCR inigormation.
b) Make sure the G-LINK (IR blaster) cable is connected
coffee@ (see page 25).
c) The V(R record timer is on. Turn off the timer.
d) The wired remote VtTR is incompatible.
Copyright @ 2004 TOSHIBA CORPORATION, All rights reserved, 95
HM94(E)092-97(10-Trbl) 95 ÷8/31/04,11:37 AM
÷
[
S ÷ L
HM94(E)09_
TVGuideOn Screen FAQs(co.ti..ed)
CHANNEL LINE-UPS &LiSTiNGS
14. Q: Why aren't all my channels initially displayed?
A: Ai}er initia_ setup, approximatdy 120 chmmds are
automatically displa),cd. The user may use the "Change
channd display" t'camre to turn ON or OFF addkional
chamlds.
Note: Eventholuh you havethe opt/onof on&ring maw
mo[_ d?anne/s,thesJstemmaynothave thememorycapacity
to hok/ det_li/edp/og/_un(Jesc/fp?'/OfIS for all of them
15, Q: When 1[opened the _[%rGuide On Screen system, 1[was
asked to choose from more than one channd lineup.
What should I do?
A: Sdect the lineup that most dosdy matches the one _'oryour
area. If'af}er),ou choose the lineup, you w:uKto make
changes to k, hig}iight SETUP in the ServiceBar.Press _r
to sdect CHANGE CHANNEL DISPLAY,Fallow the
on-screen insgr ucgions.
16. Q; Why do all my channels display "No Listing?"
A: The TV Guide On Screen system has not yet received ks
data downh_ad. The phrase "No Listings' will be replaced
wkh program in_'ormation during the next downh_ad cycle,
which <11 occur within the next 24-hour period.
17. Q; Why do some of my channels display "No Listing?"
A: There are several possibilities:
a) The channds in question were rece*K1yturned ()N (in
Change channd display) and TV Guide On Screen }*asyet
to receive ks next data downh_ad.
b) After completing the inkial setup, the first data downh)ad
of the day was interrupted by a VCR recording.
c) The TV power cord svas [eff unphiggcd f'or an extended
period of time and the TV Guide On Screen system was
unalde to receive program _istings during the sched tded
download c)'de.
d) Poor reception caused mine of the data to be missed.
e) The calde bo× was turned OFE The TV power cord mus_
be pMgged in and the cable box must be ON.
g) A/V Cable: The VCR was turned OFE If the connection
includes stereo caldes with calde box to VCR and stereo
connection t}om VCR to tdeqsion, the V(R mus[ be ON.
18. Q: A show entry in the _%r Guide On Screen system reads
"No Listing°" What does that mean?
A: Show inR_rmation t'_r that entry was not av:iaNe during
the last TV Guide On Screen syaem in_'ormation update
(downh_ad). Show inf'ormation is updated on a daily basis.
19, Q; I have seen the word "download" in reference to the _W
Gnlde On Screen system. What does that mean?
A: "Downh_ad" rdcrs to the times throughout the day when
the TV Guide ()n Semen system is r_'ceiuh_gchannd and
listings M'ormation f}om your Cable or over-the-air
antenna transmission,
20, Q: After some show titles, ][have noticed from 1 to 4 stars
(****)° What does that mean?
A: These stars are a broadcas_-ind ustry ratings system used to
inform you of a show's qualiDs The more stars, the better
the rating.
21, Q; What do the colors for shows in 6e Listings and Search
screens indicate?
A: Green =Sports; Dark Bhle :Children's; Purple :Movies;
]%al : Other Show.
22, Q: How do I add, delete, or change the assigned number of
channels on the _[Nr Guide On Screen system?
A: See the "Change chmmel display" section in the TV Guide
On Screen owner's mammk
23, Q: Why are some of my channels listed on 6e wrong
nnmber?
A: There are several possibilities:
a) Incorrect channd lineup was sdec:ed. Access "Change
system settings" and choose "Yes, but my channd _ineup is
incorrect," and then resdec_ the corrcc_ lineup.
b) ( hannd line-up changes have not yet been processed. Use
the "Change channd display" feature to make adjustments.
c) Initial setup was done incorrcc@ (that is, the wrong
ZiP/postal code was entered.) Redo the initial setup.
24, Q: Why doesn't the program highlighted match up with
the video window on my TV screen?
A: There are several possibilities:
a) The stadon in quesdon made a _ate change to its schedtded
program lisdng and the TV Guide On Screen system has
not )'el been updated.
b) TheTV is receiving broadcasts through a modified or
boosted ante*ma system or a satellite dish (not supported
by the TV Guide On Screen system).
c) Initial setup was done incorrecd> (i.e., the wrong
ZiP/postal code was entered.) Redo the initial setup.
d) Incorrect channd lineup was sdected. Access "Change
system settings" and choose "Yes, but my chmmd lineup
is incorrect," and then rcsdect the correct lineup0
e) The qdeo window may be h)cked. Press SPLIT to tudock.
25, Q! (]an 1[move my law)rite stations m the top of the _W-
Gnlde On Screen display screen?
A: Yes. Use the 'Change chamld displa3/' f'camre to make
adjustments. Highlight the station call letters to be mewed,
therl use the BLUE, GREEN, and/or Number buttons to
reassign the position of the station.
96 Copyright @ 2004 TOSHIBA CORPORA]ION. All rights reserved.
-g7(10-Trbl) 96 ÷8/31/04,11:37 AM
÷
r
A÷ L
OPERATIONS
26_ Q; How can I look for a specific show in the TV Guide
On Screen system?
A: SEARCH lets you find shows by category (Alphabetical,
HDTV, Mm.'ies, Sports, Children, Educational, News,
_trieg¢, Series) or by Ke).avoN.
27. Q: My cable box will not change channels with the
'PC Guide On Screen system° What_ wrong?
A: There arc several possibilities:
a) The incorrect cable box code was entered during TV Guide
On Screen inidal setup. Redo initial setup.
b) The G-LINK (IR ]dasher) cable may not be connected
properly (see page 25).
c) The calde box has no remote capabfli V and is
incompatible.
28. Q: How do I reslze or close the Info window?
A: Press the INFO button on the remote contro[ to resize the
Info window. Press the INFO button again to dose the
Infb window.
2% Q: Is there a way m go directly to the next day_ listings
without scrolling through each time slot?
A: Yes. Highlight the station you want to look ahead, use the
Channd Number buttons on the remote control to enter
"24," and then press MENU. In the resuking menu,
press V two times to scroll down to select the HOURS
AHEAD option, and then press ENTER.
30. Q: Why can't I record a show? All I get is snow or a blue
screen.
A: There are severn[ possibilities (without a calde box):
a) The recording unit was not connected or set tip correcd>
b) The incorrect channd lineup was sdec_ed. Press GUIDE
and then _ to highlight SETUP. Press V to high[ight
"Change us_em settings," and then press ENTER. Follow
the on-screen prompts to selec_ the correc_ channd lineup.
OPERATIONS {continued)
31. Q: Why won't my VCR change channels and why does it
change to the wrong channel?
A: There are two possibilities (with a cable box):
a) The VCR is no_ set on the correct output channel Set the
VCR to 03, 04, or whichever output channd is set by your
cable system.
b) The VCR and/or calde box are hooked up incorrecd)_
Refer to )<uir VCR owner's manua_ or contac_ )cult Calde
TV company for proper wiring procedures.
32. Q: Is Help available in the _V Gnlde On Screen system?
If so, how do I find it?
A: Yes. Highlight any of the five main Services (Listings,
Schedule, Recordings, Setup, Search) and press the INFO
key on the remote control An expanded Info Box displap
additional hdp information. Press INFO again to dose the
box
Hdp is a_soavailablein a panel menu. PressINFO m
display an expanded Info Box. PressINFO again to dose
die box.
RECORD/RENRND
33. Q: (;an I tune m a different channel while recording a
program?
A: No.
34. Q: How many programs can be scheduled for RECORD in
the GUH)E?
A: There is no _imi_to the number of shows that can be
programmed into the schedu_ememopi_
35. Q: Ira program is scheduled to RECORD on a Regular
basis, does it count as five?
A: No, whether a program is schedu[ed ONCE,
REGULARLY, or WEEKLY, it only counts as one show in
the RECORD stack memor)c
36. Q: If I have a power failure, will I need to reset the
recorded shows I have already programmed?
A: The start times and channd numbers of shows that have
been programmed will be retained in the memo Uof the
TV Guide On Screen system. Titles willappear once
listings are restored.
3Z Q: (;an I set a Record or Remind event without
highlighting a show title in the TV Guide On Screen
system?
A: Yes.TV Guide On Screen has a Manua_ Record and
Remind fcaturc_ Highlight SCHEDULE in the Service Bar,
and press MENU. Choose the m_ent type, press ENTER,
and then enter the date, start and s_op time, channe_
numbe_; and so f[_rth.
38. Q: What do the frequencies for Record and Remind mean?
A: Once--records/reminds the show one time.
Daily (manual only)--records the time, channel, input,
recorder combination Monday through Frida)<
Regularl)_ records/reminds the show every time the show
airs on the same channd and starts at the same time.
Weekl)_ records/reminds the show each time the show
airs on the same day of the week, on the same channel and
starts at the same time.
Off (no_cancd)--keeps the show in the list but will no_
record/remind the show until the t}equencyis changed.
Copyright@ 2004 TOSHIBA CORPORATION, All rights reserved, 97
HM94(E)092-97(10-Trbl) 97 ÷8/31/04,11:37 AM
÷
[
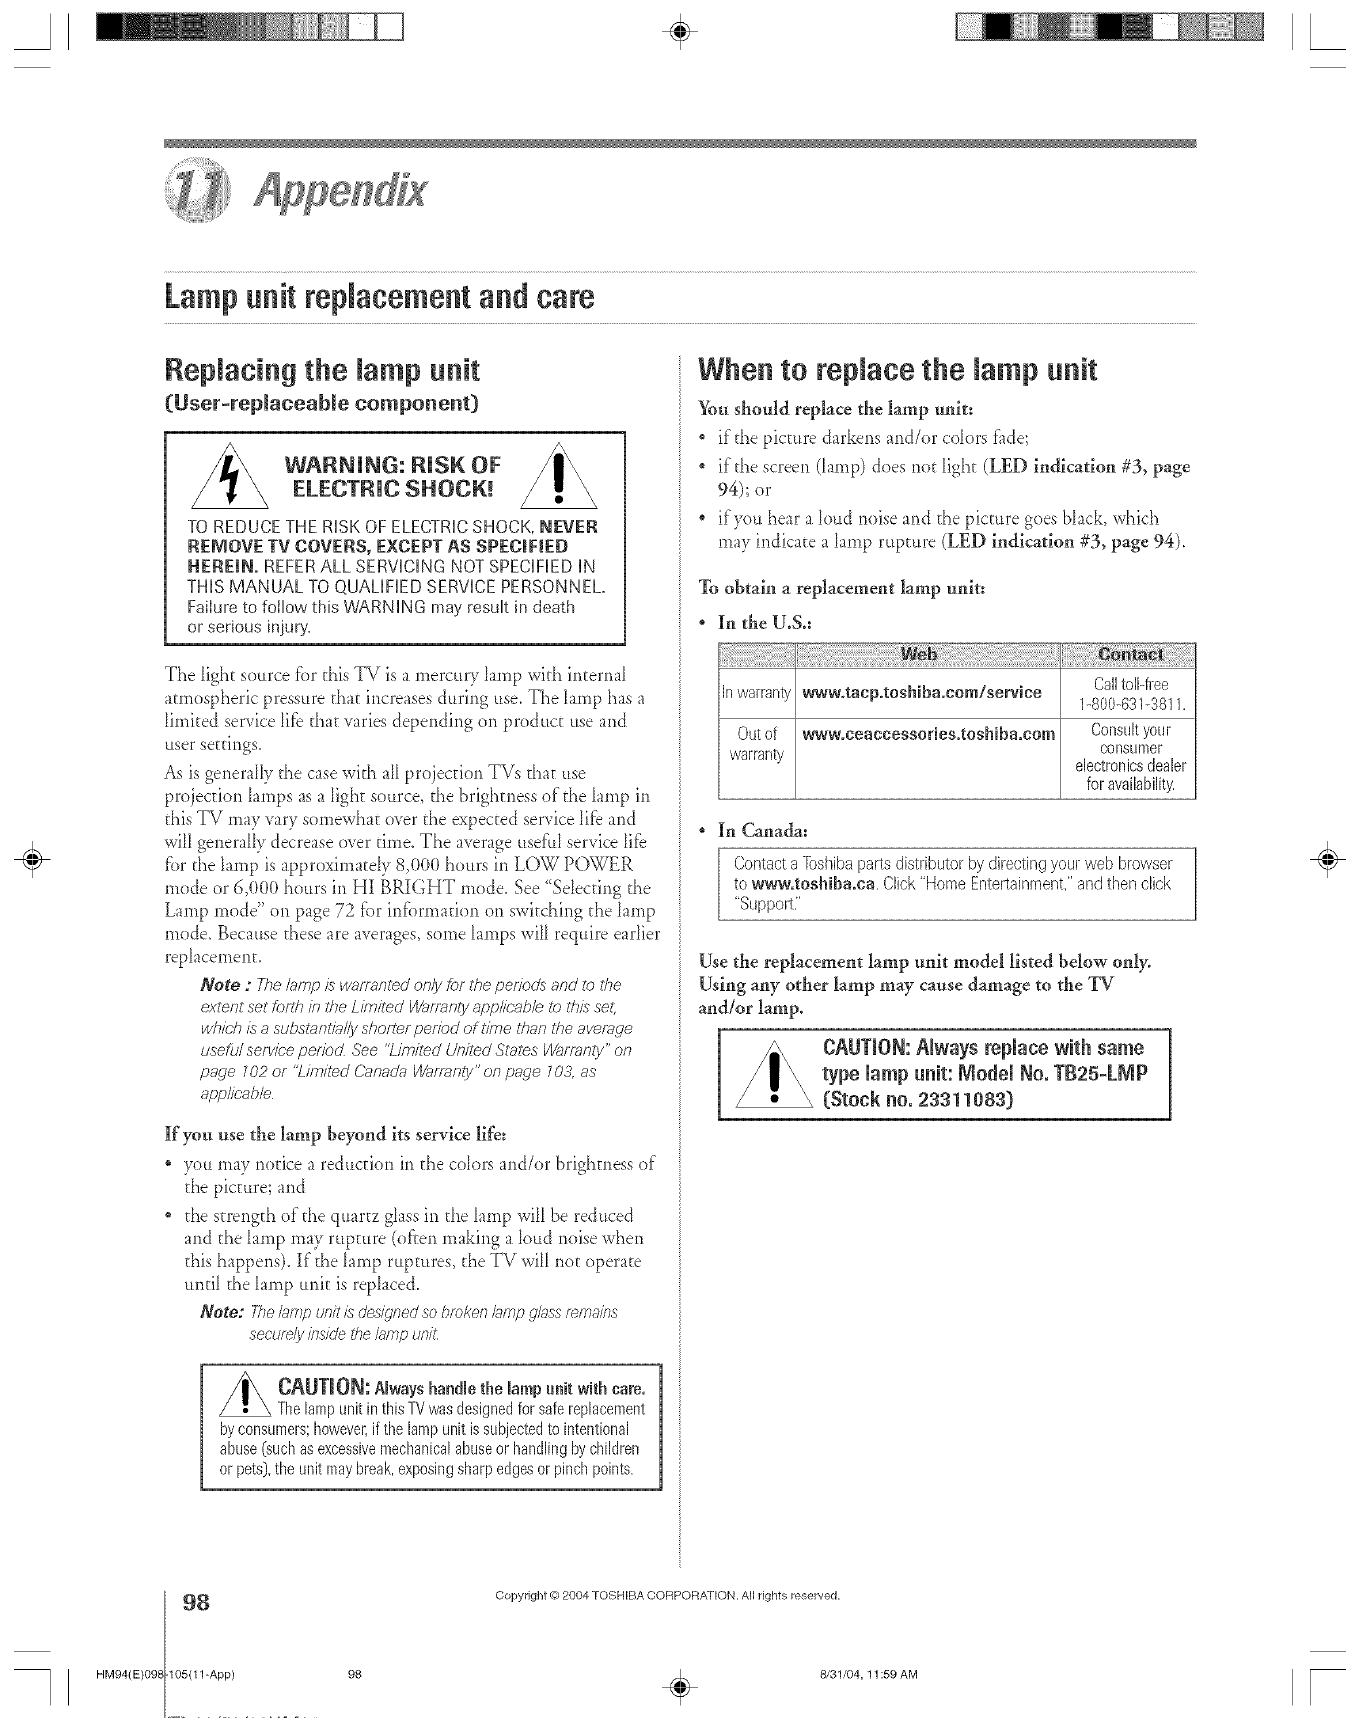
A÷ L
4
Lampunit replacement and care
Repmacing the mampunit
(User-replaceable component)
_WARNING: RiSK OFELECTRIC SHOCK!
TO REDUCETHERiSKOF ELECTRICSHOCK,NEVER
REMOVETV COVERS,EXCEPTAS SPECiFiED
HEREIN. REFERALLSERViCiNGNOTSPECiFiEDiN
THiSMANUAL TOQUALiFiEDSERVICEPERSONNEL,
Failureto foilow thisWARNINGmayresuk in death
or seriousinjuly.
The ligh_ source tbr this TV is a mercury kunp with imernal
ammspheric pressure that increases during use. Tile lamp has a
limited service lifb that varies depending on product use and
user settings,
As is generally the case with all projection TVs that use
projection lamps as a light source, the brightness of the lamp in
this TV may vary somewhat over the expected service 1rib and
will generally decrease over time. The average useful service lifb
fbr the lamp is approximatdy 8,(t(t(t hours in LOW POWER
mode or 6,(}(t(}hours in HI BRIGHT mode. See "Sdec@lg the
Lamp mode" on page 72 tbr intbrmatkm on switching the lamp
mode_ Because these are averages, some lamps will require eadier
replacement,
Note :The/amp is warmn/ed on/yfar #re perioc/sand to the
extent set forth in the Limited [/VafTant# app/k;ab/eta /his set;
which isasubs/antia//yshofter pefiad of time than t/re average
usefu/serwbeperiod See "Limited UnitedStal_s [/_#fTanty" OR
page m2 or "Limited Canar/aWan_nty"on page mA as
applit-able
If you use the lamp beyond its service life:
3_m may notice a reduction in the colors and/or brighmess of
the picture; and
the st-rengdl of the quarre grassin the Iamp wilI be reduced
and tile lamp may rupture (ofien making a loud noise when
this happens). If the lamp ruptures, the TV will not operate
until tile lamp unit is replaced.
Note: Thelamp unitis de'_/ignedsobrokenIJnp gl_ssremains
securelyinsidethe/arep urli_
CAUTmON: Always handle the lamp unit with care.
The lamp unit in this TV was designed for safe replacement
by consumers; however,if the lamp unit is subjected to intentional
abuse (such asexcessive mechanical abuse or handling by children
or pets}, the unit may break, exposingsharp edgesor pinch points.
When to reNace the mampuNt
You should replace the lamp unit:
" if'the picture darkens and/or cok)rs fi_de;
if the screen (lamp) does not light (LED indication #3, page
94); or
if you hear a loud noise and the picture goes black, which
may indicate a lamp rupture (LED indicaion #3, page 94),
To obtain areplacement lamp unit:
In the U.S.:
In warranty www.tacp.toehibaocom/service CalltoIFfree
1-800-631-3811.
Out of www.ceaccesseries.toehibaocom Consult your
warranty consumer
electronics dealer
for availability,
In Canada:
Contacta [bsbiba paresdistributorby directingyour web browser
to www.toshiba°ea. Click"HomeEntertainment,"and then dick
"Support,"
Use the replacement lamp unit model listed below only.
Using any other lamp may cause damage to the TV
and/or lamp.
CAUTION: Nways reNace with same
type lamp unit: Nodem No, TB25-LMP
(Stock no, 23311083}
÷
8
HM94(E)098 105(11-App)
Copyright @ 2084 TOSHIBA CORPORA_[ON. All rights reserved,
98 _ 8/31/04, 11 :59 AM [
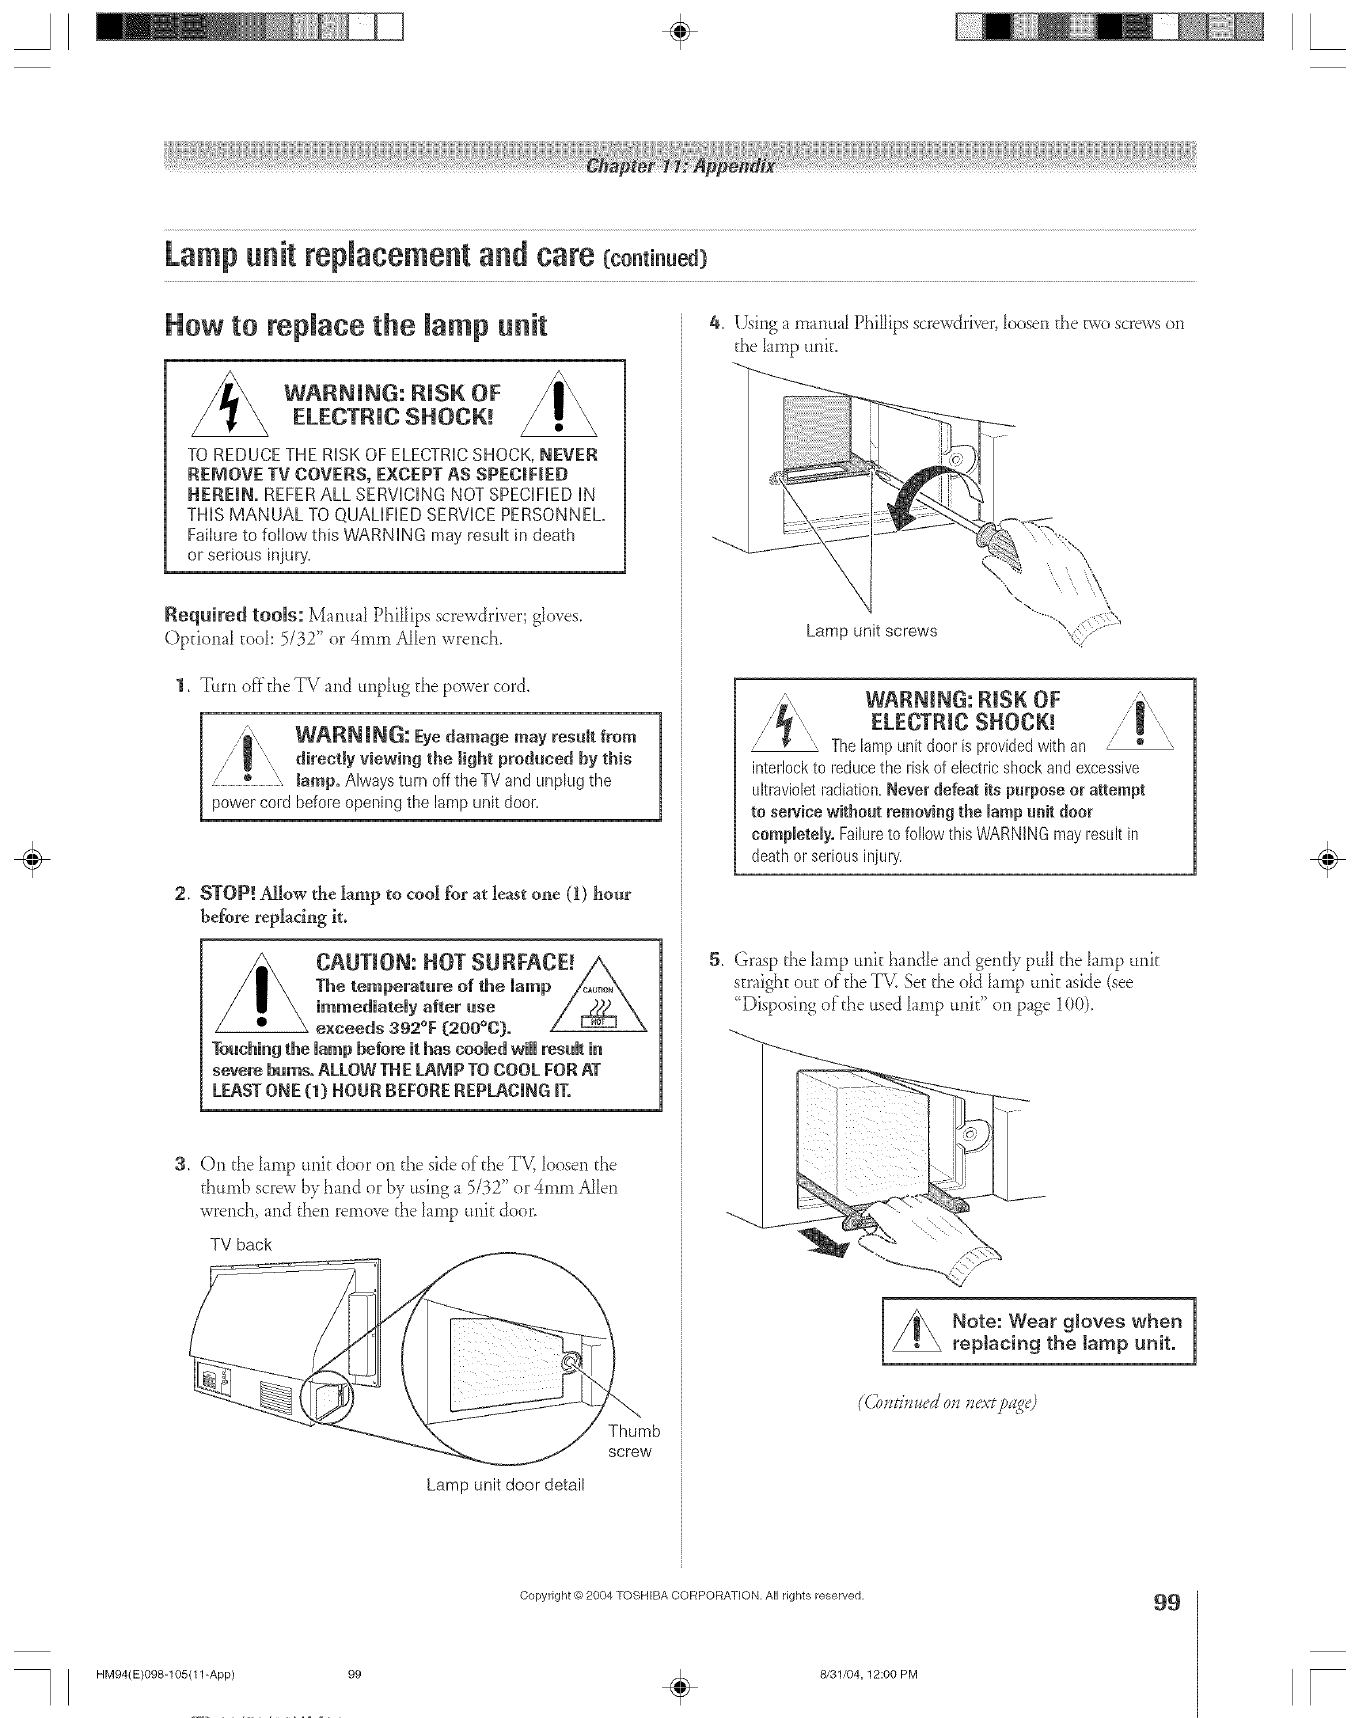
A÷ L
Lampunit replacement and care
How to repJace the Jamp unit
z_ WAF{NING: RISK OFELECTRIC SHOCK!
TO REDUCETHE RiSK OF ELECTRICSHOCK, NEVER
REMOVE TV COVERS, EXCEPT AS SPEC|FJED
HEREIN, REFERALL SERViCiNG NOT SPECiFiED iN
THiS MANUAL TO QUALiFiED SERVICE PERSONNEL.
Failure to follow this WARNING may resuk Jndeath
or serious injul%
Required tools: Manua_ Philips screwdriver; g_o_as.
Opdona_ tad: 5/32" or 4ram AHen wrench.
1. Thin off'the TV and unphg d_e power cord,
.... WAR_I_: Eyedamage may result from
directly viewing the light pradaeed by this
, \,, tamp, Always turn off the TV and LInpfflgthe
power cord before opening the lamp unit door.
2. STOP! Allow the lamp to cool for at least one (I) hater
bd_re replacing it.
/
Touchingthe lamp before ithas cooled will resuRin
severe barns, ALLOW THE LAMP TO COOL FOR AT
LEAST ONE (1) HOUR BEFORE REPLACING IT.
3. Oil the Limp unit door oil the side of'd_e TV, bosen d_e
d_unlb screw by hand or by using a 5/32" or 4ram Allen
wrench, and then remove the hmp unit door.
TV back
Thumb
screw
Lamp unit door detail
4. Using a manual Philips screwdriver,_oosenthe rsvoscrewson
the hmp unit.
Lamp unit screws
WARNING: RISK OF
ELECTRIC SHOCK!
Thelampunit door is providedwith an ]
interlockto reducethe risk of electricshock and excessive
ultravioletradJatJm].Never defeat its purpose or attempt
to service without removingthe lamp unit door
completely. Failureto follow this WARNINGmayresult in
deathor seriousinjury.
5. Grasp the Iamp unit haildle and gendy pul the hmp mlit
smflght our of the _ Set the (lid hmp unh aside (see
"Disposirg of the used hmp unit" oil page 100).
Note: Wear gloves when
replacing the tamp unR.
÷
HM94(E}098-105(11-App) 99
Copyright © 2004 TOSHIBA CORPORATION, All rights reserved.
÷8/31/04,12:00 PM
99
r
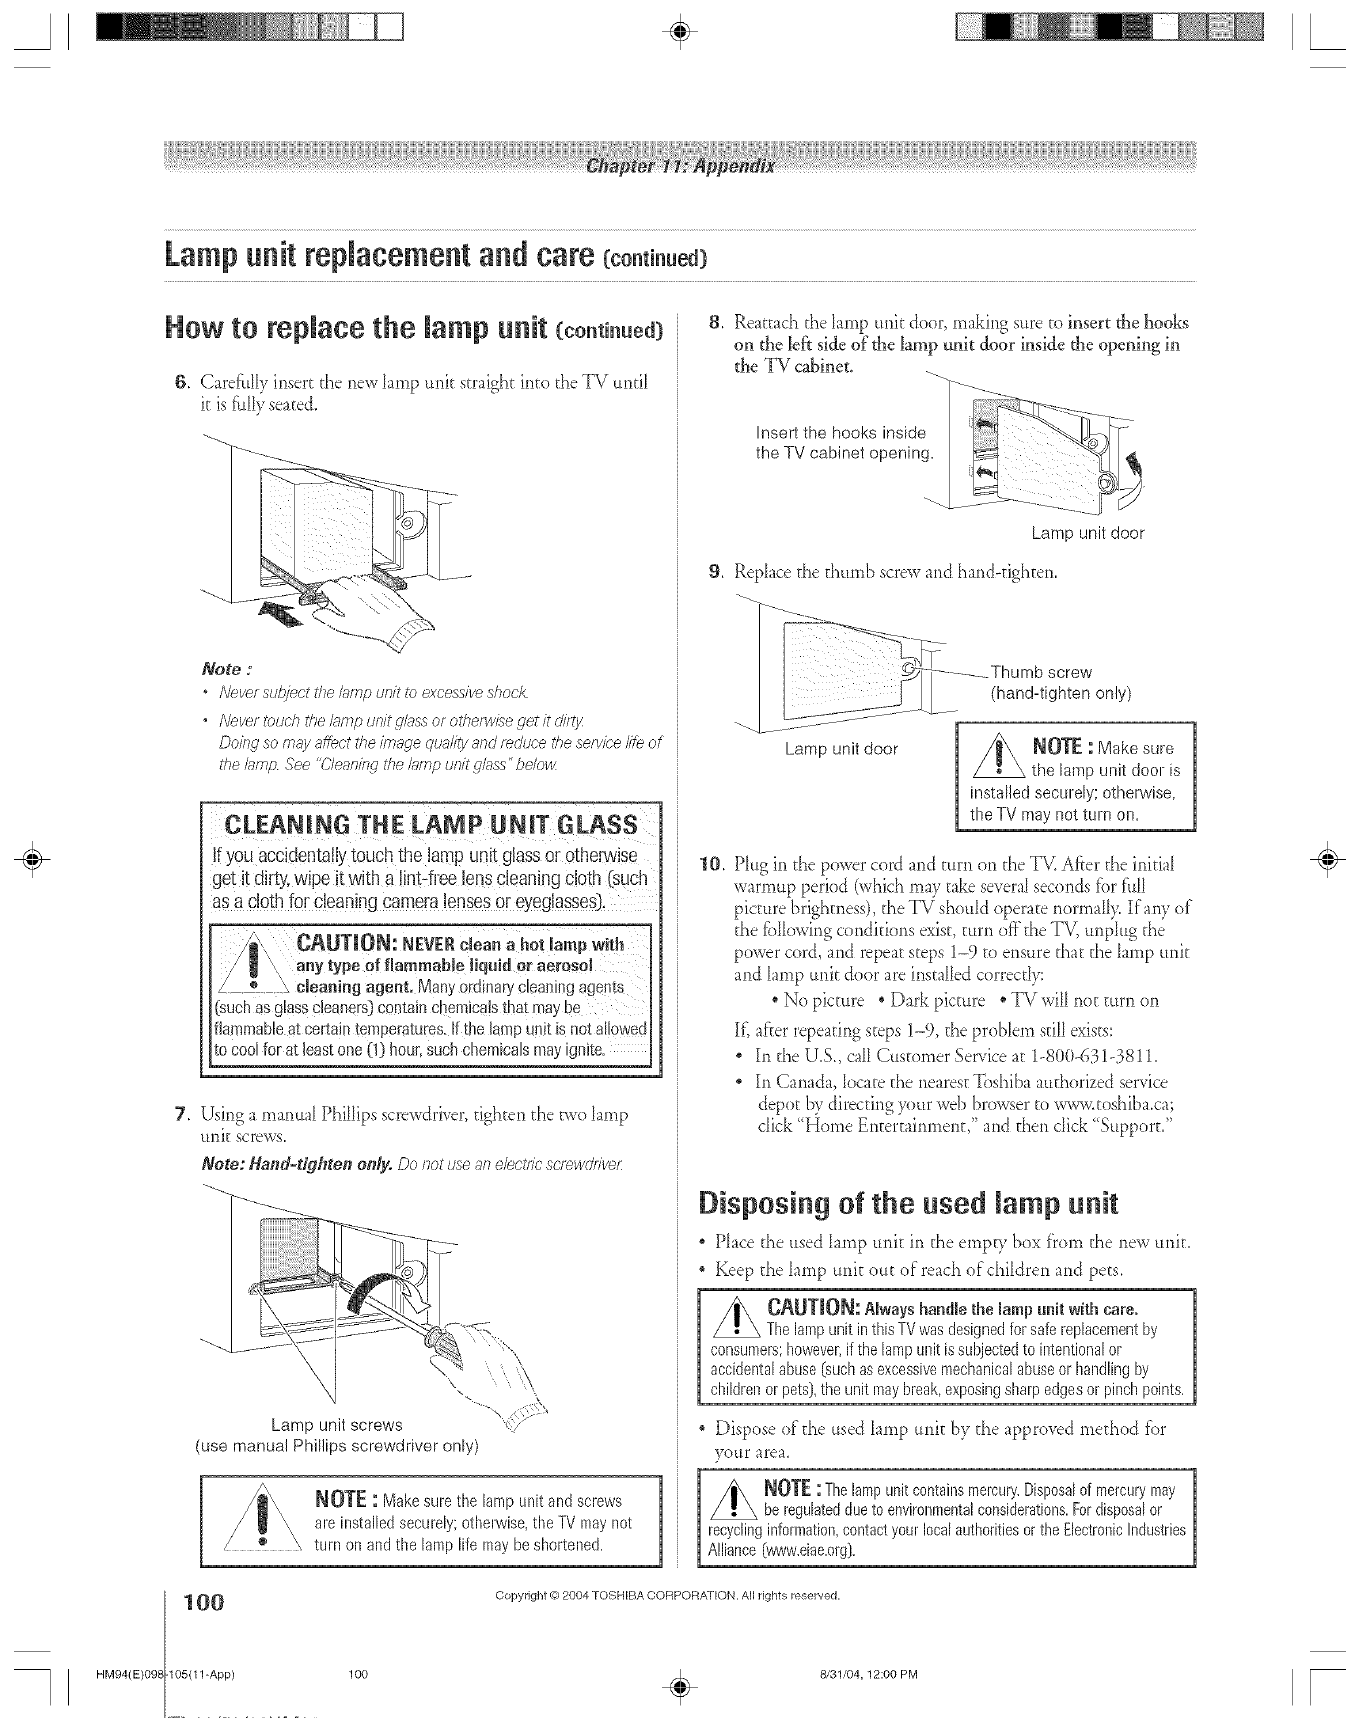
A÷ [
Lampunit replacement and care (co.t . ed}
HOw tO replace the lamp unit (continued:)
6, Carefully insert the new hrnp unk straight into the IV untl
it is _uly seated,
Note :
*Neversubjeetthel_,npan/tto excess/_shonk
°Never i_>uchtire &np u/fit gloss or otherw£e get it dir{/
Doir W so rn;!y affect the image qua@ and rnduce the service/fie of
the @np .lee "C/eauing the lamp unit gk_ss" beJow
__ H __
CLEANING THE LAMP UNIT GLASS
if you accidentahytouch the lamp unit glassor otherwise
get it dirty,wipe it with a lnt-free lenscleaningcloth (such
as a clothfor cleaningcameralensesor eyeglasses],
_UTJO_: I_EVER clean a hot lamp with
any type of flammable lquid or aerosol
® cleaning agent. Many ordinary cleaning agents
[such as glass cleaners) contain cl_em_catsthat may De
flammable _t certain ten2eratures, it me la_ p unit is not atfowed
to cool for at least one (1) hour. such cnemtcas may _gmte.
7, Using a rnanua[ Philips screwdrh'er, tighten the v,vo hrnp
unk screws.
Note: Hand-tighten only. Do not use an electric scrnwdrwer:
Lamp unit screws
(use manual Phillips screwdriver only)
NOT[ : Makesure the lampunit andscrews
are installedsecurely;otherwise,the TVmaynot
turn onandthe lamplife maybeshortened.
8, Ream_chthe hmp unit door, making sure to insert the hooks
on the left side of the hmp unit door inside the opening in
the TV cabinet.
Lamp unit door
9, Rephce the thurnb screw and hand<ighten,
10.
Lamp unit door _OTE -"Make sure
the lamp unit door is
installed securely; otherwise,
the TV may not turn on.
Ph*gin the power cord and turn on the T_ After the initial
warmup period (which rnay take severalsecunds fbr f:dl
picture brighmess), the TV should operate r_orrnal> Ira W of
the fblosving cunditions exist, turn off the TV, unphlg the
power cord, and repea_s_eps1-9 to ensure tha_ the hrnp unit
and hrnp unit door are instaled correctly:
. No picture o Dark picune " TV wil not turn on
If',af'terrepeating s;eps 1-9, the problem stil exists:
In the U.S. call Cus_on_erService a_ 1-800-631-3811.
In Canada, locate the nearest Toshiba aud_orizedservice
depot by directing 7)ur web browser _owww._oshiba.ca;
dick "Home Entertainment," and then click ;_Support,"
Disposing of the used lamp unit
"Phce the usedhmp unit in the ernpg, box from the new unit,
,Keep the hrnp unit unt of reachof chtdren and pets,
OA[JTJON: Always handle the lamp unit with care.
The lamp unit in this TV was designed for safe replacenlent by
consumers; however, if the lamp unit is subjected to intentional or
accidental abuse (such as excessive mechanical abuse or handling by
children or pets), the unit may break, exposing sharp edges or pinch points.
Dispose of the used hrnp unit by the approved method for
}x_ur area
NOTF : The lampunitcontains mercury.Disposalof mercurymay
be regulateddue to environmentalc0nsideral0ns. Fordisposalor
recyclinginformalon,contactyourlocalauthoritiesortheElectronicIndustries
Alliance(vwvw.eiaeorg},
100
HM94(E)098 105(11-App)
Copyright @ 2004 TOSHIBA CORPORATION. A/rights reserved,
÷
100 _ 8/31/04, 12:00 PM [

A÷ [
NOTE:
, This model comp;ies with the specifications listed below.
, Designs and specifications ale subject to change without notice.
, This model may not he compatible with features a#d/or specifications that may be added #l the h_tureo
Television System
NTSC standard
ATSC standard (8VSB)
Digital Cable (64 ()._AM256 QAM; in-the-dear, unencrypted*)
_EITc'l_gy_e(J chsflTftU? c'af?/)_ Vlewe(J OR this 7V
IlSlllJ a &_bleCARDSeep_,qe72hotUetails
Chamtel Coverage
VHF: 2 through 11
UHF: 14 through 69
Cable TV: Mid band (A-8 through A-I, A through I)
Super band (J through W)
Hyper band (AA through ZZ, AAA, BBB)
Ultra band (65 through 94, 100 through 125)
Power Source
120 V AC, 60 Hz
Power Consumption
250 W (average)
45 W in standby mode (power cord plugged in arrd power OFF)
Audio Power
15W+IhW
Speaker Type
Main: Two 4-inch (10cm) round
Tweeter: Two 1-5/8-inch (4cm) round
Video/Audlo TermlnaJs
S-VIDEO INPUT:
Y : I V(p-p), 75 ohm, negative sync.
C : 0.286 V(p-p) (burst signal), 75 ohm
VIDEO/AUDIO INPUT:
VIDEO: 1V(p-p), 75 ohm, negative sync.
AUDIO: 150 mV(rms) (30% moduhtion equivtlent,
22 k ohm or greater)
ColorStream _'(component video) HD INPUT:
Y : 1V(p-p), 75 ohnr
PR: 0.7 V(p-p), 75 obnr
PB: 0.7 V(p-p), 75 obnr
AUDIO: 150 mV(rms), 22 k olun or greater
Suggested resolutions: 1080i, 480p, 480i, 720p
NOTE: 7771'77VUoe_notproviUeOoloiStleafnHD OUTPUT
** E EDID Enhanced Extended Display Identification
Video/Audlo Terminals (continued)
HDMI _"INPUT:
HDMI compliant (type A connector)
HDCP compliant
E-EDID** compliant
Suggested scan rates: 1080i, 480p, 480i, 720p
HDMI Audio: 2-channel PCM; 32/44.1/48 kHz sampling
fi:equency; 16/20/24 bits per sample
NOTE: _?lsiV UoesglotproviUeHFJM!OUTPU7_
VIDEO/AUDIO OUTPUT (also fbr recording):
VIDEO: 1V(p-p), 75 obn], negative sync.
AIJDIO: 150 mV(rnrs) (30% modulation equivJent,
2.2 k ohm or Jess)
VARIABLE AUDIO OUTPUT:
0.300 mV(rnrs) (30% moduhtion equivalent,
2.2 k ohm or Jess)
G-LINK '' and IR OUTPUT:
3 V(p-p), 3.5 mm mona socket (IR blaster cables supplied)
IEEE-1394 INPUT/OUTPUT;
IEEE- 1394 compliant
DIGITAl, AUDIO OUTPUT;
Optical type
Dimensions
46HM94:
52HM94:
62HM94:
Width:
Height:
Depth:
Width:
Height:
Depth:
Width:
Hdgbt:
Depth:
53-1/8 inches (1664 ram)
31-13/16 inches (808 nrm)
15-1/4 inches (387 ram)
58-3/8 it]cbes (1483 ram)
35-1/16 inches (891 ram)
15-1/4 inches (387 ram)
67-1/16 inches (17{)3 nrm)
40-15/16 irrches (1040 nmr)
18-3/16 inches (462 ram)
Weight
46HM94:78 lbs (35.38 kg)
52HM94:83 lbs (37.65 kg)
62HM94:99 lbs (44.90 kg)
Supplled Accessories
* Two dual-wand IR blaster cables
* Remote corrtro[ with two size <<AA"alkaline batteries
OptlonaJ Stands:
46HM94:ST4694 or ST4684
52HM94:ST5294 or ST5284
62HM94:ST6294 or ST6284
Copyright @2004 TOSHIBA CORPORATION, AN rights reserved. 1{)1
HM94(E)O98-105(11-App) 101 ÷11/3/04,10:55 AM
÷
[
Limited United States Warranty
for DLP TelevisionModels
]oshiba America Consumer Produets, LLC ("]XCP"} makes the following
limited warranties to original consumers in the Urfited States
THESE LIMITED WARRANTIES EXTEND TO THE ORIGINAL
CONSUMER PURCHASER OR ANY PERSON RECEIVING THIS DLP
TELEVISION AS A GIFT FROM THE ORIGINAL
CONSUMER PURCHASER AND TO NO OTHER PURCHASER OR
TRANSFEREE.
PRODUCTS PURCHASED IN THE U.S.A. AND USED IN CANADA ARE
NOT COVERED BY THESE WARRANTIES.
PRODUCTS PURCHASED IN CANADA AND USED iN THE U.S.A. ARE
NOT COVERED BY THESE WARRANTIES.
Limited One (1) Year Warranty on Parts and Labor*
TACP waRants this DLP television and its pairs against defects in materials
or workmanship for a period of one (1) year after the date of original retail
purchase DURING THIS PERIOD, TACP WILL, ATTACP'S OPTION,
REPAIR OR REPLACE A DEFECTIVE PART WITH A NEW OR
REFURBISHED PART WITHOUT CHARGE TO YOU FOR PARTSOR
LABOR. TACP Authorized Service Station personnel will come to your home
when warranly 8elvice is required Depending on the type of repair requiled,
either the service will be performed in your home or the set will be taken to
the TACP Autholized Selvice Station fol repail and leturned to your hoa/e at
no COSt to yOU
Limited One (1) Year Warranty on Lamp Unit*
TACP waRant8 the lamp unit in this DLP television against defects in
materials or workmanship for a period of one (1) year after the date of
ouginal retail purchase DURING THIS PERIOD, TACP WILL, ,ATTACP'S
OPTION, EXCHANGE A DEFECTIVE LAMP UNIT WITH A NEW OR
REFURBISHED LAMP UNIT WITHOUT CHARGE TO YOU. LABOR
CHARGES FOR LAMP UNIT REPLACEMENT ARE NOT COVERED
UNDER WARRANTY. The lamp unit i8 a user replaceable component
Rental Units
The warrar_ty fol rer_taltlnit8, inoklding the lamp units contair_edtherein.
begins with the date of first rental or thhly (30) days from the date of
shipment to the rental firm, whichever comes fhet,
*Limited Warranty for Commercial Units
rACP wan_antsDLP televisions, including the lamp units contained therein,
sold and used for commereial purposes as follows: all paisa are warranted
against defects in materials or workmanship for a period of ninety (90) clays
after the date of oFiginalpurchase DURING THIS PERIOD, TACP WILL, AT
TACP'S OPTION, REPAIR OR REPLACE A DEFECTIVE PART WITH A NEW
OR REFURBISHED PART WITHOUT CHARGE TO YOU.
Owner's IVlanua_ and Pradnct Registration
Read this owner's manualthoFoughly before opelating this DLP television
Complete and mail the enclosed product registration card or register your
product online at wwwotaep°toshiba°com/serviee as soon as possible
By registering your product you will enable TACPto bring you new products
specifically designed to meet your needs and help us to contact you in the
unlikely event a safety notification is required under the Consumer Product
Safety Act, Failureto register your product does not diminish your warranty
rights
Yenr Responsibility
THE ABOVE WARRANTIES ARE SUBJECT TO THE FOLLOWING
CONDITIONS:
(1) "_oun/list provide your bill of sale or other proof of pLirohase
(2} All warranly servicing of this DLP television must be performed by an
Authorized TACP Service Station
(3} these warranties flora TACPare effBCtiveonly if the DLP television is
pulshased and operated in the LISA. or Puello Rieo
(4) Labor charges for installation, setup, adjustment of oustolner controls,
and instaflation or repair of antenr_a 8ystea/8 are not coveled by these
warranties, Reception problems caused by inadequate antenna systems
are your responsibility
(5} Warranties extend only to defects in matelials or workmar_ship as limited
above, and do not extend to any DLP television or parts that have been
lost or discarded by you or to damage to the DLP television OFparts
eaused by fires, misuse, accident, Acts of God (such as lightning or
fiuctuatiorm in electlic power}, improper installation, improper
maintenance, or use in violation of instructions furnished by TACP: use
or inalfunction thlough simultaneous use of this ploduct and connected
equipment; el to LInit8that have been modified or had the serial nunlber
removed, altered, defaced, or rendered illegible
How to Obtain Warranty Services
If. after following all of the operating instructions in this inanaal and cheekir_g
the "]roubleshooting" 8eclion, you find that selviee is needed;
(1) ]o find the nearest TACP Authorized Service Station. visit TACP's web
site at wwwotaep.teshiba°eora/serviee oFcall toll free I 800 631
3811
(2) Present your bill of sale or other proof of purchase to the Authorized
Service Station
For additional information, visit TACP's web site:
www.taep.toshiba.eomo
ALL WARRANTIES IMPLIED BY THE LAW OF ANY STATE OF THE
U.S.A., INCLUDING THE iMPLIED WARRANTIES OF
MERCHANTABILITY AND FITNESS FOR A PARTICULAR PURPOSE,
ARE EXPRESSLY LIMITED TO THE DURATION OF THE LIMITED
WARRANTIES SET FORTH ABOVE. WITH THE EXCEPTION OF ANY
WARRANTIES iMPLIED BY THE LAW OF ANY STATEOF THE U.S.A. AS
HEREBY LIMITED, THE FOREGOING WARRANTY iS EXCLUSIVE AND
iN LIEU OF ALL OTHER WARRANTIES, GUARANTEES, AGREEMENTS,
AND SIMILAR OBLIGATIONS OF TACP WITH RESPECT TO THE
REPAIR OR REPLACEMENT OF ANY PARTS. IN NO EVENT SHALL
TACP BE LIABLE FOR CONSEQUENTIAL OR INCIDENTAL DAMAGES
(INCLUDING, BUT NOT LIMITED TO, LOST PROFIT{-;,BUSINESS
iNTERRUPTION. OR MODIFICATION OR ERASURE OF RECORDED
DATA CAUSED BY USE, MISUSE, OR INABILITY TO USE THIS
PRODUCT).
No person, agent, distributol, dealer, or company is authorized to change,
modity, or extend the terms of these waRanties in any manner whatsoever
The time within which aetion must be commenced to enforce any obligation
of FACP arising under this warranty o_ under any law of the United States or
of any state theFeof is heFebylimited to 90 claysfrom the date you discover,
or should have discovered, the defect This lia/itation does not apply to
implied wauentie8 arising under the law of any state of the U,SA,
THIS WARRANTY GIVES YOU SPECIFIC LEGAL RIGHTS, AND YOU
MAY ALSO HAVE OTHER RIGHTS, WHICH MAY VARY FROM STATETO
STATEIN THE U.S.A. SOME STATESOF THE U.S.A. DO NOT ALLOW
LIMITATIONS ON THE DURATION OF AN IMPLIED WARRANTY,
LIMITATIONS ON THE TIME WITHIN WHICH AN ACTION MAY BE
BROUGHT, OR THE EXCLUSION OR LIMITATION OF INCIDENTAL OR
CONSEQUENTIAL DAMAGES; THEREFORE, THE ABOVE LIMITATIONS
OR EXCLUSIONS MAY NOT APPLY TO YOU UNDER SUCH
CIRCUMSTANCES.
0804
102
HM94(E)098 105(11 -App)
Copyright (0 2004 TOSHIBA CORPORA]ION. All rights reserved,
÷
102 _ 8/31/04, 12:00 PM [
Limited Canada Warranty
for DLP Television IViodeis
]oshiba of Canada Limited ("TCL"] makes the following B/lited warranties to
origh-_a[consumers in Canada
THESE LIMITED WARRANTIES EXTEND TO THE ORiGiNAL
CONSUMER PURCHASER OR ANY PERSON RECEIVING THIS DLP
TELEVISION AS A GIFT FROM THE ORIGINAL CONSUMER
PURCHASER AND TO NO OTHER PURCHASER OR TRANSFEREE.
PRODUCTS PURCHASED IN THE U.S.A. AND USED iN CANADA ARE
NOT COVERED BY THESE WARRANTIES.
PRODUCTS PURCHASED IN CANADA AND USED IN THE U.S.A. ARE
NOT COVERED BY THESE WARRANTIES.
Limited One (t} Year Warranty on Parts and Labor*
TCL warrants this DLP television television and itsparts against defects in
materials or workmanship for a period of one (1) year after the date of
original retail purchase. DURING THIS PERIOD, TCL WILL, ,ATTCES
OPTION, REPAIR OR REPLACE A DEFECTIVE PART WITH A NEW OR
REFURBISHED PART WITHOUT CHARGE TO YOU FOR PARTS OR
LABOR. TCL Authorized SepAce Depot personnel will come to your home
when warranty selvice is required Depending or] the type of repair requiled,
either the service will be pel%la/ed in your home ol the set will be taken to
the TCL Authorized Service Depot for repair and returned to your home at
no cost to you IN-HOME SERVICE ONLY APPLIES WITHIN 100
KILOMETERS OF AN AUTHORIZED TCL SERVICE DEPOT.
Limited One (1} Year Warranty on Lamp Unit _
fCL wanants the ]amp unit in this DLP television against defects in matedab
o_ workmanship for a period of one (1} year after the date of ouginal retail
purchase. DURING THIS PERIOD, TCL WILL, AT TCLiS OPTION,
EXCHANGE A DEFECTIVE LAMP UNIT WITH A NEW OR
REFURBISHED LAMP UNIT WITHOUT CHARGE TO YOU. LABOR
CHARGES FOR LAMP UNIT REPLACEMENT ARE NOT COVERED
UNDER WARRANTY. The lamp unit is a user replaceabb component.
Rentam Units
The warlar_ty for rental units, inckldir_gthe ]amp units contah-_edtherein.
begins with the date of first rental or thhly (30} days flom the date of
shipment to the rental fhm, wMchever eomes fhst
*Limited Warranty for Comraerciam Units
FCL warrants DLP televisions, h-_cludingthe ]amp ur/its car_tained therein.
sold and used for commercial purposes as fo,ows: all parts are warranted
against defects in matedab or workmanship for a period of ninety (90} days
after the date of original purchase DURING THiS PERIOD, TCL WILL,
AT TCL'S OPTION, REPAIR OR REPLACE A DEFECTIVE PART WITH A
NEW OR REFURBISHED PART WITHOUT CHARGE TO YOU. ON-SITE
SERVICE ONLY APPLIES WITHIN }O0 KILOMETERS OF AN
AUTHORIZED TCL SERVICE DEPOT.
Owner's Manual and Product Registration
Read this owner's manual thoroughly before operating this DLP television
Register your product online at www.toshibaoca as soon as possible By
registering your product you will enable TCL bring you new products
specifically designed to meet yoLu needs and help us to contact you in the
unlikely event a safety notification is required ur_derthe Consumer Product
Safety Act. Failureto register your product does not diminish your warranty
rights
Ynur RespensibiJity
THE ABOVE WARRANTIES ARE SUBJECT TO THE FOLLOWING
CONDITIONS:
(1] You must provide your bill of sale or other proof of pLucbase
(2] All warlanty sep/icing of this DLP television must be pedormed by an
Authorized FCL Service Depot.
(3} These warlanties from TCL are effective only if the DLP television is
purchased in Canada from an authorized TCL deabr and operated in
Canada
(4} Labor eharges for installation, setup, adjustment of customer controls,
and installation or repair of anterg]a systea/s are not covered by these
warranties, Reception problems caused by inadequate antenna systems
are your responsibility
(5} Warranties extend only to defects in materials or wol-kmansbip as limited
above, and do not extend to any DLP television or parts that have been
lost or discarded by you or to damage to the television or parts caused
by fires, misuse, accident, Acts of God (such as lightrfing or fiuctuatior_s
in electrie powe0, hT/properirlstallation, imploper maintenance, or use
in violation of instructior/s furnished by TCL: use or malfunction through
shmlltar_eous use of this product and connected equipment: or to units
that have been modified or bad the serial number removed, akered.
defaced, or _endered illegible
Now to Obtain Warranty Services
Ill after following aHof the operating instructbns in this manual and cheek[rig
the "lroublesbooting" section, you find that service is needed:
(1} ]o find the nearest TCL Autbonzed Service Depot. visit TCL'sweb site at
WWWotOShiba.cao
(2] Present your bill of sale or other proof of purehase to the Autbodzed
Service Depot
For additiona_ information, visit TCL's web site:
www.toshiba.ca
ALL WARRANTIES IMPLIED BY THE LAW OF ANY PROVINCE OF
CANADA, INCLUDING THE IMPLIED WARRANTIES OF
MERCHANTABILITY AND FITNESS FOR A PARTICULAR PURPOSE,
ARE EXPRESSLY LIMITED TO THE DURATION OF THE LIMITED
WARRANTIES SET FORTH ABOVE. WITH THE EXCEPTION OF ANY
WARRANTIES IMPLIED BY THE LAW OF ANY PROVINCE OF CANADA
AS HEREBY LIMITED, THE FOREGOING WARRANTY IS EXCLUSIVE
AND IN LIEU OF ALL OTHER WARRANTIES, GUARANTEES,
AGREEMENTS, AND SIMILAR OBLIGATIONS OF TCL WITH RESPECT
TO THE REPAIR OR REPLACEMENT OF ANY PARTS.IN NO EVENT
SHALL TCL BE LIABLE FOR CONSEQUENTIAL OR INCIDENTAL
DAMAGES (INCLUDING, BUT NOT LIMITED TO, LOST PROFITS,
BUSINESS INTERRUPTION, OR MODIFICATION OR ERASURE OF
RECORDED DATA CAUSED BY USE, MISUSE, OR INABILITY TO USE
THIS PRODUCT].
No persor/, agent, distributor, dealer, or company is authorized to change,
modity, or extend the terms of these warranties in any manner whatsoever
The time within which action must be commenced to enforee any obligation
of TCL arising under this warranty or under any law of Canada or of any
plovince thereof is hereby limited to 90 days from the date you discover, or
should have discovered, the detect. This limitation does not apply to in@lied
warrarlties arising urlder the law of any province of Canada
THIS WARRANTY GIVES YOU SPECIFIC LEGAL RIGHTS, AND YOU
MAY ALSO HAVE OTHER RIGHTS, WHICH MAY VARY FROM
PROVINCE TO PROVINCE IN CANADA. SOME PROVINCES OF
CANADA DO NOT ALLOW LIMITATIONS ON THE DURATION OF AN
IMPLIED WARRANTY, LIMITATIONS ON THE TiME WITHIN WHICH AN
ACTION MAY BE BROUGHT, OR THE EXCLUSION OR LIMITATION OF
INCIDENTAL OR CONSEQUENTIAL DAMAGES; THEREFORE, THE
ABOVE LIMITATIONS OR EXCLUSIONS MAY NOT APPLY TO YOU
UNDER SUCH CIRCUMSTANCES.
0804
Copyright @ 2004 tOSHIBA CORPORATION, All rights reserved. 103
HM94(E}098-105(11-App) 103 ÷8/31/(34,12:00 PM
÷
r
÷
104
HM94(E)098 105(11-App) 104
Copyright @ 2004 TOSHIBA CORPORA]ION. All rights reserved,
÷8/31/04,12:00 PM F
÷
Copyright @?2004 TOSHIBA CORPORATION, All rights reserved.
HM94(E)098-105(11-App) 105
105
8/31/04,12:00 PM [
A
A/V receiver connection ........................................................18
ANT 1/2 ..........................................................................10, 40, 67
Antenna cables .........................................................................11
Audio player ...............................................................................84
Audio system connection ......................................................20
Auto aspect .................................................................................71
Auto power off ...........................................................................87
AVH D .....................................................................................23, 49
B
Back of the TV ...........................................................................10
Blocking channels ....................................................................90
O
Cable box connection ......................................................14, 16
CabIeCARD T''.............................................................................12
CabIeCIear _" DNR ....................................................................77
Cables ...........................................................................................11
Camcorder connection ...........................................................13
CH AV buttons .........................................................................69
CH RTN button ..........................................................................69
Channel Number buttons .....................................................69
Channel programming:
Automatic programming ..................................................41
Manually adding and deleting .......................................42
Cinema mode .............................................................................72
Closed captions ........................................................................78
Color temperature ....................................................................77
ColorStream _ ...............................................................10, 15, 17
Connecting devices ..........................................................12-25
CompactFtash _'memory cards ...........................................82
Component video cables ......................................................11
Component video (CotorStream _} ..............................15, 17
CrystalScan HDSC ......................................................................7
B
Device connections ..........................................................12-25
Defaults, restore TV factory .................................................51
Digital Audio Out ......................................................................20
Digital signal meter .................................................................51
DNR (Digital Noise Reduction} ..........................................77
Double-window POP feature ...............................................73
DTV receiver connection .......................................................15
DVD player connection ...................................................16, 17
D-VHS ....................................................................................23, 48
DVl connection ..........................................................................19
EFGHJJ
EIA-775 .........................................................................................22
FAV SCAN button .....................................................................75
Factory' defaults, restore TV .................................................51
Favorite channeis ..............................................................43, 75
Features, TV ...................................................................................7
Flashing front panel lights ..........................................8, 9, 94
Focus, SRS WOW .....................................................................81
Front of the TV ..............................................................................9
Front panel lock ........................................................................91
Front panel lights ...........................................................8, 9, 94
Front panel touch pad .......................................................9, 35
Game Mode ................................................................................85
GameTimer _" ..............................................................................91
G-LINK connection .................................................................25
HD, A/V .................................................................................23, 49
HDMI connection ....................................................................18
IEEE-1394 ....................................................................................22
INPUT button .............................................................................66
Input lock .....................................................................................90
Installation, care, and service .......................................3-5, 8
Installation, setup ........................................................................8
Integrated digital tuning ...........................................................7
IR blaster .....................................................................................21
JPEG .......................................................................................82-84
L
Labeling video inputs .............................................................67
Lamp mode .................................................................................72
Lamp unit replacement ................................................98-1(}0
Language selection .................................................................40
Last mode memory' feature ..................................................87
LED indications ...............................................................8, 9, 94
Lights on front panel ....................................................8, 9, 84
Locking video inputs ...............................................................90
LOCKS menu ..............................................................................88
Channels, blocking .............................................................90
Enable rating blocking ......................................................89
GameTimer .............................................................................81
MPAA rating ..........................................................................89
New PIN code ......................................................................88
TV rating .................................................................................89
Unlocking programs temporarily ..................................90
Video inputs, locking .........................................................90
÷
106
HM94(E)106 107(Index) 106
Copyright @ 2004 TOSHIBA CORPORA]ION. All rights reserved.
÷8/31/04,12:09 PM r
M
Memory cards .....................................................................82-84
Memory' Stick T" memory' cards ...........................................82
Menu system .......................................................................34, 35
MMC memory cards ...............................................................82
M P3.........................................................................................82-84
MPEG-2 digital video signals ..............................................22
MTS feature ................................................................................79
MUTE button ..............................................................................79
OPQ
ON/OFF timer ............................................................................86
Optical audio cable .................................................................11
Picture adjustments:
Color temperature ...............................................................77
Picture mode .........................................................................76
Picture quality .......................................................................76
Picture-out-picture (POP}:
FAV SCAN button ................................................................75
FREEZE button .....................................................................74
SPLIT button ..........................................................................73
Picture scroll ...............................................................................71
Picture size selection ..............................................................69
Picture viewer. ...........................................................................82
Problems with TV ..............................................................92-97
Quick Restart .............................................................................5]
R
RECALL button .........................................................................87
Remote control:
Battery' installation ..............................................................27
Device code table ........................................................32-33
Effective range ...............................................................2], 26
Functional key chart ...........................................................28
Learning about the buttons ............................................26
Operational feature reset .................................................31
Programming ........................................................................30
Searchingand samplingthe code ...............................30
Volume lock feature...........................................................3 l
RESET button................................................................................9
Restart,Quick............................................................................50
Restore IV factory defaults ..................................................51
S
Safety, care, instalIation, and service .............................2-5
SAP sound ...................................................................................79
Satellite receiver connection ...............................................15
Scrolling the TheaterWide :_picture ...................................7 ]
SD (Secure DigitaP'} memory' cards ................................82
Service .............................................................................................4
Setup, TV ..............................................................5, 8, 12-25, 40
Setup, TV Guide On Screen system ..................................36
Sleep timer ..................................................................................86
SmartMedia T_'memory cards ..............................................82
Sound quality adjustments ...................................................80
Speakers ON/OFF ....................................................................81
Specifications ...........................................................................101
SpeedSurf ....................................................................................68
SRS WOW ...................................................................................81
StableSound _ .............................................................................80
Stereo sound ..............................................................................79
S-video cables ...........................................................................11
Symbio _" A/H D recorder ................................................23, 49
System restore ...........................................................................51
System status .............................................................................5]
T
TheaterNeP' DEVICE and CONTROL buttons .............45
TheaterNet connection ..........................................................2]
TheaterNet setup ......................................................................44
TheaterWide _ picture ..............................................................70
Time and Date setting ............................................................49
Troubleshooting .................................................................92-97
TruBass, SRS WOW .................................................................81
TV Guide On Screen :_...............................................25, 36, 53
V
V-Chip bIocking (Locks menu) ....................................89-90
VCR connection .................................................................13-18
Video cables ...............................................................................11
Video input labels ....................................................................67
Video input lock ........................................................................90
W
Warranty ...........................................................................]02, ]03
WOW, SRS ...................................................................................8]
÷
HM94(E)106-107(Index) 1o7
Copyri9ht © 2004 TOSHIBA CORPOBATION, All ri9hts reserved,
÷8/31/04,12:09 PM
107
F

TOSH|BA A_ER|CA CONSUMER PRODUCTSj
HEAD OmCE: 82 TOTOWA ROAD, WAYNE, NJ 07470, USA.
NATIONAL SERVICEDMSJON:1420 B TOSHIBA DRIVE,LEBANON, TN 37087, USA
L,L,C,
÷
TOSHIBA OF CANADA LTD,
HEAD OFFICE:191 McNABB STREEL MARKHAM, ONTARIO, L3R8H2, DANADA TEL: (905} 470 5/#00
SERVICECENTERS:
TORONTO: 191 McNABB STREET,MARKEJAM, ONTARIO L3R 8H2, CANADA TEL: (905) 470 5400
MONTREAL: 18O5OTRANS CANADA, KIRKLAND, QUEBEC, H9J 4A1, CANADA TEL: (51a) 390-7766
VANCOUVER: 22171 FRASERWOODWAY, RICHMOND, BC, V6W lJ5, CANADA TEL: (60a) 303 2500
MANUFACTUREDBY
TOgNJBA AMERICA CONSUMER PRODUCT5_ L,L,C,
ColorStream, FSTPURE StabieSound, and TheaterWkte are registered trademarks of Toshiba America Consumer Products, LLC
CabbCiear, GameThner,SurfLock Symbio, arid TheaterNet are trademarks of Toshiba America Consumer Plx>ducts,LLC
SmartMedia isa registered trademark of Toshiba Corporation
PRINTEDIN USA
(o4q 0 (RO Copyright @ 2004 TOSHIBA CORPORATION. All rights reserved,
HM94(E)108 108 _ 11/3/04,10:40 AM r
