Toshiba 56HM195 User Manual DLP PTV Manuals And Guides L0520078
TOSHIBA DLP Television Manual L0520078 TOSHIBA DLP Television Owner's Manual, TOSHIBA DLP Television installation guides
User Manual: Toshiba 56HM195 56HM195 TOSHIBA DLP PTV - Manuals and Guides View the owners manual for your TOSHIBA DLP PTV #56HM195. Home:Electronics Parts:Toshiba Parts:Toshiba DLP PTV Manual
Open the PDF directly: View PDF ![]() .
.
Page Count: 112 [warning: Documents this large are best viewed by clicking the View PDF Link!]
HIBA
Black
(E) 56/62/72HM195
L
Dear Customer,
Thank you for purchasing this Toshiba TV.This manual will
help you use tile many exciting features of your new TV.
Before operating the TV, please read this manual
completely, and keep it nearby for future reference.
Safety Precautions
WARN ING: TO REDUCE THE RISK OF FIRE OR ELECTRIC
SHOCK, DO NOT EXPOSE THIS APPLIANCE TO RAIN OR
MOISTURE.
WARNING
WARNING:TO REDUCETHE RISK OF ELECTRICSHOCK,
DO NOTREMOVECOVER(OR BACK).NO USER-
SERVICEABLEPARTSINSIDE. REFERSERVICINGTO
QUALIFIEDSERVICEPERSONNEL.(Thisdoesnotapplyto"Lamp
unitreplacementandcare"ellpages103-105ofthismanual.)
The lightning flash with arrowhead symbol, within an
equilateral triangle, is intended to alert the user to the
presence of uninsulated "dangerous voltage" within the
product's enclosure that may be of sufficient magnitude
to constitute a risk of electric shock to persons.
The exclamation point within an equilateral triangle, is
intended to alert the user to the presence of irr_portant
operating and maintenance (servicing) instructions in the
literature accompanying the appliance.
CAUTION: HOT SURFACE! iA,,
The temperature of the lamp _/_\
immediately after use /_ _,,
exceeds 392°F (2go°C).
Touching the lamp before it has cooled will result in severe
burns. ALLOW THE LAMP TO COOL FOR AT LEAST ONE [1)
HOUR BEFORE REPLACING IT.
The lamp in this product has a limited service life. The length of
service life varies depending on product use and user settings.
If you use the lamp beyond its service life:
• you may notice a reduction in the colors and/or brightness of
the picture, at which time you should replace the lamp unit; and
• the strength of the quartz glass in the lamp will be reduced
and the lamp may rupture. If the lamp ruptures, the TV will
not operate until the lamp unit is replaced.
• Dispose of the used lamp unit by the approved method for your
area.
See "Lamp unit replacement and care"
on pages 103-105.
Note: The lamp unit contains mercury.
Disposal of mercury may be regulated due to
environmental considerations. Fordisposal or recycling
information, contact your local authorities or the Electronic
Industries Alliance (www.eiae.org).
NOTE: NEVER CONNECT THIS TV
TO A PERSONAL COMPUTER (PC).
THIS TV IS NOT INTENDED FOR USE WITH A PC.
2
#01E 0024 04 566272HM195 2
Black
(E) 56/62/72HM195
NOTICE OF POSSIBLE TV STAND INSTABILITY
CAUTION: This television is for use only with
the Toshiba stand listed below. Use with other
carts or stands is capable of resulting in instability
causing possible injury.
Television Stand Model
56H M 195 ST5685
62H M 195 ST6285
72HM195 ST7285
NOTE TO CATV INSTALLERS IN THE U.SJ_.
This is a reminder to call the CATV system installer's attention to Article
820-40 of the U.S. NEC, which provides guidelines for proper grounding
and, in particular, specifies that the cable ground shall be connected to
the grounding system of the building, as close to the point of cable entry
as practical. For additional antenna grounding information, see items 27
and 28 on page 4.
Child Safety
It Makes A Difference
Where Your TV Stands
Congratulationsonyour purchase=.
As youenjoyyour new TV,keep these safetytips in mind:
Thelssue
If you are like most consumers,you havea TV inyour home. Many homes,
in fact, havemorethan one TV.
The hometheater entertainmentexperienceis a growing trend, and larger
TVsare popular purchases;however,theyare not alwayssupportedon
the properTV stands.
L_ SometimesTVsare improperlysecuredor inappropriately
situatedon dressers,bookcases,shelves,desks,audio speakers,
chests,or carts.Asa result,TVsmayfall over,causing
unnecessaryinjury.
Toshiba Cares!
Ej The consumer electronicsindustry is committedto
making homeentertainmentenjoyableand safe.
GTheConsumerElectronicsAssociationformed the
HomeEntertainmentSupportSafety Committee,
comprisedof TV and consumerelectronicsfurniture
manufacturers,to advocatechildren'ssafety and educate
consumersand their families about televisionsafety.
Tune Into Safety
L; OnesizedoesNOTfit all!Useappropriatefurniture large enougbto
supportthe weight of yourTV Candotherelectronic components).
Ej Useappropriateangle braces,straps, and anchorsto secure your furniture
to the wall [but neverscrew anythingdirectlyinto the TV).
L; Carefullyreadand understandthe otherenclosedinstructionsfor proper
useof this product.
L; Do not allowchildren to climb on or playwith furniture and TVs.
L; Avoidplacing anyitem on top of your TV Csuchasa VCR,remote control,
or toy) that a curious child mayreachfor.
L; Rememberthat children can becomeexcitedwhile watching a program
and can potentiallypush or pull a TV over.
Ej Shareoursafety messageabout this hidden hazardof the home with
your family and friends. Thank you!
2500 Wilson Blvd.
Arlington,VA 22201U.S.A.
Tel.703-907-7600 Fax703-907-7690
www.CE.org
CEAis the Sponsol;Producet and
:_ o#_t,,A_,<,.4t _ Managerof theIntelnationalCE5e'
7/28/05, 4:06 PM F
L
Important Safety Instructions
1]
2)
3)
4)
5]
6)
7)
Read these instructions.
Keep these instructions.
Heed all warnings.
Follow all instructions.
Do not use this apparatus near water.
Clean only with adry cloth.
Do not block any ventilation openings. Install in
accordance with the manufacturer's instructions.
8) Do not install near any heat sources such as radiators,
heat registers, stoves, or other apparatus (including
amplifiers) that produce heat.
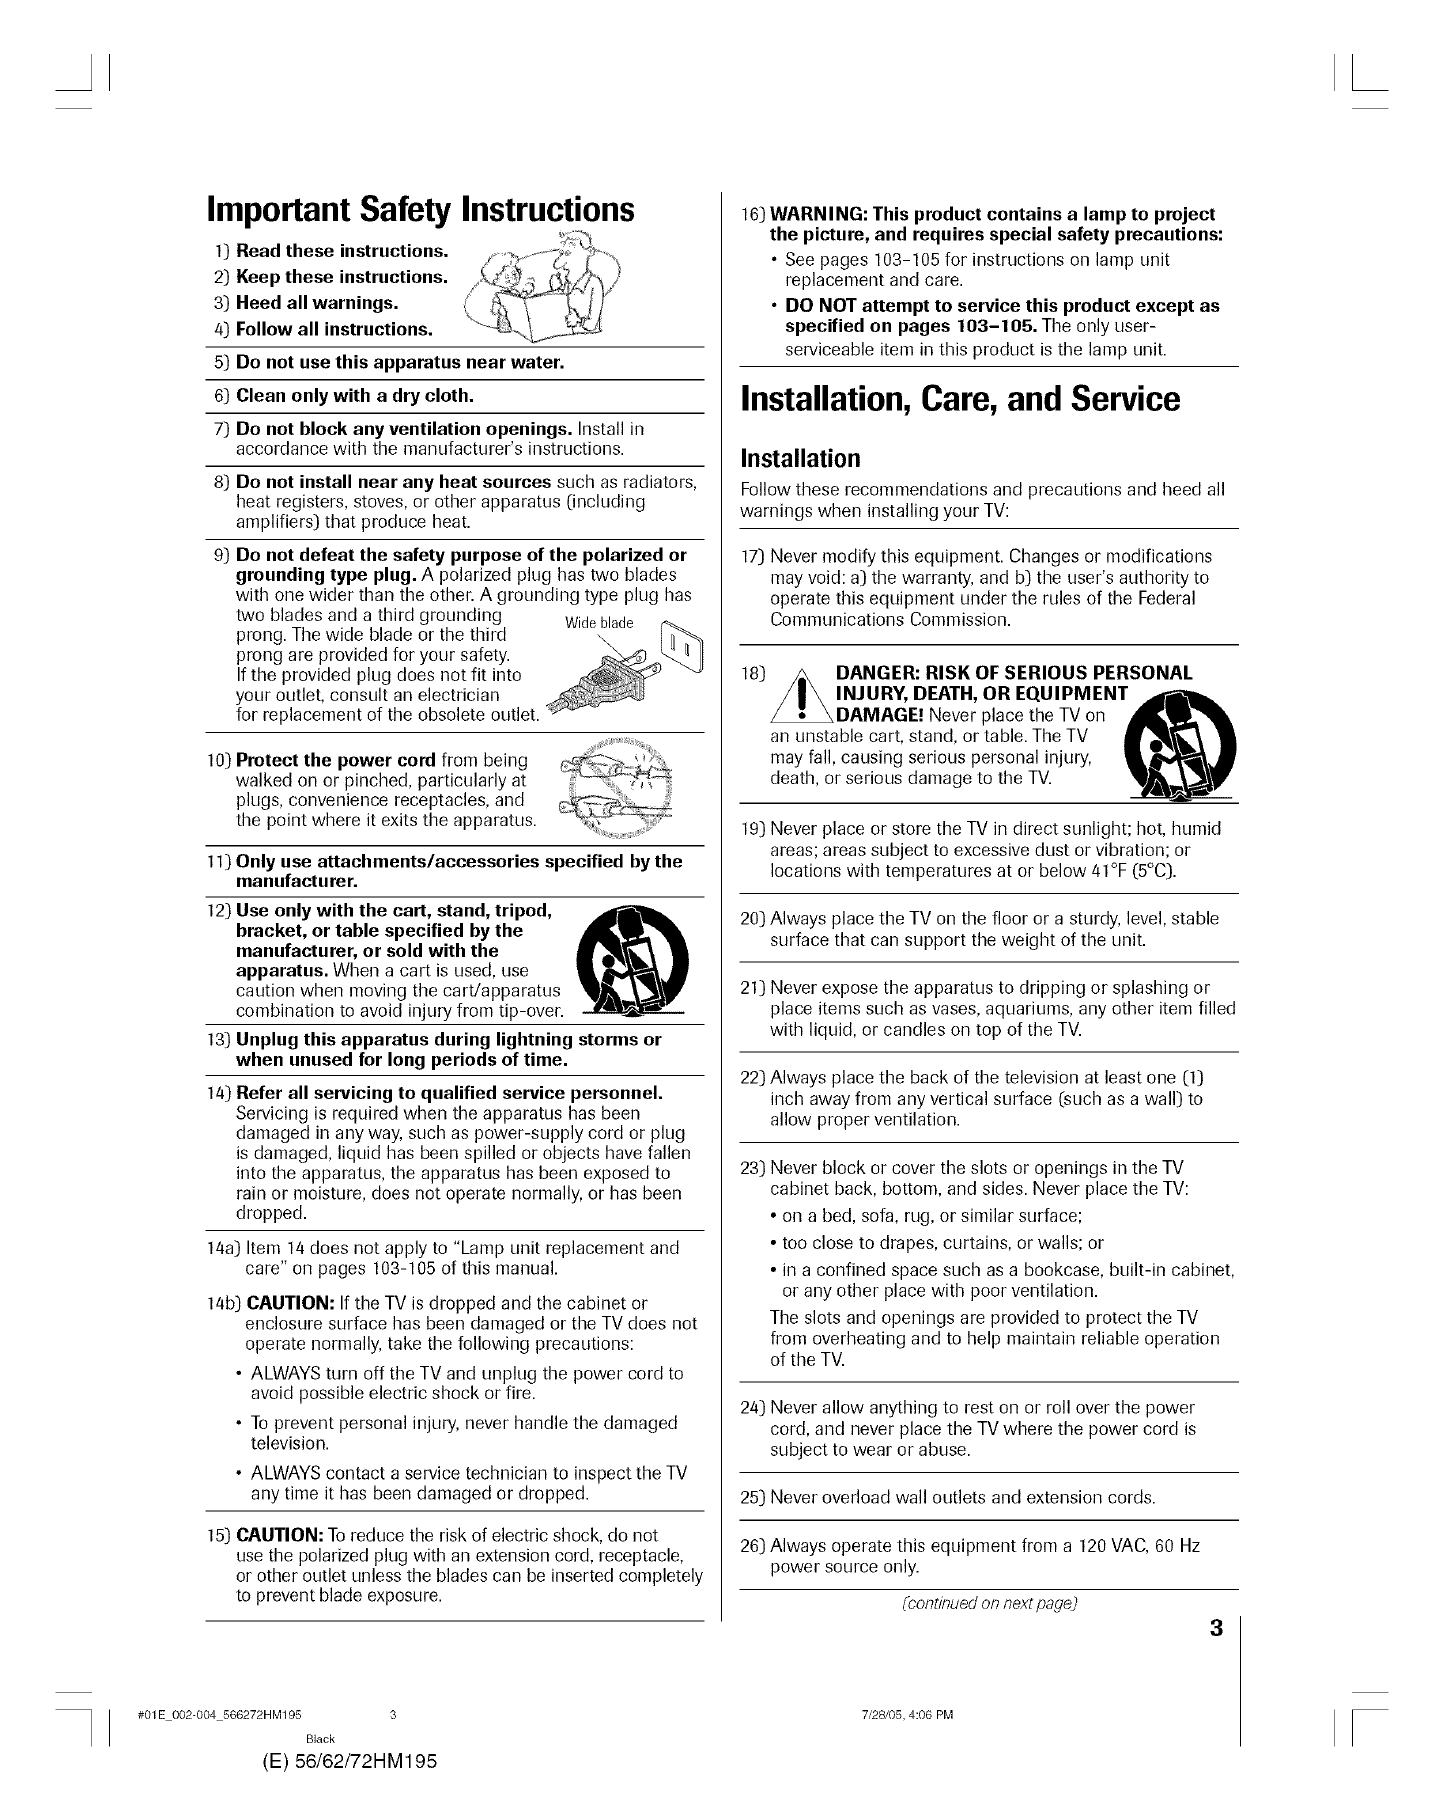
9) Do not defeat the safety purpose of the polarized or
grounding type plug. A polarized plug has two blades
with one wider than the other. A grounding type plug has
two blades and a third grounding Wideblade
prong. The wide blade or the third
prong are provided for your safety.
If the provided plug does not fit into
your outleL consult an electrician
for replacement of the obsolete outlet.
10) Protect the power cord from being
walked on or pinched, particularly at
plugs, convenience receptacles, and
the point where it exits the apparatus.
11) Only use attachments/accessories specified by the
manufacturer.
12) Use only with the cart, stand, tripod,
bracket, or table specified by the
manufacturer, or sold with the
apparatus. When a cart is used, use
caution when moving the cart/apparatus
combination to avoid injury from tip-over.
13) Unplug this apparatus during lightning storms or
when unused for long periods of time.
1/4)Refer all servicing to qualified service personnel.
Servicing is required when the apparatus has been
damaged in any way, such as power-supply cord or plug
is damaged, liquid has been spilled or objects have fallen
into the apparatus, the apparatus has been exposed to
rain or moisture, does not operate normally, or has been
dropped.
14a) Item 14does not apply to "Lamp unit replacement and
care" on pages 103-105 of this manual.
14b) CAUTION: If the TV is dropped and the cabinet or
enclosure surface has been damaged or the TV does not
operate normally, take the following precautions:
• ALWAYS turn off the TV and unplug the power cord to
avoid possible electric shock or fire.
• To prevent personal injury, never handle the damaged
television.
• ALWAYS contact a service technician to inspect the TV
any time it has been damaged or dropped.
15) CAUTION: To reduce the risk of electric shock, do not
use the polarized plug with an extension cord, receptacle,
or other outlet unless the blades can be inserted completely
to prevent blade exposure.
#01E 002-004 566272HM195 3
Black
(E) 56/62/72HM195
16) WARNING: This product contains alamp to project
the picture, and requires special safety precautions:
• See pages 103-105 for instructions on lamp unit
replacement and care.
•DO NOT attempt to service this product except as
specified on pages 103-105. The only user-
serviceable item in this product is the lamp unit.
Installation,Care, and Service
Installation
Follow these recommendations and precautions and heed all
warnings when installing your TV:
17) Never modify this equipment. Changes or modifications
may void: a) the warranty, and b) the user's authority to
operate this equipment under the rules of the Federal
Communications Commission.
18) DANGER: RISK OF SERIOUS PERSONAL
INJURY, DEATH, OR EQUIPMEN- _l_,_k
DAMAGE! Never place the TV on
an unstable cart, stand, or table. The TV
may fall, causing serious personal injury,
death, or serious damage to the TV.
19) Never place or store the TV in direct sunlight; hoL humid
areas; areas subject to excessive dust or vibration; or
locations with temperatures at or below 41°F (5°C).
20) Always place the TV on the floor or a sturdy, level, stable
surface that can support the weight of the unit.
21) Never expose the apparatus to dripping or splashing or
place items such as vases, aquariums, any other item filled
with liquid, or candles on top of the TV.
22) Always place the back of the television at least one (1)
inch away from any vertical surface (such as a wall) to
allow proper ventilation.
23) Never block or cover the slots or openings in the TV
cabinet back, bottom, and sides. Never place the TV:
•on a bed, sofa, rug, or similar surface;
• too close to drapes, curtains, or walls; or
• in a confined space such as a bookcase, built-in cabinet,
or any other place with poor ventilation.
The slots and openings are provided to protect the TV
from overheating and to help maintain reliable operation
of the TV.
24) Never allow anything to rest on or roll over the power
cord, and never place the TV where the power cord is
subject to wear or abuse.
25) Never overload wall outlets and extension cords.
26) Always operate this equipment from a 120 VAC, 60 Hz
power source only.
(continued on nextpage)
3
7/28/05, 4:06 PM F
Installation (continued from previous page)
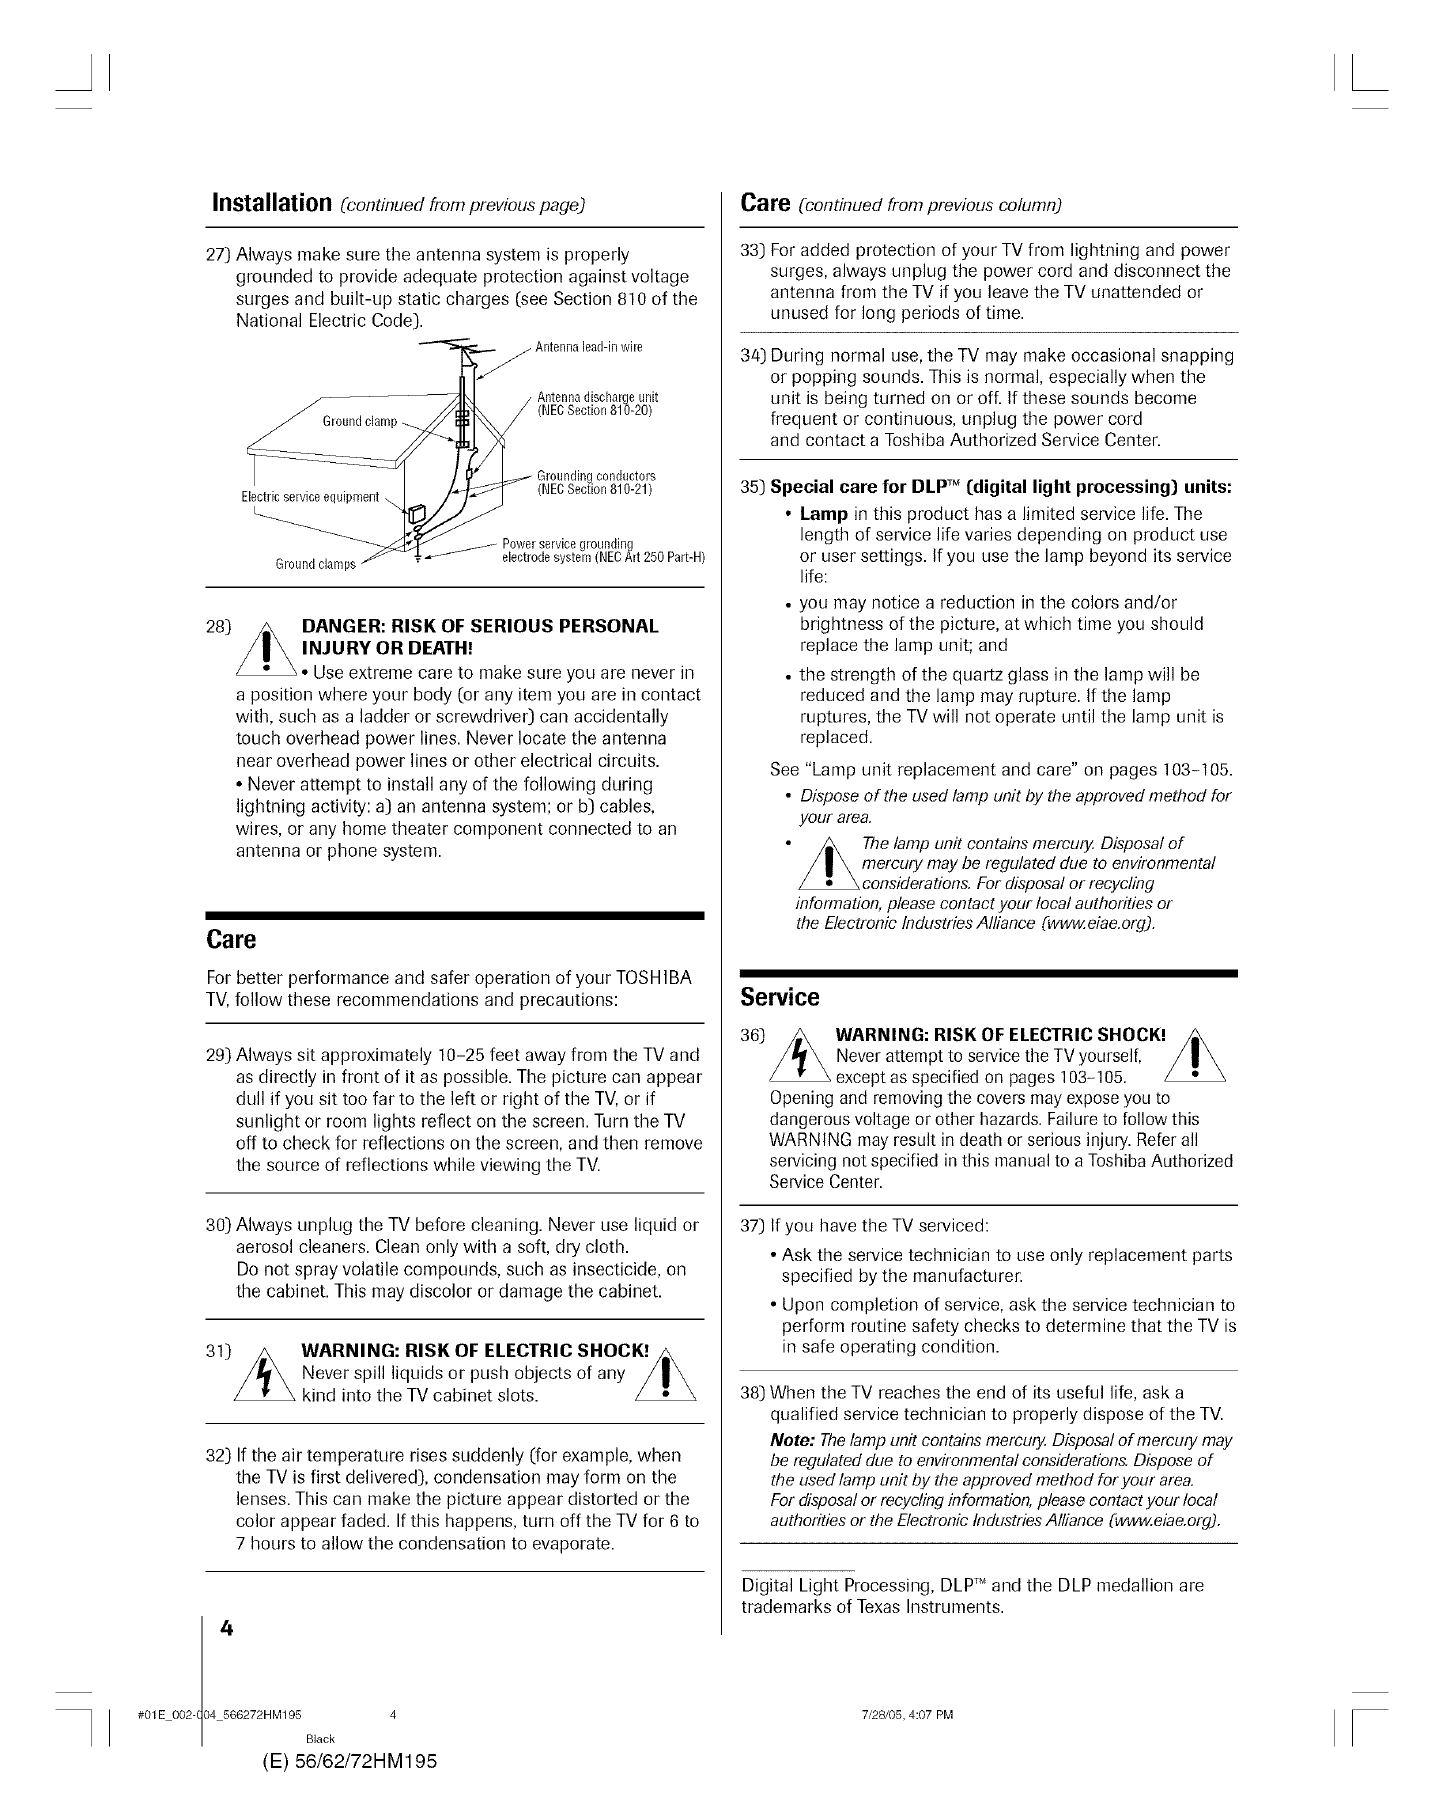
27) Always make sure the antenna system is properly
grounded to provide adequate protection against voltage
surges and built-up static charges (see Section 810 of the
National Electric Code),
j Antenna lead-in wire
/Antenna discharge unit
/(NECSection 810-20)
conductors
ElectHc_me eqmpment._serviceequipment )
e Power service grounding
/elect[odesystem (NECArt 250 Part-H)
,,dolam sY +
28)_ANGER: RISK OF SERIOUS PERSONAL
INJURY OR DEATH!
• Use extrerne care to rnake sure you are never in
a position where your body (or any item you are in contact
with, such as a ladder or screwdriver) can accidentally
touch overhead power lines. Never locate the antenna
near overhead power lines or other electrical circuits.
• Never attempt to install any of the following during
lightning activity: a) an antenna system; or b) cables,
wires, or any home theater component connected to an
antenna or phone system.
Care
For better performance and safer operation of your TOSHIBA
TV, follow these recommendations and precautions:
29) Always sit approximately 10-25 feet away from the TV and
as directly in front of it as possible. The picture can appear
dull if you sit too far to the left or right of the TV, or if
sunlight or room lights reflect on the screen. Turn the TV
off to check for reflections on the screen, and then remove
the source of reflections while viewing the TV.
30) Always unplug the TV before cleaning. Never use liquid or
aerosol cleaners. Clean only with a soft, dry cloth.
Do not spray volatile compounds, such as insecticide, on
the cabinet. This may discolor or damage the cabinet.
39 WARNING: RISK OF ELECTRIC SHOCK!
Never spill liquids or push objects of any
kind into the TV cabinet slots.
32) If the air temperature rises suddenly (for example, when
the TV is first delivered), condensation may form on the
lenses. This can make the picture appear distorted or the
color appear faded. If this happens, turn off the TV for 6 to
7 hours to allow the condensation to evaporate.
4
#01E 0024 04 566272HM195 4
Black
(E) 56/62/72HM195
Care (continued from previous column)
33)
34)
For added protection of your TV from lightning and power
surges, always unplug the power cord and disconnect the
antenna from the TV if you leave the TV unattended or
unused for long periods of time.
During normal use, the TV may make occasional snapping
or popping sounds. This is normal, especially when the
unit is being turned on or of[ If these sounds become
frequent or continuous, unplug the power cord
and contact a Toshiba Authorized Service Center.
35) Special care for DLW M(digital light processing) units:
•Lamp in this product has a limited service life. The
length of service life varies depending on product use
or user settings. If you use the lamp beyond its service
life:
• you may notice a reduction in the colors and/or
brightness of the picture, at which time you should
replace the lamp unit; and
• the strength of the quartz glass in the lamp will be
reduced and the lamp may rupture. If the lamp
ruptures, the TV will not operate until the lamp unit is
replaced.
See "Lamp unit replacement and care" on pages 103-105.
•Dispose of the used lamp unit by the approved method for
your area.
Thelamp unit contains mercury. Disposal of
mercury may be regulated due to environmental
considerations. For disposal or recycling
information, please contact your local authorities or
the Electronic Industries Alliance (www.eiae.org).
Service
36] WARNING: RISK OF ELECTRIC SHOCK!
Never attempt to service the TV yourself,
except as specified on pages 103-105.
Opening and removing the covers may expose you to
dangerous voltage or other hazards. Failure to follow this
WARNING may result in death or serious injury. Refer all
servicing not specified in this manual to a Toshiba Authorized
Service Center.
37) If you have the TV serviced:
• Ask the service technician to use only replacement parts
specified by the manufacturer.
• Upon completion of service, ask the service technician to
perform routine safety checks to determine that the TV is
in safe operating condition.
38) When the TV reaches the end of its useful life, ask a
qualified service technician to properly dispose of the TV.
Note: Thelamp unit contains mercury. Disposal of mercury may
be regulated due to environmental considerations. Dispose of
the used lamp unit by the approved method for your area.
For disposal or recycling information, please contact your local
authorities or the Electronic IndustriesAlliance Cwww..eiae.org).
Digital Light Processing, DLPm and the DLP medallion are
trademarks of Texas Instruments.
7/28/05, 4:07 PM F
Important notes about your DLPTM projection TV
2)
3)
4)
5)
The light source for this TV is a projection lamp unit with a
limited service life. When the lamp wears out, the picture may
become dark or black or the lamp may fail, at which time you
must replace the lamp unit. See "Lamp unit replacement and
care" on pages 103-105.
If you set the lamp mode to Low Power,each time you turn on
the TV,the lamp will start out in High Bright mode but will
switch to Low Power mode in approximately 1 minute. You will
notice a change in screen brightness when this happens. This is
normal and is not a malfunction. (See page 75 for details.)
Eachtime you turn on the TV, it may take several minutes to go
from no picture to full picture brightness.
The display of this TV is manufactured using an extremely high
level of precision technology; however, an occasional pixel (dot
of light) may show constantly on the screen.
This is a structural property of DLP TM(Digital Light Processing TM)
technology in the TV and is not a sign of malfunction. Such
pixels are not visible when the picture is viewed from a normal
viewing distance (see item 29 on page 4).
Depending on the media you are viewing, it is possible, although
unlikely, that a limited number of viewers may see a "rainbow
effect" on the screen, which can, in rare instances, result in eye
fatigue. This is a rare occurrence related to technology of this
type, and is not a sign of TV malfunction.
6) Always sit approximately 10-25 feet away from the TV and as
directly in front of it as possible. The picture quality may be
affected by your viewing position and length of viewing time. If
you sit too closely to the TV for too long, you may suffer from
eye fatigue. See item 29 on page 4.
7) This TV contains several cooling fans to moderate the
internal temperature. You may be able to hear the fans
for several minutes after the TV is turned off. This is a
function of the Quick Restart feature and is not a sign of TV
malfunction. You can set the Quick Restart _ feature to stop the
fans as soon as the TV is turned off. See "Setting the Quick
Restart _Mfeature" on page 51.
8) The yellow and blue LED lights at the bottom center of the TV
front indicate your TV's current status. If either light flashes, see
"LED indications" on page 99 for details.
9) If you unplug the power cord, when you plug the power cord in
again the message "Now Booting..." will displayed on the
screen until the picture appears or the yellow LED will blink until
the TV enters standby mode. This is normal and is not a sign of
malfunction.
IO)When connectingan externalAA/device,if you connectthe device's
video outputto the TV andthe device'saudio output to a separate
audio system,the pictureand sound may notsynchronizecompletely.
1l) When playing a video game on this TV,there may be a slight
delay between your command (joystick, keyboard, etc.) and the
picture movement on the screen.
Important Safety Information .............................................2-4
Important notes about your DLPTMprojection TV ...............5
Chapter 1: Introduction ..........................................................7
Welcome to Toshiba ........................................................... 7
Features of your newTV .................................................... 7
Overview of steps for installing, setting up, and
using your new TV ...................................................... 8
Chapter 2: Connecting your TV ............................................ 9
TV front and side panel controls
and connections ............................................................. 9
TV back panel connections ................................................ 10
Overview of cable types ...................................................... 11
About the connection illustrations ...................................... 12
Connecting a digital CableCARD r''.................................... 12
Connecting a VCR and antenna or Cable TV
(no Cable box) ............................................................... 13
Connecting a camcorder ..................................................... 13
Connecting a VCR and Cable box ..................................... 14
Connecting a VCR and satellite receiver ............................. 15
Connecting a DVD player with S-video,a VCR,
and a Cable box.............................................................. 16
Connecting a DVD player with ColorStream_
(component video) and a VCR ....................................... 17
Connecting two VCRs ....................................................... 18
Connecting an HDMI'" or a DVI device to the
HDMI input .................................................................. 19
Connecting a digital audio systein ...................................... 20
Connecting an analog audio systein .................................... 20
Controlling infrared remote-controlled devices
through the TV (IR pass-through) .................................. 21
Connecting IEEE1394 video devices.................................. 22
Using analog-coinpatible IEEE 1394 devices................... 22
Supported signals ........................................................... 22
Using TheaterNet r"on-screen devicecontrol .................. 22
Connecting an AVHD (external hard drive) or D-VHS
digital recorder ........................................................... 23
IEEE1394 device initialization ....................................... 23
IEEE1394 device inanageinent ....................................... 24
G-LINK" connection ........................................................ 25
Chapter 3: Using the remote control ................................. 26
Learning about the remote control ..................................... 26
Installing the remote control batteries ................................. 28
Using the reinote control MODE button to control
your other devices........................................................... 28
Reinote Control fimctional key chart ................................. 29
Prograinming the reinote control to operate
your other devices........................................................... 31
Multi-brand reinote control device codes ............................ 33
Chapter 4: Menu layout and navigation ...........................35
Main menu layout .............................................................. 35
Setup/Installation inenu layout ........................................... 36
Navigating the inenu systein ............................................... 36
Chapter 5: TV Guide On Screen TMsetup .............................37
Setting up the TV Guide On ScreenT"system ..................... 37
TV Guide On ScreenT''Reminder ...................................... 40
Turning off"the TV Guide On Screen_"automatic display
feature ............................................................................ 40
f( bnfinued on next?age)
Copyright © 2005 TOSHIBA CORPORATION. All rights reserved.
#01E 005-006 566272HM195 5
Black
(E) 56/62/72HM195
7/28/B5, 4:07 PM
5
[
Chapter 6: Setting up your TV .............................................41
Selecting the menu language ............................................... 41
Configuring tile antenna input sources............................... 41
Prograinming channels into the TV's channel memo U....... 42
Programining channels automatically .......................... 42
Manually adding and deleting chaimels in the
channel memory ..................................................... 43
Progrannning ?Tourfavoritechannels .................................. 44
Setting up and using TheaterNet _"on-screen
device control ................................................................. 45
Setting up TheaterNet ................................................. 45
Using the TheaterNet control icons............................. 46
TheaterNet IR device codes .................................. 47-49
Setting the AVHD deviceskip time .................................... 50
Setting the HDMI _"audio inode ........................................ 50
Setting the time and date .................................................... 50
Viewing the CableCARD _''inenu ...................................... 51
Setting the Quick Restart_"feature ..................................... 51
Viewing the digital signal ineter ......................................... 52
Viewing the system status ................................................... 52
Chapter 7: Using the IV Guide On Screen TM
interactive program guide ...............................................53
Setting up the TV Guide On ScreenT"systein ..................... 53
Navigating the TV Guide On Screet{" system .................... 54
TV Guide On Screen*"reinote control functions ........ 54
Video Window ........................................................... 55
Panel Menus ............................................................... 55
Infb Box...................................................................... 56
TV Guide On Screen*"Icons ...................................... 56
TV Guide On Screen_"Services.......................................... 57
LISTINGS screen ....................................................... 57
SEARCH screen .......................................................... 58
RECORDINGS screen ............................................... 60
SCHEDULE screen .................................................... 61
Record features ........................................................... 61
Remind features .......................................................... 63
SETUP screen............................................................. 65
Change system settings .......................................... 65
Change channel display ......................................... 65
Change detCaultoptions .......................................... 66
Chapter 8: Using the lV's features .....................................67
Selecting the video input source to view ............................. 67
Labeling the video input sources......................................... 68
Tuning channels ................................................................. 69
Using the Channel Browser:'*...................................... 69
Tuning your f:avoritechannels ..................................... 71
Tuning to the next prograinmed channel .................... 71
Tuning to a specific channel (progrannned or
unprogramined) ...................................................... 71
Switching between two channels using
Channel Return ...................................................... 71
Switching between vwo channels using
SurfLock'". .............................................................. 71
Selecting the picture size..................................................... 72
Natural picture size ..................................................... 72
TheaterWide 1picture size.......................................... 73
TheaterWide 2 picture size.......................................... 73
TheaterWide 3 picture size.......................................... 73
Full picture size ........................................................... 73
Scrolling the Theater\Vide _ picture .................................... 74
Using the auto aspect ratio feature ...................................... 74
Selecting the cinema mode (480i signals only) .................... 75
Selecting the lainp mode .................................................... 75
Using the POP features ...................................................... 76
Using the POP double-window feature ....................... 76
Switching the speaker audio (main or POP) ................ 77
POP double-window aspect ratio ................................ 77
Using the FREEZE feature ................................................. 78
Using the f:avoritechannel scan feature ............................... 78
Adjusting the picture .......................................................... 79
Selecting the picture inode .......................................... 79
Adjusting the picture quality ....................................... 79
Using CableClear_ DNR (digital noise reduction) ...... 80
Selecting tile color teinperature ................................... 80
Using MPEG noise reduction ..................................... 81
Using dynamic contrast ............................................... 81
Using the closed caption inode ........................................... 82
Advanced closed captions ............................................ 82
Digital closed captions ................................................ 83
Adjusting the audio ............................................................ 84
Muting the sound ....................................................... 84
Using the digital audio selector ................................... 84
Selecting stereo/SAP broadcasts ................................... 84
Adjusting the audio quality ......................................... 85
Using the sub-bass systein (SBS) ................................. 85
Using the StableSound_ feature ................................... 85
Using the SRSW£)W _"surround sound feature .......... 86
Turning off"the built-in speakers ................................. 86
Selecting the optical audio output t%rmat ................... 86
Using the media player ....................................................... 87
Media specifications .................................................... 87
Using the JPEG picture viewer .................................... 88
Using the MP3 audio player ....................................... 90
Memory card care and handling .................................. 90
Setting the On/OtTTimer .................................................. 91
Setting the sleep timer ........................................................ 91
Displaying TV setting information on-screen using
RECALL ........................................................................ 92
Understanding the auto power off feature ........................... 92
Understanding the last mode memory feature .................... 92
Using the gray level feature ................................................. 92
Chapter 9: Using the Locks menu ......................................93
Entering the PIN code ....................................................... 93
If you cannot remember your PIN code ............................. 93
Changing your PIN code ................................................... 93
BlockingTV programsand moviesby rating (V-Chip) ......... 94
Blocking channels ............................................................... 95
Unlocking prograins teinporarily ........................................ 95
Locking video inputs .......................................................... 95
Using the GameTimer _"..................................................... 96
Using the control panel lock feature ................................... 96
Chapter 10: Troubleshooting ................................................97
General troubleshooting ..................................................... 97
LED indications ................................................................. 99
TV Guide On ScreenT"FAQs................................... 100 102
Chapter 11: Appendix ......................................................... 103
LaInp unit replaceinent ............................................ 103-105
Specifications ................................................................... 106
Limited United States Warranty ....................................... 107
Limited Canada \Varranty ................................................ 108
Index .............................................................................. 110, 111
(
#01E 005-0 6 566272HM195 6
Black
E) 56/62/72HM195
Copyright © 2005 TOSHIBA CORPORATION. All rights reserved.
7/28/B5, 4:07 PM F
AL
Welcometo Toshiba
Thank you for purchasing this Toshiba TV, one of the most innow:tive DLP TMprojection [ See "Important notes about your [
TVs on the market.The goalof this manual is to guideyou through setting up and [ DLP:'_projection TV" on page 5. I
operating your TV as quickly as possible.
• This manual applies to models 56HM195, 62HM195, :and72HM195. Before you start reading check the model number on
the back of your TV.
• Instructions in this manual are based on using the remote control, xfi_t:also can use the controls on the TV control panel if they
have the same name :asthose referred to on the remote control. (MENU on the control panel functions :asENTER when a menu
is on-screen or when the TV Guide On ScreenTMsystem is open.)
• The side panel and back panel provide terminals for connecting other equipment to your TV. Seepage 9 for TV control panel :and
side panel details. See page 10 for back panel details. Seepages 12-25 for instructions on connecting other devices to your TV.
• Please read all safety and operating instructions in this manual carefully, and keep this manual for future reference.
FeaturesofyournewTV
The fbllowing are just a few of the many exciting features of your new Toshiba widescreen, integrated HD, DLP_"projection TV:
•Integrated digital tuning (8VSB ATSCand QAM} eliminates the need for a separate digital converter set-top box (in most cases).
•TV Guide On Screen := no-fee interactive program guide (Chapters 5 and 7).
•Digital CableCARD:=slot for viewing encrypted digital Cable TV programs (page 12).
•Digital recording by connecting a D-VHS digital recording device or a Toshiba Symbio TMAudio/Video Hard Drive Recorder to
one of the IEEE1394 jacks.You can record high definition and standard definition material from either tuner (page23).
•Memory card slots [SD Memory Card, MultiMediaCard, Memory Stick, CompactFlash, xD-Picture Card _''] for viewing JPEG
files as a "slide show" (page 89) and for playing MP3 files (page 90).
•TheaterNet := icons for on-screen control of'external IRand IEEE1394 devices (page 45).
•Two IEEE1394 portsfor multi-device connection and control (page 22).
•Two HDMI {[DVI}digital, high-definition multimedia interfaces (page 19).
•Two sets of ColorStmam *HD high-resolution component video inputs (pages 15 and 17).
•Dolby Digital* (page 20) and SRS WOW:= (page 86) audio technologies.
•Digital Audio Out optical audio connection (page 20).
•CableClear _DNR digital picture noise reduction (page 80).
• Double-window POP (page 76) and multi-window Favorites (page 78) features.
Note: After you set up the
TV Guide On Screen :_ system
{:Chapter 5}, the program guide
opens automatically by default
when you turn on the TV. You can
turn off the automatic program
guide {:page 40) and instead
press the TV GUIDE button on
the remote control to manually
open the program guide.
Inthe UnitedStates,TV Guideandothermhtedmarksareregisteredmarksof Gemstar-TVGuideInternationalInc.and/orone of its affiliates.In Canada,TVGUIDEis aregisteredmarkof
TranscontinentalInc.,and is usedunderlicensebyGemstarTVGuideInternationalInc.TheTVGuideOnScreen:Msystemis manufacturedunderlicensefloraGemstarTVGuide
International,inc. and/oroneof its affiliates.TheTVGuideOnScreen:Msystemis protectedbyoneor moreofthe followingissuedUnitedStatespatents6,498,895,6,418,556,6,331,877;
6,239,794;6,154,203;5,940,073;4,908,713;4,751,578;4,706,121.
GEMSTAR-TVGUIDE INTERNATIONALINC. AND/OR ITS RELATEDAFFILIATESARE NOT IN ANY WAY LIABLEFOR THEACCURACY OR
AVAILABILITY OF THE PROGRAM SCHEDULE INFORMATION OR OTHER DATAIN THE TV GUIDE ON SCREEN:_ SYSTEM AND CANNOT
GUARANTEESERVICE AVAILABILITY IN YOUR AREA. IN NO EVENTSHALL GEMSTAR-TV GUIDE INTERNATIONAL, INC. AND/OR ITS RELATED
AFFILIATES BE LIABLE FOR ANY DAMAGES IN CONNECTION WITH THE ACCURACY OR AVAILABILITY OF THE PROGRAM SCHEDULE
INFORMATION OR OTHER DATAIN THE TV GUIDE ON SCREEN:= SYSTEM.
•Thisproductincorporatescopyrightprotectiontechnologythat isprotectedbyU.S.patentsand otherintellectualproperlyrights.Useof thiscopyrightprotectiontechnologymustbe
authorizedby Macrovisionand isintendedfor homeandotherlimitedpay per view usesonly,unlessotherwiseauthorizedby Macrovision.Reverseengineeringordisassemblyis
prohibited.
#01E 007-008 566272HM195 7
Black
(E) 56/62/72HM195
Copyright © 2005 TOSHIBA CORPORATION. All rights reserved.
7/28105, 4:08 PM
7
F
Ab
Overviewofstepsfor installing,settingup,andusingyournewTV
Follow these steps to set tip your TV and begin using its many exciting features.
1Carefully read the important safety, installation, care,
and service information on pages 2-5. Keep this
manual for future reference.
2 Observe the following when choosing a location for
the TV:
• Placethe TV on the floor or on the optional TV stand listed in
the "Specifications" section (page 106}.
NOTICEOFPOSSIBLE!"1/STANDINSTABILITY
DANGER:RISKOFSERIOUSPERSONALINJURY
ORDEATH!UsethisTVonlywiththeTOSHIBATV
standlistedinthe "Specifications"section(page106).Usewithother
standsmayresultininstability,causingpossibleinjuryor death.
3.
4.
• Placethe TV ina location where light does not reflect on the
screen.
• Placethe TV far enough from walls and other objects to allow
proper ventilation. Inadequate ventilation may cause
overheating,which will damage the TV.THIS TYPE OF
DAMAGE IS NOT COVERED UNDER THE TOSHIBA
WARRANTY.
• Read"Installation" on pages 3-4.
• Read"Important notes about your DLP_MTV" on page 5.
Do not plug in any power cords until AFTERyou have
connected all canes and devicesto your TV.
BEFORE connecting cables or devices to the TV, learn
the functions of the TV's connections and controls (pages 9
and 10).
5Connect your other electronic device(s) to the TV
(pages 12-25).
6. Connect the G-LINK" cable (either one of the enclosed IR
blastel cables}fi-om youl VCRand/or Cable box (if applicable} to
the G-LINK_Mterminal so you can use the TV Guide OnScreen_M
features (appliesto VCRs and cable boxes only}. See page 25.
7. Install the batteries in the remote control (page 28}.
8See "Learning about the remote control" (page 26) for
an overview of the buttons on the remote control.
9Program the remote control to operate your other
device(s) (pages 28-34}.
10. AFTER connecting all cables and devices, plug in the
power cords for your TVand other devices.
11. After you plug in the TV power cord, the yellow LED (on
the TVfront) will blink whib the TV is booting until the remote
control is usable.When the yellow LED stops blinking, press
POWERto turn on the TV.
See 'tED indications" onpage 99.
12 See "Menu layout and navigation" for a quick overview
of navigating the TV's menu system (pages 35-36}
13 See Chapter 5 for details on setting up the TV Guide
On Screen T"system (if available in your area).
14 See Chapter 7 for details on using the TV Guide
On Screen T" program guide (if available in your area).
15. Program channels into the TV's channel memory
(page 42).
16. Set up the TheaterNet _" on-screen device control
feature (if applicableto youl particular home theater system
components) (page 45).
17. For details on using the memory card JPEG picture
viewer and MP3 audio player, see page 87.
18 For details on using the TV's features, see Chapter 8.
19 For help, refer to the Troubleshooting Guide (Chapter
lO).
20. For technical specifications and warranty information,
see Chapter 11.
21 Enjoy your new TV!
(
#01E O07-0 8 566272HM195 8
Black
E) 56/62/72HM195
Copyright © 2005 TOSHIBA CORPORATION. All rights reserved.
7/28/B5, 4:08 PM r
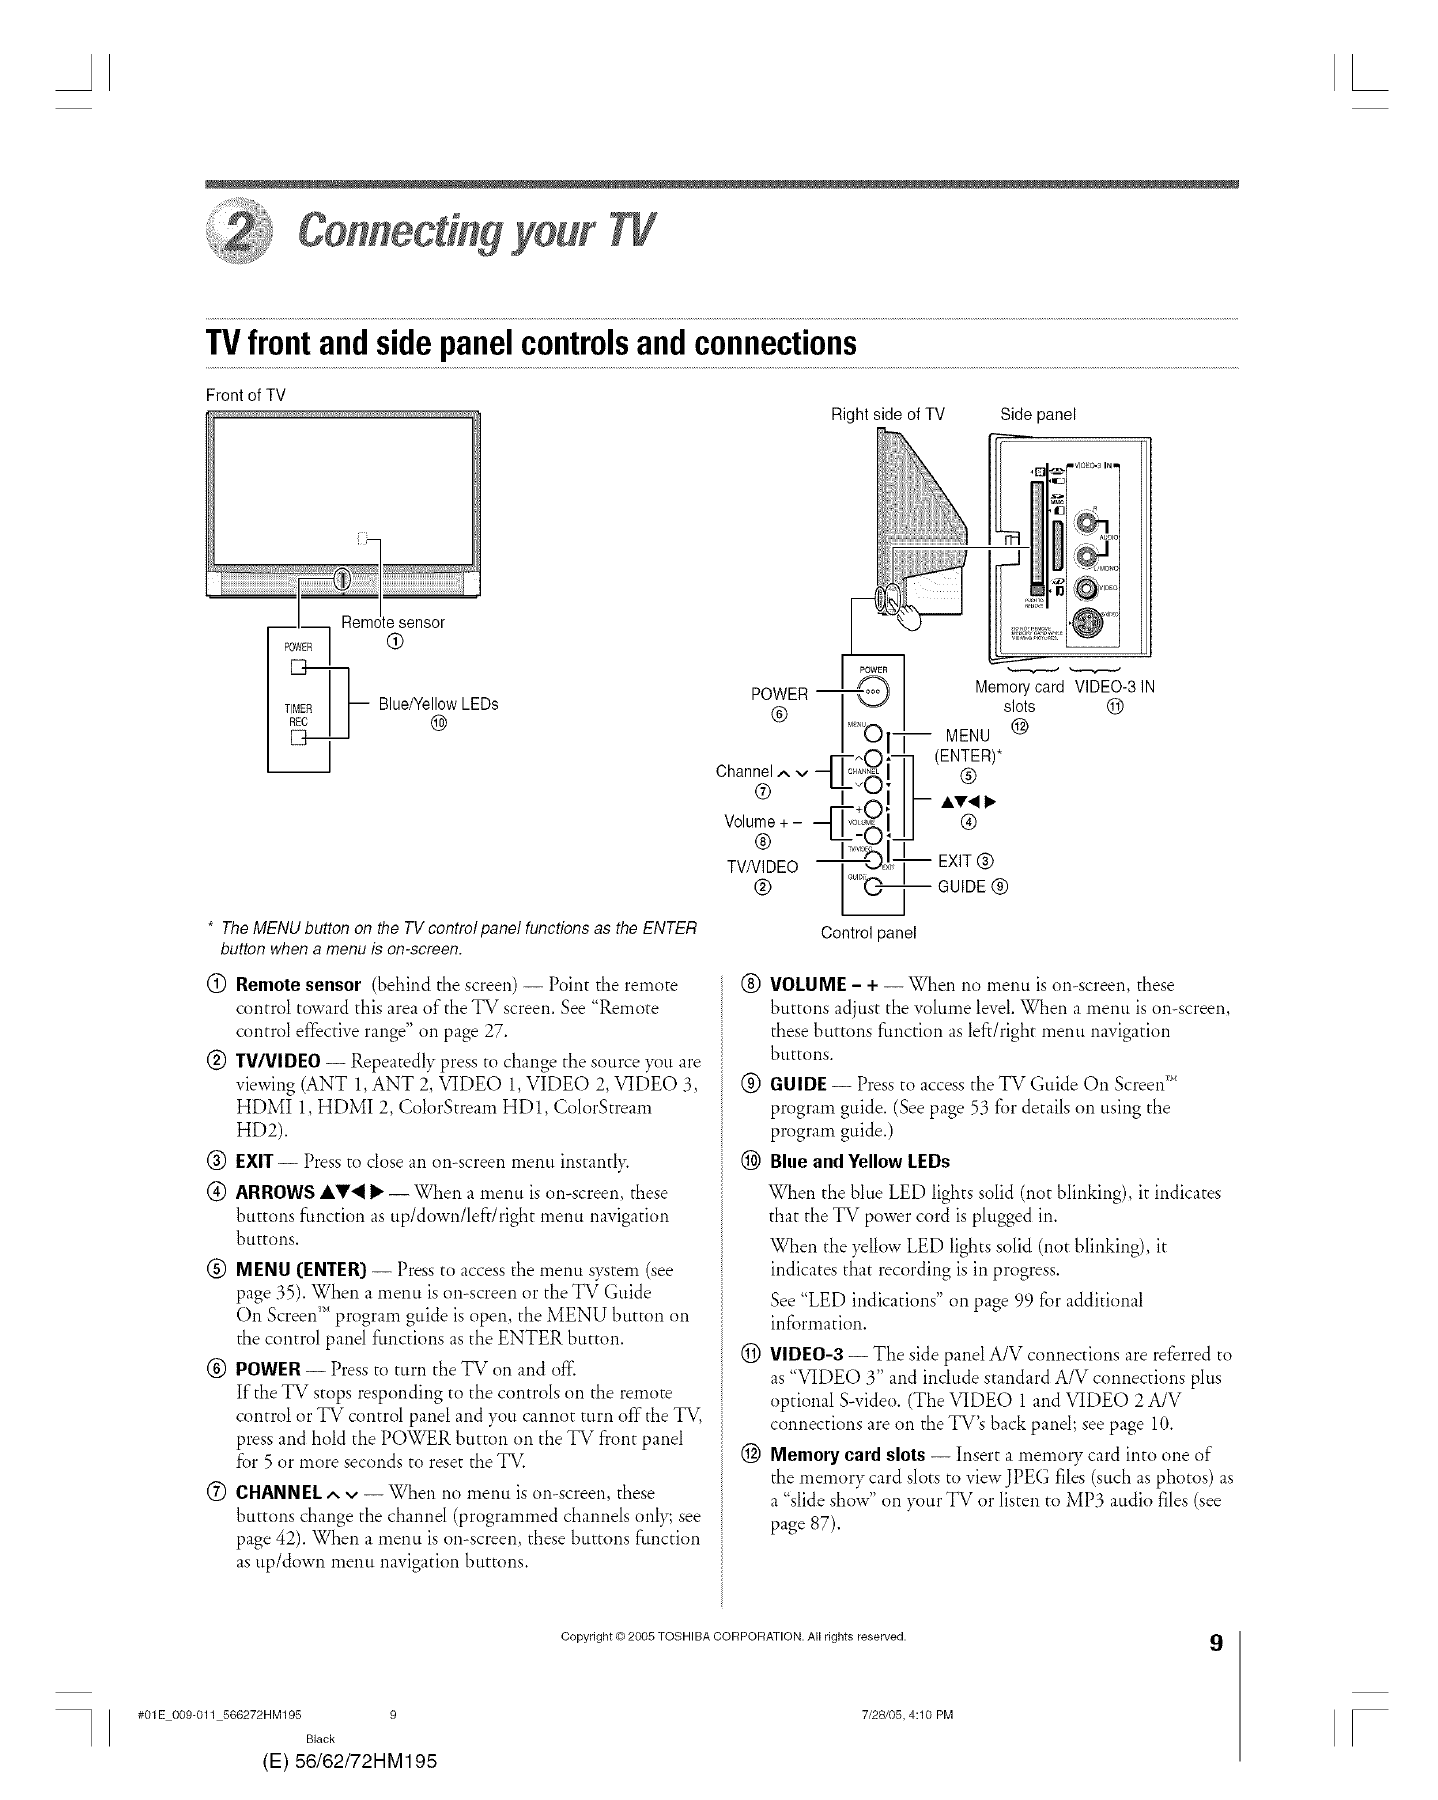
TVfront andsidepanelcontrolsandconnections
Front of TV
l.i--
Right side of TV Side panel
Rein( te sensor
q
__._-- Blue/Yellow LEDs
@
J
* The MENU button on the TV control panel functions as the ENTER
button when a menu is on-screen.
(!) Remotesensor (behind the screen) -- Point the remote
control toward this area of the TV screen. See "Remote
control effective range" on page 27.
(_) TV/VlDEO -- Repeatedly press to change the source }_u are
viewing (ANT 1, ANT 2, VIDEO 1,VIDEO 2, VIDEO 3,
HDMI 1, HDMI 2, ColorStream HD1, ColorStream
HD2).
(_) EXIT-- Press to close an on-screen menu instantly.
(_) ARROWS AV_ I_ -- When a menu is on-screen, these
buttons function as up/down/lefdright menu navigation
buttons.
(_) MENU (ENTER)-- Press to access the menu s}_tem (see
page 35). When a menu is on-screen or the TV Guide
On Screen_'_program guide is open, the MENU button on
the control panel functions as the ENTER button.
(_) POWER-- Press to turn the TV on and of_:
If the TV stops responding to the controls on the remote
control or TV control panel and you cannot turn off the TV,
press and hold the POWER button on the TV front panel
for 5 or more seconds to reset the TV.
®CRANNEL^v-- When no menu is on-screen, these
buttons change the channel (programmed channels only; see
page 42). When a menu is on-screen, these buttons ftmction
as up/down menu navigation buttons.
EXIT (_)
GUIDE (_)
®VOLUME -+--When no menu is on-screen, these
buttons adjust the volume level. When a menu is on-screen,
these buttons function as left/right menu navigation
buttons.
(_) GUIDE- Press to accessthe TV Guide On Screen _'*
program guide. (See page 53 for details on using the
program guide.)
(_) Blue andYellow LEDs
When the blue LED lights solid (not blinking), it indicates
that the TV power cord is plugged in.
When the yellow LED lights solid (not blinking), it
indicates that recording is in progress.
See "LED indications" on page 99 for additional
infi_rmation.
(_) VIDEO-3 -- The side panel A/V connections are referred to
as "VIDEO 3" and include standard A/V connections plus
optional Swideo. (The VIDE() 1 and VIDEO 2 A/V
connections are on the TV's back panel; see page 10.
@Memory card slots -- Insert a memory card into one of
the memory card slots to view JPEG files (such as photos) as
a "slide show" on }_mrTV or listen to MP3 audio files (see
page 87).
#01E 009-011 566272HM195 9
Black
(E) 56/62/72HM195
Copyright © 2005 TOSHIBA CORPORATION. All rights reserved.
7/28105, 4:10 PM
9
AL
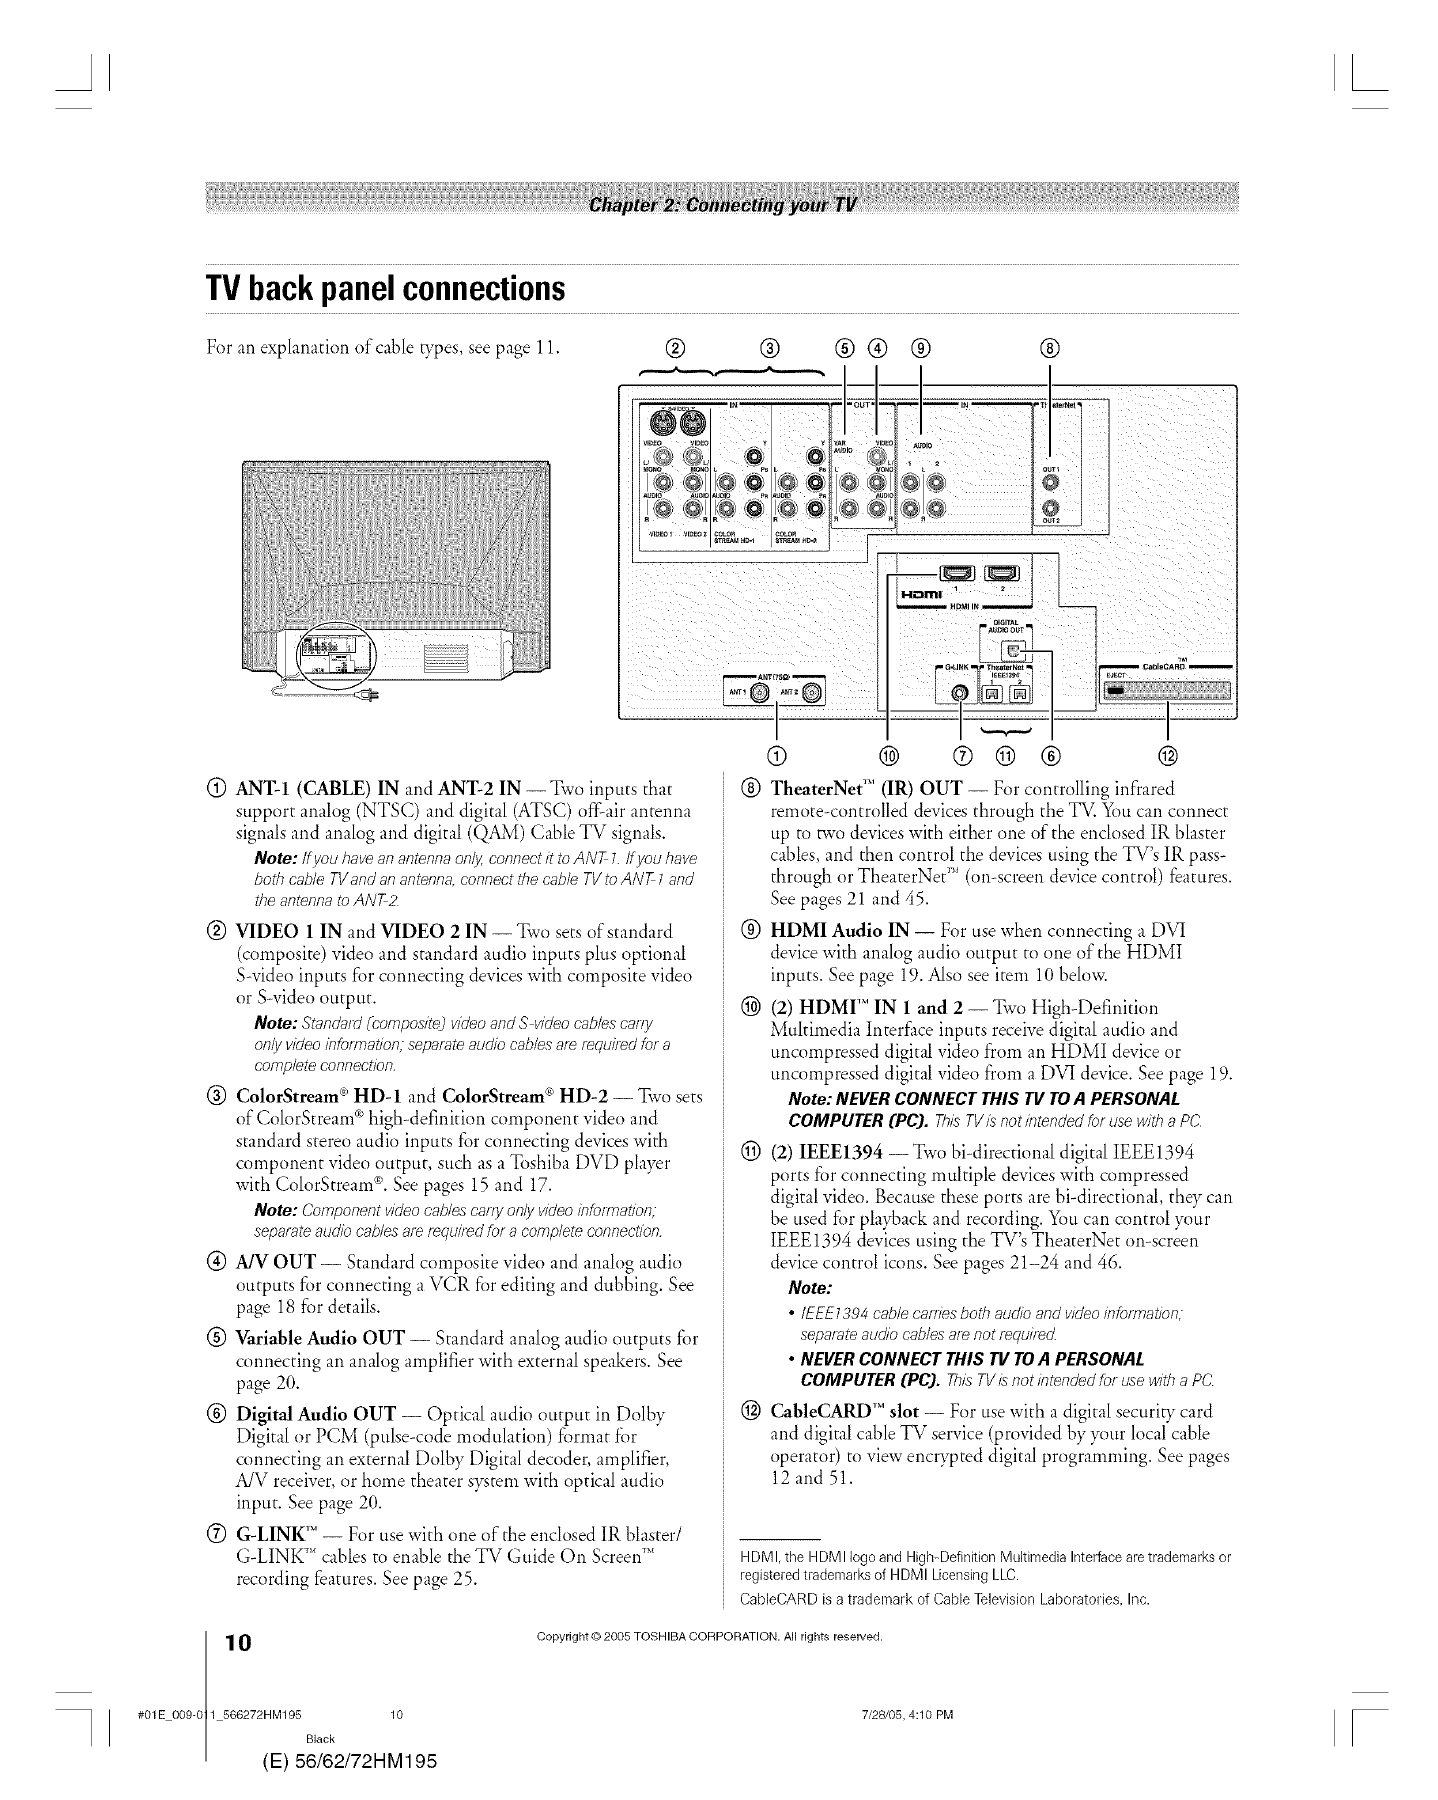
TVbackpanelconnections
For an explanation of cable _:pes, see page 11. ® ® @® @ ®
1/!, II
°
(!) ANT-1 (CABLE) IN and ANT-2 IN --Two inputs that
support analog (NTSC) and digital (ATSC) offair antenna
signals and analog and digital (QAM) Cable TV signals.
Note: If youhavean antennaonly connectit to ANT L if you have
both cable TVandanantenna,connectthe cableTVto ANT 1and
theantennato ANT2
(_) VIDEO 1 IN and VIDEO 2 IN -- Two sets of standard
(composite) video and standard audio inputs plus optkmal
S-video inputs for connecting devices with composite video
or S-video output.
Note: Standard (composite) video and S video cables cany
only video infom_at/on; separate audio cables a_ required for a
complete connection,
(_) ColorStream®HD-I and ColorStream@HD-2 -- Two sets
of ColorStream c_high-definition component video and
standard stereo audio inputs for connecting devices with
component video output, such as a Toshiba DVD player
with ColorStream ®.See pages 15 and 17.
Note: Component video cables catty only video #Tformation;
separate audio cables are f_qu#_d for a complete connection.
(_) A/V OUT -- Standard composite video and analog audio
outputs for connecting a VCR for editing and dubbing. See
page 18 for details.
(_) Variable Audio OUT -- Standard analog audio outputs for
connecting an analog amplifier with external speakers. See
page 20.
(_) Digital Audio OUT -- Optical audio output in Dolby
Digital or PCM (pulse-code modulation) format fi_r
connecting an external Dolby Digital decoder, amplifier,
A/V receiver, or home theater s}_tem with optical audio
input. See page 20.
0 G-LINW" -- For use with one of the enclosed IR blaster/
G-LINK'"*cables to enable the TV Guide On Screen_'_
recording features. See page 25.
® @ ® @ @ @
(_) TheaterNet _"(IR) OUT -- For controlling infrared
remote-controlled devices through the TV. X_)ucan connect
tip to two devices with either one of the enclosed IR blaster
cables, and then control the devices using the TV's IR pass-
through or TheaterNet _"(on-screen device control) features.
See pages 21 and/i5.
(_) HDMI Audio IN -- For use when connecting a DVI
device with analog audio output to one of the HDMI
inputs. See page 19. Also see item 10 below.
(_ (2) HDMF" IN 1 and 2 -- Two High-Definition
Multimedia Interface inputs receive digital audio and
uncompressed digital video from an HDMI device or
uncompressed digital video from a DVI device. See page 19.
Note:NEVERCONNECTTHIS IV TOA PERSONAL
COMPUTER (PC). Tb/sTV£ notintendedforusew#h8PC
(_) (2) IEEEI394 --Two bi-directional digital IEEE1394
ports fbr connecting multiple devices with compressed
digital video. Because these ports are bi-directional, they can
be used for playback and recording. You can control )_)ur
IEEE1394 devices using the TV's TheaterNet on-screen
device control icons. See pages 21-24 and 46.
Note:
•IEEE1394cablecaniesbothaudioandvideo/nfomTation,
separate audiocablesarenotrequ#_d.
•NEVERCONNECTTHIS 711TOA PERSONAL
COMPUTER CPC). gh£TVisnot#TtendedforusewitbaPC
(_) CabIeCARD _' slot -- For use with a digital securit7 card
and digital cable TV service (provided by }_mr local cable
operator) to view encrypted digital programming. See pages
12 and 51.
HDM I, the HDMI logo and High-DefinitionMultimedia Interfacearetrademarks or
registeredtrademarksof HDMI Licensing LLC.
CableCARD isa trademark of Cable Television Laboratories, Inc.
0(
#01E 009-0 1 566272HM195 10
Black
E) 56/62/72HM195
Copyright © 2005 TOSHIBA CORPORATION. Aft rights reserved.
7/28/05, 4:10 PM r
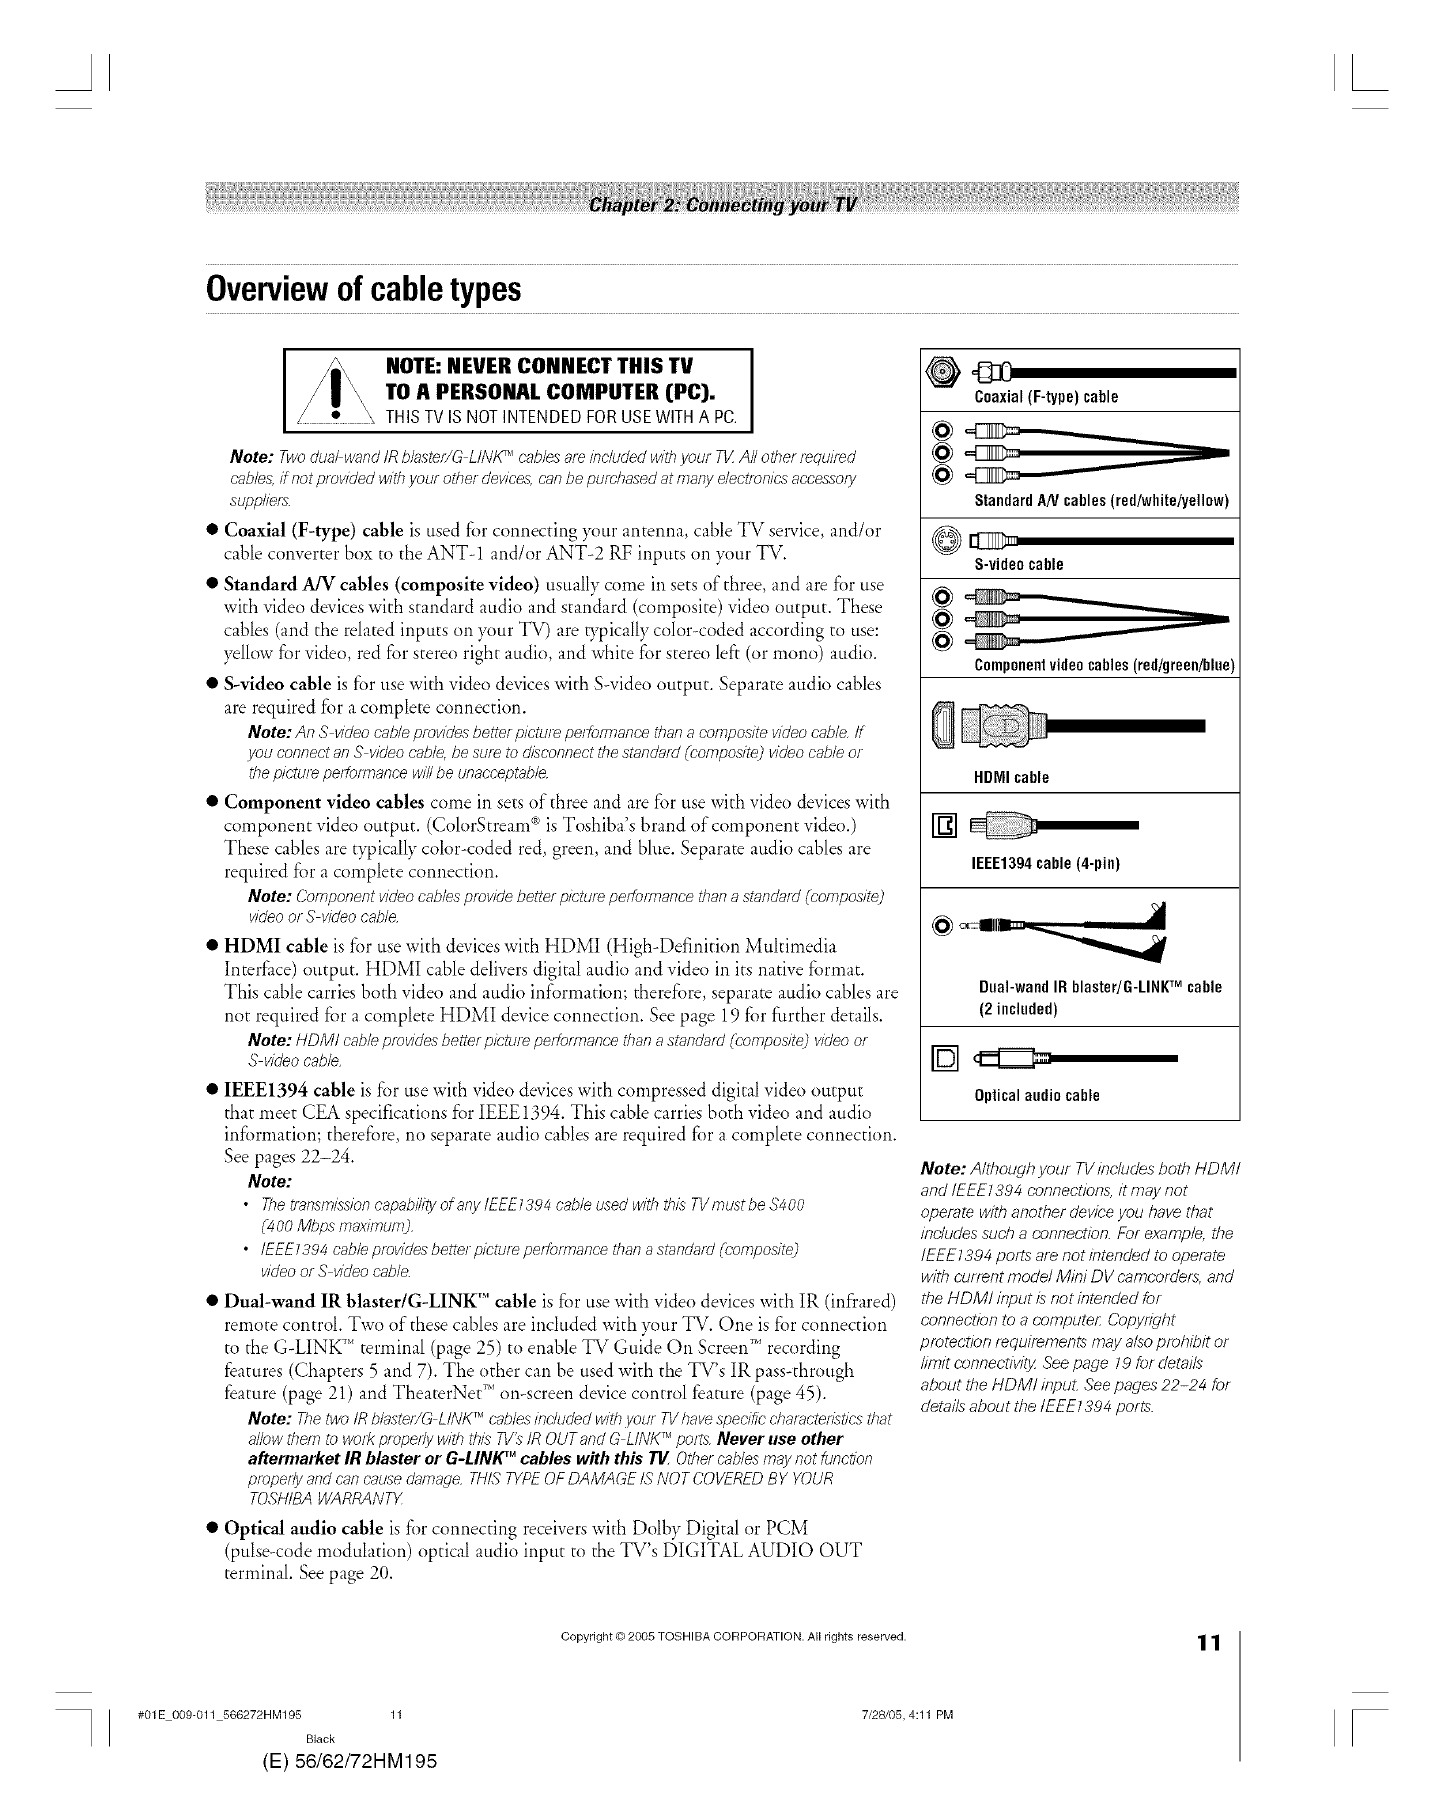
Overviewofcabletypes
NOTE: NEVER CONNECT THIS TV I
i
TO A PERSONAL COMPUTER (PC).
THISTVISNOTINTENDEDFORUSEWITHA PC.
Note: TwoduaPwand/Rblastef/G L1NtCMcablesare included wit/?you/ 7qZAll otherrequired
cables,if not providedwit/?your otherdevices,canbe purchasedat manyelectronicsaccesso/y
suppliers.
•Coaxial (F-type) cable is used for connecting )_mr antenna, cable TV service, and/or
cable converter box to the ANT-1 and/or ANT-2 RF inputs on your TV.
•Standard A/V cables (composite video) usually come in sets of three, and are fi)r use
with video devices with standard audio and standard (composite) video output. These
cables (and the related inputs on ?amr TV) are typically color-coded according to use:
yellow for video, red for stereo right audio, and white for stereo left (or mono) audio.
• S-video cable is for use with video devices with S-video output. Separate audio cables
are required for a complete connection.
Note: An S videocableprovidesbette/pictu/e perfom?ancethan acompositevideocable if
you connectanS videocable,be sureto disconnectthe standa/d(composite3videocableor
thepicturepeffom?ancewillbe unacceptable.
•Component video cables come in sets of three and are for use with video devices with
component video output. (ColorS/ream ® is Toshiba's brand of component video.)
These cables are typically color-coded red, green, and blue. Separate audio cables are
required for a complete connection.
Note: Componentvideocablesprovidebetterpictureperformancethana standard(composite)
videoorS videocable.
•HDMI cable is for use with devices with HDMI (High-Definition Multimedia
Interface) output. HDMI cable delivers digital audio and video in its native format.
This cable carries both video and audio information; therefore, separate audio cables are
not required for a complete HDMI device connection. See page 19 for further details.
Note: HDM/cableprovides better picture peffom?ance thanastandard(composite) videoor
S videocable,
• IEEE1394 cable is for use with video devices with compressed digital video output
that meet CEA specifications for IEEE1394. This cable carries both video and audio
inf)_rmation; therefore, no separate audio cables are required fi)r a complete connection.
See pages 22-24.
Note:
•Thetransmissioncapabilityof anyIEEE1394cable,used witbthL_TVmustbe $400
(400 Mbps maximum),
• IEEE7394cab/eprovidesbetterpicturepeffomT?ancetbanastandatd(composite)
videoorS videocable.
•Dual-wand IR blaster/G-LINK'" cable is f)_ruse with video devices with IR (infrared)
remote control. Two of these cables are included with )_mr TV. One is for connection
to the G-LINK'"* terminal (page 25) to enable TV Guide On Screen"* recording
features (Chapters 5 and 7). The other can be used with the TV's IR pass-through
feature (page 21) and TheaterNet"' on-screen device control feature (page 45).
Note: Thetwo IRb/astet/G LINKTMcablesincludedwit/?gout TV/?avespecificcbaractedsticsif?at
allowthornto WOlf<properlywith this TV_/ROUTand G LINKTMpelts. Never use other
aftermarket IR blaster or G-LIN/_ _cables with this TV Othercablesmaynot €unction
properlyandcancausedamage.TH/,_TYPEOFDAMAGE/,_ NOTCOVEREDBY YOUR
TOSHIBAWARRANTY
•Optical audio cable is for connecting receivers with Dolby Digital or PCM
(pulse-code modulation) optical audio input to the TV's DIGITAL AUDIO OUT
terminal. See page 20.
Coaxial(F-type)cable
StandardANcables(red/white/yellow)
@1:1_
S-videocable
@
Componentvideocables(red!green/blue
HDNIcable
[]
IEEE1394 cable(4-pin)
Dual-wandIRblaster/G-LINK"rMcable
(2 included)
Opticalaudiocable
Note: Although your TV includes both HDM/
and/FEE1394 connections, it may not
operate with another device you have that
includes such a connection. For example, the
/EEE1394 ports are not intended to operate
with current model Mini DV camcorders, and
the HDM! input is not intended for
connection to a computer: Copyright
protection requirements may also prohibit or
/ifflit connectivit3_ See page 19 for details
about the HDM! input. See pages 22-24 for
details about the tEEE1394 ports.
#01E 009-011 566272HM195 11
Black
(E) 56/62/72HM195
Copyright © 2005 TOSHIBA CORPORATION. All rights reserved.
7/28105, 4:11 PM
11
[
Abouttheconnectionillustrations
You can connec[ different types and brands of devices to your TV in several different configurations. The connection illustrations in
this manual are representative of typical device connections only. The input/output terminals on your devices may differ from those
illustrated herein. For details on connecting and using your specific devices, refer to each device's owner's manual.
Connectinga digitalCableCARDTM
This digital television is capable of receiving analog basic, digital
basic, and digital premium cable television programming by 1.
direct connection to a cable system providing such
programming. 2.
A security card (such as a digital CableCARDTM), provided by
x_ur cable operator, is required to view encrypted digital
programming. 3.
Certain advanced and interactive digital cable services (such as
video-on-demand, a cable operator's enhanced program guide,
and data-enhanced television services) will not work with the
use of a CableCARD _'*and may require the use of a separate set-
top box from your cable operator.
For more information, call your local cable operator.
You will need..
_' one digital CableCARD _'' (contact your cable operator)
_' digital cable subscription service (contact your cable
operator)
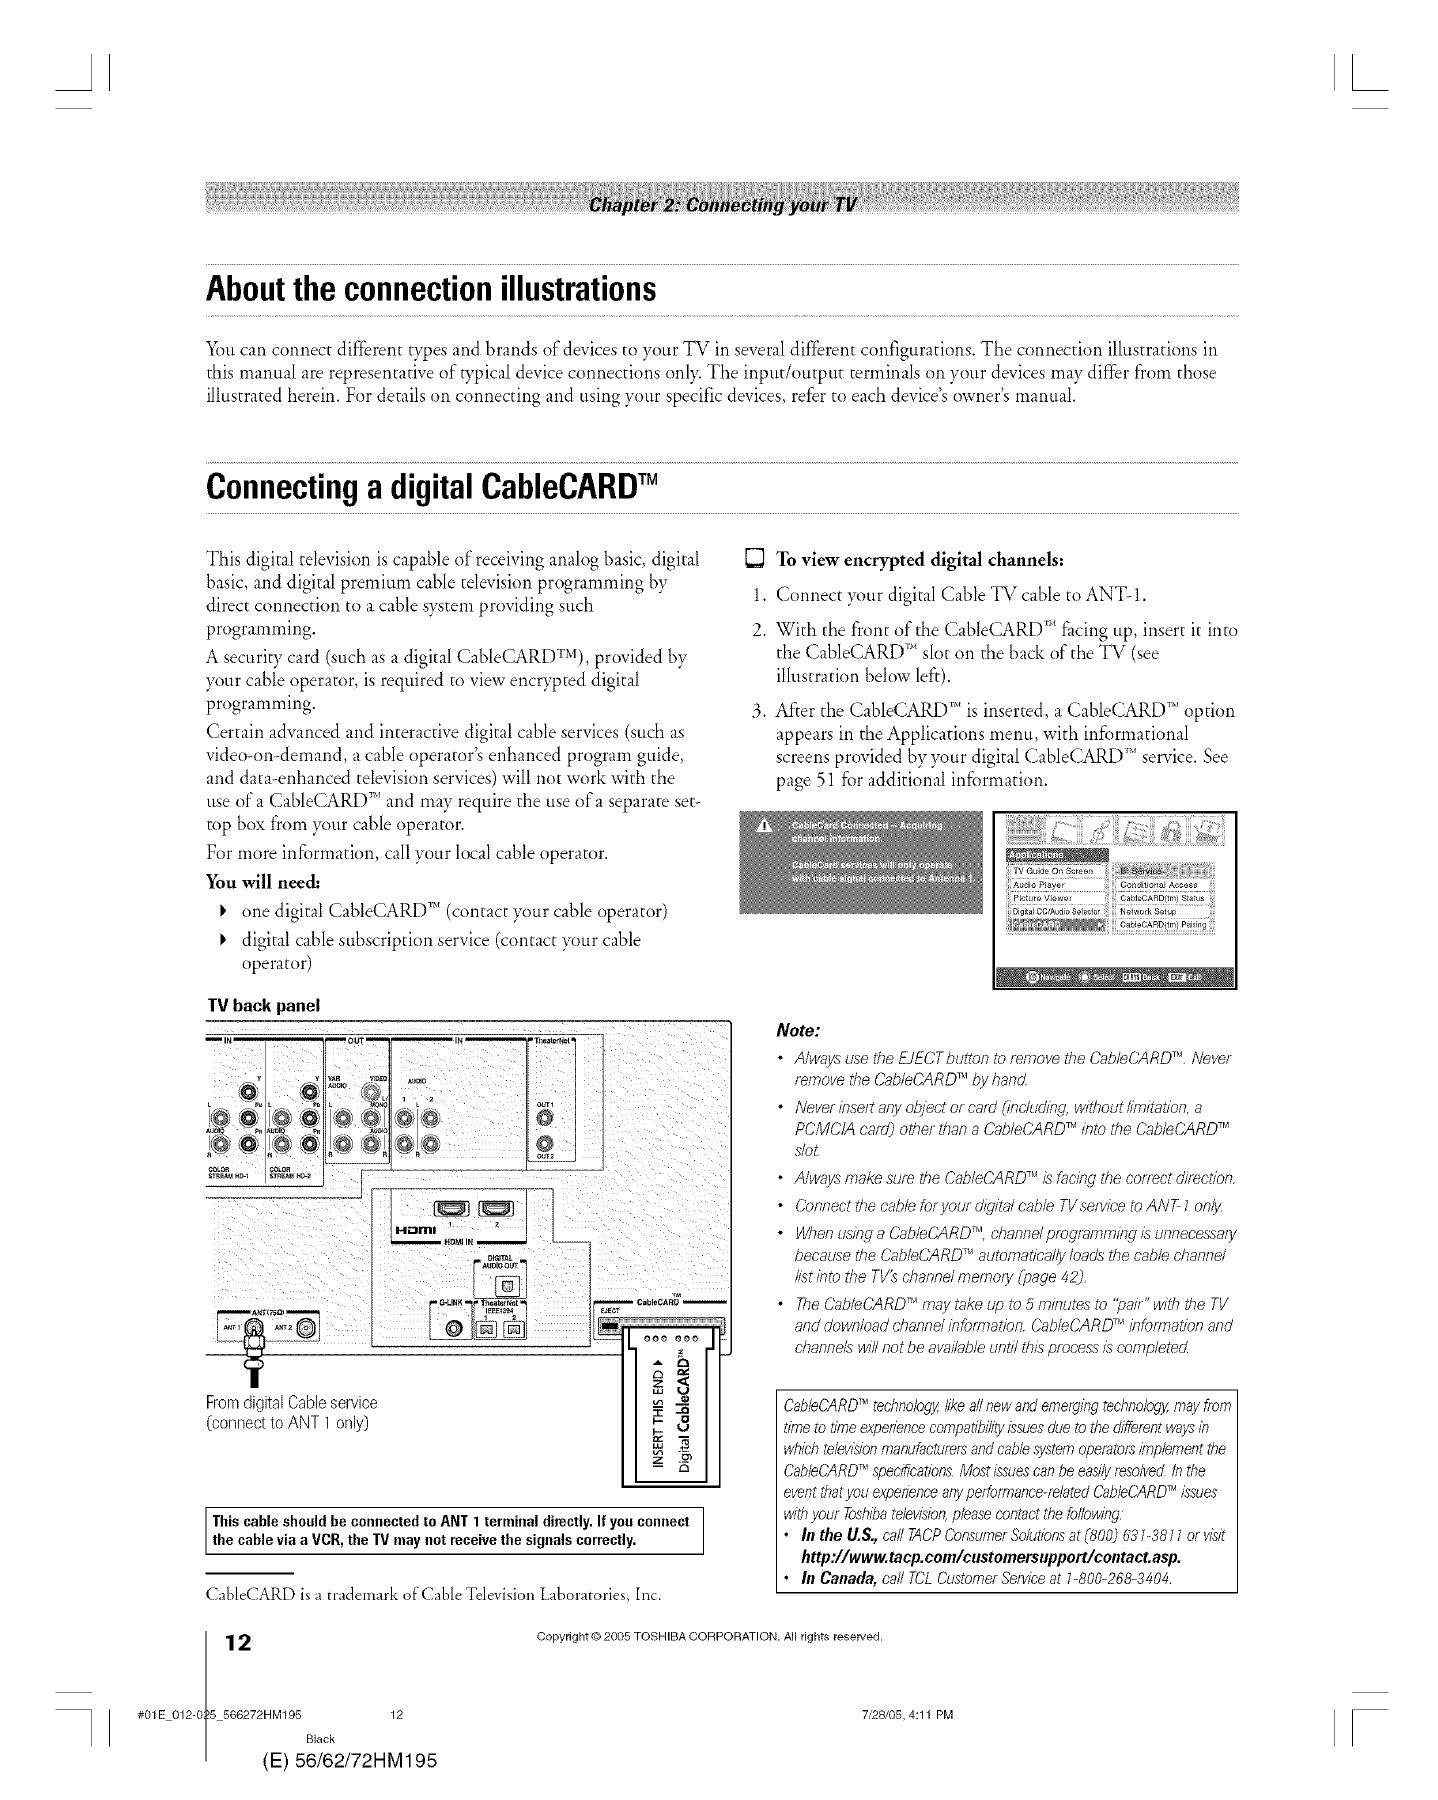
TV back panel
IN _,Y _Y VAR OU
STreAMH_I
ARg{7_l)
FromdigitalCableservice
(connecttoANT1only)
, v_o AUmO ourl
G'LINK Thea_erNet
p- O
m
Thiscable should be connected to ANT 1 terminal directly.If you connect
the cable via a VCR, the TVmay not receivethe signals correctly.
CableCARD is a trademark of Cable Television Laboratories, Inc.
To view encrypted digital channels:
Connect your digital Cable TV cable to ANT-1.
With the front of the CableCARD _'_facing tip, insert it into
the CableCARD _'*slot on the back of the TV (see
illustration below left).
After the CableCARD _''is inserted, a CableCARD _''option
appears in the Applications menu, with informational
screens provided by )_mrdigital CableCARD '_'_service. See
page 51 for additional information.
Note:
•Always use the EJECTbutton to remove the Cab/eCARD _M,Never
r_rnove the CableCAR D_''by hand
• Never Inse/t ar_yobject or card (incltlding, without hfrlitat/on, a
PCMCIA card) other than a CableCARD _ into the CableCARD _
sloL
• Always make sure the CableCARD _Mis facing the correct direction,
• Connect the cable foryour digital cable TVse/vice to ANT 1on!_
• WhenusingaCab/eCARD TM,channdprogrammingfaunnecessa/y
because the Cab/eCARD _Hautomatica/!y loads the cable channel
//,stinto the TV_ channd memo(y (page 42),
• The CableCARD _Mmay take up to 5 minutes to '>air" with the TV
and download channd /nbmTation. Cab/eCARD _MInfo/rnation and
channels will not be available until thfa process fa completed
CableCARD_Mtechnolog%like all new and emerging technology,may from
t/me to t/meexperiencecompatibili_/issuesdue to the differentways in
which televisionmanufacturersand cable systemoperatorsimplement the
CableCARD_'_specificationsMost issuescan be easilyresolved In the
event thatyou experienceanyperformance-relatedCableCARD_issues
with your Toshibatelevision,please contact the following,
•In the U.$., call TACPConsumerSolutionsat _800] 681-38_ _or visit
httpt//www.tacp.com/customersupport/contact.asp.
•In Canada, call TCLCustomerService at b800-268-3404,
2(
#01E 012-0 5 566272HM195 12
Black
E) 56/62/72HM195
Copyright © 2005 TOSHIBA CORPORATION. All rights reserved.
7/28105, 4:11 PM [
AL
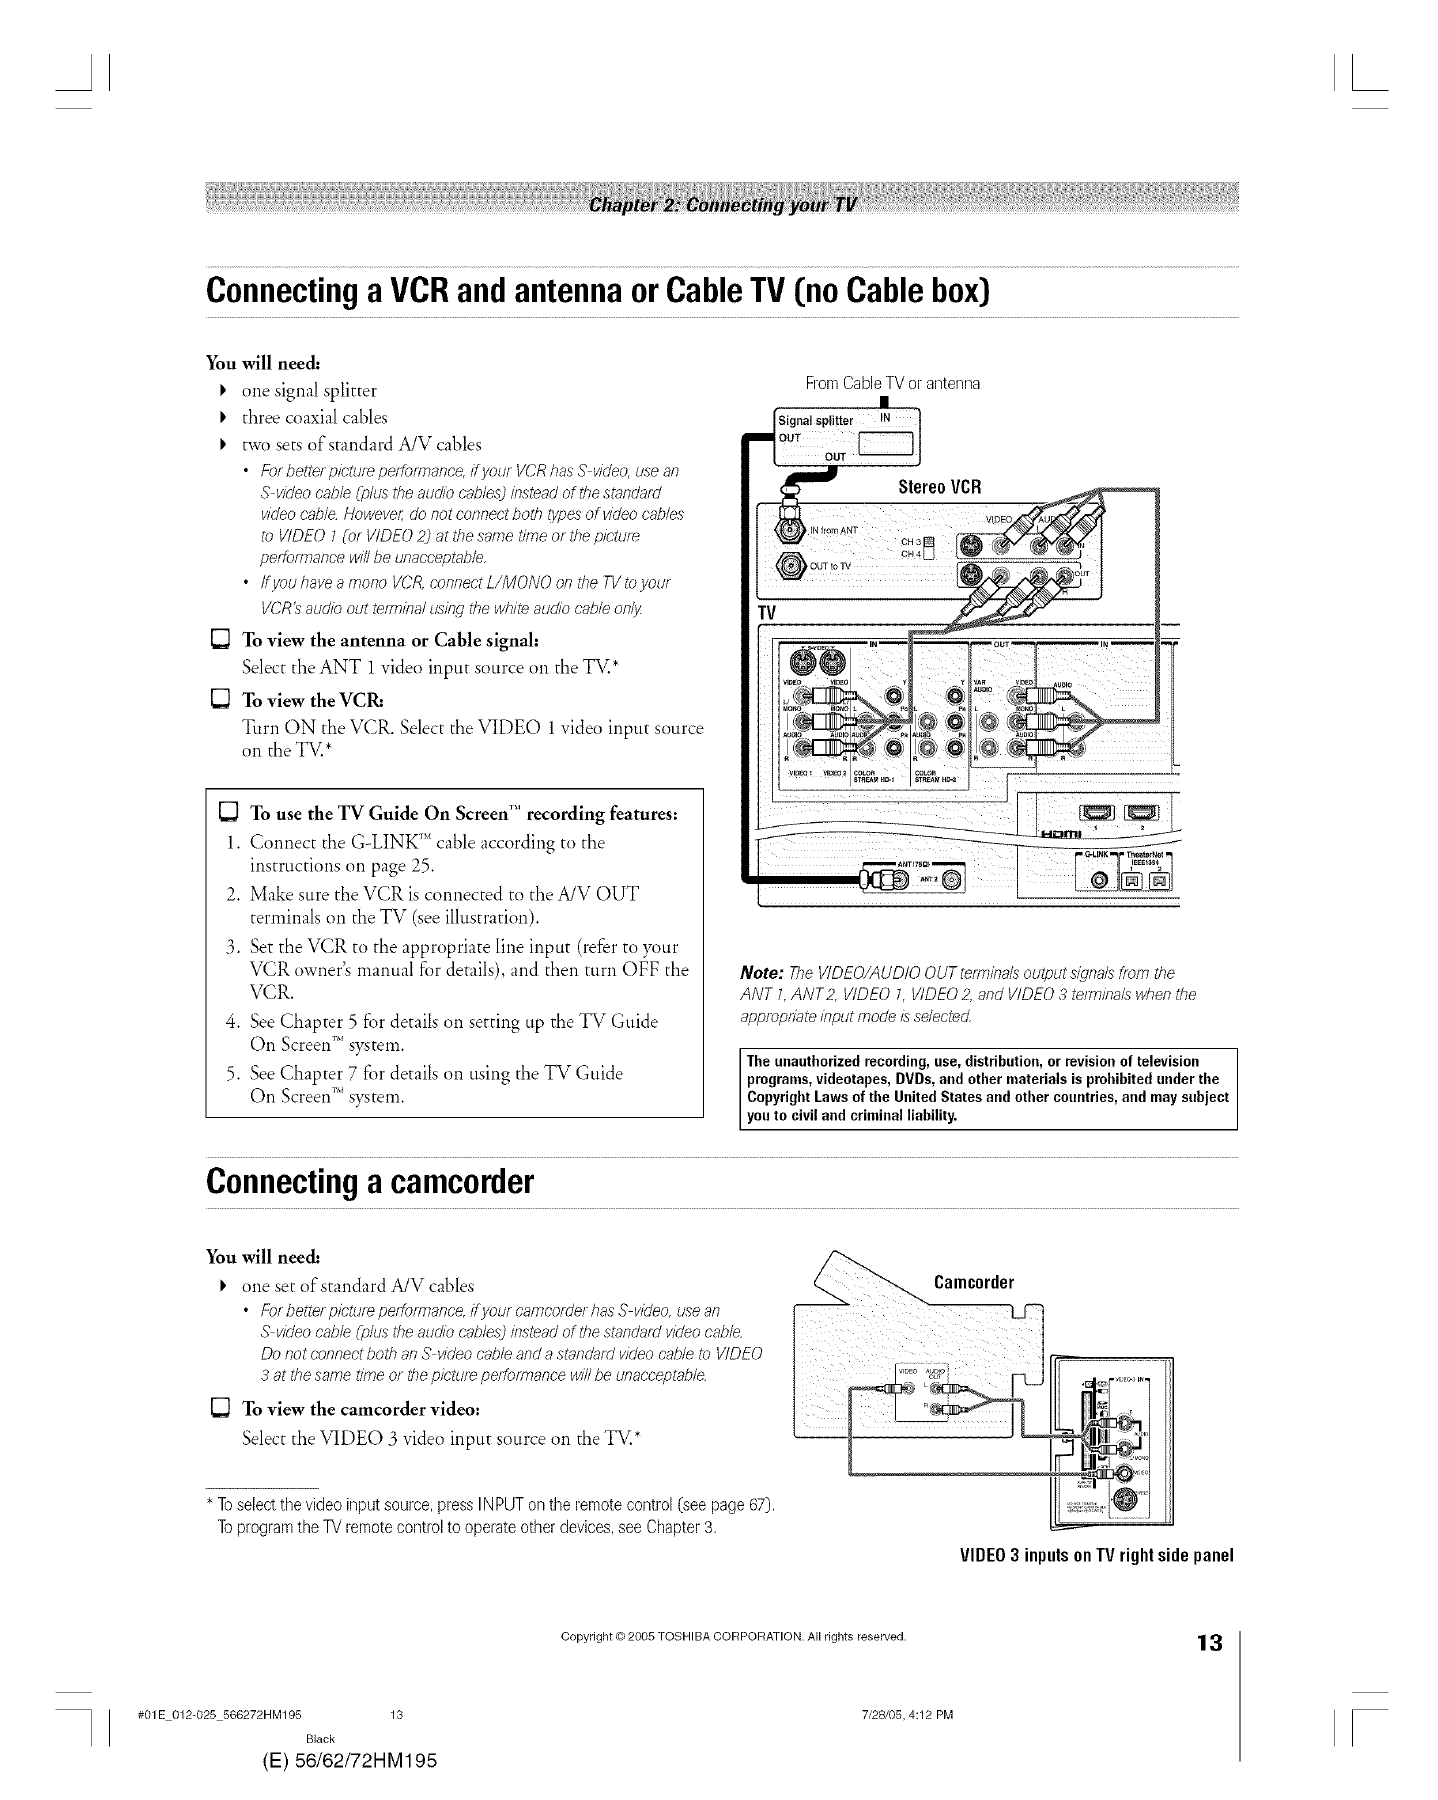
ConnectingaVCRandantennaorCableTV(noCablebox)
You will need..
I, one signal splitter
I, three coaxial cables
I, two sets of standard A/V cables
•Forbetterpictureperformance,ifyour VCRhasSvideo, use an
S videocableUus theaudio cables)insteadof thestandard
videocable.Howeve/;do not connectboth typesof videocablea
to VIDEO7(or VIDEO2) at thesame timeor thepicture
peffomTancewillbe unacceptabh,
• ffyou havea mono VCR,connectL/MONO on the TVtoyour
VCRt_audio out tem}inalusingthe whiteaudio cableonly
[_ To view the antenna or Cable signal:
Select the ANT 1 video input source on the TV.*
To view the VCP_
Turn ON the VCR. Select the VIDEO 1 video input source
on the TV.*
To use the TV Guide On Screen 1"recording features:
1. Connect the G-LINK " cable according to the
instructions on page 25.
2. Make sure the VCR is connected to the A/V OUT
terminals on the TV (see illustration).
3. Set the VCR to the appropriate line input (refer to )_)ur
VCR owner's manual for details), and then turn OFF the
VCR.
4. See Chapter 5 fbr details on setting up the TV Guide
On Screen_''system.
5. See Chapter 7 fbr details on using the TV Guide
On Screen_"system.
FromCableTV or antenna
t I+'q'I °Sq
Note: The VIDEO/AUDIO OUT te/m/bals output s/_Tna/sfrom the
ANT 1, ANT2, VIDEO 1, VIDE02, and VIDEO 3 term/bals when the
appropnate /bput mode is selectecl
The unauthorized recording,use, distribution,or revision of television
programs,videotapes, DVDs, and other materials is prohibitedunder the
CopyrightLaws of the United States and other countries,and maysubject
youto civil and criminal liability.
Connectinga camcorder
You will need..
I, one set of standard A/V cables
•Forbetterpicturepefformance, ifyourcamcorderhasS video,usean
S videocable(p/ustheaudio cables:)insteadof thestandardvideocable.
Do not connectbotb anS videocableanda standardvideocableto VIDEO
3 at thesametime or thepictureperformancewillbe unacceptable
To view the camcorder video:
Select the VIDEO .3video input source on the TV.*
* Toselectthe video input source,press INPUTon the remotecontrol(see page 67).
Toprogramthe TV remotecontrolto operateotherdevices,see Chapter3.
Camcorder
I?
VIDEO3 inputsonTVrightsidepanel
#01E 012-025 566272HM195 13
Black
(E) 56/62/72HM195
Copyright © 2005 TOSHIBA CORPORATION. All rights reserved.
7/28/05, 4:12 PM
13
F
AL
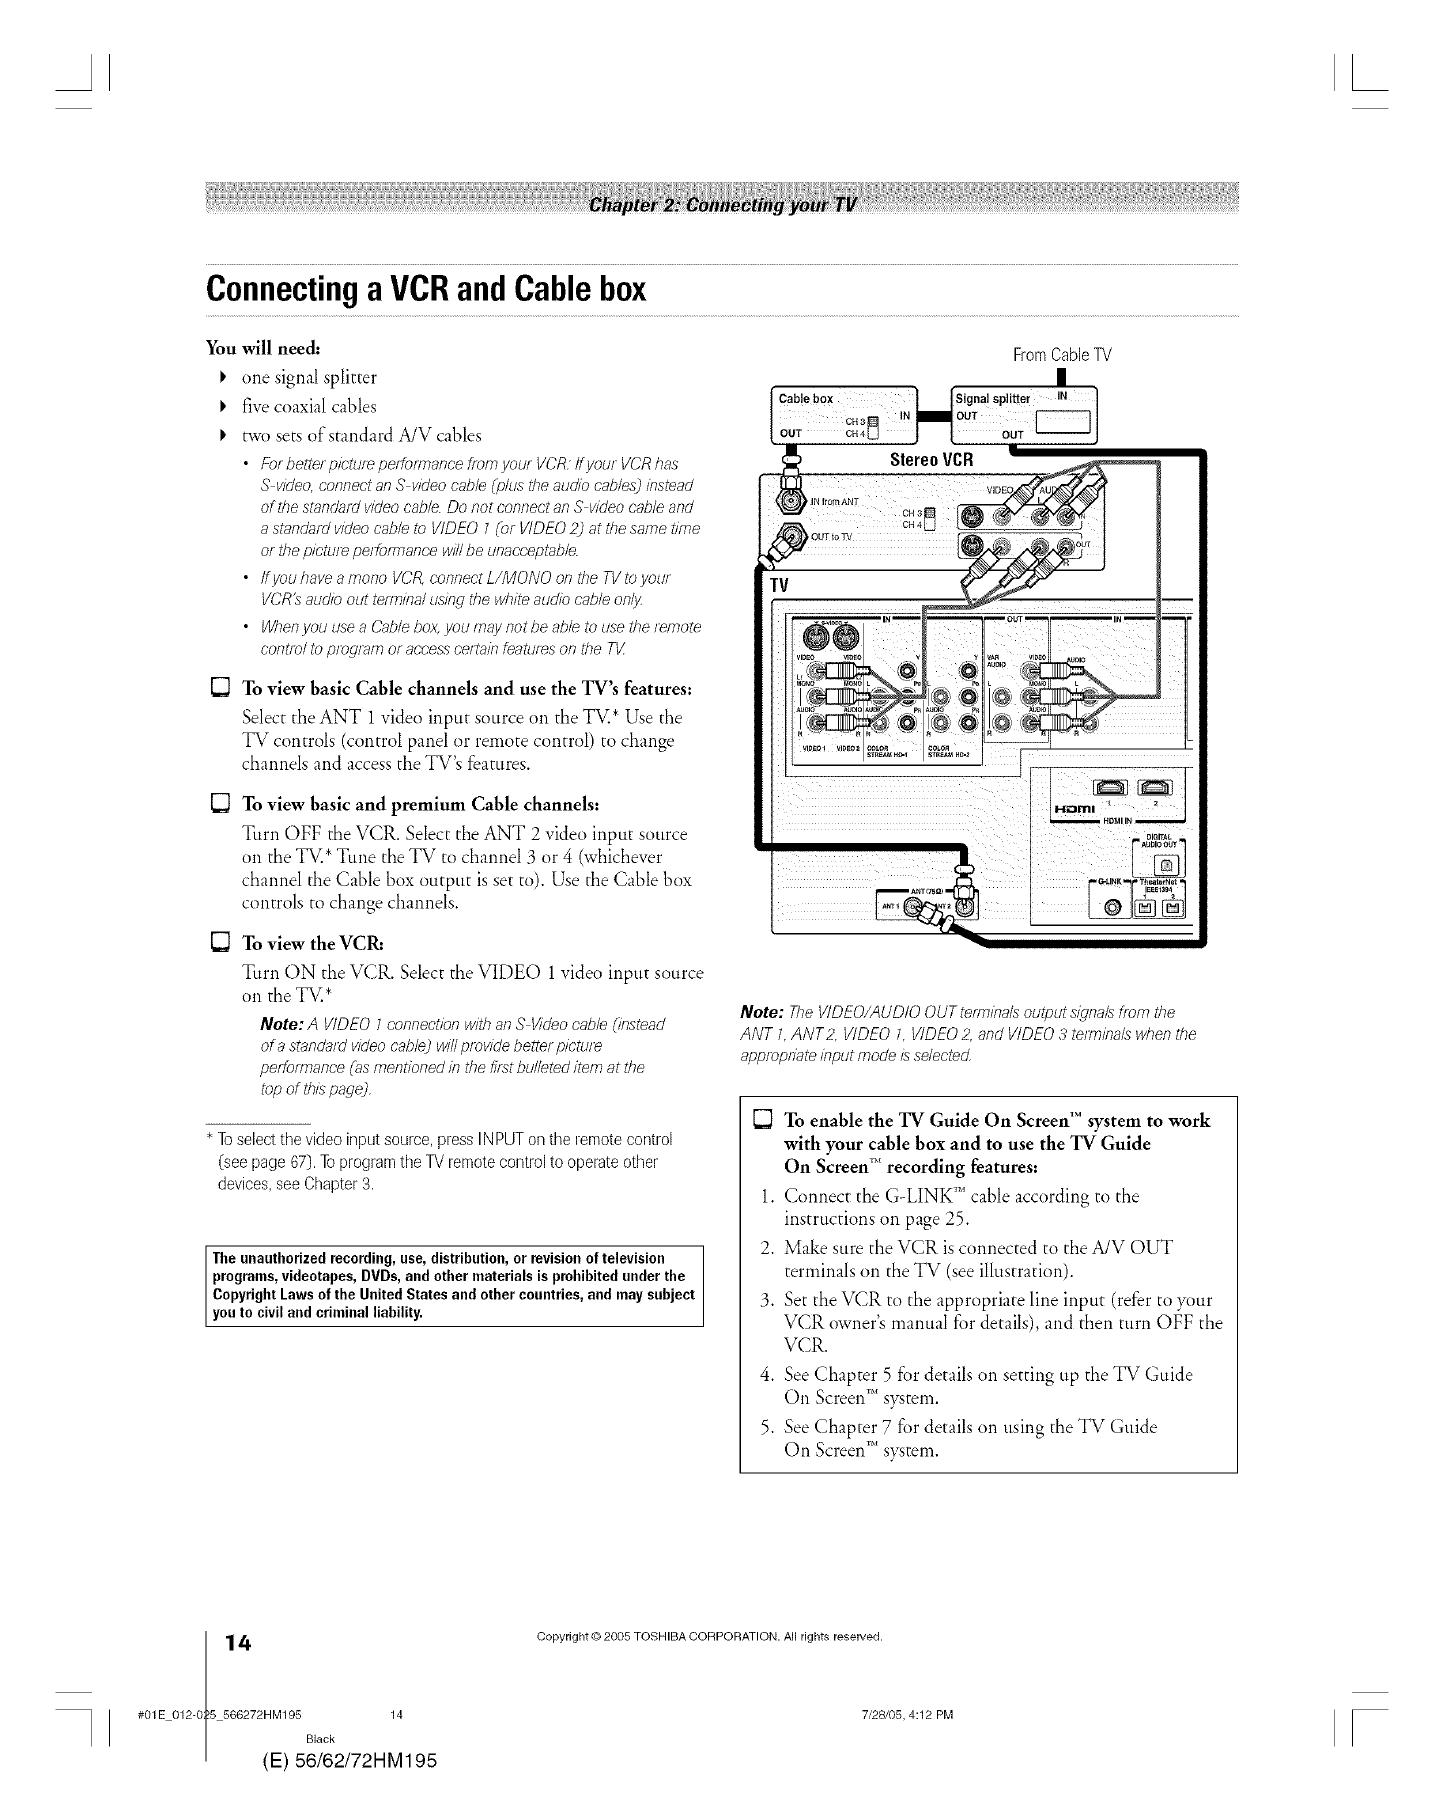
ConnectingaVCRandCablebox
You will need..
I, one signal splitter
I, five coaxial cables
I, two sets of standard A/V cables
•ForbetterpicturepefformancefromyourVCR.lfyourVCRhas
S video, connect an S video cable Ut/s the audio cab/e53 instead
of the standa/d video cable. Do not connect an S video cable and
a standa/d video cable to VIDEO 1(or VIDEO 2) at the same tffne
or the picture performance will be unacceptable.
• ffyou have a mono VCR, connect L/MONO on the TV to your
VCR_ audio out tefTnlna/using the white audio cable only
• When you use aCable box, you may not be able to use the remote
control to program or access ce/tain features on the TV
0To view basic Cable channels and use the TV's features:
Select the ANT 1 video input source on the TV.* Use the
TV controls (control panel or remote control) to change
channels and access the TV's features.
O
O
To view basic and premium Cable channels:
Turn OFF the VCR. Select the ANT 2 video input source
on the TV.* Tune the TV to channel 3 or 4 (whichever
channel the Cable box output is set to). Use the Cable box
controls to change channels.
To view the VCR:
Turn ON the VCR. Select the VIDEO 1 video input source
on the TV.*
Note: AVIDEO1connectionwithanS Videocable (instead
of a standa/dvideocable) willprovidebetterpicture
pefl-ofTnance(asmentionedif} thefif:_tbulleteditem at the
top of thispage),
* Toselectthe video input source,press INPUTon the remotecontrol
(see page 67).Toprogramthe TV remotecontrolto operateother
devices,seeChapter3.
The unauthorized recording,use, distribution,or revision of television
programs,videotapes, DVDs, and other materials is prohibitedunder the
CopyrightLaws of the United States and other countries,and maysubject
youto civil and criminal liability.
From Cable TV
I
Cab!ebox "_Signa! Splitter IN ]
OH3 IN OUT
oo, J--t 0o,
Stereo VCR I
_ OUTIoTV
TV
I
C,._IUK Th_temet
Note: The VIDEO/AUDIO OUT tefm/bals output s/iTnalsfrom the
ANT 1, ANT2, VIDEO 1, VIDE02, and VIDEO 3 termkTals when the
appropnate /bput mode is selectecJ
[2 To enable the TV Guide On Screen _"system to work
with your cable box and to use the TV Guide
On Screen '_"recording features:
1. Connect the G-LINK '_'_cable according to the
instructions on page 25.
2. Make sure the VCR is connected to the A/V OUT
terminals on the TV (see illustration).
3. Set the VCR to the appropriate line input (refer to )_mr
VCR owner's manual for details), and then turn OFF the
VCR.
4. See Chapter 5 for details on setting up the TV Guide
On Screen_"s)_tem.
5. See Chapter 7 for details on using the TV Guide
On Screen_"system.
4(
#01E 012-0 5 566272HM195 14
Black
E) 56/62/72HM195
Copyright © 2005 TOSHIBA CORPORATION. Aft rights reserved.
7/28/05, 4:12 PM [
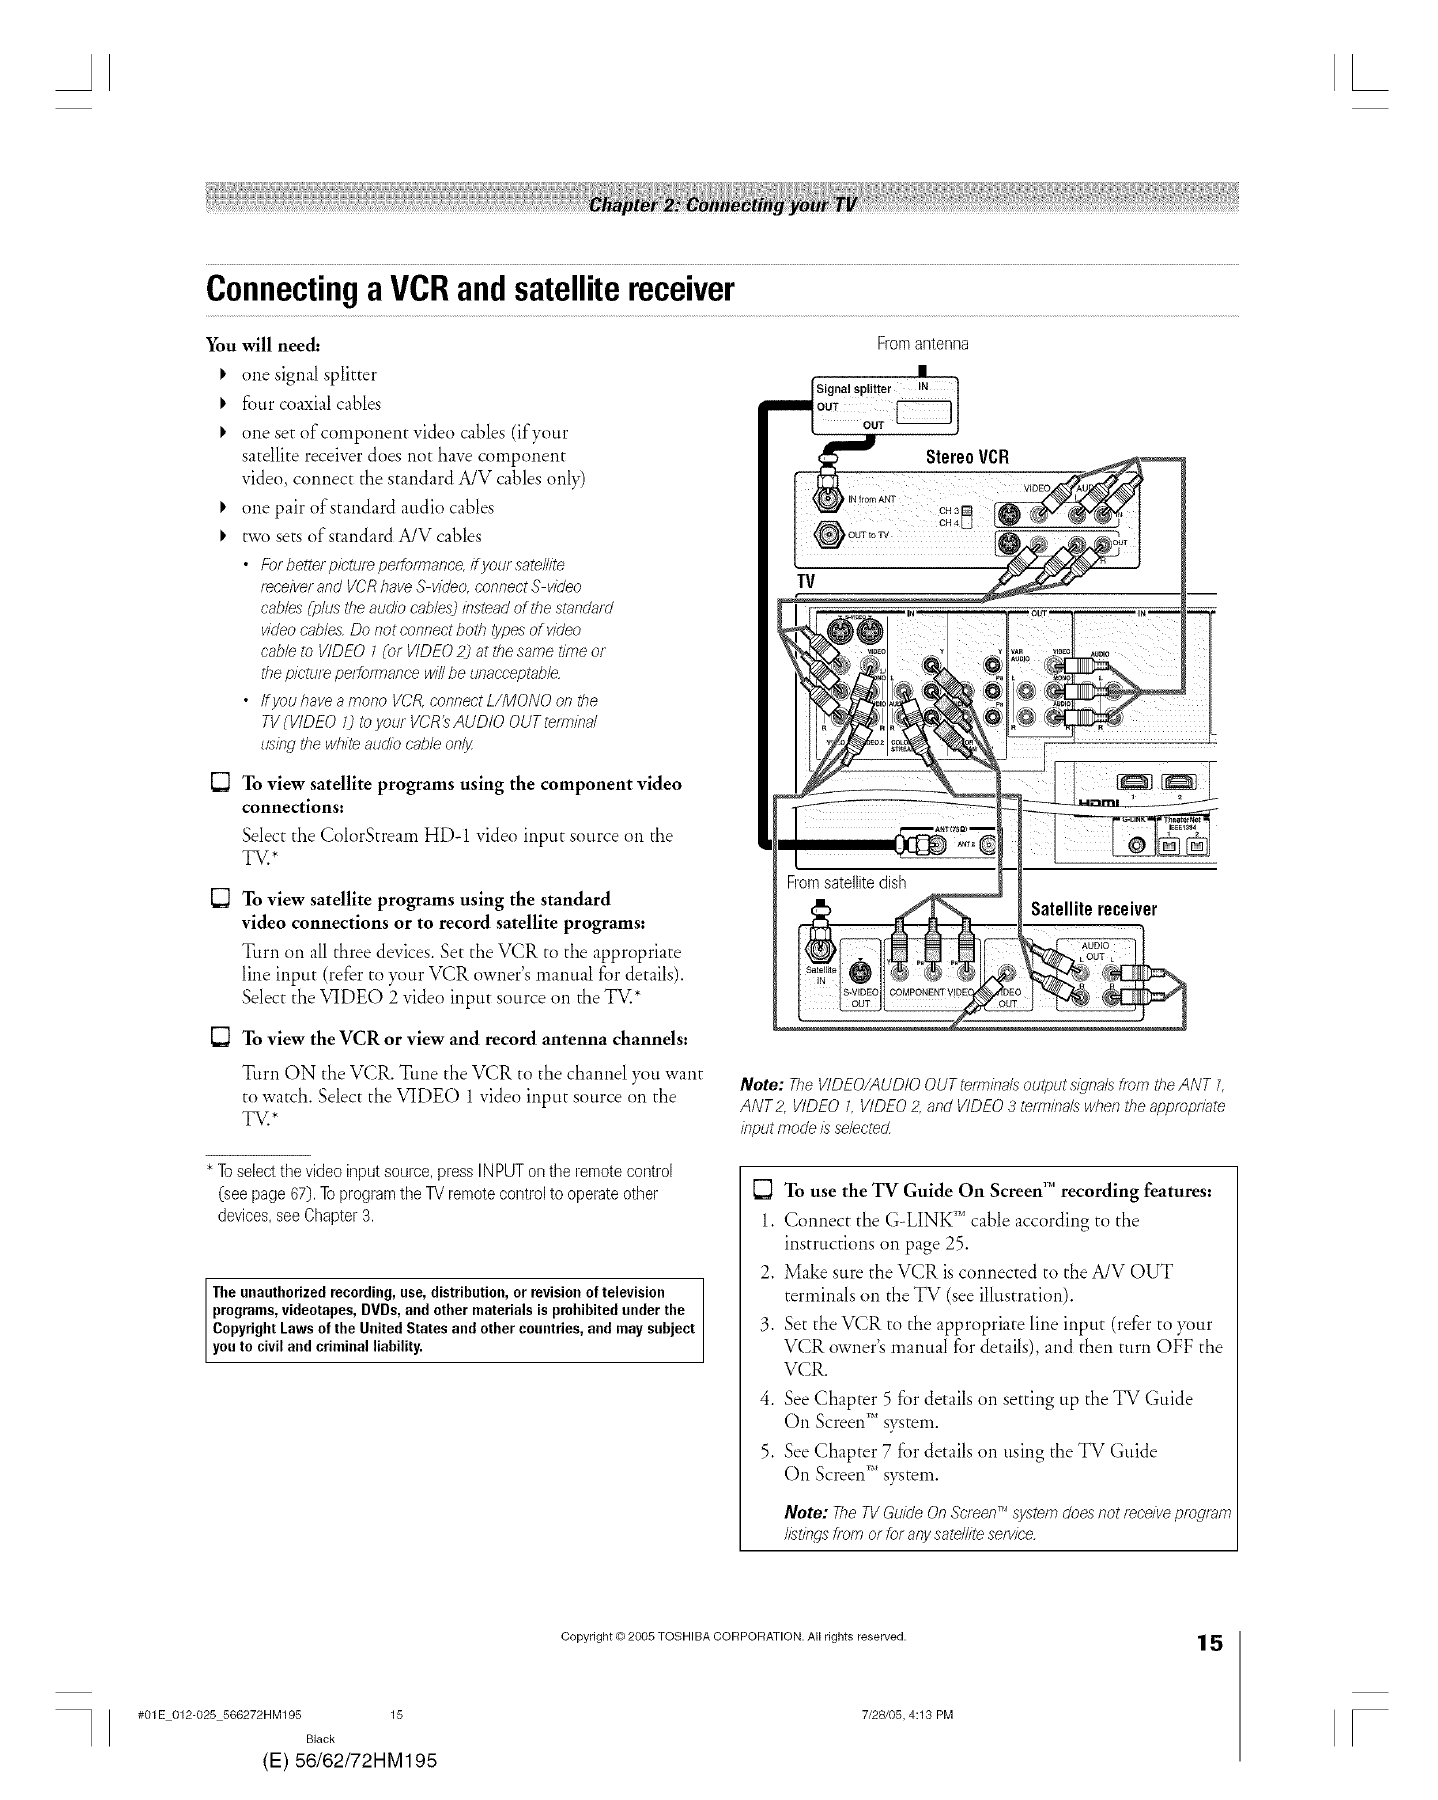
ConnectingaVCRandsatellitereceiver
You will need..
_' one signal splitter
_' four coaxial cables
_' one set of component video cables (if your
satellite receiver does not have component
video, connect the standard A/V cables only)
_' one pair of standard audio cables
_' two sets of standard A/V cables
•Forbetterpietufepefformance, ifyoursatel/ite
t_ceiverand VCRhaveS video,connectS video
cablesUus theaudio cab/e_2insteadof thestandard
videoeab/es.Do notconnectboth b/pesof video
cableto VIDEO1 (or VIDEO2) at thesame timeor
thepicturepeffom}ancewillbe unacceptable.
• ffyou haveamono VCR,connectL/MONO on the
TV(VIDEO U toyour VCR_AUDIO OUTterminal
usingthewh/_ audioeableonly
From antenna
I
SignalsP!itte, IN}
o. o.
To view satellite programs using the component video
connections:
Select the ColorStream HD-1 video input source on the
TV.*
To view satellite programs using the standard
video connections or to record satellite programs:
Turn on all three devices. Set the VCR to the appropriate
line input (refer to your VCR owner's manual for details).
Select the VIDEO 2 video input source on the TV.*
Satellitereceiver
To view the VCR or view and record antenna channels:
Turn ON the VCR. Tune the VCR to the channel you want
to watch. Select the VIDEO 1 video input source on the
TV.*
Note: The VIDEO/AUDIO OUT te/m/bals output signals from the ANT 1,
ANT2, VIDEO/, VIDEO 2, and VIDEO 3 term/hals when the appropriate
/hput mode/is selected.
* Toselectthe video input source,press INPUTon the remotecontrol
(see page 67).Toprogramthe TV remotecontrolto operateother
devices,seeChapter3.
The unauthorizedrecording,use,distribution,or revision of television
programs,videotapes, DVDs, and other materials is prohibitedunder the
CopyrightLaws of the United States and other countries,and maysubject
youto civil and criminal liability.
To use the TV Guide On Screen _" recording features:
1. Connect the G-LINK '_'_cable according to the
instructions on page 25.
2. Make sure the VCR is connected to the A/V OUT
terminals on the "IV (see illustration).
3. Set the VCR to the appropriate line input (refer to your
VCR owner's manual for details), and then turn OFF the
VCR.
4. See Chapter 5 for details on setting up the 'IV Guide
On Screen"* s)_tem.
5. See Chapter 7 fbr details on using the "IV Guide
On Screen"* system.
Note: TheTVGuideOn Screen_M,systemdoesnot/eee_veprogram
listingsfrom orfor anysatell/?esetvice,
#01E 012-025 566272HM195 15
Black
(E) 56/62/72HM195
Copyright © 2005 TOSHIBA CORPORATION. All rights reserved.
7/28/05, 4:13 PM
15
[
AL
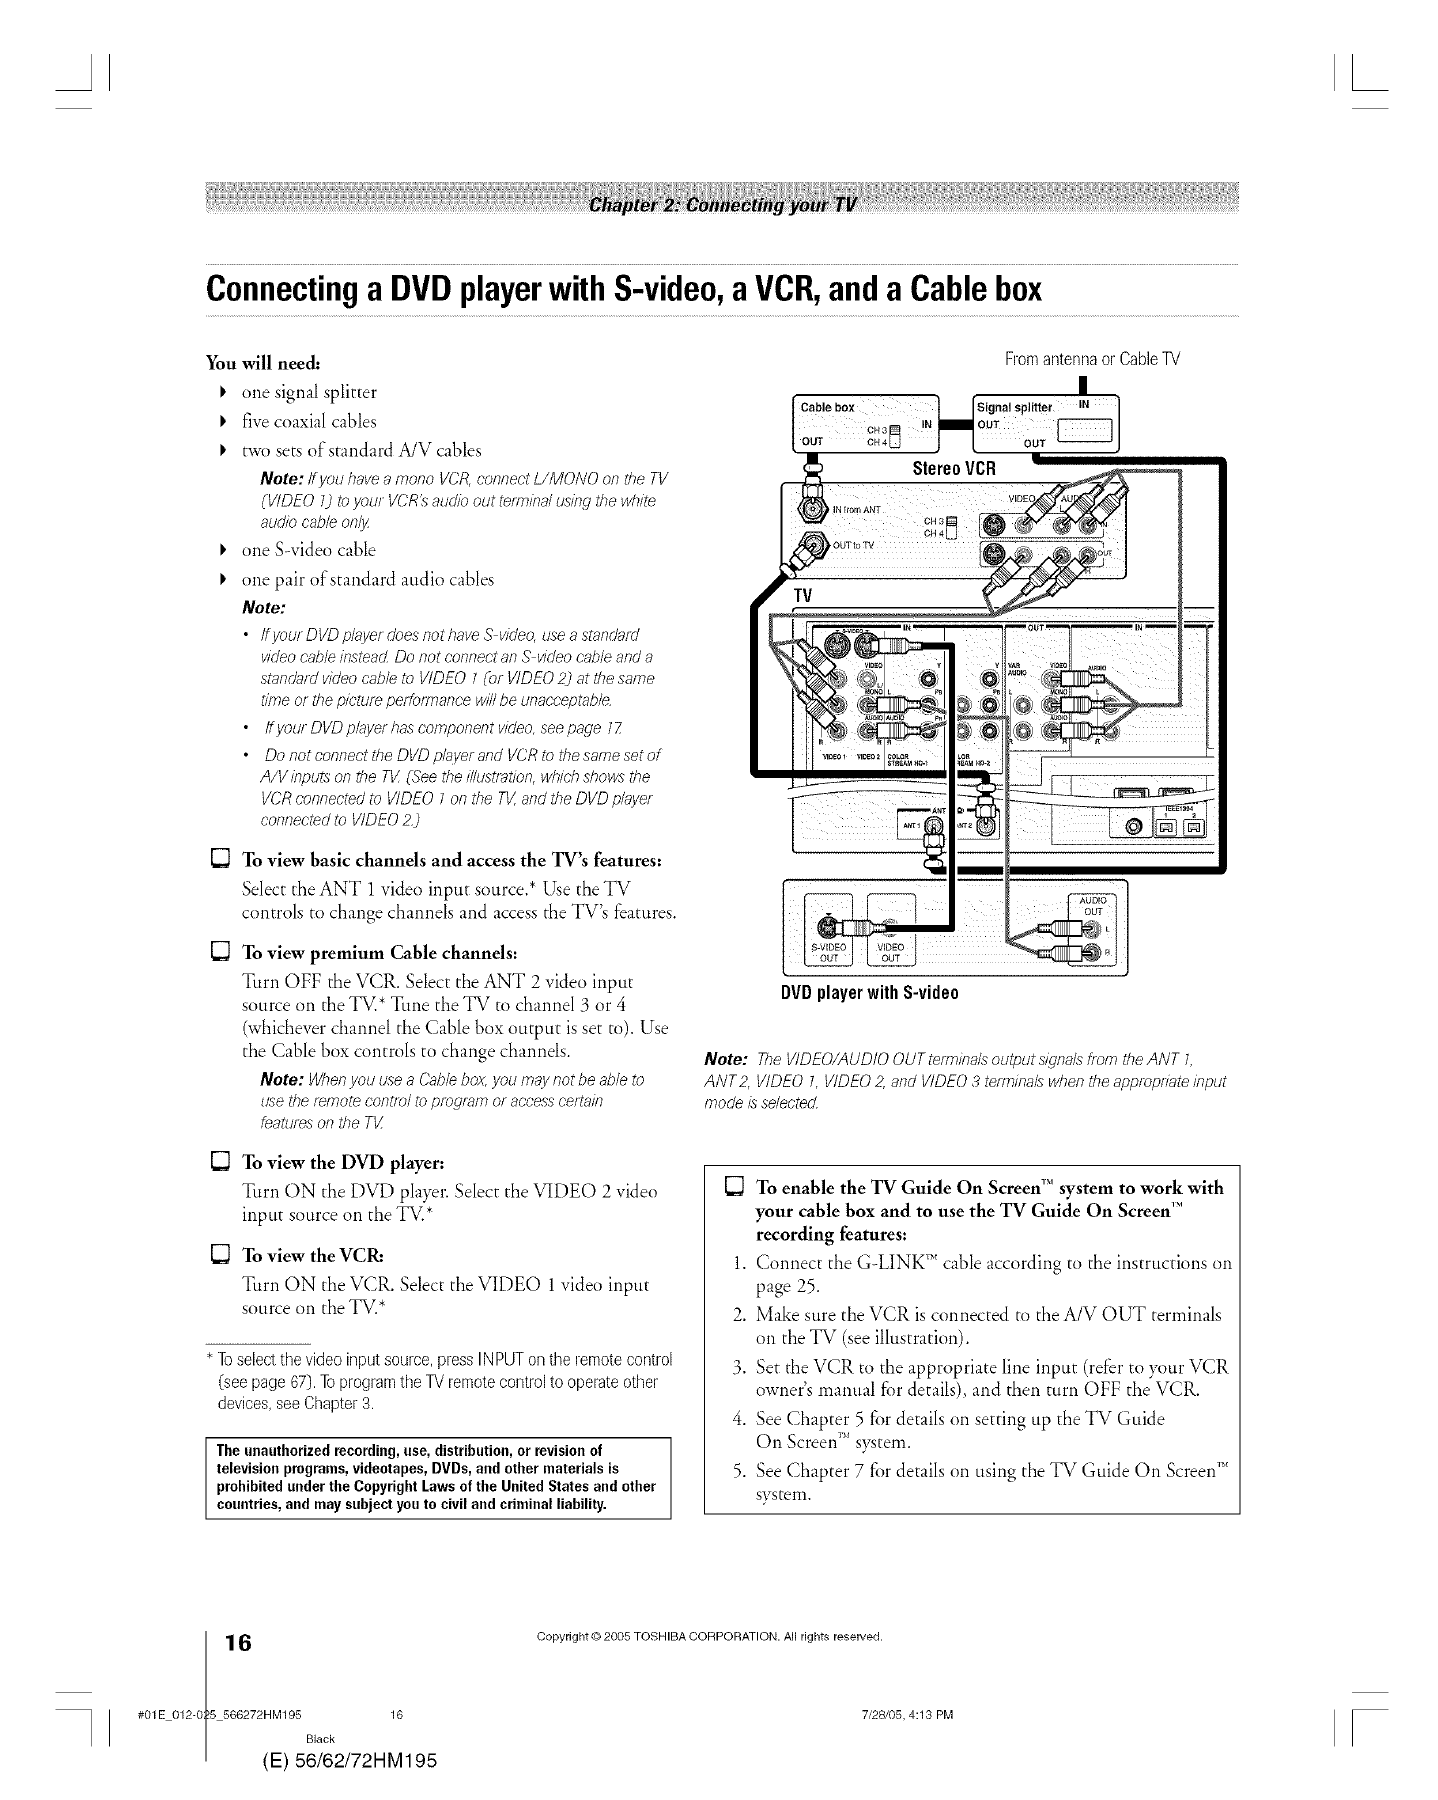
Connectinga DVDplayerwithS-video,aVCR,anda Cablebox
You will need..
I, one signal splitter
I, five coaxial cables
I, two sets of standard A/V cables
Note: If youhavea mono VCRconnectL/MONO onthe TV
(VIDEO 7)to you/VCR's audio out terminalusingthe white
audiocable,only
I, one Swideo cable
I, one pair of standard audio cables
Note:
•Ifyour DVD playerdoesnothaveS video,usea standard
videocableinstead Do not connectanS videocableand a
standardvideocableto VIDEO 1(o/ VIDEO2) at thesame
time or thepictureperformancewillbe unacceptable.
• ffyour DVDplayerhascomponentvideo,seepage 17
• Do not connectthe DVDpktyerand VCRto thesameset of
A/V inputson the TK (Seetheillustration,whichshowsthe
VCRconnectedto VIDEO Ionthe Tg,and theDVDp/aye/
connectedto VIDEO2J
C3
To view basic channels and access the TV s features:
Select the ANT 1 video input source.* Use the TV
controls to change channels and access the TV's features.
To view premium Cable channels:
Turn OFF the VCR. Select the ANT 2 video input
source on the TV.* Tune the TV to channel 3 or 4
(whichever channel the Cable box output is set to). Use
the Cable box controls to change channels.
Note: Whenyou usea Cablebox,you maynotbe able,to
use theremote controlto program or accesscertain
featureson the T_
To view the DVD player:
Turn ON the DVD player. Select the VIDEO 2 video
input source on the TV.*
To view the VCRa
Turn ON the VCR. Select the VIDEO 1 video input
source on the TV.*
* Toselectthe video input source,press INPUTon the remotecontrol
(see page 67).Toprogramthe TV remotecontrolto operateother
devices,seeChapter3.
The unauthorizedrecording,use, distribution, or revisionof
televisionprograms,videotapes,DVDs, and other materials is
prohibitedunder the CopyrightLaws of the United Statesand other
countries,and maysubject youto civil and criminal liability.
Fromantennaor CableTV
DVDplayer with S-video
Note: The VIDEO/AUDIO OUT term/bals output s/2na/s from tbe ANT 1,
ANT2, VIDEO 1, VIDEO 2, and VIDEO 3 tem_/nals when the appropnate /bput
mode/s selected.
To enable the TV Guide On Screen_"system to work with
your cable box and to use the TV Guide On Screen_"
recording features:
1. Connect the G-LINK'"* cable according to the instructions on
page 25.
2. Make sure the VCR is connected to the A/V OUT terminals
on the TV (see illustration).
3. Set the VCR to the appropriate line input (refer to )_mr VCR
owner's manual for details), and then turn OFF the VCR.
4. See Chapter 5 for details on setting tip the TV Guide
On Screen_'*system.
5. See Chapter 7 for details on using the TV Guide On Screen_'_
system.
6(
#01E 012-0 5 566272HM195 16
Black
E) 56/62/72HM195
Copyright © 2005 TOSHIBA CORPORATION. All rights reserved.
7/28105, 4:13 PM [
AL
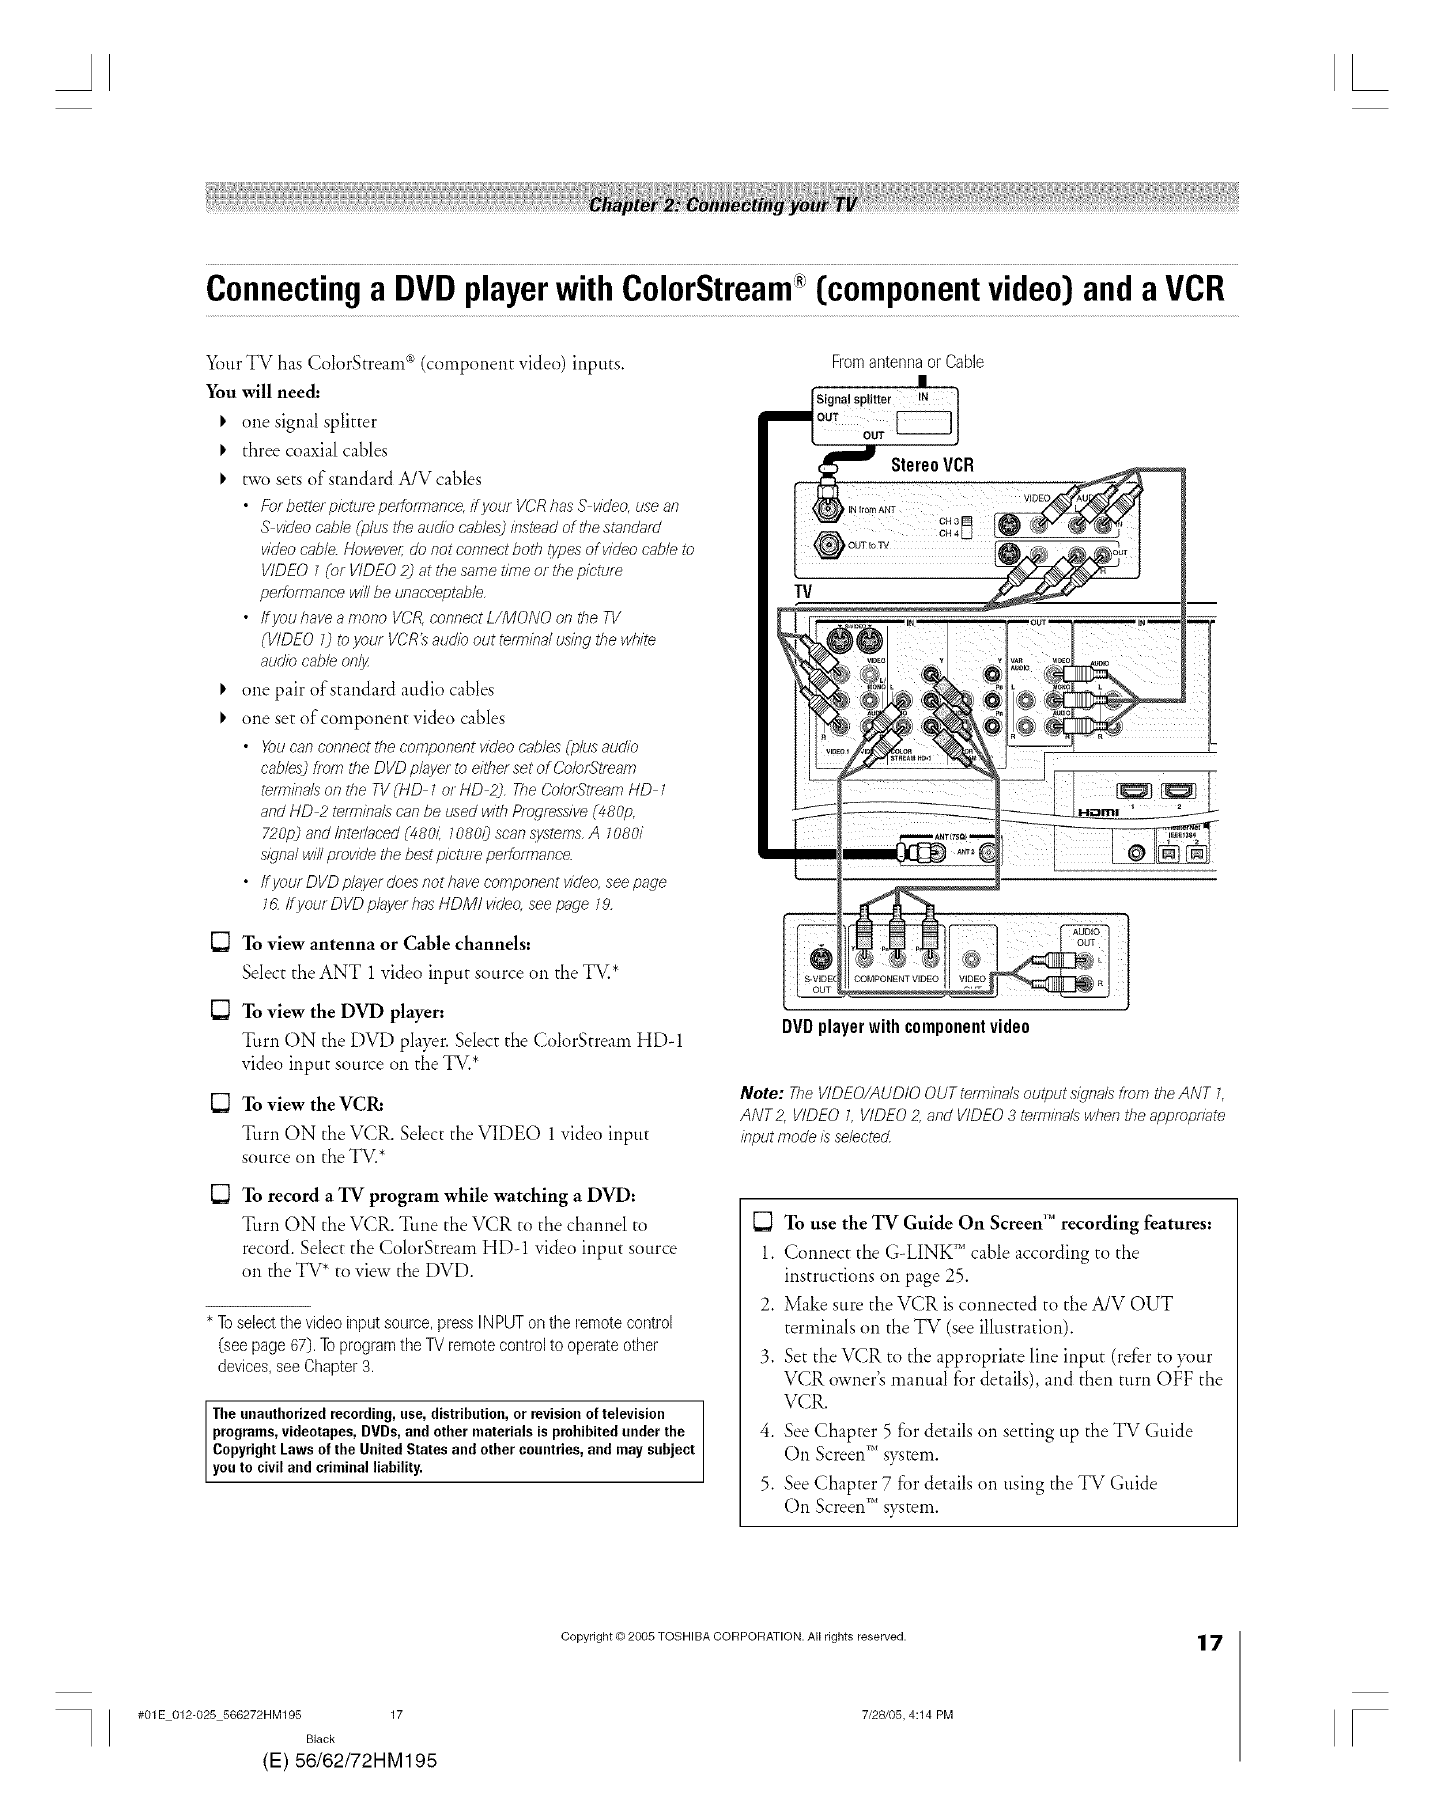
Connectinga DVDplayerwithColorStream[componentvideo[}anda VCR
YourTV has ColorStream c_(component video) inputs.
You will need..
I, one signal splitter
I, three coaxial cables
I, two sets of standard A/V cables
•Forbetterpieturepertormance,ifyour VCRhasS video,usean
S videocable,(plus theaudio eables)insteadof thestandard
videoeab/e.Howeve/;do not connectboth typesof videoeableto
VIDEO1(or VIDEO2) at the samet/meor thepicture
peffom}ancewillbe unacceptable,
• ffyou haveamono VCR,connectL/MONO on the TV
(VIDEO 7j to your VCRtsaudio out tem}inalusing the white
audiocableonly
I' one pair of standard audio cables
I, one set of component video cables
• Youcanconnectthecomponentvideocables(plusaudio
cab/e_2fiefr} theDVD playerto eitherset of Co/orStfeam
te/mina/son the TV(HD I o/ HD 2}, TheCo/orStf_amHD 1
andHD 2 te/minalscanbe usedwit/} Pmgresmve(480p,
720pj and Interlaced(480/: 10800scan,!wtems,A70801
mgnalwillprovidethebestpicturepeffom}ance.
• ffyourDVDplayerdoesnothavecomponentvfdeo, seepage
16.ff your DVDplayerhasHDMI video,seepage 19,
[_ To view antenna or Cable channels:
Select the ANT 1 video input source on the TV.*
[_ To view the DVD player:
Turn ON the DVD player. Select the ColorStream HDq
video input source on the TV.*
[_ To view the VCI_
Turn ON the VCR. Select the VIDEO 1 video input
source on the TV.*
To record a TV program while watching a DVD:
Turn ON the VCR. Tune the VCR to the channel to
record. Select the ColorStream HDq video input source
on the TV *to view the DVD.
* Toselectthe video input source,press INPUTon the remotecontrol
(see page 67).Toprogramthe TV remotecontrolto operateother
devices,seeChapter3.
The unauthorizedrecording,use,distribution,or revision of television
programs,videotapes, DVDs, and other materials is prohibitedunder the
CopyrightLaws of the United States and other countries,and maysubject
youto civil and criminal liability.
From antenna or Cable
|
Signal splitter !N
Stereo VCR
DVDplayer with component video
Note: The VIDEO/AUDIO OUT term/hals output signals from the ANT 1,
ANT2, VIDEO 1, VIDEO 2, and VIDEO 3 term/hals when the approptTDte
/hput mode/s selected.
[_ To use the TV Guide On Screen_"recording features:
1. Connect the G-LINK _' cable according to the
instructions on page 25.
2. Make sure the VCR is connected to the A/V OUT
terminals on the TV (see illustration).
3. Set the VCR to the appropriate line input (refer to )_mr
VCR owner's manual for details), and then turn OFF the
VCR.
4. See Chapter 5 for details on setting up the TV Guide
On Screen"*s)_tem.
5. See Chapter 7 fi)r details on using the TV Guide
On Screen_'*system.
#01E 012-025 566272HM195 17
Black
(E) 56/62/72HM195
Copyright © 2005 TOSHIBA CORPORATION. All rights reserved.
7/28/05, 4:14 PM
17
[
AL
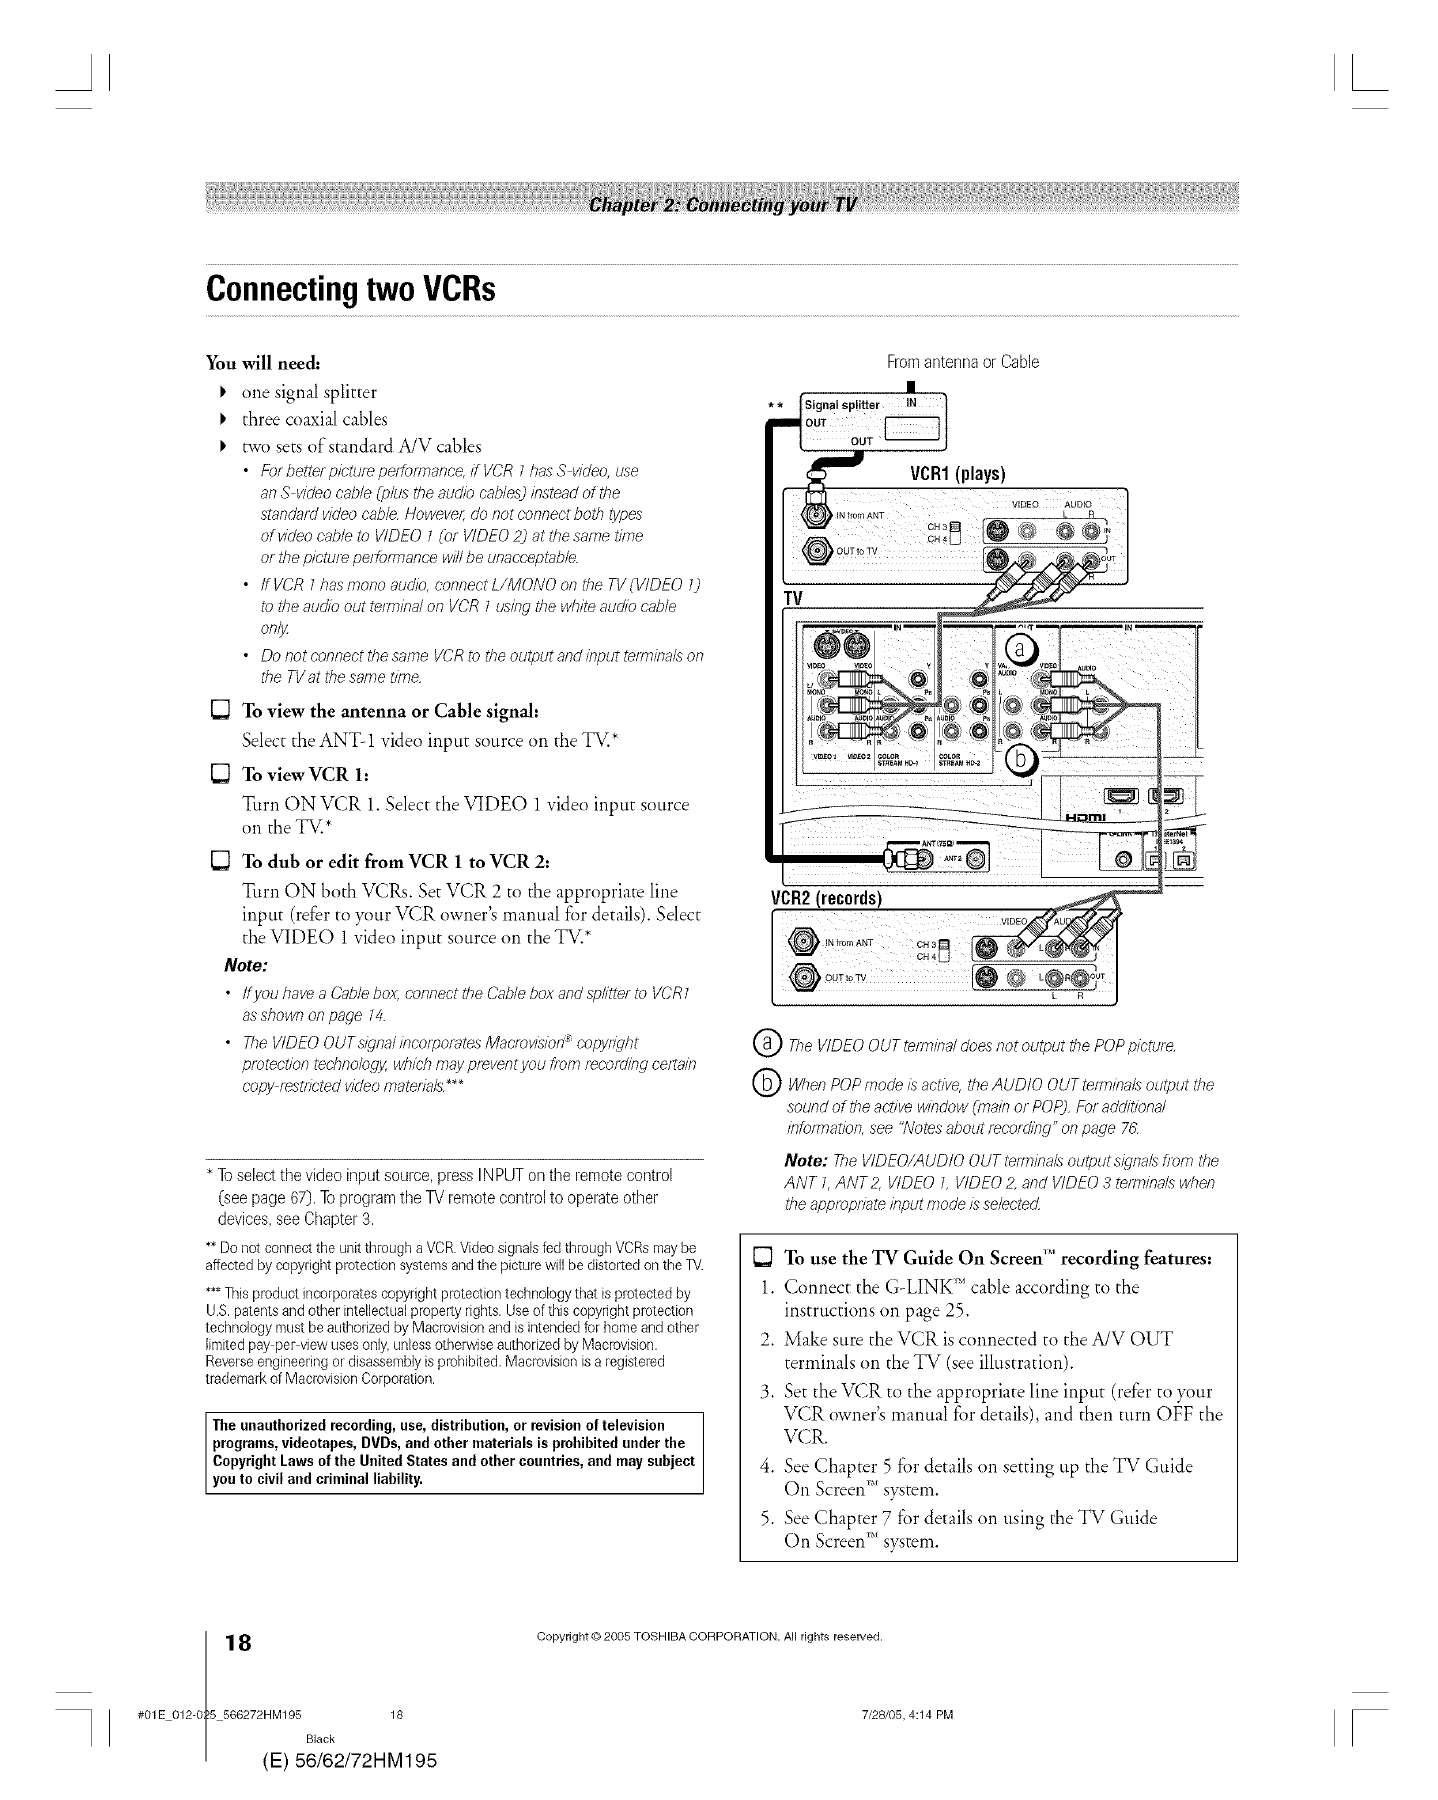
ConnectingtwoVCRs
You will need..
_' one signal splitter
_' three coaxial cables
_' two sets of standard A/V cables
•Forbetterpictureperformance,it VCR1hasS video,use
an S videocable (p/usthe audio cables:)insteadof the
standardvideocable.Howeve/:donot connectboth types
of videocableto VIDEO7(or VIDEO2) at thesame t/?ne
or thepictureperformancewillbe unacceptable.
• ff VCR7hasmonoaudio, connectL/MONO onthe TV(VIDEO 7)
to theaudioout te/minalon VCR Iusingthe wbiteaudio cable
on!g
• Donotconnecttbesame VCRtotbeoutputandinputterminalson
the TVat thesametime,
[] To view the antenna or Cable signal:
Select the ANT-1 video input source on the TV.*
[] To viewVCR h
Turn ON VCR 1. Select the VIDEO 1 video input source
on the TV.*
[] To dub or edit from VCR 1 to VCR 2:
Turn ON both VCRs. Set VCR 2 to the appropriate line
input (refer to }_mr VCR owner's manual for details). Select
the VIDE() 1 video input source on the TV.*
Note:
• /fyou haveaCable,box,connectthe Cableboxand splitterto VCR7
asshownon page 14.
• TbeVIDEOOUTslgnalincorporatesMacrovision®copydgbt
protectiontechnology,whichmaypreventyoufrom recording ce/tain
copyrestrictedvideomaterials._**
* Toselectthe video input source,press INPUTon the remotecontrol
(see page 67).Toprogramthe TV remotecontrolto operateother
devices,seeChapter3.
**Do not connectthe unit through a VCR.Video signalsfed through VCRsmaybe
affected by copyright protection systemsand the picture will be distorted on the TV.
***This product incorporatescopyright protection technology that is protected by
U.S.patentsand other intellectualproperty rights. Useof this copyright protection
technology must be authorizedby Macrovisionand is intended for home and other
limitedpay per viewuses only,unlessotherwise authorizedby Macmvision.
Reverseengineering or disassemblyis prohibked. Macrovisionis a registered
trademark of MacrovisionCorporation.
The unauthorized recording,use, distribution,or revisionof television
programs,videotapes, DVDs, and other materials is prohibitedunder the
CopyrightLaws of the United States and other countries,and maysubject
youto civil and criminal liability.
Fromantennaor Cable
VCR2(records) _
VIDEO
@ IN !rom ANT 0H3_
@ qH4U _- ]
The VIDEO OUT term/ha/doea not output the POP picture,
QWben POP mode is active, the AUDIO OUT term/ba/s output the
sound of tbe active window Cmainor POP), For additional
infom3ation, see "Notes about/ecorTJlng" on page 76.
Note: The VIDEO/AUDIO OUT terminals output signals from the
ANT 7, ANT Z VIDEO 7, VIDEO 2, and VIDEO 3 terminals wber7
the appmprfate input mode L9selected
[] To use the TV Guide On Screen _"recording features:
1. Connect the G-LINK _' cable according to the
instructions on page 25.
2. Make sure the VCR is connected to the A/V OUT
terminals on the TV (see illustration).
3. Set the VCR to the appropriate line input (refer to }_mr
VCR owner's manual for details), and then turn OFF the
VCR.
4. See Chapter 5 fbr details on setting tip the TV Guide
On Screen_''s_tem.
5. See Chapter 7 fbr details on using the TV Guide
On Screen_"s}_tem.
8(
#01E 012-0 5 566272HM195 18
Black
E) 56/62/72HM195
Copyright © 2005 TOSHIBA CORPORATION. All rights reserved.
7/28/05, 4:14 PM F
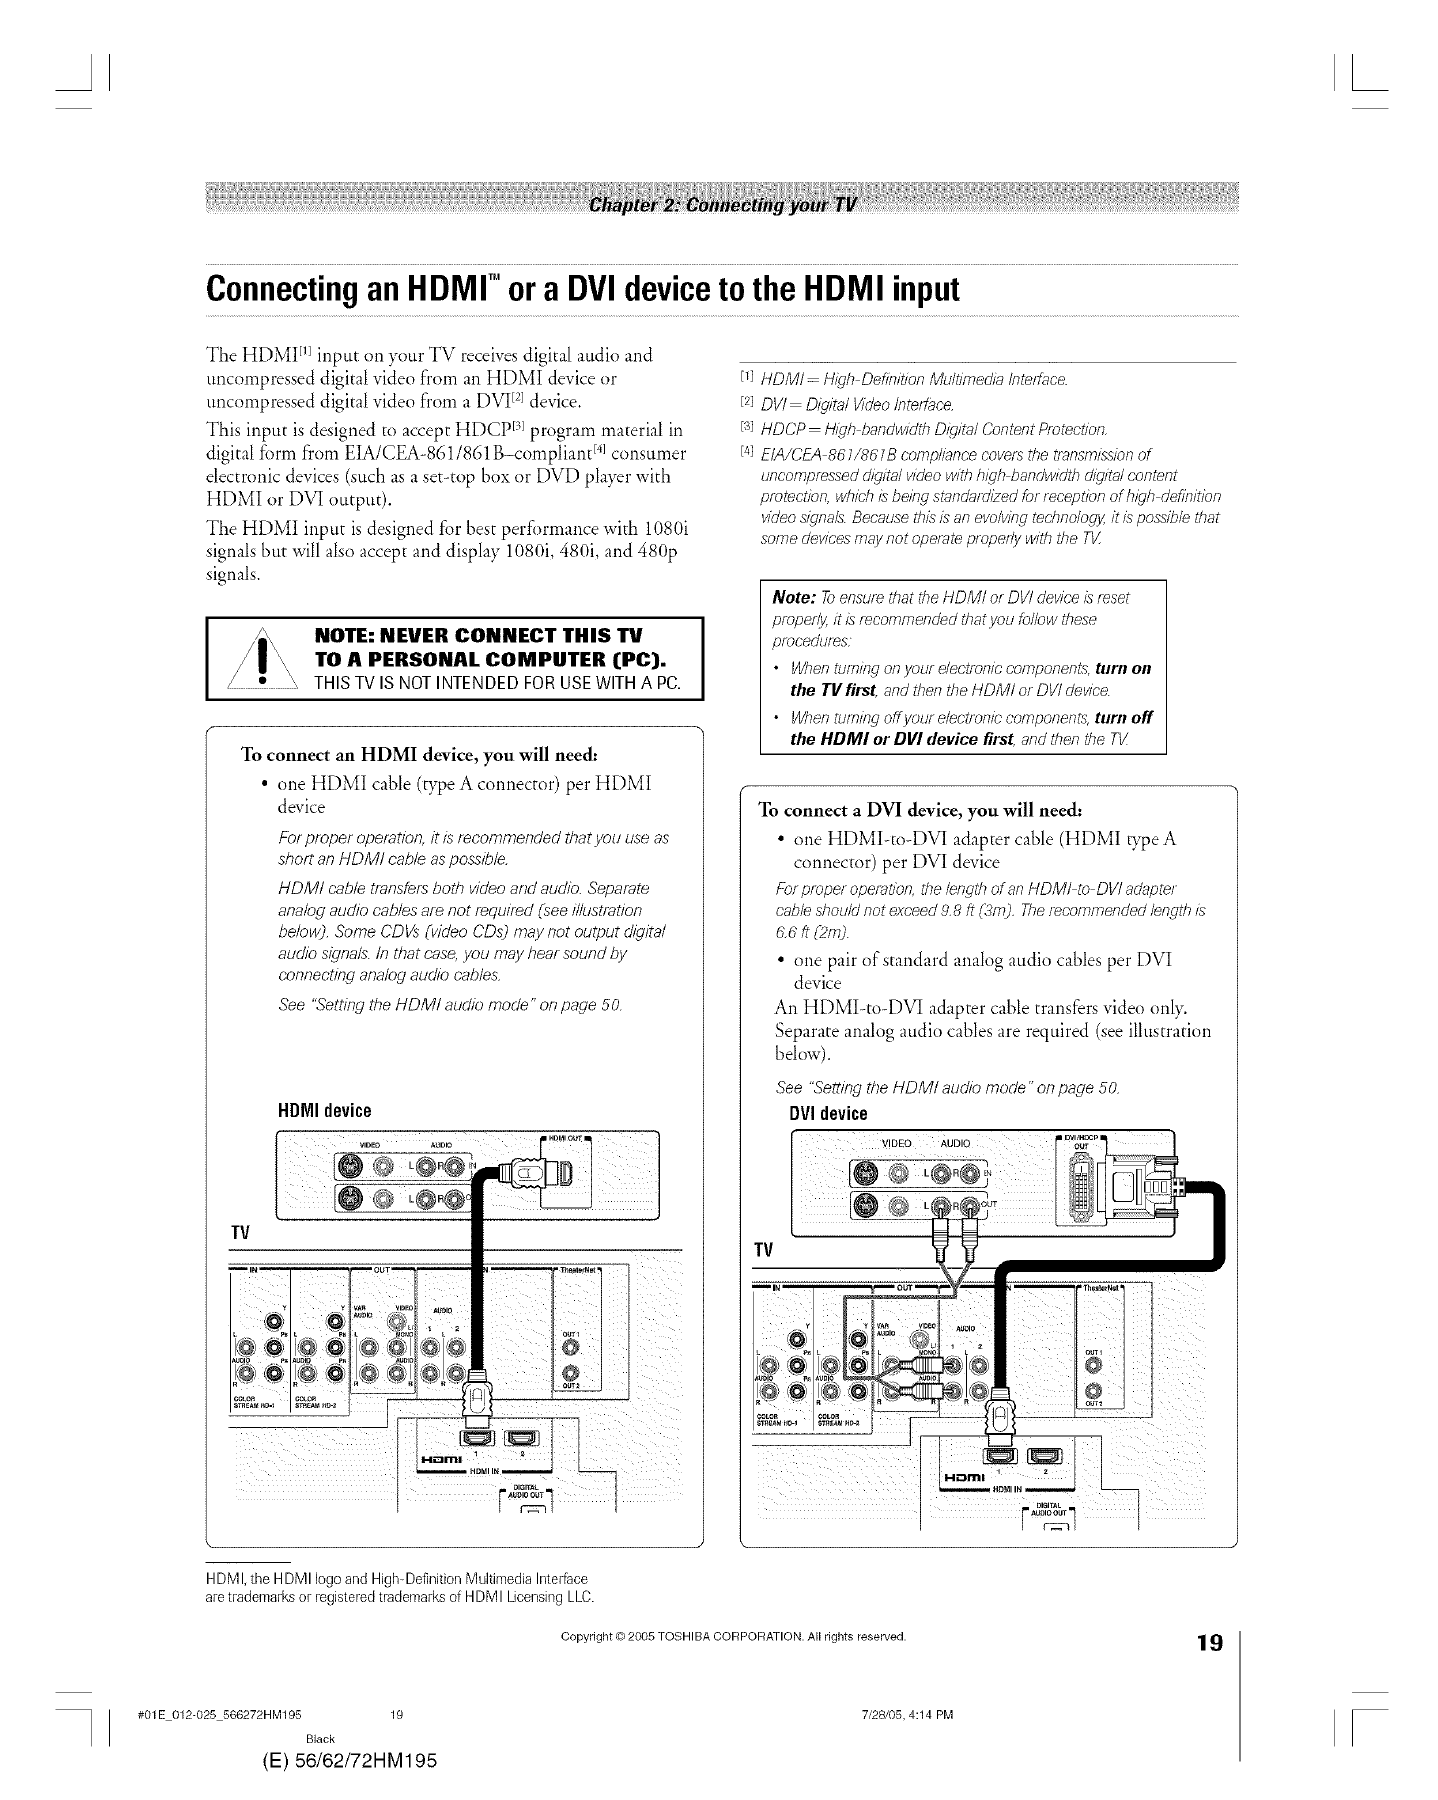
ConnectinganHDMIT°ora DVIdevicetotheHDMI input
The HDMI m input on your TV receives digital audio and
uncompressed digital video from an HDMI device or
uncompressed digital video from a DVI [2]device.
This input is designed to accept HDCP r31program material in
digital form from EIA/CEA-861/861 B-compliant r<consumer
dectronic devices (such as a set-top box or DVD player with
HDMI or DVI output).
The HDMI input is designed for best performance with 1080i
signals but will also accept and display 1080i, 480i, and 480p
signals.
INOTE: NEVER CONNECT THIS "IV
TO A PERSONAL COMPUTER (PC).
THISTY ISNOTINTENDEDFORUSEWITHA PC.
To connect an HDMI device, you will need:
•one HDMI cable (type A connector) per HDMI
device
For proper operation, it is recommended that you use as
short an HDM! cable as possible.
HDMt cable transfers both video and audio. Separate
analog audio cables are not required (see illustration
below). Some CDVs (video CDs? may not output digital
audio s/_qnals,tn that case, you may hear sound by
connecting analog audio cables.
See "Setting the HDMI audio mode" on page 50.
t-!am!
[1]
[2]
[8]
[4]
HDMI- High Definition Multimedia Interface.
DVI Digital Video Interface.
HDCP Nigh bandwirJth Digital Content P/otect/on,
EIA/CEA 861/861B compliance covers the tfansmL_sionof
uncomp/essed digital video with high bandwidth digital content
protection, _#hichis being standar&Ted for _ception of high definition
video s4gna/s.Because thL_L_an evolving technology it/_ possible that
some devices may not operate properly with the 77/
Note: Toensure that the HDM/ or DV/ device is f_set
proper!y, it is _commended that you follow these
procedures:
•When turning on your electronic components, turn on
the TV first, and then the HDMI or DVI device.
• When turning offyour electronic components, turn off
the HDMI or Dill device first, and then the Tt/
To connect a DVI device, you will need:
• one HDMI to DVI adapter cable (HDMI vpe A
connector) per DVI device
For proper ope/aOon, the lewth of an HDM/ to DV/ adapter
cable should not exceed 9,8 ft ('_m), The recommended length i_
6 6 ft (2fn).
• one pair of standard analog audio cables per DVI
device
An HDMI-to-DVI adapter cable transfers video only.
Separate analog audio cables are required (see ilhlstration
bdow).
See "Setting the HDMI audio mode" on page 50.
DVI device
TV
HDMI, the HDMI logo and High-DefinRionMultimedia Interface
aretrademarks or registeredtrademarksof HDMI LicensingLLC.
Copyright © 2005 TOSHIBA CORPORATION. All rights reserved.
#01E 012-025 566272HM195 19
Black
(E) 56/62/72HM195
7/28/05, 4:14 PM
19
[
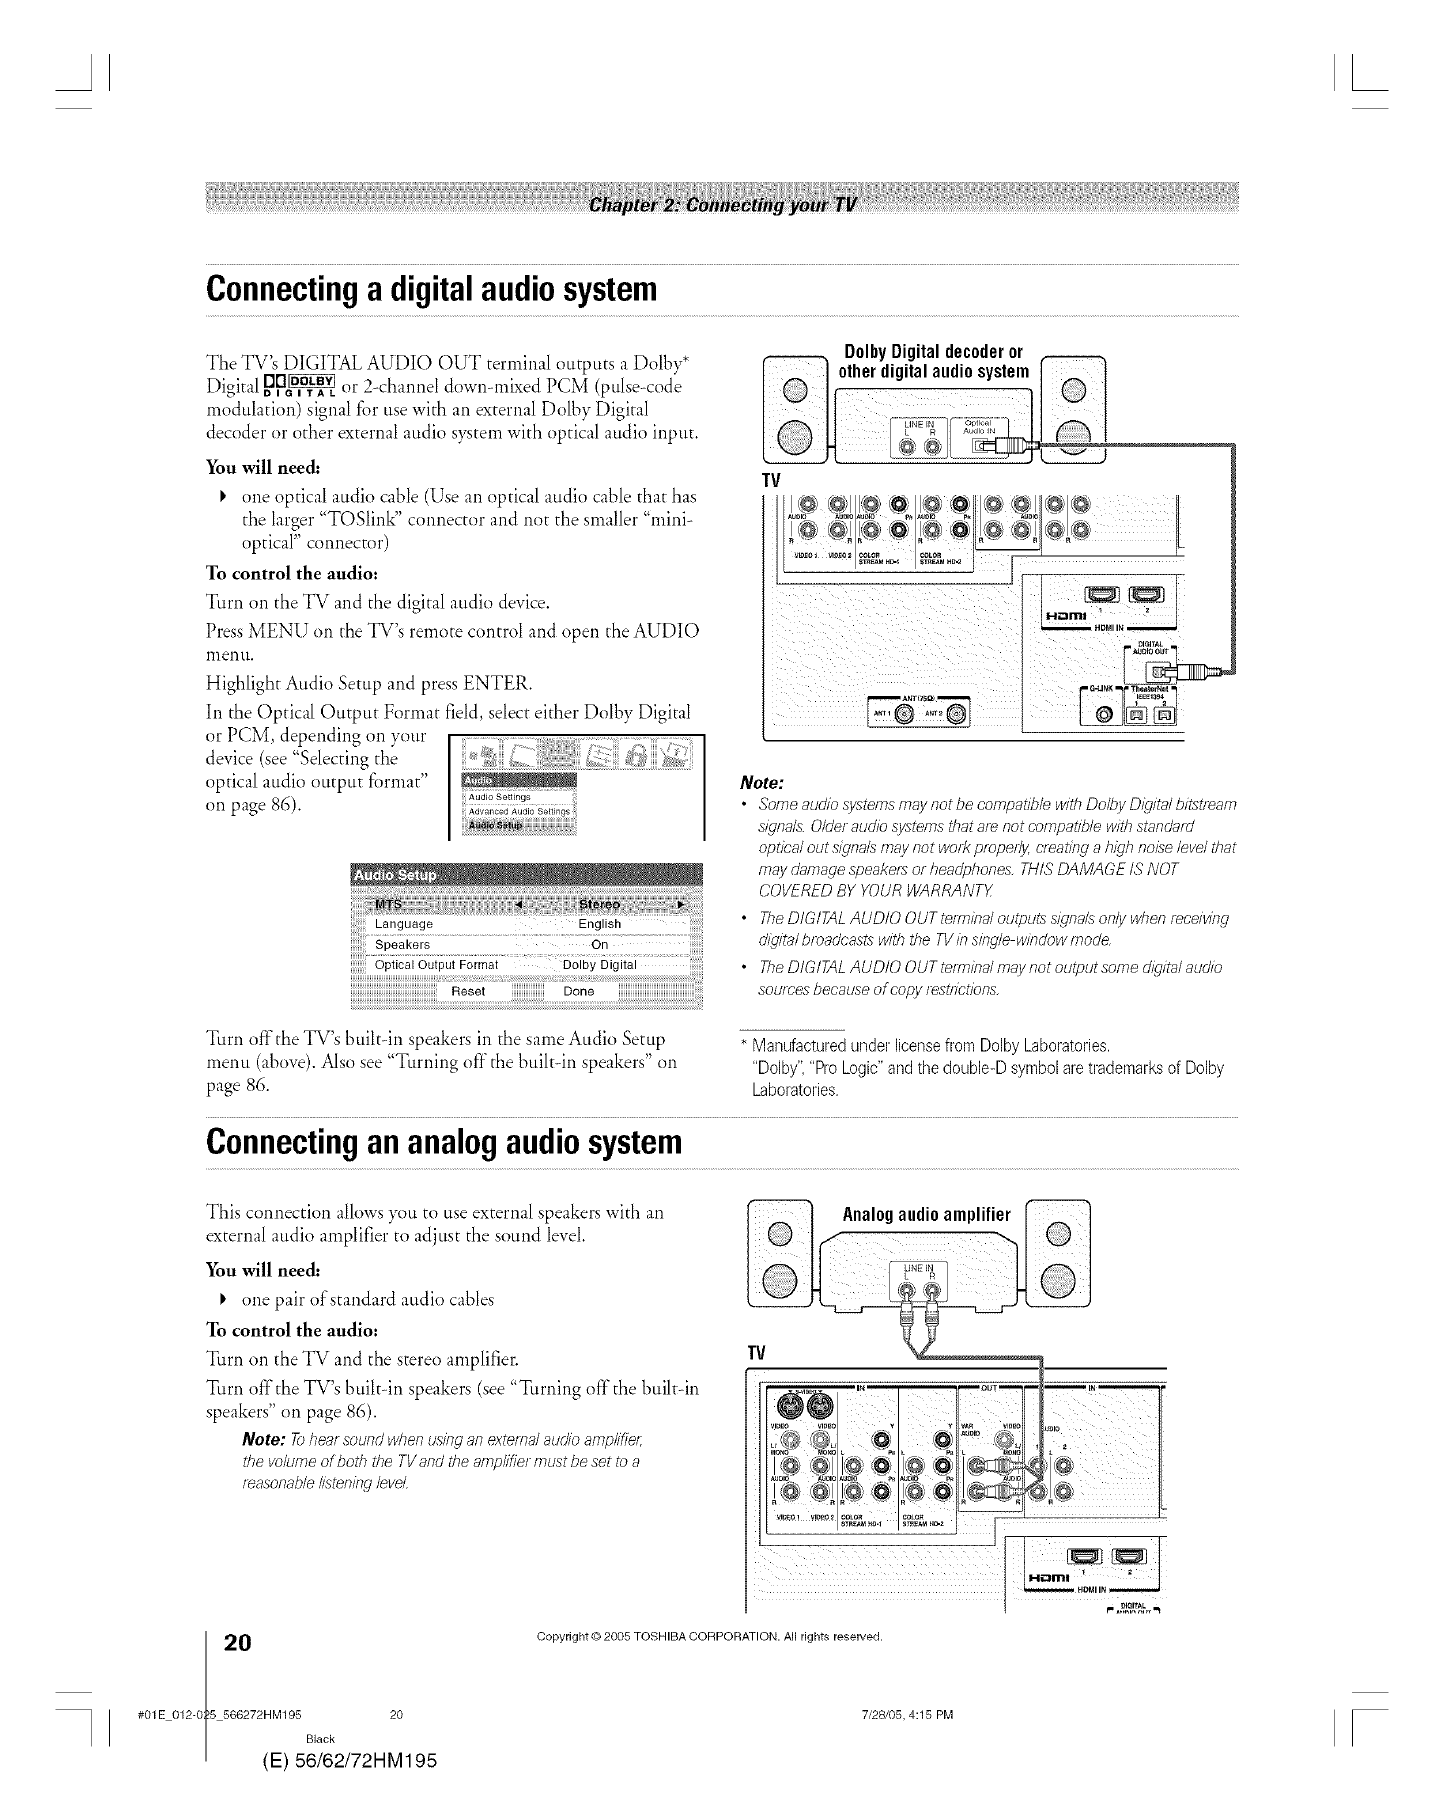
AL
Connectinga digitalaudiosystem
The TV's DIGITAL AUDIO OUT terminal outputs a Dolby*
DigitalD,[:1_ or 2-channel down-mixed PCM (pulse-code
modulation) signal for use with an external Dolby Digital
decoder or other external audio system with optical audio input.
You will need:
_' one optical audio cable (Use an optical audio cable that has
the larger "TOSlink" connector and not the smaller "mini-
optical" connector)
To control the audio:
Turn on the TV and the digital audio device.
Press MENU on the TV's remote control and open the AUDIO
nlenu.
Highlight Audio Setup and press ENTER.
In the Optical Output Format field, select either Dolby Digital
or PCM, depending on your
device (see "Selecting the
optical audio output format"
on page 86).
Reset iiiiiiiiiiiiiiiiiii Done iiiiiiiiiiiiiiiiiiiiiiiiiiiiiiiiiiiiiiiiii
Turn offthe TV's built-in speakers in the same Audio Setup
menu (above). Also see "Turning off the built-in speakers" on
page 86.
DolbyDigitaldecoderor
IV
=,...... =o.... o..... ,=._ ._o=
......... II .... III..= [ I-
I
I a
HZIIBI
iOi it --
G4JNK The_terNet
F OB8
Note:
•Some audio systems may not be compatible with Doll_y Digital bitstrearn
signals. Older audio systems that are not compatible with standard
optic'a/out signals may not woA<prope!!}4 creating a high noise level that
may damage speakers or headphones, THIS DAMAGE tS NOT
COVERED BY YOUR WARRANTY
• TheDIGITAL AUDIO OUT te/mina/outputs signals only when receiving
digital broadcasts with the TV /n single window mode
• TheDIGITALAUDlOOUTtelminalmaynotoutputsomed/gitalaud/o
sources because of copy restdctions,
* Manufacturedunder licensefrom Dolby Laboratories.
"Dolby","Pro Logic"and the doubb-D symbolaretrademarksof Dolby
Laboratories.
Connectingananalogaudiosystem
This connection allows }_tl to use external speakers with an
external audio amplifier to adjust the sound level.
You will need..
_' one pair of standard audio cables
To control the audio:
Turn on the TV and the stereo amplifier.
Turn off the TV's built-in speakers (see "Turning off the built-in
speakers" on page 86).
Note: Tohearsound whenusinganexternalaudio amp/ifiet;
the volumeof both the TVand theamplifiermust be set to a
reasonablelistening/eve_
0(
#01E 012-0 5 566272HM195 20
Black
E) 56/62/72HM195
Copyright © 2005 TOSHIBA CORPORATION• All rights reserved.
7/28105, 4:15 PM r
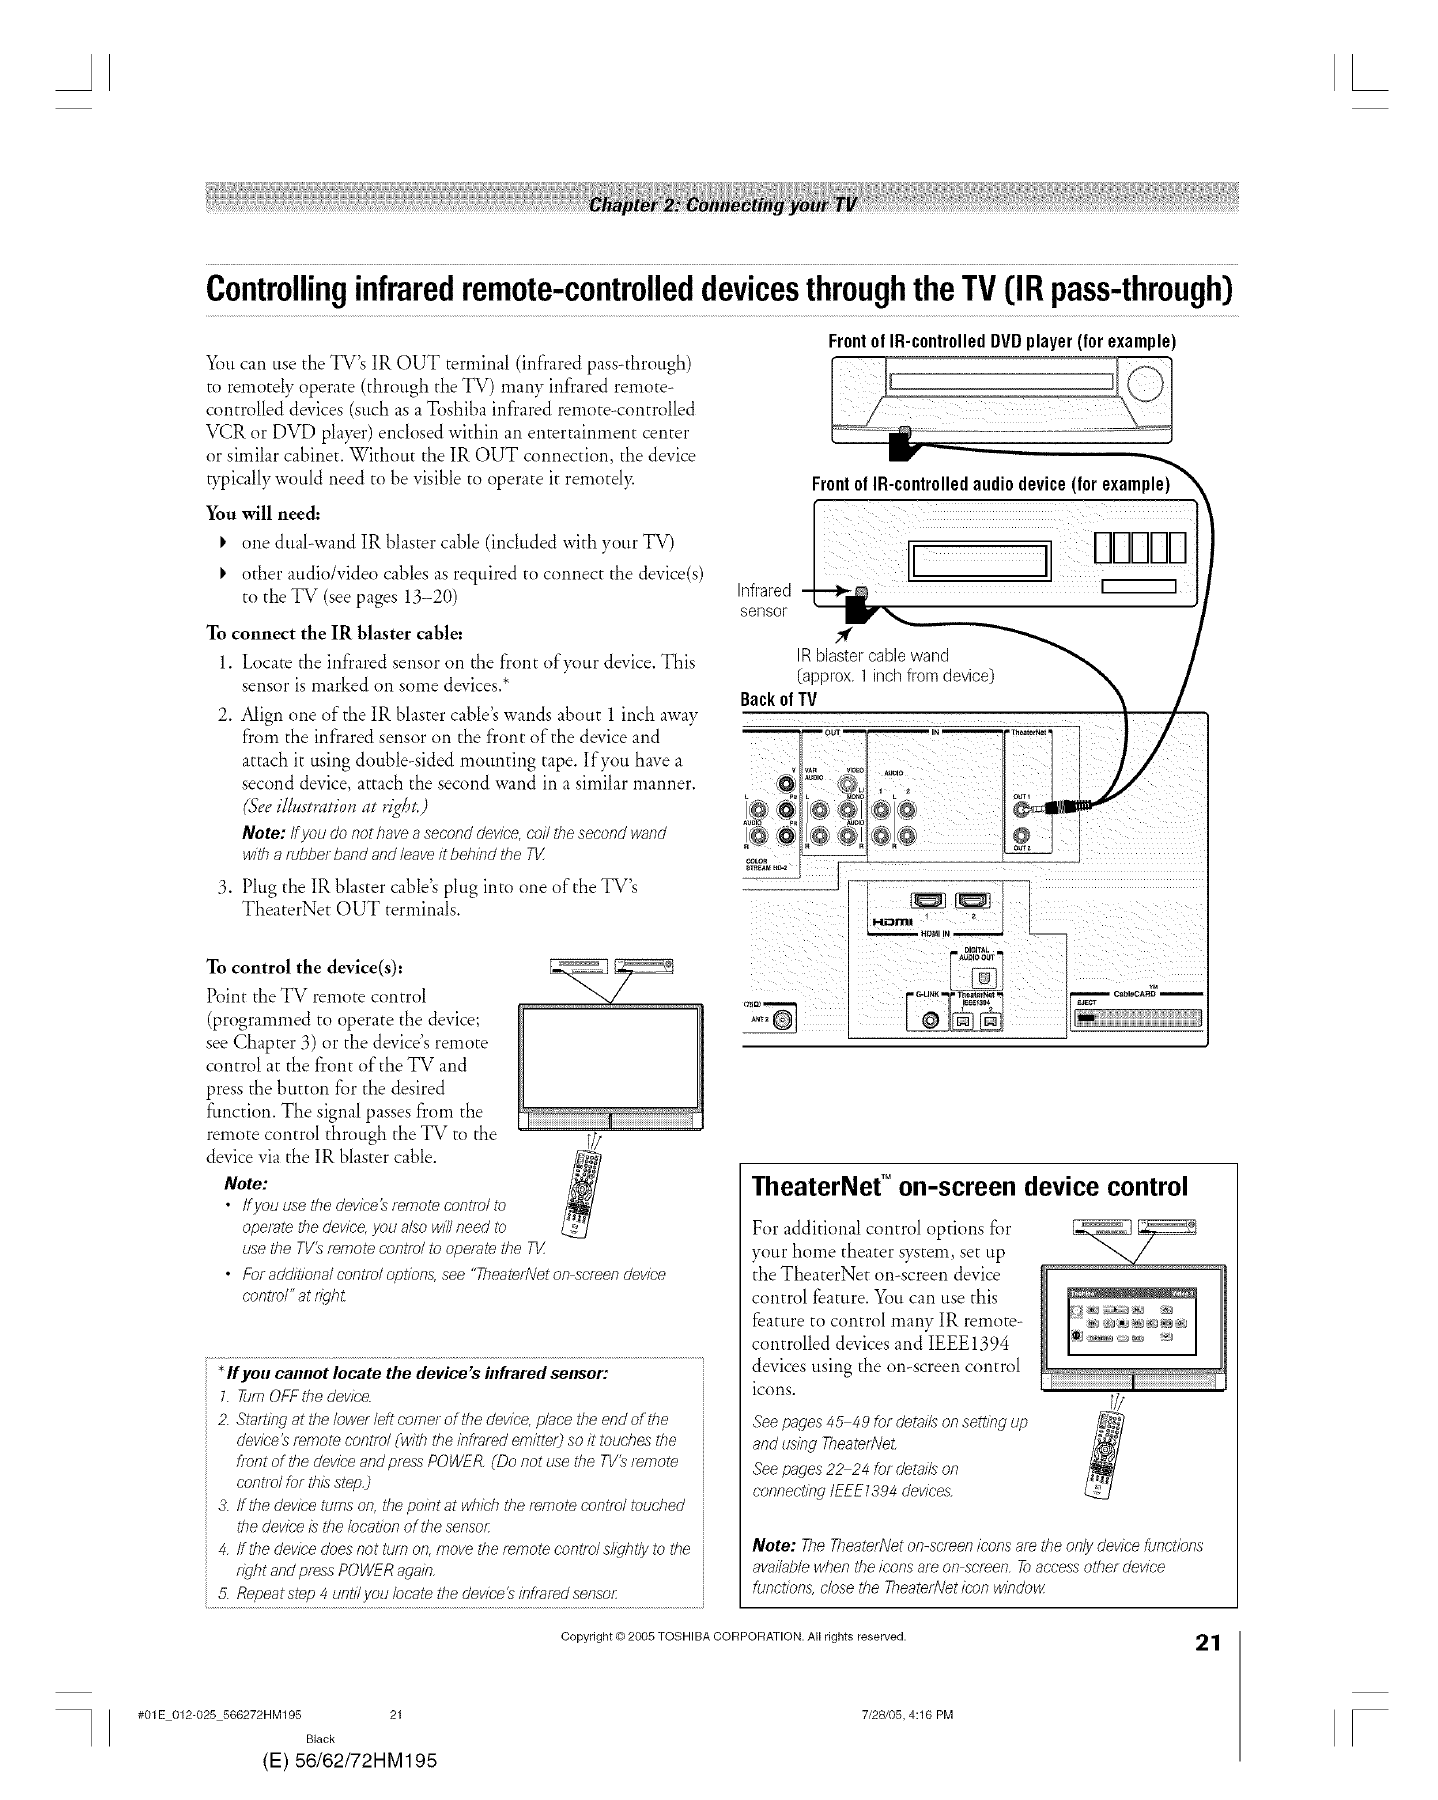
AL
Controllinginfraredremote-controlleddevicesthroughtheTV{IRpass-through)
FrontofIR-controlledDVDplayer(forexample)
xfimcan use the TV's IR OUT terminal (infrared pass-through)
to remotely operate (through the TV) many infrared remote-
controlled devices (such as a Toshiba infrared remote-controlled
VCR or DVD player) enclosed within an entertainment center
or similar cabinet. Without the IR OUT connection, the device
9-pically would need to be visible to operate it remotel>
You will need:
I, one dual-wand IR blaster cable (included with your TV)
I, other audio/video cables as required to connect the device(s)
to the TV (see pages 13-20)
To connect the IR blaster cable:
1. Locate the infrared sensor on the front of your device. This
sensor is marked on some devices.*
2. Align one of the IR blaster cable's wands about 1 inch away
from the infrared sensor on the front of the device and
attach it using double-sided mounting tape. If you have a
second device, attach the second wand in a similar manner.
(See i//ust_tation at dg]at.)
Note:/fyou donot haveaseconddevice,coilthesecondwand
w_tha rubberband andleaveitbehind the TH
3. Plug the IR blaster cable's plug into one of the TV's
TheaterNet OUT terminals.
To control the device(s):
Point the TV remote control
(programmed to operate the device;
see Chapter 3) or the device's remote
control at the front of the TV and
press the button for the desired
function. The signal passes from the
remote control through the TV to the
device via the IR blaster cable.
Note: g
•if you use the dev/c'e_ remote control to
ope/ate the device, you also w/2 need to
use the TV3 temote control to operate the TH
• Foradd/t/ona/controlopt/ons, see "TheatedVeton sc/_en dev/c'e
control" at r/gh_
ffyou cannotlocatethe devices hdraredsensor:
LTumOFFthedevice.
2. Starting at thelowerleftcornerofthedevice, place theendofthe
device'sremotecontrolCwiththeinOaf_demitter3 so it touchesthe
frontof thedeviceand p_ss POWER (Do notusethe TV'Sremote
controlfor thisstep,]
&fftbe deviceturnson,thepointat whichthet_motecontroltouched
thedeviceisthelocationof tbesensor
4. fftbedevicedoesnotturnon,movethet_motecontfo/ s//ghtly tothe
_Tgbtandp_ssPOWERagain,
&Repeat step 4 untilyou locatethedevice'sinfraredsensor
Infiared
sensor
IRblastercablewand
{approx.1inchfloradevice)
BackofTV
Frontof IR-controlledaudiodevice(forexample)
I DDDDD
TheaterNef °on-screen device control
For additional control options for
your home theater s)_tem, set up
the TheaterNet on-screen device
control feature. You can use this
feature to control many IR remote-
controlled devices and IEEE1394
devices using the on-screen control
icons.
See pages 45 49 for deta/Yson sett/bg up /_]
and us#TgTheatedVeL
See pages 22 24 for deta/Yson
connect/bg tEEE 7394 devices,
Note: The TbeaterNet on-sct_en /cons are the only device funct/bns
ava#able when the/cons are on screen, Toaccess otbe/ device
functions, close the TheaterNet /con w/bdow
Copyright © 2005 TOSHIBA CORPORATION. All rights reserved. 21
#01E 012-025 566272HM195 21
Black
(E) 56/62/72HM195
7/28105, 4:16 PM [
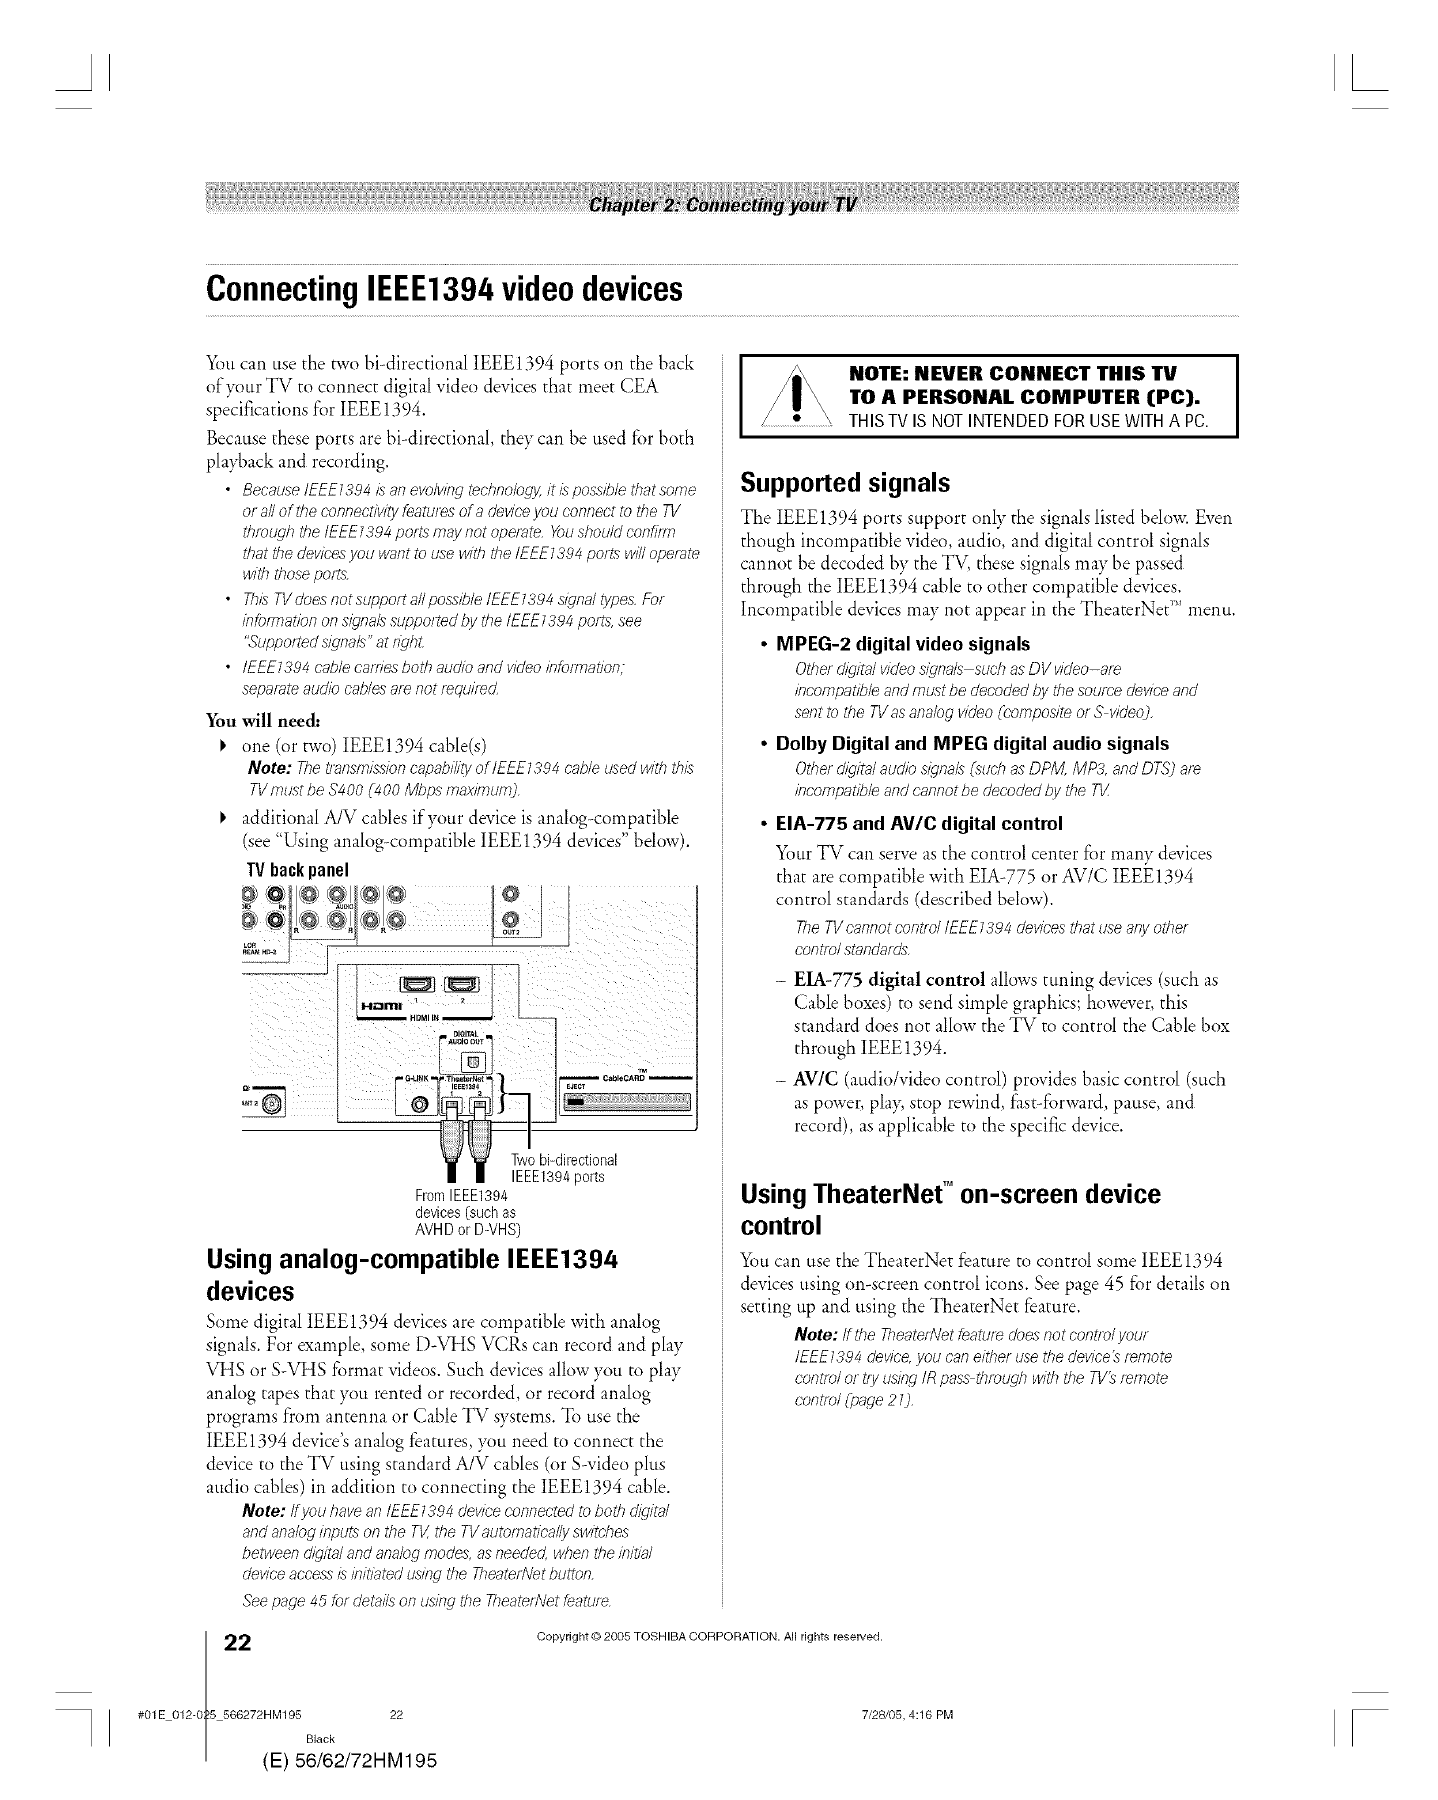
A[
ConnectingIEEE1394videodevices
xfim can use the two hi-directional IEEE1394 ports on the back
of}_)ur TV to connect digital video devices that meet CEA
specifications for IEEE1394.
Because these ports are bi-directional, they can be used for both
playback and recording.
•BecauselEEE1394isanevo/vingtechno/og34itispossib/ethatsome
or allof theconnectivityfeaturesof a deviceyou connectto the TV
thmugl7the tEEE1394portsmaynot operate.Youshould confim7
that thedevicesyou want to usewit/7theIEEE7394 portswilloperate
wtth thosepolts.
• ThisTVdoesnotsupportallpossible IEEE7394sdgna/ty,oes For
infom_ationon signalssuppo/ied by the tEEE1394posts,see
"Suppon'edsignals"at dghL
• IEEE7394cablecaniesbothaudioandvideoinformation;
sepa/ateaudio cablesale not requ#ec._
You will need..
one (or two) IEEE1394 cable(s)
Note: ThetransmLssioncapabilityof /EEEL_94 cableusedwiththis
TVmustbe $400 (400 Mbpsmaximum).
_' additional A/V cables if your device is analog-compatible
(see "Using analog-compatible IEEE1394 devices" below).
IV backpanel
FromIEEE1394
devices (such as
AVHD or D-VHS)
Using analog-compatible IEEE1394
devices
Some digital IEEE1394 devices are compatible with analog
signals. For example, some D-VHS VCRs can record and play
VHS or S-VHS format videos. Such devices allow you to play
analog tapes that you rented or recorded, or record analog
programs from antenna or Cable TV systems. To use the
IEEE1394 device's analog features, )_ti need to connect the
device to the TV using standard A/V cables (or S-video plus
audio cables) in addition to connecting the IEEE1394 cable.
Note: ff you have an I£EE1394 device connected to both digital
and analog inputs on the TV,the TVautomafically switches
between digital and analog modes, as needed, when the initial
device access is initiated using the TheaterNet button.
See page 45 for details on using the TlieatedVet feature
2(
#01E 012-0 5 566272HM195 22
Black
E) 56/62/72HM195
NOTE: NEVER CONNECT THIS "IV
TO A PERSONAL COMPUTER (PC).
.......................................THISTV ISNOTINTENDEDFORUSEWITHA PC.
Supported signals
The IEEE1394 ports support only the signals listed below. Even
though incompatible vide(), audio, and digital control signals
cannot be decoded by the TV, these signals may be passed
through the IEEE1394 cable to other compatible devices.
Incompatible devices may not appear in the TheaterNet'* menu.
•MPEG-2 digital video signals
Otherdig/talv/deos/gnals suchas DV video-a/_
incompatibleandmust bedecoded by the sourcedeviceand
sentto the TVasanalogvideo(compositeor S video].
•Dolby Digital and MPEG digital audio signals
Other digital audio signals (,suchas DPM, MP3, and DTS) am
/77compatll_leand cannot be decoded by the 77/,
•EIA-775 and AV/C digital control
Your TV can serve as the control center for many devices
that are compatible with EIA-775 or AV/C IEEE1394
control standards (described below).
TheTVcannotcontroltEEEI394devicesthatuseanyother
controlstandards,
- EIA-775 digital control allows tuning devices (such as
Cable boxes) to send simple graphics; however, this
standard does not allow the TV to control the Cable box
through IEEE 1394.
- AV/C (audio/video control) provides basic control (such
as power, play, stop rewind, first-forward, pause, and
record), as applicable to the specific device.
Using TheaterNef °on-screen device
control
xfimcan use the TheaterNet feature to control some IEEE1394
devices using on-screen control icons. See page 45 for details on
setting tip and using the TheaterNet feature.
Note: If the TlieaterNet feature does not contro/ your
IEEE1394 device, you can either use the device _remote
control or try using tR pass through with the TV_ remote
control (page 2 7),
Copyright © 2005 TOSHIBA CORPORATION. All rights reserved.
7/28105, 4:16 PM [
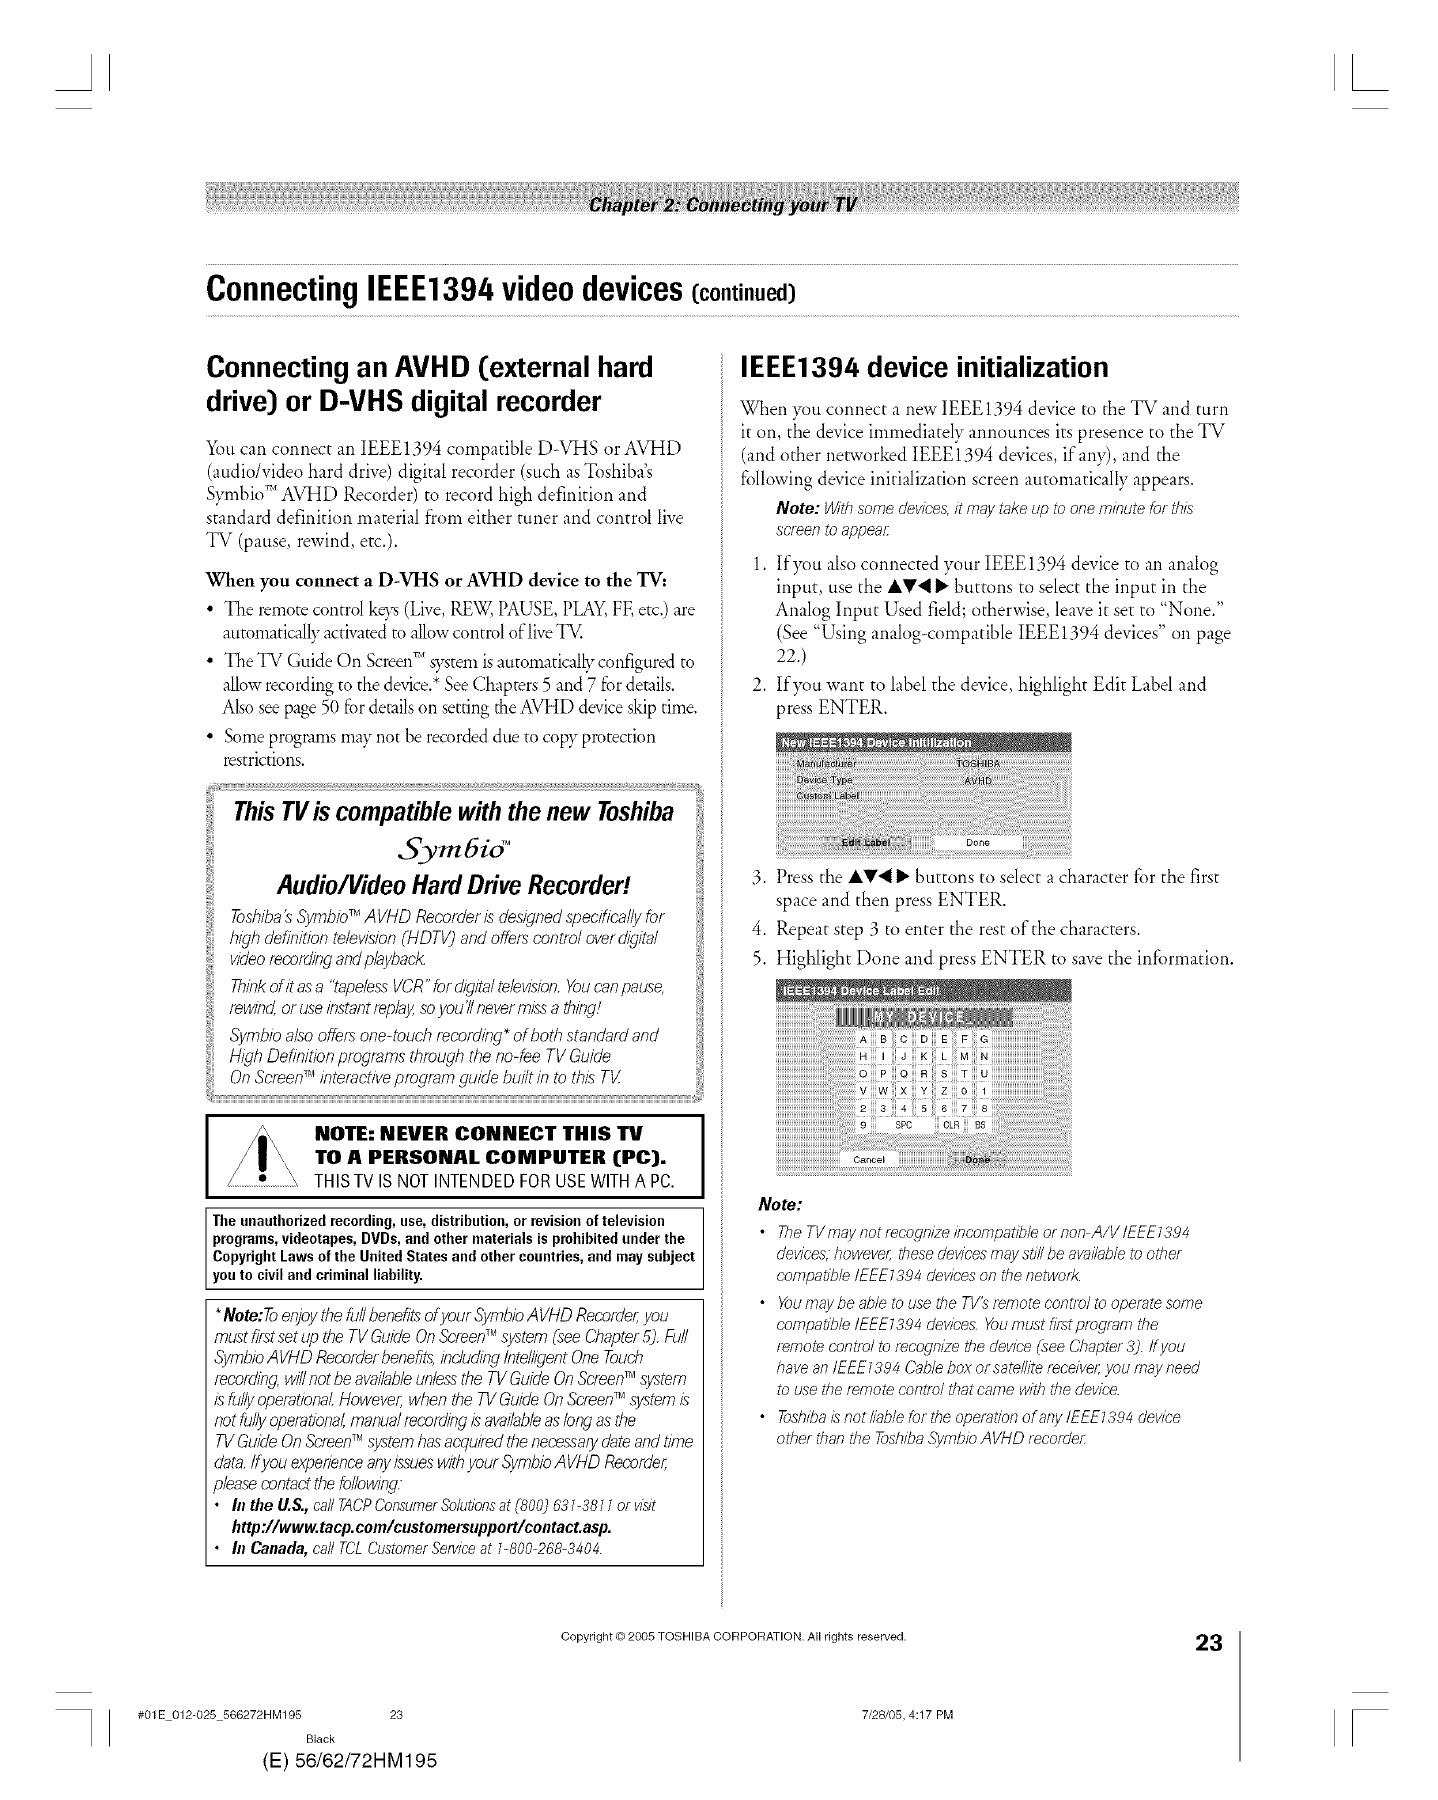
ConnectingIEEE1394videodevices(continued)
Connecting an AVHD [external hard
drive) or D-VHS digital recorder
%u can connect an IEEE1394 compatible D-VHS or AVHD
(audio/video hard drive) digital recorder (such as Toshiba's
S}m_bio_'*AVHD Recorder) to record high definition and
standard definition material from either tuner and control live
TV (pause, rewind, etc.).
When you connect a D-VHS or AVHD device to the "IV,.
•The remote control keys (Live, REW, PAUSE, PLAY,FF,etc.) are
atitomaticallyacdw_wdto allowcontrol of liveTV.
• The TV Guide On Screen"Ms)_tem isautomaticallyconfigured to
albw recording to the device.*SeeChapters 5 and 7 for &mils.
Also seepage 50 l_r &mils on setting theAVHD deviceskip time.
• Some programs may not be recorded due to cop}"protection
restrictions.
Toshiba_SymbioTMAVHDRecorder/sdesignedspecificallyfor
highdefinitiontelevision(HDTV_andofferscontroloverdig#al
videorecordingandplayback.
rh,hkof,tasa"tapelessVCR"fordig, altelev,sionYoucanpause,
rew/hd,oruse/hstantreplaysoyou2nevermissath/w/
Symb/oalsooffersone-touchrecording*of bothstandardand
HighDef/h/tionprogramsthroughtheno-feeTVGuide
TM
OnScreen interactiveprogramguidebuiltinto thisT_/
NOTE: NEVER CONNECT THIS "IV
TO APERSONAL COMPUTER (PC).
THISTV ISNOTINTENDEDFORUSEWITHA PC.
The unauthorizedrecording,use,distribution,or revision of television
programs,videotapes, DVDs, and other materials is prohibitedunder the
CopyrightLaws of the United States and other countries,and maysubject
youto civil and criminal liability.
*Note:To enjoythe fullbenefitsofyour SymbioAVHD Recorder,you
mustfirstset up the TVGuideOn ScreenTMsystem(seeChapter5). _/I
SymbioAVHD Recorderbenefits,includ#?gIntelligentOneTouch
recording willnot beavailableunlessthe TVGuide OnScreenTMsystem
isfullyoperational However, when the TVGuideOn ScreenTMsystemis
notfullyoperational,manualrecordingisavailableaslongas the
TVGukJeOn Screer#Msystemhasacquiredthenecessarydate andtime
data.Ifyou experienceanyissueswithyour SymbioAVHD Recorder,
_leasecontactthe following:
•In the U.S.,call TACPConsumerSolut/bnsat C800]681-3811or v/sit
http://www.tacp.com/customersupport/contact.asp.
•hi Canada,callTCLCustomerServiceat b800-268-3404
IEEE1394 device initialization
When you connect a new IEEE 1394 device to the TV and turn
it on, the device immediately announces its presence to the TV
(and other networked IEEE1394 devices if any) and the
following device initialization screen automatically appears.
Note: Withsomedev/c'es,/t may takeup to one m#Tutetb/ this
screento appear
1. If)_)u also connected your IEEE1394 device to an analog
input, use the AV4 • buttons to select the input in the
Analog Input Used field; otherwise, leave it set to "None."
(See "Using analog-compatible IEEE1394 devices" on page
22.)
2. If you want to label the device, highlight Edit Label and
press ENTER.
3. Press the AT4 • buttons to select a character fi_rthe first
space and then press ENTER.
4. Repeat step 3 to enter the rest of the characters.
5. Highlight Done and press ENTER to save the information.
Note:
•TheTVmaynotrecognize#TcompatibleofnonA/VIEEE1394
devices, however; these deviees may still be available to other
compatible tEEEI 394 devices on the netwod<
• Youmay be able to use the TV'_ remote control to operate some
compatible IEEEI 394 devices Youmust f%t program the
remote control to fecogniTe the device (see Chapter 3]. ff you
have an IEEE I394 Cable box or sate/lite ieeelvefi you may need
to use the remote control that came with the device.
• Toshibaisnot liable for the operation of any 1EEEI394 device
other than the Toshiba SFnbio AVHD teco_de/:
#01E 012-025 566272HM195 23
Black
(E) 56/62/72HM195
Copyright © 2005 TOSHIBA CORPORATION. All rights reserved.
7/28/05, 4:17 PM
23
F
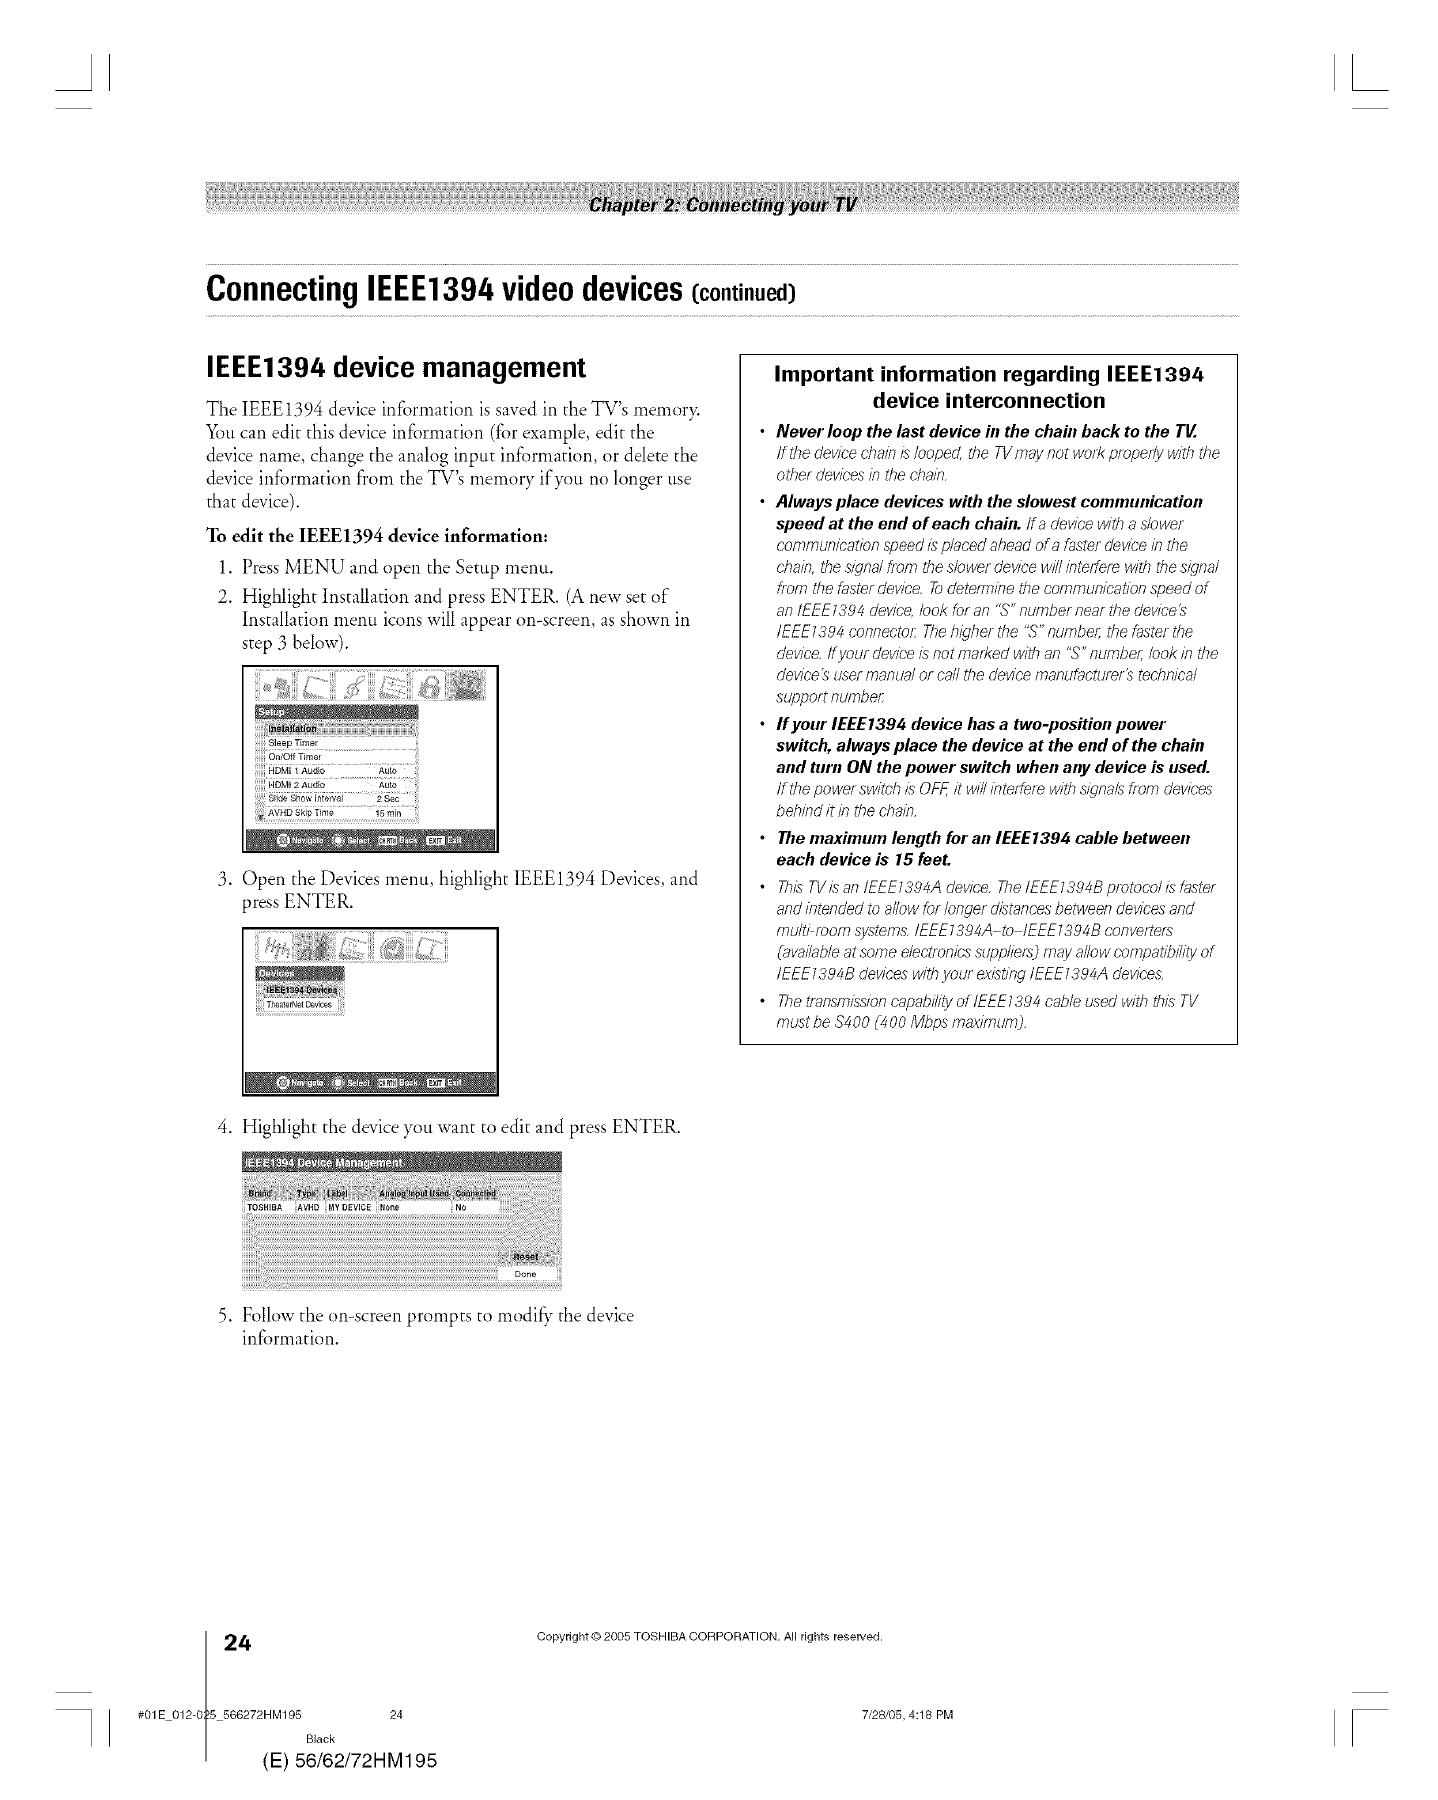
ConnectingIEEE1394videodevices(continued)
IEEE1394 device management
The IEEE1394 device information is saved in the TV's n_emory.
You can edit this device information (for example, edit the
device name, change the analog input information, or delete the
device information from the TV's memory ify_)u no longer use
that device).
To edit the IEEE1394 device information:
1. Press MENU and open the Setup menu.
2. Highlight Installation and press ENTER. (A new set of
Installation menu icons will appear on-screen, as shown in
step 3 below).
iii¸ii¸_i_;iiii_iiii!¸_7::::i!i_j !!!!7!!iiiiiii_i!i¸_iii¸¸_ili!_!iilii!!i!i!i!_iiiiih!ili_
Sleep Timer
iiiiii HDMI 2 Audio Au_ fill
3. Open the Devices menu, highlight IEEE1394 Devices, and
press ENTER.
TheaterNetDevices
4. Highlight the device you want to edit and press ENTER.
Important information regarding IEEE1394
device interconnect/on
•Never loop the last device hi the chahl back to the TV.
If the device chain is looped, the TVmay not work properly with the
other devices if7the chain.
•Always place devices with the slowest communication
speed at the end of each chain, ira device w/ff_a s/ower
communication speed is placed ahead of a faster device in the
chain, the sfgnal from the dower device will interfere wit/} the signal
/torn the faster device Todetennine the communication speed of
an IEEE139 4 device, bok for an "S" number neat the device _
IEEE 7394 connecto/: Thehigher the "S" nun}be/; the faster the
device ff your device Lsnot mad<ed wit/} an "S" number; look #7the
device _ user manual or call the device manufacturer_ technical
support numbel:
•I/your IEEE1396 device has a two-position power
switch, always place the device at the end of the chain
and turn ON the power switch when any device is used.
If the power switch L_OFF, it wi// inteffe/e with signals from devices
beh#Td it in the cba#7.
•The maximum length for an IEEEf394 cable between
each device is 15 feet.
• This TVL_an/EEEIS94A device, The IEEEIS94B protocol/:_ faster
and intefTded to a/low for longer distances betweef7 devices and
multi room systems IEEE7394A-to IEEE 7394B convettefa
(available at some electronics supp/ie_s2may allow compatibility of
IEEE 7394B devices with your existing IEEE 7394A devices
• ThetransmL_sion capability of IEEE1394 cable used witb tbLsTV
must be $400 C4O0 Mbps maximum],
TOSHIBA AVHD MYDEVICE None
Done iiii
5. Follow the on-screen prompts to modi_, the device
information.
4(
#01E 012-0 5 566272HM195 24
Black
E) 56/62/72HM195
Copyright © 2005 TOSHIBA CORPORATION. All rights reserved.
7/28/05, 4:18 PM F
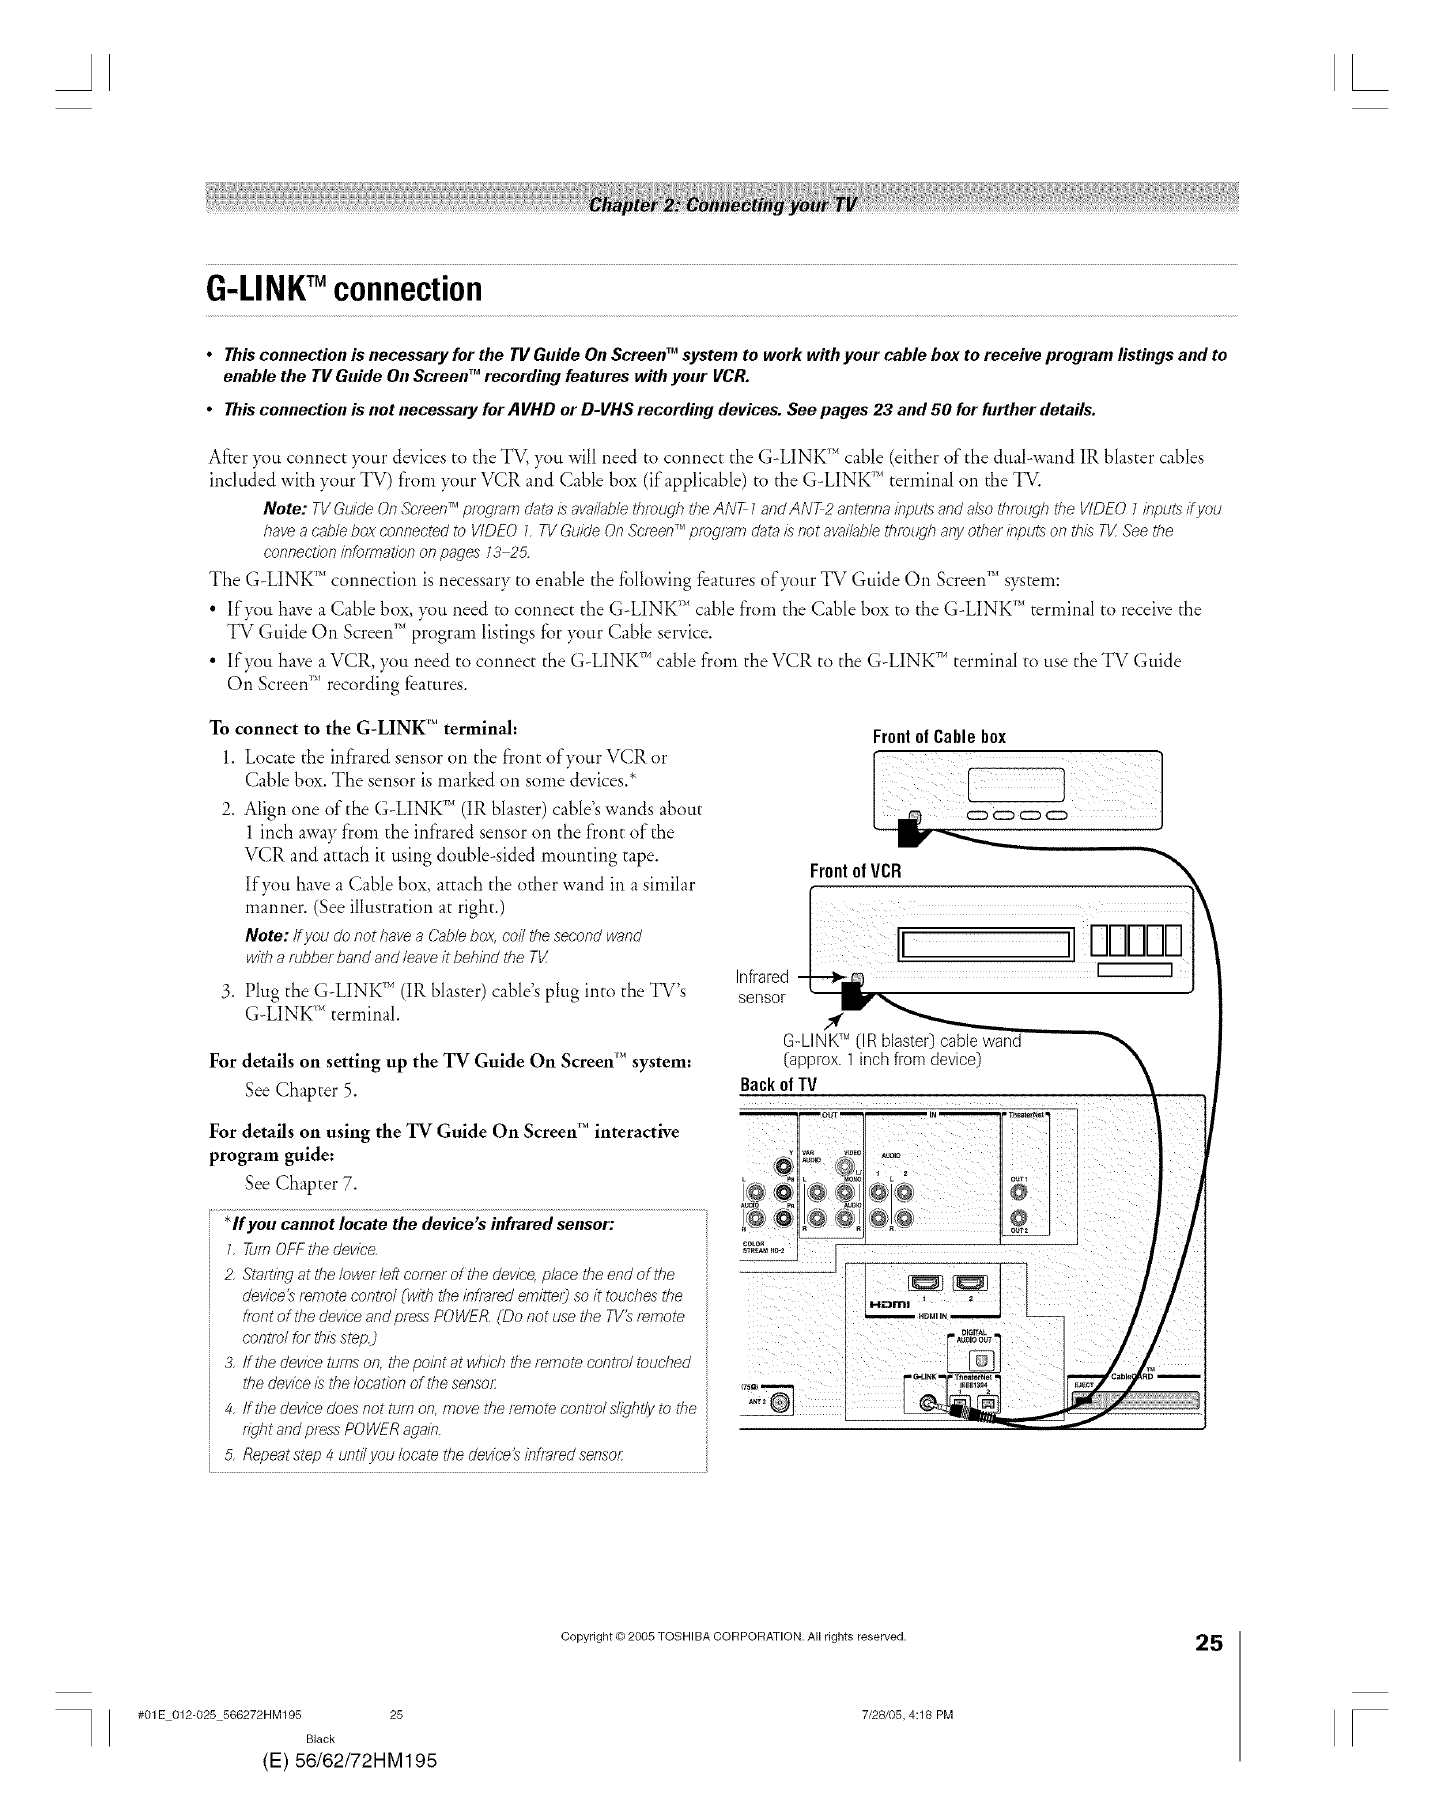
AL
G-LINKTM connection
• Thisconnection is necessary for the TV Guide On ScreenTMsystem to work with your cable box to receive program listings and to
enable the TV Guide On Screen _recording features with your VCR.
• This connection is not necessary for AVHD or D-VHS recording devices. See pages 23 and 50 for further details.
After }<_uconnect }_mr devices to the TV, }_mwill need to connect the G-LINK _'_cable (either of the dual-wand IR blaster cables
included with your TV) from }_ur VCR and Cable box (if applicable) to the G-LINK _'_terminal on the TV.
Note: TVGuideOr?ScreenTMprogramdataisavailablethrough theANT1andANT2antennainputs andalsothrough the VIDEOI inputs if you
haveacableboxconnectedto VIDEOL TVGuideOnScreenrMpmg/arndata/_notavailabletbroL4gbanyotherinputs on tl?/_77/,Seethe
connectioninformationonpages1325,
The (_;-LINK'' connection is necessary to enable the fi_llowing features ofy_)ur TV Guide On Screen _'_system:
• If}_u have a Cable box, }_ti need to connect the G-LINK '_'_cable from the Cable box to the G-LINK _'_terminal to receive the
TV Guide On Screen_'_program listings for }_mr Cable service.
• If}_u have a VCR, }_tl need to connect the G-LINK _'_cable from the VCR to the G-LINK _'_terminal to use the TV Guide
On Screen_'*recording features.
To connect to the G-LINK '' terminal:
1. Locate the infrared sensor on the front of your VCR or
Cable box. The sensor is marked on some devices.*
FrontofCablebox
Align one of the G-LINK _'_(IR blaster) cable's wands about
1inch away from the infrared sensor on the front of the
VCR and attach it using double-sided mounting tape.
If}_m have a Cable box, attach the other wand in a similar
manner. (See ilh*stration at right.)
Note: Ifyou do nothaveaCablebox,coilthesecond wand
witha robberband andleaveit behindthe TI/
Plug the G-LINK ''_ (IR blaster) cable's plug into the TV's
(_;-LINK_'_terminal.
Infrared
sensor
Frontof VCR
For details on setting up the TV Guide On Screen '= system:
See Chapter 5. %o
For details on using the TV Guide On Screen _" interactive
program guide: _ _I_
See Chapter 7. _ _11 (Q)
.......................................... >
*If you cannot locate the device's infrared sensor:
1 Turn OFF the device
2 Sta/ting at the/owe/left comer of the device, place the end of the
device_ ?emote control Cwitb the inf/ared emitte/3 so it touches the
front of the device and press POWER (Do not use the TV_ ?emote
control for t/?/_sstep.)
3 fftbe device turns on, the point at which the remote control toucbed
the device/_ the location of the sensor ,,_
4 If the device does not turn on, move the/emote control sl?ght/yto the
right and press POWER again.
5 Repeat step 4 untWyou locate the devfce_ infrared sensol7
G-LINK _=(IR blaster) cable wand
(applox. 1 inch flora device)
Back of TV
#OlE 012-025 566272HM195 25
Black
(E) 56/62/72HM195
Copyright © 2005 TOSHIBA CORPORATION. All rights reserved.
7/28105, 4:18 PM
25
[
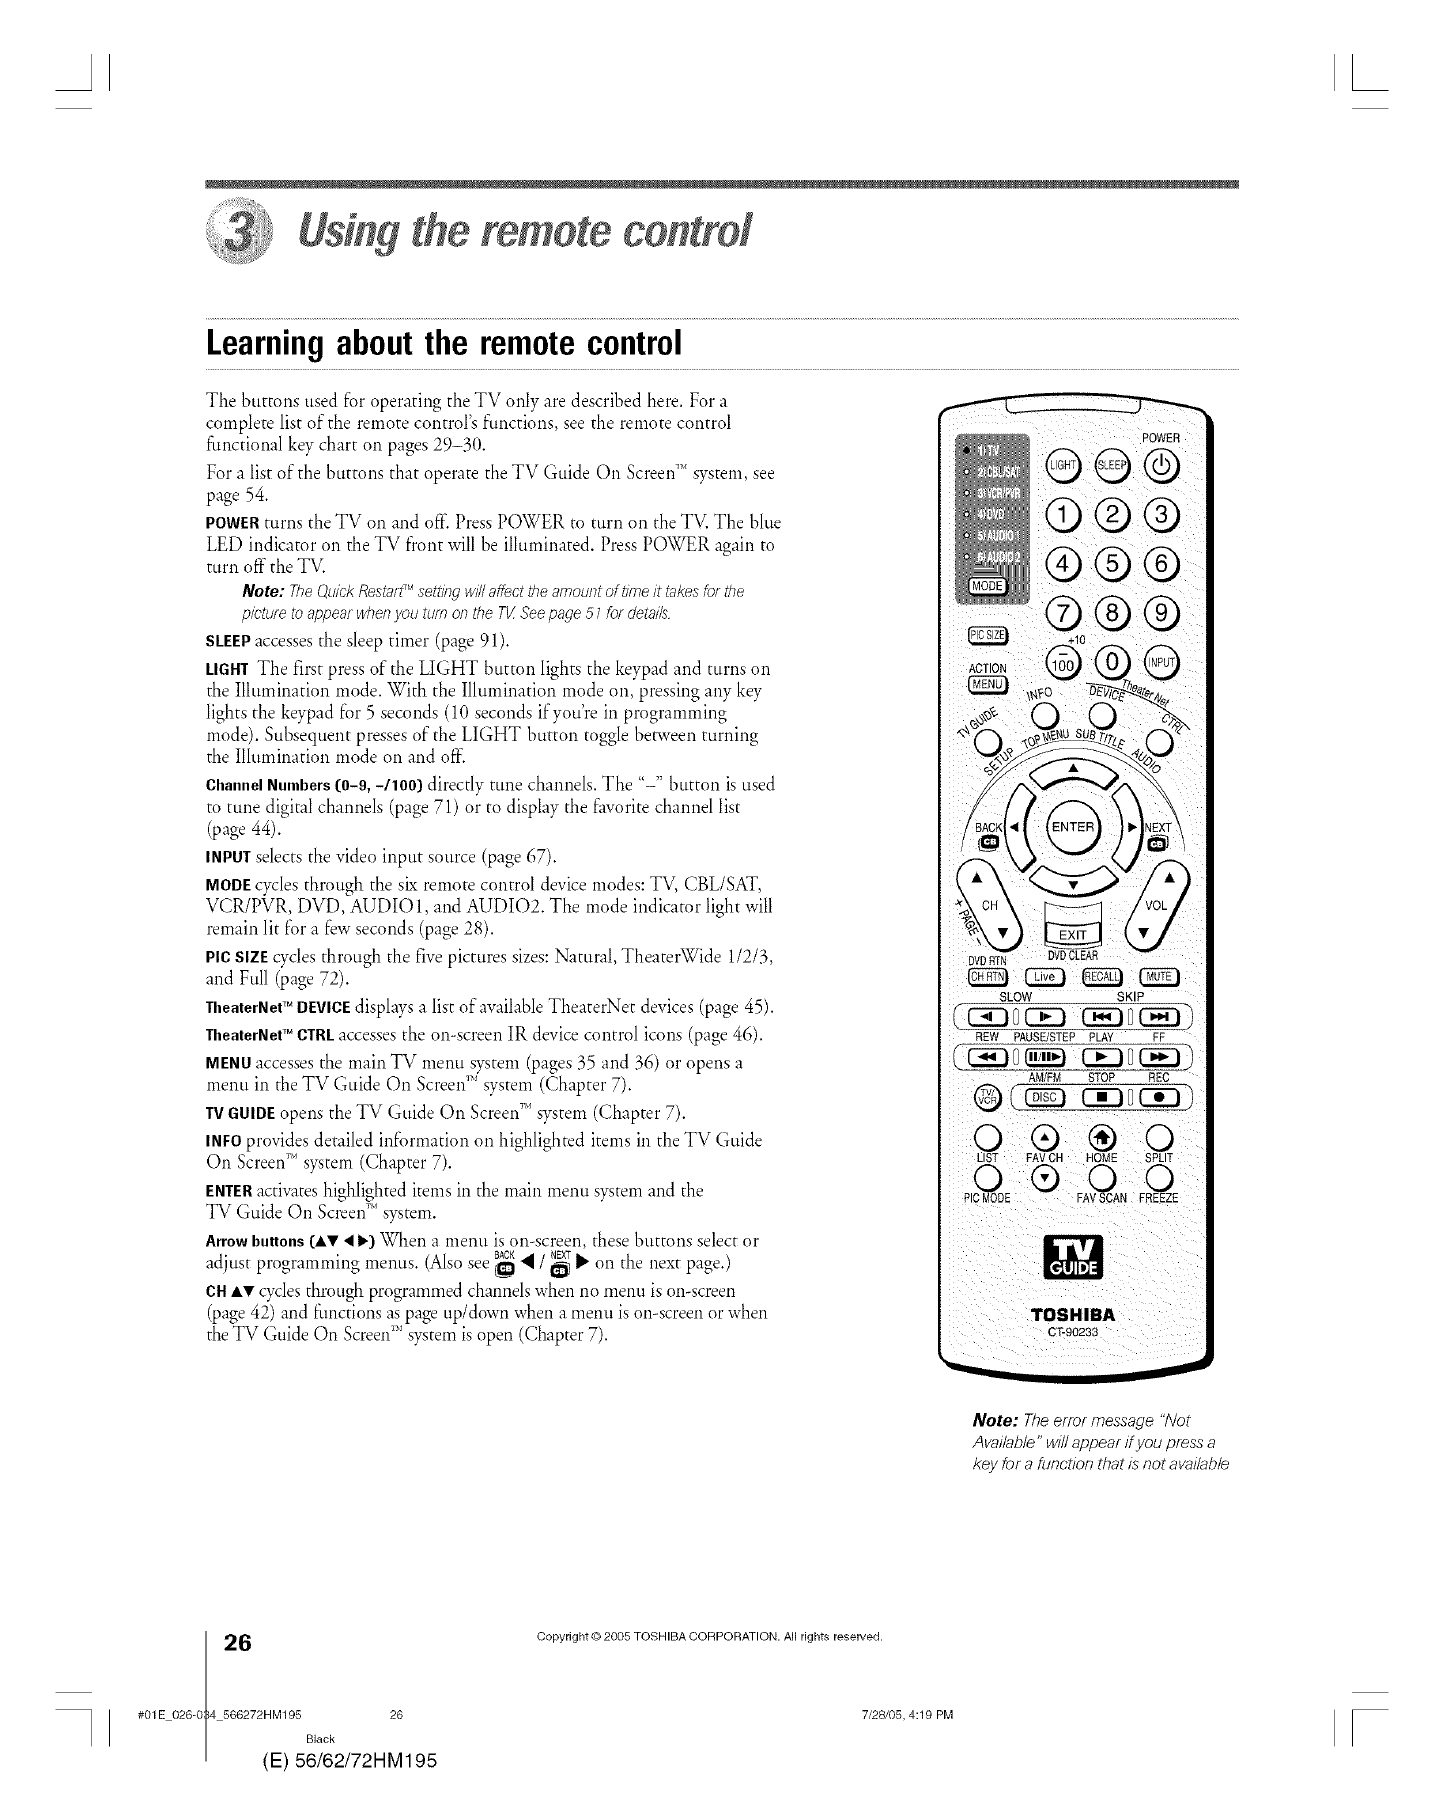
AL
remote control
Learningabout the remote control
The buttons used for operating the TV only are described here. For a
complete list of the remote control's f'unctions, see the remote control
functional key chart on pages 29-30.
For a list of the buttons that operate the TV Guide On Screen_' system, see
page 54.
POWERturns the TV on and off- Press POWER to turn on the TV. The blue
LED indicator on the TV f'ront will be illuminated. Press POWER again to
turn of]"the TV.
Note: The Quick Resta/tTMsetting w/71affect the amount of time it takes for the
pietare to appear when you tam on the 71/See page 5 1for details
SLEEPaccesses the sleep timer (page 91).
LIGHTThe first press of the MGHT button lights the keypad and turns on
the Illumination mode. With the Illumination mode on, pressing any key
lights the keypad f'or 5 seconds (10 seconds if'you're in programming
mode). Subsequent presses of the LIGHT button toggle between turning
the Illumination mode on and of_:
ChannelNumbers([0-9,-1100) directly tune channels. The "-" button is used
to tune digital channels (page 71) or to display the favorite channel list
(page 44).
INPUTselects the video input source (page 67).
MODEcycles through the six remote control device modes: TV, CBL/SAT,
VCR/PVR, DVD, AUDIO1, and AUDIO2. The mode indicator light will
remain lit l_'ora Jewseconds (page 28).
PlCSIZEcycles through the five pictures sizes:Natural, TheaterWide 1/2/3,
and Full (page 72).
TheaterNet_ DEVICEdisplays a list of available TheaterNet devices (page 45).
TheaterNet_ CTRLaccesses the on-screen IR device control icons (page 46).
MENUaccesses the main TV menu system (pages 35 and 36) or opens a
menu in the TV Guide On Screen_"system (Chapter 7).
TVGUIDEopens the TV Guide On Screen_''system (Chapter 7).
INFOprovides detailed inf'ormation on highlighted items in the TV Guide
On Screen_'' system (Chapter 7).
ENTERactiw_teshighlighted items in the main menu system and the
TV Guide On Screen_'' system.
Arrowbuttons(IY <1IP')When a menu is on-screen, these buttons select or
adjustprogrammingmenus.(Alsosee_ • /_I"on the next page.)
OHAl' cyclesthrough programmed channels when no menu is on-screen
(page 42) and functions as page up/down when a menu ison-screen or when
the TV Guide On Screen*_'system is open (Chapter 7).
ACTION i
TOSHIBA
CT-90233
Note: The error message "Not
Available" w/2 appear ff you press a
key for a function that/s not available
6(
#OlE 026-0 4 566272HM195 26
Black
E) 56/62/72HM195
Copyright © 2005 TOSHIBA CORPORATION. AII rights reserved.
7/28105, 4:19 PM F
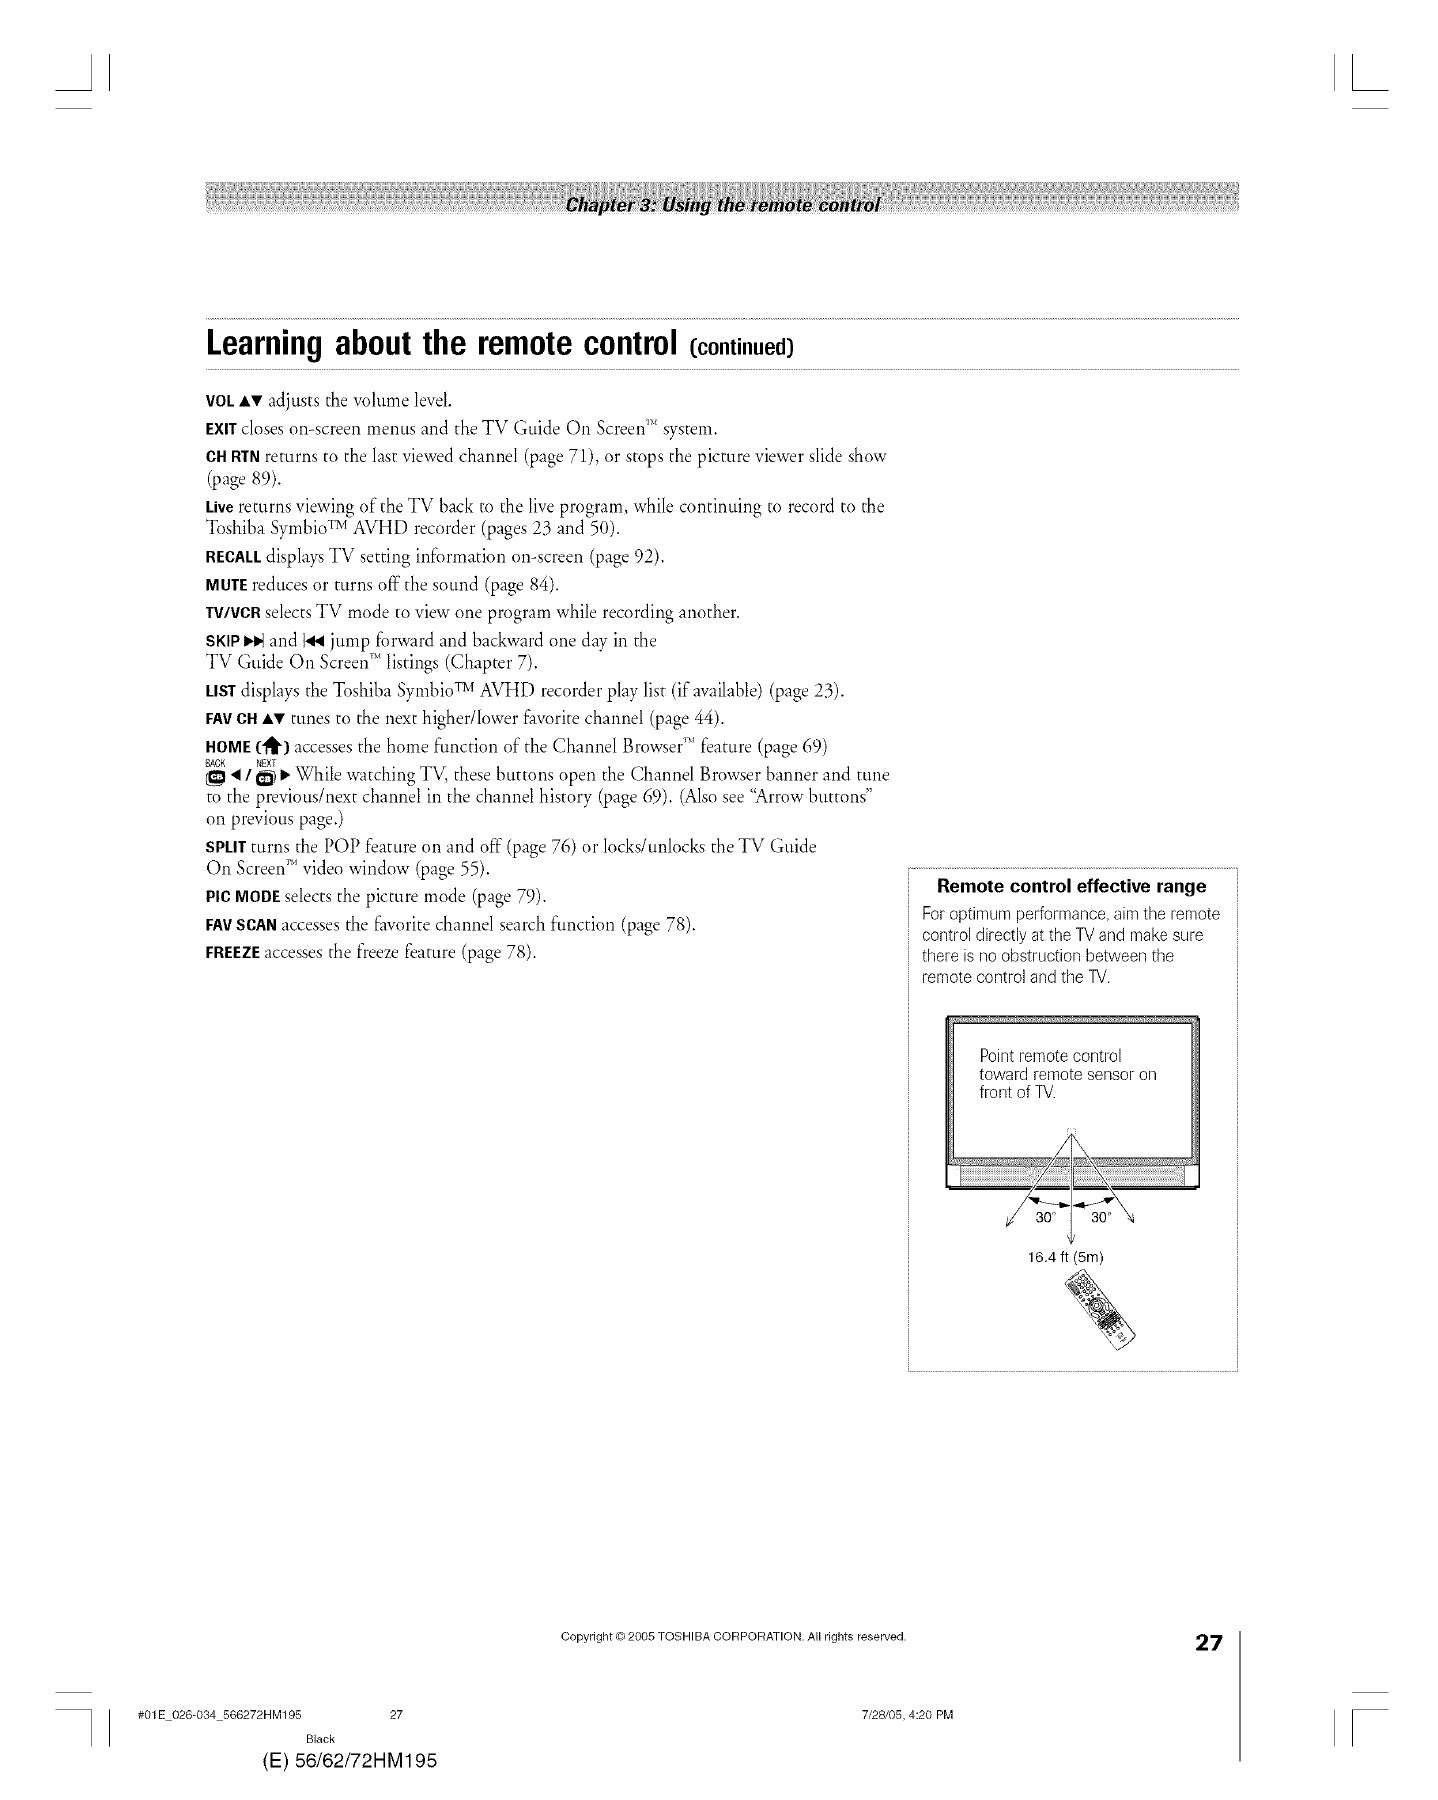
AL
Learningaboutthe remotecontrol(continued)
VOL*iV adjusts the volume level.
EXllcloses on-screen menus and the TV Guide On Screen_"system.
CHRTNreturns to the last viewed channel (page 71), or stops the picture viewer slide show
(page 89).
Livereturns viewing of"the TV back to the live program, while continuing to record to the
Toshiba SymbioTv AVHD recorder (pages 23 and 50).
RECALLdisplays TV setting information on-screen (page 92).
MUlEreduces or turns off"the sound (page 84).
TV/VCRselectsTV mode to view one program while recording another.
SKIP_ and ]_ jump tCorwardand backward one day in the
TV Guide On ScreenT_'listings (Chapter 7).
LISTdisplays the Toshiba SymbioTv AVHD recorder play list (if"available) (page 23).
FAVCHA_' tunes to the next higher/lower favorite channel (page 44).
HOME("_1_)accessesthe home function of the Channel Browser_"feature (page 69)
BACK NEXT
•/_) _ While watching TV, these buttons open the Channel Browser banner and tune
to the previous/next channel in the channel history (page 69). (Also see "Arrow buttons"
on previous page.)
SpI.H"turns the POP feature on and off (page 76) or locks/unlocks the TV Guide
On ScreenT_video window (page 55).
Pie MODEselects the picture mode (page 79).
FAVSCANaccesses the t"avoritechannel search function (page 78).
FREEZEaccesses the t:reezefeature (page 78).
Remote control effective range
Foroptimumperformance,aimthe remote
controldirectlyat theTVandmakesure
thereis noobstructionbetweenthe
remotecontrolandthe lV.
Point remote control
toward remote sensor on
front of TV.
16.4 ft (5m)
#01E 026-034 566272HM195 27
Black
(E) 56/62/72HM195
Copyright © 2005 TOSHIBA CORPORATION. All rights reserved.
7/28105, 4:20 PM
27
F
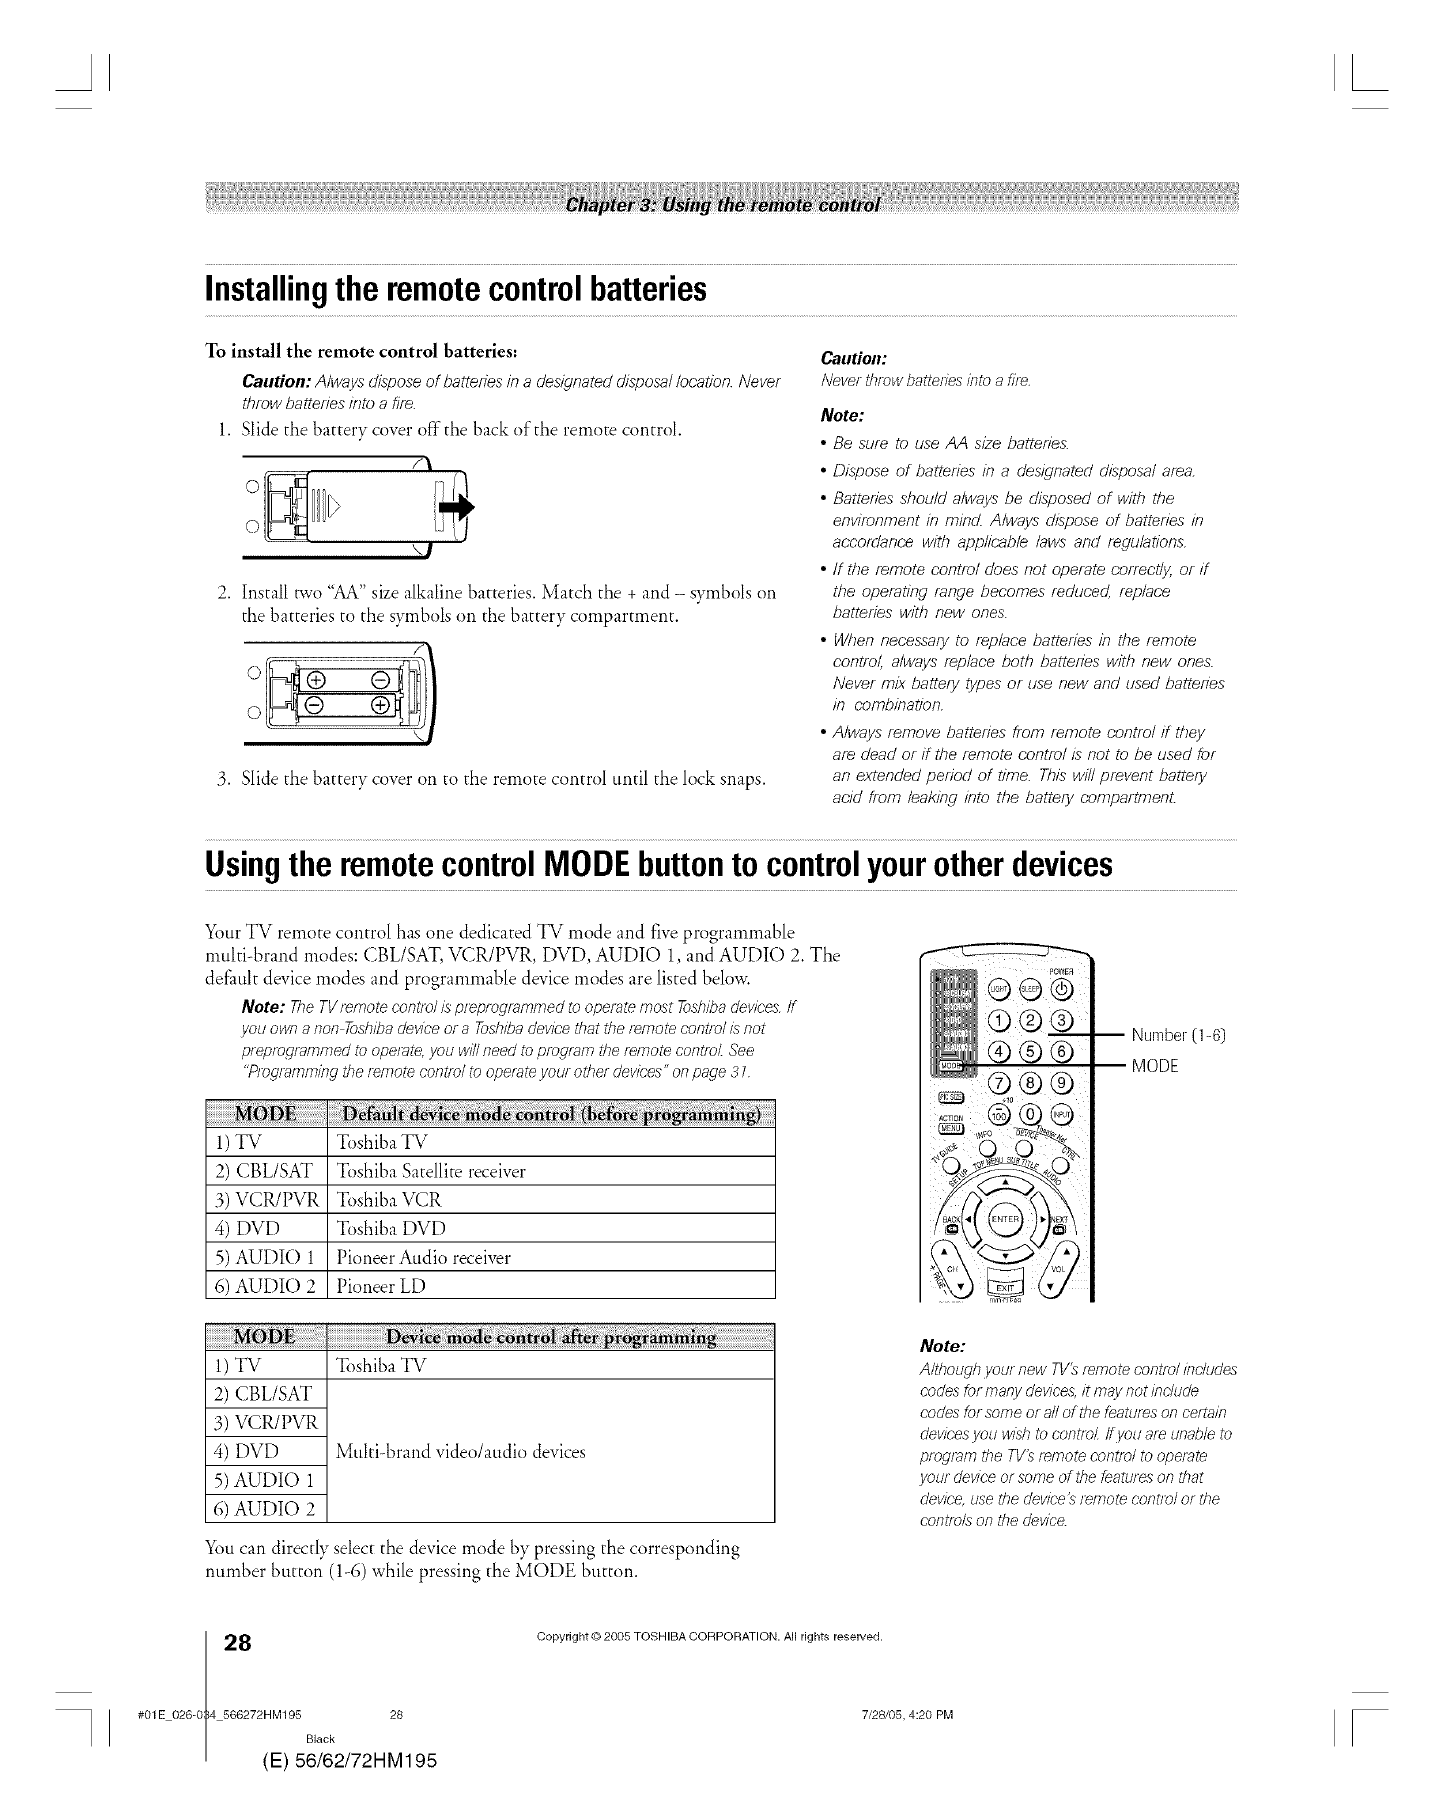
Installingthe remotecontrolbatteries
To install the remote control batteries:
Caution: Always dispose of batteries in a designated disposal location. Never
throw batteries into a fire.
1. Slide the battery cover off'the back of the remote control.
/\
\1
Install two "AA" size alkaline batteries. Match the + and - symbols on
the batteries to the symbols oil the battery compartment.
/.
oI 6_o...........................
3. Slide the battery cover on to the remote control until the lock snaps.
Caudon:
Neverthrow batterlasrbto a fl_e,
Note:
•Be sure to use AA size batteries.
• Dispose of batteries in a designated disposal area.
• Batteries should always be disposed of witb tbe
environment in mind. Always dispose of batteries in
accordance witb applicable laws and regulations.
• ff tbe remote control does not operate correctly, or if
ttre operating range becomes reduced, replace
batteries witb new ones.
• Wben necessary to replace batteries in tbe remote
control, always replace barb batteries witb new ones.
Never mix battery types or use new and used batteries
in combination.
• Always remove batteries from remote control if tbey
are dead or if tbe remote control is not to be used for
an extended period of time. Tbis will prevent battery
acid from leaking irrto ttre battery compartmenL
Usingthe remotecontrolMODEbuttonto controlyourother devices
Your TV remote control has one dedicated TV mode and five programmable
multi-brand modes: CBL/SAT, VCR/PVR, DVD, AUDIO 1, and AUDIO 2. The
default device modes and programmable device modes are listed below.
Note: TheTglemote controlL_p/eprog/ammedto operatemost Tosblbadevices,tf
you ownanon TosbibadeviceoraTosbibadevicethatthe _ernotecontroli:_not
preprograrnmedto operate,you willneed to program theremote control See
"Programming theremotecontrol to operateyour other devices"onpage 31
1) TV Toshiba TV
2) CBL/SAT Toshiba Satellite receiver
3) VCR/PVR Toshiba VCR
4) DVD Toshiba DVD
5) AUDIO 1 Pioneer Audio receiver
6) AUDIO 2 Pioneer LD
Number(1-6)
1) TV Toshiba TV
2) CBL/SAT
3) VCR/PVR
4) DVD Multi-brand video/audio devices
5) AUDIO 1
6) AUDIO 2
You can directly select the device mode by pressing the corresponding
number button (1-6) while pressing the MODE button.
Note:
A/tbougb your new TV_ _emote control includes
codes for many devices, it may not include
codes forsome or all of the features on ce_tarn
devices you wLsbto controL if you are unable to
program the TVtsremote control to operate
your device or some of the features on tbat
device, use tbe device's remote control or tbe
controls on the device.
8(
#01E 026-0 4 566272HM195 28
Black
E) 56/62/72HM195
Copyright © 2005 TOSHIBA CORPORATION. All rights reserved.
7/28/05, 4:20 PM [
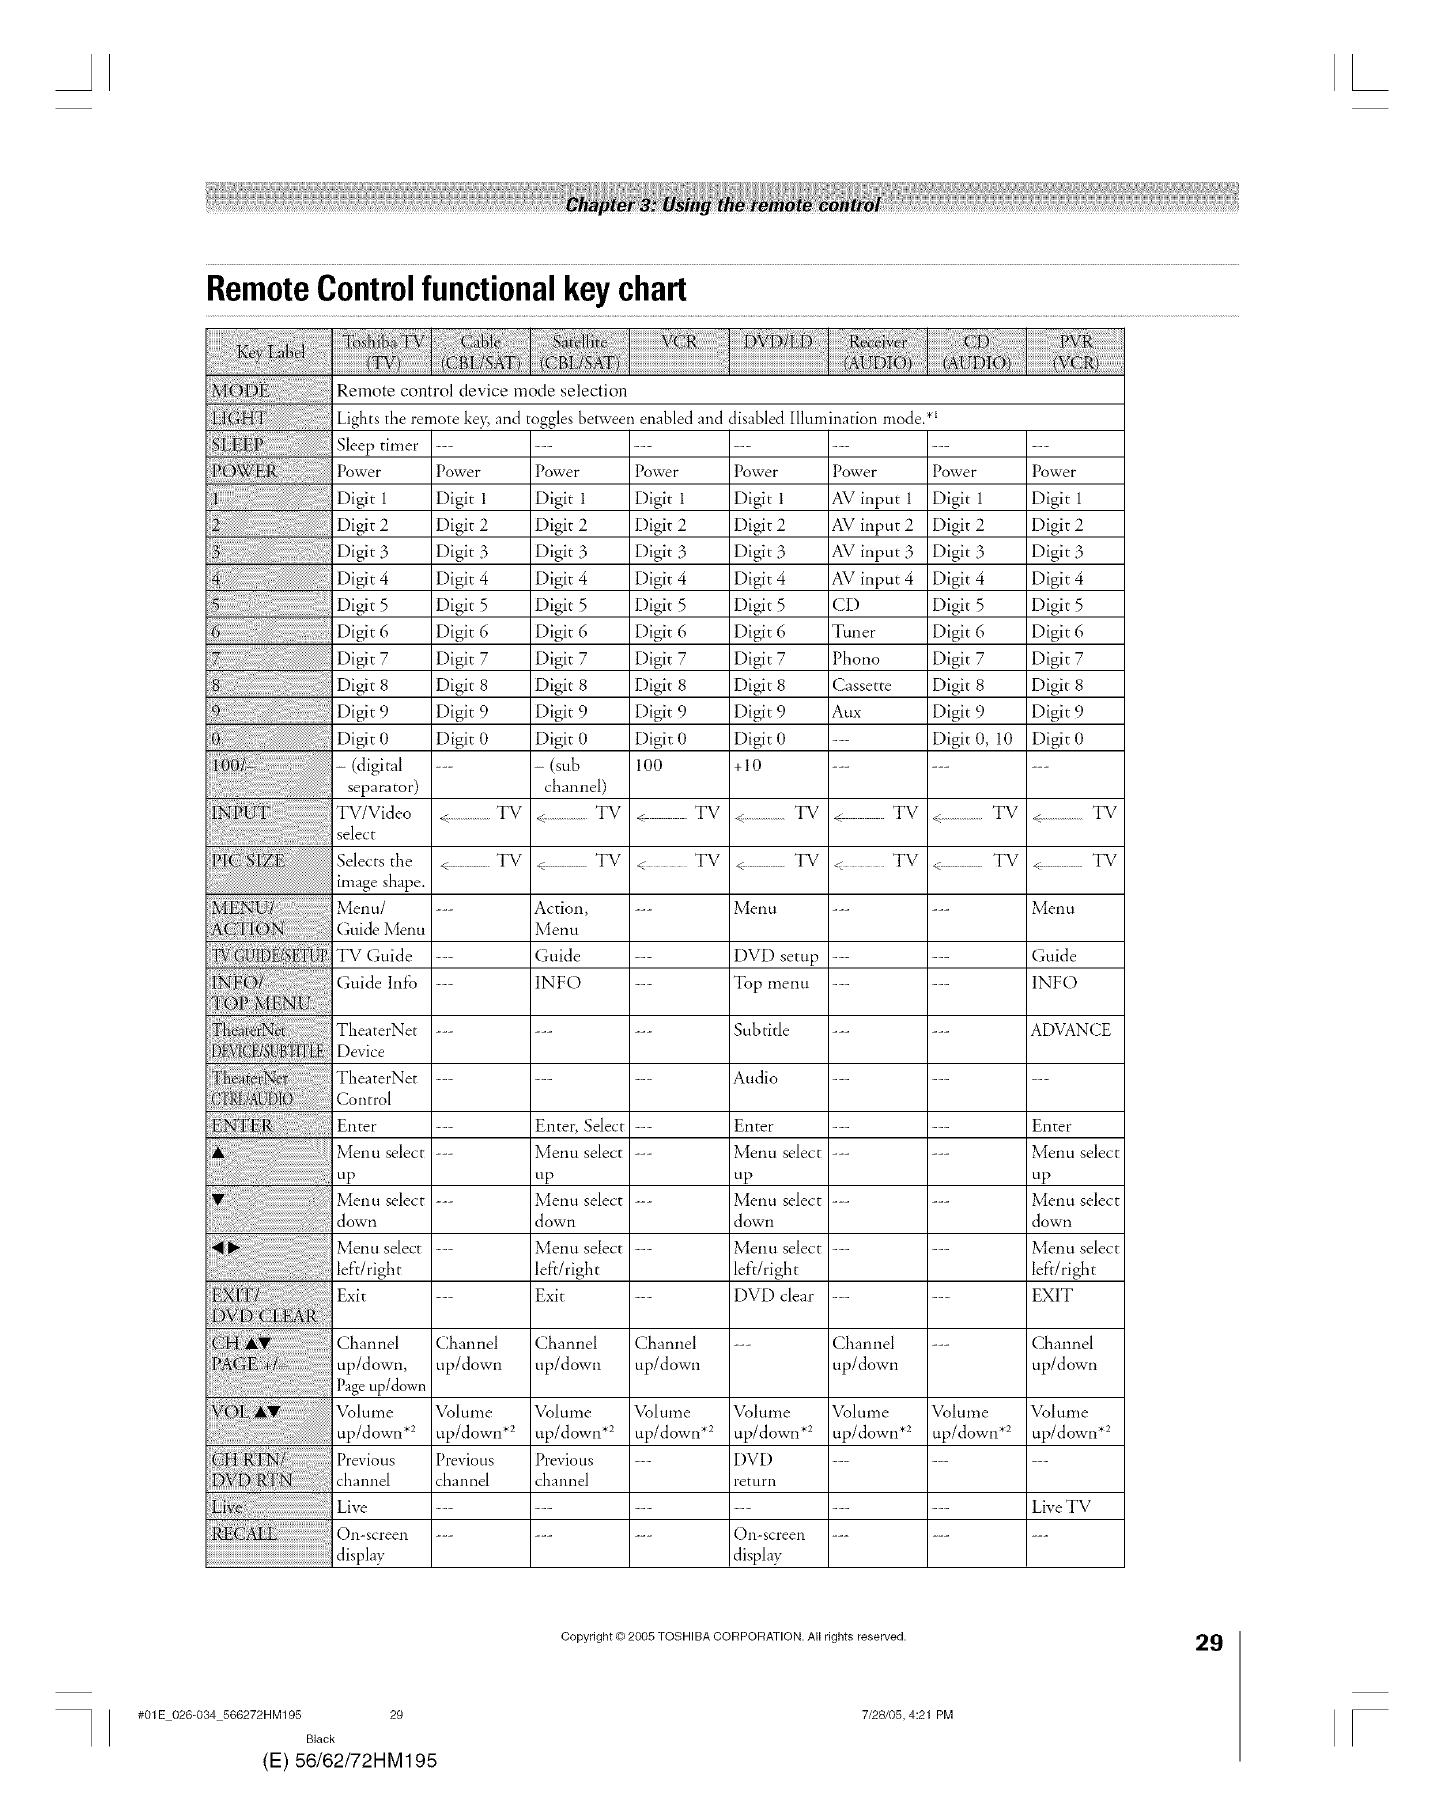
RemoteControlfunctionalkeychart
Remote control device mode selection
Lights tile remote ke> and toggles between enabled and
Power
Digit I
Digit 2
Digit 3
Digit 4
Digit 5
Digit 6
Digit 7
Digit 8
Digit 9
Digit 0
Sleep timer
Power
Digit 1
Digit 2
Digit 3
Digit 4
Digit 5
Digit 6
Digit 7
Digit 8
Digit 9
Digit 0
- (digital
separator)
TV/Video
select
Selects the
image shape.
Menu/
Cui, eMe.u
TV Guide
Guide Info
TheaterNet
Device
TheaterNet
Control
Enter
Menu select
up
Menu select
down
Menu select
lel:t/right
Exit
<.......................TV
< TV
Power
Digit I
Digit 2
Digit 3
Digit 4
Digit 5
Digit 6
Digit 7
Digit 8
Digit 9
Digit 0
- (s.b
channel)
......................TV
< Tv
Action,
Menu
Guide
INFO
Po%ve r
Digit I
Digit 2
Digit 3
Digit 4
Digit 5
Digit 6
Digit 7
Digit 8
Digit 9
Digit 0
100
Enter, Select
Menu select
up
Menu select
down
Menu select
left/right
Exit
+ TV
< TV
disabled Illumination mode. *I
Power
Digit I
Digit 2
Digit 3
Digit 4
Digit 5
Digit 6
Digit 7
Digit 8
Digit 9
Digit 0
+10
....................... WV
< TV
Menu
DVD setup
Top menu
Subtitle
Audio
Enter
Menu select
up
Menu select
down
Menu select
left/right
DVD clear
Power
Digit 1
Digit 2
Digit 3
Digit 4
Digit 5
Digit 6
Digit 7
Digit 8
Digit 9
Digit 0
Power Power
AV input 1 Digit 1
AV input 2 Digit 2
AV input 3 Digit 3
AV input 4 Digit 4
CD Digit 5
Tuner Digit 6
Phono Digit 7
Cassette Digit 8
Aux Digit 9
--- Digit 0, 10
TV ......................TV
< TV = TV
Channel ---
up/down
Volume Volume
up/down .2 up/down .2
...................... TV
<_ TV
Menu
Guide
INFO
ADVANCE
Eilter
Menu select
up
Menu select
down
Menu select
left/right
EXIT
Channel Channel Channel Channel --- Channel
up/down, up/down up/down up/down up/down
Pageup/down
Volume Volume Volume Volume Volume Volume
up/down .2 up/down .2 up/down .2 up/down .2 up/down .2 up/down .2
Previous Previous Previous --- DVD ---
channel channel channel return
Live ............ Live TV
On-screen ......... On-screen --
display display
#01E 026-034 566272HM195 29
Black
(E) 56/62/72HM195
Copyright © 2005 TOSHIBA CORPORATION. All rights reserved.
7/28/05, 4:21 PM
29
F
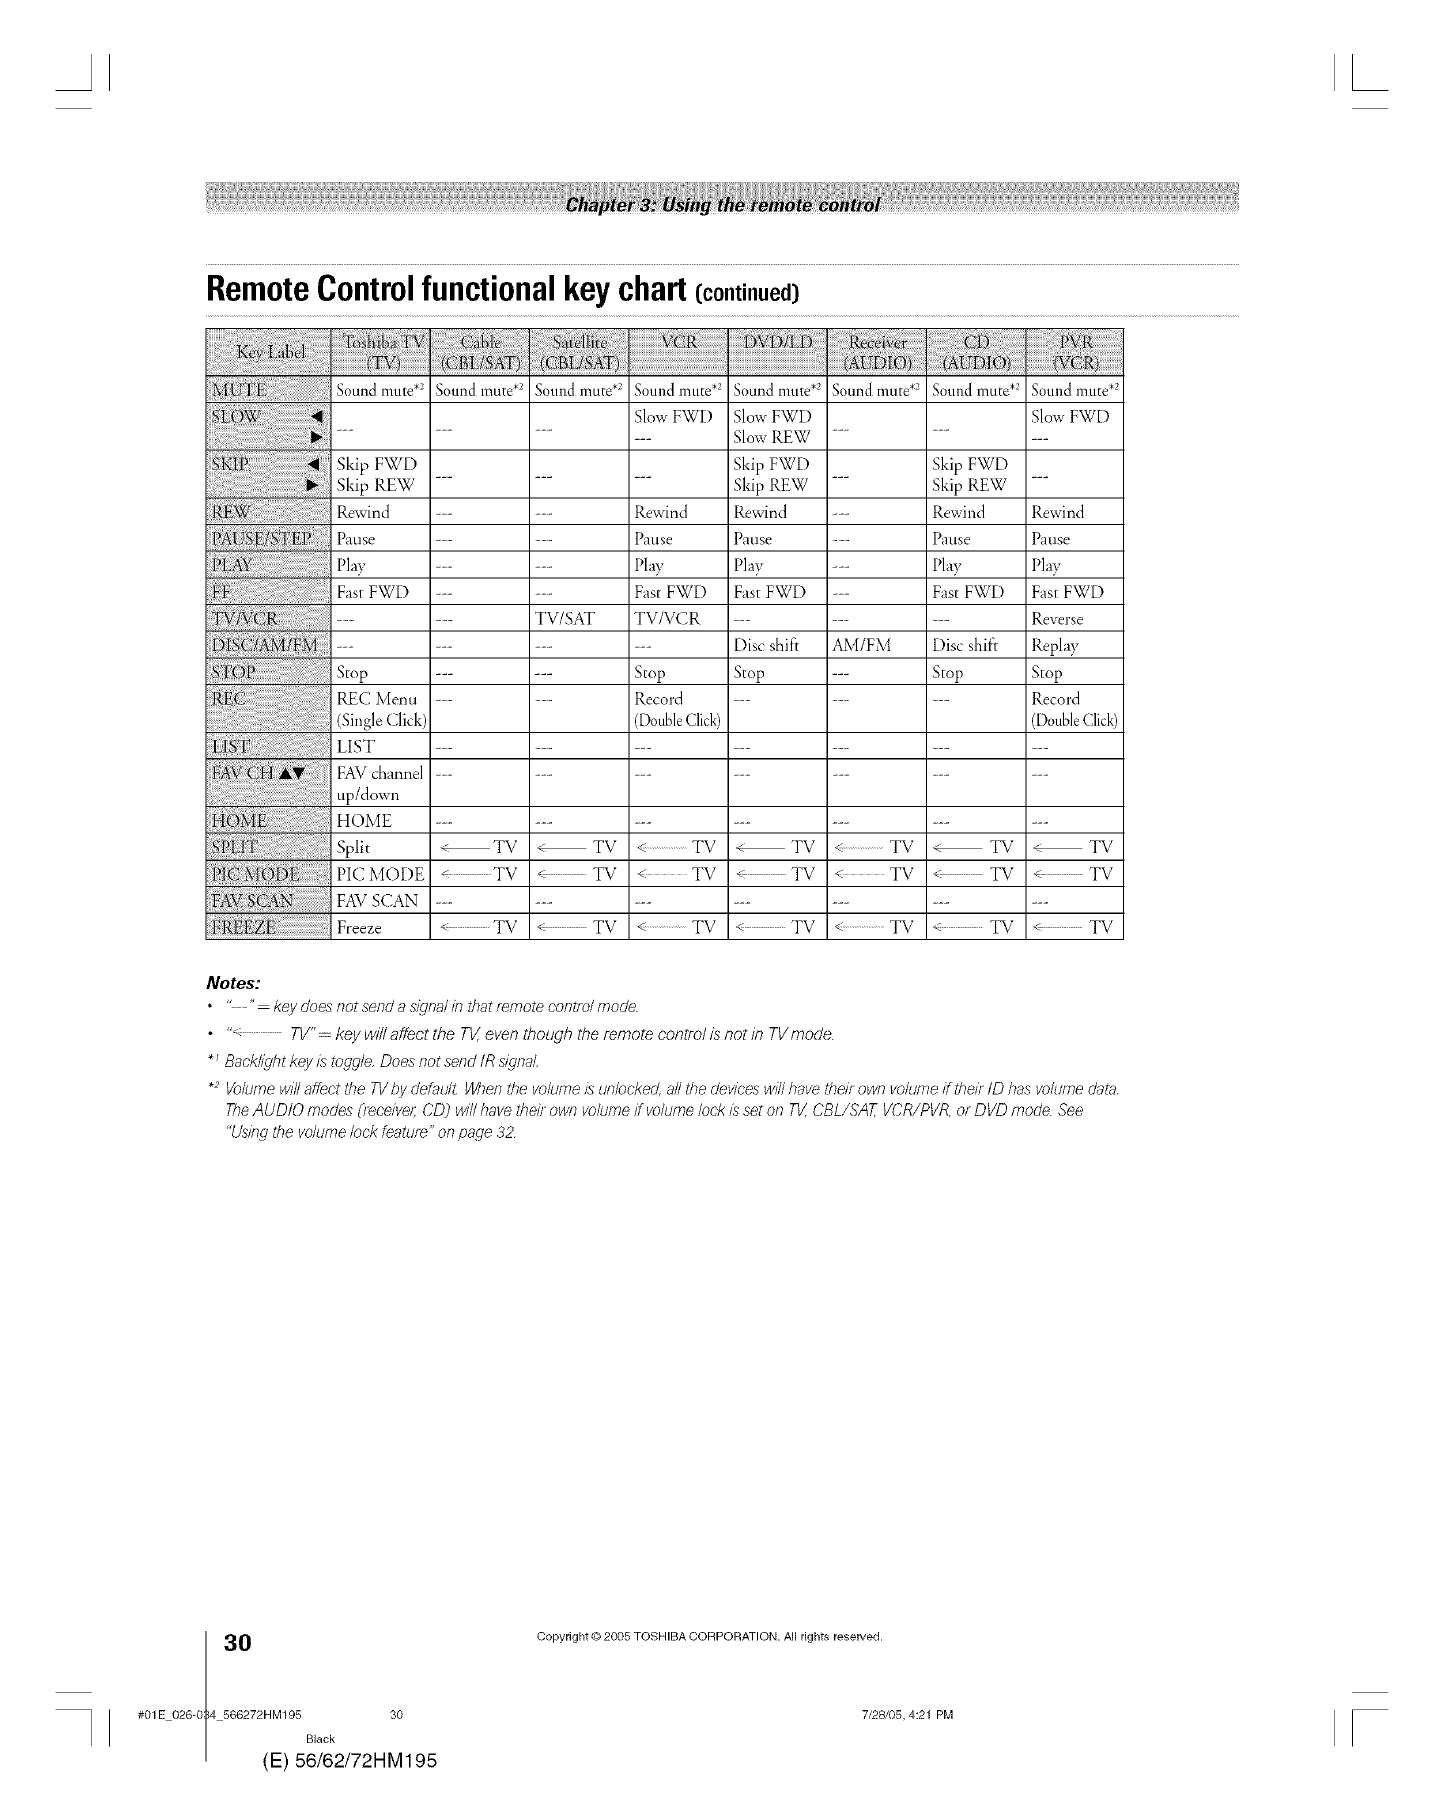
RemoteControlfunctional keychart(continued)
Sound mute .2 Sound mute .2
Skip FWD
Skip REW ---
Rewind ---
Pause ---
Play ---
Fast FWD --
Stop ---
REC Menu ---
(Single Click)
LIST ---
FAV d_annel ---
up/down
HOME ---
Spli t < TV
PIC MODE TV
FAV SCAN ---
Freeze _ TV
Sound mute .2 Sound mute .2
SlowFWD
--- Rewind
--- Pause
--- Play
--- Fast FWD
TV/SAT TV/VCR
--- Stop
--- Record
Double Click)
TV <.......................TV
÷ TV < TV
< TV <.......................TV
Sound mute *: Sound mute .2
SlowFWD
Slow REW ---
Skip FWD
Skip REW ---
Rewind ---
Pause ---
Play ---
Fast FWD ---
Disc shift AM/FM
Stop ---
< TV <.......................TV
< TV < TV
< TV <.......................TV
Sound mute .2 Sound mute .2
SlowFWD
Skip FWD
Skip REW
Rewind Rewind
Pause Pause
Play Play
Fast FWD Fast FWD
--- Reverse
Disc shif'r Replay
Stop Stop
--- Record
(DoubleClick)
TV -_c TV
TV < TV
< TV < TV
Notes:
" " key does not send assgna/in that _mote contfL_/mode.
• "< TV" =key will affect the TV, even though the remote control is not in TVmode.
sBacklight key/29toggle Does not send tR signal
.2 Volume will affect the TVby default When the volume is unlocked, all the devices will have theft own volume if theft tD has volume data
TheAUDIO modes Oece/ver; CD_ will have their own volume/f volume lock/,9 set on Tg, CBL/SAT, VCR/PVR, or DVD mode. See
"Using the volume loci< feature" on page 32,
0(
#01E 026-0 4 566272HM195 30
Black
E) 56/62/72HM195
Copyright © 2005 TOSHIBA CORPORATION. AN rights reserved.
7/28105, 4:21 PM
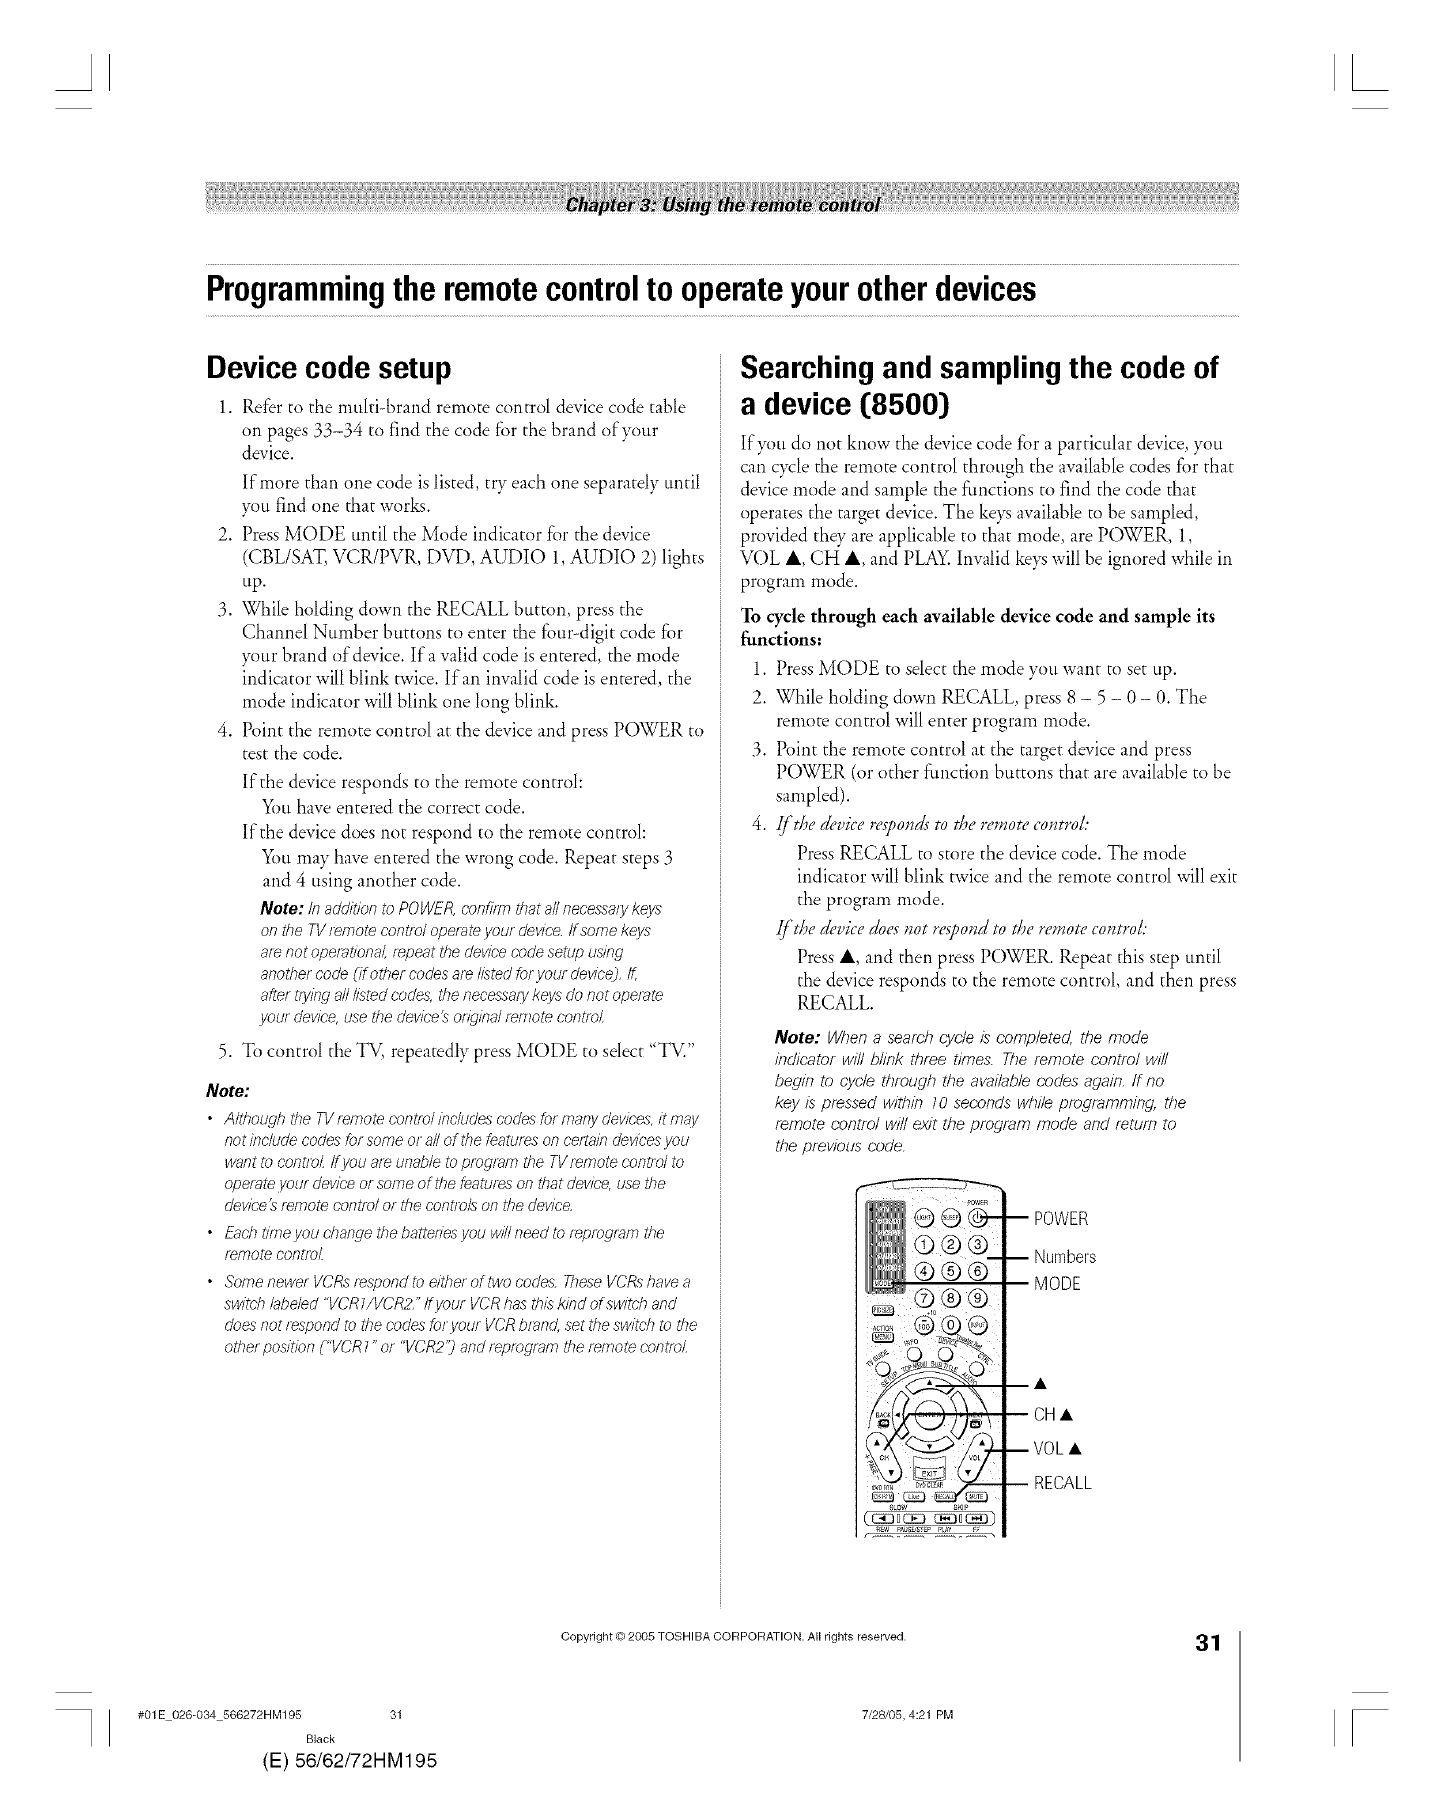
Programmingthe remotecontrolto operateyourotherdevices
Device code setup
1. Refer to the multi-brand remote control device code table
on pages 33-34 to find the code fbr the brand of your
device.
If more than one code islisted, try each one separately until
}_ti find one that works.
2. Press MODE until the Mode indicator for the device
(CBL/SAT, VCR/PVR, DVD, AUDIO 1, AUDIO 2) lights
tip.
3. While holding down the RECALL button, press the
Channel Number buttons to enter the four-digit code for
}_mr brand of&vice. Ira valid code is entered, the mode
indicator will blink twice. If an invalid code is entered, the
mode indicator will blink one long blink.
4. Point the remote control at the device and press POWER to
test the code.
If the device responds to the remote control:
_)u have entered the correct code.
If the device does not respond to the remote control:
You may have entered the wrong code. Repeat steps 3
and 4 using another code.
Note: In addition to POWER, confi[m that all necessa/y keys
on the TV remote control operate your device, ff some keys
a/_ not operational, t_peat the device code setup using
anothercode(ifothercodesaf_listedforyourdevice],If,
aftert/ying allIlatedcodes,thenecessa/ykew donotoperate
your device,usethedevice3ofTginal remotecontro[
5. To control the TV, repeatedly press MODE to select "TV."
Note:
•Although the TV remote control includes codes for many devices, it may
not include codes for some or all of the features on ce/1.aindevices you
want to controZ ff you are unable to program the TV femote control to
operate your device or some of the features on that device, use the
device t_remote control or the cont/ols on the device
• Eachtffneyouchangethebattedesyouwillneedto_programthe
remote contro_
• Sofbe newer VCRs tespond to either of two codes These VCRs have a
switch labeled "VCRT/VCR2 _ff your VCR has thL_kind of switch and
does not respond to the codes for your VCR bland, set the switch to the
other position C"VCR1" or "VCR2") and t_pmgram the remote control
Searching and sampling the code of
a device (8500}
If?_m do not know the device code for a particular device, you
can cycle the remote control through the available codes for that
device mode and sample the functions to find the code that
operates the target device. The ke?_ available to be sampled,
provided they are applicable to that mode, are POWER, 1,
VOL •, CH •, and PLAY. Invalid ke?_will be ignored while in
program mode.
To cycle through each available device code and sample its
functions:
1. Press MODE to select the mode you want to set tip.
2. While holding down RECALL, press 8 - 5 - 0 - 0. The
remote control will enter program mode.
3. Point the remote control at the target device and press
POWER (or other function buttons that are available to be
sampled).
4. If tl_edevice re,_0n_Z_"to the _'mote contt_k
Press RECALL to store the device code. The mode
indicator will blink twice and the remote control will exit
the program mode.
If the device doesnot re,_ond m the ,_,motecont*v/:
Press •, and then press POWER. Repeat this step until
the device responds to the remote control, and then press
RECALL.
Note: When a search cycle is completed, the mode
indicator will blink three times. The remote control will
begin to cycle through the available codes again, ff no
key is pressed within 10 seconds while programming, the
f_mote control will exit the program mode and retum to
the previous code.
s_ow sKiP
-- POWER
-- Numbers
MODE
CH •
VOL•
RECALL
#01E 026-034 566272HM195 31
Black
(E) 56/62/72HM195
Copyright © 2005 TOSHIBA CORPORATION. All rights reserved.
7/28105, 4:21 PM
31
[
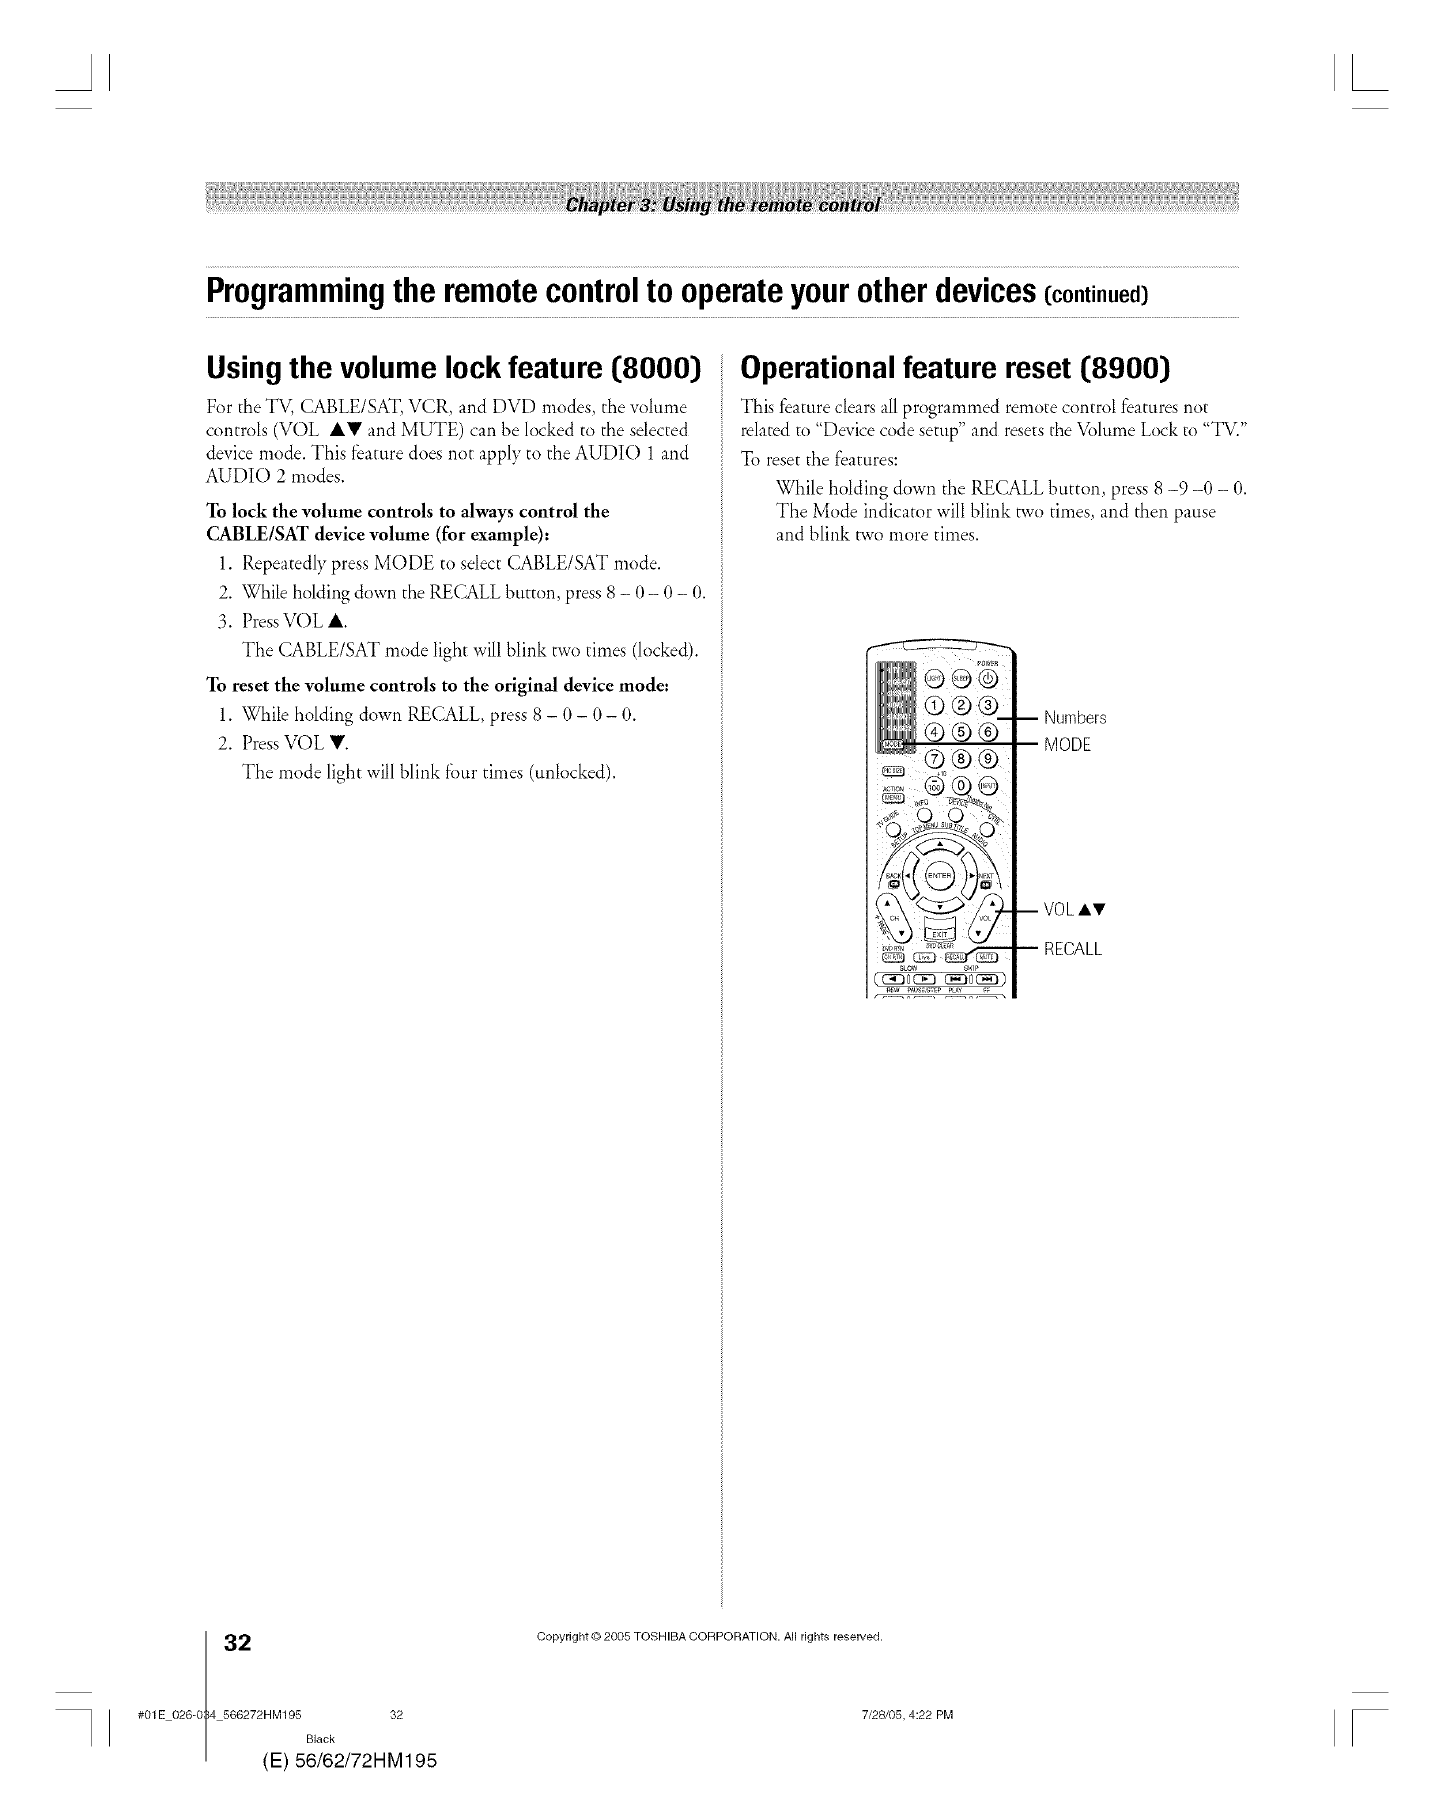
AL
Programmingtheremotecontroltooperateyourotherdevices(continued)
Usingthe volume lock feature (8000)
For the TV, CABLE/SAT, VCR, and [)VD modes, the w4ume
controls (VOL Ay and MUTE) can be locked to the selected
device mode. This feature does not apply to the AUDIO 1 and
AUDIO 2 modes.
To lock the volume controls to always control the
CABLE/SAT device volume (for example):
1. Repeatedly press MODE to select CABLE/SAT mode.
2. While holding down the RECALL button, press 8 - 0 - 0 - 0.
3. PressVOL A.
The CABLE/SAT mode light will blink two times (locked).
To reset the volume controls to the original device mode:
1. While holding down RECALL, press 8 -0-0-0.
2. PressVOL V.
The mode light will blink fbur times (unlocked).
Operational feature reset (8900)
This feature clears all programmed remote control features not
related to "Device code setup" and resets the V_)lumeLock to "TV."
To reset the features:
While holding down the RECALL button, press 8 -9 -0 - 0.
The Mode indicator will blink two times, and then pause
and blink two more times.
m Numbers
MODE
-- VOLAV
J RECALL
2(
#OlE 026-0 4 566272HM195 32
Black
E) 56/62/72HM195
Copyright © 2005 TOSHIBA CORPORATION. AI] rights reserved.
7/28/05, 4:22 PM r
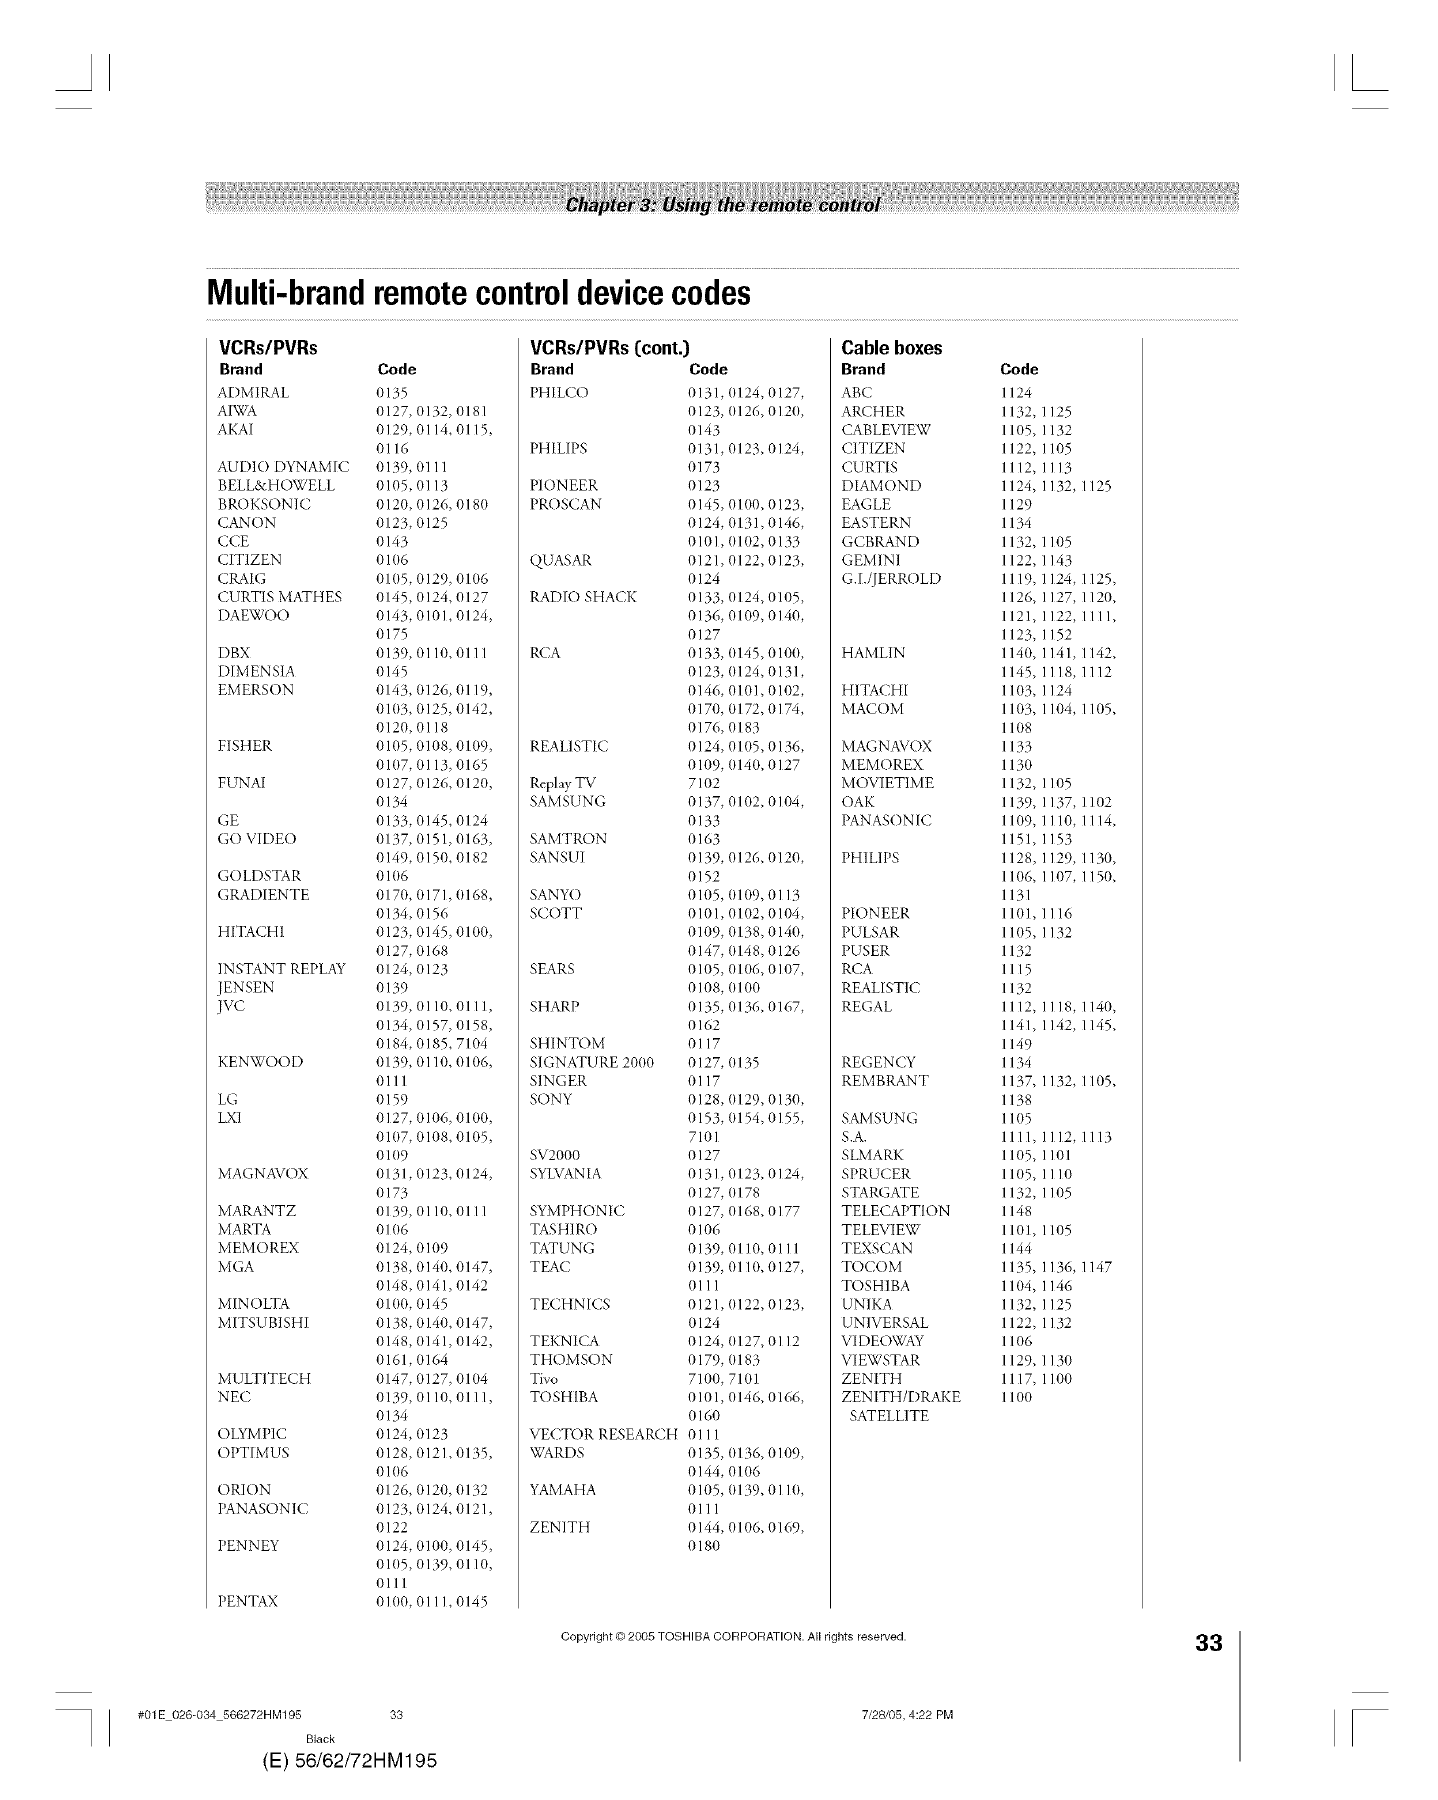
Multi-brandremotecontroldevicecodes
VCRs/PVRs
Brand Code
ADMIRAL 0135
AIWA (/127, (t132, (/I 81
AKAI 0129, 0114, 0115,
0116
AUDIO 1,)YNAMIC 0139, 0111
BELL&HOWELL 0105, 0113
BROKSONIC 0120, 0126, 018(1
CANON 0123, 0125
CCE 0143
CITIZEN 01(16
CRAIG 01(t5, 0129, 01(t6
CURTIS MATHES 0145, 0124, 0127
DAEWOO 0143, 0101,0124,
0175
DBX 0139, O110, 0111
DIMENSIA 0145
EMERSON 0143, (t126, 0119,
01(t3, 0125, 0142,
0120, 0118
FISHER 0105, 0108, 01(t9,
01(t7, 0113, 0165
FUNAI 0127, 0126, 0120,
0134
GE 0133, 0145, 0124
GO VI1,)EO 0137, 0151, 0163,
0149, 0150, 0182
GOLDSTAR 01(16
GRA1,)IENTE 0170, (1171, (1168,
0134, 0156
HITACHI 0123, 0145, 0100,
0127, 0168
INSTANT REPLAY 0124, 0123
JENSEN 0139
[VC 0139, 0110, 01 I 1,
0134, 0157, 0158,
0184, 0185, 7104
KENWOO1,) 0139, 0110, 0106,
0111
LG 0159
LXI 0127, (t106, 01(t0,
01(t7, 0108, 0105,
01(t9
MAGNAVOX 0131, 0123, 0124,
0173
MARANTZ 0139, 0110, 0111
MARTA 01(t6
MEMOREX 0124, 0109
MGA 0138, 0140, 0147,
0148, 0141, 0142
MINOLTA 0100, 0145
MITSUBISHI 0138, 0140, 0147,
0148, (t141, 0142,
0161, (t164
MULTITECH 0147, 0127, 0104
NEC 0139, 0110, 0111,
0134
OLYMPIC 0124, 0123
OPTIMUS 0128, 0121,0135,
01(t6
ORION 0126, 0120, 0132
PANASONIC 0123, 0124, 0121,
0122
PENNEY 0124, 0100, 0145,
01(t5, 0139, 0110,
0111
PENTAX 01(t0, 0111,0145
VCRs/PVRs (cont.}
Brand Code
PHIL(;(.) !-/131, (t124, (/127,
0123, (1126, 012(t,
0143
PHILIPS 0131, 0123, 0124,
0173
PION EER 0123
PROSCAN 0145, 0100, 0123,
0124, 0131, 0146,
0101, (t1(t2, 0133
QUASAR 0121, 0122, 0123,
0124
RA1,)IO SHACK 0133, 0124, 0105,
0136, 0109, 0140,
0127
RCA 0133, 0145, 0100,
0123, (t124, 0131,
0146, 0101, 0102,
0170, 0172, 0174,
0176,0183
REALISTIC 0124, 01 (15,0136,
0109, (tl4(t, 0127
Replay TV 7102
SAMSUNG 0137, 0102, 0104,
0133
SAMT RC)N 0163
SANSUI 0139, 0126, 0120,
0152
SANYO 0105, (tl09, 0113
SCOTT 0101, 0102, 0104,
0109, 0138, 0140,
0147, (t148, 0126
SEARS 0105, 0106, 0107,
0108, 0100
SHARP 0135, 0136, 0167,
0162
SHINTOM 0117
SIGNATURE 2000 0127,(tl35
SINGER 0117
SONY 0128, (t129, 0130,
0153, (1154, 0155,
7101
SV2000 0127
SYLVANIA 0131, 0123, 0124,
0127, (t178
SYMPHONIC 0127, 0168, 0177
TASHIRO 0106
TATUNG 0139, 0110, 0111
TEAC 0139, 01 I(1, 0127,
0111
TECHNICS 0121, 0122, 0123,
(tl24
TEKNICA 0124, (t127, 0112
THOMSON 0179, 0183
Tivo 7100, 7101
TOSHIBA 0101, 0146, 0166,
(tl60
VECTOR RESEARCH 0111
WARDS 0135, 0136, 0109,
0144, 01(t6
YAMAHA 0105, (tl39, 011(1,
0111
ZENITH 0144, 0106, 0169,
0180
Cable boxes
Brand Code
ABC I 124
ARCHER 1132, 1125
CABLEVIEW 1105, 1132
CITIZEN 1122, 1105
CURTIS 1112, 1113
DIAMOND 1124, 1132, 1125
EAGLE 1129
EASTERN 1134
GCBRAN1,) 1132, 1105
GEMINI 1122, 1143
G.I./JERROLD 1119, 1124, 1125,
1126, 1127, 1120,
1121, 1122, III1,
1123, 1152
HAMLIN 114(/, 1141, 1142,
1145, 1118, 1112
HITACHI I 1(t3, 1124
MACOM 1103, 1104, 1105,
I 1(18
MAGNAVOX 1133
MEMOREX 1130
MOVIETIME 1132, 1105
OAK 1139, 1137, 1102
PANASONIC 11(t9, 1110, I 114,
1151, 1153
PHILIPS 1128, 1129, 1130,
11(t6, 1107, 1150,
1131
PIONEER 1101, I I I6
PULSAR 1I (15, 1132
PUSER 1132
RCA I 115
REALISTIC I 132
REGAL 1112, 1118, 1140,
1141, 1142, 1145,
1149
REGENCY I 134
REMBRANT I 137, 1132, I 105,
1138
SAMSUNG I I(15
S.A. 1111,1112,1113
SLMARK 1105, 1101
SPRUCER 1105, I I I0
STARGATE 1132, 1105
TELECAPTION I 148
TELEVIEW 1101, 1105
TEXSCAN 1144
TOCOM 1135, 1136, 1147
TOSHIBA 1104, 1146
UNIKA 1132, 1125
UNIVERSAL I 122, 1132
VIDEOWAY I 106
VIEWSTAR 1129, 1130
ZENITH I I 17, 1100
ZENITH/1,)RAKE I 100
SATELLITE
Copyright © 2005 TOSHIBA CORPORATION. All rights reserved. 33
#01E 026-034 566272HM195 33
Black
(E) 56162/72HM195
7/28/05, 4:22 PM
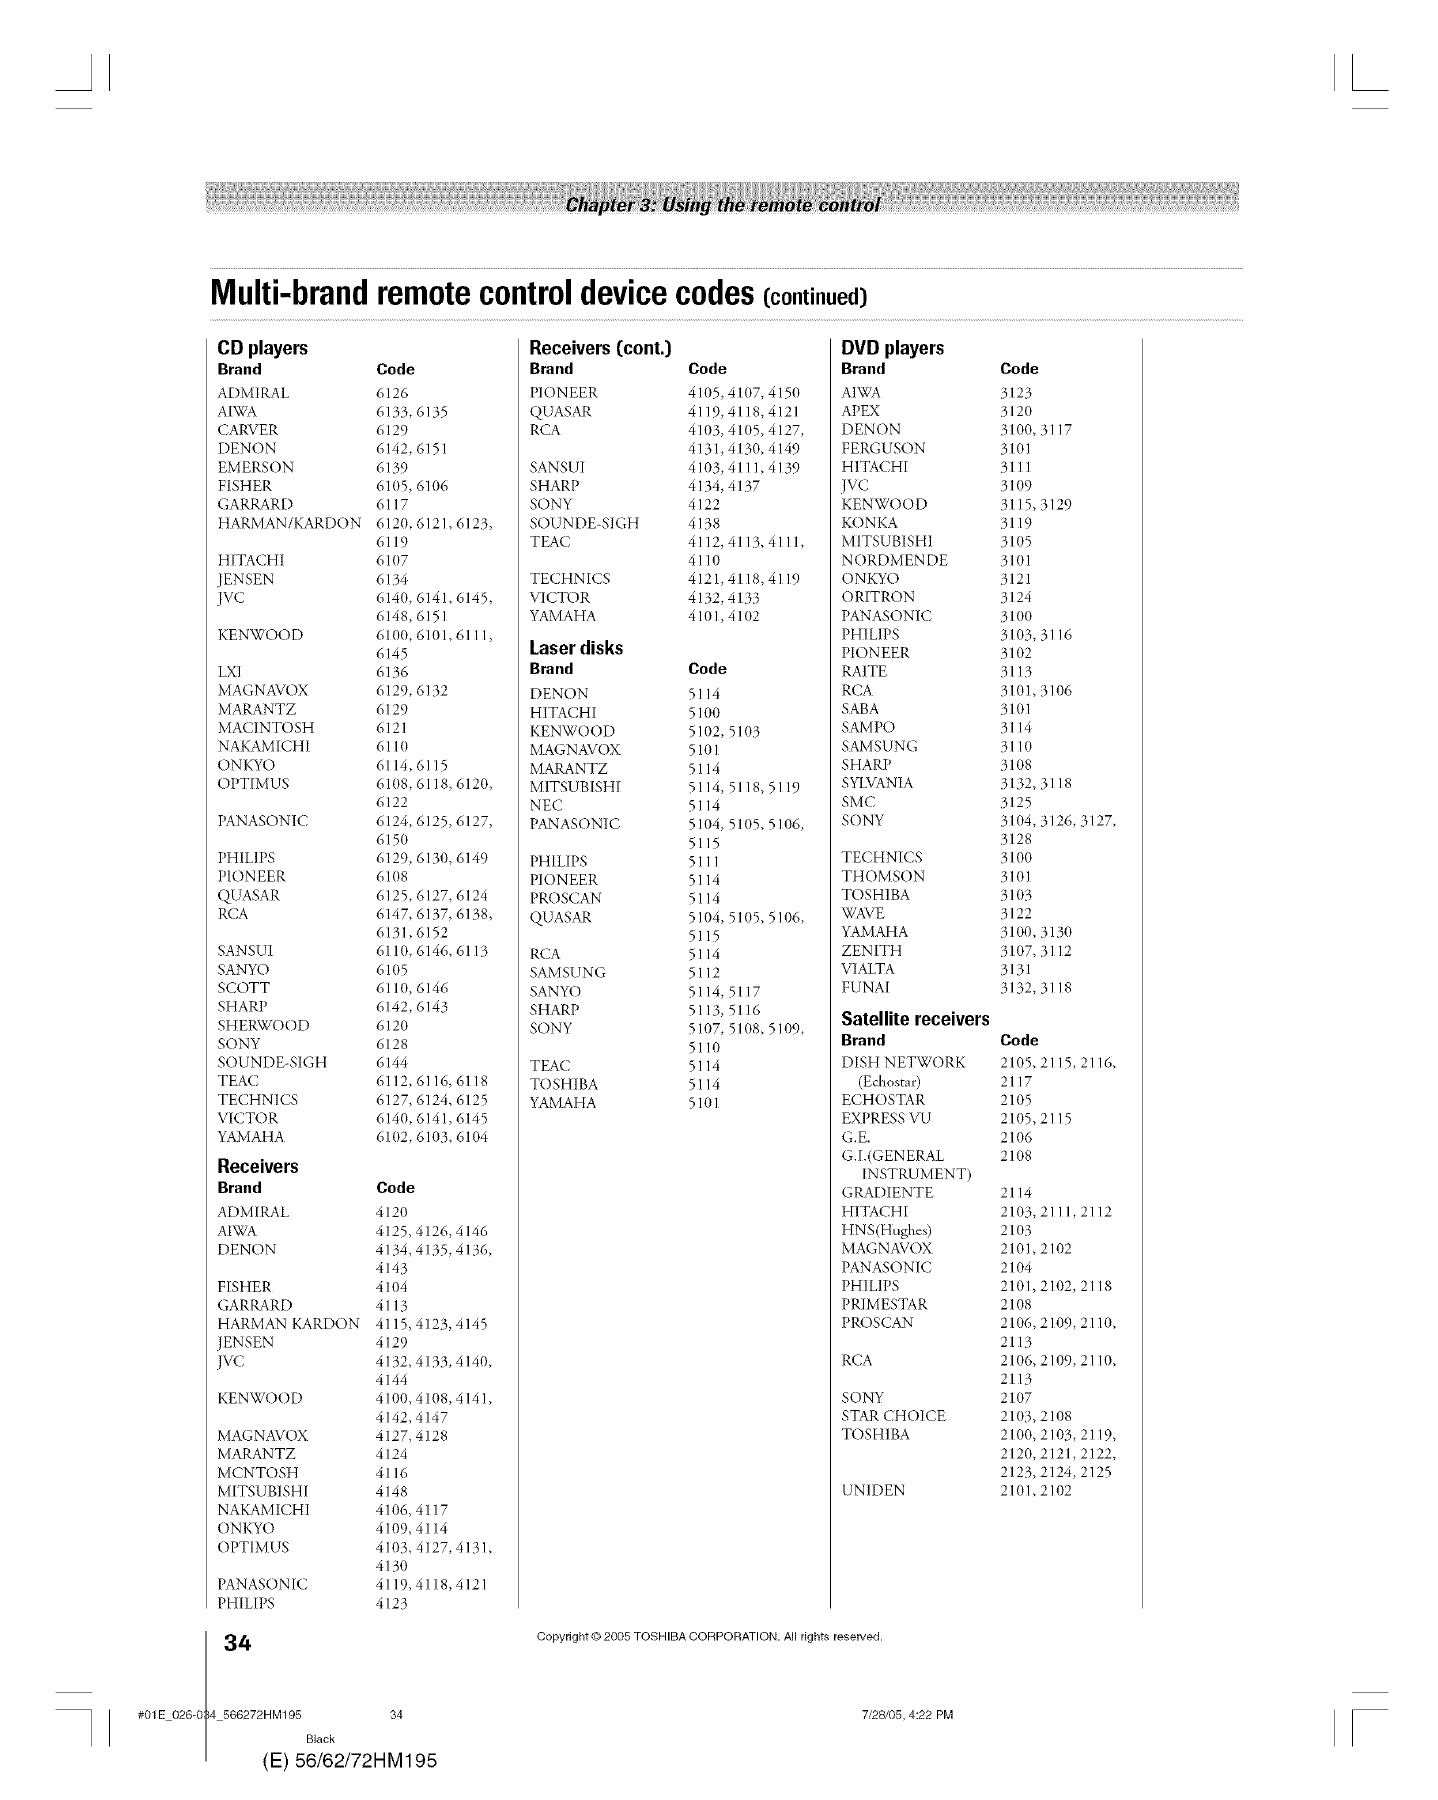
Multi-brandremotecontroldevicecodes(continued)
CD players
Brand Code
ADMIRAL 6126
AIWA 6133, 6135
CARVER 6129
DENON 6142,6151
EMERSON 6139
FISHER 61()5, 6106
GARRARD 6117
HARMAN/KARDON 6120,6121,6123,
6119
HITACHI 61(17
JENSEN 6134
JVC 6140, 6141, 6145,
6148,6151
KENWOOD 6100, 6101, 61 I I,
6145
LXI 6136
MAGNAVOX 6129, 6132
MARANTZ 6129
MACINTOSH 6121
NAKAMICHI 6110
ONKYO 6114, 6115
OPTIMUS 61(t8, 6118, 6120,
6122
PANASONIC 6124, 6125, 6127,
6150
PHILIPS 6129, 6130, 6149
PIONEER 61(18
QUASAR 6125, 6127, 6124
RCA 6147, 6137, 6138,
6131,6152
SANSUI 6110, 6146, 6113
SANYO 61(15
SCOTT 6110, 6146
SHARP 6142, 6143
SHERWOOD 6120
SONY 6128
SOUNDE-SIGH 6144
TEAC 6112, 6116, 6118
TECHNICS 6127, 6124, 6125
VICTOR 6140, 6141, 6145
YAMAHA 61(t2, 6103, 6104
Receivers
Brand Code
ADMIRAL 412{-/
AIWA 4125, 4126, 4146
DENON 4134, 4135, 4136,
4143
FISHER 4104
GARRARD 4113
HARMAN KARDON 4115,4123,4145
JENSEN 4129
JVC 4132, 4133, 4140,
4144
KENWOOD 4100, 4108, 4141,
4142,4147
MAGNAVOX 4127, 4128
MARANTZ 4124
MCNTOSH 4116
MITSUBISHI 4148
NAKAMICHI 4106, 41 ] 7
ONKYO 4109, 41 ]4
OPTIMUS 4103, 4127, 4131,
4130
PANASONIC 4119,4118,4121
PHILIPS 4123
Receivers (cont.)
Brand Code
PlON EER 41{-/5,41 (17,415(1
QUASAR 4119, 4118, 4121
RCA 4103, 41(t5, 4127,
4131,4130, 4149
SANS UI 4103, 4111, 4139
SHARP 4134, 4137
SONY 4122
SOUNDE-SIGH 4138
TEAC 4112,4113,4111,
4110
TECHNICS 4121, 4118, 4119
VICTOR 4132, 4133
YAMAHA 4101,41 (12
Laser disks
Brand Code
DENON 5114
HITACHI 5100
KENWOOD 5102, 5103
MAGNAVOX 5101
MARANTZ 5114
MITSUBISHI 5114, 5118, 5119
NEC 5114
PANASONIC 5104, 5105, 5106,
5115
PHIEIPS 5111
PIONEER 5114
PROSCAN 5114
QUASAR 5104, 51(t5, 5106,
5115
RCA 5114
SAMSUNG 5112
SANYO 5114, 5117
SHARP 5113, 5116
SONY 5107, 51(t8, 5109,
5110
TEAC 5114
TOSHIBA 5114
YAMAHA 5101
DVD players
Brand Code
AIWA 3123
APEX 3120
DENON 3100, 3117
FERGUSON 3101
HITACHI 3111
[VC 31 (19
KENWOOD 3115, 3129
KONKA 3119
MITSUBISHI 31 (15
NORDMENDE 3101
ONKYO 3121
ORITRON 3124
PANASONIC 3100
PHILIPS 31 (13,3116
PIONEER 3102
RAITE 3113
RCA 31(tl, 3106
SABA 31(tl
SAMPO 3114
SAMSUNG 31 I(1
SHARP 31 (18
SYLVANIA 3132, 3118
SMC 3125
SONY 3104, 3126, 3127,
3128
TECHNICS 3100
THOMSON 3101
TOSHIBA 31 (13
WAVE 3122
YAMAHA 3100, 3130
ZENITH 31(t7, 3112
VIALTA 3131
FUNAI 3132, 3118
Satellite receivers
Brand
DISH NETWORK
(Echostar)
ECHOSTAR
EXPRESS VU
G.E.
G.I.(GENERAL
INSTRUMENT)
GRADIENTE
HITACHI
HNS(Hughes)
MAGNAVOX
PANASONIC
PHILIPS
PRIMESTAR
PROSCAN
RCA
SONY
STAR CHOICE
TOSHIBA
UNIDEN
Code
2105,2115,2116,
2117
2105
21(t5,2115
2106
2108
2114
2103,2111,2112
2103
2101,2102
2104
2101,2102,2118
2108
2106,2109,2110,
2113
2106,2109,2110,
2113
21(t7
21(t3, 2108
21(t0, 2103, 2119,
2120,2121,2122,
2123,2124,2125
21(tl,2102
4(
#01E 026-0 4 566272HM195 34
Black
E) 56/62/72HM195
Copyright © 2005 TOSHIBA CORPORATION. All rights reserved.
7/28/05, 4:22 PM F
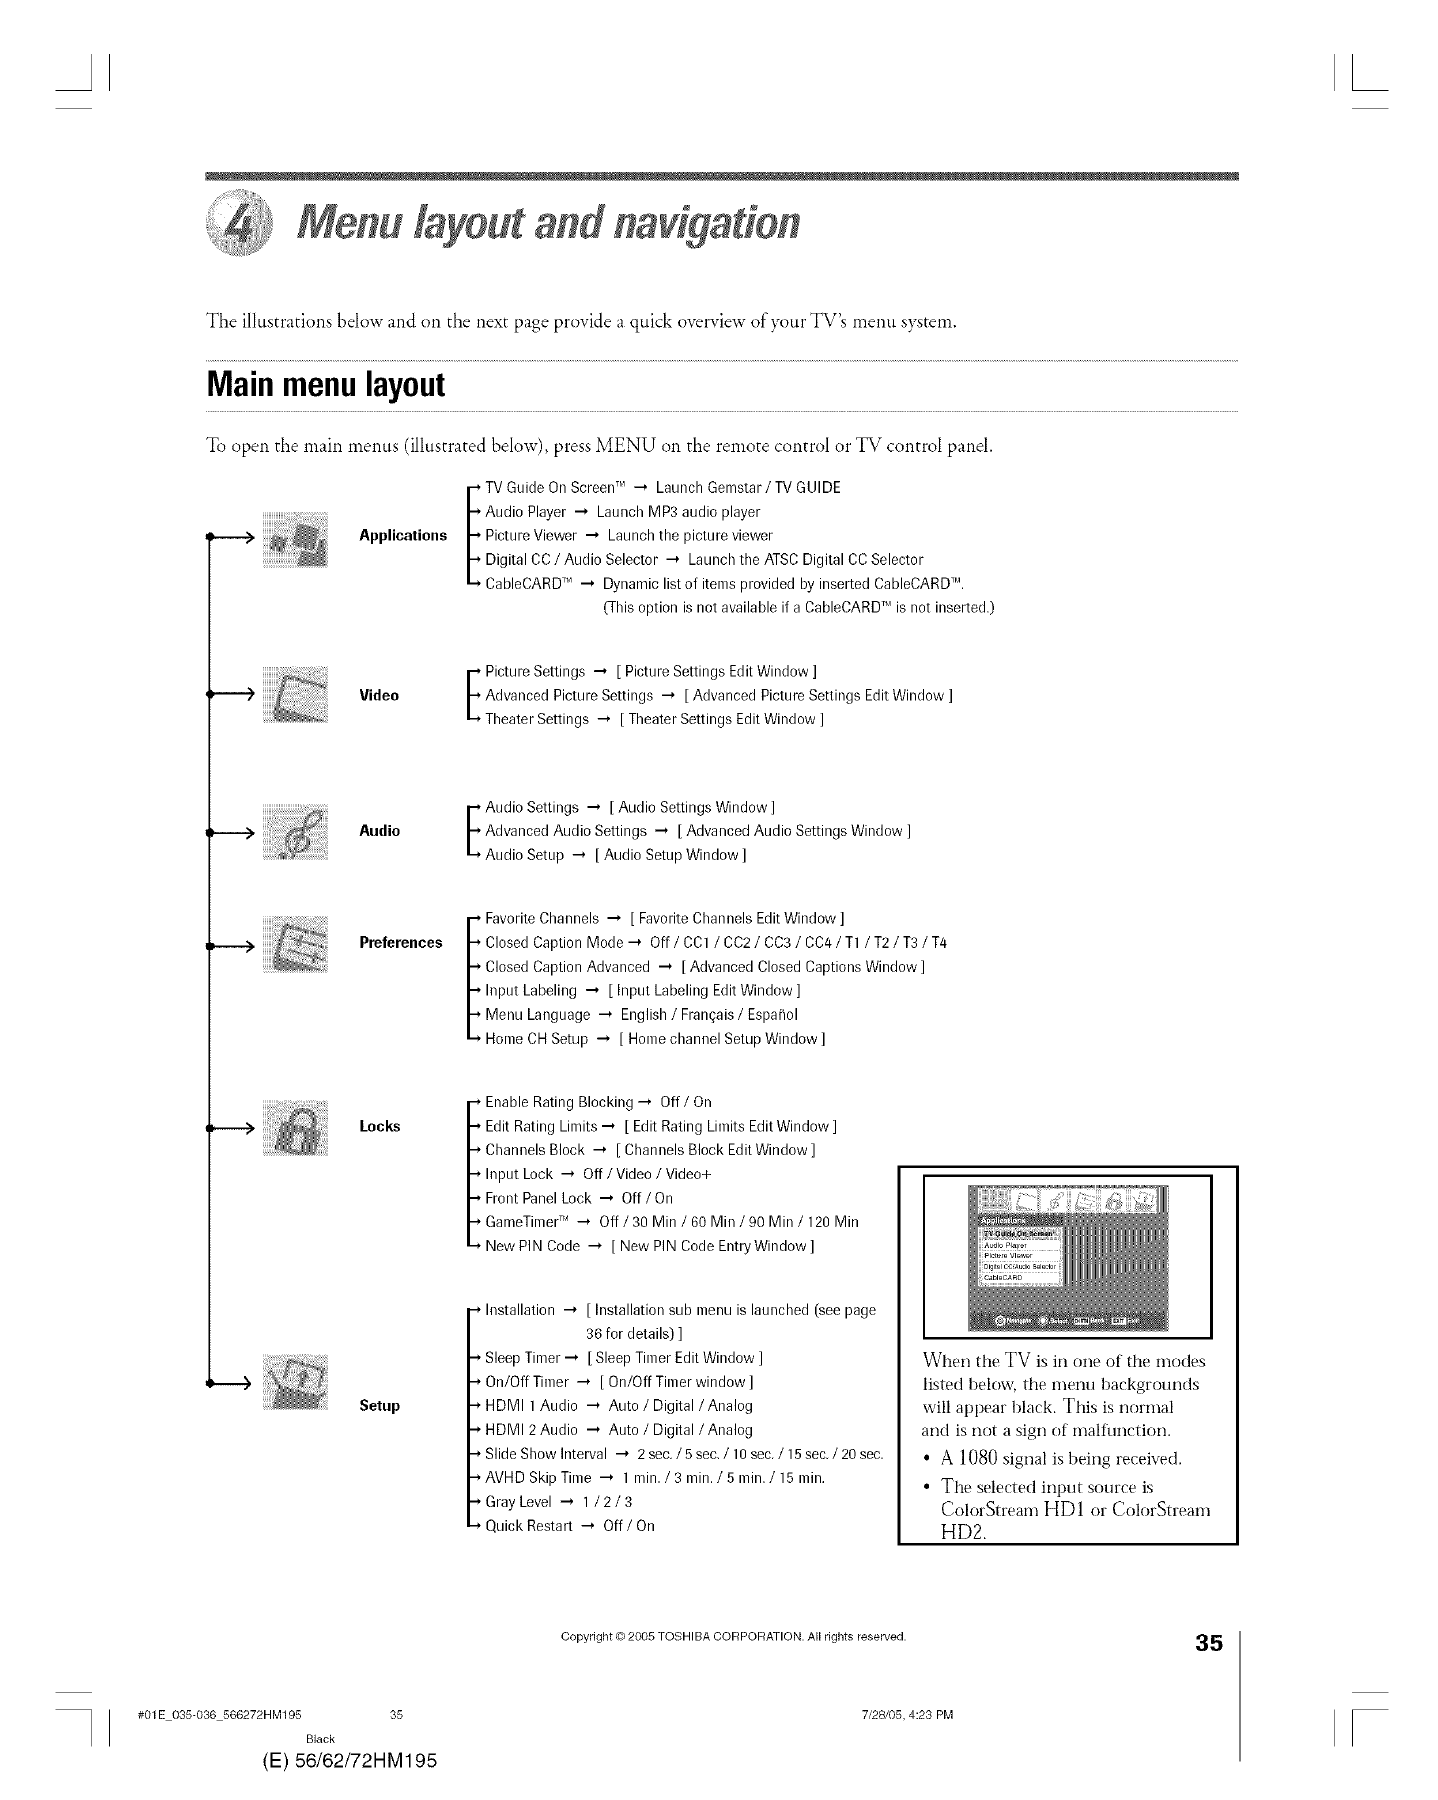
A[
The illustrations below and on the next page provide a quick overview of your TV's menu system.
Main menulayout
To open the main menus (illustrated below), press MENU on the remote control or TV control panel.
r _TV Guide On Screen_M_ Launch Gemstar/TV GUIDE
_ Audio Player _ Launch MP3 audio player
Applications _ Picture Viewer _ Launch the picture viewer
_ Digital CC /Audio Selector _ Launch the ATSC Digital CC Selector
CableCARDT'__ Dynamic list of items provided by inserted CableCARD_M.
(This option is not available if a CableCARDT'_is not inserted.)
_Video
E icture Settings _ [ Picture Settings Edit Window ]
Advanced Picture Settings _ [ Advanced Picture Settings Edit Window ]
Theater Settings _ [ Theater Settings Edit Window ]
--* iii Audio E Audio Settings _ [ Audio Settings Window ]
Advanced Audio Settings _ [ Advanced Audio Settings Window ]
Audio Setup _ [ Audio Setup Window ]
Preferences
FavoriteChannels _ [ Favorite Channels Edit Window ]
Closed Caption Mode _ Off /CC1 /CC2 /CC3 /CC4 /T1/T2 /T3/T4
Closed Caption Advanced _ [ Advanced Closed Captions Window ]
Input Labeling _ [ Input Labeling Edit Window ]
Menu Language _ English /Frangais/Espafiol
Home CH Setup _ [ Home channel Setup Window ]
,___)
Locks
Enable Rating Blocking _ Off/On
Edit Rating Limits _ [ Edit Rating Limits Edit Window ]
Channels Block _ [ Channels Block Edit Window]
Input Lock _ Off /Video /Video+
Front Panel Lock _ Off/On
GameTimerT'__ Off /30 Min /60 Min /90 Min /120 Min
New PIN Code _ [ New PIN Code EntryWindow ]
Installation _ [ Installation sub rnenu is launched (see page
36 for details) ]
Sleep Timer _ [ Sleep Timer Edit Window ]
On/Off Timer _ [ On/Off Timer window ]
HDMI I Audio _ Auto /Digital/Analog
HDMI 2 Audio _ Auto /Digital /Analog
Slide Show Interval _ 2 sec./5 sec, /10 sec./15 sec./20 sec,
AVHD Skip Time _ I min./3 min./5 rain./15 rain.
Gray Level _ 1/2/3
Quick Restart _ Off/On
When the TV is in one of the modes
listed below, the menu backgrounds
will appear black. This is normal
and is not a sign of malflmction.
• A 1080 signal is being received.
• The selected input source is
ColorStreamHD 1 or ColorStream
HD2.
#OlE 035-036 566272HM195 35
Black
(E) 56/62/72HM195
Copyright © 2005 TOSHIBA CORPORATION. All rights reserved.
7/28/05, 4:23 PM
35
[
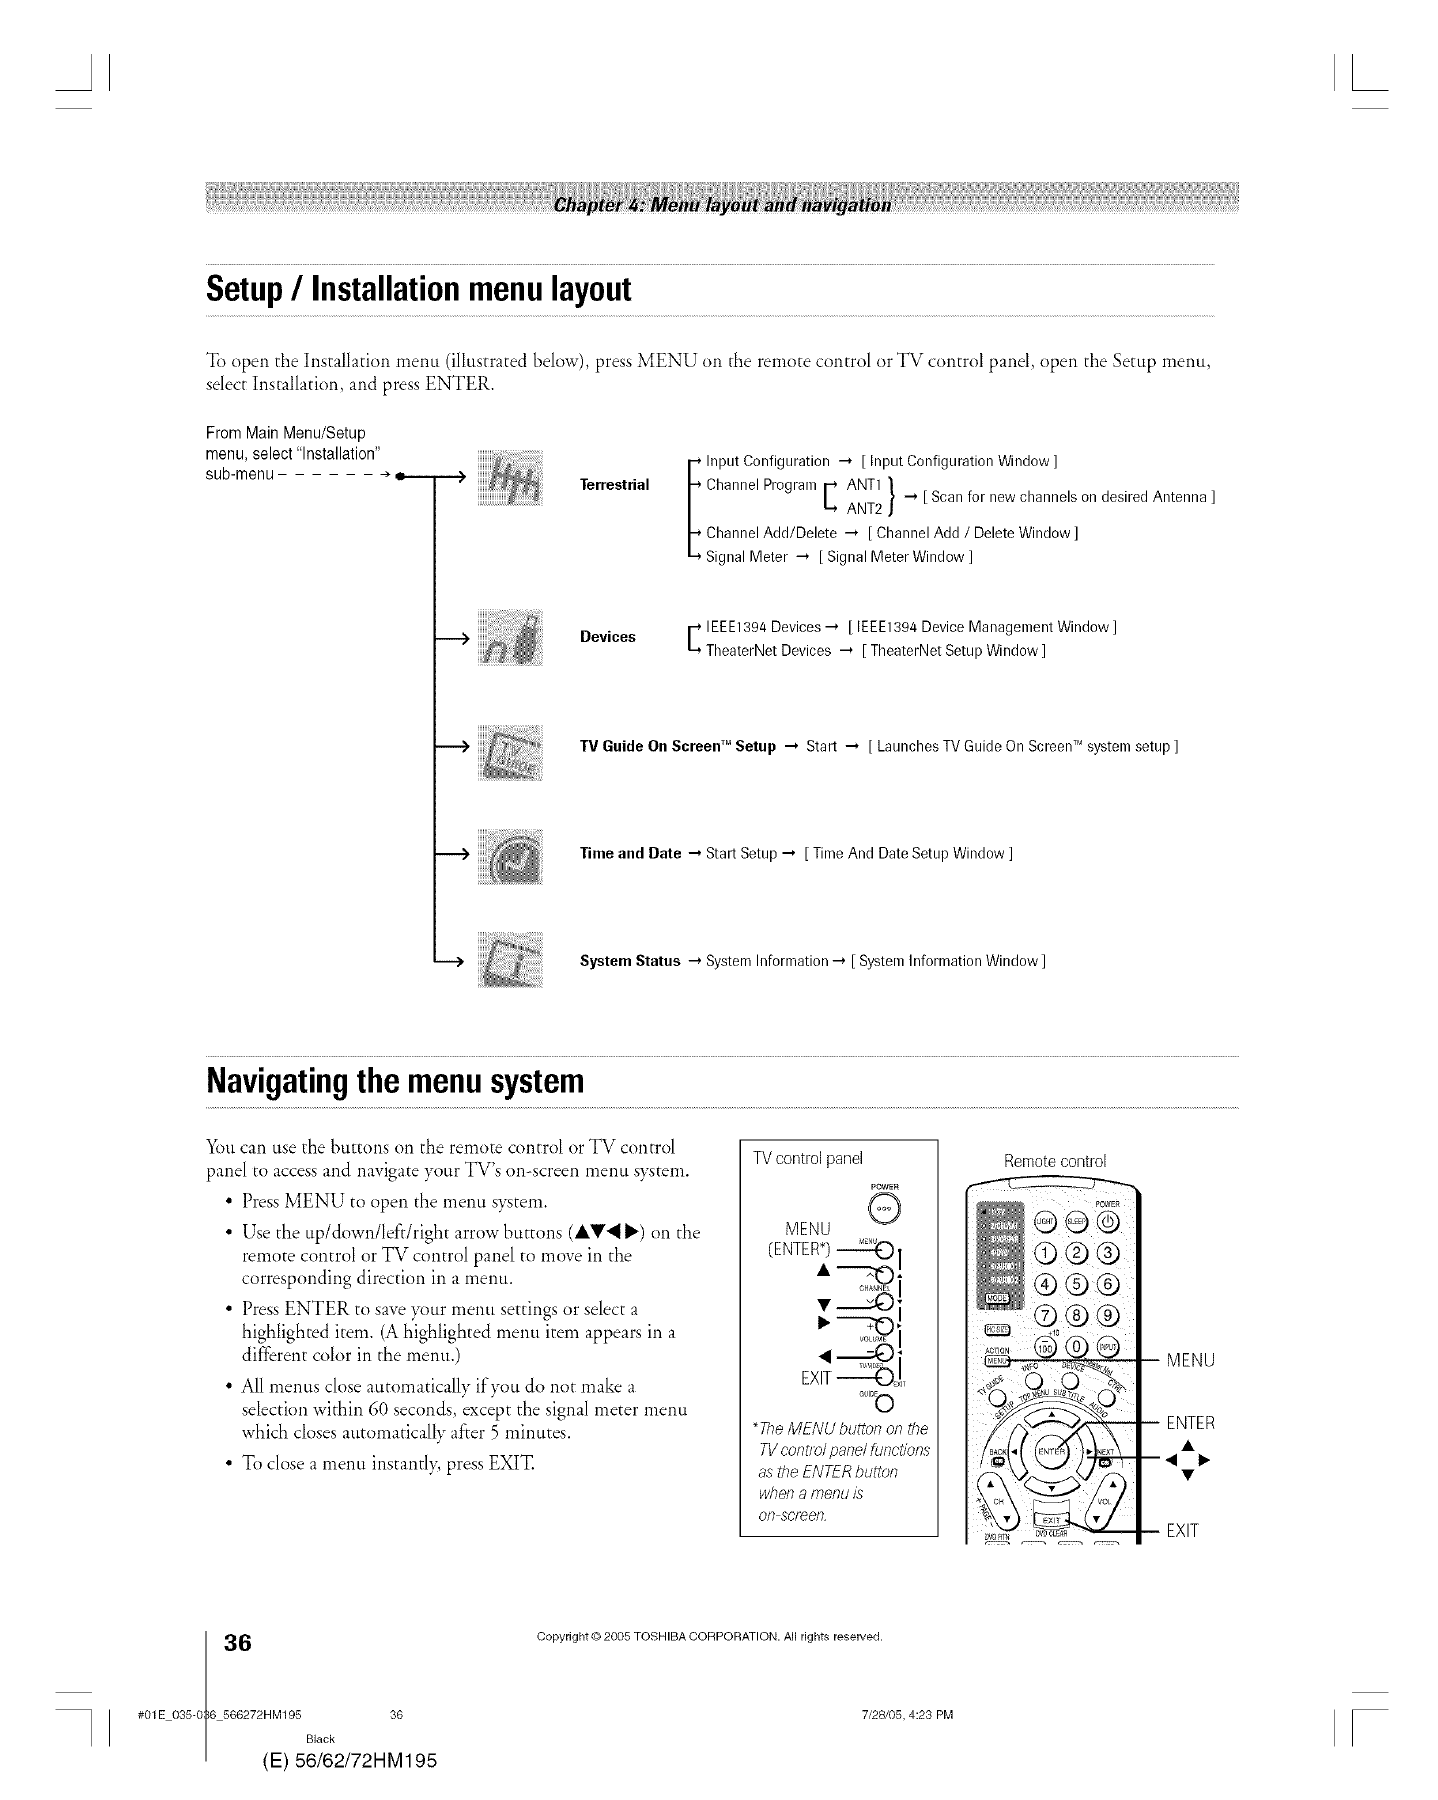
Setup/Installationmenulayout
To open the Installation menu (illustrated below), press MENU on the remote control or TV control panel, open the Setup menu,
select Installation, and press ENTER.
From Main Menu/Setup
menu, select 'Installation"
sub-menu --,
---+
---+
Terrestrial
Input Configuration _ [ Input Configuration Window ]
ANTI 1
ChannelProgram[ ANT2 J _ [Scan fornew channelson desiredAntenna]
ChannelAdd/Delete_ [ChannelAdd /DeleteWindow ]
SignalMeter -_ [SignalMeterWindow ]
Devices F IEEE1394 Devices _ [ IEEE1394 Device Managernent Window ]
LTheaterNet Devices _ [ TheaterNet Setup Window ]
TV Guide On Screen TMSetup -_ Start _ [ Launches TV Guide On Screen_Msystern setup ]
Time and Date _ Start Setup _ [ Time And Date Setup Window ]
System Status _ System Information _ [ Systern Information Window ]
Navigatingthemenusystem
You can use the buttons on the remote control or TV control
panel to access and navigate your TV's on-screen menu s)_tem.
• Press MENU to open the menu s}_tem.
• Use the up/down/left/right arrow buttons (AV._ _,) on the
remote control or TV control panel to move in the
corresponding direction in a menu.
• Press ENTER to save }_mrmenu settings or select a
highlighted item. (A highlighted menu item appears in a
different color in the menu.)
• All menus close automatically if you do not make a
selection within 60 seconds, except the signal meter menu
which closes automatically after 5 minutes.
• To close a menu instantl> press EXIT.
TVcontrolpanel
POWER
Q
MENU
(ENTER*)_I
*The MENU button on the
TV control panel functions
as the ENTER button
when a menu I_
OR Screen.
Remote control
®®®
®®®
®®®
+1o
®®® MENU
-- ENTER
-- EXIT
6(
#01E 035-0 6 566272HM195 36
Black
E) 56/62/72HM195
Copyright © 2005 TOSHIBA CORPORATION. All rights reserved.
7/28105, 4:23 PM F
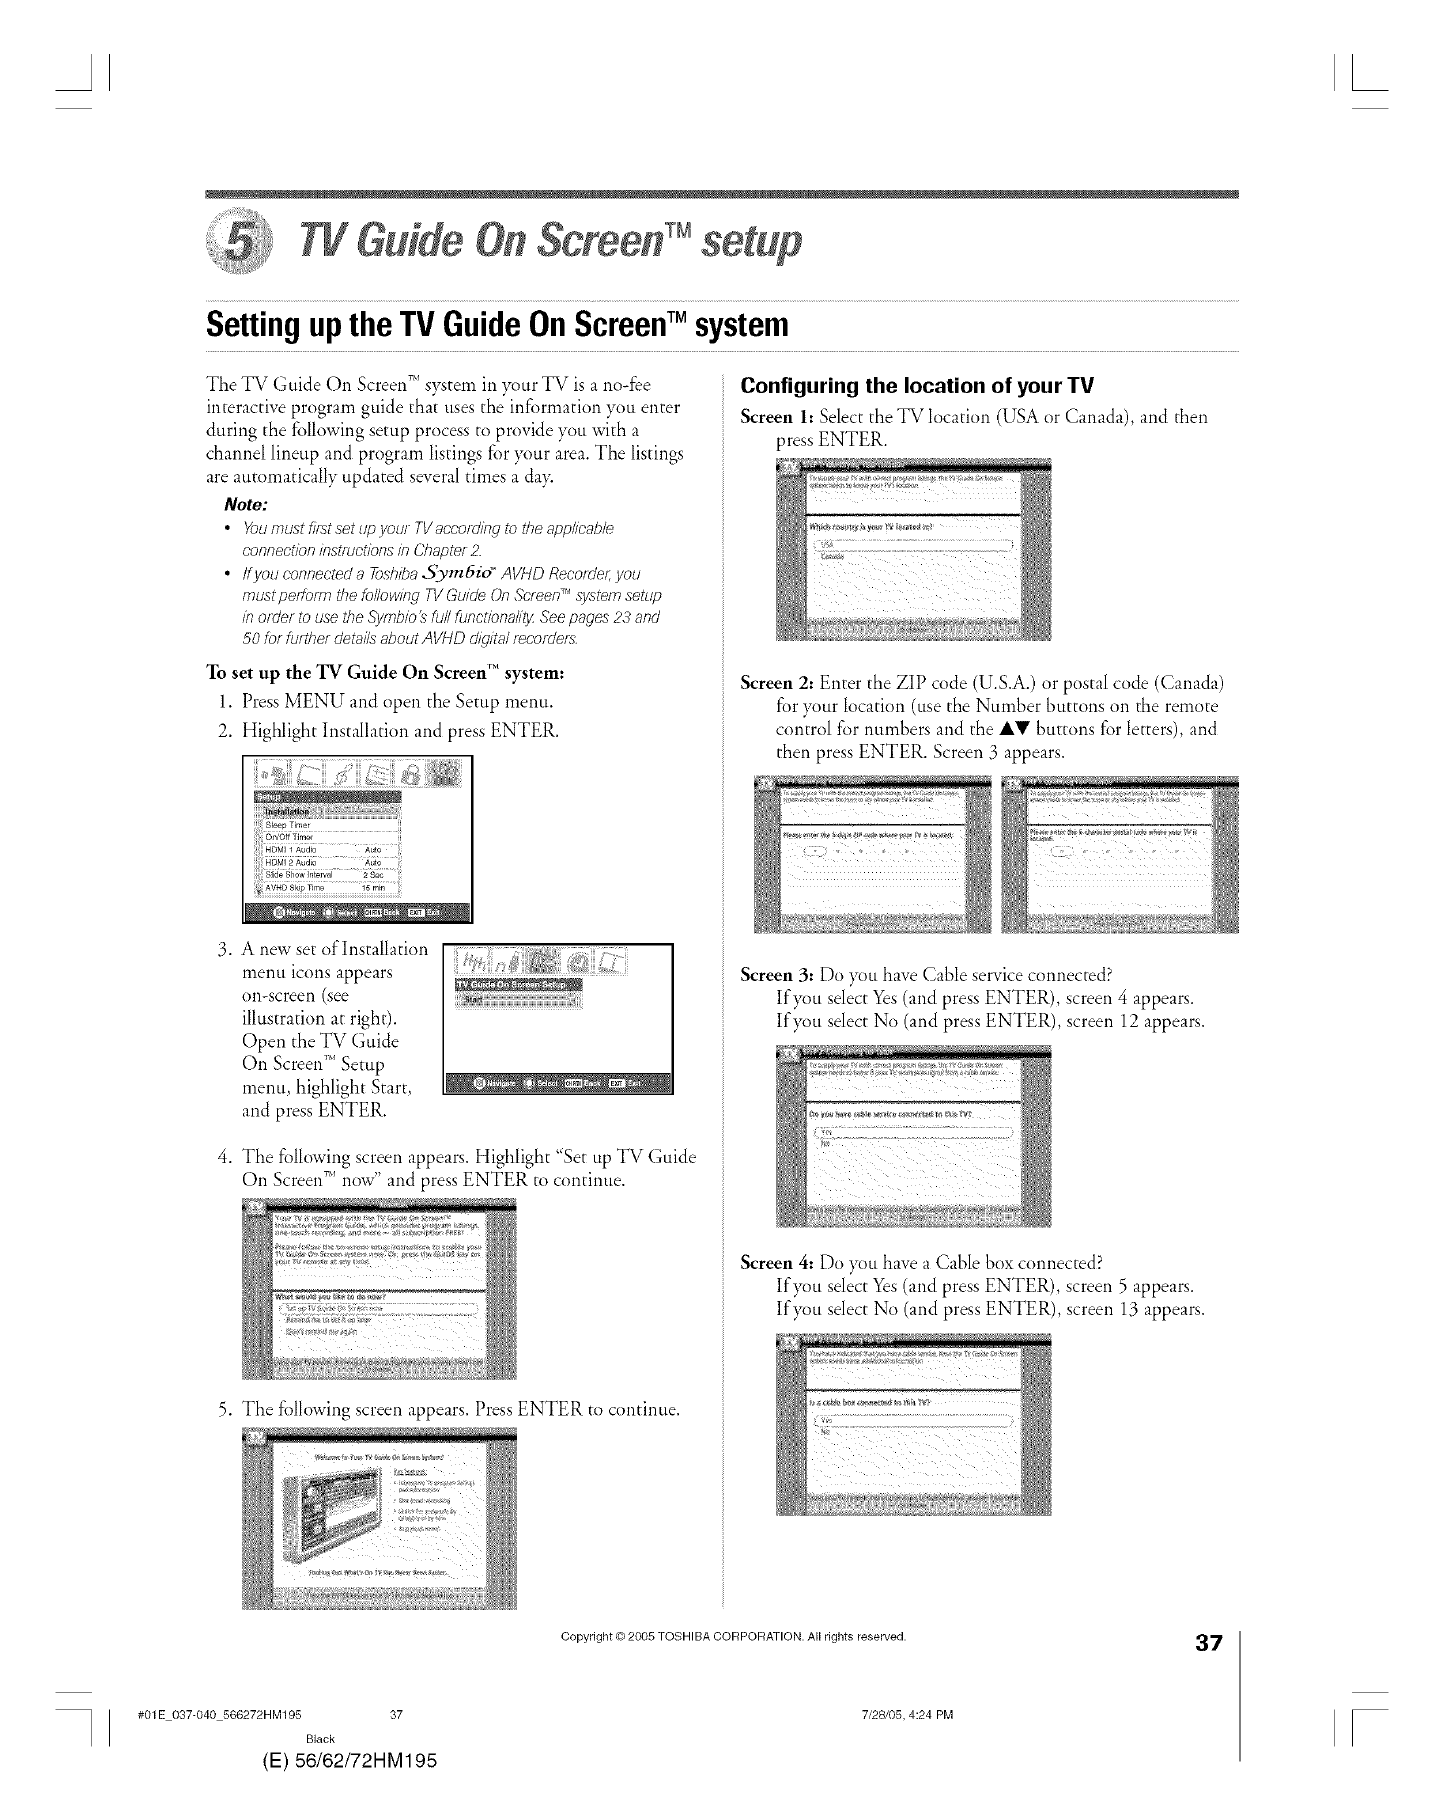
AL
WGuide gcreed Msetup
Settingupthe TV GuideOnScreeWMsystem
The TV Guide On Screen _'_s}_tem in }_mr TV is a no-fee
interactive program guide that uses the information you enter
during the following setup process to provide you with a
channel lineup and program listings for }_mr area. The listings
are automatically updated several times a da>
Note:
•Youmustfi/stsetupyourTVaccord#Tgtotheapp/_cab/e
connectioninst/zJctionsif7OY}apte/2.
• If youconnecteda Toshiba,5._mGid ° AVHD Reco_de/;you
mustpe/9/m thefollowingTVGuideOnScreenT'_systemsetup
#7order to use theSymb/otsfull functionality/Seepages23 and
50for ft#27erdeta#saboutAVHD digital_ecorders
Toset up the TV Guide On Screen _"system:
1. Press MENU and open the Setup menu.
2. Highlight Installation and press ENTER.
.
.
A new set of Installation
menu icons appears
on-screen (see
illustration at right).
Open the TV Guide
On Screen_''Setup
menu, highlight Start,
and press ENTER.
The following screen appears. Highlight "Set tip TV Guide
On Screen_'' now" and press ENTER to continue.
5. The following screen appears. Press ENTER to continue.
Configuring the location of your TV
Screen h Select the TV location (USA or Canada), and then
press ENTER.
Screen 2: Enter the ZIP code (U.S.A.) or postal code (Canada)
for }_mrlocation (use the Number buttons on the remote
control for numbers and the AY but[ons for letters), and
then press ENTER. Screen 3 appears.
Screen 3: Do you have Cable service connected?
If you select Yes(and press ENTER), screen 4 appears.
If you select No (and press ENTER), screen 12 appears.
Screen 4: Do you have a Cable box connected?
If you select Yes(and press ENTER), screen 5 appears.
If you select No (and press ENTER), screen 13 appears.
#01E 037-040 566272HM195 37
Black
(E) 56/62/72HM195
Copyright © 2005 TOSHIBA CORPORATION• All rights reserved.
7/28105, 4:24 PM
37
F
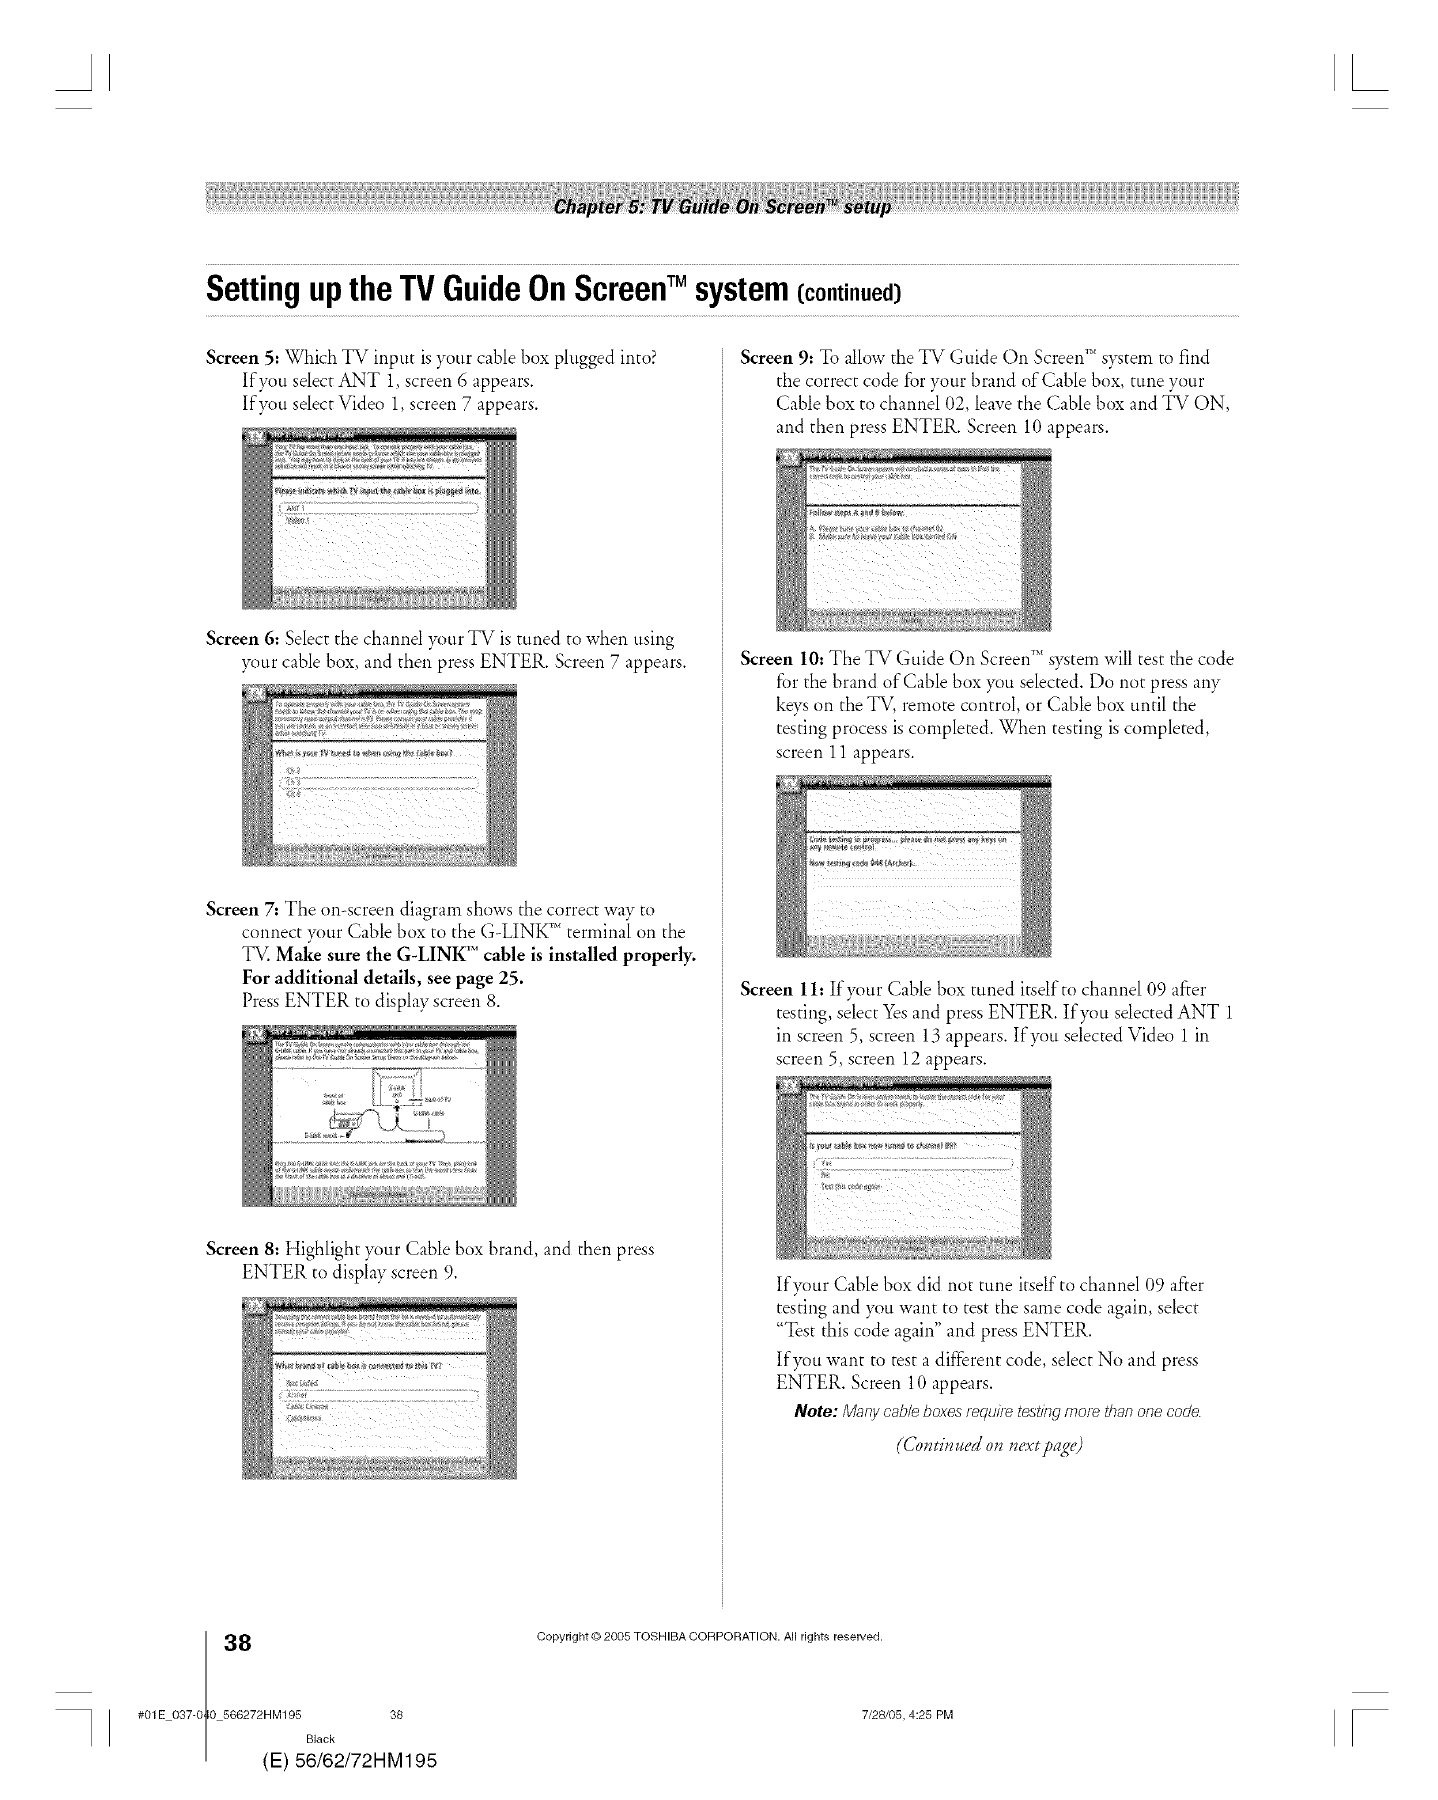
SettinguptheTVGuideOnScreeWMsystem(continued)
Screen 5: Which TV input is your cable box plugged into?
If you select ANT 1, screen 6 appears.
If you select Video 1,screen 7 appears.
Screen 6: Select the channel your TV is tuned to when using
your cable box, and then press ENTER. Screen 7 appears.
Screen 7: The on-screen diagram shows the correct way to
connect )_)urCable box to the G-LINK T''terminal on the
TV. Make sure the G-LINK 1"cable is installed properly.
For additional details, see page 25.
Press ENTER to display screen 8.
Screen 8: Highlight your Cable box brand, and then press
ENTER to display screen 9.
Screen 9: To allow the TV Guide On Screen _'*s)_tem to find
the correct code for your brand of Cable box, tune your
Cable box to channel 02, leave the Cable box and TV ON,
and then press ENTER. Screen 10 appears.
Screen 10: The TV Guide On Screen _'_s}_tem will test the code
for the brand of Cable box }_u selected. Do not press any
keys on the TV, remote control, or Cable box until the
testing process is completed. When testing iscompleted,
screen 11 appears.
Screen 1h If your Cable box tuned itself to channel 09 after
testing, select Yesand press ENTER. If you selected ANT 1
in screen 5, screen 13 appears. If)_)ti selected Video 1 in
screen 5, screen 12 appears.
If}_mr Cable box did not tune itself to channel 09 after
testing and you want to test the same code again, select
"Test this code again" and press ENTER.
If}_m want to test a different code, select No and press
ENTER. Screen 10 appears.
Note: Many cableboxes_equire testsngmorethanonecode.
(Continued on next?age)
8(
#01E 037-0 0 566272HM195 38
Black
E) 56/62/72HM195
Copyright © 2005 TOSHIBA CORPORATION. All rights reserved.
7/28/05, 4:25 PM [
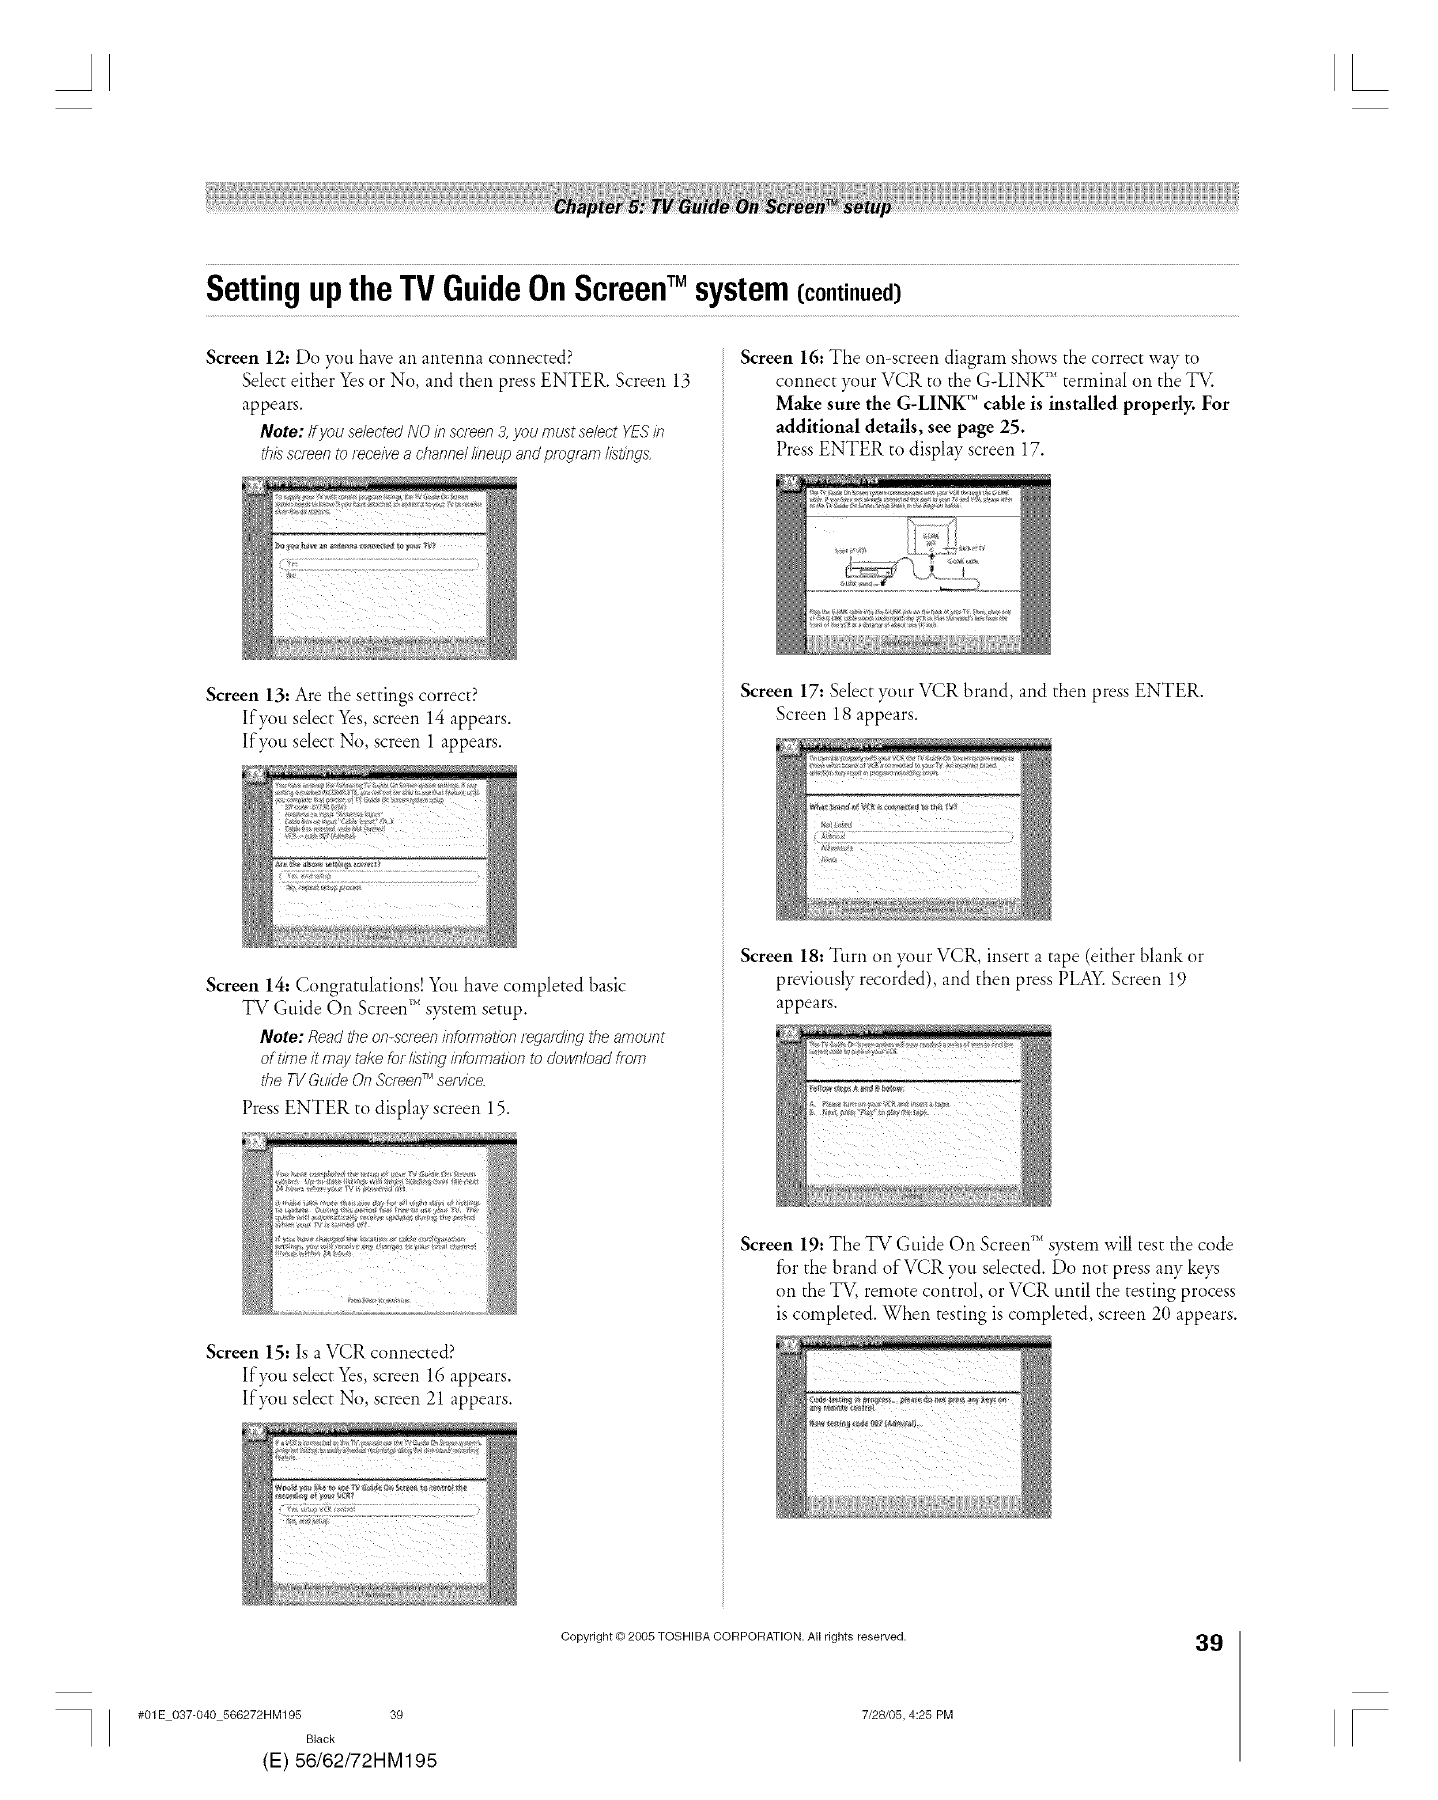
SettinguptheTVGuideOnScreeWMsystem(continued)
Screen 121 Do )_m have an antenna connected?
Select either Yes or No, and then press ENTER. Screen 13
appears.
Note: IfyouselectedNOh7screen3, youmust select Y£Sh7
thisscreento receivea channellineupandprogram/ist/fTgS
Screen 13: Are the settings correct?
If you select Yes screen 14 appears.
If you select No screen 1 appears.
Screen 14: Congratulations! You have completed basic
TV Guide On Screen _"s)_tem setup.
Note: Readthe on-screeninformation/ega_d/ngtheamount
of time itmay takefor/ist#Tginformationto down/oadfrom
the TVGuideOnScreen_Mservice.
Press ENTER to display screen 15.
Screen 15t Is a VCR connected?
If you select Yes screen 16 appears.
If you select No screen 21 appears.
Screen 161The on-screen diagram shows the correct way to
connect your VCR to the G-LINK '_'_terminal on the TV.
Make sure the G-LINK _"cable is installed properly. For
additional details, see page 25.
Press ENTER to display screen 17.
Screen 17: Selectyour VCR brand, and then press ENTER.
Screen 18 appears.
Screen 18: Turn on your VCR insert a tape (either blank or
previously recorded), and then press PLAY.Screen 19
appears.
Screen 19t The TV Guide On Screen _'_s)_tem will test the code
for the brand ofVCR )_m selected. Do not press any ke)_
on the TV, remote control, or VCR until the testing process
is completed. When testing is completed, screen 20 appears.
#01E 037-040 566272HM195 39
Black
(E) 56/62/72HM195
Copyright © 2005 TOSHIBA CORPORATION. All rights reserved.
7/28105, 4:25 PM
39
[
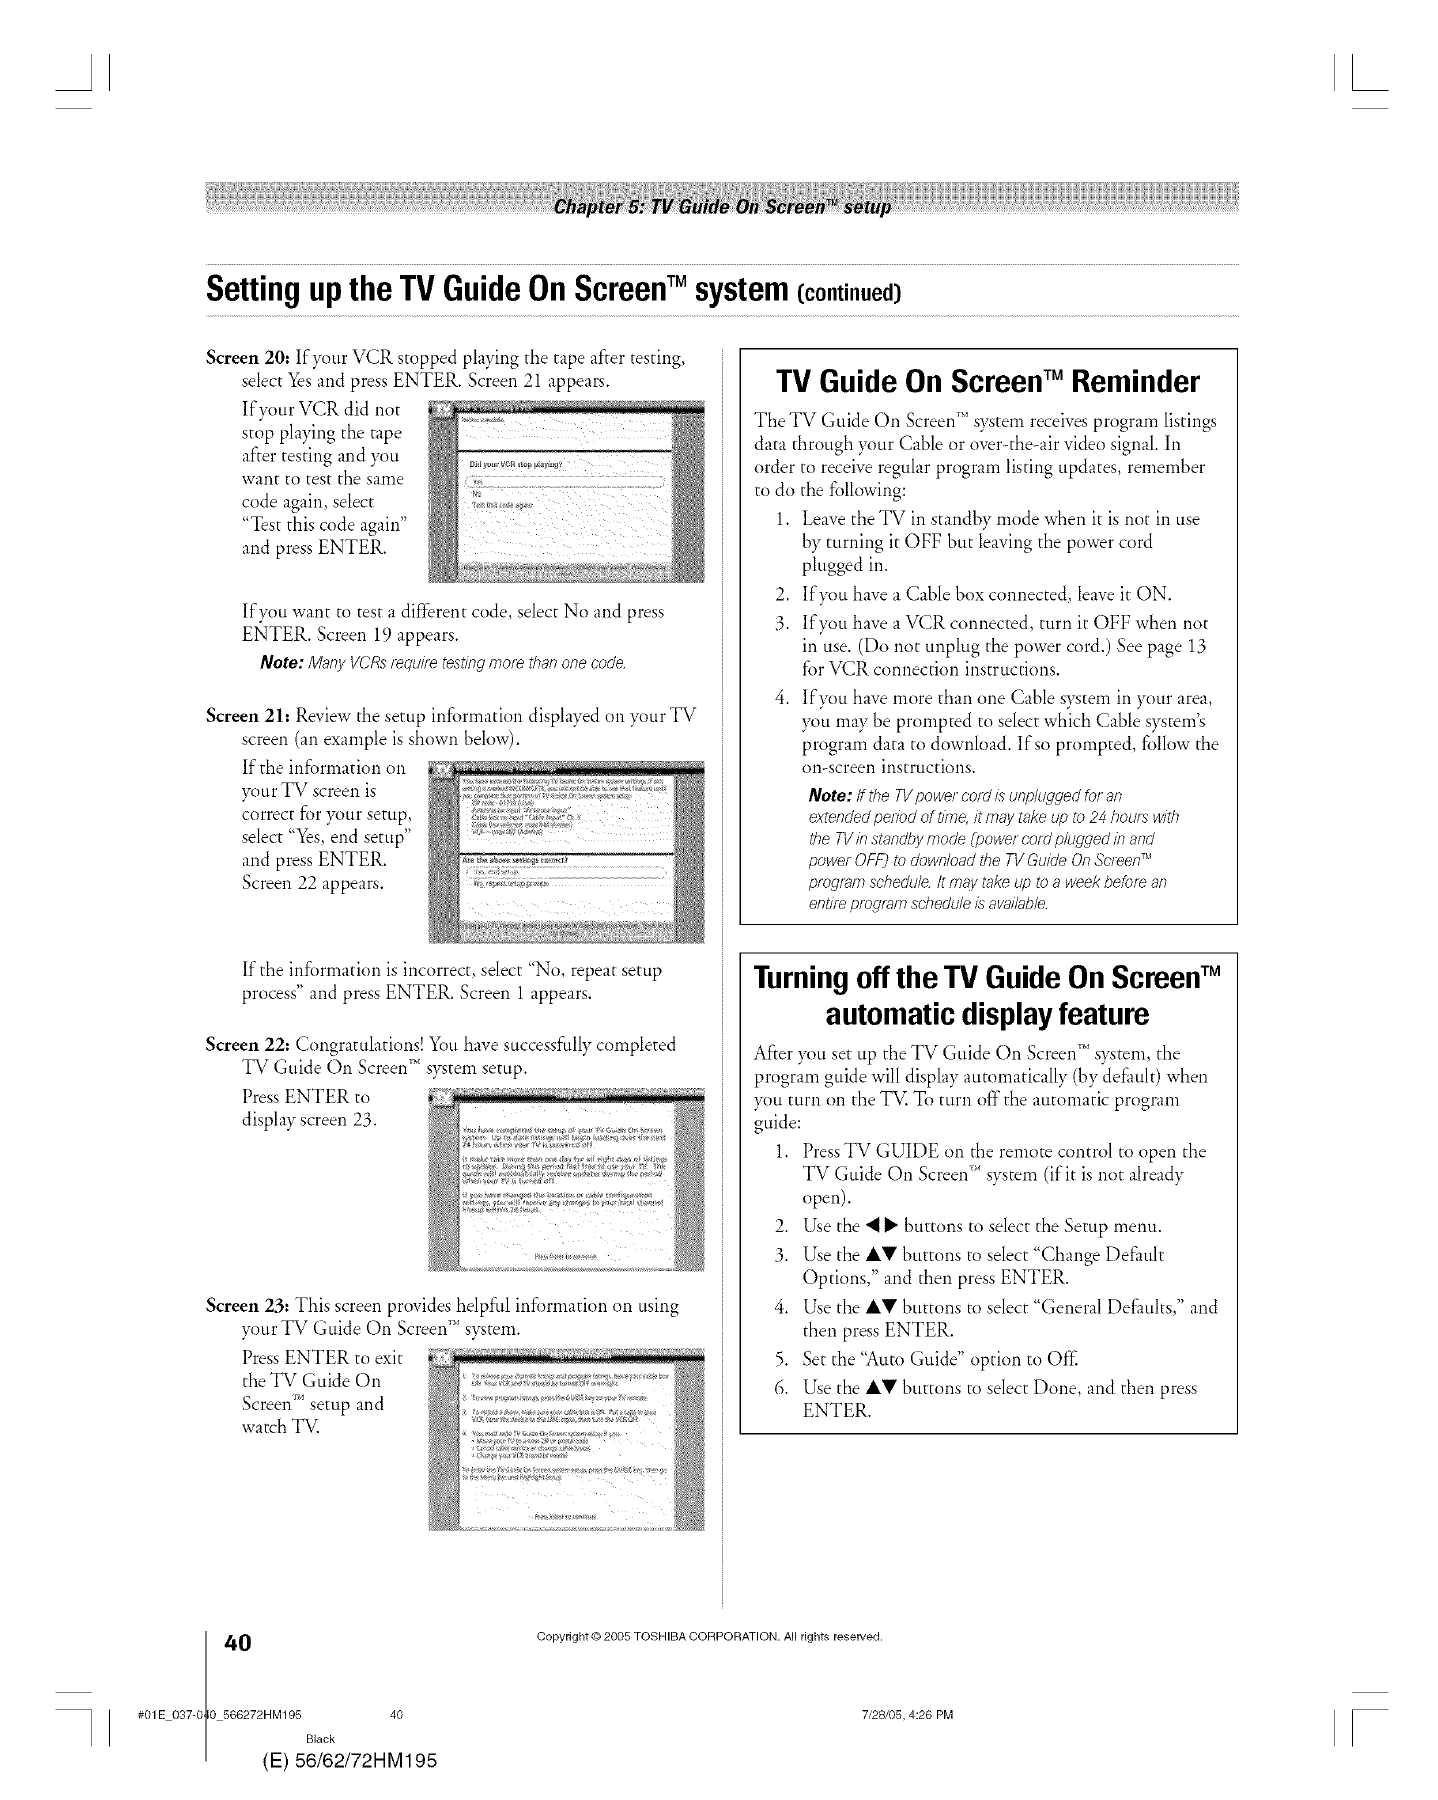
SettinguptheTVGuideOnScreeWMsystem(continued)
Screen 20: If)_mr VCR stopped playing the tape after testing,
select Yesand press ENTER. Screen 21 appears.
If your VCR did not
stop playing the tape
after testing and you
want to test the same
code again, select
"Test this code again"
and press ENTER.
If you want to test a different code, select No and press
ENTER. Screen 19 appears.
Note: Many VCRsrequ#etestingmore thanone code.
Screen 2h Review the setup information displayed oil )_mrTV
screen (an example is shown below).
If the information oil
)_ttr TV screen is
correct for your setup,
select "Yes,end setup"
and press ENTER.
Screen 22 appears.
If the information is incorrect, select "No, repeat setup
process" and press ENTER. Screen 1 appears.
Screen 22: Congratulations! You have successfully completed
TV Guide Oil Screen _'*system setup.
Press ENTER to
display screen 23.
Screen 23: This screen provides helpful information oil using
)_mrTV Guide Oil Screen_'*system.
Press ENTER to exit
the TV Guide Oil
Screen _ setup and
watch TV.
TV Guide On ScreenTM Reminder
The TV Guide On Screen_'_system receives program listings
data through your Cable or over-the-air video signal. In
order to receive regular program listing updates, remember
to do the following:
1. Leave the TV in standby mode when it is not in use
by turning it OFF but leaving the power cord
plugged in.
2. If)_m have a Cable box connected, leave it ON.
3. If)_m }lavea VCR connected, turn it OFF when not
in use. (Do not unplug the power cord.) See page 13
for VCR connection instructions.
If)_)u have more than one Cable s)_tem in your area,
)_m may be prompted to select which Cable system's
program data to download. If so prompted, follow the
on-screen instructions.
Note: ff the TV powel cold L_unplugged for an
extended pedod of time, it may take up to 24 hour:_ wit/}
the TVif} standby mode (powe/ cold plugded if} and
power OFF] to download the TV Guide On Sc/_en TM
program schedule. It may take up to a week before an
entire program sdledule L_available,
Turningoffthe TV GuideOn ScmeW"
automaticdisplayfeature
After )_tt set up the TV Guide On Screen_'*s)_tem, the
program guide will display atttomatically (by de£mlt) when
)_u turn on the TV. To turn off the atttomatic program
guide:
1. PressTV GUIDE oil the remote control to open the
TV Guide Oil Screen_Msystem (if it is not already
open).
2. Use the _ _" buttons to select the Setup menu.
3. Use the A_' buttons to select "Change Default
Options," and then press ENTER.
4. Use the AV buttons to select "General Defaults," and
then press ENTER.
5. Set the "Auto Guide" option to Of_"
6. Use the AV buttons to select Done, and then press
ENTER.
0(
#01E 037-0 0 566272HM195 40
Black
E) 56/62/72HM195
Copyright © 2005 TOSHIBA CORPORATION. All rights reserved.
7/28105, 4:26 PM F
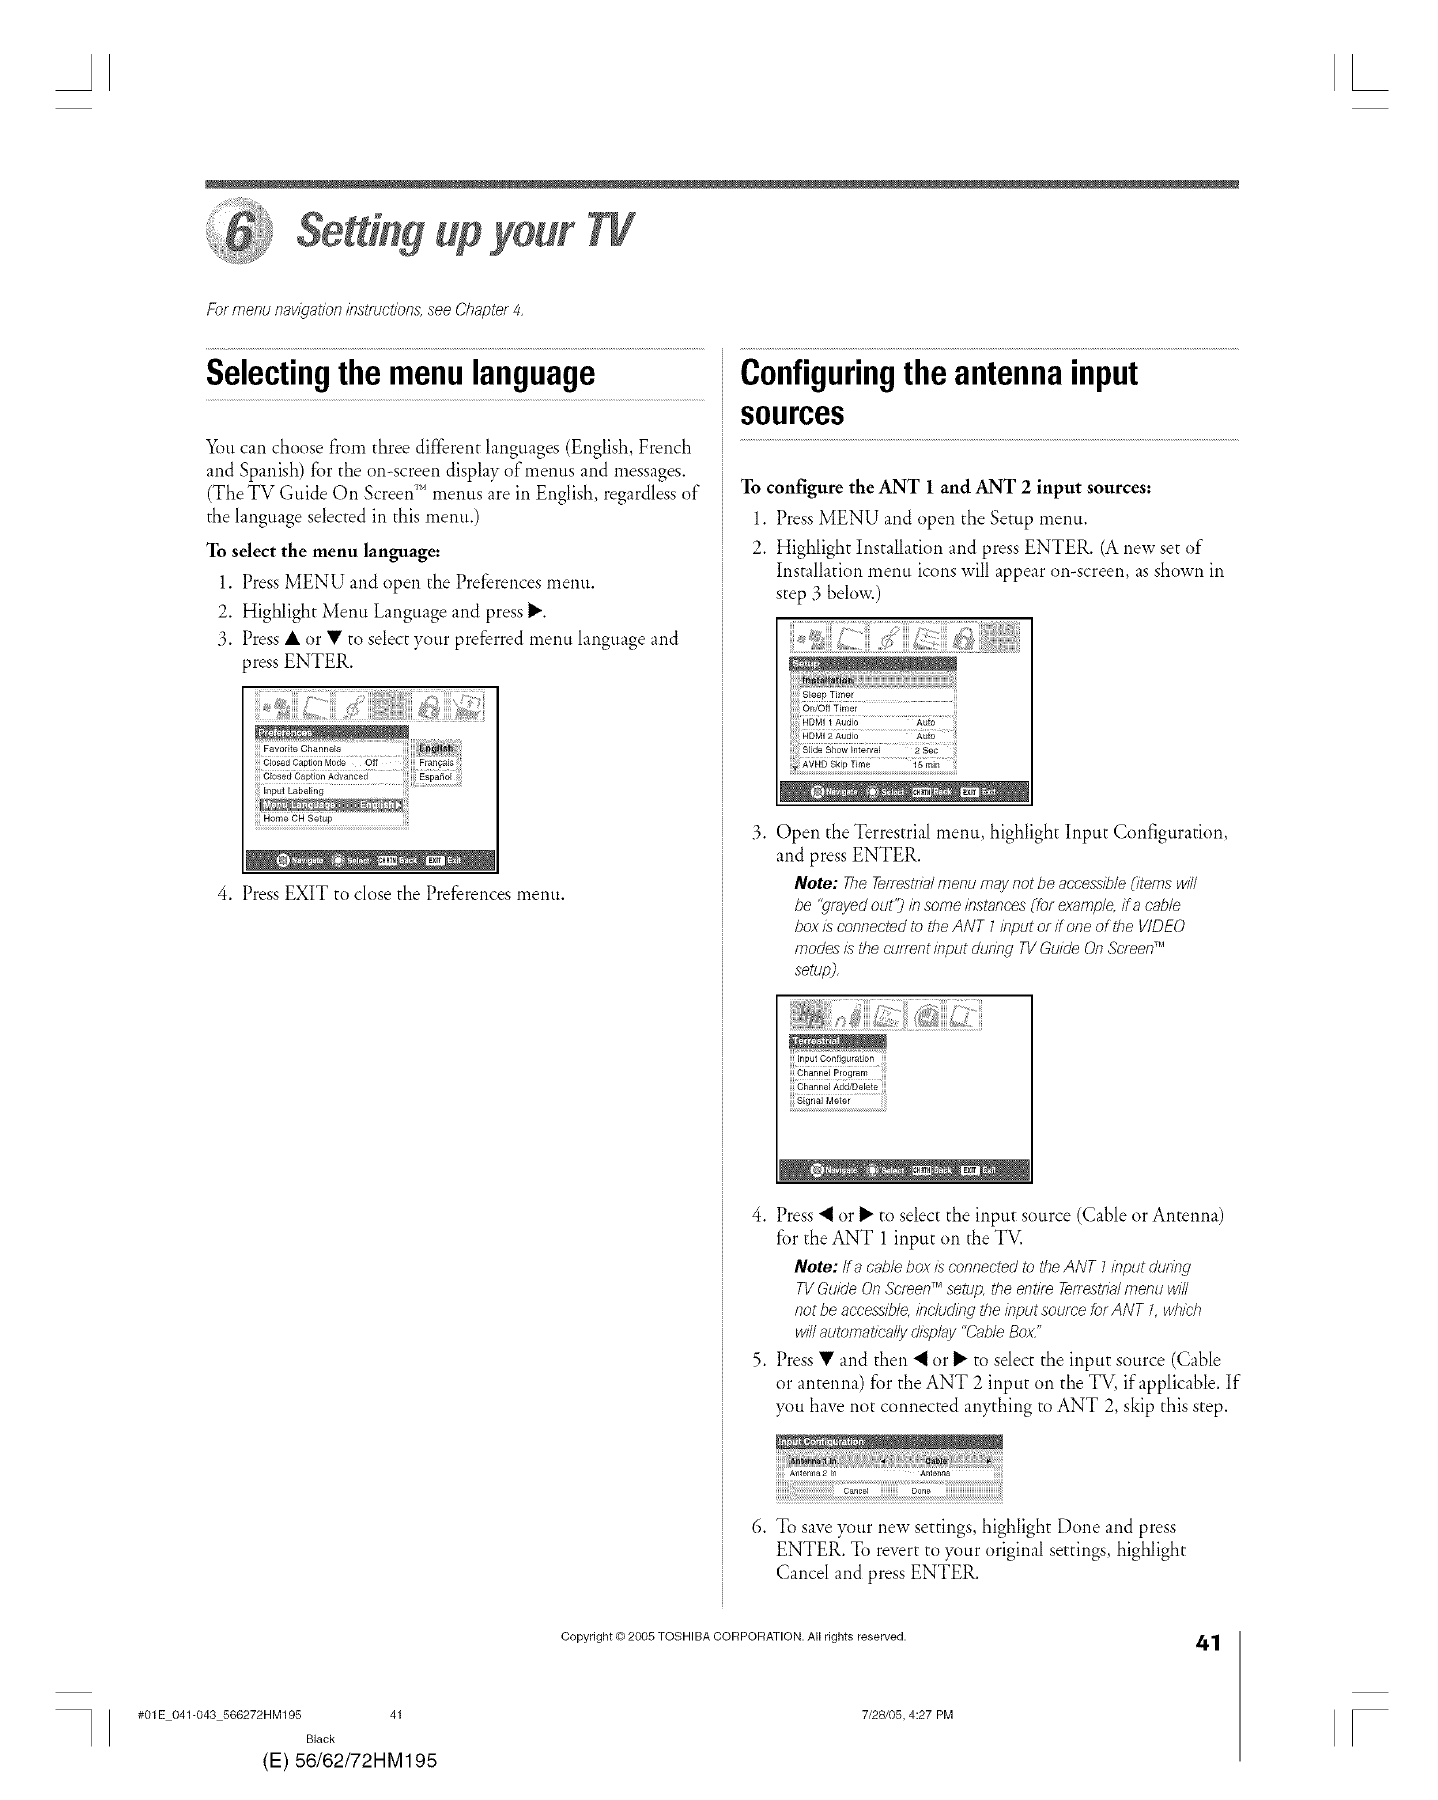
#i#g W
For menu nav/_Tat/oninstructions, see Chapter 4,
Selectingthemenulanguage
You can choose from three different languages (English, French
and Spanish) fi}r the on-screen display of menus and messages.
(The TV Guide On Screen _'_menus are in English, regardless of
the language selected in this menu.)
To select the menu languaget
1. Press MENU and open the Preferences menu.
2. Highlight Menu Language and press _.
3. Press • or • to select your preferred menu language and
press ENTER.
Home OH Setup
4. Press EXIT to close the Preferences menu.
Configuringtheantennainput
sources
To configure the ANT 1and ANT 2input sources:
1. Press MENU and open the Setup menu.
2. Highlight Installation and press ENTER. (A new set of
Installation menu icons will appear on-screen, as shown in
step 3 below.)
or,J6t_Tim_7
HDMii AGdio Xui3
;_DMiD,_di_ Auio
girl8g*,0wi,,ia;vai _gg
Open the Terrestrial menu, highlight Input Configuration,
and press ENTER.
Note: TheTerrestrialmenumay notbe accessibleCitemswill
be "grayedout"J#7some instances(forexample,if a oable
boxis connectedto theANT 1input or if oneof the VIDEO
modes/L_thecunentinput dudng TVGuide OnScreen_=
setup),
iii i !i _z :.... I;;;; .......
iii In put Configuration ii
!!!Channel Program iii¸
Signal Meter
Press 'I or I_ to select the input source (Cable or Antenna)
for the ANT 1 input on the TV.
Note:/fa cablebox/s connectedto theANT Iinput dt/dng
TVGuideOn ScreenTMsetup,the entireTerrestda/menu will
notbe accessible,includ#Tgtheinput sourcefor ANT L which
willautomaticallydisplay"CableBox"
Press • and then 'I or I_ to select the input source (Cable
or antenna) for the ANT 2 input on the TV, if'applicable. If
)_ti have not connected anything to ANT 2, skip this step.
Antenna iiiiii
6. To save your new settings, highlight Done and press
ENTER. To revert to your original settings, highlight
Cancel and press ENTER.
#01E 041-043 566272HM195 41
Black
(E) 56/62/72HM195
Copyright © 2005 TOSHIBA CORPORATION. All rights reserved.
7/28/05, 4:27 PM
41
[
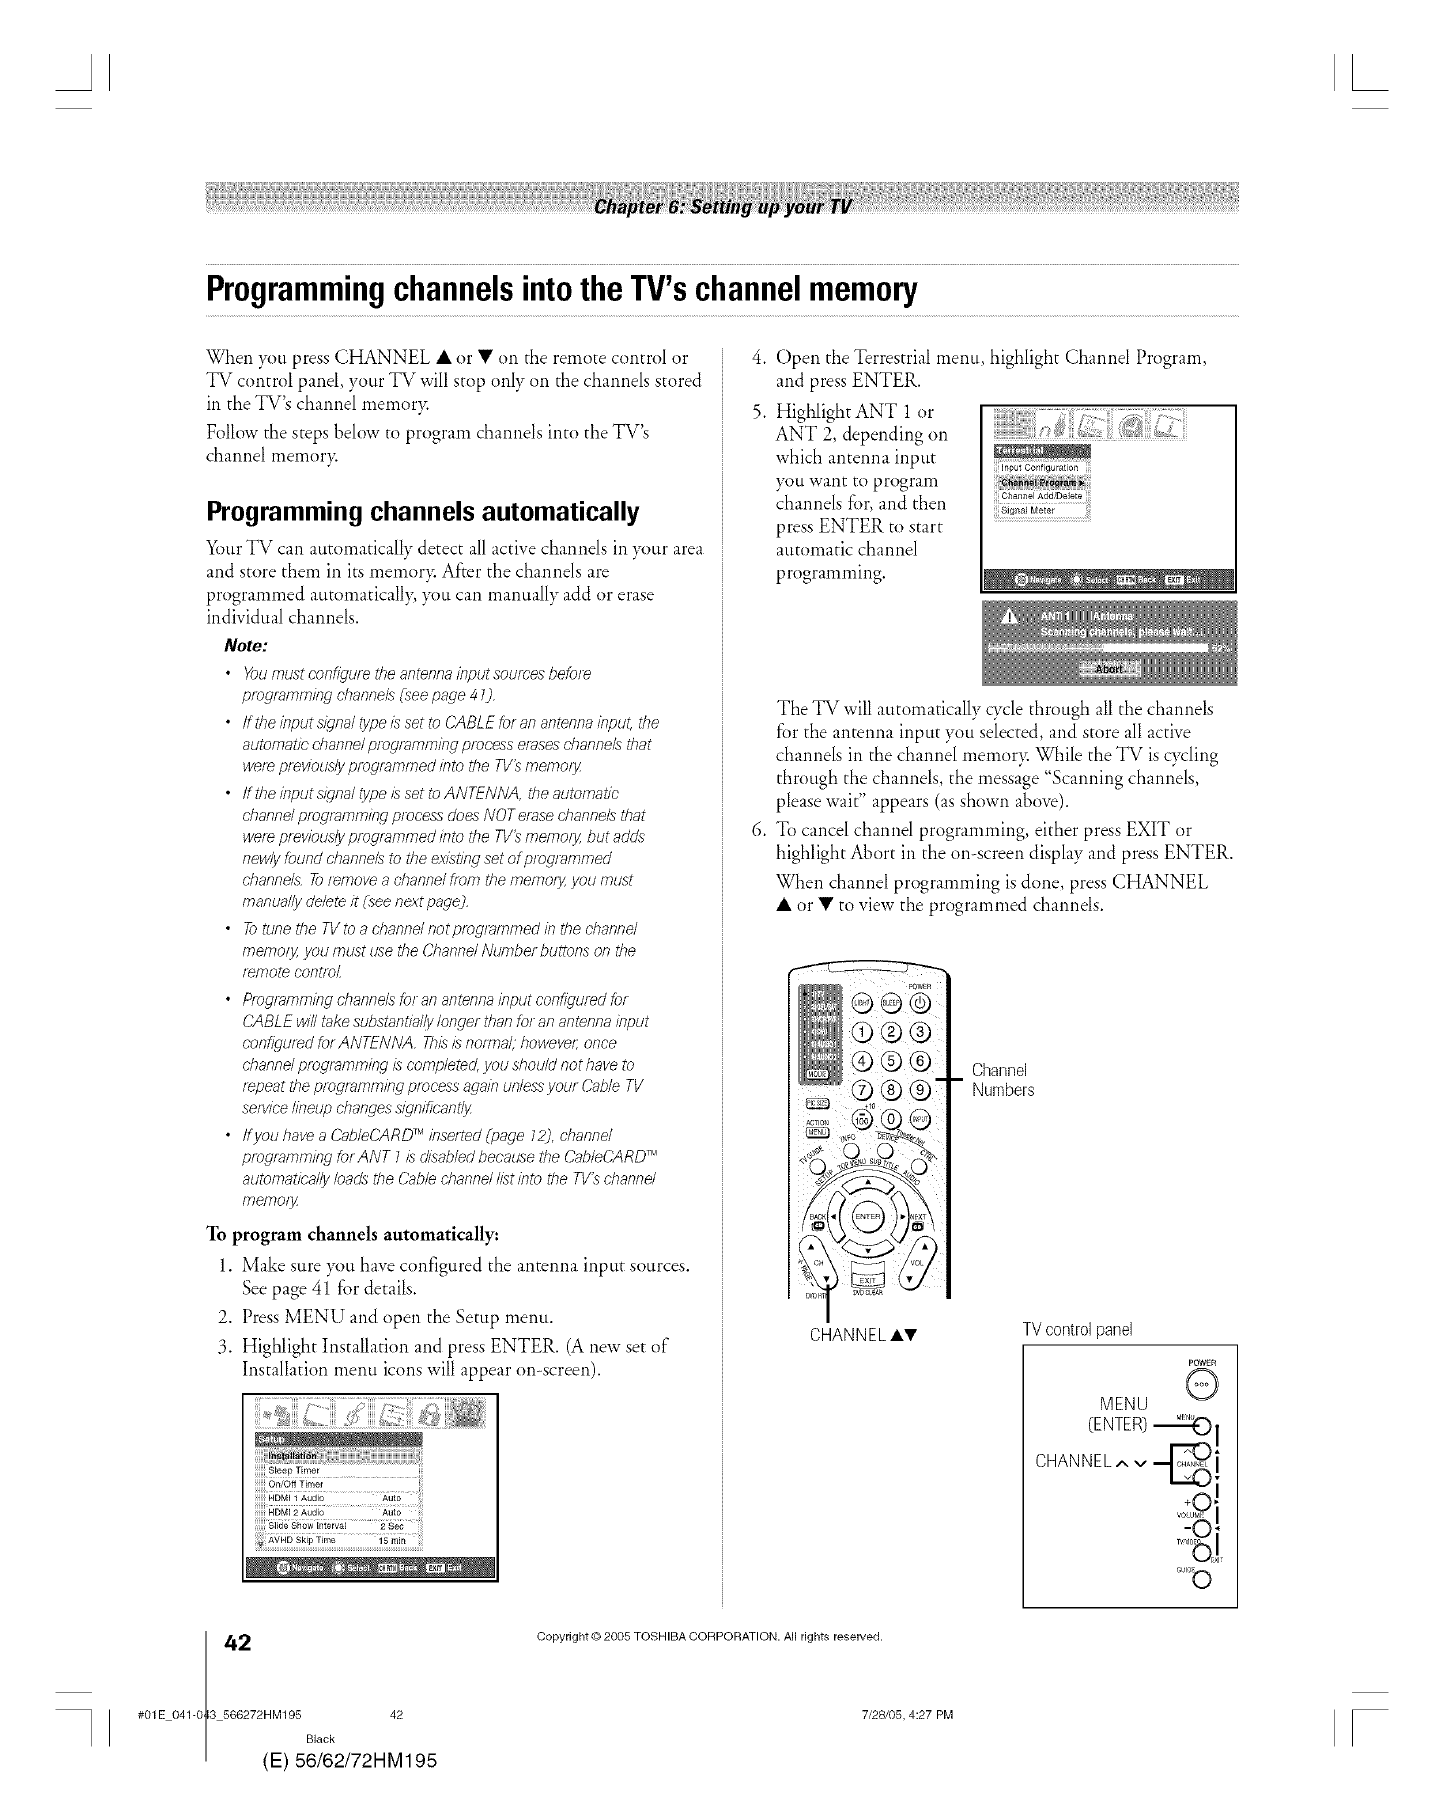
ProgrammingchannelsintotheTV'schannelmemory
When }q_tlpress CHANNEL • or • on the remote control or
TV control panel, your TV will stop only on the channels stored
in the TV's channel memor>
Follow the steps below to program channels into the TV's
channel memor>
Programming channels automatically
_5)tirTV can automatically detect all active channels in }_)ur area
and store them in its memor> After the channels are
programmed automatically you can manually add or erase
individual channels.
Note:
•Youmustconflguf_ theantennainput sources before
programming channels Cseepage41),
•Ifthelnputs/gnaltypelssettoCABLEforanantennainput, the
automaticchannelprogrammingprocesseraseschannelsthat
wereprevious!yp/ogrammedintotheTVtsmemo/y
• ffthe input signal type issettoANTENNA, theautomatic
channdp/ogramming processdoesNOTe/asechannelsthat
were previous!y programmed IntotheTVtsmemo/ybutadds
newly foundchannelsto theex£ting set of programmed
channels.To/emoveachannelfromthememo/_youmust
manually deleteit (,seenext page],
• TotunetheTVtoa channdnotprogrammed if7thechannel
memo/yyoumustusetheChannelNumberbuttonsonthe
remotecontrol
• Pfogrammingchannelsforanantennainputconflguredfor
CABLEwilltakesubstantial!y longer thanforanantennainput
configured forANTENIVA,ThisisnomTal; however;once
ehanndprogfamm/bg is completed, youshouldnothaveto
repeat the programming process again unlessyoulCableTV
servicelineup changes sfgnificant/y
• Ifyou haveaCableCARD_Minserted@age 12_,channd
programming forANT7isdisabledbecausetheCableCARD_
automatically loadstheCablechannellistintotheTV%ehannd
ITleFnOly
To program channels automatically:
1. Make sure }q3tlhave configured the antenna input sources.
Seepage 41 for details.
2. Press MENU and open the Setup menu.
3. Highlight Installation and press ENTER. (A new set of
Installation menu icons will appear on-screen).
;;;;;;S_eep Timer
HDMi 2 Audio A_{_
Slide Show Interva_ 2 See
.
5.
Open the Terrestrial menu, highlight Channel Program,
and press ENTER.
Highlight ANT 1 or
ANT 2, depending on
which antenna input
?_)uwant to program
channels for, and then
press ENTER to start
automatic channel
programming.
bput Oontiguration
Ohmmel Add/Delete
The TV will automatically cTcle through all the channels
for the antenna input you selected, and store all active
channels in the channel memor> While the TV is cycling
through the channels, the message "Scanning channels,
please wait" appears (as shown above).
To cancel channel programming, either press EXIT or
highlight Abort in the on-screen display and press ENTER.
When channel programming is done, press CHANNEL
• or • to view the programmed channels.
Channel
Numbers
CHANNELAT IV control panel
POWER
@
MENU
(ENTER)_I
CHANNEL^ v
......
2(
#01E 041-0 3 566272HM195 42
Black
E) 56/62/72HM195
Copyright © 2005 TOSHIBA CORPORATION. All rights reserved.
7/28105, 4:27 PM [
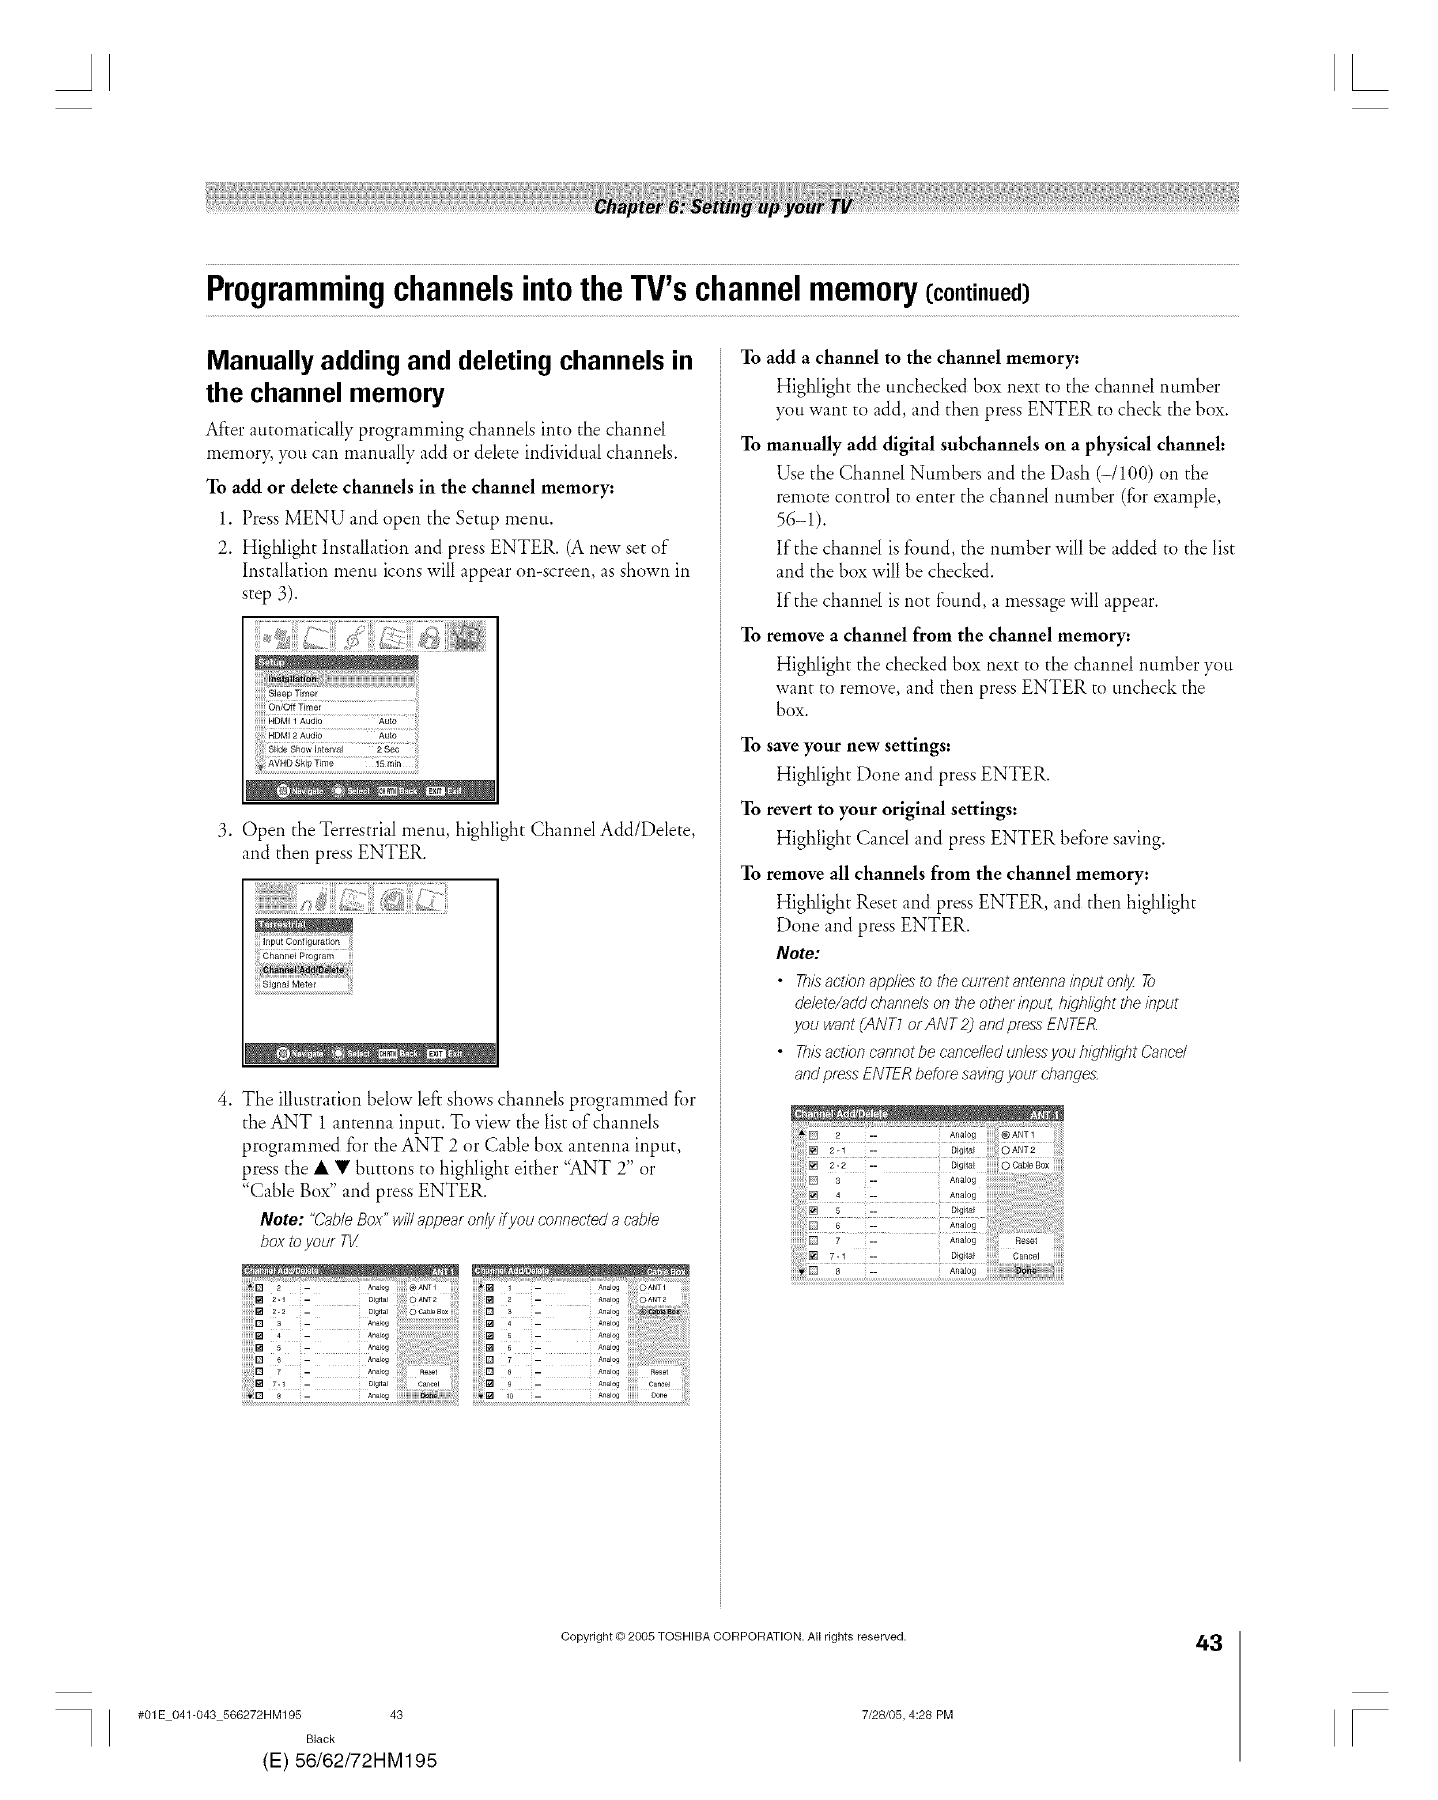
ProgrammingchannelsintotheTV'schannelmemory(continued)
Manually adding and deleting channels in
the channel memory
After automatically programming channels into the channel
memor)q you can manually add or delete individual channels.
To add or delete channels in the channel memory:
1. Press MENU and open the Setup menu.
2. Highlight Installation and press ENTER. (A new set of
Installation menu icons will appear on-screen, as shown in
step 3).
!!! _,#iiii _,== !!!i,I,oiiili_,ilI iiiit;]<;Uiiiii:_T;i
iiiiiiOn/Off Timer
............... i
3. Open the Terrestrial menu, highlight Channel Add/Delete,
and then press ENTER.
iii:i:iiiiiQ{ii{i{?ii ;iii]iii;i ziiiiiil] ii
Input Configuration
Channel Ploglam
!!!Signal Motel
.The illustration below left shows channels programmed for
the ANT 1 antenna input. To view the list of channels
programmed for the ANT 2 or Cable box antenna input,
press the • • buttons to highlight either "ANT 2" or
"Cable Box" and press ENTER.
Note: "Cable Box" will appear on!y if)'ou connected a cable
boxtoyourT_
[] 2 - n_og ® 1 -AnalogOANTI
2._ - DJg_t=, 2 -_,n_,ogdA,T2
[] _._ - 0,g.=o_=0_0. : [] _ _*,n=og
3 - analog 4 - Anglo
4-an_,og 5 -an_,_,
s - An_,og 6 L a0_,o
[] 6 _*,n_,gg [] r_An_,og
8 - Analog 10 -- Analog gon_
To add a channel to the channel memory:
Highlight the unchecked box nex[ to the channel number
you want to add, and then press ENTER to check the box.
To manually add digital subchannels on a physical channel:
Use the Channel Numbers and the Dash (-/100) on the
remote control to enter the channel number (for example,
56-1).
If the channel isfound, the number will be added to the list
and the box will be checked.
If the channel is not fimnd, a message will appear.
To remove a channel from the channel memory:
Highlight the checked box next to the channel number you
want to remove, and then press ENTER to uncheck the
box.
To save your new settings:
Highlight Done and press ENTER.
To revert to your original settings:
Highlight Cancel and press ENTER before saving.
To remove all channels from the channel memory:
Highlight Reset and press ENTER, and then highlight
Done and press ENTER.
Note:
•ThL_actionapp/ies to thecu/7_ntantennainput on/y To
delete/addchannelsontheother #Tput, highlight the input
youwant(ANTIorANT2) andBessENTER
•ThLsactioncannotbecancelledunlessyouhighlight Cancel
andptessENTERbeforesaving your changes
.. _ ®
2-_ -- Digital OANT2
iiiili_ _ i-- ii Aoa_o_iiiiiiiiiiiiiiiii!!!!!!iiiiiiiiiiiiiiiliii!i!iiliiiiiiii!
iiiiiiii:ii_4 L iAoa_ogiiiiii!iiiiiiiii!iiiiiiiii!iiiil;!iiiiiiiiiii!iiiii!iiii!!!ii
ii{ii:i_ 5 i-- i Diglal iiiiiiiiii:iiiiiiiiillii;iliii!i!iii!!ii
iiiiii!l _ i- i Ao=_oi!i!iililiiiiiili!iiiiiiliiiiiiliiiiiiiiiiiiiiiiliiiiii!iiii
ii111 ri-- ii AnalogiiiiiiiiiiiResetiiiiiili!!i
iiiiii! r._ i-- i D_e_ta_!!!!!!i!!c=ooe*iiiiiii
.... ...................................._'_' !!!!!!i!ii!ii!ii!ii!!! !Z!!!!!i
#01E 041-043 566272HM195 43
Black
(E) 56/62/72HM195
Copyright © 2005 TOSHIBA CORPORATION. All rights reserved.
7/28/05, 4:28 PM
43
[
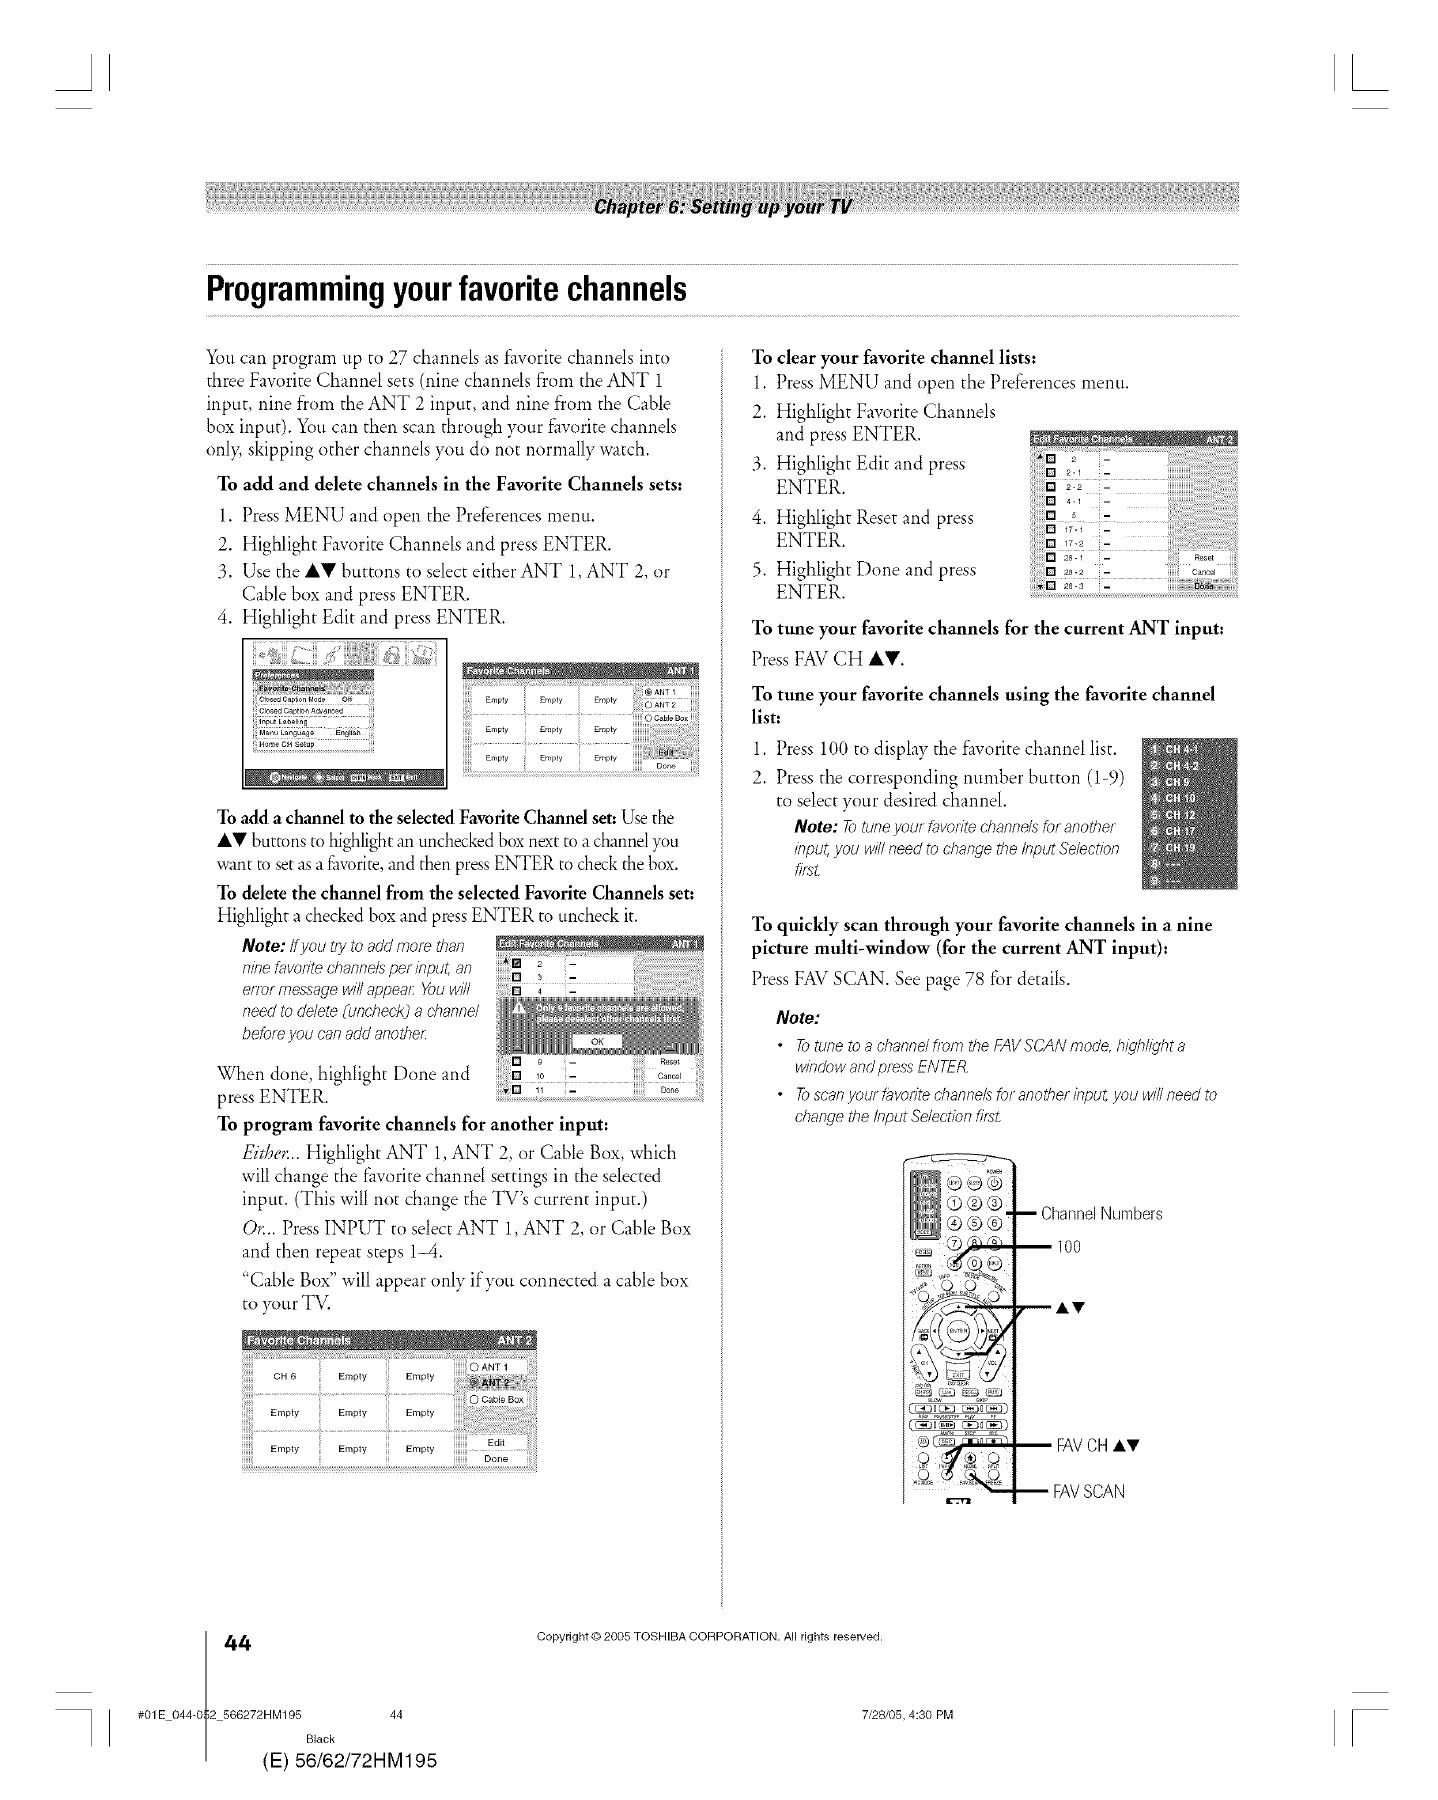
Programmingyourfavoritechannels
You can program tip to 27 channels as f_worite channels into
three Favorite Channel sets (nine channels from the ANT 1
input, nine from the ANT 2 input, and nine from the Cable
box input). You can then scan through your f_worite channels
onl> skipping other channels you do not normally watch.
To add and delete channels in the Favorite Channels sets:
1. Press MENU and open the Preferences menu.
2. Highlight Favorite Channels and press ENTER.
3. Use the IV buttons to select either ANT 1,ANT 2, or
Cable box and press ENTER.
4. Highlight Edit and press ENTER.
.................................
To add a channel to the selected Favorite Channel set: Use the
,&V buttons to }fighlight an unchecked box next to a channel you
want m set as a l:_worite and then press ENTER to check the box.
To delete the channel from the selected Favorite Channels set:
Highlight a checked box and press ENTER to uncheck it.
Note:/fyou t/y to add more than
ninefavodtechannelsper input,an
enor messagewillappear Youwill
need to delete(uncheck] a channel
beforeyou can add another:
When done highlight Done and
press ENTER.
To program favorite channels for another input:
Either:.. Highlight ANT 1,ANT 2, or Cable Box, which
will change the f_woritechannel settings in the selected
input. (This will not change the TV's current input.)
O*:.. Press INPUT to select ANT 1, ANT 2, or Cable Box
and then repeat steps 1-4.
"Cable Box" will appear only if you connected a cable box
to )_mrTV.
2.
3.
4.
5.
To clear your favorite channel lists:
1. Press MENU and open the Preferences menu.
Highlight Favorite Channels
and press ENTER.
Highlight Edit and press
ENTER.
Highlight Reset and press
ENTER.
Highlight Done and press
ENTER.
To tune your favorite channels for the current ANT input:
Press FAVCH AV.
To tune your favorite channels using the favorite channel
list:
1. Press 100 to display the favorite channel list.
2. Press the corresponding number button (1-9)
to select your desired channel.
Note: Totuneyour favo_ftechannelsfor another
input,you will needto changethe InputSelection
firsL
To quickly scan through your favorite channels in anine
picture multi-window (for the current ANT input):
Press FAV SCAN. See page 78 fi)r details.
Note:
•Totune to a channelfrom theFAVSCANmode, highlighta
windowandpressENTER
• Toscanyour favoritechannelsfor anotherinpuLyou willneedto
changethe InputSelection[i_L
__ _o_
Channel Numbers
100
_AV
FAVCH AT
FAVSCAN
4(
#01E 044-0 2 566272HM195 44
Black
E) 56/62/72HM195
Copyright © 2005 TOSHIBA CORPORATION. All rights reserved.
7/28/05, 4:30 PM [
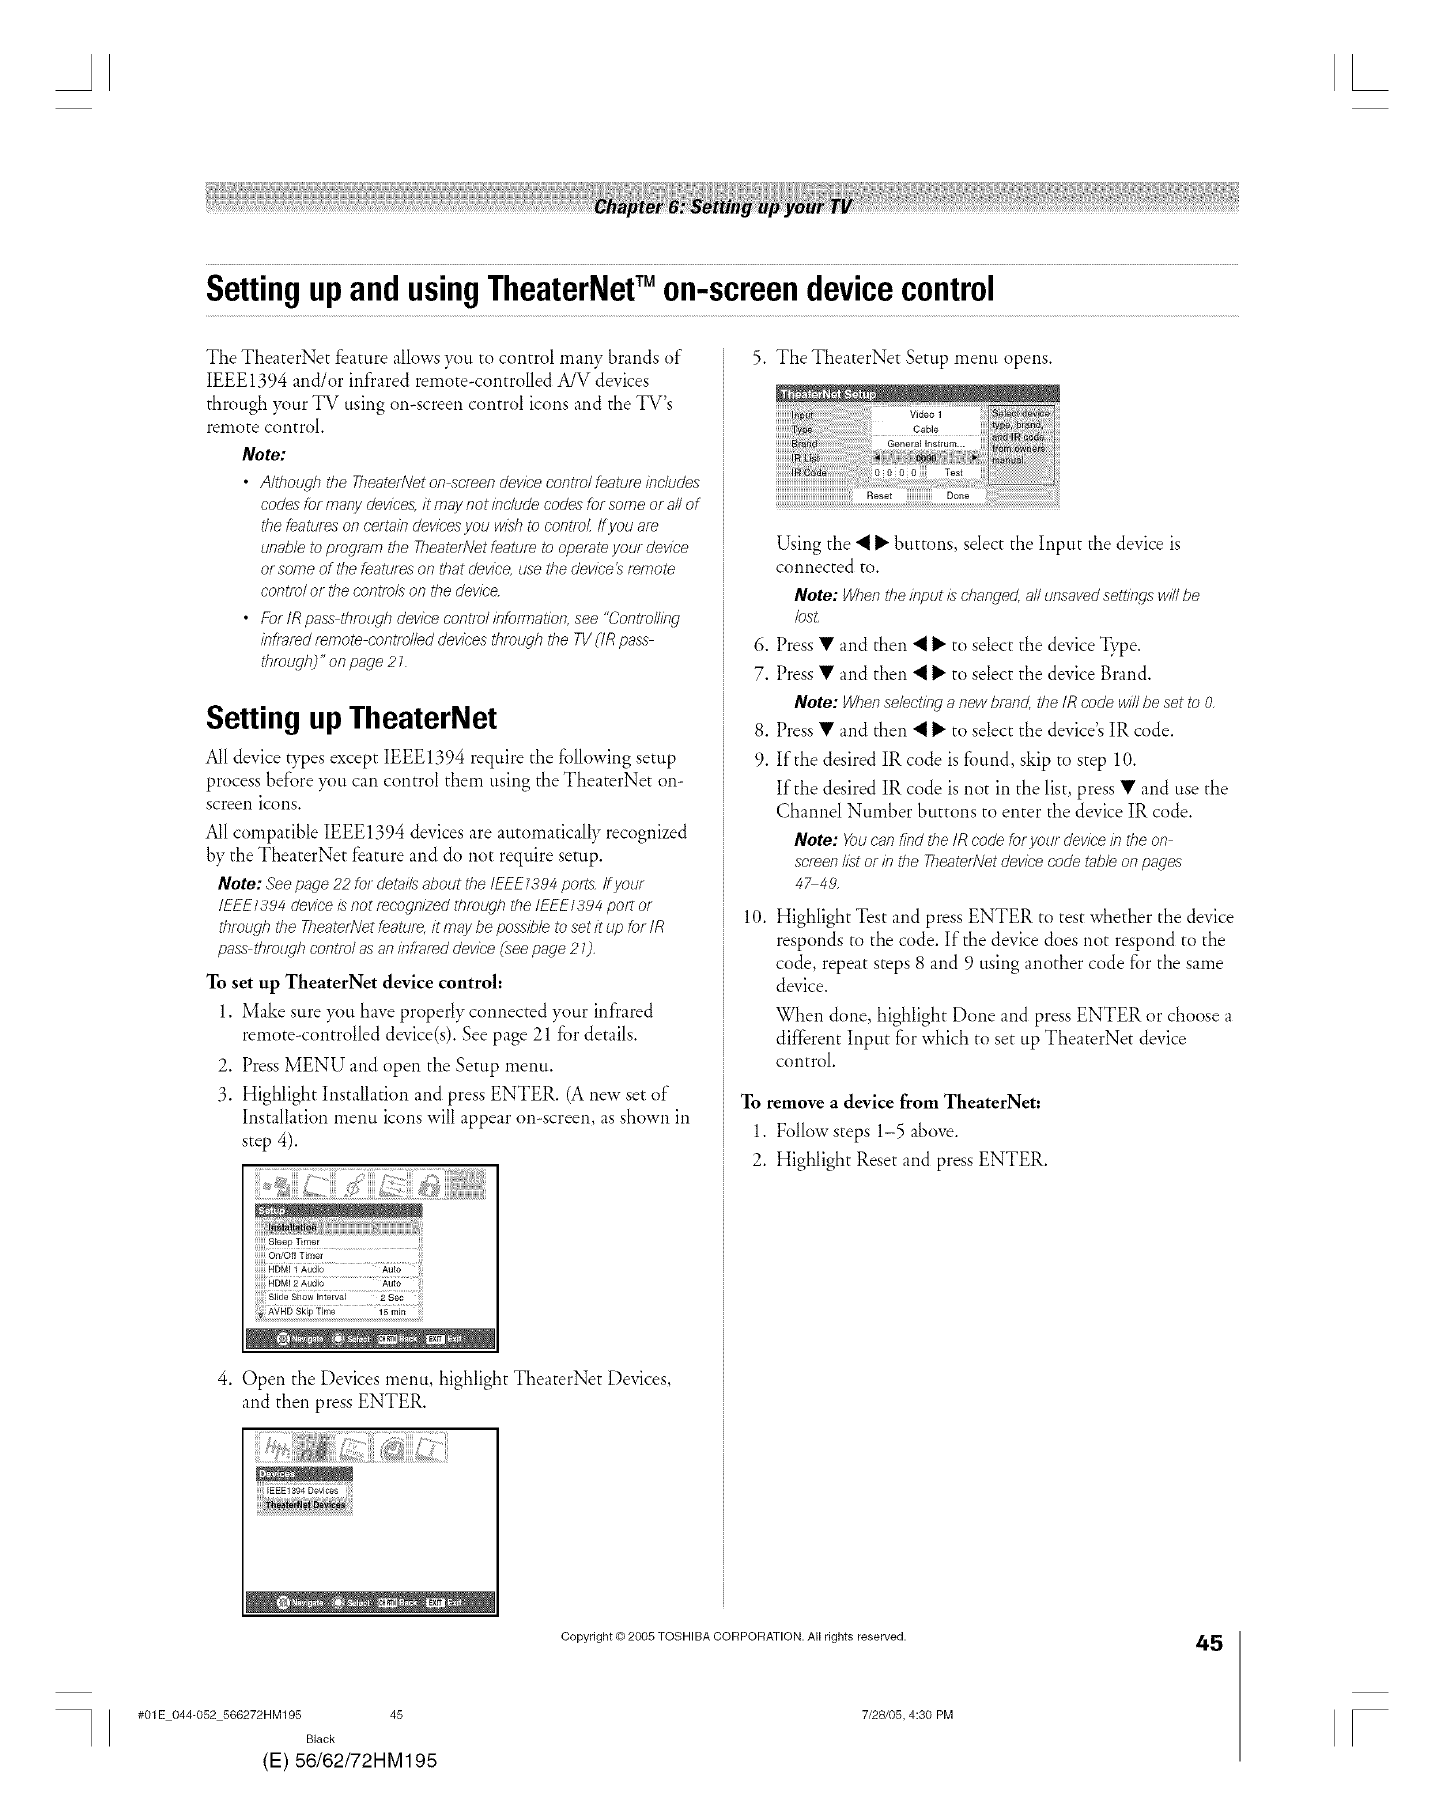
AL
SettingupandusingTheaterNetTM on-screendevicecontrol
The TheaterNet feature allows you to control many brands of
IEEE1394 and/or infrared remote-controlled A/V devices
through your TV using on-screen control icons and the TV's
remote control.
Note:
•Although the TheaterNeton scleendevicecontrolfeatureincludes
codesfor many devices,itmaynot includecodesfor someor allof
thefeatureson certaindevicesyou Wl_sbto conLro[ff you a/e
unableto program the TbeaterNetfeatureto operateyour device
orsome of:be featureson that device,usethedevicet__emote
controlor thecontrolson thedevice.
• ForIRpass throughdevicecontrolinfo/mat/on,see"Cont,mlling
infraredremote controlleddevicestbrougbthe TVCIRpass
tbmugbJ"onpage 27
Setting up TheaterNet
All device types except IEEE1394 require the following setup
process before you can control them using the TheaterNet on-
screen icons.
All compatible IEEE1394 devices are automatically recognized
by the TheaterNet feature and do not require setup.
Note: Seepage22 for deta/Tsaboutthe/EEE1394po/_s./fyour
IEEE/384 deviceisnot fecogf?lzedd}loL/ghtheIEEEI384 po/To1
tbmugb the TbeaterNetfeature,it maybe possibb to setit up for IR
pass tbrougbcontrolasan infmted device(seepage 21),
To set up TheaterNet device control:
1. Make sure you have properly connected your infrared
remote-controlled device(s). See page 21 for details.
2. Press MENU and open the Setup menu.
3. Highlight Installation and press ENTER. (A new set of
Installation menu icons will appear on-screen, as shown in
step 4).
HDMi _ Audio Aulo
AVHD Skip Time 15 Inin
4. Open the Devices menu, highlight TheaterNet Devices,
and then press ENTER.
5. The TheaterNet Setup menu opens.
Using the 'I _" buttons, select the Input the device is
connected to.
Note: Whentheinput is changed,all unsavedsettingswillbe
/osL
6. Press • and then 'I II, to select the device _'pe.
7. Press • and then 'I _" to select the device Brand.
Note: Whenselectinganew brand,theIR code willbe set to O,
8. Press • and then 'I _" to select the device's IR code.
9. If the desired IR code is found, skip to step 10.
If the desired IR code is not in the list, press • and use the
Channel Number buttons to enter the device IR code.
Note: Youcanfind the IR codefor your devicein the on
screenIL_tor in the TheatedVetdevicecode tableonpages
4_49,
10. Highlight Test and press ENTER to test whether the device
responds to the code. If the device does not respond to the
code, repeat steps 8 and 9 using another code fi)r the same
device.
When done, highlight Done and press ENTER or choose a
different Input for which to set up TheaterNet device
control
To remove a device from TheaterNet:
1. Follow steps 1-5 above.
2. Highlight Reset and press ENTER.
Copyright © 2005 TOSHIBA CORPORATION. All rights reserved. 45
#01E 044-052 566272HM195 45
Black
(E) 56/62/72HM195
7/28105, 4:30 PM r
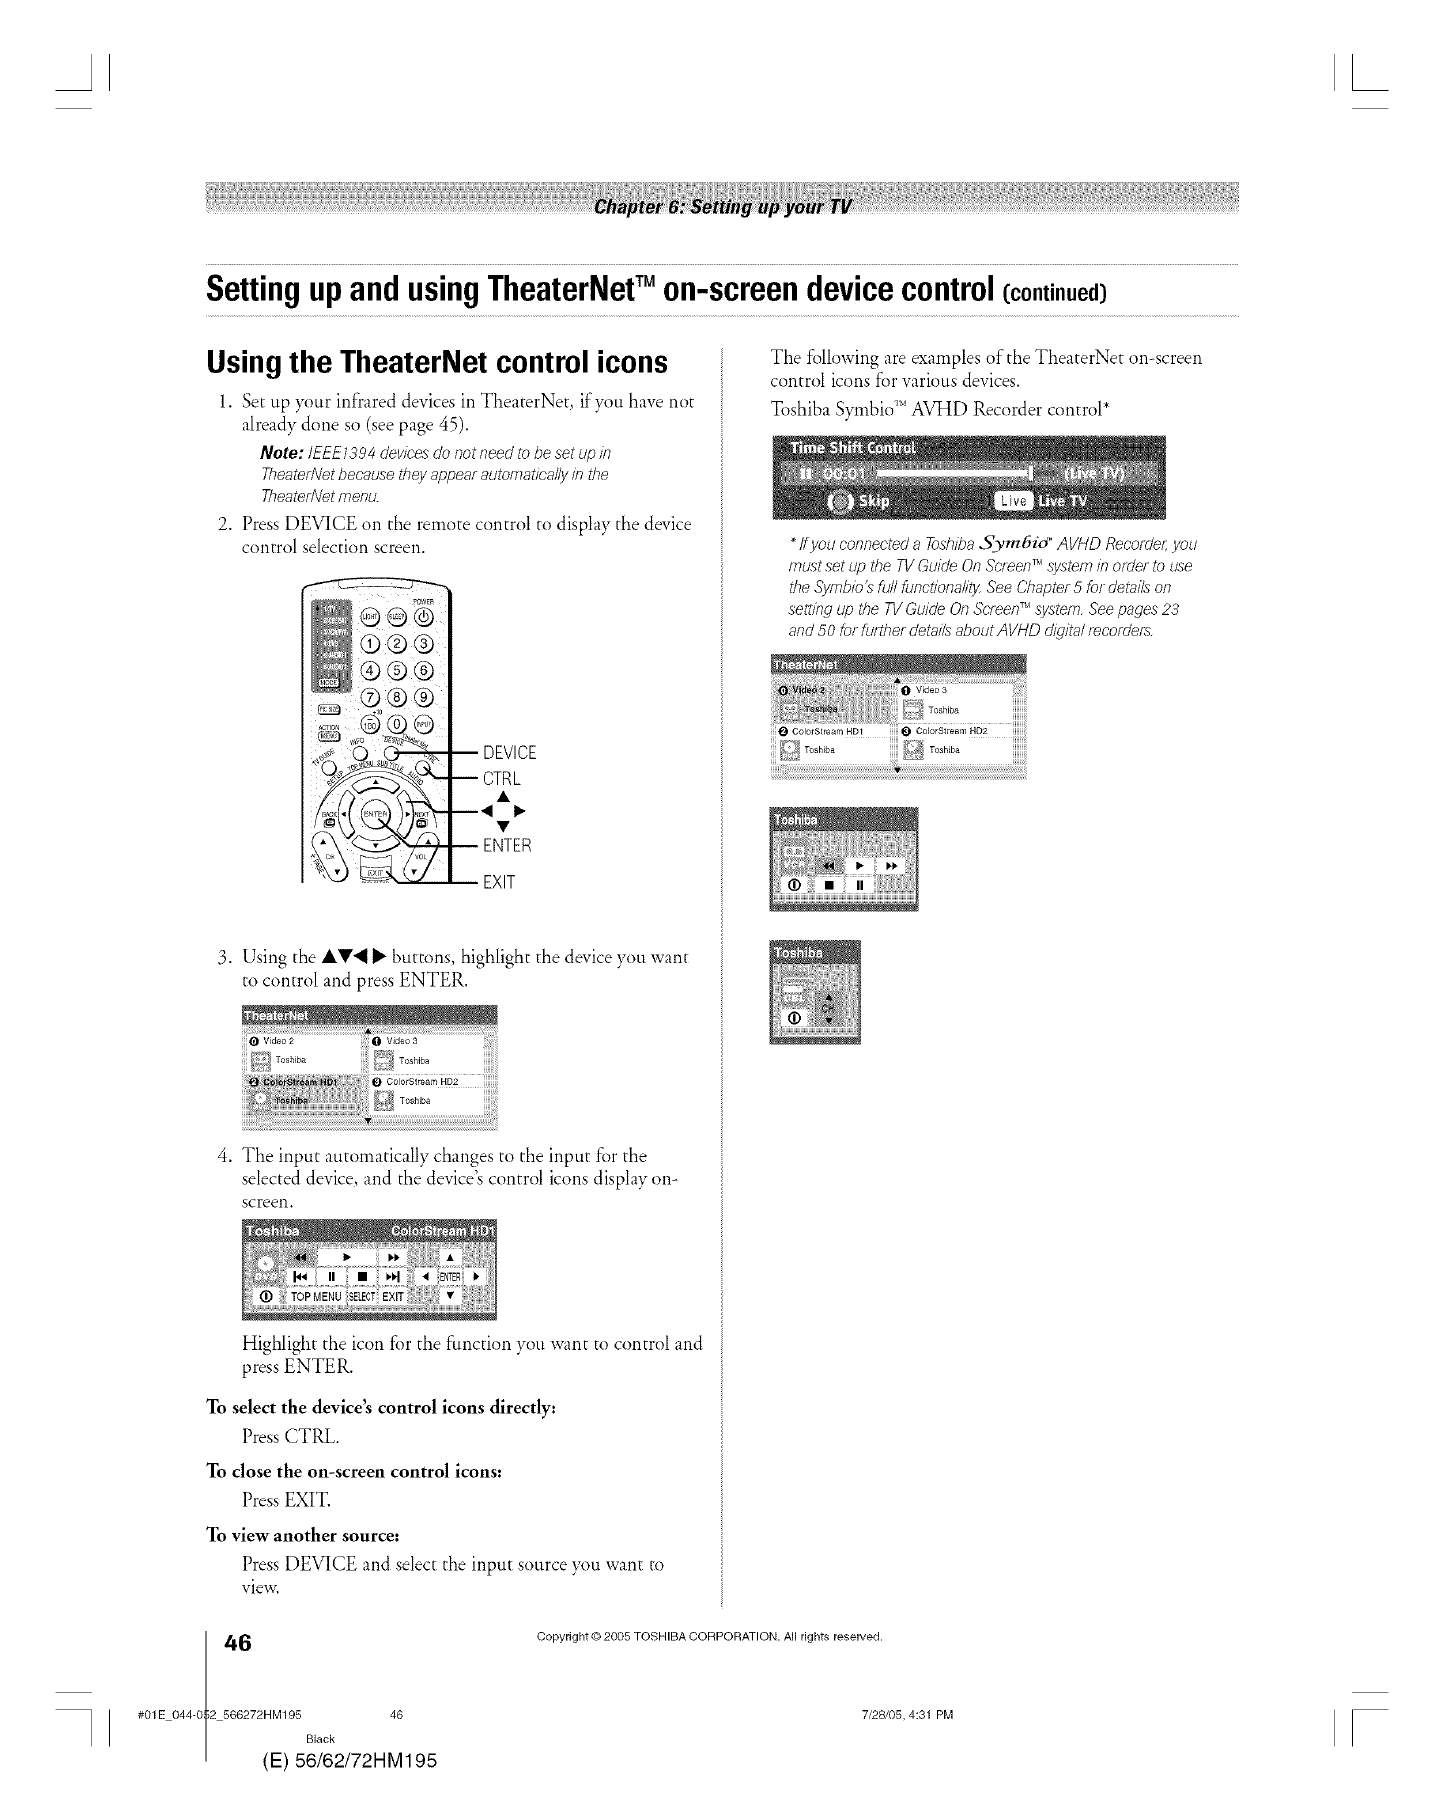
AL
SettingupandusingTheaterNetTM on-screendevicecontrol(continued)
Usingthe TheaterNet control icons
1. Set up your infrared devices in TheaterNet, if'}_mhave not
already done so (see page 45).
Note: IEEE139 4 devices do not need to be set up #7
TheaterNet because they appear automatically #7 the
TheaterNet menu.
2. Press DEVICE on the remote control to display the device
control selection screen.
DEVICE
ENTER
EXIT
3. Using the liV*I _" but[ons, highlight the device you want
to control and press ENTER.
4. The input automatically changes to the input for the
selected device, and the device's control icons display on-
screen.
Highlight the icon for the fimcdon you want to control and
press ENTER.
To select the device's control icons directly:
Press CTRL.
To close the on-screen control icons:
Press EXIT.
To view another source:
Press DEVICE and select the input source )_)u want to
view.
The following are examples of the TheaterNet on-screen
control icons for various devices.
Toshiba Symbio_' AVHD Recorder control*
If you connected aToshiba ,5_m6id °AVHD Record< you
must set up the TVGuide On Screeff r'lsystem in order to use
the Symblo's full functiona/iOz See Chapter 5 for details on
setting up the TV Guide On Screen*r'lsystem, See pages 23
and 50 for further detai/s about AVHD digital t_corde/:_
6(
#01E 044-0 2 566272HM195 46
Black
E) 56/62/72HM195
Copyright © 2005 TOSHIBA CORPORATION. All rights reserved.
7/28105, 4:31 PM F
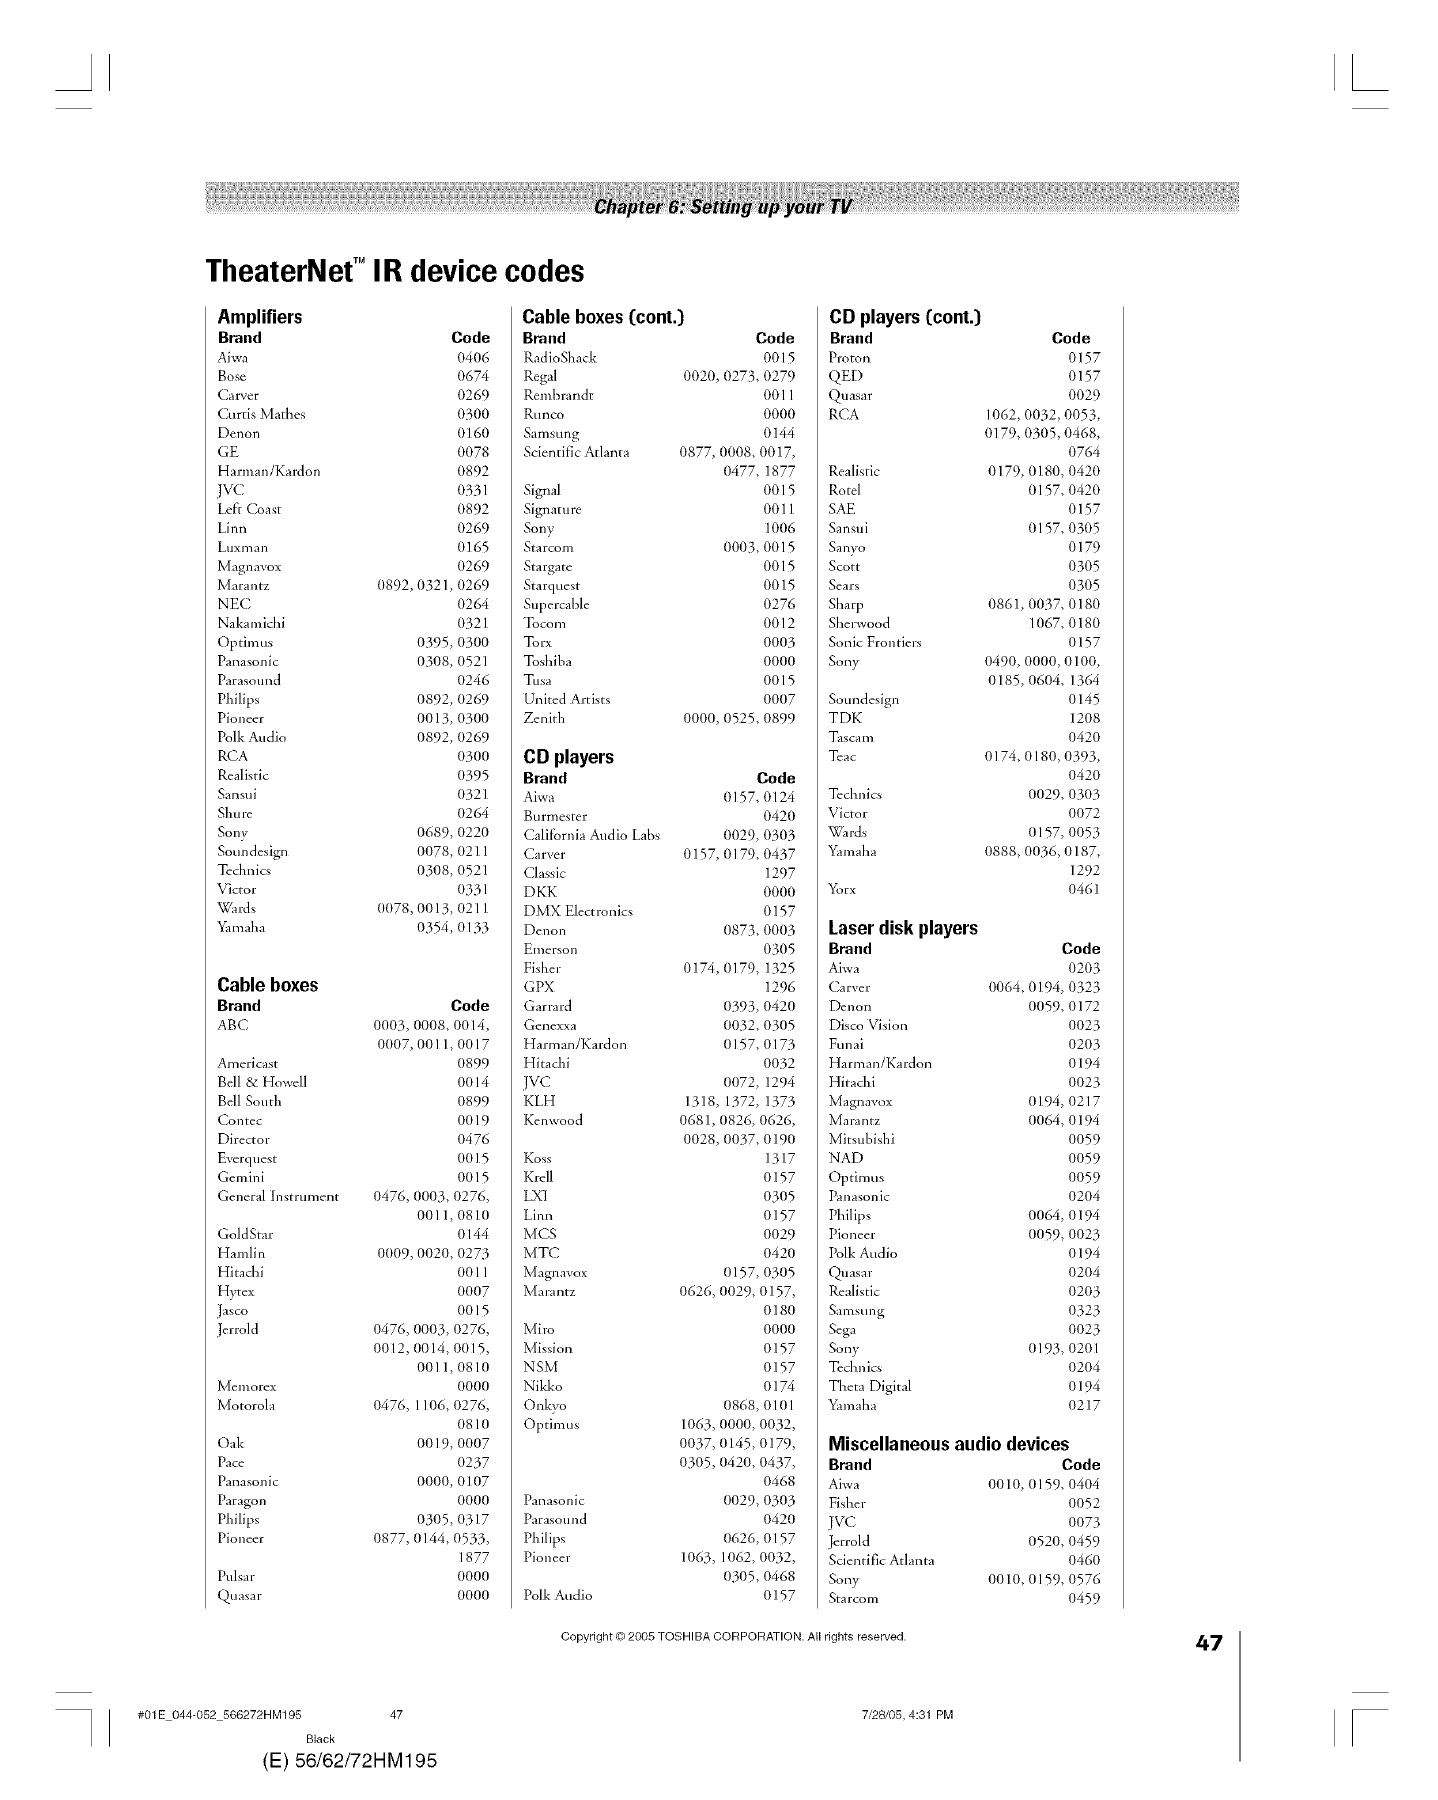
TheaterNet '° I R device codes
Amplifiers
Brand Code
Aiwa (t4(t6
Bose 0674
Carver 0269
Curtis Matbes 0300
Denon 0160
GE (t078
Harman/Kardon (t892
JVC 0331
Left Coast (t892
Linn 0269
Luxman 0165
Magnavox (t269
Marantz (t892, 0321, (t269
NEC 0264
Nakamicbi (1321
Optimus 0395, 0300
Panasonic 0308, (1521
Parasound 0246
Philips 0892, (t269
Pioneer 0013, 0300
Polk Andio 0892, (t269
RCA (t3(t0
Realistic (t395
Sansui 0321
Shure 0264
Sony 0689, 0220
Soundesign 0078, 0211
Technics 0308, 0521
Victor (1331
Wards 0078, 0013, 0211
Yamaha 0354, 0133
Cable boxes
Brand Code
ABC 0003, 0008, 0014,
0(t07, 0011,0017
Americast (t899
Bell &Howdl 0014
Bell South 0899
Contec 0019
Director 0476
Evcrquest 0015
Gemini 0015
General Instrument 0476, 0003, 0276,
0011,081(t
GoldStar 0144
Hamlin 0009, 0020, 0273
Hita&i 0011
Hytex (t007
Jasco 0015
Jerrold 0476, 0003, 0276,
0012, (t014, 0(115,
0011,0810
Memorcx 0000
Motorola 0476, 1106, 0276,
0810
Oak 0019, 0007
Pace (t237
Panasonic 0000, 0107
Paragon 0000
Philips 0305, 0317
Pioneer 0877, (t144, 0533,
1877
Pulsar 0000
Quasar 0000
Cable boxes(cont.)
Brand Code
RadioShack 0015
Regal 0020, 0273, 0279
Rembrandt 001 I
Runco 0000
Samsung 0144
Scientific Atlanta 0877, 0008, 0017,
(t477, 1877
Signal 0015
Signature 0011
Sony 10(16
Starcom (t003, 0015
Stargate 0015
Starquest 0015
Supercable 0276
Tocom 0012
Torx 0003
Toshiba 0000
Tusa 0015
United Artists 00(t7
Zenith 0000, 0525, 0899
CD players
Brand Code
Aiwa 0157, 0124
Burmester 0420
California Audio Labs 0029, 0303
Carver 0157, 0179, 0437
Classic 1297
DKK 0000
DMX Electronics 0157
Denon 0873, 00(t3
Emerson 0305
Fisher 0174, (t179, 1325
GPX 1296
Garrard (t393, 0420
Genexxa 0032, 0305
Harman/Kardon 0157, 0173
Hita&i 0032
JVC 0072, 1294
KLH 1318, 1372, 1373
Kenwood 0681,0826, 0626,
0028, 0037, 0190
Koss 1317
Krdl 0157
LXI 0305
Lim_ 0157
MCS 0029
MTC 0420
Magnavox 0157, 0305
Marantz 0626, 0029, 0157,
0180
Miro 0000
Mission 0157
NSM 0157
Nikko 0174
Onkyo (t868, 0101
Optimus 1063, 0000, 0032,
0037, (t145, 0179,
0305, (t420, 0437,
0468
Panasonic (t029, 0303
Parasound 0420
Philips (t626, 0157
Pioneer 1063, I(t62, 0032,
(t305, 0468
Polk Audio 0157
CD players(cont.)
Brand Code
Proton 0157
QED 0157
Quasar 0029
RCA 1062, 0032, 0053,
(1179, 0305, 0468,
O764
Realistic 0179, 0180, 042(t
Rotel (1157,0420
SAE 0157
Sansui 0157, 0305
Sanyo 0179
Scott 0305
Sears 0305
Sharp 0861,0037, 0180
Sherwood 1067, 0180
Sonic Frontiers 0157
Sony (t490, 0000, 0100,
0185, 0604, 1364
Soundesign 0145
TDK 1208
Tascam 0420
Tcac 0174, 0180, 0393,
0420
Te&nics 0029, 0303
Victor 0072
Wards 0157, 0053
Yamaha 0888, 0036, 0187,
1292
Yorx 0461
Laserdisk players
Brand Code
Aiwa 0203
Carver (t(/64, (t194, 0323
Denon 0059, 0172
Disco Vision 0023
Funai 0203
Harman/Kardon 0194
Hitachi 0023
Magnavox 0194, 0217
Marantz 0064, 0194
Mitsubishi 0059
NAD 0059
Optimus 0059
Panasonic 0204
Philips 0064, 0194
Pioneer 0059, 0023
Polk Audio 0194
Quasar 0204
Realistic 0203
Samsung 0323
Sega 0023
Sony (1193,0201
To&nits 0204
Tbeta Digital 0194
Yamaha 0217
Miscellaneous audio devices
Brand Code
Aiwa 0010, 0159, 0404
Fisher 0052
[VC 0073
Jerrold 0520, 0459
Scientific Atlanta 0460
Sony 0010, 0159, 0576
Starcom 0459
Copyright © 2005 TOSHIBA CORPORATION. All rights reserved.
#01E 044-052 566272HM195 47
Black
(E) 56/62/72HM195
7/28/B5, 4:31 PM
47
[
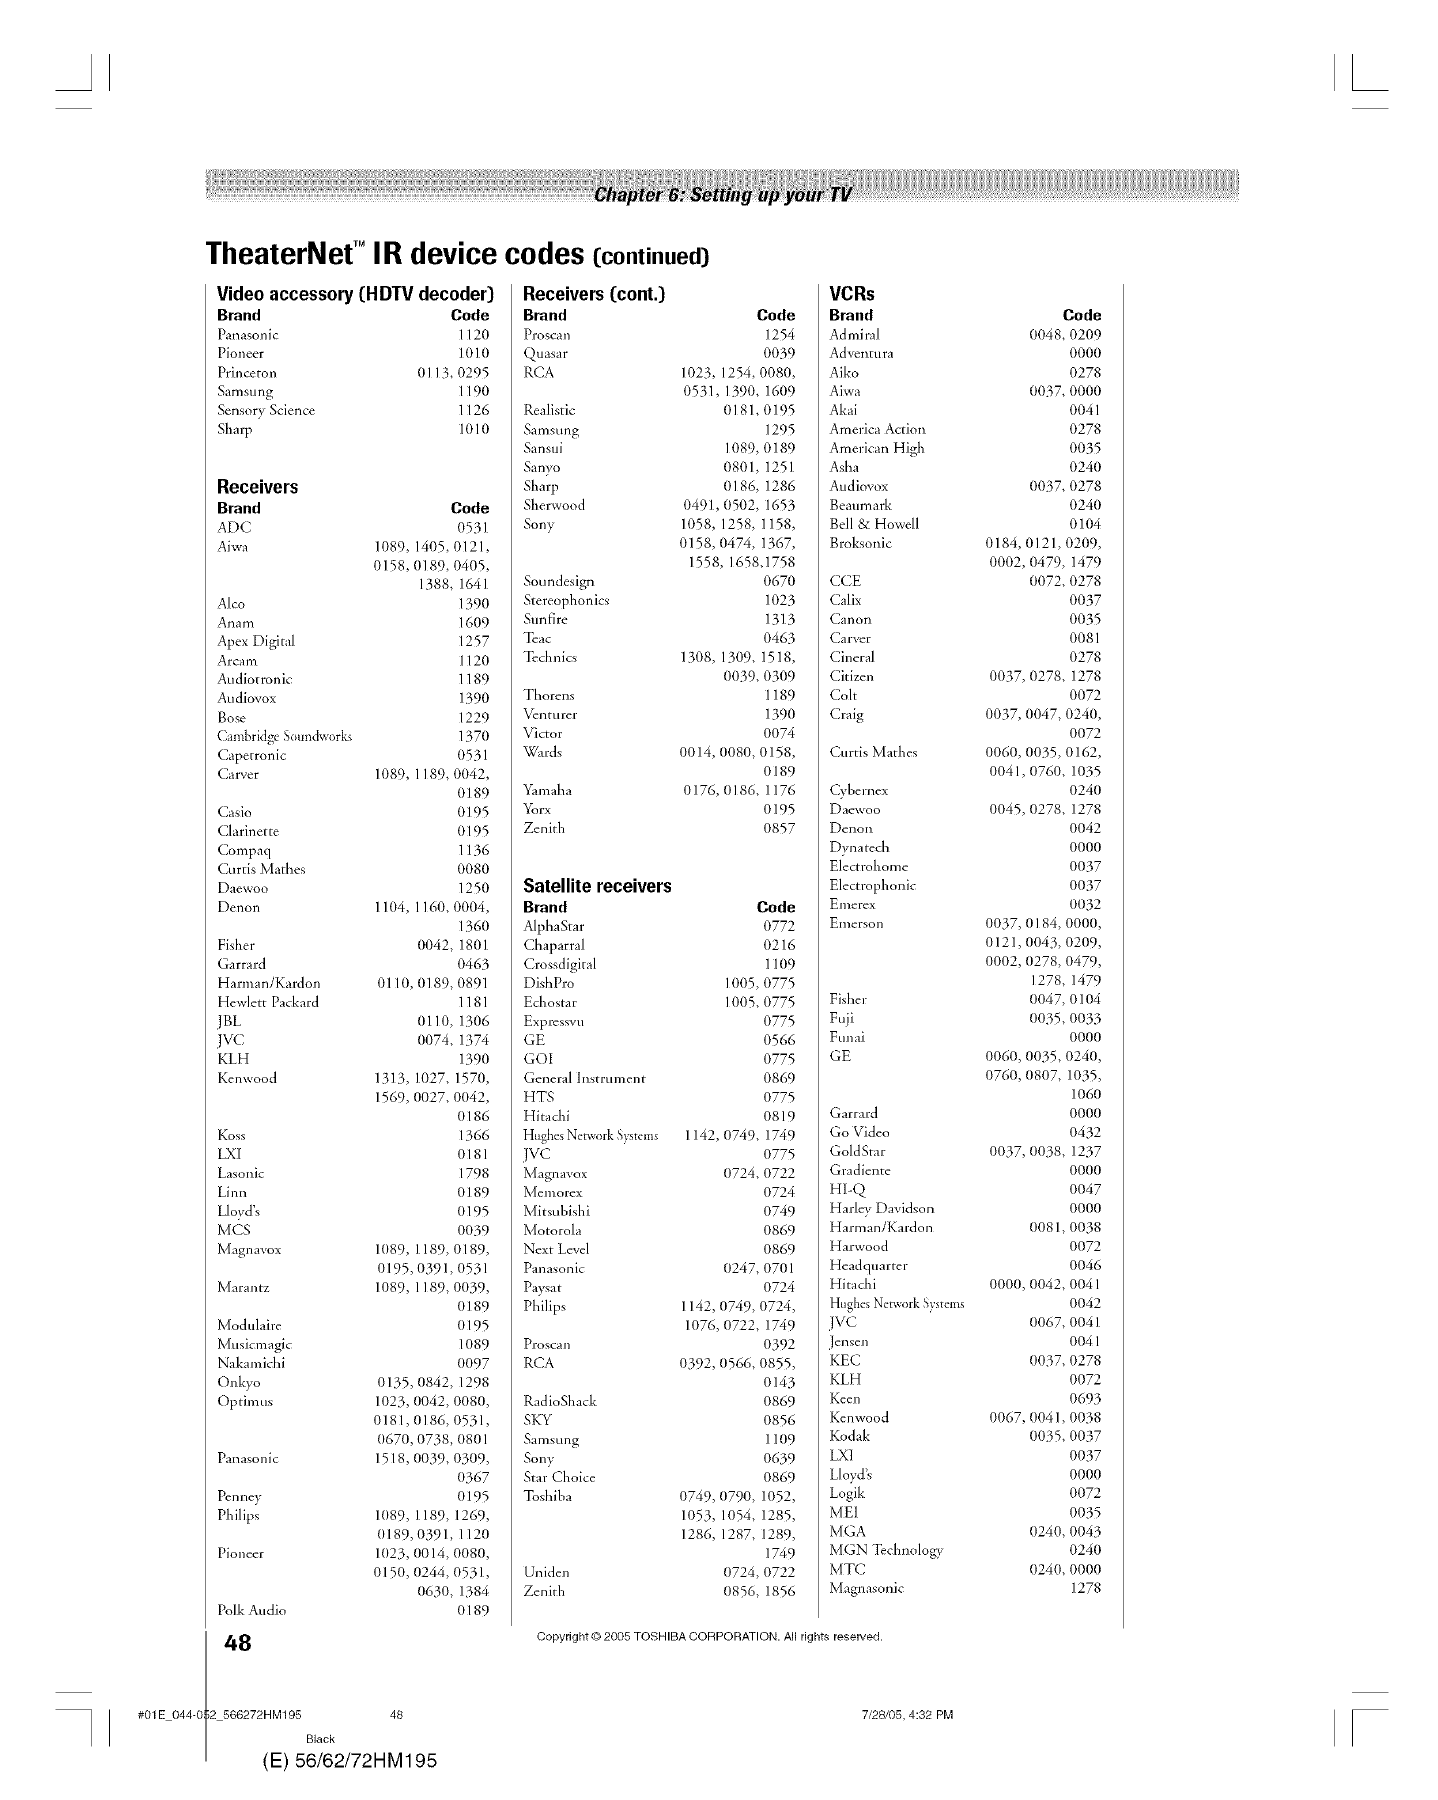
AL
TheaterNef °IR device codes (continued)
Video accessory(HDTV decoder)
Brand Code
Panasonic 1120
Pioneer 1010
Princeton (tl 13, 0295
Samsung I 190
Sensory Science I 126
Sharp 1010
Receivers
Brand Code
ADC 0531
Aiwa 1089, 1405, 0121,
0158, (t189, 0405,
1388, 1641
A]co 1390
Anam 1609
Apex Digital 1257
Arcam 1120
Audiotro.ic 1189
Audiovox 1390
Bose 1229
Cambridg. Soundworks 137(t
Capetronic (t531
Carver 1089, 1189, 0042,
(t189
Casio (t195
Clarinette 0195
Compaq 1136
Curtis Matbes 0080
Daewoo 1250
Denon 1104, 1160, 0004,
136(t
Fisher (t042, 1801
Garrard 0463
Harman/Kardon 0110, (tl 89, 0891
Hewlett Packard 1181
JBL 0110, 1306
JVC (t074, 1374
KLH 139O
Kenwood 1313, 1027, 1570,
1569, 0027, 0(t42,
0186
Koss 1366
LXI 0181
Lasonic 1798
Linn 0189
Lloyd's 0195
MCS OO39
Mag*lavox 1(t89, 1189, 0189,
0195,0391, 0531
Marantz 1089, 1189, 0(t39,
(t189
Modulaire 0195
Musicmagic 1089
Nakamichi (t097
Onkyo 0135, 0842, 1298
Optimus 1023, (t042, 0080,
0181,0186, 0531,
(t670, 0738, (t801
Panasonic 1518, 0039, 0309,
(t367
Pcnney 0195
Philips 1089, 1189, 1269,
0189,0391, 1120
Pioneer 1(t23, 0014, 0080,
0150, 0244, 0531,
(t630, 1384
Polk Audio 0189
48(
#01E 044-0 2 566272HM195 48
Black
E) 56/62/72HM195
Receivers(cont.)
Brand Code
Proscan 1254
Quasar 0039
RCA 1023, 1254, 0080,
0531, 1390, 1609
Realistic (tl 81,0195
Samsung 1295
Sansui ]089, 0189
Sanyo 0801, 1251
Sharp (tl 86, 1286
Sherwood 0491,0502, 1653
So.y 1058, 1258, 1158,
0158, 0474, 1367,
1558, 1658,1758
Soundesign 0670
Stereophonics 1023
Sunfire 1313
Tcac 0463
Technics 1308, 1309, 1518,
(t(t39, O3O9
Thorens 1189
Venturer ]390
Victor 0074
Wards 0014, (t080, 0158,
0189
Yamaha 0176, (tl86, 1176
Yorx 0195
Zenith 0857
Satellite receivers
Brand Code
Alpl,aStar t-/772
Chaparral 0216
Crossdigital 11(t9
DishPro I(t05, 0775
Echostar 1005, 0775
Exprcssvu 0775
GE 0566
GOI O775
General Instrument 0869
HTS O775
Hita&i 0819
HughesNetworkS)_tems 1142, 0749, 1749
JVC 0775
Magimvox (t724, 0722
Memorex 0724
Mitsubishi 0749
Motorola 0869
Next Level 0869
Panasonic 0247, 0701
Paysat 0724
Philips 1142, 0749, 0724,
1076, 0722, 1749
Proscan 0392
RCA 0392, (t566, 0855,
0143
RadioShack 0869
SKY 0856
Samsung l 1(t9
Sony 0639
Star Choice 0869
Toshiba 0749, 0790, 1052,
1053, 1054, 1285,
1286, 1287, 1289,
1749
Uniden (t724, 0722
Zenith (t856, 1856
VCRs
Brand
Admiral
Advcntura
Aiko
Aiwa
Akai
America Action
American High
Asha
Audiovox
geaumark
Bell & Howell
Broksonic
CCE
Calix
Canol]
Carver
Cineral
Citizen
Colt
Craig
Curtis Mathes
Qbernex
Daewoo
Denon
Dw_atecb
Electrohome
Electrophonic
gmercx
Emerson
Fisher
Fuji
Funai
GE
Garrard
Go Video
GoldStar
Gradiente
HI-Q
Harley Davidson
Harman/Kardon
Harwood
Headquarter
Hitachi
HughesNetworkSystems
JVC
Jellsen
KEC
KLH
Keen
Kenwood
Kodak
LXI
Lloyd'a
Logik
MEI
MGA
MGN Technology
MTC
Magilasonic
Copyright © 2005 TOSHIBA CORPORATION. All rights reserved.
7/28/05, 4:32 PM
Code
0048,0209
0000
0278
0037,0000
0041
0278
OO35
024(t
(t037, 0278
024(t
0104
0184,0121,0209,
0002,0479,1479
0072,0278
0037
OO35
0081
0278
0037,0278,1278
0072
0037,(t047, 024(t,
0072
0060,0035,0162,
0041,0760,1035
024(t
0045,0278,1278
0042
0000
0037
0037
0032
0037,0184,000(t,
0121,0043,0209,
0002,(t278, 0479,
1278,1479
(t047, 0104
(t035, OO33
0000
0060,0035,0240,
0760,0807, 1035,
1060
0000
O432
0037,(t038,1237
0000
0047
0000
(t081,0038
0072
0046
0000,0042,0041
0042
(t067, 0041
0041
(t037, 0278
0072
O693
0067,(t041, 0038
(t035, OO37
0037
0000
0072
OO35
(t240, OO43
024(t
(t24(t, 0000
1278
[
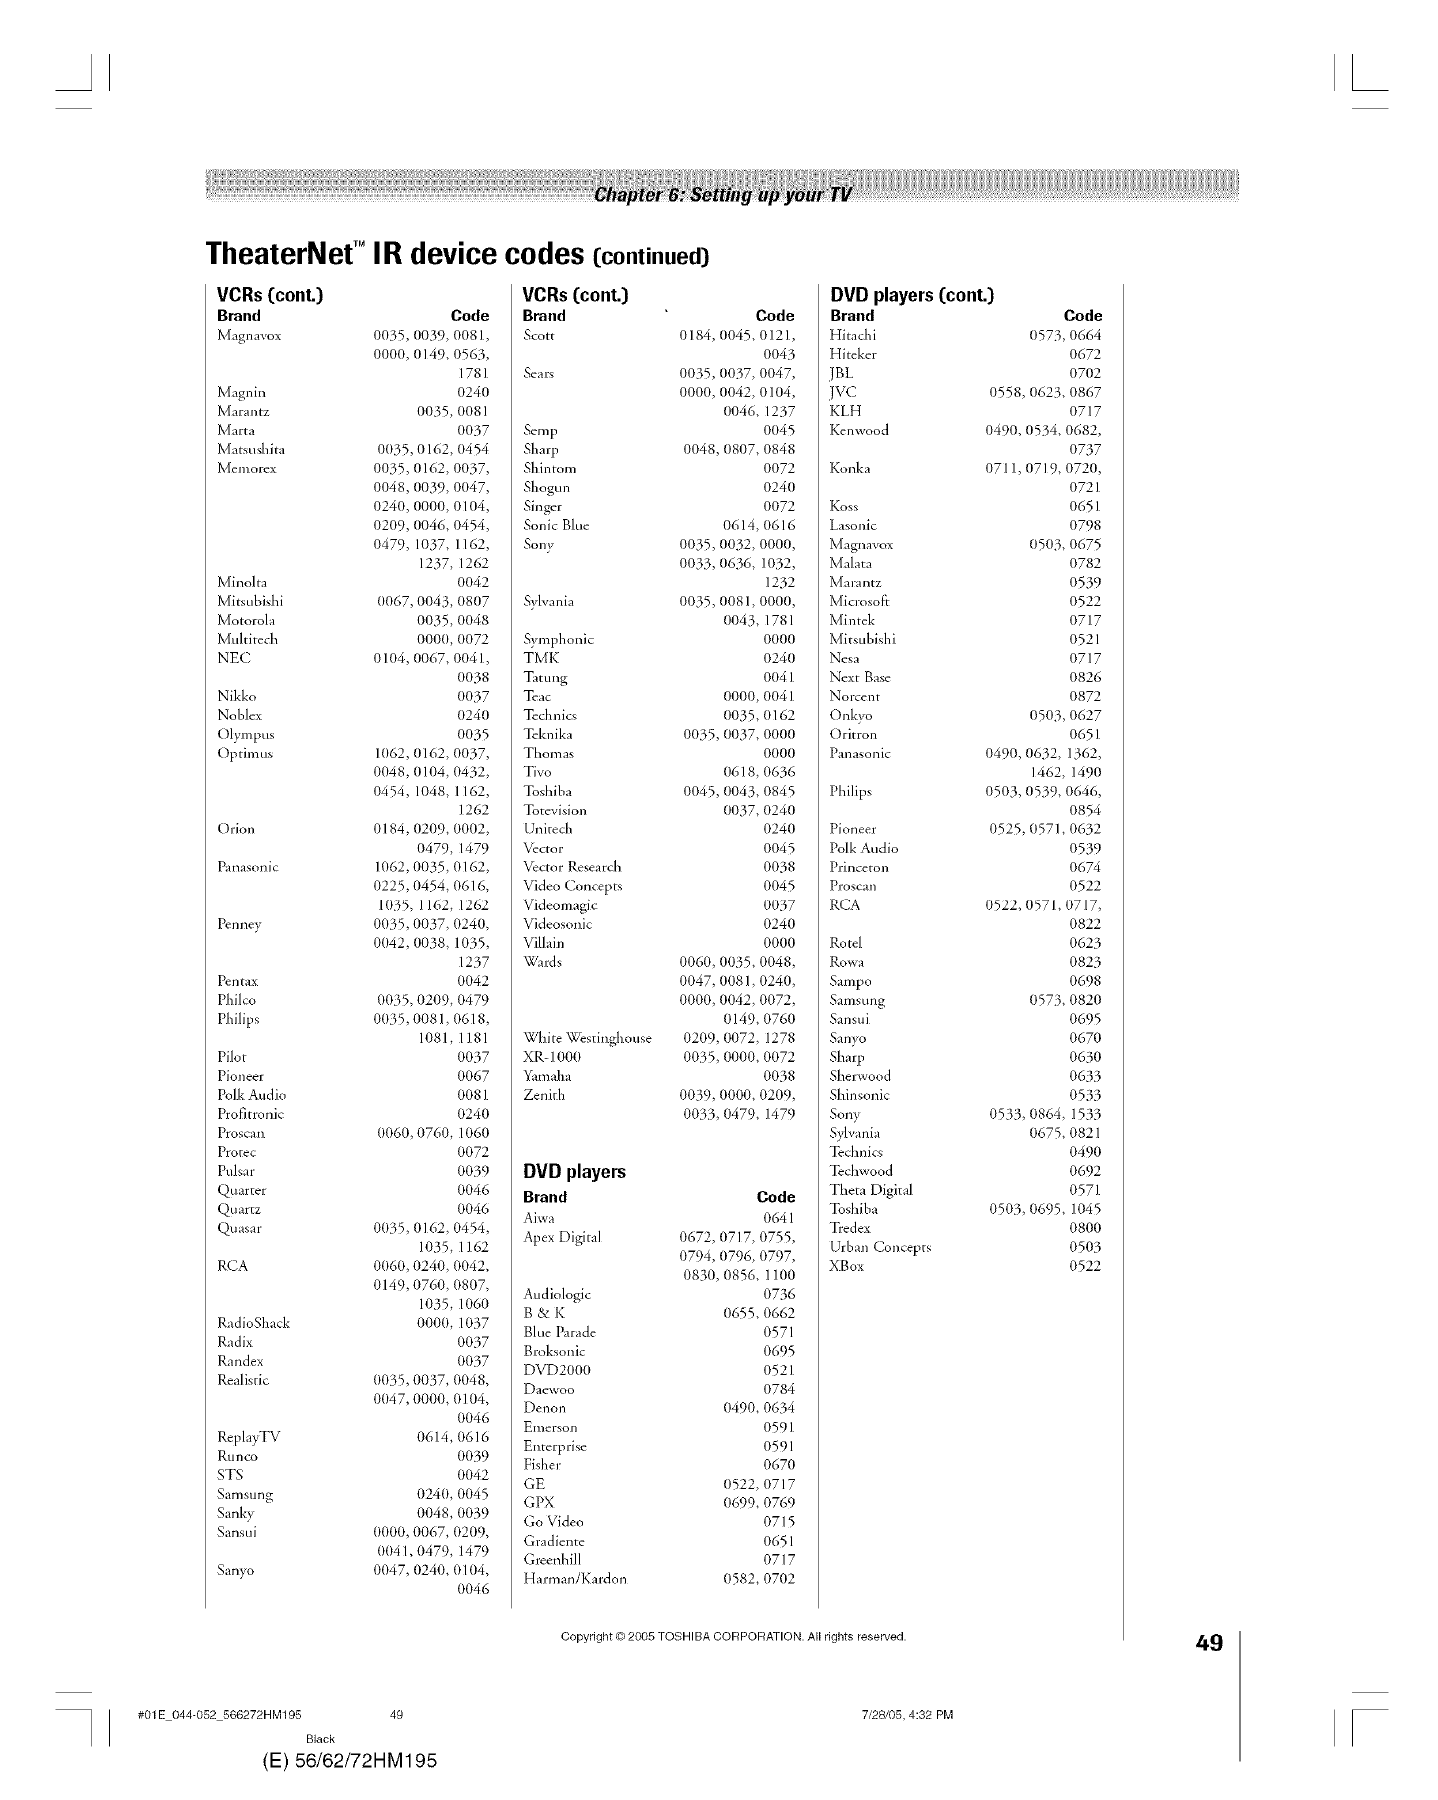
AL
TheaterNef °IR device codes (continued)
VCRs (cont.)
Brand Code
Magnavox t-/(t35,0039, (t(t81,
0000, 0149, 0563,
1781
Magnin 0240
Marantz 0035, (1081
Marta (t037
Mat_usbita 0(t35, 0162, 0454
Memorcx 0035, 0162, 0037,
0048, (t039, 0047,
0240, 0000, 0104,
0209, (t046, 0454,
0479, 1037, 1162,
1237, 1262
Minolta 0042
Mitsubishi (t067, 0043, (t8(t7
Motorola 0035, 0048
Multitecb 0000, (t072
NEC 0104, 0067, 0041,
(t038
Nikko (t037
Noblex (t24(t
Olympus 0035
Optimus 1(t62, 0162, 0037,
0048, (t104, 0432,
0454, 1048, 1162,
1262
Orion 0184, 0209, 0002,
0479, 1479
Panasonic 1062, 0035, 0162,
0225, 0454, 0616,
1(t35, 1162, 1262
Pcmley 0035, 0037, 024(t,
0042, (t038, 1035,
1237
Pcntax (t042
Philco 0035, 0209, 0479
Philips 0(t35, 0081, 0618,
1081, 1181
Pilot (t037
Pioneer (t067
Polk Audio (1081
Profitronic (t240
Proscan (t060, 0760, I(160
Protec (t072
Pulsar (t039
Quarter (t046
Quartz (t046
Quasar 0(t35, 0162, 0454,
1035, 1162
RCA 0060, 0240, 0042,
0149, 0760, 0807,
1035, 1060
RadioShack 0000, 1037
Radix 0037
Randex 0037
Realistic 0035, 0037, 0048,
0047, 0000, 0104,
0046
RcplayTV 0614, 0616
Runco 0039
STS (t042
Samsung 024(t, 0045
Sanky 0048, (t039
Sansui 0000, 0067, 0209,
004 I, 0479, 1479
Sanyo 0047, 0240, 0104,
(t046
VCRs (cont.}
Brand Code
Scott 1./184,0045, 1./121,
0043
Sears 0035, (t037, 0047,
0000, 0042, 0104,
(t046, 1237
Semp 0045
Sharp 0048, (t807, 0848
Shintom 0072
Shogun 024(t
Singer 0072
Sonic Blue 0614, (1616
Sony 0035, 0032, 0000,
0033, (t636, 1032,
1232
Sylvania 0035, 0081, 0000,
0043, 1781
Symphonic 0000
TMK 024(t
Tatung 0041
Tcac 0000, 0041
Technics (t035, 0162
Teknika 0035, 0037, 0000
Thomas 0000
Tivo 0618, 0636
Toshiba 0045, (t043, 0845
Totcvision 0037, 0240
United_ 0240
Vector 0045
Vector Research 0038
Video Concepts 0045
Videomagic 0037
Videosonic 0240
Villain 0000
Wards 0060, 0(t35, 0048,
0047, (t(t81, 0240,
0000, 0042, 0072,
(t149, 0760
White Westinghouse 0209, (t072, 1278
XR-1000 0035, 0000, 0072
Yamaha 0038
Zenith 0039, 0000, 0209,
0033, 0479, 1479
DVD players
Brand Code
Aiwa 0641
Apex Digital 1./672,(1717, 1./755,
0794, 0796, 0797,
0830, 0856, 1100
Audiologic 0736
g & K (t655, 0662
Blue Parade 0571
Broksonic 0695
DVD2000 0521
Daewoo 0784
Denon (t490, 0634
Emerson 0591
Enterprise 0591
Fisher 0670
GE (t522, 0717
GPX (}699, 0769
Go Video 0715
Gradiente 065 I
Grcenhill 0717
Harman/Kardon (t582, 0702
DVD players (cont.}
Brand Code
Hitachi 0573,1-/664
Hiteker 0672
JBL 0702
JVC 0558, 0623, 0867
KLH 0717
Kenwood 0490, 0534, 0682,
0737
Konka 0711,0719, 0720,
0721
Koss 0651
Lasonic 0798
Magnavox 0503, 0675
Malata 0782
Marantz 0539
Microsoft 0522
Mintek 0717
Mitsubishi 0521
Nesa 0717
Next Base 0826
Norcent 0872
Onkyo 0503, 0627
Oritron 0651
Panasonic 0490, 0632, 1362,
1462, 1490
Philips 0503, 0539, 0646,
O854
Pioneer 0525, 0571, 0632
Polk Audio 0539
Princeton 0674
Proscan 0522
RCA 0522, (t571,0717,
0822
Rotel 0623
Rowa 0823
Sampo 0698
Samsung (t573, 0820
Sansui 0695
San>_ 0670
Sharp 0630
Sherwood 0633
Shinsonic 0533
Sony 0533, 0864, 1533
Sylvania (t675, 0821
To&nits 0490
Te&wood 0692
Theta Digital 0571
Toshiba 0503, 0695, 1045
Tredex 0800
Urban Concepts 0503
XBox 0522
Copyright © 2005 TOSHIBA CORPORATION. All rights reserved.
#01E 044-052 566272HM195 49
Black
(E) 56/62/72HM195
7/28/B5, 4:32 PM
49
F
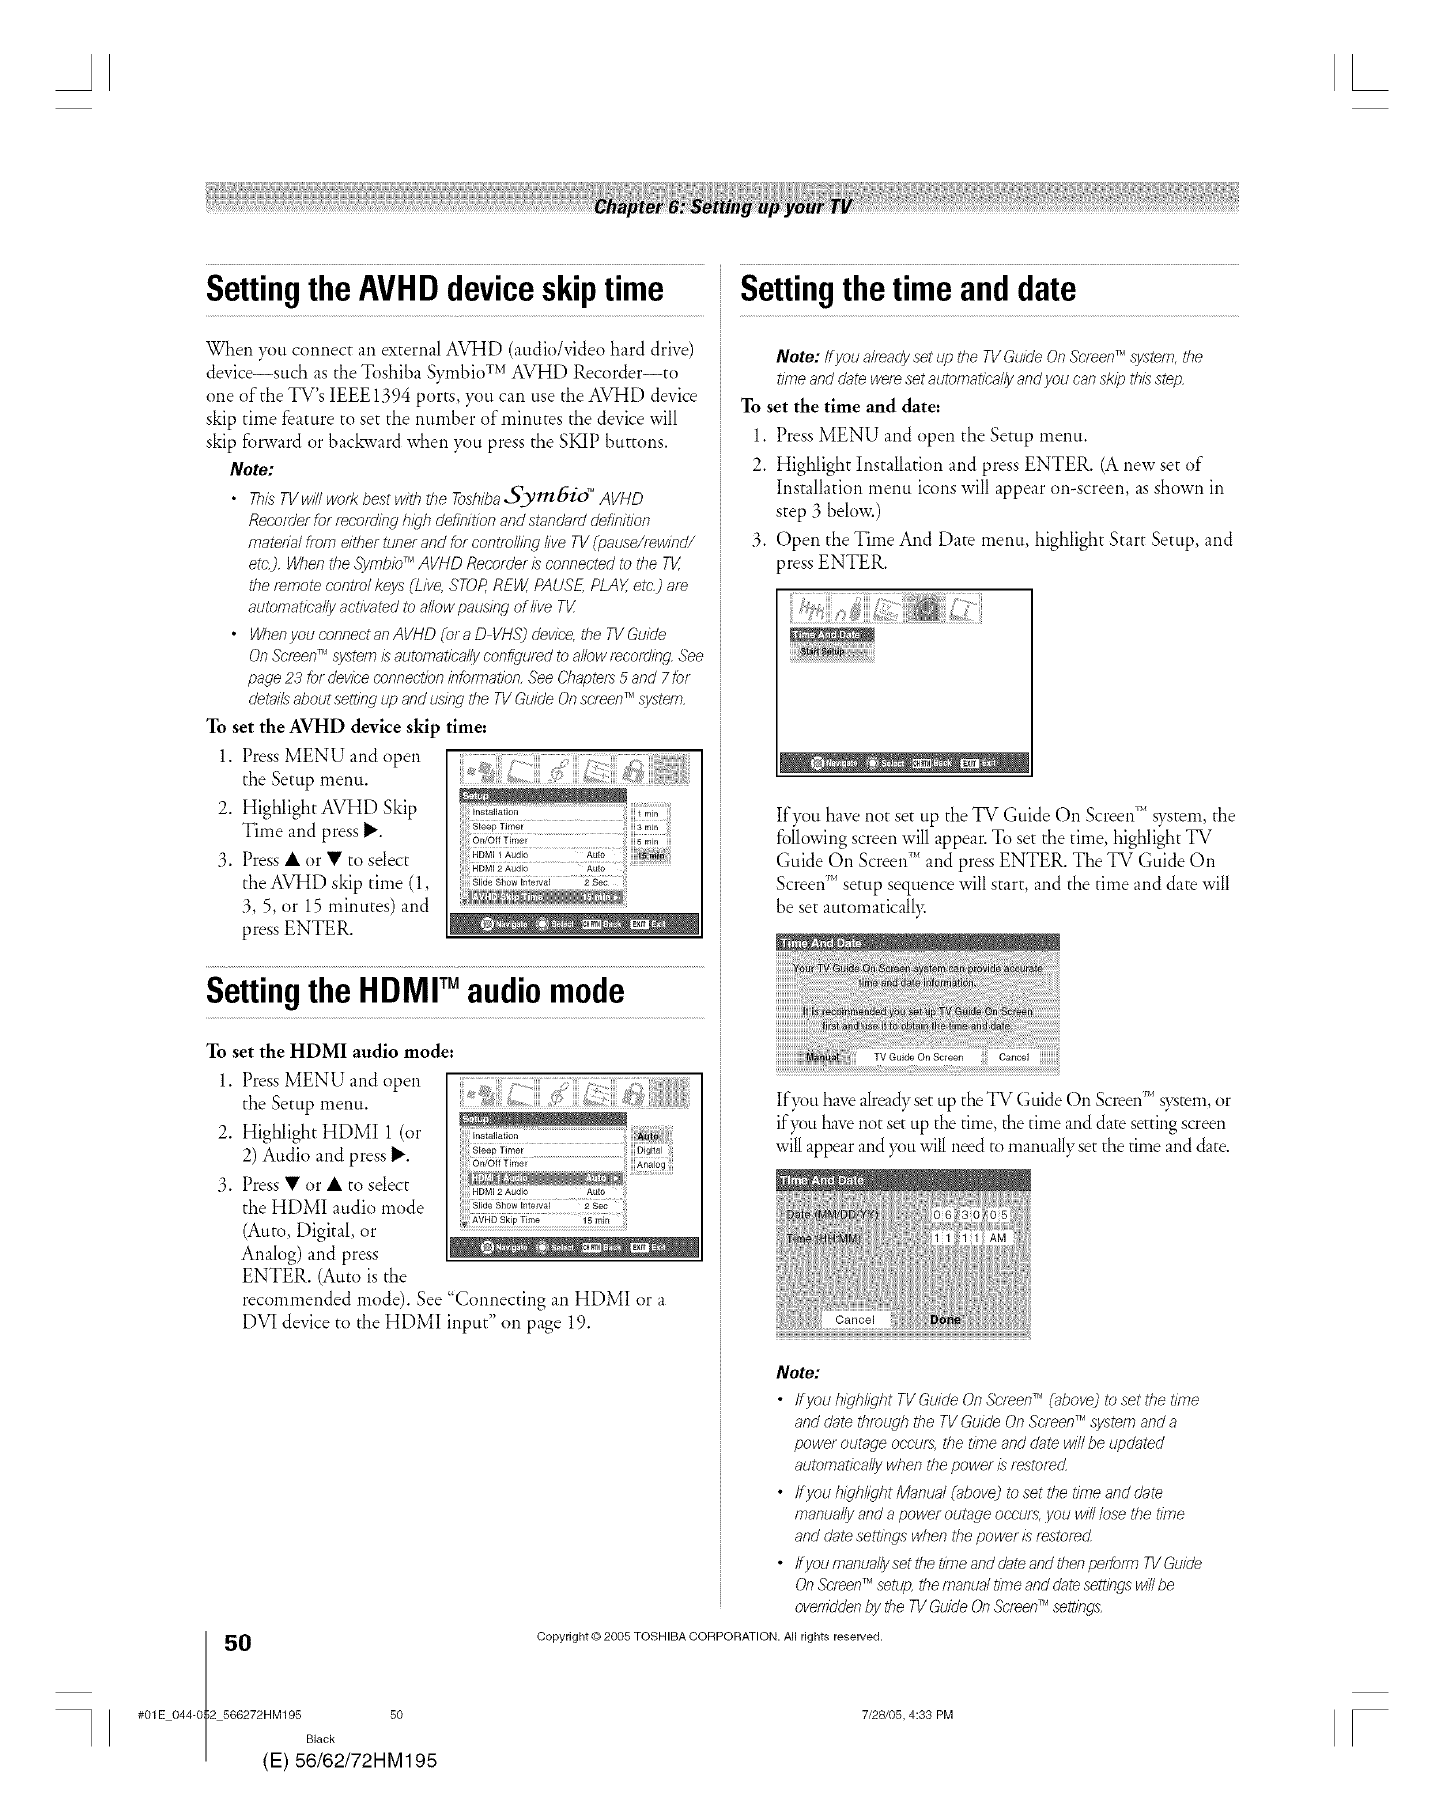
Settingthe AVHD deviceskiptime
When you connect an external AVHD (audio/video hard drive)
device--such as the Toshiba S}_nbio Tv AVHD Recorder--to
one of the TV's IEEE 1394 ports, }a)u can use the AVHD device
skip time feature to set the number of minutes the device will
skip forward or backward when ?q_tlpress the SKIP buttons.
Note:
•ThLsTVwill workbestwiththe Toshiba,_ym6id MAVHD
Reco/derfor _ecordinghighdef#7/t/onand standarddefinition
matedalft_fn eithertunerandfor controllinglive TV(pause/rewind/
etc.).WhentheSymbio_MAVND Reco_deris connectedto the TV,
theremotecontrolkeys(Live,STOP,REW,PAUSE PLAY,etc) ate
automaticallyactivatedto allowpausingof live Tg
• Whenyou connectanAVHD (or a D VNS)device,the TVGuide
OnSc/een_r'_system/:sautemat/}:al!yconf(guredto allow_ecordingSee
page23 fordeviceconnect/bnJnfofTnation,SeeChapters5 and 7fb/
detailsaboutsetting upandusingthe TVGuideOnscteenrMsystem.
To set the AVHD device skip time:
1. Press MENU and open
the Setup menu.
2. Highlight AVHD Skip
Time and press P".
3. Press • or • to select
the AVHD skip time (1,
3, 5, or 15 minutes) and
press ENTER.
Settingthe HDMP audiomode
To set the HDMI audio mode:
1. Press MENU and open
the Setup menu.
2. Highlight HDMI 1 (or
2) Audio and press _'.
3. Press • or • to select
the HDMI audio mode
(Auto, Digital, or
Analog) and press
ENTER. (Auto is the
recommended mode). See "Connecting an HDMI or a
DVI device to the HDMI input" on page 19.
0(
#01E 044-0 2 566272HM195 50
Black
E) 56/62/72HM195
Settingthetimeanddate
Note: tfyou already setuptheTVGuideOnScreeffr'lsystem, the
timeanddateweresetautomatical_/ and you can skip this step
To set the time and date:
1. Press MENU and open the Setup menu.
2. Highlight Installation and press ENTER. (A new set of
Installation menu icons will appear on-screen, as shown in
step 3 below.)
3. Open the Time And Date menu, highlight Start Setup, and
press ENTER.
If)_u have not set tip the TV Guide On Screen_'_s)_tem, the
following screen will appear. To set the time, highlight TV
Guide On Screen"_and press ENTER. The TV Guide On
Screen _'_setup sequence will start, and the time and date will
be set automatically.
Ifyou h_wealreadyset tip theTV Guide On Screen_'_svstem or
ifyou have not set tip the dine the time and date settingscreen
will appear and you will need to manually set the time and date.
Note:
•tfyouhighlightTVGuideOnScreen _M(above]tosetthet/me
anddatethrough theTVGuideOnScreenrMsystem anda
power outage occurs,thetimeanddatewillbeupdated
automatically whenthepower is testorecL
• ffyou highlight Manual (above] tosetthet#neanddate
manually andapoweroutage occurs,youwilllosethetime
anddatesettings whenthepower Lsrestored
• ffyou manual_/set the t#ne and date and then peffoflb 71/Guide
ORScreenTMsetL_o,the manual tifne and date settliTgswill be
overridden by the TVGuide On Screen_Msettings
Copyright © 2005 TOSHIBA CORPORATION. All rights reserved.
7/28105, 4:33 PM [
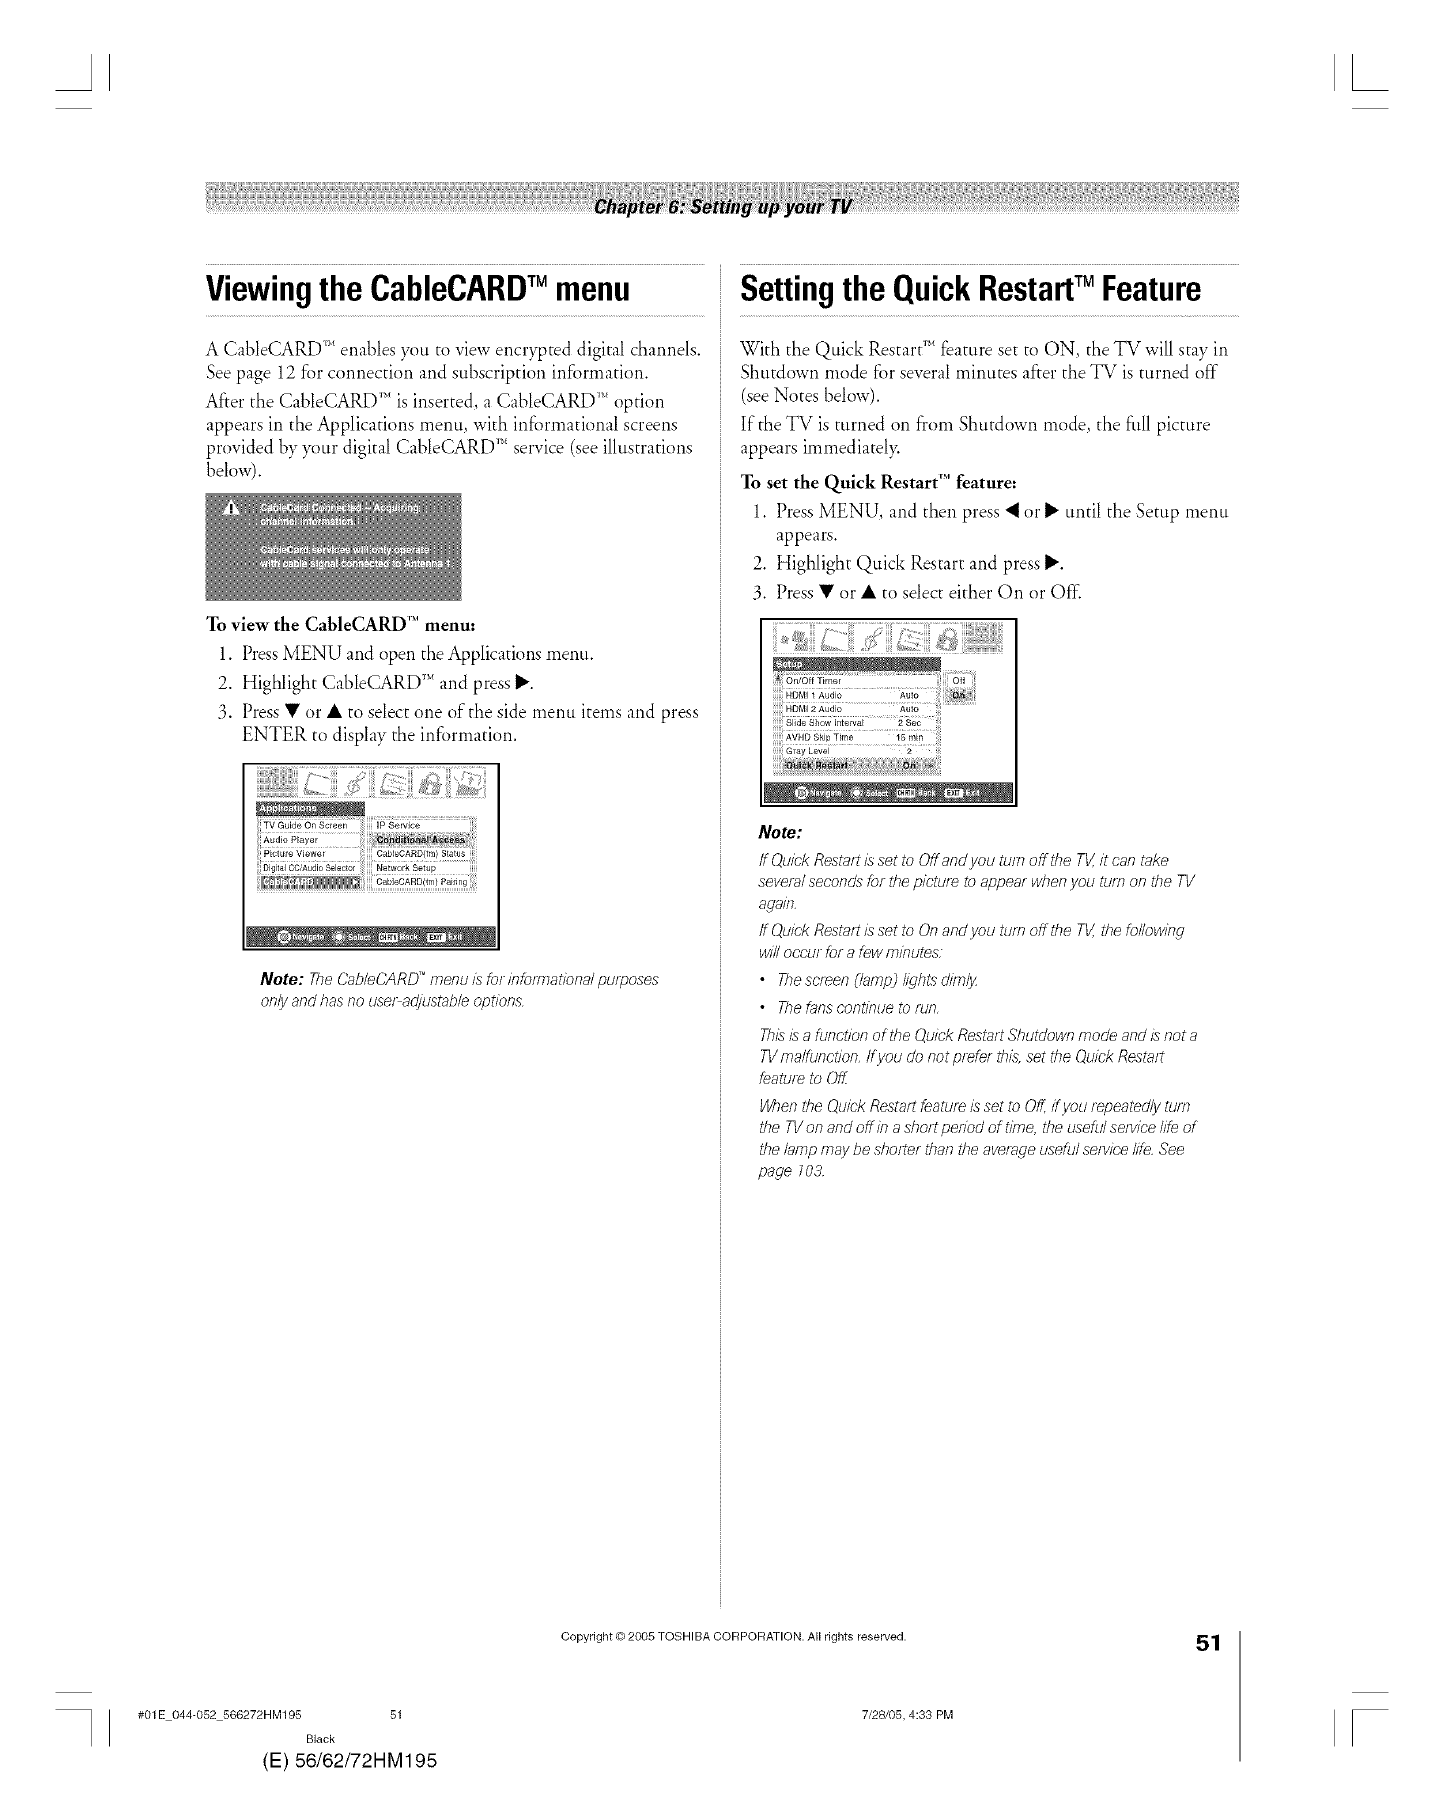
Viewingthe CableCARDTM menu
A CableCARD _"enables you to view encrypted digital channels.
See page 12 for connection and subscription information.
After the CableCARD '_'_is inserted, a CableCARD _'' option
appears in the Applications menu, with infi)rmational screens
provided by }_mr digital CableCARD _''service (see illustrations
below).
To view the CableCARD'" menu:
1. PressMENU and open the Applications menu.
2. Highlight CableCARD _'_and press _'.
3. Press • or • to select one of the side menu items and press
ENTER to display the information.
!
fiidifii8_aawa; 6figia_,,_D{{g5gia{_
Note: TheCab/egARD'°menu1}for#?fom_at/bna/purposes
onlyand hasno use/_adjustableoptions,
Settingthe QuickRestartTM Feature
With the Quick Restart _'_feature set to ON, the TV will stay in
Shutdown mode fi_rseveral minutes after the TV is turned off"
(see Notes below).
If the TV is turned on from Shutdown mode, the full picture
appears immediatel>
To set the Quick Restart'"featuret
1. Press MENU, and then press "_or _" until the Setup menu
appears.
2. Highlight Quick Restart and press _'.
3. Press • or • to select either On or Off:
........
.... _ulo ........................
8ia_Gv_i
Note:
If Quick Restart L_set to Offand you turn off the TV,it can take
several seconds for the picture to appear when you turn on the TV
again,
ff Quick Restart Lsset to On and you turn off the TV, the following
will occur for a few minutes:
•Thescreen (lamp] lights dim/_
• Thefans continue to run,
Thisis 8 function of the Quick Restae"Shutdown mode and is not a
TVmalfunct/on, lf you do not prefer thL%set the Ouick Resta/t
feature to Off.
When the Ouick Restart feature Lsset to Off, ff you _epeatedly turn
the TVon and off#7 asho_t period of t#ne, the useful service life of
the lamp may be shelter than the avetage useful se/vice life See
page 103
#01E 044-052 566272HM195 51
Black
(E) 56/62/72HM195
Copyright © 2005 TOSHIBA CORPORATION. All rights reserved.
7/28105, 4:33 PM
51
F
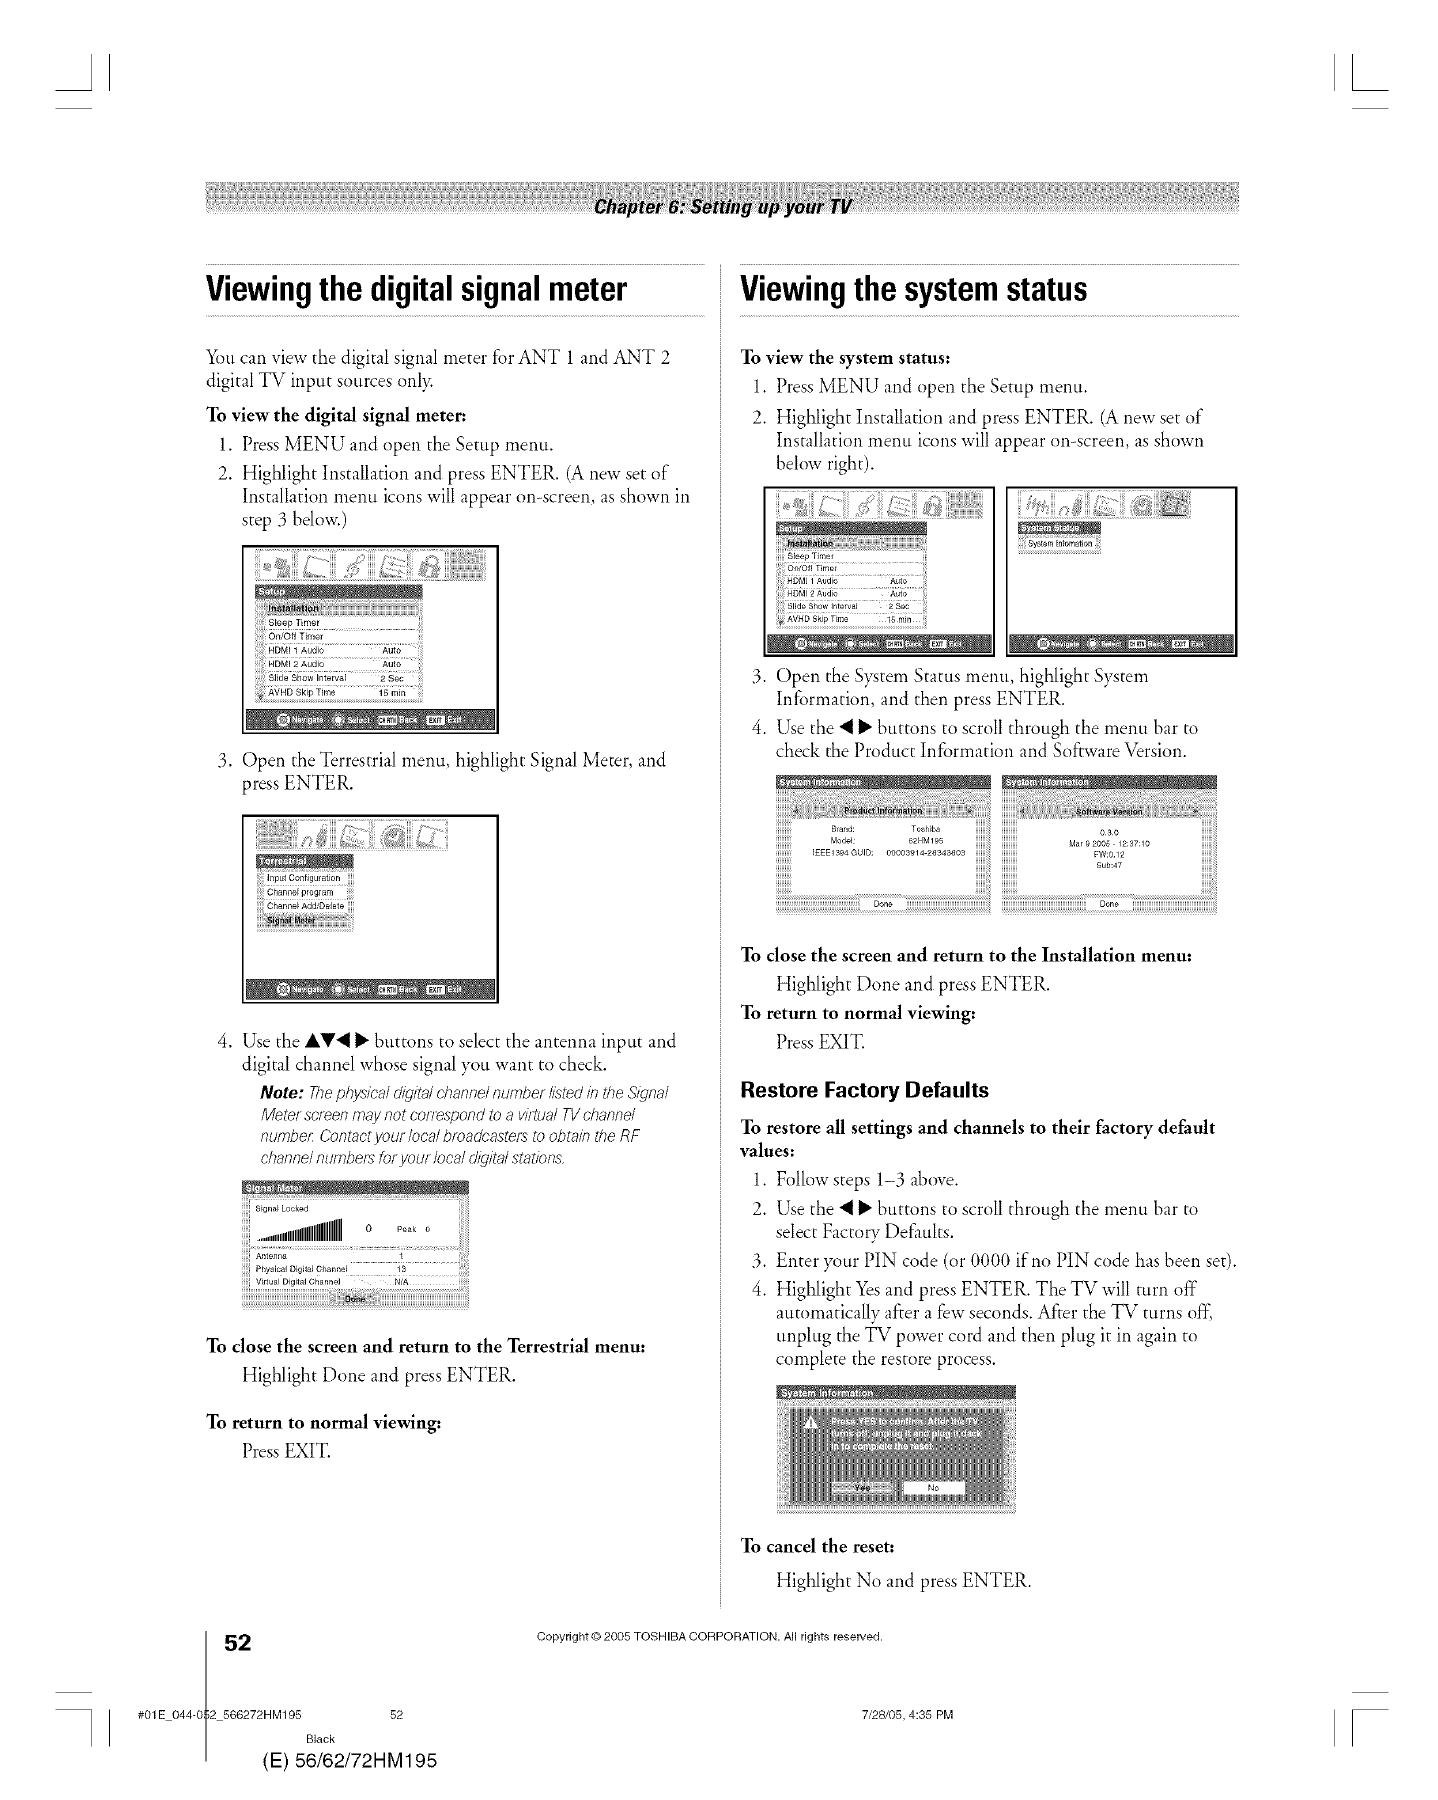
Viewingthe digitalsignalmeter
55m can view the digital signal meter for ANT 1 and ANT 2
digital TV input sources only.
To view the digital signal meter:
1. Press MENU and open the Setup menu.
2. Highlight Installation and press ENTER. (A new set of
Installation menu icons will appear on-screen, as shown in
step 3 below.)
o,_J6_Timg;
HDMi 2 Audio auia
3. Open the Terrestrial menu, highlight Signal Meter, and
press ENTER.
Channe_ Add/Delete
4. Use the IY*I _" buttons to select the antenna input and
digital channel whose signal you want to check.
Note: Thephysicaldigita/channelnumberlistedin theSignal
Mete/ screenmay not correspondto a virtualTVchannel
numbe_:Contactyou/local broadcastersto obtain theRF
channelnumbef_foryou/local d/iT/talstations,
PhysicM Digital O}_annel
Virtual DigitaJ Channel NtA
To close the screen and return to the Terrestrial menu:
Highlight Done and pressENTER.
To return to normal viewing:
Press EXIT.
Viewingthe systemstatus
To view the system status:
1. Press MENU and open the Setup menu.
2. Highlight Installation and press ENTER. (A new set of
Installation menu icons will appear on-screen, as shown
below right).
System Infomalion
Steep Time/
3. Open the System Status menu, highlight System
Information, and then press ENTER.
4. Use the *I _" buttons to scroll through the menu bar to
check the Product Information and Software Version.
To close the screen and return to the Installation menu:
Highlight Done and press ENTER.
To return to normal viewing:
Press EXIT.
Restore Factory Defaults
To restore all settings and channels to their factory default
values:
1. Follow steps 1-3 above.
2. Use the *I _" buttons to scroll through the menu bar to
select Factory Defaults.
3. Enter )_mrPIN code (or 0000 if no PIN code has been set).
4. Highlight Yesand press ENTER. The TV will turn off
automatically after a few seconds. After the TV turns ofl-,
unplug the TV power cord and then plug it in again to
complete the restore process.
To cancel the reset:
Highlight No and press ENTER.
2(
#01E 044-0 2 566272HM195 52
Black
E) 56/62/72HM195
Copyright © 2005 TOSHIBA CORPORATION• All rights reserved.
7/28/05, 4:35 PM [
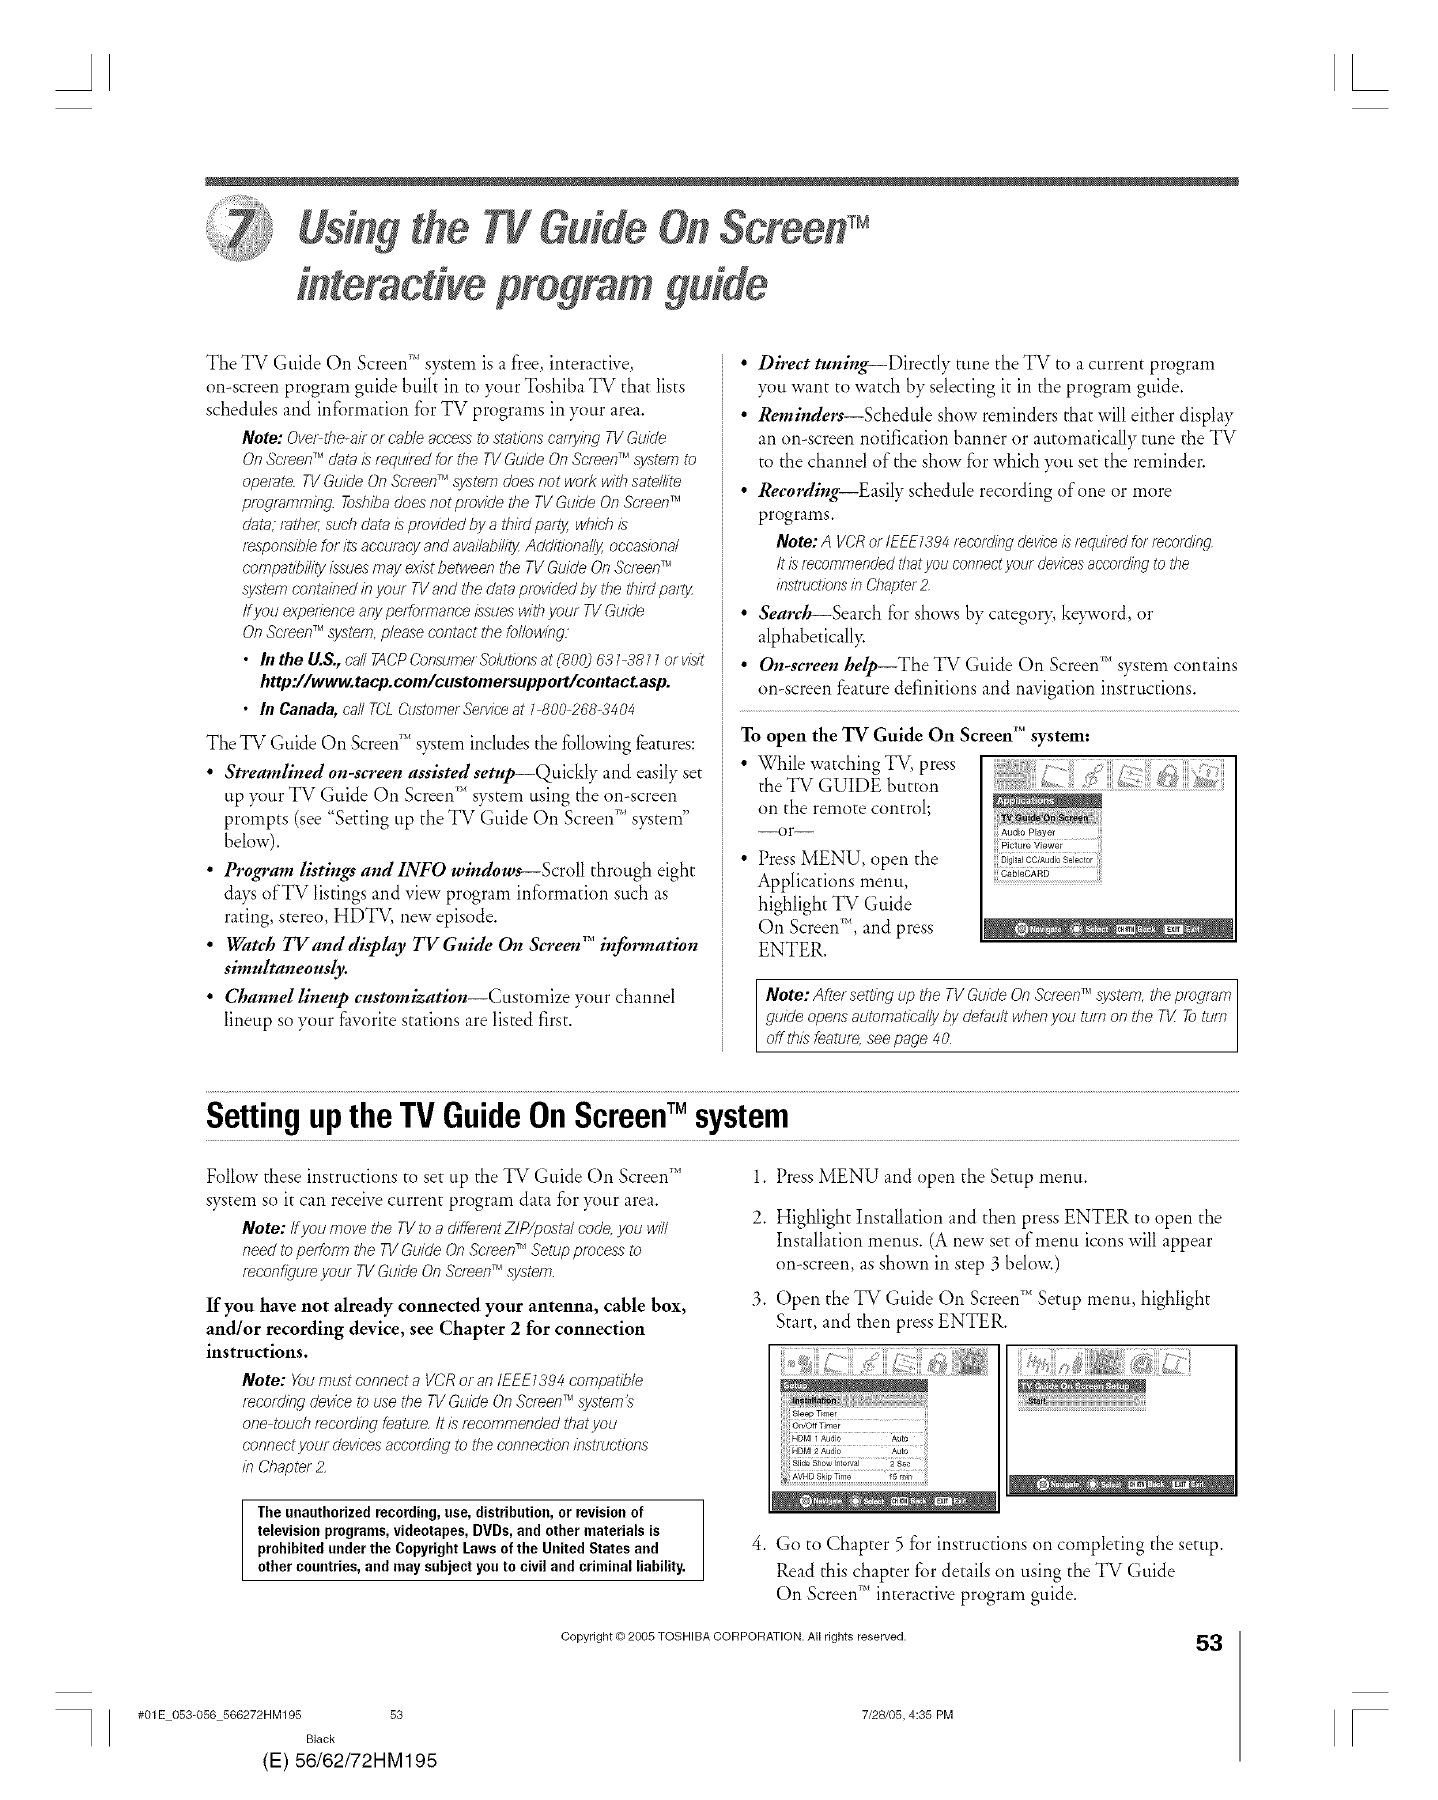
AL
WGuide
&teracdve program
Tile TV Guide Oil Screen _Msys[em is a free, interactive,
on-screen program guide buik in to )_mr Toshiba TV that lists
schedules and infbrmadon filr TV programs in your area.
Note: Overthe-a/;,or cable,accessto stationscanying TVGuide
On ScreenTMdataist_quif_d for the TVGuideOnScreenT_systemto
ope/ate.TVGuide OnScreenTMsystemdoesnot wot_ withsatellite
programming Toshibadoesnot providethe TVGuide OnScreenTM
data,rather;suchdatais providedby a thi/d pat_ whichis
responsibhfor itsaccuracyand availabilityAdditionally,occasional
compatibilityL_sueamayexL_tbetweenthe TVGuideOn Screen_r'
systemcontainedit}your TVand the dataprovidedby the th#dpa/_
Ifyou expedenceartypeffomTanceissueawithyou/ TVGuide
On Screen_Msystem, pleasecontact thefollowing.
•In the U.S.,callTACPConsume/Solutionsat (800] 631-3811orv/L_it
http://www.tacp.com/customersupport/contacLasp.
• In Canada,ca//TCLCustomerServiceat 1800 268-3404
Tile TV Guide On Screen _' s)_tem includes the fi)llowing features:
•Streamlined on-screen assisted setnp--Quickly and easily set
up )_mr TV Guide On Screen _"sys[em using the on-screen
prompts (see "Setting up the TV Guide On Screen _' s)_tem"
below).
• Program listings and INFO windows--Scroll through eight
days of TV listings and view progranl infi_rmation such as
rating, stereo, HDTV, new episode.
• Watch TVand display TV Guide On Screetfl" information
simultaneously.
• Channellineup enstomization--Custonlizeyourchannel
lineup so your favorite stations are listed first.
• Direct tnning--Directly tune the TV to a current program
you want to watch by selecting it in the program guide.
• Reminders--Schedule show reminders that will either display
an on-screen notification banner or automatically tune the TV
to the channel of the show fbr which )_m set the reminder.
• Recording--Easily schedule recording of one or more
programs.
Note:A VCRorIEEE/394recording deviceisrequired for recording
Itisrecommendedthatyouconnectyourdevicesaccording tothe
instructionsinChapter 2
• Search Search for showsby category, ke)_vord, or
alphabeticall>
•On-screen help--The TV Guide On Screen _''system contains
on-screen feature definitions and navigation instructions.
To open the TV Guide On Screen _" system:
•While watching TV, press
the TV GUIDE button
on the remote control;
--or--
•Press MENU, open the
Applications menu,
highlight TV Guide
On Screen _'',and press
ENTER.
Audio Playel
Picture Viewer
Note: After setting up the TV Guide On Screen _r'system, the program
guide opens automatically t_ydefault when you turn on the TV Toturn
off thL_feature, see page 40
Settingupthe TV GuideOnScreeff system
Follow these instructions to set up the TV Guide On Screen _"
s}_tem so it can receive current program data for }_mr area.
Note: Ifyou move the TVto a diffe/entZIP/postalcode,you will
need to perform the TVGuideOn Screen_MSetupproceasto
/econflgur_your TVGuide OnScreenTMsystem.
If you have not already connected your antenna, cable box,
and/or recording device, see Chapter 2 for connection
instructions.
Note: Youmustconnecta VCRor anIEEEI394 compatible
recordingdeviceto use the TVGuideOn Screenrr'_,_wtem's
one touch t_cotding featut_ It isiecommendedthatyou
connectyou/ devicesaccordingto the connectioninstructions
in Chapterz
The unauthorized recording,use, distribution, or revision of
television programs,videotapes, DVDs, and other materials is
prohibitedunder the CopyrightLaws of the United States and
other countries,and may subjectyou to civil and criminal liability.
1.
2.
Press MENU and open the Setup menu.
Highlight Installation and then press ENTER to open the
Installation menus. (A new set of menu icons will appear
on-screen, as shown in step 3 below.)
3. Open the TV Guide On Screen ;MSetup menu, highlight
Start, and then press ENTER.
'_5}/,,u i*_' ;<:,{
,, : iii ;: iiiiiii_>i,,ii,,i,,_ii> ,,, ,
4. Go to Chapter 5 for instructions on completing the setup.
Read this chapter for details on using the TV Guide
On Screen_'*interactive program guide.
Copyright © 2005 TOSHIBA CORPORATION. All rights reserved. 53
#01E 053-056 566272HM195 53
Black
(E) 56/62/72HM195
7/28/05, 4:35 PM [
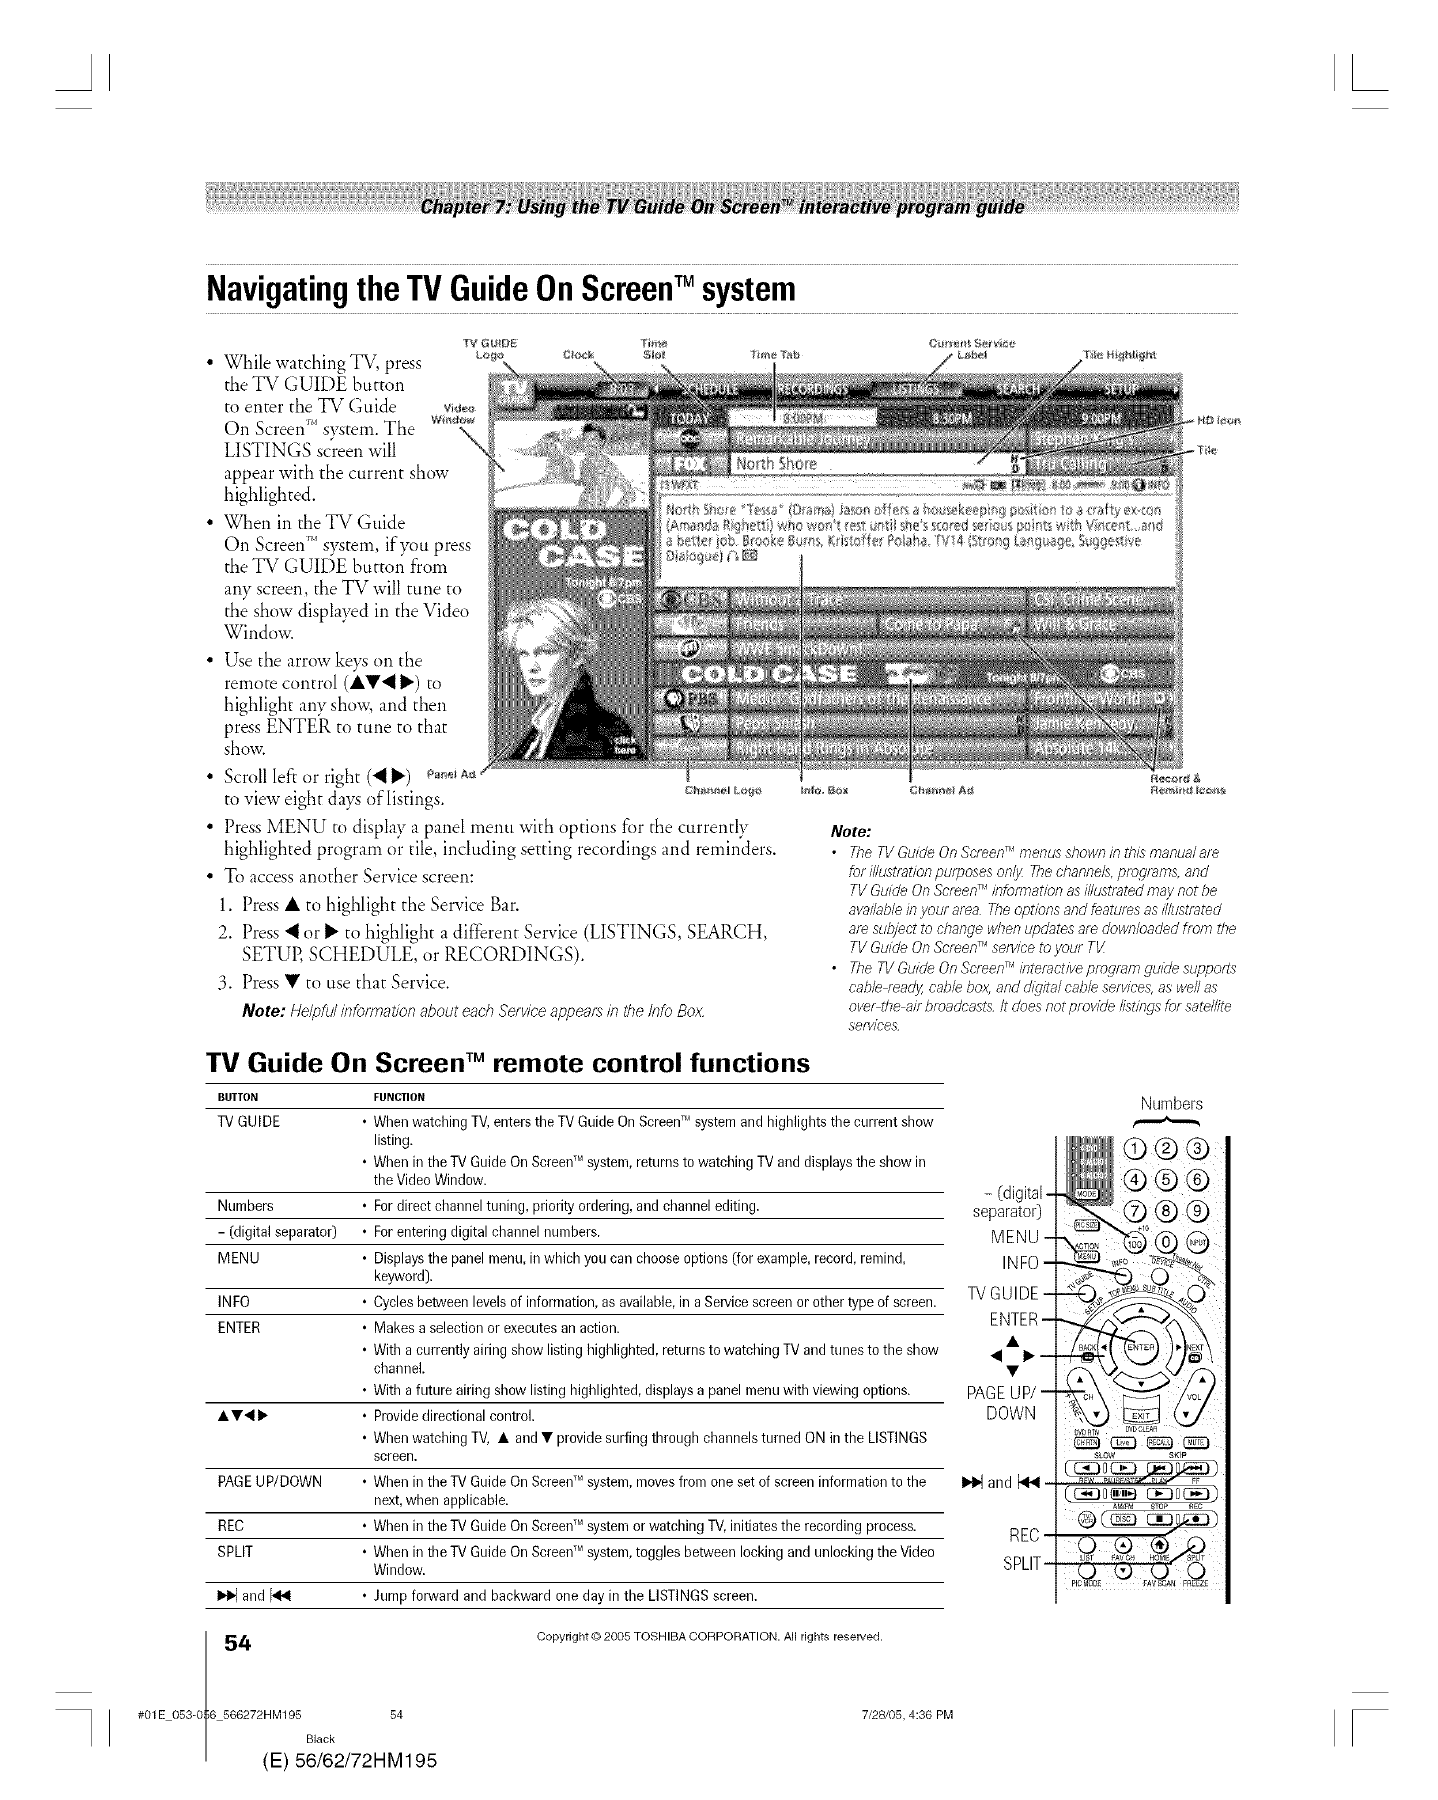
Navigatingthe TV GuideOnScreenTM system
_V G_DE Tim
• While watching TV, press o_ s!o_ r_,,**'*'_,
the TV GUIDE button
to enter the TV Guide vi,_
On Screen _Ms}_[em. The wmoo_
LISTINGS screen will
appear with the current show
highlighted.
• When in the TV Guide
On Screen _ s)_tem, if)_m press
the TV GUIDE button from
any screen, the TV will tune to
the show displayed in the Video
Window.
• Use the arrow keys on the
remote control (••'_ _') to
highlight any show, and then
press ENTER to tune to that
show.
• Scroll left or right ('_ _') _._iA_
to view eight da?_ of listings, c_.,_,_Lo_ _mo._,,
• Press MENU to display a panel menu with options for the currently
highlighted program or tile, including setting recordings and reminders.
• To access another Service screen:
1. Press • to highlight the Service Bar.
2. Press <or _" to highlight a different Service (LISTINGS, SEARCH,
SETUP, SCHEDULE, or RECORDINGS).
3. Press • to use that Service.
Note: Helpful/bfoHrat/on about each Serwce appea_s /77the Info Box
Note:
•The TVGuide On ScreenTr'Imenus shown in this manual 8/e
for illustration purposes only 7he channels, proglaf77&and
TV Guide On ScreenTHinformation asillustrated may not be
availablein yout area Theoptions and featuresas illustrated
are subject to change when updates are downloaded from the
TV Guide On Screenmservice to your T_/
•The TVGuide On So'teenT''interactive program guide supports
cable4eady, cable box, and d(gital cable services,as wellas
over the air broadcasts/7 does norprovide listings for satellite
sef¥ioes
TV Guide On Screen TM remote control functions
BUTTON FUNCTION
TV GUIDE • Whenwatching TV,enters the TV Guide On ScreenT'_systemand highlights the current show
listing.
•When in the TV Guide OnScreen;Msystem,returns to watching TV and displaysthe show in
the Video Window. - (digital-
Numbers • Fordirect channel tuning, priority ordering, and channel editing, separatolO
- [digital separator) • Forentering digital channel numbers. MENU -
MENU • Displaysthe panel menu,in which youcan chooseoptions (for example,record, remind, INFO -
keyword).
INFO • Cycles between levels of information,as available,in a Sewice screen or other type of screen. TV GUIDE -
ENTER • Makes a selection or executes an action. ENTER
• With acurrently airing show listing highlighted, returns to watching TV and tunes to the show • I_ •
channel. •
• With afuture airing show listing highlighted,displaysa panelmenu with viewing options. PAGE UP/-
• •<1_ • Providedirectional control. DOWN
• Whenwatching TV, • and • provide surfing through channelsturned ON in the LISTINGS
screen.
PAGEUP/DOWN • When in the TV Guide OnScreen_Msystem,movesfrom one set of screen information to the _ and
next,when applicable.
REC • When in the TV Guide OnScreen_Msystemor watching TV,initiates the recording process. REC
SPLIT • When in the TV Guide OnScreeff _system,toggles between locking and unlocking the Video
Window. SPLIT
and _ •Jump forward and backward one day in the LISTINGSscreen.
Numbers
( c330c£3 1
E_o_ 0_o0_)
4(
#OlE 053-0 6 566272HM195 54
Black
E) 56/62/72HM195
Copyright © 2005 TOSHIBA CORPORATION. All rights reserved.
7/28/05, 4:36 PM F
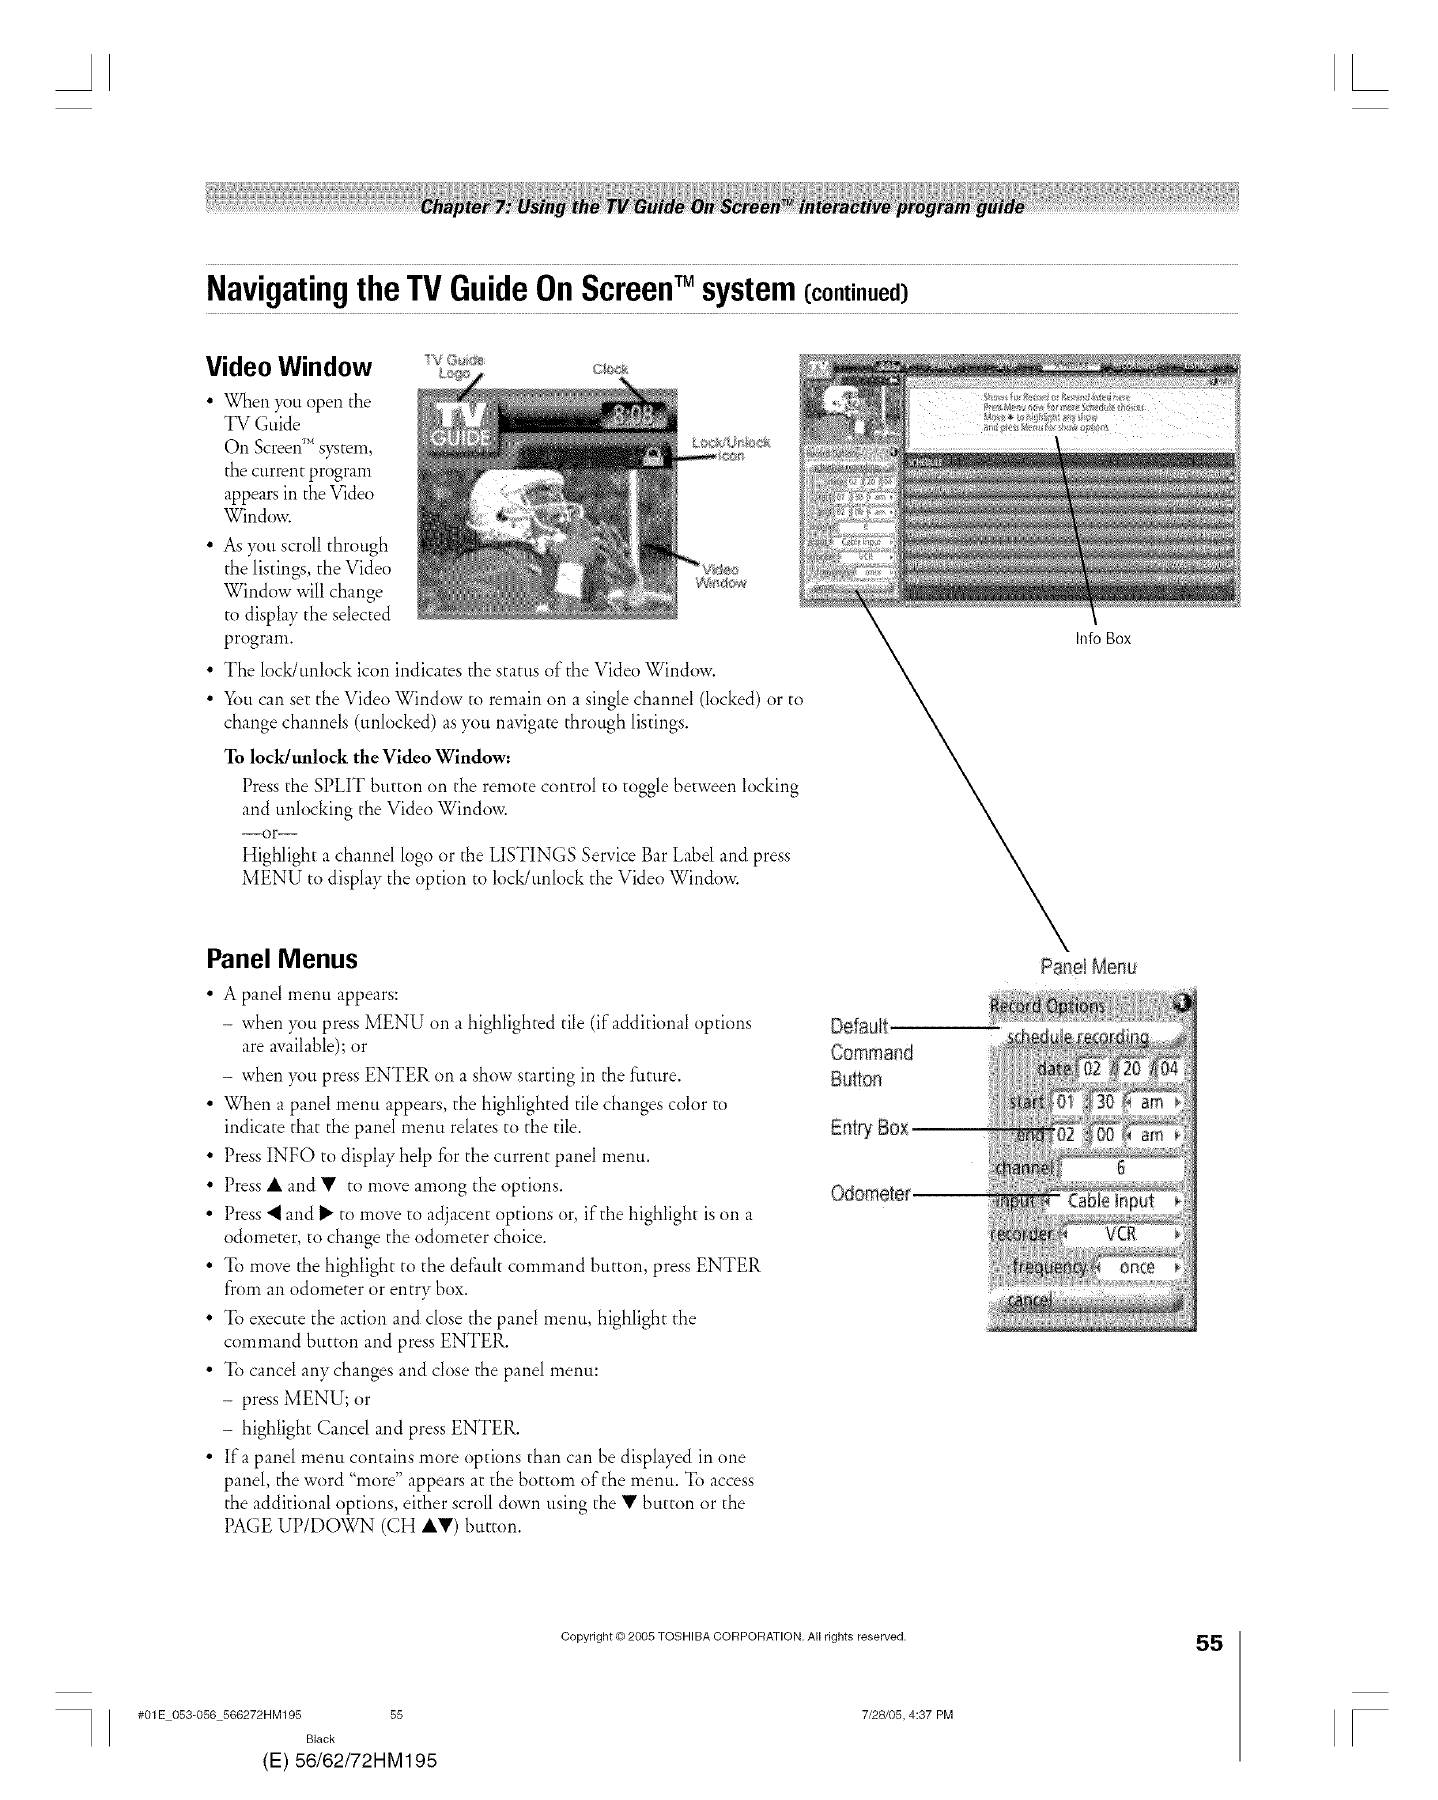
NavigatingtheTVGuideOnScreenTM system(continued)
Video Window
• When you open the
TV Guide
Oil Screen _ system,
the current program
appears in the Video
Window.
• As }_mscroll through
the listings, the Video
Window will change >__d*__
to display the selected
program.
• The locWunlock icon indicates the status of the Video Window.
• _53t_can set the Video Window to remain on a single channel (locked) or to
change channels (unlocked) as you navigate through listings.
To lock/unlock the Video Window:
Press the SPLIT button on the remote control to toggle between locking
and unlocking the Video Window.
--OF--
Highlight a channel logo or the LISTINGS Service Bar Label and press
MENU to display the option to locWunlock the Video Window.
Info Box
Panel Menus
• A panel menu appears:
- when }_u press MENU on a highlighted tile (if additional options
are available); or
- when }_mpress ENTER on a show starting in the future.
• When a panel menu appears, the highlighted tile changes color to
indicate that the panel menu relates to the tile.
• Press INFO to display help for the current panel menu.
• Press • and • to move among the options.
• Press "_ and _" to move to adjacent options or, if the highlight is on a
odometer, to change the odometer choice.
• To move the highlight to the deflmlt command button, press ENTER
from an odometer or entry box.
• To execute [he action and close the panel menu, highlight the
command bu[mn and press ENTER.
• To cancel any changes and close the panel menu:
- press MENU; or
- highlight Cancel and press ENTER.
• Ira panel menu contains more options than can be displayed in one
panel, the word "more" appears at the bottom of the menu. To access
the additional options, either scroll down using the • button or the
PAGE UP/DOWN (CH ••) button.
#01E 053-056 566272HM195 55
Black
(E) 56/62/72HM195
Copyright © 2005 TOSHIBA CORPORATION. All rights reserved.
7/28105, 4:37 PM
55
F
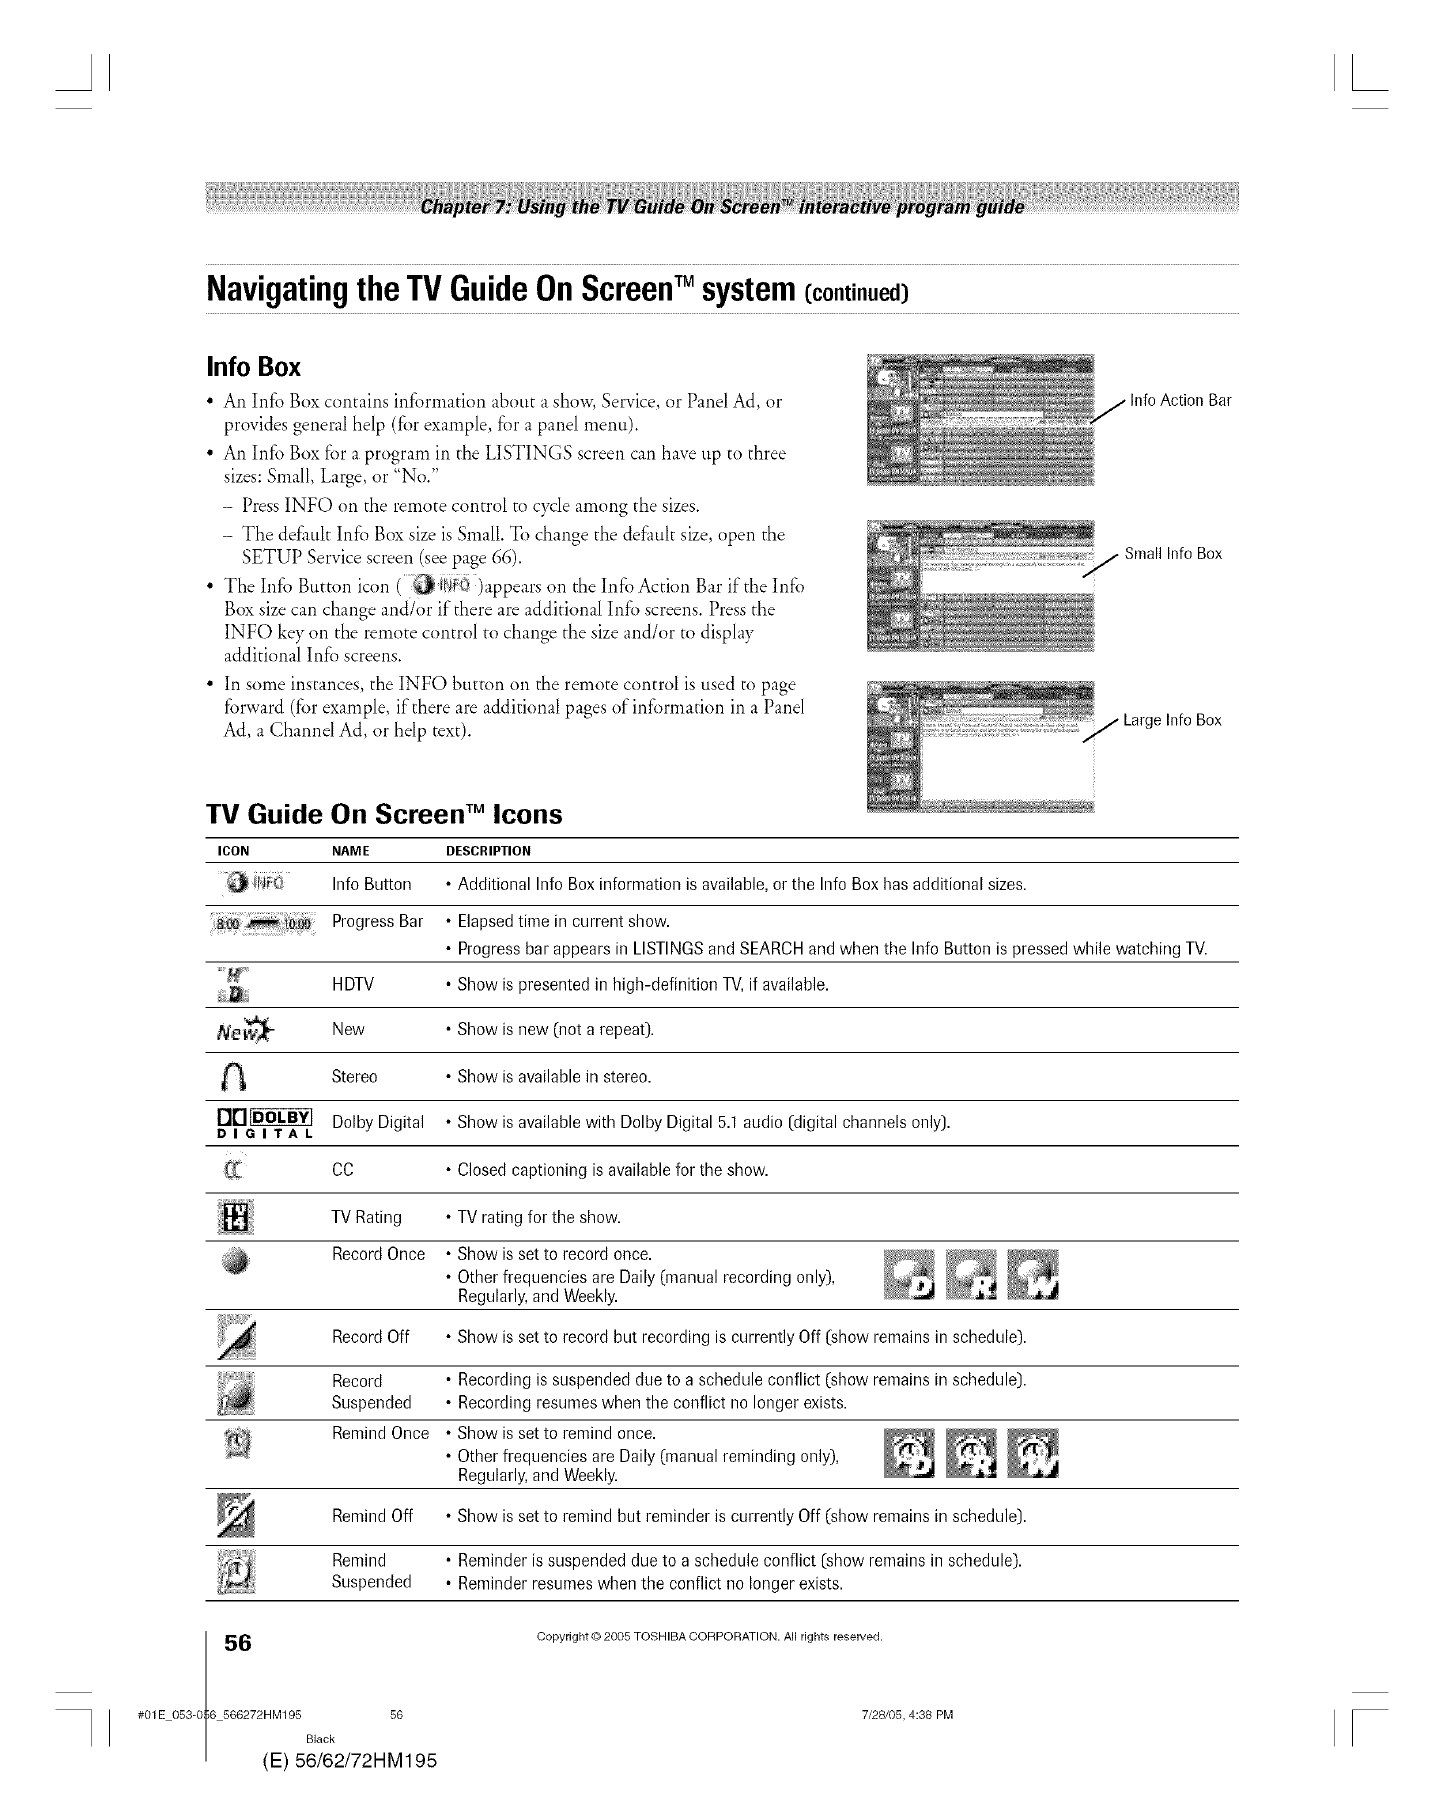
AL
NavigatingtheTVGuideOnScreenTM system(continued)
Info Box
• An Info Box contains information about a show, Service, or Panel Ad, or
provides general help (for example, for a panel menu).
• An Info Box for a program in the LISTINGS screen can have up to three
sizes:Small, Large, or "No."
- Press INFO on the remote control to cycle among the sizes.
- The de£mlt Info Box size is Small. To change the default size, open the
SETUP Service screen (see page 66).
• The Info Button icon ( _il_:o )appears on the Info Action Bar if the Info
Box size can change and/or if there are additional Info screens. Press the
INFO key on the remote control to change the size and/or to display
additional Info screens.
• In some instances, the INFO button on the remote control is used to page
forward (for example, if there are additional pages of information in a Panel
Ad, a Channel Ad, or help text).
Bar
Small Info Box
_ Large Info Box
TV Guide On Screen TM Icons
ICON NAME DESCRIPTION
Info Button •Additional Info Boxinformation is available, or tim Info Box bas additional sizes.
ProgressBar •Elapsedtime in current show.
• Progressbar appears in LISTINGS and SEARCH and when the Info Button is pressed while watching TV.
_ HDTV • Show is presented in high-definition TV,if available.
Afe_ New • Show is new (not a repeat).
Stereo • Show is available in stereo.
D I o I "r A L Dolby Digital • Show is availablewith Dolby Digital 5.1audio (digital channels only).
CO • Closed captioning is available for the show.
TV Rating • TV rating for the show.
Record Once • Show is set to record once.
• Other frequencies are Daily (manual recording only), _,_1_,_'i _,_,"
Regularly,and Weekly.
RecordOff • Show is set to record but recording is currently Off (show remains in schedule).
Record • Recording is suspended due to a schedule conflict (show remains in schedule).
Suspended • Recording resumeswhen the conflict no longer exists.
RemindOnce •Showissettoremindonce. _ _ _
• Other frequencies are Daily (manual reminding only),
Regularly,and Weekly.
Remind Off • Show is set to remind but reminder is currently Off (show remains in schedule).
Remind • Reminder issuspended due to a schedule conflict (show remains in schedule).
Suspended • Reminder resumes when the conflict no longer exists.
6(
#01E 053-0 6 566272HM195 56
Black
E) 56/62/72HM195
Copyright © 2005 TOSHIBA CORPORATION. All rights reserved.
7/28/05, 4:38 PM F
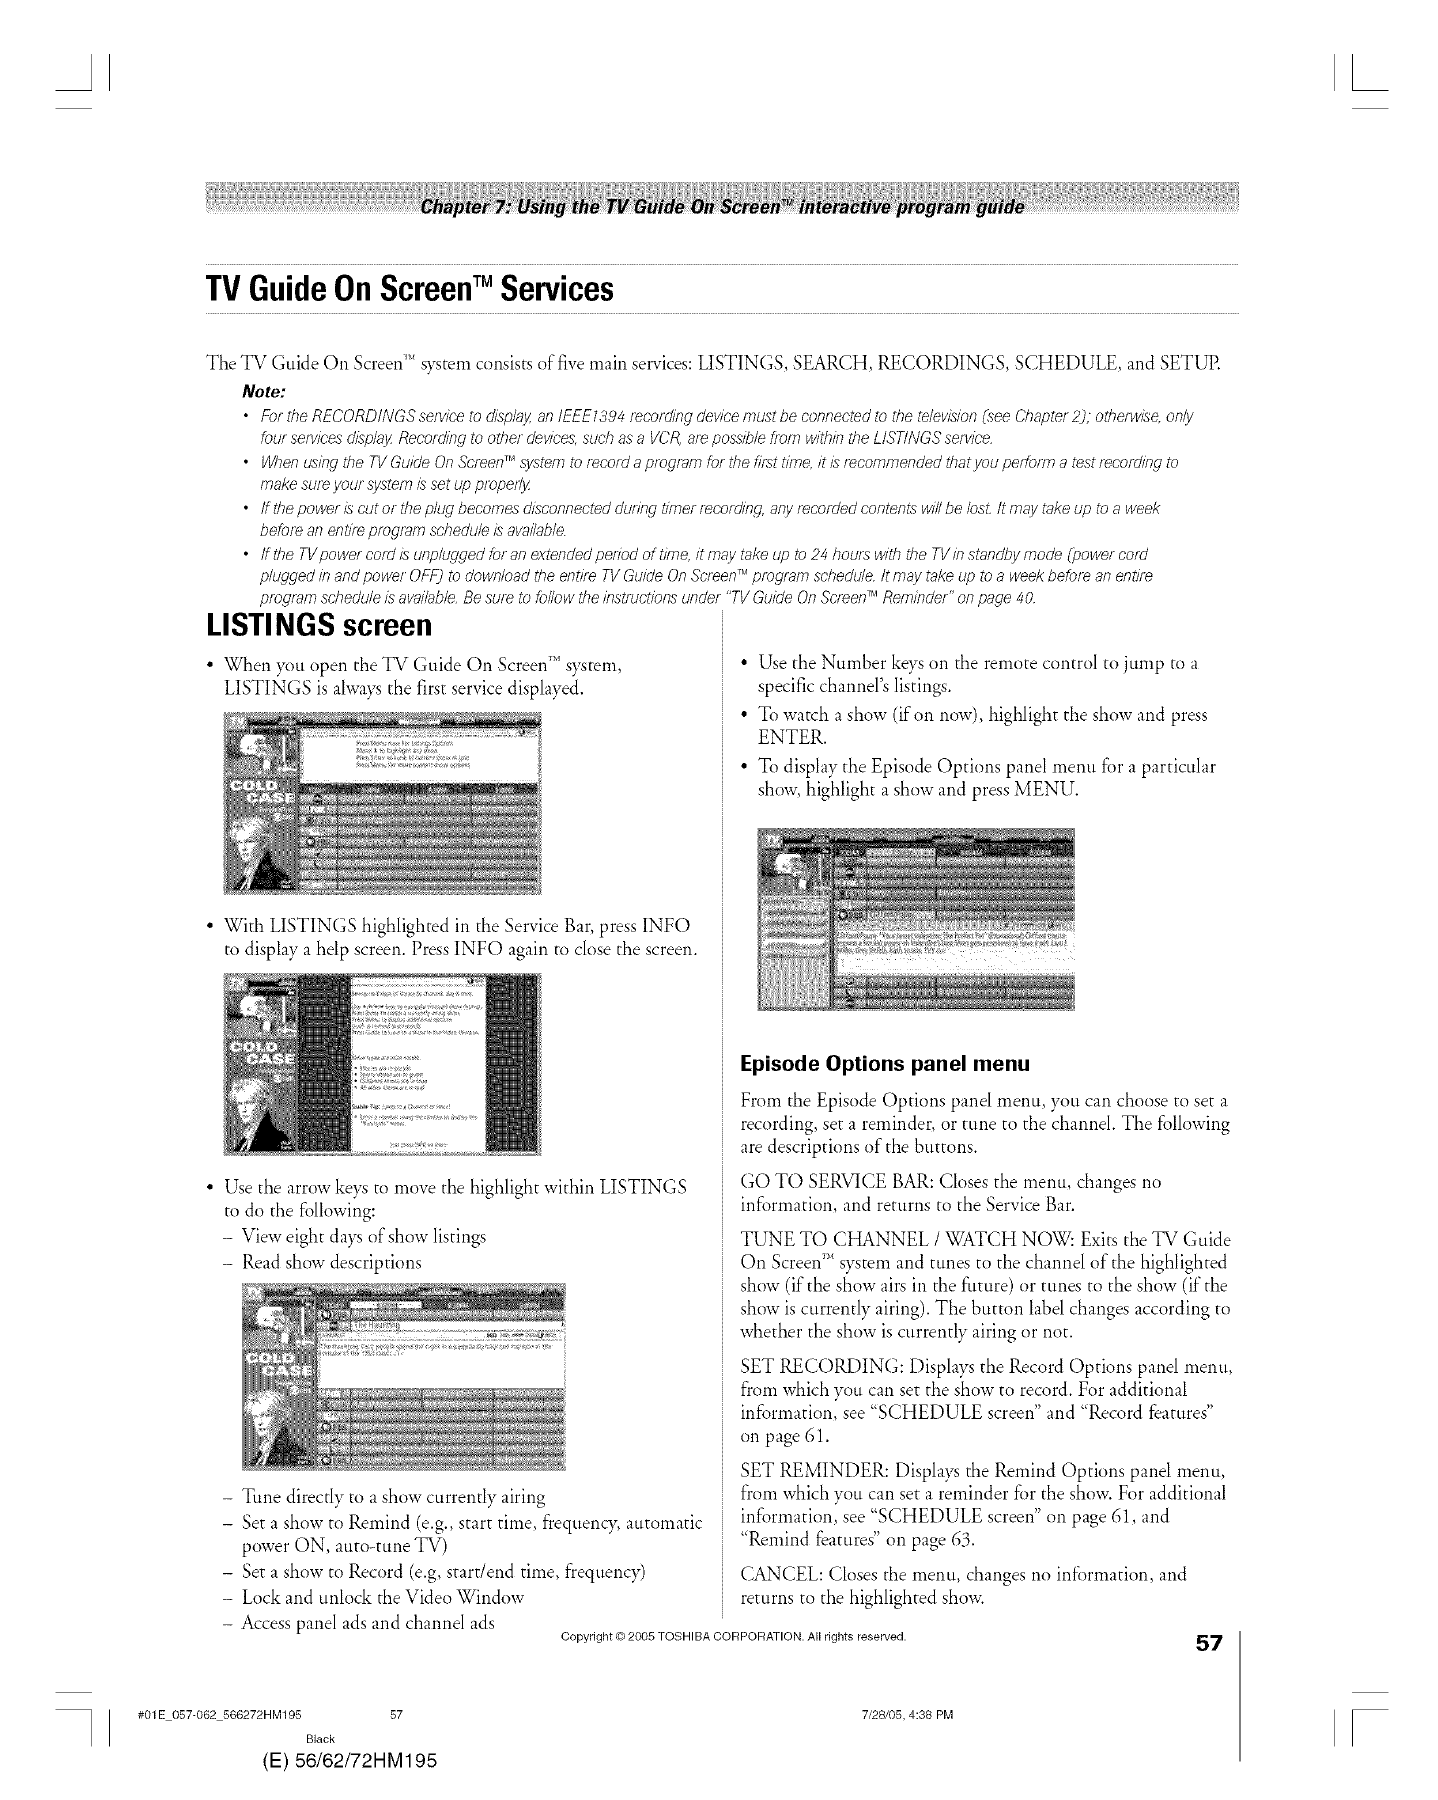
AL
TV GuideOnScreeWMServices
The TV Guide On Screen;_'_s?Ttemconsists of five main services: LISTINGS, SEARCH, RECORDINGS, SCHEDULE, and SETUE
Note:
•FortheRECORDINGSse/viceto alL,pi!!y, an IEEEI394recording devicemustbeconnectedtothetelevision(see Chapter 2); otherwise, only
fourse/vic'esdisplay Recording tootherdevice',suchasaVCR,ale possible fromwithintheLISTINGSservice.
• When using theTVGuideOnScreenTMsystem to recordaprogramfortbefirsttime,it isrecommendedthatyou peflbnnatestf_eording to
makesureyoursystemissetupproperly
•ffthepoweriscutor theplL4gbecomesdisconnectedduring timer recording, anyrecordedcontentswillbe/osLItmaytakeupto aweek
beforeanentireprogramscheduleisava#ab/e.
•ffthe TVpowercoldisunplugged foranextendedperiod of time, it maytake.upto24hour:swit/}theTVif}standby mode Cpower cold
plugged #7andpowe/OFF]todownloadtheentireTVGuideOnScreenT_programschedule..Itmaytakeuptoa weekbeforeanentire
programscheduleLsavailable.Besuretofollowtheinstructionsunder"fV GuideOnScreenTMReminder"onpage40
LISTI NGS screen
• When you open the TV Guide On Screen;_'system,
LISTINGS is ahvays the first service displayed.
• With LISTINGS highlighted in the Service Bar, press INFO
to display a help screen. Press INFO again to close the screen.
• Use the arrow keys to move the highlight within LISTINGS
to do the following:
- View eight da}_ of show listings
- Read show descriptions
•Use the Number keys on the remote control to jump to a
specific channel's listings.
• To watch a show (if on now), highlight the show and press
ENTER.
• Todisplay the Episode Options panel menu fi)r a particular
show, highlight a show and press MENU.
Episode Options panel menu
From the Episode Options panel menu you can choose to set a
recording, set a reminder, or tune to the channel. The following
are descriptions of the buttons.
GO TO SERVICE BAR: Closes the menu, changes no
information, and returns to the Service Bar.
TUNE TO CHANNEL /WATCH NOW." Exits the TV Guide
On Screen;_'_system and tunes to the channel of the highlighted
show (if the show airs in the filture) or tunes to the show (if the
show is currently airing). The button label changes according to
whether the show is currently airing or not.
SET RECORDING: Displays the Record Options panel menu,
from which you can set the show to record. For additional
information, see "SCHEDULE screen" and "Record features"
on page 61.
-Tune directly to a show currently airing
- Set a show to Remind (e.g., start time, frequentT, automatic
power ON, auto-tune TV)
- Set a show to Record (e.g, start/end time, frequency)
- Lock and unlock the Video Window
- Access panel ads and channel ads Copyright © 2005 TOSHIBA CORPORATION. All rights reserved.
SET REMINDER: Displays the Remind Options panel menu,
from which you can set a reminder for the show. For additional
information, see "SCHEDULE screen" on page 61, and
"Remind features" on page 63.
CANCEL: Closes the menu, changes no infi)rmation, and
returns to the highlighted show.
57
#01E 057-062 566272HM195 57
Black
(E) 56/62/72HM195
7/28105, 4:38 PM F
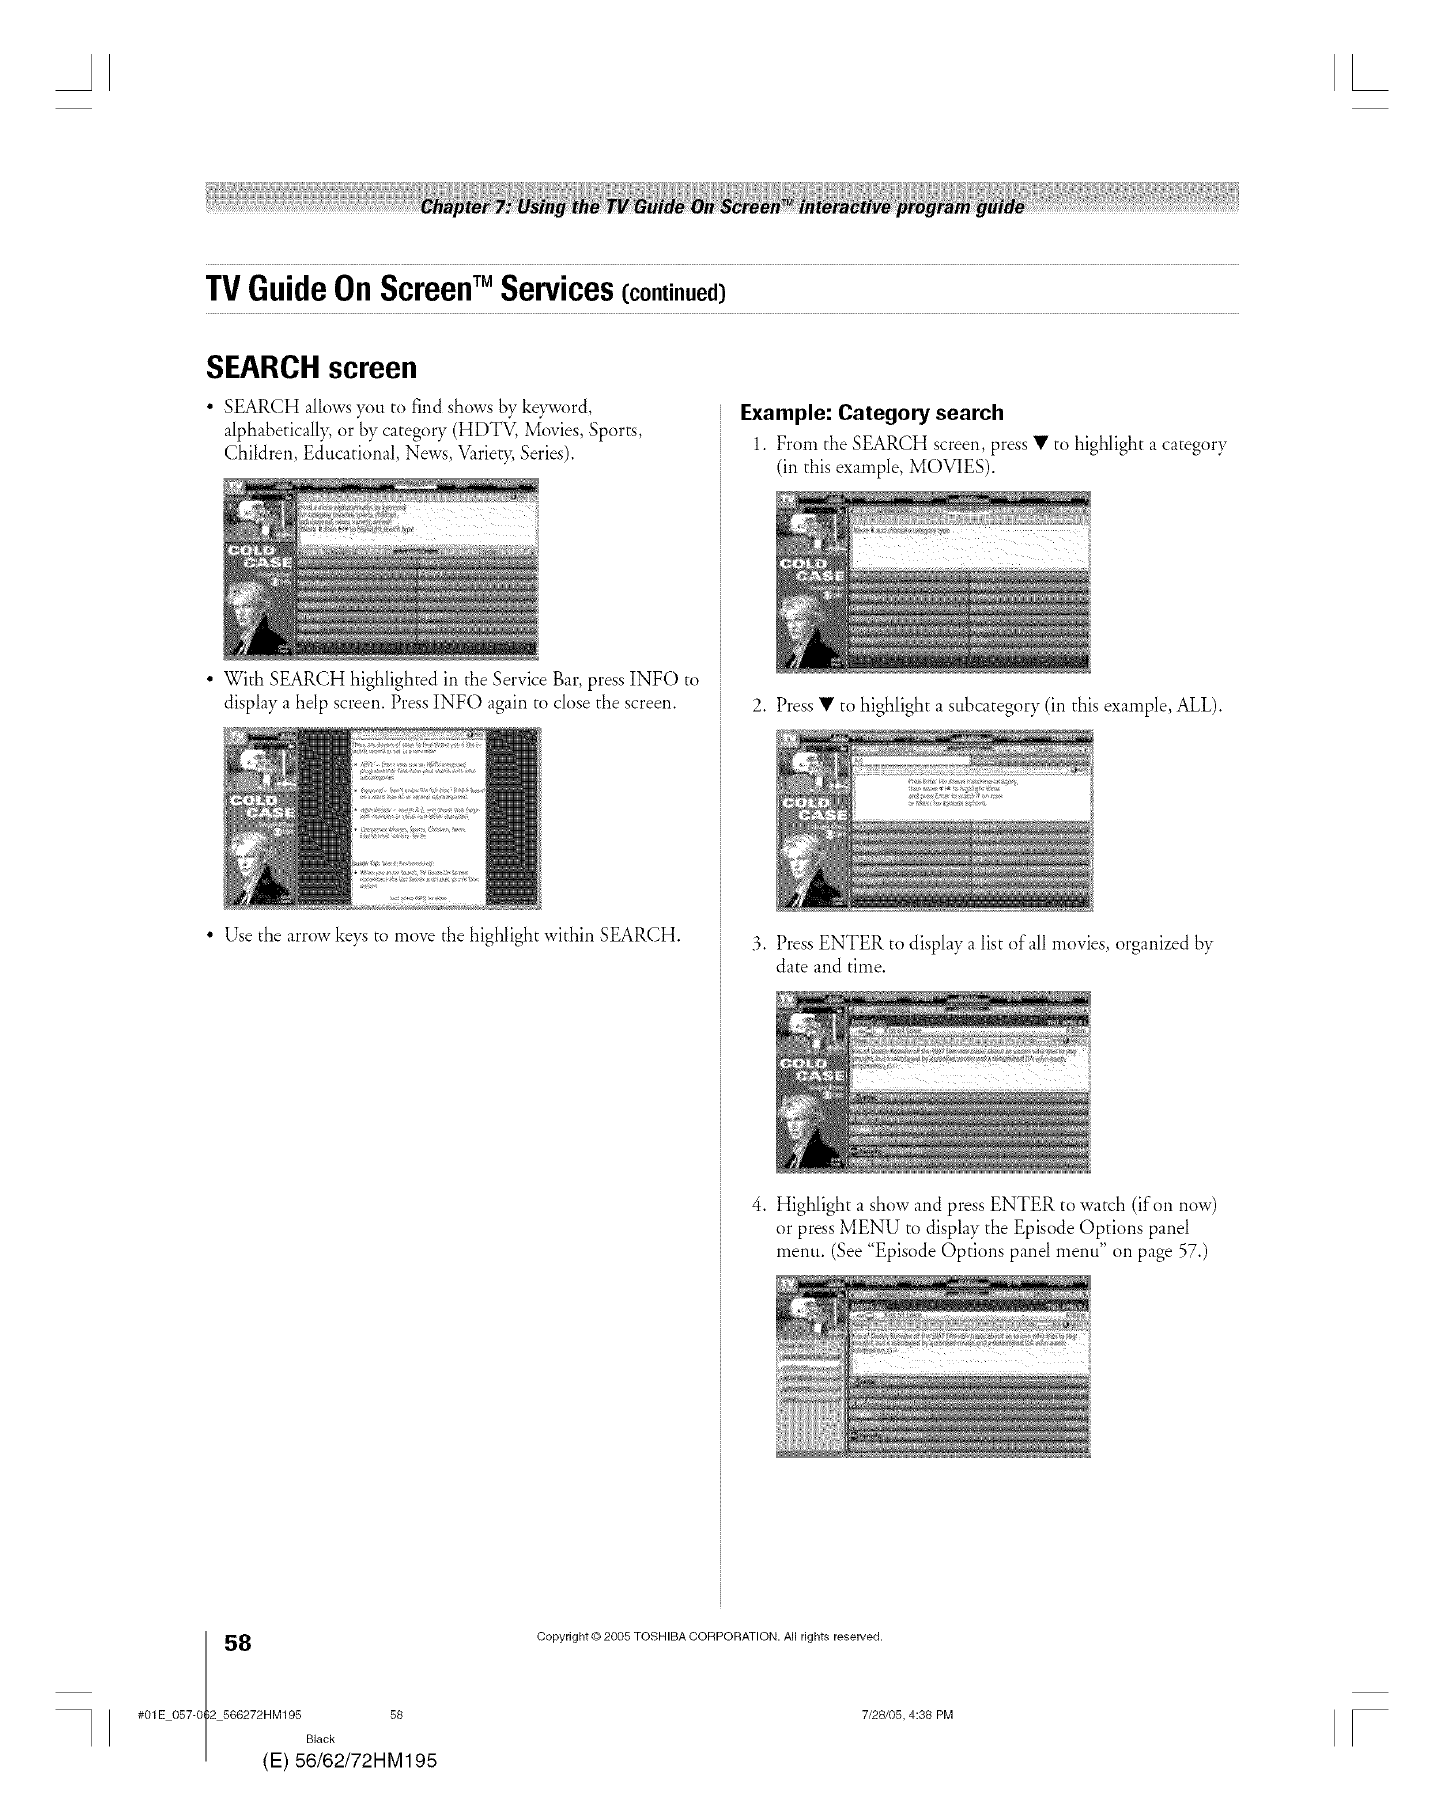
AL
TVGuideOnScreenTM Services(continued)
SEARCHscreen
•SEARCH allows you to find shows by ke_avord
alphabetically, or by category (HDTV, Movies, Sports,
Children, Educational, News, Vimety, Series).
• With SEARCH highlighted in the Service Bar, press INFO to
display a help screen. Press INFO again to close the screen.
• Use the arrow keys to move the highlight within SEARCH.
Example: Category search
1. From the SEARCH screen, press • to highlight a category
(in this example, MOVIES).
2. Press • to highlight a subcategory (in this example, ALL).
3. Press ENTER to display a list of all movies, organized by
date and time.
4. Highlight a show and press ENTER to watch (if on now)
or press MENU to display the Episode Options panel
menu. (See "Episode Options panel menu" on page 57.)
8(
#01E 057-0 2 566272HM195 58
Black
E) 56/62/72HM195
Copyright © 2005 TOSHIBA CORPORATION. All rights reserved.
7/28105, 4:38 PM [
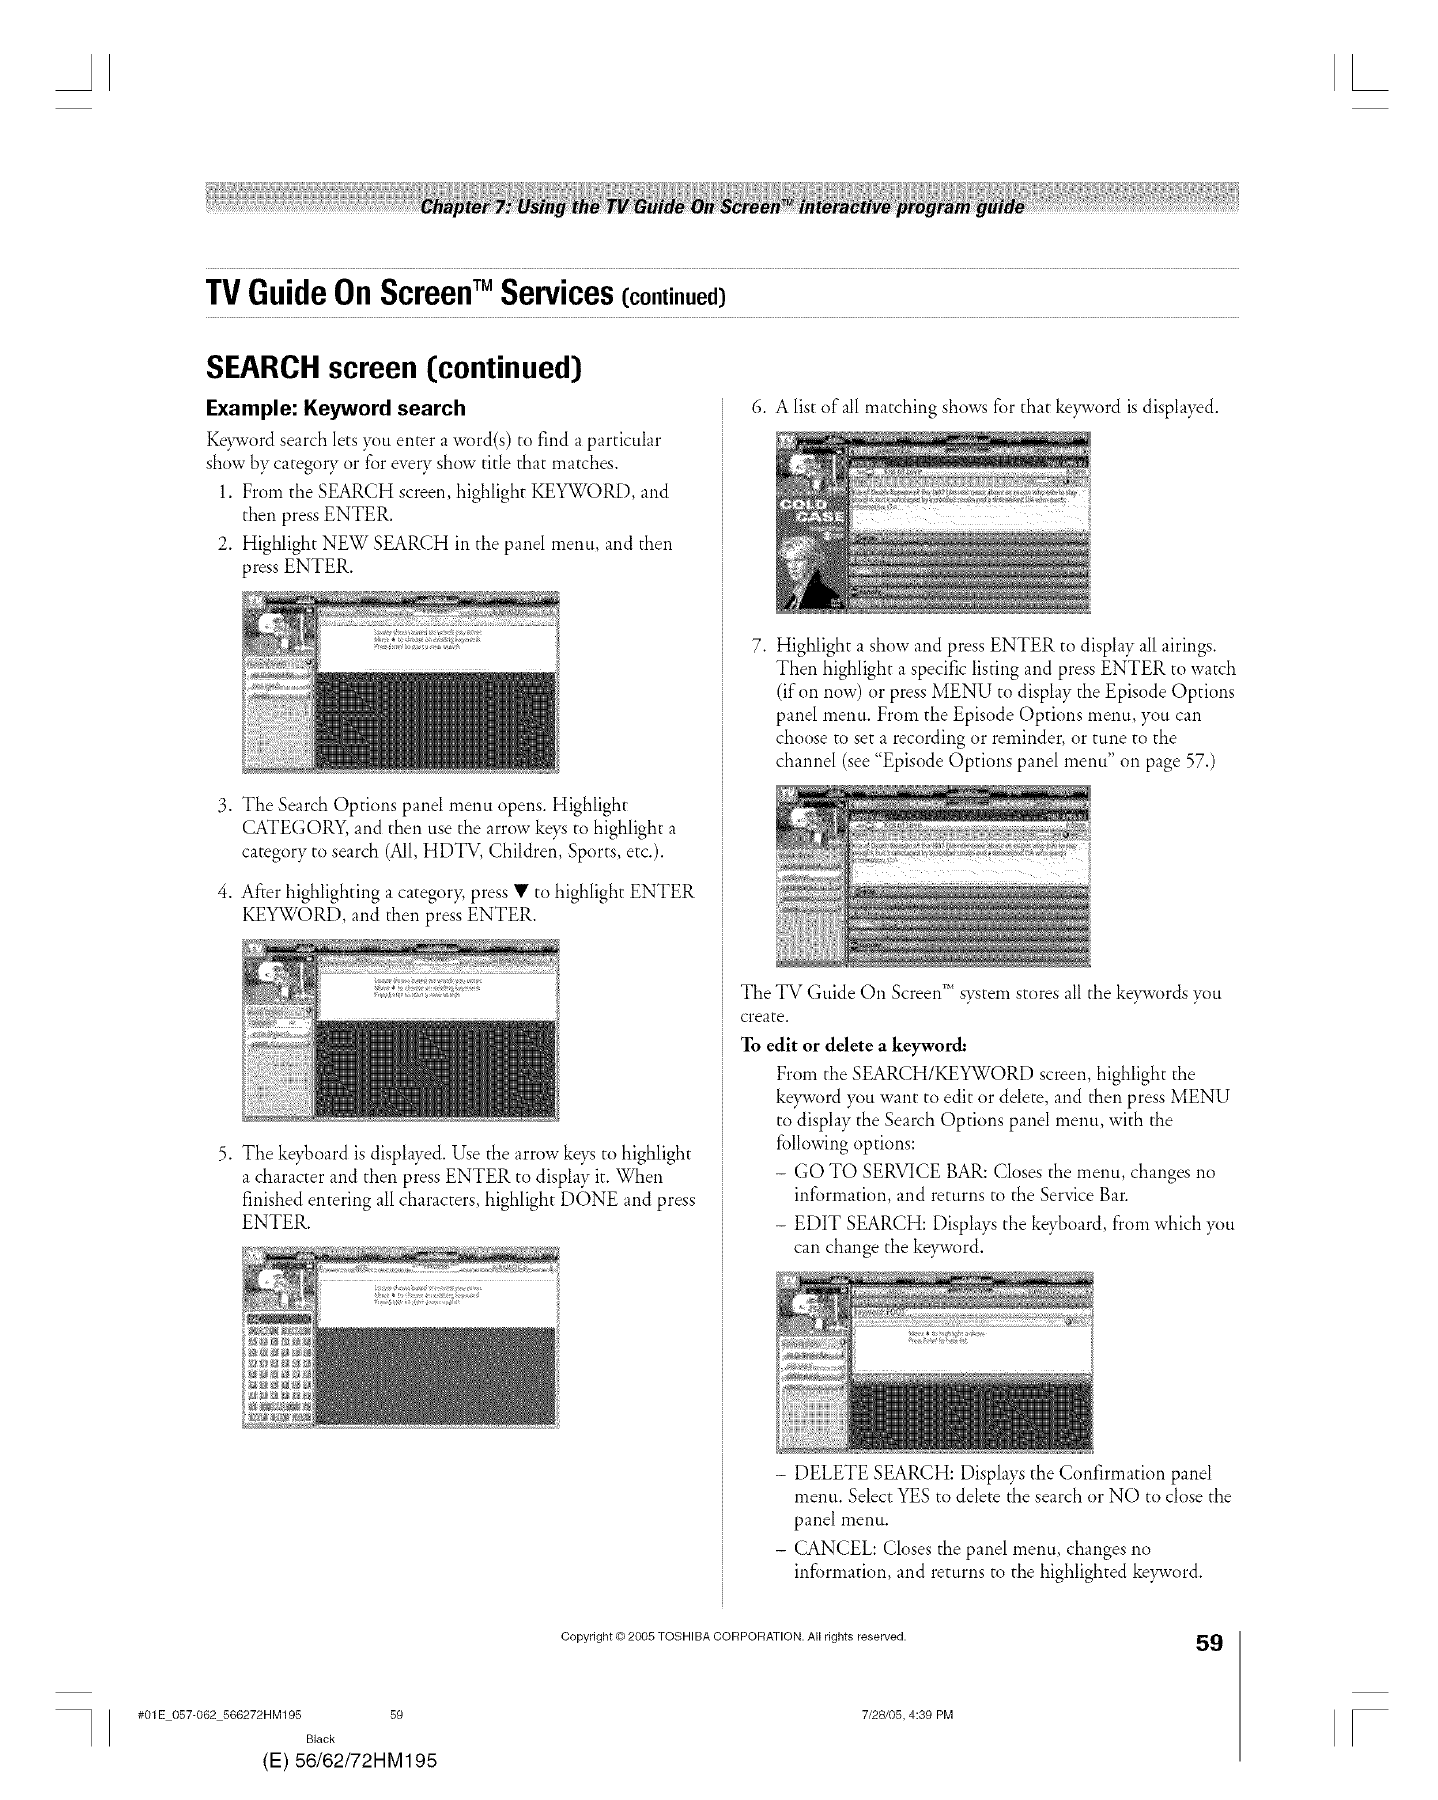
TVGuideOnScreenTM Services(continued)
SEARCHscreen [continued)
Example: Keyword search
Ke)avord search lets you enter a word(s) to find a particular
show by category or for every show title that matches.
1. From the SEARCH screen, highlight KEYWORD, and
then press ENTER.
2. Highlight NEW SEARCH in the panel menu, and then
press ENTER.
3. The Search Options panel menu opens. Highlight
CATEGORY, and then use the arrow keys to highlight a
category to search (All, HDTV, Children, Sports, etc.).
4. After highlighting a category, press • to highlight ENTER
KEYWORD, and then press ENTER.
5. The keyhoard is displayed. Use the arrow kex_ to highlight
a character and then press ENTER to display it. When
finished entering all characters, highlight DONE and press
ENTER.
6. A list of all matching shows for that ke}avord is displayed.
7. Highlight a show and press ENTER to display all airings.
Then highlight a specific listing and press ENTER to watch
(if on now) or press MENU to display the Episode Options
panel menu. From the Episode Options menu, you can
choose to set a recording or reminder, or tune to the
channel (see "Episode Options panel menu" on page 57.)
The TV Guide On Screen_'*system stores all the ke}avords you
create.
To edit or delete akeyword:
From the SEARCH/KEYWORD screen, highlight the
ke)avord )_mwant to edit or delete, and then press MENU
to display the Search Options panel menu, with the
following options:
- GO TO SERVICE BAR: Closes the reeD_u, changes no
information, and returns to the Service Bar.
- EDIT SEARCH: Displays the keyboard, from which }_)u
can change the keyword.
-DELETE SEARCH: Displays the Confirmation panel
menu. Select YES to delete the search or NO to close the
panel menu.
- CANCEL: Closes the panel menu, changes no
information, and returns to the highlighted keyword.
#01E 057-062 566272HM195 59
Black
(E) 56/62/72HM195
Copyright © 2005 TOSHIBA CORPORATION. All rights reserved.
7/28105, 4:39 PM
59
F
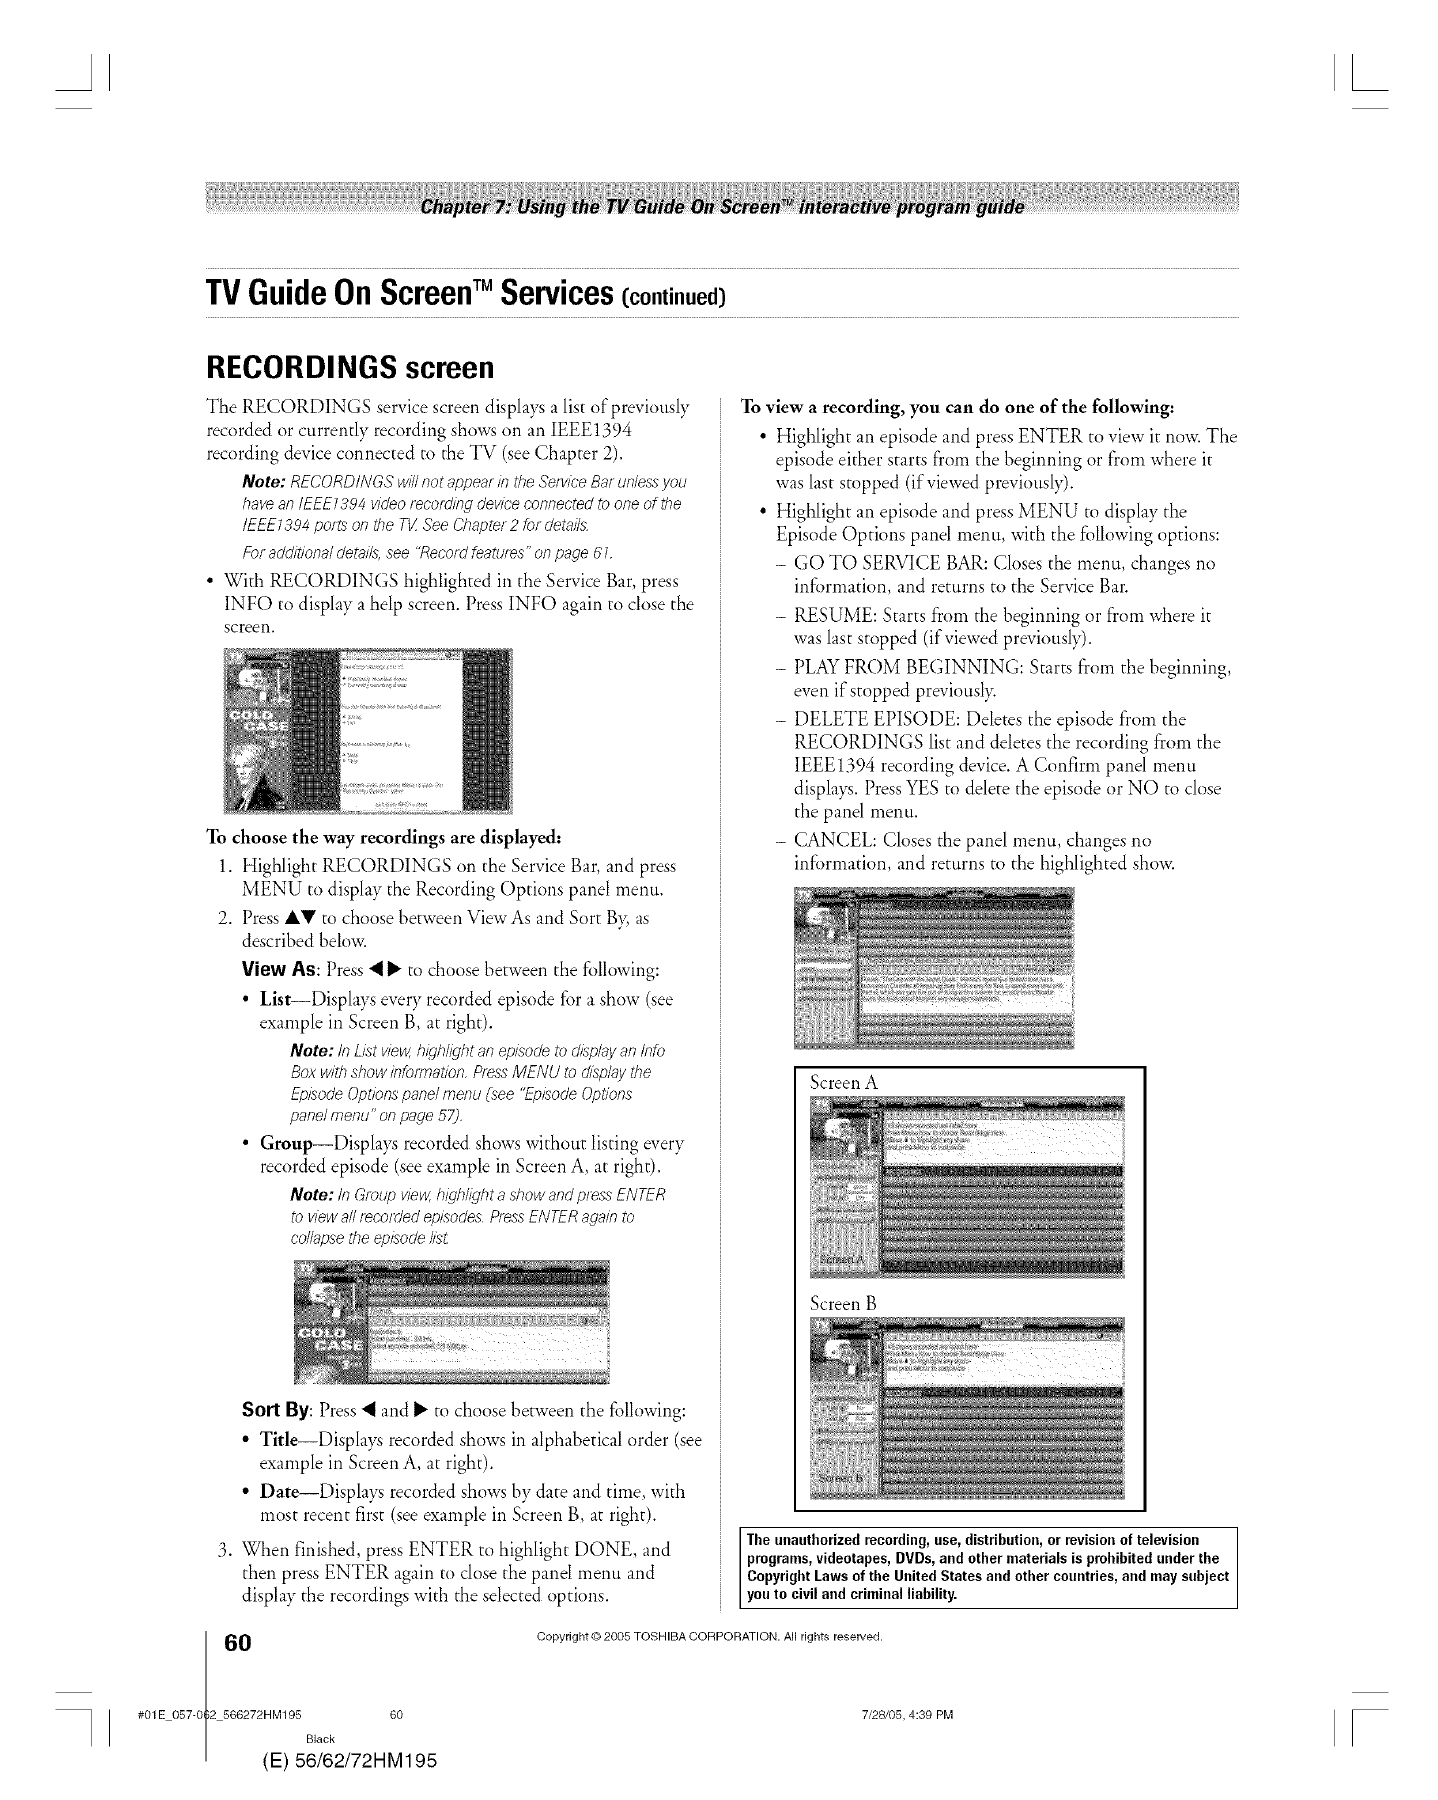
TVGuideOnScreenTM Services(continued)
RECORDINGS screen
The RECORDINGS service screen displays a list of previously
recorded or currently recording shows on an IEEE1394
recording device connected to the TV (see Chapter 2).
Note: RECORDINGS will not appear ll7the Setvic'e Bar unless you
have an IEEE 7394 video t_cotdllTg device connected to one of the
IEEE I394 port9 on the Tt/ See Chapter2 for details.
For additional details, see "Record features" on page 67.
• With RECORDINGS highlighted in the Service Bar, press
INFO to display a help screen. Press INFO again to close the
screen.
To choose the way recordings are displayed:
1. Highlight RECORDINGS on the Service Bar, and press
MENU to display the Recording Options panel menu.
2. Press IV to choose between ViewAs and Sort By, as
described below.
View As: Press "_ _" to choose between the following:
• List--Displays every recorded episode for a show (see
example in Screen B, at right).
Note:In Listview,highlightat?epLsodeto displayan lnfo
Boxwithshowll#ormation,PressMENU to displaythe
EpisodeOptionspanel menu(see "EpisodeOptions
panel menu"on page57],
• Group--Displays recorded shows without listing every
recorded episode (see example in Screen A, at right).
Note:In Groupview,highllghta show andpressENTER
to viewallteco/ded episodesPressENTERagmn to
collapsetheepisode//sL
Sort By: Press "_ and _" to choose between the following:
° Title--Displa}_ recorded shows in alphabetical order (see
example in Screen A, at right).
° Date--Displa}_ recorded shows by date and time, with
most recent first (see example in Screen B, at right).
3. When finished, press ENTER to highlight DONE, and
then press ENTER again to close the panel menu and
display the recordings with the selected options.
To view a recording, you can do one of the following:
• Highlight an episode and press ENTER to view it now. The
episode either starts from the beginning or from where it
was last stopped (if viewed previously).
• Highlight an episode and press MENU to display the
Episode Options panel menu, with the following options:
- GO TO SERVICE BAR: Closes the menu, changes no
information, and returns to the Service Bar.
- RESUME: Starts from the beginning or from where it
was last stopped (if viewed previously).
- PLAY FROM BEGINNING: Starts from the beginning,
even if stopped previousl>
- DELETE EPISODE: Deletes the episode from the
RECORDINGS list and deletes the recording from the
IEEE1394 recording device. A Confirm panel menu
displa}_. PressYES to delete the episode or NO to close
the panel menu.
- CANCEL: Closes the panel menu, changes no
infbrmation, and returns to the highlighted show.
ScreenA
Screen B
The unauthorizedrecording,use,distribution,or revision of television
programs,videotapes, DVDs, and other materials is prohibitedunder the
CopyrightLaws of the United States and other countries,and maysubject
youto civil and criminal liability.
0(
#01E 057-0 2 566272HM195 60
Black
E) 56/62/72HM195
Copyright © 2005 TOSHIBA CORPORATION. All rights reserved.
7/28105, 4:39 PM F
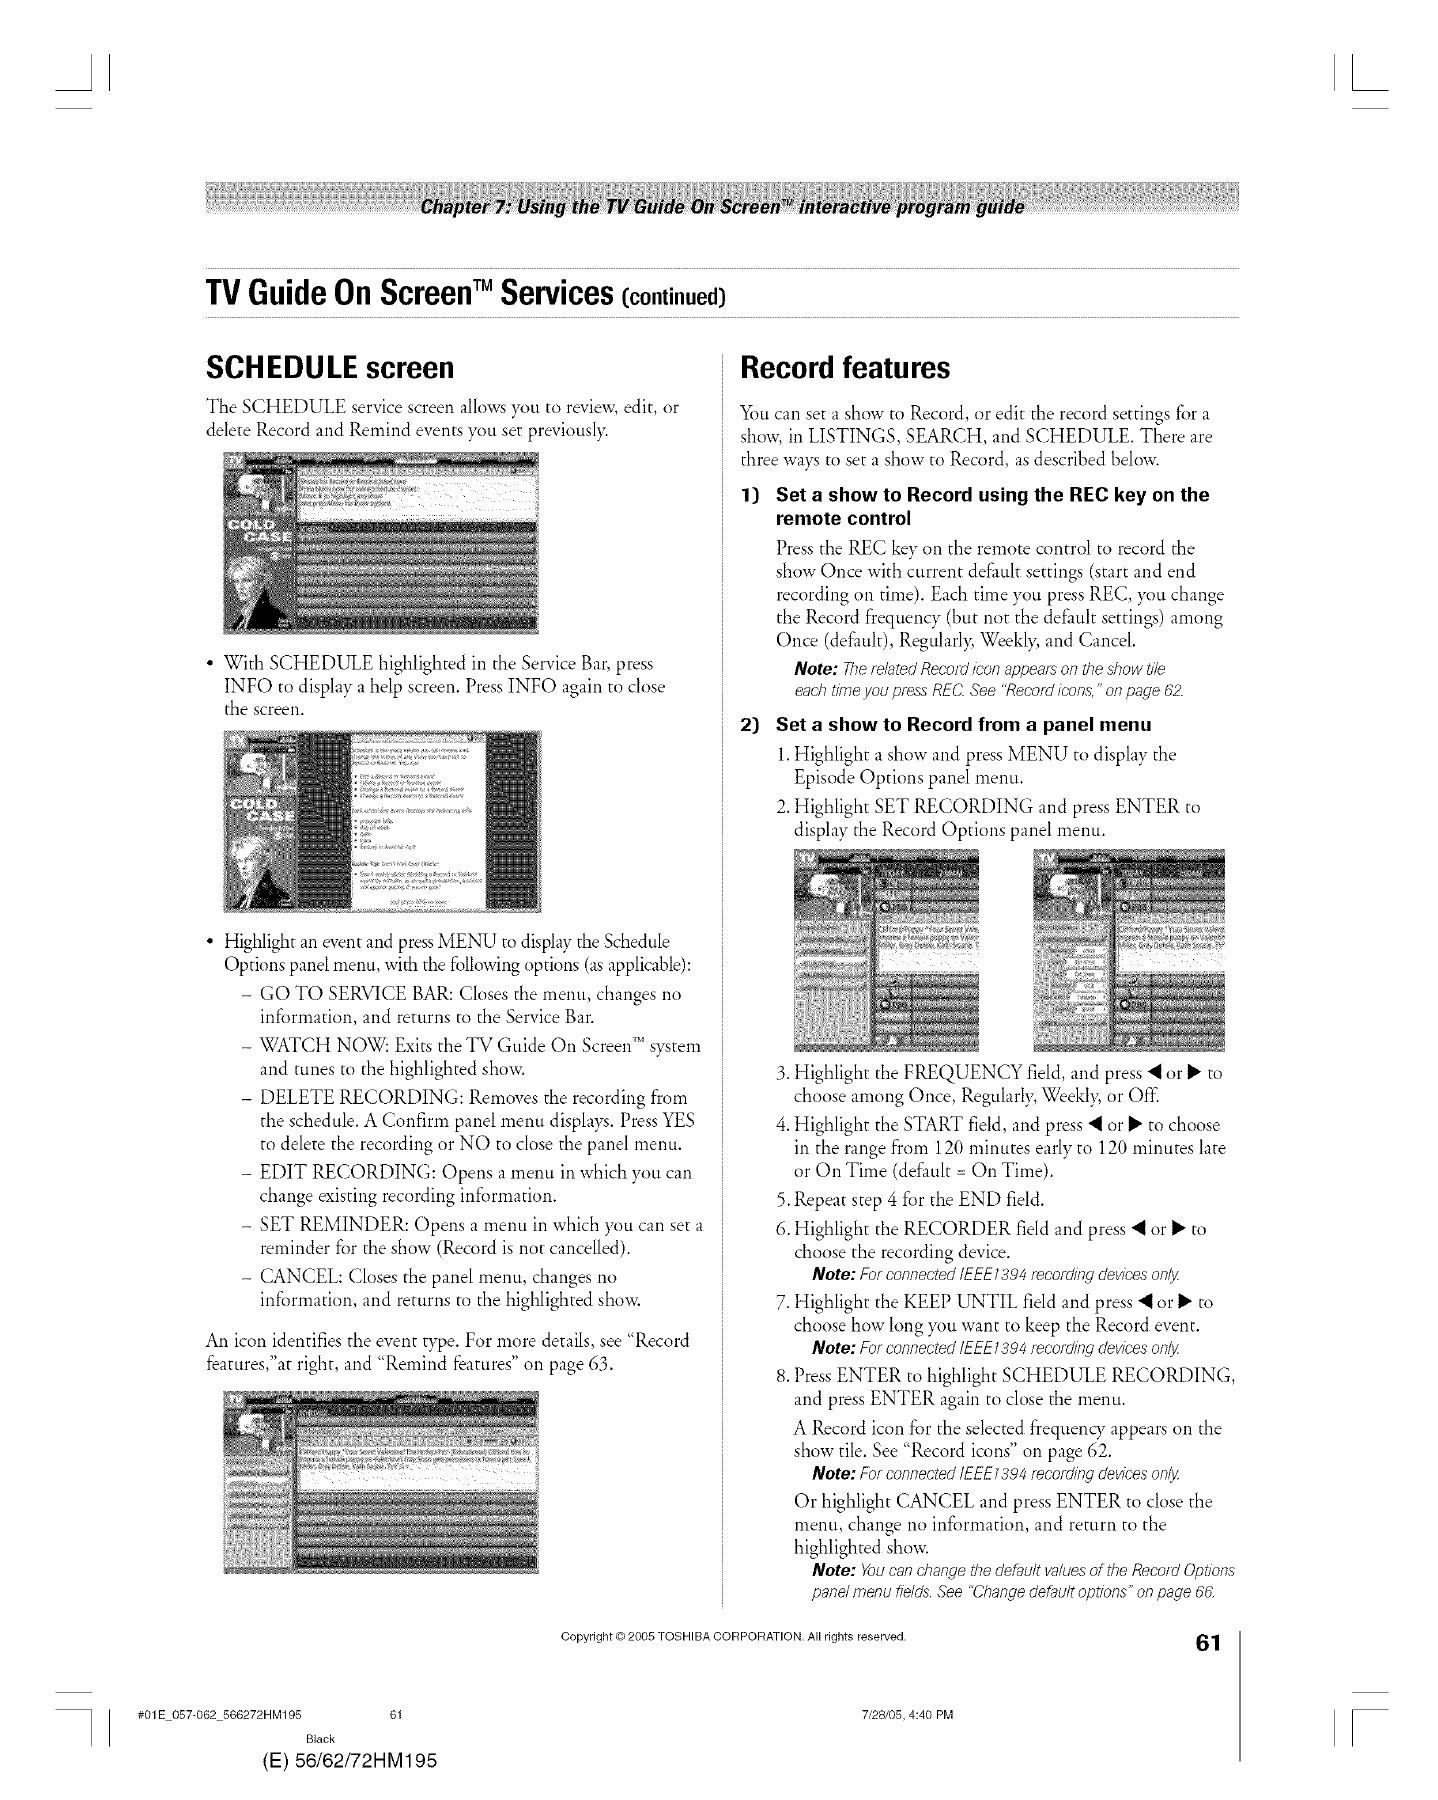
TVGuideOnScreenTM Services(continued)
SCH EDU LE screen
The SCHEDULE service screen allows you to review, edit, or
delete Record and Remind events you set previousl}<
• With SCHEDULE highlighted in the Service Bar, press
INFO to display a help screen. Press INFO again to close
the screen.
• Highlight an event and pressMENU to display the Schedule
Options panel menu, with the following options (as applicable):
- GO TO SERVICE BAR: Closes the menu, changes no
infi_rmation, and returns to the Service Bar.
- WATCH NOW: Exits the TV Guide On Screen_'_system
and tunes to the highlighted show.
- DELETE RECORDING: Removes the recording from
the schedule. A Confirm panel menu displays. PressYES
to delete the recording or NO to close the panel menu.
- EDIT RECORDING: Opens a menu in which you can
change existing recording information.
- SET REMINDER: Opens a menu in which }xm can set a
reminder for the show (Record is not cancelled).
- CANCEL: Closes the panel menu, changes no
information, and returns to the highlighted show.
An icon identifies the event type. For more details, see "Record
features,"at right, and "Remind features" on page 63.
Record features
You can set a show to Record, or edit the record settings for a
show, in LISTINGS, SEARCH, and SCHEDULE. There are
three ways to set a show to Record, as described below.
1) Set a show to Record using the REC key on the
remote control
Press the REC key on the remote control to record the
show Once with current default settings (start and end
recording on time). Each time you press REC, }_tl change
the Record frequency (but not the default settings) among
Once (default), Regularl> Weekly, and Cancel.
Note: The_datedRecordicon appearsonthe si?owtile
eachtimeyoupressREC.See "Reco/dicon&"on page 62.
2) Set a show to Record from a panel menu
1.Highlight a show and press MENU to display the
Episode Options panel menu.
2.Highlight SET RECORDING and press ENTER to
display the Record Options panel menu.
3. Highlight the FREQUENCY field, and press '4 or _ to
choose among Once, Regularl> We&l> or Off'.
4. Highlight the START field, and press '4 or _ to choose
in the range from 120 minutes early to 120 minutes late
or On Time (default = On Time).
5.Repeat step 4 for the END field.
6. Highlight the RECORDER field and press "_ or _" to
choose the recording device.
Note:ForconnectedtEEE1394_co/dif?g devices only
7. Highlight the KEEP UNTIL field and press "_ or _ to
choose how long }x_uwant to keep the Record event.
Note:ForconnectedtEEE/394_ecording devices on/y
8. Press ENTER to highlight SCHEDULE RECORDING,
and press ENTER again to close the menu.
A Record icon for the selected frequent T appears on the
show tile. See "Record icons" on page 62.
Note:Forconnected/E££1394recording devices only
Or highlight CANCEL and press ENTER to close the
menu, change no information, and return to the
highlighted show.
Note: Youcan change thedefaultvaluesof theReeoldOptions
panel menu fieldsSee"Change default options" onpage66:
Copyright © 2005 TOSHIBA CORPORATION. All rights reserved. 61
#01E 057-062 566272HM195 61
Black
(E) 56/62/72HM195
7/28105, 4:40 PM F
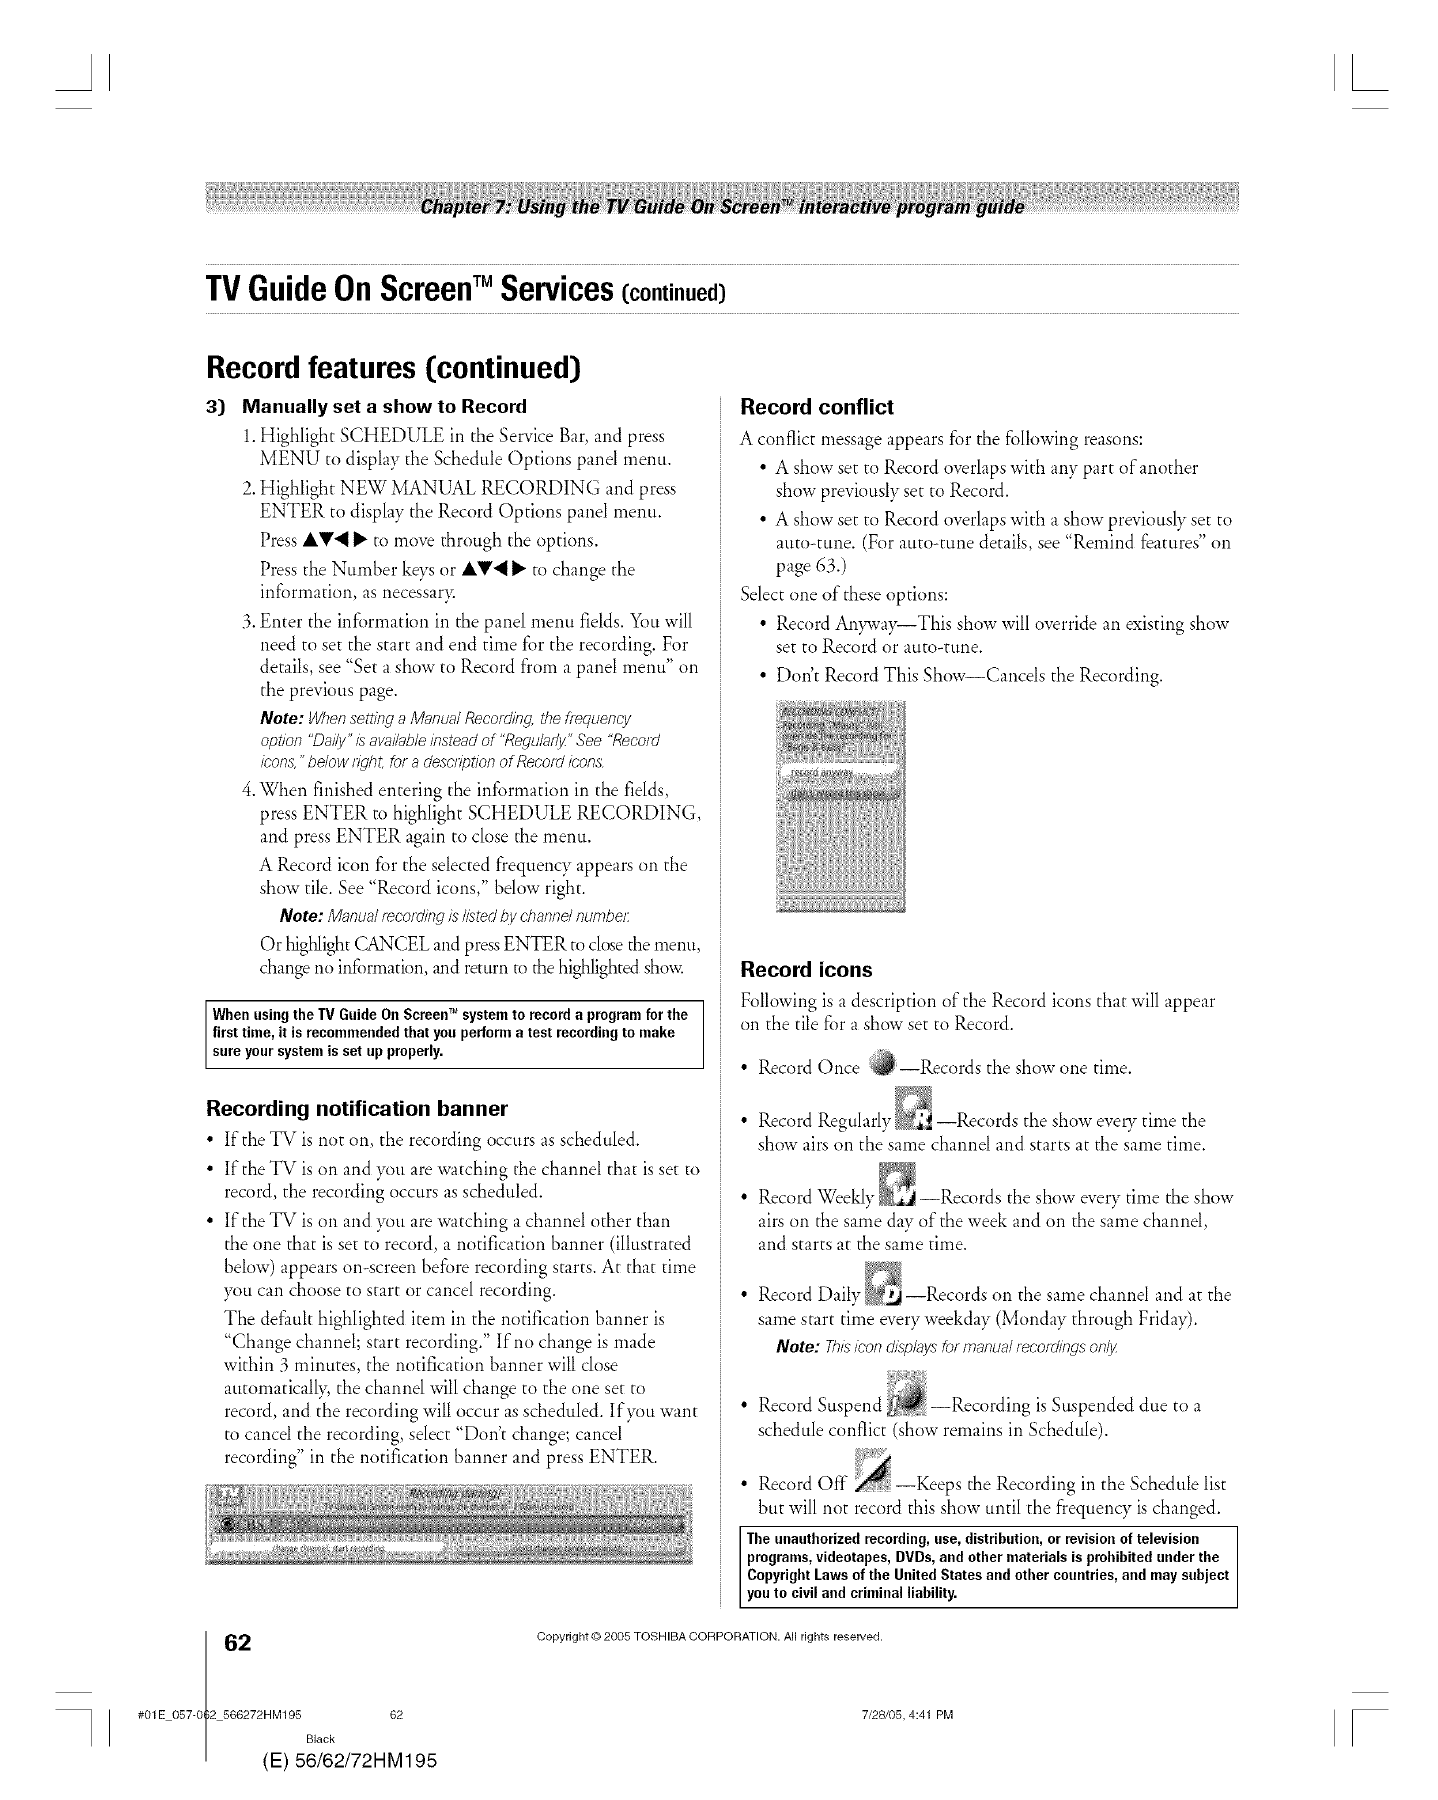
TVGuideOnScreenTM Services(continued)
Record features [continued)
3} Manually set a show to Record
1.Highlight SCHEDULE in the Service Bar, and press
MENU to display the Schedule Options panel menu.
2.Highlight NEW MANUAL RECORDING and press
ENTER to display the Record Options panel menu.
Press IY'_ _ to move through the options.
Press the Number keys or IY'_ _ to change the
information, as necessary.
3. Enter the information in the panel menu fields. You will
need to set the start and end time fbr the recording. For
details, see "Set a show to Record from a panel menu" on
the previous page.
Note: Whensetting a Manual Record#?g. the f,,_quency
opt/on "Daily" isavailableinsteadof "Regularly" See"Reco/d
icon& "below right, foradescription of Recordicons.
4. When finished entering the information in the fields,
press ENTER to highlight SCHEDULE RECORDING
and press ENTER again to close the menu.
A Record icon for the selected frequency appears on the
show tile. See "Record icons," below right.
Note:Manual_eco/ding L_listed/qychannelnumber
Or highlight CANCEL and pressENTER to closethe menu
change no infimnation, and return m the highlightedshow.
When using the TV Guide On Screen_'_'system to record a programfor the
firsttime, it is recommendedthat you performa test recordingto make
sure yoursystemis set up properly.
Recording notification banner
•If the TV is not on, the recording occurs as scheduled.
• If the TV is on and }_tl are watching the channel that is set to
record, the recording occurs as scheduled.
• If the TV is on and you are watching a channel other than
the one that is set to record, a notification banner (illustrated
below) appears on-screen before recording starts. At that time
you can choose to start or cancel recording.
The delimit highlighted item in the notification banner is
"Change channel; start recording." If no change is made
within 3 minutes, the notification banner will close
automatically, the channel will change to the one set to
record, and the recording will occur as scheduled. If}_m want
to cancel the recording, select "Don't change; cancel
recording" in the notification banner and press ENTER.
Record conflict
A conflict message appears for the following reasons:
• A show set to Record overlaps with any part of another
show previously set to Record.
• A show set to Record overlaps with a show previously set to
auto-tune. (For auto-tune details, see "Remind features" on
page 63.)
Select one of these options:
• Record An}_vay--This show will override an existing show
set to Record or auto-tune.
• Don't Record This Show--Cancels the Recording.
Record icons
Following is a description of the Record icons that will appear
on the tile for a show set to Record.
• Record Once v_--Records the show one time.
D
• Record Regularly _,a;,_--Records the show eveUtime the
show airs on the same channel and starts at the same time.
• Record Weekly _ --Records the show every time the show
airs on the same day of the week and on the same channel,
and starts at the same time.
• Record Daily _--Records on the same channel and at the
same start time every weekday (Monday through Friday).
Note: rhL_icon d/splays for manual _eco_d/ngson/y
•Record Suspend _--Recording is Suspended due to a
schedule conflict (show remains in Schedule).
• Record Off" _ --Keeps the Recording in the Schedule list
but will not record this show until the frequency is changed.
The unauthorizedrecording,use,distribution,or revisionof television
programs,videotapes, DVDs, and other materials is prohibitedunder the
CopyrightLaws of the United States and other countries,and maysubject
youto civil and criminal liability.
2(
#01E 057-0 2 566272HM195 62
Black
E) 56/62/72HM195
Copyright © 2005 TOSHIBA CORPORATION. All rights reserved.
7/28105, 4:41 PM F
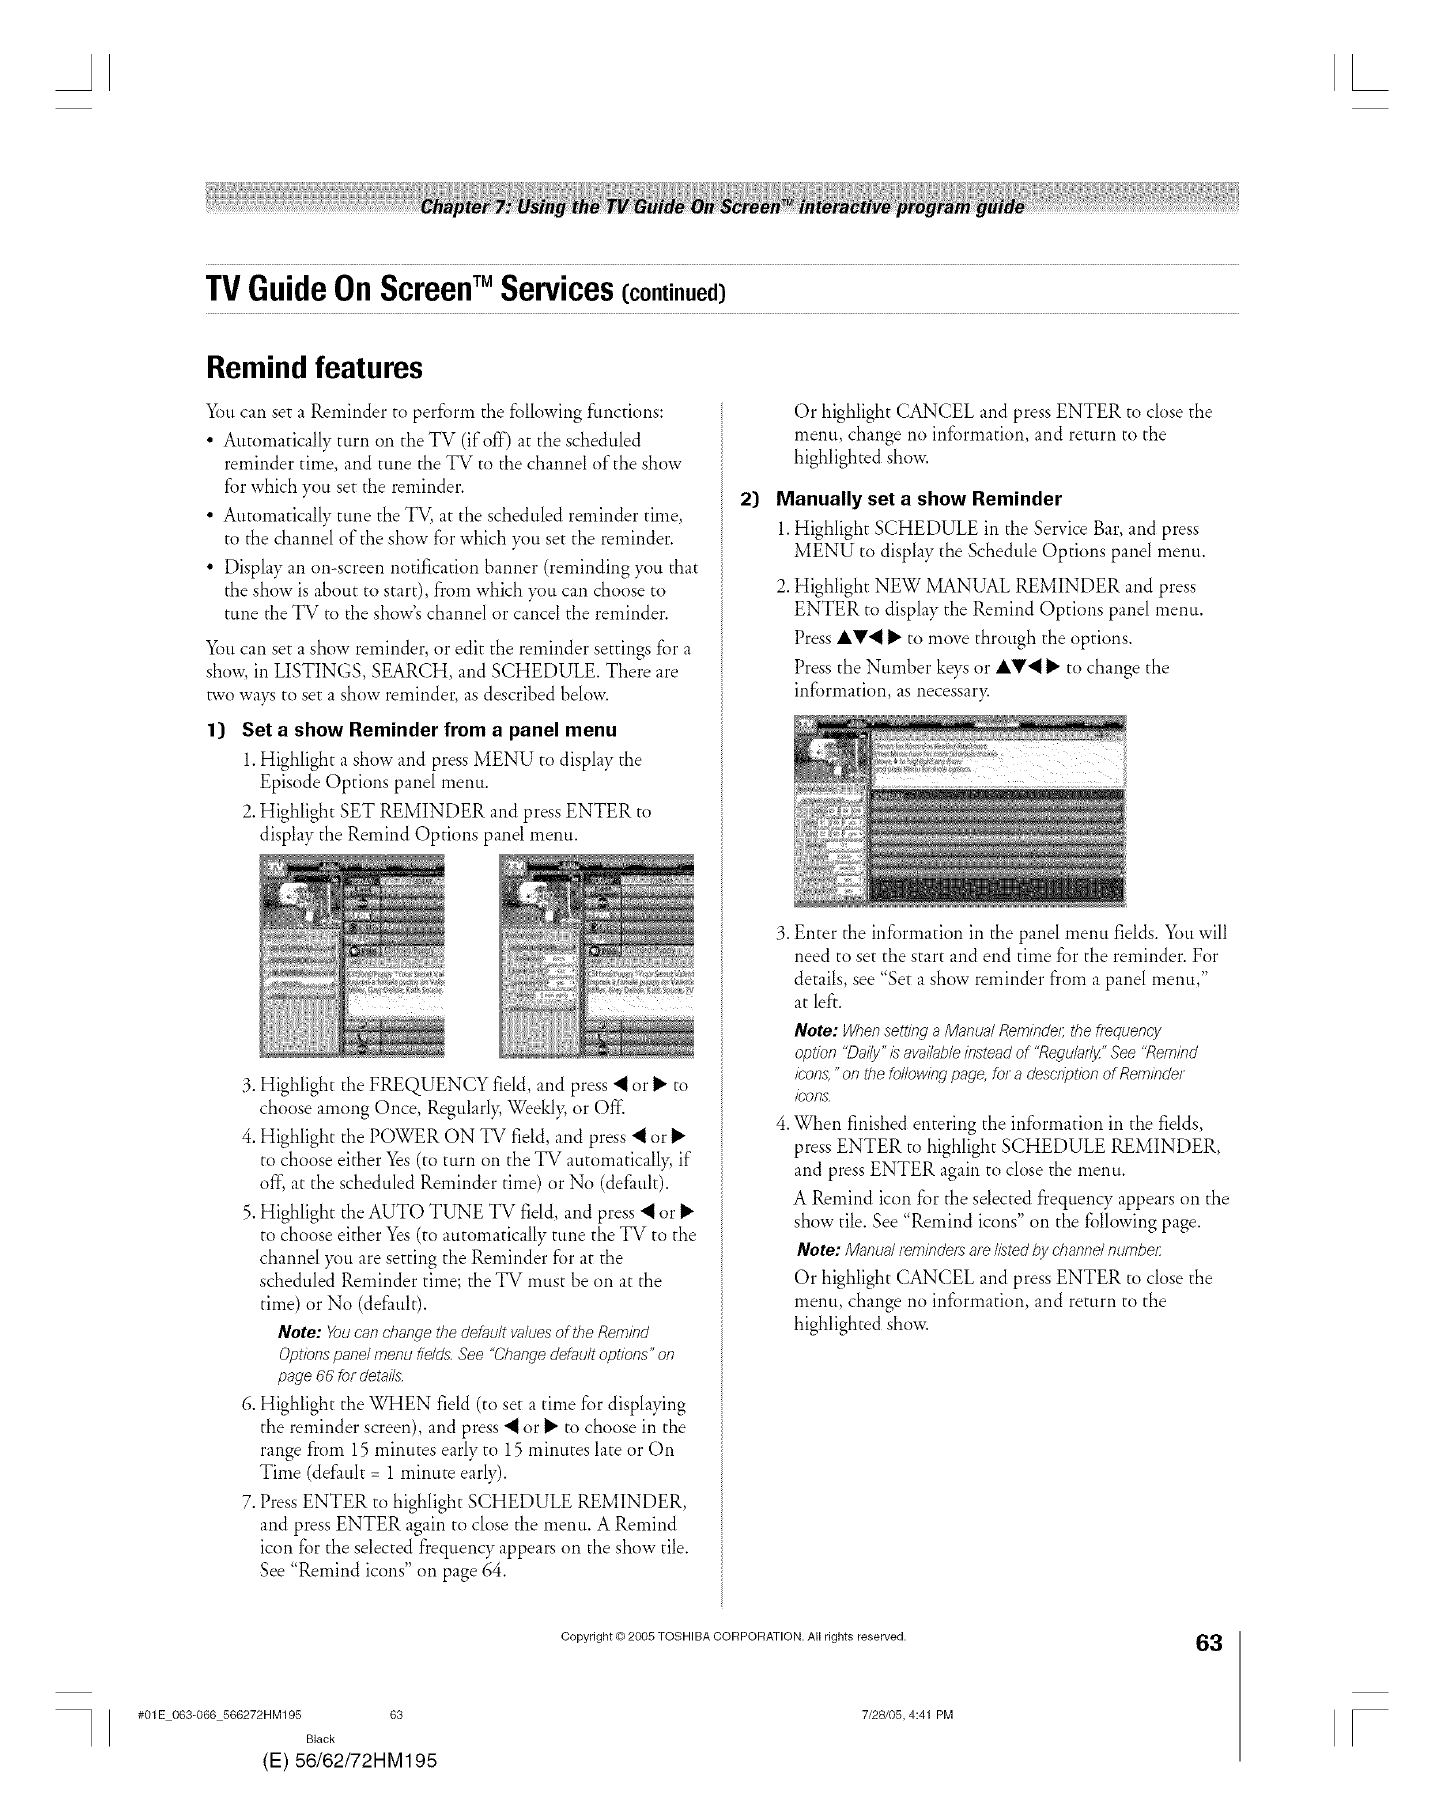
TVGuideOnScreenTM Services(continued)
Remind features
You can set a Reminder to perform the following functions:
• Automatically turn on theTV (if off) at the scheduled
reminder time, and tune the TV to the channel of the show
for which you set the reminder.
• Automatically tune the TV, at the scheduled reminder time,
to the channel of the show fbr which }_)uset the reminder.
• Display an on-screen notification banner (reminding you that
the show is about to start), from which }_tl can choose to
tune the TV to the show's channel or cancel the reminder.
_3ti can set a show reminder, or edit the reminder settings for a
show, in LISTINGS, SEARCH, and SCHEDULE. There are
two ways to set a show reminder, as described below.
13 Set a show Reminder from a panel menu
1.Highlight a show and press MENU to display the
Episode Options panel menu.
2.Highlight SET REMINDER and press ENTER to
display the Remind Options panel menu.
3. Highlight the FREQUENCY field, and press "_or lJ"to
choose among Once, Regularl> We&l> or Off"
4. Highlight the POWER ON TV field, and press "_ or lJ"
to choose either Yes (to turn oil the TV automatically, if
off, at the scheduled Reminder time) or No (delimit).
5. Highlight the AUTO TUNE TV field, and press "_ or II,
to choose either Yes (to automatically tune the TV to the
channel }x_tiare setting the Reminder for at the
scheduled Reminder time; the TV must be on at the
time) or No (default).
Note: Youcan change thedefaultvaluesof theRemind
Options panelmenufieldsSee"Change default options" on
page66fordetails.
6. Highlight the WHEN field (to set a time for displaying
the reminder screen), and press "_ or lJ"to choose in the
range from 15 mintites early to 15 minutes late or Oil
Time (default = 1 minute early).
7. Press ENTER to highlight SCHEDULE REMINDER,
and press ENTER again to close the menu. A Remind
icon for the selected frequency appears on the show tile.
See "Remind icons" oil page 64.
2)
Or highlight CANCEL and press ENTER to close the
menu, change no information, and return to the
highlighted show.
Manually set a show Reminder
1.Highlight SCHEDULE in the Service Bar, and press
MENU to display the Schedule Options panel menu.
2.Highlight NEW MANUAL REMINDER and press
ENTER to display the Remind Options panel menu.
Press AV._ II,to move through the options.
Press the Number keys or AV._ lJ"to change the
infi)rmation, as necessary.
3. Enter the information in the panel menu fields. Youwill
need to set the start and end time for the reminder. For
details, see "Set a show reminder from a panel menu,"
at left.
Note: When setting a Manual Reminder; the O_quency
option "Daily" is available instead of "Regularly" See 'Remind
icon& "on the following page,,for a descnlotion of Reminder
icons.
4. When finished entering the information in the fields,
press ENTER to highlight SCHEDULE REMINDER,
and press ENTER again to close the menu.
A Remind icon for the selected frequency appears oil the
show tile. See "Remind icons" oil the following page.
Note:Manualremff?dersarelistedt_ychannelnumbel:
Or highlight CANCEL and press ENTER to close the
menti, change no information, and return to the
highlighted show.
#01E 063-066 566272HM195 63
Black
(E) 56/62/72HM195
Copyright © 2005 TOSHIBA CORPORATION. All rights reserved.
7/28105, 4:41 PM
63
F
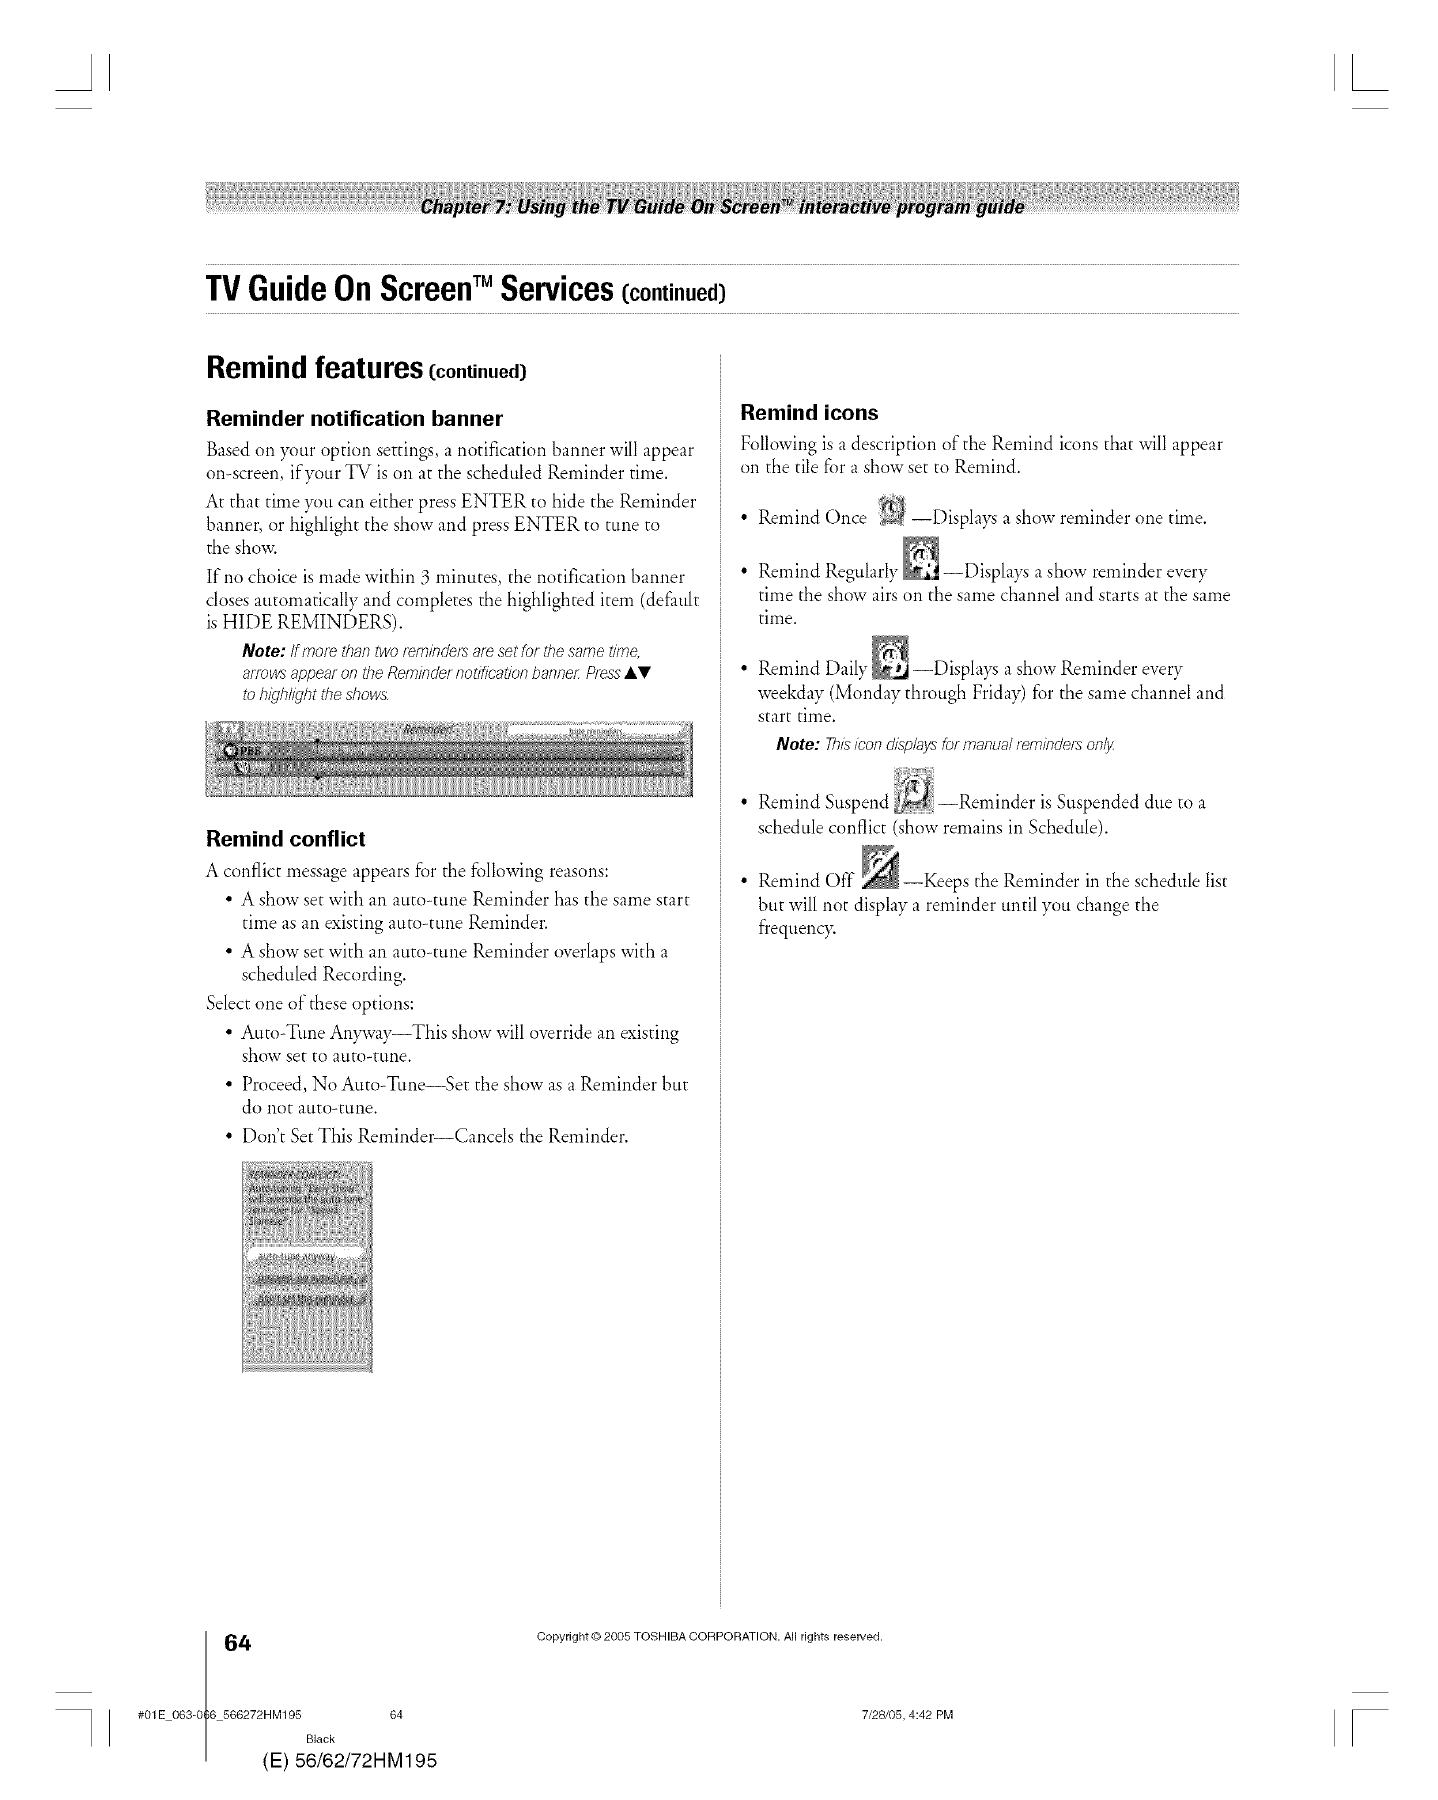
TVGuideOnScreenTM Services(continued)
Remind features (continued)
Reminder notification banner
Based on }_mr option settings, a notification banner will appear
on-screen, if your TV is on at the scheduled Reminder time.
At that time you can either press ENTER to hide the Reminder
banner, or highlight the show and press ENTER to tune to
the show.
If no choice is made within 3 minutes, the notification banner
closes automatically and completes the highlighted item (default
is HIDE REMINDERS).
Note: Ifmore than two reminde_ areset for thesame tffne,
afTOWSappearon theRein#Talernotificationbanne/:PressAV
to highlight theshows
Remind conflict
A conflict messageappearsfor the following reasons:
• A showsetwith an auto-tune Reminder hasthe samestart
time as an existing auto-tune Reminder.
• A show set with an auto-tune Reminder overlaps with a
scheduled Recording.
Select one of these options:
• Auto-Tune An)_va)_This show will override an existing
show set to auto÷tune.
• Proceed, No Auto-Tune--Set the show as a Reminder but
do not auto-tune.
• Don't Set This Reminder--Cancels the Reminder.
Remind icons
Following is adescription of the Remind iconsthat will appear
on the tile for a show set to Remind.
• Remind Once --Displays a show reminder one time.
• Remind Regularly _ --Displays a show reminder every
time the show airs on the same channel and starts at the same
time.
• Remind Daily _ --Displays a show Reminder every
weekday (Monday through Friday) for the same channel and
start time.
Note: TI_L_icondL_p/aysformanualrein#Trierson/_
• Remind Suspend _--Reminder is Suspended due to a
schedule conflict (show remains in Schedule).
• Remind Off the Reminder in the schedule list
but will not display a reminder until you change the
frequenc)<
4(
#01E 063-0 6 566272HM195 64
Black
E) 56/62/72HM195
Copyright © 2005 TOSHIBA CORPORATION. All rights reserved.
7/28105, 4:42 PM F

Ak
TVGuideOnScreenTM Services(continued)
SETUPscreen
After you complete the initial TV Guide On Screen_'_setup (as
described in Chapter 5), you can change the following settings:
• Change system settings
• Change channel display
• Change de_mlt options
Highlight a choice, press ENTER, and follow the on-screen
instructions.
With SETUP highlighted in the Service Bar, press INFO to
display a help screen. Press INFO again to close the screen.
Change system settings
This option appears only after you have completed the initial
TV Guide On Screen_'_setup process (as described in Chapter 5).
1. From the SETUP screen, highlight CHANGE SYSTEM
SETTINGS and press ENTER.
Change channel display
This option allows you to edit channel information that appears
in LISTINGS, including the following:
• Reorder the position the channels appear in LISTINGS.
• Change the "tune channel" number.
Note: The "tune ciTannel"L_the el}anne/on wlTic'17you receive
astation, For example, two viewers in the same 7/;ocode may
receive the same station on different channel numbet_,
depending on whether they have Cable service or are using a
cable box
• Switch a channel to one of the followingsettings:
- On (channel is alwa}_displayed in LISTINGS)
- Off (channel is never displayed in LISTINGS)
- Auto-Hide (channel is displayed in LISTINGS only
when program information is available)
1. From the SETUP screen, highlight CHANGE CHANNEL
DISPLAY and press ENTER.
2. Highlight the channel row you want to edit and press
ENTER to display the Grid Options panel menu.
3. To edit the options, press INFO and follow the on-screen
instructions.
2. Press ENTER again
to display the
Confirming Your
Settings screen.
3. Highlight one of the
options, press
ENTER, and fbllow
the on-screen
instructions.
#01E 063-066 566272HM195 65
Black
(E) 56/62/72HM195
Copyright © 2005 TOSHIBA CORPORATION. All rights reserved.
7/28105, 4:43 PM
65
F
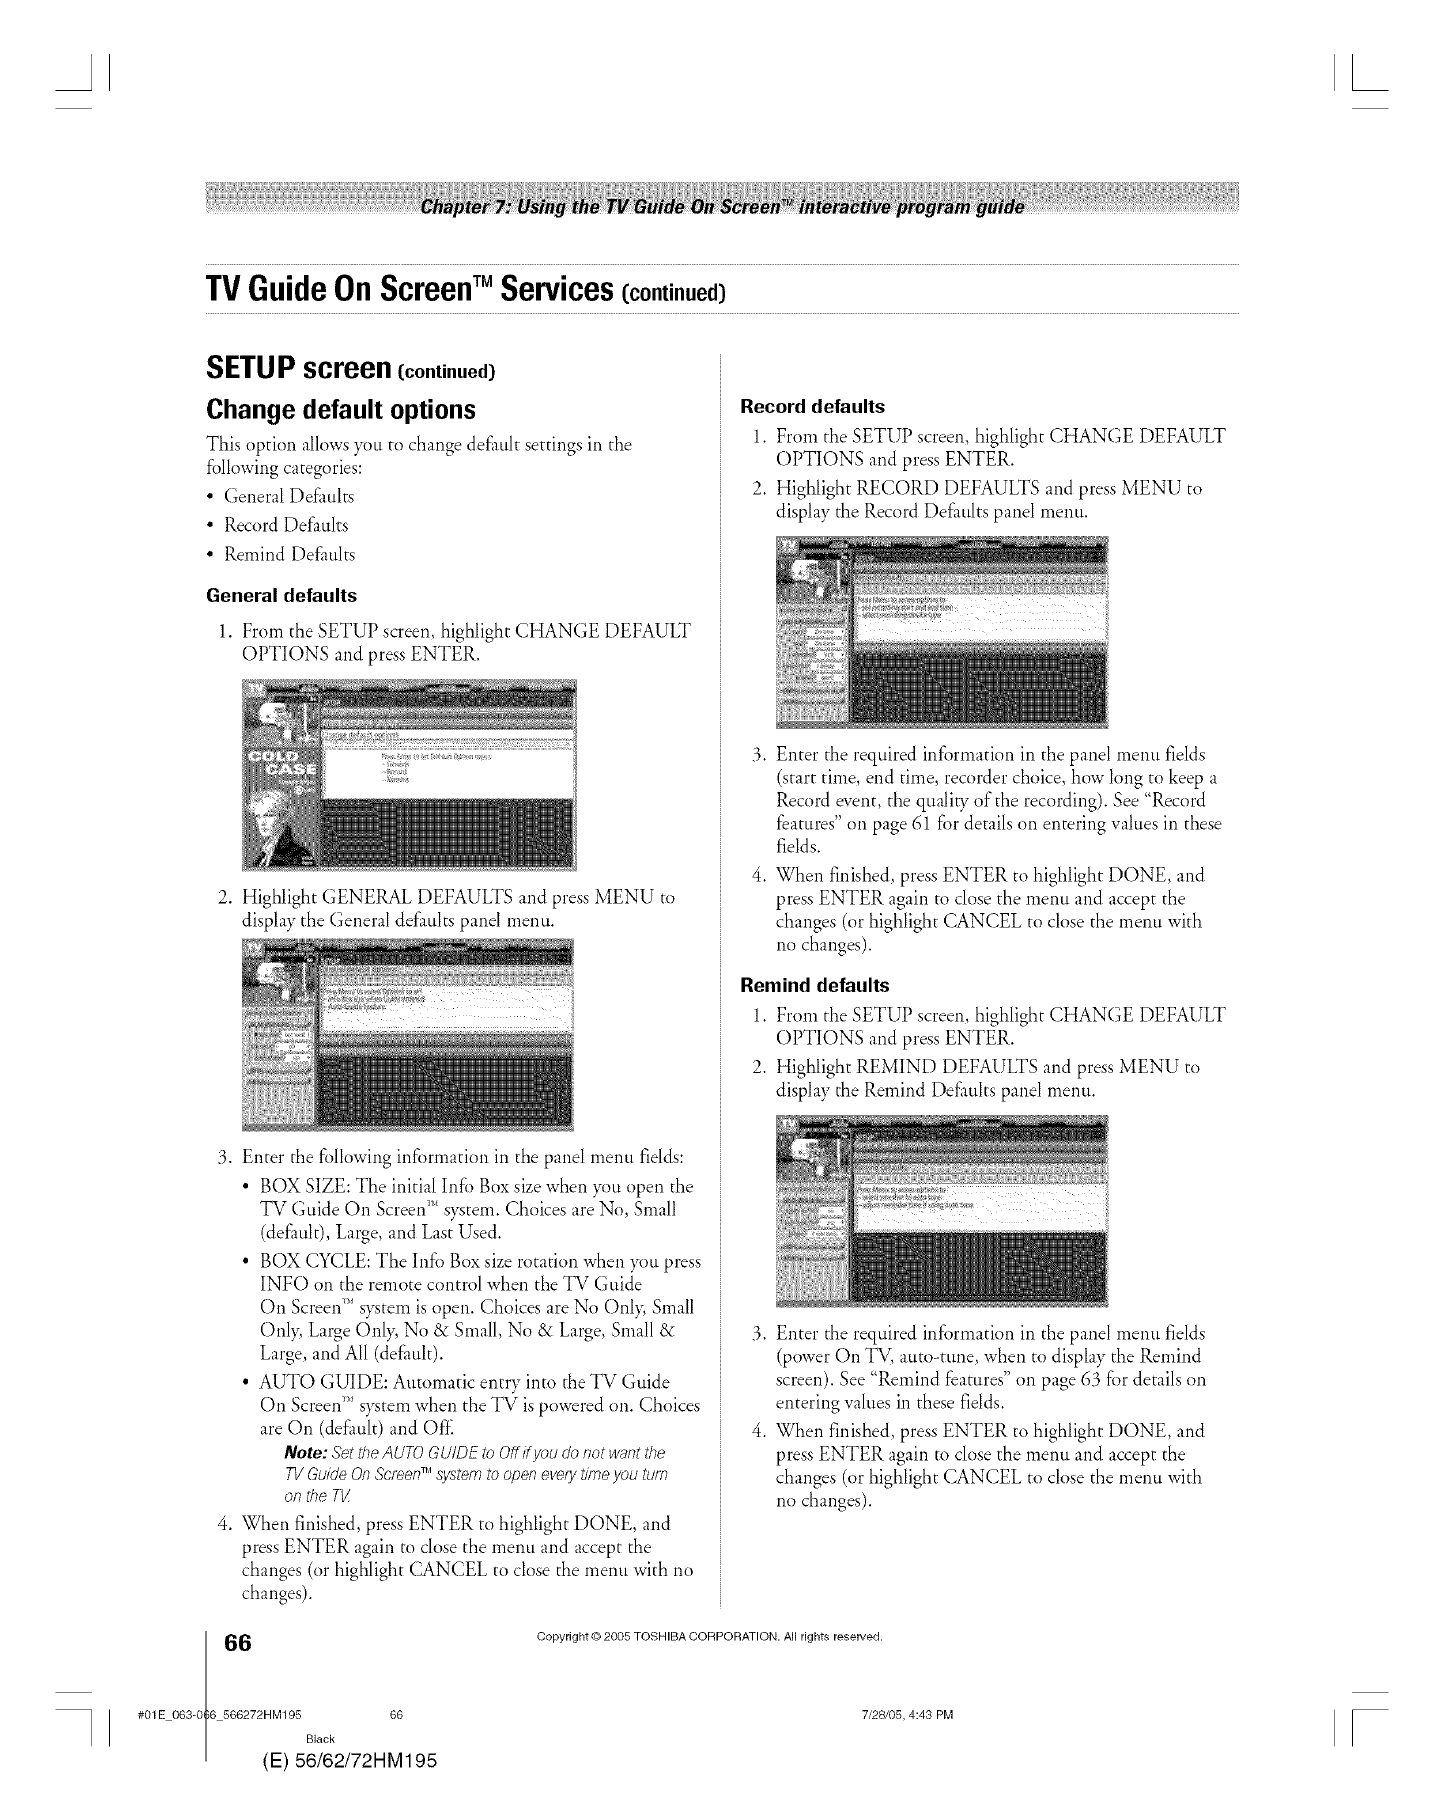
TVGuideOnScreenTM Services(continued)
SETUP screen (continued)
Change default options
This option allows ?_m to change default settings in the
following categories:
• General Defaults
• Record Defaults
• Remind Delimits
General defaults
1. From the SETUP screen, highlight CHANGE DEFAULT
OPTIONS and press ENTER.
2. Highlight GENERAL DEFAULTS and press MENU to
display the General defaults panel menu.
3. Enter the following information in the panel menu felds:
• BOX SIZE: The initial Infb Box size when }_)uopen the
TV Guide On Screen_'*system. Choices are No, Small
(default), Large, and Last Used.
• BOX CYCLE: The Info Box size rotation when )<_upress
INFO on the remote control when the TV Guide
On Screen_'_s)_tem is open. Choices are No Onl> Small
Onl> Large Only, No & Small, No & Large, Small &
Large, and All (delimit).
• AUTO GUIDE: Automatic entry into the TV Guide
On Screen_'*system when the TV is powered on. Choices
are On (default) and Of£
Note:SettheAUTOGUIDEtoOffif you donotwantthe
TVGuideOnSc/een_Msystem too,oef7eve[ytimeyouturn
onthe T_
4. When finished, press ENTER to highlight DONE, and
press ENTER again to close the menu and accept the
changes (or highlight CANCEL to close the menu with no
changes).
Record defaults
1. From the SETUP screen, highlight CHANGE DEFAULT
OPTIONS and press ENTER.
2. Highlight RECORD DEFAULTS and press MENU to
display the Record Defaults panel menu.
Enter the required information in the panel menu fields
(start time, end time, recorder choice, how long to keep a
Record event, the qualio _of the recording). See "Record
features" on page 61 for details on entering values in these
fields.
When finished, press ENTER to highlight DONE, and
press ENTER again to close the menu and accept the
changes (or highlight CANCEL to close the menu with
no changes).
Remind defaults
1. From the SETUP screen, highlight CHANGE DEFAULT
OPTIONS and press ENTER.
2. Highlight REMIND DEFAULTS and press MENU to
display the Remind Defaults panel menu.
3. Enter the required information in the panel menu fields
(power On TV, auto-June, when to display the Remind
screen). See "Remind features" on page 63 for details on
entering values in these fields.
4. When fnished, press ENTER to highlight DONE, and
press ENTER again to close the menu and accept the
changes (or highlight CANCEL to close the menu with
no changes).
6(
#01E 063-0 6 566272HM195 66
Black
E) 56/62/72HM195
Copyright © 2005 TOSHIBA CORPORATION. All rights reserved.
7/28105, 4:43 PM F
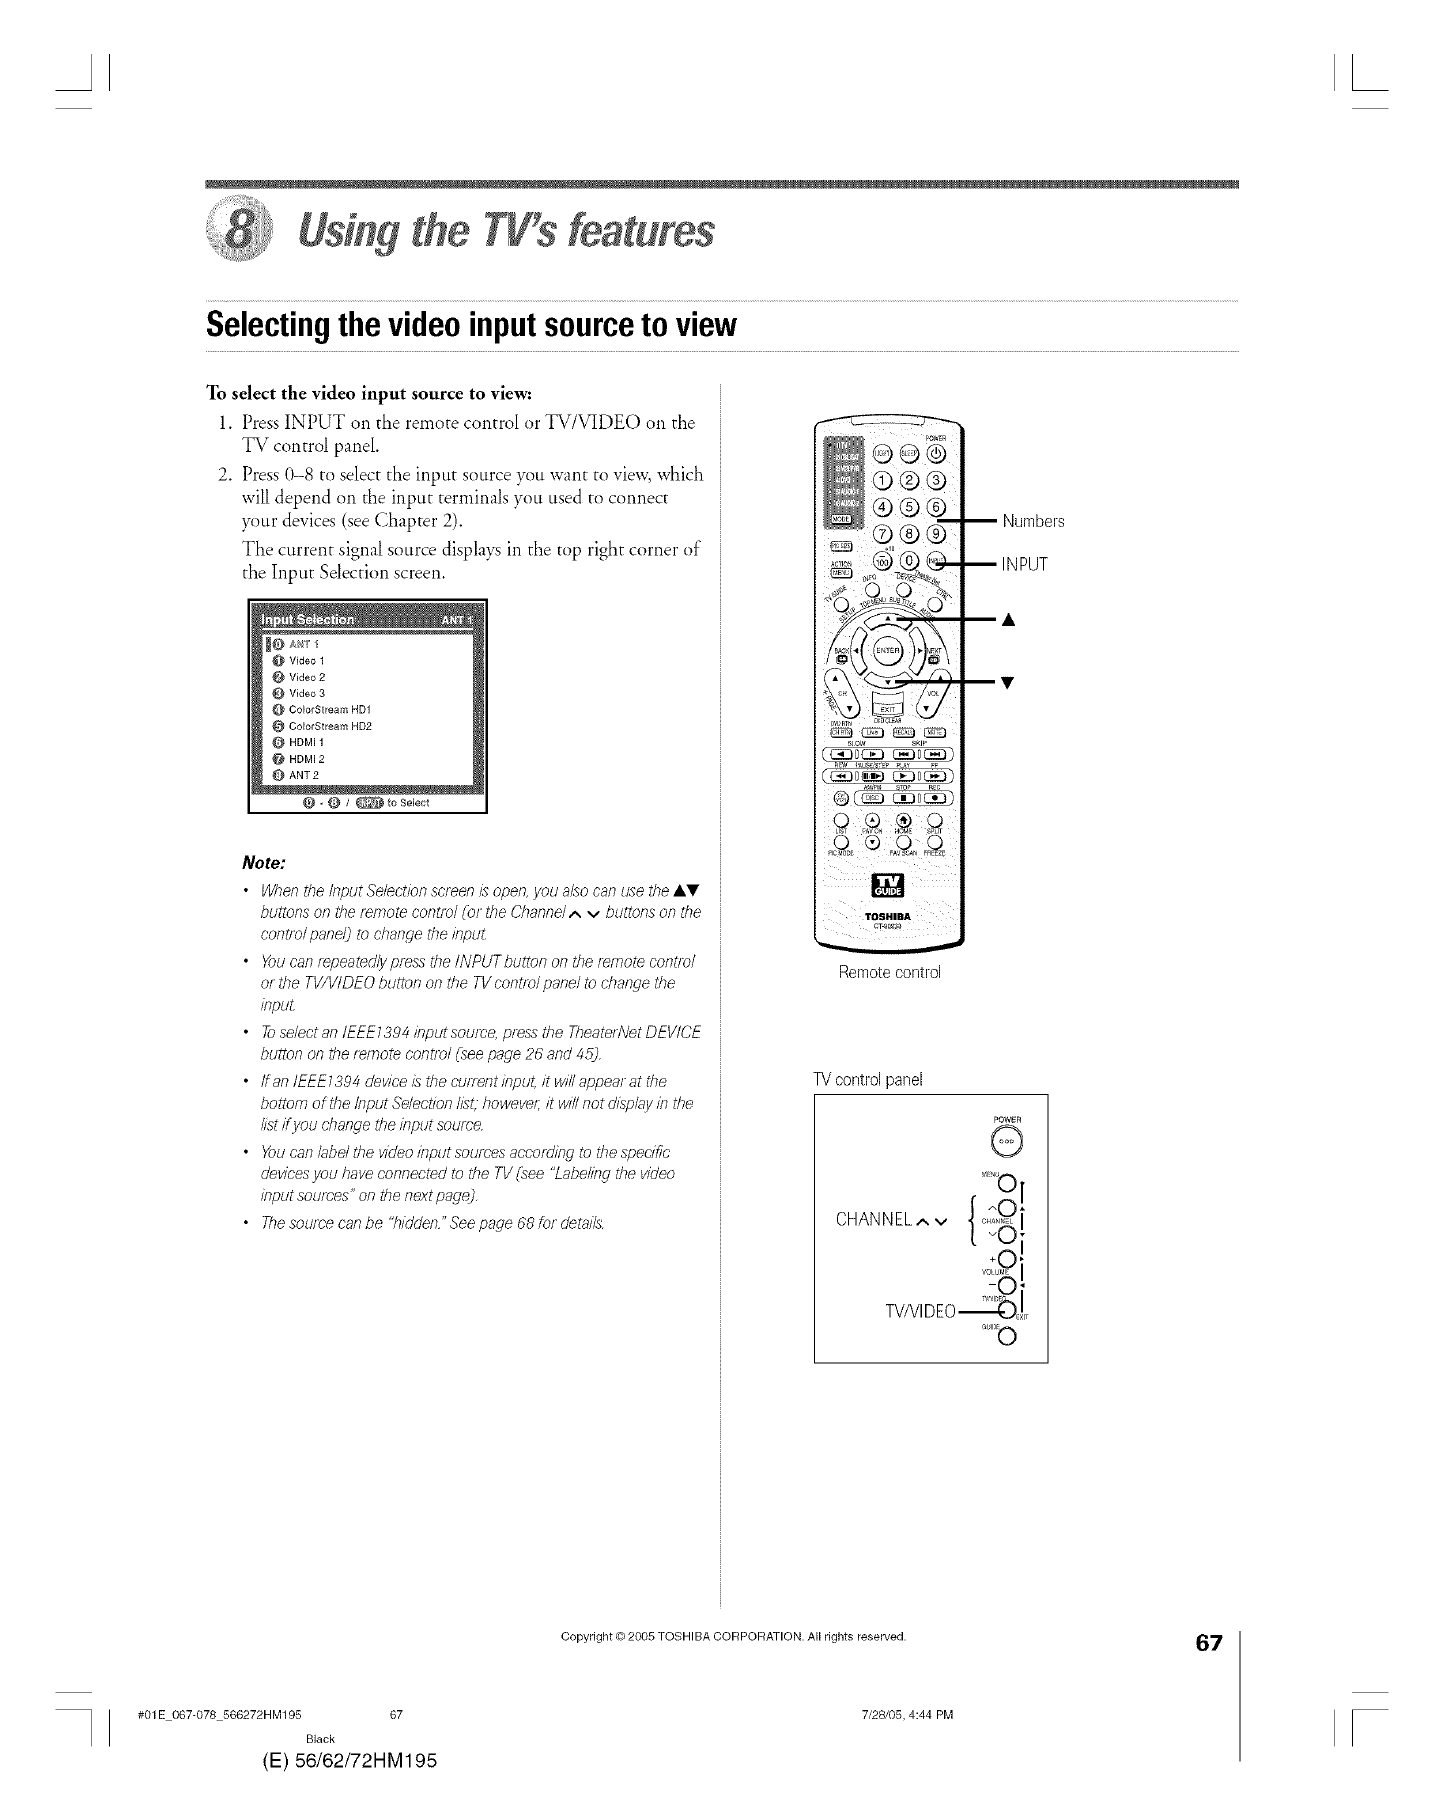
AL
Selectingthevideoinputsourcetoview
To select the video input source to view:
1. Press INPUT on the remote control or TV/VIDEO on the
TV control panel.
2. Press 0-8 to select the input source ?_u want to view, which
will depend on the input terminals you used to connect
?qmr devices (see Chapter 2).
The current signal source displa?_ in the top right corner of
the Input Selection screen.
@ Video 2
0 Video 3
ColorStream HD1
ColorStream HD2
HDMI1
@ HDMI 2
ANT 2
_/_ to Select
Note:
•When the Input Selection screen is open, you also can use the &T
buttons on the remote control COlthe Channd A v buttons on the
control panelJ to change the inpu_
• Youcan _epeated/ypress the INPUTbutton on the remote control
or the TV/VI DEO button on the TV contro/ pane/ to change the
lnpuL
•Toselectan/EEE1394inputsource, presstheTheatedVetDEVICE
button on the t_mote control Cseepage 26 and 45j.
• ffan IEEE1394 device is the cu/rent input, it will appear at the
bottom of the Input Sdect/on list, however; it will not dL_playin the
l/st ff you change the input source.
• Youcan/abe,/the video input sources according to the specific
devices you have connected to the TV Csee"Labeling the video
input sources" on the next pagej,
• Thesource can be "hiddefT."See page 68 for details.
-- Numbers
-- INPUT
C_ .......
Remote control
TV control panel
POWER
@
#01E 067@78 566272HM195 67
Black
(E) 56/62/72HM195
Copyright © 2005 TOSHIBA CORPORATION. All rights reserved.
7/28/05, 4:44 PM
67
r
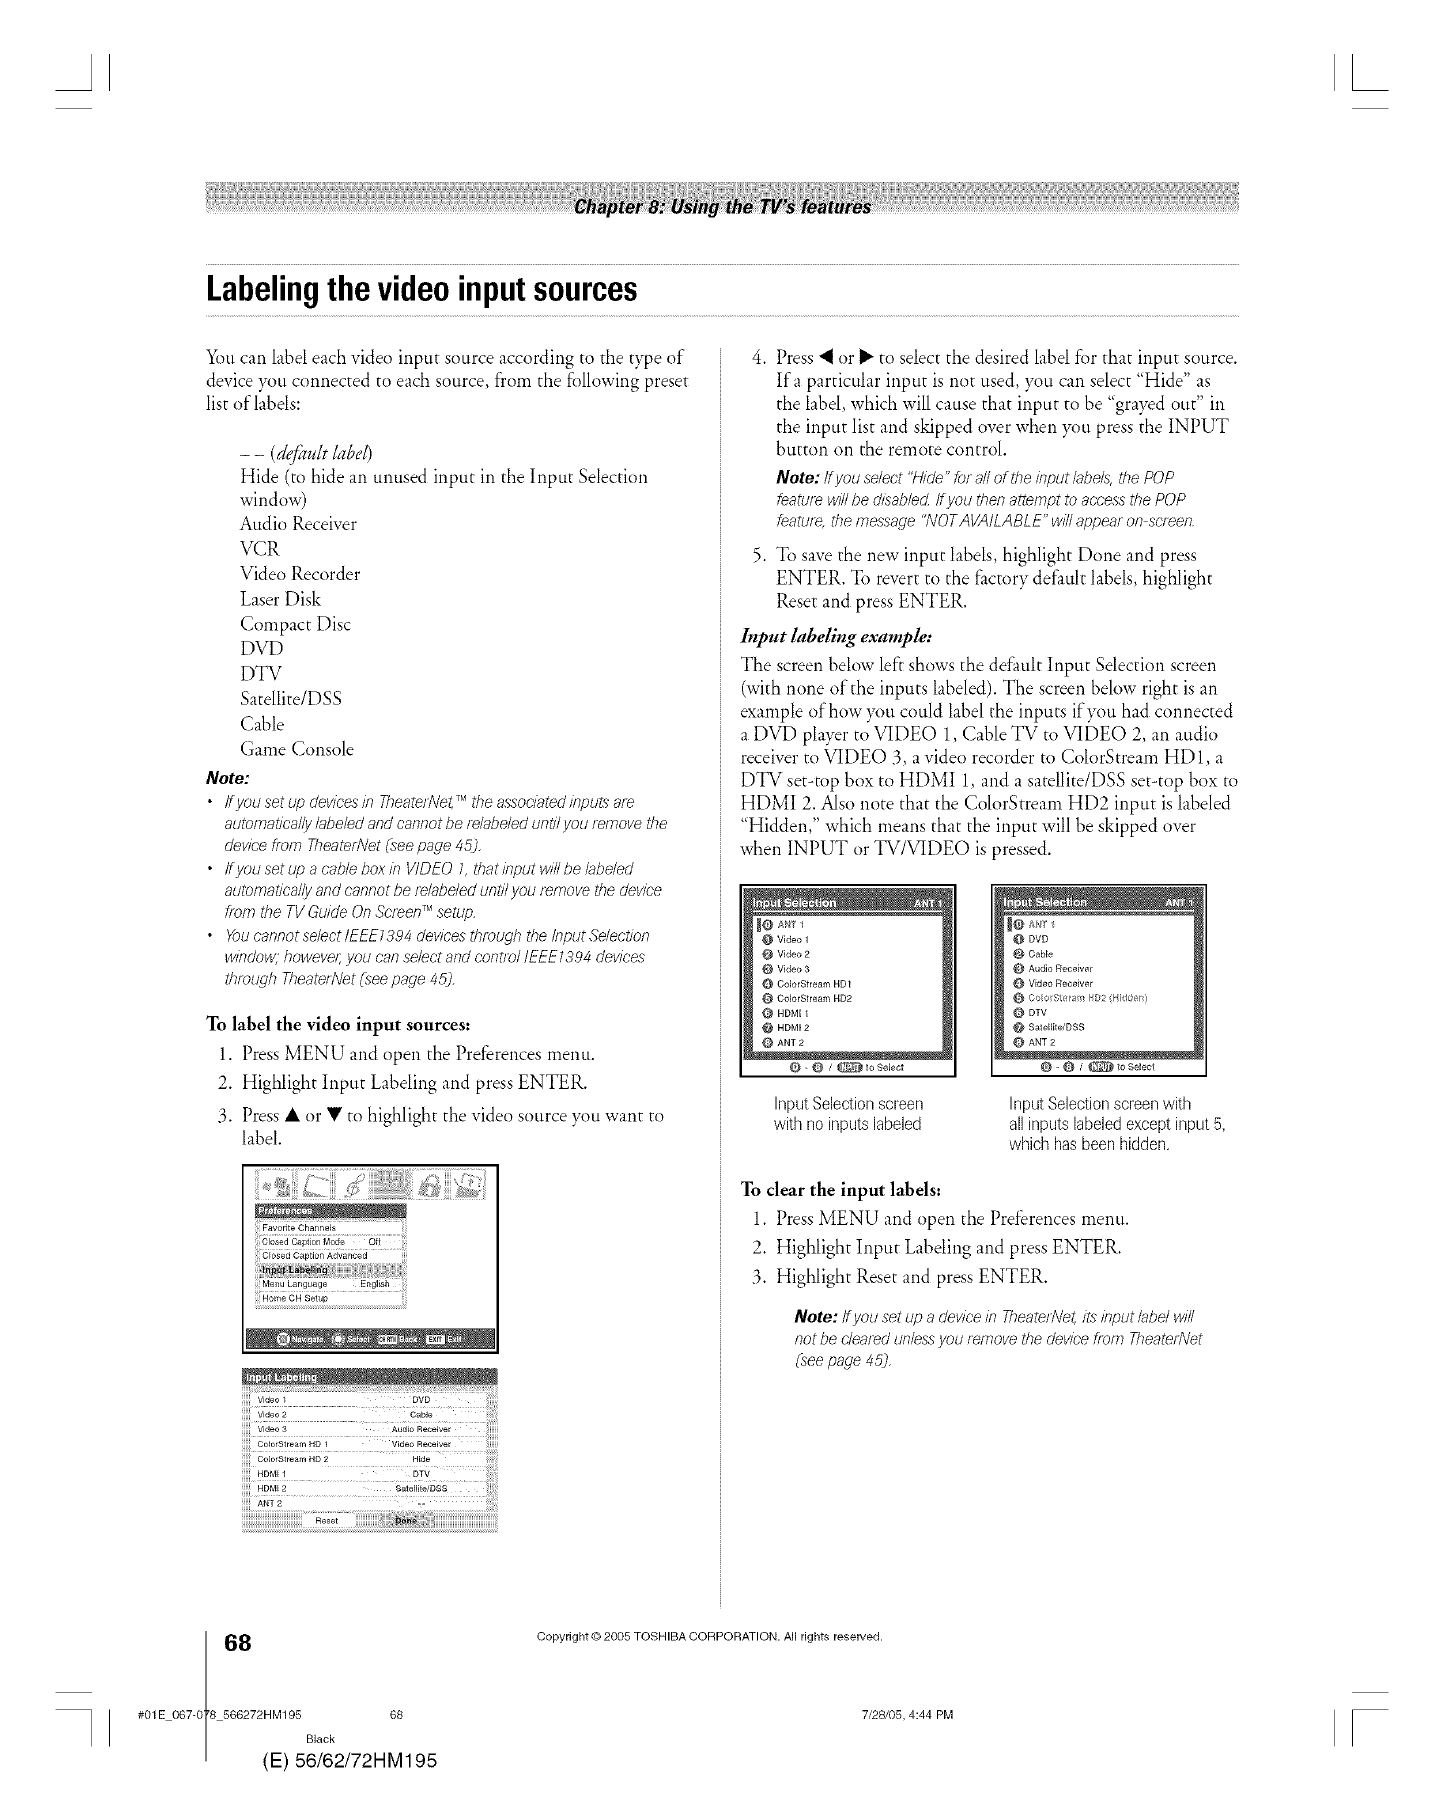
AL
Labelingthevideoinputsources
You can label each video input source according to the type of
device you connected to each source, from the fi)llowing preset
list of labds:
-- (defllu/t label)
Hide (to hide an unused input in the Input Selection
window)
Audio Receiver
VCR
Video Recorder
Laser Disk
Compact Disc
DVD
DTV
Satellite/DSS
Cable
Game Console
Note:
•Ifyou ,setupdevicesin TheaterNeLTMthe associatedinputsare
automaticallylabeledand cannotbe re/abe/eduntil you remove the
deviceflora Theate/1Vet(seepage 45),
•ffyou set up a cablebox in VIDEO1,thatinput willbe labeled
automaticallyand cannotbe relabe/eduntil youremove thedevice
from the TVGuideOn ScreenTMsetup,
• YoucannotselectlEEE7394devicesthmughthelnputSe/ect/on
window, however;you canselectand controlIEEE7394 devices
through Theate_Net(,seepage45].
To label the video input sources:
1. Press MENU and open the Preferences menu.
2. Highlight Input Labeling and )tess ENTER.
3. Press • or • to highlight the video source )_)tiwant to
label.
: l> ((}
Oo]orStmam HD 2 Hide ............
HDMI1 DTV
HDMI2 SaioiJit#)D&S
AN@_ _i
Press "_ or D"to select the desired label for that input source.
Ira particular input is not used, }<_ucan select "Hide" as
the label, which will cause that input to be "grayed out" in
the input list and skipped over when }_tl press the INPUT
button on the remote control.
Note: ff you select "H/de" for all of the #Tputlabels, the POP
feature w#l be &sabled ff you then attempt to access the POP
feature, the message "NOTAVAILABLE" w/fl appear on screen
To save the new input labels, highlight Done and press
ENTER. To revert to the factory default labels, highlight
Reset and press ENTER.
Input labeling example:
The screen below left shows the delimit Input Selection screen
(with none of the inputs labeled). The screen below right is an
example of how )_)u could label the inputs if you had connected
a DVD player to VIDEO 1, Cable TV to VIDE([) 2, an audio
receiver to VIDEO 3, avideo recorder to ColorStream HD1, a
DTV set-top box to HDMI 1, and a satellite/DSS set-top box to
HDMI 2. Also note that the ColorStream HD2 input is labeled
"Hidden," which means that the input will be skipped over
when INPUT or TV/VIDEO is pressed.
@ Video 2
Video 3
CdorStream ND1
CdorStream HD2
HDM[ 1
@ HDM[ 2
ANT 2
_-_ ]@toSel ct
@ Cable
Audio Receivel
Video Receivel
Colu Stein*it HI}2 Hidd¢>n)
0DTV
Sat ellite/DSS
ANT 2
0 - 0 /_ to S_lect
InputSelectionscreen
with no inputslabeled
Input Selection screen with
all inputslabeled except input 5,
which has been hidden.
To clear the input labels:
1. Press MENU and open the Preferences menu.
2. Highlight Input Labeling and press ENTER.
3. Highlight Reset and press ENTER.
Note: Ifyou set up adevicein TheaterNe_its inputlabelwill
notbe clearedunlessyou r_rnovethe devicefrom Theate/1Vet
(seepage45),
8(
#OlE 067-0 8 566272HM195 68
Black
E) 56/62/72HM195
Copyright © 2005 TOSHIBA CORPORATION. All rights reserved.
7/28/05, 4:44 PM [
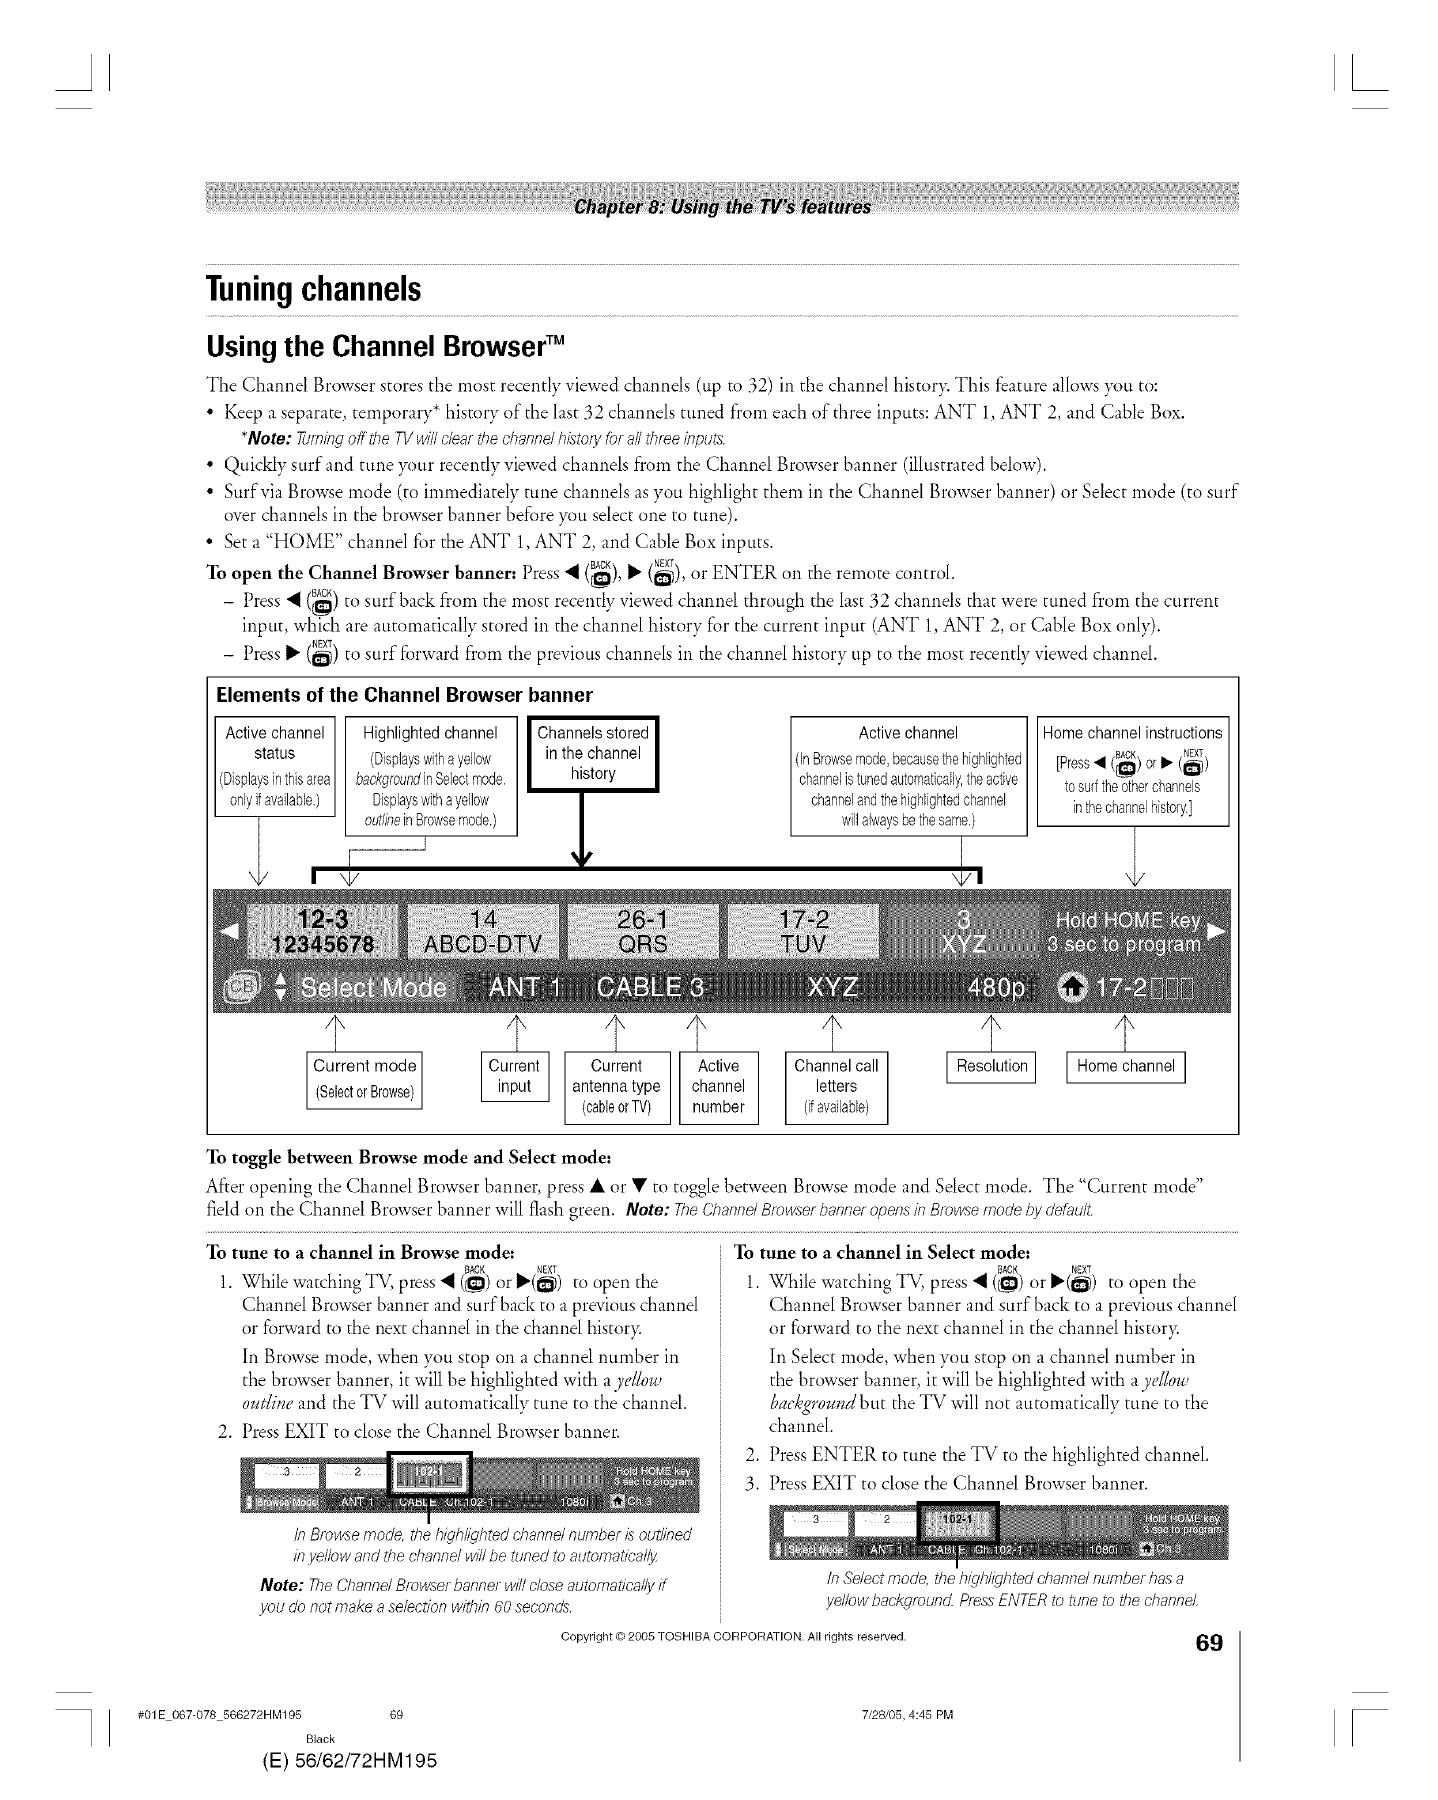
Ab
Tuningchannels
Usingthe Channel BrowserM
The Channel Browser stores the most recently viewed channels (up to 32) in the channel histor): This feature allows you to:
• Keep a separate, temporary* history of the last 32 channels tuned from each of three inputs: ANT 1,ANT 2, and Cable Box.
*Note: Turning off the TV will clear the channel histo/y for all three inputs.
• Quickly surf and tune )_)urrecently viewed channels from the Channel Browser banner (illustrated below).
• Surf via Browse mode (to immediately tune channels as you highlight them in the Channel Browser banner) or Select mode (to surf
over channels in the browser banner before )_)u select one to tune).
• Set a "HOME" channel fi)r the ANT 1,ANT 2, and Cable Box inputs.
To open the Channel Browser banner: Press "_ (_),BACK_, (_),NEXTor ENTER on the remote control.
BACK
-Press 'I (_) to surf back from the most recently viewed channel through the last 32 channels that were tuned from the current
input, which are automatically stored in the channel history for the current input (ANT 1, ANT 2, or Cable Box only).
- Press _" (_) to surf forward from the previous channels in the channel history tip to the most recently viewed channel.
Elements of the Channel Browser banner
Active channel
status
(Displaysinthisarea
onlyif available.)
Highlighted channel
(Displayswitha yellow
backgroundinSelectmode.
Displayswitha yellow
outlil;einBrowsemode.)
I
4
I Channels stored
in the channel
history
Active channel I Home channel instructions
(InBrowsemode,becausethehighlighted [Press• (_) or _. (_)
channelistunedautomatically,theactive I tosurftheotherchannels
channelandthehighlightedchannel in hechannelhisory,]
w a waysbethesame.
Current mode
SeectorBrowse
Current
antenna type
(cableorTV)
I'
Active
channel
number
Channel call
letters
(ifavailable)
Resolution I Home channel I
To toggle between Browse mode and Select mode:
After opening the Channel Browser banner, press •or • to toggle between Browse mode and Select mode. The "Current mode"
field on the Channel Browser banner will flash green. Note: TheCT}anne/Browserbanneropens117Bro_eemodeby defau/L
To tune to a channel in Browse mode:
BAC_I*(_)
1. While watching TV, press 'I (_) or to open the
Channel Browser banner and surf back to a previous channel
or forward to the next channel in the channel history.
In Browse mode, when you stop on a channel number in
the browser banner, it will be highlighted with a yellow
outline and the TV will automatically tune to the channel.
2. Press EXIT to close the Channel Browser banner.
To tune to achannel in Select mode:
1. While watching TV, press"_ (_) or I_(_) to open the
Channel Browser banner and surf back to a previous channel
or forward to the next channel in the channel history.
In Select mode, when you stop on a channel number in
the browser banner, it will be highlighted with aye//ow
backg*vundbut the TV will not automatically tune to the
channel.
2. Press ENTER to tune the TV to the highlighted channel.
3. Press EXIT to close the Channel Browser banner.
In Browse mode, the highlighted ehannd numbe/ is outlined
in yellow and the channd will be tuned to automat/cal!F
Note, The Channel Browser banner will close automatically if
you do not make aselection within 60 seconds,
Copyright © 2005 TOSHIBA CORPORATION. All rights reserved.
in Select mode, the h/_qhl/_Thtedchannel number has a
yellow background. P/ess ENTER to tune to the channel
69
#01E 067-078 566272HM195 69
Black
(E) 56/62/72HM195
7/28105, 4:45 PM [
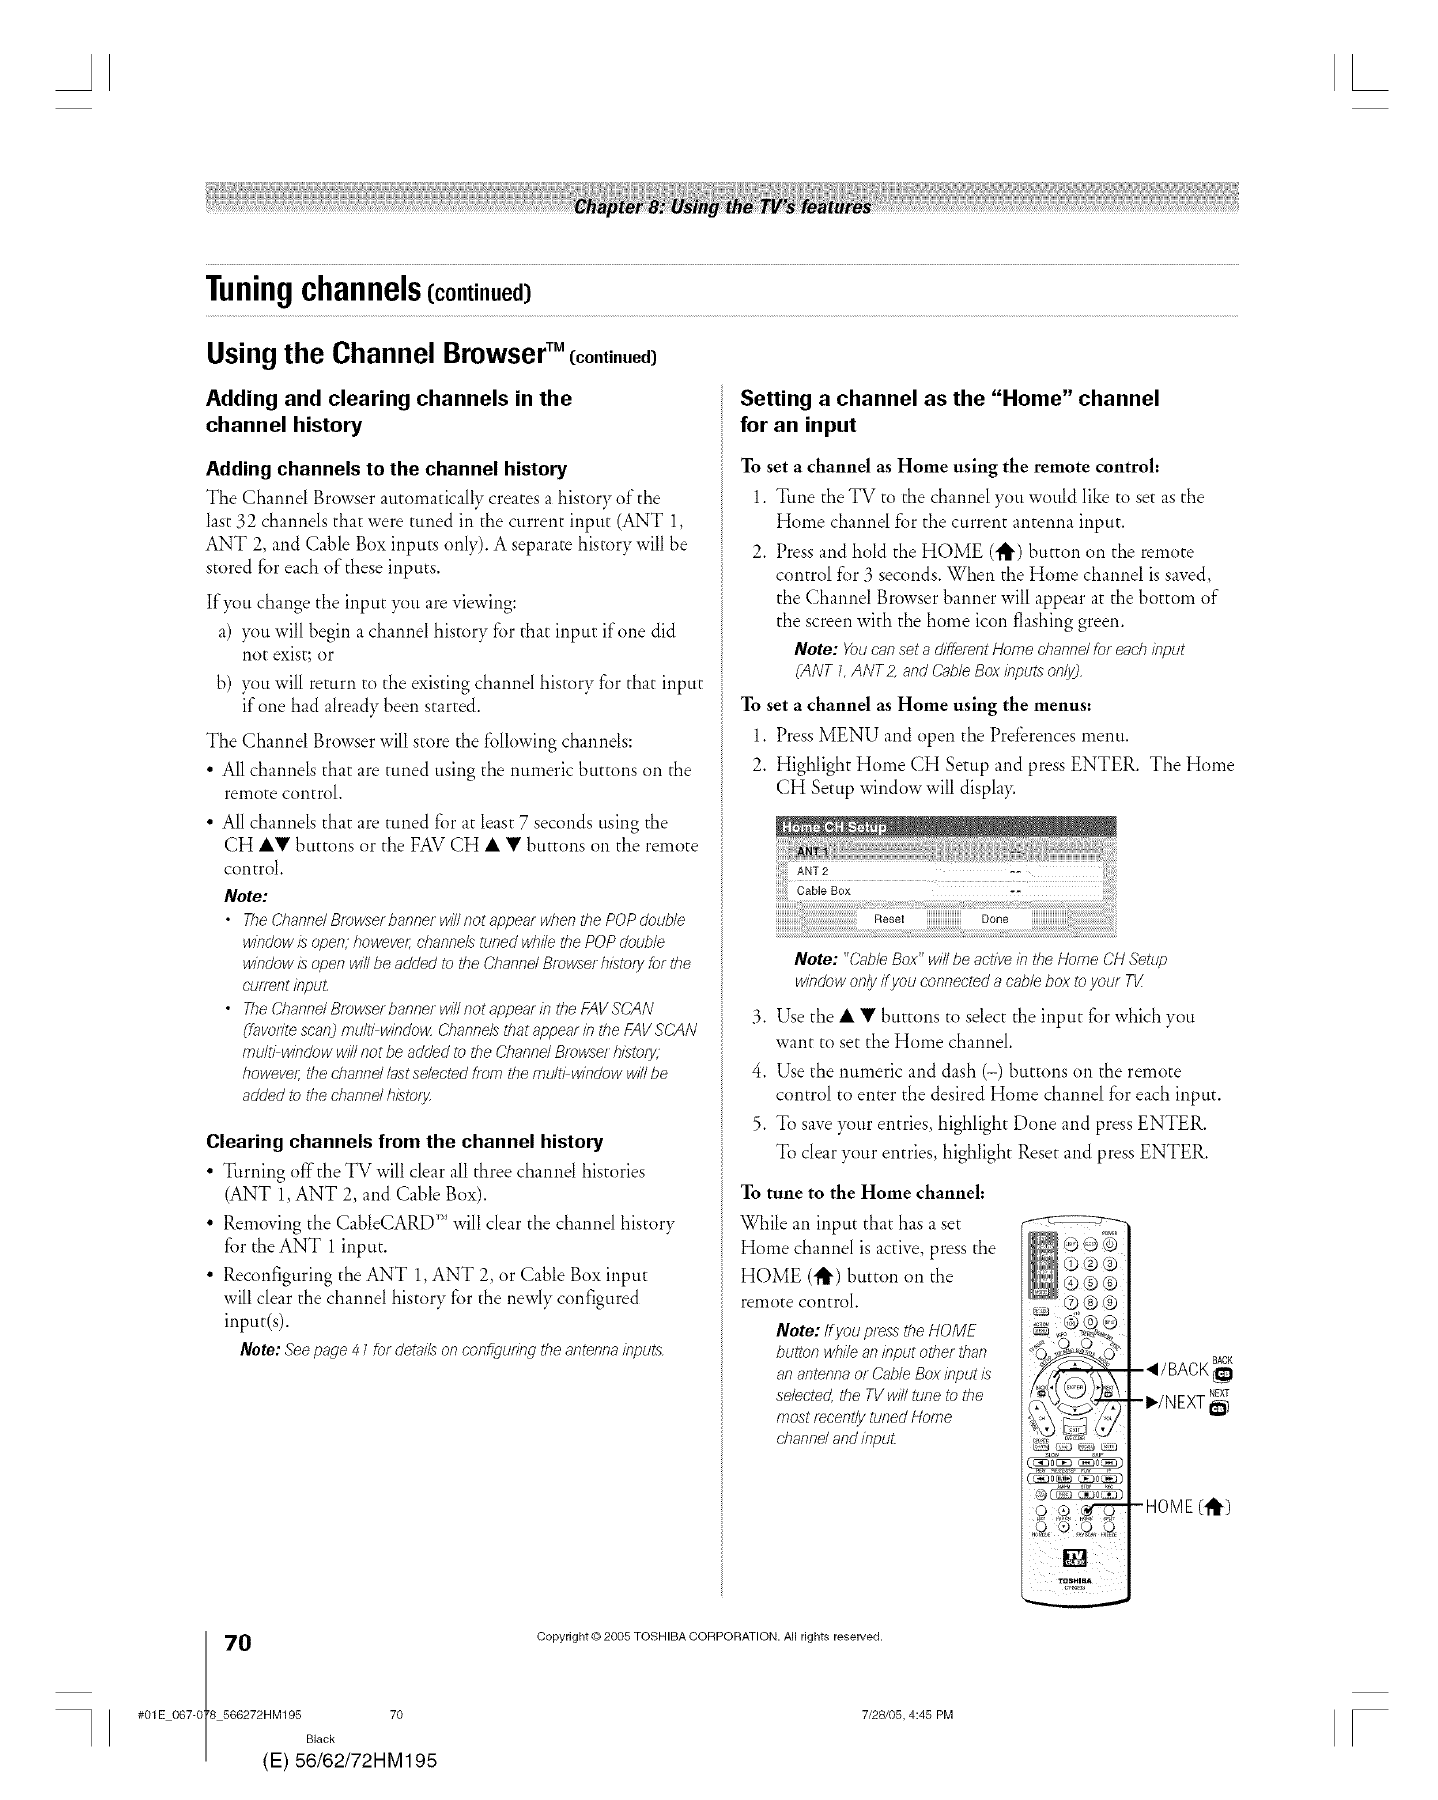
Tuningchannels(continued)
Usingthe Channel BrowserTM {continued)
Adding and clearing channels in the
channel history
Adding channels to the channel history
The Channel Browser automatically creates a history of the
last 32 channels that were tuned in the current input (ANT 1,
ANT 2, and Cable Box inputs only). A separate history will be
stored f_)r each of these inputs,
If)_m change the input )_)t*are viewing:
a) )_m will begin a channel history for that input if one did
not exist; or
b) )_)u will return to the existing channel history for that input
if one had already been started.
The Channel Browser will store the f_)llowingchannels:
• All channels that are tuned using the numeric buttons on the
remote control.
• All channels that are tuned for at least 7 seconds using the
CH A• buttons or the FAV CH • • buttons on the remote
control.
Note:
•TheCbanne/Browserbannerwi//notappearwbentbePOPdoub/e
windowisopen;however;channelstunedwhilethePOPdouble
windowisopenwillbeaddedto theCbanndBrowserhLsto/y forthe
cuff_nt input,
• TheCbanndBrowserbannerwil/notappearintbeFAVSCAN
(favorite scan) multi windo_z Channels that appear in the FAV SCAN
multi window will not be added to the Channd Browse/h/sto/z:
howeve/; the cbannd last selected from the multi window will be
added to the channd histo/y
Clearing channels from the channel history
• Turning off the TV will clear all three channel histories
(ANT 1, ANT 2, and Cable Box).
• Removing the CableCARD'* will clear the channel history
for the ANT 1 input.
• Reconfiguring the ANT 1, ANT 2, or Cable Box input
will clear the channel history for the newly configured
input(s).
NotetSeepage41fordetailsof?configuring theantennainputs
Setting a channel as the "Home" channel
for an input
To set a channel as Home using the remote control:
1. Tune the TV to the channel you would like to set as the
Home channel for the current antenna input.
2. Press and hold the HOME (1_) button on the remote
control for 3 seconds. When the Home channel is saved,
the Channel Browser banner will appear at the bottom of
the screen with the home icon flashing green.
Note: Youcansetadif&rentHomechannelforeachinput
CANT7,ANT2,andCableBoxinputson/yj,
To set a channel as Home using the menus:
1. Press MENU and open the Preferences menu.
2. Highlight Home CH Setup and press ENTER. The Home
CH Setup window will displa>
To tune to the Home channel:
While an input that has a set
Home channel is active, press the
HOME ('_) button on the
remote control.
Note: If youpressthe HOME
button whileaninput other than
anantennaor CableBoxinput/s
selected,the TVwill tune to the
mostrecent!ytunedHome
channd and/npuL
0(
#01E 06%0 8 566272HM195 70
Black
E) 56/62/72HM195
Copyright © 2005 TOSHIBA CORPORATION. All rights reserved.
7/28105, 4:45 PM [
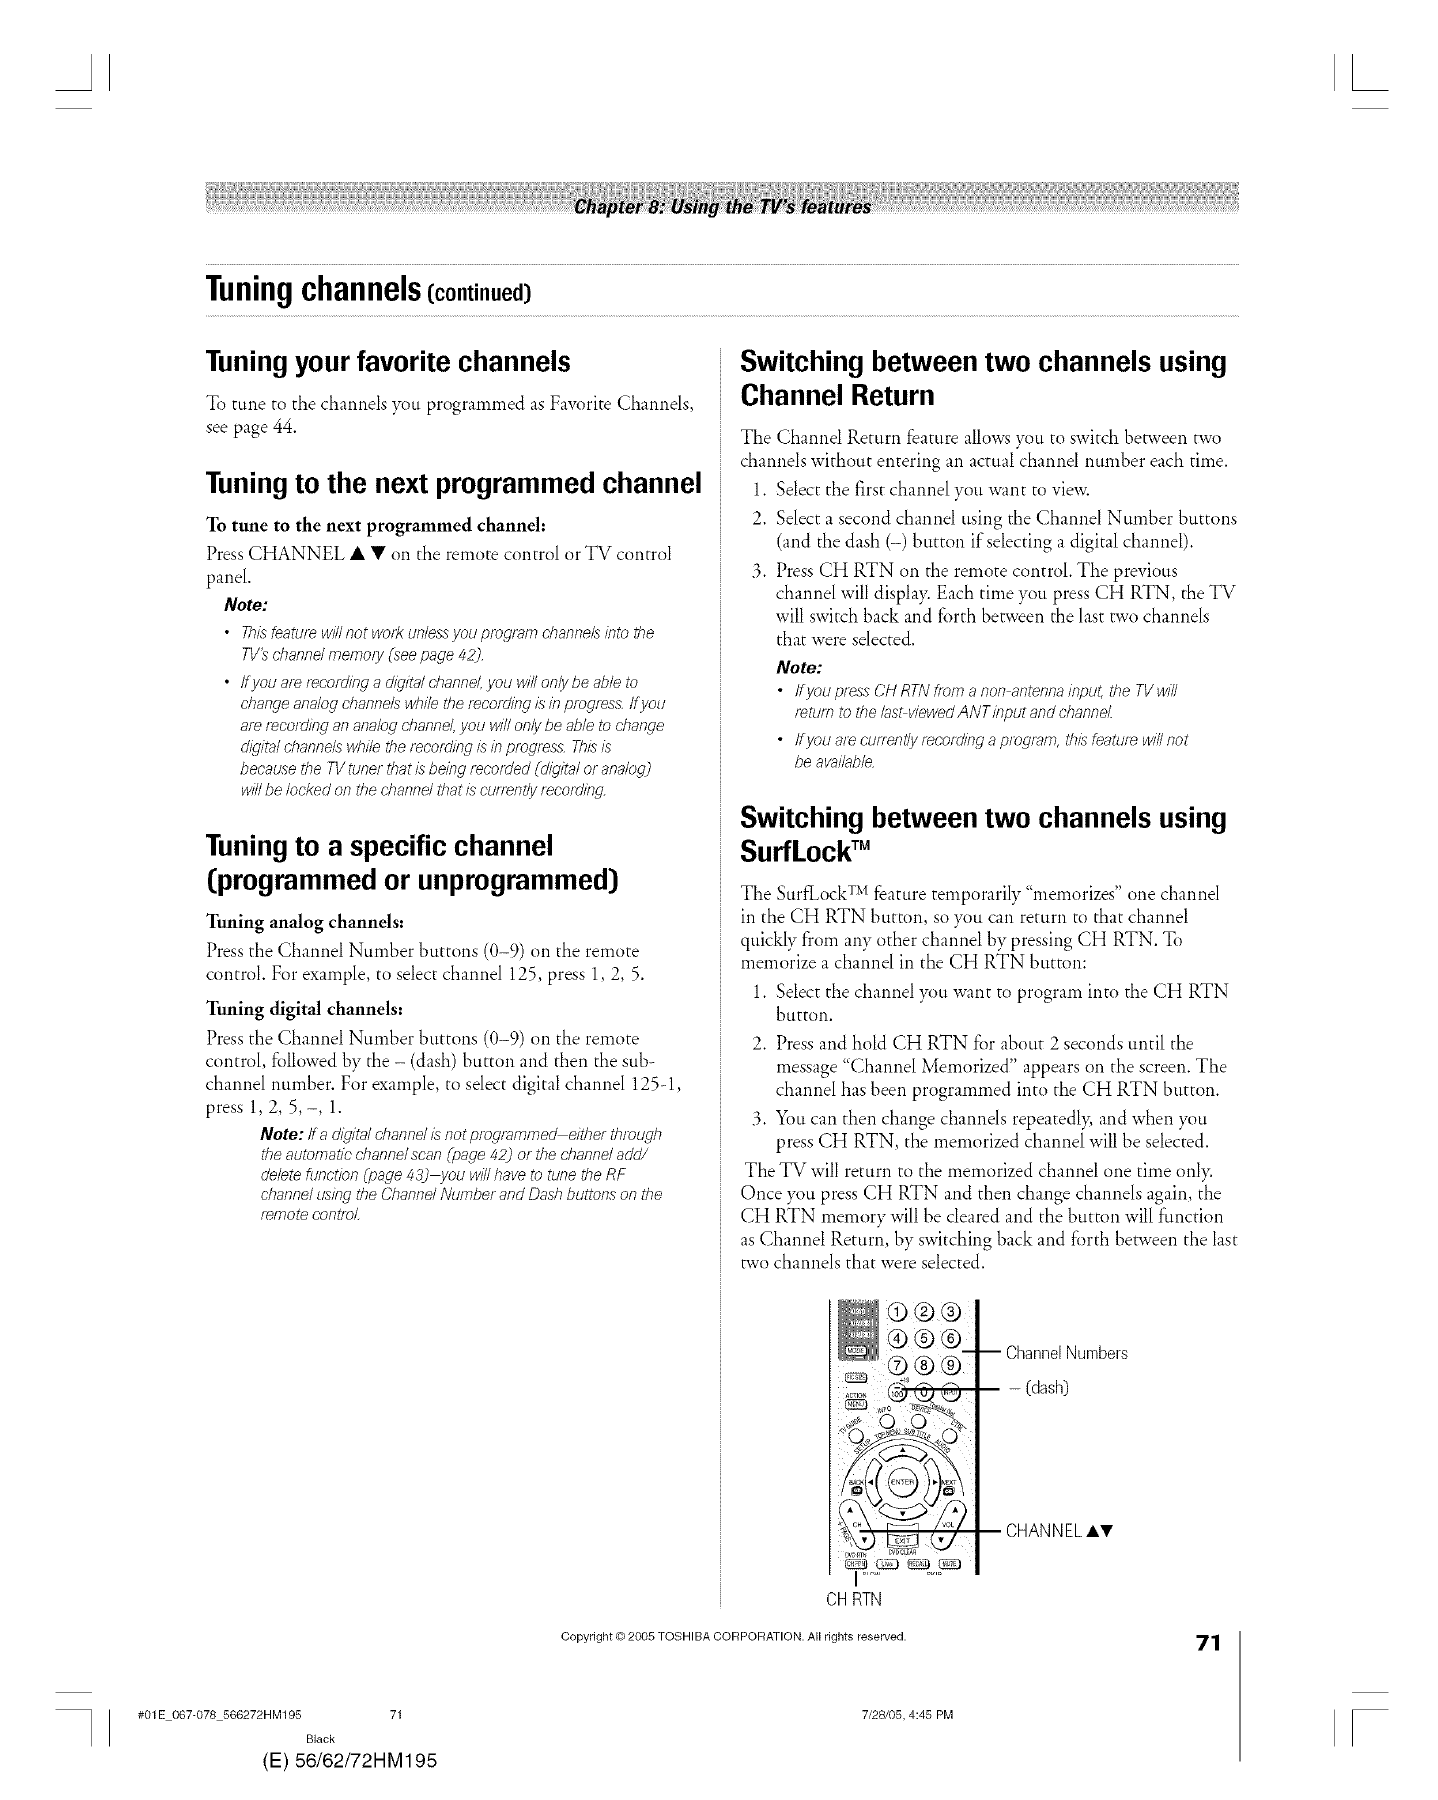
AL
Tuningchannels(continued)
Tuningyour favorite channels
To tune to tile channels you progranmled as Faw)rite Channels,
see page 44.
Tuningto the next programmed channel
To tune to the next programmed channel:
Press CHANNEL • • on the remote control or TV control
panel.
Note:
•ThLsfeaturewinnot wo_kunlessyouprogramcbanne/sintothe
TVtschanndmemo/y(,seepage 42).
•ffyouare _ecoldinga digital cbanne/, youwillon!y beableto
change analog channelswbilethefeco/ding Ls#7progressIf you
are recordingan analog channel, youwillonly beabletochange
digital cbannelswb//etherecording Ls#7progressThis/Ls
becausetheTVtune/thatLsbeing recorded (digitalor analog]
willbelockedonthechanndthatLscurrently mcotd/ng
Tuningto a specific channel
(programmed or unprogrammed)
Tuning analog channels:
Press the Channel Number buttons (0-9) oil the remote
control. For example, to select channel 125, press 1, 2, 5.
Tuning digital channels:
Press the Channel Number buttons (0-9) oil the remote
control, followed by the - (dash) button and then the sub-
channel number. For example, to select digital channel 125-1,
press 1, 2, 5,-, 1.
Note: if adigital channel is not programmed alther tbrougb
the automatic" channel scan (page 42) or the channd add/
delete function (page 43] you will have to tune the RF
channel using the Channel Number and Dash buttons on the
temote control
Switching between two channels using
Channel Return
Tile Channel Return feature allows }_u to switch between two
channels without entering an actual channel number each time.
1. Select the first channel you want to view.
2. Select a second channel using tile Channel Number buttons
(and the dash (-) button if selecting a digital channel).
3. Press CH RTN on the remote control. The previous
channel will displa> Each time you press CH RTN, the TV
will switch back and forth between the last two channels
that were selected.
Note:
•ifyou pressCH RTNfrom a non antennainput, the TVwill
_etumtothe/asbviewedANTinput and cbanneZ
• ffyou arecurrentlyrecordingaprogram,thisfeature willnot
beavailable.
Switching betweentwochannelsusing
SurfLocW"
The SurfLockTMfeature temporarily "memorizes" one channel
in the CH RTN button, so you can return to that channel
quickly from any other channel by pressing CH RTN. To
memorize a channel in the CH RTN button:
1. Select the channel you want to program into the CH RTN
buttoll.
2. Press and hold CH RTN for about 2 seconds until the
message "Channel Memorized" appears on the screen. The
channel has been programmed into the CH RTN button.
3. You can then change channels repeatedl> and when you
press CH RTN, the memorized channel will be selected.
The TV will return to the memorized channel one time only.
Once ?_m press CH RTN and then change channels again, the
CH RTN memory will be cleared and the button will function
as Channel Return, by switching back and fbrth between the last
two channels that were selected.
®®®
o®®"
G_GG
i ..........
CHRTN
-- ChannelNumbers
-(dash)
CHANNELIT
Copyright © 2005 TOSHIBA CORPORATION. All rights reserved. 71
#01E 067-078 566272HM195 71
Black
(E) 56/62/72HM195
7/28105, 4:45 PM r
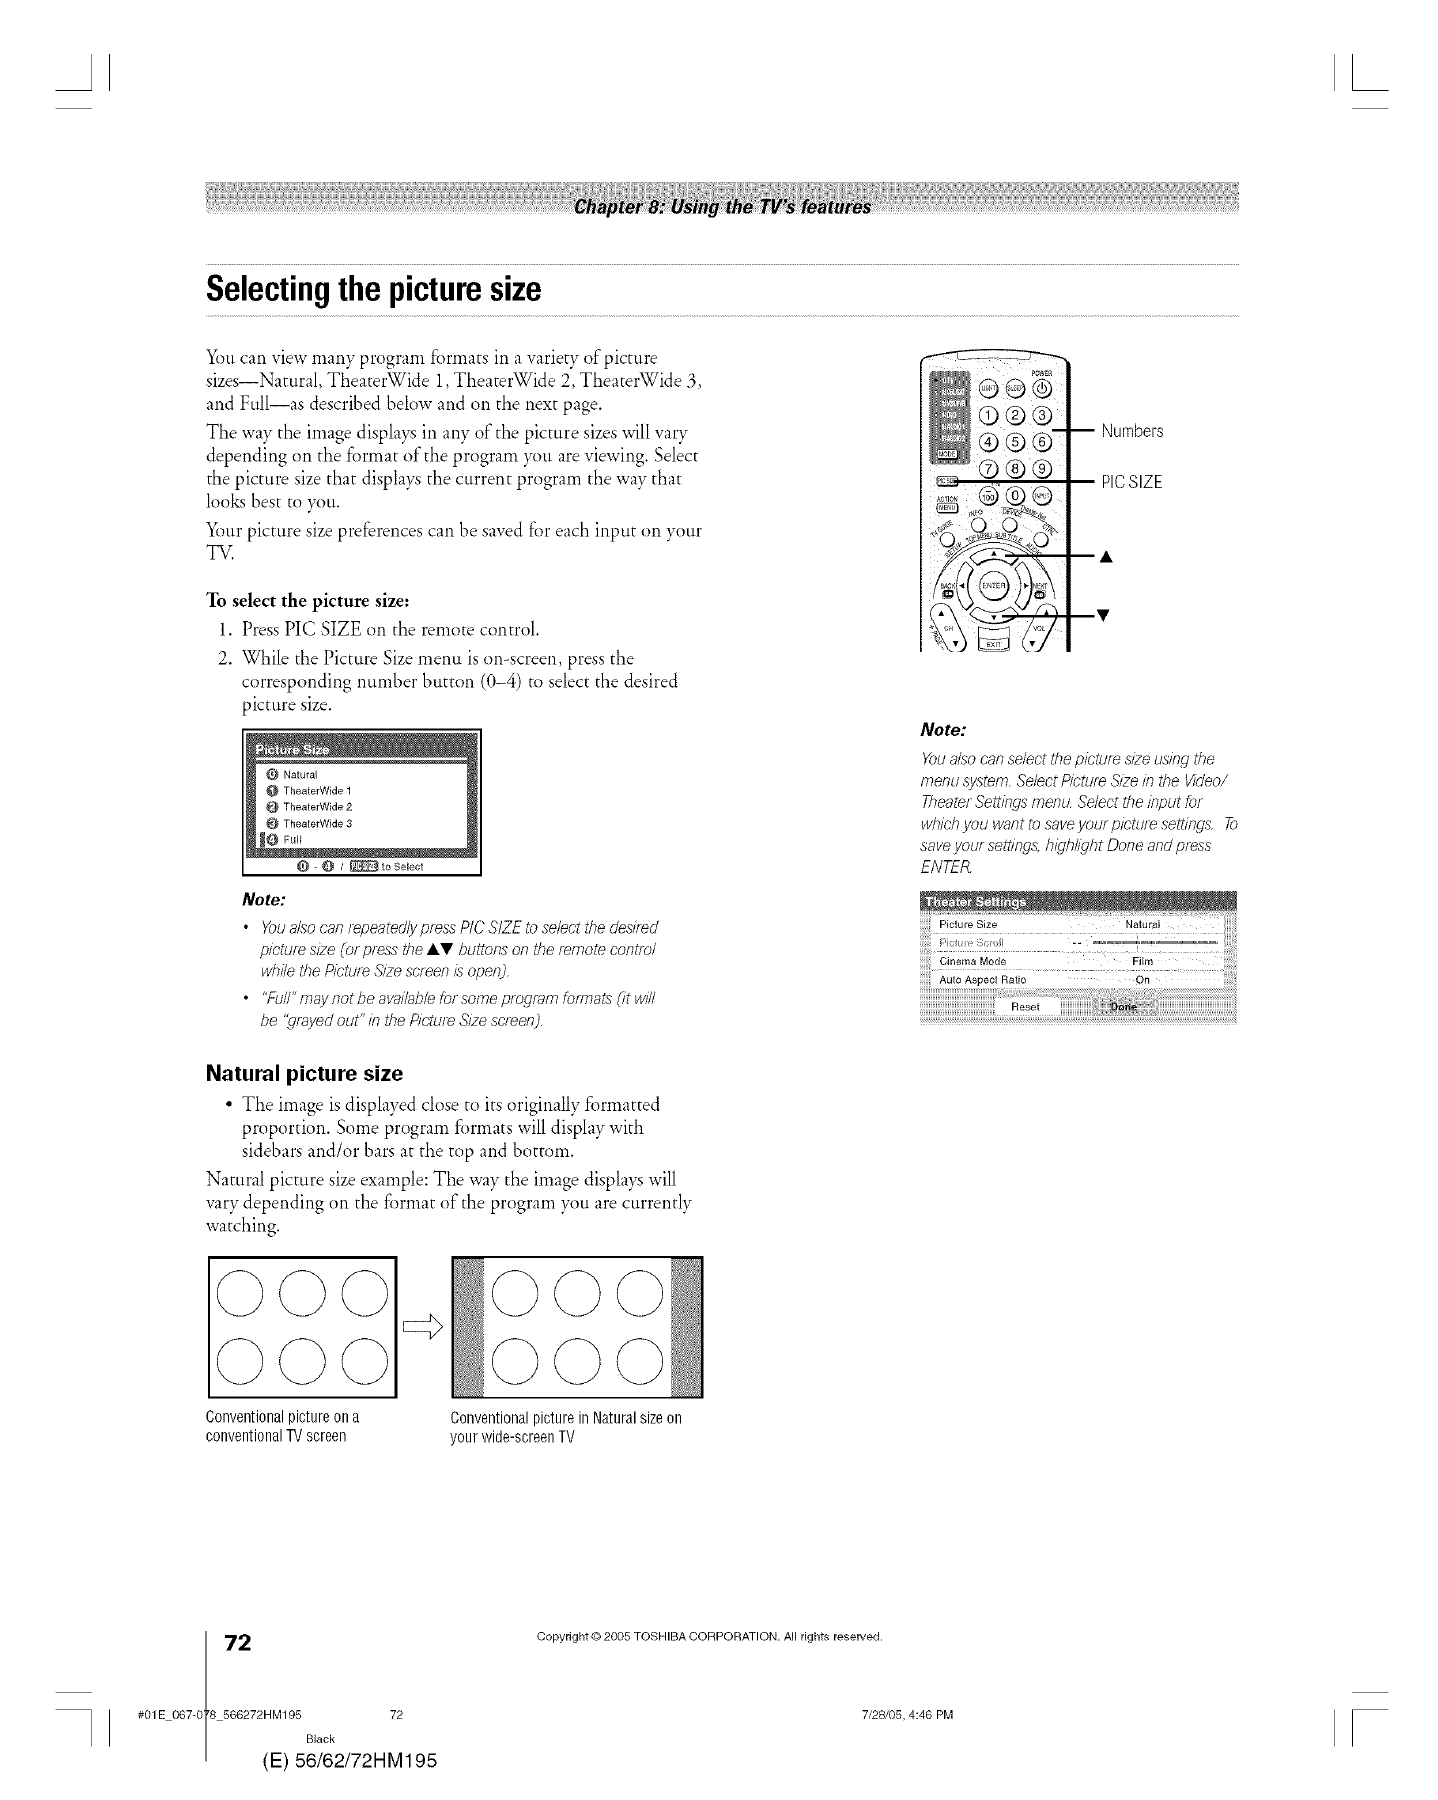
Ab
Selectingthepicturesize
You can view many program f_rmats in a variety of picture
sizes--Natural, TheaterWide 1,TheaterWide 2, TheaterWide 3,
and Full--as described below and on the next page.
The way the image displays in any of the picture sizes will vary
depending on the f_rmat of the program )_ti are viewing. Select
the picture size that displays the current program the way that
looks best to you.
Your picture size preferences can be saved for each input on your
TV.
Numbers
PICSIZE
To select the picture size:
1. Press PIC SIZE on the remote control.
2. While the Picture Size menu is on-screen, press the
corresponding number button (0-4) to select the desired
)lcture size.
Natural
@ TheaterWide 1
@ TheaterWide 2
TheaterWide 3
I÷ Ful
Q 0 /_ to Sektct
Note:
•Youa/so can repeated/ypress P/C SIZE to select the desned
p/ctu/e size (or press the &T buttons on the remote control
while, the Picture Size screen is open].
•"Full"may not be available for some program formats (it will
be "grayed cut"in the Picture Size screen
Note:
Youa/so can select the pic'tum size using the
menu ,!ystem, Select Picture Size in the Video/
Theater Settings menu Select the input for
wbicb you want to save your picture sett/ngs. To
save your settings, h/gb/iwbt Done and press
ENTER
Cinema Mode
Auto Aspect Ratio On
Reset
Natural picture size
•The image is displayed close to its originally formatted
proportion. Some program formats will display with
sidebars and/or bars at the top and bottom.
Natural picture size example: The way the image displays will
vary depending on the fi)rmat of the program )_m are currently
watching.
Conventionalpicture on a
conventionalTV screen Conventionalpicture in Naturalsize on
your wide-screen TV
2(
#01E 067-0 8 566272HM195 72
Black
E) 56/62/72HM195
Copyright © 2005 TOSHIBA CORPORATION. All rights reserved.
7/28105, 4:46 PM [
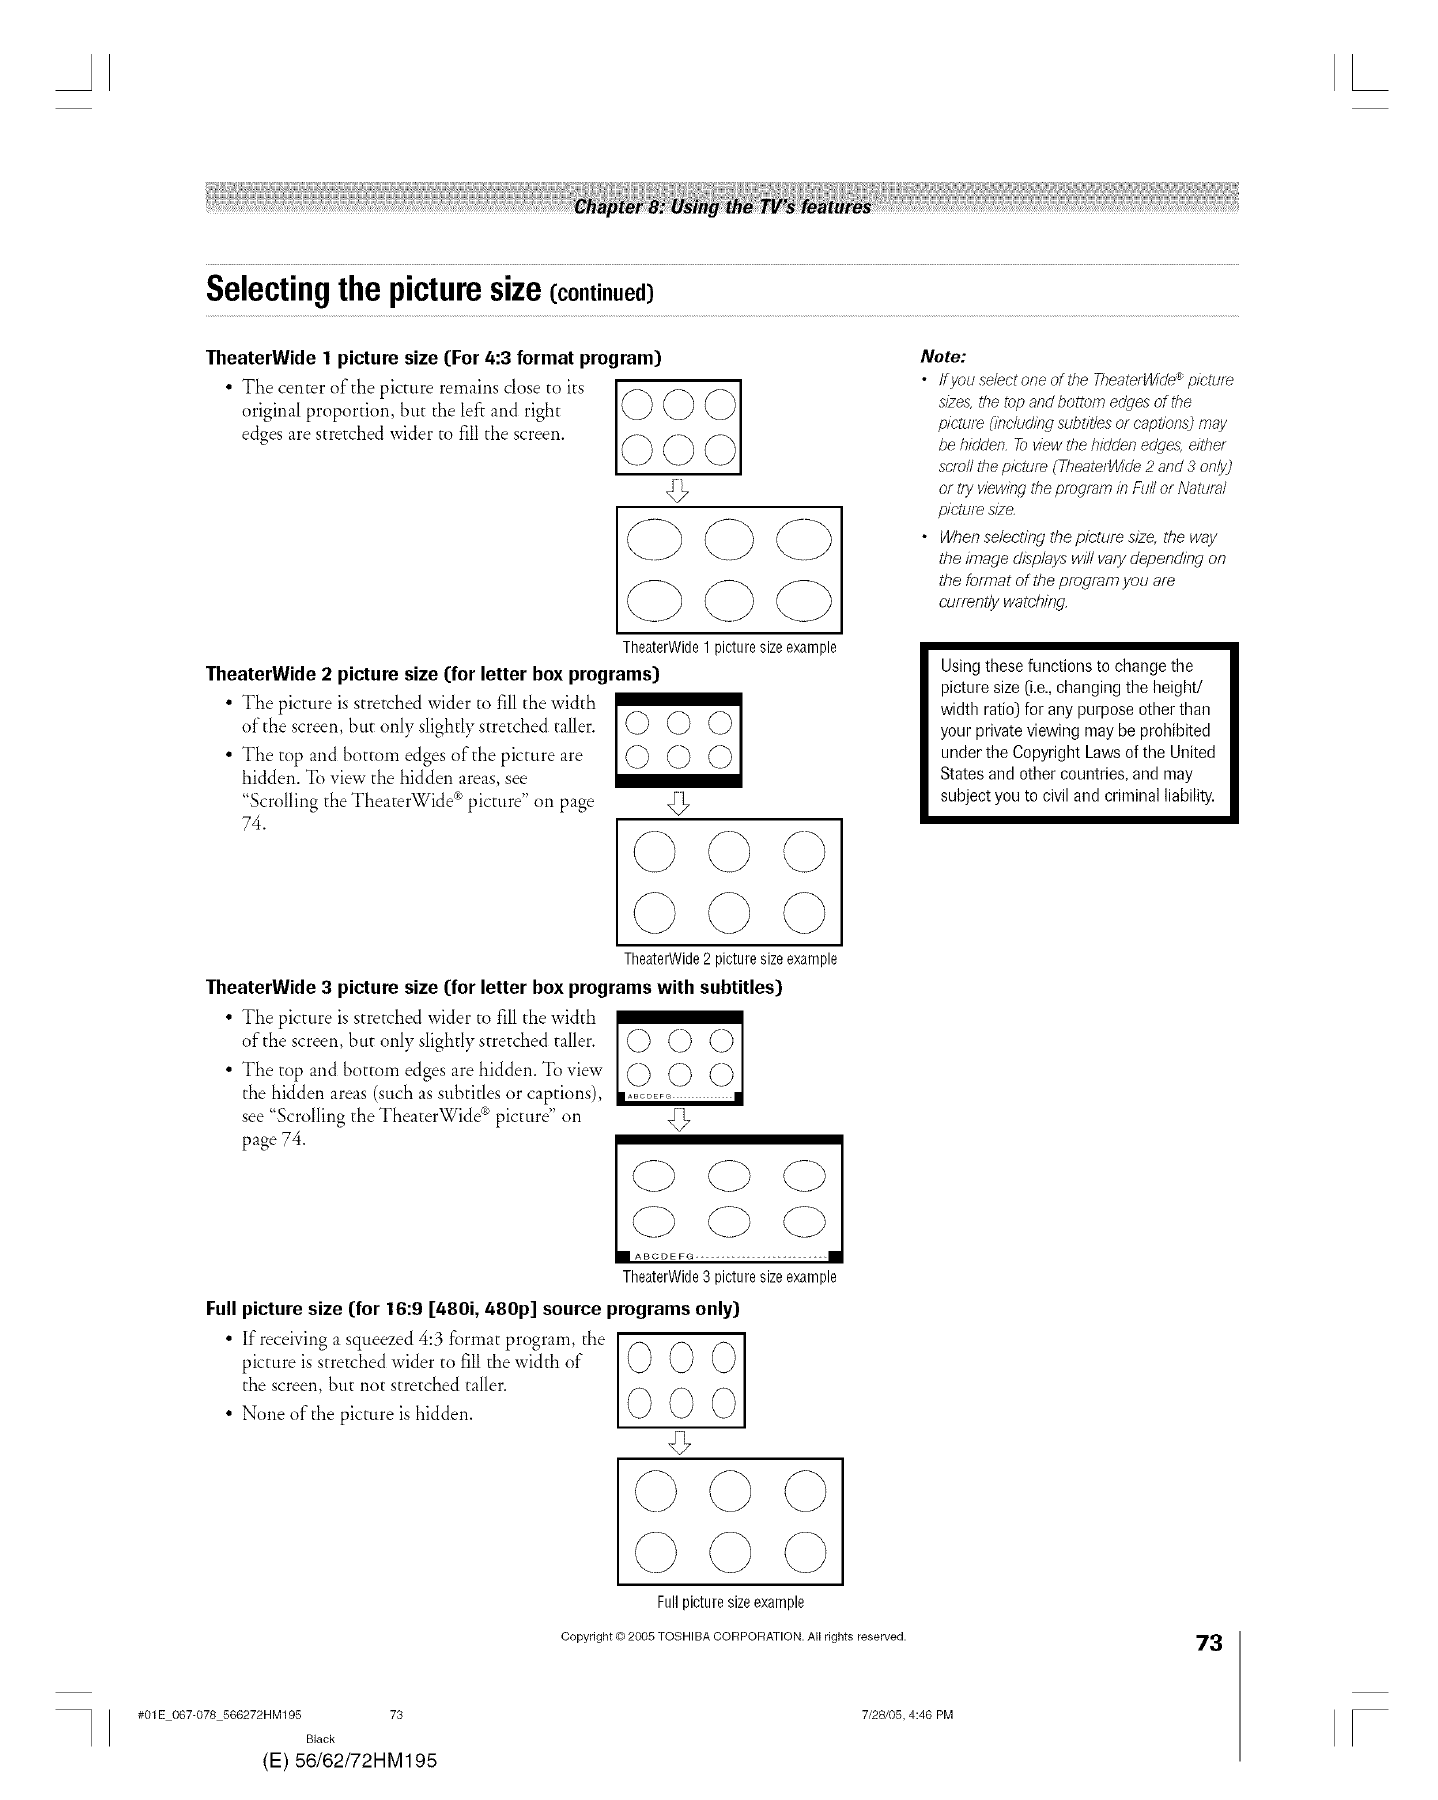
Selectingthe picturesize(continued)
• The center of the picture remains close to its
original proportion, but the left and right
edges are stretched wider to fill the screen.
TheaterWide 1picture size (For 4:3 format program) Note:
•tfyou select one of the TheaterWide _picture
m>es,the top and bottom edges of the
picture Onclud/ng subtitleB or captions9 may
be hidden, To view the hidden edges, either
scroll the pic,ture (Theate/Wide 2and 3 on!yj
or try viewing the program #7Full or Natural
picture m2e
• When selecting the picture sl2e, the way
the image displays will vary depending on
the format of the program you are
currently watching.
TheaterWide1picture size example
TheaterWide 2 picture size (for letter box programs)
• The picture is stretched wider to fill the width
of the screen, but only slightly stretched taller. (._ Q_ Q._
• The top and bottom edges of the picture are (_ @ Q)
hidden. To view the hidden areas, see
"Scrolling the TheaterWide ®picture" on page
74.
Using these functions to change the
picture size (i.e.,changing the height/
width ratio) for any purpose other than
your private viewing may be prohibited
under the Copyright Laws of the United
States and other countries, and may
subject you to civil and criminal liability.
TheaterWide2 picture sizeexample
TheaterWide 3 picture size (for letter box programs with subtitles)
• The picture is stretched wider to fill the width
of the screen, but only slightly stretched taller.
• The top and bottom edges are hidden. To view
the hidden areas (such as subtitles or captions),
see "Scrolling the TheaterWide ®picture" on
page 74. C> C3
C) (_D
I ABC[)EFG .................... •
TheaterWide3 picture size example
Full picture size (for 16:9 [480i, 480p] source programs only)
• If receiving a squeezed 4:3 format program, the I
picture is stretched wider to fill the width of 0 0 0
I
the screen, but not stretched taller.
• None of the picture is hidden. 0 0 0
G
#OlE 067-078 566272HM195 73
Black
(E) 56/62/72HM195
Full picturesizeexample
Copyright © 2006 TOSHIBA CORPORATION. All rights reserved.
7/28105, 4:46 PM
73
F
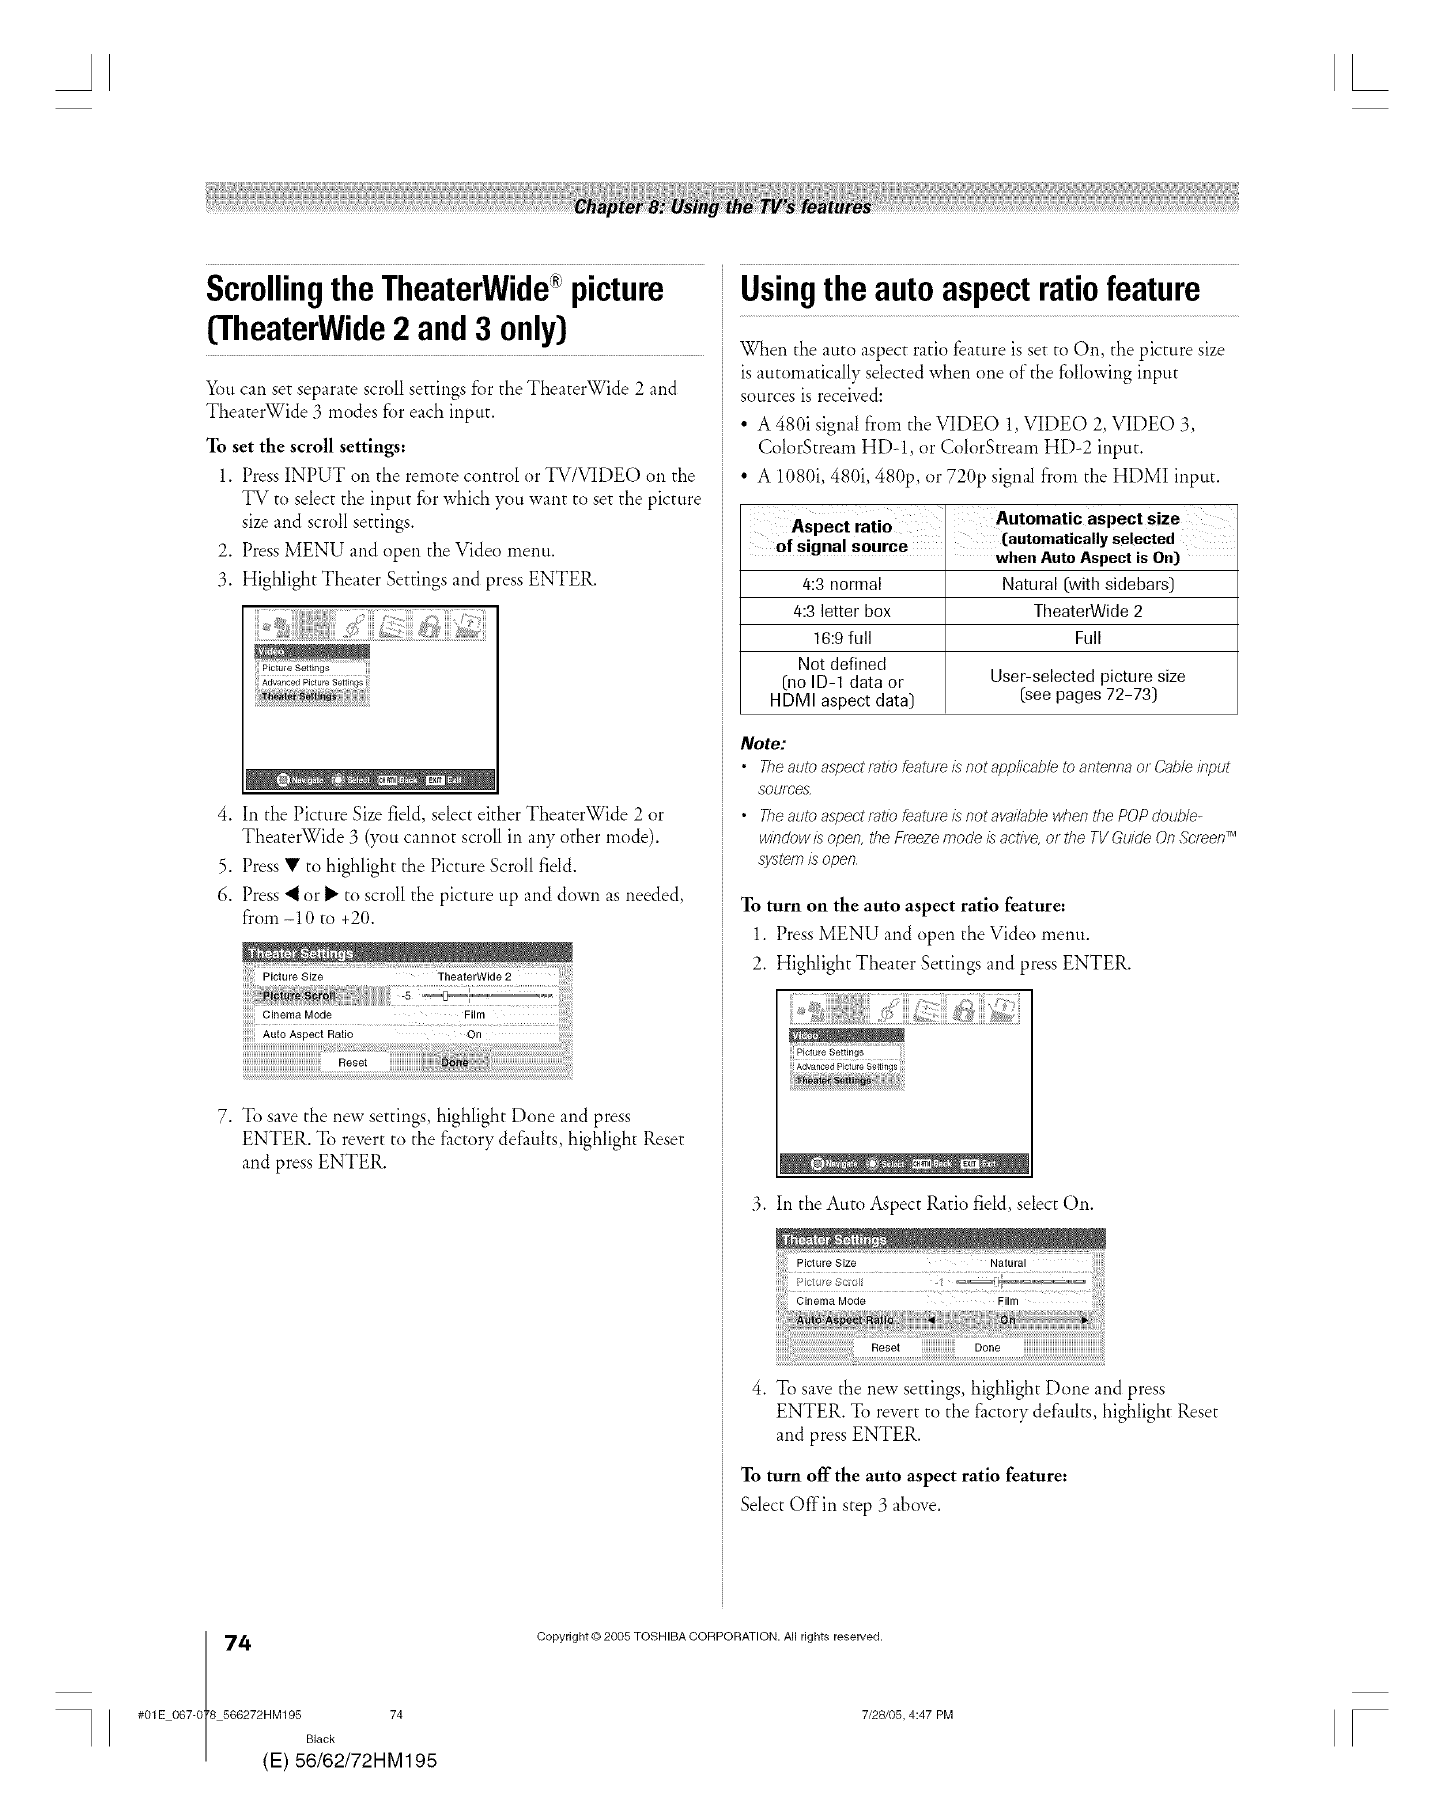
AL
Scrollingthe TheaterWide picture
(TheaterWide2 and3 only)
You can set separate scroll settings for the TheaterWide 2 and
TheaterWide 3 modes fbr each input.
To set the scroll settings:
1. Press INPUT on the remote control or TV/VIDEO on the
TV to select the input for which you want to set the picture
size and scroll settings.
2. Press MENU and open the Video menu.
3. Highlight Theater Settings and press ENTER.
4. In the Picture Size field, select either TheaterWide 2 or
TheaterWide 3 (you cannot scroll in any other mode).
5. Press • to highlight the Picture Scroll field.
6. Press 'I or 1_to scroll the picture up and down as needed,
from-10 to +20.
.
_i_;; gaa!iiiililiiii_ii
iiiiiiio,..... o0e
iiiiiii Auto Aspect Ratio
iiiiiiiiiiiiiiiiiiiiiiiiiiiiiiiiiiiiiiiiiiiiiReset
To save the new settings, highlight Done and press
ENTER. To revert to the factory defaults highlight Reset
and press ENTER.
Usingthe autoaspectratiofeature
When the auto aspect ratio feature is set to On, the picture size
is automatically selected when one of the following input
sources is received:
•A 480i signal from the VIDE() 1,VIDE() 2, VIDEO 3,
ColorStream HDq or ColorStream HD-2 input.
• A 1080i, 480i, 480p, or 720p signal from the HDMI input.
AS-oct rat o Automatic aspect size
oi signal source (automatically selected
El I when Auto Aspect is On)
4:3 normal Natural (with sidebars)
/4:3letter box TheaterWide 2
16:9 full Full
Not defined
(no ID-1 data or User-selected picture size
HDMI aspect data) (see pages 72-73)
Note:
•Theauto aspect ratio featu/e/_ not applicable to antenna or (2able input
soufr,'es
• Theauto aspect ratio feature i:_not availab/e when the POP doub/e-
window I_ open, the Freeze mode is active, or the TV Guide On ScreenTM
system i_ open
To turn on the auto aspect ratio feature:
1. Press MENU and open the Video menu.
2. Highlight Theater Settings and press ENTER.
3. In the Auto Aspect Ratio field, select On.
Reset Done
4. To save the new settings, highlight Done and press
ENTER. To revert to the factory defaults, highlight Reset
and press ENTER.
To turn off the auto aspect ratio feature:
Select Offin step 3 above.
4(
#01E 067-0 8 566272HM195 74
Black
E) 56/62/72HM195
Copyright © 2005 TOSHIBA CORPORATION. All rights reserved.
7/28105, 4:47 PM [
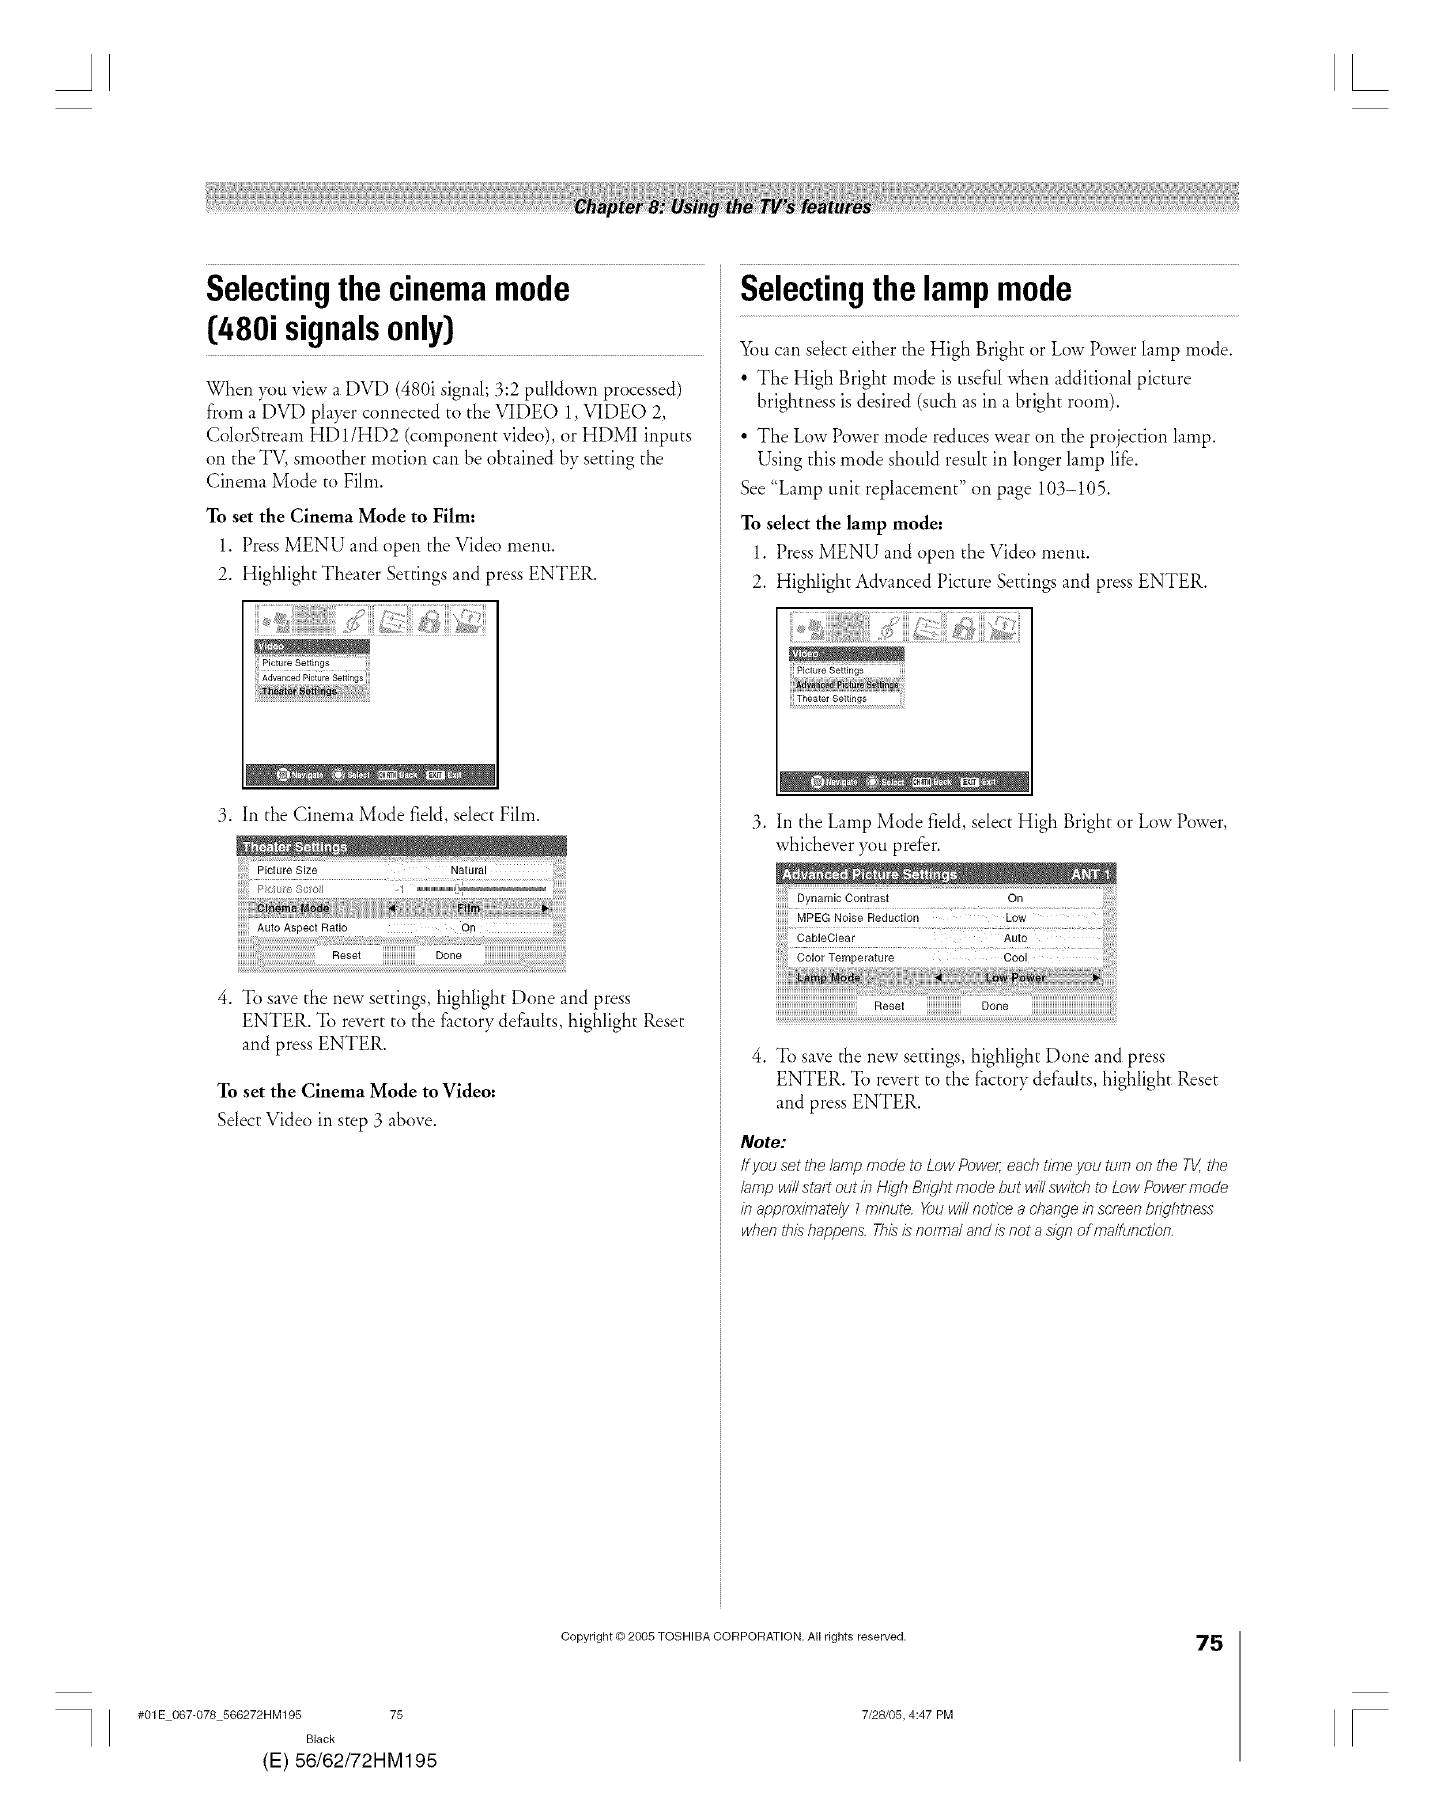
Selectingthe cinemamode
C480isignalsonly)
When }_mview a DVD (480i signal; 3:2 pulldown processed)
from a DVD player connected to the VIDEO 1, VIDEO 2,
ColorStream HD 1/HD2 (component video), or HDMI inputs
on the TV, smoother motion can be obtained by setting the
Cinema Mode to Film.
To set the Cinema Mode to Film:
1. Press MENU and open the Video menu.
2. Highlight Theater Settings and press ENTER.
3. In the Cinema Mode field, select Film.
4. To save the new settings, highlight Done and press
ENTER. To revert to the _ctorv defaults highlight Reset
and press ENTER.
To set the Cinema Mode to Video:
Select Video in step 3 above.
Selectingthe lamp mode
You can select either the High Bright or Low Power lamp mode.
• The High Bright mode is useful when additional picture
brightness is desired (such as in a bright room).
• The Low Power mode redtices wear on the projection lamp.
Using this mode should result in longer lamp life.
See "Lamp unit replacement" on page 103-105.
To select the lamp mode:
1. Press MENU and open the Video menu.
2. Highlight Advanced Picture Settings and press ENTER.
3. In the Lamp Mode field, select High Bright or Low Power,
whichever you prefer.
Dynamic Contrast On
MPEG Noise Reduction Low
CableClear Auto
ColorTernperature Cool
Reset Done
4. To save the new settings, highlight Done and press
ENTER. To revert to the factory defaults, highlight Reset
and press ENTER.
Note:
If you set the lamp mode to Low Power; each time you turn on the TV,the
lamp will stair out in High Bdght mode but will switch to Low Power mode
if?approximately I minute. You wi// notice a change if?screen bdghtness
when thL9happens Thisis normal and L9not a sign of maltunction,
#01E 067-078 566272HM195 75
Black
(E) 56/62/72HM195
Copyright © 2005 TOSHIBA CORPORATION. All rights reserved.
7/28105, 4:47 PM
75
F
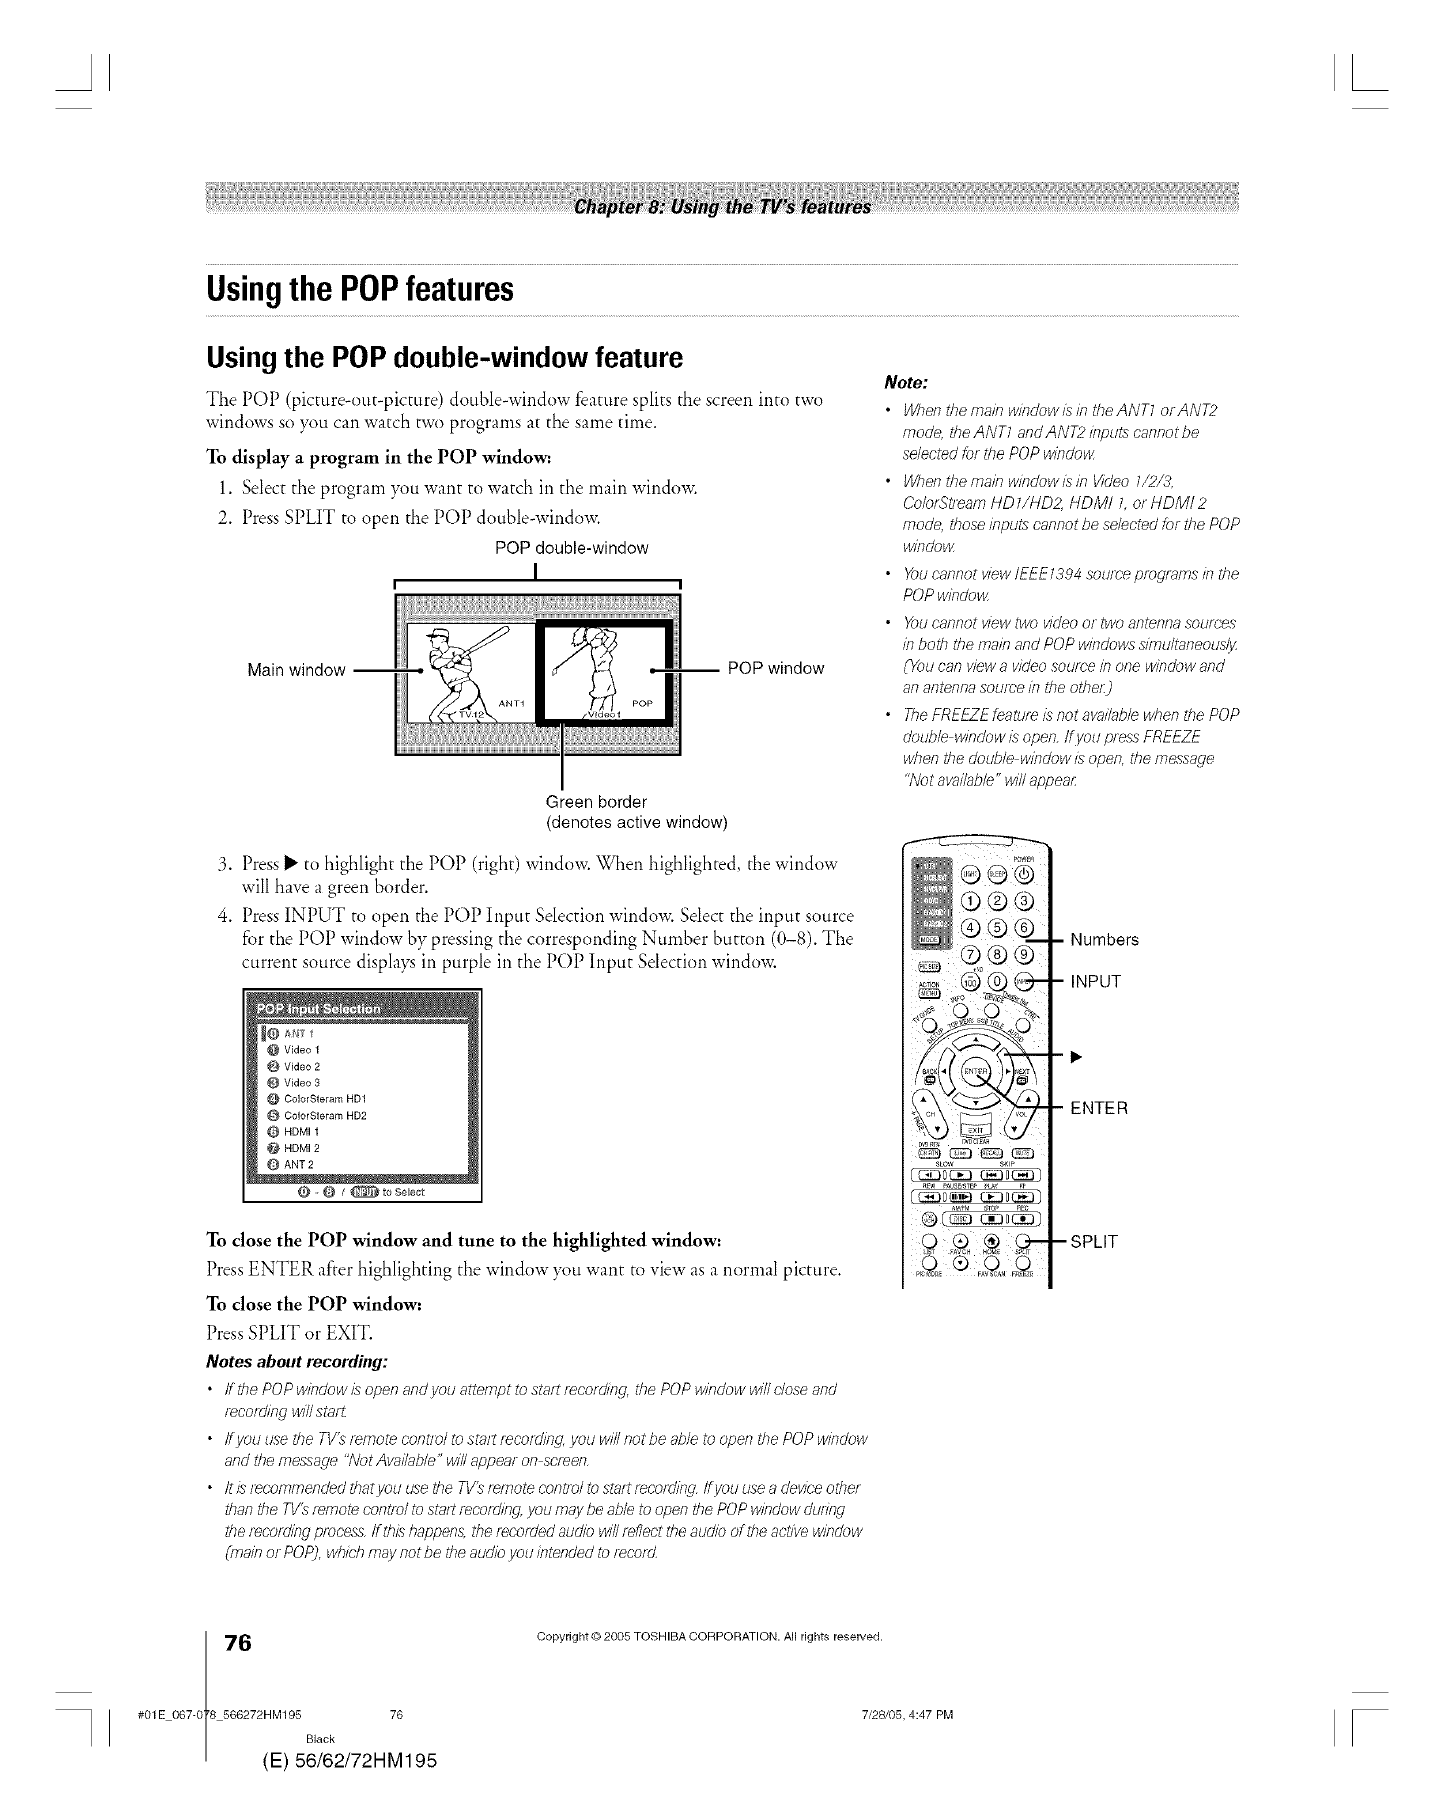
Usingthe POPfeatures
Usingthe POP double-window feature
The POP (picture-out-picture) double-window feature splits the screen into two
windows so }_mcan watch two programs at the same time.
To display a program in the POP window:
1. Select the program }_tl want to watch in the main window.
2. Press SPLIT to open the POP double-window.
POP double-window
I
I I
Main window -- -" _k f _',_ _, POP window
A0
T1 /V_£ e_ 1 POP
Green border
(denotes active window)
3. Press_" to highlight the POP (right) window. When highlighted, the window
will have a green border.
4. Press INPUT to open the POP Input Selection window. Select the input source
for the POP window by pressing the corresponding Number button (0-8). The
current source displa}_ in purple in the POP Input Selection window.
Video 2
@ Video 3
O ColorSteram HD1
ColorSteram HD2
HDMI1
@ HDMI 2
O ANT 2
_/_ to Select
To close the POP window and tune to the highlighted window:
Press ENTER after highlighting the window 5_)uwant to view as a normal picture.
To close the POP window:
Press SPLIT or EXIT.
Notes about recordieg:
•If the POP window is open and you attempt to start_recording the POP window w///c/ose and
ieco_ding will stair
• ffyou use the TV's remote cont/ol to stair recording, you will not be able to open the POP window
and the message "Not Available" will appear on screen,
• It isrecommended tbatyou use the TV_ ternote control to start recotding Ifyou use a device other
than the TV:_remote control to start/_cofding, you may be able to open the POP window dudng
the feco/dffig process ff tb/:_happens, the recotded audio will reflect the audio of the active window
(main or POP), wbich may not be the audio you intended to record
Note:
•When tbema#7 w/ndowL_#7 tbeANT1 orANT2
mode, the ANT1 and ANT2 inputs cannot be
selected for the POP window,
•W/Tenthe malb wlndowl_/13 Video 1/2/3,
ColorS_ream HD I/HD2, HDM1 l, or HDMI 2
mode, those inputs cannot be selected for the POP
window,
• Youcannot view IEEE1394 source programs in the
POP window
• Youcannot view two video or two antenna sources
/n both the main and POP windows simu/taneous!_
(You can view a video source #7one window and
an antenna source in the other:)
• TheFREEZE feature i:_not avaLlab/ewhen the POP
double window I_ open, If you press FREEZE
when the double wIncJowLsopen, the message
"Not available" will appear
SLOW SKIP
Numbers
INPUT
ENTER
,SPLIT
6(
#01E 067-0 8 566272HM195 76
Black
E) 56/62/72HM195
Copyright © 2005 TOSHIBA CORPORATION. All rights reserved.
7/28/05, 4:47 PM F
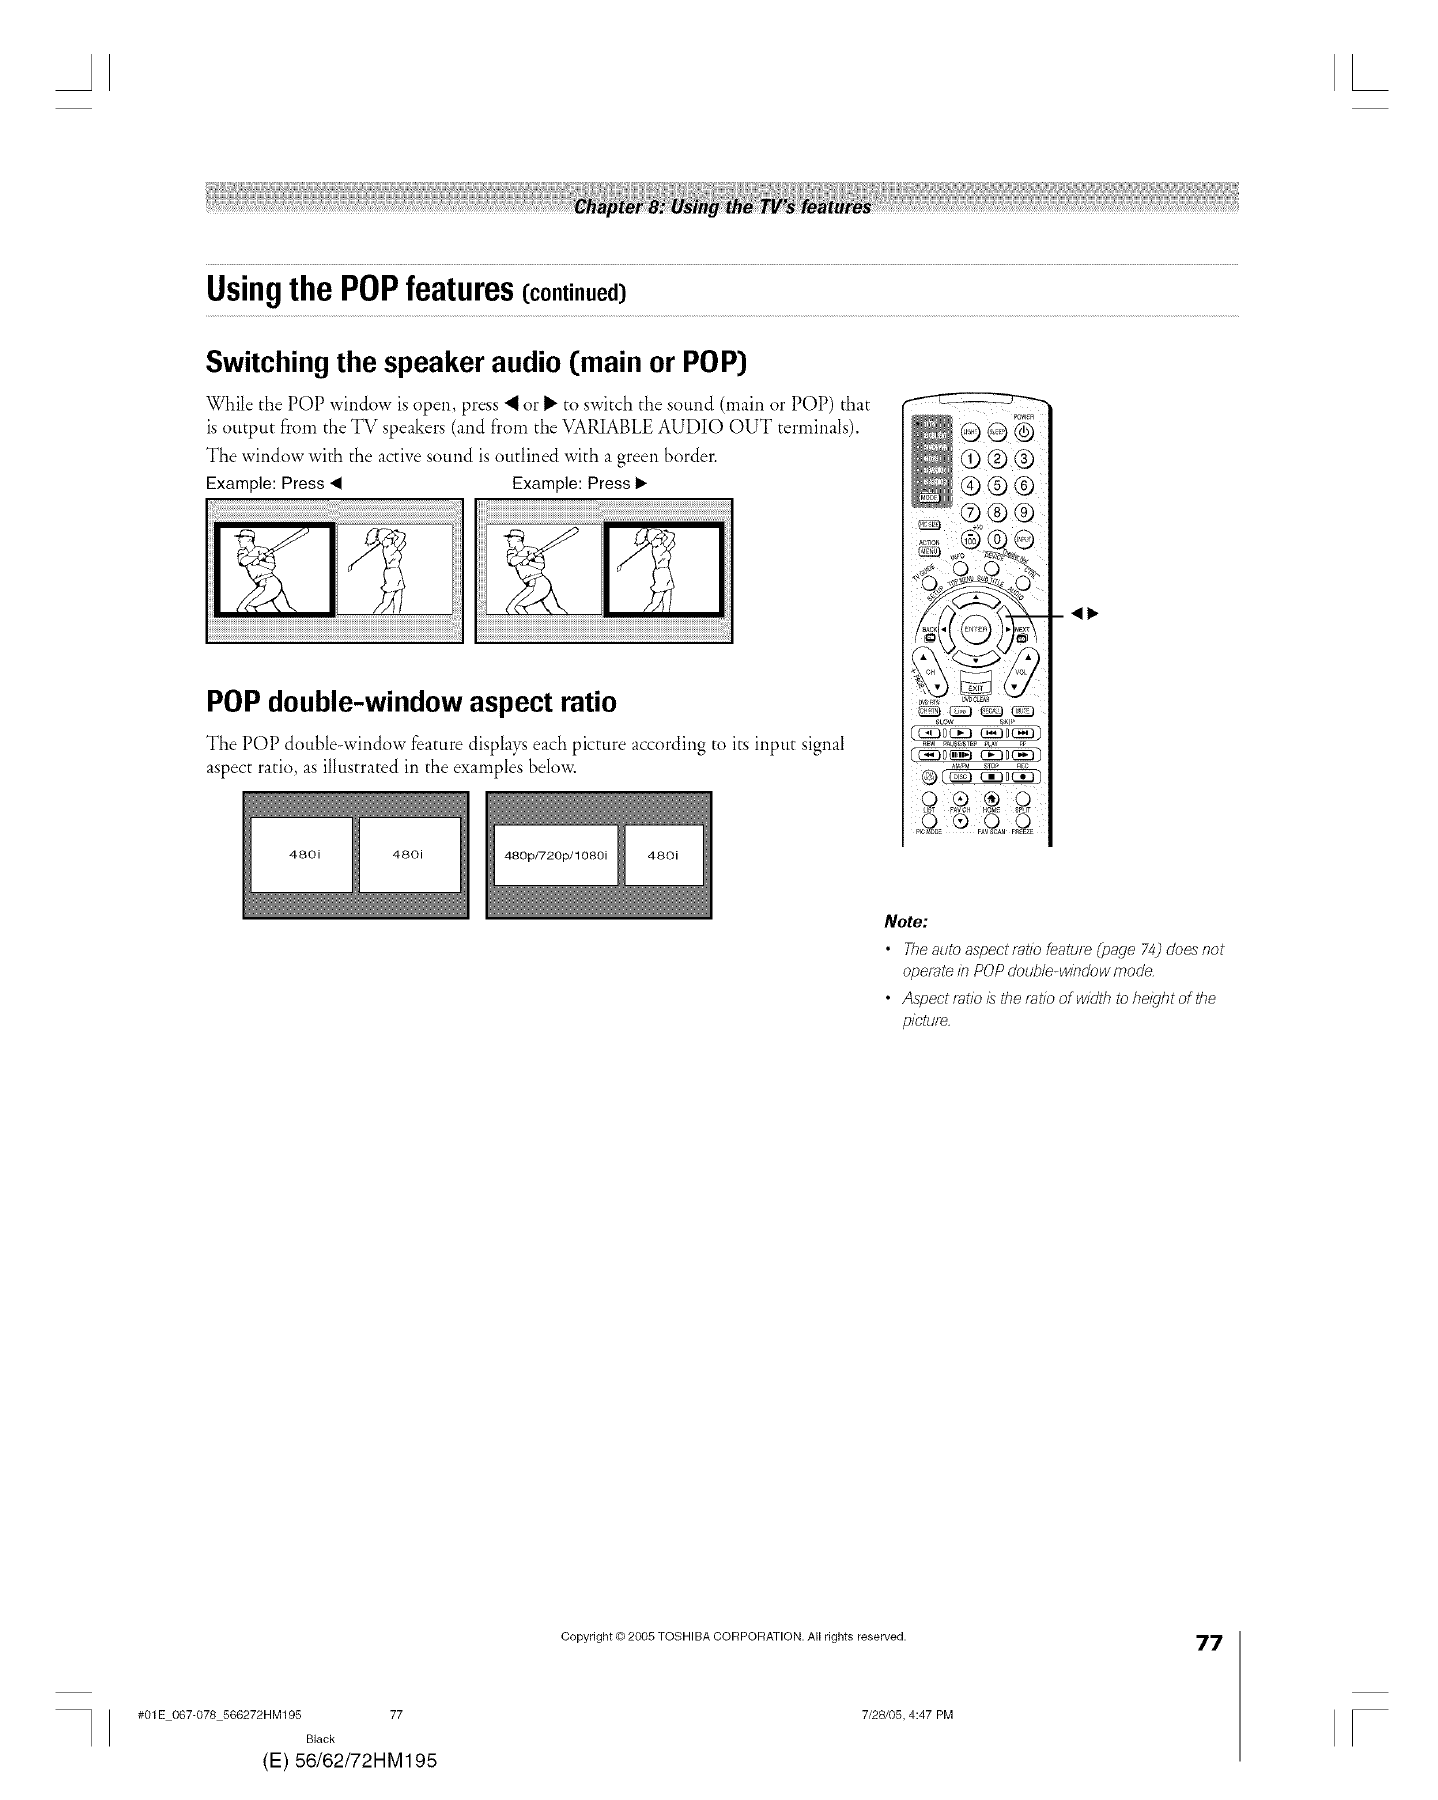
AL
UsingthePOPfeatures(continued)
Switching the speaker audio (main or POP)
While the POP window is open, press 'I or I_ to switch the sound (main or POP) that
is output from the TV speakers (and from the VARIABLE AUDIO OUT terminals).
The window with the active sound is outlined with a green border.
Example: Press• Example: Press1_
POP double-window aspect ratio
The POP double<vindow feature displays each picture according to its input signal
aspect ratio, as illustrated in the examples below.
48Oi 48Oi
@@@
@®®
®®®
®® ®
d®®
Note:
•Theauto aspectratio feature (page 74) does not
operate/n POP double-window mode.
• Aspect ratio is the mt/o of width to height of the
picttyte,
#01E 067@78 566272HM195 77
Black
(E) 56/62/72HM195
Copyright © 2005 TOSHIBA CORPORATION. All rights reserved.
7/28105, 4:47 PM
77
r
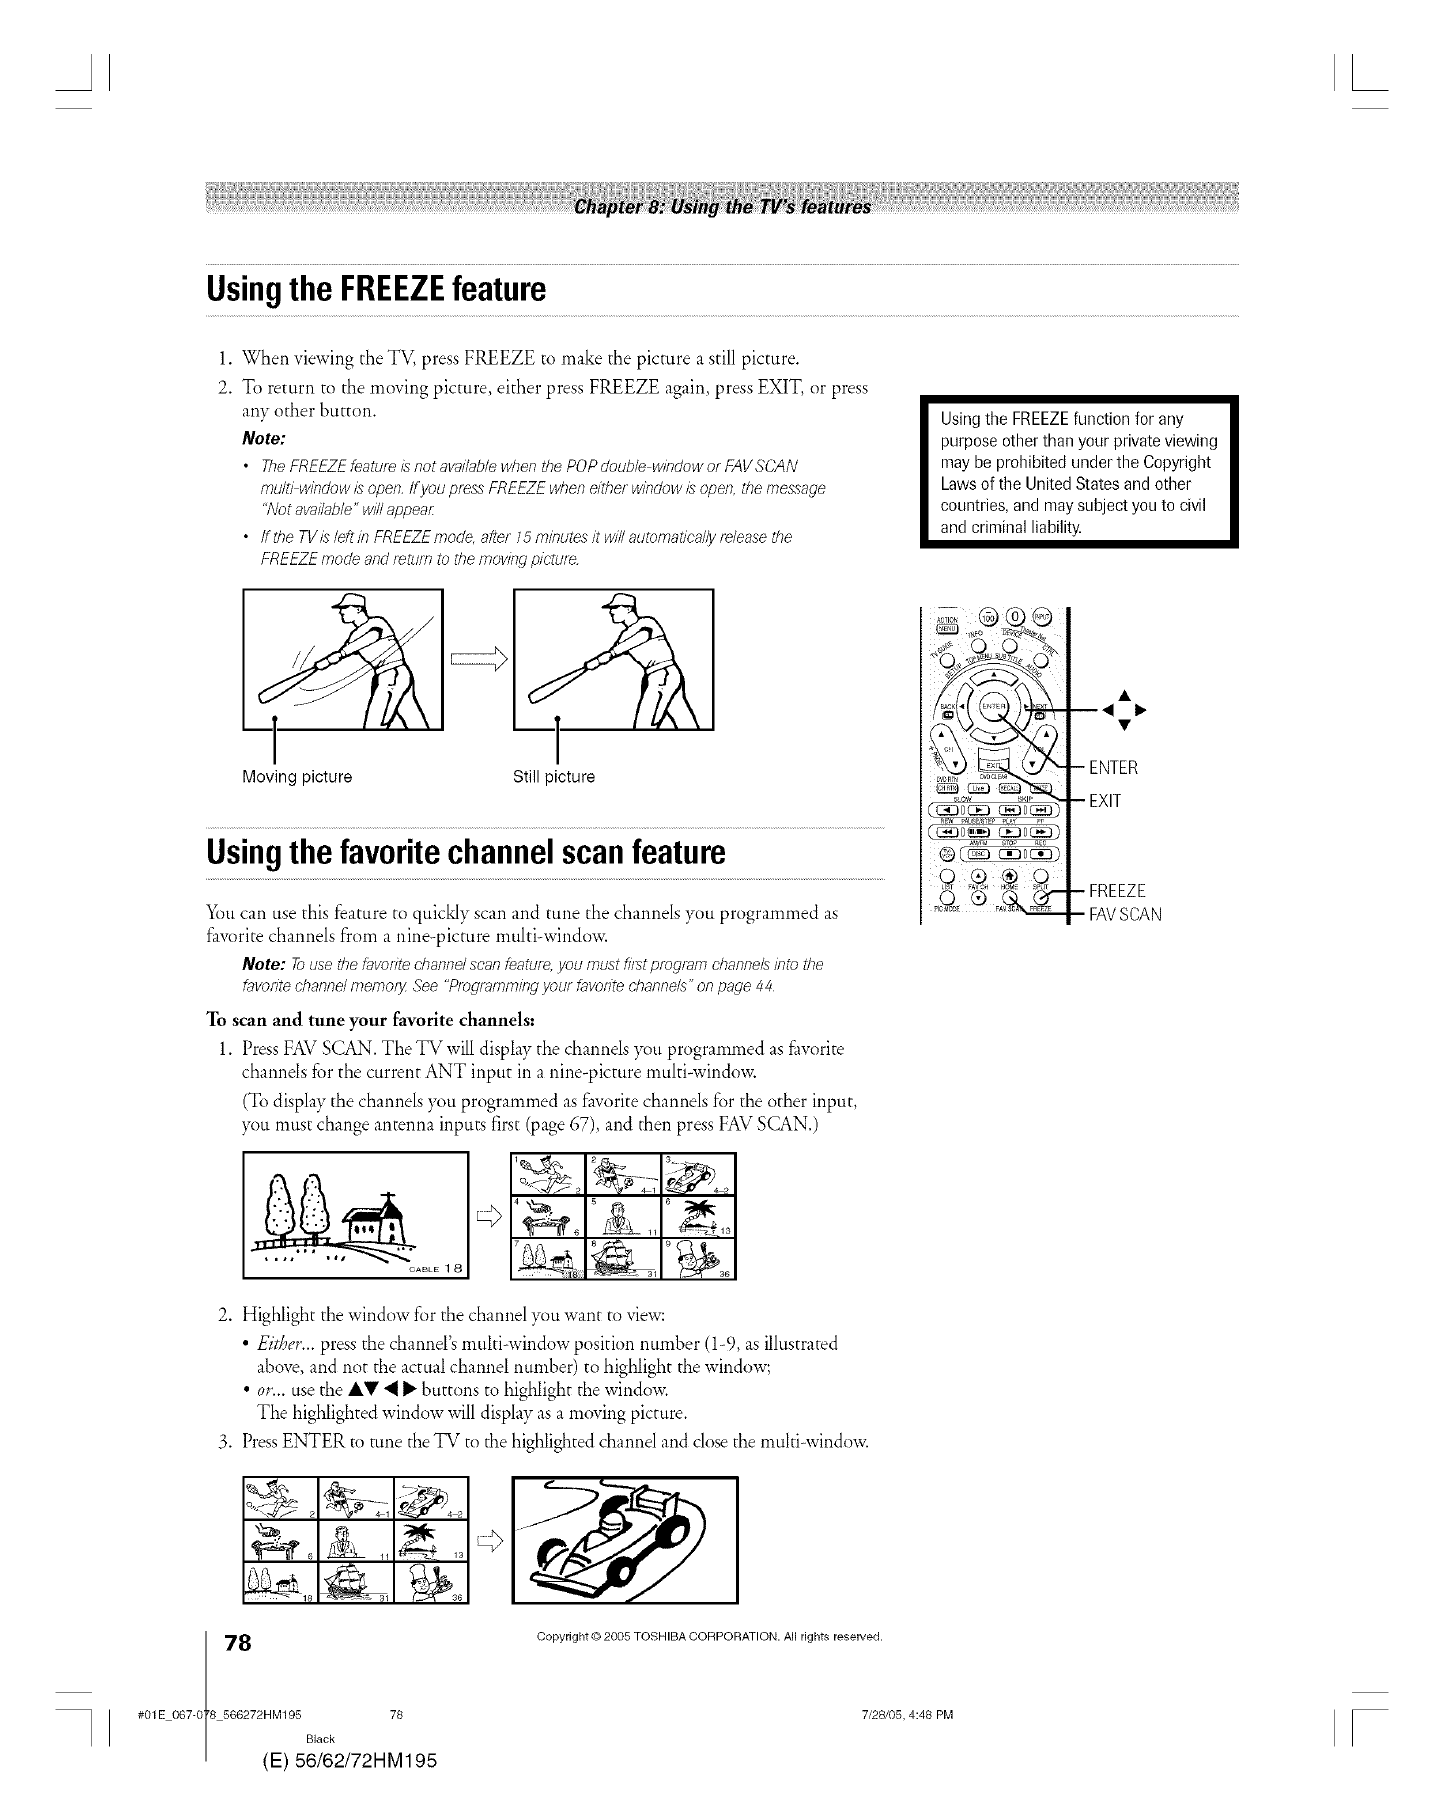
AL
Usingthe FREEZEfeature
1. When viewing the TV, press FREEZE to make the picture a still picture.
2. % return to the moving picture, either press FREEZE again, press EXIT, or press
any other button.
Note:
•TheFREEZEfeatureis notavailablewhenthe POPdouble windowof FAV,%'AN
multi windowis open,ffyou pressFREEZEwheneitherwindowisopen,the message
"Notavailable"willappear
• ffthe TVisleft/n FREEZEmode, after 15minute,9it willautomaticallyreleasethe
FREEZEmode andr_tllrr7to the movingpicture.
Using the FREEZEfunction for any
purpose otherthan your private viewing
may be prohibited under the Copyright
Laws of the United States and other
countries, and maysubject you to civil
and criminal liability.
Moving picture Still picture
Usingthefavorite channelscanfeature
_ti can use this feature to quickly scan and tune the channels you programmed as
law,rite channels from a nine-picture multi-window.
Note: Tousethefavoriteel?anne/scanfeatu£ you mustfirstprog/am channelsinto the
favoriteehannd mefr}o/y ,See"Programmingyour favoritechannel,7'on page44
To scan and tune your favorite channels:
1. PressFAVSCAN. The TV will display the channels ),_u programmed as favorite
channels for the current ANT input in a nine-picture multi-window.
(To display the channels )_)u programmed as favorite channels for the other input,
)_)u must change antenna inputs first(page 67), and then press FAVSCAN.)
CABLE 18 _ al 9 _s6
@®@
sv0_ REO
®(_ mDm)
2. Highlight the window for the channel }_u want to view:
•Eibef... press the channel's multi-window position number (1-9, as illustrated
above, and not the actual channel number) to highlight the window;
•0r... use the •V 4_" buttons to highlight the window.
The highlighted window will display as a moving picture.
3. PressENTER m tune the TV to the highlighted channel and close the multi-window.
8(
#01E 067-0 8 566272HM195 78
Black
E) 56/62/72HM195
Copyright © 2005 TOSHIBA CORPORATION. All rights reserved.
7/28105, 4:48 PM
m4 1_
- ENTER
- EXIT
-FREEZE
-FAVSCAN
r
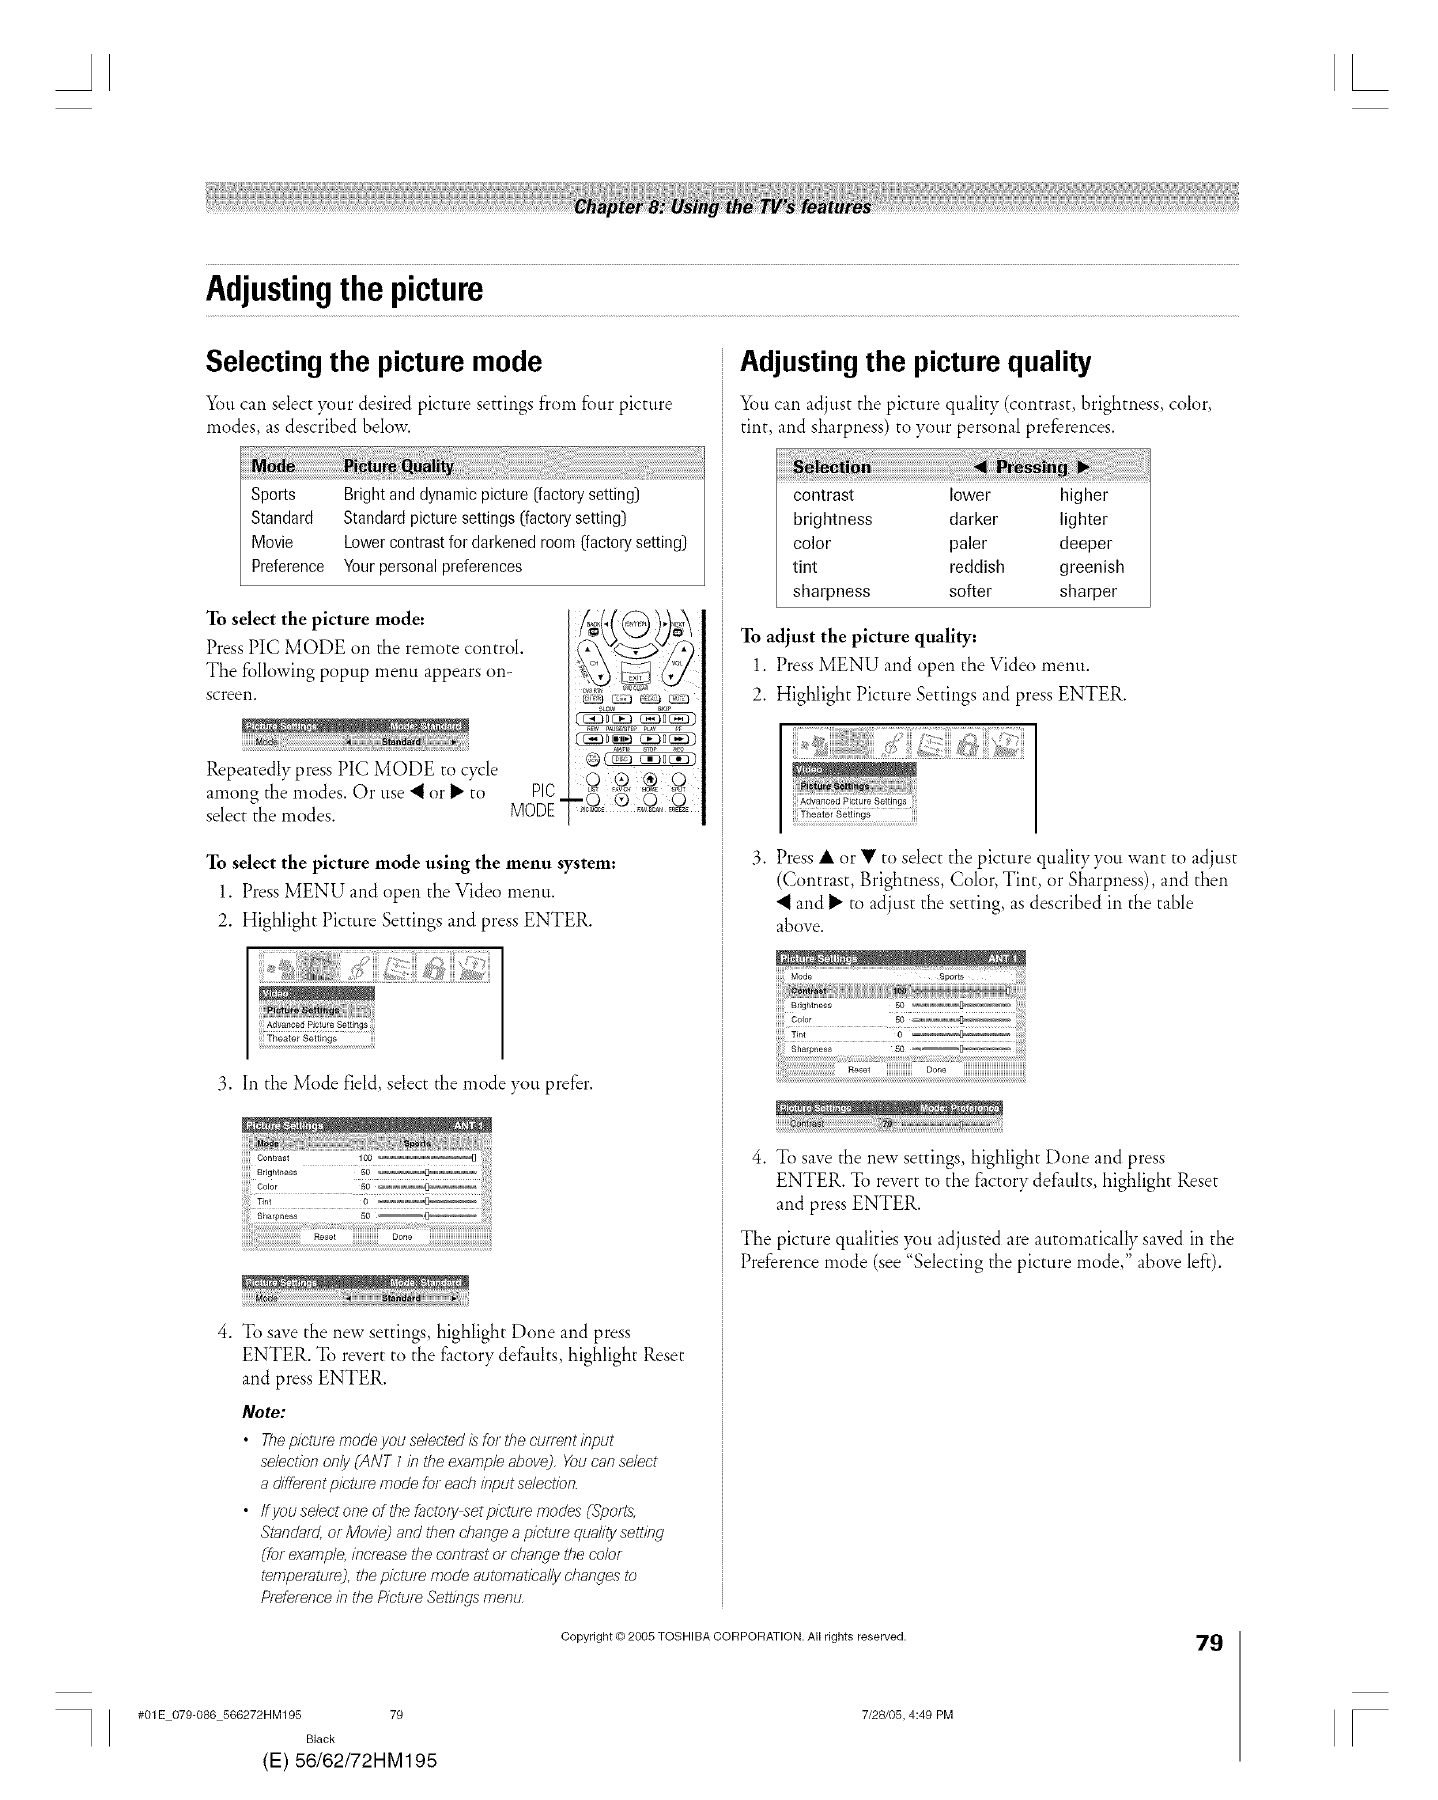
Adjustingthepicture
Selecting the picture mode
You can select your desired picture settings fron_ four picture
modes, as described below.
Adjusting the picture quality
_)u can adjust the picture quality (contrast, brightness, color,
tint, and sharpness) to your personal preferences.
To select the picture mode:
Press PIC MODE on the remote control.
The following popup menu appears on-
screen.
Repeatedly press PIC MODE to cycle
among the modes. Or use "_ or P" to PIg
select the modes. MODE-
_c.d_ c_Dc_3
To select the picture mode using the menu system:
1. Press MENU and open the Video menu.
2. Highlight Picture Settings and press ENTER.
3. In the Mode field, select the mode you prefer.
4. To save the new settings, highlight Done and press
ENTER. To revert to the factory defaults, highlight Reset
and press ENTER.
Note:
•Thepicture modeyouselectedisforthecuff_ntinput
selectiononly (ANT 1#7theexample above], Youcanselect
adifferentpicture modeforeachinput select/bn.
• ffyou selectoneofthefacto/y set picture modes (S_eotts,
Standard, or Movie] andthenchange a pfctuf_ quality setting
(for example, increasethecontrastor change thecob/
tempe/atute], the picture mode automatically changes to
P/efet_nceinthePictureSettings rnenLz
contrast lower higher
brightness darker lighter
color paler deeper
tint reddish greenish
sharpness softer sharper
To adjust the picture quality:
1. Press MENU and open the Vide() menu.
2. Highlight Picture Settings and press ENTER.
3. Press • or • to select the picture quality you want to adjust
(Contrast, Brightness, Color, Tint, or Sharpness), and then
•'I and D"to adjust the setting, as described in the table
above.
4. To save the new settings, highlight Done and press
ENTER. To revert to the factory defaults, highlight Reset
and press ENTER.
The picture qualities you adjusted are automatically saved in the
Preference mode (see "Selecting the picture mode," above left).
Copyright © 2005 TOSHIBA CORPORATION. All rights reserved. 79
#01E 079-086 566272HM195 79
Black
(E) 56/62/72HM195
7/28105, 4:49 PM [
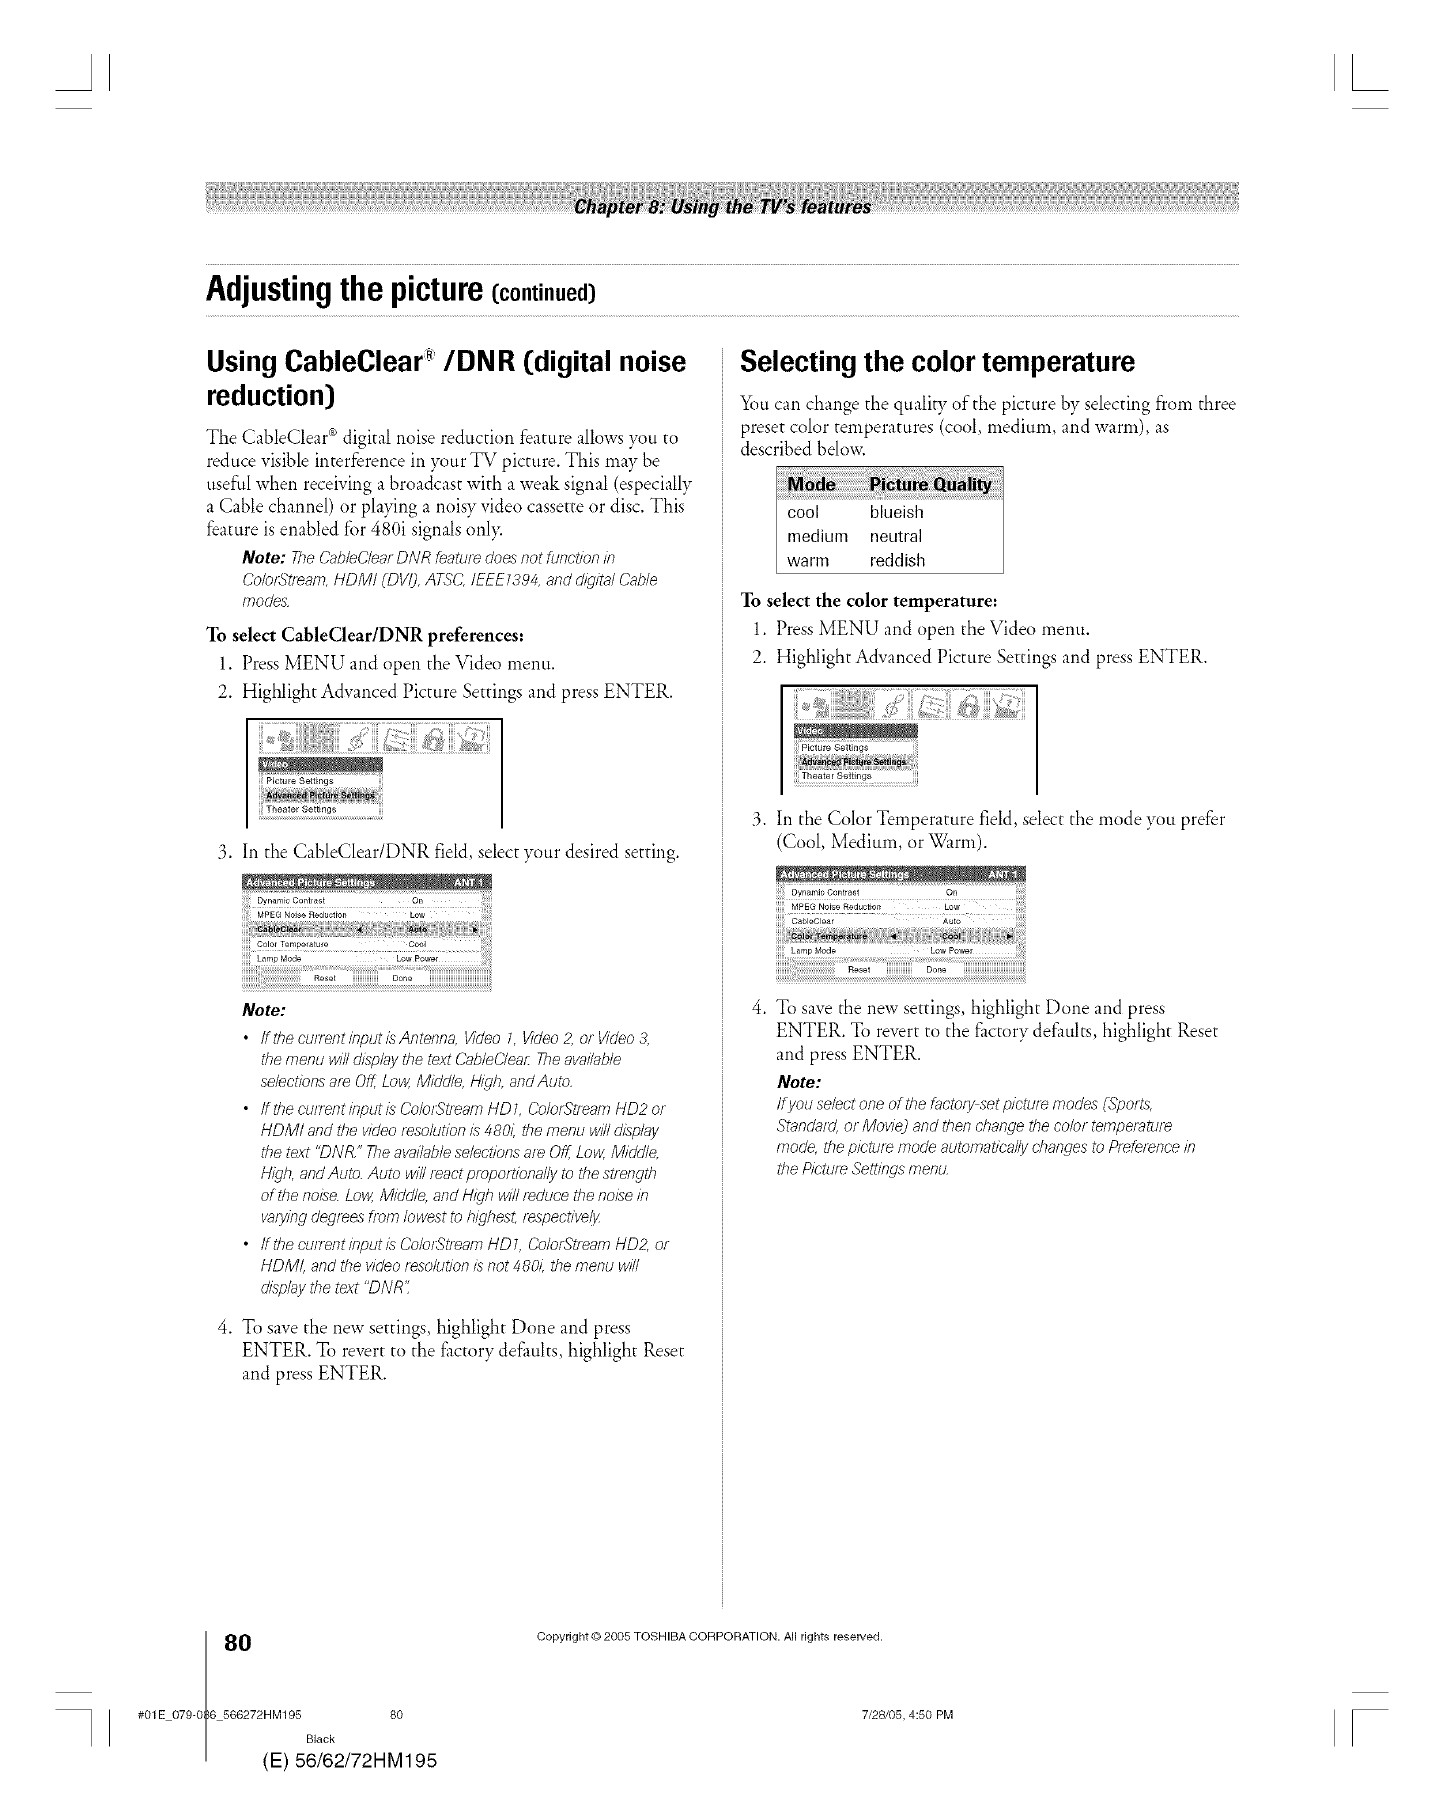
AL
Adjustingthepicture(continued)
Using CableClear /DNR (digital noise
reduction)
The CableClear c_digital noise reduction feature allows }_m to
reduce visible interference in }_mr TV picture. This may be
useful when receiving a broadcast with a weak signal (especially
a Cable channel) or playing a noisy video cassette or disc. This
feature is enabled f_r 480i signals ()ill>
Note: TheCab/eC/earDNR featuredoesnot function#7
Co/orStfeam,HDMI (DVI),ATSC IEEE1394,anddsgital(;able
modes.
To select CableClear/DNR preferences:
1. Press MENU and open the Video menu.
2. Highlight Advanced Picture Settings and press ENTER.
3. In the CableClear/DNR field select your desired setting.
Note:
•/fthe curfent/oputL_Antenna, Video L Video 2, or Video 3,
the menu will dssp/aythe text CableCleaf: Theavailable
selections ate Off, Low, Middle, I-tigb, and Auto.
•Iftbecu/TentinputL_Co/orStfeamHDL Co/o/Stf_afnHD2or
HDMt and the video resolution L_480/, the menu will display
the text "DNR" Theavailable sebctsons ase Off, Low, Middle,
High, and Auto. Auto will react propottlenally to the stf_ngtb
of tbe noise. Low, Middle, and High will reduce the noise #7
varying degrees from lowest to hsghest, respectsve!_
•ffthecu/7_ntinputl_Co/olStf_amHDL Co/o/Stf_amHD2, or
FIDMI, and the video f_so/ut/on is not 480si the menu will
dL_playthe text "DNR'.
4. To save the new settings, highlight Done and press
ENTER. To revert to the factory defaults highlight Reset
and press ENTER.
Selecting the color temperature
You can change the quality of the picture by selecting from three
preset color temperatures (cool, medium, and warm), as
described below.
To select the color temperature:
1. Press MENU and open the Video menu.
2. Highlight Advanced Picture Settings and press ENTER.
ili _ !!!iiiiiiiiiiiiiiiiiiiiiiiiiiiiiiiid_ '_ iii! _._ iiii _;_._ ;;;;#_i ;;
3. In the Color Temperature field, select the mode you prefer
(Cool, Medium, or Warm).
MPEG Noise Reduction/ Low
4. To save the new settings, highlight Done and press
ENTER. To revert to the factory defaults, highlight Reset
and press ENTER.
Note:
Ifyou selectone of thef_cto_yset p/oturemodesCSports,
Standasd,or Movie_andthen changethecolor temperature
mode,thep/oturemode automatscallychangesto Preference#7
thePictureSettlngls menu.
0(
#01E 079-0 6 566272HM195 80
Black
E) 56/62/72HM195
Copyright © 2005 TOSHIBA CORPORATION• All rights reserved.
7/28/05, 4:50 PM [
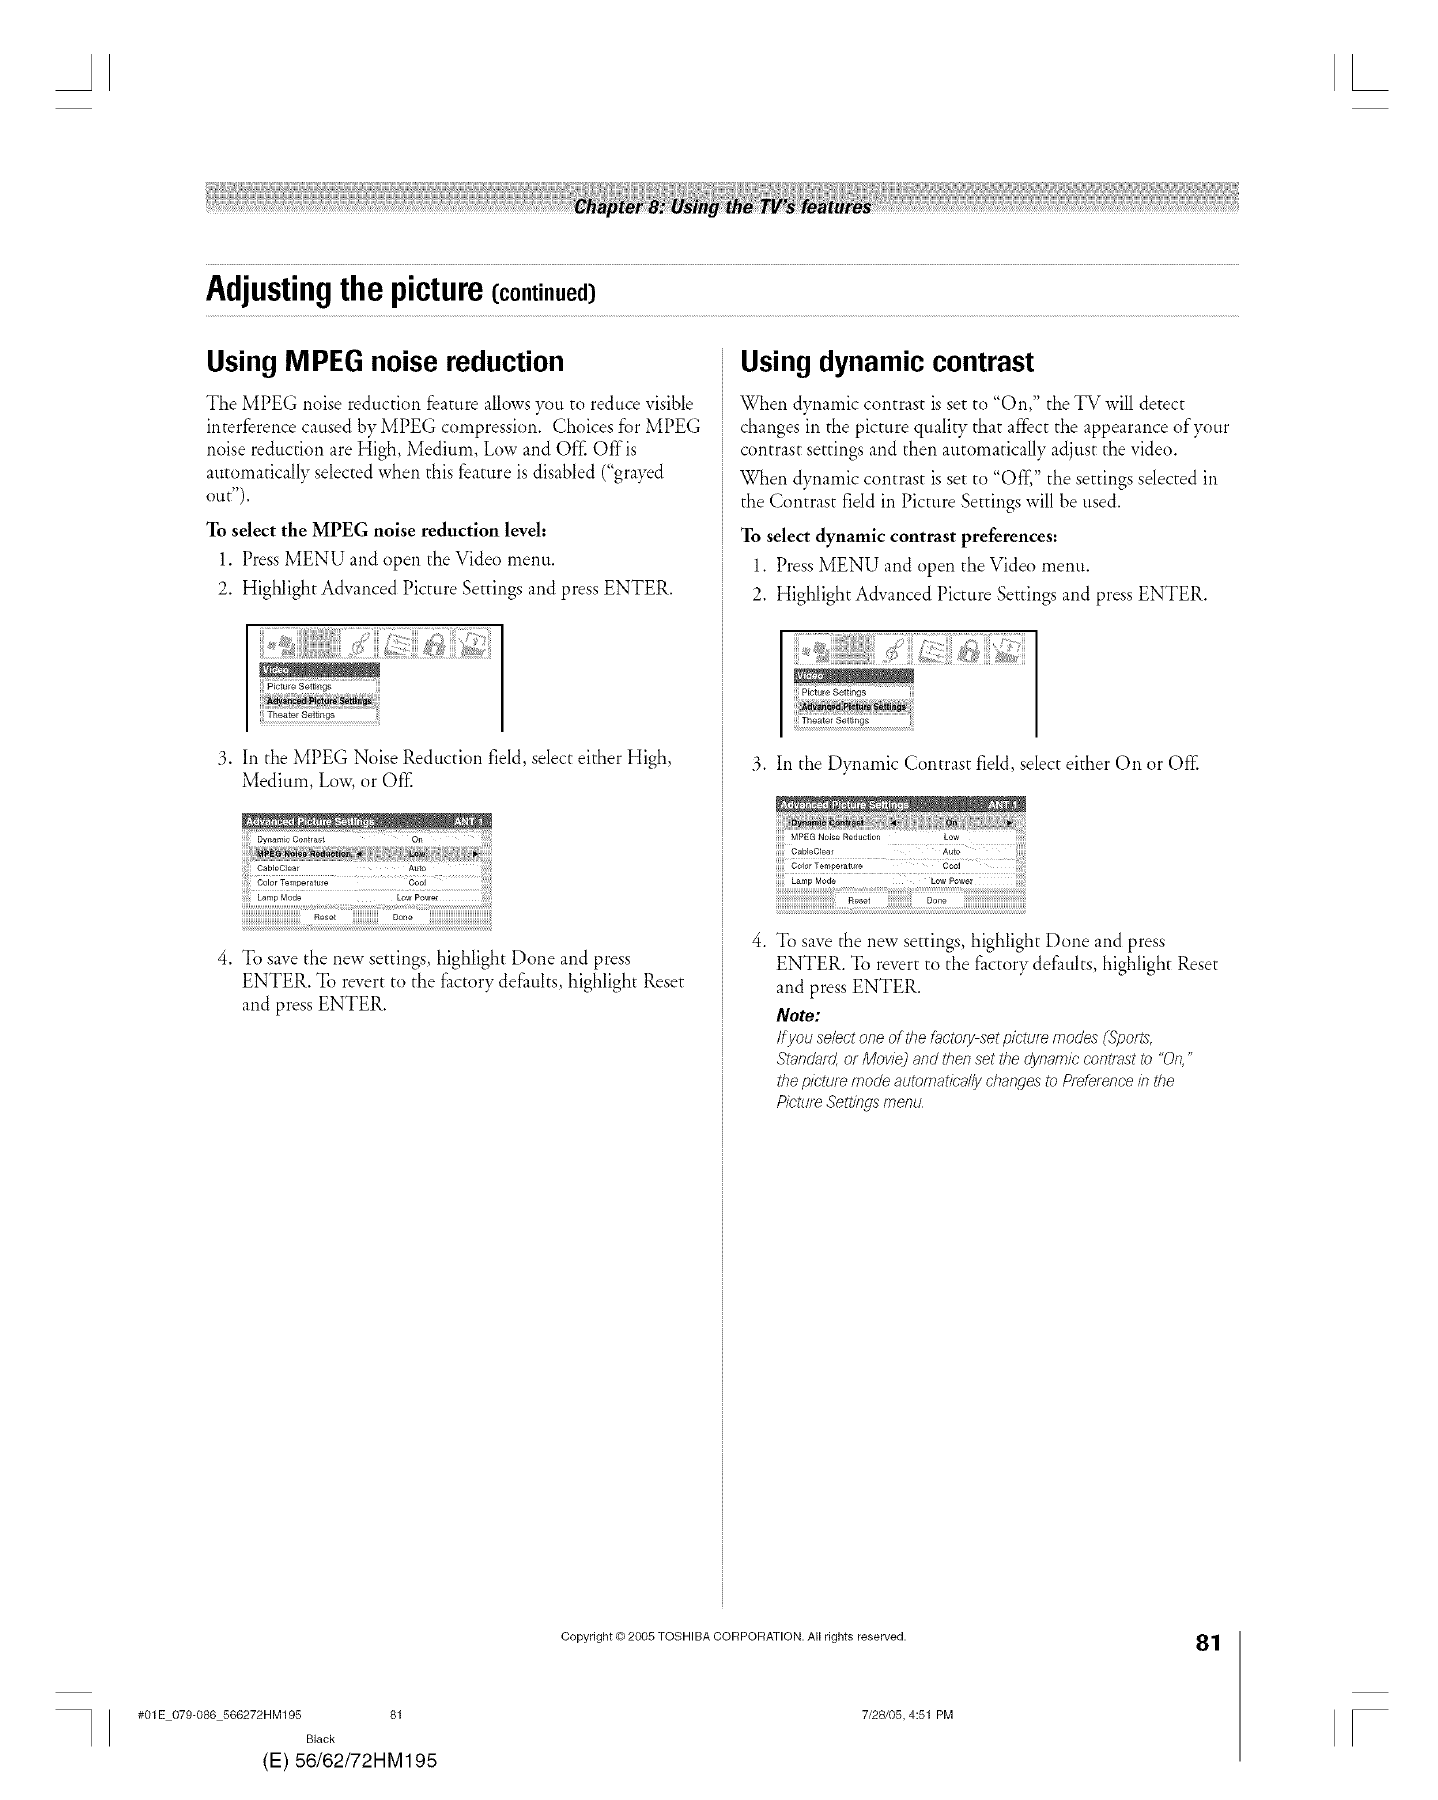
Adjustingthepicture(continued)
Using MPEG noise reduction
The MPEG noise reduction feature allows }_tl to reduce visible
interference caused by MPEG compression. Choices for MPEG
noise reduction are High, Medium, Low and Off" Off"is
automatically selected when this feature is disabled ("grayed
Otlt_),
To select the MPEG noise reduction level:
1. Press MENU and open the Video menu.
2. Highlight Adwmced Picture Settings and press ENTER.
3. In the MPEG Noise Reduction field, select either High,
Medium, Low, or Off"
4. To save the new settings, highlight Done and press
ENTER. To revert to the f_ctorv defaults highlight Reset
and press ENTER.
Using dynamic contrast
When dynamic contrast is set to "On," the TV will detect
changes in the picture quality that affect the appearance of your
contrast settings and then automatically adjust the video.
When dynamic contrast is set to "OfI]" the settings selected in
the Contrast field in Picture Settings will be used.
To select dynamic contrast preferences:
1. Press MENU and open the Video menu.
2. Highlight Adwmced Picture Settings and press ENTER.
:, ); _
_ !!!!_ t'_ ¸ _.Z dii _ i!_
_ _ _ _ #* _ _,_,. >i _ _
3. In the Dynamic Contrast field, select either On or Off"
MPEG Noise ReductJon
!!!!! Lamp Mode LOWPower iiiii;i
iiiiiiiiiiiiiiiiiiiiiiiiiiiiiiiiil¸¸ Reset iiiiiiiiiiiiii: iiiiiiiiiiiiiiiiiiiiiiiiiiiiiiiiiiill
To save the new settings, highlight Done and press
ENTER. To revert to the i_actory defaults, highlight Reset
and press ENTER.
Note:
Ifyou se/ectone of thef_cto_yset picturemodes (_oo/_s,
Standard,or Movie_andthen set the dynamiccontrastto "On,"
thep/ctUf_ modeautomatical/ychangesto P/de[_fTce#7the
Picture,eoett/fTgsmen_z
#01E 079-086 566272HM195 81
Black
(E) 56/62/72HM195
Copyright © 2005 TOSHIBA CORPORATION. All rights reserved.
7/28105, 4:51 PM
81
[
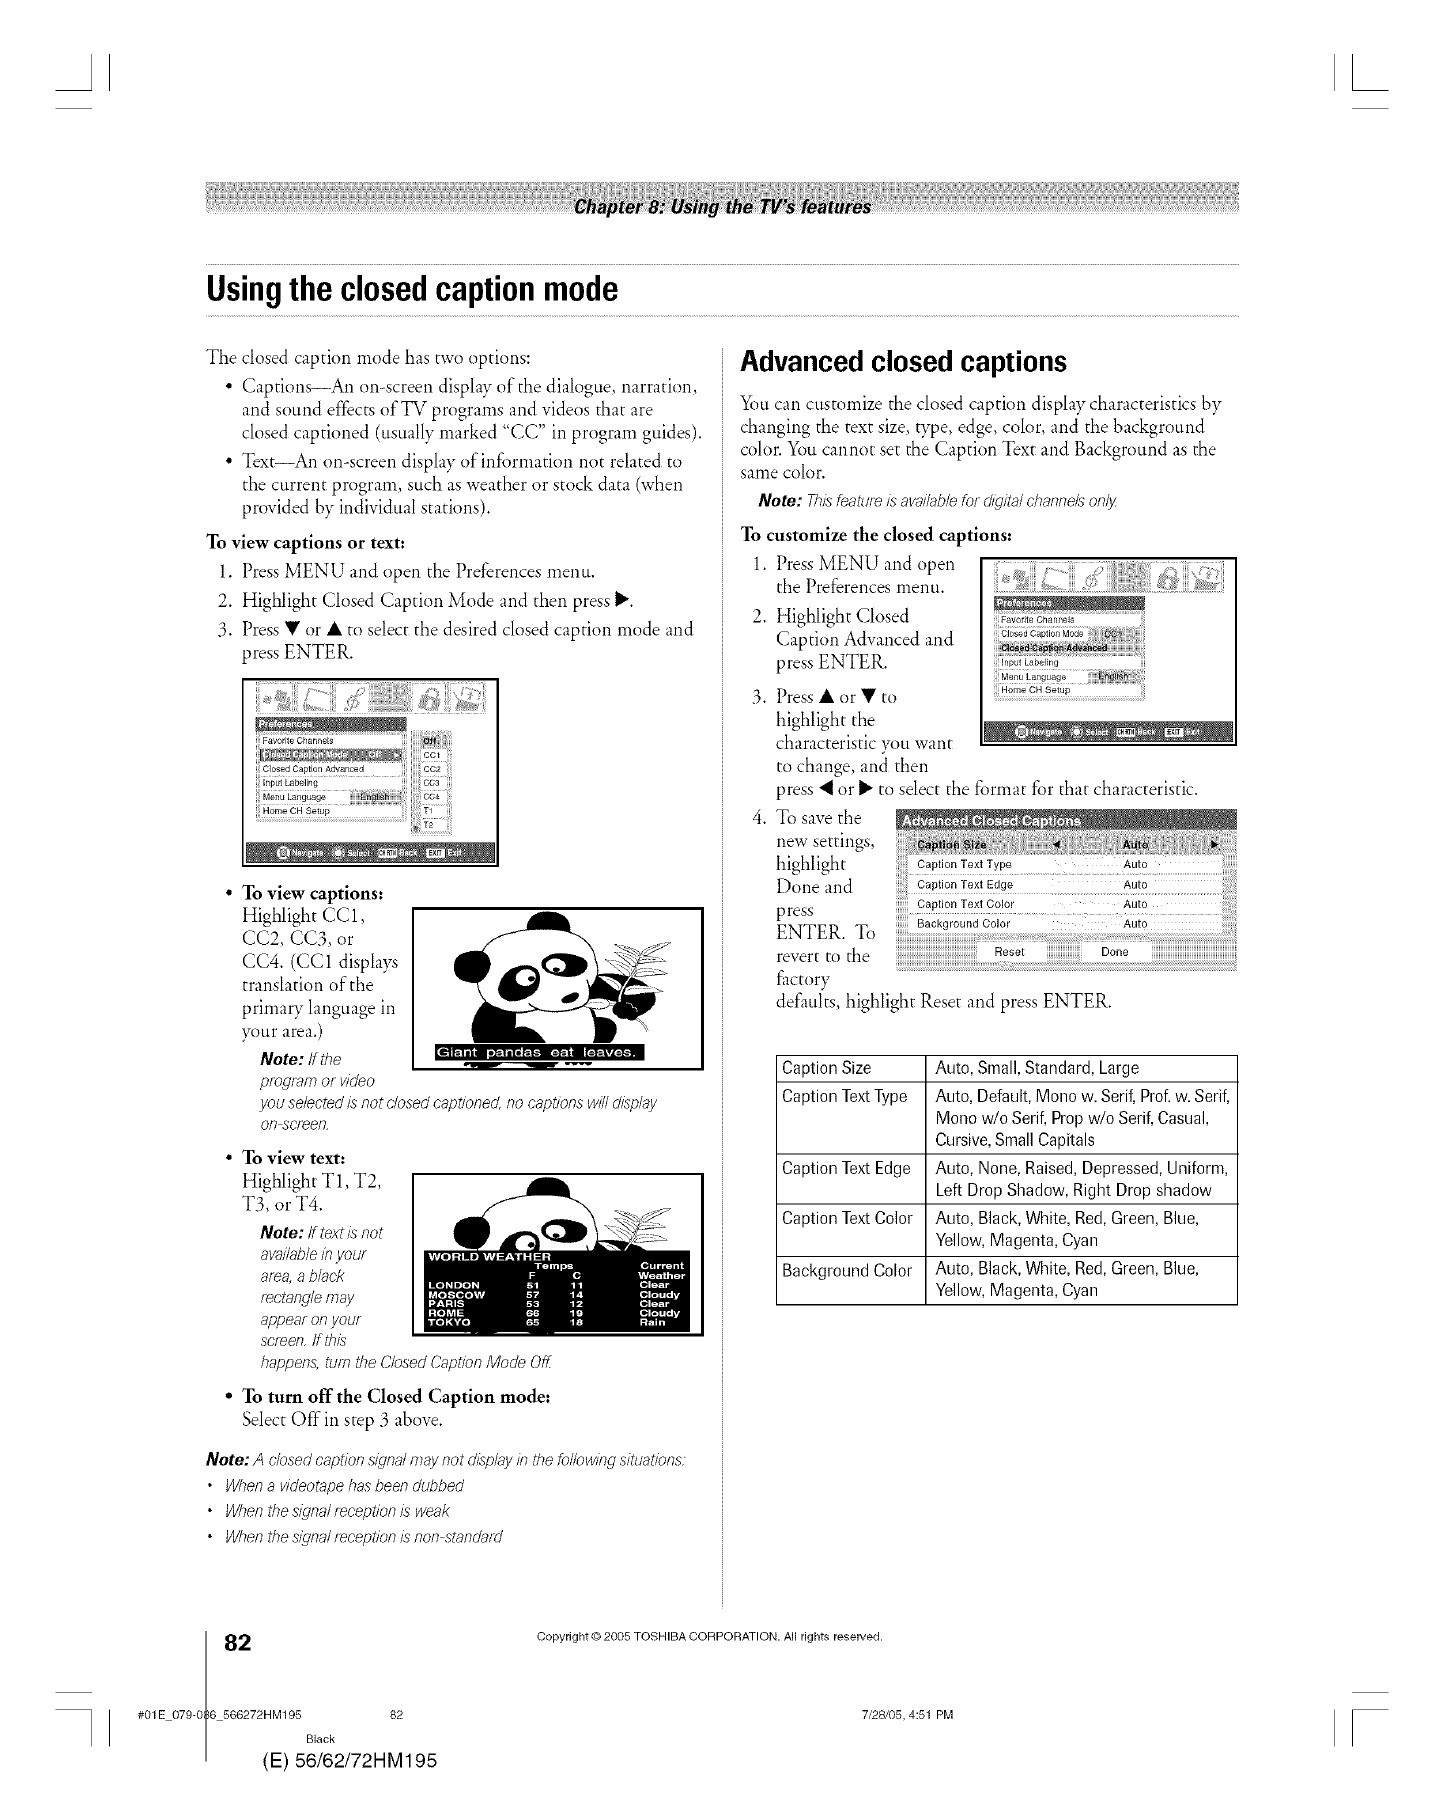
Usingtheclosedcaptionmode
The closed caption mode has two options:
• Captions_An on-screen display of the dialogue, narration,
and sound effects of TV programs and videos that are
closed captioned (usually marked "CC" in program guides).
• Text_An on-screen display of information not related to
the current program, such as weather or stock data (when
provided by individual stations).
To view captions or text:
1. Press MENU and open the Preferences menu.
2. Highlight Closed Caption Mode and then press _'.
3. Press • or • to select the desired closed caption mode and
press ENTER.
To view captions:
Highlight CC 1,
CC2, CC3, or
CC4. (CC1 displays
translation of the
primary language in
your area.)
Note: ff the [=ul,,.=._,,_._,--=_,=._*,._-.=
program or video
you sebcted Lsnot dosed captioned, no captions wl2 display
on screen,
• To view text:
Highlight T1, T2,
T3, or T4.
Note: If textL_not
available#7your
area,ablack
[ectanglemay
appearonyour
screen,If this
happen&turnthe ClosedCaptionMode Of_
• To turn off the Closed Caption mode:
Select Offin step 3 above.
Note: Aclosed caption signal may not display in the following situations:
•When avideotape has been dubbed
• When the signal teceptlon Lsweak
• When the signal reception Lsnon standald
Advanced closed captions
You can customize the closed caption display characteristics by
changing the text size, type, edge, color, and the background
color. You cannot set the Caption Text and Background as the
same color.
Note: ThisfeatureL; ava&ble for digital channelsonly
To customize the closed captions:
1. Press MENU and open
the Preferences menu.
2. Highlight Closed
Caption Adwmced and
press ENTER.
Press • or • to
highlight the
characteristic )_m want
to change, and then
press "_or _" to select the format for that characteristic.
To save the
new settings,
highlight
Done and
Reset Done
press Caption Text Color Auto
ENTER. To
revert to the
factory
defaults, highlight Reset and press ENTER.
Caption Size Auto, Small, Standard, Large
Caption TextType Auto, Default, Mono w. Serif,Pro/w. Serif,
Mono w/o Serif, Prop w/o Serif,Casual,
Cursive,SmallCapitals
Caption Text Edge Auto, None, Raised, Depressed,Uniform,
Left Drop Shadow, Right Drop shadow
Caption Text Color Auto, Black, White, Red,Green, Blue,
Yellow, Magenta, Cyan
Background Color Auto, Black, White, Red,Green, Blue,
Yellow, Magenta, Cyan
2(
#01E 079-0 6 566272HM195 82
Black
E) 56/62/72HM195
Copyright © 2005 TOSHIBA CORPORATION. All rights reserved.
7/28105, 4:51 PM [
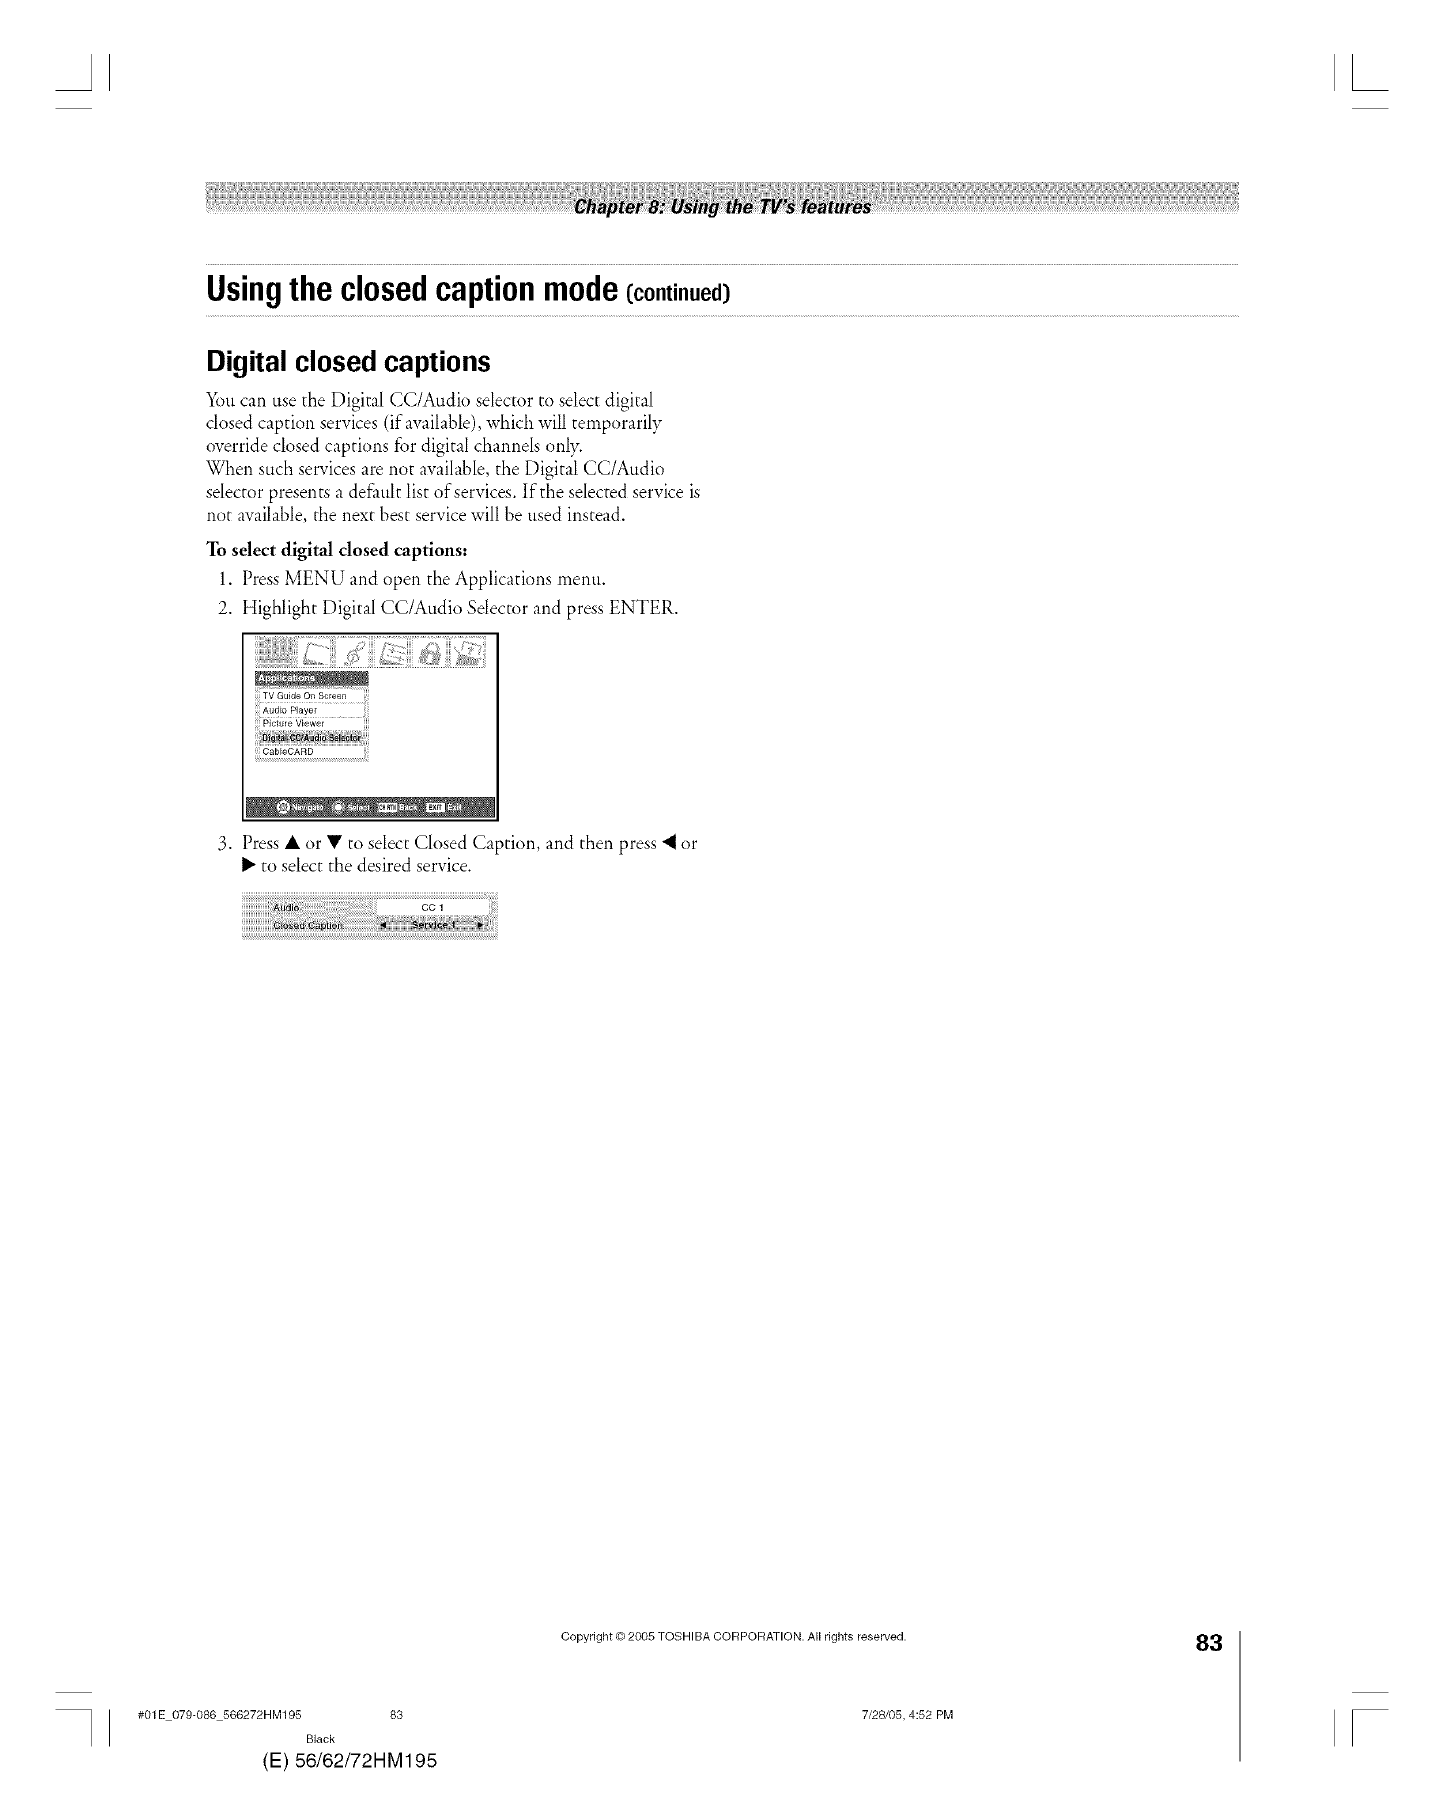
Usingtheclosedcaptionmode(continued)
Digital closed captions
xfimcan use the Digital CC/Audio selector to select digital
closed caption services (if available), which will temporarily
override closed captions for digital channels only.
When such services are not available, the Digital CC/Audio
selector presents a default list of services. If the selected service is
not available, the next best service will be used instead.
To select digital closed captions:
1. Press MENU and open the Applications menu.
2. Highlight Digital CC/Audio Selector and press ENTER.
CableCARD
3. Press • or • to select Closed Caption, and then press "_ or
_" to select the desired service.
_i cci
#01E 079-086 566272HM195 83
Black
(E) 56/62/72HM195
Copyright © 2005 TOSHIBA CORPORATION. All rights reserved.
7/28105, 4:52 PM
83
F
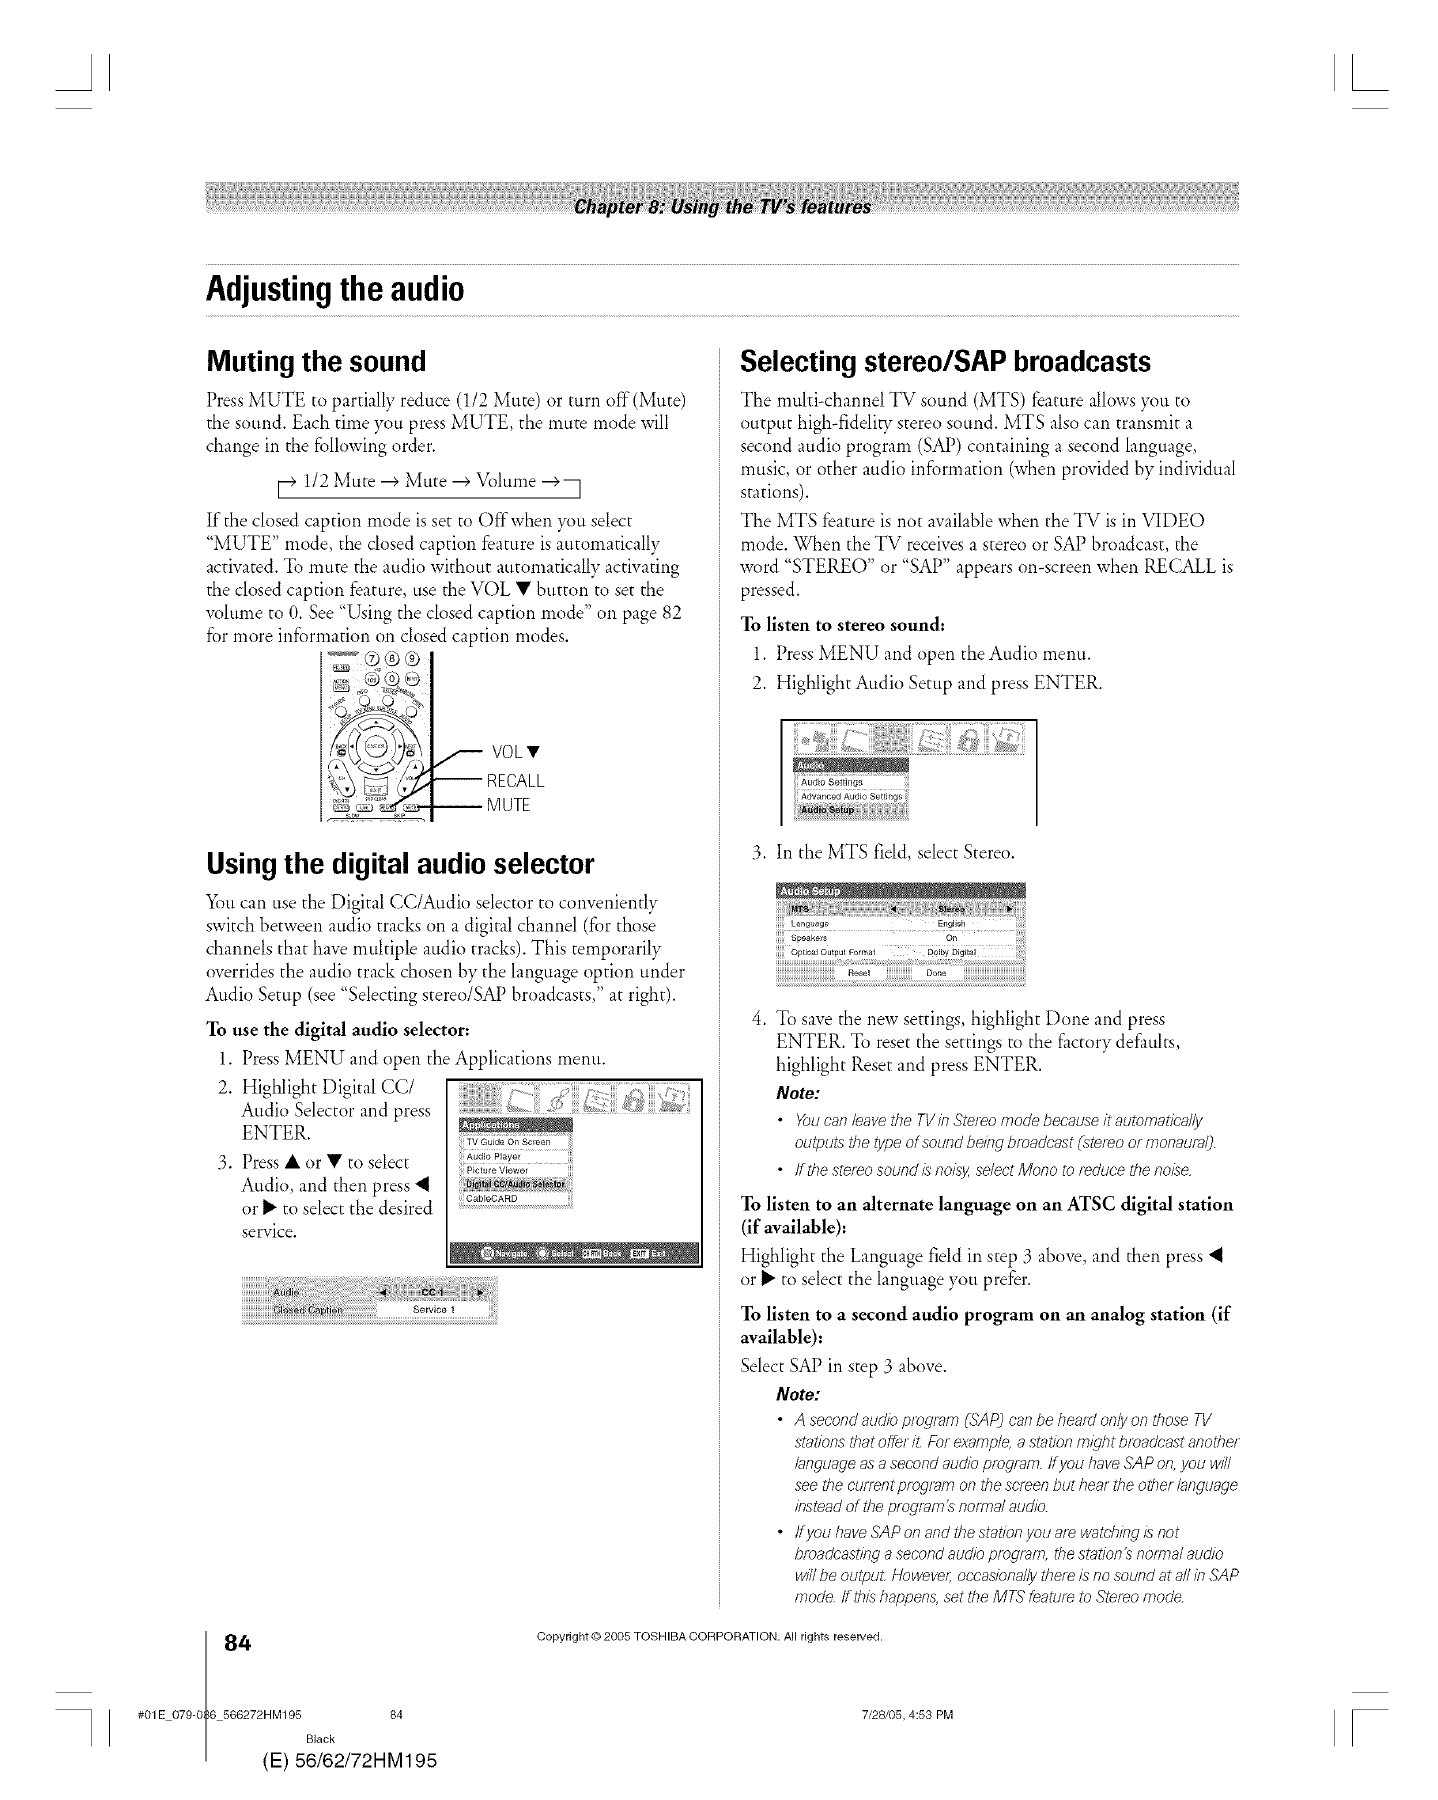
Adjustingtheaudio
Muting the sound
Press MUTE to partially reduce (1/2 Mute) or turn off(Mute)
the sound. Each time you press MUTE the mute mode will
change in the following order.
[_ 1/2 Mute --->Mute --->Volume -->7
If the closed caption mode is set to Offwhen }_u select
"MUTE" mode, the closed caption feature is automatically
activated. To mute the audio without automatically activating
the closed caption feature, use the VOL • button to set the
vohime to 0. See "Using the closed caption mode" on page 82
for more information on closed caption modes.
VOLV
RECALL
-- M UTE
Usingthe digital audio selector
You can use the Digital CC/Audio selector to conveniently
switch between audio tracks on a digital channel (for those
channels that have multiple audio tracks). This temporarily
overrides the audio track chosen by the language option under
Audio Setup (see "Selecting stereo/SAP broadcasts," at right).
To use the digital audio selector:
1. Press MENU and open the Applications menu.
2. Highlight Digital CC/
Audio Selector and press
ENTER.
3. Press • or • to select
Audio, and then press 'I
or P"to select the desired
service.
CableOARD
Service 1
Selecting stereo/SAP broadcasts
The nmlti-channel TV sound (MTS) feature allows you to
output high-fideli_ Tstereo sound. MTS also can transmit a
second audio program (SAP) containing a second language,
music, or other audio information (when provided by individual
stations).
The MTS feature is not available when the TV is in VIDEO
mode. When the TV receives a stereo or SAP broadcast, the
word "STEREO" or "SAP" appears on-screen when RECALL is
pressed.
To listen to stereo sound:
1. Press MENU and open the Audio menu.
2. Highlight Audio Setup and press ENTER.
3. In the MTS field, select Stereo.
;;;;; OptJea] Output Format D01by Digifa! iiiiiill
Ro_t iiiiiiiiiiiiiiiDon_
4. To save the new settings, highlight Done and press
ENTER. To reset the settings to the factory defaults,
highlight Reset and press ENTER.
Note:
•Youcanleavethe TVin Stereomodebecauseit automatically
outputsthetypeof soundbeing broadcast(stereoor monaural).
• ffthe stereosoundisnoLsyselectMono to teducethenoise,
To listen to an alternate language on an ATSC digital station
(if available):
Highlight the Language field in step 3 above, and then press 'I
or P" to select the language you prefer.
To listen to a second audio program on an analog station (if
available):
Select SAP in step 3 above.
Note:
• A secondaudioprogram (SAP) canbe heard onlyon thoseTV
stationsthatoffe/ i_ Forexample,a stationmight broadcastanother
languageasa secondaudio program,ff youhaveSAPon,you will
seethe CUiTentprogramon thescreenbut heartheother language
insteadof theprogram'sno/ma/audio.
• ffyou haveSAPon andthe stationyou ale watchingis not
broadcastinga secondaudioprogram,thestatlontsnomTa/audio
willbe outpuLHowever:occasionallythere/s nosound at allin SAP
mode ff thLshappen&set the MTSfeatureto Stereomode.
4(
#01E 079-0 6 566272HM195 84
Black
E) 56/62/72HM195
Copyright © 2005 TOSHIBA CORPORATION. All rights reserved.
7/28105, 4:53 PM [
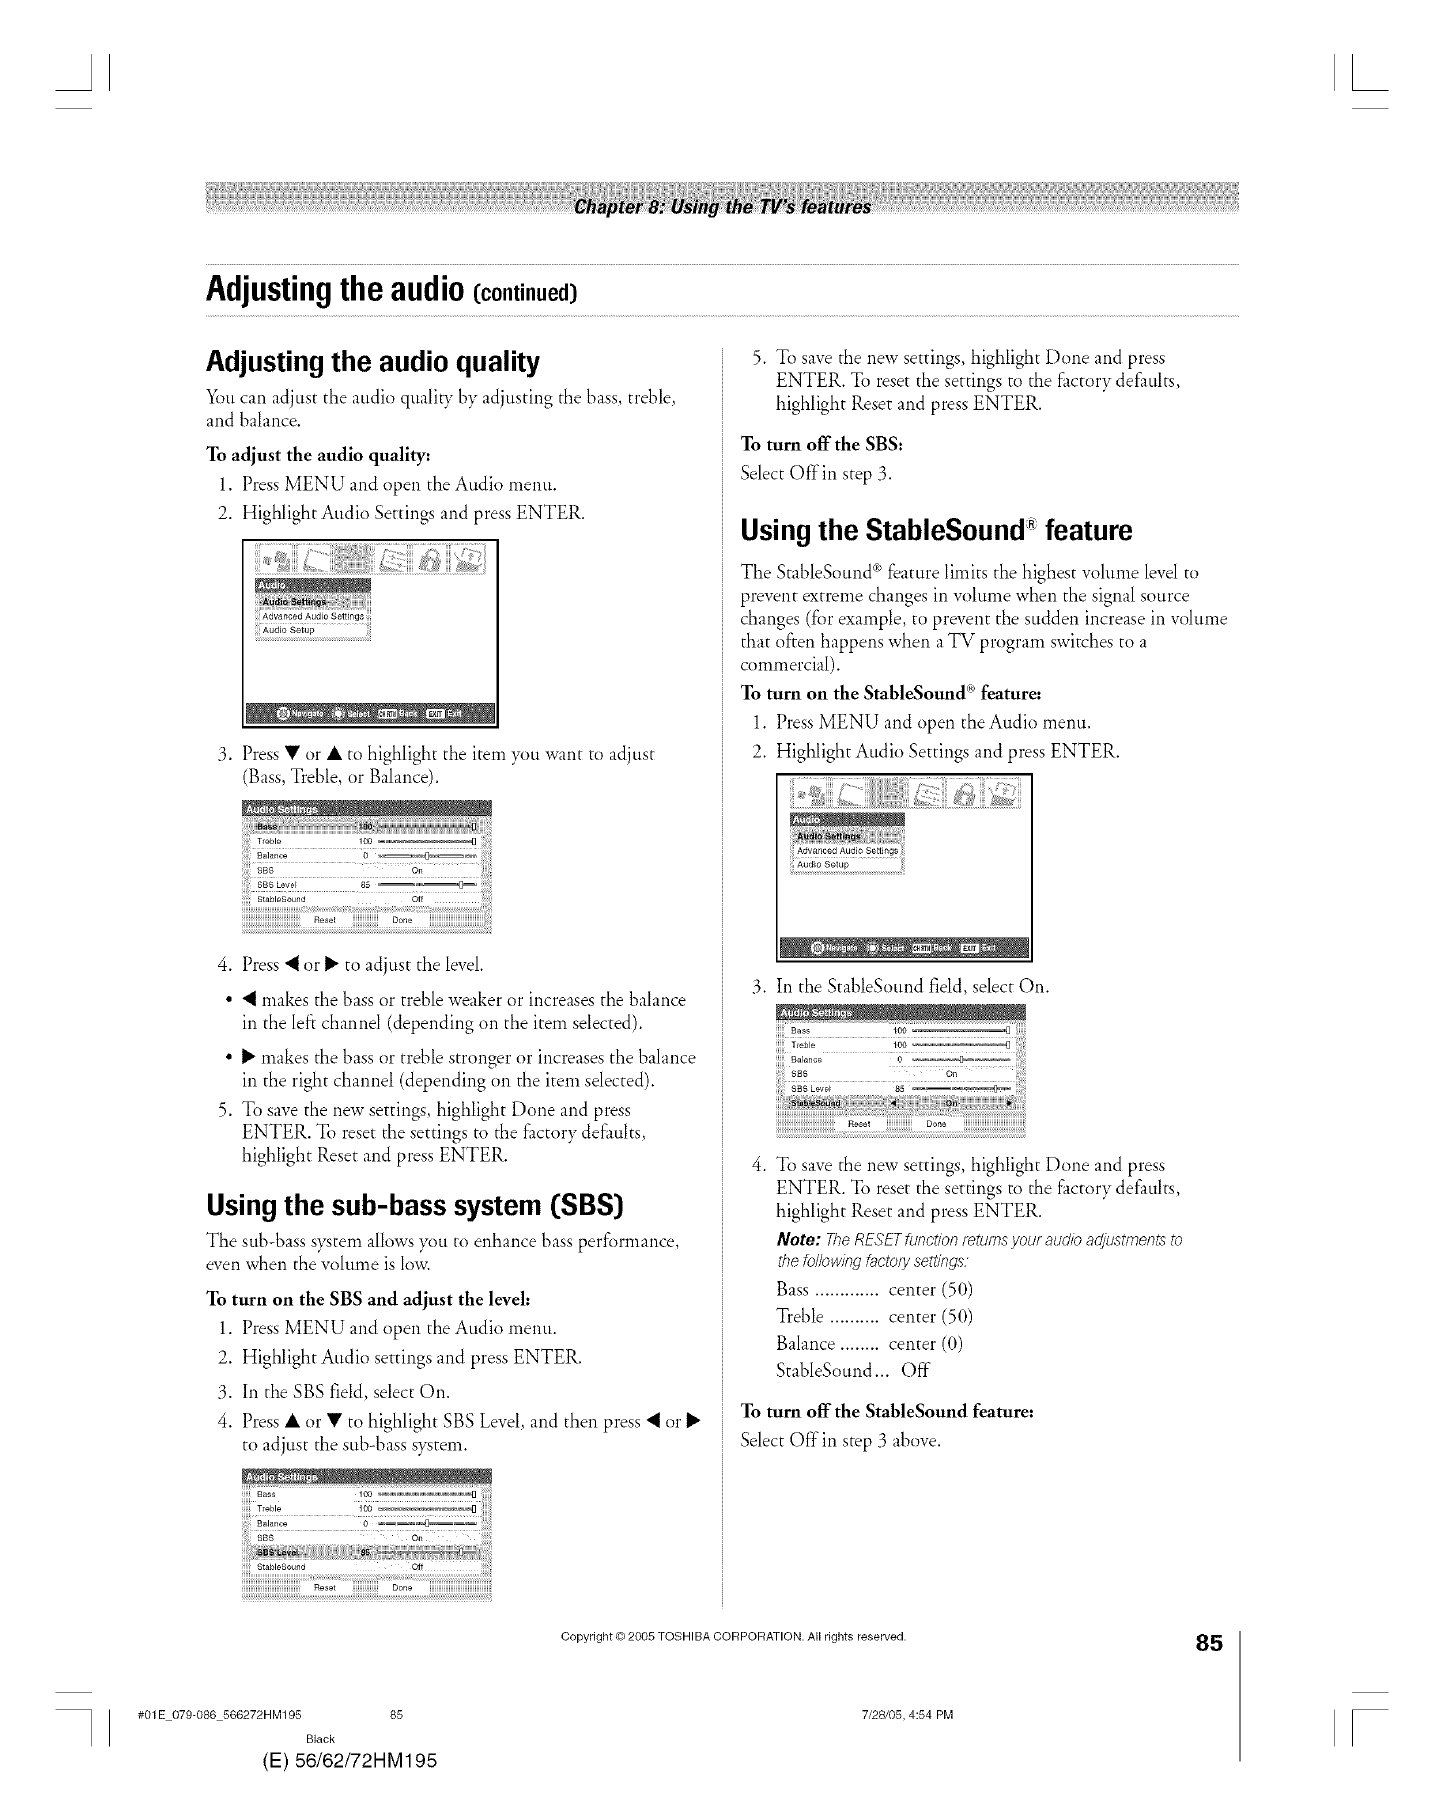
Adjustingthe audio(continued)
Adjusting the audio quality
35m can adjust the audio qualibTby adjusting the bass, treble,
and balance.
To adjust the audio quality=
1. Press MENU and open the Audio menu.
2. Highlight Audio Settings and press ENTER.
Advanced Audio Settings
3. Press • or • to highlight the item you want to adjust
(Bass, Treble, or Balance).
SBS Leve_ 85
.Press "_or _" to adjust the level.
"_makes the bass or treble weaker or increases the balance
in the left channel (depending on the item selected).
• _" makes the bass or treble stronger or increases the balance
in the right channel (depending on the item selected).
5. To save the new settings, highlight Done and press
ENTER. To reset the settings to the fi_ctorydefaults,
highlight Reset and press ENTER.
Usingthe sub-bass system [SBS)
The sub-bass s)_tem allows )_m to enhance bass performance,
even when the volume is low.
To turn on the SBS and adjust the level:
1. Press MENU and open the Audio menu.
2. Highlight Audio settings and press ENTER.
3. In the SBS field, select On.
4. Press • or • to highlight SBS Level, and then press "_or _"
to adjust the sub-bass system.
Reset HHHHHHHiDone
5. To save the new settings, highlight Done and press
ENTER. To reset the settings to the factory defaults,
highlight Reset and press ENTER.
To turnoffthe SBS:
Select Offin step 3.
Usingthe StableSound feature
The StableSound ®feature limits the highest volume level to
prevent extreme changes in volume when the signal source
changes (for example, to prevent the sudden increase in volume
that often happens when a TV program switches to a
commercial).
To turn on the StableSound <*>feature=
1. Press MENU and open the Audio menu.
2. Highlight Audio Settings and press ENTER.
3. In the StableSound field, select On.
To save the new settings, highlight Done and press
ENTER. To reset the settings to the factory defaults,
highlight Reset and press ENTER.
Note: The RESET function returns your audio adjustments to
the follow#Tgfactoff set_/bgs.
Bass ............. center (50)
Treble .......... center (50)
Balance ........ center (0)
StableSound... Off"
To turn off the StableSound feature:
Select Off in step 3 above.
Copyright © 2005 TOSHIBA CORPORATION. All rights reserved. 85
#01E 079-086 566272HM195 85
Black
(E) 56/62/72HM195
7/28105, 4:54 PM [
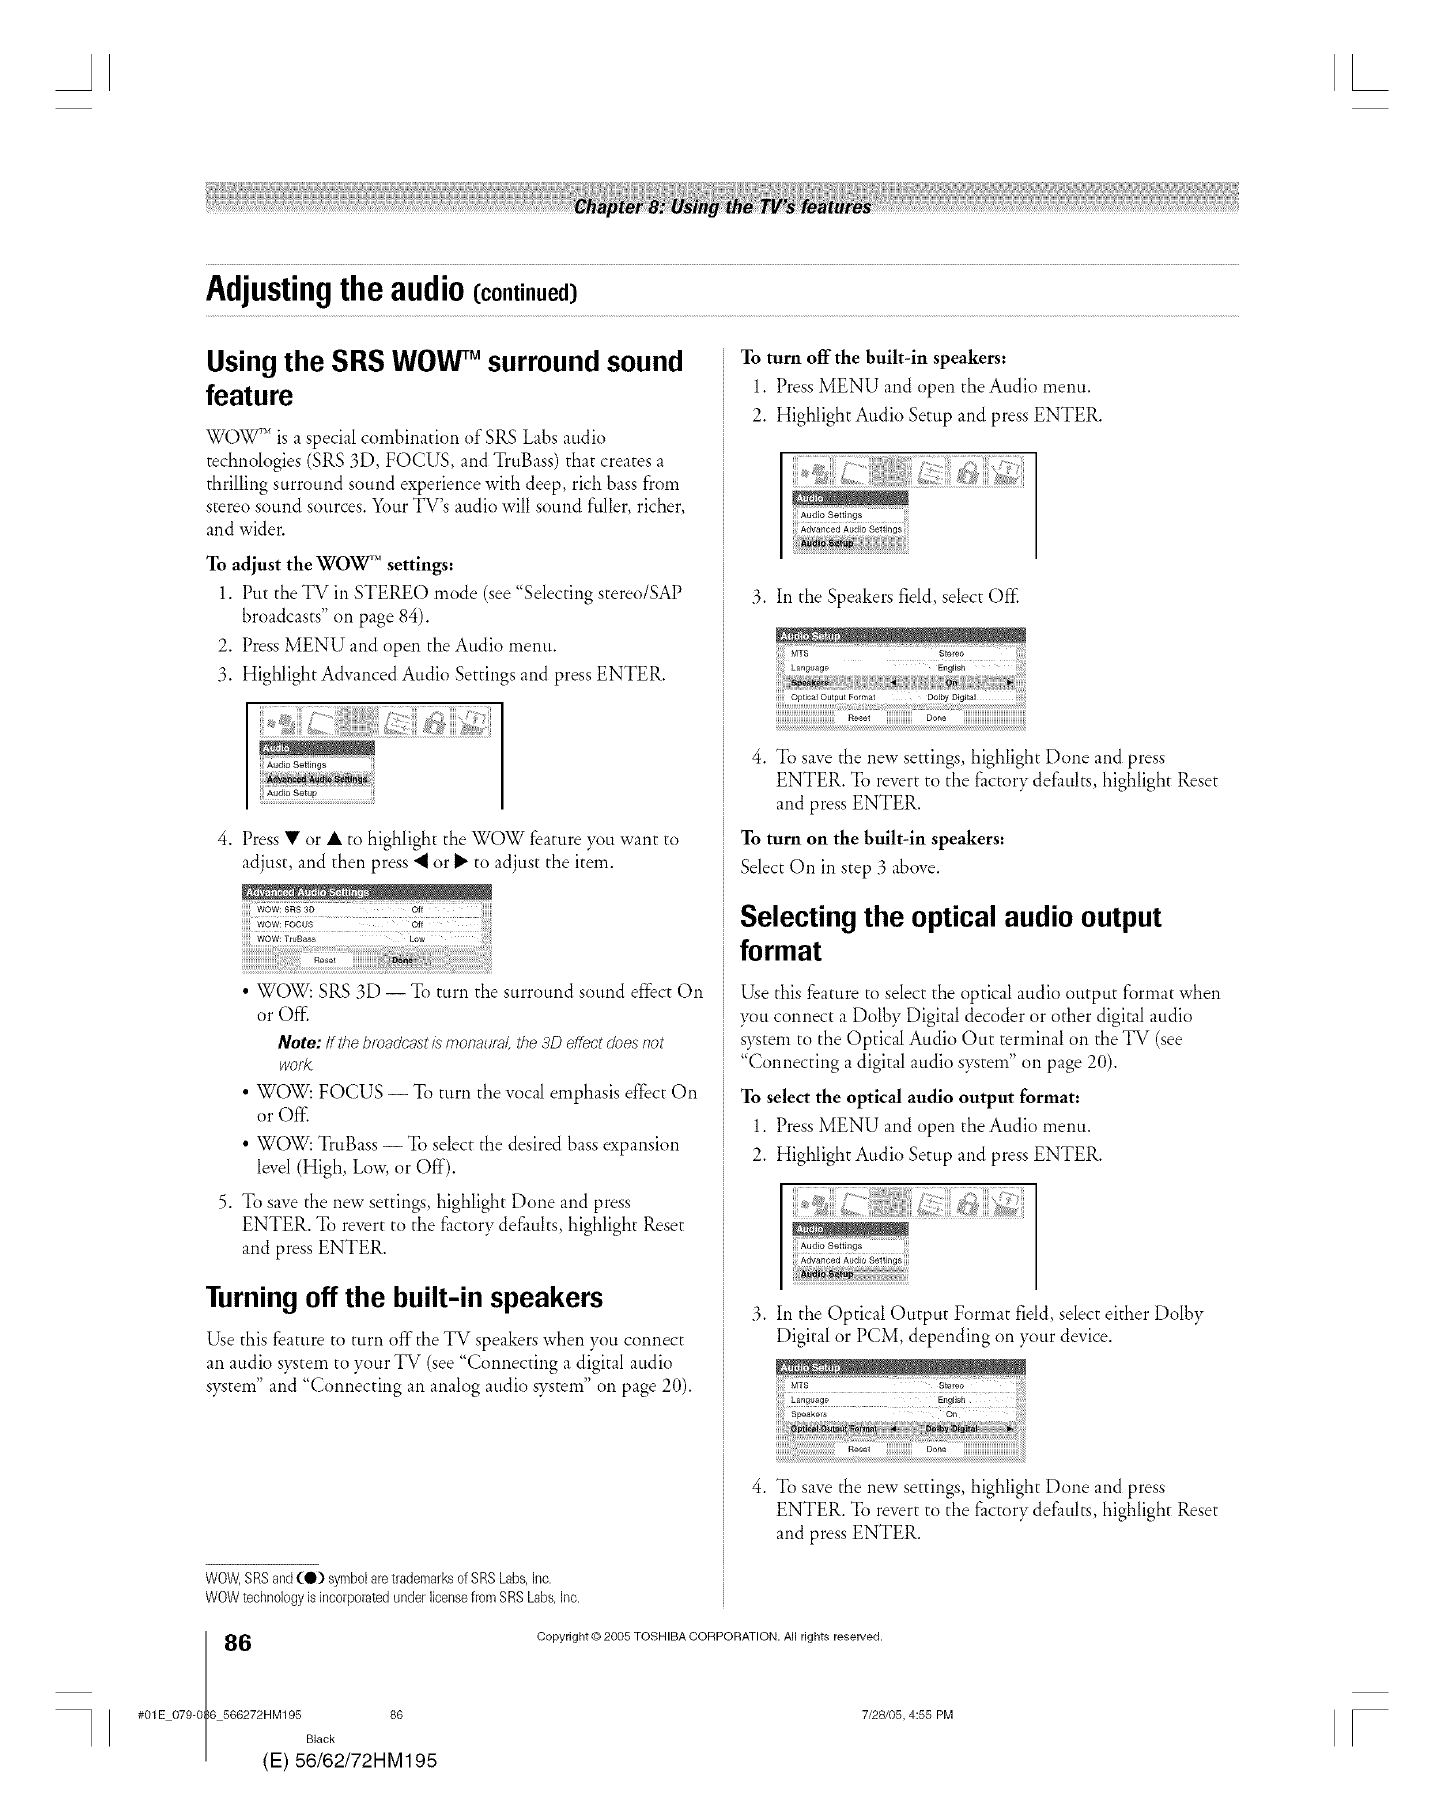
Adjustingthe audio(continued)
Usingthe SRS WOWTM surround sound
feature
W()W _'_is a special combination of SRS Labs audio
technologies (SRS 3D, FOCUS, and TruBass) that creates a
thrilling surround sound experience with deep, rich bass from
stereo sound sources. Your TV's audio will sound fuller, richer,
and wider.
To adjust the WOW _"settings:
1. Put the TV in STEREO mode (see "Selecting stereo/SAP
broadcasts" on page 84).
2. Press MENU and open the Audio menu.
3. Highlight Advanced Audio Settings and press ENTER.
Audio Settings
Audio Setup
4. Press • or • to highlight the WOW feature you want to
adjust, and then press 'I or _ to adjust the item.
• WOW: SRS 3D -- To turn the surround sound ef}'ectOn
or Off:
Note: If the broadcast L_monaural, the 3D effect does not
wot_.
• WOW: FOCUS -- % turn the vocal emphasis effect On
or Off'.
• WOW: TruBass -- To select the desired bass expansion
level (High, Low, or Off').
5. To save the new settings, highlight Done and press
ENTER. To revert to the factory defaults, highlight Reset
and press ENTER.
Turningoff the built-in speakers
Use this feature to turn off the TV speakers when you connect
an audio system to your TV (see "Connecting a digital audio
system" and "Connecting an analog audio system" on page 20).
W0W, SRSand(Q) symbolaretrademarksof SRSLabs,inc.
WOWtechnologyisincorporatedunderlicensefromSRSLabs,inc.
To turn offthe built-in speakers:
1. Press MENU and open the Audio menu.
2. Highlight Audio Setup and press ENTER.
3. In the Speakers field, select Off"
4. To save the new settings, highlight Done and press
ENTER. To revert to the factory defaults, highlight Reset
and press ENTER.
To turn on the built-in speakers:
Select On in step 3 above.
Selecting the optical audio output
format
Use this feature to select the optical audio output format when
you connect a Dolby Digital decoder or other digital audio
system to the Optical Audio Out terminal on the TV (see
"Connecting a digital audio system" on page 20).
To select the optical audio outpm format:
1. Press MENU and open the Audio menu.
2. Highlight Audio Setup and press ENTER.
3. In the Optical Output Format field select either Dolbv
Digital or PCM, depending on your device.
4. To save the new settings, highlight Done and press
ENTER. To revert to the factory defaults, highlight Reset
and press ENTER.
6(
#01E 079-0 6 566272HM195 86
Black
E) 56/62/72HM195
Copyright © 2005 TOSHIBA CORPORATION. All rights reserved.
7/28105, 4:55 PM F
Usingthe mediaplayer
You can use the TV's media player to view compatible JPEG
files or play compatible MP3 files on the TV using a memory
card (as described below and right). _5m can display JPEG files
in thumbnail mode or view them as a slide show.
Note:
• Never remove the memory card or turn off the TV while
using the memory card. Doing so may result in loss of data and/
or damage to the memo/y ca/d and/or 77/,SUCH DAMAGE tS NOT
COVERED BY YOUR TOSHIBA WARRANTY
•It/L_recommended that you back up your memory card data, Toshiba
L_not liable for any damage caused by the use of af_ymemo/y ca/d
with tbL_77/,Toshiba will not compensate fo/ any lost data or
recording(,s9 caused l_ythe use of suck cards.
• For instructions on using you/ digital camera, t_fer to the owner_
manual for your camera.
• Forinstructions on usingyourmemo/y card, refer to the owner_
manual for your memoff card
• Failure to tam proper ca_e ofa memoty card may prevent display of
p/ctu_a or playback of MP3 filea from the card or tesult #7damage to
the memo/y ca/d and/or 77/,SUCH DAMAGE IS NOT COVERED BY
YOUR TOSHIBA WARRANTY See "Memoff ca/d care and
handl#Tg" on page 90,
• Thetechnical criteria set out in this owner_ manual are meant as a
guide only
• P/ease be advised tbatyou must obtain pefTnl_s/on from the
applicable copyngbt owners to download co,oyrigbted content,
including music file& #7ar_yfo/mat, includingthe MP3 fofTrTat,pdor to
the downloading thereof. Toshiba has no dgbt to grant and does not
grant pem}Lssion to download any copyrighted contenL
Media Specifications
Memory card specifications
Supported memory card types:
-,S'_I_ memory card (ver. 1.0)
- MMC (MultiMediaCard _'*)
- Memory Stick _'_(Pro)
- xD-Picture Card"* (16MB-512MB)
- CompactFlash c_memory card (_pel)
Supported memory card format:
- FAT16
•Other memory card formats (including but not limited to FAT32
and NTFS) are not suppolted.
Maximum memory card capacity:
-512 MB.
Maximum number of files per memory card:
- JPEG = 1,000;
•All JPEGfiles overthe 1,000thona single memorycard will not
display.
-MP3 = 200.
•All MP3files overthe 200th ona singlememorycard will not play.
JPEG file specifications
Maximum displayable JPEG image size:
-8MB
•JPEGfileslargerthan8 MBwillnotdisplay.
Maximum displayable JPEG image resolution:
-6000 x 4000 pixels
MP3 file specifications
Maximum MP3 file size:
-50MB
• _ is a trademark.
• MMC and MultiMediaCard are tlademarks of Irffir_eonTechnologies AG
and licensed to MMCA (MultiMediaCard Association).
• Memoir/Stick isa trademark of Sony Corporation.
• xD Picture Card is a trademark of Fuji Photo Film Co.. Ltd.
• Toshibais an authorized licensee ofthe CompactFlash®and CFlogo _
registeredtrademarks.
Copyright © 2005 TOSHIBA COR PORATION. All rights reserved. 87
#01E 087-092 566272HM195 87
Black
(E) 56/62/72HM195
7/28/05, 4:56 PM [
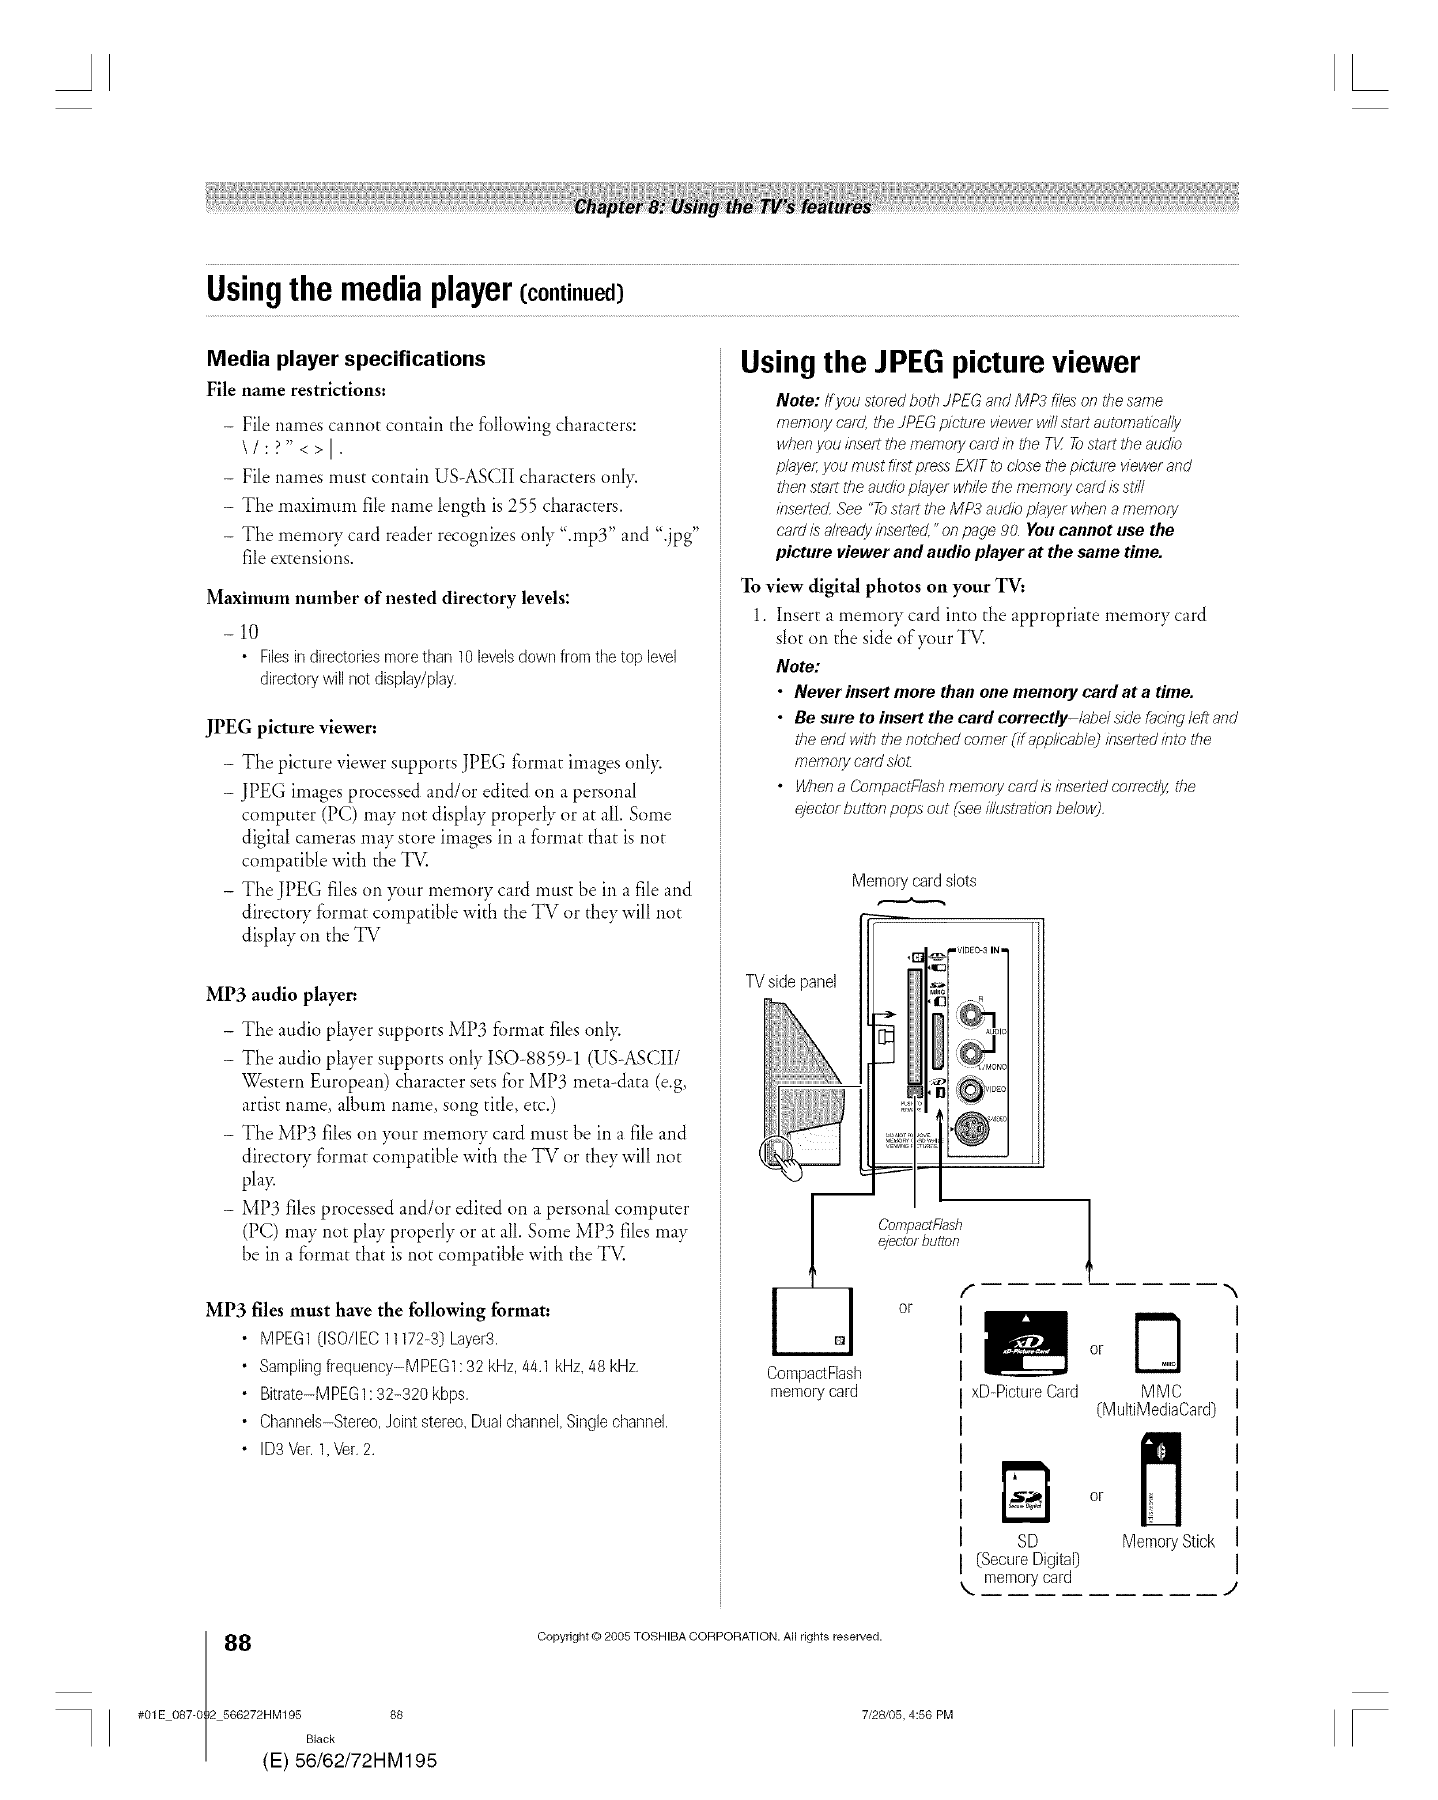
Usingthemediaplayer(continued)
Media player specifications
File name restrictions:
-File names cannot contain the following characters:
\/:?"<>1"
-File names must contain US-ASCII characters onlD
- The maxinmm file name length is 255 characters.
- The memory card reader recognizes only ".rap3" and ".jpg"
file extensions.
Maximum number of nested directory levels:
-10
•Filesindirectoriesmorethan10levelsdownfromthetoplevel
directol7willnotdisplay/play.
JPEG picture viewer:
-The picture viewer supports JPEG format images only.
- JPEG images processed and/or edited on a personal
computer (PC) may not display properly or at all. Some
digital cameras may store images in a format that is not
compatible with the TV.
- The JPEG files on )_mr memory card must be in a file and
directory fbrmat compatible with the TV or they will not
display on the TV
MP3 audio player:
-The audio player supports MP3 format files onl)0
- The audio player supports only ISO-8859-1 (US-ASCII/
Western European) character sets for MP3 meta-data (e.g,
artist name, album name, song title, etc.)
-The MP3 files on )_mr memory card must be in a file and
directory fi)rmat compatible with the TV or they will not
pla>
- MP3 files processed and/or edited on a personal computer
(PC) may not play properly or at all. Some MP3 files may
be in a format that is not compatible with the TV.
MP3 files must have the following format:
• MPEG1 (ISO/IEC 11172-3) Layer3.
• SampNngfrequency-MPEGl: 32 kHz,44.1 kHz,48kHz.
• Bitrate-MPEGl:32-320 kbps.
• Channels-Stereo,Jointstereo,Dual channel,Singlechannel.
• ID3 Ver.1,Ver.2.
Using the JPEGpicture viewer
Note: if you sto_ed both JPEG and MP3 files on the same
memo/y card, the JPEG pieture viewer w#l start automat/ca/!y
when you inse/? the memo/y ca/d in the T_ Tostart the audio
p/aye/; you must fir:stpress EXIT to close the pieture viewer and
t/?er7stair the audio player while the memo/y ca/d Lsstill
irTse_te¢._See "Tosta/?the MP3 audio player when amemo/y
card is already inse/ted,"on page 90 You cannot use the
pictureviewerandaudioplayerat the sametime.
To view digital photos on your TV:
1. Insert a memory card into the appropriate memory card
slot on the side ofy_mr TV.
Note:
•Neverinsertmore thanoee memory cardat a time.
•Besure to insertthe cardcorrectly-/abe/side facing leftand
theendwiththenotchedcorner (if app/icableJ insen'edintothe
memo/yca/dsb_
•Whena CompactFlash memorycatdisinsen'edco/mct/y the
ejector buttonpopsout(see illustration below).
TVside panel
Memorycardslots
E
CompactFlash
memorycard
CompactFlash
ejectol button
or I
I
IxD-PictureCard MMC
(MultiMediaCard)
or
SD Memory Stick
(SecureDigital)
M memorycard
i i J
8(
#01E O87-0 2 566272HM195 88
Black
E) 56/62/72HM195
Copyright (co2005 TOSHIBA CORPORATION. All rights reserved.
7/28105, 4:56 PM [
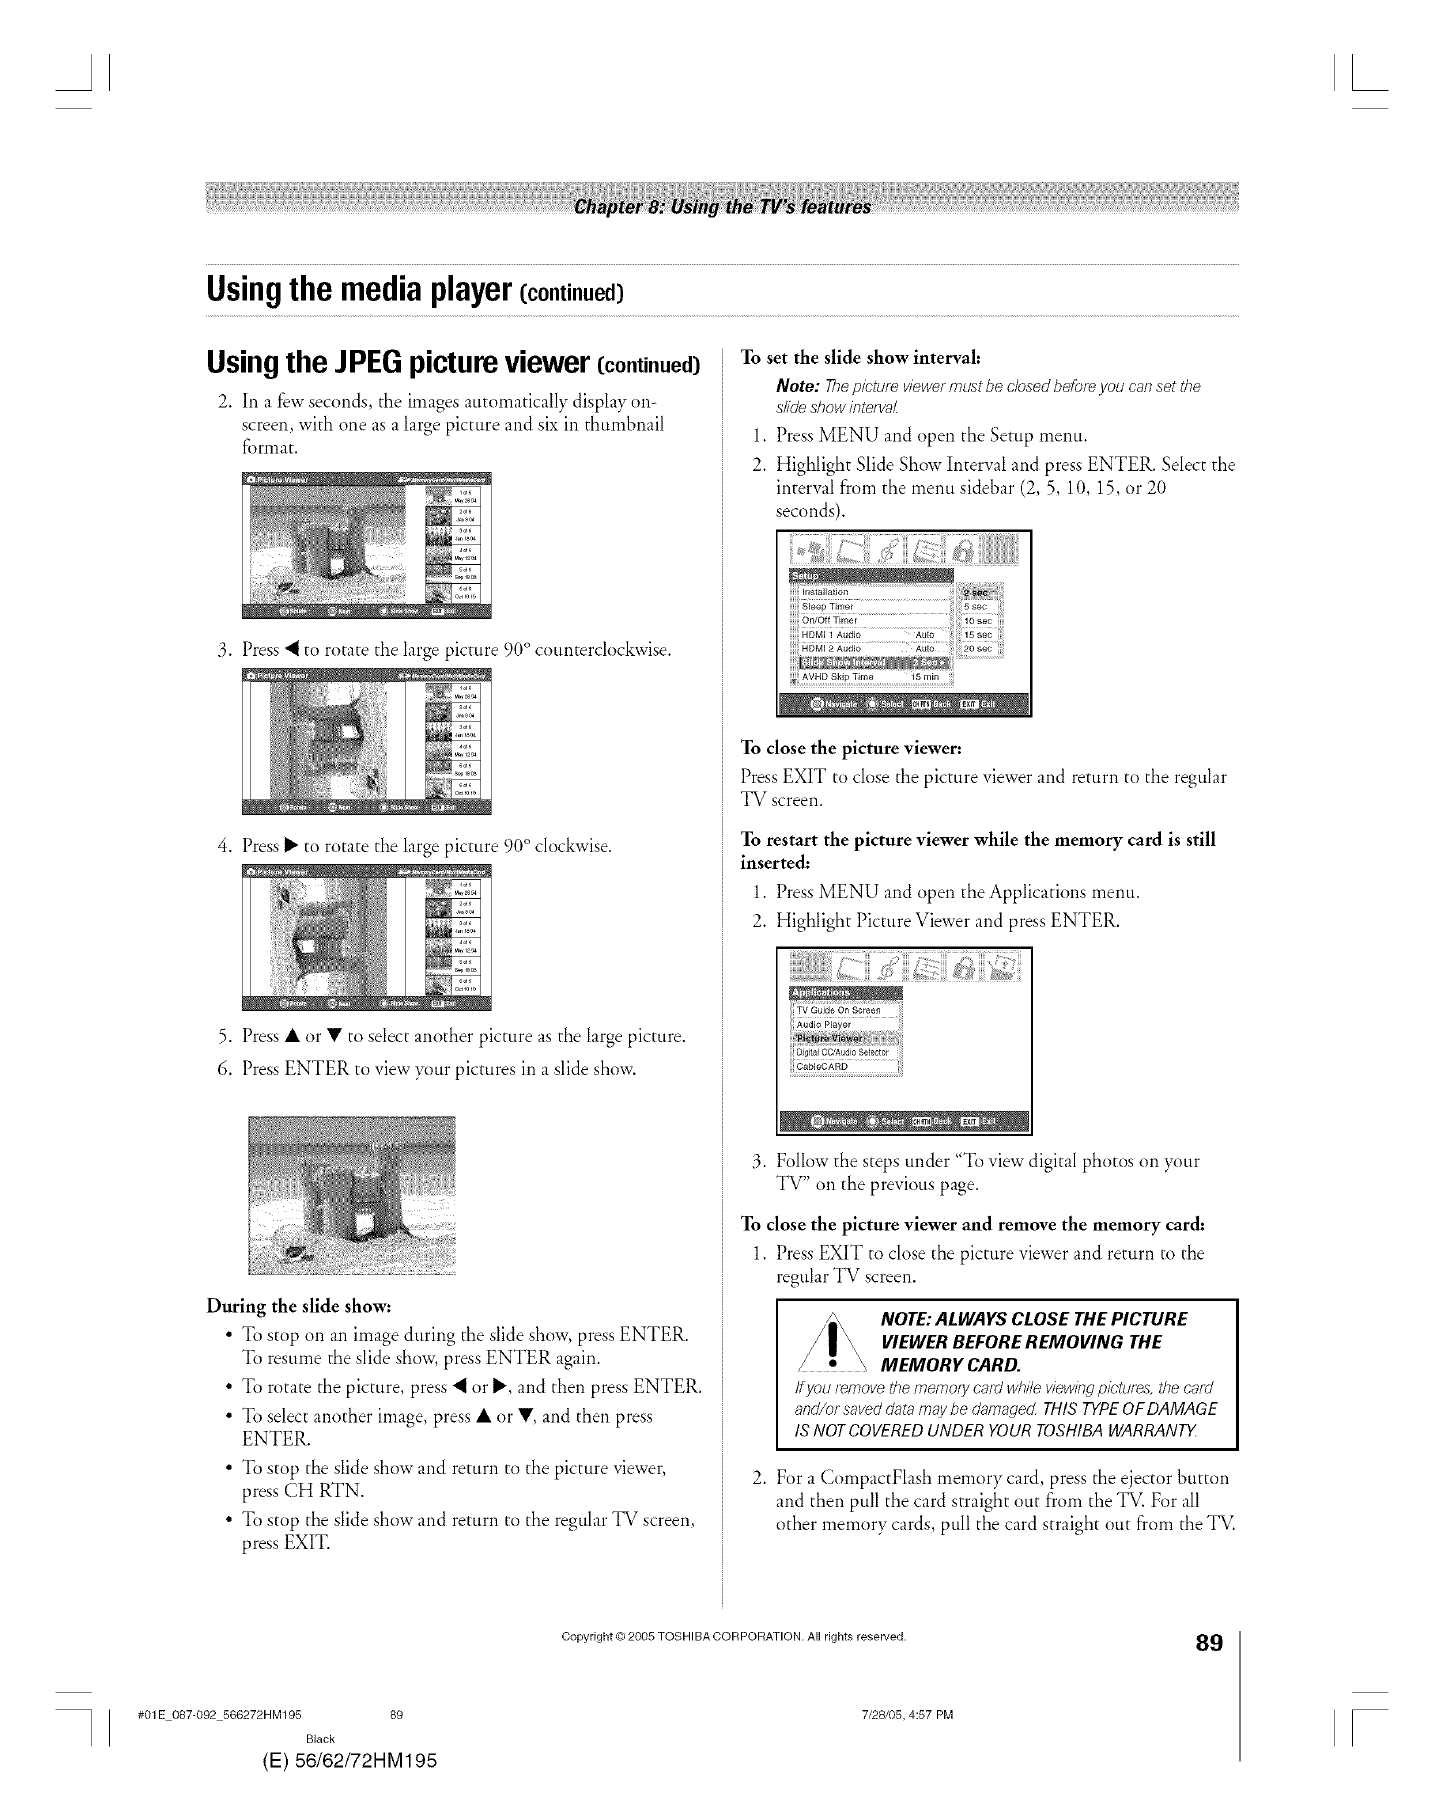
Usingthemediaplayer(continued)
Usingthe JPEGpictureviewer ([continued)
2. In a few seconds, the images atitomatically display on-
screen, with one asa large picture and six in thumbnail
format.
3. Press "_to rotate the large picture 90° counterclockwise.
4. Press_" to rotate the large picture 90° clockwise.
5. Press • or • to select another picture as the large picture.
6. Press ENTER to view your pictures in a slide show.
During the slide show:
•To stop on an image during the slide show, press ENTER.
To resume the slide show, press ENTER again.
• To rotate the picture, press "_or _', and then press ENTER.
• To select another image, press • or •, and then press
ENTER.
• To stop the slide show and return to the picture viewer,
press CH RTN.
• To stop the slide show and return to the regular TV screen,
press EXIT.
To set the slide show interval:
Note: Thepicture viewermustbe c/osedbefo_ you canset the
slideshow interval
l. Press MENU and open the Setup menu.
2. Highlight Slide Show Interval and press ENTER. Select the
interval from the menu sidebar (2, 5, 10, 15, or 20
seconds).
AVHD Skip Time 15 rain
To close the picture viewer:
Press EXIT to close the picture viewer and return to the regular
TV screen.
To restart the picture viewer while the memory card is still
inserted..
1. Press MENU and open the Applications menu.
2. Highlight Picture Viewer and press ENTER.
...... _, ,, _, _,__ _,:_,
Cab_eCARD
3. Follow the steps under "To view digital photos on )_mr
TV" oil the previous page.
To close the picture viewer and remove the memory card:
1. Press EXIT to close the picture viewer and return to the
regular TV screen.
NOTE: ALWAYS CLOSE THE PICTURE
VIEWER BEFORE REMOVING THE
MEMORY CARD.
Ifyou removethememorycard whi/eviewingpic'tur_s,thecard
and/or saveddata maybe dafnaged THIS TYPEOFDAMAGE
IS NOTCOVEREDUNDER YOURTOSHIBAWARRANTY
2. For a CompactFlash memory card, press the ejector button
and then pull the card straight out from the TV. For all
other memory cards pull the card straight out from the TV.
#01E 087-092 566272HM195 89
Black
(E) 56/62/72HM195
Copyright © 2005 TOSHIBA COR PORATION. All rights reserved.
7/28105, 4:57 PM
89
[
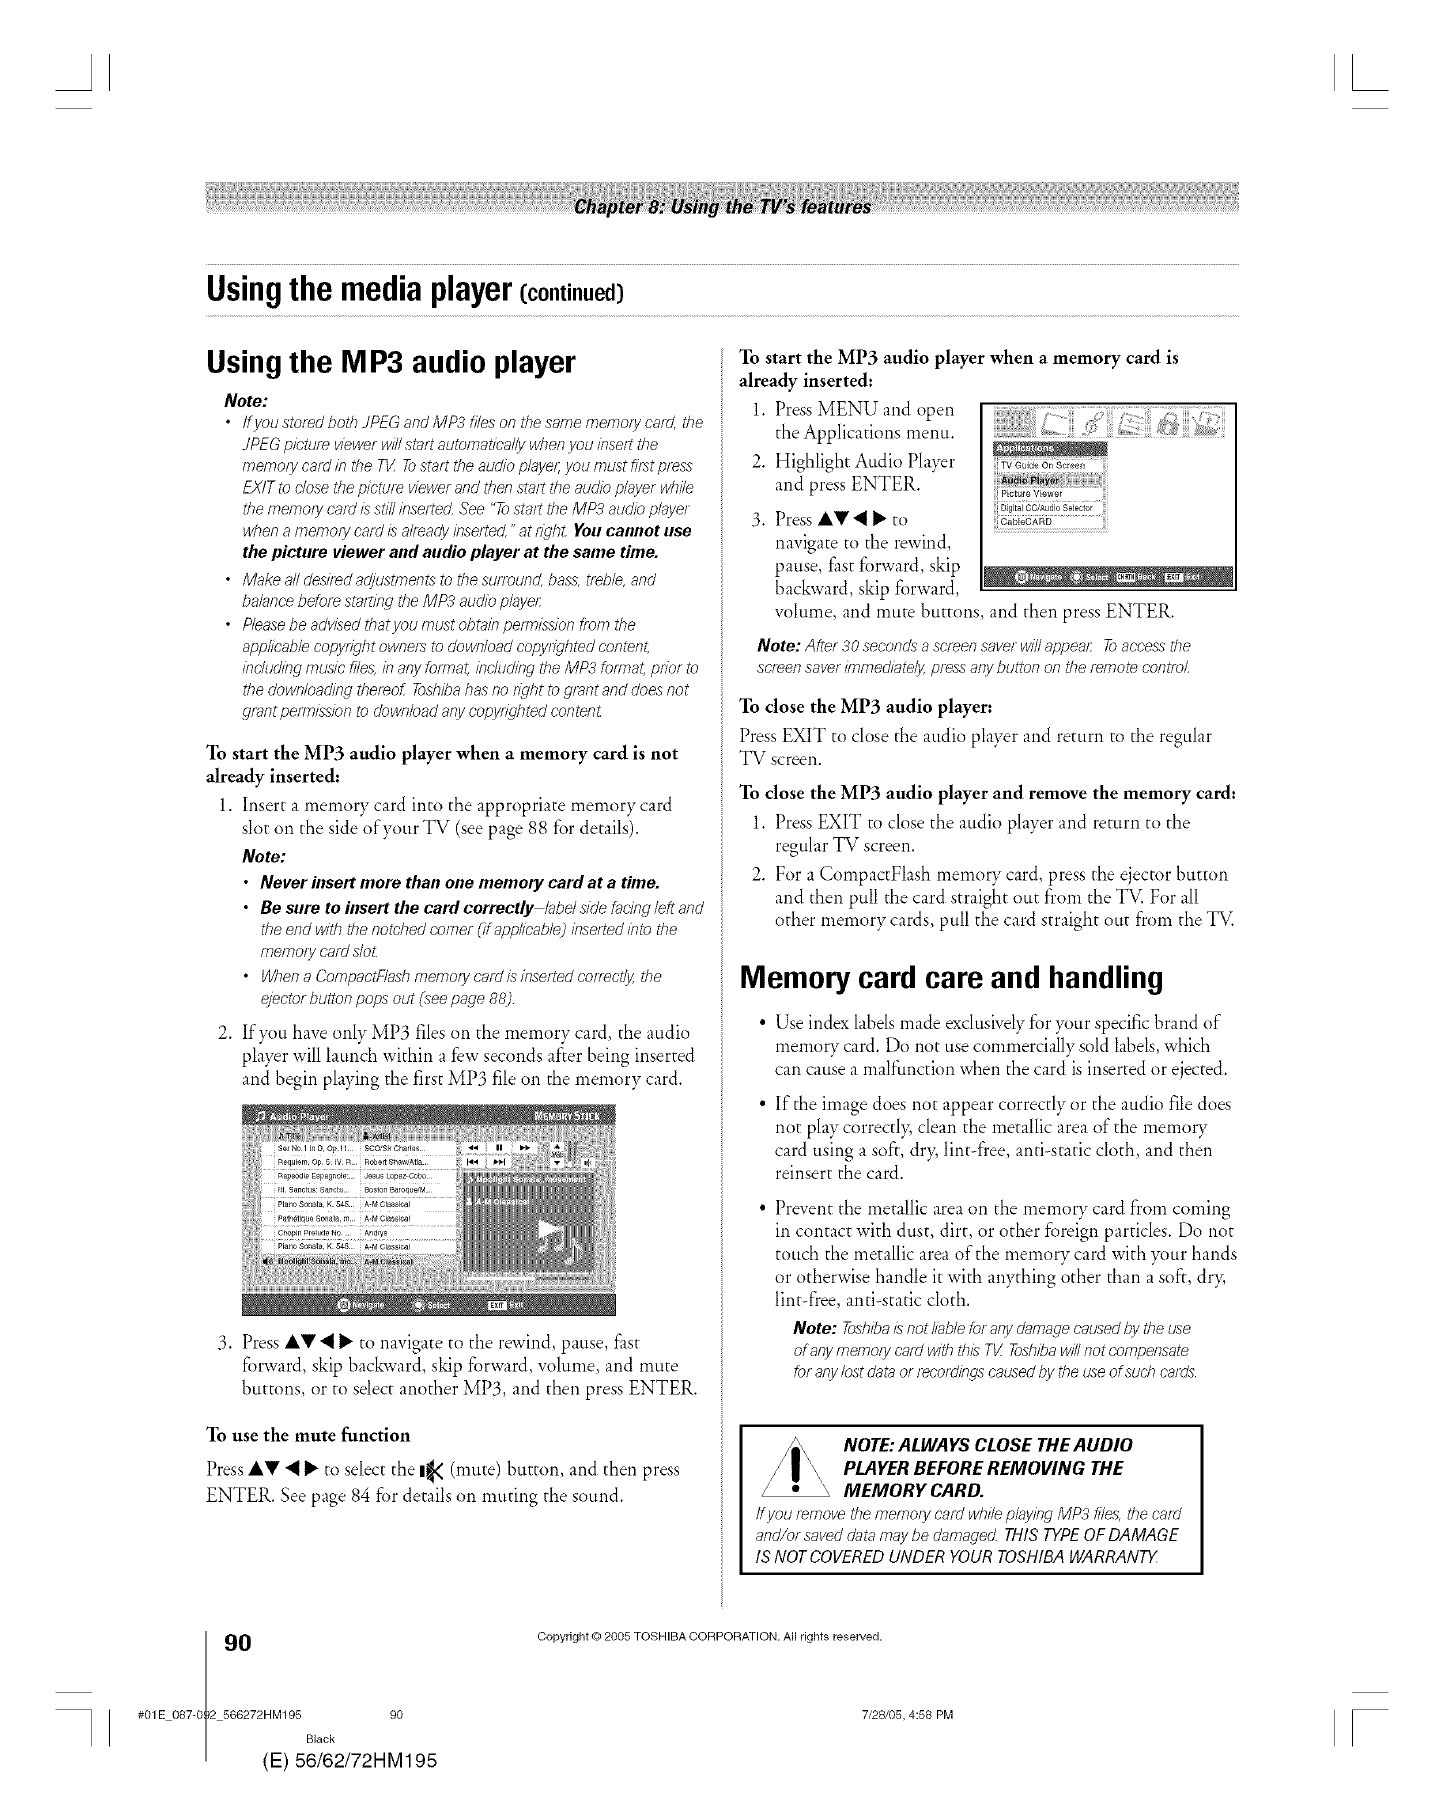
Usingthemediaplayer(continued)
Usingthe MP3 audio player
Note:
•lfyou storedbothJPEGandMP3filesonthesamememorycard,the
JPEGpieture viewerwillstartautomat/cal!y whenyouinse/tthe
memo/yca/dintheTK Tostart"theaudioplaye/; youmustfif_tpress
EXITtoclosethepicture viewerandtfTefystsittheaudioplayer while
thememo/yca/d/_ssWinse/tedSee"TostairtheMP-_audioplayer
whenamemo/ycardisal/_ady insen'ed," at righL Youcannotuse
thepicture viewerandaudioplayerat the sametime.
•Makealldesiredadjustments tothesurTound, bass, treble, and
balancebefo/_staltifYg theMP3audioplayet:
•Pleasebeadvisedtbatyou mustobtainpefmLssion fromthe
applicablecopyr/gbtownerstodownloadcoRyr/gbted content,
/fyc/ud/fyg music'DTes,inanyfo/mat, including theMP3foff-fyat, pdor to
thedowrTIoad/fyg tlYet_of.Toshibahasno dglyt tOgrant anddoesnot
grant pe/m/_ssionto dowry/oadafyycopydgbted contefyL
To start the MP3 audio player when amemory card is not
already inserted:
1. Insert a memory card into the appropriate memory card
slot on the side of your TV (see page 88 for details).
Note:
•Never hlsert more than one memory card at a time.
•Be sure to hlsert the card correctly labelside facingleft and
theend witb thenotchedcorner (if app//cab/eJinsen_edinto the
memo/yca/d slo_
• Whena CompactFlashmemoEyca/d/s insen'edco/Tect/ythe
ejectorbuttonpops out (,seepage88),
2. If)_m have only MP3 files on the memory card, the audio
player will launch within a few seconds after being inserted
and begin playing the first MP3 file on the memory card.
3. Press iV'_ I_ to navigate to the rewind, pause>fast
forward, skip backward, skip forward, volume> and mute
buttons, or to select another MP3, and then press ENTER.
To use the mute function
Press AV "_I_ to select the I_ (mute) button, and then press
ENTER. See page 84 for details on muting the sound.
To start the MP3 audio player when a memory card is
already inserted:
1. Press MENU and open
the Applications menu.
2. Highlight Audio Player
and press ENTER.
;_>g S
TV Guide On Screen
iii 117
Digital CC/Audio SeJector
Press I,V "4I_ to
navigate to the rewind,
pause, fast forward, skip
backward, skip forward,
volume, and mute buttons, and then press ENTER.
Note: After 30 seconds ascreen save/ w/7/appeal: Toaccess the
scteen saver/bymed/Dte/_ press any button on the/emote control
To close the MP3 audio player:
Press EXIT to close the audio player and return to the regular
TV screen.
To close the MP3 audio player and remove the memory card:
1. Press EXIT to close the audio player and return to the
regular TV screen.
2. For a CompactFlash memory card, press the ejector button
and then pull the card straight out from the TV. For all
other memory cards, pull the card straight out from the TV.
Memory card care and handling
Use index labels made exclusively for your specific brand of
memory card. Do not use commercially sold labels which
can cause a malfunction when the card is inserted or ejected.
If the image does not appear correctly or the audio file does
not play correctl> clean the metallic area of the memory
card using a soft, dr> lint-free, anti-static cloth, and then
reinsert the card.
Prevent the metallic area on the memory card from coming
in contact with dust, dirt, or other foreign particles. Do not
touch the metallic area of the memory card with ?_mr hands
or otherwise handle it with anything other than a soft, dr>
lint-free, anti-static cloth.
Note: Tosbibaisnotliableforany damagecausedt_ytheuse
of anymemorycardwithtb/;sTg Tosbibawillnot compefysate
for anylostdataor recordingscausedby the useof sucbcards.
NOTE: ALWAYS CLOSE THEA UDIO
PLAYER BEFORE REMOVING THE
MEMORY CARD.
If you_move thememory ca/d whileplayingMP3 fi/ea,thecard
and/or saveddatamaybe damaged.THISTYPEOFDAMAGE
IS NOTCOVEREDUNDER YOURTOSHIBAWARRANTY
0(
#01E 087-0 2 566272HM195 90
Black
E) 56/62/72HM195
Copyright CcP2005 TOSHIBA CORPORATION. All rights reserved.
7/28105, 4:58 PM [
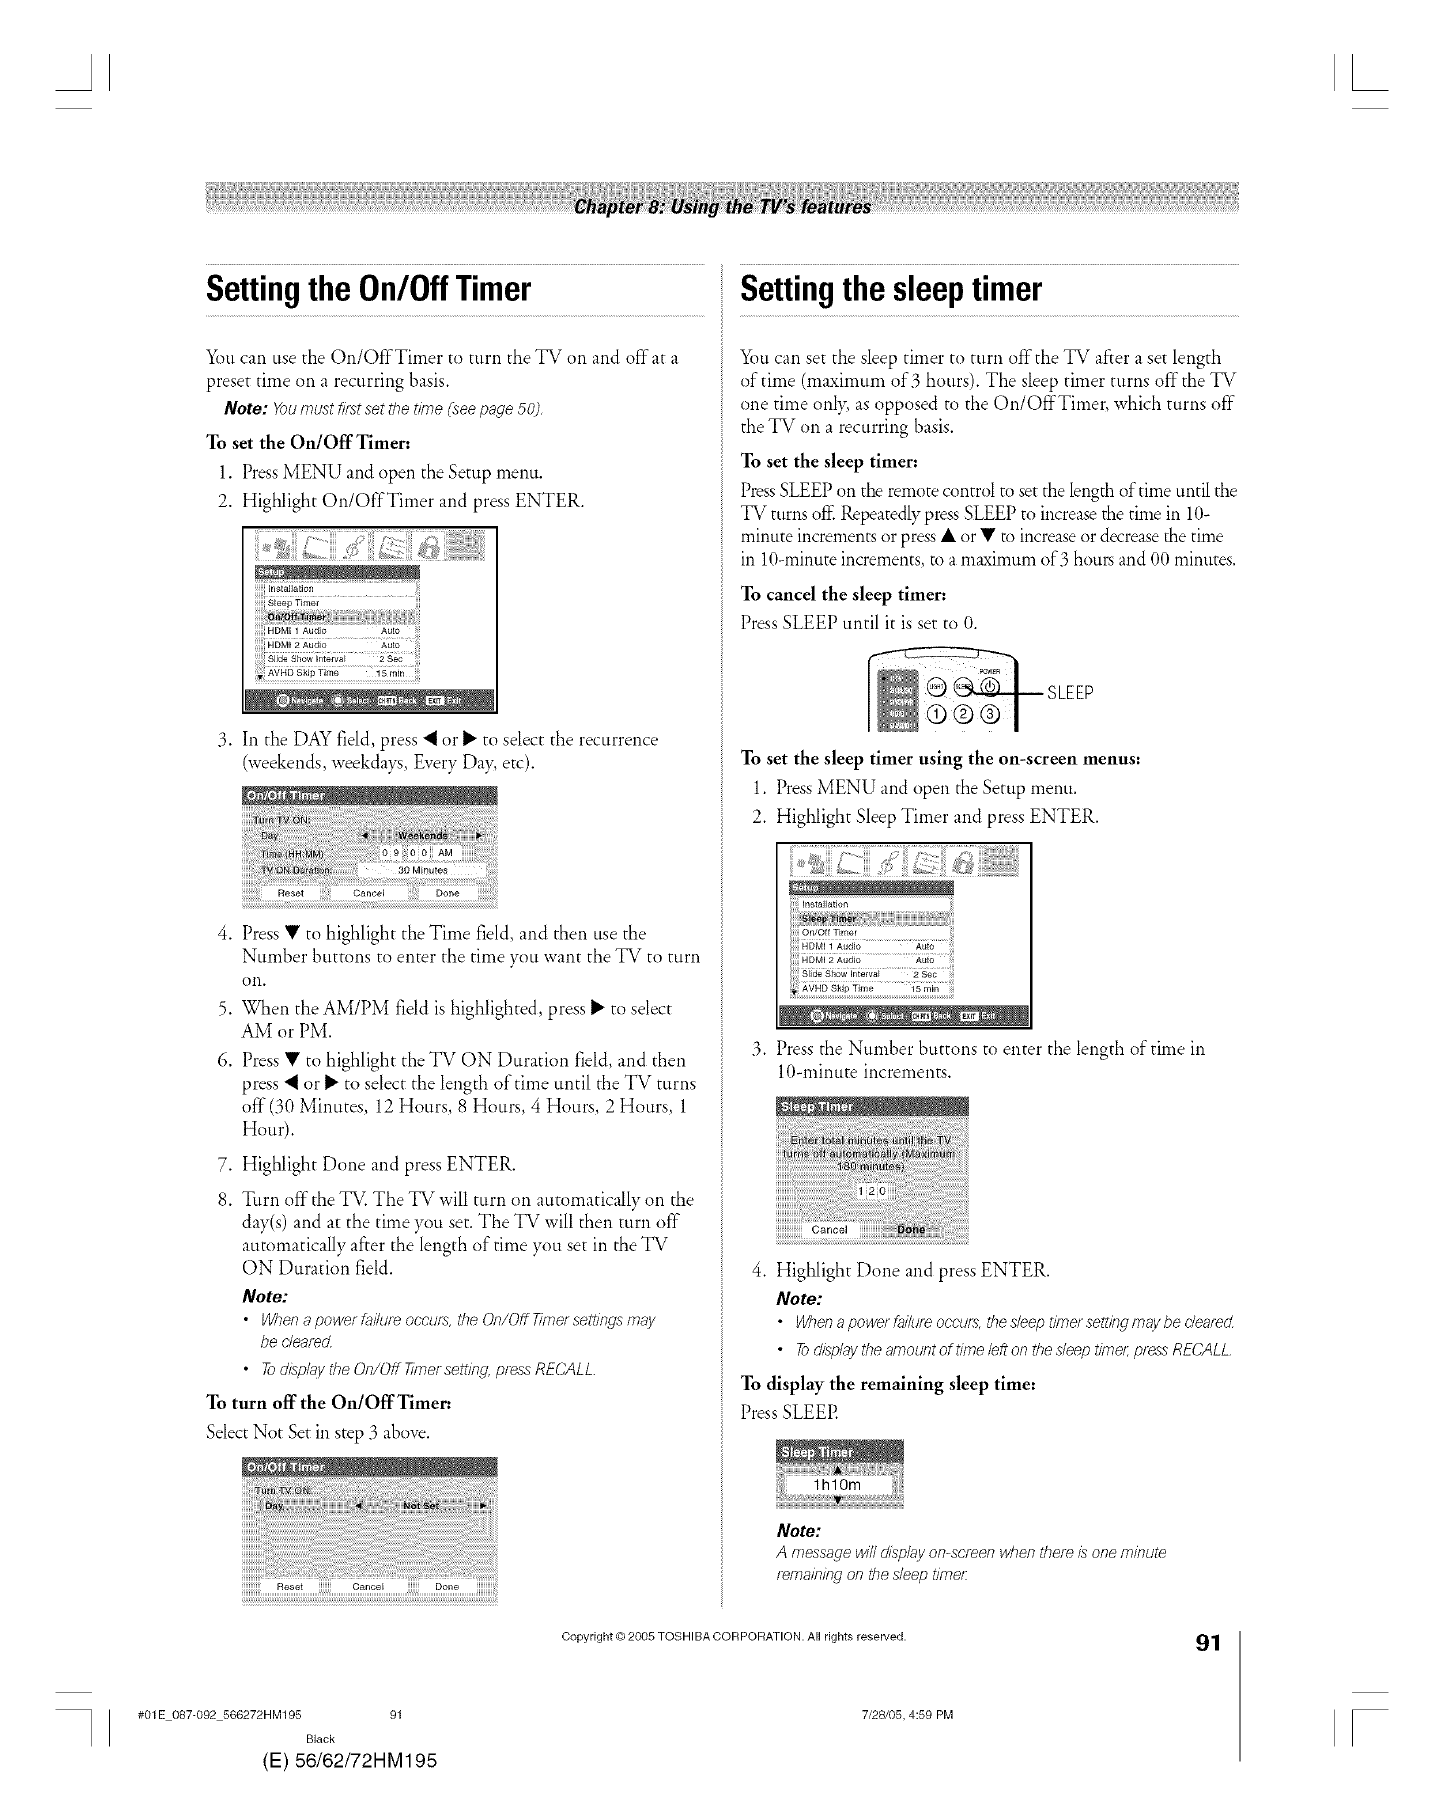
Settingthe On/Off Timer
You can use the On/OffTimer to turn the TV on and off at a
preset time on a rectirring basis.
Note: You must fi/st set the time (see page 50),
To set the On/Off Timer:
1. PressMENU and open the Setup menu.
2. Highlight On/OffTimer and press ENTER.
3. In the DAY field, press "_or _" to select the recurrence
(weekends weekdays Every Day etc).
4. Press • to highlight the Time field, and then use the
Number buttons to enter the time you want the TV to turn
on.
5. When the AM/PM field is highlighted, press _ to select
AM or PM.
6. Press • to highlight the TV ON Duration field, and then
press "_or _ to select the length of time until the TV turns
off"(30 Minutes, 12 Hours, 8 Hours, 4 Hours, 2 Hours, 1
Hour).
7. Highlight Done and press ENTER.
8. Turn off"the TV. The TV will turn on automatically on the
day(s) and at the time you set. The TV will then turn off"
automatically after the length of time you set in the TV
ON Duration field.
Note:
•WhenapowerfmTureoccurs,theOn/OffTffnersettings may
becleared.
•Todisp/g!ytheOn/Off77metsettifTgl, pressRECALL
Toturn off the On/OffTimer:
SelectNot Set in step ,3above.
Reset iiiiiii Cancel iiiiiii Done iiiiiiiiii!!i
Settingthe sleep timer
You can set the sleep timer to turn off'the TV after a set length
of time (maximum of 3 hours). The sleep timer turns off"the TV
one time onl> as opposed to the On/OffTimer, which turns off"
the TV on a recurring basis.
To set the sleep timer:
PressSLEEP on the remote control to setthe length of time until the
TV turns off Repeatedlypress SLEEP to increasethe time in 1G
minute increments or press • or • to increase or decreasethe time
in 1Gminute increments, to a maximum of 3 hours and 00 minutes.
To cancel the sleep timer:
Press SLEEP until it is set to 0.
To set the sleep timer using the on-screen menus:
1. PressMENU and open the Setup menu.
2. Highlight Sleep Timer and press ENTER.
3. Press the Number buttons to enter the length of time in
10-minute increments.
4. Highlight Done and press ENTER.
Note:
•Whenapowerfai/ureoccurs,thesleeptimersettingmaybe c/e_d
•Todhplaythe amountoftffne left on thesleep time/;pressRECALL
Todisplay the remaining sleep time:
Press SLEEE
Note:
Amessage wl7/dlspl_tyon-screen when there/s one minute
rema/h/hg on the sleep t/me_:
#01E 08%092 566272HM195 91
Black
(E) 56/62/72HM195
Copyright © 2005 TOSHIBA COR PORATION. All rights reserved.
7/28105, 4:59 PM
91
[

DisplayingTVsettinginformation Understandingtheautopoweroff
on-screenusingRECALL feature
To display TV setting information on-screen:
Press RECALL on the remote control. The following
information will display on-screen (if"applicable):
• Current input (ANT 1, ANT 2, VIDE() 1, etc.)
• If'ANT 1 or ANT 2 is the current input, whether it is
Cable TV ("CABLE") or of'f-air ("TV")
• Channel number (if'in
ANT 1 or ANT 2 mode)
• Signal strength indicator
(bar graph in lower right
corner of'screen; for
ATSC signal only)
Note: Thesignal strength
indicatorwillreactto fading
andincreasing srgnals
• Time (if'set)
• On/Of'f'timer settings (if'set)
• Remaining time on sleep timer (if'set)
• Remaining time on game timer (if'set)
• Stereo or SAP audio status
• V-Chip rating status
• Picture size
• Tuner hold* (if applicable)
*/fyou ate/ecotding ononetuner(for example, the digital
tuner3, youwillbeableto change channelsontheothertuner
only (the analog tuner#7thisexample). Thetunerfromwbich
youate recotd#Tg Ls'bnhold"(/:e, locked)soyourtecord#Tgs
willnotbeaffectedt_ychannd changes.
• Video resolution
• Lamp mode (appears only if the TV is in High Bright
mode)
To close TV setting information on-screen:
Press RECALL again.
Sample RECALL screen
The TV will automatically turn itself`off after approximately 15
minutes if'it is tuned to a vacant channel or a station that
completes its broadcast for the da> This feature fimctions in
ANT 1 and ANT 2 modes only.
Understandingthelastmode
memoryfeature
If the power is cut off while you are viewing the TV, the Last
Mode Memory feature automatically turns on the TV when
the power is resupplied.
NOTE: kbu should unplug the TVt; power cord/f/t/s possff_/e
that you will be away from the TV for an extended petTod of t/me
after the power/s testorec.L
UsingtheGrayLevelfeature
The gray level feature will set the sidebars to three different
levelsof'darkness. Sidebars are the blanks spaces on either side
of a 4:3 viewing area.
To set the gray level of the sidebarst
1. Press MENU and open the Setup menu.
2. Highlight Gray Level and press _'.
3. Press • or • to select your desired level of darkness
(1 - Black, 2 - Dark Gray or 3 - Gray).
S_eep TAmer 1
6r,/6flTimei ):_>
giic_&gh0w,,,{a}va, >ga_
x,&,g_i_Ti,,,a igmir,
Note:
•Thegray level feature does not af&ct video being viewed in
169 aspect ratio
• When receiving asignal that has sidebars {e.g., 4.,?aspect
ratio video over a 1080/or 720p signal), the gray level feature
will not be applied to tbe sidebat:_
2(
#01E 087-0 2 566272HM195 92
Black
E) 56/62/72HM195
Copyright €co2005 TOSHIBA CORPORATION. All rights reserved.
7/28105, 5:00 PM [

AL
The Locks menu includes the Enable Rating Blocking, Edit Rating Limits, Channels Block, Input Lock, Panel Lock, Game Timer,
and New PIN Code features. You can use these features after entering the correct PIN code.
EnteringthePINcode
1. Press MENU and highlight the Locks menu icon.
Input Lock
Game Timer elf
New PIN Code
2. Press •, which displays the PIN code entry screen.
• The Lock System screen (below) appears ira PIN code has
not been stored. Press the Channel Number buttons to
enter a new fi.mr-digitcode, enter the code a second time to
confirm, and press ENTER.
Cancel Done
• The Locks/Active screen (below) appears if the PIN code is
already stored. Press the Channel Number buttons to enter
your four-digit code and press ENTER.
If the wrong PIN code is entered, the message "Incorrect PIN
• o ' P_
code, please tr) %am, appears. Highlight Retry and press
ENTER. Enter the code again and press ENTER.
When the correct PIN code is entered, the Locks menu opens.
Fiont Panel Lock Off
Game Timer Off
Ifyoucannotrememberyour
PINcode
While the PIN code entering screen is displayed, press RECALL
four times within five seconds. The PIN code will be cleared and
you can enter a new PIN code.
ChangingyourPINcode
1. Press MENU and highlight the Locks menu icon.
2. Press • to display the PIN code entering screen.
3. Enter )qmrfour-digit PIN code and press ENTER.
4. Press • to highlight New PIN Code and press ENTER.
5. Press the Number buttons to enter a new four-digit code.
Retype the numbers to confirm the PIN code you entered.
6. Press ENTER. The new PIN code is now active.
#01E 093-096 566272HM195 93
Black
(E) 56/62/72HM195
Copyright © 2005 TOSHIBA CORPORATION. All rights reserved.
7/28105, 5:01 PM
93
[
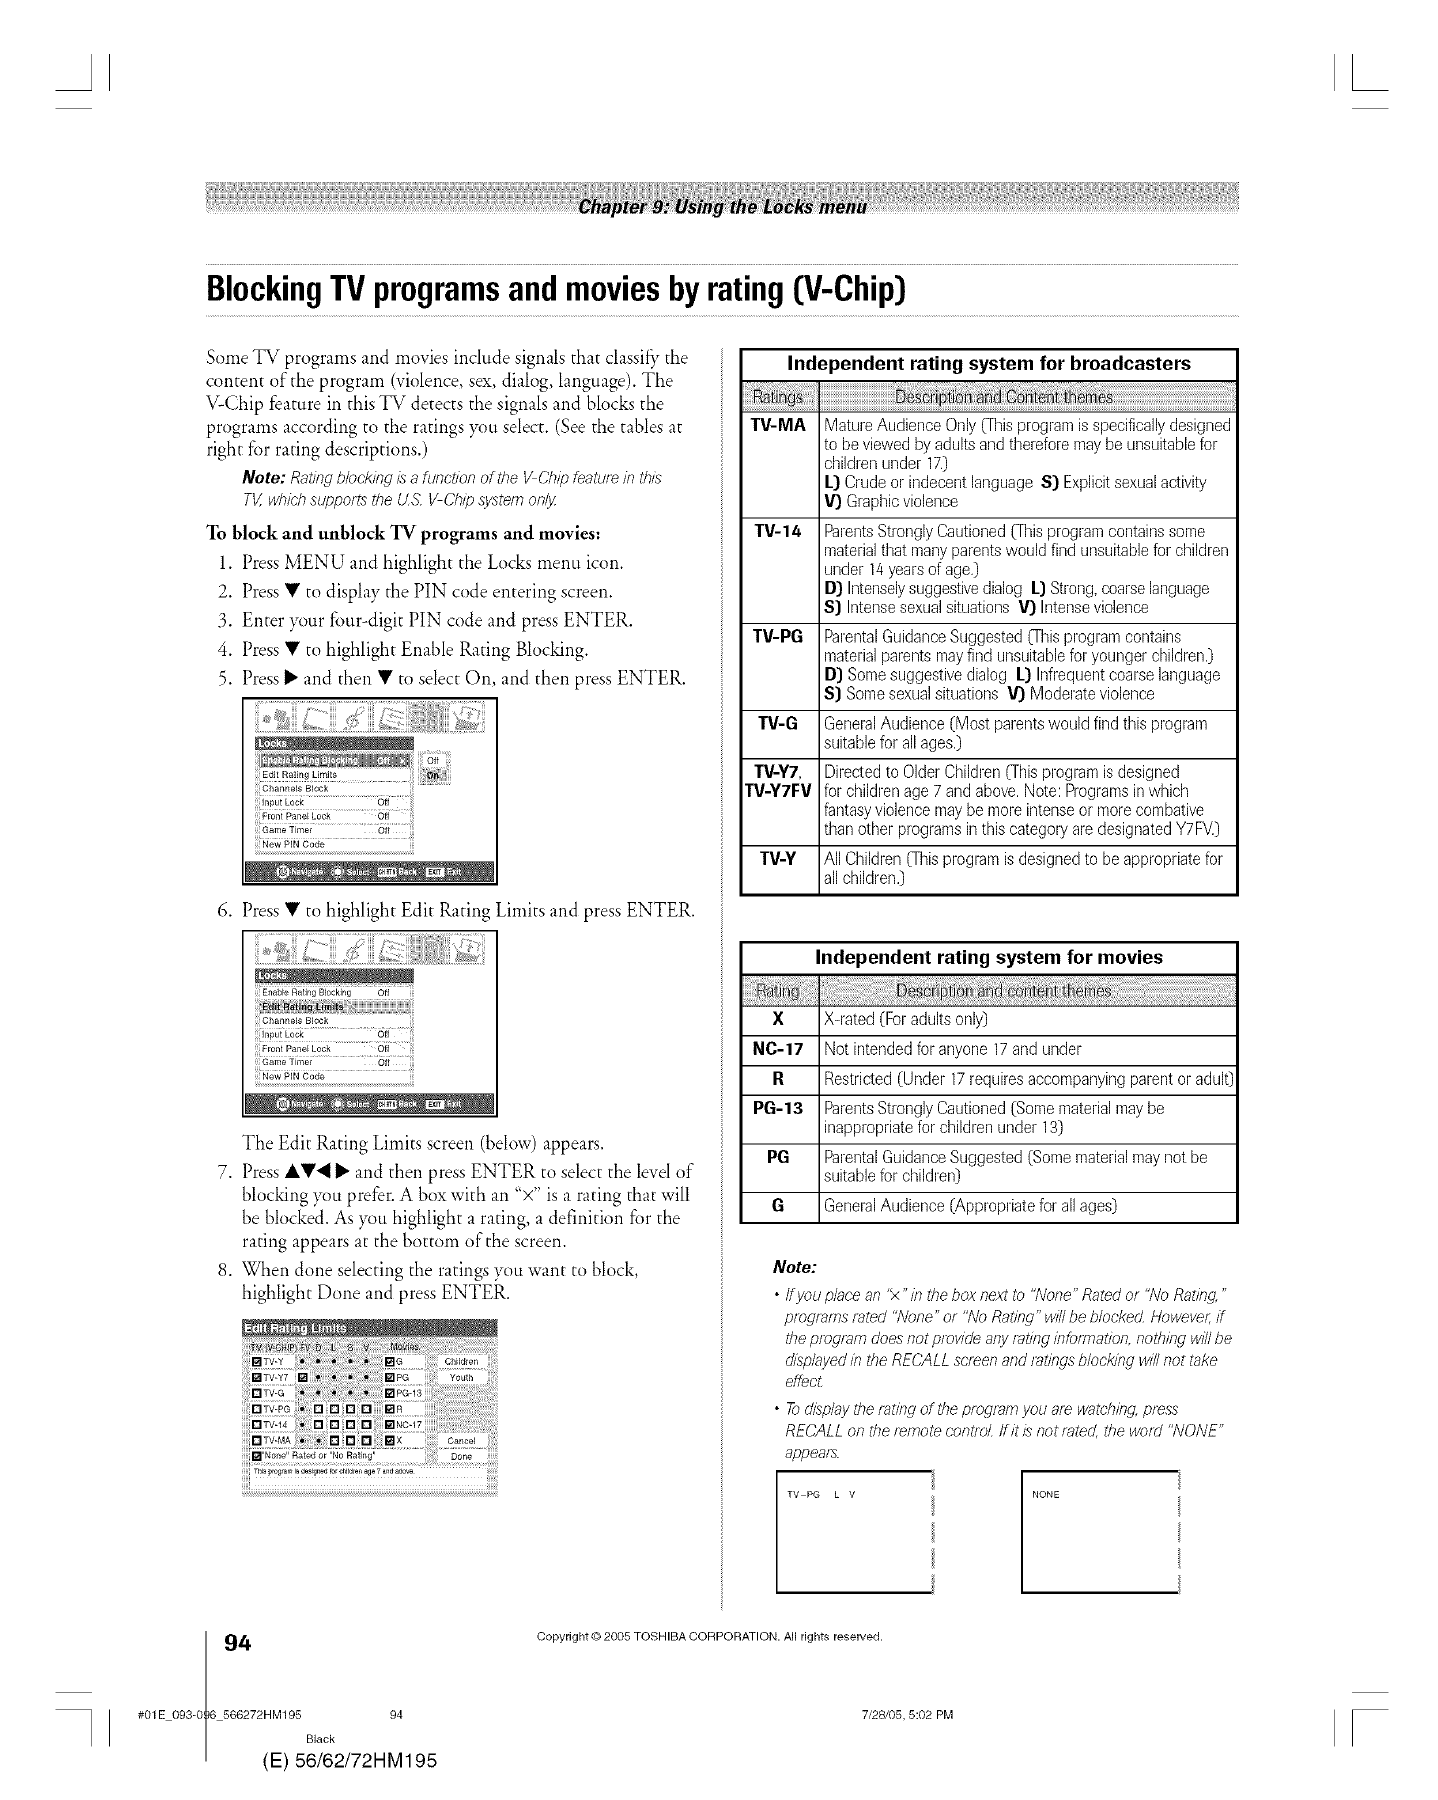
BlockingTVprogramsandmoviesbyratingIV-Chip(}
Some TV programs and movies include signals that classii_,the
content of the program (violence, sex, dialog, language). The
V-Chip feature in this TV detects the signals and blocks the
programs according to the ratings }_)uselect. (See the tables at
right for rating descriptions.)
Note: Rating blocking isafunctionofthe¼Ch/io feature#7this
TV,whichsupportstheUS.¼Chipsystefn on/y
To block and unblock TV programs and movies:
1. Press MENU and highlight the Locks menu icon.
2. Press • to display the PIN code entering screen.
3. Enter )_ur four-digit PIN code and pressENTER.
4. Press • to highlight Enable Rating Blocking.
5. Press_" and then • to select On, and then pressENTER.
8areafi,,,ei
6. Press • to highlight Edit Rating Limits and press ENTER.
input Lock
}}0hiPa,_;iLo_ 6ii
The Edit Rating Limits screen (below) appears.
7. Press A•,_ II,and then press ENTER to select the level of
blocking }_mprefer. A box with an "x" is a rating that will
be blocked. As }_mhighlight a rating, a definition for the
rating appears at the bottom of the screen.
8. When done selecting the ratings you want to block,
highlight Done and press ENTER.
_!iiiiiiiiiiiiiiiiiiiiiiiiiiiiiiiiiiiiiiiiiiiiiiiiiiiiiiiiiiiiiiiiiiiiiiiiiiiiiiiiiiiiiiiiiiiiiiiiiiiiiiiiiiiiiiiiiiiiiiiiiiiiiiiiiiiiiiiiil_l_l_l_i_
Independent rating system for broadcasters
TV-MA MatureAudienceOnly (Thisprogram isspecificallydesigned
to beviewed by adultsand thereforemaybe unsuitablefor
childrenunder 17.)
L) Crudeor indecentlanguage S) Explicitsexualactivity
V) Graphicviolence
TV-14 ParentsStronglyCautioned(Thisprogramcontainssome
materialthat manyparentswould find unsuitablefor children
under 14yearsof age.)
D) Intenselysuggestivedialog L) Strong,coarselanguage
S) Intensesexualsituations V) Intenseviolence
TV-PG ParentalGuidanceSuggested(Thisprogramcontains
materialparentsmayfind unsuitablefor youngerchildren.)
D) Somesuggestivedialog L) Infrequentcoarselanguage
S) Somesexualsituations _D Moderateviolence
13/-G GeneralAudience(Most parentswould find this program
suitablefor allages.)
]W-Y7, Directedto Older Children(Thisprogramisdesigned
I3/-Y7FV for childrenage 7 and above.Note:Programsinwhich
fantasyviolencemaybemore intenseor morecombative
than other programsin this categoly are designatedY7F_)
TV-Y All Children (Thisprogramis designedto beappropriatefor
all children.)
Independent rating system for movies
XX-rated (For adultsonly)
NC-17 Not intended for anyone17 andunder
RRestricted(Under 17requiresaccompanyingparentor adul0
PG-13 ParentsStronglyCautioned(Somematerialmaybe
inappropriatefor childrenunder 13)
PG ParentalGuidanceSuggested(Somematerialmaynot be
suitablefor children)
GGeneralAudience(Appropriatefor allages)
Note:
•lfyou place an '5<"in the box next to "None" Rated or "No Rating."
programs rated "None" or "No Rating" will be blocked. Howeve/; if
the program does not provide any rating infom}ation, nothing will be
dLsplgtyedin the RECALL screen and ratings b/ockingl will not take
effec_
• Todisplay the rating of the program you ale watching press
RECALL on the temote control ff lt ls not rated, the WOld "NONE"
appea_a.
TV PG L V NONE
4(
#01E 093-0 6 566272HM195 94
Black
E) 56/62/72HM195
Copyright © 2005 TOSHIBA CORPORATION. All rights reserved.
7/28/05, 5:02 PM [
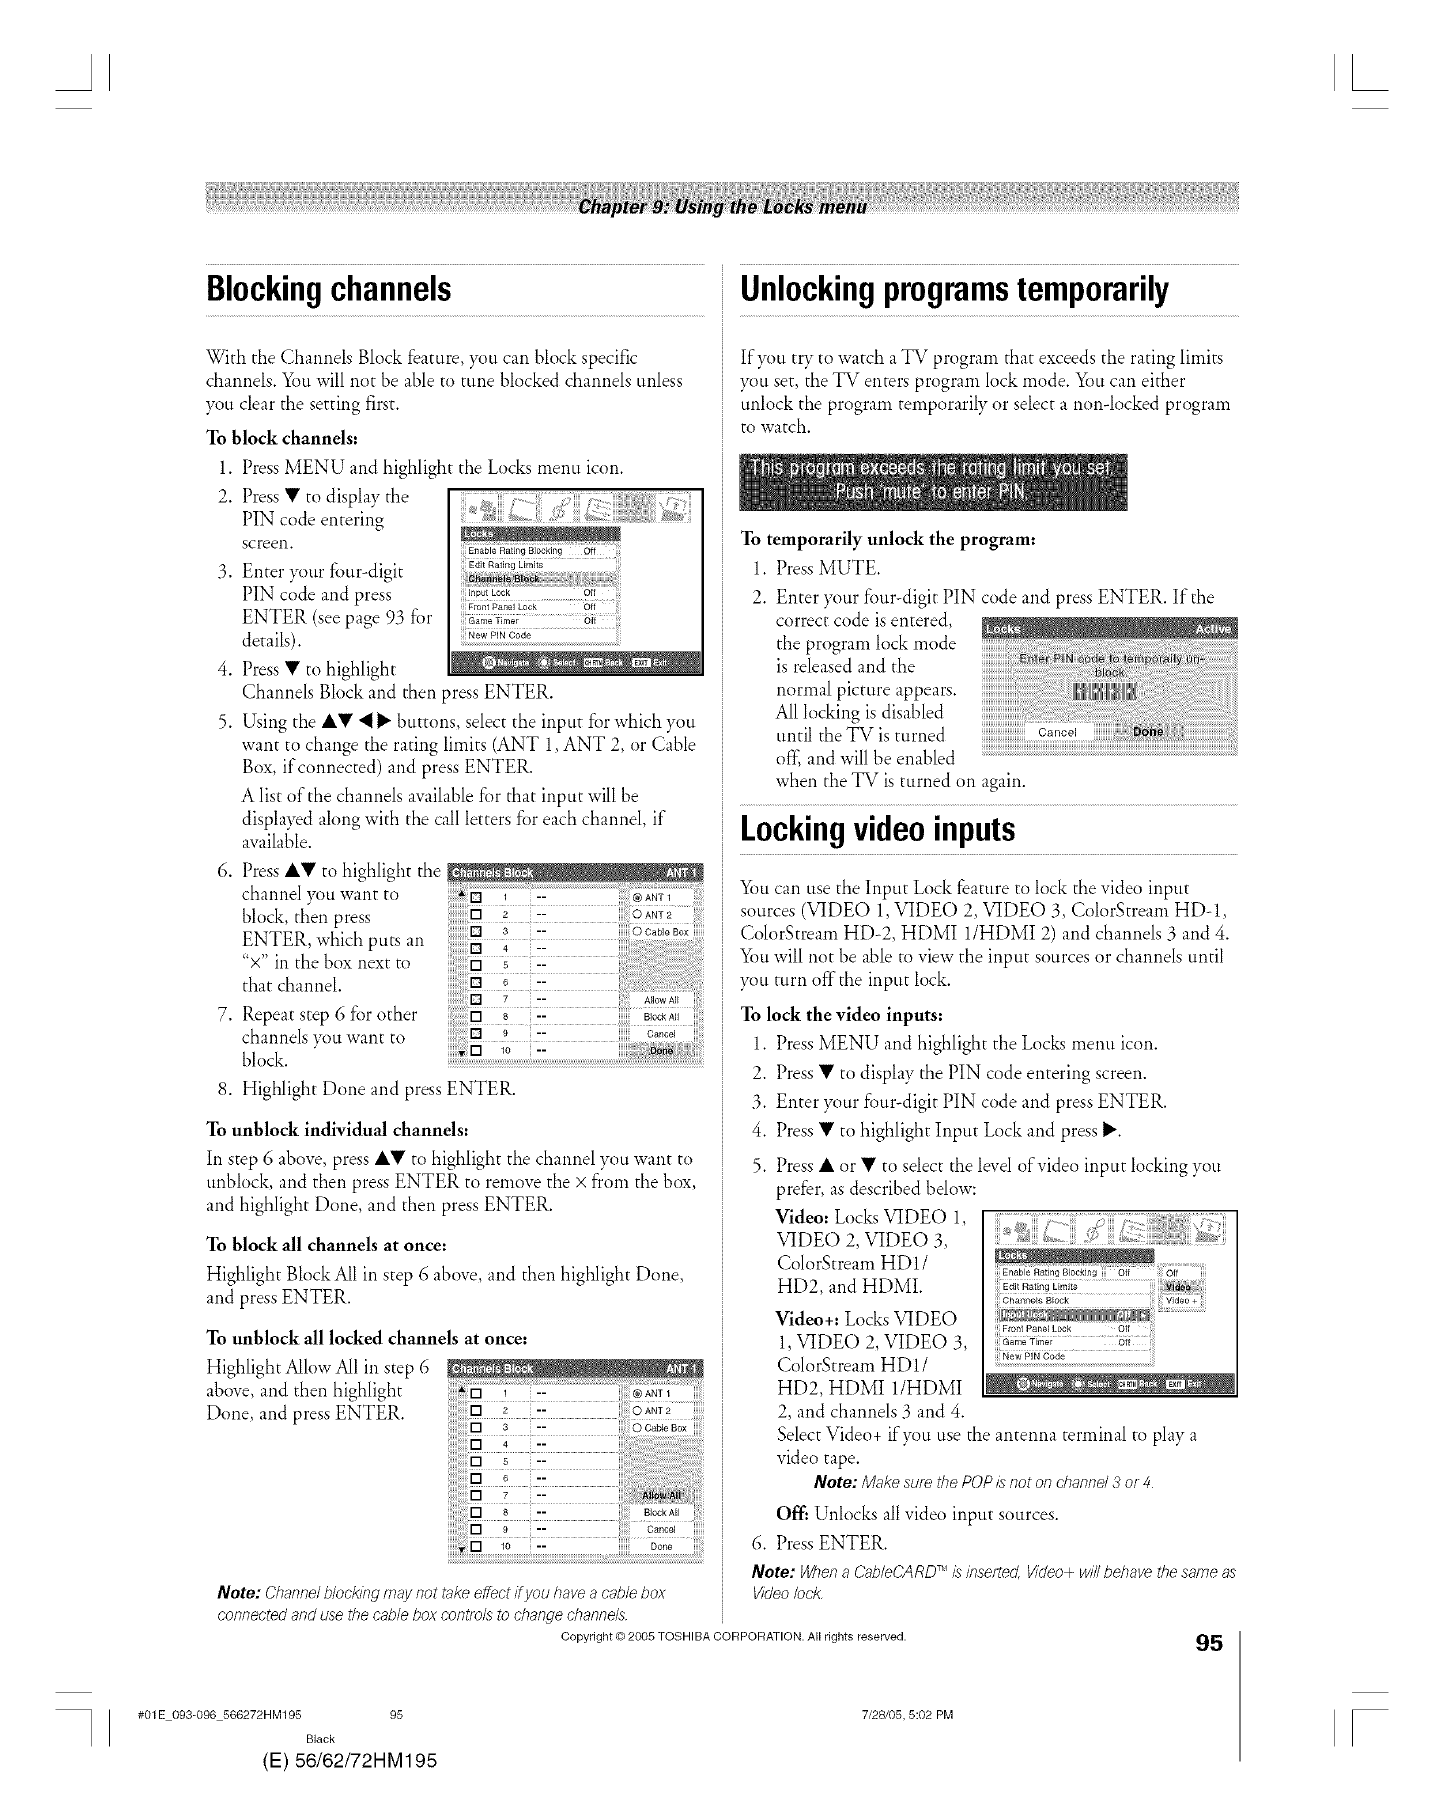
Blockingchannels Unlockingprogramstemporarily
With the Channels Block feature, you can block specific
channels. You will not be able to tune blocked channels unless
you clear the setting first.
To block channels:
1. Press MENU and highlight the Locks menu icon.
2. Press • to display the
PIN code entering
screen.
.
.
5.
.
.
Enter }_mrfour-digit
PIN code and press
ENTER (see page 93 for
details).
Press • to highlight
Channels Block and then press ENTER.
Using the A• ._ _,.buttons select the input for which you
want to change the rating limits (ANT 1, ANT 2, or Cable
Box, if connected) and press ENTER.
A list of the channels available for that input will be
displayed along with the call letters for each channel, if
available.
Input Lock
_i Game T_mer Off _
ii! New PIN Code ii
Press A• to highlight the
channel }_3tiwant to
block, then press
ENTER, which puts an
"x" in the box next to
that channel.
Repeat step 6 for other
channels you want to
block.
iiiii:i:i:i:i:i:i:H
8. Highlight Done and press ENTER.
To unblock individual channels:
In step 6 above, press A• to highlight the channel you want to
unblock, and then press ENTER to remove the × from the box
and highlight Done, and then press ENTER.
To block all channels at once:
Highlight Block All in step 6 above, and then highlight Done,
and press ENTER.
To unblock all locked channels at once:
Highlight Allow All in step 6
above, and then highlight
Done, and press ENTER.
If}_m try to watch a TV program that exceeds the rating limits
you set, the TV enters program lock mode. xfimcan either
unlock the program temporarily or select a non-locked program
to watch.
Note: Channel b/ock/bg may not take effect/Tyou have acable box
connected and use the cable box controls to change channels
Copyright © 2005 TOSHIBA CORPORATION. All rights reserved.
To temporarily unlock the program:
1. Press MUTE.
2. Enter }_mrfour-digit PIN code and press ENTER. If the
correct code is entered,
the program lock mode
is released and the
normal picture appears.
All locking is disabled
until the TV is turned
o< and will be enabled ................................................................................................................................................
when the TV is turned on again.
xfimcan use the Input Lock feature to lock the video input
sources (VIDEO 1,VIDEO 2, VIDEO 3, ColorStream HD-1,
ColorStream HD-2, HDMI 1/HDMI 2) and channels 3 and 4.
%u will not be able to view the input sources or channels until
)_)u turn off"the input lock.
To lock the video inputs:
1. Press MENU and highlight the Loclcsmenu icon.
2. Press • to display the PIN code entering screen.
3. Enter }_tir four-digit PIN code and press ENTER.
4. Press • to highlight Input Lock and press _'.
5. Press • or • to select the level of video input locking you
prefer, as described below:
Video: Locks VIDEO 1,
VIDEO 2, VIDEO 3,
ColorStream HD1 /
HD2, and HDMI.
Video+: Locks VIDEO
1, VIDEO 2, VIDEO 3,
ColorStream HD1 /
HD2, HDMI 1/HDMI
2, and channels 3 and 4.
Select Video+ if)_m use the antenna terminal to play a
video tape.
Note: Make sure the POP is not on channel 3 or 4
Off: Unlocks all video input sources.
6. Press ENTER.
Note: When aCab/eCARD _Mis inse/_ed, Video+ will behave the same as
Video/ock
95
#01E 093-096 566272HM195 95
Black
(E) 56/62/72HM195
7/28105, 5:02 PM [
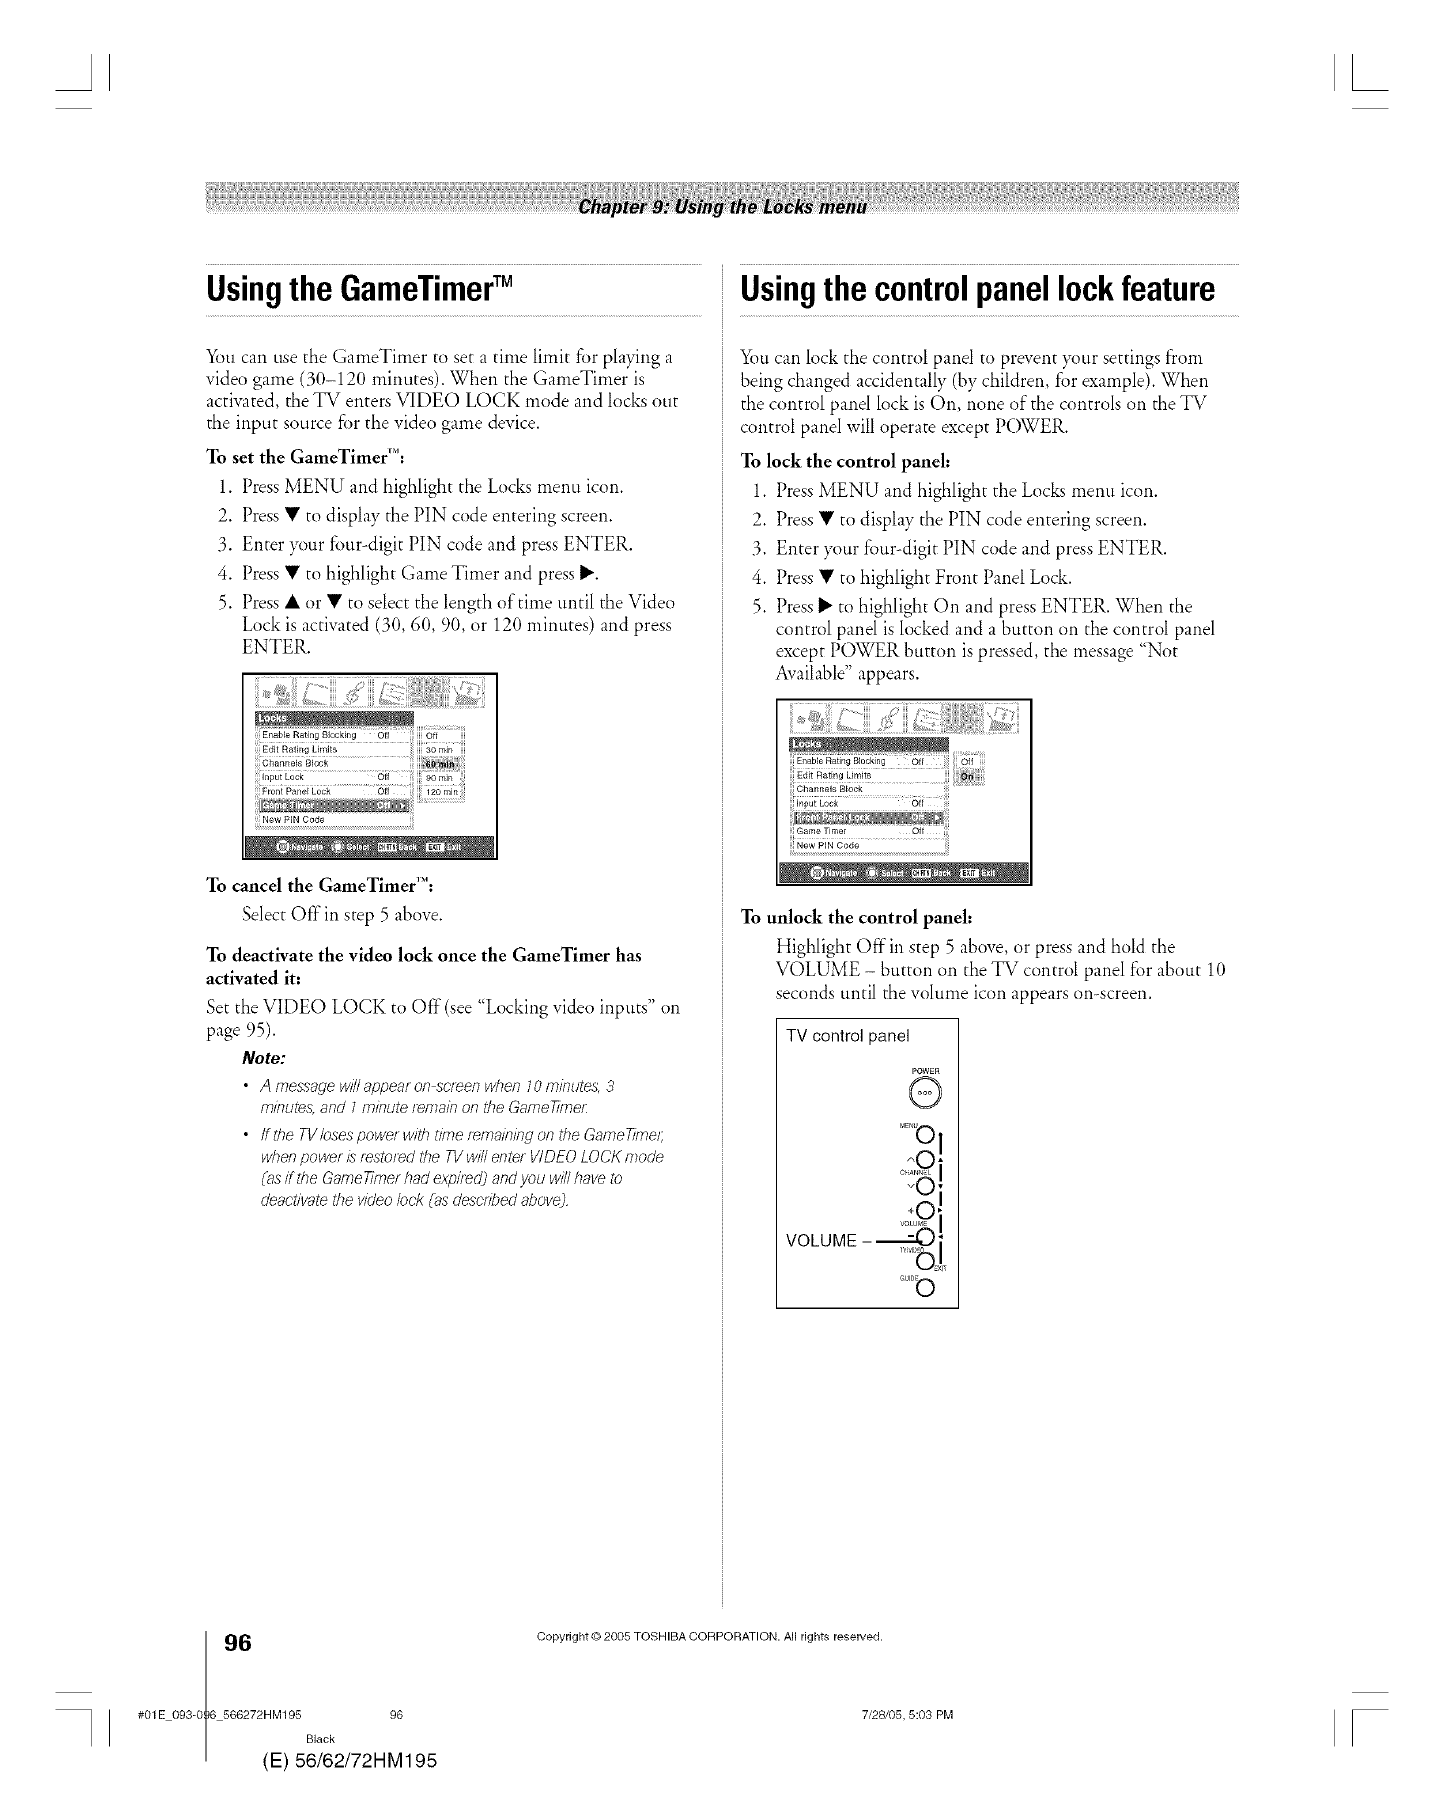
AL
Usingthe GameTimerTM
xfi_tlcan use the GameTimer to set a time limit for playing a
video game (30-120 minutes). When the GameTimer is
activated, the TV enters VIDEO LOCK mode and locks out
the input source for the video game device.
To set the GameTimer_":
1. Press MENU and highlight the Locks menu icon.
2. Press • to display the PIN code entering screen.
3. Enter }_ur four-digit PIN code and press ENTER.
4. Press • to highlight Game Timer and press _'.
5. Press • or • to select the length of time until the Video
Lock is activated (30, 60, 90, or 120 minutes) and press
ENTER.
g 0 o_ 0ff
ir,puiE0_ 6ii _0 mia
=..........................
New PIN Code
To cancel the GameTimer_M:
Select Offin step 5 above.
To deactivate the video lock once the GameTimer has
activated it:
Set the VIDEO LOCK to Off (see "Locking video inputs" on
page 95).
Note:
•A messagewillappear on screenwhen Z0 rrT#Tutes,3
ffTifTute& and 1minute/emain on the Game77mer:
• ffthe TVbses power wit/} t#netemainingon the GarneT#he/;
wf?ef7power istestoredthe TVwilleRterVIDEOLOCKmode
(asif the GameT#nerhad expired]andyou willhaveto
deactivatethevideo/ock (asdescribedabove).
Usingthe controlpanellockfeature
xfimcan lock the control panel to prevent your settings from
being changed accidentally (by children, for example). When
the control panel lock is On, none of the controls on the TV
control panel will operate except POWER.
To lock the control panel:
1. Press MENU and highlight the Locks menu icon.
2. Press • to displ Uthe PIN code entering screen.
3. Enter }_mrfour-digit PIN code and press ENTER.
4. Press • to highlight Front Panel Lock.
5. Press_" to highlight On and press ENTER. When the
control panel is locked and a button on the control panel
except POWER button is pressed, the message "Not
Available" appears.
i Game Timer Off
New PIN Code
To unlock the control panel:
Highlight Offin step 5 above, or press and hold the
VOLUME - button on the TV control panel fi._rabout 10
seconds until the volume icon appears on-screen.
TV control panel
POWER
(b
VOLUME-
GUlD_
6(
#01E 093-0 6 566272HM195 96
Black
E) 56/62/72HM195
Copyright © 2005 TOSHIBA CORPORATION. Aftrights reserved.
7/28105, 5:03 PM [
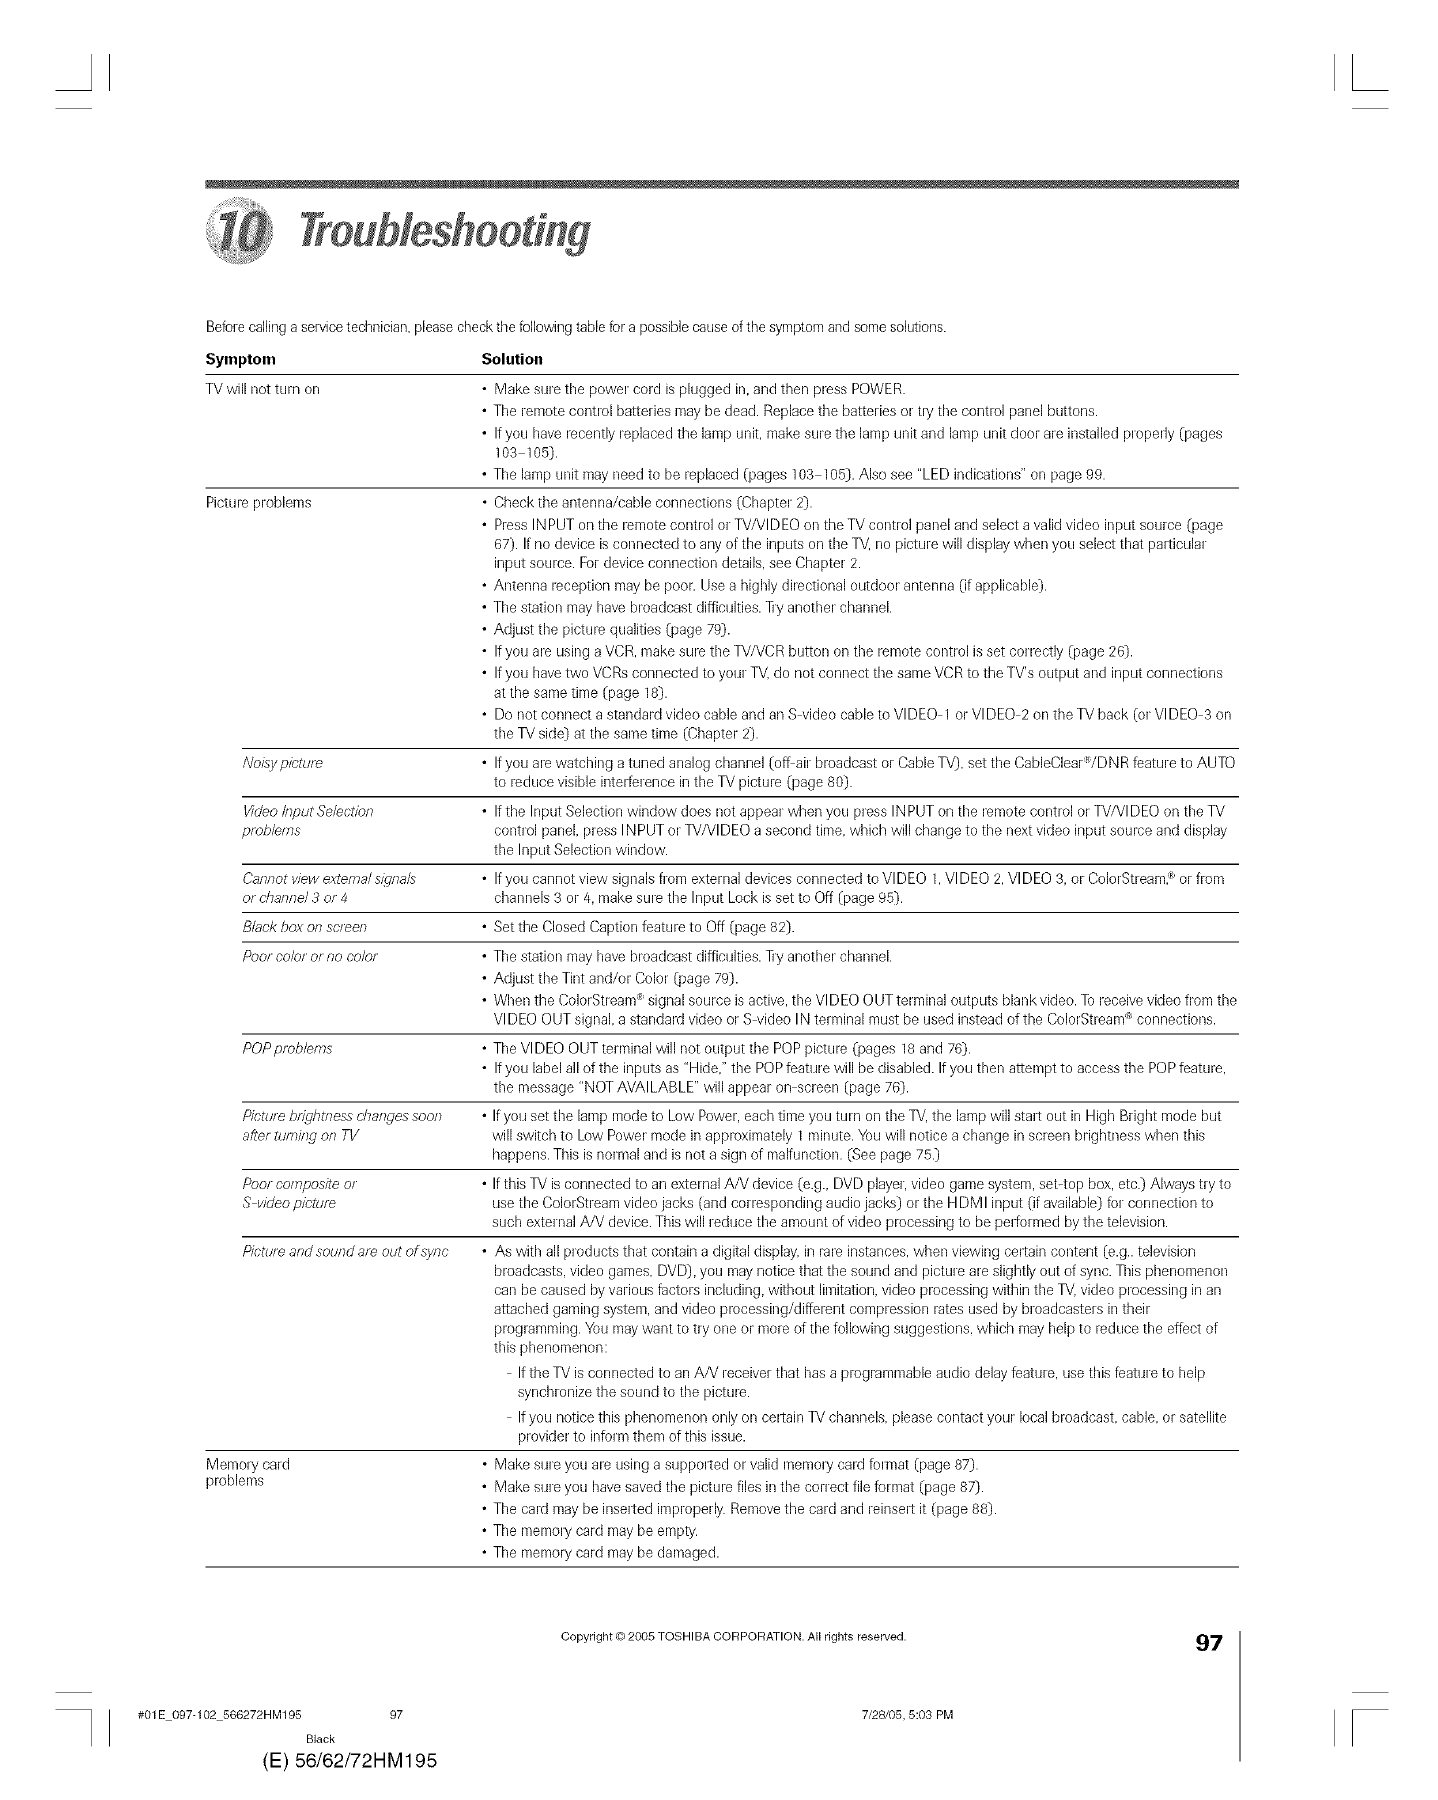
L
Beforecalling a sen/icetechnician,pleasecheckthe followingtable for a possible causeof the symptomand some solutions.
Solution
Symptom
TV will not turn on
Noisypicture
tfideoInput Selection
pmb/eres
Diff_notview exterea/s/igna/s
or channel 3 or 4
B/ac/<box on screen
Poor oo/o1or no color
POPproblems
Picture bnlgfltnes_dTangessoon
after t_fTJ#W on TV
Poor coreposite o1
S video picture
Picture and sound are out of sync
Picture problems
Memory card
pmblems
•Make sure the power cord is plugged in. and then press POWER.
• The remote control batteries may be dead. Replace the batteries or tly the control panel buttons.
• If you have recently replaced the lamp unit, make sure the lamp unit and lamp unit door are installed properly (pages
103 105).
• The lamp unit may need to be replaced (pages 103 105}. Also see "LED indications" on page 99.
• Check the antenna/cable connections (Chapter 2}.
• Press IN PUT on the remote control or TV/VIDEO on the TV control panel and select a valid video input source (page
67}. If no device is connected to any of the inputs on the TV. no picture will display when you select that palSicular
input source. Fordevice connection details, see Chapter 2.
• Antenna reception may be poor. Use a highly directional outdoor antenna (if applicable}.
• The station may have broadcast difficulties. ]iy another channel.
• Actjustthe picture qualities (page 79}.
• If you are using a VCR. make sure the TV/VCR button on the remote control is set correctly (page 26).
• If you havetwo VCRsconnected to your TV, do not connect the sameVCR to the TV'soutput and input connections
at the same time (page 18}.
• Do not connect a standard video cable and an S video cable to VIDEO 1 or VI DEC 2 on the TV back (or VIDEC 3 on
the TV side} at the same time (Chapter 2}.
• If you arewatching a tuned analog channel (off air broadcast or Cable TV), set the CableClearR/DNR feature to AUTO
to reduce visible interference in the TV picture (page 80}.
• If the Input Selection window does not appear when you press INPUTon the remote control or TV/VI DEC on the TV
control panel,press INPUT or TV/VIDEO a second time. which will change to the nextvideo input source and display
the Input Selection window.
• If you cannot view signals from external devices connected to VIDEO 1, Vl DEC 2, Vl DEC 3. or ColorStream,:'or from
charmels 3 or 4. makesure the Input Lock is set to Off (page 95}.
• Set the Closed Caption feature to Off (page 82}.
• The station may have broadcast difficulties. ]iy another channel.
• Actjustthe Tint and/or Color (page 79}.
• When the ColorStream_ signal source is active,the VIDEO OUT terminal outputs blank video. Toreceive video from the
VI DEC OUT signal, astandard video or S video IN terminal must be used instead of the ColorStleam _ connections.
• The VIDEC OUT terminal will not output the POP picture (pages 18 and 76}.
• If you label all of the inputs as "Hide." the POPfeature will be disabled. If you then attempt to access the POPfeature,
the message "NOT AVAILABLE" will appear on screen (page 76}.
• If you set the lamp mode to Low Power. eachtime you turn on the TV.the lampwill stalS out in High Bright mode but
will switch to Low Power mode in approximately 1 minute. You will notice a change in screen brightness when this
happens. This is normal and is not a sign of malfunction. (See page 75.}
• If this TV is connected to an external A/V device (e.g., DVD player,video game system, set-top box, etc.} Always try to
use the ColorStreamvideo jacks (and correspondir_gaudio jacks} or the H DMI input (if available) for connection to
such external A/V device.This will reduce the amotmt of video processing to be performed by the television.
• As with allproducts that contain a digital display, in rare instances, when viewing certain content (e.g..television
broadcasts,video games, DVD}, you may notice that the sound and picture are slightly out of sync. This phenomenon
can be caused by various factors including, without limitation, video processing within the TV. video processing in an
attached gaming system, and video processing/different compression rates used by broadcasters in their
programming. You maywant to try one or moreof the following suggestions, which may help to reduce the effect of
this phenomenon:
If the TV is cormected to an AA/receiver that hasa programmable audio delay feature, use this feature to help
synchronize the sound to the picture.
If you notice this phenomenon only on celtain TV channels, please contact your local broadcast, cable, or satellite
provider to inform them of this issue.
• Make sure you are using a supported or valid memoly caretformat (page 87}.
• Make sure you havesaved the picture flies in the comect file format (page 87).
• The caretmay be inselsed improperly. Removethe card and reinselSit (page 88}.
• The memory card may be empty.
• The memory card may be damaged.
#01E 097-102 566272HM195 97
Black
(E) 56/62/72HM195
Copyright © 2005 TOSHIBA CORPORATION. All rights reserved.
7/28/B5, 5:03 PM
97
F
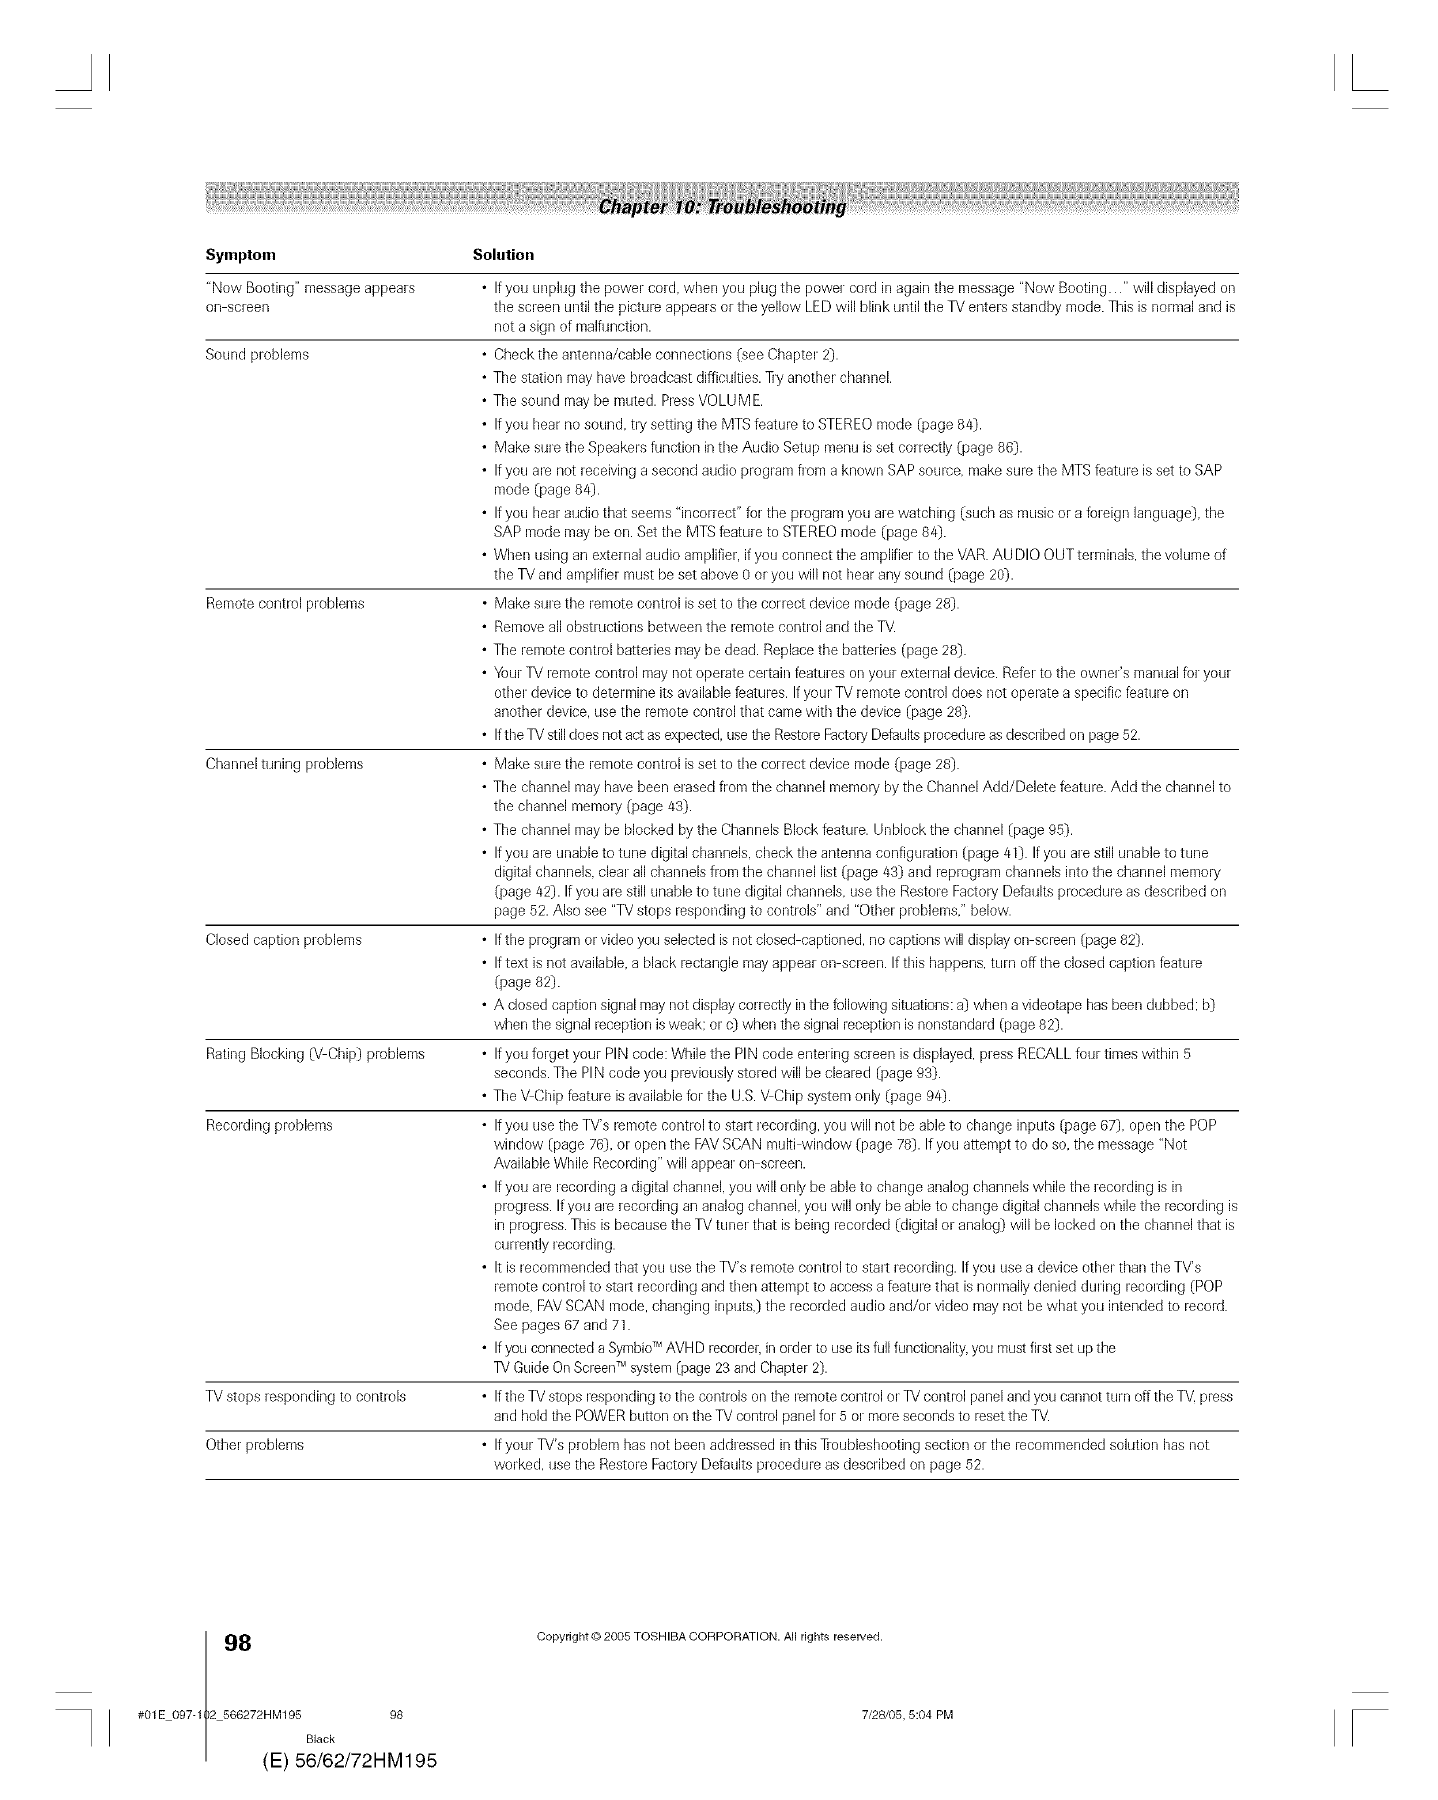
L
Symptom Solution
"Now Booting" message appears
on screen
Sound problems
Remote conhol problems
Charmeltuning problems
Closed caption problems
Rating Blocking (V Chip} problems
Recording problems
TV stops responding to conhols
Other problems
•If you unplug the power cord. when you plug the power cord in again the message "Now Booting" will displayed on
the screen until the picture appears or the yellow LED will blink until the TV enters standby mode. This is normal and is
not a sign of malfunction.
• Checkthe anterma/cable connections (see Chapter 2}.
• The station may have broadcast difficulties. ]iy another charmel.
• The sound maybe muted. Press VOLUME.
• If you hear no sound, tly setting the MTS feature to STEREO mode (page 88}.
• Make sure the Speakers function inthe Audio Setup menu isset correctly (page 86).
• If you are not receiving a second audio program from a known SAP source, makesure the MTS feature is set to SAP
mode (page 84).
• If you hearaudio that seems "incorrect" for the program you are watching (such as music or a foreign language}, the
SAP mode may be on. Set the MTS feature to STEREOmode (page 84).
• When using an externalaudio amplifier, if you connect the amplifier to the VAR.AUDIO OUT terminals, the volume of
the TV and amplifier must be set above 0 or you will not hearany sound (page 20}.
• Make sure the remote conhol is set to the correct device mode (page 28}.
• Removeall obstructions between the remote control and the TV.
• The remote conhol batteries may be dead. Replace the batteries (page 28).
• Your TV remote control may not operate certain features on your external device. Referto the owner's manual for your
other device to determine its available features. If your TV remote control does not operate a specific feature on
another device, use the remote control that came with the device (page 28}.
• Ifthe TV still does not act as expected,usethe RestoreFactoryDetaultsprocedure asdescribed on page 52.
• Make sure the remote conhol is set to the correct device mode (page 28}.
• The channel may havebeen elased from the charmel memory by the Charmel Add/Delete feature. Add the charmel to
the channel memoiy (page 83}.
• Tile channel may be blocked by the Channels Block teature. Unblock the channel (page 95).
• If you are unableto tune digital channels, check the antenna configuration (page 41}. If you arestill unable to tune
digital channels, clear all channelsfrom the charmel list (page 83} and reprogram channels into the charmel memory
(page/42}. If you are still unable to tune digital charmels, usethe Restore Factol_/Defaults procedure as described oil
page 52. Also see "TV stops responding to controls" and "Other problems." below.
• If the program or video you selected is not closed captioned, no captions will display on screen (page82).
• If text is not available,a black rectangle mayappear oil screen. If this happens, turn offthe closed caption feature
(page 82}.
• A closedcaption signalmay not display correctly in the following situations: a) when a videotape hasbeen dubbed: b}
when the signal reception isweak: or c) when the signal reception isnonstandard (page 82}.
• If you forget your PIN code: While the PIN code entering screen is displayed, press RECALL four times within 5
seconds. The PlN code you previously stored will be cleared (page 93).
• Tile VChip feature is available for the U.S. VChip system only (page 94).
• If you use the TV's remote control to stalSrecording, you will not be able to change inputs (page 67}, open the POP
window (page 76), or open the FAYSCAN multi window (page 78}. If you attempt to do so. the message "Not
Available While Recording" will appear on screen.
• If you are recording a digital charmel,you will only be able to change analog channels while the recording is in
progress. If you are recording an analog channel, you will only be able to change digital channels while the recording is
in progress. This is because the TV tuner that is being recorded (digital or analog} will be locked oil the channel that is
currently recording.
• It is recommended that you use the TMs remote control to staiSrecording. If you use a device other than the TV's
remote control to staiSrecording and then attempt to access afeature that is normally denied during recording (POP
mode. FAVSCAN mode. changing inputs,} the recorded audio and/or video may not be what you intended to record.
See pages 67 and 71.
• If you connecteda Symbio_MAVHD recorder,in order to use itsfuji functionality,you mustfirst set up the
TV Guide OnScreenTMsystem(page 23 and Chapter 2).
• If the TV stops responding to the controls on the remote control or TV control panel and you carmot turn offthe TV.press
and hold the POWERbutton on the TV control panelfor 5 or moresecondsto resetthe TV.
• If your TV's problem has not been addressed in this ]ioubleshooting section or the recommended solution has not
worked, use the Restore FactoryDefaults procedure as described on page 52.
8(
#01E 097-1 2 566272HM195 98
Black
E) 56/62/72HM195
Copyright © 2005 TOSHIBA CORPORATION. All rights reserved.
7/28/05, 5:04 PM r
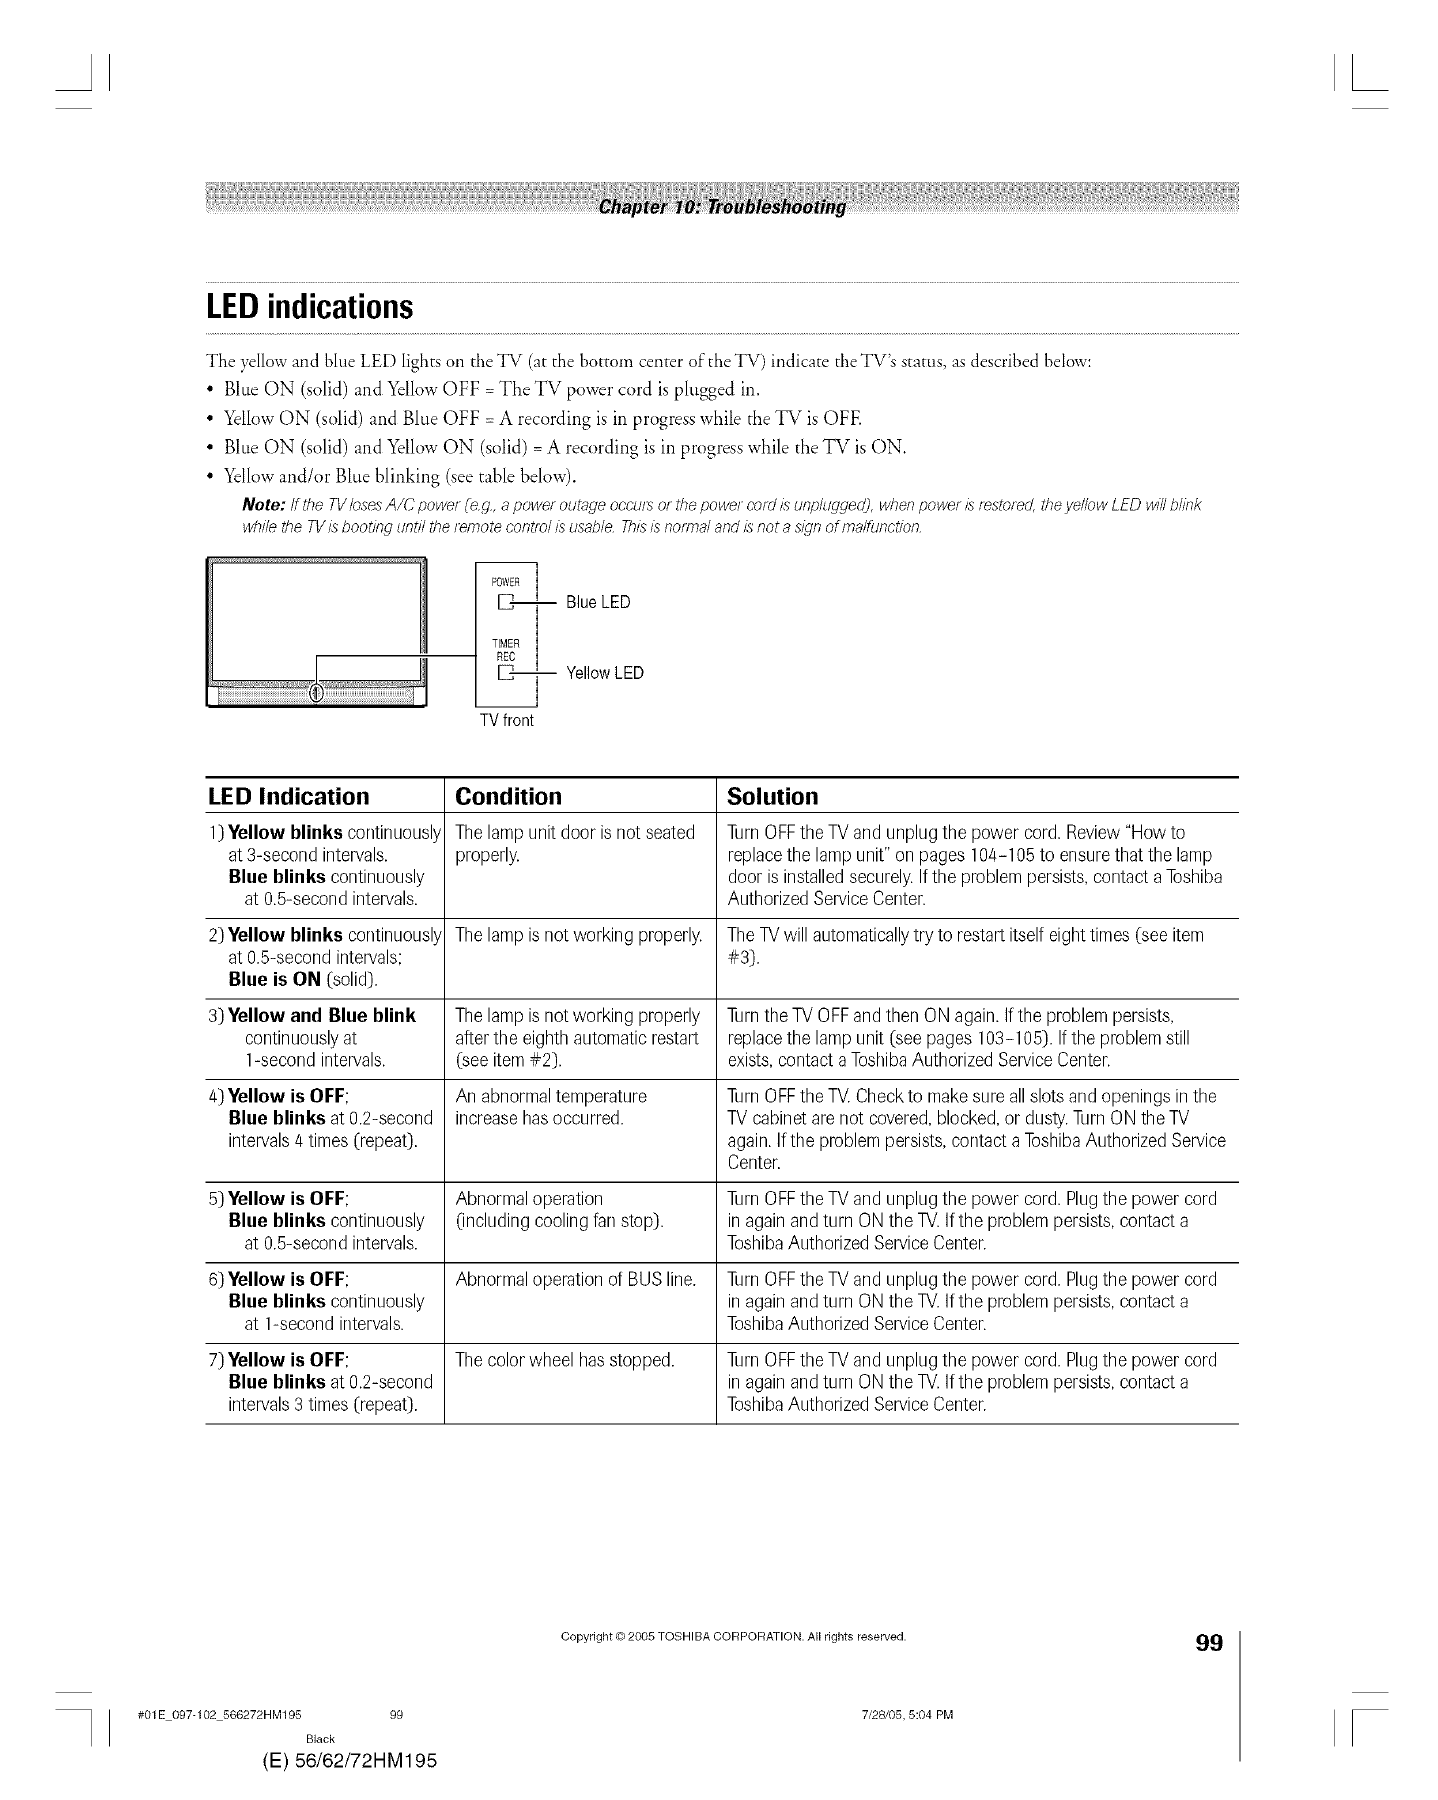
LEDindications
The yellmvand blue LED lights on tile TV (at the bottom center of"the TV) indicate tileTV's status, as described below:
• Blue ON (solid) and Yellow OFF = The TV power cord is plugged in.
• Yellow ON (solid) and Blue OFF = A recording is in progress while the TV is OFE
• Blue ON (solid) and Yellow ON (solid) = A recording is in progress while the TV is ON.
• Yellow and/or Blue blinking (see table below).
Note: If the TVloses A/C power (e,g, a power outage occu/:_ or the power cord L_unp/ugged], w/Tel7power is testo_ecJ,the yellow LED wi// b/#Tk
wh#e the TV L_bootinw until the remote control L_usable. ThL_L_normal and is not a sign of malfunction,
TIMER
I i--,
TVfront
BlueLED
Yellow LED
LED Indication Condition Solution
1)Yellow blinks continuously Thelamp unit door is not seated TurnOFFthe TV and unplugthe power cord.Review"Howto
at 3-secondintervals, properly, replacethe lamp unit" on pages 104-105to ensurethat the lamp
Blue blinks continuously dooris installedsecurely.Ifthe problempersists,contactaToshiba
at 0.5-secondintervals. AuthorizedServiceCenter.
Thelamp is not working properly.2)Yellow blinks continuously
at 0.5-secondintervals;
Blue is ON (solid).
3)Yellow and Blue blink
continuouslyat
1-secondintervals.
The lamp is not working properly
after the eighth automatic restart
(see item #2).
The TV will automatically try to restart itself eight times (see item
#3:).
Turnthe TV OFFandthen ON again.Ifthe problempersists,
replacethe lamp unit (see pages 103-105). Ifthe problemstill
exists,contactaToshibaAuthorizedServiceCenter.
4)Yellow is OFF; An abnormaltemperature TurnOFFthe TV.Checkto makesureallslots andopeningsin the
Blue blinks at 0.2-second increasehasoccurred. TV cabinetarenot covered,blocked,or dusty.TurnON the TV
intervals4 times (repeat). again.Ifthe problempersists,contacta ToshibaAuthorizedService
Center.
5)Yellow is OFF; Abnormaloperation TurnOFFthe TV and unplugthe power cord.Plugthe power cord
Blue blinks continuously (irlcludingcoolingfan stop), inagainandturn ON the TV.Ifthe problempersists,contacta
at 0.5-secondintervals. ToshibaAuthorizedServiceCenter.
6)Yellow is OFF; Abnormaloperationof BUSline. TurnOFFthe TV and unplugthe power cord.Plugthe power cord
Blue blinks continuously inagainandturn ON the TV.Ifthe problempersists,contacta
at 1-secondintervals. ToshibaAuthorizedServiceCenter.
7) Yellow is OFF; Thecolor wheel hasstopped. TurnOFFthe TV and unplugthe power cord.Plugthe power cord
Blue blinks at 0.2-second inagainandturn ON the TV.Ifthe problempersists,contacta
intervals3 times (repeat). ToshibaAuthorizedServiceCenter.
#01E 097-102 566272HM195 99
Black
(E) 56/62/72HM195
Copyright © 2005 TOSHIBA CORPORATION. All rights reserved.
7/28/05, 5:04 PM
99
F
AL
TVGuideOnScreenTM FAQs
The _llowing are frequently asked questions about the TV Guide On Screen_ system. The answers represent tile most likely solutions to the
problem.
After you set tip tile TV Guide On Screen "_systen_ (Chapter 5), tlle
program guide opens atltomatically by default when you turn on
the TV. You cm turn off"the automatic program guide (see page 40)
and instead press tile TV GUIDE button on the remote control to
manually open the TV Guide On Screen TMprogram guide.
SETUP
1. Q; What ifI move and my ZIP code or postal code changes?
A: Highlight Setup ill tile Service Bar. Press • to highlight
Change System Settings (page 65), and then press ENTER.
Follow the on-screen prompts to enter new information
(see Chapter 5 for details). It can take up to 24 hours to
receive new data.
2. Q; What ifI change my cable hook-up to antenna or vice
versa?
A: Highlight Setup in tile Service Bar. Press • to highlight
Change System Settings (page 65), and then press ENTER.
Follow the on-screen prompts to enter new input
information and rescan channels for the new input (see
Chapter 5 for details).
3. Q; What ifI change cable boxes?
A: Highlight Setup ill the Service Bar. Press• to highlight
Change System Settings (page 65), and then press ENTER.
Follow the on-screen prompts to enter new input
information and rescan channels for tile new input (see
Chapter 5 for details).
4. Q; I used to have a cable box, but now Iget direct cable.
What do I do?
A: Highlight Setup ill the Service Bar.Press• to highlight
Change System Settings (page 65), and then press ENTER.
Follow the on-screen prompts to enter new input
information and rescan channels for tile new input (see
Chapter 5 for details).
5. Q: If I add a recorder or change my cable service, how do I
change my Setup information?
A: Highlight Setup ill the Service Bar. Press • to highlight
Change System Settings (page 65), and then press ENTER.
Follow the on-screen prompts to enter new information
(see Chapter 5 for details). It can take up to 24 hours to
receive new data.
6. Q; Why does it take up to 24 hours for the TV Guide
On Screen'" system to be ready for use?
A: The initial setup process consists of finding the stations ill your
area that carry the TV Guide On Screen L'_system data and
tuning to those stations m receive tile setup and listings dam.
7. Q; I had a power outage. Do I need to go through initial
setup of the TV Guide On Screen'" system again?
A: No. The information )TOIlentered is stored in the TV Guide
On Screen _' system memor>
Note: For Cablebox use& the TVfnust be OFFand theCable
box mustbeleft ON for the TVGuideOn Sc[_ef7rM,systemto
receivechannd line upinformation,
8. Q; How do I connect the G-LINK'" (IR blaster) cable to
the G-LINK'" input on the TV?
A: See Chapter 2: Connecting your TV ill this manual.
You also call refer to the TV Guide On Screen _'' prompts
during VCR or Cable box setup.
9. Q; When will I be able to view my TV program listings and
use other TV Guide On Screen'" system features?
A: You will be able to use initial program listings within 24
hours of initial setup. It may take up to one week to receive
the full eight days of program listings.
10. Q; What should I do if I cannot complete initial setup?
A: If you are unable to complete initial setup using tile owner's
manual and the on-screen prompts, please call Toshiba's
National Service Division at 1-800-631-3811.
11. Q; IfI make a mistake during setup, how do Igo back to
the previous step?
A: Complete the remainingsetup steps.When "Confirming Your
Settings"appears,select"No, repeatsetupprocess."Followthe
on-screenprompts and input the correctinformation.
12. Q; What if the channel number is not visible on my cable
box?
A: Your cable box may be defaulting to a clock or time display
once the channel changes. Watch the box carefullywhen
testing the cable box brand code to see if the channel
changes to 09.
13. Q; Why won't my VCR turn on?
A: There are several possibilities:
a) Arl incorrect or "no VCR" code was entered during the
TV Guide On Screen _' initial setup. Press the TV GUIDE
button on the remote control, and then press I_ to
highlight SETUP. Press • to highlight "Change system
settings," and then press ENTER. Follow the on-screen
prompts to select the correct VCR information.
b) Make sure the G-LINK _M(IR blaster) cable is connected
correctly (see page 25).
c) The VCR record timer is on. Turn off the timer.
d) The wired remote VCR is incompatible.
#01E 097-1 2 566272HM195 100
Black
E) 56/62/72HM195
Copyright © 2005 TOSHIBA CORPORATION. All rights reserved.
7/28/B5, 5:04 PM [
TVGuideOnScreenTM FAQs(continued)
CHANNEL LINEUPS & LISTINGS
14. Q; Why aren't all my channels initially displayed?
A: After initial setup, approximately 120 channels are
automatically displayed. The user may use the "Change
channel display" feature to turn ON or OFF additional
channels.
Note: Eventhoughyou havethe optionof enablingmaqy
mole channels,thesystemmay nothavethe memo/ycapacity
to hold detailedp/ogram descaptionsfor allof them.
15. Q; W'hen I opened the TV Guide On Screen'" system, I was
asked to choose from more than one channel lineup.
W'hat should I do?
A: Select the lineup that most closely matches the one for your
area. If after you choose the lineup, )Tot,want to make
changes to it, highlight Setup in the Service Bar. Press • to
select Change Channel Display. Follow the on-screen
insmictions.
16. Q; Why do all my channds display "No Listing?"
A: The TV Guide On Screen'_ system has not vet received its
data download. The phrase "No Listing" wiil be replaced
with program information during the next download cycle,
which will occur within the next 24-hour period.
17. Q; Why do some of my channels display "No Listing?"
A: There are several possibilities:
a) The channels in question were recently turned ON (in
Change channel display) and TV Guide On Screen _ has
yet to receive its next data download.
b) After completing the initial setup, the first data download
of the day was interrupted by a VCR recording.
c) The TV power cord was left unplugged for an extended
period of time and the TV Guide On Screen _''system was
unable to receive program listings during the scheduled
download cycle.
d) Poor recepuon caused some of the data to be missed.
e) The cable box was turned OFE The TV prover cord must
be plugged in and the cable box must be ON.
g) A/V Cable: The VCR was turned OFE If the connection
includes stereo cables with cable box to VCR and stereo
connection from VCR to television, the VCR must be ON.
18. Q; A show entry in the TV Guide On Screen'" system reads
"No Listing." What does that mean?
A: Show information for that entry was not available during
the last TV Guide On Screen _'_'system information update
(download). Show information is updated on a daily basis.
19. Q; I have seen the word "download" in reference to the
TV Guide On Screen'" system. What does that mean?
A: "Download" refers to the times throughout the day when
the TV Guide On Screen '_' system is receiving channel and
listings information from your Cable or over-the-air
antenna transmission.
20. Q! After some show titles, I have noticed from 1 to 4 stars
(****). What does that mean?
A: These stars are a broadcast-industry ratings system used to
inform you of a show's quali_. The more stars, the better
the rating.
21. Q; What do the colors for shows in the Listings and Search
screens indicate?
A: Green = Sports;Dark Blue = Children's; Purple = Movies;
Teal = Other Show.
22. Q; How do I add, delete, or change the assigned number of
channels on the TV Guide On Screen'" system?
A: See the "Change channel display" section in theTV Guide
On Screen _Mowner's manual (see page 65).
23. Q; Why are some of my channels listed on the wrong
number?
A: There are several possibilities (see page 65 for details):
a) Incorrect channel lineup was selected. Access "Change
system settings" and choose "Yes, but my channel lineup is
incorrect," and then reselecc the correct lineup.
b) Channel lineup changes have not yet been processed. Use
the "Change chamlel display" feature to make adjustments.
c) Initial setup was done incorrectly (that is, the wrong
ZiP/postal code was entered.) Redo the initial setup.
24. Q; Why doesn't the program highlighted match up with
the video window on my TV screen?
A: There are several possibilities (see page 65 for details):
a) The station in question made a late change to its scheduled
program listing and the TV Guide On Screen"' system has
not yet been updated.
b) The TV is receiving broadcasts through a modified or
boosted antenna system or a satellite dish (not supported
by the TV Guide On Screen _" system).
c) Initial setup was done incorrecd> (i.e., the wrong
ZiP/postal code was entered.) Redo the initial setup.
d) Incorrect channel lineup was selected. Access "Change
system settings" and choose "Yes, but my channel lineup
is incorrect," and then reselect the correct lineup (see page
65 for details.)
e) The video window may be locked. Press SPLIT to unlock.
25. Q; Can I move my favorite stations to the top of the
TV Guide On Screen'" display screen?
A: Yes. Use the "Change channel display"[cature to make
adjustments (see page 65). Highlight the station callletters
to be moved, then use the up/down arrows, and/or
Number buttons to reassign the position of the station.
Copyright © 2005 TOSHIBA CORPORATION. All rights reserved. 101
#01E 097-102 566272HM195 101
Black
(E) 56/62/72HM195
7/28/B5, 5:05 PM [
A[
TVGuideOnScreenTM FAQs(continued)
OPERATIONS
26. Q; How can I look for a specific show in tile TV Guide
On Screen'" system?
A: SEARCH lets you find shows by keDvord, alphabetically,
or by category (HDTV, Movies, Sports, Children,
Educational, News, Mlrieu_, Series).
27. Q; My cable box will not change channels with the
TV Guide On Screen'" system. W'hat's wrong?
A: There are several possibilities:
a) The incorrect cable box code was entered during TV Guide
On Screen _' initial setup. Redo initial setup.
b) The G-LINK '_' (IR blaster) cable may not be connected
properly (see page 25).
c) Tile cable box has no remote capability and is
incompatible.
28. Q; How do I resize or close the Info window?
A: Pressthe INFO button on the remote control to resize the
Info window. Pressthe INFO button again to close the
Info window.
29. Q; Is there a way to go directly to the next day's listings
widmut scrolling dlrough each time slot?
A: Yes. In LISTINGS, highlight the station for which you
want to look ahead and use the Channel Number buttons
on tile remote control to enter "24." Ill the resulting menu,
press • two times to scroll down to select the HOURS
AHEAD option, and then press ENTER. You also can use
the SKIP button on the remote control
30. Q; Why can't I record a show? All I get is snow or a blue
screen.
A:
a)
b)
There are severalpossibilities (without a cahle box):
The recording unit was not connected or set up correctly.
The incorrect channel lineup was selected. PressTV
GUIDE and then I_ to highlight SETUP. Press• to
highlight "Change system settings," and then press
ENTER. Follow the on-screen prompts to select the correct
cha*mellineup.
31. Q; Why won't my VCR change channels and why does it
change to die wrong channel?
A: There :are two possibilities (with a cable box):
a) The VCR is not set on the correct output channel. Set the
VCR to 03, 04, or whichever output channel is set by your
cable system.
b) The VCR and/or cable box are hooked up incorrectl>
Refer to your VCR owner's manual or contact your Cahle
TV company for proper wiring procedures.
32. Q; Is Help available in the TV Guide On Screen'" system?
If so, how do I find it?
A: Yes. Highlight any of the five main Sen,ices (Listings,
Schedule, Recordings, Setup, Search) and press the INFO
key on tile remote control. An expanded Info Box displays
additional help information. Press INFO again to close the
box_
Help is also available ill a panel menu. Press INFO to
displayan expanded Info Box. PressINFO again to close
the box.
RECORD/REMIND
33. Q; Can I tune to adifferent channel while recording a
program?
A: No.
34. Q; How many programs can be scheduled for RECORD in
the GUIDE?
A: There is no limit to tile number of shows that call be
programmed into the schedule memor):
35. Q; Ifa program is scheduled to RECORD on a Regular
basis, does it count as five?
A: No, whether a program is scheduled ONCE,
REGULARLY, or WEEKLY, it only counts as one show ill
the RECORD stack memory.
36. Q; IfI have a power failure, will I need to reset the
recorded shows Ihave already programmed?
A: The start times and channel numbers of shows that have
been programmed will be retained ill the memo Uof the
TV Guide On Screen _"system. Titles will appear once
listings are restored.
37. Q! Can I set a Record or Remind event without
highlighting a show tide in the TV Guide On Screen'"
system?
A: Yes.TV Guide On Screen_Mhas a Manual Record and
Remind feature. Highlight SCHEDULE in the Sen,ice Bar,
and press MENU. Choose the event type, press ENTER,
and then enter the date, start and stop time, channel
number, and so forth.
38. Q; Vc'hat do the frequencies for Record and Remind mean?
A: Once--records/reminds the show one time.
Daily (mamlal only)--records the time, channel, input,
recorder combination Monday through Frida)<
Regularly-- records/reminds the show every time the show
airson the same channel and starts at the same time.
Weekly-- records/reminds the show each time the show
airs on tile same day of the week, on tile same channel and
starts at the same time.
Off (not cancel)--keeps tile show ill tile sdledule list but will
not record/remind tile show until the frequencyis changed.
#01E 097-1 2 566272HM195 102
Black
E) 56/62/72HM195
Copyright © 2005 TOSHIBA CORPORATION. All rights reserved.
7/28/B5, 5:05 PM [
AL
;!_i!ii_i_i_ii_i_ii_ ,:ii!!_
iii!i<_i_i;,_;_;iiii_i!__ ii_
Lampunitreplacementandcare
Replacing the lamp unit
(User-replaceable component)
WARNING: RISK OF
ELECTRIC SHOCK!
TO REDUCE THE RISK OF ELECTRIC SHOCK, NEVER
REMOVE TV COVERS, EXCEPT AS SPECIFIED
HEREIN. REFERALL SERVICING NOT SPECIFIED IN
THIS MANUAL TO QUALIFIED SERVICE PERSONNEL.
Failure to follow this WARNING may result in death
or serious injury.
The light source for this TV is a mercury lamp with internal
atmospheric presstire that increases during use. The lamp has a
limited service life that varies depending on product use and
user settings.
As is generally the case with all projection TVs that use
projection lamps as a light source, the brighmess of the lamp in
this TV may vary somewhat over the expected service life and
will generally decrease over time. The average useful service life
for the lamp is approximately 8,000 hours in Low Power mode
or 6,000 hours in High Bright mode. See "Selecting the Lamp
mode" on page 75 for inf)_rmation on switching the lamp mode.
Because these are averages, some lamps will require earlier
replacement.
Note : Thelamp iswarranted only for the periods and to the
extent set forth in the Limited Warrantyapplicable to thisset,
which is a substantiallyshorterperiod of time than the average
useful serviceperiod. See "Limited United States Warranty"on
page 107or "Limited CanadaWarranty"onpage 108,as
applicable.
If you use the lamp beyond its service life:
•)qm may notice a redtiction in the colors and/or brighmess of
the picture; and
• the s[rength of the quartz glass in the lamp will be reduced
and the lamp may rupture (often making a loud noise when
this happens). If the lamp ruptures, the TV will not operate
until the lamp unit is replaced.
CAUTION: Alwayshandlethe lamp unitwithcam.
ThelampunitinthisTVwasdesignedfor safereplacement
byconsumers;however,ifthelampunit issubjectedto intentional
abuse(suchasexcessivemechanicalabuseor handlingbychildren
or pets),theunitmaybreak,exposingsharpedgesor pinchpoints.
When to replace the lamp unit
You should replace the lamp unit:
• if the picture darkens and/or colors fade;
• if the screen (lamp) does no[ light (LED indication #3, page
99); or
• if)_m hear a loud noise and the picture goes black, which
may indicate a lamp rupture (LED indication #3, page 99).
To obtain a replacement lamp unit:
•In the U.S.:
,,
Inwarranty wvw.tacp.toshiba.com/service Calltoll-free
1-800-631-381l.
Outof www.ceaccessories.toshiba.com Consultyour
warranty consumer
electronicsdealer
foravailability.
" In Canada:
Contacta Toshibapads distributor by directing)/ourweb browser
to www, toshiba,ca, Click"Home Entedainment,"andthen click
"Suppolt."
Use the replacement lamp unit model listed below only.
Using any other lamp may cause damage to the TV
and/or lamp.
ICAUTION: Always replace with same ]
type lamp unit: Model No. D95-LMP I
(Stock no. 23311153)
#OlE 103-109 566272HM195 103
Black
(E) 56/62/72HM195
Copyright © 2005 TOSHIBA CORPORATION. All rights reserved.
7/28105, 5:06 PM
103
[
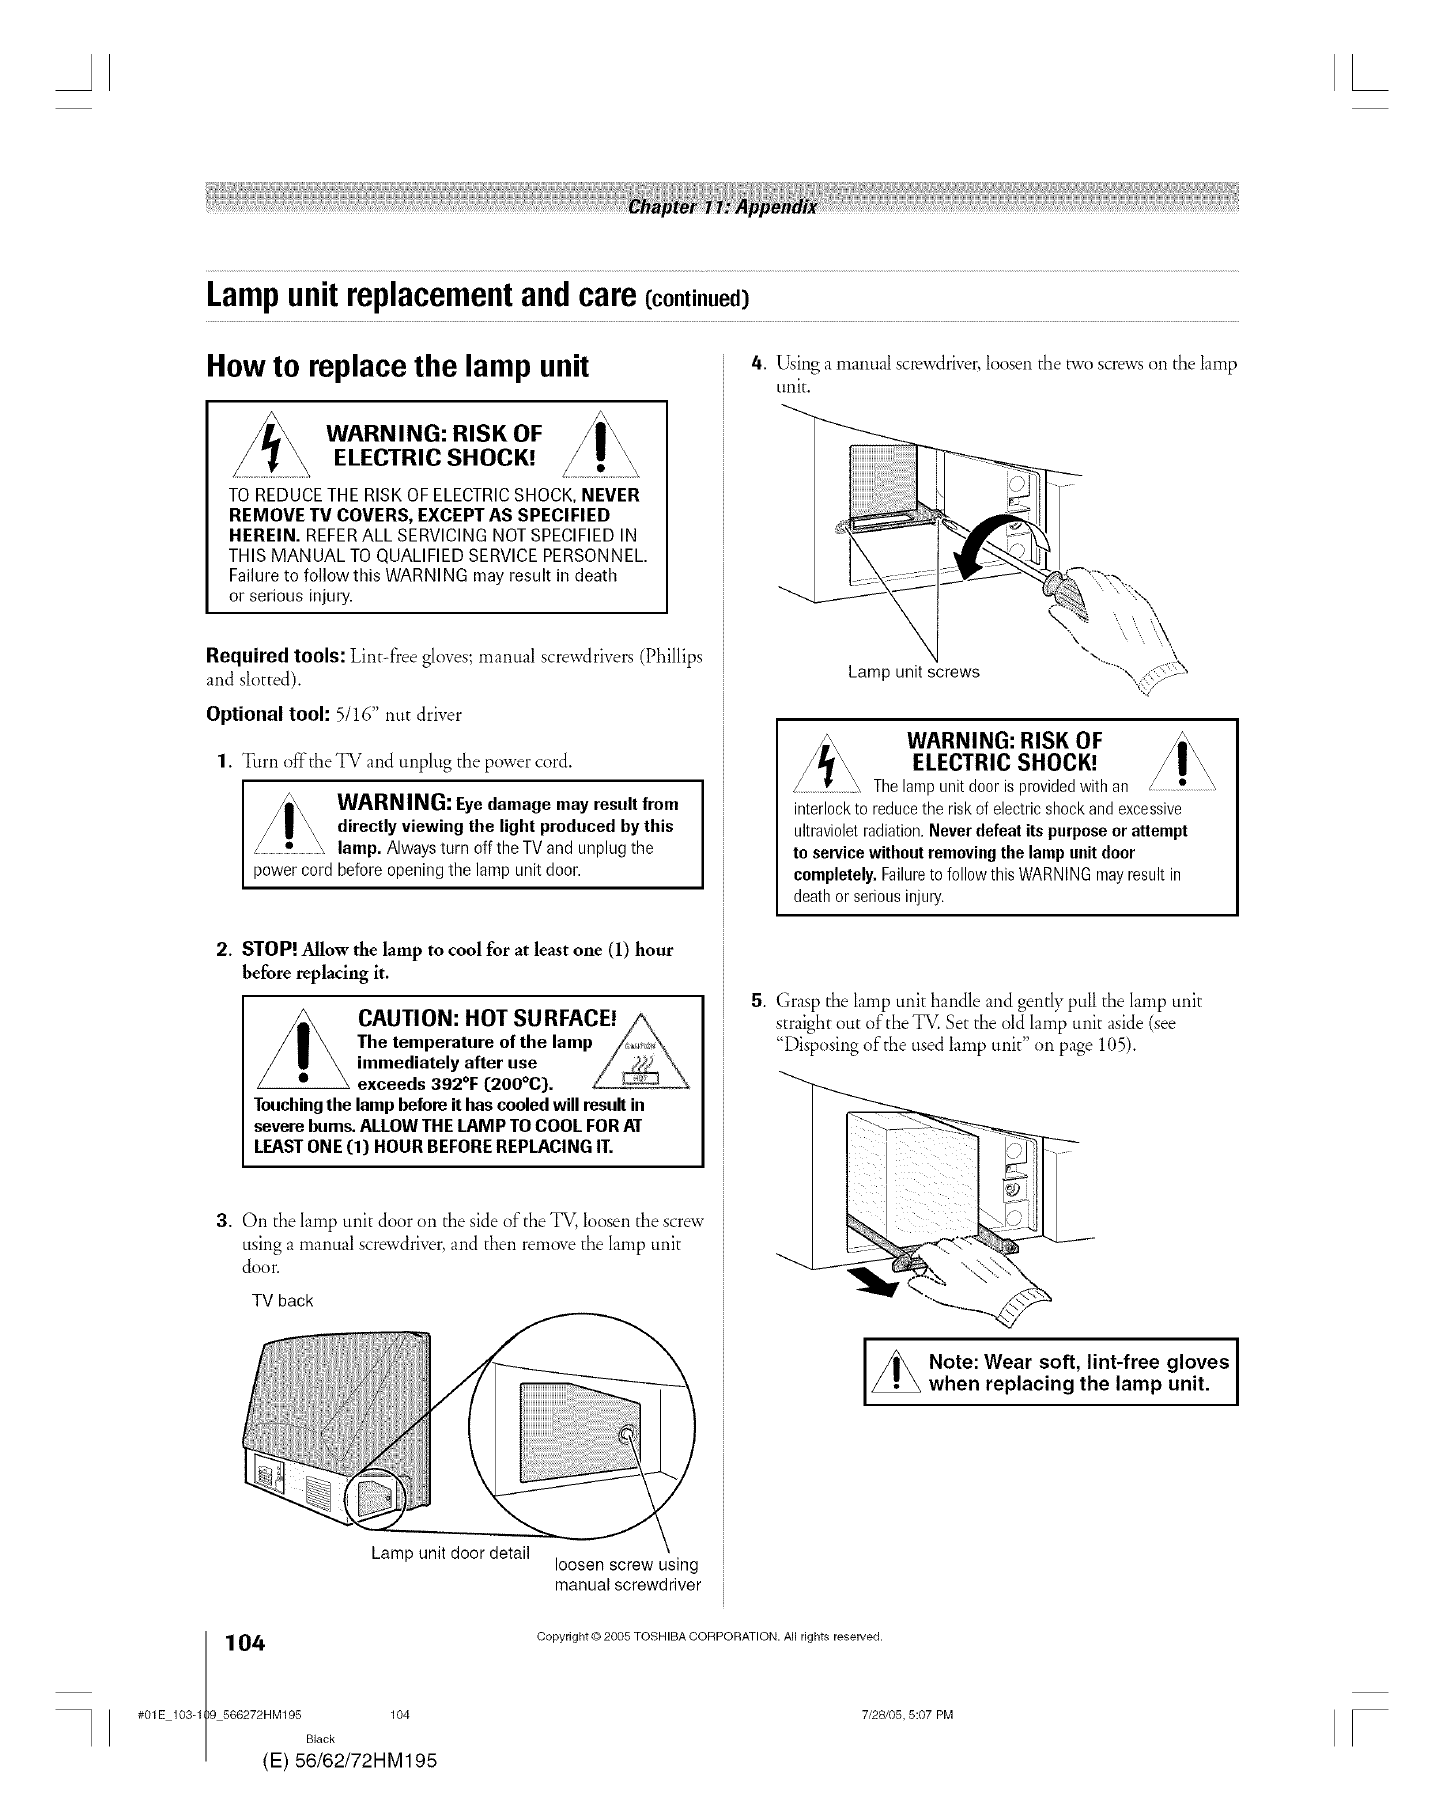
Lampunitreplacementandcare(continued)
How to replace the lamp unit
WARNING: RISK OF
ELECTRIC SHOCK!
TO REDUCE THE RISK OF ELECTRIC SHOCK, NEVER
REMOVE TV COVERS, EXCEPT AS SPECIFIED
HEREIN. REFERALL SERVICING NOT SPECIFIED IN
THIS MANUAL TO QUALIFIED SERVICE PERSONNEL.
Failure to follow this WARNING may result in death
or serious injury.
Required tools: Lint-free gloves; manual screwdrivers (Phillips
and slotted).
Optional tool: 5/16" nut driver
1. Turn offthe TV and unplug the power cord.
WARNING: Eyedamage may result from
directly viewing the light produced by this
lamp. Always turn off tile TV and unplug the
power cord before opening the lamp unit door.
2. STOP! Allow the lamp to cool for at least one (1) hour
before replacing it.
CAUTION: HOT SURFACE! /\
The temperature of the lamp /4"5_,_
immediately after use /_ \
/ exceeds 392°F (200°C). Z_ '&
Touchingthe lamp before it has cooled will result in
severe bums. ALLOW THE LAMP TO COOL FORAT
LEASTONE (1) HOUR BEFOREREPLACING IT.
3. On the lamp unit door oil the side of the TV, loosen the screw
using a manual screwdriver,and then remove the lamp unit
door.
TV back
Lamp unit door detail loosen screw using
manual screwdriver
4. Using amanual screwdriver,loosen the two screwson the lamp
unit.
i0 .....
%.. \
X."{_!:)*
Lamp unit screws
WARNING: RISK OF
ELECTRIC SHOCK!
Thelampunit dooris providedwith an
interlockto reducethe riskof electricshockand excessive
ultravioletradiation,Never defeat its purposeor attempt
to servicewithoutremovingthe lamp unit door
completely.Failureto follow this WARNINGmayresultin
deathor seriousinjury.
5. (;rasp the lamp unit handle and gently pull the lamp unit
straight out of the TV. Set the old lamp unit aside (see
"Disposing of the used lamp unit" on page 105).
Note: Wear soft, lint-free gloves
when replacing the lamp unit.
#01E 103-1 9 566272HM195 104
Black
E) 56/62/72HM195
Copyright © 2005 TOSHIBA CORPORATION. All rights reserved.
7/28/05, 5:07 PM F
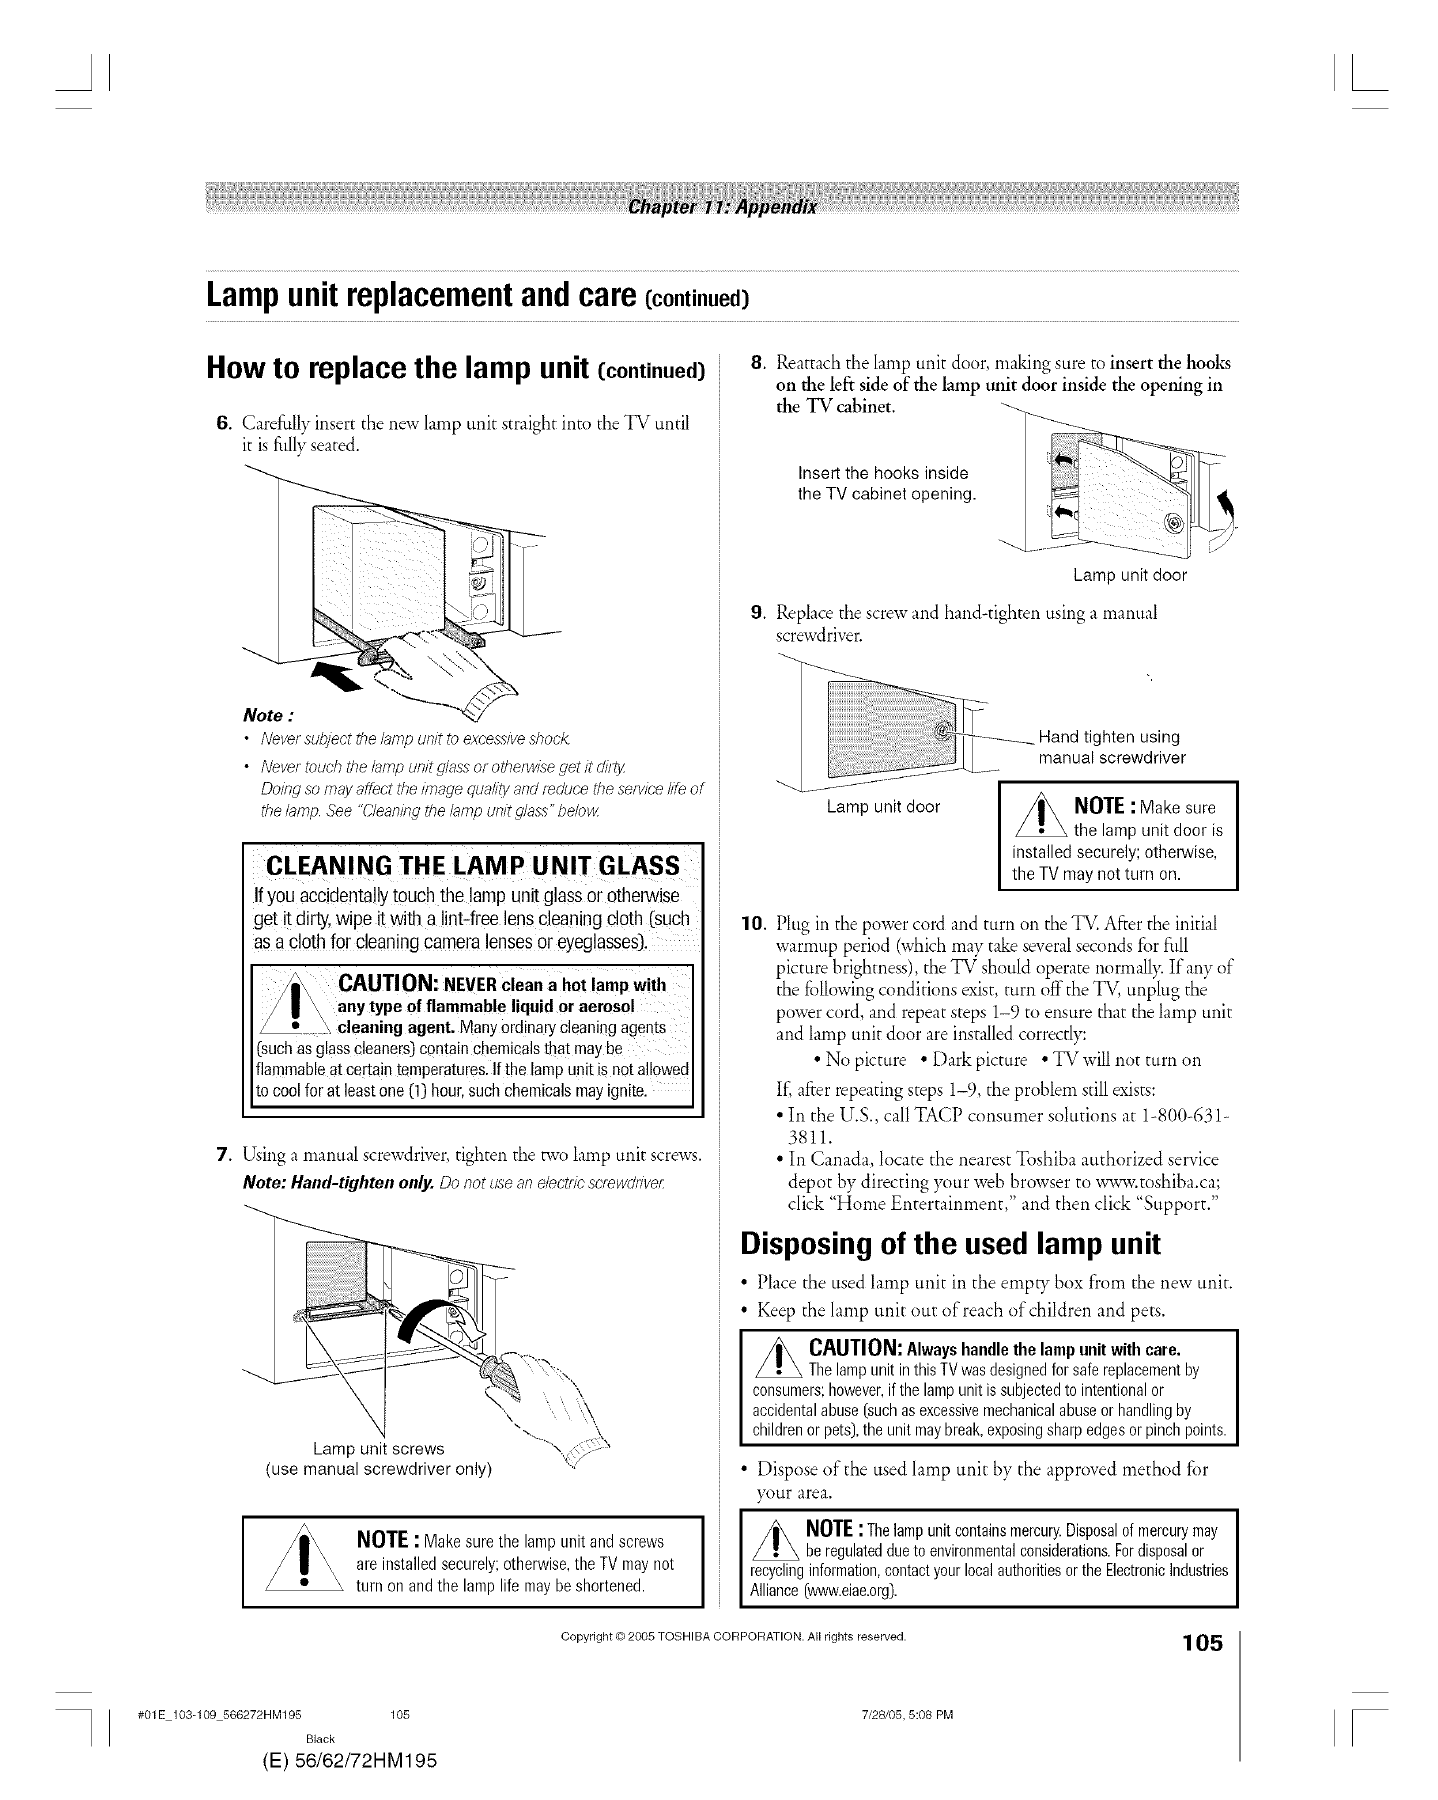
AL
Lampunitreplacementandcare(continued)
How to replace the lamp unit (continued)
6. Carefully insert the new lamp unit straight into the TV until
it is fully seated.
Note :
•Neversubjectthe lampunit to excessiveshock.
•Nevertouch thelamp unitg/assor otherwL_eget it di/?y
Doingsomayaffect theimage qualityand reducethese/vieelife of
thelamp See"Cleaningthelamp unit glass"belo_z
CLEANING THE LAMP UNIT GLASS
Ifyou accidentallytouchthe lampunit glassor otherwise
get it dirty,wipe it with a lint-freelens cleaningcloth (such
asa cloth for cleaningcameralensesor eyeglasses).
CAUTION: NEVERclean a hot lamp with
any type of flammable liquid or aerosol
cleaning agent. Many ordinarycleaning agents
(suchas glasscleaners)contain chemicalsthat maybe
flammableat certaintemperatures.Ifthe lampumt is notallowed
to cool for at leastone (1) hour.suchchemicalsmayignite.
i !
= |
7. Using a manual screwdriver, tighten the two lamp unit screws.
Note: Hand-tighten only. Do not use anelectricscrewdnver:
Lamp unit screws
(usemanual screwdriveronly)
NOTE :Makesure the lampunitand screws
are installedsecurely;otherwise,theTV maynot
turn on andthe lamp life maybeshortened.
8. Reattach the lamp unit door, making sure to insert the hooks
on the left side of the lamp unit door inside the opening in
the TV cabinet.
Insert the hooks inside
the TV cabinet opening.
Lamp unit door
9. Replace the screw and hand-tighten using a manual
screwdriver.
Lamp unit door NOTE :Makesure
the lampunit dooris
installedsecurely;otherwise,
the TVmaynot turn on.
10. Plug in the power cord and turn on the TV. After the initial
warmup period (which may take severalseconds for full
picture brightness), the TV should operate normally. If any of
the f_llowing conditions exist, turn oft the TV, unplug the
power cord, and repeat steps 1-9 to ensure that the lamp unit
and lamp unit door are installed correctly:
• No picture • Dark picture • TV will not turn on
If',after repeating steps 1-9, the problem still exists:
• In the U.S., call TACP consumer solutions at 1-800-631-
3811.
• In Canada, locate the nearest Toshiba authorized service
depo[ by directing )_mrweb browser to www.toshiba.ca;
click "Home Entertainment," and then click "Support."
Disposing of the used lamp unit
•Place the used lamp unit in the eruptT box from the new unit.
• Keep the lamp unit out of reach of children and pets.
CAUTION: Alwayshandlethe lampunit withcare.
ThelampunitinthisTVwasdesignedfor safereplacementby
consumers;however,if thelampunit issubjectedto intentionalor
accidentalabuse(suchasexcessivemechanicalabuseor handlingby
childrenor pets),theunit maybreak,exposingsharpedgesorpinchpoints.
• Dispose of the used lamp unit by the approved method for
}_mr area.
NOTE:The lamp unit contains mercury. Disposal of mercury may
beregulatedduetoenvironmentalconsiderations.Fordisposalor
recyclinginformation,contactyourlocalauthoritiesortheElectronicIndustries
Alliance(www.eiae,org),
Copyright © 2005 TOSHIBA CORPORATION. All rights reserved. 105
#01E 103-109 566272HM195 105
Black
(E) 56/62/72HM195
7/28105, 5:08 PM F
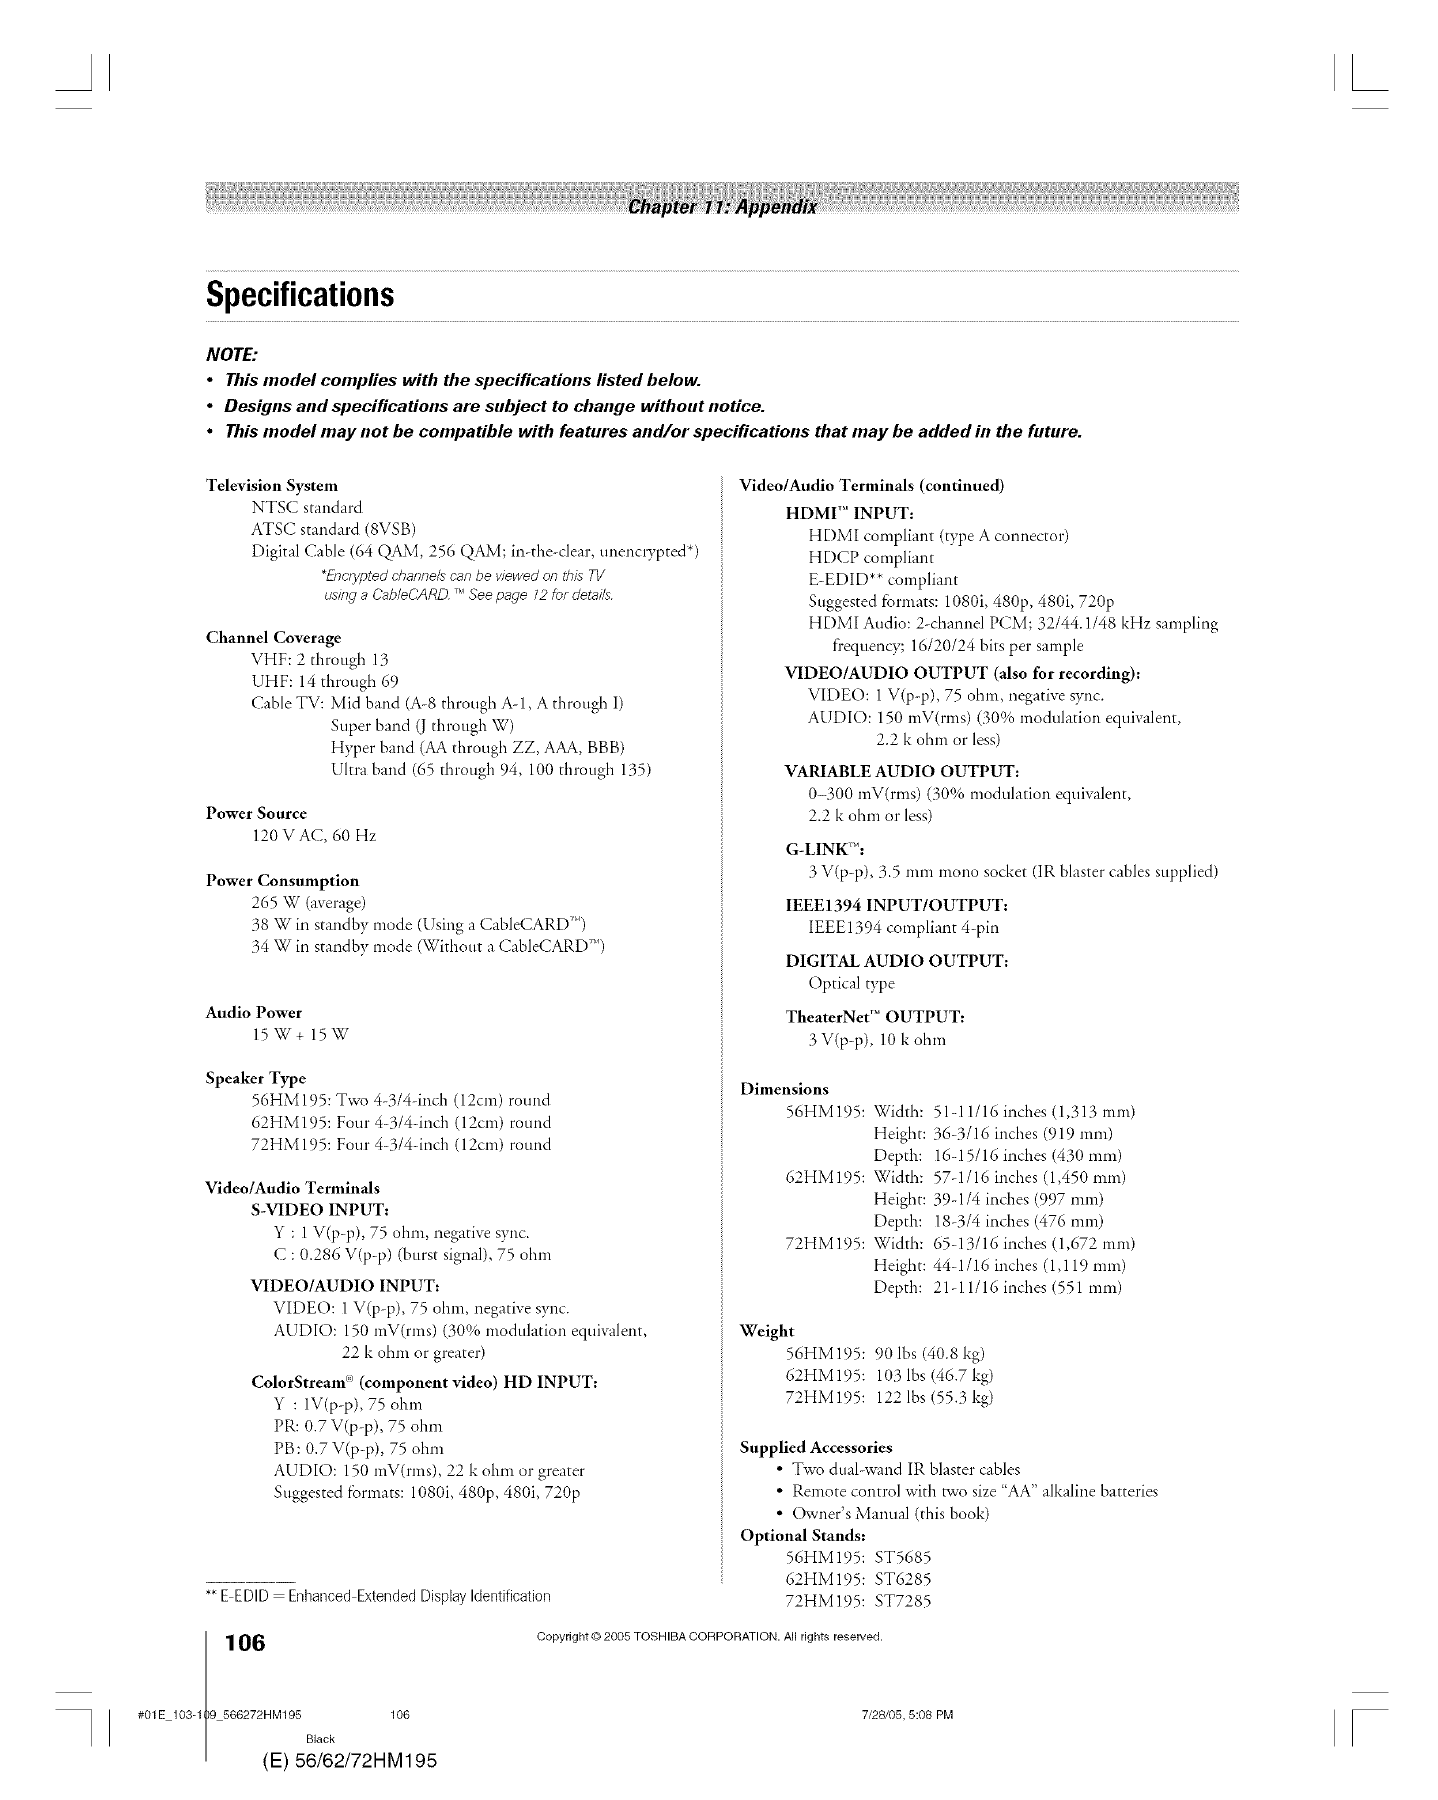
Specifications
NOTE:
•This model complies with the specifications listed below.
•Designs and specifications are subject to change without notice.
• This model may not be compatible with features and/or specifications that may be added in the future.
Television System
NTSC standard
ATSC standard (8VSB)
Digital Cable (64 QAM, 256 QAM; in-the-clear, tmencrypted*)
_Encryptedchannelscan be viewed on this TV
L/SlRg a CubleCARD Tbl Seepage 12 for details
Channel Coverage
VHF: 2 through 13
UHF: 14 through 69
Cable TV: Mid band (A-8 through A-l, A through I)
Super band (J through W)
Hyper band (AA through ZZ, AAA, BBB)
Ultra band (65 through 94, 100 through 135)
Power Source
120 V AC, 60 Hz
Power Consumption
265 W(average)
38 W in standby mode (Using a CableCARD")
34 W in standby mode (Without a CableCARD"
Audio Power
15W+ 15W
Speaker Type
56HM 195: Two 4-3/4-inch (12cm) round
62HM 195: Four 4-3/4-inch (12cm) round
72HM 195: Four 4-3/4-inch (12cm) round
Video/Audio Terminals
S-VIDEO INPUT:
Y: 1 V(p-p), 75 ohm, negative sync.
C:0.286 V(p-p) (burstsignal), 75 ohm
VIDEO/AUDIO INPUT:
VIDEO: 1V(p-p), 75 ohm, negative sync.
AUDIO: 150 mV(rms) (30% modulation equivalent,
22 k ohm or greater)
ColorStream ('_)(component video) HD INPUT:
Y: iV(p-p), 75 ohm
PR: 0.7 V(p-p), 75 ohm
PB: 0.7 V(p-p), 75 ohm
AUDIO: 150 mV(rms), 22 k ohm or greater
Suggested formats: 1080i, 480p, 480i, 720p
** E EDID Enhanced Extended Display Identification
Video/Audio Terminals (continued)
HDMI _" INPUT:
HDMI compliant (type A connector)
HDCP compliant
E-EDID** compliant
Suggested formats: 1080i, 480p, 480i, 720p
HDMI Audio: 2-channel PCM; 32/44.1/48 kHz sampling
frequency; 16/20/24 bits per sample
VIDEO/AUDIO OUTPUT (also for recording):
VIDEO: 1 V(p-p), 75 ohm, negative sync.
AUDIO: 150 mV(rms) (30% modulation equivalent,
2.2 k ohm or less)
VARIABLE AUDIO OUTPUT:
0-300 mV(rms) (30% modulation equivalent,
2.2 k ohm or less)
G-LINK%
3 V(p-p), 3.5 mm mono socket (IR blaster cables supplied)
IEEE1394 INPUT/OUTPUT:
IEEE1394 compliant 4-pin
DIGITAL AUDIO OUTPUT:
Optical type
TheaterNet'" OUTPUT:
3 V(p-p), 10 k ohm
Dimensions
56HM195:
62HM 195:
72HM195:
Width:
Height:
Depth:
Width:
Height:
Depth:
Width:
Height:
Depth:
51-11/16 inches (1,313 mm)
36-3116 inches (919 mm)
16-15/16 inches (430 mm)
57-1116 inches (1,450 ram)
39-114 inches (997 ram)
18-314 inches (476 mm)
65- 13/16 inches (1,672 mm)
44-1116 inches (1,119 ram)
21-11/16 inches (551 ram)
Weight
56HM195:90 lbs (40.8 kg)
62HM195:103 lbs (46.7 kg)
72HM195:122 lbs (55.3 kg)
Supplied Accessories
•Two dual-wand IR blaster cables
•Remote control with two size "AA" alkaline batteries
•Owner's Manual (this book)
Optional Stands:
56HM195:ST5685
62HM 195:ST6285
72HM195:ST7285
#01E 103-1 9 566272HM195 106
Black
E) 56/62/72HM195
Copyright © 2005 TOSHIBA CORPORATION. All rights reserved.
7/28/B5, 5:08 PM [
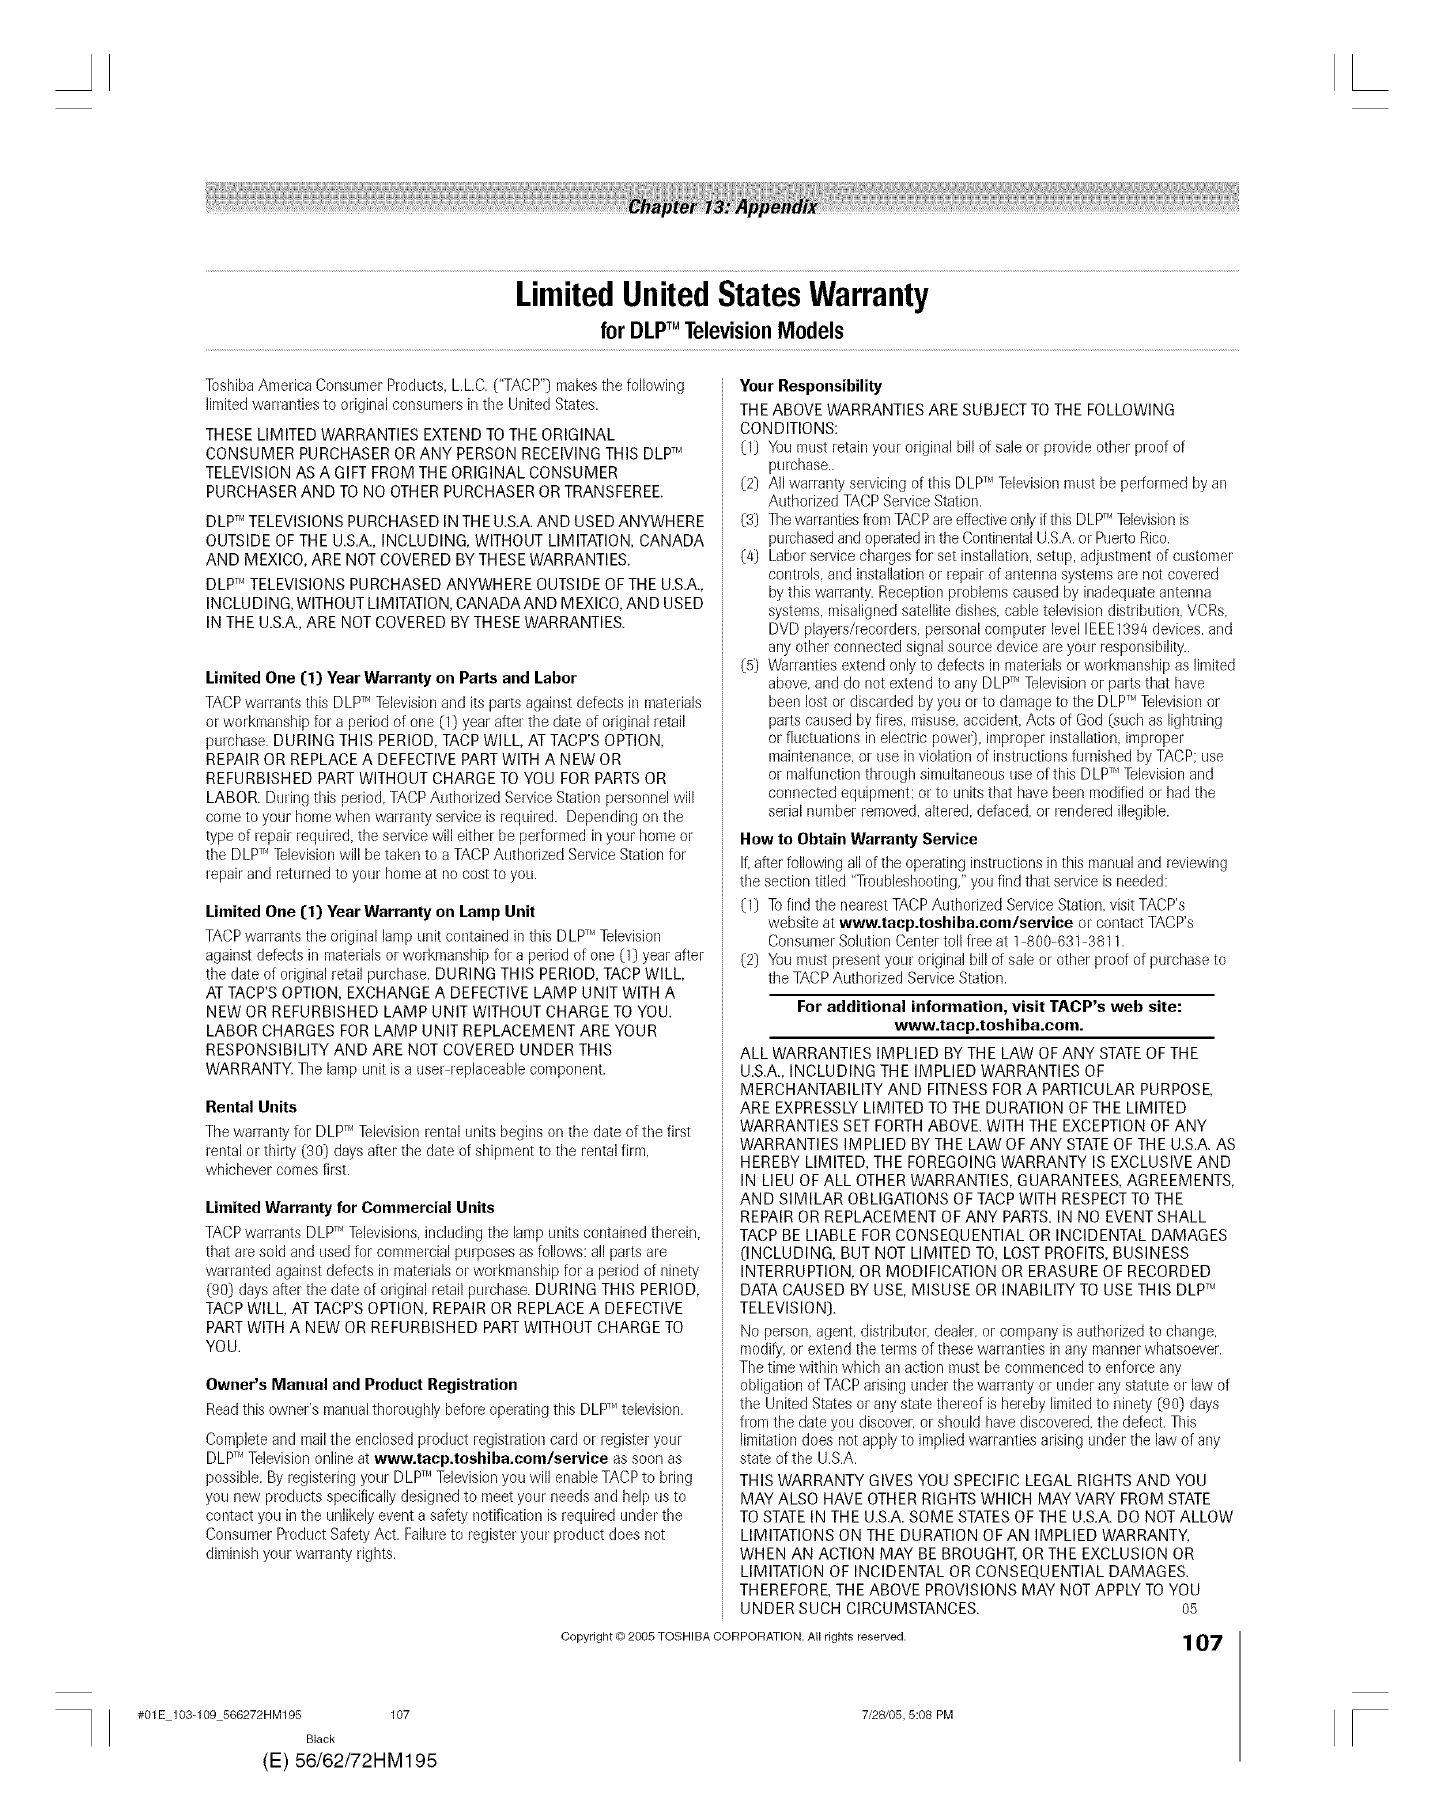
L
LimitedUnitedStatesWarranty
for DLPTMTelevisionModels
Toshiba America Consumer Products. L.L.C. ("TACP") makes the following
limited warranties to original consumers in tile United States.
THESE LIMITED WARRANTIES EXTEND TO THE ORIGINAL
CONSUMER PURCHASER OR ANY PERSON RECEIVING THIS DLPTM
TELEVISION AS A GIFT FROM THE ORIGINAL CONSUMER
PURCHASER AND TO NO OTHER PURCHASER OR TRANSFEREE.
DLPT"TELEVISIONS PURCHASED IN TH EU.S.A. AND USED ANYWHERE
OUTSIDE OF THE U.S.A., INCLUDING, WITHOUT LIMITATION, CANADA
AND MEXICO, ARE NOT COVERED BY THESE WARRANTIES.
DLPTr'TELEVISIONS PURCHASED ANYWHERE OUTSIDE OF THE U.S.A.,
INCLU DING, WITHOUT LIMITATION, CANADA AND MEXICO, AND USED
IN THE U.S.A.,ARE NOT COVERED BY THESE WARRANTIES.
Limited One (1) Year Warranty on Parts and Labor
TACP warrants this DLPTHTelevision and its parts against defects in materials
or workmanship for a period of one (1) year after the date of original retail
purchase. DURING THIS PERIOD, TACP WILL, AT TACP'S OPTION,
REPAIR OR REPLACE A DEFECTIVE PART WITH A NEW OR
REFURBISHED PART WITHOUT CHARGE TO YOU FOR PARTS OR
LABOR. During this period. TACP Authorized Service Station personnel will
come to your home when warranty service is required. Depending on the
type of repair required, the selvice will either be performed in your home or
the DLPT''Television will be taken to a TACP Authorized Service Station for
repair and returned to your home at no cost to you.
Limited One (1) Year Warranty on Lamp Unit
TACP warrants the original lamp unit contained in this DLPT''Television
against defects in materials or workmanship for a period of one (1) year after
the date of original retail purchase. DURING THIS PERIOD, TACP WILL,
AT TACP'S OPTION, EXCHANGE A DEFECTIVE LAMP UNIT WITH A
NEW OR REFURBISHED LAMP UNIT WITHOUT CHARGE TO YOU.
LABOR CHARGES FOR LAMP UNIT REPLACEMENT ARE YOUR
RESPONSIBILITY AND ARE NOT COVERED UNDER THIS
WARRANTY. The lamp unit is a user replaceable component.
Rental Units
Tile warranty for DLPTr'lTelevision rental units begins on tile date of tile first
rental or thilty (30) days after the date of shipment to the rental firm.
whichever COMBSfirst.
Limited Warranty for Commercial Units
TACP warrants DLPTMTelevisions, including the lamp units contained therein.
that are sold and used for commercial purposes as follows: all parts are
warranted against defects in materials or workmanship for a period of ninety
(90) days after the date of original retail purchase. DURING THIS PERIOD,
TACP WILL, AT TACP'S OPTION, REPAIR OR REPLACE A DEFECTIVE
PART WITH A NEW OR REFURBISHED PART WITHOUT CHARGE TO
YOU.
Owner's Manual and Product Registration
Read this owner's manual thoroughly before operating this DLPTr'ltelevision.
Complete and mail the enclosed product registlation card or register your
DLPTr'lTelevision online at www.tacp.toshiba.com/service as soon as
possible. By registering your DLPTr'lTelevisionyou will enable TACP to bring
you new products specifically designed to meet your needs and help us to
contact you in the unlikely event a safety notification is required under tile
Consumer Product Safety Act. Failure to register your product does not
diminish your warranty rights.
Your Responsibility
THE ABOVE WARRANTI ESARE S UBJECT TO THE FOLLOWI NG
CONDITIONS:
(1] You must retain your original bill of sale or provide other proof of
purchase..
(2) All warranty selvicing of this DLPTMTelevision must be pedormed by an
Authorized TACP Service Station.
(3] The waRanties from TACP areeffective only if this DLPTr'lTelevisionis
purchased and operated in the Continental U.S.A.or PueIto Rico.
(4] Labor service charges for set installation, setup, adjustment of customer
controls, and installation or repair of antenna systems are not covered
by this warranty. Reception problems caused by inadequate antenna
systems, misaligned satellite dishes, cable television distribution. VCRs,
DVD players/recorders, personal computer level IEEE1394 devices, and
any other connected signal source device are your responsibility..
(5] Warranties extend only to defects in materials or workmanship as limited
above, and do not extend to any DLPTr'lTelevision or parts that have
been lost or discarded by you or to damage to the DLPTr'lTelevision or
parts caused by fires, misuse, accident. Acts of God (such as lightning
or fluctuations in electric powe0, improper installation, improper
maintenance, or use in violation of instructions furnished by TACP: use
or malfunction through simultaneous use of this D LPTr'lTelevision and
connected equipment: or to units that have been modified or had the
serial number removed, altered, defaced, or rendered illegible.
How to Obtain Warranty Service
If.after following all of tile Bperating instructions in this manualaBd reviewiBg
tile section titled "Troubleshooting," you find that SBIViCBis needed:
(1) To find the nearest TACP Authorized Service Station. visit TACP's
website at wv_nN.tacp.toshiba.com/service or contact TACP's
Consumer Solution Center toll free at 1 800 631 3811.
(2) You must present your original bill of sale or other proof of purchase to
the TACP Authorized SBIViCBStation.
For additional information, visit TACP's web site:
www.tacp.toshiba.eom.
ALL WARRANTIES IMPLIED BY THE LAW OF ANY STATEOF THE
U.S.A., INCLUDING THE IMPLIED WARRANTIES OF
MERCHANTABILITY AND FITNESS FOR A PARTICULAR PURPOSE,
ARE EXPRESSLY LIMITED TO THE DURATION OF THE LIMITED
WARRANTIES SET FORTH ABOVE. WITH THE EXCEPTION OF ANY
WARRANTIES IMPLIED BY THE LAW OF ANY STATEOF THE U.S.A. AS
HEREBY LIMITED, THE FOREGOING WARRANTY IS EXCLUSIVE AND
IN LIEU OF ALL OTHER WARRANTIES, GUARANTEES, AGREEMENTS,
AND SIMILAR OBLIGATIONS OF TACP WITH RESPECT TO THE
REPAIR OR REPLACEMENT OF ANY PARTS. IN NO EVENT SHALL
TACP BE LIABLE FOR CONSEQUENTIAL OR INCIDENTAL DAMAGES
(INCLUDING, BUT NOT LIMITED TO, LOST PROFITS, BUSINESS
INTERRUPTION, OR MODIFICATION OR ERASURE OF RECORDED
DATA CAUSED BY USE, MISUSE OR INABILITY TO USE THIS DLPTM
TELEVISION).
No person, agent, distributor, dealer, or company is authorized to change,
modify, or extend the teRR8of these warranties in any manner whatsoever.
The time within which an action must be commenced to enforce any
obligation of TACP arising under the warranty or under any statute or law of
the United States or any state thereof is hereby limited to ninety (90) days
from the date you discover, or should have discovered, the defect. This
]imitationdoes not apply to implied warranties arising under the law of any
state of the U.S.A.
THIS WARRANTY GIVES YOU SPECIFIC LEGAL RIGHTS AND YOU
MAY ALSO HAVE OTHER RIGHTS WHICH MAY VARY FROM STATE
TO STATE IN THE U.S.A. SOME STATES OFTHE U.S.A. DO NOT ALLOW
LIMITATIONS ON THE DURATION OF AN IMPLIED WARRANTY,
WHEN AN ACTION MAY BE BROUGHT, OR THE EXCLUSION OR
LIMITATION OF INCIDENTAL OR CONSEQUENTIAL DAMAGES.
THEREFORE, THE ABOVE PROVISIONS MAY NOT APPLY TO YOU
UNDER SUCH CIRCUMSTANCES. 05
Copyright © 2005 TOSHIBA CORPORATION. All rights reserved. 107
#01E 103-109 566272HM195 107
Black
(E) 56/62/72HM195
7/28/B5, 5:08 PM r
LimitedCanadaWarranty
for DLPTMTelevisionModels
Toshiba of Canada Limited ("TCE') makes the following limited warranties to
original consumers in Canada.
THESE LIMITED WARRANTIES EXTEND TO THE ORIGINAL
CONSUMER PURCHASER OR ANY PERSON RECEIVING THIS DLPTM
TELEVISION AS A GIFT FROM THE ORIGINAL CONSUMER
PURCHASER AND TO NO OTHER PURCHASER OR TRANSFEREE.
PRODUCTS PURCHASED IN THE U.S.A.AND USED IN CANADA ARE
NOT COVERED BY THESE WARRANTIES.
PRODUCTS PURCHASED IN CANADA AND USED IN THE U.S.A. ARE
NOT COVERED BY THESE WARRANTIES.
Limited One (1) Year Warranty on Parts and Labor*
TCL warrants this DLPTutelevision television and its parts against defects in
materials or workmanship for a period of one (1) year after the date of
original retail purchase. DURING THIS PERIOD. TCL WILL. AT TCES
OPTION, REPAIROR REPLACE A DEFECTIVEPARTWITH A NEW OR
REFURBISHED PARTWITHOUT CHARGE TO YOU FOR PARTSOR
LABOR. TCL Authorized Selvice Depot personnel will come to your home
when warranty selvicB is required. Depending on the type of repair required,
either the service will be performed in your home or tile set will be taken to
the TCL Authorized Selvice Depot for repair and returned to your home at
no cost to you. IN HOME SERVICE ONLY APPLIES WITHIN 100
KILOMETERS OF AN AUTHORIZED TCL SERVICE DEPOT.
Limited One (1) Year Warranty on Lamp Unit*
TCL warrants the lamp unit inthis DLPTutelevision against defects in
materials or workmanship for a period of one (1) year after the date of
original retail purchase. DURING THIS PERIOD, TCL WILL, AT TCES
OPTION, EXCHANGE A DEFECTIVELAMP UNIT WITH A NEW OR
REFURBISHED LAMP UNIT WITHOUT CHARGE TO YOU. LABOR
CHARGES FOR LAMP UNIT REPLACEMENT ARE NOT COVERED
UN DERWARRANTY. The lamp unit is a user replaceable component.
Rental Units
Tile warranty for rental units, inchlding tile lamp units contaiBed thereiB.
begins with the date of first rental or thilty [30) days from the date of
shipment to the rental firm. whichever comes first.
*Limited Warranty for Commercial Units
TCL warrants DLPTHtelevisions, including the lamp units contained therein.
sold and used for commercial purposes as follows: all paits are warranted
against defects in materials or workmanship for a period of ninety (90) days
after the date of original purchase. DURING THIS PERIOD.TCL WILL. AT
TCES OPTION, REPAIROR REPLACE A DEFECTIVEPARTWITH A NEW OR
REFURBISHED PARTWITHOUT CHARGETO YOU. ON SITE SERVICE
ONLYAPPLIES WITHIN 100 KILOMETERS OF AN AUTHORIZED TCL
SERVICE DEPO]_
Owner's Manual and Product Registration
Read this owner's manual thoroughly before operating this DLPTr'ltelevision.
Register your product online at www.toshiba.ca as soon as possible. By
registering your product you will enable TCL bring you new products
specifically designed to meet your needs and help us to contact you in the
unlikely event a safety notification is required under tile Consumer Product
Safety Act. Failure to register your product does not diminish your warranty
rights.
Your Responsibility
THE ABOVE WARRANTIES ARE SUBJECT TO THE FOLLOWING
CONDITIONS:
(1) You IT1ustprovide your bill of sale or other proof of purchase.
(2) All warranty selvicing of this DLPT''television must be pedormed by an
Authorized TCL Service Depot.
(3] These warranties from TCL are effectiveonly if the DLPT''television is
purchased in Canadafrom an authorized TCL dealerand operated in
Canada.
(4] Labor charges for installation, setup, adjustment of customer controls.
and installation or repair of antenna systems are not covered by these
warranties. Reception problems caused by inadequate antenna systems
are your responsibility.
(5] Warranties extend only to defects in materials or workmanship as limited
above, and do not extend to any DLPT''television or pairs that have
been lost or discarded by you or to damage to the television or parts
caused by fires, misuse, accident. Acts of God (such as lightning or
fluctuations in electric power], improper installation, improper
maintenance, or use in violation of instructions furnished by TCL: use or
malfunction through simultaneous use of this product and connected
equipment: or to units that have been modified or had the serial number
removed, altered, defaced, or rendered illegible.
How to Obtain Warranty Services
If.after following all of tile operating instructions in this manualaBd checkiBg
tile "Troubleshooting" section, you find that SBIViCBis needed:
(1) To find the nearest TCL Authorized Seivice Depot. visit TCEs web site at
www.toshiba.ca.
(2) Present your bill of sale or other proof of purchase to tile Authorized
SBIViCBDepot.
For additional information, visit TCL's web site:
www.toshiba.ca
ALL WARRANTIES IMPLIED BY THE LAW OF ANY PROVINCE OF
CANADA, INCLUDING THE IMPLIED WARRANTIES OF
MERCHANTABILITY AND FITNESS FOR A PARTICULAR PURPOSE,
ARE EXPRESSLY LIMITED TO THE DURATION OF THE LIMITED
WARRANTIES SET FORTH ABOVE. WITH THE EXCEPTION OF ANY
WARRANTIES IMPLIED BY THE LAW OF ANY PROVINCE OF CANADA
AS HEREBY LIMITED, THE FOREGOING WARRANTY IS EXCLUSIVE
AND IN LIEU OF ALL OTHER WARRANTIES, GUARANTEES,
AGREEMENTS, AND SIMILAR OBLIGATIONS OF TCL WITH RESPECT
TO THE REPAIR OR REPLACEMENT OF ANY PARTS. IN NO EVENT
SHALL TCL BE LIABLE FOR CONSEQUENTIAL OR INCIDENTAL
DAMAGES (INCLUDING, BUT NOT LIMITED TO, LOST PROFITS,
BUSINESS INTERRUPTION, OR MODIFICATION OR ERASURE OF
RECORDED DATA CAUSED BY USE, MISUSE, OR INABILITY TO USE
THIS PRODUCT).
No person, agent, distributor, dealer, or company is authorized to change,
modify, or extend the terms of these warranties in any manner whatsoever.
The time within which action must be commenced to enforce any obligation
of TCL arising under this warranty or under any law of Canada or of any
province thereof ishereby limited to 90 days from tile date you discover, or
should have discovered, tile defect. This limitation does not apply to implied
warranties arising under the law of any province of Canada.
THIS WARRANTY GIVES YOU SPECIFIC LEGAL RIGHTS, AND YOU
MAY ALSO HAVE OTHER RIGHTS, WHICH MAY VARY FROM
PROVINCE TO PROVINCE IN CANADA. SOME PROVINCES OF
CANADA DO NOT ALLOW LIMITATIONS ON THE DURATION OF AN
IMPLIED WARRANTY, LIMITATIONS ON THE TIME WITHIN WHICH AN
ACTION MAY BE BROUGHT, OR THE EXCLUSION OR LIMITATION OF
INCIDENTAL OR CONSEQUENTIAL DAMAGES; THEREFORE, THE
ABOVE LIMITATIONS OR EXCLUSIONS MAY NOT APPLY TO YOU
UNDER SUCH CIRCUMSTANCES.
#01E 103-1 9 566272HM195 108
Black
E) 56/62/72HM195
Copyright © 2005 TOSHIBA CORPORATION. All rights reserved.
7/28/05, 5:08 PM F
L
A copy of the GPL source code in this product may be obtained by
contacting Toshiba Consumer Solutions at (800)631-3811. There will be a
charge to cover the costs of providing the source code.
A copy of the LGPL source code in this product may be obtained by
contacting Toshiba Consumer Solutions at (800)631-3811. There will be a
charge to cover the costs of providing the source code.
USB Protocol Copyright _ 2005 The NetBSD Foundation, Inc. All rights
reserved.
Redistribution and use in source and binary forms, with or without
modification, are permitted provided that the following conditions are
met:
1. Redistributions of source code must retain the above copyright notice.
this list of conditions and the following disclaimer.
2. Redistributions in binary form must reproduce the above copyright notice.
this list of conditions and the following disclaimer in the documentation
and/or other materials provided with the distribution.
3. Neither the name of The NBtBSD Foundation nor the names of its
contributors may be used to endorse or promote products derived ffmB
this software without specified prior written permission.
THIS SOFTWARE IS PROVIDED BY THE NETBSD FOUNDATION, INC.
AND CONTRIBUTORS "AS IS" AND ANY EXPRESS OR IMPLIED
WARRANTIES, INCLUDING, BUT NOT LIMITED TO, THE IMPLIED
WARRANTIES OF MERCHANTABILITY AND FITNESS FOR A
PARTICULAR PURPOSE ARE DISCLAIMED. IN NO EVENT SHALL THE
FOUNDATION OR CONTRIBUTORS BE LIABLE FOR ANY DIRECT,
INDIRECT, INCIDENTAL, SPECIAL, EXEMPLARY, OR CONSEQUENTIAL
DAMAGES (INCLUDING, BUT NOT LIMITED TO, PROCUREMENT OF
SUBSTITUTE GOODS OR SERVICES; LOSS OF USE, DATA, OR PROFITS;
OR BUSINESS INTERRUPTION) HOWEVER CAUSED AND ON ANY
THEORY OF LIABILITY, WHETHER IN CONTRACT, STRICT LIABILITY, OR
TORT (INCLUDING NEGLIGENCE OR OTHERWISE) ARISING IN ANY
WAY OUT OF TH E USE OF TH IS SOFTWARE, EVEN IF ADVISED OF THE
POSSIBILITY OF SUCH DAMAGE.
This product inchides software developed by tile OpenSSL Project for else in
the OpenSSL Toolkit (llttp://www.openssI.org).
This product includes cryptographic software written by Eric Young
(eay,_cryptsoft.com).
OpenSSL 0.9.7d Copyright ,_c;1998 2000 the OpenSSL Project. All Rights
reserved. Redistribution and use in source and binary forms, with or without
modification, are permitted provided that the following conditions are met:
1. Redistributions of source code must retain the above copyright notice.
this list of conditions and the following disclaimer.
2. Redistributions in binary form must reproduce the above copyright notice.
this list of conditions and tile following disclaimer in the documentation
and/or other materials provided with the distribution.
3. All adveltising materials mentioning features or use of this software must
display the following acknowledgement: This product includes software
developed by the OpenSSL Projectfor elsein the OpenSSL Toolkit
(http://openssl.org).
4. The names "OpenSSL Toolkit" and "Open SSL Project" must not be used
to endorse or promote products derived from this software without prior
written permission. For written permission, please contact openssl
core,_2openssl.org.
5. Products derived from this software may not be called "OpBnSSL" nor may
"Open SSE' appear in their nameswithout prior written permission of the
OpenSSL Project.
6. Redistributions of any form whatsoever must retain the following
acknowledgement: "This product includes software developed by the
OpenSSL Project for elsein the OpenSSL Toolkit (http://www.openssl.org)."
THIS SOFTWARE IS PROVIDED BY THE OpenSSL PROJECT'AS IS" AND
ANY EXPRESSED OR IMPLIED WARRANTIES, INCLUDING, BUT NOT
LIMITED TO, THE IMPLIED WARRANTIES OF MERCHANTABILITY AND
FITNESSFOR A PARTICULAR PURPOSEARE DISCLAIMED. IN NO EVENT
SHALL THE OpenSSL PROJECTOR CONTRIBUTORS BE LIABLE FORANY
DIRECT,INDIRECT, INCIDENTAL, SPECIAL, EXEMPLARY, OR
CONSEQUENTIAL DAMAGES (INCLUDING, BUT NOT LIMITED TO,
PROCUREMENT OF SUBSTITUTE GOODS OR SERVICES; LOSS OF USE,
DATA,OR PROFITS;OR BUSINESS INTERRUPTION) HOWEVER CAUSED
AND ON ANY THEORYOF UABILITY, WHETHER IN CONTRACT,STRICT
LIABILITY, OR TORT (INCLUDING NEGLIGENCE OR OTHERWISE)
ARISING IN ANY WAY OUT OF THE USE OF THIS SOFTWARE, EVEN IF
ADVISED OF THE POSSIBILITY OF SUCH DAMAGE. This product includes
cryptographic software written by Eric Young (eay@cryptsoft.com). This
product includes software written by Tim Hudson (tjh@cryptsoft.com).
Copyright c:, 1995-1998 Eric Young (eay@cryptsoft.com). All Rights reserved.
This package is an SSL implementation written by EricYoung
(eay@cryptsoft.com). The implementation was written so as to conform with
Netscapes SSL This library is free for commercial and non-commercial use
so long as the following conditions are adhered to. The following conditions
apply to all code found in this distribution, be it the RC4, RSA, Ihash, DES,
etc.,code; not just the SSL code. The SSL documentation included with this
distribution is covered by the same copyright terms except that the holder is
Tim Hudson (tjh@cryptsoft.com).
Copyright remains Eric Young's, and as such any Copyright notices in the
code are notto be removed. If this package is used in a product, Eric
Young should be given attribution as the author of the parts of the library
used. This can be in the form of a textual message at program startup or in
documentation (online or textual) provided with the package.
Redistribution and use in source and binary forms, with or without
modification, are permitted provided that the following conditions are met:
1. Redistributions of source code must retain the copyright notice, this list of
conditions and the following disclaimer.
2. Redistributions in binary form must reproduce the above copyright notice.
this list of conditions and the following disclaimer in the documentation
and/or other materials provided with the distribution.
3. ANadveltising materials mentioning features or use of this software must
display the foNowing acknowledgement: "This product includes
cryptographic software written by Eric Young (eay,_0cryptsoft.com)." The
word 'cryptographic' can be left out if the routines from the Nbrarybeing
used are not ciTptographic related.
4. If you include any Windows specific code (or derivative thereo0 from the
apps directory (application code) you must include an acknowledgement:
"This product includes software written by Tim Hudson
(tjh_ cryptosoft.com)."
THIS SOFTWARE IS PROVIDED BY ERIC YOUNG "AS IS" AND ANY
EXPRESSOR IMPLIED WARRANTIES, INCLUDING, BUT NOT LIMITED
TO, THE IMPLIED WARRANTIES OF MERCHANTABILITY AND FITNESS
FOR A PARTICULAR PURPOSEARE DISCLAIMED. IN NO EVENT SHALL
THE AUTHOR OR CONTRIBUTORS BE LIABLE FOR ANY DIRECT,
INDIRECT, INCIDENTAL, SPECIAL, EXEMPLARY, OR CONSEQUENTIAL
DAMAGES (INCLUDING, BUT NOT LIMITED TO, PROCUREMENT OF
SUBSTITUTE GOODS OR SERVICES; LOSS OF USE, DATA, OR PROFITS;
OR BUSINESS INTERRUPTION) HOWEVER CAUSED AND ON ANY
THEORY OF LIABILITY, WHETHER IN CONTRACT, STRICT LIABILITY, OR
TORT (INCLUDING NEGLIGENCE OR OTHERWISE) ARISING IN ANY
WAY OUT OF THE USE OF THIS SOFTWARE, EVEN IF ADVISED OF THE
POSSIBILITY OF SUCH DAMAGE. The license and distribution terms for
any publicly available version or derivative of this code cannot be changed,
i.e. this code cannot simply be copied and put under another distribution
license (including the GNU Public License).
#01E 103-109 566272HM195 109
Black
(E) 56/62/72HM195
Copyright © 2005 TOSHIBA CORPORATION. All rights reserved.
7/28/05, 5:09 PM
109
r
L
A
Antenna cables .........................................................................11
Antenna input configuration .............................................../41
Audio player ...............................................................................90
Audio quality adjustments ....................................................85
Audio system connection ......................................................20
Auto aspect ratio ......................................................................74
Auto power off ...........................................................................92
AVHD .....................................................................................23, 50
B
Back of the TV ...........................................................................10
Banner, Channel Browser _'_..................................................69
Blocking channels ....................................................................95
C
Cable box connection ......................................................14, 16
CableCARD TM.............................................................................12
CableCARD T_,connection .....................................................12
CableClear TMDNR ....................................................................80
Cables ...........................................................................................11
Camcorder connection ...........................................................13
CH AY buttons ..................................................................42, 71
CH RTN button ..........................................................................71
Channel Browser _ ...................................................................69
Channel Number buttons ..............................................42, 71
Channel programming:
Automatic programming ..................................................42
Manually adding and deleting .......................................43
Cinema mode .............................................................................75
Closed captions ........................................................................82
Color temperature ....................................................................80
ColorStream 4_......................................................................10, 17
Connecting devices ..........................................................12-25
CompactFlash 4_memory cards .....................................87, 88
Component video cables ......................................................11
Component video (ColorStream 4_)..............................10, 17
D
Device connections ..........................................................12-25
Defaults, restore TV factory .................................................52
Digital Audio Out ......................................................................20
Digital signal meter .................................................................52
DNR (Digital Noise Reduction) ..........................................80
Dolby Digital ........................................................................20, 86
Double-window POP feature ...............................................76
DVD player connection ...................................................16, 17
D-VHS ....................................................................................23, 50
DVl connection ..........................................................................19
Dynamic contrast .....................................................................81
EFGHIJ
EIA-775 .........................................................................................22
FAV SCAN button ..............................................................44, 78
Favorite channels ..............................................................44, 78
Features, TV ...................................................................................7
Focus .............................................................................................86
Front of the TV ..............................................................................9
GameTimer T" ..............................................................................96
G-LINK T'_connection ..............................................................25
HDMP audio mode ................................................................50
HDMP connection .................................................................19
IEEE1394 ......................................................................................22
INPUT button .............................................................................67
Input lock .....................................................................................95
Installation, care, and service ............................................3, 4
Installation, setup ........................................................................8
Integrated digital tuning ...........................................................7
IR blaster .....................................................................................21
JPEG .......................................................................................87-90
L
Labeling video inputs .............................................................68
Lamp mode .................................................................................75
Lamp unit replacement ..............................................103-105
Language selection .................................................................41
Last mode memory feature ..................................................92
LED indications ...............................................................8, 9, 99
Locking video inputs ...............................................................95
LOCKS menu ..............................................................................93
Channels, blocking .............................................................95
Enable rating blocking ......................................................94
Front Panel lock (control panel lock) ..........................96
GameTimer _ .........................................................................96
New PIN code ......................................................................93
Unlocking programs temporarily ..................................95
Video inputs, locking .........................................................95
#01E 110-1 1 566272HM195 110
Black
E) 56/62/72HM195
Copyright © 2005 TOSHIBA CORPORATION. AII rights reserved.
7/28/05, 5:09 PM r

M
Memory cards .....................................................................87-90
Memory Stick TMmemory cards .....................................87, 88
Menu system .......................................................................35, 36
MMC memory cards .........................................................87, 88
M P3.........................................................................................87-90
MPEG-2 digital video signals ..............................................22
MPEG noise reduction ...........................................................81
MTS feature ................................................................................84
MUTE button ..............................................................................84
OPQ
ON/OFF timer ............................................................................91
Optical audio cable .................................................................11
Optical audio output format ................................................86
Panel lock ....................................................................................96
Picture adjustments:
Color temperature ...............................................................80
Picture mode .........................................................................79
Picture quality .......................................................................79
Picture-out-picture (POP):
FAV SCAN button ................................................................78
SPLIT button ..........................................................................76
Picture scroll ...............................................................................74
Picture size selection ..............................................................72
Picture viewer ............................................................................87
POWER button ..........................................................................31
Problems with TV ...............................................................97, 98
Quick RestaW M..........................................................................51
R
RECALL button .........................................................................84
Remote control:
Battery installation ..............................................................28
Device code table ........................................................33, 34
Effective range ......................................................................27
Functional key chart ....................................................29, 30
Learning about the buttons ............................................26
Operational feature reset .................................................32
Programming ........................................................................31
Searching and sampling the code ...............................31
Volume lock feature ...........................................................32
Restore TV factory defaults ..................................................52
S
Safety, care, installation, and service .............................2-5
SAP sound ...................................................................................84
Satellite receiver connection ...............................................15
Scrolling the TheaterWide _ picture ...................................74
SD (Secure Digital T") memory cards ..........................87, 88
Service .............................................................................................4
Setup, TV ...............................................................................36, 41
Setup, TV Guide On Screen _'_system ...............................37
Sleep timer ..................................................................................91
Speakers ON/OFF ....................................................................86
Specifications ...........................................................................106
SRS 3D .........................................................................................86
SRS WOW _' ................................................................................86
StableSound :_.............................................................................85
Stereo sound ..............................................................................8/4
Sub-bass (SBS) .........................................................................85
SurfLock T_'....................................................................................71
S-video cables ...........................................................................11
Symbio _ AVH D recorder ...............................................23, 50
System status .............................................................................52
T
TheaterNet T_control ...............................................................21
TheaterNet _ DEVICE and CONTROL buttons ............./46
TheaterNet 7_'IR device codes ......................................./47-49
TheaterNet T_setup ................................................................../45
TheaterWide 4_picture size ....................................................73
Time and date setting .............................................................50
Troubleshooting ..................................................................97, 98
TruBass .........................................................................................86
TV/VIDEO button ......................................................................67
TV control panel ..................................................................9, 36
TV Guide On Screen _M.................................................8, 37, 53
V
V-Chip blocking (Locks menu) ....................................93-96
VCR connection .................................................................13-18
Video cables ...............................................................................11
Video input labels ....................................................................68
Video input lock ........................................................................95
VOLUME button .......................................................................96
W, X
Warranty ............................................................................10Z 108
WOW _, SRS_R;......................................................................................................................................86
xD-Picture Card _ ...............................................................87, 88
#01E 110-111 566272HM195 111
Black
(E) 56/62/72HM195
Copyright © 2005 TOSHIBA CORPORATION. All rights reserved.
7/28/B5, 5:09 PM
111
F

L
TOSHIBA AMERICA CONSUMER PRODUCTS, L.L.C.
HEAD OFFICE:82 TOTOWA ROAD.WAYNE, NJ 07470. U.S.A.
NATIONAL SERVICEDIVISION:1420 B TOSHIBA DRIVE.LEBANON.TN 37087, U.S.A.
TOSHIBA OF CANADA LTD.
HEAD OFFICE:191 McNABB STREET,MARKHAM, ONTARIO, L3R 8H2. CANADA TEL: (905) 470 5/400
SERVICECENTERS:
TORONTO:191 McNABB STREET.MARKHAM, ONTARIO L3R8H2. CANADA TEL: (905) 470 5/400
MONTREAL: 18050 TRANS CANADA. KIRKLAND, QUEBEC.HgJ 4A1. CANADA TEL: (514) 390 7766
VANCOUVER:22171 FRASERWOODWAY, RICHMOND. B.C.,V6W 1J5.CANADA TEL: (604) 303 2500
MAN UFACTUREDBY
TOSHIBA AMERICA CONSUMER PRODUCTS, L.L.C.
CableClear, ColorStream,StableSound, and TheaterWide are registered trademarks of Toshiba America Consumer Products, L.L.C.
Channel Browser, GameTimer.Sud_Lock,Symbio, Quick Restalt, and TheaterNet are trademarks of Toshiba America Consumer Products. L.L.C.
Digital Light Processing, DLPT'Iand the DLP medallion are trademarks of Texas Instruments.
PRINTEDIN USA
{05-08}
TOSHIBA
Copyright © 2005 TOSHIBA CORPORATION. All rights reserved.
#01E 112 566272HM195 112
Black
(E) 56/62/72HM195
7/28/05, 5:09 PM F
