Toshiba 58L5400U User Manual LCD TV Manuals And Guides 1412157L
User Manual: Toshiba 58L5400U 58L5400U TOSHIBA LCD TV - Manuals and Guides View the owners manual for your TOSHIBA LCD TV #58L5400U. Home:Electronics Parts:Toshiba Parts:Toshiba LCD TV Manual
Open the PDF directly: View PDF ![]() .
.
Page Count: 143 [warning: Documents this large are best viewed by clicking the View PDF Link!]

S
Leading innovation >>>
integrated Definition
LEDTelevisionUser'sGuide:
58L5400U
65L5400U
If you need assistance:
Toshiba's Support Web site support.toshiba.corn
For more information, see "Troubleshooting" on page 121 in this guide.
Owner's Record
The model number and serial number are on the back and side of your
television.
Print out this page and write these numbers in the spaces below. Refer
to these numbers whenever you communicate with your Toshiba dealer
about this television.
Model number:
Serial number:
Register your Toshiba television at register.toshiba.corn
Note: To display a High Definition
picture, the TV must be receiving a
High Definition signal (such as an
over-the-air High Definition TV
broadcast, a High Definition digital
cable program, or a High Definition
digital sate]Hte program). For details
contact your TV antenna installer,
cable provider, or satellite provider
GMA300035010
7/14

2
DearCustomer,
Thank you for purchasing this Toshiba LED TV. This
document will help you use the many exciting features
of your new LED TV. Before operating your LED TV,
carefully read this document completely.
Safety Precautions
WARNING: TOREDUCETHERiSKOFFiRE
ORELECTRICSHOCK,DONOTEXPOSETHIS
APPLIANCETORAINORMOISTURE,
WARNING
WARHIHG:TOREDUCETHERiSKOFELECTRIC
SHOCK,DOHOTREMOVECOVER(ORBACK},
HO USER-SERVICEABLEPARTSINSIDE,
REFERSEBVICIHGTOQUALIFIEDSERVICE
PERSUHHEL,
Thelightningflashwith arrowheadsymbol,withinan
equilateraltriangle,isintendedto alertthe userto the
presenceof uninsulated"dangerousv0Itage"withinthe
maybeof sufficientmagnitudeto
constituteariskofelectdcshocktopersons.
Theexclamationpointwithinan equilateraltriangleis
intendedto alerttheuserto thepresenceof important
operatingandmaintenance(servicing)instructionsinthe
literatureaccompanyingtheappliance,
WARNING
Improper location and installation of a television can
lead to the death of your child. Never place the
television on furniture or in a location where children
can climb up on and tip over the television. Please refer
to the Child Safety information in item 26) on page 5 of
the Important Safety Instructions/Installation section.
WAR NING: if you decide to wall mount this
television, always use a mounting bracket that has
been Listed by an independent laboratory (such as
UL, CSA, ETL) and is appropriate for the size and
weight of this television. The use of inappropriate
or non-Listed mounting brackets could result in
serious bodily injury and/or property damage. See
"To Display your LED TV on the included Pedestal
Stand:" on page 6.
NOTETOCATVINSTALLERS
This is a reminder to call the CATV system installer's
attention to Article 820-40 of the U.S. NEC, which
provides guidelines for proper grounding and, in
particular, specifies that the cable ground shall be
connected to the grounding system of the building, as
close to the point of cable entry as practical. For
additional antenna grounding information, see item 33)
and item 35) on page 5.

C!
I
PROPER TELEVISION PLACEMENT MATTERS
TOSHIBA CARES
• F4anufacturers, retailers and the rest of the consurner electronics industry _re cornrnitted to
making horne entertainrnent sale and erljoyable
• As you erljoyyour television, please note that all televisions new and old must be supported on
proper stands or installed according to the manulacturer's recommendations relevisions that
are inappropriately situated on d ressers, bookcases, shelves, desks, speakers, chests, carts, etc,
maylall over, resulting in injury
TUNE IN TO SAFETY
•ALWAYS follow the manufactLcer's recornmendations 1or the safe installation of your television
• ALWAYS read and follow all instructions for proper use of your television
• NEVER allow children to climb on or play on the television or the lurniture on which the television
is placed
• NEVER place the television on lurniture that can easily be used as steps, such as a chest of
drawers
• ALWAYS install the television where it cannot be pushed, pulled over or knocked down
• ALWAYS route cords and cables connected to the television so that they cannot be tripped
over, pulled or grabbed
WALL OR CEILING MOUNTYOUR TELEVISION
• ALWAYS contact your retailer about prolessional installation if you h_ve _ny doubts _bout your
ability to saloly mount your television
• ALWAYS use a mount that has been recommended by the television manufacturer and has a
salety eertif cation by an independent laboratory (such as UL, CSA, E rL)
• ALWAYS follow all instructions supplied by the television and mount manufacturers
• ALWAYS make sure that the wall or ceiling where you are mounting the television is appropnate
Some mounts are not designed to be mounted to walls and ceilings with steel studs or cinder
block construction If you are unsure, contact a prolessional installer
• lelevisions can be heavy A rr/inirr/um of two people is required 1or a wall or ceiling mount
installation
MOVING AN OLDER TELEVISION TO A NEW PLACE IN
YOUR HOME
• Marly new television buyers move their older CR r televisions into asecondary roorn after the
purchase of a fat panel television Special care should be made in the placernent of older CR r
televisions
• ALWAYS place your older CR r television on lurniture that is sturdy and appropriate 1or its size
and weight
• NEVER place your older CRF television on a dresser where children rnay be tempted to use the
drawers to climb
• ALWAYS make sure your older CR r television does not hang over the edge of your furniture
CE.org/safety _%,,_
4
ImportantSafetyinstructions
1) Read these instructions.
2) Keep these instructions.
3) Heed allwarnings.
4) Follow all instructions.
5) Do not use this apparatus near water,
6) Clean only with dry cloth,
7) Do not block any ventilation openings. Install in
accordance with the manufacturer's instructions.
8) Do not install near any heat sources such as
radiators, heat registers, stoves, or other apparatus
(including amplifiers) that produce heat.
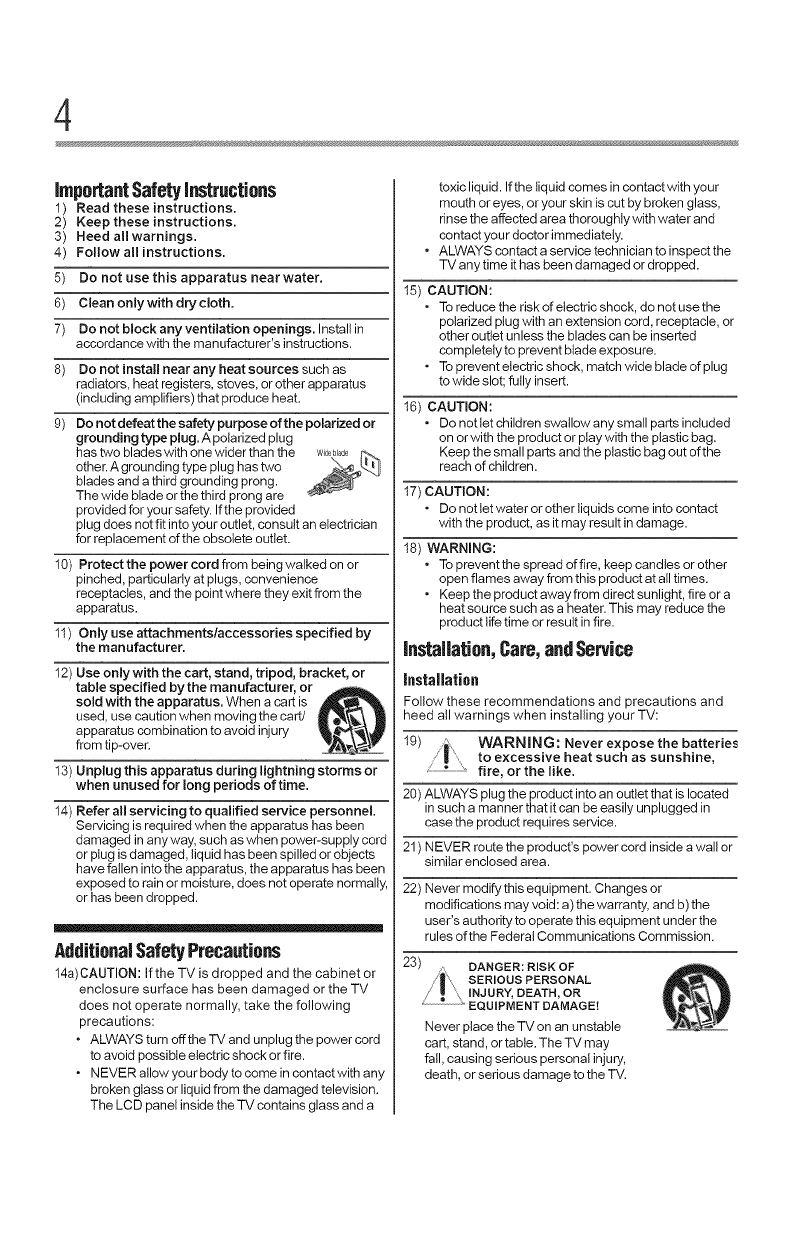
9) Do not defeat the safety purpose of the polarized or
grounding type plug. A polarized plug
has two blades with one wider than the
other.A grounding type plug has two
blades and a third grounding prong.
The wide blade or the third prong are
provided for your safety. Ifthe provided
plug does not fit into your outlet, consult an electrician
for replacement of the obsotete outlet.
10) Protect the power cord from being walked on or
pinched, particularly at plugs, convenience
receptacles, and the point where they exit from the
apparatus.
11) Onlyuseattachmentslaccessoriesspedfiedby
the manufacturer.
12) Use only with the cart, stand, tripod, bracket, or
table specified by the manufacturer, or
sold with the apparatus. When a cart is
used, use caution when moving the caw
apparatus combination to avoid injury
from tip-over.
13) Unplug this apparatus during lightning storms or
when unused for long periods of time.
14) Refer all servicing to qualified service personnel
Servicing is required when the apparatus has been
damaged in anyway, such as when power-supply cord
or ptug isdamaged, liquid has been spilled or objects
have fallen into the apparatus, the apparatus has been
exposed to rain or moisture, does not operate normally,
or has been dropped.
AdditionalSafetyPrecautions
14a)CAUTION: If the TV is dropped and the cabinet or
enclosure surface has been damaged or the TV
does not operate normally, take the fo!lowing
precautions:
oALWAYS turn off the TV and unplug the power cord
to avoid possibte electric shock or fire.
oNEVER allow your body to come in contact with any
broken gtass or liquid from the damaged television.
The LCD panel inside the TV contains glass and a
toxic liquid. Ifthe liquid comes in contact with your
mouth or eyes, or your skin is cut by broken glass,
rinse the affected area thoroughly with water and
contact your doctor immediately.
* ALWAYS contact a service technician to inspect the
TV any time it has been damaged or dropped.
15) CAUTmON:
*To reduce the risk of electric shock, do not use the
polarized plug with an extension cord, receptacle, or
other outlet unless the blades can be inserted
completely to prevent blade exposure.
*To prevent electric shock, match wide blade of plug
to wide slot; fully insert.
16) CAUTmON:
*Do not tet children swatlow any small parts inctuded
on or with the product or play with the plastic bag.
Keep the small parts and the plastic bag out of the
reach of children.
17) CAUTION:
* Do not tet water or other liquids come into contact
with the product, as it may result in damage.
18) WARNING:
*To prevent the spread of fire, keep candies or other
open flames away from this product at all times.
*Keep the product away from direct sunlight, fire or a
heat source such as a heater. This may reduce the
product life time or result in fire.
Instaflation,Care,andService
Installation
Follow these recommendations and precautions and
heed all warnings when installing your TV:
19) |", to excessive heat such as sunshine,
WARNING: Never expose the batteries
fire, or the like.
20) ALWAYS plug the product into an outlet that is located
in such a manner that it can be easily unplugged in
case the product requires service.
21 ) NEVER route the product's power cord inside a wall or
similar enclosed area.
22) Never modify this equipment. Changes or
modifications may void: a) the warranty, and b) the
user's authority to operate this equipment under the
rules of the Federal Communications Commission.
23) DANGER: RISK OF
SERIOUS PERSONAL
INJURY,DEATH, OR
EQUIPMENT DAMAGE!
Never place the TV on an unstable
cart, stand, or table. The TV may
fall, causing serious personal injury,
death, or serious damage to the TV.
5
24) When selecting a location for the TV,
* NEVER allow any part of the TV to hang over the
edge of the supporting furniture,
* NEVER place the TV on tall furniture (for example,
entertainment centers or bookcases) without
anchoring both the furniture and the TV to a suitable
support,
* Never place cloth or other material between the TV
and the supporting furniture.
* NEVER allow children to climb on the TV
25) To avoid damage to this product, never place or store
the TV in direct sunlight; hot, humid areas; or areas
subject to excessive dust or vibration.
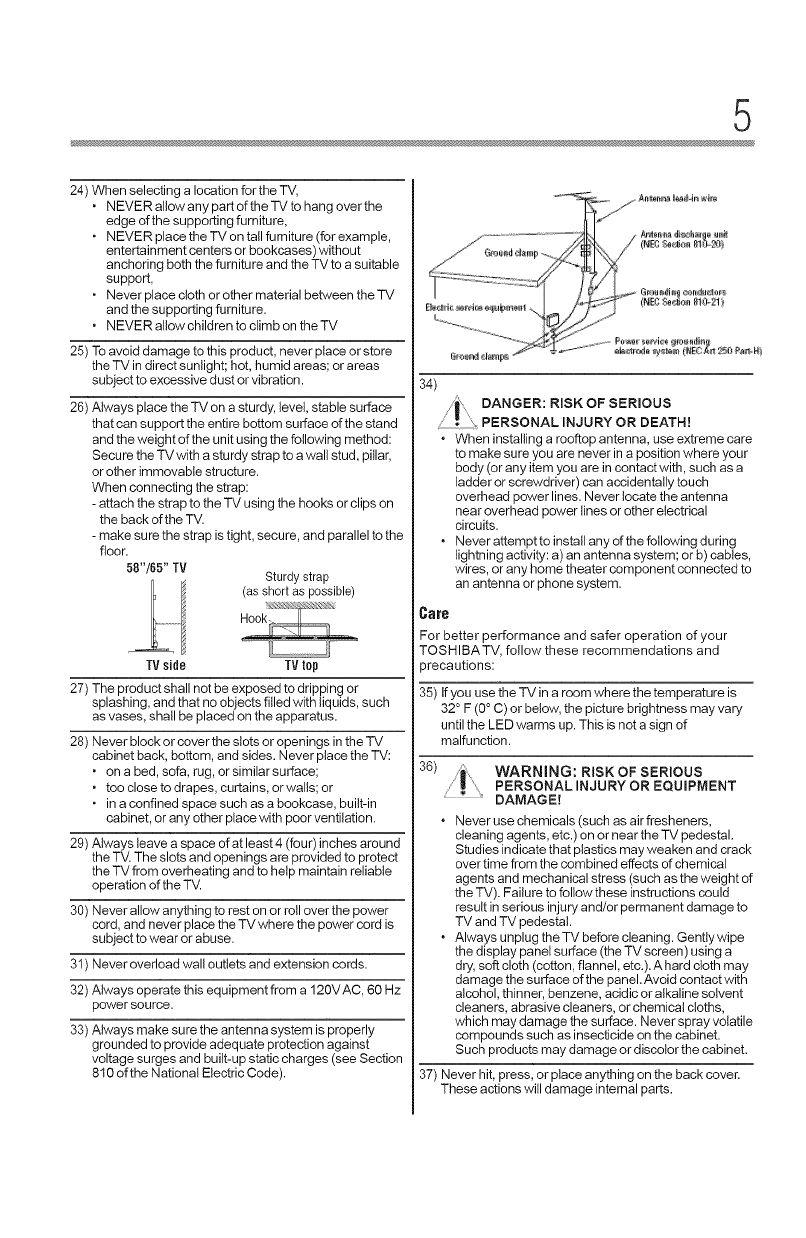
26) Always place the TV on a sturdy, level, stable surface
that can support the entire bottom surface of the stand
and the weight of the unit using the following method:
Secure the TV with a sturdy strap to a wall stud, pillar,
or other immovable structure.
When connecting the strap:
- attach the strap to the TV using the hooks or clips on
the back of the TV.
- make sure the strap is tight, secure, and parallel to the
floor.
58"/65" TV Sturdy strap
_ f (as short as possible)
TVside TV top
27) The product shall not be exposed to dripping or
splashing, and that no objects filled with liquids, such
as vases, shall be placed on the apparatus.
28) Never block or cover the slots or openings in the TV
cabinet back, bottom, and sides. Never place the TV:
* on a bed, sofa, rug, or similar surface;
* too close to drapes, curtains, or walls; or
* in a confined space such as a bookcase, built-in
cabinet, or any other place with poor ventilation.
29) Always leave a space of at least 4 (four) inches around
the TV. The slots and openings are provided to protect
the TV from overheating and to help maintain reliable
operation of the TV.
30) Never allow anything to rest on or roll over the power
cord, and never place the TV where the power cord is
subject to wear or abuse.
31) Never overload wall outlets and extension cords.
32) Always operate this equipment from a 12OVAC, 60 Hz
power source.
33) Always make sure the antenna system is properly
grounded to provide adequate protection against
voltage surges and built-up static charges (see Section
810 of the National Electric Code).
......... _.}'_ ........ Pe_'e_ _er¢i_8 gfo_llding
34)
DANGER: RISK OF SERIOUS
,PERSONAL INJURY OR DEATH!
. When installing a rooftop antenna, use extreme care
to make sure you are never in a position where your
body (or any item you are in contact with, such as a
ladder or screwdriver) can accidentally touch
overhead power lines. Never locate the antenna
near overhead power lines or other electrical
circuits.
. Neverattempttoinstallanyofthefotlowingdudng
lightning activity: a) an antenna system; or b) cables,
wires, or any home theater component connected to
an antenna or phone system.
Care
For better performance and safer operation of your
TOSHIBA TV, follow these recommendations and
)recautions:
35) Ifyou use the TV in a room where the temperature is
32 ° F (0° C) or below, the picture brightness may vary
until the LED warms up. This is not a sign of
malfunction.
36)
,, WARNING: RISK OF SERIOUS
:. PERSONAL INJURY OR EQUIPMENT
DAMAGE[
.Never use chemicals (such as air fresheners,
cleaning agents, etc.) on or near the TV pedestal.
Studies indicate that plastics may weaken and crack
over time from the combined effects of chemical
agents and mechanical stress (such as the weight of
the TV). Failure to follow these instructions could
result in serious injury and/or permanent damage to
TV and TV pedestal.
.Always unplug the TV before cleaning. Gently wipe
the display panel surface (the TV screen) using a
dry, soft cloth (cotton, flannel, etc.).A hard cloth may
damage the surface of the panel. Avoid contact with
alcohol, thinner, benzene, acidic or alkaline solvent
cleaners, abrasive cleaners, or chemical cloths,
which may damage the surface. Never spray volatile
compounds such as insecticide on the cabinet.
Such products may damage or discolor the cabinet.
37) Never hit, press, or place anything on the back cover.
These actions will damage internal parts.

6
38) WARNING:
RISK OFELECTRICSHOCK!
Never spill liquids or push objects of any kind into
the TV cabinet slots.
39) During a lightning storm, do not touch the connecting
cables or product.
40) For added protection of your TV from lightning and
power surges, always unplug the power cord and
disconnect the antenna from the TV if you leave the TV
unattended or unused for long periods of time.
41 ) Always unplug the TV to completely disconnect from
mains power. When the TV is turned off using the on/
off switch, it is not completely disconnected from power
and a minute amount of current is still consumed.
42) During normal use, the TV may make occasional
snapping or popping sounds. This is normal, especially
when the unit is being turned on or off. Ifthese sounds
become frequent or continuous, unplug the power cord
and contact a Toshiba Authorized Service Provider.
43) w_, WARNING: RISK OF SERIOUS
PERSONAL INJURY OR EQUIPMENT
".... DAMAGE!
Never strike the screen with a sharp or hea Wobject.
44)
.The LCD screen ofthis product can be damaged by
ultraviolet radiation from the sun. When selecting a
location for the television, avoid locations where the
screen may be exposed to direct sunlight, such as in
front of a window.
.Never touch, press, or place anything on the LCD
screen. These actions will damage the LCD screen.
Ifyou need to ctean the LCD screen, fotlow the
instructions in item 35) on page 5.
Service
45)
,_ WARNING:
RISKOF ELECTRICSHOCK! !
Never attempt to service the TV yourself. Opening
and removing the covers may expose you to
dangerous voltage or other hazards. Failure to
follow this WARNING may result in death or
serious injury. Refer all servicing not specified in
this manual to aToshiba Authorized Service
Provider.
46) Ifyou have the TV serviced:
Ask the service technician to use only replacement
parts specified by the manufacturer.
*Upon completion of service, ask the service
technician to perform routine safety checks to
determine that the TV is in safe operating condition.
Choosingalocationfor yourLEDTV
To Display your LED TV on the incJuded PedestaJ Stand:
Observe the following safety precautions:
1) Read and follow the pedestal assembly instructions
included with the pedestal.
CAUTION: Before beginning pedestal assembly,
carefully lay the front of the LCD Panel face down
on a flat, cushioned surface such as a quilt or
blanket. Leave the bottom of the unit protruding
over the edge of the surface and assemble the
pedestal as described in this instruction document.
Note: Extreme care should always be used when
attaching the pedestal stand to avoid damage to
the LCD panel.
2) Place the TV on a sturdy, level surface that can
support the entire bottom surface of the stand and the
weight of the unit.
3) Be sure to secure the TV to a wall, pillar, surface, or
other immovable structure see item 26) on page 5 for
additional details.
To BispJay your LED TV using aWall Bracket:
If you decide to wall mount your LED TV, always use a
wall bracket Listed by an independent laboratory (such
as UL, CSA, ETL) that is appropriate for the size
and weight of the TV:
1) CAUTION: Two people are required for installation.
2) Unplug and remove any cables and/or other
component connectors from the rear of the TV.
3) Remove the screws of the VESA Mounting Pattern
shown in the table below, if applicable.
CAUTION: Do not use the screws removed from
the back cover to attach the wall mount bracket to
the TV.
4) Always use the screws supplied or recommended by
the wall mount manufacturer.
5) Fottow the instructions provided with your wall bracket.
Before proceeding, make sure the appropriate
bracket(s) are attached to the wall and the back of the
TV as described in the instructions provided with the
wall bracket.
6) Affer attaching the appropriate bracket(s) tothe wall
and the back of the TV, remove the pedestal stand
from the TV, as described in this instruction document.
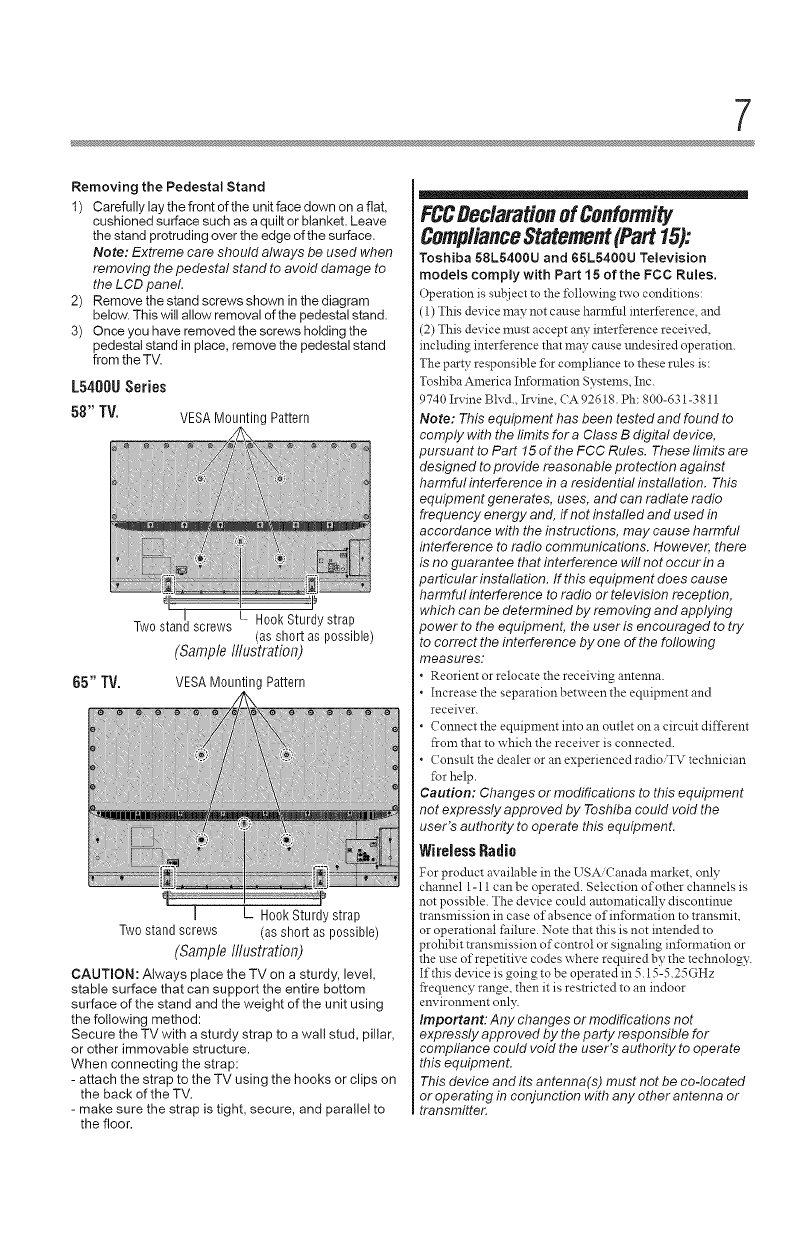
7) VESA Mounting Pattern
TVSize H01ePattern(nxv) $crewSize
58" 400mm x 400mm M6
65" 400mm x 400mm M6
7
Removing the Pedestal Stand
1) Carefully lay the front of the unit face down on a flat,
cushioned surface such as a quilt or blanket. Leave
the stand protruding over the edge of the surface.
Note: Extreme care should always be used when
removing the pedestal stand to avoid damage to
the LCD panel.
2) Remove the stand screws shown in the diagram
below. This will allow removal of the pedestal stand.
3) Once you have removed the screws holding the
pedestal stand in place, remove the pedestal stand
from the TV.
L5400USeries
58" TV. VESAMountingPattern
Twostandscrews
(Sample Illustration)
!i !i H
65" TV.
i_iiiiiiiiiii_ii?iiii_
i@
i
Hook Sturdy strap
(as short as possible)
VESA Mounting Pattern
L Hook Sturdy strap
Two stand screws (as short as possible)
(Sample Illustration)
CAUTION: Always place the TV on a sturdy, level,
stable surface that can support the entire bottom
surface of the stand and the weight of the unit using
the following method:
Secure the TV with a sturdy strap to a wall stud, pillar,
or other immovable structure.
When connecting the strap:
- attach the strap to the TV using the hooks or clips on
the back of the TV.
- make sure the strap is tight, secure, and paralle! to
the floor.
FCCDeclarationof Conformity
ComplianceStatement(Part15):
Toshiba 58L5400U and 65L5400U Television
models comply with Part 15 of the FCC Rules.
Operation is sut!ject to the fLllowing two conditions:
(1) This device may not cause harmful imerf_rence, and
(2) This device must accept any interference received,
including interference that may cause undesired operation.
The party responsible fbr compliance to these rules is:
Toshiba America Information Systems, Inc.
9740 Irvine Blvd., Ila-ine, CA 92618. Ph: 800-631-3811
Note: This equipment has been tested and found to
comply with the limits for a Class B digital device,
)ursuant to Part 15 of the FCC Rules. These limits are
designed to provide reasonable protection against
harmful interference in a residential instaflation. This
equipment generates, uses, and can radiate radio
frequency energy and, if not installed and used in
accordance with the instructions, may cause harmful
interference to radio communications. However, there
is no guarantee that interference will not occur in a
)articular installation. If this equipment does cause
harmful interference to radio or television reception,
which can be determined by removing and applying
)ower to the equipment, the user is encouraged to try
to correct the interference by one of the following
measures.
•Reorient or relocate the receiving antenna.
• Increase the separation between the equipment and
receiver.
• Connect the equipment into an outlet on a circuit different
from that to which the receiver is connected.
• Consult the dealer or an experienced radioiTV technician
for help.
Caution: Changes or modifications to this equipment
not expressly approved by Toshiba could void the
user's authority to operate this equipment.
WirelessRadio
For product available in the USA Canada market, only
channel 1-11 can be operated. Selection of other channels is
not possible. The device could automatically discontinue
transmission in case of absence of infbrmation to transmit,
or operational failure. Note that this is not intended to
)rohibit transmission of control or signaling information or
the use of repetitive codes where required by the technology.
If this device is going to be operated in 5.15-5.25GHz
frequency range, then it is restricted to an indoor
environment only.
Important: Any changes or modifications not
expressly approved by the party responsible for
compliance could void the user's authority to operate
this equipment.
This device and its antenna(s) must not be co-located
or operating in conjunction with any other antenna or
transmitter.
8
FCC Radiation Exposure Statement
This equipment complies with FCC radiation exposure
limits set forth Ibr an tmcontrolled environment. This
equipment should be installed and operated with minilrrulrr
distance 20cm between the radiator & your bo@.
ENERGYSTAR_UserInformation
ENERGY STAR User Infbrmation Statement: the fhctory
default settings of this television meet ENERGY STAR"
requirements. Changing Picture Settings may increase
energy consumption, possibly beyond the limits required for
ENERGY STAR qualification.
To ensure your television is operating at optimal energy
dficiency, select [Home] mode during initial activation. To
return to [Home] mode settings, select the [Installation] icon
from the menu, select [Store Home Mode], then select
[Home]. This places the TV in [Standard] mode. [Standard]
mode is recommended for normal home use.
ENERGY STAR s qualified TV. Products
that earn the ENERGY STAR prevent
green house gas emissions by meeting
strict guidelines set by the U.S.
Environmental Protection Agency.
ENERGY STAR and the ENERGY STAR
mark arc registered U.S. marks.
important notesaboutyour TV
The following symptoms are technical limitations of
LCD Display technology and are not an indication of
malfunction; therefore, Toshiba is not responsible for
perceived issues resulting from these symptoms.
1) An afterimage (ghost) may appear on the screen ifa
fixed, non-moving image appears for a long period of
time. The afterimage is not permanent and will
disappear in a short period of time.
2) The LCD panel contained in this TV is manufactured
using an extremely high level of precision technology;
however, there may be an occasional pixel (dot of
light) that does not operate properly (does not light,
remains constantly lit, etc.). This is a structural
property of LCD technology, is not a sign of
malfunction, and is not covered under your warranty.
Such pixels are not visible when the picture is viewed
from a normal viewing distance.
Note: Interactive video games that involve shooting a
"gun" type of joystick at an on-screen target may not
work with this T_A
9
Trademarkinformation
ClearScan, CotorMaster, ColorStream, CQ Engine,
DynaLight, Game'Timer, Native Mode, Stable Sound,
Surflock, TheaterWide, and TosLink are trademarks or
registered trademarks of Toshiba America Information
Systems, Inc. and/or Toshiba Corporation.
Blu-ray Disc TM , Blu-ray TM ,and the togos are
trademarks of the Blu-ray DiscAssociation.
_. _ *For DTS patents, see http://patents.dts.
TmSurmunrJcom. Manufactured under license from
DTS Licensing Limited. DTS, the Symbot,
& DTS and the Symbol together are
registered trademarks, and DTS
TruSurround is a trademark of DTS, Inc. ©
DTS, Inc. All Rights Reserved.
rrJ _o_Lus *Manufactured under license from Dolby
Laboratories. Dotby and the doubte-D
symbol are trademarks of Dolby
Laboratories.
_)| _ *DivX ®,DivX Certified ®and associated Iogos
Ho are trademarks of Rovi Corporation or its
subsidiaries and are used under license.
F.tl_rlrllm *The terms HDMI and HDMI High-Definition
Multimedia Interface, and the HDMI Logo
are trademarks or registered trademarks of
HDMI Licensing LLC in the United States
and other countries.
•MPEG Layer-3 audio coding technology
licensed from Fraunhofer IIS and Thomson.
•Netflix is a registered trademark of Netflix,
Inc.
•Pandora isa registered trademark of
Pandora Media, Inc.
•Samba and Samba TV are trademarks of
Free Stream Media Corp.
•WiFi is a registered trademark of the Wi-Fi
Alliance ®.
•YouTube is atrademark of Googte Inc.
•This production contains Bitstream Vera
Sans fonts under the following copyright:
Copyright © 2003 by Bitstream, Inc. All
Rights Reserved. Bitstream Vera isa
trademark of Bitstream, Inc.
•All other brand and product names are
trademarks or registered trademarks of
their respective companies.
Copyright
,_)2014 biy Toshiba America Infbrmation Systems, Inc All
rights reserved. Under the copyright laws, this guide cannot
be reprodnced in any fbrm without the prior written
permission of Toshiba No patent liability is assumed,
however, with respect to the nse of the intbrmation
contained hereto.
Notice
The infbrmation contained in this manual, including but not
limited to any prodnct specifications, is snbject to change
without notice.
J
TOSHIBA AMERICA IN FOR_'\IATION SYSTEMS,
IN(:. AND TOSHIBA OF CANADA LIMITED
(COLLECTIVELY TOSHIBA) PROVIDES NO
_,'_24RRANTY WITH REGARD TO THIS MANI AL OR
J J
ANY OTHER INFORMATION CONTAINED HEREIN
AND HEREBY EXPRESSLY DISCLAIMS ANY
J
IMPLIED '_,_24RRANTIES OF MERCHANTABILITY
J
OR FITNESS FOR ANY PARTICI_ LAR PURPOSE
J
WITH REGARD TO ANY OF THE FOREGOING.
TOSHIBA ASSUMES NO LIABILITY FOR ANY
DAMAGES INCURRED DIRECTLY OR
INDIRECTLY FROM ANY TECHNICAL OR
TYPOGRAPHICAL ERRORS OR OMISSIONS
CONTAINED HEREIN OR FOR DISCREPANCIES
BET_,_ EEN THE PROD[ CT AND THE MANUAL. IN
J J
NO EVENT SHALL TOSHIBA BE LIABLE FOR ANY
J
INCIDEN TAL, CONSEQUENTIAL, SPECIAL, OR
EXEMPLARY DAMAGES, WHETHER BASED ON
J
TORT, CONTRACT OR OTHER_YISE, ARISING
OUT OF OR IN CONNECTION WITH THIS
J
MANUAL OR ANY OTHER IN FOR_IATION
CONTAINED HEREIN OR THE [SE THEREOE
Contents
Chapter1:Introduction.............................................................17
Features..................................................................18
Overviewof installation,setup,and use...................20
TVfront andside panelcontrols and connections....21
TV backpanelconnections......................................22
Chapter2:ConnectingYourTV.................................................24
Overviewof cabletypes...........................................24
Coaxial(F-type)cable .......................................24
StandardA/V cables(red/white/yellow).............25
Componentvideo cables(red/green/blue).........25
HDMI®cable(with HDMI Logo).........................25
Opticalaudiocable............................................26
LANcable..........................................................26
About the connection illustrations .....................26
Connectinga VCR,antenna,cableTV,or camcorder26
Connectinga Blu-rayTM/DVDplayer,satellite
receiverwith ColorStreamTMor VCR...................28
Connectingan HDMI®or DVIdeviceto the HDMI®
input..................................................................29
10
co°,°ots 11
HDMI®CECconnection...........................................31
Connectinga digital audio system...........................33
Connectinga computer ...........................................34
Connectionto the TV'sHDMl®terminal.............34
Connectingto a homenetwork ................................35
Connectingthe TV directlyto a computer
without an Internetconnection....................35
Connectingthe TVto a homenetwork
without an Internetconnection....................36
Connectingthe TVto a homenetworkwith an
Internetconnection- wired..........................37
Connectingthe TVto a homenetworkwith an
Internetconnection- wireless .....................38
Chapter3:
Chapter4:
Chapter5:
Using the RemoteControl .......................................39
Installingbatteries..................................................39
Remotecontrol effective range................................40
Learningaboutthe remotecontrol...........................41
MenuLayoutandNavigation..................................44
Main menulayout....................................................44
Navigatingthe menusystem ...................................46
SettingupyourTV...................................................47
Initial Setup.............................................................47
Installationsetup selection......................................48
Storing channelsin memory (optional) ...................49
AutoTuning.............................................................49
ManualTuning...............................................
Setting channelskip ......................................
Settingthe AVinput mode.............................
Settingthe time zone.....................................
Viewingthe system status.............................
ResettingFactoryDefaults.......................
........ 51
........ 51
........ 52
........ 52
........ 53
........ 53
2 Contents
Chapter6:SettingupyourTV...................................................54
Selecting the video input source .............................. 54
Labeling the video input sources ............................. 56
Tuning to the next programmed channel ............ 58
Tuning to a specific channel (programmed or
unprogrammed) .......................................... 58
Switching between two channels using
Channel Return ........................................... 58
Switching between two channels using
Surf LockTM .................................................. 59
Selecting the picture size ......................................... 60
Full .................................................................... 61
TheaterWide 1 ................................................... 61
TheaterWide 2 ................................................... 61
TheaterWide 3 ................................................... 62
Native ModeTM ................................................... 62
4:3 .................................................................... 63
Normal .............................................................. 63
Dot by Dot ......................................................... 63
Scrolling the TheaterWide TM picture
(TheaterWide 2 and 3 only) ............................... 64
Usingthe Auto Aspectfeature ................
Usingthe 4:3 Stretch..............................
Adjustingthe picture .............................
Selectingthe picture mode...............
Adjustingthe picture quality.............
Using closedcaptions ............................
Baseclosedcaptions........................
Digital CCsettings ............................
Adjustingthe audio ................................
Muting the sound.............................
Usingthe DigitalAudio Selection......
Selectingstereo/SAPbroadcasts......
Adjustingthe audio quality...............
DTSTruSurroundTM ..........................
...............65
...............65
...............66
...............66
...............67
...............68
...............68
...............69
...............71
...............71
...............71
...............72
...............73
...............73
co°t°°ts13
SoundMode......................................................73
StableSoundTM ..................................................73
Usingthe Dolby® DigitalDynamicRange
Controlfeature ......................................... 74
Selectingthe PINcode .......................................... 74
Entera newPIN code....................................... 74
ForgottenPINcode ......................................... 74
Changingor deletingyour PINcode ................ 75
Using parentalcontrols (for USAregion)............... 75
BlockingTV programsandmovies byrating
(V-Chip).................................................... 75
Downloadingan additionalrating system........ 76
Displayingratings ........................................... 79
Unlocking programstemporarily ..................... 79
Usingthe input lockfeature................................... 80
Lockingchannels.................................................. 80
Usingthe GameTimerTM ................................... 81
Usingthe panellock feature............................. 82
MediaShare(Videos, Music,and Photos).............. 83
Auto Start function .......................................... 85
Toopenthe MediaShare.................................. 85
Viewing photofiles.......................................... 86
Playingmusicfiles .......................................... 88
Viewing photoflies and playingmusic flies
atthe sametime .........................................89
Playingvideo files .............................................89
During playbackyou cando the following:...............90
Tosetthe repeatmode:...........................................90
DivX®......................................................................91
To register your TV to a DivX® account: .....
To unregister your device: .........................
To playback DivX HD content: ....................
Setting the sleep timer .....................................
No Signal Power Down ....................................
Using HDMI® CEC...........................................
......91
......91
......92
......92
......93
......93
4 Contents
HDMI®CECplayback device (Blu-rayTM/DVD
player, etc.) control ..............................
Other HDMI®CECfunctions .......................
Setting up HDMI® CEC................................
Using the HDMI® settings feature .....................
HDMI®1(2, or 3) RGB Range .....................
HDMI ® Information Display ........................
Displaying TV status information ......................
Understanding the last mode memory feature ....
...94
...96
...96
...97
...97
...97
...98
...99
Chapter7: Using the TV's Advanced Features.......................100
Usingthe advancedpicturesettings ......................100
ColorMasteFM.................................................100
BaseColorAdjustment....................................100
ColorTemperature...........................................101
StaticGamma..................................................101
DynaLightTM .....................................................102
DynamicContrast............................................102
CinemaMode..................................................102
NoiseReduction..............................................103
Usingyour homenetwork ................................... 104
When using aWireless network connection ........ 105
Wireless LANandyour Health:...................... 105
Usingthe TV in a wireless LANenvironment: .105
Setting upthe Network........................................ 106
Wireless Setup.............................................. 106
EasySetupusing PBC(Pushbutton
configuration) ...........................................107
EasySetupusing PIN (PersonalIdentification
Number)....................................................107
AdvancedNetwork Setup................................111
NetworkConnectionTest.................................113
Usingthe software keyboard.................................114
Entertext usingthe softwarekeyboard............115
Performing aSoftwareUpgrade............................116
coo,°ots15
Viewing the Software Licenses .............................. 116
Using the TV Application Services features ........... 117
Watching movies with Netflix® ........................ 118
YouTubeTM ....................................................... 119
Pandora®......................................................... 119
Hotlist ............................................................. 120
Chapter8:Troubleshooting.....................................................121
Generaltroubleshooting ................
Picture problems...........................
Soundproblems............................
Remotecontrol problems ..............
Channeltuning problems ..............
Closedcaption problems...............
Ratingblocking(V-Chip) problems
No HDMI®CECoperation ................
HDMI®problems.............................
Networkproblems...........................
Wireless network problems.............
MediaShareproblems .....................
....121
....122
....123
....124
....124
....125
....125
....125
....125
....126
....128
....128
If the problem persists after trying the solutions ....129
AppendixA:Specifications.....................................................130
Television system .................................................. 130
Channel coverage .................................................. 130
Power source ........................................................ 131
Power maximum current ................................. 131
Power consumption ........................................ 131
Audio power .................................................... 131
Speaker type ......................................................... 131
Video/audio terminals ........................................... 131
Video/audio input ............................................ 131
ColorStream TM (component video) HD input ....131
HDMl®input ..................................................... 132
Digital audio output ............................................... 132
Wireless connection .............................................. 132
6 Contents
Ethernet ................................................................ 132
USB....................................................................... 132
Dimensions(with stand) ....................................
Weight (mass)..............................................
Operatingconditions....................................
Suppliedaccessories..........................................
Acceptablesignalformats for HDMI®.................
HDMl®signalformats...................................
.132
.133
.133
.133
.134
.134
AppendixB:LicenseAgreement.............................................135
AppendixC:Index....................................................................139
1
Introduction
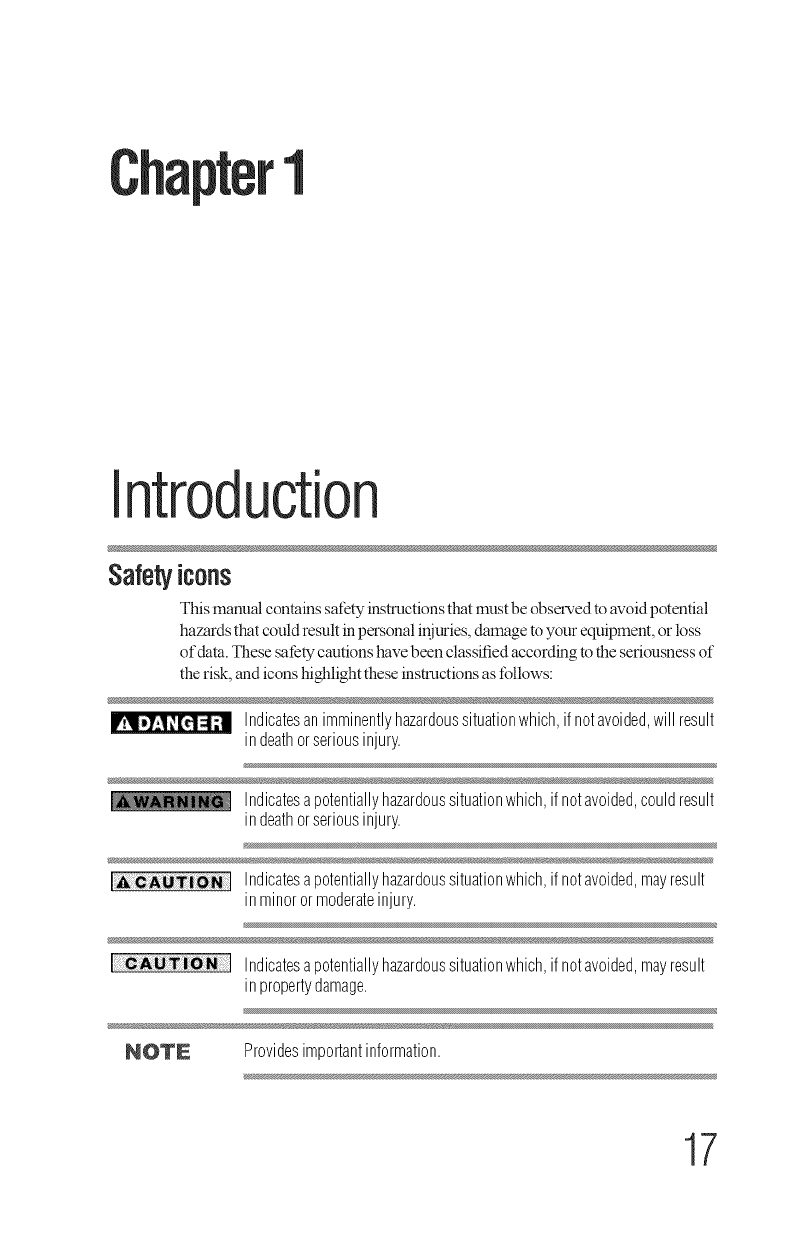
Safetyicons
This manual contains safety instructions that must be observed to avoid potential
hazards that could result in personal injuries damage to your equipment or loss
of data. These sa_ty cautions have been classified according to the seriousness of
the risk, and icons highlight these instructions as follows:
I Indicatesanimminentlyhazardoussituationwhich,if notavoided,will result
in deathorseriousinjury.
Indicatesapotentiallyhazardoussituationwhich,ifnotavoided,couldresult
in deathorseriousinjury.
Indicatesapotentiallyhazardoussituationwhich,ifnotavoided,mayresult
in minorormoderateinjury.
[--C Indicatesapotentiallyhazardoussituationwhich,ifnotavoided,mayresult
in propertydamage.
NOTE Providesimportantinformation.
17
8introduction
Features
Fsatgrss
The following are just a few of the many exciting features of your
new Toshiba wide screen, integrated HD LED TV:
****Integrateddigitaltuning(8VSB ATSCandQAM)--
Eliminates the need for a separate digital converter set-top box
(in most cases)
.*** 1920 x 1080 output resolution
.***Three HDMU--Digital, High-Definition Multimedia
Interfaces with 1080p input support.
***_Built-in WLAN--Atlows the television to access your home
wireless network.
•**. ColorStream TM HD--High-resotution component video input
and shared composite video input.
•**_ DigitalAudio Out--Optical audio connection with Dolby :_
Digital optical output form. See "Connecting a digital audio
system" on page 33.
•**_ DTS TruSurroundTM--Delivers high quality surround and
expanded sound field over two speakers. See "DTS
TruSurround TM''on page 73.
•**. Game Mode--Reduces controller delay for faster video
gaming action. See "Selecting the picture mode" on page 66.
•**. DynaLightT-_I--BackligN control monitors the brightness of
each video frame and automatically adjust backlight intensity
based on the content to create higher dynamic contrast, for
deeper blacks and increased depth. See "DynaLight TM''on page
102.
***_Dynamic Picture Mode--Delivers maxinmm contrast, clarity,
and color saturation. See "Selecting the picture mode" on page
66.
***_DNR--Dynamic Noise Reduction technology that filters out
video noise without decreasing picture sharpness, see "DNR
(Dynamic Noise Reduction)" on page 103.
.**. GameTimerTM--Altows you to set time limits for video games
play and locks the input source for gaming modules when the
pre-set time expires. See "Using the GameTimer TM''on page 81.
.**. HDMU' CEC control--Allows control of external devices
from the TV remote via HDMI _ connection. "Using HDMI ®
CEC" on page 93.
.**. ColorMasterTM--Technotogy that gives you precise control of
hue, saturation, and brightness for six primary colors: Red,

JJl|rOdUcUorl 19
Features
Green, Blue, Yellow, Magenta, and Cyan. See "ColorMaster TM''
onpage 100.
****Dual Core CQ EngineTM--Is a powerful video processing
engine with an array of advanced technologies working
together to create enhanced picture quality and enable superior
Smart TV capability.
****Cinema Mode--This picture quality feature provides a
smoother motion and a crisper image. See "Cinema Mode" on
page 102.
****ClearScan TM 240Hz--Provides picture clarity for motion
video using new Backlight Scanning technology.
****Edge Enhancer--Enhanced video processing that defines the
edges and textures for greater image details to make the picture
look crisp and clear, see "Edge Enhancer" on page 103.
****MediaShare---Atlows you to view photo files andplay music
files, see "MediaShare (Videos, Music, andPhotos)" onpage 83.
****Smart TV--Connects you to online content and your home
network. You can access key media apps including Netflix :_,
Pandora '_, andYouTube TM, see "Using the TV Application
Services features" on page 117.
*.** ENERGY STAR _'qualified
0introduction
_el_c_" oj_'_stcdlclfion,sen_, cmduse
Overviewofinstallation,setup,anduse
Follow these steps to set up your TV and begin using its many
exciting features.
1 Carefully read the important safety, installation, care, and
service information. Keep this document for future reference.
2 To choose a location for the TV:
•*** Read "hnportant notes about your TV" on page 8.
•*** Place the TV on the floor or a sturdy, level, stable surface
that can support the entire bottom surface of the stand and
the weight of the unit. Secure the TV to a wall, pillar, or
other innnovable structure, see 26) on page 5.
•*** Place the TV in a location where light does not reflect on
the screen.
•*** Always leave a space of at least 4 (four) inches around the
TV. The slots and openings are provided to protect the TV
from overheating and to help maintain reliable operation
of the TV.
3 Do not plug in any power cords until after you have connected
all cables and devices to your TV.
4 Before connecting cables or devices to the TV, learn the
functions of the TV's connections and controls, see "Overview
ofcabte types" on page 24.
5 Colmect your other electronic device(s) to the TV, see
"Connecting Your TV" on page 24.
6 Install the batteries in the remote control, see "Installing
batteries" on page 39.
7 See "Learning about the remote control" on page 41 for an
overview of the buttons on the remote control.
8 After connecting all cables and devices, plug in the power
cords for your TV and other devices. Then press the POWER
button on the TV control panel or remote control to turn on the
TV.
NOTE IftheTVstopsrespondingtothebuttonsontheremotecontrolorTV
controlpanelandyoucannotturntheTVofforon,unplugthepower
cordsfor afewsecondsandthenplugtheminandtryagain.
9 See "Navigating the menu system" on page 46 for a quick
overview of navigating the TV's menu system.
10 Program channels into the TV's channel memory, see "Auto
Tuning" on page 49.
introduction21
TV[ivt_t at_dside pat_el c'ot_trolsat_d com_ec'tiot_s
11 For details on using the TV's features, see Chapter 6 and
Chapter 7.
12 For help, refer to "Troubleshooting" on page 121.
13 For technical specifications, see "Specifications" on page 130.
14 For the End User License Agreement, see "License Agreement"
onpage 135.
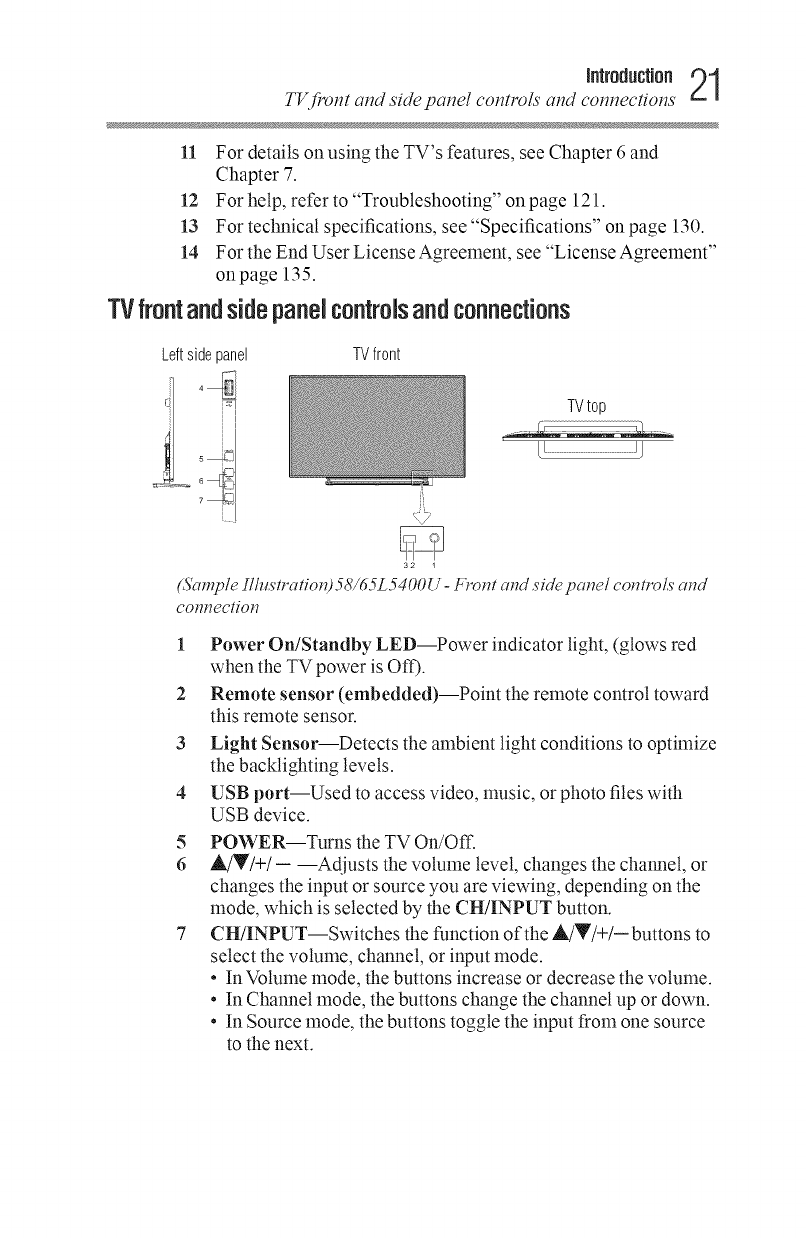
TVfrontandsidepanelcontrolsandconnections
Leftside panel
tTVfront
TVtop
LJ
32 1
(Sample lllustratiold 58/65L5400U =k_olTtand side pcmel co_Ttrol,_and
com_ectiol7
1 Power On/Standby LED--Power indicator light, (glows red
when the TV power is Off).
2 Remote sensor (embedded)--Point the remote control toward
this remote sensor.
3Light Sensor--Detects the ambient light conditions to optimize
the backlighting levels.
4 USB port--Used to access video, nmsic, or photo files with
USB device.
5 POWER--Turns the TV On/Off.
6A!V/+/- --Adjusts the volume level, changes the channel, or
changes the input or source you are viewing, depending on the
mode, which is selected by the CH/INPUT button.
7 CH/INPUT--Switches the function of the A/V/+/- buttons to
select the volume, channel, or input mode.
• In Volume mode, the buttons increase or decrease the volume.
• In Channel mode, the buttons change the channel up or down.
• In Source mode, the buttons toggle the input from one source
to the next.
2Introduction
7gbackpcmel connectiorzs
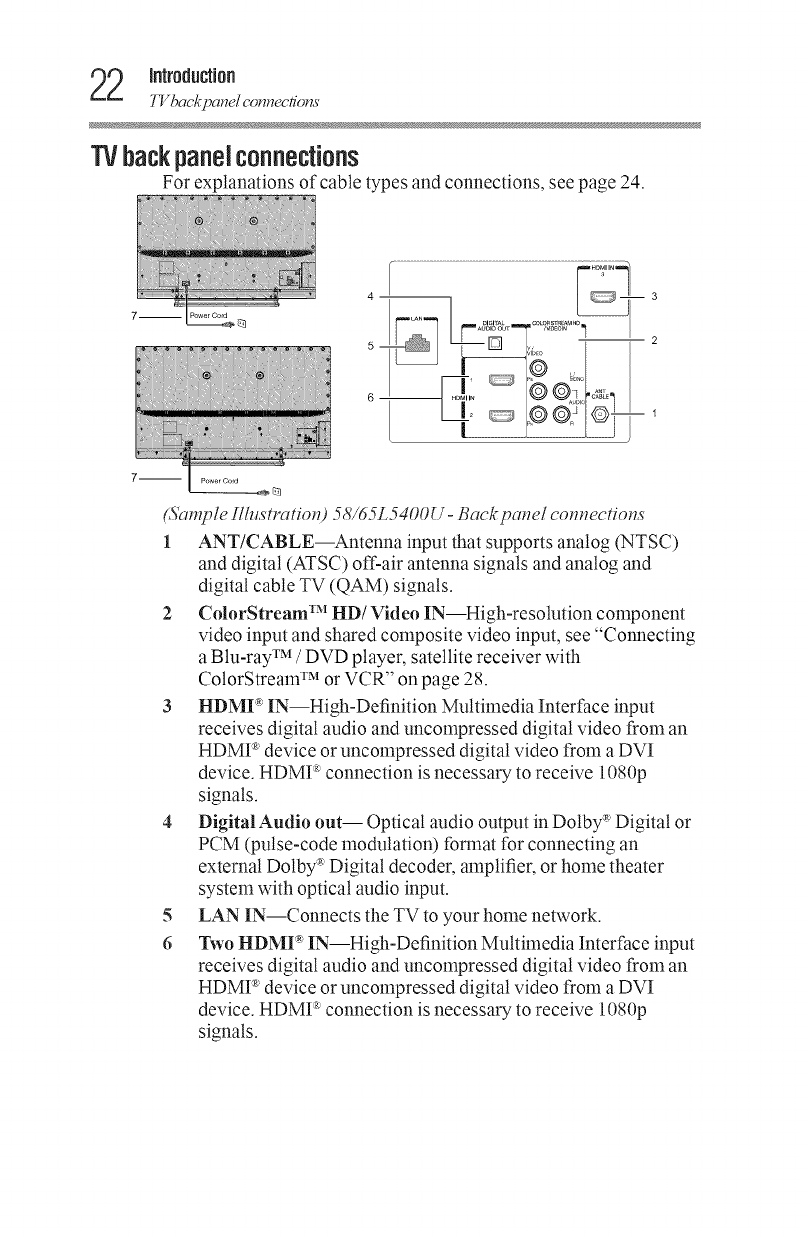
TVbackpaneJconnections
For explanations of cable types and connections, see page 24.
(&mTple IlhlstratiotO 58/65L5400U- Backpcmel connections
1 ANT/CABLE--Antenna input that supports analog (NTSC)
and digital (ATSC) off-air antenna signals and analog and
digital cable TV (QAM) signals.
2 ColorStream TM HI)/Video IN--High-resolution component
video input and shared composite video input, see "Connecting
a Blu-ray TM /DVD player, satellite receiver with
ColorStream TM or VCR" on page 28.
3 HI)MP" IN--High-Definition Multimedia Interface input
receives digital audio and uncompressed digital video from an
HDMP' device or uncompressed digital video from a DVI
device. HDMI _ connection is necessary to receive !080p
signals.
4 Digital Audio out-- Optical audio output in Dolby :_'Digital or
PCM (pulse-code modulation) format for connecting an
external Dotby * Digital decoder, amplifier, or home theater
system with optical audio input.
5 LAN IN--Connects the TV to your home network.
6 Two HI)MI _ IN--High-Definition Multimedia Interface input
receives digital audio and uncompressed digital video from an
HDMP' device or uncompressed digital video from a DVI
device. HDMI _ connection is necessary to receive !080p
signals.
Jfl|rOdUCUOfl23
TVbackpcmel connections
7 Power Cord-- Plug one end of the power cord into the.jack on
the back of the unit, and the other end into a live electrical
outlet.
Theincludedpowercordisfor usewiththisunitonly.Donotuseit
withotherequipment.
Ifyouarenotgoingto usetheunitforanextendedperiodoftime,
disconnectthepowercordfromthewalloutlet.Wheneverthepower
cordis pluggedintothewalloutlet,it will drawsomepower,even
NOTE whentheunitis off.
Component/Standard(composite)videocablescarryonlyvideo
information;separateaudiocablesarerequiredfor acomplete
connection.
2
Connecti ¥ourTV
Overviewof canetypes
Before purchasing cables, know the connector types your devices
require. You can purchase cables from most stores that sell audio/
video devices.
Coaxial(F-type)cane
(,Si_mpleIlhlstratio_O ('oaa'ial cable
Coaxial (F-type) cable connects your antenna, cable TV service,
and/or cable converter box to the ANT/CABLE input on your TV.
NOTN Pleasetightenthisconnectionbyhand.Usingtoolsmaydamagethe
connection.
24
co.°oou.gYo°,Tv
Ovel_c_+"@'able Opes
StandardANcables(rod/white/yellow)
@
(Sample IllustratiotO Stat,&_rd A V cables
Standard A/V cables (composite video) usually come in sets of
three, and connect to video devices with analog audio and
composite video output. These cables (and the related inputs on
your TV) are typically color-coded according to use: yellow for
video, red for stereo right audio, and white for stereo left (or mono)
audio.
Componentvideocanes (red/green/blue)
@
®
('ompot_et_t video cables (red/greets/blue)
Component video cables come in sets of three and connect with
video devices with component video output. (ColorStream TM is
Toshiba's brand of component video). These cables are typically
color-coded red, green, and blue. Separate audio cables are required
for a complete connection.
NOTE Componentvideocablesprovidebetterpicturequalitythan
compositevideocables.
HNVU®cable(withHDNILogo)
(Sample IllustratiotO HDMU' cable
HDMP' (High-Definition Multimedia Interface) cable connects to
devices that have an HDMI _ output. An HDMP' cable delivers
digital audio and video in its native format. Separate audio cables
are not required, see "Connecting an HDMI(R)or DVI device to the
HDMI(R)input" on page 29.
NOTE HDMI®cablesprovidethebestaudioandpicturequality.
6 Connecting¥ourTV
Connec'iT"_,4 a VL:R,antenna, cable TV,,o1"call,corder
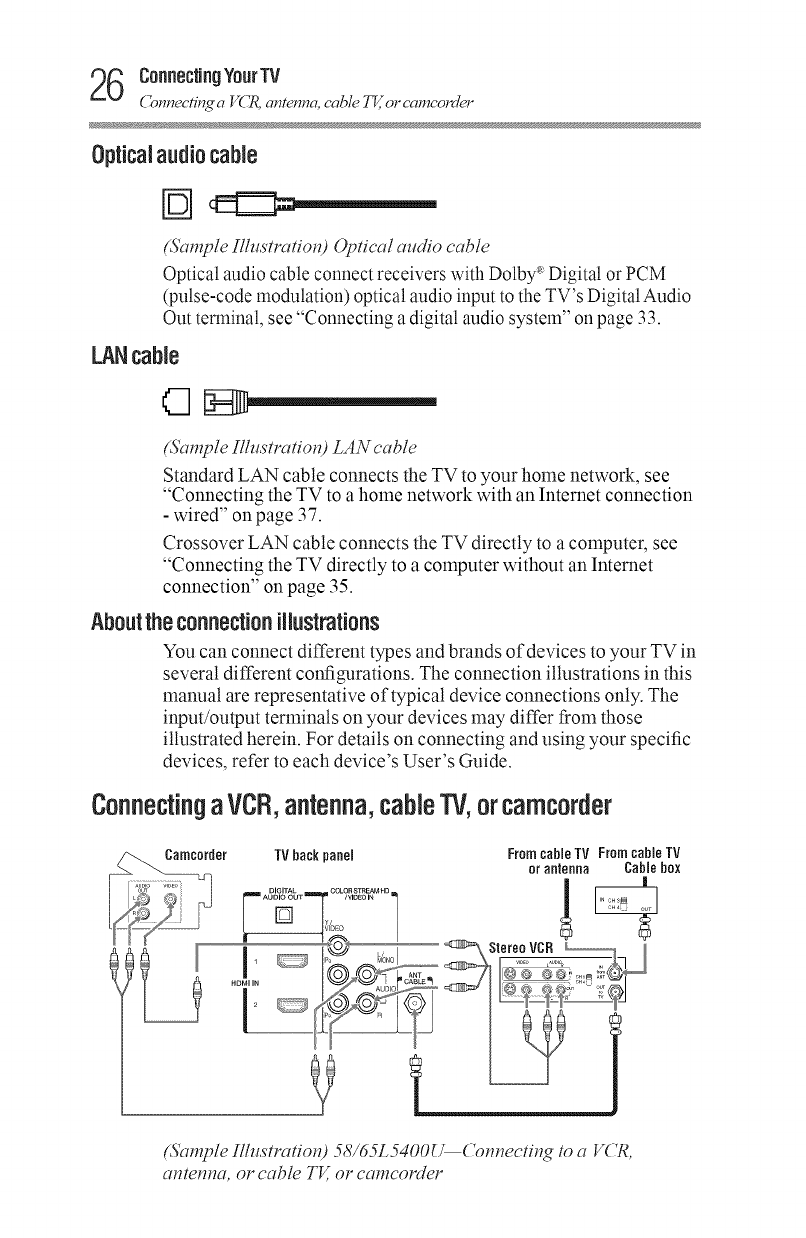
Opticalaudiocable
(,5'ampleIlh¢,s'tratio_) @tical alcdio cable
Optical audio cable connect receivers with Dolby '_Digital or PCM
(pulse-code modulation) optical audio input to the TV's Digital Audio
Out terminal, see "Connecting a digital audio system" on page 33.
LANcable
(Sample IlhlstratioH) LAN cable
Standard LAN cable connects the TV to your home network, see
"Connecting the TV to a home network with an Internet connection
- wired" on page 37.
Crossover LAN cable connects the TV directly to a computer, see
"Connecting the TV directly to a computer without an Internet
connection" on page 35.
Aboutthe connectionillustrations
You can connect different types and brands of devices to your TV in
several different configurations. The connection illustrations in this
manual are representative of typical device connections only. The
input/output terminals on your devices may differ from those
illustrated herein. For details on connecting and using your specific
devices, refer to each device's User's Guide.
ConnectingaVCR,antenna,caNe'lV,orcamcorder
TV back panel From cable TV From cable TV
or antenna Cable box
(_5'ampleilhlstratiotd 58/65L5400_('o_t_ectir_g to a V('R,
at_tet_t_a, or cable TV, or camcorder
co..ecungYourw p7
( Ton.ecfi_¢ a V( _, ame..a, cable 777,,or eamcolJer
Items needed:
¢* Coaxial cables
****Standard AV cables
If you have amono VCR, connect L/MONO on the TV to your
VCR's audio out terminal using the white audio cable only.
,*_ Standard audio cable
NOTE Themenusettingmayneedto bechangedinordertowatchtheshared
inputbetweencompositeandcomponentvideo.Compositeand
componentvideocannotbeusedsimultaneously.
NOTE Whenyouuseacablebox,youmaynotbeableto usetheremotecontrol
toprogramoraccesscertainfeaturesontheTV.Whenyouuse
ColorStreamTM HDorVideo,switchAVinputmodeappropriately.
See"SettingtheAVinputmode"onpage52.
To view the antenna or cable signal:
Select ANT/CABLE video input source on the TV.*
To view basic and premium cable channels:
Turn offthe VCR. Select the ANT/CABLE video input source on
the TV.* Tune the TV to channel 3 or 4 (whichever channel the
cable box output is set to). Use the cable box controls to change
channels.
To view the VCR or camcorder video:
Turn on the VCR or camcorder video. Select VIDEO input source
on the TV.*
*To select the video input source, press the INPUT button on the
remote control, see "Selecting the video input source" on page 54.
NOTE Theunauthorizedrecording,use,distribution,or revisionoftelevision
programs,videotapes,DVDs,andothermaterialsis prohibitedunderthe
CopyrightLawsof theUnitedStatesandothercountries,andmaysubject
youto civilandcriminalliability.
8 Connecting¥ourTV
Connecn_ a Bht-m3'TM/DVDpla3'er, satellite l_eceiver with ColorStT_eam TMOr VCR
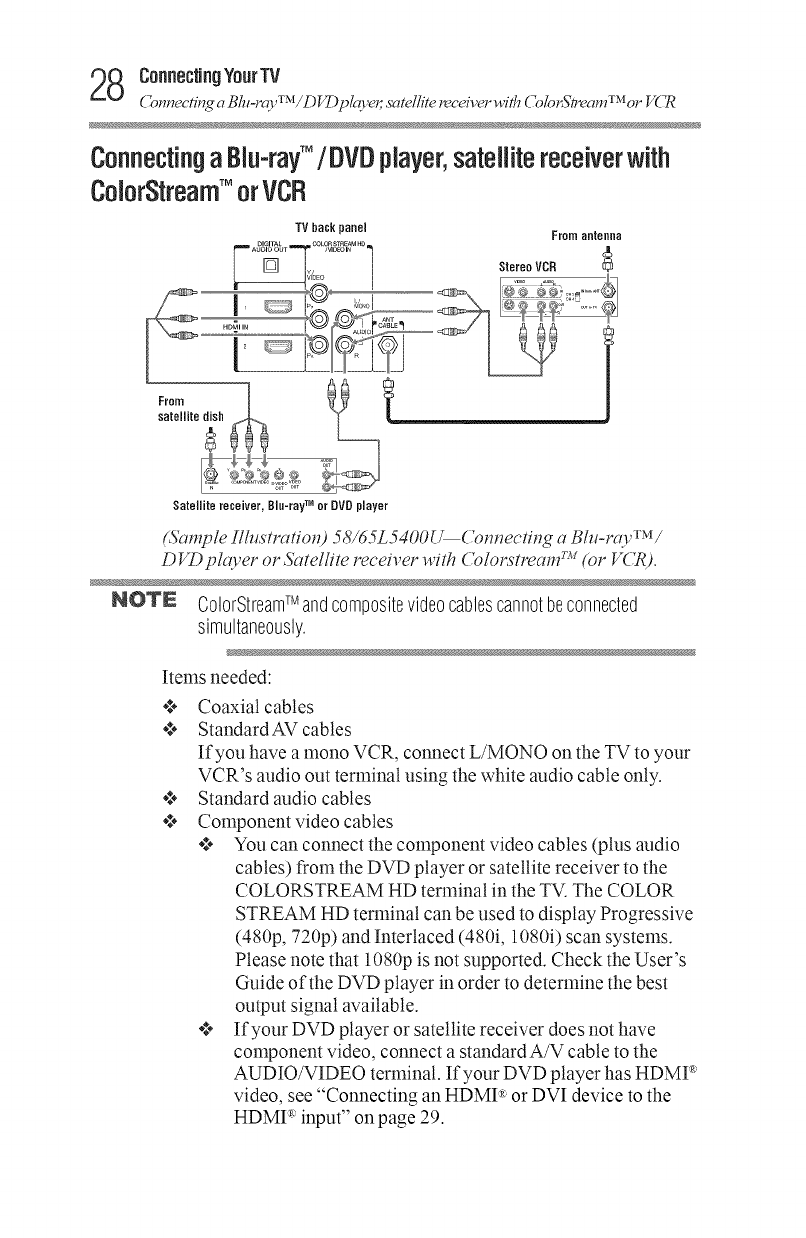
ConnectingaBlu-ray'M/DVDplayer,satellitereceiverwith
ColorStreamTM orVCR
TV back_anel From aeteeea
_M'° 1 StereoVCR
7PCA_LE'_
Satellite receiver, Biu-rayTM or 9VD player
TM
(Sample iMustratiotO 5_/65L5400{_('om_ectit_g a Blu-ray /
D VDplco,er or Satellite receiver with ( blorstream w_(or V('R).
NOTE ColorStreamTMandcompositevideocablescannotbeconnected
simultaneously.
Items needed:
Coaxial cables
Standard AV cables
If you have a mono VCR, connect L/MONO on the TV to your
VCR's audio out terminal using the white audio cable only.
Standard audio cables
Component video cables
****You can connect the component video cables (plus audio
cables) from the DVD player or satellite receiver to the
COLORSTREAM HD terminal in the TV. The COLOR
STREAM HD terminal can be used to display Progressive
(480p, 720p) and Interlaced (480i, 1080i) scan systems.
Please note that 1080p is not supported. Check the User's
Guide of the DVD player in order to determine the best
output signal available.
****If your DVD player or satellite receiver does not have
component video, connect a standard A/V cable to the
AUDIO/VIDEO terminal. If your DVD player has HDMP'
video, see "Connecting an HDMI® or DVI device to the
HDMP' input" on page 29.
co..oou.gYoo,Tv29
Connecn'_ an /_Mf _a':orDVI&_ice to the /_Mf _a':input
NOTE WhenyouuseColorStreamTM HDorVideo,switchAVinputmode
appropriately.
To view antenna or Cable channels:
Select the ANT/CABLE video input source on the TV.*
To view the DVD player:
Turn on the DVD player. Select the COLORSTREAM HD video
input source on the TV.*
To view satellite programs using the component video
connections:
Turn on the satellite receiver. Select the COLORSTREAM HD
video input source on the TV.*
To view the VCR or view and record antenna channels:
Turn on the VCR. Tune the VCR to the channel you want to watch.
Select the VIDEO input source on the TV.*
To record a TV program while watching a DVD:
Turn on the VCR. Tune the VCR to the channel to record. Select the
COLORSTREAM HD video input source on the TV* to view the
DVD.
*To select the video input source, press the INPUT button on the
remote control, see "Selecting the video input source" on page 54.
NOTE Theunauthorizedrecording,use,distribution,or revisionoftelevision
programs,videotapes,DVDs,andothermaterialsis prohibitedunderthe
CopyrightLawsof theUnitedStatesandothercountries,andmaysubject
youto civilandcriminalliability.
ConnectinganHNVll®orOVldevi;eto theHNVll®input
The HDMP' input on your TV receives digital audio and
uncompressed digital video from an HDMI _ source device, or
uncompressed digital video from a DVI (Digital Visual Interface)
source device.
This input is designed to accept HDCP (High- Bandwidth Digital-
Content Protection) program material in digital form from EIA/
CEA-861-D- compliant Ellconsumer electronic devices (such as a
set-top box or DVD player with HDMP' or DVI output).
The HDMP input can accept and display various signal formats.
For detailed signal specifications, see "HDMP' signal formats" on
page 134. Supported Audio format: Linear PCM, sampling rate
32/44.1/48 kHz.

0 Connecting¥ourTV
(7onnecfi_q cmt]D3_R'_: oz,DVI device to the/]DMT_R': input
NOTE Toconnectacomputerto theHDM?_input,see"ConnectiontotheTV's
HDMI®terminal"onpage34.
To connect an HDMP' device, you will need one HDMI ':_cable
(type A connector) per HDMY_ device.
****For proper operation, it is reconmlended that you use an
HDMP' cable with the HDMY_ Logo(H_m! ).
****HDMY_ cables transfer both video and audio. Separate analog
audio cables are not required (see illustration).
TVbackpanel
HDMI®device
.... L_o,_o _.__
g
(,SimTpleIlhlstratio_O 58/65L5400U HDMI com_ectio_s
To view the HDMI _*device video:
Select HDMI 1, HDMI 2 or HDMI 3 video input source on the TV.
(Press the INPUT button on the remote control. For more
information, see "Selecting the video input source" on page 54).
To connect a DVI device, you will need:
•.** HDMI _ to DVI adapter cable
For proper operation, the length of an HDMI _ to DVI adapter
cable should not exceed 9.8 ft (3111).The recommended length
is 6.6 ft (2m).
co..oou. Yoo,+v31
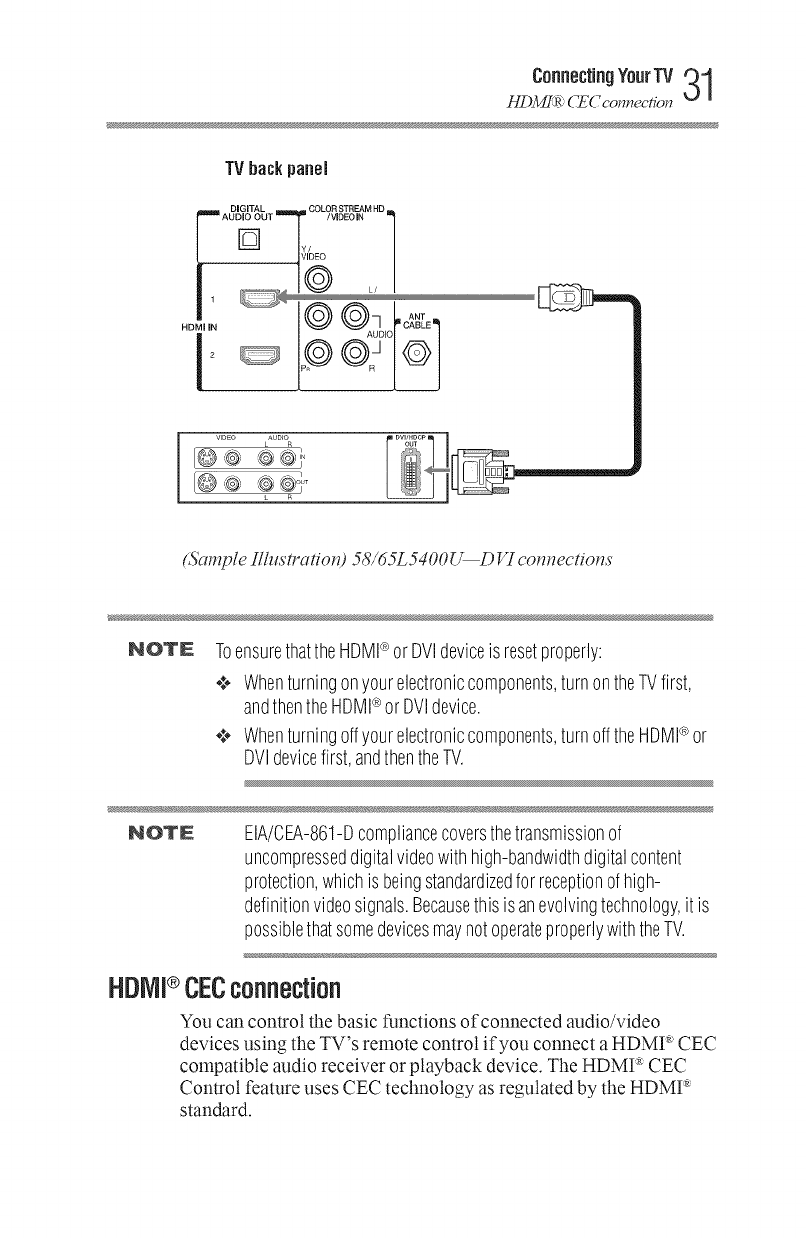
H[)3_:R:: (_ (7 connec/Tbn
TVbackpanel
DIGITAL COLOR STREAM HD
AUDIO[]OUT _vYI_E 0 /VIDEO IN a
1
HDMI iN
2
VIDEO AUD40
i R
,@
(Sample Ilhlstration) 58/65L5400U DVI cotmections
NOTE ToensurethattheHDMI®orDVIdeviceis resetproperly:
¢ Whenturningonyourelectroniccomponents,turnontheTVfirst,
andthentheHDMI®or DVIdevice.
¢ Whenturningoffyourelectroniccomponents,turnofftheHDMI®or
DVIdevicefirst,andthentheTV.
NOTE EIA/OEA-861-Dcompliancecoversthetransmissionof
uncompresseddigitalvideowithhigh-bandwidthdigitalcontent
protection,whichis beingstandardizedfor receptionofhigh-
definitionvideosignals.Becausethisisanevolvingtechnology,it is
possiblethatsomedevicesmaynotoperateproperlywiththeTV.
HDNPCECconnection
You can control the basic functions of connected audio/video
devices using the TV's remote control if you connect a HDMP' CEC
compatible audio receiver or playback device. The HDMY CEC
Control feature uses CEC technology as regulated by the HDMP'
standard.
2 ConnectingYourTV
//D3!Lr_R_:(_C connection
Sack panel
Playback device(flONI '_
CECOVO Ptayer, etc.)
Nayback device(flONI '_
CECOVOPtayer, etc.)
¢ii;;
(Sample IllustratioH) 58/65L5400U HDMI _ CEC compatible
audio receiver a_d pho,back device com_ectio_s
To connect an HDMP' device, you will need one HDMI '_cable
""7
(type A connector) per HDMI _ device (see Overvlea ofcabte
types" on page 24).
NOTE <* Ifseveraldevicesareconnected,HDMI®CECControlfeature
maynotoperateproperly.
¢ Forproperoperation,it is recommendedthatyouuseanHDMI®
cablewiththeHDMI®Logo(_,_,_!).
Before controlling the device(s):
*,**After completing the above connections, configure the HDMI _
CEC Setup menu with the desired settings, see "Setting up
HDMI ®CEC" on page 96.
*,*_The connected devices must also be configured. For details, see
the operation manual for each device.
*,*_This feature uses the CEC technology as regulated by the
HDMU standard.
****This feature is limited to models incorporating Toshiba's
HDMI _ CEC. However, Toshiba is not liable for those
operations. Refer to the individual instruction manuals for
compatibility infonnation.
NOTE Thisfeaturemaynotworkproperlydependingonthedevicesthatare
connected.
ConnectingYourTV _
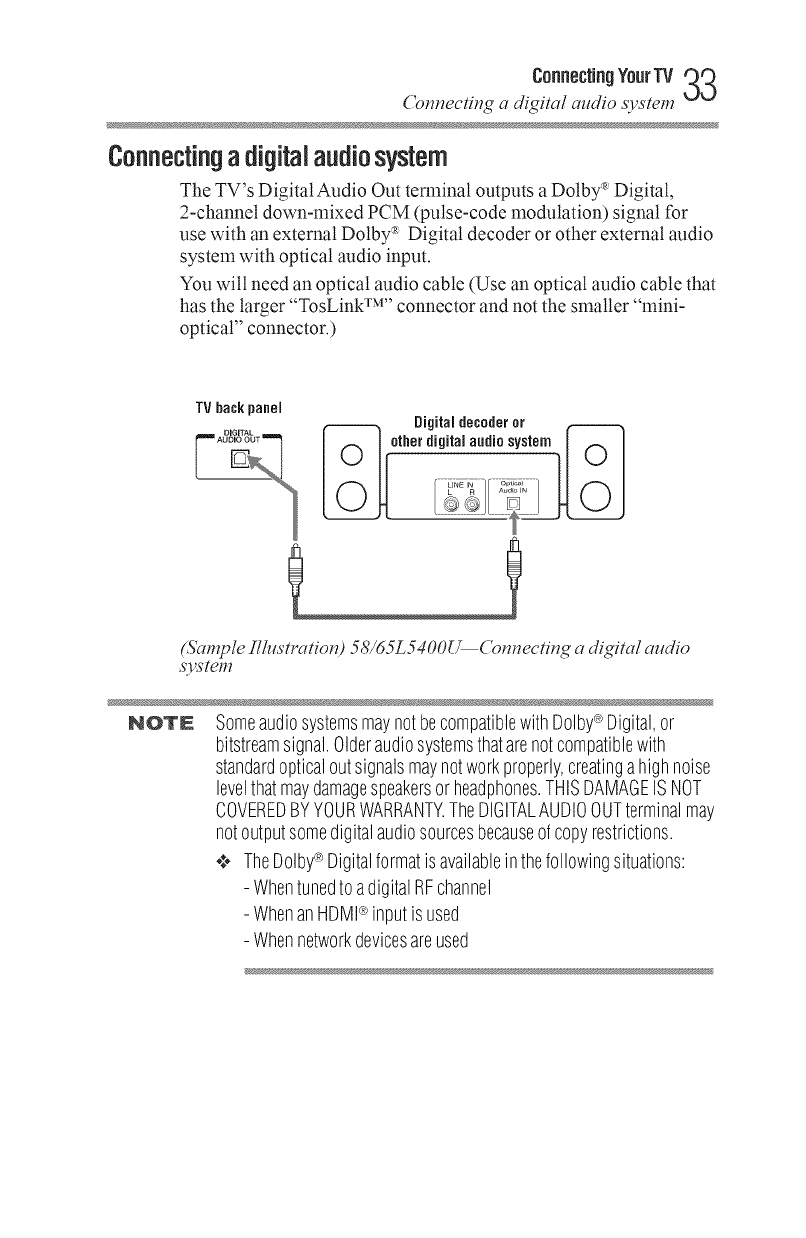
Com_ec'tit_ga digital audio system
Connectingadigitalaudiosystem
The TV's Digital Audio Out terminal outputs a Dolby _'Digital,
2-channel down-mixed PCM (pulse-code modulation) signal for
use with an external Dotby _ Digital decoder or other external audio
system with optical audio input.
You wilt need an optical audio cable (Use an optical audio cable that
has the larger "TosLink TM''connector and not the smaller "mini-
optical" connector.)
TV backpanel Digitaldecoderor
otherdigitai audio system I(_ I
I - I
.......iiN_-_............_ .........
g_a_)leIllustratiotd 58/65L5400(_(btmectit_gadigitalaudio
system
NOTE SomeaudiosystemsmaynotbecompatiblewithDolby_ Digital,or
bitstreamsignal.Olderaudiosystemsthatarenotcompatiblewith
standardopticaloutsignalsmaynotworkproperly,creatingahighnoise
levelthatmaydamagespeakersorheadphones.THISDAMAGEISNOT
COVEREDBYYOURWARRANTY.TheDIGITALAUDIOOUTterminalmay
notoutputsomedigitalaudiosourcesbecauseofcopyrestrictions.
¢ TheDolby_ Digitalformatis availableinthefollowingsituations:
- Whentunedto adigitalRFchannel
- WhenanHDMPinputisused
- Whennetworkdevicesareused
4 ConnectingYourTV
Connecfi_,_ a computer
To control the audio:
1 Turn on the TV and the digital audio device.
2 Press the MENU button on the remote control and open the
Sound menu.
3 Select Sound > Digital Audio Output > Audio Format and
then press the OK button.
4 Press the A/T (arrow) buttons to select either Auto or PCM,
depending on your device.
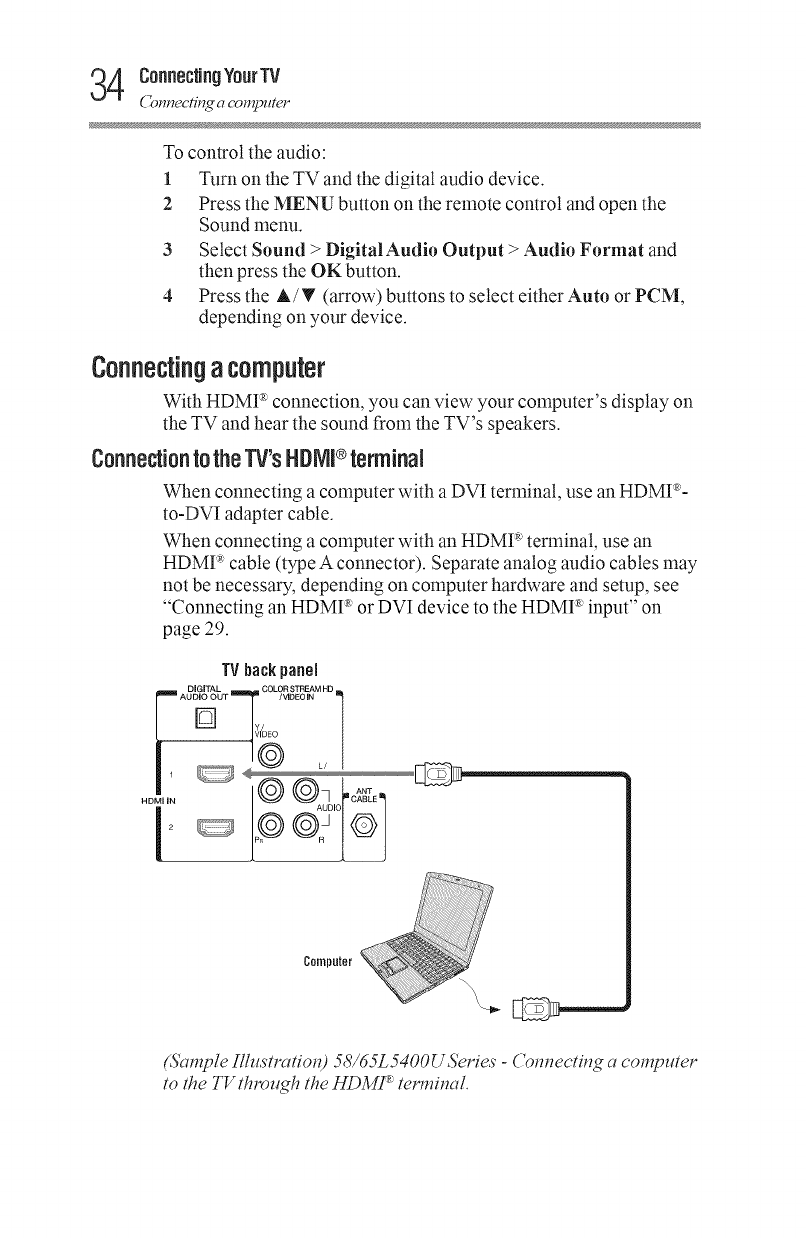
Connectingacomputer
With HDMI :_connection, you can view your computer's display on
the TV and hear the sound from the TV's speakers.
Connectionto the TV'sHDNI®terminal
When connecting a computer with a DVI terminal, use an HDMP'-
to-DVI adapter cable.
When connecting a computer with an HDMP' terminal, use an
HDMI :_cable (type A connector). Separate analog audio cables may
not be necessary, depending on computer hardware and setup, see
"Connecting an HDMP' or DVI device to the HDMP' input" on
page 29.
TVbackpanel
,""Aoc;,%%b,_oo%g;,_,o,,
2
Computer
(Sample IlhtstratiotO 58/65L5400u series - ('om_ect#_g a computer
to the TV through the HDMI _:termimd.
co..oou. Yo°,Tv
Connecti_ to a home network
Theedgesof thepicturemaybehidden.
Ifreceivinga480i(HDMI®),480p(HDMI%720p,1080i,or1080p
signalprogram,NativeModeTM scalesthevideoto displaytheentire
picturewithinthebordersofthescreen(i.e.no overscan).
Connectingtoahomenetwork
The LAN port allows your Toshiba TV to connect to your home
network.
You can use this home network to access photos, movies, and music
files that are stored on a connected Media Server and play them on
your TV.
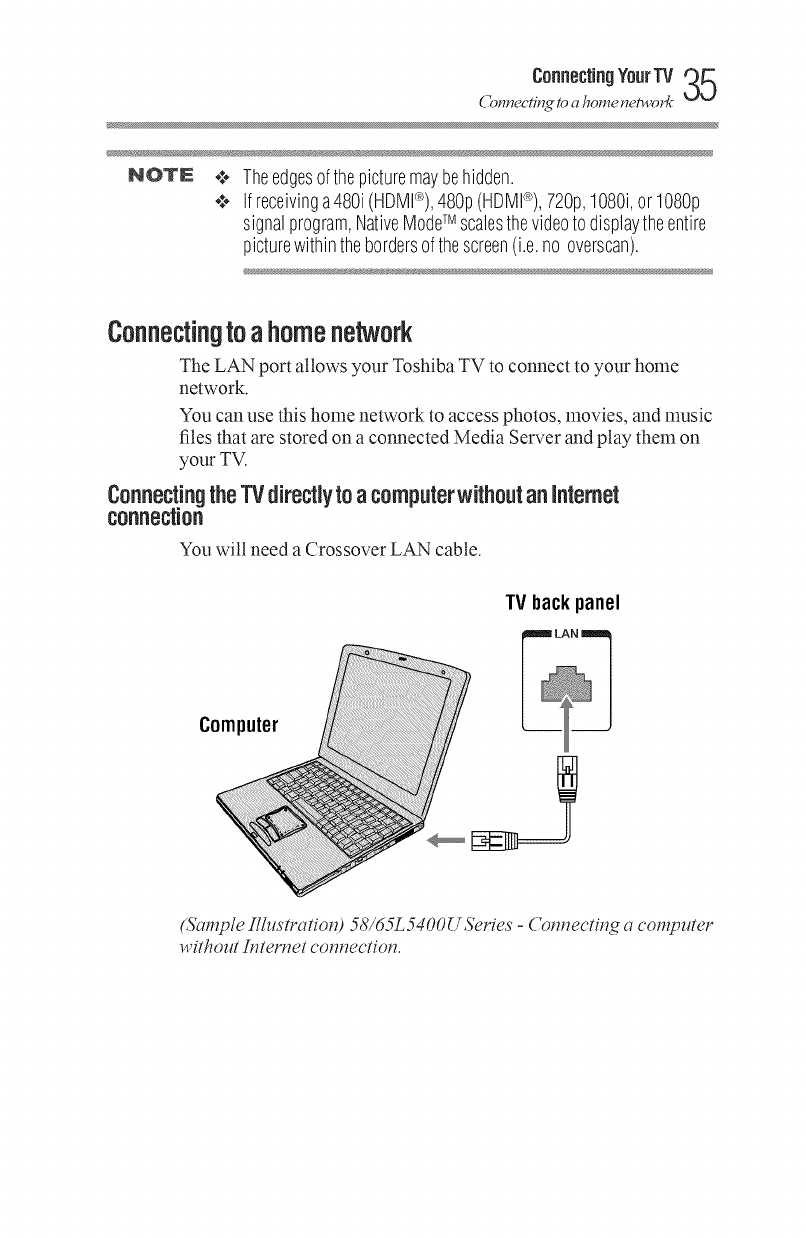
ConnectingtheTVdirectlytoacomputerwithoutanInternet
connection
You will need a Crossover LAN cable.
TV back panel
Computer
(Sample Ilhistratiot_) 58/65L 5400U Series - ('otmectit_g acomputer
without It_tert_et_cotmectiotl.
6 ConnectingYourTV
ConneclT"_ to a home netwol'k
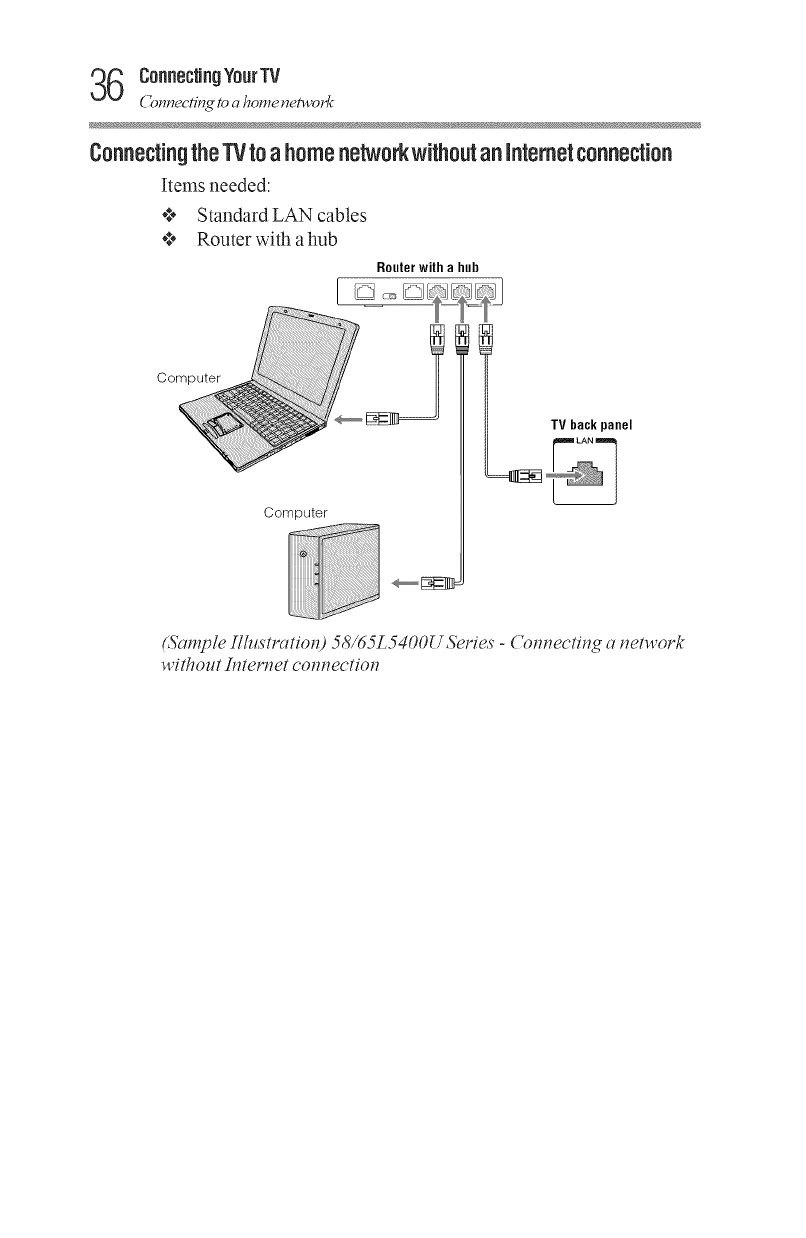
ConnectingtheTVto ahomene_orkwithoutanIntemetconnection
Items needed:
*_* Standard LAN cables
****Router with a hub
Router with ahuh
Computer
Computer
TV back panel
(Sample IllustratioH) 58/65L5400u seFies -('om, ect#_g a t_etwork
without h_ter_et, com_ectio_

co..oou. Yo°,Tv37
Connecti_ to a home network
ConnectingtheTV to a home ne_orkwith an Internetconnection-
wired
Items needed:
****Coaxial or telephone cable (depending on your modenl type)
@ StandardLAN cables
@ Router with Hub
****Modem (DSL or cable)
Modem (DSL or cable) Routerwith ahub
1--
--2,3
I
2TV backpanel
Cable or _
Phone jack_ 7
Computer
2
(Sample Illu,s'tratio_O58/65L5400U Series -('om_ectill_ with
L*_ter_etcom_ectio,_ - wired
Item." Description."
1 Coaxial or telephone cable (depending on your modem
type)
2 Standard LAN cable
Do NOT connect a phone jack directly to the TV's LAN
3port.
8 ConnectingYourTV
Connec.tin_ to a home network
ConnectingtheTVto a homehero,with an Intemetconnection-
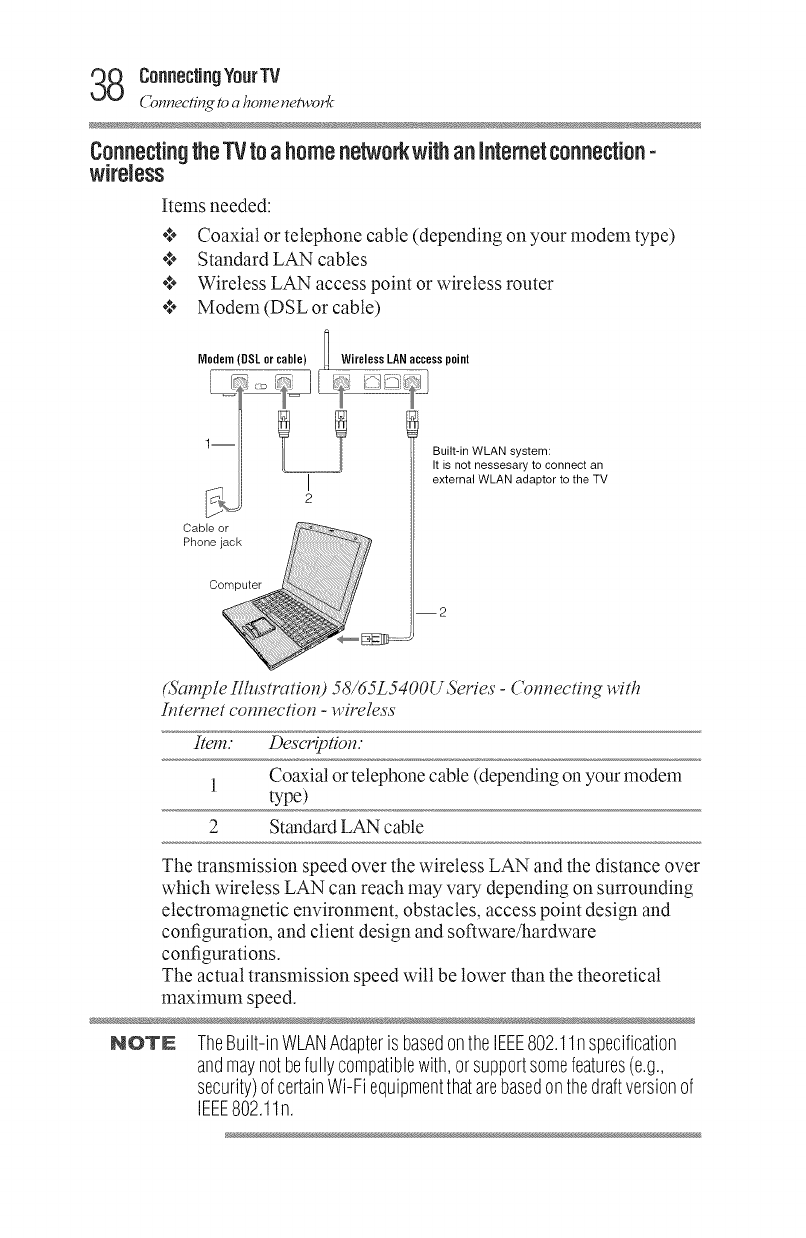
wireless
Items needed:
@ Coaxial or telephone cable (depending on your modem type)
@ Standard LAN cables
@ Wireless LAN access point or wireless router
@ Modem (DSL or cable)
Modem(DSkorcable) IWireless kAN access point
Built-in WLAN system:
It is not nessesary to connect an
external WLAN adaptor to the TV
Cable o_
Phone jack
Computer
--2
dS'ample IlhLs'tratiot 0 58/6 5L5400U Series - ('om_ecting with
b_ternet com_ection -wireless
Item." Description."
1 Coaxial or telephone cable (depending on your modem
type)
2 Standard LAN cable
The transmission speed over the wireless LAN and the distance over
which wireless LAN can reach may vary depending on surrounding
electromagnetic enviromnent, obstacles, access point design and
configuration, and client design and software/hardware
configurations.
The actual transmission speed will be lower than the theoretical
nmximum speed.
NOTE TheBuilt-inWLANAdapteris basedontheIEEE802.11nspecification
andmaynotbefullycompatiblewith,orsupportsomefeatures(e.g.,
security)ofcertainWi-Fiequipmentthatarebasedonthedraftversionof
IEEE802.11n.
UsingtheRemoteControl
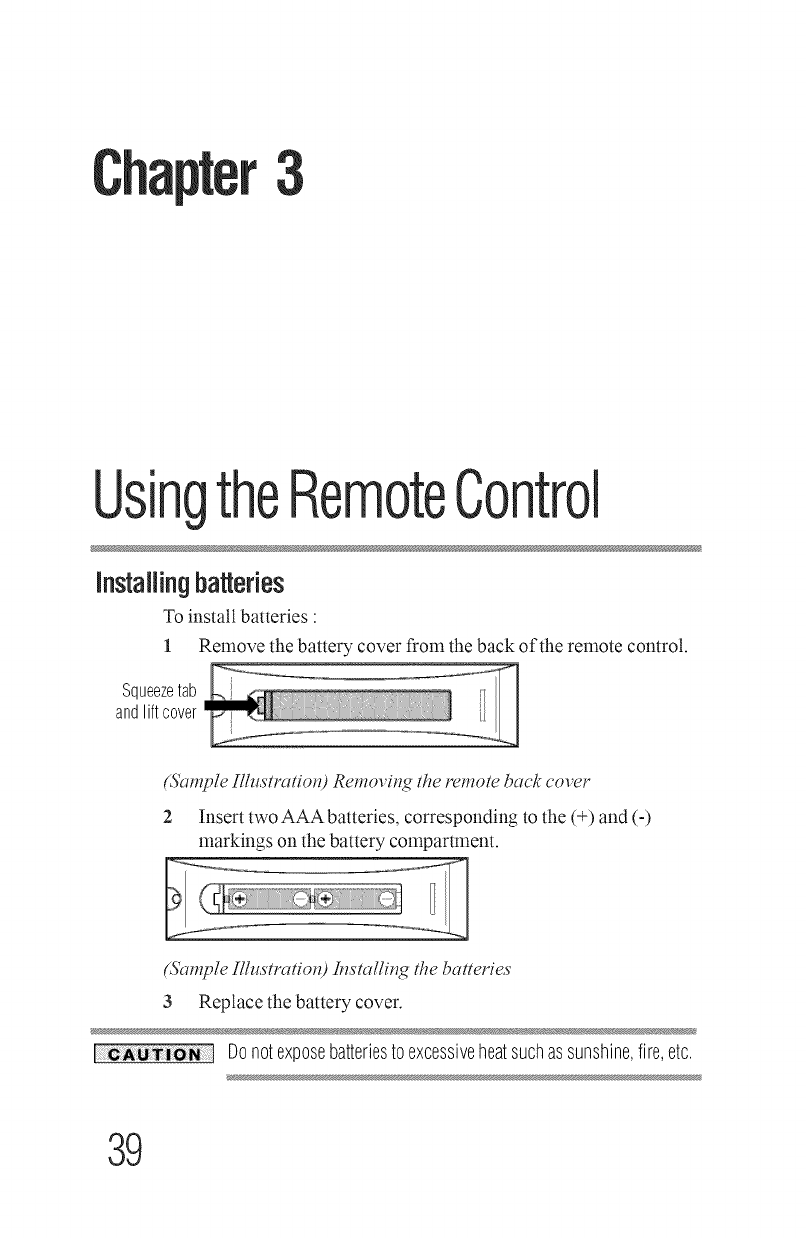
installingbatteries
To install batteries :
1 Remove the battery cover from the back of the remote control.
Squeezetab , ....
andliftcover iL_ I
(Sample Illustratio_O Remov#_g the remote back cover
2 Insert two AAA batteries, corresponding to the (+) and (-)
markings on the battery compartment.
(Sample Lllustratio_O !,,_stallir_gthe batteries
3 Replace the battery cover.
Donotexposebatteriestoexcessiveheatsuchassunshine,fire,etc.
39
0 Using the Remote Control
Remote control effect_e range
NOTE ¢_, Besureto useAAAsizebatteries.
¢,, Disposeofbatteriesinadesignateddisposalarea.
¢ Alwaysconsidertheenvironmentwhendisposingof batteries.
¢ Alwaysfollowapplicablelawsandregulations.
¢ Iftheremotedoesnotoperatecorrectly,orif theoperatingrange
isreduced,replacethebatteries.
¢ Alwaysreplacebothbatterieswithnewones.Nevermixbattery
typesor usenewandusedbatteriestogether.
¢ Alwaysremovebatteriesfromtheremoteif theyaredeador ifthe
remotecontrolisnotto beusedforanextendedperiodoftime.
Thispreventsbatteryacidfromleakingintothebatterycompartment.
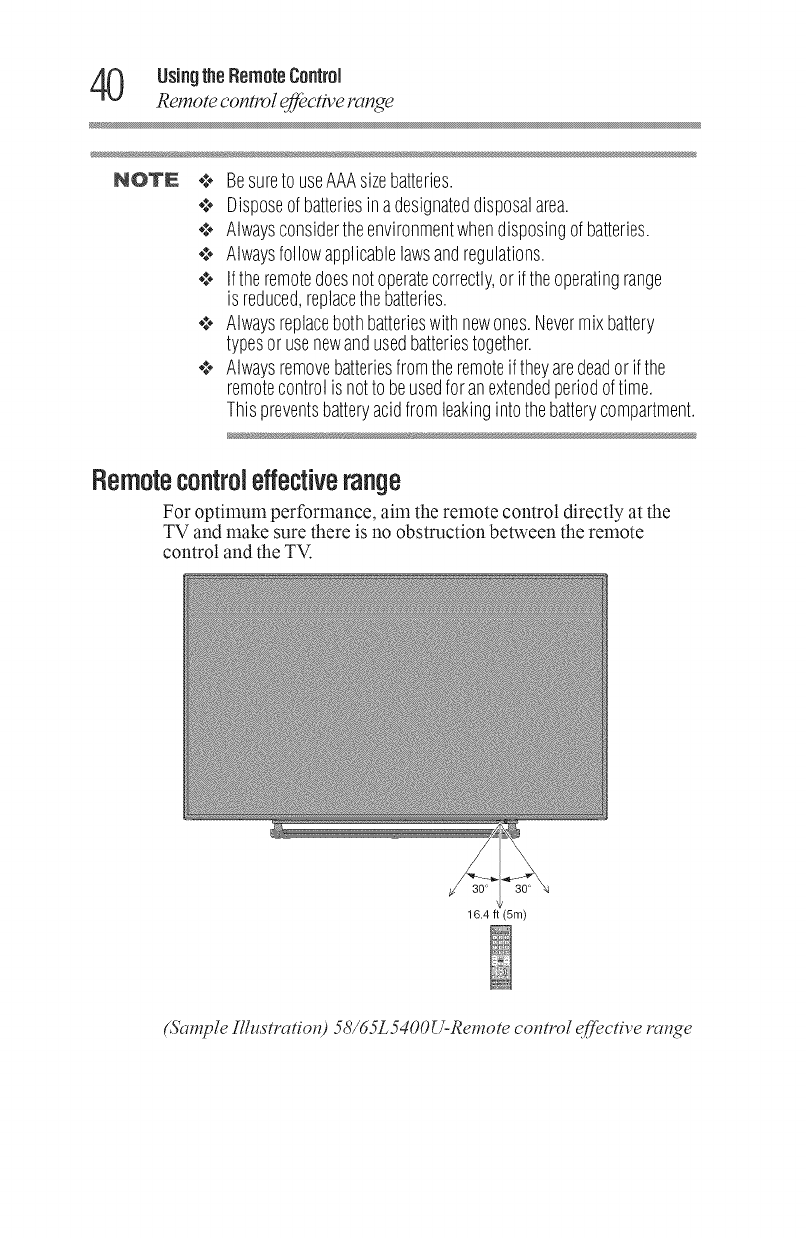
Remotecontroleffectiverange
For optimum performance, aim the remote control directly at the
TV and make sure there is no obstruction between the remote
control and the TV.
16.4 ft (5m)
(Sample Illustratio_d 58/65L5400U-Remote co_trol effective ravage
usingtheRemotecontrol AI
Learning about the remote conm)! -T |
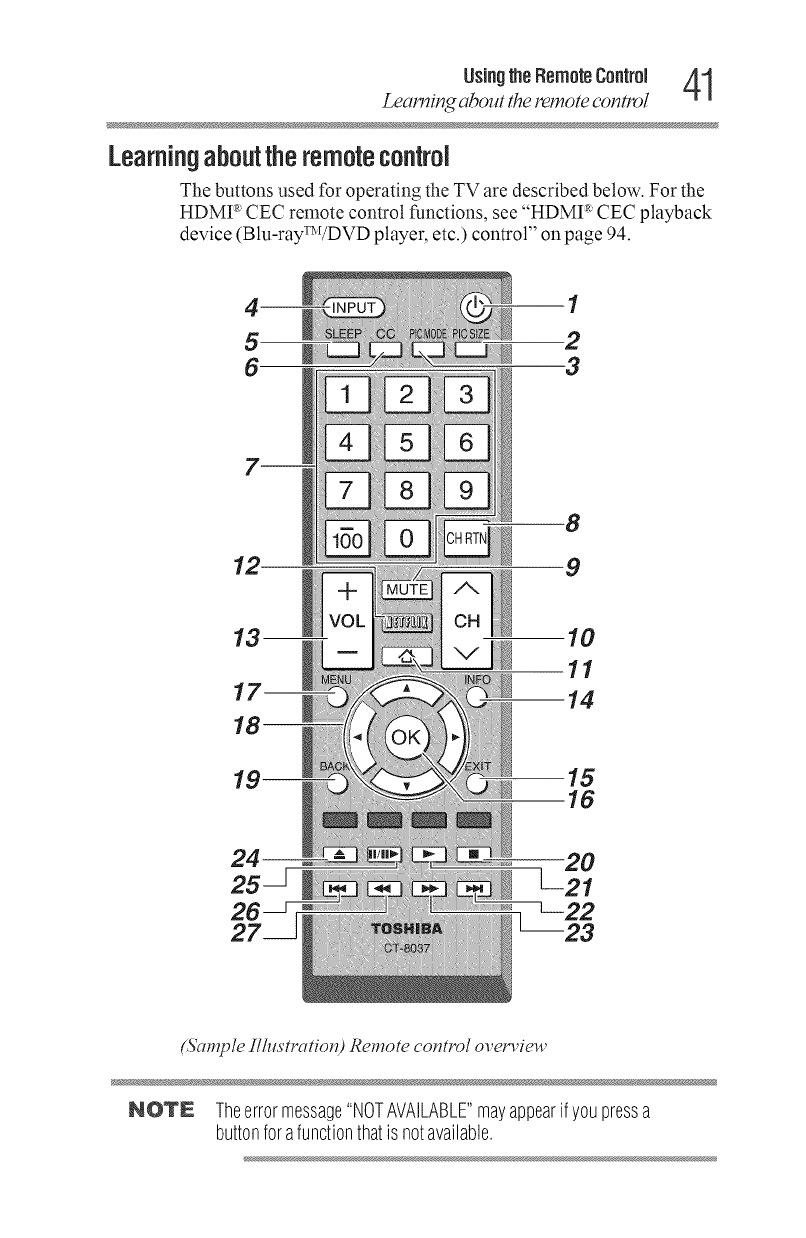
Learningabouttheremotecontrol
The buttons used for operating the TV are described below. For the
HDMP' CEC remote control functions, see "HDMP CEC playback
device (Blu-rayTWDVD player, etc.) control" on page 94.
5
1
2
3
12
8
9
10
11
14
15
16
24-- 20
25 _ L-21
(Sample Ilhlstratiotd Remote control o_,era,iew
NOTE Theerrormessage"NOTAVAILABLE"mayappearif youpressa
buttonforafunctionthatis notavailable.
2 UsingtheRemoteControl
Leal_ing abcmt the remote conn,ol
1 The POWER button turns the TV On/Off. When the TV is off,
the power LED indicator on the TV front glows red.
2 The PIC SIZE button cycles through the picture sizes, see
"Selecting the picture size" on page 60.
3 The PIC MODE button selects the picture mode, see
"Adjusting the picture" on page 66.
4The INPUT button selects the video input source, see
"Selecting the video input source" on page 54.
5 The SLEEP button accesses the sleep timer, see "Setting the
sleep timer" on page 92.
6 The C. CAPTION button accesses closed captions, see "Using
closed captions" on page 68.
7The Channel Number buttons (0-9, and Dash 100) directly
tune channels. The (Dash 100) button allows you to enter two
part channel numbers, see "Storing channels in memory
(optional)" on page 49.
8 The CH RTN button returns to the last viewed channel or
source, see "Switching between two channels using Channel
Return" on page 58.
9 The MUTE button reduces or turns offthe sound, see "Muting
the sound" on page 71.
10 The CH &/T(arrow) buttons cycle through programmed
channels (when no on-screen menu is present), see "Storing
channels in memory (optional)" on page 49.
11 The HOME button launches the applications bar.
12 The NETFLIX button launches the Netflix ®application on-
screen.
13
14
The VOL (+ -) buttons adjust the volume level.
The INFO button displays TV status information as well as
program details, when available, see "Displaying TV stares
information" on page 98.
The EXIT button closes on-screen menus.15
16 The OK button activates highlighted items in the main
menu system.
17 The MENU button accesses the main TV menu system. See
"Navigating the menu system" on page 46.
18 The Arrow buttons (A/T/-_/_) select or adjust progrannning
menus when a menu is on-screen.
usingtheRemotecontrol Aq
Learning about the remote control -T_
19 The BACK button returns to the previous screen.
The following key functions allow you to control Toshiba HDMI _ CEC
compatible devices via HDMI _ connection. See "Using HDMP' CEC" on
page 93.
20 The STOP button stops playback of the loaded playback
device.
21 The PLAY button begins playback of the loaded playback
device.
22 The SKIP forward button skips forward to locate later DVD
chapters.
23 The FF button Past-forwards the playback device. (Press during
play mode to view the picture moving rapidly forward.)
24 The EJECT button ejects the DVD or tape.
25 The PAUSE/STEP button suspends play or record temporarily.
Press during play or record mode to pause the picture; press
again to restart.
26 The SKIP reverse button skips to the beginning of the current
DVD chapter or locates the previous chapter.
27 The REW button rewinds/reverses the playback device. (Press
during play mode to view the picture moving rapidly
backward).
MenuLayoutand avi ation
Mainmenulayout
The tables below and on the next pages provide a quick overview of
your TV's menu system. To open the menus (illustrated below),
press MENU on the remote control.
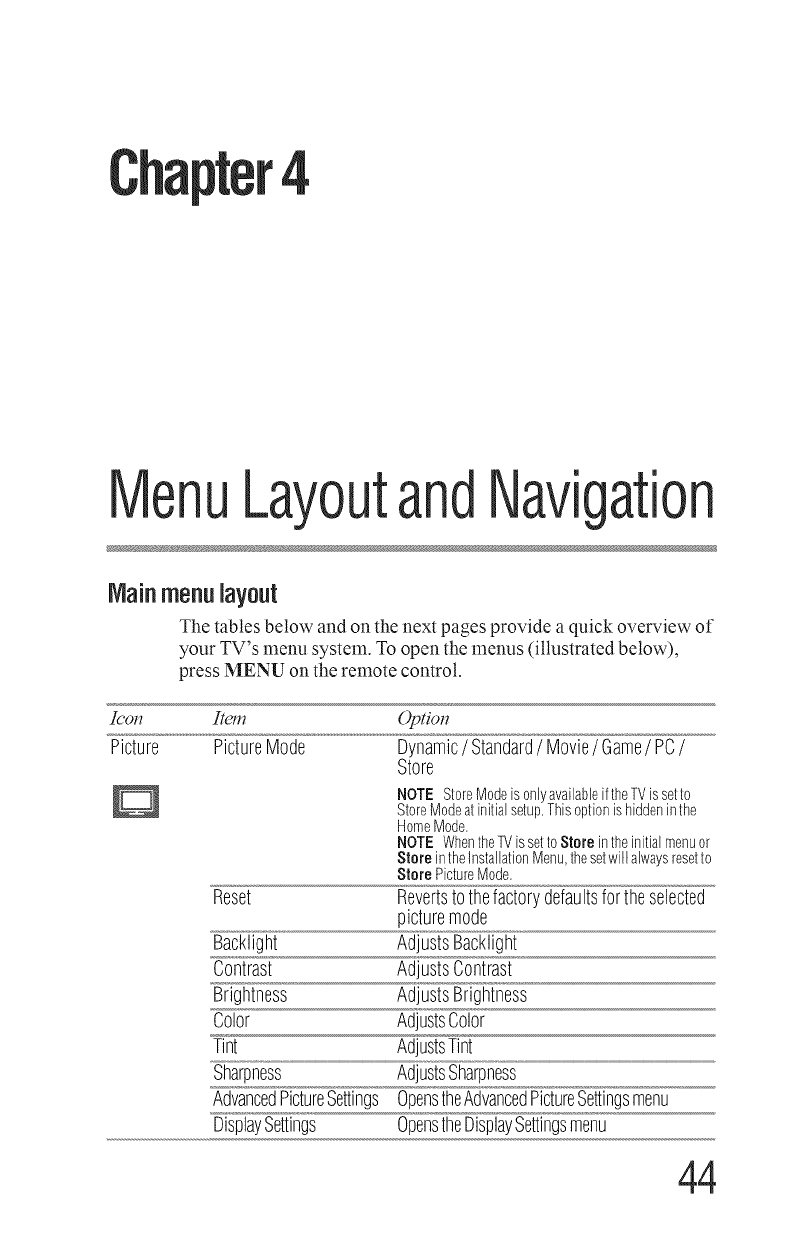
Zc'ot_ Item
Picture PictureMode
Reset
Backlight
Contrast
Brightness
Color
Tint
Sharpness
AdvancedPictureSettings
DisplaySettings
Optiol_
Dynamic/Standard/Movie/Game/PC/
Store
NOTE StoreModeis onlyavailableiftheTVissetto
StoreModeat initialsetup.This optionishiddeninthe
HomeMode.
NOTE WhentheTV is setto Stere inthe initialmenuor
Store intheInstallationMenu,thesetwill alwaysresetto
Stere PictureMode.
Revertstothefactorydefaultsfortheselected
picturemode
AdjustsBacklight
AdjustsContrast
AdjustsBrightness
AdjustsColor
AdjustsTint
AdjustsSharpness
OpenstheAdvancedPictureSettingsmenu
OpenstheDisplaySettingsmenu
44
IVlenuLayoutandNavigation 45
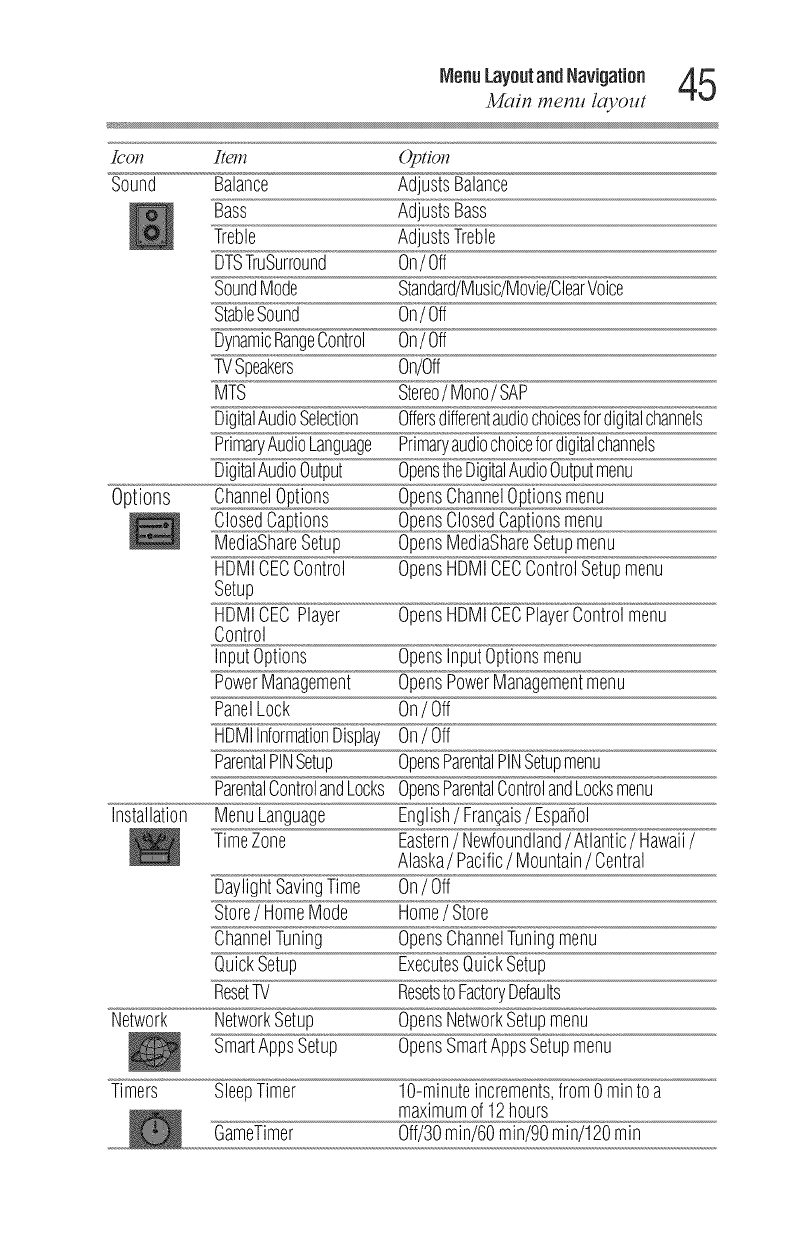
Main menu layout
Icol_ Item Optiol_
Sound Balance AdjustsBalance
Bass AdjustsBass
Treble AdjustsTreble
DTSTruSurround On/Off
SoundMode Standard/Music/Movie/ClearVoice
StableSound On/Off
DynamicRangeControl On/Off
TVSpeakers On/Off
MTS Stereo/Mono/SAP
DigitalAudioSelection Offersdifferentaudiochoicesfordigitalchannels
PrimaryAudioLanguage Primaryaudiochoicefordigitalchannels
DigitalAudioOutput OpenstheDigitalAudioOutputmenu
Options ChannelOptions OpensChannelOptionsmenu
ClosedCaptions OpensClosedCaptionsmenu
MediaShareSetup OpensMediaShareSetupmenu
HDMICECControl OpensHDMICECControlSetupmenu
Setup
HDMICECPlayer OpensHDMICECPlayerControlmenu
Control
InputOptions OpensInputOptionsmenu
PowerManagement OpensPowerManagementmenu
PanelLock On/Off
HDMIInformationDisplay On/Off
ParentalPINSetup OpensParentalPINSetupmenu
ParentalControlandLocks OpensParentalControlandLocksmenu
Installation MenuLanguage English/Fra%ais/Espa_ol
TimeZone Eastern/Newfoundland/Atlantic/Hawaii/
Alaska/Pacific/Mountain/Central
DaylightSavingTime On/Off
Store/HomeMode Home/Store
ChannelTuning OpensChannelTuningmenu
QuickSetup ExecutesQuickSetup
ResetTV ResetstoFactoryDefaults
Network NetworkSetup OpensNetworkSetupmenu
SmartAppsSetup OpensSmartAppsSetupmenu
Timers SleepTimer lO-minuteincrements,from0minto a
maximumof 12hours
GameTimer Off/30min/60min/90min/120min
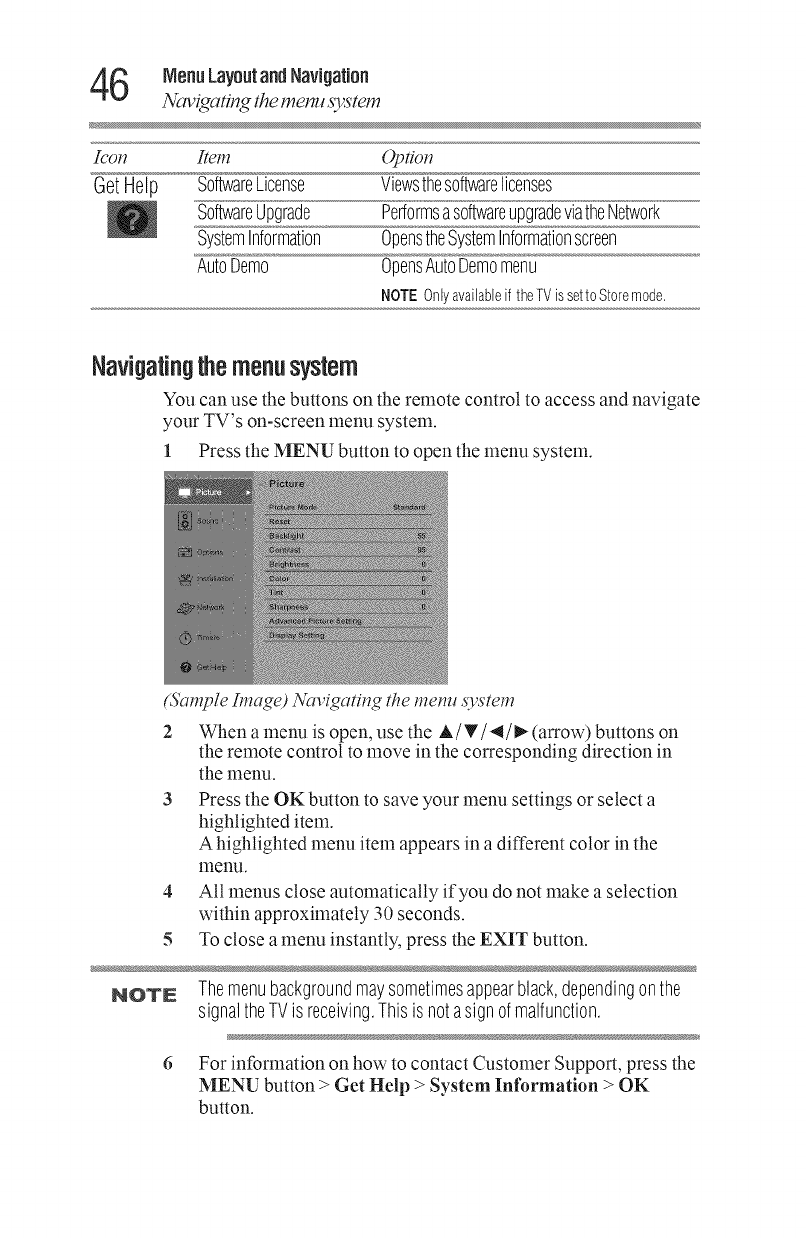
6 Menu Layoutand Navigation
Navigating the menll _ystem
Icon Item Option
GetHelp SoftwareLicense Viewsthesoftwarelicenses
SoftwareUpgrade PerformsasoftwareupgradeviatheNetwork
SystemInformation OpenstheSystemInformationscreen
AutoDemo OpensAutoDemomenu
ROTE Onlyavailableif theTV issetto Storemode.
Navigatingthemenusystem
You can use the buttons on the remote control to access and navigate
your TV's on-screen menu system.
1 Press the MENU button to open the menu system.
(St4mple ImgTge) Ncl_,igatitgg the metal ,s3,stem
2 When a menu is open, use the A/T/4/_(arrow) buttons on
the remote control to move in the corresponding direction in
the menu.
3 Press the OK button to save your menu settings or select a
highlighted item.
Ahighlighted menu item appears in a different color in the
menu.
4 All menus close automatically if you do not make a selection
within approximately 30 seconds.
5 To close a menu instantly, press the EXIT button.
NOTE Themenubackgroundmaysometimesappearblack,dependingonthe
signaltheTVis receiving.Thisis notasignof malfunction.
6 For information on how to contact Customer Support, press the
MENU button > Get Help > System Information > OK
button.
5
SettingupyourTV
initial Setup
When you first turn on or reset the TV, the Initial Setup window wilt
appear.
1 In the Menu Language field, press the 4/_ (arrow) buttons to
select your preferred language.
2 Press the A/T(arrow) buttons to select Time Zone.Then set
your desired time zone, using the 4/_ (arrow) buttons and
press the OK button.
The Store /Home Mode settings window appears.
3 For normal home use, press the 4/_ (arrow) buttons to select
Home, and then press the OK button.
The ANT/CABLE In setup window appears.
4Press the 4/_ (arrow) buttons to select the input source (Cable
or Antenna), and then press the OK button.
5 Press the OK button to select Start Scan and continue with the
Auto Tuning.
You must select a Language and either Home/Store mode, before
you can exit out of the Setup Menu. The EXIT button will not
function until these selections have been made.
47
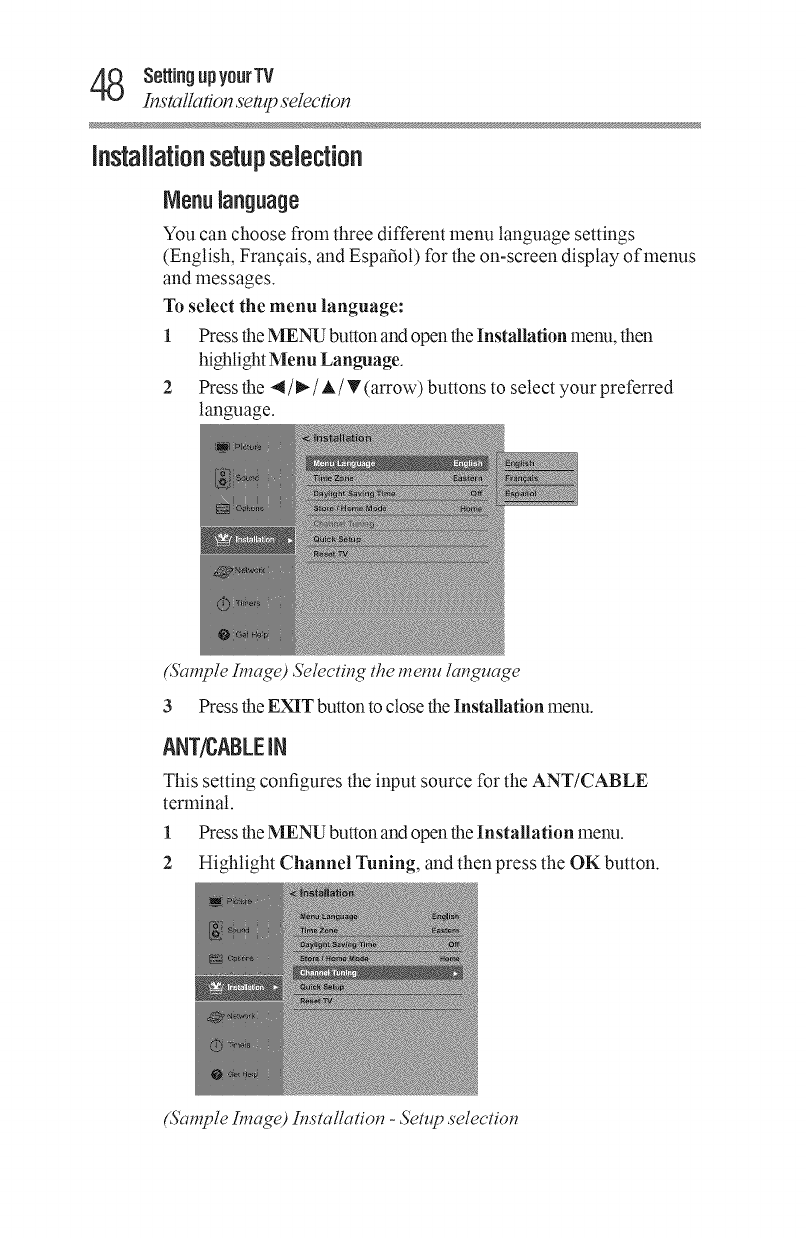
Z_ SettingupyourTV
Instal/a_on setup selec_on
installationsetupselection
IVlenulanguage
You can choose from three different menu language settings
(English, Francais, and Espafiot) for the on-screen display of menus
and messages.
To select the menu language:
1 Press the MENU button and open the Installation menu, then
highlight Menu Language.
2 Pressthe 4/_/A/T(arrow) buttonsto select your preferred
language.
(Sample Image) ,%lect#_g the metal langlmge
3 Press the EXIT button to close the Installation menu.
ANT/CABLEiN
This setting configures the input source for the ANT/CABLE
terminal.
1 Press the MENU button and open the Installation menu.
2 Highlight Channel Tuning, and then press the OK button.
(Sample Image) L_smllatio_ -setup selectio_
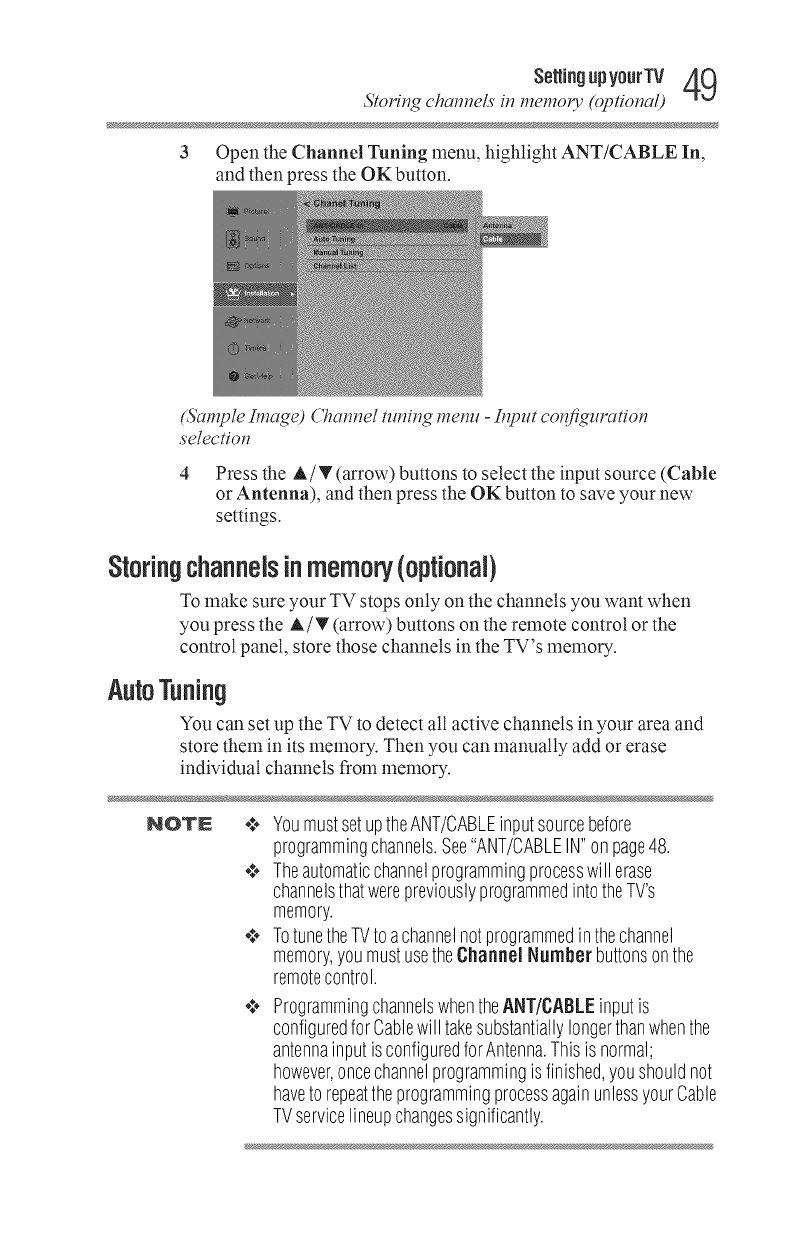
Se_ingupyourTV 49
Stor#_g c'ham_elsit_memol_ (optiot_al)
3Open the Channel Tuning menu, highlight ANT/CABLE In,
and then press the OK button.
(Sample Image) Cham_el tm_i_g metal -It_put co_figuratio_
selecdo_
4 Press the A/T (arrow) buttons to select the input source (Cable
or Antenna), and then press the OK button to save your new
settings.
Storingcl annelsinmemory(opUonal)
To make sure your TV stops only on the channels you want when
you press the A/T (arrow) buttons on the remote control or the
control panel, store those channels in the TV's memory.
AutoTuning
You can set up the TV to detect all active channels in your area and
store them in its memory. Then you can manually add or erase
individual channels from memory.
NOTE ¢. YoumustsetuptheANT/CABLEinputsourcebefore
programmingchannels.See"ANT/CABLEIN"onpage48.
¢ Theautomaticchannelprogrammingprocesswill erase
channelsthatwerepreviouslyprogrammedintotheTV's
memory.
¢ TotunetheTVtoachannelnotprogrammedinthechannel
memory,youmustusetheChannel Number buttonsonthe
remotecontrol.
¢ ProgrammingchannelswhentheANT/CABLEinputis
configuredfor Cablewill takesubstantiallylongerthanwhenthe
antennainputisconfiguredforAntenna.Thisisnormal;
however,oncechannelprogrammingis finished,youshouldnot
haveto repeattheprogrammingprocessagainunlessyourCable
TVservicelineupchangessignificantly.
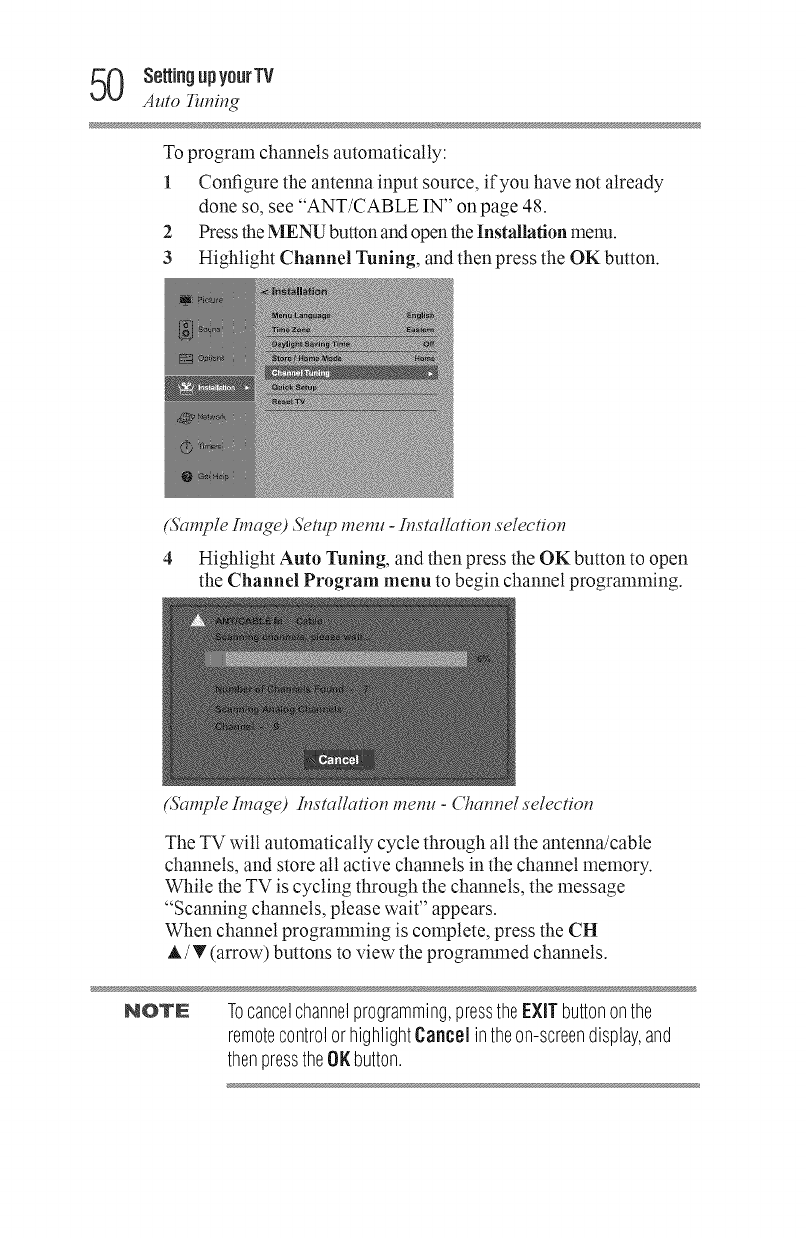
0 Se_ingupyourTV
To program channels automatically:
1 Configure the antenna input source, if you have not already
done so, see "ANT/CABLE IN" on page 48.
2 Press the MENU button and open the Installation menu.
3 Highlight Channel Tuning, and then press the OK button.
(,S'C_mpleImc_ge) setlq) me_ll - ,r,,_,s'tc_llc_tio_selectio_
4 Highlight Auto Tuning, and then press the OK button to open
the Channel Program menu to begin channel programming.
(_'C_mpleImc_ge) !,,_,s'tc_llc_tio_metal - ('h_el selectio_
The TV will automatically cycle through all the antenna/cable
channels, and store all active channels in the channel memory.
While the TV is cycling through the channels, the message
"Scanning channels, please wait" appears.
When channel progran_]_ing is complete, press the CH
A/T (arrow) buttons to view the progrann_aed channels.
NOTE Tocancelchannelprogramming,presstheEXiTbuttononthe
remotecontrolorhighlightCancelintheon-screendisplay,and
thenpressthe01(button.
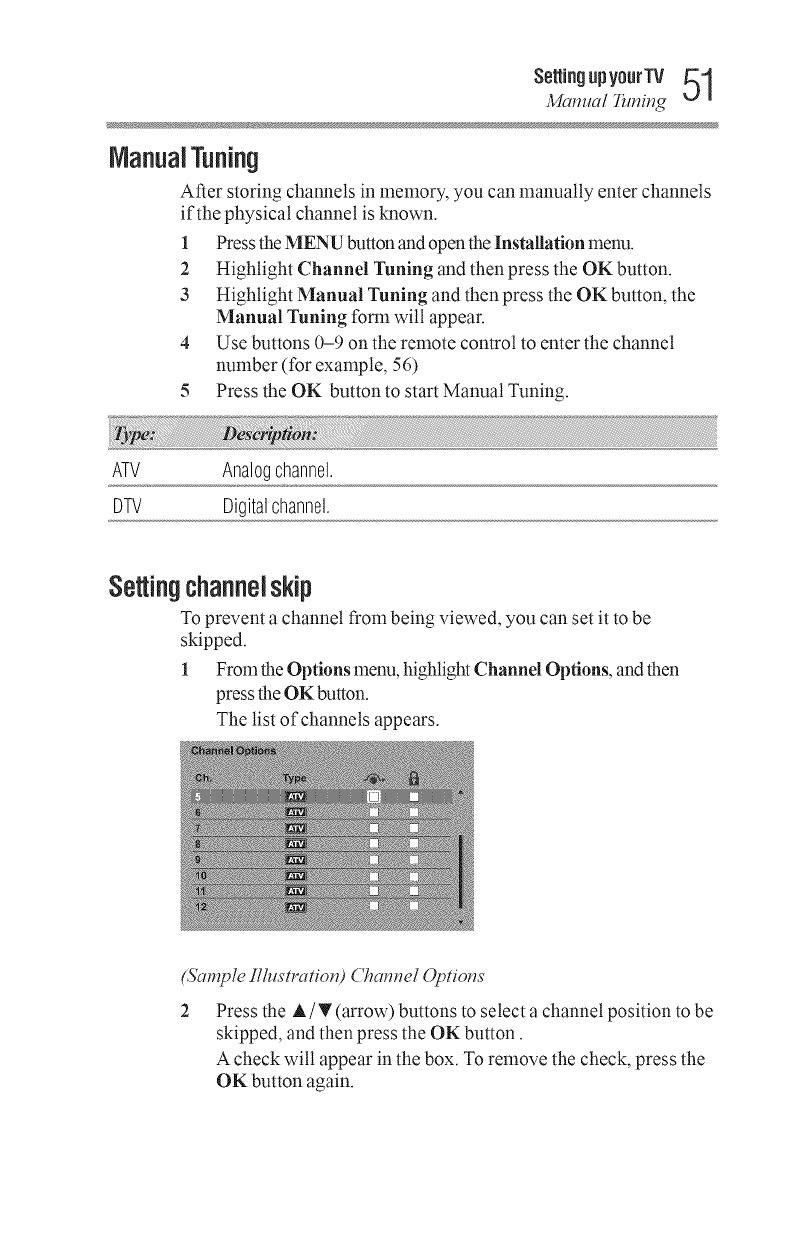
Se_ingupyourTV 51
Mamlal _m#_g
ManualTuning
After storing channels in memory, you can manually enter channels
if the physical channel is known.
1 Press the MENU button and open the Installation menu.
2 Highlight Channel Tuning and then press the OK button.
3 Highlight Manual Tuning and then press the OK button, the
Manual Tuning form will appear.
4Use buttons 0-9 on the remote control to enter the channel
number (for example, 56)
5 Press the OK button to start Manual Tuning.
ATV Analogchannel.
DTV Digitalchannel.
Settingchannelskip
To prevent a channel from being viewed, you can set it to be
skipped.
1 From the Options menu, Nghlight Channel Options, and then
press the OK button.
The list of channels appears.
(Sample [llustratio_d ('ham_el Ot)tio_s
Press the A/T (arrow) buttons to select a channel position to be
skipped, and then press the OK button.
A check will appear in the box. To remove the check, press the
OK button again.
2 Se_ingupyourTV
S'ett#_gthe AV #_put mode
To add a channel to the channel memory:
-5. Highlight the checked box next to the channel number you
wish to add, and then press the OK button to remove the check.
NOTE Youcanalsoblockspecificchannelssothattheycannotbetuned
untilyouunlockthem.Forinformation,see"Lockingchannels"on
page80.
To manually add digital sub-channels on a physical channel:
****Use the Channel Numbers and the (Dash 100) on the remote
control to enter the channel number (for example, 56-1).
If the channel is found, the number will be added to the list and
the box wilt be unchecked. If the channel is not found, a
message appears.
NOTN SkippedchannelscannotbeselectedwiththeCH A/v(arrow)
buttons;however,theycanbeaccessedusingthenumberkeysonthe
remotecontrol.
SettingtheAVinputmode
This setting determines the configuration of the shared AV input on
your TV. You can set this input for either ColorStream HD or
Video.
Add the following descriptions:
To set the AV Input mode:
1 From Options menu, highlight Input Options, and then press
the OK button.
2 Press A/T(arrow) buttons to select AV Input, and then press
the OK button.
3 Press A/T (arrow) buttons to select Video or ColorStream
IID, and then press the OK button to save your new setting.
Settingthetimezone
The Time Zone setup allows you to specify the correct time zone for
your region. This feature allows the TV status information to
display the correct time zone information for your viewing area.
To set the time zone:
1In the Installation menu, highlight Time Zone, and press the
OK button.
2 Press the A/T (arrow) buttons to select the region, and then
press the OK button.
SsttiuggpyourTV _
Vi_ing the_ystemstatus
To set the Daylight Saving Time status:
1IntheInstallation menu, highlight Dayfight Saving Time, and
press the OK button.
2Pressthe A/T (arrow) buttons to select On or Off, and then
press the OK button.
Viewingthesystemstatus
1In the Get Help menu, highlight System Information, and
then press the OK button. The related information appears.
To close the screen and return to the Get Help menu:
*.** Press the OK or the BACK button.
To return to normal viewing, press the EXIT button.
ResettingFactoryDefaults
To reset all settings and channels to their factory default values:
1 Press the MENU button and open the Installation menu.
2 Highlight Reset TV, and then press the OK button.
3 Enter your PIN code (If a PIN code has been set).
4A confirmation screen appears. Select Yes, and press the OK
button. The TV will turn off automatically.
To cancel the reset process, select No, and press the OK button.
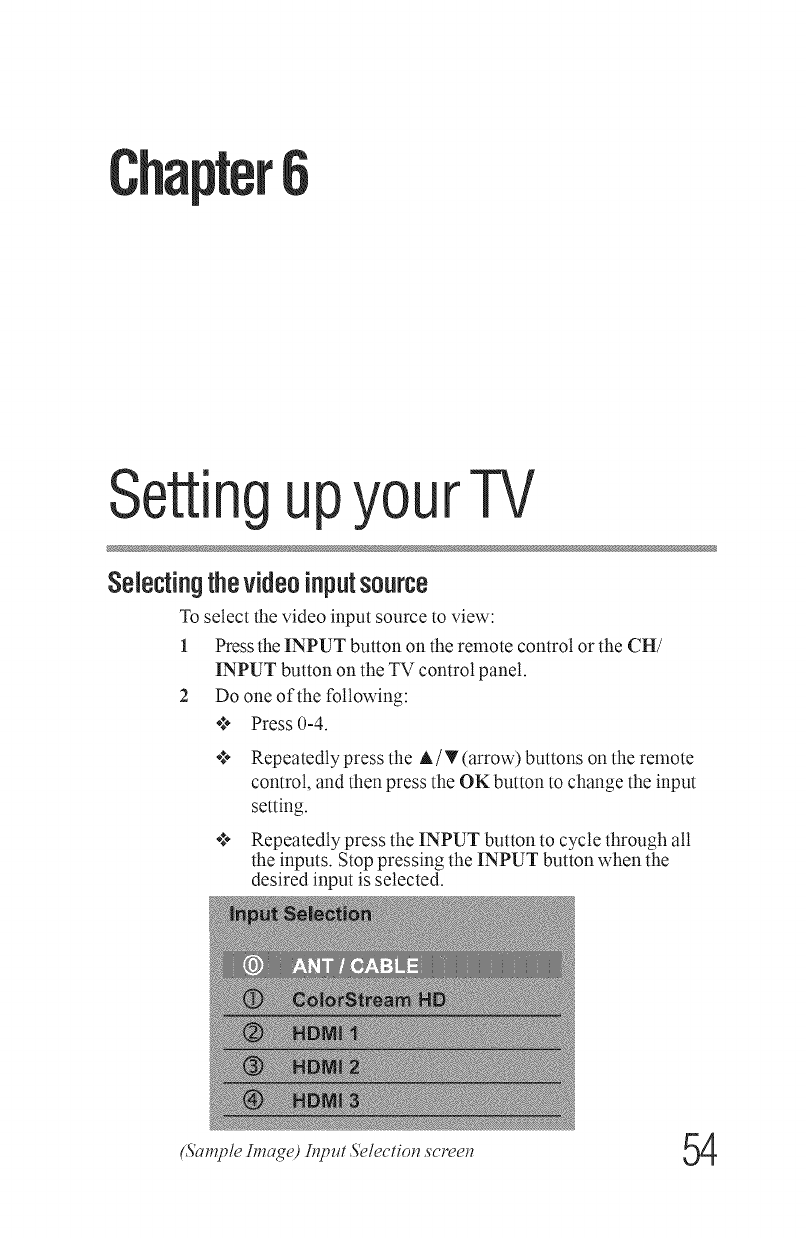
6
SettingupyourTV
Selectingthevideoinputsource
To select the video input source to view:
1 Press the INPUT button on the remote control or the CH/
INPUT button on the TV control panel.
2 Do one of the following:
*_ Press 0-4.
Repeatedly press the A /T (arrow) buttons on the remote
control, and then press the OK button to change the input
setting.
Repeatedly press the INPUT button to cycle through all
the inputs. Stop pressing the INPUT button when the
desired input is selected.
&'ample Image) lnpzct Selectiol_ ,scree_ 54
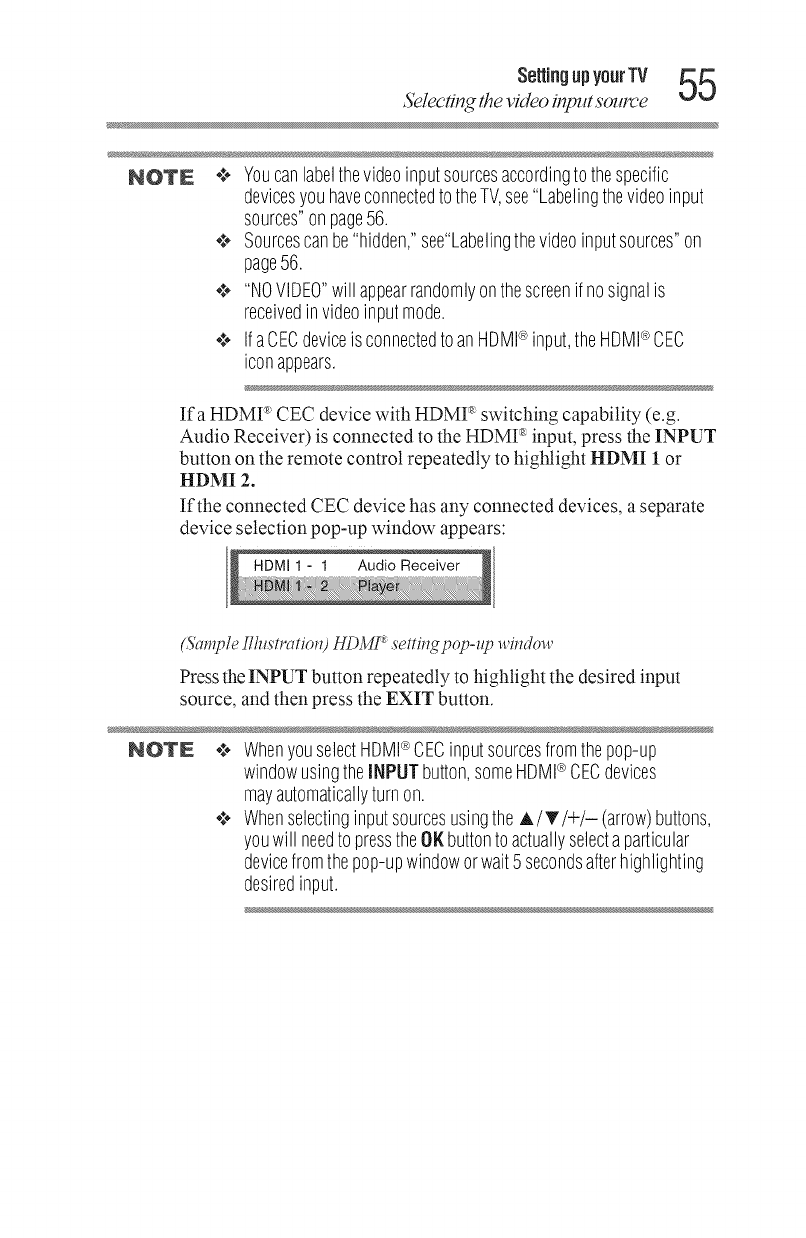
Se.i.g.pVo. TV55
Selec'dng the video inpzltsoztrc'e
NOTE .:_ Youcanlabelthevideoinputsourcesaccordingtothespecific
devicesyouhaveconnectedto theTV,see"Labelingthevideoinput
sources"onpage56.
•:,,,.Sourcescanbe"hidden,"see"Labelingthevideoinputsources"on
page56.
,,:,, "NOVIDEO"will appearrandomlyonthescreenifnosignalis
receivedinvideoinputmode.
¢ IfaCECdeviceis connectedtoanHDMI<_>input,theHDMI®CEC
iconappears.
If a HDMI _'CEC device with HDMI _ switching capability (e.g.
Audio Receiver) is connected to the HDMI _ input, press the INPUT
button on the remote control repeatedly to highlight HDMI 1 or
HDMI 2.
If the connected CEC device has any connected devices, a separate
device selection pop-up window appears:
(i5'a_Tp/eII/ustz'atiolO HDMI +_settilzq pop-ztp +.1,ilzdo_._,
Press the INPUT button repeatedly to highlight the desired input
source, and then press the EXIT button.
NOTE .:. WhenyouselectHDMI®CECinputsourcesfromthepop-up
windowusingtheINPUTbutton,someHDMI®CECdevices
mayautomaticallyturnon.
¢ Whenselectinginputsourcesusingthe A/T/+/- (arrow)buttons,
youwill needtopresstheOKbuttonto actuallyselectaparticular
devicefromthepop-upwindoworwait5 secondsafterhighlighting
desiredinput.
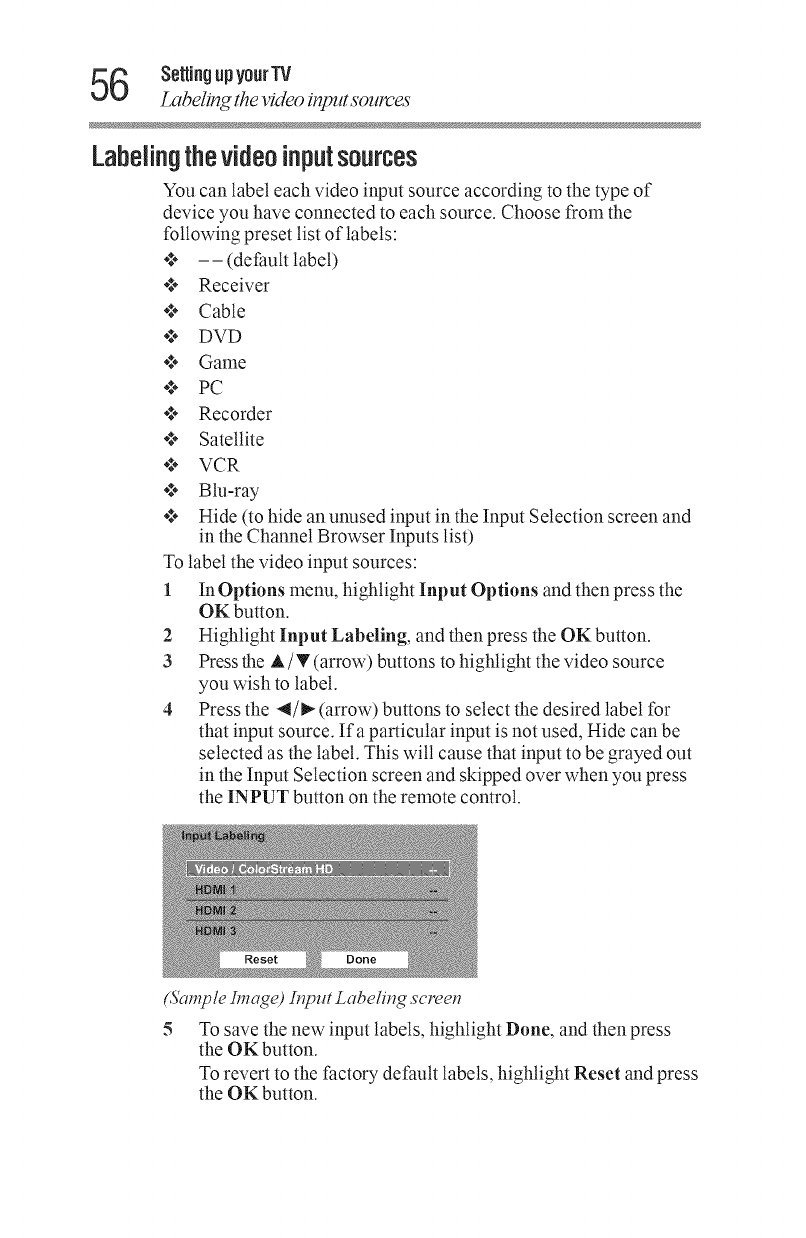
6 Setting upyourTV
Labeling the video inpzctsozcrces
Labelingthevideoinputsources
You can label each video input source according to the type of
device you have connected to each source. Choose from the
following preset list of labels:
*{* -- (default label)
*_'* Receiver
*_'* Cable
*{* DVD
*_**Game
._**PC
._**Recorder
*_**Satellite
._**VCR
*{* Btu-ray
*_**Hide (to hide an unused input in the Input Selection screen and
in the Channel Browser Inputs list)
To label the video input sources:
1 In Options menu, highlight Input Options and then press the
OK button.
2 Highlight Input Labeling, and then press the OK button.
3 Press the A/T (arrow) buttons to highlight the video source
you wish to label.
4 Press the 4/_ (arrow) buttons to select the desired label for
that input source. Ifa particular input is not used, Hide can be
selected as the label. This will cause that input to be grayed out
in the Input Selection screen and skipped over when you press
the INPUT button on the remote control.
Reset
(Sample Image) Inpllt Labeling screen
To save the new input labels, highlight Done, and then press
the OK button.
To revert to the factory default labels, highlight Reset and press
the OK button.
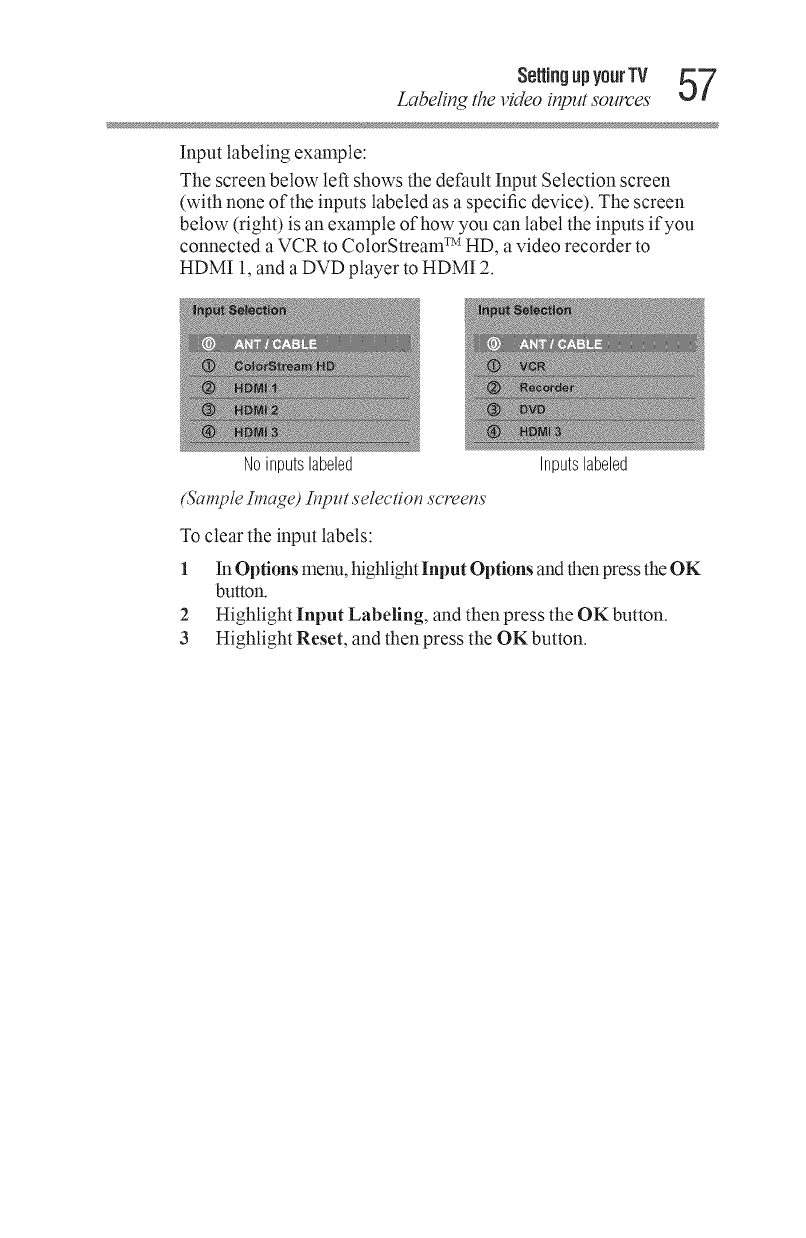
Labeling lhe video input sources
Input labeling example:
The screen below left shows the default Input Selection screen
(with none of the inputs labeled as a specific device). The screen
below (right) is an example of how you can label the inputs if you
connected a VCR to ColorStream TM HD, a video recorder to
HDMI 1, and a DVD player to HDMI 2.
Noinputslabeled Inputslabeled
(Sample Image) L,_pllt selectioH screens
To clear the input labels:
1InOptions menu, highlight Input Options and d_enpress the OK
button.
2 Highlight Input Labeling, and then press the OK button.
3 Highlight Reset, and then press the OK button.
58 Selling upy0urTV
Tuning lo the next prog_Fammed channel
Tuningtothenext programmedchannel
To tune to the next progranmaed channel, press the CH A/V
(arrow) buttons on the remote control or TV control panel.
NOTE Thisfeaturewill notfunctionuntilyouhaveprogrammedchannelsinto
theTV'schannelmemory,see"Storingchannelsinmemory(optional)"
onpage49.
Tuningtoaspecificchannel(programmedor unprogrammed)
To tune analog channels:
Press the Channel Number (0-9) on the remote control. For
example, to select channel 125, press 1, 2, 5, and then press the
OK button.
Tuning digital channels:
Press the Channel Number (0-9) on the remote control, followed by
the (Dash 10U) button, and then the sub-channel number. For
example, to select digital channel 125-1, press 1, 2, 5, -, 1, and then
press the OK button.
NOTE Ifadigitalchannelisnot programmed,eitherthroughtheautomatic
channelscanortheChanneladdfunction,see"AutoTuning"onpage49,
youwill haveto tunetheRFchannelusingtheChannelNumbersandthe
(Dash 100)buttonontheremotecontrol.
Switching heN'een Me channels using ChannelReturn
The Channel Return feature allows you to switch between two
channels without entering an actual channel number each time.
1 Select the first channel you want to view.
2 Select a second channel using the Channel Number buttons
(and the (Dash 100) button if selecting a digital channel).
3 Press the CH RTN button on the remote control. The previous
channel will display. Each time you press the CH RTN button,
the TV wilt switch back and forth between the last two channels
that were tuned.
Settingupyour TV _(_
5_'itc'hing bem'eel_ two c'/_am_e/s using SulfLoc'k TM
NOTE IfyoupresstheCHF1TI,,Ibuttonfromanon-antennainput,theTVwill
returntothelast-viewedinput.
Switching belween two channelsusingSurfLockTM
The SurfLock TM feature temporarily "memorizes" one channel to
the CH RTN button, so you can return to that channel quickly from
any other channel by pressing the CH RTN button.
To memorize a channel to the CH RTN button:
1 Tune the TV to the channel you wish to program into the CH
RTN button.
2 Press and hold the CH RTN button for a few seconds until the
message "Memorized" appears on the screen. The channel has
been programmed to the CH RTN button.
3 You can then change channels repeatedly, and when you press
the CH RTN button, the memorized channel will be tuned.
The TV will return to the memorized channel one time only. Once
you press the CH RTN button and then change channels again, the
CH RTN memory will be cleared and the button will function as
Channel Return, by switching back and forth between the last two
channels that are tuned.This feature also works for external inputs.
0SettingupyourTV
S_Zecth_ thepicture size
Selectingthe picturesize
You can view many program formats in several picture sizes--
Native, 4:3, Full, TheaterWide l, TheaterWide 2, TheaterWide 3,
Normal, and Dot by Dot.
NOTE Thepicturesizeillustrationsareexamplesonly.Theformatoftheimage
(inanyof thepicturesizes)dependsontheformatofthesignalyouare
currentlywatching.Selectthepicturesizethatdisplaysthecurrent
programinthewaythatlooksbestto you.
You can save separate picture size preferences for each input on
your TV.
To select the picture size:
1 Press the PIC SIZE button on the remote.
2 With the Picture Size menu displayed, do one of the following:
*_* Repeatedly press the PIC SIZE button.
****Press the corresponding number button (0-5) while the
Picture Size menu is displayed.
¢* Press the A/T (arrow) buttons while the Picture Size
menu is displayed.
NOTE Someofthepicturesizesmaynotbeavailabledependingonthe
receivingsignalformat.
NOTE Usingthesefunctionsto changethepicturesize(i.e.,changingthe
height/widthratio)foranypurposeotherthanyourprivateviewingmay
beprohibitedundertheCopyrightLawsof theUnitedStatesandother
countries,andmaysubjectyouto civilandcriminalliability.
NOTE IfyouselectaTheaterWideTM picturesize,thetopandbottomedgesof the
picture(includingsubtitlesorcaptions)maybehidden.Toviewthese
edges,adjustthePicturePositionortryviewingtheprogramin4:3or
Full,see"ScrollingtheTheaterWideTM picture(TheaterWide2 and3
only)"onpage64.
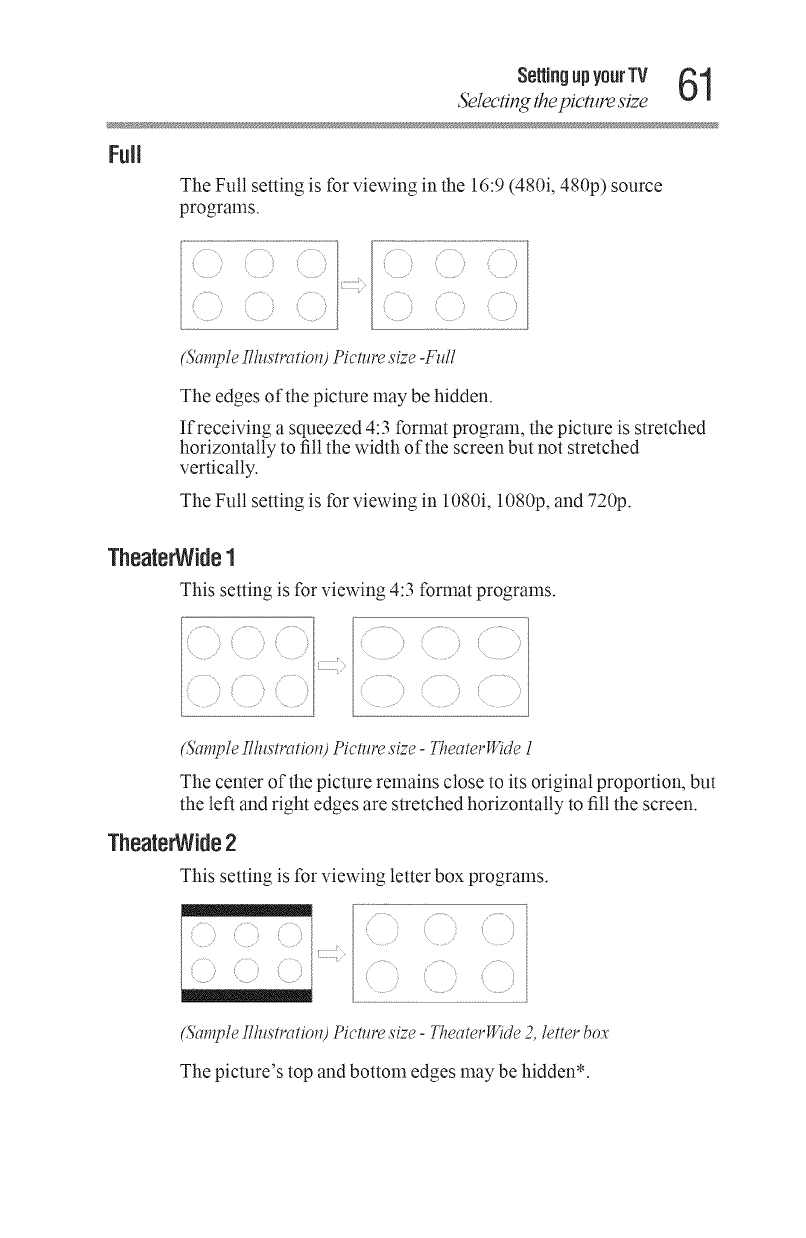
SettingupyourTV 61
Selec't#_gthepicmre size
Furl
The Full setting is for viewing in the 16:9 (480i, 480p) source
programs.
(Sample Ilhlstratiol!) Picture size -Fzdl
The edges of the picture may be hidden.
If receiving a squeezed 4:3 fonnat program, the picture is stretched
horizontally to fill the width of the screen but not stretched
vertically.
The Full setting is for viewing in 1080i, 1080p, and 720p.
TheaterWide 1
This setting is for viewing 4:3 format programs.
(SampleIlhlstratiol!) Picture size -TheaterV/ide1
The center of the picture remains close to its original proportion, but
the left and right edges are stretched horizontally to fill the screen.
TheaterWide2
This setting is for viewing letter box programs.
(SampleIlhlstratiolOPicture size -TheaterV/ide2, letter box
The picture's top and bottom edges may be hidden*.
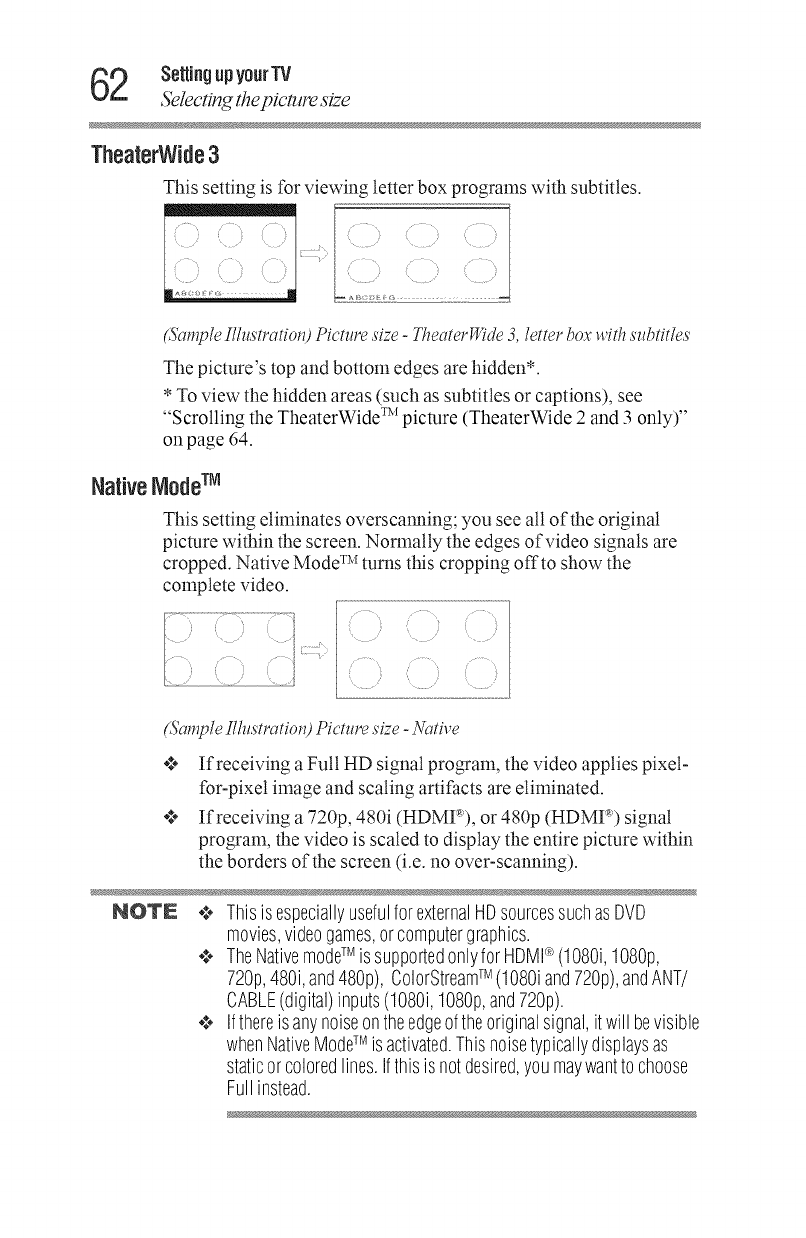
2SettingupyourTV
S_lecting thepicmre size
TheaterWide3
This setting is for viewing letter box programs with subtitles.
i
(Samplellhcstratiol_)Picture size -TheaterWide 3, letter box with ,s'zcbtitle,s'
The picture's top and bottom edges are hidden*.
* To view the hidden areas (such as subtitles or captions), see
"Scrolling the TheaterWide TM picture (TheaterWide 2 and 3 only)"
on page 64.
NativeNodeTM
This setting eliminates overscanning; you see all of the original
picture within the screen. Normally the edges of video signals are
cropped. Native Mode TM turns this cropping offto show the
complete video.
(SampI_ lflustratiol!) Picture size - NiTtk,e
If receiving a Full HD signal program, the video applies pixel-
for-pixel mlage and scaling artifacts are eliminated.
If receiving a 720p, 480i (HDMP), or 480p (HDMP) signal
program, the video is scaled to display the entire picture within
the borders of the screen (i.e. no over-scanning).
NOTE ***_Thisis especiallyusefulforexternalHDsourcessuchasDVD
movies,videogames,orcomputergraphics.
¢ TheNativemodeTM issupportedonlyforHDMI®(1080i,1080p,
72%,480i,and48%), ColorStreamTM (1080iand72%),andANT/
CABLE(digital)inputs(108%1080p,and720p).
¢ Ifthereisanynoiseontheedgeof theoriginalsignal,it will bevisible
whenNativeModeTM isactivated.Thisnoisetypicallydisplaysas
staticor coloredlines.Ifthisis notdesired,youmaywanttochoose
Fullinstead.
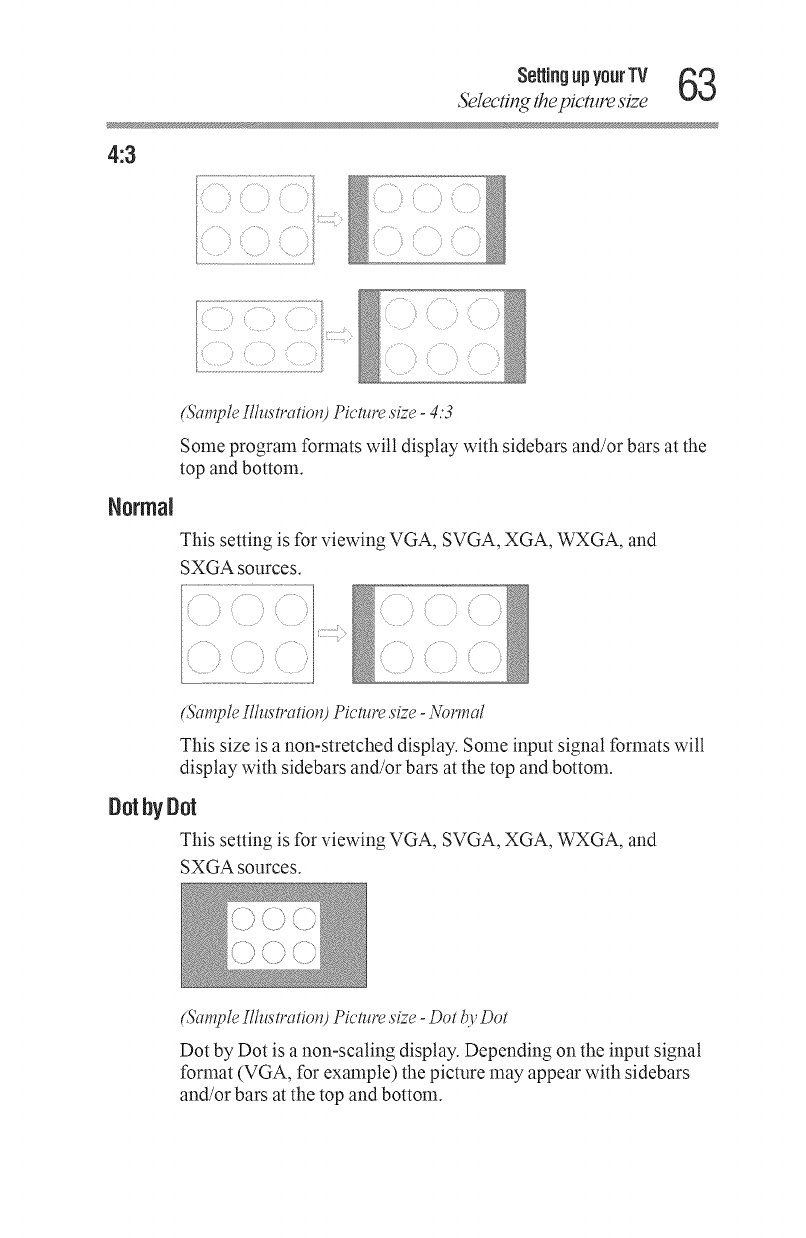
SettingupyourTV _
Select#_g thepicmre size
4:3
'; _' • • " ' • '_i _!:ii_i,i_i_i,i_'ii_
!2 51 2 J
Normal
(Sample I/lustratiol!)Pictm"esize =4:3
Some program formats will display with sidebars and/or bars at the
top and bottom.
This setting is for viewing VGA, SVGA, XGA, WXGA, and
SXGA sources.
i,y • .......
(Sample Illustratiol!)Pictm"esize -_i)rmal
This size is a non-stretched display. Some input signal formats will
display with sidebars and/or bars at the top and bottom.
Dotby Dot
This setting is for viewing VGA, SVGA, XGA, WXGA, and
SXGA sources.
(Sample Illus'tratiol!) Pictzlre size -Dot b), Dot
Dot by Dot is a non-scaling display. Depending on the input signal
format (VGA, for example) the picture may appear with sidebars
and/or bars at the top and bottom.
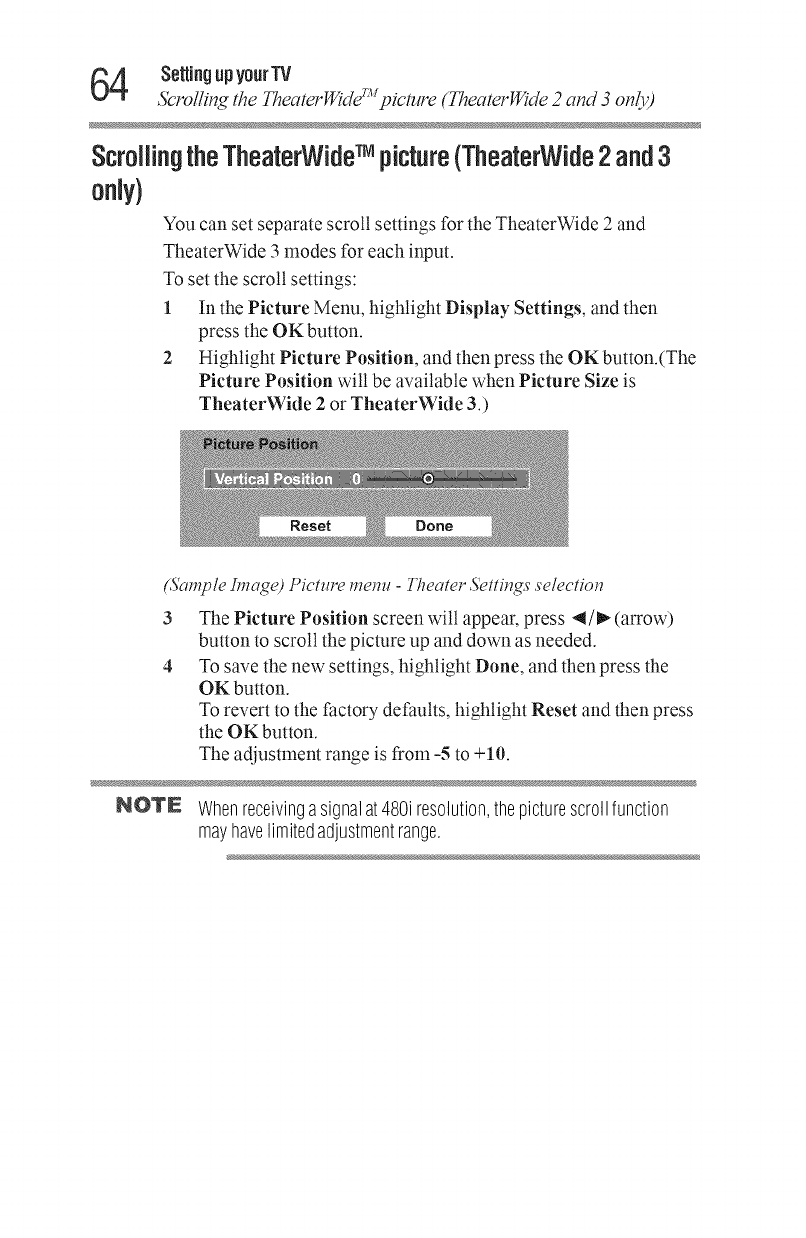
4 SettingupyourTV
5Z'rol#n_l/_eTheatcrWide_picture(TheaterWide2ai_d3 oi_/y)
ScrollingtheTheaterWideTM picture(TheaterWide2and3
only)
You can set separate scroll settings for the TheaterWide 2 and
TheaterWide 3 modes for each input.
To set the scroll settings:
1 In the Picture Menu, highlight Display Settings, and then
press the OK button.
2 Highlight Picture Position, and then press the OK button.(The
Picture Position will be available when Picture Size is
TheaterWide 2 or TheaterWide 3.)
(Sample Image) Picture metal -Theater sett#_gs se/ectiol_
3 The Picture Position screen will appear, press ,_/_(arrow)
button to scroll the picture up and down as needed.
4 To save the new settings, highlight Done, and then press the
OK button.
To revert to the factory defaults, highlight Reset and then press
the OK button.
The adjustment range is from -5 to +IQ.
NOTE Whenreceivingasignalat480iresolution,thepicturescrollfunction
mayhavelimitedadjustmentrange.
SettingupyourTV _
_'ing lhe Aulo Aspec'@_ature V_
UsingtheAutoAspectfeature
When this feature is set to On, the TV will automatically select the
picture size when one of the following input sources is received:
***_A480i, 480p, 720p, 1080i digital signal from the ANT/CABLE
input.
-.*. 480i, 480p, 720p, 1080i, 1080p, orVGA (60Hz) signal from
the HDMI :_inputs.
A,spectRatio oj_'ignal Automatic A,spectSize (automatically selected when Auto
5blmce Aspect is On)
4:3Normal 4:3
4:3LetterBox TheaterWide2
16:9Full Full
Notdefined(noID-1 Thecurrentpicturesizeyouselected,see"Selectingthe
dataorHDMI®aspect
data) picturesize"onpage60.
To turn on the auto aspect ratio feature:
1 Press the MENU button and open the Picture menu.
2 Highlight Display Settings, and then press the OK button.
3 In the Auto Aspect field, press the OK button, and then select
On.
To turn off the Auto Aspect ratio feature, Select Offin step 3 above.
Usingthe4:3Stretch
When 4:3 Stretch is activated, the TV displays 4:3 programs as a
full-screen picture.
1 From the Picture menu, highlight Display Settings, and then
press the OK button.
2 Press the A/T (arrow) buttons to select 4:3 Stretch, and then
press the OK button.
3 Press the A /T (arrow) buttons to select On or Off, and then
press the OK button
NOTE ThisfeatureisavailablewhenAutoAspectis setto On.
6 SettingupyourTV
Adjzls_ng thepicture
Adjustingthepicture
Toshiba HDTVs provide a series of preset Picture Modes with
color, contrast and other settings specifically tuned for different
types of video content. These Picture Modes include Store,
Dynamic, Standard, Movie, Game, and PC. Your personal picture
quality adjustments will also be saved as preferences in each Picture
Mode for complete control of your viewing experience.
Selecting the picturemode
You can select your desired picture settings from the modes
described below.
Mode: Description:
Dynamic Maximizescontrast,colorsaturation,sharpness,grayscale,and
brightnesstocreatemorevividanddynamicimages.
Standard Standardpicturesettings.
Movie Optimizesthebacklight,contrast,brightness,colorsaturation,
sharpness,colortemperature,grayscale,noisereductionandmotion
compensationtocreatetheperfectpicturesettingsforwatchingmovies
inadarkroom.
Game GameModereroutesthevideosignaltobypassselectinternalTV
circuitryandshortensignal-to-screentimeforreducedcontrollerdelay
andfastervideogamingaction.
PC Finetunesthevideoprocessingandoptimizessharpness,color
saturation,aspectratio,colortemperatureandnoisereductiontoproduce
thebestpicturesettingswhendisplayingvideofromaPCoranotebook.
NOTE StoreModeis onlyavailableif theTVis setto StoreModeatinitialsetup.
Thisoptionis hiddenintheHomeMode.
WhentheTVissetto Stere intheinitialmenuorStore inthe
InstallationMenu,thesetwill alwaysresettoStore PictureMode.
NOTE PCmodeisavailableforHDMI®only(grayedoutforotherinput
sources).
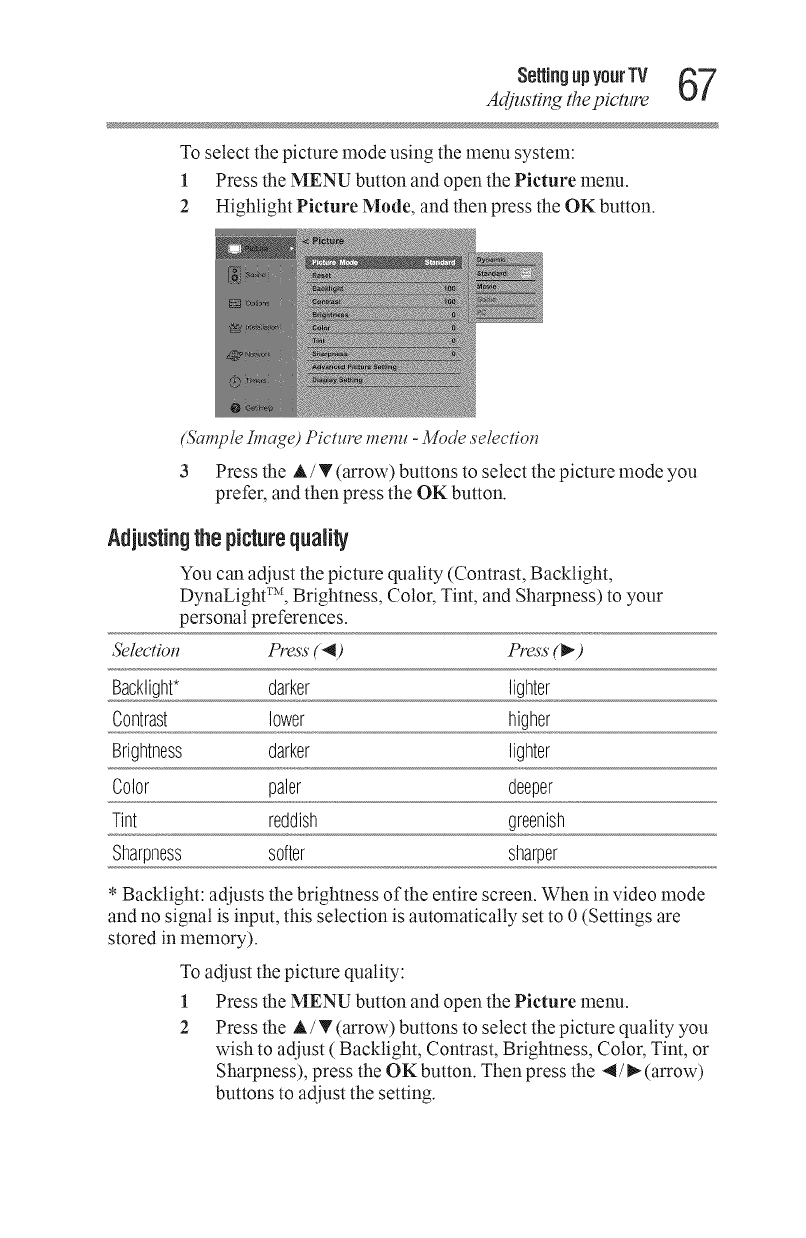
SeRJrlgupyourTV 67
A_tjustingfl_epidure
To select the picture mode using the menu system:
1 Press the MENU button and open the Picture menu.
2 Highlight Picture Mode, and then press the OK button.
(&mTpleImay_e)Picture metal -Mode selectio17
3 Pressthe A/T(arrow)buttonstoselectthepicturemodeyou
prefer, and then press the OK button.
Adjustingthe picturequali|y
You can adjust the picture quality (Contrast, Backlight,
DynaLight TM, Brightness, Color, Tint, and Sharpness) to your
personal preferences.
Selection Press ('_) Press (P'9
Backlight* darker lighter
Contrast lower higher
Brightness darker lighter
Color paler deeper
Tint reddish greenish
Sharpness softer sharper
* Backlight: adjusts the brighmess of the entire screen. When in video mode
and no signal is input, this selection is automatically set to 0 (Settings are
stored in memory).
To adjust the picture quality:
1 Press the MENU button and open the Picture menu.
2 Press the A/T (arrow) buttons to select the picture quality you
wish to adjust ( Backlight, Contrast, Brighmess, Color, Tint, or
Sharpness), press the OK button. Then press the -_/_ (arrow)
buttons to adjust the setting.
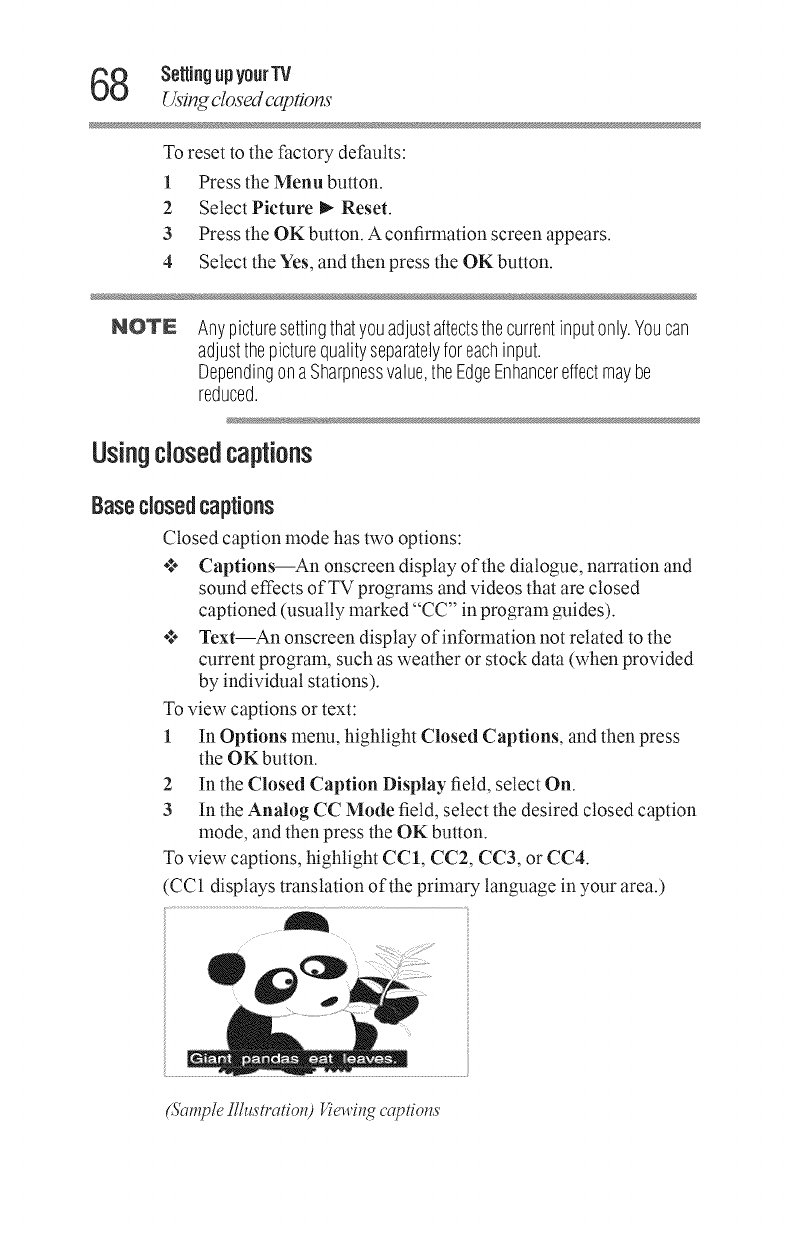
8 SettingupyourTV
Using dosd capfions
To reset to the factory defaults:
1 Press the Menu button.
2 Select Picture D,-Reset.
3 Press the OK button. A confirmation screen appears.
4 Select the Yes, and then press the OK button.
NOTE Anypicturesettingthatyouadjustaftectsthecurrentinputonly.Youcan
adjustthepicturequalityseparatelyforeachinput.
DependingonaSharpnessvalue,theEdgeEnhancereffectmaybe
reduced.
Usingclosedcaptions
Basedosed captions
Closed caption mode has two options:
•.** Captions--An onscreen display of the dialogue, narration and
sound effects of TV programs and videos that are closed
captioned (usually marked "CC" in program guides).
•.** Text--An onscreen display of information not related to the
current program, such as weather or stock data (when provided
by individual stations).
To view captions or text:
1In Options menu, highlight Closed Captions, and then press
the OK button.
2 In the Closed Caption Display feld, select On.
3 In the Analog CC Mode field, select the desired closed caption
mode, and then press the OK button.
To view captions, highlight CC1, CC2, CC3, or CC4.
(CC! displays translation of the primary language in your area.)
(Sample Ilhl,s'tratiol_) Vicm,illg captiol¢,s'
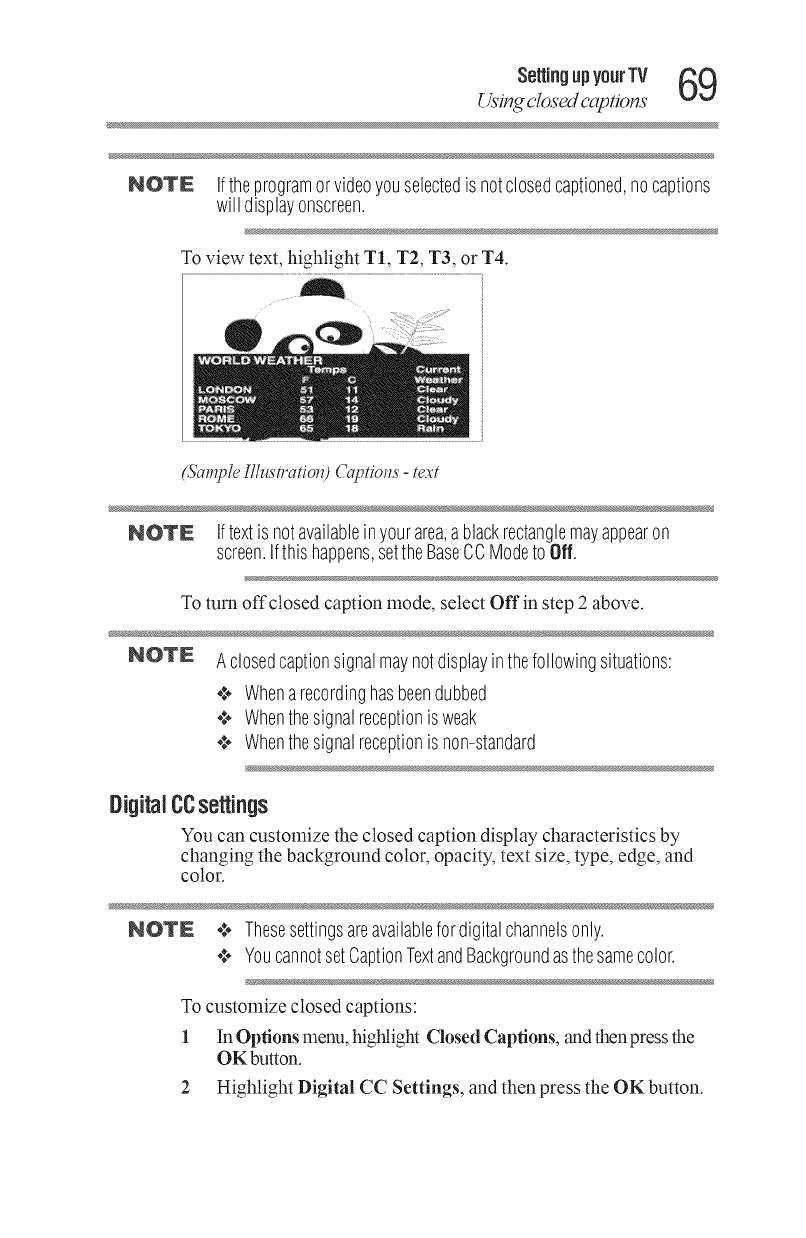
SettingupyourTV 69
Us'ingc/osedcapdons"
NOTE Iftheprogramorvideoyouselectedisnotclosedcaptioned,nocaptions
will displayonscreen.
To view text, highlight T1, T2, T3, or T4.
(Sample I/h_,s'tratiol¢) Cagtiolls -text
NOTE Iftextis notavailableinyourarea,ablackrectanglemayappearon
screen.Ifthishappens,settheBaseCCModeto Off.
To turn off closed caption mode, select Off in step 2 above.
NOTE Aclosedcaptionsignalmaynotdisplayinthefollowingsituations:
¢ Whenarecordinghasbeendubbed
¢ Whenthesignalreceptionisweak
¢ Whenthesignalreceptionisnon-standard
DigitalCCse ings
You can customize the closed caption display characteristics by
changing the background color, opacity, text size, type, edge, and
color.
NOTE .:. Thesesettingsareavailablefordigitalchannelsonly.
¢ YoucannotsetCaptionTextandBackgroundasthesamecolor.
To customize closed captions:
1 In Options menu, highlight Closed Captions, and d_enpress d_e
OK button.
2 Highlight Digital CC Settings, and then press the OK button.
0 SettingupyourTV
Using dosd cupfions
3 Press the A/T (arrow) buttons to highlight the characteristic
you wish to change, and then press the 4/1_ (arrow) buttons to
select the format for that characteristic.
4To save the new settings, highlight Done, and then press the
OK button.
To revert to the factory defaults, highlight Reset, and then press
the OK button.
Mode." Descriptiol_
CaptionSize Auto,Small,Standard,Large
Auto,Default,Mono(withSerif),Prop.(withSerif),Mono
CaptionTextType (withoutSerif),Prop.(withoutSerif),Casual,Cursive,Small
Capitals
Auto,None,Raised,Depressed,Uniform,LeftDropShadow,
CaptionTextEdge RightDropshadow
CaptionTextColor Auto,Black,White,Red,Green,Blue,Yellow,Magenta,Cyan
TextForegroundOpacity Auto,Transparent,Translucent,Flashing,Solid
Auto,Black,White,Red,Green,Blue,Yellow,Magenta,Cyan
BackgroundColor Magenta,Cyan
TextBackgroundOpacity Auto,Transparent,Translucent,Flashing,Solid
CaptionTextEdgeColor Auto,Black,White,Red,Green,Blue,Yellow,Magenta,Cyan
Usinglhe ClosedcapUonbuUon
If you press the CC button when an analog channel is tuned or from
an external input (480i signal from the video input):
•**_ The CC bar will appear and will display the options, CC 1-4,
T1-4.
If you press the CC button when a digital channel is tuned:
•**_ The CC bar will appear and will display the available caption
options for that channel or service.

Adjustingtheaudio
NuUngthesound
Pressthe MUTE button to partially reduce (1/2 Mute) or turn off
(Mute) the sound. Each time you press the MUTE button, the mute
mode changes in the following order: 1/2 Mute, Mute, Volume, 1/2
Mute, etc.
1/2 Mute _ Mute -_ Volume --+_1
(Sample Image) Levels qf m_lte
NOTE IfyoumodifyitemsintheSoundmenuwhileMuteisactive,Muteis
cancelled.
UsingtheDigitalAudioSelec|ion
You can use the Digital Audio Selection to conveniently switch
between audio tracks on a digital channel (for those channels that
have multiple audio tracks). This temporarily overrides the audio
track chosen by the Primary Audio Language option under the
Sound menu, see "Selecting stereo/SAP broadcasts" on page 72.
1 Press the MENU button and open the Sound menu.
2 Highlight Digital Audio Selection, and then press the OK
button.
(Sample Image) 5'oreadmenu -DigitaI Audio Selector selection
3 Press the -_/_(arrow) buttons to select the desired service.
4 Press the EXIT button.
2 SetUngup yourTV
Adjusling the audio
Selectingstereo/SAPbroadcas_
The multi-channel TV sound (MTS) feature allows you to output
high-fidelity stereo sound. MTS also can transmit a second audio
program (SAP) containing a second language, music or other audio
information (when provided by individual stations).
When the TV receives a stereo or SAP broadcast, the icon Stereo or
SAP appears when the INFO button is pressed. The MTS feature is
only available for analog signals on the ANT/CABLE input.
To listen in stereo sound:
1 Press the MENU button and open the Sound menu.
2 Highlight MTS, and then press the OK button.
3Select Stereo, and then press the OK button.
NOTE *:* YoucantypicallyleavetheTVin Stereomodebecauseit outputsthe
typeofsoundbeingbroadcast(stereoormonaural).
¢ Ifthesoundisnoisy,selectMonoto reducethenoise.
To listen to an alternate language on an ATSC digital station (if
available), highlight the Primary Audio Language field in step 2
above, and then select the language you prefer.
To listen to a second audio program on an analog station, if available,
select SAP in step 2 above.
NOTE •:, Asecondaudioprogram(SAP)canbeheardonlyonthoseTV
stationsthatofferit. Forexample,astationmightbroadcastanother
languageasasecondaudioprogram.IfyouhaveSAPon,youwill
seethecurrentprogramonthescreenbutheartheotherlanguage
insteadoftheprogram'snormalaudio.
¢ IfyouhaveSAPonandthestationyouarewatchingis not
broadcastingasecondaudioprogram,thestation'snormalaudiowill
beoutput.However,occasionallythereis nosoundatallinSAP
mode.Ifthishappens,settheMTSfeatureto Stereomode.
Se_ingupyourTV 73
A@/sting the a_/clio
Adjustingtheaudioquality
You can adjust the audio quality by adjusting the bass, treble and
balance.
To adjust the audio quality:
1 Press the MENU button and open the Sonnd menu.
2 Press the A /_' (arrow) buttons to highlight the item you wish to
adjust (Bass, Treble, or Balance), and then press the OK button.
3 Press the 4/_(arrow) buttons to adjust the level.
•*** 4 makes the bass or treble weaker or increases the balance
in the left channel (depending on the item selected).
•*** _ makes the bass or treble stronger or increases the
balance in the right channel (depending on the item
selected).
DTSTruSurmundTM
This technology delivers high quality surround sound and expanded
sound field over two speakers.
To turn on DTS TruSurroundT-_I:
1 Press the MENU button and open fl_eSound melm.
2 Highlight DTS TruSurround field, and then press the OK
button.
3 Press the A /T (arrow) buttons to select On, and then press the
OK button
SoundNode
Select the Sonnd Mode your prefer.
To select a Sonnd Mode:
1 Press the MENU button and open the Sonnd menu.
2 Highlight Sonnd Mode field, and then press the OK button.
3 Press the A/T (arrow) buttons to select Sonnd Mode, and then
press the OK button.
StableSoundTM
The Stable SoundTM feature limits high volume levels and prevents
the extreme changes in volume that can occur when channels are
changed or aprogran_ switches to a conm_ercial.
To turn on Stable SoundTM:
1 Press the MENU button and open the Sound menu.
4SettingupyourTV
Se/ectingtheP1Ncode
2 Highlight Stable Sound, and then press the OK button.
3 Press the A /!r (arrow) buttons to select On.
NOTN StableSoundTM cannotbeusedatthesametimeasDTSTruSurroundTM.
Thefeatureis greyedoutuntilDTSTruSurroundTM is turnedOff.
Usingthe Dolby®DigitalDynamicFlangeControlfeature
You can further compress Dolby _ Digital dynanlic range, allowing
you to switch from digital to analog broadcasts at the same dynamic
range.
To use the Dolby _Digital Dynamic Range Control:
1 Press the MENU button and open the Sound menu.
2 Highlight Dynamic Range Control, and then press the OK button.
3 Press the A /T (arrow) buttons to select On, and thenpress the OK
button.
NOTE ¢. ThisfeatureisavailablewhentheTVis tunedtoadigitalRFchannel
oranHDMI®inputwiththeDolby®Digitalsignal.
SelectingthePINcode
A PIN code is necessary for some menus.
NOTE ¢. TheParentalControlandLocksmenuis grayedoutif noPINhas
beenset.
Fntera newPINcode
1 Press the MENU button and open theOptions menu.
2 Highlight Parental PIN Setup, and then press the OK button.
:3 Use the mlmber buttons to emer a 4-digit number. Confirm the code.
ForgottenPN code
While the PIN code entering screen is displayed, press the INFO
button four times within five seconds. The PIN code will be cleared
and you can enter a new PIN code.
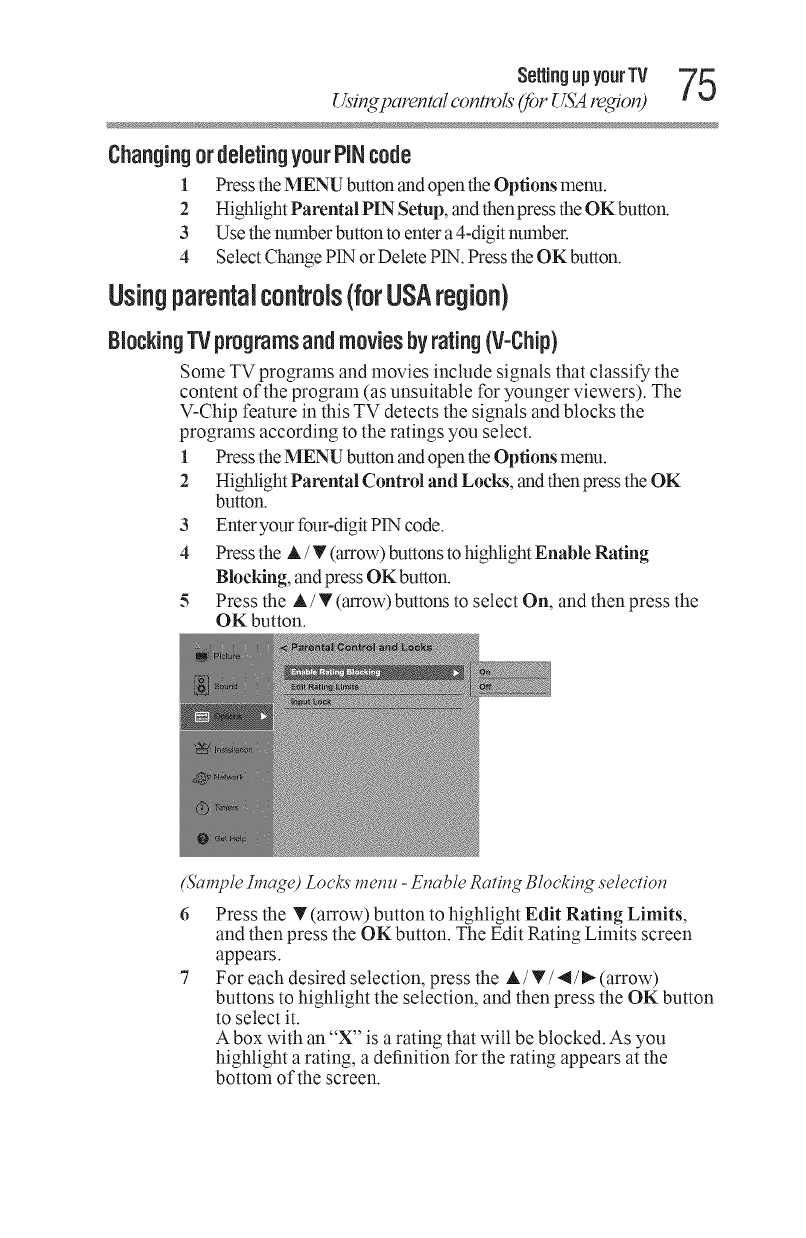
se.i.g pvo Tv75
Usingparenm/ conlro/s _)r _SMre, on)
Changingor deleUngyour PiNcode
1 Press the MENU button and open the Options menu.
2 Highlight Parental PIN Setup, and thenpress the OK button.
3 Use the number button to enter a 4-digit number.
4 Select Change PIN or Delete PIN. Press the OK button.
Usingparenialcontrols(for USAregion)
BlockingTVprogramsandmoviesbyrating(V-Chip)
Some TV programs and movies include signals that classify the
content of the prograna (as unsuitable for younger viewers). The
V-Chip feature in this TV detects the signals and blocks the
progran_s according to the ratings you select.
1Press the MENU button and open the Options menu.
2 Highlight Parental Control and Locks, and then press the OK
button.
3 Enter your four-digit PIN code.
4 Press the A /T (arrow) buttons to highlight Enable Rating
BlocMng, and press OK button.
5 Press the A /T (arrow) buttons to select On, and then press the
OK button.
(Sample Image) Locks' menu -Enable Rating Blocking selection
Press the T (arrow) button to highlight Edit Rating Limits,
and then press the OK button. The Edit Rating Limits screen
appears.
For each desired selection, press the A /T/4/_ (arrow)
buttons to highlight the selection, and then press the OK button
to select it.
A box with an "X" is a rating that will be blocked. As you
highlight a rating, a definition for the rating appears at the
bottom of the screen.
76 SettingupyourTV
Usin_parenta! con_vls _r _SM1_gion)
8 To save the new settings, highlight Done, and then press the
OK button.
NOTE Thisfeaturewill benotavailableifno PINcodeis set.
Downloadinganadditionalratingsystem
In the future, an additional rating system may become available for
use to selectively block TV programs and movies.
NOTE Thecurrentlytunedstationmustbereceivingadigitalsignalbeforean
additionalratingsystemcanbedownloaded.
To download the additional rating system, if available:
1 Press the MENU button and open the Options menu.
2 Highlight Parental Control and Locks, and then press the OK
button.
3 Enter your four-digit P1Ncode.
4 Press the A /T (arrow) buttons tohighlight Enable Rating
BlocMng, andpress the OK button.
5 Press the A /T (arrow) buttons to select On, and then press the
OK button.
6 Press the T (arrow) button to highlight Edit Rating Limits, and
then press the OK button.
The Edit Rating Lh_fltsscreen appears.
7 Highlight AirRS, and then press the OK button.
The Edit Alternate Ratings screen appears.
NOTE ¢, TheALTF{Sbuttonwill onlybeavailableifanadditionalrating
systemis currentlyavailable.
¢ ItmaytakeseveralminutesfortheTVto downloadtheadditional
ratingsystem.
¢ TheinformationdisplayedintheAlternateRatingsscreenwill depend
ontheconfigurationoftheadditionalratingsystemavailableatthe
timeofdownload.
8 For each desired selection, press the A/T/4/_ (arrow)
buttons to highlight the selection, and then press the OK button
to select it.
A box with an "X" is a rating that will be blocked.
9 To save the new settings, highlight Done, and then press the
OK button.
10 In the Edit Rating Limits screen, highlight Done, and then
press the OK button.
NOTE o:.
Theadditionalratingsystemcanonlybedownloadedonetime.You
will notbeableto downloadanyupdatestotheratingsystemshould
suchupdatesbecomeavailable.
¢ Theadditionalratingsystemis notdesigned,transmittedor
controlledbytheTVorToshiba,noristheavailabilityofanadditional
ratingsystemdeterminedor controlledbyToshiba.Similarly,the
ratingofprogramsinanadditionalratingsystemis notdetermined,
transmittedor controlledbytheTVorToshiba.
,.:,, Theadditionalratingsystemisanevolvingtechnology;therefore,
availability,contentandformatmayvary.
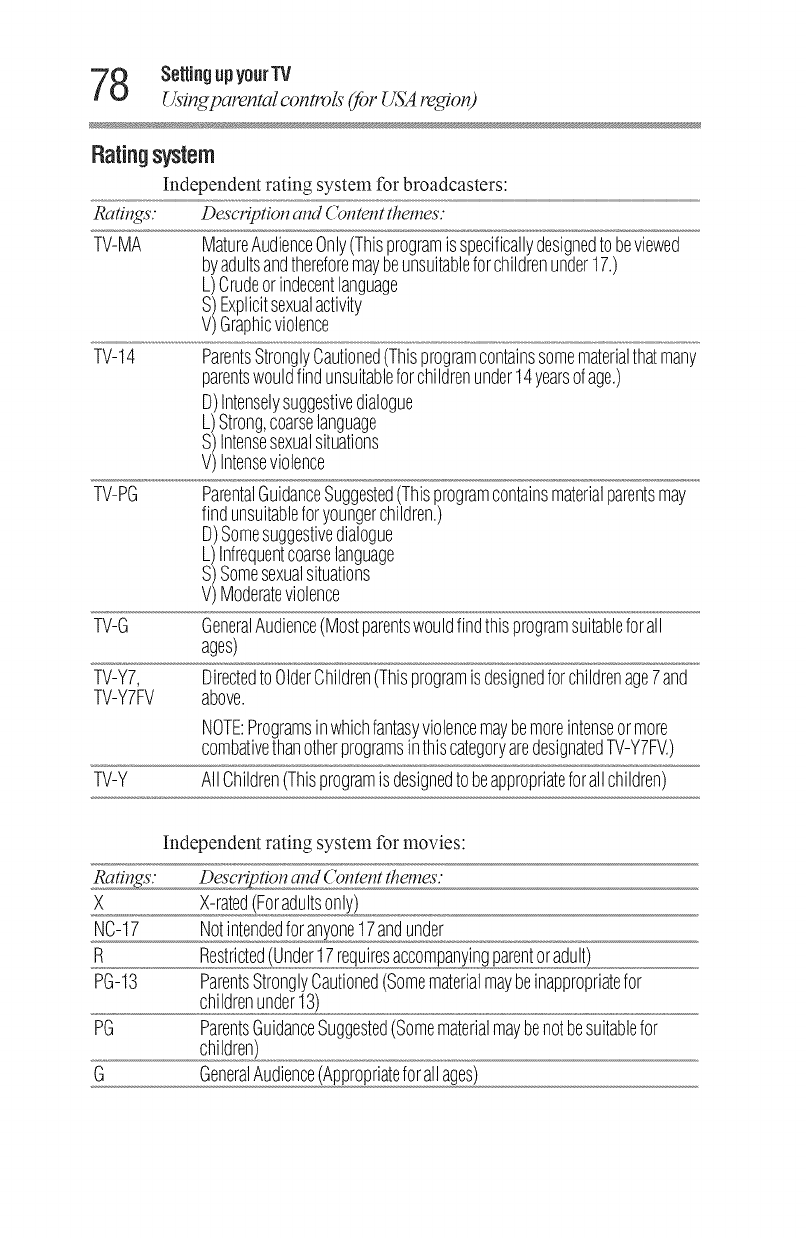
78 SellingupyourTV
Usingparent_/ confl'o/s _/" _SM region)
Rating system
Independent rating system for broadcasters:
Rat#Ns : Description and ( bntent themes'."
TV-MA
TV-14
TV-PG
MatureAudienceOnly(Thisprogramisspecificallydesignedtobeviewed
byadultsandthereforemaybeunsuitableforchildrenunder17.)
L)Crudeorindecentlanguage
S)Explicitsexualactivity
V)Graphicviolence
ParentsStronglyCautioned(Thisprogramcontainssomematerialthatmany
parentswouldfindunsuitableforchildrenunder14yearsofage.)
D)Intenselysuggestivedialogue
L)Strong,coarselanguage
S)Intensesexualsituations
V)Intenseviolence
ParentalGuidanceSuggested(Thisprogramcontainsmaterialparentsmay
findunsuitableforyoungerchildren.)
D)Somesuggestivedialogue
L)Infrequentcoarselanguage
S)Somesexualsituations
V)Moderateviolence
TV-G GeneralAudience(Mostparentswouldfindthisprogramsuitableforall
ages)
TV-Y7, DirectedtoOlderChildren(Thisprogramisdesignedforchildrenage7and
TV-Y7FV above.
NOTE:Programsinwhichfantasyviolencemaybemoreintenseormore
combativethanotherprogramsinthiscategoryaredesignatedTV-Y7FV.)
TV-Y AllChildren(Thisprogramis designedtobeappropriateforallchildren)
Independent rating system for movies:
DeseriBtion and ( bntent themes."
X X-rated(Foradultsonly)
NC-17 Notintendedforanyone17andunder
R Restricted(Under17requiresaccompanyingparentoradult)
PG-13 ParentsStronglyCautioned(Somematerialmaybeinappropriatefor
childrenunder13)
PG ParentsGuidanceSuggested(Somematerialmaybenotbesuitablefor
children)
G GeneralAudience(Appropriateforallages)
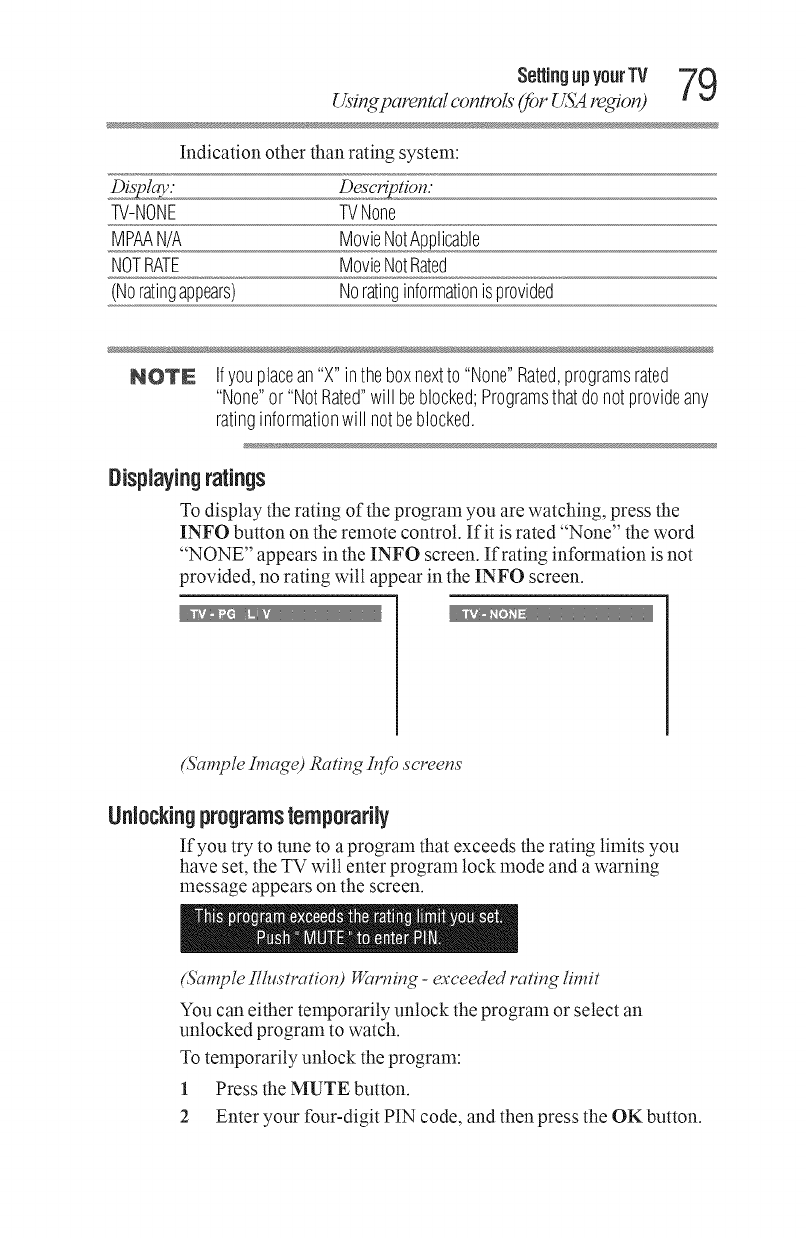
SettingupyourTV 79
Usingparental controls (for _SMregion)
Indication other than rating system:
W-NONE TVNone
MPAAN/A MovieNotApplicable
NOTRATE MovieNotRated
(Noratingappears) Noratinginformationisprovided
NOTE Ifyouplacean"X"intheboxnextto "None"Rated,programsrated
"None"or "NotRated"will beblocked;Programsthatdonotprovideany
ratinginformationwill notbeblocked.
Bisplayingratings
To display the rating of the program you are watching, press the
INFO button on the remote control. If it is rated "None" the word
"NONE" appears in the INFO screen. If rating information is not
provided, no rating will appear in the INFO screen.
0"9 O"
(Sample bmT_e)Ratin_, b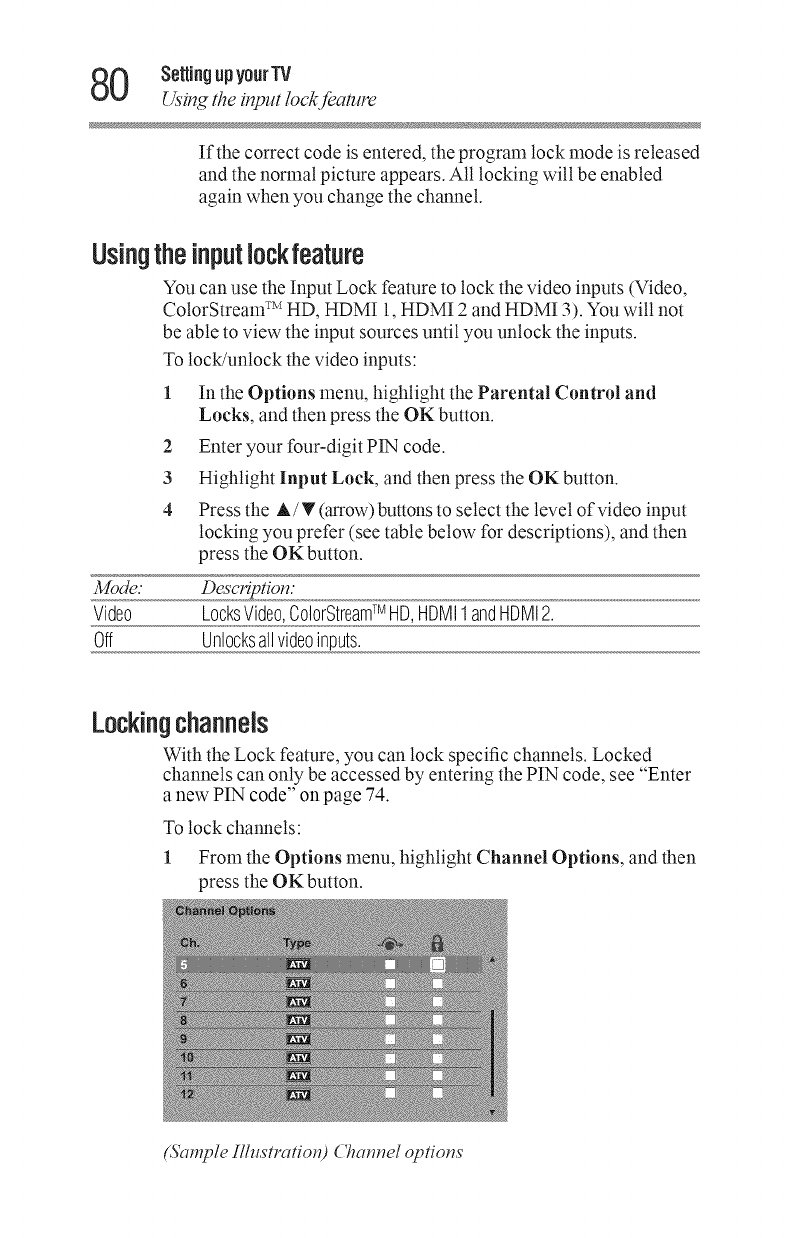
8O SetUngupyourTV
_'in_ the input/oc_/&ffure
If the correct code is entered, the program lock mode is released
and the normal picture appears. All locking will be enabled
again when you change the channel.
Usingtheinputlockfeature
You can use the Input Lock feature to lock the video inputs (Video,
ColorStream TM HD, HDMI 1, HDMI 2and HDMI 3). You will not
be able to view the input sources until you unlock the inputs.
To lock/unlock the video inputs:
1In the Options menu, highlight the Parental Control and
Locks, and then press the OK button.
2 Enter your four-digit PIN code.
3 Highlight Input Lock, and then press the OK button.
4 Press the &/T (arrow) buttons to select the level of video input
locking you prefer (see table below for descriptions), and then
press the OK button.
Mode." Description."
Video LocksVideo,ColorStreamTM HD,HDMII andHDMI2.
Off Unlocksallvideoinputs.
Lockingchannels
With the Lock feature, you can lock specific channels. Locked
channels can only be accessed by entering the PIN code, see "Enter
a new PIN code" on page 74.
To lock channels:
1 From the Options menu, highlight Channel Options, and then
press the OK button.
(Sample Ilhlstratio_d ChaHHel optioHs
SettingupyourTV 81
Locking cham_els
2 Press the A/T (arrow) buttons to select a channel in the lock
colunm.
3 Press the OK button. PIN code entry will be required to set a
locked channel.
NOTE IfthePINcodehasnotyetbeenset,awarningmessageappears.
4 Acheck appears inthe box.
5 To remove the check, press the OK button.
6Press the EXIT button.
Using the GameTimeF M
You can use the GameTimer TM to set a time limit for playing a video
game (30-120 minutes). When the GameTimer TM expires, the TV
enters Input Lock mode and locks out the input source for the video
game device.
To set the GameTimerTM:
1 In the Timers menu, highlight GameTimer, and then press the
OK button.
2 Enter your four-digit PIN code.
3 Press the T(arrow) button to select 30, 60, 90 or 120 minutes,
and then press the OK button.
To cancel the GameTimer TM, select Offin step 3 above.
To deactivate the Input Lock once the GameTimer TM has activated
it:
-:o Set the Input Lock to Off, see "Using the input lock feature" on
page 80.
NOTE ,.:,,,.A messageappearswhenl0 minutes,3 minutes,andl minuteare
remaining.
¢ IftheTVlosespowerwithtimeremaining,theTVwill enterInput
Lockmodewhenpoweris restored(asif theGameTimerhadbeen
activated).Toresumeuse,you mustdeactivatetheInputLock,see
"Usingtheinputlockfeature"onpage80.
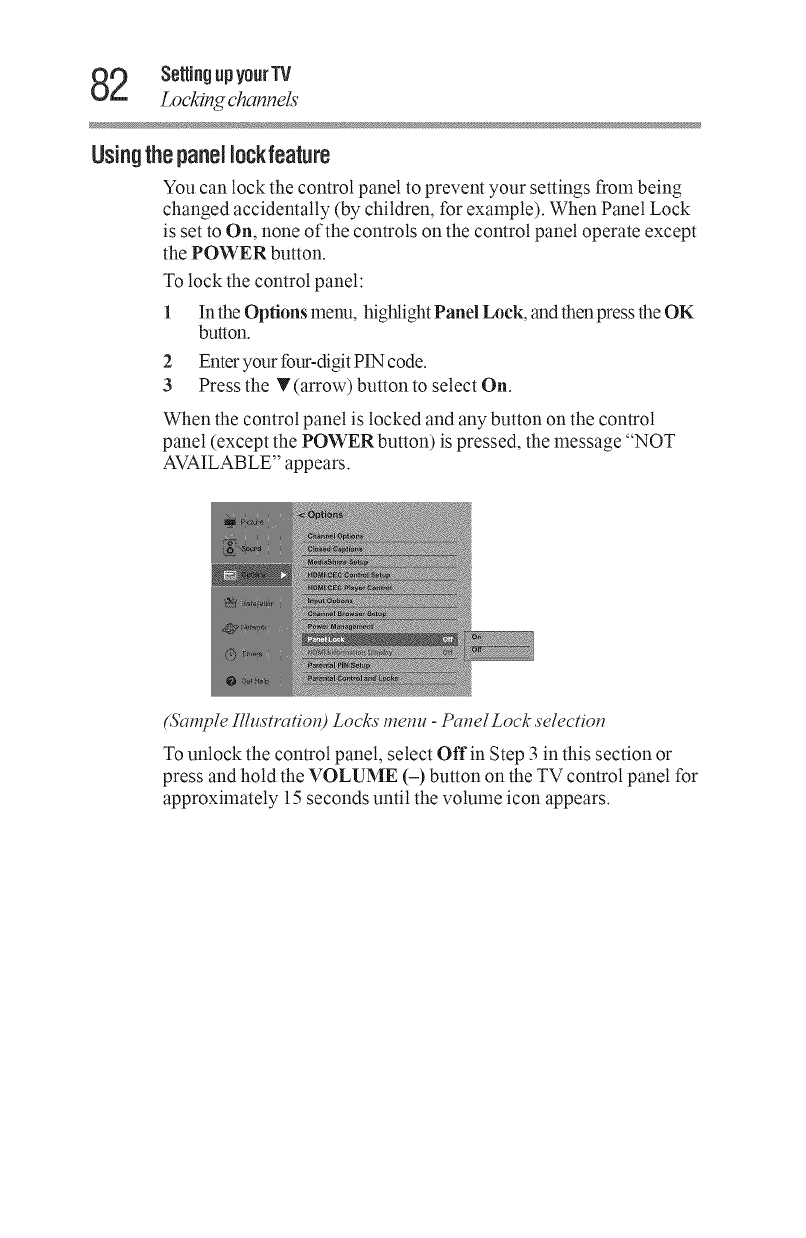
2SetUngupyourTV
Locking channels
Usinglhe panel lockfeature
You can lock the control panel to prevent your settings from being
changed accidentally (by children, for example). When Panel Lock
is set to On, none of the controls on the control panel operate except
the POWER button.
To lock the control panel:
1 Inthe Options menu, highlight Panel Lock, and fl_enpress fl_eOK
button.
2 Enteryour four-digit PIN code.
3 Press the T (arrow) button to select On.
When the control panel is locked and any button on the control
panel (except the POWER button) is pressed, the message "NOT
AVAILABLE" appears.
(Sample Illustrafio_O Locks menu -Panel Lock selectioH
To unlock the control panel, select Offin Step 3 in this section or
press and hold the VOLUME (-) button on the TV control panel for
approximately 15 seconds until the volume icon appears.
SettingupyourTV _
MediaS_are (_deo_; Music, and Photos) t.l_,.J
lVlediaShare(Videos,Music,andPhotos)
MediaShare provides a simple graphical interface to quicldy access
and play videos, music, and photos located on a USB flash drive,
compatible powered USB hard drives, or a PC, tablet or NAS HDD
connected to your home network.
To access MediaShare, press the HOME button on the remote
control.
UsingNediaShare withaUSBdeviceora Nedia SaNer
You can enjoy photo, music or video content stored on a USB
storage device or Media Server.
Photo Viewer specifications:
USB use:
•*** Data Type: JPEG Exifver 2.1
•*** File format: JPEG
•*** Maximum photo resolution: 4096 x 4096
•*** Maximum number of files: 500 per folder
Content on a connected Media Server:
•*** Data Type: JPEG Exifver 2. l
•*** File format: JPEG
•*** Maximum photo resolution: 4096 × 4096
•,** Maximum number of files: 500 per folder
Music Player specifications:
USB use:
•*** File format: MP3
•*** Sampling frequency: 32 kHz, 44.1 kHz, 48 kHz
•*** Bit rate: From 32 to 320 kbps
•,** Maximum number of files: 500 per folder
Content on a connected Media Server:
•*** File format: MP3
•*** Sampling frequency: 32 kHz, 44.1 kHz, 48 kHz
•*** Bit rate: From 32 to 320 kbps
•,** Maximum number of files: 500 per folder
Video Player specifications:
USB use:
•**_ File format: MPEG2-PS/TS/VOB, AVI, MOV, MP4, ASK
DivX, Xvid, MKV, Motion JPEG
4SettingupyourTV
MediaS_are (_deos, Music, andPhotos)
•*** Video: MPEG2, H.264, MPEG-4 part2, DivX, Xvid, JPEG
•*** Audio: MPEG1-Layerl/Layer2/Layer3, MPEG2-Layerl/
Layer2/Layer3, Dolby "_Digital(AC3), LPCM
•*** Maximum number of files: 500 per folder
•*** Maximum video resolution: 640x480 (Motion JPEG), 1920 x
1080 (other)
Content on a connected Media Server:
•*** File format: MPEG2-PS/TS, MP4 (Low resolution)
•*** Video: MPEG2, H.264
•*** Audio: MPEG1-Layerl/Layer2/Layer3, MPEG2-Layerl/
Layer2/Layer3, Dolby _ Digital(AC3), LPCM
•*** Maximum number of files: 500 per folder
-.*. Maximum video resolution: 1920 x1080
Supported file system: FAT16 and FAT32
NOTN .:. GentlyinserttheUSBdeviceintotheportanddonotremovewhile
viewingMediaShare.
,,:,, TouseMediaSharepleaseconfigurethenetworksettingsonyourTV.
Formoreinformation,see"Connectingtoahomenetwork"onpage35.
,,:,, USBdevice:USBMassStorageClassdevice(MSC)
,,:,, Connectivityis notguaranteedforall devices.
,,:,, ConnecttheUSBdevicetotheTVdirectly.
,,:,, DonotuseaUSBHub.
,,:,, Youmustobtainanyrequiredpermissionfromcopyrightownersto
usecopyrightcontent.Toshibacannotanddoesnotgrantsuch
permission.
,,:,, DependingonthefilesizeandamountinyourUSBstoragedevice,it
maytakesometimeto loadbeforecontentisviewable.Amessage
will displayon-screenwhenfilesareloadingfromtheUSBstorage
device.
,,:,, Onlylimitedtypesof U3USBdevicearesupported.Therefore,it is
suggestedthatyounotuseU3USBwithMediaShare.
,,:,, Non-supportedcharacterswill bereplacedwithasquare.
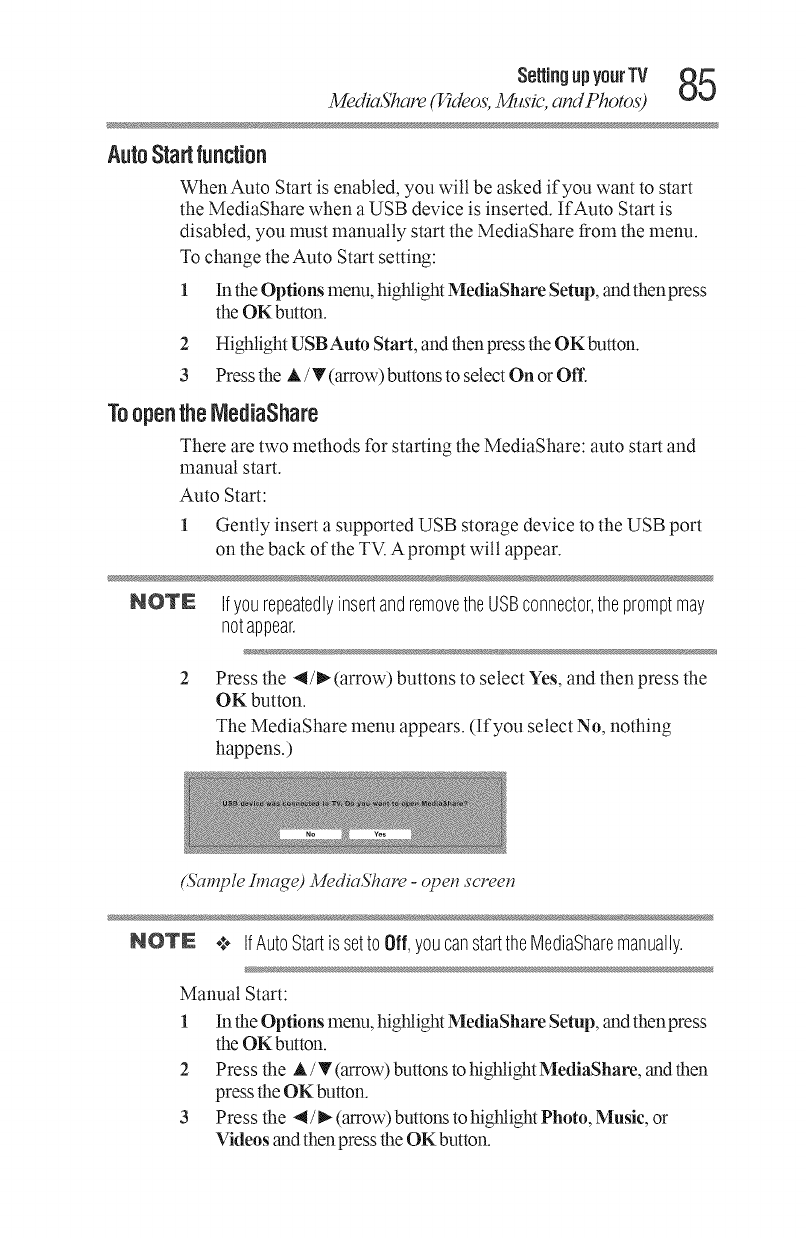
SettingupyourTV _
MediaS_are (lddeo_; Music, and Photos)
AutoStartfunction
WhenAuto Start is enabled, you will be asked if you want to start
the MediaShare when a USB device is inserted. If Auto Start is
disabled, you must manually start the MediaShare from the menu.
To change the Auto Start setting:
1Inthe Options menu, highlight MediaShare Setup, and then press
the OK button.
2 Highlight USB Auto Start, and then press the OK button.
3 Press the A /T (arrow) buttons to select On or Off.
opentheNediaShare
There are two methods for starting the MediaShare: auto start and
manual start.
Auto Start:
1 Gently insert a supported USB storage device to the USB port
on the back of the TV. Aprompt wilt appear.
NOTE IfyourepeatedlyinsertandremovetheUSBconnector,thepromptmay
notappear.
2 Press the 4/_ (arrow) buttons to select Yes, and then press the
OK button.
The MediaShare menu appears. (If you select No, nothing
happens.)
(Sample Image) MediaShare -opetz screetz
NOTE ,,:. IfAutoStartis setto Off,youcanstarttheMediaSharemanually.
Manual Start:
1Inthe Options menu, highlight MediaShare Setup, and then press
the OK button.
2 Press the A /T (arrow) buttons tohighlight MediaShare, and then
press the OK button.
3 Press the 4/_ (arrow) buttons to highlight Photo, Music, or
Videos and then press the OK button.
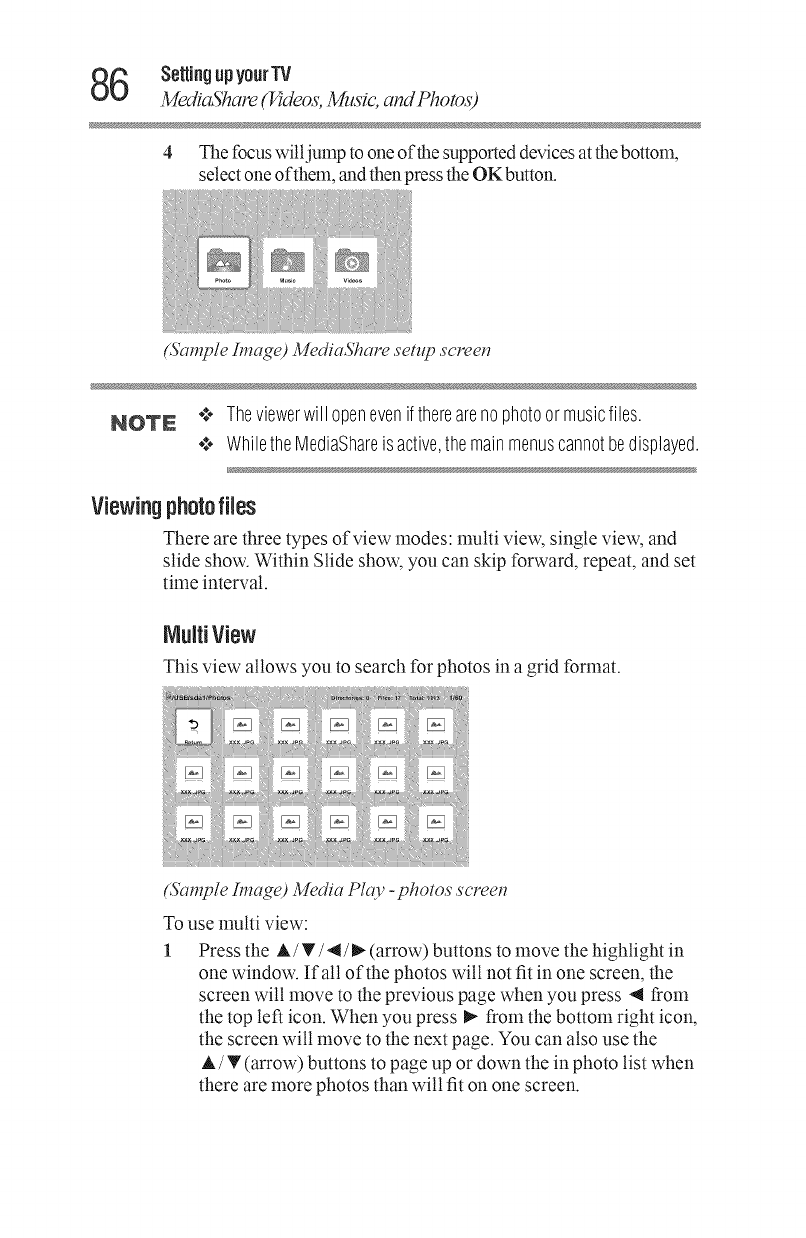
6 Setting upyourTV
MediaSoare (14deos, Music, and I°hotos)
4 The focus willjump to one of the supported devices at the bottom,
select one of them, and then press the OK button.
(&mTple Image) MediaShare setup ,s'cl'eetz
NOTE ¢, Theviewerwill openevenif therearenophotoormusicfiles.
¢ WhiletheMediaShareisactive,themainmenuscannotbedisplayed.
Viewingphotoflies
There are three types of view modes: multi view, single view, and
slide show. Within Slide show, you can skip forward, repeat, and set
time interval.
MultiView
This view allows you to search for photos in a grid format.
(Sample Image) Media PlcO, - photos screet_
To use nmlti view:
1 Press the A /T/.,4/1_ (arrow) buttons to move the highlight in
one window. If all of the photos will not fit in one screen, the
screen will move to the previous page when you press 4 from
the top left icon. When you press I_ from the bottom right icon,
the screen will move to the next page. You can also use the
A/T (arrow) buttons to page up or down the in photo list when
there are more photos than will fit on one screen.

SettingupyourTV 87
MediaS_are (_deo_; Music, and Photos)
2 When you select a folder, press the OK button to move to the
next layer, or press the BACK button to return to the previous
layer.
3 Press the OK button to view the selected photo in Single View
mode.
Singleview
In this view mode, only files located in the selected directory will be
displayed. This view allows you to change the photo content
manually. When you move from Multi View to the Single View, the
currently selected photo is displayed.
To use single view:
****Press the _ (arrow) button to view the next photo. Press 4 to
view the previous photo.
****Press A to rotate the image 90° counterclockwise. Press T to
rotate the image 90° clockwise.
Slideshow
This view allows you to watch a slide show of the photos. In this
mode, only files located in the selected directory will be played.
To use slide show:
1 Press the OK button in the Single View mode.
2 Press the -_/_ (arrow) buttons to view the previous or next
photo.
To set Interval Time and Repeat settings:
1 Press the MENU button to open the Quick Menu.
2 Press the A /T (arrow) buttons to select either Interval Time
or Repeat.
3 Press the ,_/1_ (arrow) buttons to adjust the setting and press
the BACK button.
NOTE Picturesizefunctionsaredisabled.
To close the Photo Viewer, press the EXIT button. The television
will return to the last viewed channel or external input.
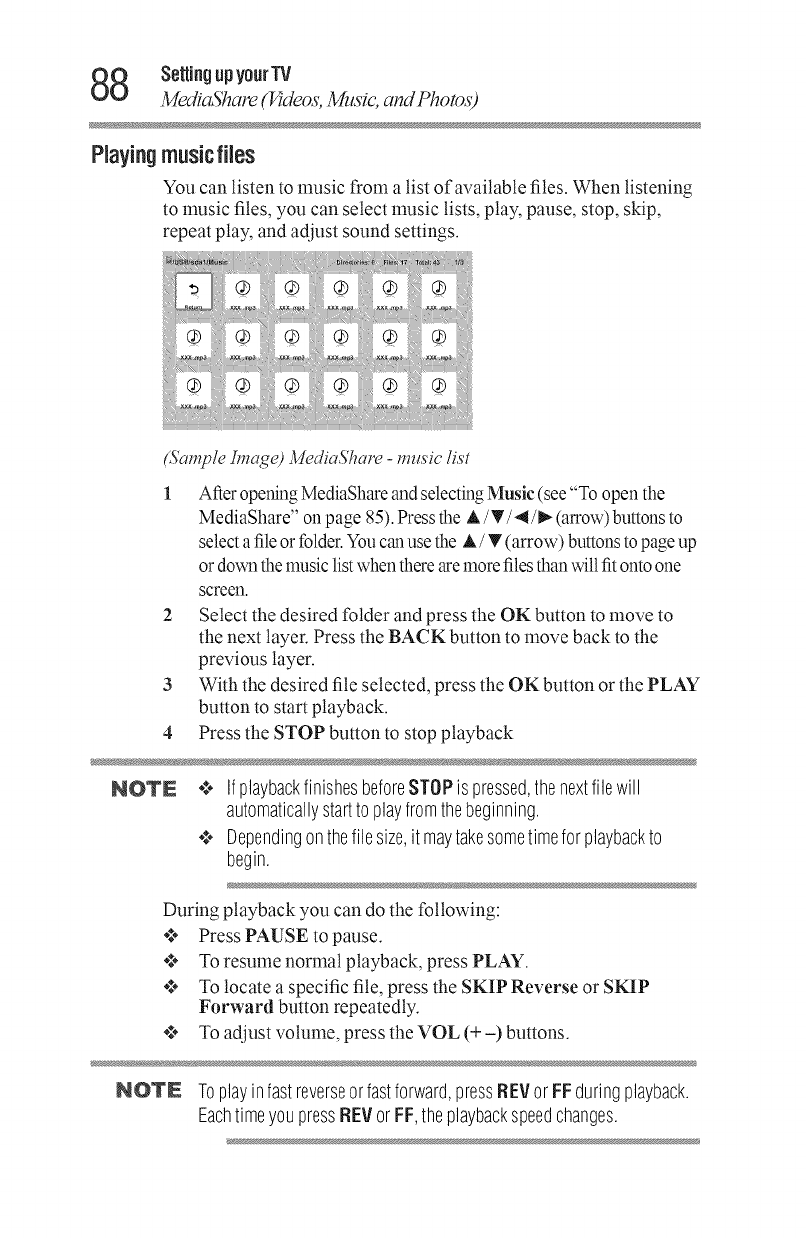
8 SettingupyourTV
MediaS_are (_deos, Music, and Photos)
PlayingmusicflJes
You can listen to music from a list of available files. When listening
to nmsic files, you can select nmsic lists, play, pause, stop, skip,
repeat play, and adjust sound settings.
(Sample Image) MediaShare -mzLs'ic list
1 After openingMediaShare and selectingMusic (see "To open the
MediaShare" on page 85).Press the A/V/4/I_ (arrow) buttons to
select afile or folder.Youcan use the A /T (arrow) buttons topage up
or down the music listwhen there aremore files than willfit ontoone
screen.
2 Select the desired folder and press the OK button to move to
the next layer. Press the BACK button to move back to the
previous layer.
3 With the desired file selected, press the OK button or the PLAY
button to start playback.
4 Press the STOP button to stop playback
NOTE .***IfplaybackfinishesbeforeSTOPis pressed,thenextfilewill
automaticallystartto playfromthebeginning.
¢ Dependingonthefilesize,it maytakesometimeforplaybackto
begin.
During playback you can do the following:
****Press PAUSE to pause.
****To resume normal playback, press PLAY.
****To locate a specific file, press the SKIP Reverse or SKIP
Forward button repeatedly.
_***To adjust volume, press the VOL (+-) buttons.
NOTE Toplayinfastreverseorfastforward,pressREVorFFduringplayback.
EachtimeyoupressREVorFF,theplaybackspeedchanges.
SettingupyourTV 89
Media57_are (14:deos;Music, and Photos)
NOTE Duringplayback,youcanadjusttheSoundfunctionsfromtheQuick
Menu.
To set the repeat mode:
1 Press the MENU button to open the Quick Menu.
2 Press the &/T(arrow) buttons to select Repeat.
3 Press the 4/_ (arrow) buttons to select Of LAll or 1.
4Press the BACK button.
To close the Music Player, press the EXIT button.
Viewingphotofilesandplayingmusicfilesatthe sametime
While viewing photo files, you can listen to music from a list of
available files.
1 While viewing photos in the Single View or Slide Show mode,
press the MENU button to open the Quick Menu.
2 Highlight Background Music and press the OK button. The
file list appears.
3Select a music file and press the OK button to start start
playback. The music is now playing in the background.
Playingvideofiles
You can watch a video from a list of available files. When watching
video files, you can select lists, play, pause, stop, skip, repeat play,
adjust picture and sound settings.
1 After opening MediaShare and selecting Videos (see "To open
the MediaShare" onpage 85). Press the A/T/4/_(arrow)
buttons to select a file or folder. You can use the A /T (arrow)
buttons to page up or down the file list when there are more files
than will fit onto one screen.
2 Select the desired folder and press the OK button to move to
the next layer. Press the BACK button to move back to the
previous layer.
3 With the desired file selected, press the OK button or the PLAY
button to start playback.
4 Press the STOP buttonto stop playback.
0 SettingupyourTV
MediaShare (Yideos,Music, al_dPhotos)
NOTE _ IfplaybackfinishesbeforeSTOPis pressed,thenextfilewill
automaticallystartto playfromthebeginning.
,,:,, Dependingonthefilesize,it maytakesometimeforplaybackto
begin.
During playback you can do the following:
*_**Press PAUSE to pause.
*_**To resume normal playback, press PLAY.
*_*_To locate a specific file, press the SKIP Reverse or SKIP
Forward button repeatedly.
_,*, To adjust volume, press the VOL (+ -) buttons.
NOTE ,._,,.Toplayinfastreverseorfastforward,pressREVorFFduring
playback.EachtimeyoupressREVorFF,theplaybackspeed
changes.
,¢,, Duringplayback,youcanadjustthepictureandsoundfunctions
fromtheQuickMenu.
To set the repeat mode:
1 Press the MENU button to open the Quick Menu.
2 Press the A/T (arrow) buttons to select Repeat.
3 Press the 4/_ (arrow) buttons to select Off, All or 1.
4Press the BACK button.
To close the Video Player, press the EXIT button.
To select subtitle or audio track (if available in the video content):
1 Press the MENU button to open the Quick Menu.
2 Press the A/T (arrow) buttons to select Options.
3 Highlight Subtitle Track or Audio Track, and then press the
4/_ to select track you prefer.
4Press the BACK button.
To close the Video Player, press the EXIT button.
Se_irlgupyourTV 91
DivX_R)
DivX®
1"oregisteryourTVtoa Div×®account:
This TV allows you to play back files purchased or rented from
DivX _)Video-On Delnand (VOD) services. When you purchase or
rent DivX <")VOD files on the internet, you will be asked to enter a
registration code.
1 Press the MENU button.
2 Select Options > MediaShare Setup > DivX _ VOD and press
the OK button.
3Press the A/T (arrow) buttons to select DivX _ VOD
Registration, and then press the OK button.
4 The DivX _ VOD window will appear and you will see the
registration code. For details on registration, please visit the
DivX _ website at
http://vod.divx.coin
5 Copy the activation file to a lnelnory device and play it on the
TV.
Tounregisteryourdevice:
1 Prcss thc MENU button.
2 Select Options > MediaShare Setup > DivX _)VOD and press
the OK button.
3 Press A/T (arrow) buttons to select DivX _)VOD
Registration, and then press the OK button.
4A confirmation message will appear. Select Yes and press the
OK button.
5 The DivX _)VOD window will appear and you will see the
registration code. For details on registration, please visit the
DivX _)website at
http://vod.divx.coin
ABOUT DIVX VIDEO: DivX R:is a digital video format created by
DivX, LLC, a subsidiary of Rovi Corporation. This is an official
DivX Certified _ device that has passed rigorous testing to verify
that it plays DivX video. Visit divx.com for more information and
software tools to convert your files into DivX videos.
ABOUT DIVX VIDEO-ON-DEMAND: This DivX Certified "'
device must be registered in order to play purchased DivX Video-
on-Demand (VOD) movies. To obtain your registration code, locate
the DivX VOD section in your device setup menu. Go to vod.divx.
coin for more information on how to complete your registration.
DivX Certified (")to play DivX (")video up to HD 1080p, including
premium content.

2Setting up yourTV
Setdng the sleep dmeF
ToplaybackDiv×HDcontent:
*_**To play in Pastreverse or fast forward directions, press the 44
or _ button during playback. Each time you press the 44 or
_ button, the playback speed will change.
*_**If the content contains no chapter, this TV generates original
chapter point in 10% increments for 10 chapters in total, that
are accessible by using the Number buttons on the remote
control.
During playback, press the I,_ button to skip to the beginning of the
next chapter.
When the _ button is pressed twice in succession, it will repeat
two times of above.
If the _ button is pressed at the last chapter, the confirmation
message will appear.
If Yes is selected, playback will skip to the beginning of the next
content.
Press the _ button to skip to the beginning of the current chapter.
When the _ button is pressed twice in succession, it will skip to
the beginning of the previous chapter. If the _ button is pressed
twice continuously at the first chapter, playback of the current
content will stop and the confirmation message will appear. If Yes is
selected, playback will skip to the beginning of the previous
content.
Settingthesleeptimer
You can set the sleep timer to turn off the TV after a set length of
time (maximum of 12 hours).
To set the sleep timer using the remote control:
1 Press the SLEEP button on the remote control to set the length
of time the TV remains on until the TV turns off.
2 Repeatedly press the SLEEP button to increase the time in
10-minute increments, or press the A /T (arrow) buttons to
increase or decrease the time in 10-minute increments, to a
maximum of 12 hours.
To set the sleep timer using the on-screen menus:
1 In Timers menu, highlight Sleep Timer, and then press the
OK button.
SettingupyourTV QQ
No 5'i_al Power Down
Press the Number buttons to enter the length of time
(maximunl of 12 hours) and then press the OK button. Or press
the A/T (arrow) buttons to increase or decrease in 10-minute
increments (nlaxinmm of 12 hours).
NOTE Ifapowerfailureoccurs,thesleeptimersettingmaybecleared.
To display the time remaining until the TV turns off, press the
SLEEP button.
To cancel the sleep timer, repeatedly press SLEEP until it is set to 0
minutes.
NoSignalPowerDown
The TV wilt automatically turn itself off after 15 minutes when no
signal is detected. You can change the setting to Offfor the
following purposes:
•*** Low signal strength of analog channel (no signal detection)
•*** Only Audio L/R is connected to external input to listen to music
through the TV speakers.
To change the no signal power down setting:
1 From the Options menu, highlight Power Management, and
then press the OK button.
2 Highlight No Signal Power Down, and then press the OK
button.
3 Press the A/T (arrow) buttons to highlight the item you want
to change, and press the ,_/_ (arrow) buttons to select On or
Off.
NOTE '¢* Defaultsettingforthis featureis On.
¢, Awarningmessagewill appear1minutebeforetheTVturnsoff.
UsingHOMPCEC
This is a new feature that uses CEC technology and allows you to
control Toshiba HDMI _ CEC compatible devices from the TV
remote via HDMI _ (see "HDMP' CEC connection" on page 31).
When Enable HDMI CEC Control in the HDMI CEC Control
Setup menu is set to On (see "Setting up HDMI ®CEC" on page 96),
the HDMI _ CEC functions described below will be enabled.
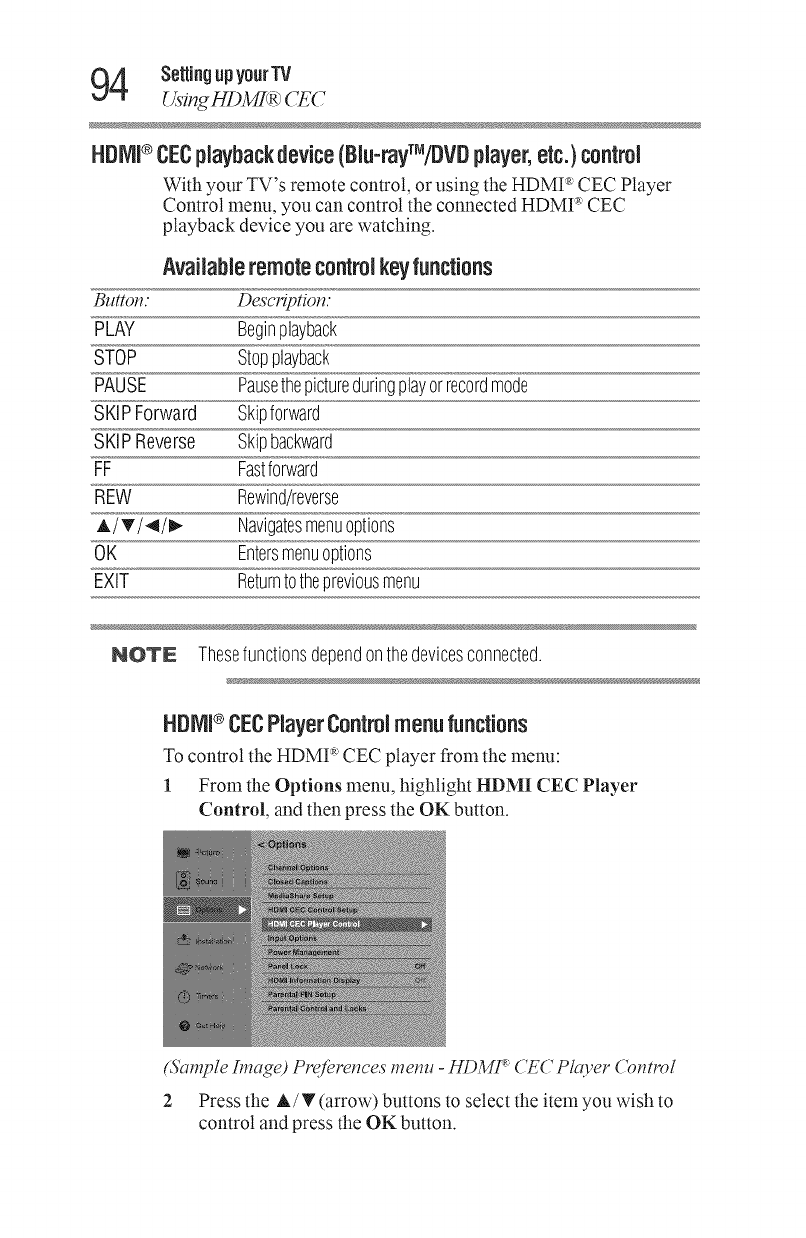
4 Sel_ingupyourTV
Usmg HDM[q _('E(
HDIVil®CECplaybackdevice(Blu-rayWDVDplayer,etc.)control
With your TV's remote control, or using the HDMI _'CEC Player
Control menu, you can control the connected HDMI _ CEC
playback device you are watching.
Availableremotecontrolkey1unctions
B_lttol_." Descriptiol_:
PLAY Beginplayback
STOP Stopplayback
PAUSE Pausethepictureduringplayorrecordmode
SKiPForward Skipforward
SKiPReverse Skipbackward
FF Fastforward
REW Rewind/reverse
,A/ T/4/I,,,- Navigatesmenuoptions
OK Entersmenuoptions
EXIT Returntothepreviousmenu
NOTE Thesefunctionsdependonthedevicesconnected.
HDNI®CECPlayer Controlmenufunctions
To control the HDMD' CEC player from the menu:
1 From the Options menu, highlight HDMI CEC Player
Control, and then press the OK button.
(Sample Image) Pl_@rences mem¢ -HDMF:' ('EC Player ('o_trol
2 Pressthe A/T(arrow)buttonstoselecttheitemyouwishto
control and press the OK button.
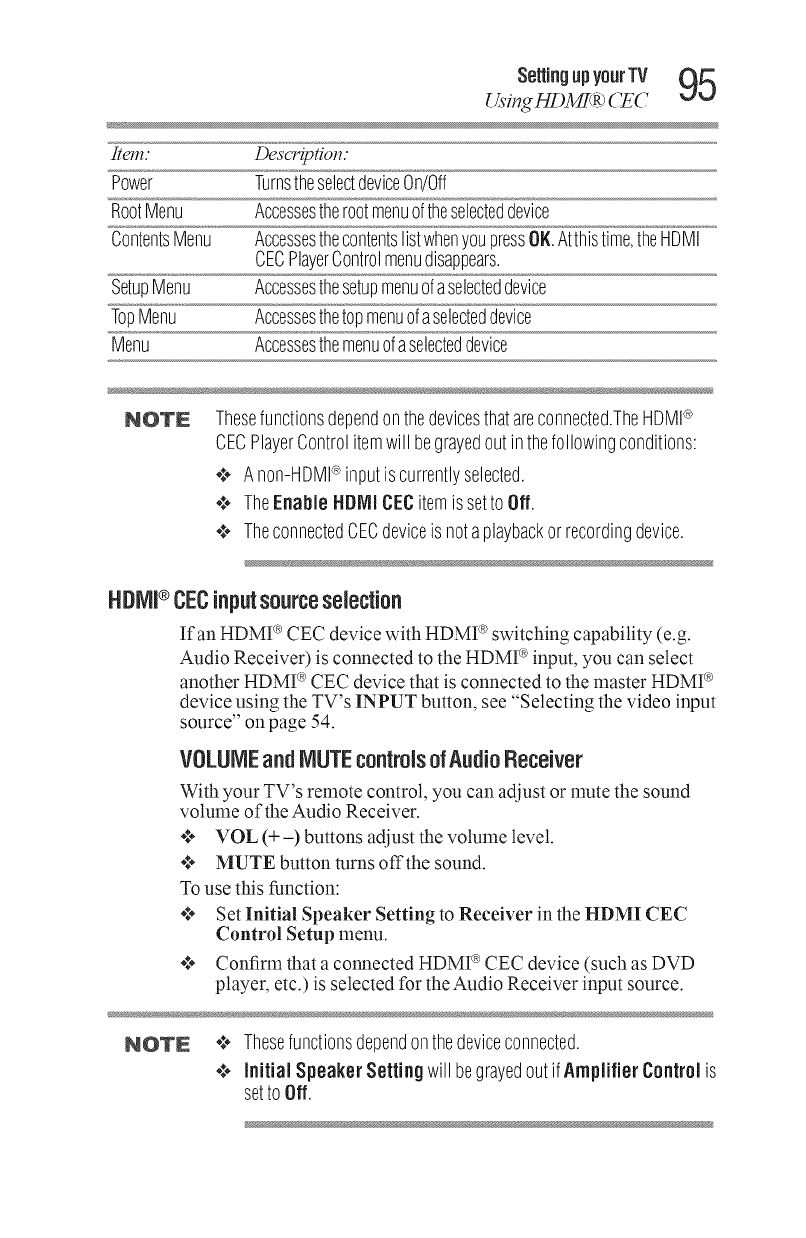
SettingupyourTV
•95
Usmg HDM[q _( _(
Item." Description:
Power TurnstheselectdeviceOn/Off
RootMenu Accessestherootmenuoftheselecteddevice
ContentsMenu AccessesthecontentslistwhenyoupressOK.Atthistime,theHDMI
CECPlayerControlmenudisappears.
SetupMenu Accessesthesetupmenuofaselecteddevice
TopMenu Accessesthetopmenuofaselecteddevice
Menu Accessesthemenuofaselecteddevice
NOTE Thesefunctionsdependonthedevicesthatareconnected.TheHDMI®
CECPlayerControlitemwill begrayedoutin thefollowingconditions:
¢ A non-HDMI® inputis currentlyselected.
¢ TheEnableHDMICECitemis settoOff.
¢ TheconnectedCECdeviceis notaplaybackorrecordingdevice.
HNVU®CECinputsourceselection
If an HDMI ®CEC device with HDMI ®switching capability (e.g.
Audio Receiver) is connected to the HDMI ®input, you can select
another HDMI ®CEC device that is connected to the master HDMI ®
device using the TV's INPUT button, see "Selecting the video input
source" on page 54.
VOLUNEandNUTEcontrolsotAudioReceiver
With your TV's remote control, you can adjust or mute the sound
volume of the Audio Receiver.
¢* VOL (+ -) buttons adjust the volume level.
****MUTE button turns offthe sound.
To use this function:
*,** Set Initial Speaker Setting to Receiver in the HDMI CEC
Control Setup menu.
_,** Confirm that a connected HDMI ®CEC device (such as DVD
player, etc.) is selected for the Audio Receiver input source.
NOTE ¢o Thesefunctionsdependonthedeviceconnected.
¢ Initial Speaker Setting will begrayedoutif AmplifierControl is
setto Off.
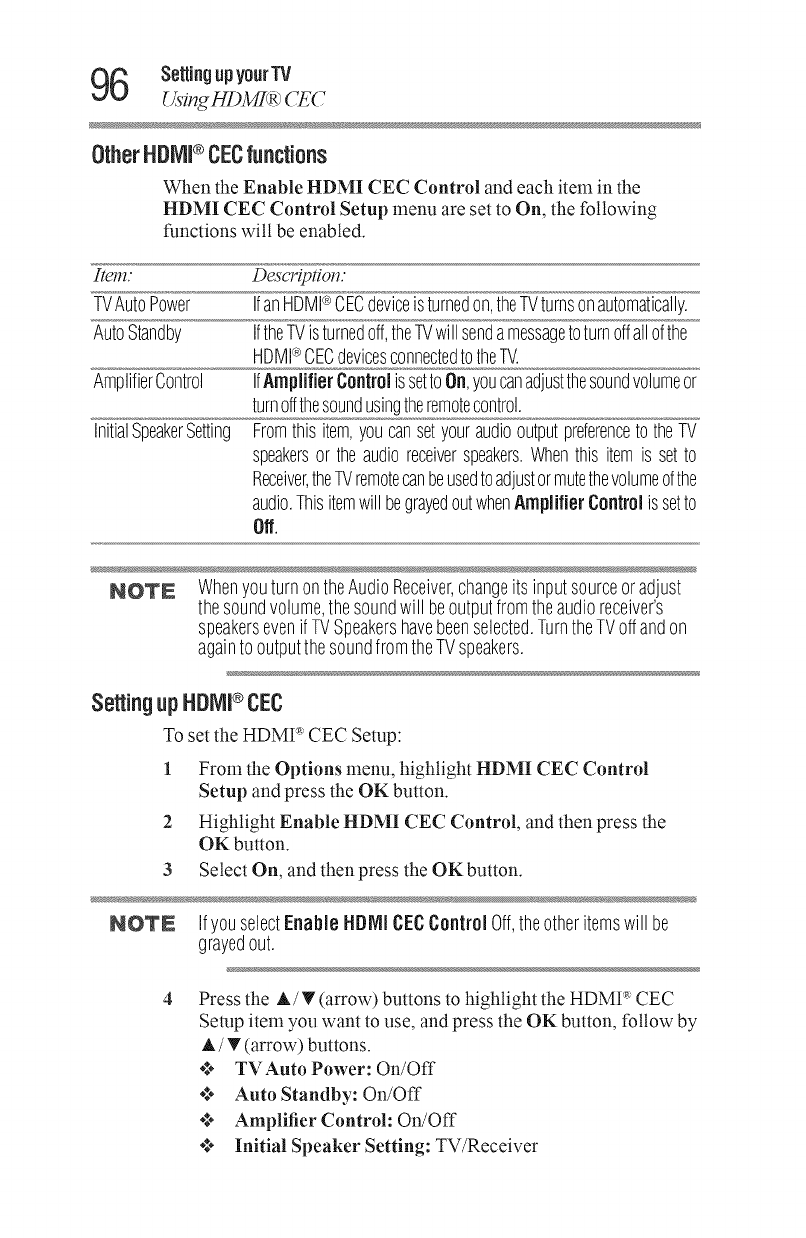
6 Se_ingupyourTV
Usmg HDM[q _('E(
OtherHDIVll®CECfunctions
When the Enable HDMI CEC Control and each item in the
HDMI CEC Control Setup menu are set to On, the following
functions wilt be enabled.
J7{Cl11."
TVAutoPower
AutoStandby
AmplifierControl
InitialSpeakerSetting
Descwiption."
IfanHDMI®CECdeviceisturnedon,theTVturnsonautomatically.
IftheTVisturnedoff,theTVwillsendamessagetoturnoffallofthe
HDMI®CECdevicesconnectedtotheTV.
IfAmplilierControlissettoOn,youcanadjustthesoundvolumeor
turnoffthesoundusingtheremotecontrol.
Fromthisitem,youcansetyouraudiooutputpreferenceto theTV
speakersor theaudioreceiverspeakers.Whenthisitemis setto
Receiver,theTVremotecanbeusedtoadjustormutethevolumeofthe
audio.Thisitemwill begrayedoutwhenAmplifierControlissetto
Off.
NOTE WhenyouturnontheAudioReceiver,changeitsinputsourceoradjust
thesoundvolume,thesoundwill beoutputfromtheaudioreceiver's
speakersevenif TVSpeakershavebeenselected.TurntheTVoffandon
againtooutputthesoundfromtheTVspeakers.
Se_ingupHBIVU®CEC
To set the HDMP' CEC Setup:
1 From the Options menu, highlight HDMI CEC Control
Setup and press the OK button.
2 Highlight Enable HDMI CEC Control, and then press the
OK button.
3 Select On, and then press the OK button.
NOTE IfyouselectEnable HDMiCECControlOff,theotheritemswill be
grayedout.
4 Press the A /T (arrow) buttons to highlight the HDMI ':_CEC
Setup item you want to use, and press the OK button, follow by
A/T (arrow) buttons.
*$* TVAnto Power: On/Off
.$* Auto Standby: On/Off
*$_ Amplifier Control: On/Off
_.**Initial Speaker Setting: TV/Receiver
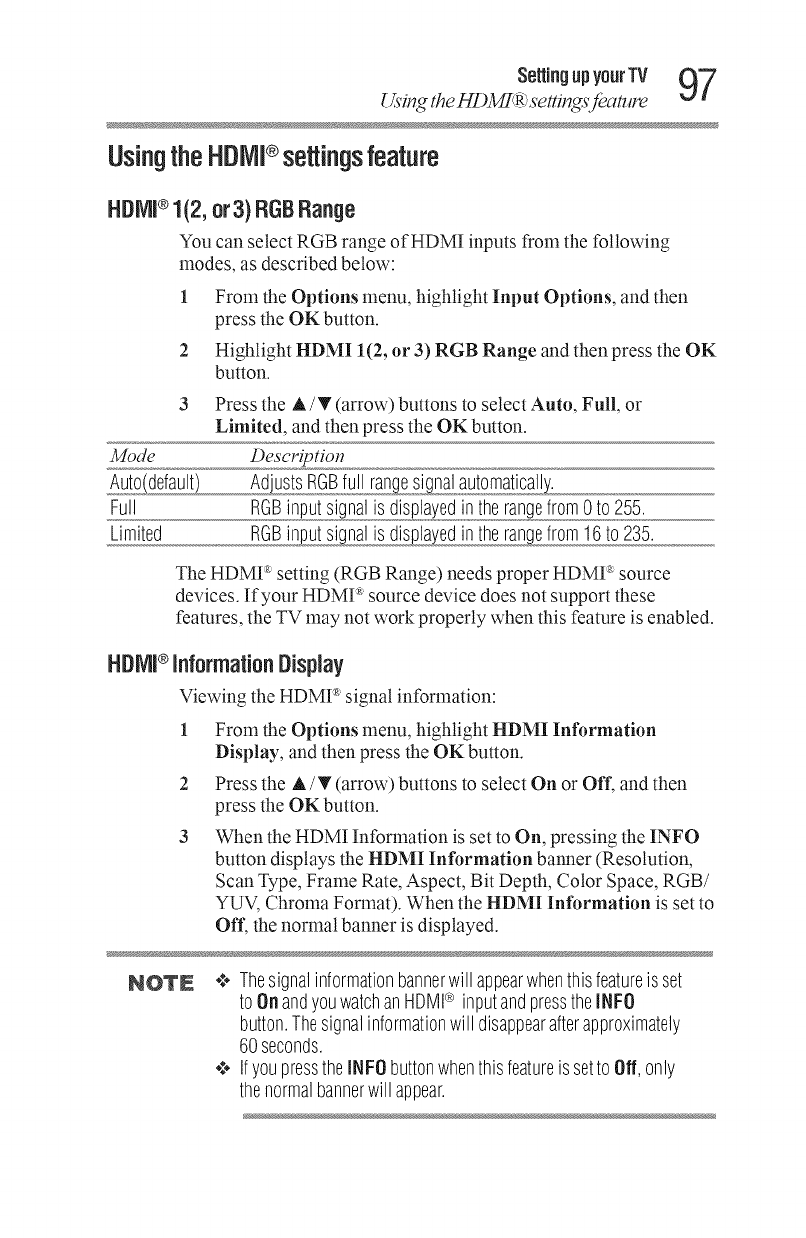
SettingupyourTV 97
!sing the HDM[_R;settings jedure
UsingtheHDlVll®settingsfeature
HDiVU®1(2,or3)RGBRange
You can select RGB range of HDMI inputs from the following
modes, as described below:
Mode
A,,,,,,u,_!o(default)
Full
Limited
1 From the Options menu, highlight Input Options, and then
press the OK button.
2 Highlight HDMI 1(2, or 3) RGB Range and then press the OK
button.
Press the A/V (arrow) buttons to select Auto, Full, or
Limited, and then press the OK button.
Deserit)tiol_
Adjus!sRGB,,,!,uo!,!_ng,,es),gnalautomatically,...........................................
RGBinputsignalis displayedintherangefrom0to 255.
RGBin efrom16to 235.
The HDMI '_setting (RGB Range) needs proper HDMI '_source
devices. If your HDMP' source device does not support these
features, the TV may not work properly when this feature is enabled.
HDiVU®InformationDisplay
Viewing the HDMP' signal information:
1 From the Options menu, highlight HDMI Information
Display, and then press the OK button.
2 Press the A/V (arrow) buttons to select On or Off, and then
press the OK button.
3 When the HDMI Information is set to On, pressing the INFO
button displays the HDMI Information banner (Resolution,
Scan Type, Frame Rate, Aspect, Bit Depth, Color Space, RGB/
YUV, Chroma Format). When the HDMI Information is set to
Off, the normal banner is displayed.
NOTN ¢ Thesignalinformationbannerwillappearwhenthisfeatureisset
toOnandyouwatchanHDMI® inputandpresstheINFO
button.Thesignalinformationwill disappearafterapproximately
60seconds.
¢ IfyoupresstheINFObuttonwhenthisfeatureis setto Off, only
thenormalbannerwill appear.
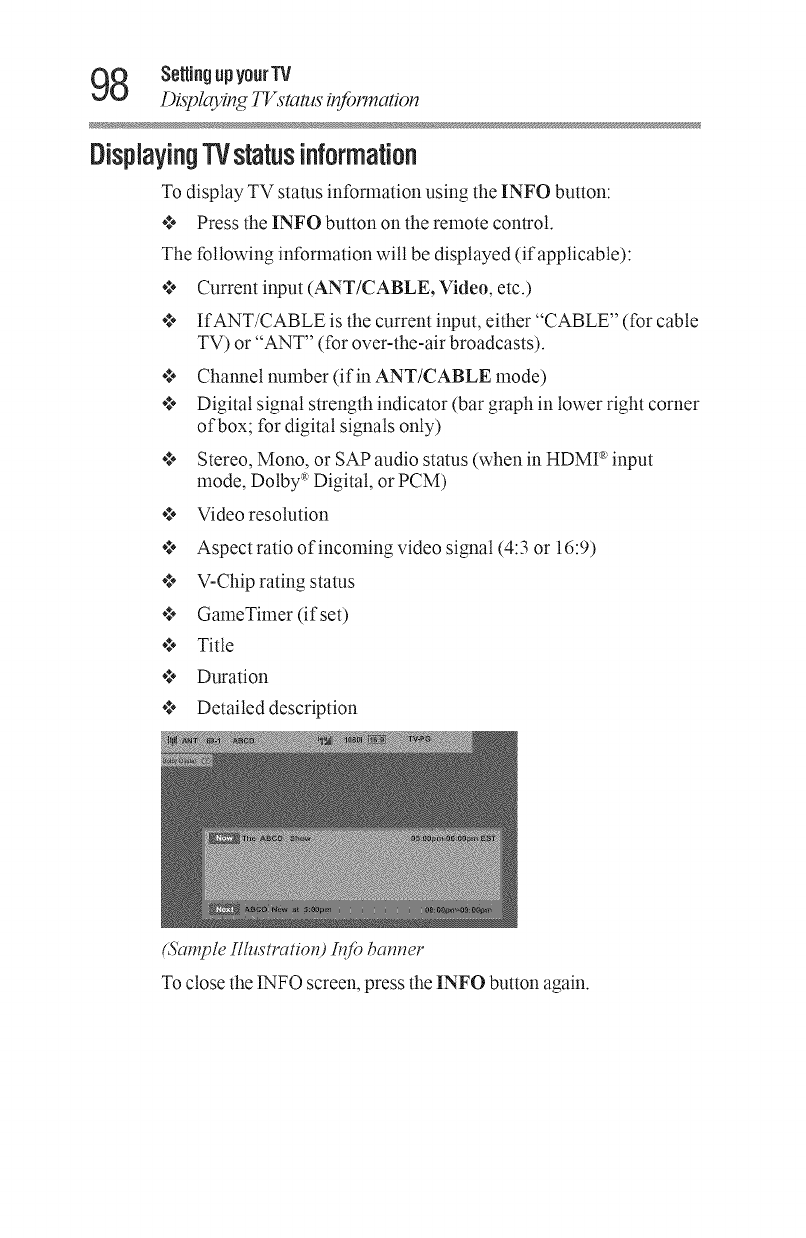
8 SettingupyourTV
Displuyirlg _stums il_)l_atiorl
Displaying"iVstatusinformation
To display TV status information using the INFO button:
*_**Press the INFO button on the remote control.
The following information will be displayed (if applicable):
*_**Current input (ANT/CABLE, Video, etc.)
*_**If ANT/CABLE is the current input, either "CABLE" (for cable
TV) or "ANT" (for over-the-air broadcasts).
*_**Channel number (if in ANT/CABLE mode)
*_**Digital signal strength indicator (bar graph in lower right corner
of box; for digital signals only)
*_**Stereo, Mono, or SAP audio status (when in HDMP' input
mode, Dolby * Digital, or PCM)
*_**Video resolution
*_**Aspect ratio of incoming video signal (4:3 or 16:9)
*_**V-Chip rating status
*_**GameTimer (if set)
*_**Title
*_**Duration
*_**Detailed description
(Sample Illustratio_) It_) bam_er
To close the INFO screen, press the INFO button again.

SettingupyourTV QQ
Understanding; the last mode memolTjbamre
Understanding the last mode memory feature
If the power is cut off while you are viewing the TV_ the Last Mode
Memory feature automatically turns on the TV when the power is
resupplied.
NOTE Ifyouknowyouwill beawayfromtheTVfor anextendedperiodoftime
youshouldunplugthepowercord.
7
Using
Features
TV'sAdvanced
Usingtheadvancedpicturesettings
ColorNasterTM
The ColorMaster TMfeature gives you precise control of Hue,
Saturation, and Brighmess for six primary colors: Red, Green, Blue,
Yellow, Magenta, and Cyan. Now you can adjust the image color
exactly the way you want it.
1 From the Picture menu, highlight Advanced Picture Settings,
and then press the OK button.
2 HighligN ColorMaster, and then press the OK button.
3 Press the &/T (arrow) buttons to select On, and then press the
OK button.
BaseColorAdjustment
When ColorMaster TMis set to On, the list of base colors appears.
You can select a base color to adjust.
1 From the Picture menu, highlight Advanced Picture Settings,
and then press the OK button.
2 Highlight Base Color Adjustment and then press the OK
button.
100
UsingtheTV'sAdvancedFeatures1 01
Using theadvancedpicmre _tfings
3Press the A /T (arrow) buttons to select a color. Press the OK
button.
4Press the 4/_(arrow) buttons to select Hue, Saturation, or
Brightness.
5 Press the & /V (arrow) buttons to adjust the setting.
6Repeat Steps 3 through 5 to adjust other colors.
To reset the adjustments to the factory defaults, select Reset on
the screen. Press the OK button.
CalorTemperature
You can change the quality of the picture by adjusting three preset
Color Temperatures(Cool, Medium, and Wani_), as described
below.
Mode." Picture QualiO;:
Cool blueish
Medium neutral
Warm reddish
1 From the Picture menu, highlight Advanced Picture Settings,
and then press the OK button.
2 Highlight Color Temperature and then press the OK button.
3 Press the OK button, follow by &/T (arrow) buttons to select
the desired color temperature, and then press the OK button.
4Press the &/T (arrow) buttons to highlight Red, Green, or
Blue level, and then press the 4/_ (arrow) buttons to adjust
the level. Press the EXIT button.
NOT£ TheRed,Green,andBluelevelsettingsareconnectedtotheColor
Temperaturesettingsandwill changebasedonwhichpresetcolor
temperature(Cool,Medium,orWarm)isselected.
StaticGamma
The static gamma feature lets you adjust the levels of black in the
picture.
1 From the Picture menu, highlight Advanced Picture Settings,
and then press the OK button.
2 Highlight Static Gamma and then press the OK button.
3Press the 4/_ (arrow) buttons to adjust the level of black
detail. Press the EXIT button.
1 02 UsingtheTV'sAdvancedFeatures
Using the advancedpic'tza_e_llingx
•_*_ If the setting is decreased, the detail of black colors is
decreased.
•_** If the setting is increased, the detail of black colors is
increased.
DyflaLighiTM
The DynaLight TM feature automatically strengthens the black
coloring of dark areas in the video according to the level of
darkness.
1 From the Picture menu, highlight Advanced Picture Settings, and
then press the OK button.
2 HigNight DynaLight and then press the OK button.
3Press the A /T (arrow) buttons to select High, Low, or Off Press
the OK button.
DynamicContrast
Dynamic Contrast detects changes in picture quality that affect the
appearance of your contrast settings and then automatically adjusts
the video.
1 From the Picture menu, highlight Advanced Picture Settings, and
then press the OK button.
2 Highlight Dynamic Contrast and thenpress the OK button.
3 Press the A /T (arrow) buttons to select High, Middle, Low, or
Oft: Press the OK button.
CinemaNode
When you view a DVD (3:2 pultdown processed) from a DVD
player connected to the VIDEO, CotorStream TM HD (component
video), or HDMP' inputs on the TV, smoother motion can be
obtained by setting the Cinema Mode to On. (available for 480i and
i080i signals).
1 From the Picture menu, highlight Advanced Picture Settings, and
then press the OK button.
2 HigNight Cinema Mode madthenpress the OK button.
3 Press the A /T (arrow) buttons to select On or Off. Press the
OK button.
UsingtheTV'sAdvancedFeatures103
Using the advanced picmre setdngs
NoiseReduction
NPEGRR
The MPEG noise reduction feature allows you to reduce visible
interference caused by MPEG compression.
1 From the Picture menu, highlight Advanced Picture Settings, and
then press the OK button.
2 Highlight Noise Reduction and then press the OK button.
3 Press the A /T (arrow) buttons to select MPEG NR and then
press the OK button.
4 Press the A /T (arrow) buttons to select High, Middle, Low, or
Off, and then press the OK button.
DRR(DynamicRoiseReduction)
DNR lets you soften the screen representation of a weak signal to
reduce the noise effect.
1 From the Picture menu, highlight Advanced Picture Settings, and
then press the OK button.
2 Highlight Noise Reduction and then press the OK button.
3 Press the A /T (arrow) buttons to select DNR and then press
the OK button.
4 Press the A /T (arrow) buttons to select High, Middle, Low, or
Off, and then press the OK button.
EdgeEnhancer
The Edge Enhancer feature defines the edges and textures for
greater image details to make the picture look crisp and clear.
1 From the Picture menu, highlight Advanced Picture Settings, and
then press the OK button.
2 Highlight Edge Enhancer and then press the OK button.
3 Press the A /V (arrow) buttons to select On or Off. Press the
OK button.
NOTE Thisfeaturemaynotworkproperlydependingonthecontent.
04 UsingtheTV'sAdvancedFeatures
Jsing the advancedpic'mre sel_ings
Usingyourhomenetwork
This TV can share videos, music, and photos across your home
network and other connected products through the MediaShare
feature. In order to do this, you wilt have to configure the
network settings on your TV, see "MediaShare (Videos, Music,
and Photos)" on page 83.
@ If you want to use your home network with an Internet
connection, you will have to configure the network settings on
your TV.
Change the network settings, see "Setting up the Network" on
page 106.
If you use Internet services, see the following note before use.
NOTE ,._,_Somefeaturesmayrequireanalways-onbroadbandInternet
connection,firmwareupdate,and/oradditionalbandwidth.
¢ ThirdpartyInternetservicesarenotprovidedbyToshiba,may
changeorbediscontinuedatanytime,andmaybesubjectto third
partyrestrictions.Toshibamakesnowarranties,representations,or
assurancesaboutthecontent,availability,orfunctionalityofthird
partycontentorservices.ThirdpartyInternetservicesmayrequire
thecreationofaseparateaccountthroughacomputerwithInternet
access,andpaymentof one-timeand/orrecurringcharges.
Usingthe"rV'SAdvancedFeaturss1 05
When usin,_ a Wireles:_'nem'ork c'om_ec'tion
WhenusingaWirelessnetworkconnection
WirelessLANandyourHealth:
Wireless LAN products, like other radio devices, emit radio
frequency electromagnetic energy. However, the level of energy
emitted by Wireless LAN devices is much less than the
electromagnetic energy emitted by wireless devices like mobile
phones.
Because Wireless LAN products operate within the guidelines
found in radio frequency safety standards and recommendations,
Toshiba believes Wireless LAN is safe for use by consumers. These
standards and recommendations reflect the consensus of the
scientific community and result from deliberations of panels and
conm_ittees of scientists who continually review and interpret the
extensive research literature.
In some situations or environments, the use of Wireless LAN may
be restricted by the proprietor of the building or responsible
representatives of the organization. Such restrictions may apply in
environments where the risk of interference to other devices or
services is perceived or identified as harmful.
If you are uncertain of the policy that applies to the use of wireless
devices in a specific organization or environment, you are
encouraged to ask for authorization to use the Wireless LAN device
prior to turning on the equipment.
Usingthe13/inawirelessLANenvironment:
•**_ It is reconmlended to use IEEE 802. l la or IEEE 802.1 In on 5
GHz for audio and SD video streaming.
•*** It is reconmlended to use IEEE 802.11n on 5 GHz for HD video
streaming.
•*** It is reconmaended that the encoding rate of video content be 20
Mbps or less.
•*** It is not reconmlended to use 2.4 GHz for audio and video
streaming.
•*** Content playback may be interrupted by surrounding
interference.

106 UsingiheTWsAdvancedFeatures
Settil_g up the Network
Se ing upthe Network
You can select the Network Type.
1 Press the MENU button.
2 Select Network > Network Setup > Connection Type and
press the OK button.
3 Press A/T (arrow) buttons to select Wired or Wireless.
4 Press the OK button.
@ If you select Wired, see Advanced Netuork Setup" on
page 111.
If you select Wireless, see the next section.
WirelessSetup
NOTE ContinuedAP(AccessPoint)connectionisnotguaranteed.Connection
maybelostwhilewatchingTV.
There are three methods for wireless setup:
@ Easy Setup (WPS) - ifAP supports WPS, this can be used.
@ WPS is a standard designed to simplify the connection of
wireless LAN equipment and the setup of network
security features.
@ Assisted Setup (setup using the AP's notification information)
- Network Name, Authentication, and Encryption are decided
based on information from the AR You need to manually set the
Security Key.
@ Manual Setup - requires manually entering all settings.
NOTE Inorderto secureyourhomenetwork,it isstronglyrecommended
thatyouuseawirelessaccesspointwithencryption.
WhenEncryptionis setto "None",datatransmittedoverawireless
LANis notsecurelyprotected.Unauthorizedusersmayaccessyour
dataandnetworkwithoutappropriatesecuritymeasures.Selecting
anencryptionsettingfromyourToshibaTVandusingasecure
networkforwirelessLANtransmissionsmayhelpavoidunauthorized
accesstoyourimportantdataand/orTV.Toshibadisclaimsanyand
allresponsibilityorliabilityresultingfromanywireless
transmissionsovertheInternetthroughyourToshibaTV.
7
Setting z_pthe Network | U
EasySetupusingPBC(PushbuUonconfiguration)
1 Press the MENU button.
2 Select Network > Network Setup > Wireless Setup and press
the OK button.
3 Press A/T (arrow) buttons to select Easy Setup and press the
OK button.
4Press A/T (arrow) buttons to select PBC and thenpress the
OK button.
5 Press !v (arrow) button to select Start Scan, and thenpress the
OK button.
6Following the on-screen instructions, push the appropriate
button on your AR
7 When a screen reporting that "Wireless configuration is
complete" appears, press the EXIT button.
To cancel searching for the AP:
*_**Press the BACK button while searching for the AR A message
appears. Press 4/1_ (arrow) buttons to select Yes, and then
press the OK button.
EasySetupusingPiN(PersonalIdenUflcationNumber)
1 Press the MENU button.
2 Select Network > Network Setup > Wireless Setup and press
the OK button.
3 Press A/T (arrow) buttons to select Easy Setup and press the
OK button.
4Press A/T (arrow) buttons to select PIN.
5 Press T (arrow) button to select Start Scan, and thenpress the
OK button.
6Enter the PIN displayed on this screen into your computer or
AR
7 Press A/T (arrow) buttons to select the desiredAR and then
press the OK button.
NOTE ChecktheMACaddressonthelabelorinthemanualoftheAPandselect
anAP.
8 When a screen reporting that "Wireless configuration is
complete" appears, press the EXIT button.
108 UsingiheTV'sAdvancedFeatures
Setting up the Network
To cancel searching for the AP:
***_Press the BACK button while searching for the AR A message
appears. Press 4/_ (arrow) buttons to select Yes, and then
press the OK button.
AssistedSetup
1Pressd_eMENU button.
2 Select Network > Network Setup > Wireless Setup and press
the OK button.
3 Press the A/T (arrow) buttons to select Assisted Setup and
press the OK button.
4Press the A/T (arrow) buttons to select the desired AP, and
then press the OK button.
NOTE ChecktheMACaddressonthelabelorinthemanualoftheAPandselect
anAP.
5 Select Security Key, and then press the OK button.
The Software Keyboard appears.
6Input the Security Key using the Software Keyboard. For more
information, see "Using the software keyboard" on page 114.
7 To save your settings, press the Enter button of the Software
Keyboard.
NOTE TheSecurityKeymustadheretothefollowingconditions:
¢ TKIP/AES:8-63ASCIIor64Hexcharacters
¢ WEP:5or 13ASCIIor10or26Hexcharacters
8 Select Done, and then press the OK button.
NOTE SettingsarenotsavediftheBACKbuttonis pressedbeforeDoneis
selected.
NanualSetup
1 Press theMENU button.
2 Select Network > Network Setup > Wireless Setup and press
the OK button.
3 Press the A/T (arrow) buttons to select Manual Setup and
then press the OK button.
Usingthe_'s AdvancedFeatures109
Setdng up the Network
4 Press the A/T (arrow) buttons to select the Network Name,
and then press the OK button.
The Software Keyboard window appears.
5 Input the Network Name using the Software Keyboard. For
more information, see "Using the software keyboard" on page
114.
6 To save your settings, press the Enter button of the Software
Keyboard.
7Press the A/T(arrow) buttons to select Authentication and
then press the OK button.
Press the A /T (arrow) buttons to select Open System, Shared
Key, WPA-PSK, WPA2-PSK, or WPA2/WPA-PSK, and then
press the OK button.
8 Press the A/T (arrow) buttons to select Encryption and then
press the OK button.
Press the A/T (arrow) buttons to select None, WEP, TKIP, or
AES.
NOTE Certainencryptiontypesareonlycompatiblewithspecificauthentication
types.
-_,,WhenAuthenticationisOpenSystemandSharedKey,onlyWEPor
Noneis compatible.
,¢,, WhenAuthenticationisSharedKey,onlyEncryptionNoneandWEP
canbeselected.
,¢', WhenAuthenticationisWPA2-PSK,onlyEncryptionAEScanbe
selected.
WhenincompatibleAuthentication/Encryptionpairingsareattempted,a
warningmessagewill bedisplayed,andnoconnectionattemptwill be
madeuntil theincompatibilityis resolved.
9 Press the A /T (arrow) buttons to select Security Key and then
press the OK button.
The Software Keyboard window appears.
10 Input the Security Key using the Software Keyboard. For more
information, see "Using the software keyboard" on page 114.
11 To save your settings, press the Done button of the Software
Keyboard.
NOTE ThisitemisgrayedoutwhenEncryptionissetto None.
12 Select Done, and then press the OK button.
When Encryption is set to None, a confirmation message
appears.
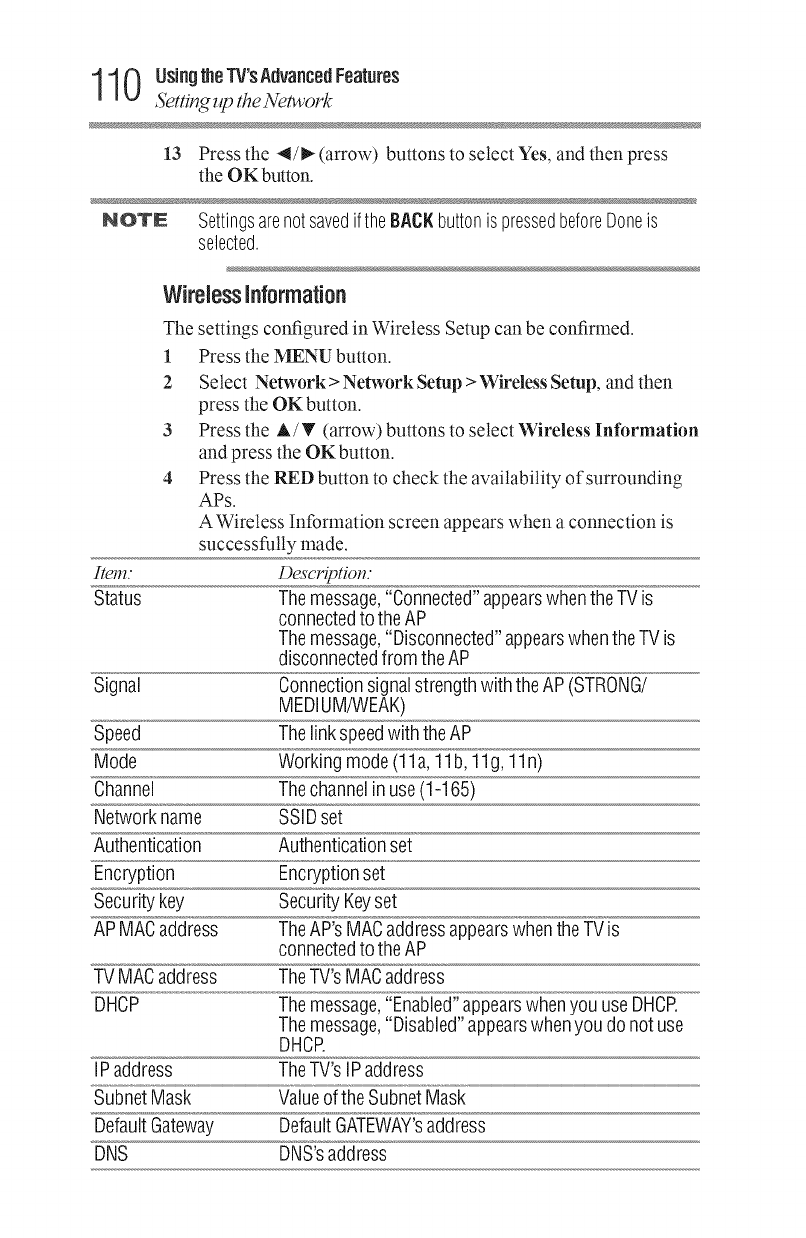
1 1 0 UsingtheTV'sAdvancedFeatures
Settling up the Network
13 Press the 4/1_ (arrow) buttons to select Yes, and then press
the OK button.
NOTE SettingsarenotsavediftheBACKbuttonis pressedbeforeDoneis
selected.
Wireless Information
The settings configured in Wireless Setup can be confirmed.
1 Press the MENU button.
2 Select Network > Network Setup > Wireless Setup, and then
press the OK button.
3 Press the A/T (arrow) buttons to select Wireless Information
and press the OK button.
4Press the RED button to check the availability of surrounding
APs.
AWiretess Information screen appears when a connection is
successfully made.
Item." Descriptiol_."
Status Themessage,"Connected"appearswhentheTV is
connectedto theAP
Themessage,"Disconnected"appearswhentheTV is
disconnectedfromthe AP
Signai Connectionsignaistrengthwith theAP(STRONG/
MEDiUM!WEAK)
Speed Theiink speedwiththe AP
Mode Workingmode(11a,11b, 11g,11n)
Channel Thechannelin use(1-165)
Networkname SSiDset
Authentication Authenticationset
Encryption Encryptionset
Securitykey SecurityKeyset
APMACaddress TheAP'sMACaddressappearswhenthe TVis
connectedto theAP
TVMACaddress TheTV'sMACaddress
DHCP Themessage,"Enabied"appearswhenyou useDHCP.
Themessage,"Disabied"appearswhenyou do not use
DHCP.
iP address TheTV'siPaddress
SubnetMask Vaiueofthe SubnetMask
DefauitGateway DefauitGATEWAY'saddress
DNS DNS'saddress
Usingthe_'S AdvancedFeatures1 1 1
Setting up the Network
NOTE Evenif anAPfor IEEE802.11nis usedwhenEncryptionis setto WEPor
TKIP,theSpeedvaluemightbelow.WerecommendthattheEncryption
settingischangedtoAES(Undermanualsetup).
NOTE WhenmanuallysettingtheIPAddress,setAutoSetuptoOff.
AdvancedNetworkSetup
IPAddressSetup
NOTE ThesettingsinAutoSetuparelinkedto thoseselectedintheDNSSetup
menu.IfAutoSetupis setto On,thenAutoSetupintheDNSSetupmenu
willalsobesettoOn.
Auto Setup:
1 Press the MENU button.
2 Select Network > Network Setup > Advanced Network
Setup and press the OK button.
3 Press the &/T (arrow) buttons to select IPAddress Setup and
then press the OK button.
4Press the A/T (arrow) buttons to select Auto Setup and press
the OK button.
5 Press the A/T (arrow) buttonto select On.
NOTE OtheritemsaregrayedoutwhenAutoSetupis settoOn.
Manual Setup:
1 Press the MENU button.
2 Select Network > Network Setup > Advanced Network
Setup and press the OK button.
3 Press the A/T (arrow) buttons to select IPAddress Setup and
then press the OK button.
4Press the A/T (arrow) buttons to select Auto Setup and press
the OK button.
5 Press the A/T (arrow) buttonto select Off.
6 Press the A/T (arrow) buttonto select IPAddress.
12 UsingtheTV'sAdvancedFeatures
,S'ettingup tke Network
Press the 4/D,- (arrow) buttons to select the IPAddress field
and use the 0-9 buttons to enter in a digit. Press the _ (arrow)
button to select the subsequent fields. To save the setting, press
the OK button.
IPaddressfieldnumbersmustbebetween0 and255.NOTE
8
9
Press the A/T (arrow) buttons to highlight Subnet Mask, edit
in the same way as IPAddress.
Press the A/T (arrow) buttons to highlight Default Gateway,
and edit in the same way as IPAddress.
NOTE IfyoumanuallysettheIPaddress,you mustnotusethesameIPaddress
withanyotherdevice.TheIPaddressyouuseshouldbeaprivate
address.
Ifyoudonotknowthecorrectvaluesto use,contactyournetwork
administratororinternetserviceprovider.
DRSSetup
NOTE ,,:,_WhentheDHCPfunctionoftherouterconnectedto thisTVis Off,set
AutoSetupto Off,andmanuallysettheDNSaddress(es).
YourInternetServiceProvidershouldhaveprovidedthesetoyou.
¢ ThesettingsinAutoSetuparelinkedtothoseselectedintheIP
AddressSetupmenu.IfAutoSetupintheIPAddressSetupmenuis
setto On,thenAutoSetupwill alsobesettoOn.
Auto Setup:
1 Press the MENU button.
2 Select Network > Network Setup > Advanced Network
Setup and press the OK button.
3Press the A/T (arrow) buttons to select DNS Setup and then
press the OK button.
4 Press the A/T (arrow) buttons to select Auto Setup and press
the OK button.
5Press the A/T (arrow) buttonto select On.
NOTE OtheritemsaregrayedoutwhenAutoSetupissetto On.
UsingtheTV'sAdvancedFeatures113
Setting up the Network
Manual Setup:
1 Press the MENU button.
2 Select Network >Network Setup > Advanced Network
Setup and press the OK button.
3 Press the A/T (arrow) buttons to select DNS Setup and then
press the OK button.
4Press the A/T (arrow) buttons to select Auto Setup and press
the OK button.
5 Press the A/T (arrow) button to select Off.
6 Press the A/T (arrow) button to select Primary DNS
Address.
7 Press the 4/_ (arrow) buttons to select the field you want to
change, and then use the number buttons to input the Primary
DNS Address.
To save the setting, press the OK button.
NOTE DNSaddressfieldnumbersmustbebetween0and255.
8 Press the & /_' (arrow) buttons to highlight Secondary DNS
Address, and edit in the same way as Primary DNS Address.
NAC Address
You can view the fixed MAC address for the TV.
1 Press the MENU button.
2 Select Network > Network Setup > Advanced Network
Setup and press the OK button.
3 Press the A/T (arrow) buttons to select MAC Address, and
then press the OK button.
NetworkConnectionTest
This function checks Internet connectivity.
1 Press the MENU button.
2 Select Network > Network Setup > Network Connection
Test, and press the OK button.
A message appears to indicate whether the connection was
successful or not.
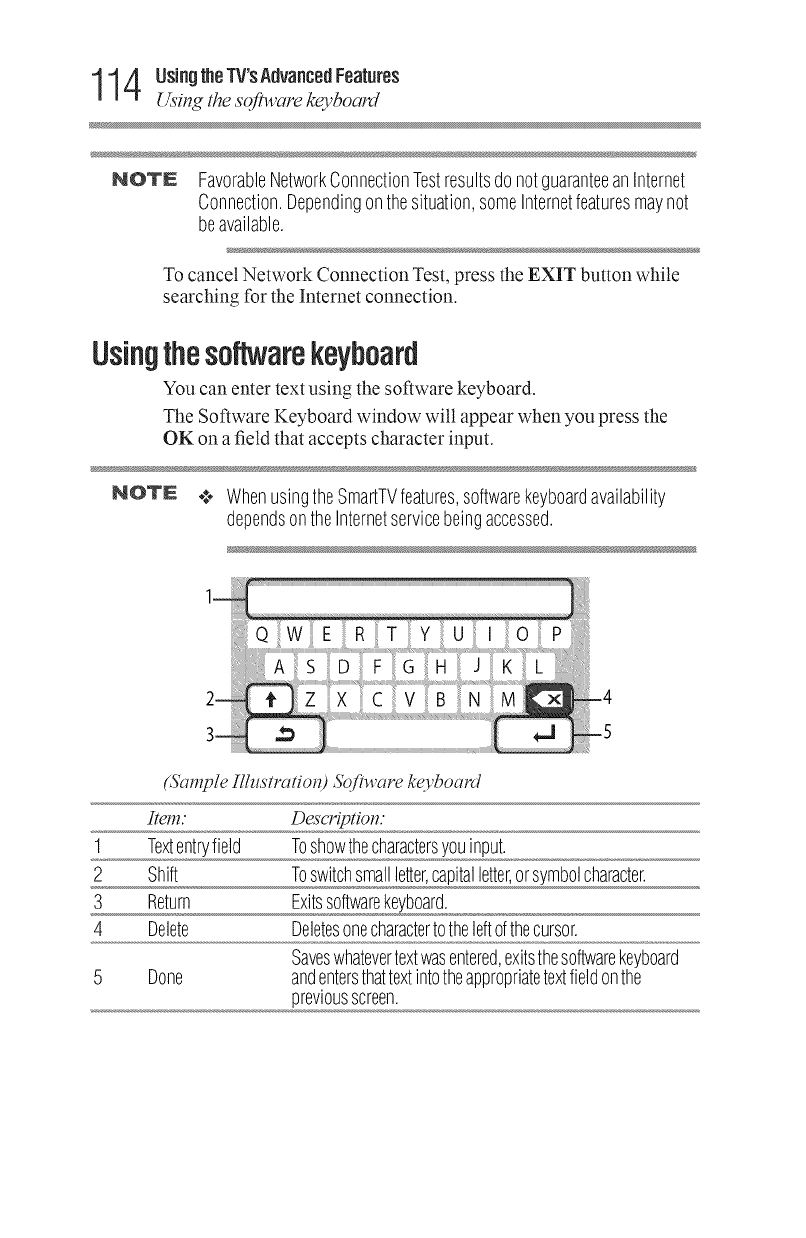
14 UsingtheTV'sAdvancedFeatures
Using lhe sofa,are keyboard
NOTE FavorableNetworkConnectionTestresultsdonotguaranteeanInternet
Connection.Dependingonthesituation,someInternetfeaturesmaynot
beavailable.
To cancel Network Connection Test, press the EXIT button while
searching for the Internet connection.
Usingthesoftwarekeyboard
You can enter text using the software keyboard.
The Software Keyboard window will appear when you press the
OK on a field that accepts character input.
NOTN ,¢,, WhenusingtheSmartTVfeatures,softwarekeyboardavailability
dependsontheInternetservicebeingaccessed.
(Sample IllustratiotO 51)jg<lre keyboard
Item." Desc_iptiol_."
1 Textentryfield Toshowthecharactersyouinput.
2 Shift Toswitchsmallletter,capitalletter,orsymbolcharacter.
3 Return Exitssoftwarekeyboard.
4 Delete Deletesonecharactertotheleftofthecursor.
Saveswhatevertextwasentered,exitsthesoftwarekeyboard
5 Done andentersthattextintotheappropriatetextfieldonthe
previousscreen.
UsingtheTWsAdvancedFeatures1 15
Jsing the software kc_vboard
Enterte_ usingthesoftwarekeyboard
1 Highlight the desired character on the on-screen software
keyboard.
2 Press the OK button.
3 Repeat Step l and 2 until you have entered all desired text.
4Select Done to save your settings and return to the previous
screen.
NOTE IftheBACK buttonispressed,changesarenotsavedandthesoftware
keyboardwindowis closed.
Input operation on the remote control:
Item." Desc_iptiol_:
OK Inputstheselectedcharacter
0-9 Thesekeysareusedtoselectacharacterforentry.
A/T/4/_ Movesthecharacterhighlight.
BACK ClosestheSoftwareKeyboardwindowwithoutsavingchanges
16 UsingtheTV'sAdvancedFeatures
Pel_[bl_ing a 5_f!_,are UpgT_ude
PerformingaSoftwareUpgrade
TOSHIBA may offer upgrades for the TV's software in the future.
The TV's software is upgraded via the Network.
NOTE AnInternetconnectionisrequired.
Before downloading software:
1 Configure your TV to connect to the Internet.
NOTE ...o Youwill notbeableto usetheTVsetwhileperformingtheupgrade.
¢ DonotturnofftheTVduringtheupgrade.
¢ Byupgrading,thefactorydefaultvaluesmaybechanged.
2 Press the MENU button.
3 Select Get Help > Software Upgrade.
4 Press the OK button.
The Network Upgrade screen appears.
5 Press the OK button.
NOTE Ifthenetworkis notavailable,awarningmessageappears.
6After a successful download, the TV software upgrade will
start automatically.
ViewingtheSoftwareLicenses
The Licenses for the software used in this TV are available for
viewing.
1 Press the MENU button.
2 Select Get Help > Software Licenses.
3 Press the OK button.
A screen appears displaying all the licensing information
required for the television's software.
UsingtheTV'sAdvancedFeatures117
Usingthe _/App/icafion 5_l_icesje_tul_s
UsingtheTVApplicationServicesfeatures
This Smart TV is a connected TV that provides key mediaApps and
built-in Wi-Fi _ for direct access to select Internet content like
Netflix '_'Pandora :_,and YouTube TM. The Smart TV also includes
MediaShare to allow playback of applicable media content from
your USB stick or home network.
You can access all of your Smart TV applications by the icon bar at
the bottom of the screen.
NOTE **_ Youneedto connecttotheInternetbeforeusingthisfeature,see
"SettinguptheNetwork"onpage106.
,¢. Someservicesdepictedinthisdocumentandprovidedthroughyour
TVmaynotbeavailableinyourregionandmaynotbeavailableto
you.
•_ Userregistrationor Ioginmayberequiredto usesomeservices.
•_ Somefeaturesmayrequireanalways-onbroadbandIntemet
connection,firmwareupdate,and/oradditionalbandwidth.Third
partyInternetservicesarenot providedbyToshiba,maychangeorbe
discontinuedatanytimeandmaybesubjectto Internetservice
providerrestrictions.Toshibamakesnowarranties,representations,
orassurancesaboutthecontent,availabilityorfunctionalityof
thirdpartycontentorservices.Useofthird partyInternetservicesmay
requirethecreationofaseparateaccountthroughacomputerwith
Internetaccessand/orpaymentofone-timeand/orrecurringcharges
andmembership.Notallthirdpartyservicesmaybeavailableonor
compatiblewiththisproduct.Inordertoexperiencethefull suggested
capabilitiesofthis product,fully-compatibledevicesmaybe
required.
NOTE ,¢'_Ifthedisplayofthedateandtimeiswrong,trytoturnofftheTV,and
turnit onagain.
,._.,,.ThemenuitemsforfeaturesliketheAppsmaychangeintheupgrade
process.
18 UsingtheTV'sAdvancedFeatures
Jsing the YVApplication Servicesjeamres
WatchingmovieswithNe_li_
1 Press the NETFLIX button on the remote control.
2 Follow the on-screen instructions.
After having activated Netflix _>player and prepared an Instant
Queue, movies and TV episodes in your Instant Queue wilt appear
on the TV screen. Select the desired content using the remote
control.
NOTE ¢. Theresolutionof videocontentstreamedfromNetflix®varies
dependingonthecommunicationspeedandbit-rate.
¢ Futureupgradescanchangethescreensandmessagesdisplayedin
theNetflix® feature.
¢ Netflix® issupportedintheU.S.andCanada,andmaynotbe
availableinothercountriesorregions.
To close Netflix '_',press the EXIT button.
To confirm the Netflix ESN (Electronic Serial Number):
1 Press the MENU button.
2 Select Network > Smart Apps Setup > Netflix Setup and
press the OK button.
3 Press the A/T (arrow) buttons to select ESN and then press the
OK button.
The Netflix ESN screen appears.
To deactivate your device:
1 Press the MENU button.
2 Select Network > Smart Apps Setup > Netflix Setup and
press the OK button.
3 Press the A/T(arrow) buttons to select Deactivation and then
press the OK button.
4Press the 4/_ (arrow) buttons to select Yes and then press the
OK button.
UsingtheTV'SAdvancedFeatures 1 1 9
/sil_gthe ]r/At)t)/ication Servic'esjbatzlres
gouTubeTM
YouTube is a video-sharing service managed by YouTube, LLC.
This TV allows you to view YouTube content.
1 Press the HOME button to launch the applications bar.
2 Press the 4/_ (arrow) buttons to select YonTnbe and press the
OK button.
To close YouTube:
1 Press the EXIT button.
Pandora®
Pandora _ is an on-demand service that offers music on the web.
1 Press the HOME button to launch the applications bac
2 Press the 4/_ (arrow) buttons to select Pandora and press the
OK button.
To close Pandora:
1 Press the EXIT button.
_0 UsingtheTV'sAdvancedFeatures
A'ingthe f_App/ication A_z_ic'esjeatures
SambaTV
By recognizing what's on screen, Samba TVTM learns what you
like, and connects you to the shows and actors you love. Across TV,
Samba TV delivers a personal television experience.
At the first time your home network connects to the Internet, the
Enable Samba TV menu will pop up, select the ACCEPT &
ENABLE button to enable Samba TVTM, or select the DECLINE
& DISABLE button to disable it.
If Samba TV had configured and then you would like to change the
setting:
1 Press the MENU button and open the Network menu.
2 Select Network > Samba Interactive TV Settings and press
the OK button.
3 Follow the indication on the web page to ENABLE or
DISABLE Samba TV.
4 Press the EXIT button.
HoUist
Hotlist is powered by Samba TV TM that provides on-demand
streaming of video content. Hotlist offers access to video content
channels and thousands of videos on the web.
1 Press the HOME button to launch the applications bar.
2 Press the ,_/_ (arrow) buttons to select HOTLIST and press
the OK button.
To close HOTLIST:
1 Press the EXIT button.
Troubleshooting
6eneral troubleshooting
Before calling a service technician, review this chapter or visit the
Toshiba technical support Web site at support.toshiba.corn for
possible causes/solutions for the problem you are experiencing.
Before you begin to troubleshoot any problem, first unplug the TV
from the AC wall outlet, wait approximately one minute, and then
plug the TV back into the AC wall outlet. If the problem still exists
attempt to troubleshoot the problem.
Black box on-screen.
The closed caption feature is set to one of the Text modes (T1, T2,
T3, or T4). Set the closed caption feature to Off, see "Using closed
captions" on page 68.
TV stops responding to controls.
If the TV stops responding to the buttons on the remote control or
TV control panel and you cannot turn off the TV, unplug the TV
from the AC wall outlet and plug it back in.
If you cause a static discharge when touching the TV and the TV
fails to function, simply unplug the TV from the AC outlet and plug
it back in. The TV should return to normal operation.
Other problems.
If your TV's problem is not addressed in this Troubleshooting
section or the reconnnended solution has not worked, use the Reset
Factory Defaults procedure, see "Resetting Factory Defaults" on
page 53.
121
122 Troubleshooting
Picmre problems
Onscreen Demo Pop-up
If your TV is displaying a Demo pop-up screen, reset the Store /
Home mode setting to Home. For more information see
"Installation setup selection" on page 48.
TV will not turn on.
Ensure the power cord is plugged in properly, and then press the
POWER button. Ensure the TV is plugged into a working AC
power outlet by plugging another device into the AC power outlet to
verify the AC power outlet is working.
Replace the batteries in the remote control, see "Installing batteries"
on page 39.
Try the control panel buttons on the TV.
Pictureproblems
Picture Settings Keep Resetting (by itself) - change from Store
mode to Home mode.
General picture problems.
Check the antenna/cable connections, see "Connecting Your TV"
on page 24.
Press the INPUT button on the remote control or on the TV and
select a valid video input source, see "Selecting the video input
source" on page 54. If no device is connected to an input on the TV, no
picture appears when you select that particular input source. For
device connection details, see "Connecting Your TV" on page 24.
Antenna reception may be poor. Use a highly directional outdoor
antenna (if applicable).
The station may be having broadcast difficulties. Try another
channel.
Adjust the picture quality, see "Using the advanced picture settings"
onpage 100.
Picture size changes by itself or when the TV is turned OFF and
back ON.
Turn the Auto Aspect feature of the TV to OFF. see "Using the
advanced picture settings" on page 100.
Cannot select external video sources.
If you cannot view signals from external devices connected to
VIDEO, ColorStream TM HD, HDMI 1,HDMI 2, or HDMI 3, ensure
that the Input Lock is set to Off, see "Using the input lock feature"
on page 80.

Troubleshooting 123
Scmndproblems
Noisy picture.
If you are watching an analog channel (off-air broadcast or Cable
TV), you can set the DNR feature to reduce visible interference in
the TV picture, see "DNR (Dynamic Noise Reduction)" on page 103.
Video Input Selection problems
If the Input Selection window does not appear when you press
INPUT on the remote control or TV, press INPUT a second time.
This will cause a change to the next video input source and display
the Input Selection window.
Poor display color or no color.
The station may be having broadcast difficulties. Try another
channel.
Adjust the Tint and/or Color, see "Adjusting the picture quality" on
page 67.
Poor composite picture.
If the TV is connected to an external A/V device (e.g. DVD player,
video game system, set-top box, etc.) try using a CotorStream TM or
HDMP' video connection instead.
Picture and sound are out of sync.
As with all products that contain a digital display, this may occur in
rare instances, when viewing certain content (e.g. television
broadcasts, video games, DVDs). The cause may include, without
limitation, video processing within the TV, video processing in an
attached gaming system, and video processing or different
compression rates used by broadcasters in their progrannning.
Try the following:
•**. If the TV is connected to an A/V receiver that has a
programmable audio delay feature, use this feature to help
synchronize the sound to the picture.
¢. If the problem occurs only on certain TV channels, inform your
local broadcast, cable, or satellite provider.
¢. Turn offand unptug the TV from the AC wall outlet for a few
seconds and plug it back in.
Soundproblems
Check the antenna!cable connections, see "Connecting a VCR,
antenna, cable TV, or camcorder" on page 26.
The station may be having broadcast difficulties. Try another
channel.
The sound may be muted. Press the VOL (+) button.
124 Troubleshooting
Remote control problems
If you hear no sound, try setting the MTS feature to Stereo mode,
see "Selecting stereo/SAP broadcasts" on page 72.
If you are not receiving a second audio program from a known SAP
source, make sure the MTS feature is set to SAP mode, see
"Selecting stereo/SAP broadcasts" on page 72.
If you hear audio that seems incorrect for the program you are
watching (such as music or a foreign language), the SAP mode may
be on. Set the MTS feature to Stereo mode, see "Selecting stereo/
SAP broadcasts" on page 72.
Remotecontrolproblems
Remove all obstructions between the remote control and the TV.
Replace the remote control's batteries, see "Installing batteries" on
page 39.
Your TV's remote control may not operate certain features on your
external devices. Refer to the User's Guide for your other device to
determine its available features. If your TV remote control does not
operate a specific feature on another device, use the remote control
that came with the device, see "Learning about the remote control"
on page 41.
If the TV still does not act as expected, perform the Reset Factory
Defaults procedure, see "Resetting Factory Defaults" on page 53.
ChanneltuningproNems
The Auto Tuning feature may have erased the channel from
memory. Add the channel to the cha_met memory, see "Storing
channels in memory (optional)" on page 49.
The Lock feature may have blocked the channel. Unblock the
channel, see "Locking channels" on page 80.
If you cannot tune digital channels, check the antenna configuration.
If the problem persists, clear all channels from the channel list and
reprogram channels into memory, see "Storing channels in memory
(optional)" on page 49. If the problem persists, use the Reset Factory
Defaults procedure, see "Resetting Factory Defaults" on page 53.
Trouble_;hooting 125
Closed caption problems
Closedcaptionproblems
If the program or video you have selected is not closed captioned,
no captions appear on the screen.If text is not available, a black
rectangle may appear.
If this happens, turn off the closed caption feature, see "Using
closed captions" on page 68.
A closed caption signal may not display correctly under the
following circumstances:
****The recording is dubbed
****The signal reception is weak
****The signal reception is non-standard
For additional information, see "Using closed captions" on page 68.
Ratingblocking{V-Chip)problems
Forgotten PIN code.
When the PIN code screen appears, press the INFO button 4 times
within approximately 5 seconds. The old PIN code is cleared, see
"Forgotten PIN code" on page 74.
The V-Chip feature is available for U.S. V-Chip systems only, see
"Using parental controls (for USAregion)" on page 75.
NoHDlVll®CECoperation
The HDMP' CEC feature is available for Toshiba HDMP' CEC
compatible devices.
Ensure that HDMD' cables with the (_m.!) Logo are used.
When the connected HDMI :_CEC device does not work correctly
after you have changed settings of the device, turn off your TV and
unplug the power cord, then plug in and turn on again.
If several devices are connected, the HDMP' CEC feature may not
operate properly.
Read the instruction manual furnished with the connected HDMI :_
CEC device.
HDlVll®problems
HDMP _cables.
Ensure that HDMP' cables with the (Oo_,_!) Logo are used, see
"Connecting an HDMI *'or DVI device to the HDMI *'input" on
page 29.
12G Troubleshooting
Network problems
Legacy HDMI ':_'sources.
Some legacy HDMV sources may not work properly with the latest
HDMI _ TV products due to new standard adoption.
Ne orkprobiems
Cannot connect to the Internet.
Check the modem and its incoming cable/telephone connections,
see "Connecting to ahome network" on page 35.
Confirm your modem's operation.
Ensure your IP address is set up correctly.
No network connection.
If using a wired network connection, check to ensure that the LAN
cables are connected properly, see "Connecting the TV to a home
network with an Internet connection - wired" on page 37.
Ensure that the modem and router power cords are plugged in and
the devices are operating properly.
Ensure that your IP address is set up correctly, see "IP Address
Setup" on page 111.
Check to ensure proper operation of other network connected
devices.
Network Setup fails (Auto).
Check to ensure that the LAN cables are connected properly, see
"Connecting the TV to a home network with an Internet connection
- wired" on page 37.
DHCP is not enabled on the router, or no router is present. Refer to
your router's documentation for instructions on enabling DHCR If
your router does not support DHCR you must manually set up the IP
address.
Internet service is not available. Check your cable/DSL modem or
contact your ISP for Internet service issues.
Network Setup fails (Manual).
Ensure that the TV IP address is not the same as any other device on
the network.
****Example: IP address 192.168.0.100 and IP address
192.168.0.101
are different addresses on the same network.
Make sure the TV IP address is on the same subnet as the networked
computer.
Troubleshooting 127
Networkproblems
•,** Example of proper setup: The computer has the IP address
192.168.0.100 with the Subnet mask 255.255.255.0, the TV has
the IP address 192.168.0.101 with the Subnet mask
255.255.255.0; both are on the same subnet.
•,** Example of improper setup: The computer has the IP address
192.168.1.100 with the Subnet mask 255.255.255.0, the TV has
the IP address 192.168.0.101 with the Subnet mask
255.255.253.0; they are on different subnets.
Unstable network connection.
When using a wired home network connection, unplug the LAN
cables, and then reconnect them.
When using a wireless home network connection:
•*** Reboot the router:
1 Remove AC power from the router and the television for
approximately one minute.
2 Reconnect AC power to the router.
3 Reconnect AC power to the television and turn it On.
4 After approximately two minutes, check connection
stability.
•_** Connect with LAN cables, if possible, and check connection
stability.
•*** Repeat the wireless network setup procedure and check
connection stability.
The media server name is not displayed.
The LAN cables, if used, are not connected properly, see
"Connecting the TV to a home network with an Internet connection
- wired" on page 37.
The WLAN, if used, is not configured properly.
The network setup on the Server is incorrect. Make sure both the
media server and TV are using the same network type (DHCP/
manual) and have compatible network settings.
Too many devices are connected. You cannot connect more than 32
sharing devices at one time.
The media server is not turned On.
The "server" is not a media server device.
Check the firewalt and streaming settings on the media server.
128 Troubleshooting
Wireless nem,ork problems
Wirelessne ork problems
Check that the router/AP (Access point) power is On.
After starting wireless network setup, confirm that the network is
configured properly by performing the network connection test, see
"Network Connection Test" on page 113.
Check the router/AP's connection status.
If the router/AP does not support PBC or WPS, Easy Setup (PBC)
will not work even if the push-button is pressed, see "Wireless
Setup" onpage 106.
If the available router/AP list is not displayed in Easy Setup (PBC)
or Assisted Setup, the power of the router/AP may be Off. Check
that it is On, and then try restarting the scan for available routers/
APs, see "Easy Setup using PBC (Push button configuration)" on
page 107.
Refer to the router/AP's instruction manual.
lVlediaShareproblems
Incorrect functionality may occur when using a USB HUB
connection.
Photo files that were processed and edited using the computer's
application software may not be viewable.
The TV may select one format automatically and play it when
contents that support two or more formats are played.
Confirm that the contents of the USB storage device are in formats
that are supported by this TV, see "MediaShare (Videos, Music, and
Photos)" on page 83.
Copyright protected content stored on the media server may not be
playable on the TV.
Content playback stability may be affected by heavy network
traffic.
Content originally recorded on a computer may not play correctly.
Set the media sharing of the media server to the correct settings,
according to the media server instruction manual.
Depending on the media server, access may be limited by the MAC
address. Set the server according to the media server's instruction
manual.
This TV's MAC Address can be confirmed in the Network Setup
portion of the User Menu, see "MAC Address" on page 113.

Troubleshooting129
Ij?heproblem persis/s after n_ing the_lutions
For Connected MediaShare
Depending on the media server, it may take time to display the list.
iftheproblempersistsaftertryingthesolutions
Contact Toshiba at: support.toshiba.com.
ix
Specifications
NOTE ",'o Thesemodelscomplywiththespecificationslistedbelow.
,,;_,Designsandspecificationsaresubjectto changewithoutnotice.
,,_,,Thesemodelsmaynotbecompatiblewithfeaturesand/or
specificationsthatmaybeaddedinthefuture.
Televisionsystem
NTSC standard
ATSC standard 8VSB
Digital Cable 64 QAM, 256 QAM; m-the-clear,unencrypted
Channelcoverage
VHF 2 through 13
UHF 14through 69
Cable TV Mid band (A-8throughA- l, Atl_'ough I)
Superband (Jd_ough W)
Hyper band (AAdgough ZZ, AAA, BBB)
Ultra band (65through 94, 100tl_'ough 135)
130
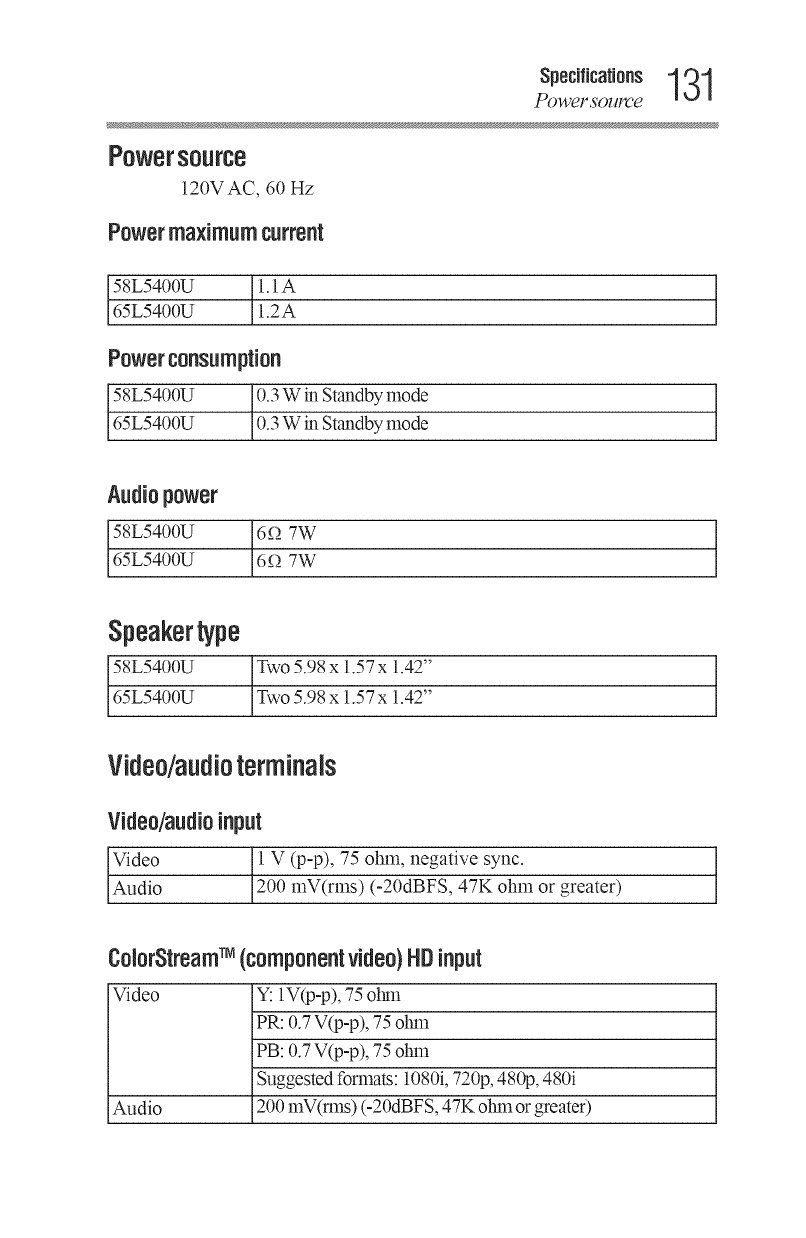
131
_DOWCF SOIIFCC
Powersource
120VAC, 60 Hz
Power maximum current
t1,1A
1.2A
Powerconsumption
58L5400U 0.3 W in Standby mode
65L5400U 0.3 W in Standby mode
Audiopower
58L5400U 60_ 7W
65L5400U 6f_ 7W
Speakertype
58L5400U Two 5.98x 157 x 1.42"
65L5400U Two 5.98x 1.57x 1.42"
Video/audioterminals
Video/audioinput
Video l V (p-p), 75 ohm, negative sync.
Audio 200 mV(rnas) (-20dBFS, 47K ohm or greater)
ColorStreamTM (componentvideo)HDinput
Video Y: IV(p-p), 75 ohn
PR: 0.7 V(p-p), 75 olin1
PB: 0.7 V(p-p), 75 olin1
Suggested formats: 1080i,720p, 480p, 480i
Audio 200 mV(rms) (-20dBFS, 47K olmaor greater)
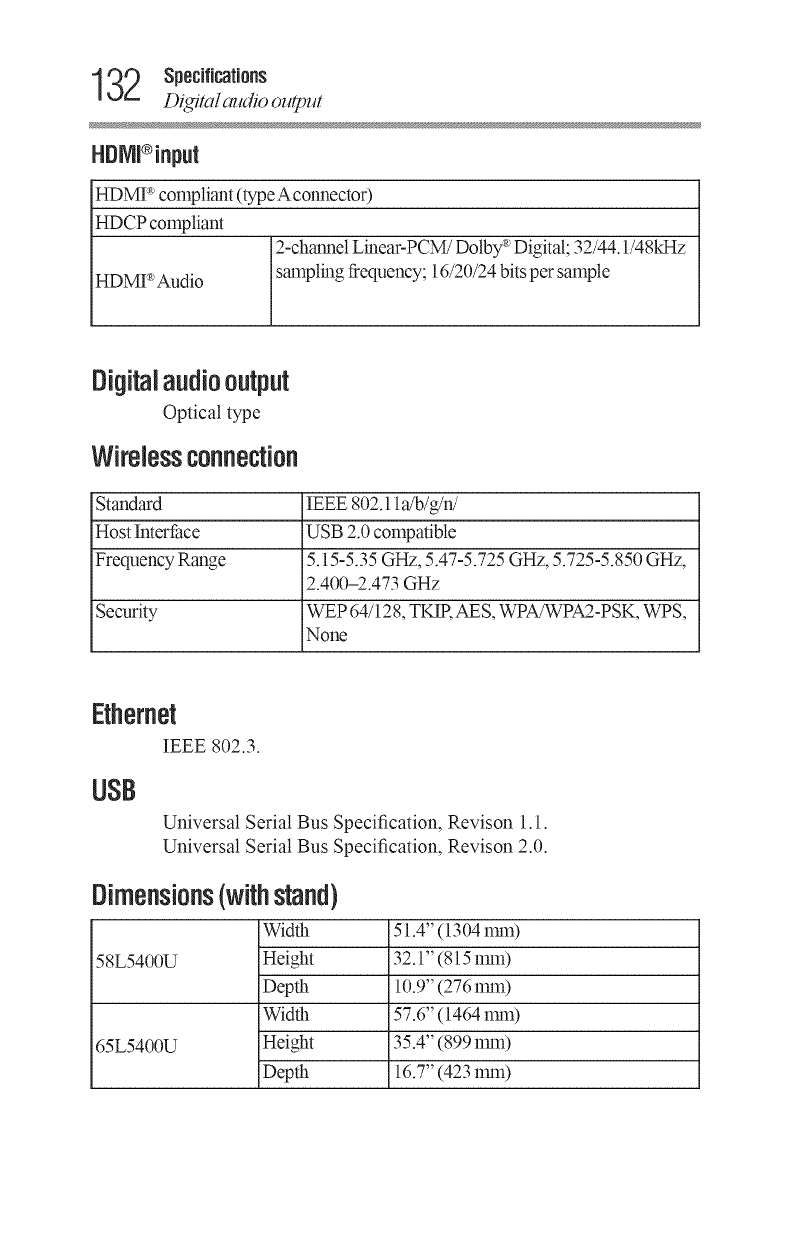
132 s,ecificatio.s
Digital audio output
HDIVll®input
HDMP' compliant (typeAconnector)
HDCP compliant
2-channel Linear-PCM/Dolby _'Digital; 32/44.1/481d-tz
HDMP'Audio sanlpling frequency; 16/20/24 bitsper sanlple
Digitalaudiooutput
Optical type
Wirelessconnection
Standard IEEE 802.11a/b/g/n!
Host Interlace USB 2.0 compatible
Frequency Range 5.15-5.35 GHz, 5.47-5.725 GHz, 5.725-5.850 GHz,
2.400-2.473 GHz
Security WEP 64/128, TKIR AES, WPAFWPA2-PSK, WPS,
None
Ethernet
IEEE 802.3.
USB
Universal Serial Bus Specification, Revison 1.1.
Universal Serial Bus Specification, Revison 2.0.
Dimensions(withstand)
Width
58L5400U
65L5400U
Height
Depth
Width
Height
Depth
51.4" (1304 nml)
32.1" (815 nml)
10.9" (276 nml)
57.6" (1464 nml)
35.4" (899 nml)
16.7" (423 nma)
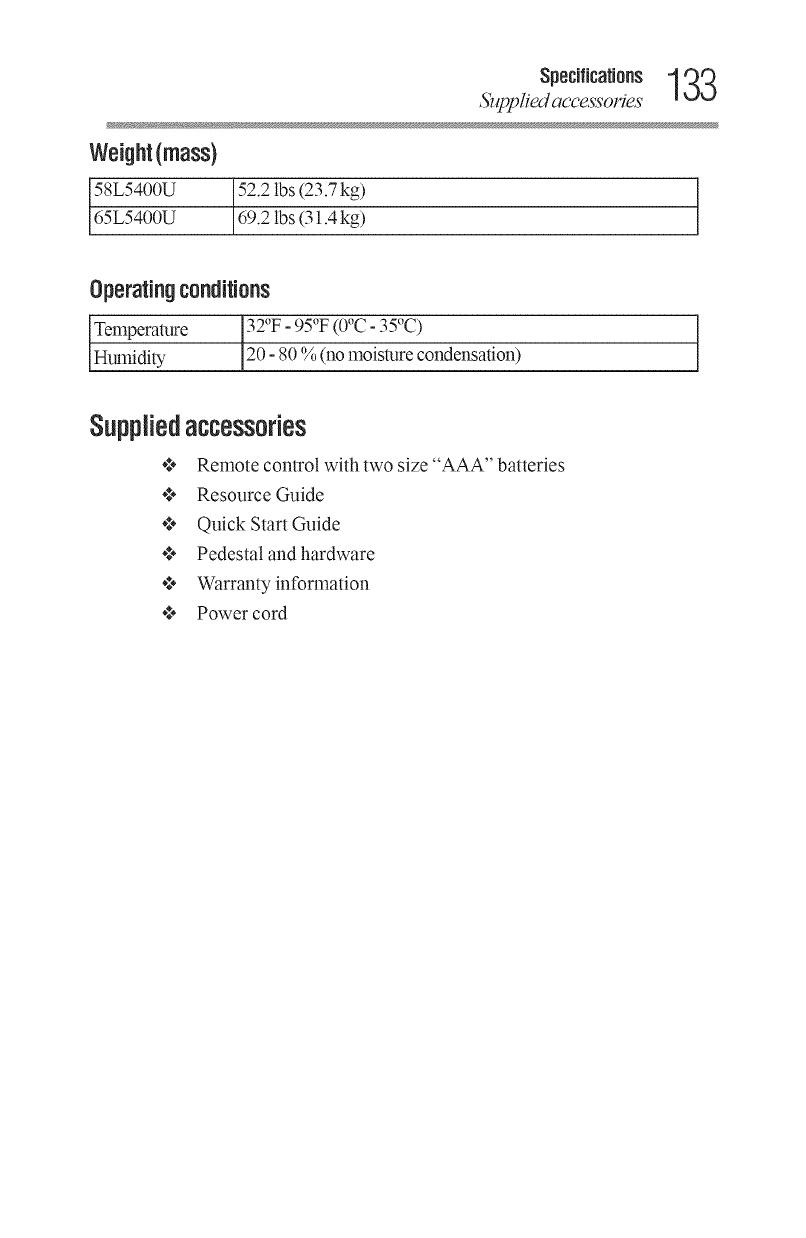
Specifications 133
5_lpplied acce_ories
Weight(mass)
58L5400U 52.2 lbs (23.7 kg)
65L5400U 69.2 lbs (31.4 kg)
Operatingconditions
30 _o o 30
_l'e .[_. 'F- 95°F (0°C - 35°C)
JHulm'dity 120 - 80 % (no moisture condensation)
Suppliedaccessories
**** Remote control with two size "AAA" batteries
****Resource Guide
****Quick Start Guide
****Pedestal and hardware
****Warranty information
****Power cord
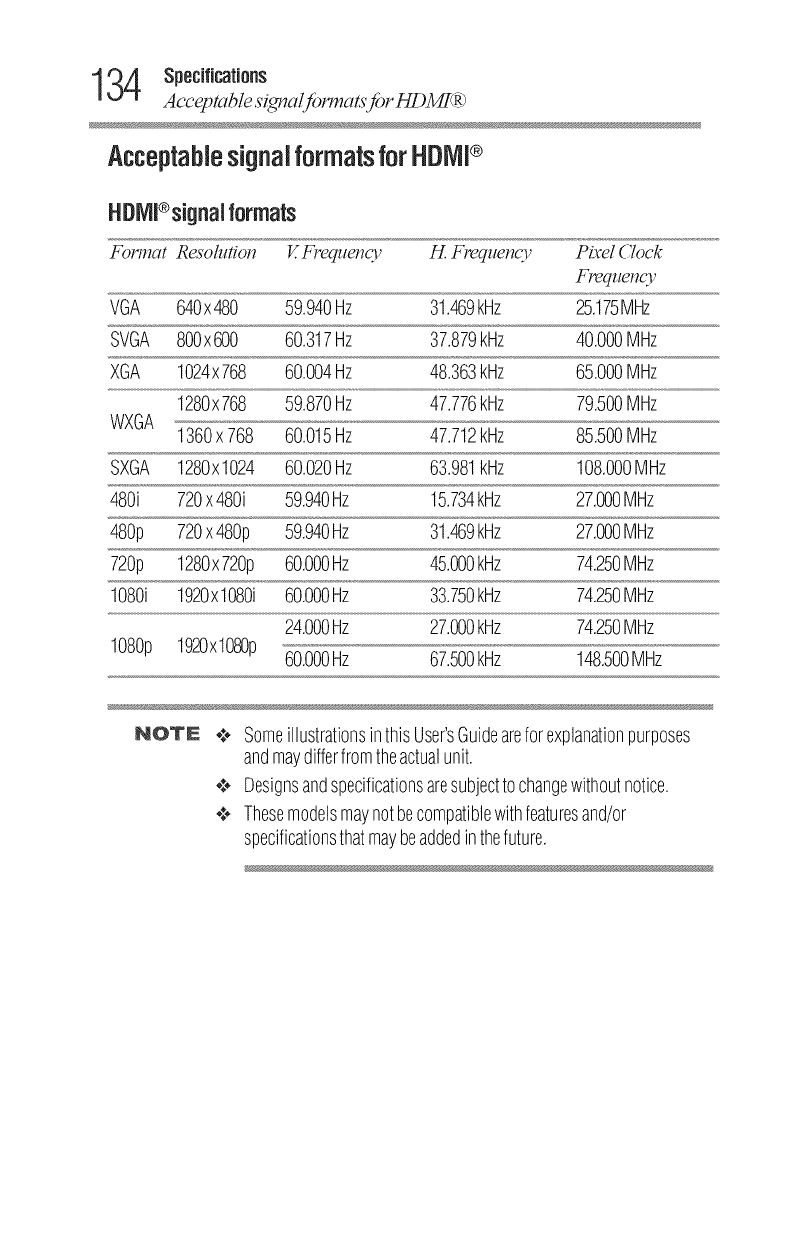
134 spec,ficatio.s
Acceptable signal f!_rmats f!_rHDM[_R_
Acceptablesignalformatsfor HDlVll®
HDMl®signalformats
Format Resolution _Frequel_cy H. Frequency Pixel Clock
Frequency
VGA 640x480 59.940Hz 31.469kHz 25.175MHz
SVGA 800x600 60.317Hz 37.879kHz 40.000MHz
XGA 1024x768 60.004Hz 48.363kHz 65.000MHz
1280x768 59.870Hz 47.776kHz 79.500MHz
WXGA 1360x 768 60.015Hz 47.712kHz 85.500MHz
SXGA 1280x1024 60.020Hz 63.981kHz 108.000MHz
480i 720x 480i 59.940Hz 15.734kHz 27.000MHz
480p 720x 480p 59.940Hz 31.469kHz 27.000MHz
720p 1280x720p 60.000Hz 45.000kHz 74.250MHz
1080i 1920x1080i 60.000Hz 33.750kHz 74.250MHz
24.000Hz 27.000kHz 74.250MHz
108% 1920x1080p 60.000Hz 67.500kHz 148.500MHz
NOTE ,¢,_SomeillustrationsinthisUser'sGuideareforexplanationpurposes
andmaydifferfromtheactualunit.
¢ Designsandspecificationsaresubjecttochangewithoutnotice.
¢ Thesemodelsmaynotbecompatiblewithfeaturesand/or
specificationsthatmaybeaddedinthefuture.

LicenseAgreement
LicenseInformationonthesoftwareusedintheTOSHIBA
Digital"IV
The software pre-installed inthe TOSHIBA* Digital Televisions consists of multiple,
independent software components. Each software component iscopyrighted by TOSHIBAor
a third party.
The TOSHIBA Digital Televisions uses sol,rare components that are distlibuted as freeware
under a third-party end-user license ageement or copyright notice (hereinafter ret}rred to as a
"EULA"). Some EULAs require that the source code of the applicable component be
disclosed as the condition fbrdistributing the software component in executable format.
In addition, some of the software components which are used in Toshiba Digital Televisions
include the software that are made or developed originally by TOSHIBA. These software and
accompanied documents are copyrighted by TOSHIBA, and protected by the CopyrightAct,
an international treaty's articles and other governing laws. The software components which
are made or developed oliginally by TOSHIBA and not subject to EI__As are not a target of
source code offering.
The Toshiba Standard Limited Warranty provided inrespect of the Digital TV is the only
warranty provided and no additional warranties are provided in respect of the software
components subject to EULAs.
Some of the sol,rare components distributed under EULAs aremade available for use by the
user on the premise that they are not copyrighted or warranted by TOSHIBA or any thirdparty.
*This End User License Ageement ("EULA") isa legal agreement between you and
TOSHIBA CORPORATION (for the purposes of this License Agreement, "TOSHIBA" shall
refer toToshiba Corporation).
135

13G uce.se.g ee,.e.t
These sot_vare components ate licensed to the user free of charge and theretbre not covered
by any warranty within the scope of the applicable laws. These sot_vare components are
provided in "as is" condition without any warranty, whether express or implied. "Warranty"
here includes, but not lunited to, an implied warranty tbrmarketability or fitness _br specific
uses. All risks associated with the quality or per_bnnance of these sol,ware components ate
assumed by the user. TOSHIBA shall not be liable whatsoever _brany cost of repair or
correction or other incidental expense incurred in connection with a de_ct tbundin any of
these sotbvare components. Unless specified under the applicable laws or in a written
agreement, a party who changes or redistributes the sot_warewith consent from the
copyright holders or based onthe atbrementioned licenses shall not be held liable
whatsoever for any loss arising from the use of or inability muse such sot_vare components.
The same applies even when the copyright holders or relevant third parties have been
inlbrmed of the possibility of such loss. "Loss" here includes normal, special, incidental and
indirect loss (including, but not limited to, the loss of data or its accuracy; loss incurred by the
user or any third pat-_y;and interface incompatibility with other sot_vare). Please read each
EULA for details on theuse conditions and items that must be observed regarding these
so_vare components.
The table below lists the sol,ware components pre-installed in the TOSHIBA Digital
Televisions, which are subject to EULAs. The user should read the applicable EULAs
carefully be_bre using these so_vare components. The EULAs are exhibited in their original
text _nglish) as exactly written by the respective parties other than TOSHIBA.
For at least three (3) years from the date of distribution of the this product, Toshibawill give
to anyone who contacts Toshiba Consumer Solutions at (800) 631-3811, for a chatge of no
more than our cost of physically pertbrming source code distribution, a complete machine-
readable copy of the complete corresponding GPL and LGPL source code _brthe version of
the GPL and LGPL code thatwe distributed to you in this product.
Pre-lnstaHedSoftware - EULA
,ipeglib.h - Exhibit A
FreeType 2.2.0 - Exhibit B
scalfact.c - Exhibit C
ExhibRA
The authors make NO WARRANTY or representation, either express or implied, with
respect to this sot_vare, its quality, accuracy, merchantability, orfitness _bra particular
purpose.
This software is provided "AS IS", and you, its user; assume the entire risk as to its quality
and accuracy.This sol,ware is copyright (C) 1991-2011, Thomas G. Lane, Guido Vollbeding.
All Rights Rese_wedexcept as specified below.Permission is hereby ganted to use, copy,
modi_, and distribute this so_vare (orportions thereo_) _brany purpose, without fee,
subiect to these conditions:
(1) If any part of the source code _brthis sot_vare is distributed, then this README file must
be included, with this copyright and no-warranty notice unaltered; and any additions,
uoo°.o 137
deletions, or changes to the original files must be cleatly indicated in accompanying
documentation.
(2) If only executable code is distributed, then the accompanying documentation must state
that "this so,rare isbased in part on thework of the h_dependent ,1PEG(houp".
(3) Permission ibruse of this software is _anted only ifthe user accepts fullresponsibility
lbr any undesirable consequences; the authors accept NO LIABILITY lbr damages of any
kind.
These conditions epply to any sof_vate derived from or based on the IJG code, notjust to the
unmodified library. If you use our work, you ought to acka_owledgeus.
Permission is NOT granted for the use of any IJG author's name or company name in
advertising or publicity relating to this sol,ware or products derived from it. This sof_vate
may be refEned to only as "the h_dependent JPEG Group's software".
We specifically permit and encourage the use of this sol,rare as thebasis of commercial
products, provided that allwatTanty or liability claims ate assumed by the product vendor.
ansi21mr.cis included in this distribution by permission oiL. Peter Deutsch, soleproprietor
of its copyright holder, Aladdin Enterprises of Menlo Patk, CA. ansi2ka_.cis NOT covered
by the above copyright and conditions, but instead by theusual distribution terms of the Dee
SoI_vate Foundation; pl_a_eipally,that you must include source code ifyou redistribute it.
(See the file ansi21mmcfor full details.) Howevel; since ansi2km-.cis not needed as part of any
pro_am generated from the IJG code, this does not lhnit you more than the Ibregoing
patagraphs do.
The Unix co_zfigurationscript %o_zfigure"was produced with GNUAutocon£ It is copyright
by the Free Sol,rare Foundation but is freely distributable. The same holds Ibr its suppolling
scripts (co_Lfig.guess,config.sub, ltmain,sh). Another support script, install-sh, is copyright
by X Consortium but is also fredy distributable.
The IJG distribution formerly included code to read and write GIF files. Toaw_id
entanglement with the Unisys LZWpatent, GIF reading support has been removed
altogethel, and the GIF writer has been simplified to produce "uncompressed GIFs". This
technk]ue does not use the LZW algorithm; the resulting GIF files are larger than usual, but
are readable by all standatd GIF decoders.
We are required to state that
"The Graphics h_terchange Format(c) is the Copyright property of CompuServe
hacoq3orated.GIF(sm) is a Service Matk property of CompuServe Incorporated."
Exhibit B
The FreeType Project LICENSE
2002-Apr- 11
Copyright 1996-2002 by
David Turner, Robert Wilhelm, and Werner Lembetg
Introduction
The FreeType Proiect is distributed in several archive packages; some of them may contain,
in addition to the FreeType font engine, vatious tools and contributions which rely on, or
relate to, the FreeType Proiect.
138 uce.se.g eeme.t
This license applies to all files found in such packages, and which do not fhllunder their own
explicit license. The license aftEcts thus the FreeType fbnt engine, the test programs,
documentation and makefiles, atthe very least.
This license was respired by the BSD, Artistic, and IJG (Independent ,IPEG Group) licenses,
which allencourage inclusion and use of free sol,rare incommercial and freeware products
alike. As a consequence, its main points are that:
o***We don't promise that this software works. However, we will be interested in
any kind of bug reports. ("as is' distribution)
o***You can use this software for whatever you want, in parts or full form, without
having to pay us. ('royalty-free' usage)
o***You may not pretend that you wrote this software. If you use it, or only parts of
it, in a program, you must acknowledge somewhere in your documentation that
you have used the FreeType code. ('credits')
We specifically pem_itand encourage the inclusion of this sot_vare, with or without
modifications, in commercial products. We disclaim allwarranties covering The FreeType
Project and assume no liability related to The FreeType Pr_wct.
Finally, many people asked us for a preferred tb_rafor a credit/disclaimer to use in
compliance with this license. We thus encourage you to use the following text:
Portions of this sol,rare are copyright <) 1996-2002 The DeeType
Proiect (freetype.org). All rights reselwed.
ExhibitC
scalfact.c Scalethctors for layer I and II This program is free software; you can redistribute it
and/or modify it under the terms of the GNU General Public License as published by the
Free Sot_vare Foundation; either version 2of the License, or (atyour option) any later
version. This program is distributed in the hope that it will be useful, but WITH( )UT ANY
WARRANTY; without even the implied warranty o f MERCHANTABILITY or FITNESS
FORA PARTICULAR PURPOSE. See the GNU General Public License fbr more details.
You should have received a copy of the GNU General Public License along with this
program; ifnot, write to the Free Sol,rare Foundation, h_c., 675 Mass Ave,Cambridge, MA
02139, USA.
C
Index
A
Acceptablesignalformatsfor HDMI®
HDMI®signalformats132
AdditionalSafetyPrecautions
Installation,Care,andService
Choosinga locationfor your B
LEDTV
ToDisplayyourLEDTVonthe
includedPedestalStand4
Adjustingthepicture
Selectingthepicturemode
Adjustingthepicturequality
Usingclosedcaptions66,67
ANT/CABLEIN
Storingchannelsin memory
(optional)
AutoTuning
ManualTuning48 C
AutoAspect
using 65
AutoStartfunction
MediaPlayer85
Availableremotecontrolkeyfunctions
HDMI®CECPlayerControlmenu
functions
HDMI®CECinputsource
selection
VOLUMEandMUTEcontrolsof
AudioReceiver94
Baseclosedcaptions
DigitalCCsettings
Adjustingtheaudio
Mutingthesound 68
BlockingTVprogramsandmoviesby
rating(V-Chip)
Downloadinganadditionalrating
system
Ratingsystem
Displayingratings75
CinemaMode
NoiseReduction
MPEGNR
DNR 102
ColorTemperature
139
140,.°ox
StaticGamma
DynaLightTM
DynamicContrast101
Componentvideocables(red/green/blue)
HDMI®cable(withHDMILogo)
Opticalaudiocable
Aboutthe connectionillustrations
25 I_
Connectingadigitalaudiosystem
Connectinga computer
Connectionto theTV'sHDMI®
terminal26, 33
ConnectingaVCR,antenna,cableTV,or
camcorder
Connectinga Blu-rayTM /DVD !'t
player,satellitereceiverwith
ColorStreamTM orVCR
ConnectinganHDMI®or DVI
deviceto theHDMI® input
HDMI®CECconnection26
ConnectingYourTV
Overviewof cabletypes
Coaxial(F-type)cable
StandardA/Vcables(red/white/ !
yellow)24
11
Dimensions(withstand)
Weight(mass)
Operatingconditions
Suppliedaccessories131
EdgeEnhancer103
EnteranewPINcode
ForgottenPINcode
ChangingordeletingyourPIN
code
Usingparentalcontrols(for USA
region) 74
ExhibitB
Introduction
ExhibitC
Index 135,136
features18,20
Full
TheaterWide1
TheaterWide2
TheaterWide3 60, 61,65,97
HDMI®1(2,or3) RGBRange97
HDMI®CEC
using 93
HDMI®InformationDisplay
DisplayingTVstatusinformation
Understandingthelastmode
memoryfeature97
Introduction
Safetyicons
Features
Overviewof installation,setup,and
use 17
lastmodememoryfeature99
LicenseAgreement
LicenseInformationonthesoftware
usedintheTOSHIBADigitalTV
Pre-lnstalledSoftware- EULA
ExhibitA 134
Locksmenu
settingpin code 74
141
M deleting75
enteringPINcode 74
MediaShare83 forgotten74
MenuLayoutandNavigation Powermaximumcurrent
Mainmenulayout Powerconsumption
Navigatingthemenusystem Audiopower
44 Speakertype 130
N programratings
displaying79
Native unlockingprograms79
4:3
Normal
DotbyDot 60, 62
NoHDMI® CECoperation
HDMI®problems
MediaPlayerproblems
Iftheproblempersistsaftertrying
thesolutions 124
0
OtherHDMI® CECfunctions
SettingupHDMI® CEC
UsingtheHDMI® settings
feature
HDMI®1(or2) RGBRange96
P
PanelLock82
parentalcontrols
using 75
picture
adjustingquality67
)icturesize
Normal63
TheaterWide1 61
TheaterWide2 61
TheaterWide3 62
pincode
changing75
Q
quicksetup
ANT/CABLEIN 48
FI
Remotecontrolproblems
Channeltuningproblems
Closedcaptionproblems
Ratingblocking(V-Chip)problems
123
ResettingFactoryDefaults53
$
safetyicons 17
SafetyPrecautions
WARNING
CHILDSAFETY
ImportantSafetyInstructions2, 4
SambaTVTM 119
ScrollingtheTheaterWideTM picture
(TheaterWide2 and3 only)
UsingtheAutoAspectfeature
Usingthe4:3 Stretch
UsingtheFREEZEfeature64
Settingchannelskip
SettingtheAVinputmode
Settingthetimezone
142,°,,ox
Viewingthe systemstatus51
Settingthesleeptimer
NoSignalPowerDown
UsingHDMI® CEC
HDMI®CECplaybackdevice(Blu-
rayTM/DVDplayer,etc.)control 91
SettingupyourTV
InitialSetup
Installationsetupselection
Menulanguage47
Slideshow
Playingmusicfiles
Viewingphotofilesandplaying
musicfilesat thesametime
Sortingphotoormusicfiles 86,87
SoundMode
StableSoundTM
UsingtheDolby® Digital
DynamicRangeControlfeature
SelectingthePINcode 73
Specifications
Televisionsystem
Channelcoverage
Powersource129
T
timer
sleeptimer 92
timezone
setting 52
ToDisplayyourLEDTVusingaWall
Bracket
FCCDeclarationof Conformity
ComplianceStatement(Part15)
ENERGYSTAR®User
Information
ImportantnotesaboutyourTV 6
TrademarkInformation
Copyright
Notice9
Troubleshooting
Generaltroubleshooting
Pictureproblems
Soundproblems120
Tuningto aspecificchannel(programmed
or unprogrammed)
Switchingbetweentwochannels
usingChannelReturn
Switchingbetweentwo
channelsusingSurfLockTM
Selectingthe picturesize 58
TVfrontandsidepanelcontrolsand
connections
TVbackpanelconnections21
TVpanelcontrols
leftside 21
TVremote
functionality41
U
Unlockingprogramstemporarily
Usingthe inputlockfeature
Lockingchannels
UsingtheGameTimerTM 79
UsingtheDigitalAudioSelection
Selectingstereo/SAPbroadcasts
Adjustingtheaudioquality
DTSTruSurroundTM 71
Usingthepanellockfeature
Usingthe MediaPlayer
UsingMediaPlayerwitha USB
device
AutoStartfunction82
UsingtheRemoteControl
Installingbatteries
Remotecontroleffectiverange
Learningaboutthe remotecontrol
39
UsingtheTV'sAdvancedFeatures
Usingtheadvancedpicturesettings
,.°ox143
ColorMasterTM
BaseColorAdjustment100
V
Video/audioterminals
Video/audioinput
ColorStreamTM (component
video)HDinput
HDMI®input 130
videoinputsources
labeling56
