Toshiba 58L7350U User Manual LED TELEVISION Manuals And Guides 1307097L
User Manual: Toshiba 58L7350U 58L7350U TOSHIBA LED TELEVISION - Manuals and Guides View the owners manual for your TOSHIBA LED TELEVISION #58L7350U. Home:Electronics Parts:Toshiba Parts:Toshiba LED TELEVISION Manual
Open the PDF directly: View PDF ![]() .
.
Page Count: 103 [warning: Documents this large are best viewed by clicking the View PDF Link!]

Leading innovation
IntegratedHighDefinitionLED
TelevisionUser'sGuide:
58L7350U/65L7350U
If you need assistance:
Toshiba's Support Web site support.toshiba.corn
For more information, see "Troubleshooting" on page 173 in this guide.
Owner's Record
The model number and serial number are on the back and side of your television.
Record these numbers, whenever you communicate with your Toshiba dealer about
this Television.
Model name:
Serial number:
Register your Toshiba Television at register.toshiba.com
Note: To display a High Definition
picture, the TV must be receiving a
High Definition signal (such as an over-
the-air High Definition TV broadcast, a
High Definition digital cable program,
or a High Definition digital satellite
program). For details, contact your TV
antenna installer, cable provider, or
satellite provider
GMA300020011
3/13
2
CHILD SAFETY:
PROPERTELEViSiON PLACEMENT MATTERS
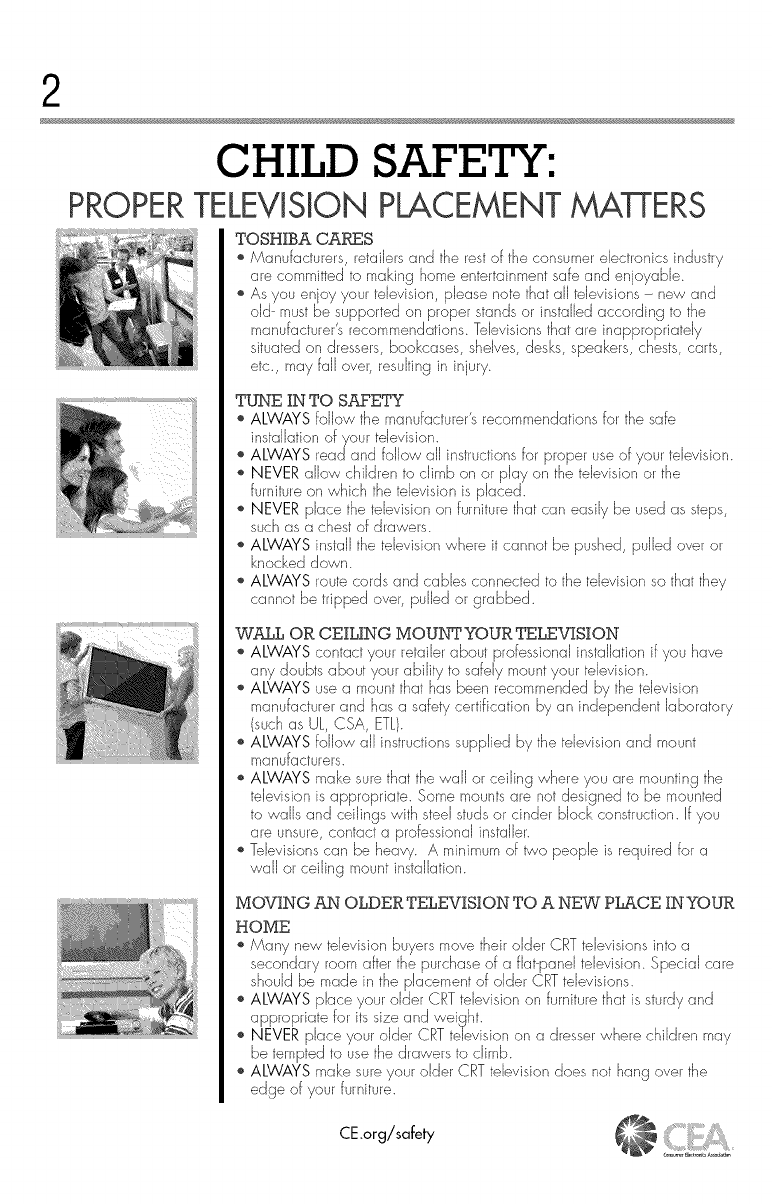
TOSHIBA CARES
o Manufacturers, retailers and the rest of the consumer electronics industry
are committed to making home entertainment safe and enjoyable.
o As you en oy your television, please note that all televisions - new and
old-must be supported on proper stands or installed according to the
etc., may fall over, resulting in injury.
TUNE IN TO SAFETY
o ALWAYS follow the manufacturer's recommendations for the safe
installation ofyour television.
o ALWAYS readand follow all instructions for plopel use of your television.
o NEVER allow children to climb on or play on the tdevision or the
furniture on which the television is placed.
o NEVER place the television on furniture that car/easily be used as steps,
such as a chest of drawers.
o ALWAYS install the television where it cannot be pushed, pulled over or
knocked down.
o ALWAYS route cords and cables connected to the television so that they
cannot be tripped over, pulled or grabbed.
WALL OR CEILING MOUbY£YOUR TELEVISION
o ALWAYS contact your retailer about professional installation if you have
any doubts about your ability to safely mount your television.
o ALWAYS use a mount that has been recamrr_ended by the television
manufacturer and has a safety certification by an independent laboratory
(such as UL, CSA, ETL).
o ALWAYS follow all instructions supplied by the television and mount
manufacturers.
o ALWAYS make sure that the wall or ceiling where you are mounting the
television is appropriate. Same mounts are not designed to be mounted
to walls and ceilings with steel studs or cinder block construction. If you
are unsure, contact a professional installer.
o Televisions can be heavy. A minimum of _a people is required for a
wall or ceiling i_,,/ountir/staJJation.
MOVING AN OLDER TELEVISION TO ANEW PLACE IN YOUR
HOME
o Many new television buyers move their older CRT televisions into a
secondary room after the purchase of a flat-panel television. Special care
should be made ir/the placement of older CRT televisions.
o ALWAYS place your older CRT television on furniture that is sturdy and
appropriate for its size and weight.
o NEVER place youl older CRT television on a dresser where children may
be tempted to use the drawers to climb.
o ALWAYS make sure your older CRT television does not hang over the
edge of your furniture.
CE.org/safely
3
DearCustomer,
Thank you for purchasing this Toshiba LED TV.
This document will help you use the many exciting
features of your new LED TV. Before operating your
LED TV, carefully read this manual completely.
Safety Precautions
WARNING: TO REDUCE THE RISK OF FIRE
OR ELECTRIC SHOCK, DO NOT EXPOSE
THIS APPLIANCE TO RAIN OR MOISTURE.
WARNING
WARNING: TO REDUCE THE RISK OF ELECTRIC
SHOCK, DO NOT REMOVE COVER (OR BACK).
NO USER-SERVICEABLE PARTS INSIDE. REFER
SERVICING TO QUALIFIED SERVICE PERSONNEL.
The lightning flash with arrowhead
symbol, within an equilateral triangle,
is intended to alert the user to the
presence of uninsulated "dangerous
voltage" within the product's
enclosure that may be of sufficient
magnitude to constitute a risk of
electric shock to persons.
The exclamation point within an
equilateral triangle is intended to
alert the user to the presence of
important operating and maintenance
(servicing) instructions in the literature
accompanying the appliance.
WARNING
To prevent injury, this apparatus must be securely
attached to the floor/wall in accordance with the
installation instructions. See item 26) on page 4.
WARNING: If you decide to wall mount this
television, always use a mounting bracket that has
been Listed by an independent laboratory (such as
UL, CSA, ETL) and is appropriate for the size and
weight of this television. The use of inappropriate or
non-Listed mounting brackets could result in serious
bodily injury and/or property damage. See "To Display
your LED TV us ng a Wa Bracket: on page 6.
NOTETO CATVINSTALLERS
This is a reminder to call the CATV system installer's
attention to Article 820-40 of the U.S. NEC, which
provides guidelines for proper grounding and, in
particular, specifies that the cable ground shall be
connected to the grounding system of the building,
as close to the point of cable entry as practical. For
additional antenna grounding information, see items
33) and 34) on page 5.
ImportantSafety Instructions
1) Read these instructions.
2) Keep these instructions.
3) Heed all warnings.
4) Follow all instructions.
5) Do not use this apparatus near water.
6) Clean only with dry cloth.
7) Do not block any ventilation openings. Install in
accordance with the manufacturer's instructions.
8) Do not install near any heat sources such as
radiators, heat registers, stoves, or other products
(including amplifiers) that produce heat.
9) Do not defeat the safety
purpose of the polarized
or grounding type plug. A
polarized plug has two blades
with one wider than the other. A
grounding type plug has two blades and a third
grounding prong. The wide blade or the third
prong are provided for your safety. If the provided
plug does not fit into your outlet, consult an
electrician for replacement of the obsolete outlet.
10) Protect the power cord from being walked on
or pinched, particularly at plugs, convenience
receptacles, and the point where they exit from
the apparatus.
11) Only use attachments/accessories specified
by the manufacturer.
12) Use only with the cart, stand,
tripod, bracket, or table specified
by the manufacturer, or sold
with the apparatus. When a cart
is used, use caution when moving
the cart/apparatus combination to
avoid injury from tip-over.
13) Unplug this apparatus during lightning storms
or when unused for long periods of time.
14) Refer all servicing to qualified service
personnel. Servicing is required when the
apparatus has been damaged in any way, such
as power-supply cord or plug is damaged, liquid
has been spilled or objects have fallen into the
apparatus, the apparatus has been exposed to
rain or moisture, does not operate normally, or
has been dropped.
AdditionalSafety Precautions
14a) CAUTION: If the TV is dropped and the cabinet
or enclosure surface has been damaged or the
TV does not operate normally, take the following
precautions:
• ALWAYS turn off the TV and unplug the power
cord to avoid possible electric shock or fire.
• NEVER allow your body to come in contact with
any broken glass or liquid from the damaged
television. The LCD panel inside the TV contains
4
glass and a toxic liquid. If the liquid comes in
contact with your mouth or eyes, or your skin
is cut by broken glass, rinse the affected area
thoroughly with water and contact your doctor
immediately.
• ALWAYS contact a service technician to inspect
the TV any time it has been damaged or
dropped.
15) CAUTION:
• To reduce the risk of electric shock, do not
use the polarized plug with an extension cord,
receptacle, or other outlet unless the blades
can be inserted completely to prevent blade
exposure.
• To prevent electric shock, match wide blade of
plug to wide slot; fully insert.
16) CAUTION:
• Do not let children swallow any small parts
included on or with the product or play with the
plastic bag. Keep the small parts and the plastic
bag out of the reach of children.
17) CAUTION:
• Do not let water or other liquids come into
contact with the product, as it may result in
damage.
18)WARNING:
• To prevent the spread of fire, keep candles or
other open flames away from this product at all
times.
• Keep the product away from direct sunlight, fire
or a heat source such as a heater. This may
reduce the product lifetime or result in fire.
Installation, Care, and Service
Installation
Follow these recommendations and precautions and
heed all warnings when installing your TV:
19) WARNING: NEVER expose batteries
to excessive heat such as sunshine
or fire,
20)ALWAYS plug the product into an outlet that is
located in such a manner that it can be easily
unplugged in case the product requires service.
21) NEVER route the product's power cord inside a
wall or similar enclosed area.
22) Never modify this equipment. Changes or
modifications may void: a) the warranty, and b)
the user's authority to operate this equipment
under the rules of the Federal Communications
Commission.
23) DANGER: RISK OF
SERIOUS PERSONAL
INJURY, DEATH, OR
EQUIPMENT DAMAGE
Never place the TV on an unstable
cart, stand, or table. The TV may fall, causing
serious personal injury, death, or serious damage
to the TV.
24)When selecting a location for the TV,
• NEVER allow any part of the TV to hang over
the edge of the supporting furniture,
• NEVER place the TV on tall furniture (for
example, entertainment centers or bookcases)
without anchoring both the furniture and the TV
to a suitable support,
• Never place cloth or other material between the
TV and the supporting furniture.
• NEVER allow children to climb on the TV.
25) To avoid damage to this product, never place or
store the TV in direct sunlight; hot, humid areas;
or areas subject to excessive dust or vibration.
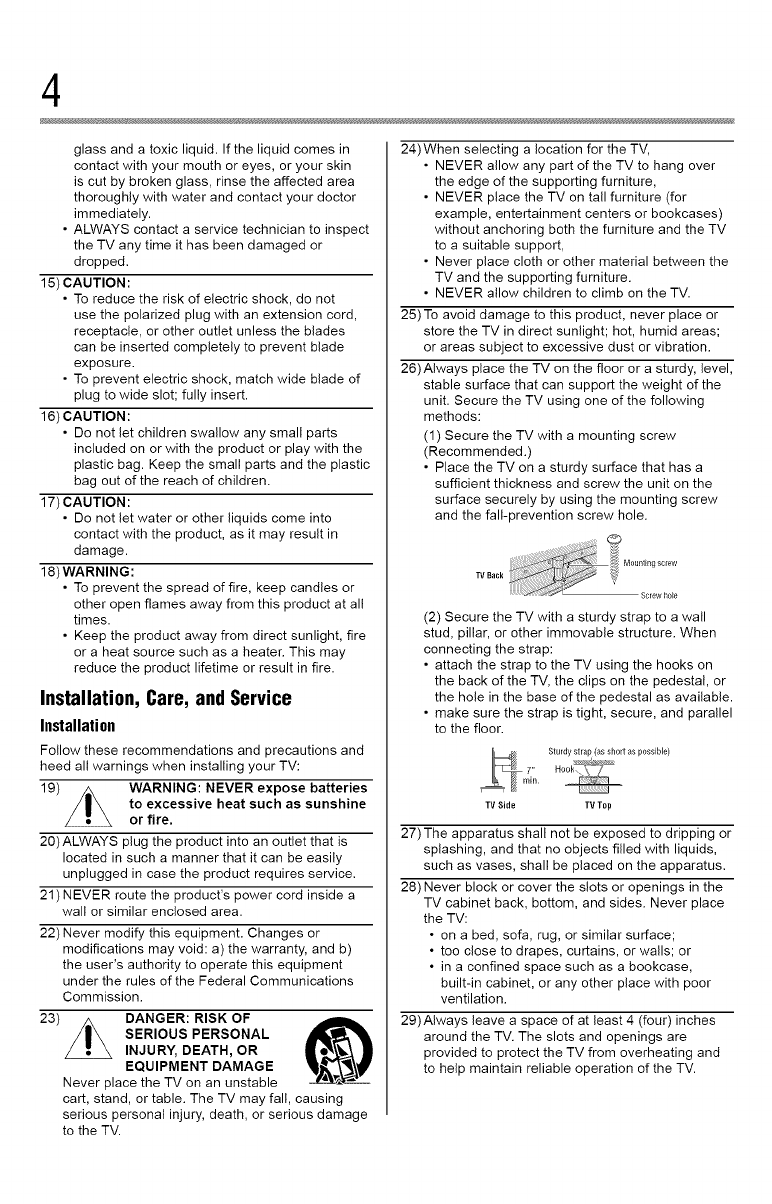
26)Always place the TV on the floor or a sturdy, level,
stable surface that can support the weight of the
unit. Secure the TV using one of the following
methods:
(1) Secure the TV with a mounting screw
(Recommended.)
• Place the TV on a sturdy surface that has a
sufficient thickness and screw the unit on the
surface securely by using the mounting screw
and the fall-prevention screw hole.
TVBack i_1}_i_i0untingscreWscrewh01e
(2) Secure the TV with a sturdy strap to a wall
stud, pillar, or other immovable structure. When
connecting the strap:
• attach the strap to the TV using the hooks on
the back of the TV, the clips on the pedestal, or
the hole in the base of the pedestal as available.
• make sure the strap is tight, secure, and parallel
to the floor.
_l_/_ Sturdy strap (as short as possible)
7"
rain.
TV Side TV Top
27)The apparatus shall not be exposed to dripping or
splashing, and that no objects filled with liquids,
such as vases, shall be placed on the apparatus.
28) Never block or cover the slots or openings in the
TV cabinet back, bottom, and sides. Never place
the TV:
• on a bed, sofa, rug, or similar surface;
• too close to drapes, curtains, or walls; or
• in a confined space such as a bookcase,
built-in cabinet, or any other place with poor
ventilation.
29)Always leave a space of at least 4 (four) inches
around the TV. The slots and openings are
provided to protect the TV from overheating and
to help maintain reliable operation of the TV.
5
30) Never allow anything to rest on or roll over the
power cord, and never place the TV where the
power cord is subject to wear or abuse.
31) Never overload wall outlets and extension cords.
32)Always operate this equipment from a 120V AC,
60 Hz power source.
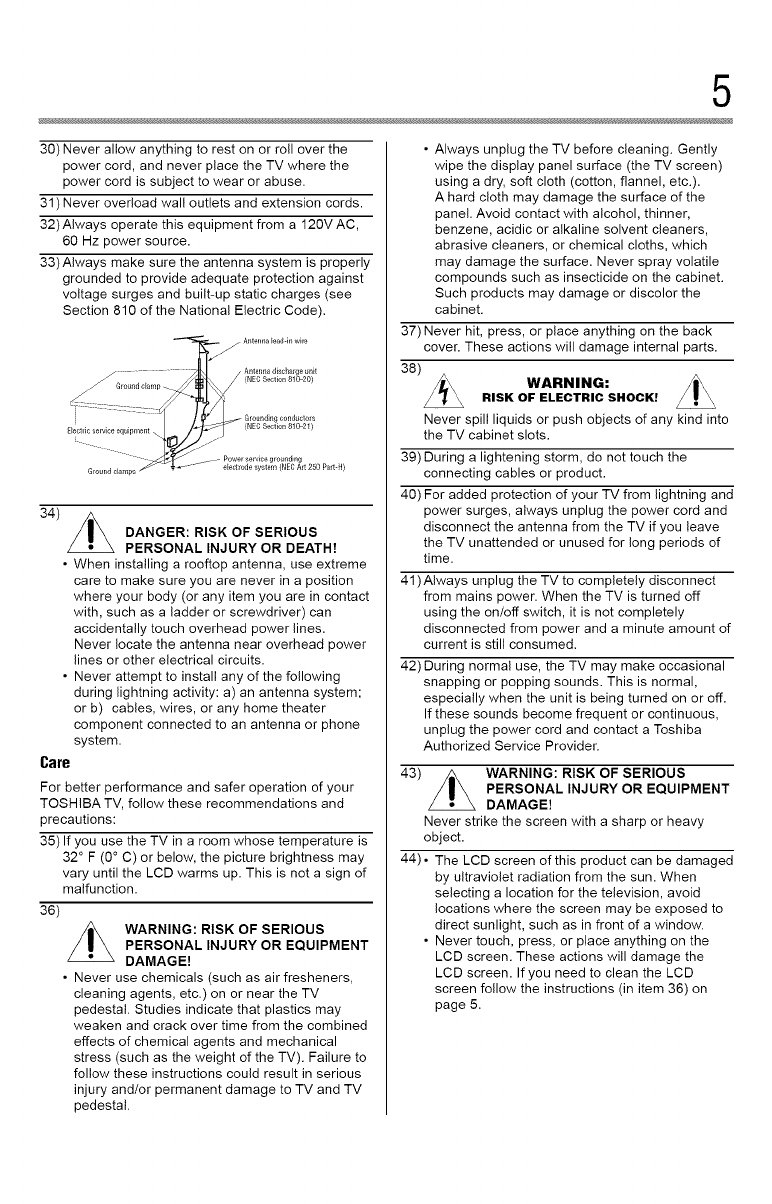
33)Always make sure the antenna system is properly
grounded to provide adequate protection against
voltage surges and built-up static charges (see
Section 810 of the National Electric Code).
34)
DANGER: RISK OF SERIOUS
PERSONAL INJURY OR DEATH!
•When installing a rooftop antenna, use extreme
care to make sure you are never in a position
where your body (or any item you are in contact
with, such as a ladder or screwdriver) can
accidentally touch overhead power lines.
Never locate the antenna near overhead power
lines or other electrical circuits.
• Never attempt to install any of the following
during lightning activity: a) an antenna system;
or b) cables, wires, or any home theater
component connected to an antenna or phone
system.
Care
For better performance and safer operation of your
TOSHIBA TV, follow these recommendations and
precautions:
35) If you use the TV in a room whose temperature is
32 ° F (0° C) or below, the picture brightness may
vary until the LCD warms up. This is not a sign of
malfunction.
36)
WARNING: RISK OF SERIOUS
PERSONAL INJURY OR EQUIPMENT
DAMAGE!
• Never use chemicals (such as air fresheners,
cleaning agents, etc.) on or near the TV
pedestal. Studies indicate that plastics may
weaken and crack over time from the combined
effects of chemical agents and mechanical
stress (such as the weight of the TV). Failure to
follow these instructions could result in serious
injury and/or permanent damage to TV and TV
pedestal.
• Always unplug the TV before cleaning. Gently
wipe the display panel surface (the TV screen)
using a dry, soft cloth (cotton, flannel, etc.).
A hard cloth may damage the surface of the
panel. Avoid contact with alcohol, thinner,
benzene, acidic or alkaline solvent cleaners,
abrasive cleaners, or chemical cloths, which
may damage the surface. Never spray volatile
compounds such as insecticide on the cabinet.
Such products may damage or discolor the
cabinet.
37) Never hit, press, or place anything on the back
cover. These actions will damage internal parts.
38)
WARNING:RISK OF ELECTRIC SHOCK!
Never spill liquids or push objects of any kind into
the TV cabinet slots.
39) During a lightening storm, do not touch the
connecting cables or product.
40) For added protection of your TV from lightning and
power surges, always unplug the power cord and
disconnect the antenna from the TV if you leave
the TV unattended or unused for long periods of
time.
41 )Always unplug the TV to completely disconnect
from mains power. When the TV is turned off
using the on/off switch, it is not completely
disconnected from power and a minute amount of
current is still consumed.
42) During normal use, the TV may make occasional
snapping or popping sounds. This is normal,
especially when the unit is being turned on or off.
If these sounds become frequent or continuous,
unplug the power cord and contact a Toshiba
Authorized Service Provider.
43) WARNING: RISK OF SERIOUS
PERSONAL INJURY OR EQUIPMENT
DAMAGE!
Never strike the screen with a sharp or heavy
object.
44) • The LCD screen of this product can be damaged
by ultraviolet radiation from the sun. When
selecting a location for the television, avoid
locations where the screen may be exposed to
direct sunlight, such as in front of a window.
• Never touch, press, or place anything on the
LCD screen. These actions will damage the
LCD screen. If you need to clean the LCD
screen follow the instructions (in item 36) on
page 5.

6
Service
45) WARNING:
RISK OF ELECTRIC SHOCK!
Never attempt to service the TV yourself. Opening
and removing the covers may expose you to
dangerous voltage or other hazards. Failure
to follow this WARNING may result in death or
serious injury. Refer all servicing not specified
in this manual to a Toshiba Authorized Service
Provider,
46) If you have the TV serviced:
•Ask the service technician to use only
replacement parts specified by the manufacturer.
• Upon completion of service, ask the service
technician to perform routine safety checks
to determine that the TV is in safe operating
condition.
Choosinga location for your LEDTV
To Display your LED TV on the included Pedestal
Stand:
Observe the following safety precautions:
1) Read and follow the pedestal assembly
instructions included with the pedestal.
CAUTION: Before beginning pedestal assembly,
carefully lay the front of the LCD Panel face down
on a flat, cushioned surface such as a quilt or
blanket. Leave the bottom of the unit protruding
over the edge of the surface and assemble the
pedestal as indicated below.
Note: Extreme care should always be used when
attaching the pedestal stand to avoid damage to
the LCD panel.
2) Place the TV on a sturdy, level surface that can
support the weight of the TV.
3) Be sure to secure the TV to a wall, pillar, surface,
or other immovable structure see item 26) page
4 for additional details.
To Display your LED TV using a Wall Bracket:
If you decide to wall mount your LED TV, always use
a wall bracket Listed by an independent laboratory
(such as UL, CSA, ETL) that is appropriate for the
size and weight of the TV (see page 3):
1) CAUTION: Two people are required for
installation.
2) Unplug and remove any cables and/or other
component connectors from the rear of the TV.
3) Remove the screws of the VESA Mounting
Pattern show in the table if applicable.
CAUTION: Do not use the screws removed from
the back cover to attach the wall mount bracket to
the TV.
4) Always use the screws supplied or recommended
by the wall mount manufacturer.
5) Follow the instructions provided with your wall
bracket. Before proceeding, make sure the
appropriate bracket(s) are attached to the wall and
the back of the TV as described in the instructions
provided with the wall bracket.
6) After attaching the appropriate bracket(s) to the
wall and the back of the TV, remove the pedestal
stand from the TV, as described below.
7) VESA Mounting Pattern
58L7350U 400x400 mm M6
65L735OU 400x400 mm M6
(unit in mm)
Removing the Pedestal Stand
1) Carefully lay the front of the unit face down on a
flat, cushioned surface such as a quilt or blanket.
Leave the stand protruding over the edge of the
surface.
Note: Extreme care should always be used when
removing the pedestal stand to avoid damage to
the LCD panel.
2) Remove the screws shown in the below diagram.
This will allow removal of the pedestal stand.
3) Once you have removed all of the screws holding
the pedestal stand in place, remove the pedestal
stand from the TV.
58V 65" VESA Mounting Pattern
Four stand screws One clip
CAUTION: Always place the TV on the floor or a
sturdy, level, stable surface that can support the
weight of the unit. Secure the TV as described in
item 26) of the Important Safety Instructions in
this document.
7
SafetyPrecautionsfor 3D glasses
Available 3D glasses
Toshiba FPT-AGO3 (supplied)
• The 3D function has been designed for
private use and entertainment in your home
environment. Please note that any commercial
use of the 3D function could lead to copyright
infringement of authors' rights. Toshiba asks
you to respect the intellectual property rights of
third parties.
Warning
DO NOT INGEST BATTERY, CHEMICAL BURN
HAZARD.
• This product contains a coin/button cell battery.
If the coin/button cell battery is swallowed, it
can cause severe internal burns in just 2 hours
and can lead to death.
• Keep new and used batteries away from
children. If the battery compartment does not
close securely, stop using the product and keep
it away from children.
• If you think batteries might have been
swallowed or placed inside any part of the body,
seek immediate medical attention.
About handling the 313 glasses
• Do not leave the 3D glasses or the accessories
within the reach of small children.
Inhaling or swallowing them may cause suffocation
or lesions in the stomach wall.
If swallowed, consult a doctor immediately.
• Do not repair, modify, or disassemble the 3D
glasses by yourself.
Doing so may cause a fire or cause you to become
indisposed while viewing 3D images.
• Do not expose the glasses to excessive heat
such as sunshine, fire, or the like.
Caution
About the 3D glasses
• Do not use the 3D glasses if they are cracked,
broken, or not working properly.
Continuing to use them in such a state may cause
injury, eye strain, or indisposition.
• Do not stand or walk while wearing 3D glasses.
You may lose your balance which could result in
falls or other accidents.
• Do not wear the 313glasses for any purpose
other than viewing 3D programming.
3D glasses do not function as sunglasses.
• Do not drop, exert pressure on, or step on the
313 glasses.
Doing so may damage the glass section, which may
result in injury.
Exposing the 3[9 glasses to liquid or excessive heat
may damage the liquid crystal shutter function.
• If your nose or temple turns red, or you feel any
pain or discomfort, stop using the 31:)glasses.
Such symptoms may occur when wearing 3D
glasses for long periods of time.
• Be careful not to pinch your fingers in the hinge
of the 3D glasses.
Cautions on watching the 3D images
• Some viewers may experience a seizure or
blackout when exposed to certain flashing
images or lights contained in certain 3D
television pictures or video games.
Anyone who has had a seizure, loss of awareness,
or other symptoms linked to an epileptic condition,
or has a family history of epilepsy, should contact a
health care provider before using the 3D function.
- Due to the possible impact on vision development,
viewers of 3D video images should be age 6 or
above.
Children and teenagers may be more susceptible
to health issues associated with viewing in 3[9 and
should be closely supervised to avoid prolonged
viewing without rest.
• Avoid using the 3D function when under the
influence of alcohol.
• If you are ill or feel ill, you should refrain from
viewing 313 images, and consult your health
care provider as may be appropriate.
• If you experience any of the following symptoms
when viewing 31:)video images, stop viewing
and contact your health care provider:
Convulsions, eye or muscle twitching, loss of
awareness, altered vision, involuntary movements,
disorientation, eye strain, nausea!vomiting,
dizziness, headaches.
• If you feel eye fatigue or other discomfort
from viewing 313video images, remove the 313
glasses and discontinue use until the condition
is eliminated.
• Viewing in 3D may cause dizziness and/or
disorientation for some viewers.
Therefore, to avoid injury do not place your TV near
open stairwells, balconies, or wires.
Also do not sit near objects that could be broken if
accidentally hit.
When viewing 3D images, always wear 3D glasses.
• Watching 3D images without 3D glasses may
cause eye strain.
Use specified 3D glasses.
• When watching 3D images, do not wear 3D
glasses at an angle and do not lie down.
If you watch while lying down or with the glasses
tilted, the 3D effect is lost and it may cause eye
strain.
• It is recommended that the viewer's eyes and
3D glasses are level with the screen.
• If you have prescription eye glasses or contact
lenses, wear the 3D glasses over them.
Watching 3D images without appropriate eyewear
may cause eye strain.
• If3D images often appear in double or if you
cannot see the images in 3D, stop viewing.
Continuous viewing may cause eye strain.
8
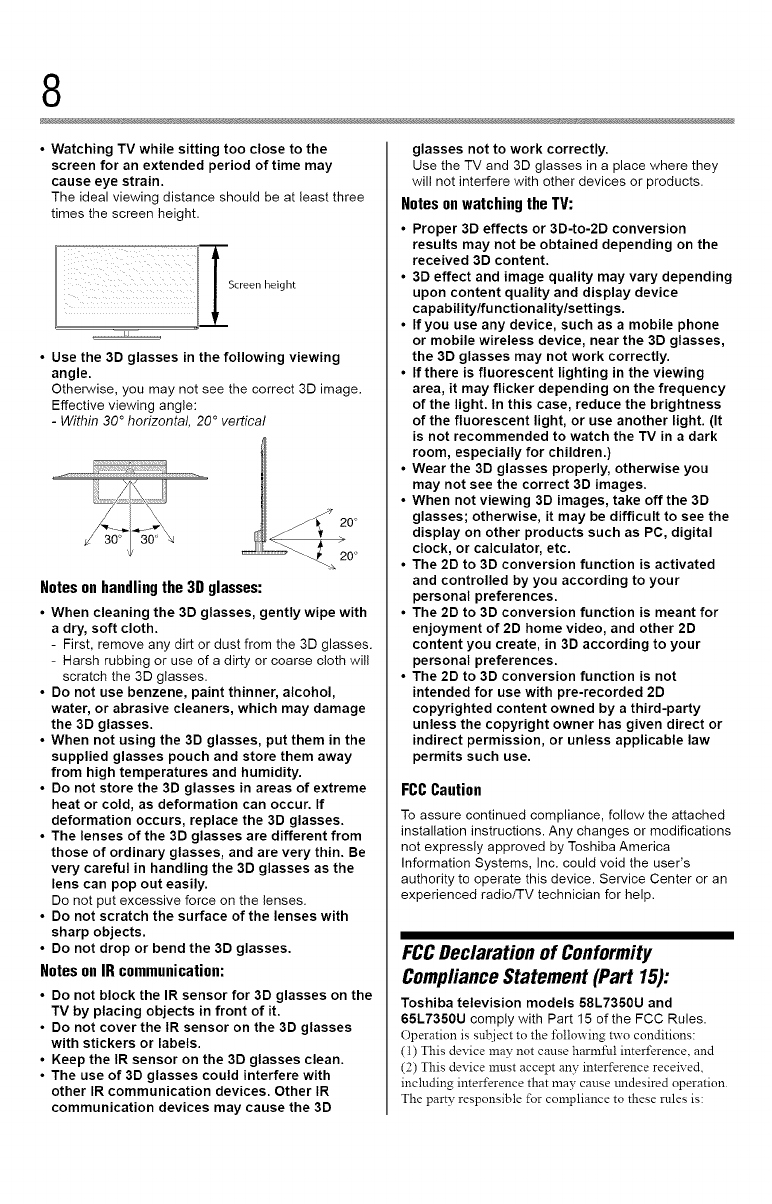
•Watching TV while sitting too close to the
screen for an extended period of time may
cause eye strain.
The ideal viewing distance should be at least three
times the screen height.
Screen height
• Use the 3D glasses in the following viewing
angle.
Otherwise, you may not see the correct 3D image.
Effective viewing angle:
-Within 30 °horizontal, 20 ° vertical
Notes onhandling the 3D glasses:
• When cleaning the 3D glasses, gently wipe with
a dry, soft cloth.
- First, remove any dirt or dust from the 3D glasses.
- Harsh rubbing or use of a dirty or coarse cloth will
scratch the 3D glasses.
• Do not use benzene, paint thinner, alcohol,
water, or abrasive cleaners, which may damage
the 3D glasses.
• When not using the 3D glasses, put them in the
supplied glasses pouch and store them away
from high temperatures and humidity.
• Do not store the 3D glasses in areas of extreme
heat or cold, as deformation can occur. If
deformation occurs, replace the 3D glasses.
• The lenses of the 3D glasses are different from
those of ordinary glasses, and are very thin. Be
very careful in handling the 3D glasses as the
lens can pop out easily.
Do not put excessive force on the lenses.
• Do not scratch the surface of the lenses with
sharp objects.
• Do not drop or bend the 3D glasses.
Notes on IR communication:
• Do not block the IR sensor for 3D glasses on the
TV by placing objects in front of it.
• Do not cover the IR sensor on the 3D glasses
with stickers or labels.
• Keep the IR sensor on the 3D glasses clean.
• The use of 3D glasses could interfere with
other IR communication devices. Other tR
communication devices may cause the 3D
glasses not to work correctly.
Use the TV and 3D glasses in a place where they
will not interfere with other devices or products.
Notes on watching the TV:
• Proper 3D effects or 3D-to-2D conversion
results may not be obtained depending on the
received 3D content.
• 3D effect and image quality may vary depending
upon content quality and display device
capability/fu nctionality/settings.
• If you use any device, such as a mobile phone
or mobile wireless device, near the 3D glasses,
the 3D glasses may not work correctly.
• If there is fluorescent lighting in the viewing
area, it may flicker depending on the frequency
of the light. In this case, reduce the brightness
of the fluorescent light, or use another light. (It
is not recommended to watch the TV in a dark
room, especially for children.)
• Wear the 3D glasses properly, otherwise you
may not see the correct 3D images.
• When not viewing 3D images, take offthe 3D
glasses; otherwise, it may be difficult to see the
display on other products such as PC, digital
clock, or calculator, etc.
• The 2D to 3D conversion function is activated
and controlled by you according to your
personal preferences.
• The 2D to 3D conversion function is meant for
enjoyment of 2D home video, and other 2D
content you create, in 3D according to your
personal preferences.
• The 2D to 3D conversion function is not
intended for use with pre-recorded 2D
copyrighted content owned by a third-party
unless the copyright owner has given direct or
indirect permission, or unless applicable law
permits such use.
FCCCaution
To assure continued compliance, follow the attached
installation instructions. Any changes or modifications
not expressly approved by Toshiba America
Information Systems, Inc. could void the user's
authority to operate this device. Service Center or an
experienced radio/TV technician for help.
FCCDeclaration of Conformity
ComplianceStatement (Part 15):
Toshiba television models 58L7350U and
65L7350U comply with Part 15 of the FCC Rules.
Operation is subject to the following two conditions:
(1) This device may not cause harmful interference, and
(2) This device must accept any interference received,
including interference that may cause tmdesired operation.
The party responsible for compliance to these rules is:
9
Toshiba America Information Systems, Inc. 9740 Irvine
Blvd., Irvine, CA 92618. Phone: 800-631-3811
Note: This equipment has been tested and found
to comply with the limits for a Class B digital device,
pursuant to Part 15 of the FCC Rules. These limits
are designed to provide reasonable protection against
harmful interference in a residential installation. This
equipment generates, uses, and can radiate radio
frequency energy and, if not installed and used in
accordance with the instructions, may cause harmful
interference to radio communications. However, there
is no guarantee that interference will not occur in a
particular installation. If this equipment does cause
harmful interference to radio or television reception,
which can be determined by removing and applying
power to the equipment, the user is encouraged to
try to correct the interference by one of the following
measures.
• Reorient or relocate the receiving antenna.
• Increase the separation between the equipment and
receiver.
• Connect the equipment into an outlet on a circuit
different from that to which the receiver is connected.
• Consult the dealer or an experienced radioiTV technician
for help.
Caution: Changes or modifications to this equipment
not expressly approved by Toshiba could void the
user's authority to operate this equipment.
Wireless Radio
For product available in the USA/Canada market,
only channel 1 11 can be operated. Selection ofodier
channels is not possible. The device could automatically
discontinue transmission in case of absence of information
to transmit, or operational failure. Note that this is not
intended to prohibit transmission of control or signaling
information or the use of repetitive codes where required
by die technology. If diis device is going to be operated in
5.15 5.25GHz frequency range, dien it is restricted to an
indoor environment only.
Important: Any changes or modifications not
expressly approved by the party responsible for
compliance could void the user's authority to operate
this equipment. This device and its antenna(s) must
not be co-located or operating in conjunction with any
other antenna or transmitte_
FCC Radiation Exposure Statement: This equipment
complies with FCC radiation exposure limits set forth
for an uncontrolled environment. This equipment
should be installed and operated with minimum
distance 20cm between the radiator & your body
Wireless Radio
For product available in the USA (anada market, only
channel 1 11 canbe operated. Selection ofodier channels
is not possible.
The device could automatically discontinue transmission
in case of absence of infornration to transmit, or
operational failure. Note that this is not intended to prohibit
transmission of control or signaling information or the use
of repetitive codes where required by die technology.
Important: Any changes or modifications not
expressly approved by the party responsible for
compliance could void the user's authority to operate
this equipment.
IMPORTANT NOTE:
IC Radiation Exposure Statement. This equipment
complies with IC RSS-102 radiation exposure limits
set forth for an uncontrolled environment. This
equipment should be installed and operated with
minimum distance 20cm between the radiator & your
body
FCC Radiation Exposure Statement:
This equipment complies with FCC radiation exposure
limits set fordi for an uncontrolled environment. This
equipment should be installed and operated with a
minimum distance of 20 cm between the radiator and your
body.
ENERGYSTAR_UserInformation
ENERGY STAR User Information Statement: the factory
default settings of this television meet ENERGY STAR"
requirements. Changing Picture Settings may increase
energy consumption, possibly beyond the limits required
for ENERGY STAR qualification.
To ensure your television is operating at optimal energy
efficiency:, select [Home] mode during initial activation.
To return to [Home] mode settings, select [Home] under
the Installation Tab of the TV Meml. [AutoView] mode is
recommended lbr normal home use.
m
ENERGY STAR s qualified T\_
Products that earn the ENERGY STAR
prevent green house gas emissions by
meeting strict guidelines set by the
U.S. Environmental Protection Agency.
ENERGY STAR and the ENERGY STAR
mark are registered U.S. marks.
10
Importantnotes aboutyour TV
The following symptoms are technical limitations of
LCD Display technology and are not an indication of
malfunction; therefore, Toshiba is not responsible for
perceived issues resulting from these symptoms.
1) An afterimage (ghost) may appear on the screen
if a fixed, non-moving image appears for a long
period of time. The afterimage is not permanent
and will disappear in a short period of time.
2) The LCD panel contained in this TV is
manufactured using an extremely high level
of precision technology; however, there may
be an occasional pixel (dot of light) that does
not operate properly (does not light, remains
constantly lit, etc.). This is a structural property of
LCD technology, is not a sign of malfunction, and
is not covered under your warranty. Such pixels
are not visible when the picture is viewed from a
normal viewing distance.
Note: Interactive video games that involve shooting a
'gun" type of joystick at an on-screen target may not
work with this T_Z
TrademarkInformation
• AutoView, Cinema Series, ClearScan, ColorMaster,
ColorStream, CQ Engine, DynaLight, GameTimer,
Native Mode, and TriVector are trademarks
or registered trademarks of Toshiba America
Information Systems, Inc.
• ActiveX is a registered trademark of the Microsoft
Corporation.
• Android is a trademark of Google Inc.
_'m-;r,L-¢_l-_a• Manufactured under license from
............. Audyssey Laboratories.
U.S. and foreign patents pending.
Audyssey Premium Television TM is a
trademark of Audyssey Laboratories.
Audyssey Premium Television TM is a
suite of technologies that remove the
acoustical problems caused by small
speakers and drivers.
Working together these technologies
deliver a better translation of the
audio content and make the television
experience sound closer to the original.
• Blu-ray Disc TM, Blu-ray TM, and the Iogos are
trademarks of the Blu-ray Disc Association
• CinemaNow is a registered trademark of BBY
Solutions, Inc.
• DivX <_,DivX Certified <_,DivX Plus <_HD and
associated Iogos are trademarks of Rovi
Corporation or its subsidiaries and are used under
license.
FrlDOLBY •Manufactured under license from Dolby
mGtXALPLUS
PULSE_ Laboratories Dolby and the double-D
symbol are trademarks of Dolby
Laboratories
• ENERGY STAR and the ENERGY STAR mark are
registered US. marks.
• The terms HDMI and HDMI High-Definition
Multimedia Interface, and the HDMI logo are
trademarks or registered trademarks of HDMI
Licensing LLC in the United States and other
countries.
• Intel and the Intel logo are trademarks of Intel
Corporation in the U.S and/or other countries
• iTunes Store is a trademark of Apple Inc, registered
in the US. and other countries.
• MPEG Layer-3 audio coding technology licensed
from Fraunhofer IIS and Thomson
• Netflix is a registered trademark of Netflix, Inc.
• Skype, the Skype logo and the "S" logo are
trademarks of Skype and are used with the
permission of Skype
• VUDU, Vudu Apps, and Vudu HD Movies are
trademarks and registered trademarks of VUDU,
Inc
• Designed with UEI Technology TM. Under License
from Universal Electronics Inc
Portions © UEI 2000-2012
• WiFi is a registered mark of the Wi-Fi Alliance.
• All other brand and product names are trademarks
or registered trademarks of their respective
companies.
• THIS PRODUCT IS LICENSED UNDER THE
AVC PATENT PORTFOLIO LICENSE FOR THE
PERSONALAND NONCOMMERCIAL USE
OF A CONSUMER TO (i) ENCODE VIDEO IN
COMPLIANCE WITH THE AVC STANDARD
("AVC VIDEO") AND/OR (ii) DECODE AVC
VIDEO THAT WAS ENCODED BY A CONSUMER
ENGAGED IN A PERSONALAND NON-
COMMERCIAL ACTIVITY AND/OR WAS
OBTAINED FROM AVIDEO PROVIDER LICENSED
TO PROVIDEAVC VIDEO NO LICENSE IS
GRANTED OR SHALL BE IMPLIED FORANY
OTHER USE. ADDITIONAL INFORMATION MAY
BE OBTAINED FROM MPEG LA, LLC. SEE
HTTP://WWW MPEGLA.COM
• THIS PRODUCT IS LICENSED UNDER THE
VC-1 PATENT PORTFOLIO LICENSE FOR
THE PERSONALAND NONCOMMERCIAL USE
OF A CONSUMER TO (i) ENCODE VIDEO IN
COMPLIANCE WITH THE VC-1 STANDARD
("VC-1 VIDEO")AND/OR (ii) DECODE VC-1
VIDEO THAT WAS ENCODED BY A CONSUMER
ENGAGED IN A PERSONALAND NON-
COMMERCIAL ACTIVITY AND/OR WAS
OBTAINED FROM AVIDEO PROVIDER LICENSED
11
TO PROVIDE VC-1 VIDEO. NO LICENSE IS
GRANTED OR SHALL BE IMPLIED FORANY
OTHER USE. ADDITIONAL INFORMATION MAY
BE OBTAINED FROM MPEG LA, LLC. SEE
HTTP://WWW.MPEGLA.COM
• THIS PRODUCT IS LICENSED UNDER THE
MPEG-4 VISUAL PATENT PORTFOLIO LICENSE
FOR THE PERSONALAND NON-COMMERCIAL
USE OF ACONSUMER FOR (i) ENCODING
VIDEO IN COMPLIANCE WITH THE MPEG-
4 VISUAL STANDARD ("MPEG-4 VIDEO")AND/
OR (ii) DECODING MPEG-4 VIDEO THAT WAS
ENCODED BYACONSUMER ENGAGED IN A
PERSONAL AND NON-COMMERCIAL ACTIVITY
AND/OR WAS OBTAINED FROM A VIDEO
PROVIDER LICENSED BY MPEG LATO PROVIDE
MPEG-4 VIDEO. NO LICENSE IS GRANTED
OR SHALL BE IMPLIED FOR ANY OTHER USE.
ADDITIONAL INFORMATION INCLUDING THAT
RELATING TO PROMOTIONAL,INTERNAL AND
COMMERCIAL USES AND LICENSING MAY BE
OBTAINED FROM MPEG powered LA,LLC. SEE
HTTP://WWW.MPEGLA.COM
Copyright
This guide is copyrighted by Toshiba America In%rmafion
Systems, Inc. with all rights reserved. Under the copyright
laws, this guide cannot be reproduced in any _rm without
the prior written pem_ission of Toshiba. No patent liability
is assumed, however, with respect to the use of_e
in%rmation contained herein.
_;2013 by Toshiba America In/_rmation Systems, Inc. All
rights reserved.
Notice
The insinuation contained in this manual, including but not
limited to any pro_ct specifications, is su_ect to change
without notice.
TOSHIBA CORPORATION AND TOSHIBA
AMERICA INFORMATION SYSTEMS, INC.
(TOSHIBA) PROVIDES NO _K&RIL&NTY WITH
REGARD TO THIS MANI AL OR ANY OTHER
INFORMATION CONTAINED HEREIN AND
HEREBY EXPRESSLY DISCLAIMS ANY IMPLIED
_2&RRANTIES OF MERCHANTABILITY OR
FITNESS FOR ANY PARTICULAR PURPOSE WITH
REGARD TO ANY OF THE FOREGOING. TOSHIBA
ASSI MES NO LIABILITY FOR ANY DAMAGES
INCI RRED DIRECTLY OR INDIRECTLY FROM
ANY TECHNICAL OR TYPOGRAPHICAL ERRORS
OR OMISSIONS CONTAINED HEREIN OR FOR
DISCREPANCIES BETWEEN THE PRODUCT
AND THE MANI AL. IN NO EVENT SHALL
TOSHIBA BE LIABLE FOR ANY INCIDENTAL,
CONSEQI ENTIAL, SPECIAL, OR EXEMPLARY
DAMAGES, WHETHER BASED ON TORT,
CONTRACT OR OTHERWISE, ARISING OUT
OF OR IN CONNECTION WITH THIS MANI AL
OR ANY OTHER INFORMATION CONTAINED
HEREIN OR THE USE THEREOF.
Contents
Chapter1 Introduction ...................................................20
Safety icons ............................................................... 20
Features .................................................................... 21
Overview of installation, setup, and use .................... 22
TV front and side panel controls and connections ..... 24
Front panel .......................................................... 24
Left side ............................................................... 24
TV back panel controls and connections ................... 25
Back panel controls ............................................. 25
Back panel connections ....................................... 26
Chapter2: ConnectingYourTV .......................................27
Overview of cable types ............................................. 27
Coaxial cable (F-type) .....................................
Standard AV cables (red/white/yellow) ...........
Component video cables (red/green/blue) ......
HDMITMcable (with HDMI Logo) ......................
Dual-wand IR blaster cable .............................
Optical audio cable .........................................
Analog RGB (15-pin) computer cable .............
3.5mm Stereo to RCA Y-cable ........................
...27
...27
...28
...28
...28
...29
...29
...29
12
LAN cable ............................................................ 30
About the connection illustrations ....................... 30
Connecting an antenna, satellite receiver, and/or
cable TV box ....................................................... 30
Connecting DVD to ColorStream ®or VCR to
composite video ................................................. 32
Connecting remote IR devices ................................... 33
Using the IR blaster OUT terminal ....................... 33
Connecting a digital audio system ............................. 36
Connecting an HDMITM or DVI device to the HDMITM
input ................................................................... 37
Using the TV remote and HDMITM CECControl to
control other devices .......................................... 39
Connecting an HDMITM audio system ......................... 40
Connecting a computer ............................................. 41
Connecting a computer to the TV's PC IN
terminal .......................................................... 41
Connect a computer to the TV's HDMITM
terminal .......................................................... 42
Connecting to a home network .................................. 43
Connecting the TV directly to a computer
without an Internet connection ..................... 43
Connecting the TV to a home network without an
Internet connection ........................................ 44
Connecting the TV to a home network with an
Internet connection - wired ............................ 45
Connecting the TV to a home network with an
Internet connection - wireless ........................ 46
Chapter 3: Usingthe RemoteControl..............................48
Controlling other devices .......................................... 48
Installing batteries ..................................................... 48
Remote control effective range ................................. 50
Learning about the remote control ............................ 51

4Contents
Chapter 4: Initial Setup and Menu ................................... 53
Initial setup ............................................................... 53
Performing the initial setup ................................. 54
Navigating the menu system ............................... 63
Quick Menu ......................................................... 64
Chapter 5:
Chapter 6:
Setting up your TV ......................................... 65
How to navigate the menu ......................................... 65
Changing initial settings ...................................... 65
Individual settings ............................................... 65
Storing channels in memory (optional) ..........
Skipping channels ..........................................
Skipping video inputs .....................................
Labeling analog TV channels ..........................
Labeling video inputs ......................................
Configuring shared input ................................
... 67
... 68
... 69
... 69
...70
...70
Basic features................................................. 71
Using 3D functions .................................................... 71
Viewing 3D images .............................................. 73
Setting the 3D PIN code ...................................... 79
Displaying 3D Important Information .................. 81
Adjusting 2D to 3D depth .................................... 82
Switching left and right images ........................... 82
Tuning Channels ........................................................ 82
Tuning to the next programmed channel ............. 82
Tuning to a specific channel (programmed or
unprogrammed) ........................
Using Channel Return .....................
Selecting the video input to view ..........
Using closed captions ..........................
Analog CC mode .............................
Digital CC settings ..........................
................... 82
................... 83
................... 83
................... 84
................... 84
................... 85
Settingthe PINcode............................................86
Enteringa newPINcode.....................................87
Changingor deletingyourPINcode....................87
ForgottenPINcode..............................................87
Usingparentalcontrols.............................................88
BlockingTVprogramsandmoviesbyrating
(V-Chip).........................................................88
Downloadinganadditionalratingsystem.......... 88
Displayingratings..............................................91
Unlockingprograms........................................91
Lockingspecificchannels.....................................91
Lockingvideoinputs.......................................92
Settingatimelimitfor games.......................... 92
Lockingthecontrolpanel................................ 93
UsingHDMITM CECControl ..................................... 93
Controlling HDMITMCEC playback devices .......... 94
HDMITMCEC Control input source selection ........ 95
Adjusting the amplifier's audio .......................... 95
Other HDMI_MCEC Control functions .................. 96
Viewing the HDMI _Msignal information ................... 96
Using your computer with the TV.......................... 97
Adjusting the image ......................................... 97
Setting the computer audio ............................. 98
Setting the timer to turn on the TV ........................ 98
Setting the sleep timer .......................................... 99
Setting No Signal Power Down ........................... 100
Setting TV Power On Control .................................. 101
Displaying TV status information ............................ 101
Viewing support information ................................... 102
Resetting to Factory Defaults .................................. 103
Power failure ........................................................... 103
6Contents
Chapter 7: Picture and Sound Controls ......................... 104
Selecting the picture size......................................... 104
Scrolling the picture ................................................ 108
Using the Auto Aspect feature ................................. 109
Using the 4:3 Stretch .............................................. 109
Adjusting the picture ............................................... 110
Selecting the picture mode ................................ 110
Adjusting the picture quality .............................. 111
Using the advanced picture settings features .......... 112
Edge Enhancer ................................................... 112
Dynamic Contrast .............................................. 112
DynaLight ® ........................................................ 113
ClearScan® ....................................................... 113
MPEG NR .......................................................... 113
UltraClear DNR .................................................. 114
Ambient Light Sensor ........................................ 114
ColorlVlasterTM .................................................... 114
Base Color Adjustment ...................................... 115
Color temperature .............................................. 115
Resetting to the factory default .......................... 116
Setting the expert picture settings ........................... 116
Test Pattern ....................................................... 116
RGB Filter .......................................................... 116
White Balance .................................................... 117
Adjusting the audio ................................................. 118
Muting the sound .............................................. 118
Selecting stereo/SAP broadcasts ....................... 118
Adjusting the audio balance ............................... 118
Adjusting the range ........................................... 119
TV Speakers On/Off ........................................... 119
Setting the Primary Audio Language ................. 119
Selecting the optical audio output format .......... 119
Using the Dolby® Digital Dynamic Range Control
feature .......................................................... 121
Audyssey Premium TelevisionTM ........................ 121
C°.te.ts 17
Using Audyssey EQ® for Wall Mounted or
Table-top TVs ............................................... 122
Using Audyssey Dynamic Volume ® .................. 122
Audyssey ABXTM ................................................ 122
Using the surround sound feature ..................... 122
Chapter 8: Advanced features ........................................ 123
Using your home network ....................................... 123
When using a Wireless network connection ...... 124
Setting up the Network ............................................ 125
Wireless Setup .................................................. 125
Advanced Network Setup ................................... 130
Network Connection Test ................................... 132
Using the software keyboard ................................... 133
Enter text using the software keyboard .............. 134
Performing a Software Upgrade .............................. 135
Viewing the Software Licenses ................................ 135
Using Intel® WiDi .................................................... 136
Changing the Intel® WiDi Device Name.............. 137
Device List ......................................................... 137
Using the Cloud TV Service ..................................... 137
Using the Cloud TV features .................................... 138
eMANUAL .......................................................... 138
Feature apps ...................................................... 138
Netflix® .............................................................. 139
VUDUTM HD Movies and VUDUTM Apps .............. 140
Internet .............................................................. 140
Using SkypeTM ................................................... 143
MediaShare (Videos, Music, and Photos) .......... 153
MediaShare specifications ................................. 153
Basic operation .................................................. 154
Viewing movie files ............................................ 157
Playing music files ............................................. 162
Viewing photo files ............................................ 164
Search ............................................................... 167

8Contents
Network Device Setup ............................................. 168
External Control Setup ....................................... 168
Setting up the Media Renderer feature .............. 169
Chapter 9: Cloud TV Companion Apps .......................... 170
Using Apps on a Tablet or Smart phone .................. 170
Apps Control Profile ................................................ 171
Pairing ..................................................................... 172
Chapter10:Troubleshooting ........................................... 173
General troubleshooting .......................................... 173
Picture problems ..................................................... 174
Sound problems ...................................................... 176
Remote control problems ........................................ 176
Channel tuning problems ........................................ 176
Closed caption problems ......................................... 177
Rating blocking (V-Chip) problems ......................... 177
HDMITMCEC Control operation ................................. 177
HDMITMproblems ..................................................... 178
Network problems ................................................... 178
Wireless network problems ..................................... 180
MediaShare problems ............................................. 180
Light Indicator ......................................................... 181
Power On/Standby light .......................................... 181
If the problem persists after trying the solutions ..... 181
AppendixA:Specifications...............................................182
Television system .................................................... 182
Channel coverage .................................................... 182
Power source .......................................................... 183
Power consumption ................................................ 183
Audio power ............................................................ 183
Speaker type ........................................................... 183
Video/audio terminals ............................................. 183
Video/audio input .............................................. 183
ColorStream ® (component video) HD input ....... 183
HDMI,Minput ...................................................... 184
C°.te.ts 19
Digital audio output ........................................... 184
PC input ............................................................. 184
Wireless connection ................................................ 184
Ethernet ............................................................. 184
USB ................................................................... 184
Dimensions with table stand ................................... 184
Weight (mass) with stand ....................................... 185
Operating conditions ............................................... 185
Supplied accessories ............................................... 185
Acceptable signal formats for PC IN, and HDMITM,
and 3D .............................................................. 186
PC IN signal formats .......................................... 186
HDMITMsignal formats ........................................ 187
3D Signal formats* ............................................ 188
Operating the TV with combination buttons ............ 189
AppendixB:Wireless QWERTYkeyboardwith touchpad ....190
International Key table ....................................... 193
Index.............................................................................. 194
ChapterI
Introduction
Safetyicons
This manual contains safety instructions that must be observed to avoid
potential hazards that could result in personal injuries, damage to your
equipment, or loss of data. These safety cautions have been classified
according to the seriousness of the risk, and icons highlight these
instructions as follows:
Indicatesanimminentlyhazardoussituationwhich,if notavoided,will resultin
deathorseriousinjury.
Indicatesapotentiallyhazardoussituationwhich,if notavoided,couldresultin
deathorseriousinjury.
Indicatesapotentiallyhazardoussituationwhich,if notavoided,mayresultin
minorormoderateinjury.
N _
Indicatesapotentiallyhazardoussituationwhich,if notavoided,mayresultin
propertydamage.
NOTE Providesimportantinformation.
2O
Introduction 21
Features
Features
o*.oIntegrated digital tuning (SVSB ATSC and QAM) --
Eliminates the need for aseparate digital converter set-top box (in
most cases).
o*.o1920 x 1080 display resolution.
o*.oFour HDMI _" Digital, High-Definition Multimedia Interfaces
with 1080p input support
o*.oHDMI TM capabilities ARC (Audio Return Channel)--Enables the
audio signal of the TV to be sent to an AV amplifier via an HDMI TM
cable.
•:. HDMI TM CEC Control--Allows control of external devices from
the TV remote via HDMI TM connection
•:. ColorStream " HD--High-resolution component video input.
o*.oDigital Audio Out--Optical audio connection with Dolby _ Digital
optical output format, see "Connecting a digital audio system" on
page 36.
•:. CQ EngineW_L-A powerful video processing engine with an array
of advanced technology including Edge Enhancement, Dynamic
Ga_mna, ColorMaster, Expert Mode and new UltraClear DNR that
creates superior picture quality.
•:. UltraClear DNR--New Dynamic Noise Reduction technology
that filters out video noise without decreasing picture sharpness for
clean, crystal-clear images, see "DNR" on page 114.
PC IN (Analog RGB)--Colnputer Input terminal, see "Connecting
acomputer" on page 41.
IR Blaster Out-- Controls infrared remote controlled devices from
the TV.
o*.oBuilt-in WLAN--Allows the television to access your home
wireless network.
o*.. Intel "_WiDi--Allows direct wireless connection between the TV
and Intel ®WiDi equipped computers or mobile devices.
o*.oColorMasterT_L-Allows you to adjust the TV's standard colors,
see "ColorMaster TM''on page 114.
•:. ClearScan': --Uses both frame interpolation technology and
advanced backlight control with image synchronization to quadruple
the TV refresh rate for an even clearer fast motion video.
2Introduction
Overview of installation, setup, and use
E
o:. DynaLight:_--Backlight control monitors the brightness of each
video frame and automatically adjusts backlight intensity based on
the content to create higher dynamic contrast, for deeper blacks and
increased depth.
o:. AutoView'--Allows you to automatically adjust picture settings
including Brightness, Contrast, Galmna, and Sharpness based
on ambient room light conditions and incoming picture content
to create the best possible picture settings without any manual
adjustlnent. See "ENERGY STAR®User Information" on page 9.
o:. Audyssey Premium Television"_Includes innovative audio
enhancement technologies that create clear, rich, and natural sound.
These technologies include EQ _, ABX", Dynamic Volulne _,
Volume Extension "_',and Day/Night and Wall/Table Modes. See
"Audyssey Premium Television TM'' on page 121.
o:. MediaShare--Allows you to view photo files and play music or
movie files, see "MediaShare (Videos, Music, and Photos)" on page
153.
o:. Cloud TV--Enhanced content discovery includes real time
streaming news, true social interaction features, and mobile device
interaction.
o:° Wireless QTWERY keyboard with built-in touchpad.
o:° 3D capability --Allows you to view and experience 3D content on
the television while using special glasses.
o:° ENERGY STAR _ qualified
Overviewofinstallation,setup,anduse
Follow these steps to set up your TV and begin using its many exciting
features.
1 Carefully read the important safety, installation, care, and service
information. Keep this manual for furore reference.
2 To choose a location for the TV:
o*.oRead "Important notes about your TV" on page 10.
o:. Place the TV on the floor or a sturdy, level, stable surface that
can support the weight of the unit. Secure the TV to a wall,
pillar, or other ilnlnovable structure, see 24) on page 4.
o:. Place the TV in a location where light does not reflect on the
screen.
Introduction 23
TV front and side panel controls and connections
Place the TV tar enough from walls and other objects to
allow proper ventilation. Inadequate ventilation may cause
overheating, which will damage the TV. THIS TYPE OF
DAMAGE IS NOT COVERED UNDER THE TOSHIBA
WARRANTY.
3 Do not plug in any power cords until after you have connected all
cables and devices to your TV.
4 Before connecting cables or devices to the TV, review the functions
of the TV's connections and controls, see "Overview of cable types"
on page 27.
5Connect your other electronic device(s) to the TV, see "Connecting
Your TV" on page 27.
6 Install the batteries in the remote control, see "Installing batteries"
on page 48.
7 See "Using the Remote Control" on page 48 for an overview of
the buttons on the remote control.
8After connecting all cables and devices, plug in the power cords for
your TV and other devices. Then press the POWER button on the
TV control panel or remote control to turn on the TV.
NOTE: If the TVstops responding to the buttons o17the remote
control or TV control panel and you cannot turn the TV off or on,
unplug the power cords for afew seconds and then plug them in and
tlT again.
9 See "Navigating the menu system" on page 63 for a quick
overview of navigating the TV's menu system.
10 Program channels into the TV's channel memory, see "Auto
Tuning" on page 67.
11 For details on using the TV's features, see chapters 6, 7, and 8.
12 For help, refer to "Troubleshooting" on page 173.
13 For technical specifications, see "Specifications" on page 182.
4Introduction
TV front and side panel controls"and connection
TVfrontandsidepanelcontrolsandconnections
1 Analog
Video port-
ARC HDMITM
only port-
1 Digital-
Audio jack
Ambient light sensor -PowerLED
(Sample Illustration) L 7350U Series front and side panel controls and
connections
Frontpanel
!Power On/Standby LED--Power indicator light, (glows green
when the TV power is On).
2 Ambient light sensor--This sensor detects the ambient light
conditions to optimize the backlighting levels, see "Ambient Light
Sensor" on page 114.
3 Remote Sensor--Point the remote control toward this remote
sensor, see "Remote control effective range" on page 50.
Left side
4Analog Video Port--Analog Video input. Connect using a
COlmnercially available conversion cable.
53 HDMI TM Ports--High-Definition Multimedia Interface input
receives digital audio and uncolnpressed digital video from an
HDMI TM device or uncolnpressed digital video from a DVI device.
HDMI TM connection is necessary to receive 1080p signals.
6 ARC HDMI" only port--Audio Return Channel (ARC) enables
the audio signal of the TV to be sent to an AV amplifier via the
HDMI cable.
7 Digital Audio Jack--Optical audio output in Dolby _ Digital or
PCM (pulse-code modulation) format for connecting an external
Dolby _ Digital decoder, amplifier, A/V receiver, or home theater
system with optical audio input.
8 2 USB Ports--Used to access video, music, or photo files with
USB device.
Introduction 25
TV back panel controls and connections
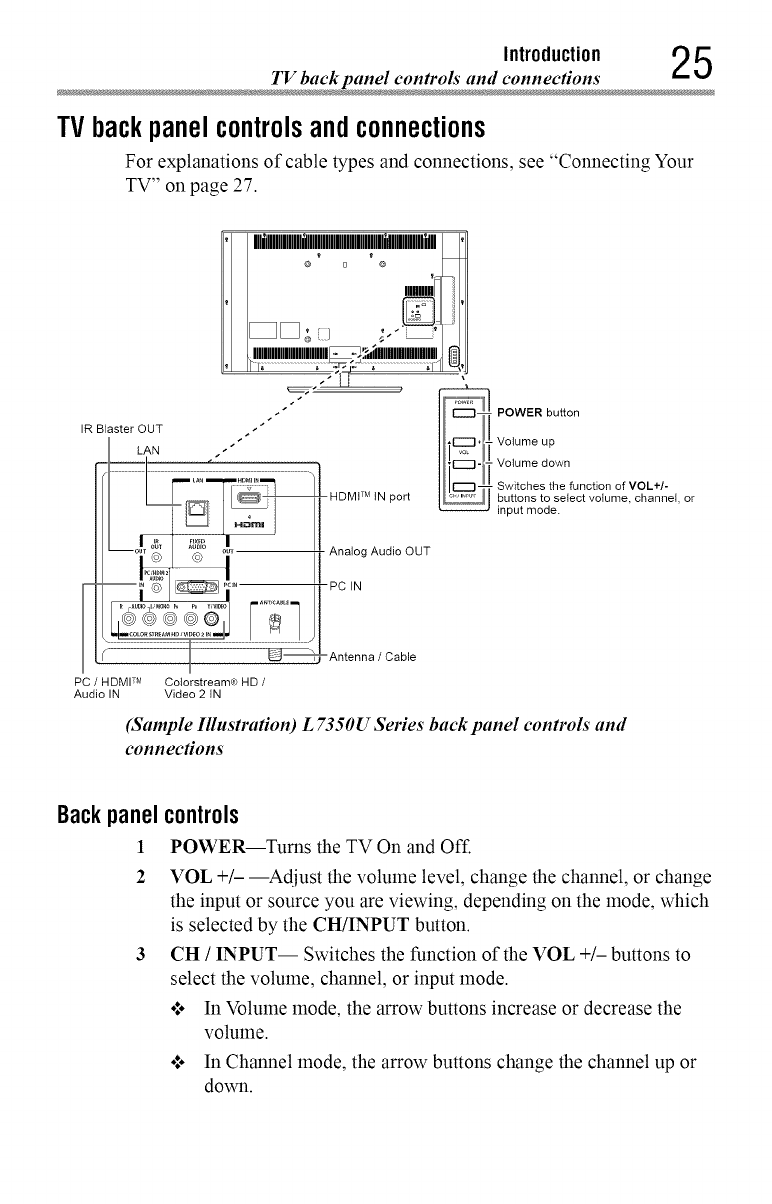
TVbackpanelcontrolsandconnections
For explanations of cable types and connections, see "Connecting Your
TV" on page 27.
I I IIIHIIIH !_
_ input mode ,, or
lo__. __ I Analog Audio OUT
--_,i,_ -- Pc,.
(_ -Antenna /Cable
PC /HDMI TM Colorstream® HD /
Audio IN Video 2 tN
(Sample Illustration) L7350U Series back panel controls and
connections
Backpanel
!
2
controls
POWER--Turns the TV On and Off.
VOL +/- --Adjust the volume level, change the channel, or change
the input or source you are viewing, depending on the mode, which
is selected by the CH/INPUT button.
CH /INPUT-- Switches the function of the VOL +/- buttons to
select the volume, channel, or input mode.
o*.. In Volume mode, the arrow buttons increase or decrease the
volume.
o*.. In Channel mode, the arrow buttons change the channel up or
down.
6Introduction
TV back panel controls"and connection
Backpanel
4
5
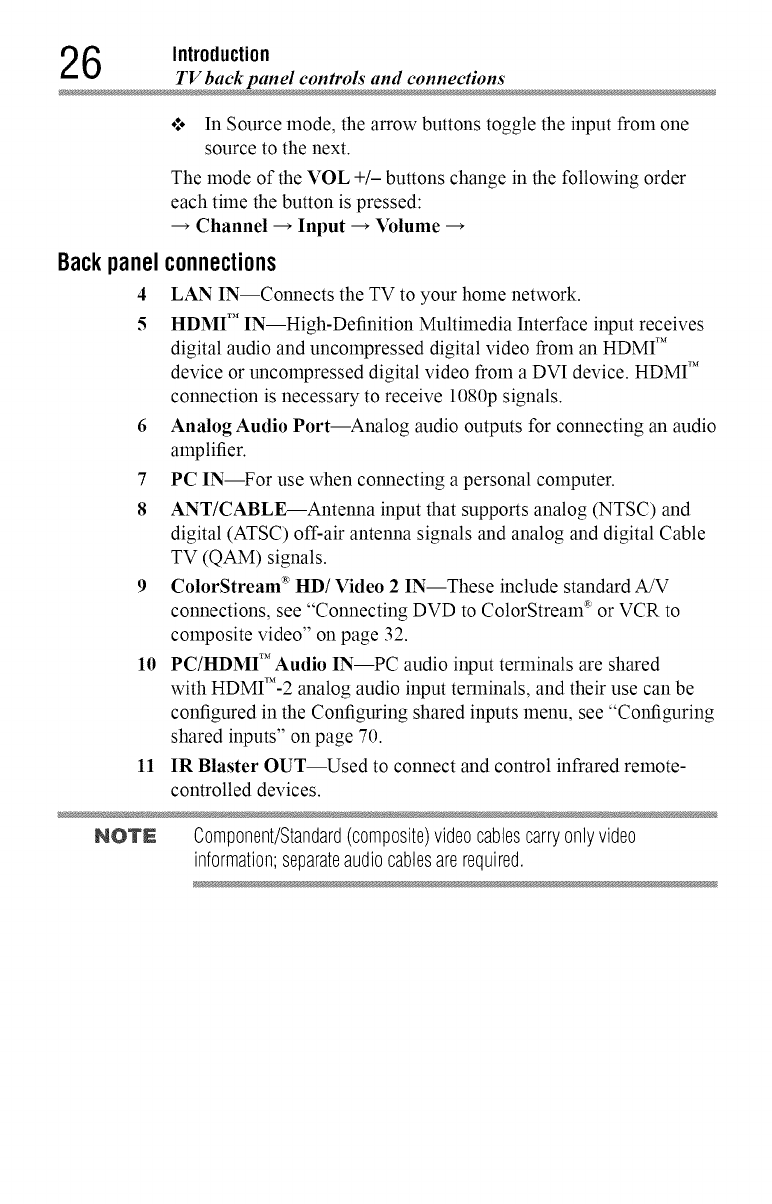
o*.oIn Source mode, the arrow buttons toggle the input from one
source to the next.
The mode of the VOL +/- buttons change in the following order
each time the button is pressed:
--_ Channel --_ Input --_ Volume --_
connections
LAN IN--Connects the TV to your home network.
HDMI TM IN--High-Definition Multimedia Interface input receives
digital audio and uncolnpressed digital video from an HDMI TM
device or uncolnpressed digital video from a DVI device. HDMI TM
connection is necessary to receive 1080p signals.
6 Analog Audio Port--Analog audio outputs for connecting an audio
amplifier.
7 PC IN--For use when connecting a personal computer.
8 ANT/CABLE--Antenna input that supports analog (NTSC) and
digital (ATSC) off-air antenna signals and analog and digital Cable
TV (QAM) signals.
9 ColorStream _'HD/Video 2 IN--These include standard A/V
connections, see "Connecting DVD to ColorStream _ or VCR to
composite video" on page 32.
10 PC/HDMI TM Audio IN--PC audio input terminals are shared
with HDMI'M-2 analog audio input terminals, and their use can be
configured in the Configuring shared inputs menu, see "Configuring
shared inputs" on page 70.
11 IR Blaster OUT--Used to connect and control infrared remote-
controlled devices.
NOTE Component/Standard(composite)videocablescarryonlyvideo
information;separateaudiocablesarerequired.
Chapter2
ConnectingYourTV
Overviewof cabletypes
Before purchasing cables, know the connector types your devices require.
You can purchase cables from most stores that sell audio/video devices.
Coaxialcable (F-type)
(Sample Illustration) Coaxial cable
Coaxial (F-type) cable connects your antenna, cable TV service, and/or
cable converter box to the ANT/CABLE input on your TV.
NOTN Pleasetightenthisconnectionby hand.Usingtoolsmaydamagethe
connection.
Standard AVcables (red/white/yellow)
@
,@
(Sample Illustration) Standard A/V cables
27
8ConnectingYourTV
Overview of cable types
Standard A/V cables (composite video) usually come in sets of three, and
connect to video devices with analog audio and composite video output.
These cables (and the related inputs on your TV) are typically color-
coded according to use: yellow for video, red for stereo right audio, and
white for stereo left (or lnono) audio.
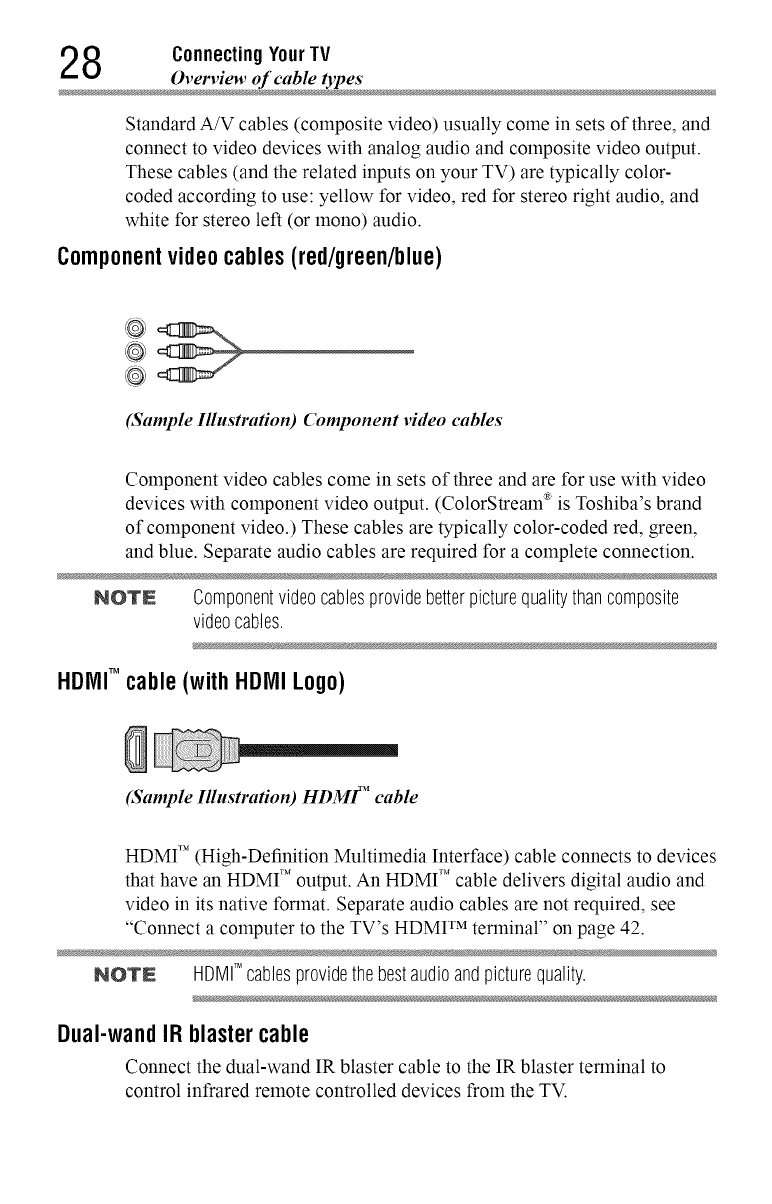
Componentvideocables(red/green/blue)
(Sample Illustration) Component video cables
Component video cables come in sets of three and are for use with video
devices with component video output. (ColorStream _ is Toshiba's brand
of component video.) These cables are typically color-coded red, green,
and blue. Separate audio cables are required for a complete connection.
NOTN Componentvideocablesprovidebetterpicturequalitythancomposite
videocables.
HDJVJlTM cable (with HDIVllLogo)
(Sample Illustration) HDMF' cable
HDMI TM (High-Definition Multimedia Interface) cable connects to devices
that have an HDMI T_"output. An HDMI T_"cable delivers digital audio and
video in its native format. Separate audio cables are not required, see
"Connect a computer to the TV's HDMI TM terminal" on page 42.
NOTN HDMITM cablesprovidethebestaudioandpicturequality.
Dual-wandIR blastercable
Connect the dual-wand IR blaster cable to the IR blaster terminal to
control infrared remote controlled devices from the TV.
Connecting YourTV 2 9
Overview of cable types
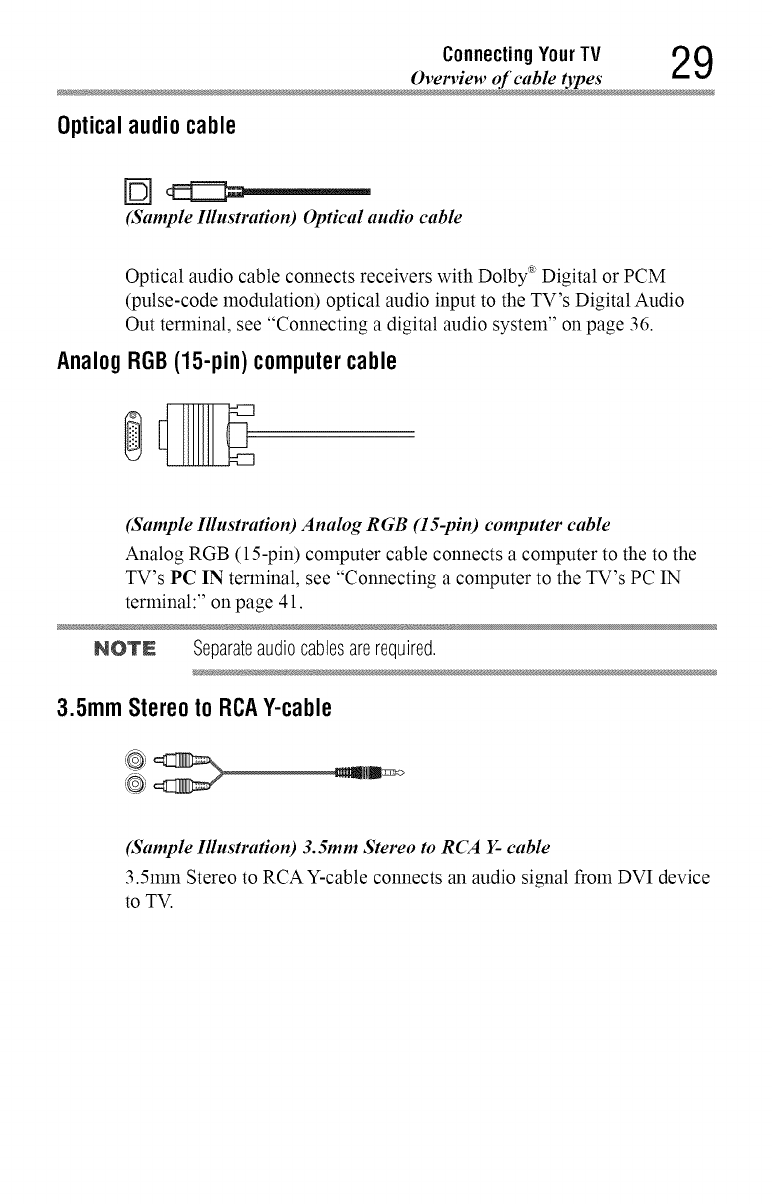
Opticalaudio cable
[_ _t_=-...._
(Sample Illustration) Optical audio cable
Optical audio cable connects receivers with Dolby ':*Digital or PCM
(pulse-code modulation) optical audio input to the TV's Digital Audio
Out terminal, see "Connecting a digital audio system" on page 36.
AnalogRGB(15-pin)computercable
(Sample IllnstraKon) Analog RGB (15-pin) computer cable
Analog RGB (15-pin) computer cable connects a computer to the to the
TV's PC IN terminal, see "Connecting a computer to the TV's PC IN
terminal:" on page 41.
NOTE Separateaudiocablesarerequired.
3.5mmStereotoRCAY-cable
(Sample IllnstraKon) 3. 5ram Stereo to RCA Y- cable
3.5nnn Stereo to RCA Y-cable connects an audio signal from DVI device
to TV.
0ConnectingYourTV
Connecting an antenna, satellite receiver, and cable TV b
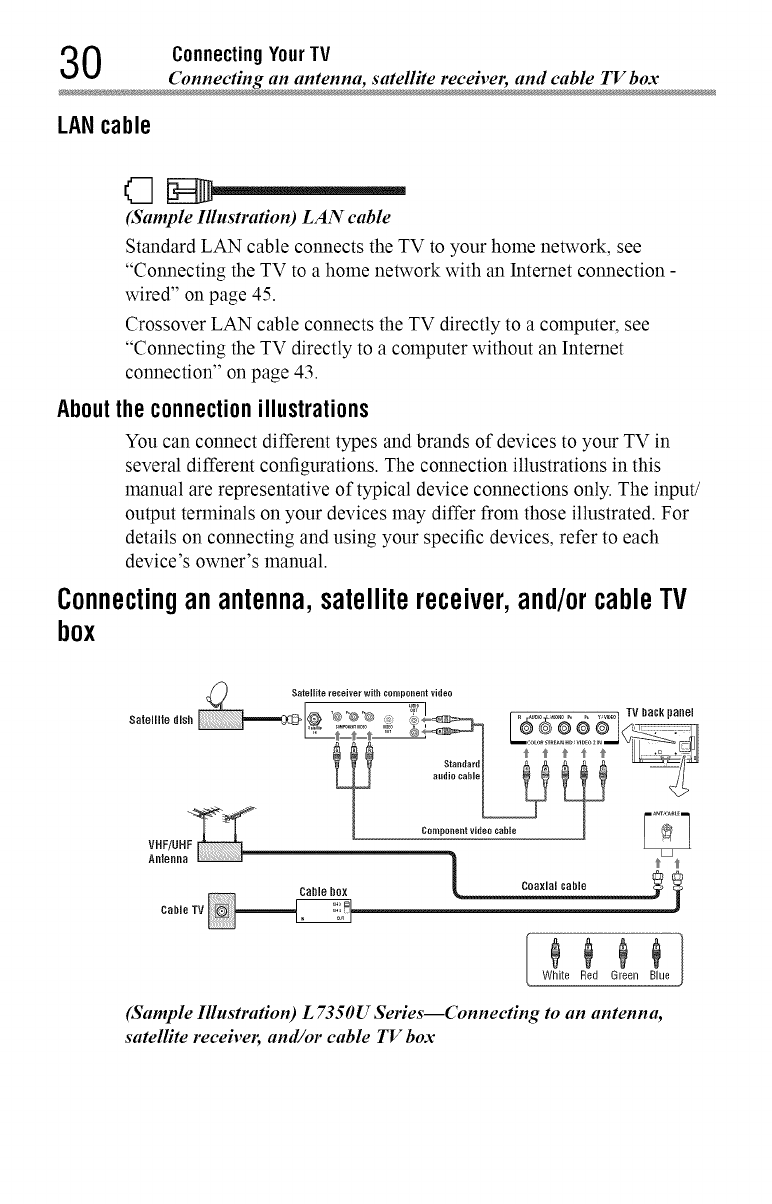
LANcable
(Sample Illnstra#on) LAN cable
Standard LAN cable connects the TV to your home network, see
"Connecting the TV to a home network with an Internet connection -
wired" on page 45.
Crossover LAN cable connects the TV directly to a computer, see
"Connecting the TV directly to a computer without an Internet
connection" on page 43.
Abouttheconnectionillustrations
You can connect different types and brands of devices to your TV in
several different configurations. The connection illustrations in this
manual are representative of typical device connections only. The input/
output terminals on your devices may differ from those illustrated. For
details on connecting and using your specific devices, refer to each
device's owner's manual.
Connectinganantenna,satellitereceiver,and/orcableTV
box
Satellite dish <O,_ :_} _,_ ........ .......... w_ ___
X , g2a
Cable box Coaxial cable
Cable TV
White Red Green Blue
(Sample Illustration) L 7350U Series--Connecting to an antenna,
satellite receiver, and/or cable TV box

Connecting YourTV 31
Connecting an antenna, satellite receive_ and cable TV b
Items needed:
•:. Coaxial cables
•:. Standard AV cables
•:. Component video cables (red/green/blue)
NOTE Whenyou useacablebox,youmaynotbeableto usetheremotecontrol
to programoraccesscertainfeaturesontheTV.
To view the antenna or cable signal:
Select ANT/CABLE video input source on the TV.*
To view basic and premium cable channels:
Select the ANT/CABLE video input source on the TV.* Tune the TV to
channel 3 or 4 (whichever channel the cable box output is set to). Use the
cable box controls to change channels.
To view the VCR or camcorder video:
Turn On the VCR or camcorder video. Select VIDEO input source on the
TV.*
•To select the video input source, press the INPUT button on the remote
control, see "Selecting the video input to view" on page 83.
NOTE Theunauthorizedrecording,use,distribution,or revisionoftelevision
programs,videotapes,DVDs,andothermaterialsis prohibitedunderthe
CopyrightLawsof theUnitedStatesandothercountries,andmaysubject
youto civil andcriminalliability.
2ConnectingYourTV
Connecting D VD to Colot_tream v or VCR to composite video
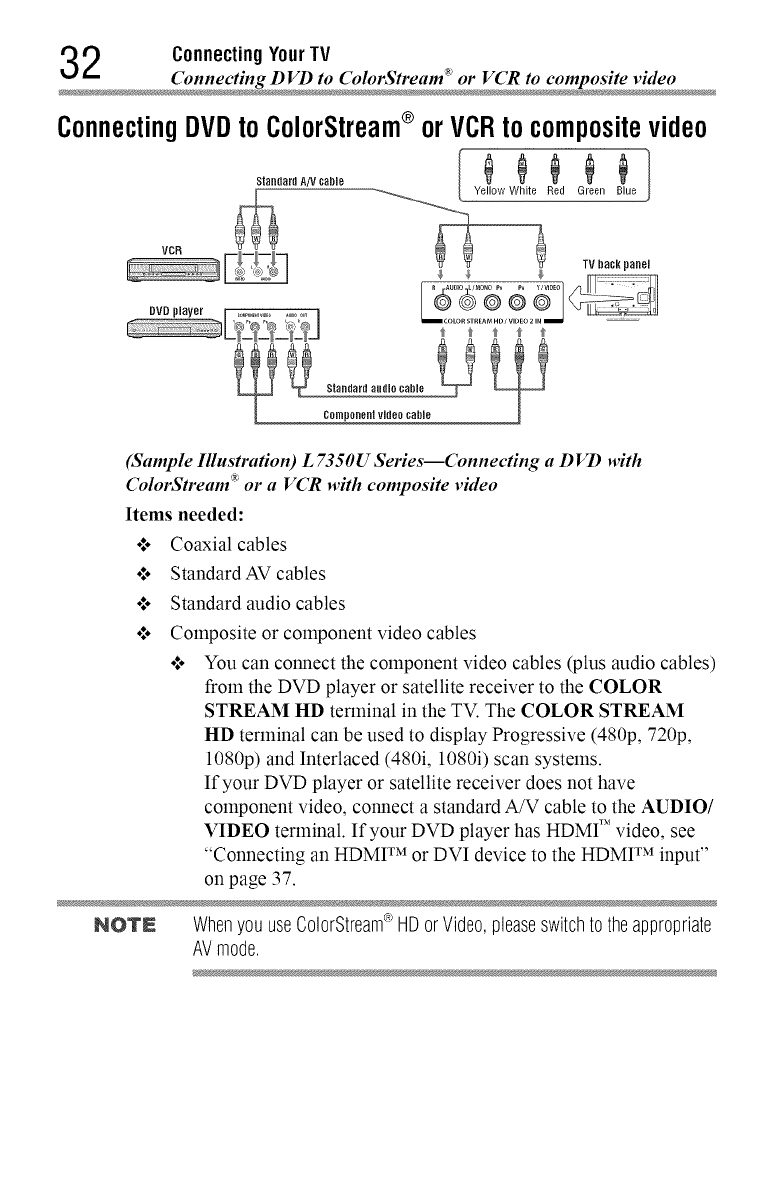
ConnectingDVDtoColorStream®orVCRtocompositevideo
........... Yellow White Red Green Blue
VCR TV back panel
(Sample Illustradon) L 7350U Series--Connecting a D VD with
ColorStream "_or a VCR with composite video
Items needed:
•*.o Coaxial cables
•*.o Standard AV cables
o*.oStandard audio cables
o*.oComposite or component video cables
o*.oYou can connect the component video cables (plus audio cables)
from the DVD player or satellite receiver to the COLOR
STREAM HD terminal in the TV. The COLOR STREAM
HD terminal can be used to display Progressive (480p, 720p,
1080p) and Interlaced (480i, 1080i) scan systems.
If your DVD player or satellite receiver does not have
component video, connect a standard A/V cable to the AUDIO/
VIDEO terminal. If your DVD player has HDMI TM video, see
"Connecting an HDMI TM or DVI device to the HDMI TM input"
on page 37.
NOTN Whenyou useColorStream®HDorVideo,pleaseswitchto theappropriate
AVmode.
ConnectingYourTV 3 3
Connecting DVD to Colot_tream cR_or VCR to composite video
To view antenna or Cable channels:
Select the ANT/CABLE video input source on the TV.*
To view the DVD player:
Turn ON the DVD player. Select the ColorStream _ HD video input source
on the TV.*
To view satellite programs using the component video connections:
Turn ON the satellite receiver. Select the ColorStream _ HD video input
source on the TV.*
To view the VCR or view and record antenna channels:
Turn ON the VCR. Tune the VCR to the channel you want to watch.
Select the VIDEO video input source on the TV.*
To record a TV program while watching a DVD:
Turn ON the VCR. Tune the VCR to the channel to record. Select the
ColorStream _ HD video input source on the TV* to view the DVD.
*To select the video input source, press the INPUT button on the remote
control, see "Selecting the video input to view" on page 83.
NOTN Theunauthorizedrecording,use,distribution,orrevisionof television
programs,videotapes,DVDs,andothermaterialsis prohibitedunderthe
CopyrightLawsof theUnitedStatesandothercountries,andmaysubject
youto civil andcriminalliability.
ConnectingremoteIRdevices
Usingthe IR blasterOUTterminal
You can use the TV's IR OUT terminal to remotely operate many infrared
remote-controlled devices enclosed in an entertainment center or similar
cabinet.
Items needed:
o*.oDual-wand IR blaster cable (see "Dual-wand IR blaster cable" on
page 28)
•*.o Other cables as required to connect the device(s) to the TV (see
"Overview of cable types" on page 27)
See the remote IR blaster setup section (see page 59).
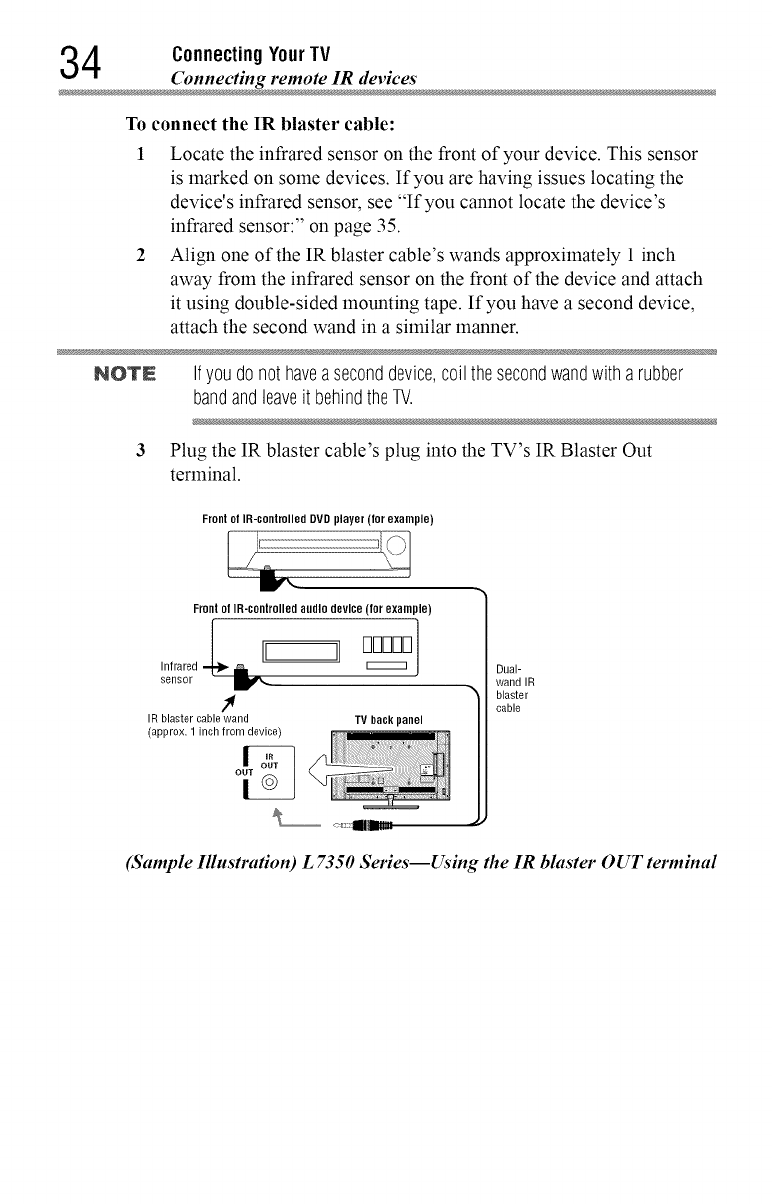
4ConnectingYourTV
Connecting remote IR devices
To connect the IR blaster cable:
1 Locate the infrared sensor on the front of your device. This sensor
is marked on some devices. If you are having issues locating the
device's infrared sensor, see "If you cannot locate the device's
infrared sensor:" on page 35.
2 Align one of the IR blaster cable's wands approximately 1 inch
away from the infrared sensor on the front of the device and attach
it using double-sided mounting tape. If you have a second device,
attach the second wand in a similar manner.
NOTN Ifyoudonot haveaseconddevice,coilthesecondwandwitharubber
bandandleaveit behindtheTV.
3 Plug the IR blaster cable's plug into the TV's IR Blaster Out
terminal.
Front ol IR-controlled DVD player (for example)
BCk
Front ol IR-controlled audio device (for example)
,nfrared-L=, m= mn
sensor _f_.,
f
IR blaster cable wand TV bacl_ panel
(approx. 1 inch from device) li_J']-]
Dual-
wand IR
1_ laster
cable
(Sample Ilhtstrafion) L 7350 Series--Using the IR bhtster OUT terminal
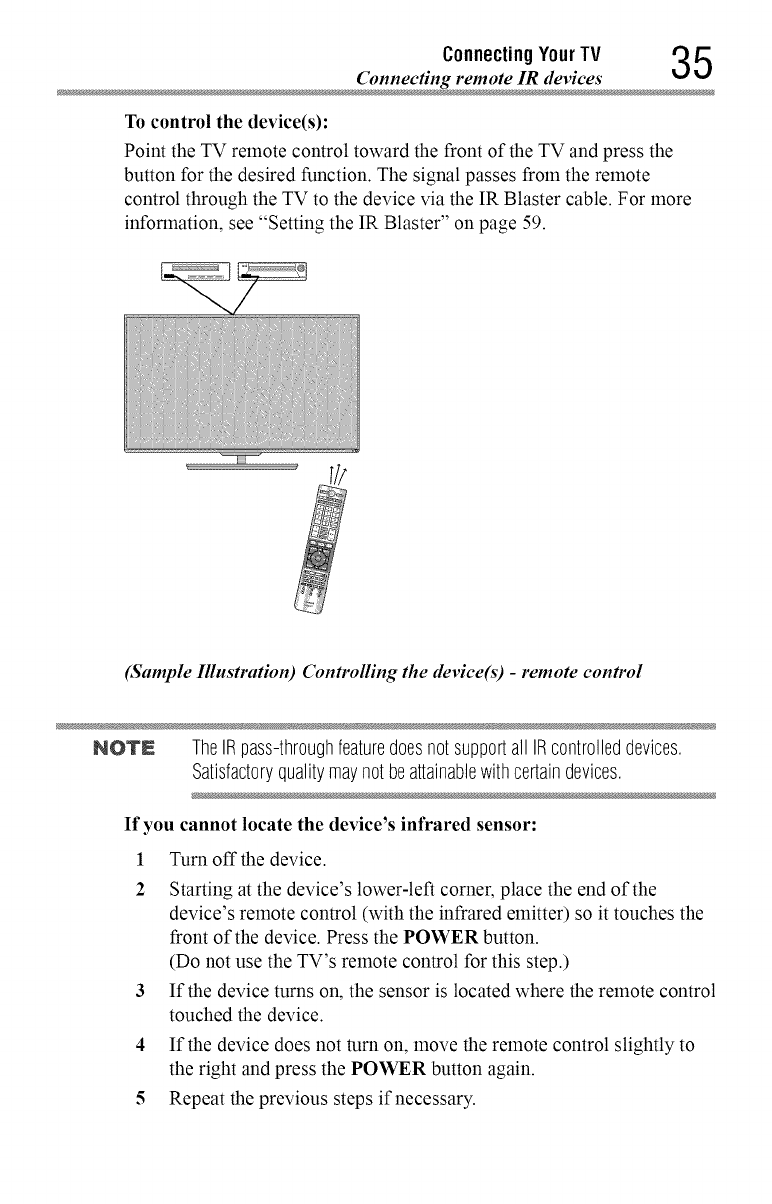
Connecting YourTV 35
Connecting remote IR devices
To control the device(s):
Point the TV remote control toward the front of the TV and press the
button for the desired function. The signal passes from the remote
control through the TV to the device via the IR Blaster cable. For more
information, see "Setting the IR Blaster" on page 59.
(Sample Illustration) Controlling the device(s) -remote control
NOTE TheIRpass-throughfeaturedoesnotsupportall IRcontrolleddevices.
Satisfactoryqualitymaynotbeattainablewithcertaindevices.
If you cannot locate the device's infrared sensor:
1Turn off the device.
2 Starting at the device's lower-left corner, place the end of the
device's remote control (with the infrared emitter) so it touches the
front of the device. Press the POWER button.
(Do not use the TV's remote control for this step.)
3 If the device turns on, the sensor is located where the remote control
touched the device.
4 If the device does not turn on, move the remote control slightly to
the right and press the POWER button again.
5 Repeat the previous steps if necessary.
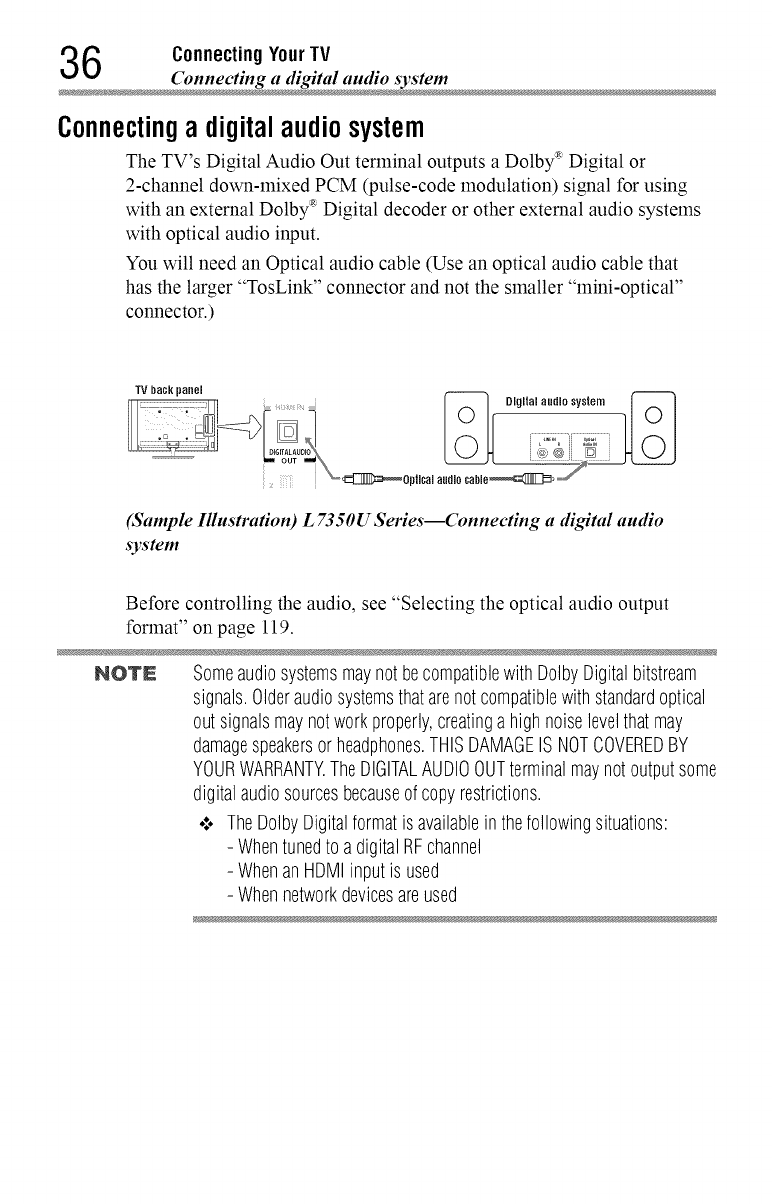
6ConnectingYourTV
Connecting a digital audio syste
Connectinga digitalaudiosystem
The TV's Digital Audio Out terminal outputs aDolby _ Digital or
2-channel down-mixed PCM (pulse-code modulation) signal for using
with an external Dolby _ Digital decoder or other external audio systems
with optical audio input.
You will need an Optical audio cable (Use an optical audio cable that
has the larger "TosLink" connector and not the smaller "mini-optical"
connector.)
TV back panel
_Digital aualosystem ]]_
audio ¢able_ j
(Sample Illustration) L7350U Series--Connecting a digital audio
system
Before controlling the audio, see "Selecting the optical audio output
format" on page 119.
NOTE SomeaudiosystemsmaynotbecompatiblewithDolbyDigitalbitstream
signals.Olderaudiosystemsthatarenotcompatiblewithstandardoptical
out signalsmaynotworkproperly,creatinga highnoiselevelthatmay
damagespeakersorheadphones.THISDAMAGEISNOTCOVEREDBY
YOURWARRANTY.TheDIGITALAUDIOOUTterminalmaynotoutputsome
digitalaudiosourcesbecauseof copyrestrictions.
¢ TheUolbyDigitalformatis availablein thefollowingsituations:
- Whentunedto adigitalRFchannel
- WhenanHDMIinputis used
- Whennetworkdevicesareused
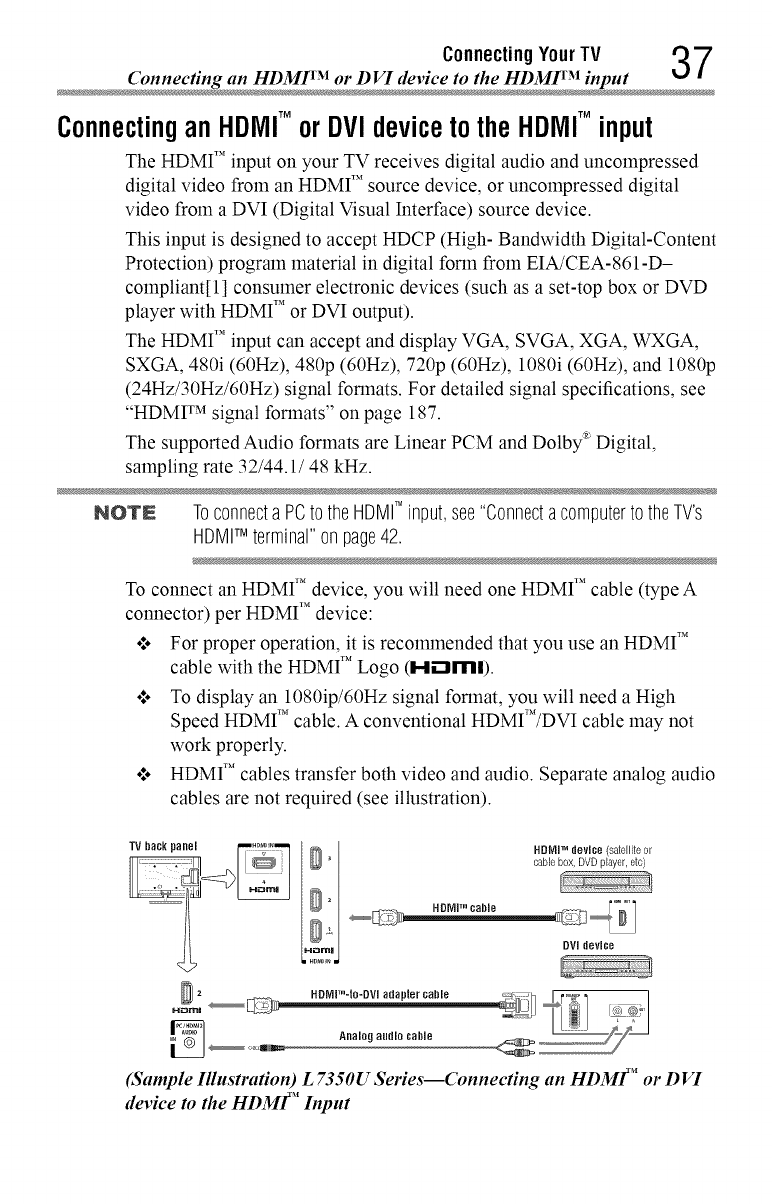
ConnectingYourTV 3 7
Connecting an HDM1 TM or D FI device to the HDM1 TM inpu
ConnectinganHDMITM or DVIdevicetotheHDMITM input
The HDMI TM input on your TV receives digital audio and uncompressed
digital video from an HDMI TM source device, or uncompressed digital
video from a DVI (Digital Visual Interface) source device.
This input is designed to accept HDCP (High- Bandwidth Digital-Content
Protection) program material in digital form from EIA/CEA-861-D-
compliant[l] consumer electronic devices (such as a set-top box or DVD
player with HDMI TM or DVI output).
The HDMI TM input can accept and display VGA, SVGA, XGA, WXGA,
SXGA, 480i (60Hz), 480p (60Hz), 720p (60Hz), 1080i (60Hz), and 1080p
(24Hz/30Hz/60Hz) signal formats. For detailed signal specifications, see
"HDMI TM signal formats" on page 187.
The supported Audio formats are Linear PCM and Dolby _ Digital,
sampling rate 32/44.1/48 kHz.
NOTE Toconnecta PCto theHDMITM input,see"Connectacomputerto theTV's
HDMITM terminal"on page42.
To connect an HDMI T''device, you will need one HDMI TM cable (type A
connector) per HDMI TM device:
o:o For proper operation, it is reco_mnended that you use an HDMI TM
cable with the HDMI T''Logo (H--lml).
o:o To display an 1080ip/60Hz signal format, you will need a High
Speed HDMI _'' cable. A conventional HDMI_'/DVI cable may not
work properly.
o:o HDMI _'_cables transfer both video and audio. Separate analog audio
cables are not required (see illustration).
HDMiTM device (satelliteor
cablebox,DVDplayer,etc)
DVidevice
(Sample Illustra#on) L7350U Series--Connecting an HDMF' or DVI
device to the HDMF' Input

8ConnectingYourTV
Connecting an HDMF' or D VI device to the HDMf' inpu
To view the HDMI TM device video:
Select HDMI 1, HDMI 2, HDMI 3 or HDMI 4 video input source
on the TV. (Press the INPUT button on the remote control. For more
information, see "Selecting the video input to view" on page 83.
To connect a DVI device, you will need:
.l. HDMI T''to DVI adapter cable
For proper operation, the length of an HDMI TM to DVI adapter cable
should not exceed 9.8 ft (3m). The recommended length is 6.6 ft
(2m).
.!. 3.5ram Stereo to RCAY-cable
An HDMI TM to DVI adapter cable transfers video only. Separate
analog audio cables are required (see illustration).
NOTE ToensurethattheHDMI"or DVldeviceis resetproperly:
o:. Whenturningonyourelectroniccomponents,turnontheTVfirst,and
thenthe HDM(° or DVldevice.
o:. Whenturningoffyourelectroniccomponents,turnofftheHDMITM or
DVldevicefirst,andthentheTV.
NOTE [1] EIA/CEA-861-Dcompliancecoversthetransmissionof uncompressed
digitalvideowithhigh-bandwidthdigitalcontentprotection,whichis being
standardizedfor receptionof highdefinitionvideosignals.Becausethisis
anevolvingtechnology,it is possiblethatsomedevicesmaynot operate
properlywiththeTV.
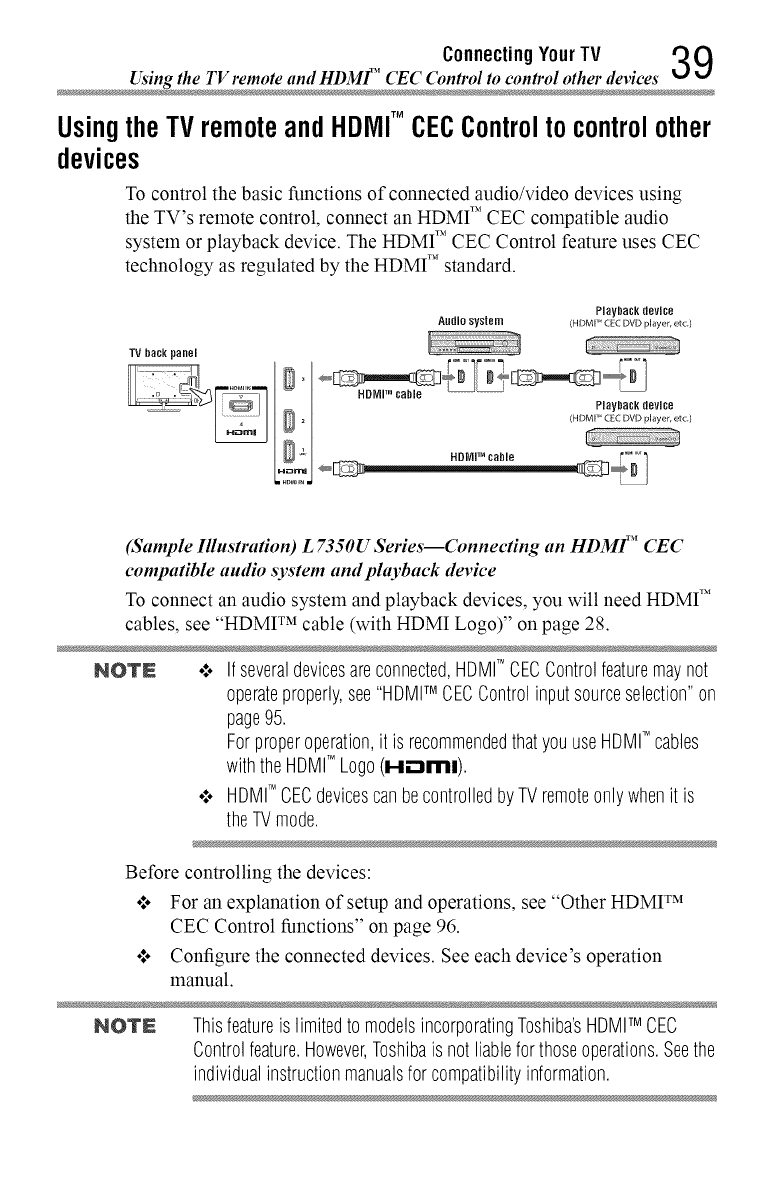
ConnectingYourTV 3 9
Usingthe TV remote and HDMf" CEC Control to control other device
UsingtheTVremoteandHDMITM CECControltocontrolother
devices
To control the basic functions of connected audio/video devices using
the TV's remote control, connect an HDMI TM CEC compatible audio
system or playback device. The HDMI TM CEC Control feature uses CEC
technology as regulated by the HDMI T''standard.
TV back panel
HDMP _cable
Audio system Playback device
(HDMI _< CEC DVD player, etc.)
Playback device
(HDMP CEC DVD player, etc.)
(Sample Illustration) L 7350U Series--Connecting an HDMF' CEC
compatible audio system and phtyback device
To connect an audio system and playback devices, you will need HDMI TM
cables, see "HDMI TM cable (with HDMI Logo)" on page 28.
NOTE o:. Ifseveraldevicesareconnected,HDMITM CECControlfeaturemaynot
operateproperly,see"HDMITM CECControlinputsourceselection"on
page95.
Forproperoperation,it is recommendedthatyouuseHDMITM cables
withtheHDMIT"Logo(H_ml).
•:. HDMITM CECdevicescanbecontrolledbyTVremoteonlywhenit is
theTVmode.
Before controlling the devices:
o:. For an explanation of setup and operations, see "Other HDMI TM
CEC Control functions" on page 96.
•:. Configure the connected devices. See each device's operation
manual.
NOTN Thisfeatureis limitedto modelsincorporatingToshiba'sHDMITM CEC
Controlfeature.However,Toshibais not liablefor thoseoperations.Seethe
individualinstructionmanualsfor compatibilityinformation.
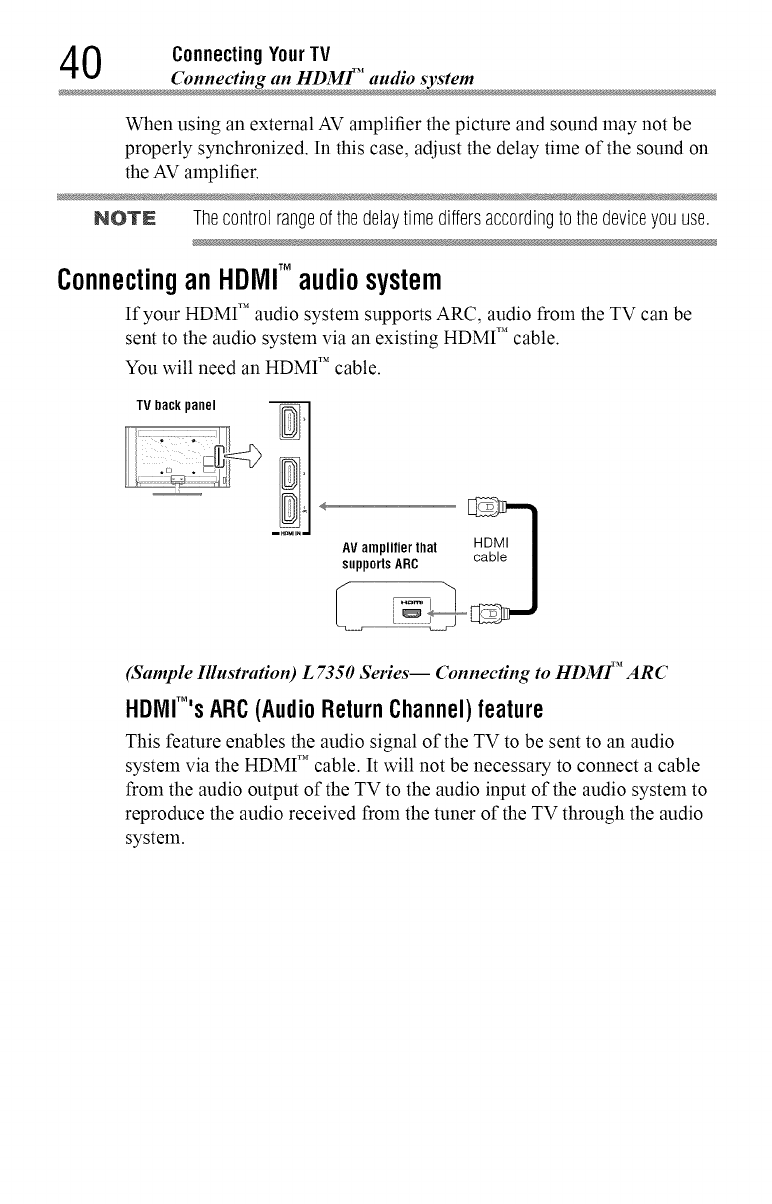
0ConnectingYourTV
Connecting an HDMF' audio syste
When using an external AV amplifier the picture and sound may not be
properly synchronized. In this case, adjust the delay time of the sound on
the AV amplifier.
NOTN Thecontrolrangeofthedelaytimediffersaccordingto thedeviceyou use.
ConnectinganHDMITM audiosystem
If your HDMI TM audio system supports ARC, audio from the TV can be
sent to the audio system via an existing HDMI TM cable.
You will need an HDMI TM cable.
TV hack panel
AVamplifier thai nu'v" I
supportsARC cable I
(Smnple Illustration) L 7350 Series--Connecting to HD:!/IF' ARC
HDIVII'M'sARC(Audio Return Channel)feature
This feature enables the audio signal of the TV to be sent to an audio
system via the HDMI T_"cable. It will not be necessary to connect a cable
from the audio output of the TV to the audio input of the audio system to
reproduce the audio received from the tuner of the TV through the audio
system.
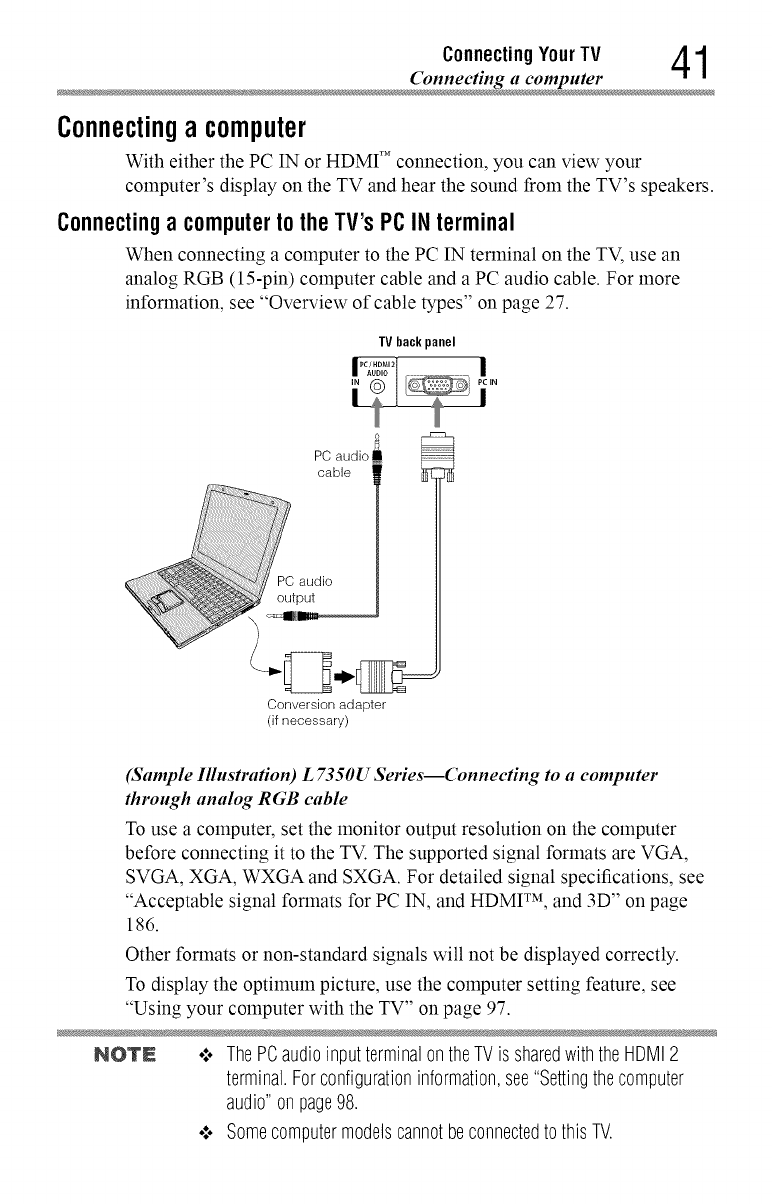
Connecting YourTV 41
Connecting a computer
Connectingacomputer
With either the PC IN or HDMI TM connection, you can view your
computer's display on the TV and hear the sound from the TV's speakers.
Connectinga computertotheTV'sPCINterminal
When connecting a computer to the PC IN terminal on the TV, use an
analog RGB (15-pin) computer cable and a PC audio cable. For more
information, see "Overview of cable types" on page 27.
IV backpanel
PC/HDMI2
I .....1........................I
PC IN
I
PC audio
cable
PC audio
output
Conversion adapter
(if necessary)
(Sample Illustration) L7350U Series--Connecting to a computer
through analog RGB cable
To use a computer, set the monitor output resolution on the computer
before connecting it to the TV. The supported signal formats are VGA,
SVGA, XGA, WXGA and SXGA. For detailed signal specifications, see
"Acceptable signal formats for PC IN, and HDMI TM, and 3D" on page
186.
Other formats or non-standard signals will not be displayed correctly.
To display the optimum picture, use the computer setting feature, see
"Using your computer with the TV" on page 97.
NO'rN .:o ThePCaudioinputterminalontheTVis sharedwiththeHDMI2
terminal.Forconfigurationinformation,see"Settingthecomputer
audio"on page98.
•:. Somecomputermodelscannotbeconnectedto thisTV.
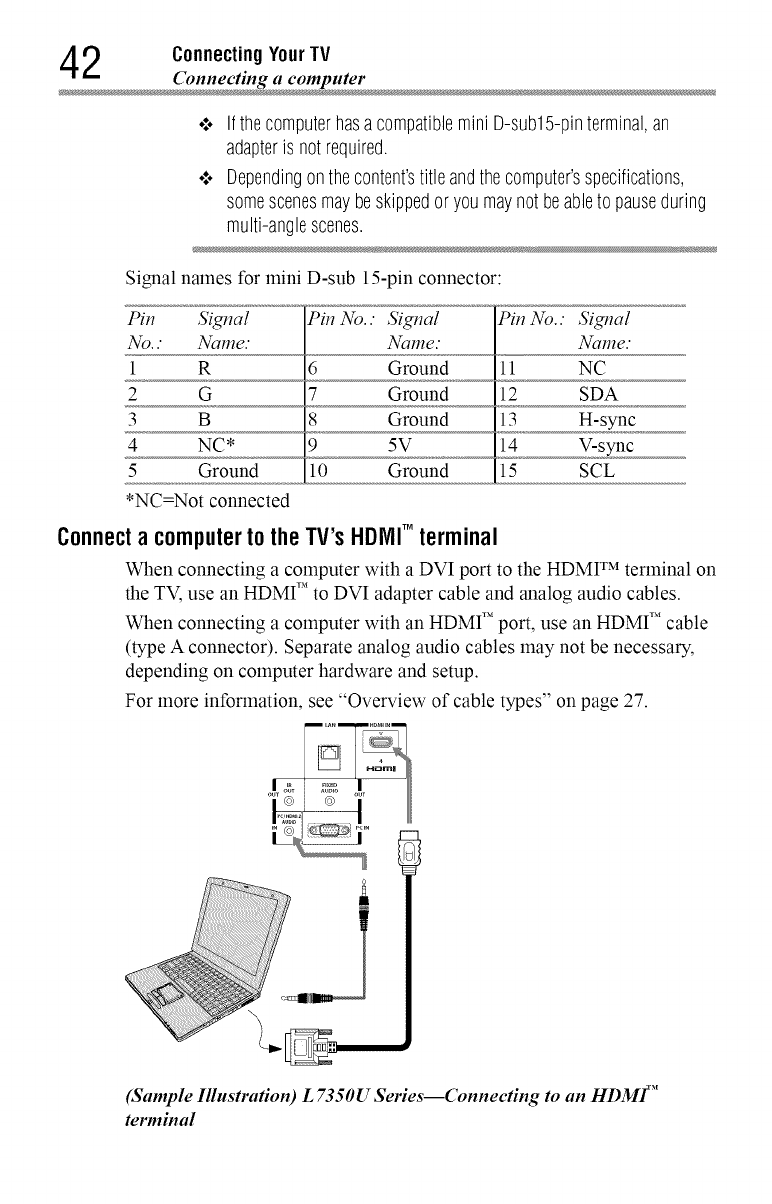
2ConnectingYourTV
o:° Ifthecomputerhasacompatiblemini D-sub15-pinterminal,an
adapteris notrequired.
¢ Dependingonthecontent'stitleandthecomputer'sspecifications,
somescenesmaybeskippedor youmaynot beableto pauseduring
multi-anglescenes.
Signal names for mini D-sub 15-pin connector:
Pin Signal Pin No.." Signal Pin No.." Signal
No.." Name." Name." Name."
1 R 6 Ground 11 NC
2 G 7 Ground 12 SDA
3 B 8 Ground 13 H-sync
4 NC* 9 5V 14 V-sync
5 Ground 10 Ground 15 SCL
*NC=Not connected
Connecta computerto the TV's HDIVIITM terminal
When connecting a computer with a DVI port to the HDMF Mterminal on
the TV, use an HDMI TM to DVI adapter cable and analog audio cables.
When connecting a computer with an HDMI TM port, use an HDMI TM cable
(type A connector). Separate analog audio cables may not be necessary,
depending on computer hardware and setup.
For more information, see "Overview of cable types" on page 27.
\
(Sample Illustration) L 7350U Series--Connecting to an HDMF'
terminal
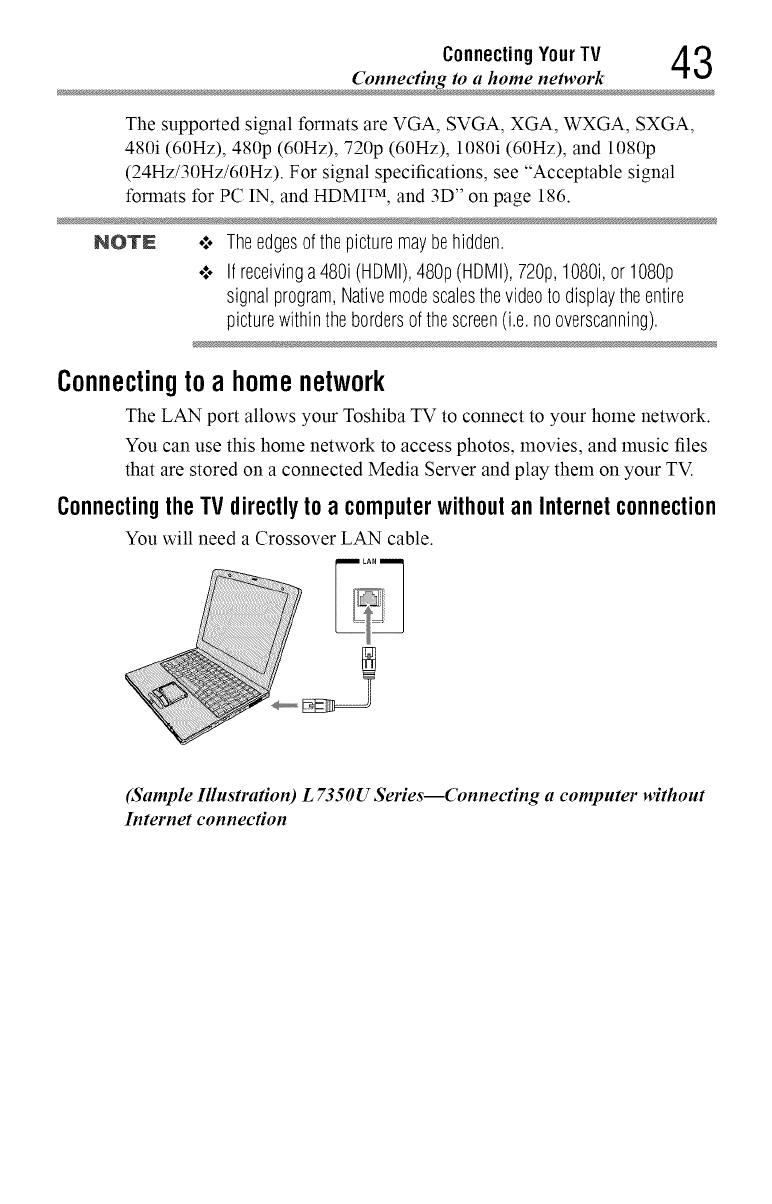
Connecting YourTV 4 3
The supported signal formats are VGA, SVGA, XGA, WXGA, SXGA,
480i (60Hz), 480p (60Hz), 720p (60Hz), 1080i (60Hz), and 1080p
(24Hz/30Hz/60Hz). For signal specifications, see "Acceptable signal
fonnats for PC IN, and HDMI TM, and 3D" on page 186.
NOTN .:. Theedgesof thepicturemaybehidden.
•".. Ifreceivinga480i(HDMI),480p(HDMI),720p,1080i,or1080p
signalprogram,Nativemodescalesthevideoto displaytheentire
picturewithinthe bordersof thescreen(i.e.nooverscanning).
Connectingtoa homenetwork
The LAN port allows your Toshiba TV to connect to your home network.
You can use this home network to access photos, movies, and music files
that are stored on a connected Media Server and play them on your TV.
ConnectingtheTVdirectlyto a computerwithoutan Internetconnection
You will need a Crossover LAN cable.
(Sample Illustration) L 7350U Series--Connecting a computer without
Iuternet connection
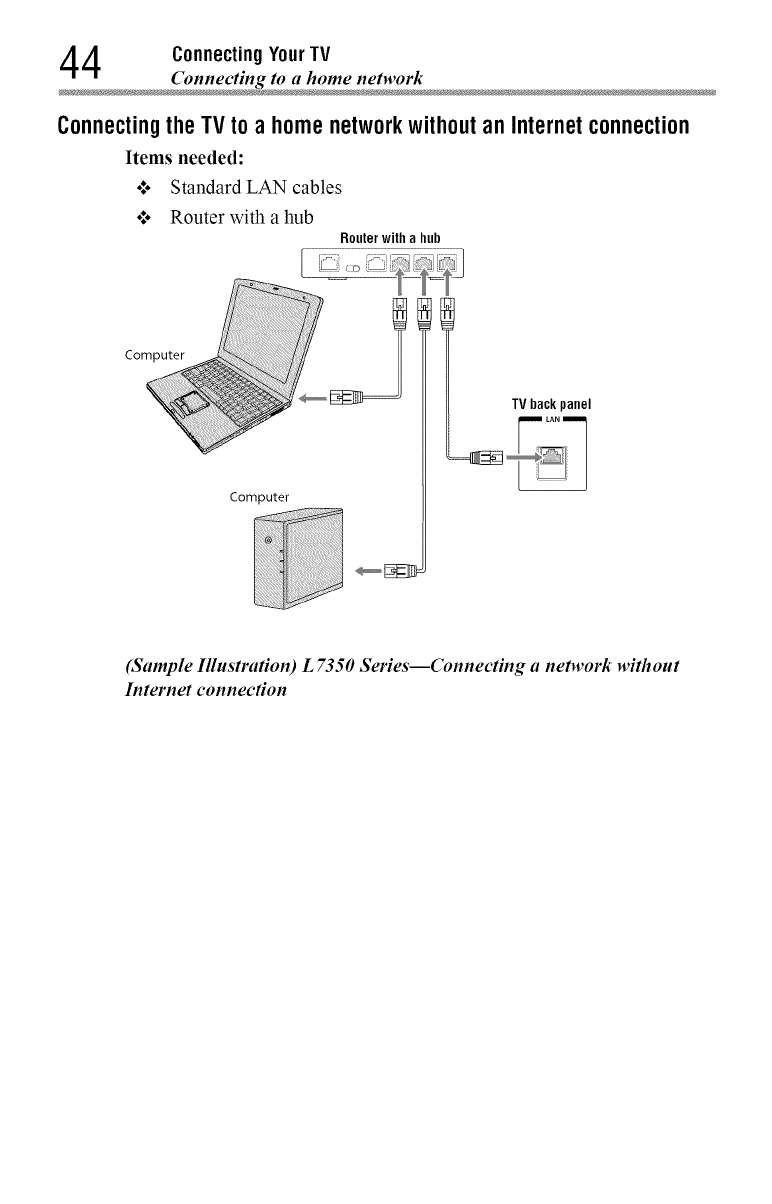
4ConnectingYourTV
Connecting to ahome networ
Connectingthe TV to a home networkwithout an Internetconnection
Items needed:
o*,oStandard LAN cables
o*.oRouter with a hub
Router with a hub
....
Computer
TV back panel
(Sample Illustration) L 7350 Series--Connecting a network without
Internet connection
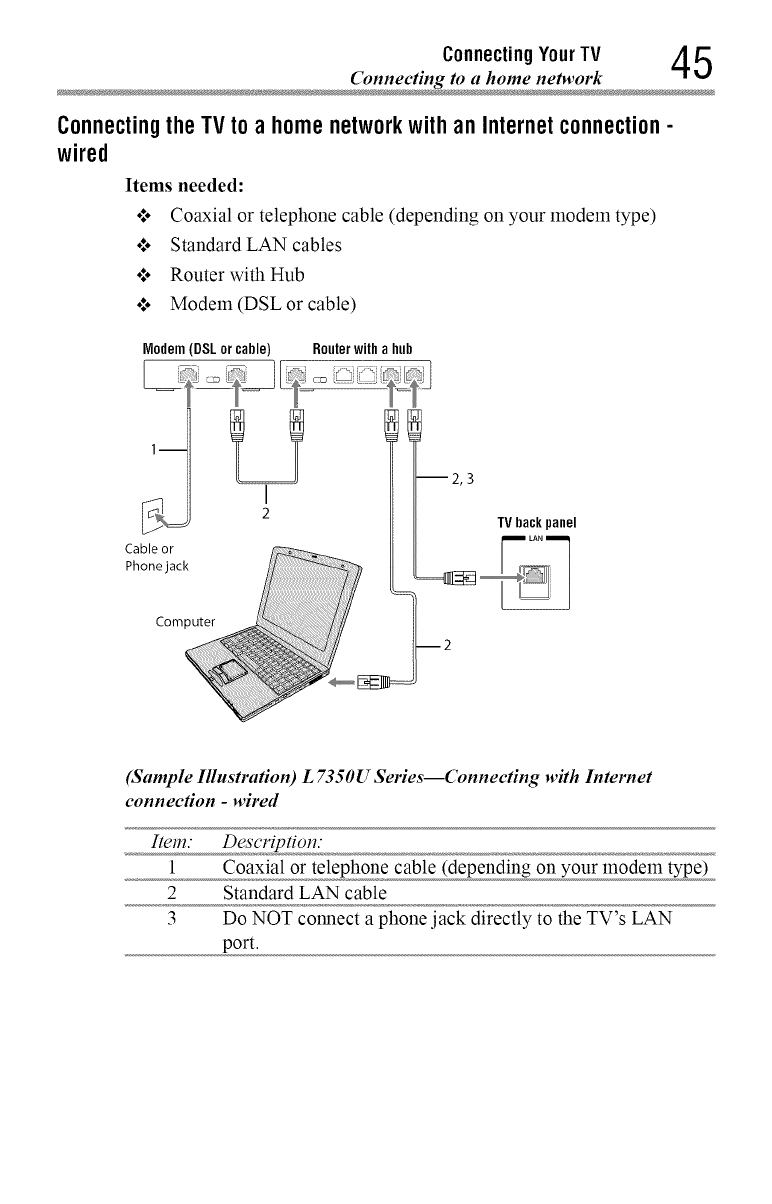
Connecting YourTV 45
Connecting to ahome networ
Connectingthe TVto a homenetworkwithanInternetconnection-
wired
Items needed:
•:. Coaxial or telephone cable (depending on your modem type)
•:. Standard LAN cables
•:. Router with Hub
•:. Modem (DSL or cable)
Modem (DSL or cable) Router with a hub
lm
Cable or
Phone jack
I
2
--2,3
TV back panel
(Sample Illustration) L 7350U Series--Connecting with Internet
eonnee#on -wired
Item Description:
1 Coaxial or telephone cable (depending on your modem type)
2 Standard LAN cable
3 Do NOT connect a phone jack directly to the TV's LAN
port
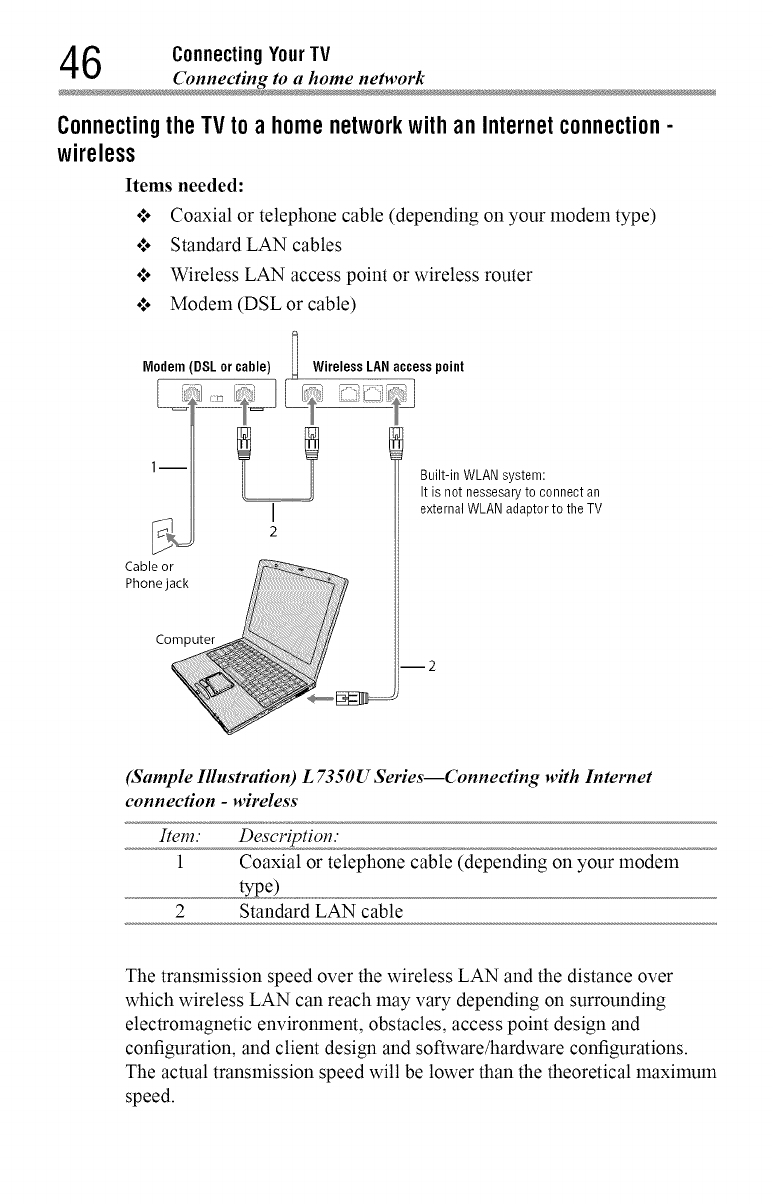
6ConnectingYourTV
ConnectingtheTVto a homenetworkwithanInternetconnection-
wireless
Items needed:
o:. Coaxial or telephone cable (depending on your modem type)
•1. Standard LAN cables
•1. Wireless LAN access point or wireless router
.t. Modem (DSL or cable)
A
Modem (DSL or came) IWireless LANaccess point
1- l l Built-in WLAN system:
It is not nessesary to connect an
I external WLAN adaptor to the TV
2
Cable or_
Phone jack
Computer
m2
(Sample Illustration) L 7350U Series--Connecting with Internet
connection -wireless
Item." Description."
1 Coaxial or telephone cable (depending on your modem
type)
2 Standard LAN cable
The transmission speed over the wireless LAN and the distance over
which wireless LAN can reach may vary depending on surrounding
electromagnetic environment, obstacles, access point design and
configuration, and client design and software/hardware configurations
The actual transmission speed will be lower than the theoretical lnaxilnuln
speed
Connecting YourTV 4 7
NOTE TheBuilt-inWLANAdapteris basedontheIEEE802.11n specificationand
maynot befullycompatiblewith, orsupportsomefeatures(e.g.,security)
of certainWi-Fiequipmentthatarebasedonthedraftversionof IEEE
802.11n.
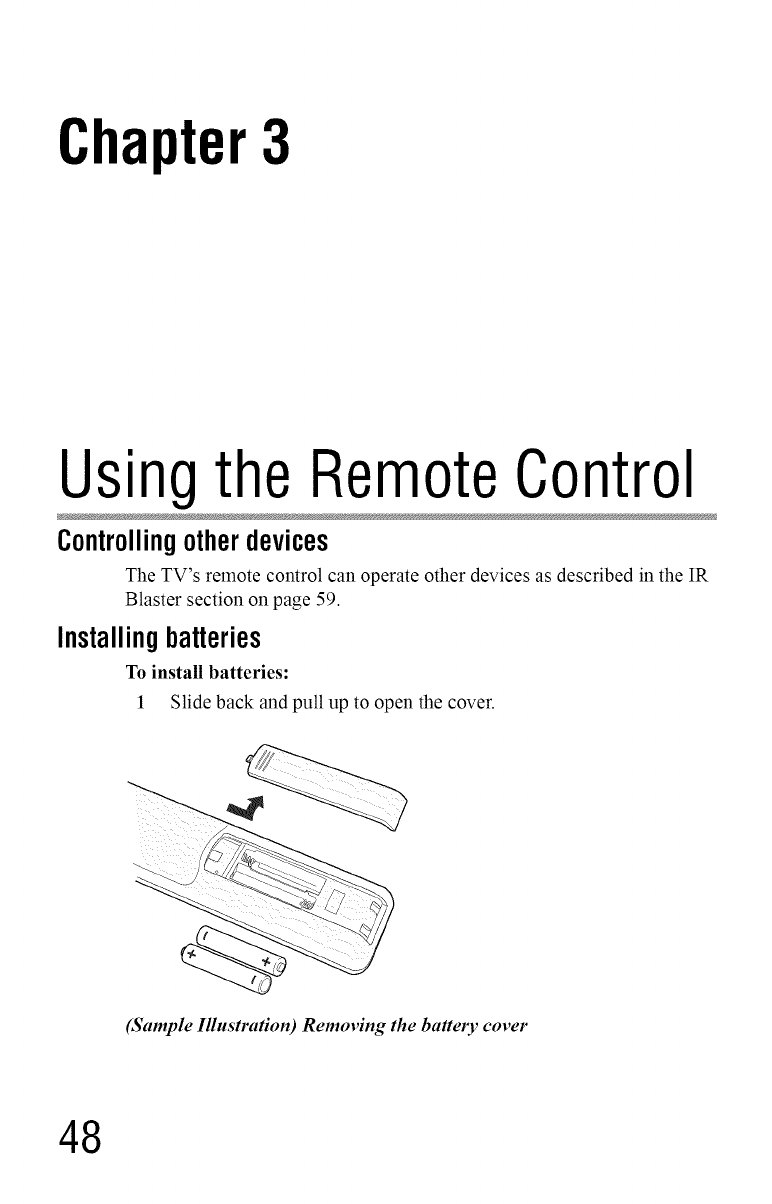
Chapter3
Usingthe RemoteControl
Controllingotherdevices
The TV's remote control can operate other devices as described in the IR
Blaster section on page 59.
Installingbatteries
To install batteries:
1 Slide back and pull up to open the cover.
(Sample Illustration) Removing the battery cover
48
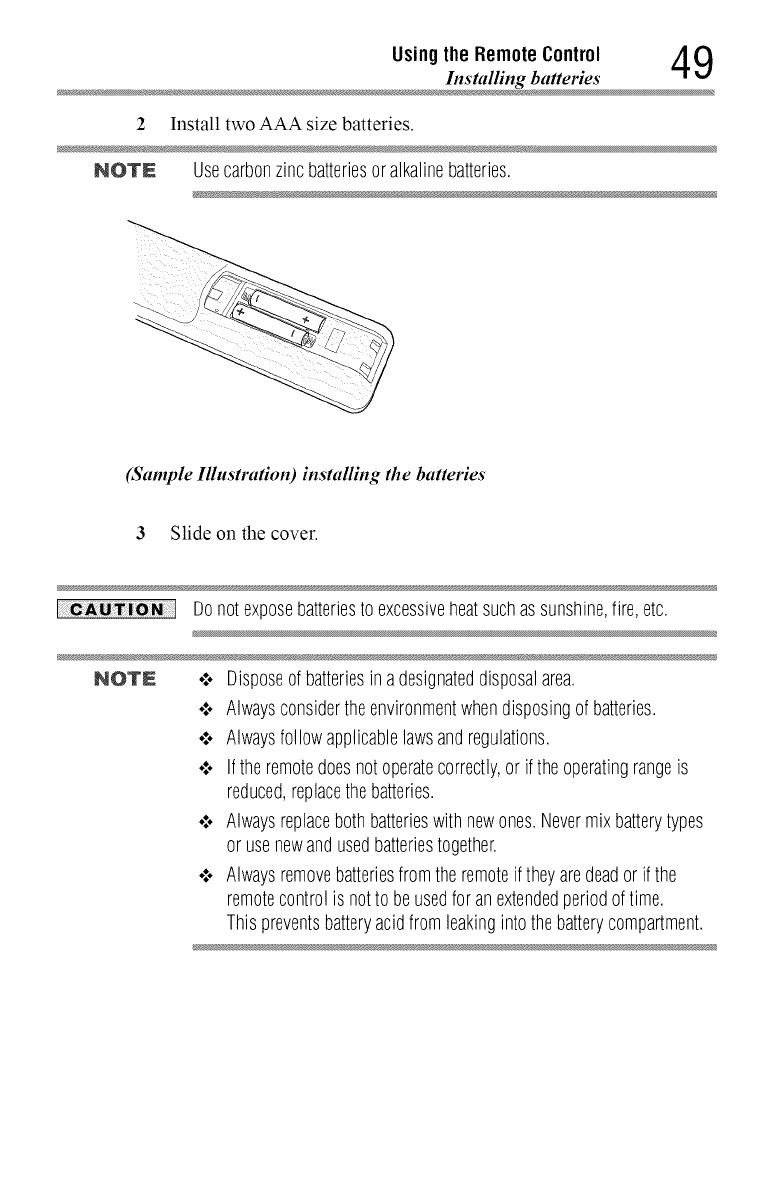
Usingthe RemoteControl 4 9
Installing batteries
2 Install two AAA size batteries.
NOTE Usecarbonzincbatteriesoralkalinebatteries.
(Sample Illustration) installing the batteries
3 Slide on the cover.
Donot exposebatteriesto excessiveheatsuchassunshine,fire,etc.
NOTE .'.. Disposeof batteriesinadesignateddisposalarea.
•".. Alwaysconsidertheenvironmentwhendisposingof batteries.
•".. Alwaysfollowapplicablelawsandregulations.
•".. Iftheremotedoesnotoperatecorrectly,or ifthe operatingrangeis
reduced,replacethebatteries.
•".. Alwaysreplacebothbatterieswith newones.Nevermixbatterytypes
or usenewandusedbatteriestogether.
•".. Alwaysremovebatteriesfromthe remoteif theyaredeadorif the
remotecontrolis notto beusedfor anextendedperiodoftime.
Thispreventsbatteryacidfromleakingintothebatterycompartment.
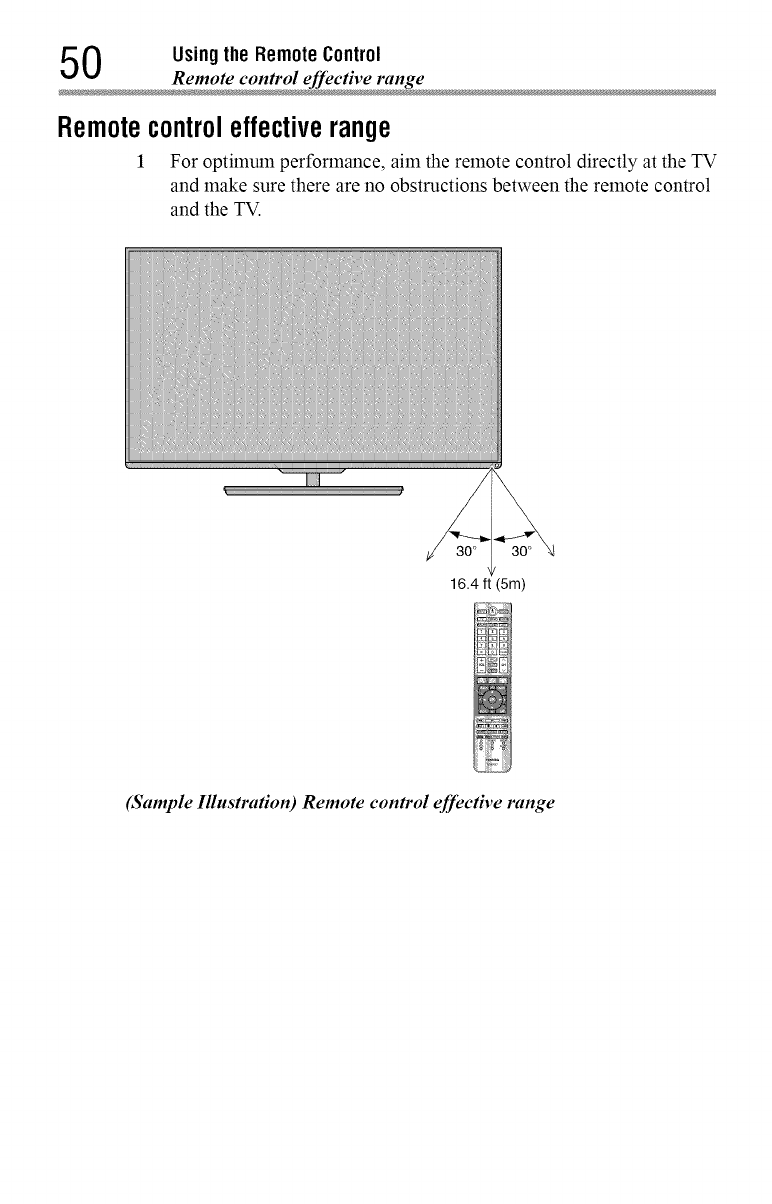
0Using the RemoteControl
Remote control effective range
Remotecontroleffectiverange
1For optimum performance, aim the remote control directly at the TV
and make sure there are no obstructions between the remote control
and the TV.
16.4 ft (5m)
(Sample Illustration) Remote control effective range
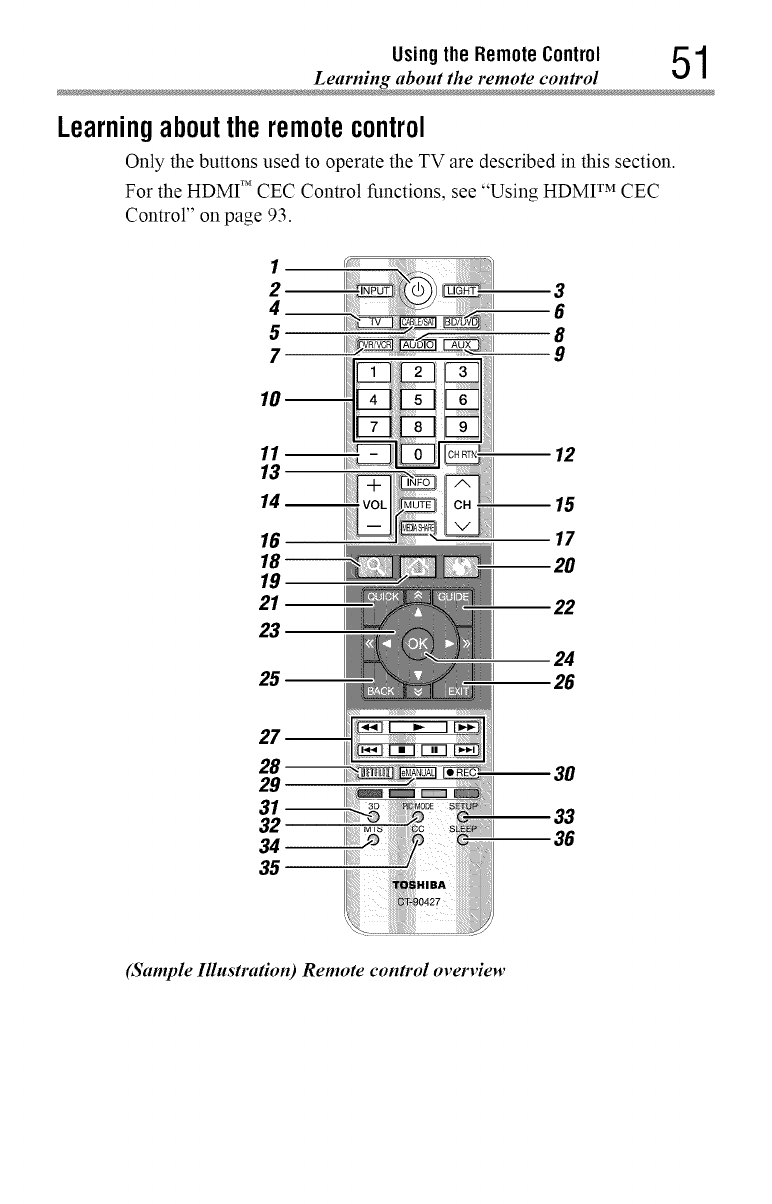
Usingthe RemoteControl 51
Learning about the remote contro
Learningabouttheremotecontrol
Only the buttons used to operate the TV are described in this section.
For the HDMI TM CEC Control functions, see "Using HDMI TM CEC
Control" on page 93.
3
8
9
10 m
11
13
14_
16
18--
19
21
23
25
12
15
17
22
24
26
7m
8m
29
31--
32
34
35
3O
33
36
(Smnple Illustration) Remote control overview
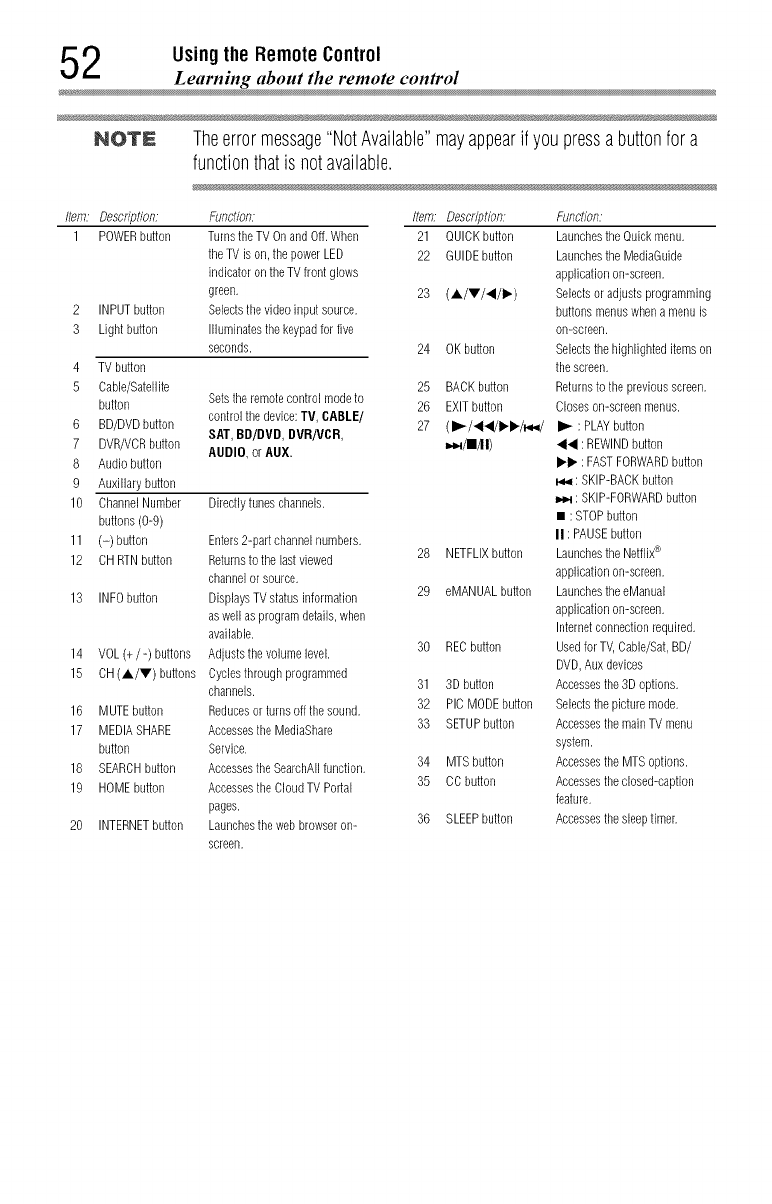
2Usingthe RemoteControl
Learning about the remote control
NOTE Theerrormessage"NotAvailable"mayappearif you pressabuttonfor a
functionthatis notavailable.
Item: Description, Function, Item, Description: Function:
1 POWERbutton TurnstheTVOnand Off.When 21 QUICKbutton Launchesthe Quickmenu.
theTVis on,thepowerLED 22 GUIDEbutton Launchesthe MediaGuide
indicatoronthe TV front glows applicationon-screen.
green. 23 (A/V/</_.) Selectsoradjusts programming
2 INPUTbutton Selectsthe videoinput source, buttonsmenuswhen amenu is
3 Light button Illuminatesthekeypadfor five on-screen.
seconds. 24 OKbutton Selectsthehighlighteditemson
4 TVbutton thescreen.
5 Cable/Satellite 25 BACKbutton Returnsto the previousscreen.
button Setstheremotecontrol modeto 26 EXITbutton Closeson-screenmenus.
controlthe device:TV, CABLE/
6 BD/DVDbutton SAT,BD/DVD, DVFI/VCFI, 27 (1_/<</_'1_/_/ I_ : PLAYbutton
7 DVR/VCRbutton AUDIO, orAUX. m,,Dq/ll/ll) << : REWINDbutton
8 Audiobutton I_" : FASTFORWARDbutton
9 Auxiliarybutton 14,,_:SKIP-BACKbutton
10 ChannelNumber Directlytuneschannels. _ : SKIP-FORWARDbutton
buttons(0-9) • : STOPbutton
11 (-) button Enters2-part channelnumbers. II : PAUSEbutton
12 CH RTNbutton Returnsto the lastviewed 28 NETFLIXbutton LaunchestheNetflix®
channelorsource, applicationon-screen.
13 INFObutton DisplaysTV statusinformation 29 eMANUALbutton LaunchestheeManual
aswellasprogramdetails,when applicationon-screen.
available. Internetconnectionrequired.
14 VOL(+/-) buttons Adjuststhevolumelevel. 30 RECbutton UsedforTV,Cable/Sat,BD/
DVD,Auxdevices
15 CH(A/V) buttons Cyclesthroughprogrammed
channels. 31 3D button Accessesthe3Doptions.
16 MUTEbutton Reducesorturns oftthe sound. 32 PIC MODEbutton Selectsthepicturemode.
17 MEDIASHARE AccessestheMediaShare 33 SETUPbutton AccessesthemainTV menu
button Service. system.
18 SEARCHbutton AccessestheSearchAIIfunction. 34 MTSbutton AccessestheMTSoptions.
19 HOMEbutton AccessestheCloudTV Portal 35 CCbutton Accessestheclosed-caption
pages, feature.
20 INTERNETbutton Launchesthewebbrowseron- 36 SLEEPbutton Accessesthesleeptimer.
screen.
Chapter4
Initial Setupand Menu
Initial setup
When you first turn on or reset the TV, the Menu Language screen
appears.
NOTE o*.oYoucanstopinitialsetupby pressingtheEXITbutton.However,if you
do notfinishChannelTunning setting,theQuickSetup screenwill
appeareverytimeyouturnonyourTV.
•".. TheEXITbuttondoesnotworkuntil afteryouhavesettheStore/
HomeMode setting.
53
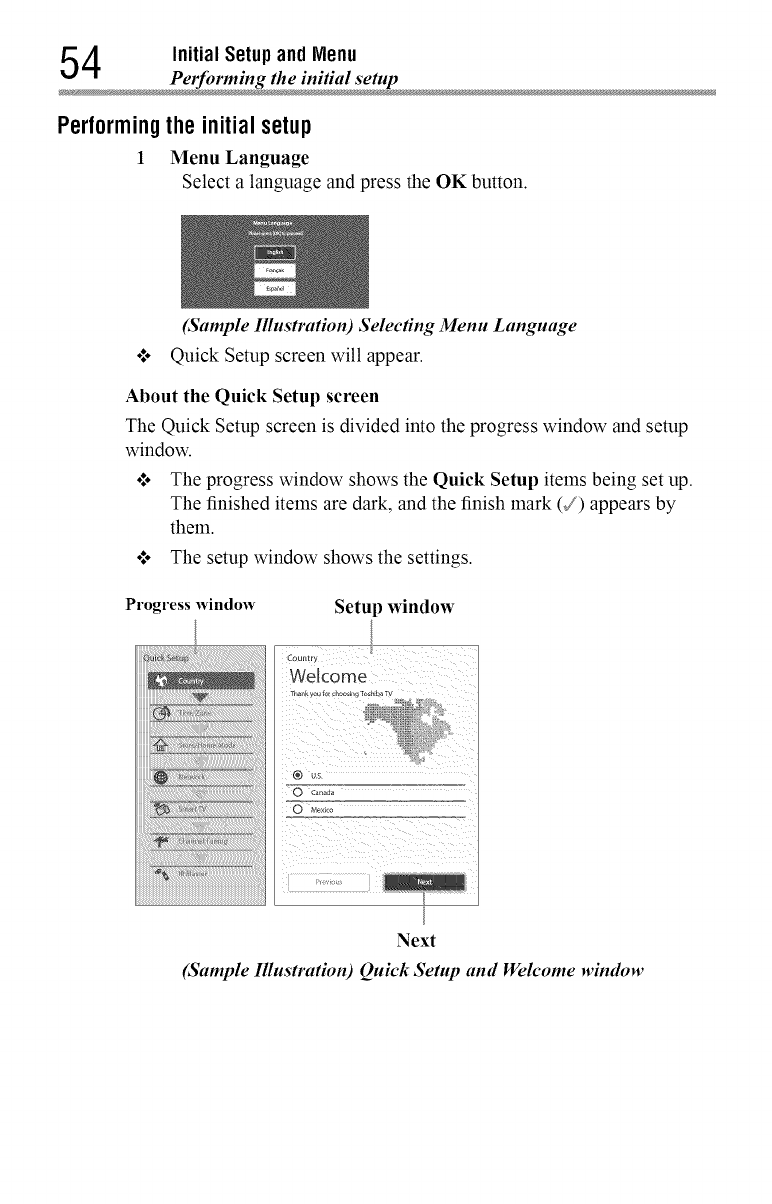
4Initial Setupand Menu
Perfl_rming the initial setup
Performingthe initialsetup
1 Menu Language
Select alanguage and press the OK button.
(Sample Illustration) Selecting Menu Language
o*.. Quick Setup screen will appear.
About the Quick Setup screen
The Quick Setup screen is divided into the progress window and setup
window.
o*.oThe progress window shows the Quick Setup items being set up.
The finished items are dark, and the finish mark (v_) appears by
them.
o:* The setup window shows the settings.
Progress window Setup window
iiiii_i!!!!!!!i_iiiiiiiiiiii_i
Welcome
Next
(Sample Illustration) Quick Setup and Welcome window
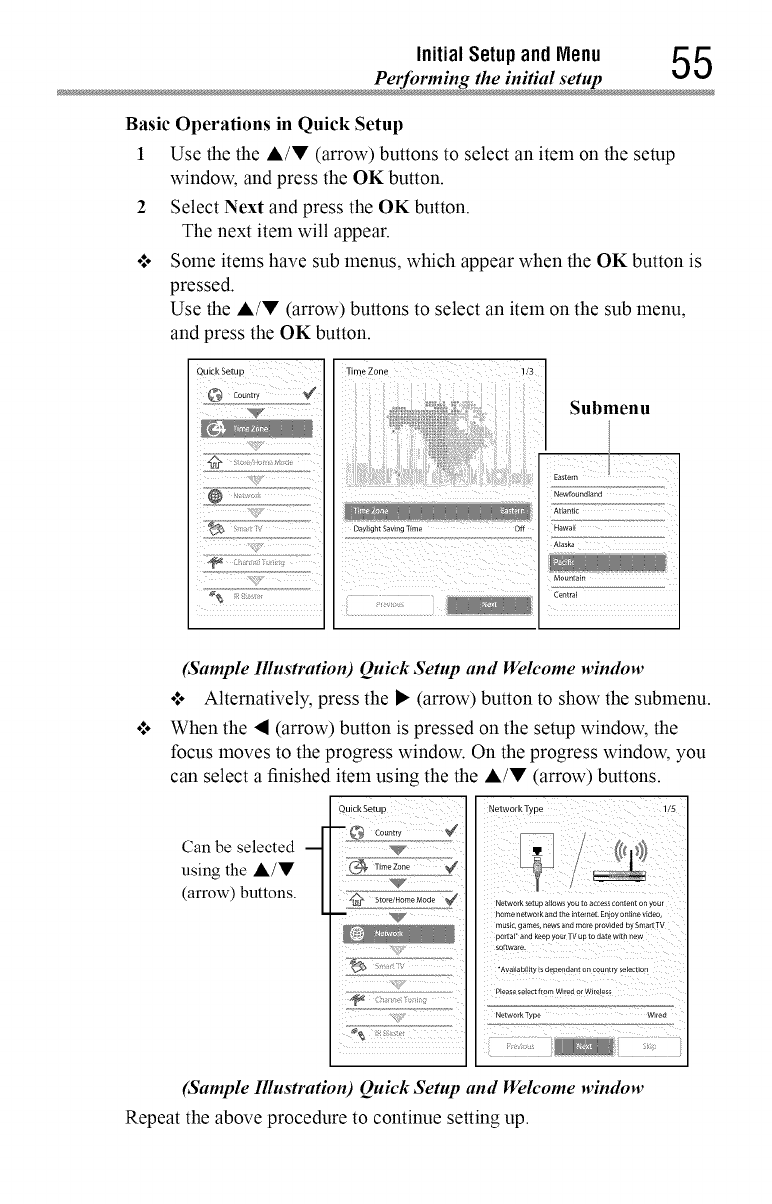
Initial Setup and Menu 5 5
Perfi_rming the initial setup
Basic Operations in Quick Setup
1Use the the &/V (arrow) buttons to select an item on the setup
window, and press the OK button.
2 Select Next and press the OK button.
The next item will appear.
.l. Some items have sub menus, which appear when the OK button is
pressed.
Use the A/V (arrow) buttons to select an item on the sub menu,
and press the OK button.
_:i!iiY¸
Submenu
(Sanlple Illustration) Quick Setup and Welcome wimlow
.l. Alternatively, press the I_ (arrow) button to show the submenu.
When the • (arrow) button is pressed on the setup window, the
focus moves to the progress window. On the progress window, you
can select a finished item using the the A/V (arrow) buttons.
Quick Setup Network Type 1/5
co......
Canbeselected -- ..............._ .................... _/
using theA/.(arrow.)buttons. _{} ...........S_o,o/,omoVod__ __*!__ _ii _
home networ k and the Entemet. Enjoy on_i_e vEdeo,
music, games, news a_d more provided by Smart TV
portaP a_d keep your TV up to date with new
Network Type Wked
(Sample Illustration) Quick Setup and Welcome window
Repeat the above procedure to continue setting up.
6Initial Setupand Menu
Perfi_rming the initial set
PerformingtheQuickSetup
1Country
Select a country then press the OK button.
2 Time Zone
Select Time Zone, and select a time zone from the sublnenu.
Select Daylight Saving Time, and select On or Off from the
sublnenu.
Select Next.
Store /Home Mode
Select Store /Home Mode, and select Home or Store from the
sublnenu.
To use at home, select Home.
Select Next.
NOTN StoreModeis onlyavailableif theTVis setto StoreModeat initial setup.
Thisoptionis hiddenintheHomeMode.
4Network
o:. To make full use of the functions, it is reco_mnended that you
set up a network and connect to the Internet.
To start the Network Setup, select Next on the screen or to skip
the setup, select Skip. If you skip this setup, you can setup the
Network at any time through the Network menu.
Network setup
1 Select Network Type, and select Wired or Wireless from the
sub menu.
Select Next.
o:. If you select Wired, proceed to the Network Connection
Test (Step 3). If you selected Wireless, please proceed to
the following step.
Select Wireless Setup, and select Easy Setup, Assisted
Setup, or Manual Setup from the sub menu.
Select Next.
Initial Setup and Menu 5 7
Performing the initial setup
NOTE 4 EasySetup.IfyourAccessPoint(AP)supportsWPS,thismethod
canbeused.WPSis astandarddesignedto simplifytheconnectionof
wirelessLANequipmentandthesetupof networksecurityfeatures.
4AssistedSetup(setupusingtheAP'snotificationinformation).
TheNetworkName,Authentication,andEncryptionaredecidedbased
on informationfromtheAR Youneedto manuallysettheSecurityKey
for thismethod.
4 Manual Setup(to inputallsettingsmanually).
Once your wired or wireless network has been configured,
perform a Network Connection Test.
A network connection test screen will appear while the test
is being performed. If the test was successful, the successful
connection screen will appear.
If the network connection test failed, the connection failure
screen will appear.
For more information, see "Setting up the Network" on page
125.
4Press the OK button.
When the network can be accessed, Software Upgrade
availability check starts automatically. When Software
Upgrade is completed, proceed to the next step.
NOTE Inorderto secureyourhomenetwork,it is stronglyrecommendedthatyou
useawirelessaccesspointwithencryption.
Smart TV
Select TV Power On Control, and select Enabled or Disabled
from the sub menu.
If you select Enabled, you can turn on or offthe television from
the companion devices such as Tablet or Slnartphone.
Select Next.
1
When Enabled is selected, perform the following procedure:
Select Enable Control, and select On or Off from the sub
menu.
When On is selected, you can control the TV using companion
devices such as a tablet or slnartphone.
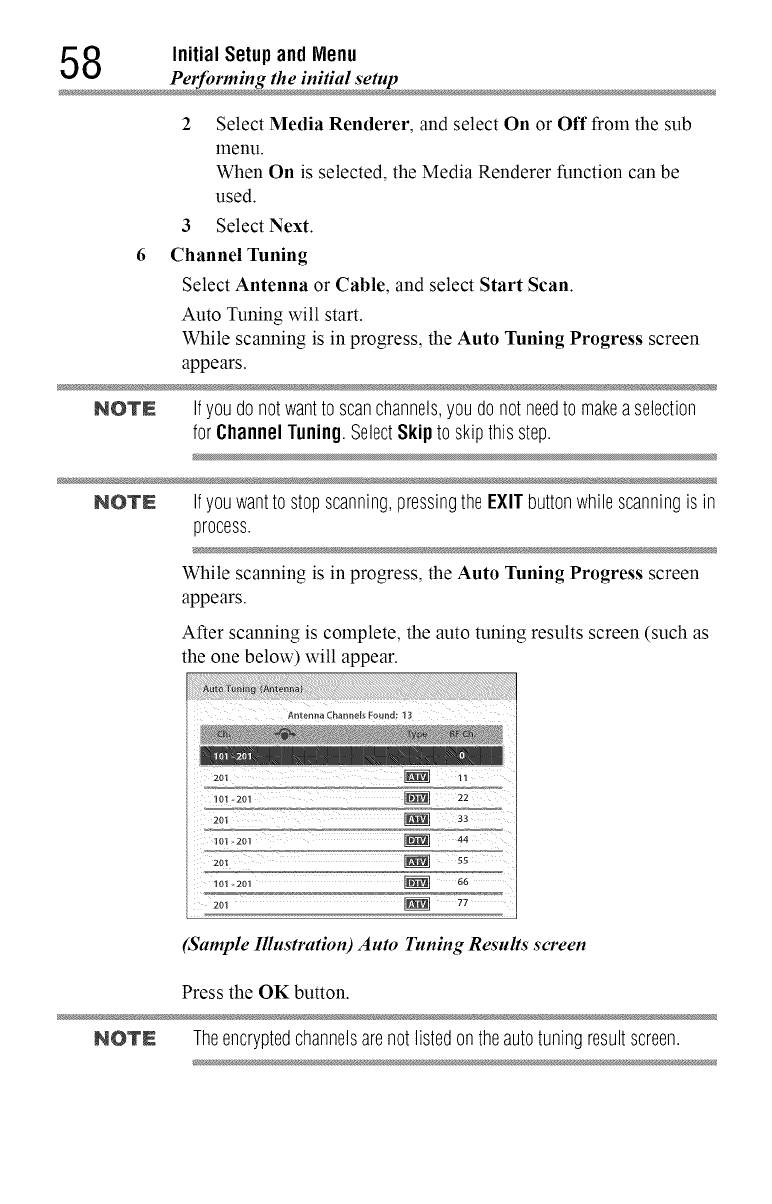
8Initial Setupand Menu
Perfi_rming the initial setup
2 Select Media Renderer, and select On or Off from the sub
menu.
When On is selected, the Media Renderer function can be
used.
3 Select Next.
6 Channel Tuning
Select Antenna or Cable, and select Start Scan.
Auto Tuning will start.
While scanning is in progress, the Auto Tuning Progress screen
appears.
NOTE Ifyoudonotwantto scanchannels,you donotneedto makeaselection
for Channel Tuning.SelectSkip to skipthisstep.
NOTE Ifyouwantto stopscanning,pressingthe EXITbuttonwhilescanningis in
process.
While scanning is in progress, the Auto Tuning Progress screen
appears.
After scanning is complete, the auto tuning results screen (such as
the one below) will appear.
Antenna Chartnels Found: 13
2ol _ 3_
=_o_-20_° _°_°° _°°_°°_°°_°°_°°_°_44
20_ _ ss
101-201 _ 66
201 _ 77
(Sample Illustration) Auto Tuning Results screen
Press the OK button.
NOTE Theencryptedchannelsarenotlistedontheautotuningresultscreen.
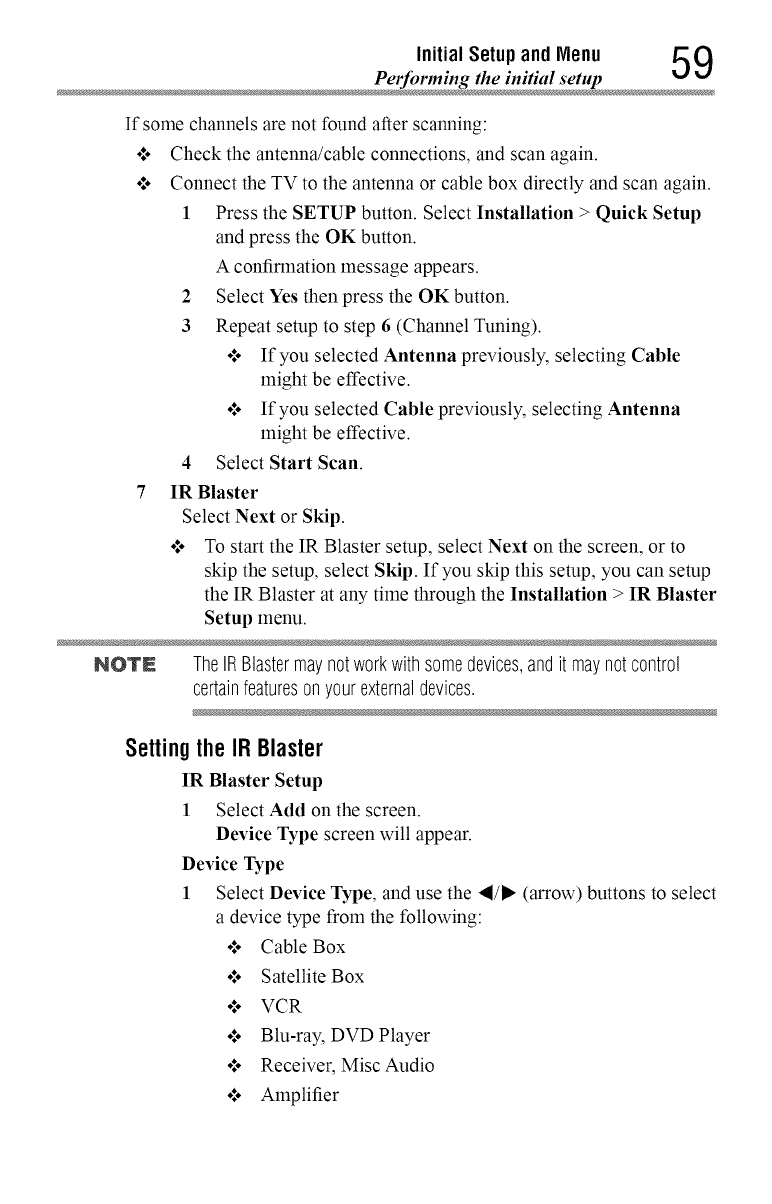
Initial Setup and Menu 5 9
Perfi_rming the initial setup
If some channels are not found after scanning:
•:. Check the antenna/cable connections, and scan again.
•:. Connect the TV to the antenna or cable box directly and scan again.
1Press the SETUP button. Select Installation > Quick Setup
and press the OK button.
A confirmation message appears.
2 Select Yes then press the OK button.
3 Repeat setup to step 6 (Channel Tuning).
o:. If you selected Antenna previously, selecting Cable
might be effective.
o:. If you selected Cable previously, selecting Antenna
might be effective.
4 Select Start Scan.
7 IRBlaster
Select Next or Skip.
o:. To start the IR Blaster setup, select Next on the screen, or to
skip the setup, select Skip. If you skip this setup, you can setup
the IR Blaster at any time through the Installation > IR Blaster
Setup menu.
NOTN TheIRBlastermaynotworkwithsomedevices,andit maynotcontrol
certainfeaturesonyourexternaldevices.
Selling theIR Blaster
IR Blaster Setup
1 Select Add onthe screen.
Device Type screen will appear.
Device Type
1 Select Device Type, and use the "_/I_"(arrow) buttons to select
adevice type from the following:
o:. Cable Box
o:. Satellite Box
o:. VCR
o:. Blu-ray, DVD Player
o:. Receiver, Misc Audio
ol. Amplifier

0Initial Setupand Menu
Perfi_rming the initial set
2
3
o**oCD Player
•*.o Video Accessory
Press the •button then press the GREEN button.
The Brand screen will appear.
Use the A/• (arrow) buttons to select the brand name then
press the OK button.
•*.o Select a field and press the OK button to show the
software keyboard. Enter the first few characters of the
brand name and press the Green button. The brand name
starting with the entered characters will appear on the
Brand screen.
4 Press the OK button.
Model Name screen will appear.
Model Name
1
2
Press the GREEN button.
The Model Name screen will appear.
Use the A/• (arrow) buttons to select the model name then
press the OK button.
olo Select a field and press the OK button to show the
software keyboard. Enter the first few characters of the
model name and press the GREEN button. The model
name starting with the entered characters will appear on
the Model Name screen.
3 Press the • (arrow) button to select Code Set then press the
OK button.
Code Set screen will appear.
Code Set
1 Use the "_/I_ (arrow) buttons to select the code.
°lo After the code is selected, press the RED button to show
the Test screen. The test will start automatically.
NOTN IfamodelhasmorethanoneCodeSet,a messagewill appearstating"This
modelhasmorethanoneCodeSet.Pleaseselectandtestyourpreferred
CodeSet."Youwill needto chooseacodesetusingthe(A/V arrow)
buttonsandperformtheTestoptionto ensurethecorrectCodeSethas
beenselected.
Initial Setupand Menu 61
Perfin'ming the initial setup
2Press the OK button.
Input & Mode Key screen will appear.
Input & Mode Key
1 Use the "_/1_ (arrow) buttons to select the TV input to which
the IR device is connected.
•:. --- (Appears when Device Type is set to Receiver, Misc
Audio or Amplifier)
o:. ANT/CABLE
o:. Videol
•:. Video2 (If selected)
•:. ColorStream HD (If selected)
o:. HDMI 1
o:. HDMI 2
o:. HDMI 3
o:. HDMI 4
olo PC
2 Press the • (arrow) button.
3 Use the ,/_ (arrow) buttons to select device mode key.
•:. CABLE/SAT
•:. BD/DVD
•:. DVR/VCR
•:. AUDIO
•:. AUX
4Pressthe OKbutton.
•:° When Device Type is set to Receiver, Misc Audio or
Amplifier, the Volume Control screen will appear.
•:° When Device Type is set to Cable Box, Satellite Box,
Blu-ray or DVD Player, the Guide Preferences screen
will appear.
•:° When Device Type is set to VCR, CD Player or Video
Accessory, press the OK button on the IR Blaster Setup
complete screen.
Support Information screen will appear.
2Initial Setupand Menu
Perfi_rming the initial set
Volume Control
1Use the ,_/_ (arrow) buttons to set up the Volume control to
select:
4* TV (this is the default)
4. External
The Volume + or -and MUTE buttons will control the
External equipment through the IR blaster.
2 Press the OK button.
Press the OK button on the IR Blaster Setup complete screen.
Support Information screen will appear.
Guide Preferences
1 Use the ,_/_ (arrow) buttons to set up the Guide preferences
to select:
•}o TV MediaGuide
4. External Device Guide
2 Press the • (arrow) button to select Interval Time.
4. 0.125 sec
4. 0.25 sec
olo 0.375 sec
4. 0.5 sec
olo 0.625 sec
•:. 0.75 sec
•:. 0.875 sec
•". 1 sec
•1. After the interval time is selected, press the RED button to
show the Test screen. The test will start automatically.
3 Pressthe OKbutton.
Press the OK button on the IR Blaster Setup complete screen.
Support Information screen will appear.
8 Support Information
Read through the information, and press the OK button.
•1. The initial setup is completed.
NOTE Referto thisinformationif thereis aproblemandyouneedto contact
CustomerSupport.Tofind help,thefollowingoperationcanbeperformed
atanytime.SETUPbutton> Get Help> System Information>OK
button.
Initial Setupand Menu _
Navigating the menu system k,l _,J
Navigatingthemenusystem
o*.oTo open the menu system, press the SETUP button on the remote
control.
iiiiNi2_ii!i!i!iiiiiiiii!iiiiiiiiiiiiiiiiiiiiiii_ii_i_i_
iiii!_%ii_@i_i!_iii!i!!i!ii!ii!ii!ii
iiii!i ii!iiii!ii!ii!ii!ii!ii!ii!ii!i@i!i!ii!ii!ii!ii!ii!i!iiiiiiiiiiiiiiiiiiil
iiii ! !!i !i !i i! i! i! i! i! i ii i ii ii ii ii ii ii ii ii ii ii ii ii ii ii ii ii ii ii ii iiiiii ii ii ii
_##############################_
_cmro
Ptctu_e Mod_ S*anda_d
Sa_kh_ht
cont,as_ O0
cob, 0
_mr 0
Shalpl_5_ 0
Advanced Plc*ure S_tl3g_
_×_el_pt_tb,eSo_ln 9,
_)t_Na Seekings
(Sample Illustration) Main menu
.l. When a menu is open, press the A/V/,_/_ (arrow) buttons on the
remote control to move in the corresponding direction.
To show the setup items or sub menus, press the I_ (arrow) button (or
the OK button).
To select a highlighted item or save your menu settings, press the
OK button. (A highlighted menu item appears in a different color in
the menu.)
•1. All menus close automatically if no selection is made within
approximately 60 seconds.
•1. To close a menu instantly, press the EXIT button.
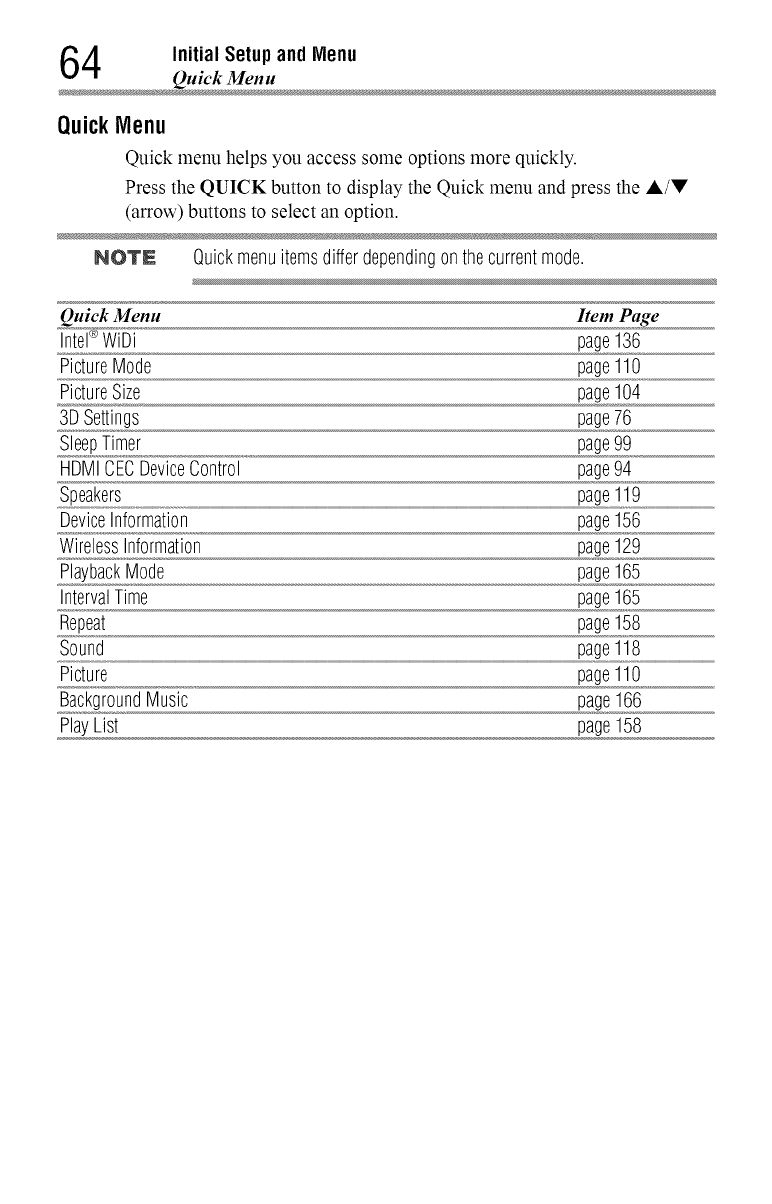
4Initial Setupand Menu
Quick Men
Quick Menu
Quick menu helps you access some options more quickly.
Press the QUICK button to display the Quick menu and press the A/V
(arrow) buttons to select an option.
NOTE Quickmenuitemsdifferdependingonthecurrentmode.
Quick Menu Item Page
i_n_{e'i_®_W]Di_ page136
PictureMode page110
PictureSize page104
3DSettings page76
SleepTimer page99
HDMICECDeviceControl page94
Speakers page119
DeviceInformation page156
WirelessInformation page129
PlaybackMode page165
IntervalTime page165
Repeat page158
Sound page118
Picture page110
BackgroundMusic page166
PlayList page158
Chapter5
Settingup your TV
Howtonavigatethemenu
o:o Press the SETUP button. Select Installation, Main menu,
Submenu, and then press the OK or EXIT button.
Changinginitial settings
From Quick Setup:
1 Press the SETUP button.
2 Select Installation >Quick Setup, and press the OK button.
A confinnation message appears.
3 Press the ,_/_ (arrow) buttons to select Yes.
4 Press the OK button.
To change settings, see "Initial setup" on page 53.
Individual settings
MenuLanguage
You can choose from three different menu language settings (English,
Fran_ais, and Espafiol). The TV displays menus and messages in your
preferred language.
1 Press the SETUP button.
2 Select Installation > Menu Language and press the OK button.
3 Press the A/V (arrow) buttons to select your preferred language.
4 Press the OK button. 65
6Settingup yourTV
Individual settings
Country
You can select the country in which you reside.
1 Press the SETUP button.
2 Select Installation > Country and press the OK button.
3 Press the A/V (arrow) buttons to select the country.
4 Press the OK button.
TimeZone
This setting allows you to specify the correct time zone for your region.
1 Press the SETUP button.
2 Select Installation > Time Zone and press the OK button.
3 Press the A/V (arrow) buttons to select your time zone.
4 Press the OK button.
DaylightSavingTime
1 Press the SETUP button.
2 Select Installation > Daylight Saving Time and press the OK
button.
3 Press the A/V (arrow) buttons to select On or Off.
4 Press the OKbutton.
Store/HomeNode
You can select Store or Home to designate the TV location. Select Home
for normal home use.
1 Press the SETUP button.
2 Select Installation > Store /Home Mode and press the OK button.
3 Press the A/V (arrow) buttons to select Home or Store.
4 Press the OK button.
NO'rN StoreModeis onlyavailableif theTVis setto StoreModeat initial setup.
ANT/CABLEIn
This setting configures the antenna input source for the ANT/CABLE
terminal.
1 Press the SETUP button.
2 Select Installation > Channel Tuning > ANT/CABLE In and
press the OK button.
Setting up yourTV 67
Storing channels in memoty (optiona
3Press the A/V (arrow) buttons to select Antenna or Cable.
4 Press the OKbutton.
5 Select Start Scan.
After scanning is complete, the auto tuning results screen will
appear.
6 Press the OK or EXIT button.
Storingchannelsinmemory(optional)
To make sure your TV stops only on the channels you want when you press
the CH A/V buttons on the remote control or the control panel, store
those channels in the TV's memory.
AutoTuning
NOTE Youmustsetuptheantenna/cableinputsourcefirst.See"Initialsetup"on
page53.
You can set up the TV to detect all active channels in your area and store
them in its memory. Then you can manually store or skip individual
channels from memory.
Option: Description:
Cable Note:IfyouselectCable,autotuningdeletespreviouslystoredchannels
frommemory.
Thissetuprequiressometime,butyoudonotneedto repeatthesetup
unlessyourcableTVservice'slineupchangessignificantly.
Antenna Toskipanantennasourcechannelandremoveit frommemory,setthe
channelto beskipped.See"Skippingchannels"onpage68.
NOTN Totuneto channelsnot storedinmemory,usebuttons0-9 andtheDASH
buttonontheremotecontrol.
1 Press the SETUP button.
2 Select Installation > Channel Tuning > Auto Tuning, and then
press the OK button.
A confirmation screen appears.
3 Press the OK button to start Auto Tuning or press the EXIT button
to abort.
The TV cycles through the channels and stores all active channels
in melnory.
4 To view the progralmned channels, press the CH A/V buttons.
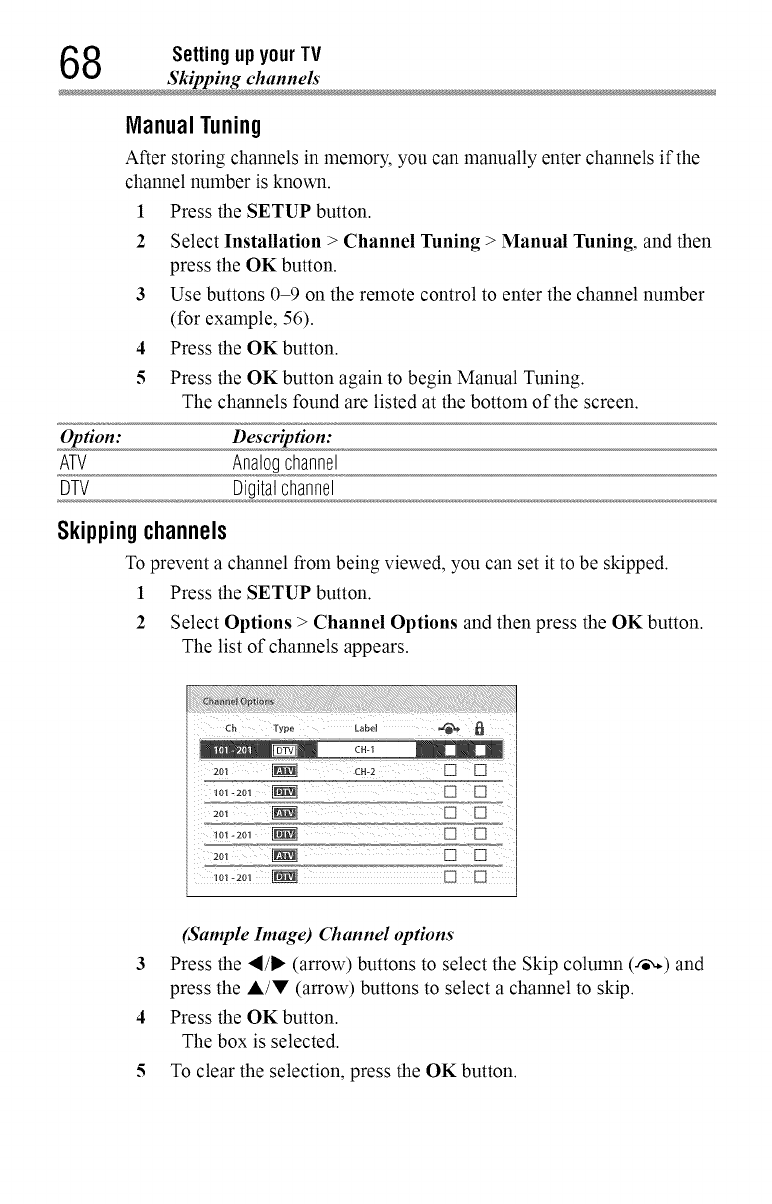
8Settingup yourTV
Skipping channels"
ManualTuning
After storing channels in memory, you can manually enter channels if the
channel number is known.
1 Press the SETUP button.
2 Select Installation > Channel Tuning > Manual Tuning, and then
press the OK button.
3 Use buttons 0-9 on the remote control to enter the channel number
(for example, 56).
4Press the OK button.
5Press the OK button again to begin Manual Tuning.
The channels found are listed at the bottom of the screen.
Option: Description:
ATV Analogchannel
DTV Digitalchannel
Skipping channels
To prevent a channel from being viewed, you can set it to be skipped.
1 Press the SETUP button.
2 Select Options > Channel Options and then press the OK button.
The list of channels appears.
Ch Type Lauel _
2o_ _ :,-2 [] []
_o,-2o,_ [] []
,o_-2o-_ [] []
2o, _ [] []
,o,-2o, _ [] []
(Sample hnage) (71annel options
3 Press the "I/1_ (arrow) buttons to select the Skip colulnn (-'_) and
press the A/V (arrow) buttons to select a channel to skip.
4 Press the OK button.
The box is selected.
5 To clear the selection, press the OK button.
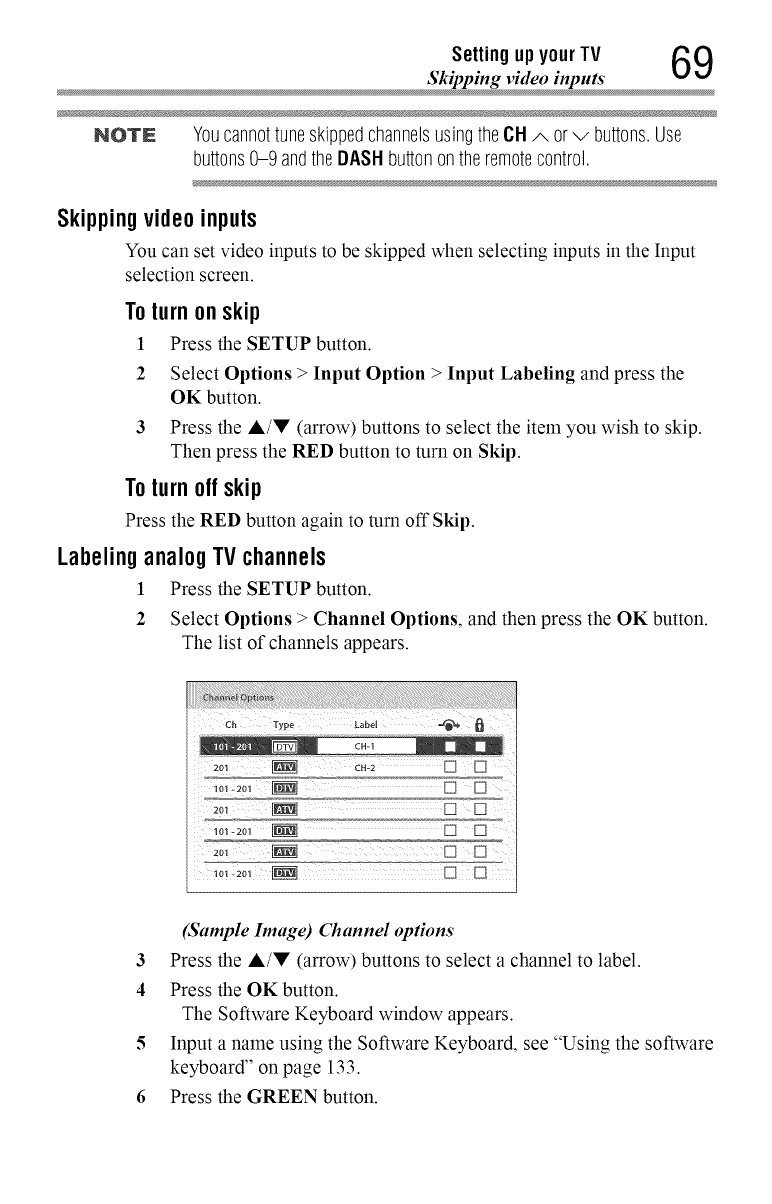
Setting up yourTV 69
Skipping video inputs
NOTE YoucannottuneskippedchannelsusingtheCHA orv buttons.Use
buttons0-9 andtheDASHbuttononthe remotecontrol.
Skipping video inputs
You can set video inputs to be skipped when selecting inputs in the Input
selection screen.
To turn on skip
1 Press the SETUP button.
2 Select Options > Input Option > Input Labeling and press the
OK button.
3 Press the A/V (arrow) buttons to select the item you wish to skip.
Then press the RED button to turn on Skip.
To turn off skip
Press the RED button again to turn off Skip.
LabelinganalogTVchannels
I Press the SETUP button.
2 Select Options > Channel Options, and then press the OK button.
The list of channels appears.
Ch Type _abel _
2°, _ c,-2 [] []
,o,-2o, _ [] []
_ol-2o _ [] []
lolo2ol _ [] []
(Sample hnage) (7,annel options
3 Press the A/V (arrow) buttons to select a channel to label.
4 Press the OKbutton.
The Software Keyboard window appears.
5 Input a name using the Software Keyboard, see "Using the software
keyboard" on page 133.
6 Press the GREEN button.
0Settingup yourTV
Labeling video inputs
Labelingvideoinputs
The input labels are shown in the input selector and banner displays. You
can label video inputs according to the devices you have connected to the
TV.
1
2
Press the SETUP button.
Select Options > Input Option > Input Labeling and press the
OK button.
3 Press the A/V (arrow) buttons to select the item you wish to label.
Press the ,_/, (arrow) buttons to select Receiver, Cable, DVD,
Game, PC, Recorder, Satellite, VCR or Blu-ray TM.
•:" When entering arbitrarycharacters, press the GREEN button.
The Software Keyboard window appears.
Input aname using the Software Keyboard, see "Using the
software keyboard" on page 133.
4 Repeat Step 3 for other video inputs.
Configuringsharedinput
To set Shared PCAudio
1 Press the SETUP button.
2 Select Options > Input Option > PC/HDMI 2 Audio and press the
OK button.
3 Press the A/V (arrow) buttons to select PC or HDMI 2.
NOTE Toapplythesetting,switchthe inputto PCor HDMI2.
Chapter6
Basicfeatures
Using3Dfunctions
Before using the 3D function, note the following:
In addition to compatible 3D glasses, viewing 3D programming requires
the following (not included):
o**oAvailable 3D glasses •Toshiba FPT-AG03 (supplied)
o**oCompatible 3D playback device or 3D source.
o**o3D capable HDMI TMcable.
If you wish to obtain extra 3D glasses:
Toshiba provides 3D glasses for this television as an option.
To obtain them visit:
US: http://ceaccessories.toshiba.com/
Canada: http ://www. shoptoshiba.ca/
NOTN Usethe typeof 3DglassesthatarecompatiblewithtoyourTV.
71
2Basicfeatures
Using 3D functions
Health precautions:
o:o Dueto thepossibleimpactonvisiondevelopment,viewersof 3D
programmingshouldbeage6 orabove.Childrenmaybemore
susceptibleto healtheffectsfromviewing3Dimagesandshouldbe
closelysupervised.
¢ Someviewersmayexperienceaseizureorblackoutwhenexposed
to certainflashingimagesor lightscontainedin certain3Dtelevision
picturesor videogames.Anyonewhohashada seizure,lossof
awareness,orothersymptomslinkedto anepilepticcondition,or
hasafamilyhistoryofepilepsy,shouldcontacta healthcareprovider
beforeusingthe3Dfunction.
Handlingthe 3D glasses:
o:° Whencleaningthe3Dglasses,gentlywipewithadry,softcloth.
¢ First,removeanydirtor dustfromthe3DGlasses.
¢ Harshrubbingoruseof adirtyor coarseclothwill scratchthe3D
Glasses.Donot usebenzene,paintthinner,alcohol,water,or abrasive
cleaners,whichmaydamagethe3Dglasses.
¢ Whennotusingthe3D glasses,storethemawayfromhigh
temperaturesandhumidity.
¢ Donotstorethe3Dglassesinareasof extremeheator cold,as
deformationcanoccur.If deformationoccurs,replacethe3Dglasses.
¢ Thelensesofthe3D glassesaredifferentfromthoseof ordinary
glasses,andareverythin.Beverycarefulin handlingthe3Dglasses
asthelenscanpopouteasily.
¢ Donotputexcessiveforceonthelenses.
¢ Donotscratchthesurfaceof thelenseswithsharpobjects.
¢ Donotdropor bendthe3Dglasses.
¢ Donotusebenzene,paintthinner,alcohol,water,orabrasivecleaners,
whichmaydamagethe3Dglasses.
¢ The3D glassesarenotsubjectto repair.Iftheglassesarebrokenor
scratched,purchaseanewpairof 3Dglasses.
¢ The3D glassesarenotsubjectto repair,butcanbereplacedif a
problemoccursdueto aninitialfaultwiththeglasses.
¢ Becarefulnotto pinchyourfingersinthehingeofthe 3Dglasses.
Basicfeatures 73
U_'ing 3D functions
NOTE Watchingthe TV:
•:o Proper3Deffectsor3D-to-2Dconversionresultsmaynotbeobtained
dependingonthereceived3Dcontent.
¢ 3D effectandimagequalitymayvarydependinguponcontentquality
anddisplaydevicecapability/functionality/settings.
,,:. Wearthe3Dglassesproperly,otherwiseyoumaynotseethecorrect
3D images.
¢ Whennotviewing3Dimages,takeoffthe3D glasses;otherwise,it
maybedifficultto seethedisplayonotherproductssuchasyour
computer,digitalclock,orcalculator,etc.
•_. Usethe3Dglassesattheproperviewingangleanddistance,see
"SafetyPrecautionsfor 3Dglasses"onpage7.
NOTE Useahigh-speedHDMITM cablewhenyouconnectadevicesuchasa 3D
compatibleBlu-rayDiscTM playerorcomputerto theTV.Whenyou usea
standardHDMITM cable,3D imagesmaynotdisplaycorrectly.
Somefunctionscannotbeshownin 3Dmode.
Viewing3D images
Incoming video signals can either be in 2D or 3D format. A 2D signal
can be viewed in either 2D or 3D, and 3D can be viewed in either 2D or
3D. If the TV can detect the fact that a signal is 3D, it can change to 3D
mode automatically - see "Setting the auto start mode" on page 79.
Otherwise you can change the viewing mode using the 3D button. Finally,
the format of the 3D signal can be either Side by Side (SBS) or Top and
Bottom (TAB). You may have to choose the correct format if the TV can
not detect it automatically - see "Switching display mode or selecting 3D
format", below.
Moreover, you can change 2D images to 3D images by pressing the 3D
button when viewing in 2D.
NOTE o:. Inorderto switchto 3D,theTVmustbereceivinga3Dsignal.
,,:. Ifappropriatemodeandformatarenotselected,3Dimagewill notbe
correctlydisplayed.
,,:. Iftheappropriate3D modeandformatarenotselected,the3D image
will notdisplaycorrectly.
¢ Thereareindividualdifferencesin perceptionof 3D images.

4Basicfeatures
Using 3Dfunctions
o:o Whenviewing3D images,wearthe3Dglasses.
o:o The2Dto 3Dconversionfunctionis activatedandcontrolledbyyou
accordingto yourpersonalpreferences.
¢ The2Dto 3Dconversionfunctionis meantfor enjoymentof 2D home
video,andother2D contentyou create,in 3Daccordingto your
personalpreferences.
¢ Itis not intendedfor unauthorizeduseof copyrightedworks.Tothe
extentthatyouneedto obtainpermissionfromacopyrightholder
to viewcopyrightedworks,it is yourresponsibilityto obtainsuch
permission.
¢ The2Dto 3Dconversionfunctionis not intendedfor usewith pre-
recorded2Dcopyrightedcontentownedbyathird-partyunlessthe
copyrightownerhasgivendirector indirectpermission,orunless
applicablelawpermitssuchuse.Totheextentyouneedto obtain
permissionfromacopyrightholderto viewcopyrightedworks,it is
yourresponsibilityto obtainsuchpermission.
Switching display mode or selecting 3D format
There are four TV viewing modes:
Mode: Description:
3D Displays3Dimages.
2D Displays2D imagesbychanging3Dimagesto 2D.
2Dto 3D Displays3Dimagesbychanging2Dimagesto 3D.
Native Displaysa receivedsignalformatas it is.
3D signals can be sent in one of three formats:
3D Format: Description:
SidebySide(SBS) Imagesfor theleftandrighteyesarepositionedside-
by-side.
TopandBottom(TAB) Imagesfor theleftandright eyesarepositionedatthe
topandbottomofthescreen
FramePacking(FP)* Imagesfor theleftandright eyesarepositionedatthe
topandbottomofthescreen.
* This format cannot be selected manually.
o**oIf the right and left images are the same in Native mode, select SBS.
o**oIf the top and bottom images are the same in Native mode, select
TAB.
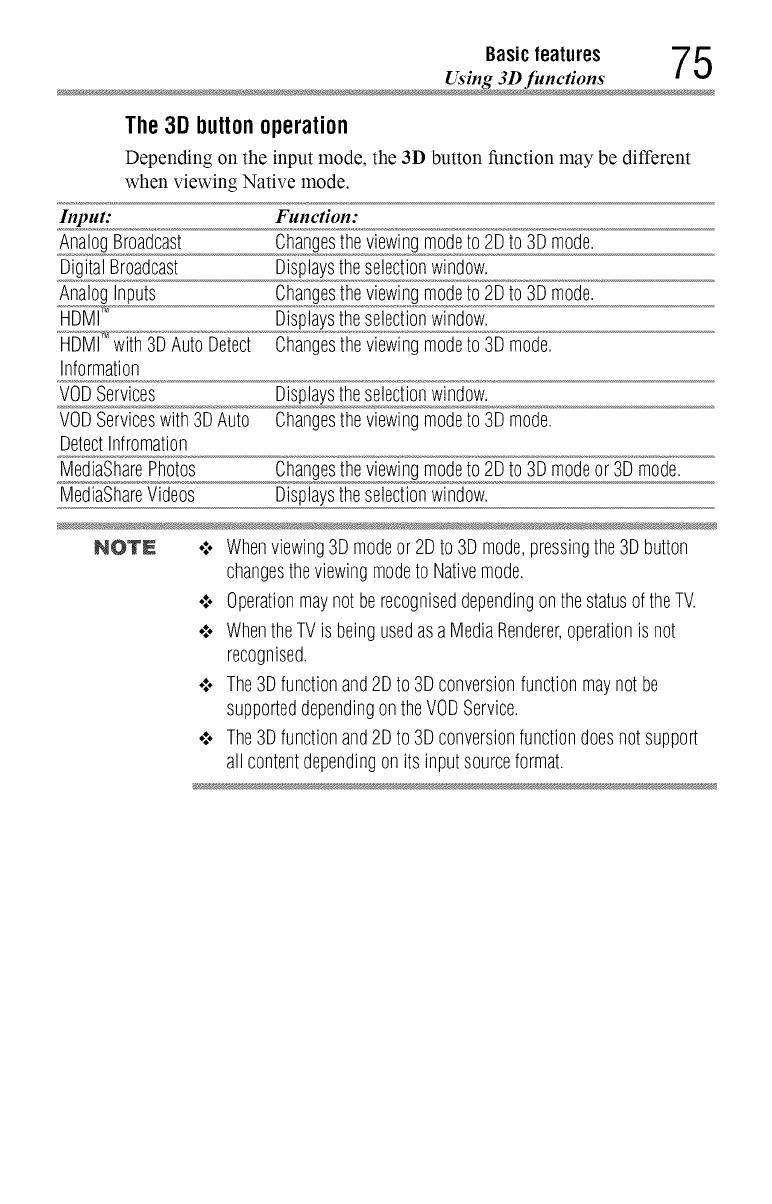
Basicfeatures 7 5
Using 3D functions
The 3D buttonoperation
Depending on the input mode, the 3D button function may be different
when viewing Native mode.
Input:
AnalogBroadcast
DigitalBroadcast
AnalogInputs
HDMC
_5_i_w)h3DAutoDetect
Information
VODServices
YOUServiceswith3DAuto
DetectInfromation
MediaSharePhotos
MediaShareVideos
Function:
Changestheviewingmodeto 2Dto 3Dmode.
Displaystheselectionwindow.
Changestheviewingmodeto 2Dto 3Dmode.
Displaystheselectionwindow.
Changestheviewingmodeto 3D mode.
Displaystheselectionwindow.
Changestheviewingmodeto 3D mode.
Changestheviewingmodeto 2Dto 3Dmodeor 3Dmode.
Displaystheselectionwindow.
NOTN o:° Whenviewing3D modeor 2Dto 3Dmode,pressingthe3Dbutton
changestheviewingmodeto Nativemode.
¢ Operationmaynot berecogniseddependingonthestatusof theTV.
¢ WhentheTVis beingusedasaMediaRenderer,operationis not
recognised.
¢ The3Dfunctionand2Dto 3Dconversionfunctionmaynotbe
supporteddependingontheVODService.
¢ The3Dfunctionand2Dto 3Dconversionfunctiondoesnot support
all contentdependingonitsinputsourceformat.
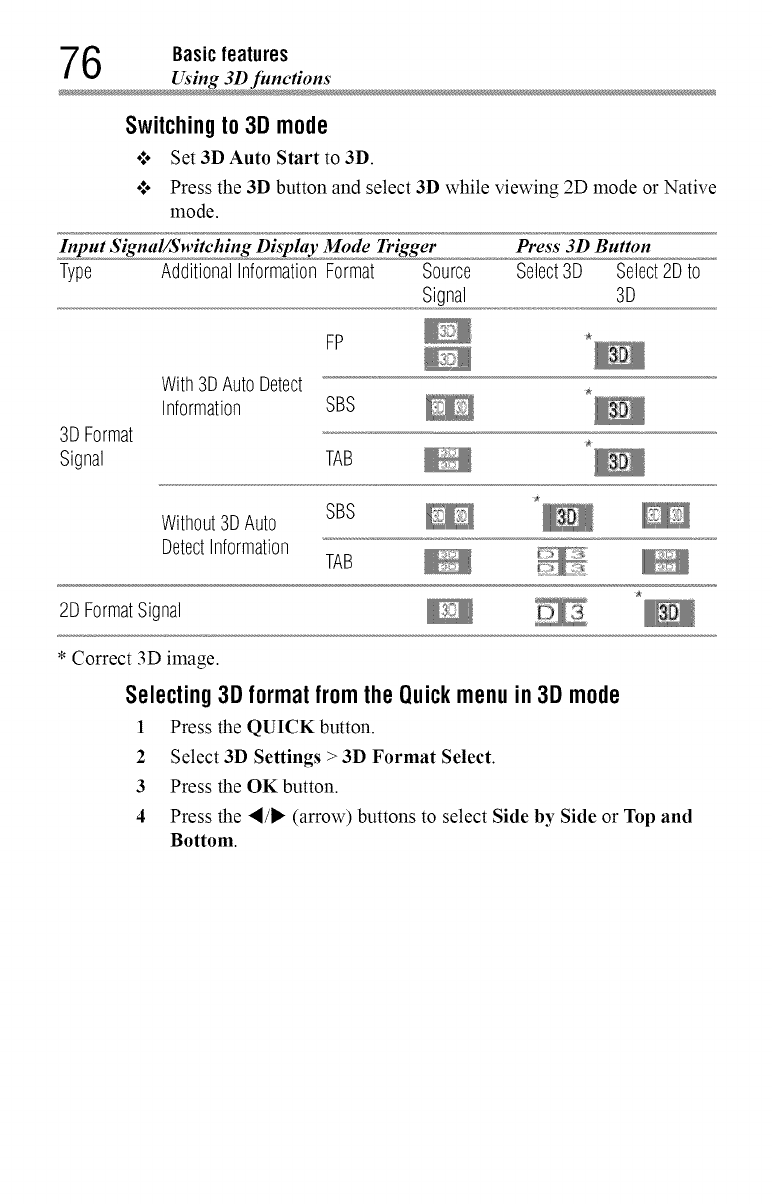
6Basicfeatures
Using 3D function
Switching to 3D mode
o:. Set 3D Auto Start to 3D.
•:. Press the 3D button and select 3D while viewing 2D mode or Native
mode.
Input SignalX$witching Disphty Mode Trigger Press 3D Button
Type AdditionalInformationFormat Source Select3D Select2D to
Signal 3D
FP
With3DAutoDetect
Information SBS
3DFormat
Signal TAB
SBS
Without3DAuto _;_
DetectInformation TAB
2DFormatSignal
*Correct 3D image.
Selecting 3D format from the Quickmenu in 3D mode
1 Press the QUICK button.
2 Select 3D Settings > 3D Format Select.
3 Press the OK button.
4 Press the _I/I_ (arrow) buttons to select Side by Side or Top and
Bottom.
Basicfeatures 7 7
Using 3D functions
Input Signal/Switching Display Mode Trigger Quick menu/
3D Format Select
Type Additional Format Source SBS TAB
Information Signal
FP
With3DAutoDetect
Information SBS
3DFormat
Signal TAB
Without3DAuto SBS
DetectInformation TAB
2DFormatSignal
*Correct 3D image.
Switching to2Dmode
.:. Set 3D Auto Start to 2D.
o:. Press the 3D button while viewing 3D mode.
Input Signal/Switching Display Mode Trigger Press 3D Button
Type Additional Format Source Select30 Select20 to 30
Information Signal
FP
With3DAutoDetect
Information SBS
3DFormat
Signal TAB
SBS
Without3DAuto
DetectInformation TAB
2DFormatSignal
* Correct 2D image.
8Basic features
Using 3D function
Selecting 2D format from the Quickmenu in 2D mode
1 Press the QUICK button.
2 Select 3D Settings > 2D Format Select.
3 Press the OK button.
4 Press the "_/1_ (arrow) buttons to select Side by Side or Top and
Bottom.
Input Signal/Switching Display Mode Trigger Quick menu/
3D Format Select
Type Additional Format Source SBS TAB Native
Information Signal
3DFormat
Signal
FP
With 3D
Auto Detect SBS
Information
TAB
Without 3D SBS
Auto Detect
Information TAB
2D Format Signal
*Correct 2D image.
NOTE Takeoff the 3D glasses in 2D mode
Switching to Native mode
Press the 3D button while viewing 3D mode.
Press the 3D button while viewing 2D to 3D mode.
NOTE When3Dformatsignalwith3DAutoDetectInformationis received,it is
notpossibleto switchto Native.
Basicfeatures 79
Using 3D functions
Quick menu in 2D mode
1 Press the QUICK button.
2 Select 3D Settings > 2D Format Select and press the OK button.
3 Press "_/1_ (arrow) buttons to select Native.
To switch 2D to 3D mode
•_. Press the 3D button and select 2D to 3D while viewing 2D or Native
mode.
NOTE WhenusingATV,Video,OolorStreamHD,V0DServices,MediaShare
Photoor PC,theviewingmodecanbechangedto2D to 3Dmodeby
pressing3D.
Sellingtheautostartmode
This controls what the TV does when it detects a 3D format signal with
3D Auto Detect Information.
1 Press the SETUP button.
2 Select 3D > 3D Auto Start and press the OK button.
3 Press the A/V (arrow) buttons to select 3D, 2D, or Off.
Option: Description:
3D Displaysin3D modeautomaticallywhen3Dformatsignalwith3DAuto
DetectInformationis received.
2D Displaysin2D modeautomaticallywhen3Dformatsignalwith3DAuto
DetectInformationis received.
Off Displaysascreenthatallowsyouto select3Dor2D when3Dformatsignal
with3DAutoDetectInformationis received.
Selling the3DPIN code
A 3D PIN code is necessary for using 3D Safety Settings.
EnteranewPINcode
1 Press the SETUP button.
2 Select3D >3DPIN.
3 Press the OK button.
4 Press the number buttons to enter a 4-digit number, and then
confirm the code.
NOTN ThePINcodecannotbesetto "0000."
0Basicfeatures
Using 3D function
Changeor deleteyourPINcode
1 Press the SETUP button.
2 Select 3I) > 3D PIN.
3 Press the OK button.
4 Press the number buttons to enter your 4-digit PIN code.
5 Select Change PIN or Delete PIN, and then press the OK button.
NOTE .'.. ThePINcodecannotbesetto "0000."
4 IfPiNis deleted,3DSafetySettingsaregrayedout,andthe settings
areresetto thefactorydefault.
ForgottenPIN codes
1 Press the SETUP button.
2 Select3D >3DPIN.
3 Press the OK button.
4 Press the INFO button 4 times quickly.
5 Select Change PIN and press the OK button.
6 Enter a new PIN code.
Setting the 3D start message
When this feature is set to On, a message displays on the screen when a
3D signal is received.
1 Press the SETUP button.
2 Select 3D > 3D Safety Settings.
3 Press the OK button.
4 Enter your 4-digit 3D PIN code.
5 Press the A/V (arrow) buttons to select 3D Start Message and
press the OK button.
6 Press the A/V (arrow) buttons to select On or Off.
Setting the 3D Lock
When this feature is set to On, you must enter your 3D PIN code to
change the display mode to 3D mode or 2D to 3D mode.
1 Press the SETUP button.
2 Select 3D > 3D Safety Settings.
3 Press the OK button.
Basicfeatures 81
Using 3D functions
4 Enter your 4-digit 3D PIN code.
5 Press the A/V (arrow) buttons to select 3D Lock and press the OK
button.
6 Press the J,/V (arrow) buttons to select On.
Setting the 3D Timer Lock
When the 3D Timer Lock feature is set to On, the P1N input window and
the 3D start message will not appear while the 3D Enable timer is active,
even if you switch to 3D Mode. This prevents it from asking for the 3D
Lock PIN, and will not display the 3D start message every you switch to
3D.
1 Press the SETUP button.
2 Select 3D > 3D Safety Settings.
3 Press the OK button.
4 Enter your 4-digit 3D PIN code.
5 Press the A/V (arrow) buttons to select 3D Timer Lock and press
the OK button.
6 Press the A/V (arrow) buttons to select On.
NQTN ThePINinputwindowappearswhen"continue"is selectedin thereminder
dialogueboxfor Enable3DTimerevenif 3DTimerLockis activated.
Setting theEnable3DTimer
This feature allows you to set a reminder to not watch a 3D video for an
extended period of time. Once a set period of time has passed, a dialogue
box appear asking if you wish to continue viewing.
1 Press the SETUP button.
2 Select 3D > 3D Safety Settings.
3 Press the OK button.
4 Enter your 4-digit 3D PIN code.
5 Press the A/V (arrow) buttons to select Enable 3D Timer and
press the OK button.
6 Press the A/V (arrow) buttons to select 30, 60, 90, or 120 minutes.
7 To cancel the timer, select Off.
Displaying3D Important Information
1 Press the SETUP button.
2Basicfeatures
Tuning Channels
2 Select 3D > 3D Important Info.
Read through the information.
3 Press the "_/1_ (arrow) buttons to select Yes or No and press the OK
button.
Adjusting2D to 3D depth
With this feature, you can adjust the level of 3D depth.
Within the Menu:
1 Press the SETUP button.
2 Select 3D > 2D to 3D Depth and press the OK button.
3 Press the "_/1_ (arrow) buttons to select either 1, 2, 3, 4, or 5, and
press the OK button.
Within the Quick menu:
1 Press the QUICK button in 2D to 3D mode.
2 Select 3D Settings > 2D to 3D Depth.
3 Press the "_/1_ (arrow) buttons to select either 1, 2, 3, 4, or 5, and
then press the OK button.
Switchingleftandrightimages
The left and right eye shutter timing of the glassescan be swapped. If 3D
images look blurred, switch the left and right sides of the 3D image.
1 Press the QUICK button to open the Quick menu.
2 Select 3D Settings > Left and Right Image and press the OK
button.
3 Press the A/V (arrow) buttons to select Swapped.
TuningChannels
Tuningto the nextprogrammedchannel
Press the CH ,&/V buttons on the remote control or TV control panel.
Tuningto a specificchannel(programmedor unprogrammed)
Channel." Description:
Analog Usethe0-9 buttonsontheremotecontrol.(Forexample,to selectchannel
125,press1,2, 5.),andthenpresstheOKbutton.
Digital Usethe0-9 buttonsontheremotecontrolto enterthemajorchannel
number.(andpresstheBASH buttonif needed,(Forexample,to select
digitalchannel125-1,press1,2, 5,-, 1.)),andthenpresstheOKbutton.
Basicfeatures 83
Selecting the video input to vie.,
UsingChannel Return
You can switch between two channels without entering a channel number
each time. This feature also works for external inputs.
1 Select the first channel you want to view.
2 Select a second channel using the Channel Number buttons (and
press the DASH button if needed).
3 Each time you press the CH RTN button, the TV switches between
the last two channels that were tuned.
Selectingthevideoinputtoview
To select the video input to view:
1 Press the INPUT button.
2 Change the input:
o*,oPress 0-7.
o*,oRepeatedly press the A/V (arrow) buttons and then press the
OK button.
o*,oRepeatedly press the INPUT button.
Inputs"
0 ANT/GABLE
1 Video1
2 Video2/ColorStreamHD
3 HDMI1
4 HDMI2
5 HDMI3
6 HDMI4
7 PC
NO'rN o;. Youcanlabelthevideoinputsourcesaccordingto thespecificdevices
you haveconnectedto theTV,see"Labelingvideoinputs"onpage
70.
•:. Youcanskipsources,see"Skippingvideoinputs"onpage69.
•:. Inputsthataresetto beskippedwill beskippedwhenselectingby
repeatedlypressingtheINPUTbuttonor theA/T (arrow)buttons.
•:. Youcanselectinputsthataresetto beskippedusingthenumber
buttons.
•:. IfoneormoreHDMITM CECdevicesareconnectedto anHDMITM input,
theiconappearsinthe inputselector.Inthiscase,thelabel,see
"Labelingvideoinputs"on page70will notappearintheinput
selector.

4Basicfeatures
Using closed caption
To select an HDMI TM CEC device:
1Press the A/V (arrow) buttons to select an HDMI TM input.
2 Press the _ (arrow) button. The list of HDMI TM CEC devices for
that input appears.
3 If the input has multiple HDMI TM CEC devices, press the A/V
(arrow) buttons to select a device.
4 Press the OK button.
Usingclosedcaptions
To turn on the closed caption mode:
1 Press the SETUP button.
2Select Options >Closed Captions.
3 Press the OK button.
4 Press the &/V (arrow) buttons to select Closed Captions Display
and press the OK button.
5 Press the A/V (arrow) buttons to select On or Off.
NOTE IfClosedCaptionsDisplayisset to Off,Analog CCMode and
Digital CCSettingswillbenotavailable,
AnalogCCmode
The closed caption mode has two options:
Mode: Description:
Captions Displaysthedialogue,narration,andsoundeffectsof TVprograms
andvideosthatareclosedcaptioned(usuallymarked"CC"in program
guides).
Text Displaysinformationnotrelatedto thecurrentprogram,suchasweather
orstockdata(whenprovidedby individualstations).
To view captions or text:
1 Press the SETUP button.
2Select Options >Closed Captions.
3 Press the OK button.
4 Press the &/V (arrow) buttons to select Analog CC Mode and
press the OK button.
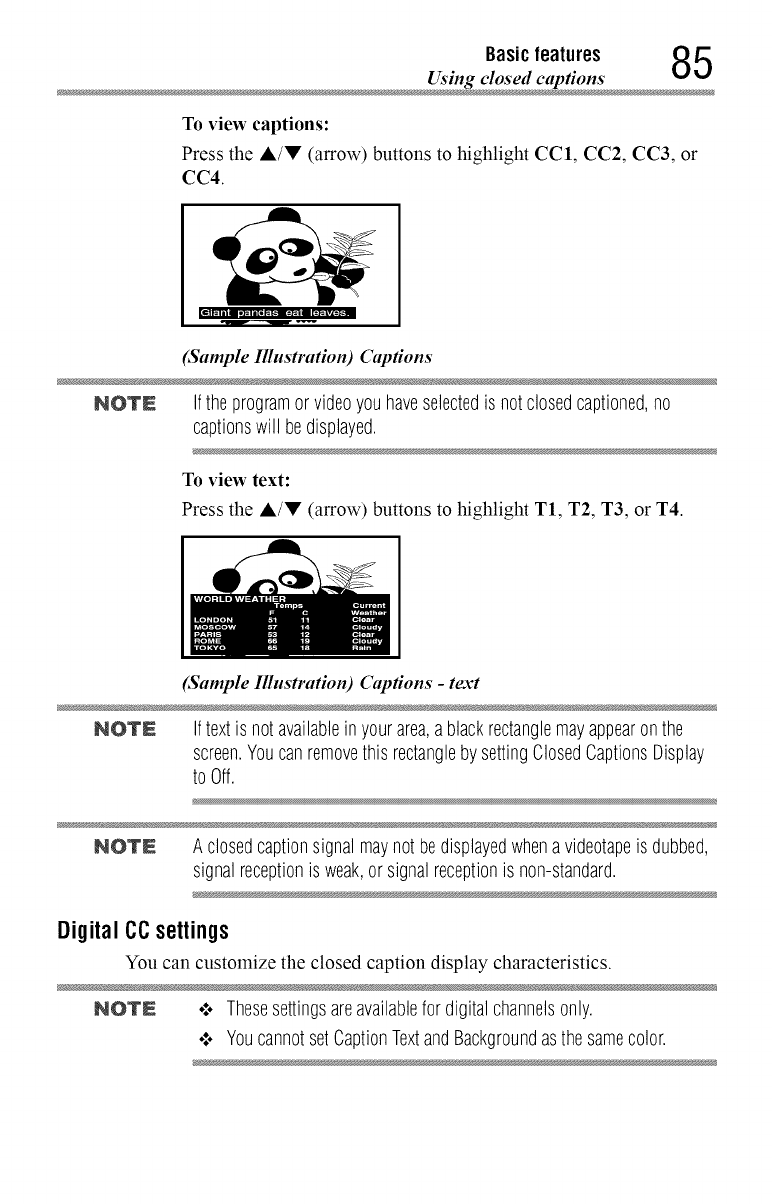
Basicfeatures 85
Using closed captions
To view captions:
Press the &/V (arrow) buttons to highlight CC1, CC2, CC3, or
CC4.
(Sample Illustration) Captions
NOTE Ifthe programor videoyouhaveselectedis notclosedcaptioned,no
captionswill bedisplayed.
To view text:
Press the A/V (arrow) buttons to highlight T1, T2, T3, or T4.
(Sample Illustration) Captions -text
NOTE Iftext is notavailableinyourarea,a blackrectanglemayappearonthe
screen.Youcanremovethis rectangleby settingClosedCaptionsDisplay
to Off.
NOTE A closedcaptionsignalmaynot bedisplayedwhenavideotapeis dubbed,
signalreceptionis weak,or signalreceptionis non-standard.
Digital CC settings
You can customize the closed caption display characteristics.
NOTE .:o Thesesettingsareavailablefor digitalchannelsonly.
¢ YoucannotsetCaptionTextandBackgroundasthesamecolor.

6Basicfeatures
Using closed captions
Mode: Description:
CaptionSize Auto,Small,Standard,Large
CaptionTextType Auto,Default,Mono(withSerif),Prop.(withSerif),Mono(without
Serif),Prop.(withoutSerif),Casual,Cursive,SmallCapitals
CaptionTextEdge Auto,None,Raised,Depressed,Uniform,LeftDropShadow,
RightDropShadow
CaptionTextColor Auto,Black,White,Red,Green,Blue,Yellow,Magenta,Cyan
TextForegroundOpacity Auto,Transparent,Translucent,Flashing,Solid
BackgroundColor Auto,Black,White,Red,Green,Blue,Yellow,Magenta,Cyan
TextBackgroundOpacity Auto,Transparent,Translucent,Flashing,Solid
CaptionTextEdgeColor Auto,Black,White,Red,Green,Blue,Yellow,Magenta,Cyan
To customize the closed captions:
1 Press the SETUP button.
2 Select Options > Closed Captions.
3Press the OK button.
4
5
Press the A/V (arrow) buttons to select Digital CC Settings.and
then press the OK button.
Press the A/V (arrow) buttons to select acharacteristic and then
press the OK button.
Press the A/V (arrow) buttons to select the format for that
characteristic.
Usingthe ClosedCaptionbutton
If you press the CC button when an analog channel is tuned or from an
external input (480i signal from the video input):
ol. The CC bar will appear and will display the options, CC 1-4, T 1-4.
If you press the CC button when a digital channel is tuned:
ol. The CC bar will appear and will display the available caption
options for that channel or service.
Setting thePINcode
A PIN code is necessary for some menus.
NOTE TheParentalControlandLocksmenuis grayedoutif no PINhasbeenset.
Basicfeatures 87
Using parental con trois
Enteringa newPINcode
1Press the SETUP button.
2 Select Options > Parental PIN Setup.
3Press the OKbutton.
4 Use the number buttons to enter a4-digit number, and then confirm
the code.
NOTE ThePINcodecannotbesetto "0000".
Changingor deletingyourPINcode
1 Press the SETUP button.
2 Select Options > Parental PIN Setup.
3 Press the OK button.
4 Use the number buttons to enter your 4-digit PIN code.
5 Select Change PIN or Delete PIN, and then press the OK button.
NOTN .:. ThePINcodecannotbesetto "0000".
•".. IfyoudeletethePiNcode,thesettingsof ParentalControlsandLocks
arereset.
Forgotten
!
2
3
4
5
6
PINcode
Press the SETUP button.
Select Options > Parental PIN Setup.
Press the OK button.
Press the INFO button 4 times quickly.
Select Change PIN and press the OK button.
Enter a new PIN code.
8Basicfeatures
Using parental controls
Usingparentalcontrols
Blocking TV programs and movies by rating (V-Chip)
Some TV programs and movies include signals that classify the content
of the program (as unsuitable for younger viewers). The V-Chip feature
in this TV detects the signals and blocks the programs according to the
ratings you select.
NOTE TheV-Chipfeaturein thisTVsupportstheU.S.V-Chipsystemonly.
1 Press the SETUP button.
2 Select Options > Parental Control and Locks.
3 Press the OKbutton.
4 Enter your 4-digit PIN code.
5 Press the A/V (arrow) buttons to select Enable Rating Blocking
and press the OK button.
6 Press the A/_!' (arrow) buttons to select On.
7 Press the A/'!!' (arrow) buttons to select Edit Rating Limits, and
then press the OK button.
The Edit Rating Limits screen appears.
8 Press the A/V/_I/I_ (arrow) buttons.
9 Press the OK button to select a level of blocking.
A box with an "X" indicates a rating that will be blocked. As you
highlight a rating, the rating's definition appears at the bottom of
the screen.
10 Select Done and then press the OK button.
NOTE Thisfeaturewill notbeavailableif noPINcodeis set.
Downloading an additional rating system
An additional rating system may be available for use in selectively
blocking TV programs and movies.
NOTE Thecurrentlytunedstationmustbereceivingadigitalsignalbeforean
additionalratingsystemcanbedownloaded.
Basicfeatures 89
Using parental con trois
1
2
3
4
Press the SETUP button.
Select Options > Parental Control and Locks.
Press the OK button.
Enter your 4-digit PIN code.
The Parental Control and Locks screen appears.
5Press the A/V (arrow) buttons to select Enable Rating Blocking
and press the OK button.
6 Press the A/V (arrow) buttons to select On.
7Press the A/V (arrow) buttons to select Edit Rating Limits, and
then press the OK button.
The Edit Rating Limits screen appears.
8 Select Alt RS, and then press the OK button.
The Edit Alternate Ratings screen appears.
NOTE 4 TheAIt RS buttonis onlyavailableif anadditionalratingsystemis
currentlyavailable.
4 Thedownloadmaytakeseveralminutes.
4 TheinformationdisplayedontheAlternateRatingsscreendependson
theconfigurationof theadditionalratingsystemavailableat thetime
of download.
9 Press the A/V/,/_ (arrow) buttons.
10 Press the OK button to select the desired level of blocking. A box
with an "X" indicates the rating that will be blocked.
NOTE 4Youcanonly downloadtheadditionalratingsystemonce.Youcannot
download updatesif they becomeavailable.
4 The additional ratingsystemis not designed,transmitted,or controlled
bythe TVor Toshiba,nor is the availabilityof an additional rating
systemdeterminedor controlled byToshiba.
Similarly,theratingof programs in an additional ratingsystemis not
determined,transmitted,or controlled bythe TV or Toshiba.
4 The additional ratingsystemis an evolvingtechnology;therefore,
availability,content, and format mayvary.
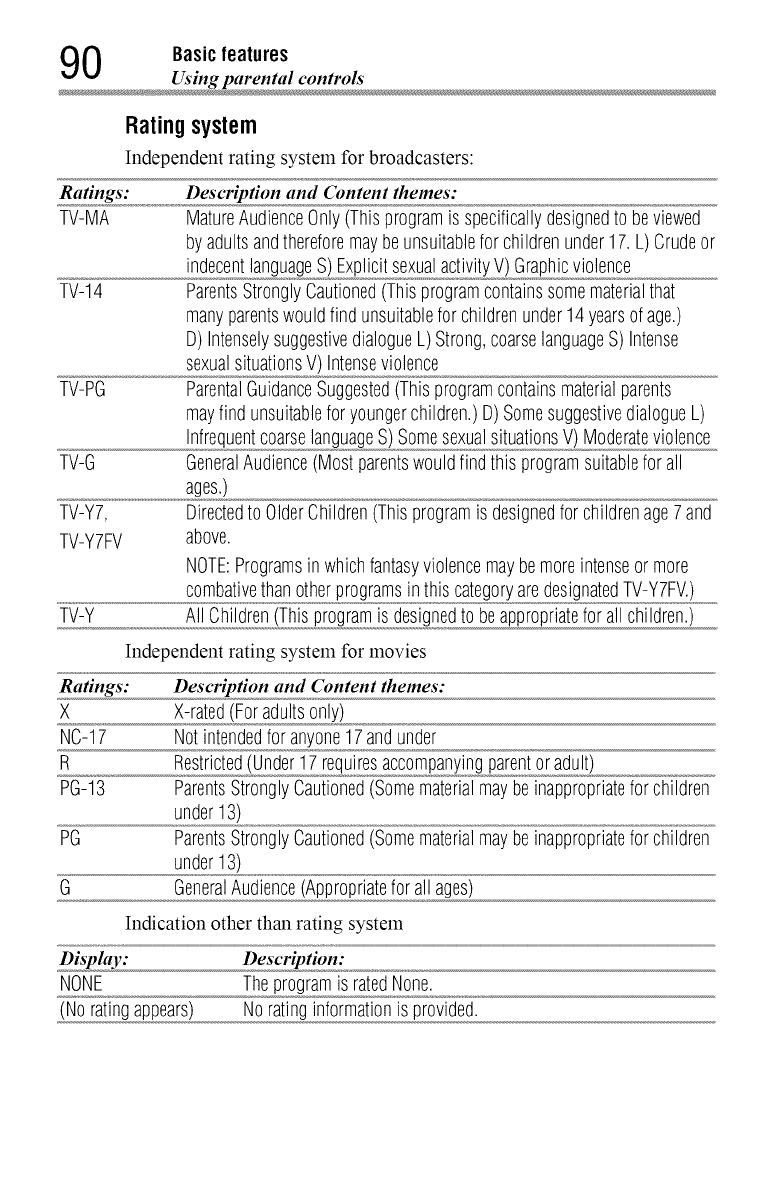
0Basicfeatures
Using parental controls
Rating system
Independent rating system for broadcasters:
Ratings: Description and Content themes:
TV-MA MatureAudienceOnly(Thisprogramis specificallydesignedto beviewed
byadultsandthereforemaybeunsuitablefor childrenunder17.L)Crudeor
indecentlanguageS)ExplicitsexualactivityV)Graphicviolence
TV-14 ParentsStronglyCautioned(Thisprogramcontainssomematerialthat
manyparentswouldfind unsuitablefor childrenunder14yearsof age.)
D) IntenselysuggestivedialogueL)Strong,coarselanguageS) Intense
sexualsituationsV) Intenseviolence
TV-PG ParentalGuidanceSuggested(Thisprogramcontainsmaterialparents
mayfind unsuitablefor youngerchildren.)D) SomesuggestivedialogueL)
InfrequentcoarselanguageS)SomesexualsituationsV) Moderateviolence
TV-G GeneralAudience(Mostparentswouldfindthis programsuitablefor all
ages.)
TV-Y7, Directedto OlderChildren(Thisprogramis designedfor childrenage7and
TV-Y7FV above.
NOTE:Programsinwhichfantasyviolencemaybemoreintenseor more
combativethanotherprogramsinthiscategoryaredesignatedTV-Y7FV.)
TV-Y All Children(Thisprogramis designedto beappropriatefor all children.)
Independent rating system for movies
Ratings: Description and Content themes:
X X-rated(Foradultsonly)
NC-17 Notintendedfor anyone17andunder
R Restricted(Under17requiresaccompanyingparentoradult)
PG-13 ParentsStronglyCautioned(Somematerialmaybeinappropriateforchildren
under13)
PG ParentsStronglyCautioned(Somematerialmaybeinappropriateforchildren
under13)
G GeneralAudience(Appropriatefor all ages)
Indication other than rating system
Display: Description:
NONE Theprogramis ratedNone.
(Noratingappears) Noratinginformationis provided.
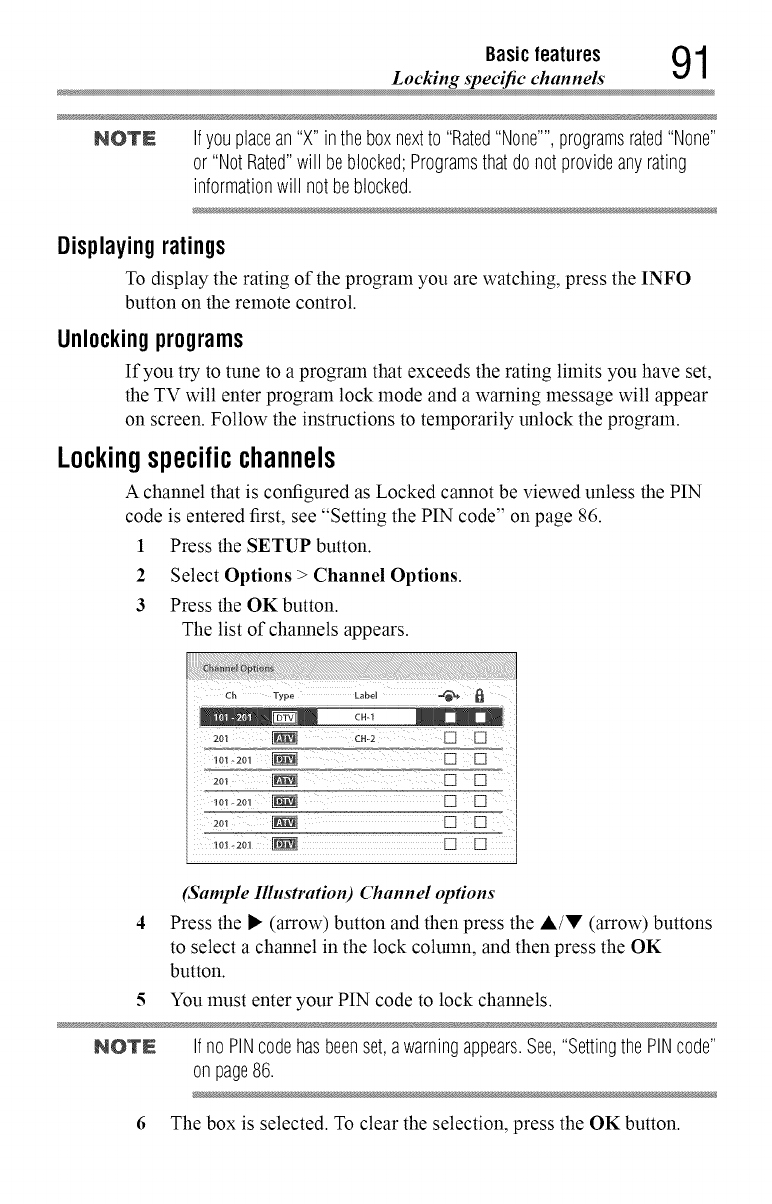
Basicfeatures 91
Locking specific channels
NOTE Ifyouplacean"X" intheboxnextto "Rated"None"",programsrated"None"
or "NotRated"will beblocked;Programsthatdonot provideanyrating
informationwill notbeblocked.
Displayingratings
To display the rating of the program you are watching, press the INFO
button on the remote control.
Unlockingprograms
If you try to tune to a program that exceeds the rating limits you have set,
the TV will enter program lock mode and a warning message will appear
on screen. Follow the instructions to temporarily unlock the program.
Lockingspecificchannels
A channel that is configured as Locked cannot be viewed unless the PIN
code is entered first, see "Setting the PIN code" on page 86.
1 Press the SETUP button.
2 Select Options > Channel Options.
3 Press the OK button.
The list of channels appears.
Ch Type Label _
2oi _j cH.2 [] []
2ol _ [] [] "7'_
(Sample Illustration) Channel opdons
Press the I_ (arrow) button and then press the A/V (arrow) buttons
to select a channel in the lock column, and then press the OK
button.
5 You must enter your PIN code to lock channels.
NOTN IfnoPINcodehasbeenset,awarningappears.See,"SettingthePINcode"
on page86.
6 The box is selected. To clear the selection, press the OK button.

2Basic features
Locking spec_c channels"
Lockingvideo inputs
You can lock video inputs. You cannot view the input sources until you
unlock the inputs by entering the PIN code.
1 Press the SETUP button.
2 Select Options > Parental Control and Locks.
3 Press the OK button.
4 Enter your 4-digit P1N code.
5Press the A/V (arrow) buttons to select Input Lock and press the
OK button.
6Press the A/V (arrow) buttons to select Video or Off.
Mode: Description:
Video LocksVideo1,Video2, ColorStreamHD,HDMI1, HDMI2, HDMI3,
HDMI4, andPC.
Off Unlocksall videoinputs.
Settinga time limitforgames
You can use the GameTimer _ to set a time limit for playing a video game.
When the time expires, the TV locks all external inputs.
1 Press the SETUP button.
2 Select Timers >GameTimer.
3 Press the OK button.
4 Enter your 4-digit P1N code.
5Press the &/V (arrow) buttons to select 30, 60, 90, or 120 minutes.
6To cancel the timer, select Off.
To deactivate the Input Lock once the GameTimer :_'has activated it:
•:. Set the Input Lock to Off, see "Locking video inputs" on page 92.
NOTN .:o A messageappearswhen10minutes,3 minutes,and1minuteare
remaining.
¢ IftheTV losespowerwithtimeremaining,theTVwill enterInput
Lockmodewhenpoweris restored(asif theGameTimerhadbeen
activated).Youmustdeactivatethe InputLock,see"Lockingvideo
inputs"onpage92.
Basicfeatures 93
Using HDMf' CEC Contro
Lockingthe controlpanel
You can lock the control panel to prevent your settings from being
changed accidentally (by children, for example). When Panel Lock is set
to On, none of the controls on the control panel operate except POWER.
1 Press the SETUP button.
2 Select Options > Panel Lock and press the OK button.
3 Press the A/V (arrow) buttons to select On.
NO'rN WhenPanel Lockis setto On,"PanelLock"appearsonscreenwhenthe
buttonsontheTVcontrolpanelarepressed.UnlesstheTVis in"Active
Standby",thencontrolpanelPOWERbuttoncanturnontheTV.
To unlock the control panel:
o:. Select Off in Step 3 above.
UsingHDMITM CECControl
This feature uses CEC technology and allows you to control Toshiba
HDMI TM CEC compatible devices from the TV remote control via HDMI T''
connection.
When Enable HDMI TM CEC Control in the HDMI T''CEC Control Setup
menu is set to On, the following HDMI TM CEC Control functions are
enabled.
To set HDMITM CECControlSetup
1 Press the SETUP button.
2 Select Options > HDMI CEC Control Setup and press the OK
button.
3 Press the A/V (arrow) buttons to select Enable HDMI CEC
Control and press the OK button.
4 Press the A/V (arrow) buttons to select On.
NOTN IfyousetEnableHDMI CECControlto Off, theotheritemsunder
HDMI CECControl Setup will begrayedout.
5 Press the A/V (arrow) buttons to select an item and press the OK
button.
Press the A/V (arrow) buttons to select On or the desired mode:
o*.. TV Auto Power: On/Off
o*.. Auto Standby: On/Off
4Basicfeatures
Using HDMf _CEC Contro
•:. Amplifier Control: On/Off
olo Initial Speaker Setting: TV Speakers/Amplifier
NOTE Thesefunctionsdependontheconnecteddevices.
ControllingHDiVllTM CECplaybackdevices
With your TV's remote control, you can control the connected HDMI TM
CEC playback device (DVD player, etc.) you are watching.
Button: Description:
I_- Beginsplayback
• Stopsplayback
II Pausesthepictureduringplayor recordmode
Skipsforward.
Skipsbackward.
,I,. Fastforward
,_ Rewind/reverse
• • • I_ Menunavigation,etc.
OK Enterscontentwithamenu
RED,GREEN, Controlsvariousoperation
YELLOW,BLUE
0-9 buttons Controlsvariousoperation,e.g.tuningto aspecificchannelforthe
tunerdevice
Channel•/• Changesto thenextavailablechannelupordowninthesequence
NOTE Thesefunctionsdependontheconnecteddevices.
HDIVlffCECPlayerControlmenufunctions
I Press the QUICK button to open the Quick menu.
2 Select HDMI CEC Device Control, and then press the OK button.
3 Press the •/• (arrow) buttons to select the item you want to
control, and then press the OK button.
Item: Description:
Power Turnsthe selecteddeviceOnandOff
RootMenu Accessestheselecteddevice'stop menu
ContentsMenu Accessesthecontentlist whentheOKbuttonis pressed
SetupMenu Accessesthedevice'ssetupmenu
Audio Selectsthedevice'ssound
Eject Ejectsthedevice'smedia
Basicfeatures 95
Using HDMF _CEC Control
NOTE Thesefunctionsdependontheconnecteddevices.
TheHDMI'_CECDeviceControlitemis notavailableunderthefollowing
conditions:
¢ Anon-HDMl"input isselected
¢ TheEnableHDIVllCECControlitemis setto Off
o:. TheconnectedHDMITM CECdeviceis notaplayback,recordingor
tunerdevice
HDIVllTM CECControlinput sourceselection
If an HDMI TM CEC device with HDMI T_"switching capability (e.g. an
amplifier) is connected to the HDMI T_"input, you can select another
HDMI TM CEC device that is connected to the master HDMI TM device.
Use the INPUT button on the remote control or the control panel, see
"Learning about the remote control" on page 51.
Adjustingthe amplifier's audio
Using the TV's remote control, you can adjust or mute the sound volume
of your audio system.
o:. The VOL (+ -) buttons adjust the volume level.
o:. The MUTE button turns off the sound.
1 Press the SETUP button.
2 Select Options > HDMI CEC Control Setup and press the OK
button.
3 Press the A/V (arrow) buttons to select Initial Speaker Setting
and press the OK button.
4 Press the A/V (arrow) buttons to select Amplifier.
NOTE ConfirmthataconnectedHDMITM CECdevice(suchas DVDplayer,etc.)is
selectedfortheAmplifierinputsource.
NOTE ¢ Youcanalsousethisfunctionwhentheaudiosystemis connectedto
theTV'sDIGITALAUDIOOUTterminal(not HDMI'_connection).
Selectadigitalaudioinputmodeontheamplifier.
¢ Thesefunctionsdependonthedeviceconnected.
6Basicfeatures
Viewmg the HDM1 _ signal infin'matio
OtherHDIVllTM CECControlfunctions
When Enable HDMI CEC Control and all items in the HDMI TM CEC
Control Setup menu are set to On, the following functions will be
enabled:
Item:
TVAutoPower
AutoStandby
AmplifierControl
InitialSpeaker
Setting
Description:
Ifan_E_C" deviceis turnedon,theTVturnsonautomatically.
IftheTVis turnedoff,it will sendamessageto turn offall ofthe
HDMITM CECdevicesconnectedto theTV.
IfAmplifier Control is setto On,youcanadjustthesoundvolumeor
turn offthesoundusingtheremotecontrol.
Withthisitem,you cansetyouraudiooutputpreferenceto theTV
SpeakersortheAmplifier.Whenthis itemis setto Amplifier,theremote
controlcanbeusedto adjustor mutethevolumeoftheaudio.This
itemwill notbeavailableandsetto TVSpeakersautomaticallyunless
an HDMITM CECcompatibleaudiosystemis connected.
NOTE Whenyouturn ontheaudiosystem,changeitsinputsource,oradjustthe
soundvolume,thesoundwill beoutputfromtheaudiosystem'sspeakers
evenif TVSpeakershasbeenselected.TurntheTVoffandonagainto
outputthe soundfromtheTVspeakers.
ViewingtheHDMITM signalinformation
1 Press the SETUP button.
2Select Options > HDMI Information Display and press the OK
button.
3 Press the A/V (arrow) buttons to select On.
4 Press the INFO button.
HDMI TM Information is shown (Resolution, Scan Type, Frame
Rate, Aspect, Bit Depth, Color Space, RGB/YUV, Chroma
Format), and the nounal banner and signal infounation banner
appear.
NOTE 4Thesignalinformationbannerwill appearwhenthisfeatureis setto
OnandyouwatchanHDMI"inputandpresstheINF0button.The
signalinformationwill disappearafter60 seconds.
•".. IfyoupresstheINF0buttonwhenthisfeatureis setto Off,onlythe
normalbannerwill appear.
Basicfeatures 97
Viewing the HDM1 _Msignal information
UsingyourcomputerwiththeIV
Adjustingtheimage
If the edges of the picture are hidden, readjust Horizontal Position and
Vertical Position. If the picture is affected by interference, readjust Clock
Phase and Sampling Clock.
1 Select PC input mode, see "Selecting the video input to view" on
page 83.
2 Press the SETUP button.
3 Select Picture > Display Settings and press the OK button.
4 Press the OK button.
5 Press the A/!!' (arrow) buttons to select PC Settings, and then
press the OK button.
NOTN Ifacomputeris notconnectedorthereis no PCinputsignal,thismenuwill
notbeavailable.
6 Press the &/V (arrow) buttons to select an item and press the OK
button.
7 Press the "I/1_ (arrow) buttons to make adjustments.
NOTN Thescreenis disruptedmomentarilywhenadjustingthePCsettings.Thisis
nota signof malfunction.
Mode: Description: Adjustment Range
HorizontalPosition Movesthepictureleft/right Within+10fromcenter*
VerticalPosition Movesthepictureup/down Within+10fromcenter*
ClockPhase Helpsto reducenoiseandsharpen Within+32fromcenter*
thepicture
SamplingClocks Helpsto reducenoiseandminimize Within+5 fromcenter*
periodicverticalstripesonthescreen
*The default settings and/or adjustment ranges vary depending on the input signal
format.
ToresetthePCSettings:
Select Reset, and then press the OK button.
8Basicfeatures
Setting the timer to turn on the T
Settingthecomputeraudio
You can output sound from your computer when connecting it to your TV,
using the AUDIO IN terminal and PC audio cable.
1 Press the SETUP button.
2 Select Options > Input Options and press the OK button.
3 Press the A/V (arrow) buttons to select PC/HDMI 2 Audio and
press the OK button.
4 Press the A/V (arrow) buttons to select PC.
NOTE Toapplythesetting,switchthe inputto PCor HDMI2.
SettingthetimertoturnontheTV
You can set the on timer to turn on the TV to a preset channel or input at a
preset time.
To activate the timer:
1Press the SETUP button.
2 Select Timers > On Timer.
3Press the OK button.
4Press the A/V (arrow) buttons to select Enable On Timer and
press the OK button.
5Press the "_/1_ (arrow) buttons to select On.
NOTE Ifthe EnableOnTimer is setto Off,othermenusunderOnTimer
cannotbechanged.
ItcantaketheTVapproximately60secondsto turnonthroughtheOn
Timer feature.
To set the timer:
1 Press the SETUP button.
2 Select Timers > On Timer.
3 Press the OK button.
4Set these options to your preference:
Basicfeatures 99
Setting the timer to turn on the TV
Item: Description:
Input Videoinputsource
Channel Channelto view
Volume Volumelevel
Timeuntil PowerOn DesiredlengthoftimeuntiltheTVturnson:
minimum=00:10,maximum=12:00
Pressthe -,_/I_ (arrow)buttons
Usethenumberbuttons
5Select Done, and then press the OK button.
NOTE Ifyoudonot operatetheTVfor 1hourafterit is poweredonby theOn
Timerfeature,it turnsoff.
To cancel the timer:
1 Press the SETUP button.
2Select Timers >On Timer.
3 Press the OK button.
4 Press the &/V (arrow) buttons to select Enable On Timer and
press the OK button.
5 Press the ,/_ (arrow) buttons to select Off.
Settingthesleeptimer
You can set the TV to turn off after a specific amount of time
0naximum = 12 hours).
Using the remote control:
1 Press the SLEEP button.
2Set the amount of time until the TV turns off.
o:o Repeatedly press the SLEEP button to increase the time.
•:o Press the A/V (arrow) buttons to increase or decrease the time.
Using the on-screen menus:
1 Press the SETUP button.
2 Select Timers > Sleep Timer.
3 Press the OKbutton.
4 Select the amount of time until the TV turns off.
•:. Use the number buttons.
•:. Press the &/V (arrow) buttons to increase or decrease the time.
1O0 Basicfeatures
_Setting No Signal Power Down
NOTE Ifapowerfailureoccurs,thesleeptimersettingmaybecleared.
To display the time remaining until the TV turns off, press the SLEEP
button.
To cancel the sleep timer, press the SLEEP button repeatedly or press the
&/V (arrow) buttons until it is set to 0 minutes.
NOTN Whenthefollowingfeaturesareset,thefeaturethatis setfor thenearest
timewill function.
4 SleepTimer
4 Autoshutdownafter1 hourof inactivity(afterpoweringonbyOn
Timer)
4 Nosignalautopoweroff (afterapproximately15minutesof nosignal)
SettingNoSignalPowerDown
When an input's setting in this feature is set to On, The TV will
automatically turn itself off after about 15 minutes if no signal is detected.
You can change each input's setting to Off: ANT/CABLE, Video 1, Video
2, ColorStream HD, HDMI 1, HDMI 2, HDMI 3, HDMI 4, or PC.
1 Press the SETUP button.
2Select Options >Power Management > No Signal Power Down,
and then press the OK button.
3 Press the &/V (arrow) buttons to select the item you want to
change and press the OK button.
4 Press the A/V (arrow) buttons to select On or Off.
5 Press the EXIT button.
NOTN 4Defaultsettingfor eachinputis On.
4 Awarningmessagewill appear1minutebeforeturningoff.
Basicfeatures 1 01
Setting TV Power On _mtro
SettingTVPowerOnControl
When the TV is connected to the home network via Wireless LAN with
the TV Power On Control in Enabled, your TV can be turned on by
control from Apps.
1 Press the SETUP button.
2Select Options > Power Management > TV Power On Control
and press the OK button.
3 Press the A/V (arrow) buttons to select Enabled (Active Standby).
NOTE .'.. Dependingonthedeviceconnectedto thehomenetwork,it maytakea
whilefortheTVto turnon.
4 Dependingonthedeviceconnectedto thehomenetwork,thisfeature
maynotwork.
4 IftheunencryptedWirelessSetupis done,thisfeaturecannotbe
used.
4 ThepowerconsumptionduringActiveStandbyis morethanit during
NormalStandby.
4 AfterthechangefromPowerOnstatetoActiveStandby,theremaybea
periodof severalsecondswhentheTVdoesnot receivetheoperation
fromaremotecontrolorexternalapparatus.
DisplayingTVstatusinformation
To display TV status information, press INFO.
The following information will be displayed (if applicable):
o:, Current input (ANT/CABLE, Video, etc.)
o**oEither "CABLE" (for cable TV) or "ANT" (for over-the-air
broadcasts), if ANT/CABLE is the current input
o**oChannel number (if in ANT/CABLE mode)
o**oInput label (if set)
o**oDigital signal strength indicator (for ATSC/QAM signals only)
o**oStereo, Mono, or SAP audio status (when in HDMI TM input mode,
PCM)
o:* Video resolution
o**oAspect ratio ofincolning video signal (4:3 or 16:9)
o**oV-Chip rating status (if available)
o**oGameTilner (if set)
102 Basicfeatures
Viewing support infi_rmatio
o:. Channel Label (if set or received)
o:. Current display mode (Side by Side, Top and Bottom, or Frame
Packing)
o:. Current display format (3D, 2D to 3D, or 3D to 2D)
o:. Input video format (3D appears when video format is 3D)
To close the screen, press the INFO button again.
The following additional information (only available for ANT/CABLE
input) will display for digital channels (if applicable):
o:. Title
o:. Duration
o:. Detailed description
o:. Next program's information
Viewingsupportinformation
1 Press the SETUP button.
2 Select Get Help > System Information.
3 Press the OK button to display support information containing Web/
Customer service numbers for US, Canada, and Mexico.
Basicfeatures 1 03
Resetting to Factor T Default
ResettingtoFactoryDefaults
You can reset all settings and channels to Factory Defaults.
1 Press the SETUP button.
2 Select Installation > Reset TV.
3 Enter your PIN code (if a PIN code has been set).
A confirmation screen appears.
4 Select Yes, and then press the OK button.
The TV will turn off automatically.
To cancel the reset:
o:o Press the "_/1_ (arrow) buttons to select No, and then press the OK
button.
Powerfailure
If power is lost while you are watching the TV, the Last Mode Memory
feature automatically turns on the TV when power is restored.
