Toshiba 65L7350U User Manual LED TELEVISION Manuals And Guides 1307098L
User Manual: Toshiba 65L7350U 65L7350U TOSHIBA LED TELEVISION - Manuals and Guides View the owners manual for your TOSHIBA LED TELEVISION #65L7350U. Home:Electronics Parts:Toshiba Parts:Toshiba LED TELEVISION Manual
Open the PDF directly: View PDF ![]() .
.
Page Count: 96

Leading innovation
IntegratedHighDefinitionLED
TelevisionUser'sGuide:
58L7350U/65L7350U
If you need assistance:
Toshiba's Support Web site support.toshiba.corn
For more information, see "Troubleshooting" on page 173 in this guide.
Owner's Record
The model number and serial number are on the back and side of your television.
Record these numbers, whenever you communicate with your Toshiba dealer about
this Television.
Model name:
Serial number:
Register your Toshiba Television at register.toshiba.com
Note: To display a High Definition
picture, the TV must be receiving a
High Definition signal (such as an over-
the-air High Definition TV broadcast, a
High Definition digital cable program,
or a High Definition digital satellite
program). For details, contact your TV
antenna installer, cable provider, or
satellite provider
GMA300020011
3/13
Chapter7
PictureandSound
Controls
Selectingthepicturesize
You can view many program formats in several picture sizes-- Native, 4:3,
Full, TheaterWide 1, TheaterWide 2, TheaterWide 3, Normal, and Dot by
Dot.
NOTN o**oThepicturesizeillustrationsareexamplesonly.Theformatof the
image(inanyofthe picturesizes)dependsontheformatofthesignal
youarecurrentlywatching.Selectthepicturesizethatdisplaysthe
currentprograminthewaythatlooksbestto you.
¢ Usingthesefunctionsto changethepicturesize(i.e.,changingthe
height/widthratio)for anypurposeotherthanyourprivateviewing
maybeprohibitedundertheCopyrightLawsofthe UnitedStatesand
othercountries,andmaysubjectyouto civilandcriminalliability.
¢ Somepicturesizesmaynotbeavailabledependingontheformatof
thesignalbeingreceived.
¢ IfyouselectaTheaterWide®picturesize,thetopandbottomedgesof
thepicture(includingsubtitlesorcaptions)maybehidden.Toview
theseedges,adjustthePicturePositionortryviewingtheprogramin
4:3 orFull,see"Scrollingthepicture"onpage108.
104
Picture and SoundControls 1 05
Selecting the picture siz
You can save separate picture size preferences for each input on your TV.
To select the picture size using the Quick menu:
1 Press the QUICK button to open the Quick menu.
2Select Picture Size, and then press the OK button.
3 Press the A/V (arrow) buttons to select the Picture Size, and then
press the OK button.
NOTN Whenin2Dto 3Dmode,3Dmode,or2Dmode,PictureSizedoesnot
appearin theQuickmenu.
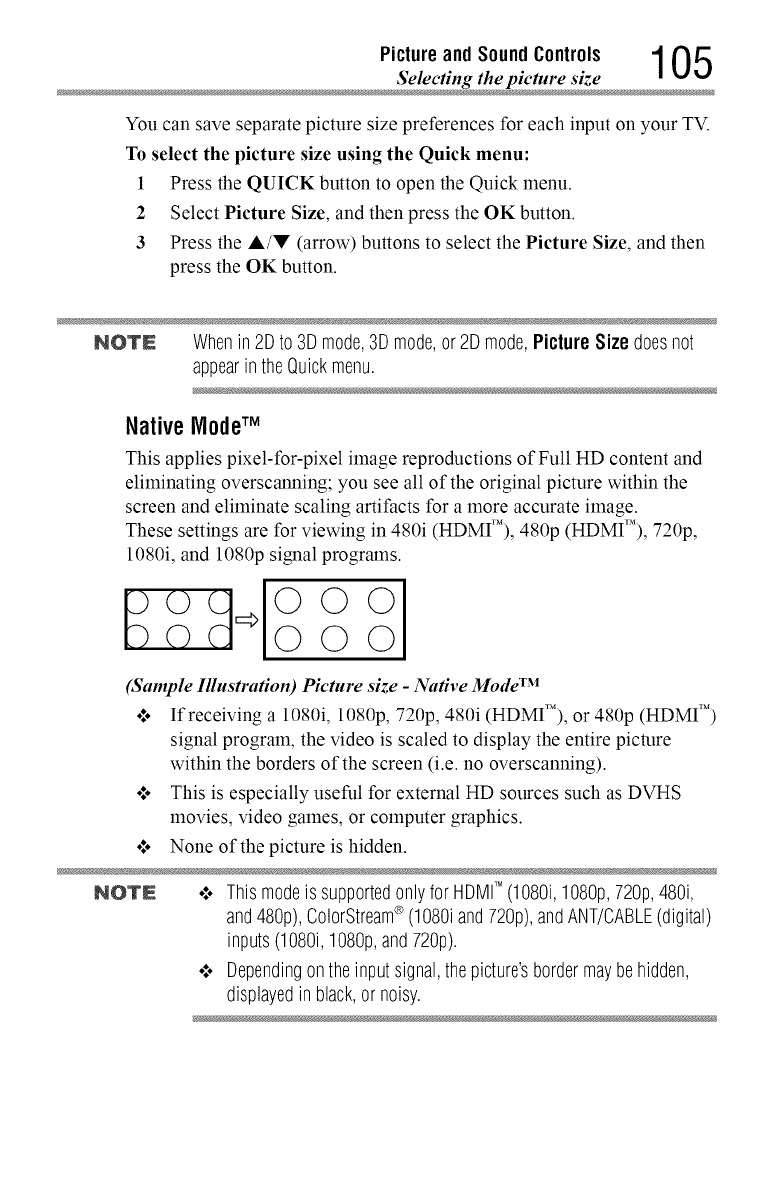
Native NodeTM
This applies pixel-for-pixel image reproductions of Full HD content and
eliminating overscanning; you see all of the original picture within the
screen and eliminate scaling artifacts for a more accurate image.
These settings are for viewing in 480i (HDMIT'), 480p (HDMI'M), 720p,
1080i, and 1080p signal programs.
o OOO
(Sample Illustration) Picture size -Nadve Mode TM
o:. If receiving a1080i, 1080p, 720p, 480i (HDMI'M),or 480p (HDMI TM)
signal program, the video is scaled to display the entire picture
within the borders of the screen (i.e. no overscanning).
.l. This is especially useful for external HD sources such as DVHS
movies, video games, or computer graphics.
°.*oNone of the picture is hidden.
NQTN o:. Thismodeis supportedonlyfor HDMITM (10801,1080p,720p,4801,
and480p),ColorStream®(1080iand720p),andANT/CABLE(digital)
inputs(1080i,1080p,and720p).
•:. Dependingontheinputsignal,thepicture'sbordermaybehidden,
displayedin black,or noisy.
106 Picture and Sound Controls
Selecting the picture siz
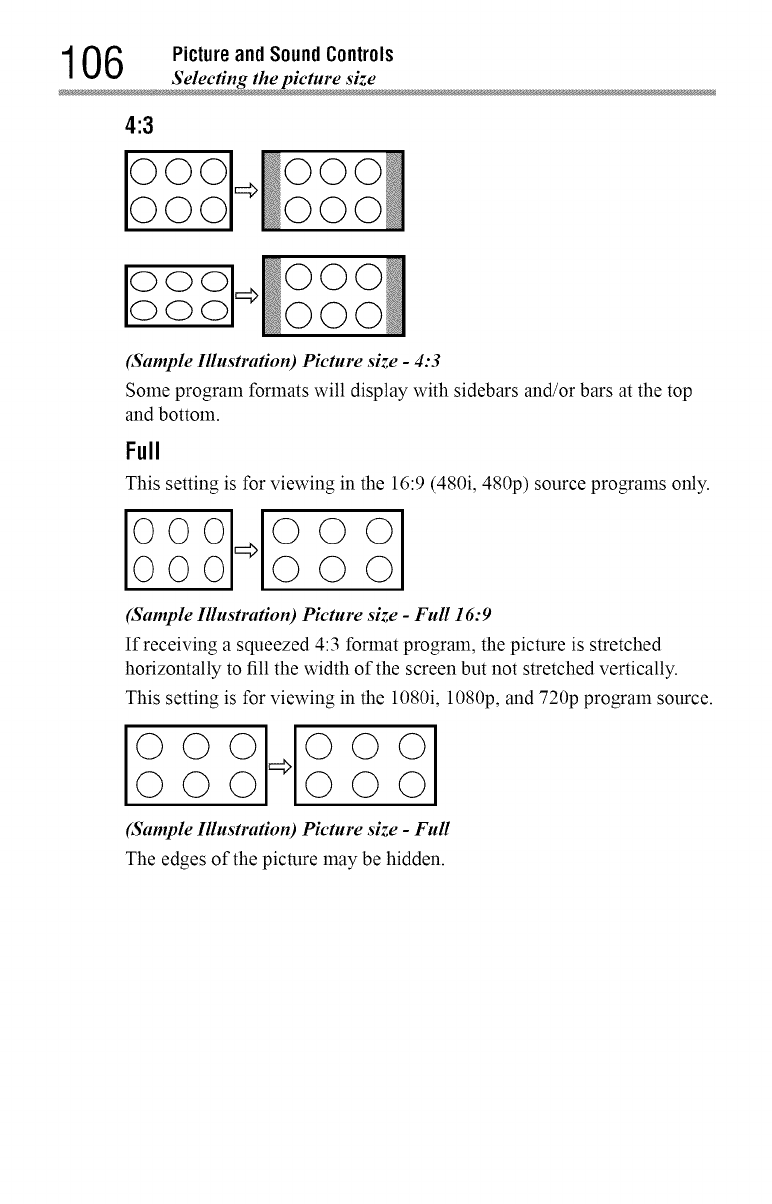
4:3
0 000
ooo O0
oo O0
(Sample Illustration) Picture size -4:3
Some program formats will display with sidebars and/or bars at the top
and bottom.
Full
This setting is for viewing in the 16:9 (480i, 480p) source programs only.
I °°11°°°1
00_000
(Sample Illustration) Picture size -Full 16:9
If receiving asqueezed 4:3 format program, the picture is stretched
horizontally to fill the width of the screen but not stretched vertically.
This setting is for viewing in the 1080i, 1080p, and 720p program source.
iooollooo
000=>000
(Sample Illustration) Picture size -Full
The edges of the picture may be hidden.
Picture and SoundControls 107
Selecting the picture size
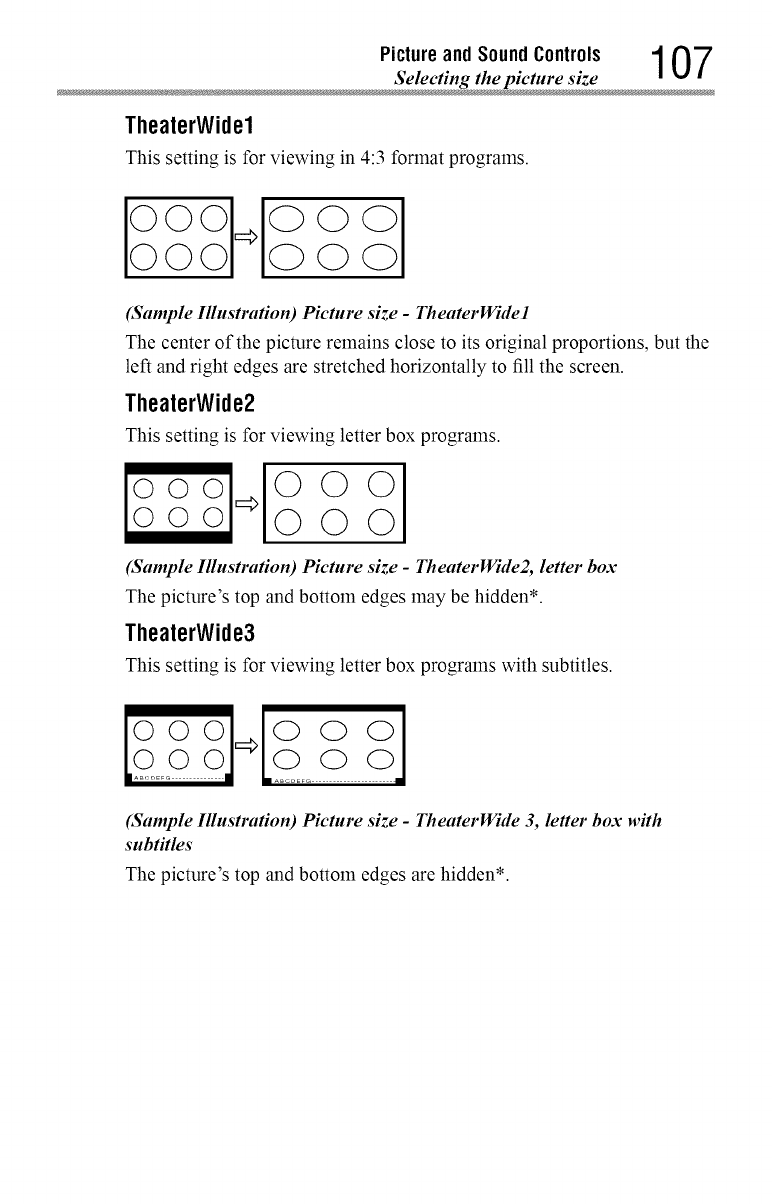
TheaterWidel
This setting is for viewing in 4:3 format programs.
(Sample Illustration) Picture s&e- TheaterWidel
The center of the picture remains close to its original proportions, but the
left and right edges are stretched horizontally to fill the screen.
TheaterWide2
This setting is for viewing letter box programs.
©©©
©©©
(Sample Illustration) Picture s&e- TheaterWide2, letter box
The picture's top and bottom edges may be hidden*.
TheaterWide3
This setting is for viewing letter box programs with subtitles.
k J.......
(Sample Illustration) Picture size -TheaterWide 3, letter box with
subtitles
The picture's top and bottom edges are hidden*.
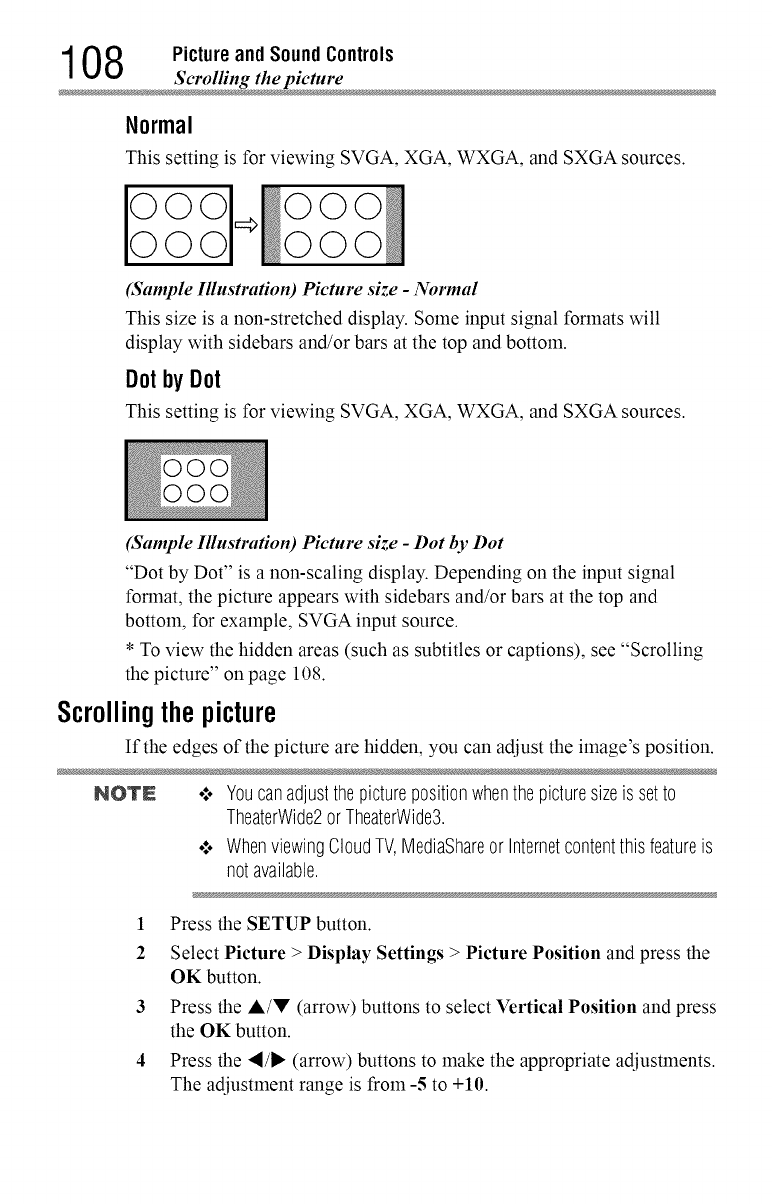
108 Picture and Sound Controls
Scrolling the pictur
Normal
This setting is for viewing SVGA, XGA, WXGA, and SXGA sources.
iooooo1 ooo
0 000
(Sample Illustration) Picture size -Nornud
This size is a non-stretched display. Some input signal formats will
display with sidebars and/or bars at the top and bottom.
Dotby Dot
This setting is for viewing SVGA, XGA, WXGA, and SXGA sources.
(Sample Illustration) Picture size -Dot by Dot
"Dot by Dot" is a non-scaling display. Depending on the input signal
format, the picture appears with sidebars and/or bars at the top and
bottom, for example, SVGA input source.
*To view the hidden areas (such as subtitles or captions), see "Scrolling
the picture" on page 108.
Scrollingthepicture
If the edges of the picture are hidden, you can adjust the image's position.
NOTN .*.. Youcanadjustthepicturepositionwhenthe picturesizeis setto
TheaterWide2or TheaterWide3.
•".. WhenviewingCloudTV,MediaShareorInternetcontentthisfeatureis
notavailable.
1Press the SETUP button.
2Select Picture >Display Settings > Picture Position and press the
OK button.
3 Press the &/V (arrow) buttons to select Vertical Position and press
the OK button.
4 Press the "_/1_ (arrow) buttons to make the appropriate adjusnnents.
The adjustment range is from -5 to +10.
Picture and Sound Controls 109
Using the Auto Aspect featur
UsingtheAutoAspectfeature
When this feature is set to On, the TV will automatically select the picture
size when one of the following input sources is received:
o*,o480i, 480p, 720p, 1080i digital signal from the ANT/CABLE input
°_o 480i, 480p, 720p, 1080i, 1080p, or VGA (60/72/75 Hz) signal from
the HDMI TM 1/2/3/4 input
NOTE Theautoaspectratiofeatureis notapplicabletothe PCinput.
1 Press the SETUP button.
2 Select Picture > Display Settings > Auto Aspect and press the OK
button.
3 Press the A/V (arrow) buttons to select On.
4 Press the EXIT button.
Usingthe4:3 Stretch
When 4:3 Stretch is activated, the TV displays 4:3 programs as a full-
screen picture.
NOTN Thisfeatureis availablewhenAutoAspectis setto On.
1 Press the SETUP button.
2 Select Picture > Display Settings > 4:3 Stretch and press the OK
button.
3 Press the A/V (arrow) buttons to select On.
4 Press the EXIT button.
1 1 0 Picture and Sound Controls
Adjusting the pictur
Adjustingthepicture
Selectingthepicturemode
You can select your desired picture settings from the modes described
below.
Mode: Description:
AutoView_ AutomaticallyadjustsmultiplepicturesettingsincludingBrightness,
Contrast,Gamma,andSharpnessbasedonambientroomlight conditions
andincomingpicturecontentto createthebestpossiblepicturesettings
withoutanymanualadjustment.
Dynamic MaximizesContrast,ColorSaturation,Sharpness,GrayScaleand
Brightnessto createmorevividanddynamicimages
Standard Standardpicturesettings
Movie Lowercontrastfora darkenedroom
Game Optimizedfor playingvideogamesby displayingtheimagesin their
purestform(4:4:4)withoutthelossofcolor information.Theresultis
superiorimagequalityandshortersignalto screentimefor afastergaming
experience.
PC Optimizedforviewingyourpersonalcomputer.
NOTN o:, PCmodeis availablefor HDMI'_andPCinputsonly(notdisplayedfor
otherinputsources).
•:, GameModeis notavailablein ANT/CABLEinput.
1Press the SETUP button.
2 Select Picture >Picture Mode and press the OK button.
3 Press the ,&/V (arrow) buttons to select a mode.
4 Press the EXIT button.
*_o The picture mode can also be changed by pressing the PIC MODE
button on the remote control.
NOTN Thepicturemodeyouselectaffectsthecurrentinputonly.Youcanselecta
differentpicturemodefor eachinput.
Picture and Sound Controls 1 1 1
Adjusting the pictur
Adjustingthepicturequality
The adjustments you make to picture quality under a picture mode are
saved to that picture mode.
Selection Press (_I) Press (1_)
Backlight* Darker Lighter
Contrast Lower Higher
Brightness Darker Lighter
Color Paler Deeper
Tint Reddish Greenish
Sharpness Softer Sharper
*Backlight: Adjusts the brightness of the entire screen. When in video mode and
no signal is input, this selection is set to 0. (Settings are stored in memory.)
NOTN Somesettingscannotbeadjustedwhenthepicturemodeis setto
AutoView.
To adjust the picture quality:
1 Press the SETUP button.
2 Select Picture and press the OK button.
3 Press the A/V (arrow) buttons to select the setting you would
like to adjust (Backlight, Contrast, Brightness, Color, Tint, or
Sharpness).
4 Press the I* (arrow) button.
5 Press the "ql/l*(arrow) buttons to adjust the setting.
6 Press the EXIT button.
NO'rN o:o Anypicturesettingsthatyouadjustaffectthecurrentinputonly.
Youcanadjustthepicturequalityseparatelyfor eachinput.
•:. Dependingona Sharpnessvalue,theEdgeEnhancereffectmaybe
reduced.
To reset to the factory defaults:
1 Press the SETUP button.
2 Select Picture > Reset.
3 Press the OK button.
A confirmation screen appears.
4 Press the "_/1_ (arrow) buttons to select Yes, and then press OK.
1 1 2 Picture and Sound Controls
Using the advanced picture settings feature
Usingtheadvancedpicture settingsfeatures
NOTE SomeoftheAdvancedPictureSettingsfeatureswill notbeavailablefor
adjustmentwhenthepicturemodeis settoAutoView.
EdgeEnhancer
If the Edge Enhancer set to On, the clarity levels can be adjusted
automatically.
1Press the SETUP button.
2 Select Picture > Advanced Picture Settings > Edge Enhancer
and press the OK button.
3Press the A/V (arrow) buttons to select On.
4 Press the EXIT button.
NOTE o:. Ifthepicturemodeis setto AutoView,EdgeEnhanceris not
available.
•".. Thisfeaturemaynotworkproperlydependingonthecontent.
•".. Noisemayappearontheimagedependingonthedeviceconnectedto
theTV(e.g.adevicewithaspecificenhancerfunction).
DynamicContrast
Dynamic Contrast detects changes in picture quality that affect the
appearance of your contrast settings and then automatically adjusts the
video.
1 Press the SETUP button.
2Select Picture >Advanced Picture Settings > Dynamic Contrast
and press the OK button.
3 Press the A/V (arrow) buttons to select High, Middle, Low, or
Off.
4 Press the EXIT button.

Picture and Sound Controls 1 1 3
Using the advanced picture settings feature
DynaLight®
The DynaLight ®dynamic backlight control monitors the brightness of
each video frame and automatically adjusts backlight intensity based
on the content to create higher dynamic contrast, for deeper blacks and
increased depth.
1 Press the SETUP button.
3
4
ClearScan®
2 Select Picture > Advanced Picture Settings > DynaLight and
press the OK button.
Press the J,/V (arrow) buttons to select On or Off.
Press the EXIT button.
ClearScan _ 240Hz uses both frame interpolation technology and
advanced backlight control with image synchronization to quadruple the
TV refresh rate for an even clearer Past motion video.
1 Press the SETUP button.
2 Select Picture >Advanced Picture Settings > ClearScan and
press the OK button.
3 Press the A/V (arrow) buttons to select Cinema, Smooth,
Standard, or Off.
4 Press the EXIT button.
NOTN Ifthe picturemodeis setto Gameor PCmode,thisfeatureisautomatically
notavailable.
iVlPEGNR
The MPEG noise reduction feature allows you to reduce visible
interference caused by MPEG compression.
1 Press the SETUP button.
2 Select Picture >Advanced Picture Settings > Noise Reduction
and press the OK button.
3 Press the A/V (arrow) buttons to select MPEG NR and press the
OK button.
4 Press the J,/V (arrow) buttons to select Low, Middle, High, or
Off.
5 Press the EXIT button.
NOTE Ifthe picturemodeis setto Gameor PC,thisfeatureis notavailable.
1 1 4 Picture and Sound Controls
Using the advanced picture settings feature
UltraClearDNR
DNR is a Dynamic Noise Reduction technology that filters out video
noise without decreasing picture sharpness for clean, crystal-clear images.
1 Press the SETUP button.
2 Select Picture >Advanced Picture Settings > Noise Reduction
and press the OK button.
3 Press the J,/V (arrow) buttons to select DNR and press the OK
button.
4 Press the A/V (arrow) buttons to select Low, Middle, High, Auto,
or Off.
5 Press the EXIT button.
NOlr£ Thedifferencesmaynotalwaysbenoticeable.Forthebestresults,use
lowersettings,aspicturequalitymaybegreatlyreducedif thesettingis too
high.
Ifthe picturemodeis setto 6ame or PC,thisfeatureis notavailable.
AmbientLightSensor
When the ambient light function of Auto Brightness Sensor is set to On,
the TV optimizes the backlighting levels to suit ambient light conditions.
1 Press the SETUP button.
2 Select Picture > Advanced Picture Settings > Auto Brightness
Sensor Settings and press the OK button.
3 Press the A/V (arrow) buttons to select On or Off.
4 Press the EXIT button.
NOTE Whenthepicturemodeis setto AutoView_, thisfeatureis automatically
setto On.
ColorNasterTM
The ColorMaster TM feature allows you to adjust standard colors.
1 Press the SETUP button.
2 Select Picture > Advanced Picture Settings > ColorMaster and
press the OK button.
3 Press the A/V (arrow) buttons to select On or Off.
4 Press the EXIT button.
Picture and Sound Controls 1 1 5
Using the advanced picture settings feature
BaseColorAdjustment
When ColorMaster TM is set to On, the list of base colors appears.
You can select a base color to adjust.
1 Press the SETUP button.
2 Select Picture > Advanced Picture Settings > Base Color
Adjustment.
3 Press the OKbutton.
The Base Color Adjustment screen appears.
4 Press the A/• (arrow) buttons to select a color. Press the I_ (arrow)
button.
5 Press the ,_/I_ (arrow) buttons to select Hue, Saturation, or
Brightness.
6Press the A/• (arrow) buttons to adjust the setting.
7 Repeat Steps 4 through 6 to adjust other colors. To reset the
adjustments to the factory defaults, select Reset on the screen, and
then press the OK button. (A confirmation screen appears. Press the
4/I_ (arrow) buttons to select Yes, and then press the OK button.)
Colortemperature
I Press the SETUP button.
2 Select Picture > Advanced Picture Settings > Color Temperature
and press the OK button.
3 Select Color Temperature and press the OK button. Press the A/
• (arrow) buttons to select Cool, Medium, or Warm.
4Press the OKbutton.
5 Select Color Temperature and press the OK button. Press the A/
• (arrow) buttons to select the Red Level, Green Level, or Blue
Level.
6Press the I_ (arrow) button.
7 Press the "_/l_ (arrow) buttons to adjust the level. The adjustment
range is -10 (less of selected color) to +10 (more of
8 selected color).
9Press the EXIT button.
NOTE This featureis not available in Standardand Movie mode.
1 1 6 Picture and Sound Controls
Setting the expert picture setting
Resettingtothefactorydefault
1 Press the SETUP button.
2 Select Picture > Advanced Picture Settings > Reset.
3 Press the OKbutton.
A confirmation screen appears.
4 Select Yes, and then press the OK button.
Settingtheexpertpicturesettings
NOTE Thisfeatureis onlyavailableinStandardandMoviemode.
TestPattern
When the test pattern is on screen, you can navigate the Picture submenus
without removing the image. When you move to a non-Picture menu, or
close the menus, regular video will be restored.
1 Press the SETUP button.
2 Select Picture > Expert Picture Settings > Test Pattern and press
the OK button.
3 Press the A/• (arrow) buttons to select On.
4 Adjust picture settings.
NOTN WhentheTVis in2Dto 3Dmodeor 3Dmode,this featureis notavailable.
RGBFilter
This feature individually enables or disables the red, green, and blue
components of the picture to allow for more accurate adjustment of each
color.
1 Press the SETUP button.
2Select Picture > Expert Picture Settings > RGB Filter and press
the OK button.
3Press the A/• (arrow) buttons to select Red, Green, or Blue to
adjust.
4 Press the _, (arrow) button.
5 Press the A/• (arrow) buttons to select On, and then press the OK
button.
6 Press the • (arrow) button to select Color or Tint, press the ,_/_
(arrow) buttons to adjust.
7 Press the EXIT button.
Picture and Sound Controls 1 1 7
_Setting the expert picture settings
NOTE Itis not possibleto turnoffall threecolorssimultaneously.
White Balance
Window Display
This feature displays the Window Pattern to adjust the white balance.
1 Press the SETUP button.
2 Select Picture > Expert Picture Settings > White Balance and
press the OK button.
3 Press the A/V (arrow) buttons to select Window Display and press
the OK button.
4 Press the A/V (arrow) buttons to select On.
5Adjust the picture settings.
SettingType
You can adjust the white balance setting.
2P White Balance:
1 Press the SETUP button.
2Select Picture >Expert Picture Settings >White Balance >
Setting Type and press the OK button.
3 Press the &/V (arrow) buttons to select 2P and the press the OK
button.
4 Press the A/V (arrow) buttons to select 2P White Balance and
press the OK button.
5Press the A/V (arrow) buttons to select Red-Offset, Green-Offset,
Blue-Offset, Red-Gain, Green-Gain, or Blue-Gain.
6 Press the IP"(arrow) button.
7 Press the _I/IP"(arrow) buttons to adjust.
10P White Balance:
1 Press the SETUP button.
2Select Picture >Expert Picture Settings >White Balance >
Setting Type and press the OK button.
3 Press the &/V (arrow) buttons to select 10P and the press the OK
button.
4 Press the A/V (arrow) buttons to select 10P White Balance and
press the OK button.
5Press the A/V (arrow) buttons to select IRE, Red, Green, or Blue.
1 1 8 Picture and Sound Controls
Adjusting the audi
6 Press the I_ (arrow) button.
7 Press the _I/I_ (arrow) buttons to adjust.
Adjustingtheaudio
Mutingthesound
Press the MUTE button to partially reduce (1/2 Mute) or turn off (Mute)
the sound. Each time you press the MUTE button, the mute mode
changes in the following order: 1/2 Mute, Mute, Volume, 1/2 Mute, etc.
NO'rN Ifyoumodifyitemsin theSound menuwhileMuteis active,Muteis
cancelled.
Selecting stereo/SAPbroadcasts
The MTS (multi-channel TV sound) feature is only available for analog
signals on the ANT/CABLE input. When the TV receives a stereo or SAP
(second audio program) broadcast, the icon STEREO or SAP appears on
screen when the INFO button is pressed.
To listen in stereo sound:
1 Press the SETUP button.
2 Select Sound > MTS and press the OK button.
3 Press the A/V (arrow) buttons to select Stereo.
4 Press the EXIT button.
NOTE o:. YoucantypicallyleavetheTVin Stereomodebecauseit outputsthe
typeof soundbeingbroadcast(stereoormonaural).
•:. Ifthesoundis noisy,selectMend.
•_. Ifthereis nosoundin SAPmode,selectStereo.
Adjustingthe audio balance
You can adjust the audio balance.
1 Press the SETUP button.
2 Select Sound > Balance and press the OK button.
3 Press the "I/1_ (arrow) buttons to adjust the balance.
4 Press the EXIT button.
Picture and Sound Controls 1 1 9
Adjusting the audi
Adjusting therange
You can adjust bass and treble.
1 Press the SETUP button.
2 Select Sound > Bass or Treble.
3 Press the OK button.
4 Press the "_/1_ (arrow) buttons to adjust the range.
5 Press the EXIT button.
IV SpeakersOn/Off
This feature allows you to turn the TV speakers off when connecting the
audio system.
1 Press the SETUP button.
2 Select Sound > TV Speakers and press the OK button.
3 Press the A/V (arrow) buttons to select On or Off.
To turn on the built-in speakers:
1 Choose On in step 3 above.
SettingthePrimaryAudioLanguage
You can set the Primary Audio Language of the digital broadcast.
1 Press the SETUP button.
2 Select Sound > Primary Audio Language and press the OK
button.
3 Press the A/V (arrow) buttons to select English, Fran_ais, or
Espafiol.
4 Press the EXIT button.
Selecting theoptical audiooutputformat
You can select the optical audio output format when you connect a
Dolby _ Digital decoder or other digital audio systems to the TV's
DIGITAL AUDIO OUT terminal.
AudioFormat
l Press the SETUP button.
2 Select Sound > Digital Audio Output > Audio Format and press
the OK button.
3 Press the A/'_' (arrow) buttons to select Auto or PCM.
4 Press the EXIT button.
12 0 Picture and Sound Controls
Adjusting the audi
Audio Delay
1 Press the SETUP button.
2Select Sound > Digital Audio Output > Audio Delay and press the
OK button.
Press the
Auto:
Manual:
A/V (arrow) buttons to select Auto or Manual.
This mode automatically adjusts the audio timing to meet
the video timing.
The time lag might be large between the image and sound
depending on the connected equipment (amplifier etc.). In
that case, select Manual.
You can manually adjust the audio signal timing to meet
the video signal timing.
4 Press the EXIT button.
Delay Adjustment
1 Press the SETUP button.
2 Select Sound > Digital Audio Output > Delay Adjustment and
press the OK button.
3 Press the "I/1_ (arrow) buttons to adjust the audio signal timing (0 -
250ms) to meet the video signal timing.
4 Press the EXIT button.
NOT£ .:o Thisfeatureis grayedoutwhenAudioDelay is inAuto.
¢ Atimelagwill occurwhenthevideosignalor audiosignalis changed.
Adjustthetimingaccordingly.
¢ Whenadjustingthetiming,turn downthevolumeof theAVequipment
usedasfaraspossible.
Dependingontheequipment,noiseetc.mayoccurwhenthesignalis
changed.
¢ Dependingontheconnectedequipment(amplifier,etc.),adjustment
maynot bepossible.
¢ Whentheopticalaudiooutputsetting(Auto,---,POM)is changed,it
maybenecessaryto adjustthetimingagain.
•:o Donotuseotherthanfor audiooutputfromtheAVamplifier,etc.
(Malfunctionmayoccur)
Pictureand Sound Controls 1 21
Adjusting the audi
Usingthe Dolby®Digital Dynamic RangeControlfeature
You can further compress Dolby _ Digital and Dolby _ Digital Plus
dynamic range so you can switch from digital to analog broadcasts at the
same dynamic range.
1 Press the SETUP button.
2 Select Sound > Dynamic Range Control and press the OK button.
3 Press the ,&/V (arrow) buttons to select On.
NOTN Thisfeatureis availablewhenDolby®Digitalor Dolby® DigitalPlusis input
to theTVinthefollowingsituations:
•".. Whentunedto adigitalRFchannel
•".. WhenanHDMIT"inputis used
Thisfeatureis automaticallysetto Off whenDynamicVolume (Audyssey
DynamicVolume®) is setto Dayor Night.
Thisfeaturewill alsoaffectDigital Audio Outputwhentheopticalaudio
outputformatis setto PCM.
AudysseyPremiumTelevisionTM
These televisions use a suite of technologies for better sound including:
ol. Audyssey EQ®--provides clear, accurate and natural sound right
out of the box. This technology ensures you enjoy your audio
experience as much as your video.
o:. Audyssey ABXWM--technology uses sophisticated driver analysis
and low frequency monitoring to extend the range and bass of small
speakers. This enables the system to produce lower frequencies than
would be possible with a traditional system of the same size.
o:. Audyssey Dynamic Volulne®--autolnatically adjusts volume to
provide a consistent sound level between television programs,
colmnercials, and between the loud and soft passages of movies.
o:. Audyssey Volume Extension®--doubles the volume capability in
small speakers while blocking distortion so your TV gets loud and
still sounds great.
o:. DayfNight Modes--automatically keeps the volume of the TV at
the perfect level for day or night.
o:. Wall/Table Modes--automatically keeps the volume at the perfect
level for television mounted on a wall or located on a table-top.
12 2 Picture and Sound Controls
Adjusting the audi
UsingAudysseyEQ®for Wall Mounted or Table-topTVs
This feature automatically keeps the volume at the perfect level for
television mounted on a wall or located on a table-top.
1 Press the SETUP button.
2 Select Sound > Audyssey Premium Television > TV Mounting
and press the OK button.
3 Press the A/V (arrow) buttons to select Wall or Table.
UsingAudysseyDynamicVolume®
This feature provides a consistent sound volume between television
programs, commercials, and between the loud and soft passages of
movies.
1 Press the SETUP button.
2 Select Sound > Audyssey Premium Television > Dynamic
Volume and press the OK button.
3 Press the A/V (arrow) buttons to select Night, Day, or Off.
NOTE .:. IfDynamicRange Controlis setto On,thisfeatureis automatically
setto Off.
•1o ThisfeaturedoesnotaffecttheaudiosignaloutputfromtheDIGITAL
AUDIOOUTterminal.
AudysseyABXTM
Audyssey ABX TM technology uses sophisticated driver analysis and low
frequency monitoring to extend the range and bass of small speakers.
To turn on Audyssey ABXTM:
1 Press the SETUP button.
2 Select Sound > Audyssey Premium Television > Audyssey ABX
and press the OK button.
3Press the &/V (arrow) buttons to select Off, Low, or High.
Audyssey EQ _ and Audyssey Volume Extension _ are default settings that
are set to On.
Usingthe surroundsoundfeature
Surround settings help to create a thrilling surround sound experience
with deep, rich bass from stereo sound sources. Your TV's audio will
sound fuller, richer, and wider.
•**o Press the SETUP button. Select Sound > Surround, and then
select On or Off.
Chapter8
Advancedfeatures
Usingyourhomenetwork
o*.oThis TV can share videos, music, and photos across your home
network and other connected products through the MediaShare
feature. In order to do this, you will have to configure the network
settings on your TV, see "MediaShare (Videos, Music, and Photos)"
on page 153.
o**oIf you want to use your home network with an Internet connection,
you will have to configure the network settings on your TV.
If necessary, change the network settings, see "Setting up the
Network" on page 125.
If you use Internet services, see the following note before use.
Third party Internet services are not provided by Toshiba, may change or
be discontinued at any time, and may be subject to third party restrictions.
Toshiba makes no warranties, representations, or assurances about the
content, availability, or functionality of third party content or services.
Third party internet services may require the creation of a separate
account through a computer with internet access, and payment of one-
time and/or recurring charges.
Certain features currently not available in Canada/Mexico.
123
12 4 Advanced features
Using your home networ
Whenusinga Wirelessnetworkconnection
WirelessLANandyourHealth:
Wireless LAN products, like other radio devices, emit radio frequency
electromagnetic energy. However, the level of energy emitted by Wireless
LAN devices is much less than the electromagnetic energy emitted by
wireless devices like mobile phones.
Because Wireless LAN products operate within the guidelines found
in radio frequency safety standards and recolmnendations, Toshiba
believes Wireless LAN is safe for use by consumers. These standards
and recommendations reflect the consensus of the scientific colnlnunity
and result from deliberations of panels and committees of scientists who
continually review and interpret the extensive research literature.
In some situations or environments, the use of Wireless LAN may be
restricted by the proprietor of the building or responsible representatives
of the organization. Such restrictions may apply in environments where
the risk of interference to other devices or services is perceived or
identified as harmful.
If you are uncertain of the policy that applies to the use of wireless
devices in a specific organization or environment, you are encouraged to
ask for authorization to use the Wireless LAN device prior to turning on
the equipment.
UsingtheTV ina wireless LANenvironment:
o:o It is recommended to use IEEE 802.11 a or IEEE 802.1 in on 5 GHz
for audio and SD video streaming.
o:o It is recommended to use IEEE 802.1 in on 5 GHz for HD video
streaming.
o:o It is recommended that the encoding rate of video content be 20
Mbps or less.
o:o It is not recommended to use 2.4 GHz for audio and video
streaming.
o:o Content playback may be interrupted by surrounding interference.
Advancedfeatures 1 2 5
Setting up the Networ
Settingupthe Network
You can select the Network Type.
1 Press the SETUP button.
2 Select Network > Network Setup > Connection Type and press
the OK button.
3 Press the A/V (arrow) buttons to select Wired or Wireless.
4 Press the OKbutton.
o*,oIf you select Wired, see Advanced Netu ork Setup" on page
130.
If you select Wireless, see the next section.
WirelessSetup
NOTN ContinuedAP(AccessPoint)connectionis notguaranteed.
ConnectionmaybelostwhilewatchingTV.
There are three methods for wireless setup:
o:. Easy Setup (WPS)
IfAP supports WPS, this can be used.
o*,oWPS is a standard designed to simplify the connection of
wireless LAN equipment and the setup of network security
features.
•*.o Assisted Setup (setup using the AP's notification information)
Network Name, Authentication, and Encryption are decided based
on information from the AP. You need to manually set the Security
Key.
°:o Manual Setup
Requires manually entering all settings.
NOTE .:. Inorderto secureyourhomenetwork,it is stronglyrecommendedthat
you useawirelessaccesspointwithencryption.
¢ WhenEncryptionis setto "None",datatransmittedoverawireless
LANis notsecurelyprotected.Unauthorizedusersmayaccessyour
dataandnetworkwithoutappropriatesecuritymeasures.Selectingan
encryptionsettingfromyourToshibaTVandusinga securenetwork
for wirelessLANtransmissionsmayhelpavoidunauthorizedaccess
to yourimportantdataand/orTV.Toshibadisclaimsanyandall
responsibilityor liabilityresultingfromanywirelesstransmissions
overthe InternetthroughyourToshibaTV.
12 6 Advanced features
Setting up the Networ
EasySetup using PBC (Pushbuttonconfiguration)
Press the SETUP button.1
2
3
4
5
6
7
Select Network >Network Setup > Wireless Setup and press the
OK button
Press the A/• (arrow) buttons to select Easy Setup and press the
OK button.
Press the A/• (arrow) buttons to select PBC.
Press the • (arrow) button to select Start Scan, and then press the
OK button.
Following the on-screen instructions, push the appropriate button on
your AR
When a screen reporting that "the setup has succeeded" appears,
press the OK button.
To cancel searching for the AP:
o*.oPress the BACK button while searching for the AR A message
appears. Press the "_/1_ (arrow) buttons to select Yes, and then press
the OK button.
EasySetupusingPIN(PersonalIdentificationNumber)
1Press the SETUP button.
2 Select Network >Network Setup > Wireless Setup and press the
OK button.
3 Press the A/• (arrow) buttons to select Easy Setup and press the
OK button.
4 Press the A/• (arrow) buttons to select PIN.
5Press the • (arrow) button to select Start Scan, and then press the
OK button.
The Scan screen appears.
6 Enter the PIN displayed on this screen into your computer or AP.
7 Press the A/• (arrow) buttons to select the desired AP, and then
press the OK button.
NOTN ChecktheMACaddressonthe labelor inthemanualof theAPandselect
anAP.
8 When a screen reporting that "the setup succeeded" appears, press
the OK button.
Advancedfeatures 1 2 7
Setting up the Network
To cancel searching for the AP"
o:° Press the BACK button while searching for the AP. A message
appears. Press the "_/_ (arrow) buttons to select Yes, and then press
the OK button.
AssistedSetup
1 Press the SETUP button.
2 Select Network > Network Setup > Wireless Setup and press the
OK button.
3 Press the A/V (arrow) buttons to select Assisted Setup and press
the OK button.
4 Press the A/V (arrow) buttons to select the desired AP, and then
press the OK button.
NOTE ChecktheMACaddressonthe labelor inthemanualof theAPandselect
anAP.
5 Select Security Key, and then press the OK button.
The Software Keyboard appears.
6 Input the Security Key using the Software Keyboard. For more
information, see "Using the software keyboard" on page 133.
7 To save your settings, press the GREEN button.
NOTN TheSecurityKeymustadheretothefollowingconditions:
¢ TKIP/AES:8-63ASCIIor64 Hexcharacters
¢ WEP:5 or 13ASCIIor 10or 26Hexcharacters
8 Select Done, and then press the OK button.
NOTE Settingsarenotsavedif the BACKbuttonis pressedbeforeDoneis
selected.
ManualSetup
1 Press the SETUP button.
2 Select Network > Network Setup > Wireless Setup and press the
OK button.
3 Press the A/V (arrow) buttons to select Manual Setup, and then
press the OK button.
12 8 Advanced features
Setting up the Networ
4Press the A/V (arrow) buttons to select Network Name, and then
press the OK button.
The Software Keyboard window appears.
5Input the Network Name using the Software Keyboard. For more
information, see "Using the software keyboard" on page 133.
6 To save your settings, press the GREEN button.
7 Press the A/V (arrow) buttons to select Authentication and press
the OK button.
Press the A/V (arrow) buttons to select Open System, Shared
Key, WPA-PSK, or WPA2- PSK.
8Press the A/V (arrow) buttons to select Encryption and press the
OK button.
Press the "_/_ (arrow) buttons to select None, WEP, TKIP, or
AES.
NOTE Certainencryptiontypesareonlycompatiblewithspecificauthentication
types.
•*,oWhenAuthenticationis OpenSystemandSharedKey,onlyWEPor
Nonearecompatible.
•*,oWhenAuthenticationis WPA-PSKorWPA2-PSK,onlyTKIPorAES
arecompatible.
WhenincompatibleAuthentication/Encryptionpairingsareattempted,a
warningmessagewill bedisplayed,andnoconnectionattemptwill be
madeuntil theincompatibilityis resolved.
9 Press the A/V (arrow) buttons to select Security Key, and then
press the OK button.
The Software Keyboard window appears.
10 Input the Security Key using the Software Keyboard. For more
information, see "Using the software keyboard" on page 133.
11 To save your settings, press the GREEN button.
NOTE Thisitemis grayedoutwhenEncryptionis setto None.
12 Select Done, and then press the OK button.
When Encryption is set to None, a message appears.
13 Press the ,_/_ (arrow) buttons to select Yes, and then press the OK
button.
Advancedfeatures 1 2 9
_Setting up the Network
NOTE Settingsarenotsavedif the BACKbuttonis pressedbeforeDoneis
selected.
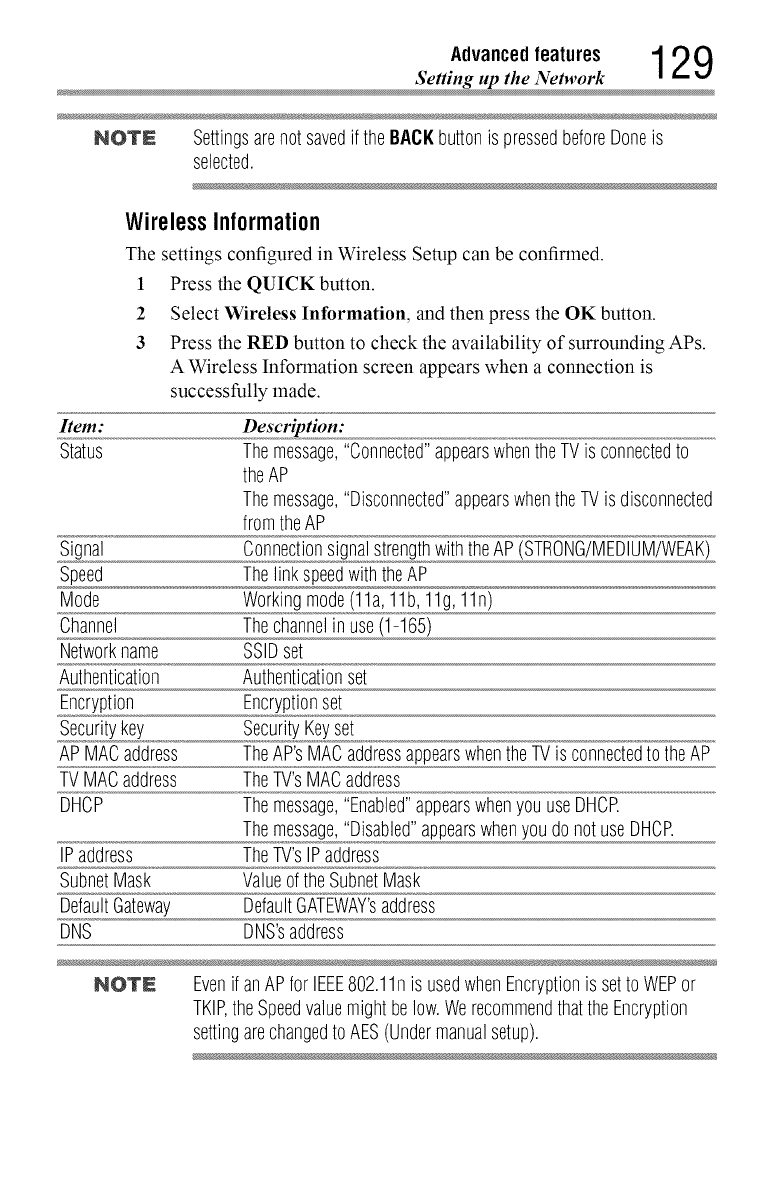
WirelessInformation
The settings configured in Wireless Setup can be confirmed.
1 Press the QUICK button.
2 Select Wireless Information, and then press the OK button.
3 Press the RED button to check the availability of surrounding APs.
A Wireless Information screen appears when a connection is
successfully made.
Item: Description:
Status Themessage,"Connected"appearswhentheTVis connectedto
theAP
Themessage,"Disconnected"appearswhentheTVis disconnected
fromtheAP
Signal ConnectionsignalstrengthwiththeAP(STRONG/MEDIUM/WEAK)
Speed ThelinkspeedwiththeAP
Mode Workingmode(11a,11b,11g,11n)
Channel Thechannelin use(1-165)
Networkname SSIDset
Authentication Authenticationset
Encryption Encryptionset
Securitykey SecurityKeyset
APMACaddress TheAP'sMACaddressappearswhentheTVis connectedto theAP
TVMACaddress TheTV'sMACaddress
DHCP Themessage,"Enabled"appearswhenyouuseDHCR
Themessage,"Disabled"appearswhenyoudonotuseDHCR
IPaddress TheTV'sIPaddress
SubnetMask Valueofthe SubnetMask
DefaultGateway DefaultGATEWAY'saddress
DNS DNS'saddress
NOTE Evenif anAPfor IEEE802.11nis usedwhenEncryptionis setto WEPor
TKIP,theSpeedvaluemightbelow.WerecommendthattheEncryption
settingarechangedto AES(Undermanualsetup).
130 Advanced features
Setting up the Networ
Advanced Network Setup
NOTE WhenmanuallysettingtheIPAddress,setAutoSetupto Off.
IPAddressSetup
NOTE ThesettingsinAutoSetuparelinkedto thoseselectedinthe DNSSetup
menu.IfAutoSetupis setto On,thenAutoSetupin theDNSSetupmenu
will alsobesetto On.
Auto Setup:
1Press the SETUP button.
2 Select Network >Network Setup > Advanced Network Setup
and press the OK button.
3 Press the A/V (arrow) buttons to select IP Address Setup, and
then press the OK button.
4 Press the A/V (arrow) buttons to select Auto Setup and press the
OK button.
5 Press the A/V (arrow) buttons to select On.
NOTE OtheritemsaregrayedoutwhenAuto Setupissetto On.
Manual Setup:
1 Press the SETUP button.
2Select Network >Network Setup >Advanced Network Setup
and press the OK button.
3 Press the &/V (arrow) buttons to select IP Address Setup, and
then press the OK button.
4 Press the &/V (arrow) buttons to select Auto Setup and press the
OK button.
5Press the A/V (arrow) buttons to select Off.
6 Press the A/V (arrow) buttons to select IPAddress.
7Press the ,/• (arrow) buttons to select the IP Address field and
use the 0-9 buttons to enter in a digit. Press the • (arrow) button
to select the subsequent fields. To save the setting, press the OK
button.
Advancedfeatures 1 31
_Setting up the Network
NOTE IPaddressfield numbersmustbebetween0and255.If youinputan
incompatiblenumberandpressthe OKbutton,thefield numberwill be
resetto thepreviousvalue.
8Press the &/V (arrow) buttons to highlight Subnet Mask, and edit
in the same way as IP Address.
9Press the A/V (arrow) buttons to highlight Default Gateway, and
edit in the same way as IP Address.
NOTE IfyoumanuallysettheIPaddress,youmustnotusethesameIPaddress
withanyotherdevice.TheIPaddressyouuseshouldbeaprivateaddress.
Ifyoudonot knowthecorrectvaluesto use,contactyournetwork
administratororinternetserviceprovider.
DNSSetup
NOTE .:. Whenthe DHOPfunctionofthe routerconnectedto thisTVis Off,set
AutoSetupto Off,andmanuallysettheDNSaddress(es).
YourInternetServiceProvidershouldhaveprovidedtheseto you.
•:. Thesettingsin AutoSetup arelinkedto thoseselectedinthe IP
AddressSetupmenu.IfAuto Setupis setto On,thenAutoSetup
intheIP AddressSetup menuwill alsobesetto On.
Auto setup:
1 Press the SETUP button.
2Select Network >Network Setup > Advanced Network Setup
and press the OK button.
3 Press the A/V (arrow) buttons to select DNS Setup, and then press
the OK button.
4Press the &/V (arrow) buttons to select Auto Setup and press the
OK button.
5Pressthe A/V (arrow) buttons to select On.
NOTE OtheritemsaregrayedoutwhenAuto Setupissetto On.
Manual setup:
1 Press the SETUP button.
2Select Network >Network Setup > Advanced Network Setup
and press the OK button.
13 2 Advanced features
Setting up the Networ
3
4
5
6
7
Press the A/V (arrow) buttons to select DNS Setup, and then press
the OK button.
Press the A/V (arrow) buttons to select Auto Setup and press the
OK button.
Press the &/V (arrow) buttons to select Off.
Press the &/V (arrow) buttons to select Primary DNS Address.
Press the "4/I="(arrow) buttons to select the field you want to
change, and then use the number buttons to input the Primary DNS
Address. To save the setting, press the OK button.
NOTE DNSaddressfield numbersmustbebetween0 and255.Ifyou inputan
incompatiblenumberandpressthe Oil button,thefield numberwill be
resetto thepreviousvalue.
8Press the &/V (arrow) buttons to select Secondary DNS Address,
and edit in the same way as Primary DNS Address.
MACAddress
You can view the fixed MAC address for the TV.
1 Press the SETUP button.
2Select Network >Network Setup > Advanced Network Setup
and press the OK button.
3 Press the A/V (arrow) buttons to select MAC Address, and then
press the OK button.
Network ConnectionTest
This function checks Internet connectivity.
1 Press the SETUP button.
Select Network >Network Setup > Network Connection Test,
and then press the OK button.
A message appears to indicate whether the connection was
successful or not.
NO'rN FavorableNetworkConnectionTestresultsdonotguaranteeanInternet
Connection.Dependingonthesituation,someInternetfeaturesmaynotbe
available.
To cancel Network Connection Test, press the EXIT button while
searching for the Internet connection.
Advancedfeatures 133
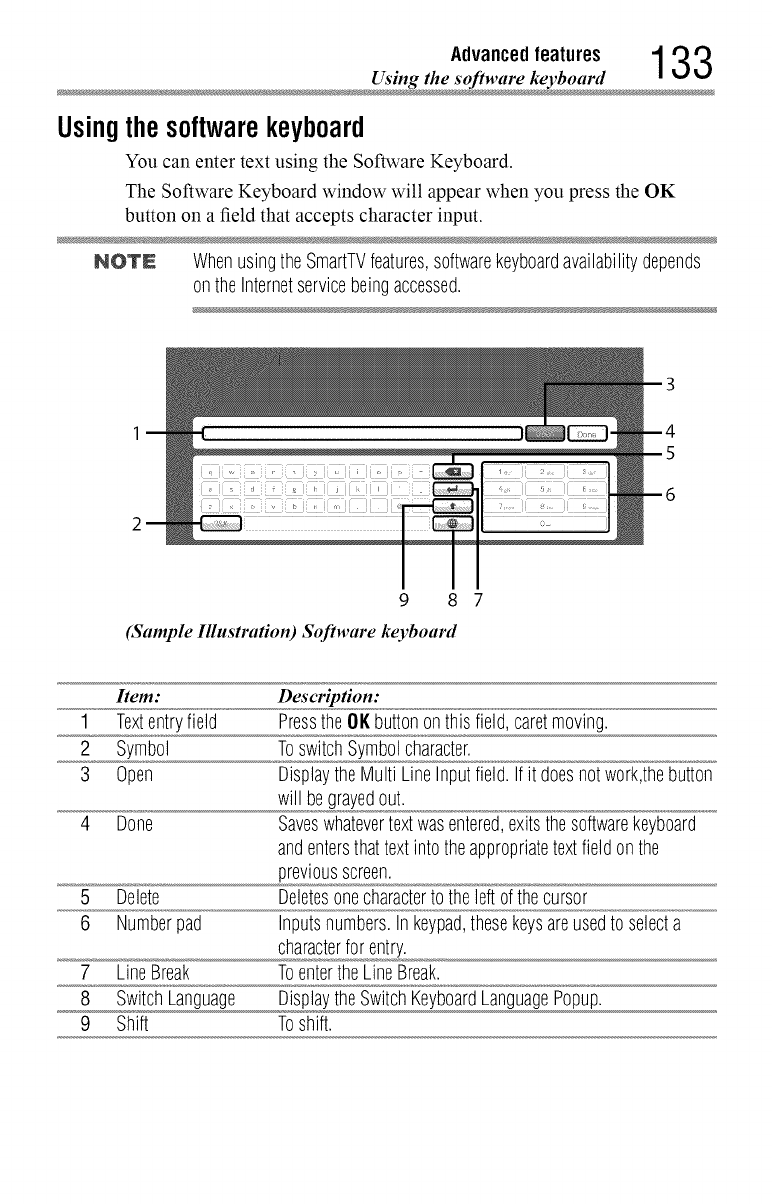
Using the software keyboar
Usingthesoftwarekeyboard
You can enter text using the Software Keyboard.
The Software Keyboard window will appear when you press the OK
button on a field that accepts character input.
NOTN WhenusingtheSmartTVfeatures,softwarekeyboardavailabilitydepends
ontheInternetservicebeingaccessed.
9 8 7
(Sample Illustration) Software keyboard
Item: Description:
1 Textentryfield Pressthe OKbuttononthis field,caretmoving.
2 Symbol ToswitchSymbolcharacter.
3 Open DisplaytheMulti LineInputfield.Ifit doesnotwork,thebutton
will begrayedout.
4 Done Saveswhatevertextwasentered,exitsthesoftwarekeyboard
andentersthattextintotheappropriatetextfieldonthe
previousscreen.
5 Delete Deletesonecharacterto theleftofthecursor
6 Numberpad Inputsnumbers.In keypad,thesekeysareusedto selecta
characterforentry.
7 LineBreak ToentertheLineBreak.
8 SwitchLanguage DisplaytheSwitchKeyboardLanguagePopup.
9 Shift Toshift.
134 Advanced features
Using the software keyboar
Entertextusingthesoftwarekeyboard
1Highlight the desired character on the on-screen software keyboard.
2 Press the OK button.
3 Repeat Step 1 and 2 until you have entered all desired text.
4 Select Done or press the GREEN button to save your settings and
return to the previous screen.
NOTN Ifthe BACKbuttonis pressed,changesarenotsavedandthesoftware
keyboardwindowis closed.
Input operation on the remote control:
Item: Description:
OK Inputstheselectedcharacter
0-9 Thesekeysareusedto selectacharacterforentry.
A/T/4/I_ Movesthecharacterhighlight
RED Deletesonecharacterto theleftofthecursor
GREEN Done
YELLOW Todisplaythehelp
BLUE Shortcutkeyfor Shift
BACK Closesthe SoftwareKeyboardwindowwithoutsavingchanges
Advancedfeatures 135
Performing a Software Upgra
PerformingaSoftwareUpgrade
TOSHIBA may offer upgrades for the TV's software in the future.
The TV's software is upgraded via the Network.
NOTN AnInternetconnectionis required.
Before downloading software:
1Configure your TV to connect to the Internet.
NOTN .:o Youwill notbeableto usetheTVsetwhileperformingtheupgrade.
¢ DonotturnofftheTVduringtheupgrade.
¢ By upgrading,thefactorydefaultvaluesmaybechanged.
2 Press the SETUP button.
3 Select Get Help > Software Upgrade.
4 Press the OK button.
The Network Upgrade screen appears.
5 Press the OK button.
NOTN Ifthe networkis notavailable,awarningmessageappears.
6 After a successful download, the TV software upgrade will start
automatically.
ViewingtheSoftwareLicenses
The Licenses for the software used in this TV are available for viewing.
1 Press the SETUP button.
2 Select Get Help > Software Licenses.
3 Press the OKbutton.
Ascreen appears displaying all the licensing information required
for the television's software.
136 Advanced features
U_ing InteF _VViD
Using
Intel®WiDi
InteF_ Wireless Display (Intel _ WiDi) is supported on this TV. Toshiba has
also included peer-to-peer wireless technologies to allow direct wireless
connection between the TV and InteF_ WiDi equipped PC or mobile
device. If your PC or mobile device has Intel ®WiDi, the Toshiba Cloud
TVs allow you to display the small screen content on the big screen
quickly and easily.
1 Press the QUICK button to open the Quick Menu.
2 Press the A/V (arrow) buttons to select Intel _ WiDi and then press
the OK button.
A prompt will appear on the screen when Connection Type is set to
Wireless. Select Yes.
3 Launch the InteF_ WiDi software on your device and select "scan for
available adaptors".
Intel ®WiDi device name and ID list will then be displayed on the
device screen.
Select the TV which you wish to connect to.
"Connecting" will be shown on the TV.
4Connecting your PC to the TV the first time
When selecting the Toshiba TV for the first time, a 4-digit or 8-digit
code will appear on your TV screen. This code needs to be inputted
into your computer to authenticate the connection.
If authentication has already taken place
"Please Wait" will appear on screen.
5 After the Intel ®WiDi connection is complete, the TV screen will
mirror the content shown on the device screen.
NOlr£ ,,:. WhenconnectingIntel®WiDi,devicemusthavepowerturnedon.
,,:. WhentheTVNetworkSettingsaresetto WirelessandIntel®WiUi
softwareis startingup,otherTVapplicationscannotbeused.
,,:. Intel®WiUidevicenameof theTVcanbechangedfromthe Intel®
WiUisoftware.
•(_ • •
To exit Intel WIDI:
Exit InteF_ Wireless Display by pushing the disconnect button on Intel _
WiDi software on the device or by pressing the EXIT button on the TV
remote control.
NO'rN Ifthe devicehasbeeninactivefor sometime,the Intel¢ WiDiconnection
will bedisconnectedautomatically.
Advancedfeatures 1 37
Using InteF _WiI)
ChangingtheIntel®WiDi DeviceName
The TV's Intel ®WiDi device name can be changed.
1 Press the SETUP button.
2 Select Network > Network Device Setup > Inte[ _WiDi Setup and
press the OK button.
3 Press the &/V (arrow) buttons to select Inte[ _ WiDi Device Name
and press the OK button.
4 Select the InteP' WiDi Device Name and press the OK button.
The Software Keyboard window will appear.
5 Input the Intel ®WiDi device name by using the software keyboard.
Press the GREEN button.
6 Select Done and press the OK button to save your setting.
DeviceList
Device List displays a list of MAC addresses for previously connected
device that have been connected before. The maximum number that can
be stored is 20.
If the list run out of space, the least-recently-used MAC address will be
deleted and the new MAC address added automatically.
1 Press the SETUP button.
2 Select Network > Network Device Setup > Inte[ _WiDi Setup and
press the OK button.
3 Press the &/V (arrow) buttons to select Device List and press the
OK button.
Device List will appear.
The registered device can be deleted one by one by pressing the Red
button in the List.
When doing so the following text can be seen "Do you want to
unregister this device? Yes/No" (default cursor is "No").
UsingtheCloudTVService
Toshiba's universal portal for internet content and services. (services are
dependent on country).
NOTN Youneedtoconnectto theInternetbeforeusingthisfeature,see"Setting
uptheNetwork"onpage125.
138 Advanced features
Using the Cloud TV Servic
1 Press the _ button.
The menu screen of the Cloud TV service is displayed.
2 Press the A/V/,/_, to select a Cloud TV service, and press the
OK button.
UsingtheCloudTVfeatures
NOTE .:. Youneedto connectto theInternetbeforeusingthisfeature,see
"SettinguptheNetwork"onpage125.
•".. Certainservicesmaynot becurrentlyavailableinyourarea.
•".. Userregistrationor Ioginmayberequiredto usesomeservices.
•".. ThirdpartyInternetservicesarenot providedbyToshiba,maychange
or bediscontinuedat anytimeandmaybesubjectto Internetservice
providerrestrictions.Toshibamakesnowarranties,representations,
or assurancesaboutthecontent,availabilityorfunctionalityofthird-
partycontentorservices.Useofthird partyInternetservicesmay
requirethecreationofa separateaccountthrougha computerwith
Internetaccessand/orpaymentof one-timeand/orrecurringcharges
andmembership.Notall third partyservicesmaybeavailableon or
compatiblewiththisproduct.In orderto experiencethefull suggested
capabilitiesofthis product,fully-compatibledevicesmayberequired.
NOTN o:, Ifthe displayofthe dateandtimeis wrong,tryto turnofftheTV,and
turn it onagain.
•".. Themenuitemsfor featureslike theAppsmaychangeintheupgrade
process.
eMANUAL
The eMANUAL provides on-screen, context-sensitive, instructions that
describe the TV features.
To access the eManual, press the eMANUAL button on the remote
control and select "eManuar'. Or you can access the eManual through
the icon on the Cloud TV Portal pages.
Featureapps
With easier content discovery, Cloud TV puts you closer than ever to
the things you love-- like Netflix _ and Hulu Plus :_,along with video on
demand, broadcast programlning, the Web, even music, photos and videos
on your home network.
Advancedfeatures 1 3 9
_Using the Cloud TV features
NOTE Appswill varybycountryandavailabilitymaychangein thefuturewith
respecttocurrentapps.
Netflix ®
Watching movieswith Netflix®
1 Press the NETFLIX on the remote control and select the Netflix _
icon.
2 Follow the on-screen instructions.
After having activated Netflix _ player and prepared an Instant Queue,
movies and TV episodes in your Instant Queue will appear on the TV
screen. Select the desired content using the remote control.
NOTE o:.TheresolutionofvideocontentstreamedfromNetflix®varies
dependingonthecommunicationspeedandbit-rateandis controlled
byNetflix®.
•:. Futureupgradescanchangethescreensandmessagesdisplayedin
theNetflix®feature.
¢ Netflix® is supportedin theU.S.andCanada,andmaynot beavailable
inothercountriesorregions.
To close Netflix _, press the EXIT button.
To confirm the Netflix ESN (Electronic Serial Number):
1 Press the SETUP button.
2 Select Network > Smart Apps Setup > Netflix Setup and press the
OK button.
3 Press the A/V (arrow) buttons to select ESN, and then press the
OK button.
The Netflix ESN screen appears.
To deactivate your device:
1 Press the SETUP button.
2 Select Network > Smart Apps Setup > Netflix Setup and press the
OK button.
3Press the A/V (arrow) buttons to select Deactivation, and then
press the OK button.
4Press the "_/_, (arrow) buttons to select Yes, and then press the OK
button.
14 0 Advanced features
Using the Cloud TV features
VUDUTM HD Movies and VUDUTM Apps
VUDU TM HD Movies and VUDU TM Apps offer on-demand service that
offers high definition movies on the Web and much more.
1 Press the _ button
The menu screen of the Cloud TV service is displayed.
2 Press the ,_/_ (arrow) buttons to select VUDU, and then press the
OK button.
NOTE o:° UseofVUDUTM requiresaworkingbroadbandInternetconnection(1
to 2 Mbpsfor SDvideo,2.25to 4.5 Mbpsfor HDvideo,and4.5to 9
Mbpsfor HDXvideo).
o:oThemessage"Buffering..."will displayif thespeedofyour Internet
connectioncannot keepupwiththespeedof thestreamingcontent
fromVUDUTM.
To close VUDU, press the EXIT button.
To deactivate your device:
1 Press the SETUP button.
2 Select Network > Smart Apps Setup > VUDU Deactivation.
3 Press the OKbutton.
4 Press the ,/I* (arrow) buttons to select Yes, and then press the OK
button.
Internet
OpenWebBrowser
The open/web browser with HTML5 video and audio codecs which allow
you to explore the web the way you want. Search for, bookmark, and
browse your favorite sites to enjoy the content you want, with simple,
intuitive navigation.
The web browser on this device:
o:o does not support platform-dependent technologies such as ActiveX ®.
o*.oonly supports preinstalled plug-ins.
o:o may not support media formats other than the following: JPEG /
PNG /GIF.
o*.ouses a single built-in font. Some text may not be displayed as
intended.
o*.odoes not support downloading of files or fonts.
Advancedfeatures 1 41
Using the Cloud TV feature
.t. is aTV browser It may work differently than PC browsers
.t. does not support parental control or locks in the content, and it is
the responsibility of the user to monitor browser usage by minors
NOTE Somepagesmaynotbedisplayedcorrectlyormaydisplaydifferentlyon
differentdevices.
Usingthe webbrowser
l Connect to the network.
2 Press the Ib$button on the remote control to access the web browser
page.
3 Use the A/V/,4/I_ (arrow) buttons to select to the URL Address
Bar and press the OK button.
4 Enter the desired URL address by using the software keyboard, see
"Using the software keyboard" on page 133.
Press the GREEN button when finished.
5 You can now browse websites on your TV using the A/V/'4/I_
(arrow) buttons on the remote control
NOTN .**oWhenyou pressthe GREENbuttonwhilebrowsingwebcontent,you
canusethe A/V/,4/>. (arrow)buttonsontheremotecontrolin
mousecontrolmode.
¢ YoucanusetheWirelessQWERTYkeyboardinadditiontothe
softwarekeyboard.
Browsingfavorite websites
1 Connect to the network.
2 Press the _ button on the remote control to access the web browser
page.
3 Use the A/V/,4/_ (arrow) buttons to select the Favorites STAR
icon on the browser menu bar and press the OK button.
NOTN Byaddingfrequentlyvisitedwebsitesto Favorites,you canbrowsethem
easily.
Youcanviewtheaddressesof thewebsitesyouvisitedpreviously.
14 2 Advanced features
Using the Cloud TV feature
4 Select the item or folders to move to the desired URL address and
press the OK button.
NOTN YoucanpresstheGREENbuttononthe remotefor thumbnailviewof all
yourfavorites.
5 You can now browse websites on your TV using the A/V/,I/I_
(arrow) buttons on the remote control.
NOTN WhenyoupresstheGREENbuttonwhilebrowsingwebcontent,you
canusethe A/T/,_/I_ (arrow)buttonsonthe remotecontrolin mouse
controlmode.
Addingfavorite websites
1 Connect to the network.
2 Press the _ button on the remote control to access the web browser
page.
3 Follow "Using the web browser" on page 141 to display your
desired website.
4 Press the Navigation buttons to scroll to Favorites STAR on the
Browser Menu Bar and press the OK button.
NOTN Byaddingfrequentlyvisitedwebsitesto Favorites,you canbrowsethem
easily.
Youcanviewtheaddressesof thewebsitesyouvisitedpreviously.
5 Press the OK button to save the desired website to your favorites.
NOTN Thedesiredwebsiteis highlightedanddisplayedonthetop rowwiththe+
(Add)icon.
The+ (Add)iconwill changeto a pageiconafterthewebsitehasbeen
savedtofavorites.
6 Press the BACK button on the remote to return to browsing your
website.
Advancedfeatures 1 4 3
Using the Cloud TV feature
PIP (Picture-in-picture) function
When viewing the web browser page, currently airing programs or images
from external inputs can be displayed in a PIP window (sub-screen).
1 Press the RED button while viewing the web browser page.
The currently airing program or images from external inputs are
displayed in a PIP window.
o*,oThe position of the PIP window, and whether it is displayed or
not can be set in the web browser Settings.
To stop displaying the PIP window:
Press the RED button when the PIP window is displayed.
NOTE o:. TheCH A/V buttonscannotbeusedwhenthe PIPwindowis
displayed.
¢ ImagesinthePIPwindowcannotbedisplayedin 3D.
¢ Imagesfrom3Dsignalswill notbedisplayedin thePIPwindow.
UsingSkypeTM
SkypeTM-ready Toshiba TVs bring your family and friends closer to your
home. Skype TM on your Toshiba TV allows you to share special moments
no matter the distance.
BeforeusingSkypeTM -Preparation
o*,oConnect the FREETALK HD Camera: TALK-7291 to the TV's
USB terminal. Do not use a USB hub. For a SkypeTM-ready Toshiba
TV compatible camera, please visit the following website: http://
shop.skype.com
°_o Arrange the HD camera on top of the TV, ensuring it's in the center.
o*.oConnect to the network.
NOTN o:, TheHDcamerais soldseparately.
,,:, DonotconnectacameraotherthantherecommendedHDcamera.
¢ Usingawirelessnetworkmayresultindegradedcallquality.
,,:, Someofthefeaturesavailableon otherversionsof SkypeTM arenot
availableonthetelevision.
,,:, WhenusingSkypeTM, somefunctionsoftheTVwill notbeavailable.
,,:, Thesoundsettingsareswitchedto SkypeTM mode.
14 4 Advanced features
Using the Cloud TV feature
o:oIfyoucannothearthepersonyou'respeakingwith,checkyourTV
volume.
o:oWhenOpticalDigitaloutputorAnalogoutputis usedandyouare
signedin, theringtonemaynotsound.
o:oThevolumelevelonSkypeTM maydifferfromotherfeaturesonyour
TV.
o:oWhentheResetTVfeatureis usedfromtheTVMenu,SkypeTM
informationis resetto factorydefaultsettings.
,,:o ScreenshotsusedinthismanualmaydifferfromtheTVMenu,
SkypeTM will beresetto itsfactorydefaultsettings.
No emergency calls with Skype TM
SkypeTM cannotbeusedfor emergencycalls.
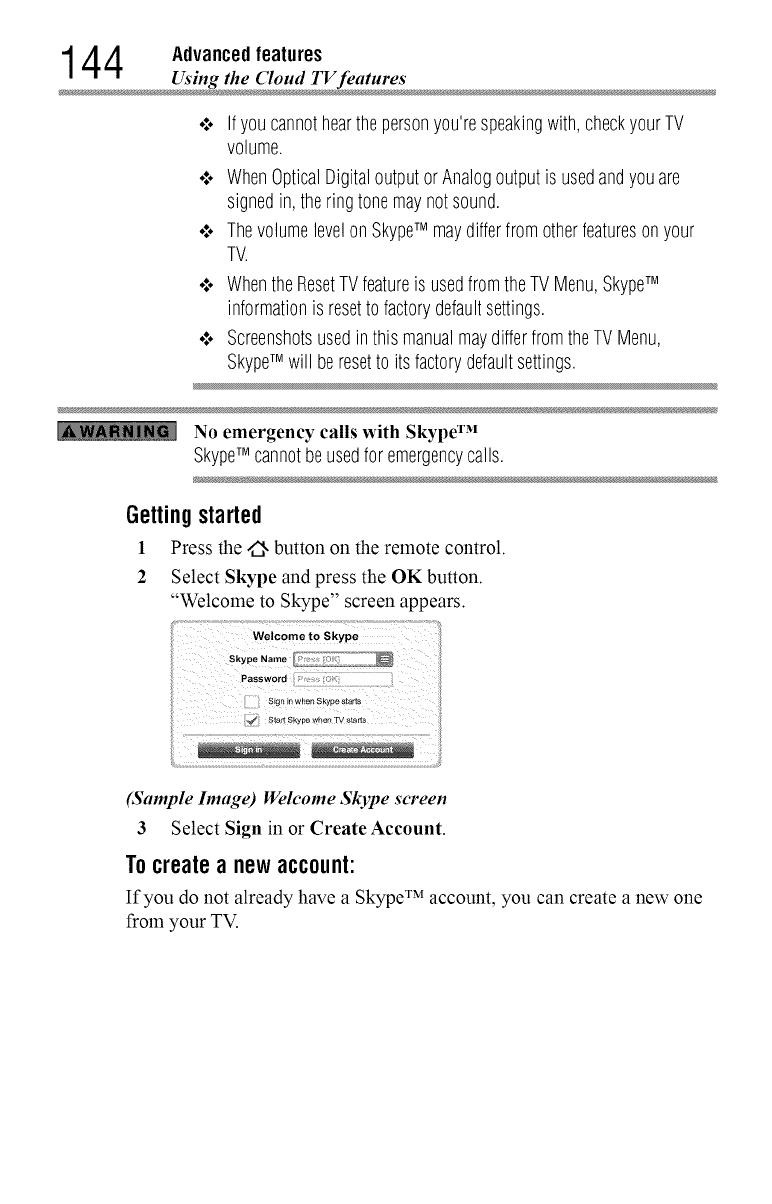
Gettingstarted
1Press the/_, button on the remote control.
2 Select Skype and press the OK button.
"Welcolne to Skype" screen appears.
(Sample Image) Welcome Skype screen
3 Select Sign in or Create Account.
Tocreatea newaccount:
If you do not already have a Skype TM account, you can create a new one
from your TV.
Advancedfeatures 1 4 5
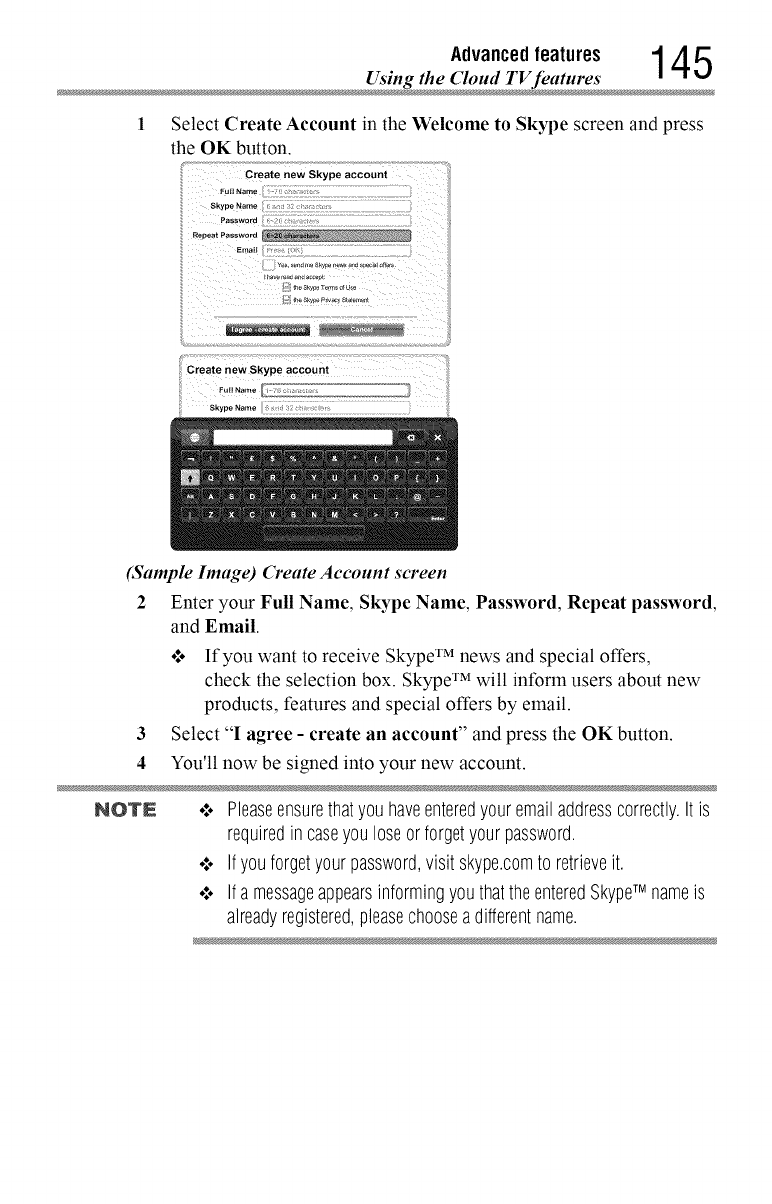
Using the Cloud TV feature
Select Create Account in the Welcome to Skype screen and press
the OK button.
Create new Skype account
Full Na_
$kype Natne
Passworo
Reoeat Password
Emait
(Sample hnage) Create Account screen
2 Enter your Full Name, Skype Name, Password, Repeat password,
and Email.
o:o If you want to receive Skype TM news and special offers,
check the selection box. Skype TM will inform users about new
products, features and special offers by email.
3 Select "I agree- create an account" and press the OK button.
4 You'll now be signed into your new account.
NOTN .:. Pleaseensurethatyouhaveenteredyouremailaddresscorrectly.Itis
requiredin caseyou loseorforgetyourpassword.
•".. Ifyouforgetyourpassword,visit skype.comto retrieveit.
•".. Ifa messageappearsinformingyou thattheenteredSkypeTM nameis
alreadyregistered,pleasechooseadifferentname.
14 6 Advanced features
Using the ('loud TV feature
To Sign into SkyperM:
If you haYe a Skype TM account, sign into Skype TM in the Welcome to
Skype screen.
1 Enter your Skype Name and Password.
2 Select Sign in and press the OK button.
•:. If"Sign in when Skype starts" is checked, your account will
sign in automatically when you launch Skype TM from the menu.
•:. If"Start Skype when TV starts" is checked, your account will
sign in automatically when you turn on the TV.
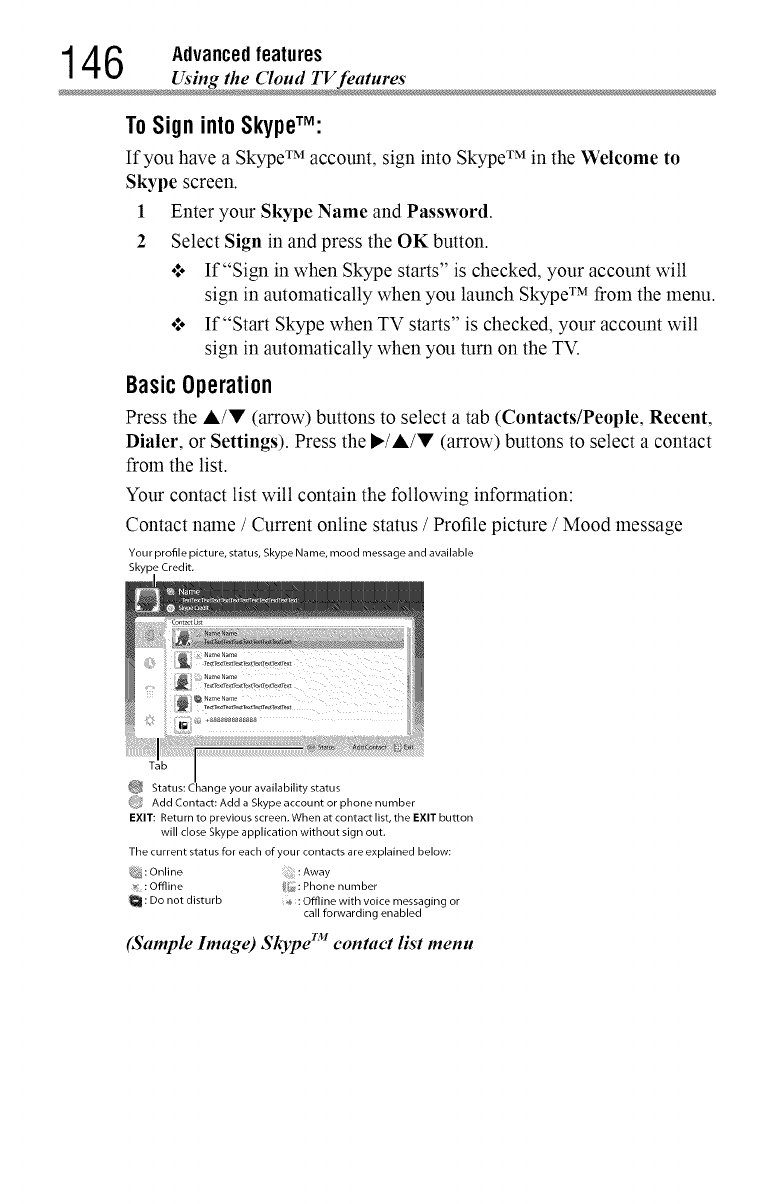
BasicOperation
Press the A/V (arrow) buttons to select atab (Contacts/People, Recent,
Dialer, or Settings). Press the I_/A/V (arrow) buttons to select acontact
from the list.
Your contact list will contain the following information:
Contact name /Current online status /Profile picture /Mood message
Your profile picture, status, Skype Name, mood message and available
Skype Credit.
Tab
_ Status: Change your availability status
(_,_ Add Contact: Add a Skype account or phone number
EXIT: Return to previous screen. When at contact list, the EXIT button
will close Skype application without sign out.
The current status for each of your contacts are explained below:
_9_: Online :Away
:Offline _ :Phone number
: Do not disturb _ : Offline with voice messaging or
call forwarding enabled
(Sample Image) Skype contact list menu
Advancedfeatures 1 4 7
Using the Cloud TV feature
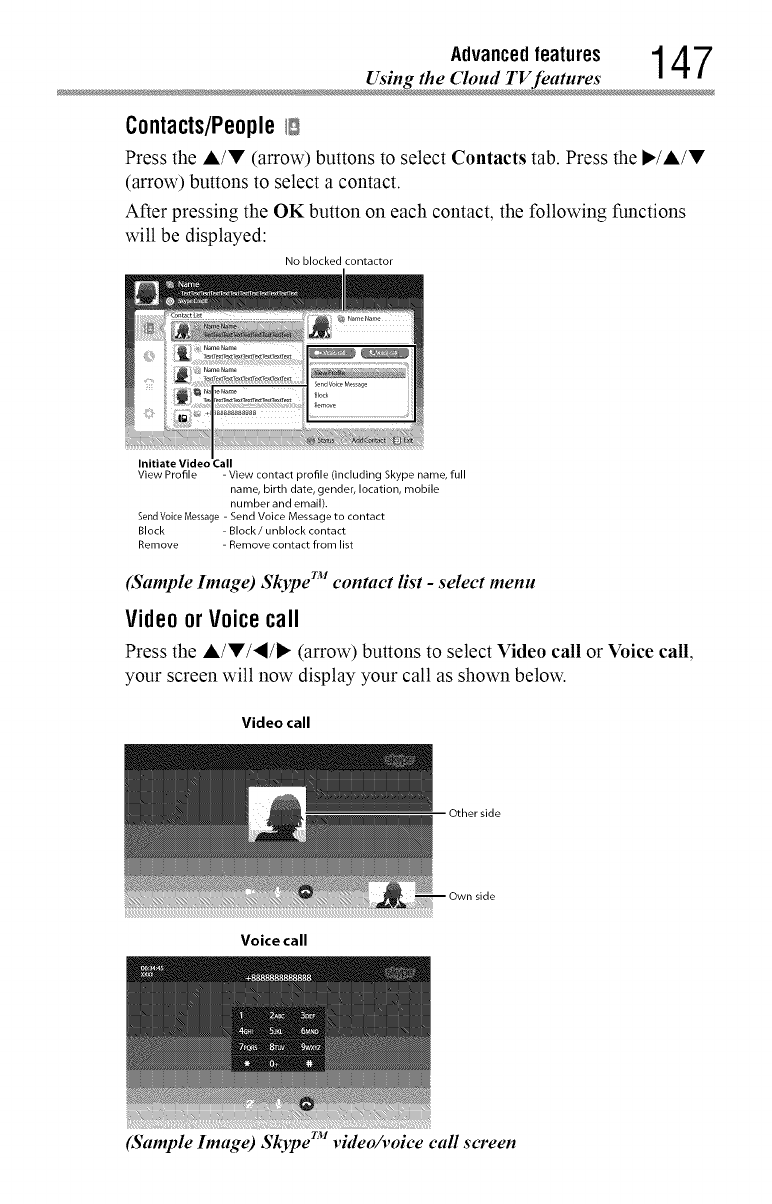
Contacts/PeopleI_
Press the A/V (arrow) buttons to select Contacts tab. Press the I*/A/V
(arrow) buttons to select a contact.
After pressing the OK button on each contact, the following functions
will be displayed:
No blocked contactor
Initiate Video
View Profile - View contact profile (including Skype name, full
name, birth date, gender, location, mobile
number and email).
Send Voice Message - Send Voice Message to contact
Block - Block /unblock contact
Remove - Remove contact from list
(Sample hnage) Skype TM contact list -select menu
Videoor Voicecall
Press the A/V/'_/I_ (arrow) buttons to select Video call or Voice call,
your screen will now display your call as shown below.
Video call
Other side
Voice call
side
(Sample Image) r.v • •Skype vtdeo/votce call screen
14 8 Advanced features
Using the Cloud TV feature
Below is all icon pictures in conversation window.
Start video
}
Stop video
Resume the call
Unmute the webcam mic
2;
_, Mute the webcam mic
Nonnal size video
Full screen video
Open dial pad
End call ( Hang up the call )
Groupcalls
Using your Toshiba TV, you can.join Skype TM group voice and video
calls. However, you can only send and receive audio while on these calls.
NOTE Youmustbeinvitedonto agroupcall,youcannotinitiateit fromtheTV.
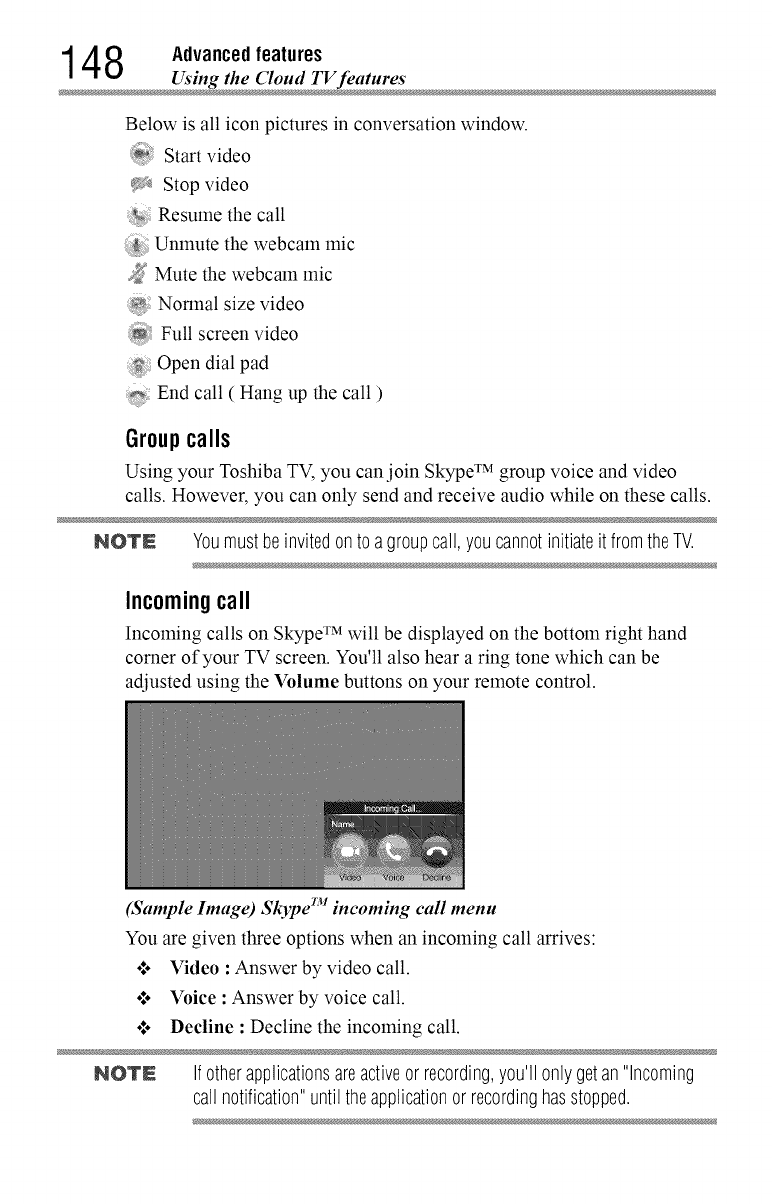
Incomingcall
Incoming calls on Skype TM will be displayed on the bottom right hand
corner of your TV screen. You'll also hear a ring tone which can be
adjusted using the Volume buttons on your remote control.
(Sample Image) Skype TM incoming call menu
You are given three options when an incoming call arrives:
•1. Video :Answer by video call
•1. Voice :Answer by voice call
•1. Decline :Decline the incoming call
NOTN Ifotherapplicationsareactiveorrecording,you'll onlygetan"Incoming
call notification"until theapplicationor recordinghasstopped.
Advancedfeatures 1 4 9
Using the Cloud TV feature
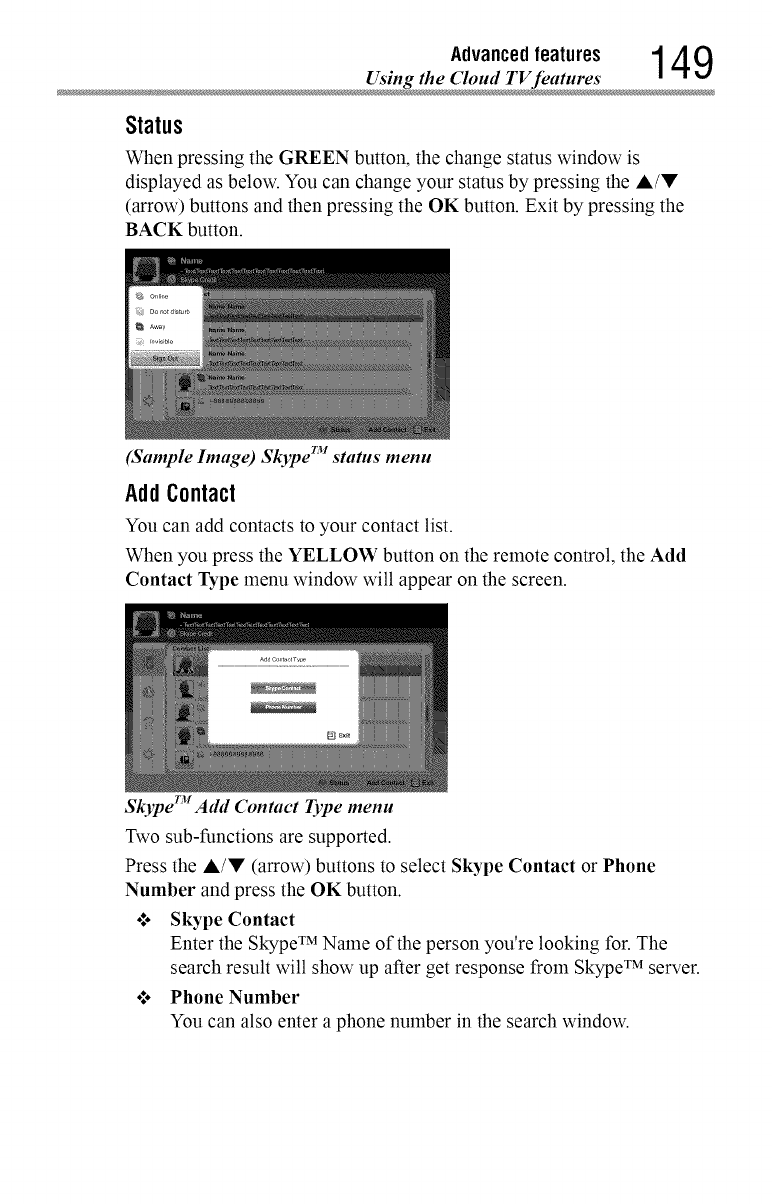
Status
When pressing the GREEN button, the change status window is
displayed as below. You can change your status by pressing the A/!!'
(arrow) buttons and then pressing the OK button. Exit by pressing the
BACK button.
(Sample Inutge) r_Skype status menu
AddContact
You can add contacts to your contact list.
When you press the YELLOW button on the remote control, the Add
Contact Type menu window will appear on the screen.
Skyper'_t Athl Contact Type menu
Two sub-functions are supported.
Press the A/V (arrow) buttons to select Skype Contact or Phone
Number and press the OK button.
•1. Skype Contact
Enter the Skype TM Name of the person you're looking for. The
search result will show up after get response from Skype TM server.
•1. Phone Number
You can also enter a phone number in the search window.
150Advancedusingthe featureS_loudTFfeatures
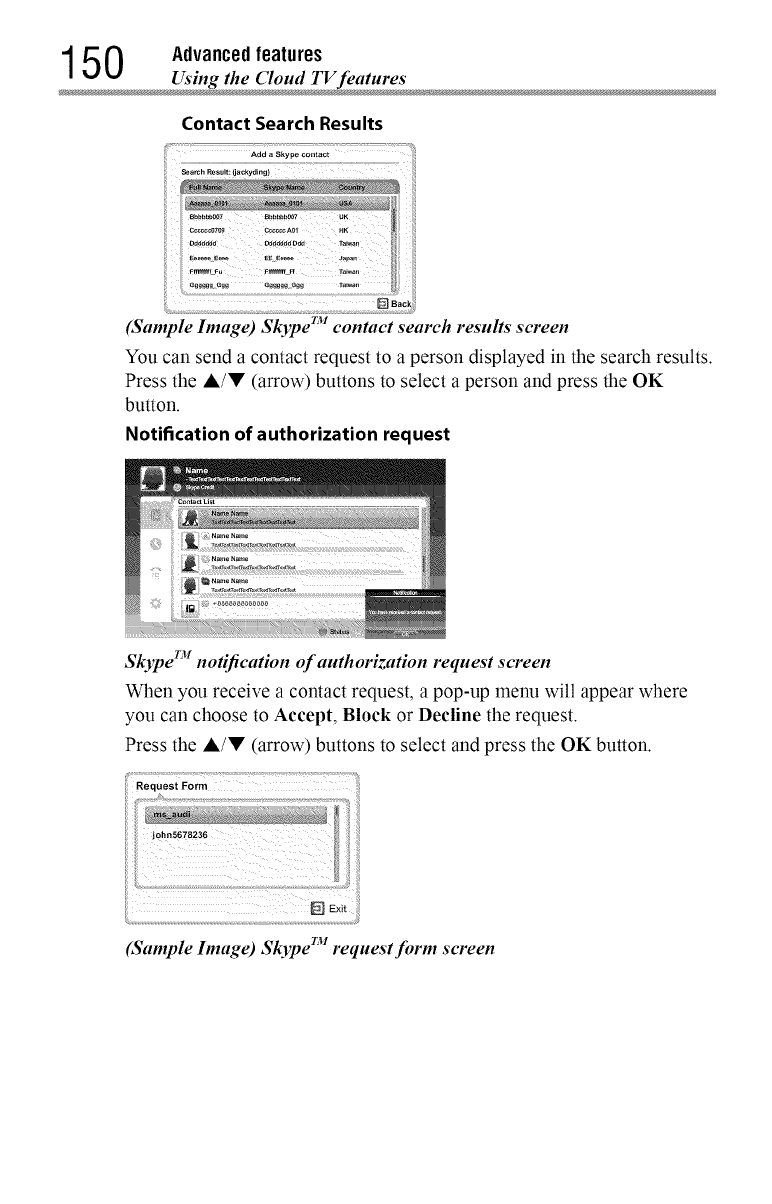
Contact Search Results
Adda Skype contact
(Sample Image) Skype TM contact search results screen
You can send a contact request to a person displayed in the search results.
Press the A/V (arrow) buttons to select a person and press the OK
button.
Notification of authorization request
Skype TM notification of authorization request screen
When you receive a contact request, a pop-up menu will appear where
you can choose to Accept, Block or Decfine the request.
Press the A/V (arrow) buttons to select and press the OK button.
(Sample Image) Skype TM request form screen
Advancedfeatures 1 51
Using the (Joud TV feature
Press the "_/1_ (arrow) to select and press the OK button.
(Sample Image) Skype TM request form screen
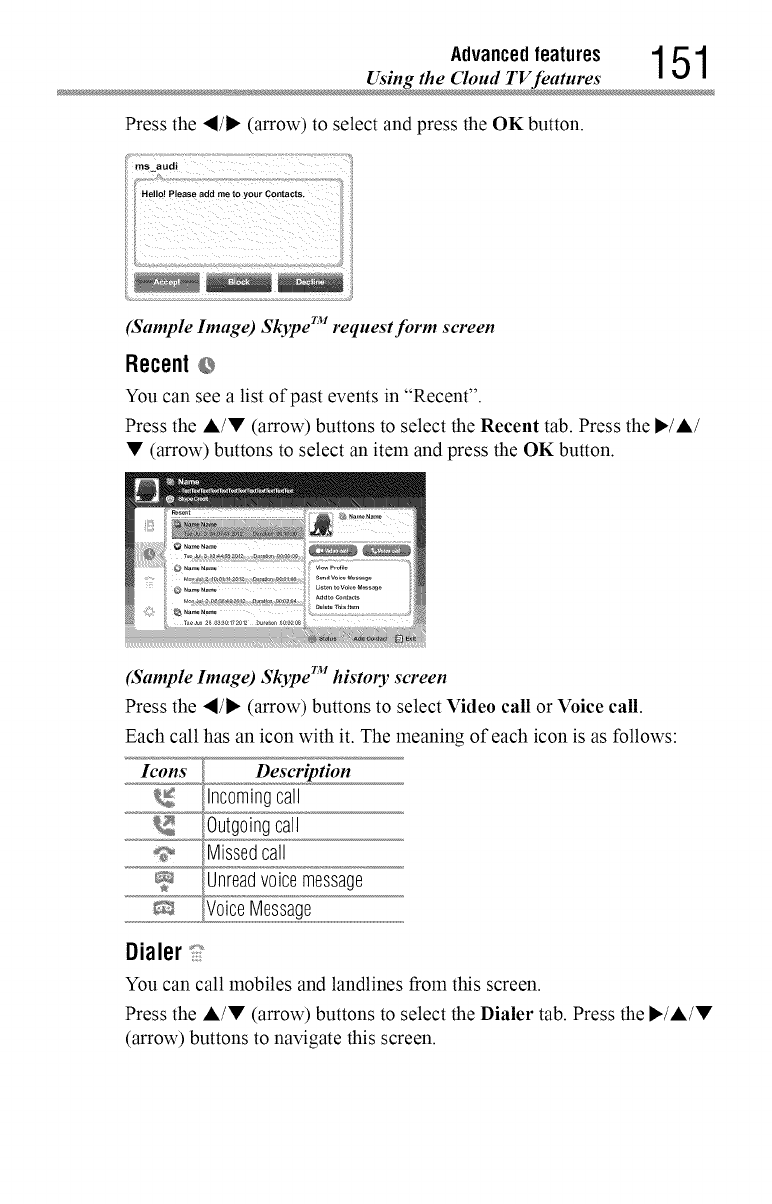
Recent
You can see a list of past events in "Recent".
Press the A/• (arrow) buttons to select the Recent tab. Press the I_/A/
• (arrow) buttons to select an item and press the OK button.
(Sample Image) Skype TM history screen
Press the ,_/_ (arrow) buttons to select Video call or Voice call.
Each call has an icon with it. The meaning of each icon is as follows:
Icons Description
Incomingcall
Outgoingcall
9 Missedcall
Unreadvoicemessage
_ VoiceMessage
Dialer:i J
You can call mobiles and landlines from this screen.
Press the A/• (arrow) buttons to select the Dialer tab. Press the ,/A/•
(arrow) buttons to navigate this screen.
15 2 Advanced features
Using the ('loud TV feature
(Sample hnage) Skype TM dialer screen
Select the country or region first, and then enter the phone number with
area code. You'll need a little Skype TM Credit in your account to call
mobiles or landlines using Skype TM.
Emergency calls over Skype TM are not supported.
EmergencycallsoverSkypeTM arenotsupported.
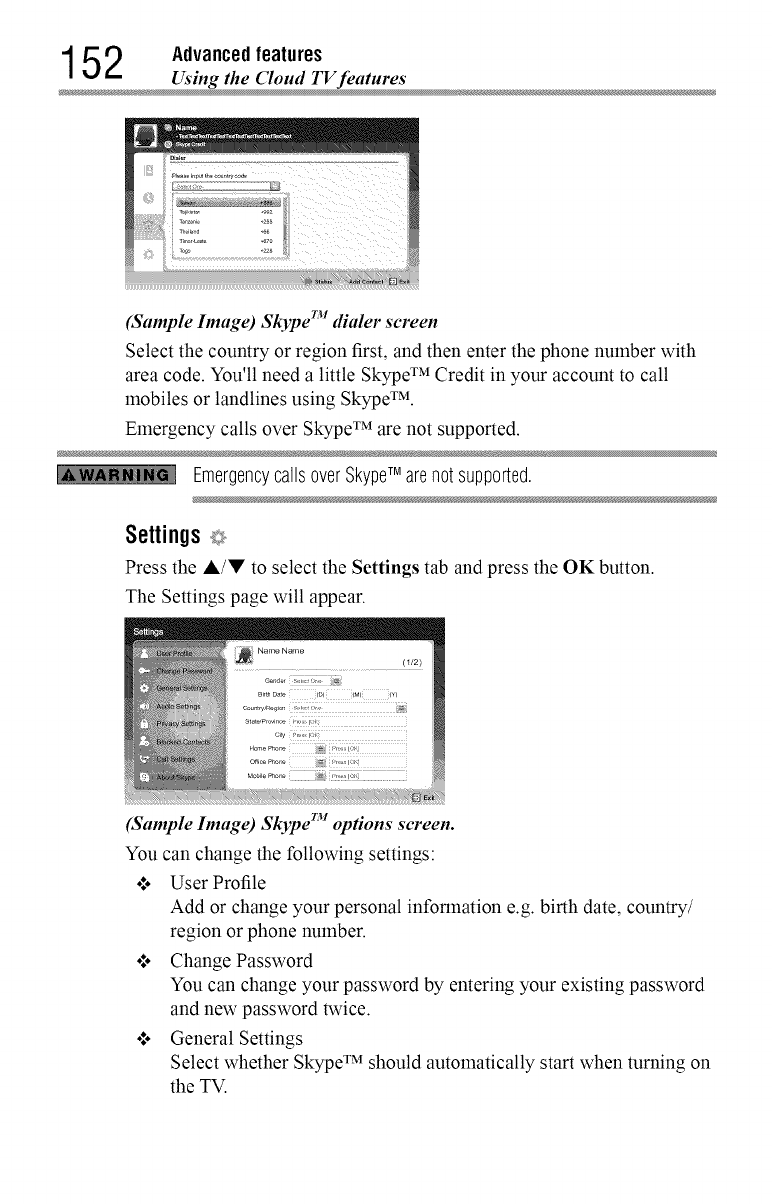
Settings _
Press the A/'!!' to select the Settings tab and press the OK button.
The Settings page will appear.
(Sample hnage) Skype TM opdons screen.
You can change the following settings:
.l. User Profile
Add or change your personal information e.g. birth date, country/
region or phone number.
ol. Change Password
You can change your password by entering your existing password
and new password twice.
ol. General Settings
Select whether Skype TM should automatically start when turning on
the TV.
Advancedfeatures 153
Using the Cloud TV feature
o*,oAudio Settings
Adjust the speaker /ringtone volume manually.
The volume of your speakers will be different on Skype TM compared
to your normal TV volume level. The speaker volume range is 0 -
100% by 1 steps, and ringtone volume is 0 - 100% by 25 steps.
o*,oPrivacy Settings
Set who you allow calls from, whether it's Anyone or People in my
Contact list only.
o*,oBlocked Contacts
If you do not want someone to reach you, simply block them by
entering their Skype TM Name or phone number from this menu.
Successfully blocked contacts are displayed in this window.
o*,oCall Settings
If you're not signed into Skype TM, you can forward incoming calls
to another phone number, Skype TM name or choose to accept voice
messages. However you'll need to have Skype TM Credit to turn this
feature on.
o*,oAbout Skype
Displays information about Skype TM.
MediaShare (Videos, Music, and Photos)
MediaShare provides a simple graphic interface to quickly access and
share videos, music, and image files across your home network and the
other connected devices.
To access the MediaShare Service, press the MEDIA SHARE button on
the remote or select the MediaShare tab from the Cloud TV Portal pages.
NOTE o:o TouseMediaSharepleaseconfigurethenetworksettingsonyourTV.
Formoreinformation,see"Connectingto ahomenetwork"onpage
43.
•:. Donotinsert/removeaUSBdevicewhilein use.
•:. TheSETUPbuttonis notavailablewhileusingtheMediaShare
feature.
MediaShare specifications
Devices:
o*,oUSB device: USB Mass Storage Class devices (MSC)
o*,oConnected Media Server:
Your computer (for example)
154 Advanced features
.... Using the ('loud TV features
NOTE .:. Connectivityis notguaranteedfor alldevices.
¢ Somefunctionalitymaybelostwitha USBHUBconnection.
Supported file system:
•**o FAT16 and FAT32
NOTE Youmustobtainanyrequiredpermissionfromcopyrightownersto
downloador usecopyrightedcontent.Toshibacannotanddoesnot grant
suchpermission.
UsingIVlediaSharewith a USB device
WhenAuto Start is enabled, you will be asked if you want to start the
MediaShare when a USB device is inserted. If Auto Start is disabled
(or if you want to connect to a media server on the network), you must
manually start the MediaShare from the Cloud TV Portal pages or press
the MEDIA SHARE buton on the remote control.
Basicoperation
To changethe AutoStart setting
1 Press the SETUP button.
2 Select Options > MediaShare Setup > USB Auto Start and press
the OK button.
3 Press the A/V (arrow) buttons to select On or Off.
AutoStart
1 Insert a USB device into the USB terminal.
A prompt appears.
2 Press the </1_ (arrow) buttons to select Yes, and then press the OK
button.
3 Press the A/V (arrow) buttons to select Videos, Music, or Photos,
and then press the OK button.
4 To change the device, press the A/V/</I_ (arrow) buttons to select
the devices on the screen, and then press the OK button.
5 Press the ,&/V (arrow) buttons to select the device and then press
the OK button.
6 Press the A/V (arrow) buttons to select OK and then press the OK
button.

Advancedfeatures 1 5 5
_Using the Cloud TV features
NOTE IfAutoStartis setto Off,youcanstarttheMediaShare(MediaPlayer)
manually.
Manual Start
1 Insert a USB device into the USB terminal.
2 Press the MEDIA SHARE button.
3 To change the device, press the A/V/'_/I_ (arrow) buttons to select
the devices on the screen, and then press the OK button.
4 Press the A/V (arrow) buttons to select the device and then press
the OK button.
5 Press the A/V (arrow) buttons to select OK and then press the OK
button.
To select a file inthe list of contents
1 Press the A/V/,_/I_" (arrow) buttons to select a file or folder.
File:
Press the OK button to play or view.
Folder:
Press the OK button to move to the next layer, or press the BACK
button to return to the previous layer.
Sort
I
2
Select the Sort and press the OK button.
Press the A/V (arrow) buttons to select the sorting rule (File
Name, New or Old) and press the OK button.
3 Select OK and press the OK button.
NOTE Sortingmaytakealittletime.
ToclosetheMediaShare
1 Press the EXIT button.
2 Press the "_/1_ (arrow) buttons to select Yes and then press the OK
button.
The TV will return to the last-viewed channel or video input.
156 Advanced features
Using the Cloud TV feature
UsingIVlediaSharewitha MlediaServer
You need to configure a home network before using this feature, see
"Setting up the Network" on page 125.
1 Press the MEDIA SHARE button.
2 To change the device press the A/V/'_/I_ (arrow) buttons to select
the Device Name button on the screen, and then press the OK
button.
3 Press the ,&/V (arrow) buttons to select the device and then press
the OK button.
4 Press the A/V (arrow) buttons to select OK and then press the OK
button.
To select a file inthe list of contents
1 Press the A/V/'_/I_ (arrow) buttons to select a file or folder.
File:
Press the OK button to play or view.
Folder:
Press the OK button to move to the next layer, or press the BACK
button to return to the previous layer.
Sort
I
2
Select the Sort and press the OK button.
Press the A/V (arrow) buttons to select the sorting rule (Title, New
or Old) and press the OK button.
3 Select OK and press the OK button.
NO'rN .:. Sortingmaytakealittletime.
•:. DependingontheMediaserver,thisfunctionmaynot beusable.
ToclosetheIVlediaShare
1 Press the EXIT button.
2 Press the "_/1_ (arrow) buttons to select Yes and then press the OK
button.
The TV will return to the last-viewed channel or video input.
To display the device information
1 Press the QUICK button to open the Quick menu in list mode or
Multi View mode.
2 Press the A/V (arrow) buttons to select Device Information.
Advancedfeatures 1 5 7
Using the Cloud TV feature
Viewingmoviefiles
BasicPlayback
1Select a file, see "To select a file in the list of contents" on page 155.
2 Press the OK button or PLAY button to begin playback.
NOTE o:o Dependingonthefile size,it maytakesometimeto startplayback.
¢ Dependingontheimages,the3Dfunctionmayturnonwhenthe3D
buttonis pressed.Referto "Using3Dfunctions"onpage71for
informationaboutoperationandsettings.
Press the STOP button to stop playback.
The screen returns to the list.
If playback finishes before the STOP button is pressed, the screen
returns to the list.
NOTE Whenthe repeatmodeis settoAll, thenextfile will startplaying
automatically.
ResumePlayback
You can resume playback from where it was last stopped.
o**oPress the STOP button while playing the movie to memorize the
stopped position.
If the same file is selected and played, playback will resume from
the last stopped position.
NOTN o:* IfyouplaydifferentcontentorexitMediaShare,thememorized
stoppedpositionwill bedeleted.
¢ Thisfunctionmaynotbeavailabledependingonthecontent.
Topauseplayback
°_o Press the PAUSE button during playback.
o*.oTo resume nonnal playback, press the PLAY button.
NOTN ThePAUSEbuttonoroperationsduringPausemaynotbefunctional
dependingoncontentor mediaserver.

158 Advanced features
Using the ('loud TV feature
Tolocatea specificfile
o*.oPress the Skip Reverse or Skip Forward button repeatedly to
access the desired file.
•*.. (M,q):Playback starts from the beginning of the current file or
previous file.
•*.. (t,_): To locate subsequent files.
Toplay infast reverseor fast forward directions
•_o Press the "_'qlor I_'I_button during playback. Each time you press
the ,_ or I_I_button, the playback speed will change.
NOTE Thesefeaturesmaynot beoperabledependingonthecontentormedia
server.
Mode:
Off
All
1
Tosettherepeatmode
1 Press the QUICK button.
2Press the A/V (arrow) buttons to select Repeat.
The current repeat setting appears.
3Press the "I/_ (arrow) buttons to select Off, All, or 1.
4Press the BACK button.
The setting is effective until the TV is turned off.
Description:
Thecontentis playedbackonly once
All contentsinthesamefolderarerepeatedlyplayedback
Thesamecontentis repeatedlyplayedback
Toselecta moviefrom Play List (exceptfor DIVlR)
While playing a movie, you can select a different movie from the Play
List.
1 Press the QUICK button to open the Quick Menu.
2 Press the A/W (arrow) buttons to select Play List and press the OK
button.
The Movie List will appear.
3 Press the A/V (arrow) buttons to select a file name.
To display the file status information
1 Press the INFO button during playback.
The infounation will be displayed at the bottom of the screen.
2 Press the INFO button again to hide the information.
Advancedfeatures 1 5 9
Using the Cloud TV features
NOTE Theinformationmaynot correctlydisplaydependingonthecontentor
mediaserver.
To registeryour TV to a DivX®account:
This TV allows you to play back files purchased or rented from DivX _
Video-On Demand (VOD) services. When you purchase or rent DivX _
VOD files on the internet, you will be asked to enter a registration code.
1 Press the SETUP button.
2Select Options > MediaShare Setup > DivX :_'VOD and press the
OK button.
3 Press the A/V (arrow) buttons to select DivX* VOD Registration,
and then press the OK button.
4 The DivX* VOD window will appear and you will see the
registration code. For details on registration, please visit the DivX *
website at
http://vod.divx.com
5 Copy the activation file to a memory device and play it on the TV.
Tounregisteryourdevice:
1 Press the SETUP button.
2 Select Options > MediaShare Setup > DivX _'VOD and press the
OK button.
3 Press the A/V (arrow) buttons to select DivX* VOD
Deregistration, and then press the OK button.
4 A confirmation message will appear. Select Yes and press the OK
button.
5 The DivX* VOD window will appear and you will see the
deregistration code. For details on registration, please visit the
DivX _ website at
http://vod.divx.com
ABOUT DIVX VIDEO: DivX * is a digital video format created by DivX,
LLC, a subsidiary of Rovi Corporation. This is an official DivX Certified ®
device that plays DivX video. Visit divx.coln for more information and
software tools to convert your files into DivX videos.
ABOUT DIVX VIDEO-ON-DEMAND: This DivX Certified ® device
must be registered in order to play purchased DivX Video-on-Demand
(VOD) movies. To obtain your registration code, locate the DivX
160 Advanced features
Using the Cloud TV feature
VOD section in your device setup menu. Go to vod.divx.com for more
information on how to complete your registration.
DivX Certified ®to play DivX _ and DivX Plus ®HD (H.264/MKV) video
up to 1080p HD including premium content.
To playback DivX Plus® HD content:
o*.oTo play in fast reverse or fast forward directions, press the "_,I or
_._. button during playback. Each time you press the ._._ or
button, the playback speed will change.
o*.oIf the content contains no chapter, this TV generates original chapter
point in 10% increments for 10 chapters in total, that are accessible
by using the Number buttons on the remote control.
During playback, press the t,_ button to skip to the beginning of the next
chapter. When the t,_ button is pressed twice in succession, it will repeat
two times of above. If the t,_ button is pressed at the last chapter, the
confirmation message will appear. If Yes is selected, playback will skip to
the beginning of the next content.
Press the M,qbutton to skip to the beginning of the current chapter.
When the M,qbutton is pressed twice in succession, it will skip to the
beginning of the previous chapter. If the M,qbutton is pressed twice
continuously at the first chapter, playback of the current content will stop
and the confirmation message will appear. If Yes is selected, playback
will skip to the beginning of the previous content.
o:, Press the • (arrow) button to skip to the beginning of the previous
content.
Press the • (arrow) button to skip to the beginning of the next
content.
The Number button is used for direct jump.
For example: If you press the 3 button and then press the OK button,
playback will jump to the beginning of 3rd chapter.
NOTN .',. Dependingonthecontentdatawill not beoperated.
•".. Theplaybackspeed(.,14/I_.I_.)maynot changedependingonthe
stream.
Advancedfeatures 1 61
Using the Cloud TV feature
UsingMultiTitleandAlternativeTimelinesMultiTitle
DivX Plus _ HD files may contain up to 100 titles.
You can change the title (It contains same video file) by pressing the RED
button.
When the RED button is pressed, it will display the title change window
at the bottom on the screen (same as Subtitle or Audio change window).
The title is changed cyclically each time the RED button is pressed.
Playback starts from the beginning of the title, which is selected by the •
or • (arrow) buttons.
o:, Pressing the "I/1_ (arrow) buttons also changes the multi title.
NOTE Dependingonthecontentdatawill notbeoperated.
Filespecifications:
USB use:
o:. File format: MPEG2 PS, MPEG2 TS, MPEG-2 VOB, AVI, MOV,
MP4, ASF, DivX, Xvid, MKV, RealMedia, Flash Video(FLV1),
3GPP, Motion JPEG
o:. Video: MPEG2, H.264, MPEG-4 part2, DivX, Xvid, VC-
I(WMV9), RealVideo 8,9,10, Sorenson H.263(FLV1), JPEG
_• .
o:. Audio: MPEG1-Layer2/MPEG1-Layer,/Dolby Digital (AC3)/
LPCM, AAC, WMA7/8/9, ADPCM
o:. Maximum number of files: 1000 per folder
o:. Maximum video resolution: 640x480(Motion JPEG), 1920 x
1080(other)
Content on a connected Media Server:
o:. File format: MPEG2 PS, MPEG2 TS, MP4(Low resolution)
o:. Video: MPEG2(PS), H264
or. Audio: LPCM/MPEG1 Layer2/MPEG2 Layer2/DolbyDigital
(AC3)/AAC
•:. Maximum number of files: 1000 per folder
.t. Maximum video resolution: 1920 x 1080
NOTE Itmaynotbepossibleto usecertainplaybackordisplaysomefiles. In
somecasescertainfilesandserversmaynot supportplaybackfeatures,
suchaspause.
162 Advanced features
Using the Cloud TV feature
Playingmusicfiles
BasicPlayback
1Select a file, see "To select a file in the list of contents" on page 155.
Press the OK button or PLAY button to begin playback.
NOTE Dependingonthefile size,it maytakesometimeto startplayback.
2 Press the STOP button to stop playback.
The screen returns to the list.
If playback finishes before the STOP button is pressed, the screen
returns to the list.
Topauseplayback
1 Press the PAUSE button during playback.
2 To resume nounal playback, press the PLAY button.
NOTN ThePAUSEbuttonor operationsduringPausemaynotbefunctional
dependingoncontentor mediaserver.Certainprocessesmaytakesome
timeto complete.
Tolocatea specificfile
o*.oPress the SKIP REVERSE or SKIP FORWARD button repeatedly
to access the desired file.
•*.o (_,i): Playback starts from the beginning of the current file or
previous file.
•*.o (t,_): To locate subsequent files.
Toplay infastreverseorfastforwarddirections
°_o Press the "_'qlor I_I_ button during playback. Each time you press
the _l_l or I_I_ button, the playback speed will change.
NOTN Thesefeaturesmaynot beoperabledependingonthecontentormedia
server.
Tosettherepeatmode
1 Press the QUICK button.
2 Press the A/V (arrow) buttons to select the Repeat.
The current repeat setting appears.
Advancedfeatures 1 63
Using the Cloud TV feature
3Press the "_/_ (arrow) buttons to select Off, All, or 1.
4Press the BACK button.
The setting is effective until the TV is turned off.
Mode: Description:
Off Thecontentis playedbackonly once
All Allcontentsinthesamefolderarerepeatedlyplayedback
1 Thesamecontentis repeatedlyplayedback
To select a music from Play List (exceptfor Media Renderer
function)
While playing a music file, you can select a different music file from the
Play List.
1 Press the QUICK button to open the Quick Menu.
2 Press the A/V (arrow) buttons to select Play List and press the OK
button.
The Music List will appear.
3 Press the A/V (arrow) buttons to select a file name.
To display the file status information:
1 Press the INFO button during playback.
The information appears at the bottom of the screen.
2 Press the INFO button again to hide the information.
NOTE Theinformationmaynot correctlydisplaydependingonthecontentor
mediaserver.
File specifications:
USB use:
o:. File format: MP3, MP4 (AAC), WMA7/8/9, WAV(LPCM)
o:. Sampling frequency: 32 kHz, 44.1 kHz, 48 kHz
o:. Bit rate: From 32 to 320 kbps
.!. Maximum number of files: 1000 per folder
Content on a connected Media Server:
o:. File format: MP3, MP4 (AAC), WMA9 std, LPCM
o:. Sampling frequency: 32 kHz, 44.1 kHz, 48 kHz
o:. Bit rate: From 32 to 320 kbps
ol. Maximum number of files: 1000 per folder
164 Advanced features
_Using the ('loud TV features
NOTE Itmaynotbepossibleto usecertainplaybackfeaturesordisplaysome
files.In somecasescertainfilesandserversmaynotsupportplayback
features,suchasfast-forward.
Viewingphotofiles
MultiViewmode
This view mode allows you to search for photos in a grid format.
These pictures are displayed using thumbnail data in each image file.
1 Press the •/•/'_/_, (arrow) buttons to move the highlight by one
window.
If all of the photos will not fit in one screen, when pressing the •
(arrow) button at the top thumbnail, the screen will scroll up one by
one. Similarly, when pressing the • (arrow) button at the bottom
thumbnail, the screen will scroll down one by one.
When you select a folder, press the OK button to move to the next
layer.
Press the BACK button to move back to the previous layer.
Press the OK button to view the selected photo in Single View
mode.
NOTN .:. Displayingthumbnaildatamaytaketime.
•".. In orderto usethe •/• (arrow)buttonsto scrollthescreen,there
mustbeenoughcontentto takeuptwo screens.
SingleViewmode
In this view mode, only files located in the selected directory are
displayed. When moving from Multi View mode to Single View mode,
the currently selected photo appears.
1 On Multi view mode, press the •/•/'_/_, (arrow) buttons to select
a file, and then press the OK button.
2 Press the "_/1_ (arrow) buttons to view the next or previous file.
NOTN Singleviewmodeis changedto MultiViewmodewhentheBACKbuttonis
pressed.
Advancedfeatures 1 6 5
Using the Cloud TV feature
Slide Show mode
This view allows you to watch a slide show of the photos. In this mode,
only files located in the selected directory appear.
1 To switch to Slide Show mode, press the OK button while in Single
View mode.
To return to Single View mode, press the OK button again.
2 Press the "_/_ (arrow) buttons to view the next or previous file.
Node settings
Press the QUICK button to open the Quick menu while in Single
View mode or Slide Show mode.
1
2Press the A/V (arrow) buttons to select the item (Interval Time or
Repeat).
3 Press the "_/1_ (arrow) buttons to adjust the setting.
4 Press the BACK button to return to Single View mode or Slide
Show mode.
Mode: Description:
IntervalTime Setsatimeintervalatwhichto viewphotos
Repeat Displaysphotosinthesamedirectoryrepeatedly(On/Off)
Selecting the Playback Node
You can view 3D photos in 3D and you can also view 2D photos in 3D.
1 Press the 3D button while in Single View mode or Slideshow mode.
The mode switches between 2D Mode and 3D Mode each time the
3D button is pressed.
o*.. 2D Mode
All photos are displayed in 2D.
o*.o3D Mode
The photos are displayed in the 3D mode selected in the Quick
Menu Playback Mode. For the Quick Menu Playback Mode,
refer to the following:
Setting the Playback Mode in Quick Menu
1 Press the QUICK button to open the Quick Menu.
2 Select Playback Mode and press the OK button.
166 Advanced features
Using the Cloud TV feature
3Press the A/V (arrow) buttons to select 3D Mode 1 or 3D Mode 2
and then press the OK button.
•*,. 3D Mode 1
3D photos in the USB memory are displayed in 3D. 2D photos
are displayed in 2D.
•*,. Some 3D photos cannot be displayed in 3D.
•:. 3D Mode 2
All photos are displayed in 3D.
2D photos are converted and displayed in 3D, and 3D photos
are displayed in 3D.
Tozoomin/outphotos(exceptfor Media Rendererfunction)
During the Single View mode or Slideshow mode, the zoom function can
be used. The Slideshow mode changes to the Single View mode.
RED button : Zoom in
xl --* x2 --* x4 --* x8 zoom
GREEN button : Zoom out
x8 --* x4 --* x2 --* xl zoom
A,/V/'_/I_ buttons: Vertical or Horizontal scrolling
To set BackgroundMusic
1 Press the QUICK button to open the Quick Menu while in the Slide
Show mode or Single View mode.
2 Select Background Music and press the OK button.
3 Press the A/V (arrow) buttons to select On.
The music file in the same folder as the displayed photo will start
playing.
NOTN .1. Whenthemusicfile repeatmodeis setto All, all themusicfilesin
thesamefolderasthephotowill beplayedrepeatedly.
+ Tostopmusicfile playback,selectOffin BackgroundMusic
Rotate the image
While viewing the image in Single View mode or Slide Show mode, press
the A/V (arrow) buttons to rotate the image 90 degrees.
Toselecta photofrom Play List (exceptfor MediaRenderer
function)
While in the Single View mode or Slide Show mode, you can select a
different photo from the Play List.
Advancedfeatures 1 6 7
Using the Cloud TV feature
1Press the QUICK button to open the Quick Menu from Single View
mode or Slide Show mode.
2Press the A/V (arrow) buttons to select Play List and press the OK
button.
The Photo List will appear.
3Press the A/V (arrow) buttons to select afile name.
Displayfile statusinformation
1Press the INFO button.
The information appears at the bottom of the screen.
2 Press the INFO button again to hide the information.
NOTN Theinformationmaynot correctlydisplaydependingonthecontentor
mediaserver.Certainprocessesmaytakesometimeto complete.
Search
Filespecifications:
USB use:
o*.oData compatibility: JPEG Exifver 2.2
°*.° File format: JPEG, BMP
o*.oMaximum viewable resolution: 15360 × 8640 (JPEG:Base-line),
1024 × 768 (JPEG:Progressive), 9600 × 6400 (BMP)
•:o Maximum number of files: 1000 per folder
Content on aconnected Media:
o*.oData compatibility: JPEG Exifver 2.2
o*.oFile format: JPEG
Maximum photo resolution: 4096 x 4096
Maximum number of files: 1000 per folder.
To search for content,
1 Select the search.
2 Enter in keyword and the search will search for:
•:. Media Server
Videos; Title name
Music; Title name/Artist name/Album name
Photos; Title name
•:. USB
Videos/Music/Photos; File name
168 Advanced features
_Network Device Setup
NOTE Foldersarenotsubjectto thesearchfunction.
3The retrieval result is displayed.
4 Select one of the search results.
5The selected content will play.
NOTN Thesearchretrievalstopswhencontentis beingplayed.
o:. The results screen shows different categories of media; Videos,
Music and Photos. Select the • below a category and press the
OK button to display results only for that category of media on the
screen.
•:. To return to the previous display, select • and press the OK button.
NetworkDeviceSetup
In order to set the access the External Control Setup, Media Renderer
Setup, or Device Name Setup, you must use the Network Device Setup
iIlenu.
ExternalControlSetup
1 Press the SETUP button.
2 Select Network > Network Device Setup > External Control
Setup and press the OK button.
3 Use the A/• (arrow) buttons to select and set Enable Control to
On or Off.
To access the Home Control Profile:
1 Press the SETUP button.
2 Select Network > Network Device Setup > External Control
Setup and press the OK button.
3 Use the A/• (arrow) buttons to select and set Enable Control to
On or Off.
4 Use the •/• (arrow) buttons to select Home Control Profile and
press the OK button.
The Home Control Profile window will appear.
Advancedfeatures 1 6 9
Network Device Setup
5Use the A/V/,I/I_ (arrow) buttons to navigate to the User Name
or Password field. Input the user name and password using the
Software Keyboard or Wireless QWERTY keyboard.
•_o For more information, see "Using the software keyboard" on page
133.
NOTN 0nly the0-9 andcapital/lowercaseA-Zcharactersmaybeusedforthe user
nameandpassword.
Setting upthe Media Renderer feature
The TV can be configured as a Media Renderer. When operating as a
Media Renderer, the TV displays content provided by mobile devices or
PCs. The selection of the media is done by the media controller.
The TV can play photo, movie, or audio files when operating as a Media
Renderer.
1 Press the SETUP button.
2 Select Network > Network Device Setup > Media Renderer and
press the OK button.
3 Press the A/V (arrow) buttons to select On or Off, and then press
the OK button.
DeviceNamesetup
The device name as a Media Renderer can be changed.
1 Press the SETUP button.
2Select Network > Network Device Setup > Device Name Setup
and press the OK button.
3 Select the Device Name field. Press the OK button.
The Software Keyboard screen appears.
4 Input the device name by using the Software Keyboard. To save
your setting, press the GREEN button.
5Select Done. Press the OK button.
NOTN Themaximumnumberof charactersallowedfor thedevicenameis 15.
0nly 0-9,A- Z (uppercaseonly),"-" canbeusedinthedevicename.
Chapter9
CloudTV Companion
Apps
UsingAppsona TabletorSmartphone
Toshiba provides apps for tablets and smart phones. The apps will vary by
country and availability may change in the future with respect to current
apps
NOTN Appswill varybycountryandavailabilitymaychangein thefutureon
currentapps.
These apps are available for compatible Toshiba equipment using
compatible tablets and smart phones powered by Android TMor iOS. You
can download these apps through the Google PlaywMor the iTunes Store.
In order to use these apps, you must configure the settings through the
Apps Control Profile.
NOTN .*,. ThirdpartyInternetservicesarenot providedby Toshiba,maychange
or bediscontinuedat anytime,andmaybesubjectto Internetservice
providerrestrictions.Toshibamakesnowarranties,representations,
or assurancesaboutthecontent,availability,orfunctionalityofthird-
partycontentorservices.Useofthird-partyInternetservicesmay
requirethecreationof aseparateaccountthroughacomputerwith
Internetaccessand/orpaymentof one-timeand/orrecurringcharges
andmembership.Notall third-partyservicesmaybeavailableonor
compatiblewiththis product.In orderto experiencethefull suggested
capabilitiesofthis product,fully-compatibledevicesmayberequired.
170
AppsCollaboration 1 71
Apps Control Profi
o:oAppscanonlybeusedwhenyourTVandyourtabletor smartphone
areconnectedto theInternet.
¢ Startingandoperationofthis servicemaytakeseveralminutes.
¢ Softwareupdatesmaybeneededinorderto usethisservice.
¢ Inorderto experiencethefull suggestedcapabilitiesofthisproduct,
fully-compatibledevicesmayberequired.
¢ Certainfeaturesmaynotbeavailableinall countries.
¢ CompanionAppsavailablethroughtheCloudmaybechanged
or removedatanytime.Notall operatingsystemAppsmaybe
compatiblewiththeCloud. Servicesdepictedinthis documentand
providedthroughtheCloudmaynot beavailablein yourregionand
maynot beavailableto you.Pleasecheckyourindividualdevicefor
appcompatibility.
¢ As soonastheapplicationis deployed,thisfeaturecanbeused.
AppsControlProfile
To select the Apps Control Profile
1 Press the SETUP button.
2 Select Network >Network Device Setup >External Control
Setup and press the OK button.
3 Press the &/!!' (arrow) buttons to select and set Apps Control
Profile and press the OK button.
The Apps Control Profile window will appear.
4 Press the A/V (arrow) buttons to select Device Registration Setup
and press the OK button.
The Device Registration Setup window will appear.
5 Use the A/V (arrow) buttons to select the Companion Device ID.
6Select the Cancel, All, or Delete buttons.
NOTN .:o Ifthemaximumnumberof registereddevices(20)is exceeded,no
additionaldevicescanberegistered.Deleteunnecessarydevices
beforeregisteringa newdevice.
¢ Whenre-registeringadevicewhichhasbeendeletedfromthelist,
pairingmustbecarriedoutagain.
1 72 AppsCollaboration
Pairin
To enable the New Device Detection:
1
2
4
5
6
Press the SETUP button.
Select Network > Network Device Setup > External Control
Setup and press the OK button.
Press the A/V (arrow) buttons to select and set Apps Control
Profile and press the OK button.
The Apps Control Profile window will appear.
Press the A/V (arrow) buttons to select New Device Detection and
press the OK button.
Use the ,/_ (arrow) buttons to select Enable or Disable.
Press the OK button to submit.
Pairing
To use Apps, it is necessary to connect a compatible tablet or smart phone
and this TV to your home network, and carry out pairing (using a 4 or 8
digit password to authenticate the device).
Refer to the Apps manual for more details about pairing.
NOTN .:. PairingwithexternaldevicescannotbecarriedoutwhentheTVis
connectedto anunencryptedwirelessLANaccesspoint.Activatethe
encryptionsettingsforthewirelessLANaccesspointbeforecarrying
out Pairing.
•".. Whenthe EnableControlisnot setto ONin ExternalControlSetup,
AppsfunctionsincludingPairingcannotbeused.
Chapter10
Troubleshooting
Generaltroubleshooting
Before calling a service technician, review this chapter or visit the
Toshiba Technical Support Website at "support.toshiba.corn" for possible
causes/solutions for the problem you are experiencing.
Before you begin to troubleshoot any problem, first unplug the TV from
the AC wall outlet, wait approximately one minute, and then plug the
TV back into the AC wall outlet. If the problem still exists attempt to
troubleshoot the problem.
Black box on screen.
The closed caption feature is set to one of the Text modes (T1, T2, T3, or
T4). Set the closed caption feature to Off, see "Using closed captions" on
page 84.
TV stops responding to controls.
If the TV stops responding to the buttons on the remote control or TV
control panel and you cannot turn off the TV, unplug the TV from the AC
wall outlet and plug it back in.
If you cause a static discharge when touching the TV and the TV fails to
function, simply unplug the TV from the AC outlet and plug it back in.
The TV should return to normal operation.
173
174 Picture problem
Other problems.
If your TV's problem is not addressed in this Troubleshooting chapter or
the recommended solution has not worked, use the Reset Factory Defaults
procedure, see "Resetting to Factory Defaults" on page 103.
TV will not turn on.
Check the AC wall outlet by trying another device in the AC wall outlet.
Ensure the power cord is plugged in properly, and then press the POWER
button.
Replace the batteries in the remote control, see "Installing batteries" on
page 48.
Try the control panel buttons on the TV.
3D problems.
Watch the TV at a proper viewing angle and distance, see "Safety
Precautions for 3D glasses" on page 7.
If 3D images are not correct, the 3D format may be different.
Change the 3D format in the Quick menu, see "Selecting 3D format from
the Quick menu in 3D mode" on page 76.
The left and right sides of 3D images may be reversed. Switch the left and
right, see "Switching left and right images" on page 82.
If2D images are not correct, the 2D format may be different.
Change the 2D format in the Quick menu, see "Selecting 2D format from
the Quick menu in 2D mode" on page 78.
Pictureproblems
General picture problems.
Check the antenna/cable connections, see "Connecting Your TV" on page
27.
Press INPUT on the remote control or on the TV and select avalid video
input source, see "Selecting the video input to view" on page 83. If you
have no picture after selecting a Input source, check the device connected
to that input for proper operation. For device connection details, see
"Connecting Your TV" on page 27.
Antenna reception may be poor. Use a highly directional outdoor antenna
(if applicable).
The station may be having broadcast difficulties. Try another channel.
Adjust the picture quality, see "Using the advanced picture settings
features" on page 112.
Troubleshooting 1 7 5
Picture problem
If Edge Enhancer does not achieve asharper picture, change the
Sharpness value to increase the sharpness level, see "Edge Enhancer" on
page 112.
Video Input Selection problems.
If the Input Selection window does not appear when you press INPUT
on the remote control or the TV control panel, press INPUT a second
time. The TV displays the next video input source and the Input Selection
screen.
Cannot view external signals.
If you cannot view signals from external devices connected to VIDEO 1,
VIDEO 2, ColorStream HD, HDMI 1, HDMI 2, HDMI 3, HDMI 4 or PC,
ensure that the Input Lock is set to Off, see "Locking video inputs" on
page 92.
Poor display color or no color.
Check for proper hookup connections between your devices.
The station may be having broadcast difficulties. Try another channel.
Adjust the Tint and/or Color, see "ColorMaster xM'' on page 114.
Poor composite picture.
If the TV is connected to an external A/V device (e.g. DVD player, video
game system, set-top box, etc.) try using a ColorStream or HDMI TM video
connection instead.
Picture and sound are out of sync.
As with all products that contain a digital display, this may occur in
rare instances, when viewing certain content (e.g. television broadcasts,
video games, DVDs). The cause may include, without limitation, video
processing within the TV, video processing in an attached gaming system,
and video processing or different compression rates used by broadcasters
in their programlning.
Try the following:
o:. If the TV is connected to an A/V receiver that has a progralranable
audio delay feature, use this feature to help synchronize the sound
to the picture.
o:. If the problem occurs only on certain TV channels, inform your
local broadcast, cable, or satellite provider.
o:. The settings of PC/HDMI 2 Audio may be not correct. Check the
connections, see "Connecting a computer" on page 41.
o:. Turn off and unplug the TV from the AC wall outlet for a few
seconds and plug it back in.
176 Troubleshooting
Sound problem
Soundproblems
Check the antenna/cable connections, see "Connecting a digital audio
system" on page 36.
The station may be having broadcast difficulties. Try another channel.
The sound may be muted. Press the VOL (+ -) buttons or MUTE button.
If you connect a computer using either the PC IN terminal or an HDMI TM
terminal, snake sure that the Rear Shared Audio setting is properly set, see
"Connecting a digital audio system" on page 36.
Remotecontrolproblems
Remove all obstructions between the remote control and the TV.
Replace the remote control's batteries, see "Installing batteries" on page
48.
Your TV's remote control may not operate certain features on your
external device. Refer to the owner's manual for your other device to
determine its available features. If your TV remote control does not
operate a specific feature on another device, use the remote control that
came with the device, see "Learning about the remote control" on page
51.
If the TV still does not act as expected, perform the Reset Factory
Defaults procedure, see "Resetting to Factory Defaults" on page 103.
Channeltuningproblems
Ensure that the remote control is set to the correct device mode, see
"Learning about the remote control" on page 51.
The Auto Tuning feature may have erased the channel from lnelnory. To
add the channel to the channel lnelnory, see "Manual Tuning" on page
68.
The Lock feature may have blocked the channel. To unblock the channel,
see "Unlocking programs" on page 91.
If you cannot tune digital channels, check the antenna configuration, see
"Initial setup" on page 53. If the problem persists, clear all channels
from the channel list and reprogram channels into melnory, see "Storing
channels in memory (optional)" on page 67. For additional information,
see "TV stops responding to controls." on page 173. If the problem
persists, use the Reset Factory Defaults procedure, see "Resetting to
Factory Defaults" on page 103.
Troubleshooting 177
Closed caption problem
Closedcaptionproblems
If the program or video you have selected is not closed captioned, no
captions appear on the screen.
If text is not available, a black rectangle may appear. If this happens, turn
offthe closed caption feature, see "Using closed captions" on page 84.
A closed caption signal may not display correctly under the following
circumstances:
o*.oThe recording is dubbed
o*.oThe signal reception is weak
o*.oThe signal reception is nonstandard
For additional information, see "Using closed captions" on page 84.
Ratingblocking(V-Chip)problems
Forgotten PIN code.
When the PIN code screen appears, press the INFO button 4 times within
approximately 5 seconds. The old PIN code is cleared, see "Forgotten
PIN code" on page 87.
The V-Chip feature is available for U.S. V-Chip systems only, see "Using
parental controls" on page 88.
HDMITM CECControloperation
HDMI TM CEC Control feature is available for Toshiba HDMF MCEC
compatible devices.
HDMI T'_cables.
Ensure that HDMI TM cables with the (H_rnl) Logo are used.
The HDMI "_CEC operation is not working correctly.
When the connected HDMI T'*CEC device does not work correctly after
you have changed the device's settings, turn offthe TV and unplug the
power cord. After approximately one minute, plug the power cord in and
turn on the TV. You may also try using a different HDMI T'*cable.
If several devices are connected, the HDMI TM CEC Control feature may
not operate properly. Make sure the CEC function is set to On in the TV
settings and that the controlling device(s) you support CEC.
Read the instruction manual of the connected HDMI _'_CEC device.
178 Troubleshooting
HDMF' problem
HDMITM problems
HDMI TM cables.
Ensure that HDMI TM cables with the (H_:lrn|) Logo are used, see
"Connecting an HDMI TM or DVI device to the HDMI TM input" on page
37.
Networkproblems
Cannot connect to the Internet.
Check the modem and its incoming cable/telephone connections, see
"Connecting to a home network" on page 43.
Confirm your modeln's operation.
Ensure your IP address is set up correctly, see "IP Address Setup" on
page "IP Address Setup" on page 130.
No network connection.
If using a wired network connection, check to ensure that the LAN cables
are connected properly, see "Connecting the TV to a home network with
an Internet connection - wired" on page 45.
Ensure that the modem and router power cords are plugged in and the
devices are operating properly.
Ensure that your IP address is set up correctly, see "IP Address Setup" on
page 130.
Check to ensure proper operation of other network connected devices.
Network Setup fails (Auto).
Check to ensure that the LAN cables are connected properly, see
"Connecting the TV to a home network with an Internet connection -
wired" on page 45.
DHCP is not enabled on the router, or no router is present. Refer to your
router's documentation for instructions on enabling DHCP. If your router
does not support DHCR you must manually set up the IP address.
Internet service is not available. Check your cable/DSL modem or contact
your ISP for Internet service issues.
Network Setup fails (Manual).
Ensure that the TV IP address is not the same as any other device on the
network.
.l. Example: IP address 192.168.0.100 and IP address 192.168.0.101
are different addresses on the same network.
Troubleshooting 1 7 9
Network problem
Make sure the TV IP address is on the same subnet as the networked
computer.
•:° Example of proper setup: The computer has the IP address
192.168.0.100 with the Subnet mask 255.255.255.0, the TV has the
IP address 192.168.0.101 with the Subnet mask 255.255.255.0; both
are on the same subnet.
o:. Example of improper setup: The computer has the IP address
192.168.1.100 with the Subnet mask 255.255.255.0, the TV has the
IP address 192.168.0.101 with the Subnet mask 255.255.253.0; they
are on different subnets.
Unstable network connection.
When using a wired home network connection, unplug the LAN cables,
and then reconnect them.
When using a wireless home network connection:
o*,oReboot the router:
1 Remove AC power from the router and the television for
approximately one minute.
2 Reconnect AC power to the router.
3 Reconnect AC power to the television and turn it On.
4 After approximately two minutes, check connection stability.
o*,oConnect with LAN cables, if possible, and check connection
stability.
o:* Repeat the wireless network setup procedure and check connection
stability.
The media server name is not displayed.
The LAN cables, if used, are not connected properly, see "Connecting the
TV to a home network with an Internet connection - wired" on page 45.
The WLAN, if used, is not configured properly.
The network setup on the Server is incorrect. Make sure both the media
server and TV are using the same network type (DHCP/lnanual) and have
compatible network settings.
Too many devices are connected. You cannot connect more than 32
sharing devices at one time.
The media server is not turned On.
The "server" is not a media server device.
Check the firewall and streaming settings on the media server.
1 80 Troubleshooting
Wireless network problem
Wirelessnetworkproblems
Check that the router/AP (Access point) power is On.
After starting wireless network setup, confirm that the network is
configured properly by perforlning the network connection test, see
"Network Connection Test" on page 132.
Check the router/AP's connection status.
If the router/AP does not support PBC or WPS, Easy Setup (PBC) will
not work even if the push-button is pressed, see "Wireless Setup" on page
125.
If the available router/AP list is not displayed in Easy Setup (PBC) or
Assisted Setup, the power of the router/AP may be Off. Check that it is
On, and then try restarting the scan for available routers/APs, see "Easy
Setup using PBC (Push button configuration)" on page 126.
Refer to the router/AP's instruction manual.
IVlediaShareproblems
Ensure that the devices (TV and Server) are connected correctly.
Incorrect functionality may occur when using a USB HUB connection.
Photo files that were processed and edited using the computer's
application software may not be viewable.
When viewing content that supports two or more formats the TV may
select one format automatically.
Copyright protected content stored on the media server may not be
playable on the TV.
Content playback stability may be affected by heavy network traffic.
Content originally recorded on a computer may not play correctly.
Set the media sharing of the media server to the correct settings,
according to the media server instruction manual.
Confirm that the contents of either the media server or the USB storage
device are in formats that are supported by this TV, see "MediaShare
specifications" on page 153.
Depending on the media server, access may be limited by the MAC
address. Set the server according to the media server's instruction manual.
This TV's MAC Address can be confirmed in the Network Setup portion
of the User Menu, see "MAC Address" on page 132.
Troubleshooting 1 81
Light Indicato
For Connected MediaShare
Depending on the media server, it may take time to display the list.
Media Renderer
Depending the state of this TV, Media Controller may not be able to
control a Media Renderer playback.
If Media Renderer playback starts regardless of the user's intention, set
Media Renderer to Off.
LightIndicator
The Power light on the front of the TV indicates the TV's stares, as
described below.
PowerOn/Standbylight
Green:
o:o The TV is On and operating properly.
Red:
o:o The power is Offor in Standby.
If the problempersistsafter trying the solutions
In the U.S., visit TAIS Consumer Solutions on the web at
"support.toshiba.coin" or call 800-631-3811.
In Canada, locate the nearest Toshiba authorized service depot, or
Visit www.toshiba.ca, click "Holne Entertainment," and then click
"Support."
AppendixA
Specifications
NOTE ,,:o Thismodelcomplieswiththespecificationslistedbelow
•:o Designsandspecificationsaresubjectto changewithoutnotice
•:o Thismodelmaynot becompatiblewithfeaturesand/orspecifications
thatmaybeaddedinthefuture
Televisionsystem
NTSC standard
ATSC standard 8VSB
Digital Cable 64 QAM, 256 QAM; in-the-clear, unencrypted
Channelcoverage
VHF 2 through 13
UHF 14 through 69
Mid band (A-8 through A-l, A through I)
Cable TV Super band (J through W)
Hyper band (AA through ZZ, AAA, BBB)
Ultra band (65 through 94, 100 through 135)
182
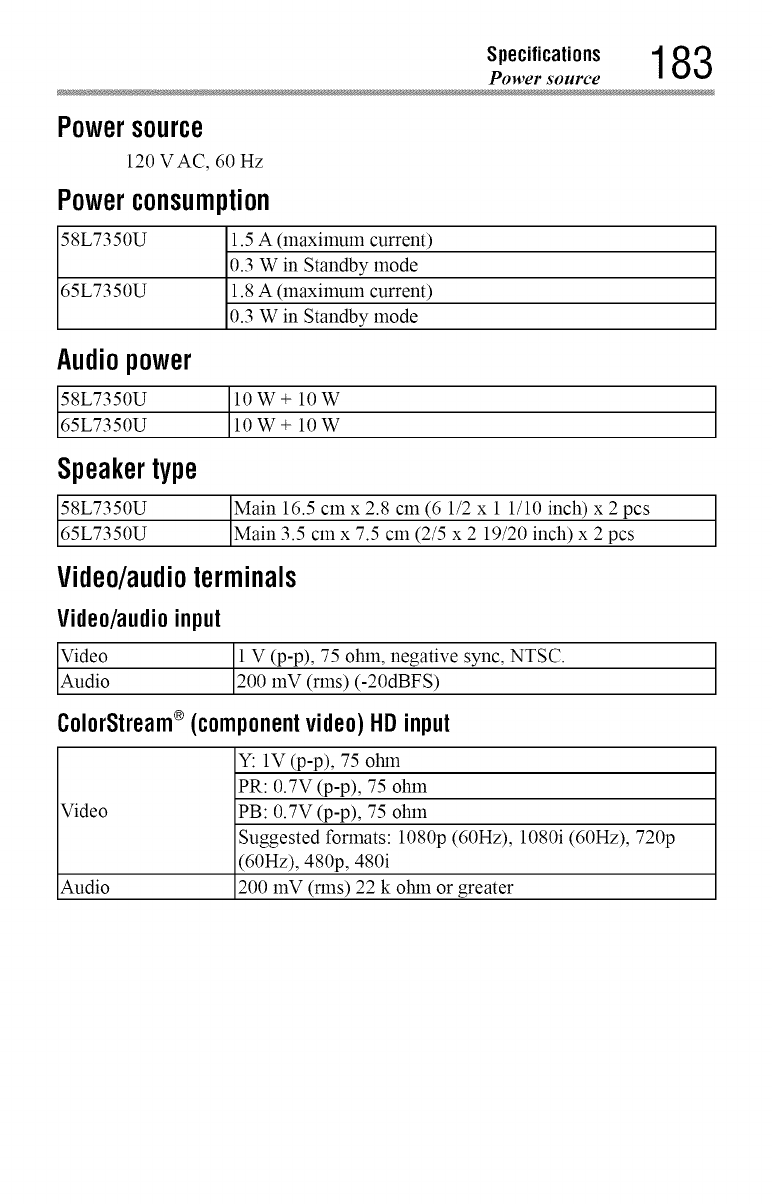
S,,eo,,,oa,,o.. 183
Power source
Powersource
120 VAC, 60 Hz
Powerconsumption
58L7350U 1.5 A (lnaxilnuln current)
0.3 W in Standby mode
65L7350U 1.8 A (lnaxilnuln current)
0.3 W in Standby mode
Audiopower
l0W+ 10W
10W+ 10W
Speakertype
16.5 cmx 2.8 cm (6 1/2 x 1 1/10 inch) x 2 pcs
IMain _ cl-nx-7_ cm (--_-5x2 19/2--_-nc_-2 p_s
Video/audioterminals
Video/audioinput
11V (p-p), 75 ohm, negative NTSC.
sync,
ColorStream®(componentvideo)HDinput
Y: 1V (p-p), 75 ohm
PR: 0.7V (p-p), 75 ohm
Video PB: 0.7V (p-p), 75 ohm
Suggested formats: 1080p (60Hz), 1080i (60Hz), 720p
(60Hz), 480p, 480i
Audio 200 mV (rlns) 22 k ohm or greater
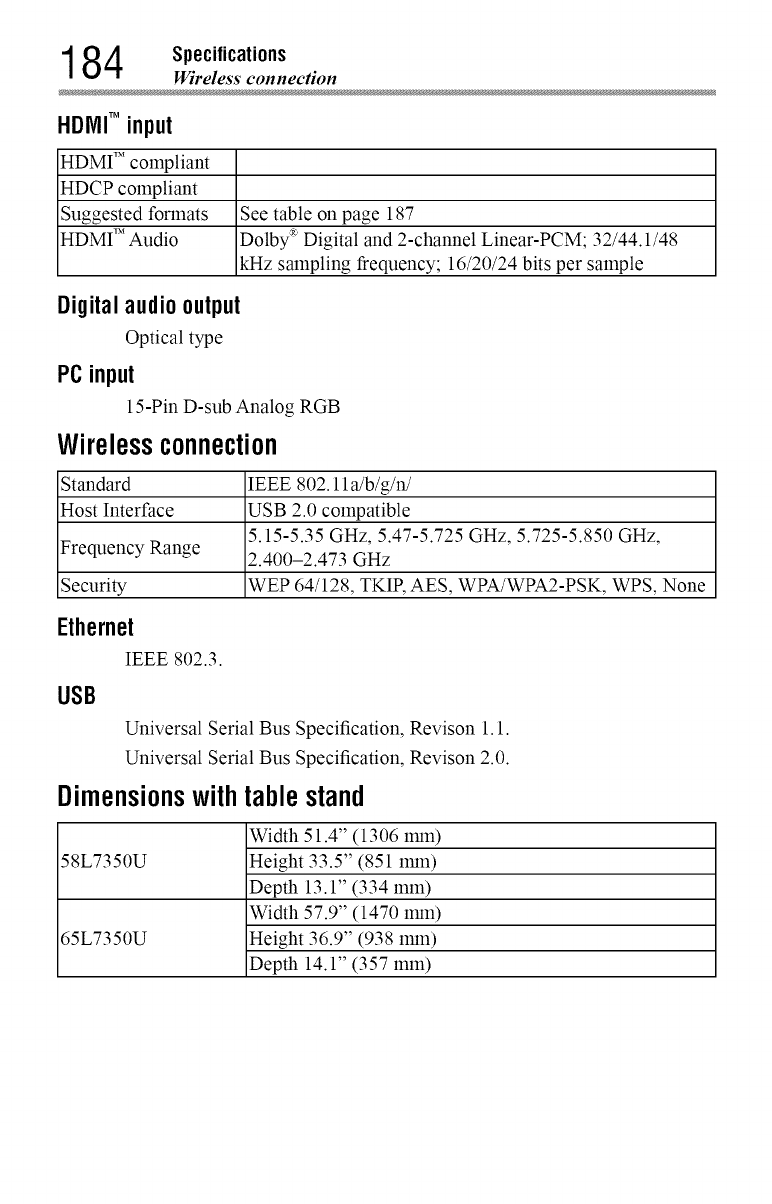
184 Specifications
Wireless connection
HDMITM input
HDMI TM compliant
HDCP compliant
Suggested formats
HDMI TM Audio
See table on page 187
Dolby _ Digital and 2-channel Linear-PCM; 32/44.1/48
kHz sampling frequency; 16/20/24 bits per sample
Digitalaudiooutput
Optical type
PCinput
15-Pin D-sub Analog RGB
Wirelessconnection
Standard IEEE 802.11 a/b/g/n/
Host Interface USB 2.0 compatible
5.15-5.35 GHz, 5.47-5.725 GHz, 5.725-5.850 GHz,
Frequency Range 2.400-2.473 GHz
Security WEP 64/128, TKIR AES, WPA/WPA2-PSK, WPS, None
Ethernet
IEEE 802.3.
USB
Universal Serial Bus Specification, Revison 1.1.
Universal Serial Bus Specification, Revison 2.0.
Dimensionswithtablestand
58L7350U
65L7350U
Width 51.4" (1306 iron)
Height 33.5" (851 1ran)
Depth 13.1" (334 rain)
Width 57.9" (1470 1ran)
Height 36.9" (938 1ran)
Depth 14.1" (357 rain)
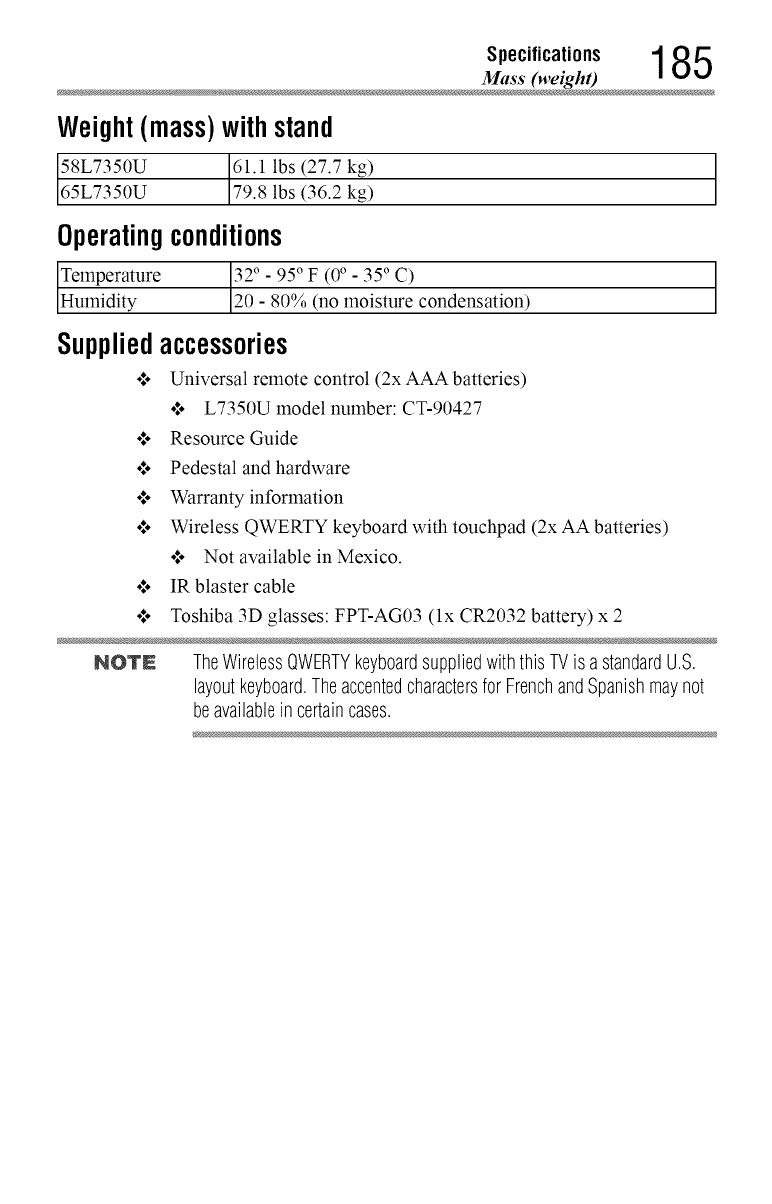
Specifications 1 85
Mass (weigh
Weight(mass)withstand
_ lbs (27.7 kg)
179.8lbs (36.2 kg)
Operatingconditions
_ure 3._°_- 95° F (_ - 35° C)
IHumidity 120-80% (no moisture condensation)
Suppliedaccessories
o*.oUniversal remote control (2x AAA batteries)
o*.oL7350U model number: CT-90427
•*.o Resource Guide
•*.o Pedestal and hardware
•*.o Warranty information
o*.oWireless QWERTY keyboard with touchpad (2x AA batteries)
o*.oNot available in Mexico.
o*.oIR blaster cable
o:* Toshiba 3D glasses: FPT-AG03 (lx CR2032 battery) x 2
NOTN TheWirelessQWERTYkeyboardsuppliedwiththisTVis astandardU.S.
layoutkeyboard.Theaccentedcharactersfor FrenchandSpanishmaynot
beavailableincertaincases.
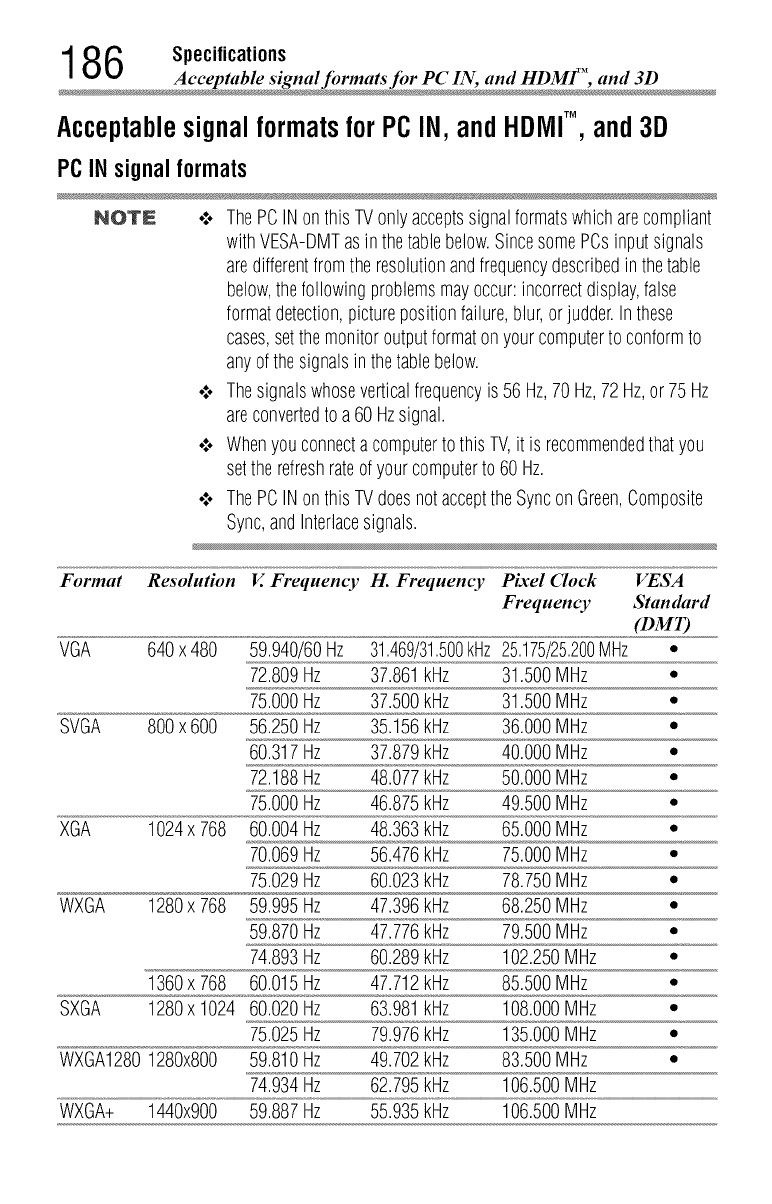
186 Specifications
Acceptable signal formats fi_r PC IN, and HDMF', and 3
AcceptablesignalformatsforPCIN,andHDMITM, and3D
PCIN signal formats
NOTE o:, ThePCINonthisTVonlyacceptssignalformatswhicharecompliant
withVESA-DMTasin thetablebelow.SincesomePCsinputsignals
aredifferentfromthe resolutionandfrequencydescribedin thetable
below,thefollowingproblemsmayoccur:incorrectdisplay,false
formatdetection,picturepositionfailure,blur,orjudder.Inthese
cases,setthemonitoroutputformaton yourcomputerto conformto
anyofthe signalsinthetablebelow.
•:. Thesignalswhoseverticalfrequencyis 56Hz,70 Hz,72Hz,or75 Hz
areconvertedto a60 Hzsignal.
,,.. Whenyouconnectacomputerto thisTV,it is recommendedthatyou
setthe refreshrateofyourcomputerto 60Hz.
•;. ThePCINonthisTVdoesnotaccepttheSynconGreen,Composite
Sync,andInterlacesignals.
Format Resolution !4.Frequency H. Frequency Pixel (lock VESA
Frequency Standard
(DMT)
VGA 640x 480 59.940/60Hz 31,469/31,500kHz 25,175/25,200MHz •
72.809Hz 37.861kHz 31.500MHz *
75.000Hz 37.500kHz 31.500MHz *
SVGA 800x 600 56.250Hz 35.156kHz 36.000MHz *
60.317Hz 37.879kHz 40.000MHz *
72.188Hz 48.077kHz 50.000MHz ,,
75.000Hz 46.875kHz 49.500MHz *
XGA 1024x 768 60.004Hz 48.363kHz 65.000MHz ,,
70.069Hz 56.476kHz 75.000MHz *
75.029Hz 60.023kHz 78.750MHz ,,
WXGA 1280x 768 59.995Hz 47.396kHz 68.250MHz *
59.870Hz 47.776kHz 79.500MHz ,,
74.893Hz 60.289kHz 102.250MHz *
1360x 768 60.015Hz 47.712kHz 85.500MHz *
SXGA 1280x 1024 60.020Hz 63.981kHz 108.000MHz *
75.025Hz 79.976kHz 135.000MHz *
WXGA12801280x800 59.810Hz 49.702kHz 83.500MHz *
74.934Hz 62.795kHz 106.500MHz
WXGA+ 1440x900 59.887Hz 55.935kHz 106.500MHz
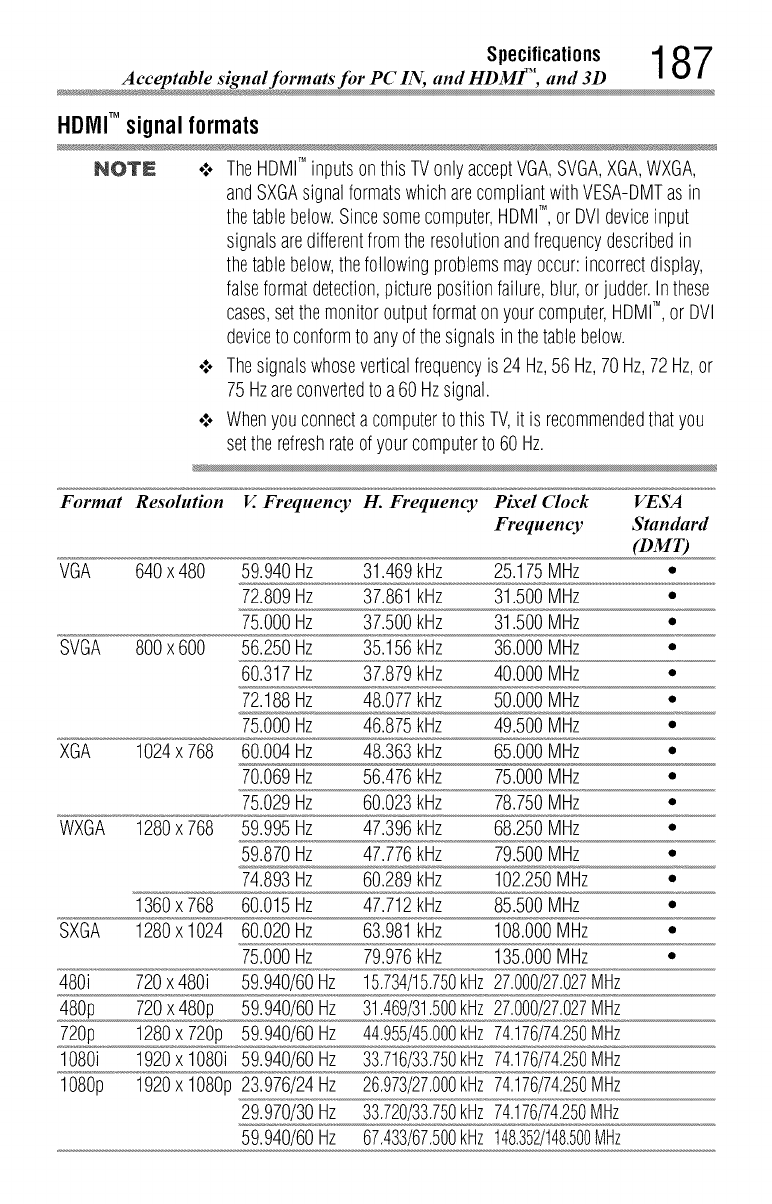
Specifications 1 8 7
Acceptable signal fi_rmats for PC IN, and HDMF', and 3
HDIVllTM signal formats
NOTE o:. TheHDMITM inputsonthisTVonlyacceptVGA,SVGA,XGA,WXGA,
andSXGAsignalformatswhicharecompliantwithVESA-DMTasin
thetablebelow.Sincesomecomputer,HDMI",or DVldeviceinput
signalsaredifferentfromtheresolutionandfrequencydescribedin
thetablebelow,thefollowingproblemsmayoccur:incorrectdisplay,
falseformatdetection,picturepositionfailure,blur,orjudder.Inthese
cases,setthemonitoroutputformaton yourcomputer,HDMITM, or DVl
deviceto conformto anyof thesignalsin thetablebelow.
•:. Thesignalswhoseverticalfrequencyis 24Hz,56 Hz,70Hz,72Hz,or
75Hzareconvertedto a60 Hzsignal.
°:o Whenyouconnectacomputerto thisTV,it is recommendedthatyou
setthe refreshrateofyourcomputerto 60Hz.
SVGA
XGA
WXGA
SXGA
Format Resolution EFrequency H. Frequency Pixel Clock VESA
Frequency Standard
(DMT)
VGA 640x 480 59.940Hz 31.469kHz 25.175MHz *
72.809Hz 37.861kHz 31.500MHz
75.000Hz 37.500kHz 31.500MHz *
800x 600 56.250Hz 35.156kHz 36.000MHz *
60.317Hz 37.879kHz 40.000MHz *
72.188Hz 48.077kHz 50.000MHz "
75.000Hz 46.875kHz 49.500MHz *
1024x 768 60.004Hz 48.363kHz 65.000MHz "
70.069Hz 56.476kHz 75.000MHz *
75.029Hz 60.023kHz 78.750MHz "
1280x 768 59.995Hz 47.396kHz 68.250MHz *
59.870Hz 47.776kHz 79.500MHz "
74.893Hz 60.289kHz 102.250MHz *
1360x 768 60.015Hz 47.712kHz 85.500MHz *
1280x 1024 60.020Hz 63.981kHz 108.000MHz *
75.000Hz 79.976kHz 135.000MHz *
720x480i 59.940/60Hz 15.734/15.750kHz 27.000/27.027MHz480i
480p
720p
1080i
1080p
720x480p
1280x 720p
1920x 1080i
1920x 1080p
59.940/60Hz 31.469/31.500kHz 27.000/27.027MHz
59.940/60Hz 44.955/45.000kHz74.176/74.250MHz
59.940/60Hz 33.716/33.750kHz74.176/74.250MHz
23.976/24Hz 26.973/27.000kHz74.176/74.250MHz
29.970/30Hz 33.720/33.750kHz74.176/74.250MHz
59.940/60Hz 67.433/67.500kHz148.352/148.500MHz
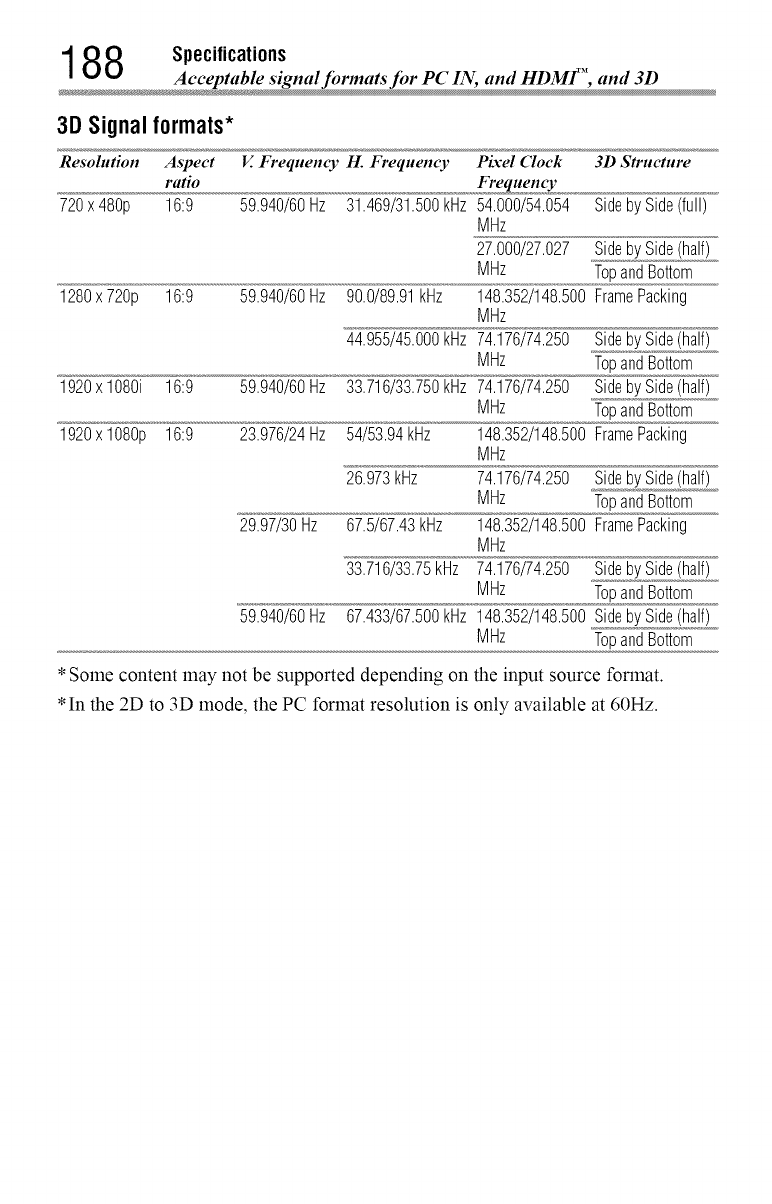
188 Specifications
Acceptable signal formats for PC IN, and HDMF', and 3
3D Signal formats*
Resolution Aspect V. Frequency H. Frequency 319 Strttctttre
ratio
720 x 480p 16:9 59.940/60 Hz 31.469/31.500 kHz Side by Side (full)
1280 720p
1920 1080i
1920 1080p
16:9
16:9
16:9
Pixd ('_lock
Frequency
54.000/54.054
MHz
27.000/27.027 Sideby Side(half)
MHz TopandBottom
59.940/60Hz 90.0/89.91kHz 148.352/148.500FramePacking
MHz
44.955/45.000kHz 74.176/74.250 Sideby Side(half)
MHz TopandBottom
59.940/60Hz 33.716/33.750kHz 74.176/74.250 Sideby Side(half)
MHz TopandBottom
23.976/24Hz 54/53.94kHz 148.352/148.500FramePacking
MHz
26.973kHz 74.176/74.250 Sideby Side(half)
MHz TopandBottom
29.97/30Hz 67.5/67.43kHz 148.352/148.500FramePacking
MHz
33.716/33.75kmz 74.176/74.250 Sideby Side(half)
MHz TopandBottom
59.940/60Hz 67.433/67.500kHz 148.352/148.500Sideby Side(half)
MHz TopandBottom
*Some content may not be supported depending on
*In the 2D to 3D mode, the PC format resolution is
the input source format.
only available at 60Hz.
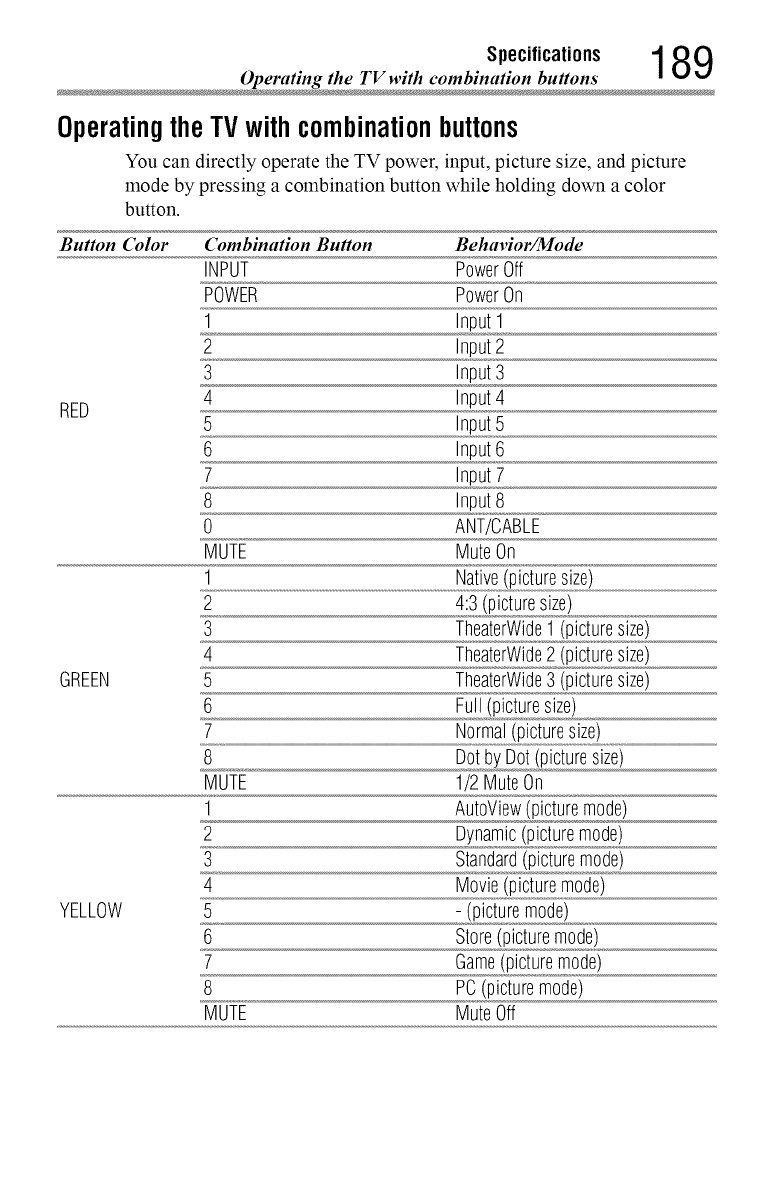
189
OperatingtheTVwithcombinationbuttons
You can directly operate the TV power, input, picture size, and picture
mode by pressing a combination button while holding down a color
button.
Button Color Combination Button Behavior/Mode
INPUT PowerOff
POWER PowerOn
1 Input1
2 Input2
3 Input3
4 Input4
RED 5 Input5
6 Input6
7 Input7
8 input8
0 ANT/CABLE
MUTE MuteOn
2
3 TheaterWide1 (picturesize)
4 TheaterWide2 (picturesize)
GREEN 5 TheaterWide3 (picturesize)
6 Full(picturesize)
7 Normal(picturesize)
8 Dotby Dot(picturesize)
MUTE 1/2 MuteOn
1 AutoView(picturemode)
2 Dynamic(picturemode)
3 Standard(picturemode)
4 Movie(picturemode)
YELLOW 5 - (picturemode)
6 Store(picturemode)
ZGame(picturemode)
8 PC(picturemode)
MUTE MuteOff
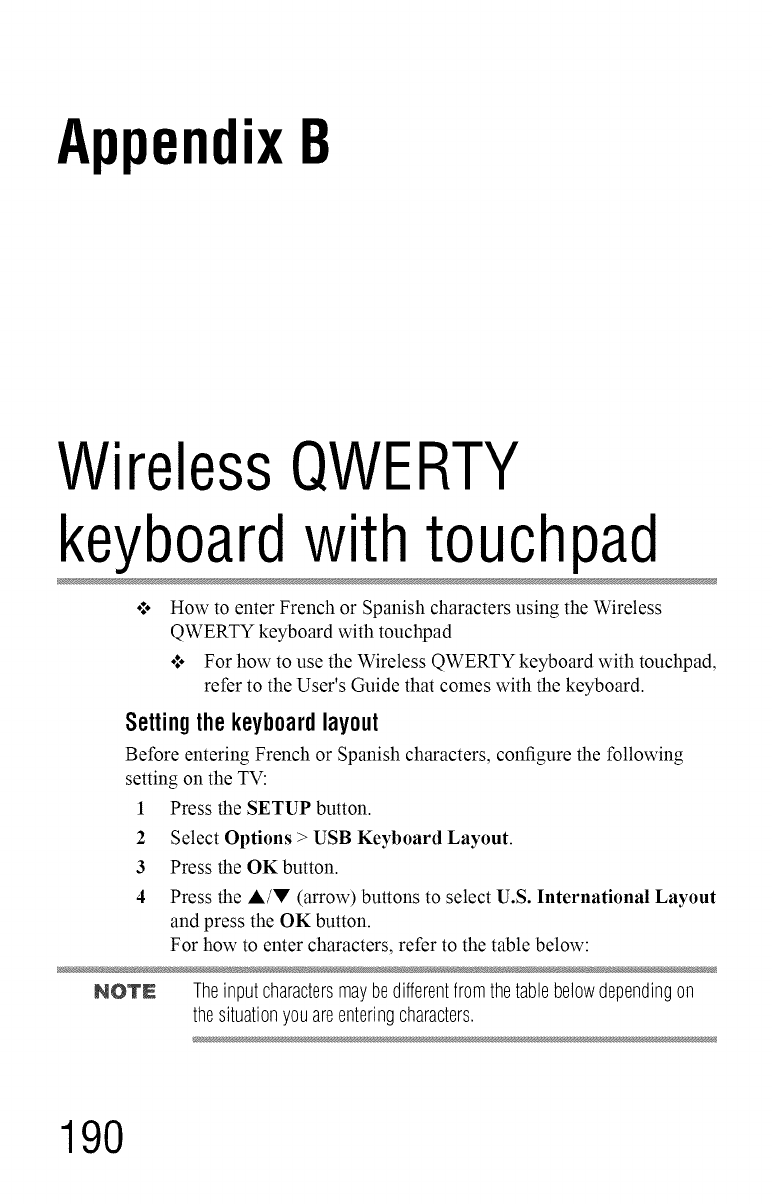
AppendixB
Wireless QWERTY
keyboardwith touchpad
How to enter French or Spanish characters using the Wireless
QWERTY keyboard with touchpad
o*,oFor how to use the Wireless QWERTY keyboard with touchpad,
refer to the User's Guide that comes with the keyboard.
Setting the keyboardlayout
Before entering French or Spanish characters, configure the following
setting on the TV:
1 Press the SETUP button.
2Select Options > USB Keyboard Layout.
3 Press the OK button.
4 Press the A/V (arrow) buttons to select U.S. International Layout
and press the OK button.
For how to enter characters, refer to the table below:
NOTE Theinputcharactersmaybedifferentfromthetablebelowdependingon
thesituationyouareenteringcharacters.
190

191
Printing\Simultaneous Key normal ' Shift RightAlt(Alt Gr) Shift +Right Alt
a andA a orA*l fi or fi_ *l
b and B b or B *
c and C c or C * I J,_
<J ¢
dandD dorD *_ D 6
eandE eorE *_ d ort_ *l
fandF forF ,1
g and G g or G *
h and H h or H *
i and I i or I ,1 i or I ,1
j and J j or J ,l
kandK korK *l ce or (E ,1
1 andL 1 orL*l oor O*l
mandM morM *l ,Lt
n andN n orN*l 15orN*l
o andO o or O *l 6 or 0 *l
p and P p or P * l /3or 0 * l
qandQ qorQ*l _iorA*l
randR rorR*l R)
s and S s or S ,1 B §
t and T t or T *l 13or 13*
u and 17 u or 1-7* l fi or (5 * l
v andV v orV*l
w and W w or W * l fi or A * l
x and X x or X * l
yandY yorY *l tior 17 *_
z and Z z or Z *l _e or t * l
1 and ! 1 ! i
2 and @ 2 @ 2
3 and # 3 # 3
4 and $ 4 $ _ £
5 and % 5 % t2
6 and/' 6 1/4
7 and & 7 & V:
8 and * 8 * V4
9 and ( 9 ( '
0 and ) 0 ) '
Spacebar Space Space
- and (underscore) ¥
(underscore)
= and + = + × +
[ and { [ { <_ "
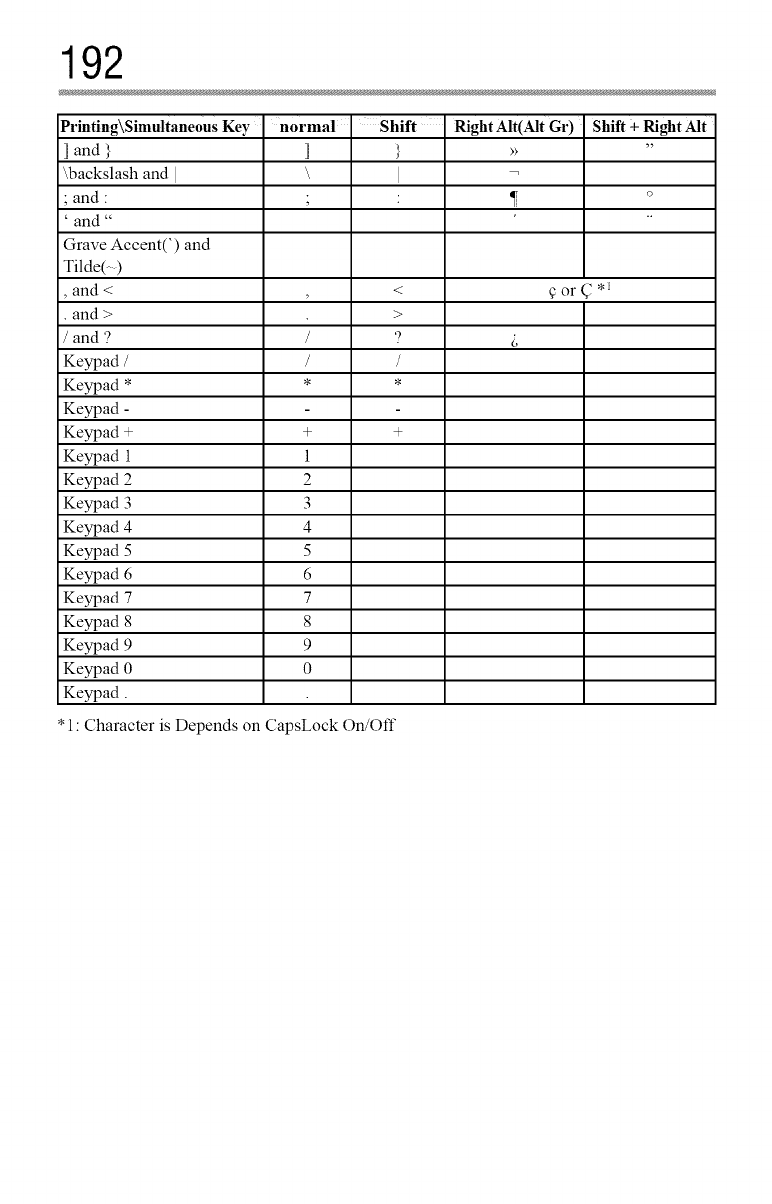
192
Printing\Simultaneous Key
]and }
\backslash and I
• and "
and _
Grave Accent(') and
Tilde(- )
, and < , <
• and > >
/and '? /9
Keypad / / /
Keypad * * *
Keypad -
Keypad + + +
Keypad 1 1
Keypad 2 2
Keypad 3 3
Keypad 4 4
Keypad 5 5
Keypad 6 6
Keypad 7 7
Keypad 8 8
Keypad 9 9
Keypad 0 0
Keypad.
• 1: Character is Depends on CapsLock On/Off
normal 'Shift RightAlt(Alt Gr) Shift +Right Alt
] } , ,,
\I
• . 17 o
i,
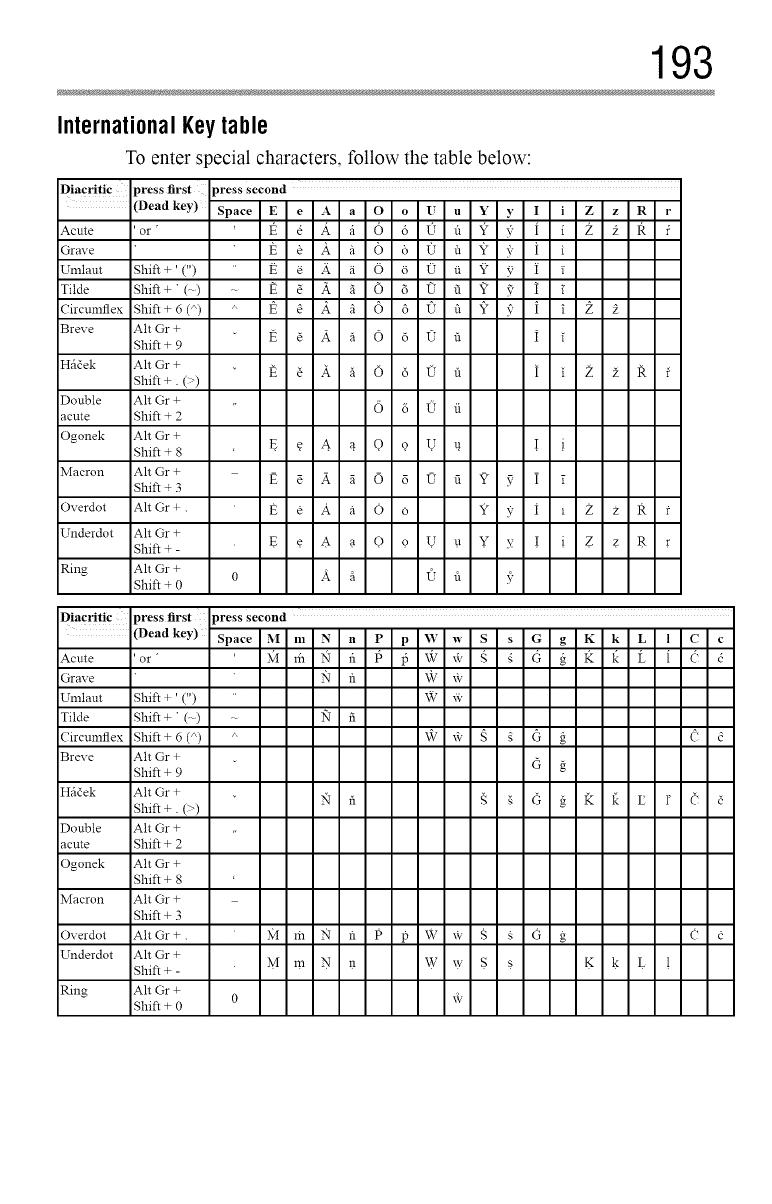
193
International Keytable
To enter special characters, follow the table below:
DiacritiC press first press second
(Dead key) Space Ee A aO oUu Y y I i Z z R r
Acute 'or "t_ _ A. fi (5 6 l"T fl Y 7_" I i Z k 15. f
Grave 1_ _ A fi 0 6 0 fi ") 3'_ [ i
Umlaut Shift +' (") 1_ _ _. /i. O 6 l_T fi _- 5' I Y
Tilde Shift + ' (--) -- t_ _ Yt fi 0 6 l_" fi "? 9 I i"
Circumflex Shift+ 6 (_) A I_ _ A _ 6 6 l_" fi "Z 7_ [ i 2 k
Breve Alt Gr +I_ _ Afi O 6 l_" fi _
Shift + 9
Hfi_ek Alt Gr +1_ _ A fi O 6 l_" fi I i Z _ IZ f
Shift +. (>)
Double Alt Gr +6 6 l) fi
acute Shift + 2
Ogonek Alt Gr +
Shift + 8 t_ _ & _! Q 91,] t! { i
Macron Alt Gr +t_ _ A g O6 l_" fi Y v: i 7
Shift + 3
Overdot Alt Gr+. E e A a O 6 Y 5_ I 1 Zz R f
Underdot Alt Gr +
Shift+- E . € .A. a .O. 9 .U. u .Y x { . i . Z.z. R. r
Ring Alt Gr + ok a t2 a v
Shift + 0
Diacritic press first press second
(Dead key) Space M m N n P p "_$ w S s G g K k L l C c
Acute 'or' M m N fl t_ p q¢ _, g g d g £'_'L'i'6 d
Grave N fl \_7 xk'
Umlaut Shift + ' (") W "4_,
Tilde Shift + ' (-) -- lq fi
Circumflex Shift + 6 (_) _' _7 @ _ _ G _ d d
Breve Alt Gr + _
Shift + 9
Hfi_ek Alt Or+ N fl S ._ G _ I_ 1_ E 1' ('
Shift +. (>)
Double Ah Gr +
acute Shift + 2
Ogonek Ah Gr +
Shift + 8
Macron Ah Gr +
Shift + 3
Overdot AhGr+. M m N fl P 15 W xi: S _ G g Qd
Underdot Ah Gr +
Shift+- M.m.N. t_ W.w. $ . s K. 1¢ . L. 1
Ring Ah Gr + 0 ¢
Shift + 0
Index
Numerics
3D
2D from Quick menu 78
3D from Quick menu 76
3D lock 80
3D timer lock 81
adjusting 2D to 3D depth 82
auto start mode 79
button operation 75
change pin code 80
delete pin code 80
enable 3D timer 81
enter new pin code 79
forgotten pin code 80
functions 71
Native mode 78
selecting format 74
setting 3D pin code 79
start message 80
switch left right images 82
switching display mode 74
switching to 2D mode 77
switching to 3D mode 76
viewing images 73
4/3 stretch
using 109
194
A
advanced picture settings
Alnbient Light Sensor 114
Base Color Adjustment 115
ClearScan _ 113
Color temperature 115
ColorMaster TM 114
DNR 114
DynaLight _ 113
Dynamic Contrast 112
Edge Enhancer 112
MPEG NR 113
resetting to factory default 116
using 112
audio
adjusting balance 118
adjusting range 119
Audyssey Dynamic Volulne _
122
bass/treble 126
Dolby ®Digital Dynamic Range
Control 121
muting sound 118
optical audio output forlnat 119
,.,ex 195
Auto Aspect
using 109
c
cables
3.51nln to RCA Y-cable 29
analog RGB (15-pin) 29
coaxial (F-type) 27
component video (red/green/blue)
28
Dual-wand IR blaster cable 28
HDMI TM28
LAN 30
optical audio 29
overview of cables 27
standard A/V (red/white/yellow)
27
channel return 83
channels
auto tuning 67
labeling analog TV channels
69
labeling video inputs 70
locking specific channels 91
manual tuning 68
next progrannned channel 82
skipping 68
skipping video inputs 69
specific channel 82
storing in memory 67
closed captions
Analog CC mode 84
button 86
Digital CC settings 85
using 84
computer
adjusting image 97
setting the audio 98
to the TV's HDMI TM 42
using with the TV 97
connecting
a computer 41
audio system 36
cable TV 30
camcorder 30
computer to TV's PC IN 41
DVD player with ColorStream _
32
DVI device to HDMI TMinput
37
HDMI TM audio system 40
HDMI TM device to HDMI _Minput
37
IR devices 33
satellite receiver 30
to a computer (no Internet
connection) 43
to a home network 43
to a home network (no Internet
connection) 44
to a home network (wired Internet
connection) 45
to a home network (wireless
Internet connection) 46
TV's HDMI TM 42
VCR 32
VCR and antenna 30
control other devices
HDMI'_-CEC Control 39
control panel
lock 93
controlling other devices
TV remote 39
E
expert picture settings
RGB Filter 116
setting 116
Test Pattern 116
White Balance 117
External Control Setup 168
196 ,.,ex
F
Factory Defaults
reset 103
t_avorites
adding 142
browsing 141
features 21
H
HDMI TM
viewing signal information 96
HDMI TM CEC
adjusting amplifier's audio 95
controlling playback devices
94
input source selection 95
other functions 96
HDMI TM CEC Control
using 93
HDMI TM settings feature
using 96
home network
using 123
I
icon
safety 20
IR Blaster Out terminal
using 33
IR Blaster setup 59
N
Media Renderer
device name setup 169
setup 169
MediaShare (Media Player)
basic operation 154
playing music files 162
specifications 153
viewing movie files 157
viewing photo files 164
N
network
advanced setup 130
connection test 132
DNS setup 131
quick setup 56
setup 125
wireless setup 125
Network Device Setup 168
no signal power down
set 100
0
overview
installation 22
setup 22
use 20
P
parental controls
blocking programs/movies by
rating (V-Chip) 88
using 88
picture
adjusting 110
adjusting quality 111
picture mode
selecting 110
picture size
4/3 106
Dot by Dot 108
Full 106
Native 105
Normal 108
selecting 104
TheaterWide 1 107
TheaterWide 2 107
TheaterWide 3 107
,.,ex 197
pin code
changing 80
deleting 80
entering new pin code 79
forgotten 80
setting pin code 79
power failure 103
program ratings
displaying 91
unlocking programs 91
Q
quick setup
channel tuning 58
country 56
IR Blaster 59
network 56
smart TV 57
store /home mode 56
time zone 56
R
rating system 90
downloading additional 88
8
safety
icons 20
scrolling the picture 108
shared inputs
configuring 70
SlnartTV
using 138
SlnartTV TM
Netflix ®139
VUDU TM 140
software keyboard
using 133
software licenses
show 135
software upgrade
perforlning 135
specifications
3D Signal formats 188
acceptable signal formats 186
audio power 183
channel coverage 182
ColorStream _ HD input 183
Digital audio output 184
ethernet 184
HDMI TM input 184
HDMI TM signal formats 187
mass (weight) 185
operating conditions 185
PC IN signal formats 186
PC input 184
power consumption 183
power source 183
remote, combination buttons
189
speaker type 183
supplied accessories 185
TV system 182
USB 184
video/audio terminals 183
wireless connection 184
support information
show 102
l
time limit
set for games 92
timer
sleep timer 99
turn on TV 98
troubleshooting 173
channel tuning problems 176
closed caption problems 177
contact Toshiba 181
HDMI TM 178
HDMI TM CEC Control problems
177
light indicator 181
light indicator functions 181
198 ,n,ex
MediaShare (Media Player)
problems 180
network problems 178
picture problems 174
Rating blocking problems 177
remote control problems 176
sound problems 176
wireless network problems 180
TV connections
front 24
side 24
TV panel connections
back 25
TV panel controls
front 24
left side 24
side 24
TV remote
control other devices 48
effective range 50
functionality 51
install batteries 48
TV stares information
show 101
v
Video
video input
locking 92
selecting 83
w
web browser 140
access web page 142
adding favorites 142
browsing favorites 141
