Toshiba D R5SU User Manual DVD RECORDER Manuals And Guides L0604892
TOSHIBA DVD Systems Manual L0604892 TOSHIBA DVD Systems Owner's Manual, TOSHIBA DVD Systems installation guides
User Manual: Toshiba D-R5SU D-R5SU TOSHIBA DVD RECORDER - Manuals and Guides View the owners manual for your TOSHIBA DVD RECORDER #DR5SU. Home:Electronics Parts:Toshiba Parts:Toshiba DVD RECORDER Manual
Open the PDF directly: View PDF ![]() .
.
Page Count: 58

TOSHIBA
RAM/_/RW _V | D E 0
RAM4.7
DVD VIDEO RECORDER
-R5SU
-C
OWNER'S MANUAL
$PATIALIZEP" '® [__
VE_TU/_L SUR_OUHD
H_:3m|
Before connecting, operating or adjusting this product,
please read this instruction booklet carefully and completely.
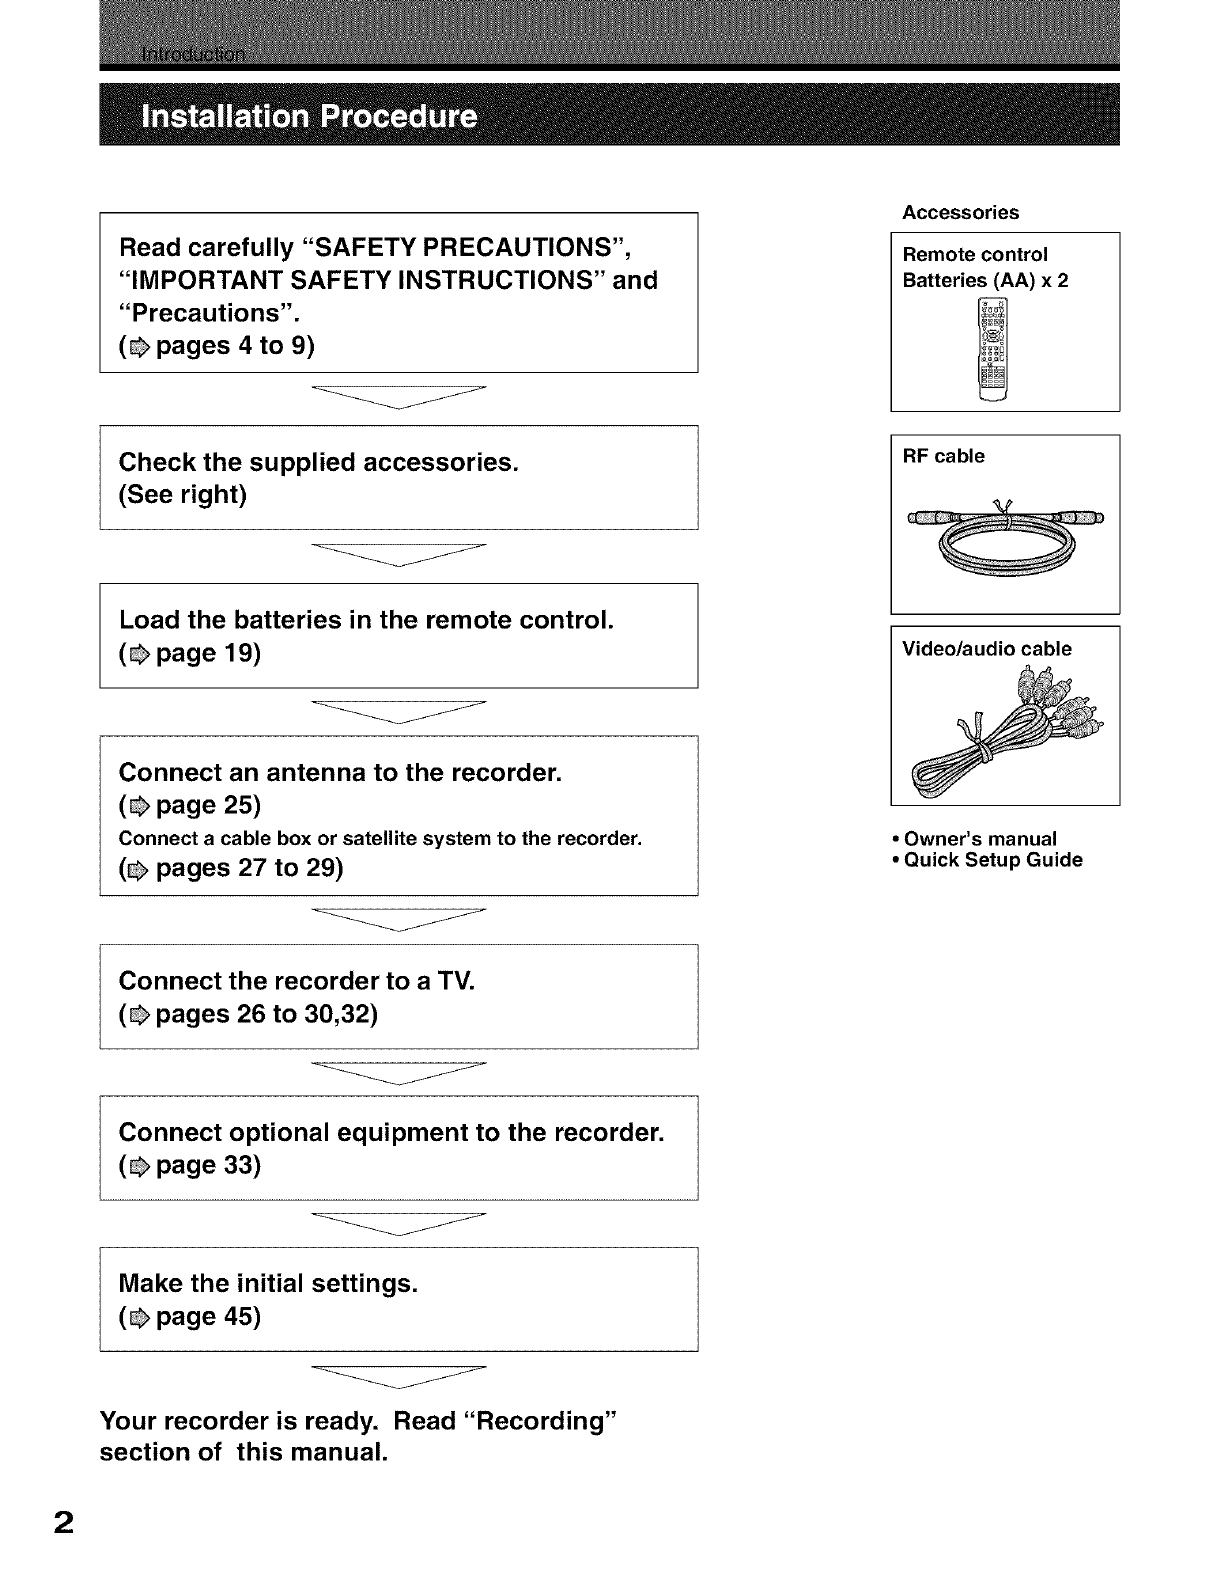
Read carefully "SAFETY PRECAUTIONS",
"IMPORTANT SAFETY INSTRUCTIONS" and
"Precautions".
(_ pages 4 to 9)
j
Accessories
Remote control
Batteries (AA) x 2
Check the supplied accessories.
(See right)
Load the batteries in the remote control.
(_ page 19)
J
Connect an antenna to the recorder.
(_ page 25)
Connect a cable box or satellite system to the recorder,
(_ pages 27 to 29)
j
RF cable
Video/audio cable
• Owner's manual
•Quick Setup Guide
Connect the recorder to a TV.
(_ pages 26 to 30,32)
j
Connect optional equipment to the recorder.
(_ page 33)
J
V
Make the initial settings.
(_ page 45)
Your recorder is ready. Read "Recording"
section of this manual.
2
Introduction
Installation Procedure ................................................... 2
Table of Contents ........................................................... 3
SAFETY PRECAUTIONS ................................................ 4
IMPORTANT SAFETY INTRODUCTIONS ...................... 6
Precautions ..................................................................... 8
Notes on handling ...................................................................... 8
When not in use ......................................................................... 8
Notes on placement ................................................................... 8
Notes on cleaning ...................................................................... 8
Notes on antennas .................................................................... 8
Notes on recording and editing ................................................. 8
Power Outage ............................................................................ 8
Notes on the unit ........................................................................ 8
Notes on moisture condensation ............................................... 9
About This Product ....................................................... 10
Some differences ..................................................................... 10
Playback Restrictions .............................................................. 10
Recording Restrictions and Copyright ..................................... 10
Compatibility ............................................................................ 10
Choosing a disc ............................................................ 11
On DVD-RAM discs ................................................................. 13
On DVD-R discs ...................................................................... 14
On DVD-RW discs ................................................................... 14
Marks on DVD video discs ...................................................... 14
Structure of disc contents ........................................................ 15
On handling discs .................................................................... 15
On cleaning discs .................................................................... 15
On storing discs ....................................................................... 15
Discs andpurposes ................................................................. 16
Index to parts and controls .......................................... 17
Remote control ........................................................................ 17
Preparation of the remote control ............................................ 19
Display ..................................................................................... 20
Front panel .............................................................................. 21
Rear panel ............................................................................... 22
Before operating this recorder ................................................. 23
Connections
Connecting an antenna and TV ................................... 25
Connecting to cable TV signal .................................... 27
Connecting to a satellite system ................................ 29
Connecting to a TV with the HDMI terminal ............... 30
About HDMI TM........................................................................... 30
Setting the output resolution for the HDMr Moutput that best
matches your TV's capabilities ................................................. 31
Audio setting for the HDMI T''connection ................................... 31
Connecting to a TV equipped with component video
inputs ............................................................................ 32
Connecting to an audio system .................................. 33
Quick Start Guide
Power up ....................................................................... 34
Plugging In and Power On ...................................................... 34
Time and Date Settings ........................................................... 34
Channels Setup ....................................................................... 34
Auto Scanning Channels ......................................................... 34
Restore Defaults ...................................................................... 34
Switching to TV Mode .............................................................. 34
Playback
Disc Playback ............................................................... 35
Inserting a Disc ........................................................................ 35
Starting, Stopping and Pausing Playback ............................... 35
Fast Forward /Reverse Scanning ........................................... 35
Skipping to the Next /Previous Chapter or Track .................... 35
Slow Motion Playback .............................................................. 35
Frame-By-Frame Step Playback .............................................. 35
Advanced Playback Functions ................................... 36
ZOOM Playback ...................................................................... 36
Instant Replay .......................................................................... 36
Instant Skip .............................................................................. 36
Multi-Angle Function ................................................................ 36
Changing the Auto Track ......................................................... 36
Subtitles ................................................................................... 36
Displaying Playback Session Information ................................ 36
Jumping and Repeat Playback ................................... 37
Jumping to a Title, Chapter/Track or Time Point ..................... 37
Repeat Playback ..................................................................... 37
A-B Repeat .................................................................................... 37
TIMESLIP (Chase Play) ........................................................... 37
Viewing JPEG/Play Audio CDIMP31WMA/DivX ¢ ......... 38
JPEG Images, Slide shows and Rotation ..................................... 38
MP3/WMA file Playback ................................................................ 39
DivX¢ File Playback ....................................................................... 39
Recording
Recording-Rear Input Connections ........................... 40
Selecting an Input Source ............................................................. 40
Recording-Front Input Connections ........................... 41
Controlling a DV Camcorder .......................................................... 41
Making a Recording ....................................................................... 41
Stopping a Recording .................................................................... 4!
Pausing and Resume Recording ................................................... 41
Specifying the Recording Time ...................................................... 41
Finalize ........................................................................................... 41
Using DISPLAY to View Recording Options .................................. 4!
Playing and Editing Your Recordings ........................ 42
The Title Screen ............................................................................ 42
Playing a Title ................................................................................ 42
Playing a Chapter .......................................................................... 42
Renaming a Title ........................................................................... 42
Delete a Title ................................................................................. 42
Renaming a Disc ........................................................................... 42
On-Screen Keyboard &
Scheduled Recordings ................................................ 43
About On-Screen Keyboard .......................................................... 43
Using the On-Screen Keyboard .................................................... 43
Deleting Characters ...................................................................... 43
Saving Your Changes ................................................................... 43
Scheduled Recordings .................................................................. 43
Scheduled a Recording ................................................................. 43
Scheduled Time Recordings ....................................... 44
Setting Starting and Ending Times ................................................ 44
Setting the Source ......................................................................... 44
Setting the Recurrence .................................................................. 44
Setting the Quality Mode ............................................................... 44
Saving the Schedule ...................................................................... 44
Editing a Saved Schedule .............................................................. 44
Suspending /Activating a Schedule .............................................. 44
Deleting a Saved Schedule ........................................................... 44
Setup Menu
General .......................................................................... 45
About the SETUP MENU .............................................................. 45
Using the SETUP MENU .............................................................. 45
Language ...................................................................................... 45
Rating ............................................................................................ 46
Clock ............................................................................................. 46
Disc ............................................................................................... 47
Version .......................................................................................... 48
DivX(R) ......................................................................................... 48
Restore .......................................................................................... 48
Other ............................................................................................. 48
A/V Output .................................................................... 48
Video ............................................................................................. 48
Picture ........................................................................................... 48
Audio ............................................................................................. 49
TV Channel ................................................................... 50
Schedule ....................................................................... 50
Recording ..................................................................... 51
Other ............................................................................. 52
Help ............................................................................... 52
Others
Before calling service personnel ................................ 53
Power ............................................................................................ 53
Connection to your TV ................................................................... 53
TV reception .................................................................................. 53
Playback ........................................................................................ 53
Recording ...................................................................................... 54
Program ........................................................................................ 54
Remote control .............................................................................. 53
Clock ............................................................................................. 54
Specification ................................................................ 55
Limited Warranty ......................................................... 56 3
CAUTION
ATTENTION
WARNING: TO REDUCETHE RISK OF
ELECTRIC SHOCK, DO NOT REMOVE
COVER(ORBACK).NO USERSERVICEABLE
PARTS INSIDE. REFER SERVICING TO
QUALIFIEDSERVICEPERSONNEL. @
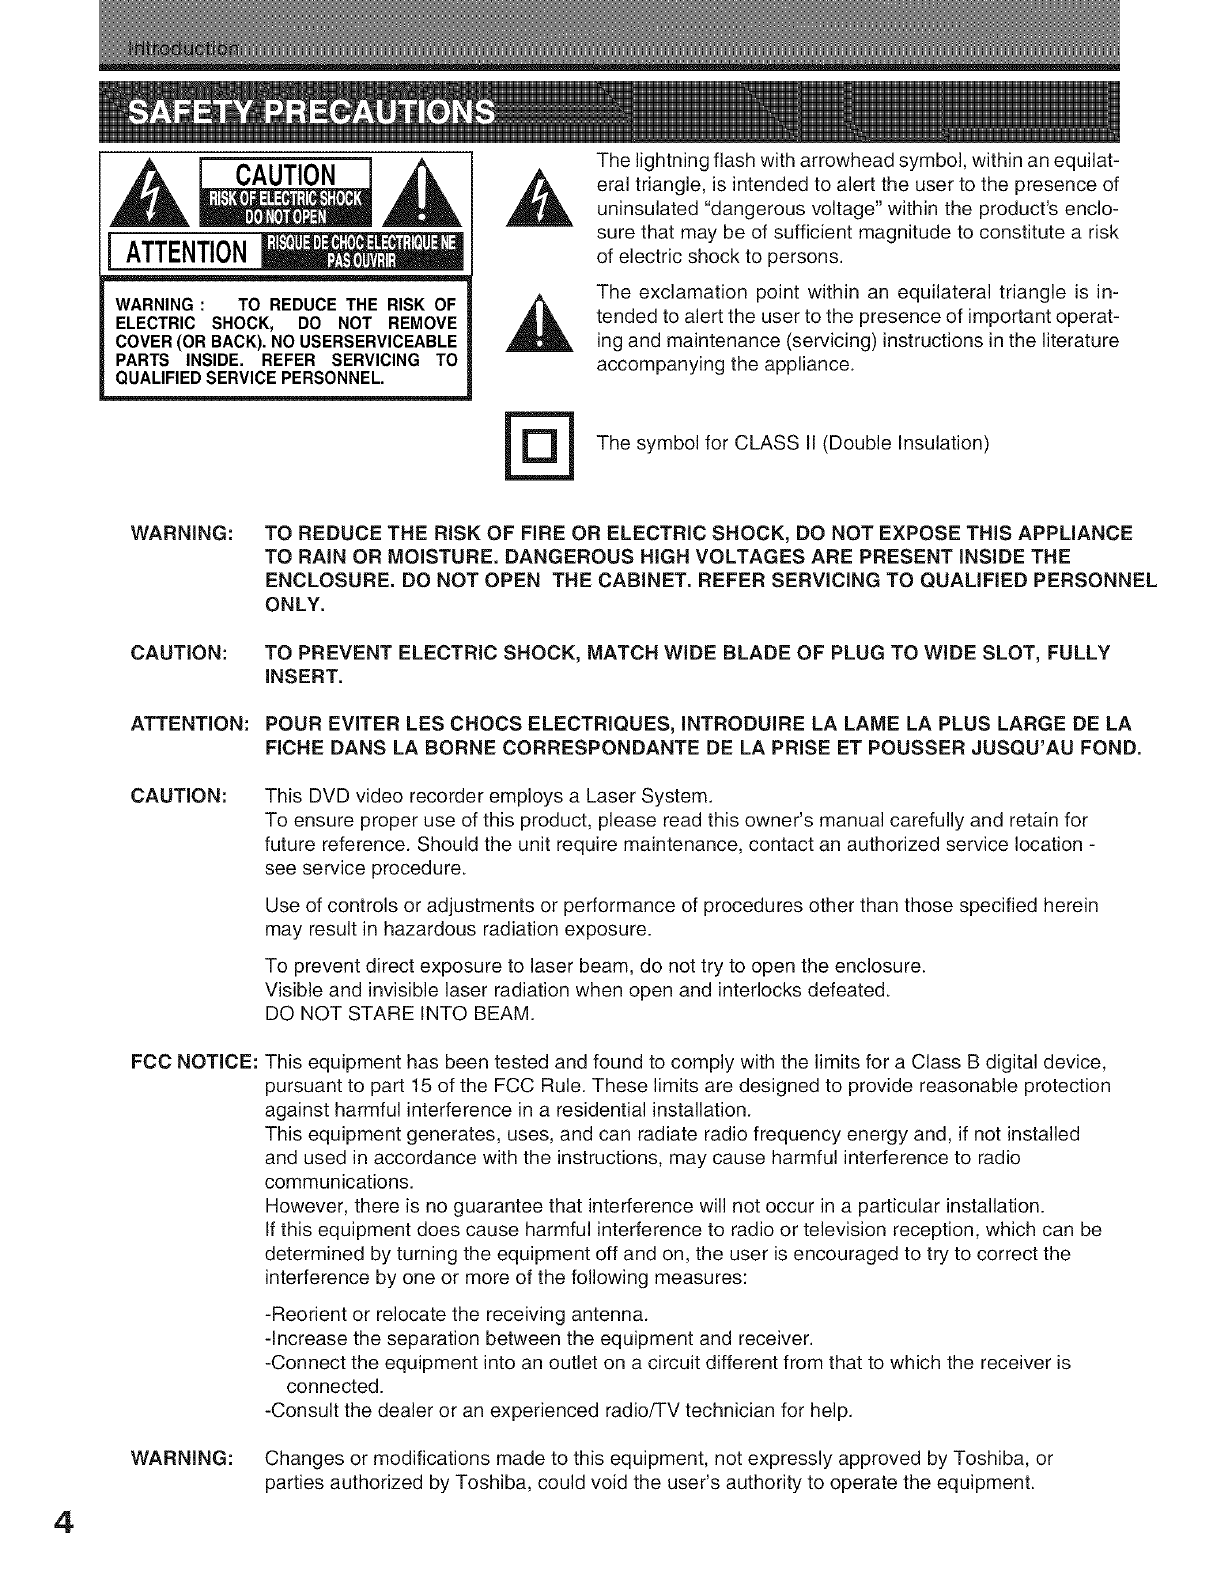
The lightning flash with arrowhead symbol, within an equilat-
eral triangle, is intended to alert the user to the presence of
uninsulated "dangerous voltage" within the product's enclo-
sure that may be of sufficient magnitude to constitute a risk
of electric shock to persons.
The exclamation point within an equilateral triangle is in-
tended to alert the user to the presence of important operat-
ing and maintenance (servicing) instructions in the literature
accompanying the appliance.
The symbol for CLASS II (Double Insulation)
4
WARNING:
CAUTION:
ATTENTION:
CAUTION:
FCC NOTICE:
WARNING:
TO REDUCE THE RISK OF FIRE OR ELECTRIC SHOCK, DO NOT EXPOSE THIS APPLIANCE
TO RAIN OR MOISTURE. DANGEROUS HIGH VOLTAGES ARE PRESENT INSIDE THE
ENCLOSURE. DO NOT OPEN THE CABINET. REFER SERVICING TO QUALIFIED PERSONNEL
ONLY.
TO PREVENT ELECTRIC SHOCK, MATCH WIDE BLADE OF PLUG TO WIDE SLOT, FULLY
INSERT.
POUR EVITER LES CHOCS ELECTRIQUES, INTRODUIRE LA LAME LA PLUS LARGE DE LA
FICHE DANS LA BORNE CORRESPONDANTE DE LA PRISE ET POUSSER JUSQU'AU FOND.
This DVD video recorder employs a Laser System.
To ensure proper use of this product, please read this owner's manual carefully and retain for
future reference. Should the unit require maintenance, contact an authorized service location -
see service procedure.
Use of controls or adjustments or performance of procedures other than those specified herein
may result in hazardous radiation exposure.
To prevent direct exposure to laser beam, do not try to open the enclosure.
Visible and invisible laser radiation when open and interlocks defeated.
DO NOT STARE INTO BEAM.
This equipment has been tested and found to comply with the limits for a Class B digital device,
pursuant to part 15 of the FCC Rule. These limits are designed to provide reasonable protection
against harmful interference in a residential installation.
This equipment generates, uses, and can radiate radio frequency energy and, if not installed
and used in accordance with the instructions, may cause harmful interference to radio
communications.
However, there is no guarantee that interference will not occur in a particular installation.
If this equipment does cause harmful interference to radio or television reception, which can be
determined by turning the equipment off and on, the user is encouraged to try to correct the
interference by one or more of the following measures:
-Reorient or relocate the receiving antenna.
-Increase the separation between the equipment and receiver.
-Connect the equipment into an outlet on a circuit different from that to which the receiver is
connected.
-Consult the dealer or an experienced radio/TV technician for help.
Changes or modifications made to this equipment, not expressly approved by Toshiba, or
parties authorized by Toshiba, could void the user's authority to operate the equipment.
Introduction
SAFETY PRECAUTIONS ( Continued )
Note to cable system installer:
This reminder is provided to call the cable system installer's attention to Article 820-40 of the NEC that provides
guidelines for proper grounding and, in particular, specifies that the cable ground shall be connected to the
grounding system of the building, as close to the point of cable entry as practical.
The instructions shall state that an ALL-POLE MAINS SWITCH with a contact separation of at least 3 mm in each
pole shall be incorporated in the electrical installation of the building.
CAUTION: These servicing instructions are for use by qualified service personnel only. To reduce the risk of
electric shock do not perform any servicing other than that contained in the operating instructions
unless you are qualified to do so.
In the spaces provided below, record the Model and Serial No. located on the rear panel of your recorder.
Model No Serial No.
Retain this information for future reference.
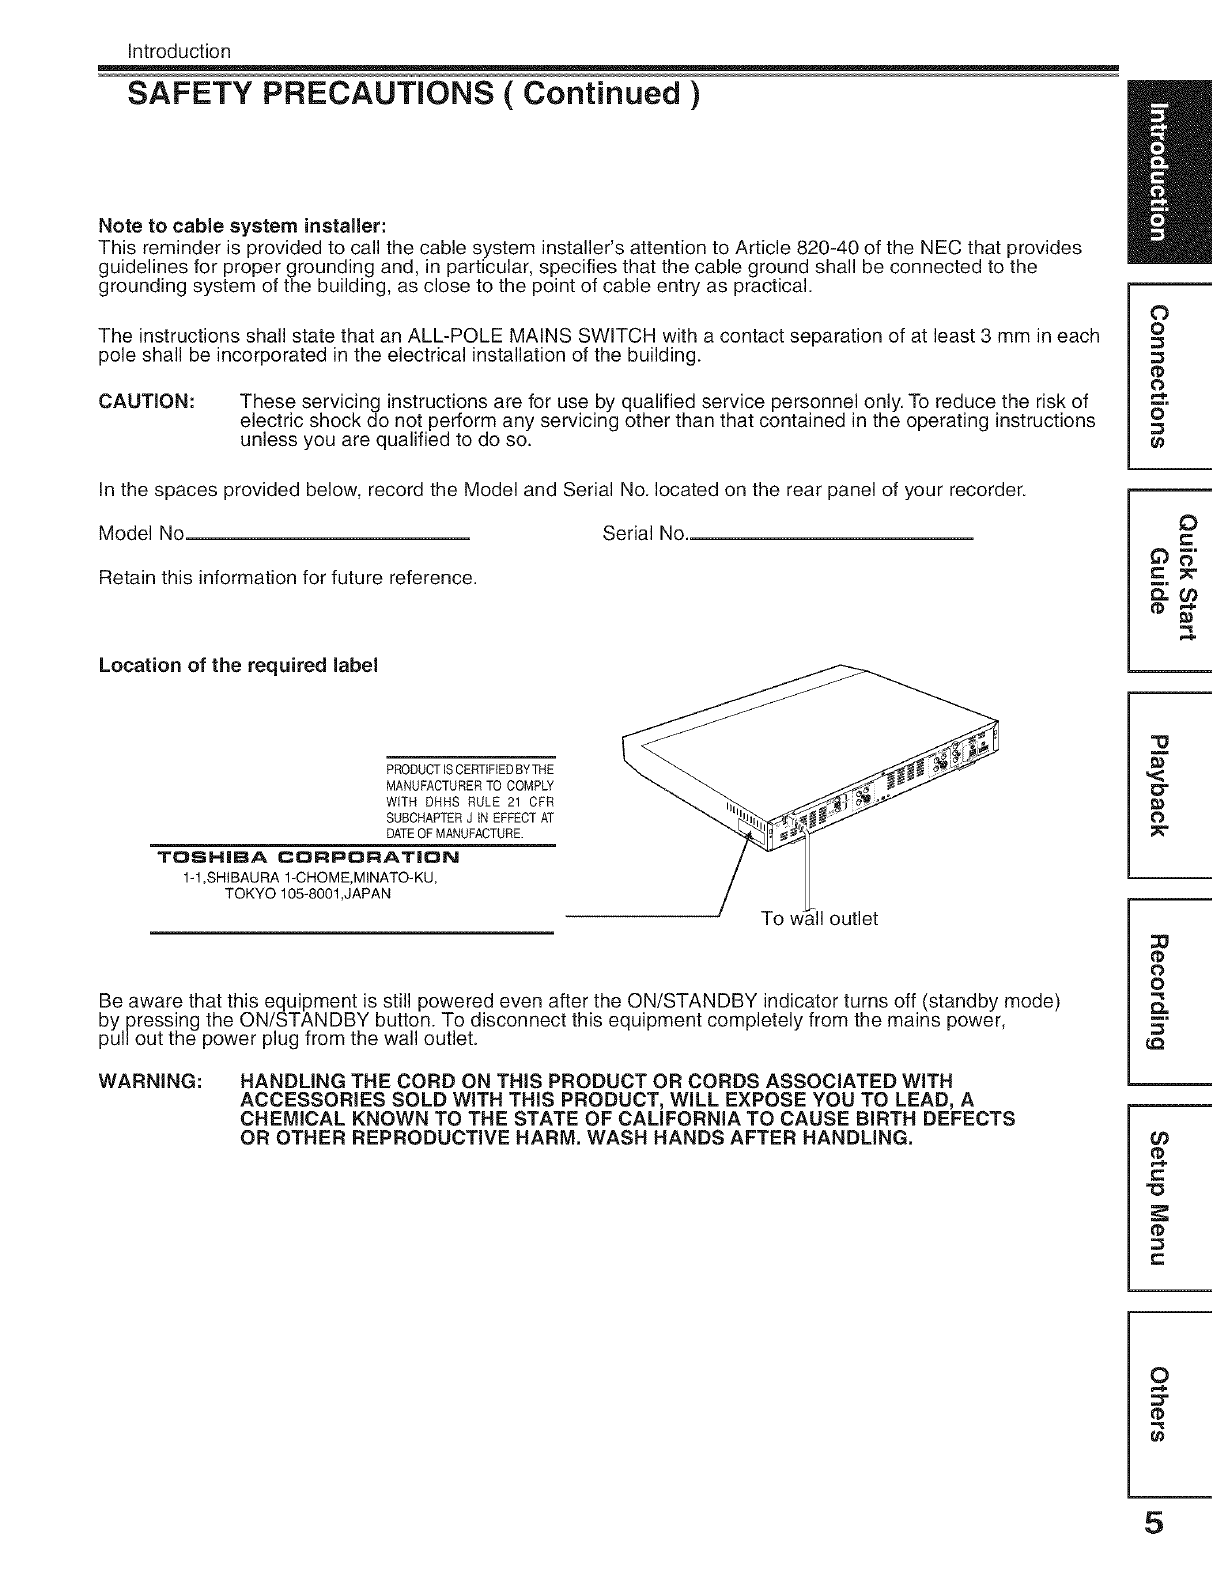
Location of the required label
O
o
0
o
0
e-
PRODUCTISCERTIFIEDBYTHE
MANUFACTURERTO COMPLY
WITH DNHS RULE 21 CFR
SUBCHAPTERJ IN EFFECTAT
DATEOF MANUFACTURE.
TOSHIBA CORPORAT|ON
1-1 ,SHIBAURA 1-CHOME,MINATO-KU,
TOKYO 105-8001 ,JAPAN
To [11outlet
Be aware that this equipment is still powered even after the ON/STANDBY indicator turns off (standby mode)
by pressing the ON/STANDBY button. To disconnect this equipment completely from the mains power,
pullout the power plug from the wall outlet.
WARNING: HANDLING THE CORD ON THIS PRODUCT OR CORDS ASSOCIATED WITH
ACCESSORIES SOLD WITH THIS PRODUCT, WILL EXPOSE YOU TO LEAD, A
CHEMICAL KNOWN TO THE STATE OF CALIFORNIA TO CAUSE BIRTH DEFECTS
OR OTHER REPRODUCTIVE HARM, WASH HANDS AFTER HANDLING,
"O
,<
0"
0
0
o
0_
¢0
tD
r=
0
t_
5
1. Read these instructions. 9.
2. Keep these instructions.
Do not defeat the safety purpose of the
polarized or grounding-type plug. A polarized
plug has two blades with one wider than the
other. A grounding type plug has two blades
and a third grounding prong. The wide blade or
the third prong are provided for your safety. If
the provided plug does not fit into your outlet,
consult an electrician for replacement of the
obsolete outlet.
3. Heed all warnings. 10. Protect the power cord from being walked on or
pinched particularly at plugs, convenience
receptacles, and the point where they exit from
the apparatus.
4. Follow all instructions.
11. Only use attachments/accessories specified by
the manufacturer.
5. Do not use this apparatus near water.
6. Clean only with dry cloth.
7. Do not block any ventilation openings. Install in
accordance with the manufacturers
instructions.
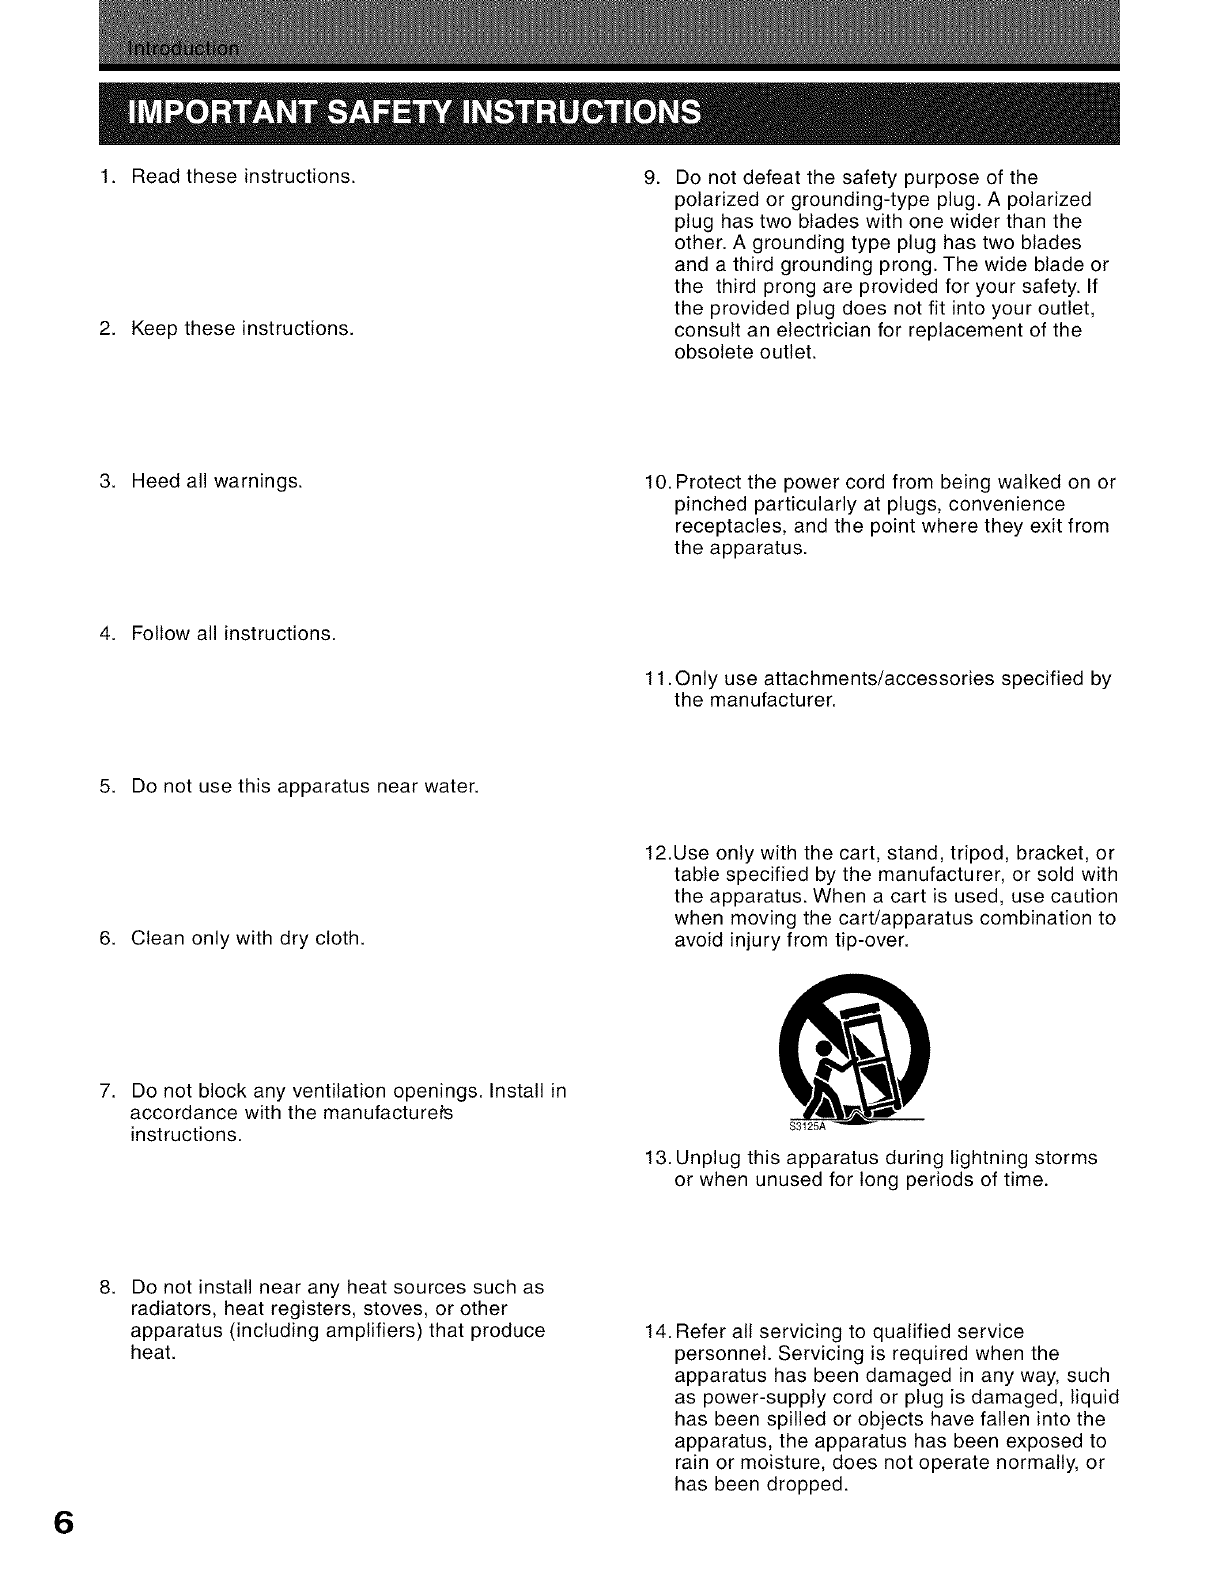
12.Use only with the cart, stand, tripod, bracket, or
table specified by the manufacturer, or sold with
the apparatus. When a cart is used, use caution
when moving the cart/apparatus combination to
avoid injury from tip-over.
13. Unplug this apparatus during lightning storms
or when unused for long periods of time.
6
.Do not install near any heat sources such as
radiators, heat registers, stoves, or other
apparatus (including amplifiers) that produce
heat. 14. Refer all servicing to qualified service
personnel. Servicing is required when the
apparatus has been damaged in any way, such
as power-supply cord or plug is damaged, liquid
has been spilled or objects have fallen into the
apparatus, the apparatus has been exposed to
rain or moisture, does not operate normally, or
has been dropped.
Introduction
IMPORTANT SAFETY INSTRUCTIONS (Continued )
ADDITIONAL SAFETY INSTRUCTIONS
15. Do not overload walt outlets; extension cords, or
integral convenience receptacles as this can
result in a risk of fire or electric shock.
21. Do not use a cracked, deformed, or repaired
disc. These discs are easily broken and may
cause serious personal injury and apparatus
malfunction.
16. Apparatus should not be exposed to dripping or
splashing and objects filled with liquids, such
as vases, should not be placed on the
apparatus.
22.1f the apparatus should smoke or smell,
immediately disconnect the power cord from the
wall outlet. Wait until the smoke or smell stops,
then ask your dealer for a check and repair.
Neglecting to do so may cause fire.
17. Keep fingers well clear of the disc tray as it is
closing. Neglecting to do so may cause serious
personal injury.
23. During thunderstorms, do not touch the
connecting cables or the apparatus.
0
o
o
o
0
e-
18. Do not place anything on top of this apparatus.
"13
<
o-
o
19. Do not place the apparatus on amplifiers or
equipment that may produce heat.
0
o
Q.
LQ
20. Do not cover the ventilating holes. (/)
t,-
"O
t-,
O
r..i.
• Never disconnect the power cord from a wall outlet
while the recorder is turned on. Doing so may
cause malfunction.
® When shipping the recorder, the original shipping
carton and packing materials come in handy. For
maximum protection, repack the unit as it was
originally packed at the factory.
® Do not use volatile liquids, such as insect spray,
near the recorder. Do not leave rubber or plastic
products in contact with the recorder for a long
time.They will leave marks on the finish.
• The top and rear panels of the recorder may
become warm after a long period of use. This is
not a malfunction.
Use a soft, dry cloth for cleaning.
• Unplug the recorder before cleaning.
• Do not use any type of solvent, such as thinner or
benzine, as they may damage the surface of the
recorder.
• Image and sound quality depend very much on
signal reception.
® Reception may be poor in weak signal areas. In this
case, consult your dealer or purchase a commercially
available antenna booster. Refer to the booster's
instruction manual for installation details.
• For usual absence
When the recorder is not in use, be sure to remove
any disc that may be in the recorder and turn the
power off.
• Prolonged absence
When the recorder will not be used for a prolonged
period of time, unplug the power cord from the wall
outlet.
® Place the recorder on a level surface. Do not use
it on a shaky or unstable surface such as a wobbly
table. Doing so may cause a loaded disc to dislodge
from its proper position and cause damage to the
recorder. Before deciding on a location for the
recorder, make sure that the surface of the location
can withstand the weight of the recorder. Never
place the recorder in an elevated location as it may
accidentally fall and cause injury or property damage.
® If you place the recorder near a TV, radio, or VCR,
the playback picture of the recorder may degrade
and the sound may distort depending on the
condition and location of said equipment. In such
event, it is recommended that you place the recorder
as far away as possible from such other equipment.
• To avoid damage to the recorder, never place or
store the recorder in direct sunlight; hot or humid
areas; or areas subject to excessive dust, smoke
(including cigarette smoke), or vibration.
• When you record/edit important content, make trial
operations beforehand to confirm the recorder can
function properly.
• When the power cord is disconnected or when a
power failure occurs during any operation of this
product, all contents recorded on a disc may be
erased. A DVD-R disc may become unavailable.
• Depending on the channel or program, an excessive
sound input level may cause noise or cut of recorded
sound. Adjust the initial setting of the recording level
when necessary.
• If a program you have set a timer recording includes
copy restriction signals, it may not be recorded. When
programming a recording, confirm that a program you
want to record is not copy-restricted.
• After a power outage the clock display will flash. Set
the clock to the correct time.
• Do not give a shock or shake (especially during
operation).
• Do not use in a place where the temperature rises or
changes rapidly.
8
Introduction
Precautions ( Continued )
Moisture condensation damages the unit. Please
read the following carefully,
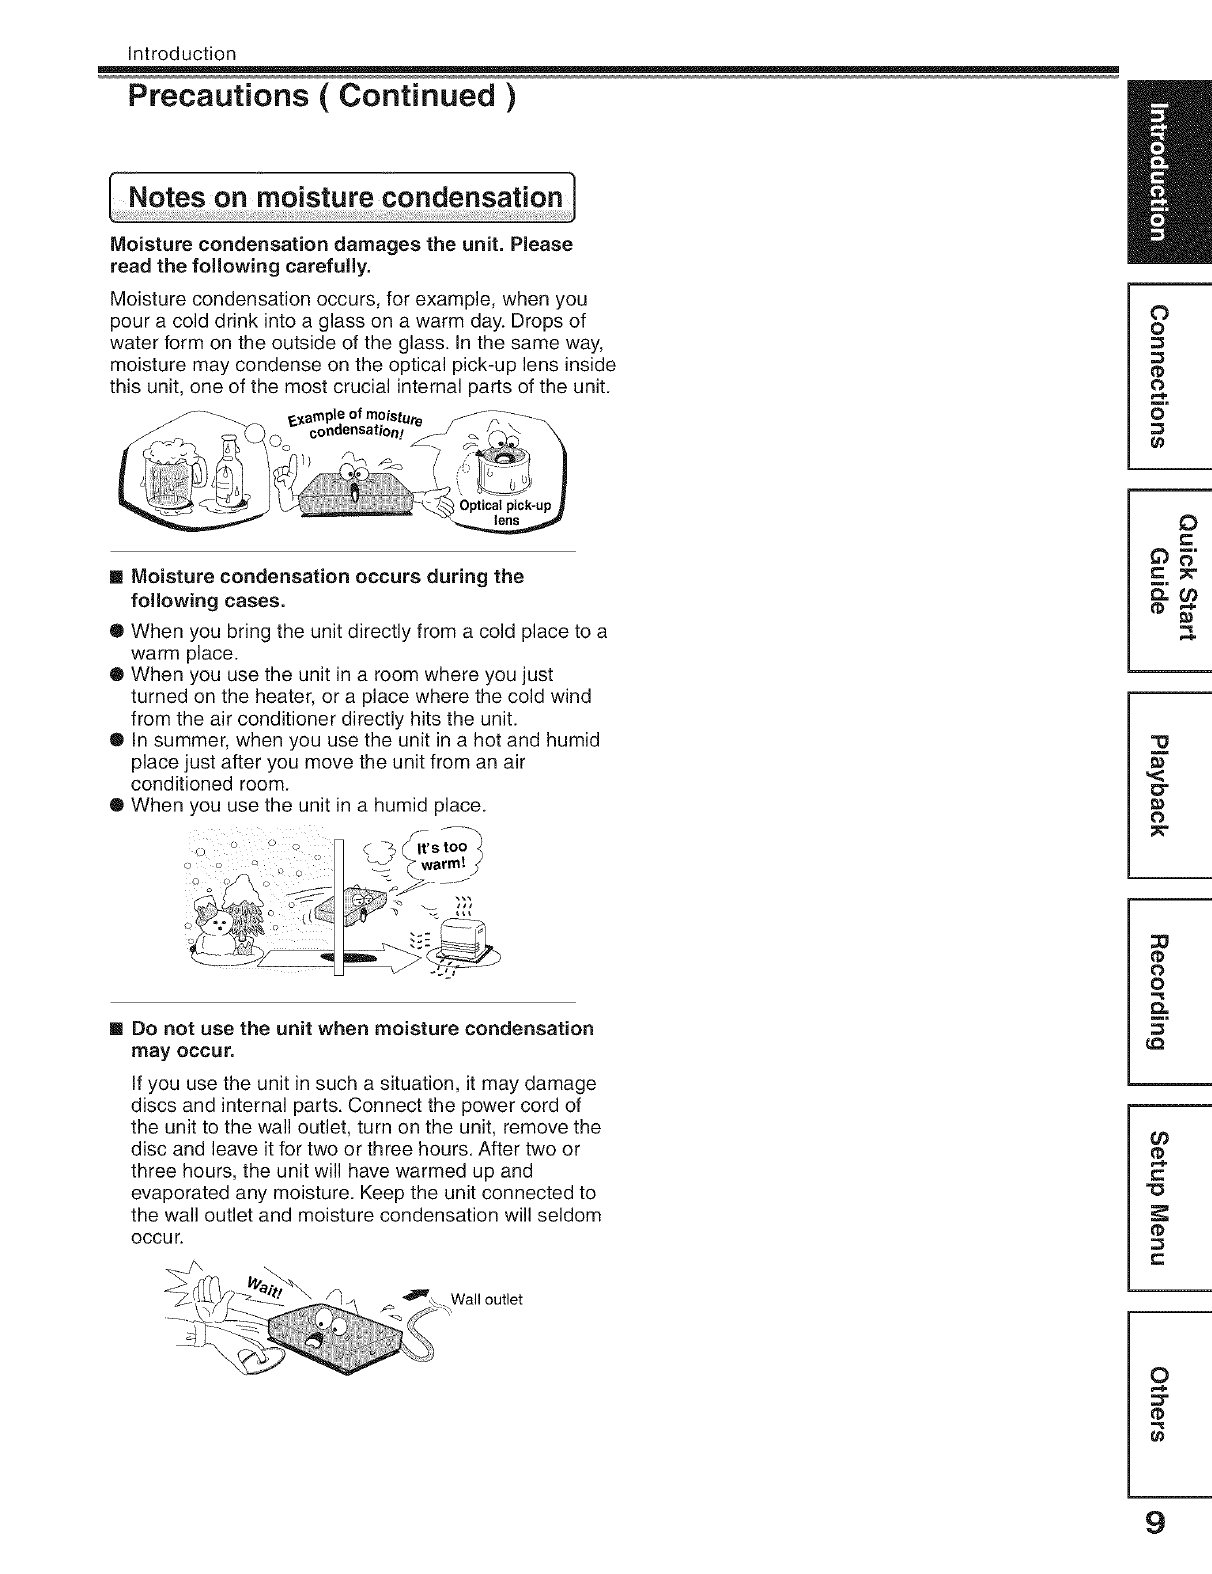
Moisture condensation occurs, for example, when you
pour a cold drink into a glass on a warm day. Drops of
water form on the outside of the glass. In the same way,
moisture may condense on the optical pick-up lens inside
this unit, one of the most crucial internal parts of the unit.
0 o
[] Moisture condensation occurs during the
following cases.
® When you bring the unit directly from a cold place to a
warm place.
® When you use the unit in a room where you just
turned on the heater, or a place where the cold wind
from the air conditioner directly hits the unit.
• in summer, when you use the unit in a hot and humid
place just after you move the unit from an air
conditioned room.
• When you use the unit in a humid place.
o
!? 0
[] Do not use the unit when moisture condensation
may occur.
If you use the unit in such a situation, it may damage
discs and internal parts. Connect the power cord of
the unit to the wall outlet, turn on the unit, remove the
disc and leave it for two or three hours. After two or
three hours, the unit will have warmed up and
evaporated any moisture. Keep the unit connected to
the wall outlet and moisture condensation will seldom
occur.
outlet
0
o
0
o
0
e-
0"
0
0
o
0_
¢0
tD
r=
0
t_
9
Because of its recording capacity, this DVD recorder
operates more like a computer and differently than a
standard DVD player. In addition to containing a
microprocessor, it contains an operating system,
random access memory (RAM), and a
DVD-RAM/R/RW drive. The operating system
includes software that is transferred to the RAM when
the machine is turned on and at other times during
operation. This transfer can take time. Therefore,
when you turn the DVD recorder on, it may take a
little while before it is ready to use. Likewise, other
functions may not be performed as quickly as they
would on other AV equipment. Additionally, accessing
those programs (or deleting a program from a
DVD-RAM or DVD-RW disc) may take more time.
Please take these factors into consideration as you
use the DVD recorder.
In isolated cases, a disc bearing the DVD or CD logo
may not fully and properly playback all features or as
intended by the creator of the disc. This can be due,
among other reasons, to problems and errors that can
occur during the creation or recording of DVD and
other software and the manufacture of software discs
(including blank discs). Moreover, because of
variations in the quality of discs, this recorder may not
be able to record on all discs that bear a DVD-RAM,
DVD-R or DVD-RW logo, but you should not encounter
difficulty if you use only high quality recordable DVD
discs. Additionally, discs recorded in this device may
not operate properly in other DVD players, recorders
and/or personal computer drives. If you happen to
encounter difficulties playing or recording a DVD disc
or playing a CD disc, please feel free to call our
Customer Service Hotline at 1-800-319-6684.
This owner's manual explains the basic instructions
for this recorder. Some DVD video discs are
produced in a manner that allows specific or limited
operation during playback. As such, the recorder
may not respond to all operating commands. This is
not a defect in the recorder. Please refer to the notes
on compatible discs later in this Introduction and to
the discussion of DVD playback and features later in
this manual.
"Q" may appear on the TV screen during operation.
"(_)" means that the operation is not permitted by the
recorder or the disc.
Copy-protected contents of DVD-Video discs, VIDEO
CDs or audio CDs on the market cannot be copied on
this recorder. Contents without copy protection should
be copied or edited only in accordance with applicable
copyright laws, which may restrict copying or editing.
Contents that permit single copying (copy once
contents) can be recorded onto DVD-RAM/RW discs,
with some dubbing and editing restrictions. DVD-R
discs cannot record these contents.
The unauthorized recording, use, distribution, or
revision of copyrighted materials including, without
limitation, television programs, videotapes, and DVDs,
is prohibited under the Copyright Laws of the United
States and other countries, and may subject you to
civil and criminal liability.
10
There are many types and formats of discs. Please use the following information to select an appropriate
disc.
is atrademark of DVD Format /logo Licensing Corporation,
Notes
= Handle the disc according to the disc instruction manual
=Toshiba cannot guarantee that all discs bearing the DVD or CD Iogos will operate as expected. Additionally,
Toshiba cannot guarantee that discs recorded in this device wiJloperate properly in other DVD players.
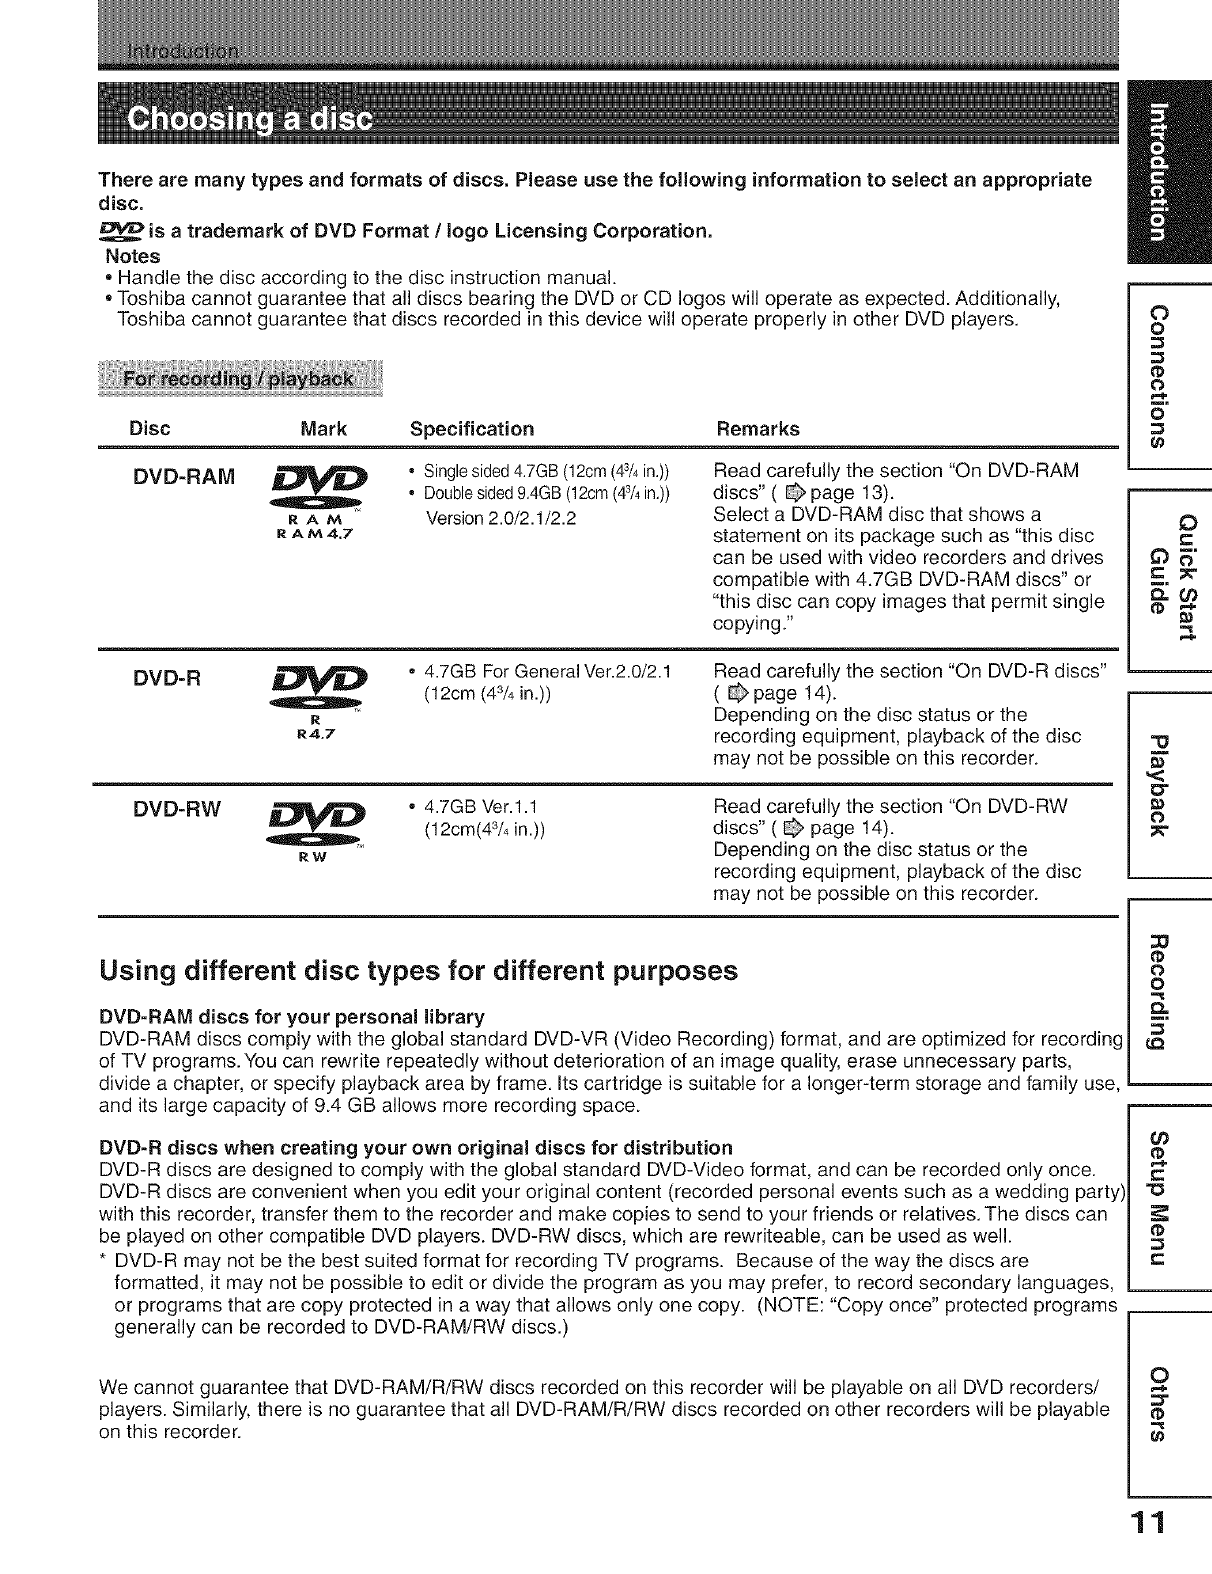
Disc
DVD-RAM
DVD-R
Mark Specification Remarks
RAtA
R A tA 4,7
•Single sided 4,7GB (12cm (43/4in,))
•Doublesided9,4GB (12cm(43/4in,))
Version 2.0/2.1/2.2
R
R4,7
Read carefully the section "On DVD-RAM
discs"( @page 13).
Select a DVD-RAM disc that shows a
statement on its package such as "this disc
can be used with video recorders and drives
compatible with 4.7GB DVD-RAM discs" or
"this disc can copy images that permit single
copying."
•4.7GB For General Ver.2.0/2.1
(12cm (43/4 in.))
DVD-RW _ • 4.7GB Ver.l.1(12cm(43/4in.))
RW
Read carefully the section "On DVD-R discs"
( _ page 14).
Depending on the disc status or the
recording equipment, playback of the disc
may not be possible on this recorder.
Read carefully the section "On DVD-RW
discs" ( @ page 14).
Depending on the disc status or the
recording equipment, playback of the disc
may not be possible on this recorder.
Using different disc types for different purposes
DVD-RAM discs for your personal library
DVD-RAM discs comply with the global standard DVD-VR (Video Recording) format, and are optimized for recording
of TV programs. You can rewrite repeatedly without deterioration of an image quality, erase unnecessary parts,
divide a chapter, or specify playback area by frame. Its cartridge is suitable for a longer-term storage and family use,
and its large capacity of 9.4 GB allows more recording space.
DVD-R discs when creating your own original discs for distribution
DVD-R discs are designed to comply with the global standard DVD-Video format, and can be recorded only once.
DVD-R discs are convenient when you edit your original content (recorded personal events such as a wedding party)
with this recorder, transfer them to the recorder and make copies to send to your friends or relatives. The discs can
be played on other compatible DVD players. DVD-RW discs, which are rewriteable, can be used as well.
*DVD-R may not be the best suited format for recording TV programs. Because of the way the discs are
formatted, it may not be possible to edit or divide the program as you may prefer, to record secondary languages,
or programs that are copy protected in a way that allows only one copy. (NOTE: "Copy once" protected programs
generally can be recorded to DVD-RAM/RW discs.)
We cannot guarantee that DVD-RAM/R/RW discs recorded on this recorder will be playable on all DVD recorders/
players. Similarly, there is no guarantee that all DVD-RAM/R/RW discs recorded on other recorders will be playable
on this recorder.
O
o
0
o
0
e-
,<
O"
O
0
o
0_
¢0
tD
r=
0
t_
11
Introduction
Choosing a disc ( Continued )
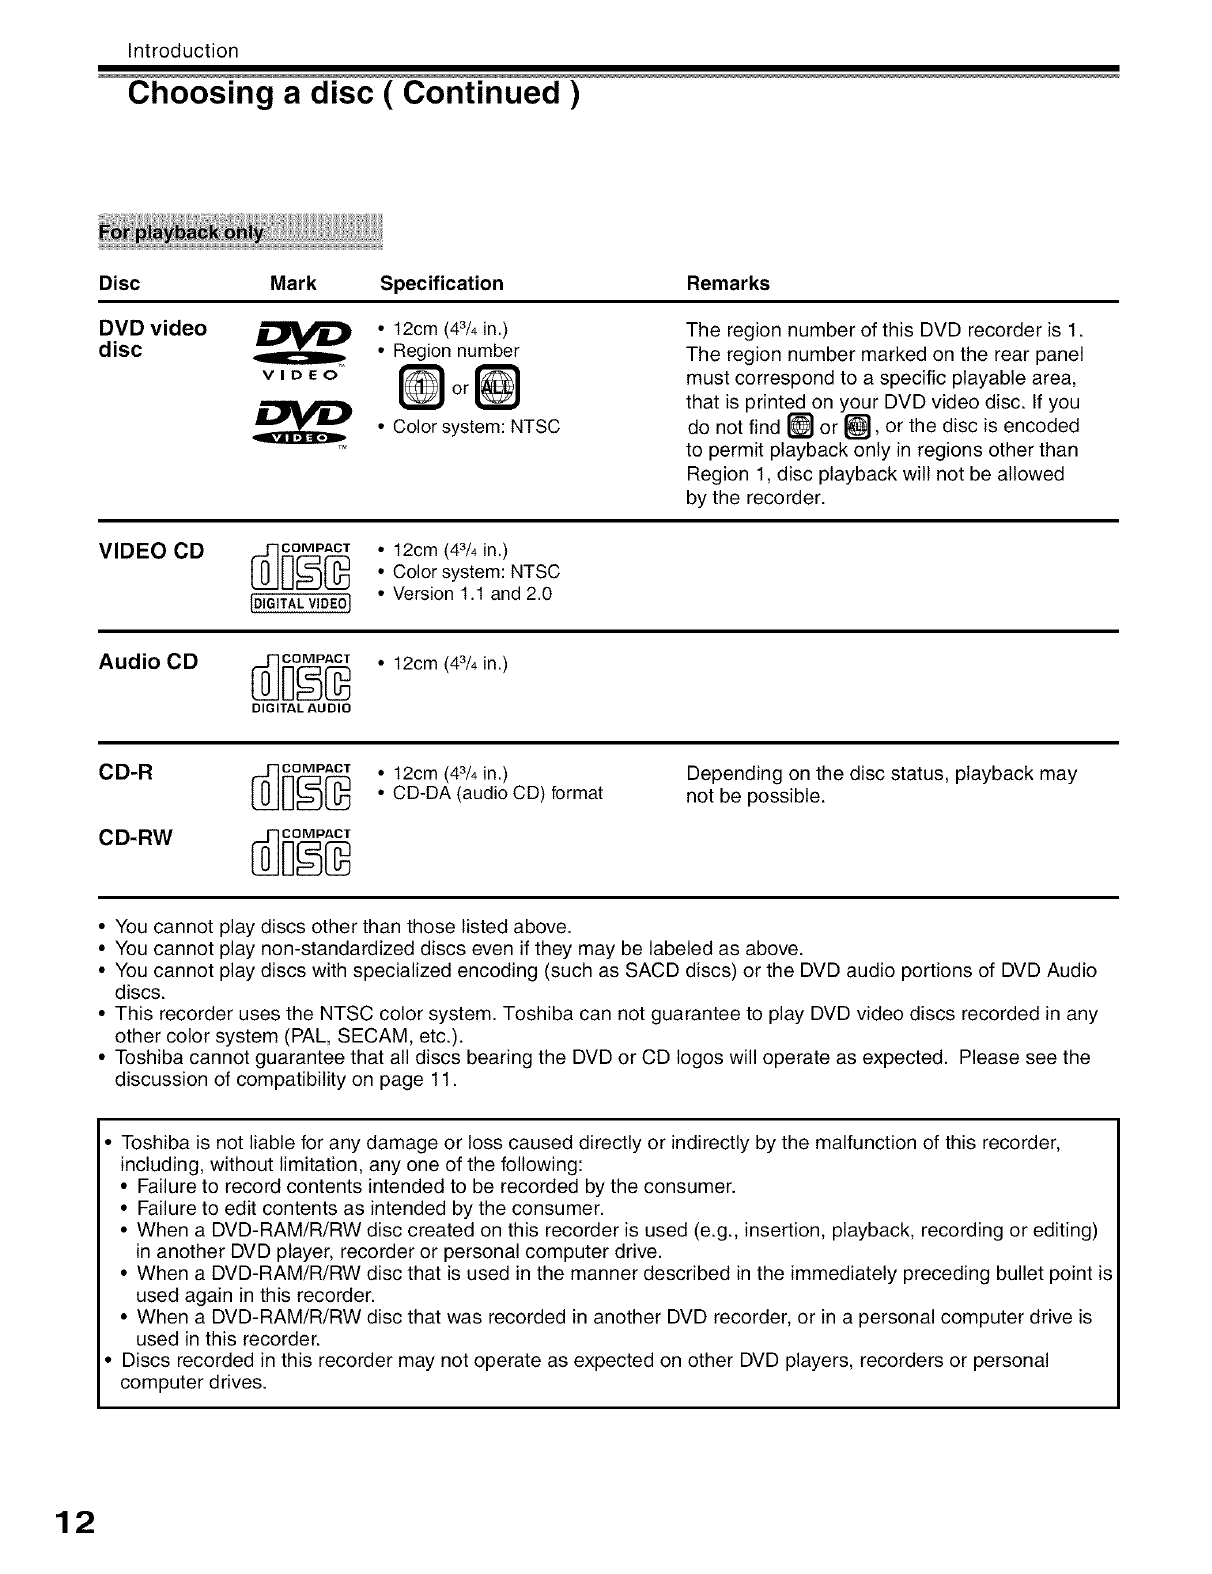
Disc
DVD video
disc
VIDEO
VIDEO CD
Mark Specification Remarks
•12cm (43/4in.)
• Region number
or
• Color system: NTSC
The region number of this DVD recorder is 1.
The region number marked on the rear panel
must correspond to a specific playable area,
that is printed on your DVD video disc. If you
do not find _ or _, or the disc is encoded
to permit playback only in regions other than
Region 1, disc playback will not be allowed
by the recorder.
_oc_ _ o12cm (43/4in.)• Color system: NTSC
[DIGITALVIDEO] °Version 1.1 and 2.0
Audio CD
_ _]o_ o12cm (43/4in.)
DIGITAL AUDIO
• 12cm (43/4in.)
• CD-DA (audio CD) format Depending on the disc status, playback may
not be possible.
• You cannot play discs other than those listed above.
• You cannot play non-standardized discs even if they may be labeled as above.
• You cannot play discs with specialized encoding (such as SACD discs) or the DVD audio portions of DVD Audio
discs.
• This recorder uses the NTSC color system. Toshiba can not guarantee to play DVD video discs recorded in any
other color system (PAL, SECAM, etc.).
• Toshiba cannot guarantee that all discs bearing the DVD or CD logos will operate as expected. Please see the
discussion of compatibility on page 11.
• Toshiba is not liable for any damage or loss caused directly or indirectly by the malfunction of this recorder,
including, without limitation, any one of the following:
• Failure to record contents intended to be recorded by the consumer.
• Failure to edit contents as intended by the consumer.
• When a DVD-RAM/R/RW disc created on this recorder is used (e.g., insertion, playback, recording or editing)
in another DVD player, recorder or personal computer drive.
• When a DVD-RAM/R/RW disc that is used in the manner described in the immediately preceding bullet point is
used again in this recorder.
• When a DVD-RAM/R/RW disc that was recorded in another DVD recorder, or in a personal computer drive is
used in this recorder.
• Discs recorded in this recorder may not operate as expected on other DVD players, recorders or personal
computer drives.
12
Introduction
Choosing adisc (Continued )
[] Use only DVD-RAM discs that comply with
DVD-RAM standard Version 2.0, 2.1 or 2.2.
The recorder cannot record on a disc formatted in
any other standard. When using such a disc, initialize
it by using the disc-format function of this recorder.
Q The recorder may not record, dub, or edit some
DVD-RAM discs, because they are edited/recorded
with another manufacturer's equipment or PC,
contain a large number of titles, or have little
remaining capacity. Also, a DVD-RAM disc may not
be edited or recorded if its title contains still pictures.
O DVD-RAM discs formatted in UDF2.0 on a PC are
not compatible with this recorder. Before using these
discs, initialize them on this recorder.
• This recorder complies with current copyright
protection technology and can copy a disc only when
the disc permits copying once. When there is no
indication on the disc, copying will not be allowed.
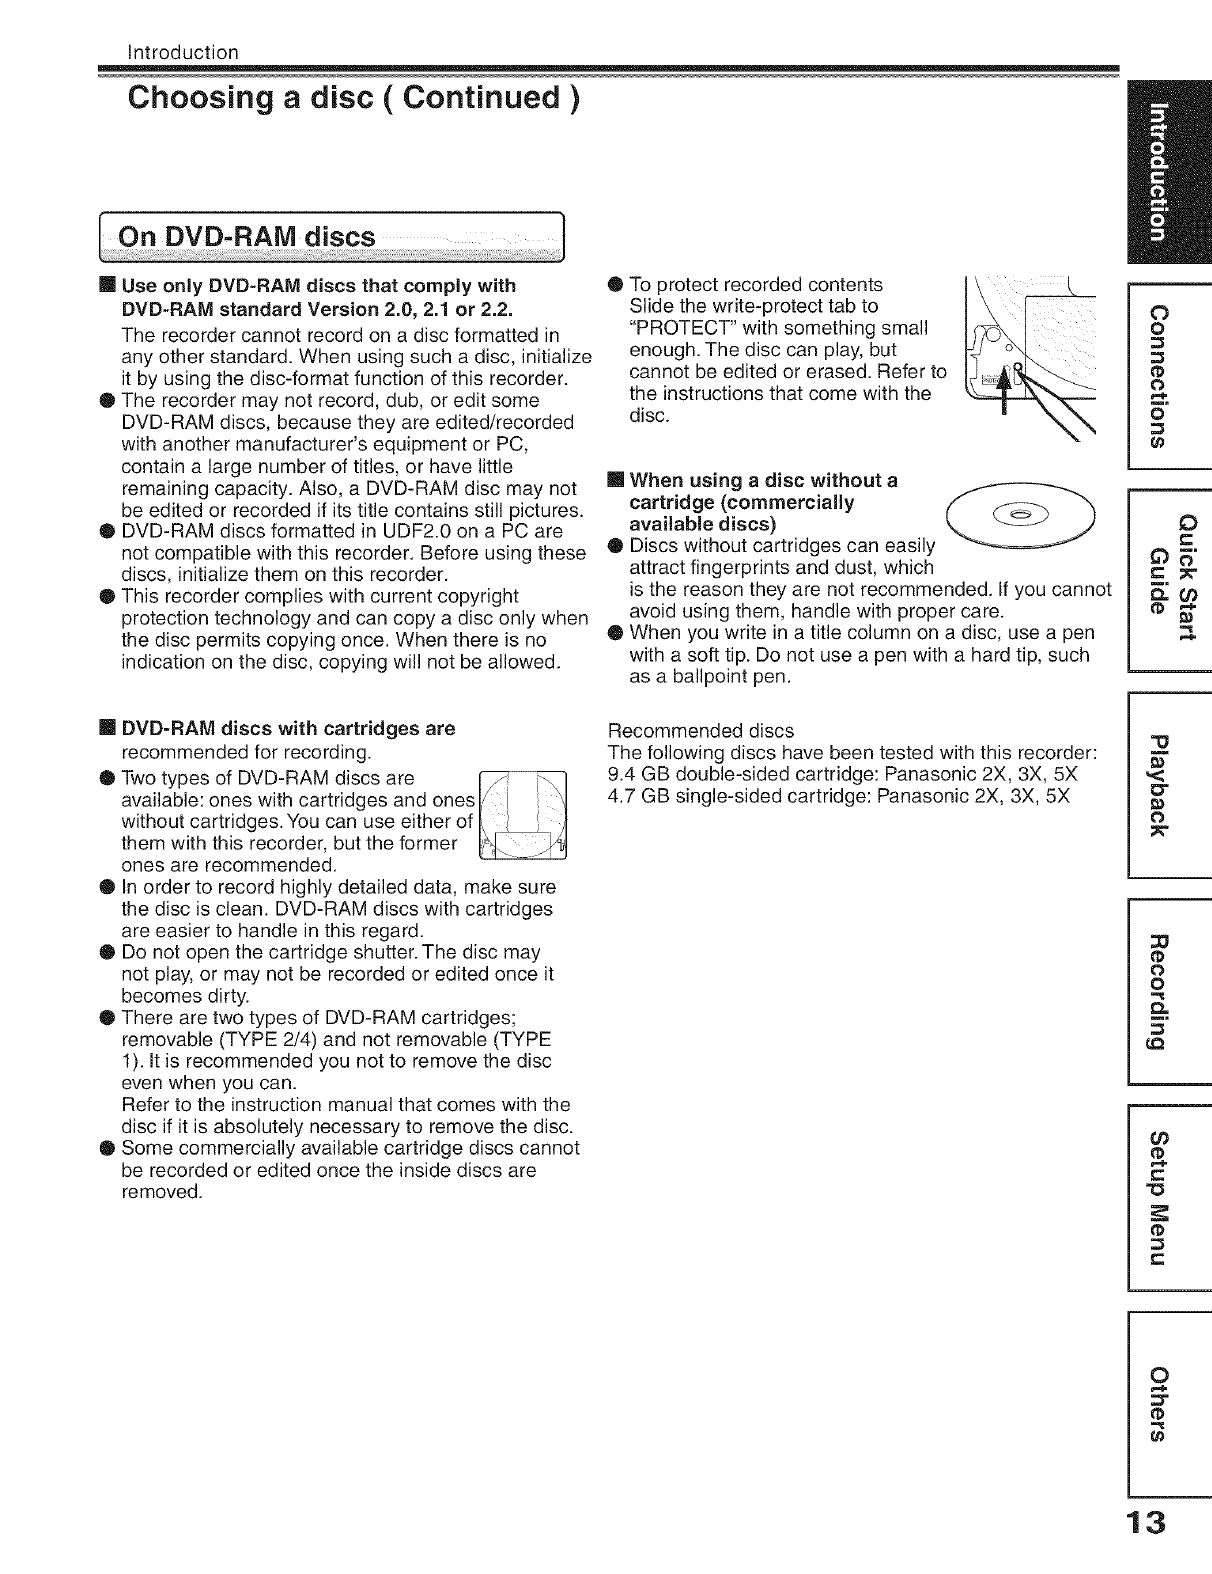
[] DVD-RAM discs with cartridges are
recommended for recording.
• Two types of DVD-RAM discs are
available: ones with cartridges and onest/ J \1
without cartridges.You can use either of I\ _ /I
them with this recorder, but the former
ones are recommended.
• In order to record highly detailed data, make sure
the disc is clean. DVD-RAM discs with cartridges
are easier to handle in this regard.
• Do not open the cartridge shutter. The disc may
not play, or may not be recorded or edited once it
becomes dirty.
O There are two types of DVD-RAM cartridges;
removable (TYPE 2/4) and not removable (TYPE
1). It is recommended you not to remove the disc
even when you can.
Refer to the instruction manual that comes with the
disc if it is absolutely necessary to remove the disc.
• Some commercially available cartridge discs cannot
be recorded or edited once the inside discs are
removed.
O To protect recorded contents
Slide the write-protect tab to
"PROTECT" with something small
enough. The disc can play, but
cannot be edited or erased. Refer to
the instructions that come with the
disc.
[] When using a disc without a
cartridge (commercially
available discs)
• Discs without cartridges can easily
attract fingerprints and dust, which
is the reason they are not recommended. If you cannot
avoid using them, handle with proper care.
• When you write in a title column on a disc, use a pen
with a soft tip. Do not use a pen with a hard tip, such
as a ballpoint pen.
Recommended discs
The following discs have been tested with this recorder:
9.4 GB double-sided cartridge: Panasonic 2X, 3X, 5X
4.7 GB single-sided cartridge: Panasonic 2X, 3X, 5X
O
o
0
o
0
e-
,<
O"
O
0
o
0_
¢0
tD
r=
0
t_
13
Introduction
Choosing adisc ( Continued )
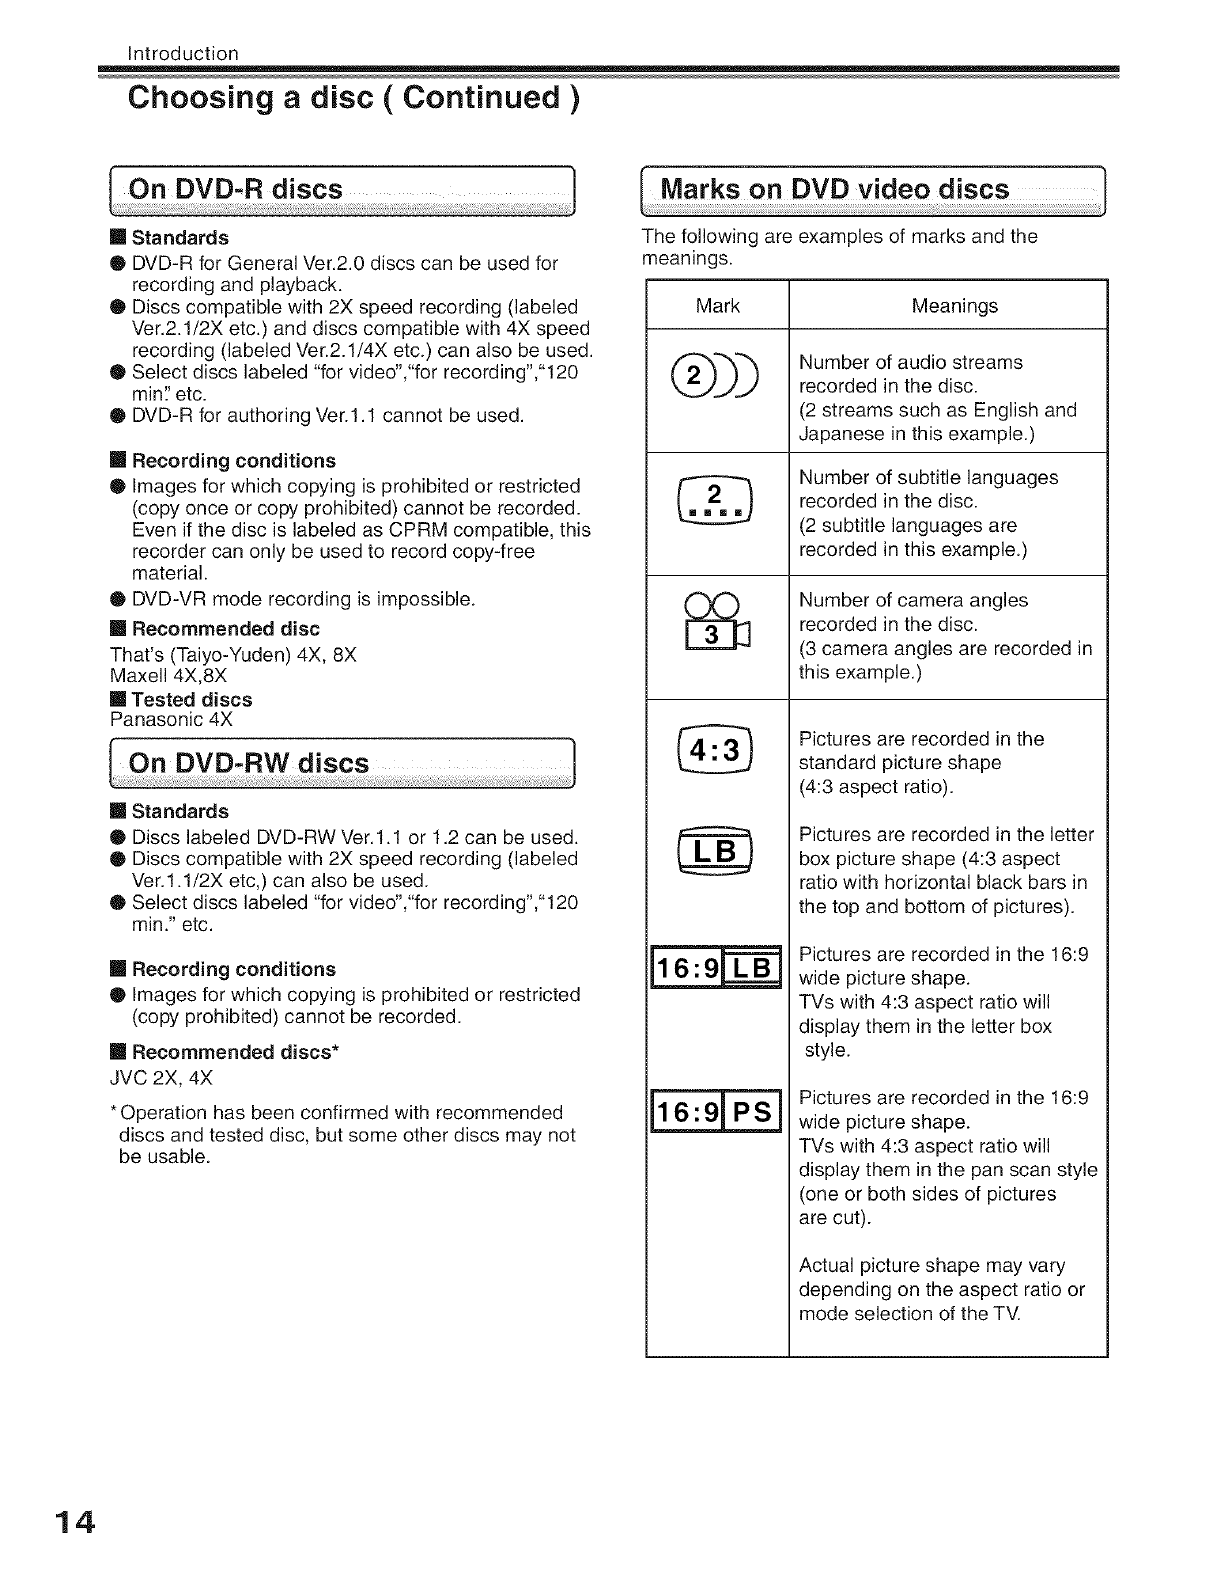
[] Standards
O DVD-R for General Ver.2.0 discs can be used for
recording and playback.
O Discs compatible with 2X speed recording (labeled
Ver.2.1/2X etc.) and discs compatible with 4X speed
recording (labeled Ver.2.1/4X etc.) can also be used.
O Select discs labeled "for video',"for recording',"120
min? etc.
O DVD-R for authoring Ver.1.1 cannot be used.
[] Recording conditions
Q Images for which copying is prohibited or restricted
(copy once or copy prohibited) cannot be recorded.
Even if the disc is labeled as CPRM compatible, this
recorder can only be used to record copy-free
material.
• DVD-VR mode recording is impossible.
[] Recommended disc
That's (Taiyo-Yuden) 4X, 8X
Maxell 4X,8X
[] Tested discs
Panasonic 4X
[] Standards
• Discs labeled DVD-RW Ver.l.1 or 1.2 can be used.
• Discs compatible with 2X speed recording (labeled
Ver.l.1/2X etc,) can also be used.
O Select discs labeled "for video',"for recording',"120
min." etc.
[] Recording conditions
• Images for which copying is prohibited or restricted
(copy prohibited) cannot be recorded.
[] Recommended discs*
JVC 2X, 4X
• Operation has been confirmed with recommended
discs and tested disc, but some other discs may not
be usable.
The following are examples of marks and the
meanings.
Mark
®))
%
Meanings
Number of audio streams
recorded in the disc.
(2 streams such as English and
Japanese in this example.)
Number of subtitle languages
recorded in the disc.
(2 subtitle languages are
recorded in this example.)
Number of camera angles
recorded in the disc.
(3 camera angles are recorded in
this example.)
Pictures are recorded in the
standard picture shape
(4:3 aspect ratio).
Pictures are recorded in the letter
box picture shape (4:3 aspect
ratio with horizontal black bars in
the top and bottom of pictures).
Pictures are recorded in the 16:9
wide picture shape.
TVs with 4:3 aspect ratio will
display them in the letter box
style.
Pictures are recorded in the 16:9
wide picture shape.
TVs with 4:3 aspect ratio will
display them in the pan scan style
(one or both sides of pictures
are cut).
Actual picture shape may vary
depending on the aspect ratio or
mode selection of the TV.
14
Introduction
Choosing a disc (Continued )
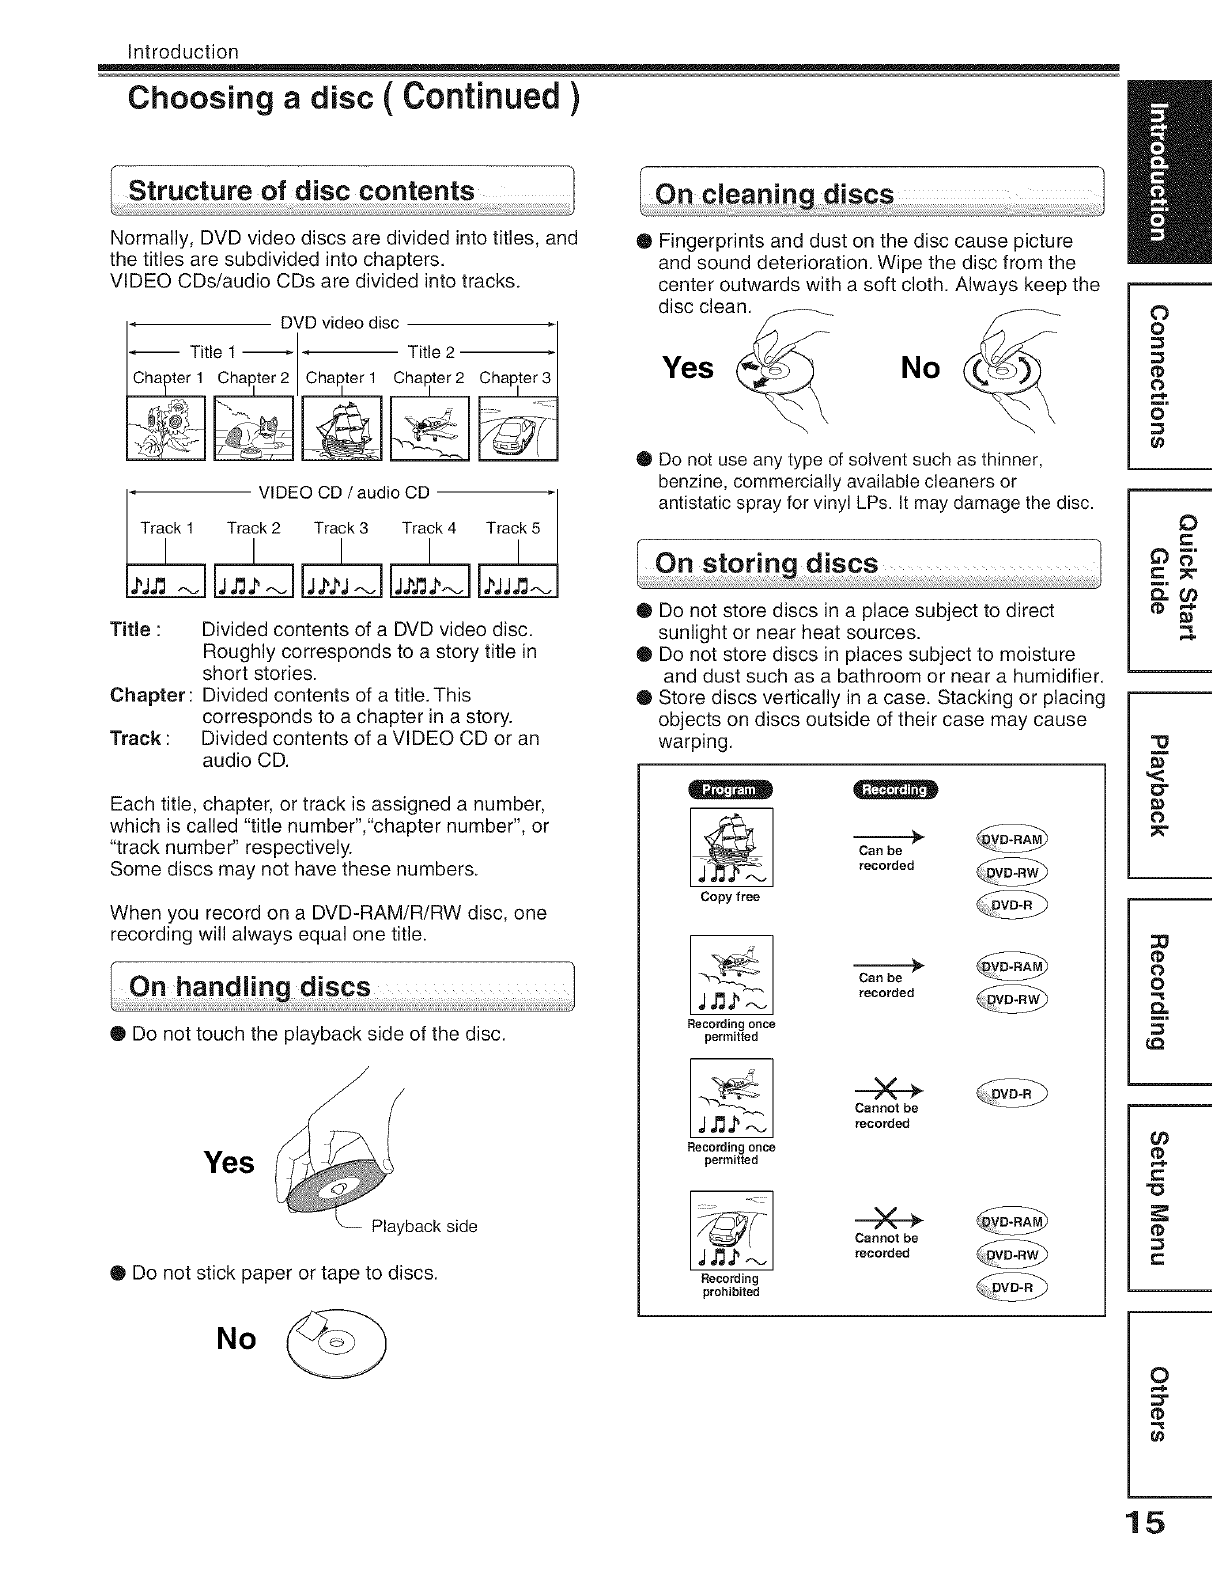
Structure of disc contents l
Normally, DVD video discs are divided into titles, and
the titles are subdivided into chapters.
VIDEO CDs/audio CDs are divided into tracks.
'Tra_ VIDEOCD /audio CD _
Track 2 Track 3 Track 4
Title :
Chapter:
Track :
Divided contents of a DVD video disc.
Roughly corresponds to a story title in
short stories.
Divided contents of a title. This
corresponds to a chapter in a story.
Divided contents of a VIDEO CD or an
audio CD.
Each title, chapter, or track is assigned a number,
which is called "title number","chapter number", or
"track number" respectively.
Some discs may not have these numbers.
When you record on a DVD-RAM/R/RW disc, one
recording will always equal one title.
• Do not touch the playback side of the disc.
Yes
Playbackside
• Do not stick paper or tape to discs.
• Fingerprints and dust on the disc cause picture
and sound deterioration. Wipe the disc from the
center outwards with a soft cloth. Always keep the
disc clean.
Yes No
• Do not use any type of solvent such as thinner,
benzine, commercially available cleaners or
antistatic spray for vinyl LPs. It may damage the disc.
Q Do not store discs in a place subject to direct
sunlight or near heat sources.
O Do not store discs in places subject to moisture
and dust such as a bathroom or near a humidifier.
@ Store discs vertically in a case. Stacking or placing
objects on discs outside of their case may cause
warping.
Copy free
Can be
recorded
Recording once
permitted
Can be
recorded
,IJ3._.-.J
Recording once
permitted
Cannot be
recorded
Recording
prohibited
Cannot be
recorded
No
0
o
0
o
0
e-
,<
O"
O
0
o
0_
¢0
tD
r=
0
t_
15
Introduction
Choose a disc ( Continued )
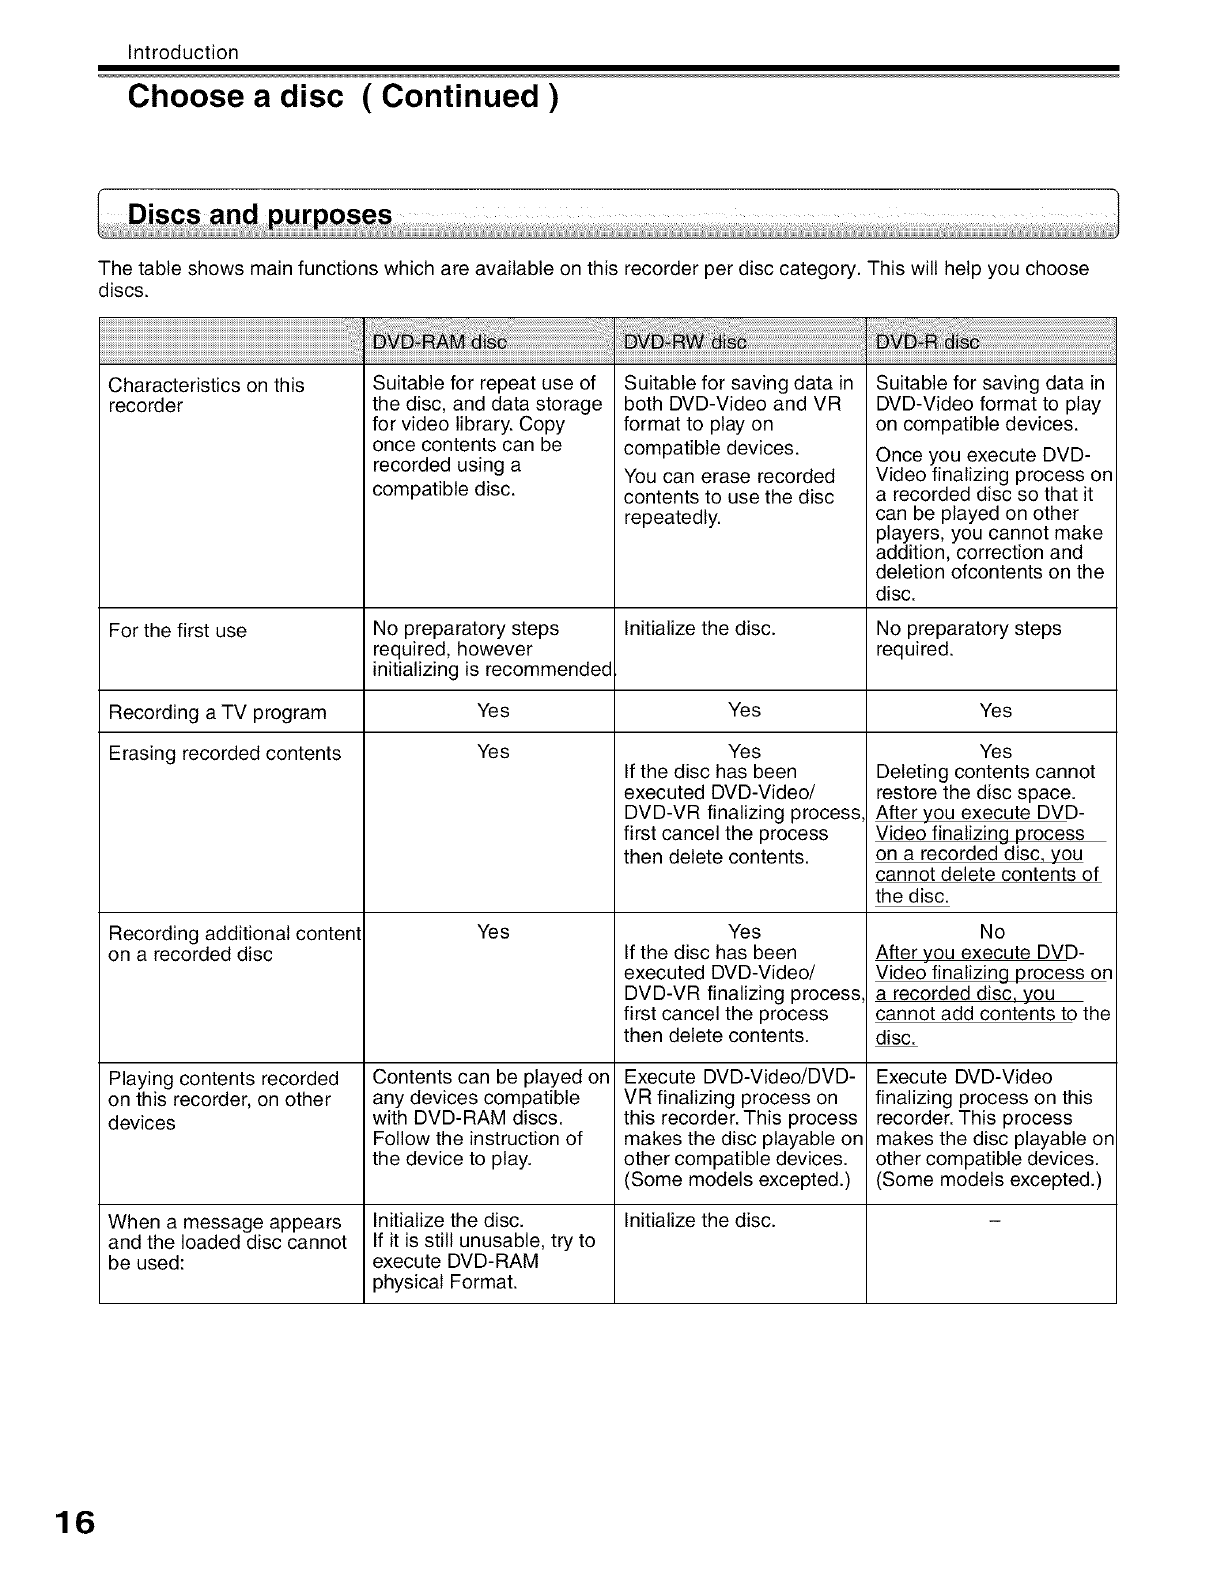
The table shows main functions which are available on this recorder per disc category. This will help you choose
discs.
Characteristics on this
recorder
For the first use
Recording a TV program
Erasing recorded contents
Recording additional content
on a recorded disc
Playing contents recorded
on this recorder, on other
devices
Suitable for repeat use of
the disc, and data storage
for video library. Copy
once contents can be
recorded using a
compatible disc.
No preparatory steps
required, however
initializing is recommended
Yes
Yes
Yes
Contents can be played on
any devices compatible
with DVD-RAM discs.
Follow the instruction of
the device to play.
Initialize the disc.
If it is still unusable, try to
execute DVD-RAM
physical Format.
When a message appears
and the loaded disc cannot
be used:
Suitable for saving data in
both DVD-Video and VR
format to play on
compatible devices.
You can erase recorded
contents to use the disc
repeatedly.
Initialize the disc.
Yes
Yes
If the disc has been
executed DVD-Video/
DVD-VR finalizing process
first cancel the process
then delete contents.
Yes
If the disc has been
executed DVD-Video/
DVD-VR finalizing process
first cancel the process
then delete contents.
Execute DVD-Video/DVD-
VR finalizing process on
this recorder. This process
makes the disc playable on
other compatible devices.
(Some models excepted.)
Initialize the disc.
Suitable for saving data in
DVD-Video format to play
on compatible devices.
Once you execute DVD-
Video finalizing process on
a recorded disc so that it
can be played on other
players, you cannot make
addition, correction and
deletion ofcontents on the
disc.
No preparatory steps
required.
Yes
Yes
Deleting contents cannot
restore the disc space.
After you execute DVD-
Video finalizing process
on a recorded disc, you
cannot delete contents of
the disc.
No
After you execute DVD-
Video finalizing process on
a recorded disc, you
cannot add contents to the
disc.
Execute DVD-Video
finalizing process on this
recorder. This process
makes the disc playable on
other compatible devices.
(Some models excepted.)
16
/..................................
[i___/ .............................
s.............
......... J
/
OPEN/CLOSE
DISPLAY
0 _
PAUSE PLAY STOP
SKiPREV REV FWD SKIPFWD
INSTANTREPLAYREC SLOW INSTANTSKIP
TOPMENU/", MENU
®®®
® ®®
_u_u0_ _
_ CI] CI3 _
SEARCH ANGLE AUDIO SUBTITLE
SETUP
O
0
O
0
O
Oi
O
0
0
O.
O)
n_
0
17
Introduction
Index to parts and controls (Continued )
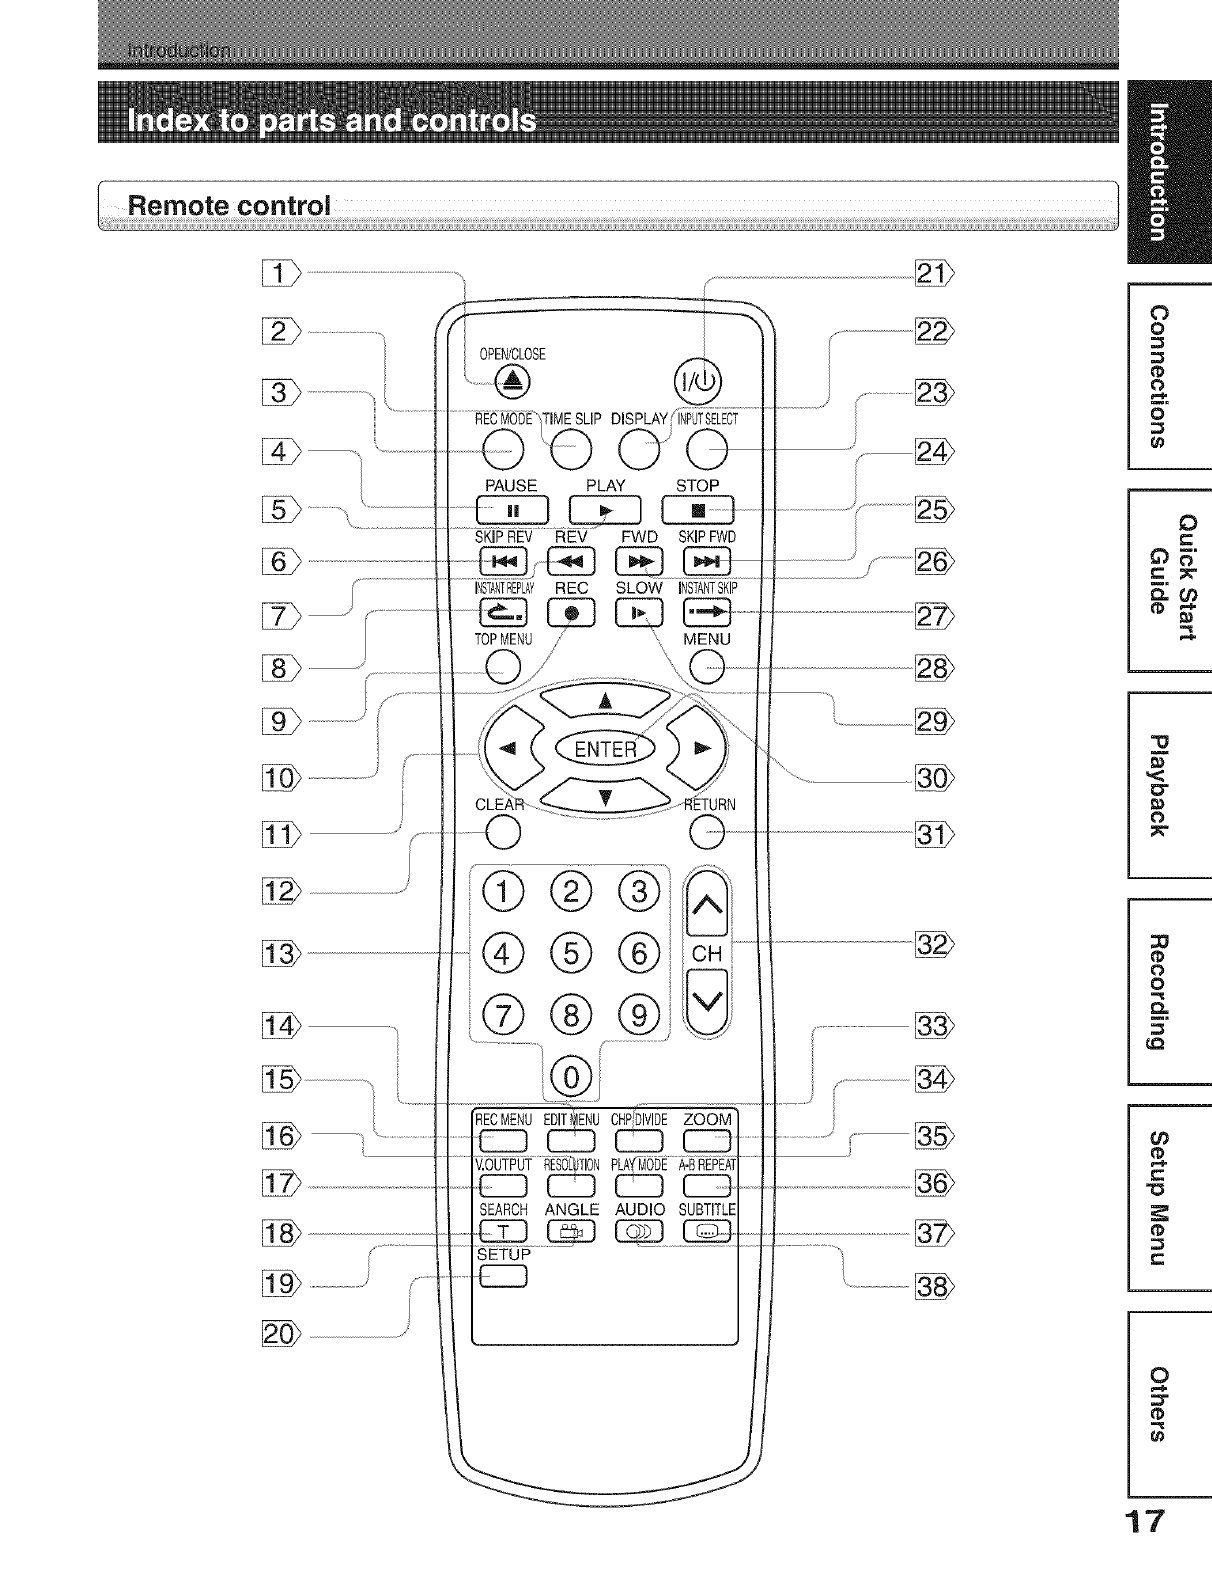
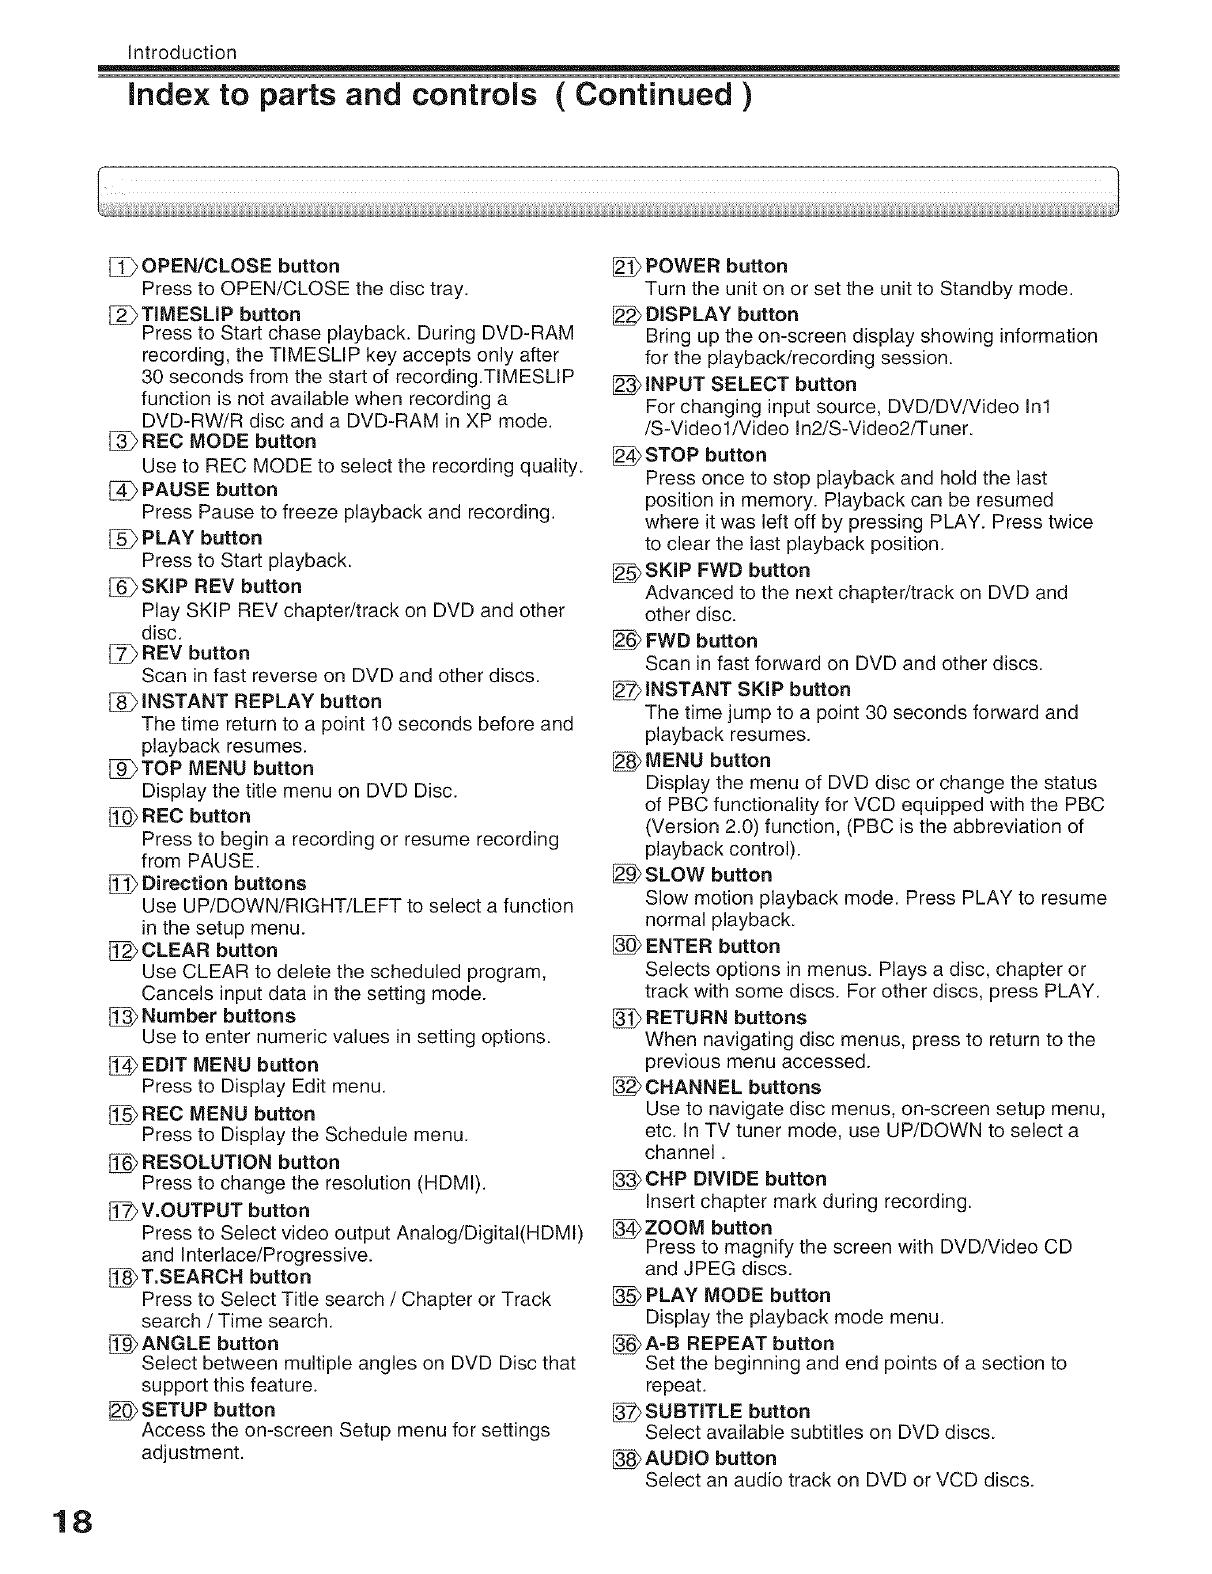
[_ OPEN/CLOSE button
Press to OPEN/CLOSE the disc tray.
[_i_ TIMESLIP button
Press to Start chase playback. During DVD-RAM
recording, the TIMESLIP key accepts only after
30 seconds from the start of recording.TIMESLIP
function is not available when recording a
DVD-RW/R disc and a DVD-RAM in XP mode.
[_ REC MODE button
Use to REC MODE to select the recording quality.
PAUSE button
Press Pause to freeze playback and recording.
[_ PLAY button
Press to Start playback.
[_SKIP REV button
Play SKIP REV chapter/track on DVD and other
disc.
[_ REV button
Scan in fast reverse on DVD and other discs.
INSTANT REPLAY button
The time return to a point 10 seconds before and
playback resumes.
[_)TOP MENU button
Display the title menu on DVD Disc.
[_ REC button
Press to begin a recording or resume recording
from PAUSE.
[_ Direction buttons
Use UP/DOWN/RIGHT/LEFT to select a function
in the setup menu.
CLEAR button
Use CLEAR to delete the scheduled program,
Cancels input data in the setting mode.
Number buttons
Use to enter numeric values in setting options.
EDIT MENU button
Press to Display Edit menu.
[_ REC MENU button
Press to Display the Schedule menu.
RESOLUTION button
Press to change the resolution (HDMI).
V.OUTPUT button
Press to Select video output Analog/Digital(HDMI)
and Interlace/Progressive.
_T.SEARCH button
Press to Select Title search /Chapter or Track
search /Time search.
[!_ ANGLE button
Select between multiple angles on DVD Disc that
support this feature.
_SETUP button
Access the on-screen Setup menu for settings
adjustment.
POWER button
Turn the unit on or set the unit to Standby mode.
DISPLAY button
Bring up the on-screen display showing information
for the playback/recording session.
INPUT SELECT button
For changing input source, DVD/DV/Video In1
/S-Videol/Video In2/S-Video2/Tuner.
STOP button
Press once to stop playback and hold the last
position in memory. Playback can be resumed
where it was left off by pressing PLAY. Press twice
to clear the last playback position.
_SKIP FWD button
Advanced to the next chapter/track on DVD and
other disc.
FWD button
Scan in fast forward on DVD and other discs.
INSTANT SKIP button
The time jump to a point 30 seconds forward and
playback resumes.
MENU button
Display the menu of DVD disc or change the status
of PBC functionality for VCD equipped with the PBC
(Version 2.0) function, (PBC is the abbreviation of
playback control).
SLOW button
Slow motion playback mode. Press PLAY to resume
normal playback.
ENTER button
Selects options in menus. Plays a disc, chapter or
track with some discs. For other discs, press PLAY.
RETURN buttons
When navigating disc menus, press to return to the
previous menu accessed.
CHANNEL buttons
Use to navigate disc menus, on-screen setup menu,
etc. In TV tuner mode, use UP/DOWN to select a
channel.
_CHP DIVIDE button
Insert chapter mark during recording.
_ZOOM button
Press to magnify the screen with DVD/VIdeo CD
and JPEG discs.
PLAY MODE button
Display the playback mode menu.
_:>A-B REPEAT button
Set the beginning and end points of a section to
repeat.
SUBTITLE button
Select available subtitles on DVD discs.
_AUDIO button
Select an audio track on DVD or VCD discs.
18
Introduction
index to parts and controls ( Continued )
2
3
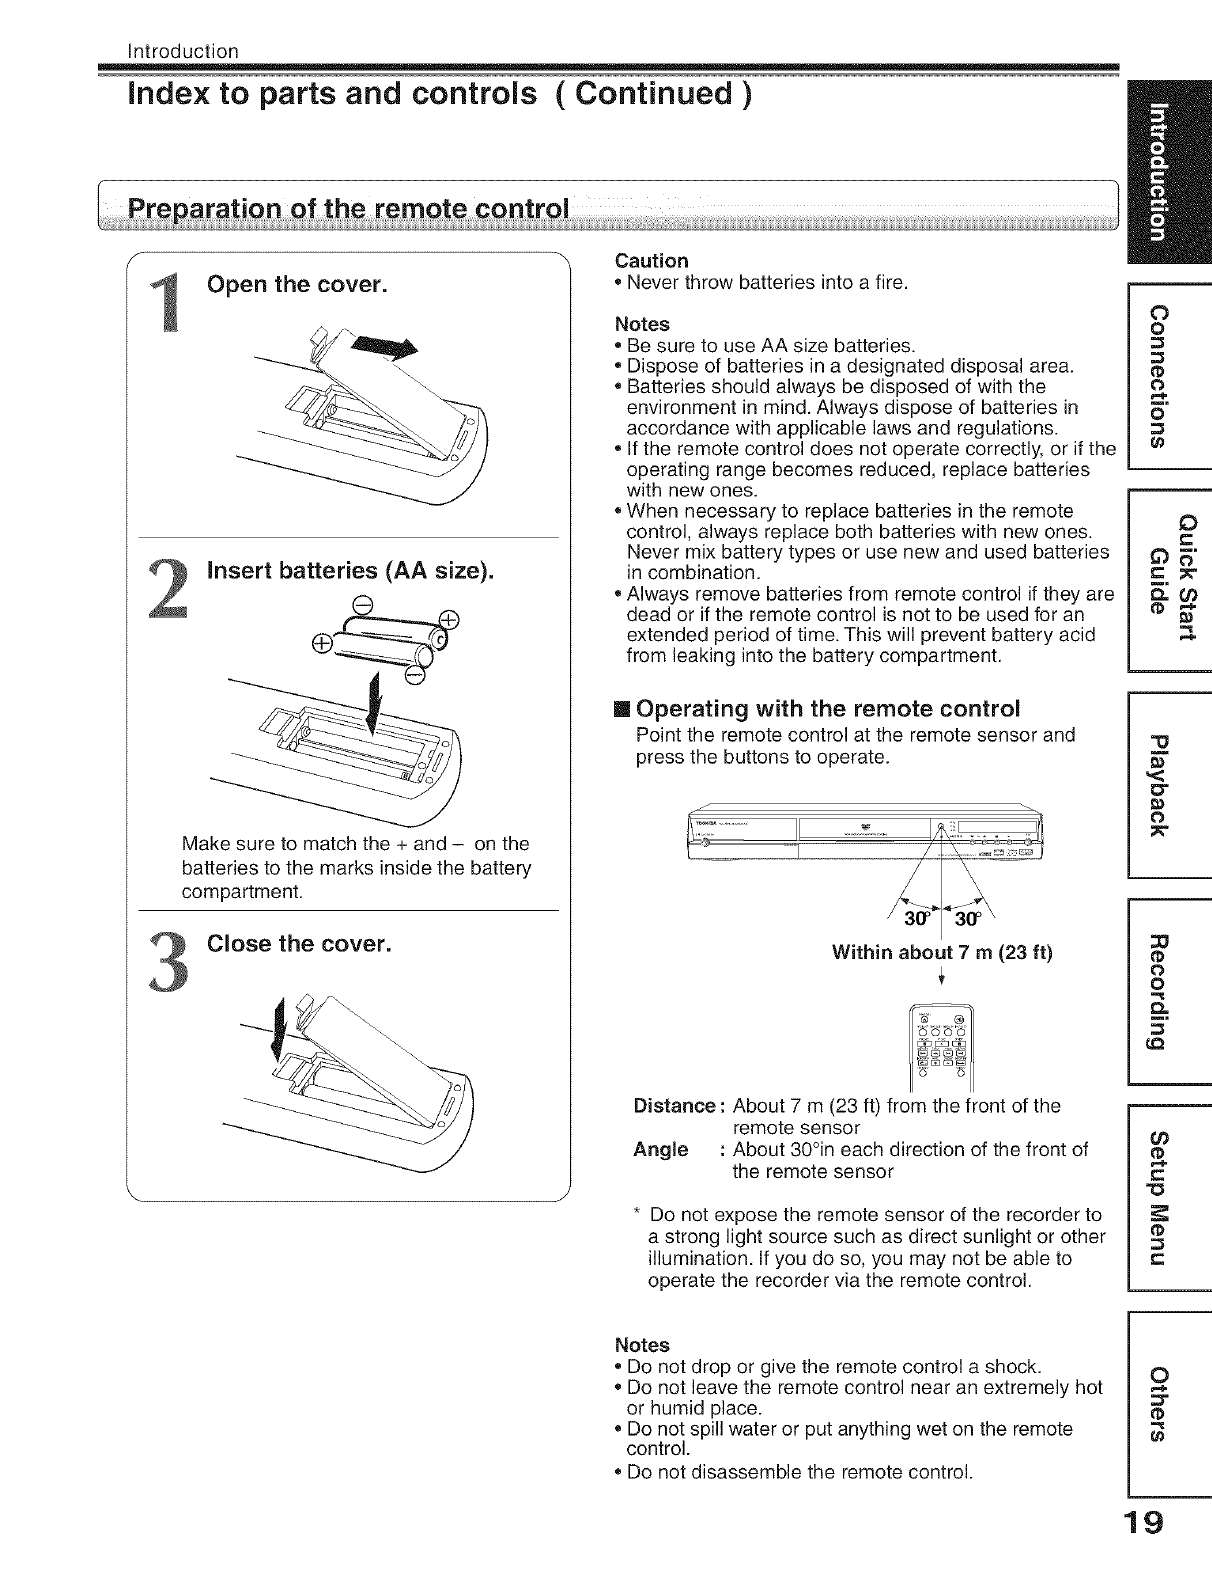
Open the cover.
insert batteries (AA size).
Make sure to match the + and - on the
batteries to the marks inside the battery
compartment.
Close the cover.
Caution
oNever throw batteries into a fire.
Notes
Be sure to use AA size batteries.
Dispose of batteries in a designated disposal area.
Batteries should always be disposed of with the
environment in mind. Always dispose of batteries in
accordance with applicable laws and regulations.
If the remote control does not operate correctly, or if the
operating range becomes reduced, replace batteries
with new ones.
When necessary to replace batteries in the remote
control, always replace both batteries with new ones.
Never mix battery types or use new and used batteries
in combination.
Always remove batteries from remote control if they are
dead or if the remote control is not to be used for an
extended period of time. This will prevent battery acid
from leaking into the battery compartment.
[] Operating with the remote control
Point the remote control at the remote sensor and
press the buttons to operate.
Within about 7 m (23 ft)
Distance : About 7 m (23 ft) from the front of the
remote sensor
Angle : About 30°in each direction of the front of
the remote sensor
* Do not expose the remote sensor of the recorder to
a strong light source such as direct sunlight or other
illumination. If you do so, you may not be able to
operate the recorder via the remote control.
O
o
0
o
0
e-
,<
O"
O
0
o
0_
¢0
tD
r-
Notes
=Do not drop or give the remote control a shock.
=Do not leave the remote control near an extremely hot
or humid place.
=Do not spill water or put anything wet on the remote
control.
Do not disassemble the remote control.
O
t_
19

Introduction
Index to parts and controls (Continued )
1080i
720p
480p ooo, o o,j
Multi display
Displays the current channel or other numbers
such as, track number, input selection, the
current time, elapsed time, etc.
For example, J-l. r J- J-t
o._ 3 ,- (8:15PM)
I__. -IJ-I
.c u (4:20 AM )
f-II- I-II
c _EZ_L_ (cableTV125ch)
etc.
2. HDMI indicator _ page 31
The current resolution of the HDMI output lights
up, When HDMI indicator lights up, the Video
signals from COMPONENT OUTPUT jacks are
progressive and from VIDEO OUTPUT jack are
nothing.
2O
Introduction
index to parts and controls (Continued )
See pages with arrows for details.
L
O
o
0
o
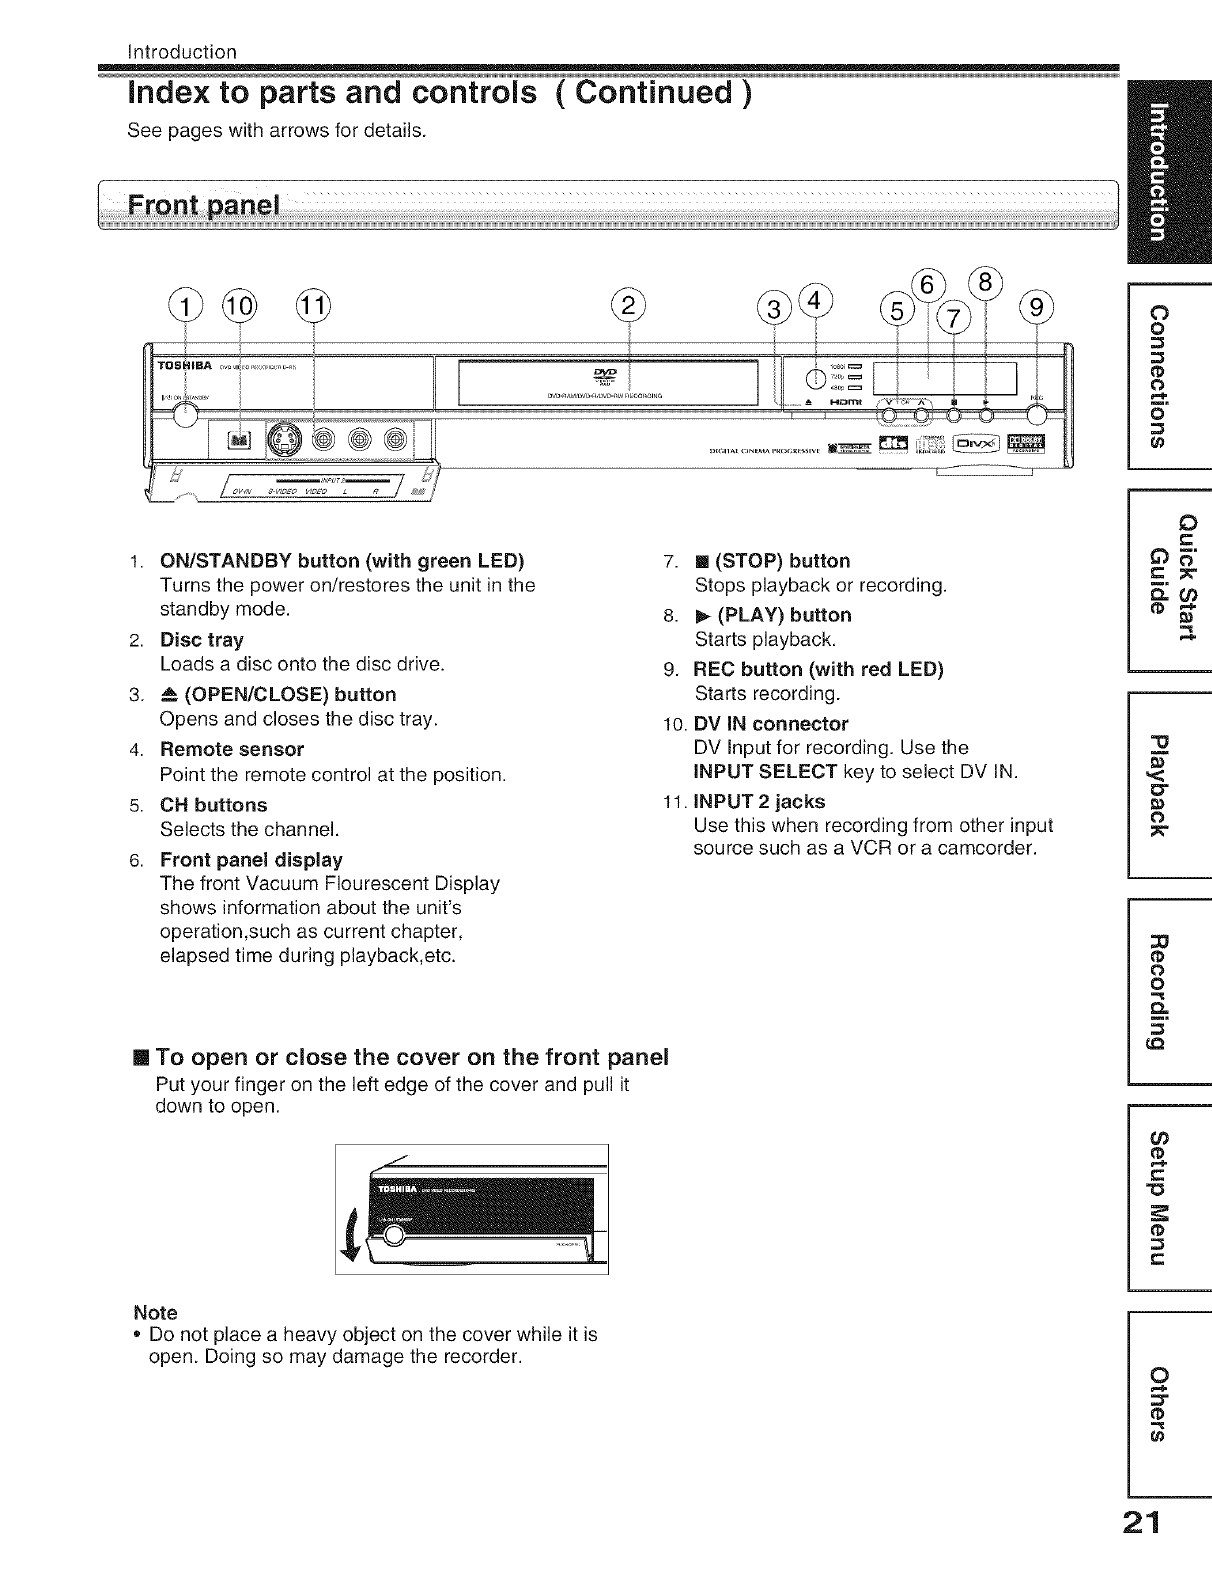
1. ON/STANDBY button (with green LED)
Turns the power on/restores the unit in the
standby mode.
2. Disc tray
Loads a disc onto the disc drive.
3. _ (OPEN/CLOSE) button
Opens and closes the disc tray.
4. Remote sensor
Point the remote control at the position.
5. CH buttons
Selects the channel.
6. Front panel display
The front Vacuum FIourescent Display
shows information about the unit's
operation,such as current chapter,
elapsed time during playback,etc.
[] To open or close the cover on the front panel
Put your finger on the left edge of the cover and pull it
down to open.
7. [] (STOP) button
Stops playback or recording.
8. _ (PLAY) button
Starts playback.
9. REC button (with red LED)
Starts recording.
10. DV IN connector
DV Input for recording. Use the
INPUT SELECT key to select DV IN.
11. INPUT 2 jacks
Use this when recording from other input
source such as a VCR or a camcorder.
O
0"
0
0
o
0_
¢0
tD
r-
Note
. Do not place a heavy object on the cover while it is
open. Doing so may damage the recorder. O
t_
21
Introduction
index to parts and controls ( Continued )
@
o_o
@@@@
I_, e_D!17_<_oil
t.
2.
3.
4.
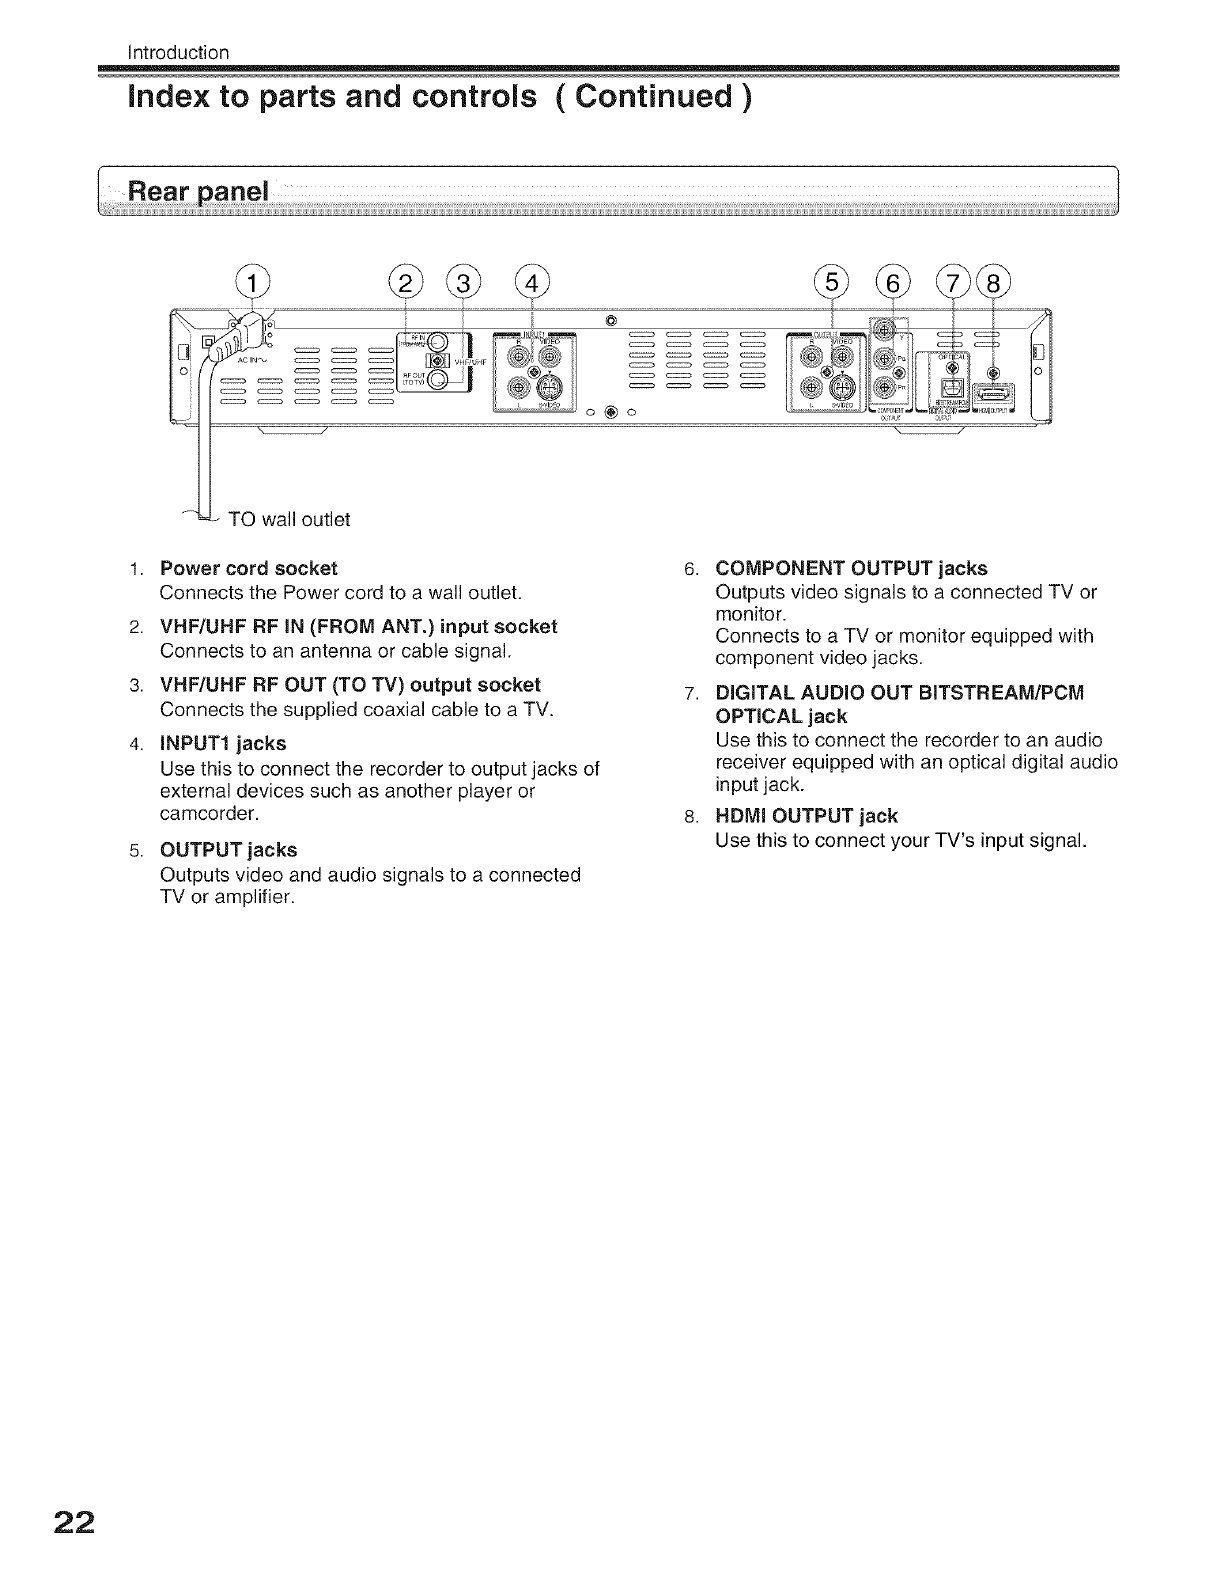
TO wall outlet
Power cord socket
Connects the Power cord to a wall outlet.
VHF/UHF RF IN (FROM ANT.) input socket
Connects to an antenna or cable signal.
VHF/UHF RF OUT (TO TV) output socket
Connects the supplied coaxial cable to a TV.
INPUT1 jacks
Use this to connect the recorder to output jacks of
external devices such as another player or
camcorder.
OUTPUT jacks
Outputs video and audio signals to a connected
TV or amplifier.
6. COMPONENT OUTPUT jacks
Outputs video signals to a connected TV or
monitor.
Connects to a TV or monitor equipped with
component video jacks.
7. DIGITAL AUDIO OUT BITSTREAM/PCM
OPTICAL jack
Use this to connect the recorder to an audio
receiver equipped with an optical digital audio
input jack.
8. HDMI OUTPUT jack
Use this to connect your TV's input signal.
22
Introduction
Index to parts and controls ( Continued )
[] is your recorder ready?
• Refer to "QUICK SETUP GUIDE" and finish the
necessary preparations.
• Turn on the connected equipment such as a TV or
audio system and select the input source from the
recorder.
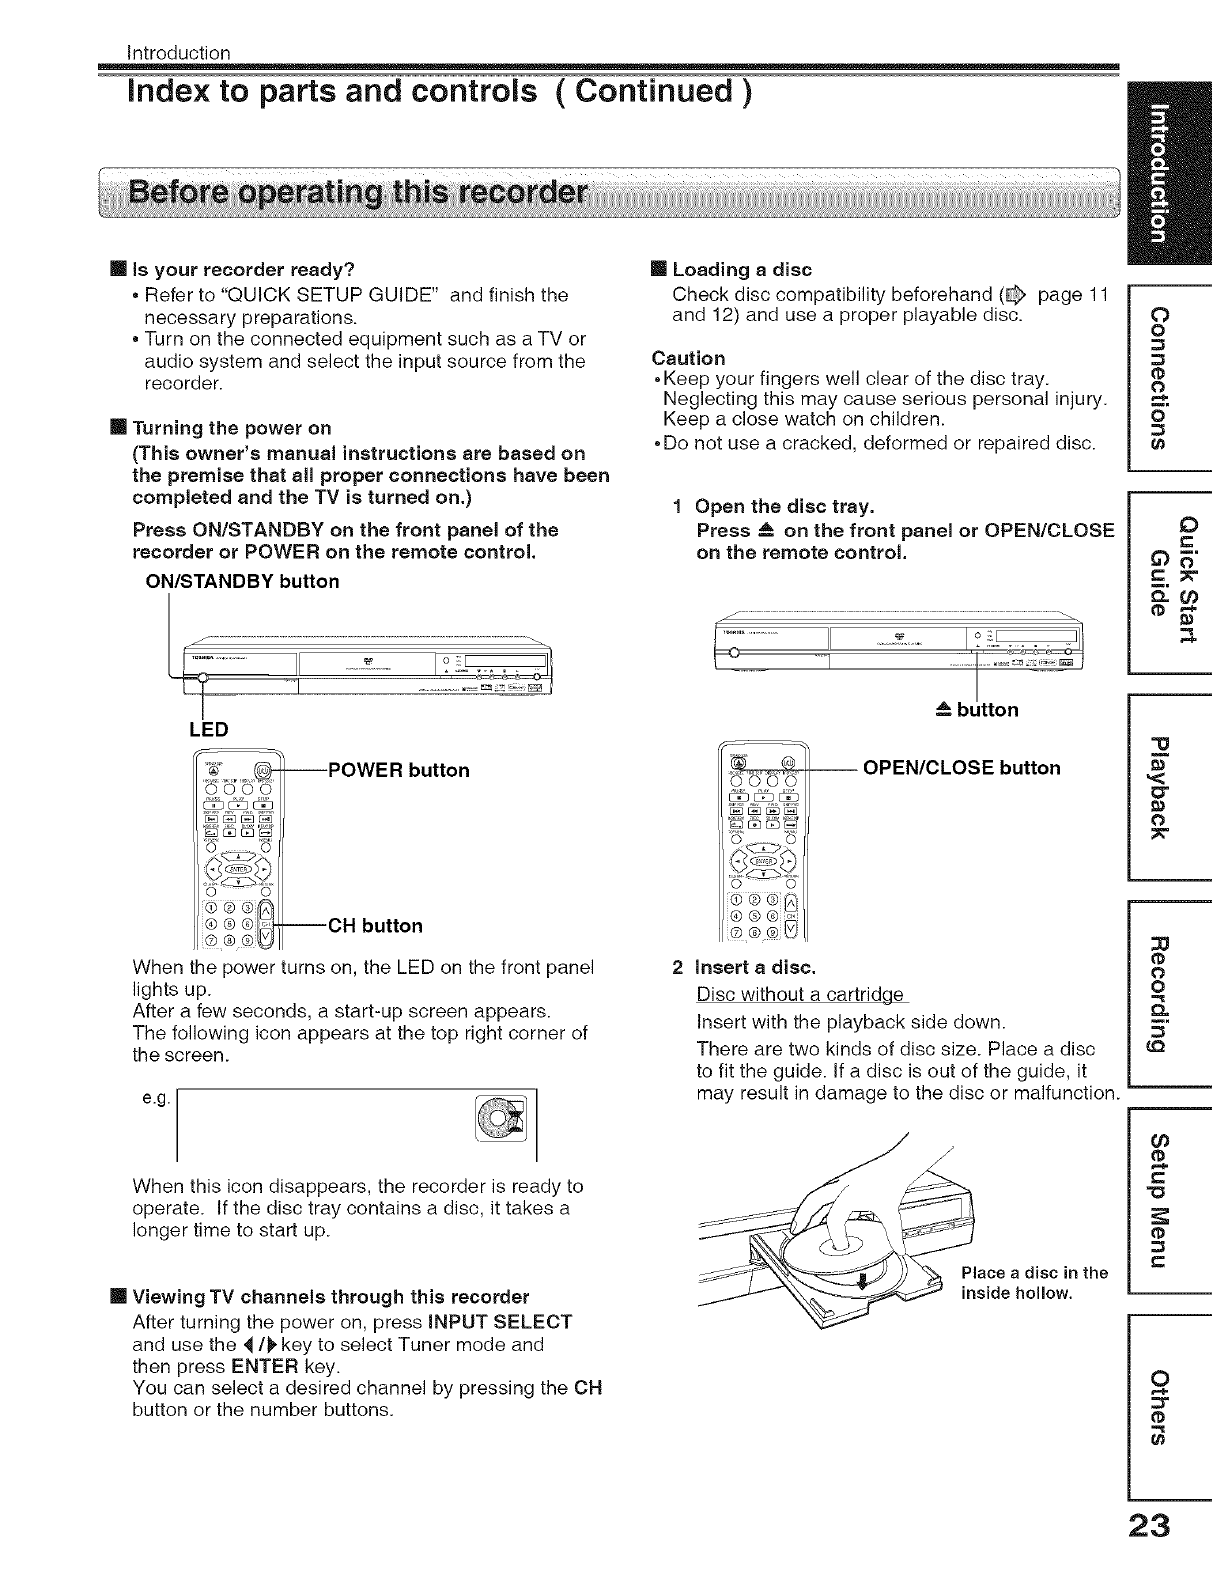
[] Turning the power on
(This owner's manual instructions are based on
the premise that all proper connections have been
completed and the TV is turned on.)
Press ON/STANDBY on the front panel of the
recorder or POWER on the remote control.
ON/STANDBY button
LED
0000
_EE2_
v v
/_. w/-..
--POWER button
--CH button
When the power turns on, the LED on the front panel
lights up.
After a few seconds, a start-up screen appears.
The following icon appears at the top right corner of
the screen.
e,g.
When this icon disappears, the recorder is ready to
operate. If the disc tray contains a disc, it takes a
longer time to start up.
[] Viewing TV channels through this recorder
After turning the power on, press iNPUT SELECT
and use the _/1_ key to select Tuner mode and
then press ENTER key.
You can select a desired channel by pressing the CH
button or the number buttons.
[] Loading a disc
Check disc compatibility beforehand (_ page 11
and 12) and use a proper playable disc.
Caution
,Keep your fingers well clear of the disc tray.
Neglecting this may cause serious personal injury.
Keep a close watch on children.
,Do not use a cracked, deformed or repaired disc.
1 Open the disc tray.
Press _ on the front panel or OPEN/CLOSE
on the remote control.
Abutton
0000
_ [_] E_] E_]
OPEN/CLOSE button
_ v
{4) (s) (_) o,,
i(z) (D ®iLO_
2 insert a disc.
Disc without a cartridge
Insert with the playback side down.
There are two kinds of disc size. Place a disc
to fit the guide, tf a disc is out of the guide, it
may result in damage to the disc or malfunction.
Place a disc in the
inside hollow.
0
o
@
0
o
0
"o
0I
0
@
0
o
60
-o
0
23
Introduction
Index to parts and controls ( Continued )
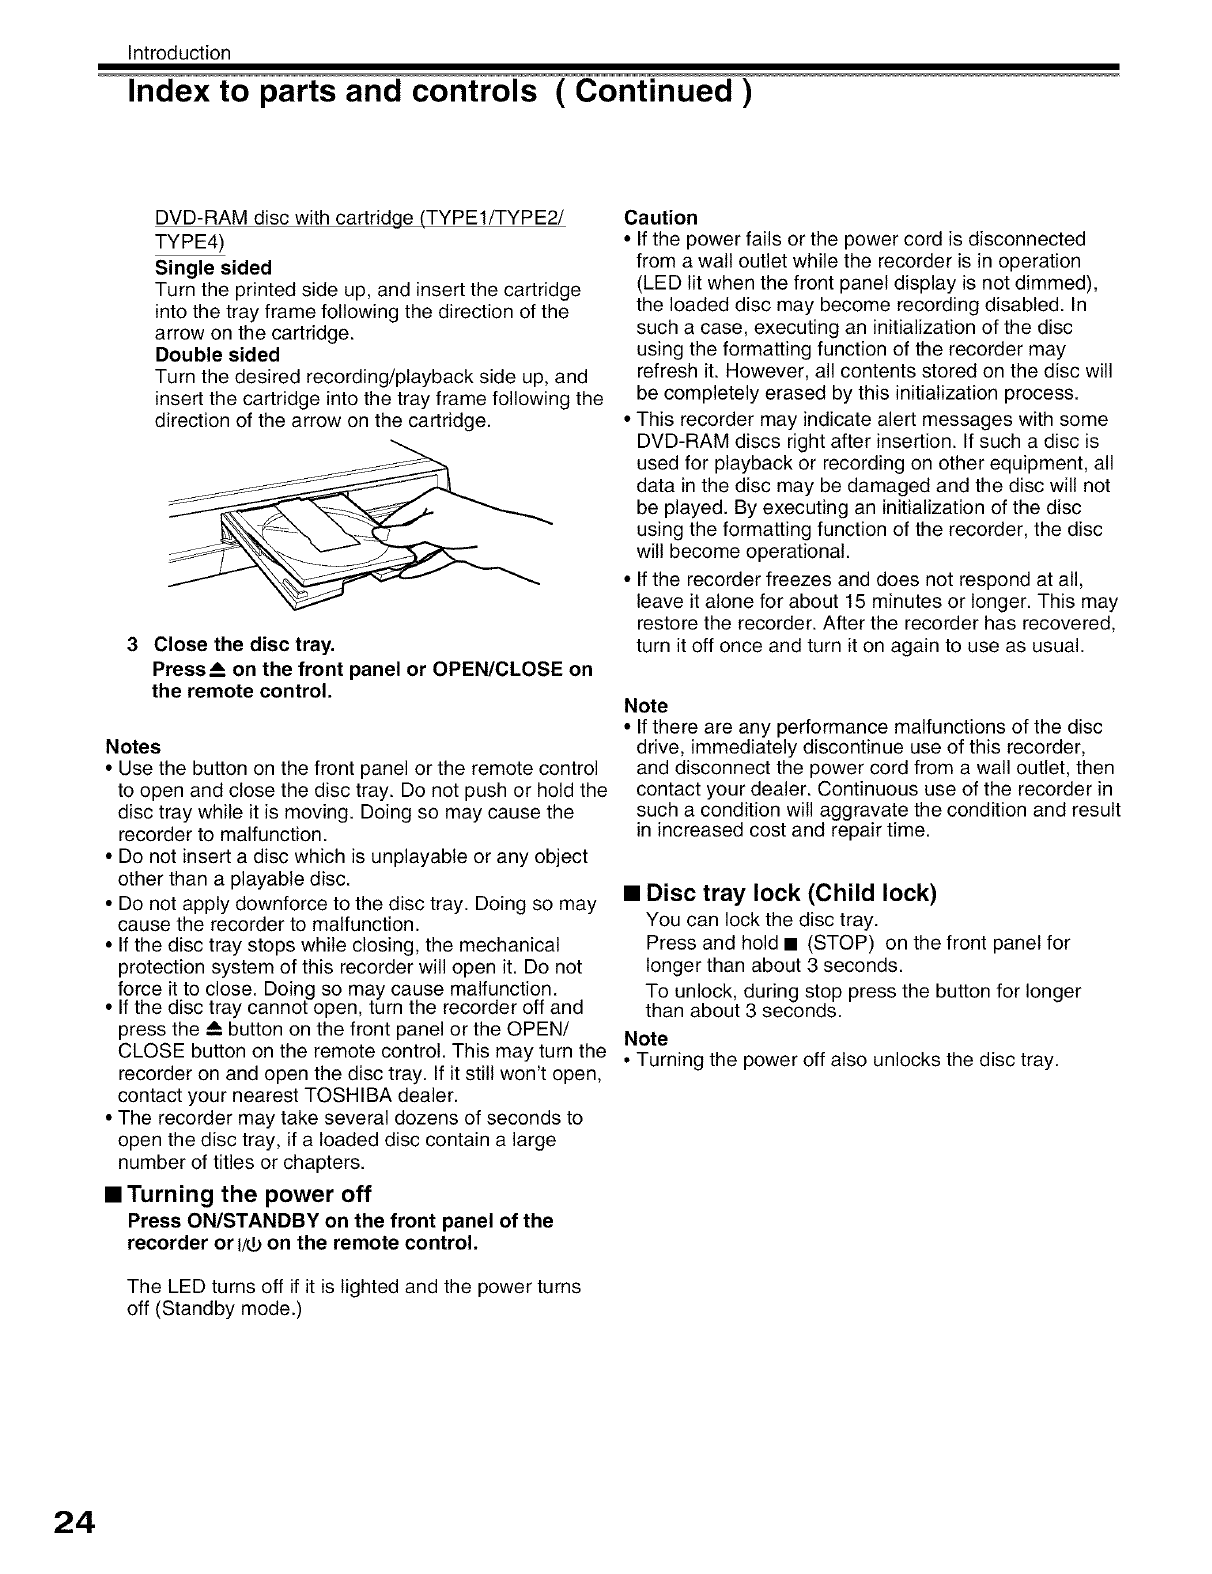
DVD-RAM disc with cartridge (TYPE1/TYPE2/
TYPE4)
Single sided
Turn the printed side up, and insert the cartridge
into the tray frame following the direction of the
arrow on the cartridge.
Double sided
Turn the desired recording/playback side up, and
insert the cartridge into the tray frame following the
direction of the arrow on the cartridge.
3 Close the disc tray,
Press__on the front panel or OPEN/CLOSE on
the remote control.
Notes
•Use the button on the front panel or the remote control
to open and close the disc tray. Do not push or hold the
disc tray while it is moving. Doing so may cause the
recorder to malfunction.
• Do not insert a disc which is unplayable or any object
other than a playable disc.
• Do not apply downforce to the disc tray. Doing so may
cause the recorder to malfunction.
• If the disc tray stops while closing, the mechanical
protection system of this recorder will open it. Do not
force it to close. Doing so may cause malfunction.
• If the disc tray cannot open, turn the recorder off and
press the A button on the front panel or the OPEN/
CLOSE button on the remote control. This may turn the
recorder on and open the disc tray. If it still won't open,
contact your nearest TOSHIBA dealer.
• The recorder may take several dozens of seconds to
open the disc tray, if a loaded disc contain a large
number of titles or chapters.
•Turning the power off
Press ON/STANDBY on the front panel of the
recorder or t/_ on the remote control.
The LED turns off if it is lighted and the power turns
off (Standby mode.)
Caution
• If the power fails or the power cord is disconnected
from a wall outlet while the recorder is in operation
(LED lit when the front panel display is not dimmed),
the loaded disc may become recording disabled. In
such a case, executing an initialization of the disc
using the formatting function of the recorder may
refresh it. However, all contents stored on the disc will
be completely erased by this initialization process.
• This recorder may indicate alert messages with some
DVD-RAM discs right after insertion. If such a disc is
used for playback or recording on other equipment, all
data in the disc may be damaged and the disc will not
be played. By executing an initialization of the disc
using the formatting function of the recorder, the disc
will become operational.
• If the recorder freezes and does not respond at all,
leave it alone for about 15 minutes or longer. This may
restore the recorder. After the recorder has recovered,
turn it off once and turn it on again to use as usual.
Note
• If there are any performance malfunctions of the disc
drive, immediately discontinue use of this recorder,
and disconnect the power cord from a wall outlet, then
contact your dealer. Continuous use of the recorder in
such a condition will aggravate the condition and result
in increased cost and repair time.
•Disc tray lock (Child lock)
You can lock the disc tray.
Press and hold • (STOP) on the front panel for
longer than about 3 seconds.
To unlock, during stop press the button for longer
than about 3 seconds.
Note
° Turning the power off also unlocks the disc tray.
24
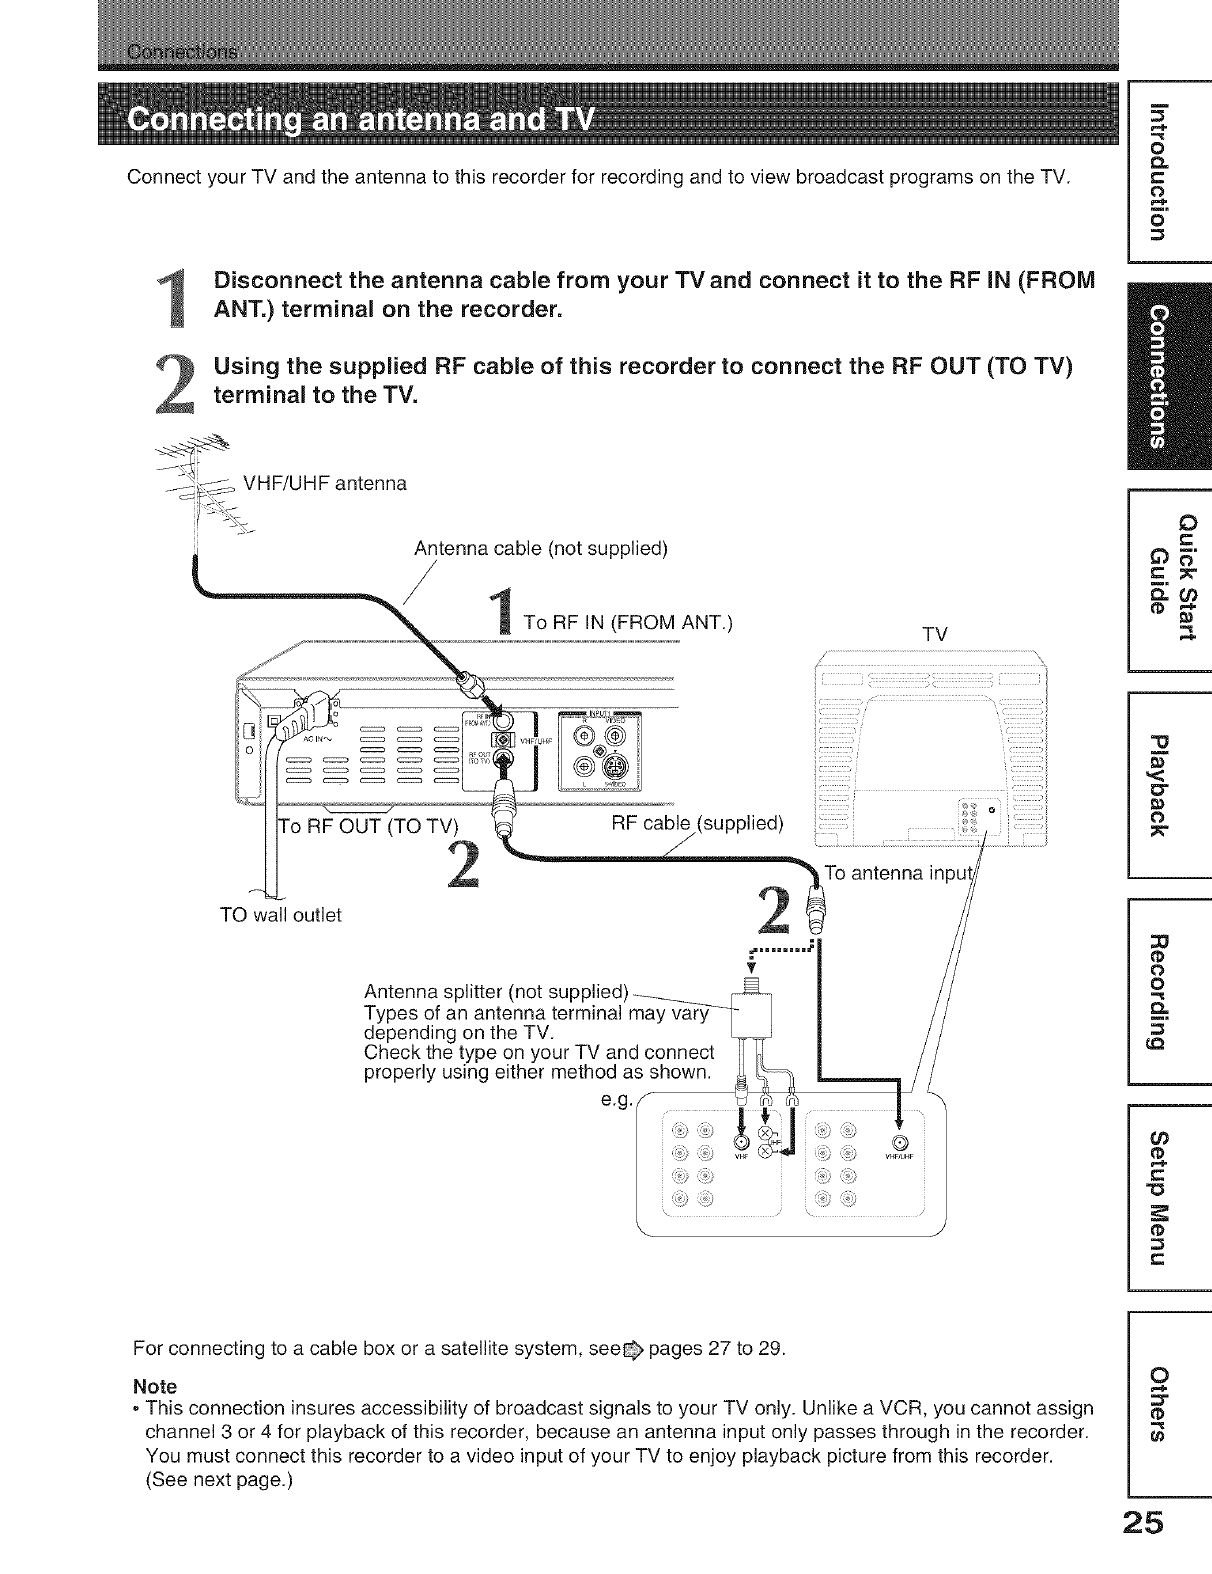
Connect your TV and the antenna to this recorder for recording and to view broadcast programs on the TV.
1
2
Disconnect the antenna cable from your TVand connect it to the RF IN (FROM
ANT.) terminal on the recorder.
Using the supplied RF cable of this recorder to connect the RF OUT (TO TV)
terminal to the TV.
VHF/UHF antenna
Antenna cable (not supplied)
/1 To RF IN (FROM ANT.) TV
I
o
t_
c
o
o
0
TO wall outlet
o
(TO TV) RF cable (supplied)
2 2 i° antenna inPi
_nnimi=#' _
Antenna splitter (not supplied)_ :_
Types of an antenna terminal may vary--- / /
depending on the TV. / /
Check the type on your TV and connect II _1 / /
properly using either method as shown. _ _, _ _ //
egF i;i
VHFQU_F_'_I"_ VHF '
O"
O
0
o
0.
O0
"0
For connecting to a cable box or a satellite system, see@ pages 27 to 29.
Note
• This connection insures accessibility of broadcast signals to your TV only. Unlike a VCR, you cannot assign
channel 3 or 4 for playback of this recorder, because an antenna input only passes through in the recorder.
You must connect this recorder to a video input of your TV to enjoy playback picture from this recorder.
(See next page.)
0
:3"
t_
25
Con nections
Connecting an antenna and TV ( Continued )
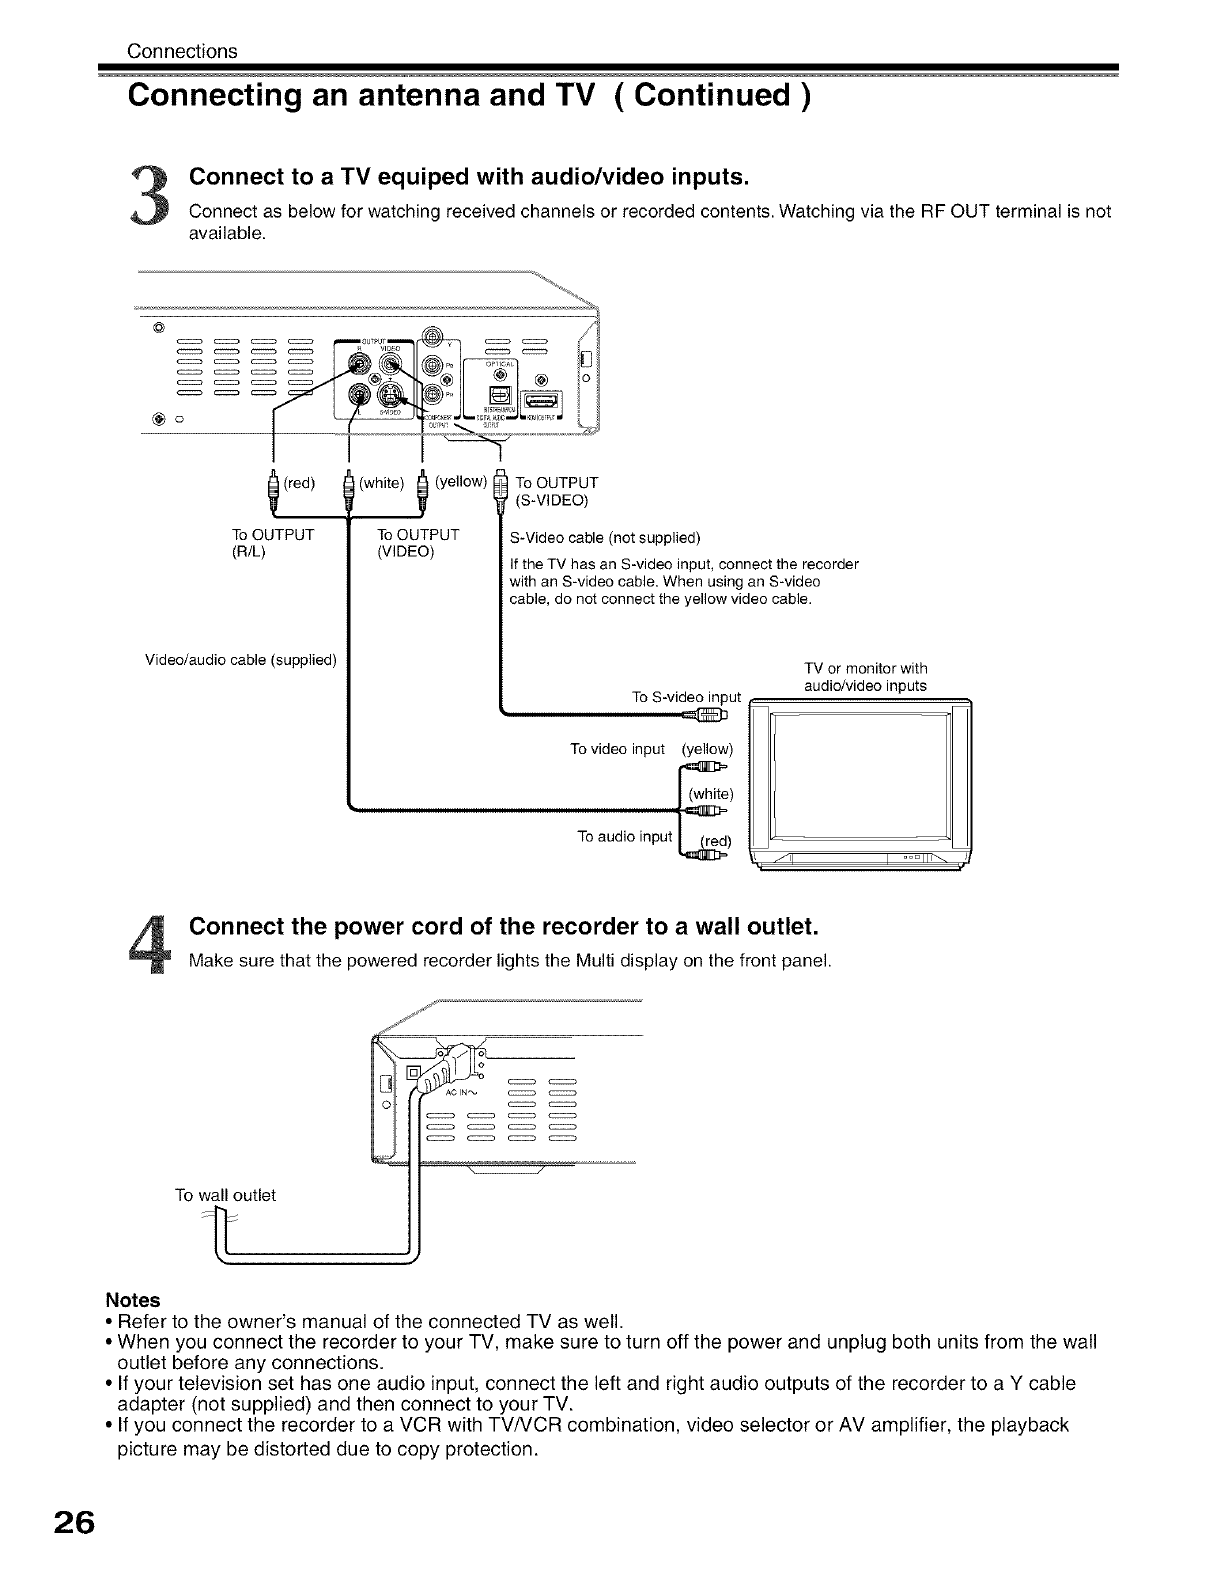
Connect to a TV equiped with audio/video inputs.
Connect as below for watching received channels or recorded contents. Watching via the RF OUT terminal is not
available.
@
s
Go
_ (red)
To OUTPUT
(R/L)
Video/audio cable (supplied)
(white) _ (yellow)
To OUTPUT
(VIDEO)
To OUTPUT
(S-VIDEO)
S-Video cable (not supplied)
If the TV has an S-video input, connect the recorder
with an S-video cable. When using an S-video
cable, do not connect the yellow video cable.
To S-video input
@
To video input (yellow)
To audio input I trod)
TV or monitor with
audio/video inputs
fll I ooD Ill_
Connect the power cord of the recorder to a wall outlet.
Make sure that the powered recorder lights the Multi display on the front panel.
To wall outlet
c:zzzza
Notes
• Refer to the owner's manual of the connected TV as well.
• When you connect the recorder to your TV, make sure to turn off the power and unplug both units from the wall
outlet before any connections.
• If your television set has one audio input, connect the left and right audio outputs of the recorder to a Y cable
adapter (not supplied) and then connect to your TV.
• If you connect the recorder to a VCR with TVNCR combination, video selector or AV amplifier, the playback
picture may be distorted due to copy protection.
26
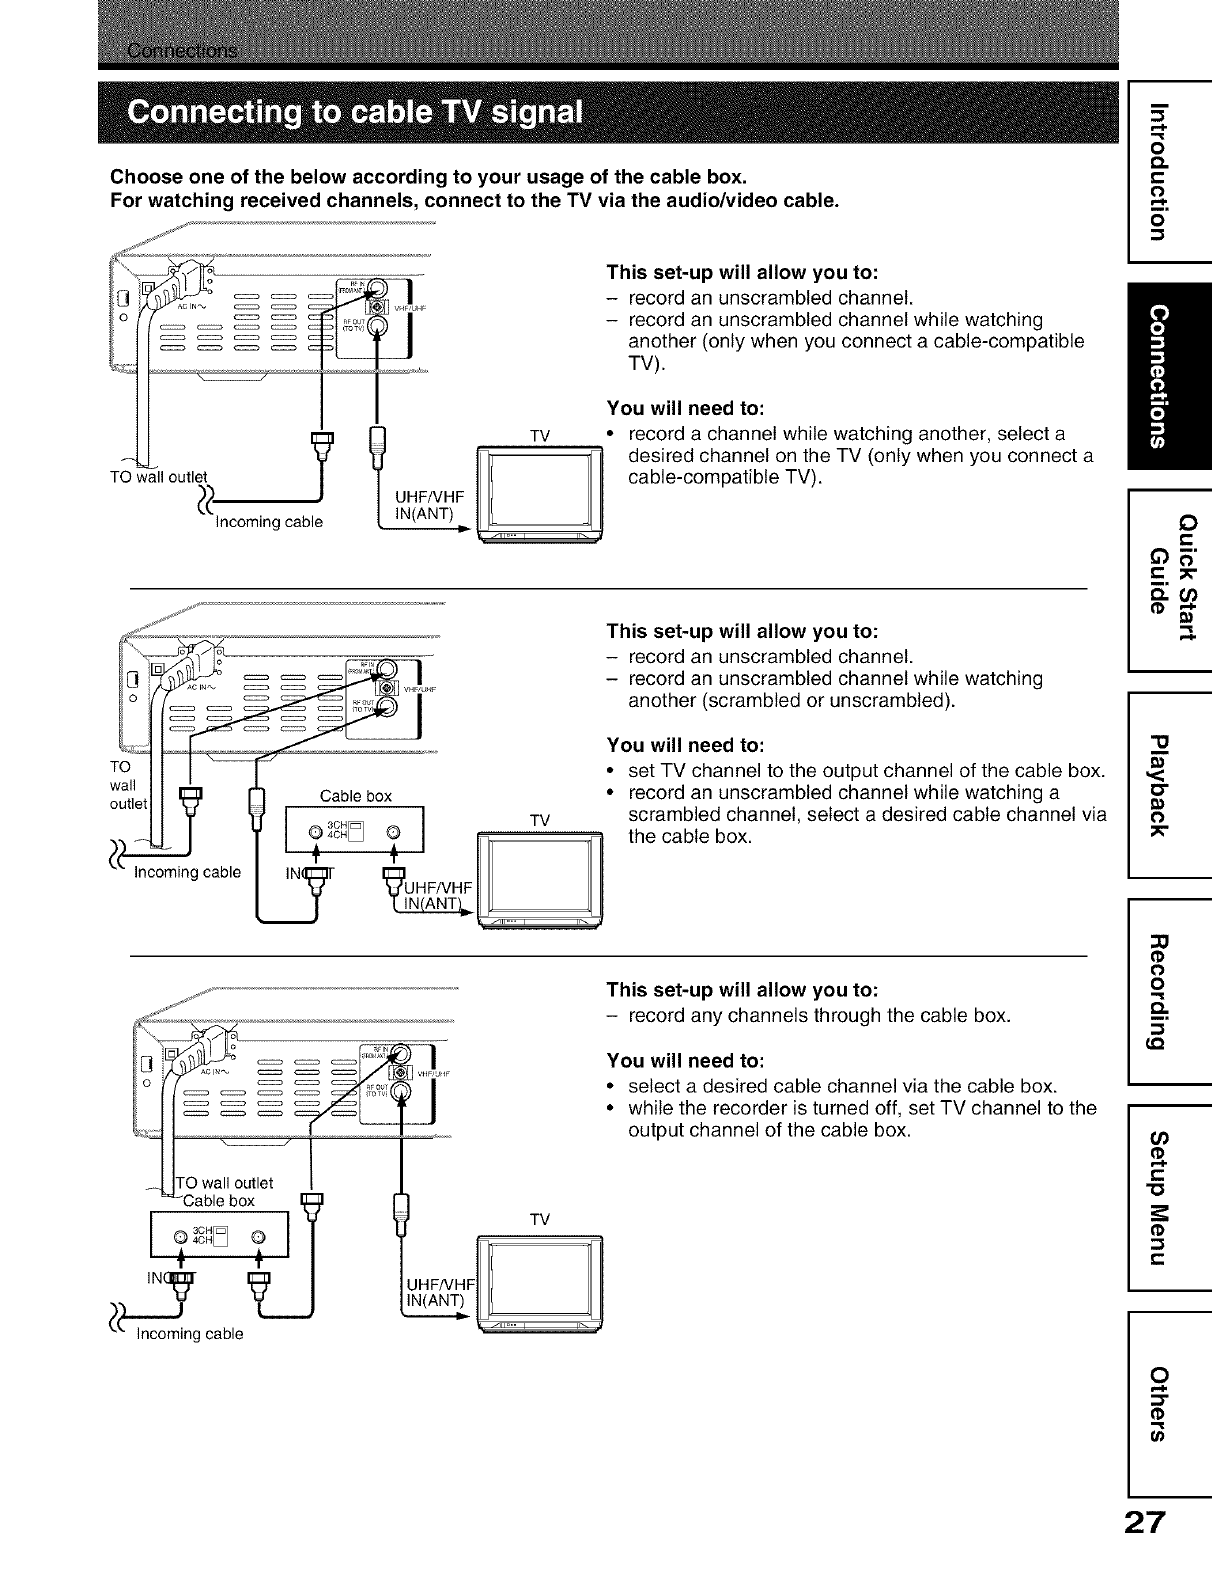
Choose one of the below according to your usage of the cable box.
For watching received channels, connect to the TV via the audio/video cable.
sjr j_
0 _ _ nFOUT
I
TO wall outlet
_ UHF/VHF
Incoming cable IN(ANT)
This set-up will allow you to:
- record an unscrambled channel.
- record an unscrambled channel while watching
another (only when you connect a cable-compatible
TV).
TV
You will need to:
• record a channel while watching another, select a
desired channel on the TV (only when you connect a
cable-compatible TV).
TVl
I_IN(ANT L
Incoming cable IN UHF/VHF
TO wall outlet
"Cable box [_
IL)_g cable
!
TV
on q
This set-up will allow you to:
- record any channels through the cable box.
You will need to:
• select a desired cable channel via the cable box.
• while the recorder is turned off, set TV channel to the
output channel of the cable box.
o
£%
o
o
0
e-
o
0
o
Q.
LQ
O_
(1)
e-
"ID
e-
0
::3"
27
Con nections
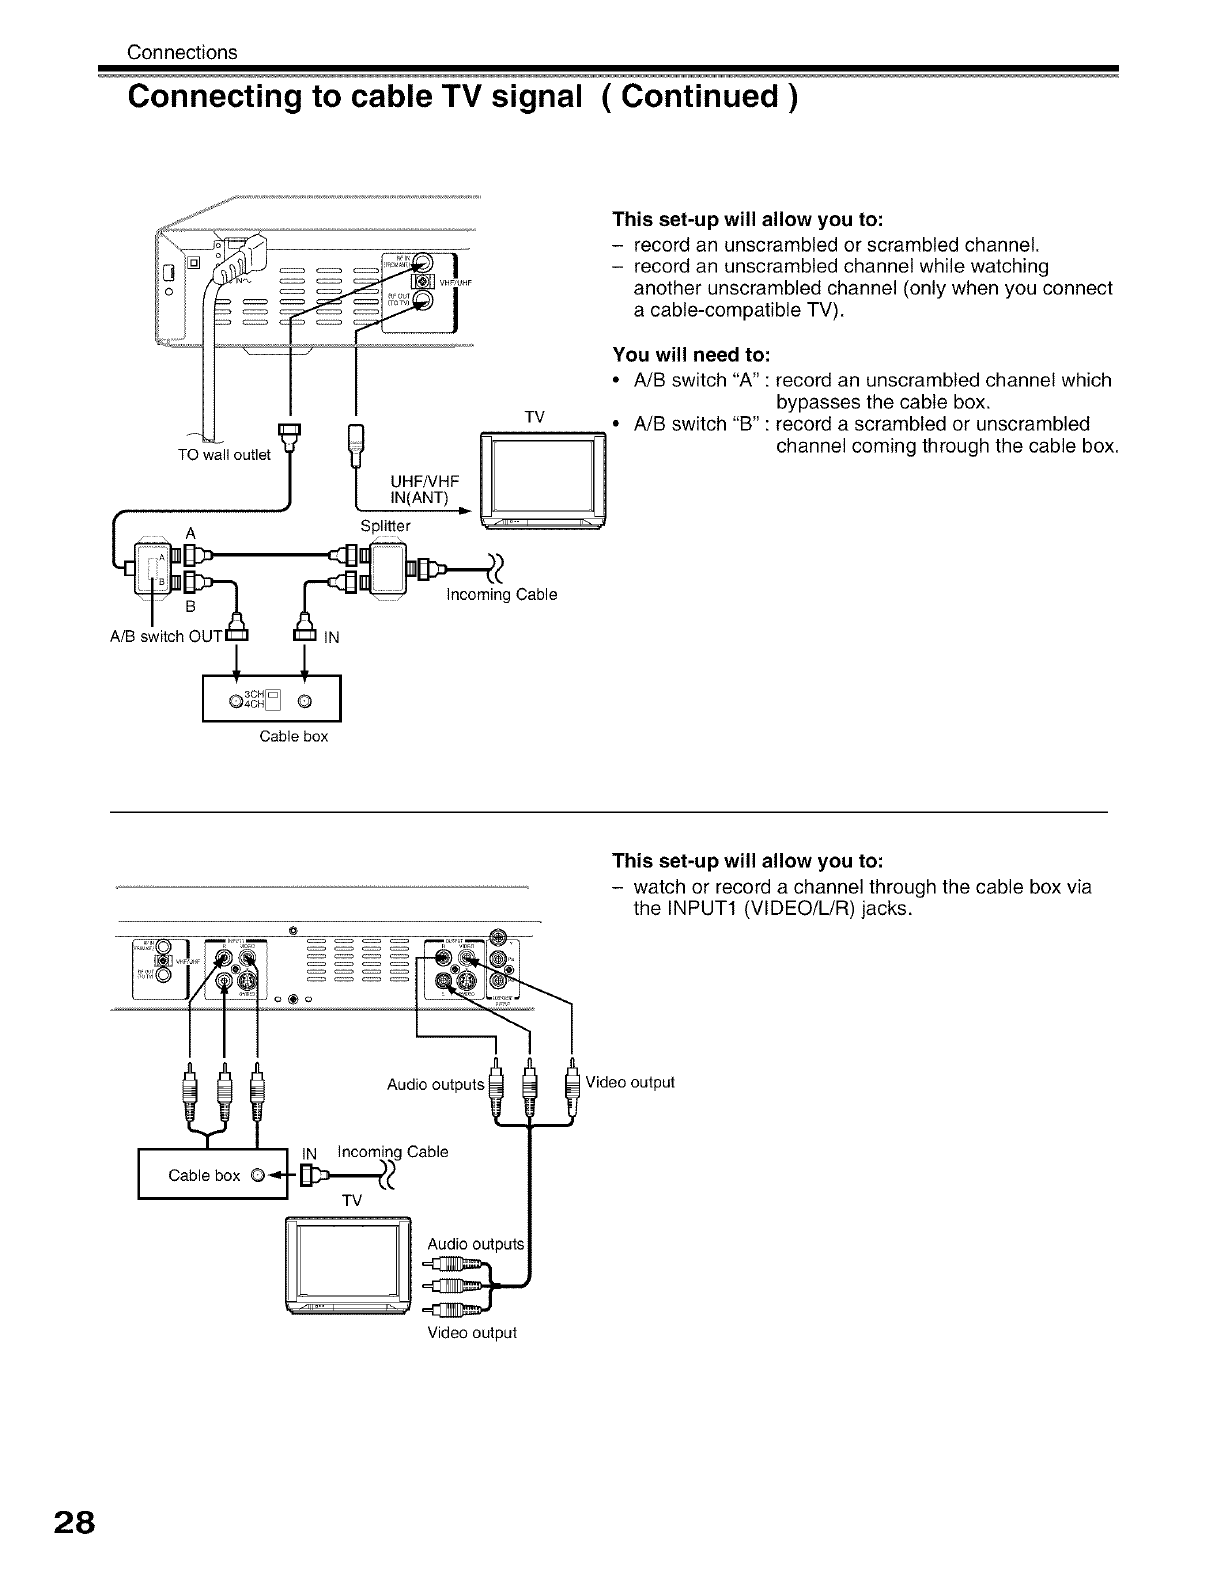
Connecting to cable TV signal ( Continued )
TO wall outlet
UHFNHF
IN(ANT)
Splitter
TV
This set-up will allow you to:
- record an unscrambled or scrambled channel.
- record an unscrambled channel while watching
another unscrambled channel (only when you connect
a cable-compatible TV).
You will need to:
•A/B switch "A': record an unscrambled channel which
bypasses the cable box.
• A/B switch "B" : record a scrambled or unscrambled
channel coming through the cable box.
I3CH
®4o._ ®
ca ,e
I
Cable box
III
UI
ICable box ©__i g Cable
TV
Videooutput
This set-up will allow you to:
- watch or record a channel through the cable box via
the INPUT1 (VIDEO/L/R) jacks.
Video output
28
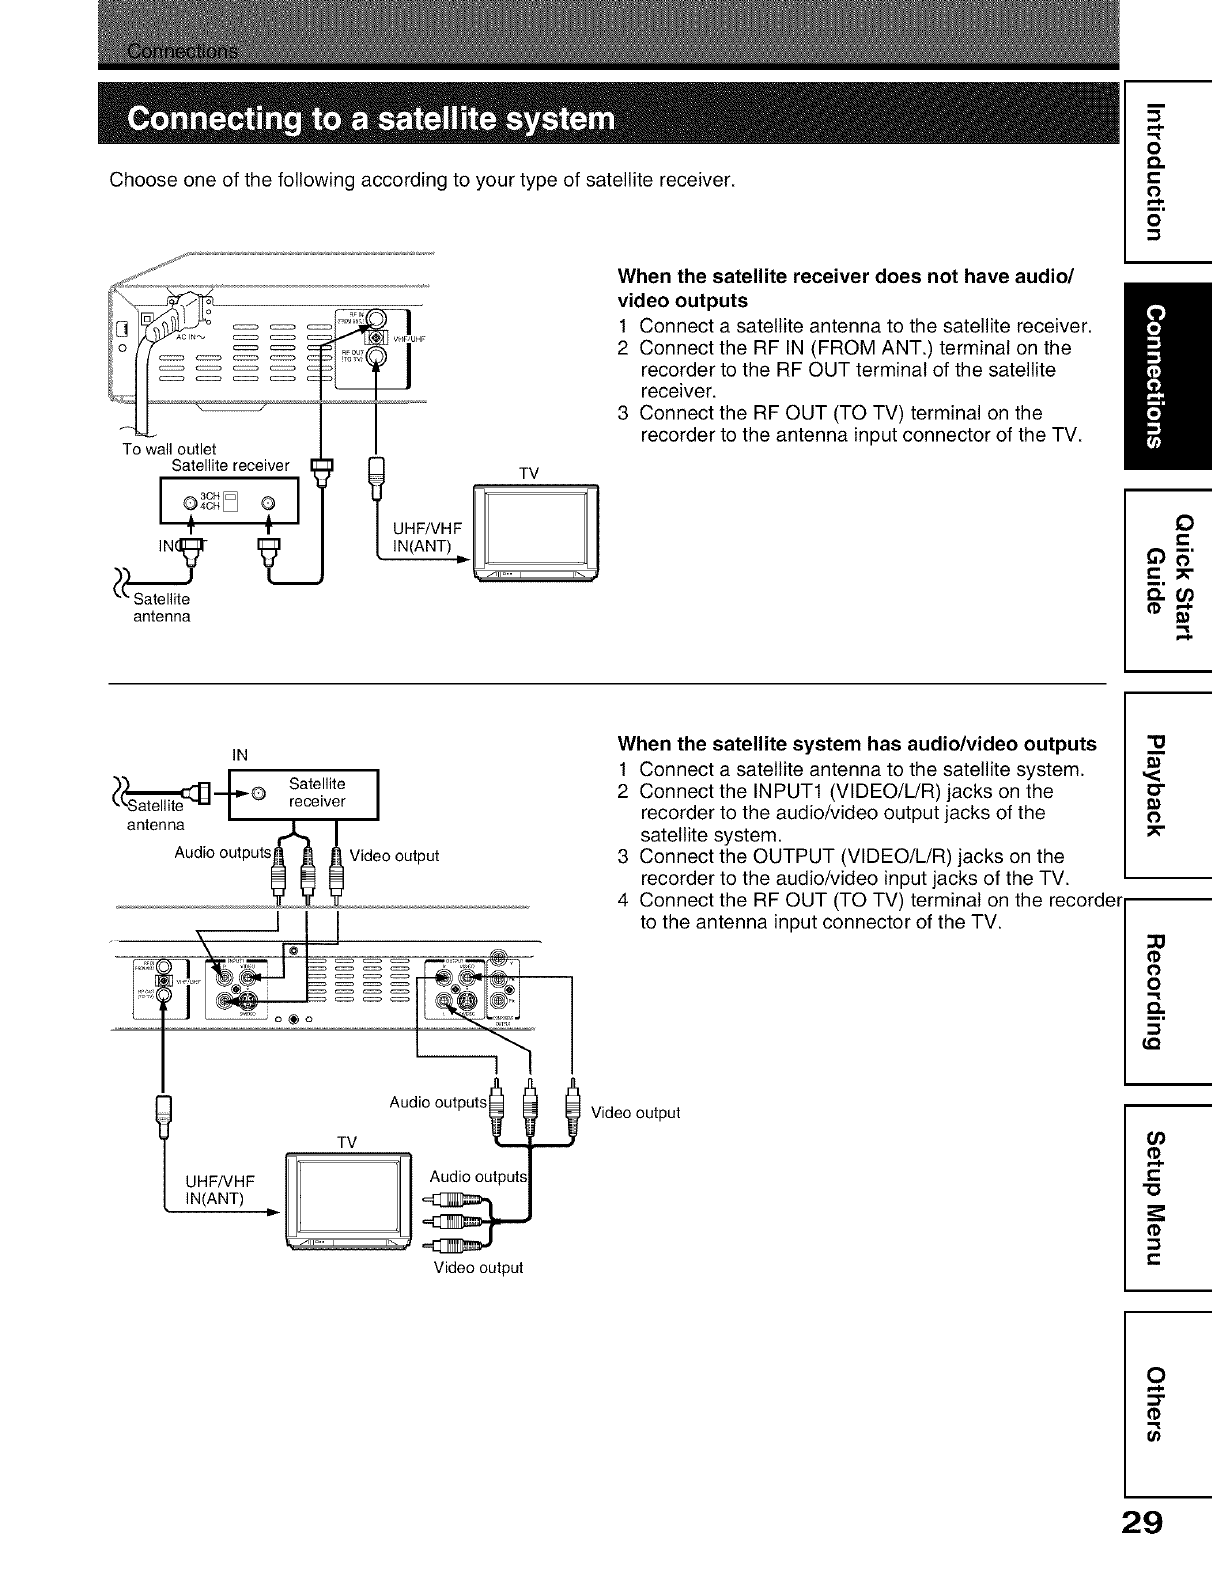
Choose one of the following according to your type of satellite receiver.
jsj kt
0 _ _ _ _OUT
I°[f..... _1_4
To wall outlet
Satellite receiver
3CH 1
? 4OH [_ ?
TT
V
antenna
]
UHF
TV
UHF/VHF
IN(ANT)
When the satellite receiver does not have audio/
video outputs
1 Connect a satellite antenna to the satellite receiver.
2 Connect the RF IN (FROM ANT.) terminal on the
recorder to the RF OUT terminal of the satellite
receiver.
3 Connect the RF OUT (TO TV) terminal on the
recorder to the antenna input connector of the TV.
=:
o
Q.
t-
O
o
IN Sa,e,,,teI
@ receiver
antenna _
Audio outputs Video output
%%..
l
TV Audio outputs _,,,,.
IN(ANT) m.-, ,
Video output
When the satellite system has audio/video outputs
1 Connect a satellite antenna to the satellite system.
2 Connect the INPUT1 (VIDEO/L/R) jacks on the
recorder to the audio/video output jacks of the
satellite system.
3 Connect the OUTPUT (VIDEO/L/R) jacks on the
recorder to the audio/video input jacks of the TV.
4 Connect the RF OUT (TO TV) terminal on the recorde_
to the antenna input connector of the TV.
Video output
"o
,<
o
0
o
Q.
--I
LQ
O_
"0
-I
e-
0
:3"
(1)
"=i
Ul
29
"=i
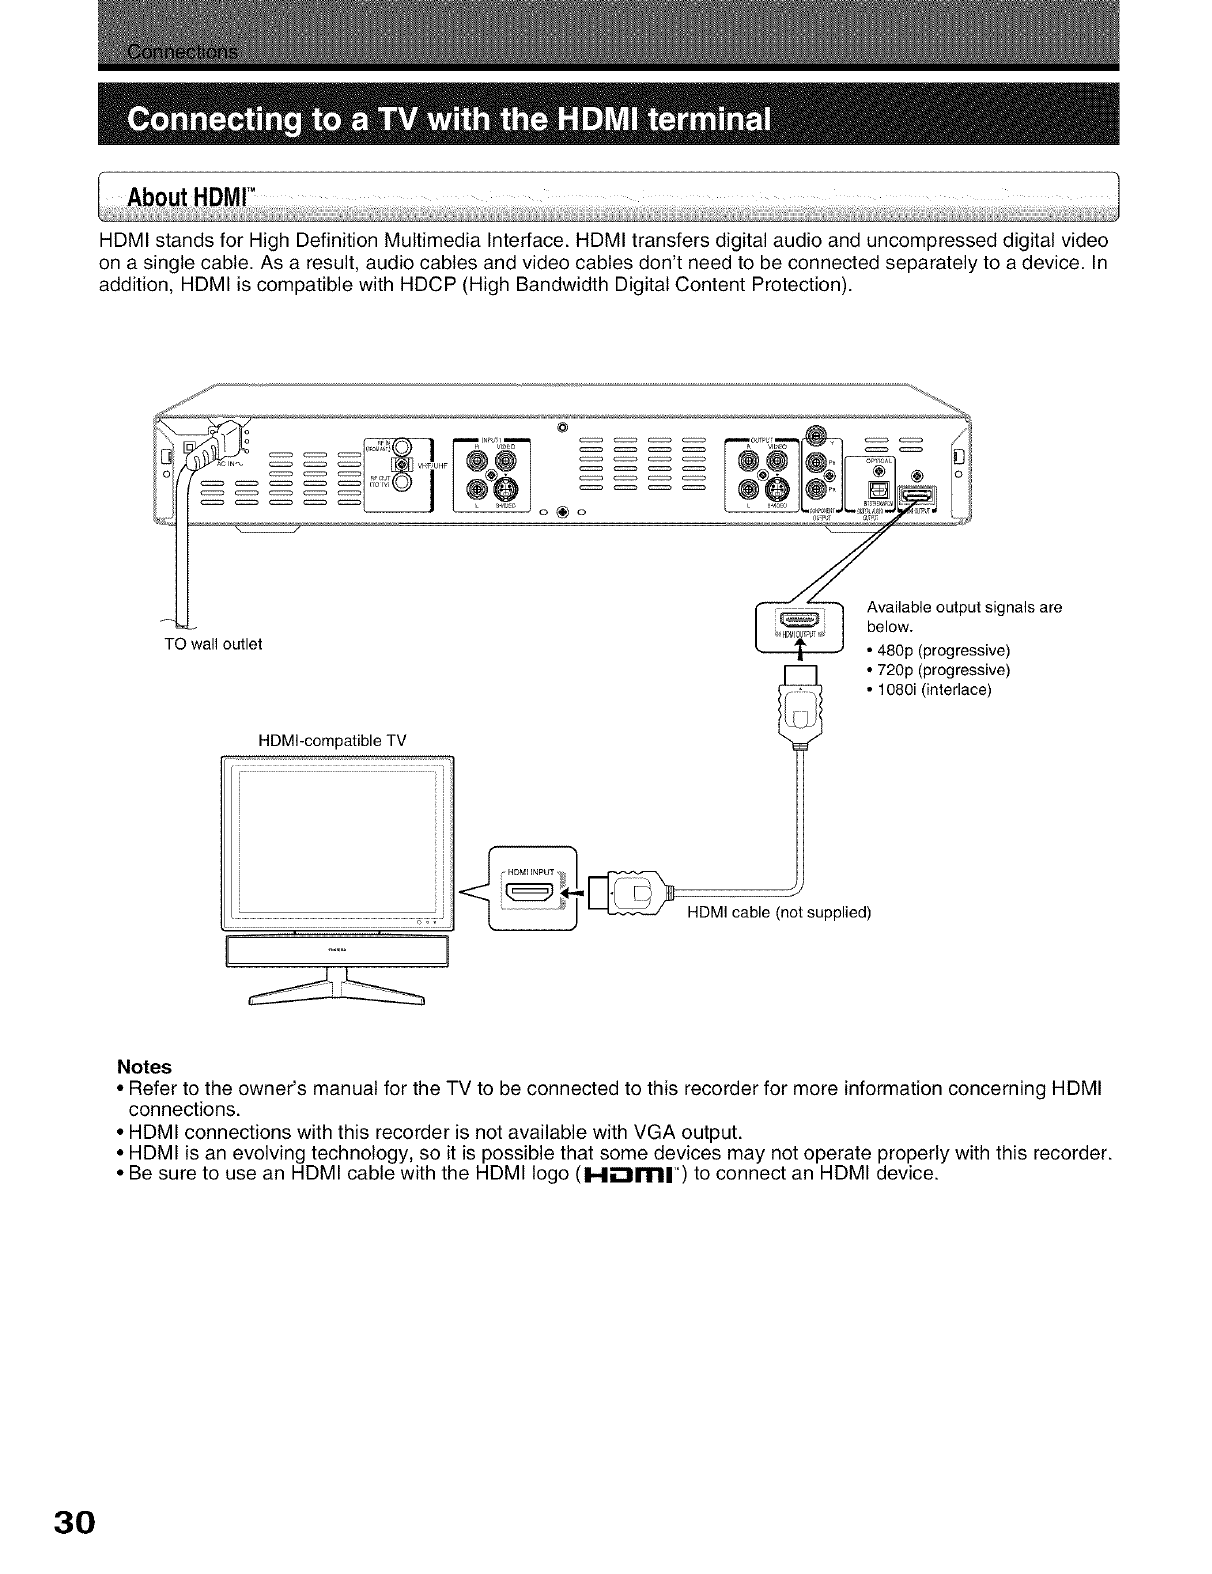
HDMI stands for High Definition Multimedia Interface. HDMI transfers digital audio and uncompressed digital video
on a single cable. As a result, audio cables and video cables don't need to be connected separately to a device. In
addition, HDMI is compatible with HDCP (High Bandwidth Digital Content Protection).
jj_
l/ ....
HDMI-compatible TV
TO wall outlet
@
o_o
ilable output signals are
W.
p (progressive)
I ! °720p(pr°gressive)
• 1080i (interlace)
HDMI cable (not supplied)
Notes
•Refer to the owner's manual for the TV to be connected to this recorder for more information concerning HDMI
connections.
• HDMI connections with this recorder is not available with VGA output.
• HDMI is an evolving technology, so it is possible that some devices may not operate properly with this recorder.
• Be sure to use an HDMI cable with the HDMI logo (Hii:iml') to connect an HDMI device.
30
Connections
Connecting to a TV with the HDMi terminal ( Continued )
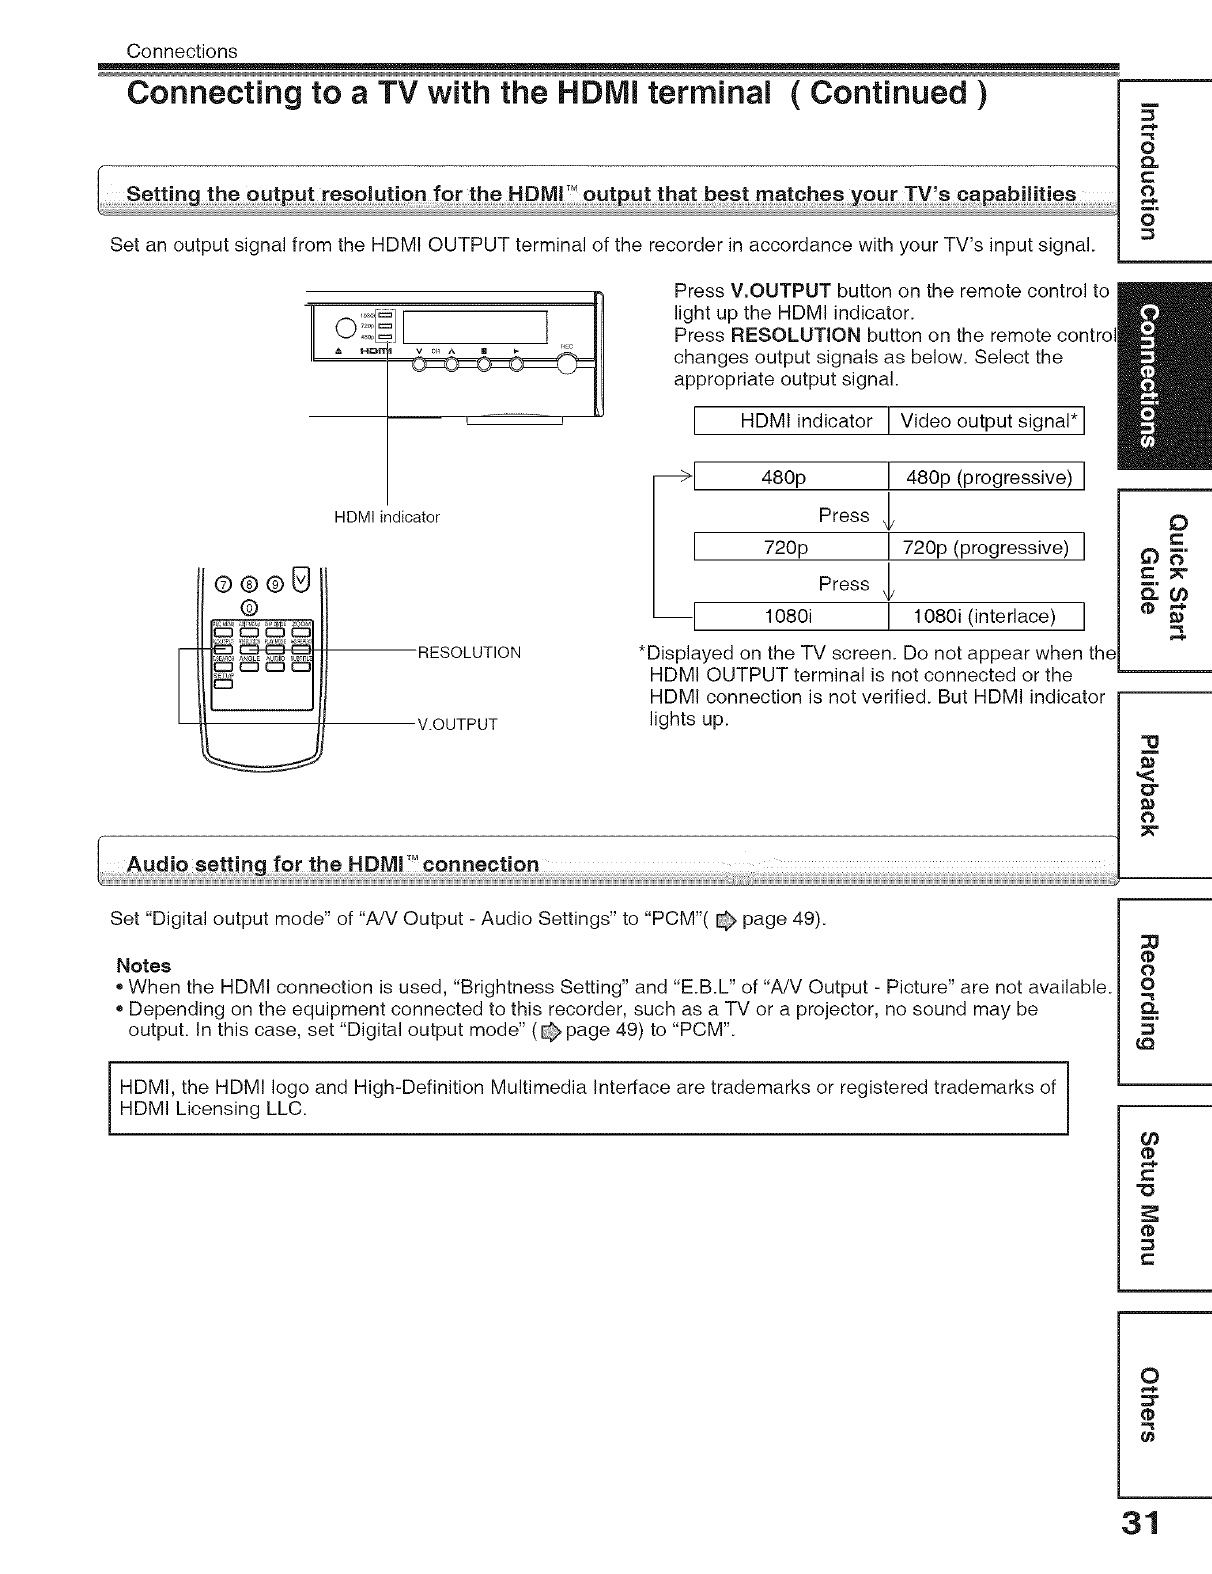
Set an output signal from the HDMI OUTPUT terminal of the recorder in accordance with your TV's input signal.
O
O
o
E
HDMI indicator
®®®0
@
__1 RESOLUTION
V.OUTPUT
Press VoOUTPUT button on the remote control to
light up the HDMI indicator.
Press RESOLUTION button on the remote control
changes output signals as below. Select the
appropriate output signal.
I HDMI indicator ! Video output signal*
480p ! 480p (progressive)
Press
720p ! 720p (progressive)
Press
1080i ! 1080i (interlace)
*Displayed on the TV screen. Do not appear when the
HDMI OUTPUT terminal is not connected or the
HDMI connection is not verified. But HDMI indicator
lights up.
O
t-
_)_"
t- 3_"
"10
,<
ol
o
Set "Digital output mode" of "A/V Output -Audio Settings" to "PCM"( _ page 49).
Notes
*When the HDMI connection is used, "Brightness Setting" and "E.B.L" of "A!V Output - Picture" are not available.
*Depending on the equipment connected to this recorder, such as a TV or a projector, no sound may be
output. In this case, set "Digital output mode" (_ page 49) to "PCM".
HDMI, the HDMI logo and High-Definition Multimedia Interface are trademarks or registered trademarks of
HDMI Licensing LLC.
_3
@
O
o
O.
"0
0
ZT
31
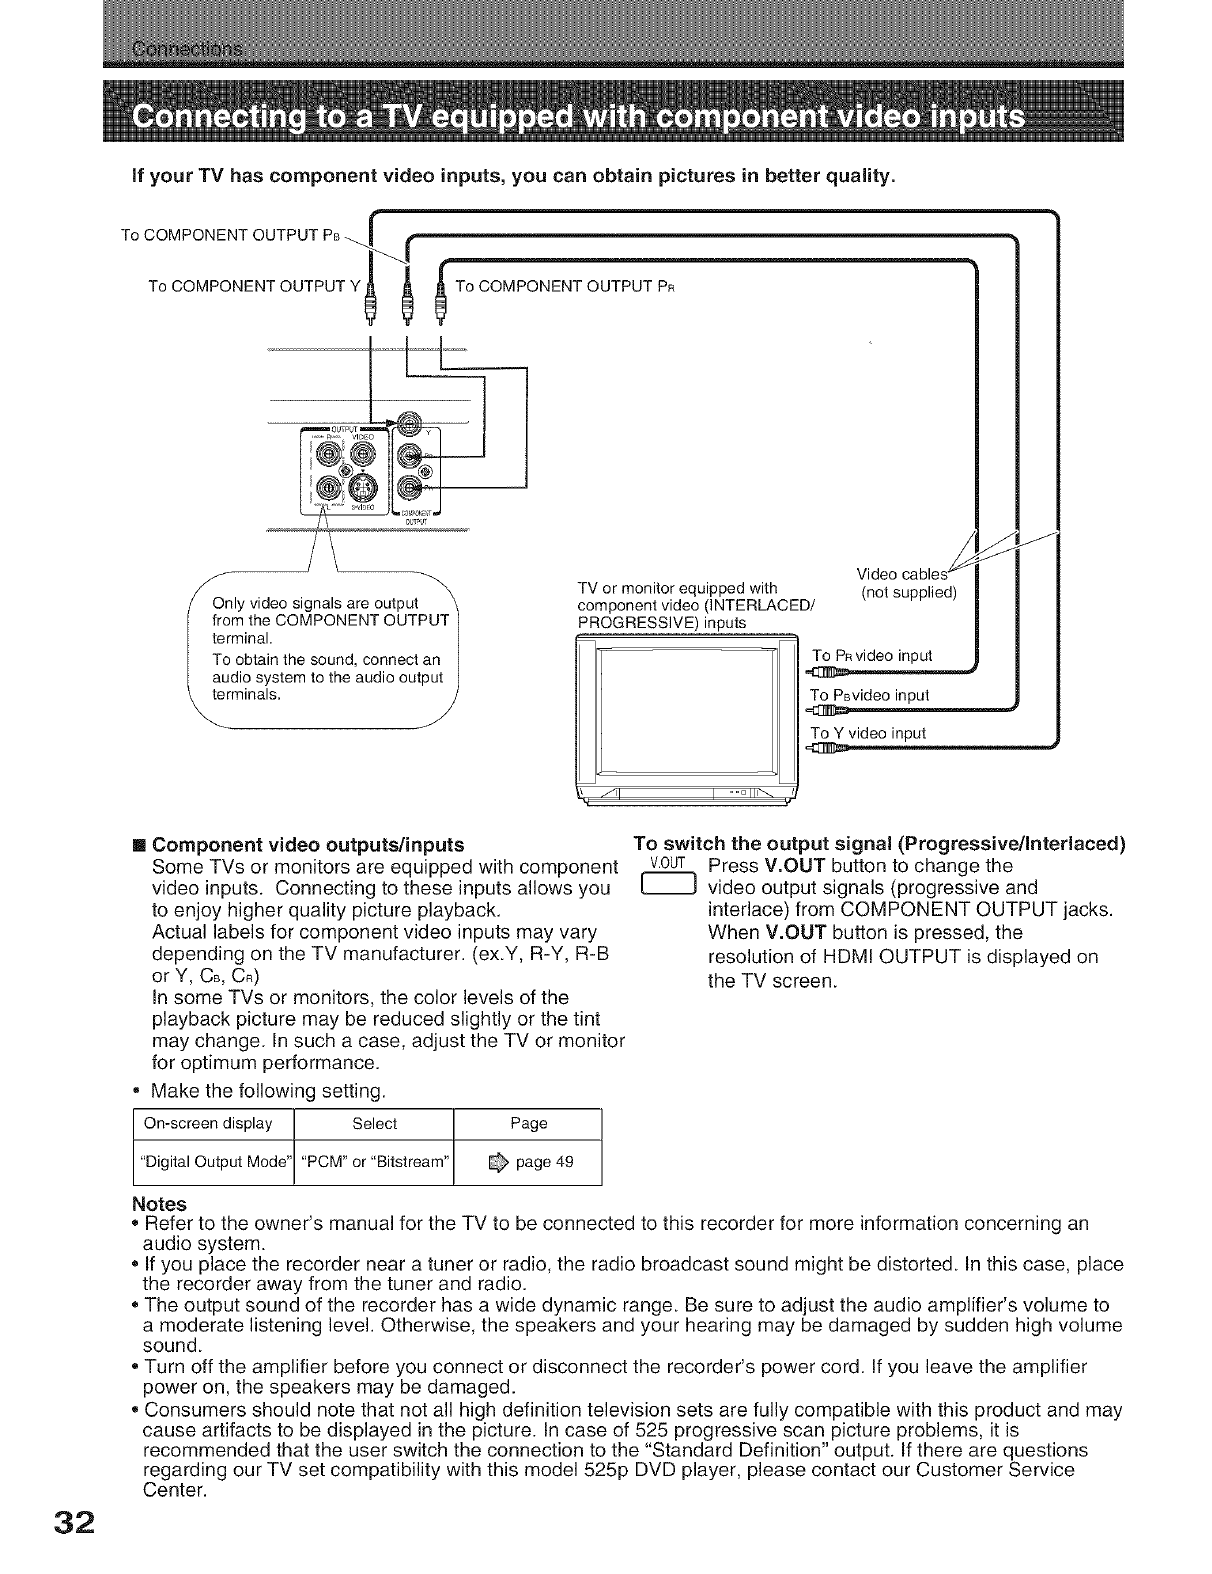
if your TV has component video inputs, you can obtain pictures in better quality.
f
To COMPONENT OUTPUT PB _I f
To COMPONENT OUTPUT m'_"""_Yt _ _--To COMPONENT OUTPUT PR
ONENT OUTPUT ]
ound, connect an I
the audio output I
_._rminals,
TV or monitor equipped with (not supplied)
component video (INTERLACED/
PROGRESSIVE) inputs
To PRvideo input
To PBvideo input
-- jl I
J
32
[] Component video outputs/inputs
Some TVs or monitors are equipped with component
video inputs. Connecting to these inputs allows you
to enjoy higher quality picture playback.
Actual labels for component video inputs may vary
depending on the TV manufacturer. (ex.Y, R-Y, R-B
or Y, CB,CR)
In some TVs or monitors, the color levels of the
playback picture may be reduced slightly or the tint
may change. In such a case, adjust the TV or monitor
for optimum performance.
, Make the following setting.
On-screen display Select Page
"Digital Output Mode' "PCM" or "Bitstream" _ page 49
To switch the output signal (Progressivellnterlaced)
V.0UT Press V.OUT button to change the
[_ video output signals (progressive and
interlace) from COMPONENT OUTPUT jacks.
When V.OUT button is pressed, the
resolution of HDMI OUTPUT is displayed on
the TV screen.
Notes
o Refer to the owner's manual for the TV to be connected to this recorder for more information concerning an
audio system.
If you place the recorder near a tuner or radio, the radio broadcast sound might be distorted. In this case, place
the recorder away from the tuner and radio.
The output sound of the recorder has a wide dynamic range. Be sure to adjust the audio amplifier's volume to
a moderate listening level. Otherwise, the speakers and your hearing may be damaged by sudden high volume
sound.
Turn off the amplifier before you connect or disconnect the recorder's power cord. If you leave the amplifier
power on, the speakers may be damaged.
Consumers should note that not all high definition television sets are fully compatible with this product and may
cause artifacts to be displayed in the picture. In case of 525 progressive scan picture problems, it is
recommended that the user switch the connection to the "Standard Definition" output. If there are questions
regarding our TV set compatibility with this model 525p DVD player, please contact our Customer Service
Center.

You can enjoy multichannel surround-sound such as 5.1 channel by connecting to an amplifier
compatible with Dolby ®Digital and DTS ® sound.
*For connection to your TV, see_pages 25,26 and 32
*For details of output sound, see_page 48 and 49 in "A/V Output".
Caution
. When you are connecting via the DIGITAL AUDIO OUTPUT BITSTREAM/PCM jack) an AV decoder that
does not have Dolby Digital, Digital Theater Systems (DTS) or MPEG2 decoding function, be sure to set
m
o
Q.
c
o
o
"Digital Output Mode" to "PCM" from the on-screen displays ( _ 49). Otherwise, high volume sound may
damage your hearing as well as the speakers.
•When playing DTS-encoded discs (DVD video discs and audio CDs), excessive noise may be output from
the analog stereo jacks. To avoid possible damage to the audio system, you should take proper precautions
when the analog audio out (L/R) jacks of the recorder are connected to an amplification system. To enjoy
DTS Digital Surround ®playback, an external 5.1 channel DTS Digital Surround ®decoder system must be
connected to the DIGITAL AUDIO OUTPUT BITSTREAM/PCM jack of the recorder. J _.
==_ Amplifier ___]
[_ To OPTICAL typedigital audio input
D
I To DIGITAL AUDIO _'
OUTPUT "_
BITSTREAM/PCM
O
Optical digital cable (not supplied)
I Manufacturedunder license from DolbyLaboratories."Dolby" and'] o Make the setting on @ page 49, "Digital Output Mode".
the double-D symbol are trademarks of Dolby Laboratories. J
I "DTS" and "DTS Digital Out" are trademarks of Digital Theater |
Systems, Inc. J
Notes
*Do not connect the digital audio output bitstream/PCM jack of the recorder to the AC-3 RF input of a receiver
with a Dolby Digital decoder. This input on your AN Receiver is reserved for Laserdisc use only and is
incompatible with the digital audio output bitstream/PCM jack of the recorder.
*Connect the digital audio output bitstream/PCM jack of the recorder to the "OPTICAL" input of a Receiver or
Processor.
*Refer to the owner's manual for the TV to be connected to this recorder for more information concerning
connecting an audio system.
*The output sound of the recorder has a wide dynamic range. Be sure to adjust the audio amplifier's volume to a
moderate listening level. Otherwise, the speakers and your hearing may be damaged by a sudden high volume
sound.
*Turn off the amplifier before you connect or disconnect the recorder's power cord. If you leave the amplifier
power on, the speakers may be damaged.
:D
0
o
0_
O0
"0
0
33
Plug the DVD recorder's electrical plug into a
wall socket or power strip.
Press the ON /STANDBY button on the front
panel, or the I/_ button on the remote control to
turn the DVD recorder on.
When the DVD player's splash screen appears
on your TV, you're ready to go!
welcome _ 1
TOSHIBA
Note
• If this screen does not appear, please check the
Video connection ( 26,28,31 and 32) or HDMI
indicator ( page 31 ).
This is the easiest way to fill your channel list with
those channels available in your area. The unit scans
for channels automatically.
Press SETUP to enter the Setup Menu. Select
the TV channel with the A/v keys.
Press ENTER to bring up the menu to select your
connection type (Antenna or Cable), use the
A/v keys to select and press ENTER.
The unit scans for channels When
automatically.
it is completed, press RETURN to exit the TV
Channel menu.
Choose this option to clear the channel list of all your
previous changes. ( page 48)
The recorder uses the Time and Date values to
determine when to begin and end Scheduled
Recordings.
Press SETUP to enter the Setup Menu.
Use the A/v keys to select General and press
ENTER. Use theA/v keys to select Clock and
press ENTER.
Use _/v keys to select a field and then press
ENTER.
3
4
5
Use the _ v/_/), keys to set the value of the
field and press ENTER.
Press RETURN to exit the Clock Menu.
Select the Clock Menu and press ENTER. The
Clock screen appears with the following options.
• Clock Settings - Set the time. This setting will
show AM or PM.
o Date Settings - Set the date. Use 2-digit year
format.
Once you have configured your channels, you can
begin using the recorder's built-in TV TUNER for
Recording or simply watching your favorite programs.
When the unit is first turned on, the DVD
PLAYBACK mode is selected by default. Press
INPUT SELECT and use the ,_/_,and ENTER
keys to switch to TUNER mode.
Use the ^/V keys to change channels while
watching TV. Alternatively, you can enter a
channel number directly with NUMBER keys,
and press ENTER.
To return to DVD Playback mode, press the
INPUT SELECT key and select DVD at any time.
Once your Antenna or Cable TV input is connected
to the connector on the back of the unit, you can
setup the recorder's built-in TV Tuner by auto-
scanning for available channels and then adding or
deleting the channels you choose.
Press SETUP to enter the Setup Menu.
Select the TV channel with the A/v keys and
press ENTER.
You can RETURN repeatedly to exit the
press
Setup Menu at any time.
34
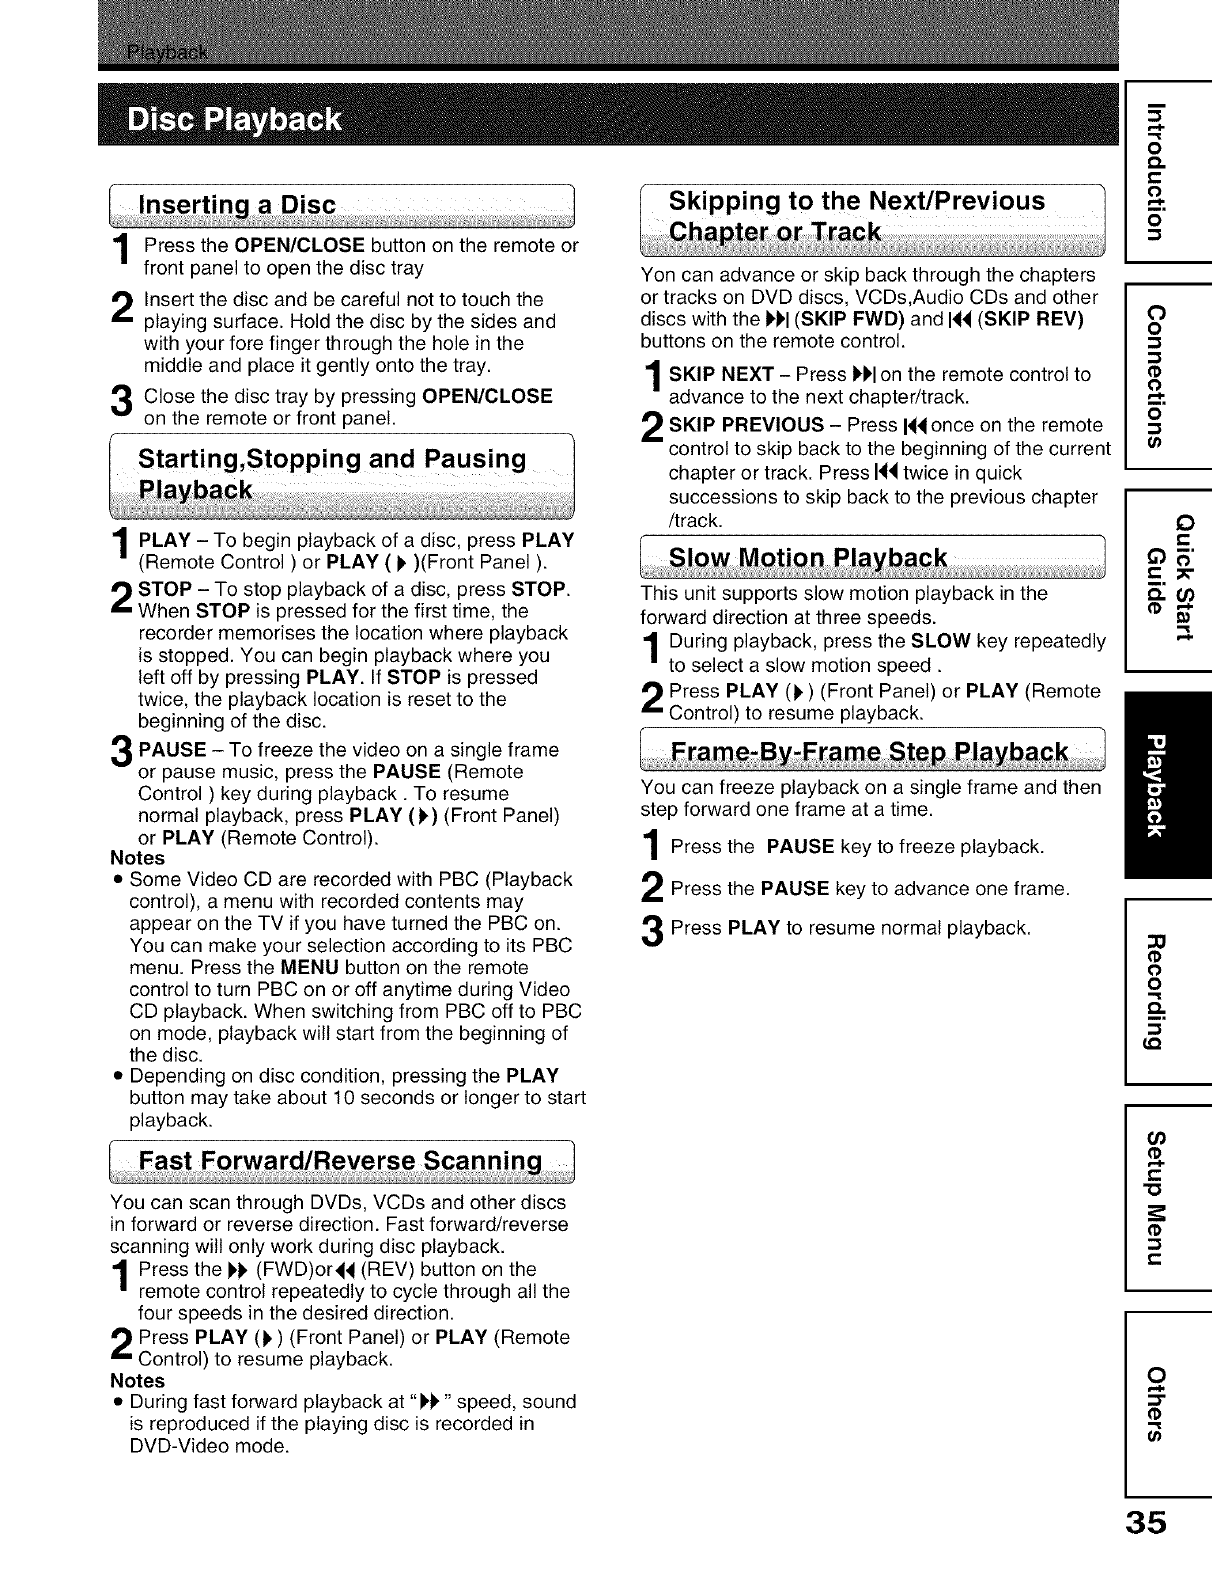
Press the OPEN/CLOSE button on the remote or
front panel to open the disc tray
Insert the disc and be careful not to touch the
playing surface. Hold the disc by the sides and
with your fore finger through the hole in the
middle and place it gently onto the tray.
Close the disc tray by pressing OPEN/CLOSE
on the remote or front panel.
PLAY - To begin playback of a disc, PLAY
press
(Remote Control ) or PLAY ( I' )(Front Panel ).
STOP - To stop playback of a disc, press STOP.
When STOP is pressed for the first time, the
recorder memorises the location where playback
is stopped. You can begin playback where you
left off by pressing PLAY. If STOP is pressed
twice, the playback location is reset to the
beginning of the disc.
PAUSE To freeze the video frame
on a single
or pause music, press the PAUSE (Remote
Control ) key during playback. To resume
normal playback, press PLAY (),) (Front Panel)
or PLAY (Remote Control).
Notes
• Some Video CD are recorded with PBC (Playback
control), a menu with recorded contents may
appear on the TV if you have turned the PBC on.
You can make your selection according to its PBC
menu. Press the MENU button on the remote
control to turn PBC on or off anytime during Video
CD playback. When switching from PBC off to PBC
on mode, playback will start from the beginning of
the disc.
• Depending on disc condition, pressing the PLAY
button may take about 10 seconds or longer to start
playback.
Skipping to the Next/Previous
Yon can advance or skip back through the chapters
or tracks on DVD discs, VCDs,Audio CDs and other
discs with the )')'1(SKIP FWD) and I_ (SKIP REV)
buttons on the remote control.
SKIP NEXT Press i_)'lon the remote control to
advance to the next chapter/track.
SKIP PREVIOUS - Press H_ once on the remote
control to skip back to the beginning of the current
chapter or track. Press H_ twice in quick
successions to skip back to the previous chapter
/track.
This unit supports slow motion playback in the
forward direction at three speeds.
During playback, press the SLOW key repeatedly
to select a slow motion speed.
Press PLAY ()) (Front Panel) or PLAY (Remote
Control) to resume playback.
You can freeze playback on a single frame and then
step forward one frame at a time.
Press the PAUSE key to freeze playback.
Press the PAUSE key to advance one frame.
Press PLAY to resume normal playback.
You can scan through DVDs, VCDs and other discs
in forward or reverse direction. Fast forward/reverse
scanning will only work during disc playback.
1Press the )k (FWD)or_ (REV) button on the
|remote control repeatedly to cycle through all the
four speeds in the desired direction.
Press PLAY ()) (Front Panel) or PLAY (Remote
Control) to resume playback.
Notes
• During fast forward playback at "F)" speed, sound
is reproduced if the playing disc is recorded in
DVD-Video mode.
F..I.
o
£%
o
0
o
o
0
e-
0
o
Q.
m,
LQ
t-
"0
t-
0
(1)
g}
35

Use the ZOOM function to magnify or shrink the
image on screen during playback or when paused.
Press the ZOOM key repeatedly to choose a
magnification level from 2x,3x,4x,1/2x or Off.
When the ZOOM function is first activated,
directional arrows will appear on screen. During
this time, you can use the _,/v and 4/t_ keys
on the remote control to move around the image
in order to view the area that is currently off
screen.
Press the ZOOM key repeatedly to choose
ZOOM Off to return normal viewing.
The INSTANT REPLAY key lets you return before at
10 second intervals.
During playback, press the INSTANT REPLAY
key to return before at 10 second intervals.
Most DVD discs include at least one subtitle track in
one language. Subtitles are useful when viewing
movies in a foreign language or for hearing-impaired
viewers. Subtitles
During playback, press the
SUBTITLE button to access the
Subtitle Menu.
2
3
Use the ,L/v keys to select an
available language and press
ENTER. In this example, we have
chosen Spanish subtitle.
To turn off Subtitle, press the
SUBTITLE key to access the
Subtitle Menu. Use theA/V key to
select OFF and then press ENTER.
Subtitles
Spanish
Subtitles
OFF
The INSTANT SKIP key lets you "jump" forward at
30 second intervals
During playback, press the INSTANTSKIP key
to "jump'forward at 30 second intervals.
Some DVD discs are recorded with multiple viewing
angles for certain scenes. When you are viewing a
disc that supports this feature, you can choose among
the available angles on the disc with the ANGLE key.
Press the ANGLE repeatedly to the
key change
scene to the next angle in those recorded.
the Audio Track
Most DVD discs are recorded with multiple audio
tracks. These can contain multiple languages and
different audio formats, such as 5.1Channel, 2
Channel and other languages. For Video CD, there
are three audio tracks (stereo,left or right) which can
be selected.
Audio Audio
the AUDIO button to
During playback, press
access the Audio Menu.
Use the A/v keys to select an audio track and
press ENTER to confirm. Press AUDIO button
to exit the Audio Menu.
When playing a DVD or Video CD, you can display
the current title, chapter/track, elapsed playback
time and other useful information with the DISPLAY
key.
During playback, press the DISPLAY key to view
available information. °
O c.op:03,2 O Eog,,..Of ° ,0
"_ Title :
,. j
O The type of video or file format displayed. Also
displays the Date and Time of the unit.
O Playback action icon designating current
status: Play, Pause, Fast Forward, etc.
Title Number/Track Number currently being
displayed. Also displays total number of
Titles/Tracks on the disc.
DVD Audio Track selected.
O
O
O
O
O
2
For DVD : Chapter number currently being
played. Also displays total number of chapters
on the disc. For Video CD: Audio Track selected.
Subtitle Language currently selected.
Angle selected and available angles on the disc.
Progress bar,current elasped play time and
total time of the title/current track.
Press DISPLAY again to exit the menu.
36

The T.SEARCH function provides a convenient way
to navigate DVD and Video CD by allowing you to
select the Title, Chapter/Track or Time to jump to.
During playback,press the T.SEARCH key to
bring the T.Search Menu.
Title Chapter
v
Use the 4/l_ keys to choose Title or Chapter/
Track. Use the A/v or the NUMBER keys to
select a Title or Chapter/Track to jump to. Press
the ENTER key to confirm.
Title Ch_ter
r_/23 _/33
,v,
To jump to a time on the disc, press !' to select
the Time field. Use the A/v or NUMBER keys to
enter the time. Use the 4 /!, keys to move
between to each desired time fields, then press
ENTER to confirm your selection.
_!_ :17:48 1
To repeat a segment of a disc, use the PLAY MODE
key. On DVDs, you can repeat an entire Disc (All),
Title or Chapter. On VCDs, Track and All repeat is
supported.
Press PLAY MODE during disc playback to set
the Repeat Mode.
To return to normal playback, PLAY MODE
press
until the Repeat OFF icon appears on-screen
signifying that repeat play is cancelled.
Note
•In case of Video CD with PBC, you cannot set
Repeat function during playback.
Re
The A-B REPEAT key lets you to define your own
segment to repeat.
During playback, when you reach the start of the
segment you want to repeat, press the A-B
REPEAT button. An icon, Repeat A, is
displayed on-screen, letting you know that the
segment start point has been saved.
When you reach the end of the segment you
want to repeat, press the A-B REPEAT button
again. The Repeat A-B icon is now displayed
on-screen. The segment will now begin to repeat.
To cancel repeat and resume normal playback,
press A-B REPEAT again. The repeat icon on-
screen changes to Repeat OFF.
1
2
While recording a TV program on a DVD-RAM
disc, press TIMESLIP. The recorder displays a
TV program as it is being recorded.
Go back to the beginning of the TV program,
press SKIP REV. When you go back to the
beginning, playback starts automatically.
You can check how far you are from the current
broadcast by pressing DISPLAY button to view
the Display Menu.
Locate a scene want through the
you
following operations if necessary.
Fast-forward/fast-reverse:
Press FWD or REV button.
Slow-motion:
Press SLOW button.
•To resume normal playback, press the PLAY
button.
Press TIMESLIP to exit from Chase Play.
Notes
• TIMESLIP function is not available when recording
a DVD-RW/R disc and a DVD-RAM in XP mode.
• TIMESLIP function does not work until 30 seconds
of recording have elapsed.
About the Screen Saver
When the recorder is left in DVD stop mode for a
period of about 5 minutes, the Screen Saver will
load to protect the television from "screen burn",
which could occur if an unusual bright image is
displayed on-screen for an extended period of
time.
welcome
TOSHIBA
F..h
o
£%
o
0
o
o
0
e-
0
o
Q.
m,
LQ
O_
¢D
t-
"0
¢D
t.-
0
r..h
:D"
(1)
37
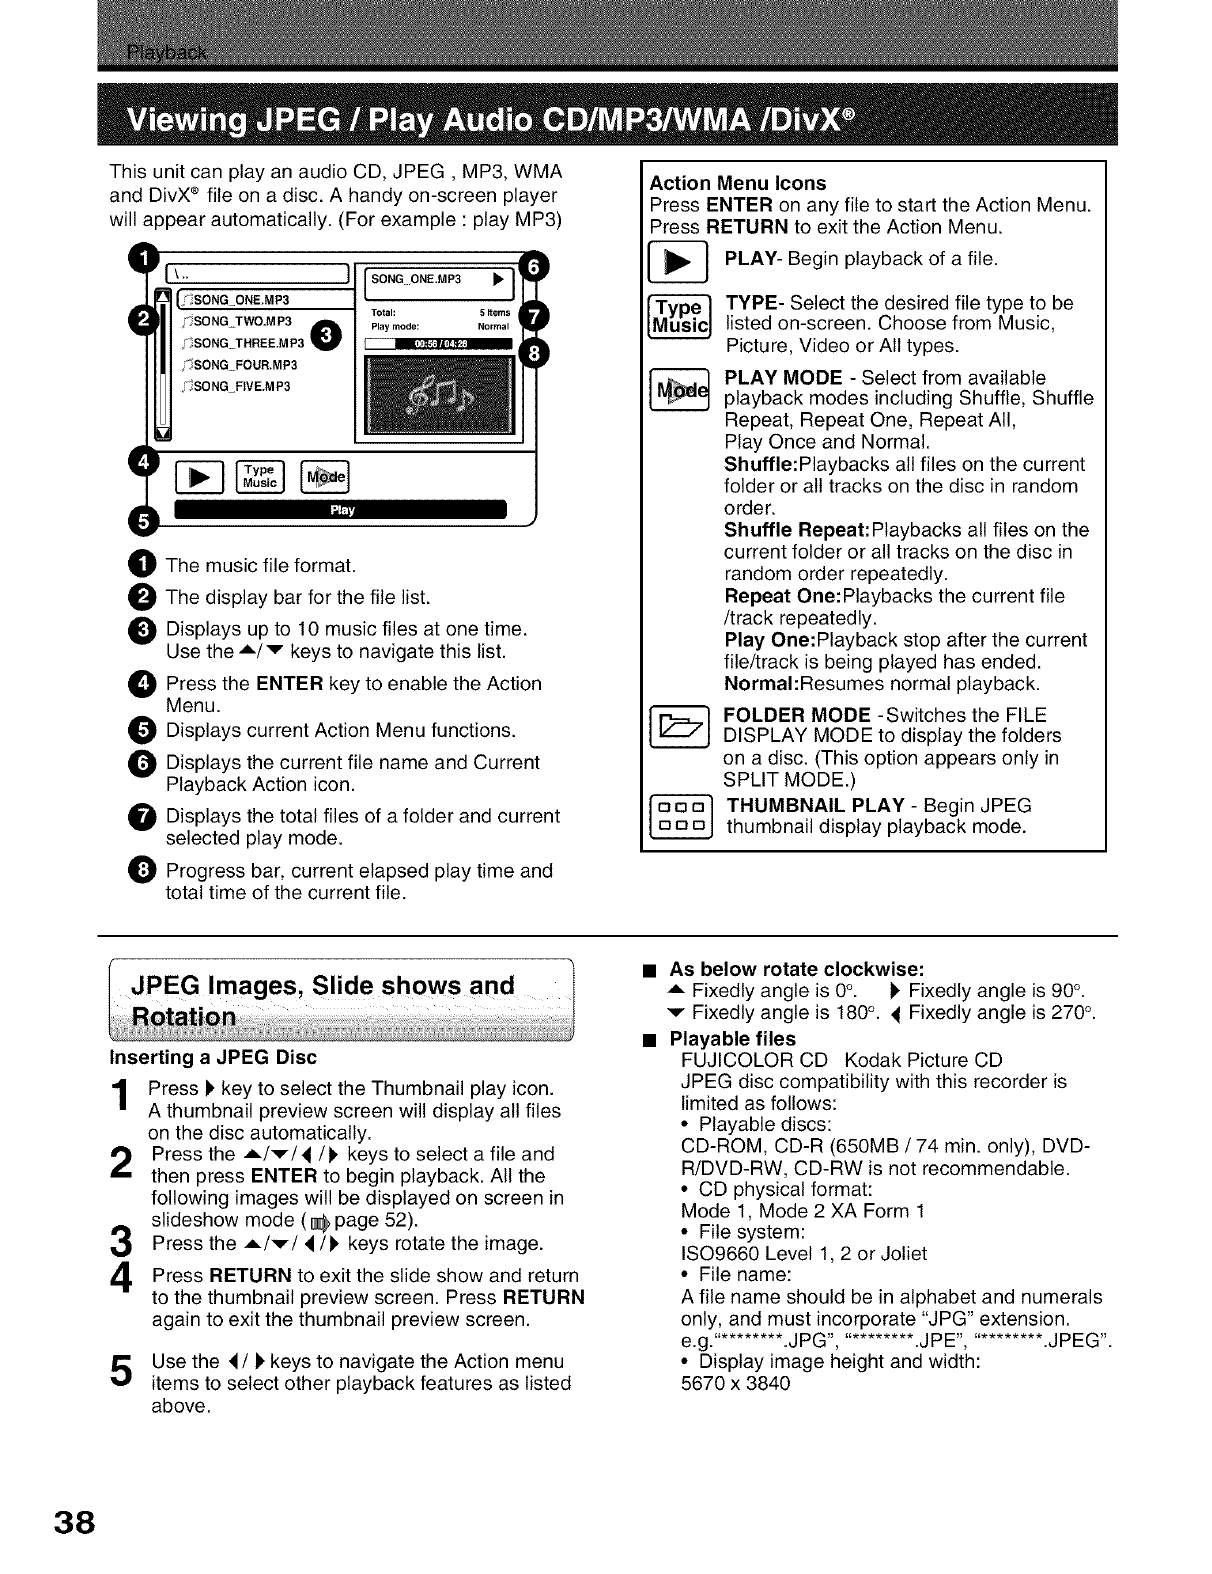
This unit can play an audio CD, JPEG, MP3, WMA
and DivX ®file on a disc. A handy on-screen player
will appear automatically. (For example : play MP3)
e[ \'" ][SONG ONE.MP3
[j_SONG_ONE.MP3 Total: 5Items
9SONG TWO,MP3 _Playmode: Normal
_ SONG THREE.MP3 _ I
_;_SONG FOUR.MP3
.SONG_FIVE.MP3
OThe music file format.
_1 The display bar for the file list.
O
O
0
0
O
0
Displays up to 10 music files at one time.
Use the A/v keys to navigate this list.
Press the ENTER key to enable the Action
Menu.
Displays current Action Menu functions.
Displays the current file name and Current
Playback Action icon.
Displays the total files of a folder and current
selected play mode.
Progress bar, current elapsed play time and
total time of the current file.
Action Menu Icons
Press ENTER on any file to start the Action Menu.
Press RETURN to exit the Action Menu.
PLAY- Begin playback of a file.
TYPE- Select the desired file type to be
listed on-screen. Choose from Music,
Picture, Video or All types.
PLAY MODE - Select from available
playback modes including Shuffle, Shuffle
Repeat, Repeat One, Repeat All,
Play Once and Normal.
Shuffle:Playbacks all files on the current
folder or all tracks on the disc in random
order.
Shuffle Repeat:Playbacks all files on the
current folder or all tracks on the disc in
random order repeatedly.
Repeat One:Playbacks the current file
/track repeatedly.
Play One:Playback stop after the current
file/track is being played has ended.
Normal:Resumes normal playback.
FOLDER MODE -Switches the FILE
DISPLAY MODE to display the folders
on a disc. (This option appears only in
SPLIT MODE.)
THUMBNAIL PLAY - Begin JPEG
thumbnail display playback mode.
Images, Slide shows and
Inserting a JPEG Disc
Press kkey to select the Thumbnail play icon.
A thumbnail preview screen will display all files
on the disc automatically.
Press the A/v/4/l' keys to select a file and
then press ENTER to begin playback. All the
following images will be displayed on screen in
slideshow mode (1_ page 52).
Press the A/v/4/k keys rotate the image.
Press RETURN to exit the slide show and return
to the thumbnail preview screen. Press RETURN
again to exit the thumbnail preview screen.
Use the 4/kkeys to navigate the Action menu
items to select other playback features as listed
above.
•As below rotate clockwise:
A Fixedly angle is 0°. I' Fixedly angle is 90°.
v Fixedly angle is 180°. 4Fixedly angle is 270 °.
• Playable files
FUJICOLOR CD Kodak Picture CD
JPEG disc compatibility with this recorder is
limited as follows:
• Playable discs:
CD-ROM, CD-R (650MB /74 min. only), DVD-
R/DVD-RW, CD-RW is not recommendable.
• CD physical format:
Mode 1, Mode 2 XA Form 1
• File system:
ISO9660 Level 1,2 or Joliet
• File name:
A file name should be in alphabet and numerals
only, and must incorporate "JPG" extension.
e.g.'......... .JPG', .......... .JPE", .......... .JPEG'.
• Display image height and width:
5670 x 3840
38
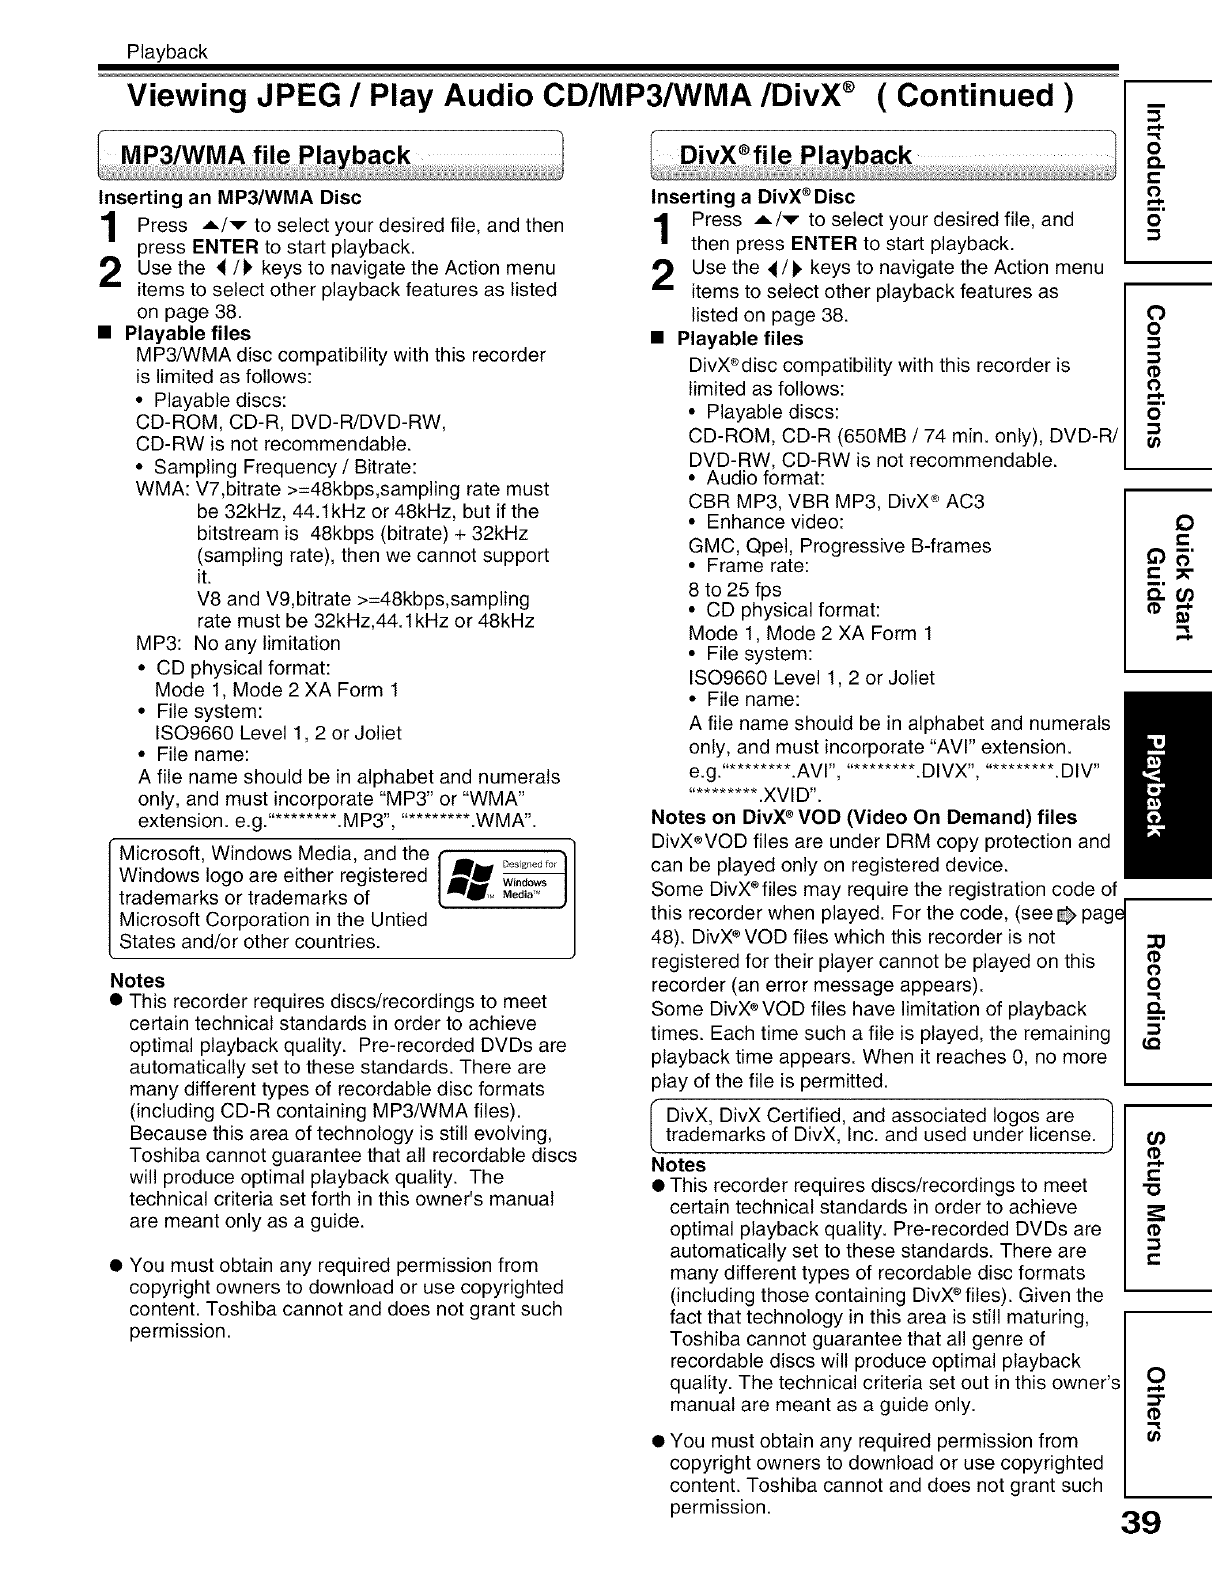
Playback
Viewing JPEG /Play Audio CD/MP3/WMA/DivX ®( Continued )
Inserting an MP3/WMA Disc
Press A/v to select desired file, and then
your
press ENTER to start playback.
Use the 4/1_ keys to navigate the Action menu
items to select other playback features as listed
on page 38.
•Playable files
MP3/WMA disc compatibility with this recorder
is limited as follows:
• Playable discs:
CD-ROM, CD-R, DVD-R/DVD-RW,
CD-RW is not recommendable.
• Sampling Frequency /Bitrate:
WMA: V7,bitrate >=48kbps,sampling rate must
be 32kHz, 44.1kHz or 48kHz, but if the
bitstream is 48kbps (bitrate) + 32kHz
(sampling rate), then we cannot support
it.
V8 and V9,bitrate >=48kbps,sampling
rate must be 32kHz,44.1 kHz or 48kHz
MP3: No any limitation
• CD physical format:
Mode 1, Mode 2 XA Form 1
• File system:
ISO9660 Level 1,2 or Joliet
• File name:
A file name should be in alphabet and numerals
only, and must incorporate "MP3" or "WMA"
extension, e.g.' ......... .MP3", .......... .WMA'.
Microsoft, Windows Media, and the
Windows logo are either registered
trademarks or trademarks of
Microsoft Corporation in the Untied
States and/or other countries.
Desigl_ed for
Windows
Media _
Notes
•This recorder requires discs/recordings to meet
certain technical standards in order to achieve
optimal playback quality. Pre-recorded DVDs are
automatically set to these standards. There are
many different types of recordable disc formats
(including CD-R containing MP3/WMA files).
Because this area of technology is still evolving,
Toshiba cannot guarantee that all recordable discs
will produce optimal playback quality. The
technical criteria set forth in this owner's manual
are meant only as a guide.
• You must obtain any required permission from
copyright owners to download or use copyrighted
content. Toshiba cannot and does not grant such
permission.
Inserting a DivX®Disc
Press A/v to select your desired file, and
then press ENTER to start playback.
Use the 4/Fkeys to navigate the Action menu
items to select other playback features as
listed on page 38.
• Playable files
DivX®disc compatibility with this recorder is
limited as follows:
• Playable discs:
CD-ROM, CD-R (650MB /74 min. only), DVD-R/
DVD-RW, CD-RW is not recommendable.
• Audio format:
CBR MP3, VBR MP3, DivX ®AC3
• Enhance video:
GMC, Qpel, Progressive B-frames
• Frame rate:
8 to 25 fps
• CD physical format:
Mode 1, Mode 2 XA Form 1
• File system:
ISO9660 Level 1, 2 or Joliet
• File name:
A file name should be in alphabet and numerals
only, and must incorporate "AVI" extension.
e.g.'......... .AVI', .......... .DIVX', .......... .DIV"
.......... .XVID'.
Notes on DivX ®VOD (Video On Demand) files
DivX®VOD files are under DRM copy protection and
can be played only on registered device.
Some DivX®files may require the registration code of
this recorder when played. For the code, (see @ page
48). DivX®VOD files which this recorder is not
registered for their player cannot be played on this
recorder (an error message appears).
Some DivX®VOD files have limitation of playback
times. Each time such a file is played, the remaining
playback time appears. When it reaches 0, no more
play of the file is permitted.
I DivX, DivX Certified, and associated loges are 1
trademarks of DivX, Inc. and used under license, j
Notes
• This recorder requires discs/recordings to meet
certain technical standards in order to achieve
optimal playback quality. Pre-recorded DVDs are
automatically set to these standards. There are
many different types of recordable disc formats
(including those containing DivX®files). Given the
fact that technology in this area is still maturing,
Toshiba cannot guarantee that all genre of
recordable discs will produce optimal playback
quality. The technical criteria set out in this owner's
manual are meant as a guide only.
• You must obtain any required permission from
copyright owners to download or use copyrighted
content. Toshiba cannot and does not grant such
permission.
i
e..I.
o
c%
o
o
0
o
o
o
0_
0
o
Q.
LQ
U)
t-
"O
t.-
£
::3"
(I}
U_
39
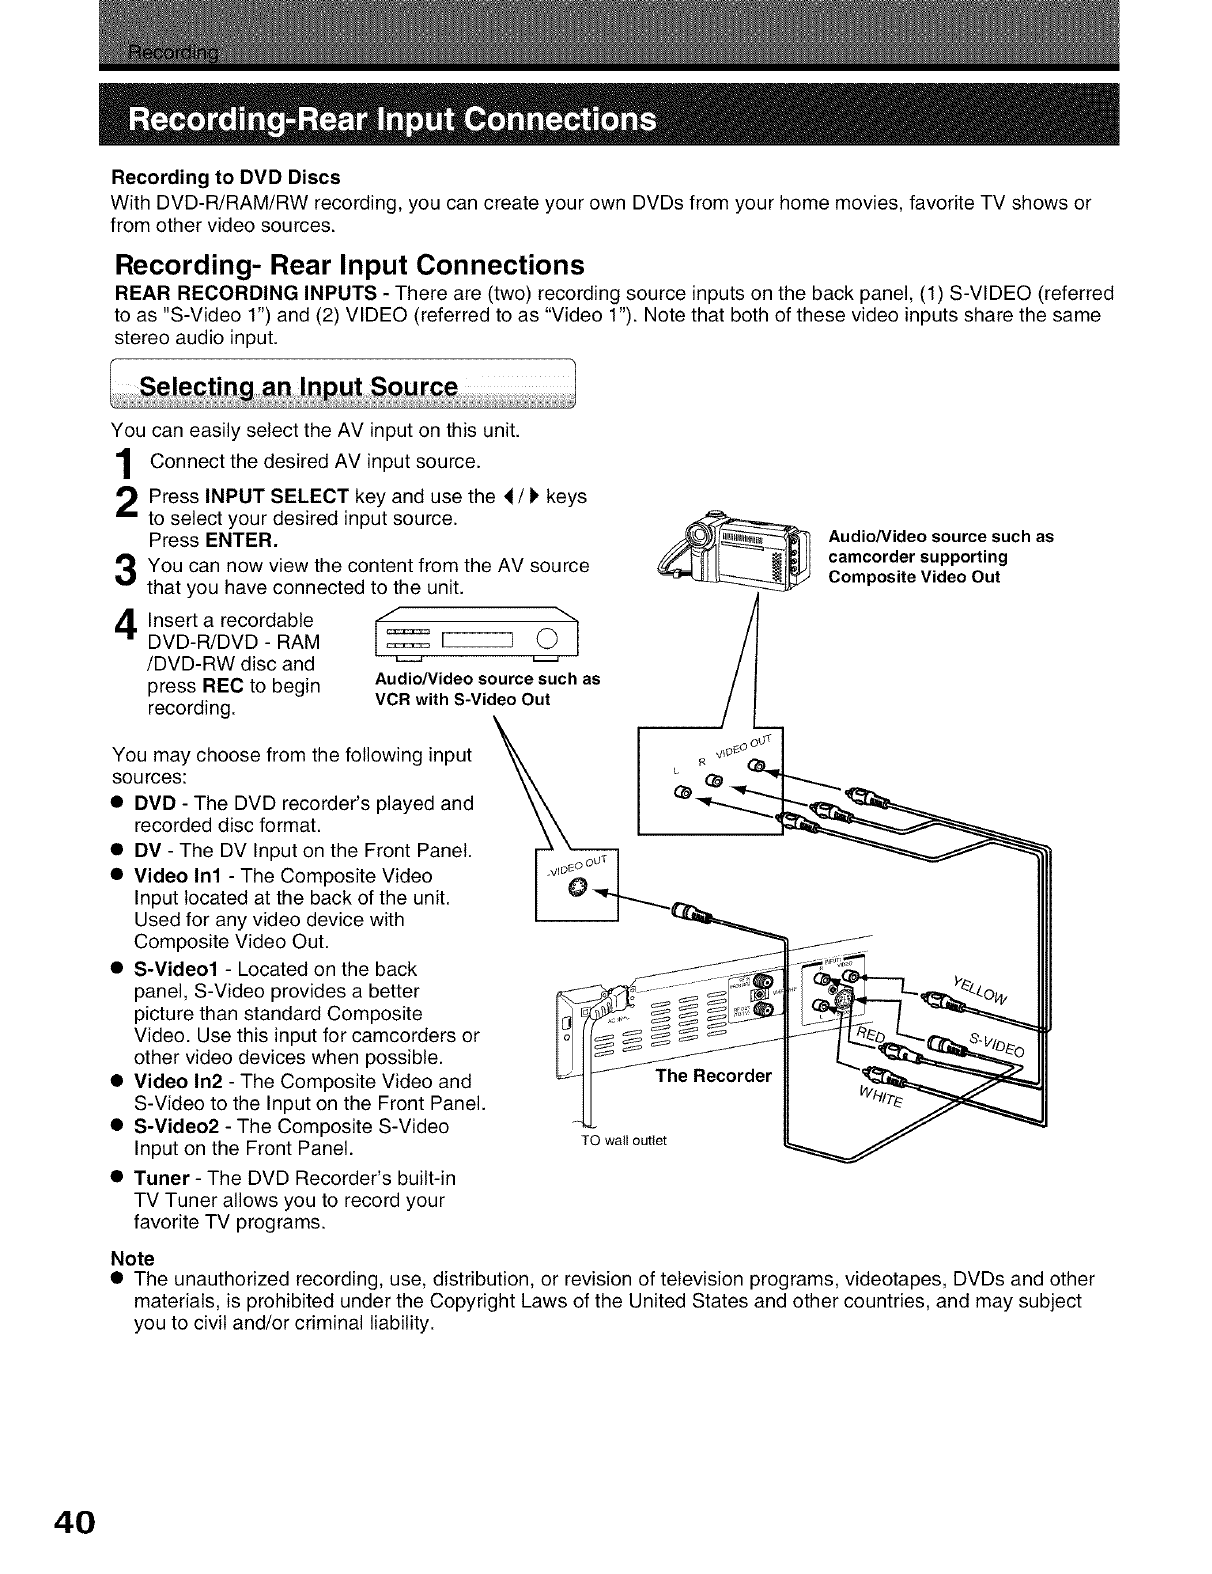
Recording to DVD Discs
With DVD-R/RAM/RW recording, you can create your own DVDs from your home movies, favorite TV shows or
from other video sources.
Recording- Rear Input Connections
REAR RECORDING INPUTS - There are (two) recording source inputs on the back panel, (1) S-VIDEO (referred
to as "S-Video 1") and (2) VIDEO (referred to as "Video 1"). Note that both of these video inputs share the same
stereo audio input.
You can easily select the AV input on this unit.
Connect the desired AV input source.
Press INPUT SELECT key and use the d /_ keys
to select your desired input source.
Press ENTER.
You can now view the content from the AM source
that you have connected to the unit.
4Insert a recordable _ ,__'_
DVD-R/DVD - RAM
/DVD-RW disc and
press REC to begin Audio/Video source such as
recording. VCRwith S-Video Out
You may choose from the following input
sources:
• DVD - The DVD recorder's played and
recorded disc format.
DV - The DV Input on the Front Panel.
Video In1 - The Composite Video
Input located at the back of the unit.
Used for any video device with
Composite Video Out.
S-Video1 - Located on the back
panel, S-Video provides a better
picture than standard Composite
Video. Use this input for camcorders or
other video devices when possible.
Video In2 - The Composite Video and _ _ The-Recorder
S-Video to the Input on the Front Panel.
S-Video2 - The Composite S-Video
Input on the Front Panel. TOwalloutlet
Tuner - The DVD Recorder's built-in
TV Tuner allows you to record your
favorite TV programs.
Audio/Video source such as
camcorder supporting
Composite Video Out
/
Note
• The unauthorized recording, use, distribution, or revision of television programs, videotapes, DVDs and other
materials, is prohibited under the Copyright Laws of the United States and other countries, and may subject
you to civil and/or criminal liability.
40
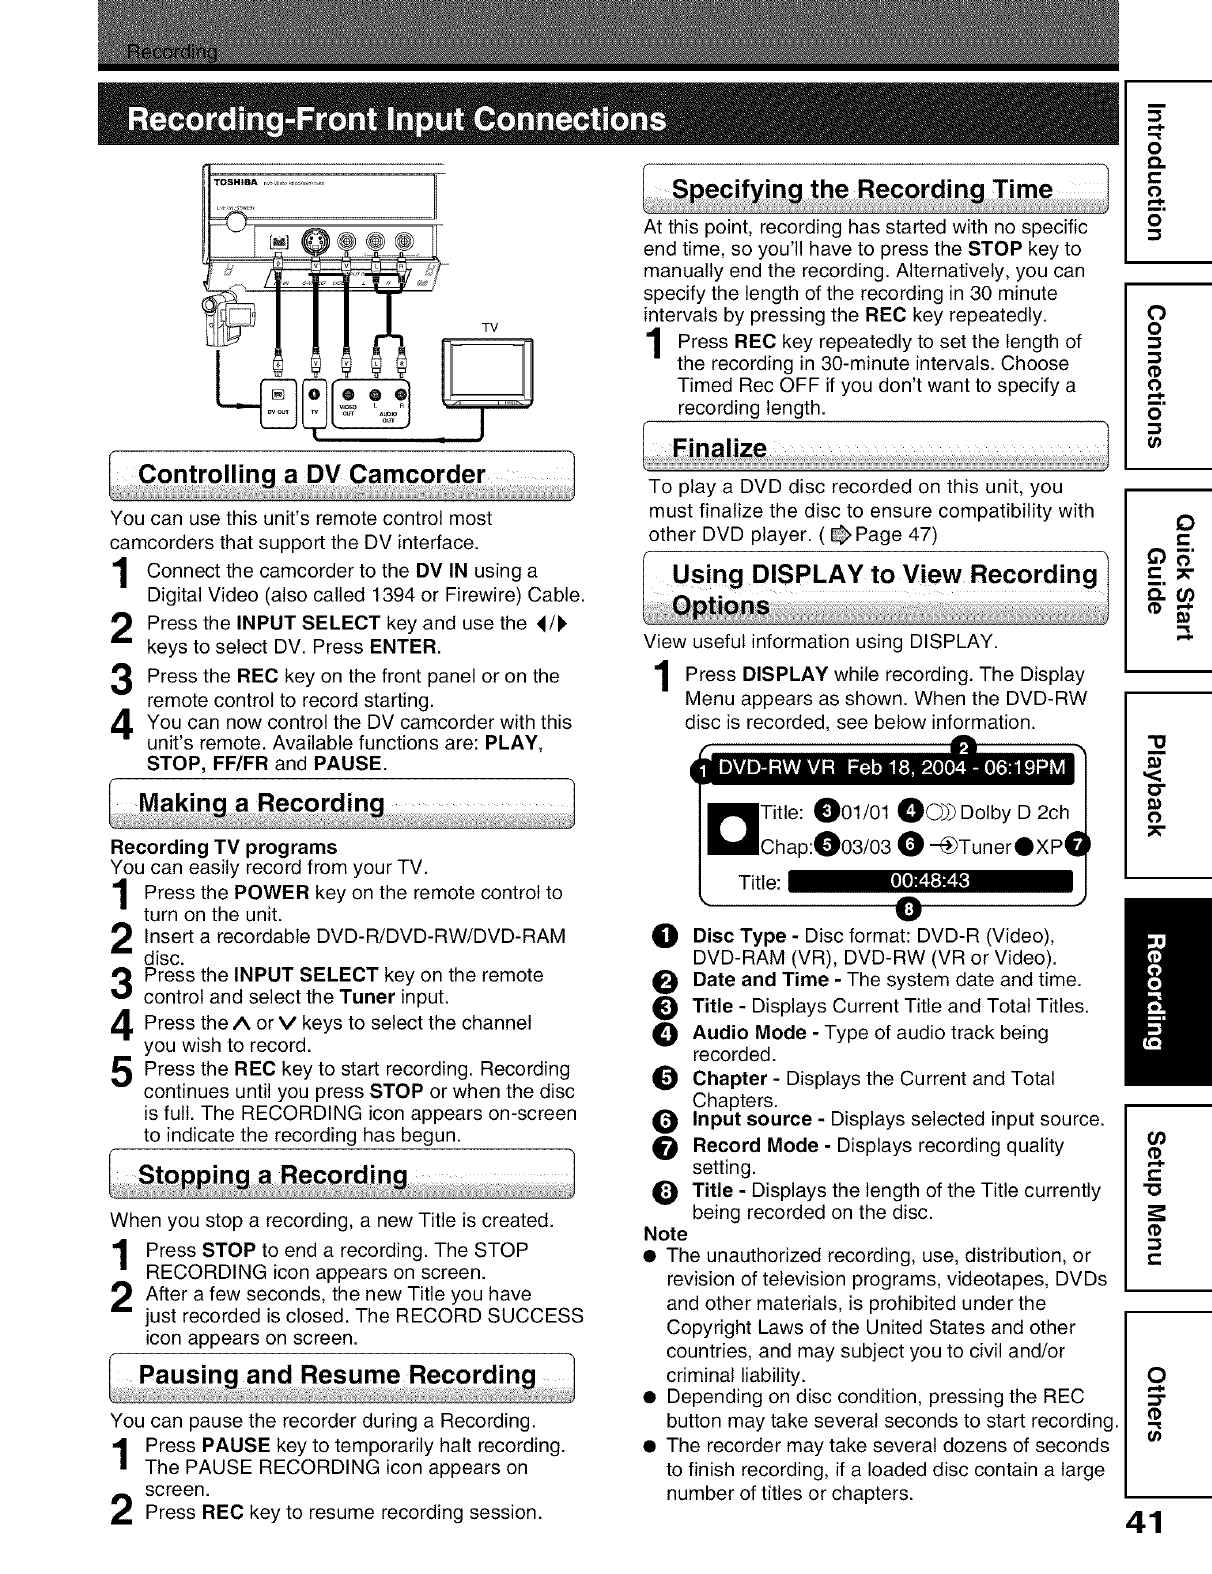
TOSHIBA c _ ,,, ,,_, ,_,,., _
TV
DV Camcorder
You can use this unit's remote control most
camcorders that support the DV interface.
Connect the camcorder to the DV IN using a
Digital Video (also called 1394 or Firewire) Cable.
Press the INPUT SELECT key and use the 4/I*
keys to select DV. Press ENTER.
Press the REC key on the front panel or on the
remote control to record starting.
You can now control the DV camcorder with this
unit's remote. Available functions are: PLAY,
STOP, FF/FR and PAUSE.
a Recordin(
Recording TV programs
You can easily record from your TV.
Press the POWER key on the remote control to
turn on the unit.
Insert a recordable DVD-R/DVD-RW/DVD-RAM
disc.
Press the INPUT SELECT key on the remote
control and select the Tuner input.
Press the/k or Y keys to select the channel
you wish to record.
Press the REC key to start recording. Recording
continues until you press STOP or when the disc
is full. The RECORDING icon appears on-screen
to indicate the recording has begun.
When you stop a recording, a new Title is created.
Press STOP to end a recording. The STOP
RECORDING icon appears on screen.
After a few seconds, the new Title have
you
just recorded is closed. The RECORD SUCCESS
icon appears on screen.
You can pause the recorder during a Recording.
Press PAUSE key to temporarily halt recording.
The PAUSE RECORDING icon appears on
screen.
Press REC key to resume recording session.
At this point, recording has started with no specific
end time, so you'll have to press the STOP key to
manually end the recording. Alternatively, you can
specify the length of the recording in 30 minute
intervals by pressing the REC key repeatedly.
Press REC key repeatedly to set the of
length
the recording in 30-minute intervals. Choose
Timed Rec OFF if you don't want to specify a
recording length.
To play a DVD disc recorded on this unit, you
must finalize the disc to ensure compatibility with
other DVD player. ( _ Page 47)
View useful information using DISPLAY.
Press DISPLAY while The Display
recording.
Menu appears as shown. When the DVD-RW
disc is recorded, see below information.
Title:
_) Disc Type - Disc format: DVD-R (Video),
DVD-RAM (VR), DVD-RW (VR or Video).
O Date and Time - The system date and time.
Title - Displays Current Title and Total Titles.
_) Audio Mode - Type of audio track being
recorded.
O Chapter - Displays the Current and Total
Chapters.
Input source - Displays selected input source.
Record Mode - Displays recording quality
setting.
_1 Title - Displays the length of the Title currently
being recorded on the disc.
Note
•The unauthorized recording, use, distribution, or
revision of television programs, videotapes, DVDs
and other materials, is prohibited under the
Copyright Laws of the United States and other
countries, and may subject you to civil and/or
criminal liability.
• Depending on disc condition, pressing the REC
button may take several seconds to start recording.
• The recorder may take several dozens of seconds
to finish recording, if a loaded disc contain a large
number of titles or chapters.
o
o.
o
0
o
o
0
e-
"u
E
(3"
_0
0
(O
e-P
e-
"O
e-
0
;3"
O_
41
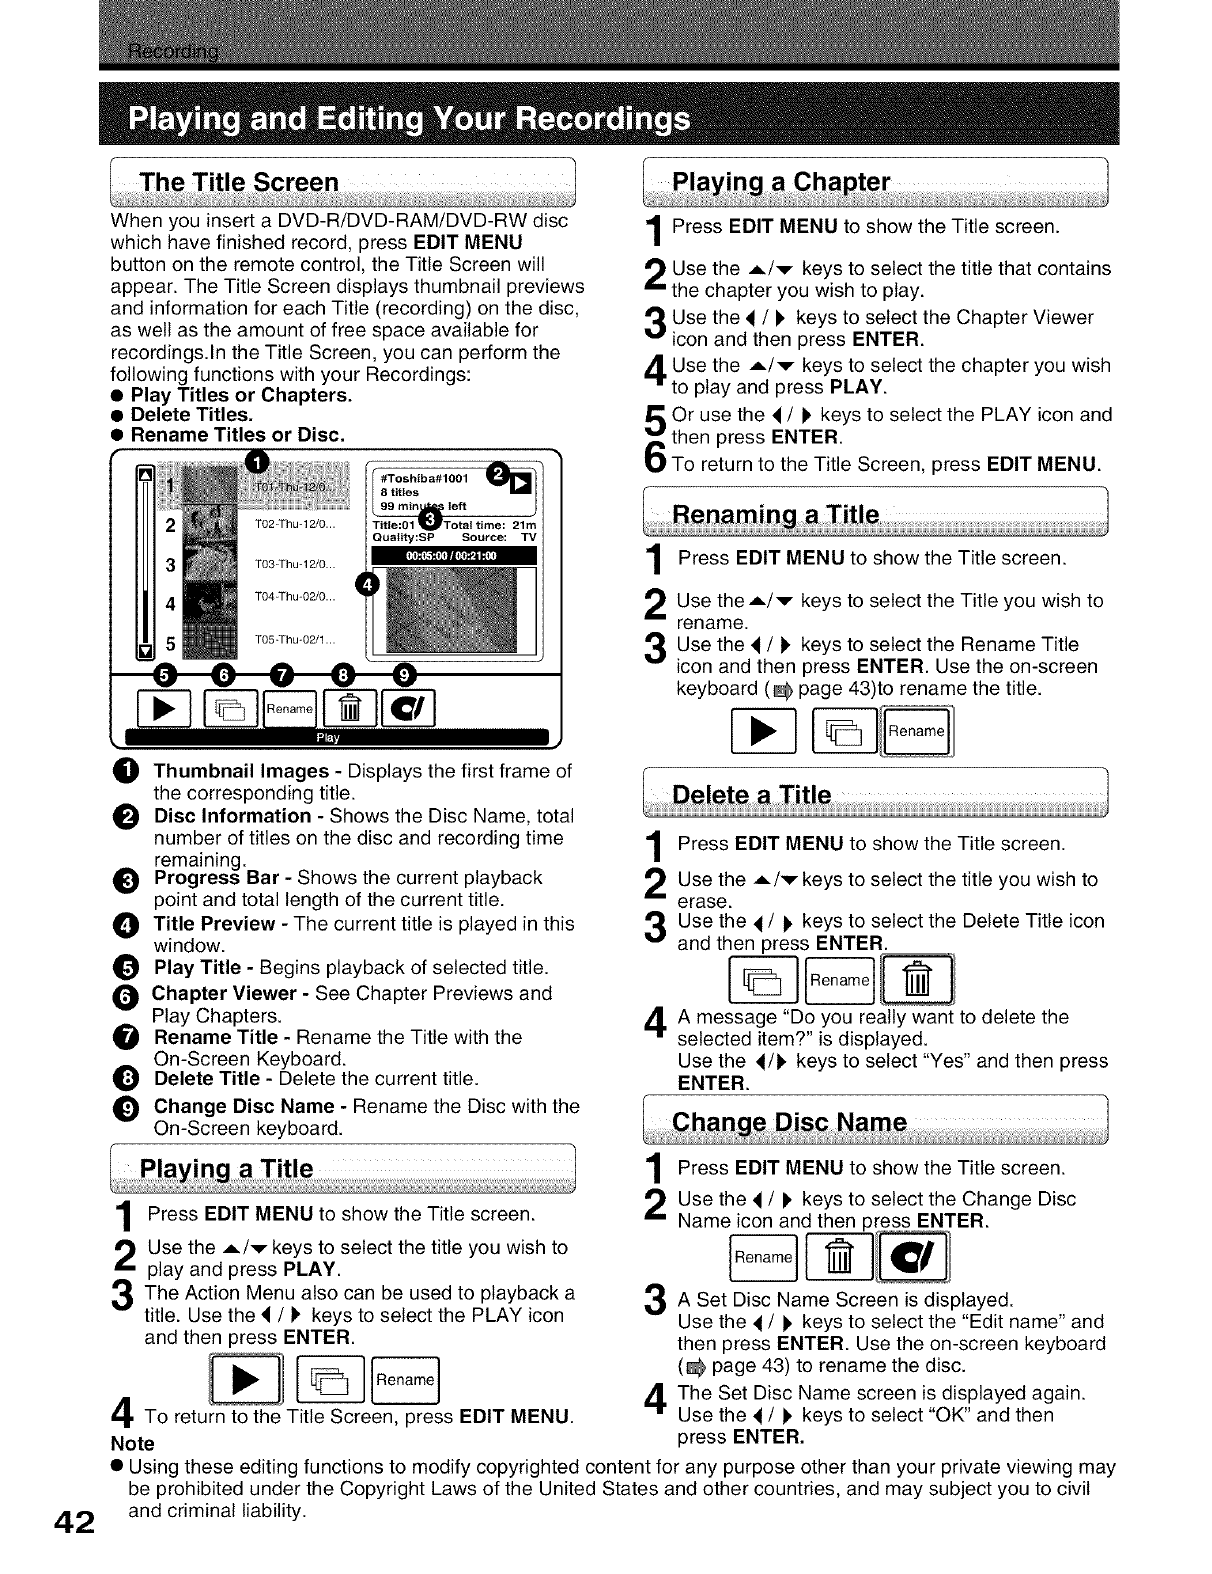
,_n
When you insert a DVD-R/DVD-RAM/DVD-RW disc
which have finished record, press EDIT MENU
button on the remote control, the Title Screen will
appear• The Title Screen displays thumbnail previews
and information for each Title (recording) on the disc,
as well as the amount of free space available for
recordings.In the Title Screen, you can perform the
following functions with your Recordings:
• Play Titles or Chapters.
• Delete Titles.
• Rename Titles or Disc,
TO2-Thu-12/0... | Title:01 _l_Total time: 21m |
TO3-Thu-12/O... I_l
TO4-Thu-02/O...
TO5_Thu-02/1 ...
_i_ Thumbnail Images - Displays the first frame of
the corresponding title•
Disc Information - Shows the Disc Name, total
number of titles on the disc and recording time
remaining•
Progress Bar - Shows the current playback
point and total length of the current title•
O Title Preview - The current title is played in this
window•
Play Title - Begins playback of selected title•
Chapter Viewer - See Chapter Previews and
Play Chapters•
Rename Title - Rename the Title with the
On-Screen Keyboard•
O Delete Title - Delete the current title•
Change Disc Name - Rename the Disc with the
On-Screen keyboard•
Press EDIT MENU to show the Title screen•
Use the _./v keys to select the title that contains
the chapter you wish to play.
Use the 4/) keys to select the Chapter Viewer
icon and then press ENTER•
Use the A/v keys to select the chapter you wish
to play and press PLAY.
Or use the 4/_' keys to select the PLAY icon and
then press ENTER•
To return to the Title Screen, press EDIT MENU.
Press EDIT MENU to show the Title screen•
Use the A/v keys to select the Title you wish to
rename•
Use the 4/) keys to select the Rename Title
icon and then press ENTER• Use the on-screen
keyboard (_ page 43)t0 rename the title•
Press EDIT MENU to show the Title screen•
Use the A/v keys to select the title you wish to
erase•
Use the 4/) keys to select the Delete Title icon
and then press ENTER•
A message "Do you really want to delete the
selected _tem. ts d_splayed.
Use the 4/1' keys to select "Yes" and then press
ENTER•
42
Press EDIT MENU to show the Title screen•
Use the A/v keys to select the title you wish to
play and press PLAY•
The Action Menu also can be used to playback a
title• Use the 4/!' keys to select the PLAY icon
and then press ENTER•
Ren°me]
To return to the Title Screen, press EDIT MENU•
Note
Press EDIT MENU to show the Title screen•
Use the 4/I, keys to select the Change Disc
Name icon and then press ENTER•
A Set Disc Name Screen is displayed•
Use the 4/1' keys to select the "Edit name" and
then press ENTER• Use the on-screen keyboard
(_ page 43) to rename the disc.
The Set Disc Name screen is displayed again•
Use the 4/) keys to select "OK" and then
press ENTER.
• Using these editing functions to modify copyrighted content for any purpose other than your private viewing may
be prohibited under the Copyright Laws of the United States and other countries, and may subject you to civil
and criminal liability•
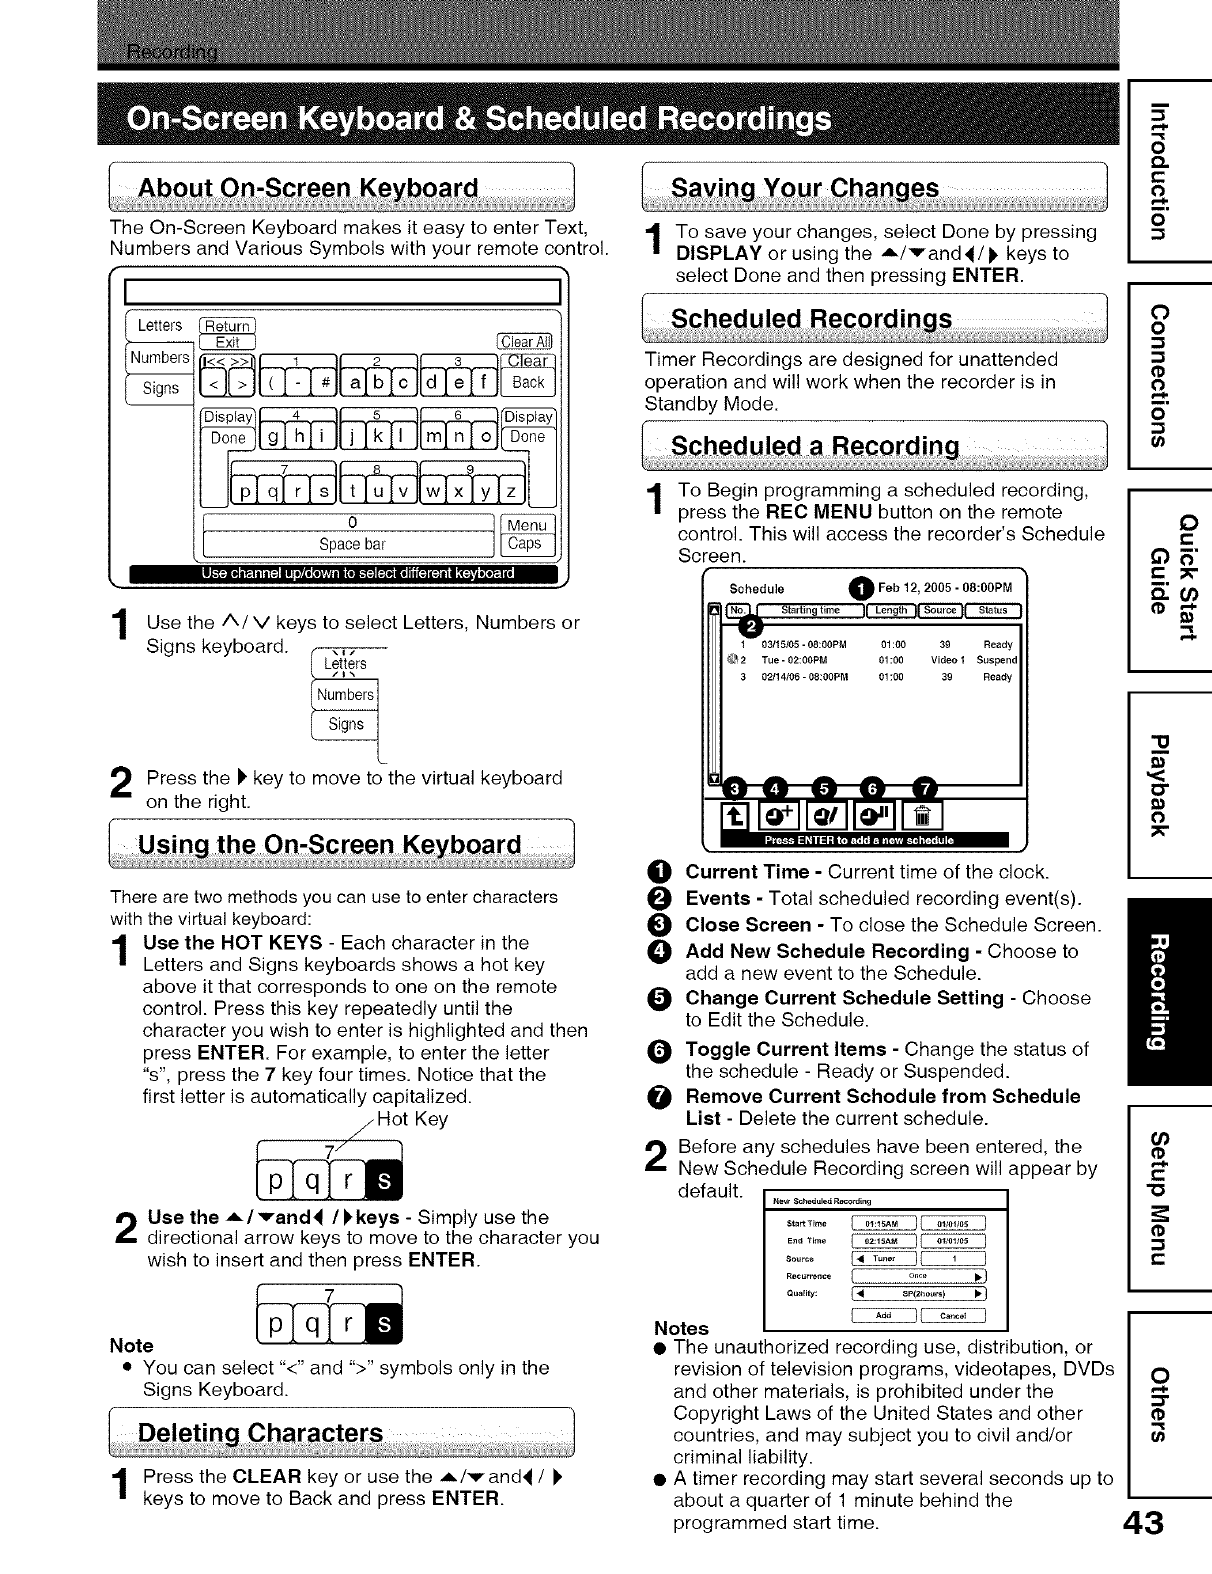
TheOn-ScreenKeyboardmakesit easytoenterText,
NumbersandVariousSymbols with your remote control.
I
1Use the A/V keys to select Letters, Numbers or
Signs keyboard.
Press the )' key to move to the virtual keyboard
on the right.
To save your chanqes, select Done by pressing
DISPLAY or using the A/rand _/) keys to
select Done and then pressing ENTER.
Timer Recordings are designed for unattended
operation and will work when the recorder is in
Standby Mode.
Sched uled a Recordin
1To Begin programming a scheduled recording,
press the REC MENU button on the remote
control. This will access the recorder's Schedule
Screen.
Schedule OFeb 12, 2005 -08:00PM
Starting time U Length I__
1 03t15_5-08:00PM 01:00 39 Ready
O2 Tue-02:00PM 01:00 Video1 Suspend
30_14/06-08:00PM 01:00 39 Ready
There are two methods you can use to enter characters
with the virtual keyboard:
Use the HOT KEYS - Each character in the
Letters and Signs keyboards shows a hot key
above it that corresponds to one on the remote
control. Press this key repeatedly until the
character you wish to enter is highlighted and then
press ENTER. For example, to enter the letter
"s", press the 7 key four times. Notice that the
first letter is automatically capitalized.
Hot Key
Use the A/vand_ /_,keys - Simply use the
directional arrow keys to move to the character you
wish to insert and then press ENTER.
Note
• You can select "<" and ">" symbols only in the
Signs Keyboard.
Press the CLEAR key or use the A/vand_ /
keys to move to Back and press ENTER.
O
O
@
2
li) Current Time - Current time of the clock.
OEvents - Total scheduled recording event(s).
i_ Close Screen - To close the Schedule Screen.
_) Add New Schedule Recording - Choose to
add a new event to the Schedule.
Change Current Schedule Setting - Choose
to Edit the Schedule.
Toggle Current Items - Change the status of
the schedule - Ready or Suspended.
Remove Current Schodule from Schedule
List - Delete the current schedule.
Before any schedules have been entered, the
New Schedule Recording screen will appear by
default. New S_heeuled R_d_ng
...... _CCCCB
R......... [ ..... _.}
Quality: {4 sP(2aour_) • }
EC2_CD_
Notes
• The unauthorized recording use, distribution, or
revision of television programs, videotapes, DVDs
and other materials, is prohibited under the
Copyright Laws of the United States and other
countries, and may subject you to civil and/or
criminal liability.
• A timer recording may start several seconds up to
about a quarter of 1 minute behind the
programmed start time.
O
t-
O
m,
o
O
o
(1
m,
o
O
t-
63E
_m
"o
Or)
t-
-o
t-
O
43
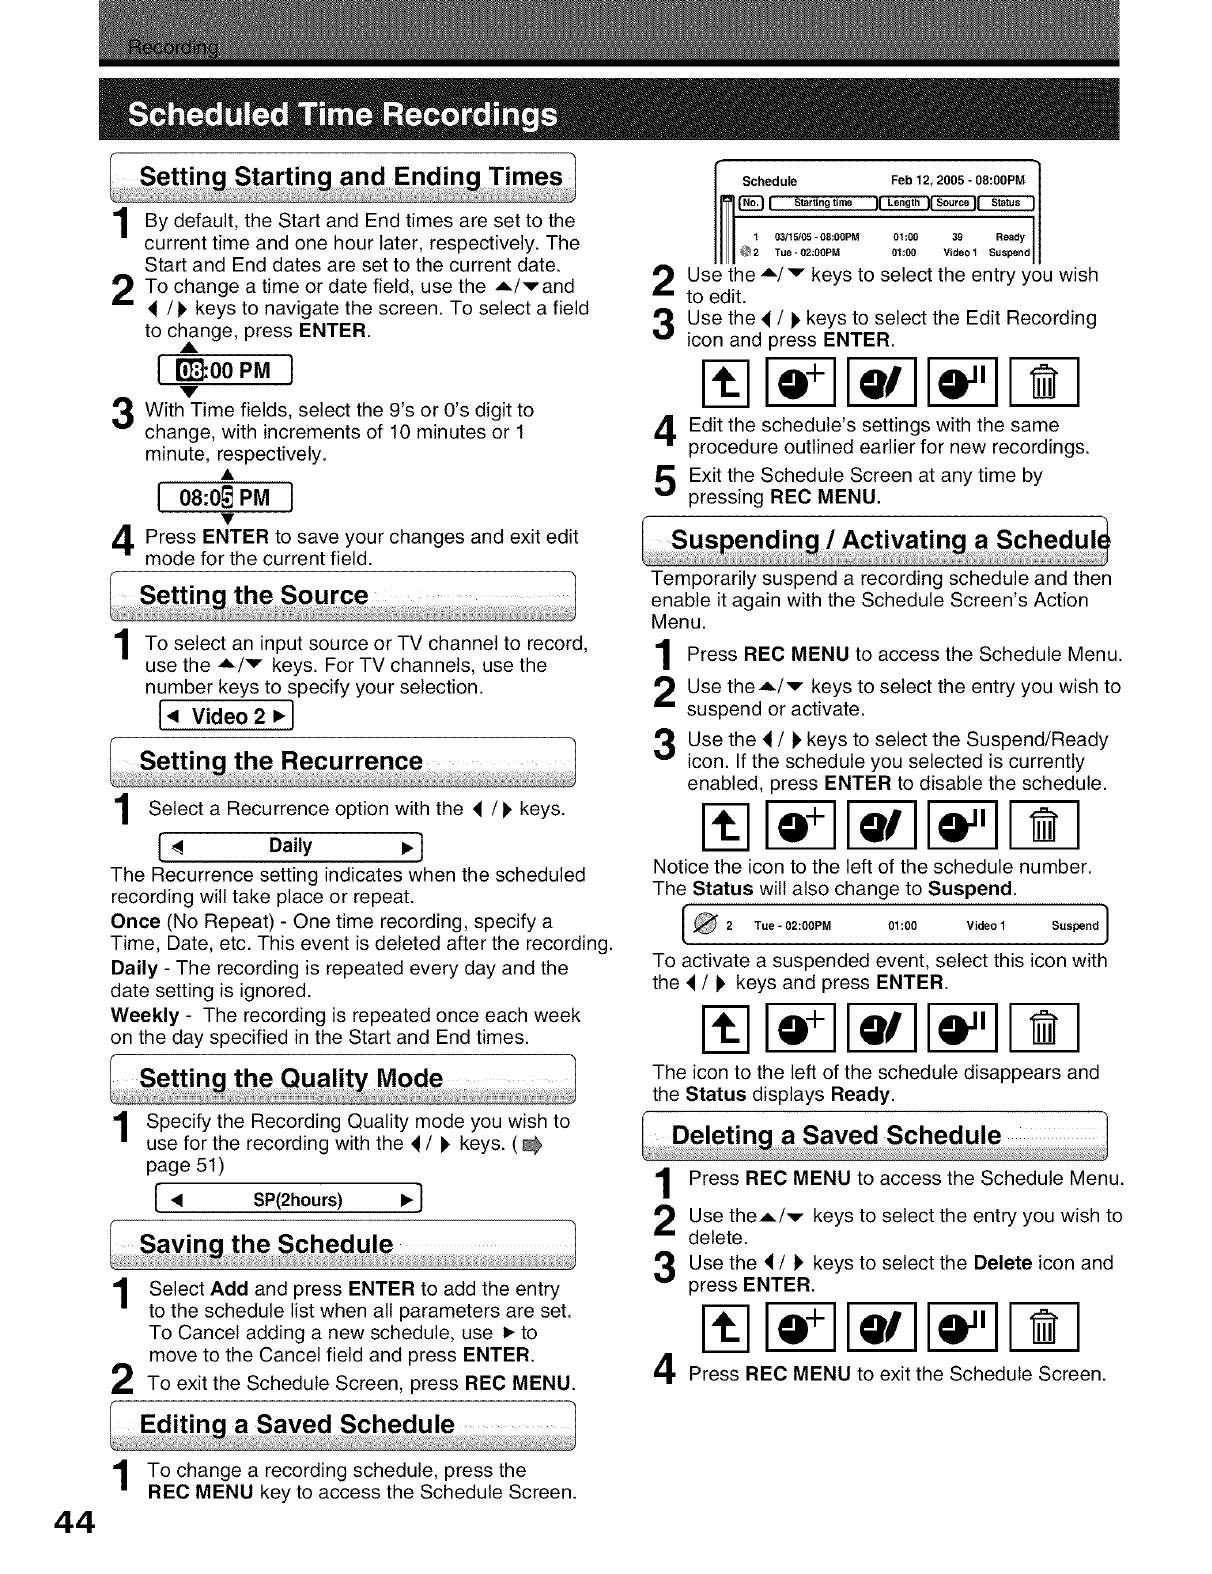
Startin¢ and Endinc Times
By default, the Start and End times are set to the
current time and one hour later, respectively. The
Start and End dates are set to the current date.
To change a time or date field, use the A/rand
</I_ keys to navigate the screen. To select a field
to change, press ENTER.
A
I mooPMI
v
With Time fields, select the 9's or O's digit to
change, with increments of 10 minutes or 1
minute, respectively.
I 08:0_PM I
Press ENTER to save your changes and exit edit
mode for the current field.
the Source
1To select an input source or TV channel to record,
use the ._./v keys. For TV channels, use the
number keys to specify your selection.
l< Video2•}
Select Recurrence with the </
aoption keys.
[ _ Daily •}
The Recurrence setting indicates when the scheduled
recording will take place or repeat.
Once (No Repeat) - One time recording, specify a
Time, Date, etc. This event is deleted after the recording.
Daily - The recording is repeated every day and the
date setting is ignored.
Weekly - The recording is repeated once each week
on the day specified in the Start and End times.
, Mode
1Specify the Recording Quality mode you wish to
use for the recording with the 4/) keys. (
page 51)
[ • SP(2hours) •}
Select Add and press ENTER to add the entry
to the schedule list when all parameters are set.
To Cancel adding a new schedule, use i, to
move to the Cancel field and press ENTER.
To exit the Schedule Screen, press REC MENU.
I Schedute Feb 12, 2005 - 08:00PM ]
_l Startlngtlme H Length IlSourcellstatus II
Use the A/v keys to select the entry you wish
to edit.
Use the _/_ keys to select the Edit Recording
iCOn and press ENTER.
%
Edit the schedule's settings with the same
procedure outlined earlier for new recordings.
Exit the Schedule Screen at any time by
pressing REC MENU.
Temporarily suspend a recording schedule and then
enable it again with the Schedule Screen's Action
Menu.
Press REC MENU to the Schedule Menu.
access
Use theA/v keys to select the entry you wish to
suspend or activate.
Use the 4/l, keys to select the Suspend/Ready
icon. If the schedule you selected is currently
enabled, press ENTER to disable the schedule.
% i-0- i-=711- -TIi- -i
Notice the icon to the left of the schedule number.
The Status will also change to Suspend.
To activate a suspended event, select this icon with
the < /_ keys and press ENTER.
The icon to the left of the schedule disappears and
the Status displays Ready.
Press REC MENU to access the Schedule Menu.
Use theA/v keys to select the entry you wish to
delete.
Use the </l, keys to select the Delete icon and
press ENTER.
%I-0- raTII- -q
Press REC MENU to exit the Schedule Screen.
Editinc a Saved Schedule
To change a recording schedule, press the
REC MENU key to access the Schedule Screen.
44
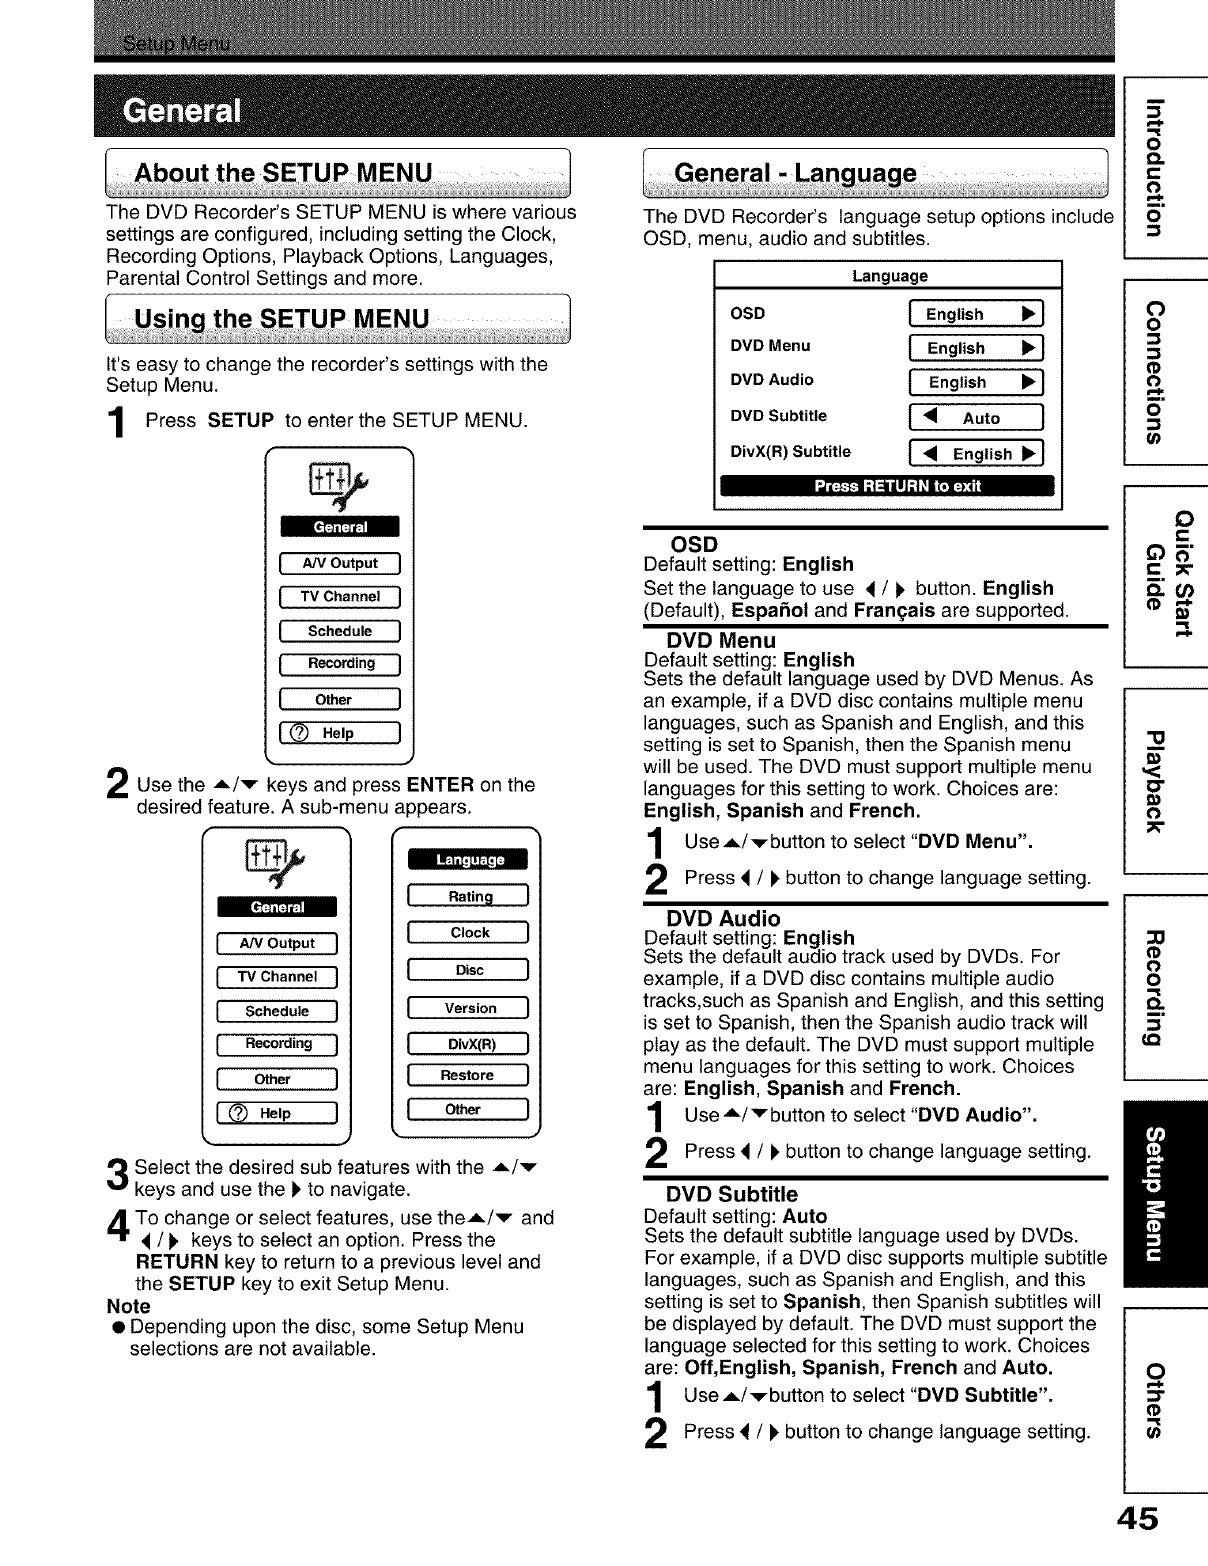
The DVD Recorder's SETUP MENU is where various
settings are configured, including setting the Clock,
Recording Options, Playback Options, Languages,
Parental Control Settings and more.
It's easy to change the recorder's settings with the
Setup Menu.
Press SETUP to enter the SETUP MENU.
II_:-_-11 ;l ;;ili II _| _.i(*!;):41
IA/V Output
ITVChannel
ISchedule
IRecording
IOther
I(_ Help
Use the A/v keys and press ENTER on the
desired feature. A sub-menu appears.
IA/VOutput ]
ITVChannel J
ISchedule I
I Recording J
I Ot ' I
I _) Help l
Rating I
Clock I
Disc 1
Version I
OivX(R) 1
Restore I
O_r J
Select the desired sub features with the .,=/v
keys and use the _ to navigate.
To change or select features, use the.-./v and
</I_ keys to select an option. Press the
RETURN key to return to a previous level and
the SETUP key to exit Setup Menu.
Note
• Depending upon the disc, some Setup Menu
selections are not available.
The DVD Recorder's language setup options include
OSD, menu, audio and subtitles.
Language
OSD [ English _'1
DVD Menu [English _1
DVD Audio [English _1
DVD Subtitle 1• Auto J
DivX(R) Subtitle I • English _J
OSD
Default setting: English
Set the language to use 4/i, button. English
(Default), EspaSol and Frangais are supported.
DVD Menu
Default setting: English
Sets the default language used by DVD Menus. As
an example, if a DVD disc contains multiple menu
languages, such as Spanish and English, and this
setting is set to Spanish, then the Spanish menu
will be used. The DVD must support multiple menu
languages for this setting to work. Choices are:
English, Spanish and French.
Use.,L/vbutton to select "DVD Menu".
Press < /l, button to change language setting.
DVD Audio
Default setting: English
Sets the default audio track used by DVDs. For
example, if a DVD disc contains multiple audio
tracks,such as Spanish and English, and this setting
is set to Spanish, then the Spanish audio track will
play as the default. The DVD must support multiple
menu languages for this setting to work. Choices
are: English, Spanish and French.
Use.'=/Vbutton to select "DVD Audio".
Press _ /), button to change language setting.
DVD Subtitle
Default setting: Auto
Sets the default subtitle language used by DVDs.
For example, if a DVD disc supports multiple subtitle
languages, such as Spanish and English, and this
setting is set to Spanish, then Spanish subtitles will
be displayed by default. The DVD must support the
language selected for this setting to work. Choices
are: Off,English, Spanish, French and Auto.
UseA/vbutton to select"DVD Subtitle".
Press 4 /I_button to change language setting.
O
o.
t-
¢}
m,
o
O
o
::3
(D
o
m
0
C
"u
J
o-
o
o
o.
r.o
O
f_k
(D
t_
45
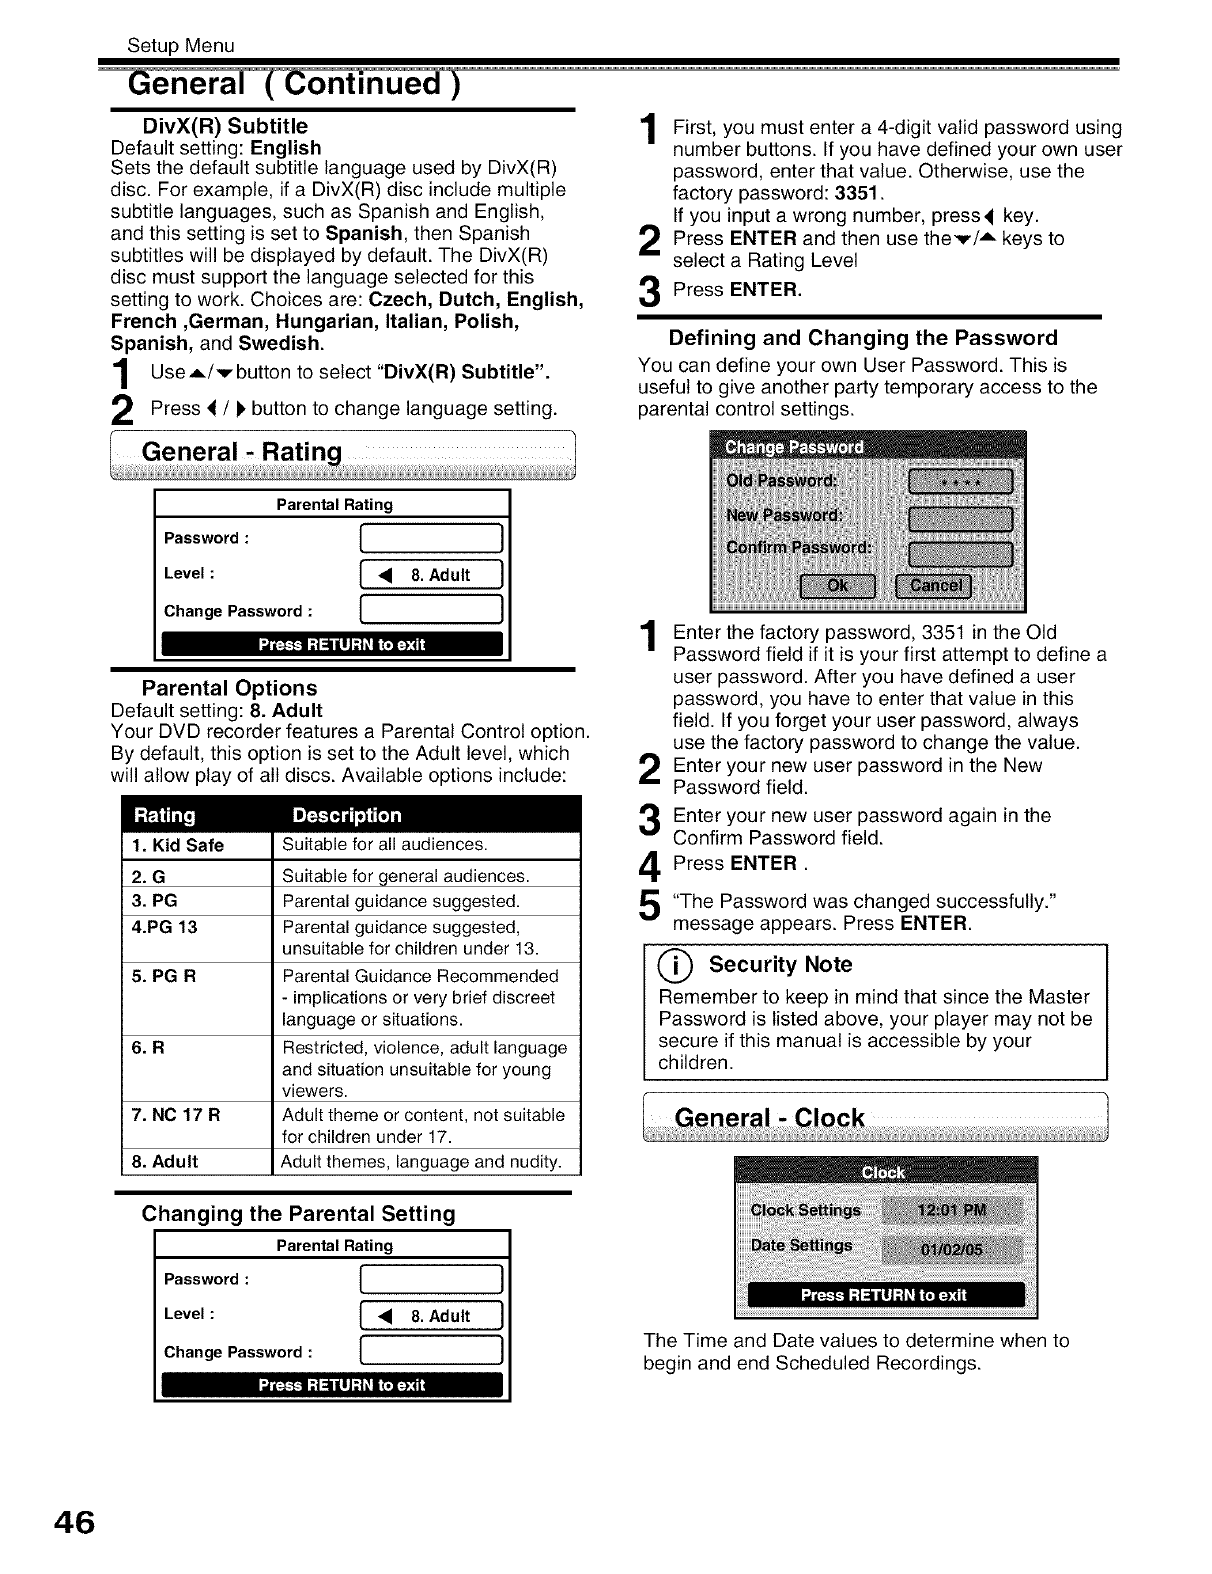
Setup Menu
DivX(R) Subtitle
Default setting: English
Sets the default subtitle language used by DivX(R)
disc. For example, if a DivX(R) disc include multiple
subtitle languages, such as Spanish and English,
and this setting is set to Spanish, then Spanish
subtitles will be displayed by default. The DivX(R)
disc must support the language selected for this
setting to work. Choices are: Czech, Dutch, English,
French ,German, Hungarian, Italian, Polish,
Spanish, and Swedish.
UseA/vbutton to select "DivX(R) Subtitle".
Press </pbutton to change language setting.
First, must enter a valid password
you 4-digit using
number buttons. If you have defined your own user
password, enter that value. Otherwise, use the
factory password: 3351.
If you input a wrong number, press4 key.
Press ENTER and then use thev/A keys to
select a Rating Level
Press ENTER.
Defining and Changing the Password
You can define your own User Password. This is
useful to give another party temporary access to the
parental control settings.
Parental Rating
Password : [
Level : [•
Change Password : [
8. Adult
I
J
Parental Options
Default setting: 8. Adult
Your DVD recorder features a Parental Control option.
By default, this option is set to the Adult level, which
will allow play of all discs. Available options include:
1. Kid Safe
2. G
3. PG
4.PG 13
5. PG R
6. R
7. NO 17R
8. Adult
Suitable for all audiences.
Suitable for general audiences.
Parental guidance suggested.
Parental guidance suggested,
unsuitable for children under 13.
Parental Guidance Recommended
- implications or very brief discreet
language or situations.
Restricted, violence, adult language
and situation unsuitable for young
viewers.
Adult theme or content, not suitable
for children under 17.
Adult themes, language and nudity.
Changing the Parental Setting
Parental Rating
Password : [
Level : [ • 8. Adult
Change Password : [
)
)
)
1
2
3
4
5
Enter the factory password, 3351 in the Old
Password field if it is your first attempt to define a
user password. After you have defined a user
password, you have to enter that value in this
field. If you forget your user password, always
use the factory password to change the value.
Enter your new user password in the New
Password field.
Enter your new user password again in the
Confirm Password field.
Press ENTER.
"The Password was changed successfully."
message appears. Press ENTER.
O Security Note
Remember to keep in mind that since the Master
Password is listed above, your player may not be
secure if this manual is accessible by your
children.
The Time and Date values to determine when to
begin and end Scheduled Recordings.
46
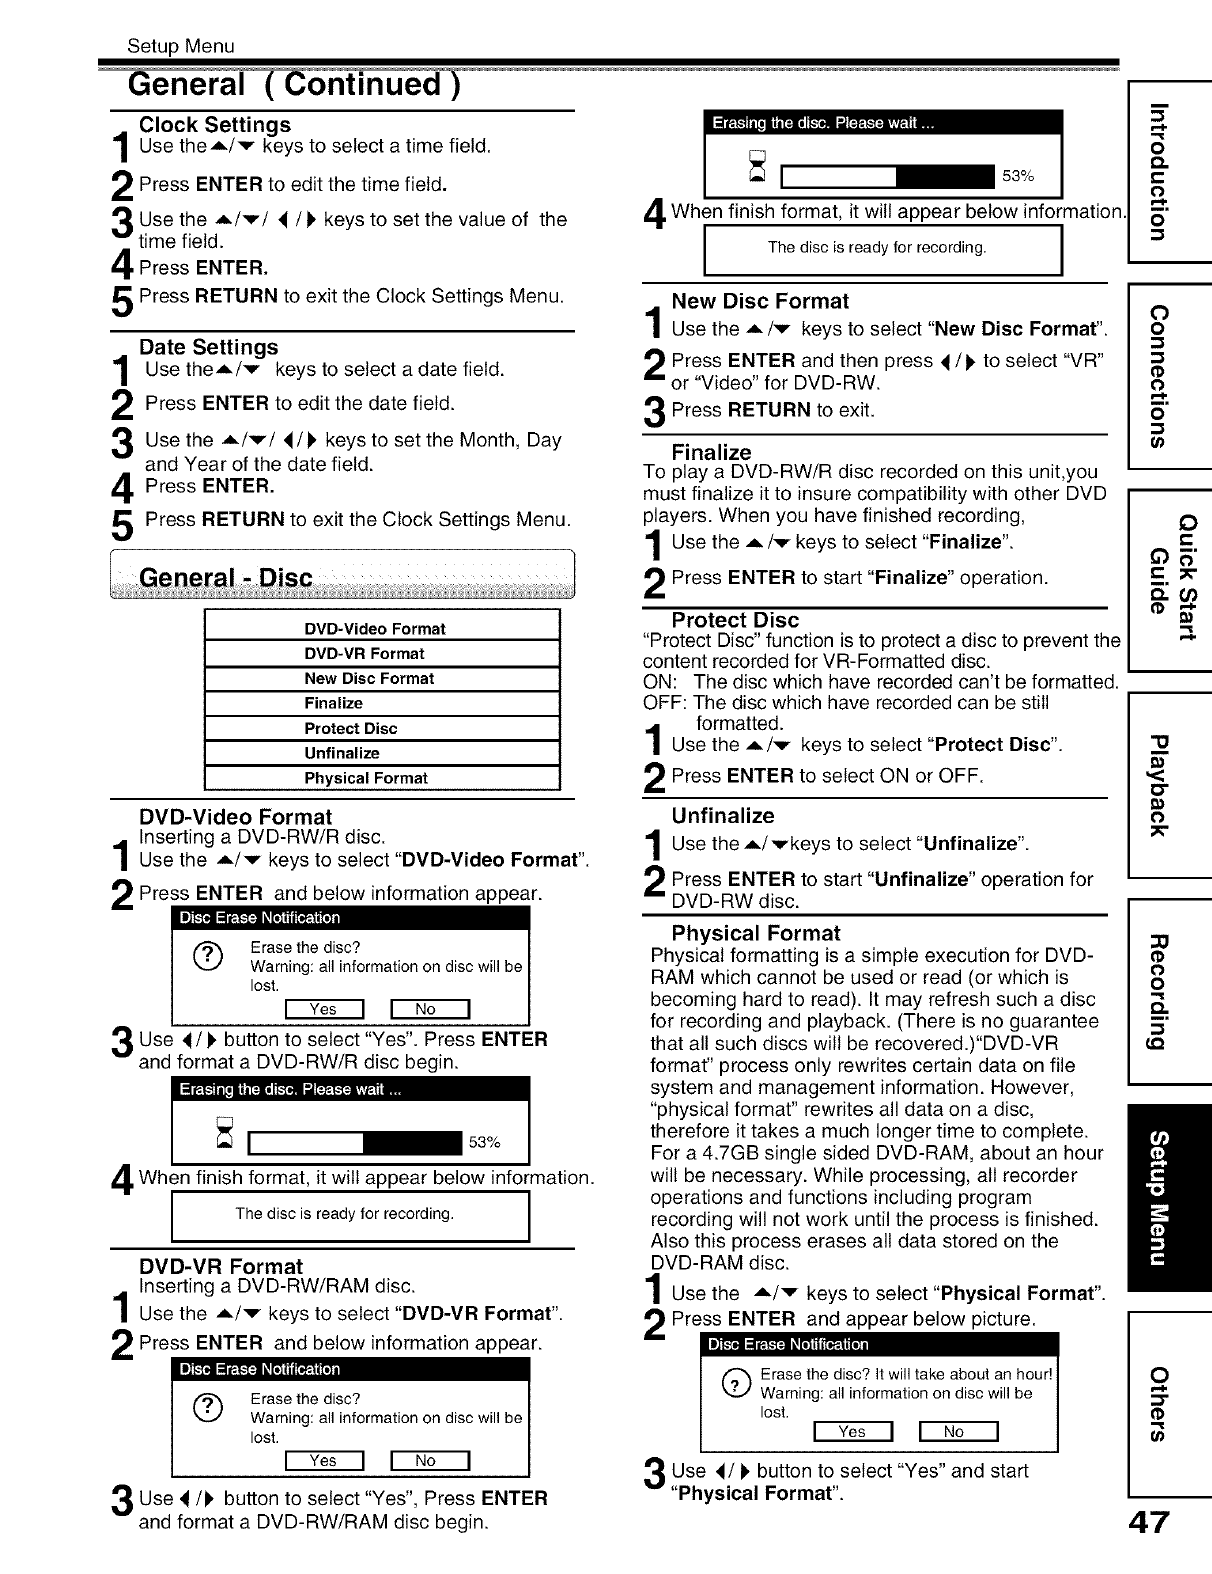
Setup Menu
Clock Settings
Use theA/v keys to select a time field.
Press ENTER to edit the time field.
Use the A/v/ _/) keys to set the value of the
time field.
Press ENTER.
Press RETURN to exit the Clock Settings Menu.
Date Settings
Use theA/v keys to select a date field.
Press ENTER to edit the date field.
Use the A/v/_/) keys to set the Month, Day
and Year of the date field.
Press ENTER.
Press RETURN to exit the Clock Settings Menu.
DVD-Video Format
DVD-VR Format
New Disc Format
Finalize
Protect Disc
Unfinalize
Physical Format
DVD-Video Format
Inserting a DVD-RW/R disc.
Use the A/v keys to select "DVD-Video Format".
Press ENTER and below information appear.
_tt'cJ_rt6_l
Q Erase the disc?
Warning: all information on disc will be
lost,
Use 4/I_ button to select "Yes". Press ENTER
and format a DVD-RW/R disc begin.
_ 53%
When finish format, it will below information.
appear
The disc is ready for recording,
DVD-VR Format
Inserting a DVD-RW/RAM disc.
Use the A/v keys to select "DVD-VR Format".
Press ENTER and below information appear.
_tt'¢J_t6_l
O Erase the disc?
Warning: all information on disc will be
lost,
Use _/!, button to select "Yes", Press ENTER
and format a DVD-RW/RAM disc begin.
When finish format, it will appear below information.
IThe disc is ready for recording. I
I
I
New Disc Format
Use the =./v keys to select "New Disc Format".
Press ENTER and then /to select "VR"
press
or "Video" for DVD-RW.
Press RETURN to exit.
Finalize
To play a DVD-RW/R disc recorded on this unit,you
must finalize it to insure compatibility with other DVD
players. When you have finished recording,
Use the ,=,/v keys to select "Finalize".
Press ENTER to start "Finalize" operation.
Protect Disc
"Protect Disc" function is to protect a disc to prevent the
content recorded for VR-Fermatted disc.
ON: The disc which have recorded can't be formatted.
OFF: The disc which have recorded can be still
formatted.
Use the A/,_ keys to select "Protect Disc".
Press ENTER to select ON or OFF.
Unfinalize
Use the A/vkeys to select "Unfinalize'.
Press ENTER to start "Unfinalize" operation for
DVD-RW disc.
Physical Format
Physical formatting is a simple execution for DVD-
RAM which cannot be used or read (or which is
becoming hard to read). It may refresh such a disc
for recording and playback. (There is no guarantee
that all such discs will be recovered.)"DVD-VR
format" process only rewrites certain data on file
system and management information. However,
"physical format" rewrites all data on a disc,
therefore it takes a much longer time to complete.
For a 4.7GB single sided DVD-RAM, about an hour
will be necessary. While processing, all recorder
operations and functions including program
recording will not work until the process is finished.
Also this process erases all data stored on the
DVD-RAM disc.
Use the A/,_ keys to select "Physical Format".
2Press_pear below picture.
Q rase the disc? it will take about an hour!
Warning: all information on disc will be
lost.
Use 4/l, button to select "Yes" and start
"Physical Format".
m
F..I.
o
o.
t-
O
__.
o
0
o
o
o
0
e-
"13
<
O"
_0
0
0
o
LQ
0
e,-i=
=3"
(I)
47
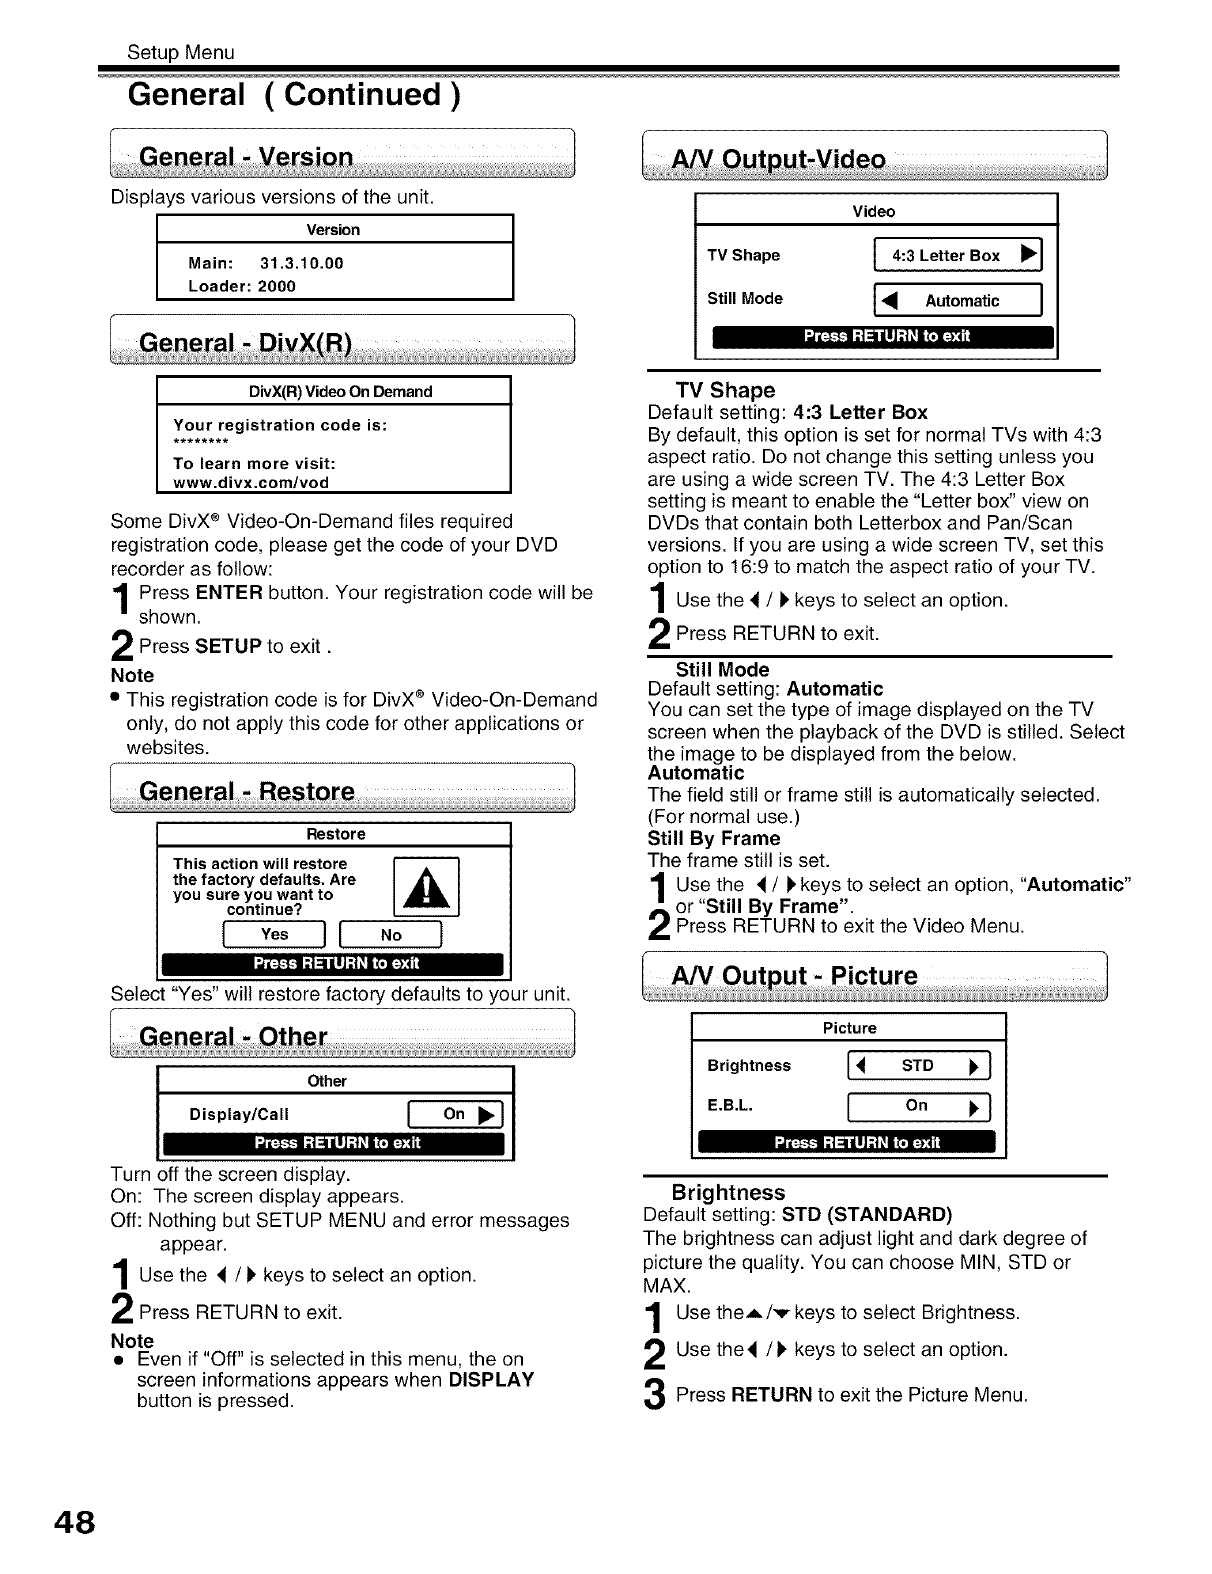
Setup Menu
General ( Continued )
Displays various versions of the unit.
IVersion
Main: 31.3.10.00
Loader: 2000
DivX(R) Video On Demand
Your registration code is:
To learn more visit:
www.divx.com/vod
Video
TV Shape I4:3 Letter Box i_ I
Still Mode 1_1 Automatic I
_ l €-_1 ;t::illl;|_i{.l:):4L
Some DivX ® Video-On-Demand files required
registration code, please get the code of your DVD
recorder as follow:
Press ENTER button. Your registration code will be
shown.
Press SETUP to exit.
Note
• This registration code is for DivX ®Video-On-Demand
only, do not apply this code for other applications or
websites.
Restore
This action will restore
the factory defaults. Are
you sure you want to
continue?
{Yes II No I
TV Shape
Default setting: 4:3 Letter Box
By default, this option is set for normal TVs with 4:3
aspect ratio. Do not change this setting unless you
are using a wide screen TV. The 4:3 Letter Box
setting is meant to enable the "Letter box" view on
DVDs that contain both Letterbox and Pan/Scan
versions. If you are using a wide screen TV, set this
option to 16:9 to match the aspect ratio of your TV.
Use the 4 /I_keys to select an option.
Press RETURN exit.
to
Still Mode
Default setting: Automatic
You can set the type of image displayed on the TV
screen when the playback of the DVD is stilled. Select
the image to be displayed from the below.
Automatic
The field still or frame still is automatically selected.
(For normal use.)
Still By Frame
The frame still is set.
Use the _ /l_keys to select an option, "Automatic"
or "Still By Frame".
Press RETURN to exit the Video Menu.
ul:]-l-1;i :1 ill ;t _l {.] i:):ll
Select "Yes" will restore factory defaults to your unit.
I Other
Display/Call I On _}
;Ii:t-1-1 ;i :1 ill ;1 _l n(,l:):ll
Turn off the screen display.
On: The screen display appears.
Off: Nothing but SETUP MENU and error messages
appear.
Use the 4 /I_keys to select an option.
Press RETURN to exit.
Note
• Even if "Off" is selected in this menu, the on
screen informations appears when DISPLAY
button is pressed.
Picture
Brightness I4 STD _ }
E.B.L. I On
ul_-l-1 ;| :1111 ;| _l {,] [:):ll
Brightness
Default setting: STD (STANDARD)
The brightness can adjust light and dark degree of
picture the quality. You can choose MIN, STD or
MAX.
Use theA/v keys to select Brightness.
Use thed /l, keys to select an option.
Press RETURN to exit the Picture Menu.
48
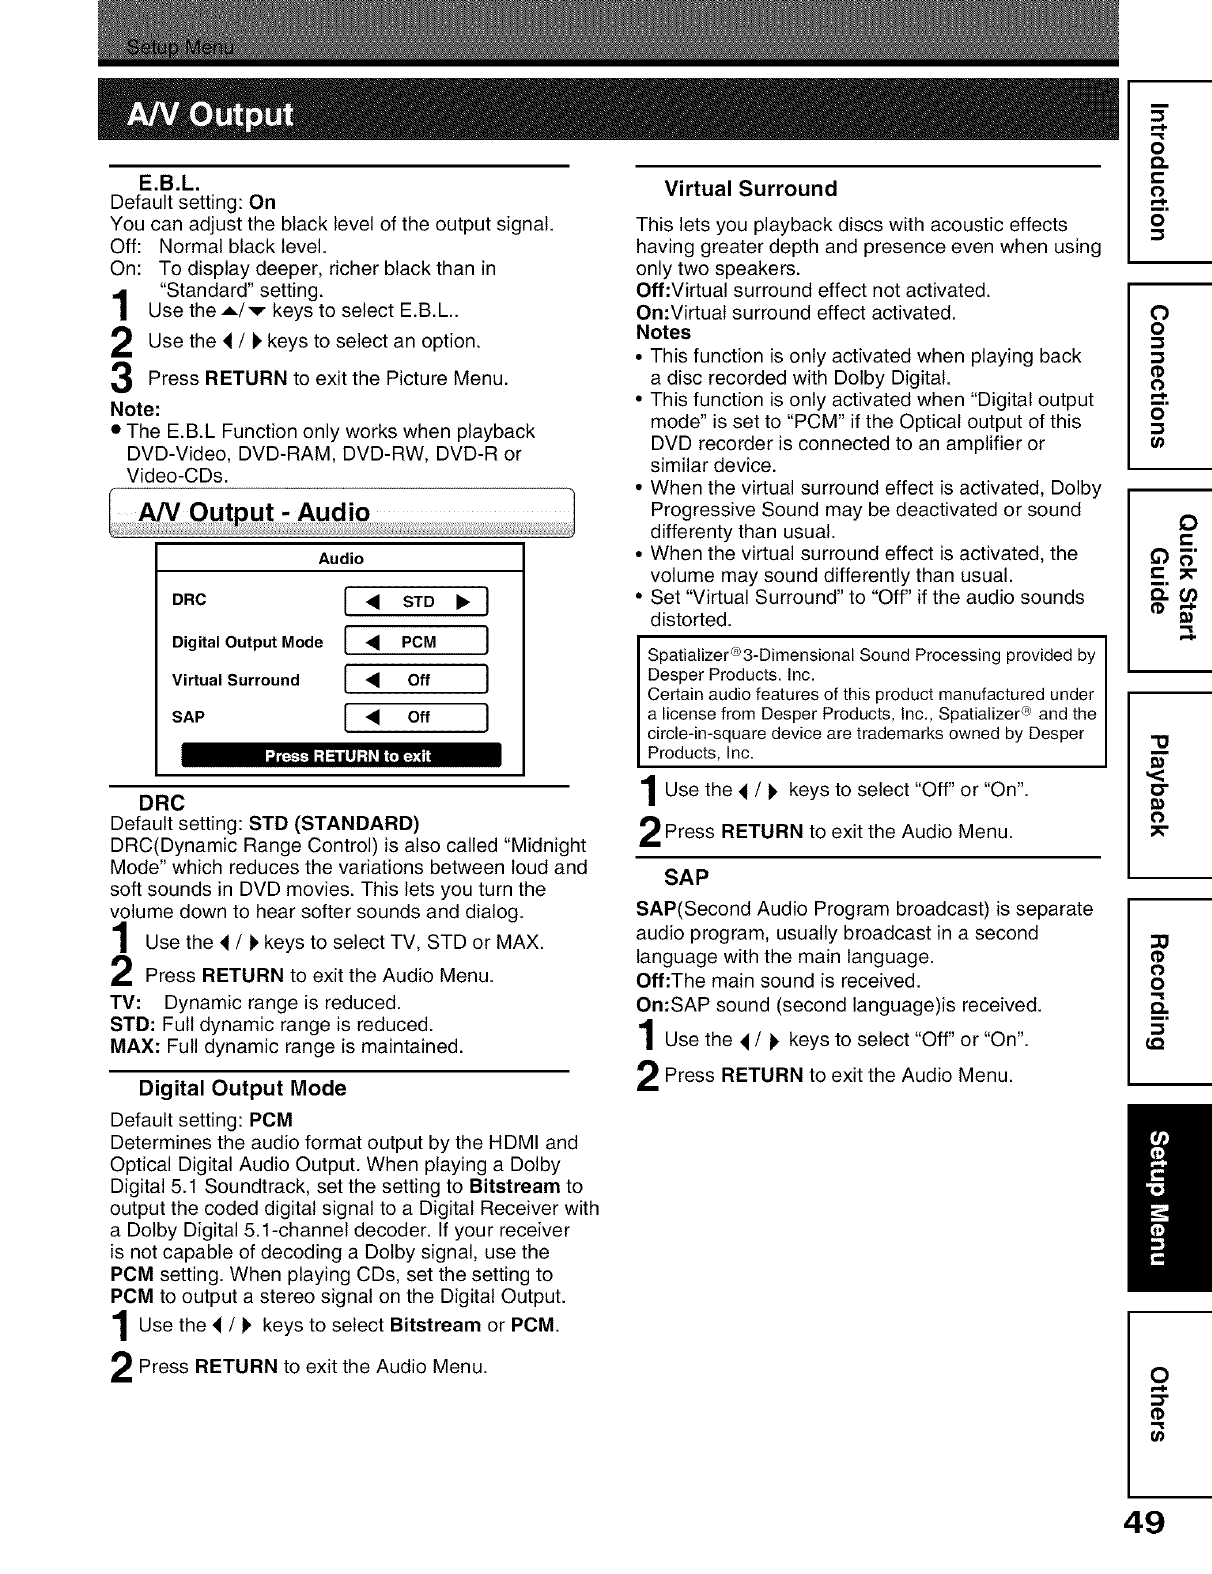
1
2
3
E.B.L.
Default setting: On
You can adjust the black level of the output signal.
Off: Normal black level.
On: To display deeper, richer black than in
"Standard" setting.
Use the A/v keys to select E.B.L..
Use the </kkeys to select an option.
Press RETURN to exit the Picture Menu.
Note:
• The E.B.L Function only works when playback
DVD-Video, DVD-RAM, DVD-RW, DVD-R or
Video-CDs.
Audio
DRC I • STD
Digital Output Mode 1• PCM J
Virtual Surround I •Off J
SAP l• o, J
I;_"_ [_i=_v]_
DRC
Default setting: STD (STANDARD)
DRC(Dynamic Range Control) is also called "Midnight
Mode" which reduces the variations between loud and
soft sounds in DVD movies. This lets you turn the
volume down to hear softer sounds and dialog.
Use the < /kkeys to select TV, STD or MAX.
Press RETURN to exit the Audio Menu.
TV: Dynamic range is reduced.
STD: Full dynamic range is reduced.
MAX: Full dynamic range is maintained.
Digital Output Mode
Default setting: PCM
Determines the audio format output by the HDMI and
Optical Digital Audio Output. When playing a Dolby
Digital 5.1 Soundtrack, set the setting to Bitstream to
output the coded digital signal to a Digital Receiver with
a Dolby Digital 5.1-channel decoder. If your receiver
is not capable of decoding a Dolby signal, use the
PCM setting. When playing CDs, set the setting to
PCM to output a stereo signal on the Digital Output.
Use the _ /!' to select Bitstream PCM.
keys or
Press RETURN to exit the Audio Menu.
Virtual Surround
This lets you playback discs with acoustic effects
having greater depth and presence even when using
only two speakers.
Off:Virtual surround effect not activated.
On:Virtual surround effect activated.
Notes
•This function is only activated when playing back
a disc recorded with Dolby Digital.
• This function is only activated when "Digital output
mode" is set to "PCM" if the Optical output of this
DVD recorder is connected to an amplifier or
similar device.
• When the virtual surround effect is activated, Dolby
Progressive Sound may be deactivated or sound
differenty than usual.
•When the virtual surround effect is activated, the
volume may sound differently than usual.
• Set "Virtual Surround" to "Off" if the audio sounds
distorted.
Spatializer®3-Dimensional Sound Processing provided by
Desper Products, Inc,
Certain audio features of this product manufactured under
a license from Desper Products, Inc,, Spatializer ® and the
circle-in-square device are trademarks owned by Desper
Products, Inc.
Use the < /l, keys to select "Off" or "On".
Press RETURN to exit the Audio Menu.
SAP
SAP(Second Audio Program broadcast) is separate
audio program, usually broadcast in a second
language with the main language.
Off:The main sound is received.
On:SAP sound (second language)is received.
Use the < /!' keys to select "Off" or "On".
Press RETURN to exit the Audio Menu.
o
£%
o
o
0
o
o
o
co
0
e-
'13
<
0
0
o
LQ
0
r..l.
(I)
g}
49
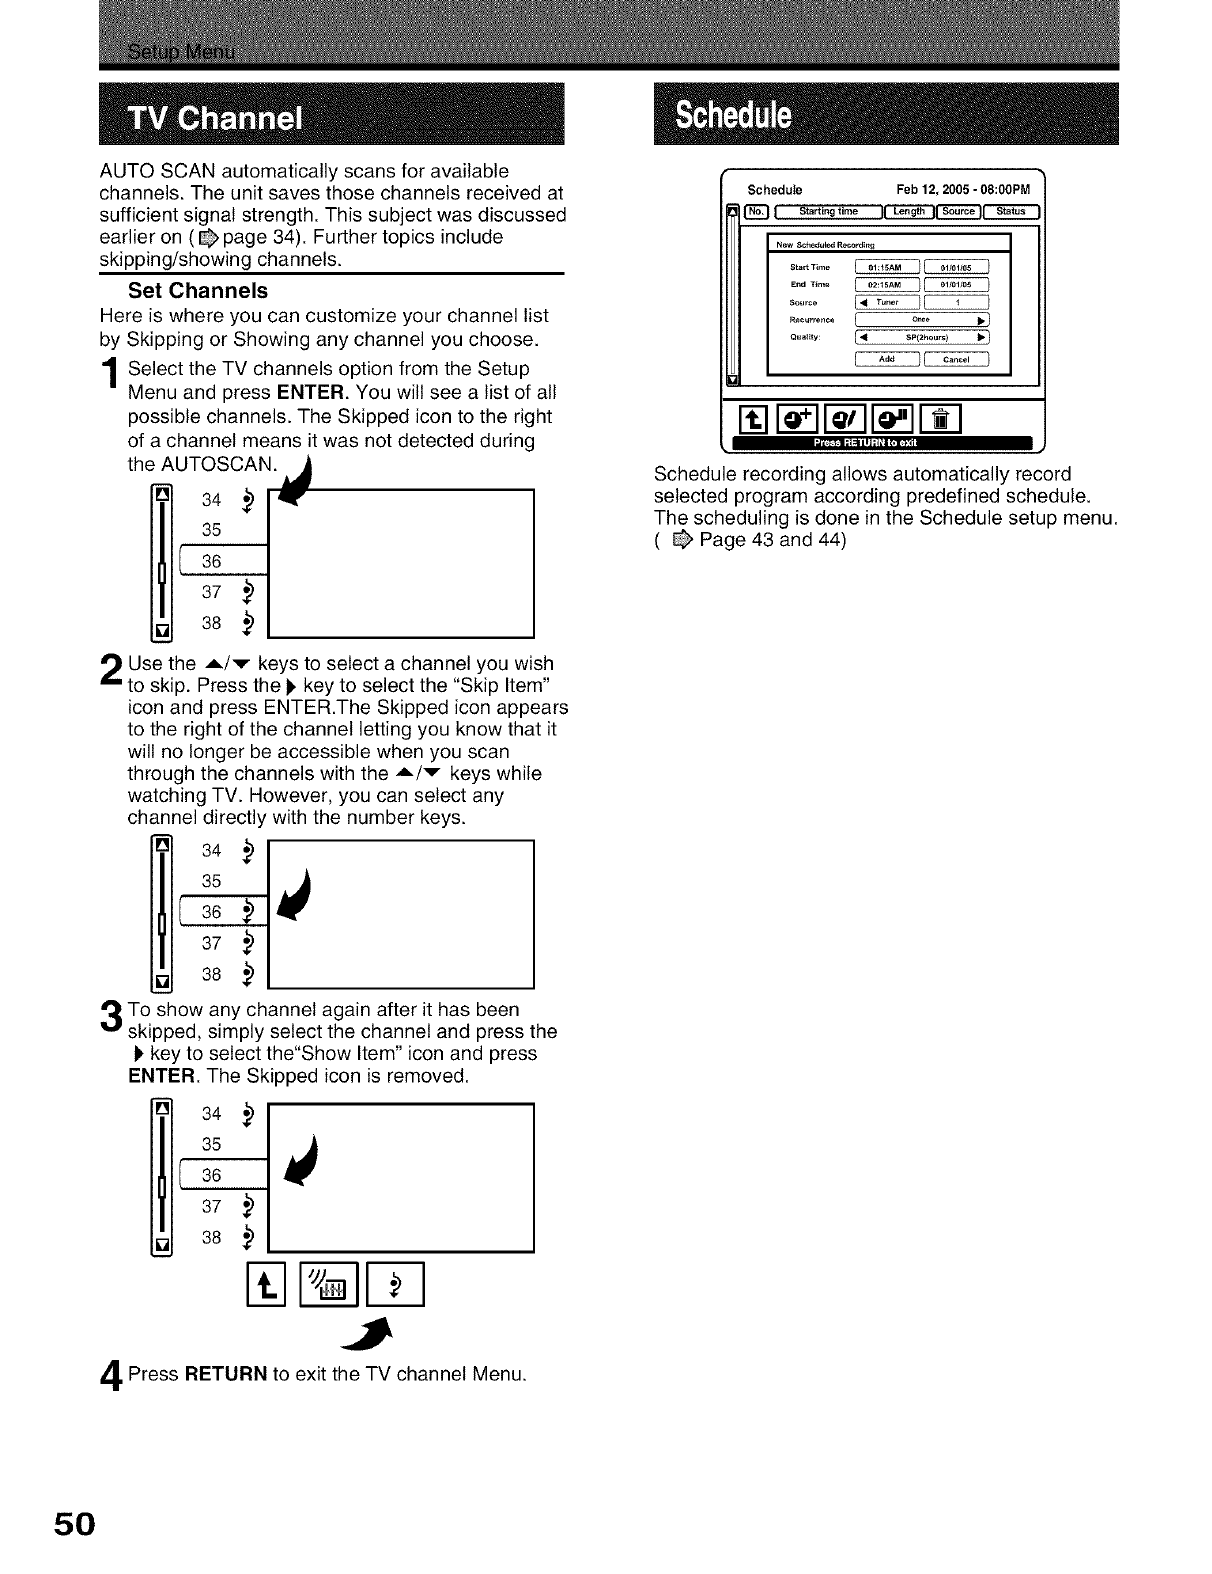
AUTO SCAN automatically scans for available
channels. The unit saves those channels received at
sufficient signal strength. This subject was discussed
earlier on ( _ page 34). Further topics include
skipping/showing channels.
Set Channels
Here is where you can customize your channel list
by Skipping or Showing any channel you choose.
Select the TV channels option from the Setup
Menu and press ENTER. You will see a list of all
possible channels. The Skipped icon to the right
of a channel means it was not detected during
the AUTOSCAN. _
34 .) qw,
35
I a6
37 ,)
38 .)
Use the A/v keys to select a channel you wish
to skip. Press the 1, key to select the "Skip Item"
icon and press ENTER.The Skipped icon appears
to the right of the channel letting you know that it
will no longer be accessible when you scan
through the channels with the A/v keys while
watching TV. However, you can select any
channel directly with the number keys.
34 ,)
35
Schedule Feb 12, 2005 -08:00PM
[]_DI S_rtlngtlmeIILengt.I_ S_I--'_T_--
New Sc_edule_ Roco_d_r_
...... _CCCCC3
. ......... / o=o _1
Qu._ty: [<SP(_hO.,.) IP/
[] r -ll- Tlr I- 1
_ ;1 :I ill ;1#1 t;113"1
Schedule recording allows automatically record
selected program according predefined schedule.
The scheduling is done in the Schedule setup menu.
( @ Page 43 and 44)
37
38
To show any channel again after it has been
skipped, simply select the channel and press the
I_key to select the"Show Item" icon and press
ENTER. The Skipped icon is removed.
34
35
I 36
37
38
.)
.)
Press RETURN to exit the TV channel Menu.
5O
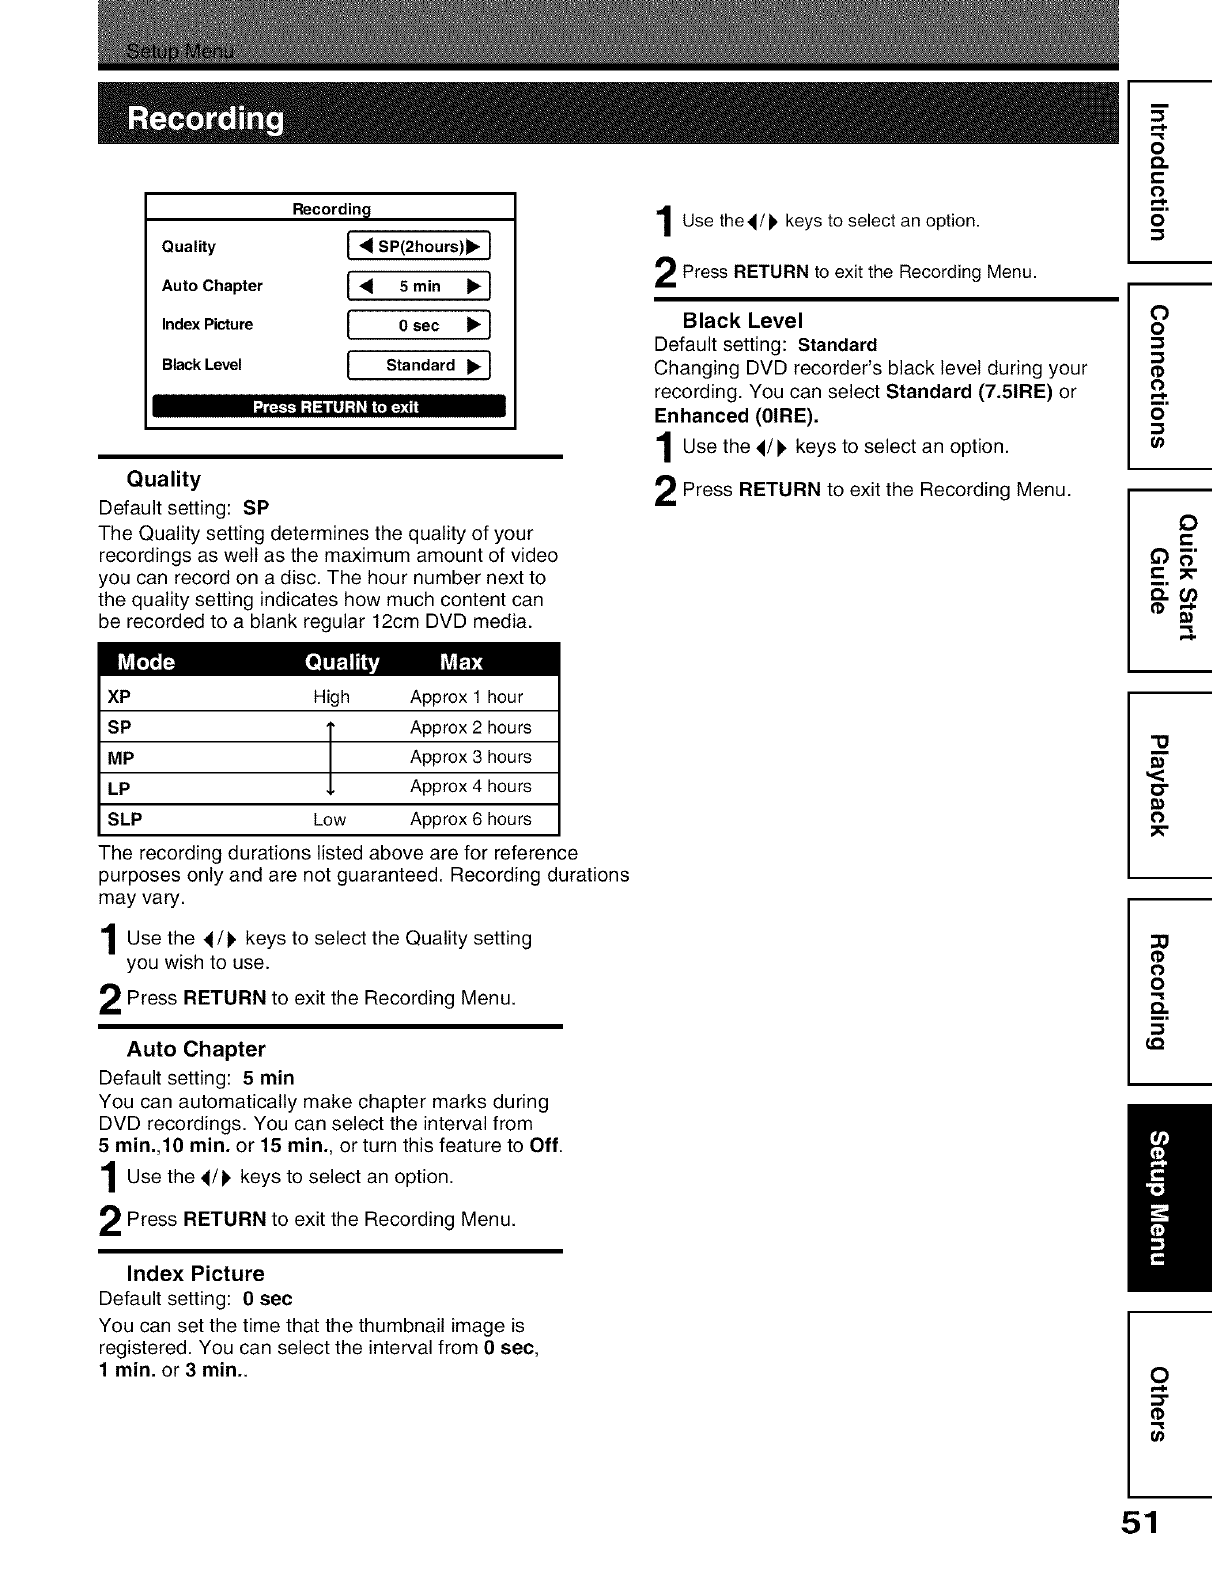
Recording
Quality I _ SP(2h°urs)l_ I
Auto Chapter I _ 5 min _ !
Index Picture I0sec I_ I
BlackLevel IStandard _ I
Quality
Default setting: SP
The Quality setting determines the quality of your
recordings as well as the maximum amount of video
you can record on a disc. The hour number next to
the quality setting indicates how much content can
be recorded to a blank regular 12cm DVD media.
Use thed/p keys to select an option.
Press RETURN to exit the Recording Menu.
Black Level
Default setting: Standard
Changing DVD recorder's black level during your
recording. You can select Standard (7.51RE) or
Enhanced (01RE).
Use 4/I_ keys an option.
the to select
Press RETURN to exit the Menu.
Recording
o
£%
o
o
0
o
o
o
0_
0
e-
XP High Approx 1 hour
SP TApprox 2 hours
MP Approx 3 hours
LP _, Approx 4 hours
SLP Low Approx 6 hours
The recording durations listed above are for reference
purposes only and are not guaranteed. Recording durations
may vary.
Use the 4/1_ keys to select the Quality setting
you wish to use.
Press RETURN to exit the Recording Menu.
Auto Chapter
Default setting: 5 min
You can automatically make chapter marks during
DVD recordings. You can select the interval from
5 rain.,10 rain. or 15 rain., or turn this feature to Off.
Use 4/1, keys an option.
the to select
Press RETURN to exit the Menu.
Recording
Index Picture
Default setting: 0 sec
You can set the time that the thumbnail image is
registered. You can select the interval from 0sec,
1 min. or 3 min..
"O
<
o
0
o
Q.
LQ
O
::3"
U_
51
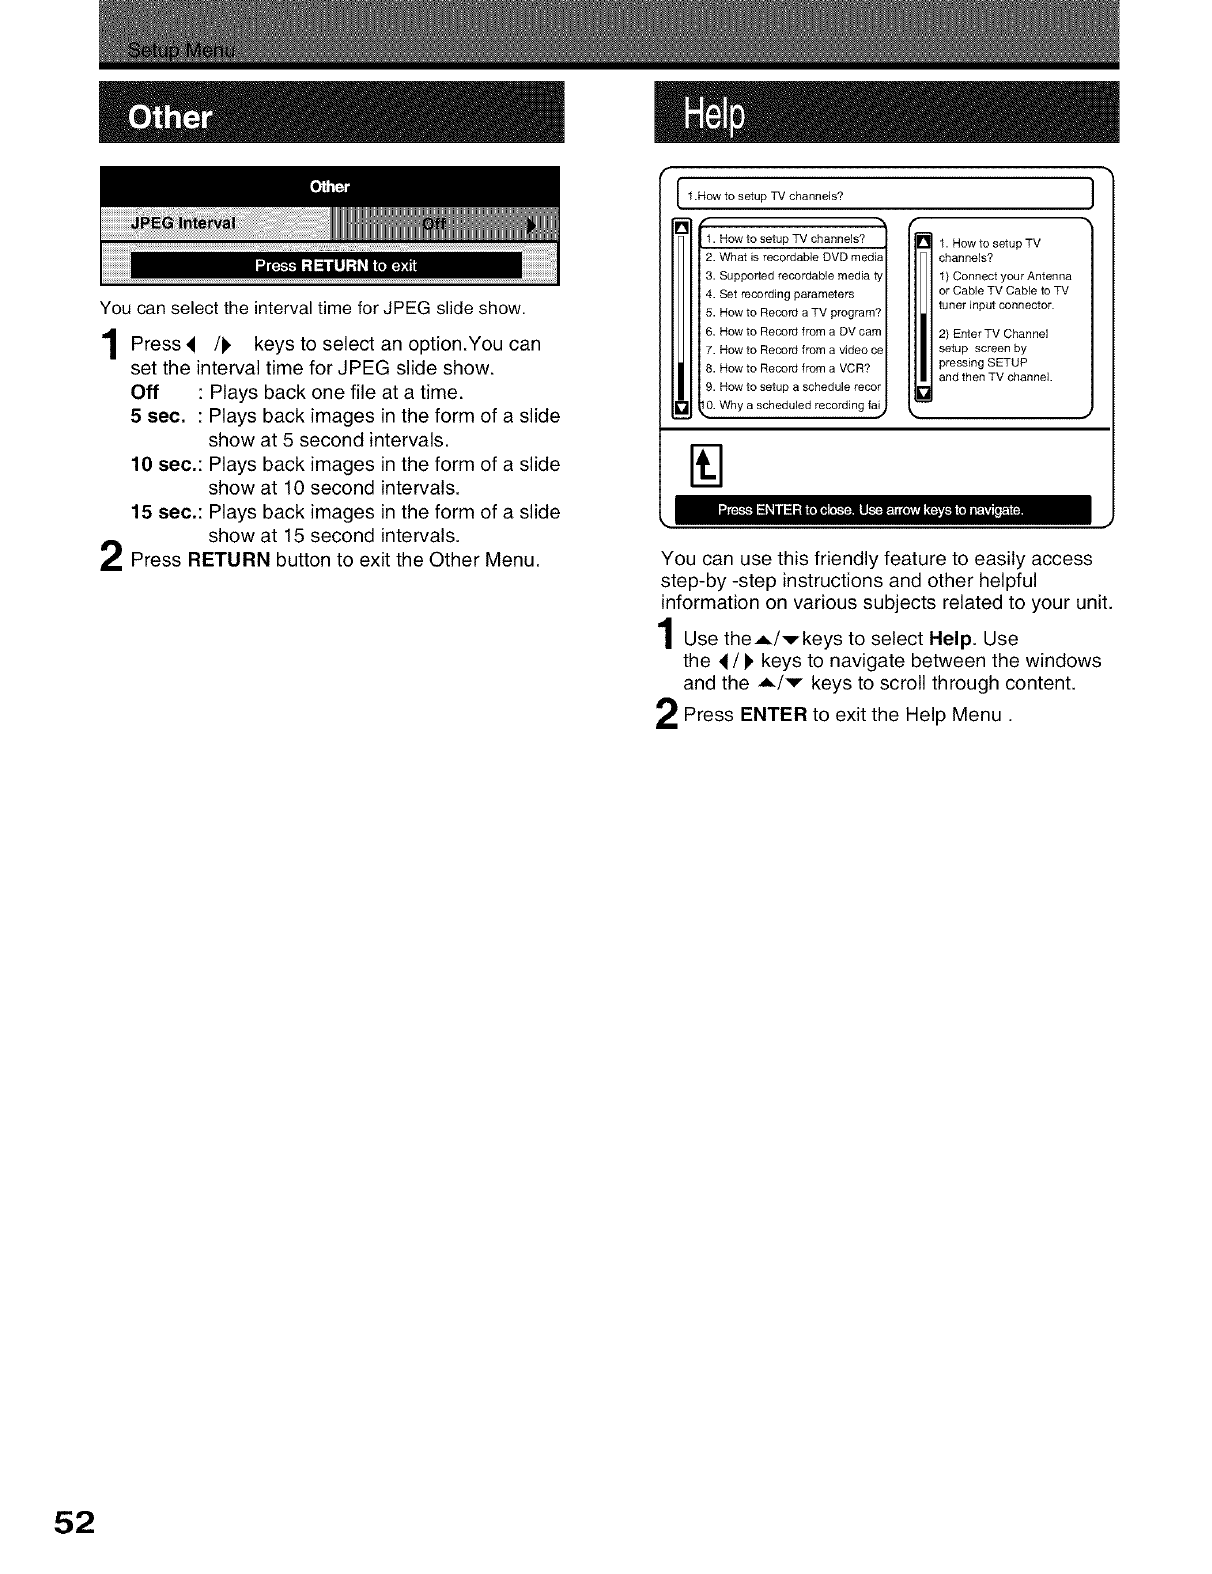
You can select the interval time for JPEG slide show.
4/P keys an option.You can
Press to select
set the interval time for JPEG slide show.
Off : Plays back one file at a time.
5 sec,: Plays back images in the form of a slide
show at 5 second intervals.
10 sec.: Plays back images in the form of a slide
show at 10 second intervals.
15 sec.: Plays back images in the form of a slide
show at 15 second intervals.
Press RETURN button to exit the Other Menu.
1 .How to setup TV channels?
'2.
3.
4.
5.
6.
7.
8.
9.
L0.
How to setup TV channels?
What is recordab]e DVD media
Supported recordab]e media t_
Set recording parameters
How to Record a TV program?
How to Record from a DV cam
How to Record from a video ce
How to Record from a VCR?
How to setup a schedule recor
Why a scheduled recording fai,
J
)
r_ . How to setup TV 1
channels?
1o)rC° b_e_tYcUrMAen;oen n4
IiItuner input connector.
2_E n; esrcTrVeC hbynnel
pressing SETUP
and then TV channel.
You can use this friendly feature to easily access
step-by -step instructions and other helpful
information on various subjects related to your unit.
Use the,L/vkeys to select Help. Use
the 4/)' keys to navigate between the windows
and the A/v keys to scroll through content.
Press ENTER to exit the Help Menu.
52
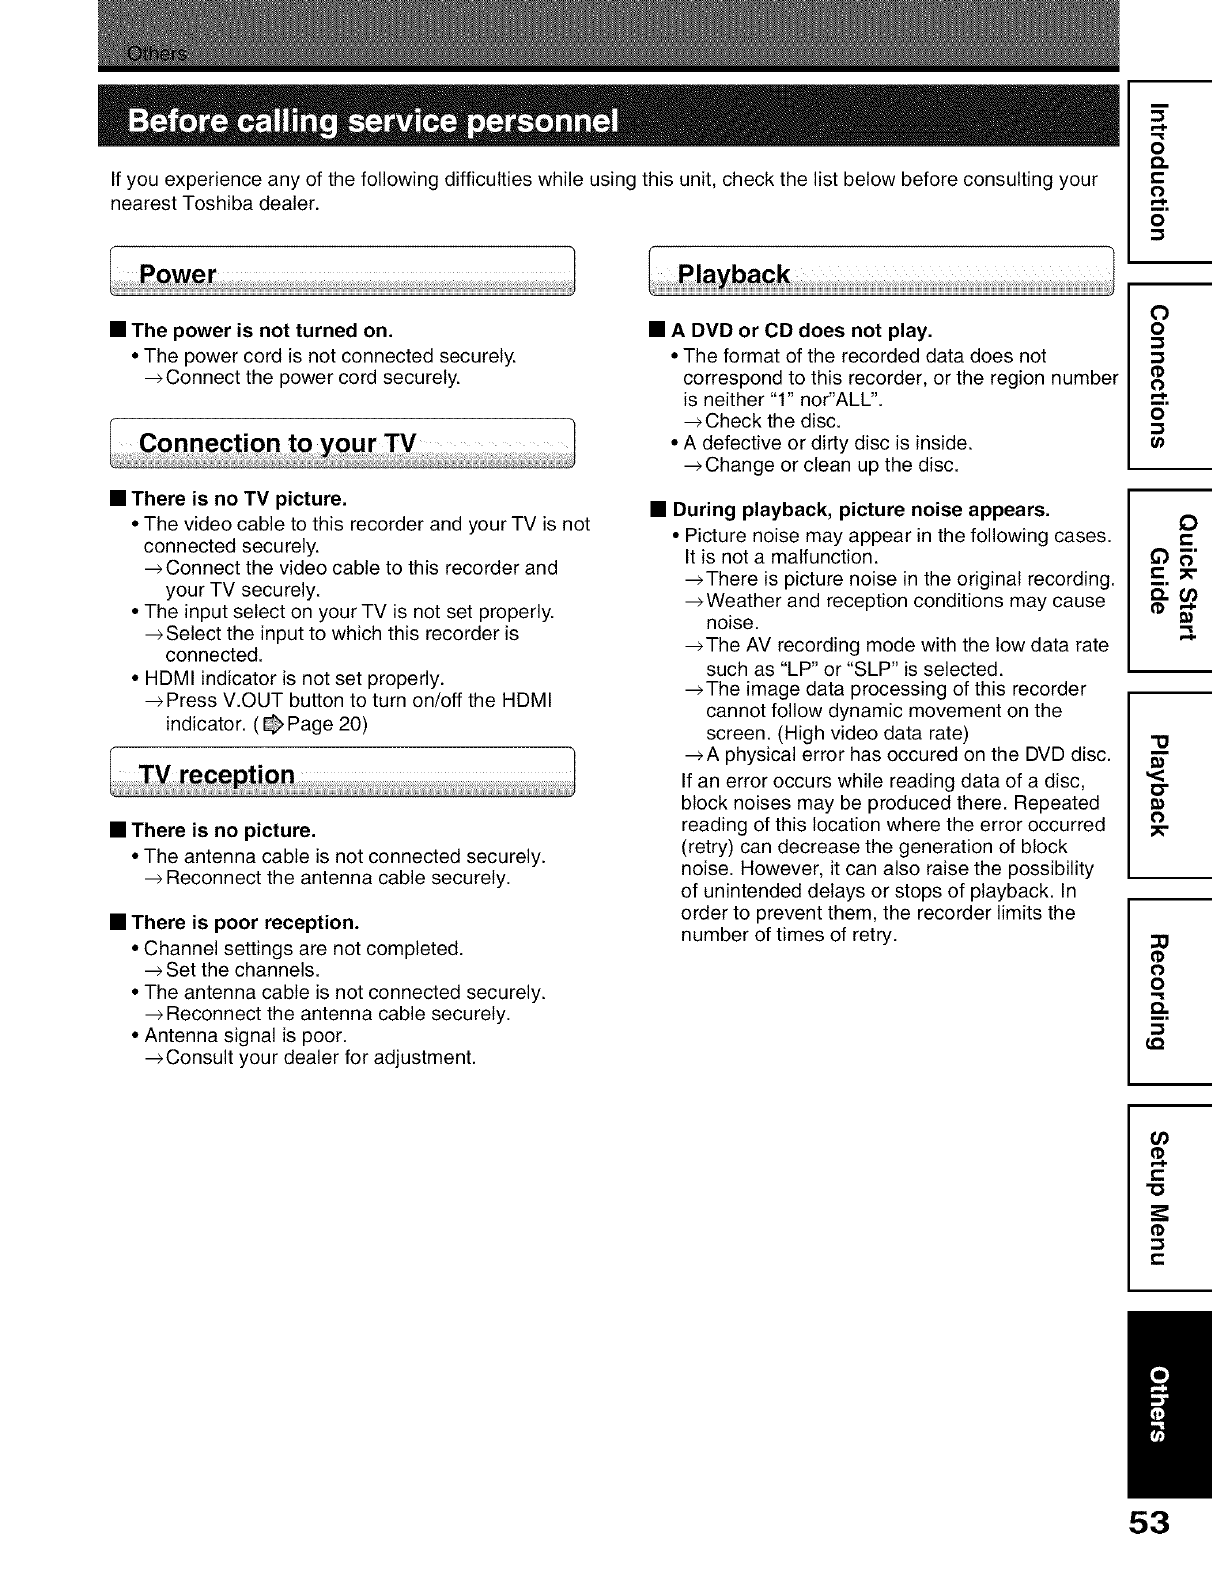
If you experience any of the following difficulties while using this unit, check the list below before consulting your
nearest Toshiba dealer.
o
o.
o
o
• The power is not turned on.
• The power cord is not connected securely.
_Connect the power cord securely.
• There is no TV picture.
• The video cable to this recorder and your TV is not
connected securely.
_Connect the video cable to this recorder and
your TV securely.
• The input select on your TV is not set properly.
_Select the input to which this recorder is
connected.
• HDMI indicator is not set properly.
Press V.OUT button to turn on/off the HDMI
indicator. ( _ Page 20)
• There is no picture.
• The antenna cable is not connected securely.
Reconnect the antenna cable securely.
•There is poor reception.
• Channel settings are not completed.
Set the channels.
• The antenna cable is not connected securely.
Reconnect the antenna cable securely.
• Antenna signal is poor.
_Consult your dealer for adjustment.
• A DVD or CD does not play.
• The format of the recorded data does not
correspond to this recorder, or the region number
is neither "1" nor'ALL'.
_Check the disc.
• A defective or dirty disc is inside.
_Change or clean up the disc.
•During playback, picture noise appears.
• Picture noise may appear in the following cases.
It is not a malfunction.
_There is picture noise in the original recording.
_Weather and reception conditions may cause
noise.
_The AV recording mode with the low data rate
such as "LP" or "SLP" is selected.
_The image data processing of this recorder
cannot follow dynamic movement on the
screen. (High video data rate)
_A physical error has occured on the DVD disc.
If an error occurs while reading data of a disc,
block noises may be produced there. Repeated
reading of this location where the error occurred
(retry) can decrease the generation of block
noise. However, it can also raise the possibility
of unintended delays or stops of playback. In
order to prevent them, the recorder limits the
number of times of retry.
O
o
o
o
0_
0
e-
_c._-
"U
o-
_0
o
0
o
o.
LQ
(/)
(1)
t-
"0
(1)
t-
53
Others
Before calling service personnel ( Continued )
•Data cannot be recorded on a DVD-RAM disc.
• The disc is protected from deleting data.
Set the write-protect tab to the opposite of
"PROTECT" ( _page 13).
• The disc is protected by a PC or the recorder.
_Disable the protection on the device which
protected the disc.
• The disc space is not sufficient.
-->Delete unwanted data (@ page 42) or prepare
a new disc.
• The disc is not initialized.
-->Initialize the disc.
• The disc may contain errors.
-->Complete the physical format on the disc.
• The physical format on the disc is not completed.
_Complete the physical format on the disc.
•Timer programming cannot be completed,
• Clock setting has not been completed.
_Complete the clock setting ( _ page 34,
"Time and Date Settings").
• The programs list is full.
Delete some of the timer programs ( @ page 44).
• When the power goes off, timer programs will be
deleted.
-->Check the timer programs and set them again.
•The remote control does not work.
• The batteries in the remote control are exhausted.
Replace all the batteries in the remote control
(@ page 19, "Preparation of the remote
control").
• The light emitter of the remote control is not
pointed at the sensor of this recorder.
-->Point the emitter of the remote control at the
sensor of this recorder.
• The sensor of this recorder is located too far away
from the remote control.
-->Operate the remote control within 7 meters
(23 ft) from the sensor of this recorder.
• There are obstacles between the remote control
and this recorder.
Remove any obstacles.
• The sensor is disturbed by sunlight or fluorescent
light.
--> Change the place of this recorder or shield the
light.
• The remote mode is not appropriate.
_Adjust the remote mode of the remote control
and this recorder.
• The setting of the TV/DVD selector is not correct.
Set the TV/DVD selector to the equipment to
operate.
•The clock blinks.
-->Complete the initial setting again (_ page 34,
"Time and Date Settings").
•The clock does not keep time.
_Set the time and date manually (_ page 34,
"Time and Date Settings").
54
•Power requirement during operation
22W
•Power requirement at standby
1.3W
•Power supply
120V AC, 60 Hz
•Mass
3.5kg
•External dimension
Width 430 x Height 62 x Depth 302mm
• Incoming channels
TV: 2-69CH, Cable:1-125CH
• Antenna input/output terminal
VHF/UHF: 75_, RF Connector
• Signal system
Standard NTSC Color TV system
• Laser
Semiconductor laser, Wavelength: 650nm/780nm
• Format
DVD-VR format
DVD-Video format
•Image recording system
MPEG2
• Sound recording system
AC 3
•VIDEO input
1.0Vp-p (75_-_), Sync signal negative,
Pin jack x 2 systems, 1 at rear, 1 in front
• VIDEO output
1.0Vp-p (75_), Sync signal negative,
Pin jack x 1 system, 1 at rear
• S-VIDEO input
(Y) 1.0Vp-p (75 _ ), Sync signal negative,
(C) 0.286Vp-p (75_), 1 at rear, 1 in front
Mini DIN4 Pin x 2 systems
• S-VIDEO output
(Y) 1.0Vp-p (75_), Sync signal negative,
(C) 0.286Vp-p (75_-_),1 at rear
Mini DIN4 Pin x 1 system
•COMPONENT output (Y, PB, PR)
Y output (green), 1.0Vp-p (75_),
Sync signal negative, Pin jack x 1 system
PB,PRoutput (blue, red), 0.7Vp-p (75_-_)
Pin jack x 1 system each
•AUDIO input
2.0V (rms), 22k£_or above, pin jack
(L, R) x 2 systems
1 at rear, 1 in front
•AUDIO output
2.0V (rms), 2.2k_or below, pin jack
(L, R) x 1 systems
2 at rear
•DIGITAL AUDIO OUTPUT
BITSTREAM/PCM (OPTICAL terminal)
Optical connector x 1 system
• HDMI output
This is for connection of an HDMI cable
• DV input
4-pin X 1 in front
• Remote control
Wireless remote control (SE- R0218)
• Operating conditions
Temperature: 41_'F- 95°F (5°C - 35C),
Position: Horizontal
•Clock display
12 hour digital display
• Clock accuracy
Quartz (monthly deviation: approximately+ 30
seconds)
•This model complies with the above specifications.
• Designs and specifications are subject to change without notice.
• This model may not be compatible with features and/or specifications that may be added in the future.
• The screen illustrations used in this Owner's Manual are for reference purposes only. Because the screen
illustrations used in this Owner's Manual are simplified for easy recognition, they may vary slightly from the
unit's s actual screen displays.
o
£%
o
o
0
o
o
o
0_
"u
<
o
0
o
o.
LQ
O
(1)
U}
55
Limited United States Warranty
Digital Audio Video ("DAV") Product-Depot Repair Warranty
Toshiba America Consumer Products, L.LC,. ("TACP') makes the following limited warranties to original
consumers in the United States. THESE LIMITED WARRANTIES EXTEND TO THE ORIGINAL CONSUMER
PURCHASER OR ANY PERSON RECEIVING THIS DAV PRODUCT AS A GIFT FROM THE ORIGINAL
CONSUMER PURCHASER AND TO NO OTHER PURCHASER OR TRANSFEREE.
DAV PRODUCTS PURCHASED IN THE U.S.A. AND USED ANYWHERE OUTSIDE OF THE U.S.A.,
INCLUDING, WITHOUT LIMITATION, CANADA AND MEXICO, ARE NOT COVERED BY THESE WARRANTIES.
DAV PRODUCTS PURCHASED ANYWHERE OUTSIDE OF THE U.S.A., INCLUDING, WITHOUT LIMITATION,
CANADA AND MEXICO, AND USED IN THE U.S.A., ARE NOT COVERED BY THESE WARRANTIES.
Limited Ninety (90) Day Warranty on Labor* Your Responsibility
TACP warrants this DAV Product and its parts against THE ABOVE WARRANTIES ARE SUBJECT TO THE
defects in materials or workmanship for a period of FOLLOWING CONDITIONS:
ninety (90) days after the date of original retail purchase. (1)You must retain your bill of sale or provide other
DURING THIS PERIOD, TACP WILL, AT TACP's proof of purchase.
OPTION, REPAIR OR REPLACE A DEFECTIVE PART
WITH A NEW OR REFURBISHED PART WITHOUT
CHARGE TO YOU FOR PARTS OR LABOR.
Limited One (1) Year Warranty on Parts*
TACP further warrants the parts in this DAV Product
(2)All warranty servicing of this DAV Product must be
made by the Depot Warranty Repair Center
specified by the TACP Consumer Solutions Center.
against defects in materials or workmanship for a period (3)The warranties from TACP are effective only if the
of one (1) year after the date of original retail purchase. DAV Product is purchased and operated in the
DURING THIS PERIOD, TACP WILL, AT TACP'S Continental U.S.A. or Puerto Rico.
OPTION, REPAIR OR REPLACE A DEFECTIVE PART
WITH A NEW OR REFURBISHED PART WITHOUT (4)Labor service charges for set installation, setup,
CHARGE TO YOU FOR THE PART, PROVIDED THAT
IF A DEFECTIVE PART IS REPAIRED OR REPLACED adjustment of customer controls and installation or
AFTER NINETY (90) DAYS FROM THE DATE OF
ORIGINAL RETAIL PURCHASE, THE CONSUMER
SHALL PAY ALL LABOR CHARGES INVOLVED IN
THE REPAIR OR REPLACEMENT THEREOF.
*Rental Units
The warranty for DAV Product rental units begins on the
date of the first rental or thirty (30) days after the date of
shipment to the rental firm, whichever comes first.
*Commercial Units
DAV Products sold and used for commercial purposes
have a limited warranty for all parts and labor, which
warranty begins on the date of original retail purchase
and ends on the date that is ninety (90) days thereafter.
Owner's Manual and Product Registration Card
Read this owner's manual thoroughly before operating
this DAV Product.
repair of antenna systems are not covered by this
warranty. Reception problems caused by inadequate
antenna systems are your responsibility.
(5)Warranties extend only to defects in materials or
workmanship as limited above and do not extend to
any DAV Product or parts that have been lost or
discarded by you or to damage to DAV Product or
parts caused by fires, misuse, accident, Acts of God,
such as lightning or fluctuations in electric power,
improper installation, improper maintenance or use
in violation of instructions furnished by TACP; use or
malfunction through simultaneous use of this DAV
Product and connected equipment; or to units that
have been modified or had the serial number
removed, altered, defaced, or rendered illegible.
Complete and mail the enclosed product registration
card or register your DAV Product on-line at
www.tacp.toshiba.com/service as soon as possible. By
registering your DAV Product you will enable TACP to
bring you new products specifically designed to meet
your needs and help us to contact you in the unlikely
event a safety notification is required under the
Consumer Product Safety Act. Failure to complete and
return the product registration card does not diminish
your warranty rights.
56
Others
Limited Warranty ( Continued )
How to Obtain Warranty Services
If, after following all of the operating instructions in this
manual and checking the section "Before calling service
personnel", you find that service is needed:
(1) For instructions on how to obtain warranty service
for your DAV Product, contact TACP's Consumer
Solution Center toll-free at 1-800-631-3811.
(2) You must include a copy of original bill of sale or
other proof of purchase along with the entire DAV
Product to the Depot Warranty Repair Center
specified by the TACP Consumer Solutions Center.
You are responsible for all inbound transportation
and insurance charges for the DAV Product to the
Depot Warranty Repair Center specified by the
TACP Consumer Solutions Center.
For additional information, visit TACP's web site:
www.tacp.toshiba.com.
ALL WARRANTIES IMPLIED BY THE LAW OF ANY
STATE OF THE U.S.A., INCLUDING THE IMPLIED
WARRANTIES OF MERCHANTABILITY AND FITNESS
FOR A PARTICULAR PURPOSE, ARE EXPRESSLY
LIMITED TO THE DURATION OF THE LIMITED
WARRANTIES SET FORTH ABOVE. WITH THE
EXCEPTION OF ANY WARRANTIES IMPLIED BY THE
LAW OF ANY STATE OF THE U.S.A. AS HEREBY
LIMITED, THE FOREGOING WARRANTY IS
EXCLUSIVE AND IN LIEU OF ALL OTHER
WARRANTIES, GUARANTEES, AGREEMENTS, AND
SIMILAR OBLIGATIONS OF TACP WITH RESPECT TO
THE REPAIR OR REPLACEMENT OF ANY PARTS. IN
NO EVENT SHALLTACP BE LIABLE FOR
CONSEQUENTIAL OR INCIDENTAL DAMAGES
(INCLUDING, BUT NOT LIMITED TO, LOST PROFITS,
BUSINESS INTERRUPTION, OR MODIFICATION OR
ERASURE OF RECORDED DATA CAUSED BY USE,
MISUSE OR INABILITY TO USE THIS DAV PRODUCT).
No person, agent, distributor, dealer or company is
authorized to change, modify or extend the terms of
these warranties in any manner whatsoever. The time
within which an action must be commenced to enforce
any obligation of TACP arising under the warranty or
under any statute, or law of the United States or of any
state thereof, is hereby limited to ninety (90) days from
the date you discovered or should have discovered, the
defect. This limitation does not apply to implied
warranties arising under state law.
THIS WARRANTY GIVES YOU SPECIFIC LEGAL
RIGHTS AND YOU MAY ALSO HAVE OTHER
RIGHTS WHICH MAY VARY FROM STATE TO STATE
IN THE U.S.A. SOME STATES OF THE U.S.A. DO
NOT ALLOW LIMITATIONS ON HOW LONG AN
IMPLIED WARRANTY LASTS, WHEN AN ACTION
MAY BE BROUGHT, OR THE EXCLUSION OR
LIMITATION OF INCIDENTAL OR CONSEQUENTIAL
DAMAGES, SO THE ABOVE PROVISIONS MAY NOT
APPLY TO YOU UNDER SUCH CIRCUMSTANCES.
m
o
o.
o
o
0
o
o
o
0_
0
e-
"u
o-
_0
o
0
o
O.
_0
(O
e-P
e-
"O
e-
57
Others
Limited Warranty ( Continued )
- IMPORTANT-
CANADIAN WARRANTY INFORMATION
GARANTIE CANADIENNE
TOSHIBA
STANDARD WARRANTY
TYPE OF SET
WARRANTY PERIOD
DVD Player
DVD/VCR Combination
Home Theatre in a Box
DVD Recorder
Portable DVD
12 MONTHS
GARANTIE NORMALE
TYPE D'APPAREIL
DUREE DE LA GARANTIE:
Lecteur DVD
DVD/magnetoscope combo
Cinema maison darts une bofte
Enregistreur DVD
DVD Portatif
12 MOIS
CANADIAN WARRANTY
Toshiba of Canada Limited (TCL) makes the following
limited warranties to original consumers in Canada.
Please retain your "Bill of Sale" as proof of purchase.
To obtain a "Canadian Warranty" please register
online at www.toshiba.ca
GARANTIE CANADIENNE
1) Toshiba du Canada Limitee (TCL) offre au Canada les
garanties limitees suivantes aux consommateurs origin-
aux. Veuillez conserver votre ,, facture _ comme preuve
d'achaP,our obtenir une garantie canadienne,
veuillez vous inscrire en ligne a www.toshiba.ca
Canadian Warranty Information
Should service be required on this unit during the one year
warranty period, TCL's option will beto repair or exchange the
defective unit, It will be necessary to follow this procedure:
Contact: Toshiba of Canada Limited at the Consumer
Electronics Group, customer support line,
Phone: 1-800-268-3404
Email: ceg customer_support@toshiba,ca
All in-warranty repairs mustbe made by an authorizedTCL
service centre.
For service exchange TCL will arrange to have the unit picked
up by courier and a replacement unitwill be returnedvia same
courier. (Note:A major credit card number will be required as a
charge of $25,00 will apply if no fault is found with the unit,)
During the first 3 months of ownership, a new unit will be sup-
plied as a replacement, During the remainder of the warranty
period a service-renewed unit will be supplied.
The original "Bill of Sale" must be provided as proof of pur-
chase (it will be returned with the replacement unit,)
This 12-month warranty will be strictly adhered to
Out of warranty units should be repaired by a TCL authorized
service centre.
Note: It isthe responsibility of the owner to ensure proper
packaging. Should damage in shipping occur, due to poor
packaging, a charge back for the repair will result.
This warranty applies to the original purchaser only and is not
transferable,
This warranty does not apply to sets that have been subjected
to misuse, neglect, accident, physical damage or acts of
nature.
Sets with the serial number removed, altered, replaced or
defaced will not be covered by this warranty,
The warranties from TCL are effective only ifthe product is
purchased in Canada from an authorized TCL dealer and
operated in Canada.
Products utilized for rental or commercial purposes are not
covered by this warranty.
This warranty is in lieu of all other warranties, guaranties or
agreements, whether expressed or implied,and no person,
agent distributor, dealer, service centre or company is author-
ized to change, modify or extend its terms in any manner
whatsoever,
Information sur la garantie Canadienne
Si vous avez besoin de service sur cet appareil au cours le
I'annee de garantie, Toshiba du Canada Limitee aura I'op tion
de r@arer ou echanger I'appareil defectueux, Vous devrez
suivre la procedure suivante:
Contact: Toshiba du Canada Limitee au Groupe t_lectronique
aux consommateurs, service & la clientele.
T_I: 1-800-268-3404
Courriel: ceg customer_support@toshiba.ca
Toutes les reparationsau cours de la garantiedoivent #tre faites
par un centrede service autoriseToshiba,
Pour un echange TCL s'assurera qu'un service de courder
ramassera I'unite et qu'un appareil de remplacement soit
expedie par le m_me service de courrier,
(Note: Un numero de carte de credit sera requis car une
charge de 25,005 sera appliquee si toutefois rappareil n'avait
aucun probleme de fonctionnement,)
Une nouvelle unite sera fournie comme remplacement durant
les premiers 3 mois de propriet& Par centre durant la balance
de la garantie une unite remise a neuf sera foumie,
La -facture originale doit _tre fournie comme preuve d'achat
(elle vous sera retoumee avec I'unite de remplacement.)
Cette garantie de 12 mois sera strictement adheree
Les unites hers de garantie devraient _tre reparees par un
centre de service autorise Toshiba,
Note: C'est la responsabilite du proprietaire de s'assurer que
remballage est adequat. Vous serez facture pour toutes repa-
rations causees par des dommages encourus &cause d'un
emballage non adequat.
Cette garantie est octroyee & racheteur initial et n'est pas
transferable, Cette garantie ne s'aplique pas aux appareils qui
ont ete sujets aux abus, negligences, accidents, dommages
physiques ou actes naturels,
Les appareils dent le numero de serie a ete enlev& altet&
remplace ou barbouille ne sent pas couverts par cette
garantie,
Les garanties de TCL sent valides seulement sur les unites
sent achetees et utilisees au Canada d'un marchand autorise
TCL.
Cette garantie ne couvre pas les produits de location ou &
usage commercial, Cette garantie remplace toutes autres
garanties ou ententes exprimees ou sous-entendues, Aucune
personne, agent, distdbuteur, concessionaire ou compagnie
n'est autorise & changer, modifier ou prolonger les termes de
cette garantie de quelque fa£on que ce soit.
Toshiba of Canada Limited 191 McNabb Street Markham, Ontario L3R 8H2
58
