Toshiba D VR600KU User Manual DVD/VCR Manuals And Guides LR707446
TOSHIBA DVD/VCR Combo Manual LR707446 TOSHIBA DVD/VCR Combo Owner's Manual, TOSHIBA DVD/VCR Combo installation guides
User Manual: Toshiba D-VR600KU D-VR600KU TOSHIBA DVD/VCR - Manuals and Guides View the owners manual for your TOSHIBA DVD/VCR #DVR600KU. Home:Electronics Parts:Toshiba Parts:Toshiba DVD/VCR Manual
Open the PDF directly: View PDF ![]() .
.
Page Count: 80
TOSHIBA
introduction
Various settings
Discplayback
Hi-FiVC & DVDV! EO
D-VR6OOKU
OWNER'S MANUAL
RECORDER
Tape playback
Recording
Editing the disc
Hi-FiSOPB
@2007 Toshiba Corporation
This device does not tape-record copy protected DVD Video
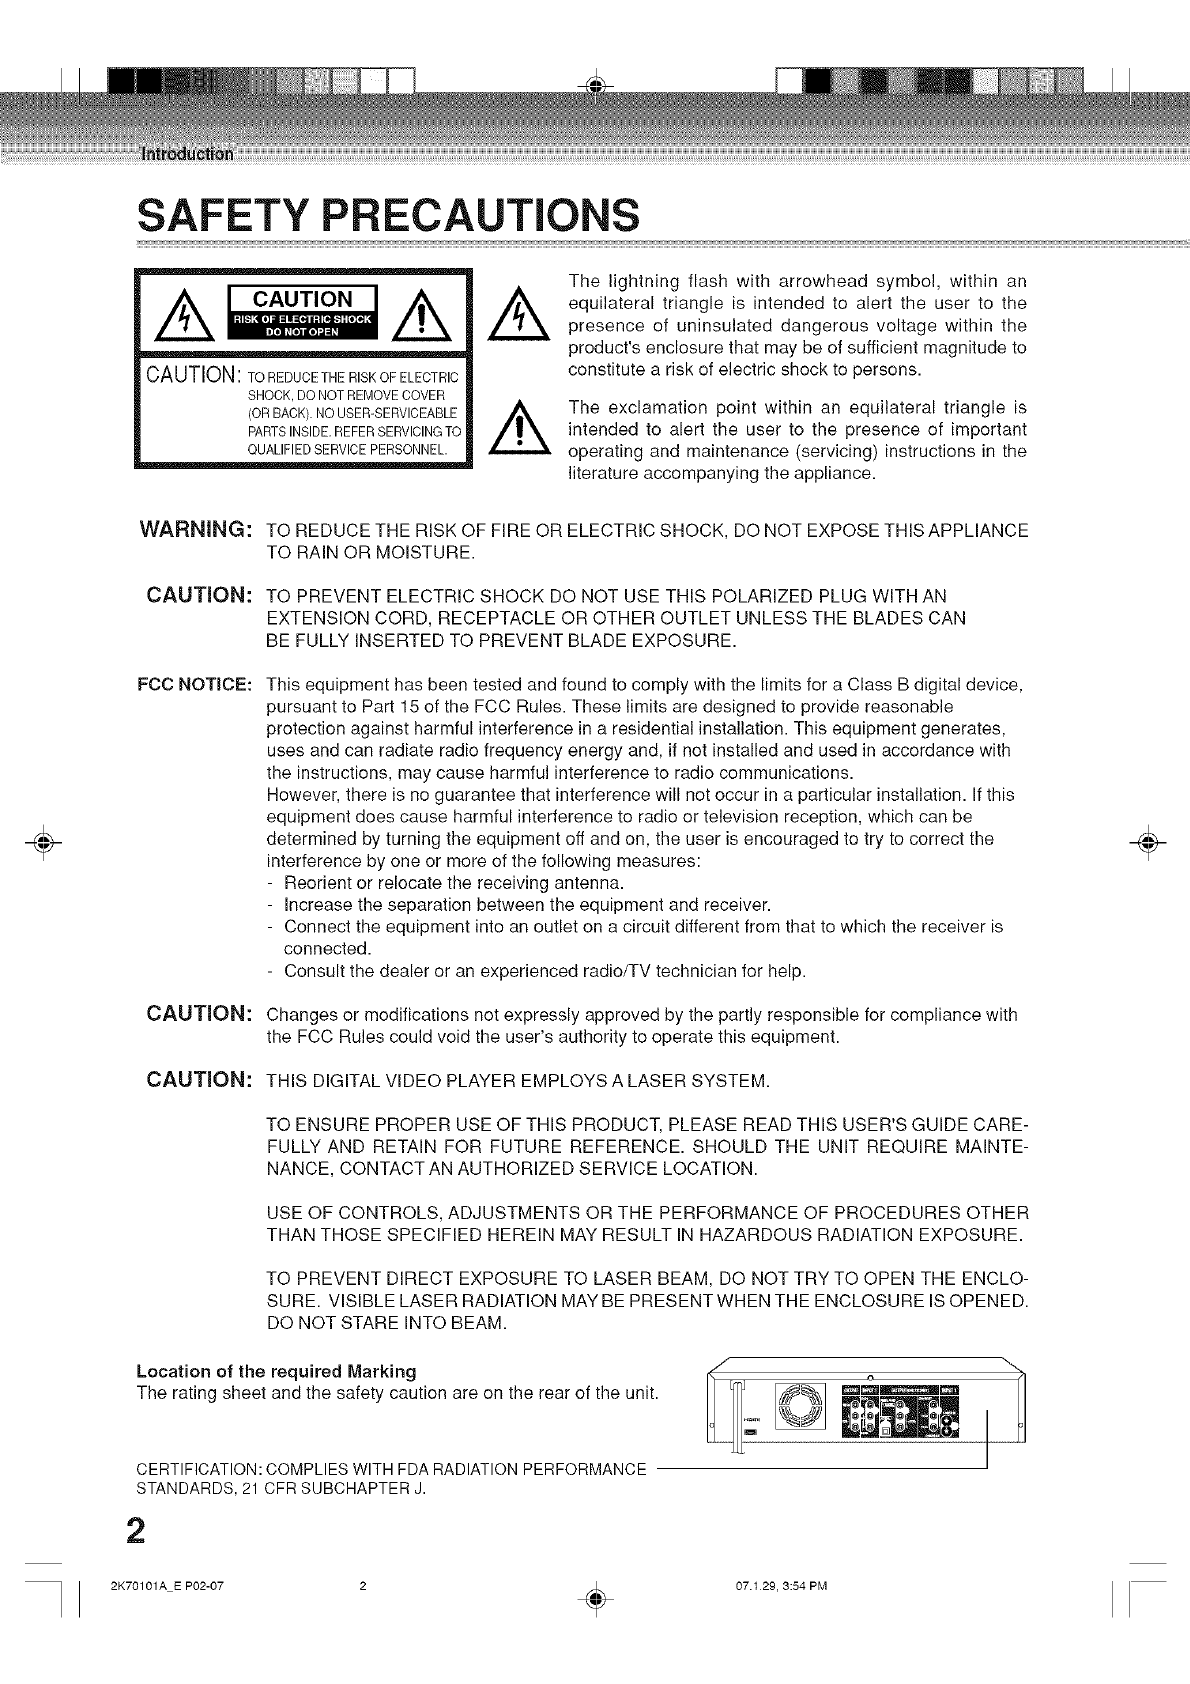
SAFETY PRECAUTIONS
A CAOT'ON
CAUTION: TO REDUCE THE RISK OF ELECTRIC
SHOCK, DO NOT REMOVE COVER
(OR BACK). NO USER-SERVICEABLE
PARTSINSIDE. REFERSERVICING TO
QUALIFIED SERVICE PERSONNEL.
AThe lightning flash with arrowhead symbol, within an
equilateral triangle is intended to alert the user to the
presence of uninsulated dangerous voltage within the
product's enclosure that may be of sufficient magnitude to
constitute a risk of electric shock to persons.
The exclamation point within an equilateral triangle is
intended to alert the user to the presence of important
operating and maintenance (servicing) instructions in the
literature accompanying the appliance.
÷
WARNING: TO REDUCE THE RISK OF FIRE OR ELECTRIC SHOCK, DO NOT EXPOSE THIS APPLIANCE
TO RAIN OR MOISTURE.
CAUTION: TO PREVENT ELECTRIC SHOCK DO NOT USE THIS POLARIZED PLUG WITH AN
EXTENSION CORD, RECEPTACLE OR OTHER OUTLET UNLESS THE BLADES CAN
BE FULLY INSERTED TO PREVENT BLADE EXPOSURE.
FCC NOTICE: This equipment has been tested and found to comply with the limits for a Class B digital device,
pursuant to Part 15 of the FCC Rules. These limits are designed to provide reasonable
protection against harmful interference in a residential installation. This equipment generates,
uses and can radiate radio frequency energy and, if not installed and used in accordance with
the instructions, may cause harmful interference to radio communications.
However, there is no guarantee that interference will not occur in a particular installation. If this
equipment does cause harmful interference to radio or television reception, which can be
determined by turning the equipment off and on, the user is encouraged to try to correct the
interference by one or more of the following measures:
- Reorient or relocate the receiving antenna.
- Increase the separation between the equipment and receiver.
- Connect the equipment into an outlet on a circuit different from that to which the receiver is
connected.
- Consult the dealer or an experienced radio/TV technician for help.
CAUTION: Changes or modifications not expressly approved by the partly responsible for compliance with
the FCC Rules could void the user's authority to operate this equipment.
CAUTION: THIS DIGITAL VIDEO PLAYER EMPLOYS A LASER SYSTEM.
TO ENSURE PROPER USE OF THIS PRODUCT, PLEASE READ THIS USER'S GUIDE CARE-
FULLY AND RETAIN FOR FUTURE REFERENCE. SHOULD THE UNIT REQUIRE MAINTE-
NANCE, CONTACT AN AUTHORIZED SERVICE LOCATION.
USE OF CONTROLS, ADJUSTMENTS OR THE PERFORMANCE OF PROCEDURES OTHER
THAN THOSE SPECIFIED HEREIN MAY RESULT IN HAZARDOUS RADIATION EXPOSURE.
TO PREVENT DIRECT EXPOSURE TO LASER BEAM, DO NOT TRY TO OPEN THE ENCLO-
SURE. VISIBLE LASER RADIATION MAY BE PRESENT WHEN THE ENCLOSURE IS OPENED.
DO NOT STARE INTO BEAM.
Location of the required Marking
The rating sheet and the safety caution are on the rear of the unit.
CERTIFICATION: COMPLIES WITH FDA RADIATION PERFORMANCE
STANDARDS, 21 CFR SUBCHAPTER J.
H
2
÷
2K70101A E P02-07 2 _ 07.129, 3:54 PM
iMPORTANT SAFEGUARDS
1. READ INSTRUCTIONS
All the safety and operating instructions should be read before the unit is operated.
2. RETAIN INSTRUCTIONS
The safety and operating instructions should be retained for future reference.
3. HEED WARNINGS
All warnings on the unit and in the operating instructions should be adhered to.
4. FOLLOW INSTRUCTIONS
All operating and use instructions should be followed.
5. CLEANING
Unplug this unit from the wall outlet before cleaning. Do not use liquid cleaners or aerosol cleaners.
Use a soft dry cloth for cleaning the exterior cabinet only.
6. ATTACHMENTS
The manufacturer of this unit does not make any recommendations for attachments, as they may cause
hazards.
7. WATER AND MOISTURE
Do not use this unit near water. For example, near a bathtub, washbowl, kitchen sink, laundry tub, in a wet
basement, or near a swimming pool. PORTABLECARTWARNING
8. ACCESSORIES (symbol provided by RETAC)
Do not place this unit on an unstable cart, stand, tripod, bracket, or table.
The unit may fall, causing serious injury, and serious damage to the unit.
8A. An appliance and cart combination should be moved with care. Quick stops,
excessive force, and uneven surfaces may cause the appliance and cart
combination to overturn.
9. VENTILATION
Slots and openings in the cabinet back or bottom are provided for ventilation, S3125A
to ensure reliable operation of the unit, and to protect it from overheating.
These openings must not be blocked or covered. The openings should never be blocked by placing the unit
on a bed, sofa, rug, or other similar surface. This unit should never be placed near or over a radiator or heat
source. This unit should not be placed in a built-in installation such as a bookcase or rack unless proper
ventilation is provided and/or the manufacturer's instructions have been adhered to.
10. POWER SOURCE
This unit should be operated only from the type of power source indicated on the rating plate. If you are not
sure of the type of power supply to your home, consult your appliance dealer or local power company.
11. GROUNDING OR POLARIZATION
This unit is equipped with a polarized alternating-current line plug (a plug having one blade wider than the
other). This plug will fit into the power outlet only one way. This is a safety feature. If you are unable to insert
the plug fully into the outlet, try reversing the plug. If the plug should still fail to fit, contact your electrician to
replace your obsolete outlet. Do not defeat the safety purpose of the grounding-type plug.
12. POWER-CORD PROTECTION
Power-supply cords should be routed so that they are not likely to be walked on or pinched by items placed
upon or against them, paying particular attention to cords at plugs, convenience receptacles, and the point
where they exit from the appliance.
=_
o
3
÷
iMPORTANT SAFEGUARDS
4
13. LIGHTNING
To protect your unit from a lightning storm, or when it is left unattended and unused for long periods of time,
unplug it from the wall outlet and disconnect the antenna or cable system. This will prevent damage to the
unit due to lightning and power line surges.
14. POWER LINES
An outside antenna system should not be located in the vicinity of overhead power lines or other electric
light or power circuits, or where it can fall onto or against such power lines or circuits. When installing an
outside antenna system, extreme care should be taken to keep from touching such power lines or circuits,
as contact with them might be fatal.
15. OVERLOADING
Do not overload wall outlets and extension cords, as this can result in a risk of fire or electric shock.
16. OBJECT AND LIQUID ENTRY
Do not push objects through any openings in this unit, as they may touch dangerous voltage points or short
out parts that could result in fire or electric shock. Never spill or spray any type of liquid into the unit.
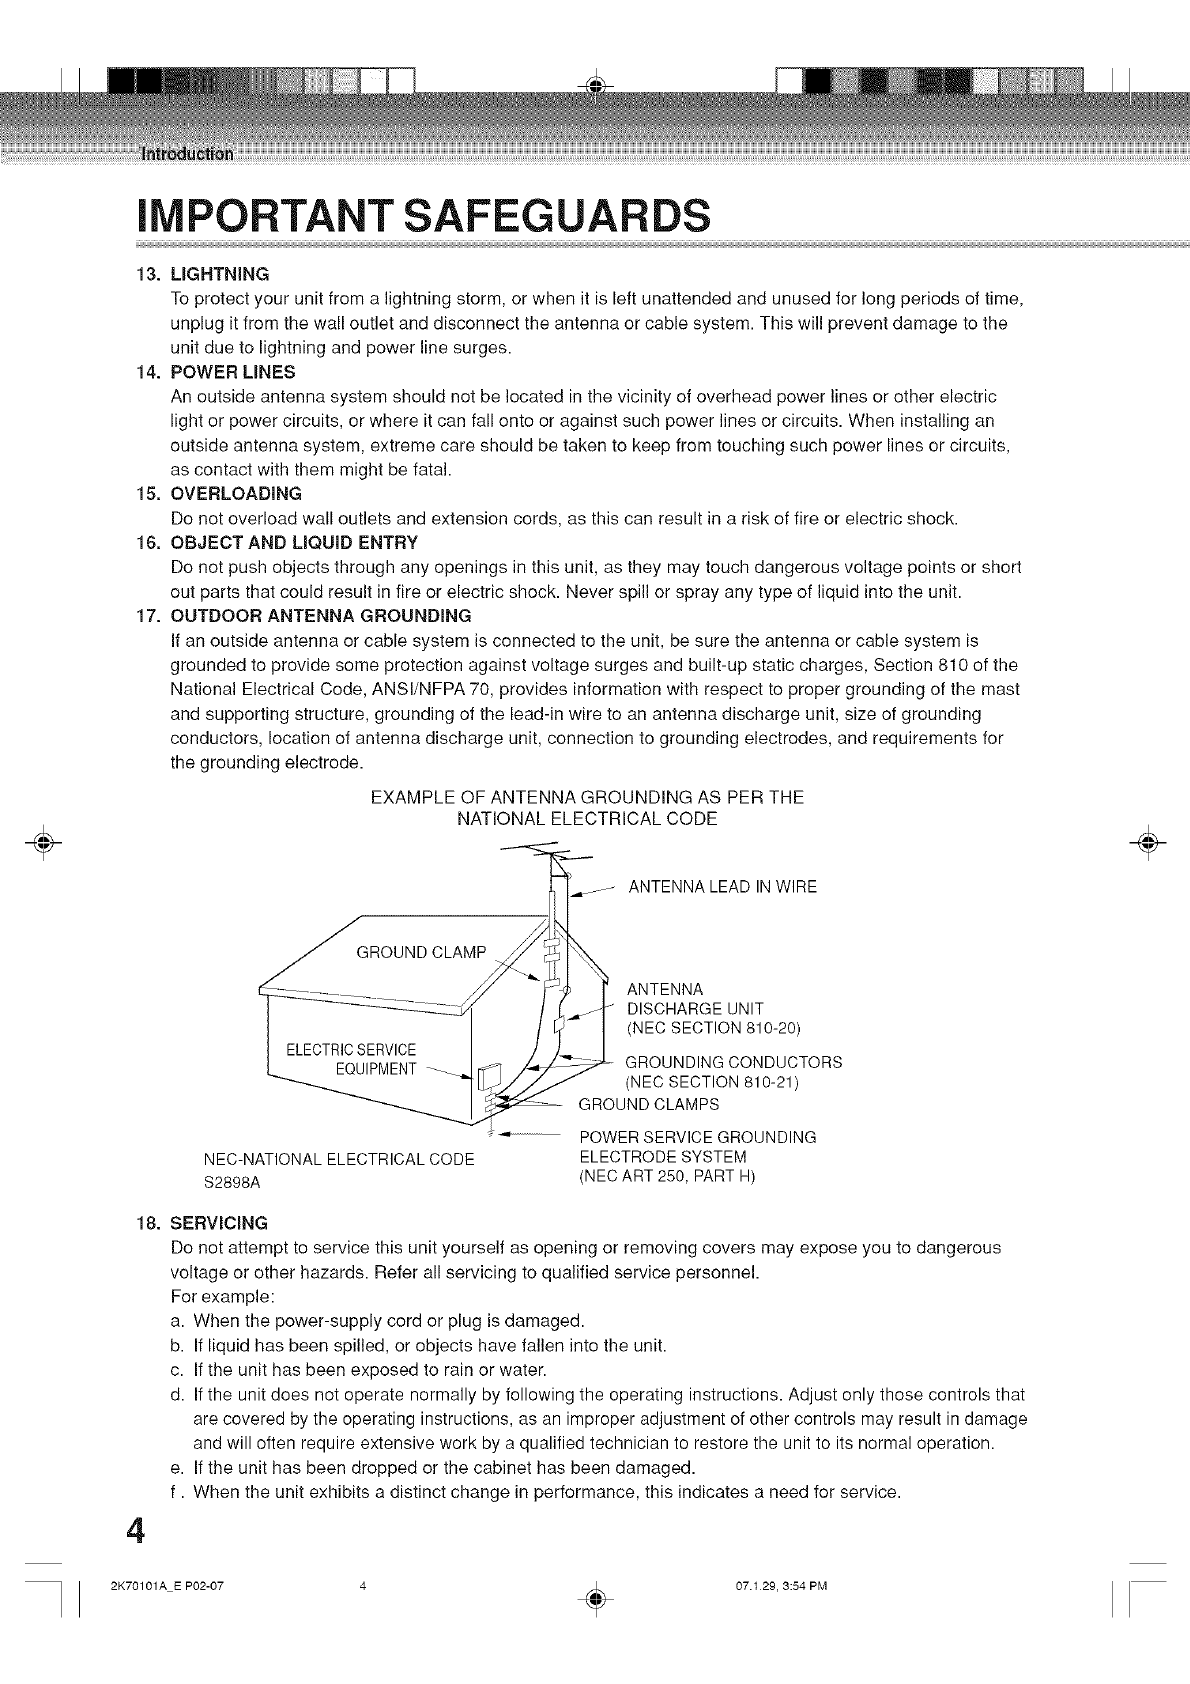
17. OUTDOOR ANTENNA GROUNDING
If an outside antenna or cable system is connected to the unit, be sure the antenna or cable system is
grounded to provide some protection against voltage surges and built-up static charges, Section 810 of the
National Electrical Code, ANSI/NFPA 70, provides information with respect to proper grounding of the mast
and supporting structure, grounding of the lead-in wire to an antenna discharge unit, size of grounding
conductors, location of antenna discharge unit, connection to grounding electrodes, and requirements for
the grounding electrode.
18.
EXAMPLE OF ANTENNA GROUNDING AS PER THE
NATIONAL ELECTRICAL CODE
GROUND CLAMP
NEC-NATIONAL ELECTRICAL CODE
$2898A
_-_-- GROUND CLAMPS
ANTENNA LEAD IN WIRE
ANTENNA
DISCHARGE UNIT
(NEC SECTION 810-20)
GROUNDING CONDUCTORS
(NEC SECTION 810-21)
POWER SERVICE GROUNDING
ELECTRODE SYSTEM
NEC ART 250, PART H)
÷
SERVICING
Do not attempt to service this unit yourself as opening or removing covers may expose you to dangerous
voltage or other hazards. Refer all servicing to qualified service personnel.
For example:
a. When the power-supply cord or plug is damaged.
b. If liquid has been spilled, or objects have fallen into the unit.
c. If the unit has been exposed to rain or water.
d. If the unit does not operate normally by following the operating instructions. Adjust only those controls that
are covered by the operating instructions, as an improper adjustment of other controls may result in damage
and will often require extensive work by a qualified technician to restore the unit to its normal operation.
e. If the unit has been dropped or the cabinet has been damaged.
f. When the unit exhibits a distinct change in performance, this indicates a need for service.
2K70101A E P02-07 4 _ 07.129, 3:54 PM
iMPORTANT SAFEGUARDS
÷
19.
20.
21.
22.
23.
24.
25.
26.
REPLACEMENT PARTS
When replacement parts are required, be sure the service technician uses replacement parts specified by
the manufacturer or those that have the same characteristics as the original part.
Unauthorized substitutions may result in fire, electric shock or other hazards.
SAFETY CHECK =_
=_
Upon completion of any service or repairs to this unit, ask the service technician to perform safety checks to o
determine that the unit is in proper operating condition.
HEAT _"
The product should be situated away from heat sources such as radiators, heat registers, stoves, or other
products (including amplifiers) that produce heat.
D_SC TRAY
Keep your fingers well clear of the disc tray as it is closing. It may cause serious personal injury.
CONNECTING
When you connect the product to other equipment, turn off the power and unplug all of the equipment from
the wall outlet. Failure to do so may cause a product damage. Read the owner's manual of the other equip-
ment carefully and follow the instructions when making any connections.
LASER BEAM
Do not look into the opening of the disc tray or ventilation opening of the product to see the source of the
laser beam. It may cause sight damage.
DiSC
Do not use a cracked, deformed, or repaired disc. These discs are easily broken and may cause serious
personal injury and product malfunction.
NOTE TO CABLE TV SYSTEM iNSTALLER
This reminder is provided to call the Cable TV system installer's attention to Article 820-40 of the NEC that
provides guidelines for proper grounding and, in particular, specifies that the cable ground shall be con-
nected to the grounding system of the building, as close to the point of cable entry as practical.
CONDENSATION
Moisture will form in the operating section of the DVD/VCR if the unit is brought from cool surroundings into a warm
room or if the temperature of the room rises suddenly. When this happens, the DVD/VCR's performance will be
impaired.
To prevent this, let the DVD/VCR stand in its new surroundings for about an hour before switching it on, or make
sure that the room temperature rises gradually.
Condensation may also form during the summer if the DVD/VCR is exposed to the breeze from an air conditioner.
In such cases, change the location of the DVD/VCR.
* This product incorporates copyright protection technology that is protected by method claims of certain U.S.
patents and other intellectual property rights owned by Macrovision Corporation and other rights owners.
Use of this copyright protection technology must be authorized by Macrovision Corporation, and is intended
for home and other limited viewing uses only unless otherwise authorized by Macrovision Corporation.
Reverse engineering or disassembly is prohibited.
Consumers should note that not all high definition television sets are fully compatible with this product
and may cause artifacts to be displayed in the picture. In case of 525 progressive scan picture problems,
it is recommended that the user switch the connection to the "STANDARD DEFINITION" output. If there
are questions regarding our TV set compatibility with this model 525p DVD player, please contact our
customer service center.
* _ is a trademark of DVD Format/Logo Licensing Corporation.
* DivX, DivX Certified, and associated loges are trademarks of DivX, Inc. and are used under license.
* HDMI, the HDMI logo and High-Definition Multimedia Interface are trademarks or registered trademarks of
HDMI licensing LLC.
* Manufactured under license from Dolby Laboratories. Dolby and the double-D symbol are trademarks of
Dolby Laboratories.
* "DTS" and "DTS Digital Out" are registered trademarks of DTS, Inc.
* Unauthorized recording of copyrighted television programs, films, video cassettes and other materials may
infringe the rights of copyright owners and be contrary to copyright laws.
* Microsoft, Windows Media, and the Windows logo are either registered trademarks or trademarks of Microsoft
Corporation in the United States and/or other countries.
5
÷
2K70101A E P02-07 5 _ 07.1 29, 3:54 PM
÷
6
introduction
•SAFETY PRECAUTIONS .................................... 2
•iMPORTANT SAFEGUARDS .............................. 3
• Contents ............................................................. 6
• Features .............................................................. 8
• Disc ..................................................................... 9
Handling discs ................................................... 9
Discs which can be played back ........................ 9
Discs which cannot be played back ................... 9
Discs on which video can be recorded ............ 10
Recording format ............................................. 11
O Parts and functions ......................................... 12
Front ................................................................ 12
Rear ................................................................. 12
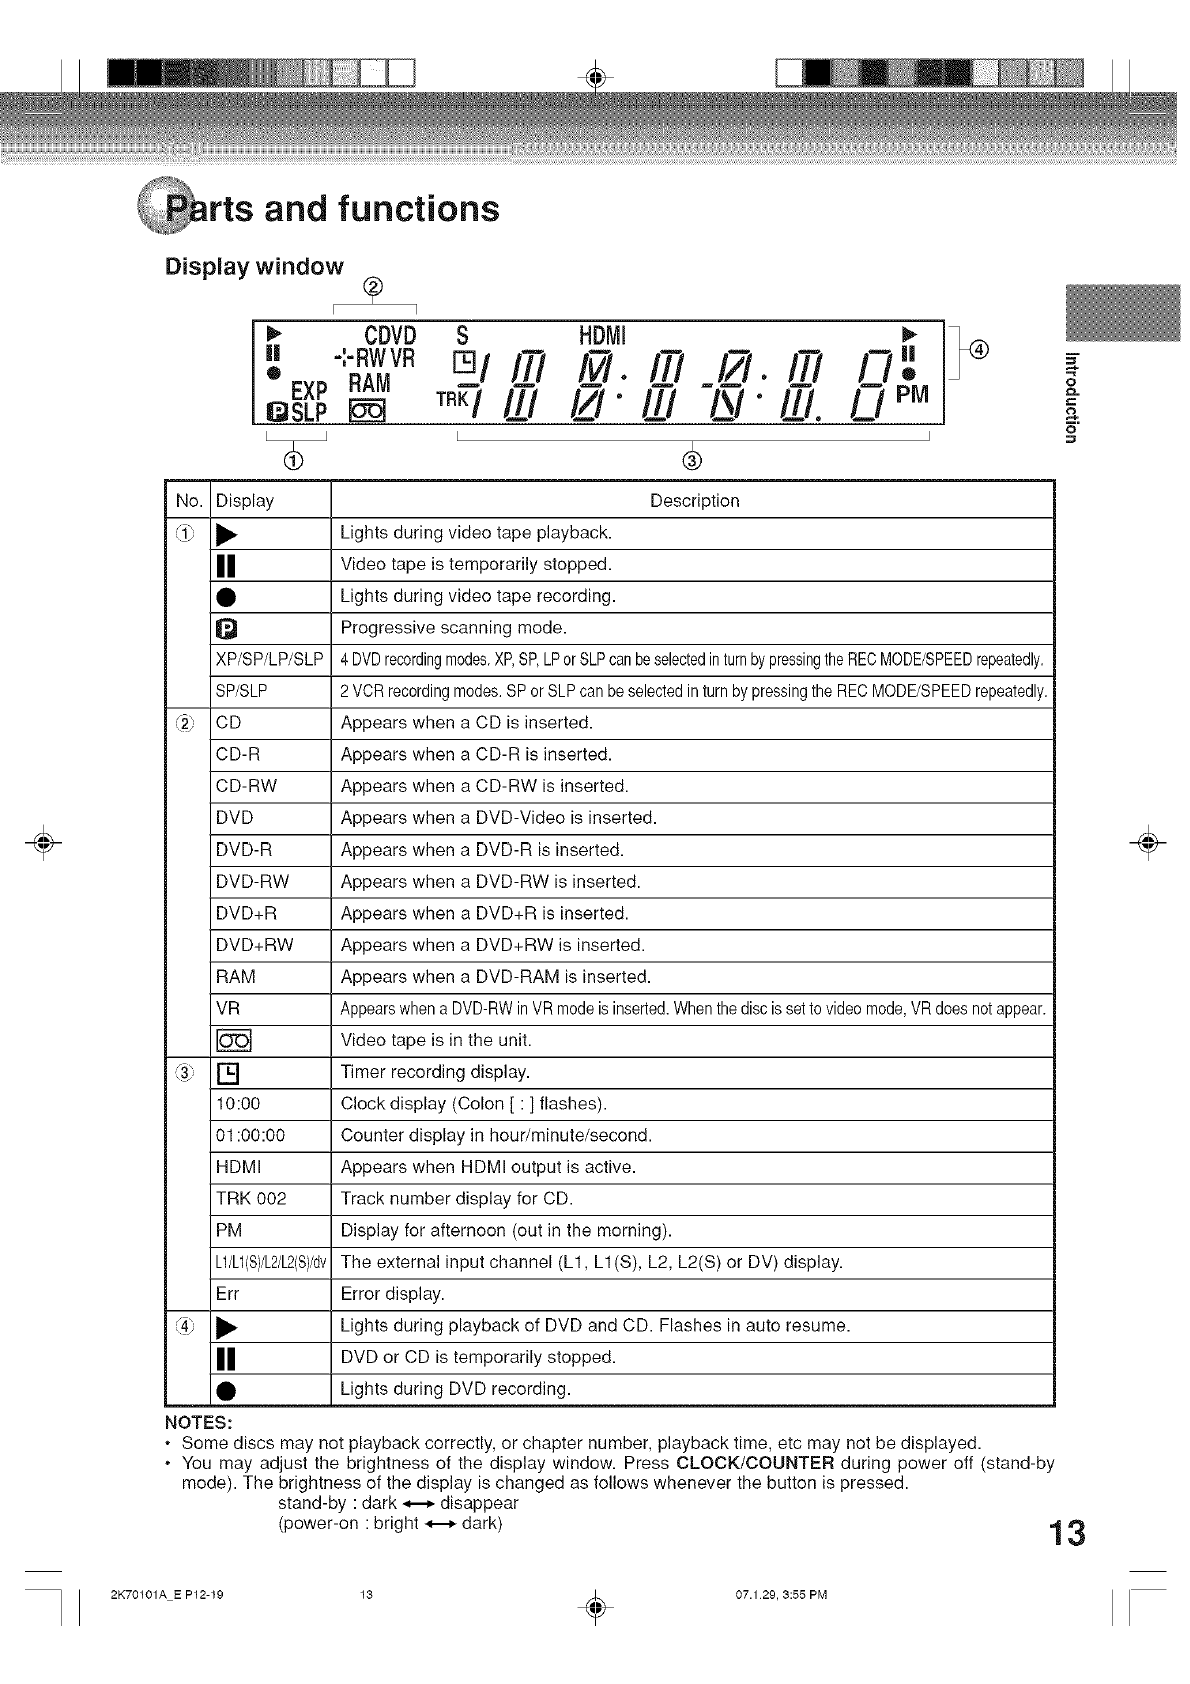
Display window ................................................ 13
Remote control ................................................ 14
Power Source .................................................. 15
• Connecting to a Cable or Satellite Box .......... 16
O Connections with the TV or
audio component ............................................. 17
Various settings
Q SETUP MENU ................................................... 20
Using the SETUP MENU ................................. 20
OSetting the language ........................................ 21
OSD ................................................................. 21
DVD Menu ....................................................... 21
DVD Audio ....................................................... 21
DVD Subtitle .................................................... 21
DivX(R) Subtitle ............................................... 21
•Setting the parental control ............................ 22
Setting your password ..................................... 22
Selecting parental control ................................ 22
Setting the new password ................................ 22
Temporarily cancelling parental control ........... 22
QSetting the clock .............................................. 23
Clock Settings .................................................. 23
Date Settings ................................................... 23
OSetting the disc ................................................ 23
Format ............................................................. 23
New Disc Format ............................................. 24
Finalize ............................................................ 24
Unfinalize ......................................................... 24
Make compatible .............................................. 24
Protect Disc ..................................................... 25
Physical Format ............................................... 25
Q DivX(R) Video On Demand .............................. 25
DivX(R) ............................................................ 25
O Restore .............................................................. 25
Restore ............................................................ 25
QSetting other item ............................................ 25
Display/Call ...................................................... 25
•Setting the A/V Output ..................................... 26
TV Shape ......................................................... 26
Still Mode ......................................................... 26
Brightness ........................................................ 26
E.B.L ................................................................ 26
DRC ................................................................. 27
Digital Output Mode ......................................... 27
Virtual Surround (QSound) .............................. 27
External Audio Input ......................................... 27
QRecording ......................................................... 27
Auto Chapter .................................................... 27
Index Picture .................................................... 27
Black Level ...................................................... 27
O Other ................................................................. 28
JPEG Interval ................................................... 28
Disc playback
•Playback procedure ......................................... 29
• Playback by selecting a title ........................... 30
• Checking media information ........................... 31
O Special playback .............................................. 32
Fast forward playback ...................................... 32
Review playback .............................................. 32
Still playback .................................................... 32
Frame advance ................................................ 32
Slow motion playback ...................................... 32
Locating a chapter or track .............................. 32
•instant skip ....................................................... 33
• Locating a specific scene ............................... 33
QRepeat playback ............................................... 34
Instant replay ................................................... 34
A-B repeat playback ........................................ 34
Title/Chapter repeat playback .......................... 34
• Title selection ................................................... 35
• DVD menu ......................................................... 35
• Changing angles .............................................. 36
• Zooming ............................................................ 36
• Karaoke playback ............................................ 36
• Changing soundtrack language ..................... 37
• Subtitles ............................................................ 37
• To turn off the PBC (VIDEO CD Version 2.0) ..... 37
Q Various operations on CD ............................... 38
Control menu ................................................... 38
Playing back a selected track .......................... 38
Play once ......................................................... 38
Shuffle playback .............................................. 39
Repeat playback of selected track ................... 39
Repeat playback of all tracks ........................... 39
Shuffle and repeat playback ............................ 39
÷
2K70101A E P02-07 6 _ 07.129, 4:10 PM
÷
QMP3/WMA/JPEG/DivX _>playback .................... 40
Using the Play screen ...................................... 40
When the file to be displayed is selected ......... 40
Playing back MP3/WMA files ........................... 41
JPEG slide show .............................................. 42
To display a JPEG file each one ...................... 42
Playing back DivX_ video flies ......................... 43
Tape playback
•Loading and unloading acassette tape ......... 44
• Cassette tape playback ................................... 45
• Special playback .............................................. 46
Picture search .................................................. 46
Still picture ....................................................... 46
Slow motion ..................................................... 46
Frame by frame picture .................................... 46
Adjusting tracking condition ............................. 46
Repeat playback .............................................. 46
Instant skip ....................................................... 46
Audio output selection ..................................... 46
To display VCR operation status ...................... 46
•ZERO RETURN function .................................. 47
O Video index search system ............................. 47
Recording
ORead this before recording on disc ................ 48
Types of disc .................................................... 48
Recording modes ............................................. 48
Disc remaining time ......................................... 48
Images that cannot be recorded ...................... 49
• Recording a TV program ................................. 50
O One-touch Timer Recording (OTR) ................ 51
Q Timer recording ................................................ 52
Q Chase Playback ................................................ 55
Editing the disc
• Editing the disc ................................................ 56
• Adding chapter mark ....................................... 57
• Erasing chapter ................................................ 58
• Combining chapters ........................................ 59
• Selecting thumbnail picture ............................ 60
• Changing title name ......................................... 61
Q Erasing title ...................................................... 62
Q Changing disc name ........................................ 63
Q Using the keyboard screen ............................. 64
Dubbing
• Dubbing a tape onto a disc ............................. 66
• Dubbing a disc onto a tape ............................. 67
Q Dubbing using other equipment ..................... 68
Additional information
• Glossary ........................................................... 70
• Problems and troubleshooting ....................... 72
• Video head cleaning ........................................ 73
• Error/Warning message list ............................ 74
Q Specifications ................................................... 75
• Limited Canadian Warranty ............................. 76
=_
=_
&
÷
Media mark
Each applicable media are indicated using the symbol shown below.
: DVD-Video : DVD+RW
: DVD-RAM : DVD+R
: DVD-RW in VR mode :Audio/Video CD and CD-R/CD-RW
: DVD-RW in Video mode : Video tape
: DVD-R
7
2K70101A E P02-07 7 _ 07.1 29, 3:54 PM
÷
Not only you can playback and record video tapes, but
you can also playback DVD discs or make recordings
using DVD-RAM, DVD-RW, DVD-R, DVD+RW or
DVD+R discs with this unit. In addition, you can enjoy
editing the programs you record.
Playback function
A realistic, powerful, Movie Theater sound
When connected to Dolby Digital and DTS compliant
devices, you can enjoy realistic and powerful surround
sound.
Playback the scene you want to see immedi-
ately
@@@@@@@
As DVD's do not require rewinding like video tapes, you
can get to the scene you wish to watch immediately. A
variety of search functions allow you to find the scene
you wish to watch.
Title menu
@@@@@@
As thumbnail images are displayed in the title menu,
you can find the title you want to play back quickly.
Audio/Video CD/MP3/WMA/JPEG/DivX ® play-
back
Audio/Video CD/MP3/WMA/DivX _"_files can be played
back. Also, you can display JPEG files on the TV screen
and enjoy them as a slide show.
Progressive scan
@@@@@@@
This unit supports the progressive scanning system. If
your TV is equipped with component video input jacks
which support the progressive video input, you can en-
joy high quality picture.
Chase Playback
You can begin playback from the beginning of a pro-
gram currently being recorded. You will find this func-
tion of great advantage on long programs, as you do
not have to wait for the end of recording to begin play-
back.
Recording function
Timer recording
@@@@@@@
The timer recording system allows you to select the
date, time and channel and record the desired programs.
Up to 12 timer programs within a month can be stored
in this unit.
One-touch Timer Recording (OTR)
@@@@@@@
The One-touch Timer Recording feature provides a
simple and convenient way to make a timed recording.
Edit function
Chapter mark
You can add a chapter mark to the original title. This
function is useful when searching for the scene you
wish to watch that you have marked with the Chapter
mark function.
Erasing chapter
You can erase an unnecessary chapter.
Dubbing function
Dubbing a tape onto a disc or a disc onto a
tape
With just this one unit, you can dub whatever you like,
from video tape to disc, or from disc to video tape.
, Dubbing cannot be carried out when attempting to
copy a "copy guarded" video tape or disc.
DV input
@@@@@@@
You can connect a DV-equipped digital video camera
to this unit using a DV cable for input and output of
audio, video and control signals.
÷
8
2K70101A E P08-11 8 _ 07.129, 3:54 PM
÷
isc
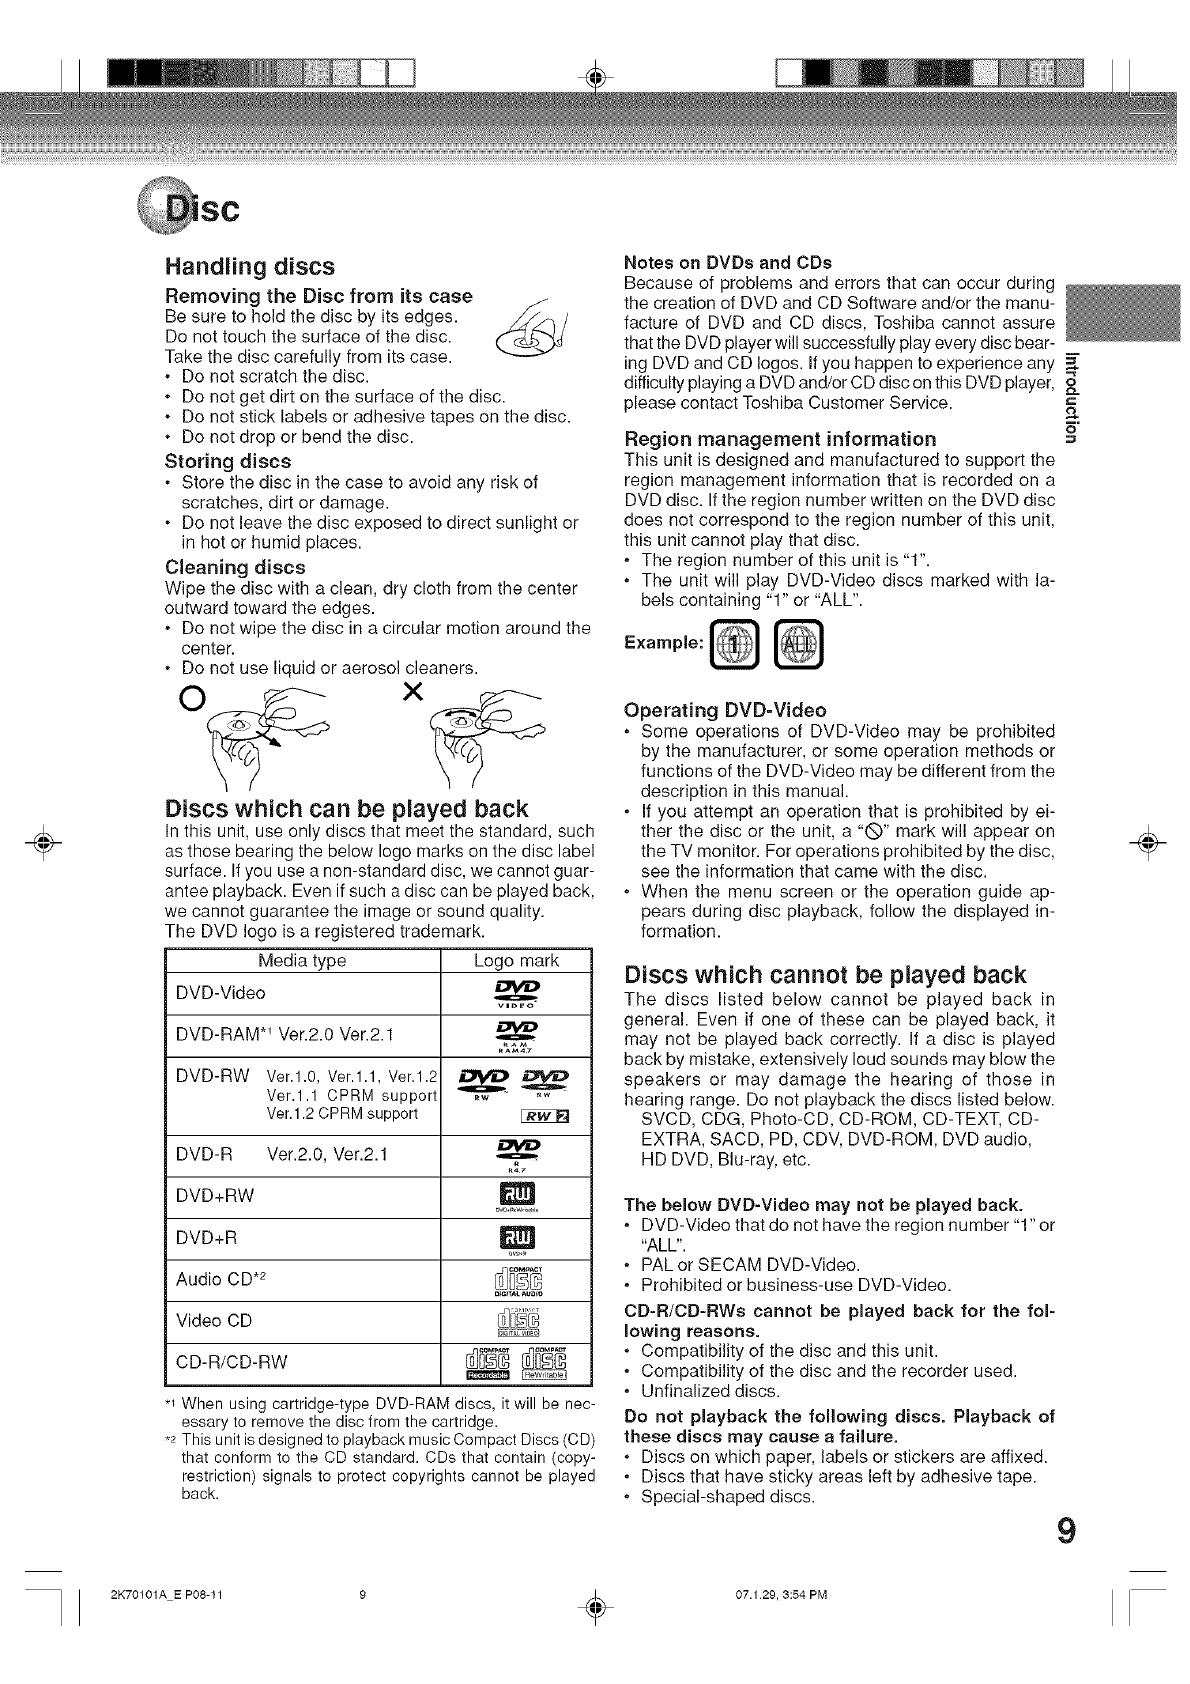
Handling discs
Removing the Disc from its case
Be sure to hold the disc by its edges.
Do not touch the surface of the disc.
Take the disc carefully from its case.
.Do not scratch the disc.
•Do not get dirt on the surface of the disc.
.Do not stick labels or adhesive tapes on the disc.
•Do not drop or bend the disc.
Storing discs
•Store the disc in the case to avoid any risk of
scratches, dirt or damage.
•Do not leave the disc exposed to direct sunlight or
in hot or humid places.
Cleaning discs
Wipe the disc with a clean, dry cloth from the center
outward toward the edges.
•Do not wipe the disc in a circular motion around the
center.
.Do not use liquid or aerosol cleaners.
Discs which can be played back
In this unit, use only discs that meet the standard, such
as those bearing the below logo marks on the disc label
surface. If you use a non-standard disc, we cannot guar-
antee playback. Even if such a disc can be played back,
we cannot guarantee the image or sound quality.
The DVD logo is a registered trademark.
Media type Logo mark
DVD-Video video
DVD-RAM *_ Ver.2.0 Ver.2.1
_M47
DVD-RW Ver.l.0, Ver.l.1, Ver.l.2 _
Ver.l.1 CPRM support ,w
Ver.1.2CPRMsupport
DVD-R Ver.2.0, Ver.2.1
DVD+RW
DVD+R
Audio CD .2 _ _'_
Video CD
CD-R/CD-RW _i_ _
*_ When using cartridge-type DVD-RAM discs, it will be nec-
essary to remove the disc from the cartridge.
*2 This unit is designed to playback music Compact Discs (CD)
that conform to the CD standard. CDs that contain (copy-
restriction) signals to protect copyrights cannot be played
back.
Notes on DVDs and CDe
Because of problems and errors that can occur during
the creation of DVD and CD Software and/or the manu-
facture of DVD and CD discs, Toshiba cannot assure
that the DVD player will successfully play every disc bear-
ing DVD and CD Iogos. Ifyou happen to experience any
difficulty playing a DVD and/or CD disc on this DVD player, o
please contact Toshiba Customer Service.
Region management information
This unit is designed and manufactured to support the
region management information that is recorded on a
DVD disc. If the region number written on the DVD disc
does not correspond to the region number of this unit,
this unit cannot play that disc.
•The region number of this unit is "1".
.The unit will play DVD-Video discs marked with la-
bels containing "1" or "ALL".
Example:
Operating DVD-Video
*Some operations of DVD-Video may be prohibited
by the manufacturer, or some operation methods or
functions of the DVD-Video may be different from the
description in this manual.
*If you attempt an operation that is prohibited by ei-
ther the disc or the unit, a "(_" mark will appear on
the TV monitor. For operations prohibited by the disc,
see the information that came with the disc.
*When the menu screen or the operation guide ap-
pears during disc playback, follow the displayed in-
formation.
Discs which cannot be played back
The discs listed below cannot be played back in
general. Even if one of these can be played back, it
may not be played back correctly. If a disc is played
back by mistake, extensively loud sounds may blow the
speakers or may damage the hearing of those in
hearing range. Do not playback the discs listed below.
SVCD, CDG, Photo-CD, CD-ROM, CD-TEXT, CD-
EXTRA, SACD, PD, CDV, DVD-ROM, DVD audio,
HD DVD, Blu-ray, etc.
The below DVD-Video may not be played back.
*DVD-Video that do not have the region number "1" or
"ALL".
*PAL or SECAM DVD-Video.
*Prohibited or business-use DVD-Video.
CD-R/CD-RWe cannot be played back for the fol-
lowing reasons.
*Compatibility of the disc and this unit.
.Compatibility of the disc and the recorder used.
.Unfinalized discs.
Do not playback the following discs. Playback of
these discs may cause a failure.
*Discs on which paper, labels or stickers are affixed.
*Discs that have sticky areas left by adhesive tape.
*Special-shaped discs. 9
÷
2K70101A E P08-11 9 _ 07.129, 3:54 PM
÷
Discs on which video can be
recorded
To record video with this unit, use the discs below:
Media type Logo mark
DVD-RAM Ver.2.0 Ver.2.1 .AM47
DVD-RW Ver.1.0, Ver.1.1, Ver.1.2
Ver.1.1 CPRM support _
Ver.1.2 CPRM support
(1_6x SPEED)
DVD-R Vet.2.0, Vet.2.1
(1_16x SPEED)
DVD+RW o_.
DVD+R
DVD-RAM
• When using cartridge-type DVD-RAM discs, it will
be necessary to remove the disc from the car-
tridge.
• Use only DVD-RAM discs that comply with DVD-
RAM standard Version 2.0 or 2.1.
The recorder cannot record on a disc formatted in
any other standard. When using such a disc, initialize
it by using the disc-format function of this recorder.
, The recorder may not record, dub, or edit some DVD-
RAM discs, because they are edited/recorded with
another manufacture's equipment or PC, contain a
large number of titles, or have little remaining capac-
ity. Also, a DVD-RAM disc may not be edited or re-
corded if its title contains still pictures.
• When you load a DVD-RAM disc for PC, "Incorrect
disc" may appear on screen. In this case, please for-
mat the disc to use with this recorder.
• DVD-RAM discs formatted in UDF2.0 on a PC are not
compatible with this recorder. Before using these
discs, initialize them on this recorder.
• This recorder complies with current copyright
protection technology and can copy a disc only when
the disc permits copying once. When there is no
indication on the disc, copying will not be allowed.
Such an indication on a disc is required also for the
Library Management database.
DVD-RW
, The disc can be erased and used again about 1,000
times.
• Only the VR mode can be used for Vet.1.0 discs.
, With Ver.l.1/1.2 discs, you can record by selecting
the VR mode or Video mode.
• When you record in the VR mode, you can repeat-
edly record and erase. By erasing unnecessary titles,
you increase remaining time effectively.
, When you record in the Video mode, you can record
until the disc becomes full.
• When you use the Video mode, you can newly record
on the disc by formatting the disc. However, if the disc
is formatted, all the recorded contents will be erased.
DVD-R
•You can record on the disc only in the Video mode.
, You can record until the disc becomes full.
, Finalizing the discs allows playback on other DVD
players. However, the finalized discs can no longer
be recorded.
• Discs can be recorded repeatedly until they are final-
ized.
DVD+RW
.You can record on the disc only in the +VR mode.
•Make the discs compatible allows playback on other
DVD players.
DVD+R
.You can record on the disc only in the +VR mode.
• You can record until the disc becomes full.
NOTES:
, There are some players that cannot playback discs
that were recorded with this unit. We cannot guaran-
tee the playback with other units.
, This unit can record on DVD-RAM/RW/R discs that
are 8 cm in diameter.
, This unit cannot record on CD-RW/R.
÷
10
2K70101A E P08-11 10 _ 07.129, 3:54 PM
÷
isc
Recording format
DVD-RW disc has two modes for formatting discs for
recording: VR mode and Video mode.
VR mode
.This mode can be used for DVD-RAM/-RW.
.In this mode, the discs can be recorded and edited
repeatedly.
.The disc recorded in this mode can be played back
with other DVD-RW-compatible players.
•When a Vet.1.1 CPRM or Ver. 1.2 disc is used, you
can record a "Copy Once" program (see page 49).
Video mode
•This mode can be used for DVD-R and DVD-RW
(Vet. 1.1/1.2).
• When you finalize the disc after recording, the disc
recorded with this unit can be played back with other
DVD players.
• Recording, editing or playback of an unfinalized disc
can be done only with this unit. However, there are
some limitation to editing operations.
• In this mode, you cannot record a "Copy Once" pro-
gram (see page 49).
.When you record a TV program of a bilingual broad-
cast, only one of the audio modes can be recorded.
You have to select it.
+VR mode
.This mode used for DVD+R and DVD+RW.
•When you make the disc compatible after recording,
the disc recorded with this unit can be played back
with other DVD players.
•You cannot record a "Copy Once" program (see page
49.)
Format modes that can be used with each disc
The usable format depends on the media type as shown
in the below table.
Media type
DVD-RAM
Vet.2.0/2.1 )
DVD-RW
(Ver.1.0)
DVD-RW
Vet.1.1/1.2)
DVD-R
(Vsr.2.0/2.1)
DVD+RW
DVD+R
Format
VR mode
VR mode
VR mode
Video mode
Video mode
+VR mode
Available functions
Playback, recording and
editing
Playback, recording and
editing
Playback, recording and
editing
Playback and recording
Editing (with limitation)
Playback and recording
Editing (with limitation)
Playback and recording
Editing (with limitation)
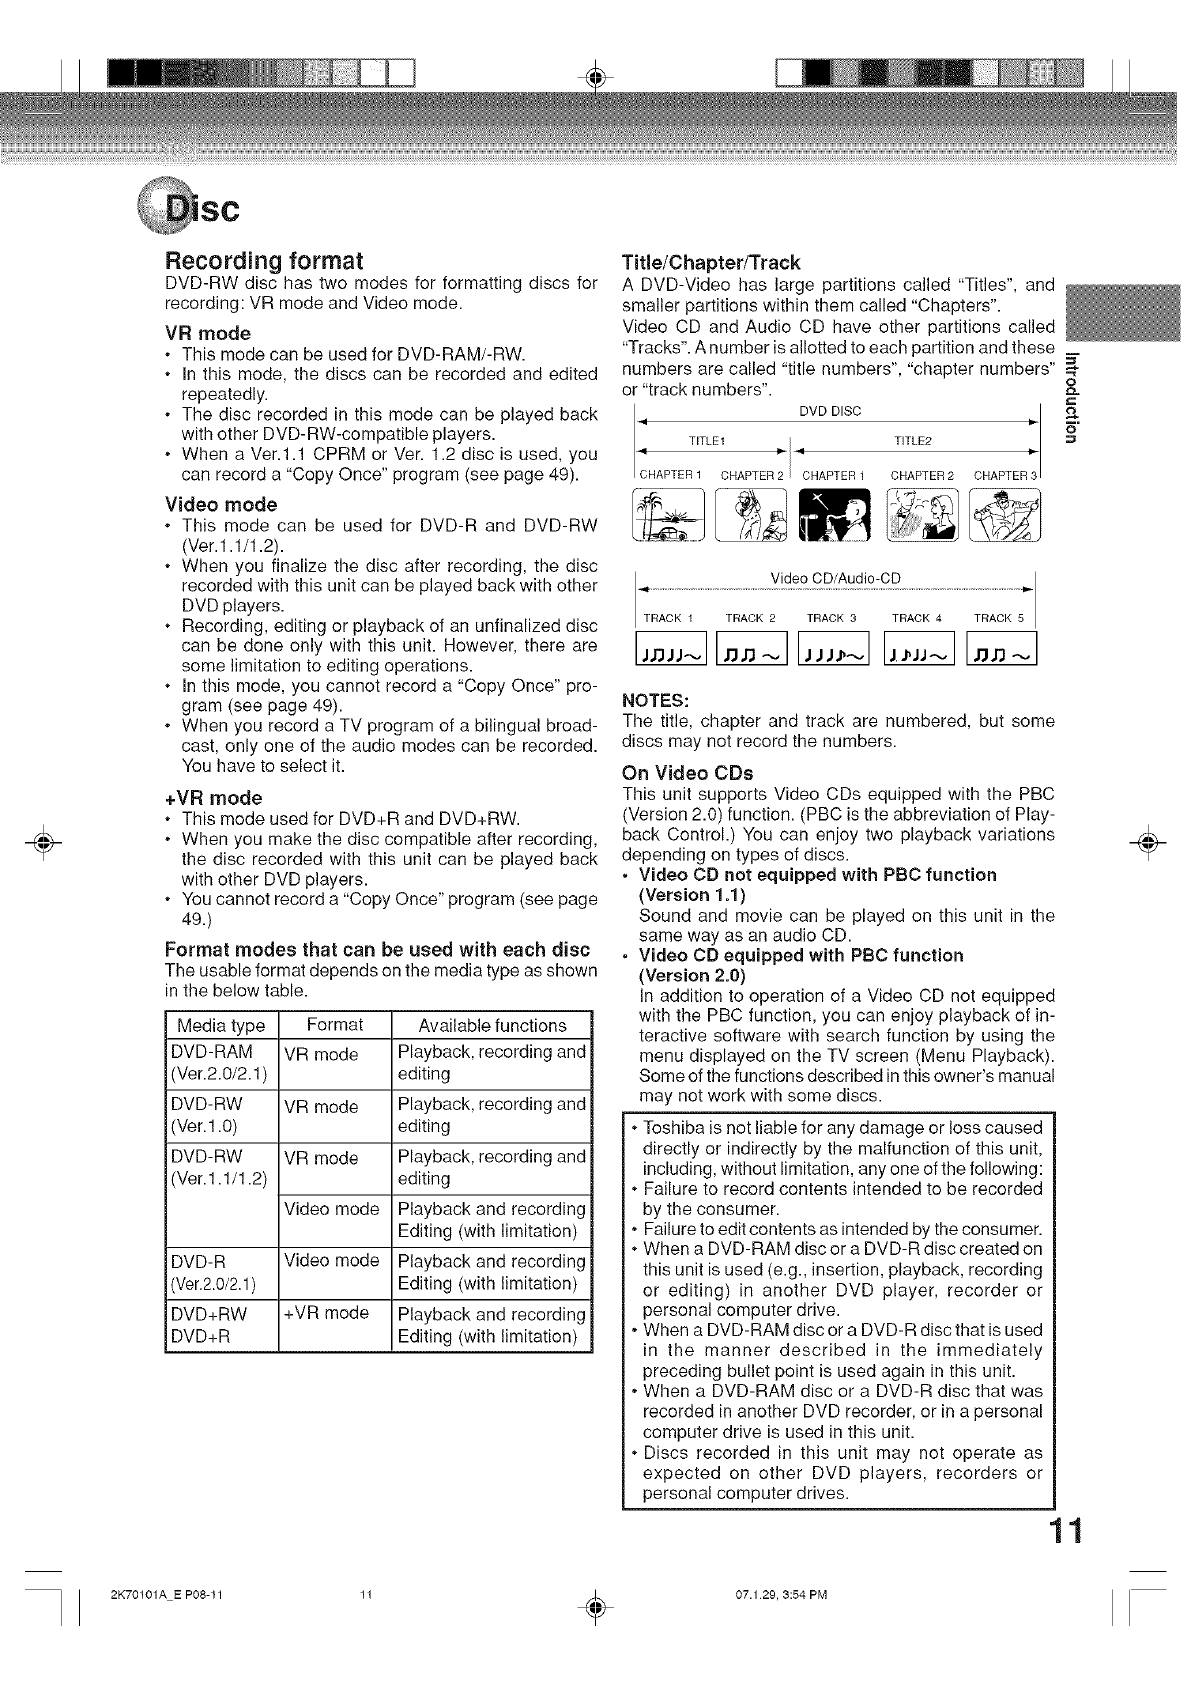
Title/Chapter/Track
A DVD-Video has large partitions called "Titles", and
smaller partitions within them called "Chapters".
Video CD and Audio CD have other partitions called
"Tracks". A number is allotted to each partition and these
numbers are called "title numbers", "chapter numbers"
or "track numbers".
DVD DISC
IHAPTER 1 CHAPTER 2
9 TITLE1 _' C'tHAPTER 1
TITLE2 CHAPTERI p-
CHAPTER 2
....................................
TRACK TRACK 2 TRACK 3 TRACK 4 TRACK 5
NOTES:
The title, chapter and track are numbered, but some
discs may not record the numbers.
On Video CDs
This unit supports Video CDs equipped with the PBC
(Version 2.0) function. (PBC is the abbreviation of Play-
back Control.) You can enjoy two playback variations
depending on types of discs.
. Video CD not equipped with PBC function
(Version 1.1)
Sound and movie can be played on this unit in the
same way as an audio CD.
. Video CD equipped with PBC function
(Version 2.0)
In addition to operation of a Video CD not equipped
with the PBC function, you can enjoy playback of in-
teractive software with search function by using the
menu displayed on the TV screen (Menu Playback).
Some of the functions described in this owner's manual
may not work with some discs.
.Toshiba is not liable for any damage or loss caused
directly or indirectly by the malfunction of this unit,
including, without limitation, any one of the following:
.Failure to record contents intended to be recorded
by the consumer.
.Failure to edit contents as intended by the consumer.
.When a DVD-RAM disc or a DVD-R disc created on
this unit is used (e.g., insertion, playback, recording
or editing) in another DVD player, recorder or
personal computer drive.
•When a DVD-RAM disc or a DVD-R disc that is used
in the manner described in the immediately
preceding bullet point is used again in this unit.
•When a DVD-RAM disc or a DVD-R disc that was
recorded in another DVD recorder, or in a personal
computer drive is used in this unit.
.Discs recorded in this unit may not operate as
expected on other DVD players, recorders or
personal computer drives.
=_
,=_
o
o=
11
÷
2K70101A E P08-11 11 _ 07.129, 3:54 PM
÷
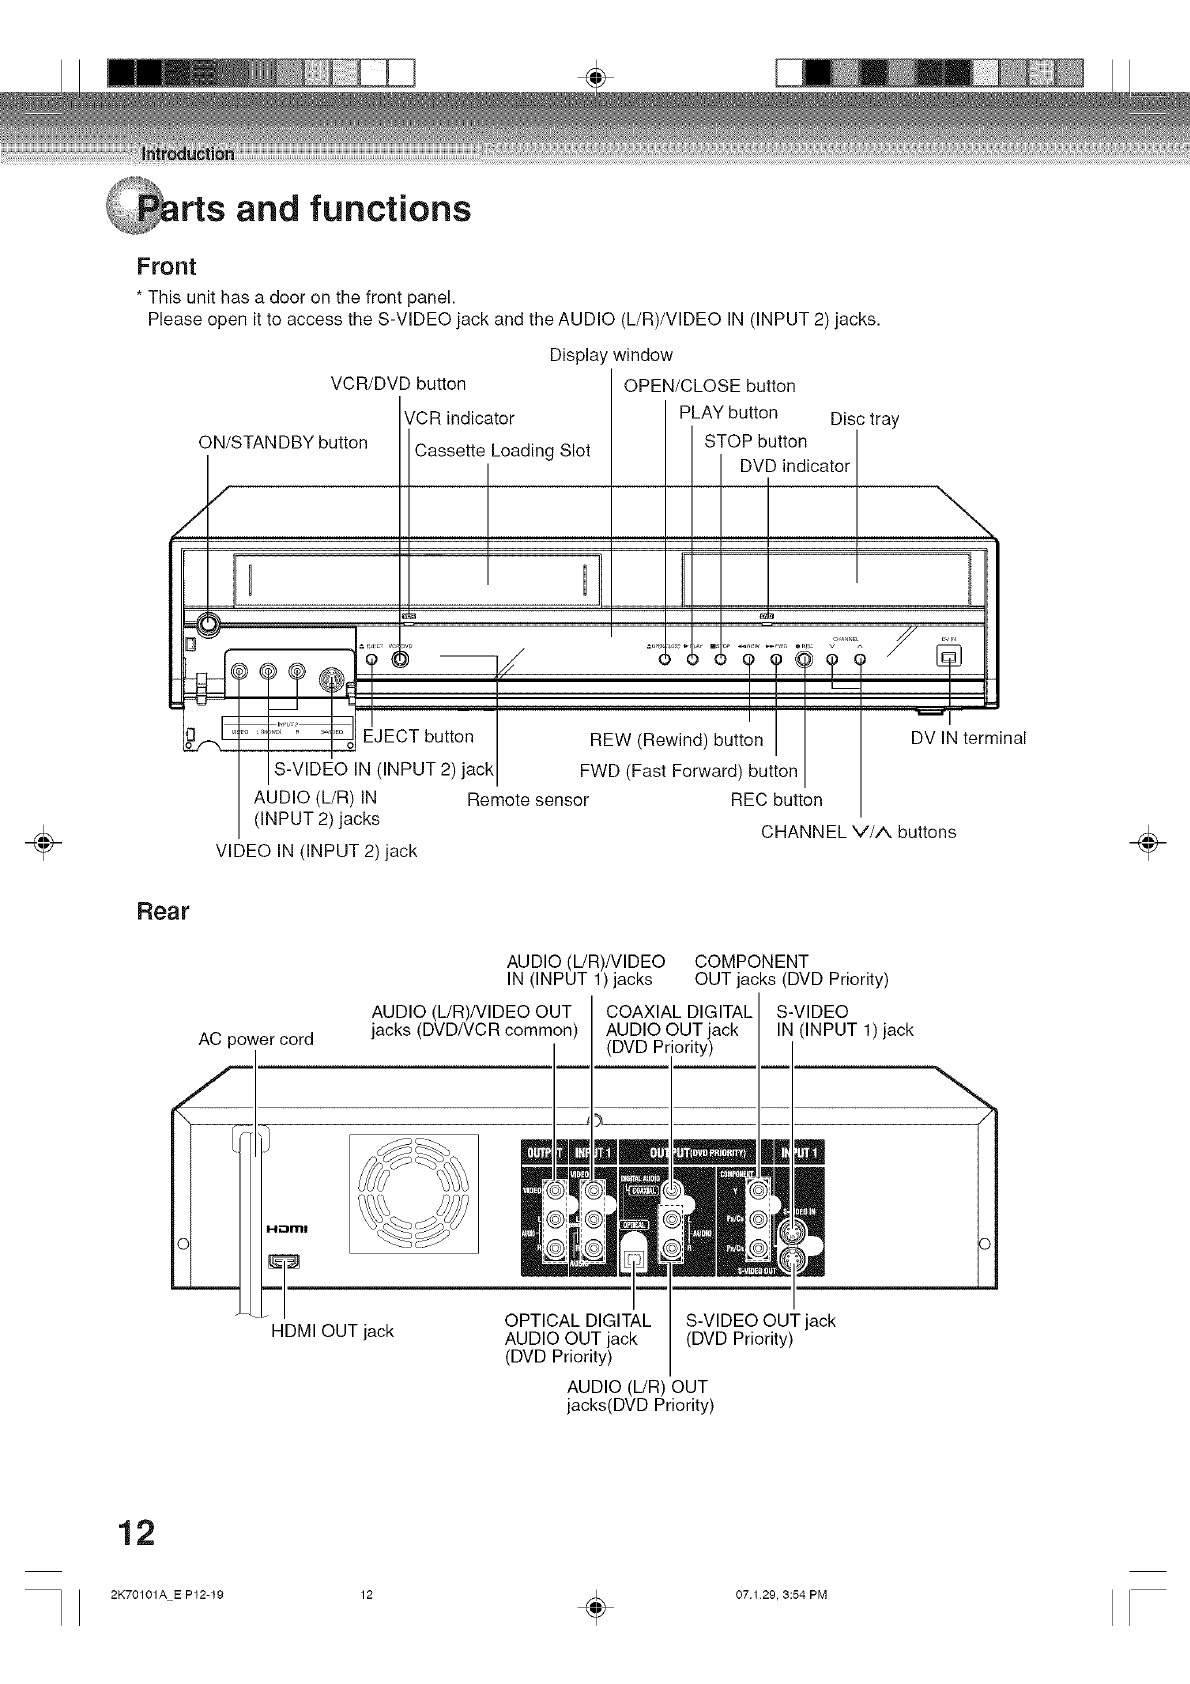
_rts and functions
Front
* This unit has a door on the front panel.
Please open it to access the S-VIDEO jack and the AUDIO (L/R)/VIDEO IN (INPUT 2) jacks.
VCR/DVD button
VCR indicator
ON/STAN DBY button
Displa
Cassette Loading Slot
l
#_.[, ......
......... 3EO EJECT button
SVIDEO IN (INPUT 2) jack
AUDIO (L/R) IN
(INPUT 2) jacks
m/
l
window
OPEN/CLOSE button
PLAY button Disc tray
STOP button
DVD indicator
REW (Rewind) button
FWD (Fast Forward) button
Remote sensor REC button
\
DV IN ten
VIDEO IN (INPUT 2) jack
CHANNEL V//X buttons ÷
Rear
AC power cord
AUDIO (L/R)/VlDEO
IN (INPUT 1)jacks
AUDIO (L/R)/VIDEO OUT COAXIAL DIGITAL
jacks (DVD/VCR common) AUDIO OUT jack
DVD Priority)
COMPONENT
OUT jacks (DVD Priority)
S-VIDEO
IN (INPUT 1)jack
HDMI OUT jack OPTICAL DIGITAL S-VIDEO OUT jack
AUDIO OUT jack (DVD Priority)
(DVD Priority)
AUDIO (L/R) OUT
jacks(DVD Priority)
12
2K70101A E P12-19 12 _ 07.129, 3:54 PM
÷
rts and functions
|!
0EXP
QSLP
L
Display window
CDVD
-',-RWVR
RAM
J
s,oM, .
T"K//!/ L.//" 5/"/_//. 0 pM
I I
®
No. Display Description
',_1 _I_ Lights during video tape playback.
Video tape is temporarily stopped.
Lights during video tape recording.
Progressive scanning mode.
XP/SP/LP/SLP 4 DVDrecordingmodes.XP,SP,LPorSLPcanbeselectedinturnbypressingtheRECMODE/SPEEDrepeatedly.
SP/SLP 2 VCR recordingmodes.SP orSLPcan beselectedin turnbypressingthe REC MODE/SPEEDrepeatedly.
(Z': CD Appears when a CD is inserted.
CD-R Appears when a CD-R is inserted.
CD-RW Appears when a CD-RW is inserted.
DVD Appears when a DVD-Video is inserted.
DVD-R Appears when a DVD-R is inserted.
DVD-RW Appears when a DVD-RW is inserted.
DVD+R Appears when a DVD+R is inserted.
DVD+RW Appears when a DVD+RW is inserted.
RAM Appears when a DVD-RAM is inserted.
VR Appearswhen a DVD-RWin VR modeis inserted.Whenthe discis set to videomode,VR doesnotappear.
Video tape is in the unit.
(3} [] Timer recording display.
10:00 Clock display (Colon [ :] flashes).
01:00:00 Counter display in hour/minute/second.
HDMI Appears when HDMI output is active.
TRK 002 Track number display for CD.
PM Display for afternoon (out in the morning).
L1/LI(S)/L2/L2(S)/dvThe external input channel (L1, LI(S), L2, L2(S) or DV) display.
Err Error display.
,',_4"_.__I_ Lights during playback of DVD and CD. Flashes in auto resume.
DVD or CD is temporarily stopped.
Lights during DVD recording.
NOTES:
•Some discs may not playback correctly, or chapter number, playback time, etc may not be displayed.
.You may adjust the brightness of the display window. Press CLOCK/COUNTER during power off (stand-by
mode). The brightness of the display is changed as follows whenever the button is pressed.
stand-by : dark *--_ disappear
(power-on : bright *--_ dark)
=_
,=_
o
o=
13
÷
2K70101A E P12-19 13 _ 07.1 29, 3:55 PM

÷
rts and functions
Remote control Page
OPEN/CLOSE Opens or Closes the tray. 29
EJECT Ejects the cassette tape. 44
PROGRESSIVE Activates the progressive scanning mode. 17
RESOLUTION Changes the HDMI output resolution. 18
ON/STANDBY Turns power on/off. 15
0-9 Setting input 33, 64
Entering a password 22
INSTANT REPLAY Repeats playback between the section played
10 seconds before and present section. 34
INSTANT SKIP Skips commercial breaks. 33, 46
DISPLAY Displays VCR or DVD operation status. 31,47
VCR Switches to operation between VCR and DVD.29, 45, 67
DVD
TRK +/- Manual tracking in the playback mode for VCR 46
DUBBING Copies VCR to DVD or DVD to VCR. 66, 67
DVD MENU Displays the menu of the DVD disc. 35
INPUT SELECT Switches the connected TV to external inputs. 68
TOPMENU/TITLEMENU Selects titles of a DVD disc. 31, 35, 38, 57
SETUP Display or erase the setup menu 20, 52
• / T/_1 / • Cursor buttons 20, 29
ENTER Option selection in the menu 20, 29
RETURN Return to the previous menu screen 20, 22
CANCEL Cancels input data in the setting mode. 22
PAUSE/STILL Still picture/Recording pause on/off 32, 46
PLAY Playback 29, 45
STOP Stop 29, 45, 50
SKIP I_/I_1 Skips chapters in the forward or reverse direction. 32
INDEX I_/I,_1 Searches for the INDEX mark of a tape. 47
SEARCH _I_I/REW Rewind/Review playback 32, 45, 46
SEARCH •t_/RFWD Fast Forward/Forward search playback 32, 45, 46
REC MODE/SPEED Selectsthe recording mode. 50, 51
REC/OTR Recording and One touch Timer Recording 50, 51, 69
TIMER REC Sets the unit to start recording at a preset time. 53
SLOW Slow motion playback 32, 46
ANGLE Changes playback angle. 36
COUNTER RESET Resets the counter to 00:00:00. 47
AUDIO Changes the language of the DVD. 37
AUDIO SELECT Switches sound between mono and stereo. 37, 46
SUBTITLE Selects subtitles of the DVD disc. 37
ATR Digital AUTO TRACKING 46
CLOCK/COUNTER Changes the front panel display mode. 47
ZOOM Zoom 36
ZERO RETURN Stops the tape when the counter reaches 00:00:00. 47
A-B REPEAT Repeats playback between A and B. 34
PLAY MODE Selects the playback mode. 33
REPEAT Repeats playback. 46
÷
14
2K70101A E P12-19 14 _ 07.129, 3:55 PM
÷
rts and functions
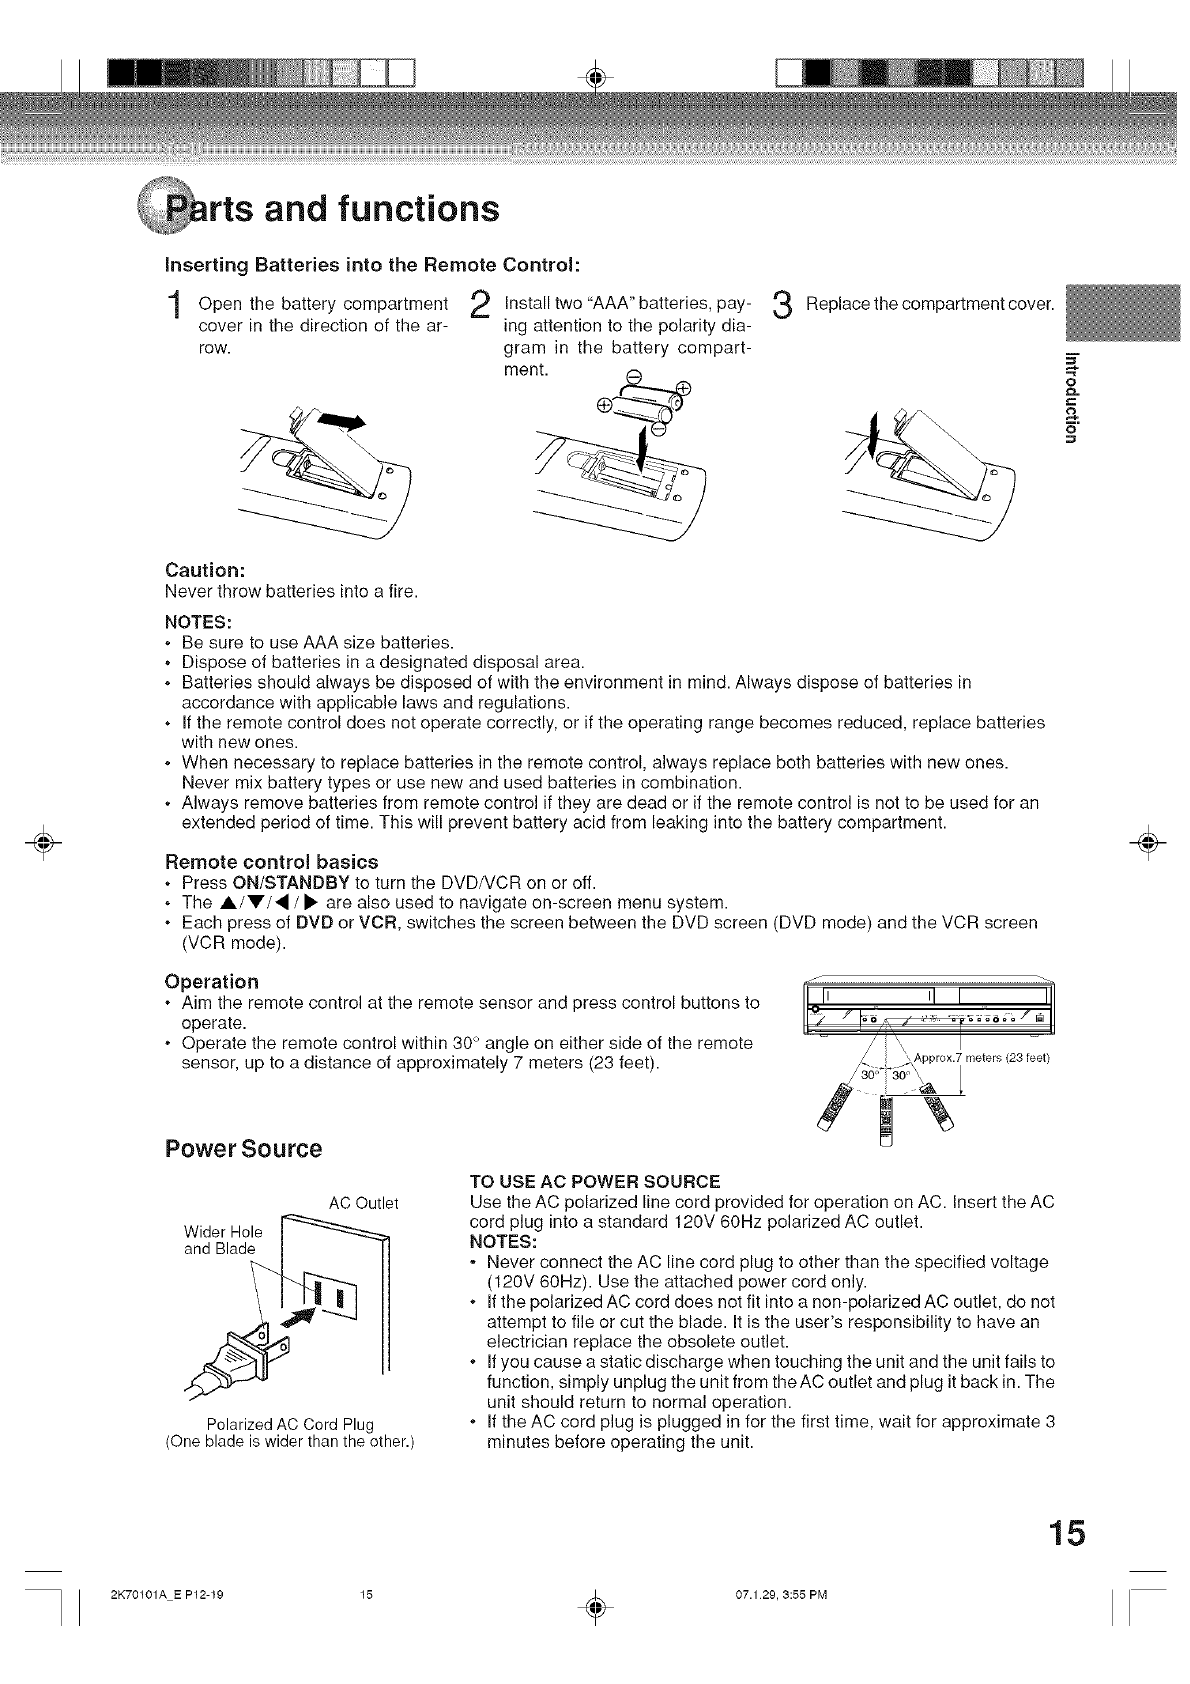
inserting Batteries into the Remote Control:
Open the battery compartment
cover in the direction of the ar-
row.
Installtwo"AAA" batteries, pay-
ing attention to the polarity dia-
gram in the battery compart-
ment.
Replacethe compartment cover.
Caution:
Never throw batteries into a fire.
NOTES:
•Be sure to use AAA size batteries.
•Dispose of batteries in a designated disposal area.
oBatteries should always be disposed of with the environment in mind. Always dispose of batteries in
accordance with applicable laws and regulations.
oIf the remote control does not operate correctly, or if the operating range becomes reduced, replace batteries
with new ones.
•When necessary to replace batteries in the remote control, always replace both batteries with new ones.
Never mix battery types or use new and used batteries in combination.
•Always remove batteries from remote control if they are dead or if the remote control is not to be used for an
extended period of time. This will prevent battery acid from leaking into the battery compartment.
Remote control basics
oPress ON/STANDBY to turn the DVD/VCR on or off.
oThe A/V/, /• are also used to navigate on-screen menu system.
.Each press of DVD or VCR, switches the screen between the DVD screen (DVD mode) and the VCR screen
(VCR mode).
Operation
•Aim the remote control at the remote sensor and press control buttons to
operate.
•Operate the remote control within 30° angle on either side of the remote
sensor, up to a distance of approximately 7 meters (23 feet).
Power Source
AC Outlet
Wider Hole r_:mm=__:_.m_
Polarized AC Cord Plug
(One blade is wider than the other.)
s
iLl I! I ]
\ Approx.7 meters (23 feet)
TO USE AC POWER SOURCE
Use the AC polarized line cord provided for operation on AC. Insert the AC
cord plug into a standard 120V 60Hz polarized AC outlet.
NOTES:
• Never connect the AC line cord plug to other than the specified voltage
(120V 60Hz). Use the attached power cord only.
,If the polarized AC cord does not fit into a non-polarized AC outlet, do not
attempt to file or cut the blade. It is the user's responsibility to have an
electrician replace the obsolete outlet.
,If you cause a static discharge when touching the unit and the unit fails to
function, simply unplug the unit from theAC outlet and plug it back in. The
unit should return to normal operation.
,If the AC cord plug is plugged in for the first time, wait for approximate 3
minutes before operating the unit.
=_
o
o=
÷
15
2K70101A E P12-19 15 _ 07.1 29, 3:55 PM
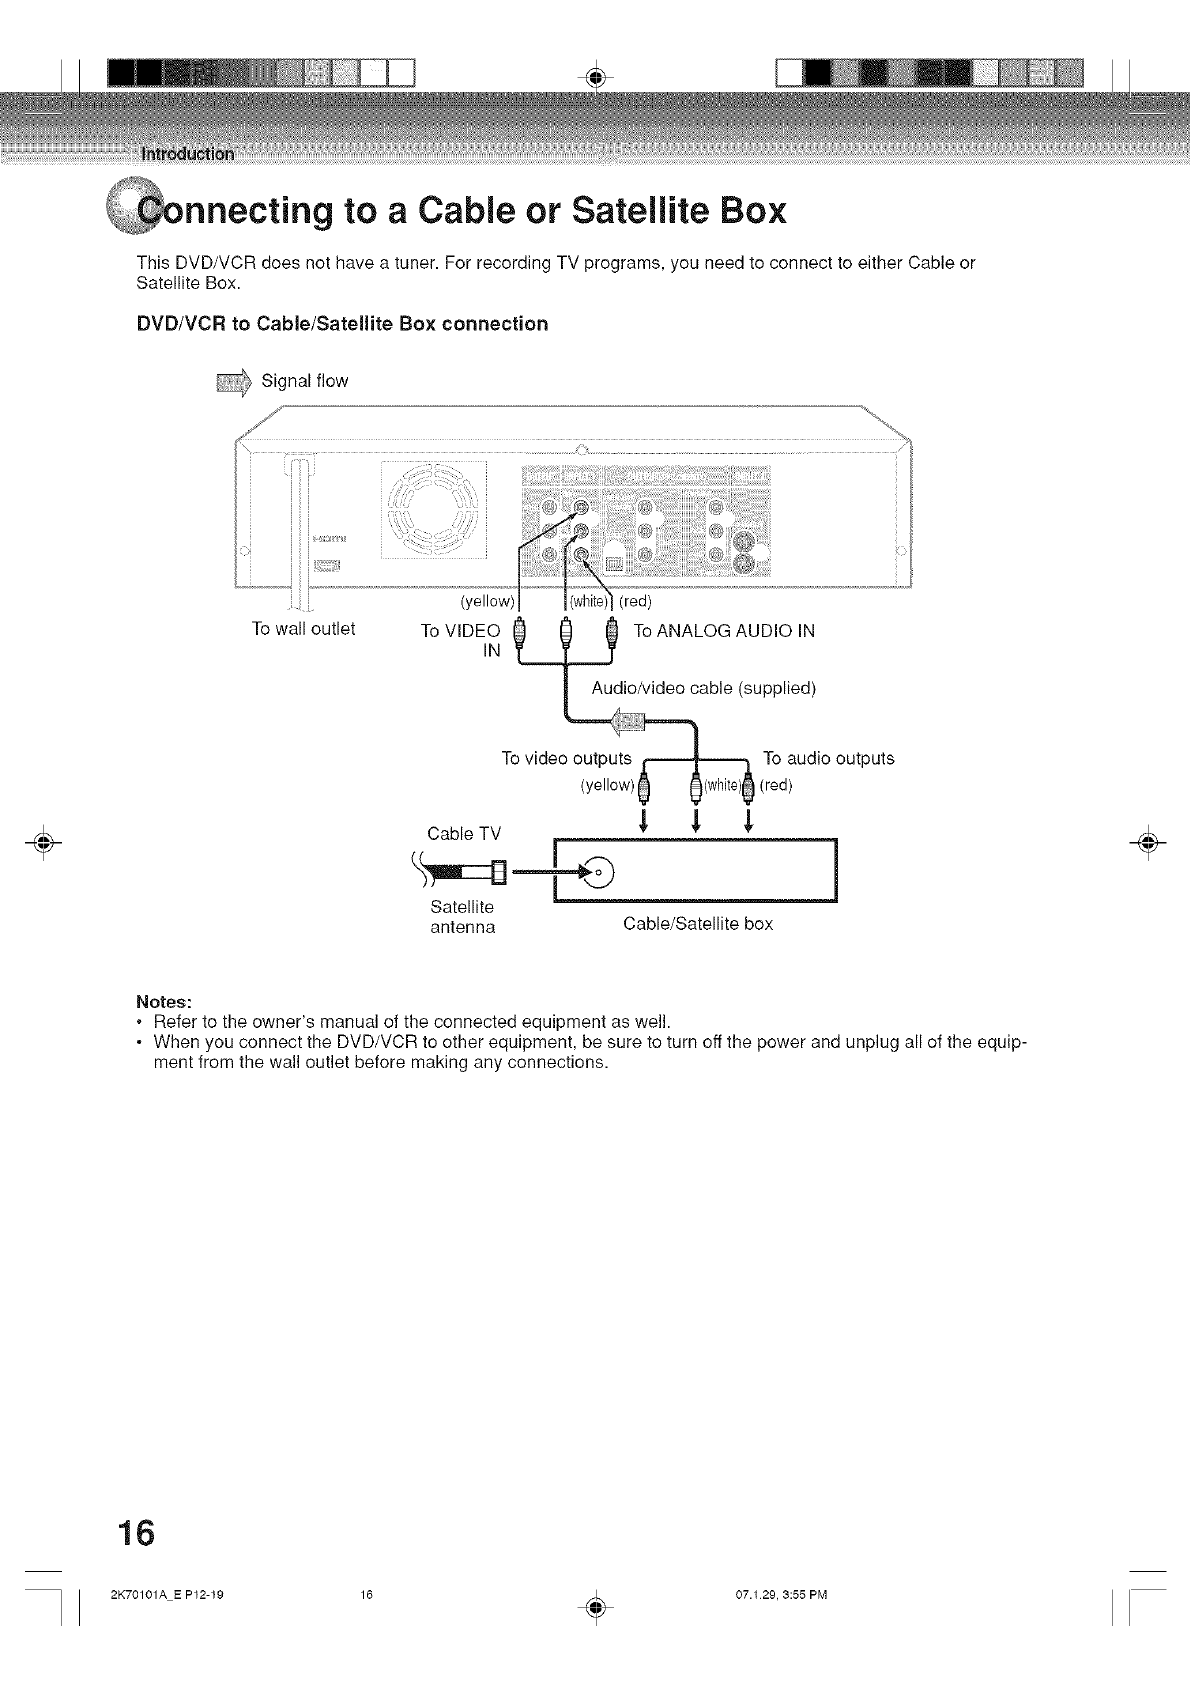
_nnecting to a Cable or Satellite Box
This DVD/VCR does not have a tuner. For recording TV programs, you need to connect to either Cable or
Satellite Box.
DVD/VOR to Cable/Satellite Box connection
_ Signal flow
÷
To wall outlet
®
ToVlO_o___ ToANALOGAOOIOIN
able (supplied)
To video outputs _ 1 _, To audio outputs
(yellow)Q 0(white)_ (red)
CableTV _ _
+oo l
Satellite
antenna Cable/Satellite box
÷
Notes:
. Refer to the owner's manual of the connected equipment as well.
•When you connect the DVD/VCR to other equipment, be sure to turn off the power and unplug all of the equip-
ment from the wall outlet before making any connections.
16
2K70101A E P12-19 16 _ 07.129, 3:55 PM
with the TV or audio component
The exact arrangement you use to interconnect various video
and audio components to the DVD/VCR is dependent on the
model and features of each component. Check the Owner's
Manual provided with each component for the location of video
and audio inputs and outputs.
Connect to a TV with Audio/Video output
Youcan enjoy playback by connecting the unit to a TV.
The unauthorized recording, use, distribution, I
or revision of television programs, videotapes,
DVDs and other materials, is prohibited under
the Copyright Laws of the United States and I
other countries, and may subject you to civil I
_and/or cr mna ab ty. _ o=
Connect the unit to a TV equipped with audio input (L/R) and video input jacks using the supplied audio/video cable. 6".
Video output
Audio (L) output
k
Audio (R) output ___ o'_
To Video ieput--&_, To Audio (R) input
)"To Audio (L) input
Audio/video cable (not supplied)
DVD/VCR
Connect to a TV with S-Video output
If your TV has an S-Video input, you can get higher quality by connecting it with the S-Video output of the unit using
the S-Video cable instead of connecting the video input of the TV to the video output jack of the unit.
÷ ÷
DVD/VCR \ DVD audio (R) output
Connect to a TV with Component video output
You can enjoy the highest quality picture by connecting the unit's component video out jacks to the component
video input jacks of your TV with component video cables (not supplied).
DVD/VCR DVDaudio(R) output
To switch the output signals (Progressive/Interlace):
Press PROGRESSIVE to change the video output signals (480p: progressive and 480i: interlace) from Compo-
nent video output jacks.
NOTES:
. PROGRESSIVE button is not available in VCR mode.
•When the progressive mode is active, the Progressive indicator "I[_ "on the display window will light up.
17
2K70101A E P12-19 17 _ 07.1 29, 3:55 PM
nnections with the TV or audio component
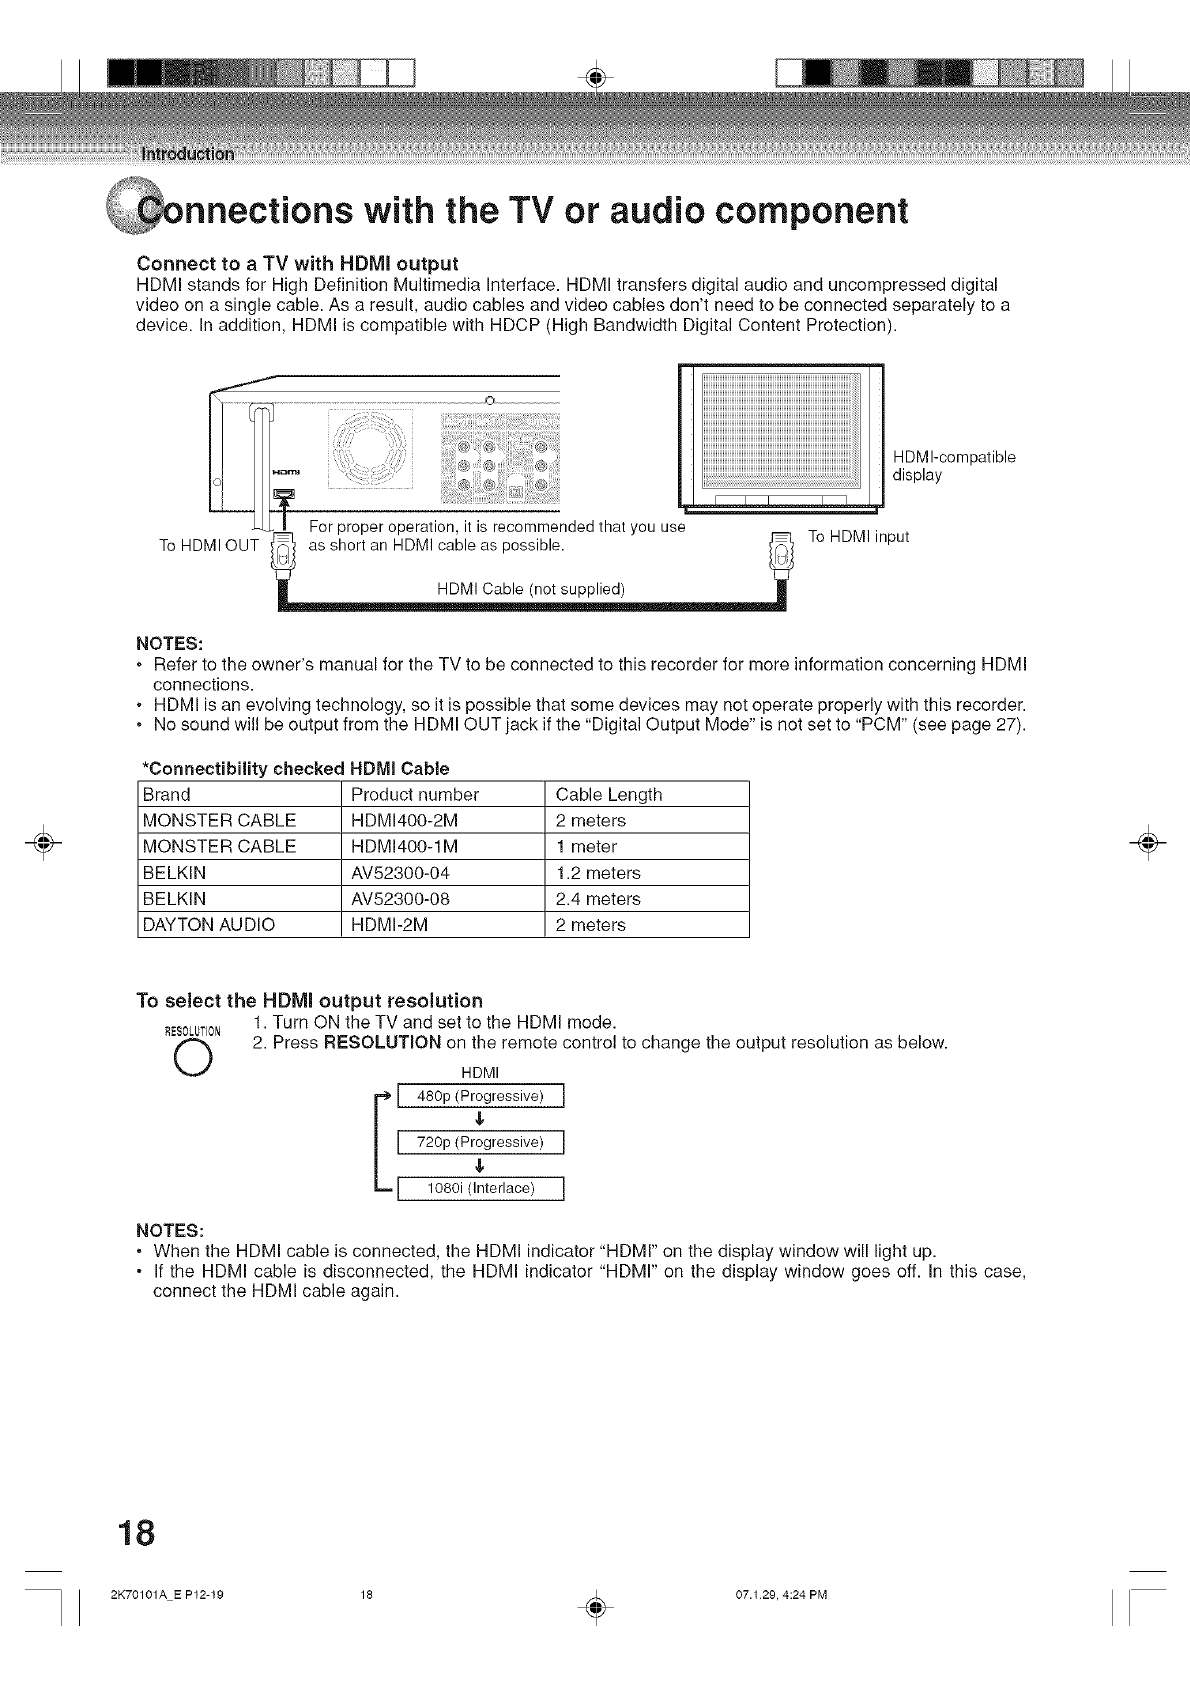
Connect to a TV with HDMI output
HDMI stands for High Definition Multimedia Interface. HDMI transfers digital audio and uncompressed digital
video on a single cable. As a result, audio cables and video cables don't need to be connected separately to a
device, in addition, HDMI is compatible with HDCP (High Bandwidth Digital Content Protection).
÷
/iiiiiiiiiiiiiiiiiiiiiiiiiiiiiiiiiiiiiiiiiiiiiiiiiiiiiiiiiiiiiiiiiiiiiiiiiiiiiiiiiii
-_-_[_ _ iiiiiiiiiiiiiiiiiiiiiiiiiiiiiiiiiiiiiiiiiiiiiiiiiiiiiiiiiiiiiiiiiiiiiiiiiiiiiiiiiii
//? _i ¸ i!!99_; _! i_i:i i_ _ _¢:iii i_ ;:il
.... ,_J HDM -compat b e
LJ _ .... dspay
k-T
21Z For proper operation it is recommended that you use To HDMIin ut
ToHDMIOUT _ asshortan HDMlca!_leaspossible. _ P
HDMI Cable (not supplied) ..........
NOTES:
, Refer to the owner's manual for the TV to be connected to this recorder for more information concerning HDMI
connections.
,HDMI is an evolving technology, so it is possible that some devices may not operate properly with this recorder.
,No sound will be output from the HDMI OUT jack if the "Digital Output Mode" is not set to "PCM" (see page 27).
*Connectibility checked HDMI Cable
Brand Product number Cable Length
MONSTER CABLE HDMI400-2M 2 meters
MONSTER CABLE HDMI400-1M 1 meter
BELKIN AV52300-04 1.2 meters
BELKIN AV52300-08 2.4 meters
DAYTON AUDIO HDMI-2M 2 meters
÷
RESOLUTION
0
To select the HDMI output resolution
1. Turn ON the TV and set to the HDMI mode.
2. Press RESOLUTION on the remote control to change the output resolution as below.
HDMI
[ 480p (Progressive) I
[ 720p (Progressive) I
[ 1080i (Interlace) I
NOTES:
, When the HDMI cable is connected, the HDMI indicator "HDMI" on the display window will light up.
• If the HDMI cable is disconnected, the HDMI indicator "HDMI" on the display window goes off. In this case,
connect the HDMI cable again.
18
2K70101A E P12-19 18 _ 07.129, 4:24 PM
÷
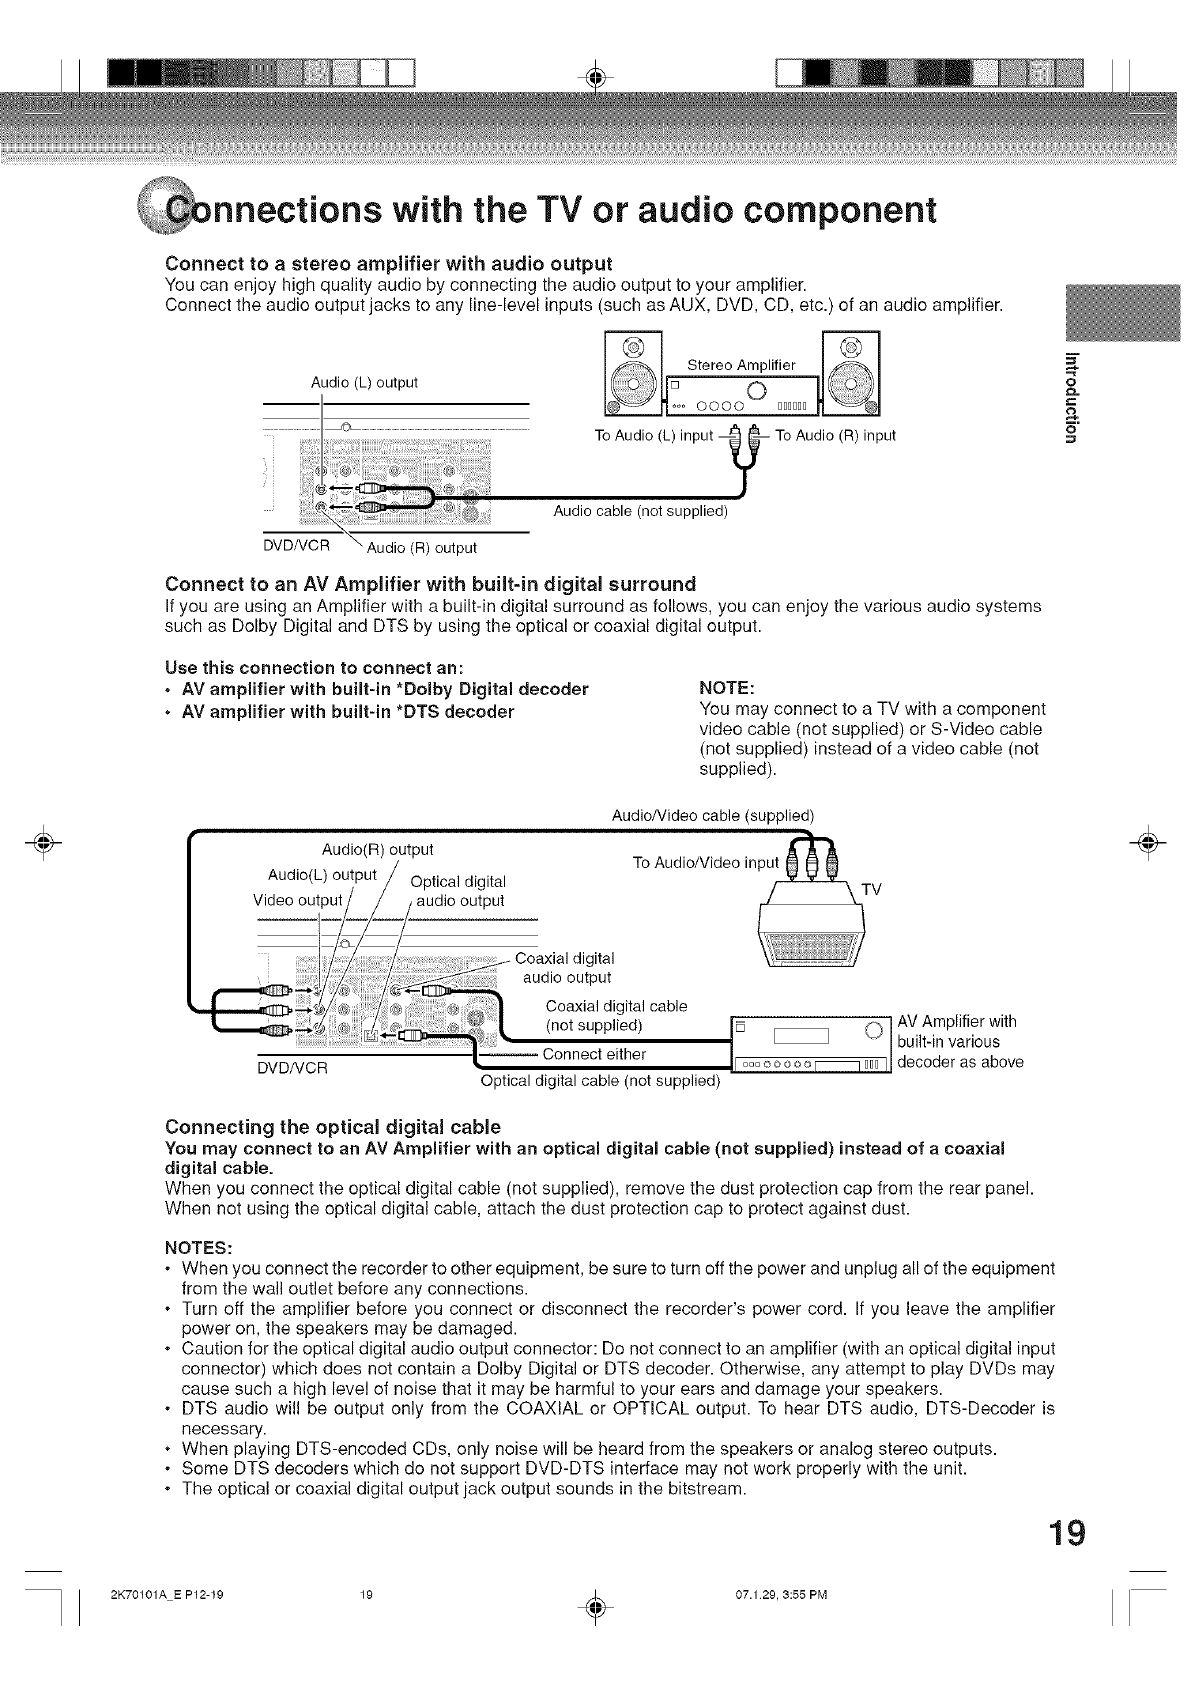
nnections with the TV or audio component
Connect to a stereo amplifier with audio output
You can enjoy high quality audio by connecting the audio output to your amplifier.
Connect the audio output jacks to any line-level inputs (such as AUX, DVD, CD, etc.) of an audio amplifier.
Audio (L) output
Stereo Amplifier
° ------G-
ooo 0©0© 000000
To Audio (L) input --_-- To Audio (R) input
J
Audio cable(notsupplied)
DVDNCR _ Audio (R) output
Connect to an AV Amplifier with built-in digital surround
If you are using an Amplifier with a built-in digital surround as follows, you can enjoy the various audio systems
such as Dolby Digital and DTS by using the optical or coaxial digital output.
Use this connection to connect an:
o AV amplifier with built-in *Dolby Digital decoder
• AV amplifier with built-in *DTS decoder
NOTE:
You may connect to a TV with a component
video cable (not supplied) or S-Video cable
(not supplied) instead of a video cable (not
supplied).
Audio(R) output
Optical digital
raudio output
AudioNideo cable (supplied)
=_
,=_
o
o=
DVD/VCR
Coaxial digital
audio output
Coaxial digital cable
(notsupplied)
Connecteither
Optical digital cable (not supplied)
[] _, AV Amplifier with
I _ "_ I built-in various
decoder as above
Connecting the optical digital cable
You may connect to an AV Amplifier with an optical digital cable (not supplied) instead of a coaxial
digital cable.
When you connect the optical digital cable (not supplied), remove the dust protection cap from the rear panel.
When not using the optical digital cable, attach the dust protection cap to protect against dust.
NOTES:
.When you connect the recorder to other equipment, be sure to turn off the power and unplug all of the equipment
from the wall outlet before any connections.
.Turn off the amplifier before you connect or disconnect the recorder's power cord. If you leave the amplifier
power on, the speakers may be damaged.
•Caution for the optical digital audio output connector: Do not connect to an amplifier (with an optical digital input
connector) which does not contain a Dolby Digital or DTS decoder. Otherwise, any attempt to play DVDs may
cause such a high level of noise that it may be harmful to your ears and damage your speakers.
•DTS audio will be output only from the COAXIAL or OPTICAL output. To hear DTS audio, DTS-Decoder is
necessary.
•When playing DTS-encoded CDs, only noise will be heard from the speakers or analog stereo outputs.
•Some DTS decoders which do not support DVD-DTS interface may not work properly with the unit.
.The optical or coaxial digital output jack output sounds in the bitstream.
19
÷
2K70101A E P12-19 19 _ 07.1 29, 3:55 PM
÷
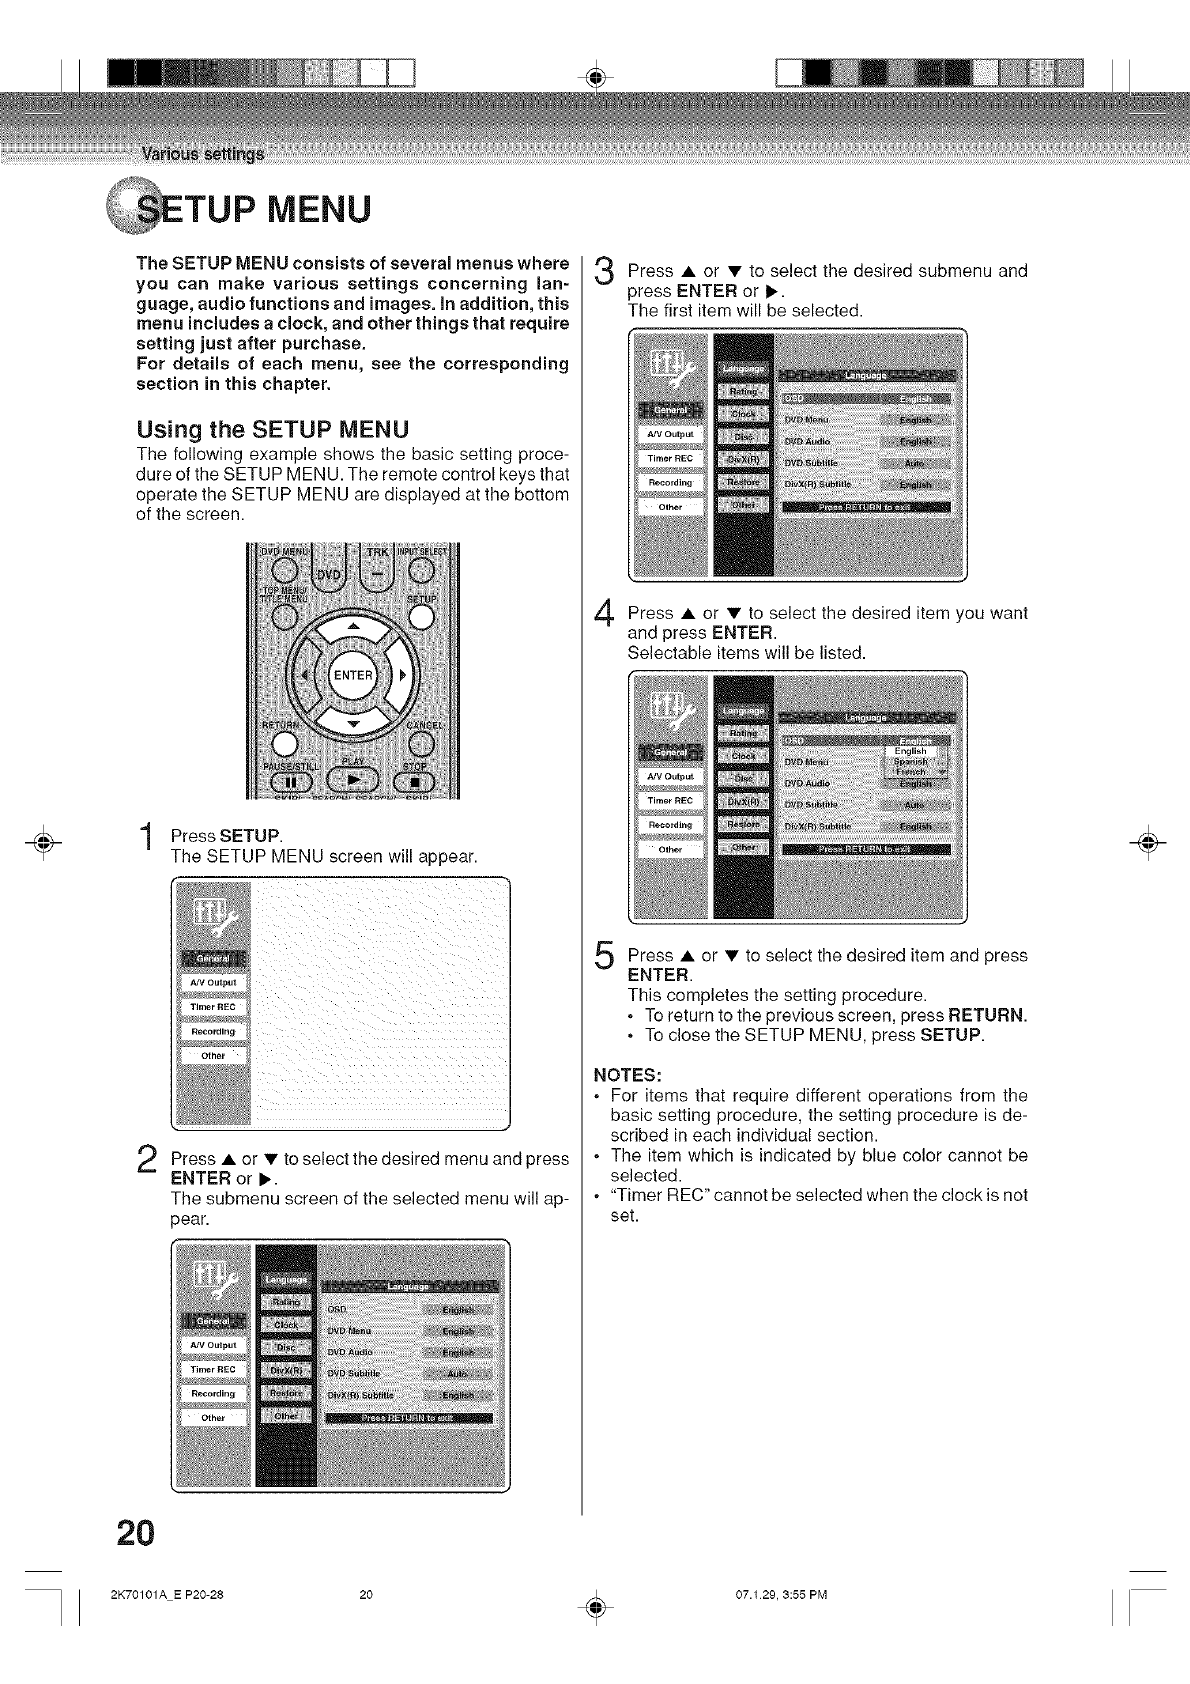
TUP MENU
The SETUP MENU consists of several menus where
you can make various settings concerning lan-
guage, audio functions and images, in addition, this
menu includes a clock, and other things that require
setting just after purchase.
For details of each menu, see the corresponding
section in this chapter.
Using the SETUP MENU
The following example shows the basic setting proce-
dure of the SETUP MENU. The remote control keys that
operate the SETUP MENU are displayed at the bottom
of the screen.
liiiii_iliiilTR_
_TER|:
2
Press SETUP.
The SETUP MENU screen will appear.
Press • or • to select the desired menu and press
ENTER or I_.
The submenu screen of the selected menu will ap-
pear.
Press select the desired submenu and
or to
press ENTER or il_.
The first item will be selected.
Press • or • to select the desired item you want
and press ENTER.
Selectable items will be listed.
Press select the desired item and
or to press
ENTER.
This completes the setting procedure.
.To return to the previous screen, press RETURN.
.To close the SETUP MENU, press SETUP.
NOTES:
. For items that require different operations from the
basic setting procedure, the setting procedure is de-
scribed in each individual section.
. The item which is indicated by blue color cannot be
selected.
. "Timer REC" cannot be selected when the clock is not
set.
÷
2O
2K70101A E P20-28 20 _ 07.129, 3:55 PM
÷
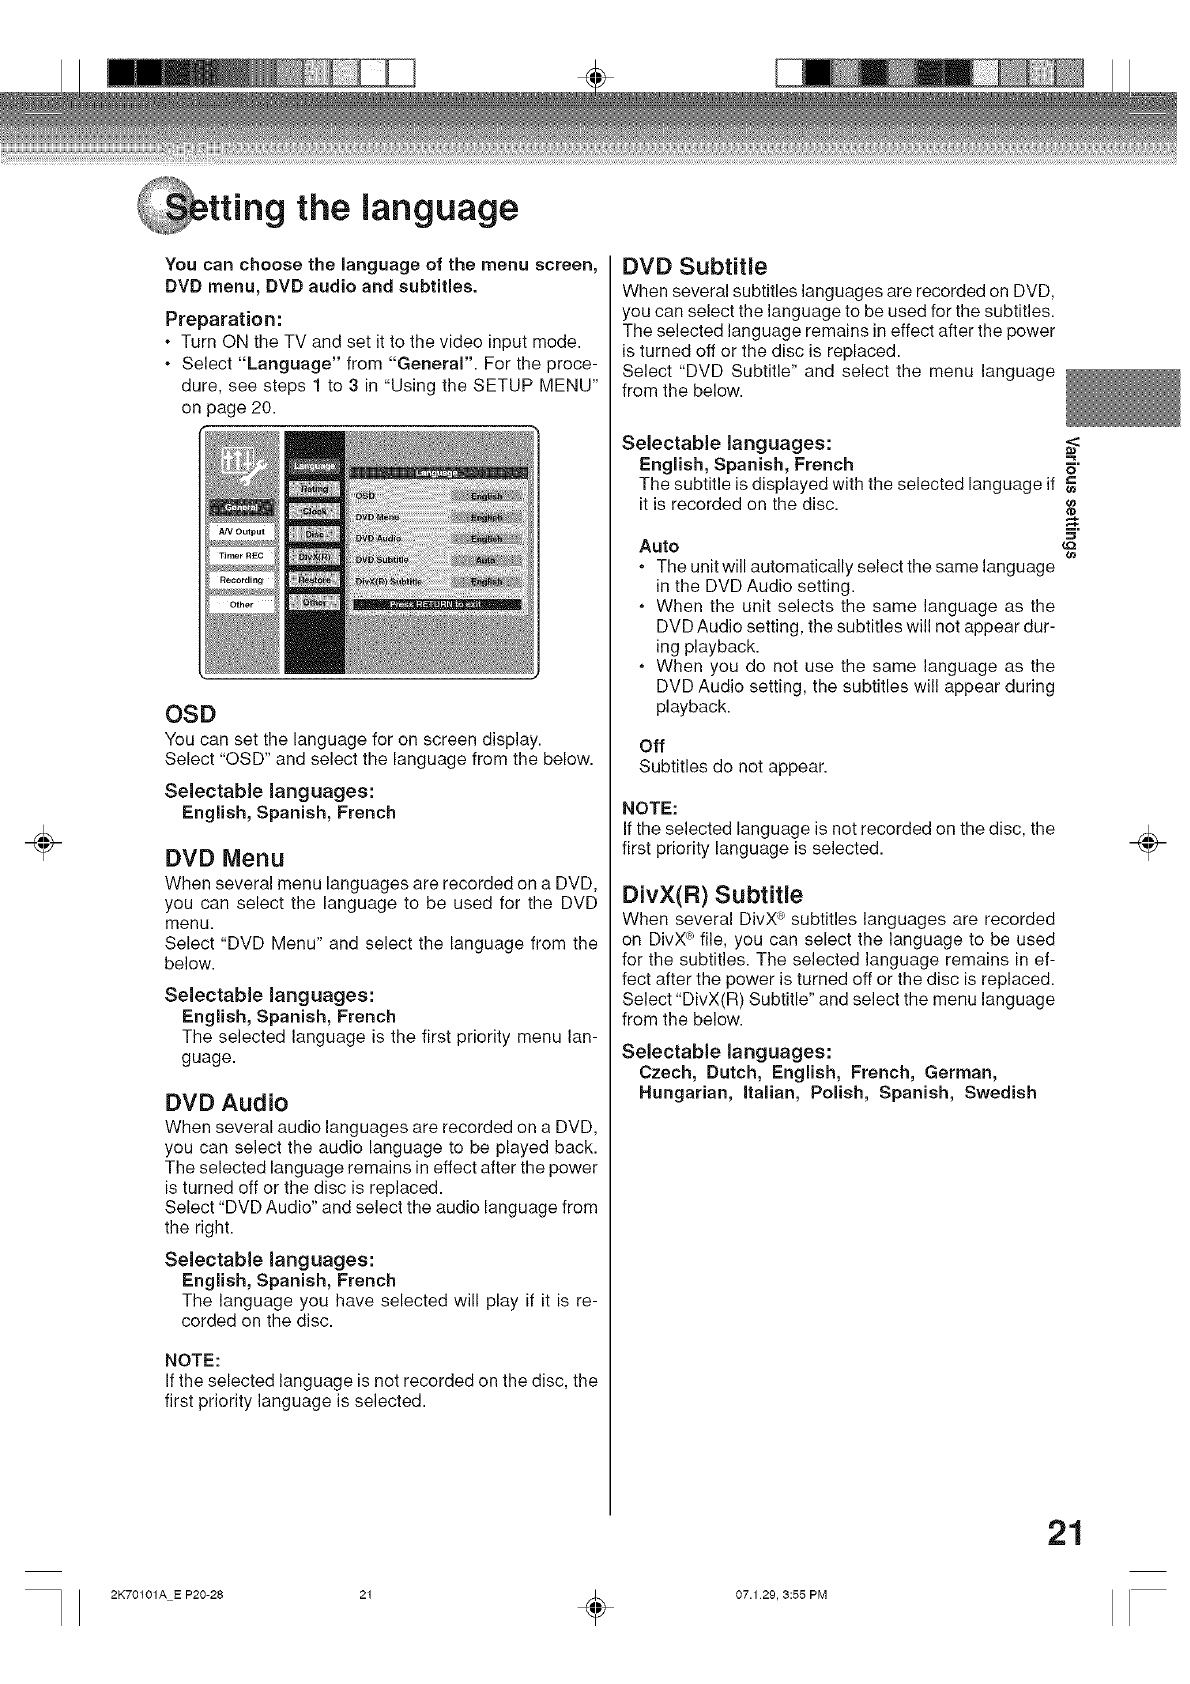
ttlng the language
You can choose the language of the menu screen,
DVD menu, DVD audio and subtitles.
Preparation:
.Turn ON the TV and set it to the video input mode.
.Select "Language" from "General". For the proce-
dure, see steps 1 to 3 in "Using the SETUP MENU"
on page 20.
OSD
You can set the language for on screen display.
Select "OSD" and select the language from the below.
Selectable languages:
English, Spanish, French
DVD Menu
When several menu languages are recorded on a DVD,
you can select the language to be used for the DVD
menu.
Select "DVD Menu" and select the language from the
below.
Selectable languages:
English, Spanish, French
The selected language is the first priority menu lan-
guage.
DVD Audio
When several audio languages are recorded on a DVD,
you can select the audio language to be played back.
The selected language remains in effect after the power
is turned off or the disc is replaced.
Select "DVD Audio" and select the audio language from
the right.
Seleetable languages:
English, Spanish, French
The language you have selected will play if it is re-
corded on the disc.
NOTE:
If the selected language is not recorded on the disc, the
first priority language is selected.
DVD Subtitle
When several subtitles languages are recorded on DVD,
you can select the language to be used for the subtitles.
The selected language remains in effect after the power
is turned off or the disc is replaced.
Select "DVD Subtitle" and select the menu language
from the below.
Selectable languages: =<
English, Spanish, French _.
The subtitle is displayed with the selected language if
it is recorded on the disc.
Auto
.The unit will automatically select the same language
in the DVD Audio setting.
• When the unit selects the same language as the
DVD Audio setting, the subtitles will not appear dur-
ing playback.
• When you do not use the same language as the
DVD Audio setting, the subtitles will appear during
playback.
¢e
Off
Subtitles do not appear.
NOTE:
If the selected language is not recorded on the disc, the
first priority language is selected.
DivX(R) Subtitle
When several DivX® subtitles languages are recorded
on DivX#_file, you can select the language to be used
for the subtitles. The selected language remains in ef-
fect after the power is turned off or the disc is replaced.
Select "DivX(R) Subtitle" and select the menu language
from the below.
Selectable languages:
Czech, Dutch, English, French, German,
Hungarian, italian, Polish, Spanish, Swedish
÷
21
2K70101A E P20-28 21 _ 07.1 29, 3:55 PM
÷
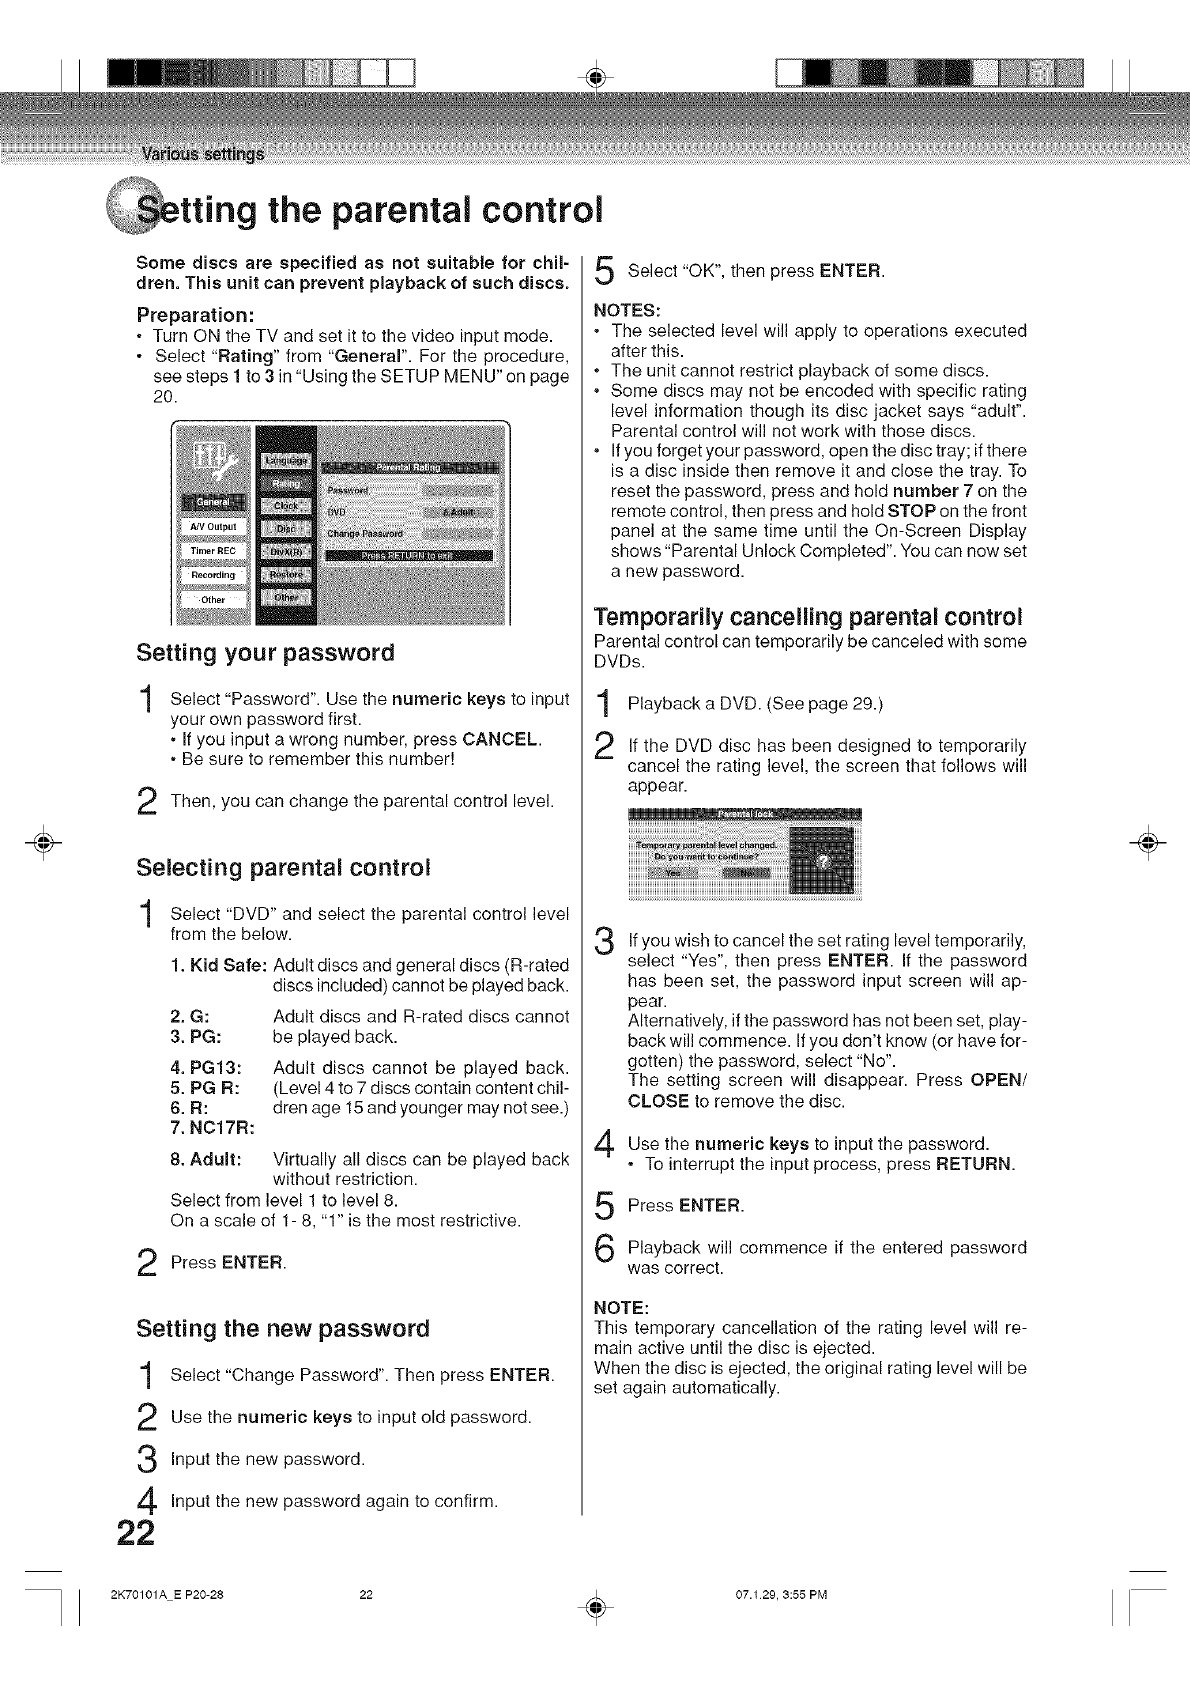
tting the parental control
Some discs are specified as not suitable for chil-
dren. This unit can prevent playback of such discs.
Preparation:
. Turn ON the TV and set it to the video input mode.
•Select "Rating" from "Generar'. For the procedure,
see steps 1 to 3in "Using the SETUP MENU" on page
20.
Setting your password
Select "Password". Use the numeric keys to input
your own password first.
. If you input a wrong number, press CANCEL.
.Be sure to remember this number!
Then, you can change the parental control level.
Selecting parental control
Select "DVD" and select the parental control level
from the below.
1. Kid Safe:
2. G:
3. PG:
4. PG13:
5. PG R:
6. R:
7. NC17R:
Adult discs and general discs (R-rated
discs included) cannot be played back.
Adult discs and R-rated discs cannot
be played back.
Adult discs cannot be played back.
(Level 4 to 7 discs contain content chil-
dren age 15 and younger may not see.)
8. Adult: Virtually all discs can be played back
without restriction.
Select from level 1 to level 8.
On a scale of 1- 8, "1" is the most restrictive.
Press ENTER.
Setting the new password
1
2
3
4
22
Select "Change Password". Then press ENTER.
Use the numeric keys to input old password.
Input the new password.
Input the new password again to confirm.
Select "OK", then press ENTER.
NOTES:
• The selected level will apply to operations executed
after this.
. The unit cannot restrict playback of some discs.
• Some discs may not be encoded with specific rating
level information though its disc jacket says "adult".
Parental control will not work with those discs.
• If you forget your password, open the disc tray; if there
is a disc inside then remove it and close the tray. To
reset the password, press and hold number 7 on the
remote control, then press and hold STOP on the front
panel at the same time until the On-Screen Display
shows "Parental Unlock Completed". You can now set
a new password.
Temporarily cancelling parental control
Parental control can temporarily be canceled with some
DVDs.
Playback a DVD. (See page 29.)
If the DVD disc has been designed to temporarily
cancel the rating level, the screen that follows will
appear.
3
4
5
6
If you wish to cancel the set rating level temporarily,
select "Yes", then press ENTER. If the password
has been set, the password input screen will ap-
pear.
Alternatively, if the password has not been set, play-
back will commence. If you don't know (or have for-
gotten) the password, select "No".
The setting screen will disappear. Press OPEN/
CLOSE to remove the disc.
Use the numeric keys to input the password.
• To interrupt the input process, press RETURN.
Press ENTER.
Playback will commence if the entered password
was correct.
NOTE:
This temporary cancellation of the rating level will re-
main active until the disc is ejected.
When the disc is ejected, the original rating level will be
set again automatically.
÷
2K70101A E P20-28 22 _ 07.129, 3:55 PM
÷
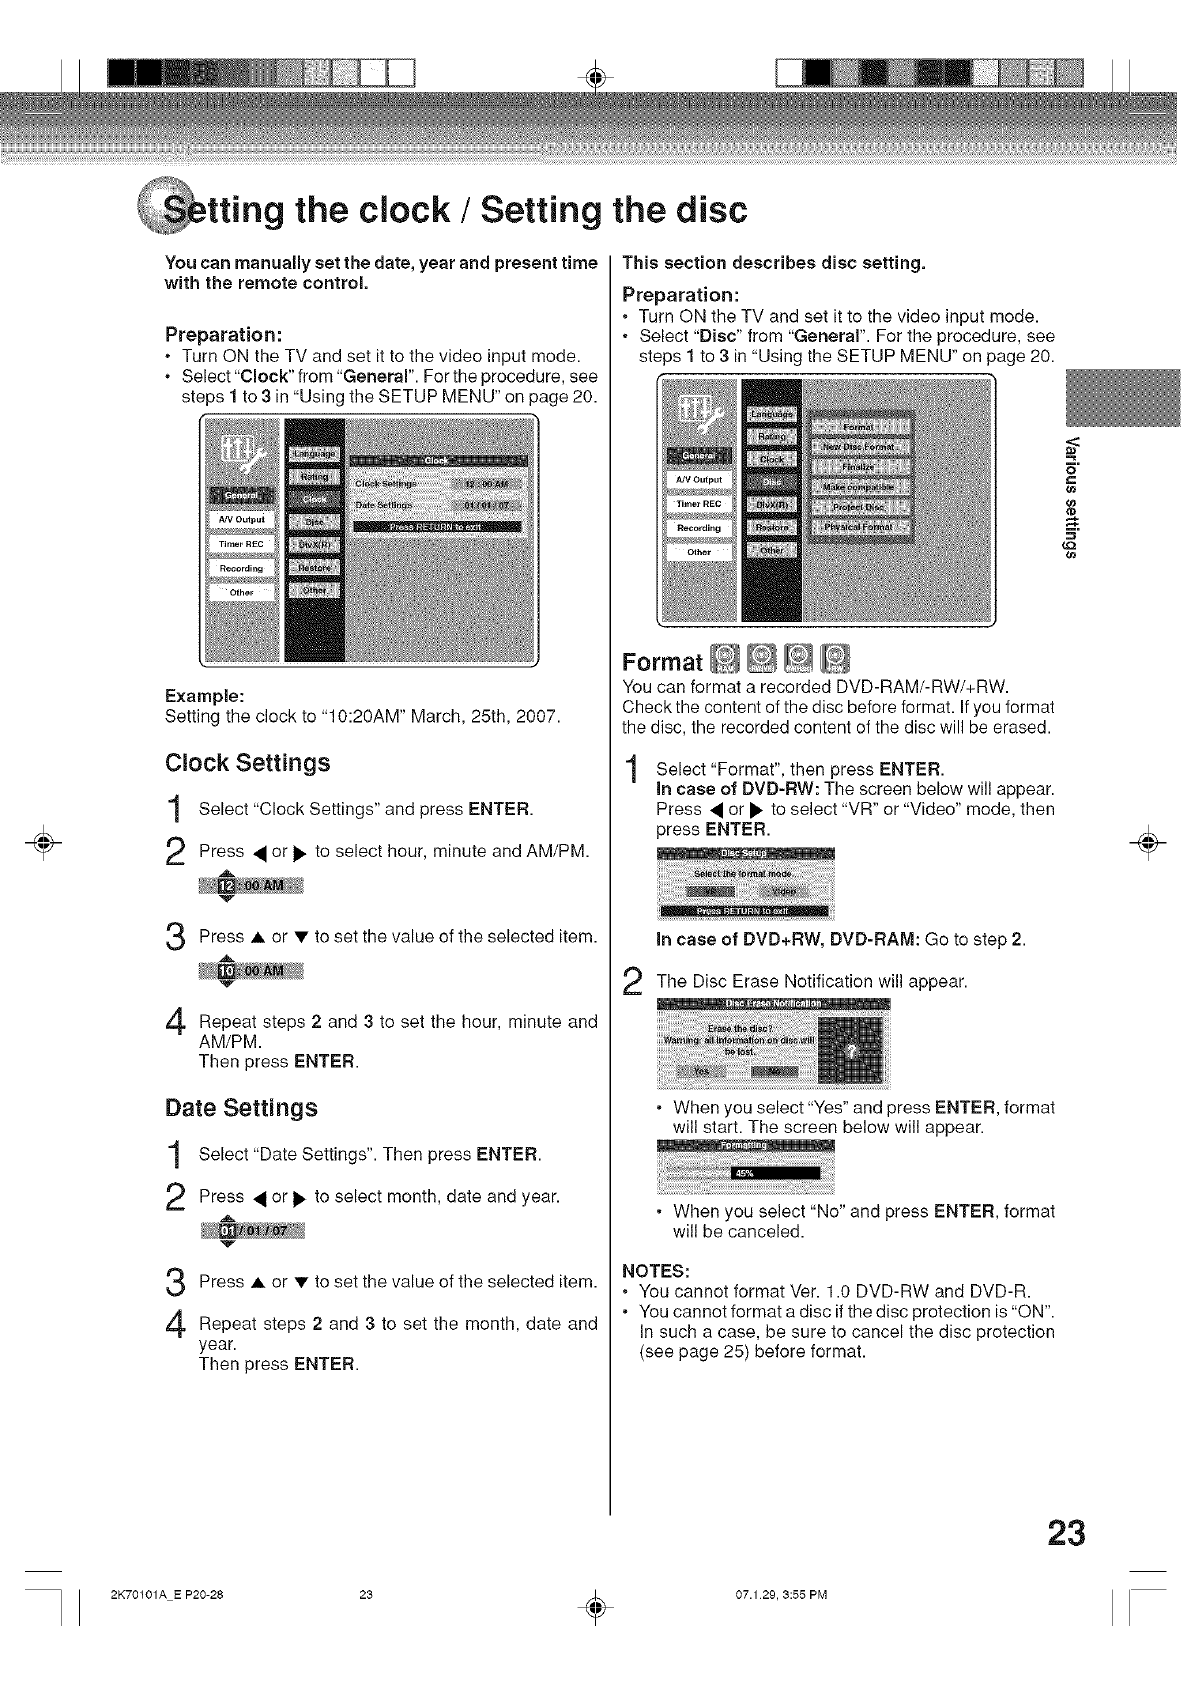
g the clock /Setting the disc
You can manually set the date, year and present time
with the remote control.
Preparation:
•Turn ON the TV and set it to the video input mode.
.Select "Clock" from "General". For the procedure, see
steps 1 to 3 in "Using the SETUP MENU" on page 20.
Example:
Setting the clock to "10:20AM" March, 25th, 2007.
Clock Settings
1
2
Select "Clock Settings" and press ENTER.
Press • or • to select hour, minute and AM/PM.
N_
Press • or • to set the value of the selected item.
A
Repeat steps 2 and 3to set the hour, minute and
AM/PM.
Then press ENTER.
Date Settings
1
2
Select "Date Settings". Then press ENTER.
Press • or • to select month, date and year.
v
Press • or • to set the value of the selected item.
2 and 3 the date andRepeat steps to set month,
year.
Then press ENTER.
This section describes disc setting.
Preparation:
. Turn ON the TV and set it to the video input mode.
. Select "Disc" from "General". For the procedure, see
steps 1 to 3 in "Using the SETUP MENU" on page 20.
You can format a recorded DVD-RAM/-RW/+RW.
Check the content of the disc before format. If you format
the disc, the recorded content of the disc will be erased.
Select "Format", then press ENTER.
In case of DVD-RW: The screen below will appear.
Press • or • to select "VR" or "Video" mode, then
press ENTER.
In case of DVD÷RW, DVD-RAM: Go to step 2.
The Disc Erase Notification will appear.
• When you select "Yes" and press ENTER, format
will start. The screen below will appear.
• When you select "No" and press ENTER, format
will be canceled.
NOTES:
. You cannot format Ver. 1.0 DVD-RW and DVD-R.
• You cannot format a disc if the disc protection is "ON".
In such a case, be sure to cancel the disc protection
(see page 25) before format.
=<
¢e
¢e
÷
23
2K70101A E P20-28 23 _ 07.1 29, 3:55 PM
÷
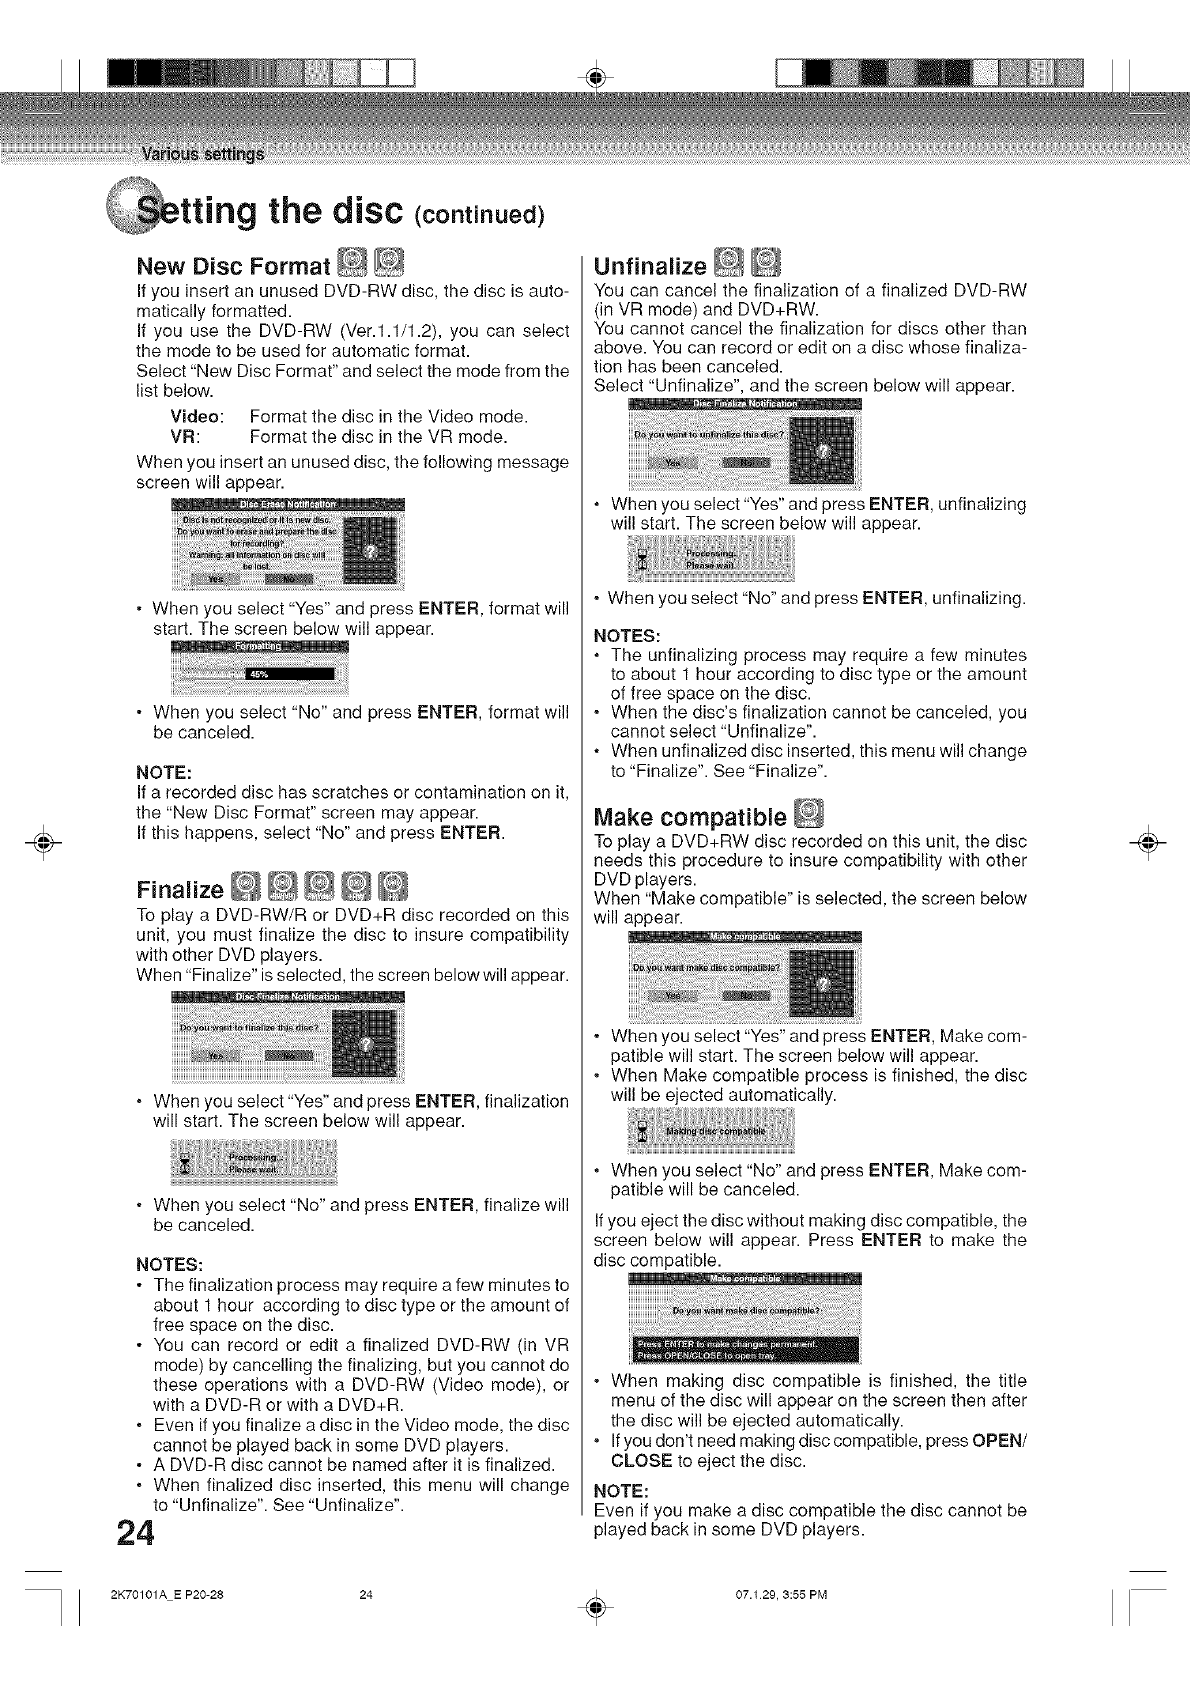
tting the disc (conti.ue¢
New Disc Format g_ _
If you insert an unused DVD-RW disc, the disc is auto-
matically formatted.
If you use the DVD-RW (Ver.1.1/1.2), you can select
the mode to be used for automatic format.
Select "New Disc Format" and select the mode from the
list below.
Video: Format the disc in the Video mode.
VR: Format the disc in the VR mode.
When you insert an unused disc, the following message
screen will appear.
• When you select "Yes" and press ENTER, format will
start. The screen below will appear.
• When you select "No" and press ENTER, format will
be canceled.
NOTE:
If a recorded disc has scratches or contamination on it,
the "New Disc Format" screen may appear.
If this happens, select "No" and press ENTER.
To play a DVD-RW/R or DVD+R disc recorded on this
unit, you must finalize the disc to insure compatibility
with other DVD players.
When "Finalize" is selected, the screen below will appear.
, When you select "Yes" and press ENTER, finalization
will start. The screen below will appear.
,When you select "No" and press ENTER, finalize will
be canceled.
NOTES:
•The finalization process may require a few minutes to
about 1 hour according to disc type or the amount of
free space on the disc.
•You can record or edit a finalized DVD-RW (in VR
mode) by cancelling the finalizing, but you cannot do
these operations with a DVD-RW (Video mode), or
with a DVD-R or with a DVD+R.
,Even if you finalize a disc in the Video mode, the disc
cannot be played back in some DVD players.
•A DVD-R disc cannot be named after it is finalized.
,When finalized disc inserted, this menu will change
to "Unfinalize". See "Unfinalize".
24
You can cancel the finalization of a finalized DVD-RW
(in VR mode) and DVD+RW.
You cannot cancel the finalization for discs other than
above. You can record or edit on a disc whose finaliza-
tion has been canceled.
Select "Unfinalize", and the screen below will appear.
, When you select "Yes" and press ENTER, unfinalizing
will start. The screen below will appear.
• When you select "No" and press ENTER, unfinalizing.
NOTES:
, The unfinalizing process may require a few minutes
to about 1 hour according to disc type or the amount
of free space on the disc.
• When the disc's finalization cannot be canceled, you
cannot select "Unfinalize".
, When unfinalized disc inserted, this menu will change
to "Finalize". See "Finalize".
Make compatible
To play a DVD+RW disc recorded on this unit, the disc
needs this procedure to insure compatibility with other
DVD players.
When "Make compatible" is selected, the screen below
will appear.
• When you select "Yes" and press ENTER, Make com-
patible will start. The screen below will appear.
• When Make compatible process is finished, the disc
will be ejected automatically.
, When you select "No" and press ENTER, Make com-
patible will be canceled.
If you eject the disc without making disc compatible, the
screen below will appear. Press ENTER to make the
disc compatible.
• When making disc compatible is finished, the title
menu of the disc will appear on the screen then after
the disc will be ejected automatically.
• If you don't need making disc compatible, press OPEN/
CLOSE to eject the disc.
NOTE:
Even if you make a disc compatible the disc cannot be
played back in some DVD players.
÷
2K70101A E P20-28 24 _ 07.129, 3:55 PM
÷
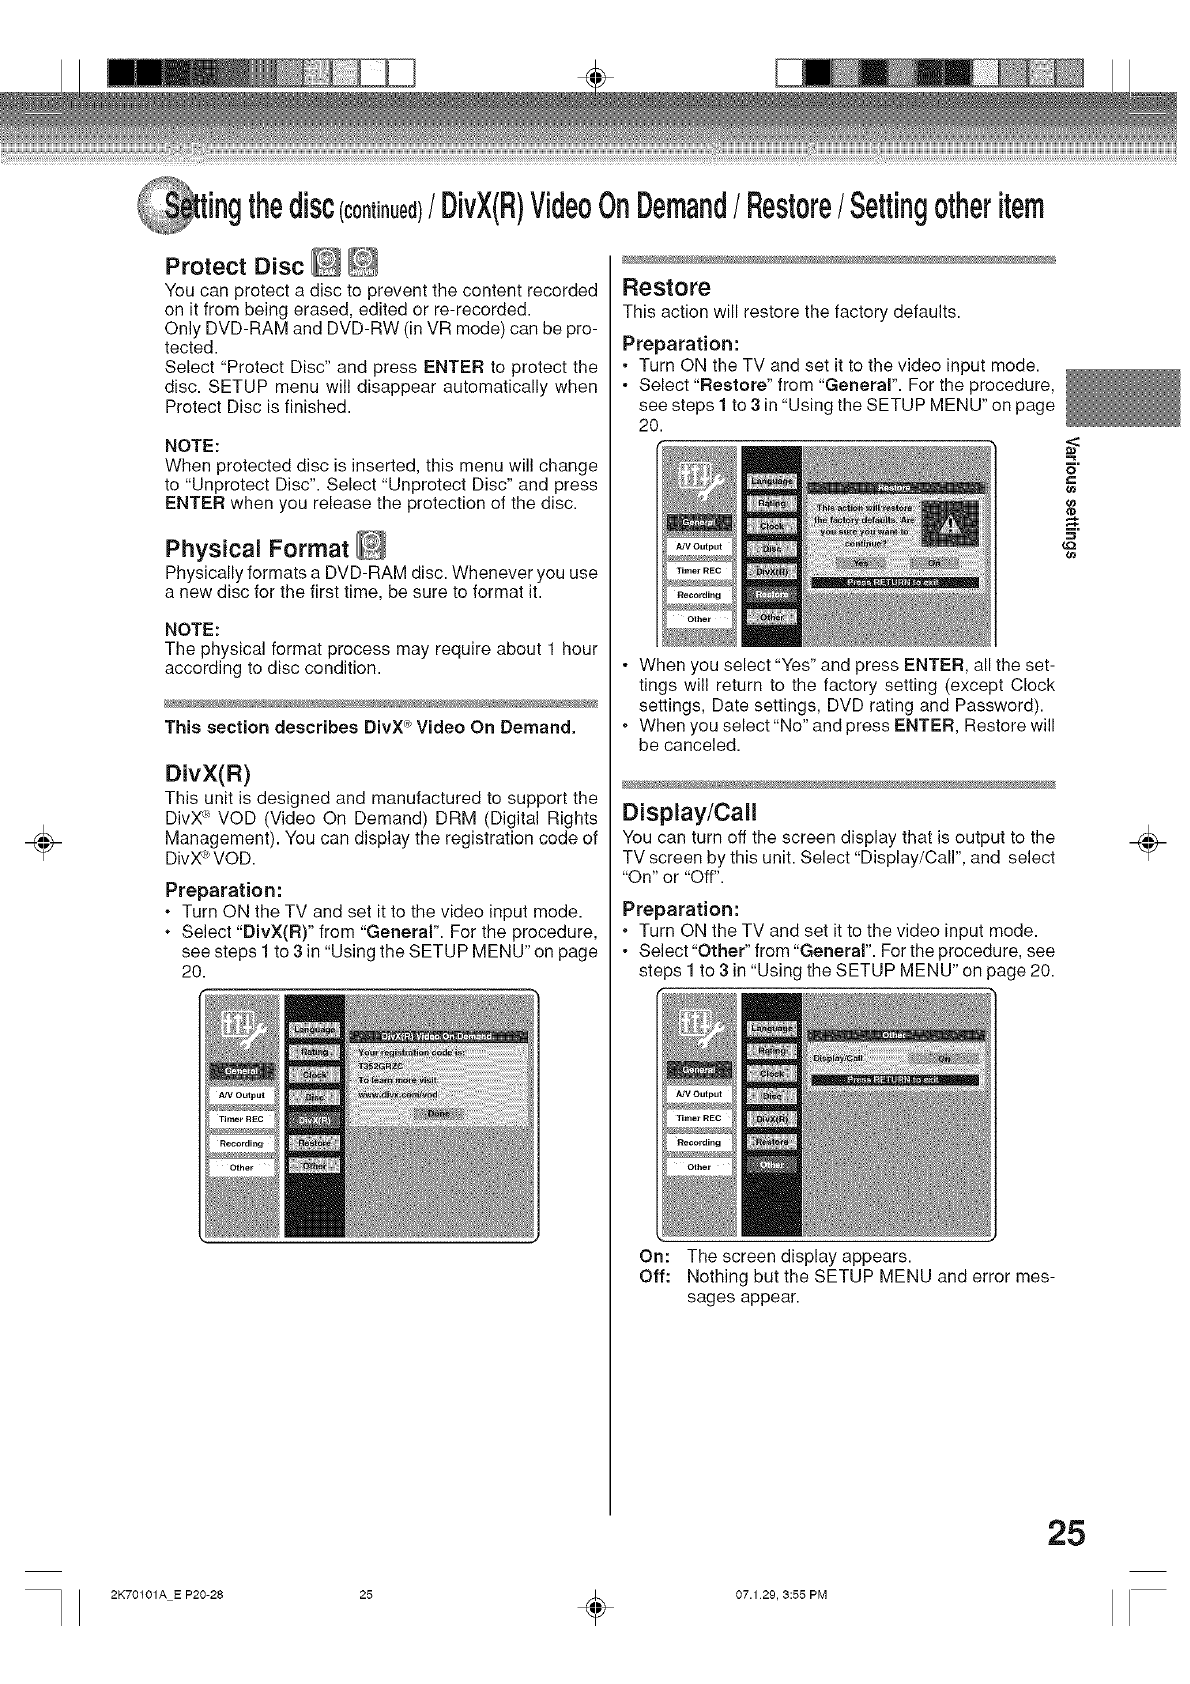
ting thedisc(c0nt nue¢/Div×(R)VideoOn
Protect Disc _ _
You can protect a disc to prevent the content recorded
on it from being erased, edited or re-recorded.
Only DVD-RAM and DVD-RW (in VR mode) can be pro-
tected.
Select "Protect Disc" and press ENTER to protect the
disc. SETUP menu will disappear automatically when
Protect Disc is finished.
NOTE:
When protected disc is inserted, this menu will change
to "Unprotect Disc". Select "Unprotect Disc" and press
ENTER when you release the protection of the disc.
Physical Format _
Physically formats a DVD-RAM disc. Whenever you use
a new disc for the first time, be sure to format it.
NOTE:
The physical format process may require about 1 hour
according to disc condition.
This section describes DivX_ Video On Demand.
DivX(R)
This unit is designed and manufactured to support the
DivX_ VOD (Video On Demand) DRM (Digital Rights
Management). You can display the registration code of
DivX_ VOD.
Preparation:
•Turn ON the TV and set it to the video input mode.
.Select "DivX(R)" from "General". For the procedure,
see steps 1 to 3 in "Using the SETUP MENU" on page
20.
Demand/Restore/Settingotheritem
Restore
This action will restore the factory defaults.
Preparation:
• Turn ON the TV and set it to the video input mode.
• Select "Restore" from "General". For the procedure,
see steps 1 to 3 in "Using the SETUP MENU" on page
20.
• When you select "Yes" and press ENTER, all the set-
tings will return to the factory setting (except Clock
settings, Date settings, DVD rating and Password).
.When you select "No" and press ENTER, Restore will
be canceled.
Display/Call
You can turn off the screen display that is output to the
TV screen by this unit. Select "Display/Call", and select
"On" or "Off".
Preparation:
.Turn ON the TV and set it to the video input mode.
• Select "Other" from "General". For the procedure, see
steps 1 to 3 in "Using the SETUP MENU" on page 20.
On: The screen display appears.
Off: Nothing but the SETUP MENU and error mes-
sages appear.
_<
,=_
€0
¢0
(.Q
co
÷
25
2K70101A E P20-28 25 _ 07.1 29, 3:55 PM
÷
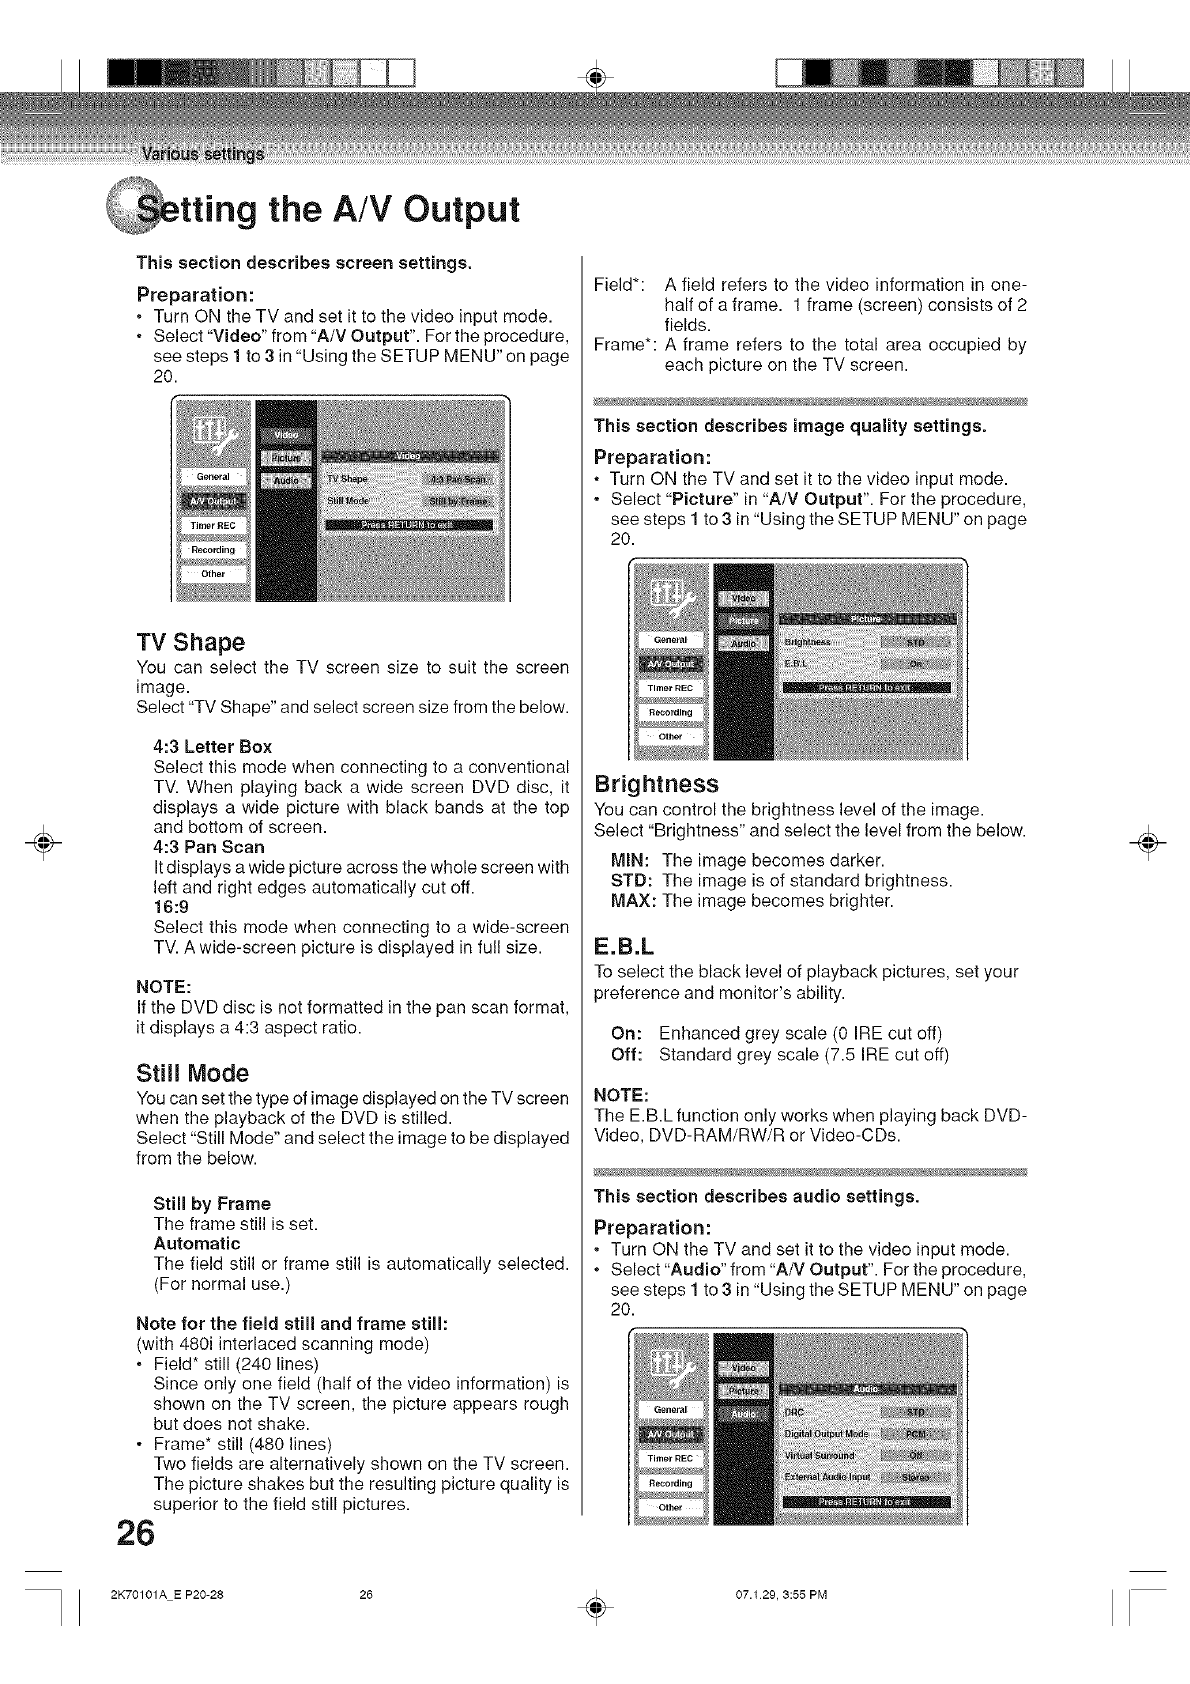
tting the A/V Output
This section describes screen settings.
Preparation:
* Turn ON the TV and set it to the video input mode.
* Select "Video" from "A/V Output". Fortheprocedure,
see steps 1 to 3in "Using the SETUP MENU" on page
20.
TV Shape
You can select the TV screen size to suit the screen
image.
Select "TV Shape" and select screen size from the below.
4:3 Letter Box
Select this mode when connecting to a conventional
TV. When playing back a wide screen DVD disc, it
displays a wide picture with black bands at the top
and bottom of screen.
4:3 Pan Scan
It displays a wide picture across the whole screen with
left and right edges automatically cut off.
16:9
Select this mode when connecting to a wide-screen
TV. A wide-screen picture is displayed in full size.
NOTE:
If the DVD disc is not formatted in the pan scan format,
it displays a 4:3 aspect ratio.
Still Mode
You can set the type of image displayed on the TV screen
when the playback of the DVD is stilled.
Select "Still Mode" and select the image to be displayed
from the below.
Still by Frame
The frame still is set.
Automatic
The field still or frame still is automatically selected.
(For normal use.)
Note for the field still and frame still:
(with 480i interlaced scanning mode)
* Field* still (240 lines)
Since only one field (half of the video information) is
shown on the TV screen, the picture appears rough
but does not shake.
- Frame* still (480 lines)
Two fields are alternatively shown on the TV screen.
The picture shakes but the resulting picture quality is
superior to the field still pictures.
26
Field*: A field refers to the video information in one-
half of a frame. 1 frame (screen) consists of 2
fields.
Frame*: A frame refers to the total area occupied by
each picture on the TV screen.
This section describes image quality settings.
Preparation:
* Turn ON the TV and set it to the video input mode.
- Select "Picture" in "A/V Output". For the procedure,
see steps 1 to 3 in "Using the SETUP MENU" on page
20.
Brightness
You can control the brightness level of the image.
Select "Brightness" and select the level from the below.
MIN: The image becomes darker.
STD: The image is of standard brightness.
MAX: The image becomes brighter.
E.B.L
To select the black level of playback pictures, set your
preference and monitor's ability.
On: Enhanced grey scale (0 IRE cut off)
Off: Standard grey scale (7.5 IRE cut off)
NOTE:
The E.B.L function only works when playing back DVD-
Video, DVD-RAM/RW/R or Video-CDs.
This section describes audio settings.
Preparation:
• Turn ON the TV and set it to the video input mode.
• Select "Audio" from "A/V Output". For the procedure,
see steps 1 to 3 in "Using the SETUP MENU" on page
20.
÷
2K70101A E P20-28 26 _ 07.129, 3:55 PM
÷
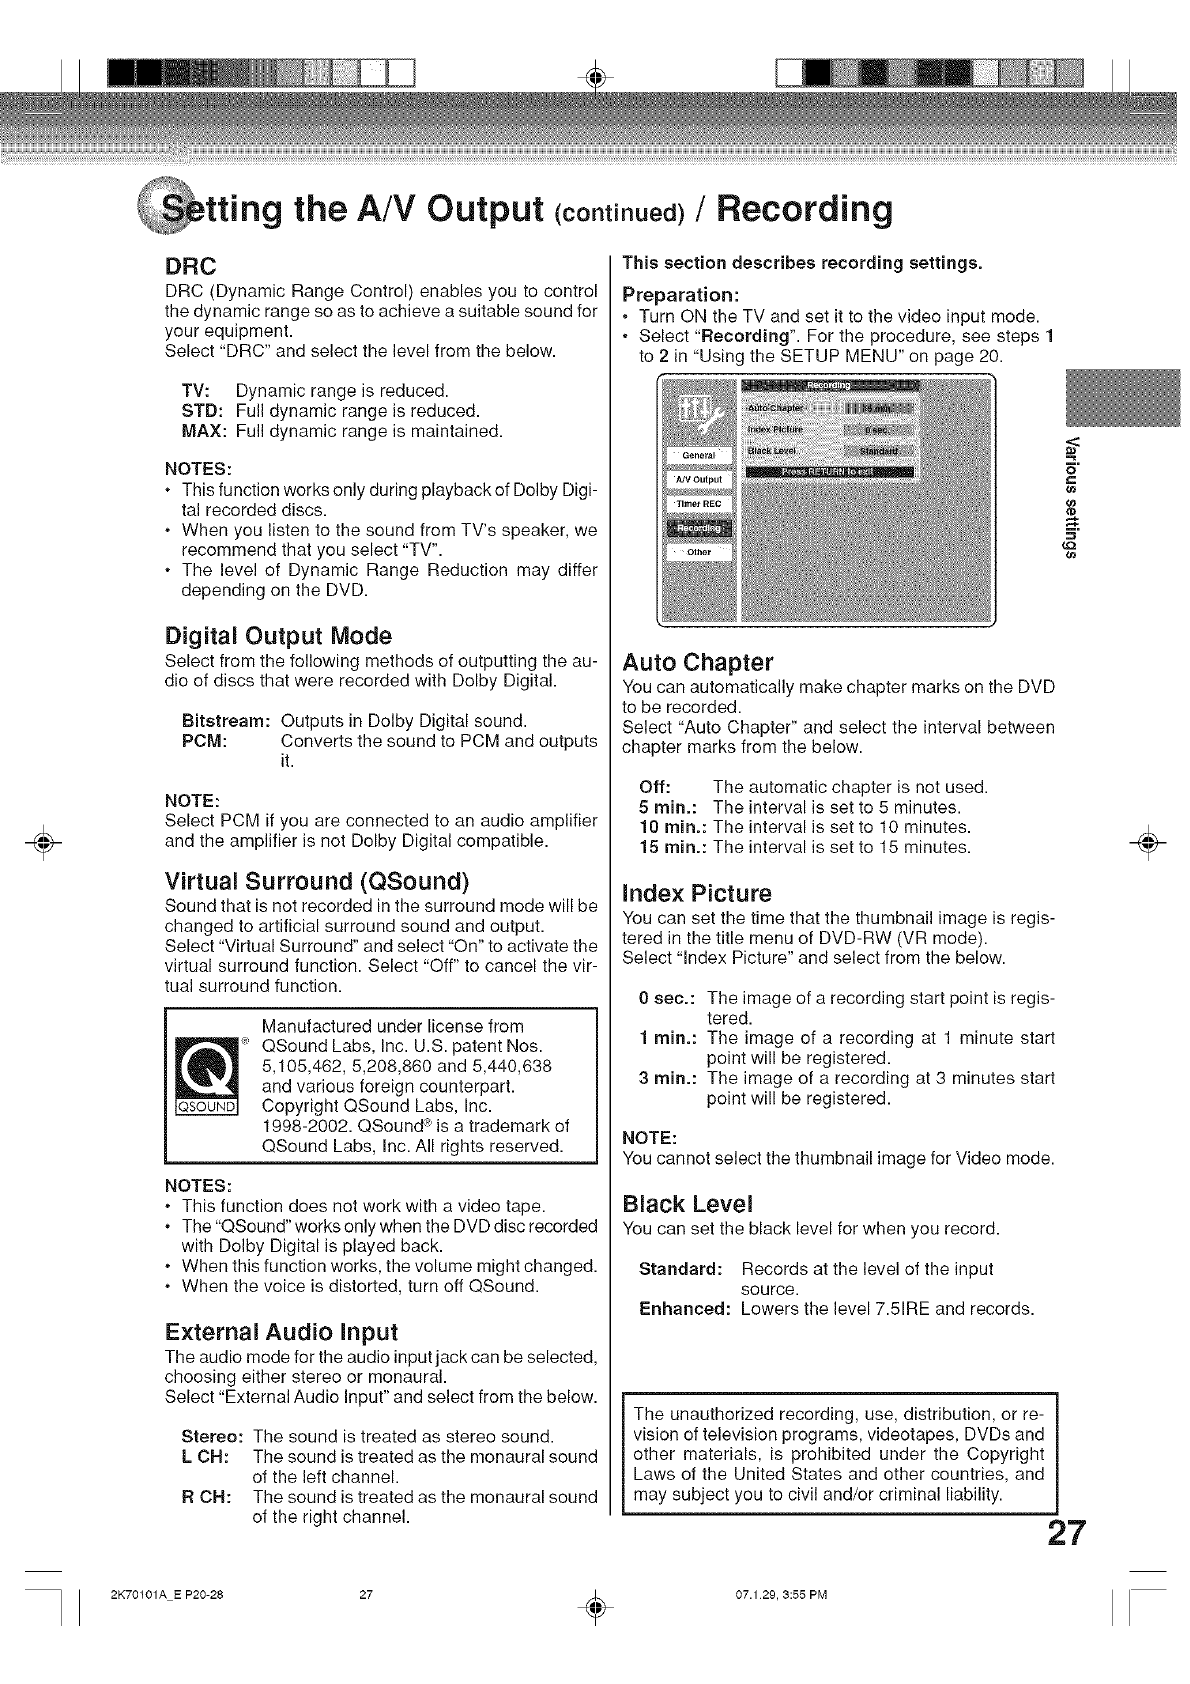
g the A/V Output (continued)/Recording
DRC
DRC (Dynamic Range Control) enables you to control
the dynamic range so as to achieve a suitable sound for
your equipment.
Select "DRC" and select the level from the below.
TV: Dynamic range is reduced.
STD: Full dynamic range is reduced.
MAX: Full dynamic range is maintained.
NOTES:
•This function works only during playback of Dolby Digi-
tal recorded discs.
•When you listen to the sound from TV's speaker, we
recommend that you select "TV".
The level of Dynamic Range Reduction may differ
depending on the DVD.
Digital Output Mode
Select from the following methods of outputting the au-
dio of discs that were recorded with Dolby Digital.
Bitstream: Outputs in Dolby Digital sound.
PCM: Converts the sound to PCM and outputs
it.
NOTE:
Select PCM if you are connected to an audio amplifier
and the amplifier is not Dolby Digital compatible.
Virtual Surround (QSound)
Sound that is not recorded in the surround mode will be
changed to artificial surround sound and output.
Select "Virtual Surround" and select "On" to activate the
virtual surround function. Select "Off" to cancel the vir-
tual surround function.
Manufactured under license from
QSound Labs, Inc. U.S. patent Nos.
5,105,462, 5,208,860 and 5,440,638
and various foreign counterpart.
Copyright QSound Labs, Inc.
1998-2002. QSound _ is a trademark of
QSound Labs, Inc. All rights reserved.
NOTES:
This function does not work with a video tape.
The "QSound" works only when the DVD disc recorded
with Dolby Digital is played back.
When this function works, the volume might changed.
When the voice is distorted, turn off QSound.
External Audio input
The audio mode for the audio input jack can be selected,
choosing either stereo or monaural.
Select "External Audio Input" and select from the below.
Stereo: The sound is treated as stereo sound.
L CH: The sound is treated as the monaural sound
of the left channel.
R OH: The sound is treated as the monaural sound
of the right channel.
This section describes recording settings.
Preparation:
Turn ON the TV and set it to the video input mode.
Select "Recording". For the procedure, see steps 1
to 2 in "Using the SETUP MENU" on page 20.
Auto Chapter
You can automatically make chapter marks on the DVD
to be recorded.
Select "Auto Chapter" and select the interval between
chapter marks from the below.
Off: The automatic chapter is not used.
5 rain.: The interval is set to 5 minutes.
10 rain.: The interval is set to 10 minutes.
15 rain.: The interval is set to 15 minutes.
index Picture
You can set the time that the thumbnail image is regis-
tered in the title menu of DVD-RW (VR mode).
Select "Index Picture" and select from the below.
0 sec.: The image of a recording start point is regis-
tered.
1 rain.: The image of a recording at 1 minute start
point will be registered.
3 rain.: The image of a recording at 3 minutes start
point will be registered.
NOTE:
You cannot select the thumbnail image for Video mode.
Black Level
You can set the black level for when you record.
Standard: Records at the level of the input
source.
Enhanced: Lowers the level 7.51RE and records.
The unauthorized recording, use, distribution, or re-
vision of television programs, videotapes, DVDs and
other materials, is prohibited under the Copyright
Laws of the United States and other countries, and
may subject you to civil and/or criminal liability.
=<
¢e
¢e
27
÷
2K70101A E P20-28 27 _ 07.1 29, 3:55 PM
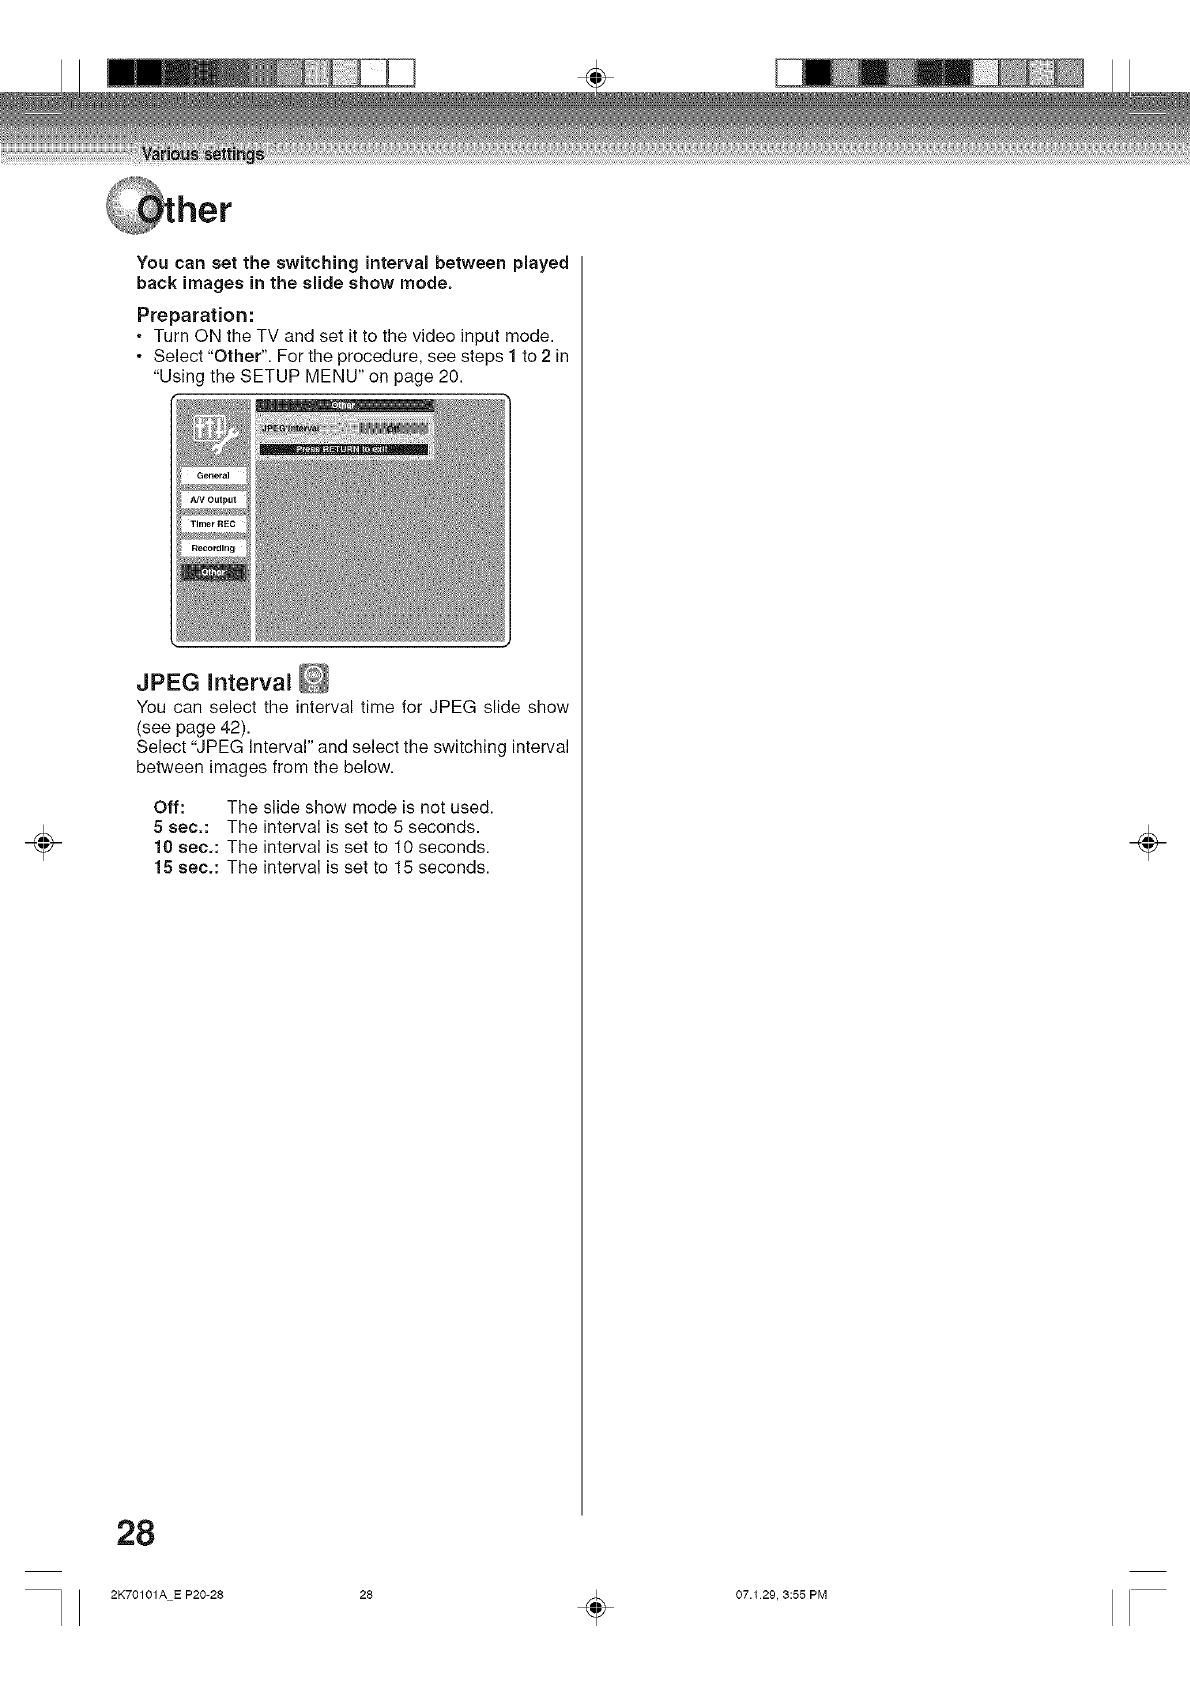
÷
You can set the switching interval between played
back images in the slide show mode.
Preparation:
, Turn ON the TV and set it to the video input mode.
Select "Other". For the procedure, see steps 1 to 2 in
"Using the SETUP MENU" on page 20.
JPEG Interval
You can select the interval time for JPEG slide show
(see page 42).
Select "JPEG Interval" and select the switching interval
between images from the below.
Off: The slide show mode is not used.
5 seco: The interval is set to 5 seconds.
10 sec,: The interval is set to 10 seconds.
15 sec.: The interval is set to 15 seconds. ÷
28
2K70101A E P20-28 28 _ 07.129, 3:55 PM
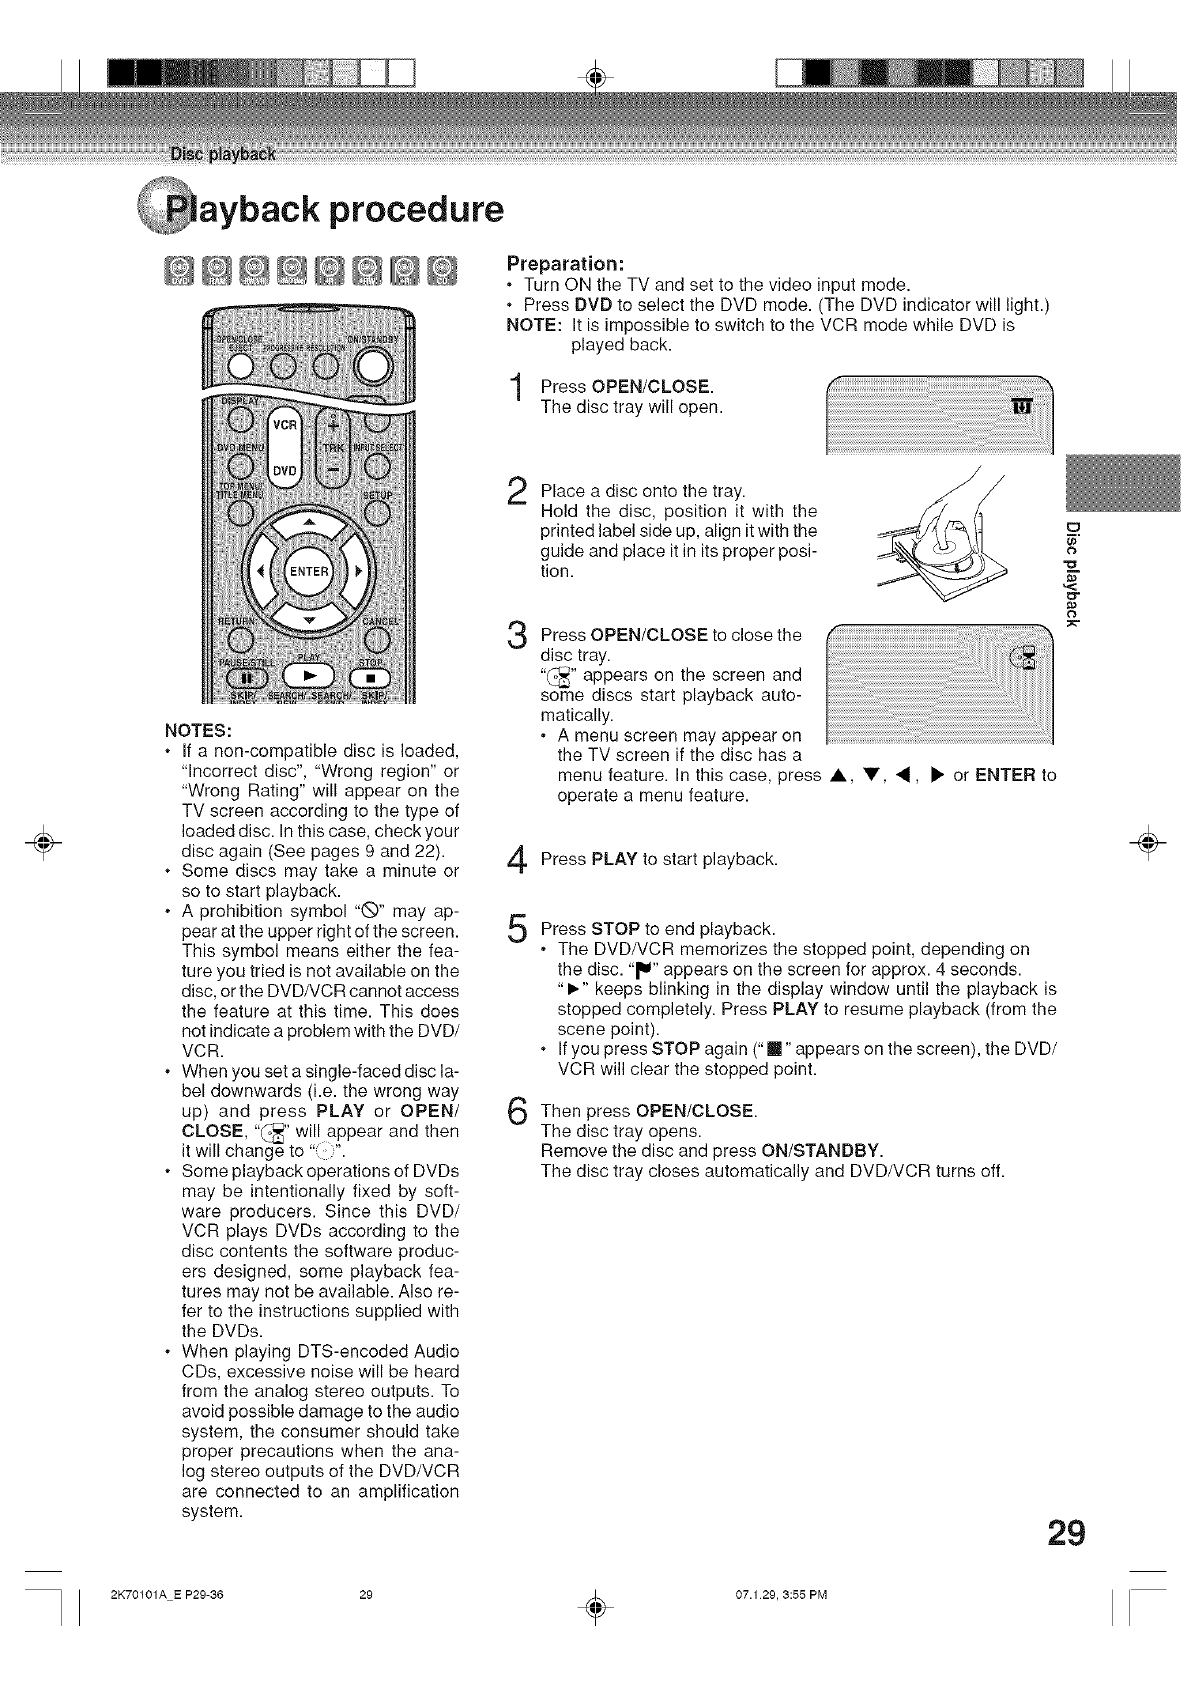
÷
ayback procedure
@@@@@@@@
NOTES:
.If a non-compatible disc is loaded,
"Incorrect disc", "Wrong region" or
"Wrong Rating" will appear on the
TV screen according to the type of
loaded disc. In this case, check your
disc again (See pages 9 and 22).
.Some discs may take a minute or
so to start playback.
.A prohibition symbol "@" may ap-
pear at the upper right of the screen.
This symbol means either the fea-
ture you tried is not available on the
disc, or the DVD/VCR cannot access
the feature at this time. This does
not indicate a problem with the DVD/
VCR.
.When you set a single-faced disc la-
bel downwards (i.e. the wrong way
up) and press PLAY or OPEN/
CLOSE, "_" will appear and then
it will change to ":::::".
•Some playback operations of DVDs
may be intentionally fixed by soft-
ware producers. Since this DVD/
VCR plays DVDs according to the
disc contents the software produc-
ers designed, some playback fea-
tures may not be available. Also re-
fer to the instructions supplied with
the DVDs.
.When playing DTS-encoded Audio
CDs, excessive noise will be heard
from the analog stereo outputs. To
avoid possible damage to the audio
system, the consumer should take
proper precautions when the ana-
log stereo outputs of the DVD/VCR
are connected to an amplification
system.
Preparation:
•Turn ON the TV and set to the video input mode.
.Press DVD to select the DVD mode. (The DVD indicator will light.)
NOTE: It is impossible to switch to the VCR mode while DVD is
played back.
Press OPEN/CLOSE.
The disc tray will open.
2
3
Place a disc onto the tray.
Hold the disc, position it with the
printed label side up, align it with the
guide and place it in its proper posi-
tion.
Press OPEN/CLOSE to close the
disc tray.
"_" appears on the screen and
some discs start playback auto-
matically.
•A menu screen may appear on
the TV screen if the disc has a
menu feature. In this case, press A, V, _, • or ENTER to
operate a menu feature.
Press PLAY to start playback.
Press STOP end
to playback.
.The DVD/VCR memorizes the stopped point, depending on
the disc. "_" appears on the screen for approx. 4 seconds.
"I_" keeps blinking in the display window until the playback is
stopped completely. Press PLAY to resume playback (from the
scene point).
•If you press STOP again (" []" appears on the screen), the DVD/
VCR will clear the stopped point.
Then OPEN/CLOSE.press
The disc tray opens.
Remove the disc and press ON/STANDBY.
The disc tray closes automatically and DVD/VCR turns off.
1:3
29
÷
2K70101A E P29-36 29 _ 07.1 29, 3:55 PM
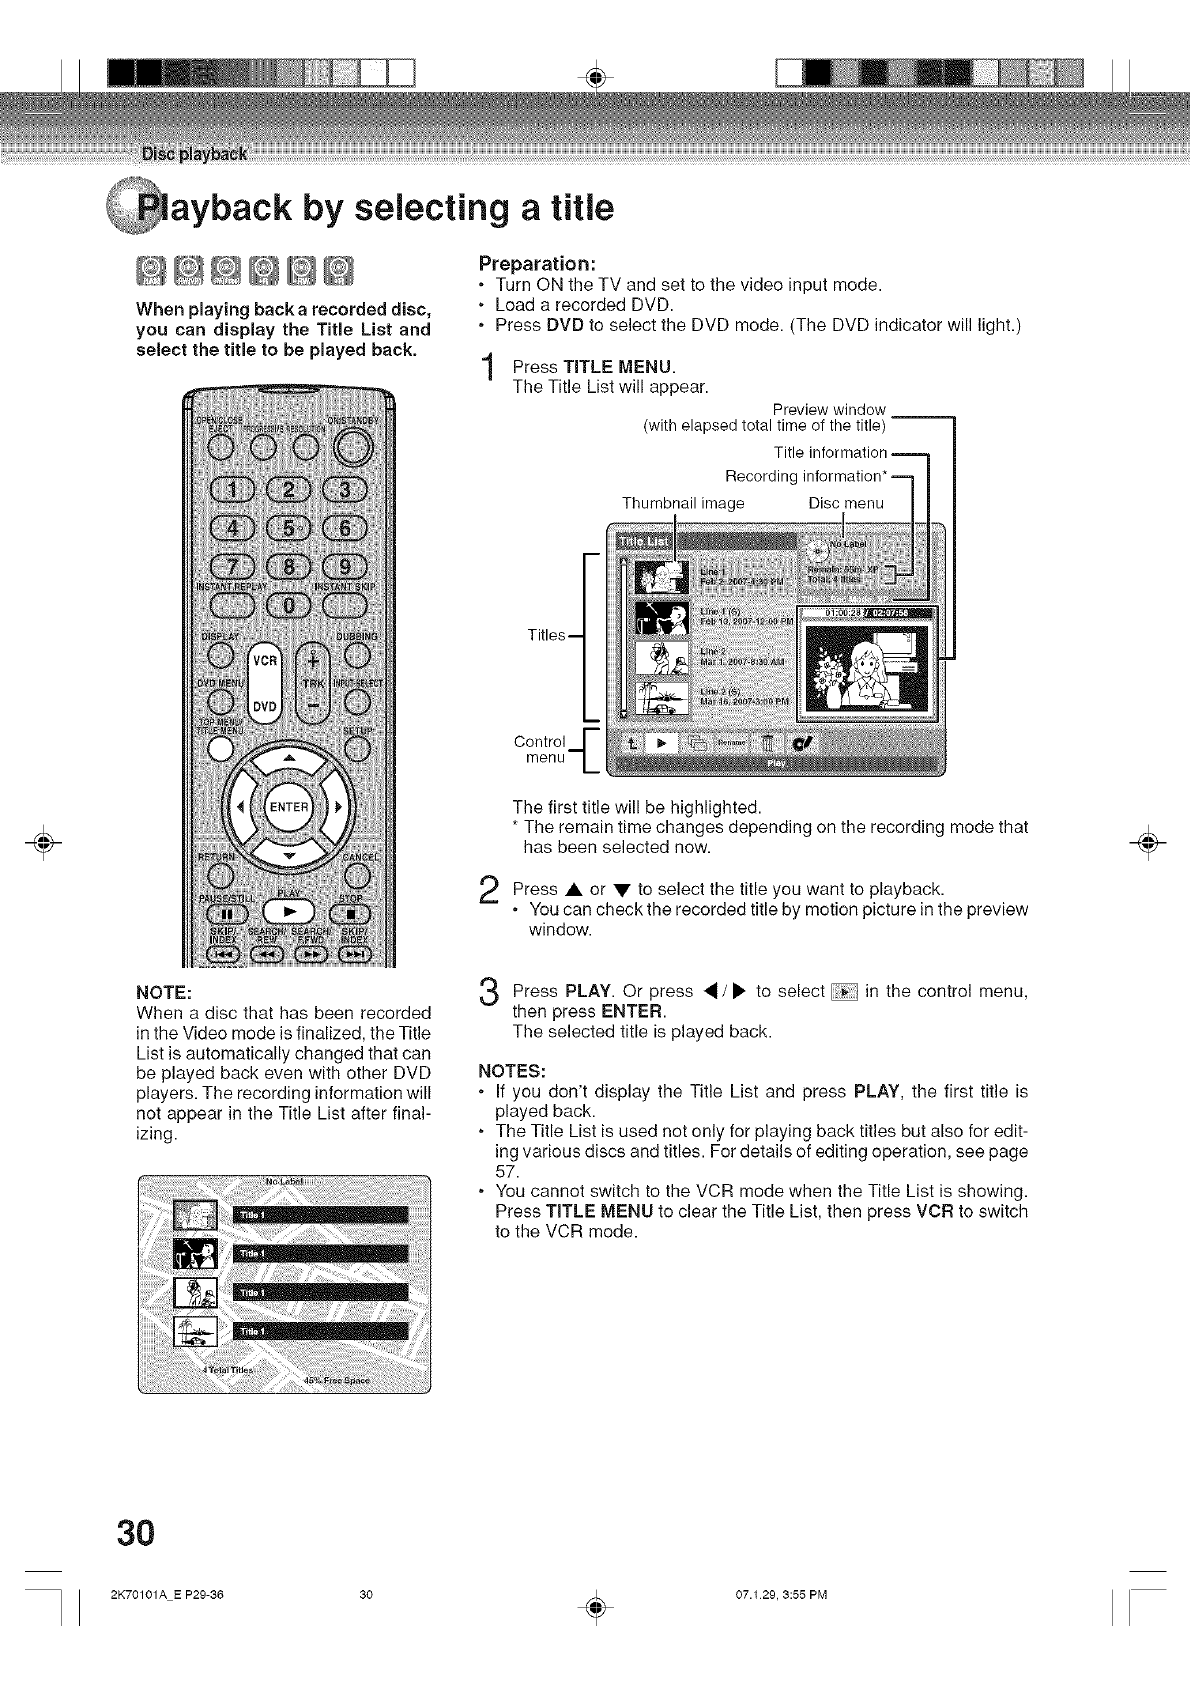
÷
ayback by selecting a title
@@@@@@
When playing back a recorded disc,
you can display the Title List and
select the title to be played back.
Preparation:
•Turn ON the TV and set to the video input mode.
. Load a recorded DVD.
•Press DVD to select the DVD mode. (The DVD indicator will light.)
Press TITLE MENU.
The Title List will appear.
Preview window
(with elapsed total time of the title)
Titles f
Control ,_J--
menu L
Recording
Thumbnail image Disc menu
The first title will be highlighted.
* The remain time changes depending on the recording mode that
has been selected now.
• or • to you want to playback.
Press select the title
You can check the recorded title by motion picture in the preview
window.
÷
NOTE:
When a disc that has been recorded
in the Video mode is finalized, the Title
List is automatically changed that can
be played back even with other DVD
players. The recording information will
not appear in the Title List after final-
izing.
Press PLAY. Or _ /• to select in the controlpress menu,
then press ENTER.
The selected title is played back.
NOTES:
•If you don't display the Title List and press PLAY, the first title is
played back.
.The Title List is used not only for playing back titles but also for edit-
ing various discs and titles. For details of editing operation, see page
57.
.You cannot switch to the VCR mode when the Title List is showing.
Press TITLE MENU to clear the Title List, then press VOR to switch
to the VCR mode.
30
2K70101A E P29-36 30 _ 07.129, 3:55 PM
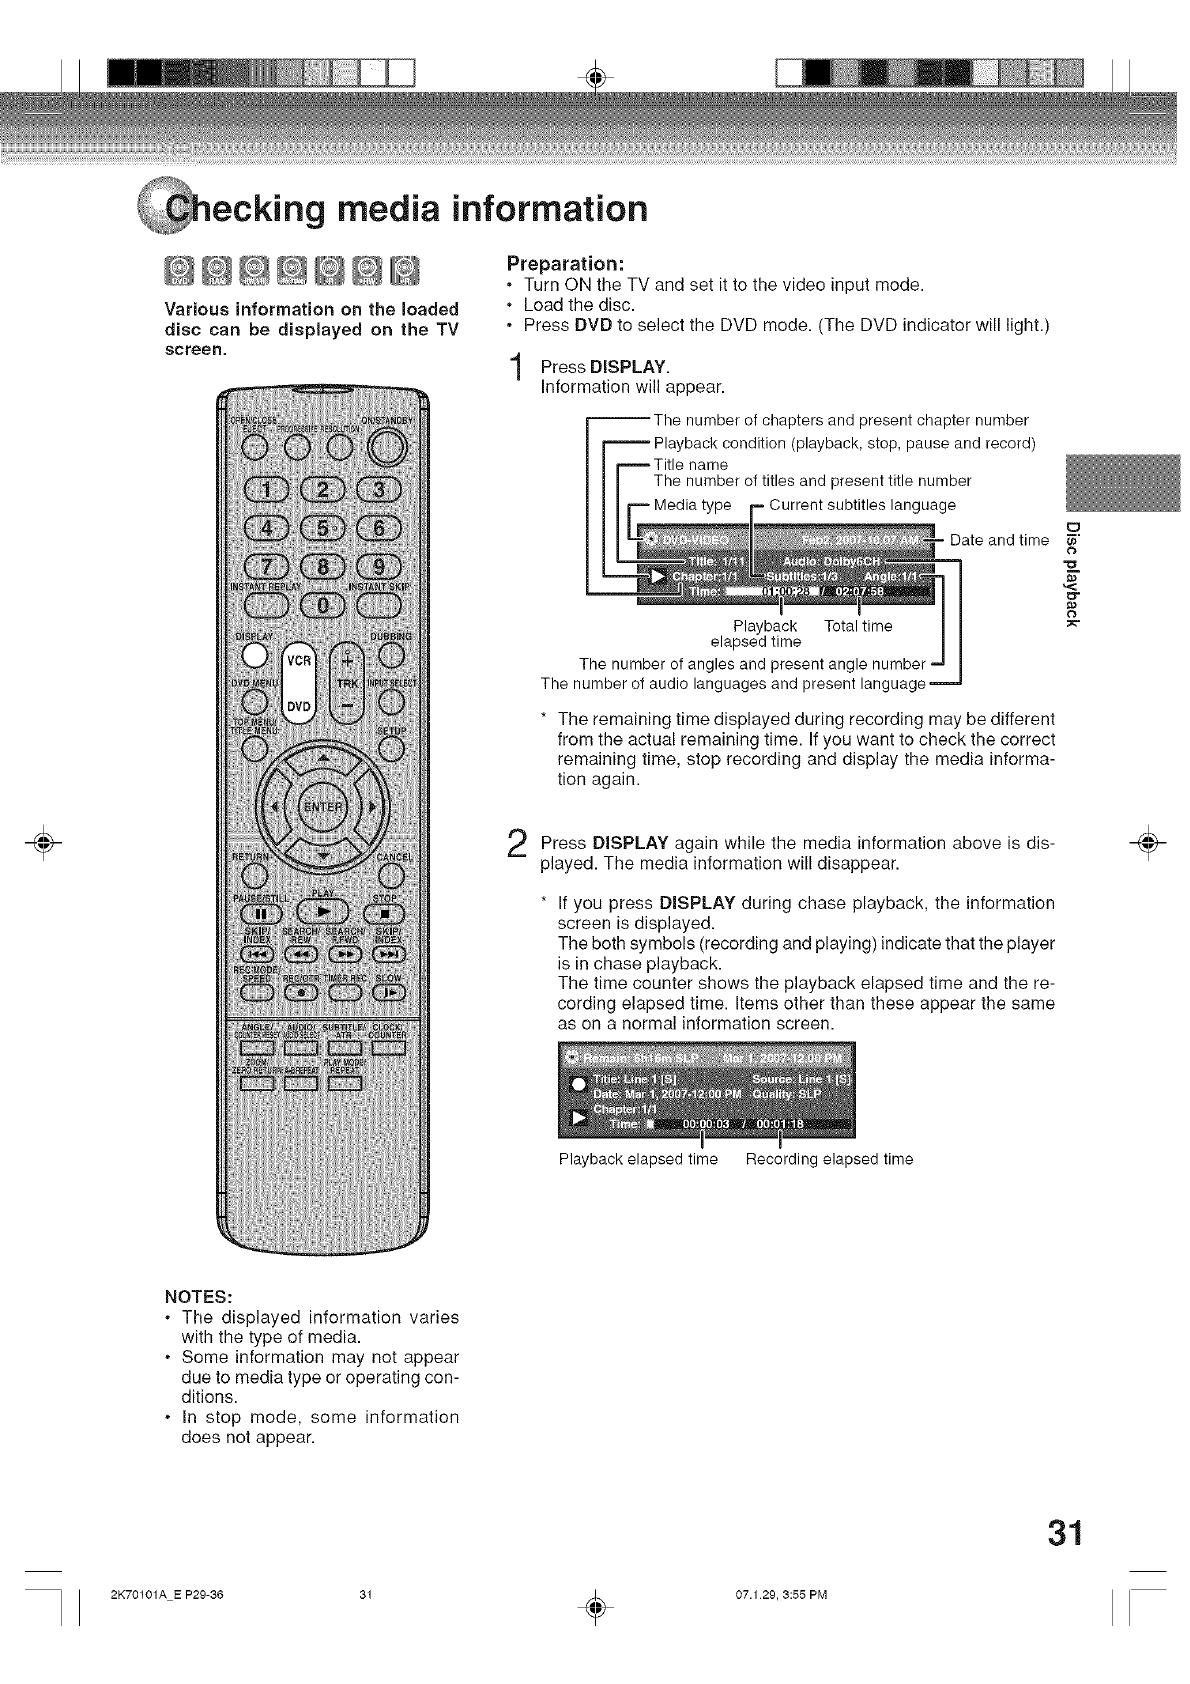
÷
g media information
@@@@@@@
Various information on the loaded
disc can be displayed on the TV
screen.
Preparation:
•Turn ON the TV and set it to the video input mode.
.Load the disc.
•Press DVD to select the DVD mode. (The DVD indicator will light.)
Press DISPLAY.
Information will appear.
--The number of chapters and present chapter number
Playback condition (playback, stop, pause and record)
The number of titles and present title number
Media type =Current subtitles language
Date and time
Playback Total time
elapsed time
The number of angles and present angle
The number of audio languages and present language
* The remaining time displayed during recording may be different
from the actual remaining time. If you want to check the correct
remaining time, stop recording and display the media informa-
tion again.
Press DISPLAY while the media information above is dis-again
played. The media information will disappear.
* If you press DISPLAY during chase playback, the information
screen is displayed.
The both symbols (recording and playing) indicate that the player
is in chase playback.
The time counter shows the playback elapsed time and the re-
cording elapsed time. Items other than these appear the same
as on a normal information screen.
Playback elapsed time Recording elapsed time
÷
NOTES:
•The displayed information varies
with the type of media.
.Some information may not appear
due to media type or operating con-
ditions.
.In stop mode, some information
does not appear.
31
2K70101A E P29-36 31 _ 07.1 29, 3:55 PM
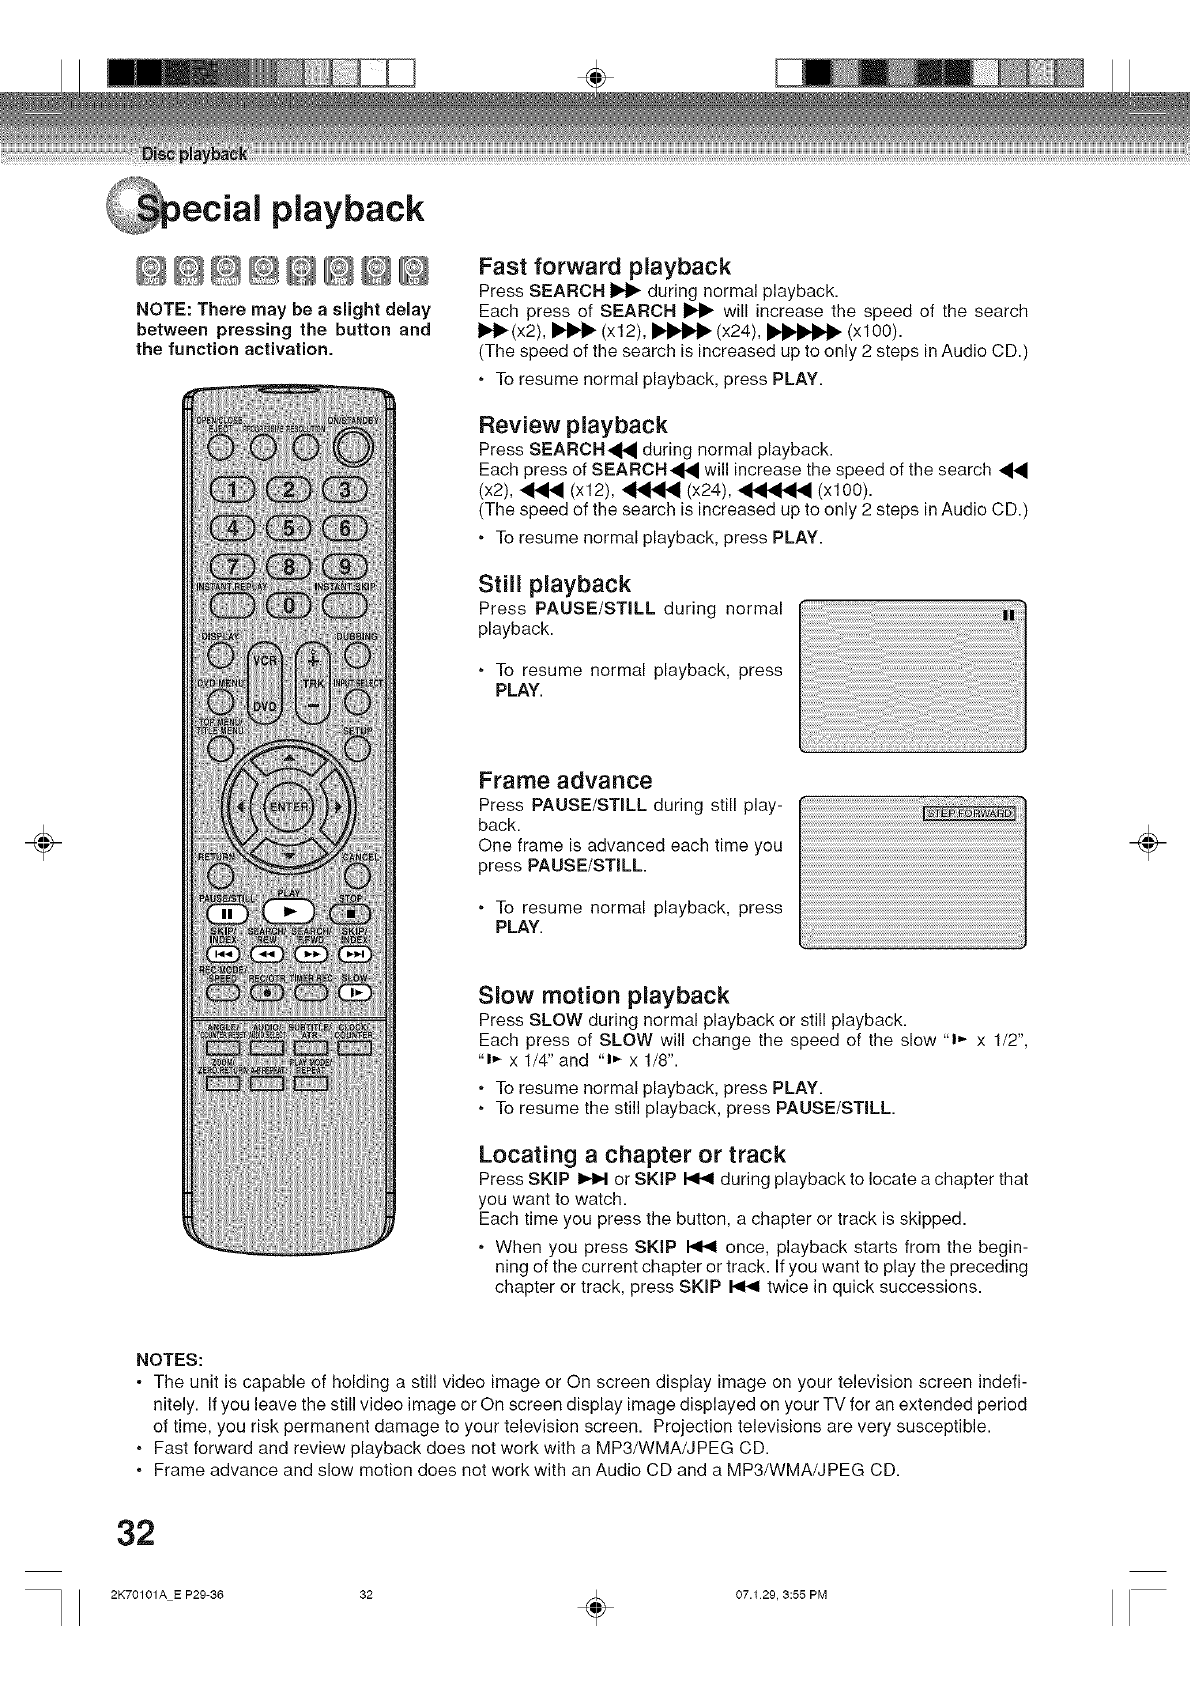
÷
playback
@@@@@@@@
NOTE: There may be aslight delay
between pressing the button and
the function activation.
Fast forward playback
Press SEARCH _ during normal playback.
Each press of SEARCH I_ will increase the speed of the search
I_l_(x2), _ (x12), I1_'_ (x24), _ (xl00).
(The speed of the search is increased up to only 2 steps in Audio CD.)
• To resume normal playback, press PLAY.
Review playback
Press SEARCH_I_I during normal playback.
Each press of SEARCH_,_ will increase the speed of the search
(x2), _ (x12), _ (x24), _ (xl00).
(The speed of the search is increased up to only 2 steps in Audio CD.)
, To resume normal playback, press PLAY.
Still playback
Press PAUSE/STILL during normal
playback.
,To resume normal playback, press
PLAY.
Frame advance
Press PAUSE/STILL during still play-
back.
One frame is advanced each time you
press PAUSE/STILL
,To resume normal playback, press
PLAY.
} _ ; ;;;_;} _{;;;{{;_!;;_}_;;8:{} 9:_88{
_,x,x,x,x,x,x,x,x,x,x,x,x,x,x,x,x,x,x,x,x,x,x,x,x,x,x,x,x,x,x,_
Slow motion playback
Press SLOW during normal playback or still playback.
Each press of SLOW will change the speed of the slow "1,- x 1/2",
"1,,-x 1/4" and "1_ x 1/8".
•To resume normal playback, press PLAY.
.To resume the still playback, press PAUSE/STILL
Locating a chapter or track
Press SKIP _ or SKIP _ during playback to locate a chapter that
you want to watch.
Each time you press the button, a chapter or track is skipped.
• When you press SKIP _ once, playback starts from the begin-
ning of the current chapter or track. If you want to play the preceding
chapter or track, press SKIP _ twice in quick successions.
÷
NOTES:
• The unit is capable of holding a still video image or On screen display image on your television screen indefi-
nitely. If you leave the still video image or On screen display image displayed on your TV for an extended period
of time, you risk permanent damage to your television screen. Projection televisions are very susceptible.
, Fast forward and review playback does not work with a MP3/WMA/JPEG CD.
, Frame advance and slow motion does not work with an Audio CD and a MP3/WMA/JPEG CD.
32
2K70101A E P29-36 32 _ 07.129, 3:55 PM
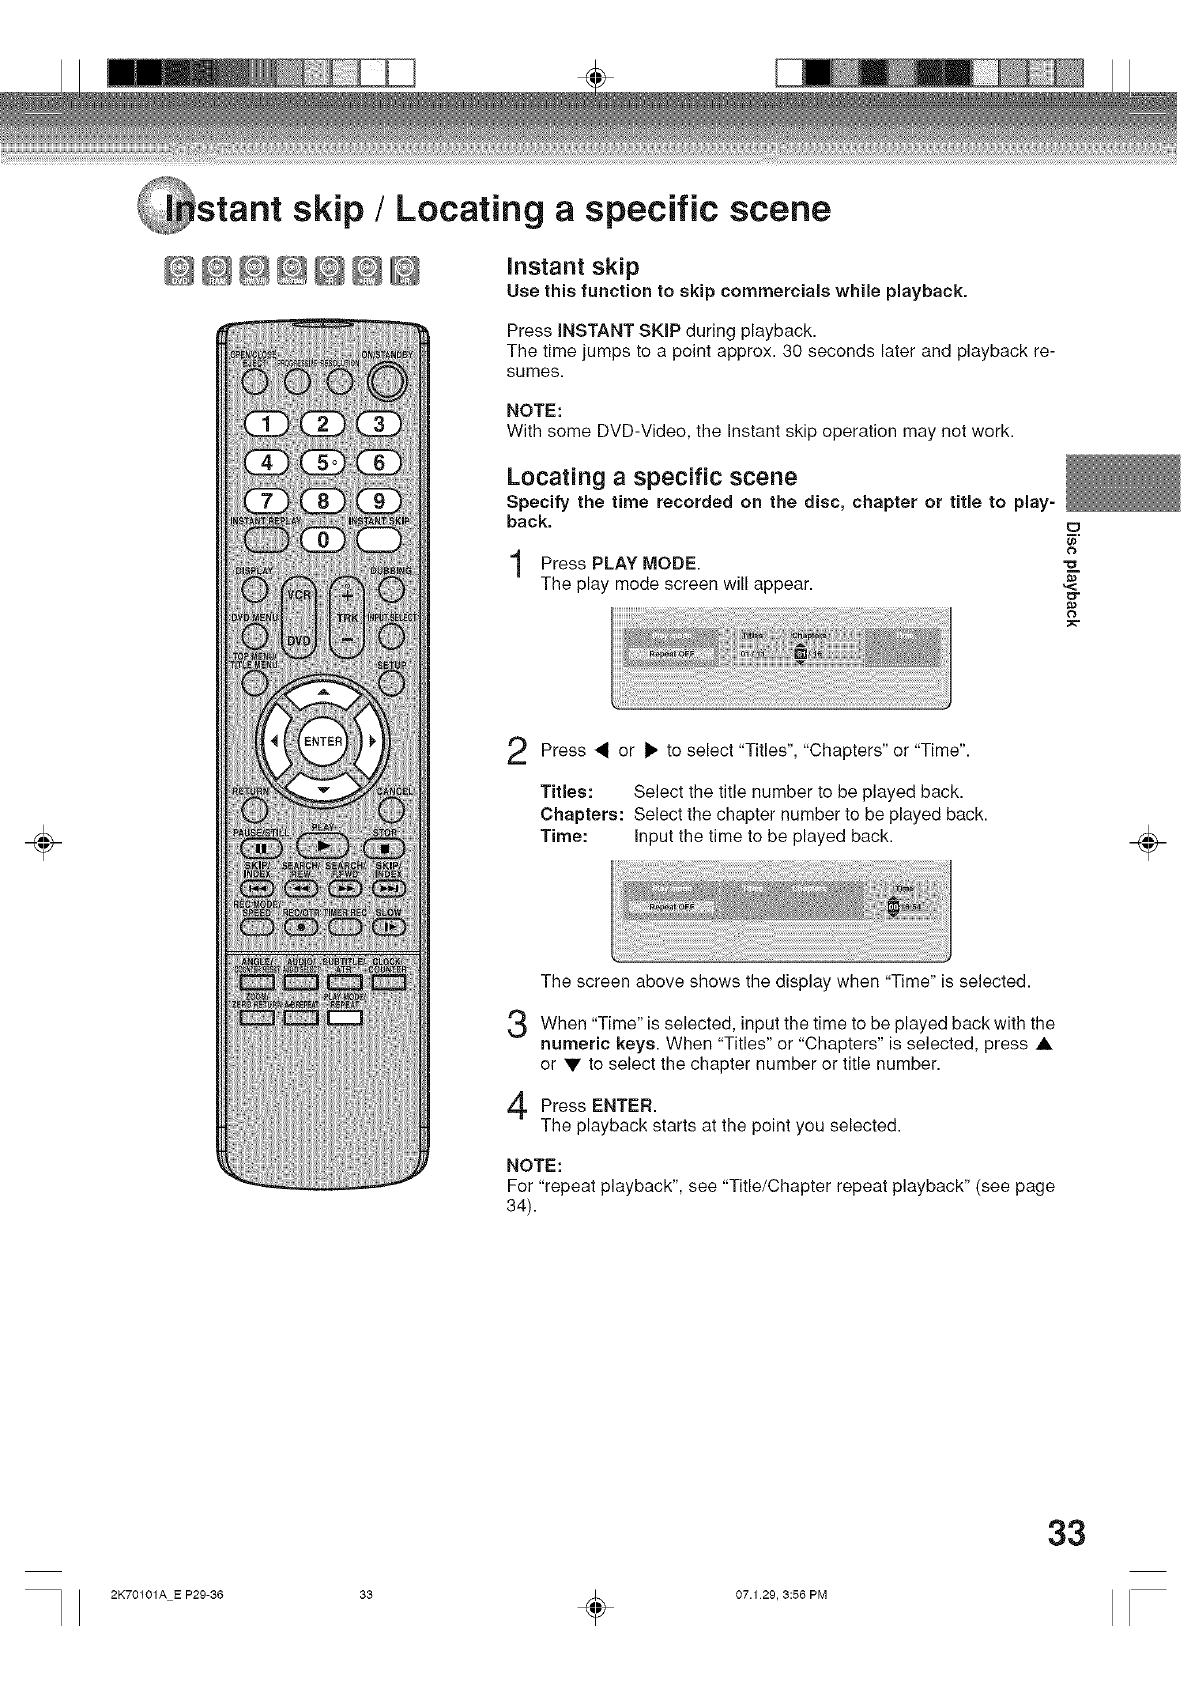
÷
stant skip /Locating aspecific scene
@@@@@@@ instant skip
Use this function to skip commercials while playback.
Press INSTANT SKIP during playback.
The time jumps to a point approx. 30 seconds later and playback re-
sumes.
NOTE:
With some DVD-Video, the Instant skip operation may not work.
Locating a specific scene
Specify the time recorded on the disc, chapter or title to play-
back.
Press PLAY MODE.
The play mode screen will appear.
Press '9 or I_ to select "Titles", "Chapters" or "Time".
Titles: Select the title number to be played back.
Chapters: Select the chapter number to be played back.
Time: Input the time to be played back.
The screen above shows the display when "Time" is selected.
When "Time" is the time to be back with the
selected, input played
numeric keys. When "Titles" or "Chapters" is selected, press •
or • to select the chapter number or title number.
Press ENTER.
The playback starts at the point you selected.
NOTE:
For "repeat playback", see "Title/Chapter repeat playback" (see page
34).
1:3
÷
33
2K70101A E P29-36 33 _ 07.1 29, 3:56 PM
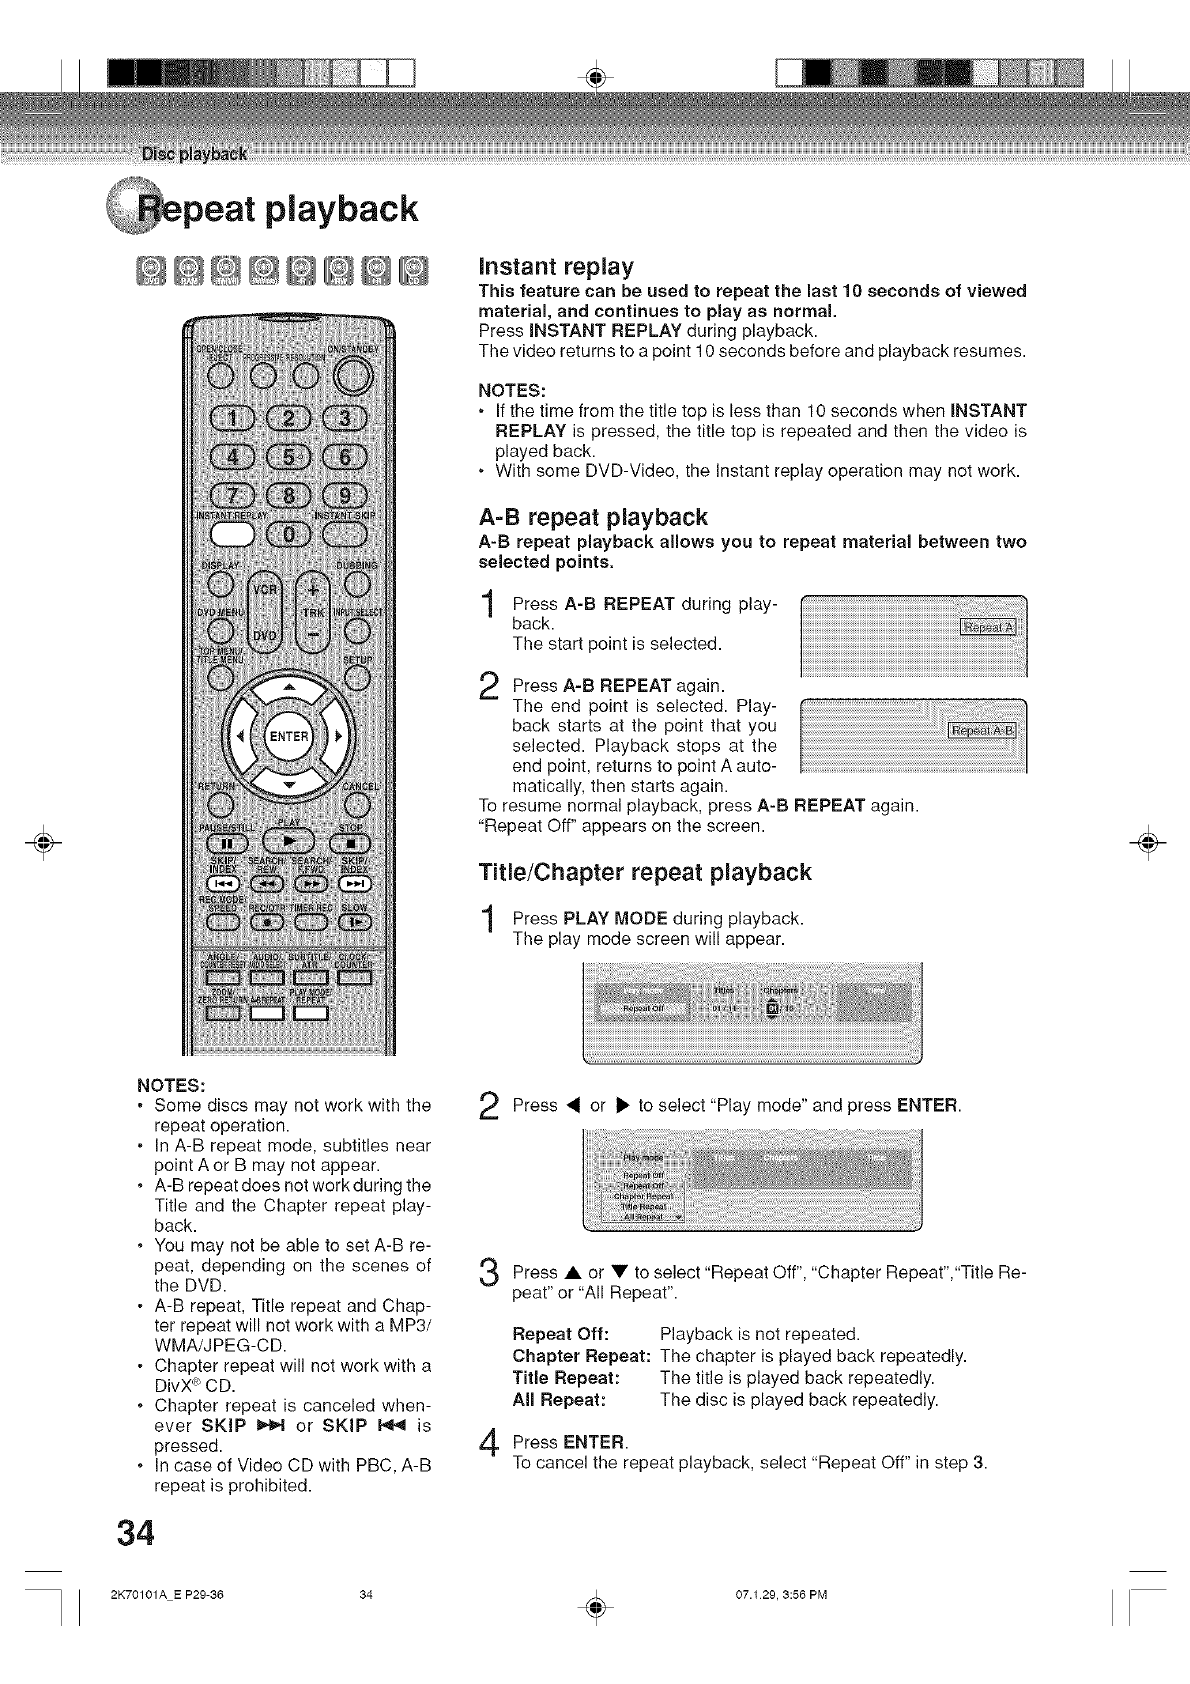
÷
peat playback
@@@@@@@@ Instant replay
This feature can be used to repeat the last 10 seconds of viewed
material, and continues to play as normal.
Press INSTANT REPLAY during playback.
The video returns to a point 10 seconds before and playback resumes.
NOTES:
, if the time from the title top is less than 10 seconds when INSTANT
REPLAY is pressed, the title top is repeated and then the video is
played back.
, With some DVD-Video, the instant replay operation may not work.
A=B repeat playback
A-B repeat playback allows you to repeat material between two
selected points.
Press A-B REPEAT during play-
back.
The start point is selected.
Press A-B REPEAT again.
The end point is selected. Play-
back starts at the point that you
selected. Playback stops at the
end point, returns to point A auto-
matically, then starts again.
To resume normal playback, press A-B REPEAT again.
"Repeat Off" appears on the screen.
Title/Chapter repeat playback
Press PLAY MODE during playback.
The play mode screen will appear.
÷
NOTES:
• Some discs may not work with the
repeat operation.
• In A-B repeat mode, subtitles near
point A or B may not appear.
, A-B repeat does not work during the
Title and the Chapter repeat play-
back.
, You may not be able to set A-B re-
peat, depending on the scenes of
the DVD.
• A-B repeat, Title repeat and Chap-
ter repeat will not work with a MP3/
WMA/JPEG-CD.
• Chapter repeat will not work with a
DivX_"_CD.
, Chapter repeat is canceled when-
ever SKiP _ or SKIP _ is
pressed.
, In case of Video CD with PBC, A-B
repeat is prohibited.
34
Press 4 or l_ to select "Play mode" and press ENTER.
• or to "Repeat Off", "Chapter Repeat","Title
Press select Re-
peat" or "All Repeat".
Repeat Off: Playback is not repeated.
Chapter Repeat: The chapter is played back repeatedly.
Title Repeat: The title is played back repeatedly.
All Repeat: The disc is played back repeatedly.
Press ENTER.
To cancel the repeat playback, select "Repeat Off" in step 3.
2K70101A E P29-36 34 _ 07.129, 3:56 PM
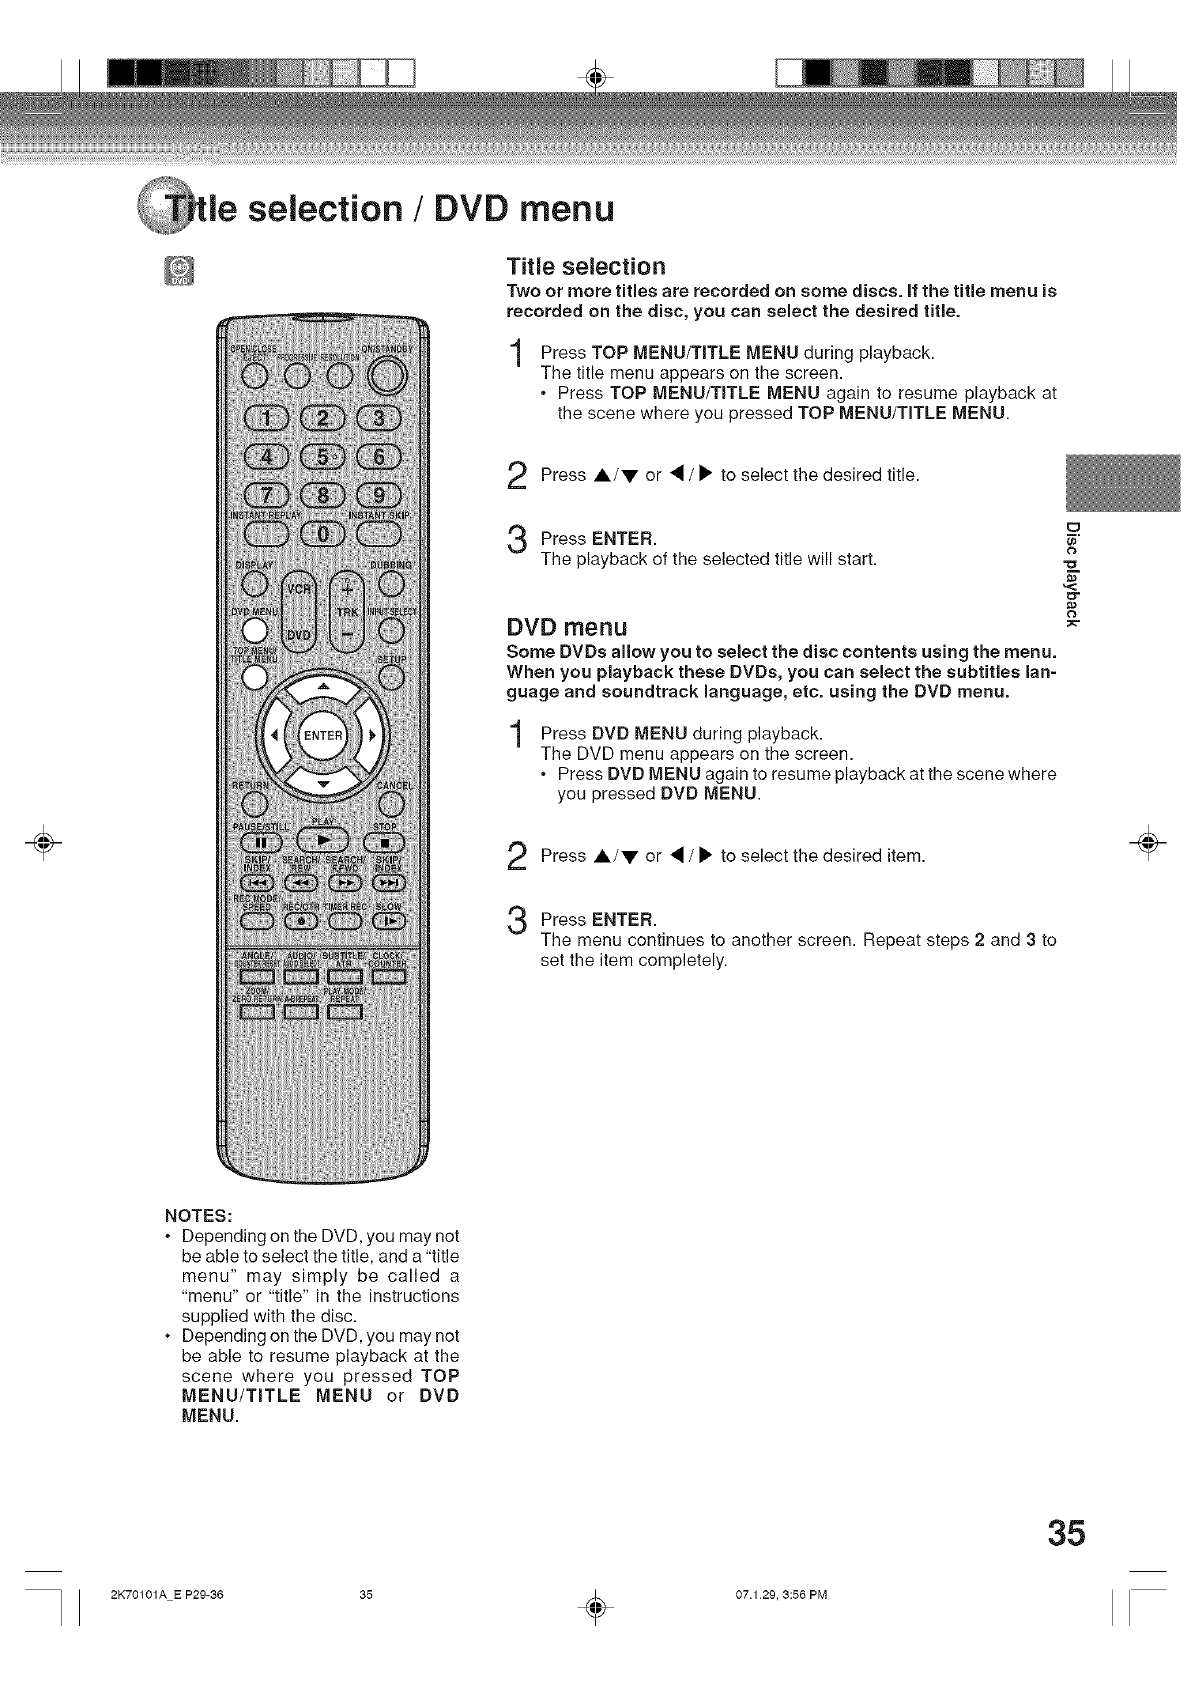
÷
selection /DVD menu
Title selection
Two or more titles are recorded on some discs. If the title menu is
recorded on the disc, you can select the desired title.
Press TOP MENU/TITLE MENU during playback.
The title menu appears on the screen.
•Press TOP MENU/TITLE MENU again to resume playback at
the scene where you pressed TOP MENU/TITLE MENU.
Press A/V or • /• to select the desired title.
Press ENTER.
The playback of the selected title will start.
DVD menu
Some DVDs allow you to select the disc contents using the menu.
When you playback these DVDs, you can select the subtitles lan-
guage and soundtrack language, etc. using the DVD menu.
Press DVD MENU during playback.
The DVD menu appears on the screen.
.Press DVD MENU again to resume playback at the scene where
you pressed DVD MENU.
Press A/V or • /• to select the desired item.
Press ENTER.
The menu continues to another screen. Repeat steps 2 and 3 to
set the item completely.
÷
NOTES:
.Depending on the DVD, you may not
be able to select the title, and a "title
menu" may simply be called a
"menu" or "title" in the instructions
supplied with the disc.
•Depending on the DVD, you may not
be able to resume playback at the
scene where you pressed TOP
MENU/TITLE MENU or DVD
MENU.
35
2K70101A E P29-36 35 _ 07.1 29, 3:56 PM
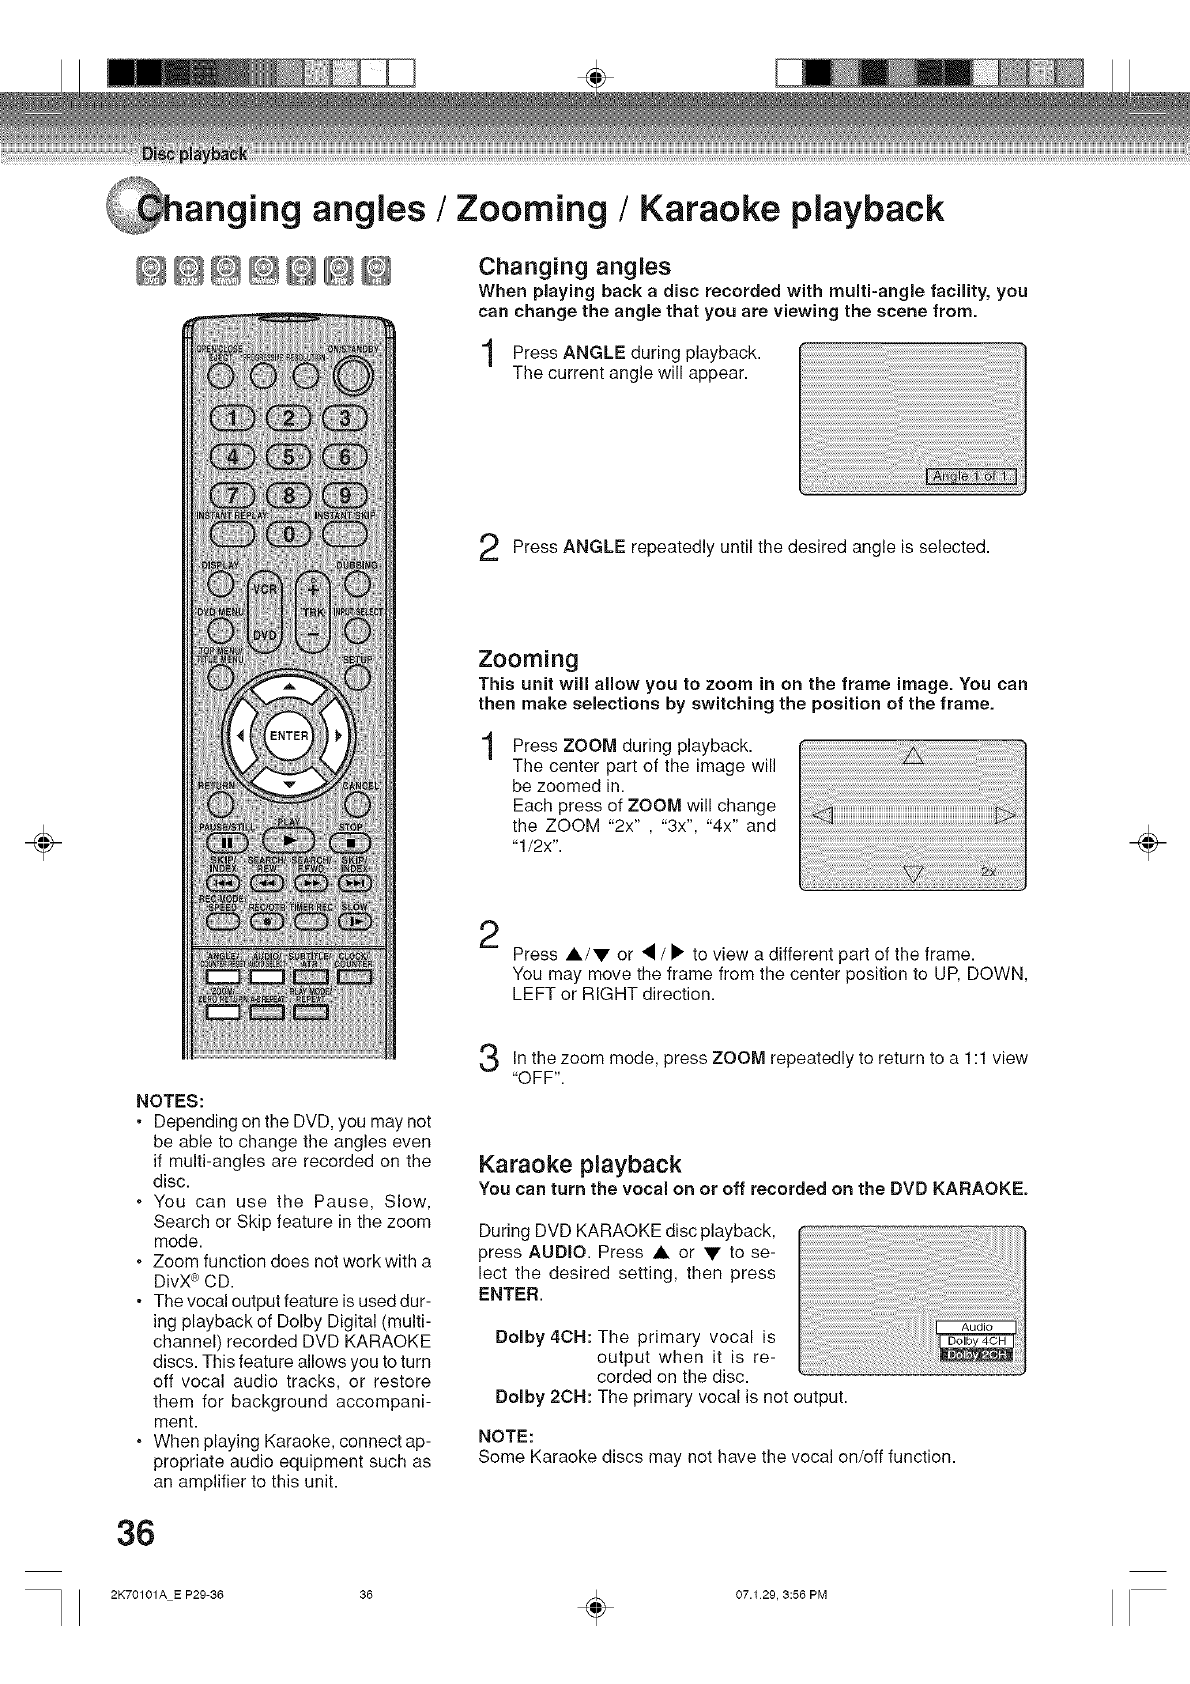
÷
Y_
anging angles /Zooming /Karaoke playback
@@@@@@@ Changing angles
When playing back a disc recorded with multi-angle facility, you
can change the angle that you are viewing the scene from.
during playback.
Press ANGLE
The current angle will appear.
Press ANGLE repeatedly until the desired angle is selected.
Zooming
This unit will allow you to zoom in on the frame image. You can
then make selections by switching the position of the frame.
Press ZOOM during playback.
The center part of the image will
be zoomed in.
Each press of ZOOM will change
the ZOOM "2x" ,"3x', "4x" and
"1/2x'.
2Press A/• or • /• to view a different part of the frame.
You may move the frame from the center position to UP, DOWN,
LEFT or RIGHT direction.
÷
NOTES:
• Depending on the DVD, you may not
be able to change the angles even
if multi-angles are recorded on the
disc.
, You can use the Pause, Slow,
Search or Skip feature in the zoom
mode.
, Zoom function does not work with a
DivX_ CD.
• The vocal output feature is used dur-
ing playback of Dolby Digital (multi-
channel) recorded DVD KARAOKE
discs. This feature allows you to turn
off vocal audio tracks, or restore
them for background accompani-
ment.
, When playing Karaoke, connect ap-
propriate audio equipment such as
an amplifier to this unit.
36
zoom mode, press repeatedly to return to a
In the ZOOM 1 view
"OFF".
Karaoke playback
You can turn the vocal on or off recorded on the DVD KARAOKE.
During DVD KARAOKE disc playback,
press AUDIO. Press • or •to se-
lect the desired setting, then press
ENTER.
Dolby 4CH: The primary vocal is
output when it is re-
corded on the disc.
Dolby 2OH: The primary vocal is not output.
NOTE:
Some Karaoke discs may not have the vocal on/off function.
2K70101A E P29-36 36 _ 07.129, 3:56 PM
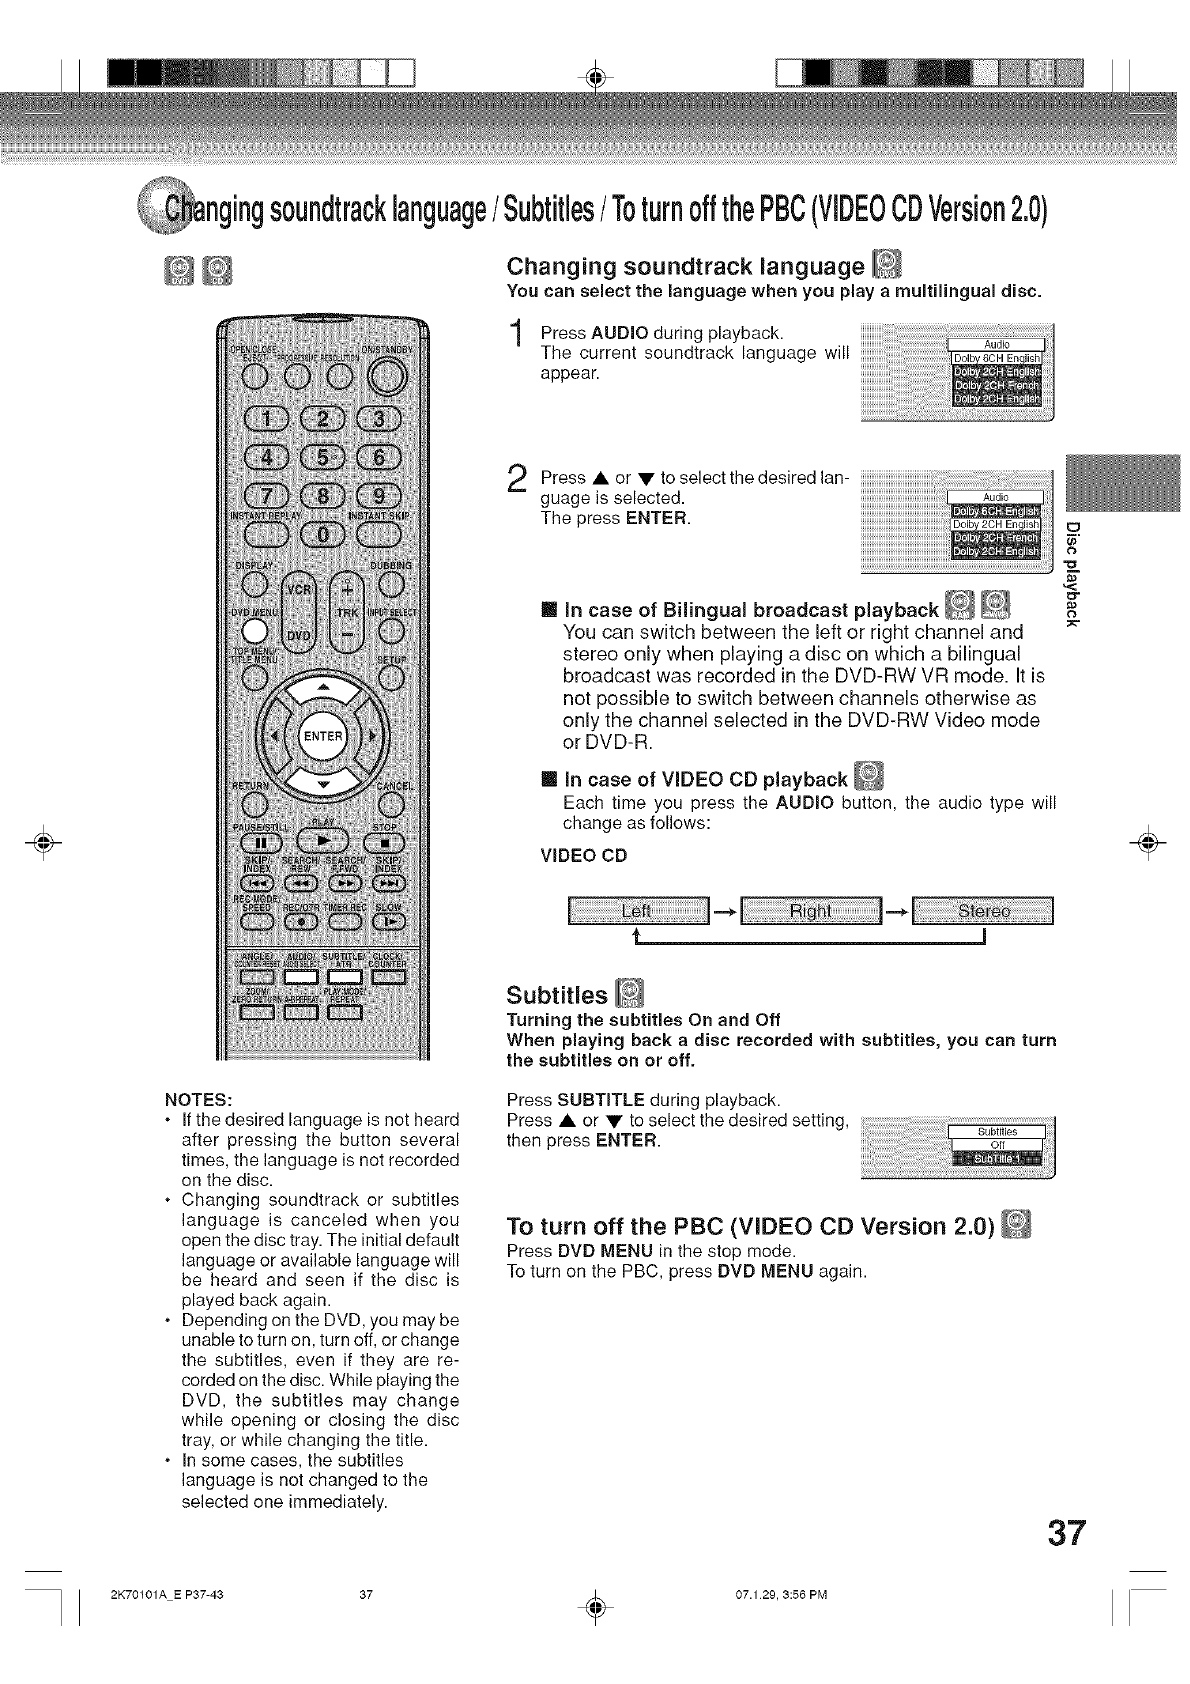
÷
nging soundtracklanguage/Subtitles/ToturnoffthePBC(VIDEOCOVersion2.0)
Changing soundtrack language _
You can select the language when you play a multilingual disc.
Press AUDIO during playback.
The current soundtrack language will
appear.
Press select the desired lan-
or to
guage is selected.
The press ENTER.
m In case of Bilingual broadcast playback _# _
You can switch between the left or right channel and
stereo only when playing a disc on which a bilingual
broadcast was recorded in the DVD-RW VR mode. It is
not possible to switch between channels otherwise as
only the channel selected in the DVD-RW Video mode
or DVD-R.
[] In case of VIDEO CD playback
Each time you press the AUDIO button, the audio type will
change as follows:
VIDEO CD
NOTES:
,If the desired language is not heard
after pressing the button several
times, the language is not recorded
on the disc.
•Changing soundtrack or subtitles
language is canceled when you
open the disc tray. The initial default
language or available language will
be heard and seen if the disc is
played back again.
,Depending on the DVD, you may be
unable to turn on, turn off, or change
the subtitles, even if they are re-
corded on the disc. While playing the
DVD, the subtitles may change
while opening or closing the disc
tray, or while changing the title.
•In some cases, the subtitles
language is not changed to the
selected one immediately.
Subtitles
Turning the subtitles On and Off
When playing back a disc recorded with subtitles, you can turn
the subtitles on or off.
Press SUBTITLE during playback.
Press • or • to select the desired setting,
then press ENTER.
To turn off the PBC (VIDEO CD Version 2.0) _
Press DVD MENU in the stop mode.
To turn on the PBC, press DVD MENU again.
37
÷
2K70101A E P37-43 37 _ 07.1 29, 3:56 PM
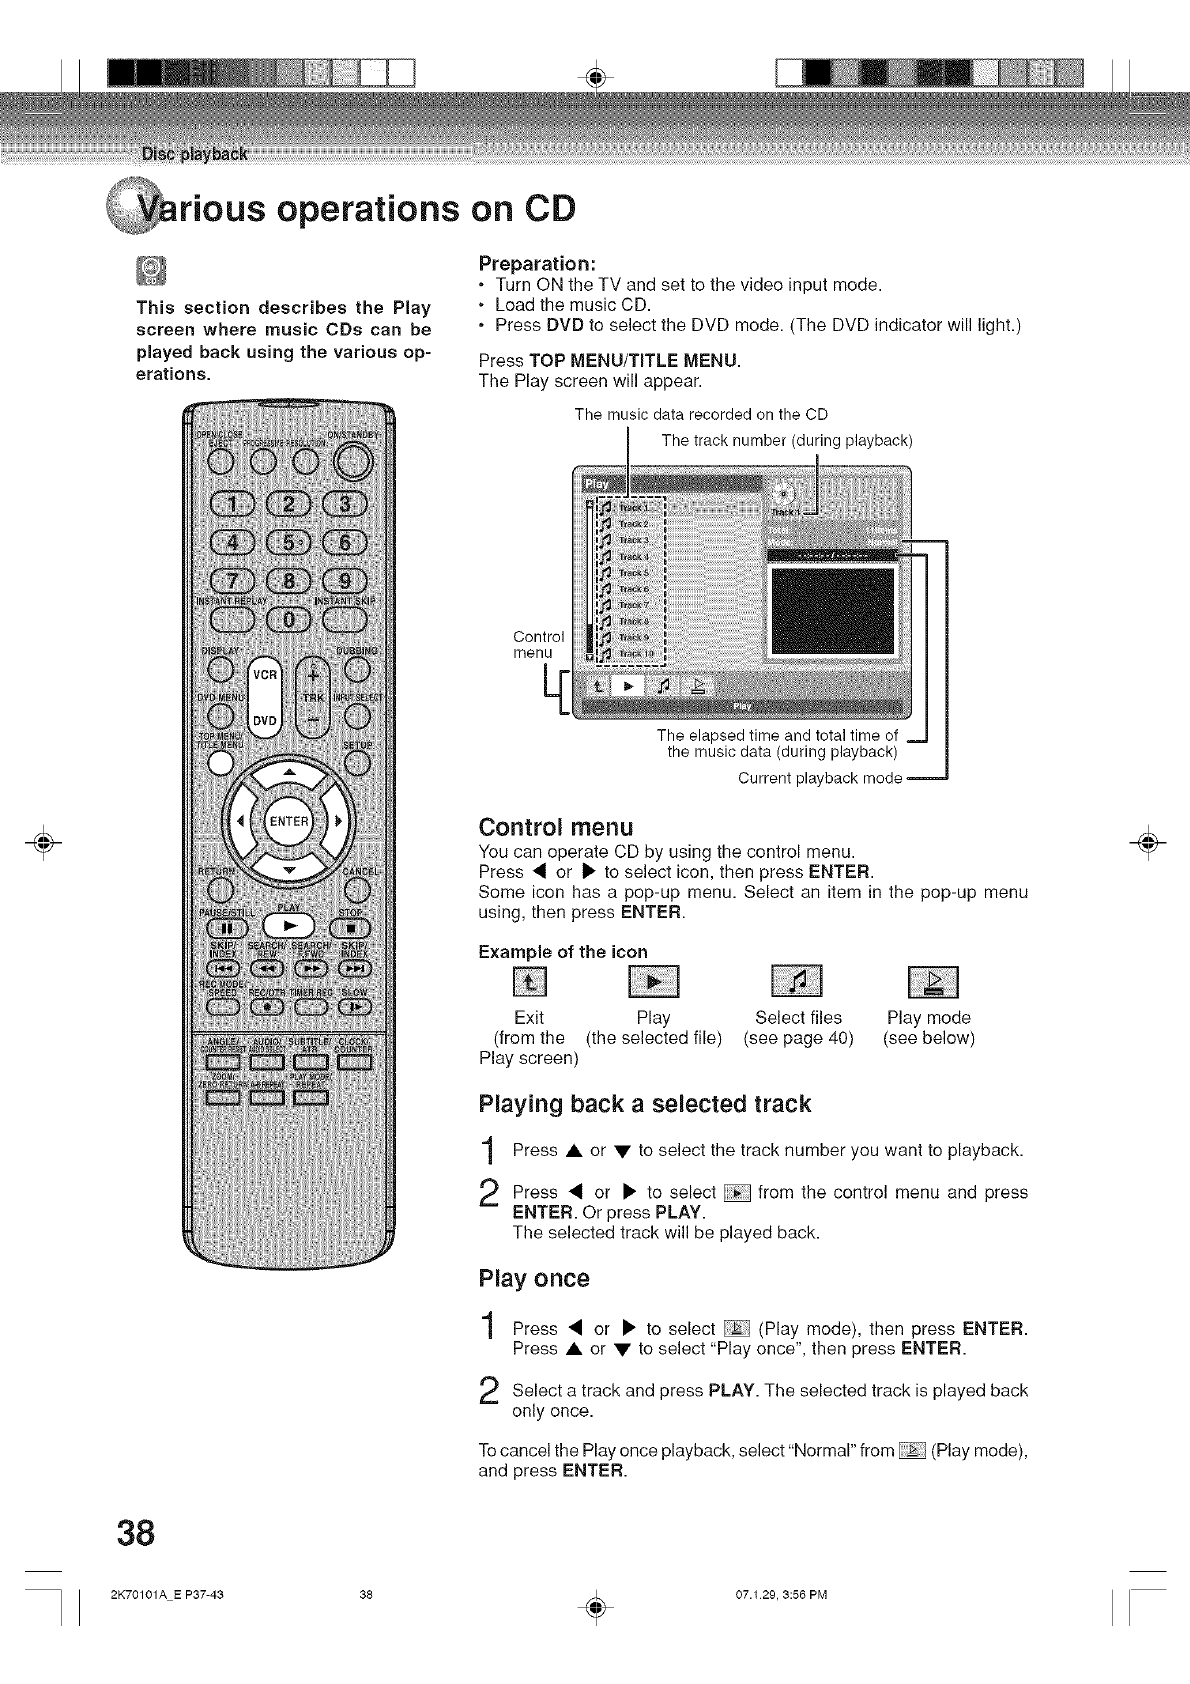
÷
rious operations on CD
This section describes the Play
screen where music CDs can be
played back using the various op-
erations.
Preparation:
•Turn ON the TV and set to the video input mode.
.Load the music CD.
•Press DVD to select the DVD mode. (The DVD indicator will light.)
Press TOP MENU/TITLE MENU.
The Play screen will appear.
The music data recorded on the CD
The track number (during playback)
Control
menu
The elapsed time and total time of
the music data (during playback)
Current playback mode
Control menu
You can operate CD by using the control menu.
Press • or • to select icon, then press ENTER.
Some icon has a pop-up menu. Select an item in the pop-up menu
using, then press ENTER.
Example of the icon
Exit Play Select files Play mode
(from the (the selected file) (see page 40) (see below)
Play screen)
Playing back a selected track
1
2
Press • or • to select the track number you want to playback.
Press • or • to select from the control menu and press
ENTER. Or press PLAY.
The selected track will be played back.
Play once
1
2
Press • or • to select (Play mode), then press ENTER.
Press • or • to select "Play once", then press ENTER.
Select a track and press PLAY. The selected track is played back
only once.
Tocancel the Play once playback, select "Normal" from (Play mode),
and press ENTER.
÷
38
2K70101A E P37-43 38 _ 07.129, 3:56 PM
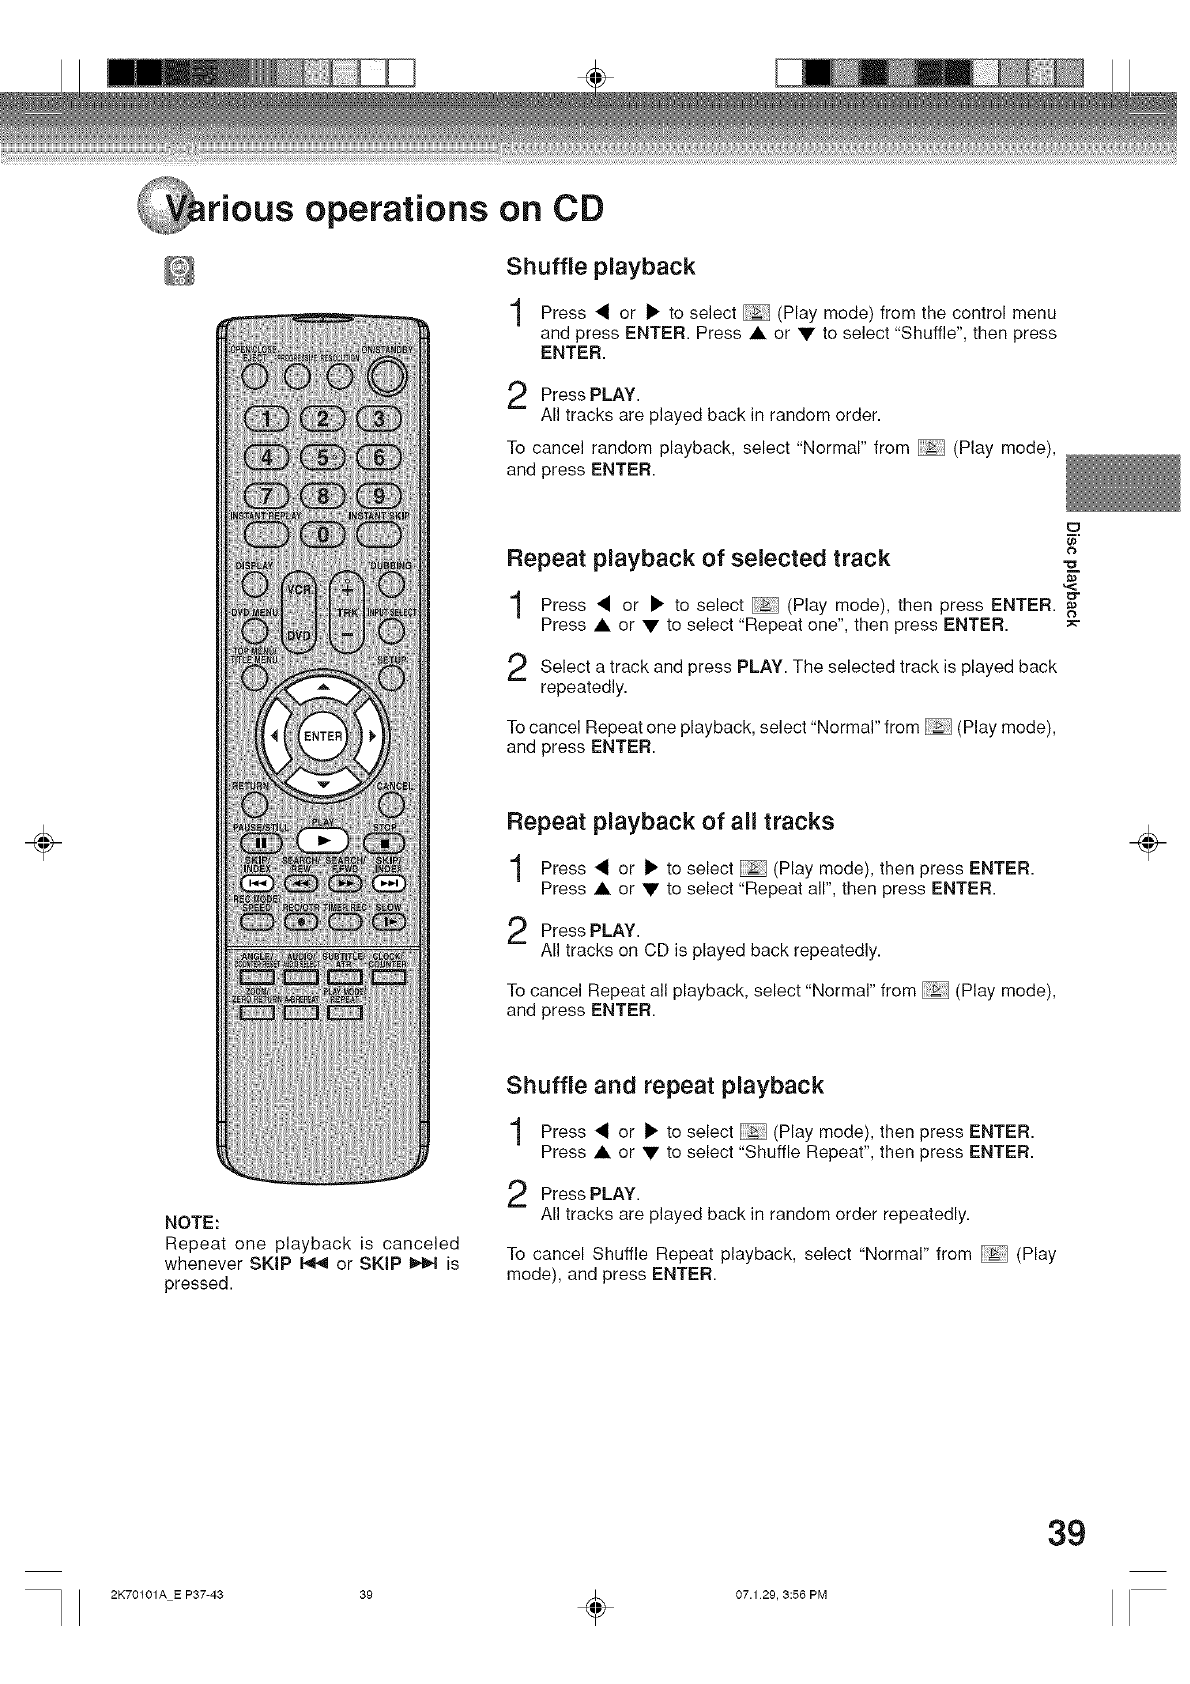
÷
rious operations on CD
Shuffle playback
Press "_ or _" to select (Play mode) from the control menu
and press ENTER. Press • or • to select "Shuffle", then press
ENTER.
Press PLAY.
All tracks are played back in random order.
To cancel random playback, select "Normal" from _ (Play mode),
and press ENTER.
Repeat playback of selected track
1Press • or _" to select _ (Play mode), then press ENTER. _-
Press • or • to select "Repeat one", then press ENTER. _=
Select track and PLAY. The selected track is back
apress played
repeatedly.
To cancel Repeat one playback, select "Normal" from (Play mode),
and press ENTER.
Repeat playback of all tracks
Press _ or i_ to select (Play mode), then press ENTER.
Press • or • to select "Repeat all", then press ENTER.
Press PLAY.
All tracks on CD is played back repeatedly.
To cancel Repeat all playback, select "Normal" from (Play mode),
and press ENTER.
NOTE:
Repeat one playback is canceled
whenever SKIP _ or SKIP _ is
pressed.
Shuffle and repeat playback
Press _ or _ to select (Play mode), then press ENTER.
Press • or • to select "Shuffle Repeat", then press ENTER.
Press PLAY.
All tracks are played back in random order repeatedly.
To cancel Shuffle Repeat playback, select "Normal" from _ (Play
mode), and press ENTER.
÷
39
2K70101A E P37-43 39 _ 07.1 29, 3:56 PM
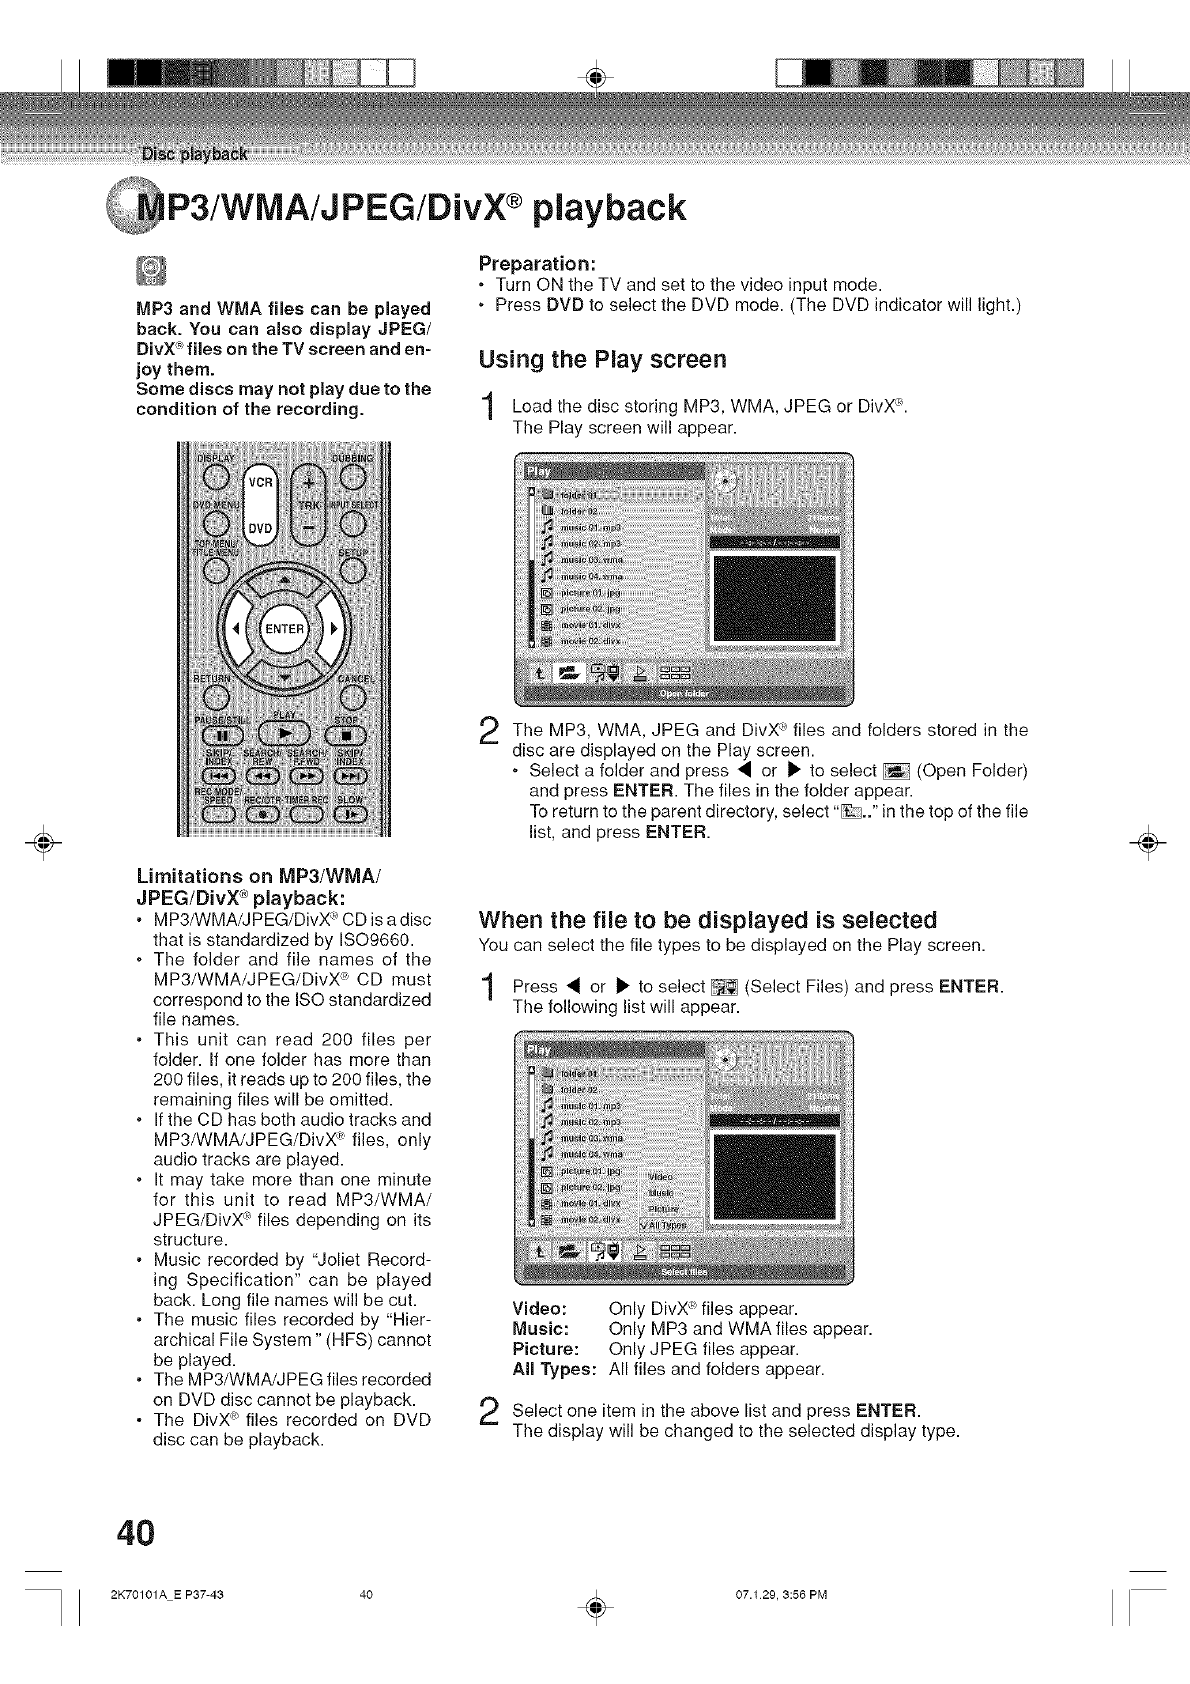
Ji_% ¸¸¸ _ m (_)
P3/WMA/JPEG/DwX playback
MP3 and WMA flies can be played
back. You can also display JPEG/
DivX_>files on the TV screen and en-
joy them.
Some discs may not play due to the
condition of the recording.
Preparation:
•Turn ON the TV and set to the video input mode.
.Press DVD to select the DVD mode. (The DVD indicator will light.)
Using the Play screen
Load the disc storing MP3, WMA, JPEG or DivX_.
The Play screen will appear.
÷Limitations on MP3/WMA/
JPEG/DivX ®playback:
• MP3/WMA/JPEG/DivX _ CD is a disc
that is standardized by ISO9660.
. The folder and file names of the
MP3/WMA/JPEG/DivX _ CD must
correspond to the ISO standardized
file names.
• This unit can read 200 files per
folder. If one folder has more than
200 files, it reads up to 200 files, the
remaining files will be omitted.
, If the CD has both audio tracks and
MP3/WMA/JPEG/DivX _ files, only
audio tracks are played.
, It may take more than one minute
for this unit to read MP3/WMA/
JPEG/DivX #_files depending on its
structure.
• Music recorded by "Joliet Record-
ing Specification" can be played
back. Long file names will be cut.
• The music files recorded by "Hier-
archical File System" (HFS) cannot
be played.
• The MP3/WMA/JPEG files recorded
on DVD disc cannot be playback.
• The DivX_"_files recorded on DVD
disc can be playback.
2The MP3, WMA, JPEG and DivX _'files and folders stored in the
disc are displayed on the Play screen.
.Select a folder and press • or i_ to select _ (Open Folder)
and press ENTER. The files in the folder appear.
To return to the parent directory, select "_.." in the top of the file
list, and press ENTER.
When the file to be displayed is selected
You can select the file types to be displayed on the Play screen.
Press • or II_ to select _ (Select Files) and press ENTER.
The following list will appear.
Video: Only DivX_ files appear.
Music: Only MP3 and WMA files appear.
Picture: Only JPEG files appear.
All Types: All files and folders appear.
Select item in the above list and ENTER.
one press
The display will be changed to the selected display type.
÷
4O
2K70101A E P37-43 40 _ 07.129, 3:56 PM
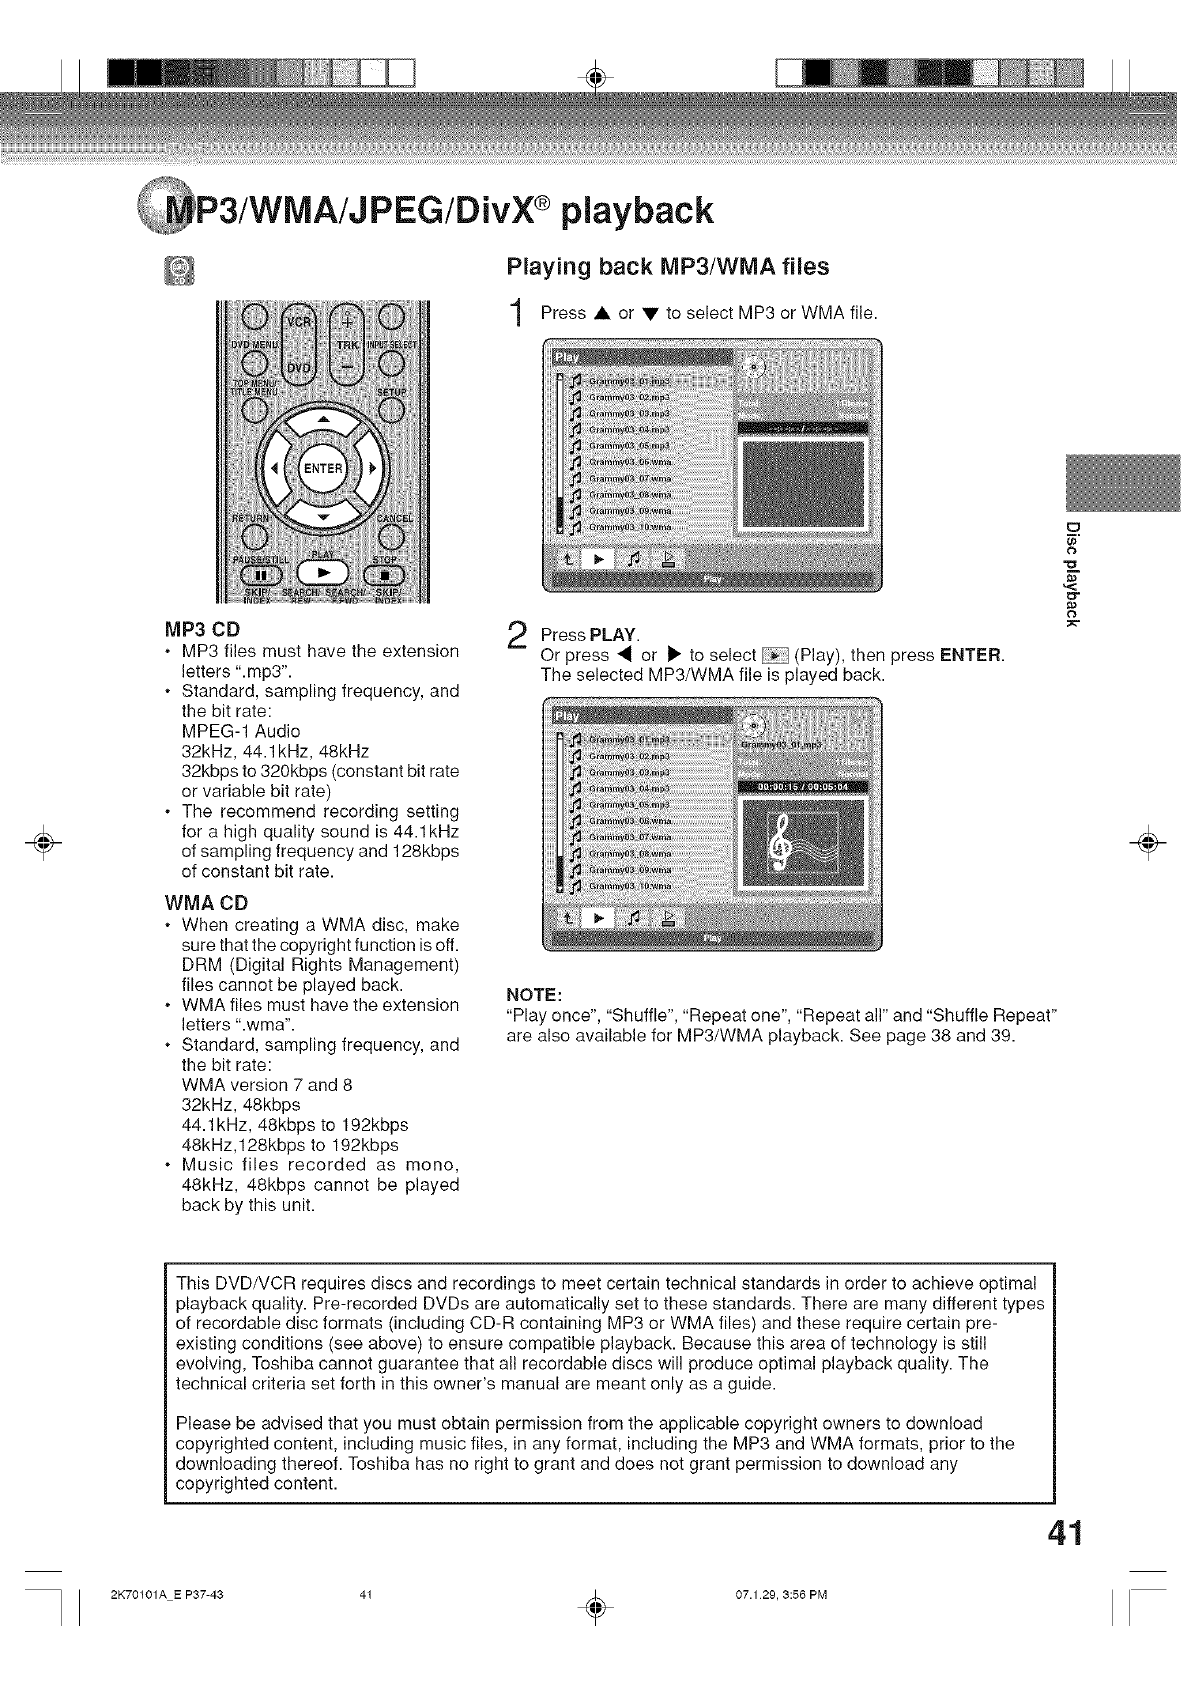
'WMA/JPEG/DivX ®playback
Playing back MP3/WMA files
Press • or • to select MP3 or WMA file.
÷
MP3 CD
•MP3 files must have the extension
letters ".mp3".
, Standard, sampling frequency, and
the bit rate:
MPEG-1 Audio
32kHz, 44.1kHz, 48kHz
32kbps to 320kbps (constant bit rate
or variable bit rate)
• The recommend recording setting
for a high quality sound is 44.1kHz
of sampling frequency and 128kbps
of constant bit rate.
WMA CD
=When creating a WMA disc, make
sure that the copyright function is off.
DRM (Digital Rights Management)
files cannot be played back.
• WMA files must have the extension
letters ".wma".
, Standard, sampling frequency, and
the bit rate:
WMA version 7 and 8
32kHz, 48kbps
44.1 kHz, 48kbps to 192kbps
48kHz,128kbps to 192kbps
, Music files recorded as mono,
48kHz, 48kbps cannot be played
back by this unit.
Press PLAY.
Or press _ or 1_ to select (Play), then press ENTER.
The selected MP3/WMA file is played back.
NOTE:
"Play once", "Shuffle", "Repeat one", "Repeat all" and "Shuffle Repeat"
are also available for MP3/WMA playback. See page 38 and 39.
÷
This DVD/VCR requires discs and recordings to meet certain technical standards in order to achieve optimal
playback quality. Pre-recorded DVDs are automatically set to these standards. There are many different types
of recordable disc formats (including CD-R containing MP3 or WMA files) and these require certain pre-
existing conditions (see above) to ensure compatible playback. Because this area of technology is still
evolving, Toshiba cannot guarantee that all recordable discs will produce optimal playback quality. The
technical criteria set forth in this owner's manual are meant only as a guide.
Please be advised that you must obtain permission from the applicable copyright owners to download
copyrighted content, including music files, in any format, including the MP3 and WMA formats, prior to the
downloading thereof. Toshiba has no right to grant and does not grant permission to download any
copyrighted content.
41
2K70101A E P37-43 41 _ 07.1 29, 3:56 PM
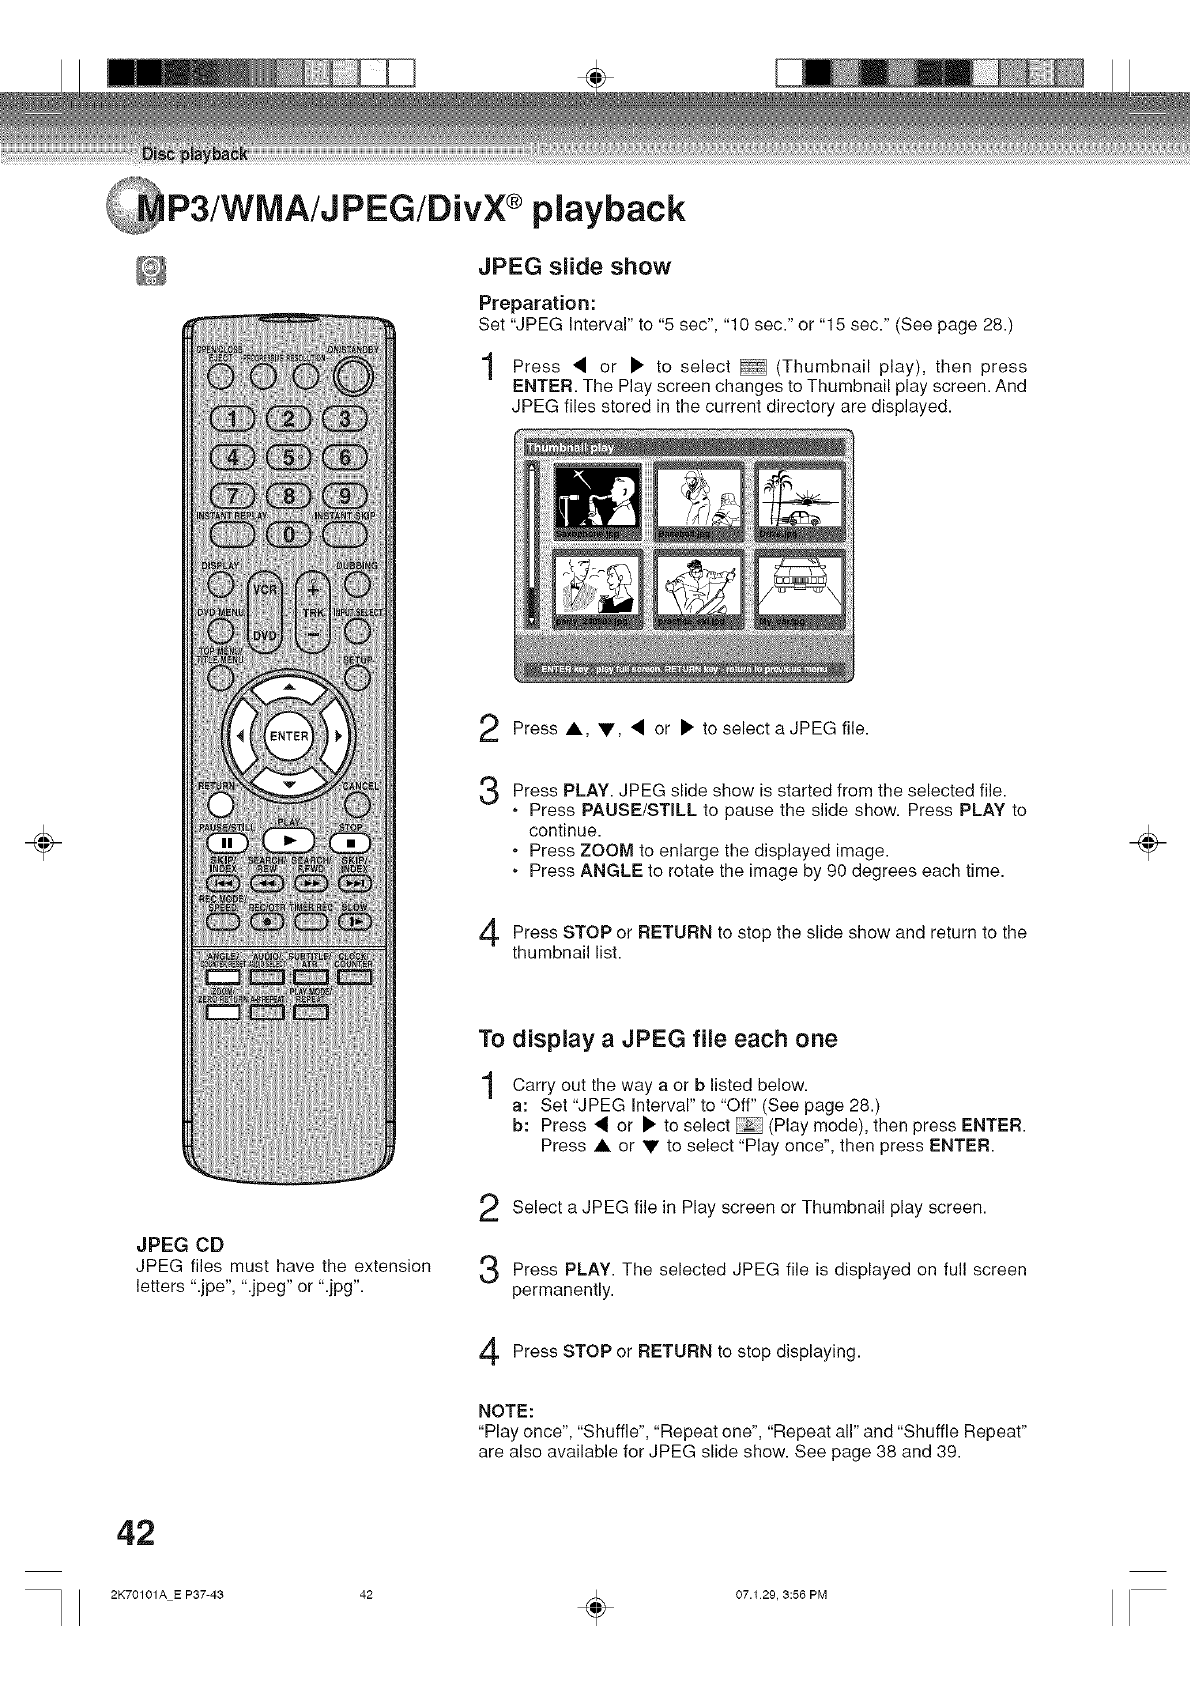
÷
P3/WMA/JPEG/DivX ®playback
JPEG slide show
Preparation:
Set "JPEG Interval" to "5 sec", "10 sec." or "15 sec." (See page 28.)
Press or to select _ (Thumbnail play), then press
ENTER. The Play screen changes to Thumbnail play screen. And
JPEG files stored in the current directory are displayed.
2
3
Press •, V, • or • to select a JPEG file.
Press PLAY. JPEG slide show is started from the selected file.
•Press PAUSE/STILL to pause the slide show. Press PLAY to
continue.
•Press ZOOM to enlarge the displayed image.
.Press ANGLE to rotate the image by 90 degrees each time.
Press STOP RETURN the slide show and the
or to stop return to
thumbnail list.
To display a JPEG file each one
Carry out the way a or b listed below.
a: Set "JPEG Interval" to "Off" (See page 28.)
b: Press • or • to select _ (Play mode), then press ENTER.
Press • or •to select "Play once", then press ENTER.
÷
JPEG CD
JPEG files must have the extension
letters ".jpe', ".jpeg" or ".jpg'.
Select a JPEG file in Play screen or Thumbnail play screen.
Press PLAY. The selected JPEG file is displayed on full screen
permanently.
Press STOP or RETURN to stop displaying.
NOTE:
"Play once", "Shuffle", "Repeat one", "Repeat all" and "Shuffle Repeat"
are also available for JPEG slide show. See page 38 and 39.
42
2K70101A E P37-43 42 _ 07.129, 3:56 PM
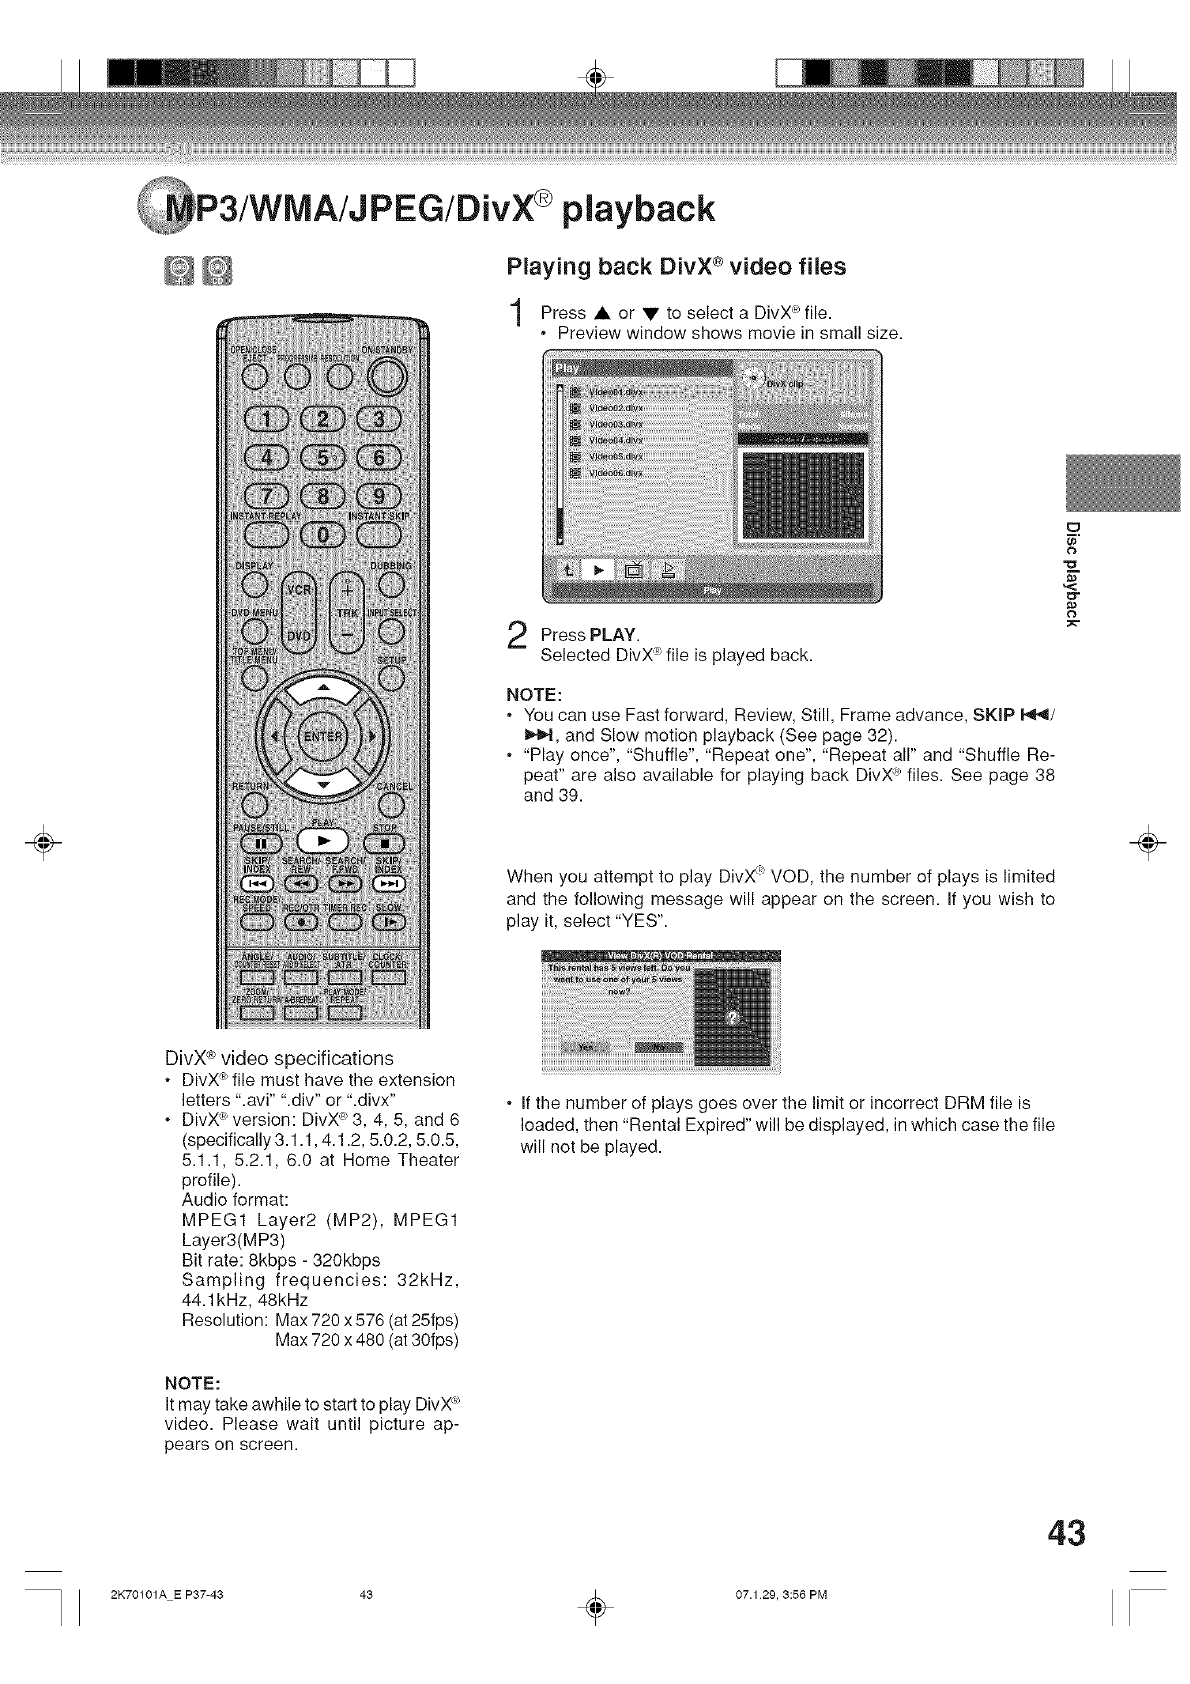
÷
P3/WMA/JPEG/DivX playback
Playing back DivX ®video files
Press • or • to select a DivX _ file.
•Preview window shows movie in small size.
Press PLAY.
Selected DivX _ file is played back.
NOTE:
,You can use Fast forward, Review, Still, Frame advance, SKIP t,4_/
Ib,._l,and Slow motion playback (See page 32).
•"Play once", "Shuffle", "Repeat one", "Repeat all" and "Shuffle Re-
peat" are also available for playing back DivX_ files. See page 38
and 39.
When you attempt to play DivX<'_'VOD, the number of plays is limited
and the following message will appear on the screen. If you wish to
play it, select "YES".
#a
÷
DivX ®video specifications
• DivX_ file must have the extension
letters ".avi" ".div" or ".divx"
, DivX _ version: DivX_ 3, 4, 5, and 6
(specifically 3.1.1,4.1.2, 5.0.2, 5.0.5,
5.1.1, 5.2.1, 6.0 at Home Theater
profile).
Audio format:
MPEG1 Layer2 (MP2), MPEG1
Layer3(MP3)
Bit rate: 8kbps - 320kbps
Sampling frequencies: 32kHz,
44.1 kHz, 48kHz
Resolution: Max 720 x 576 (at 25fps)
Max 720 x 480 (at 30fps)
NOTE:
It may take awhile to start to play DivX _
video. Please wait until picture ap-
pears on screen.
• If the number of plays goes over the limit or incorrect DRM file is
loaded, then "Rental Expired" will be displayed, in which case the file
will not be played.
43
2K70101A E P37-43 43 _ 07.1 29, 3:56 PM
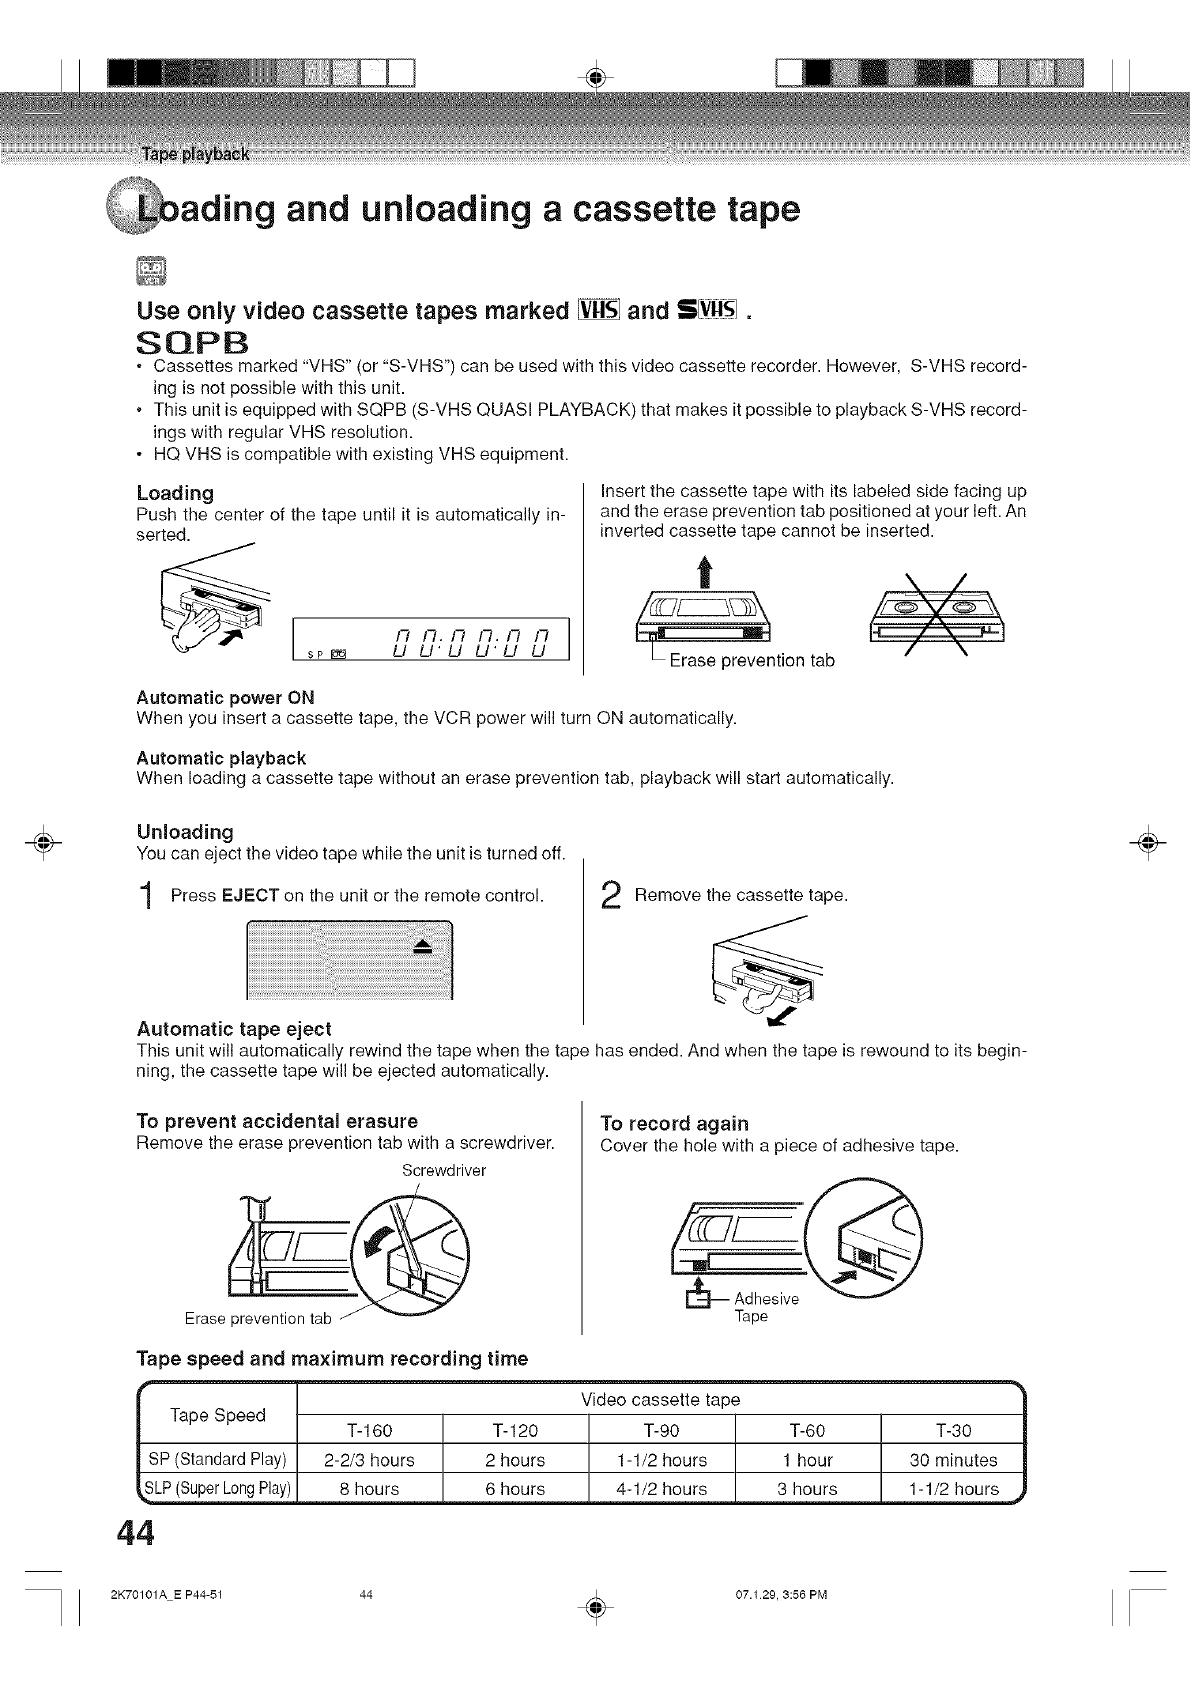
ading and unloading a cassette tape
÷
Use only video cassette tapes marked _ and S{iYlgg_,.
SQPB
, Cassettes marked "VHS" (or "S-VHS') can be used with this video cassette recorder. However, S-VHS record-
ing is not possible with this unit.
, This unit is equipped with SQPB (S-VHS QUASI PLAYBACK) that makes it possible to playback S-VHS record-
ings with regular VHS resolution.
• HQ VHS is compatible with existing VHS equipment.
Loading
Push the center of the tape until it is automatically in-
serted.
Insert the cassette tape with its labeled side facing up
and the erase prevention tab positioned at your left. An
inverted cassette tape cannot be inserted.
t
_ntion tab
Automatic power ON
When you insert a cassette tape, the VCR power will turn ON automatically.
Automatic playback
When loading a cassette tape without an erase prevention tab, playback will start automatically.
Unloading
Youcan ejectthe video tape while the unit is turned off.
Press EJECT on the unit or the remote control. _ cassette tape.
Remove the
Automatic tape eject
This unit will automatically rewind the tape when the tape has ended. And when the tape is rewound to its begin-
ning, the cassette tape will be ejected automatically.
To prevent accidental erasure
Remove the erase prevention tab with a screwdriver.
Screwdriver
To record again
Cover the hole with a piece of adhesive tape.
Tape
Tape speed and maximum recording time
Video cassette tape
Tape Speed T-160 T-120 T-90 T-60 T-30
SP (Standard Play) 2-2/3 hours 2 hours 1-1/2 hours 1 hour 30 minutes
!LP (SuperLongPlay). 8 hours . 6 hours . 4-1/2 hours . 3 hours . 1-1/2 hours .
44
÷
2K70101A E P44-51 44 _ 07.129, 3:56 PM
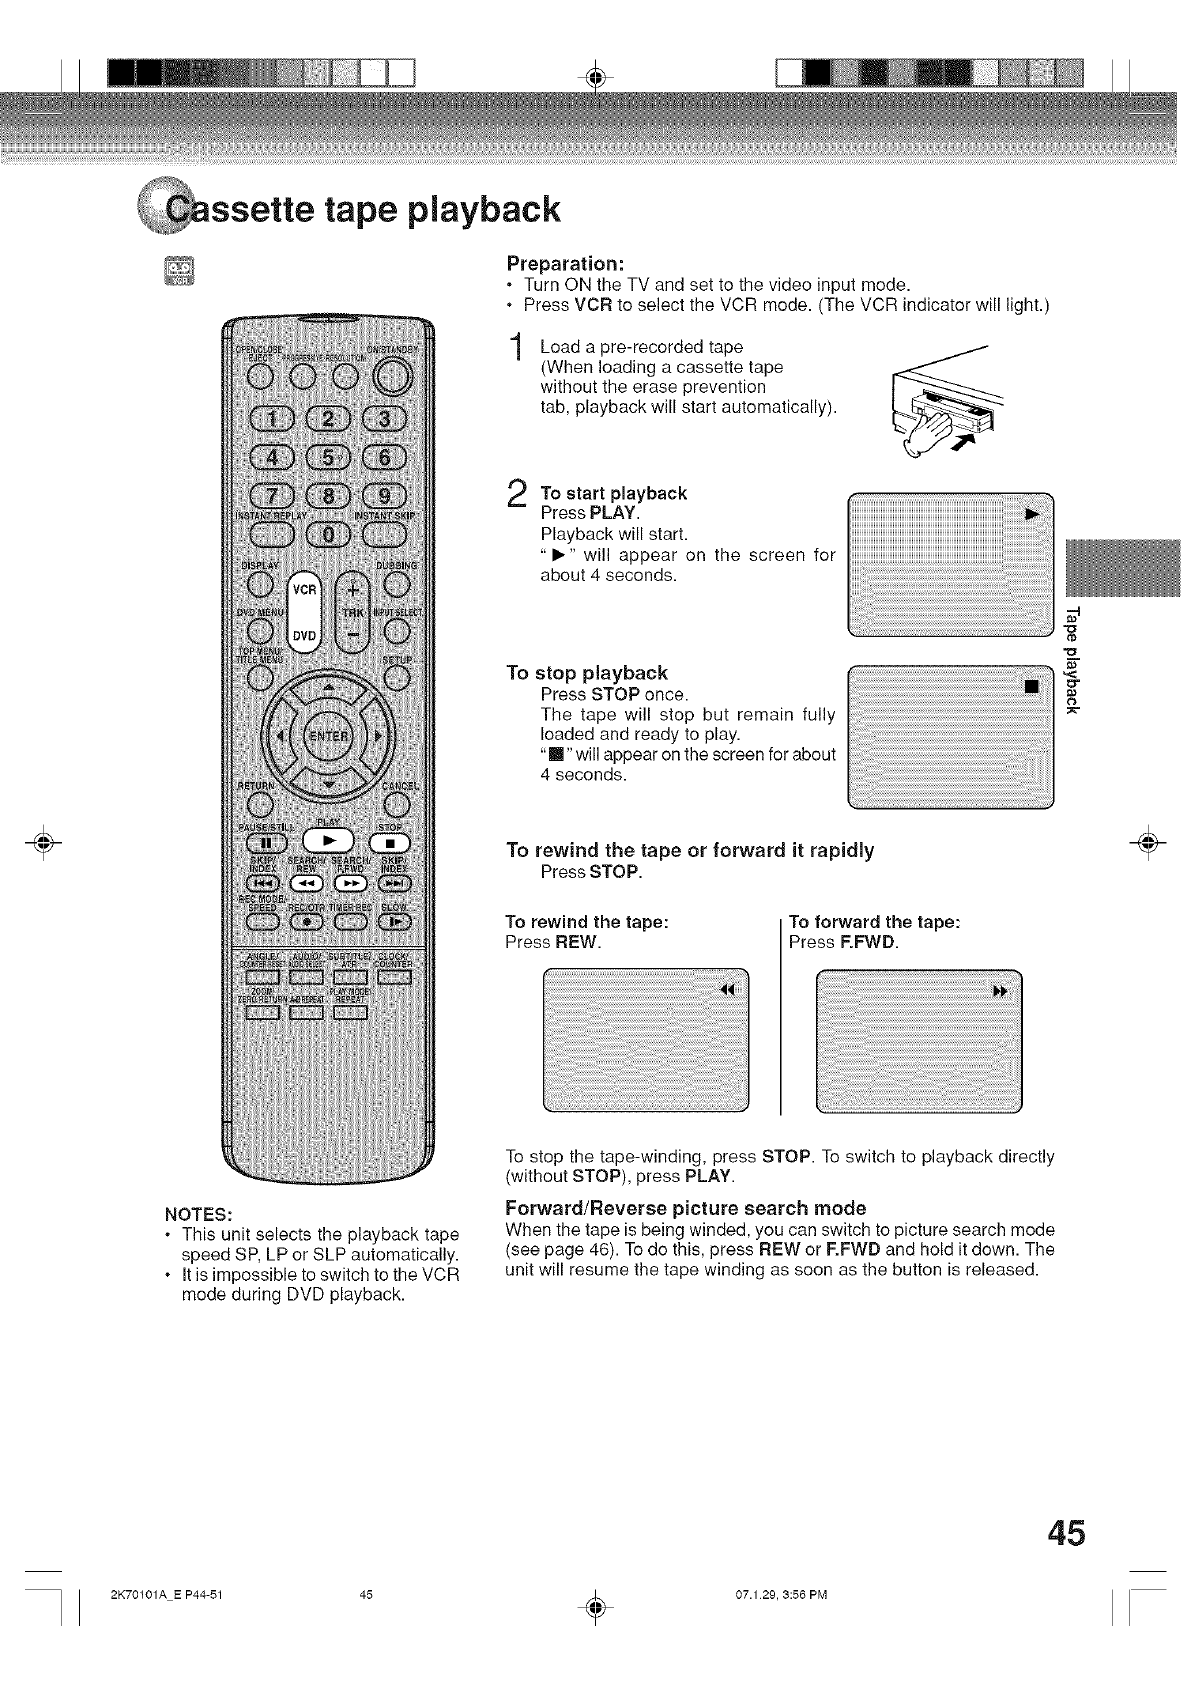
÷
tape playback
NOTES:
* This unit selects the playback tape
speed SP, LP or SLP automatically.
It is impossible to switch to the VCR
mode during DVD playback.
Preparation:
•Turn ON the TV and set to the video input mode.
.Press VCR to select the VCR mode. (The VCR indicator will light.)
Load a pre-recorded tape
(When loading a cassette tape
without the erase prevention
tab, playback will start automatically).
To start playback
Press PLAY.
Playback will start.
"1_" will appear on the screen for
about 4 seconds.
To stop playback
Press STOP once.
The tape will stop but remain fully
loaded and ready to play.
"m - will appear on the screen for about
4 seconds.
To rewind the tape or forward it rapidly
PressSTOP.
To rewind the tape:
Press REW. To forward the tape:
Press RFWD.
To stop the tape-winding, press STOP. To switch to playback directly
(without STOP), press PLAY.
Forward/Reverse picture search mode
When the tape is being winded, you can switch to picture search mode
(see page 46). To do this, press REW or F.FWD and hold it down. The
unit will resume the tape winding as soon as the button is released.
÷
45
2K70101A E P44-51 45 _ 07.1 29, 3:56 PM
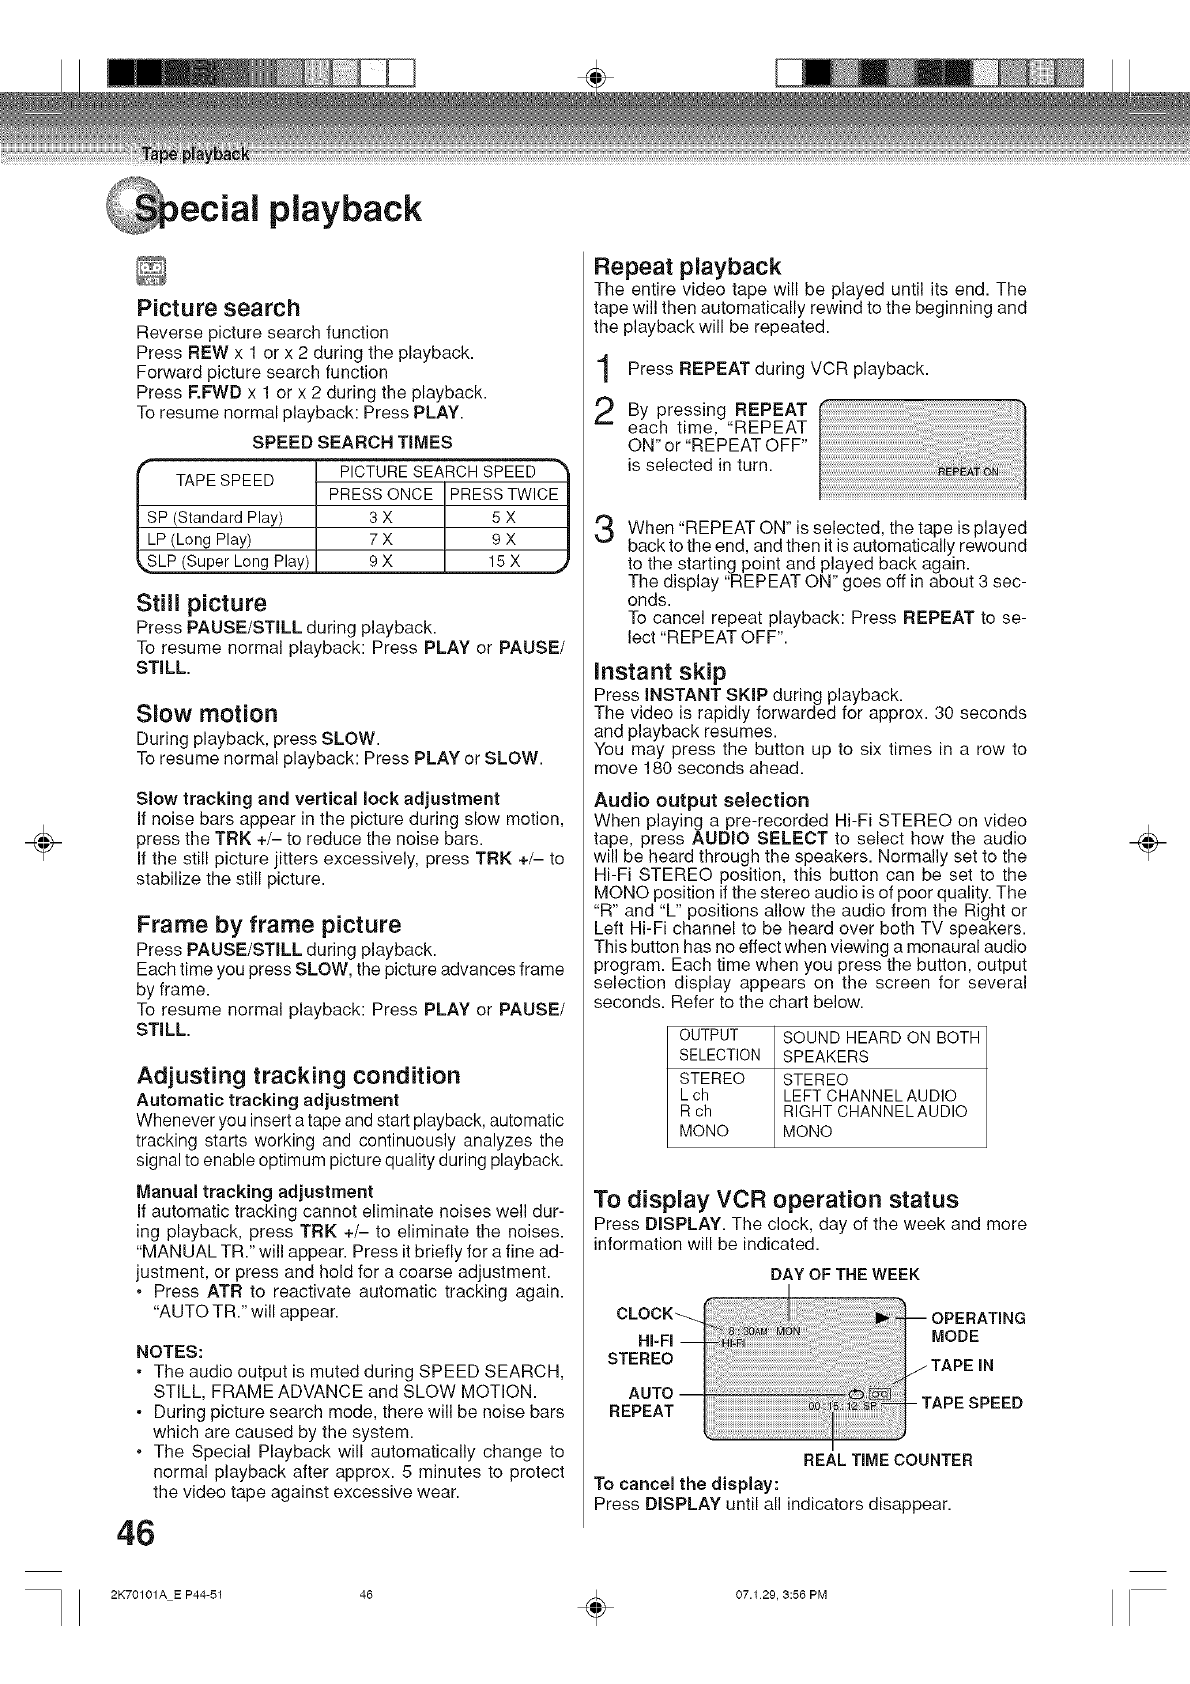
÷
eciai playback
Picture search
Reverse picture search function
Press PEW x 1 or x 2 during the playback.
Forward picture search function
Press RFWD x 1 or x 2 during the playback.
To resume normal playback: Press PLAY.
SPEED SEARCH TIMES
PICTURESEARCH SPEED
TAPE SPEED PRESS ONCE PRESSTWICE
SP (Standard Play) 3 X 5 X
LP(Long Play) 7 X 9 X
SLP (Super Long Play) 9 X 15X ,_
Still picture
Press PAUSE/STILL during playback.
To resume normal playback: Press PLAY or PAUSE/
STILL.
Slow motion
During playback, press SLOW.
To resume normal playback: Press PLAY or SLOW.
Slow tracking and vertical lock adjustment
If noise bars appear in the picture during slow motion,
press the TRK +/- to reduce the noise bars.
If the still picture jitters excessively, press TRK +/- to
stabilize the still picture.
Frame by frame picture
Press PAUSE/STILL during playback.
Each time you press SLOW, the picture advances frame
by frame.
To resume normal playback: Press PLAY or PAUSE/
STILL.
Adjusting tracking condition
Automatic tracking adjustment
Whenever you insert a tape and start playback, automatic
tracking starts working and continuously analyzes the
signal to enable optimum picture quality during playback.
Manual tracking adjustment
If automatic tracking cannot eliminate noises well dur-
ing playback, press TRK +/- to eliminate the noises.
"MANUAL TR." will appear. Press it briefly for a fine ad-
justment, or press and hold for a coarse adjustment.
*Press ATR to reactivate automatic tracking again.
"AUTO TR." will appear.
NOTES:
•The audio output is muted during SPEED SEARCH,
STILL, FRAME ADVANCE and SLOW MOTION.
•During picture search mode, there will be noise bars
which are caused by the system.
•The Special Playback will automatically change to
normal playback after approx. 5 minutes to protect
the video tape against excessive wear.
46
Repeat playback
The entire video tape will be played until its end. The
tape will then automatically rewind to the beginning and
the playback will be repeated.
1
2
3
Press REPEAT during VCR playback.
By pressing REPEAT
each time, "REPEAT
ON" or"REPEAT OFF"
is selected in turn.
::::::::::::::::::::::::::::::::::::::::::::::::::::::::::::::::::::::::::::::::::::::::::::::::::::::::::::::::::__
When "REPEAT ON" is selected, the tape is played
back to the end, and then it is automatically rewound
to the starting point and played back again.
The display "REPEAT ON" goes off in about 3 sec-
onds.
To cancel repeat playback: Press REPEAT to se-
lect "REPEAT OFF".
instant skip
Press INSTANT SKIP during playback.
The video is rapidly forwarded for approx. 30 seconds
and playback resumes.
You may press the button up to six times in a row to
move 180 seconds ahead.
Audio output selection
When playing a pre-recorded Hi-Fi STEREO on video
tape, press AUDIO SELECT to select how the audio
will be heard through the speakers. Normally set to the
Hi-Fi STEREO position, this button can be set to the
MONO position if the stereo audio is of poor quality. The
"R" and "L" positions allow the audio from the Right or
Left Hi-Fi channel to be heard over both TV speakers.
This button has no effect when viewing a monaural audio
program. Each time when you press the button, output
selection display appears on the screen for several
seconds. Refer to the chart below.
OUTPUT SOUND HEARD ON BOTH
SELECTION SPEAKERS
STEREO STEREO
Lch LEFT CHANNELAUDIO
Rch RIGHT CHANNELAUDIO
MONO MONO
To display VCR operation status
Press DISPLAY. The clock, day of the week and more
information will be indicated.
DAY OF THE WEEK
OPERATING
HI-FI MODE
STEREO iN
AUTO
REPEAT SPEED
REAL TIME COUNTER
To cancel the display:
Press DISPLAY until all indicators disappear.
÷
2K70101A E P44-51 46 _ 07.129, 3:56 PM

RETURN function /Video
ZERO RETURN function
This function makes tape rewind-
ing stop at the counter "00:00:00"
position automatically.
index search system
Press DISPLAY.
The counter display shows the tape run-
ning time during playback or recording.
2Press COUNTER RESET at the desired
tape position. The counter display will be
reset to the "00:00:00" position (e.g. the be-
ginning of recording).
÷
NOTES for Counter Display:
•If you rewind the tape beyond
"00:00:00", a minus sign C-') will be
displayed in front of the time.
•When you load a tape, the counter
will reset to "00:00:00".
•The counter does not function on
non-recorded (blank) sections of the
tape. When you rewind, fast forward
or play tapes through blank sections,
the counter stops.
NOTES for Video index search sys-
tem:
•When you record an INDEX mark
at the very beginning of the tape, the
mark may not be found.
•During INDEX search, the tape may
stop and begin to play at a slightly
different location.
•INDEX may not function properly
with old or worn out video tapes.
. INDEX marks may not be found if it
is extremely close to the point where
the search began.
. In recording, if you stop recording
temporarily, the INDEX mark is not
recorded on the tape.
Press STOP when playback or recording is finished.
Press ZERO RETURN.
The tape will be rewound or fast forwarded and automatically stop _
at the "00:00:00" position. -_
s-
Switching the display between clock and counter "_
Press CLOCK/COUNTER. The clock and tape counter alternate with _,
each other in the display window.
s p [_ F_I"L PM
f!
,'-i ,. I-'l 7 9 0sp _ U U "F
Video index search system
This function enables you to locate the beginning of any record-
ing made on the VOR.
Recording an INDEX MARK
The Index search function automatically records
an INDEX mark on the tape whenever a record-
ing is initiated.
Index search
Press iNDEX _ or _ during stop or play
mode.
For Succeeding programs: Press iNDEX _.
For Preceding programs: Press iNDEX I,,11_.
(Additional press increases the INDEX NO.
up to 9.)
When the iNDEX _ or _ is pressed, the
unit starts searching the INDEX NO. selected
and finds the portion, then playback starts
automatically.
To stop the Index Search, press STOP.
iiiiiiiiiiiiiiiiiiiiiiiiiiiiiiiiiiiiiiiiiiiiiiiiiiiiiiiiiiiiiiiiiiiiiiiiiiiiiiiiiiiiiiiiiiiiiiiiiiiiiii_!_:_:_:_:_:_:_:_:_:_:_:_:_:_!_!_i_i_!zi_!_i_!_i!;!_
or _ is displayed
INDEX NO. (up to 9)
47
÷
2K70101A E P44-51 47 _ 07.1 29, 3:56 PM
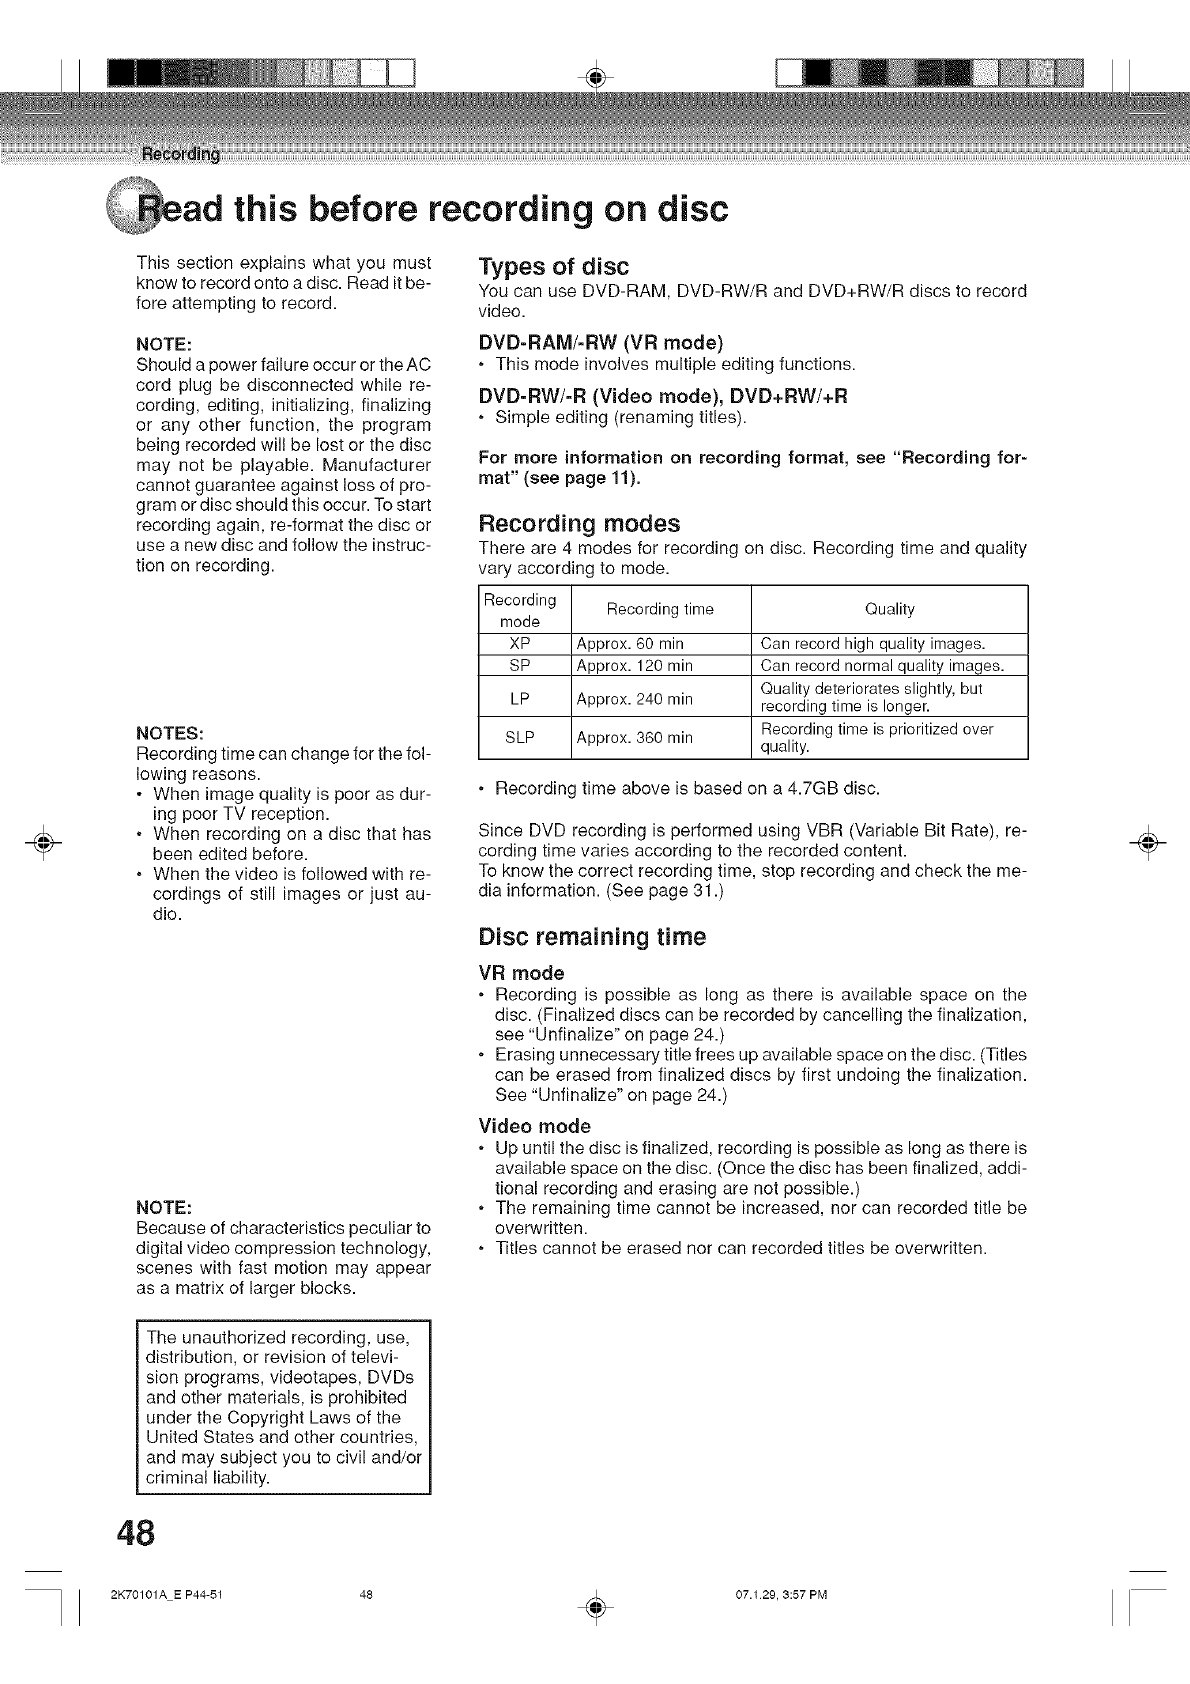
÷
ad this before recording on disc
This section explains what you must
know to record onto a disc. Read it be-
fore attempting to record.
NOTE:
Should a power failure occur or the AC
cord plug be disconnected while re-
cording, editing, initializing, finalizing
or any other function, the program
being recorded will be lost or the disc
may not be playable. Manufacturer
cannot guarantee against loss of pro-
gram or disc should this occur. To start
recording again, re-format the disc or
use a new disc and follow the instruc-
tion on recording.
NOTES:
Recording time can change for the fol-
lowing reasons.
• When image quality is poor as dur-
ing poor TV reception.
.When recording on a disc that has
been edited before.
.When the video is followed with re-
cordings of still images or just au-
dio.
NOTE:
Because of characteristics peculiar to
digital video compression technology,
scenes with fast motion may appear
as a matrix of larger blocks.
Types of disc
You can use DVD-RAM, DVD-RW/R and DVD+RW/R discs to record
video.
DVD-RAM/-RW (VR mode)
•This mode involves multiple editing functions.
DVD-RW/-R (Video mode), DVD+RW/+R
•Simple editing (renaming titles).
For more information on recording format, see "Recording for-
mat" (see page 11).
Recording modes
There are 4 modes for recording on disc. Recording time and quality
vary according to mode.
Recording Recording time Quality
mode
XP Approx. 60 min Can record high quality images.
SP Approx. 120 min Can record normal quality images.
Quality deteriorates slightly, but
LP Approx. 240 min recording time is longer.
Recording time is prioritized over
SLP Approx. 360 min quality.
•Recording time above is based on a 4.7GB disc.
Since DVD recording is performed using VBR (Variable Bit Rate), re-
cording time varies according to the recorded content.
To know the correct recording time, stop recording and check the me-
dia information. (See page 31 .)
Disc remaining time
VR mode
•Recording is possible as long as there is available space on the
disc. (Finalized discs can be recorded by cancelling the finalization,
see "Unfinalize" on page 24.)
•Erasing unnecessary title frees up available space on the disc. (Titles
can be erased from finalized discs by first undoing the finalization.
See "Unfinalize" on page 24.)
Video mode
•Up until the disc is finalized, recording is possible as long as there is
available space on the disc. (Once the disc has been finalized, addi-
tional recording and erasing are not possible.)
•The remaining time cannot be increased, nor can recorded title be
overwritten.
•Titles cannot be erased nor can recorded titles be overwritten.
The unauthorized recording, use,
distribution, or revision of televi-
sion programs, videotapes, DVDs
and other materials, is prohibited
under the Copyright Laws of the
United States and other countries,
and may subject you to civil and/or
criminal liability.
48
÷
2K70101A E P44-51 48 _ 07.129, 3:57 PM
this before recording on disc
The unauthorized recording, use,
distribution, or revision of televi-
sion programs, videotapes, DVDs
and other materials, is prohibited
under the Copyright Laws of the
United States and other countries,
and may subject you to civil and/or
criminal liability.
NOTE:
This unit does not support VCPS. Copy
Once programs cannot be recorded to
DVD+RW/+R disc.
images that cannot be recorded
Some DVD-Video and broadcasts contain copy-restriction signals to
protect copyrights. There are 3 types of copy-restriction signals: "Copy
Free", "Copy Never" and "Copy Once".
"Copy Free" (unrestricted recording)
Land-based TV broadcasts and images you record yourself with a video
camera allow unrestricted recording. There are no restrictions on re-
cording.
"Copy Never" (recording prohibited)
.Images that contain the recording prohibited signal cannot be re-
corded.
•If the recording prohibited signal appears halfway through an image
you are recording, recording is paused at that instant. When the
recording prohibited signal ends, recording resumes.
.This unit incorporates a built-in copy guard. It cannot record soft-
ware or broadcasted programs that contain copy restriction signals
designed to protect copyright, etc.
::u
"Copy Once" (one-time recordable) o_
o
Programs (images) that contain the one-time recordable signal can be _.
m.
recorded only in the VR mode using a DVD-RW disc that supports _
CPRM Ver. 1.1 and Ver 1.2.
÷ ÷
49
2K70101A E P44-51 49 _ 07.1 29, 3:57 PM
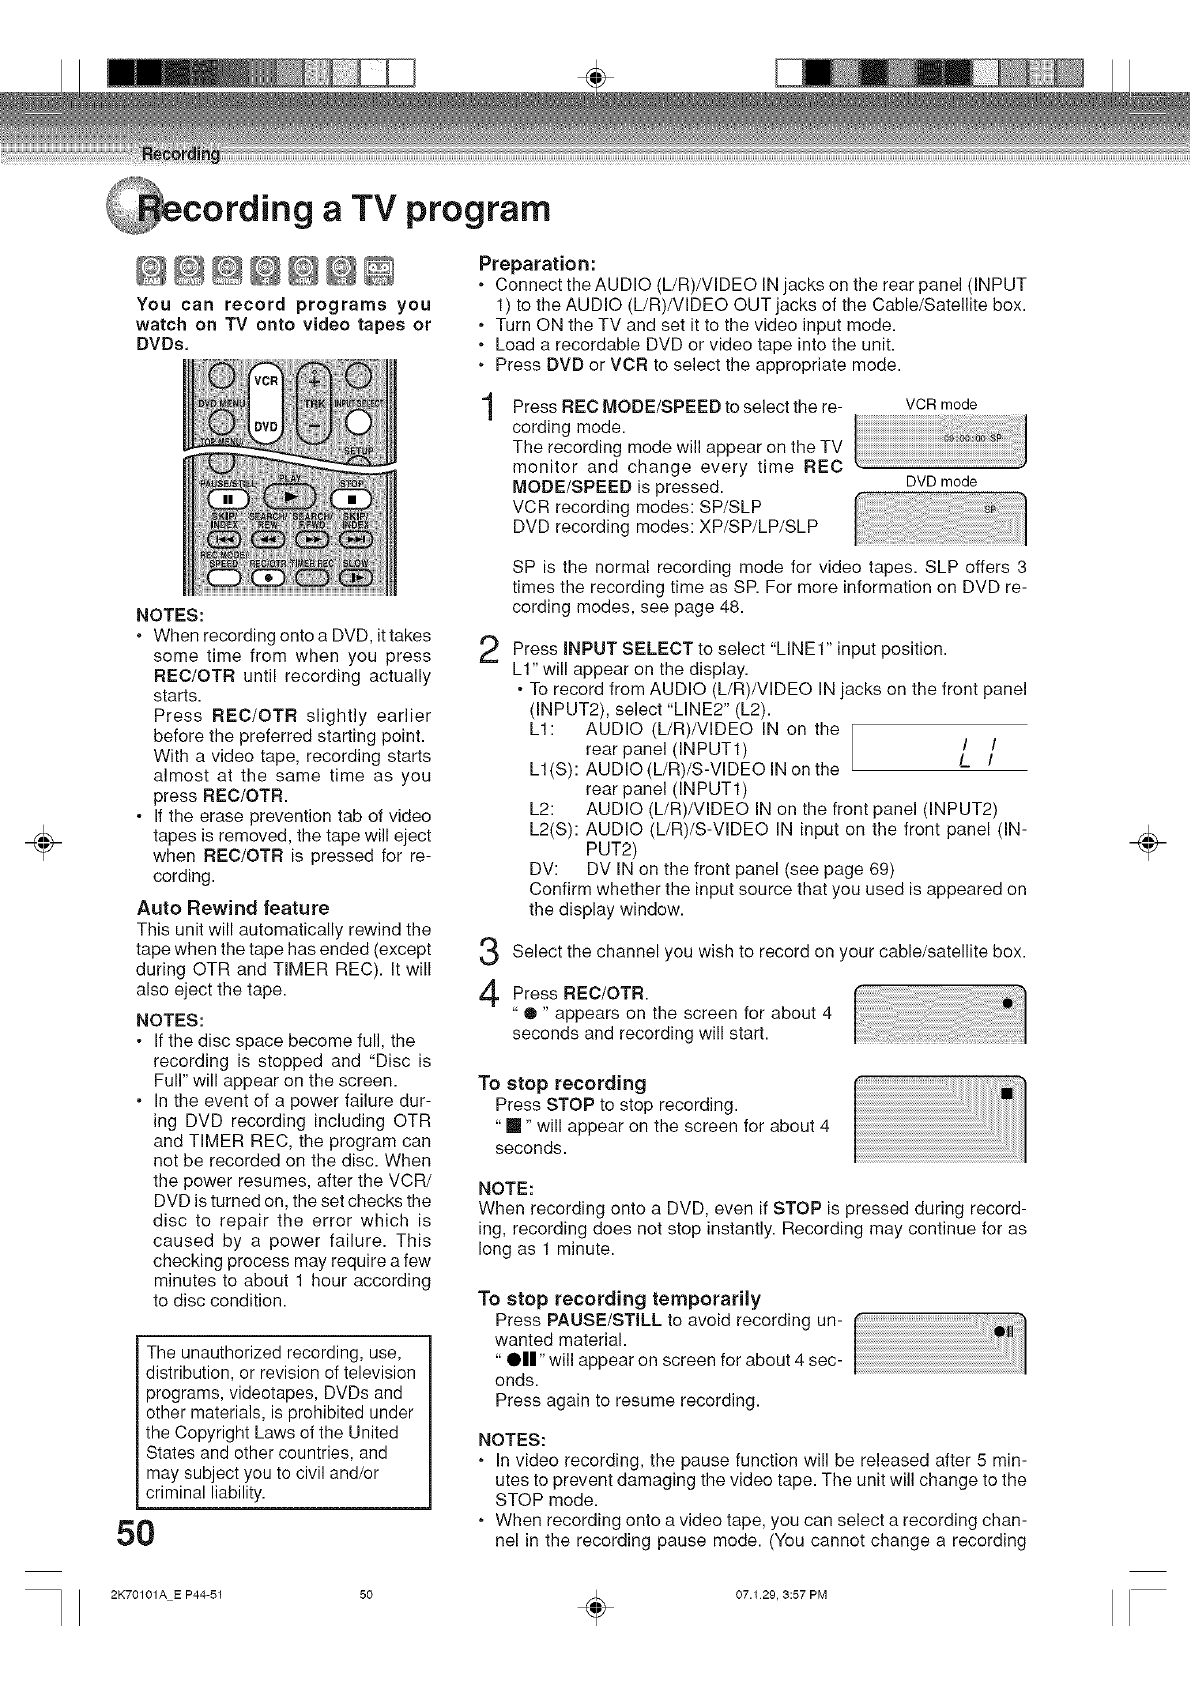
÷
cordlng a TV program
You can record programs you
watch on TV onto video tapes or
DVDs.
Preparation:
•Connect the AUDIO (L/R)/VIDEO IN jacks on the rear panel (INPUT
1) to the AUDIO (L/R)/VIDEO OUT jacks of the Cable/Satellite box.
•Turn ON the TV and set it to the video input mode.
•Load a recordable DVD or video tape into the unit.
.Press DVD or VOR to select the appropriate mode.
Press REC MODE/SPEED to select the re-
cording mode.
The recording mode will appear on the TV
monitor and change every time REC
MODE/SPEED is pressed.
VCR recording modes: SP/SLP
DVD recording modes: XP/SP/LP/SLP
VCR mode
DVD mode
NOTES:
.When recording onto a DVD, it takes
some time from when you press
REO/OTR until recording actually
starts.
Press REO/OTR slightly earlier
before the preferred starting point.
With a video tape, recording starts
almost at the same time as you
press REO/OTR.
•If the erase prevention tab of video
tapes is removed, the tape will eject
when REO/OTR is pressed for re-
cording.
Auto Rewind feature
This unit will automatically rewind the
tape when the tape has ended (except
during OTR and TIMER REC). It will
also eject the tape.
NOTES:
•If the disc space become full, the
recording is stopped and "Disc is
Full" will appear on the screen.
•In the event of a power failure dur-
ing DVD recording including OTR
and TIMER REC, the program can
not be recorded on the disc. When
the power resumes, after the VCR/
DVD is turned on, the set checks the
disc to repair the error which is
caused by a power failure. This
checking process may require a few
minutes to about 1 hour according
to disc condition.
The unauthorized recording, use,
distribution, or revision of television
programs, videotapes, DVDs and
other materials, is prohibited under
the Copyright Laws of the United
States and other countries, and
may subject you to civil and/or
criminal liability.
50
SP is the normal recording mode for video tapes. SLP offers 3
times the recording time as SP. For more information on DVD re-
cording modes, see page 48.
2Press INPUT SELECT to select "LINE1" input position.
L1" will appear on the display.
•To record from AUDIO (L/R)/VlDEO IN jacks on the front panel
(INPUT2), select "LINE2" (L2).
LI: AUDIO (L/R)/VIDEO IN on the
rear panel (INPUT1) / /
LI(S): AUDIO (L/R)/S-VlDEO IN on the L /
rear panel (INPUT1)
L2: AUDIO (L/R)/VlDEO IN on the front panel (INPUT2)
L2(S): AUDIO (L/R)/S-VlDEO IN input on the front panel (IN-
PUT2)
DV: DV IN on the front panel (see page 69)
Confirm whether the input source that you used is appeared on
the display window.
Select the channel you wish to record on your cable/satellite box.
Press REC/OTR.
" ® " appears on the screen for about 4
seconds and recording will start.
To stop recording
Press STOP to stop recording.
"[]" will appear on the screen for about 4
seconds.
NOTE:
When recording onto a DVD, even if STOP is pressed during record-
ing, recording does not stop instantly. Recording may continue for as
long as 1 minute.
To stop recording temporarily
Press PAUSE/STILL to avoid recording un-
wanted material.
"III" will appear on screen for about 4 sec-
onds.
Press again to resume recording.
NOTES:
•In video recording, the pause function will be released after 5 min-
utes to prevent damaging the video tape. The unit will change to the
STOP mode.
•When recording onto a video tape, you can select a recording chan-
nel in the recording pause mode. (You cannot change a recording
÷
2K70101A E P44-51 50 _ 07.129, 3:57 PM
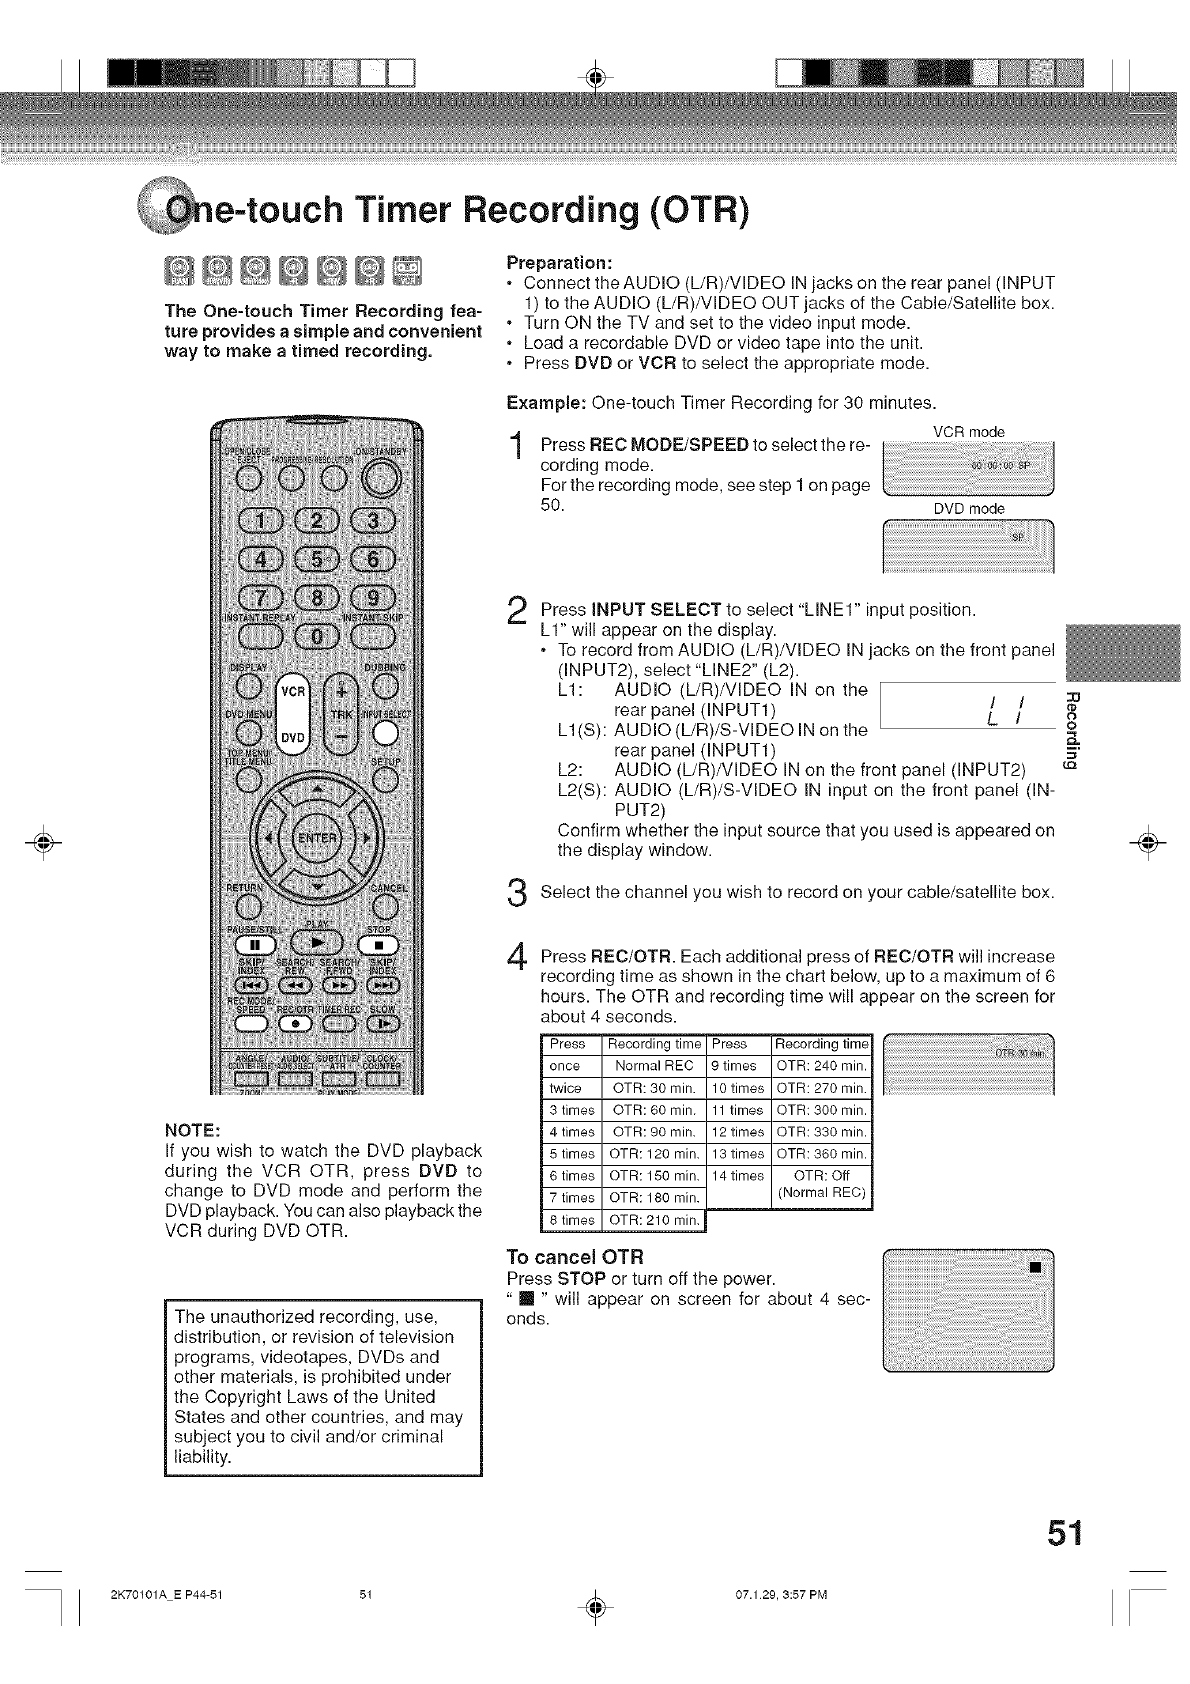
÷
e-touch Timer Recording (OTR)
@@@@@@@
The One-touch Timer Recording fea-
ture provides asimple and convenient
way to make atimed recording.
Preparation:
, Connect theAUDIO (L/R)/VIDEO IN jacks on the rear panel (INPUT
1) to the AUDIO (L/R)/VIDEO OUT jacks of the Cable/Satellite box.
• Turn ON the TV and set to the video input mode.
, Load a recordable DVD or video tape into the unit.
• Press DVD or VOR to select the appropriate mode.
Example: One-touch Timer Recording for 30 minutes.
Press REC MODE/SPEED to select the re-
cording mode.
For the recording mode, see step 1 on page
50.
VCR mode
NOTE:
If you wish to watch the DVD playback
during the VCR OTR, press DVD to
change to DVD mode and perform the
DVD playback. You can also playback the
VCR during DVD OTR.
The unauthorized recording, use,
distribution, or revision of television
programs, videotapes, DVDs and
other materials, is prohibited under
the Copyright Laws of the United
States and other countries, and may
subject you to civil and/or criminal
liability.
2
3
DVD mode
Press INPUT SELECT to select "LINE1" input position.
LI" will appear on the display.
•To record from AUDIO (L/R)/VlDEO IN jacks on the front panel
(INPUT2), select "LINE2" (L2).
LI: AUDIO (L/R)/VIDEO IN on the / /
rearpanel (INPUT1) L /
L1(S): AUDIO (L/R)/S-VlDEO IN on the
rear panel (INPUT1)
L2: AUDIO (L/R)/VIDEO IN on the front panel (INPUT2)
L2(S): AUDIO (L/R)/S-VIDEO IN input on the front panel (IN-
PUT2)
Confirm whether the input source that you used is appeared on
the display window.
Select the channel you wish to record on your cable/satellite box.
4Press REC/OTR. Each additional press of REC/OTR will increase
recording time as shown in the chart below, up to a maximum of 6
hours. The OTR and recording time will appear on the screen for
about 4 seconds.
Press Recording time
once Normal REC
twice OTR: 30 rain.
3 times OTR; 60 rain.
4 times OTR; 90 rain.
5 times OTR: 120 rain.
6 times OTR; 150 rain.
7 times OTR; 180 rain.
8 times OTR: 210 rain.
Press Recording time
9 times OTR: 240 rain.
10 times OTR: 270 rain.
11 times OTR: 300 rain.
12 times OTR: 330 rain.
13 times OTR: 360 rain.
14 times OTR: Off
(Normal REC)
To cancel OTR
Press STOP or turn off the power.
" m " will appear on screen for about 4 sec-
onds.
::u
0
o
÷
51
2K70101A E P44-51 51 _ 07.1 29, 3:57 PM
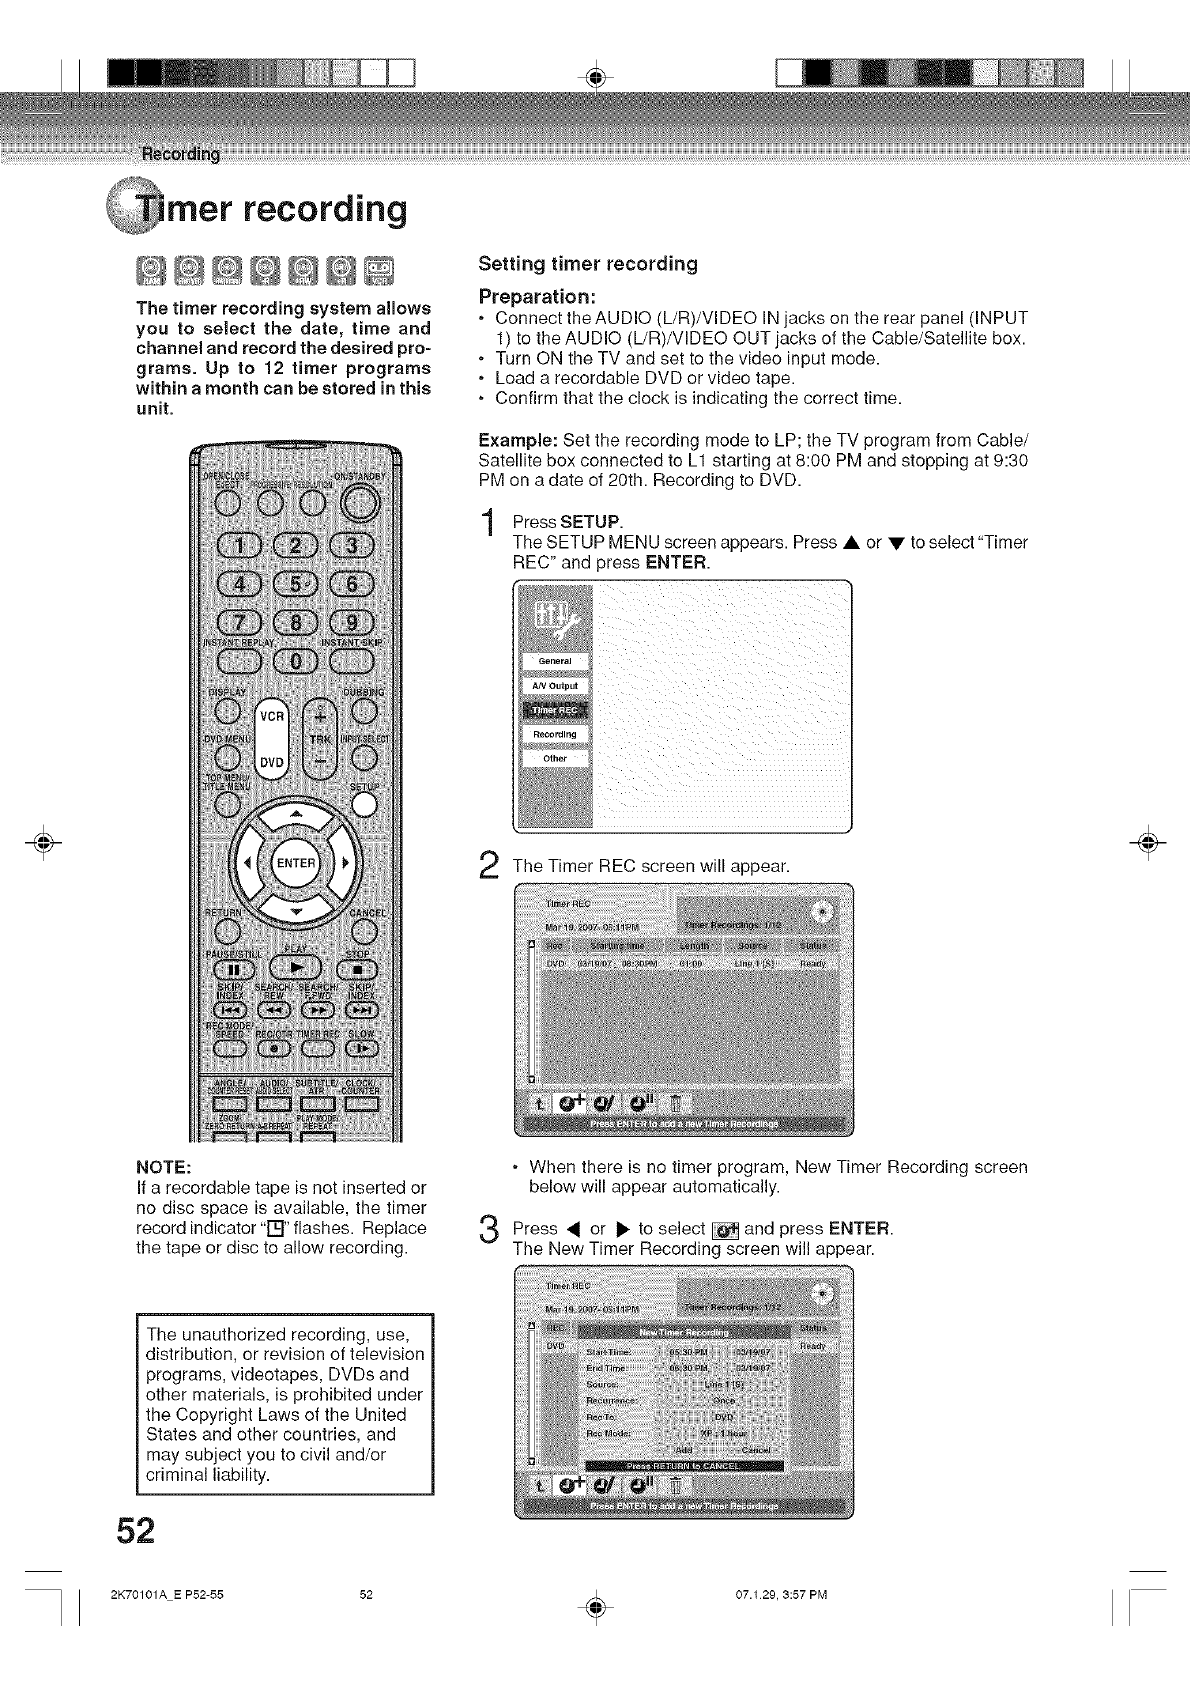
÷
mer recording
@@@@@@@
The timer recording system allows
you to select the date_ time and
channel and record the desired pro-
grams. Up to 12 timer programs
within a month can be stored in this
unit.
Setting timer recording
Preparation:
•Connect theAUDIO (L/R)/VIDEO IN jacks on the rear panel (INPUT
1) to the AUDIO (L/R)/VIDEO OUT jacks of the Cable/Satellite box.
•Turn ON the TV and set to the video input mode.
•Load a recordable DVD or video tape.
.Confirm that the clock is indicating the correct time.
Example: Set the recording mode to LP; the TV program from Cable/
Satellite box connected to L1 starting at 8:00 PM and stopping at 9:30
PM on a date of 20th. Recording to DVD.
Press SETUP.
The SETUP MENU screen appears. Press • or •to select "Timer
REC" and press ENTER.
The Timer REC screen will appear. ÷
NOTE:
If a recordable tape is not inserted or
no disc space is available, the timer
record indicator "rq" flashes. Replace
the tape or disc to allow recording.
,When there is no timer program, New Timer Recording screen
below will appear automatically.
,_ or • _ press
Press to select and ENTER.
The New Timer Recording screen will appear.
The unauthorized recording, use,
distribution, or revision of television
programs, videotapes, DVDs and
other materials, is prohibited under
the Copyright Laws of the United
States and other countries, and
may subject you to civil and/or
criminal liability.
52
2K70101A E P52-55 52 _ 07.129, 3:57 PM
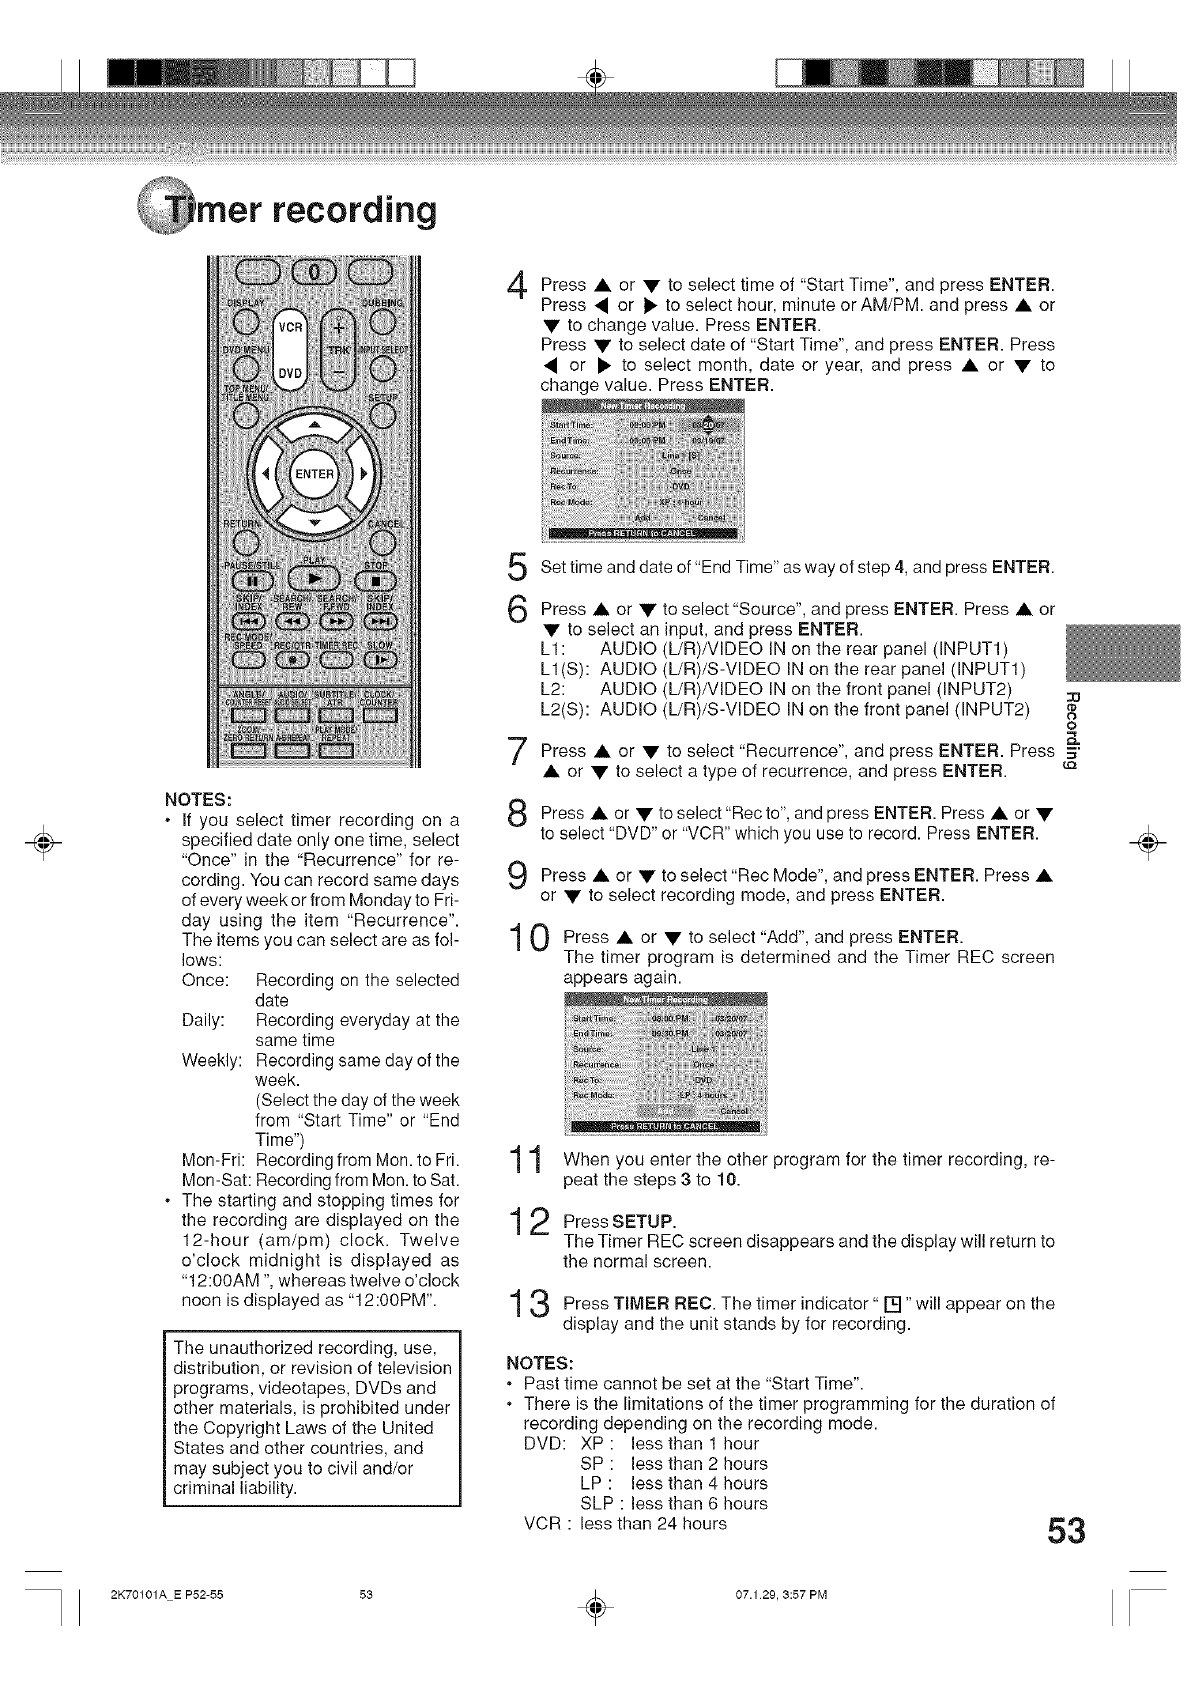
recording
Press select time of "Start and ENTER.
or to Time", press
Press • or • to select hour, minute or AM/PM. and press • or
• to change value. Press ENTER.
Press • to select date of "Start Time", and press ENTER. Press
• or • to select month, date or year, and press • or • to
change value. Press ENTER.
÷NOTES:
.If you select timer recording on a
specified date only one time, select
"Once" in the "Recurrence" for re-
cording. You can record same days
of every week or from Monday to Fri-
day using the item "Recurrence".
The items you can select are as fol-
lows:
Once: Recording on the selected
date
Daily: Recording everyday at the
same time
Weekly: Recording same day of the
week.
(Select the day of the week
from "Start Time" or "End
Time")
Mon-Fri: Recording from Mon. to Fri.
Mon-Sat: Recording from Mon. to Sat.
.The starting and stopping times for
the recording are displayed on the
12-hour (am/pro) clock. Twelve
o'clock midnight is displayed as
"12:00AM ", whereas twelve o'clock
noon is displayed as "12:00PM".
The unauthorized recording, use,
distribution, or revision of television
programs, videotapes, DVDs and
other materials, is prohibited under
the Copyright Laws of the United
States and other countries, and
may subject you to civil and/or
criminal liability.
5
6
7
8
9
Set time and date of "End Time" as way of step 4, and press ENTER.
Press • or • to select "Source", and press ENTER. Press • or
• to select an input, and press ENTER.
L1: AUDIO (L/R)/VIDEO IN on the rear panel (INPUT1)
LI(S): AUDIO (L/R)/S-VlDEO IN on the rear panel (INPUT1)
L2: AUDIO (L/R)/VlDEO IN on the front panel (INPUT2)
L2(S): AUDIO (L/R)/S-VlDEO IN on the front panel (INPUT2) 0
o
Press • or • to select "Recurrence", and press ENTER. Press 5"
• or • to select a type of recurrence, and press ENTER.
Press • or • to select "Recto", and press ENTER. Press • or •
to select "DVD" or "VCR" which you use to record. Press ENTER.
Press • or • to select "Rec Mode", and press ENTER. Press •
or • to select recording mode, and press ENTER.
0 Press • to select and ENTER.
OF "Add", press
The timer program is determined and the Timer REC screen
appears again.
1When you enter the other program for the timer recording, re-
peat the steps 3to 10.
2Press SETUP.
The Timer REC screen disappears and the display will return to
the normal screen.
3Press TIMER REC. The timer indicator" "will the
[] appear on
display and the unit stands by for recording.
NOTES:
.Past time cannot be set at the "Start Time".
•There is the limitations of the timer programming for the duration of
recording depending on the recording mode.
DVD: XP : less than 1 hour
SP : less than 2 hours
LP : less than 4 hours
SLP : less than 6 hours
VCR : less than 24 hours 53
÷
2K70101A E P52-55 53 _ 07.1 29, 3:57 PM
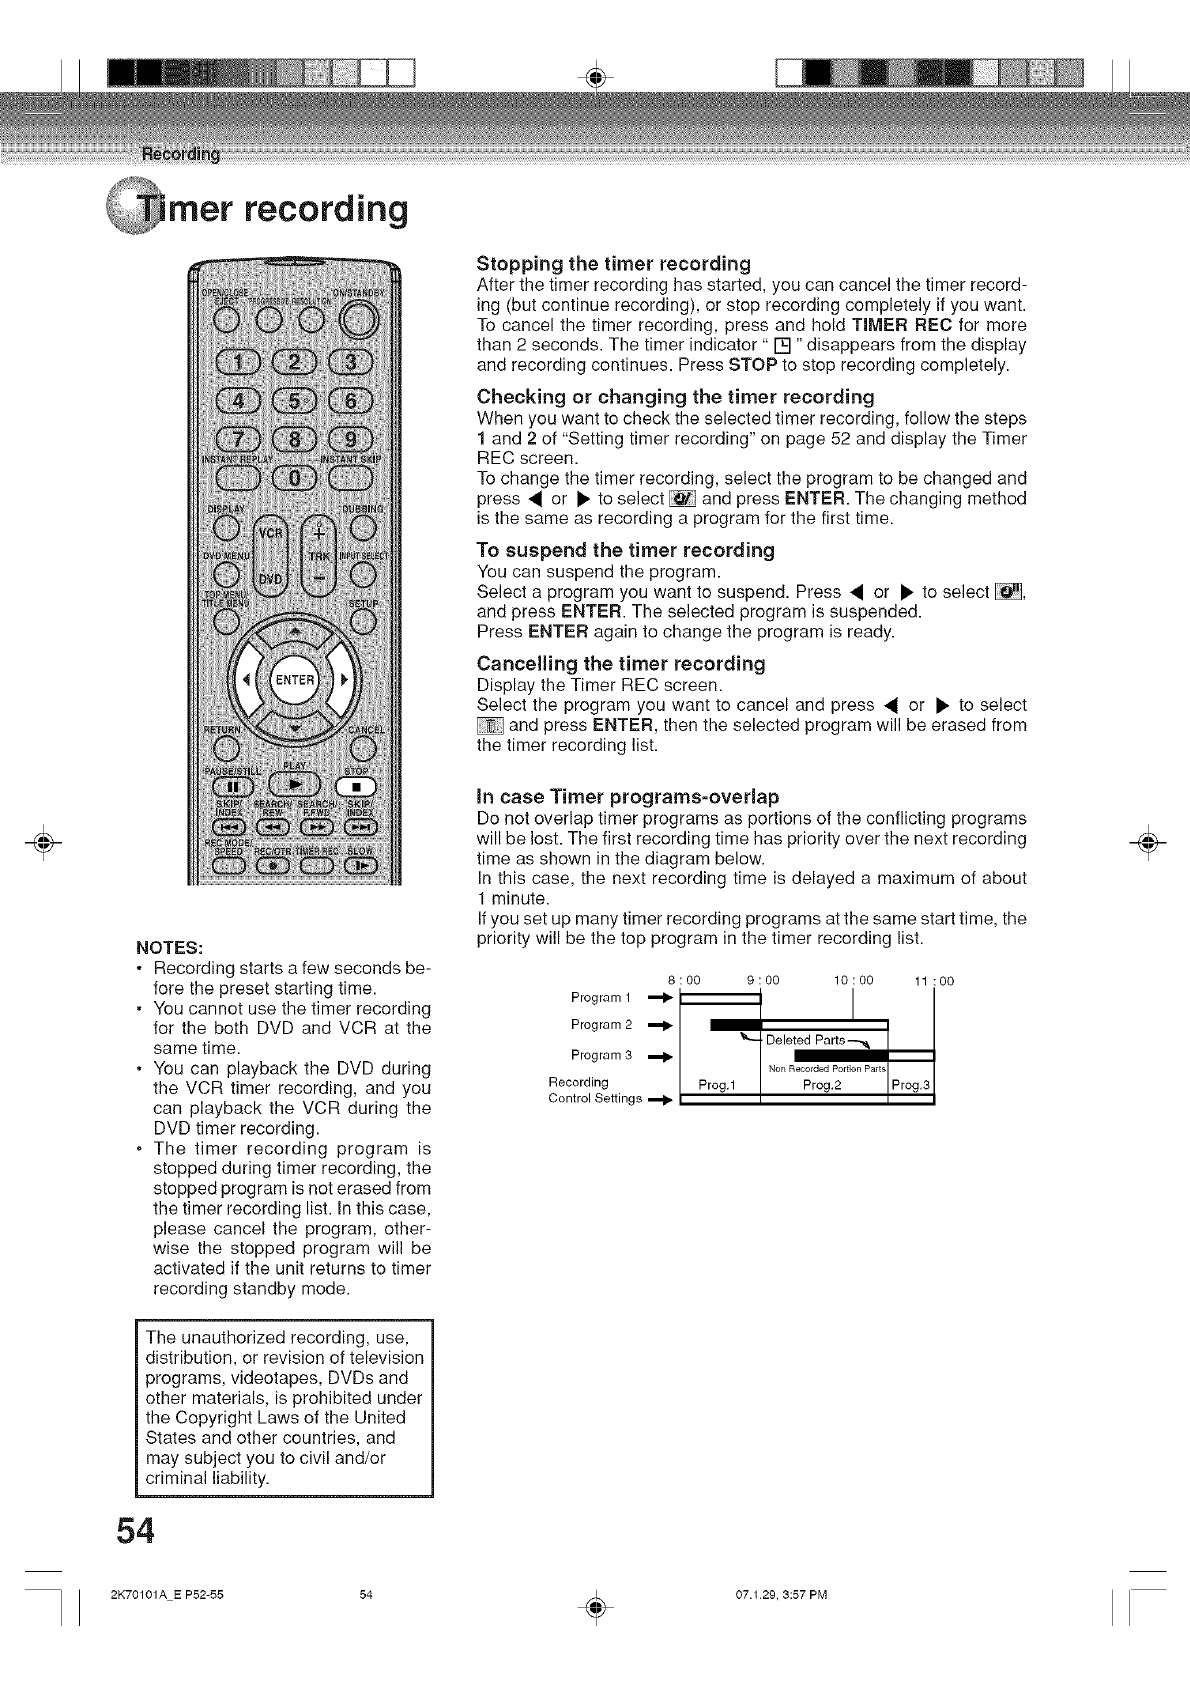
÷
mer recording
NOTES:
•Recording starts a few seconds be-
fore the preset starting time.
•You cannot use the timer recording
for the both DVD and VCR at the
same time.
•You can playback the DVD during
the VCR timer recording, and you
can playback the VCR during the
DVD timer recording.
. The timer recording program is
stopped during timer recording, the
stopped program is not erased from
the timer recording list. In this case,
please cancel the program, other-
wise the stopped program will be
activated if the unit returns to timer
recording standby mode.
The unauthorized recording, use,
distribution, or revision of television
programs, videotapes, DVDs and
other materials, is prohibited under
the Copyright Laws of the United
States and other countries, and
may subject you to civil and/or
criminal liability.
54
Stopping the timer recording
After the timer recording has started, you can cancel the timer record-
ing (but continue recording), or stop recording completely if you want.
To cancel the timer recording, press and hold TIMER REC for more
than 2 seconds. The timer indicator" [] "disappears from the display
and recording continues. Press STOP to stop recording completely.
Checking or changing the timer recording
When you want to check the selected timer recording, follow the steps
1 and 2 of "Setting timer recording" on page 52 and display the Timer
REC screen.
To change the timer recording, select the program to be changed and
press • or • to select _ and press ENTER. The changing method
is the same as recording a program for the first time.
To suspend the timer recording
You can suspend the program.
Select a program you want to suspend. Press • or • to select _,
and press ENTER. The selected program is suspended.
Press ENTER again to change the program is ready.
Cancelling the timer recording
Display the Timer REC screen.
Select the program you want to cancel and press • or • to select
and press ENTER, then the selected program will be erased from
the timer recording list.
in case Timer programs-overlap
Do not overlap timer programs as portions of the conflicting programs
will be lost. The first recording time has priority over the next recording
time as shown in the diagram below.
In this case, the next recording time is delayed a maximum of about
1 minute.
If you set up many timer recording programs at the same start time, the
priority will be the top program in the timer recording list.
8:00 9:00 10:00 11:00
Program 1 ,_ I
I
Program 2
. Deleted Parts--_
Program 3
Non Recorded Portion Pa_ts
Recording Prog.1 Prog.2 Prog.3
Control Settings ,_
÷
2K70101A E P52-55 54 _ 07.129, 3:57 PM

÷
Playback
You can begin playback from the
beginning of a program currently
being recorded. You will find this
function of great advantage on long
programs, as you do not have to
wait for the end of recording to be-
gin playback.
NOTES:
•Chase playback is not available
when recording a DVD-RW/R disc,
DVD+RW/R disc and video tape.
•Chase playback is not available
when recording in XP mode.
.Instant skip, A-B repeat, and Zoom
will not work during chase playback.
.Chase playback does not work until
30 seconds of recording have
elapsed.
. If you press DISPLAY during chase
playback, the information screen is
displayed (see page 31 ).
2
While recording a program onto the DVD-RAM disc, press PLAY
to start chase playback.
The program as it is being recorded will playback.
Locate a scene you want through the following operations if nec-
essary.
Fast forward/Review playback:
Press SEARCH _1_ /I_. Every press SEARCH, it switches the
speed of the search.
.To resume chase playback, press PLAY.
•If the playback position catches up to within about 60 seconds,
chase playback resumes. It may differ depending on the record-
ing condition and search speed.
Still playback:
Press PAUSE/STILL
.To resume chase playback, press PLAY.
Frame advance
Press PAUSE/STILL during still playback.
One frame is advanced each time you press PAUSE/STILL.
.To resume normal playback, press PLAY.
Slow motion playback
Press SLOW during normal playback or still playback.
Each press of SLOW will change the speed of the slow "1_-x 1/2",
"1,.-x 1/4" and "i_ x 1/8".
•To resume normal playback, press PLAY.
•To resume the still playback, press PAUSE/STILL
Locating a chapter:
Press SKIP I_1_/I=H_Ito locate a chapter that you want to watch.
•If you press SKiP _ while playing back the newest chapter, it
starts playing back from about 15 seconds before the recording
position.
Locating a specific scene:
Press PLAY MODE enables you to do a Time Search or a Chapter
Search. (See page 34.)
Instant replay
Press iNSTANT REPLAY during playback.
The video returns to a point 10 seconds before and playback
resumes.
Press STOP end chase
to playback.
If you press STOP again, the recording stops.
0
o
÷
55
2K70101A E P52-55 55 _ 07.1 29, 3:57 PM
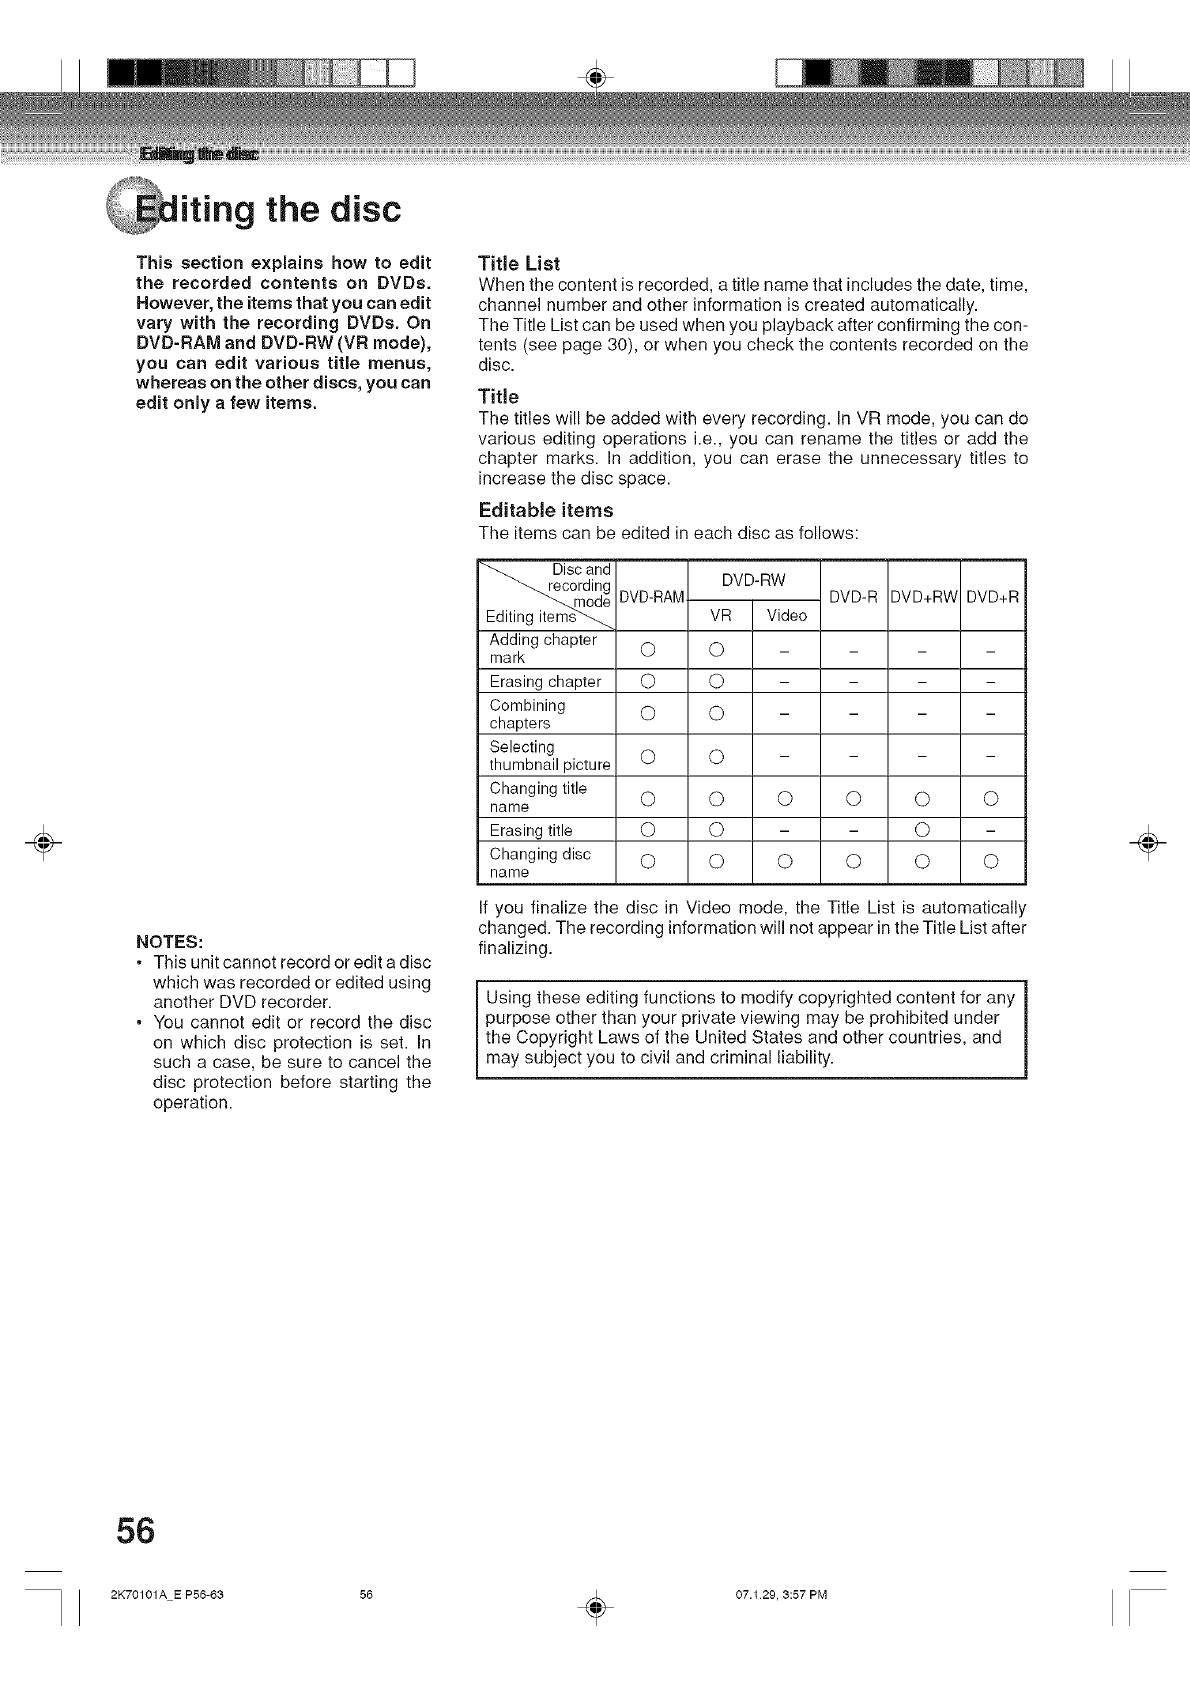
÷
iting the disc
This section explains how to edit
the recorded contents on DVDs.
However, the items that you can edit
vary with the recording DVDs. On
DVD-RAM and DVD-RW (VR mode),
you can edit various title menus,
whereas on the other discs, you can
edit only a few items.
NOTES:
• This unit cannot record or edit a disc
which was recorded or edited using
another DVD recorder.
• You cannot edit or record the disc
on which disc protection is set. in
such a case, be sure to cancel the
disc protection before starting the
operation.
Title List
When the content is recorded, a title name that includes the date, time,
channel number and other information is created automatically.
The Title List can be used when you playback after confirming the con-
tents (see page 30), or when you check the contents recorded on the
disc.
Title
The titles will be added with every recording. In VR mode, you can do
various editing operations i.e., you can rename the titles or add the
chapter marks. In addition, you can erase the unnecessary titles to
increase the disc space.
Editable items
The items can be edited in each disc as follows:
_Disc and
rding DVD-RW
e DVD-RAM
VR Video
Adding chapter
mark 0 0
Erasing chapter 0 0
Combining 0 0
chapters
Selecting
thumbnail picture 0 0
Changing title
name 0 0 0 0 0 0
Erasing title 0 0 0 -
Changing disc 0 0 0 0 0 0
name
If you finalize the disc in Video mode, the Title List is automatically
changed. The recording information will not appear in the Title List after
finalizing.
Using these editing functions to modify copyrighted content for any
purpose other than your private viewing may be prohibited under
the Copyright Laws of the United States and other countries, and
may subject you to civil and criminal liability.
DVD-R DVD+RW DVD+R
÷
56
2K70101A E P56-63 56 _ 07.129, 3:57 PM
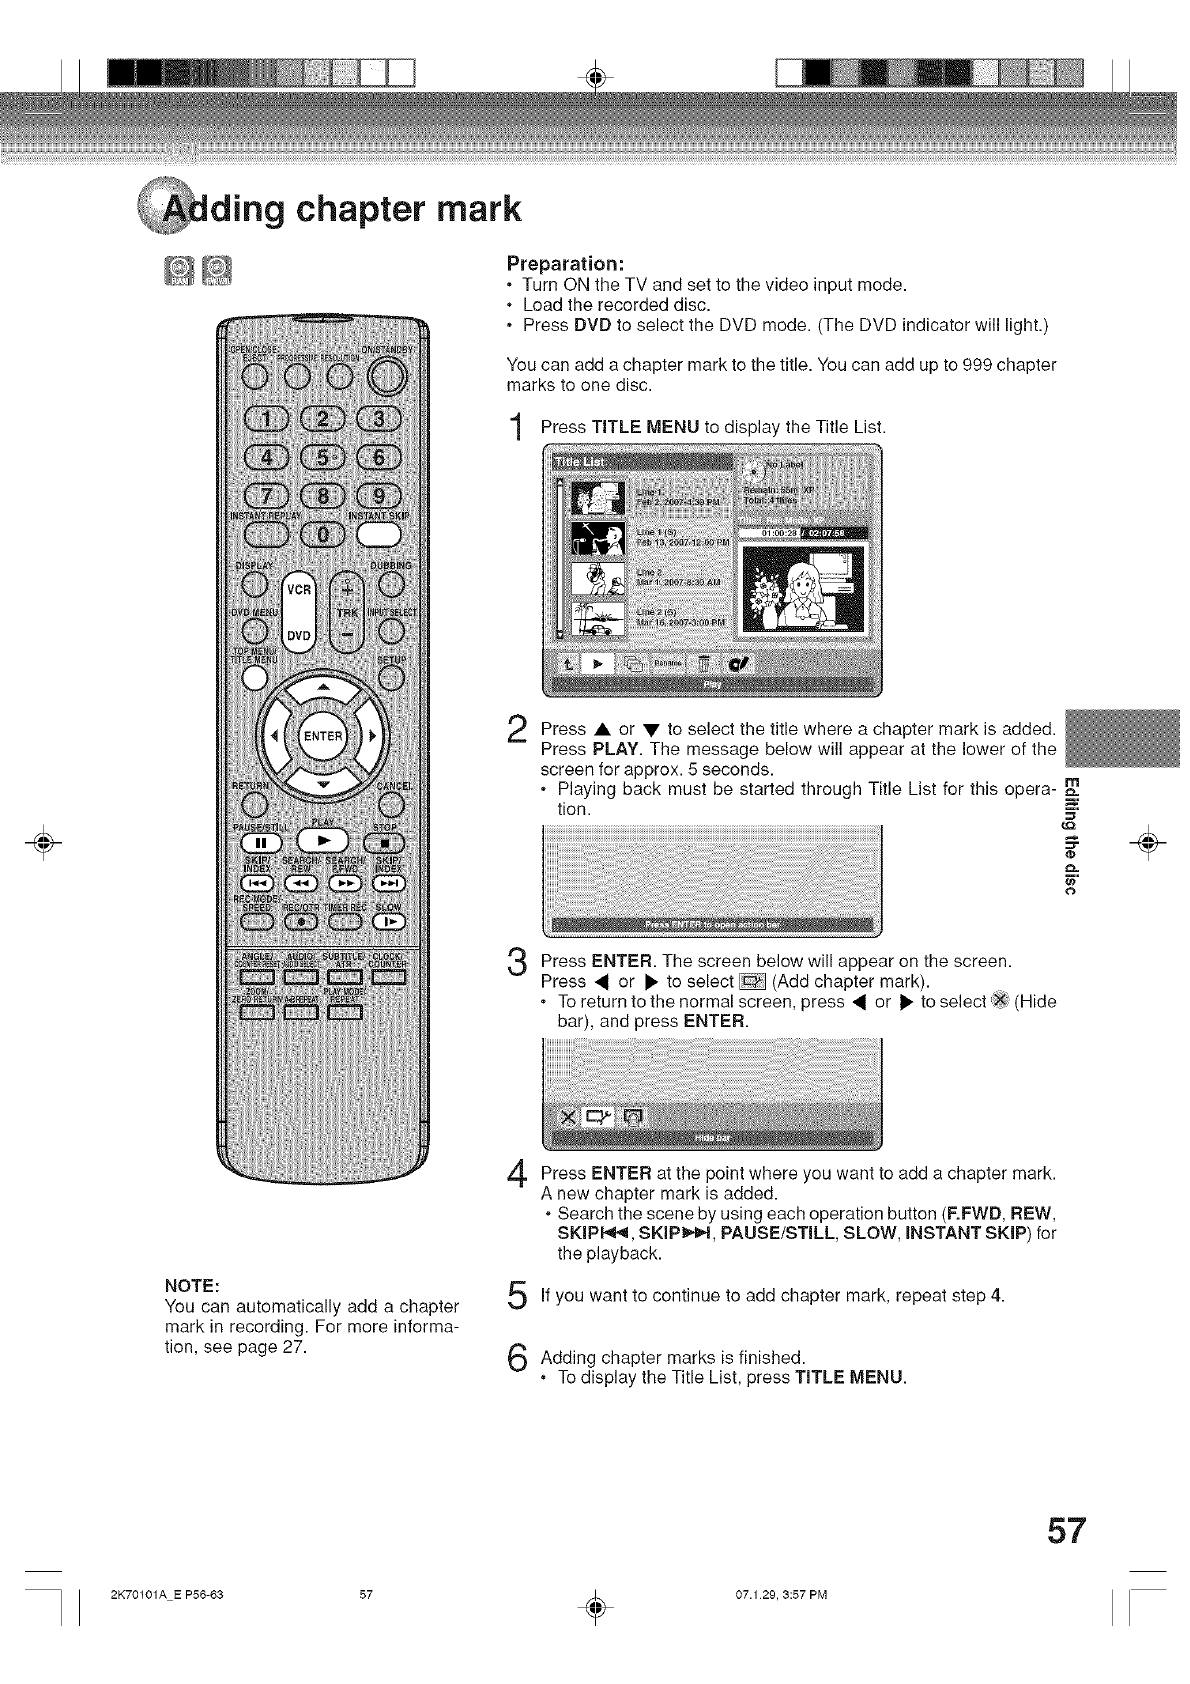
÷
gchapter mark
Preparation:
•Turn ON the TV and set to the video input mode.
.Load the recorded disc.
•Press DVD to select the DVD mode. (The DVD indicator will light.)
You can add a chapter mark to the title. You can add up to 999 chapter
marks to one disc.
Press TITLE MENU to display the Title List.
Press • or • to select the title where a chapter mark is added.
Press PLAY. The message below will appear at the lower of the
screen for approx. 5 seconds.
,Playing back must be started through Title List for this opera- _
tion. -=':
N"
Press ENTER. The below will the
screen appear on screen.
Press 4 or • to select _ (Add chapter mark).
•To return to the normal screen, press _ or • to se ect IX (Hide
bar), and press ENTER.
NOTE:
You can automatically add a chapter
mark in recording. For more informa-
tion, see page 27.
at point you want to a chapter
Press ENTER the where add mark.
A new chapter mark is added.
•Search the scene by using each operation button (F.FWD, hEW,
SKIPI,,t_, SKIPI_,4, PAUSE/STILL SLOW, INSTANT SKIP) for
the playback.
If you want to continue to add chapter mark, repeat step 4.
marks is finished.Adding chapter
•To display the Title List, press TITLE MENU.
÷
57
2K70101A E P56-63 57 _ 07.1 29, 3:57 PM
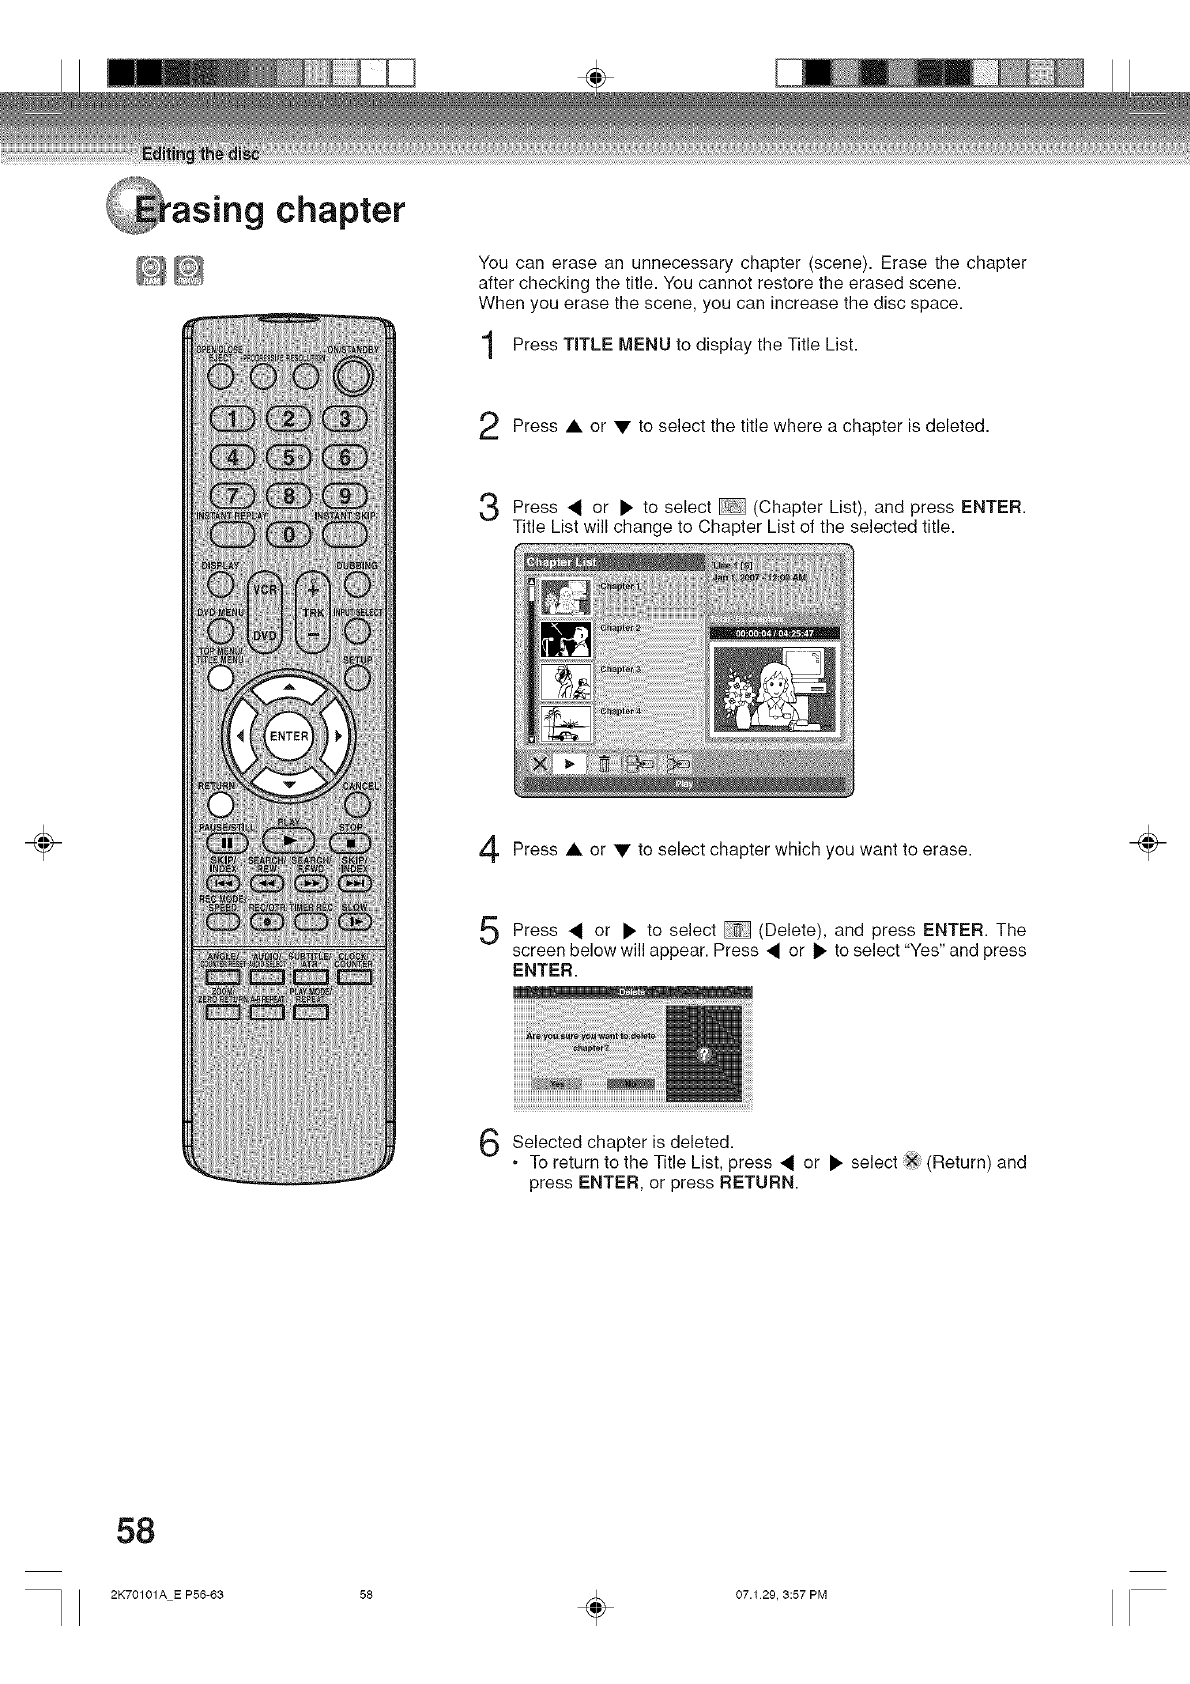
÷
chapter
You can erase an unnecessary chapter (scene). Erase the chapter
after checking the title. You cannot restore the erased scene.
When you erase the scene, you can increase the disc space.
Press TITLE MENU to display the Title List.
Press • or •to select the title where a chapter is deleted.
_i or • to (Chapter List), press
Press select and ENTER.
Title List will change to Chapter List of the selected title.
Press • or • to select chapter which you want to erase.
Press to select and ENTER. The
or (Delete), press
screen below will appear. Press • or • to select "Yes" and press
ENTER.
Selected is deleted.
chapter
.To return to the Title List, press _ or • select (Return) and
press ENTER, or press RETURN.
÷
58
2K70101A E P56-63 58 _ 07.129, 3:57 PM
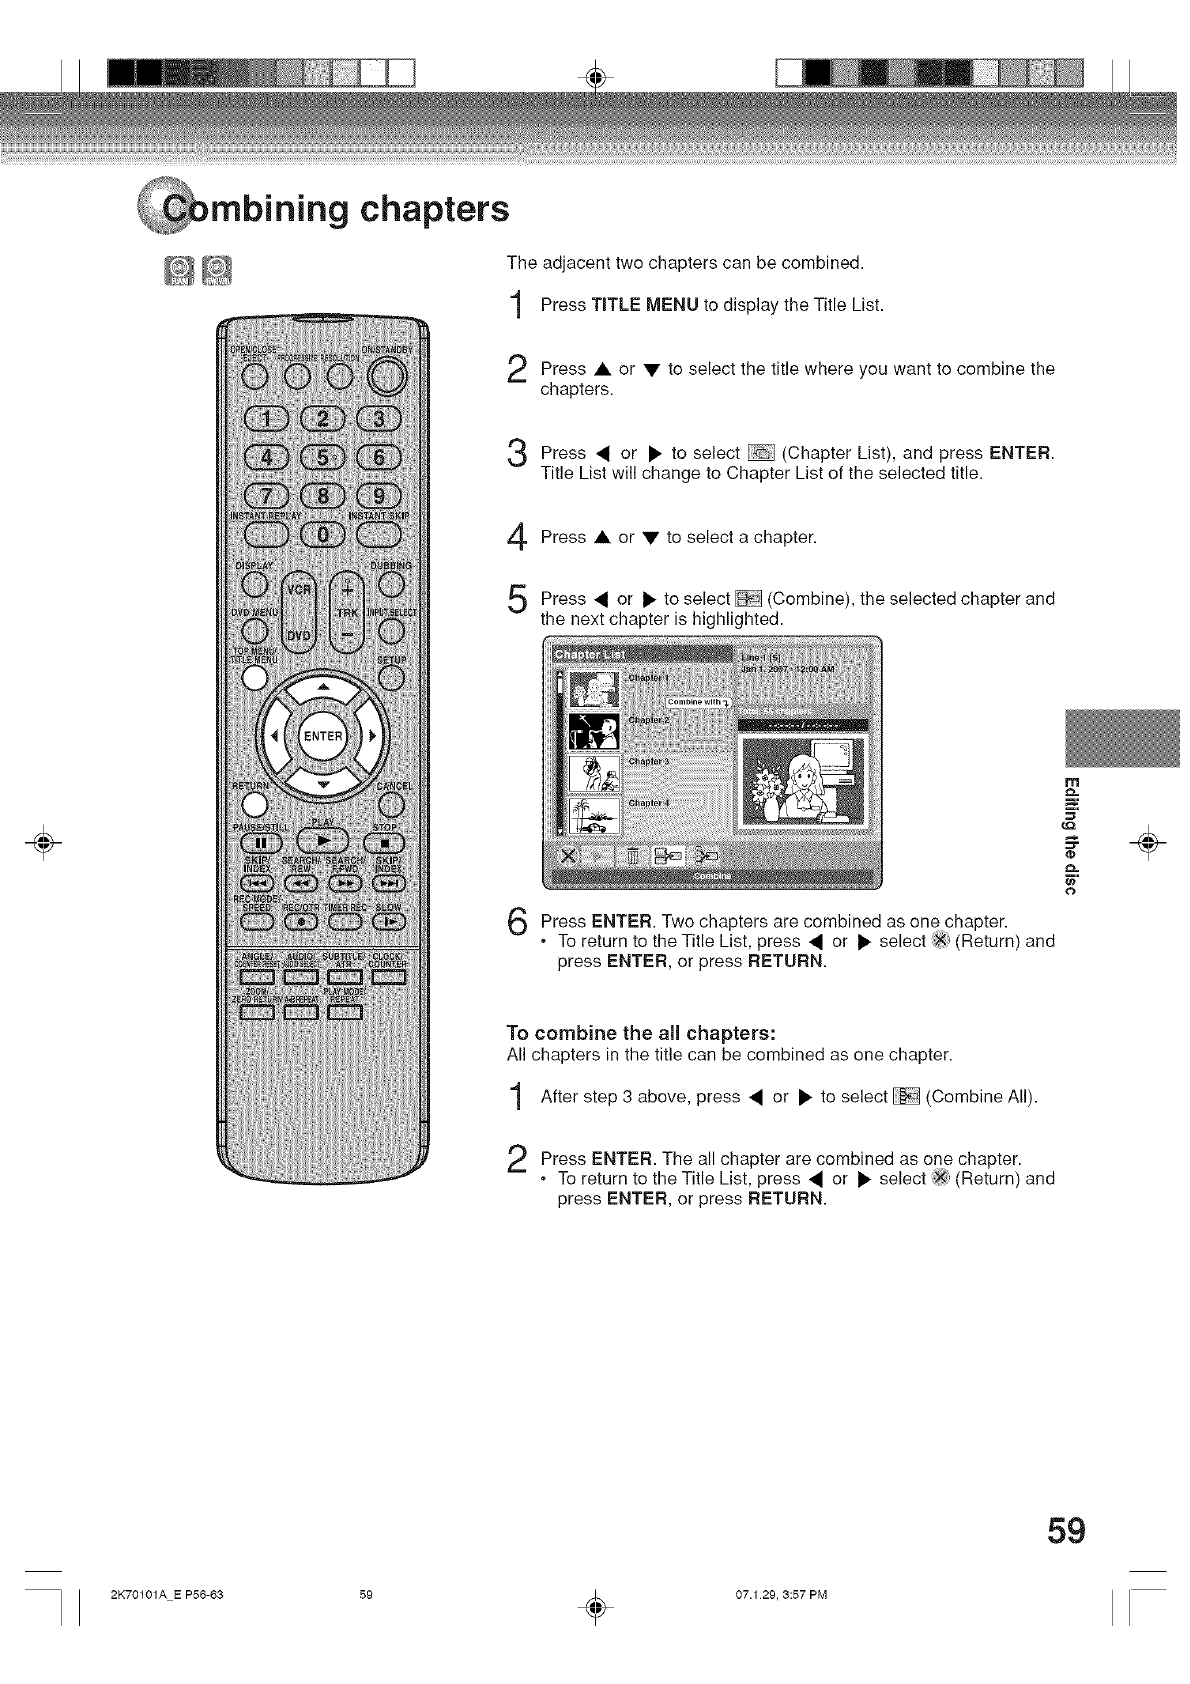
÷
mb ng chapters
..... = =
|ill
The adjacent two chapters can be combined.
Press TITLE MENU to display the Title List.
Press • or • to select the title where you want to combine the
chapters.
• or • to (Chapter List), press
Press select and ENTER.
Title List will change to Chapter List of the selected title.
Press • or • to select a chapter.
Press • or • to select _ (Combine), the selected chapter and
the next chapter is highlighted.
chapters are as one chapter.
Press ENTER. Two combined
.To return to the Title List, press • or • select X" (Return) and
press ENTER, or press RETURN.
To combine the all chapters:
All chapters in the title can be combined as one chapter.
After step 3 above, press • or • to select _ (Combine All).
Press ENTER. The all chapter are combined as one chapter.
.To return to the Title List, press • or • select ix_,(Return) and
press ENTER, or press RETURN.
n3
o
÷
59
2K70101A E P56-63 59 _ 07.1 29, 3:57 PM
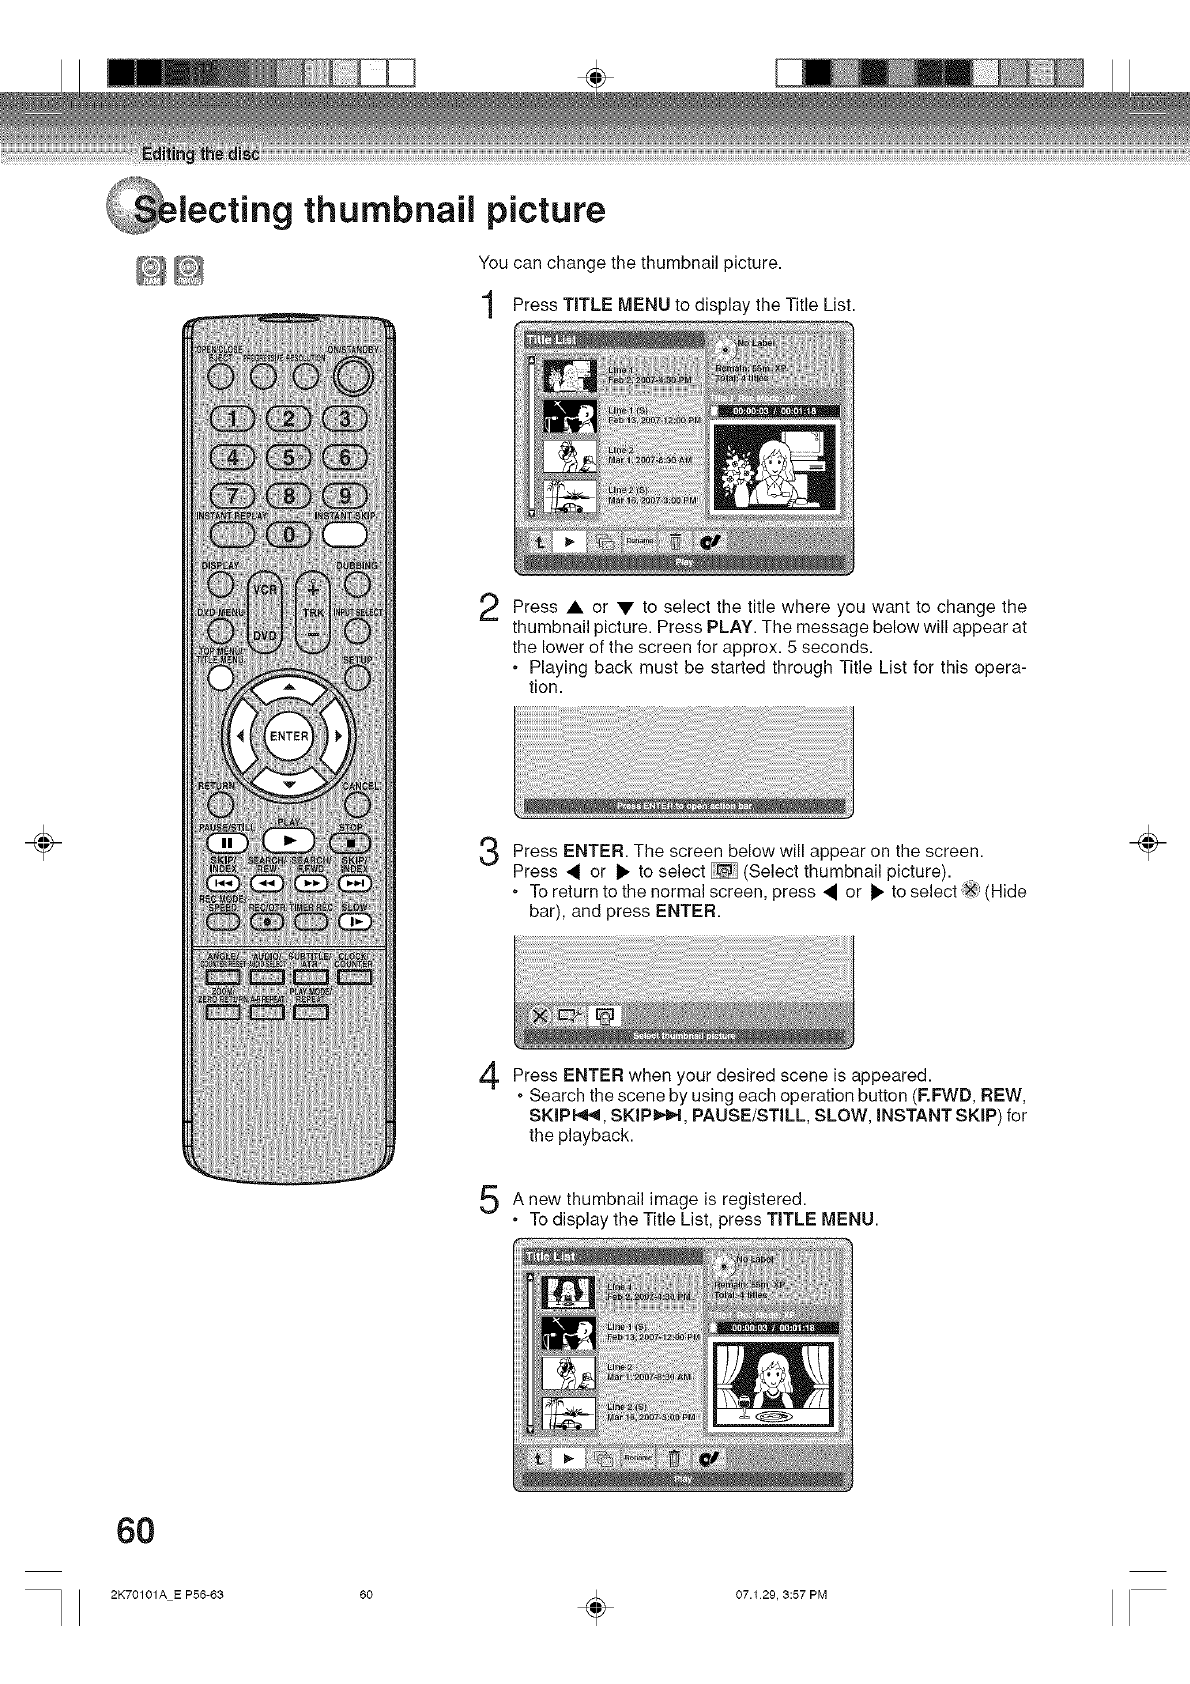
lecting thumbnail picture
_ _ You can change the thumbnail picture.
Press TITLE MENU to display the Title List.
÷
2Press • or • to select the title where you want to change the
thumbnail picture. Press PLAY. The message below will appear at
the lower of the screen for approx. 5 seconds.
•Playing back must be started through Title List for this opera-
tion.
3Press ENTER. The screen below will appear on the screen.
Press • or I_ to select _ (Select thumbnail picture).
.To return to the normal screen, press • or l_ to select '×_ (Hide
bar), and press ENTER.
Press ENTER when desired isyour scene appeared.
. Search the scene by using each operation button (F,FWD, REW,
SKiPI,,_, SKiP_,,._, PAUSE/STiLL SLOW, iNSTANT SKIP) for
the playback.
÷
new image registered.
A thumbnail is
•To display the Title List, press TITLE MENU.
6O
2K70101A E P56-63 60 _ 07.129, 3:57 PM
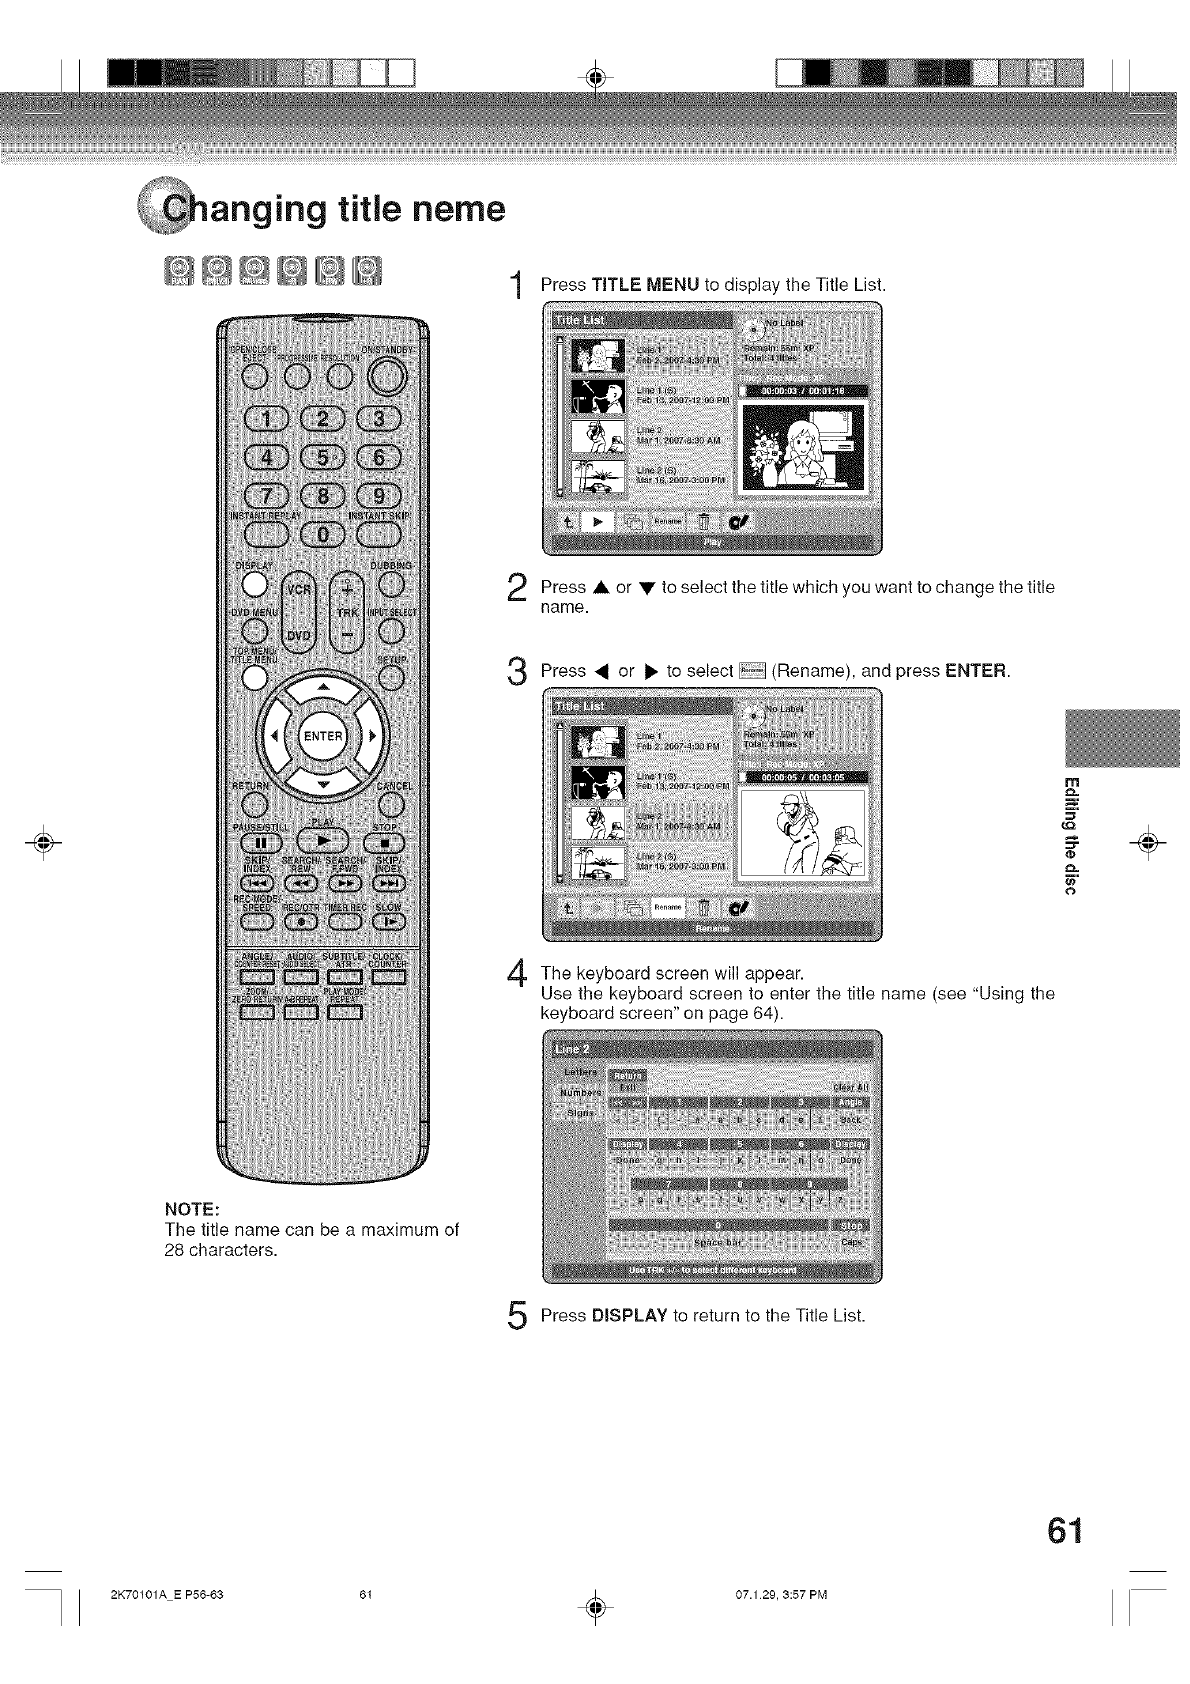
_anging title neme
@@ _ @_ 1 Press TITLE MENU to display the Title List.
÷
Press • or • to select the title which you want to change the title
name.
Press ._ or I_ to select (Rename), and press ENTER.
The keyboard screen will appear.
Use the keyboard screen to enter the title name (see "Using the
keyboard screen" on page 64).
n3
o
÷
NOTE:
The title name can be a maximum of
28 characters.
Press DISPLAY to return to the Title List.
61
2K70101A E P56-63 6I _ 07.1 29, 3:57 PM
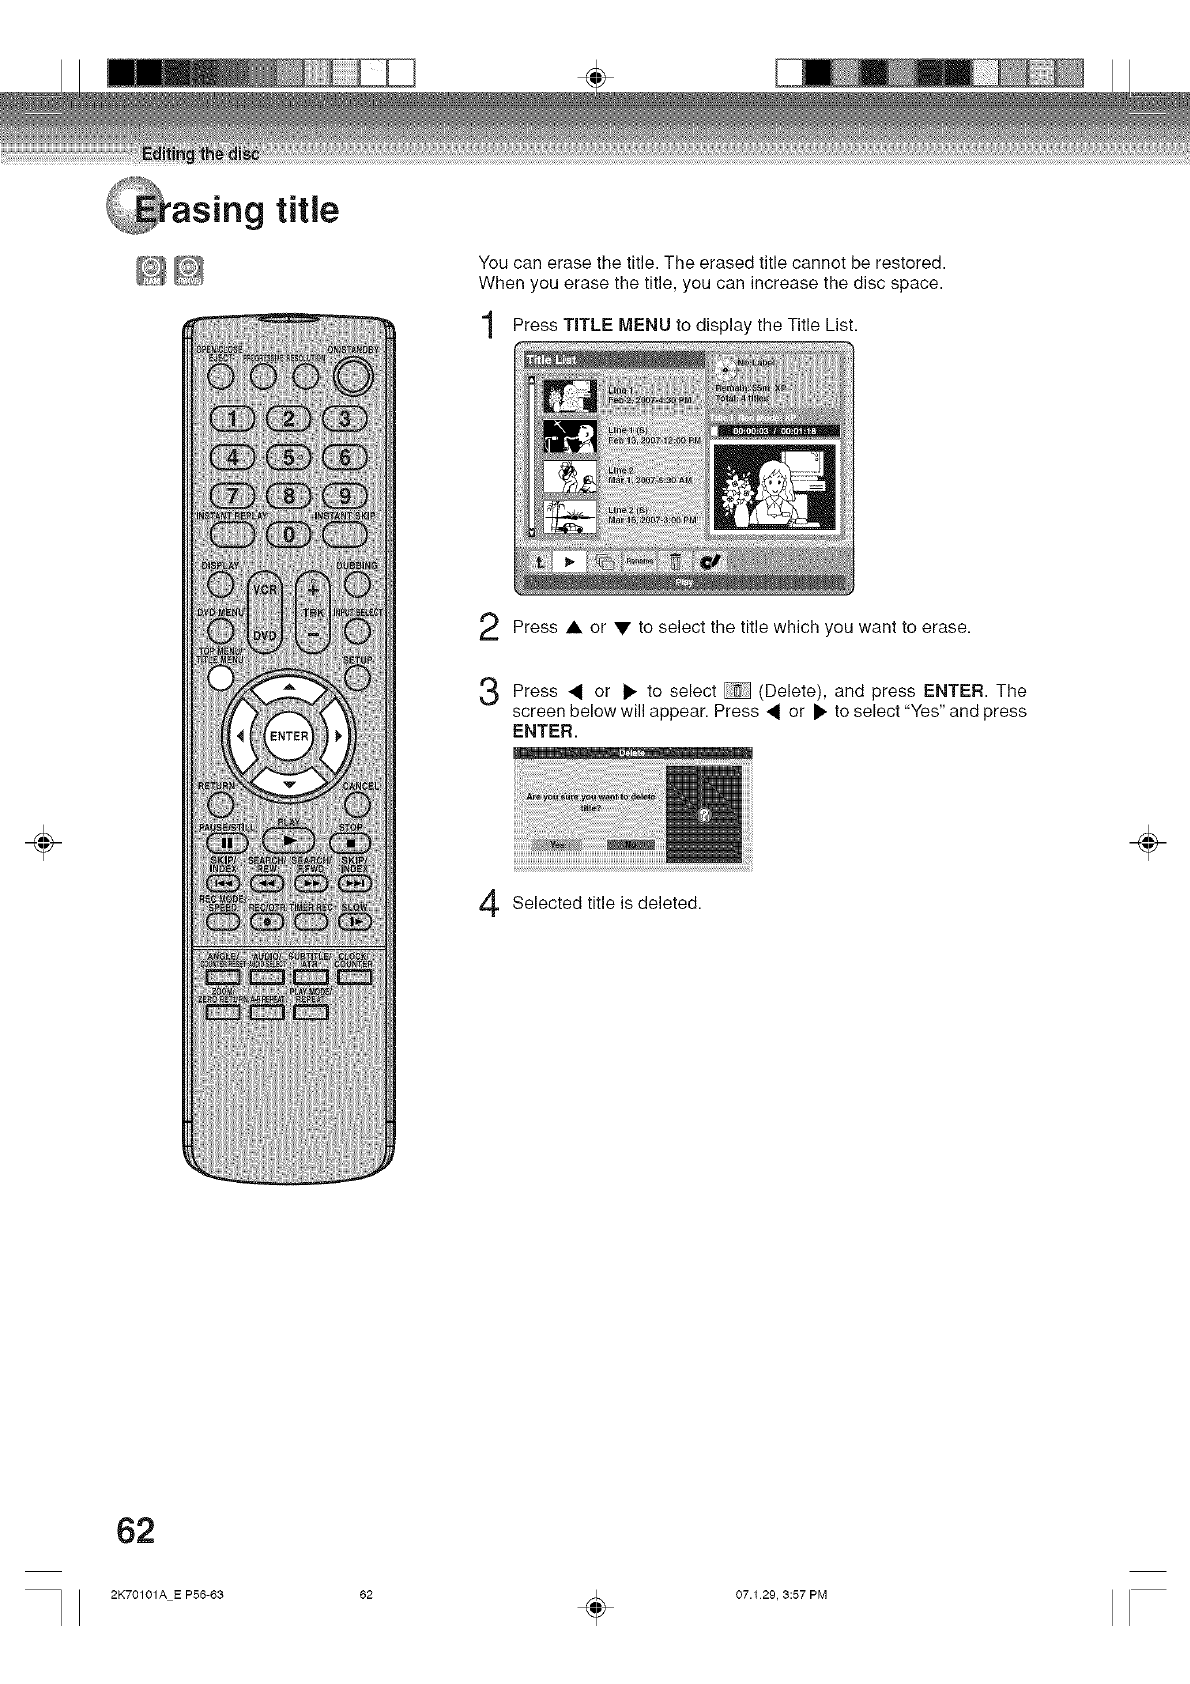
÷
You can erase the title. The erased title cannot be restored.
When you erase the title, you can increase the disc space.
Press TITLE MENU to display the Title List.
Press • or • to select the title which you want to erase.
Press to select _ and ENTER. The
<or (Delete), press
screen below will appear. Press _ or • to select "Yes" and press
ENTER.
Selected title is deleted.
÷
62
2K70101A E P56-63 52 _ 07.129, 3:57 PM
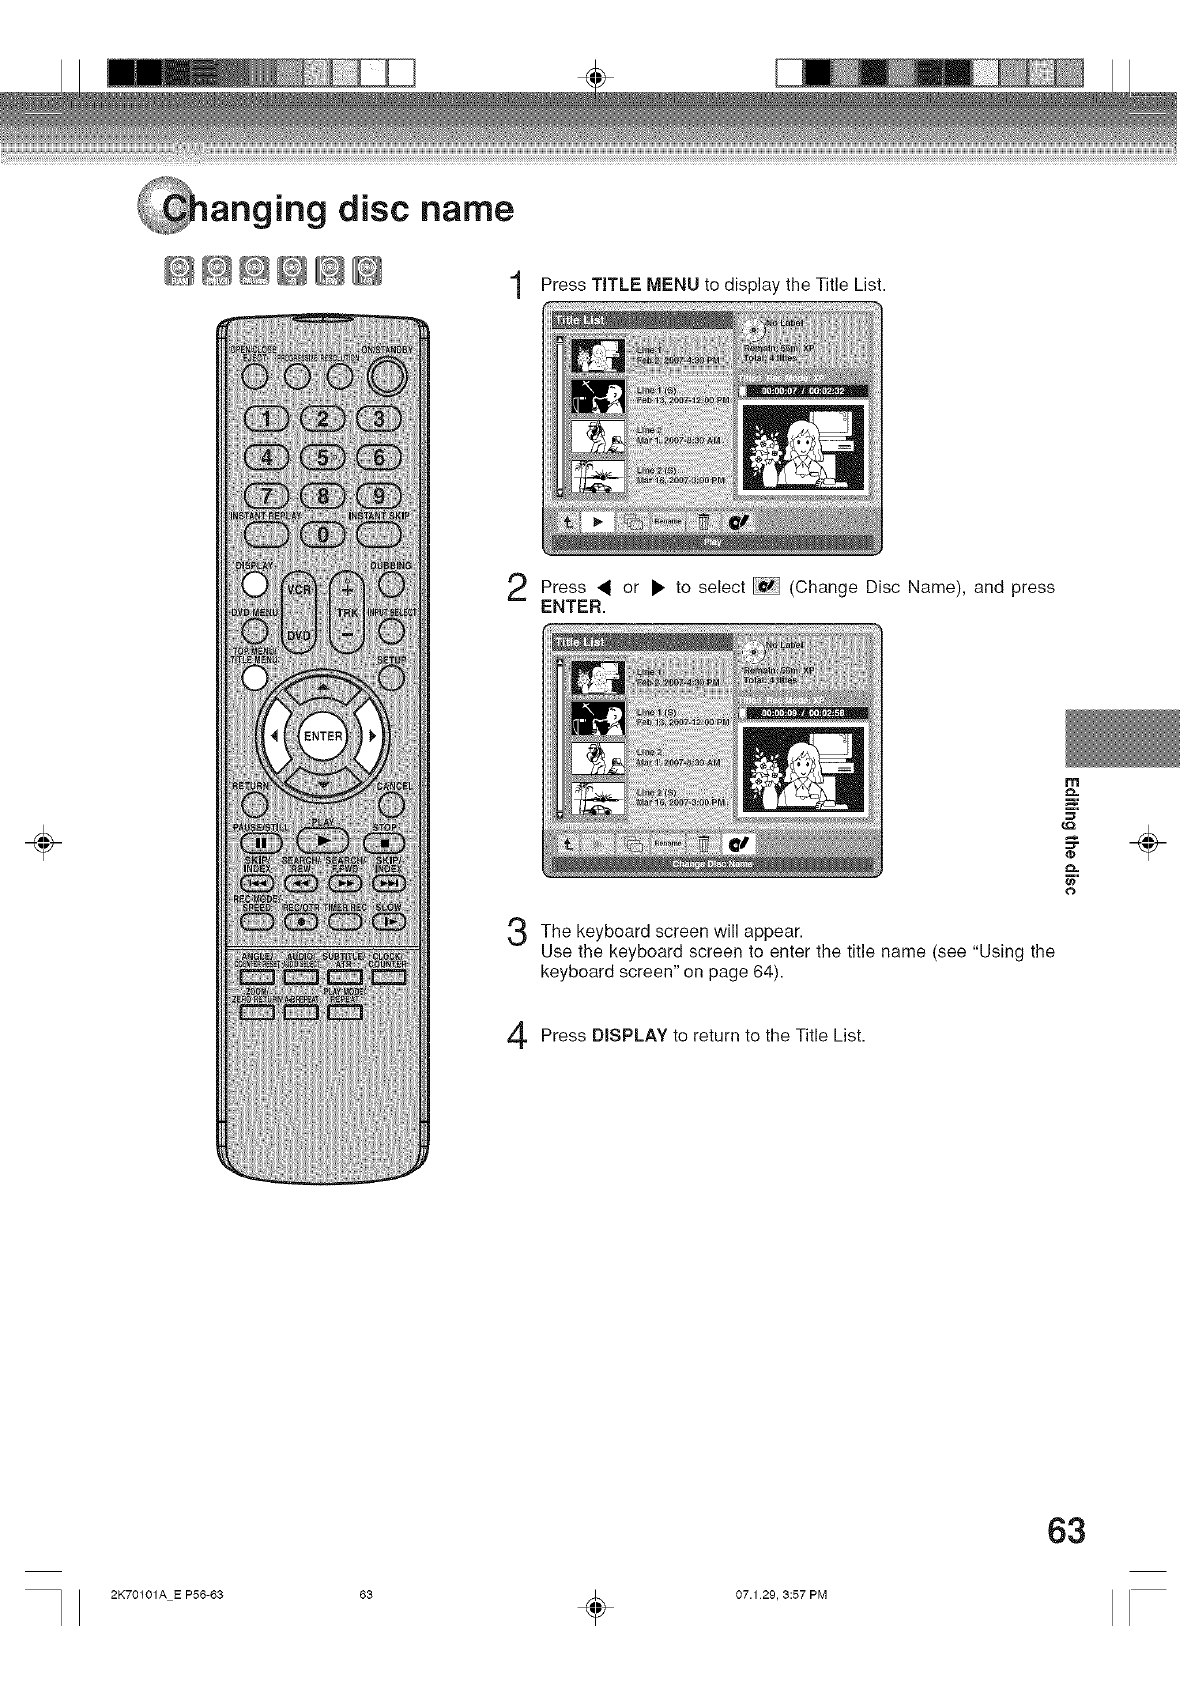
_anging disc name
@@ @@@ 1 Press TITLE MENU to display the Title List.
÷
Press _ or • to select (Change Disc Name), and press
ENTER.
keyboard screen appear.
The will
Use the keyboard screen to enter the title name (see "Using the
keyboard screen" on page 64).
Press DISPLAY to return to the Title List.
m
o
÷
63
2K70101A E P56-63 63 _ 07.1 29, 3:57 PM
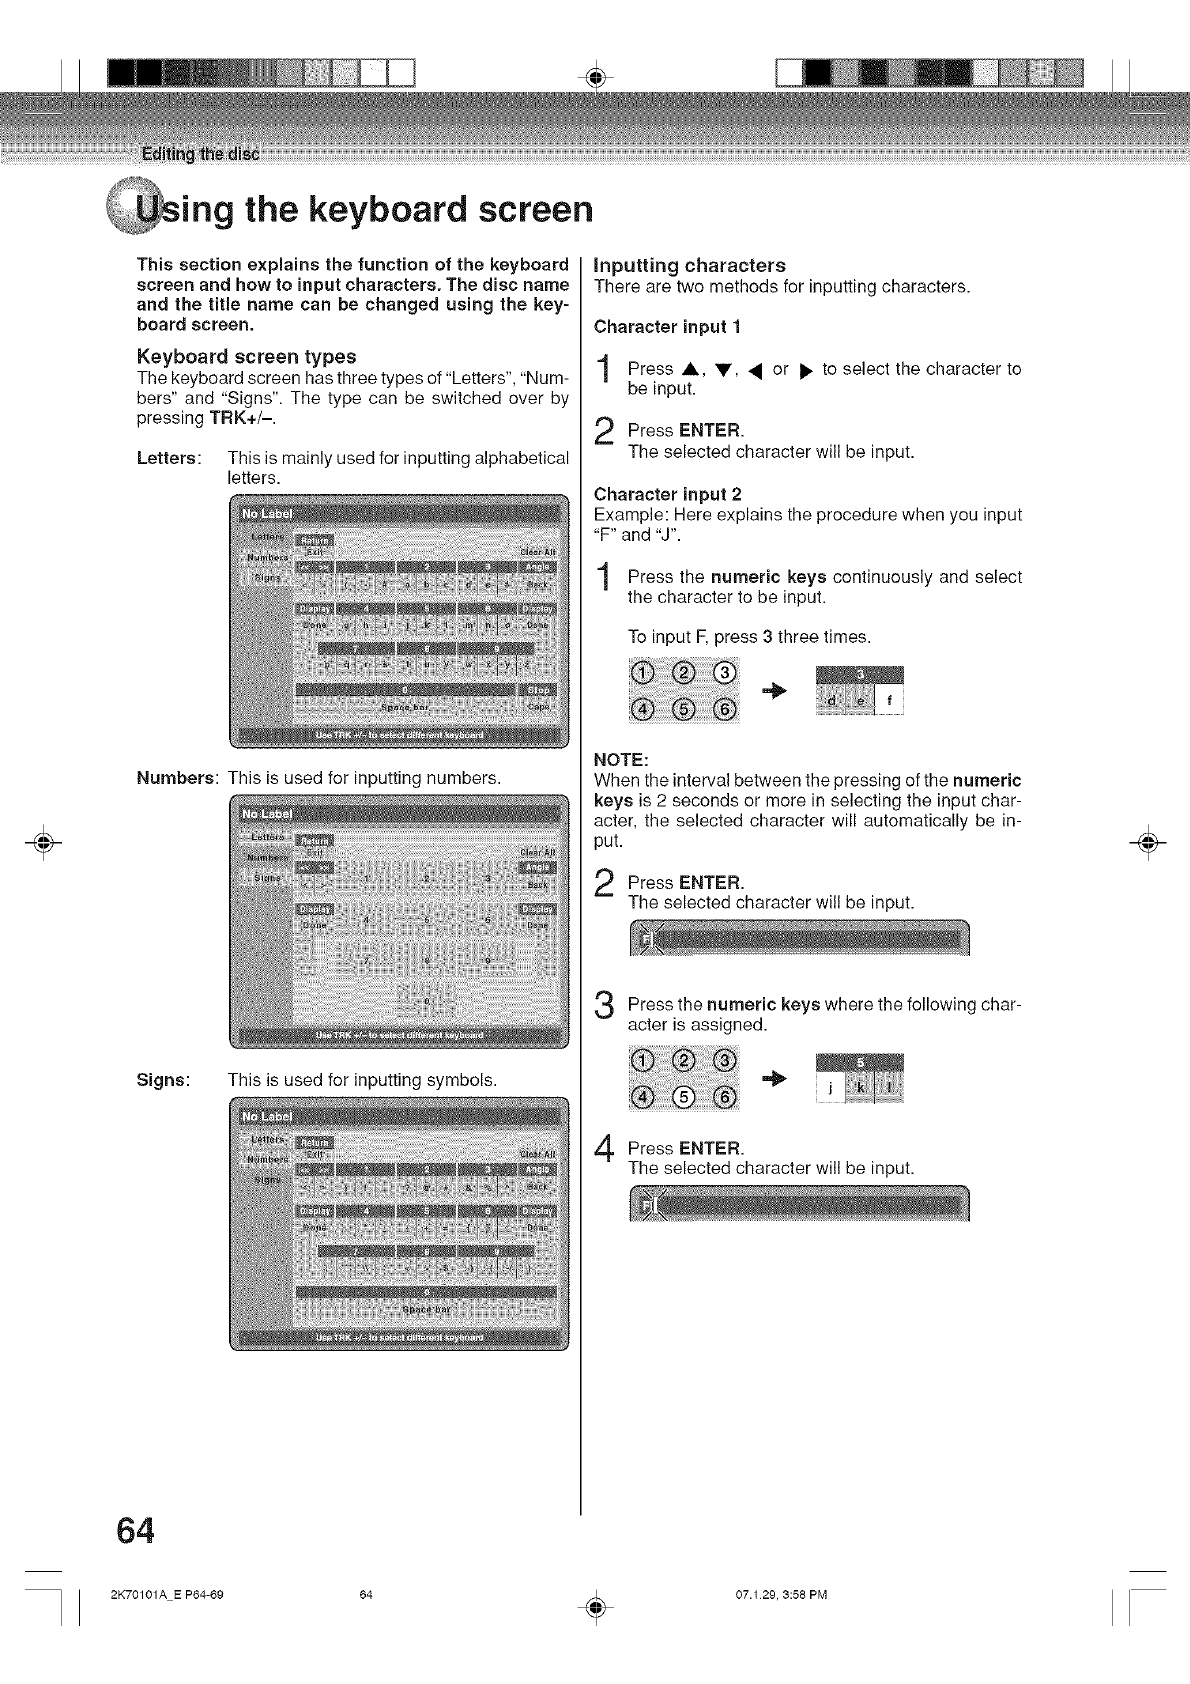
÷
ing the keyboard screen
This section explains the function of the keyboard
screen and how to input characters. The disc name
and the title name can be changed using the key-
board screen.
Keyboard screen types
The keyboard screen has three types of "Letters", "Num-
bers" and "Signs". The type can be switched over by
pressing TRK+/-.
Letters: This is mainly used for inputting alphabetical
letters.
Numbers: This is used for inputting numbers.
Signs: This is used for inputting symbols.
inputting characters
There are two methods for inputting characters.
Character input 1
Press A, V, • or • to select the character to
be input.
Press ENTER.
The selected character will be input.
Character input 2
Example: Here explains the procedure when you input
"F" and "J'.
Press the numeric keys continuously and select
the character to be input.
To input F, press 3 three times.
NOTE:
When the interval between the pressing of the numeric
keys is 2 seconds or more in selecting the input char-
acter, the selected character will automatically be in-
put.
Press ENTER.
The selected character will be input.
Press the numeric where the char-
keys following
acter is assigned.
Press ENTER.
The selected character will be input.
÷
64
2K70101A E P64-69 64 _ 07.129, 3:58 PM
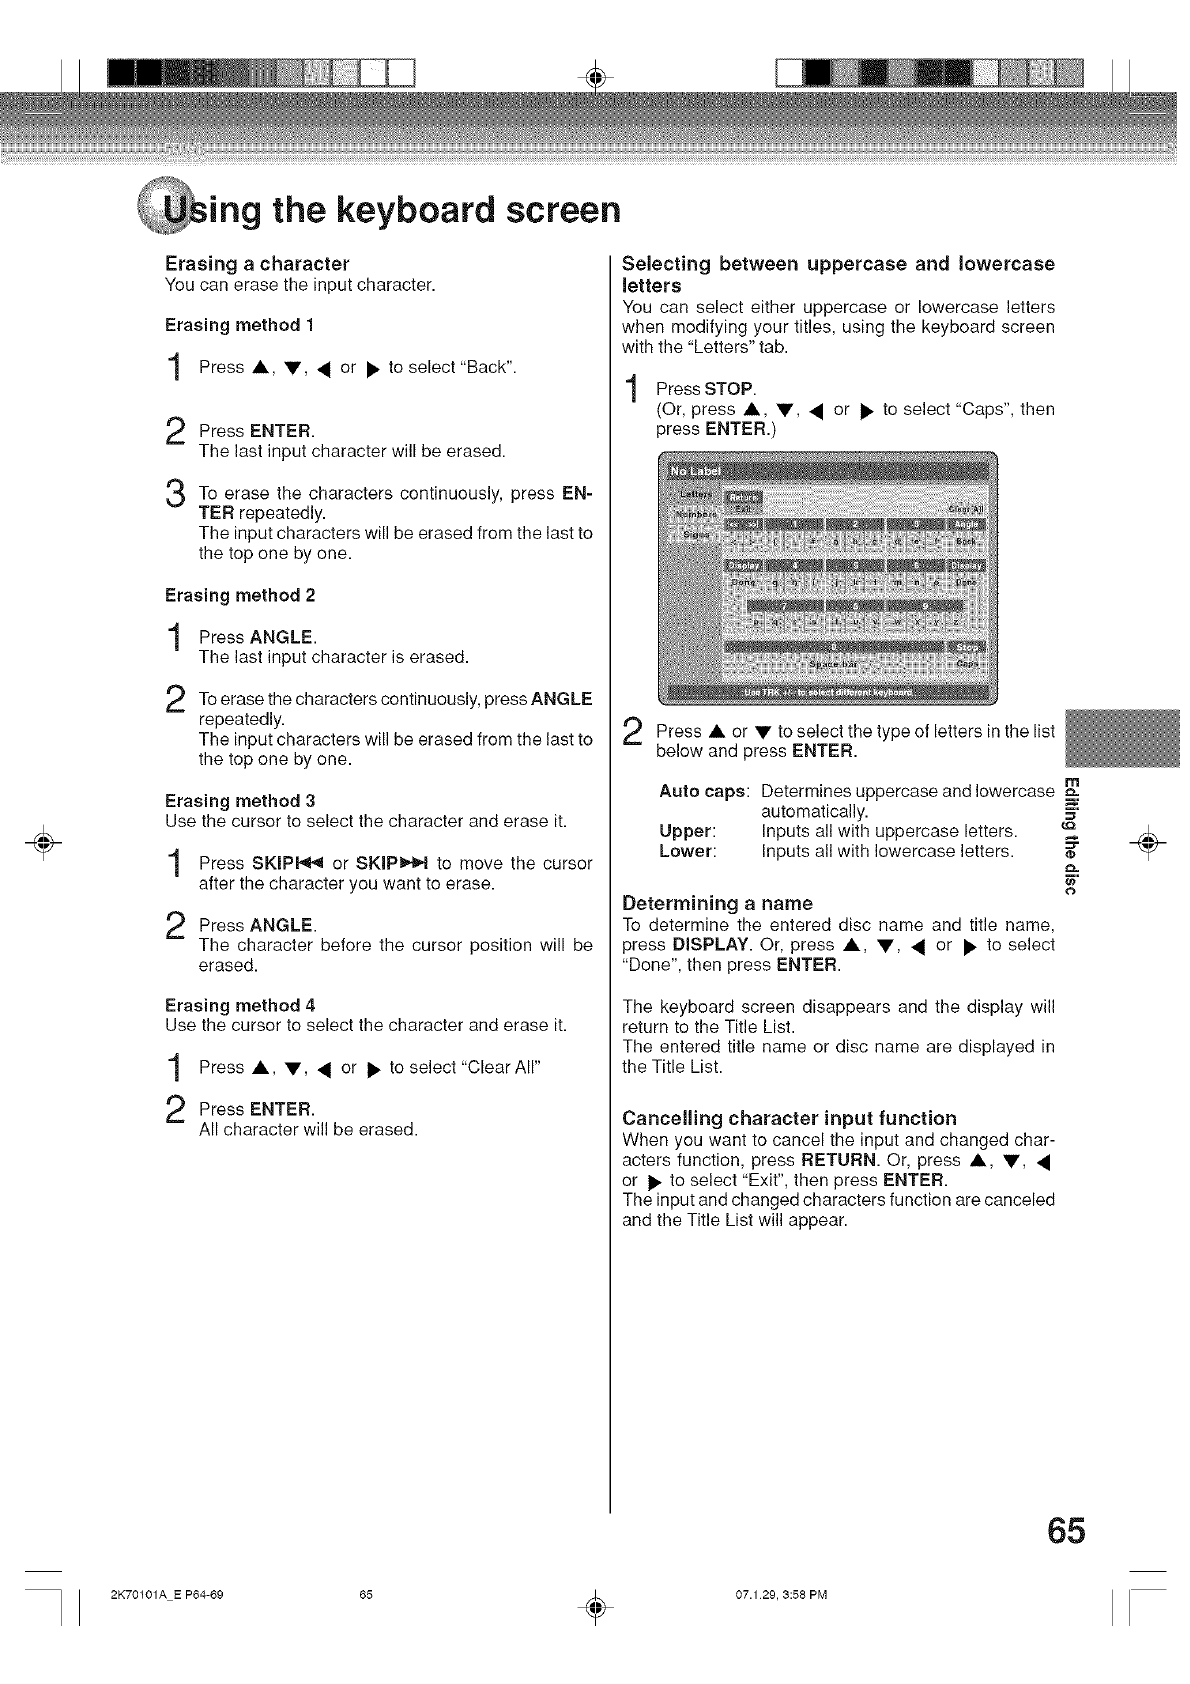
÷
ing the keyboard screen
Erasing a character
Youcan erase the input character.
Erasing method 1
Press ,&, V, • or • to select"Back".
Press ENTER.
The last input character will be erased.
3To erase the characters continuously, press EN-
TER repeatedly.
The input characters will be erased from the last to
the top one by one.
Erasing method 2
Press ANGLE.
The last input character is erased.
2To erase the characters continuously, press ANGLE
repeatedly.
The input characters will be erased from the last to
the top one by one.
Erasing method 3
Use the cursor to select the character and erase it.
1
2
Press SKIP_ or SKIP_ to move the cursor
after the character you want to erase.
Press ANGLE.
The character before the cursor position will be
erased.
Erasing method 4
Use the cursor to select the character and erase it.
Press •, V, • or • to select "Clear All"
Press ENTER.
All character will be erased.
Selecting between uppercase and Jowercase
letters
You can select either uppercase or lowercase letters
when modifying your titles, using the keyboard screen
with the "Letters" tab.
Press STOP.
(Or, press A, •, • or • to select "Caps", then
press ENTER.)
Press • or • to select the type of letters in the list
below and press ENTER.
Auto caps: Determines uppercase and lowercase
automatically. 5"
Upper:
Lower: Inputs all with uppercase letters.
Inputs all with lowercase letters.
o
Determining a name
To determine the entered disc name and title name,
press DISPLAY. Or, press ,&, •, • or • to select
"Done", then press ENTER.
The keyboard screen disappears and the display will
return to the Title List.
The entered title name or disc name are displayed in
the Title List.
Cancelling character input function
When you want to cancel the input and changed char-
acters function, press RETURN. Or, press •, •, •
or • to select "Exit", then press ENTER.
The input and changed characters function are canceled
and the Title List will appear.
÷
65
2K70101A E P64-69 65 _ 07.1 29, 3:58 PM
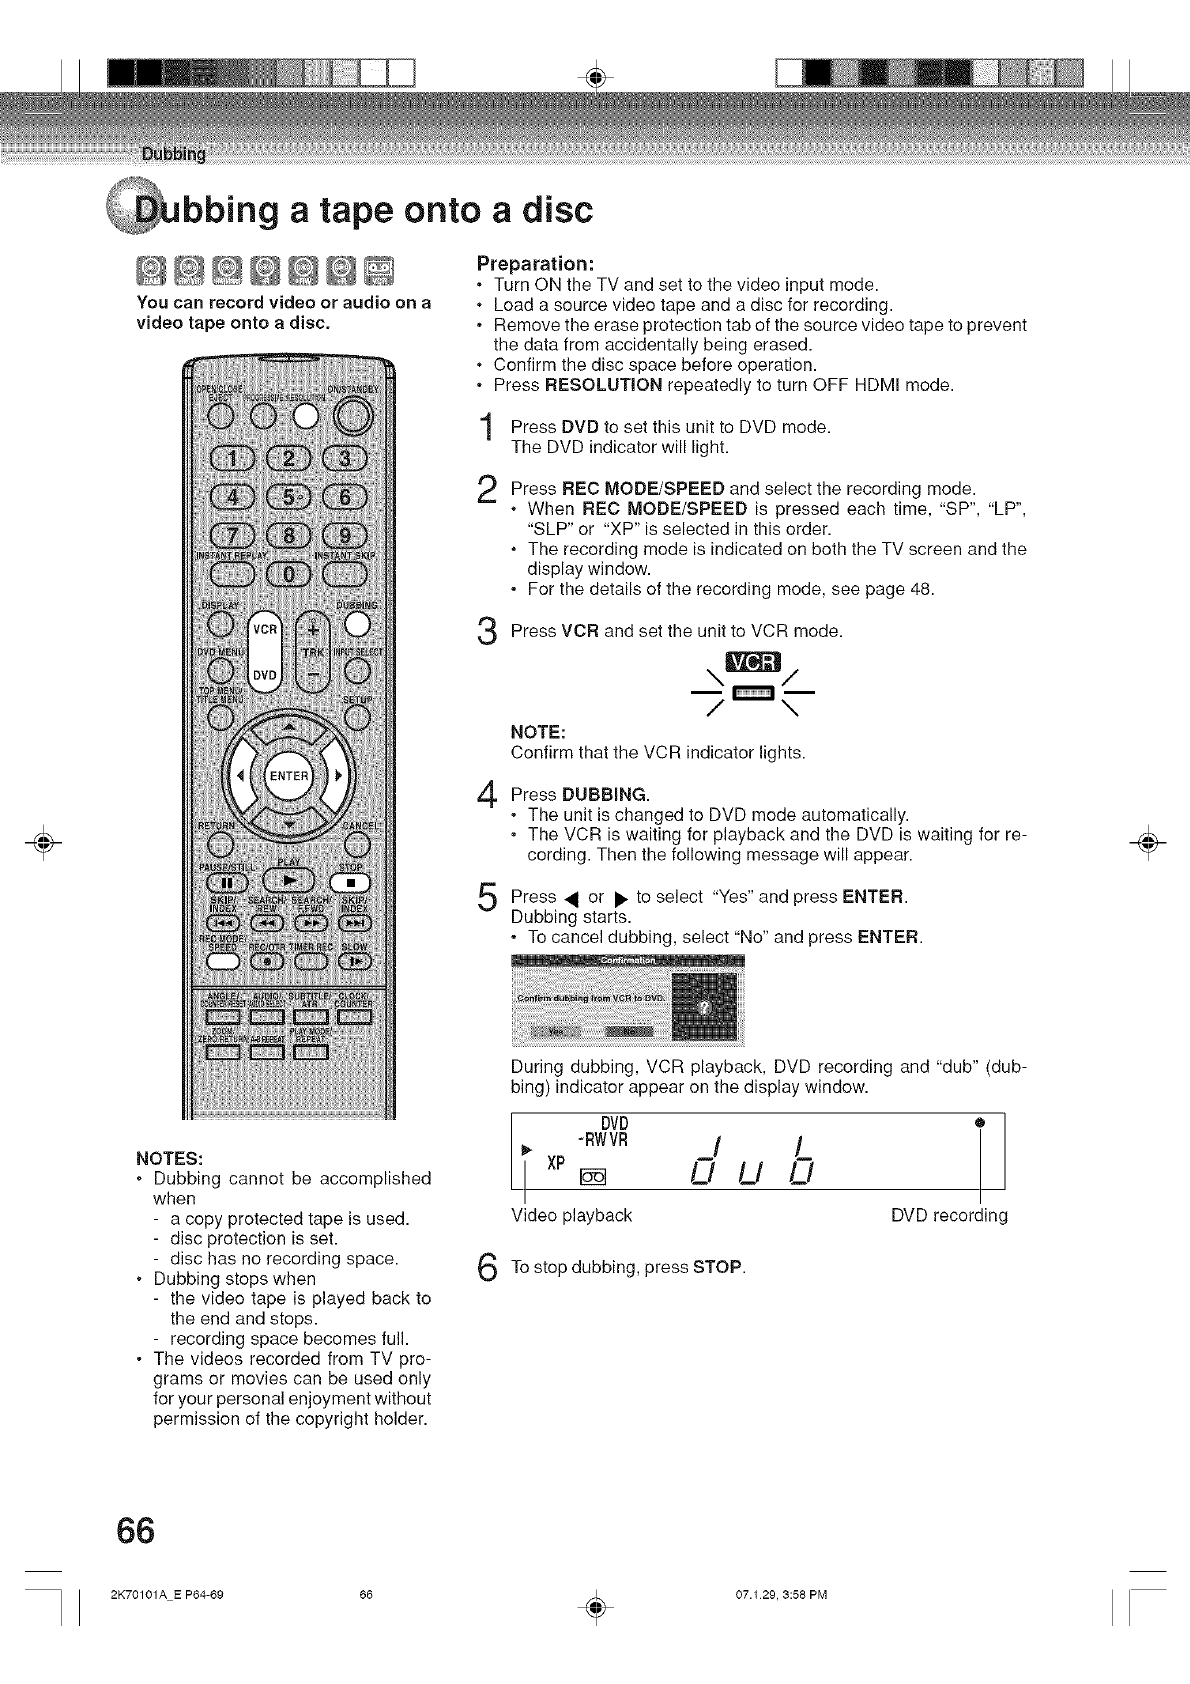
÷
bbing a tape onto adisc
@@@@@@@
You can record video or audio on a
video tape onto adisc.
Preparation:
•Turn ON the TV and set to the video input mode.
.Load a source video tape and a disc for recording.
•Remove the erase protection tab of the source video tape to prevent
the data from accidentally being erased.
.Confirm the disc space before operation.
•Press RESOLUTION repeatedly to turn OFF HDMI mode.
Press DVD to set this unit to DVD mode.
The DVD indicator will light.
2Press REC MODE/SPEED and select the recording mode.
. When REC MODE/SPEED is pressed each time, "SP", "LP",
"SLP" or "XP" is selected in this order.
. The recording mode is indicated on both the TV screen and the
display window.
• For the details of the recording mode, see page 48.
3Press VCR and set the unit to VCR mode.
\\/
NOTE:
Confirm that the VCR indicator lights.
4Press DUBBING.
• The unit is changed to DVD mode automatically.
• The VCR is waiting for playback and the DVD is waiting for re-
cording. Then the following message will appear.
Press to select "Yes" and ENTER.
or press
Dubbing starts.
• To cancel dubbing, select "No" and press ENTER.
÷
NOTES:
. Dubbing cannot be accomplished
when
- a copy protected tape is used.
- disc protection is set.
- disc has no recording space.
. Dubbing stops when
- the video tape is played back to
the end and stops.
- recording space becomes full.
• The videos recorded from TV pro-
grams or movies can be used only
for your personal enjoyment without
permission of the copyright holder.
During dubbing, VCR playback, DVD recording and "dub" (dub-
bing) indicator appear on the display window.
DVD •
-RWVR /Jt
"xPm O U O
Video playback DVD recording
To stop dubbing, press STOP.
66
2K70101A E P64-69 86 _ 07.129, 3:58 PM
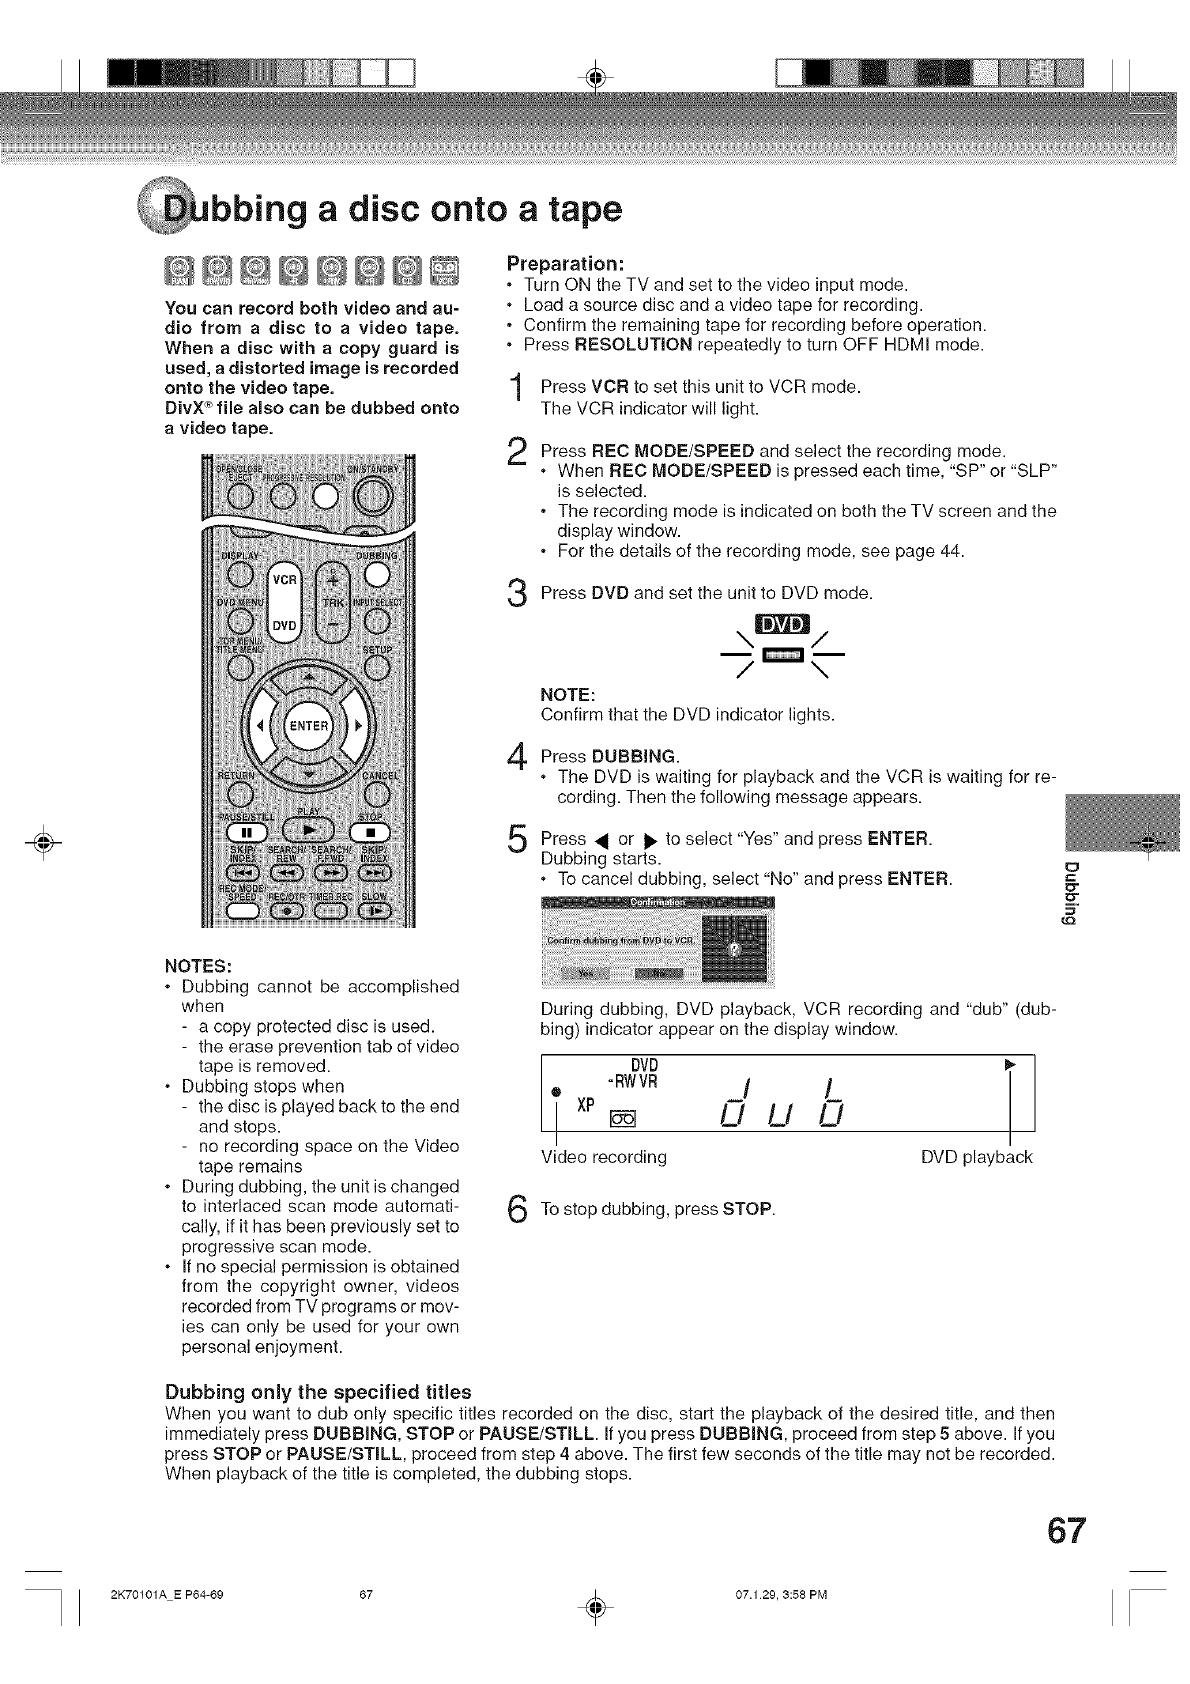
÷
bbing a disc onto atape
@@@@@@@@
You can record both video and au-
dio from adisc to a video tape.
When adisc with acopy guard is
used, a distorted image is recorded
onto the video tape.
Div× _ file also can be dubbed onto
avideo tape.
Preparation:
•Turn ON the TV and set to the video input mode.
,Load a source disc and a video tape for recording.
•Confirm the remaining tape for recording before operation.
•Press RESOLUTION repeatedly to turn OFF HDMI mode.
Press VCR this unit VCR mode.
to set to
The VCR indicator will light.
Press REC MODE/SPEED and select the recording mode.
,When REC MODE/SPEED is pressed each time, "SP" or "SLP"
is selected.
,The recording mode is indicated on both the TV screen and the
display window.
•For the details of the recording mode, see page 44.
Press DVD and set the unit to DVD mode.
NOTE:
Confirm that the DVD indicator lights.
Press DUBBING.
•The DVD is waiting for playback and the VCR is waiting for re-
cording. Then the following message appears.
Press to select "Yes" and ENTER.
or press
Dubbing starts.
. To cancel dubbing, select "No" and press ENTER.
NOTES:
•Dubbing cannot be accomplished
when
- a copy protected disc is used.
- the erase prevention tab of video
tape is removed.
,Dubbing stops when
- the disc is played back to the end
and stops.
- no recording space on the Video
tape remains
.During dubbing, the unit is changed
to interlaced scan mode automati-
cally, if it has been previously set to
progressive scan mode.
•If no special permission is obtained
from the copyright owner, videos
recorded from TV programs or mov-
ies can only be used for your own
personal enjoyment.
6
During dubbing, DVD playback, VCR recording and "dub" (dub-
bing) indicator appear on the display window.
IDVD _ I
°RWVR _/ L
" xP U U U
Video recording DVD playback
To stop dubbing, press STOP.
Dubbing only the specified titles
When you want to dub only specific titles recorded on the disc, start the playback of the desired title, and then
immediately press DUBBING, STOP or PAUSE/STILL If you press DUBBING, proceed from step 5 above, ifyou
press STOP or PAUSE/STILL proceed from step 4 above. The first few seconds of the title may not be recorded.
When playback of the title is completed, the dubbing stops.
_=
67
2K70101A E P64-69 67 _ 07.1 29, 3:58 PM
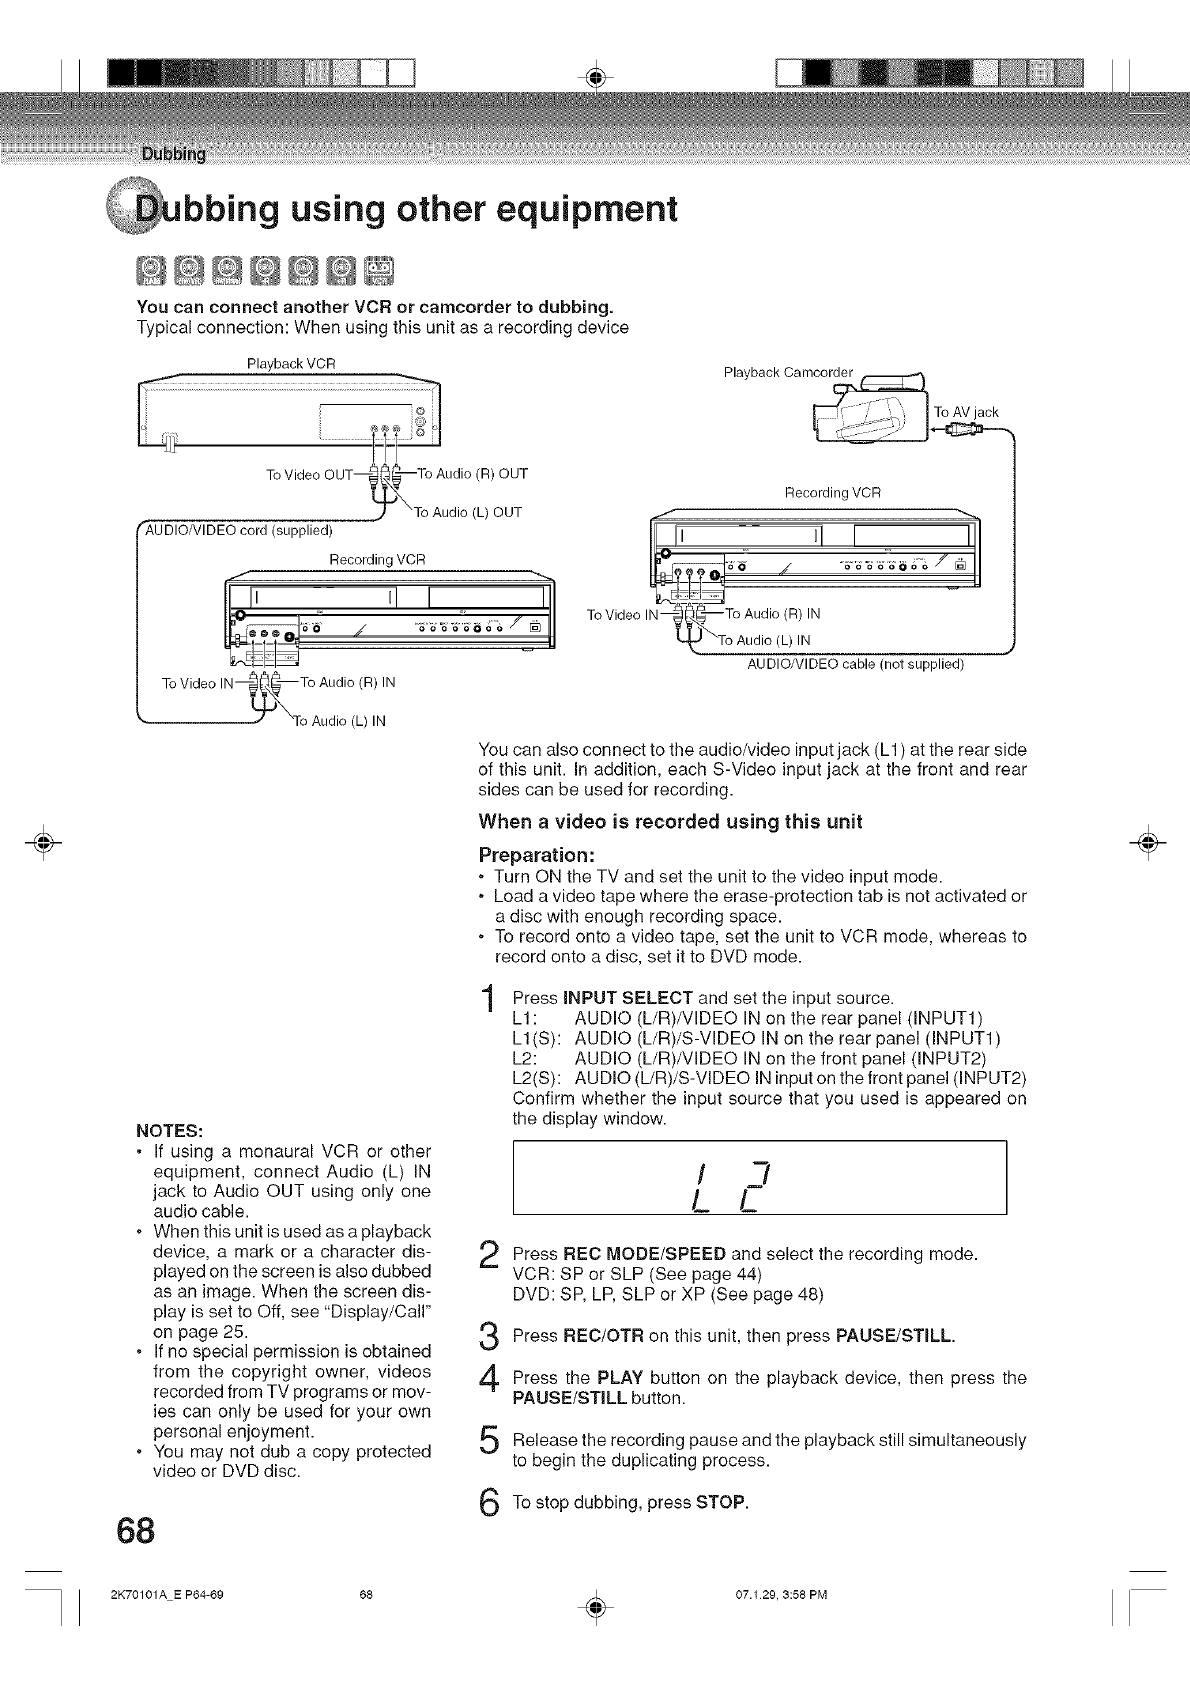
bbing using other equipment
@@@@@@@
You can connect another VCR or camcorder to dubbing,
Typical connection: When using this unit as a recording device
Playback VCR
®
Playback Camcorder
To AV jack
÷
T° V ide° OUT--_-_;_ i_ ((El)oOtU:
_AUDIONIDEO cord (supplied)
Recording VCR
L"' 1
Recording VCR
TI I",,.
_J "To Audio (L) IN
AUDIO/VIDEO cable (not supplied)
You can also connect to the audio/video input jack (L1) at the rear side
of this unit. In addition, each S-Video input jack at the front and rear
sides can be used for recording.
When a video is recorded using this unit
Preparation:
, Turn ON the TV and set the unit to the video input mode.
, Load a video tape where the erase-protection tab is not activated or
a disc with enough recording space.
, To record onto a video tape, set the unit to VCR mode, whereas to
record onto a disc, set it to DVD mode.
NOTES:
• If using a monaural VCR or other
equipment, connect Audio (L) IN
jack to Audio OUT using only one
audio cable.
•When this unit is used as a playback
device, a mark or a character dis-
played on the screen is also dubbed
as an image. When the screen dis-
play is set to Off, see "Display/Call"
on page 25.
•If no special permission is obtained
from the copyright owner, videos
recorded from TV programs or mov-
ies can only be used for your own
personal enjoyment.
• You may not dub a copy protected
video or DVD disc.
68
Press iNPUT SELECT and set the input source.
L1: AUDIO (L/R)/VIDEO IN on the rear panel (INPUT1)
L1(S): AUDIO (L/R)/S-VIDEO IN on the rear panel (INPUT1)
L2: AUDIO (L/R)/VIDEO IN on the front panel (INPUT2)
L2(S): AUDIO (L/R)/S-VIDEO IN input on the front panel (INPUT2)
Confirm whether the input source that you used is appeared on
the display window.
/2
L L
2
3
4
5
6
Press REC MODE/SPEED and select the recording mode.
VCR: SP or SLP (See page 44)
DVD: SP, LP, SLP or XP (See page 48)
Press REC/OTR on this unit, then press PAUSE/STILL
Press the PLAY button on the playback device, then press the
PAUSE/STILL button.
Release the recording pause and the playback still simultaneously
to begin the duplicating process.
To stop dubbing, press STOP.
÷
2K70101A E P64-69 88 _ 07.129, 3:58 PM

g using other equipment
@@@@@@@
You can connect a DV format digital video camera to the DV iN terminal to record or playback from it.
Playback Digital Video Camera
To DV OUT
÷
NOTES:
, The DV terminal of this recorder
supports only input from a DV for-
mat digital video camera. It cannot
output to a connected device. Some
models of DV format digital video
cameras may be not compatible.
•DV recording does not start in the
following cases:
- While timer recording standby
mode
- While VCR mode
•DV recording does not work if the
DV terminal is connected to equip-
ment other than DV format digital
video camera, such as a PC.
, Do not keep the DV terminal
connected unless you record from
a DV format digital video camera, as
it may give influence on the recorder
if operated.
•When you want to record both ste-
reo 1 and stereo 2 sounds from a
DV format digital video camera, ad-
ditionally make a connection to the
audio input jacks on this recorder
using cables such as audio/video
cables supplied with the DV format
digital video camera.
•If a DV format digital video camera
is not recognized, pull out the plug
and connect it again.
•Some models of DV format digital
video cameras may support a dif-
ferent compression format. From
such equipment, recording is not
possible.
•Depending on the models of DV for-
mat digital video cameras, record-
ing may not work properly or some
functions may be disabled.
, On an input source from a DV tape
which is partly recorded over, chap-
ters may not made properly.
Recording VCR
To DV IN L
DV cable (not supplied)
Dubbing DV movie
Preparation:
•Turn ON the TV and set to the video input mode.
• Set the digital video camera to the Playback mode.
,Connect a DV format digital video camera to the DV IN terminal on
the front panel.
,Load a disc or insert cassette tape with enough recording space. o
_=
Press DVD or VCR to set this unit to a mode that you used to dub. ,._
Press iNPUT SELECT and the channel DV.
set to
• You cannot playback DVD or VCR when DV input mode se-
lected.
3Press REC/OTR.
The digital video camera starts playback and this unit starts re-
cording.
• You also can use PLAY, RFWD, REV, PAUSE and STOP to
control DV camera.
stop dubbing, press
To STOP.
If the playback finished, the recording stops automatically.
69
2K70101A E P64-69 69 _ 07.1 29, 3:58 PM
÷
A-B Repeat Playback
Playback that repeats between two set points, A and
B.
angle
Recorded onto some DVD discs are scenes which
have been simultaneously shot from a number of dif-
ferent angles (the same scene is shot from the front,
from the left side, from the right side, etc.). With such
discs, you can select the angle from which to view the
scene.
auto chapter
Feature that automatically makes chapter marks on a
DVD disc during recording.
blue background
Feature that automatically changes unpleasant noise
images to a blue screen when a channel without a
broadcast or a channel on which the broadcast has
ended has been selected.
Play screen
Screen that appears when TITLE MENU is pressed
during Audio CD, Video CD or MP3/WMA/JPEG/
DivX "_CD is inserted.
CABLE
Cable television.
chapter
A section within a title is called a "chapter".
Chase playback
Feature that playback from the beginning of a pro-
gram currently being recorded.
copy guard
Copyright protection signal. Software and broadcasts
that contain this signal cannot be recorded.
Dolby Digital
Dolby '_Digital Recording enables consumers to record
high-quality video with stereo sound on recordable
DVD discs. The technology, when utilized instead of
PCM recording, also saves recordable disc space,
allowing for higher video resolution or extended re-
cording time on each DVD. DVDs created using Dolby
Digital Recording will play back on all DVD-Video play-
ers.
Manufactured under ficense from Dolby
Laboratories. Dolby and the double-D symbol are
trademarks of Dolby Laboratories.
DTS
This is a digital sound system developed by Digital
Theater Systems for use in cinemas. This system uses
6 audio channels and provides accurate sound field
positioning and realistic acoustics. (By connecting a
DTS Digital Surround decoder, you can also listen to
DTS Digital Surround sound.)
DVD menu
Menu recorded on a DVD-Video that enables the user
to select subtitles language, dubbing, etc.
finalize
Operation that enables discs recorded or edited with
this unit to be played back on other DVD players.
instant replay
If INSTANT REPLAY is pressed during playback, play-
back returns to a point 10 seconds earlier and re-
sumes.
instant skip
When press during playback, playback jumps 30 sec-
ends and resumes.
interlaced scanning
Technology that alternately displays odd-numbered
scanning lines and even-numbered scanning lines.
Also called "480i', "i" meaning "interlace".
letter box
Feature that displays black bands above and below
the playback images during playback of a disc re-
corded in wide (16:9) format on a 4:3 TV connected
to this unit.
MP3
One type of audio compression that uses MPEG1.
This format compresses the sound to use up about 1/
10 of the original file space, without impairing the origi-
nal sound quality.
OTR
One-touch Timer Recording. Start a timed recording
by pressing just one button (up to 6 hours).
pan scan
Feature that cuts the left and right edges of playback
images to a 4:3 size during playback of a disc recorded
in wide (16:9) format on a 4:3 TV connected to this
unit.
parental control
Some discs control viewing according to the age of
the viewer. A control level can be set for those types
of discs.
PBS
Acronym for Public Broadcast System. The PBS chan-
nel transmits data for auto clock setting.
Progressive scan
Technology that simultaneously displays odd-num-
bered scanning lines and even-numbered scanning
lines from top to bottom. Also called "480p", "p" mean-
ing "progressive".
÷
7O
2K70101A E P70-74 70 _ 07.129, 3:58 PM
÷
region number
There is software that enables DVD playback in dif-
fering countries. The number of that kind of disc is
called the "region number".
SETUP MENU
Menu that contains settings for various features of this
unit, such as recording and playback. Timer record-
ing is also set from the SETUP MENU.
slide show
Technique for flipping through and viewing many im-
ages (JPEG files).
subtitle language
Language used for subtitles of movies, etc. Viewers
can watch in a language of their choosing.
title
A program recorded on a disc is called a "title".
Title List
Menu that lists titles and tracks recorded on the disc.
It is used for playback and disc editing.
top menu
Menu on a DVD-Video for selecting chapters for play-
back, subtitle language, etc. Some DVD-Video call this
top menu "Title".
track
A song on an Audio CD is called a "track".
Video mode
This recording format is compatible with commercially
available DVD players.
virtual surround
Technology that converts audio that is not recorded in
surround sound into audio that assimilates surround
sound.
VR mode
This recording format is the basic DVD-RW recording
format, and lets you enjoy the various editing func-
tions available with this unit.
+VR mode (plus VR mode)
This recording format is the basic DVD+RW record-
ing format.
o=
o=
o
o
3
÷
71
2K70101A E P70-74 71 _ 07.1 29, 3:58 PM
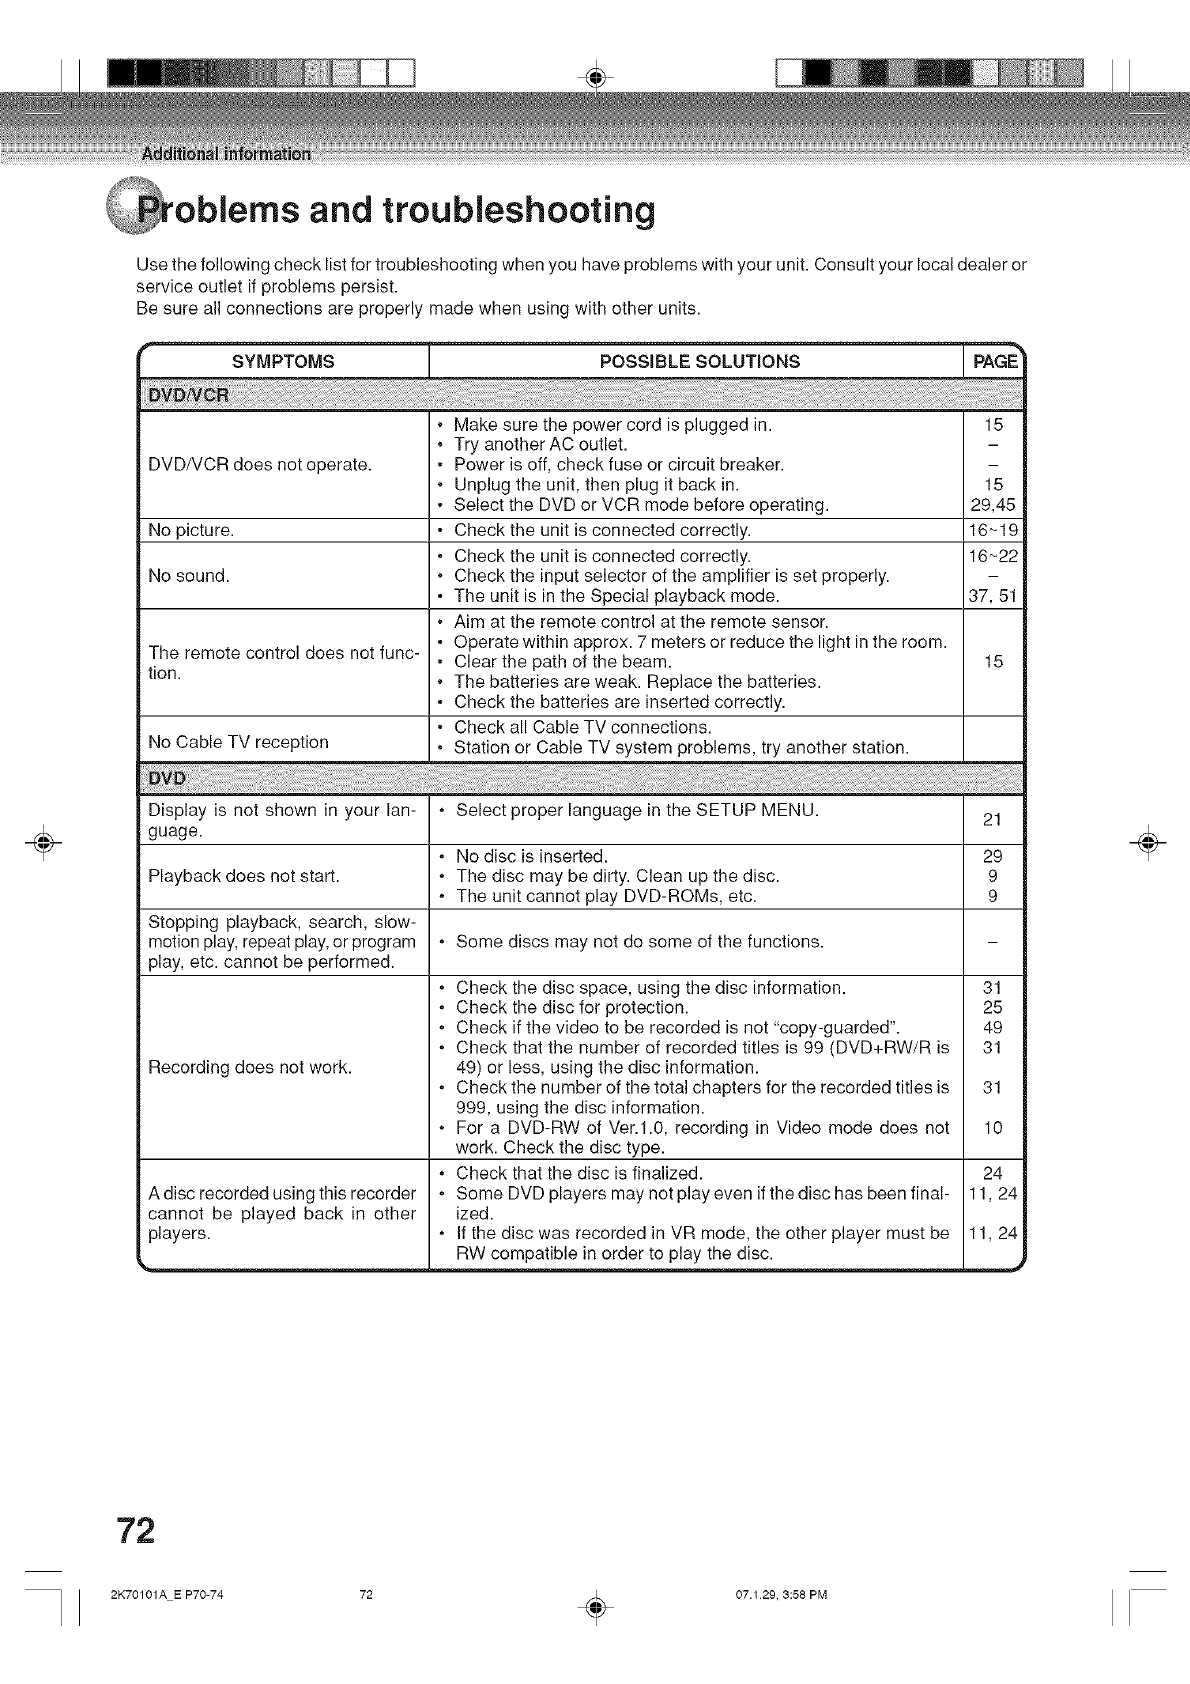
÷
oblems and troubleshooting
Use the following check list for troubleshooting when you have problems with your unit. Consult your local dealer or
service outlet if problems persist.
Be sure all connections are properly made when using with other units.
SYMPTOMS POSSIBLESOLUTIO.S
D
DVD/VCR does not operate.
No picture.
No sound.
The remote control does not func-
tion.
No Cable TV reception
Display is not shown in your lan-
guage.
Playback does not start.
Stopping playback, search, slow-
motion play, repeat play, or program
play, etc. cannot be performed.
Recording does not work.
A disc recorded using this recorder
cannot be played back in other
players.
. Make sure the power cord is plugged in. 15
. Try another AC outlet.
• Power is off, check fuse or circuit breaker.
. Unplug the unit, then plug it back in. 15
• Select the DVD or VCR mode before operating. 29,45
• Check the unit is connected correctly. 16~19
. Check the unit is connected correctly. 16~22
. Check the input selector of the amplifier is set properly.
• The unit is in the Special playback mode. 37, 51
. Aim at the remote control at the remote sensor.
• Operate within approx. 7 meters or reduce the light in the room.
• Clear the path of the beam. 15
. The batteries are weak. Replace the batteries.
• Check the batteries are inserted correctly.
• Check all Cable TV connections.
. Station or Cable TV system problems, try another station.
•Select proper language in the SETUP MENU.
•No disc is inserted.
•The disc may be dirty. Clean up the disc.
.The unit cannot play DVD-ROMs, etc.
•Some discs may not do some of the functions.
21
29
9
9
•Check the disc space, using the disc information. 31
•Check the disc for protection. 25
.Check if the video to be recorded is not "copy-guarded'. 49
•Check that the number of recorded titles is 99 (DVD+RW/R is 31
49) or less, using the disc information.
.Check the number of the total chapters for the recorded titles is 31
999, using the disc information.
.For a DVD-RW of Ver.l.0, recording in Video mode does not 10
work. Check the disc type.
•Check that the disc is finalized.
.Some DVD players may not play even if the disc has been final-
ized.
•If the disc was recorded in VR mode, the other player must be
RW compatible in order to play the disc.
24
11,24
11,24
÷
72
2K70101A E P70-74 72 _ 07.129, 3:58 PM
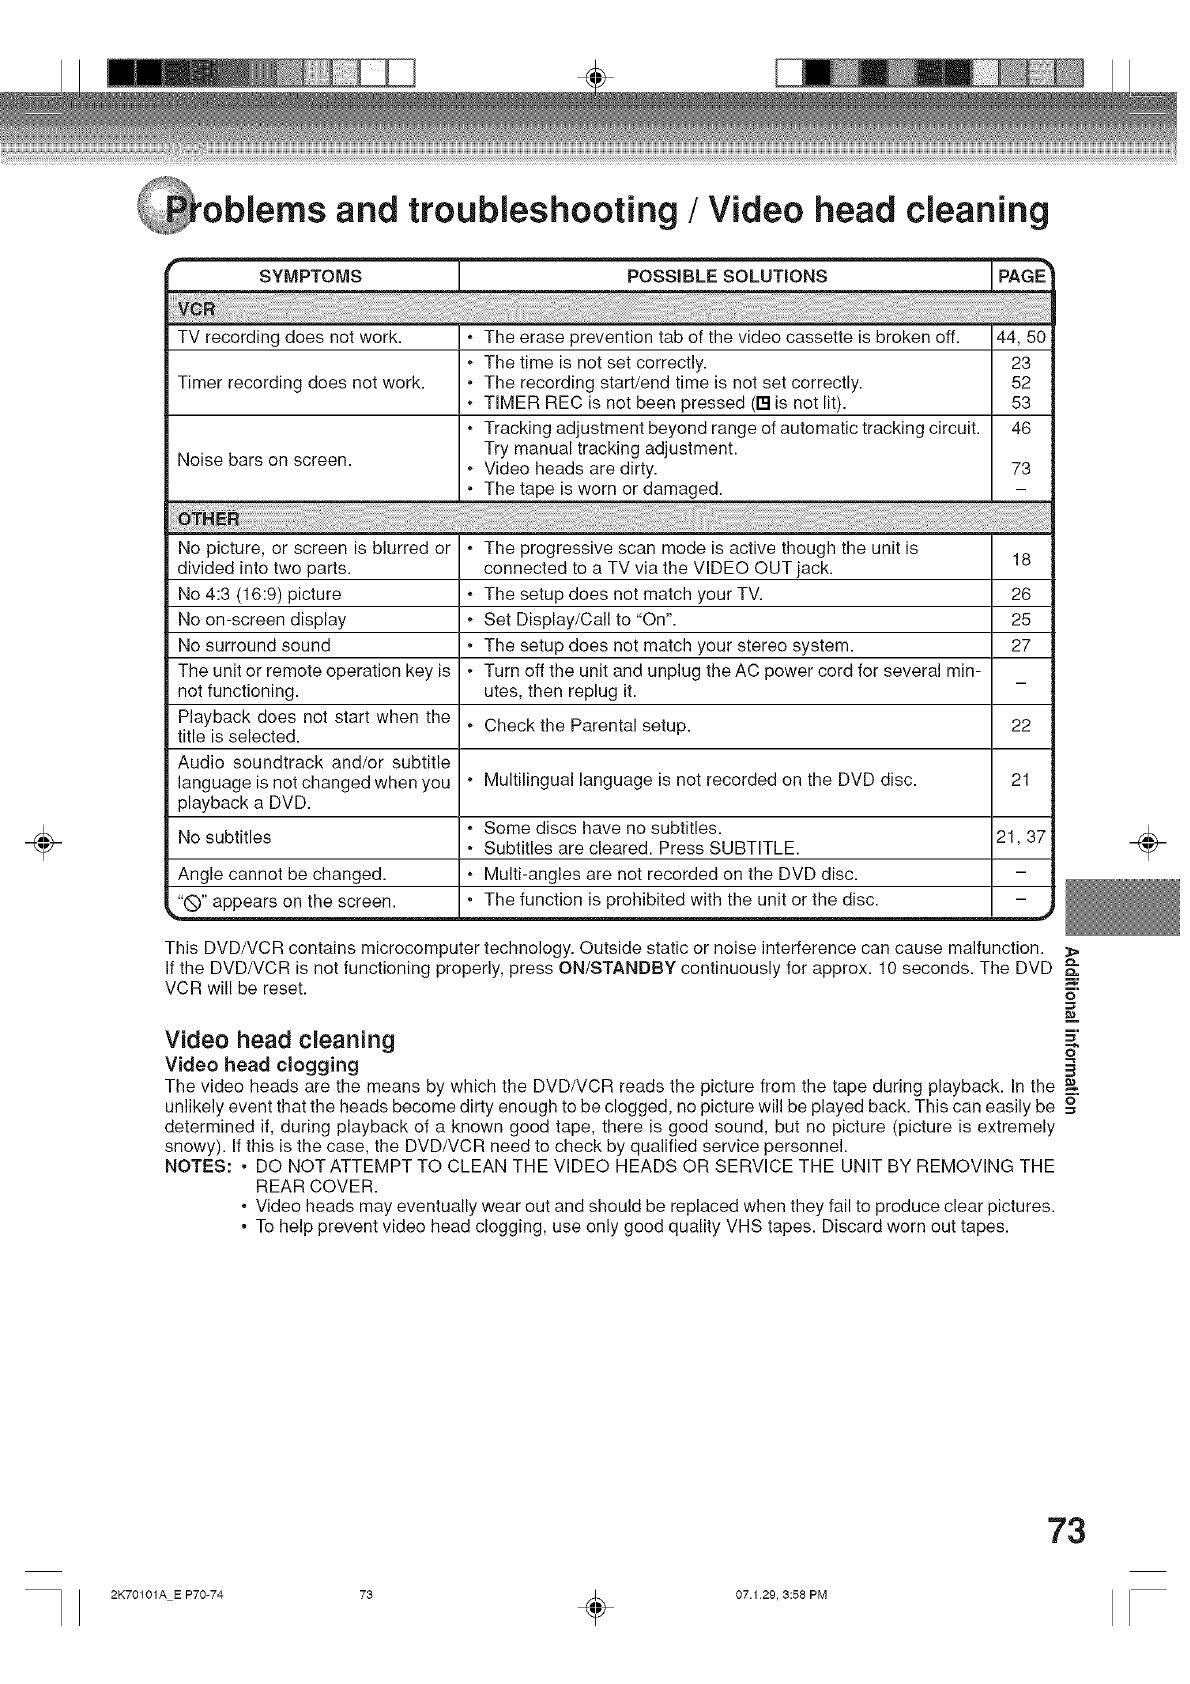
÷
and troubleshooting /Video head cleaning
SYMPTOMS POSSIBLE SOLUTIONS PAGE
TV recording does not work. .The erase prevention tab of the video cassette is broken off.
.The time is not set correctly.
Timer recording does not work.
Noise bars on screen.
No picture, or screen is blurred or
divided into two parts.
No 4:3 (16:9) picture
No on-screen display
No surround sound
The unit or remote operation key is
not functioning.
Playback does not start when the
title is selected.
Audio soundtrack and/or subtitle
language is not changed when you
playback a DVD.
No subtitles
Angle cannot be changed.
"Q" appears on the screen.
•The recording start/end time is not set correctly.
.TIMER REC is not been pressed (11:1is not lit).
.Tracking adjustment beyond range of automatic tracking circuit.
Try manual tracking adjustment.
.Video heads are dirty.
•The tape is worn or damaged.
.The progressive scan mode is active though the unit is
connected to a TV via the VIDEO OUT jack.
.The setup does not match your TV.
.Set Display/Call to "On".
•The setup does not match your stereo system.
•Turn off the unit and unplug the AC power cord for several min-
utes, then replug it.
.Check the Parental setup.
Multilingual language is not recorded on the DVD disc.
.Some discs have no subtitles.
•Subtitles are cleared. Press SUBTITLE.
.Multi-angles are not recorded on the DVD disc.
• The function is prohibited with the unit or the disc.
44,50i
23
52
53
46
73
18
26
25
27
22
21
21,37i
This DVD/VCR contains microcomputer technology. Outside static or noise interference can cause malfunction.
If the DVD/VCR is not functioning properly, press ON/STANDBY continuously for approx. 10 seconds. The DVD
VCR will be reset.
Video head cleaning
Video head clogging
&
=,:
o
o
3
The video heads are the means by which the DVD/VCR reads the picture from the tape during playback. In the
unlikely event that the heads become dirty enough to be clogged, no picture will be played back. This can easily be =6"
determined if, during playback of a known good tape, there is good sound, but no picture (picture is extremely
snowy). If this is the case, the DVD/VCR need to check by qualified service personnel.
NOTES: •DO NOTATTEMPT TO CLEAN THE VIDEO HEADS OR SERVICE THE UNIT BY REMOVING THE
REAR COVER.
.Video heads may eventually wear out and should be replaced when they fail to produce clear pictures.
•To help prevent video head clogging, use only good quality VHS tapes. Discard worn out tapes.
÷
73
2K70101A E P70-74 73 _ 07.1 29, 3:58 PM
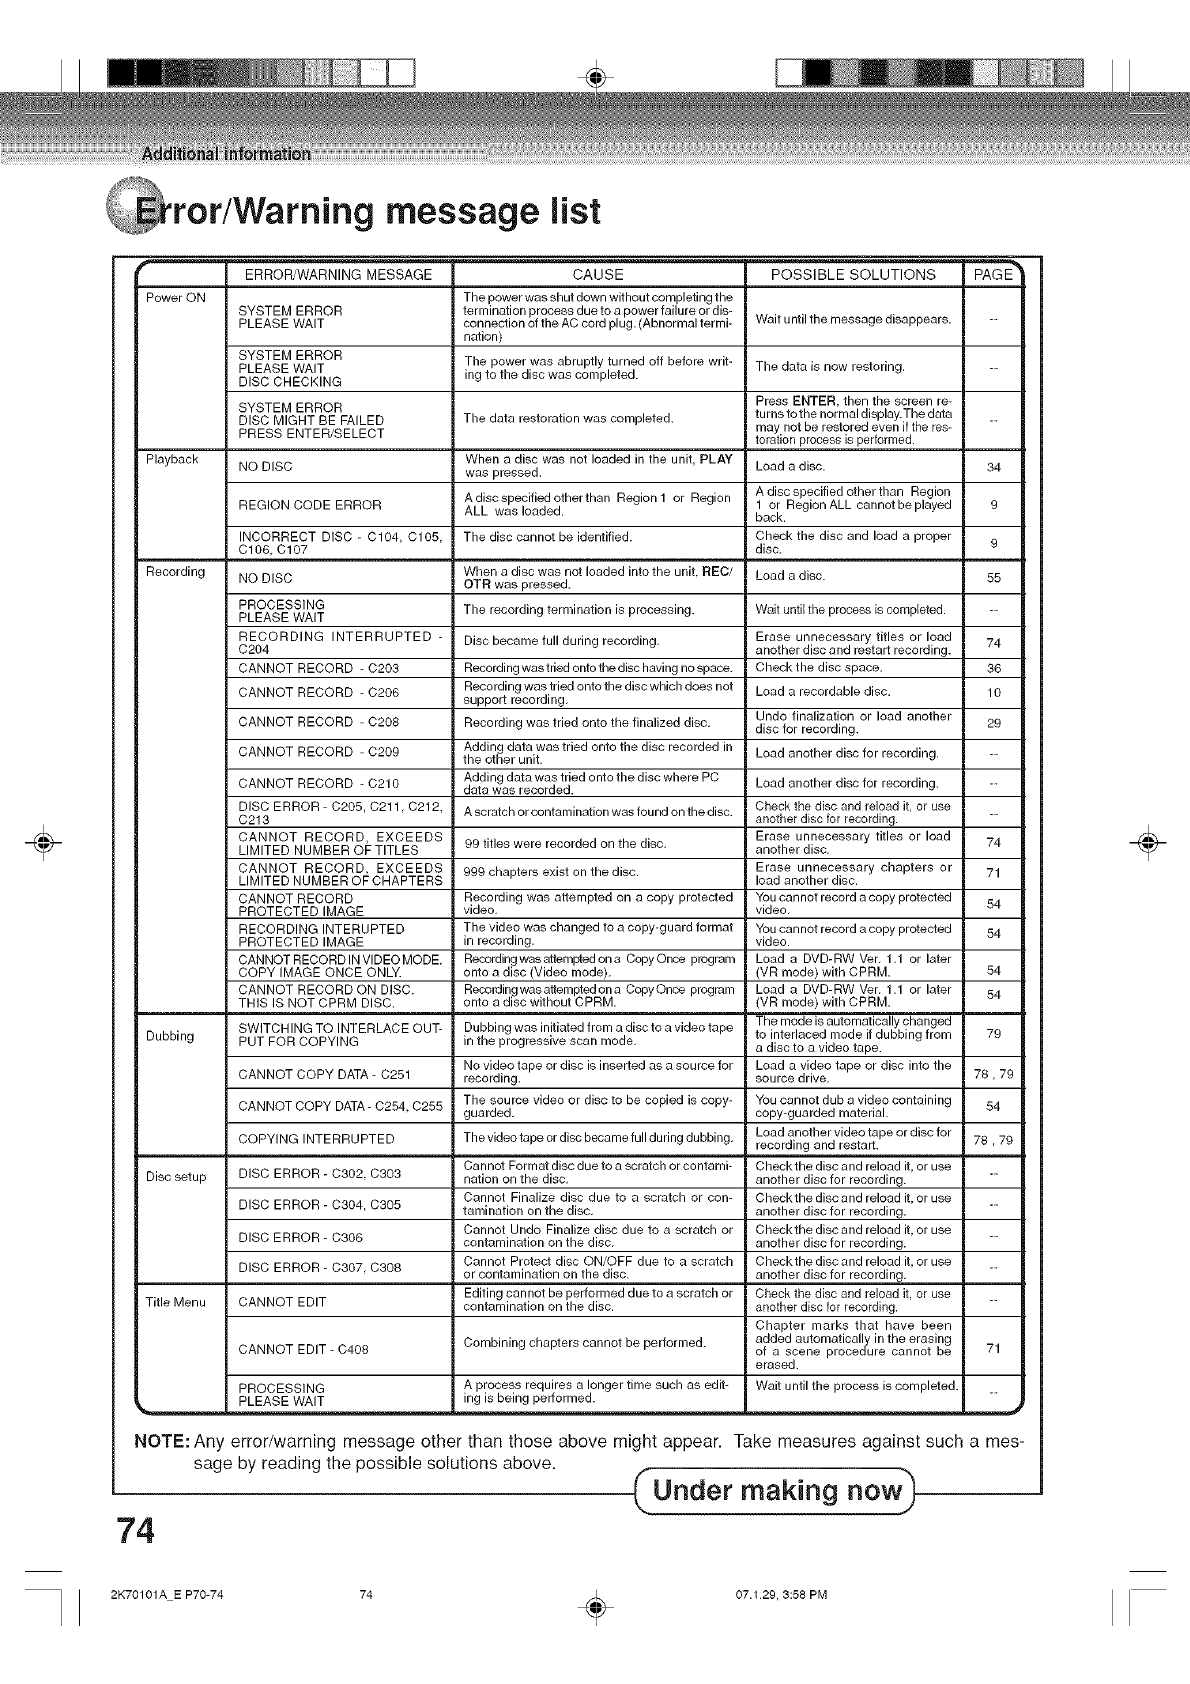
÷
ror/Warning message list
r
Power ON
Playback
Recording
Dubbing
Disc setup
ERROR/WARNING MESSAGE
SYSTEM ERROR
PLEASE WAIT
SYSTEM ERROR
PLEASE WAIT
DISC CHECKING
SYSTEM ERROR
DISC MIGHT BE FAILED
PRESS ENTER/SELECT
NO DISC
REGION CODE ERROR
INCORRECT DISC - C104, C105,
C106, C107
NO DISC
PROCESSING
PLEASE WAIT
RECORDING INTERRUPTED -
C204
CANNOT RECORD - C203
CANNOT RECORD - C206
CANNOT RECORD - C208
CANNOT RECORD - C209
CANNOT RECORD - C210
DISC ERROR - C205, C211, C212,
C213
CANNOT RECORD, EXCEEDS
LIMITED NUMBER OF TITLES
CANNOT RECORD EXCEEDS
LIMITED NUMBER OF CHAPTERS
CANNOT RECORD
PROTECTED IMAGE
RECORDING INTERUPTED
PROTECTED IMAGE
CANNOT RECORD IN VIDEO MODE,
COPY IMAGE ONCE ONLY.
CANNOT RECORD ON DISC.
THIS IS NOT CPRM DISC.
SWITCHING TO INTERLACE OUT-
PUT FOR COPYING
CANNOT COPY DATA - C251
CANNOT COPY DATA - C254, C255
COPYING INTERRUPTED
DISC ERROR - C302, C303
DISC ERROR - C304, C305
DISC ERROR - C306
DISC ERROR - C307, C308
Title Menu CANNOT EDIT
CANNOT EDIT - C408
CAUSE
The power was shut down without completing the
termination process due to a power failure or dis-
connection of the AC cord plug. (Abnormal termi-
nation)
The power was abruptly turned off before writ-
ing to the disc was completed.
,=
POSSIBLE SOLUTIONS PAGE TM
Wait until the message disappears. --
The data is now restoring. --
The data restoration was completed.
When a disc was not loaded in the unit, PLAY
was pressed.
A disc specified other than Region 1 or Region
ALL was loaded.
The disc cannot be identified.
When a disc was not loaded into the unit, REC/
OTR was pressed.
The recording termination is processing.
Press ENTER, then the screen re-
turns to the normal display. The data
may not be restored even if the res-
toration process is performed.
Load a disc. 34
A disc specified other than Region
1 or Region ALL cannot be played 9
back.
Check the disc and load a proper
disc. 9
Load a disc. 55
Wait until the process is completed. --
Erase unnecessary titles or load 74
another disc and restart recording.
Check the disc space. 36
Load a recordable disc. 10
Undo finalization or load another
disc for recording. 29
Load another disc for recording. --
Load another disc for recording. --
Check the disc and reload it, or use
another disc for recording. --
Erase unnecessary titles or load 74
another disc.
Erase unnecessary chapters or 71
load another disc.
You cannot record a copy protected
video. 54
You cannot record a copy protected 54
video.
Load a DVD-RW Vet. 1.1 or later
(VR mode) with CPRM. 54
Load a DVD-RW Vet. 1.1 or later 54
(VR mode) with CPRM.
The mode is automatically changed
to interlaced mode if dubbing from 79
a disc to a video tape.
Load a video tape or disc into the
source drive. 78,79
You cannot dub a video containing 54
copy-guarded material.
Load another video tape or disc for
recording and restart. 78,79
Check the disc and reload it, or use
another disc for recording. --
Check the disc and reload it, or use
another disc for recording.
Check the disc and reload it, or use
another disc for recording.
Check the disc and reload it, or use
another disc for recording.
Check the disc and reload it, or use
another disc for recording.
Chapter marks that have been
added automatically in the erasing
of a scene procedure cannot be 71
erased.
Wait until the process is completed. __
Disc became full during recording.
Recording was tried onto the disc having no space.
Recording was tried onto the disc which does not
support recording.
Recording was tried onto the finalized disc.
Adding data was tried onto the disc recorded in
the other unit.
Adding data was tried onto the disc where PC
data was recorded.
A scratch or contamination was found on the disc.
99 titles were recorded on the disc.
999 chapters exist on the disc.
Recording was attempted on a copy protected
video.
The video was changed to a copy-guard format
in recording.
Recording was attempted on a Copy Once program
onto a disc (Video mode).
Recording was attempted on a Copy Once program
onto a disc without CPRM.
Dubbing was initiated from a disc to a video tape
in the progressive scan mode.
No video tape or disc is inserted as a source for
recording.
The source video or disc to be copied is copy-
guarded.
The video tape or disc became full during dubbing.
Cannot Format disc due to a scratch or contami-
nation on the disc.
Cannot Finalize disc due to a scratch or con-
tamination on the disc.
Cannot Undo Finalize disc due to a scratch or
contamination on the disc.
Cannot Protect disc ON/OFF due to a scratch
or contamination on the disc.
Editing cannot be performed due to a scratch or
contamination on the disc.
Combining chapters cannot be performed.
PROCESSING A process requires a longer time such as edit-
PLEASE WAIT ing is being performed.
NOTE: Any error/warning message other than those above might appear. Take measures against such a mes
sage by reading the possible solutions above.
74
÷
2K70101A E P70-74 74 _ 07.129, 3:58 PM
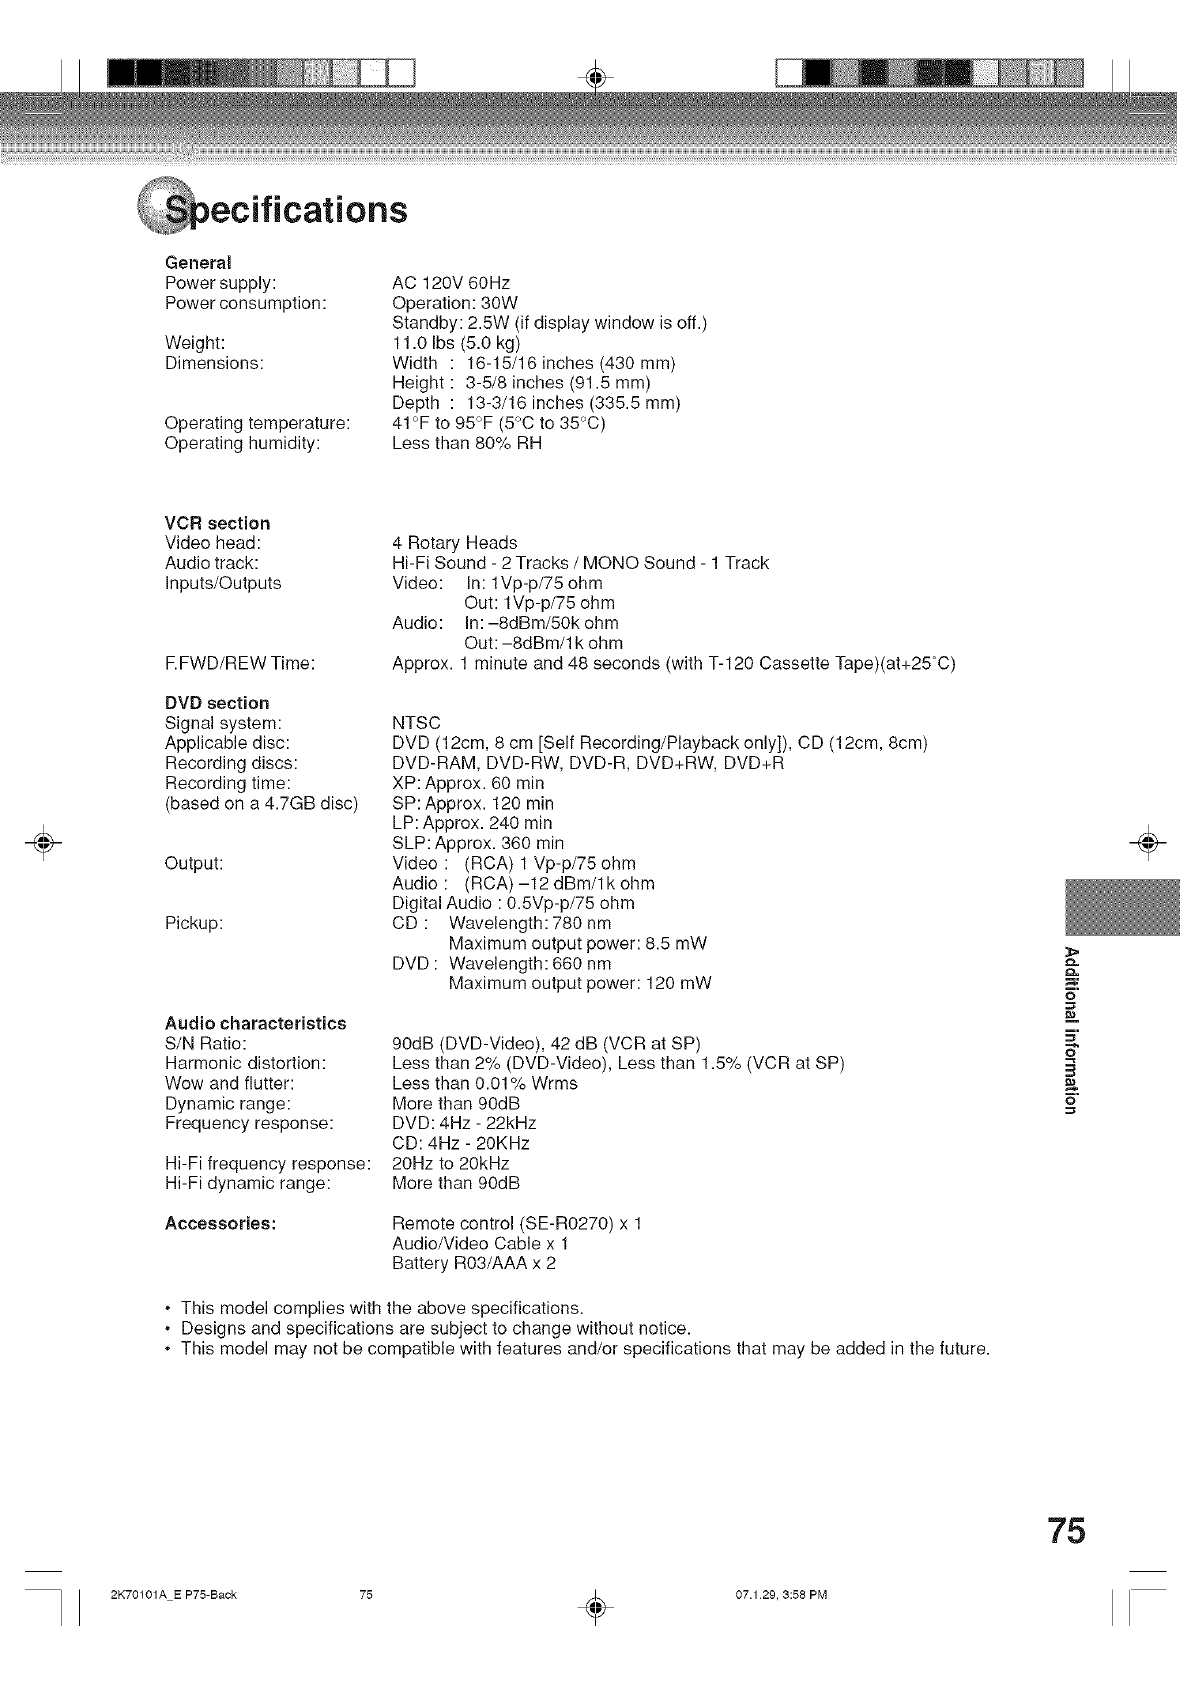
General
Power supply:
Power consumption:
Weight:
Dimensions:
Operating temperature:
Operating humidity:
AC 120V 60Hz
Operation: 30W
Standby: 2.5W (if display window is off.)
11.0 Ibs (5.0 kg)
Width : 16-15/16 inches (430 mm)
Height : 3-5/8 inches (91.5 mm)
Depth : 13-3/16 inches (335.5 mm)
41°F to 95°F (5°C to 35°C)
Less than 80% RH
÷
VCR section
Video head:
Audio track:
Inputs/Outputs
RFWD/REW Time:
4 Rotary Heads
Hi-Fi Sound - 2 Tracks /MONO Sound - 1 Track
Video: In: 1Vp-p/75 ohm
Out: lVp-p/75 ohm
Audio: In: -8dBm/50k ohm
Out: -8dBm/1 k ohm
Approx. 1 minute and 48 seconds (with T-120 Cassette Tape)(at+25°C)
DVD section
Signal system:
Applicable disc:
Recording discs:
Recording time:
(based on a 4.7GB disc)
Output:
Pickup:
NTSC
DVD (12cm, 8 cm [Self Recording/Playback only]), CD (12cm, 8cm)
DVD-RAM, DVD-RW, DVD-R, DVD+RW, DVD+R
XP: Approx. 60 min
SP: Approx. 120 min
LP: Approx. 240 min
SLP: Approx. 360 min
Video : (RCA) 1 Vp-p/75 ohm
Audio: (RCA)-12dBm/lkohm
Digital Audio : 0.5Vp-p/75 ohm
CD : Wavelength:780 nm
Maximum output power: 8.5 mW
DVD : Wavelength: 660 nm
Maximum output power: 120 mW
Audio characteristics
S/N Ratio:
Harmonic distortion:
Wow and flutter:
Dynamic range:
Frequency response:
Hi-Fi frequency response:
Hi-Fi dynamic range:
90dB (DVD-Video), 42 dB (VCR at SP)
Less than 2% (DVD-Video), Less than 1.5% (VCR at SP)
Less than 0.01% Wrms
More than 90dB
DVD: 4Hz - 22kHz
CD: 4Hz - 20KHz
20Hz to 20kHz
More than 90dB
Accessories: Remote control (SE-R0270) x 1
Audio/Video Cable x 1
Battery R03/AAA x 2
•This model complies with the above specifications.
.Designs and specifications are subject to change without notice.
•This model may not be compatible with features and/or specifications that may be added in the future.
=,:
o
o
3
÷
75
2K70101A E P75-Back 75 _ 07.1 29, 3:58 PM
÷
mited Canadian Warranty
For Toshiba Brand DVD Players, DVD Recorders, DVD/VCR Combo Players and Portable DVD Players
Toshiba of Canada Limited ("TCL") makes the following limited warranties to original consumers in Canada. THESE LiMiTED
WARRANTIES EXTEND TO THE ORIGmNAL CONSUMER PURCHASER OR ANY PERSON RECEmVING THiS TOSHIBA
BRAND DVD PLAYER, DVD RECORDER, DVD/VCB COMBO PLAYER OR PORTABLE DVD PLAYER (the "PLAYER(S)" or
"Pmayer(s)") AS A GIFT FROM THE ORmGINAL CONSUMER PURCHASER AND TO NO OTHER PURCHASER OR
TRANSFEREE.
PLAYERS PURCHASED iN CANADA, AND USED ANYWHERE OUTSIDE OF CANADA mNCLUDmNG,WmTHOUT LmMJTATmON,
THE UNITED STATES AND MEXmCO, ARE NOT COVERED BY THESE WARRANTmES.
PLAYERS PURCHASED ANYWHERE OUTSIDE OF CANADA, mNCLUDING, WITHOUT LIMmTATJON, THE UNITED STATES
AND MEXICO, AND USED IN CANADA, ABE NOT COVERED BY THESE WARRANTIES.
Limited One (1) Year Warranty on Parts and Labour (home/non-commerciam use)
Subject to the mere limited warranty if the Player is used for any commercial or business purposes as set out below, TCL
warrants the Player and its parts against material defects in materials or workmanship that result in the Player failing for a period
of one (1) year after the date of original retail purchase. DURING THIS PERmOD, TCL WILL, AT TCL'S OPTION, REPAIR OR
REPLACE A DEFECTmVE PART WITH A NEW OR REFURBmSHED PART, WITHOUT CHARGE TO YOU FOR PARTS OR
LABOUR. YOU MUST DELIVER THE ENTIRE PLAYER TO THE CLOSEST TCL DESIGNATED DVD PLAYER, DVD RECORDER,
DVD/VCR COMBO PLAYER OR PORTABLE DVD PLAYER AUTHORIZED SERVICE DEPOT ("ASD"). YOU MUST PAY FOR
ALL TRANSPORTATmON AND INSURANCE CHARGES FOR THE PLAYER TO AND FROM THE ASD.
Rentam Units
The warranty for Player rental units begins with the date of first rental or thirty (30) days from the date of shipment to the rental
firm, whichever comes first.
Limited Warranty for Commercial Units
TCLwarrants Players that are used for any commercial or business purposes as follows: all parts are warranted against material
defects in materials or workmanship that result in the Player failing for a period of ninety (90) days after the date of original retail
purchase. DURING THIS PEBmOD, TCL WILL, AT TCL'S OPTION, REPAIR OR REPLACE A DEFECTIVE PART WroTHA NEW
OR REFURBISHED PART, WITHOUT CHARGE TO YOU FOB PARTS OR LABOUR. YOU MUST DEMVER THE ENTIRE
PLAYER TO THE CLOSEST ASD. YOU MUST PAY FOR ALL TRANSPORTATmON AND mNSURANCE CHARGES FOR THE
PLAYER TO AND FROM THE ASD.
Your Responsibimity
THE ABOVE WARRANTIES ARE SUBJECT TO THE FOLLOWING CONDITIONS:
(1) You must provide your bill of sale or other proof of purchase.
(2) All warranty servicing of this Player must be performed by a Toshiba Factory Service Depot.
(3) The warranties from TCL are effective only if the Player is (i) purchased as new and unopened from TCL or from TCL's
authorized distributors, dealers or ressllers ("ADR's") and (ii) located/operated in Canada.
(4) Warranties extend only to material defects in materials or workmanship as limited above, and do not extend to:
a. Service, repairs or replacement made necessary by accident, misuse, abuse, moisture, liquids, dust, dirt, neglect, accident,
damage, 24/7 applications, improper installation, improper operation, improper cleaning, improper maintenance, normal
wear and tear, or any other external cause or event, act or omission outside the control of TCL, including fire, theft, acts
of God, alteration, power failures, power surges or power shortages, lightning, other electrical faults, or repairs, modifications
or replacements by persons other than those authorized by TCL to service the Player;
b. Replacement of missing, discarded or lost parts, the provision of retrofits, or preventive maintenance;
c. Repair of damage that is cosmetic only or does not affect the Player functionality, such as wear and tear, scratches and
dents;
d. Service on Toshiba-branded accessory items (such accessory items may be covered by their own warranty);
e. Service on third party products or service made necessary by use of incompatible third party products;
f. Service made necessary by the simultaneous use of this Player and connected equipment;
g. Modifications to the Player not approved in writing by TCL, and service made necessary by the use or installation of non-
Toshiba modifications to the Player;
h. Service of a Player on which the TOSHIBA label or logo, rating label or serial number have been defaced or removed;
i. On-site service and repair of the Player; and
j. Damage to the Player caused by failure to follow the specifications, User manuals or guides as to usage and/or storage.
Disclaimer and Limitation of Remedy
TO THE EXTENT NOT PRECLUDED BY LAW, ALL OTHER EXPRESS AND iMPLIED WARRANTIES, CONDITIONS AND
REPRESENTATIONS FOR THiS PLAYER, INCLUDING THE iMPLiED WARRANTIES AND CONDiTiONS OF
MERCHANTABiLiTY AND FITNESS FOR A PARTICULAR PURPOSE, ABE HEREBY DmSCLAIMED AND EXCLUDED. iF
THE APPLICABLE LAW, STATUTORY OR OTHERWISE, PRECLUDES THE EXCLUSION OF ANY IMPUED WARRANTIES,
CONDITIONS AND REPRESENTATIONS THEN SUCH iMPLIED WARRANTIES, CONDITIONS AND REPRESENTATIONS
ARE OTHERWISE LIMITED iN DURATION TO THE TERM OF THiS EXPRESS WRITTEN LIMITED WARRANTY. TO THE
EXTENT NOT PRECLUDED BY LAW, THiS WRITTEN WARRANTY SUPERCEDES AND SPECIFICALLY DiSCLAiMS ANY
OTHER WARRANTY, CONDiTiON OR REPRESENTATION NOT STATED iN THiS WARRANTY, WHETHER MADE BY TCL,
TOSHIBA CORPORATmON, THEIR AFFILIATES, ADRs AND ASDs AND WHETHER MADE ORALLY OR IN WRITING
(INCLUDING ANY STATEMENT IN ANY BROCHURE, PRESS RELEASE, ANNOUNCEMENT, ADVERTISEMENT, POINT OF
SALE DISPLAY, ETC.).
76
÷
2K70101A E P75-Back 76 _ 07.129, 3:58 PM
÷
ited Canadian Warranty
YOU MUST READ AND FOLLOW ALL SET-UP AND USAGE INSTRUCTIONS IN THE APPLICABLE USER GUIDES AND/OR
MANUALS. IF YOU FAIL TO DO SO, THIS PLAYER MAY NOT FUNCTION PROPERLY AND YOU MAY SUFFER DAMAGE.
THIS WARRANTY WILL NOT COVER ANY SERVICE THAT IS REQUIRED, IN PART OR IN WHOLE, AS A RESULT OF ANY
FAILURE TO FOLLOW THE SET-UP AND USAGE INSTRUCTIONS. THIS WARRANTY DOES NOT APPLY AND SHALL BE
VOID AND UNENFORCEABLE IF THE PLAYER IS OPENED, SERVICED, OR REPAIRED BY PERSONS OTHER THAN THOSE
AUTHORIZED BYTCLTO SERVICE OR REPAIR THE PLAYER.
IF THE PLAYER FAILS TO WORKAS WARRANTED ABOVE, YOUR SOLE AND EXCLUSIVE REMEDY SHALL BE REPAIR OR
REPLACEMENT OF THE DEFECTIVE PART. IN NO EVENT WILLTCL. TOSHIBACORPORATION. THEIR AFFILIATES ADRs
OR ASDs (THE "RELATED PARTIES") BE LIABLE TO YOU OR ANY THIRD PARTY FOR ANY DAMAGES, MONEY,
REIMBURSEMENT, COSTS OR EXPENSES. THIS LIMITATION APPLIES TO DAMAGES, MONEY, REIMBURSEMENT, COSTS
OR EXPENSES OF ANY KIND WHATSOEVER INCLUDING ANY DIRECT OR INDIRECT DAMAGES, DAMAGE TO PROPERTY
OR PERSON, LOST PROFITS, LOST SAVINGS, INCONVENIENCE OR OTHER SPECIAL, INCIDENTAL, EXEMPLARY OR
CONSEQUENTIAL DAMAGES, WHETHER FOR BREACH OF WARRANTY, BREACH OF CONTRACT, TORT (INCLUDING
NEGLIGENCE), UNDER A STATUTE OR UNDER ANY OTHER LAW OR FORM OR ACTION, OR WHETHER ARISING OUT
OF THE USE OF OR INABILITY TO USE THE PLAYER, EVEN IF ANY OF THE RELATED PARTIES HAS BEEN ADVISED OF
THE POSSIBILITY OF SUCH DAMAGES OR OF ANY CLAIM BY ANY OTHER PARTY.
No person, agent, distributor, dealer or company is authorized to change, modify or extend the terms of these warranties in any
manner whatsoever.
Arbitration and Dispute Resolution
To the extent not precluded by law, any claim, dispute, controversy or disagreement (whether for breach of warranty, breach of
contract, tort (including negligence), under a statute or under any other law or form of action) against any of the Related Parties
arising out of, or otherwise relating to: (i) this warranty; (ii) the Player; (iii) any oral or written representations, statements,
brochures, press releases, advertising, announcement, point of sale display, or promotional material relating to the Player; (iv)
the relationships that result from this warranty, (the foregoing claims, disputes controversies and disagreements are collectively
referred to as the "Dispute"), shall be referred to and resolved by final and binding arbitration (to the exclusion of the courts). To
the extent not precluded by law, you agree to waive any right that you may have to commence or participate in any representative
or class proceeding against the Related Parties relating to any Dispute. If and where applicable and to the extent not precluded
by law, you further agree to opt out of any such representative or class proceedings. Arbitration of any Dispute will be conducted
in the forum and in the manner as agreed to between you and TCL. Failing such agreement, the arbitration will be conducted by
one arbitrator pursuant to the laws and rules relating to arbitration generally in force in the jurisdiction in which you reside at the
time that the Dispute arises. To the extent not precluded by law, no claim, dispute, controversy or disagreement of any other
person may be joined or combined with any Dispute by you, without the prior written consent of TCL.
Critical Applications
The Player you have purchased is not designed for any "critical applications." "Critical applications" means life support systems,
medical applications, connections to implanted medical devices, commercial transportation, nuclear facilities or systems or any
other applications where Player failure could lead to injury to persons or loss of life or catastrophic property damage.
IF THE CUSTOMER USES THE PLAYER INANY CRITICALAPPLICATION, THE CUSTOMER -AND NOT TCL, ITSAFFILIATES,
ADRs OR ASDs-ASSUME SOLE AND FULL RESPONSIBILITY FOR SUCH USE. TCL RESERVES THE RIGHT TO REFUSE
TO SERVICE ANY PLAYER USED INA CRITICALAPPLICATION. TCL, ITSAFFILIATES, ADRs AND ASDs HEREBY DISCLAIM _:
ANY AND ALL LIABILITY, DAMAGES AND CONSEQUENCES ARISING OUT OF THE SERVICE OR REFUSAL TO SERVICE o
SUCH PLAYER AND FURTHER DISCLAIM ANY AND ALL LIABILITY, CONSEQUENCES AND DAMAGES THAT MAY ARISE
OR RESULT FROM THE USE OF THE PLAYER IN ANY CRITICAL APPLICATIONS.
General Provisions
If and to the extent that any provision of this limited warranty should generally be found to be unenforceable, the unenforceable -"".
provision shall be severed from the warranty and deemed not to form part of the warranty. The remaining provisions of this o
warranty shall be and remain valid and enforceable. If and to the extent that any provision of this limited warranty as it relates to
any of the Related Parties is found to be invalid or unenforceable in respect of that party (the "Excluded Party") the Excluded
Party shall be deemed to be severed or excluded from the provision, and the provision shall remain valid, enforceable and
applicable in respect of the other or rsmaininq Related Parties.
To the extent permitted by law, this limited warranty shall be governed and construed in accordance with the laws of Ontario.
If there is any inconsistency between this limited warranty, on the one hand, and any statement in the packaging of the Player or
in any other document enclosed with, or used in the context of the promotion or sale of, the Player, on the other hand, the
provisions of this limited warranty shall prevail.
How to Obtain Warranty Services
If, after following all of the operating instructions in this manual and checking the "Troubleshooting" section, you find that service
is needed:
(1) To find the nearest TCLAuthorized Service Depot, visit TCL's web site at www.toshiba.ca, or call toll free 1-868-275-6372.
(2) Present your bill of sale or other proof of purchase to the Toshiba Factory Service Depot.
For additional information, visit TCL's website:
www.toshiba.ca
÷
77
2K70101A E P75-Back 77 _ 07.1 29, 3:58 PM

÷ ÷
2K70101A E P75-Back 78 _ 07.129, 3:58 PM
÷ ÷
2K70101A E P75-Back 79 _ 07.1 29, 3:58 PM
÷
÷ ÷
TOSHIBA
TOSHIBA AMERICA CONSUMER PRODUCTS, L.L.C.
IIIIIIIIIIIMNIIIINII
J2K70101A SH07/02[N Printed in Thailand
2K70101A E P75-Back 80 _ 07.129, 3:58 PM
