Toshiba E Studio 2830C Owners Manual
2014-12-11
: Toshiba Toshiba-E-Studio-2830C-Owners-Manual-121652 toshiba-e-studio-2830c-owners-manual-121652 toshiba pdf
Open the PDF directly: View PDF ![]() .
.
Page Count: 178 [warning: Documents this large are best viewed by clicking the View PDF Link!]
- Preface
- CONTENTS
- OVERVIEW
- PRINTING FROM WINDOWS
- Before Using the Printer Driver
- Printing from Application
- Setting Up Print Options
- Printing with Best Functions for Your Needs
- PRINTING FROM MACINTOSH
- PRINTING FROM UNIX
- Printing from an Application
- Considerations and Limitations
- Printing Using LP Command
- Generic “lp” and “lptap” Options
- General Options
- Print Language
- Stapling
- Output Bin
- Hole Punching
- Media Type
- Paper Source
- Duplexing
- Paper Size
- Printing Modes
- Department Code
- Smoothing
- Distinguish Thin Lines
- Do not Print Blank Pages
- Toner Save
- Booklet Modes
- Page Layout
- Center Margin
- Outer Margin
- Collate
- Orientation
- Font Pitch
- Page Length
- Color Mode
- Pure Black and Pure Gray
- Image Quality Type
- Halftone
- Black Over Print
- Color Balance
- Image Attributes
- PCL5e Specific Options
- Printing from an Application
- MANAGING PRINT JOBS FROM THE CONTROL PANEL
- OTHER PRINTING METHODS
- APPENDIX
- INDEX
MULTIFUNCTIONAL DIGITAL COLOR SYSTEMS
Printing Guide

©2008 TOSHIBA TEC CORPORATION All rights reserved
Under the copyright laws, this manual cannot be reproduced in any form without prior written permission of TTEC. No patent liability
is assumed, however, with respect to the use of the information contained herein.
Preface 1
Preface
Thank you for purchasing TOSHIBA Multifunctional Digital Systems or Multifunctional Digital Color Systems. Also this
guide describes instructions on how to set up the printer drivers required for this equipment, and how to print with them.
Read this manual before using your Multifunctional Digital Systems or Multifunctional Digital Color Systems. Keep this
manual within easy reach, and use it to configure an environment that makes best use of the e-STUDIO’s functions.
How to read this manual
Symbols in this manual
In this manual, some important items are described with the symbols shown below. Be sure to read these items before
using this equipment.
Other than the above, this manual also describes information that may be useful for the operation of this equipment with
the following signage:
Screens
Screens on this manual may differ from the actual ones depending on the use-environment of the equipment such as the
installing status of options.
Trademarks
yThe official name of Windows 2000 is Microsoft Windows 2000 Operating System.
yThe official name of Windows XP is Microsoft Windows XP Operating System.
yThe official name of Windows Vista is Microsoft Windows Vista Operating System.
yThe official name of Windows Server 2003 is Microsoft Windows Server 2003 Operating System.
yMicrosoft, Windows, Windows NT, and the brand names and product names of other Microsoft products are
trademarks of Microsoft Corporation in the US and other countries.
yApple, AppleTalk, Macintosh, Mac, Mac OS, Safari, TrueType, and LaserWriter are trademarks of Apple Inc. in the US
and other countries.
yAdobe, Adobe Acrobat, Adobe Reader, Adobe Acrobat Reader, and PostScript are trademarks of Adobe Systems
Incorporated.
yMozilla, Firefox and Firefox logo are trademarks or registered trademarks of Mozilla Foundation in the U.S. and other
countries.
yIBM, AT and AIX are trademarks of International Business Machines Corporation.
yNOVELL, NetWare, and NDS are trademarks of Novell, Inc.
yTopAccess is a trademark of Toshiba Tec Corporation.
yOther company names and product names in this manual are the trademarks of their respective companies.
Indicates a potentially hazardous situation which, if not avoided, could result in death, serious
injury, serious damage, or fire in the equipment or surrounding assets.
Indicates a potentially hazardous situation which, if not avoided, may result in minor or moderate
injury, partial damage to the equipment or surrounding assets, or loss of data.
Indicates information to which you should pay attention when operating the equipment.
Describes handy information that is useful to know when operating the equipment.
Pages describing items related to what you are currently doing. See these pages as required.

CONTENTS 3
CONTENTS
Preface....................................................................................................................................... 1
How to read this manual........................................................................................................ 1
Chapter 1 OVERVIEW
Features and Functions ........................................................................................................... 6
About Printer Drivers .............................................................................................................. 7
For Macintosh........................................................................................................................ 7
For UNIX................................................................................................................................ 7
Chapter 2 PRINTING FROM WINDOWS
Before Using the Printer Driver............................................................................................. 10
Configuring the Options....................................................................................................... 10
Setting the Department Code .............................................................................................. 12
Copying the PPD File for Windows ..................................................................................... 14
Printing from Application ...................................................................................................... 15
Considerations and Limitations ........................................................................................... 15
How to Print......................................................................................................................... 16
Setting Up Print Options........................................................................................................18
How to Set up...................................................................................................................... 18
Print Options........................................................................................................................ 21
Printing with Best Functions for Your Needs ...................................................................... 59
Printing Various Print Job Types ......................................................................................... 59
Layout and Finishing Options in Basic Tab Menu ............................................................... 65
Layout and Finishing Options in Finishing Tab Menu.......................................................... 67
Finishing Options in Paper Handling Tab Menu .................................................................. 74
Finishing Options in Effect Tab Menu.................................................................................. 76
Using Various Types of Paper............................................................................................. 80
Chapter 3 PRINTING FROM MACINTOSH
Printing from Application on Mac OS X 10.2.4 to Mac OS X 10.5.x ................................... 86
Considerations and Limitations ........................................................................................... 86
How to Print from Mac OS X 10.2.4 to Mac OS X 10.5.x .................................................... 87
Page Setup Dialog on Mac OS X 10.2.4 to Mac OS X 10.5.x ............................................. 88
Print Dialog on Mac OS X 10.3.x to Mac OS X 10.5.x......................................................... 93
Print Dialog on Mac OS X 10.2.x....................................................................................... 108
Chapter 4 PRINTING FROM UNIX
Printing from an Application ............................................................................................... 124
Considerations and Limitations ......................................................................................... 124
Printing Using LP Command ............................................................................................. 124
Generic “lp” and “lptap” Options ........................................................................................ 124
General Options ................................................................................................................ 125
PCL5e Specific Options..................................................................................................... 136

4 CONTENTS
Chapter 5 MANAGING PRINT JOBS FROM THE CONTROL PANEL
Monitoring the Print Job Status .......................................................................................... 140
Normal Print/Scheduled Print jobs..................................................................................... 140
Proof Print jobs.................................................................................................................. 144
Private Print jobs ............................................................................................................... 147
Invalid jobs ........................................................................................................................ 151
Printing files from USB media (USB Direct Printing) ......................................................... 154
Viewing the Print Job Log ................................................................................................... 159
Checking Supplies ............................................................................................................... 161
Viewing the drawer status ................................................................................................. 161
Checking remaining toner levels ....................................................................................... 161
Chapter 6 OTHER PRINTING METHODS
FTP Printing .......................................................................................................................... 164
Email Printing ....................................................................................................................... 165
Chapter 7 APPENDIX
Internal Fonts List ................................................................................................................ 168
Internal PCL Fonts List ...................................................................................................... 168
Internal PS Fonts List ........................................................................................................ 169

1.OVERVIEW
This chapter describes the overview of the printing functions.
Features and Functions........................................................................................................... 6
About Printer Drivers............................................................................................................... 7
For Macintosh.........................................................................................................................................................7
For UNIX ................................................................................................................................................................7

1 OVERVIEW
6 Features and Functions
Features and Functions
Extensive Client Platform Support
This equipment supports printing from IBM-compatible PC, Macintosh, and UNIX workstations. Not all features are
supported on all platforms, however.
Various Port Options
You can map this equipment to print to an SMB, IPP, Raw TCP, or LPR port.
Multiple Job Types
Job Types refer to the way this equipment handles a print job.
yNormal mode requires no special handling and is the most frequently used printing mode.
yScheduled Print lets you specify the time and date at which to print a job.
yPrivate Print mode allows you to hold a job in the print queue until you enter a password at the copier touch panel to
print the job.
yProof Print mode prints the first copy of a multi-copy job and then awaits your approval before printing the remaining
copies.
yStore to e-Filing mode allows you to store the printed document in e-Filing.
yOverlay File prints a document element, such as text or graphics, to a file for superimposing on the background of
other documents.
Professional Finishing Options
Depending on the type of finishing units you have installed on this equipment, you can choose to sort, group, fold and
staple your documents (including saddle-stitching) and punch binding holes.
Sophisticated Document Layout and Assembly Options
You can choose whether to print your document as you have set it up in the application, or to impose printer-driven
document layout options such as printing in Book Format or printing Multiple Pages per Sheet.
Additionally, the printer drivers provide the ability to print selected pages on different media. This includes printing front
and back covers, inserting sheets at predefined positions within the document, or interleaving pages so that every other
page is inserted blank or printed on a different type of media.
Various Sizes of Printing Paper Available
You can use paper larger than the standard sizes defined in the custom paper size setting when you print data created
with applications. (Largest size: 12.00 x 47.24 inches (305 x 1200 mm))
Watermark and Image Overlay Support
Watermarks are a great way to subtly convey useful information about your printed documents. Common watermarks are
[Confidential,” [Draft,” and [Original.” Several watermarks have been pre-defined for use with your documents, or you can
create and save your own custom watermarks.
Watermarks consist of text. Image Overlays can be any combination of text, graphics or other document elements.
Printing watermarks consumes fewer resources than using Image Overlays, so you should use watermarks wherever
possible, particularly when printing speed is an issue.

1 OVERVIEW
About Printer Drivers 7
About Printer Drivers
Printer drivers required for each OS are included in the Client Utilities CD-ROM. For instructions on how to install them,
refer to the Software Installation Guide.
For Macintosh
Printer drivers required for Macintosh OSs are included in the following folders of the Client Utilities CD-ROM:
Macintosh PPD files
yFor Mac OS X 10.2.4 – 10.5.x
[Client Utilities CD-ROM]:Client:MacPPD:OSX
For UNIX
Printer drivers required for UNIX are included in the following folders of the Client Utilities CD-ROM:
Solaris Filter
yTar file for Solaris v2.6/2.7/7.8/8/9
[Client Utilities CD-ROM]/Admin/SolarisFilter/Usa/
HP-UX Filter
yTar file for HP-UX ver.10.20/11.x.
[Client Utilities CD-ROM]/Admin/HP-UXFilter/Usa/
AIX Filter
yTar file for AIX 4.3.3.
[Client Utilities CD-ROM]/Admin/AIXFilter/Usa/
Linux Filter
yThis includes the Tar file for Red Hat 7.x/8.x/9.x, Red Hat Enterprise WS2, SuSE Linux 7.x/8.x/9.x, Mandrake Linux
7.x/8.x/9.x and Turbo Linux 8/10.
[Client Utilities CD-ROM]/Admin/LinuxFilter/Usa/
SCO UNIX Filter
yThis includes the Tar file for SCO UnixWare 7 and SCO OpenUNIX 8.
[Client Utilities CD-ROM]/Admin/OpenUnixFilter/Usa/
CUPS PPD files
yPPD file for CUPS v1.1.15
[Client Utilities CD-ROM]/Admin/CUPS/Usa/

1 OVERVIEW
8 About Printer Drivers

2.PRINTING FROM WINDOWS
This chapter describes the instructions on how to print from a Windows computer.
Before Using the Printer Driver............................................................................................. 10
Configuring the Options........................................................................................................................................10
Setting the Department Code...............................................................................................................................12
Copying the PPD File for Windows ......................................................................................................................14
Printing from Application ......................................................................................................15
Considerations and Limitations ............................................................................................................................15
How to Print..........................................................................................................................................................16
Setting Up Print Options........................................................................................................18
How to Set up.......................................................................................................................................................18
Print Options.........................................................................................................................................................21
Printing with Best Functions for Your Needs ...................................................................... 59
Printing Various Print Job Types...........................................................................................................................59
Layout and Finishing Options in Basic Tab Menu ................................................................................................65
Layout and Finishing Options in Finishing Tab Menu ...........................................................................................67
Finishing Options in Paper Handling Tab Menu ...................................................................................................74
Finishing Options in Effect Tab Menu ...................................................................................................................76
Using Various Types of Paper ..............................................................................................................................80
2 PRINTING FROM WINDOWS
10 Before Using the Printer Driver
Before Using the Printer Driver
Before printing, you have to configure the following options:
yConfiguration Settings
You have to configure such options as optional drawers, finisher, and hole punch unit. The features of these optional
devices are not available unless you tell the system that the optional devices are installed.
yDepartment Code
This system can manage jobs by department code. This feature lets you manage job counters for every department
code. For example, a network administrator can check the number of copies printed by a specific department member.
If the Department Code is enabled, enter your Department Code provided by your administrator.
Configuring the Options
To use this equipment properly, you need to save the configuration of the options installed on the [Configuration] tab menu
after you installed the printer drivers. In the default setting, you can obtain the configuration data of options installed
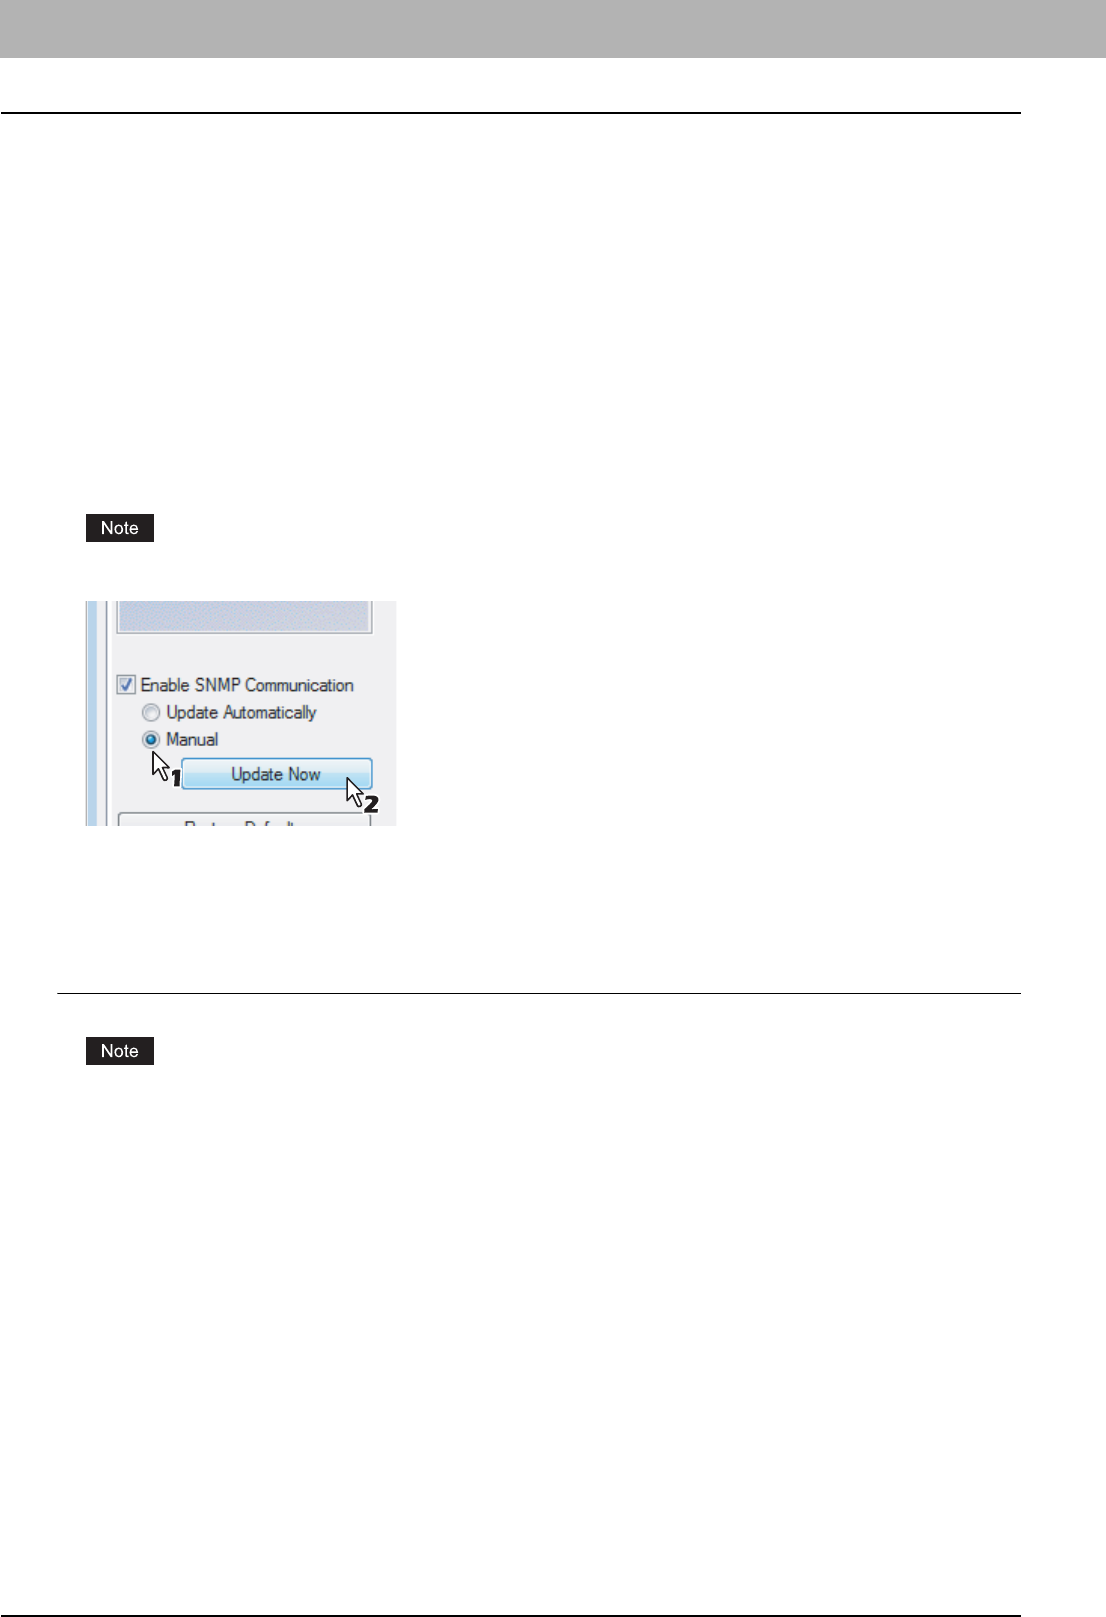
automatically by opening the [Configuration] tab menu. If you want to configure options manually, see the following page:
yIf SNMP communication between this equipment and your computer is not available, configure options manually.
P.10 “Configuring options manually”
If available, select [Manual] of [Enable SNMP Communication] on the [Configuration] tab menu, and then click [Update
Now]. You can obtain the configuration data as you click it.
Configuring options manually
If SNMP communication between this equipment and your computer is not available.
Setting the configuration tab manually
You need to log in Windows with the “Power Users” privilege (only for Windows 2000) or “Administrator” privilege (for
Windows 2000/XP/Server 2003).
1
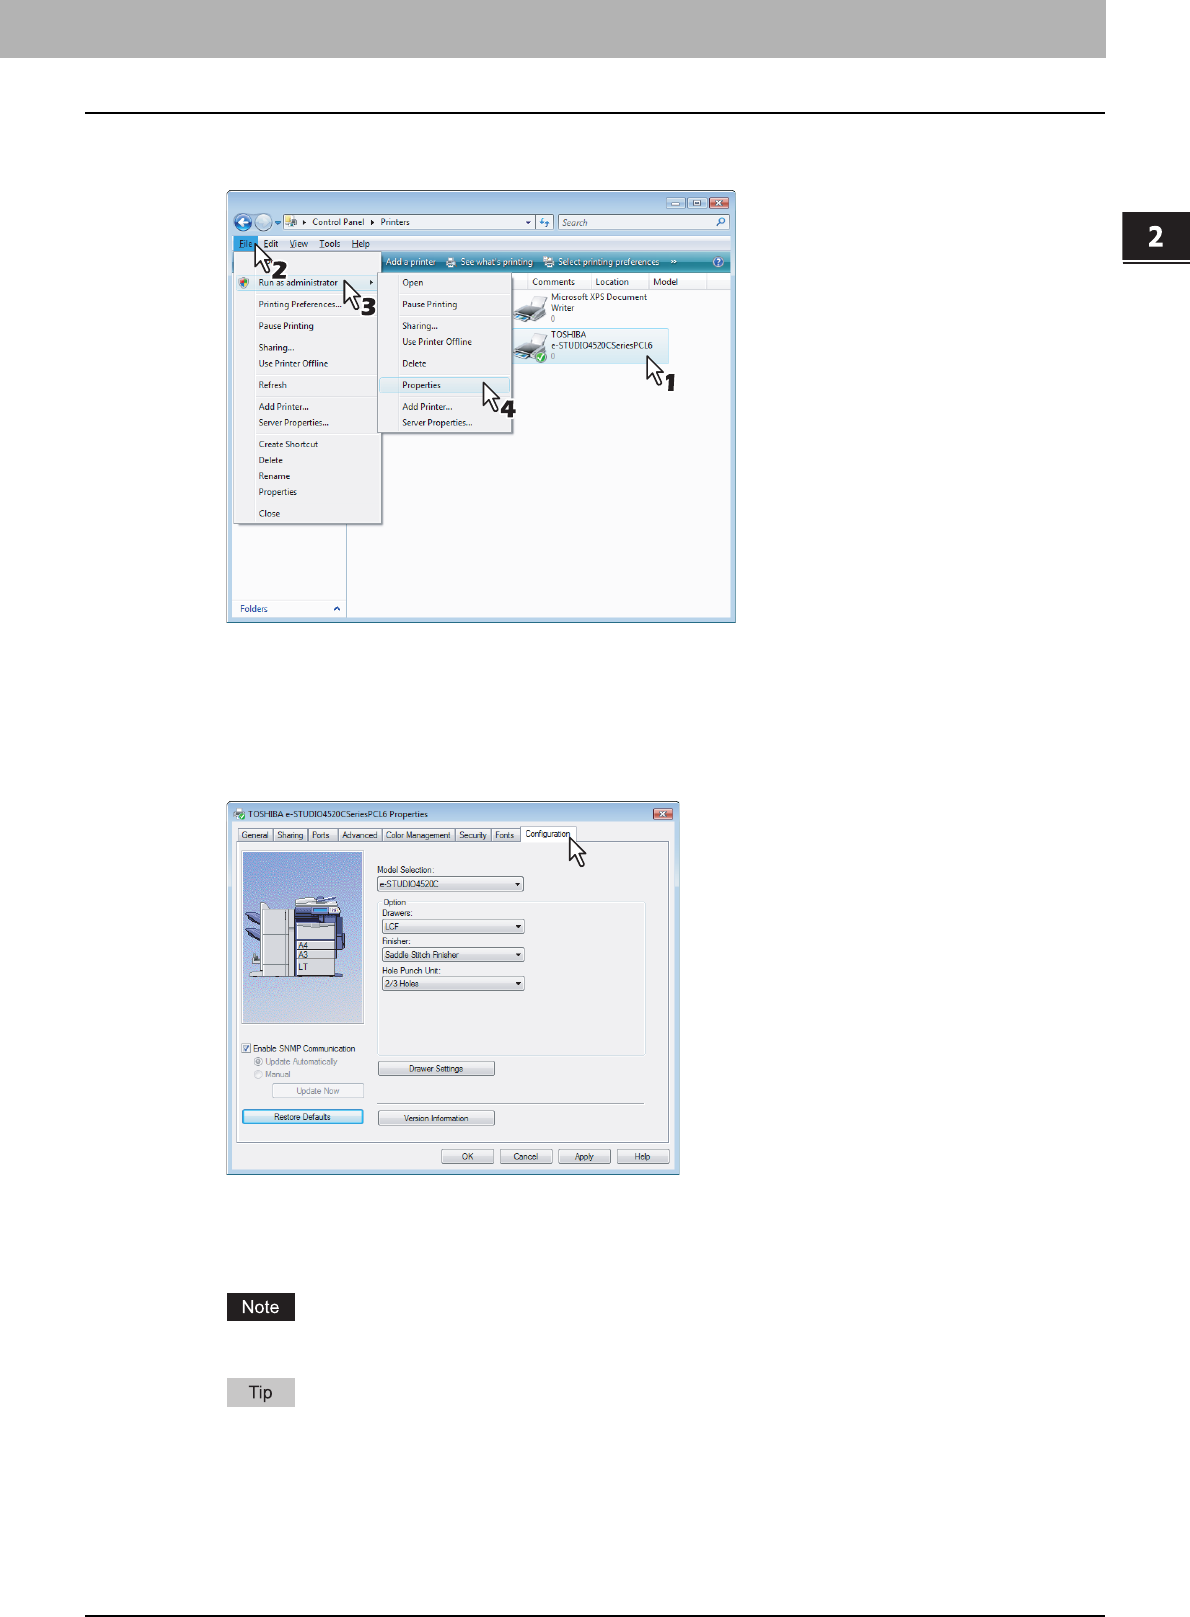
Select as follows: [Start] menu -> [Control Panel] -> [Hardware and Sound] -> [Printers]
yFor Windows XP or Windows Server 2003
Select as follows: [Start] menu -> [Printers and Faxes]
yFor Windows 2000
Select as follows: [Start] menu -> [Settings] -> [Printers]
yThe Printers folder appears.
2.PRINTING FROM WINDOWS
Before Using the Printer Driver 11
2 PRINTING FROM WINDOWS
2
Select the printer driver of this equipment, and select as follows: [File] menu -> [Run as
administrator] -> [Properties] Enter the administrator password if required.
yIf the [File] menu is not displayed, press [Alt].
yThe User Account Control dialog box appears.
yThe Printer Driver Properties dialog box appears if the User Account Control setting is disabled. Go to step 4.
3
Click [Continue] in the User account control dialog box.
yThe printer driver properties dialog box appears.
4
Display the [Configuration] tab, and set the following options.
Model Selection — This sets the model type of the equipment.
Drawers — This sets whether the drawers or LCF (optional) are installed.
Finisher — This sets whether or not the optional finisher is installed.
Hole Punch Unit — This sets whether or not the optional hole punch unit is installed.
LCF is not available for some countries or regions.
For more information about each item, see the descriptions about the Configuration Tab.
P.56 “Configuration Tab”
5
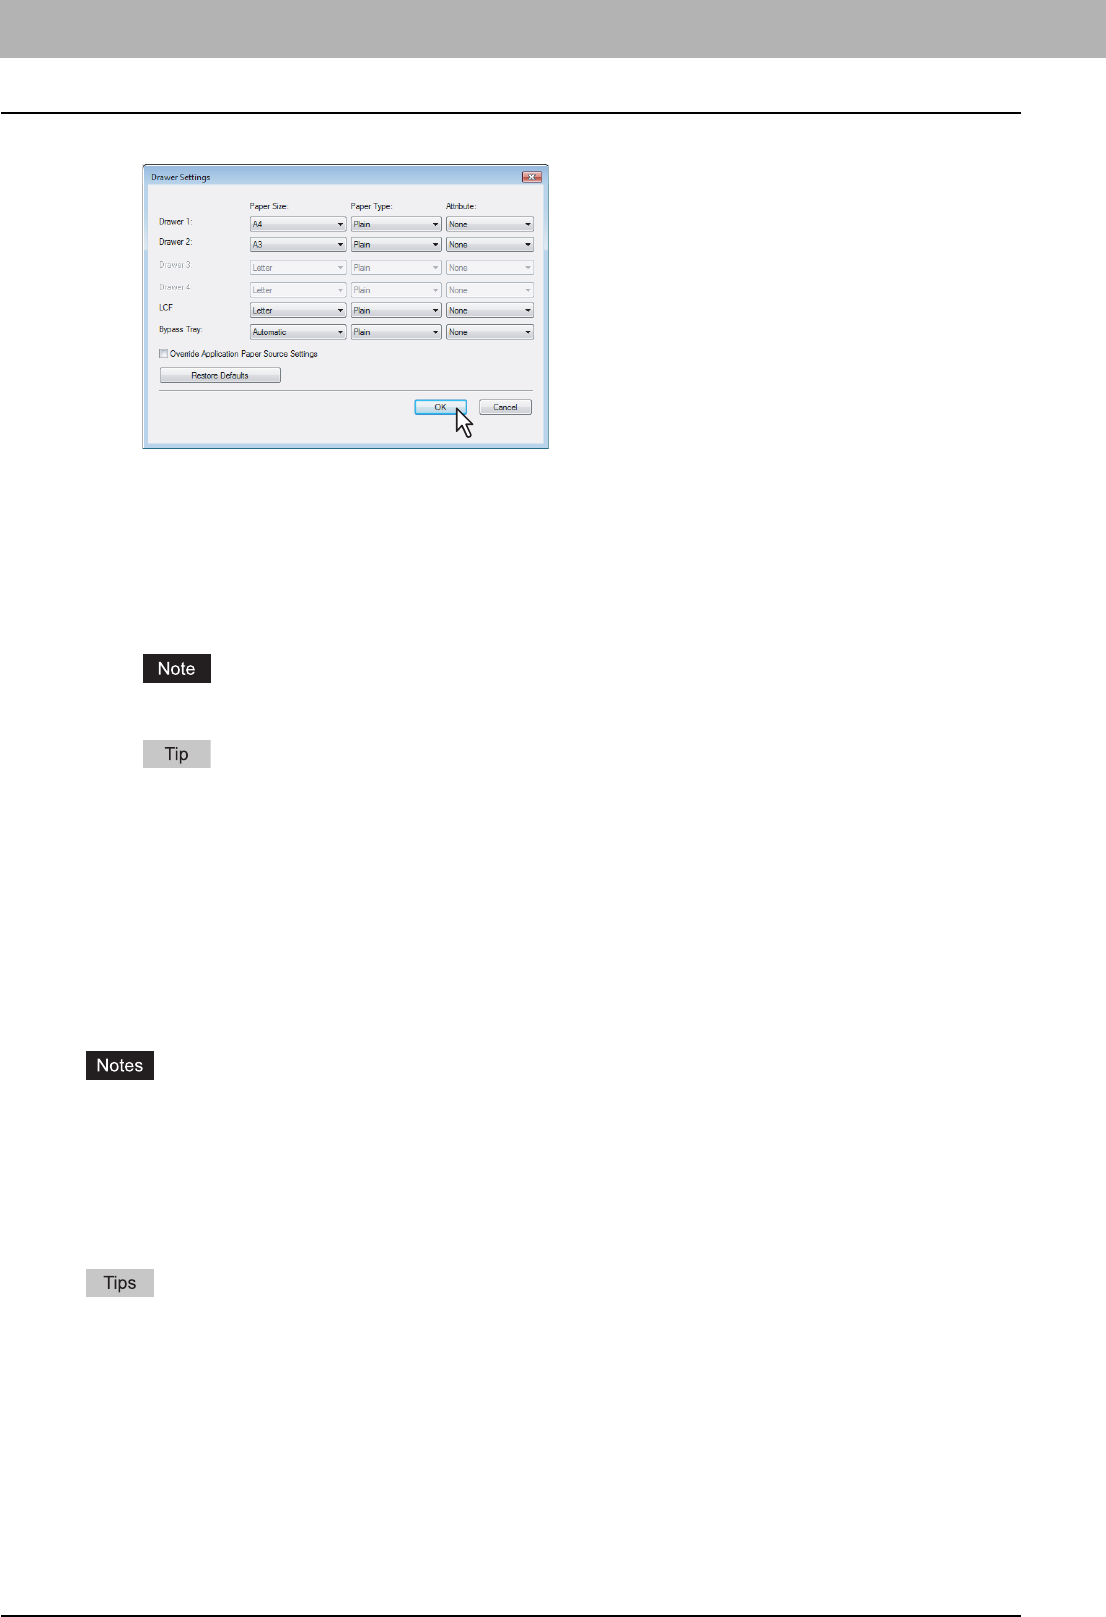
Click [Drawer Settings].
yThe Drawer Settings dialog box appears.
2 PRINTING FROM WINDOWS
12 Before Using the Printer Driver
6
Set the following options and click [OK].
Drawer 1 — Select the size and type of paper that is loaded in the 1st Drawer.
Drawer 2 — Select the size and type of paper that is loaded in the 2nd Drawer.
Drawer 3 — Select the size and type of paper that is loaded in the 3rd Drawer (optional) when it is installed.
Drawer 4 — Select the size and type of paper that is loaded in the 4th Drawer (optional) when it is installed.
LCF — Select the size and type of paper that is loaded in the LCF (optional) when it is installed.
Bypass Tray — Select the type of paper that is loaded in the Bypass Tray.
Override Application Paper Source Settings — Check this to use the paper source setting in the printer driver
rather than the application setting.
LCF is not available for some countries or regions.
For more information about each item, see descriptions about the Drawer Settings.
P.58 “Drawer Settings”
7
Click [Apply] and [OK] to save settings.
Setting the Department Code
When this equipment is managed by department codes, you have to enter your department code on the printer driver.
This allows a network administrator to check the number of copies printed by specific department members. Also users
can check to see who submitted the print jobs, by using the Touch Panel Display and monitoring tools.
Please ask your administrator whether or not you should enter the Department Code.
yWhen the User Management Setting is enabled on the equipment, the User Management Setting is used to
manage the print jobs instead of the department code. In that case, the user name that is entered to log in to your
computer is used for the authentication of the print job. Therefore, you do not need to enter the department code in
the printer driver but your user name must be registered in the equipment. If the user name is not registered, your
print job is processed as the invalid job according to the Department Code Enforcement settings.
yIf the No Limit Black function is enabled, you do not have to specify the department code when you print a
document with [Black and White] selected for the [Color] box in the Basic tab of printer driver.
yHow the equipment performs printing for an invalid department code print job, for which an invalid department code
is specified, varies depending on the Department Code Enforcement setting that can be set in the TopAccess
Administrator mode and whether SNMP communication is enabled or not. When SNMP communication is enabled
and Department Code Enforcement is set to [ON], an error message will be displayed when entering an invalid
department code. When SNMP communication is disabled and Department Code Enforcement is set to [ON], the
invalid department code print job will be stored in the invalid department code print job list without printing. When
the Department Code Enforcement is set to [Print], the invalid department code print job will be printed. When the
Department Code Enforcement is set to [Delete], the invalid department code print job will be deleted without
printing.
yA department code can be entered every time you begin printing. If you have to use a different department code
for each print job, enter it when you begin printing.
2.PRINTING FROM WINDOWS
Before Using the Printer Driver 13
2 PRINTING FROM WINDOWS
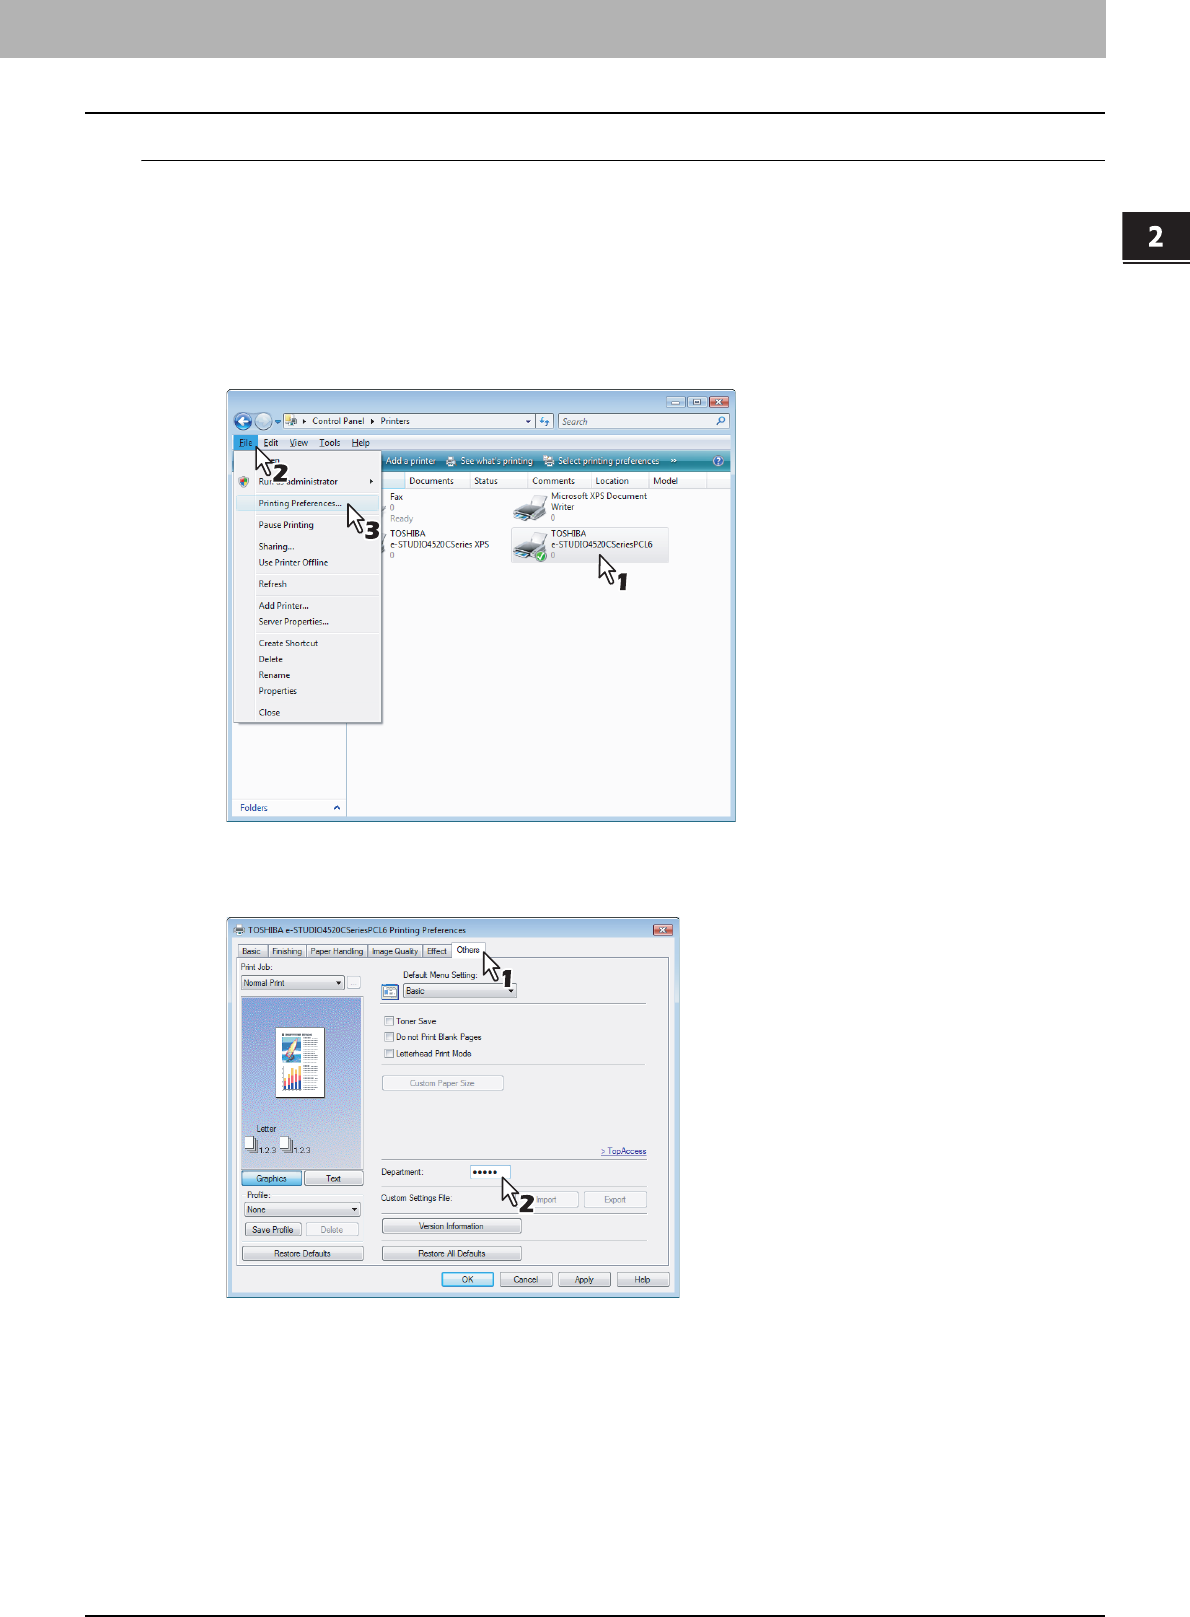
Entering department code
1
Select as follows: [Start] menu -> [Control Panel] -> [Hardware and Sound] -> [Printers]
yFor Windows XP or Windows Server 2003
Select as follows: [Start] menu -> [Printers and Faxes]
yFor Windows 2000
Select as follows: [Start] menu -> [Settings] -> [Printers]
yThe Printers folder appears.
2
Select the printer driver of this equipment, and then select as follows: [File] menu ->
[Printing Preferences]
yIf the [File] menu is not displayed, press [Alt].
yThe Printing Preferences dialog box appears.
3
Display the [Others] tab and enter your department code in the [Department] box.
yIn the [Department] box, only numeric characters can be entered. The Department Code must be 5-digit
number. If the department code is shorter than 5 digits long, add 0 to make it 5 digits long.
4
Click [Apply] and [OK] to save the settings.
2 PRINTING FROM WINDOWS
14 Before Using the Printer Driver
Copying the PPD File for Windows
The Client Utilities CD-ROM contains a printer description file for popular Windows applications. For applications not
allowing the automatic installation of PPD files, copy the PPD file to a proper directory in order to enable printer-specific
settings in the Print dialog box or the Page Setup dialog box.
Copying the printer description file
1
In the Client Utilities CD-ROM, open the folder that contains the PS3 printer driver.
yFor Windows 2000/XP/Vista/Server 2003:
[Client Utilities CD-ROM]:\Client\Drivers\PS\W2K_XP_VISTA\<language>\
yFor Windows XP x64/Vista x64/Server 2003 x64:
[Client Utilities CD-ROM]:\Client\Drivers\PS\XP_VISTA_X64\<language>\
2
Copy the printer description file (*.ppd) to the appropriate location.
For a proper directory to which the PPD file is to be copied, refer to the manual of the application.

2 PRINTING FROM WINDOWS
Printing from Application 15
Printing from Application
This section describes how to print a document from an application.
P.15 “Considerations and Limitations”
P.16 “How to Print”
Considerations and Limitations
yWhen the User Management Setting is enabled on the equipment, the user name that is entered to log in to your
computer is used for the authentication of the print job. Therefore, your user name must be registered in the
equipment. If the user name is not registered, your print job is processed as the invalid job according to the
Department Code Enforcement settings.
When the Windows Domain Authentication is used for the User Management Setting, your computer must log in the
domain.
yIf the No Limit Black function is enabled, you do not have to specify the department code when you print a document
with selecting [Black and White] in the [Color] option in the Basic tab of printer driver.
ySome options listed in the printer driver can also be set from an application (for example, collation). However, using
collation in the application may cause problems. In that case, use the driver option to perform the function, rather than
setting it from the application. Depending on the application, settings such as the orientation may need to be set in the
application, or the printer driver, or both. The application may not set up the file properly for printing on this equipment
and may also take longer to process. In order to print properly from the application that you are using, please see the
section about printing in the application’s manual.
About "Use PostScript Passthrough"
yWhen printing with the PS3 printer driver from Adobe Acrobat, the Fit to Paper enlargement feature does not work if
the [Use PostScript Passthrough] option is enabled in the PostScript settings of the PS3 printer driver. To use the Fit to
Paper enlargement feature, please disable the [Use PostScript Passthrough] option in the PostScript settings of the
PS3 printer driver.
yWhen printing with the PS3 printer driver from the application that creates the PostScript code for printing such as
Adobe Acrobat, the following print options may not work correctly. In that case, please disable the [Use PostScript
Passthrough] option in the PostScript settings of the PS3 printer driver.
- Manual Scale
- Print Paper Size
- Paper Type
- Use Front Cover
- Use Back Cover
- Interleave Pages
- Insert Pages
-Booklet
- Multiple Pages per Sheet
- All options in the Effect tab
- All options in the Image Quality tab
2 PRINTING FROM WINDOWS
16 Printing from Application
How to Print
Once you have installed the printer driver and configured it properly, you can print directly from most Windows
applications. Simply choose the Print command from your application.
You can print using the various functions by setting print options on the printer driver.
Printing from Windows applications
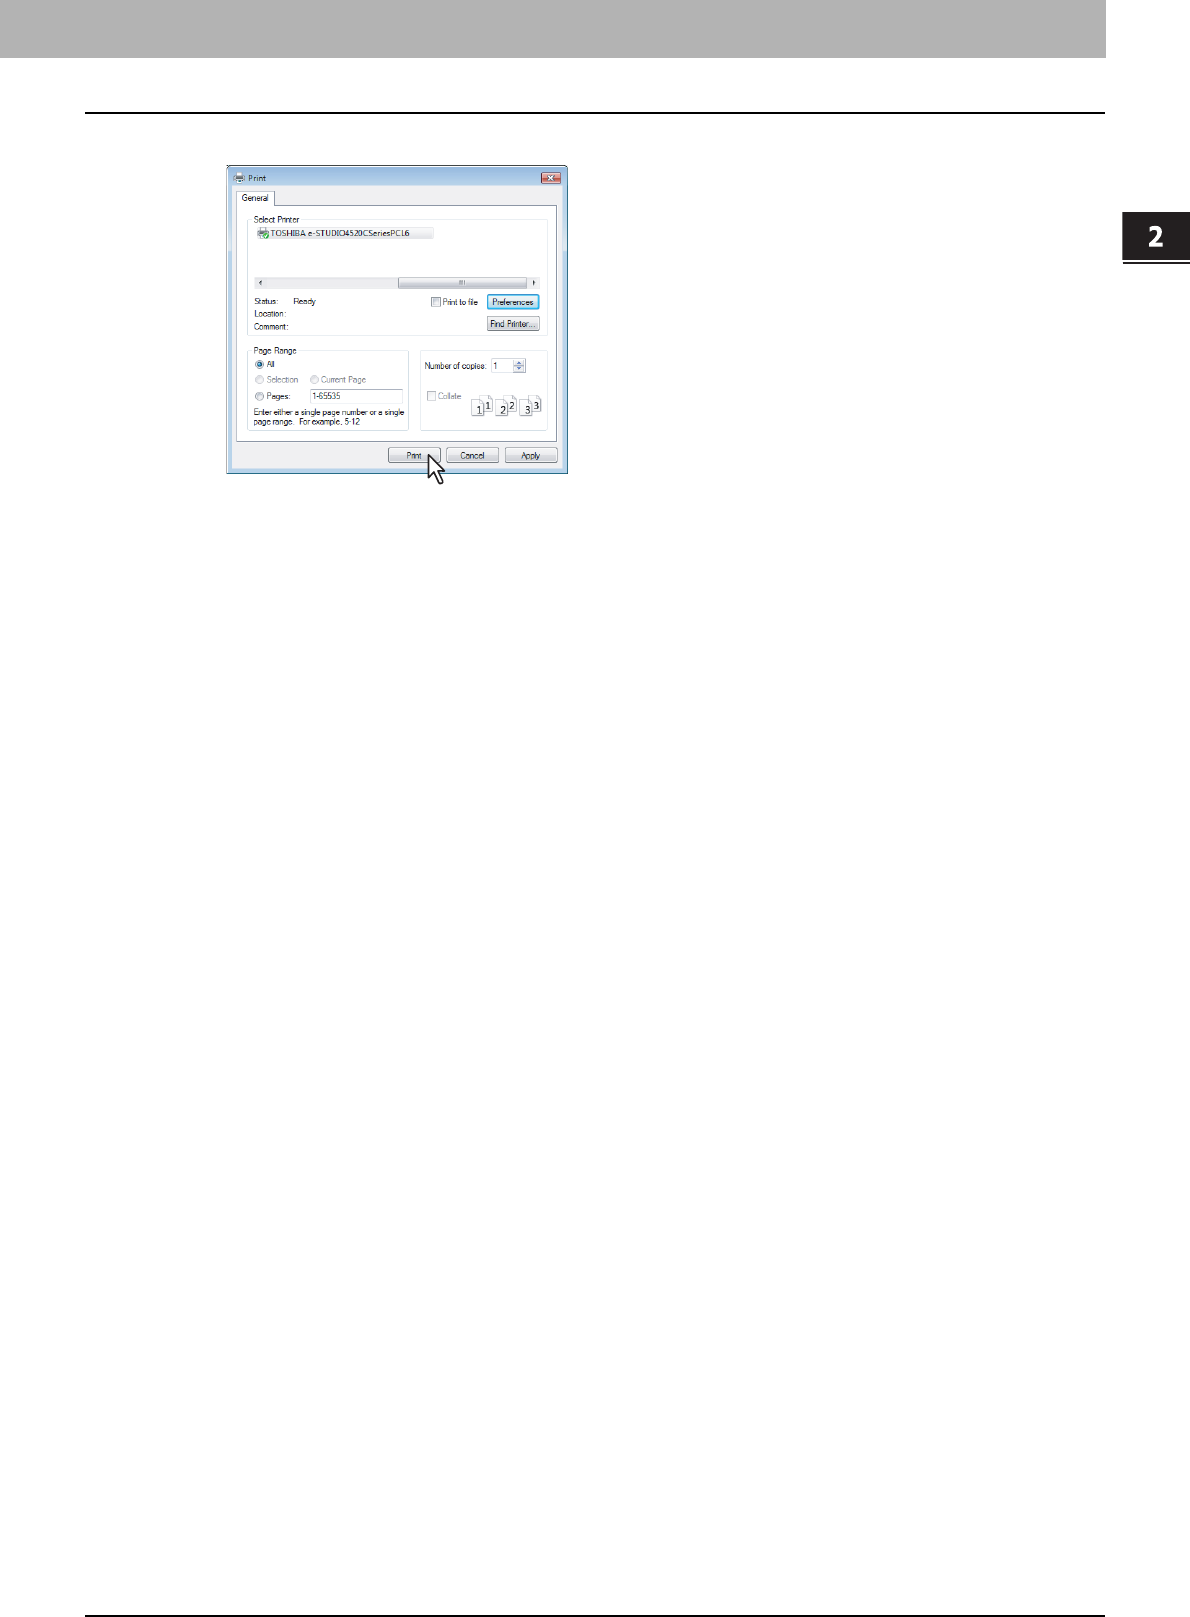
The following describes an example for printing from NotePad on Windows Vista.
1
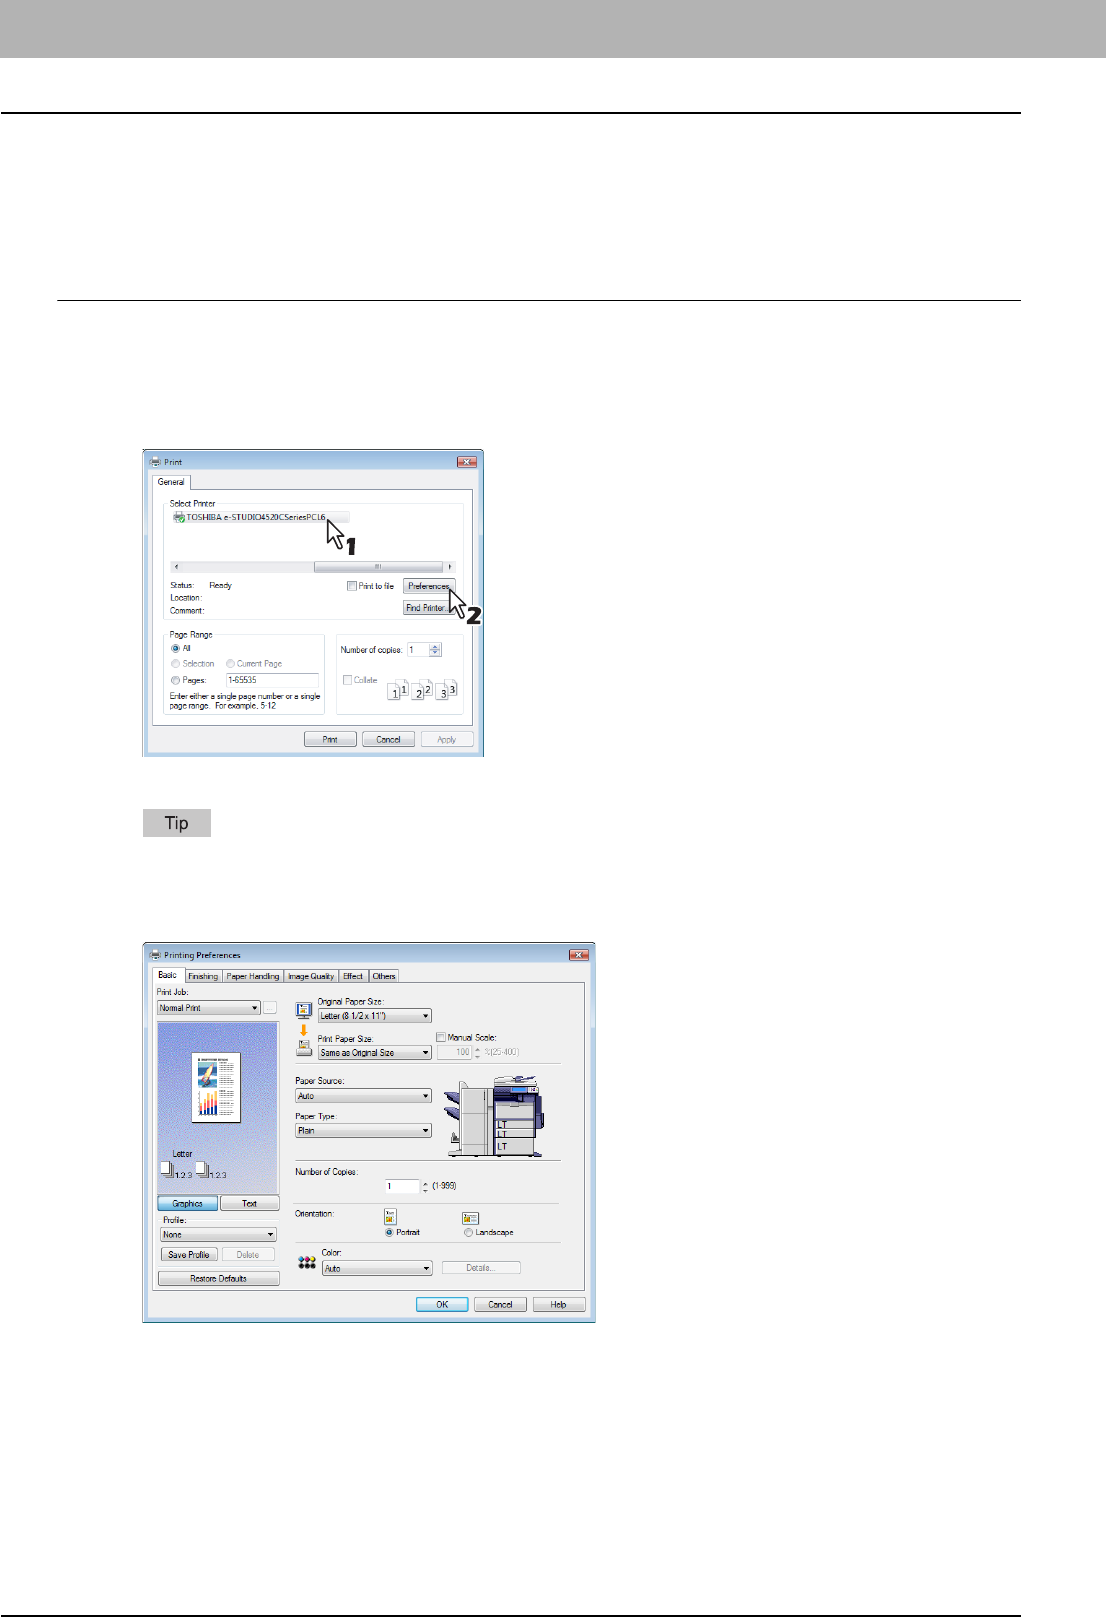
Open a file and select [Print] from the [File] menu of the application.
yThe Print dialog box appears.
2
Select the printer driver of the equipment to be used and Click [Preferences].
yThe Printing Preferences dialog box appears.
The procedures for displaying the properties dialog for the printer driver may be different depending on the
application that you are using. See your application’s manual about displaying the printer properties dialog box.
3
Setting the Print Options for each tab according to how you want to print.
ySetting the print options varies depending on how you want to print a document.
P.21 “Print Options”
yYou can also set the print options using setting profiles.
P.18 “Setting Print Options Using Profiles”
4
Click [OK] to save the settings.
2.PRINTING FROM WINDOWS
Printing from Application 17
2 PRINTING FROM WINDOWS
5
Click [Print] to print a document.
2 PRINTING FROM WINDOWS
18 Setting Up Print Options
Setting Up Print Options
Print Options are the attributes you set to define the way a print job is processed. For example, the private print and proof
print options determine how the copier manages your print job.
To find the printing instructions for your specific needs, refer to the procedures in the following section.
P.59 “Printing with Best Functions for Your Needs”
How to Set up
There are several ways to set print options. How the settings affect printing varies depending on the way you set the
options. The tabs displayed also vary depending on how you display the printer properties.
Setting Initial Values of Print Options
Setting the print options by displaying the printer properties from the Printers folder within the Windows Start menu will
establish the initial values of the options. For example, the paper size setting you most commonly use, optional device
settings, user information settings, etc., are settings you will not want to change every time you print. It is convenient to set
these options as initial values.
How to display: Windows Vista
1
Click [Start], [Control Panel], [Hardware and Sound] and select [Printers].
2
Select the printer driver for the equipment, click the [File] menu and select [Printing
Preferences].
yIf the [File] menu is not displayed, press [Alt].
How to display: Windows 2000/XP/Server 2003
1
Select as follows: [Start] menu -> [Printers and Faxes] ([Settings] -> [Printers] for
Windows 2000)
2
Select the printer driver for the equipment, click the [File] menu and select [Printing
Preferences].
Setting Print Options for Each Print Job
Setting the print options by displaying the printer properties from the Print dialog box within an application will establish the
values for the current print job. The print option settings specific to each print job are set using this method.
How to display:
1
Click the [File] menu and select [Print] on an application.
2
Select the printer driver of the equipment to be used and Click [Properties].
Setting Print Options Using Profiles
Print option settings can be saved so you can easily load specifically configured settings for a particular job.
There are several profiles that have been registered as default.
In order to print a document using profiles, you should create the saved profile first.
P.19 “Saving profile”
Once you save profile, you can load the settings for a particular job to print a document.
P.20 “Loading profile”
You can also delete the profile that you no longer require.
P.20 “Deleting profile”
2.PRINTING FROM WINDOWS
Setting Up Print Options 19
2 PRINTING FROM WINDOWS
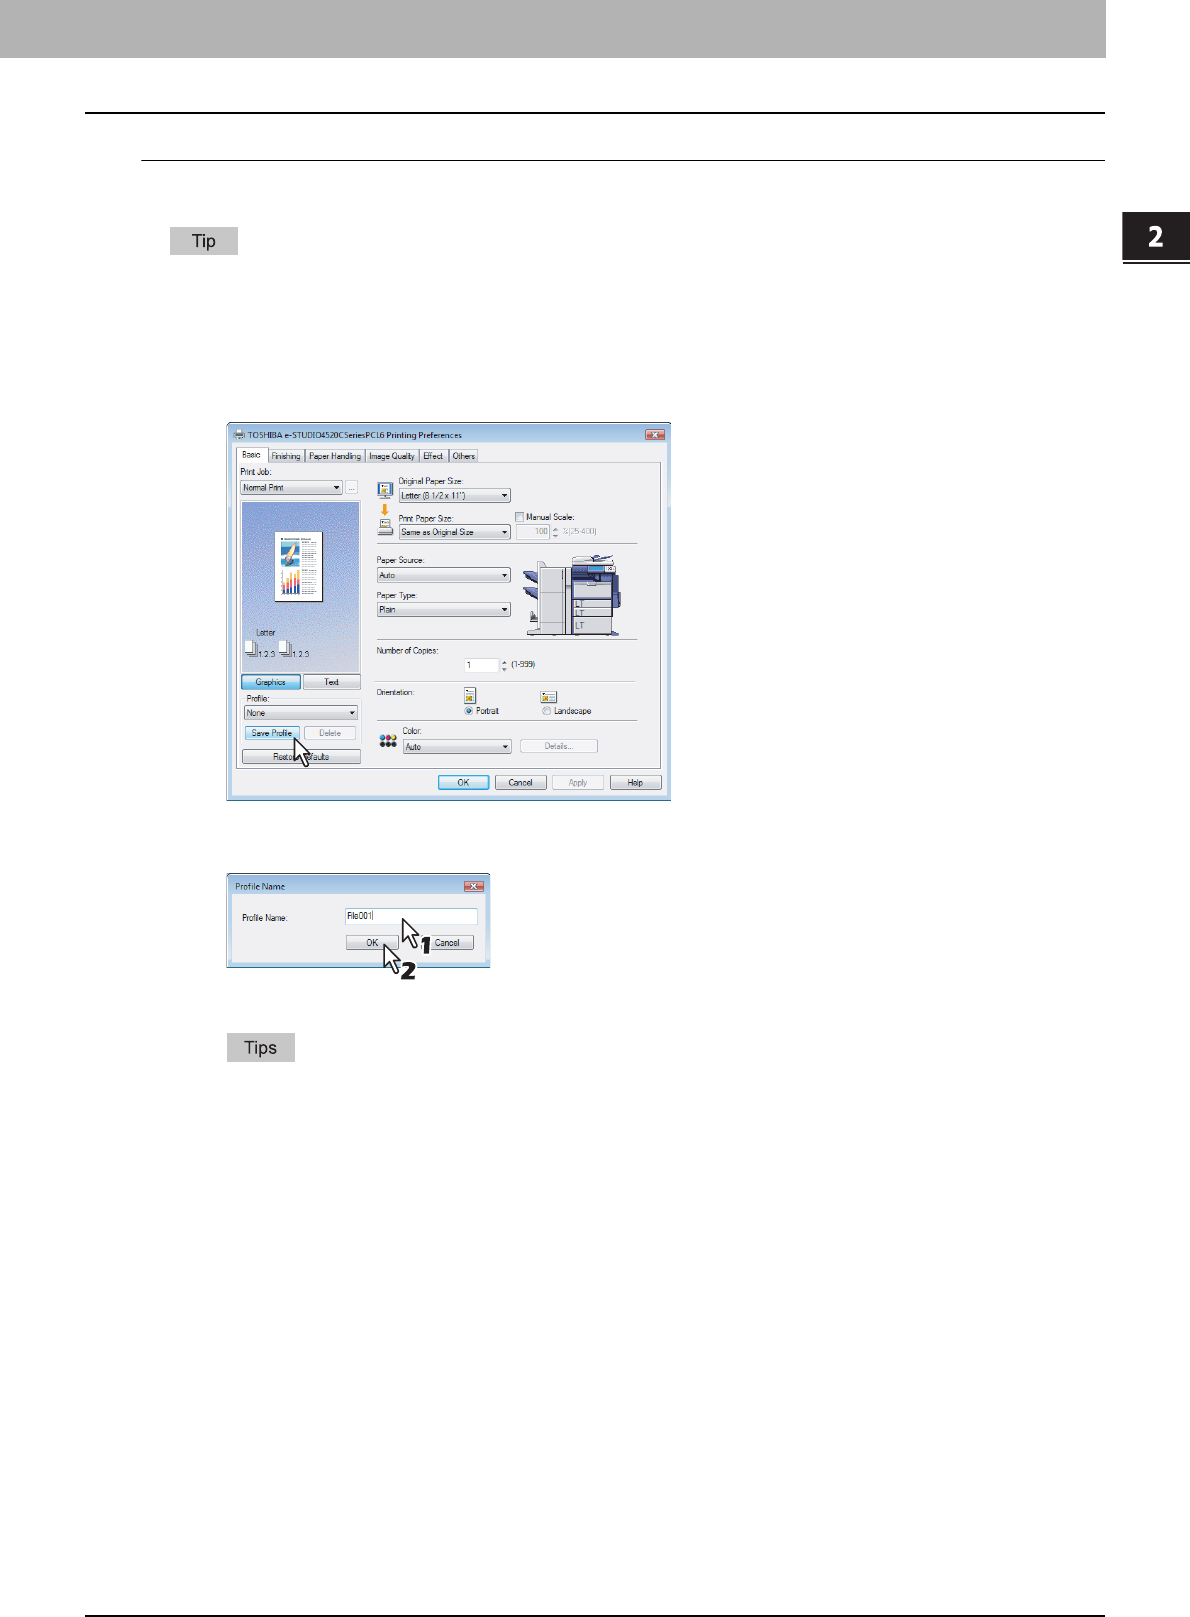
Saving profile
You can register up to 20 profiles (including 5 default profiles) for each printer driver.
You can delete the default profile or overwrite it by changing its contents and saving it under the same name.
1
Configure the print options on each tab.
ySetting the print options varies depending on how you want to print a document.
P.21 “Print Options”
2
Click [Save Profile] at the Profile group.
yThe Profile Name dialog box appears.
3
Enter the profile name and click [OK].
yThe file name can be up to 63 characters long.
yIf you enter the existing profile name, it prompts whether to overwrite the existing profile or not. If you want
to overwrite the existing profile, click [OK].
yIf you try to save more than 20 profiles, a dialog box notifying you that no more profiles can be saved
appears, then the 21st profile is saved as a temporary profile. If you want to register this temporary profile,
delete unnecessary profiles first, and then select [Temporary] to recall this profile and click [Save Profile] to
save it.
yYou cannot specify [None] for the profile name.
4
The setting profile is saved.
2 PRINTING FROM WINDOWS
20 Setting Up Print Options
Loading profile
1
Select a profile in the [Profile] box.
yThe settings profile is loaded from the file and applied to the printer options.
Selecting [None] in the [Profile] box cannot restore the initial settings on the printer driver. To return the setting
to the default one after you selected profiles, click [Restore Defaults] on each tab menu. To return the settings in
all the tab menus other than the [Fonts] or [Configuration] tab, click [Restore All Defaults] in the [Others] tab
menu.
Deleting profile
1
Select a profile that you want to delete in the [Profile] box, and click [Delete].
yThe Confirm Profile Delete dialog box appears.
2
Click [Yes] to delete the selected profile.
2.PRINTING FROM WINDOWS
Setting Up Print Options 21
2 PRINTING FROM WINDOWS
Print Options
This section describes print options in each tab of the printer driver. This section will help you to find the description of
specific print options, or understand the functions for each print option.
How to display:
1
Select as follows: [Start] menu -> [Control Panel] -> [Hardware and Sound] -> [Printers]
yFor Windows XP or Windows Server 2003
Select as follows: [Start] menu -> [Printers and Faxes]
yFor Windows 2000
Select as follows: [Start] menu -> [Settings] -> [Printers]
yThe Printers folder appears.
2
Select the printer driver of this equipment, and then select as follows: [File] menu ->
[Printing Preferences]
yIf the [File] menu is not displayed, press [Alt].
yThe Printing Preferences dialog box appears.
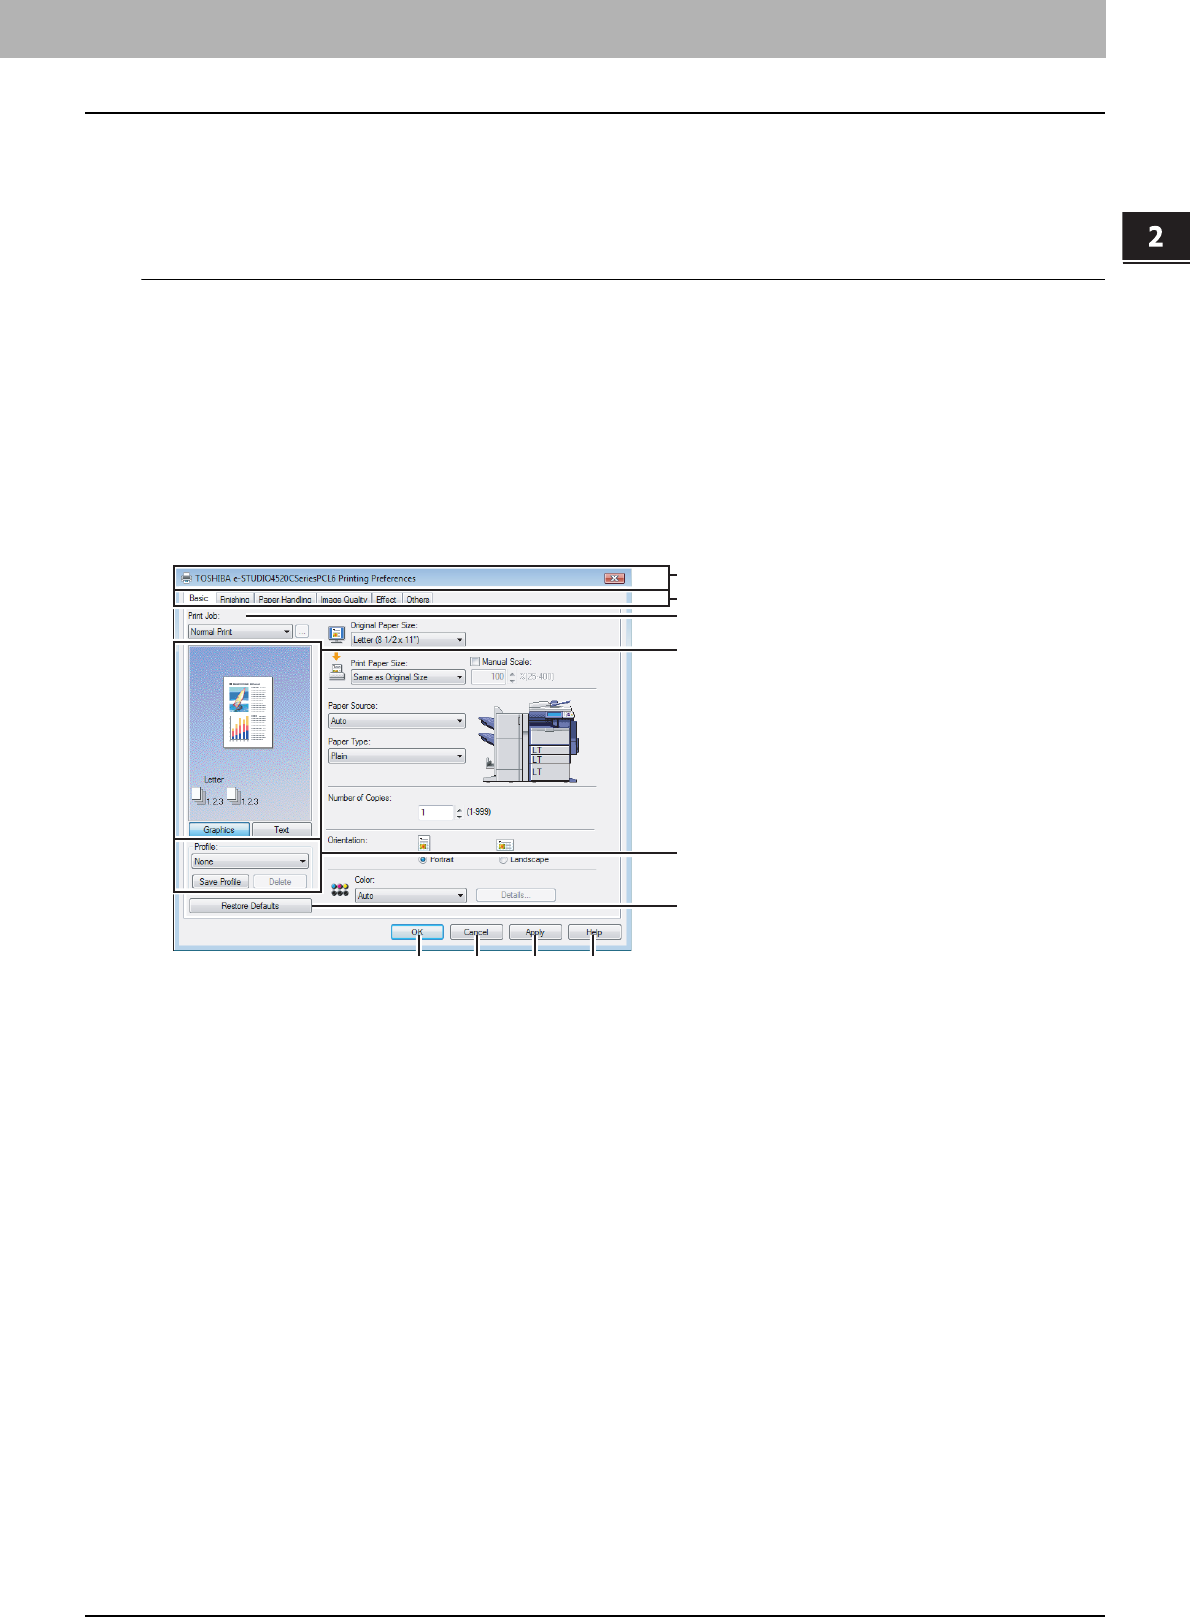
1) Printer Name
Displays the name given to the printer driver when it was installed, or the name it displays on the icon in the Printer
folder.
2) Menu Tabs
The menu items of the printer driver are displayed as tabs. Clicking on a tab will display the contents of the selected
tab. The tabs displayed vary depending on the way the print properties are displayed.
- Basic Tab
The Basic tab contains basic print operation settings, such as original paper size, print paper size, paper source,
paper type, orientation, number of copies, and so on.
P.24 “Basic Tab”
- Finishing Tab
The Finishing tab allows you to enable sort printing, stapling and punching, 2-sided printing, and N-up printing.
P.28 “Finishing Tab”
- Paper Handling Tab
The Paper Handling Tab contains Cover page printing.
P.34 “Paper Handling Tab”
- Image Quality Tab
The Image Quality Tab allows you to select how images are printed. You can easily select appropriate image
quality depending on the type of job being printed.
P.39 “Image Quality Tab”
- Effect Tab
The Effect Tab contains print options that add the effects to your print jobs such as Watermarks, Overlay Image
printing and so on.
P.45 “Effect Tab”
1
2
4
3
5
6
78 9 10
2 PRINTING FROM WINDOWS
22 Setting Up Print Options
-Others Tab
The Others Tab contains special features such as toner save, custom pager size, and so on.
P.49 “Others Tab”
-Fonts Tab
The Fonts Tab allows you to select how the TrueType fonts are printed. This tab is only displayed when the printer
properties are accessed from the Printers folder.
P.54 “Fonts Tab”
- Configuration Tab
The Configuration Tab allows you to configure the options. When any optional unit is installed in this equipment,
set the configuration of the machine on this tab. This tab is only displayed when the printer properties are
accessed from the Printers folder.
P.56 “Configuration Tab”
3) Print Job
This sets the type of print job.
- Normal Print
Select this to print a job normally.
- Scheduled Print
Select this to print a job at a future date and time.
When this is selected, click the button on the right to set the date and time to print a job.
-Private Print
Select this to print a private job. When you select this, enter a password using the alphanumeric characters and
symbol characters (ASCII code characters between 0x21 to 0x7E) in the [Password] box that is displayed after the
print settings have been made and the print job is sent. The password must be between 1 and 63 characters.
The print job, sent as a private job, is saved in the private job queue on this equipment, and is not printed until you
activate printing from the Touch Panel Display. This option is useful when you want to print a confidential
document that is secured by a password. The user has to enter the password to print the private job when
activating printing from the Touch Panel Display.
- Proof Print
Select this to print the first copy of a multicopy job and then wait for approval before printing the remaining copies.
The print job, sent as a proof job, is saved in the proof job queue on this equipment, and the remaining copies are
not printed until you activate printing from the Touch Panel Display. This option allows you to check a job’s output
before printing the remaining copies and thereby reduce paper waste.
When printing from an application that sends a separate job for each number of copies, this equipment will print all
copies even if you set the Proof Print. In that case, set one copy for the number of copies for a proof print job in the
printer driver, and then change the number of copies from the Control Panel to print required copies of the print job.
- Print to Overlay File
Select this to save the print job as an overlay file that is imposed on other documents. When you select this, click
the button on the right and enter the file name.
For example, if you want to print a master page image on the background of a document, you can create an
overlay file of the master merge image using this option. Then you can print a document using this overlay by
specifying this file as an overlay image in the [Overlay Image] option of the Effect tab.
yIf the print job has several pages in the document, only the first page of the document will be saved as an
overlay file.
yBoth the overlay file and the documents on which you superimpose the overlay image must be created at the
same size, color mode.
yWhen creating an overlay file using the PS3 printer driver from an application that can create the PS command
directly, the overlay file will not be created properly. In that case, disable the [Use PostScript Passthrough]
option in the PostScript Settings dialog box.
P.53 “PostScript Settings”
- Store to e-Filing
Select this to save a job to an e-Filing. When this is selected, select the box from the box after the print setting has
been finished. When the SNMP commutation is enabled, it detects the available box numbers and Box name in
the box. If not, all box numbers are listed in the box.
If you select a user box, you may be required to enter the appropriate password for the selected box. The job
saved to a box can be printed from the Touch Panel Display at a later time. It can also be composed with other
documents using the e-Filing web utility.
You can also print a job and save it to a box by checking on the [Print] option.

2.PRINTING FROM WINDOWS
Setting Up Print Options 23
2 PRINTING FROM WINDOWS
yWhen you store a document in e-Filing using the printer driver, the printing image (not the original document in
your computer) will be stored in e-Filing.
yDocuments stored in e-Filing are retained with the best image quality for printing. If you want to download them
into your computer with a higher image quality, scan the original documents and store them in e-Filing.
yFor more information about e-Filing operations, please refer to the e-Filing Guide.
yFor the detailed instructions on how to print with the [Print job] setting, see the following page:
P.59 “Printing Various Print Job Types”
4) Preview window
In the Preview windows, you can check the current settings in the printer driver. You can change the view type by
clicking [Graphic] to display the print options settings graphically or [Text] to display the print option settings in text
form.
5) Profile
Print option settings can be saved on your hard disk. You can save print option settings by clicking [Save Profile] and
easily load a setting file by selecting a profile name in the box.
P.18 “Setting Print Options Using Profiles”
There are several profiles that have been registered as default.
6) [Restore Defaults]
Click this to restore the settings to the original factory defaults.
7) [OK]
Click this to enter the input settings and complete the print option settings.
8) [Cancel]
Click this to cancel the input settings and exit the print option settings.
9) [Apply]
Click this to enter the input settings without closing the print option settings. This button is only displayed when the
printer properties are accessed from the Printers folder. This button remains grayed out until a setting is changed.
10) [Help]
Click this to browse the Help for the printer driver.
2 PRINTING FROM WINDOWS
24 Setting Up Print Options
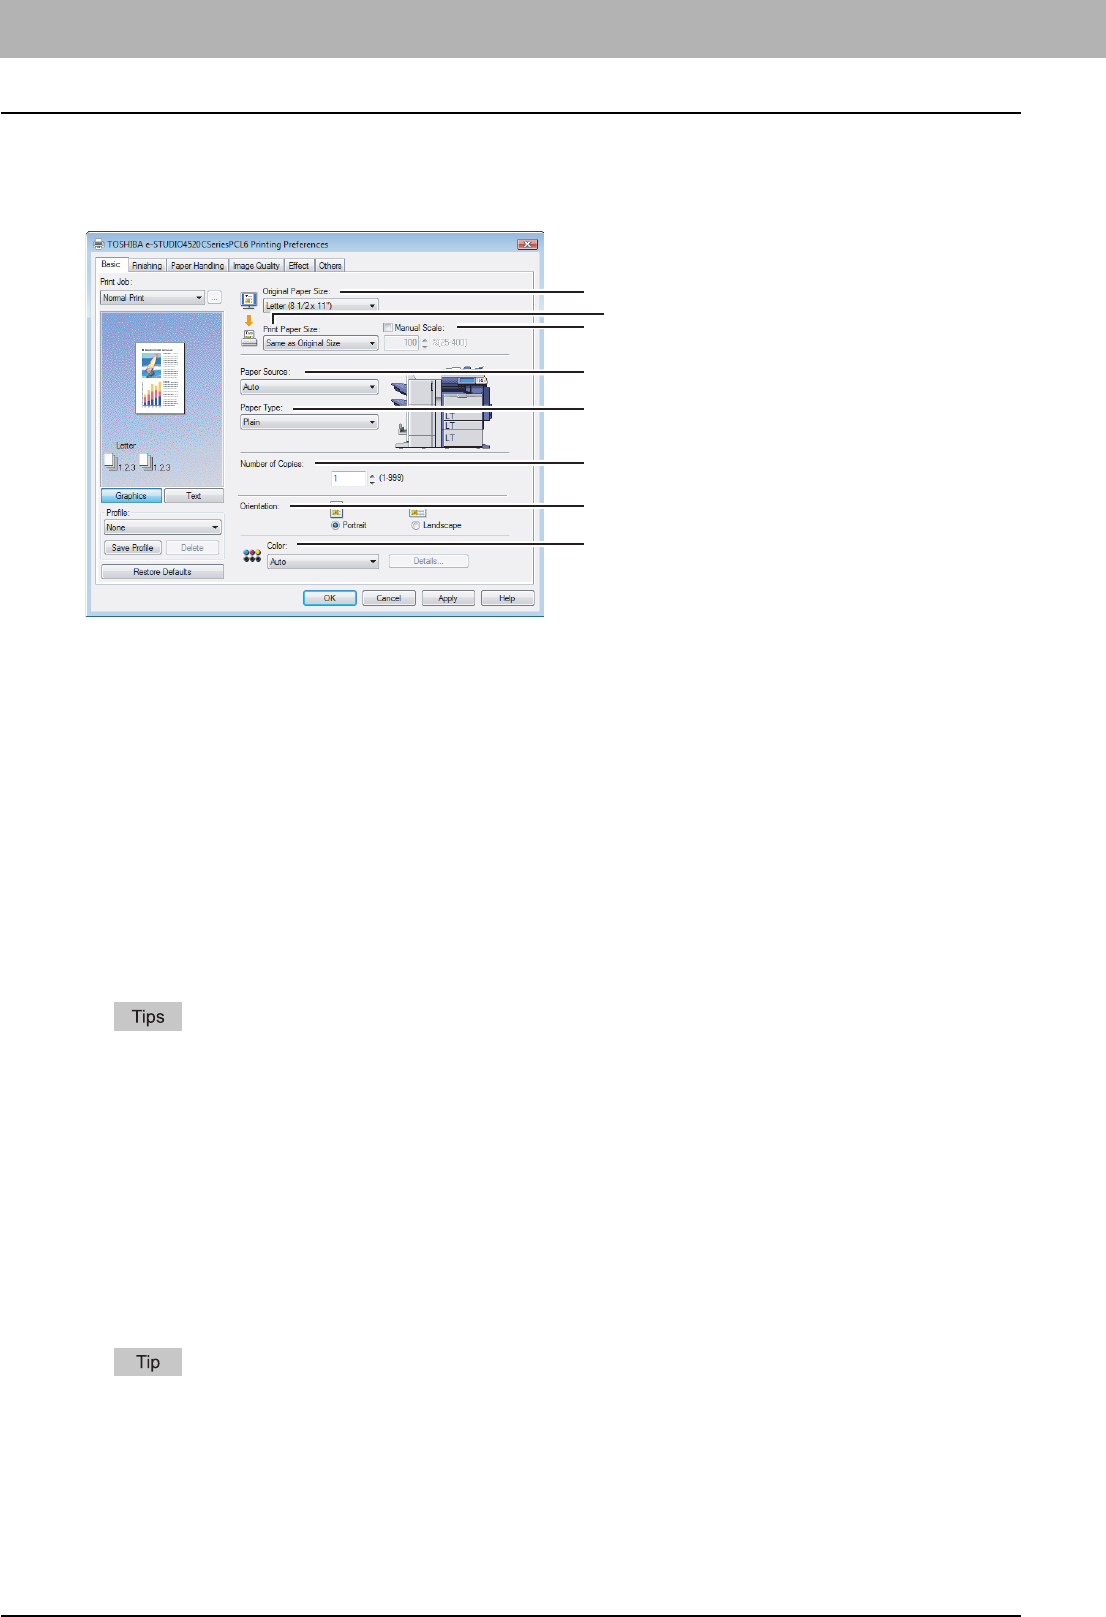
Basic Tab
The Basic tab contains basic print operation settings, such as the original paper size, print paper size, paper source, paper
type, orientation, number of copies, and so on.
1) Original Paper Size
This selects the size of a document to be printed.
yThere are also 20 custom paper sizes in the [Original Paper Size] box. You can set the custom paper sizes in
the Others tab.
P.49 “Others Tab”
yThe default paper size will be [Letter] or [A4] according to the regional setting in the Windows.
y[(305 x 457mm)] is displayed only for the European version, and [(12 x 18”)] is displayed only for the US
version.
2) Print Paper Size
Select this to enlarge or reduce a page image to fit exactly in the selected paper size. If you do not wish to enable
enlarge or reduce printing, select [Same as Original Size].
Also when you want to enable Tab printing, select [Letter Tab] or [A4 Tab] here. When you select [Letter Tab] or [A4
Tab], the Primary Tab dialog box appears.
P.26 “Primary Tab Dialog”
There are also 20 custom paper sizes in the [Print Paper Size] box. You can set the custom paper sizes in the
Others tab.
P.49 “Others Tab”
Available original paper sizes are listed below:
yLetter (8 1/2 x 11”)
yLegal (8 1/2 x 14”)
yLedger (11 x 17”)
yStatement (5 1/2 x 8 1/2”)
yComputer ( 10 1/8 x 14”)
y13”LG (8 1/2 x 13”)
y8.5”SQ (8 1/2 x 8 1/2”)
y(12 x 18”)
yLetter Tab (8 1/2 x 11”)
yA4 (210 x 297 mm)
yA5 (148 x 210 mm)
yA3 (297 x 420 mm)
yB4 (257 x 364 mm)
yB5 (182 x 257 mm)
y(305 x 457 mm)
yFolio (210 x 330 mm)
yA6 (105 x 148 mm)
yA4 Tab (210 x 297 mm)
y16K (195 x 270 mm)
y8K (270 x 390 mm)
y(320 x 450 mm)
y(320 x 460 mm)
1
32
5
4
6
7
8
2.PRINTING FROM WINDOWS
Setting Up Print Options 25
2 PRINTING FROM WINDOWS
3) Manual Scale
Check this box to manually enter the scale, to enlarge or reduce an image. The reproduction ratio can be set at
between 25 and 400%. This function cannot be used when Drawer or LCF (optional) is selected for the Paper Source
or the Magazine sort function is enabled.
For the detailed instructions on how to print with the [Manual Scale] setting, see the following page:
P.65 “Fitting images within paper size”
4) Paper Source
This selects the paper source. Please select a paper source that correlates with the printing size.
-Auto — Automatically selects the paper set in this equipment according to the printed document size.
-Drawer 1 — Paper is fed from the 1st Drawer.
-Drawer 2 — Paper is fed from the 2nd Drawer.
-Drawer 3 — Paper is fed from the 3rd Drawer. This cannot be selected if Drawer 3 and 4 (optional) are not
installed.
-Drawer 4 — Paper is fed from the 4th Drawer. This cannot be selected if Drawer 3 and 4 (optional) are not
installed.
-LCF — Paper is fed from the LCF. This cannot be selected if the LCF (optional) is not installed.
-Bypass Tray — Paper is fed from the Bypass Tray. When this is selected and print a job, the [JOB STATUS] of the
equipment will blink. Press the [JOB STATUS] and check the paper size of the job. Then set the paper and press
the [START] button to print a job.
yLCF is not available for some countries or regions.
yThe selectable values vary depending on the optional devices installed on this equipment and their
configuration on the Configuration tab.
yWhen the paper size settings on the Configuration tab differ from the paper size settings in the equipment, the
paper source setting is ignored and the equipment may prompt to set the paper in the bypass tray.
5) Paper Type
This sets the media type of the paper.
-Plain — Select this when printing on 17-28 lbs plain paper (64-105 g/m2 plain paper).
-Recycled — Select this when printing on the recycled paper.
-Thick1 — Select this when printing on 32-90 lbs thick paper (106-163 g/m2 thick paper).
-Thick2 — Select this when printing on 90-110 lbs thick paper (164-209 g/m2 thick paper).
-Thick3 — Select this when printing on 110-130 lbs thick paper (210-256 g/m2 thick paper).
-Thick4 — Select this when printing on the front side of 110-130 lbs thick paper (257-300 g/m2 thick paper).
-Special 1 — Select this when printing on the special 1 paper.
-Special 2 — Select this when printing on the special 2 paper.
-Transparency — Select this when printing on transparent sheets.
-Thick1 (Back) — Select this when printing on the back side of 32-90 lbs thick paper (106-163 g/m2 thick paper).
-Thick2 (Back) — Select this when printing on the back side of 90-110 lbs thick paper (164-209 g/m2 thick paper).
-Thick3 (Back) — Select this when printing on the back side of 110-130 lbs thick paper (210-256 g/m2 thick paper).
-Thick4 (Back) — Select this when printing on the back side of 110-130 lbs thick paper (257-300 g/m2 thick paper).
-Special 1 (Back) — Select this when printing on the back side of the special 1 paper.
-Special 2 (Back) — Select this when printing on the back side of the special 2 paper.
When [A4 Tab] or [Letter Tab] is selected at the [Print Paper Size] box, [Tab] will be displayed and you cannot
change the paper type.
For more information about the paper types that are available for this equipment, please refer to the Quick Start
Guide.
2 PRINTING FROM WINDOWS
26 Setting Up Print Options
6) Number of Copies
This sets the number of printed copies. You can set any integer from 1 to 999.
7) Orientation
This sets the paper printing direction.
-Portrait — The document is printed in the portrait direction.
-Landscape — The document is printed in the landscape direction.
8) Color
This sets whether a print job is printed in the color or monochrome mode.
-Auto — Select this to determine the color mode automatically. When a print job is a black and white document, the
system automatically prints the document in the monochrome mode. When a print job is a color document, it prints
the document in the color mode.
-Color — Select this to print a document in the color mode.
-Black and White — Select this to print a document in the monochrome mode.
-Twin Color — Select this to print a document in the twin color mode. When this is selected, click [Details] to
specify the color that the non-black part of document will be printed in. You can specify either [Red], [Green],
[Blue], [Cyan], [Magenta], [Yellow], or [White].
For instructions on how to print color images with the [Black and White] or [Twin Color] setting, see the following page:
P.66 “Printing Color Document in Gray scale”
P.66 “Printing Color Document in Twin Color”
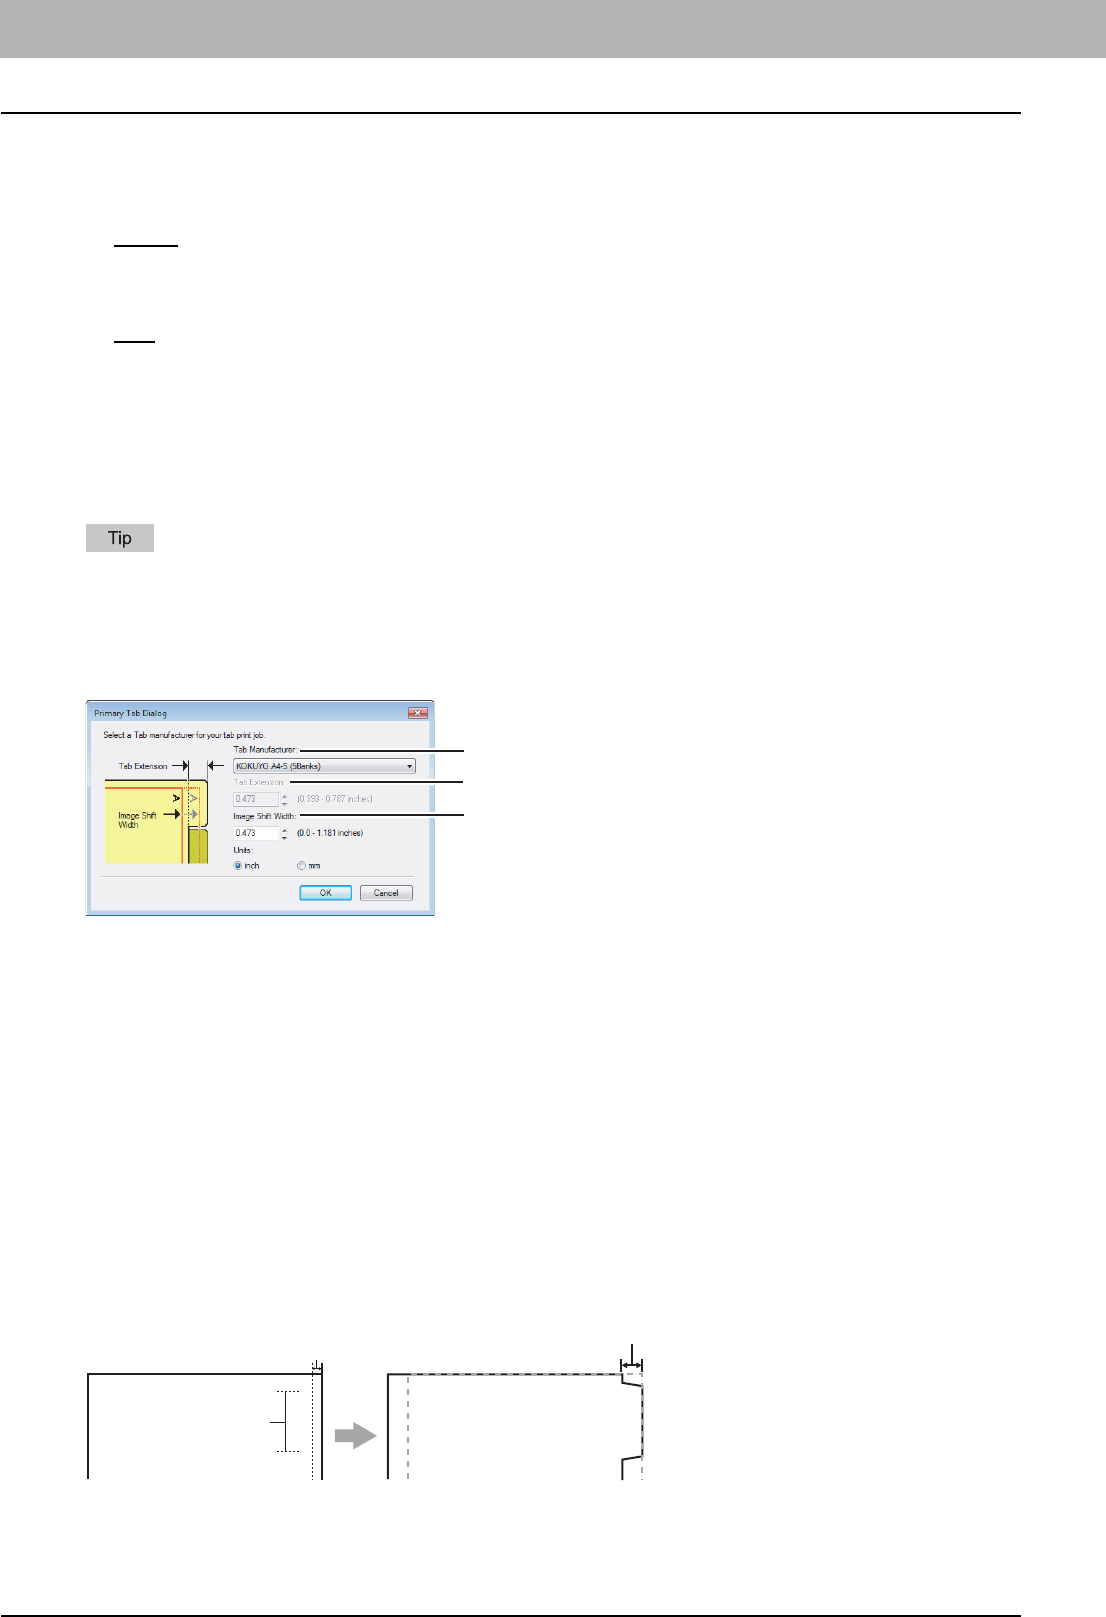
Primary Tab Dialog
1) Tab Manufacturer
Select the product name of the tab paper that you use. This equipment supports following tab paper.
If you use tab papers other than those above, select [Custom]. When you select [Custom], you must specify the tab
extension manually.
2) Tab Extension
Enter the width of the tab extension. This must be set only when [Custom] is selected in the [Tab Manufacturer] option.
3) Image Shift Width
Enter the width to shift the printed image.
For example, if you want to print text on the tab extension of Letter Tab paper, create a Letter sized document and
input the text on the right side. You must place the text at the exact height to fit the tab extension. Also the right
margin, the margin between the text and right edge of the document, must have more than 0.17 inch or 4.2 mm space
because the equipment cannot print in the space. Then enter the width of the tab extension as Image Shift Width.
For Letter Tab: Blanks USA copy Tabs (5 Banks) LT + 1/2” Tab
Blanks USA copy Tabs (8 Banks) LT + 1/2” Tab
For A4 Tab: KOKUYO A4-S (5 Banks)
King JIM A4-S (5Banks)
3
2
1
Tab Text
Document Printed Image
Tab Text
Width of Tab Extension = Image Shift Margin
More than 0.17" or 4.2mm
Must exactly
fit the tab extension
2.PRINTING FROM WINDOWS
Setting Up Print Options 27
2 PRINTING FROM WINDOWS
4) Units
Select the unit for the Tab Extension and Image Shift option. The default unit varies depending on the regional setting
of the client computer.
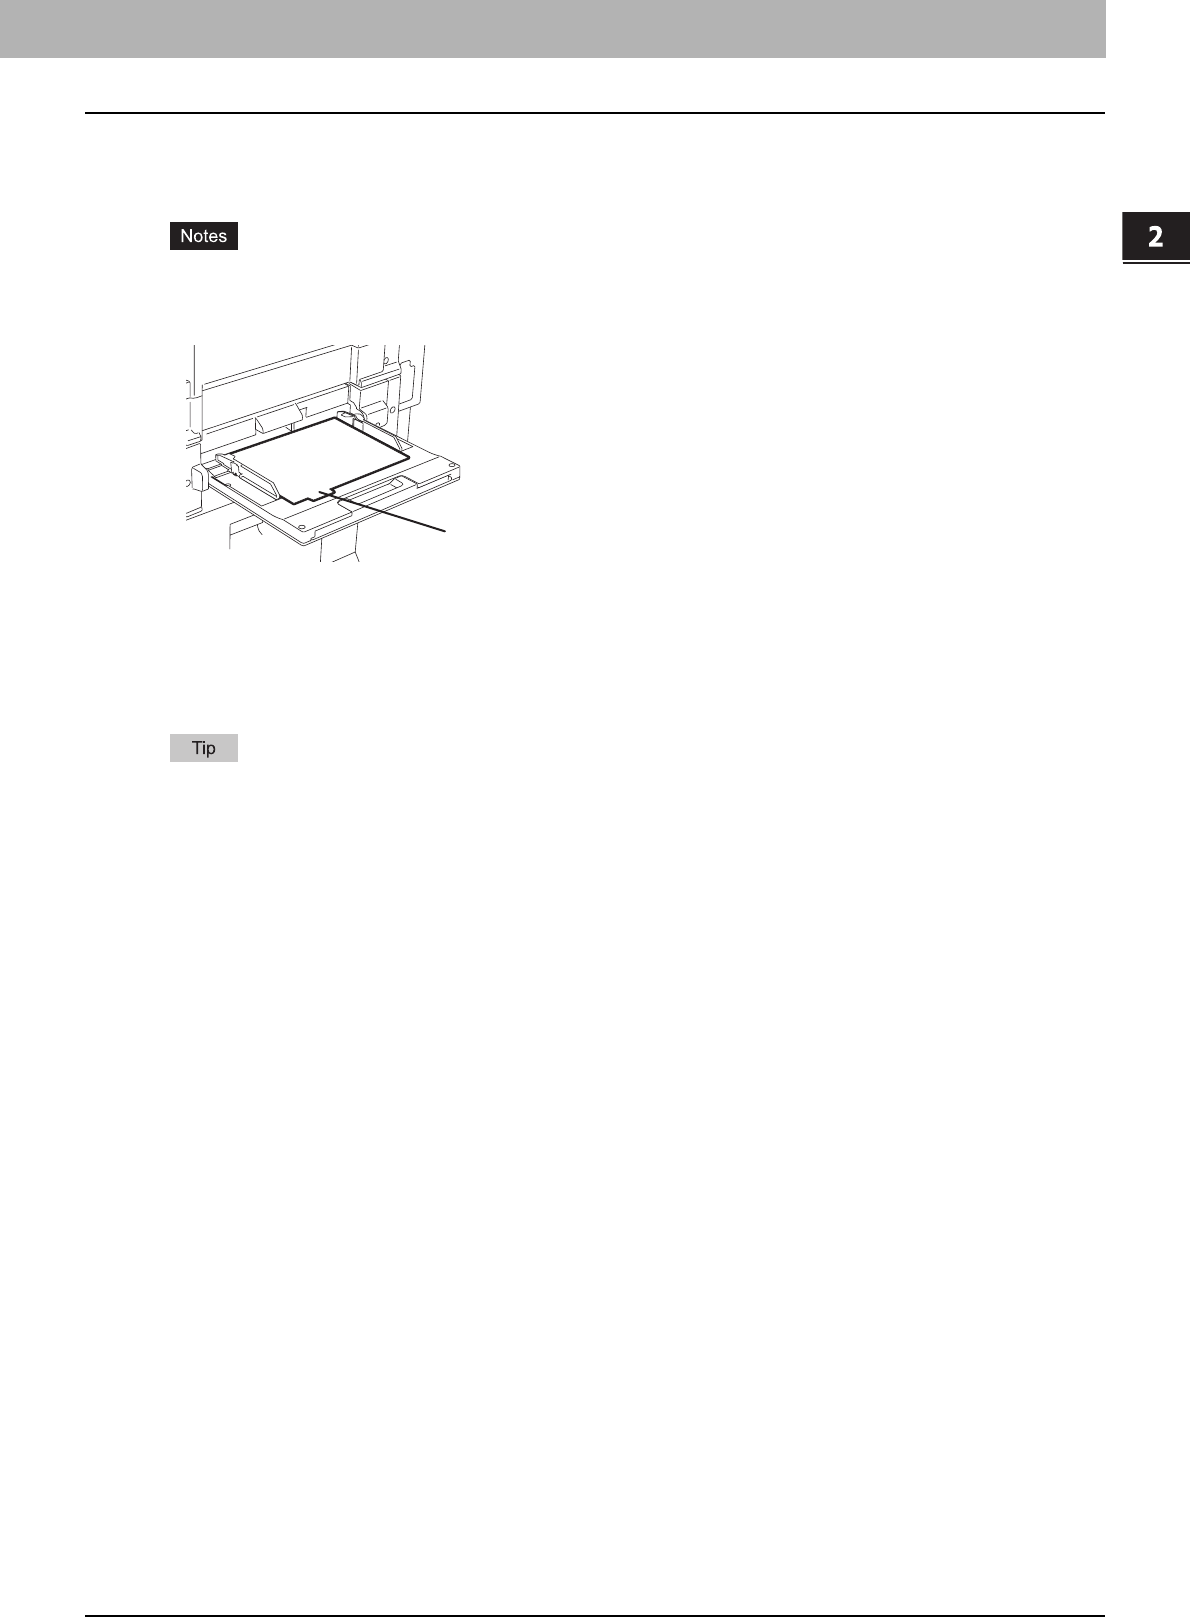
yThe tab paper cannot be fed from LCF (optional) and drawers
yWhen you place the tab paper on the Bypass Tray, make sure the tab side of the paper is on the outside. The job
will be output to the inner tray.
yIf the document for tab printing is not created properly or the Image Shift Width is not set properly, the image will not
be printed in the correct position within the tab extension. Please make sure to create the document and set the
Image Shift Width correctly.
yIf mis-printing occurs while multiple tab pages are printed continuously, dirt may adhere to the reverse side of
paper. To avoid this, it is recommended to print tab paper as a separated job for each page so that this equipment
performs cleaning before printing the next tab paper.
For the detailed instructions on how to print on tab paper, see the following page:
P.80 “Printing on Tab Paper”
Place the tab pape
r
so that the tab side
is on the outside.
2 PRINTING FROM WINDOWS
28 Setting Up Print Options
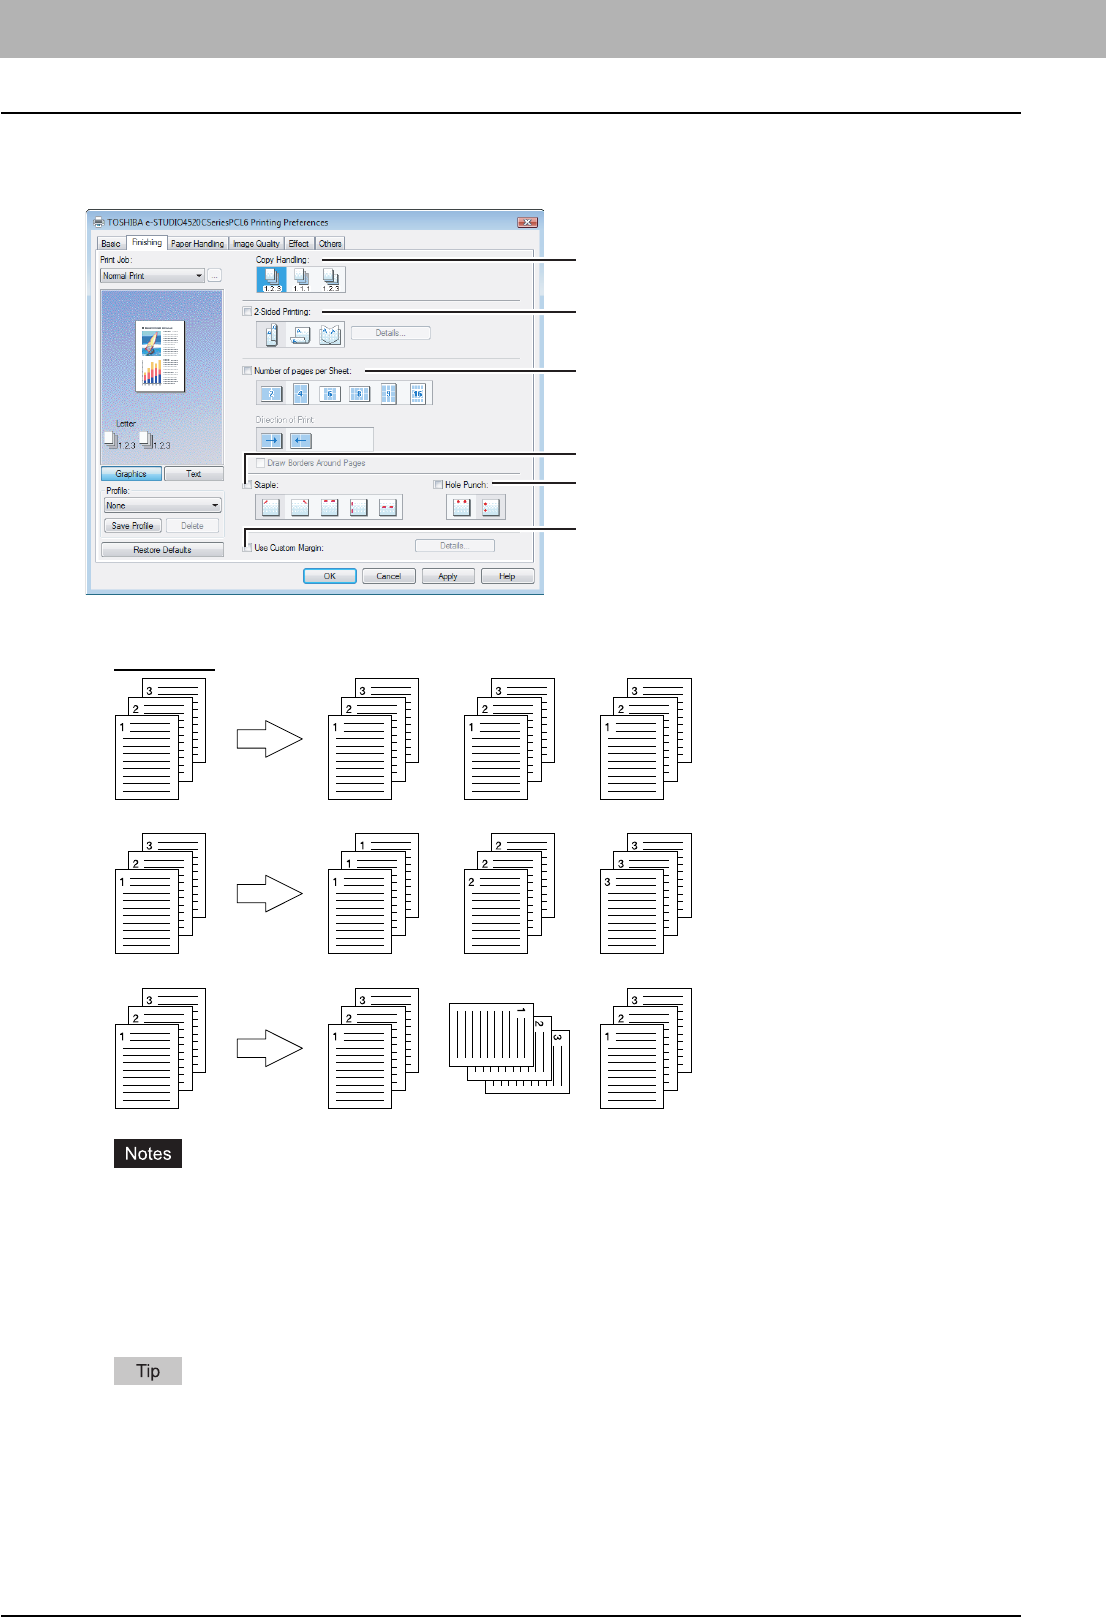
Finishing Tab
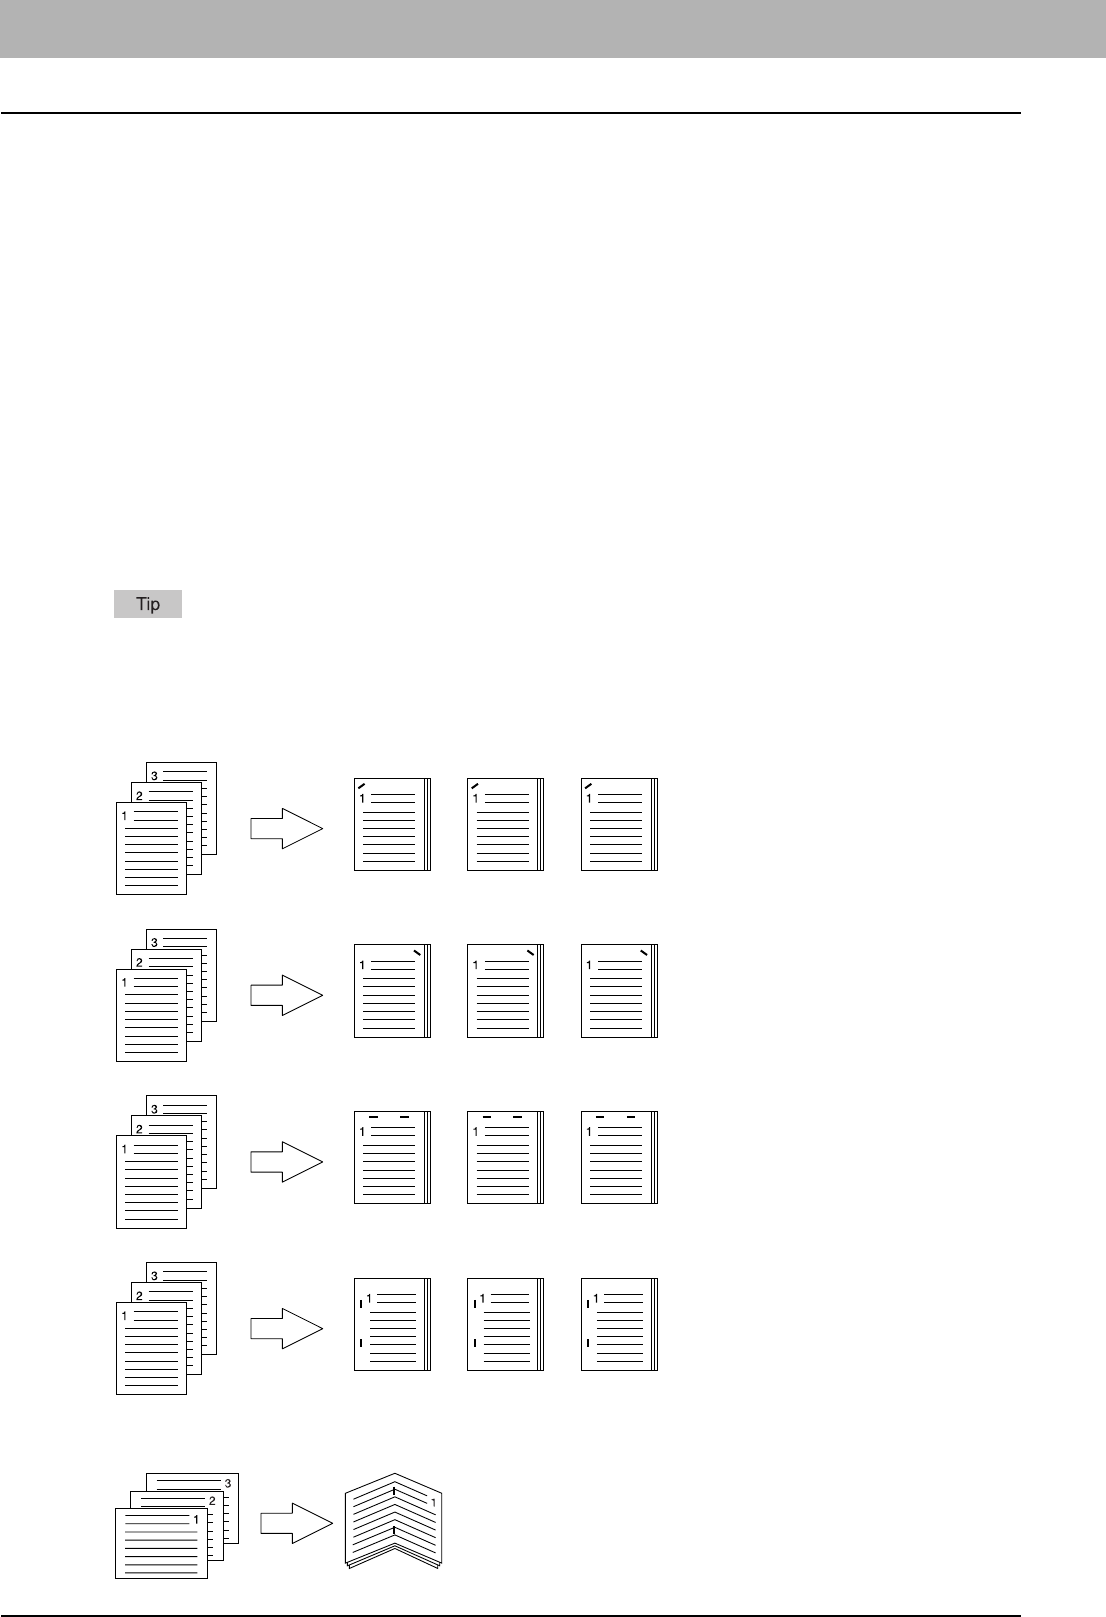
The Finishing tab allows you to enable sort printing, 2-sided printing, N-up printing, stapling and punching.
1) Copy Handling
This sets how to sort the printed sheets when numerous copies are made for printing.
-Sort Copies — Select this for sort-printing (1, 2, 3... 1, 2, 3...).
-Group Copies — Select this for group-printing (1, 1, 1... 2, 2, 2... 3, 3, 3...).
-Rotated Sort Copies — Select this for rotate sort-printing.
y[Group Copies] and [Rotated Sort Copies] can be selected only when more than 1 copy are entered at the
Number of Copies option.
y[Rotated Sort Copies] can be selected only when [Letter], [A4], [B5], or [16K] is selected at the Print Paper Size
option. When you use the "Rotated Sort Copies" option, place copy paper of a desired size in two drawers
(portrait and landscape directions) before you start printing. Select one paper size from [Letter], [A4], [B5] and
[16K], and then place the selected paper in two drawers or the LCF (optional) trays in different directions (e.g.
A4 and A4-R) in advance.
For the detailed instructions on how to print with the [Copy Handling] setting, see the following page:
P.67 “Sort Printing”
1
3
2
5
4
6
2.PRINTING FROM WINDOWS
Setting Up Print Options 29
2 PRINTING FROM WINDOWS
2) 2-Sided Printing
This sets 2-Sided printing (printing on both sides of paper) according to the type of binding for 2-sided-printed pages.
This option is only for printing on both sides of the paper. If you want to bind the output with staples, you should set the
finishing option as well.
-None — Select this if you do not want to print on both sides of the paper.
-Book — Select this to print on both sides of the paper in the same direction and to bind the document along the
vertical side of the paper so that the pages can be turned over right and left.
-Tablet — Select this to print on both sides of the paper with a vertical reversal and to bind the document along the
horizontal side of the paper so that the pages can be turned over up and down.
-Booklet — Select this to print a properly paginated booklet or magazine-style publication. When this is selected,
click [Details...] to specify the details of the Booklet printing.
P.32 “Booklet Details”
y2-Sided printing cannot be set when the following paper size in selected at the [Print Paper Size] box in the
Basic Tab.
-A6
-A4 Tab
- Letter Tab
- (320 x 450 mm)
- (320 x 460 mm)
- Custom Paper Size
y2-Sided printing cannot be set when the following paper type in selected at the [Paper Type] box in the Basic
Ta b .
- Transparency
- Thick4
- Thick4 (Back)
yWhen Booklet printing is performed using the PS3 printer driver from an application that can create the PS
command directly, the overlay image will not be printed. In that case, disable the [Use PostScript Passthrough]
option in the PostScript Settings dialog box.
P.53 “PostScript Settings”
For the detailed instructions on how to print with the [2-Sided printing] setting, see the following page:
P.68 “Printing on Both Sides of a Sheet”
1
2
Portrait
1
2
Landscape
1
2
Portrait
1
2
Landscape
2 PRINTING FROM WINDOWS
30 Setting Up Print Options
3) Number of pages per sheet
This sets the printing of multiple pages on one sheet. The pages are reduced to fit the selected paper size
automatically and printed.
-2 pages — Select this to print images from 2 pages arranged on one sheet.
-4 pages — Select this to print images from 4 pages arranged on one sheet.
-6 pages — Select this to print images from 6 pages arranged on one sheet.
-8 pages — Select this to print images from 8 pages arranged on one sheet.
-9 pages — Select this to print images from 9 pages arranged on one sheet.
-16 pages — Select this to print images from 16 pages arranged on one sheet.
Direction of print
This sets how the pages are arranged on one sheet.
-Left to Right — Select this to arrange pages horizontally from the left and printed top to bottom on one sheet.
-Right to Left — Select this to arrange pages horizontally from the right and printed top to bottom on one sheet.
-Left to Right by column — Select this to arrange pages vertically from the top and printed left to right on one
sheet.
-Right to Left by column — Select this to arrange pages vertically from the top and printed right to left on one
sheet.
Draw Borders Around Pages
Check this to print borders around each page.
For the detailed instructions on how to print with the [Number of pages per sheet ] setting, see the following page:
P.72 “Printing Several Pages on One Sheet”
4) Staple
This sets whether a print job is printed with staples.
-Upper Left — Select this to staple the printed document in the upper left.
-Upper Right — Select this to staple the printed document in the upper right.
-Center Top — Select this to double staple the printed document along the top edge.
-Middle Left — Select this to double staple the printed document along the left side.
-Center Double — Select this to fold and double staple the printed document in the center. When you select this,
the pages will be printed on the sheets according to the print option settings, and then simply fold and double staple
in the center of the sheets.
2.PRINTING FROM WINDOWS
Setting Up Print Options 31
2 PRINTING FROM WINDOWS
[Center Double] can be used to create a booklet from a document that has been already created as a paginated
booklet. To create a paginated booklet from a normal document, perform the booklet printing in the 2-Sided
Printing option.
yThe selectable options vary depending on the paper size.
yThe "Staple" option is available only when the Finisher (optional) is installed.
y[Center Double] can be selected only when the Saddle Stitch Finisher (optional) is installed.
yThe "Staple" option is not available when 2-Sided printing is selected together with the Magazine sort function.
yStapling cannot be set when the following paper sizes are selected in the [Print Paper Size] box in the Basic
Ta b .
-A5
-A6
- (305 x 457mm)
-Statement
- (12 x 18”)
-A4 Tab
- Letter Tab
- (320 x 450 mm)
- (320 x 460 mm)
- Custom Paper Size
yStapling cannot be set when the following paper types are selected at the [Paper Type] box in the Basic Tab.
- Thick 4
- Special 1
- Special 2
- Transparency
- Thick 4 (Back)
- Special 1 (Back)
- Special 2 (Back)
For the detailed instructions on how to print with the [Staple ] setting, see the following page:
P.73 “Stapling”
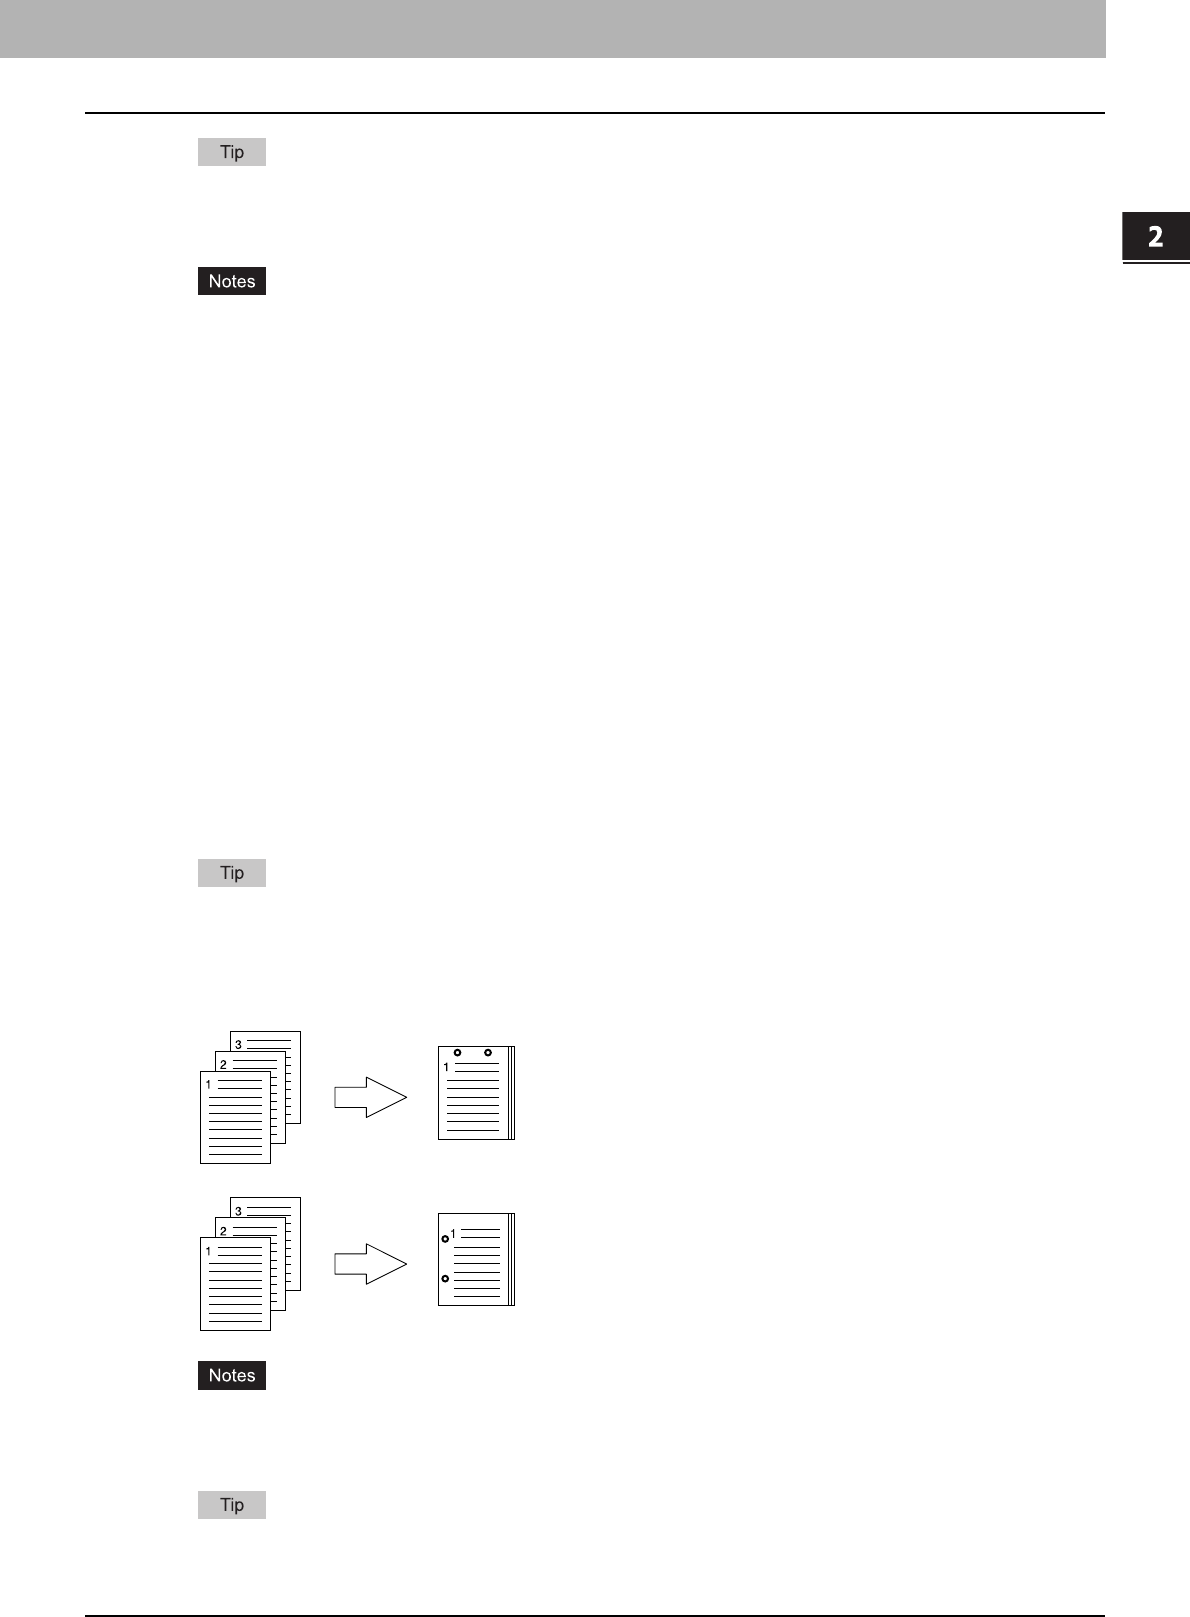
5) Hole Punch
This sets whether a print job is printed with hole punches.
-Center Top — Select this to create holes along the top edge and print.
-Middle Left — Select this to create holes along the left side and print.
yHole punching can be selected only when a hole punch unit (optional) is installed.
yThe "Hole Punch" option is not available when 2-Sided printing is selected together with the Magazine sort
function.
For the detailed instructions on how to print with the [Hole Punch ] setting, see the following page:
P.73 “Hole Punching”
2 PRINTING FROM WINDOWS
32 Setting Up Print Options
6) Use Custom Margin
Check this to set the margin on the printed pages. When this is checked, click [Detail...] to set the margins in the
Custom Margin dialog box.
The margin range is between 4.2 mm and 100 mm (0.17 inch and 3.94 inch). Less than 4.2 mm cannot be set for the
range.
yThe [Use Custom Margin] checkbox is unselectable when you are using an XPS printer driver.
yIf [Booklet] is selected on [2-Sided Printing], this setting is automatically disabled regardless of the ON/OFF of
the [Use Custom Margin] checkbox.
yEnable this function to add the margins if the application does not support the margin function. When the
application has the margin function, use the application’s function rather than this option.
yThis cannot specify the binding margin for Booklet printing.
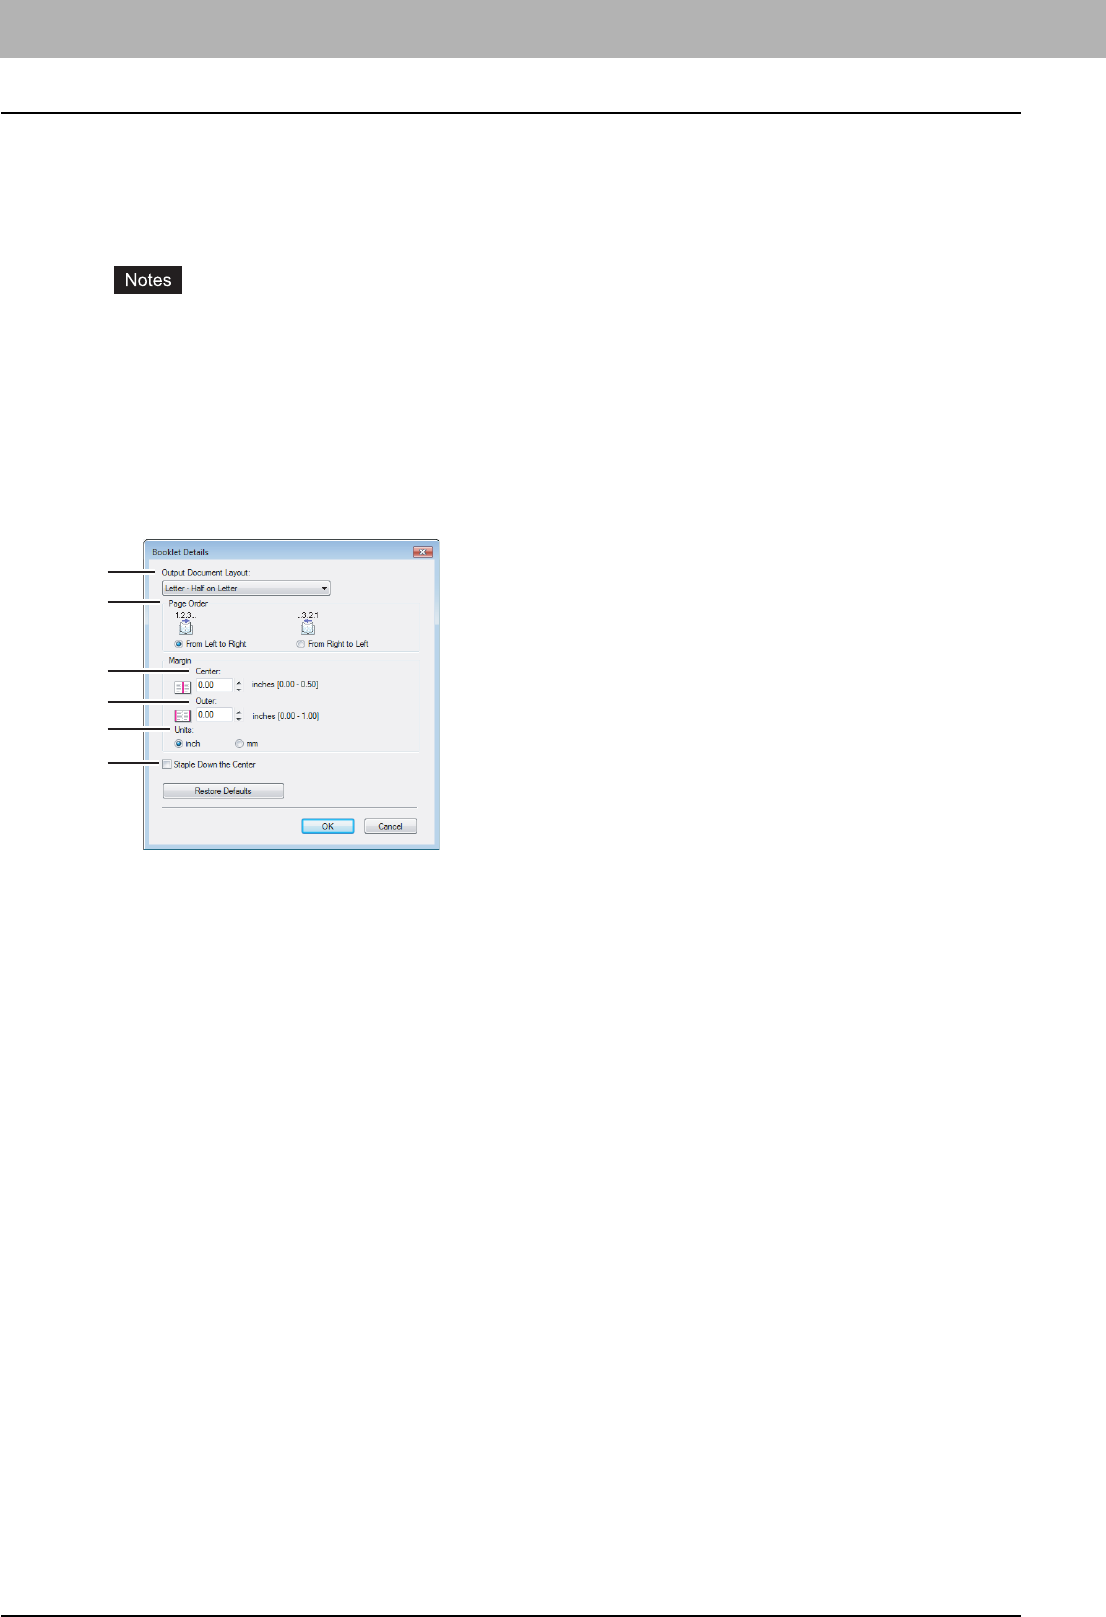
Booklet Details
Booklet Details dialog box, you can specify how Booklet printing is performed.
1) Output Document Layout
Select the booklet size to be made.
-A5 on A4 — Select this to print an A5 size booklet. Every 2 pages are printed on A4 paper to fit on half a sheet
(A5).
-A4 on A3 — Select this to print an A4 size booklet. Every 2 pages are printed on A3 paper to fit on half a sheet
(A4).
-B5 on B4 — Select this to print a B5 size booklet. Every 2 pages are printed on B4 paper to fit on half a sheet (B5).
-Letter-Half on Letter — Select this to print a 1/2 Letter size booklet. Every 2 pages are printed on Letter paper to
fit on half a sheet.
-LT on LD — Select this to print a Letter size booklet. Every 2 pages are printed on Ledger paper to fit on half a
sheet (Letter).
-A6 on A5 — Select this to print an A6 size booklet. Every 2 pages are printed on A5 paper to fit on half a sheet
(A6).
-B6 on B5 — Select this to print a B6 size booklet. Every 2 pages are printed on B5 paper to fit on half a sheet (B6).
-1/2 LG on LG — Select this to print a 1/2 Legal size booklet. Every 2 pages are printed on Legal paper to fit on half
a sheet.
-1/2 Comp on Comp — Select this to print a 1/2 Computer size booklet. Every 2 pages are printed on Computer
paper to fit on half a sheet.
-1/2 Folio on Folio — Select this to print a 1/2 Folio size booklet. Every 2 pages are printed on Folio paper to fit on
half a sheet.
-1/2 Statement on Statement — Select this to print a 1/2 Statement size booklet. Every 2 pages are printed on
Statement paper to fit on half a sheet.
-1/2 13LG on 13LG — Select this to print a 1/2 13inch LG size booklet. Every 2 pages are printed on 13inch LG
paper to fit on half a sheet.
-1/2 8.5SQ on 8.5SQ — Select this to print a 1/2 8.5inch SQ size booklet. Every 2 pages are printed on 8.5inch SQ
paper to fit on half a sheet.
-32K on 16K — Select this to print a 32K size booklet. Every 2 pages are printed on 16K paper to fit on half a
sheet.
-16K on 8K — Select this to print a 16K size booklet. Every 2 pages are printed on 8K paper to fit on half a sheet.
1
2
3
4
5
6
2.PRINTING FROM WINDOWS
Setting Up Print Options 33
2 PRINTING FROM WINDOWS
2) Page Order
Select this to print the pages from left to right or right to left.
3) Margin - Center
This sets the gutter on the center of two sided page. You can enter up to 0.50 inch (12.70 mm). The printed images
will be reduced according to the margin setting.
4) Margin - Outer
This sets the gutter on the right side and left side on the paper. You can enter up to 1.00 inch (25.40 mm). The printed
images will be reduced according to the margin setting.
5) Units
Select the unit for the Center Margin and Outer Margin option. The default unit varies depending on the regional
setting in the Windows.
6) Staple Down the Center
Check this to double staple in the center.
[Staple Down the Center] is available only when [A5 on A4], [A4 on A3], [B5 on B4], [Letter - Half on Letter], [LT on
LD], or [1/2 LG on LG] is selected at the [Output Document Layout] box and the Saddle Stitch Finisher (optional) is
installed.
For the detailed instructions on how to print with the [Booklet] setting, see the following page:
P.69 “Making a Booklet”
2 PRINTING FROM WINDOWS
34 Setting Up Print Options
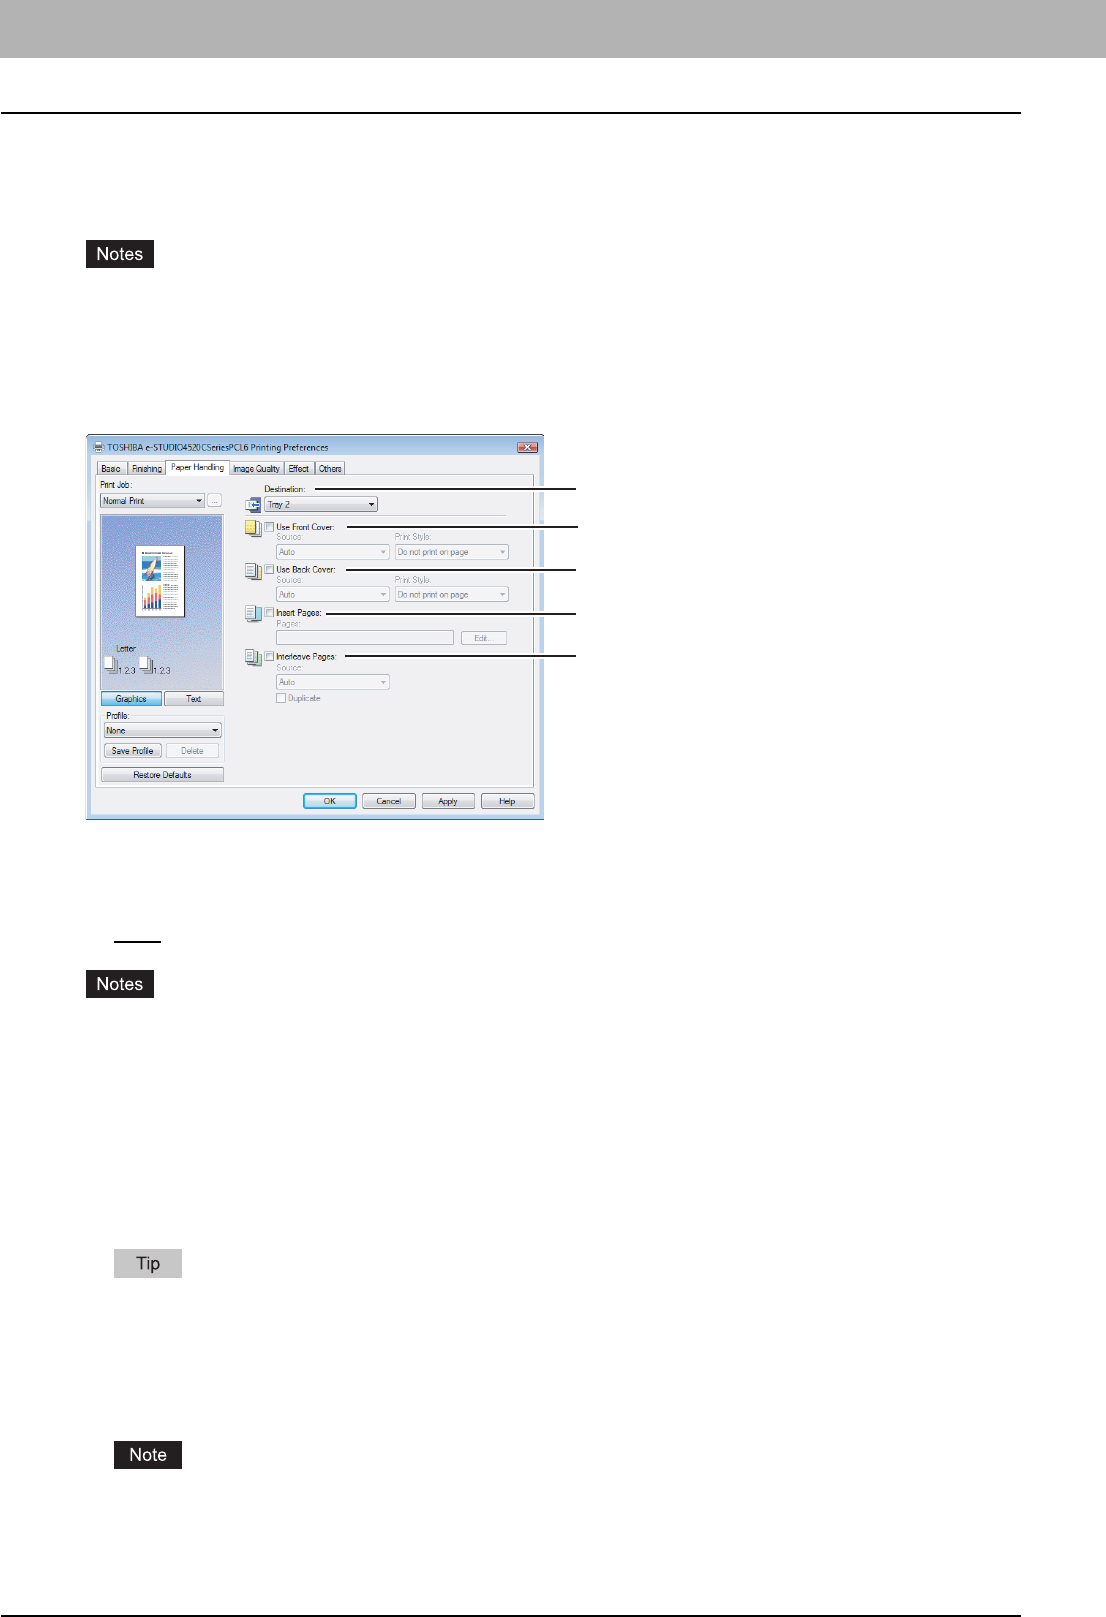
Paper Handling Tab
The Paper Handling tab allows you to enable Front Cover printing, Back Cover printing, Inserting Pages, and Interleaving
Pages.
y"Use Front Cover", "Use Back Cover", "Insert Pages" and "Interleave Pages" are not available when the Tab
printing function is set.
yWhen the size of covers or sheets to be inserted is the same as that of the copy paper, change the media type or
specify "Paper Source" on the Basic tab menu; otherwise all data will be printed from the insertion drawer.
yIf you select [Store to e-Filing] in the [Print job] box, [Use Front Cover], [Use Back Cover], [Insert Pages] and
[Interleave Pages] are unselectable.
1) Destination
This selects the destination tray to which jobs will be output.
-Inner Tray — Select this to route the output to the inner tray.
-Tray 1 — Select this to route the output to the upper tray of the Finisher (optional).
-Tray2 — Select this to route the output to the lower tray of the Finisher (optional).
y[Tray 1] can be selected when the Hanging Finisher (optional), Finisher (optional) or Saddle Stitch Finisher
(optional) are installed and configured on the Configuration tab.
y[Tray 2] can be selected when the Finisher (optional) or Saddle Stitch Finisher (optional) are installed and
configured on the Configuration tab.
2) Use Front Cover
This sets front cover printing which allows you to insert or print a cover on a sheet fed from a different Drawer or
Bypass tray than the Paper Source option selected on the Basic tab.
To enable cover printing, check on the box and select the location from where a cover sheet is to be fed and the print
style to be used.
For the detailed instructions on how to print with the [Use Front Cover ] setting, see the following page:
P.74 “Inserting Different Types of Paper”
Source
Select the location from where a cover sheet is to be fed. When [Auto] is selected, the paper is automatically selected
according to the printed document size.
The selectable values in the [Source] box vary depending on the optional devices installed on this equipment and
their configuration on the Configuration tab.
1
3
2
5
4
2.PRINTING FROM WINDOWS
Setting Up Print Options 35
2 PRINTING FROM WINDOWS
Print Style
This selects how you want to print a cover.
-Do not print on page — Select this to insert a blank cover.
-Print one side of the page — Select this to print the first page image on the front side of a cover.
-Print both sides of page — Select this to print the first two page images on both sides of a cover. This is available
only when the 2-Sided Printing option is enabled on the Finishing tab.
If [Print one side of the page] is selected while 2-Sided Printing is performed, the first page is printed on the front
side of the cover sheet and the back side of the cover will be blank.
3) Use Back Cover
This sets back cover printing which allows you to insert or print a back cover on a sheet fed from a different Drawer or
Bypass tray than the Paper Source option selected on the Basic tab.
To enable back cover printing, check on the box and select the location from where a back cover sheet is to be fed and
the print style to be used.
For the detailed instructions on how to print with the [Use Back Cover] setting, see the following page:
P.74 “Inserting Different Types of Paper”
Source
Select the location from where a back cover sheet is to be fed. When [Auto] is selected, the paper is automatically
selected according to the printed document size.
The selectable values in the [Source] box vary depending on the optional devices installed on this equipment and
their configuration on the Configuration tab.
Print Style
This selects how you want to print a back cover.
-Do not print on page — Select this to insert a blank cover.
-Print one side of the page — Select this to print the last page image on the front side of a cover.
-Print both sides of page — Select this to print the last two page images on both sides of a cover. This is available
only when the 2-Sided Printing option is enabled on the Finishing tab.
yIf [Print one side of the page] is selected while 2-Sided Printing is performed, the last page is printed on the
front side of the cover sheet and back side of the cover will be blank.
yIf [Print both sides of page] is selected but there is only one page printed on the back cover, the last page is
printed on the front side of the cover sheet and back side of the cover will be blank.
4) Insert Pages
This sets sheet insertion printing which allows you to insert a sheet between pages, or print a specific page on a sheet
fed from a tray other than the Paper Source option selected on the Basic tab.
This option is useful when you want to insert a blank sheet between chapters, or when you want to print chapter cover
pages on the different paper.
To enable sheet insertion printing, check on the box and click [Edit...] to set how the pages are inserted in the Insert
Pages dialog box.
P.36 “Insert Pages”
yThis option cannot be set when the [Interleave Pages] option is enabled.
yUp to 50 pages can be inserted.
yInsert Pages printing is performed using the PSL3 printer driver from an application that can create the PS
command directly, the interleaving sheets may not be inserted between the designated pages. In that case,
disable the [Use PostScript Passthrough] option in the PostScript Settings dialog box.
P.53 “PostScript Settings”
2 PRINTING FROM WINDOWS
36 Setting Up Print Options
For the detailed instructions on how to print with the [Insert Pages] setting, see the following page:
P.74 “Inserting Different Types of Paper”
5) Interleave Pages
This sets the interleaving page feature that is useful when you want to insert paper of a different type (or from another
source) between every page of your print job. For example, you could use this option to insert blank, colored sheets
between overhead transparencies.
To enable interleaving pages, check on the box and select the location from where sheets are to be fed.
yWhen this option is enabled as well as the [Use Front Cover] and [Use Back Cover] options enabled, no page is
inserted after the front cover and back cover.
yThis option cannot be set when [Insert Pages] option is enabled.
For the detailed instructions on how to print with the [Interleave Pages] setting, see the following page:
P.75 “Interleaving Pages”
Source
Select the location from where the interleaving sheet is to be fed. When [Auto] is selected, the paper is automatically
selected according to the printed document size.
The selectable values in the [Source] box vary depending on the optional devices installed on this equipment and
their configuration on the Configuration tab.
Duplicate
When you check on this, you can print previous page images on the inserted sheet.
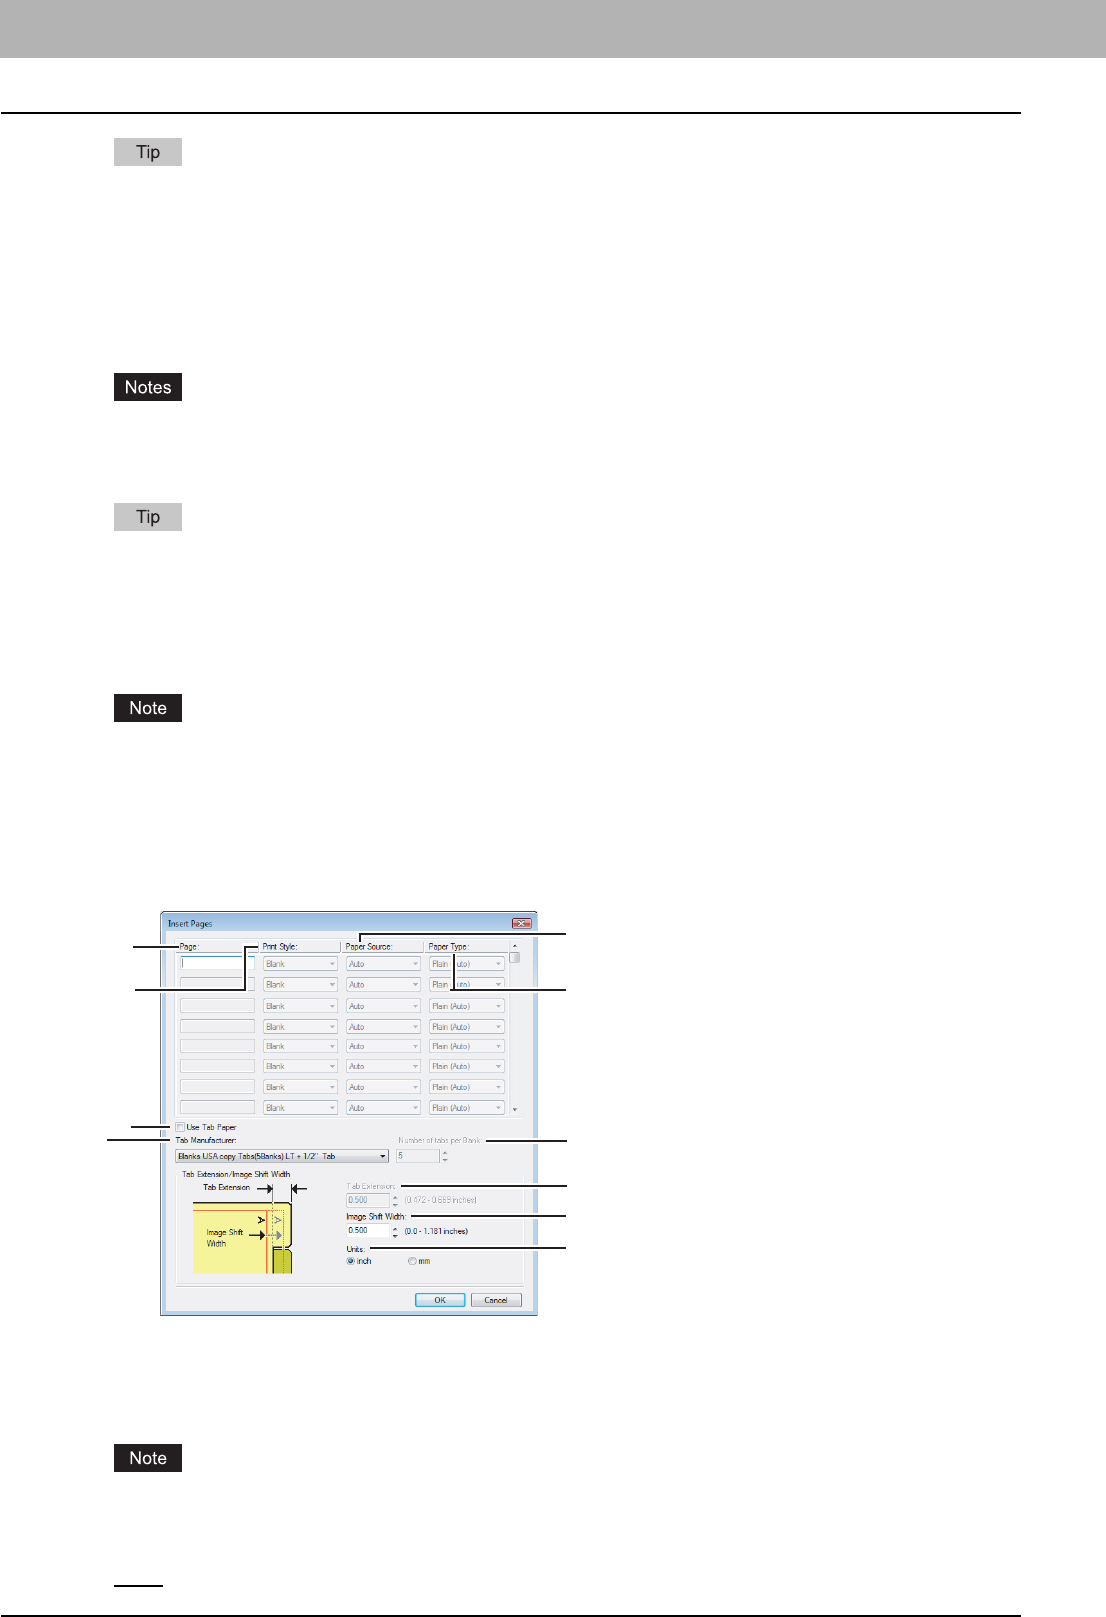
Insert Pages
1) Page
Enter the page number where the sheet is to be inserted.
When [Blank] is selected from the [Print Style] box, the blank sheet is inserted before the entered pages.
When [1 Side] is selected from the [Print Style] box, the entered page will be printed on the inserted sheet.
A sheet cannot be inserted before the first page when 2-Sided printing is enabled.
2) Print Style
This selects how you want to print on insertion sheets.
-Blank — Select this to insert blank sheets.
1
24
7
8
9
10
3
5
6
2.PRINTING FROM WINDOWS
Setting Up Print Options 37
2 PRINTING FROM WINDOWS
-1 Side — Select this to print the specified page on the front side of the insertion sheets.
-2 Sides — Select this to print the specified page and the next page on both sides of the insertion sheets.
3) Paper Source
Select the location from where insertion sheets are to be fed. When [Auto] is selected, the paper is automatically
selected according to the printed document size.
The selectable values in the [Paper Source] box vary depending on the optional devices installed on this
equipment and their configuration on the Configuration tab.
4) Paper Type
Select the paper type to be inserted.
5) Use Tab Paper
Check this box when you insert a sheet of tab paper between two specified pages or print the data of the specified
page in originals on the inserted tab paper.
6) Tab Manufacturer
Select the product name of the tab paper that you use. This equipment supports the following tab paper.
If you use tab paper other than those above, select [Custom]. When you select [Custom], you must specify the tab
extension manually.
7) Number of tabs per Bank
Enter the number of tabs for each tab set.
8) Tab Extension
Enter the width of the tab extension. This must be set only when [Custom] is selected in the [Tab Manufacturer] option.
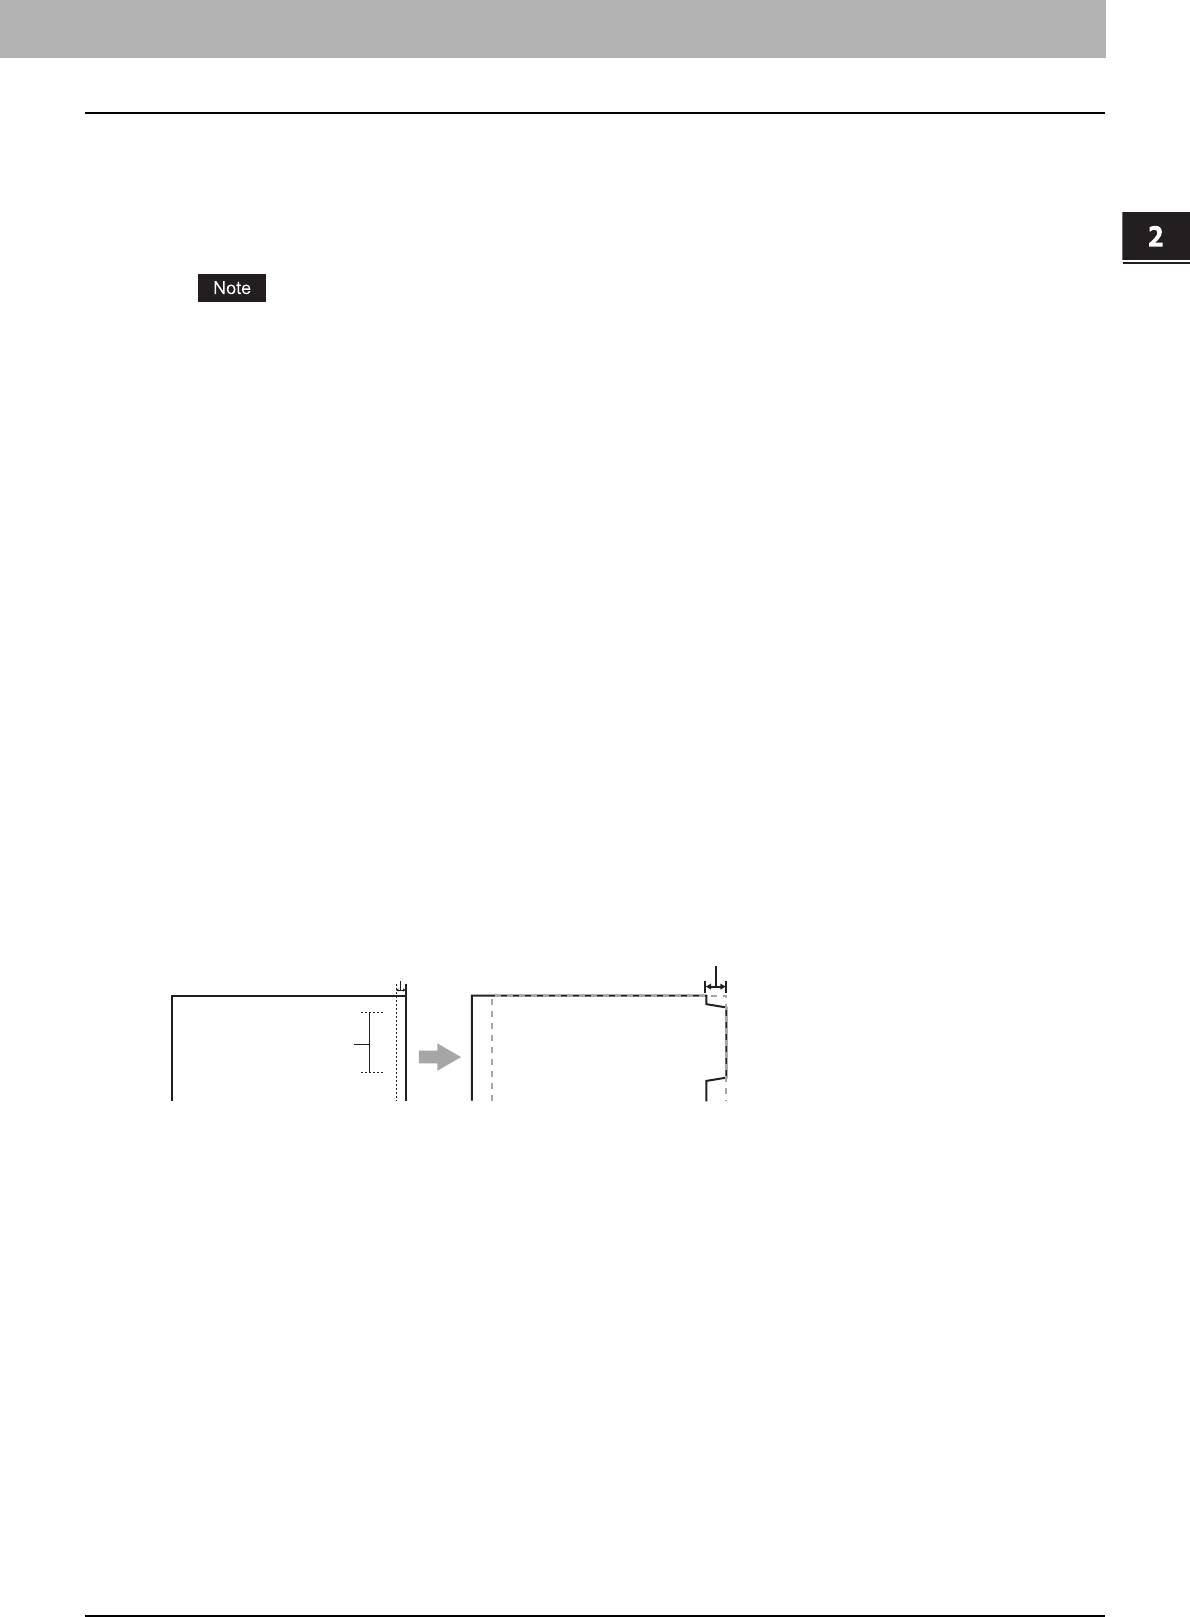
9) Image Shift Width
Enter the width to shift the printed image.
For example, if you want to print text on the tab extension of Letter Tab paper, create a Letter sized document and
input the text on the right side. You must place the text at the exact height to fit the tab extension. Also the right
margin, the margin between the text and right edge of the document, must have more than 0.17 inch or 4.2 mm space
because the equipment cannot print in the space. Then enter the width of the tab extension as Image Shift Width.
10) Units
Select the unit for the Tab Extension and Image Shift option. The default unit varies depending on the regional setting
of the client computer.
For Letter Tab: Blanks USA copy Tabs (5 Banks) LT + 1/2” Tab
Blanks USA copy Tabs (8 Banks) LT + 1/2” Tab
For A4 Tab: KOKUYO A4-S (5 Banks)
King JIM A4-S (5Banks)
Tab Text
Document Printed Image
Tab Text
Width of Tab Extension = Image Shift Margin
More than 0.17" or 4.2mm
Must exactly
fit the tab extension
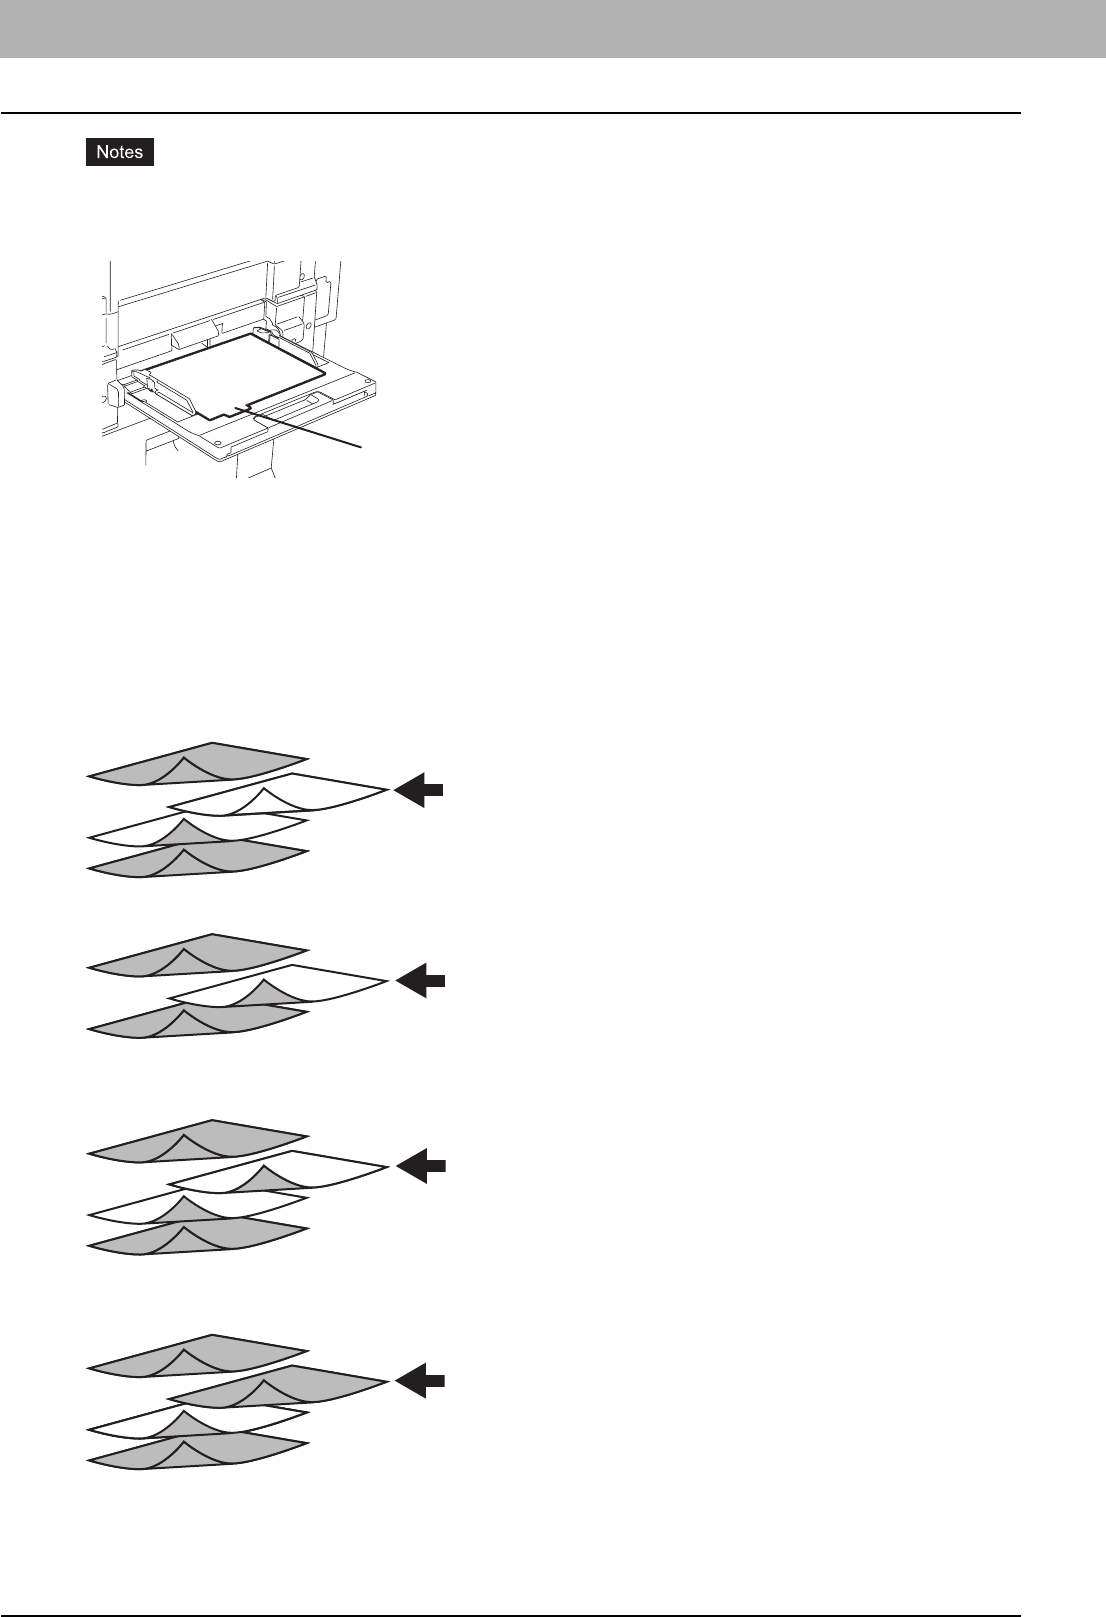
2 PRINTING FROM WINDOWS
38 Setting Up Print Options
yThe tab paper cannot be fed from the LCF (optional) and drawers
yWhen you place the tab paper on the Bypass Tray, make sure the tab side of the paper is on the outside. The job
will be output in the inner tray.
yIf the document for tab printing is not created properly or the Image Shift Width is not set properly, the image will not
be printed in the correct position within the tab extension. Please make sure to create the document and set the
Image Shift Width correctly.
yIf mis-printing occurs while multiple tab pages are printed continuously, dirt may adhere to the reverse side of
paper. To avoid this, it is recommended to print tab paper as a separated job for each page so that this equipment
performs cleaning before printing the next tab paper.
yWhen printing tab paper, the tab paper may be caught in the exit in the inner tray because the roller to deliver the
tab extension does not exit. In that case, remove the tab paper before printing a next job.
yIf [Blank] is selected while 2-sided printing is performed, and you enter an even numbered page (printed on the
back side of the paper) for the [Pages] box, the specified page will be blank. The desired blank sheet is inserted
next and the 2-sided printing continues from the next page.
yIf [1 Side] is selected while 2-sided printing is performed, the specified page is printed on the front side of the sheet
and back side of the sheet will be blank.
yIf [1 Side] is selected while 2-sided printing is performed, and you enter an even numbered page (printed on the
back side of the paper) for the [Pages] box, the specified page will be blank. The page is printed on the front side of
the inserted sheet and the 2-sided printing continues from the next page.
yIf [2 Sides] is selected while 2-sided printing is performed, and you enter an even numbered page (printed on the
back side of the paper) for the [Pages] box, the specified page will be blank. The specified page and the next page
are printed on the inserted sheet and the 2-sided printing continues from the next page.
Place the tab pape
r
so that the tab side
is on the outside.
1
2
3
4
5
1
2
3
4
5
1
2
3
4
5
6
4
5
1
2
3
4
5
6
7
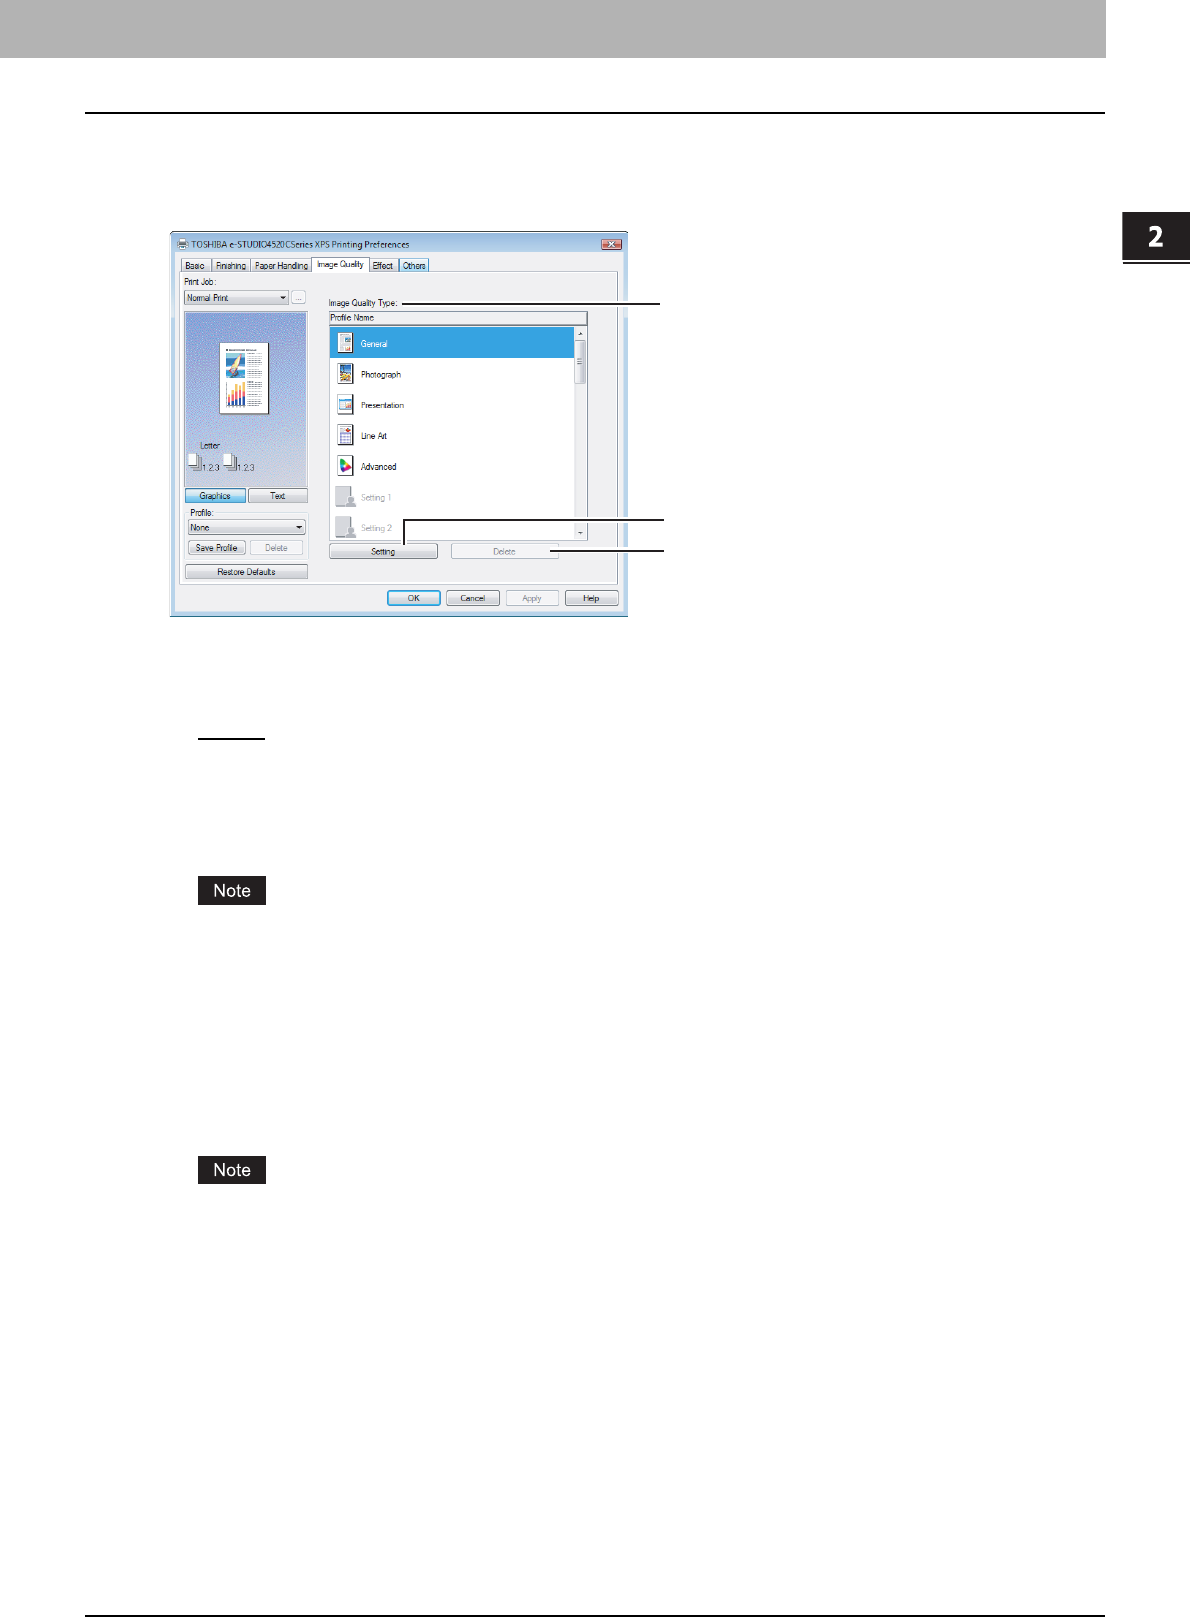
2.PRINTING FROM WINDOWS
Setting Up Print Options 39
2 PRINTING FROM WINDOWS
Image Quality Tab
The Image Quality Tab allows you to select how images are printed. You can easily select appropriate image quality
depending on the type of document.
1) Image Quality Type
This sets how colors are printed by selecting the job type. The printer driver automatically applies proper image quality
for selected job type. You can select a pre-defined image quality type, or you can select a custom image quality type
that you created. The custom image quality type can be created or modified by clicking [Setting].
-General — Select this to apply proper image quality for printing a general color document.
-Photograph — Select this to apply proper image quality for printing photos.
-Presentation — Select this to apply proper image quality for printing a vivid document.
-Line Art — Select this to apply proper image quality for printing a document contain a lot of characters or line arts.
-Advanced — Select this to apply a profile which can adjust color space. The [Advanced] option is available only for
the PS3/XPS Printer driver.
The Image Quality type option is not available when [Black and White] or [Twin Color] is selected at the [Color] box
on the Basic tab.
2) [Setting]
Click this to customize an image quality setting. When this is clicked, the Setting dialog box appears. You can set up
to 20 custom image quality settings.
P.40 “Setting: Basic Tab”
P.42 “Setting: Color Balance Tab”
P.43 “Setting: Image Attribute Tab”
P.44 “Setting: Advanced Tab”
In order to create a new custom image quality setting, you must access the printer driver properties from the
Printers folder (When using Windows XP/Server 2003, Printers and Faxes). When you access the printer driver
properties from an application’s Print dialog box, you cannot add or reduce the custom image quality setting.
3) [Delete]
Click this to delete the custom image quality setting. When you click this, the confirmation dialog box appears. Click
[Yes] to delete the setting.
1
3
2
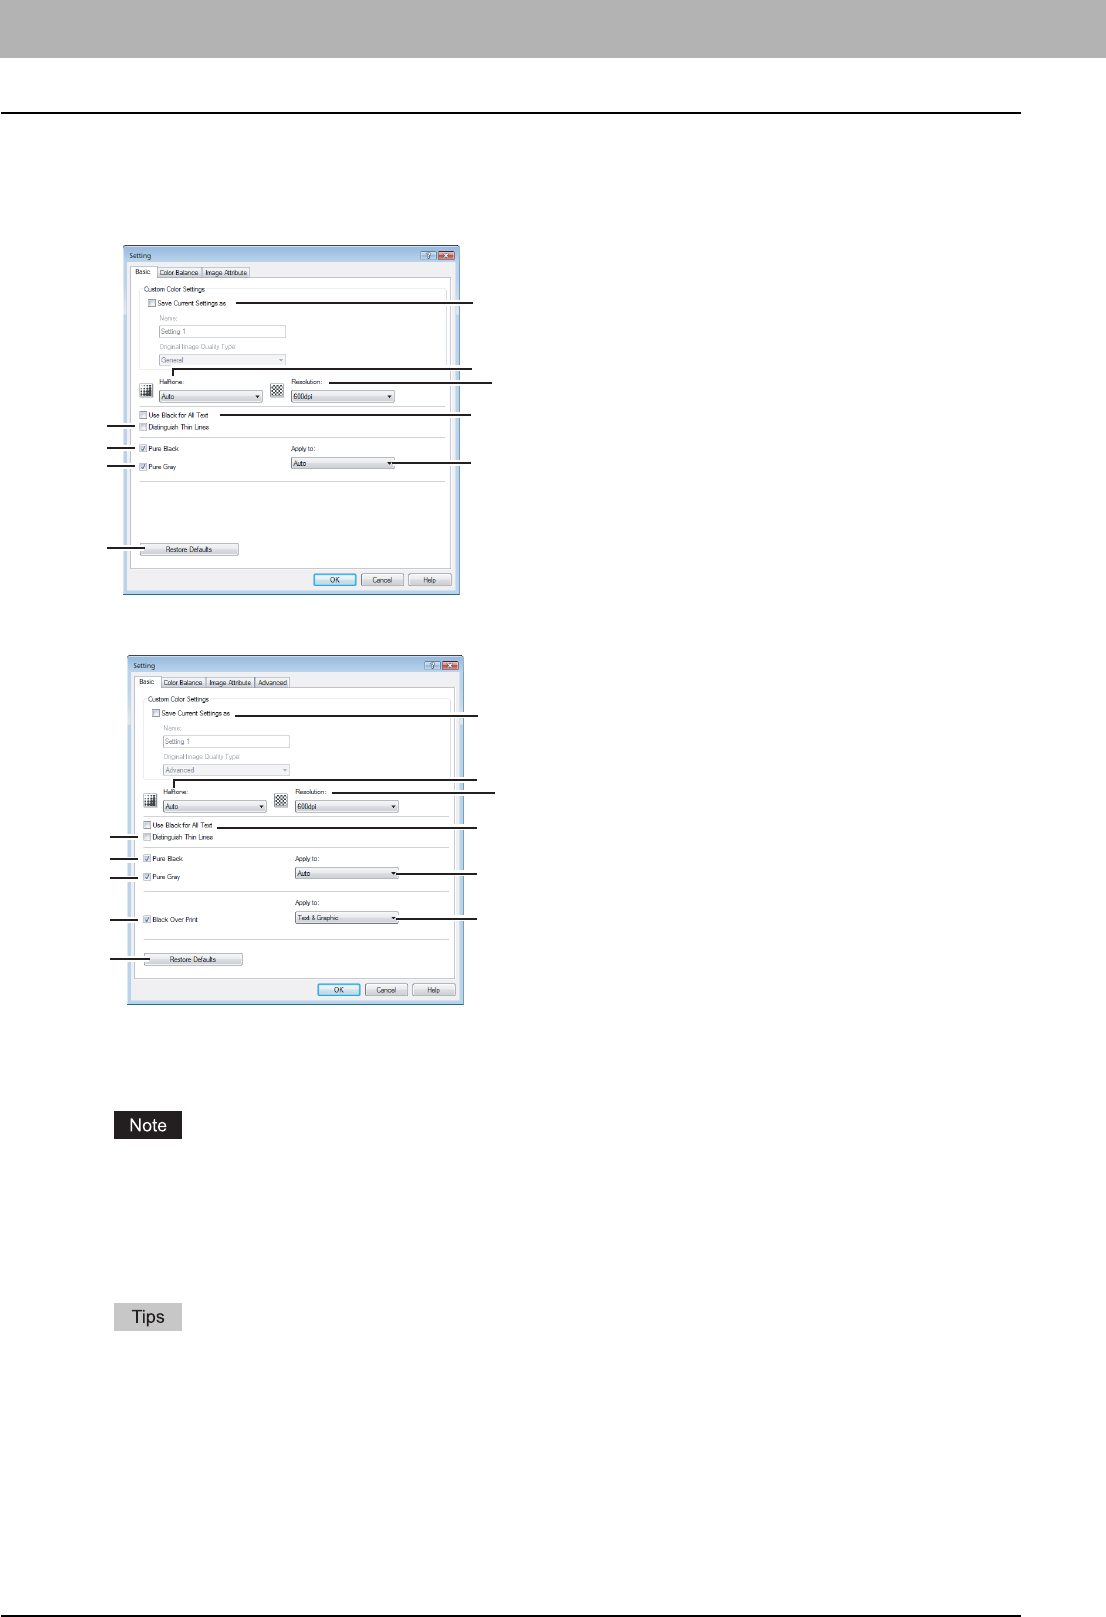
2 PRINTING FROM WINDOWS
40 Setting Up Print Options
Setting: Basic Tab
In the Basic Tab of the Setting dialog box, you can specify the following functions.
Basic Tab for PCL6/XPS
Basic Tab for PS3
1) Save Current Settings As
Check this to save the settings as the different setting. If you do not check this, the Image Quality Type that you
selected will be undefined. Up to 20 custom image quality types can be created.
This option can be set when you log into Windows as a user who has the “Administrators” or “Power Users
privilege (when using Windows 2000)” and access the printer driver properties from the Printers folder (When using
Windows XP/Server 2003, Printers and Faxes folder).
Name
Enter the Image Quality type name to be created. This must be entered when [Save Current Settings As] is checked.
yWhen you edit an existing custom Image Quality Type, the settings of this Image Quality Type will be
overwritten regardless of whether or not this Image Quality Type is renamed.
yEven if you enter any of the default Image Quality Type names ([General], [Photograph], [Presentation], [Line
Art] or [Advanced]) registered as default settings, these default Image Quality types will not be overwritten. The
Image Quality Type is saved as a new custom Image Quality Type under the name you have specified.
Original Image Quality Type
Select the image quality type to be applied as the based image quality.
1
4
8
2
6
5
7
11
3
1
4
8
10
2
6
5
7
9
11
3

2.PRINTING FROM WINDOWS
Setting Up Print Options 41
2 PRINTING FROM WINDOWS
2) Halftone
This sets how halftones are printing.
-Auto — Select this to print using proper halftone depending on the contents in the document automatically.
-Smooth — Select this to print halftone smoothly.
-Detail — Select this to print halftone in detail.
3) Resolution
This sets the resolution for printed.
-600 dpi — Select this to print in 600 x 600 dpi.
4) Use Black for All Text
Check this to print all texts in 100% black except white texts.
5) Distinguish Thin Lines
Check this to print thin lines clearly.
6) Pure Black
Check this to print the black contents using the black toner. When you check this, please select how this function
applies in the [Apply to] box.
7) Pure Gray
Check this to print the gray scale contents using the black toner. When you check this, please select how this function
applies in the [Apply to] box.
The Pure Gray option is not available when [Pure Black] is not enabled.
8) Apply to
Select how the Pure Black and Pure Gray functions apply.
-Auto — Select this to detect black areas or black-and-gray areas according to the types of documents and print
them using black toner.
-Text — Select this to print only black text or black-and-gray text using black toner.
-Text & Graphic — Select this to print only black text and graphics, or black-and-gray text and graphics using black
toner.
-Text, Graphic & Image — Select this to print all black areas or all black-and-gray areas using black toner.
9) Black Over Print
Check this when printing background content that has black text overlayed on it. If this is enabled, the gap between
text and background is minimized and color deviation is prevented. if this is not enabled, the background of the black
content will not print.
The [Black Over Print] option is available only for PS3 printer driver.
10) Apply to
Select how the Black Over Print functions apply.
-Text — Select this to print all the full-color background and then print black text on the color background.
-Text & Graphic — Select this to print all the full-color background and then print black text and graphics on the
color background.
The [Apply to] option is available only for PS3 printer driver.
11) [Restore Defaults]
Click this to restore all the image quality setting details displayed in the Basic tab menu to the original factory defaults.
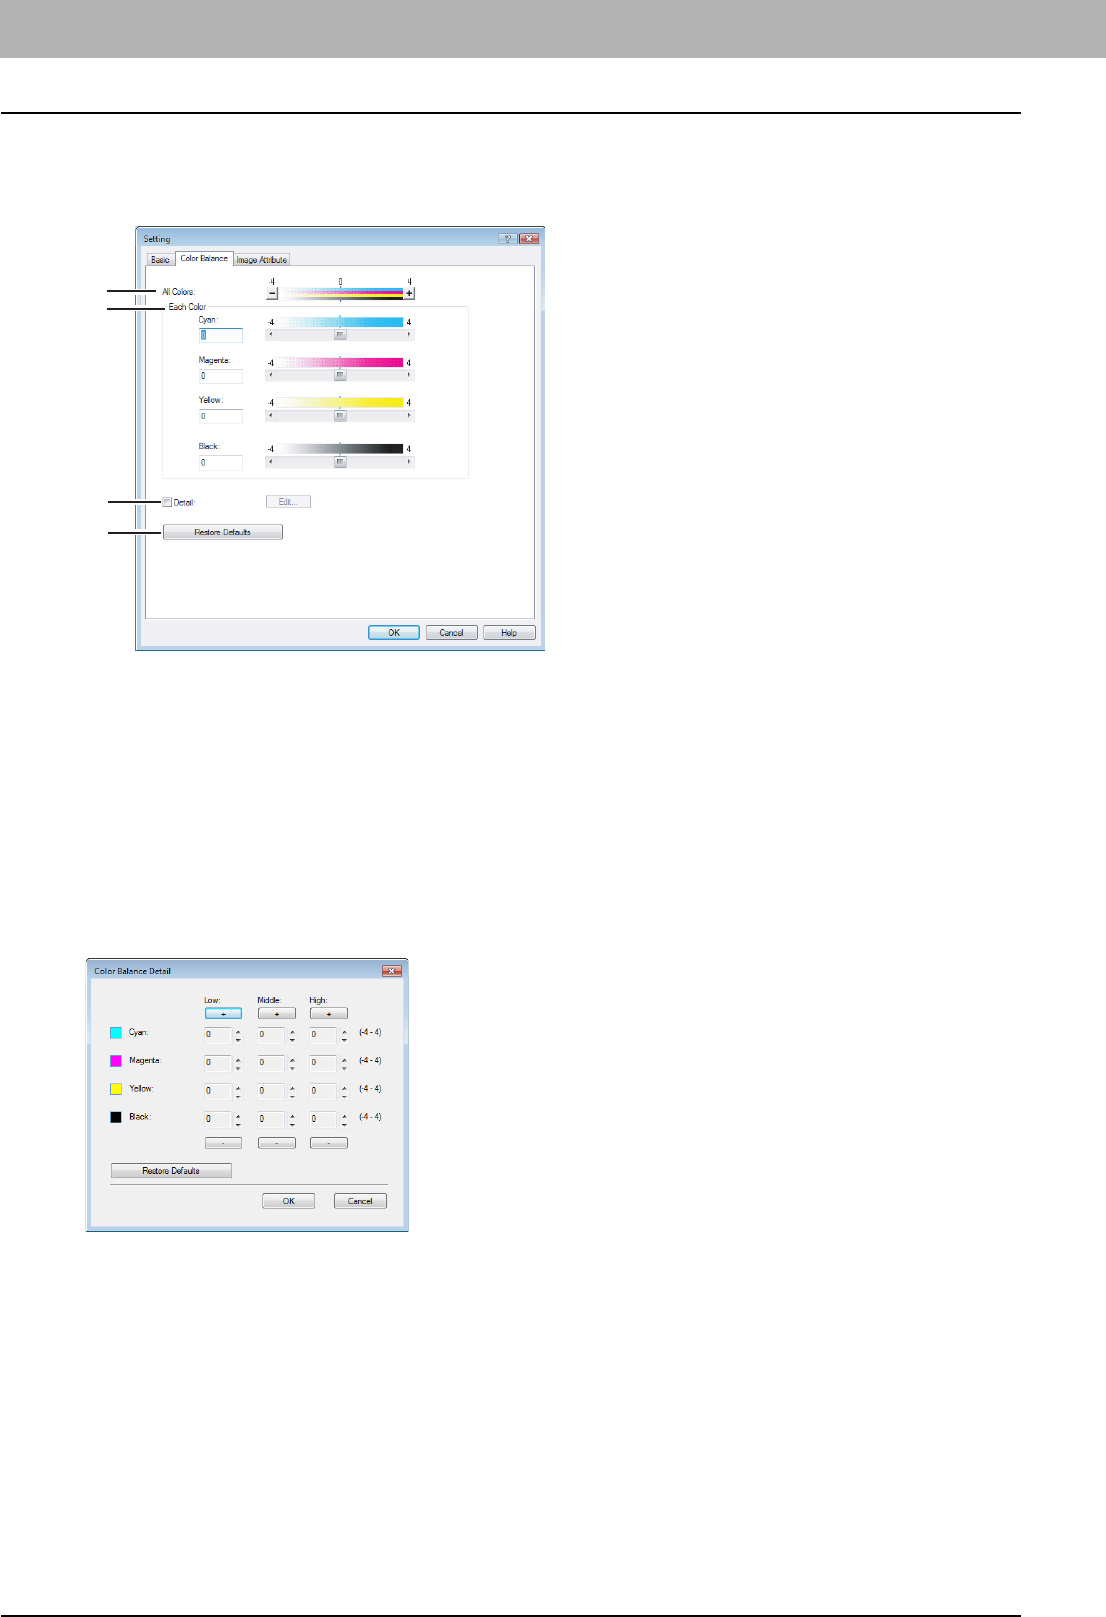
2 PRINTING FROM WINDOWS
42 Setting Up Print Options
Setting: Color Balance Tab
In the Color Balance tab of the Setting dialog box, you can specify the following functions. Adjust the density level by
moving the scroll bar, or pressing buttons on the right and left of the scroll bar.
1) All Colors
Adjust the density of the all colors.
2) Each Color
Adjust the density of each color separately.
3) Detail
Check this to adjust the density of each color separately in details. When you check this, click [Edit] to display the
Color Balance Details dialog box and specify the density of each color.
— Color Balance Details
In the Color Balance Details dialog box, you can specify the density of low, medium, and high colors for each color.
- Low — Change this density to adjust the density of light color.
- Middle — Change this density to adjust the density of half color.
- High — Change this density to adjust the density of deep color.
4) [Restore Defaults]
Click this to restore all the image quality setting details displayed in the Color Balance tab menu to the original factory
defaults.
1
2
3
4
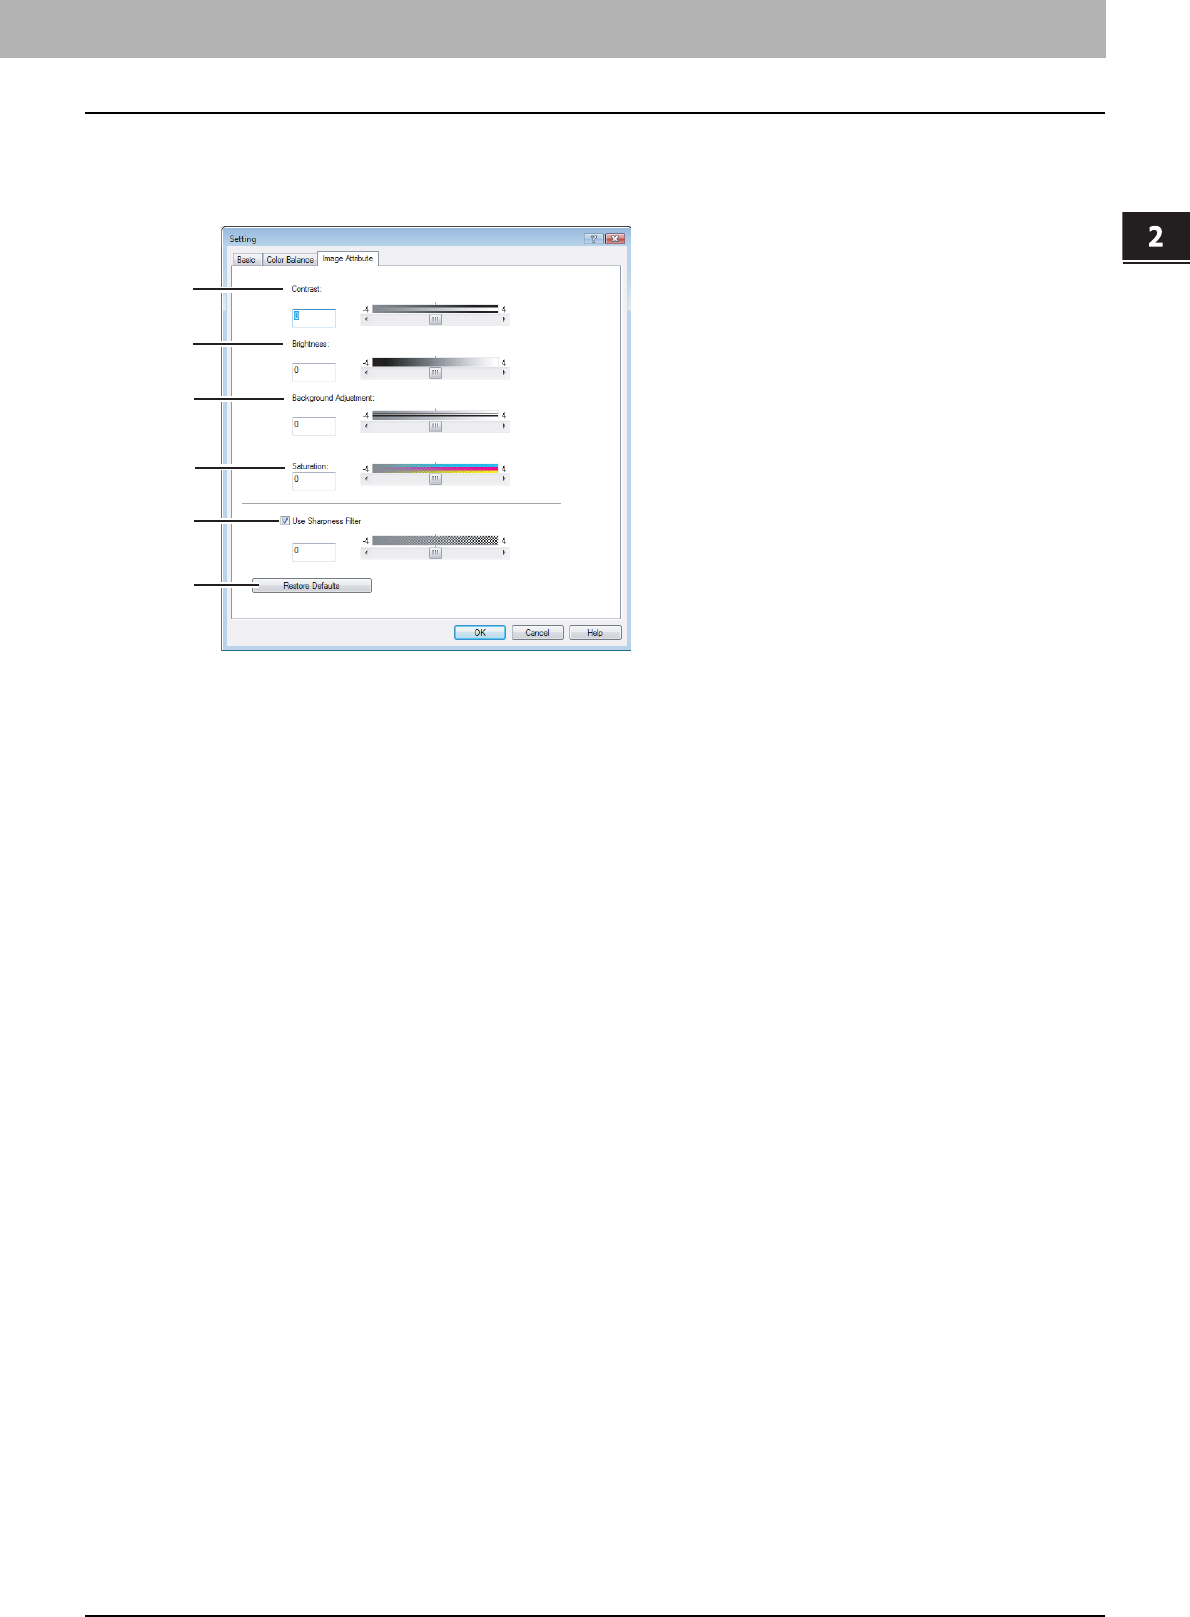
2.PRINTING FROM WINDOWS
Setting Up Print Options 43
2 PRINTING FROM WINDOWS
Setting: Image Attribute Tab
In the Image Attribute tab of the Setting dialog box, you can specify the following functions. Adjust the density level by
moving the scroll bar, or pressing buttons on the right and left of the scroll bar.
1) Contrast
Adjust the contrast for printing. You can set from -4 (lowest) to 4 (highest) in units of 1 by moving the scroll bar.
2) Brightness
Adjust the brightness for printing. You can set from -4 (darkest) to 4 (lightest) in units of 1 by moving the scroll bar.
3) Background Adjustment
Adjust the background adjustment for printing. You can set from -4 (lightest) to 4 (darkest) in units of 1 by moving the
scroll bar.
4) Saturation
Adjust the saturation for printing. You can set from -4 (low clear) to 4 (high clear) in units of 1 by moving the scroll bar.
5) Use Sharpness Filter
Check this box when you use a sharpness filter. You can set from -4 (softest) to 4 (sharpest) in units of 1 by moving the
scroll bar..
6) [Restore Defaults]
Click this to restore all the image quality setting details displayed in the Image Attribute tab menu to the original factory
defaults.
1
2
3
4
5
6
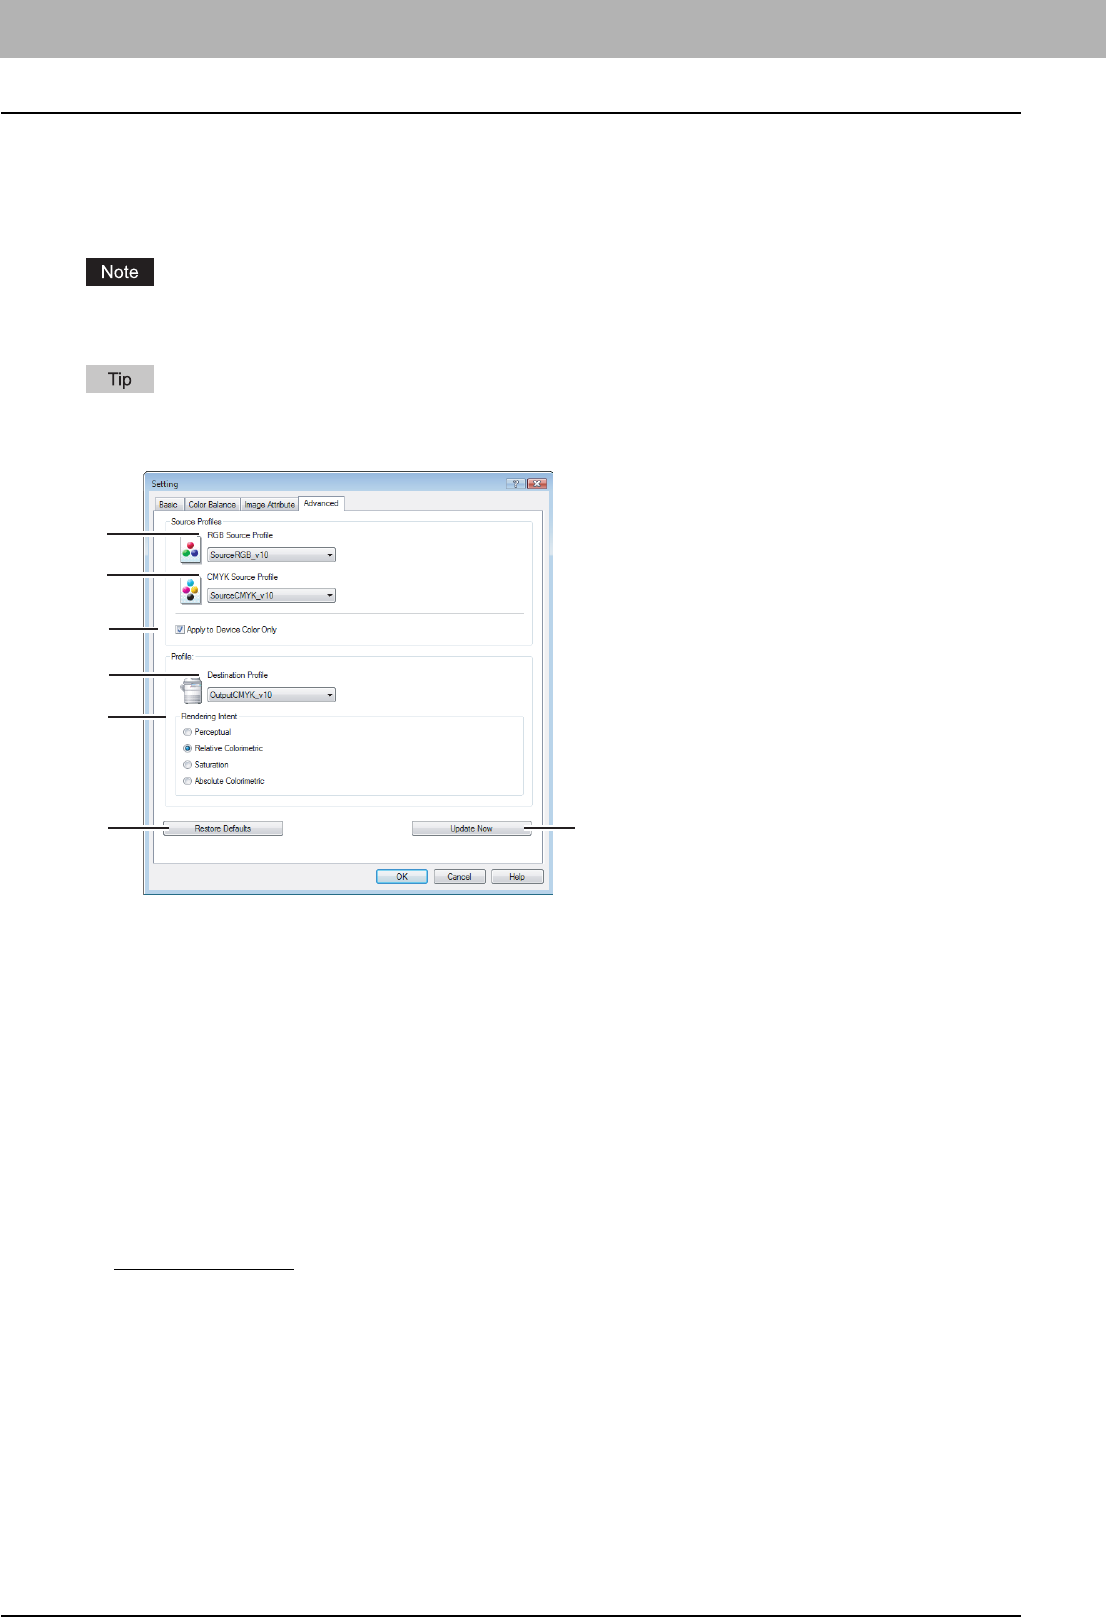
2 PRINTING FROM WINDOWS
44 Setting Up Print Options
Setting: Advanced Tab
In the Advanced dialog box of the [Advanced] tab menu, you can set the functions below.
The color profile data of this equipment may be updated. If the SNMP communication between this equipment and your
computer is available, open the [Advanced] tab menu and then click [Update Now] to obtain the updated color profile data.
The [Advanced] tab menu is displayed when [Advanced] is selected in [Image Quality]. The [Advanced] option is
available only for the PS3/XPS Printer driver.
Color profiles can also be set from the TopAccess menus. For the detailed instructions on how to set color profiles from
the TopAccess menu, refer to the TopAccess Guide.
1) RGB Source Profile
This selects RGB source profile. When you obtained color profile data from this equipment, the RGB source profile
data of this equipment appear.
2) CMYK Source Profile
This selects CMYK source profile. When you obtained color profile data from this equipment, the CMYK source profile
data of this equipment appear.
3) Apply to Device Color Only
Check this box when you give priority to color profiles embedded in the image.
4) Destination Profile
This selects destination profile. When you obtained color profile data from this equipment, the destination profile data
of this equipment appear.
5) Rendering Intent
This selects a method for color space conversion when you print images..
-Perceptual — This is recommended for photo images.
-Relative Colorimetric — More original colors can be retained than those when you select [Perceptual].
-Saturation — This is recommended when the vividness of colors is more important than their correct reproduction.
It is useful for graphic charts.
-Absolute Colorimetric — Original colors can be retained even on colored paper.
6) [Restore Defaults]
Click this to restore all the image quality setting details displayed in the Advanced tab menu to the original factory
defaults.
7) [Update Now]
Click this to obtain the latest color profile data set for this equipment and update the existing color profile data. This is
enabled only when SNMP communication with this equipment is enabled.
1
2
3
4
5
67
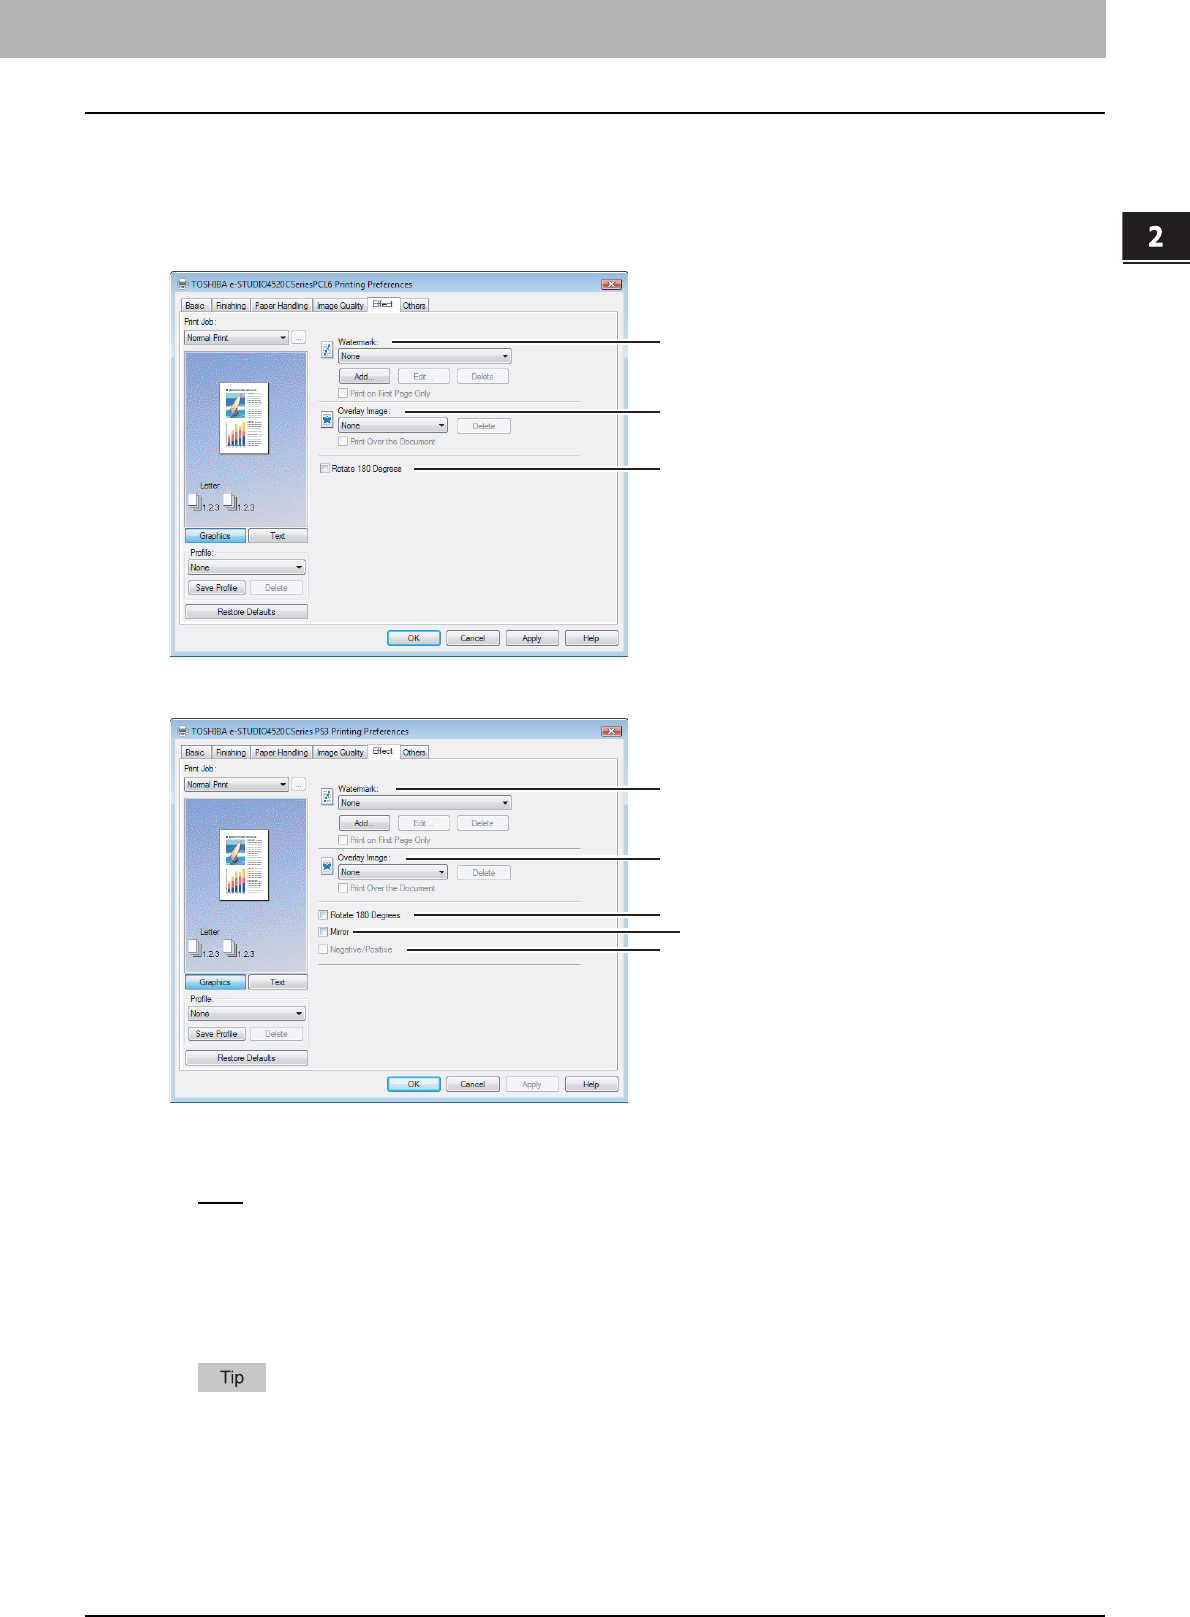
2.PRINTING FROM WINDOWS
Setting Up Print Options 45
2 PRINTING FROM WINDOWS
Effect Tab
The Effect Tab contains print options that add effects to your print jobs such as Watermarks, Overlay Image printing,
Rotate printing, Mirror printing, and Negative printing.
Effect Tab for PCL6
Effect Tab for PS3/XPS
1) Watermark
This selects the watermark to be used or edited. The following values except [None] are the default watermarks that
have been registered in the printer driver. Up to 15 new watermarks can be added in this box.
-None — Select this if no watermark is desired.
The following default watermarks are also displayed in the box:
- TOP SECRET
- CONFIDENTIAL
-DRAFT
- ORIGINAL
-COPY
For the detailed instructions on how to print with the [Watermark] setting, see the following page:
P.76 “Printing with Watermarks”
1
3
2
1
3
5
4
2
2 PRINTING FROM WINDOWS
46 Setting Up Print Options
[Add]
Click this to create a new watermark. The Watermark dialog box appears by clicking on this.
P.48 “Add/Edit Watermark”
[Edit]
Select a watermark from the [Watermark] box and click it to edit the watermark. The Watermark dialog box appears by
clicking on this.
P.48 “Add/Edit Watermark”
[Delete]
Select a watermark from the [Watermark] box and click it to delete a watermark.
P.78 “Deleting a watermark”
yThe default watermarks can be deleted but, once deleted, they cannot be restored.
y[None] cannot be deleted.
Print on First Page Only
Check this to print a watermark on the first page only. This setting will become available when any watermark is
selected from the [Watermark] box.
2) Overlay Image
This selects an overlay image to be used. This feature allows you to print an image on the background of a print job,
although the watermark allows only text.
yWhen [Overlay Image] is selected together with the N in 1 function, 1 overlay image will be printed on the entire
page, regardless of the number of images set in 1 page.
yBoth the overlay file and the documents on which you superimpose the overlay image must be created at the
same size, color mode and orientation.
yWhen printing with Overlay Image using the PS3 printer driver from an application that can create the PS
command directly, the overlay image will not be printed. In that case, disable the [Use PostScript Passthrough]
option in the PostScript Settings dialog box.
P.53 “PostScript Settings”
yIf you want to use an overlay image in your job, you must first create an overlay file. To create an overlay
image, create an overlay image with most applications and print it as an overlay file. You can enable creating
an overlay file on the [Print Job] box.
P.62 “Printing a document as an overlay file”
yFor the detailed instructions on how to print with the [Overlay Image] setting, see the following page:
P.78 “Printing with an Overlay File”
[Delete]
Click this to delete the overlay image that you select in the box.
P.79 “Deleting an overlay image”
Print Over the Document
Check this to print overlay image over the document.
3) Rotate 180 degrees
Check on this to perform rotation printing of an image.

2.PRINTING FROM WINDOWS
Setting Up Print Options 47
2 PRINTING FROM WINDOWS
4) Mirror
Check on this to perform mirror printing of an image.
yThis print option is not displayed for the PCL6 printer driver.
yMirror printing may not be applied when the application gives priority to the application’s PostScript settings
over the printer driver settings.
yWhen printing from Adobe Acrobat or similar applications, mirror printing does not work if the [Use PostScript
Passthrough] option is enabled in the PostScript settings. To use mirror printing, please disable the [Use
PostScript Passthrough] option in the PostScript Settings dialog box.
P.53 “PostScript Settings”
5) Negative/Positive
Check on this to perform negative printing of an image.
yThis print option is not displayed for the PCL6 printer driver.
yThe Negative/Positive option is available only when [Black and White] is selected at the [Color] box on the
Basic tab.
yNegative printing may not be applied when the application gives priority to the application’s PostScript settings
over the printer driver settings.
yWhen printing from Adobe Acrobat or similar applications, Negative/Positive printing does not work if the [Use
PostScript Passthrough] option is enabled in the PostScript settings. To use Negative/Positive printing, please
disable the [Use PostScript Passthrough] option in the PostScript Settings dialog box.
P.53 “PostScript Settings”

2 PRINTING FROM WINDOWS
48 Setting Up Print Options
Add/Edit Watermark
When you click [Add] or [Edit], the Watermark dialog box appears and you can create new watermark or edit selected
watermarks.
1) X Position
The horizontal position of a watermark is displayed. You can change the position using the horizontal scroll bar.
2) Y Position
The vertical position of a watermark is displayed. You can change the position using the vertical scroll bar.
3) Units
Select the unit for the [X Position] and [Y Position] box.
4) [Center Watermark]
Click this to automatically move the watermark position to the center.
5) Caption
Enter the text of a watermark. You can enter up to 63 alphanumeric characters. When you are editing a watermark, the
selected watermark text is displayed in the box.
6) Font Name
Select the font to be used for the watermark text.
7) Style
Select the font style for the watermark text.
-Regular — Select this to set the regular style to the text.
-Bold — Select this to set the bold style to the text.
-Italic — Select this to set the italic style to the text.
-Bold Italic — Select this to set the bold and italic style to the text.
8) Font Size
Enter the font size for the watermark text. The font size can be set from 6 to 300 pt in units of 1 pt.
9) Color
Select the color of the watermark text. If the color that you require is not listed in the box, click [Browse] to add new
color.
When [Black and White] is selected at the [Color] box on the Basic tab, this option will be disabled.
10) Angle
Enter the degree of angle for rotating the watermark text. The angle can be set from -90 to 90 degrees in units of 1
degree. You can also set the degree of angle by moving the scroll bar.
11) Solid
Select this to print solid type of watermark.
12) Draw as Outline
Select this to print outline type of watermark.
13) Transparency
Select this to print a transparent watermark. When you select this, set the brightness from 0 (darker) to 100% (lighter)
in units of 1%. You can also set the brightness using the scroll bar.
13
12
11
1
2
3
4
5
6
7
8
9
10
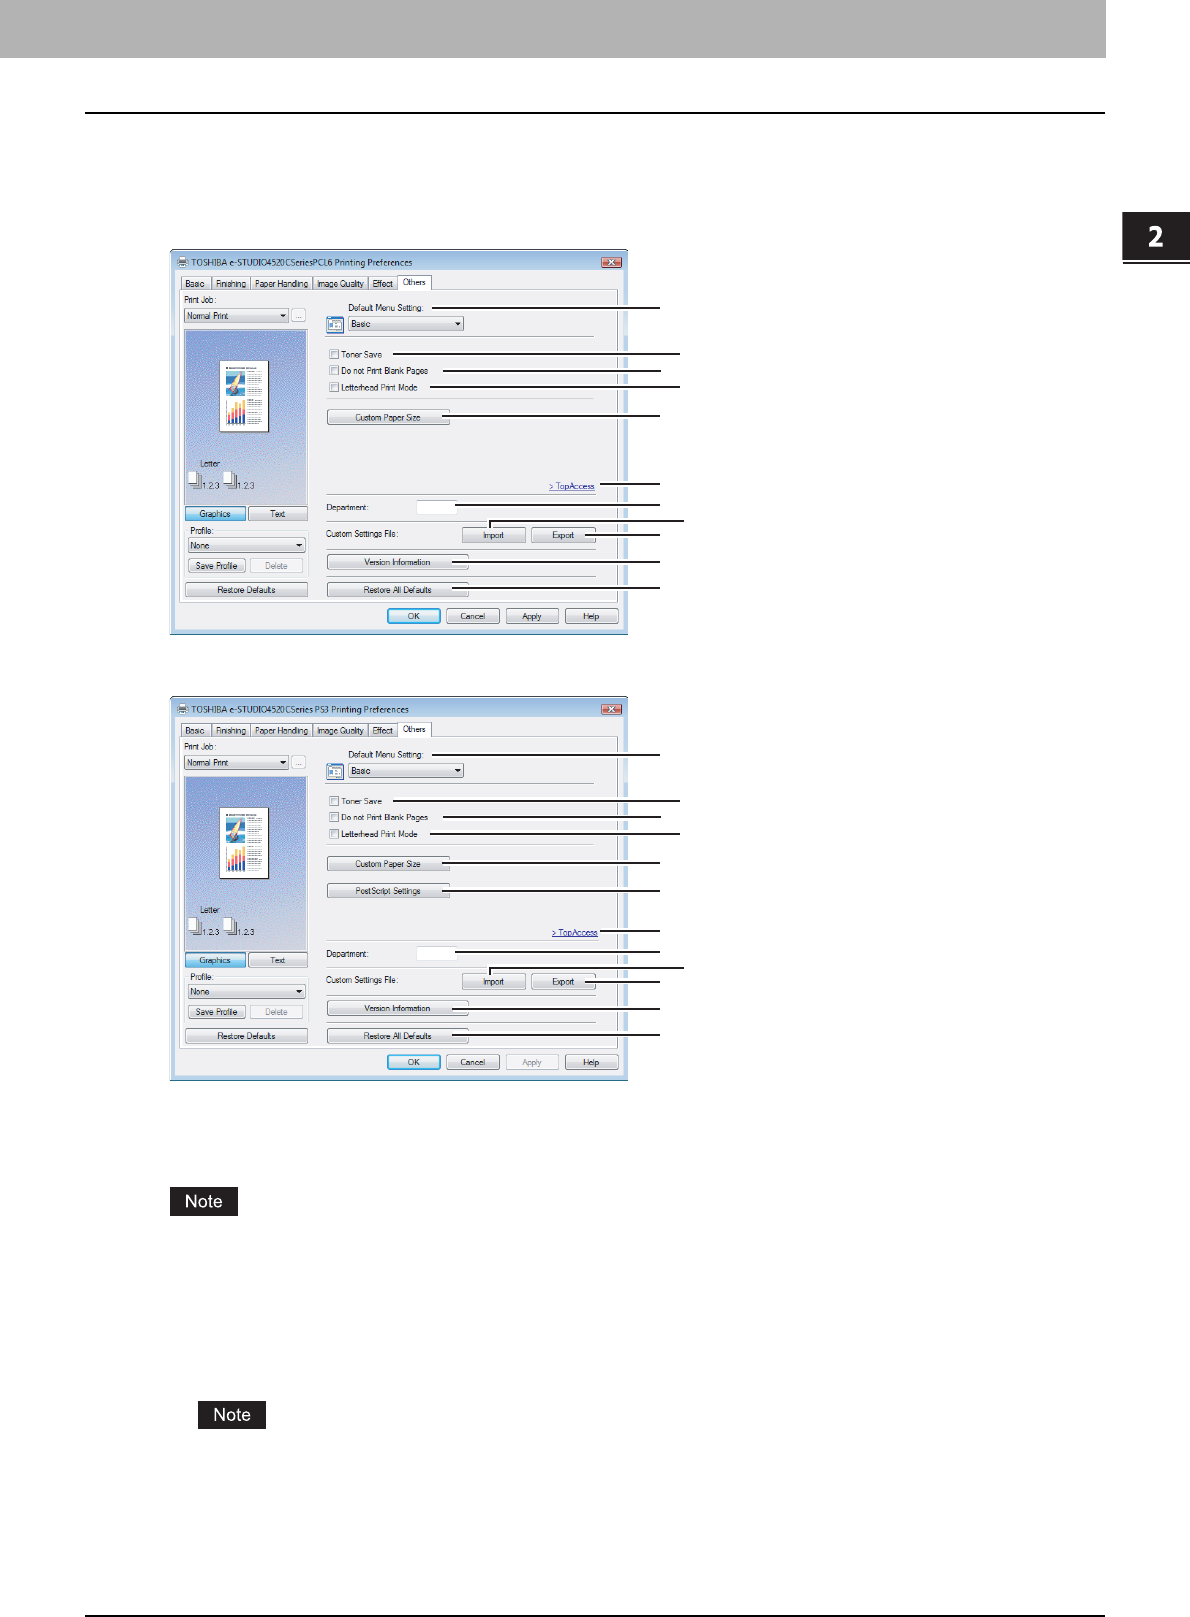
2.PRINTING FROM WINDOWS
Setting Up Print Options 49
2 PRINTING FROM WINDOWS
Others Tab
The Others tab contains print options such as toner saving, custom paper size and so on.
Others Tab for PCL6/XPS
Others Tab for PS3
1) Default Menu Setting
Select the default tab that is displayed when opening the properties of printer driver. Set functions frequently used as
a default menu setting for your convenience.
If you made settings on the [Others] tab menu from the print setting page of an application, the settings are temporary.
If you want to validate the settings every time you open the printer driver menus, set the printer driver from the
[Printers] folder.
P.18 “Setting Initial Values of Print Options”
2) Toner Save
Check this to print in toner save mode.
When the toner save mode is enabled, printing may become lighter.
1
3
11
12
4
5
7
8
9
10
2
1
3
11
12
4
5
6
7
8
9
10
2
2 PRINTING FROM WINDOWS
50 Setting Up Print Options
3) Do not Print Blank Pages
Check this to ignore blank pages for printing.
If Watermark feature is enabled all pages will be printed even when the content is blank.
The pages having a header or footer will be printed even if the content is blank.
4) Letterhead Print Mode
Check this to perform duplex printing on paper whose sides need to be distinguished, such as paper with illustrations
on one side.
5) [Custom Paper Size]
Click this to specify the custom paper size. The Custom Paper Size dialog box appears by clicking this.
P.52 “Custom Paper Size”
To set a custom paper size, you must log in as a user with an administrator privilege or with a power user privilege.
(In case of Windows 2000).Then access the printer driver properties from the Printers folder (or the Printers and
Faxes folder in case of Windows XP/Server 2003). When you access the printer driver properties from an
application’s Print dialog box, you cannot add or reduce the custom paper size.
6) [PostScript Settings]
Click this to specify the PostScript specific functions. The PostScript Settings dialog box appears by clicking this.
P.53 “PostScript Settings”
This print option is available only for the PS3 printer driver.
7) [TopAccess Link]
Click this to start a web browser and display the TopAccess menu.
8) Department
Enter the user’s department code if the system is managed with department codes. Please ask your administrator for
your department code.
yWhen the User Management Setting is enabled on the equipment, the User Management Setting is used to
manage the print jobs instead of the department code. In that case, the user name that is entered to log in to
your computer is used for the authentication of the print job. Therefore, you do not need to enter the department
code in the printer driver but your user name must be registered in the equipment. If the user name is not
registered, your print job is processed as the invalid job according to the Department Code Enforcement
settings.
yIf the No Limit Black function is enabled, you do not have to specify the department code when you print a
document with selecting [Black and White] in the [Color] option in the Basic tab of printer driver.
yIf the number of the printed sheets for a print job exceeds the output limitation for the entered department code,
the print job is stored in the invalid department code print job list without printing. When you want to print the
print job, perform printing from the [JOB STATUS] in the Control Panel by entering another department code for
which the output limitation is more than the number of printed sheets.
How the equipment performs printing for an invalid department code print job, which an invalid department code is
specified, varies depending on the Department Code Enforcement setting that can be set from TopAccess
Administrator mode and whether SNMP Communication is enabled or not. When SNMP Communication is
enabled and Department Code Enforcement is set to [ON], an error message will be displayed when entering an
invalid department code. When SNMP Communication is disabled and Department Code Enforcement is set to
[ON], the invalid department code print job will be stored in the invalid department code print job list without
printing. When the Department Code Enforcement is [Print], the invalid department code print job will be printed.
When the Department Code Enforcement is [Delete], the invalid department code print job will be deleted without
printing.
2.PRINTING FROM WINDOWS
Setting Up Print Options 51
2 PRINTING FROM WINDOWS
9) [Import]
Click this to import custom settings (e.g. custom paper size, image quality type, watermark, overlay, profiles) to the
printer driver.
How to import custom settings
- Click [Import]. A dialog box to select a file appears. Then select a file (*cfx) to be imported.
- Click [OK]. A dialog box to confirm if you overwrite the file appears. Then click [OK].
yTo start importing, select a printer driver for this equipment in the [Printers] folder. Then select as follows: [File]
menu -> [Run as administrator] -> [Properties]. Enter administrator password if required.
- If the [File] menu is not displayed, press the [Alt] button.
- Click [Continue] in the User account control dialog box.
yYou need to log in Windows with the “Power Users” privilege (only for Windows 2000) or “Administrator”
privilege (for Windows 2000/XP/Server 2003) to open the properties page of the printer driver.
10) [Export]
Click this to export custom settings (e.g. custom paper size, image quality type, watermark, overlay, profiles) from the
printer driver.
How to export custom settings
- Click [Export].
- The Save as dialog box appears. Specify a file name and a directory. Then click [OK].
yTo start exporting, select a printer driver for this equipment in the [Printers] folder. Then select as follows: [File]
menu -> [Run as administrator] -> [Properties]. Enter administrator password if required.
- If the [File] menu is not displayed, press the [Alt] button.
- Click [Continue] in the User account control dialog box.
yYou need to log in Windows with the “Power Users” privilege (only for Windows 2000) or “Administrator”
privilege (for Windows 2000/XP/Server 2003) to open the properties page of the printer driver.
11) [Version Information]
Click this to display the Version Information dialog box.
12) [Restore All Defaults]
Click this to return settings in all the tab menus other than the [Font] and [Configuration] tab menus to the default ones.
A confirmation dialog box appears as you click this, and if you click [OK], print settings in all the tab menus will return
to the default ones.
If you want to change the settings in the [Font] and [Configuration] tab menus, you need to access with the
administrator privilege from the Printers folder. For the details, see the following page:
P.54 “Fonts Tab”
P.56 “Configuration Tab”
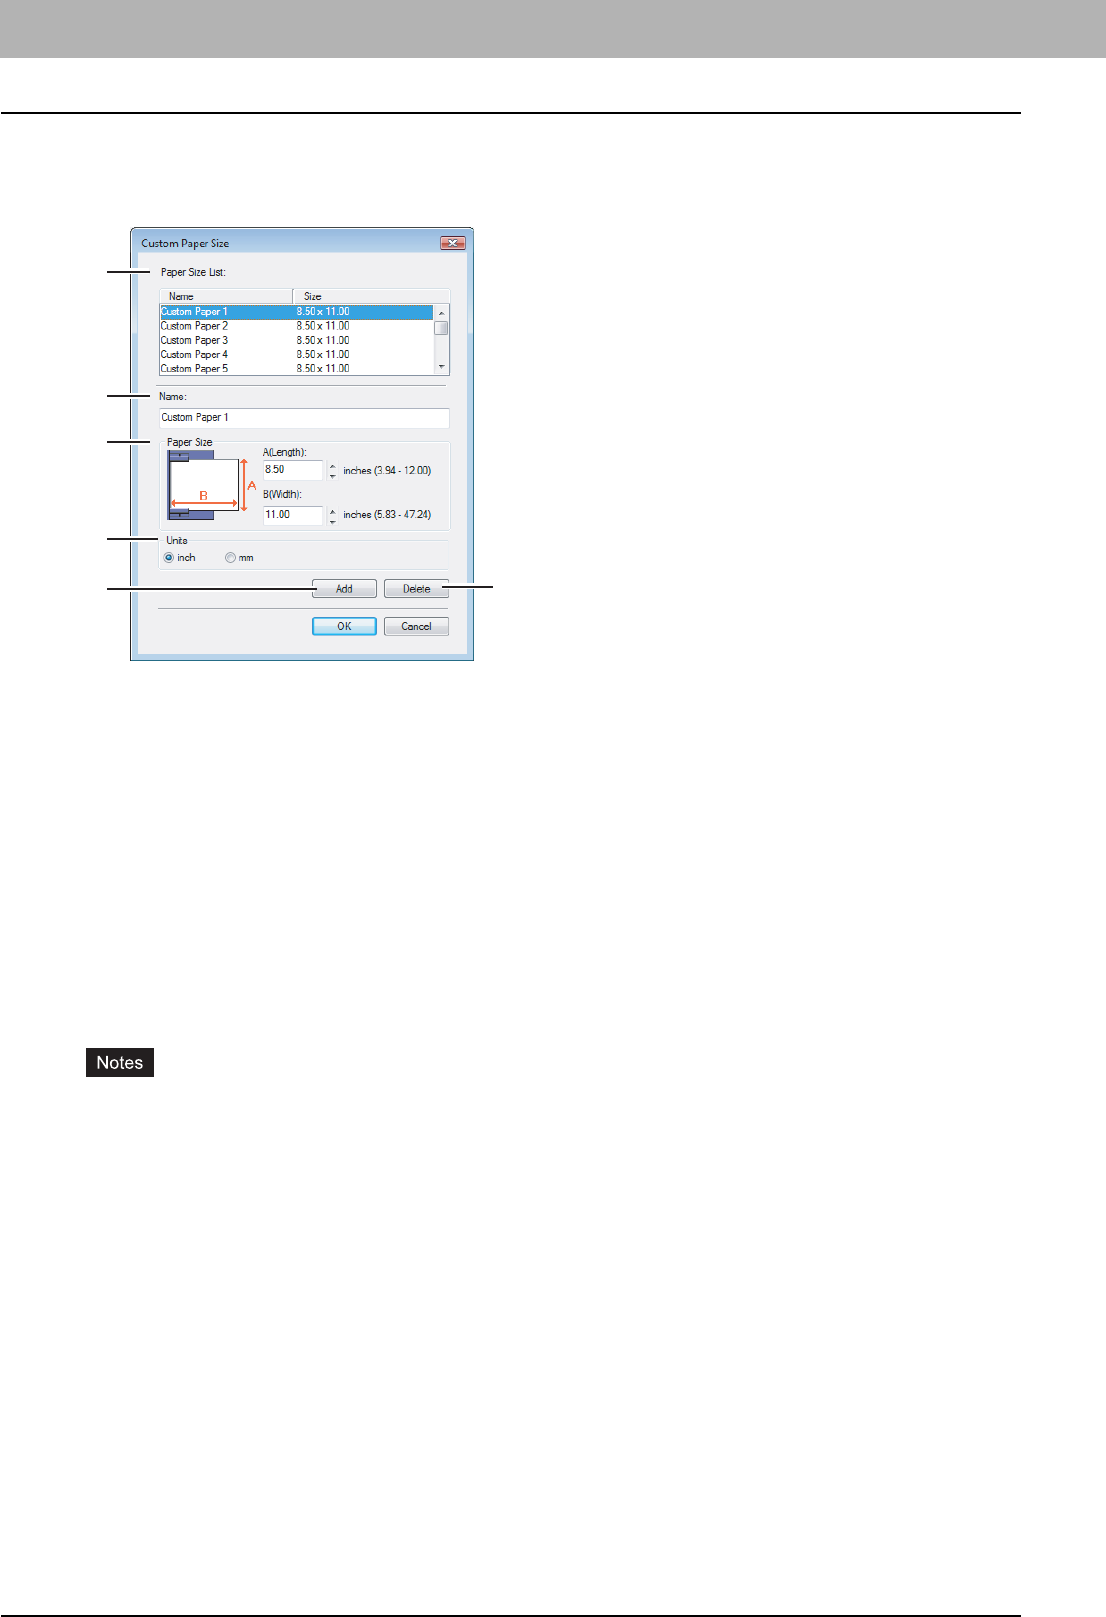
2 PRINTING FROM WINDOWS
52 Setting Up Print Options
Custom Paper Size
In the Custom Paper Size dialog box, up to 20 custom paper sizes can be defined. The custom page size that you specify
can be selected in the [Original Paper Size] and [Print Paper Size] box on the Basic tab.
1) Paper Size List
Select the custom paper size that you want to modify.
2) Name
Enter the custom paper size name. You can enter up to 63 characters. This name will be displayed in the [Original
Paper Size] and [Print Paper Size] box on the Basic tab.
3) Paper Size
Enter A (Length) and B (Width) to specify the paper size.
4) Units
Select the unit for the paper size. The default unit varies depending on the regional setting in the Windows.
5) [Add]
Click this to save the settings over the selected custom paper size that you selected in the [Paper Size List].
6) [Delete]
Click this to clear and restore the default settings of the selected custom paper size that you selected in the [Paper
Size List]. When you click this, the confirmation dialog box appears. Click [Yes] to delete the setting.
yTo register a custom paper size, either A (Length) or B (Width) should be different more than 0.1inch (2mm) from
the standard paper size. If not, the created custom paper size is considered as the standard paper size.
yYou cannot create a custom paper size with A (Length) longer than B (Width). If you want to print such a
document, print the document by selecting [landscape] for the [Orientation].
yThere are some precautions when you use paper larger than standard sizes. For the details, see the following
page:
P.82 “Printing on paper larger than standard sizes”
1
2
3
4
56

2.PRINTING FROM WINDOWS
Setting Up Print Options 53
2 PRINTING FROM WINDOWS
PostScript Settings
1) Output Format
This selects the output format for printing.
-ASCII — The job is sent in ASCII data format.
-Encapsulated PostScript (EPS) — The job is sent in EPS format.
-Tagged BCP — Select this to send a job in Tagged Binary format over parallel ports.
-Using Adobe DSC — Select this to send a job with DSC comments.
The EPS format is usually used for creating an image to import into another document. Therefore, only the first
page of the document will be printed when [Encapsulated PostScript (EPS)] is selected. An exit tray where paper
is output is set by the administrator. For the details, ask your administrator.
2) Print Error Information
Check on this to print a PS error information page when any errors occur for printing.
3) Compress Bitmap
Check on this to send compress bitmaps to this equipment.
4) Use PostScript Passthrough
Check this for PostScript data created by the application that creates the PostScript code for printing (such as Adobe
Acrobat, Adobe Photoshop, or Adobe Illustrator) to be passed through to this equipment.
If this option is enabled, the following print options may not work correctly when printing from the application that
creates the PostScript code for printing such as Adobe Acrobat. In that case, please disable this option for printing.
- Manual Scale
-Print Paper Size
- Paper Type
- Use Front Cover
- Use Back Cover
- Interleave Pages
- Insert Pages
- Booklet
- Multiple Pages per Sheet
- All options in the Effect tab
- All options in the Image Quality tab
1
2
3
4
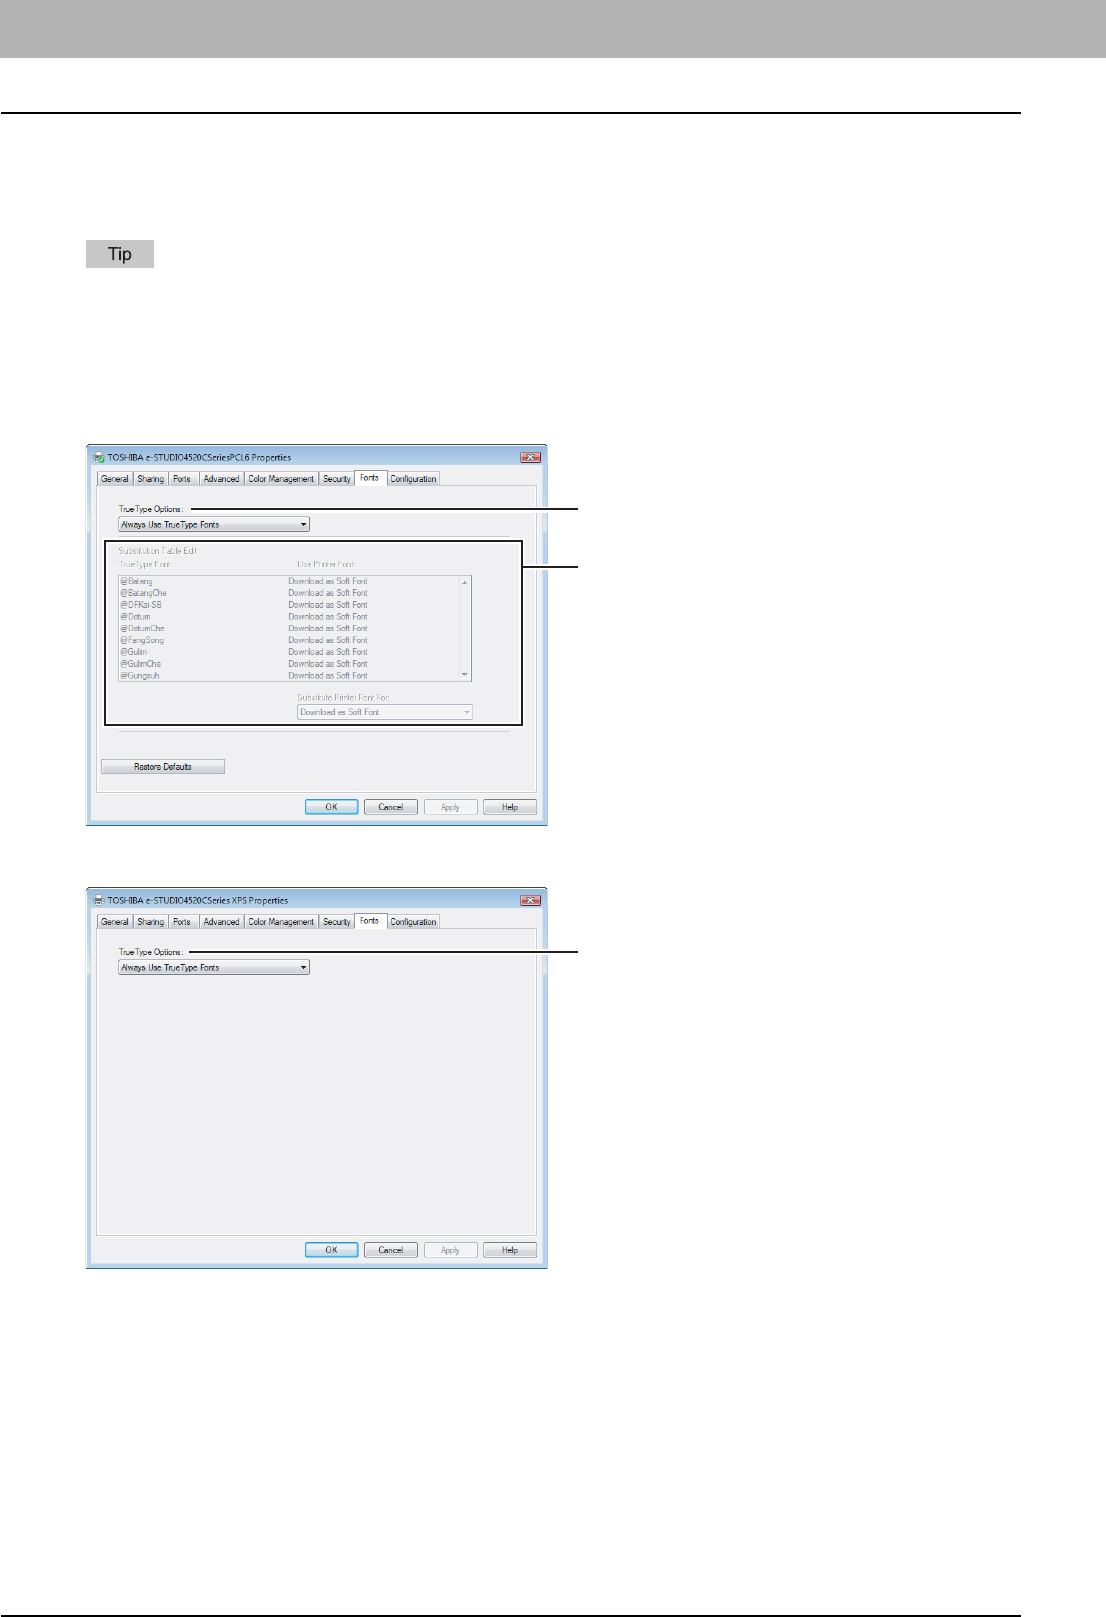
2 PRINTING FROM WINDOWS
54 Setting Up Print Options
Fonts Tab
The Fonts tab allows you to select how the TrueType fonts are printed. The Fonts tab can be displayed only from the
Printers folder (and not displayed when displaying the properties from the application’s Print dialog box).
To perform settings on the [Font] tab menu, you need to select the printer driver of this equipment on the Printers
folder, and then select as follows: [File] menu -> [Run as administrator] -> [Properties]
Enter the administrator password if required.
- If the [File] menu is not displayed, press [Alt].
- If the User account control dialog box is displayed, click [Continue] in this dialog box.
Font Tab for PCL6/PS3
Font Tab for XPS
1
2
1

2.PRINTING FROM WINDOWS
Setting Up Print Options 55
2 PRINTING FROM WINDOWS
1) TrueType Options
This sets how to print TrueType fonts.
-Always Use TrueType Fonts — Select this to print the document the same as the print image shown on the
screen. All TrueType fonts are extracted on the system for printing.
-Always Use Printer Fonts — Select this to substitute the TrueType fonts with the internal fonts for printing. The
print result may differ from the print image on the screen.
-Use Font Substitution Table — Select this to substitute the TrueType fonts using the internal fonts according to
the settings of the font substitution table. You can edit the font substitution table that is displayed at the
Substitution Table Edit table.
-Download as Bitmap — Select this to print the document as same as the image shown on the screen.
yThe default value will be [Always Use TrueType Fonts] for the PCL6 printer driver.
yThe default value will be [Use Font Substitution Table] for the PS3 printer driver.
yWhen you are using XPS printer driver, only [Always User TrueType Fonts] appears.
2) Substitution Table Edit
This table shows how each TrueType font is substituted. You can edit the substitution setting for each TrueType font.
In this table, the TrueType font names are displayed in the TrueType Font column, and how the TrueType font is
printed is shown in the Use Printer Font column.
To edit the substitution table, select the TrueType font that you want to edit from the table, and select how the TrueType
font is to be printed at the [Substitution Printer Font For] box.
At the [Substitution Printer Font For] box, you can select [Download as Soft Font] to send the TrueType fonts in Type
42 format, or other available printer fonts to be substituted. The printer fonts displayed in the box differ depending on
the TrueType fonts.
The [Substitution Table Edit] is not displayed for the XPS printer driver.
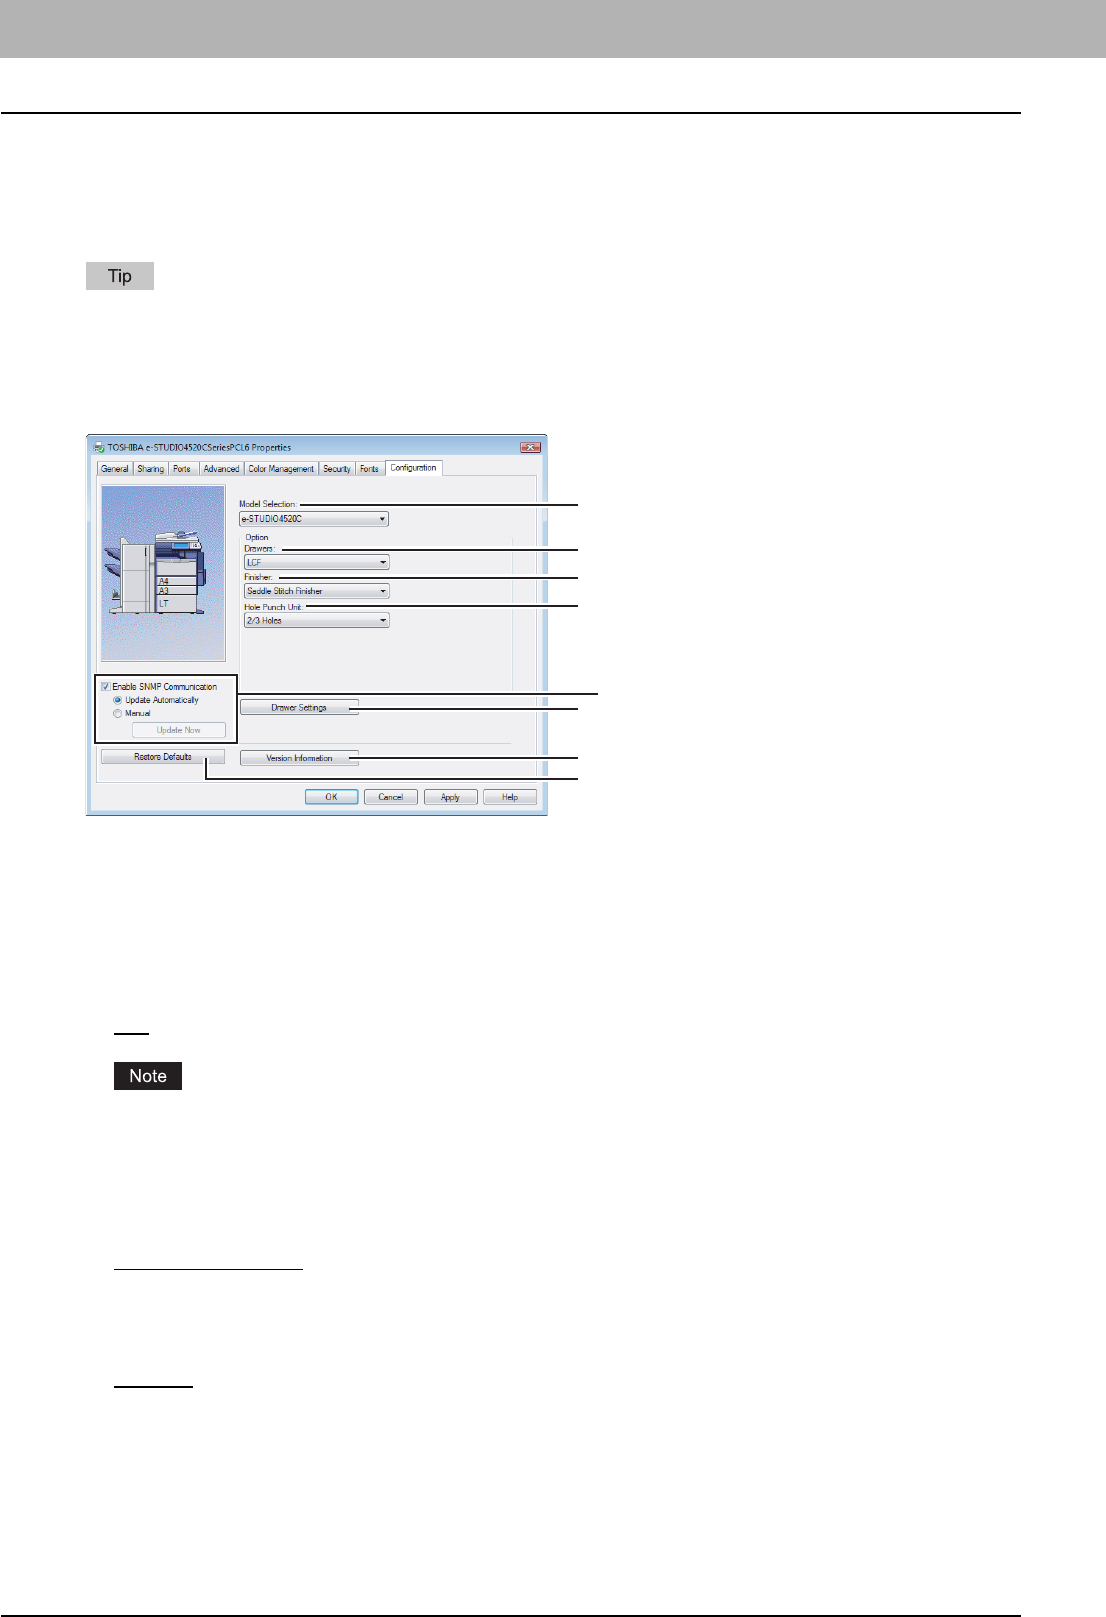
2 PRINTING FROM WINDOWS
56 Setting Up Print Options
Configuration Tab
The Configuration Tab allows you to configure options. When any optional unit is installed in this equipment, set the
configuration of the machine on this tab. The Configuration tab can be displayed only from the Printers folder (and not
displayed when displaying the properties from the application’s Print dialog box).
To perform settings on the [Configuration] tab menu, you need to select the printer driver of this equipment on the
Printers folder, and then select as follows: [File] menu -> [Run as administrator] -> [Properties]
Enter the administrator password if required.
- If the [File] menu is not displayed, press [Alt].
- If the User account control dialog box is displayed, click [Continue] in this dialog box.
1) Model Selection
This sets the model name of the equipment.
- e-STUDIO4520C/e-STUDIO3530C/e-STUDIO3520C/e-STUDIO2830C/e-STUDIO2820C/e-STUDIO2330C
2) Drawers
This sets whether or not the optional drawers or LCF are installed.
-None — Select this when neither drawer nor LCF is installed.
-Drawer3 — Select this when 3rd drawer is installed.
-Drawer3 & Drawer4 — Select this when the the 3rd drawer and 4th drawer are installed.
-LCF — Select this when the LCF is installed.
LCF is not available for some countries or regions.
3) Finisher
This sets whether or not the optional finisher is installed.
-None — Select this when a finisher is not installed.
-Hanging Finisher — Select this when a Hanging Finisher is installed.
-Finisher — Select this when a Finisher is installed.
-Saddle Stitch Finisher — Select this when the Saddle Stitch Finisher is installed.
4) Hole Punch Unit
This sets whether or not the optional hole punch unit is installed.
-None — Select this when a hole punch unit is not installed.
-2 Holes — Select this when a 2 hole punch unit is installed.
-2/3 Holes — Select this when a 2/3 hole punch unit is installed.
-4 Holes (F) — Select this when a 4 hole (F) punch unit is installed.
-4 Holes (S) — Select this when a 4 hole (S) punch unit is installed.
1
3
2
4
5
7
8
6
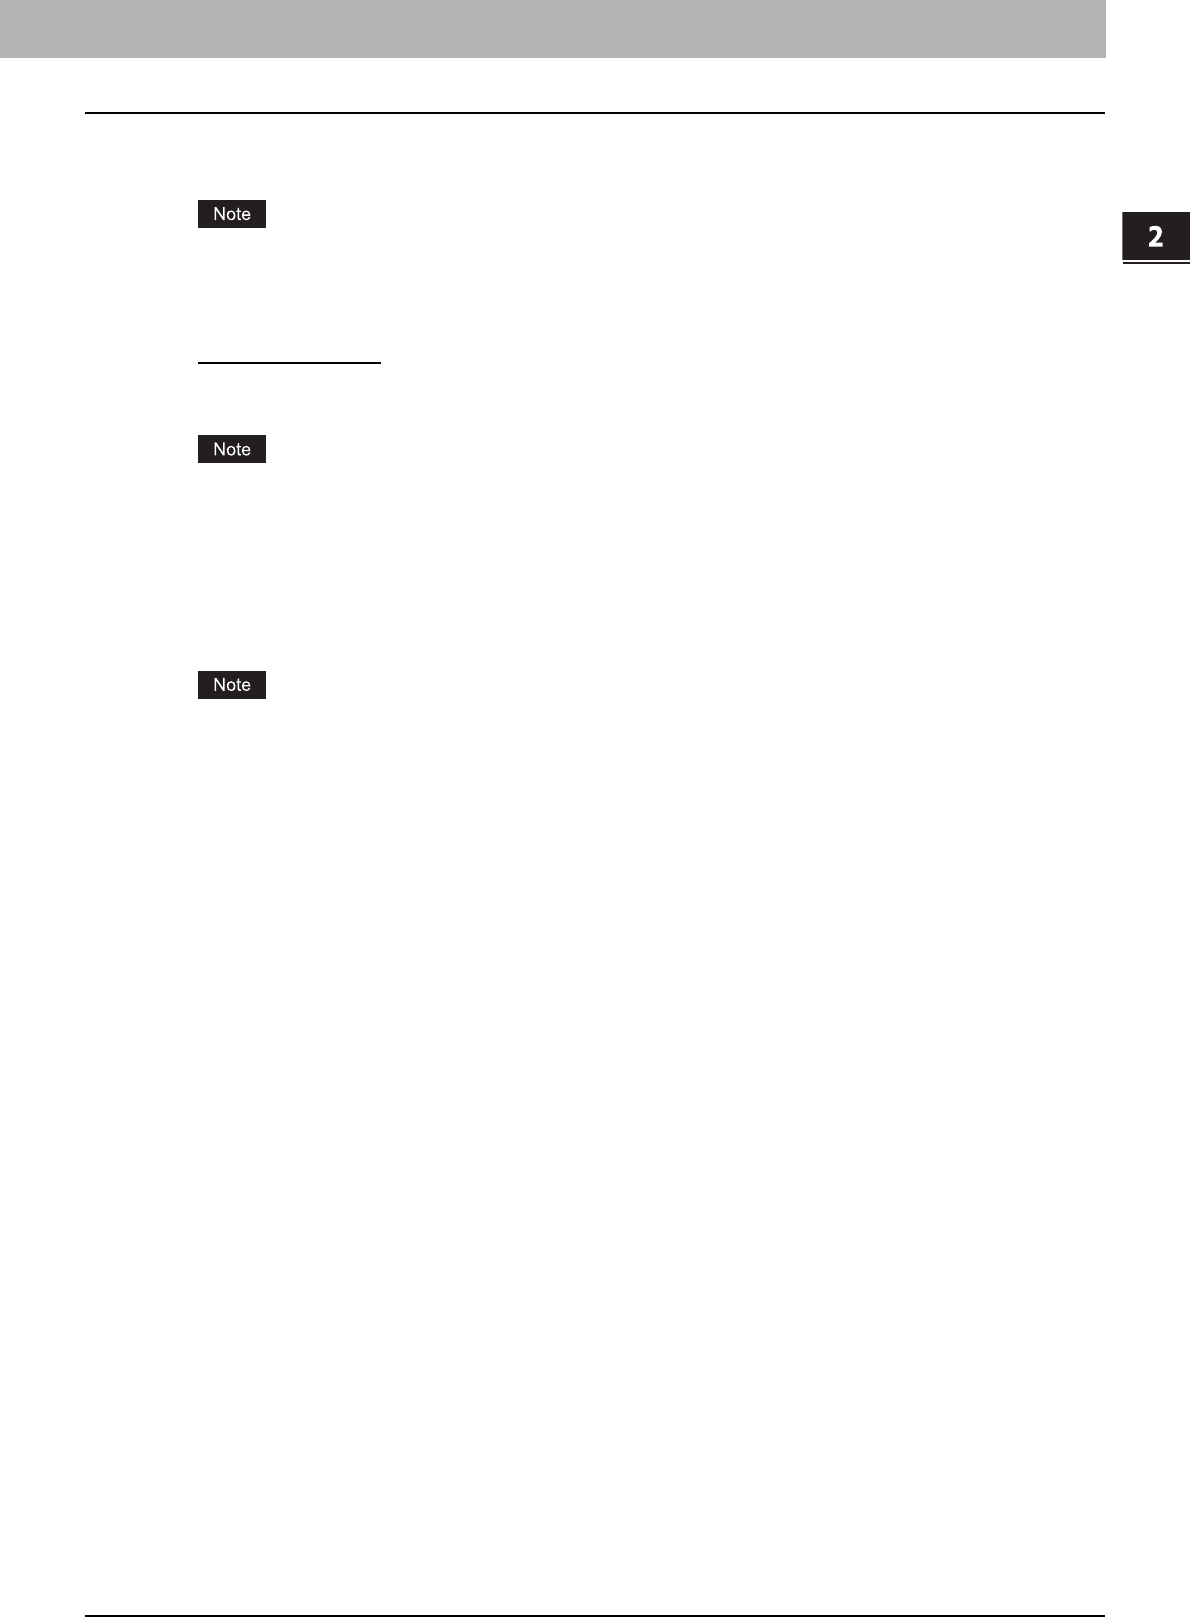
2.PRINTING FROM WINDOWS
Setting Up Print Options 57
2 PRINTING FROM WINDOWS
5) Enable SNMP Communication
Check this to enable obtaining the configuration information from this equipment.
If you disable SNMP Communication, TopAccessDocMon notification also will be disabled.
Update Automatically/Manual
Select the method to update the option configuration information of the printer driver. This is available only when
[Enable SNMP Communication] is checked.
-Update Automatically— Select this to update the option configuration information automatically every time the
[Configuration] tab menu of the printer driver is opened.
-Manual — Select this to update the option configuration information manually.
If the connection to the equipment has not been configured correctly, the message “The address of your printer
could not be located. Would you like to find it?” will be displayed when the Configuration tab is displayed. If it is
displayed, click [Yes] and search for the equipment using the Local Discovery dialog box. After searching for the
equipment, SNMP communication will be enabled.
[Update Now]
Click this to obtain the configuration information from this equipment immediately. This is available only when [Enable
SNMP Communication] is checked.
If the connection to the equipment has not been configured correctly, the message “The address of your printer
could not be located. Would you like to find it?” will be displayed when you click [Update Now]. If it is displayed,
click [Yes] and search for the equipment using the Local Discovery dialog box. After searching for the equipment,
SNMP communication will be enabled.
6) [Drawer Settings]
Click this to set the paper size and paper type of each drawer. The Drawer Settings dialog box appears by clicking
this.
P.58 “Drawer Settings”
7) [Version Information]
Click this to display the Version Information dialog box.
8) [Restore Defaults]
Click this to restore the configuration of this equipment displayed in the [Configuration] tab menu to the original factory
defaults.
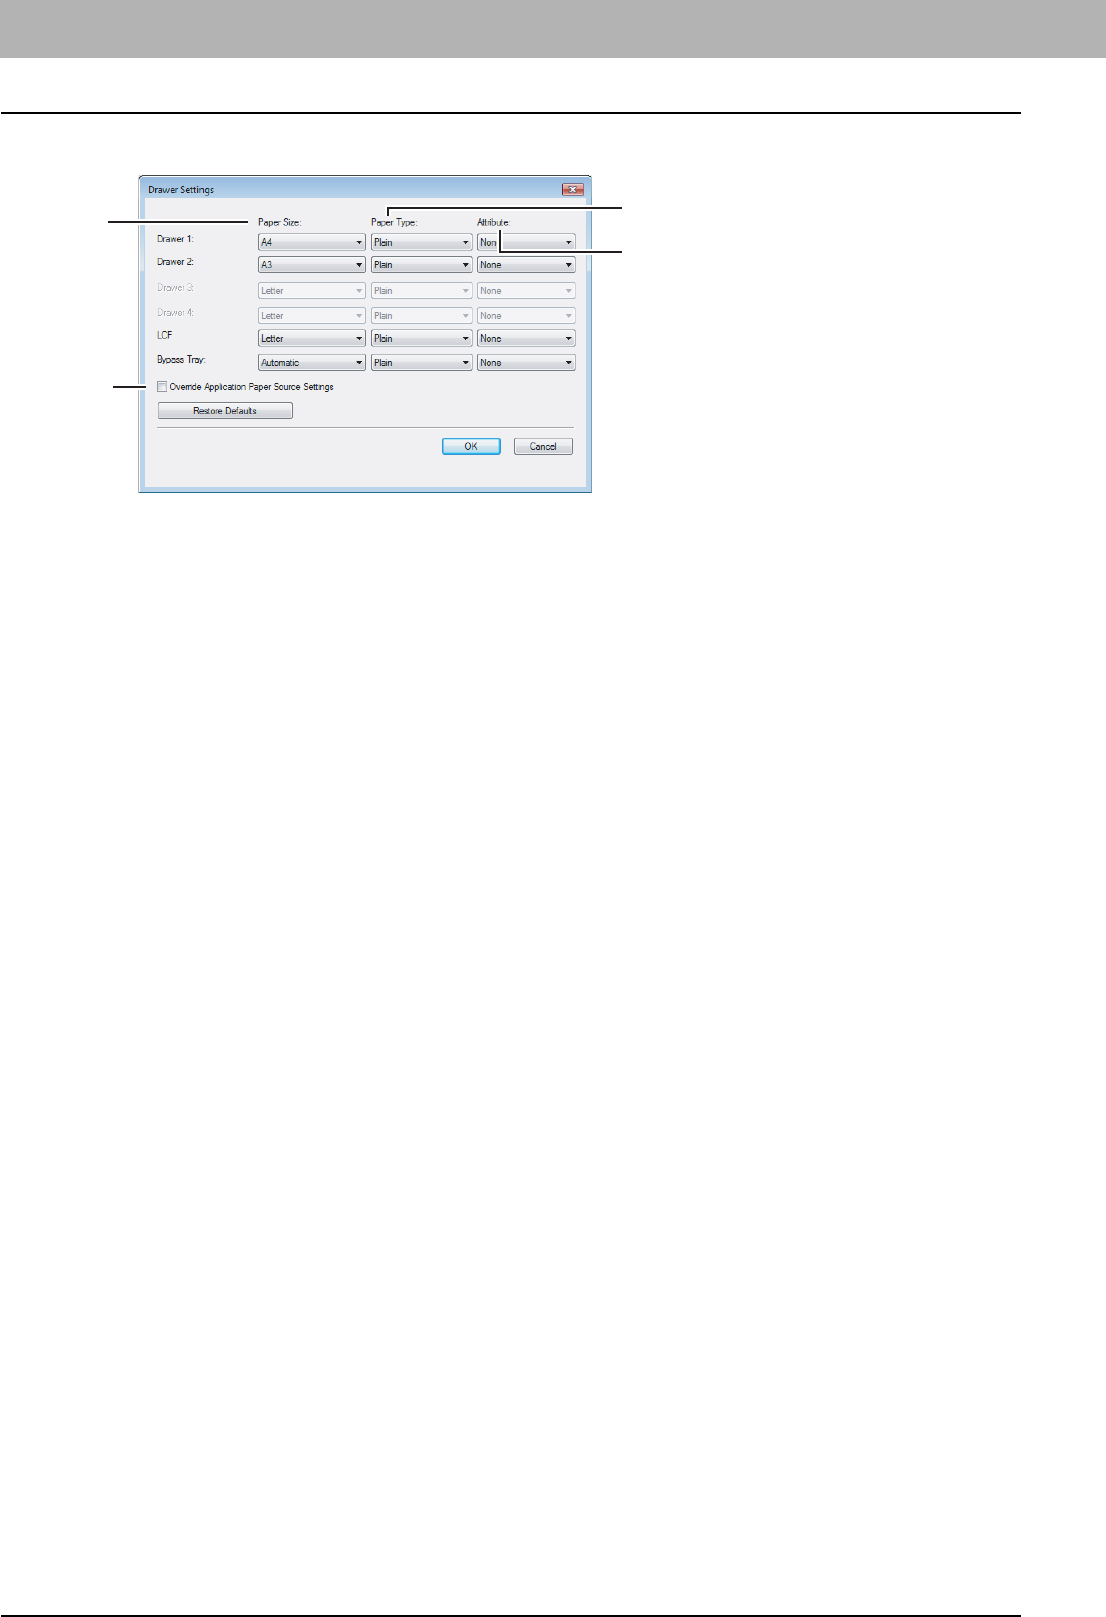
2 PRINTING FROM WINDOWS
58 Setting Up Print Options
Drawer Settings
yPaper Size
Select the paper size set in each drawer.
yPaper Type
Select the paper type set in each drawer.
yAttribute
Select the attribute of the paper. When you set the attribute, the drawer will be selected preferentially according to the
print settings.
yAttribute
Check this to use the paper source setting in the printer driver rather than the application setting.
1
2
3
4
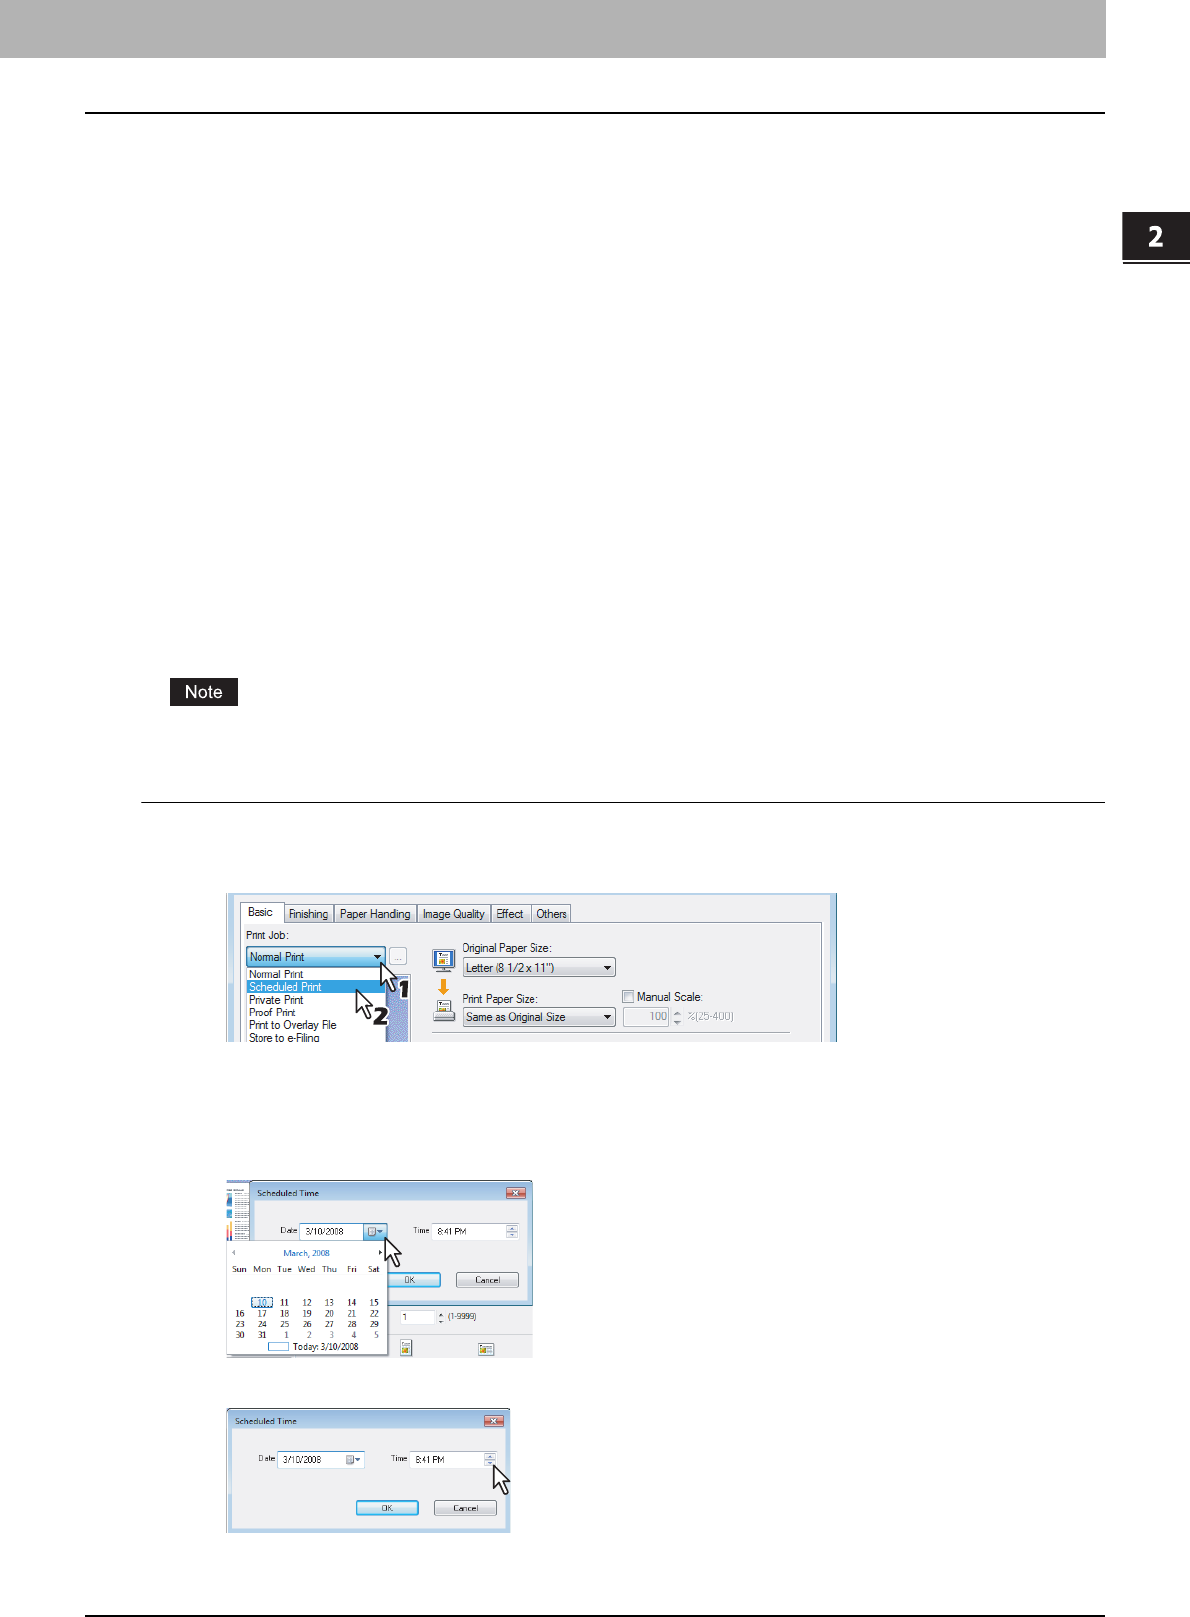
2 PRINTING FROM WINDOWS
Printing with Best Functions for Your Needs 59
Printing with Best Functions for Your Needs
In this section, procedures are given to print various types of print jobs, using the layout and finishing options. Read this
section before starting printing and select a procedure best suited for your needs.
P.59 “Printing Various Print Job Types”
P.65 “Layout and Finishing Options in Basic Tab Menu”
P.67 “Layout and Finishing Options in Finishing Tab Menu”
P.74 “Finishing Options in Paper Handling Tab Menu”
P.76 “Finishing Options in Effect Tab Menu”
P.80 “Using Various Types of Paper”
Printing Various Print Job Types
The printer drivers provide various ways to handle such jobs as Scheduled Print, Private Print, Proof Print, Overlay Image
file, and Store to e-Filing.
P.59 “Printing Scheduled Print Jobs”
P.60 “Printing Private Print Jobs”
P.61 “Printing Proof Print Jobs”
P.62 “Creating An Overlay File”
P.63 “Storing to e-Filing”
Printing Scheduled Print Jobs
The Print Scheduling feature allows you to specify the date and time to print your job. This can be especially useful for
delaying printing until off-peak hours.
Time of the System and MFP shoud be the same.
Printing on a specified date and time
1
Display the Basic tab.
2
Select [Scheduled Print] in the [Print Job] box.
3
Click [...].
yThe Scheduled Time dialog box appears.
4
Click the arrow button at the [Date] box to display the Calendar window, and select the
desired date for your print job.
5
Select the [Time] box and click the spin button to change the time.
yTo change the hour, select the hour number and click the spin button.
yTo change the time, select the time number and click the spin button.
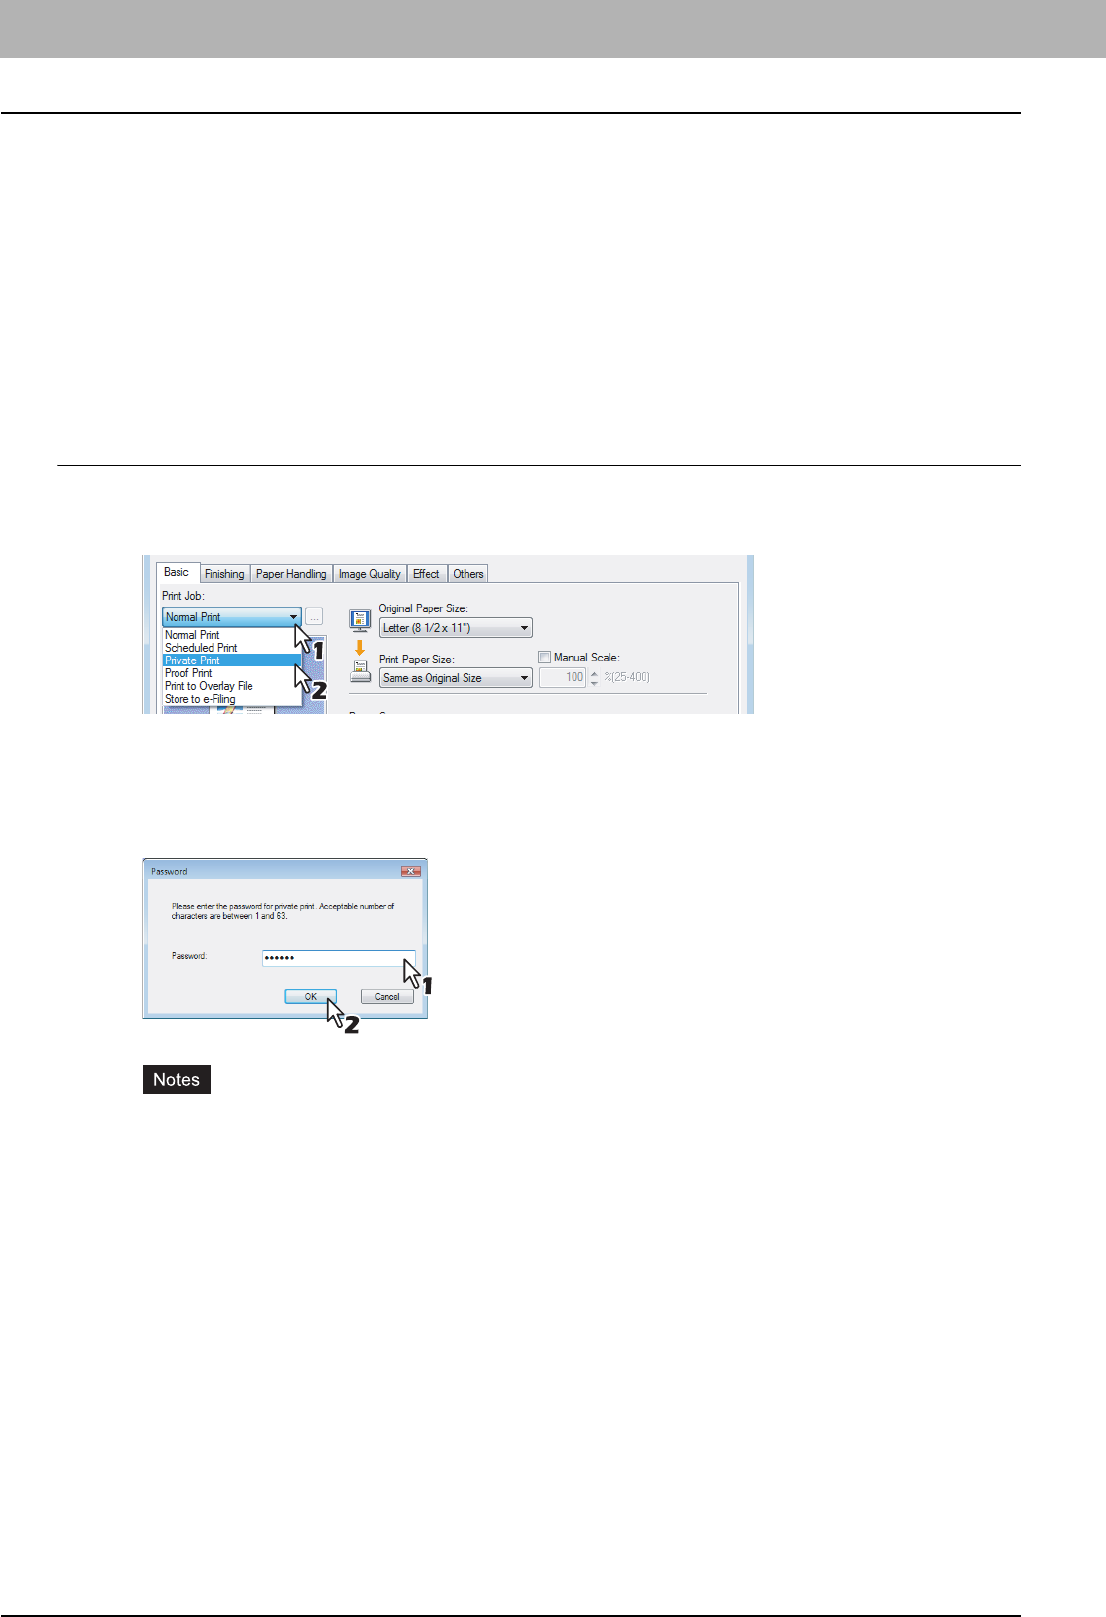
2 PRINTING FROM WINDOWS
60 Printing with Best Functions for Your Needs
6
Click [OK].
yThe specified date and time is displayed in the [Time] box.
7
Set any other print options you require and click [OK].
8
Click [OK] or [Print] to send the print job.
yThe document will be queued to print at the specified time and date.
Printing Private Print Jobs
The private print feature permits sensitive or confidential documents to be printed only in the presence of the person who
sent the job.
Printing confidential documents
1
Display the Basic tab.
2
Select [Private Print] in the [Print Job] box.
3
Set any other print options you require and click [OK].
4
Click [OK] or [Print] to send the print job.
yThe print job is stored in the Private Job list in the Touch Panel Display.
5
Enter a password in the [Password] box and click [OK].
yEnter a password using the alphanumeric characters and symbol characters (ASCII code characters
between 0x21 to 0x7E) in the [Password] box. The password must be between 1 and 63 characters.
yThis number will be used to release the private job from the Touch Panel Display. If you forget this number,
you can no longer print the private print job.
yWhen the user authentication is enabled, printing can be performed without a password.
6
Press the [PRINT] button on the control panel.
yThe print job list is displayed.
7
Press the [PRIVATE].
8
Select the desired user name and press [PASSWORD]. Then enter the password.
yThe private print job list is displayed.
9
Select the desired job on the private print job list and press [PRINT].
yFor the detailed instructions on how to use the control panel, see the following page:
P.147 “Private Print jobs”
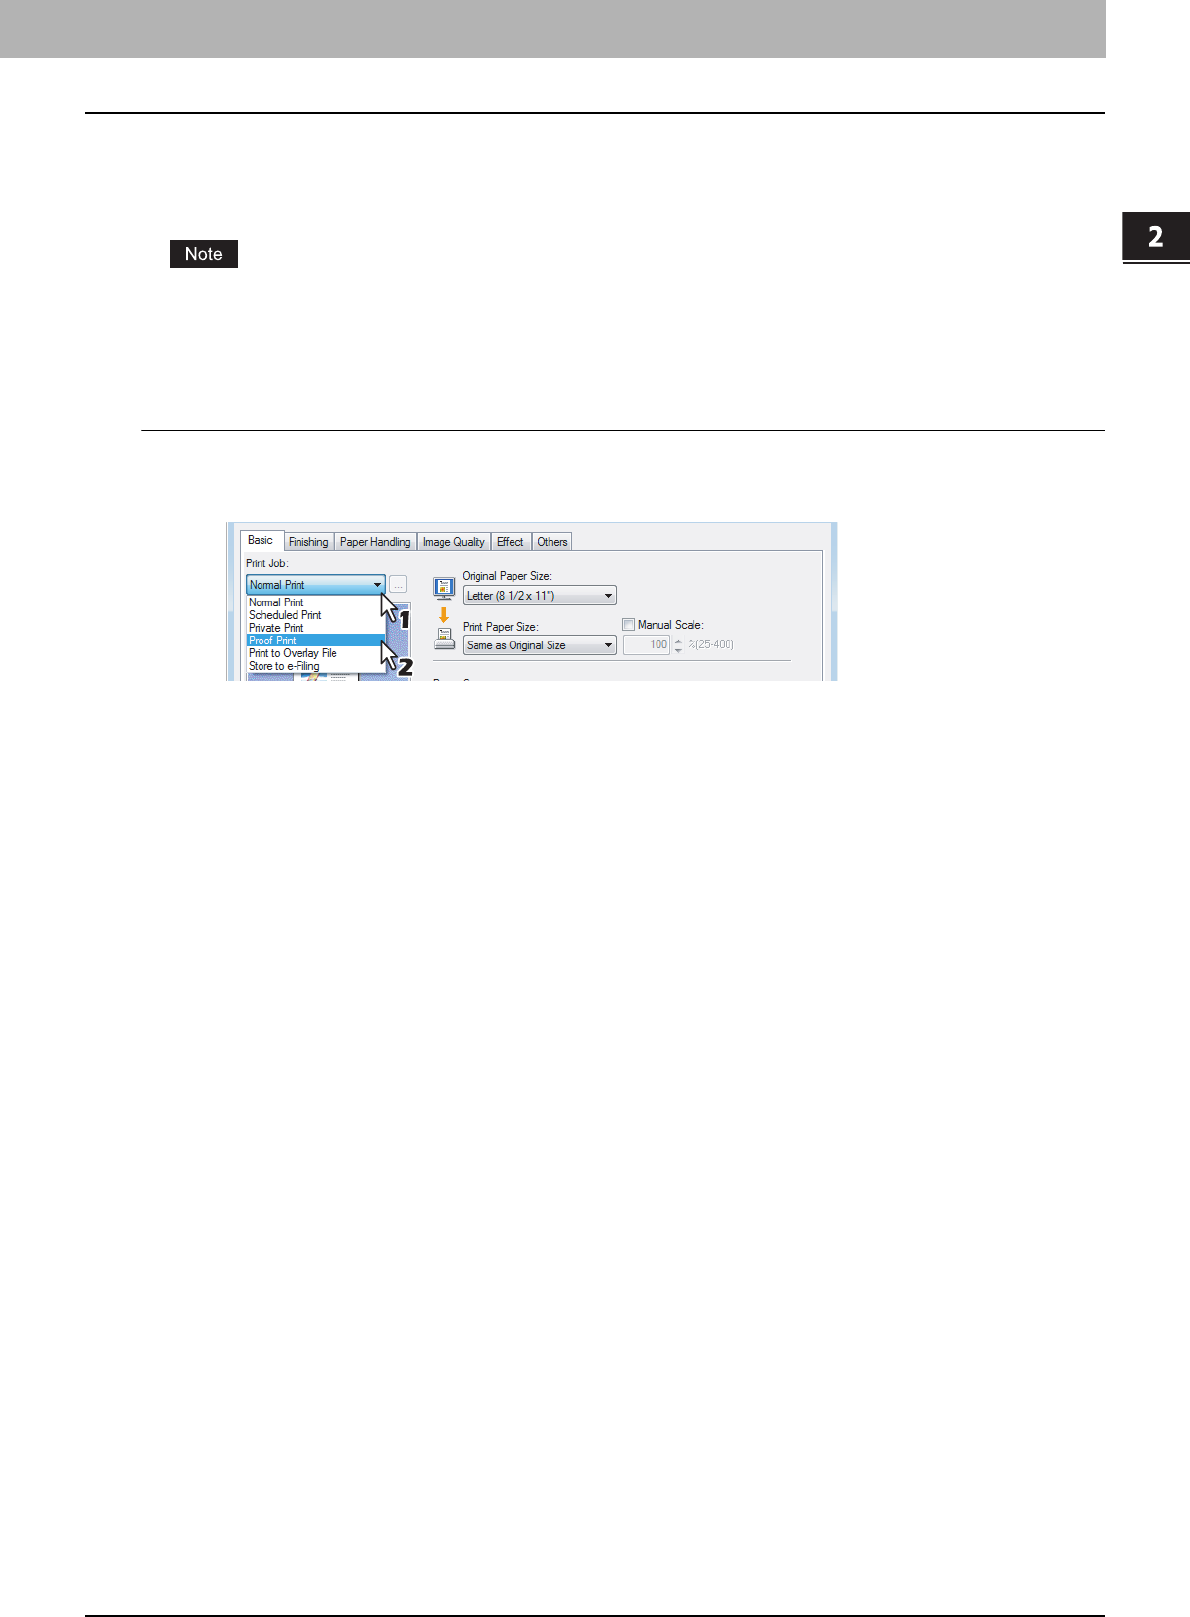
2.PRINTING FROM WINDOWS
Printing with Best Functions for Your Needs 61
2 PRINTING FROM WINDOWS
Printing Proof Print Jobs
The proof print feature prevents costly mistakes by allowing you to check the printed output on a sample copy before
printing an entire multi-copy job
When printing from an application that sends data separately for each number of copies, this equipment will print all of
the copies even if you set the Proof Print. In that case, set one copy for the number of copies for a proof print job in the
printer driver, and then change the number of copies from the Control Panel to print the required number of copies of
the print job.
Printing a proof copy
1
Display the Basic tab.
2
Select [Proof Print] in the [Print Job] box.
3
Set any other print options you require and click [OK].
4
Click [OK] or [Print] to send the print job.
yOne copy of the document is printed and the print job is stored in the Proof Job list in the Touch Panel Display.
5
Press the [Print] button on the control panel.
yThe print job list is displayed.
6
Press the [PROOF].
yThe proof print job list is displayed.
7
Select the desired job on the proof print job list and press [PRINT].
yFor the detailed instructions on how to use the control panel, see the following page:
P.144 “Proof Print jobs”

2 PRINTING FROM WINDOWS
62 Printing with Best Functions for Your Needs
Creating An Overlay File
You can save up to 20 documents as overlay files using printer driver. The created overlay file can then be merged into
another document during printing.
P.78 “Printing with an Overlay File”
yIf the print job has several pages in the document, only the first page of the document will be saved as an overlay
file.
yBoth the overlay file and the documents on which you superimpose the overlay image must be created at the same
size, color mode, and orientation.
yWhen creating an overlay file using the PS3 printer driver from an application that can create the PS command
directly, the overlay file will not be created properly. In that case, disable the [Use PostScript Passthrough] option
in the PostScript Settings dialog box.
P.53 “PostScript Settings”
Printing a document as an overlay file
1
Display the Basic tab.
2
Select [Print to Overlay File] in the [Print Job] box.
3
Click [...].
yThe Overlay Image Name dialog box appears.
4
Enter a overlay image name and then click [OK].
yYou can enter up to 63 characters.
5
Set any other print options you require and click [OK].
6
Click [OK] or [Print] to send the print job.
yThe document is saved as an overlay file.
You can use the created overlay file to print a document.
P.78 “Printing with an Overlay File”
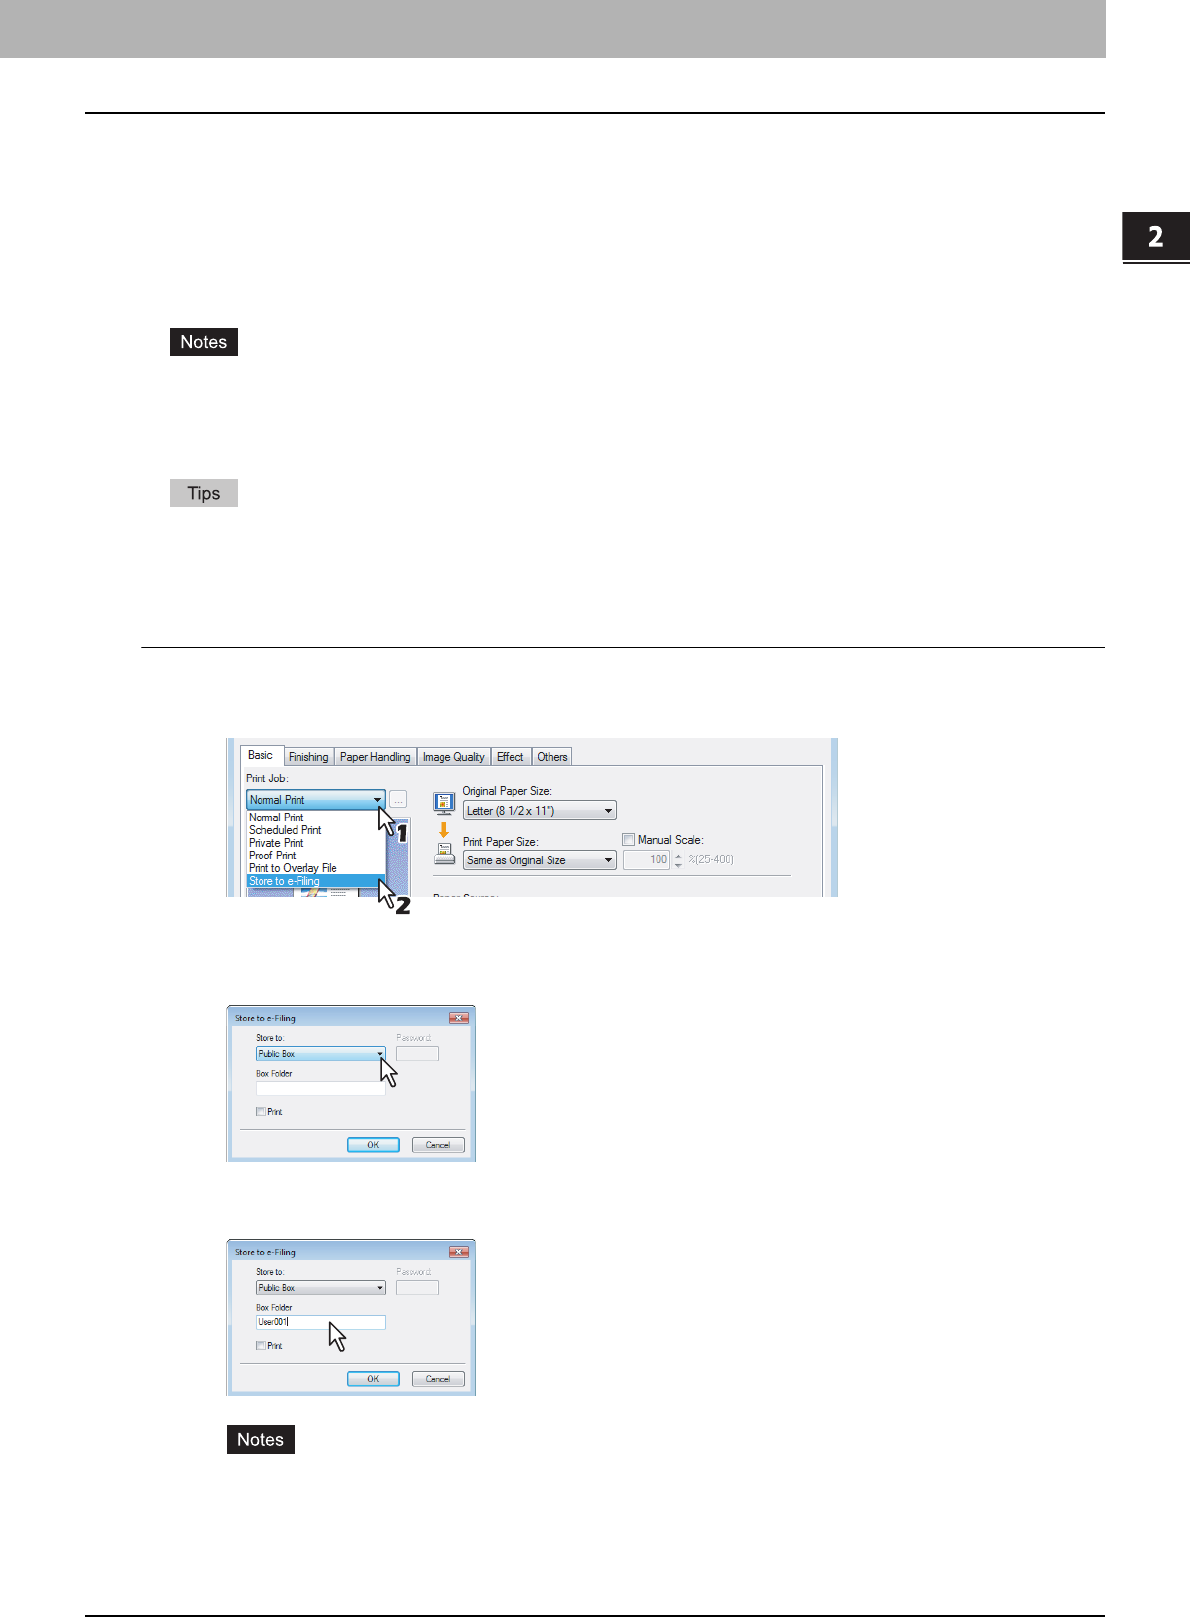
2.PRINTING FROM WINDOWS
Printing with Best Functions for Your Needs 63
2 PRINTING FROM WINDOWS
Storing to e-Filing
The Store to e-Filing feature allows you to send print jobs to e-Filing on this equipment. The job stored to e-Filing can then
be printed from the Touch Panel Display at a later time. It can be also composed with other documents using the e-Filing
web utility.
You can select either a [public] or [user] box to store print jobs. Also you can specify a folder in which the print job is to be
stored in these boxes. The public box is shared by all users who can see the jobs stored in this box. User boxes are
boxes that users can create as desired. Access to user boxes can be restricted with a password.
yWhen you store a document in e-Filing using the printer driver, the printing image (not the original document in your
computer) will be stored in e-Filing.
yDocuments stored in e-Filing are retained in the best image quality for printing. If you want to download them into
your computer in a higher image quality, scan the original documents and store them in e-Filing.
yYou can manage the files within a box from the Touch Panel Display. Please refer to the e-Filing Guide to manage
files in a box.
yYou can also manage the files within a box using the e-Filing web utility. Please refer to the e-Filing Guide.
Saving a print job to a public box
1
Display the Basic tab.
2
Select [Store to e-Filing] in the [Print Job] box.
3
Set any other print options you require and click [OK].
4
Select [Public Box] to save a print job to a public box.
5
When you specify a folder in which the print job is to be stored in a public box, enter
the folder name.
yIf the entered folder name is not found, a new folder is created under this folder name.
yEnter the box name within 64 letters.
yOnce there are 100 boxes, you cannot create a new box.
6
If you print a job as well as saving to the public box, check the [Print] box.
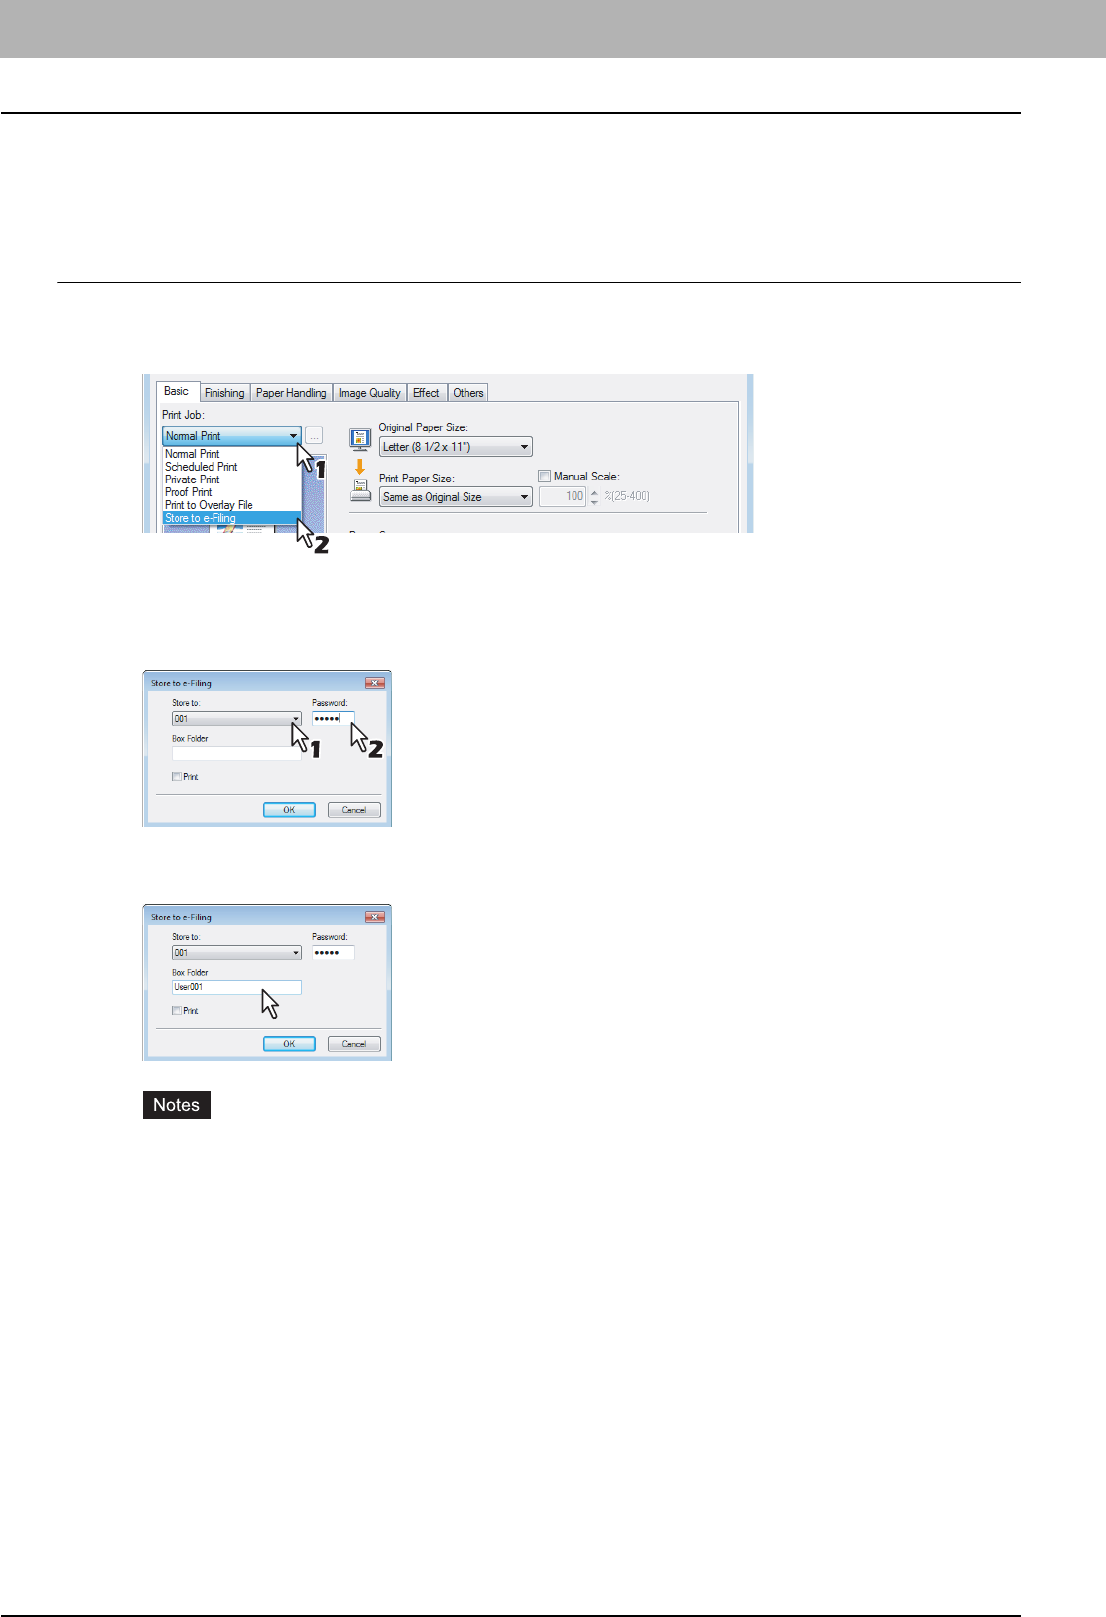
2 PRINTING FROM WINDOWS
64 Printing with Best Functions for Your Needs
7
Click [OK].
8
Click [OK] or [Print] to send the print job.
yThe print job is saved to the public box.
Saving a print job to a user box
1
Display the Basic tab.
2
Select [Store to e-Filing] in the [Print Job] box.
3
Set any other print options you require and click [OK].
4
Select a user box to save a print job and enter the 5-digit password for the user box in
the [Password] box if required.
5
When you specify a folder in which the print job is to be stored in a user box, enter the
folder name.
yIf the entered folder name is not found, a new folder is created under this folder name.
yEnter the box name within 64 letters.
yOnce there are 100 boxes, you cannot create a new box.
6
If you print a job as well as saving to a box, check the [Print] box.
7
Click [OK].
8
Click [OK] or [Print] to send the print job.
yThe print job is saved to a specified user box.

2.PRINTING FROM WINDOWS
Printing with Best Functions for Your Needs 65
2 PRINTING FROM WINDOWS
Layout and Finishing Options in Basic Tab Menu
The printer driver allows you to create a print job with layout options to make your document more essential. In this
section various printing functions enabled with the [Basic] tab menu are explained.
P.65 “Fitting images within paper size”
P.66 “Printing Color Document in Gray scale”
P.66 “Printing Color Document in Twin Color”
Fitting images within paper size
You can automatically enlarge or reduce a document image to fit a specified paper size, or manually set the scale to
enlarge or reduce the image.
Printing enlarged or reduced image to fit specified paper size
1
Display the Basic tab.
2
Select the document size on the [Original Paper Size] box. Then select the paper size
that you want to print at the [Print Paper Size] box.
yThe document image is automatically enlarged or reduced depending on the original paper size and print paper
size.
3
Set any other print options you require and click [OK].
4
Click [OK] or [Print] to send the print job.
yEnlarged or reduced image is printed to fit specified paper size.
Printing an enlarged or reduced image by specifying the scale manually
1
Display the Basic tab.
2
Check the [Manual Scale] box. Then enter the scale.
yThe scale can be set from 25% to 400% in units of 1%.
3
Set any other print options you require and click [OK].
4
Click [OK] or [Print] to send the print job.
yAn enlarged or reduced image is printed by specified scale.
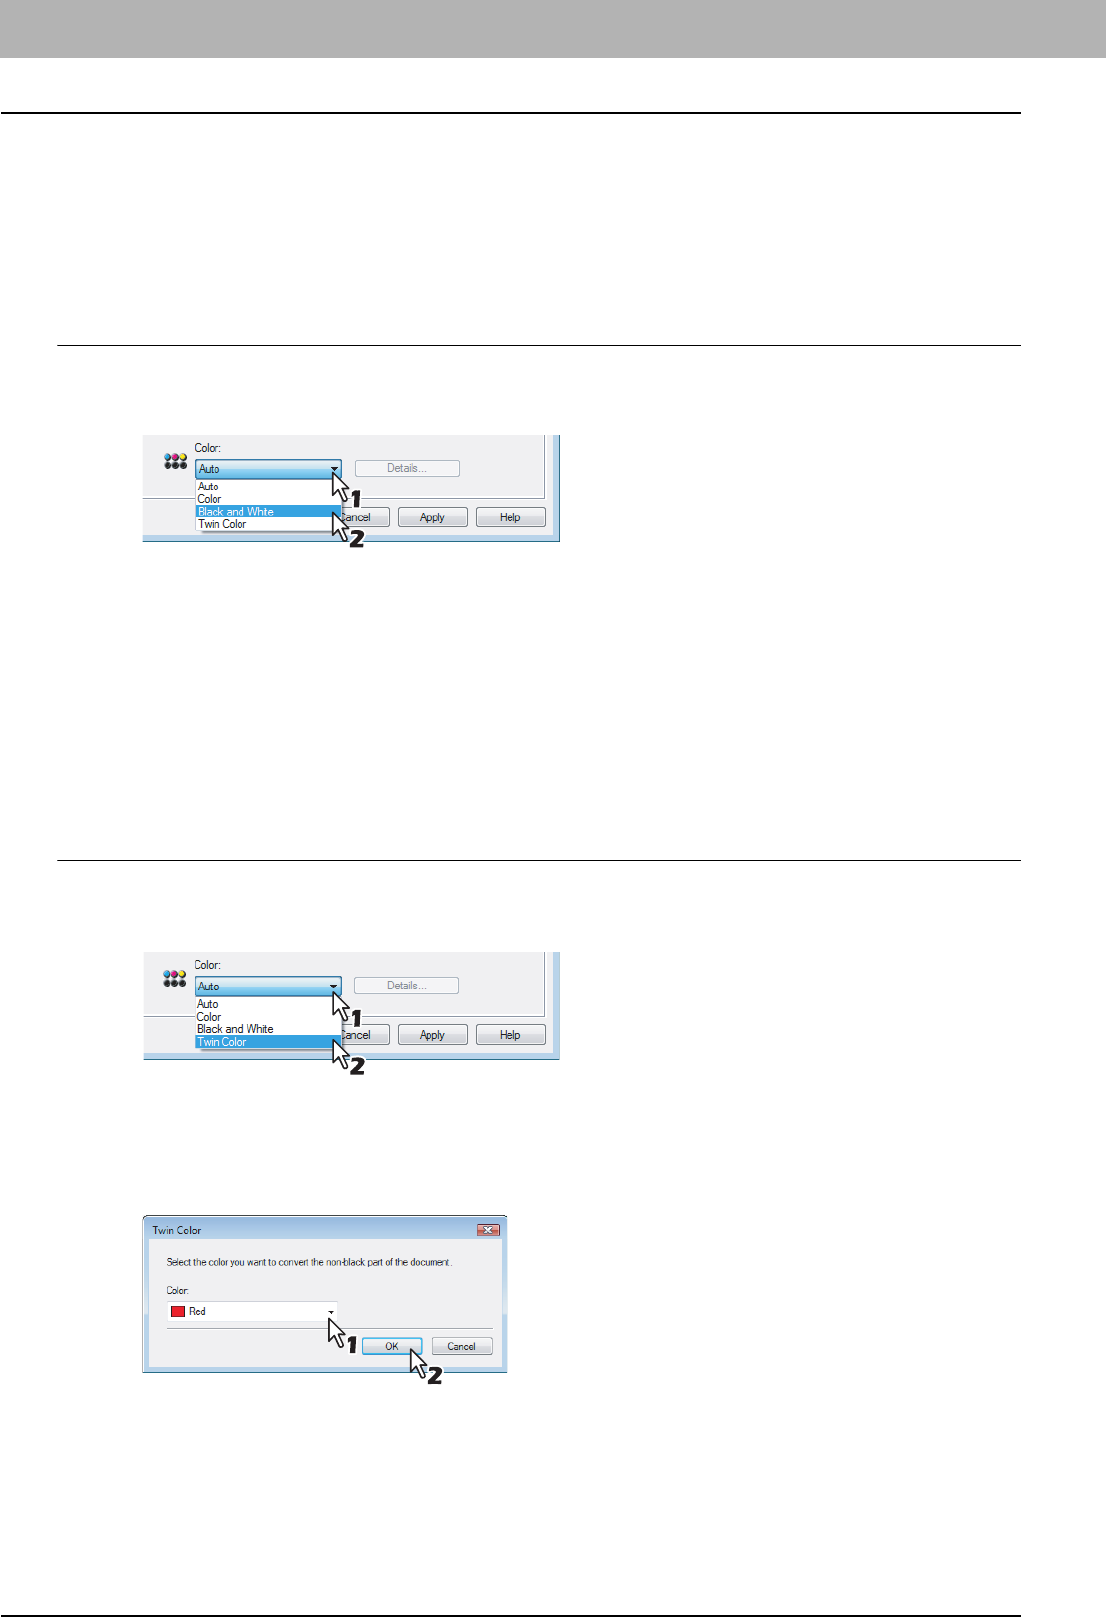
2 PRINTING FROM WINDOWS
66 Printing with Best Functions for Your Needs
Printing Color Document in Gray scale
This equipment can print in color as well as black and white.
The printer driver automatically detects whether the document uses only color or only black and white, and it prints the
document accordingly.
Additionally, you can select black and white mode manually to print a color document in gray scale to reduce the print cost
and consumption of color toners.
Printing a color document in gray scale
1
Display the Basic tab.
2
Select [Black and White] at the [Color] box.
3
Set any other print options you require and click [OK].
4
Click [OK] or [Print] to send the print job.
yThe print job is printed in gray scale.
Printing Color Document in Twin Color
This equipment can print in the twin color mode.
When the document is printed in the twin color mode, the black parts of the document are printed in black and colored
parts of the document are printed in a specified color.
Printing a color document in twin color mode
1
Display the Basic tab.
2
Select [Twin Color] at the [Color] box.
3
Click [Details...].
yThe Twin Color dialog box appears.
4
Select a color that the color parts of the document are to be printed at the [Color] box
and click [OK].
5
Set any other print options you require and click [OK].
6
Click [OK] or [Print] to send the print job.
yThe print job is printed in the twin color mode.
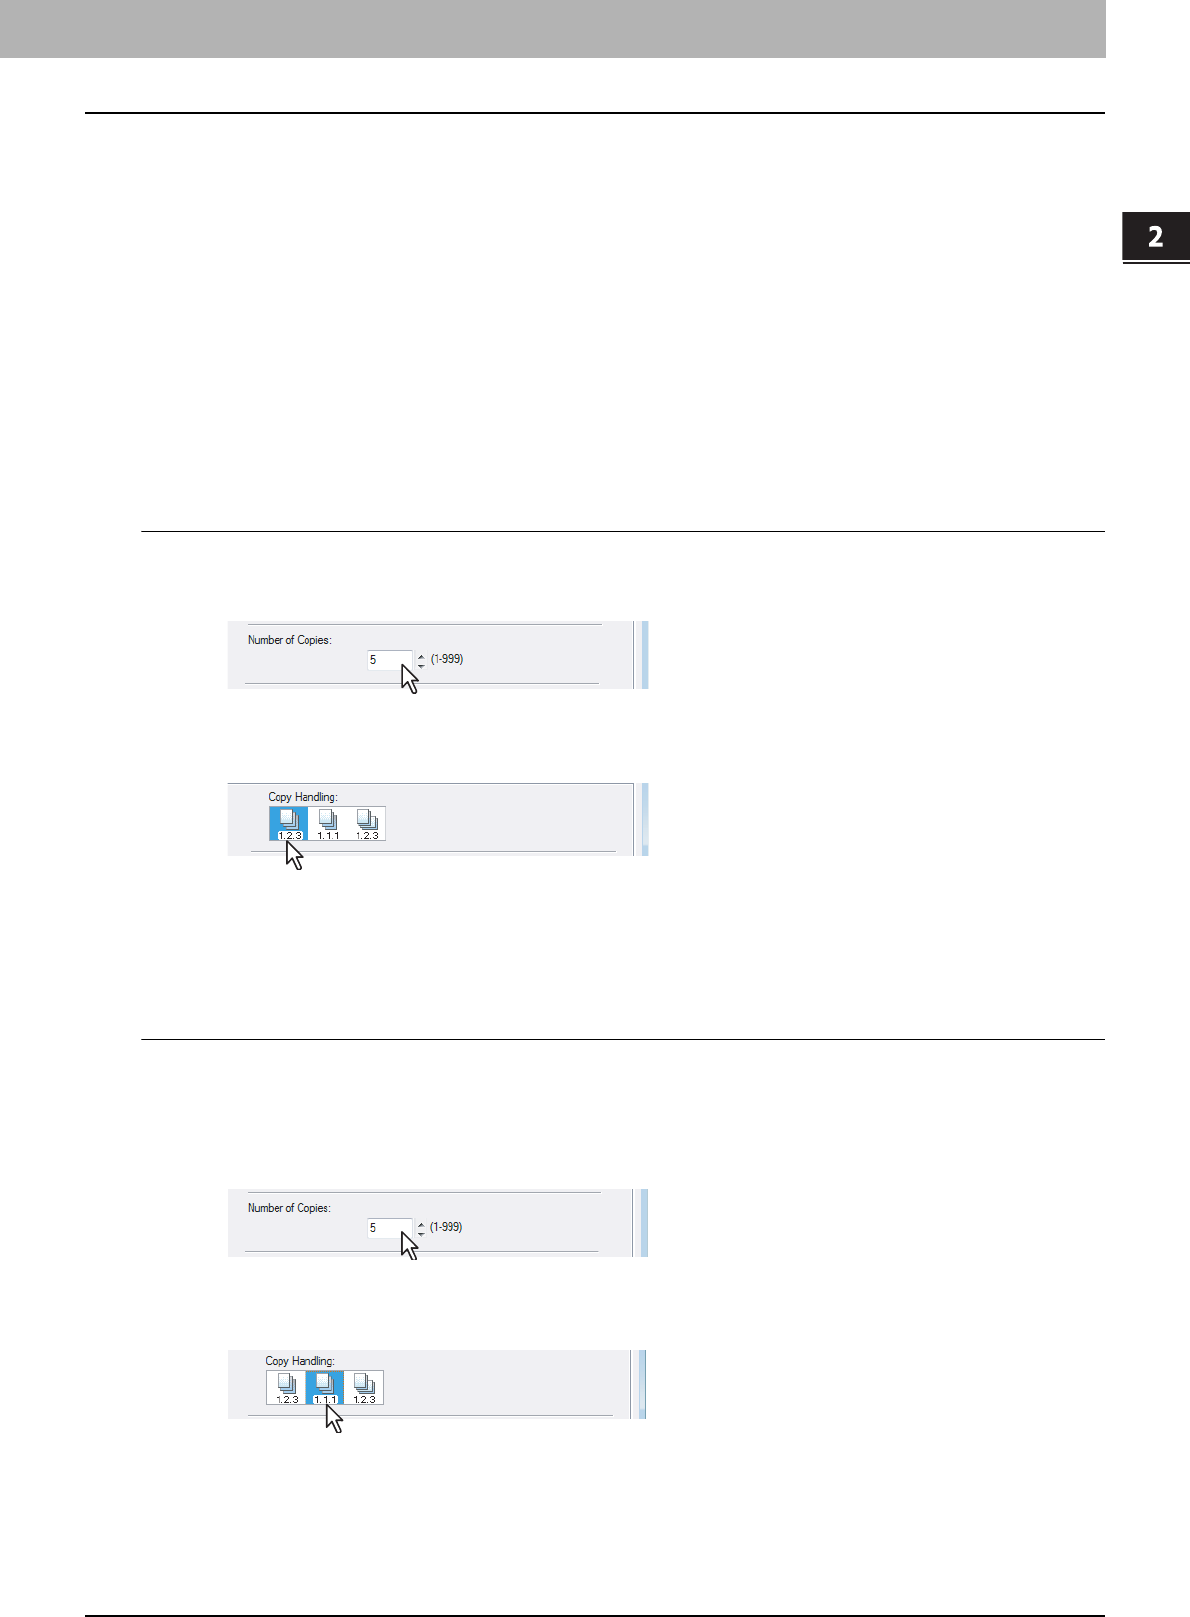
2.PRINTING FROM WINDOWS
Printing with Best Functions for Your Needs 67
2 PRINTING FROM WINDOWS
Layout and Finishing Options in Finishing Tab Menu
The printer driver allows you to create a print job with layout options to make your document more essential. In this
section various printing functions enabled with the [Finishing] tab menu are explained.
P.67 “Sort Printing”
P.68 “Printing on Both Sides of a Sheet”
P.69 “Making a Booklet”
P.72 “Printing Several Pages on One Sheet”
P.73 “Stapling”
P.73 “Hole Punching”
Sort Printing
You can select how multiple copies of a document to be output, such as separately for each copy, grouping each page,
and alternating the paper direction for each copy.
Output each copy separately
1
Display the Basic tab.
2
Enter the number of copies to be printed at the [Number of Copies] box.
3
Display the Finishing tab.
4
Select [Sort Copies] icon at [Copy Handling].
5
Set any other print options you require and click [OK].
6
Click [OK] or [Print] to send the print job.
yThe print job is output separately for each copy.
Output with grouping of each page within a set
For example, assume that you have a three page job (A, B, C) and you want three copies of each page in this order (AAA,
BBB, CCC).
1
Display the Basic tab.
2
Enter the number of copies to be printed at the [Number of Copies] box.
3
Display the Finishing tab.
4
Select [Group Copies] icon at [Copy Handling].
5
Set any other print options you require and click [OK].
6
Click [OK] or [Print] to send the print job.
yThe print job is output separately for each page.
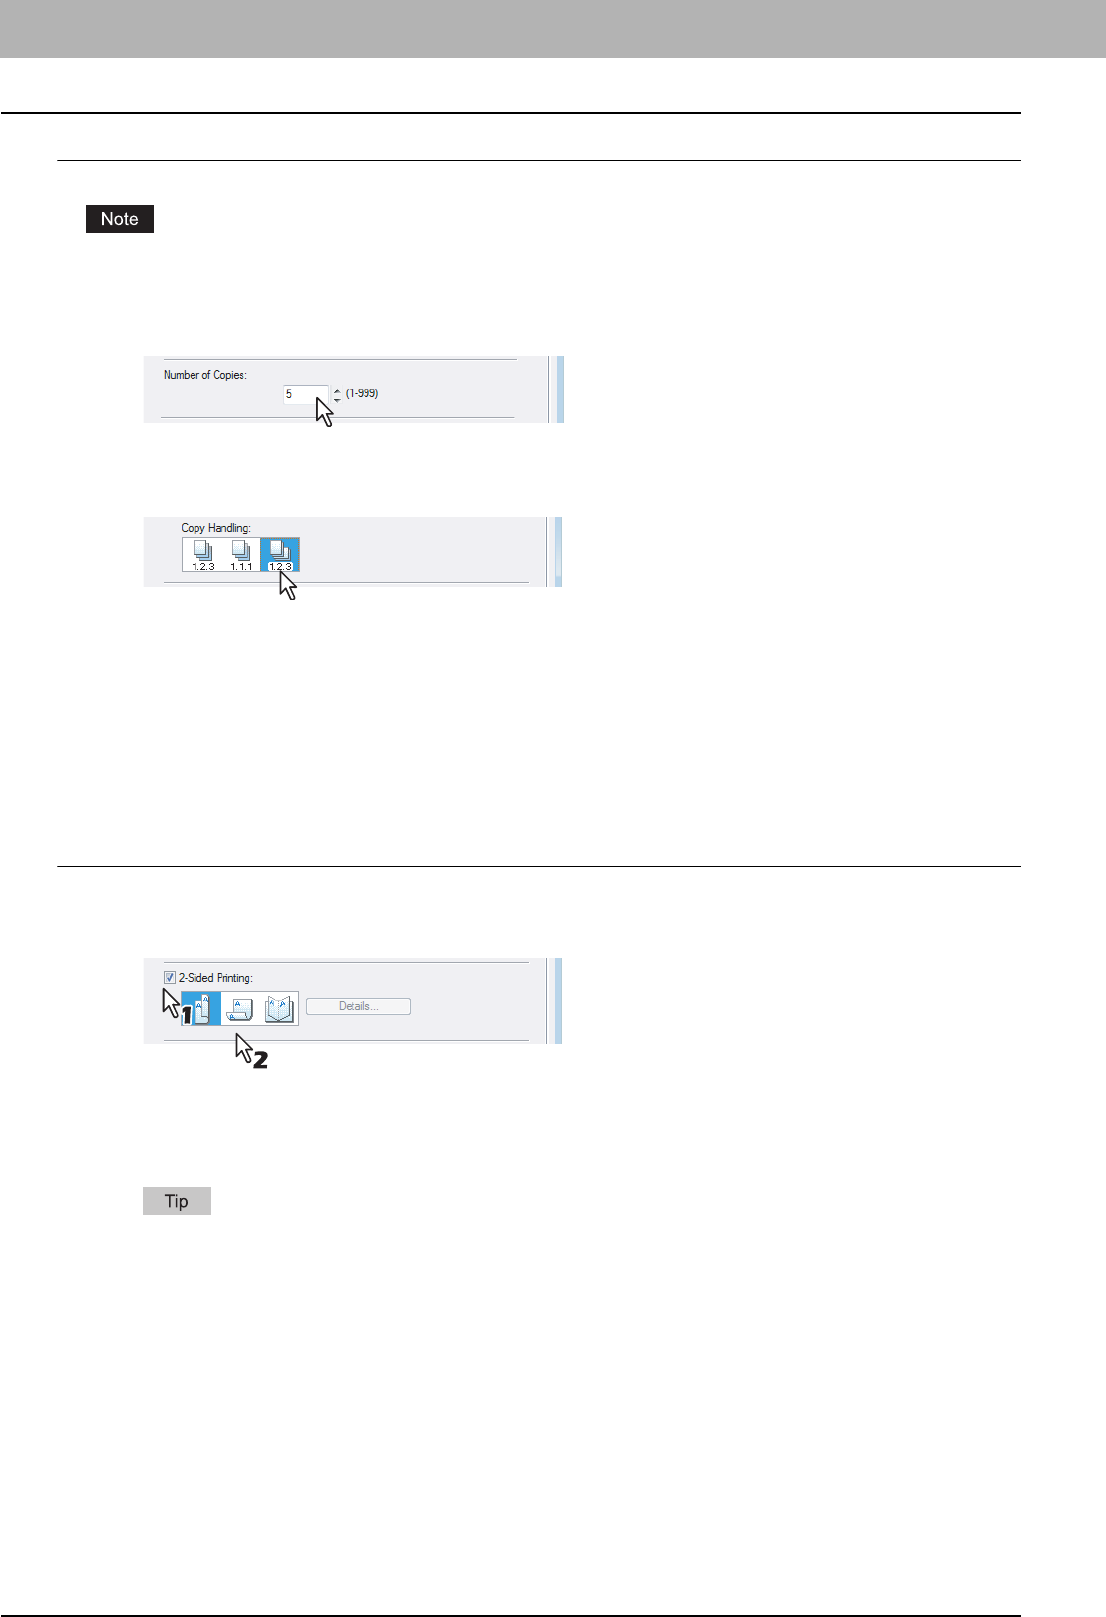
2 PRINTING FROM WINDOWS
68 Printing with Best Functions for Your Needs
Output in a different direction for each copy
Rotated Sort Copies can be enabled only when printing on Letter, A4, B5, or 16K.
1
Display the Basic tab.
2
Enter the number of copies to be printed at the [Number of Copies] box.
3
Display the Finishing tab.
4
Select the [Rotated Sort] icon at [Copy Handling].
5
Set any other print options you require and click [OK].
6
Click [OK] or [Print] to send the print job.
yThe print job is output in a different direction for each copy.
Printing on Both Sides of a Sheet
You can print on both sides of the paper.
Printing on both sides of paper
1
Display the Finishing tab.
2
Check the [2-Sided Printing] check box and select the direction to be printed.
Book — Select this to print on both sides of the paper in a vertical direction, so the pages can be bound and turned
over right and left.
Tablet — Select this to print on both sides of the paper in a vertical reversal motion, so the pages can be bound
and turned over up and down.
You can also set booklet printing at the [2-Sided Printing] option by selecting the [Booklet] icon. For the
instructions on how to perform booklet printing, see the following section.
P.69 “Making a Booklet”
3
Set any other print options you require and click [OK].
4
Click [OK] or [Print] to send the print job.
yThe print job is printed on both sides of paper in the specified direction.
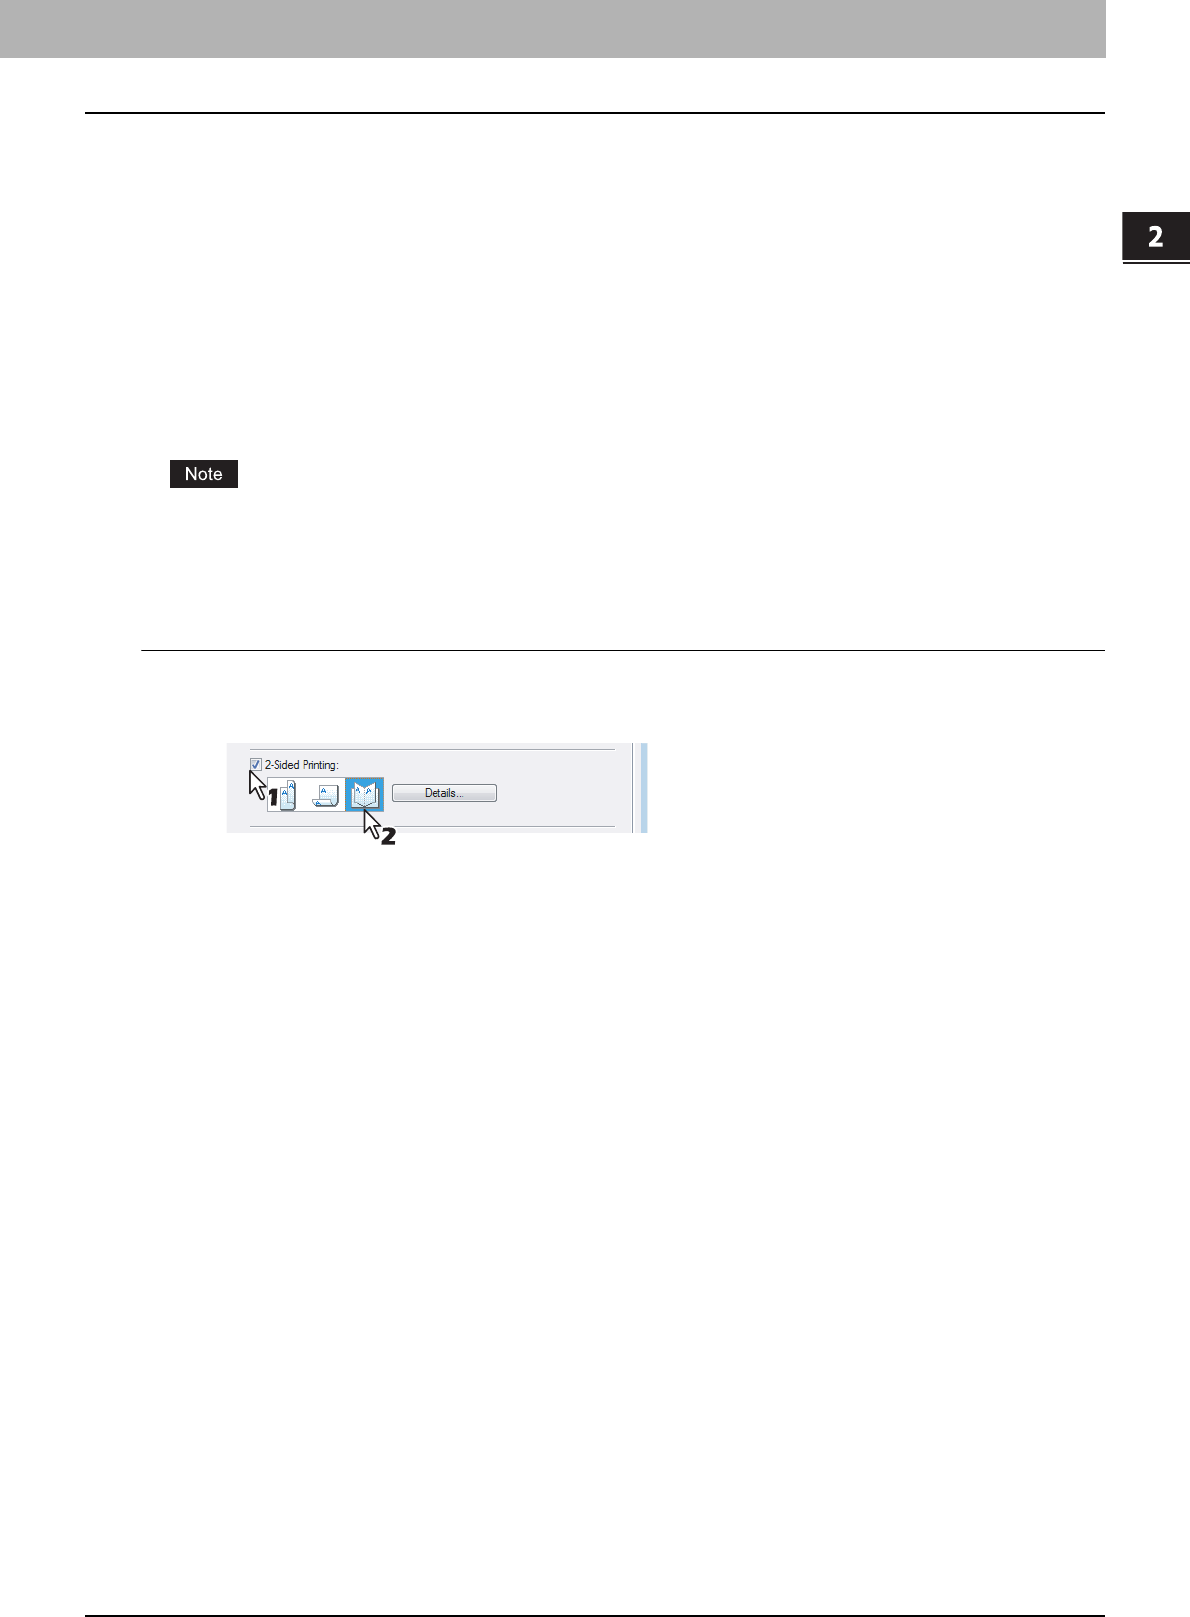
2.PRINTING FROM WINDOWS
Printing with Best Functions for Your Needs 69
2 PRINTING FROM WINDOWS
Making a Booklet
Printing in normal booklet mode produces a document that, when folded, becomes a properly paginated booklet or
magazine-style publication. You can even create bound booklets that are folded and stapled in the center.
For example, if you create a document on letter-size paper (8½ x 11 inches) and then print in booklet mode, the yield is a
5½-x-8½-inch booklet. Each page has been scaled to fit on half a sheet and reordered so that the booklet is properly
paginated when folded.
To retain your original document size when printing booklets, select the booklet size to be the same as your original
document size. Then, your 8½-inch document is printed on ledger size paper (11 x 17 inches) and reordered so that, when
folded, the yield is an 8½-x-11-inch booklet. You can select from the following page-size options when printing a tiled
booklet:
yLetter Booklet on Ledger
yA4 Booklet on A3
yB5 Booklet on B4
When Booklet printing is performed using the PS3 printer driver from an application that can create the PS command
directly, the overlay image will not be printed. In that case, disable the [Use PostScript Passthrough] option in the
PostScript Settings dialog box.
P.53 “PostScript Settings”
Creating a booklet
1
Display the Finishing tab.
2
Check the [2-Sided Printing] box and select the [Booklet] icon.
3
Click [Details...].
yThe Booklet Details dialog box appears.
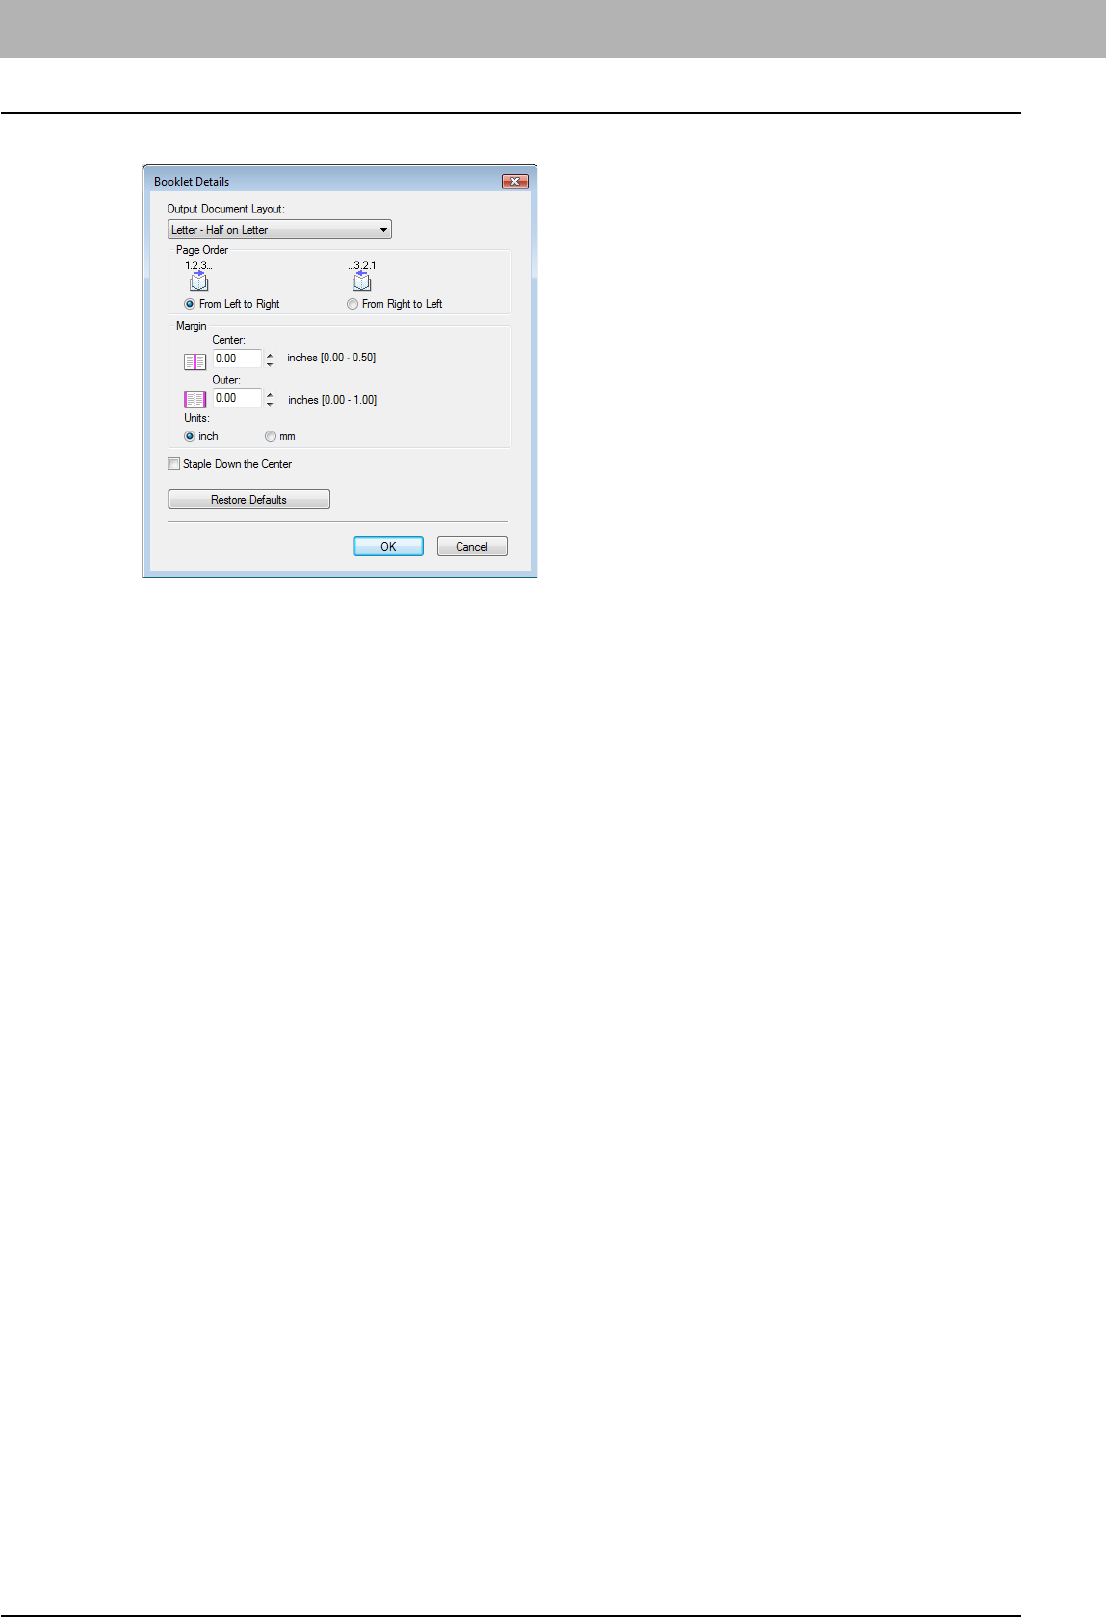
2 PRINTING FROM WINDOWS
70 Printing with Best Functions for Your Needs
4
Select the booklet size at the [Output Document Layout] box.
Letter-Half on Letter — Select this to print a 1/2 Letter size booklet. Every 2 pages are printed on Letter paper to
fit on half a sheet.
LT on LD — Select this to print a Letter size booklet. Every 2 pages are printed on Ledger paper to fit on half a
sheet (Letter).
1/2 LG on LG — Select this to print a 1/2 Legal size booklet. Every 2 pages are printed on Legal paper to fit on half
a sheet.
1/2 Statement on Statement — Select this to print a 1/2 Statement size booklet. Every 2 pages are printed on
Statement paper to fit on half a sheet.
1/2 Comp on Comp — Select this to print a 1/2 Computer size booklet. Every 2 pages are printed on Computer
paper to fit on half a sheet.
1/2 13LG on 13LG — Select this to print a 1/2 13inch LG size booklet. Every 2 pages are printed on 13inch LG
paper to fit on half a sheet.
1/2 8.5SQ on 8.5SQ — Select this to print a 1/2 8.5inch SQ size booklet. Every 2 pages are printed on 8.5inch SQ
paper to fit on half a sheet.
A5 on A4 — Select this to print an A5 size booklet. Every 2 pages are printed on A4 paper to fit on half a sheet
(A5).
A4 on A3 — Select this to print an A4 size booklet. Every 2 pages are printed on A3 paper to fit on half a sheet
(A4).
B5 on B4 — Select this to print a B5 size booklet. Every 2 pages are printed on B4 paper to fit on half a sheet (B5).
B6 on B5 — Select this to print a B6 size booklet. Every 2 pages are printed on B5 paper to fit on half a sheet (B6).
1/2 Folio on Folio — Select this to print a 1/2 Folio size booklet. Every 2 pages are printed on Folio paper to fit on
half a sheet.
A6 on A5 — Select this to print an A6 size booklet. Every 2 pages are printed on A5 paper to fit on half a sheet
(A6).
32K on 16K — Select this to print a 32K size booklet. Every 2 pages are printed on 16K paper to fit on half a
sheet.
16K on 8K — Select this to print a 16K size booklet. Every 2 pages are printed on 8K paper to fit on half a sheet.
5
Select the page order for booklet in the [In page of the order] option.
From Left to Right — Select this to print the pages from left to right.
From Right to Left — Select this to print the pages from right to left.
6
If you want to add a margin space between facing pages, enter a width in the [Center]
box, and if you want to add a margin on the outside edge, enter a width in the [Outer]
box.
yYou can change the unit of the margin at the [Units].
yThe center margin can be set from 0.00 inch to 0.50 inches in units of 0.01 inch when the unit is inch, and from
0.00 mm to 12.70 mm in units of 0.10 mm when the unit is mm.
The printed images will be reduced according to the margin setting.
yThe outer margin can be set from 0.00 inch to 1.00 inches in units of 0.01 inch when the unit is inch, and from
0.00 mm to 25.40 mm in units of 0.10 mm when the unit is mm.
The printed images will be reduced according to the margin setting.
2.PRINTING FROM WINDOWS
Printing with Best Functions for Your Needs 71
2 PRINTING FROM WINDOWS
7
If you want to double staple the center, check the [Staple Down the Center] box.
[Staple Down the Center] is available only when the Saddle Stitch Finisher (optional) is installed and configured
on the Configuration tab.
8
Click [OK] to close the Booklet Details dialog box.
9
Set any other print options you require and click [OK].
10
Click [OK] or [Print] to send the print job.
yThe print job is printed as a booklet.
If a Saddle Stitch Finisher (optional) is not installed, the output will not be folded. But you can create a booklet
by manually folding along the center.
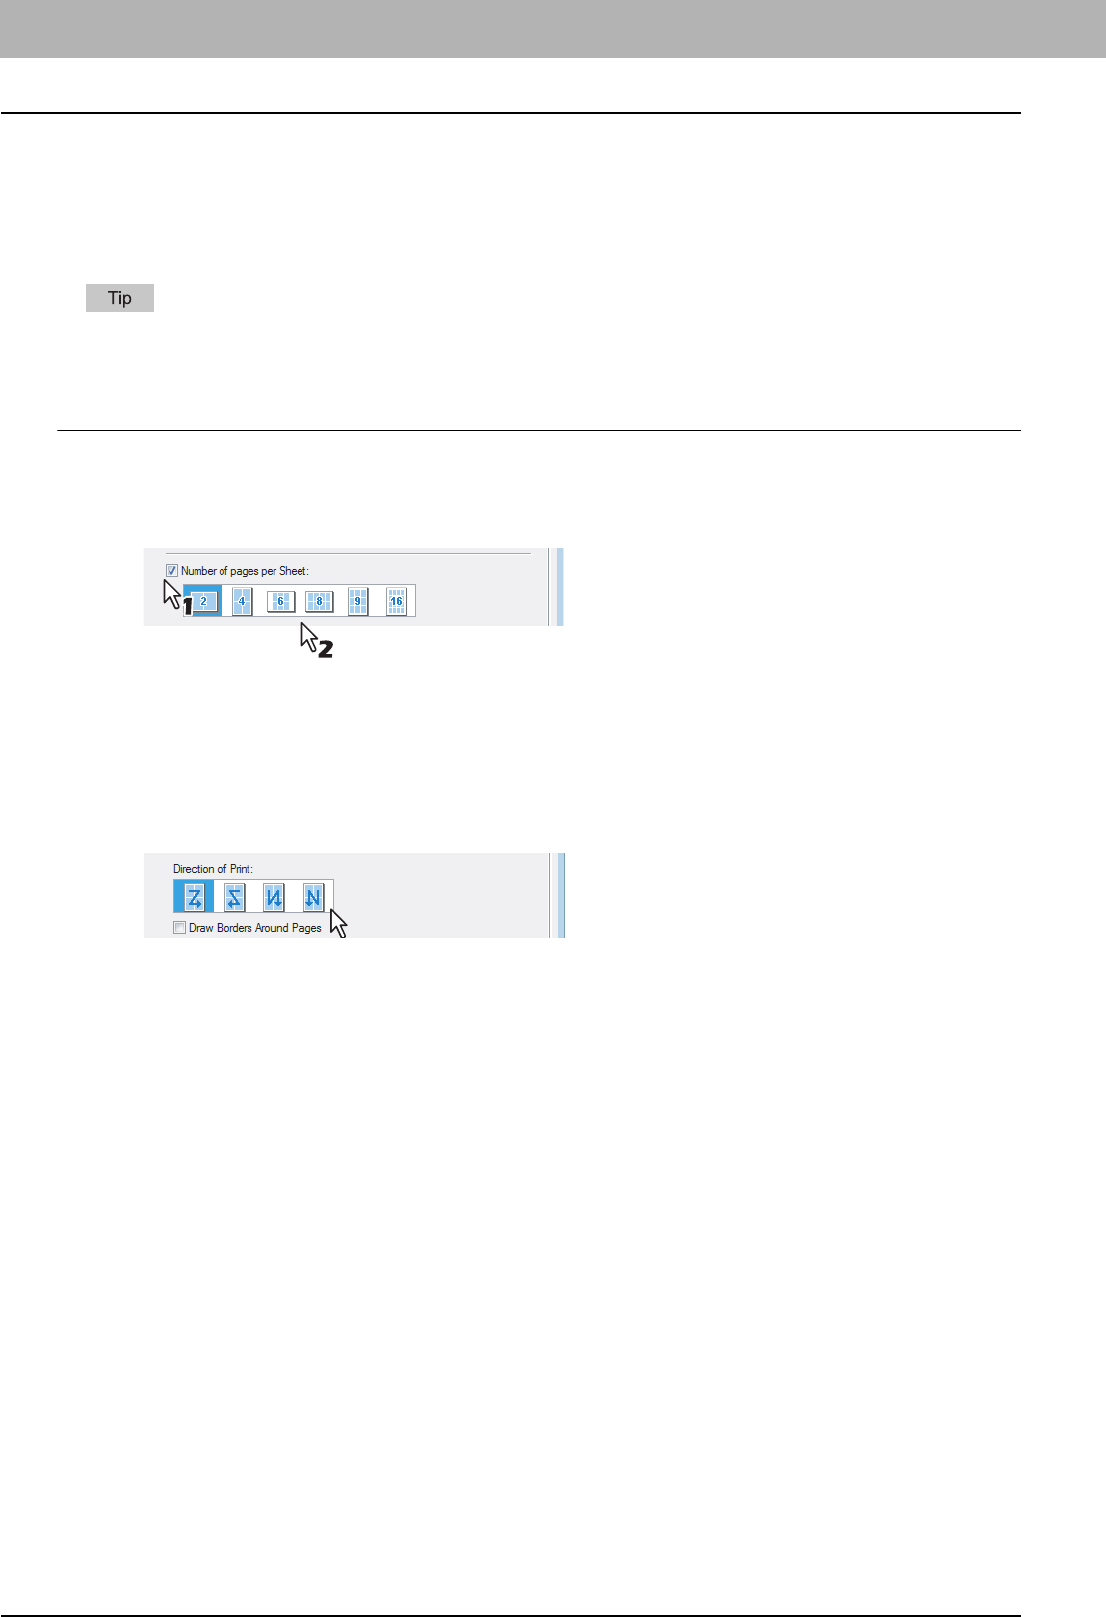
2 PRINTING FROM WINDOWS
72 Printing with Best Functions for Your Needs
Printing Several Pages on One Sheet
The N-up feature allows you to condense and print several pages of a document on one sheet of paper. This feature is
very useful for browsing a large number of pages for appearance or page order.
For example, to check the navigation path of a number of web pages or review the narrative of a slide presentation, using
N-up is not only convenient but conserves paper as well.
If you are using the Image Overlay feature in combination with N-up printing, the overlay prints once per sheet, rather
than once per page.
Printing multiple pages per sheet
1
Display the Finishing tab.
2
Select how many pages you want to print on a single sheet at the [Number of pages per
sheet] box.
2 pages — Select this to print images from 2 pages arranged on one sheet.
4 pages — Select this to print images from 4 pages arranged on one sheet.
6 pages — Select this to print images from 6 pages arranged on one sheet.
8 pages — Select this to print images from 8 pages arranged on one sheet.
9 pages — Select this to print images from 9 pages arranged on one sheet.
16 pages — Select this to print images from 16 pages arranged on one sheet.
3
Select how the pages are arranged on one sheet in the [Direction of print] option.
Left to Right — Select this to arrange pages horizontally from the left and printed top to bottom on one sheet.
Right to Left — Select this to arranged pages horizontally from the right and printed top to bottom on one sheet.
Left to Right by column — Select this to arrange pages vertically from the top and printed left to right on one
sheet.
Right to Left by column — Select this to arrange pages vertically from the top and printed right to left on one
sheet.
4
If you want to draw a line around each page, check the [Draw Borders Around Pages]
box.
5
Set any other print options you require and click [OK].
6
Click [OK] or [Print] to send the print job.
yMultiple pages are printed per sheet.
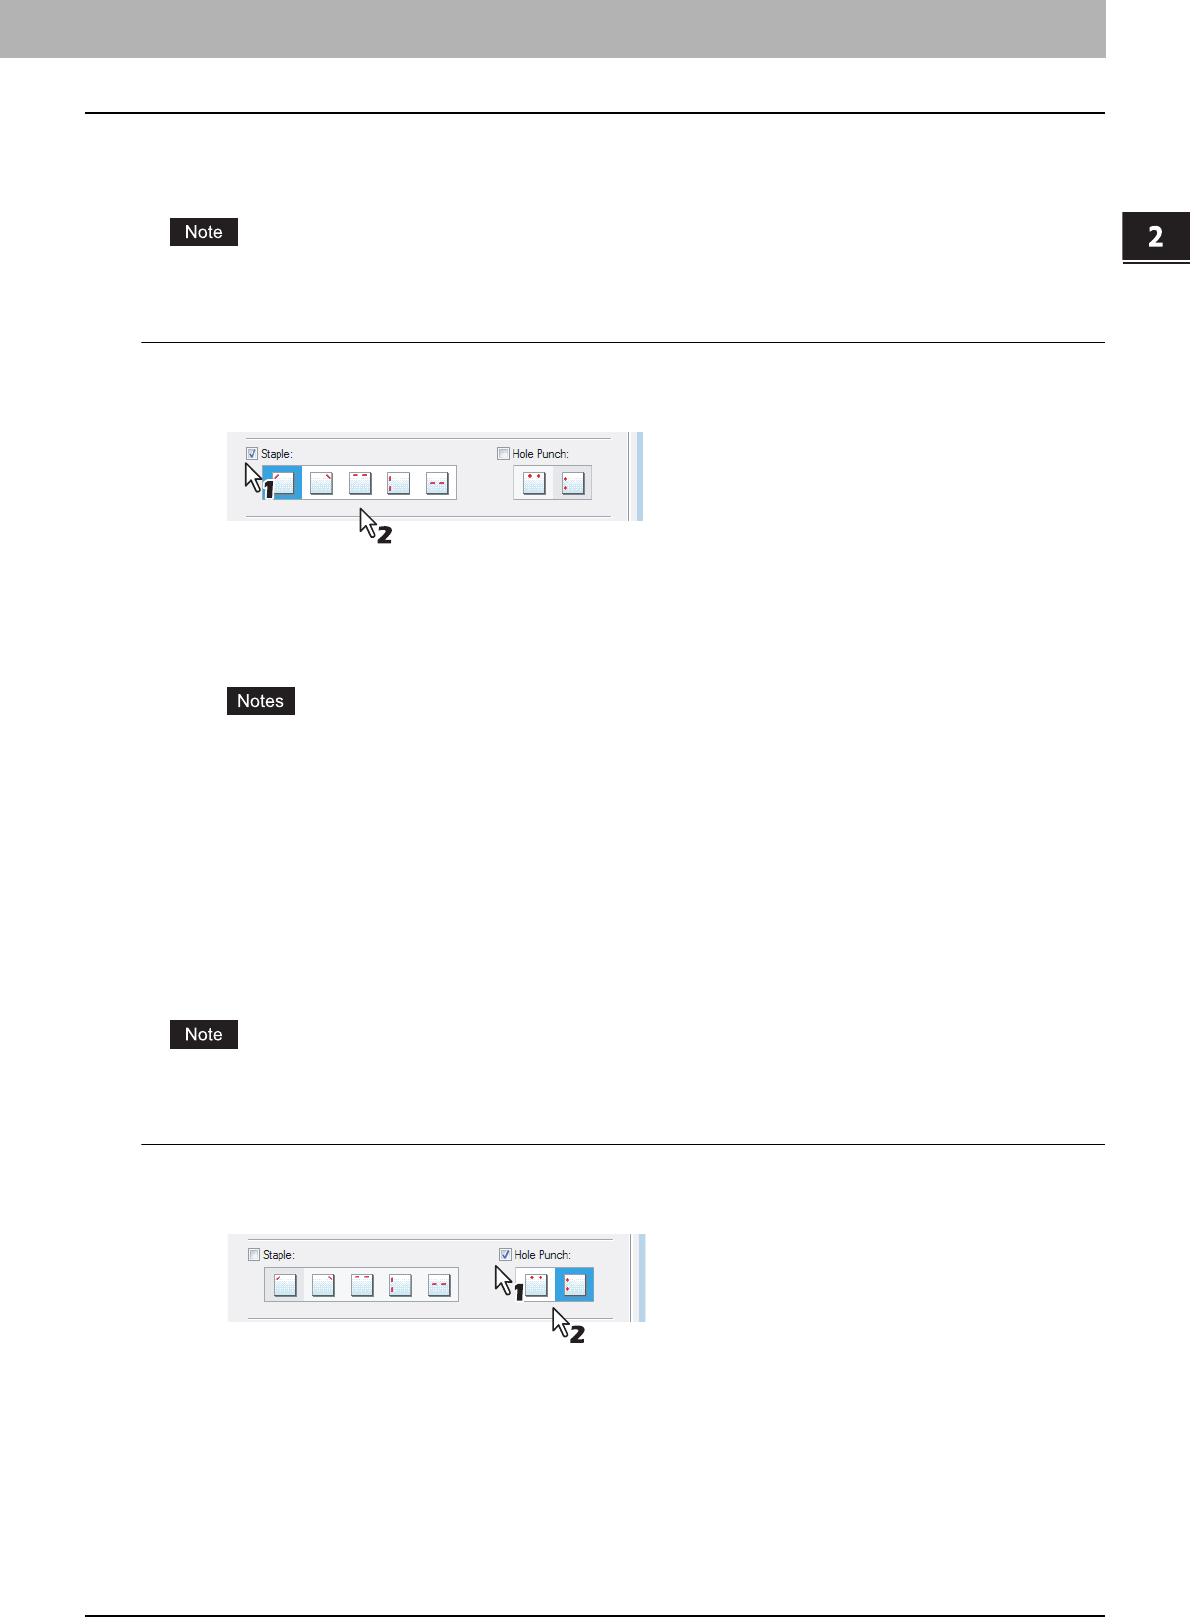
2.PRINTING FROM WINDOWS
Printing with Best Functions for Your Needs 73
2 PRINTING FROM WINDOWS
Stapling
You can staple sets of paper to exit from the equipment.
Stapling is not available if a finisher (optional) is not installed.
Stapling the paper
1
Display the Finishing tab.
2
Check the [Staple] check box. Then select how to staple.
Upper Left — Select this to staple the printed document at the upper left.
Upper Right — Select this to staple the printed document at the upper right.
Center Top — Select this to double staple the printed document along the top edge.
Middle Left — Select this to double staple the printed document along the left side.
Center Double — Select this to fold and double staple the printed document in the center.
yThe selectable options vary depending on the paper size.
y[Center Double] can be selected only when the Saddle Stitch Finisher (optional) is installed and configured
on the Configuration tab.
3
Set any other print options you require and click [OK].
4
Click [OK] or [Print] to send the print job.
yThe output is stapled for each copy.
Hole Punching
Select this to punch holes on printed sheets of paper to exit from the equipment.
Hole Punching is not available if a hole punch unit (optional) is not installed.
Punching holes
1
Display the Finishing tab.
2
Check the [Hole Punch] check box. Then select how to hole punching.
Center Top — Select this to create holes along the top edge.
Middle Left — Select this to create holes along the left side.
3
Set any other print options you require and click [OK].
4
Click [OK] or [Print] to send the print job.
yThe output is hole punched.
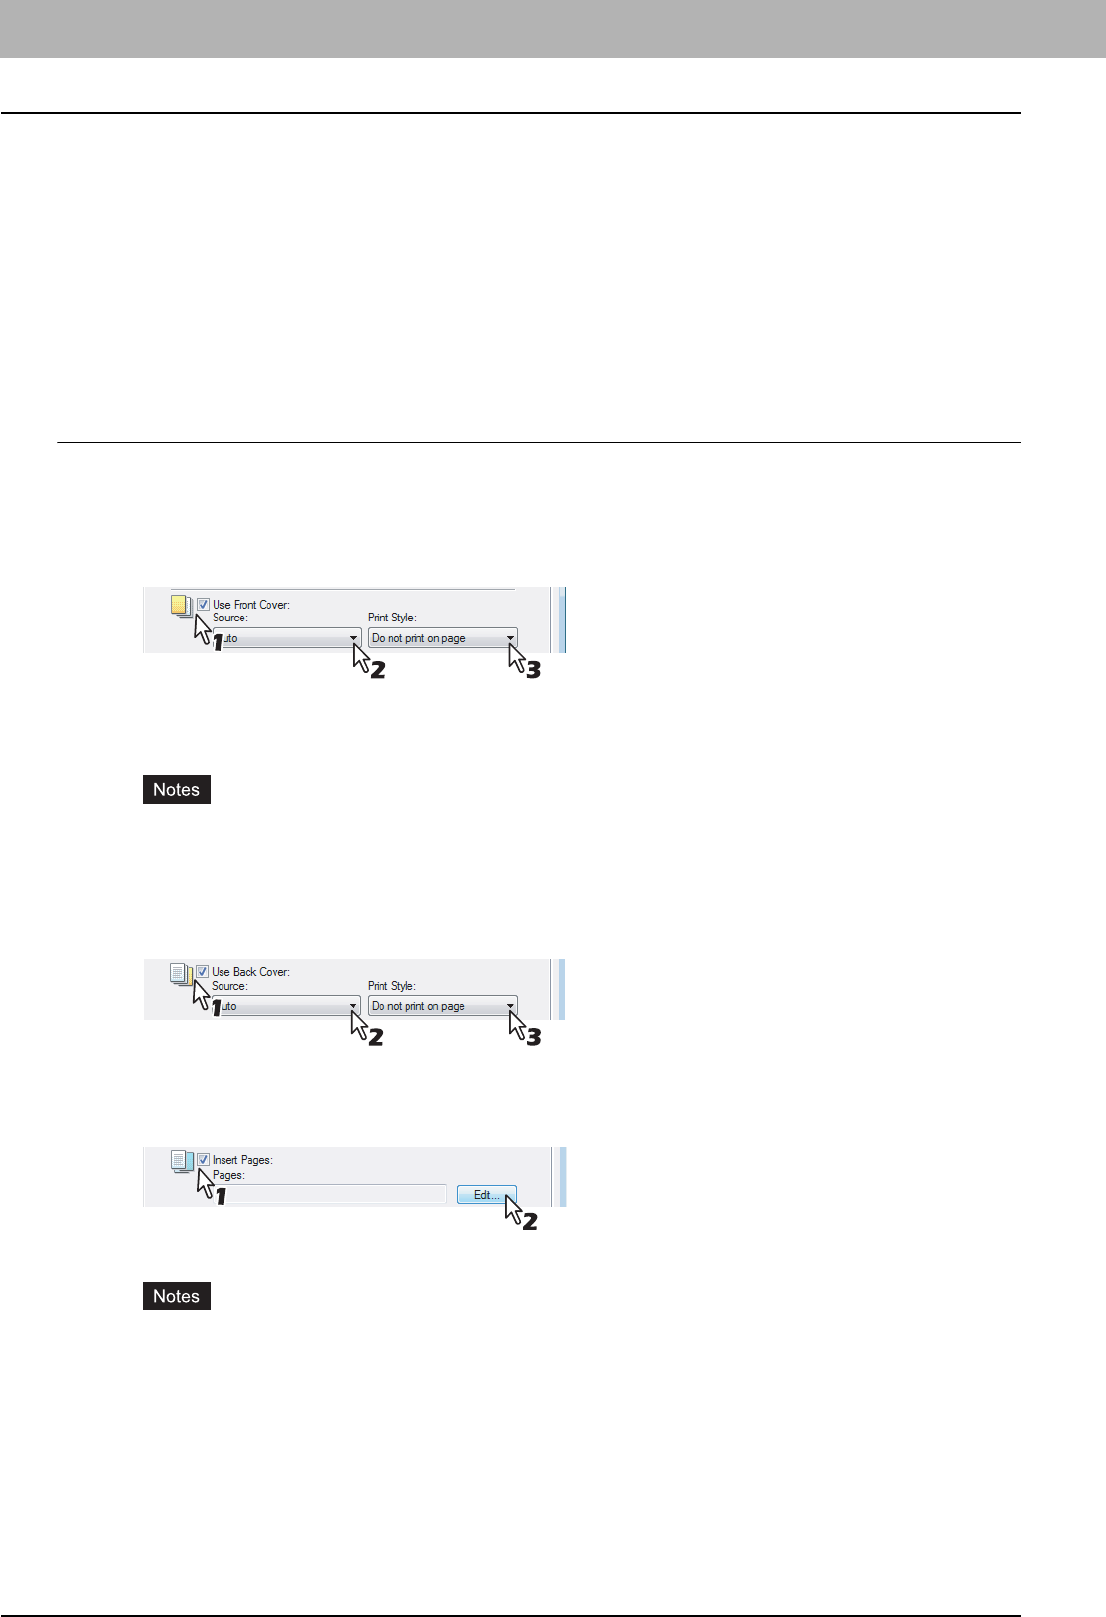
2 PRINTING FROM WINDOWS
74 Printing with Best Functions for Your Needs
Finishing Options in Paper Handling Tab Menu
The printer driver allows you to create a print job with layout options to make your document more essential. In this
section various printing functions enabled with the [Paper Handling] tab menu are explained.
P.74 “Inserting Different Types of Paper”
P.75 “Interleaving Pages”
Inserting Different Types of Paper
You can print paper for front covers, back covers, or for inserting between pages by feeding from different paper sources.
This is useful when you want to print or insert a color cover and color sheets in front of every chapter in a document.
Printing or inserting a front cover and back cover
1
Display the Paper Handling tab.
2
To print or insert a front cover, check the [Use Front Cover] box and select the drawer
where the cover paper is loaded at the [Source] box. Then select whether inserting a
blank cover or printed front cover at the [Print Style] box.
Do not print on page — Select this to insert a blank front cover.
Print one side of the page — Select this to print the first page of the document on a front side of a cover.
Print both sides of page — Select this to print the first two pages of the document on both sides of a cover.
yWhen [Auto] is selected in the [Source] box, the paper is automatically selected according to the printed
document size.
y[Print both sides of page] is available only when 2-Sided printing is enabled at the Finishing tab.
3
To print or insert a back cover, check the [Use Back Cover] box and set the [Source]
and [Print Style] options that you require.
yHow to set the Source and Print Style options is the same as for the [Use Front Cover] option.
4
To print or insert sheets between the pages, check the [Insert Pages] box and click
[Edit...].
yThe Insert Pages dialog box appears.
yUp to 50 pages can be inserted.
yInsert Pages printing is performed using the PSL3 printer driver from an application that can create the PS
command directly, the interleaving sheets may not be inserted between the designated pages. In that case,
disable the [Use PostScript Passthrough] option in the PostScript Settings dialog box.
P.53 “PostScript Settings”
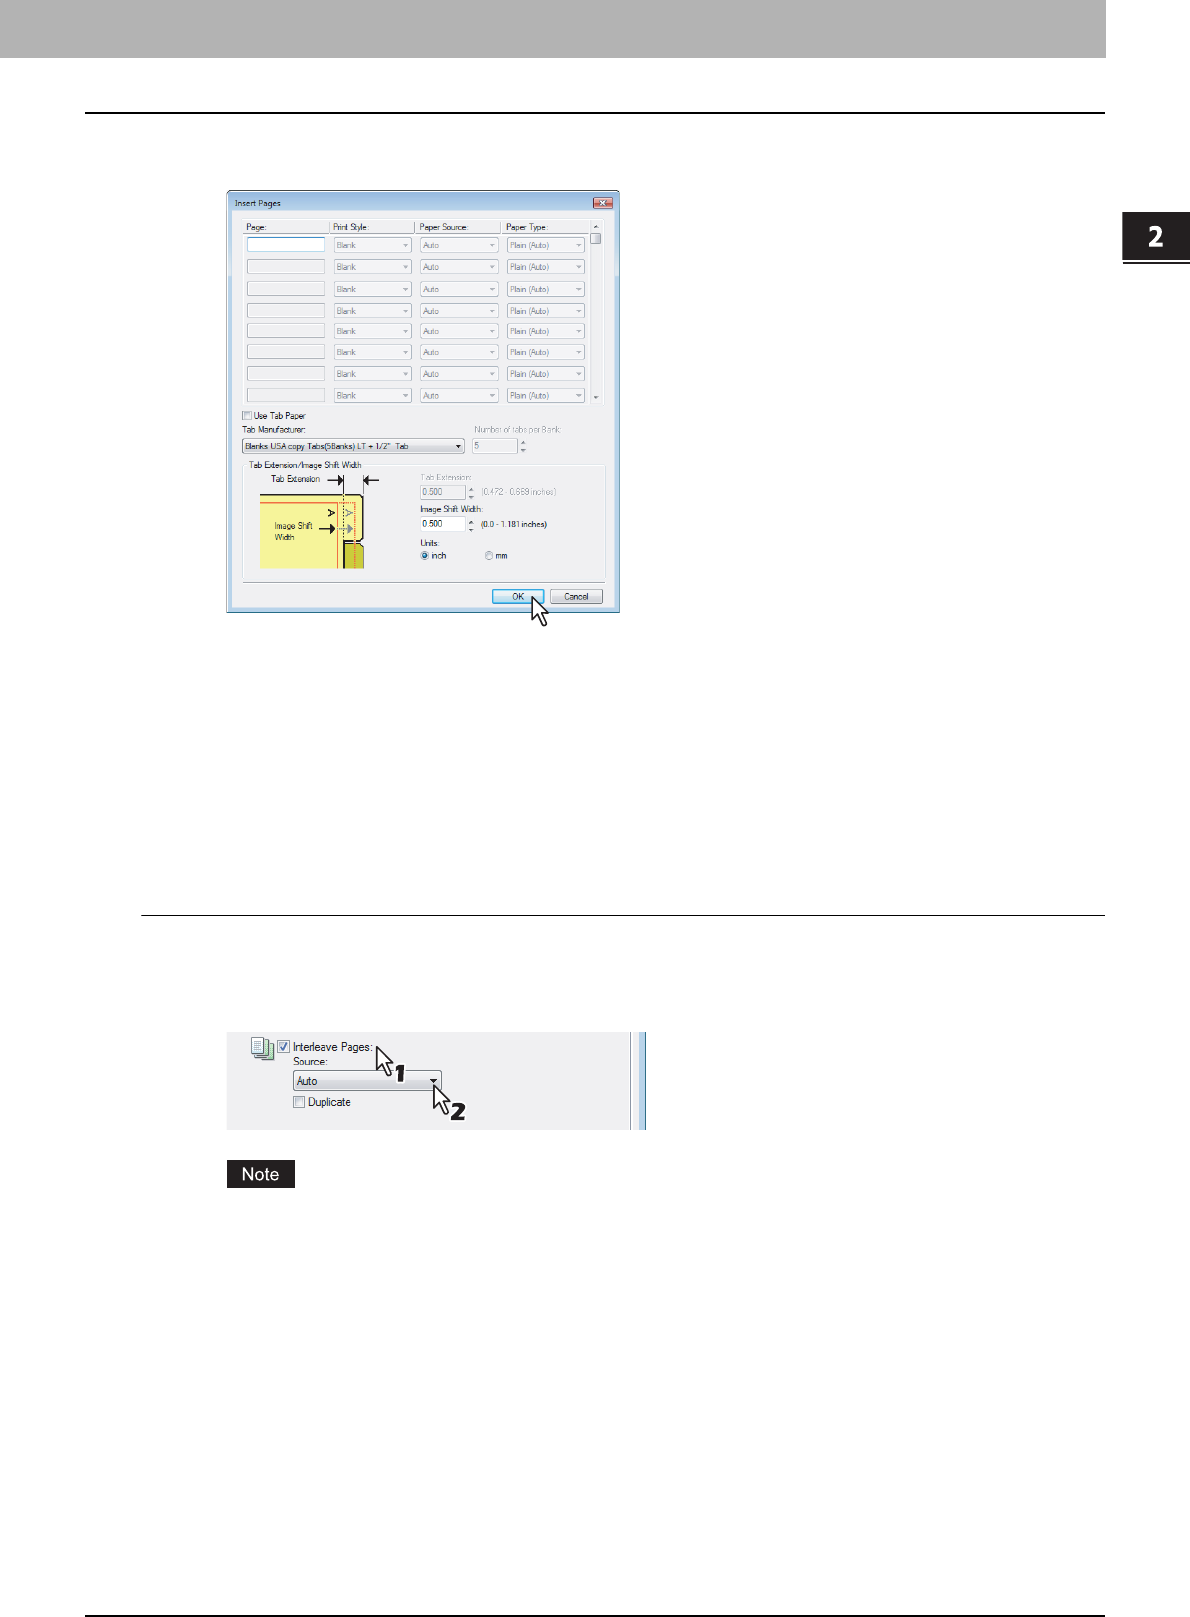
2.PRINTING FROM WINDOWS
Printing with Best Functions for Your Needs 75
2 PRINTING FROM WINDOWS
5
Enter the page numbers the sheet will be inserted in each [Page] box and select the
[Print Style], [Paper Source], and [Paper Type] options as you require.
6
Set any other print options you require and click [OK].
7
Click [OK] or [Print] to send the print job.
yA front cover and back cover are printed or inserted for output.
Interleaving Pages
This feature is useful when you want to insert paper of a different type, or from another source, between every page of
your print job. For example, you could use this option to insert blank, colored sheets between overhead transparencies.
Inserting sheets between every page of a print job
1
Display the Paper Handling tab.
2
To insert sheets between every page, check the [Interleave Pages] box and select the
drawer where the desired paper is loaded at the [Source] box.
When [Auto] is selected in the [Source] box, the paper is automatically selected according to the printed
document size.
3
To print the previous page on interleaved sheets, check on [Duplicate] box.
yThis equipment prints every previous page on interleaved sheets which are inserted after the page so that you
can duplicate a document.
4
Set any other print options you require and click [OK].
5
Click [OK] or [Print] to send the print job.
ySheets are interleaved between every page.
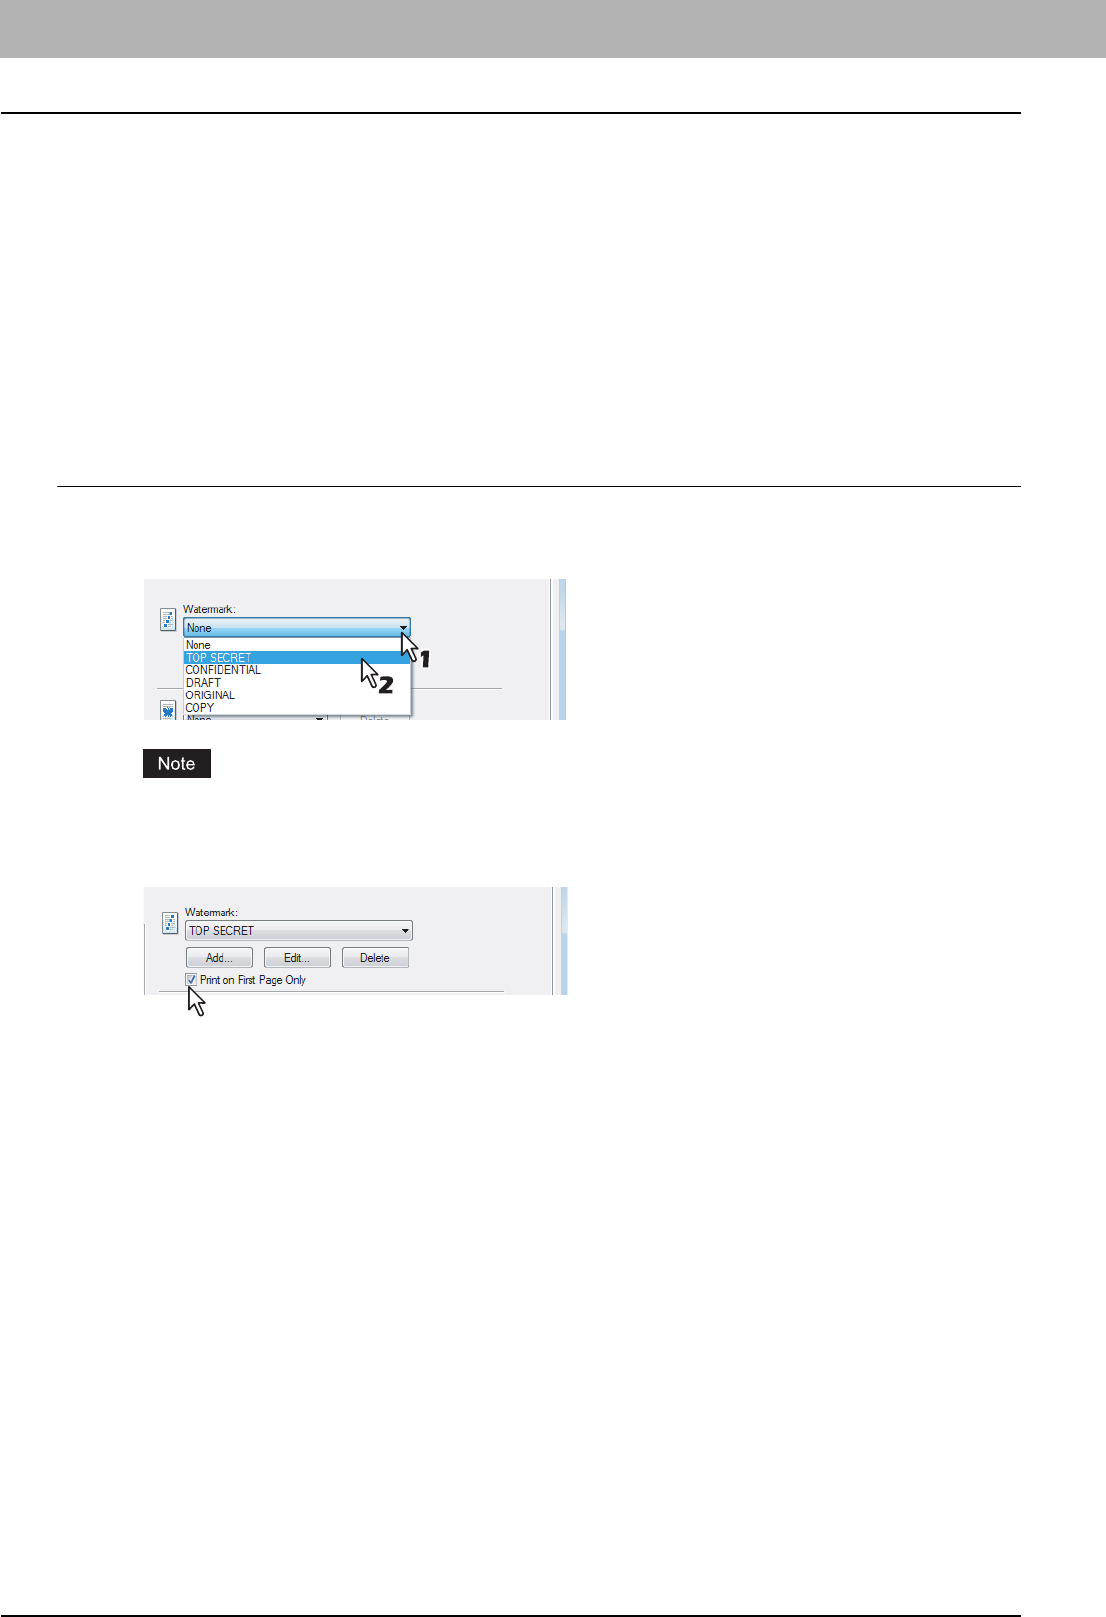
2 PRINTING FROM WINDOWS
76 Printing with Best Functions for Your Needs
Finishing Options in Effect Tab Menu
The printer driver allows you to create a print job with layout options to make your document more essential. In this
section various printing functions enabled with the [Effect] tab menu are explained.
P.76 “Printing with Watermarks”
P.78 “Printing with an Overlay File”
Printing with Watermarks
Watermarks overprint your document with useful information, such as [TOP SECRET,] [CONFIDENTIAL,] [DRAFT,]
[ORIGINAL,] or [COPY.] You can choose from several predefined watermarks or you can create and save your own
custom watermarks.
Watermarks are text only. To add graphics or other document elements, use image overlays instead.
Printing a watermark
1
Display the Effect tab.
2
Select the watermark to be printed at the [Watermark] box.
You can create a new watermark if the watermark that you prefer is not listed in the box.
3
If you want to print the watermark on only the first page, check on the [Print on First
Page Only] box.
4
Set any other print options you require and click [OK].
5
Click [OK] or [Print] to send the print job.
yThe print job is printed with the watermark.
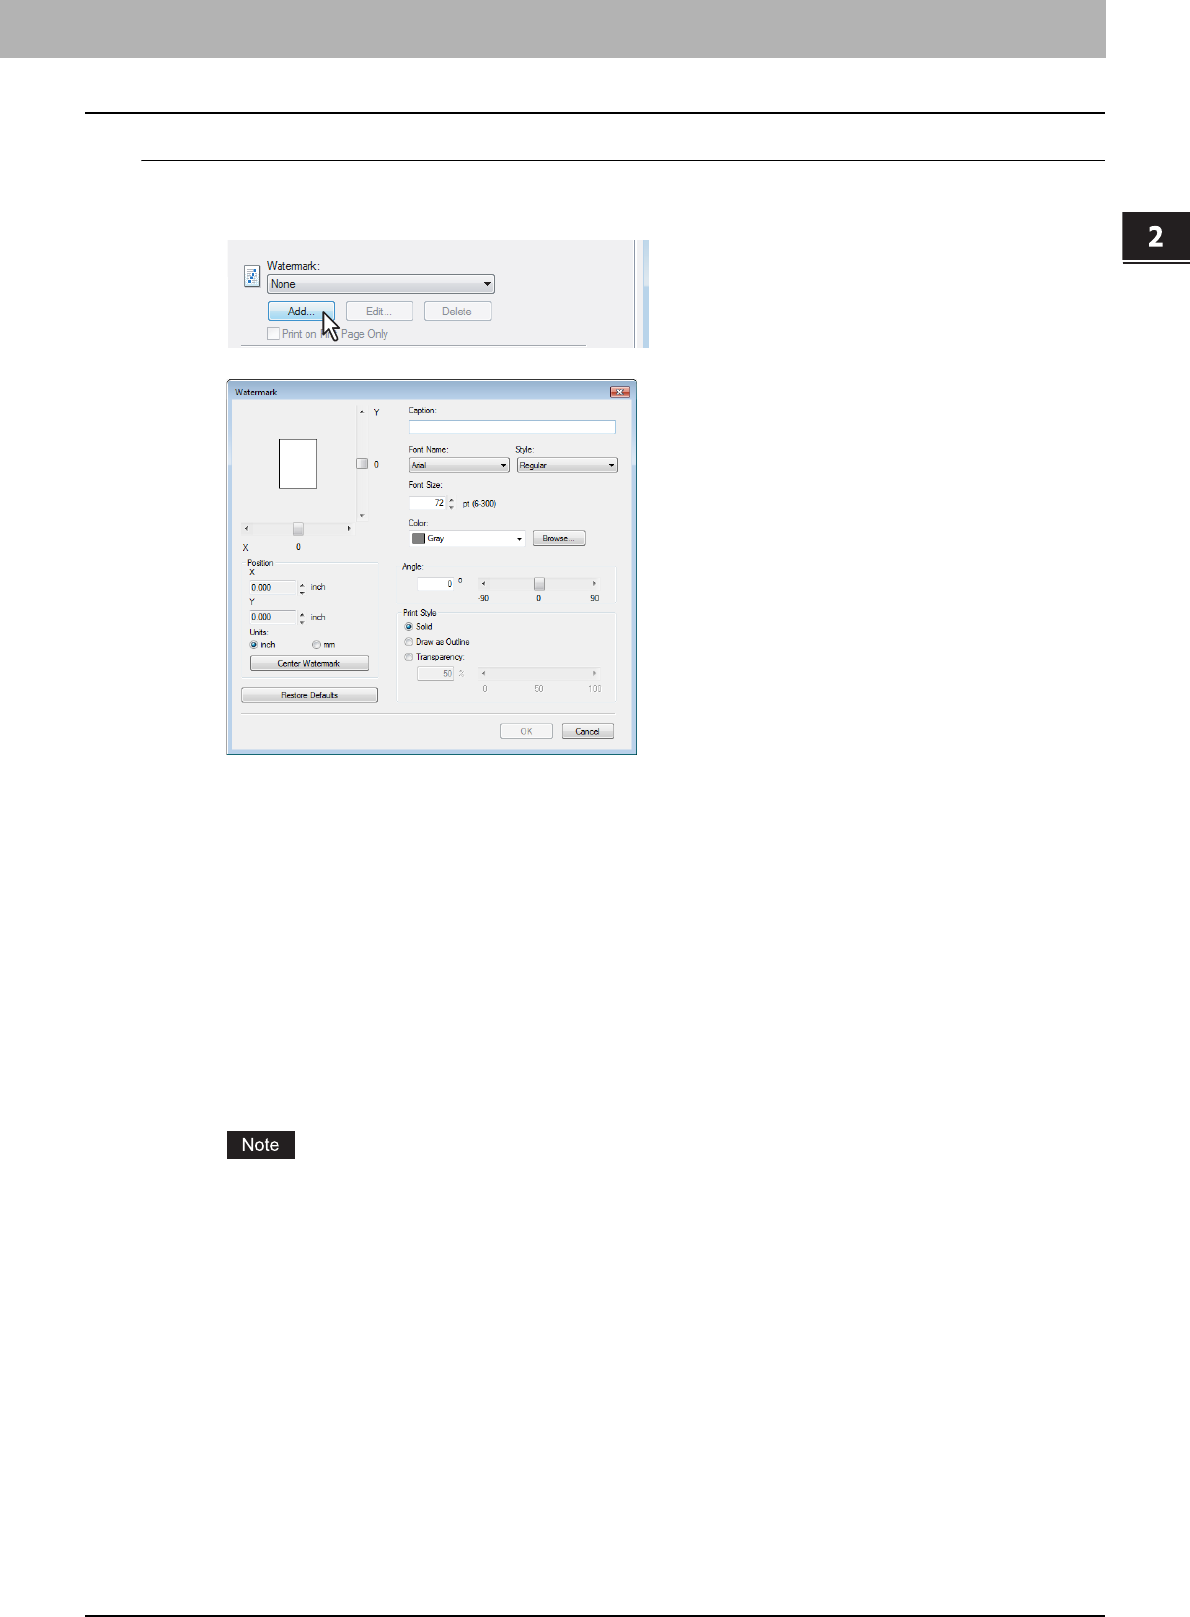
2.PRINTING FROM WINDOWS
Printing with Best Functions for Your Needs 77
2 PRINTING FROM WINDOWS
Creating or editing a watermark
1
Click [Add] to create a new watermark, or select a watermark that you want to edit and
click [Edit] to edit a watermark.
yThe Watermark dialog box appears.
2
Adjust the position of the watermark by specifying X and Y values in [Position].
yIf you click [Center Watermark], the watermark comes at the center of the page.
3
Enter the watermark text in the [Caption] box.
yYou can enter up to 63 characters for the [Caption] box. However, if too many characters are entered, the
watermark may not be printed correctly.
4
Select a font for the watermark at the [Font Name] box.
5
Select a font style for the watermark at the [Style] box.
6
Enter the font size in the [Font Size] box.
yYou can enter any integer between 6 and 300pt in units of 1pt.
7
Select a color for the watermark at the [Color] box.
yIf your preferred color is not listed in the box, click [Browse...] to display the color palette and add your color.
When [Black and White] is selected at the [Color] box on the Basic tab, the [Color] box is not available.
8
To rotate the watermark, enter the number of degrees in the [Angle] box.
yYou can enter from -90 degrees to 90 degrees in units of 1 degree in the [Angle] box.
yYou can also set the angle using the scroll bar.
9
Select how the watermark text is printed from [Solid], [Draw as Outline], and
[Transparency].
Solid — Select this to print solid type of watermark.
Draw as Outline — Select this to print an outline type of watermark.
Transparency — Select this for a transparent watermark. Set the transparent ratio from 0 to 100% in units of 1%.
You can also set the transparent ratio using the scroll bar.
10
Click [OK] to save the watermark settings.
yThe watermark is added or edited.
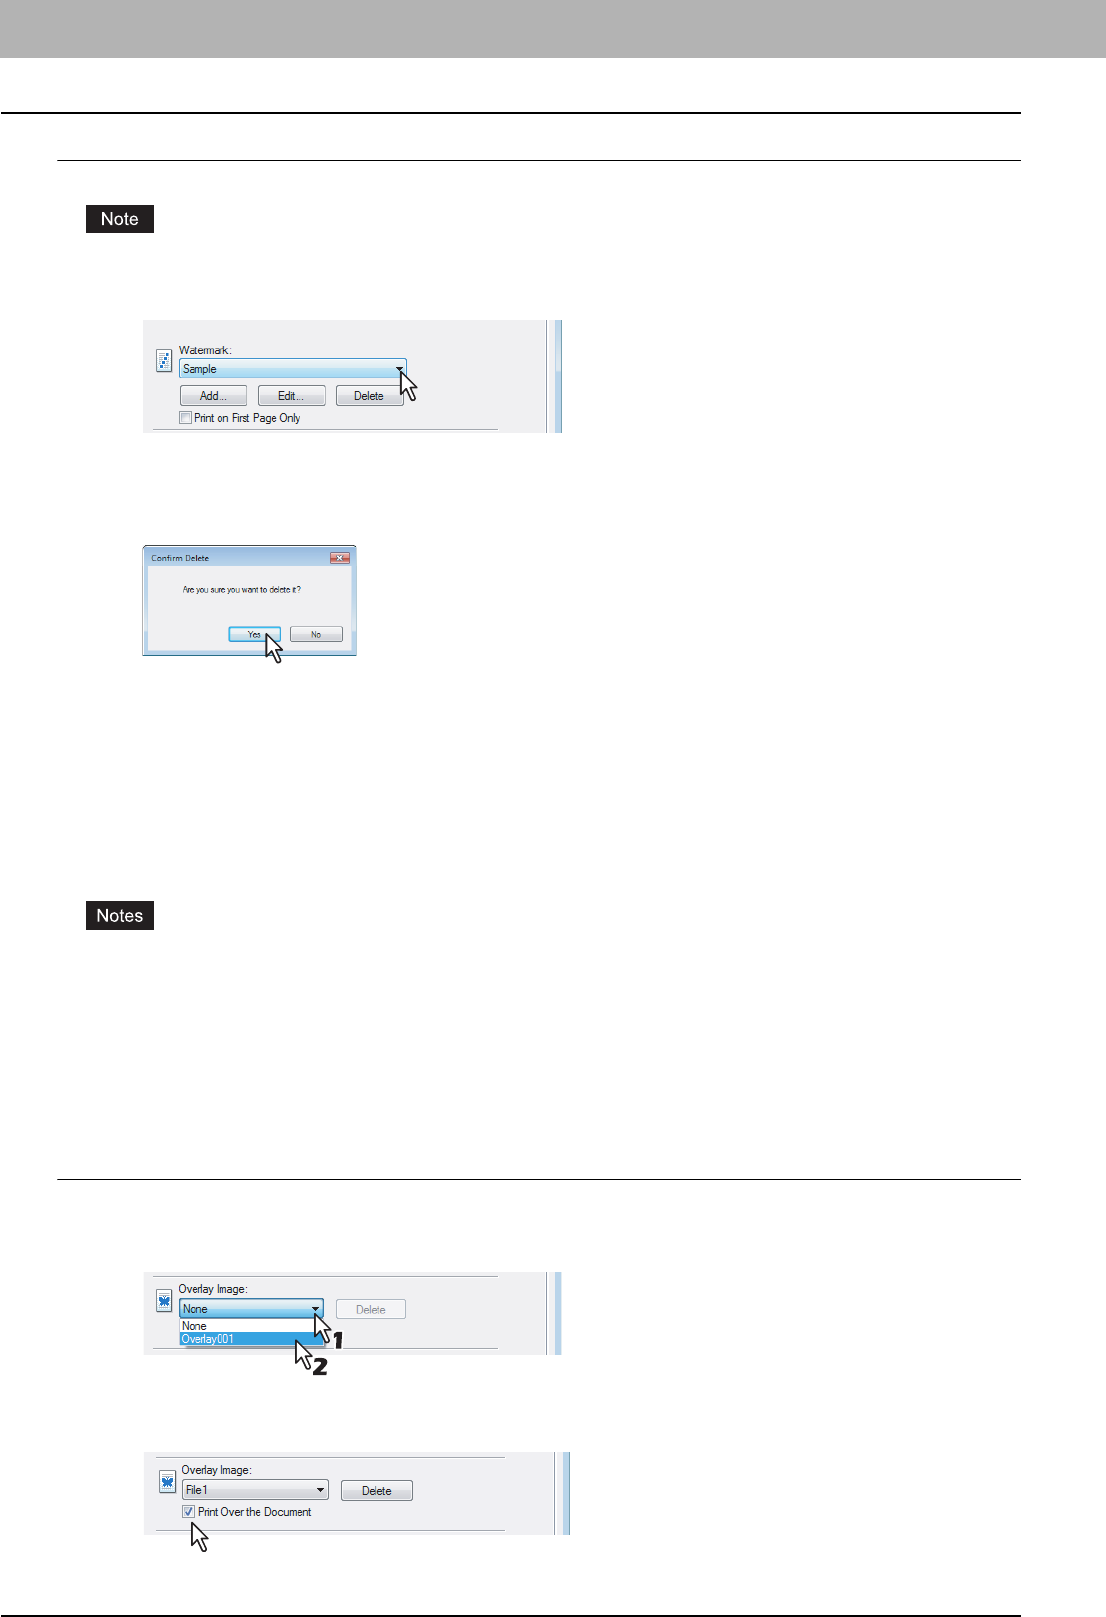
2 PRINTING FROM WINDOWS
78 Printing with Best Functions for Your Needs
Deleting a watermark
You can delete the default watermarks. However, they cannot be restored by clicking the [Restore Defaults] button.
1
Select a watermark that you want to delete at the [Watermark] box.
2
Click [Delete].
yThe Confirm Delete dialog box appears.
3
Click [YES].
yThe watermark is deleted.
Printing with an Overlay File
Using image overlays ensures that widely-used images are readily available and consistently reproduced. Image overlays
are independent documents that are merged into other documents during printing and thereby increase the time required
to print a job. To superimpose text on your document, it may be faster to use watermarks.
To print with an overlay file, you should create an overlay file first.
P.62 “Creating An Overlay File”
yIf you use Image Overlays in combination with the N-up feature, the image overlay is printed once per sheet, not
once per page.
yBoth the overlay file and the documents on which you superimpose the overlay image must be created at the same
size, color mode, and orientation.
yWhen printing with Overlay Image using the PS3 printer driver from an application that can create the PS
command directly, the overlay image will not be printed. In that case, disable the [Use PostScript Passthrough]
option in the PostScript Settings dialog box.
P.53 “PostScript Settings”
Printing an overlay image as a print job
1
Display the Effect tab.
2
Select the overlay image name to be used in the [Overlay Image] box.
3
If you want to print the overlay image over the document, check on the [Print Over the
Document] box.
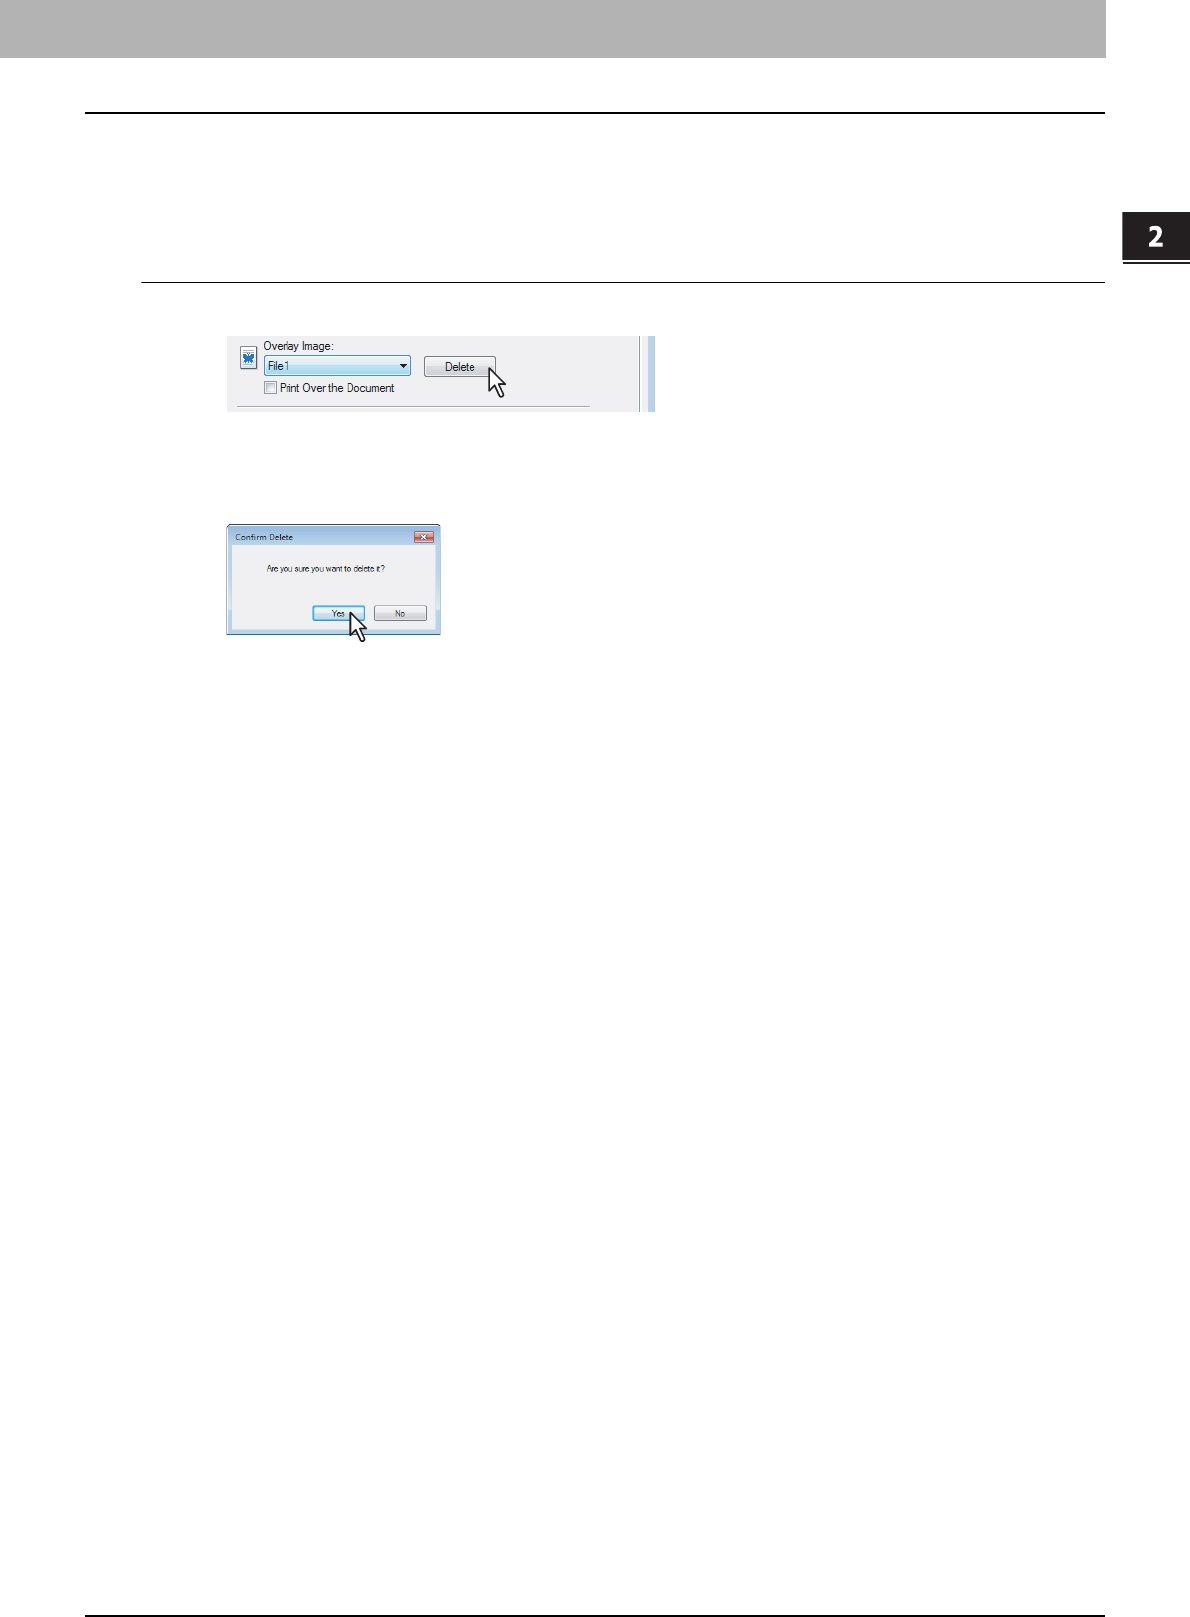
2.PRINTING FROM WINDOWS
Printing with Best Functions for Your Needs 79
2 PRINTING FROM WINDOWS
4
Set any other print options you require and click [OK].
5
Click [OK] or [Print] to send the print job.
yThe print job is printed with the overlay image.
Deleting an overlay image
1
Select an overlay image that you want to delete at the [Overlay Image] box.
2
Click [Delete].
yThe Confirm Delete dialog box appears.
3
Click [Yes].
yThe overlay image is deleted.
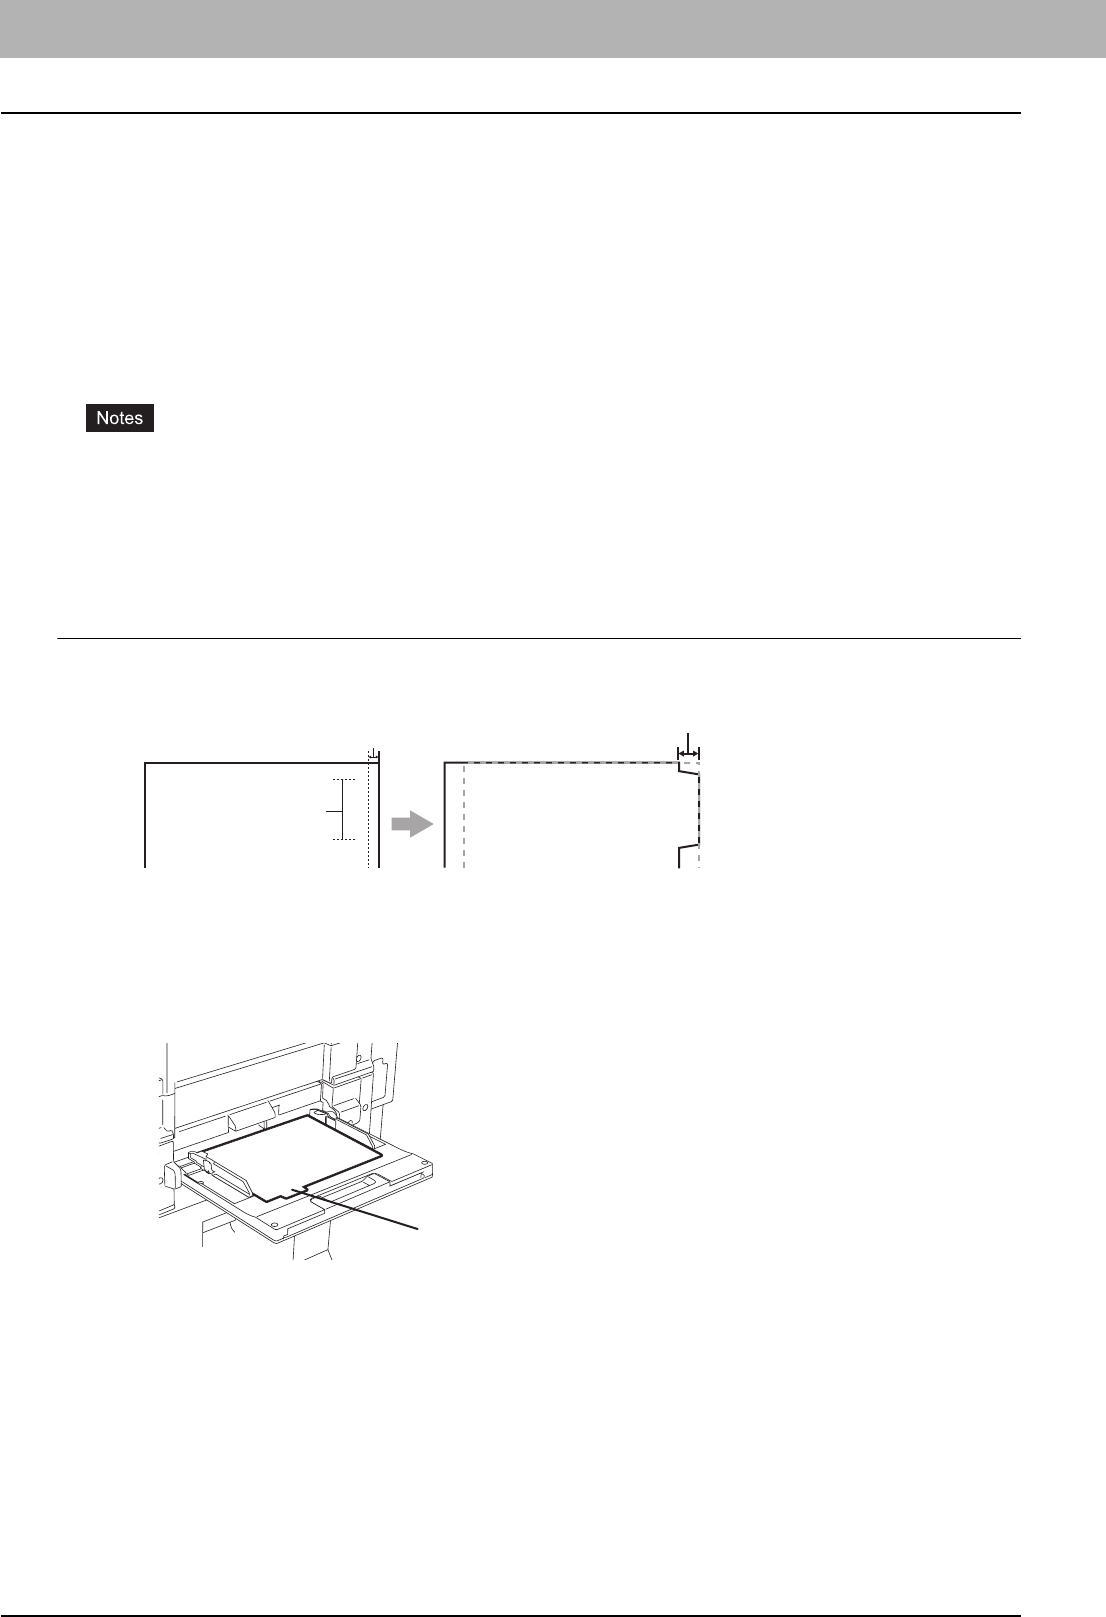
2 PRINTING FROM WINDOWS
80 Printing with Best Functions for Your Needs
Using Various Types of Paper
This equipment allows you to print on various types of paper. The procedure below is for print jobs which require
precautions before placing paper.
P.80 “Printing on Tab Paper”
P.82 “Printing on paper larger than standard sizes”
Printing on Tab Paper
This equipment supports tab printing, which can print in the tab extension of the tab paper. The job will be output in the
inner tray.
yThis equipment can print only on the Letter sized or A4 sized tab paper.
yIf mis-printing occurs while multiple tab pages are printed continuously, toner may adhere to the reverse side of
paper. To avoid this, it is recommended to print tab paper as a separated job for each page so that this equipment
performs cleaning before printing the next tab paper.
yWhen printing tab paper, the tab paper may be caught in the exit of the inner tray because the roller failed to deliver
the tab extension to the exit. In that case, remove the tab paper before printing the next job.
Printing a document on tab paper
1
Create a Letter sized or A4 sized document and place the text or object that should
appear on the tab extension as described below.
When you create a document for tab printing, place the text or object that should appear on the tab extension on
the right side of the document. You must place the text in the height that exactly fits the tab extension. Also the
right margin, a margin between the text and right edge of the document, must have more than 0.17 inch or 4.2 mm
space because the equipment cannot print in the space.
2
Place tab paper on the Bypass Tray.
yWhen placing the tab paper on the Bypass Tray, place the tab paper so that the tab side is on the outside.
Tab Text
Document Printed Image
Tab Text
Width of Tab Extension = Image Shift Margin
More than 0.17" or 4.2mm
Must exactly
fit the tab extension
Place the tab pape
r
so that the tab side
is on the outside.
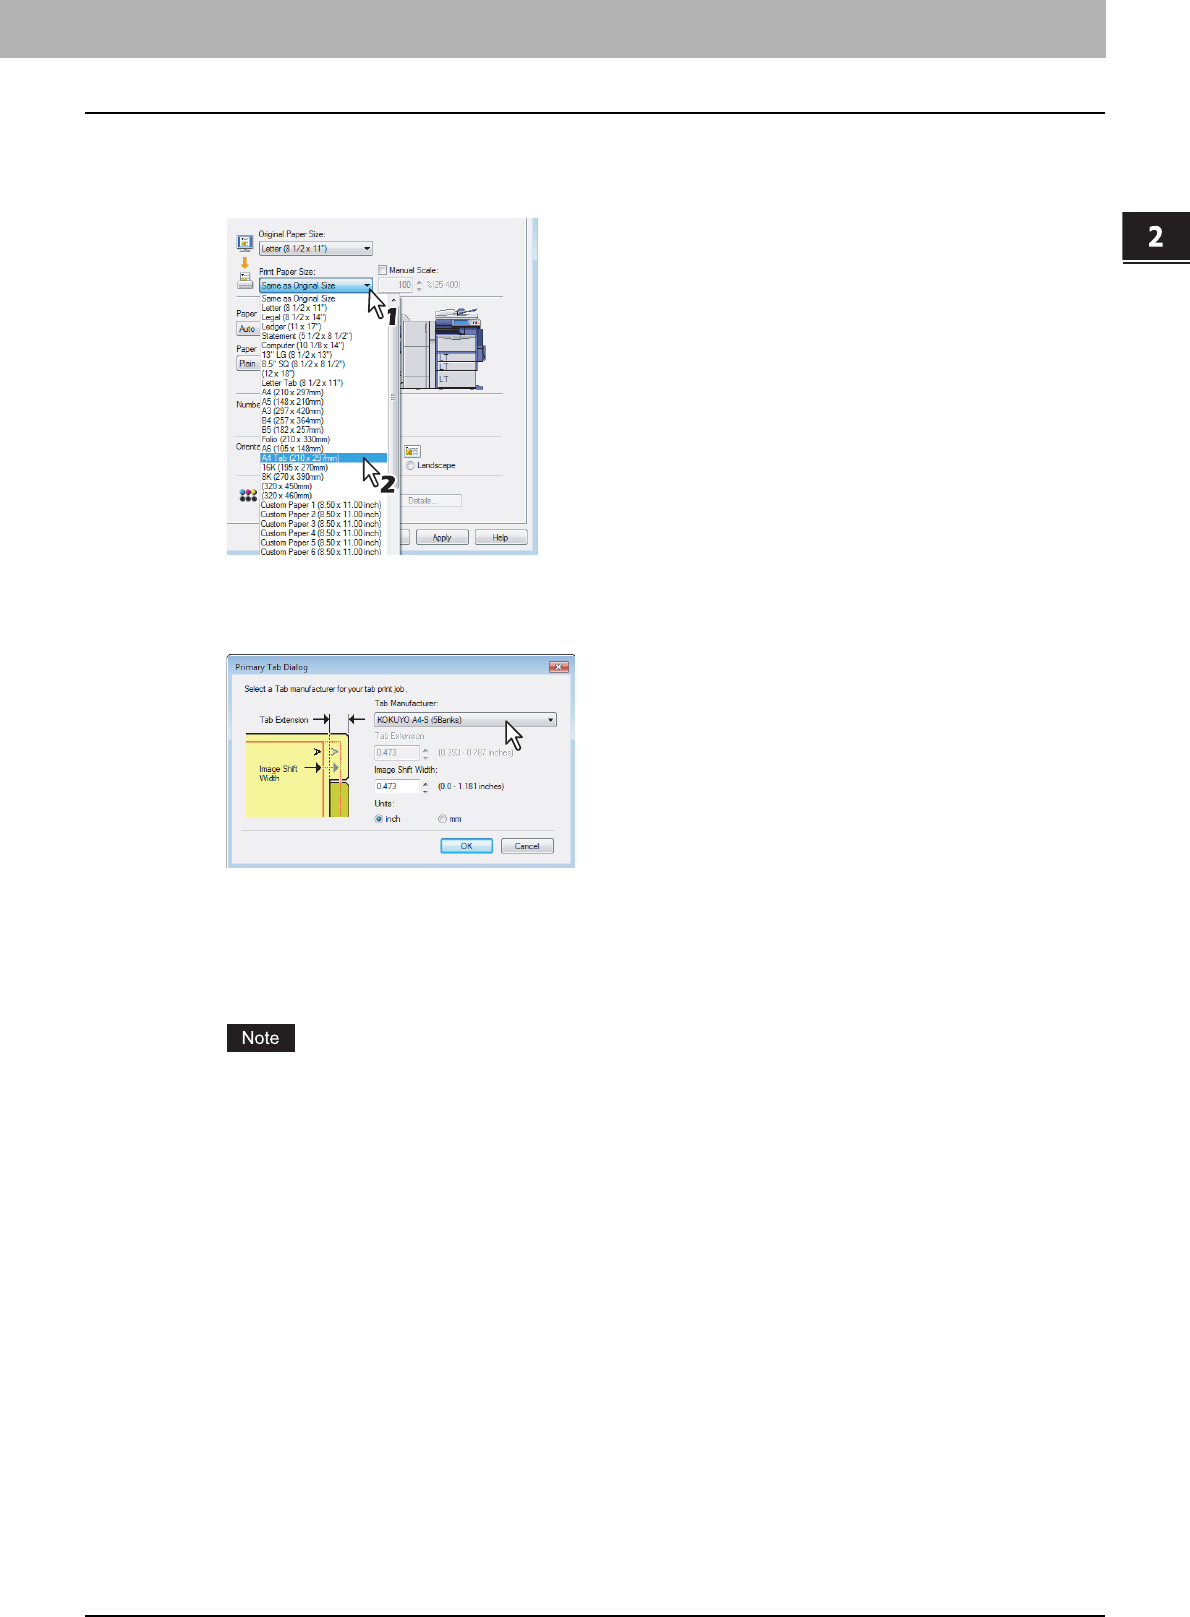
2.PRINTING FROM WINDOWS
Printing with Best Functions for Your Needs 81
2 PRINTING FROM WINDOWS
3
When printing a document, display the Basic tab of the printer driver properties, select
document size in the [Original Paper Size] box, and select either [Letter Tab] or [A4 Tab]
(according to the document size) in the [Print Paper Size] box.
yThe Primary Tab Dialog dialog box appears.
4
In the [Tab Manufacturer] box, select the product name of the tab paper that you use, or
select [Custom] when you use other manufactured tab paper.
5
When you select [Custom] in the [Tab Manufacturer] option, enter the width of tab
extension in the [Tab Extension] box.
6
Enter the width to shift the printed image in the [Image Shift Width] box.
yIf you created a document as described in Step 1, enter the width of the tab extension here.
This equipment cannot print in the 0.17 inch or 4.2 mm margin area on the right side on the paper. Therefore,
be sure to enter the image shift margin so that an image will be printed within the printable area.
7
Click [OK].
8
Set any other print options you require and click [OK].
9
Click [OK] or [Print] to send the print job.
10
Press the [JOB STATUS] on the control panel.
yThe print job list appears.
11
Select the desired job in the print job list and then press the [START] button on the
control panel.
yThe print job is printed on the tab paper.
yFor the detailed instructions on how to use the control panel, see the following page:
P.140 “Monitoring the Print Job Status”

2 PRINTING FROM WINDOWS
82 Printing with Best Functions for Your Needs
Printing on paper larger than standard sizes
The procedure below is for printing on paper larger than standard sizes defined in the custom paper size setting. (Largest
size: 12.00 x 47.24 inches (305 x 1200 mm))
Custom paper sizes can be defined in the [Other] tab menu.
P.52 “Custom Paper Size”
Printing on paper larger than standard sizes
1
Display the properties of the printer driver and select the custom paper size in [Print
Paper Size] of the [Basic] tab menu before starting printing.
2
Set any other print options you require and click [OK].
3
Click [OK] or [Print] to send the print job.
4
Place paper larger than the standard sizes on the bypass tray.
yDo not mix it with other sizes.
yPrint one sheet by one from the bypass tray even if you have set the number of copies more than one.
5
Press the [JOB STATUS] on the control panel.
yThe print job list appears.
6
Select the desired job in the print job list and then press the [START] button on the
control panel.
yThe print job is printed on paper larger than the standard sizes.
yFor the detailed instructions on how to use the control panel, see the following page:
P.140 “Monitoring the Print Job Status”
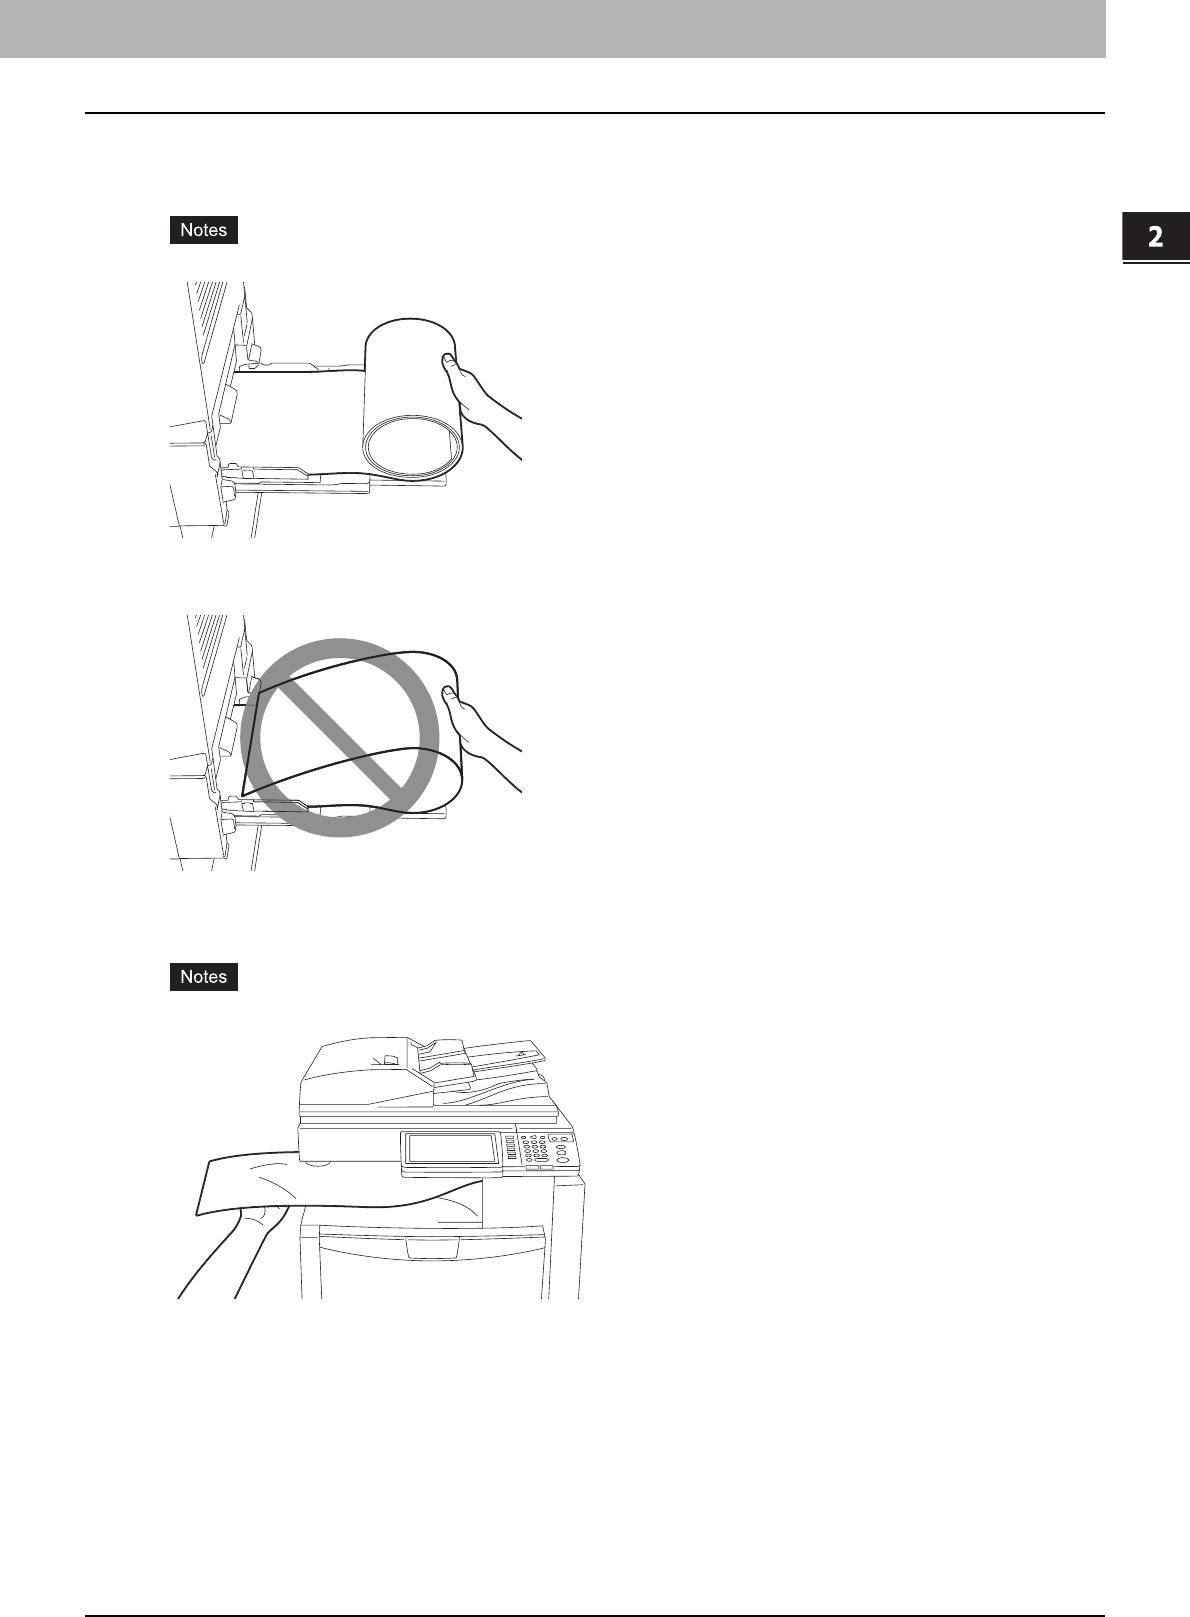
2.PRINTING FROM WINDOWS
Printing with Best Functions for Your Needs 83
2 PRINTING FROM WINDOWS
Inserting from the bypass tray
When printing
ySlightly curl the paper and start printing while holding it lightly by hand on the bypass tray.
yBe careful not to cut your fingers with the edge of paper when holding it.
yMake sure that the trailing edge of the paper will not be caught into the equipment as printing goes while you are
holding it.
yResolution will automatically be 300 dpi.
When feeding out
yWhen receiving the paper fed out, lightly hold it by hand.
yBe careful not to cut your fingers with the edge of paper when holding it.
yDo not pull it out forcibly while it is being fed.

3.PRINTING FROM MACINTOSH
This chapter describes the instructions on how to print from a client computer.
Printing from Application on Mac OS X 10.2.4 to Mac OS X 10.5.x ................................... 86
Considerations and Limitations ............................................................................................................................86
How to Print from Mac OS X 10.2.4 to Mac OS X 10.5.x .....................................................................................87
Page Setup Dialog on Mac OS X 10.2.4 to Mac OS X 10.5.x..............................................................................88
Print Dialog on Mac OS X 10.3.x to Mac OS X 10.5.x .........................................................................................93
Print Dialog on Mac OS X 10.2.x........................................................................................................................108

3 PRINTING FROM MACINTOSH
86 Printing from Application on Mac OS X 10.2.4 to Mac OS X 10.5.x
Printing from Application on Mac OS X 10.2.4 to Mac OS X 10.5.x
Once you have installed the PPD file as described in Installing the Printer on Mac OS X 10.2.4 to Mac OS X 10.5.x of
the Software Installation Guide, you can print directly from most of the Mac OS X applications.
Considerations and Limitations
yIf you print a PDF file with “Preview” application on Mac OS X 10.2.x, the page order will be incorrect. Please use
Adobe Acrobat Reader.
yThe print jobs sent from Mac OS X 10.3.x or earlier are processed as invalid jobs depending on the Department Code
Enforcement setting. When the printing is performed on Mac OS X 10.3.x to Mac OS X 10.5.x, the printing job is
displayed with a user name "OSX User" on the Touch Panel Display of the equipment.
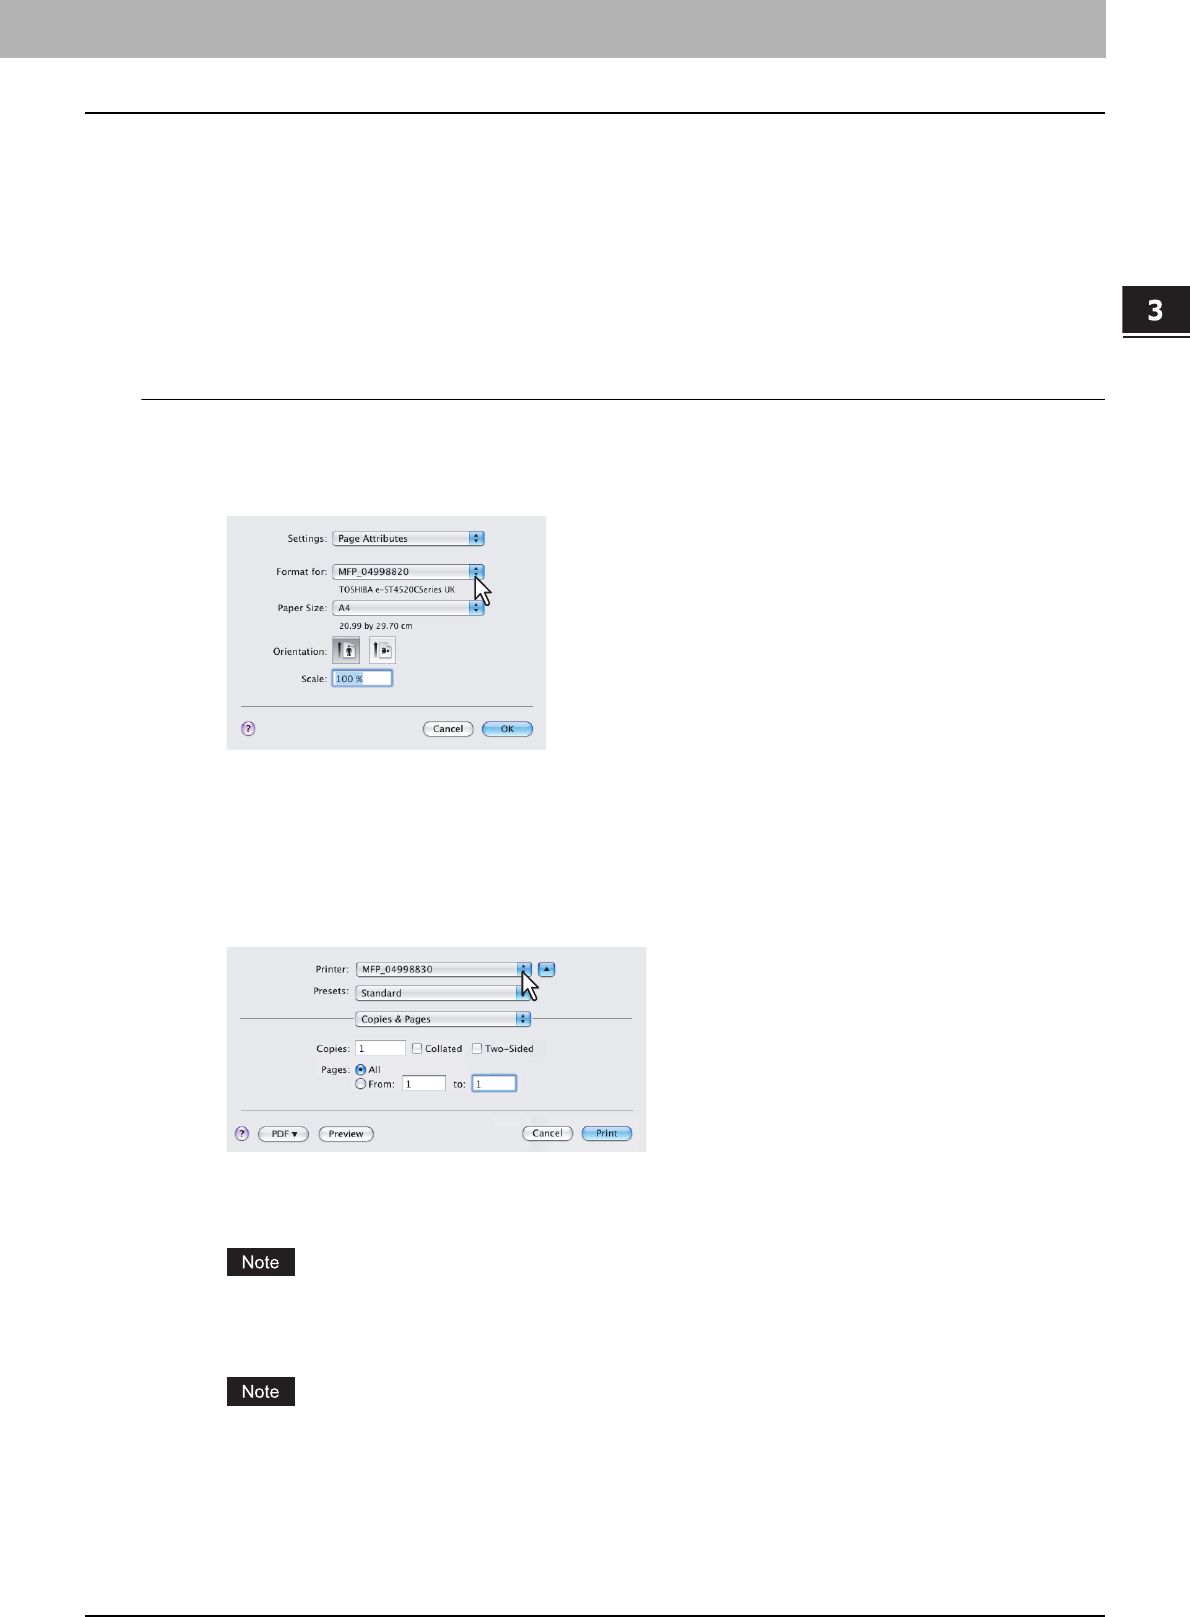
3.PRINTING FROM MACINTOSH
Printing from Application on Mac OS X 10.2.4 to Mac OS X 10.5.x 87
3 PRINTING FROM MACINTOSH
How to Print from Mac OS X 10.2.4 to Mac OS X 10.5.x
You do not need to switch printers before starting printing because they are all managed under the setting of [Print & Fax]
of [System Preferences]. Once a printer is added to the Printer List, you can select any printer directly from the Page
Setup dialog box or the Print dialog box.
Setting Options and Printing from Macintosh Computers
In Mac OS X applications, print options are set from both the Page Setup dialog box and the Print dialog box.
Printing from Macintosh applications
1
Open a file and select [Page Setup] from the [File] menu of the application.
2
Select the name of the equipment at the [Format for] box and specify the Page Setup
settings for your print job.
ySetting the Page Setup varies depending on how you want to print a document.
P.88 “Page Attributes”
3
Click [OK] to save the Page Setup settings.
4
Select [Print] from the [File] menu of the application.
5
In the dialog box that appears, make sure the name of the equipment is selected at the
[Printer] box and specify the Print settings for your print job.
ySetting the Print Setup varies depending on how you want to print a document.
P.93 “Print Dialog on Mac OS X 10.3.x to Mac OS X 10.5.x”
P.108 “Print Dialog on Mac OS X 10.2.x”
The Print dialog boxes vary across applications.
6
Click [Print] to print a document.
The content set in the Print dialog box can be saved as [presets]. Select [Save as] in the [Presets] box and save
it under the desired name. If you use this preset content as a default setting, select it in the [Presets] box.
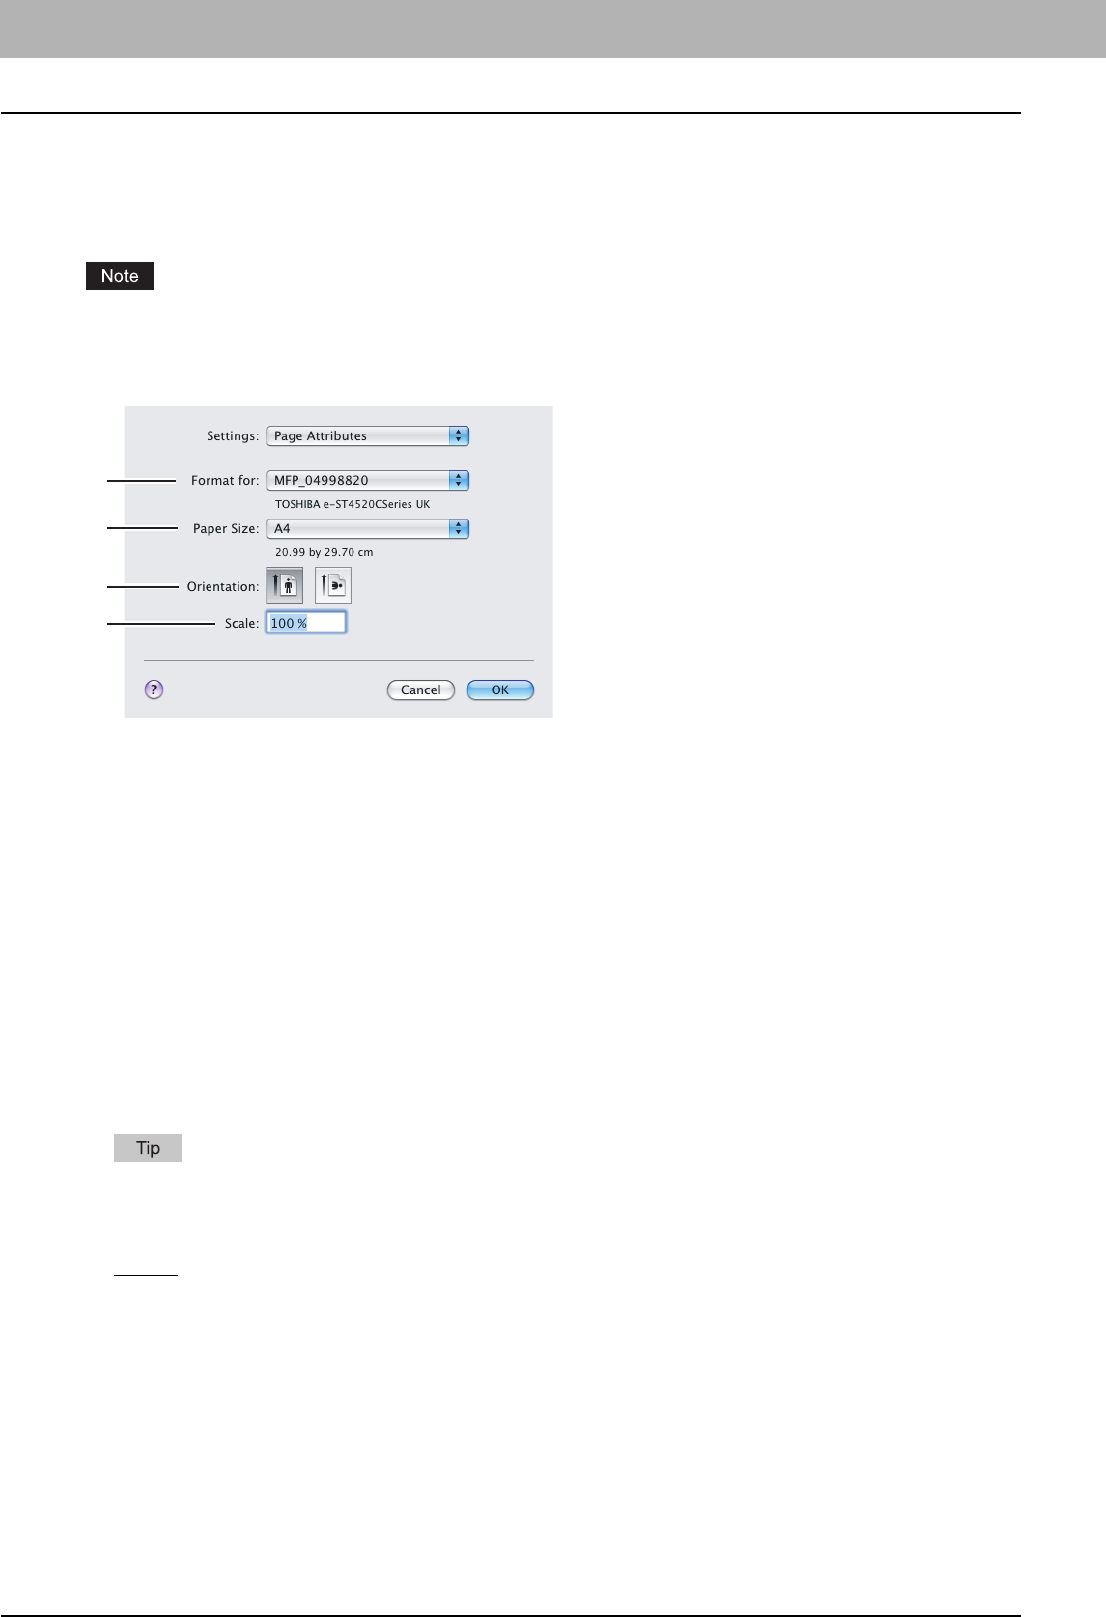
3 PRINTING FROM MACINTOSH
88 Printing from Application on Mac OS X 10.2.4 to Mac OS X 10.5.x
Page Setup Dialog on Mac OS X 10.2.4 to Mac OS X 10.5.x
The Page Setup dialog boxes can be displayed by selecting the [Page Setup] command from the [File] menu of the
application.
In the Page Setup dialog boxes, you can specify the Page Attributes settings and manage the Custom Page Size settings.
The Page Setup dialog boxes vary across applications.
Page Attributes
1) Format for
This selects the printer to be used for printing.
2) Paper Size
This selects the size of a document to be printed.
The default paper size is [US Letter] for the United States, and [A4] for the other countries.
3) Orientation
This sets the paper printing direction.
-Portrait — The document is printed in the portrait direction.
-Landscape (90 degree) — The document is printed in the landscape direction from left.
-Landscape (270 degree) — The document is printed in the landscape direction from right. This is selectable only
for Mac OS X 10.2.x to Mac OS X 10.4.x.
4) Scale
This changes the size of the printed image on the page. Enter the zoom ratio to enlarge or reduce an image. You can
set any integer from 1 to 10000(%) for the zoom ratio. For Mac OS X 10.2.4 to Mac OS X 10.4.x, the acceptable range
for zoom ratio is from 25% to 400%.
Available original paper sizes are listed below:
yA3
yA4
yA5
yA6
yJB4
yJB5
yLedger
yUS Legal
yUS Letter
yStatement (5 1/2 x 8 1/2”)
yFolio
yComputer (10 1/8 x 14”)
y13”LG (8 1/2 x 13”)
y8.5”SQ (8 1/2 x 8 1/2”)
y(12 x 18”)
y(305 x 457 mm)
y8K (270 x 390 mm)
y16K (195 x 270 mm)
y(320 x 450 mm)
y(320 x 460 mm)
1
2
3
4
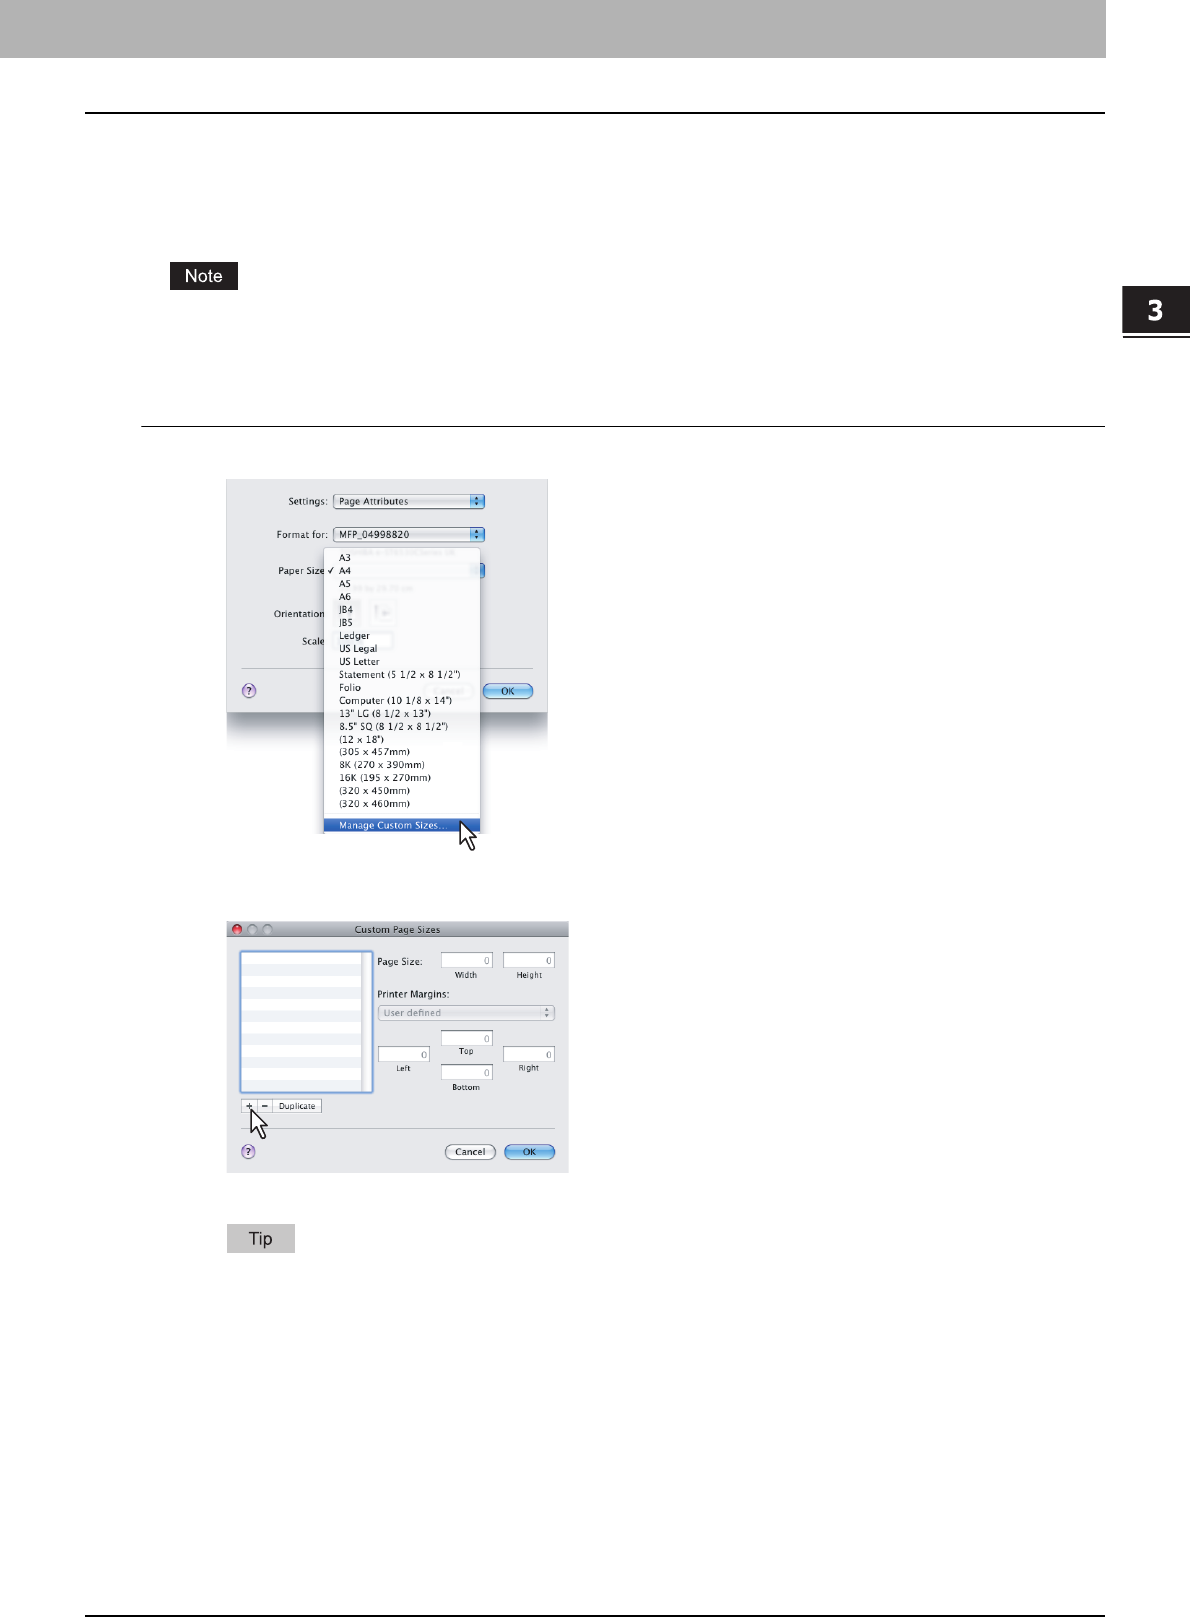
3.PRINTING FROM MACINTOSH
Printing from Application on Mac OS X 10.2.4 to Mac OS X 10.5.x 89
3 PRINTING FROM MACINTOSH
Custom Page Sizes
The PPD file for this equipment supports the Custom Page Sizes.
The procedure to create the Custom Page Size varies between the Mac OS X 10.4.x to Mac OS X 10.5.x and Mac OS X
10.2.8 to Mac OS X 10.3.x.
When you print on paper larger than standard sizes, print them one sheet by one.
P.82 “Printing on paper larger than standard sizes”
Creating Custom Page Size on Mac OS X 10.4.x to Mac OS X 10.5.x
1
Select [Manage Custom Sizes] in the [Paper Size] box.
yThe Custom Page Sizes dialog box appears.
2
Click the [+] button.
yA new custom page size name is added to the list.
If you want to create a new custom page size by duplicating an existing custom page size, select the custom
page size name on the list and click [Duplicate].
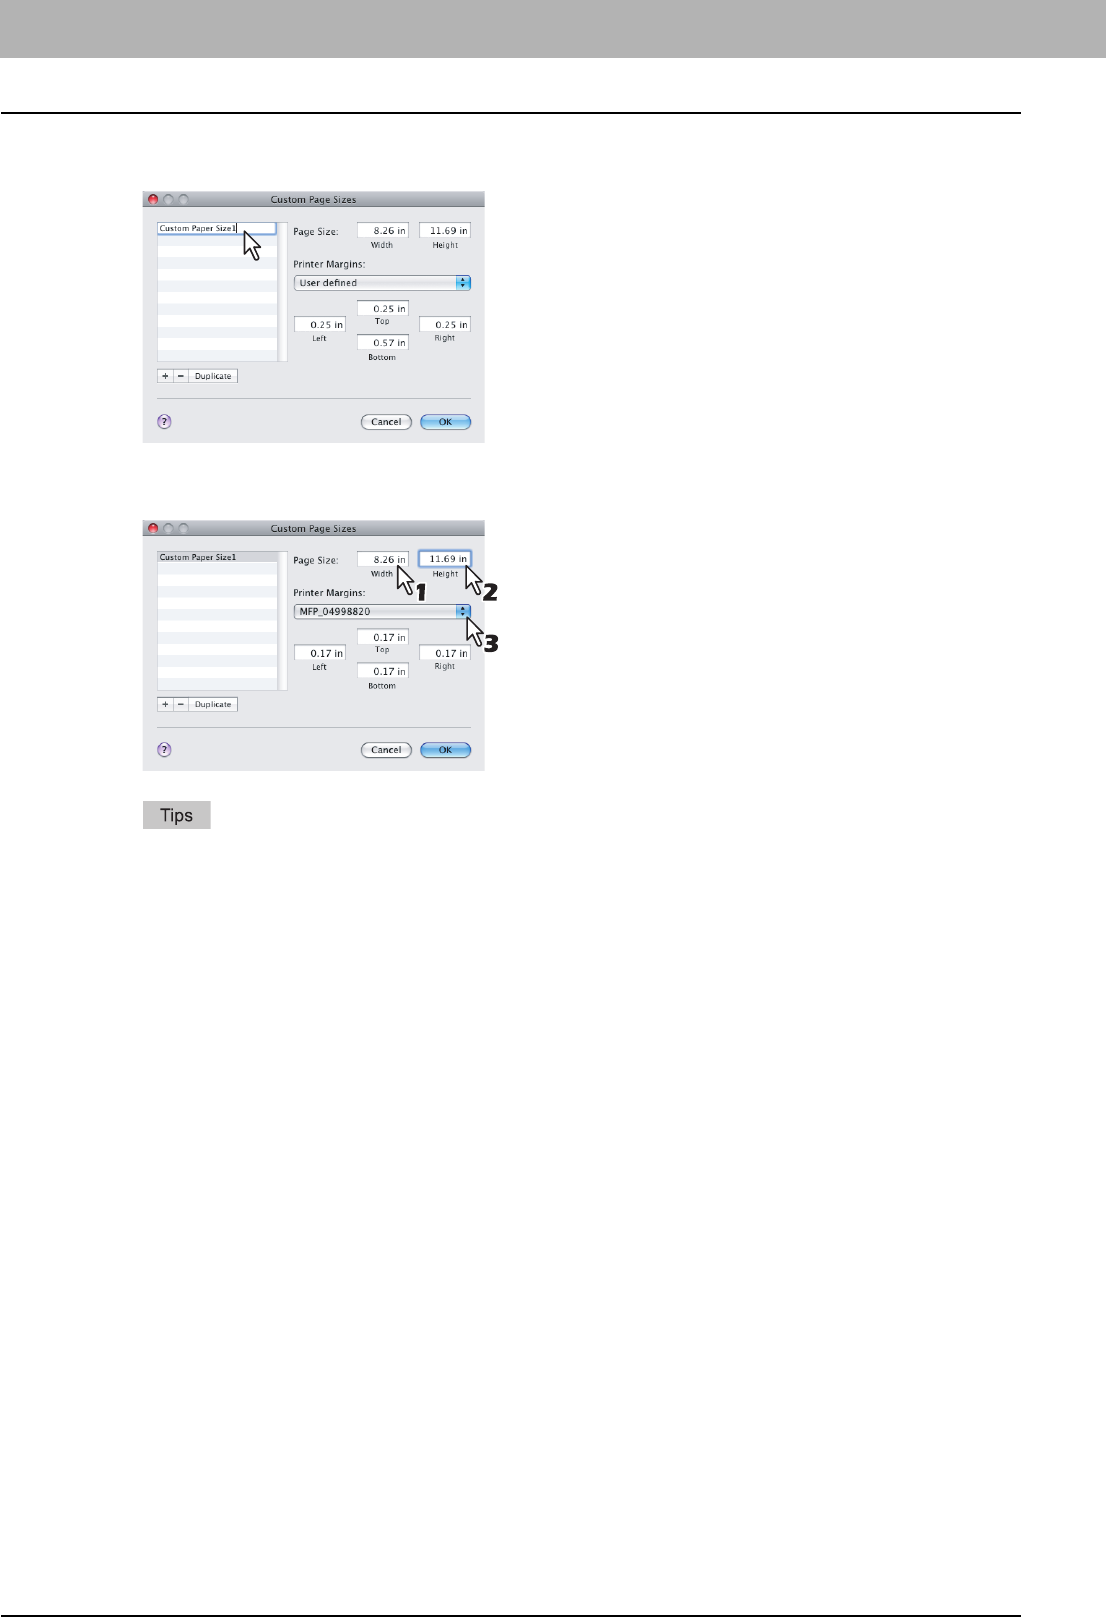
3 PRINTING FROM MACINTOSH
90 Printing from Application on Mac OS X 10.2.4 to Mac OS X 10.5.x
3
Double-click the added custom page size name on the list and rename the custom page
size.
4
Enter the width and height in the [Page Size] boxs, and select the printer name of this
equipment in the [Printer Margins] box.
yPlease use the margin settings that are automatically entered by selecting the printer name in the [Printer
Margins] box.
yYou can delete the created custom page size by clicking the [-] button.
5
Click [OK].
yThe Custom Page Size is saved and it can be selected in the [Paper Size] box in the Page Attributes menu.
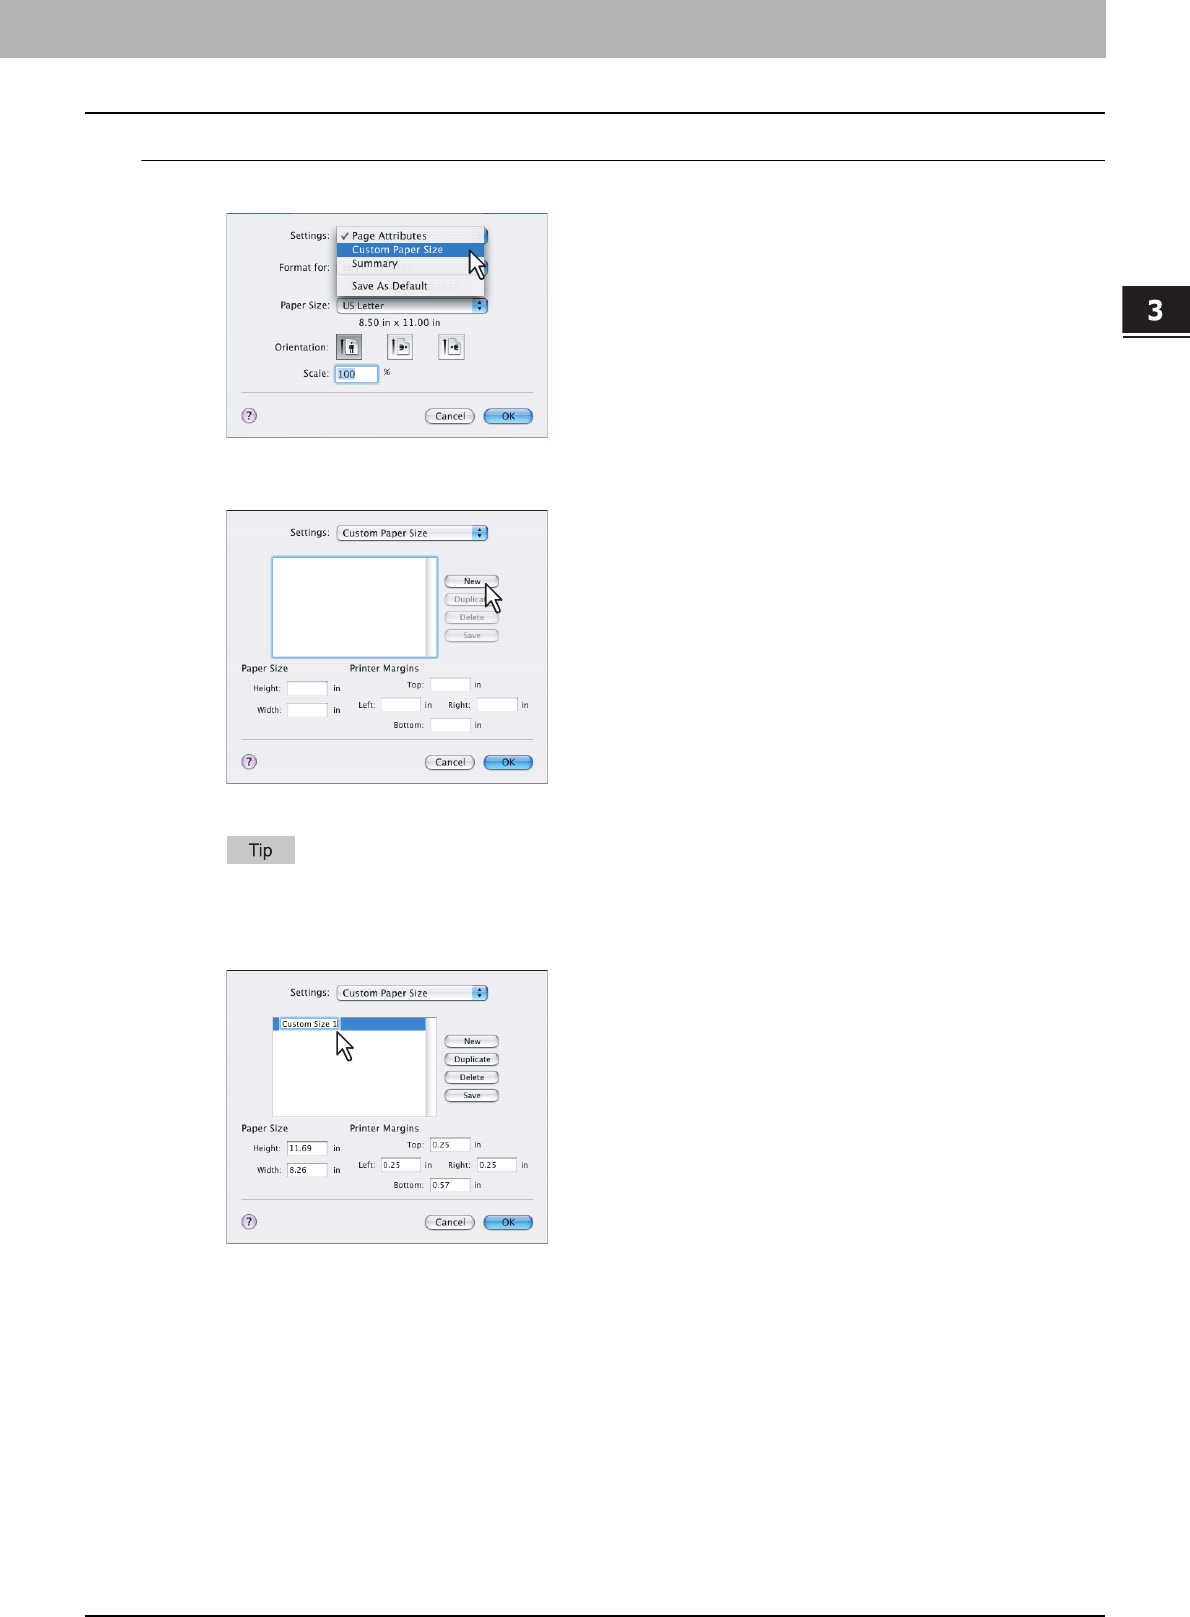
3.PRINTING FROM MACINTOSH
Printing from Application on Mac OS X 10.2.4 to Mac OS X 10.5.x 91
3 PRINTING FROM MACINTOSH
Creating Custom Page Size on Mac OS X 10.2.8 to Mac OS X 10.3.x
1
Select [Custom Paper Size] in the [Settings] box.
yThe Custom Paper Size menu is displayed.
2
Click [New].
yA new custom page size name is added to the list.
If you want to create a new custom page size by duplicating an existing custom page size, select the custom
page size name on the list and click [Duplicate].
3
Rename the custom page size.
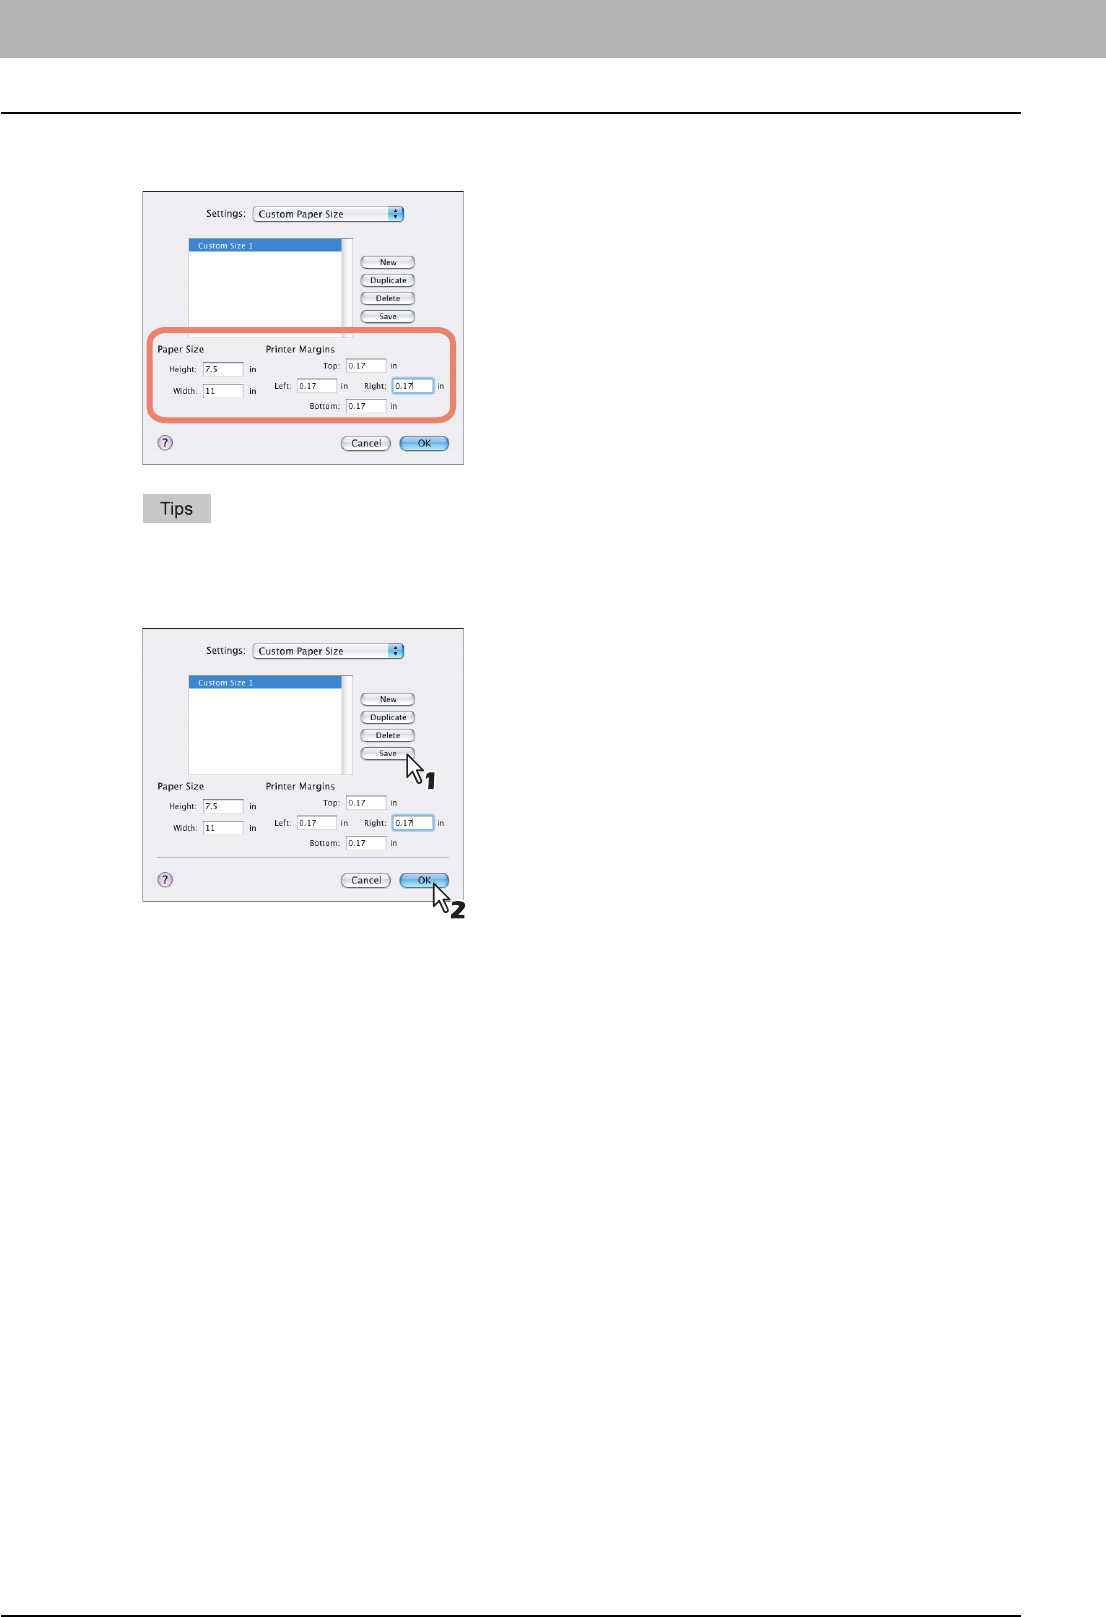
3 PRINTING FROM MACINTOSH
92 Printing from Application on Mac OS X 10.2.4 to Mac OS X 10.5.x
4
Enter the width and height in the [Page Size] boxs, and enter the printer margins in the
[Printer Margins] boxs.
yIn the [Printer Margins] box, please enter “0.17” inch.
yYou can delete the created custom page size by clicking [Delete].
5
Click [Save] and click [OK].
yThe Custom Page Size is saved and it can be selected in the [Paper Size] box in the Page Attributes menu.

3.PRINTING FROM MACINTOSH
Printing from Application on Mac OS X 10.2.4 to Mac OS X 10.5.x 93
3 PRINTING FROM MACINTOSH
Print Dialog on Mac OS X 10.3.x to Mac OS X 10.5.x
The Print dialog boxes can be displayed by selecting the [Print] command from the [File] menu of the application.
The Print dialog boxes are different between Mac OS X 10.2.x and Mac OS X 10.3.x to Mac OS X 10.5.x. Please see
the following section for the descriptions of the Print dialog boxes for Mac OS X 10.2.x.
P.108 “Print Dialog on Mac OS X 10.2.x”
The Print dialog boxes vary across applications.
Copies & Pages
In the Copies & Pages menu, you can set general print options such as the number of copies, and sort printing.
1) Copies
This sets the number of printed copies. You can set any integer from 1 to 9999.
2) Collated
Check this for sort-printing (1, 2, 3... 1, 2, 3...)
3) Pages
This sets the range of pages to be printed.
-All — Select this to print all pages.
-From/To — Select this to specify the pages to be printed. Enter the page range in the From and To box.
4) Two-sided
This sets two-sided printing. When you check this, [Long Edge Binding] is automatically selected in the [Two-Sided]
box in the Layout menu. This is selectable only for Mac OS X 10.5.x.
Layout
In the Layout menu, you can set N-up printing (multiple pages per sheet).
1
3
2
4
1
2
3
4
5
3 PRINTING FROM MACINTOSH
94 Printing from Application on Mac OS X 10.2.4 to Mac OS X 10.5.x
1) Pages per Sheet
This sets the number of multiple pages printed on one sheet. The pages are reduced to fit the selected paper size
automatically and are printed.
-1 — Select this if do not wish to enable N-up printing.
-2 — Select this to print images from 2 pages arranged on one sheet.
-4 — Select this to print images from 4 pages arranged on one sheet.
-6 — Select this to print images from 6 pages arranged on one sheet.
-9 — Select this to print images from 9 pages arranged on one sheet.
-16 — Select this to print images from 16 pages arranged on one sheet.
2) Layout Direction
This sets how pages are arranged on one sheet. This is available only when N-up printing (printing multiple pages on
one sheet) is set.
-Across Left to Right Before Down — Pages arranged horizontally from left to right and then top to bottom on one
sheet.
-Across Right to Left Before Down — Pages arranged horizontally from right to left and then top to bottom on one
sheet.
-Down Before Across Left to Right — Pages arranged vertically from top to down and then left to right on one
sheet.
-Down Before Across Right to Left — Pages arranged vertically from top to down and then right to left on one
sheet.
3) Border
Select if a border line is to be drawn on each page.
-None — Select this if no border line is to be drawn.
-Single Hairline — Select this to draw single hairline for the border.
-Single Thin Line — Select this to draw single thin line for the border.
-Double Hairline — Select this to draw double hairline for the border.
-Double Thin Line — Select this to draw double thin line for the border.
4) Two-Sided
This sets whether or not you want to print on both sides of the paper.
-Off — Select this when you do not want to print on both sides of the paper.
-Long edge binding — Select this to bind along the long edge side of the paper. The direction to be printed on the
back side of the paper differs depending on the orientation.
-Short edge binding — Select this to bind along the short edge side of the paper. The direction to be printed on the
back side of the paper differs depending on the orientation.
5) Reverse Page Orientation
This sets the orientation of paper exited. When the orientation of the paper is reversed with this setting, the top of the
paper comes to the control panel side. This is selectable only for Mac OS X 10.5.x.
1
2
Landscape
1
2
Portrait
1
2
Landscape
1
2
Portrait
3.PRINTING FROM MACINTOSH
Printing from Application on Mac OS X 10.2.4 to Mac OS X 10.5.x 95
3 PRINTING FROM MACINTOSH
Output Options
In the Output Options menu, you can save a print job as a file.
This menu is displayed only for Mac OS X 10.3.x.
1) Save as File
Check this to save a print job as a file. When this is checked, select the file type at the [Format] box.
2) Format
This sets the format of a file to be saved.
-PDF — Select this to save a print job as a PDF file.
-PostScript — Select this to save a print job as a PS file.
Scheduler
In the Scheduler menu, you can set when a print job will be sent to the equipment.
1) Print Document
This sets when a print job will be sent to the equipment.
-Now — Select this to send a print job now.
-At — Select this to specify the time to send a print job. When you select this, specify the time to be send. The print
job will be held in the queue on Mac OS X until the specified time has been reached or you resume the print job to
be sent from the queue on Mac OS X.
-On Hold — Select this to hold a print job in the queue on Mac OS X. When you select this, the print job will be held
in the queue on Mac OS X until you resume the print job to be sent from the queue on Mac OS X.
2) Priority
Select the priority of a print job.
12
1
2
3 PRINTING FROM MACINTOSH
96 Printing from Application on Mac OS X 10.2.4 to Mac OS X 10.5.x
Paper Handling
In the Paper Handling menu, you can set Reverse page order printing and Odd or Even numbered page printing.
The screens in the Paper Handling menu vary between Mac OS X 10.3.x and Mac OS X 10.4.x.
Mac OS X 10.3.x
1) Reverse page order
Check this when you want to print a document beginning with the last page.
2) Print
Select whether all pages will be printed or only odd or even pages will be printed.
Mac OS X 10.4.x
1) Page Order
Select the page order for printing.
2) Print
Select whether all pages will be printed or only odd or even pages will be printed.
3) Destination Paper Size
Select the output paper size.
-Use documents paper size — Select this to print on the same sized paper as the document size.
-Scale to fit paper size — Select this to perform enlarge/reduce printing. When this is selected, select the output
paper size in the box. If you do not want to enlarge the document images when a larger paper size is selected,
check the [Scale down only] box.
1
2
1
3
2
3.PRINTING FROM MACINTOSH
Printing from Application on Mac OS X 10.2.4 to Mac OS X 10.5.x 97
3 PRINTING FROM MACINTOSH
Mac OS X 10.5.x
1) Page To Print
Select whether all pages will be printed or only odd or even pages will be printed.
2) Destination Paper Size
Select the output paper size.
-Scale to fit paper size — Select this to perform enlarge/reduce printing. When this is selected, select the output
paper size in the box. If you do not want to enlarge the document images when a larger paper size is selected,
check the [Scale down only] box.
3) Page Order
Select the page order for printing.
ColorSync
In the ColorSync menu you can adjust colors on the printouts.
This menu is displayed only for Mac OS X 10.3.x to Mac OS X 10.4.x.
1) Color Conversion
Select the method for color management.
-Standard — Select this if you want the application you are using to control the color management of the printouts.
-In Printer — Select this if you want the printer you are using to control the color management of the printouts.
2) Quartz Filter
Select the presence of the Quartz Filter.
1
3
2
1
2
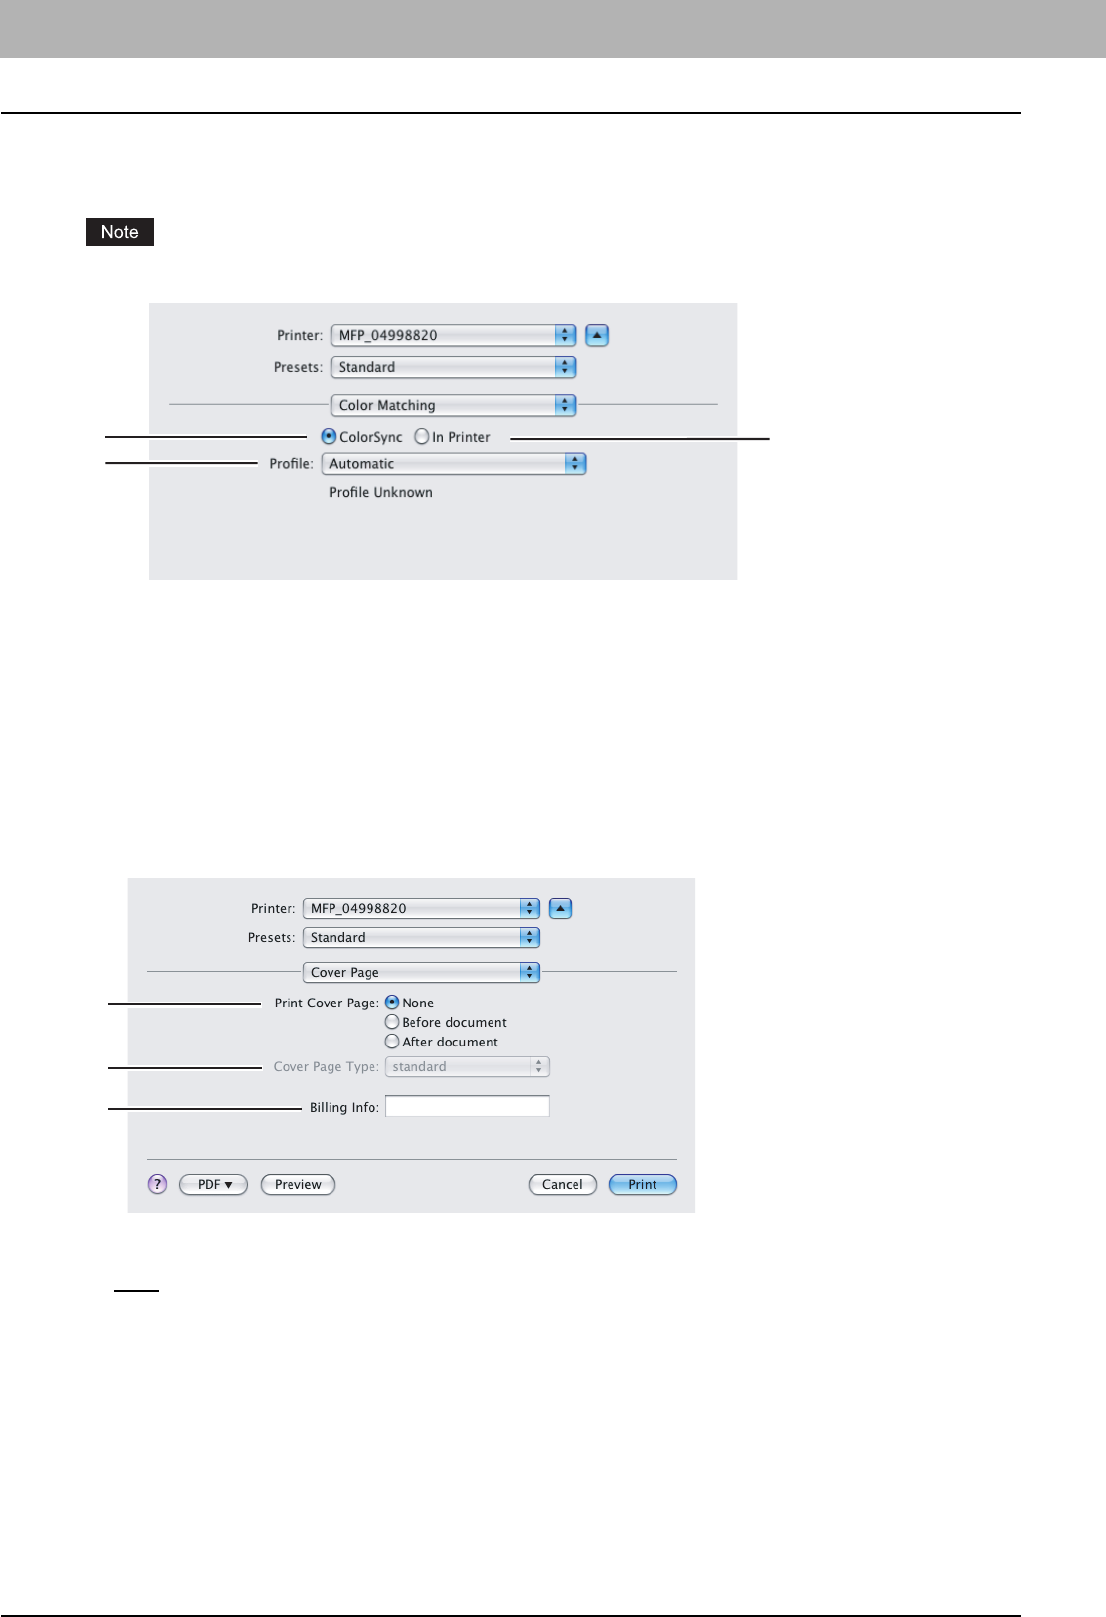
3 PRINTING FROM MACINTOSH
98 Printing from Application on Mac OS X 10.2.4 to Mac OS X 10.5.x
Color Matching
In the Color Matching menu you can adjust colors on the printouts.
This menu is displayed only for Mac OS X 10.5.x.
1) ColorSync
Select this if you want the application you are using to control the color management of the printouts.
2) In Printer
Select this if you want the printer you are using to control the color management of the printouts.
3) Profile
Select a color profile to be applied if you selected [ColorSync].
Cover Page
In the Cover Page menu, you can set whether a print job is sent with a banner page. The banner page includes
information about owner of the job, job name, application name, date and time, and printer name.
1) Print Cover Page
This sets how a banner page is inserted.
-None — Select this not to print a banner page.
-Before Document — Select this to print a banner page before the document.
-After Document — Select this to print a banner page after the document.
2) Cover Page Type
Select the type of a banner page. The paper size selected in the Page Setup dialog box appears as a default setting.
3) Billing Info
Enter the billing information to have it appear on the banner page.
1
3
2
1
2
3
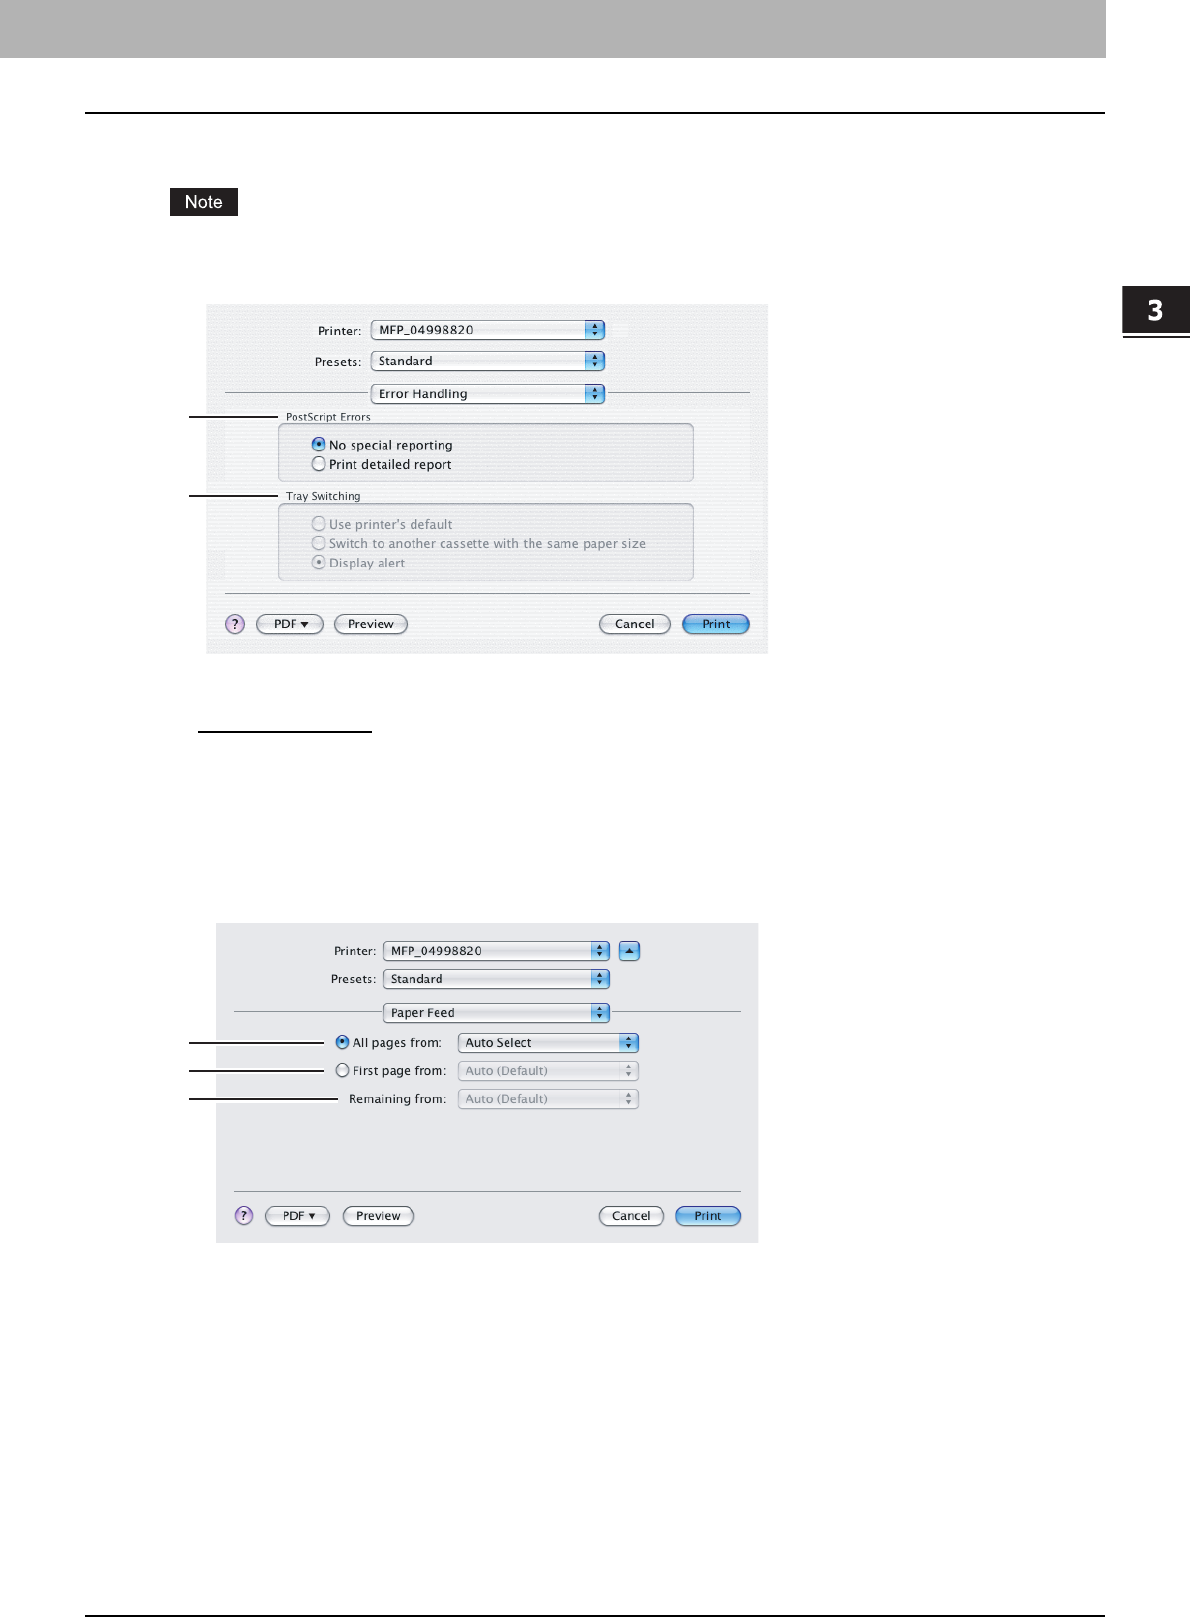
3.PRINTING FROM MACINTOSH
Printing from Application on Mac OS X 10.2.4 to Mac OS X 10.5.x 99
3 PRINTING FROM MACINTOSH
Error Handling
This menu is displayed only for Mac OS X 10.3.x to Mac OS X 10.4.x.
In the Error Handling menu, you can set how to report a PostScript error.
1) PostScript Errors
This sets whether or not you want to print a PostScript error report.
-No special reporting — Select this if you do not want to print PostScript error information.
-Print detailed report — Select this to print PostScript error information.
2) Tray Switching
This is not supported by this equipment.
Paper Feed
In the Paper Feed menu, you can set the paper source.
1) All pages from
Select this option button when you want to use the same paper source for all pages. When this is selected, select the
paper source or paper type to be used at the box.
2) First page from
Select this option button when you want to specify different paper sources for the first page and remaining pages.
When this selected, select the paper source or paper type to be used for the first page at the box.
3) Remaining from
Select the paper source or paper type to be used for remaining pages in the box. This can be selected only when you
select the [First page from] option button.
1
2
1
2
3
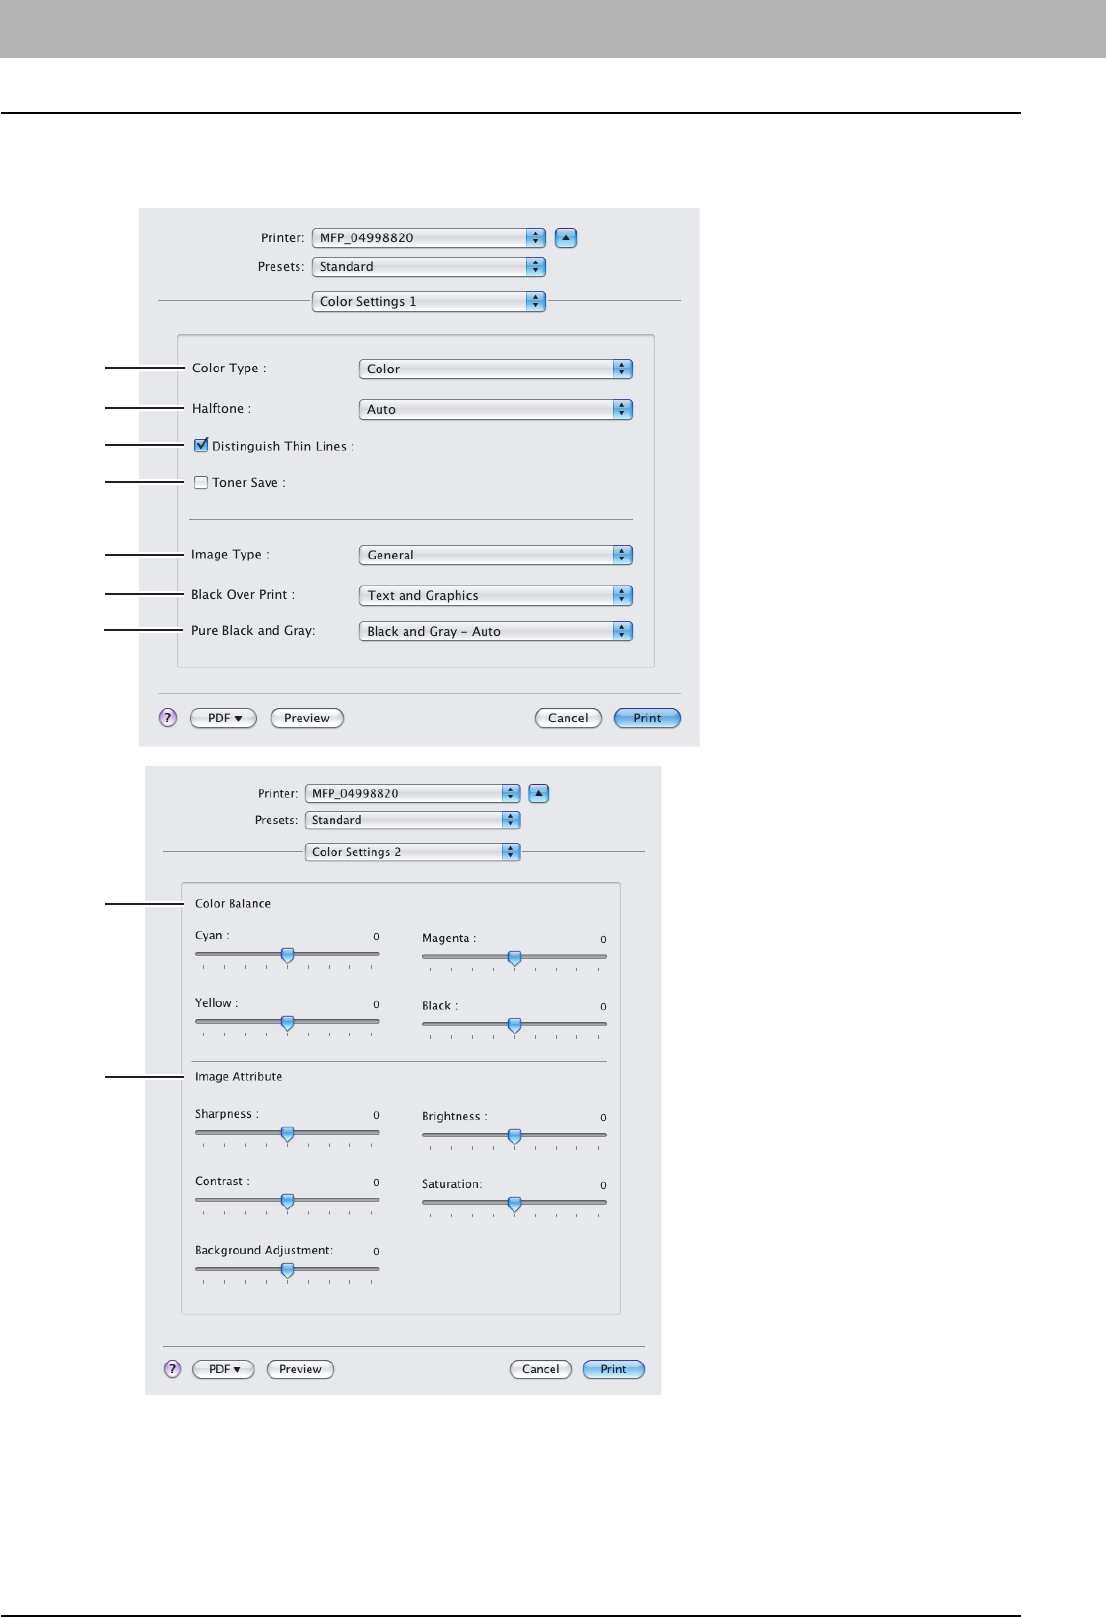
3 PRINTING FROM MACINTOSH
100 Printing from Application on Mac OS X 10.2.4 to Mac OS X 10.5.x
Color Settings
In the Color Settings 1 and Color Settings 2 menu, you can adjust the color settings for printing.
1
2
5
7
3
4
6
8
9
3.PRINTING FROM MACINTOSH
Printing from Application on Mac OS X 10.2.4 to Mac OS X 10.5.x 101
3 PRINTING FROM MACINTOSH
1) Color Type
This sets whether a print job is printed in the color mode or monochrome mode.
-Auto — Select this to determine the color mode automatically. When a print job is a black and white document, the
system automatically prints the document in the monochrome mode. When a print job is a color document, it prints
the document in the color mode.
-Color — Select this to print a document in the color mode.
-Mono — Select this to print a document in the monochrome mode.
-Black and Red — Select this to print a document in the twin color mode with red. When this is selected, the black
parts of the document are printed in black and color parts of the document are printed in red.
-Black and Green — Select this to print a document in the twin color mode with green. When this is selected, the
black parts of the document are printed in black and color parts of the document are printed in green.
-Black and Blue — Select this to print a document in the twin color mode with blue. When this is selected, the
black parts of the document are printed in black and color parts of the document are printed in blue.
-Black and Cyan — Select this to print a document in the twin color mode with cyan. When this is selected, the
black parts of the document are printed in black and color parts of the document are printed in cyan.
-Black and Magenta — Select this to print a document in the twin color mode with magenta. When this is selected,
the black parts of the document are printed in black and color parts of the document are printed in magenta.
-Black and Yellow — Select this to print a document in the twin color mode with yellow. When this is selected, the
black parts of the document are printed in black and color parts of the document are printed in yellow.
-Black and White — Select this to print a document in the twin color mode with white. When this is selected, the
black parts of the document are printed in black and color parts of the document are not printed.
2) Halftone
This sets how halftones are printed.
-Auto — Select this to print using proper halftone depending on the contents in the document automatically.
-Detail — Select this to print halftone in detail.
-Smooth — Select this to print halftone smoothly.
3) Distinguish Thin Lines
Check this to print thin lines clearly.
4) Toner Save
Check this to print in the save mode.
5) Image Type
This sets how colors are printed by selecting the job type. The printer driver automatically applies proper image quality
for selected job type.
-General — Select this to apply proper image quality for printing a general color document.
-Photograph — Select this to apply proper image quality for printing photos.
-Presentation — Select this to apply proper image quality for printing a vivid document.
-Line Art — Select this to apply proper image quality for printing a document that contains a lot of characters or line
arts.
6) Black Over Print
Check this when printing background content that has black text overlayed on it. If this is enabled, the gap between
text and background is minimized and color deviation is prevented.
-Off — Select this so as not to print the background of the black content.
-Text — Select this to print all the full-color background and then print black text on a color background.
-Text and Graphics — Select this to print all the full-color background and then print black text and graphics on a
color background.
7) Pure Black and Gray
Select whether printing the black and gray scale contents in a document using the black toner.
-Off — Select this to print the document in the color mode.
-Black - Auto — Select this to print in the most appropriate image quality according to conditions such as the
original types.
-Black - Text — Select this to print the black text using the black toner.
-Black - Text and Graphic — Select this to print the black text and graphics using the black toner.
-Black - Text, Graphic and Image — Select this to print the black text, graphics and images using the black toner.
-Black and Gray - Auto — Select this to print black and gray scale contents using the black toner according to the
document.
-Black and Gray - Text — Select this to print the black and gray scale text using the black toner.
-Black and Gray - Text and Graphic — Select this to print the black and gray scale text and graphics using the
black toner.
-Black and Gray - Text, Graphic and Image — Select this to print the black and gray scale text, graphics, and
images using the black toner.
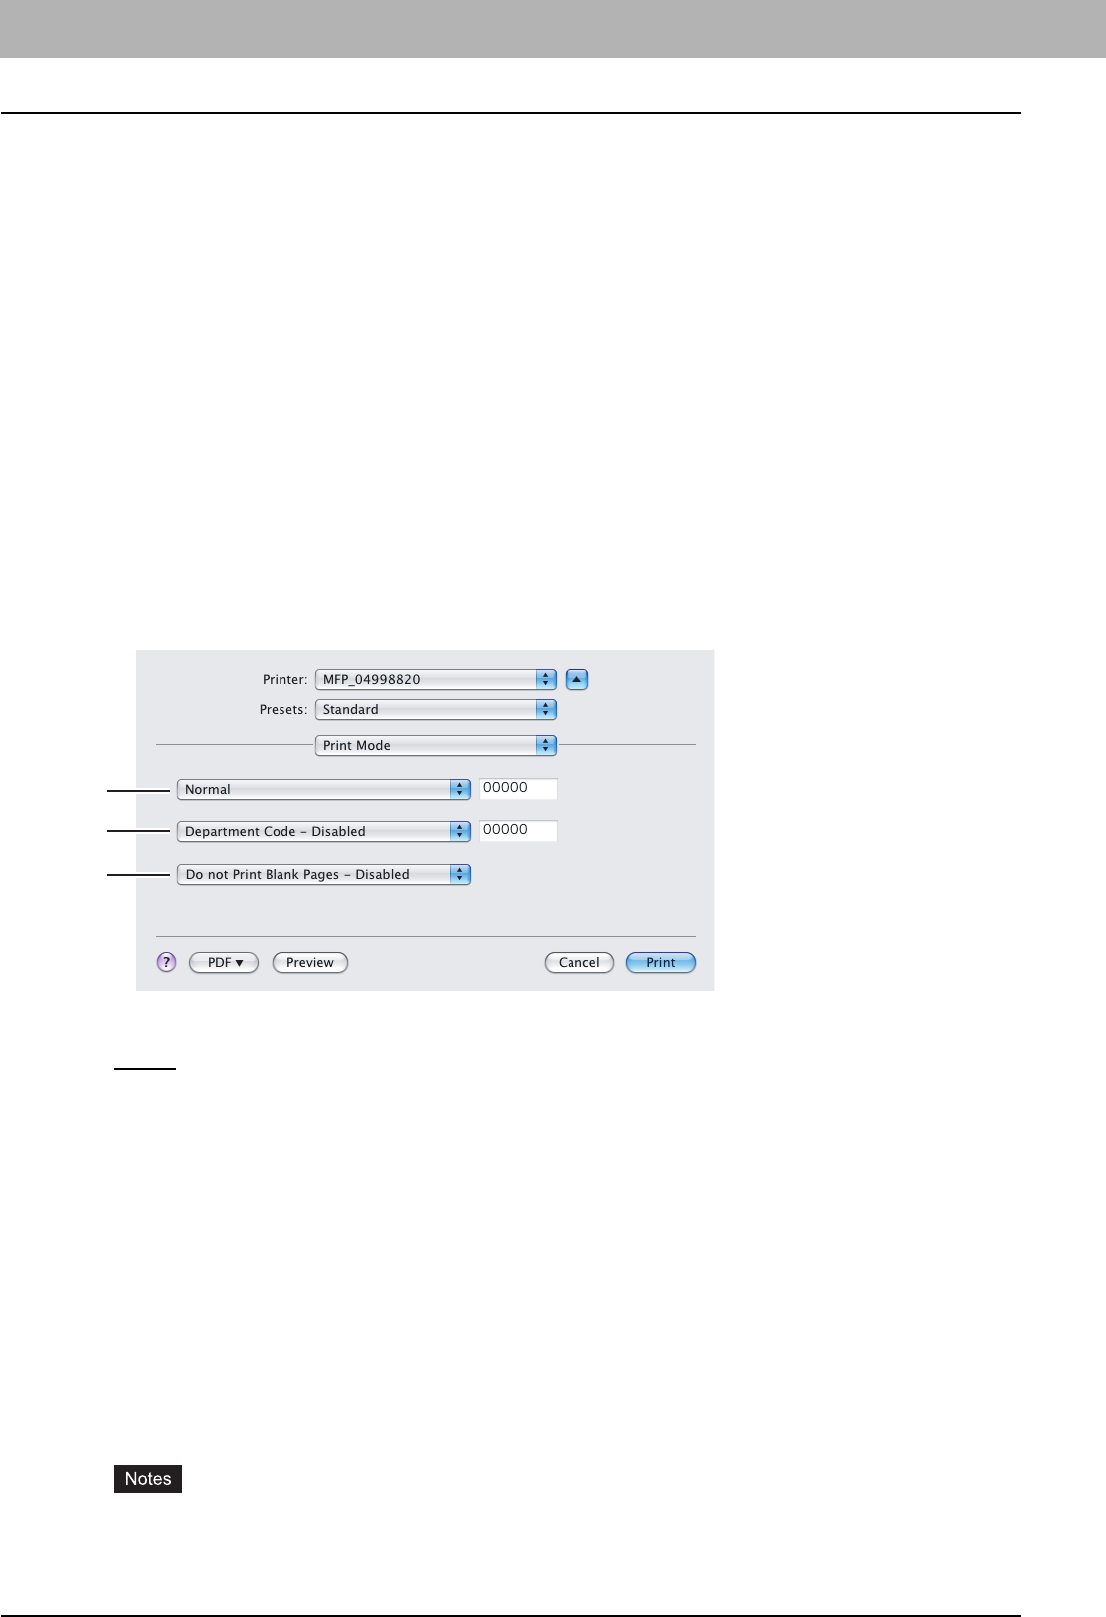
3 PRINTING FROM MACINTOSH
102 Printing from Application on Mac OS X 10.2.4 to Mac OS X 10.5.x
8) Color Balance
Adjusts the density of each color for printing. You can set from -4 to 4 in units of 1.
9) Image Attribute
This sets the sharpness, brightness, contrast, saturation and background adjustment for printing.
-Sharpness
Adjusts the sharpness for printing. You can set from -4 (smoothest) to 4 (sharpest) in units of 1 by moving the scroll
bar.
- Brightness
Adjusts the brightness for printing. You can set from -4 (darkest) to 4 (lightest) in units of 1 by moving the scroll bar.
- Contrast
Adjusts the contrast for printing. You can set from -4 (lowest) to 4 (highest) in units of 1 by moving the scroll bar.
- Saturation
Adjusts the saturation for printing. You can set from -4 (low clear) to 4 (high clear) in units of 1 by moving the scroll
bar.
- Background Adjustment
Adjusts the density level of the background. You can set from -4 (lightest) to 4 (darkest) in units of 1 by moving the
scroll bar.
Print Mode
In the Print Mode menu, you can set the way this equipment handles the print job. This menu allows you to enable various
job types such as Private Print and Proof Print.
1) Print Mode
This sets the type of print job.
-Normal — Select this to print a normal job.
-Proof — Select this to print the first copy of a multicopy job and then wait for approval before printing the remaining
copies. The print job, sent as a proof job, is saved in the proof job queue on this equipment, and the remaining
copies are not printed until you activate printing from the Touch Panel Display. This option allows you to check a
job’s output before printing the remaining copies and thereby reduce paper waste.
-Private — Select this to print a private job. When this is selected, specify the 5-digit password in the field next to
the box. The print job is saved in the private job queue on this equipment, and not printed until you activate printing
from the Touch Panel Display of this equipment. This option is useful when you want to print a confidential
document secured using a password. The user has to enter the password to print the private job when activating
printing from the Touch Panel Display.
2) Department Code
Select whether a department code is required for printing. When this is enabled, specify the 5-digit department code in
the field next to the box.
Enabling the department code depends on whether this equipment is managed with department codes or not. Please
ask your administrator for your department code.
3) Do not Print Blank Pages
Select whether you require printing blank pages.
yWhen more than 2 is selected at the [Page per Sheet] option in the Layout menu, the blank pages will be
printed.
yThe pages containing a header or footer will be printed even if the content is blank.
1
2
3
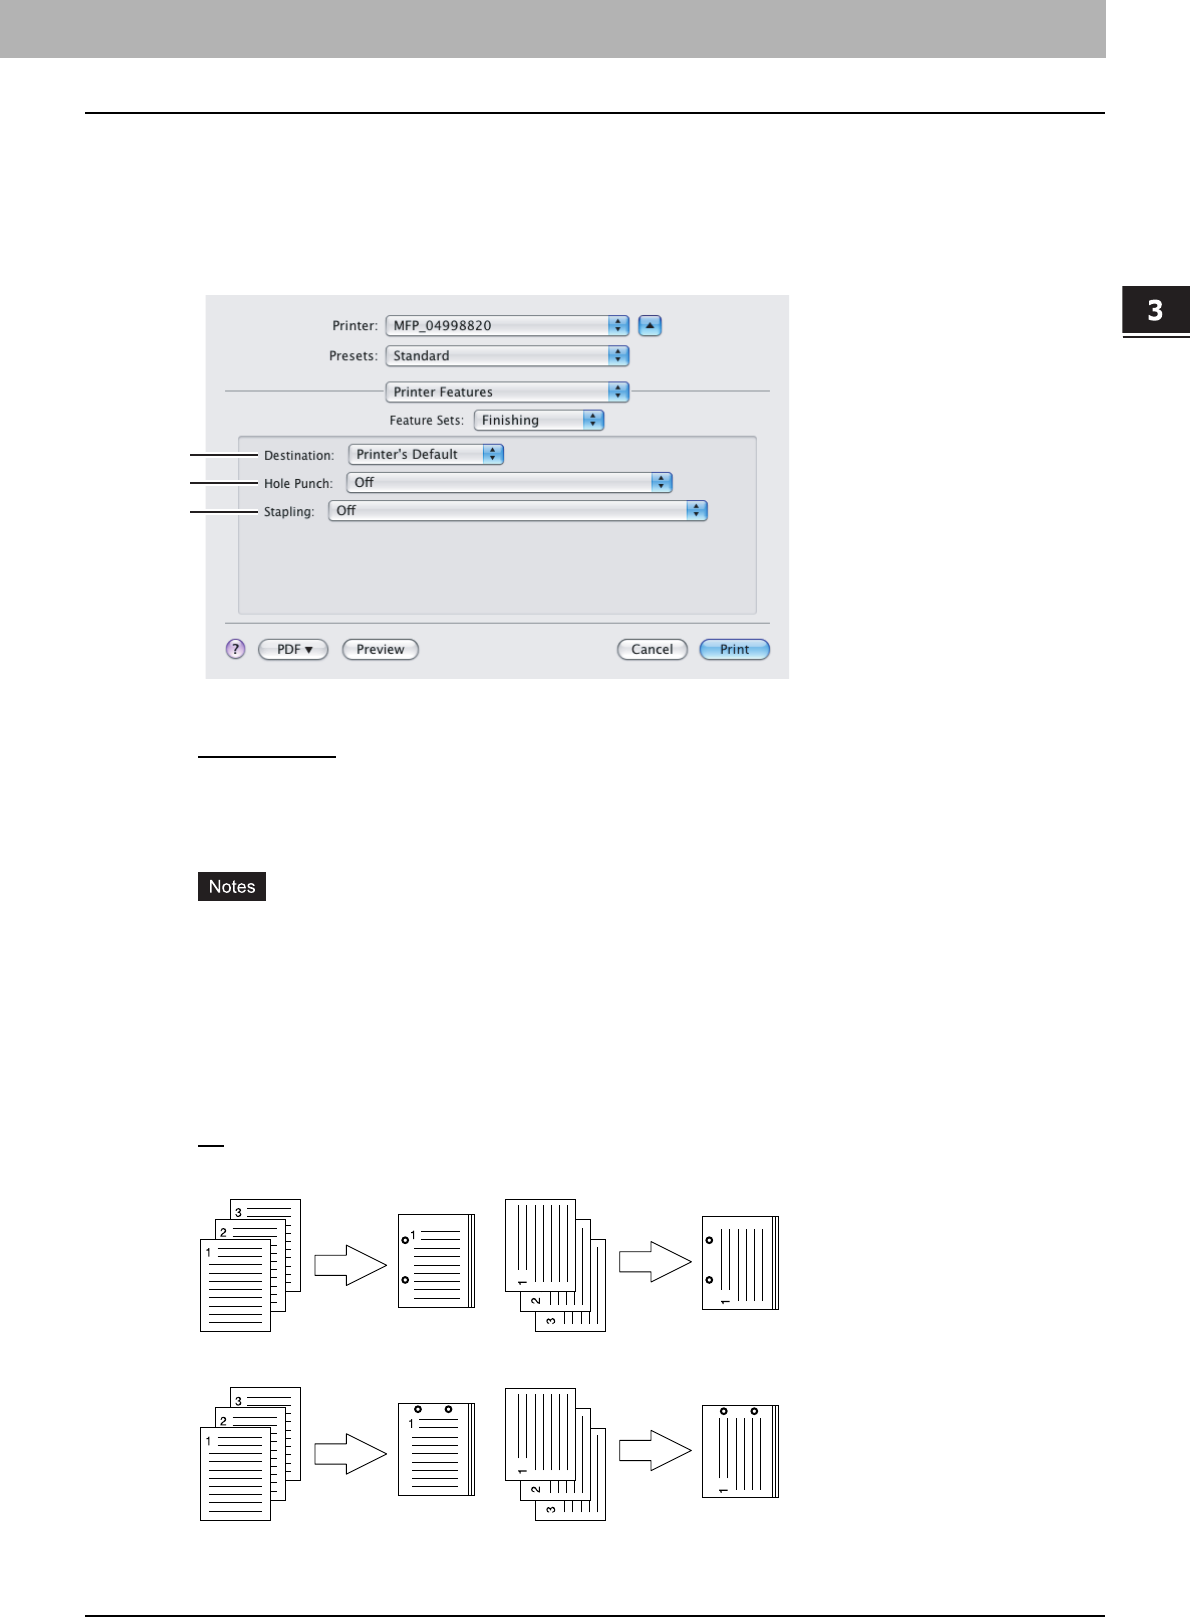
3.PRINTING FROM MACINTOSH
Printing from Application on Mac OS X 10.2.4 to Mac OS X 10.5.x 103
3 PRINTING FROM MACINTOSH
Printer Features
In the Printer Features menu, you can set special printing features.
Finishing
In the Finishing menu, you can set the destination, hole punching and stapling.
1) Destination
This selects the destination tray.
-Printer’s Default — Select this to route the output to the default tray (that is set as the default tray for raw job in the
Printer setting page of TopAccess Administrator’s page).
-Inner Tray — Select this to route the output to the inner tray.
-Tray 1 — Select this to route the output to the upper tray of the Finisher (optional).
-Tray 2 — Select this to route the output to the lower tray of the Finisher (optional).
yDepending on the type of finisher (optional) installed and destination settings, stapling and hole punching may
not be performed.
yDepending on the equipment settings, the paper may be delivered to a tray that cannot carry out stapling or
hole punching when "Auto" is selected as the "Destination" option.
y[Tray 1] can be selected when the Hanging Finisher (optional), Finishe (optional) or Saddle Stitch Finisher
(optional) are installed.
y[Tray 2] can be selected when the Finisher (optional) or Saddle Stitch Finisher (optional) are installed.
2) Hole Punch
This sets whether or not a print job is hole punched.
-Off — Select this to print without hole punches.
-Long Edge Punch without rotation — Select this to create holes on the left side for a portrait document, or on the
top for a landscape document.
-Short Edge Punch without rotation — Select this to create holes on the top for a portrait document, or on the
right for a landscape document.
1
2
3
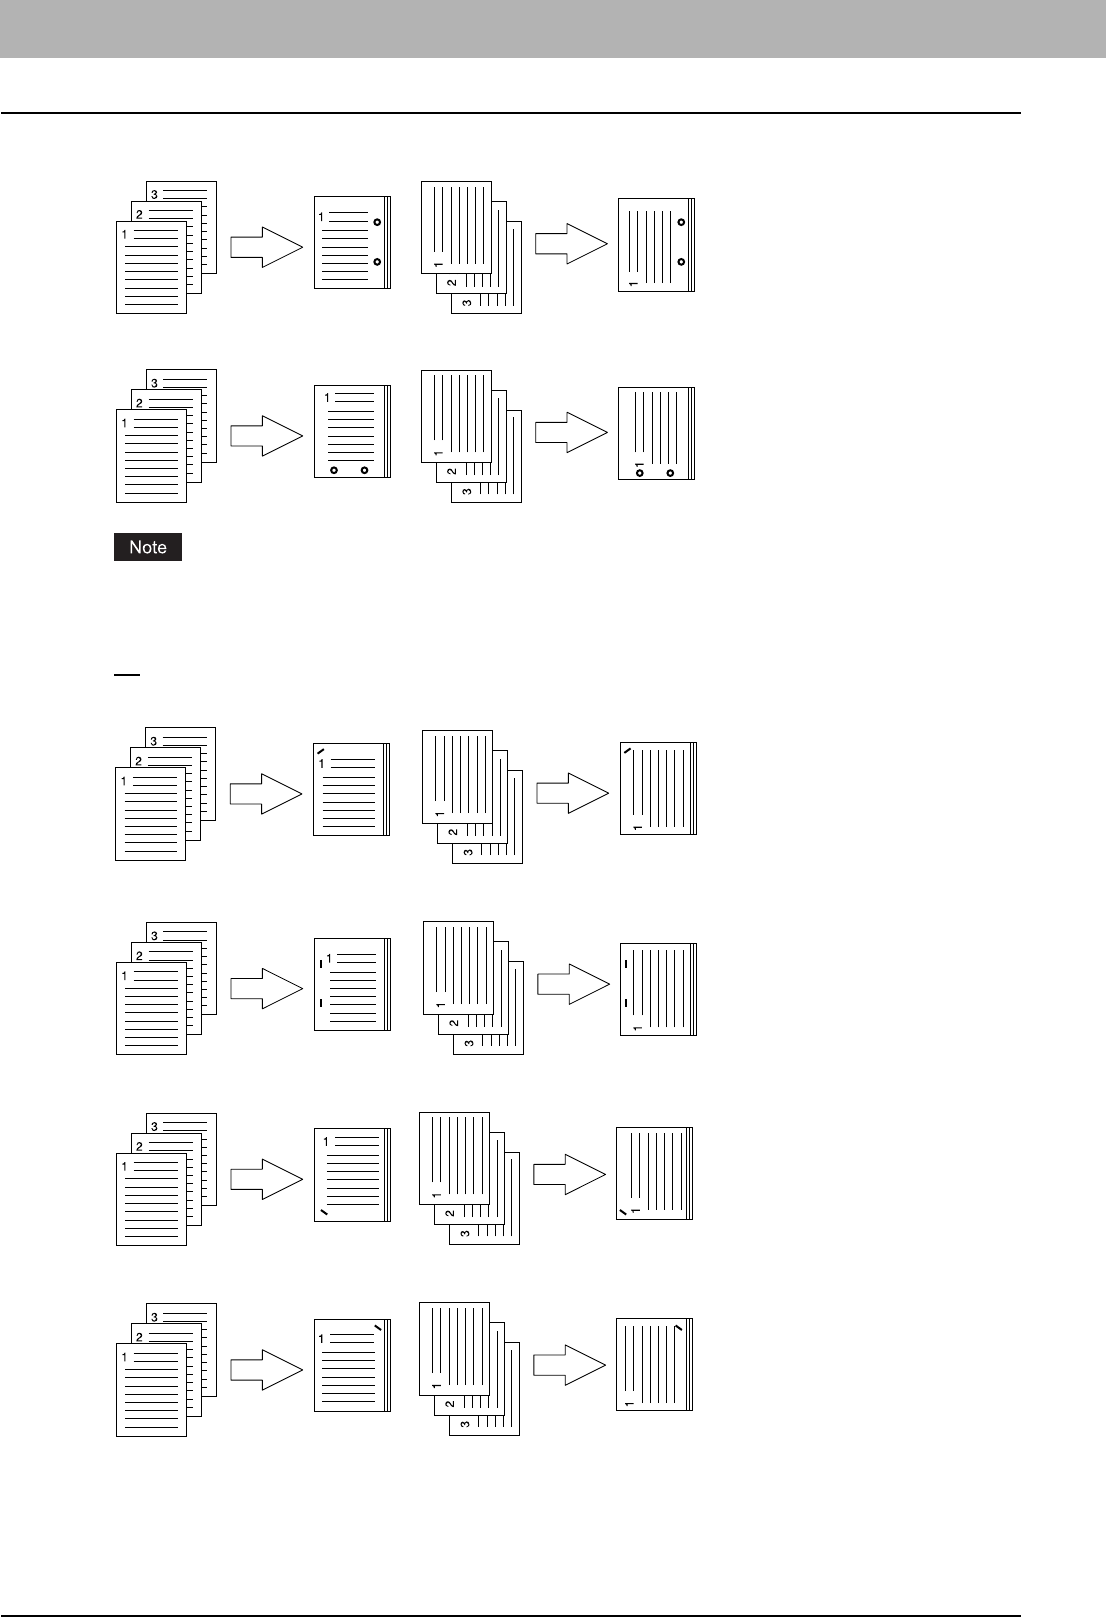
3 PRINTING FROM MACINTOSH
104 Printing from Application on Mac OS X 10.2.4 to Mac OS X 10.5.x
-Long Edge Punch with 180 degree rotation — Select this to create holes on the right side for a portrait
document, or on the bottom for a landscape document.
-Short Edge Punch with 180 degree rotation — Select this to create holes on the bottom for a portrait document,
or on the left for a landscape document.
This option cannot be selected if a hole punch unit (optional) is not installed.
3) Stapling
This sets whether a print job is stapled.
-Off — Select this to print without stapling.
-Upper Left (Portrait)/Upper Right (Landscape) — Select this to staple on the upper left for a portrait document,
or on the upper right for a landscape document.
-Middle Left (Portrait)/Middle Top (Landscape) — Select this to double staple on the left for a portrait document,
or on the top for a landscape document.
-Lower Left (Portrait)/Upper Left (Landscape) — Select this to staple on the lower left for a portrait document, or
on the upper left for a landscape document.
-Upper Right (Portrait)/Lower Right (Landscape) — Select this to staple on the upper right for a portrait
document, or on the lower right for a landscape document.
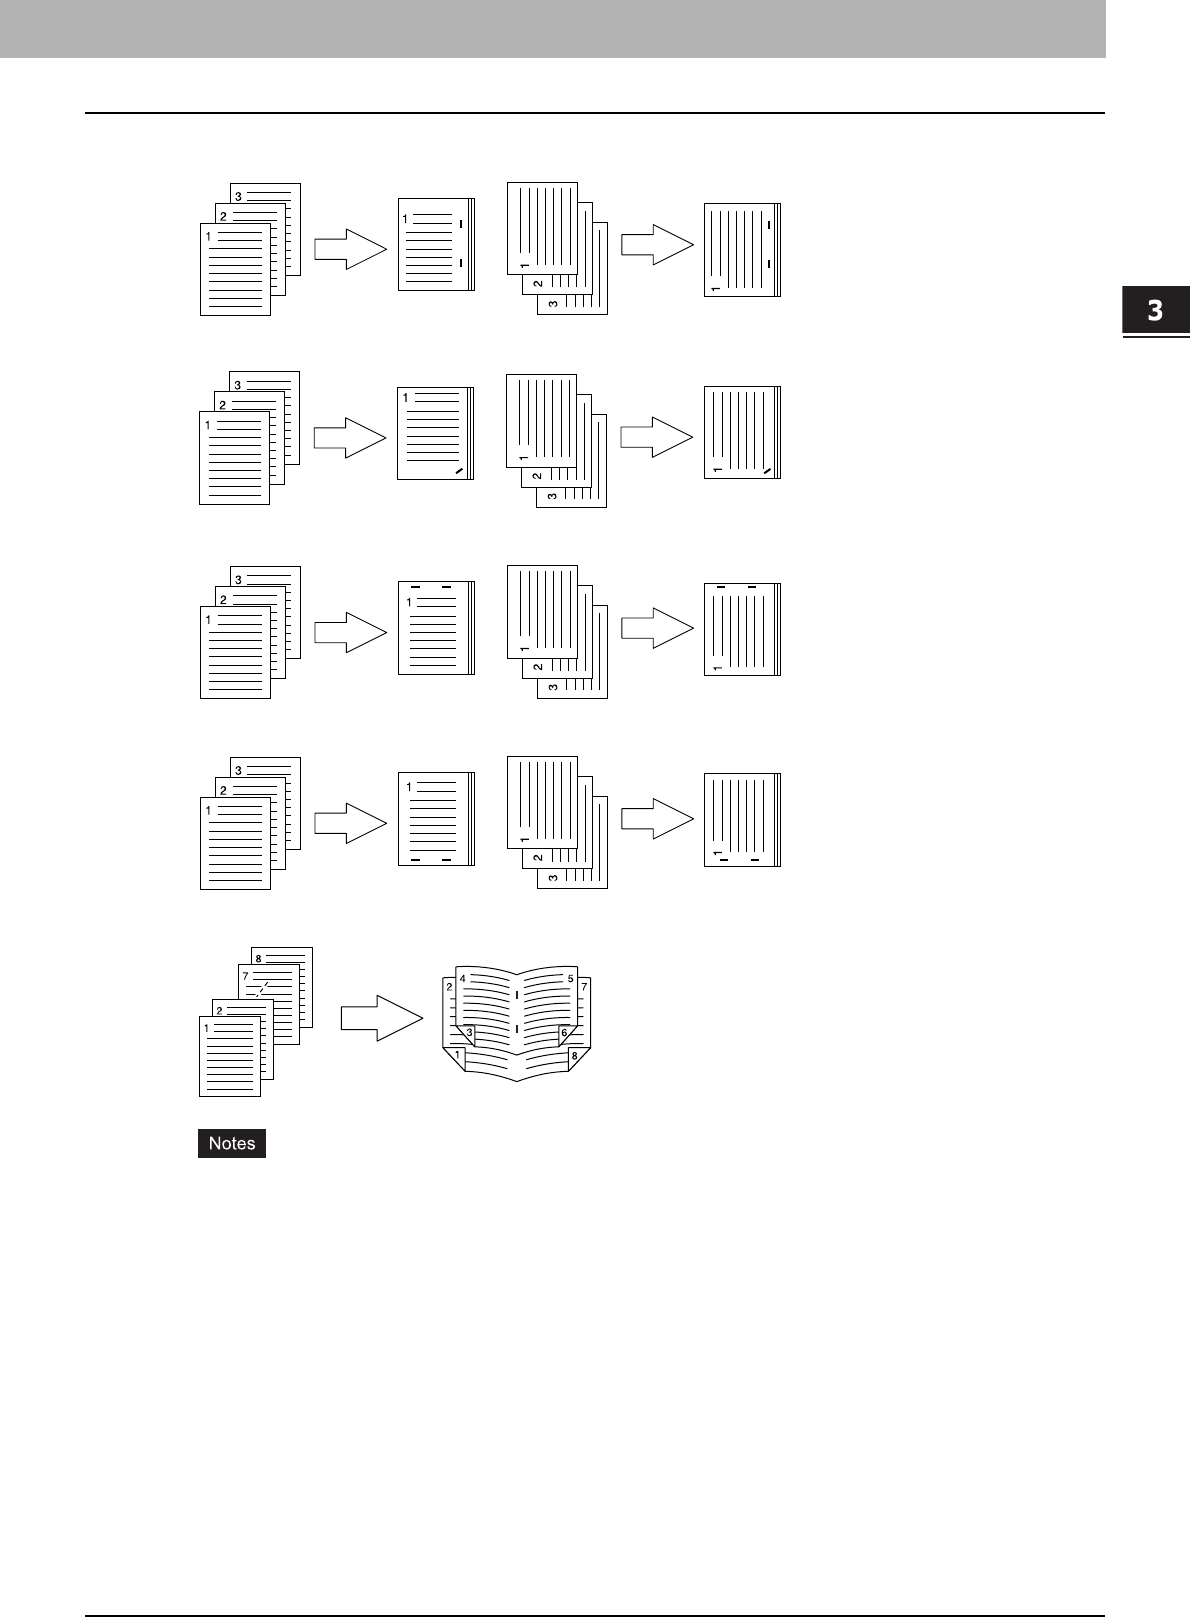
3.PRINTING FROM MACINTOSH
Printing from Application on Mac OS X 10.2.4 to Mac OS X 10.5.x 105
3 PRINTING FROM MACINTOSH
-Middle Right (Portrait)/Middle Bottom (Landscape) — Select this to double staple on the right for a portrait
document, or on the bottom for a landscape document.
-Lower Right (Portrait)/Lower Left (Landscape) — Select this to staple on the lower right for a portrait document,
or on the lower left for a landscape document.
-Middle Top (Portrait)/Middle Right (Landscape) — Select this to double staple on the top for a portrait
document, or on the right for a landscape document.
-Middle Bottom (Portrait)/Middle Left (Landscape) — Select this to double staple on the bottom for a portrait
document, or on the left for a landscape document.
-Saddle Stitch (Portrait)/Saddle Stitch (Landscape) — Select this to double staple in the center for a booklet to
be printed. Select this only when booklet printing is performed.
yThis option cannot be enabled if a finisher (optional) is not installed.
yOnly [Upper Left (Portrait)/Upper Right (Landscape)] is selectable when the Hanging Finisher (optional) is
installed.
y[Saddle Stitch (Portrait)/Saddle Stitch (Landscape)] can be selected only when the Saddle Stitch Finisher
(optional) is installed.
yStapling cannot be enabled when [Tray 1] is selected at the [Destination] option.
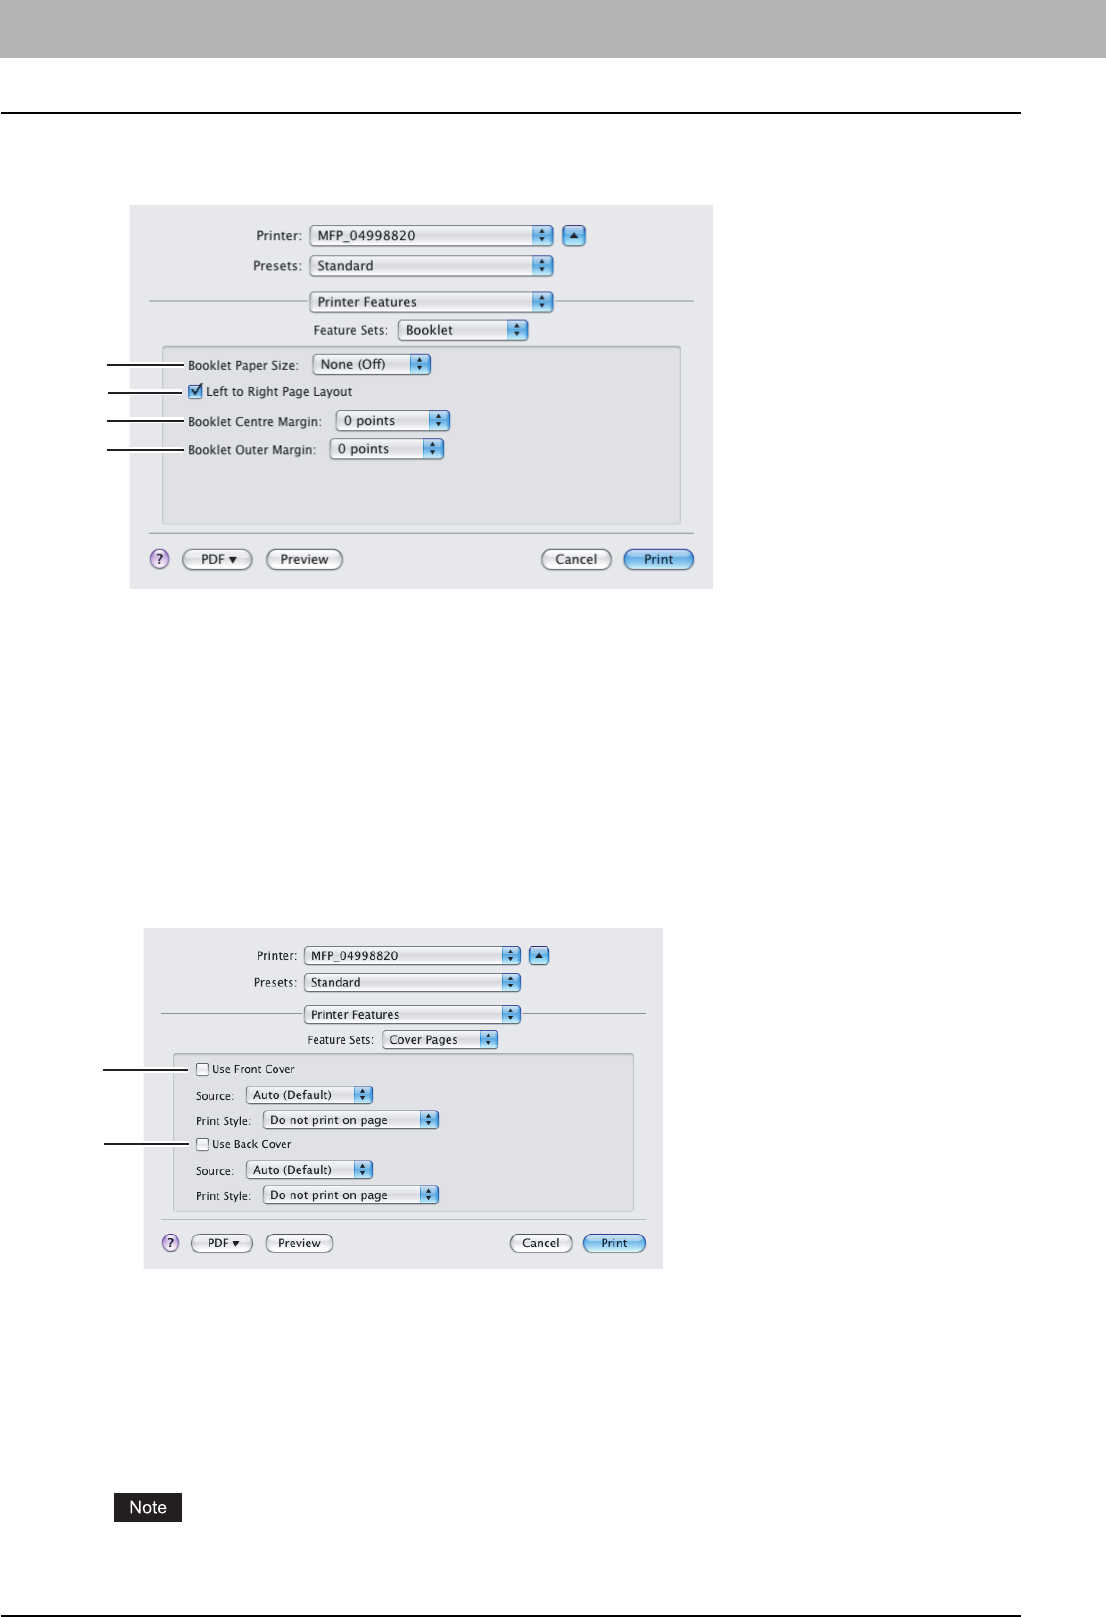
3 PRINTING FROM MACINTOSH
106 Printing from Application on Mac OS X 10.2.4 to Mac OS X 10.5.x
Booklet
In the Booklet menu, you can set booklet printing.
1) Booklet Paper Size
Select a paper size for the booklet. Each two pages are printed on both side of a sheet which is then folded. The
booklet size will be the half size of the paper size that you specify.
2) Left to Right Page Layout
Check this to create a booklet that can be read from left to right.
3) Booklet Center Margin
Select the width of the margin added to the center.
4) Booklet Outer Margin
Select the width of the margin added to the short edge side of a sheet.
Cover Pages
In the Cover Pages menu, you can set Front Cover printing and Back Cover printing.
1) Use Front Cover
This sets front cover printing which allows you to insert or print a cover on a sheet fed from a different drawer or the
bypass tray.
To enable cover printing, check on the box and select the location from where a cover sheet is to be fed and the print
style to be used.
Source
Select the location from where a cover sheet is to be fed. When [Auto(Default)] is selected, the paper is automatically
selected according to the printed document size.
The selectable values in the [Source] box vary depending on the optional devices installed on this equipment and
their configuration on the Paper Feed menu.
1
2
3
4
1
2
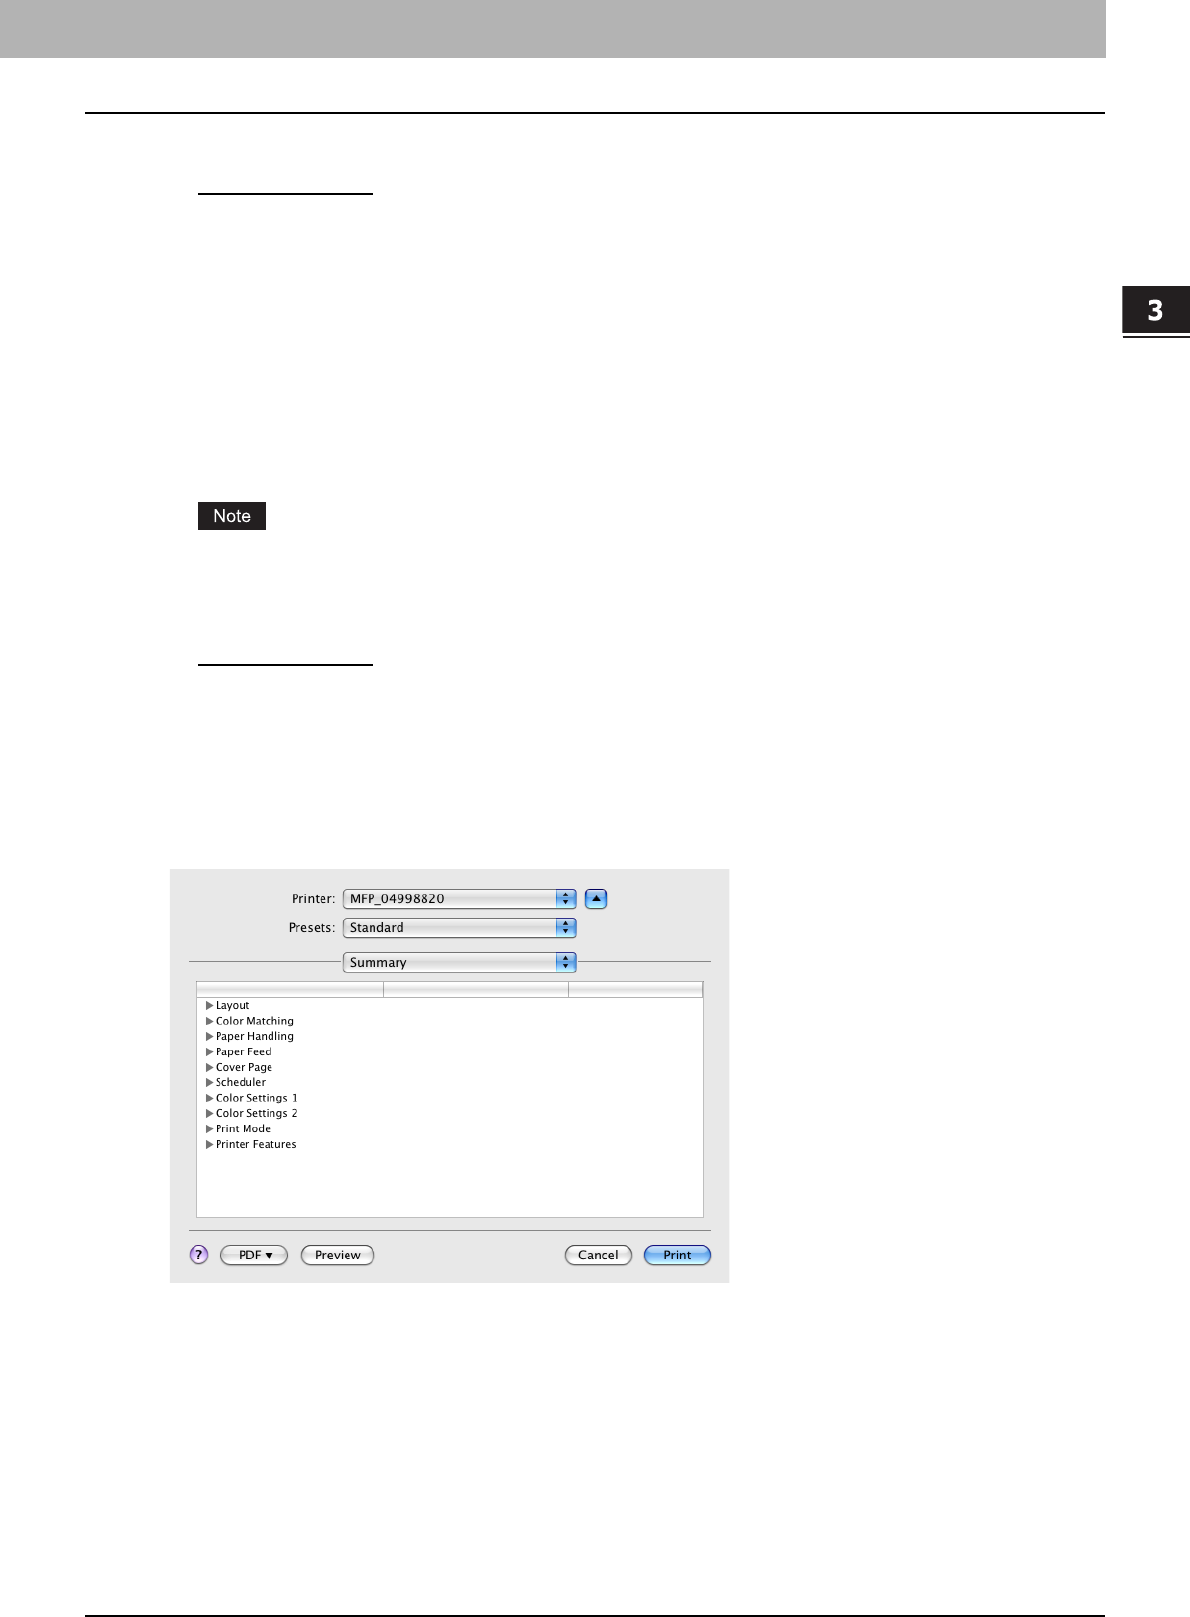
3.PRINTING FROM MACINTOSH
Printing from Application on Mac OS X 10.2.4 to Mac OS X 10.5.x 107
3 PRINTING FROM MACINTOSH
Print Style
This selects how you want to print a cover.
-Do not print on page — Select this to insert a blank cover.
-Print on page — Select this to print the first page image on the front side of a cover. When the Two-Sided Printing
option is enabled in the Layout menu, the first two page images are printed on both sides of a cover.
-Print on 1 side of the page — Select this to print the first page image on the front side of a cover. This is available
only when the Two-Sided Printing option is enabled in the Layout menu.
2) Use Back Cover
This sets back cover printing which allows you to insert or print a back cover on a sheet fed from a different drawer or
the bypass tray.
To enable back cover printing, check on the box and select the location from where a back cover sheet is to be fed and
the print style to be used.
Source
Select the location from where a back cover sheet is to be fed. When [Auto(Default)] is selected, the paper is
automatically selected according to the printed document size.
The selectable values in the [Source] box vary depending on the optional devices installed on this equipment and
their configuration on the Paper Feed menu.
Print Style
This selects how you want to print a back cover.
-Do not print on page — Select this to insert a blank cover.
-Print on page — Select this to print the last page image on the front side of a cover. When the Two-Sided Printing
option is enabled in the Layout menu, the last two page images are printed on both sides of a cover.
-Print on 1 side of the page — Select this to print the last page image on the front side of a cover. This is available
only when the Two-Sided Printing option is enabled in the Layout menu.
Summary
In the Summary menu, you can confirm the current settings for printing.
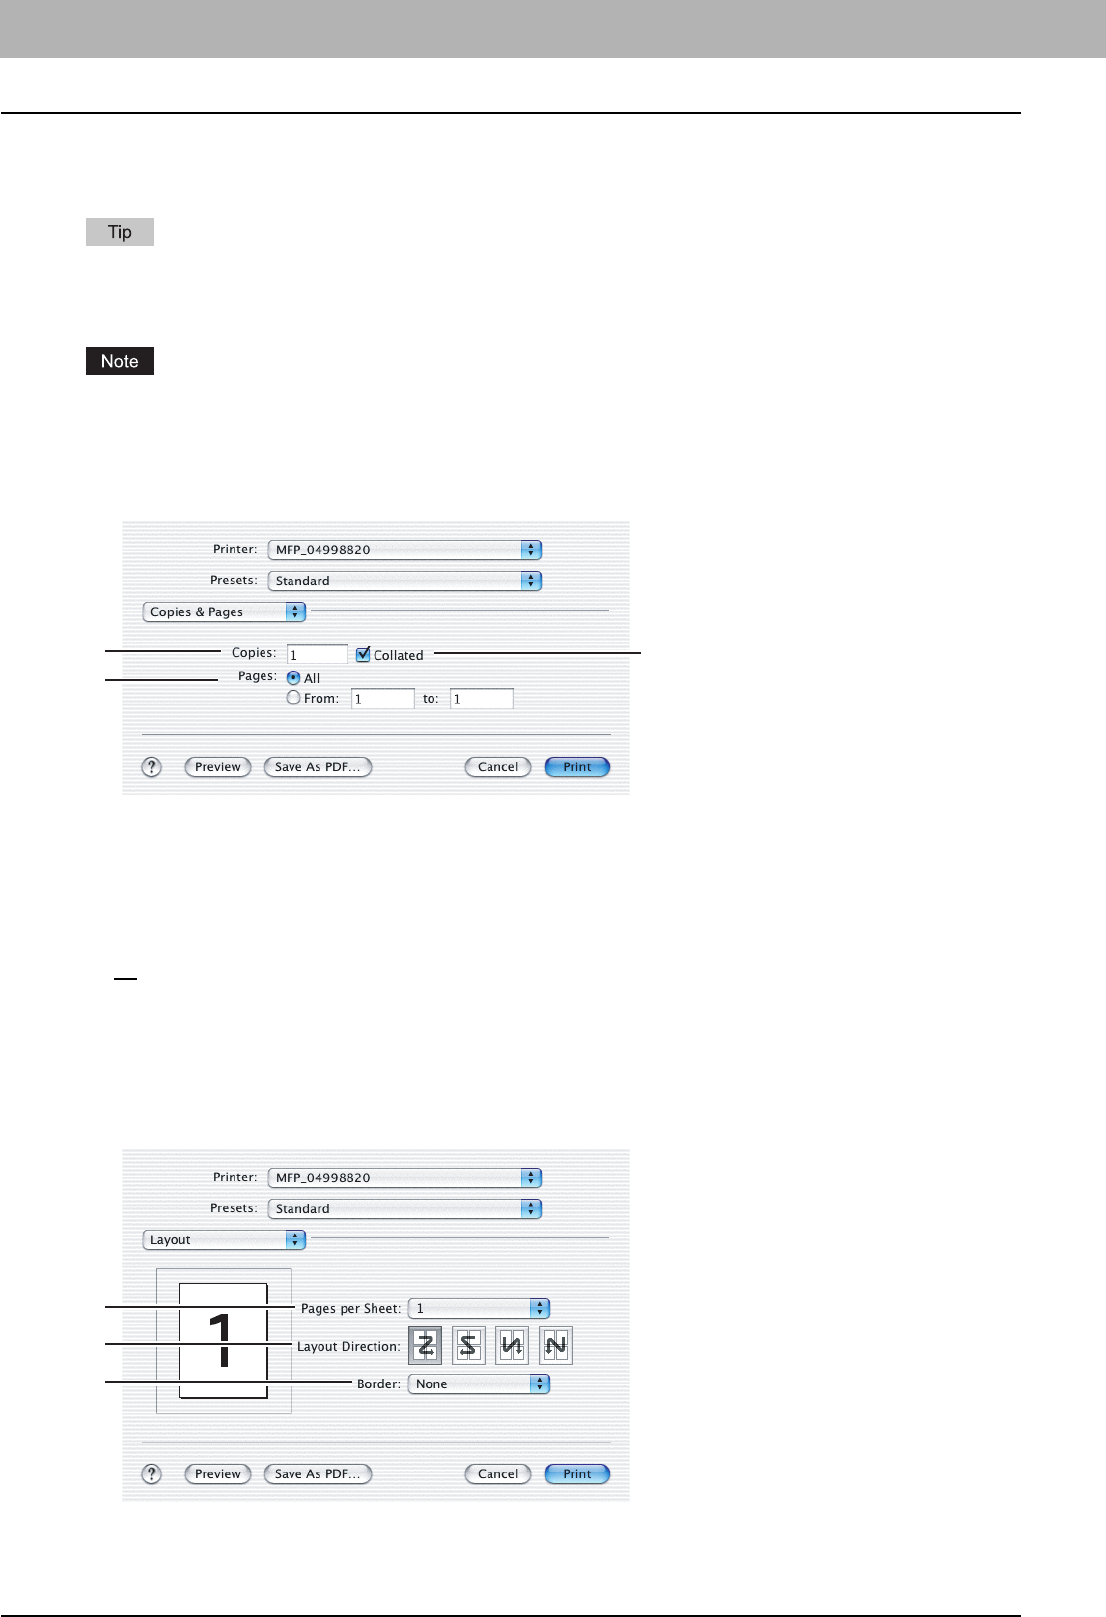
3 PRINTING FROM MACINTOSH
108 Printing from Application on Mac OS X 10.2.4 to Mac OS X 10.5.x
Print Dialog on Mac OS X 10.2.x
The Print dialog boxes can be displayed by selecting the [Print] command from the [File] menu of the application.
The Print dialog boxes are different between Mac OS X 10.2.x and Mac OS X 10.3.x to Mac OS X 10.5.x. Please see
the following section for the descriptions of the Print dialog box for Mac OS X 10.3.x to Mac 10.5.x.
P.93 “Print Dialog on Mac OS X 10.3.x to Mac OS X 10.5.x”
The Print dialog boxes vary across applications.
Copies & Pages
In the Copies & Pages menu, you can set the general print options such as number of copies, sort printing.
1) Copies
This sets the number of printed copies. You can set any integer from 1 to 9999.
2) Collated
Check this for sort-printing (1, 2, 3... 1, 2, 3...)
3) Pages
This sets the pages to be printed.
-All — Select this to print all pages.
-From/to — Select this to specify the pages to be printed. Enter the page range in the From and To box.
Layout
In the Layout menu, you can set N-up printing (multiple pages per sheets). The items in the Layout menu vary depending
on the Mac OS X version.
1) Pages per Sheet
This sets the number of multiple pages to be printed on one sheet. The pages are reduced to fit the selected paper
size automatically and are printed.
12
3
1
2
3
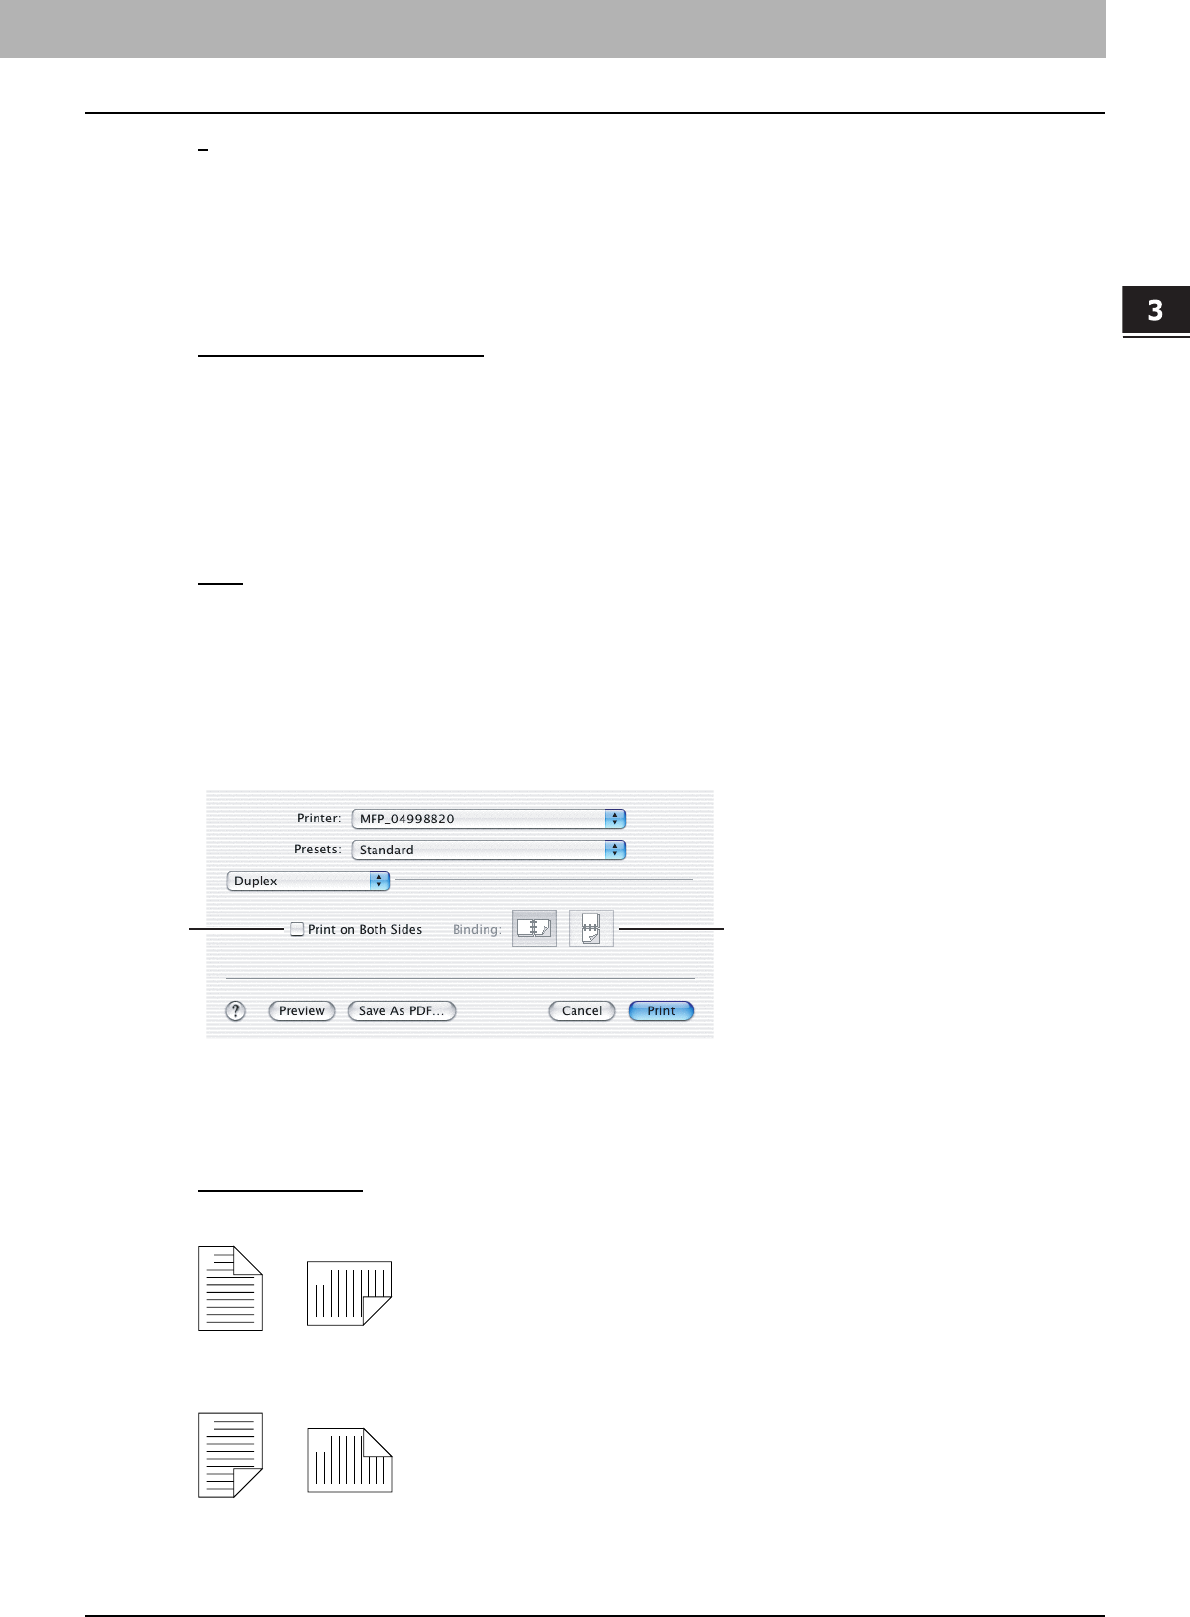
3.PRINTING FROM MACINTOSH
Printing from Application on Mac OS X 10.2.4 to Mac OS X 10.5.x 109
3 PRINTING FROM MACINTOSH
-1 — Select this if do not wish to enable N-up printing.
-2 — Select this to print images from 2 pages arranged on one sheet.
-4 — Select this to print images from 4 pages arranged on one sheet.
-6 — Select this to print images from 6 pages arranged on one sheet.
-9 — Select this to print images from 9 pages arranged on one sheet.
-16 — Select this to print images from 16 pages arranged on one sheet.
2) Layout Direction
This sets how pages are arranged on one sheet. This is available only when the N-up printing (printing multiple sheets
on a page) is set.
-Across Left to Right Before Down — Pages are arranged horizontally from left to right and then top to bottom on
one sheet.
-Across Right to Left Before Down — Pages are arranged horizontally from right to left and then top to bottom on
one sheet.
-Down Before Across Left to Right — Pages are arranged vertically from top to bottom and then left to right on
one sheet.
-Down Before Across Right to Left — Pages are arranged vertically from top to bottom and then right to left on
one sheet.
3) Border
Select if a border line is to be drawn on each page.
-None — Select this if no border line is to be drawn.
-Single hairline — Select this to draw single hairline for the border.
-Single thin line — Select this to draw single thin line for the border.
-Double hairline — Select this to draw double hairline for the border.
-Double thin line — Select this to draw double thin line for the border.
Duplex
In the Duplex menu, you can set 2-Sided printing (printing on both sides of a sheet).
1) Print on Both Sides
Check this to print on both sides of the paper. When this is checked, select the binding direction at the [Binding]
option.
2) Binding
This sets the type of binding for 2-sided printed pages.
-Long Edge Binding — Select this to bind along the long edge side of paper. The direction to be printed on the
back side of the paper differs depending on the orientation.
-Short Edge Binding — Select this to bind along the short edge side of paper. The direction to be printed on the
back side of the paper differs depending on the orientation.
12
1
2
Landscape
1
2
Portrait
1
2
Landscape
1
2
Portrait
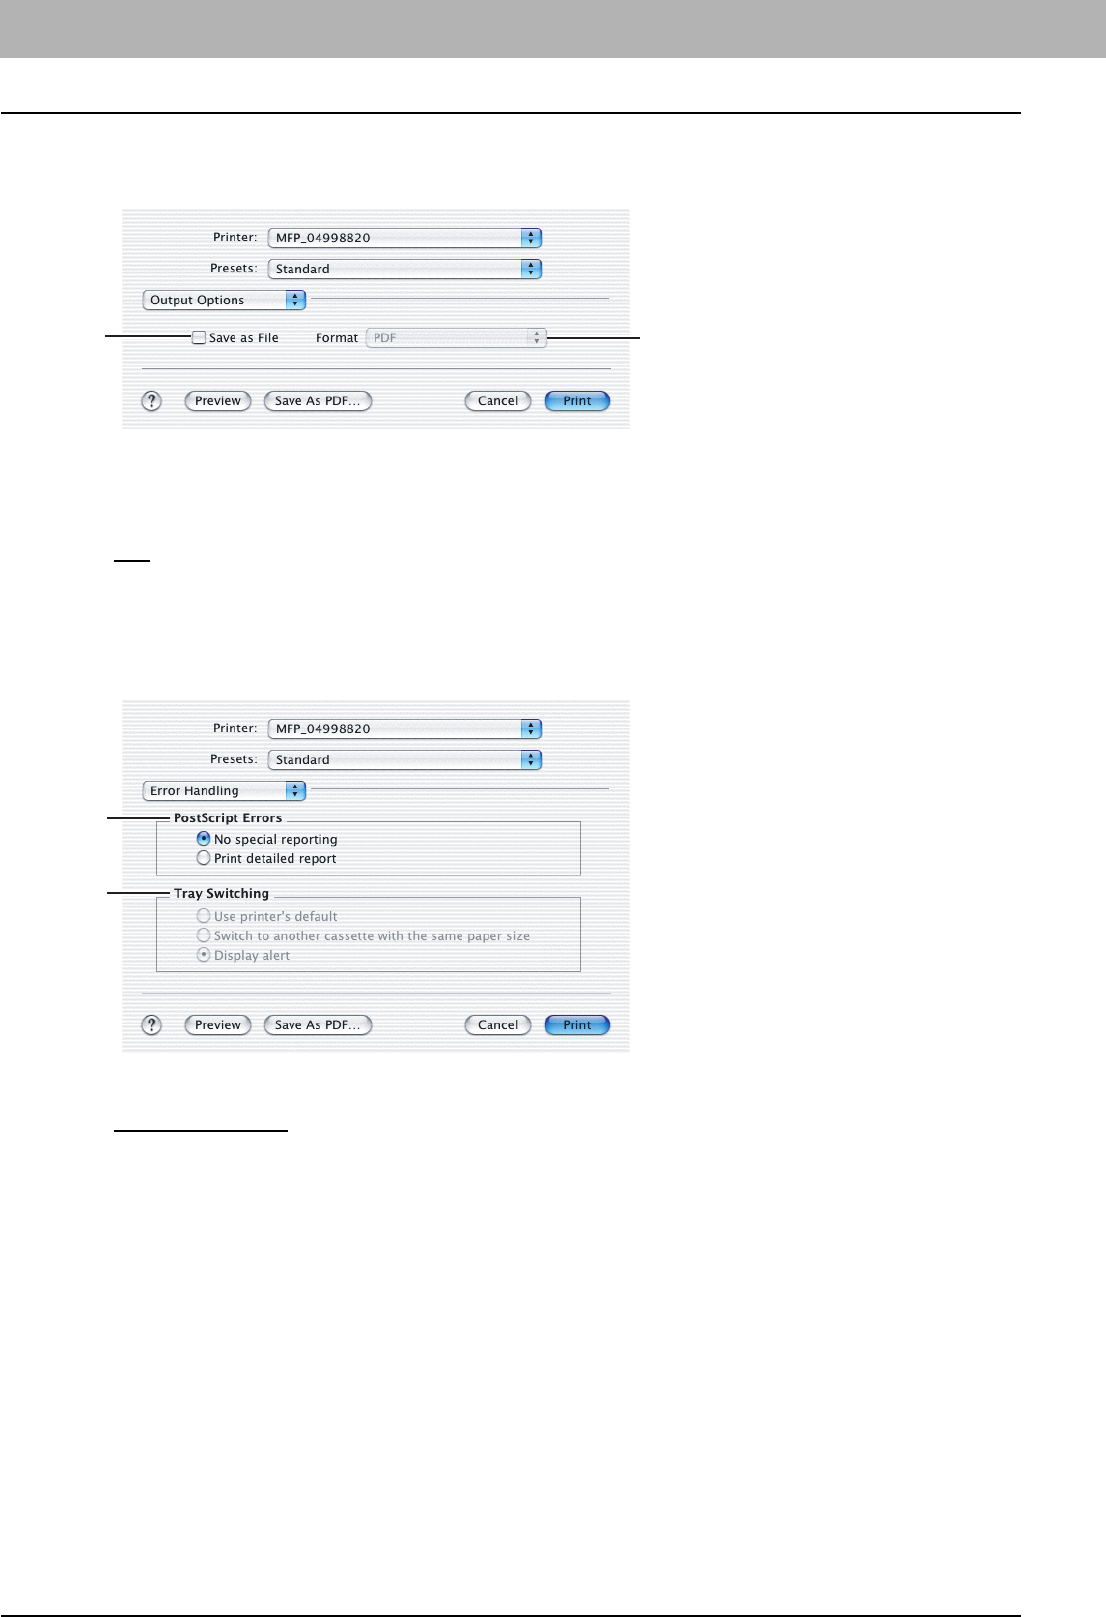
3 PRINTING FROM MACINTOSH
110 Printing from Application on Mac OS X 10.2.4 to Mac OS X 10.5.x
Output Options
In the Output Options menu, you can save a print job as a file.
1) Save as File
Check this to save a print job as a file. When this is checked, select the file type at the [Format] box.
2) Format
This sets the format of a file to be saved.
-PDF — Select this to save a print job as a PDF file.
-PostScript — Select this to save a print job as a PS file.
Error Handling
In the Error Handling menu, you can set how to report a PostScript error.
1) PostScript Errors
This sets whether or not you want to print a PostScript error report.
-No special reporting — Select this if you do not want to print PostScript error information.
-Print detailed report — Select this to print PostScript error information.
2) Tray Switching
This is not supported by this equipment.
12
1
2

3.PRINTING FROM MACINTOSH
Printing from Application on Mac OS X 10.2.4 to Mac OS X 10.5.x 111
3 PRINTING FROM MACINTOSH
Paper Feed
In the Paper Feed menu, you can select the paper source or media type.
1) All pages from
Select the option button when you want to use the same paper source for all pages. When this is selected, select the
paper source or paper type to be used at the box.
2) First page from
Select the option button when you want to specify different paper source for a first page and remaining pages. When
this selected, select the paper source or paper type to be used for a first page at the box.
3) Remaining from
Select the paper source or paper type to be used for the remaining pages in the box. This can be selected only when
you select the option button of the [First page from] option.
1
2
3
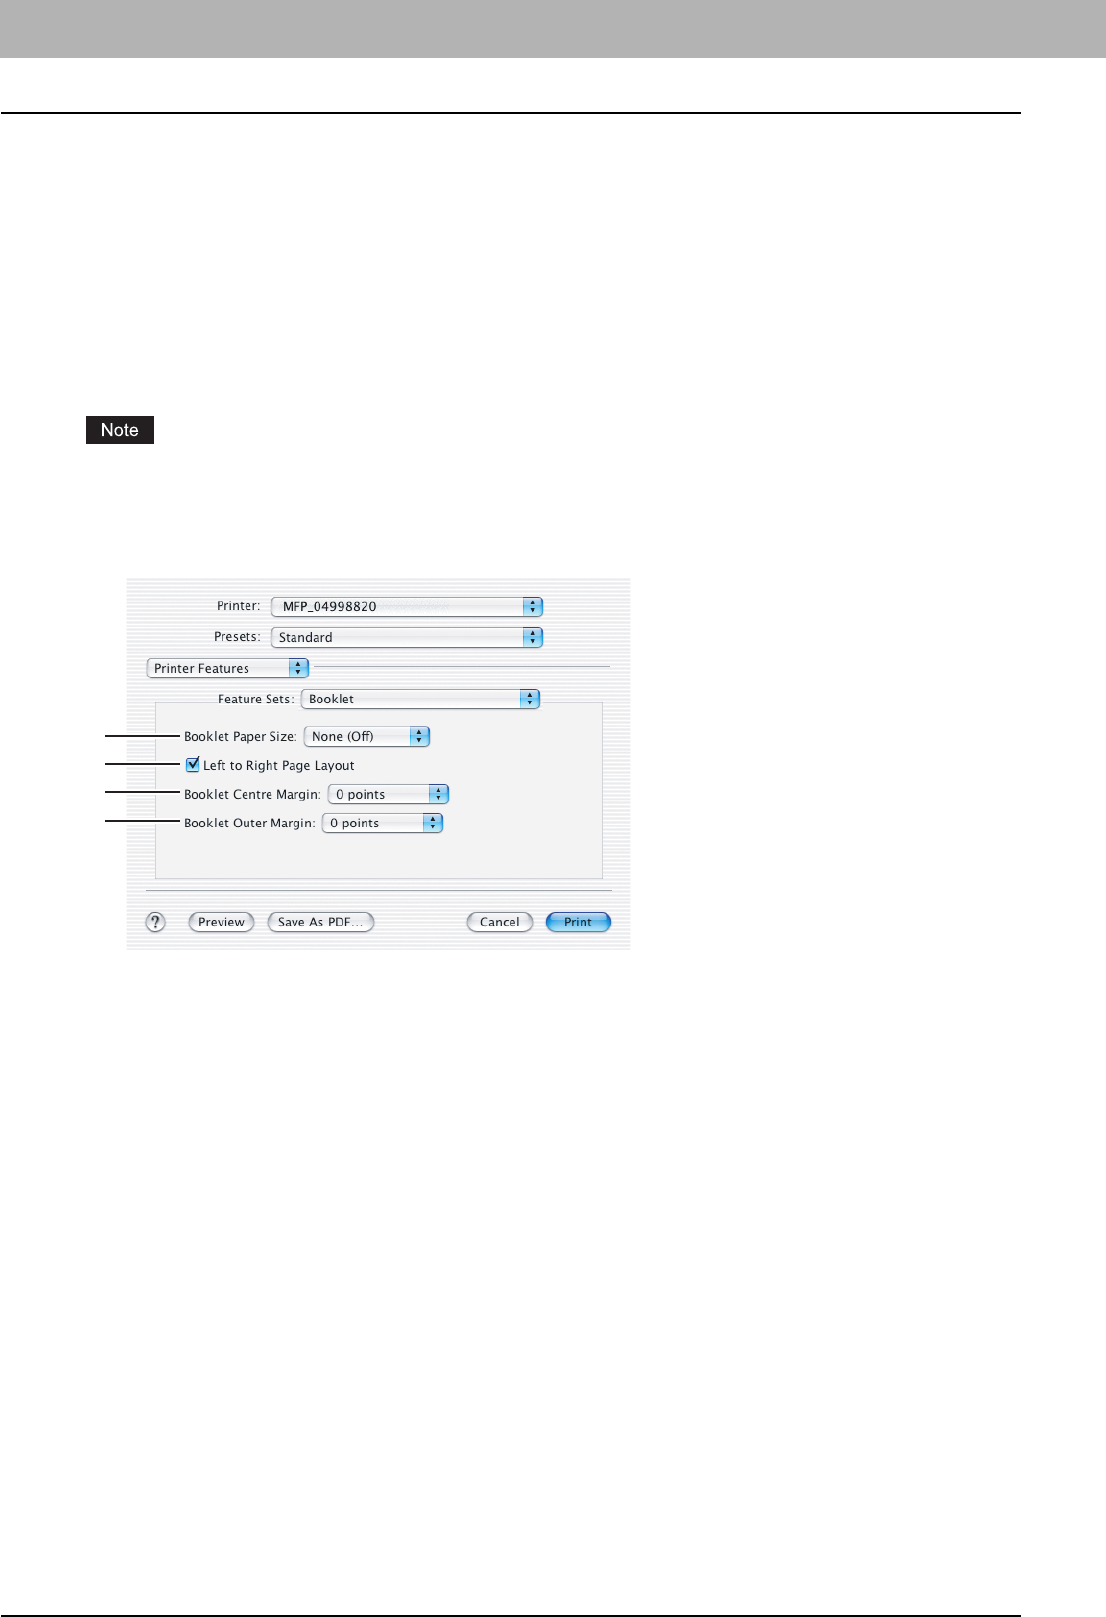
3 PRINTING FROM MACINTOSH
112 Printing from Application on Mac OS X 10.2.4 to Mac OS X 10.5.x
Printer Features
In the Printer Features menu, you can set special printing features.
P.112 “Booklet”
P.113 “Color Settings 1”
P.114 “Color Settings 2”
P.115 “Color Settings 3”
P.115 “Color Settings 4”
P.116 “Finishing”
P.119 “Printing Modes”
P.120 “Printing Modes DC”
P.121 “Private Document Password”
Do not use the Cover Pages menu.
Booklet
In the Booklet menu, you can set booklet printing.
1) Booklet Paper Size
Select a paper size for the booklet. Each two pages are printed on both side of a sheet which is then folded. The
booklet size will be the half size of the paper size that you specify.
2) Left to Right Page Layout
Check this to create a booklet that can be read from left to right.
3) Booklet Center Margin
Select the width of space added to the center.
4) Booklet Outer Margin
Select the width of space added to the short edge side of a sheet.
1
2
3
4
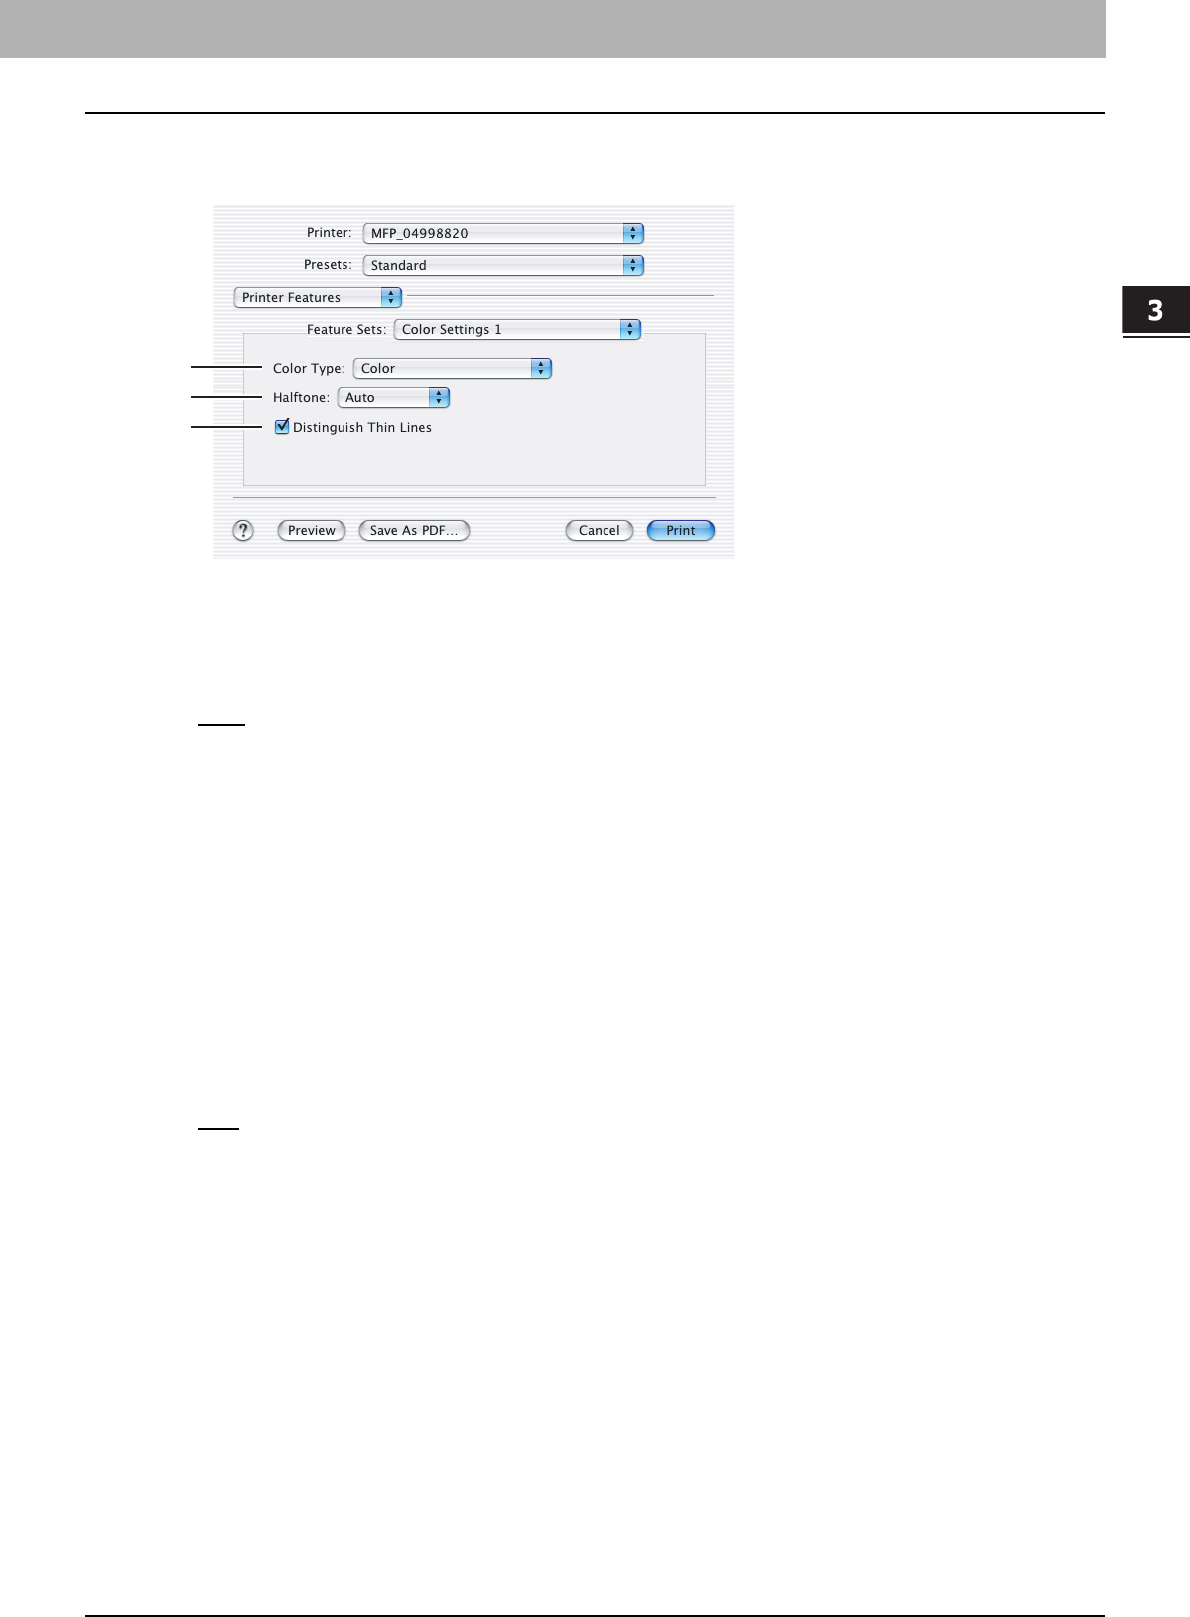
3.PRINTING FROM MACINTOSH
Printing from Application on Mac OS X 10.2.4 to Mac OS X 10.5.x 113
3 PRINTING FROM MACINTOSH
Color Settings 1
In the Color Settings 1, you can set special features for printing.
1) Color Type
This sets whether a print job is printed in the color mode or monochrome mode.
-Auto — Select this to determine the color mode automatically. When a print job is a black and white document, the
system automatically prints the document in the monochrome mode. When a print job is a color document, it prints
the document in color mode.
-Color — Select this to print a document in the color mode.
-Mono — Select this to print a document in the monochrome mode.
-Black and Red — Select this to print a document in the twin color mode with red. When this is selected, the black
parts of the document are printed in black and color parts of the document are printed in red.
-Black and Green — Select this to print a document in the twin color mode with green. When this is selected, the
black parts of the document are printed in black and color parts of the document are printed in green.
-Black and Blue — Select this to print a document in the twin color mode with blue. When this is selected, the
black parts of the document are printed in black and color parts of the document are printed in blue.
-Black and Cyan — Select this to print a document in the twin color mode with cyan. When this is selected, the
black parts of the document are printed in black and color parts of the document are printed in cyan.
-Black and Magenta — Select this to print a document in the twin color mode with magenta. When this is selected,
the black parts of the document are printed in black and color parts of the document are printed in magenta.
-Black and Yellow — Select this to print a document in the twin color mode with yellow. When this is selected, the
black parts of the document are printed in black and color parts of the document are printed in yellow.
-Black and White — Select this to print a document in the twin color mode with white. When this is selected, the
black parts of the document are printed in black and color parts of the document are not printed.
2) Halftone
This sets how halftones are printed.
-Auto — Select this to print using proper halftone depending on the contents in the document automatically.
-Detail — Select this to print halftone in detail.
-Smooth — Select this to print halftone smoothly.
3) Distinguish Thin Lines
Check this to print thin lines clearly.
1
2
3
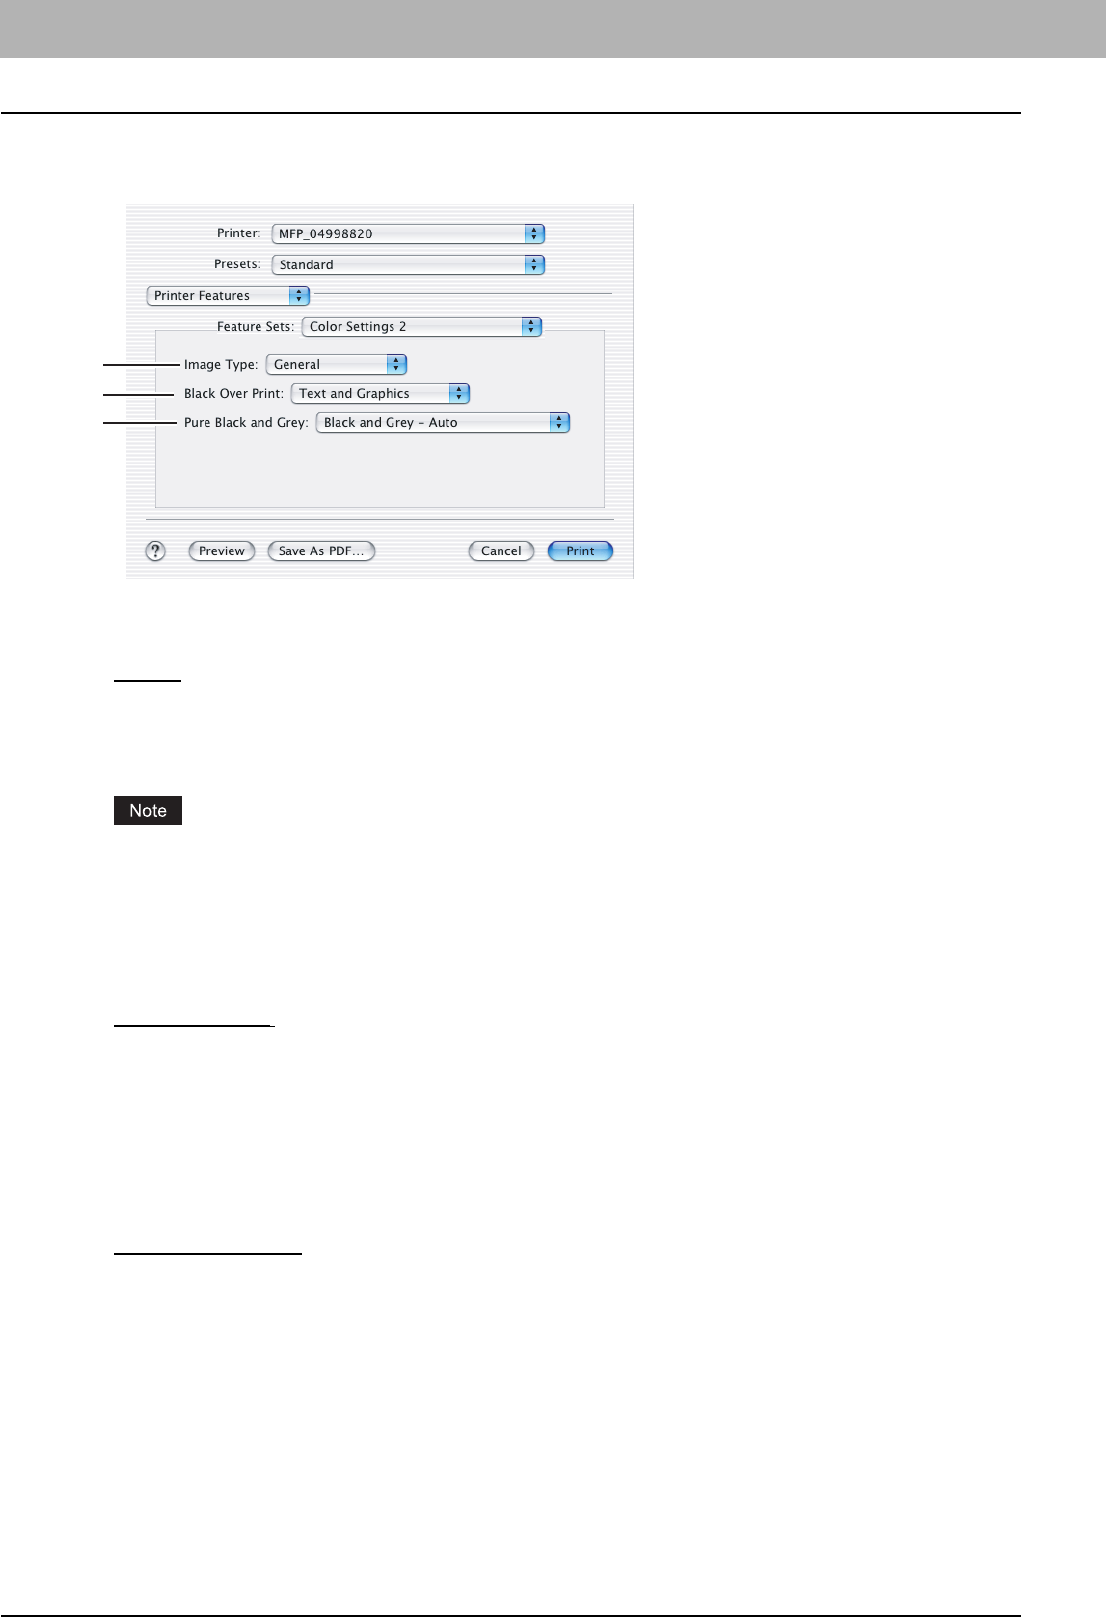
3 PRINTING FROM MACINTOSH
114 Printing from Application on Mac OS X 10.2.4 to Mac OS X 10.5.x
Color Settings 2
In the Color Settings 2, you can set image quality for printing.
1) Image Type
This sets how colors are printed by selecting the job type. The printer driver automatically applies proper image quality
for selected job type.
-General — Select this to apply proper image quality for printing a general color document.
-Photograph — Select this to apply proper image quality for printing photos.
-Presentation — Select this to apply proper image quality for printing a vivid document.
-Line Art — Select this to apply proper image quality for printing a document containing a lot of characters or line
arts.
Other than [General] cannot be selected when [Mono] is selected at the [Color Type] box in the Color Settings 1
menu.
2) Black Over Print
Check this when printing background content that has black text overlayed on it. If this is enabled, the gap between
text and background is minimized and color deviation is prevented.
-Off — Select this so as not to print the background of the black content.
-Text — Select this to print all the full-color background and then print black text on a color background.
-Text and Graphics — Select this to print all the full-color background and then print black text and graphics on a
color background.
3) Pure Black and Gray
Select whether to print the black and gray scale contents in a document using the black toner.
-Off — Select this to print the document in the color mode.
-Black - Auto — Select this to print in the most appropriate image quality according to conditions such as the
original type.
-Black - Text — Select this to print the black texts using the black toner.
-Black - Text and Graphic — Select this to print the black text and graphics using the black toner.
-Black - Text, Graphic and Image — Select this to print the black text, graphics and images using the black toner.
-Black and Gray - Auto — Select this to print black and gray scale contents using the black toner according to the
document.
-Black and Gray - Text — Select this to print the black and gray scale text using the black toner.
-Black and Gray - Text and Graphic — Select this to print the black and gray scale text and graphics using the
black toner.
-Black and Gray - Text, Graphic and Image — Select this to print the black and gray scale text, graphics, and
images using the black toner.
1
2
3
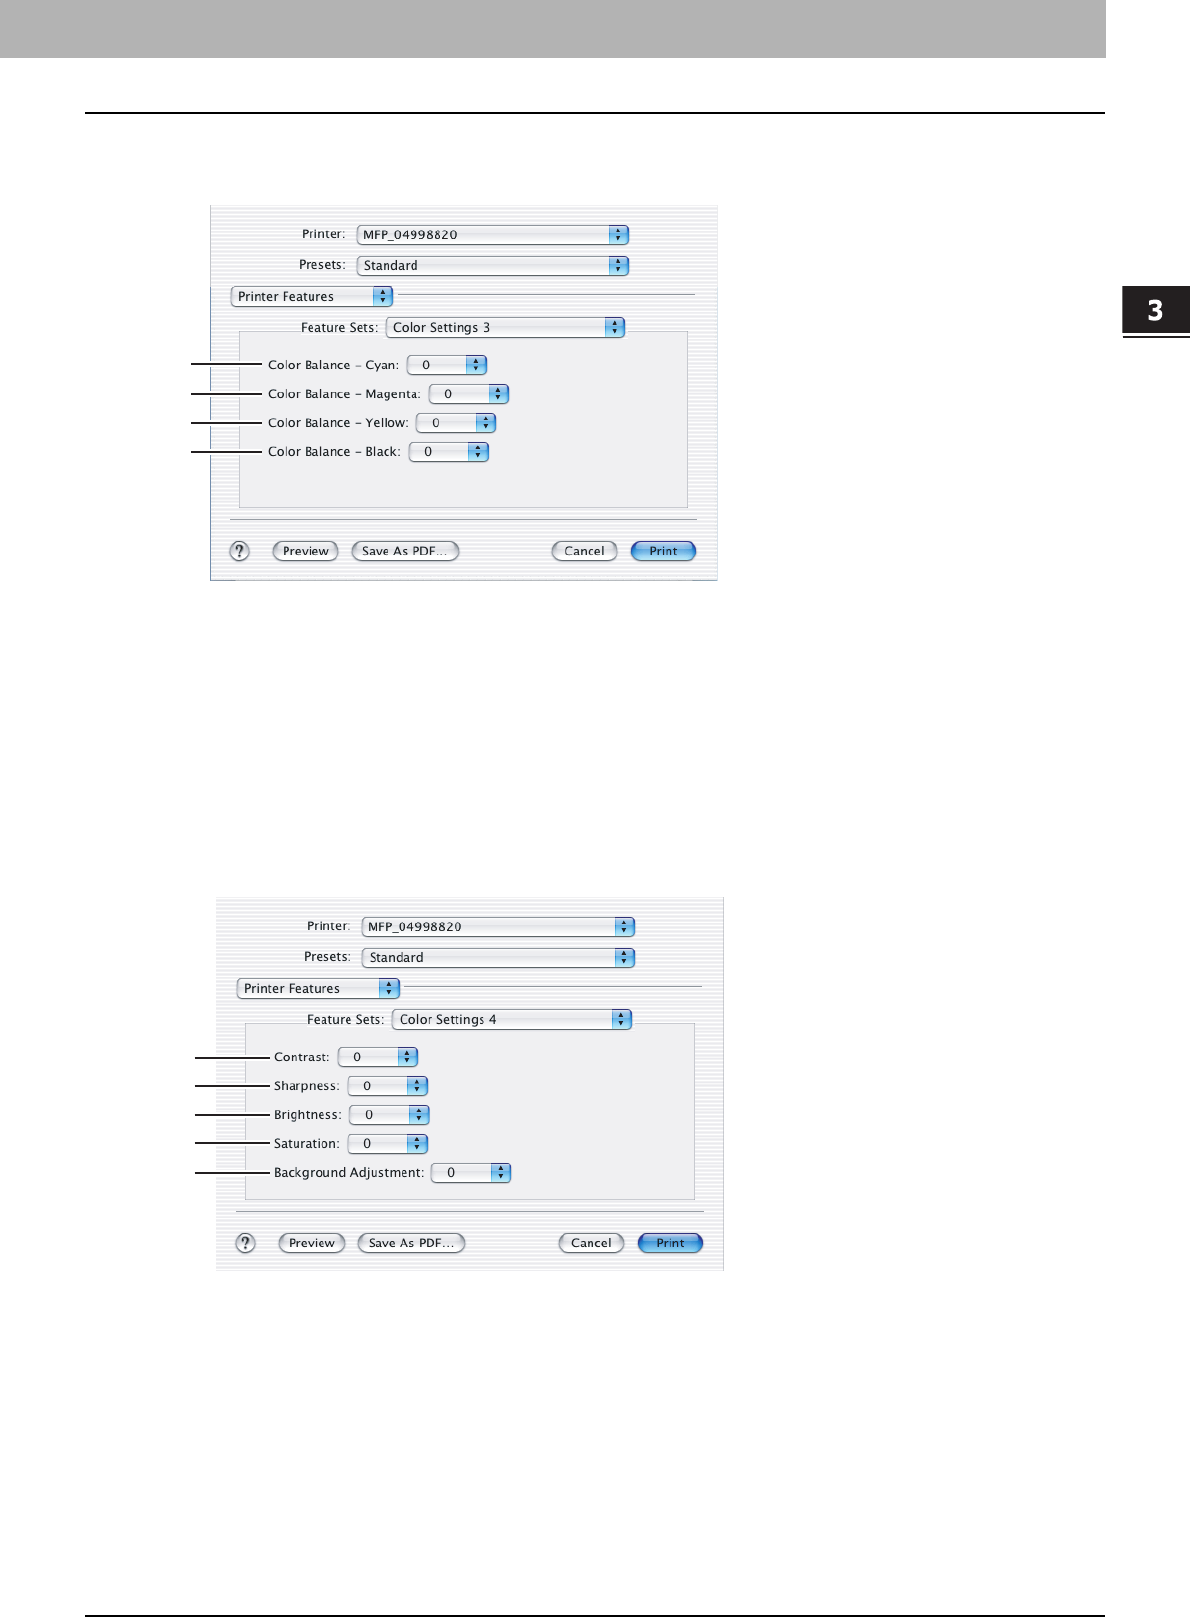
3.PRINTING FROM MACINTOSH
Printing from Application on Mac OS X 10.2.4 to Mac OS X 10.5.x 115
3 PRINTING FROM MACINTOSH
Color Settings 3
In the Color Settings 3, you can set color balance for printing.
1) Color Balance - Cyan
Adjusts the density of cyan for printing. You can set from -4 to 4 in units of 1.
2) Color Balance - Magenta
Adjusts the density of magenta for printing. You can set from -4 to 4 in units of 1.
3) Color Balance - Yellow
Adjusts the density of yellow for printing. You can set from -4 to 4 in units of 1.
4) Color Balance - Black
Adjusts the density of black for printing. You can set from -4 to 4 in units of 1.
Color Settings 4
In the Color Settings 4, you can set image attributes for printing.
1) Contrast
Adjusts the contrast for printing. You can set from -4 (lowest) to 4 (highest) in units of 1 by moving the scroll bar.
2) Sharpness
Adjusts the sharpness for printing. You can set from -4 (smoothest) to 4 (sharpest) in units of 1 by moving the scroll
bar.
3) Brightness
Adjusts the brightness for printing. You can set from -4 (darkest) to 4 (lightest) in units of 1 by moving the scroll bar.
4) Saturation
Adjusts the saturation for printing. You can set from -4 (low clear) to 4 (high clear) in units of 1 by moving the scroll bar.
5) Background Adjustment
Adjusts the density level of the background. You can set from -4 (lightest) to 4 (darkest) in units of 1 by moving the
scroll bar.
1
2
3
4
1
2
3
4
5
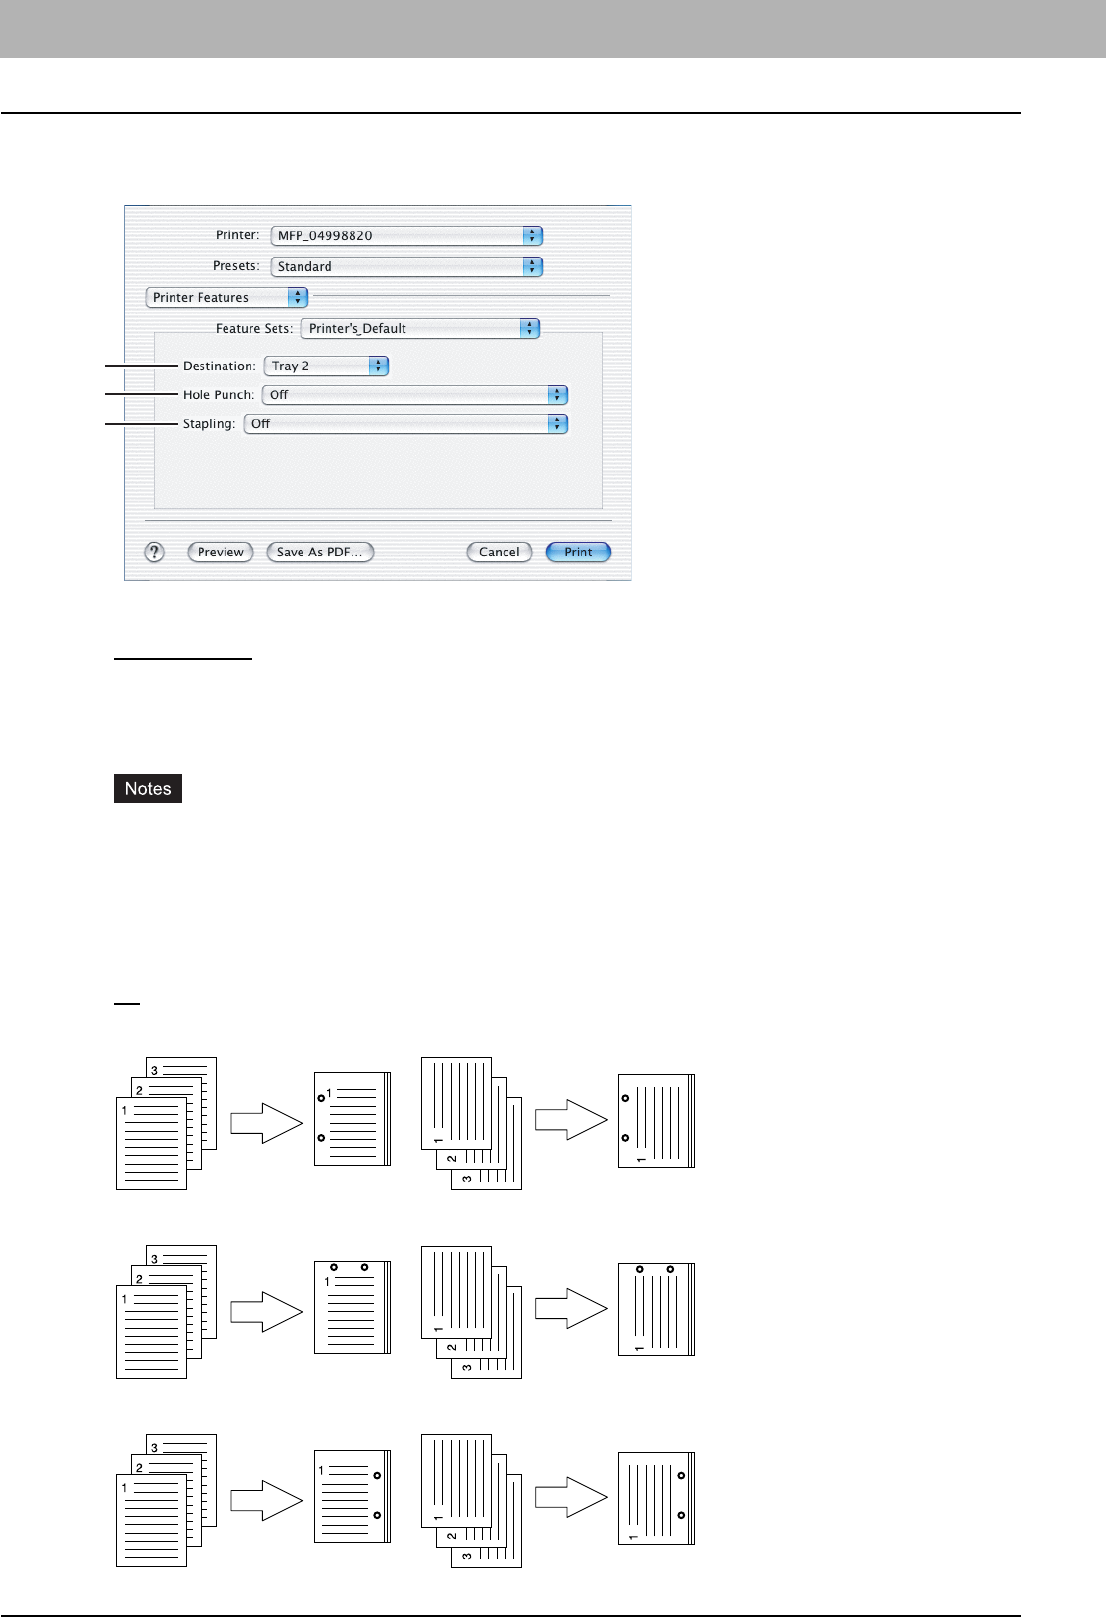
3 PRINTING FROM MACINTOSH
116 Printing from Application on Mac OS X 10.2.4 to Mac OS X 10.5.x
Finishing
In the Finishing menu, you can set the destination, hole punching and stapling.
1) Destination
This selects the destination tray.
-Printer’s Default — Select this to route the output to the default tray (that is set as the default tray for raw job in the
Printer setting page of TopAccess Administrator’s page).
-Inner Tray — Select this to route the output to the inner tray.
-Tray 1 — Select this to route the output to the upper tray of the Finisher (optional).
-Tray 2 — Select this to route the output to the lower tray of the Finisher (optional).
yDepending on the type of finisher (optional) installed and destination settings, stapling and hole punching may
not be performed.
y[Tray 1] can be enabled when the Hanging Finisher (optional), Finishe (optional) or Saddle Stitch Finisher
(optional) is installed.
y[Tray 2] can be enabled when the Finisher (optional) or Saddle Stitch Finisher (optional) is installed.
2) Hole Punch
This sets whether or not a print job is hole punched.
-Off — Select this to print without hole punches.
-Long Edge Punch without rotation — Select this to create holes on the left side for a portrait document, or on the
top for a landscape document.
-Short Edge Punch without rotation — Select this to create holes on the top for a portrait document, or on the
right for a landscape document.
-Long Edge Punch with 180 degree rotation — Select this to create holes on the right side for a portrait
document, or on the bottom for a landscape document.
1
2
3
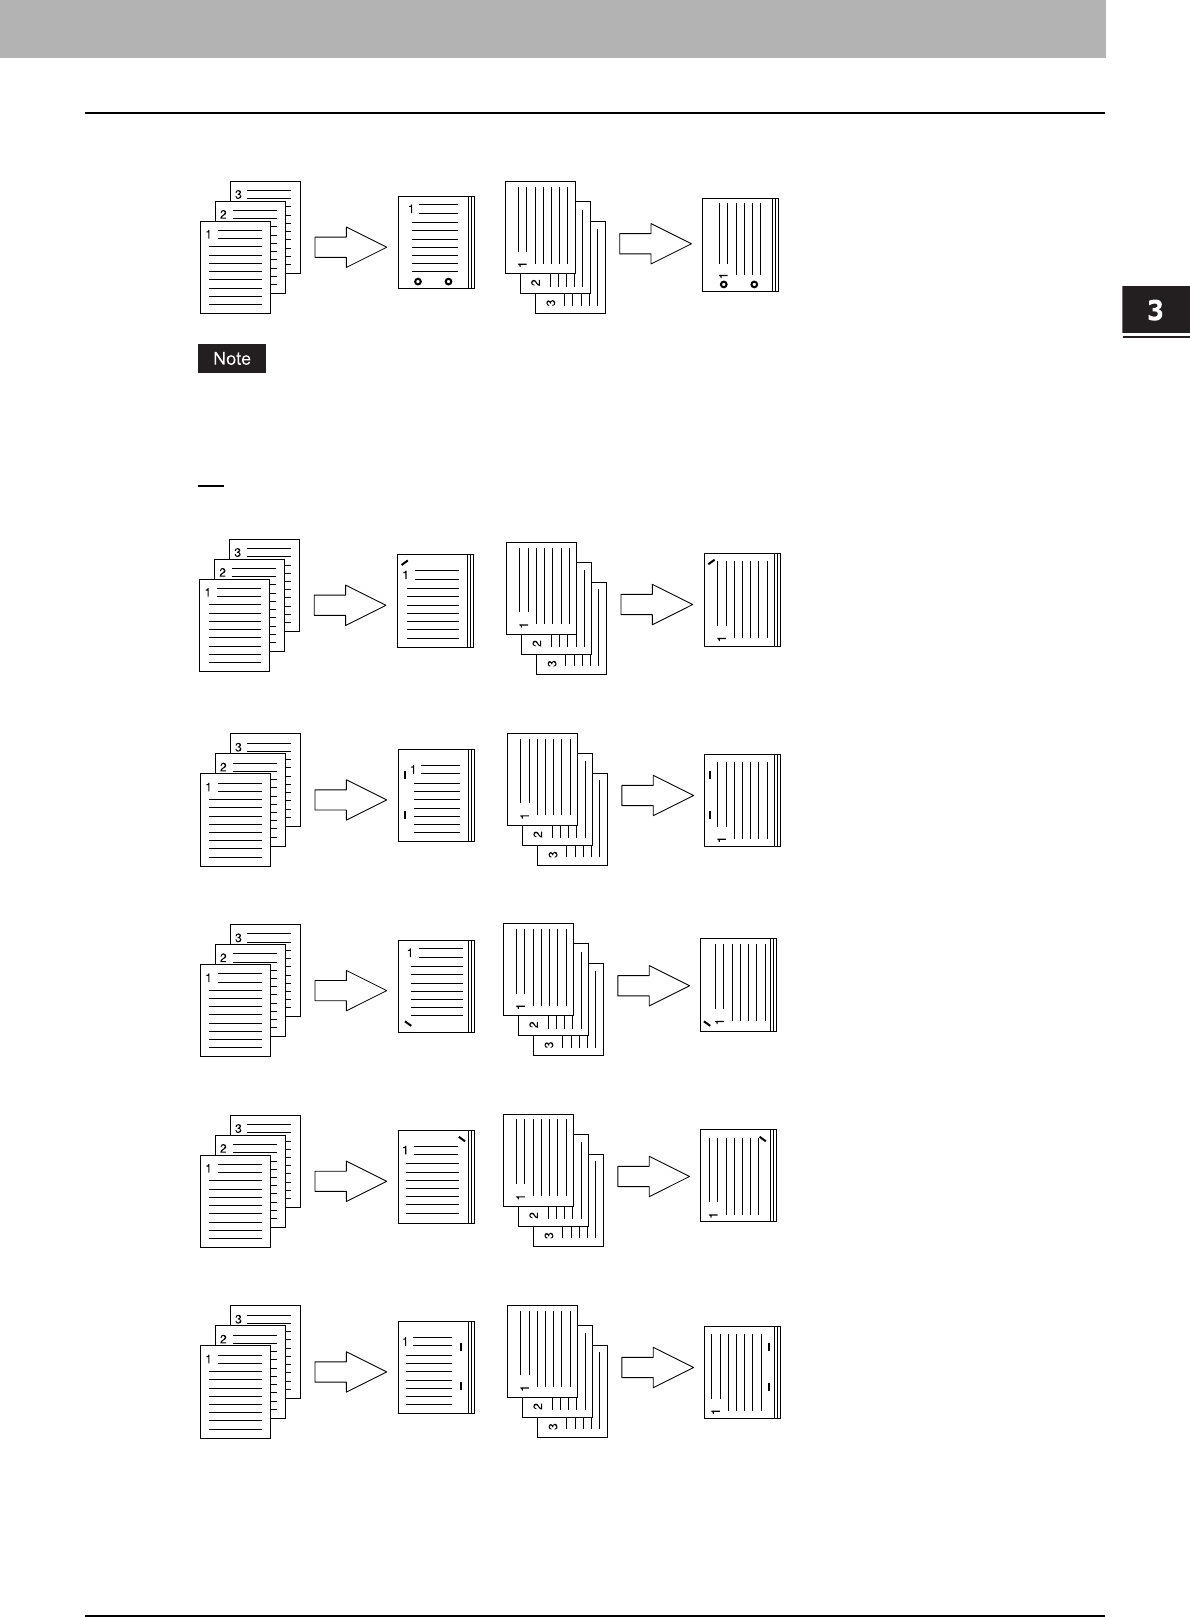
3.PRINTING FROM MACINTOSH
Printing from Application on Mac OS X 10.2.4 to Mac OS X 10.5.x 117
3 PRINTING FROM MACINTOSH
-Short Edge Punch with 180 degree rotation — Select this to create holes on the bottom for a portrait document,
or on the left for a landscape document.
This option cannot be selected if a hole punch unit (optional) is not installed.
3) Stapling
This sets whether a print job is stapled.
-Off — Select this to print without stapling.
-Upper Left (Portrait)/Upper Right (Landscape) — Select this to staple on the upper left for a portrait document,
or on the upper right for a landscape document.
-Middle Left (Portrait)/Middle Top (Landscape) — Select this to double staple on the left for a portrait document,
or on the top for a landscape document.
-Lower Left (Portrait)/Upper Left (Landscape) — Select this to staple on the lower left for a portrait document, or
on the upper left for a landscape document.
-Upper Right (Portrait)/Lower Right (Landscape) — Select this to staple on the upper right for a portrait
document, or on the lower right for a landscape document.
-Middle Right (Portrait)/Middle Bottom (Landscape) — Select this to double staple on the right for a portrait
document, or on the bottom for a landscape document.
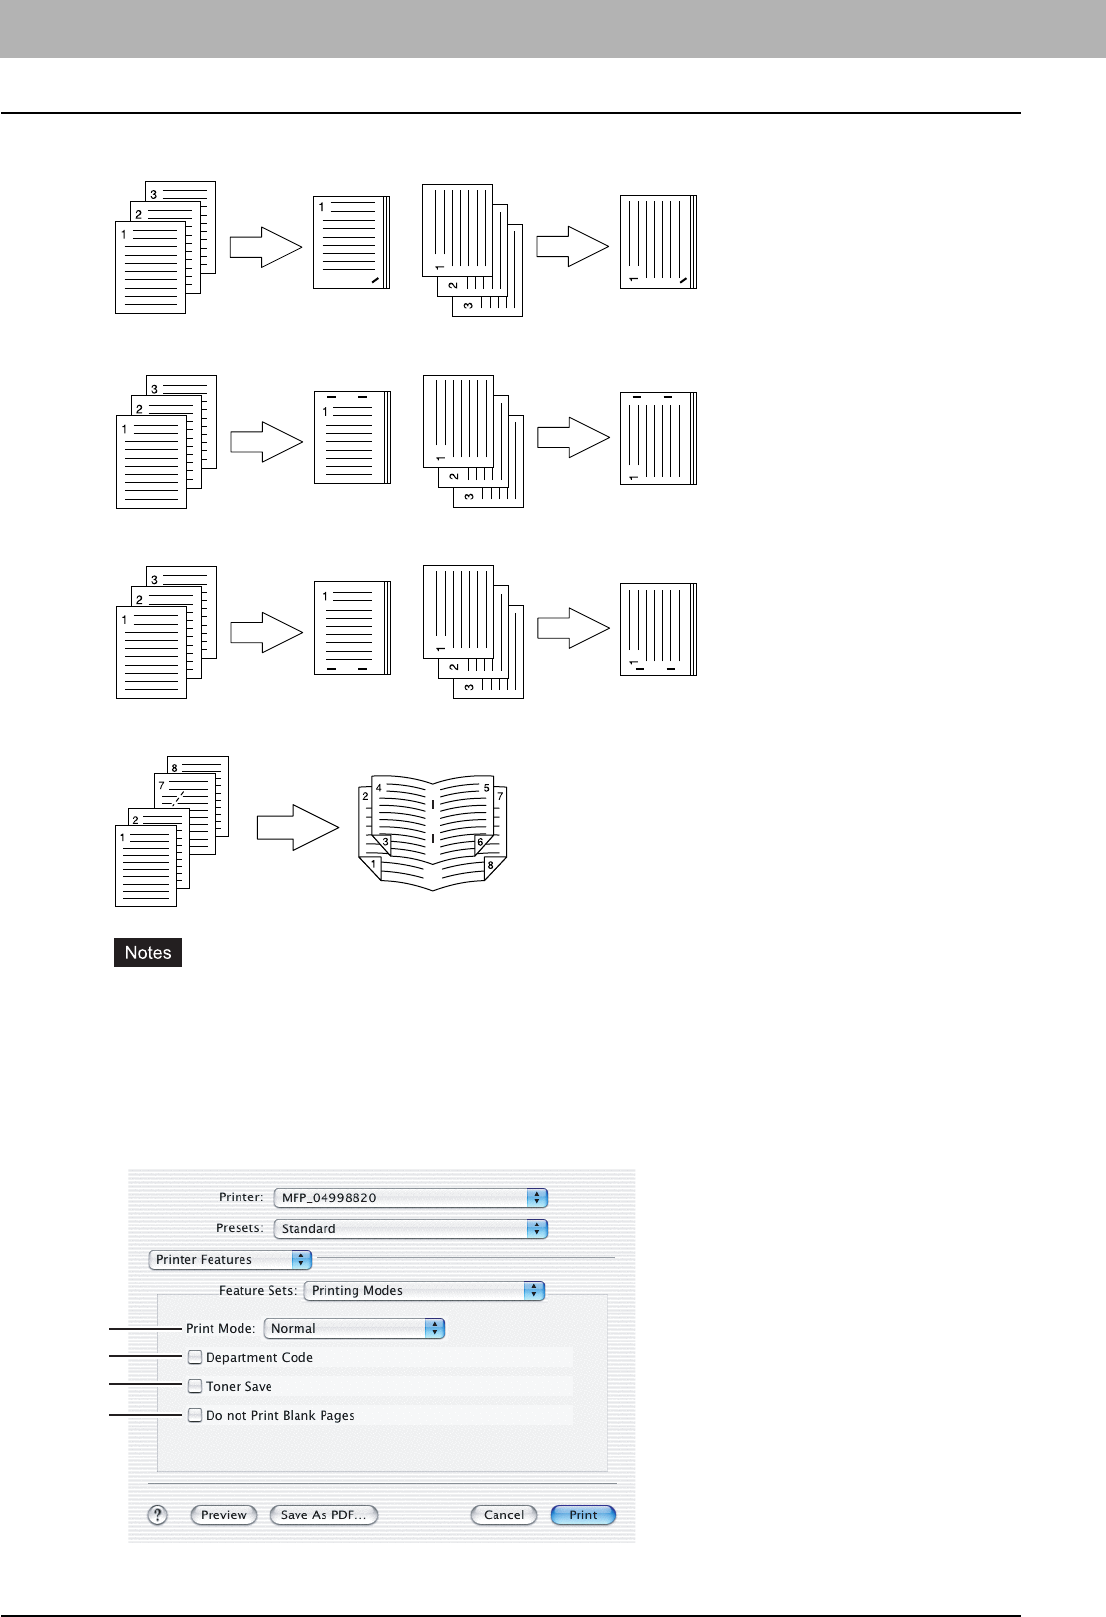
3 PRINTING FROM MACINTOSH
118 Printing from Application on Mac OS X 10.2.4 to Mac OS X 10.5.x
-Lower Right (Portrait)/Lower Left (Landscape) — Select this to double staple on the lower right for a portrait
document, or on the lower left for a landscape document.
-Middle Top (Portrait)/Middle Right (Landscape) — Select this to double staple on the top for a portrait
document, or on the right for a landscape document.
-Middle Bottom (Portrait)/Middle Left (Landscape) — Select this to double staple on the bottom for a portrait
document, or on the left for a landscape document.
-Saddle Stitch (Portrait)/Saddle Stitch (Landscape) — Select this to double staple on the center for a booklet to
be printed. Select this only when booklet printing is performed.
yThis option cannot be enabled if a finisher (optional) is not installed.
y[Saddle Stitch (Portrait)/Saddle Stitch (Landscape)] can be selected only when the Saddle Stitch Finisher
(optional) is installed.
Printing Modes
In the Printing Modes menu, you can set the way this equipment handles the print job. This menu allows you to enable
various job types such as Private Print and Proof Print.
1
2
3
4
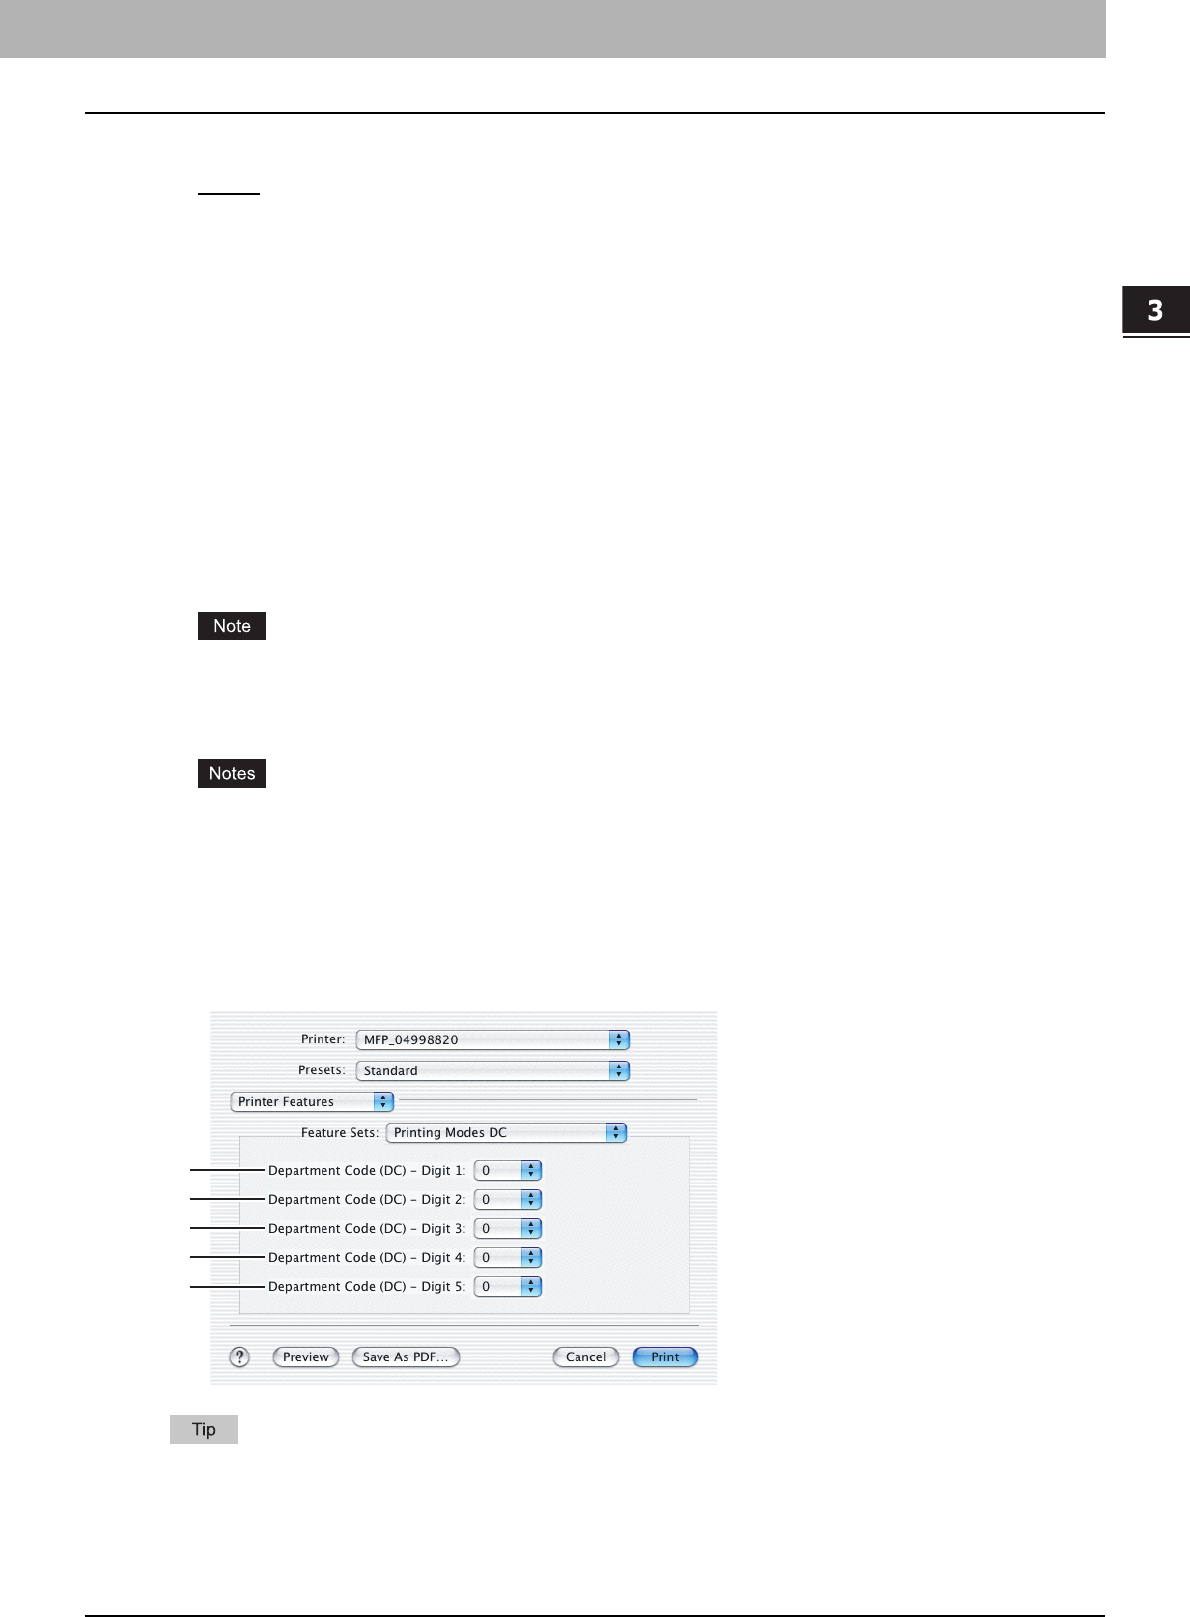
3.PRINTING FROM MACINTOSH
Printing from Application on Mac OS X 10.2.4 to Mac OS X 10.5.x 119
3 PRINTING FROM MACINTOSH
1) Print Mode
This sets the type of print job.
-Normal — Select this to print a normal job.
-Proof — Select this to print the first copy of a multicopy job and then wait for approval before printing the remaining
copies. The print job, sent as a proof job, is saved in the proof job queue on this equipment, and the remaining
copies are not printed until you activate printing from the Touch Panel Display. This option allows you to check a
job’s output before printing the remaining copies and thereby reduce paper waste.
-Private - Password — Select this to print a private job. When this is selected, specify the 5-digit password in the
Private Document Password menu. The print job is saved in the private job queue on this equipment, and not
printed until you activate printing from the Touch Panel Display of this equipment. This option is useful when you
want to print a confidential document secured using a password. The user has to enter the password to print the
private job when activating printing from the Touch Panel Display.
2) Department Code
Check this if a department code is required for printing. When this is enabled, specify the 5-digit department code in
the DC menu.
Enabling the department code depends on whether this equipment is managed with department codes or not. Please
ask your administrator for your department code.
P.120 “Printing Modes DC”
3) Toner Save`
Select this to print in the toner save mode.
When the toner save mode is enabled, printing may become light.
4) Do not Print Blank Pages
Select whether you require printing blank pages.
yWhen more than 2 is selected at the [Page per Sheet] option in the Layout menu, the blank pages will be
printed.
yThe pages that the header or footer is present will be printed even if the content is blank.
Printing Modes DC
In the Printing Modes DC menu, you can specify your department code, if this equipment is enabled the department
codes. Before specifying the department code, you must check the Department Code option in the Printing Modes menu.
Then specify the department code in this menu.
How the equipment performs printing for an invalid department code print job, for which an invalid department code is
specified, varies depending on the Department Code Enforcement setting that can be set from TopAccess
Administrator mode. When the Department Code Enforcement is set to "ON", the invalid department code print job will
be stored in the invalid department code print job list without printing. When the Department Code Enforcement is set
to "Print", the invalid department code print job will be printed. When the Department Code Enforcement is set to
"Delete", the invalid department code print job will be deleted without printing.
1
2
3
4
5
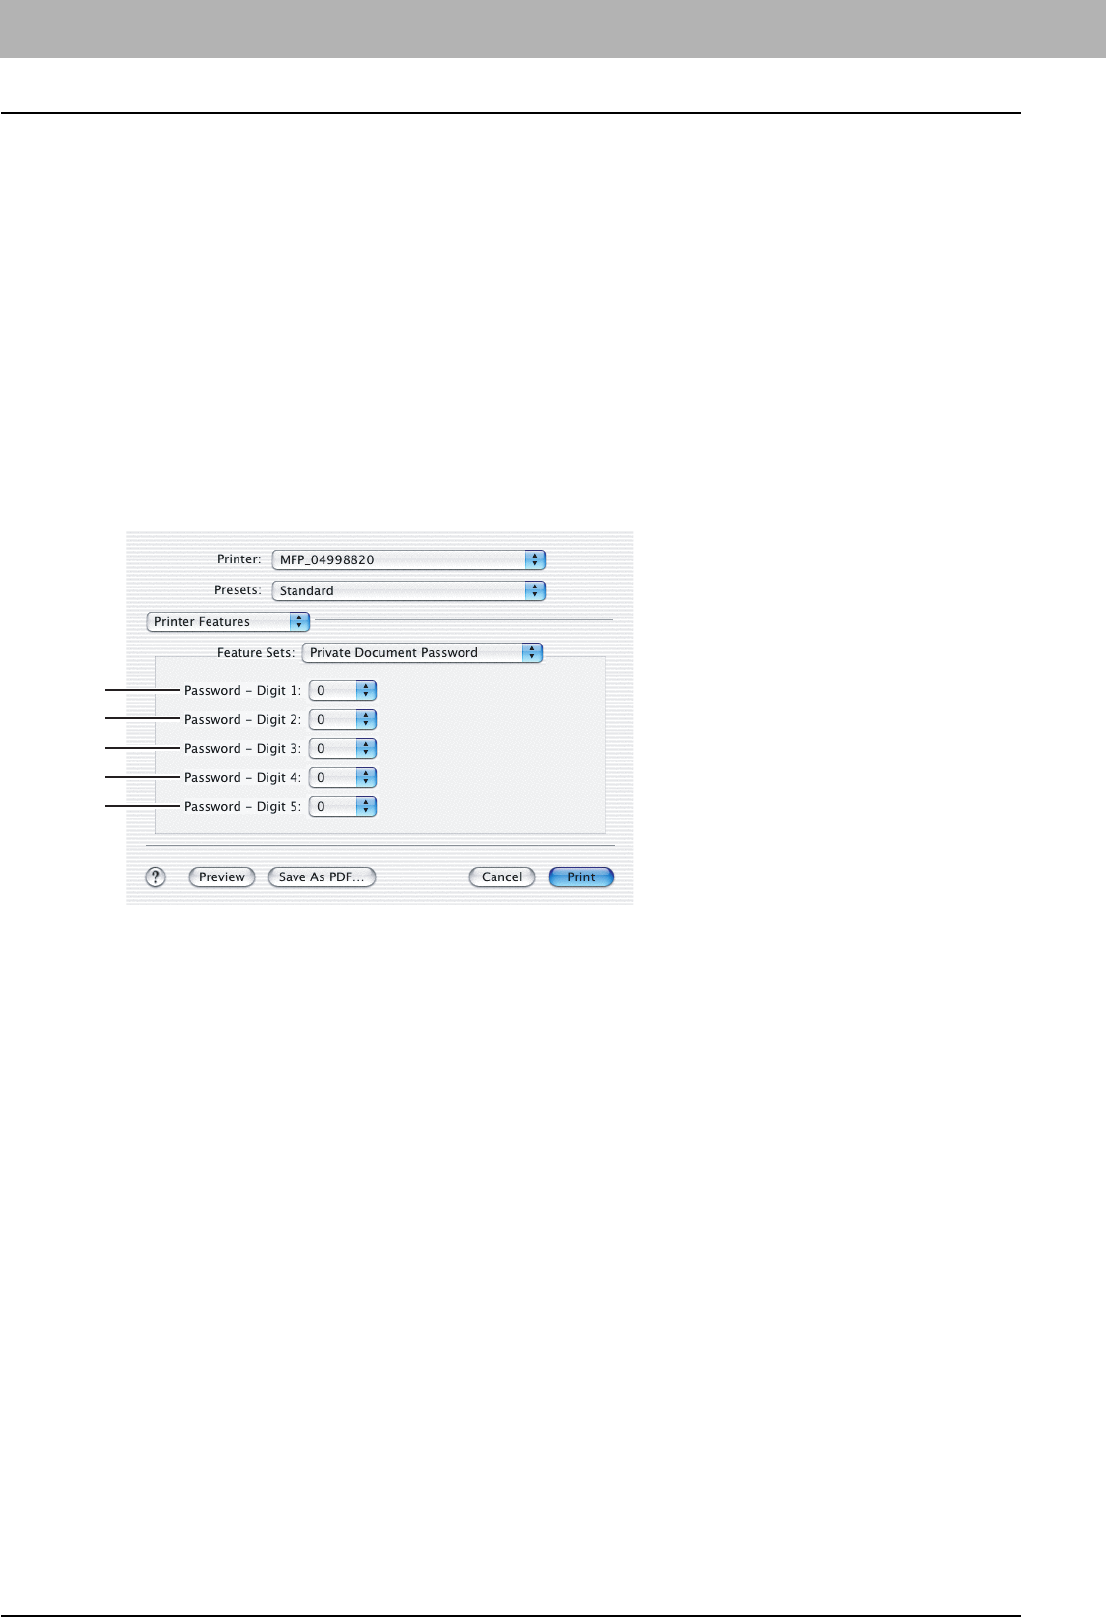
3 PRINTING FROM MACINTOSH
120 Printing from Application on Mac OS X 10.2.4 to Mac OS X 10.5.x
1) Department Code (DC) - Digit 1
Select the first digit of the department code.
2) Department Code (DC) - Digit 2
Select the second digit of the department code.
3) Department Code (DC) - Digit 3
Select the third digit of the department code.
4) Department Code (DC) - Digit 4
Select the fourth digit of the department code.
5) Department Code (DC) - Digit 5
Select the fifth digit of the department code.
Private Document Password
In the Private Document Password menu, you can specify the Document ID number for the private job. It is recommended
to specify the Private Document Password when you select to print a private job. If you do not specify the Private
Document Password, the private job uses default Private Document Password “00000”.
1) Password - Digit 1
Select the first digit of the Document ID.
2) Password - Digit 2
Select the second digit of the Document ID.
3) Password - Digit 3
Select the third digit of the Document ID.
4) Password - Digit 4
Select the fourth digit of the Document ID.
5) Password - Digit 5
Select the fifth digit of the Document ID.
1
2
3
4
5

3.PRINTING FROM MACINTOSH
Printing from Application on Mac OS X 10.2.4 to Mac OS X 10.5.x 121
3 PRINTING FROM MACINTOSH

4.PRINTING FROM UNIX
This chapter describes the instructions on how to print from UNIX workstation.
Printing from an Application............................................................................................... 124
Considerations and Limitations ..........................................................................................................................124
Printing Using LP Command ..............................................................................................................................124
Generic “lp” and “lptap” Options .........................................................................................................................124
General Options .................................................................................................................................................125
PCL5e Specific Options......................................................................................................................................136

4 PRINTING FROM UNIX
124 Printing from an Application
Printing from an Application
This section describes how to print from a UNIX workstation.
yWhen the User Management Setting is enabled on the equipment, the print jobs that are sent from UNIX
workstations are processed as invalid jobs according to the Department Code Enforcement setting.
yBefore attempting to print from a UNIX workstation, make sure all the UNIX Filters are installed in your workstation.
For instructions on how to install or set CUPS, refer to the Software Installation Guide.
Considerations and Limitations
yThis equipment acts only as a filter and not as a complete driver. The size and order of the printed pages cannot be
modified.
yThe UNIX filters do not support the following engine-supplied features:
- Enlarge/Reduce printing
- Rotate Sort
- N-up printing
- Watermarks
- Cover Sheets
- Sheet Insertion
- Scheduled Print
- Print to Overlay File
- Store to e-Filing
- Use Overlay Image
yLinux uses the lptap command to send a file to this equipment.
Since lp is not supported in all versions of Linux, the lptap command should be used instead.
yAIX supports printing using the qdaemon. This can be invoked by the user with the commands lp, lpr or qprt. In order
to use the filter, either lp or qprt should be used.
Printing Using LP Command
Use the lp command (lptap in Linux) to send a file to this equipment for printing. This command specifies various printer-
specific options using the -o option parameter on the command line. The lp command also sets other print options using
various other parameters. Use the man estcolor.1 command to display the online document that describes the various
options and parameters that can be set to configure printed output.
All the options are sent to this equipment at the start of a print job so, if the print file contains its own commands, they may
override the lp options.
Generic “lp” and “lptap” Options
How to print files
Enter the following “Ip” command to print files with the specified printer:
"lp -d <queuename> <filename>"
Copies
The number of copies of a print job is specified using the “-n <value>” parameter with the “lp” command. The default value
is determined by the “lp” command and it is always 1. The copies are always collated.
Title
The title that is printed on the banner page can be specified using the “-t <title>” parameter with the “lp” command. The
default value is determined by the “lp” command and it is often the name of the print file. If multiple files are printed using
the same “lp” command the default title is set to the name of the first file by the “lp” command.
4.PRINTING FROM UNIX
Printing from an Application 125
4 PRINTING FROM UNIX
General Options
The following options apply to all print files.
yOption commands are case sensitive and must be entered exactly as shown.
ySome printing functions may be disabled depending on the combinations of option commands because priority is
given to the specifications of this equipment over option commands.
Print Language
The “net_estcolor” program needs to know what printer language is used in each of the files that it is printing so that it can
issue the correct commands to select various options. The following options are valid for the print languages.
All PCL5e jobs automatically send the “<esc>&k2G” command to convert the line-feed character into a carriage-return -
line-feed sequence. If the PCL5e job contains some of its own escape sequences it may override this setting.
The default print language is “auto”.
Example: The command to specify that a file is PostScript is “lp -o ps filename”.
Stapling
The staple position can be specified using the following option.
Option Value Alternate Value Description
auto Each file to be printed is examined to see if it starts with
the “%!” sequence. If it does, then it is assumed that it is
a PostScript file, otherwise it assumes that it is a plain
text or a PCL6 file.
pcl The print file is always treated as a plain text or a PCL6
file.
postscript ps The file is always treated as a PostScript file.
raw The file is treated as a fully formatted file that already
contains all the necessary commands. The file is sent to
the printer without any modifications. In this mode no
other options are valid and a banner page is not printed.
Option Value Alternate Value Description
staple=0 Stapling is turned off.
staple=1 Staple in the top left corner of a portrait page and the
upper right corner of a landscape page.
staple=2 Put two staples on the left side of a portrait page or the
top side of a landscape page printed on long-edge-feed
paper. This command has no affect when the paper is
fed from the short-edge side.
staple=3 Staple in the bottom left corner of a portrait page and
the upper left corner of a landscape page.
staple=4 Staple in the top right corner of a portrait page and the
bottom right corner of a landscape page.
staple=5 Put 2 staples on the right side of a portrait page or the
bottom side of a landscape page printed on long-edge-
feed paper. This command has no affect when the
paper is fed from the short-edge side.
staple=6 Staple in the bottom right corner of a portrait page and
the lower left corner of a landscape page.
staple=7 Put 2 staples on the top side of a portrait page or the
right side of a landscape page printed on short-edge-
feed large format (A3/Ledger) paper. This command
has no affect when the paper is fed from the long-edge
side or small paper size.
staple=8 Put 2 staples on the bottom side of a portrait page or
the left side of a landscape page printed on short-edge-
feed large format (A3/Ledger) paper. This command
has no affect when the paper is fed from the long-edge
side or small paper size.
4 PRINTING FROM UNIX
126 Printing from an Application
If this option is not specified, the printer’s default value will be used.
Example: The command to staple in the upper left corner of a long edge feed portrait page is “lp -o staple=1 filename”.
The value for the stapling position depends on the paper size, the paper feed direction, and the print direction. This
function is not available for all paper sizes and the users should refer to the copier manual for a list of compatible paper
sizes. In particular, A5, A6 and statement paper sizes will not work with this function.
Select [Tray 2] for stapling with the Finisher MJ-1101 (optional).
Output Bin
The output bin can be specified using the following options.
If the finisher (optional) is not installed on the equipment, the default output tray will be used (inner). If the finisher option
is installed on the equipment, the default output tray will be used (bin2).
Example: The command to specify output bin 1 is “lp -o bin1 filename”.
Hole Punching
When the hole punch option is installed it can be activated using the following option.
If this option is not specified, the default value of “nopunch” will be used.
This function is not available for all paper sizes and the users should refer to the copier manual for a list of compatible
paper sizes. In particular, A5, A6 and statement paper sizes will not work with this function.
Example: The command to hole punch the long edge feed portrait page is
“lp -o punch=1 filename”.
staple=9 Put 2 staples in the middle of a landscape page and fold
the paper in half vertically along the staple line (saddle
stitching). This command works in conjunction with
booklet printing. This command has no affect when the
paper is fed from the long-edge side.
Option Value Alternate Value Description
inner Select the inner tray.
bin1 Select the upper output tray of the Finisher (optional).
bin2 Select the lower output tray of the Finisher (optional).
Option Value Alternate Value Description
punch=0 nopunch Hole punching is turned off.
punch=1 Hole punch on long edge without rotation.
punch=2 Hole punch on short edge without rotation.
punch=3 Hole punch on long edge with 180 degree rotation.
punch=4 Hole punch on short edge with 180 degree rotation.
Option Value Alternate Value Description
4.PRINTING FROM UNIX
Printing from an Application 127
4 PRINTING FROM UNIX
Media Type
The paper source can also be selected using the media type using the following option.
In PostScript Deferred Media Selection is always turned on so the paper size has priority over the media type and the
paper source.
In PCL5e the paper size always has priority over the media type and the paper source.
If this option is not specified, the default value will be used.
Example: The command to specify Thick1 media type is “lp -o mtype=Thick1 filename”.
Paper Source
The paper source can be selected using the following options.
In PostScript Deferred Media Selection is always turned on so the paper size has priority over the paper source. In PCL5e
the paper size always has priority over the paper source.
If this option is not specified the command will not be sent so the printer’s default value will be used.
Example: The command to specify the LCF paper source is “lp - o lcf filename”.
Duplexing
The current duplex mode can be specified using the following options.
If this option is not specified, the default value “simplex” will be used.
It is not necessary to specify duplexing for Booklet Mode (sduplex). Setting duplexing separately can override the booklet
mode setting for duplexing.
Example: The command to specify long edge duplexing is “lp -o duplex filename”.
Option Value Alternate Value Description
mtype=Plain The paper source that contains Plain paper is
requested.
mtype=
Transparency
The paper source that contains transparency slides is
requested.
mtype=Thick1 The paper source that contains Thick1 paper is
requested.
mtype=Thick2 The paper source that contains Thick2 paper is
requested.
mtype=Thick3 The paper source that contains Thick3 paper is
requested.
Option Value Alternate Value Description
auto-source Select auto paper tray selection.
manual Select Bypass Tray.
drawer1 upper
cas1
Select the 1st drawer.
drawer2 lower
cas2
Select the 2nd drawer.
drawer3 pedupper
cas3
Select the 3rd drawer.
drawer4 pedlower
cas4
Select the 4th drawer.
LCF lcf Select the LCF. LCF is not available for some countries
or regions.
Option Value Alternate Value Description
simplex Turn duplexing off.
duplex lduplex
duplex_long
duplex=long
hduplex
Turn duplexing on with long edge binding.
sduplex duplex_short
duplex=short
vduplex
Turn duplexing on with short edge binding.
4 PRINTING FROM UNIX
128 Printing from an Application
Paper Size
The current paper size can be specified using the following options.
If this option is not specified, the printer’s default value will be used.
Example: The command to specify the A4 paper size is “lp -o a4 filename”.
Printing Modes
The printing mode can be selected using the following options.
If this option is not specified, the printer’s default value will be used.
A private printing job requires the user to enter a maximum number of 63 character long string.
Character lengths longer than 63 will be clipped to 63.
The following characters are invalid, but no type checking is carried out.
“& ‘ ( ) ; < > ˆ ` | ~
Option Value Alternate Value Description
letter lt
LT
Select letter size paper.
A4 a4 Select A4 size paper.
legal lg
LG
Select legal size paper.
statement st
ST
Select statement size paper.
ledger ld
LD
Select ledger size paper.
ledgerwide ldwide
LDWIDE
Select ledger wide size paper.
folio folio-japan Select folio size paper.
A3 a3 Select A3 size paper.
A3WIDE a3wide Select A3-Wide size paper.
A5 a5 Select A5 size paper.
A6 a6 Select A6 size paper.
B4 b4
b4-jis
B4-JIS
Select JIS B4 size paper.
B5 b5
b5-jis
B5-JIS
Select JIS B5 size paper.
computer co
CO
Select computer size paper.
legal13 lg13
LG13
Select LG13inch size paper.
sq85 letter-square Select SQ8.5inch size paper.
postcard Select postcard size paper.
8K 8k Select 8K size paper.
16K 16k Select 16K size paper.
Option Value Alternate Value Description
normal Process as a normal print job.
proof Process as a proof print job.
private=din Process as a private print job. The din is up to a 63-
digit (between 1 to 63) password.
4.PRINTING FROM UNIX
Printing from an Application 129
4 PRINTING FROM UNIX
Department Code
The department access code can be set using the following option.
How the equipment performs printing for an invalid department code print job, for which an invalid department code is
specified, varies depending on the Department Code Enforcement setting that can be set from TopAccess
Administrator mode. When the Department Code Enforcement is set to "ON", the invalid department code print job will
be stored in the invalid department code print job list without printing. When the Department Code Enforcement is set
to "Print", the invalid department code print job will be printed. When the Department Code Enforcement is set to
"Delete", the invalid department code print job will be deleted without printing.
Smoothing
The smoothing mode can be set using the following option.
Example: The command to set the smoothing mode is “lp -o smoothing=on filename”.
Distinguish Thin Lines
The thin line limit mode can be set using the following option.
Example: The command to set the thin line limit mode is
“lp -o thinlinelimit=on filename”.
Do not Print Blank Pages
The blank page mode can be selected using the following option.
Example: The command to set the blank page mode is
“lp -o blankpage=0 filename”.
Toner Save
The toner save mode can be set using the following option.
Example: The command to set the toner save mode is “lp -o tonersave=on filename”.
Option Value Alternate Value Description
dept=code Set the department access code. The code is a 5-digit
numeric value.
Option Value Alternate Value Description
smoothing=on ON Set the smoothing mode.
smoothing=off OFF Cancel the smoothing mode.
Option Value Alternate Value Description
thinlinelimit=on ON Set the thin line limit mode.
thinlinelimit=off OFF Cancel the thin line limit mode.
Option Value Alternate Value Description
blankpage=0 Set the blank page mode (disable Do not Print Blank
Pages).
blankpage=1 Cancel the blank page mode (enable Do not Print Blank
Pages).
Option Value Alternate Value Description
tonersave=on ON Set the toner save mode.
tonersave=off OFF Cancel the toner save mode.
4 PRINTING FROM UNIX
130 Printing from an Application
Booklet Modes
The booklet mode can be selected using the following options.
The booklet mode applies only for the PostScript data. When the PCL data is printed, the booklet mode option will be
invalid.
In a job, if this value is LT, and in PDL too the data is for LT paper size, this will result in a scaled booklet on Letter paper.
In a job, if this value is A3, and in PDL the data is for A4 paper size, this will result in a tiled booklet on A3 paper.
When the Booklet Mode options is selected, the paper size is automatically set to the same size as for Booklet Mode. This
function is only available for A3, A4, B4, Letter and Ledger paper sizes.
If the booklet mode is selected, then duplexing is also selected automatically (sduplex). Setting duplexing separately can
override the booklet mode setting for duplexing.
Example: The command to select the letter size paper for the booklet printing mode is
“lp –o booklet=letter filename”.
Option Value Alternate Value Description
booklet=letter lt
LT
Select letter size paper for the booklet printing mode.
booklet=A4 a4 Select A4 size paper for the booklet printing mode.
booklet=legal lg
LG
Select legal size paper for the booklet printing mode.
booklet=
statement
st
ST
Select statement size paper for the booklet printing
mode.
booklet=ledger ld
LD
Select ledger size paper for the booklet printing mode.
booklet=folio folio-japan Select folio size paper for the booklet printing mode.
booklet=A3 a3 Select A3 size paper for the booklet printing mode.
booklet=A5 a5 Select A5 size paper for the booklet printing mode.
booklet=B4 b4
B4-JIS
b4-jis
Select JIS B4 size paper for the booklet printing mode.
booklet=B5 b5
B5-JIS
b5-jis
Select JIS B5 size paper for the booklet printing mode.
booklet=
computer
co
CO
Select computer size paper for the booklet printing
mode.
booklet=legal13 lg13
LG13
Select legal-13 size paper for the booklet printing mode.
booklet=SQ85 sq85
letter-square
Select 8.5 inch square size paper for the booklet
printing mode.
booklet=8K 8k Select 8K size paper for the booklet printing mode.
booklet=16K 16k Select 16K size paper for the booklet printing mode.

4.PRINTING FROM UNIX
Printing from an Application 131
4 PRINTING FROM UNIX
Page Layout
The booklet mode page layout can be selected using the following options.
If left2right=off then long edge binding is selected, otherwise if left2right=on then short edge binding is used.
Example: The command to select left to right page layout for booklet printing mode is
“lp -o left2right=on filename”.
Center Margin
The booklet mode center margin can be selected using the following options.
Example: The command to select the center margin value for booklet printing mode is
“lp -o centermargin=value filename”.
Option Value Alternate Value Description
left2right=off OFF Select right to left page layout for the booklet printing
mode.
This value decides the layout of the pages in the
booklet.
If this value is OFF then the layout of pages is Right to
Left as shown in the figure below.
left2right=on ON Select left to right page layout for the booklet printing
mode.
This is the default setting.
If the value is ON then the layout of the pages is from
Left to Right as shown in the figure below.
Option Value Alternate Value Description
centermargin
=value
Select the center margin value for the booklet printing
mode.
This value specifies in pixels the Center Margin or the
“Gutter”. This is in addition to the center margin already
specified by the application. The valid range for value is
0 - 300. Default is 0.
4 PRINTING FROM UNIX
132 Printing from an Application
Outer Margin
The booklet mode outer margin can be selected using the following options.
Example: The command to select the outer margin value for booklet printing mode is
“lp -o outermargin=value filename”.
Collate
The collate option can be selected using the following options.
If this option is not specified, the default value of “collate=on” will be used.
Example: The command to select collate off is “lp -o collate=off filename”.
Orientation
The following orientation options are available.
If this option is not specified the command will not be sent so the printer’s default value will be used.
Example: The command to specify landscape orientation is “lp -o landscape filename”.
Font Pitch
If the pitch is specified the net_estcolor program will always select the Courier font; otherwise the default font is used. The
following options are used to select the font pitch.
In all the cases shown above the Courier font will also be selected. When the pitch is changed the font size will
automatically be scaled to the appropriate size.
If this option is not specified, the default pitch and font will be used.
Example: The command to specify 8 characters per inch is “lp -o pitch=8 filename”.
Option Value Alternate Value Description
outermargin
=value
Select the outer margin value for the booklet printing
mode.
This value specifies in pixels the Outer Margin or the
“Creep” per page, which should take place while
printing a booklet. The valid range for value is 0 - 600.
Default is 0.
Option Value Alternate Value Description
collate=off OFF Cancel the collate printing mode.
collate=on ON Set the collate printing mode.
Option Value Alternate Value Description
portrait Print the document in portrait orientation.
landscape Print the document in landscape orientation.
Option Value Alternate Value Description
c pitch=16.67 Set the character pitch to 16.67 characters per inch.
10 pitch=10 Set the character pitch to 10 characters per inch.
12 pitch=12 Set the character pitch to 12 characters per inch.
pitch=value Set the character pitch to value characters per inch.
4.PRINTING FROM UNIX
Printing from an Application 133
4 PRINTING FROM UNIX
Page Length
The number of lines to print on a page can be specified with the following option.
As this equipment is a page printer we cannot change the physical length of a piece of paper so the actual effect of this
command is to change the value for lines per inch so that the requested number of lines is printed on the page. The actual
page length may differ from this value if the top margin or the text length option is used.
If this option is not specified the PJL command will not be sent so the printer’s default value will be used. The minimum
page length allowable is 5. If value is less than 5, page length is set to 5.
The command to specify 66 lines per page is “lp -o pl=66 filename”.
Color Mode
The color mode for printing mode can be selected using the following options.
Example: The command to set the color mode for the print job is
“lp -o colormode=COLOR filename”
Pure Black and Pure Gray
The pure black and pure gray mode can be selected using the following options.
Example: The command to set the pure black and pure gray mode for the print job is
“lp -o pureblackgray=1 filename”
Option Value Alternate Value Description
pl=value Set the lines per page to value.
Option Value Alternate Value Description
colormode=
COLOR
color Set color mode printing for the print mode.
colormode=
GRAYSCALE
grayscale Set grayscale mode printing for the print mode.
colormode=
AUTO
auto Set auto color mode printing for the print mode.
colormode=
2KR
2kr Set twin color mode (Black and Red) printing for the
print mode.
colormode=
2KG
2kg Set twin color mode (Black and Green) printing for the
print mode.
colormode=
2KB
2kb Set twin color mode (Black and Blue) printing for the
print mode.
colormode=
2KC
2kc Set twin color mode (Black and Cyan) printing for the
print mode.
colormode=
2KM
2km Set twin color mode (Black and Magenta) printing for
the print mode.
colormode=
2KY
2ky Set twin color mode (Black and Yellow) printing for the
print mode.
colormode=
2KW
2kw Set twin color mode (Black and White) printing for the
print mode.
Option Value Alternate Value Description
pureblackgray=0 Disable the pure black and pure gray mode.
pureblackgray=1 Enable the pure black and pure gray mode.
4 PRINTING FROM UNIX
134 Printing from an Application
Image Quality Type
The Image Quality Type can be selected using the following options.
Example: The command to set the normal quality type for the print job is
“lp -o iqnormal filename”
Halftone
The halftone can be selected using the following options.
Example: The command to set the auto halftone for the print job is
“lp -o halftone=AUTO filename”
Black Over Print
The black over print mode can be selected using the following options.
Example: The command to set the black over print mode for the print job is
“lp -o blackoverprint=1 filename”
Color Balance
The Color Balance can be selected using the following options.
Example: The command to set “1” to the color balance for black toner for the print job is
“lp -o CBK=1 filename”
Option Value Alternate Value Description
iqnormal Set the proper image quality for printing a general color
document.
iqphoto Set the proper image quality for printing photos.
iqpresen Set the proper image quality for printing a vivid
document.
iqlineart Set the proper image quality for printing a document
containg a lot of characters or line arts.
Option Value Alternate Value Description
halftone=AUTO Set the proper halftone depending on the contents in
the document automatically.
halftone=DETAIL Set the halftone in detail.
halftone=
SMOOTH
Set the halftone smoothly.
Option Value Alternate Value Description
blackoverprint=0 Disable the black over print mode.
blackoverprint=1 Enable the black over print mode.
Option Value Alternate Value Description
CBC=value Specify the color density of cyan toner. You can specify
the following values:
-4. -3, -2, -1, 0, 1, 2, 3, 4
CBM=value Specify the color density of magenta toner. You can
specify the following values:
-4. -3, -2, -1, 0, 1, 2, 3, 4
CBY=value Specify the color density of yellow toner. You can
specify the following values:
-4. -3, -2, -1, 0, 1, 2, 3, 4
CBK=value Specify the color density of black toner. You can
specify the following values:
-4. -3, -2, -1, 0, 1, 2, 3, 4

4.PRINTING FROM UNIX
Printing from an Application 135
4 PRINTING FROM UNIX
Image Attributes
The Image Attributes can be selected using the following options.
Example: The command to set “1” to the brightness for the print job is
“lp -o brightness=1 filename”
Option Value Alternate Value Description
brightness=value Specify the brightness. You can specify the following
values:
-4. -3, -2, -1, 0, 1, 2, 3, 4
contrast=value Specify the contrast. You can specify the following
values:
-4. -3, -2, -1, 0, 1, 2, 3, 4
saturation=value Specify the saturation. You can specify the following
values:
-4. -3, -2, -1, 0, 1, 2, 3, 4
sharpness=value Specify the sharpness. You can specify the following
values:
-4. -3, -2, -1, 0, 1, 2, 3, 4
backgroundadjus
tment=value
Specify the backgroundadjustment. You can specify
the following values:
-4. -3, -2, -1, 0, 1, 2, 3, 4
4 PRINTING FROM UNIX
136 Printing from an Application
PCL5e Specific Options
Some of the options only apply to plain text or PCL5e files.
Text Wrapping
The following options control text wrapping when it reaches the right margin.
If this option is not specified the command will not be sent so the printer’s default value will be used.
Example: The command to specify wrapping is “lp -o wrap filename”.
Left Margin
The left margin position can be specified with the following option.
If the left margin is set to the right of the right margin it will be ignored.
If this option is not specified the command will not be sent so the printer’s default value will be used.
Example: The command to set the left margin to five columns is “lp -o lm=5 filename”.
Right Margin
The right margin position can be specified with the following option.
If the right margin is set to the left of the left margin or if it is set to a position wider than the logical page it will be ignored.
The right margin is specified in columns from the left margin. A negative value will be ignored.
If this option is not specified the command will not be sent so the printer’s default value will be used.
Example: The command to set the right margin to fifty columns is
“lp -o rm=50 filename”.
Top Margin
The top margin position can be specified with the following option.
If the top margin is set too high or too low part of the text may not appear due to the printer’s unprintable region. The top
margin will be ignored if it is set to a value greater than the printer’s logical page length. Setting this value may affect the
number of lines specified using the page length option.
If this option is not specified the command will not be sent so the printer’s default value will be used.
Example: The command to set the top margin to ten lines is “lp -o tm=10 filename”.
Text Length
The text length can be specified using the following options.
If the text length is set too high, the part of the text may not appear due to the printer’s unprintable area. The text length
will be ignored if it is set to a value greater than the printer’s logical page length minus the top margin. The text length is
specified in rows from the top margin. Setting this value may affect the number of lines specified using the page length
option.
If this option is not specified the command will not be sent so the printer’s default value will be used.
Example: The command to set the text length to 40 lines is “lp -o tl=40 filename”.
Option Value Alternate Value Description
wrap Enable automatic text wrapping.
nowrap Disable automatic text wrapping.
Option Value Alternate Value Description
lm=value Set the left margin to value columns.
Option Value Alternate Value Description
rm=value Set the right margin to value columns.
Option Value Alternate Value Description
tm=value Set the top margin to value lines.
Option Value Alternate Value Description
tl=value Set the length to value lines.

4.PRINTING FROM UNIX
Printing from an Application 137
4 PRINTING FROM UNIX
Banner Page
A banner page is automatically generated for each file in each job. The banner page contains the following items. The
banner page is always sent as a PCL5e job.
yThe name of the user that submitted the print job.
yThe job ID number and from which workstation it was submitted.
yThe title of the job. This title can be specified using the “-t” option. The same title is used for every file within a job. The
default title is controlled by the “lp” command.
yThe name of the printer or its IP address.
yThe date and time when the job was printed according to the print server.
Only one copy of the banner page is printed for each file, even if a number of copies of the job are requested. The banner
page is sent to the equipment as a separate sub-job so that it is never stapled to the document.
The banner page is printed with the following settings.
yCopies = 1.
yStapling off.
yOrientation = portrait.
yDuplex off.
yPaper size as requested by the “-o” parameter or the printer’s default value.
yThe paper source and the media type for the banner page can be set to different values than the job’s paper source
and media type.
yAuto paper source selection or the requested banner page source or media type.
yOutput bin as requested by the “-o” parameter or the printer default value.
y6 lines per inch
yAuto-wrap on.
yAutomatic carriage-return when a line-feed is sent.
yThe banner page is designed to fit the paper bigger than Statement / A5.
The banner page uses the default paper size if paper is set to:
-Statement
-A5
-A6
-B5
-Postcard
yThe default is that the banner page is printed before the job so that it is in the correct stacking order.
yWhen the language is set to “raw” the banner is always disabled.
yThe paper source and the media type for the banner page can be set to different values than the job’s paper source
and media type. If a banner paper source is not specified then the auto source command is sent. If a banner media
type is not specified then no banner media type command is sent, so the printer’s default value will be used.
yIf the file being printed specifies the paper destination or the paper size internally the banner page may print to the
wrong output or on an incorrect paper size.
yHole punching cannot be applied to banner pages.
4 PRINTING FROM UNIX
138 Printing from an Application
Banner Options
The banner page can be printed using the following options.
The default value for this option is that the banner page prints first.
Example: The command to printing the banner page after the job.
“lp -o banner=last filename”.
Banner Paper Source
The banner paper source can be specified using the following option.
If the banner paper source is not specified the PCL5e auto paper source command “<esc>&l7H” will be sent. The banner
page source cannot be set to manual feed. The paper size always has priority over the paper source.
Example: The command to specify that the banner page paper source is the LCF is
“lp -o blcf filename”.
Banner Media Type
The banner page paper source can also be selected using the media type using the following option.
The paper size always has priority over the media type and the paper source.
If this option is not specified the command will not be sent so the printer’s default value will be used to print the banner
page.
The command to specify that the banner page should be printed on a media type is
“lp -o bmtype=Plain1 filename”.
Option Value Alternate Value Description
banner=last Print the banner page after the job so that it will be
physically on top of the job in the output tray.
banner=first banner Print the banner page before the job so that it will be
physically under the job in the output tray.
nobanner nb Do not print a banner. The ability to specify the
“nobanner” option can be disabled by the system
administrator to force all jobs to print with a banner.
Option Value Alternate Value Description
bauto-source Select the auto paper tray selection.
bdrawer1 bupper
bcas1
Select the 1st drawer.
bdrawer2 blower
bcas2
Select the 2nd drawer.
bdrawer3 bpedupper
bcas3
Select the 3rd drawer.
bdrawer4 bpedlower
bcas4
Select the 4th drawer.
blcf BLCF Select the LCF. LCF is not available for some countries
or regions.
Option Value Alternate Value Description
bmtype=Plain1 The paper source that contains Plain1 paper is
requested.
bmtype=
Transparency
The paper source that contains transparency slides is
requested.
bmtype=Thick1 The paper source that contains Thick1 paper is
requested.
bmtype=Thick2 The paper source that contains Thick2 paper is
requested.
bmtype=Thick3 The paper source that contains Thick3 paper is
requested.

5.MANAGING PRINT JOBS
FROM THE CONTROL PANEL
This chapter describes how to use the control panel to control the print jobs and monitor the equipment.
Monitoring the Print Job Status .......................................................................................... 140
Normal Print/Scheduled Print jobs .....................................................................................................................140
Proof Print jobs...................................................................................................................................................144
Private Print jobs ................................................................................................................................................147
Invalid jobs .........................................................................................................................................................151
Printing files from USB media (USB Direct Printing) ..........................................................................................154
Viewing the Print Job Log ................................................................................................... 159
Checking Supplies ............................................................................................................... 161
Viewing the drawer status ..................................................................................................................................161
Checking remaining toner levels ........................................................................................................................161
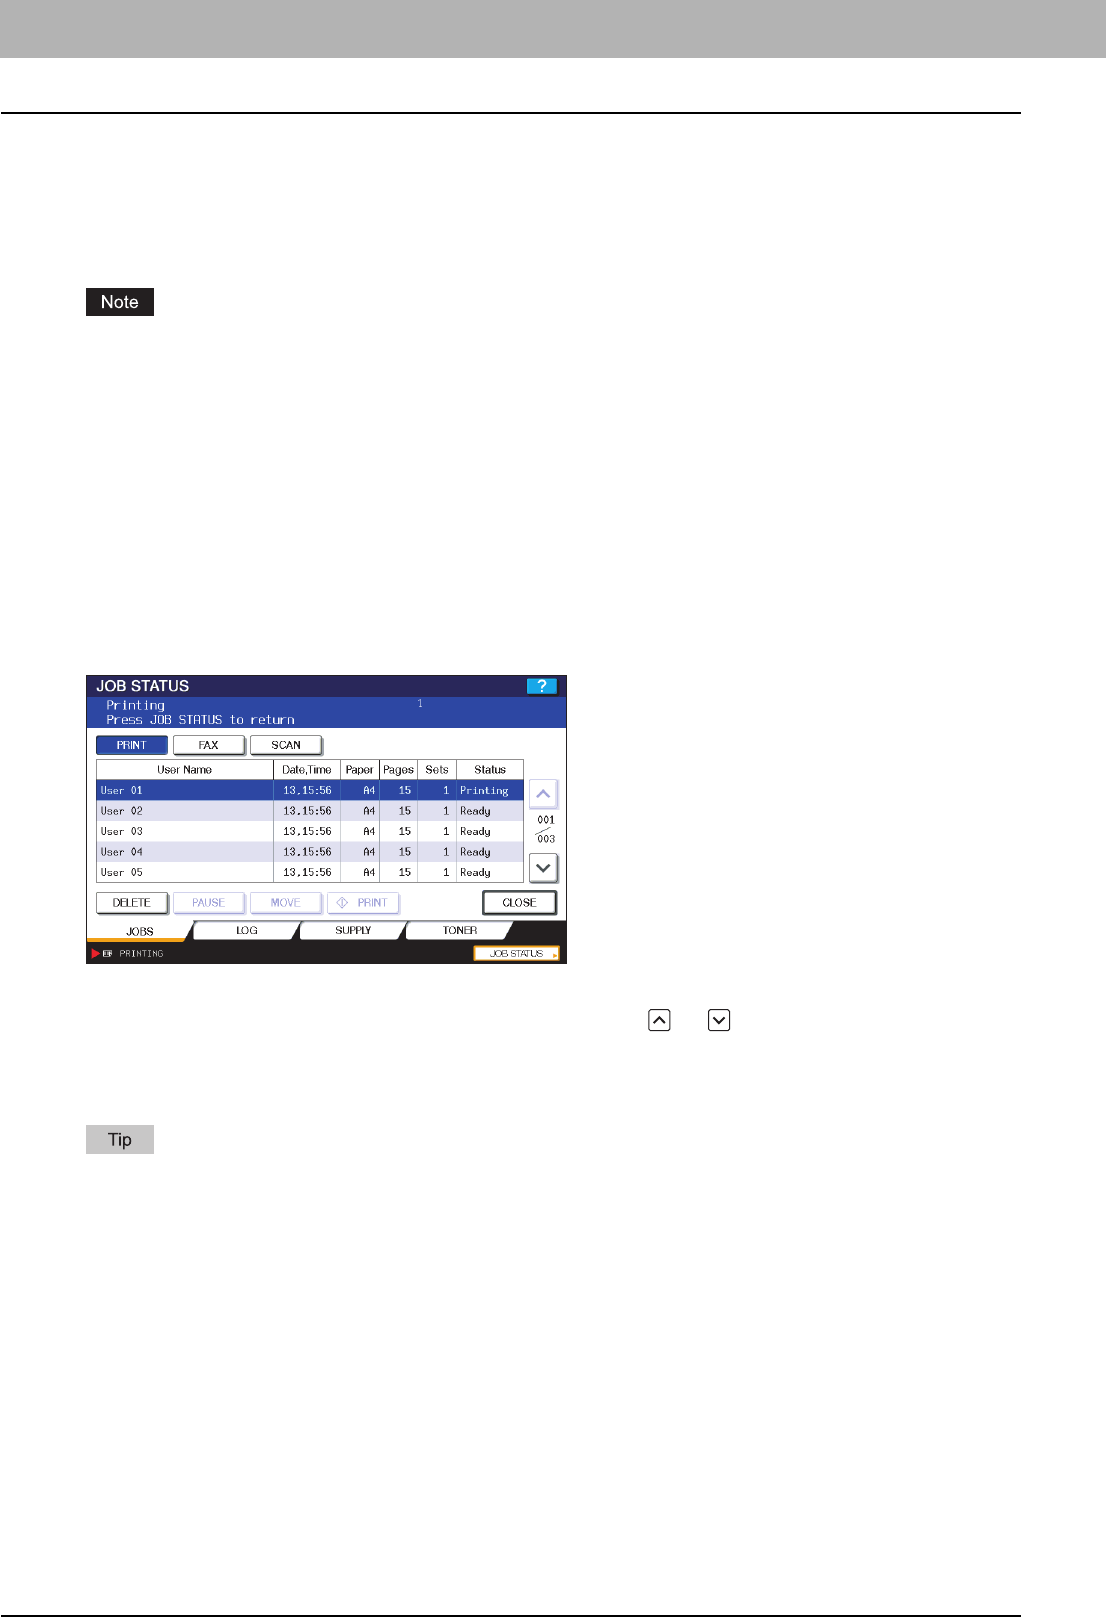
5 MANAGING PRINT JOBS FROM THE CONTROL PANEL
140 Monitoring the Print Job Status
Monitoring the Print Job Status
Your print jobs can be monitored on the equipment's touch panel. The types of print jobs you can monitor include Normal
Print, Scheduled Print, Private Print, and Proof Print. If the Department Management feature is enabled, the equipment
can also display the Invalid jobs, which are held without being printed. You can view the status, as well as release, delete,
pause/resume, and change the order of these jobs. Connecting a USB storage device to the equipment allows you to print
PDF, encrypted PDF, XPS, JPEG, PRN and PS files contained in the media directly from the touch panel without using a
client computer (USB Direct Printing).
If the equipment is managed by the User Management feature, you need to enter the user information, such as the
user name and password.
P.140 “Normal Print/Scheduled Print jobs”
P.144 “Proof Print jobs”
P.147 “Private Print jobs”
P.151 “Invalid jobs”
P.154 “Printing files from USB media (USB Direct Printing)”
Normal Print/Scheduled Print jobs
Pressing [JOB STATUS] on the touch panel displays the [JOBS] tab on the JOB STATUS screen. On the [JOBS] tab, the
Normal Print and Scheduled Print jobs are listed together with the copy jobs. You can view each job for its user name, date
and time, paper size, the number of pages, the number of copies, and the current status. You can also delete, pause/
resume, and change the order of the jobs on the list.
For the Scheduled Print jobs, “Scheduled” is indicated in the “Status” column.
Up to 1000 jobs can be listed. To display the previous or next page, press or . The number of jobs displayed on a
page varies depending on the equipment model.
To exit from the JOB STATUS screen, press [CLOSE].
On the [JOBS] tab, you can select the desired mode for monitoring the status by pressing [PRINT], [FAX], or [SCAN].
For details on the scan or Internet fax job status, refer to the Scanning Guide. For details on the fax job status, refer to
the GD-1250/GD-1260/GD-1270 Operator's Manual for FAX Unit (optional).
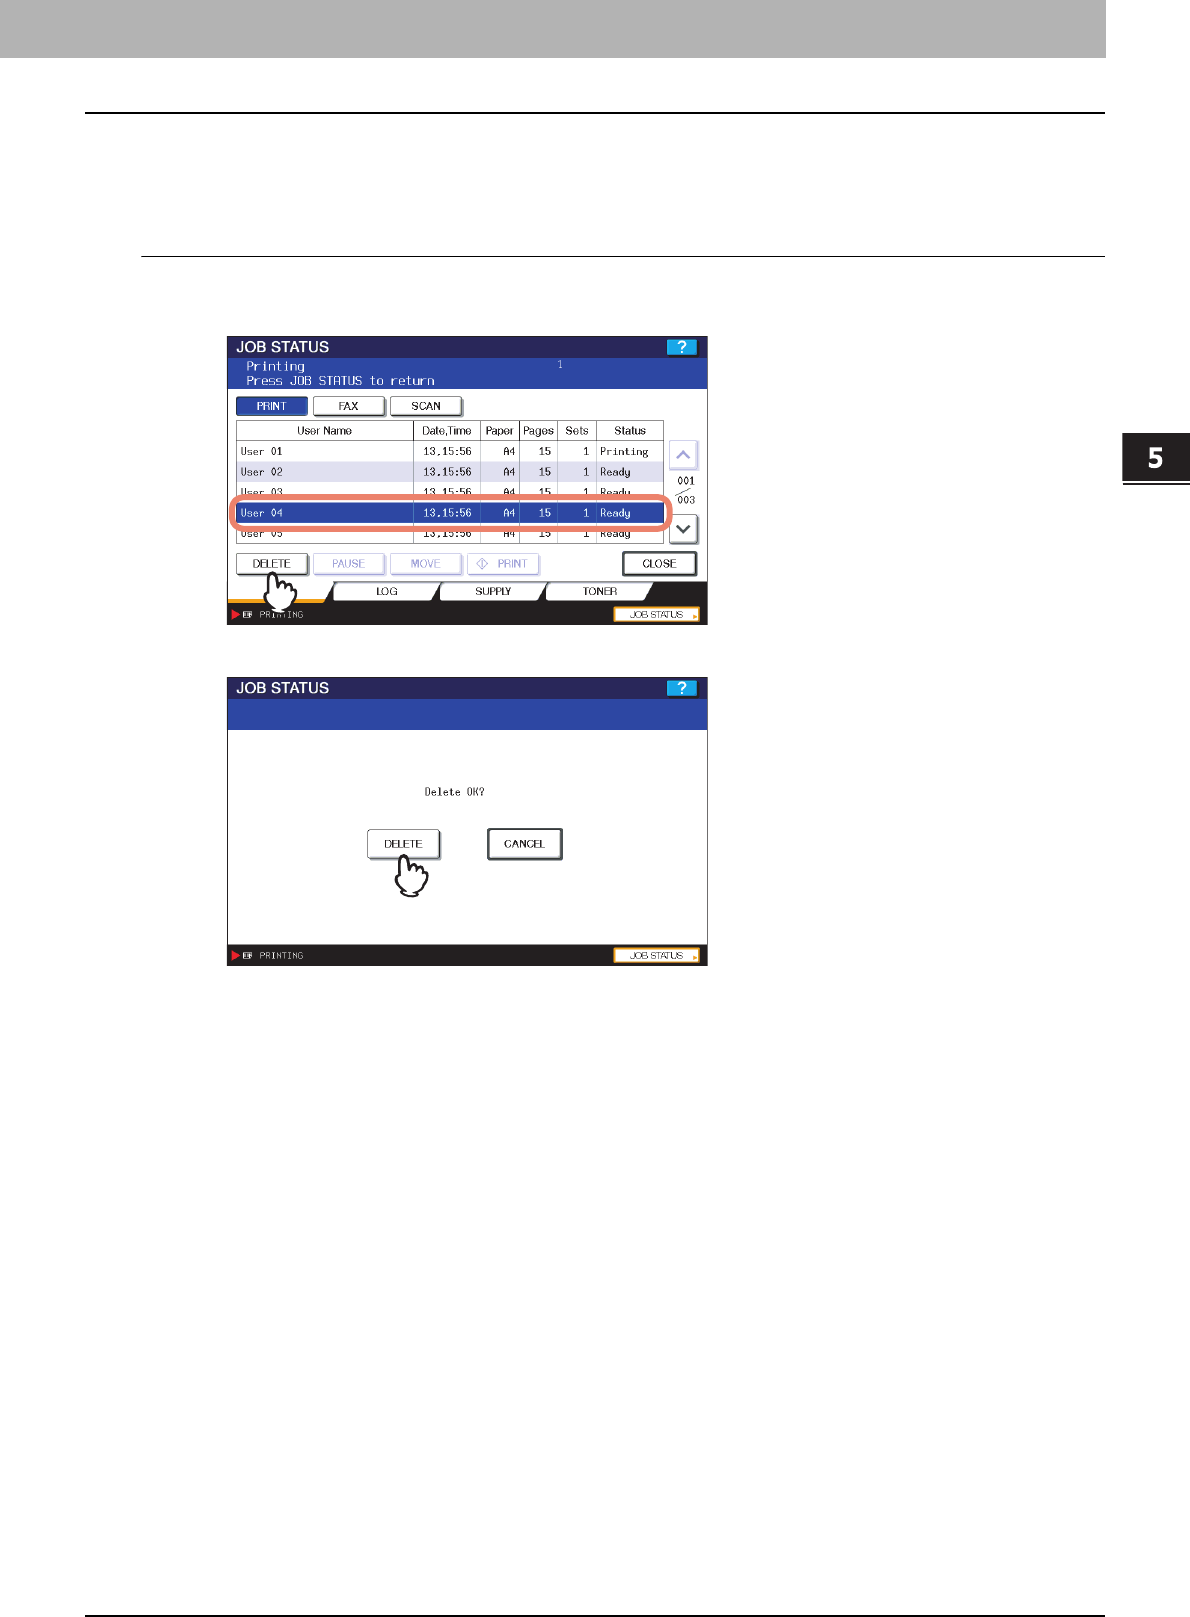
5.MANAGING PRINT JOBS FROM THE CONTROL PANEL
Monitoring the Print Job Status 141
5 MANAGING PRINT JOBS FROM THE CONTROL PANEL
Deleting jobs
Follow the procedure below when you want to delete unnecessary Normal Print/Scheduled Print jobs.
Deleting jobs
1
On the [JOBS] tab listing the print jobs ( P.140), select the job that you want to delete,
and then press [DELETE].
2
When “Delete OK?” appears, press [DELETE].
The selected job is deleted.
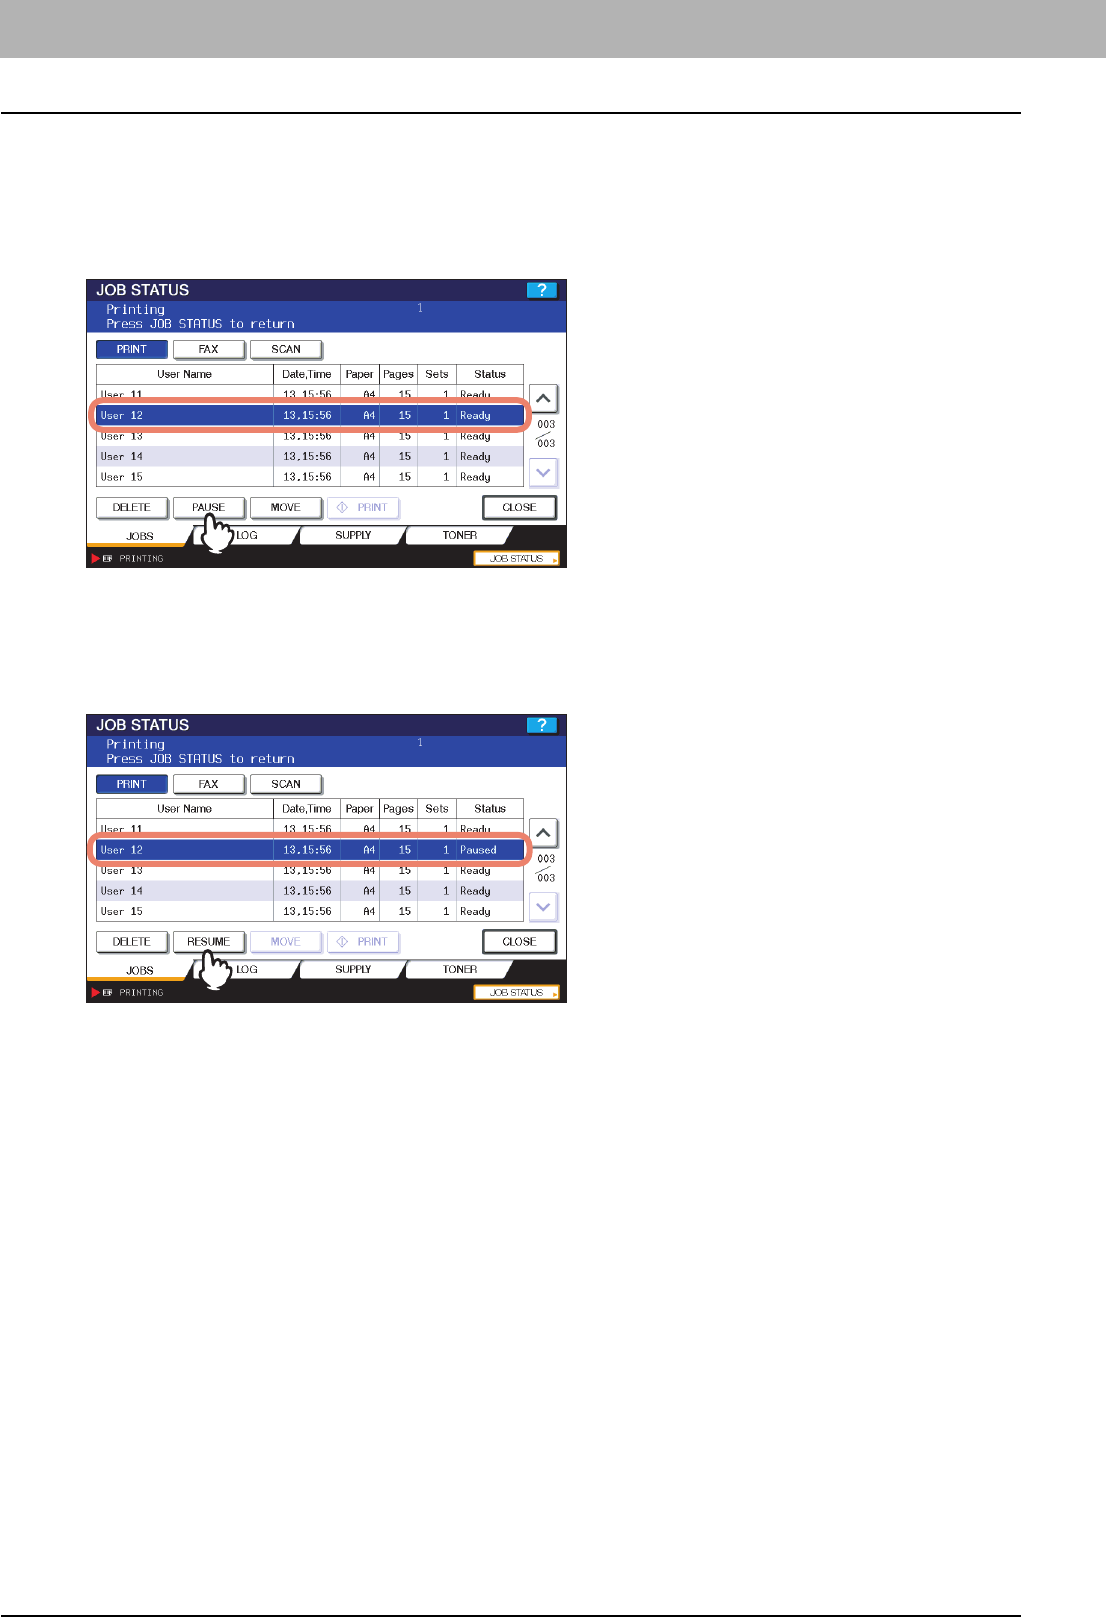
5 MANAGING PRINT JOBS FROM THE CONTROL PANEL
142 Monitoring the Print Job Status
Pausing/Resuming jobs
The eleventh job or subsequent, when counted from the one in progress, can be paused and resumed.
Pausing jobs
On the [JOBS] tab listing the print jobs ( P.140), select the job that you want to pause and then press [PAUSE].
The selected job is paused. When a job is paused, the subsequent jobs on the list will be released earlier.
Resuming the Paused jobs
Select the job that you want to resume and then press [RESUME].
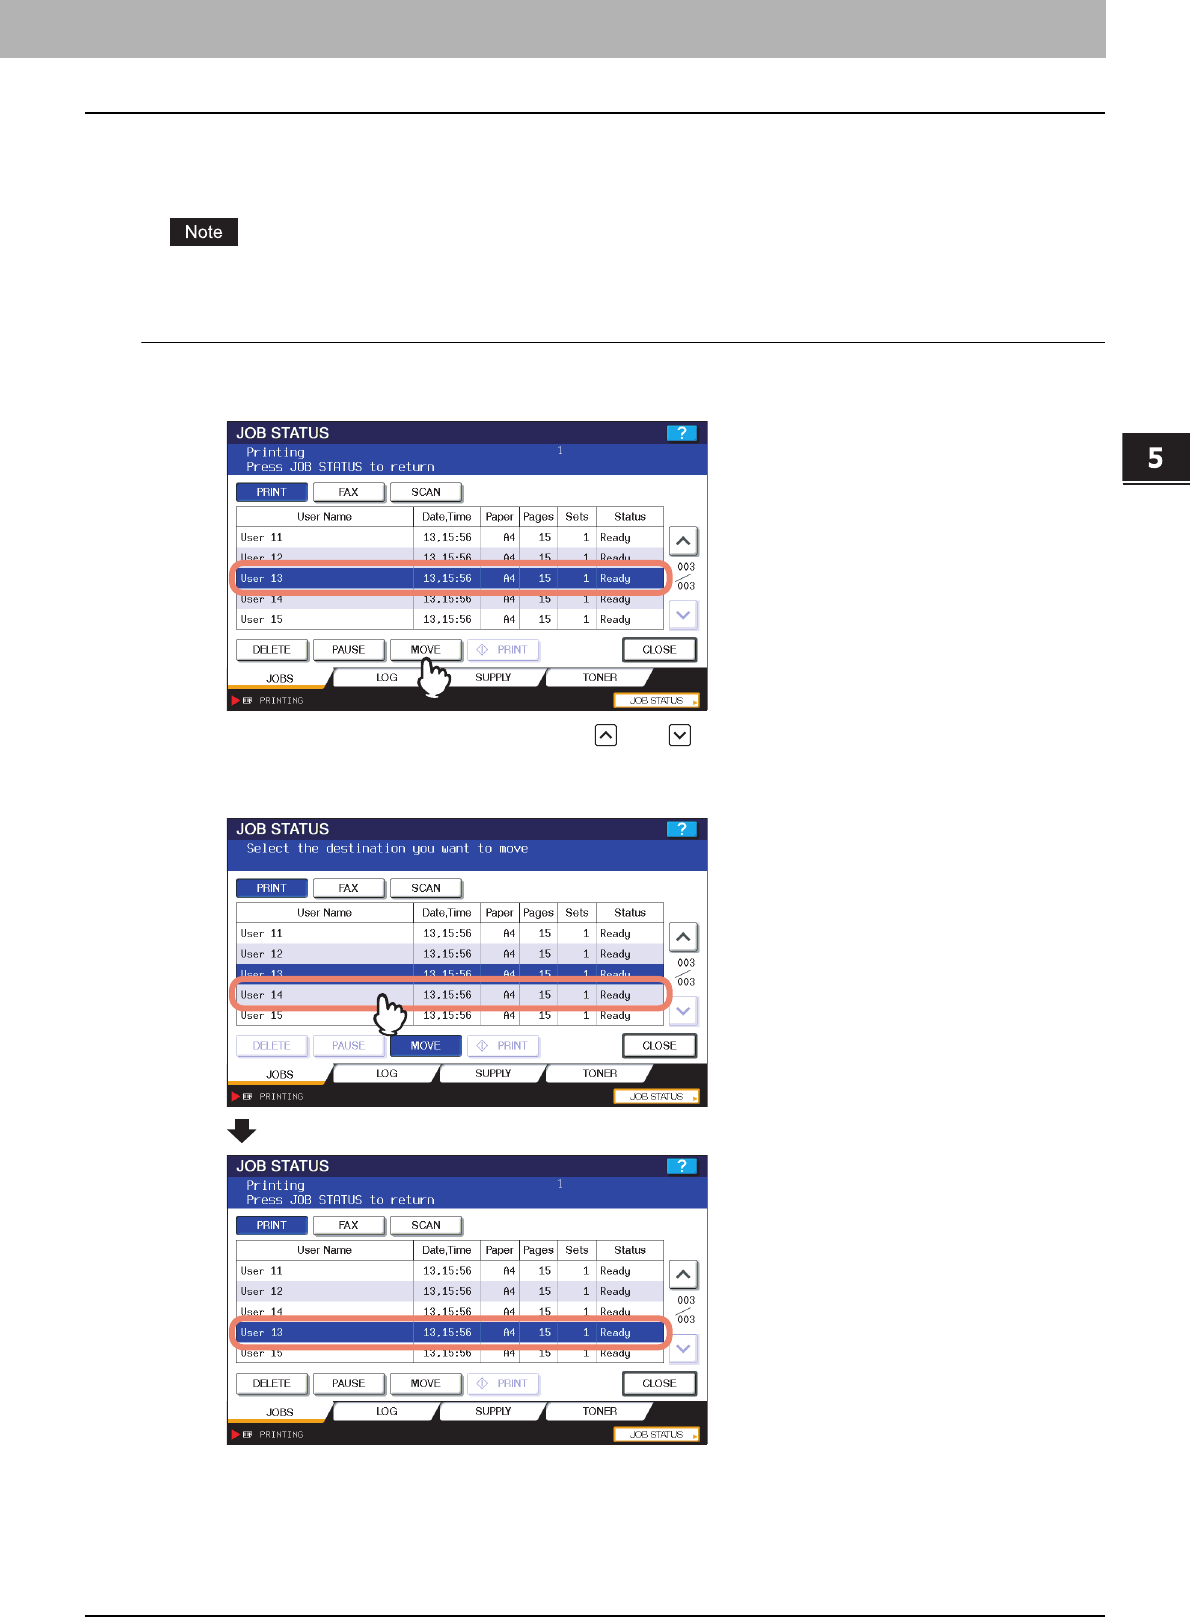
5.MANAGING PRINT JOBS FROM THE CONTROL PANEL
Monitoring the Print Job Status 143
5 MANAGING PRINT JOBS FROM THE CONTROL PANEL
Changing the job order
You can change the order of the jobs by moving them within the list.
You can only move the jobs from and to the 11th position or subsequent when counted from the one in progress.
Changing the job order
1
On the [JOBS] tab listing the print jobs ( P.140), select the job that you want to move
in the list, and then press [MOVE].
If the target job is not displayed on the page, use and to change between pages.
2
Specify the new position of the job. (The job will be moved under a job selected here.)
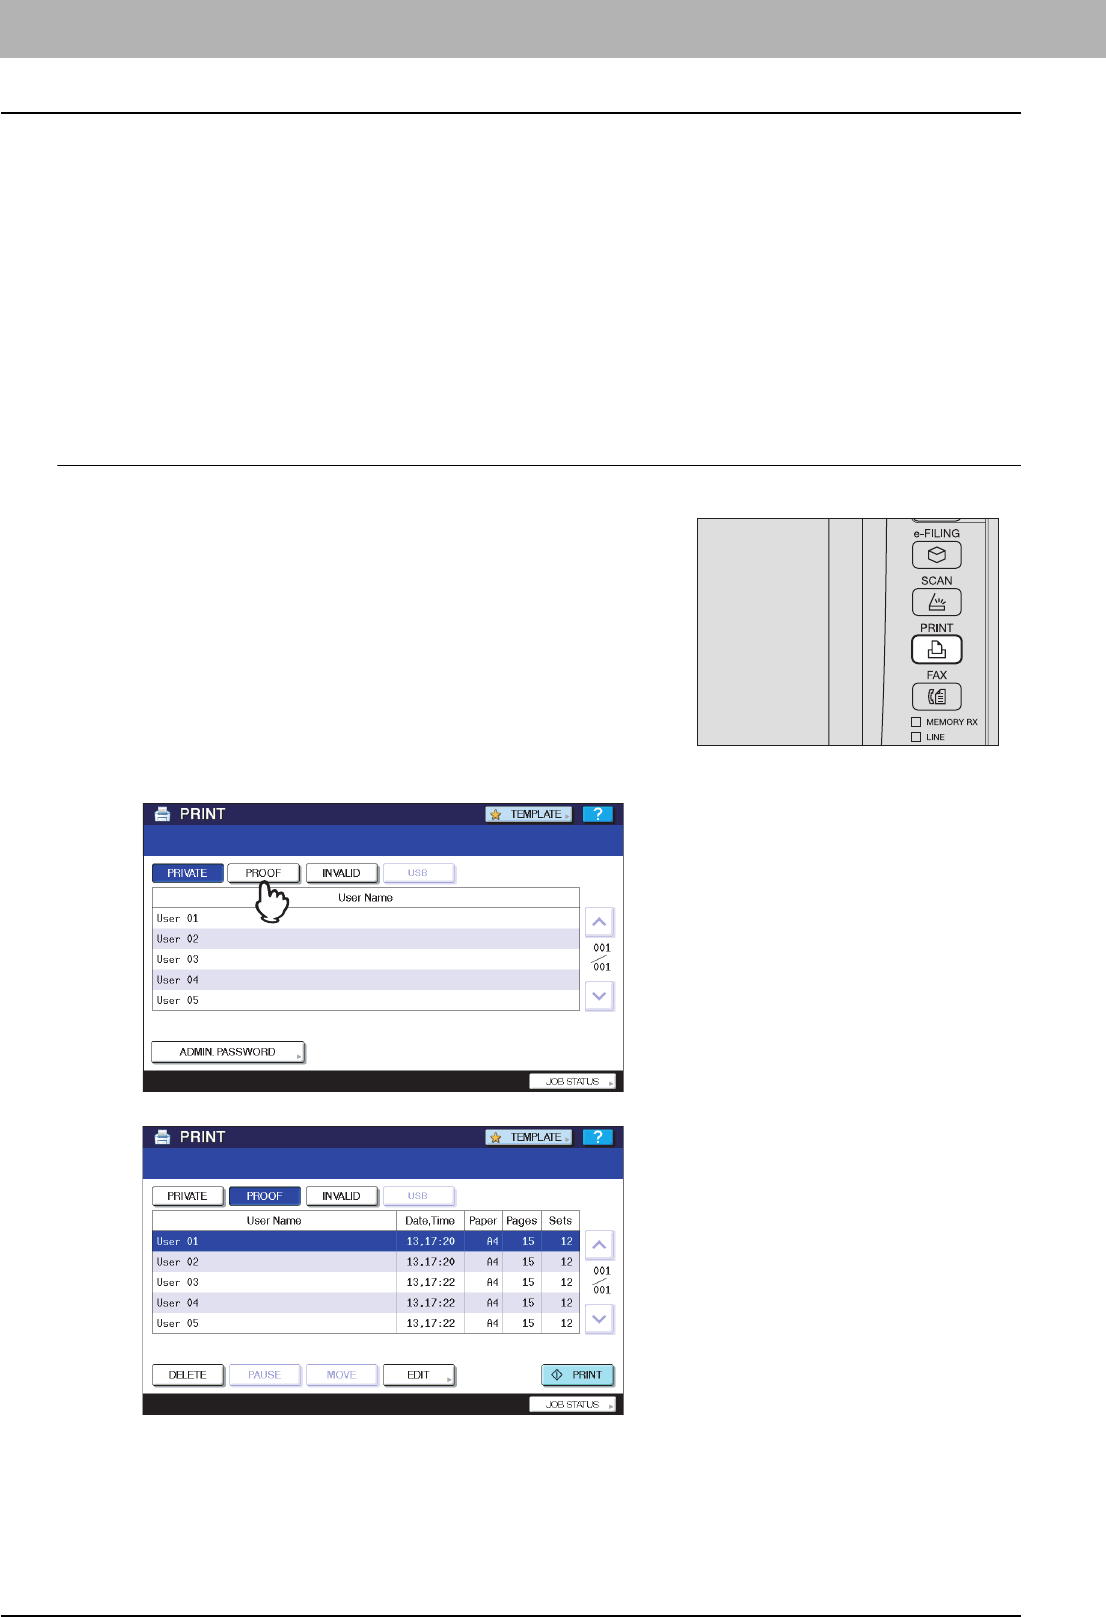
5 MANAGING PRINT JOBS FROM THE CONTROL PANEL
144 Monitoring the Print Job Status
Proof Print jobs
Proof Print refers to the function to print only a single copy as a sample and suspend the rest of the job when you print
multiple copies from a computer on the network,
After viewing the first copy, you can decide, on the Proof Print job list, whether to print out the remaining copies or cancel
the job to change the settings. If you select to print the remaining copies, you can change the number of copies to print.
To learn more about Proof Print, see the following section:
P.61 “Printing Proof Print Jobs”
Displaying the Proof Print job list
Follow the procedure below when you want to display the list of the Proof Print jobs.
Displaying the Proof Print job list
2
Press [PROOF].
The Proof Print jobs are listed on the screen.
1
On the control panel, press the [PRINT] button.
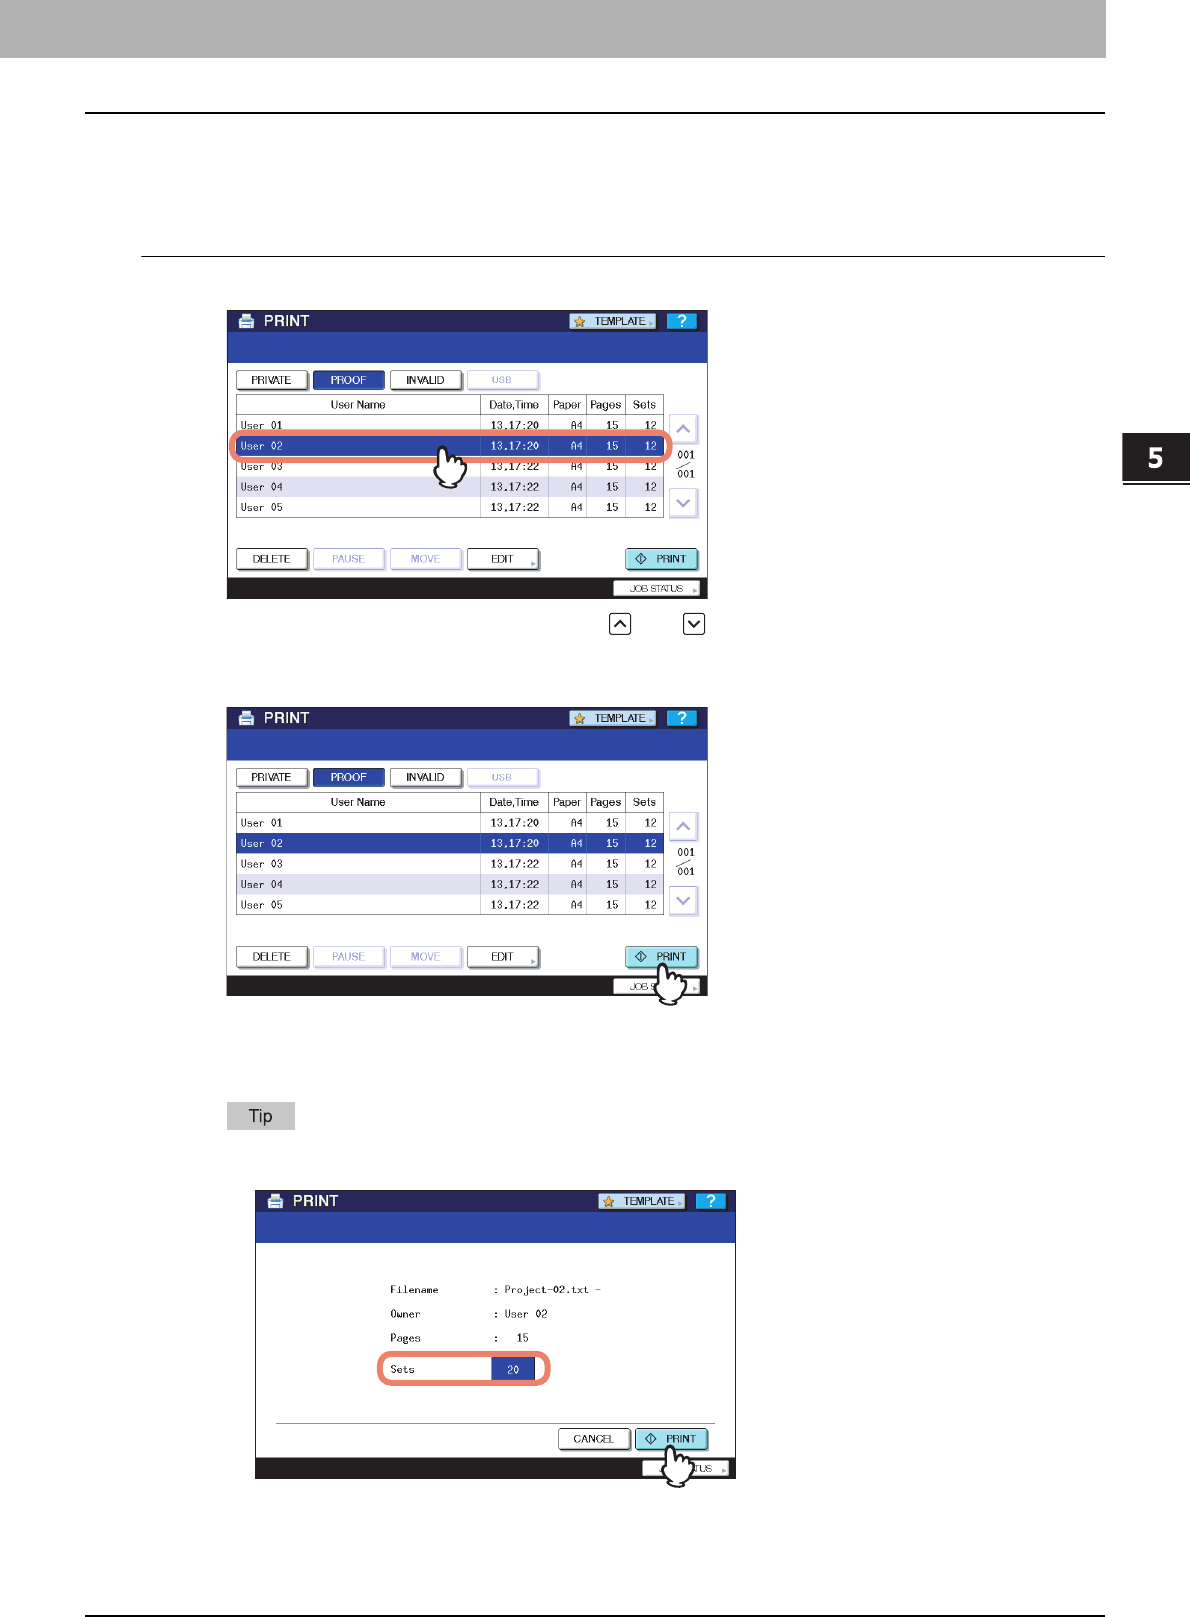
5.MANAGING PRINT JOBS FROM THE CONTROL PANEL
Monitoring the Print Job Status 145
5 MANAGING PRINT JOBS FROM THE CONTROL PANEL
Printing remaining copies
Follow the procedure below if you have checked the first copy and want to print the remaining copies.
Printing remaining copies
1
On the Proof Print job list ( P.140), select the job for printing.
If the target job is not displayed on the screen, use and to change between pages.
2
Press [PRINT].
The remaining copies are printed out.
The job in progress can be monitored on the [JOBS] tab listing the Normal Print jobs ( P.140).
To change the number of copies to print, press [EDIT] and enter the number of copies. Pressing [PRINT] starts
the job.
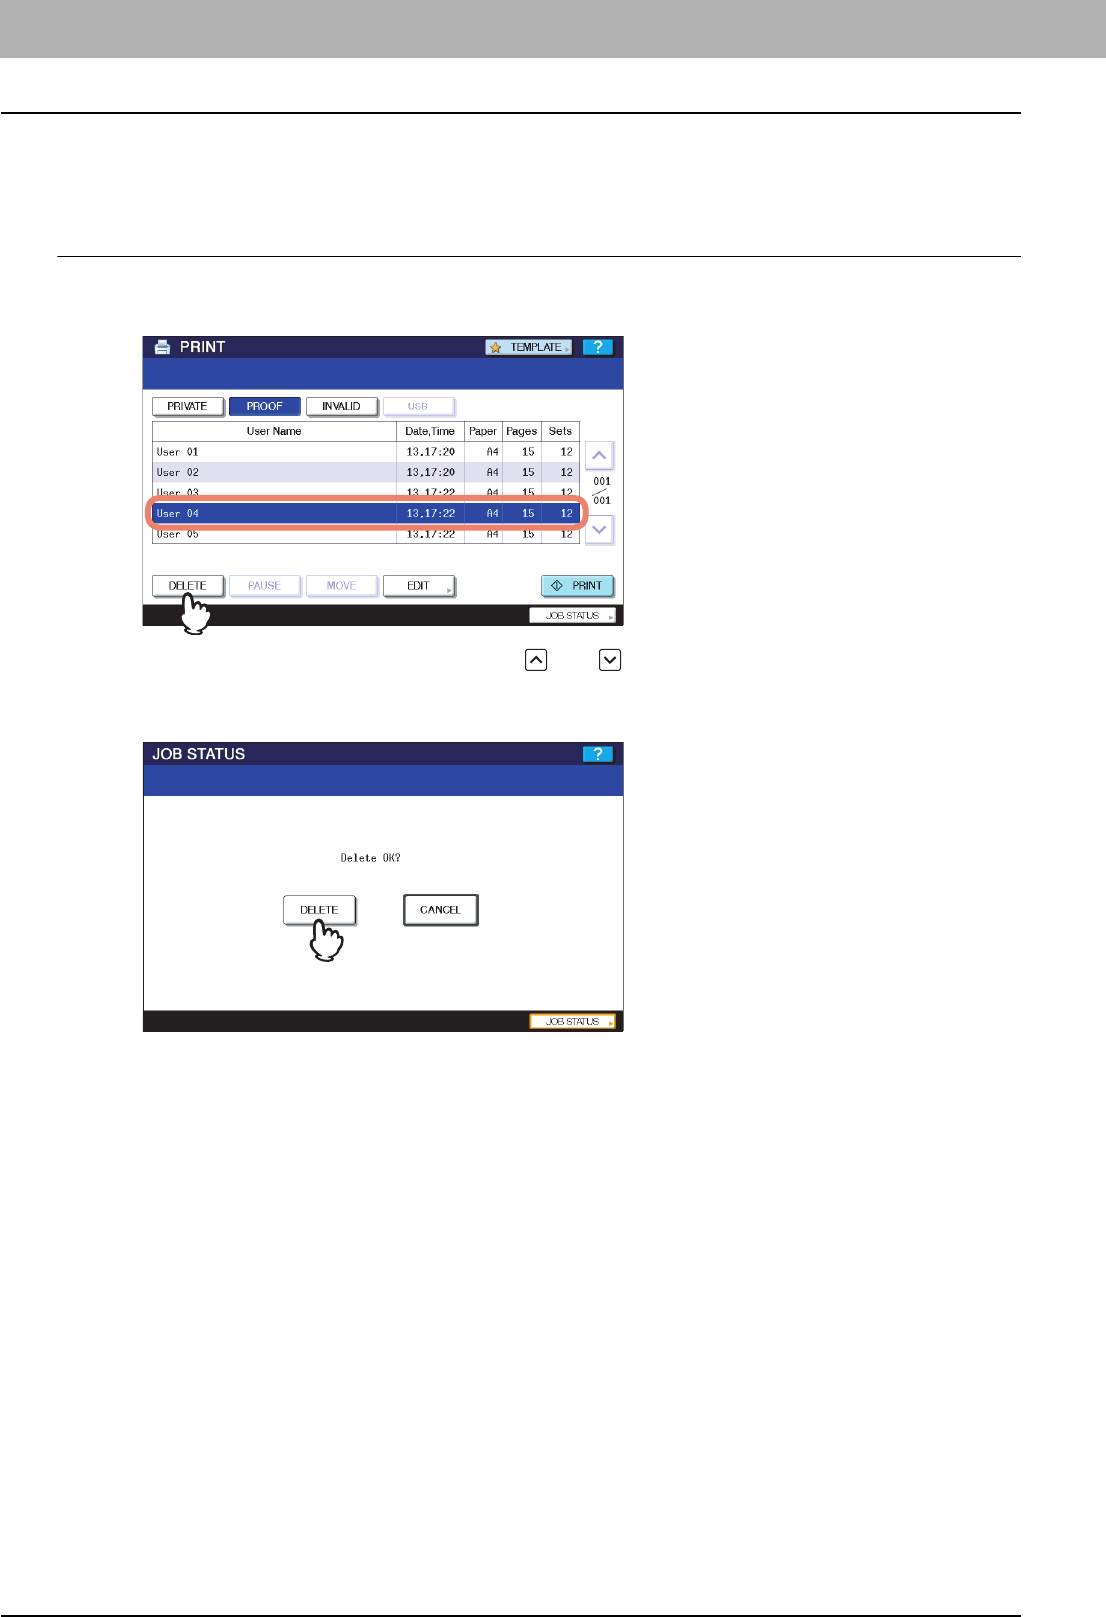
5 MANAGING PRINT JOBS FROM THE CONTROL PANEL
146 Monitoring the Print Job Status
Deleting Proof Print jobs
Follow the procedure below to delete the Proof Print jobs.
Deleting Proof Print jobs
1
On the Proof Print job list ( P.144), select the job that you want to delete, and then
press [DELETE].
If the target job is not displayed on the screen, use and to change between pages.
2
When “Delete OK?” appears, press [DELETE].
The selected job is deleted.
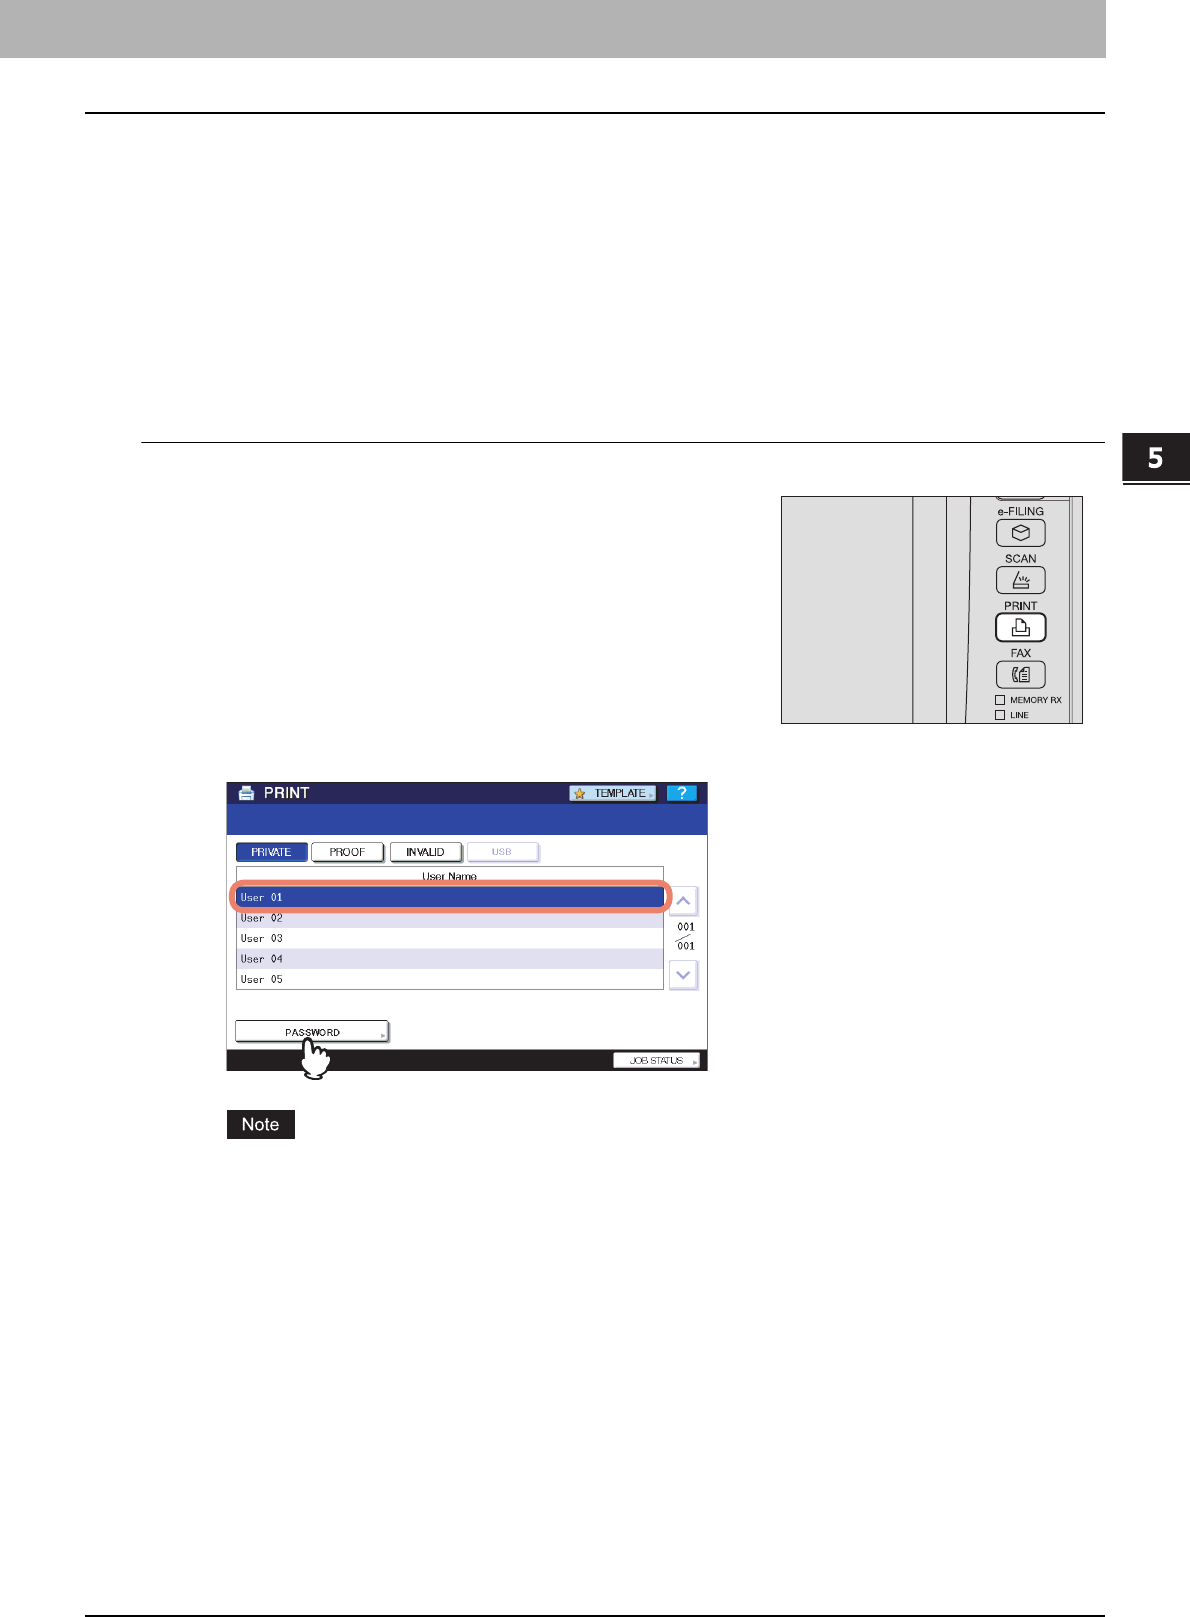
5.MANAGING PRINT JOBS FROM THE CONTROL PANEL
Monitoring the Print Job Status 147
5 MANAGING PRINT JOBS FROM THE CONTROL PANEL
Private Print jobs
Private Print refers to the function to print a document from a computer on the network only when a set password is keyed
in to the equipment's control panel. This function is useful when you want to print confidential documents and prevent
them from being seen by others. The Private Print jobs can be released or deleted from the Private Print job list.
To learn more about Private Print, see the following section:
P.60 “Printing Private Print Jobs”
Displaying the Private Print job list
Follow the procedure below to display the list of the Private Print jobs.
Displaying the Private Print job list
2
On the Private Print job list, select the desired user name and then press [OK].
If you perform the operation as the administrator, press [ADMIN. PASSWORD] instead of selecting a user
name. The on-screen keyboard appears, with which you can enter the 6 to 10 digit administrator password. In
this case, the jobs can be deleted but are not allowed to be printed. If you enter an incorrect password three
times in a row, the equipment becomes unavailable to operate (about 30 seconds). In this case, wait until the
equipment becomes available again, and then enter the correct administrator password.
1
On the control panel, press the [PRINT] button.
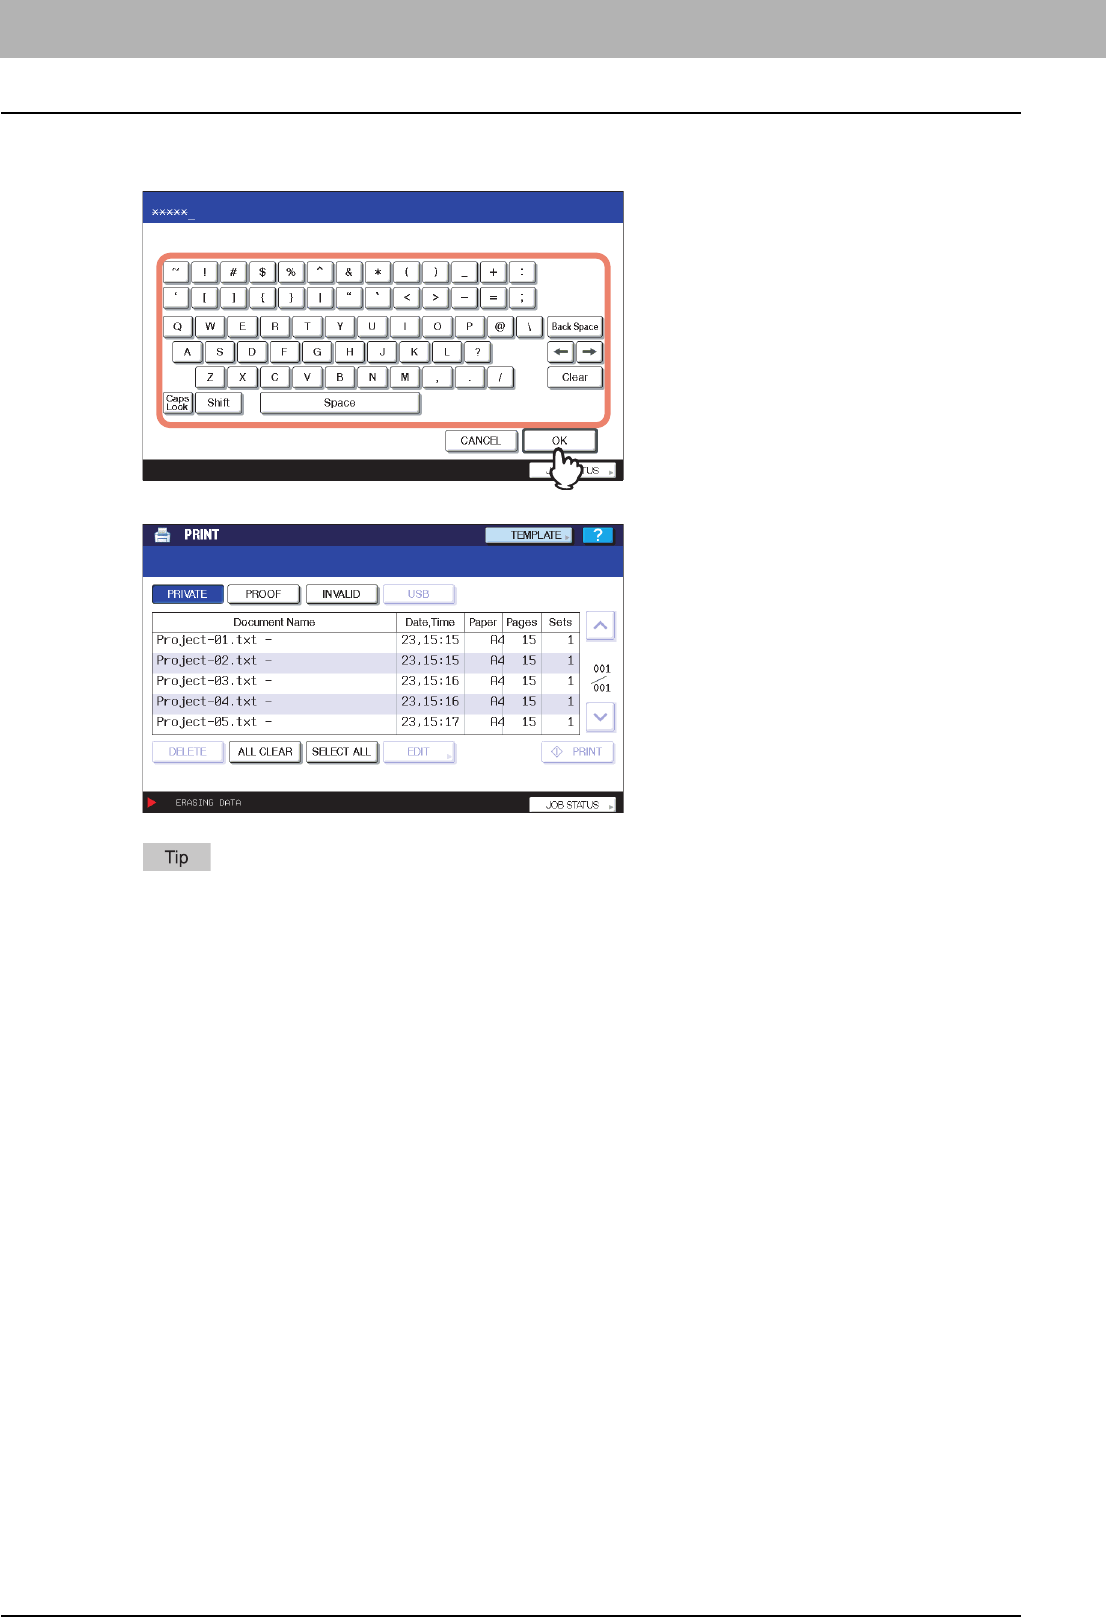
5 MANAGING PRINT JOBS FROM THE CONTROL PANEL
148 Monitoring the Print Job Status
3
Enter the password for the Private Print job, which has previously been set via the
computer, and then press [OK].
The Private Print jobs are listed on the screen.
The displayed list contains the Private Print jobs for which the same password has been set.
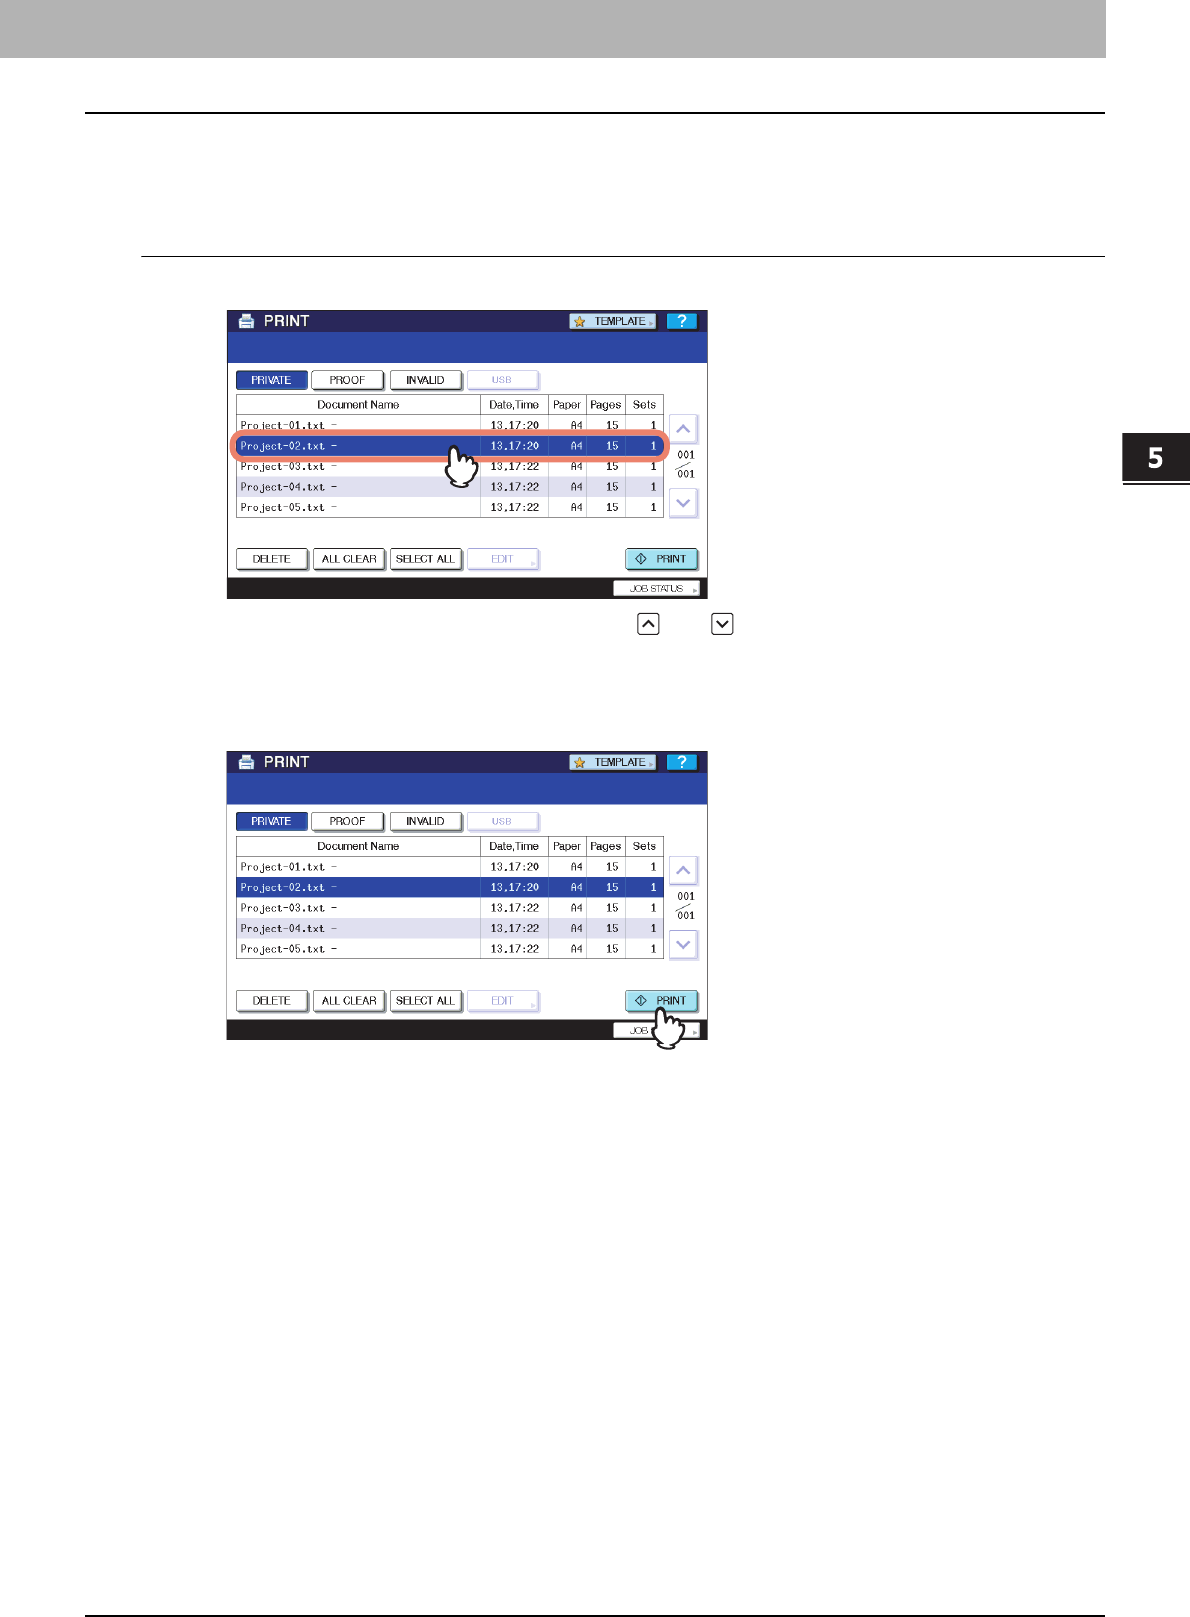
5.MANAGING PRINT JOBS FROM THE CONTROL PANEL
Monitoring the Print Job Status 149
5 MANAGING PRINT JOBS FROM THE CONTROL PANEL
Printing Private Print jobs
Follow the procedure below to release your Private Print jobs from the control panel.
Printing Private Print jobs
1
On the Private Print job list ( P.147), select a job for printing.
yIf the target job is not displayed on the screen, use and to change between pages.
yIf you want to select all the jobs displayed on the screen, press [SELECT ALL]. To cancel the selection, press
[ALL CLEAR].
2
Press [PRINT].
The equipment starts printing.
The job in progress can be monitored on the [JOBS] tab listing the Normal Print jobs ( P.140).
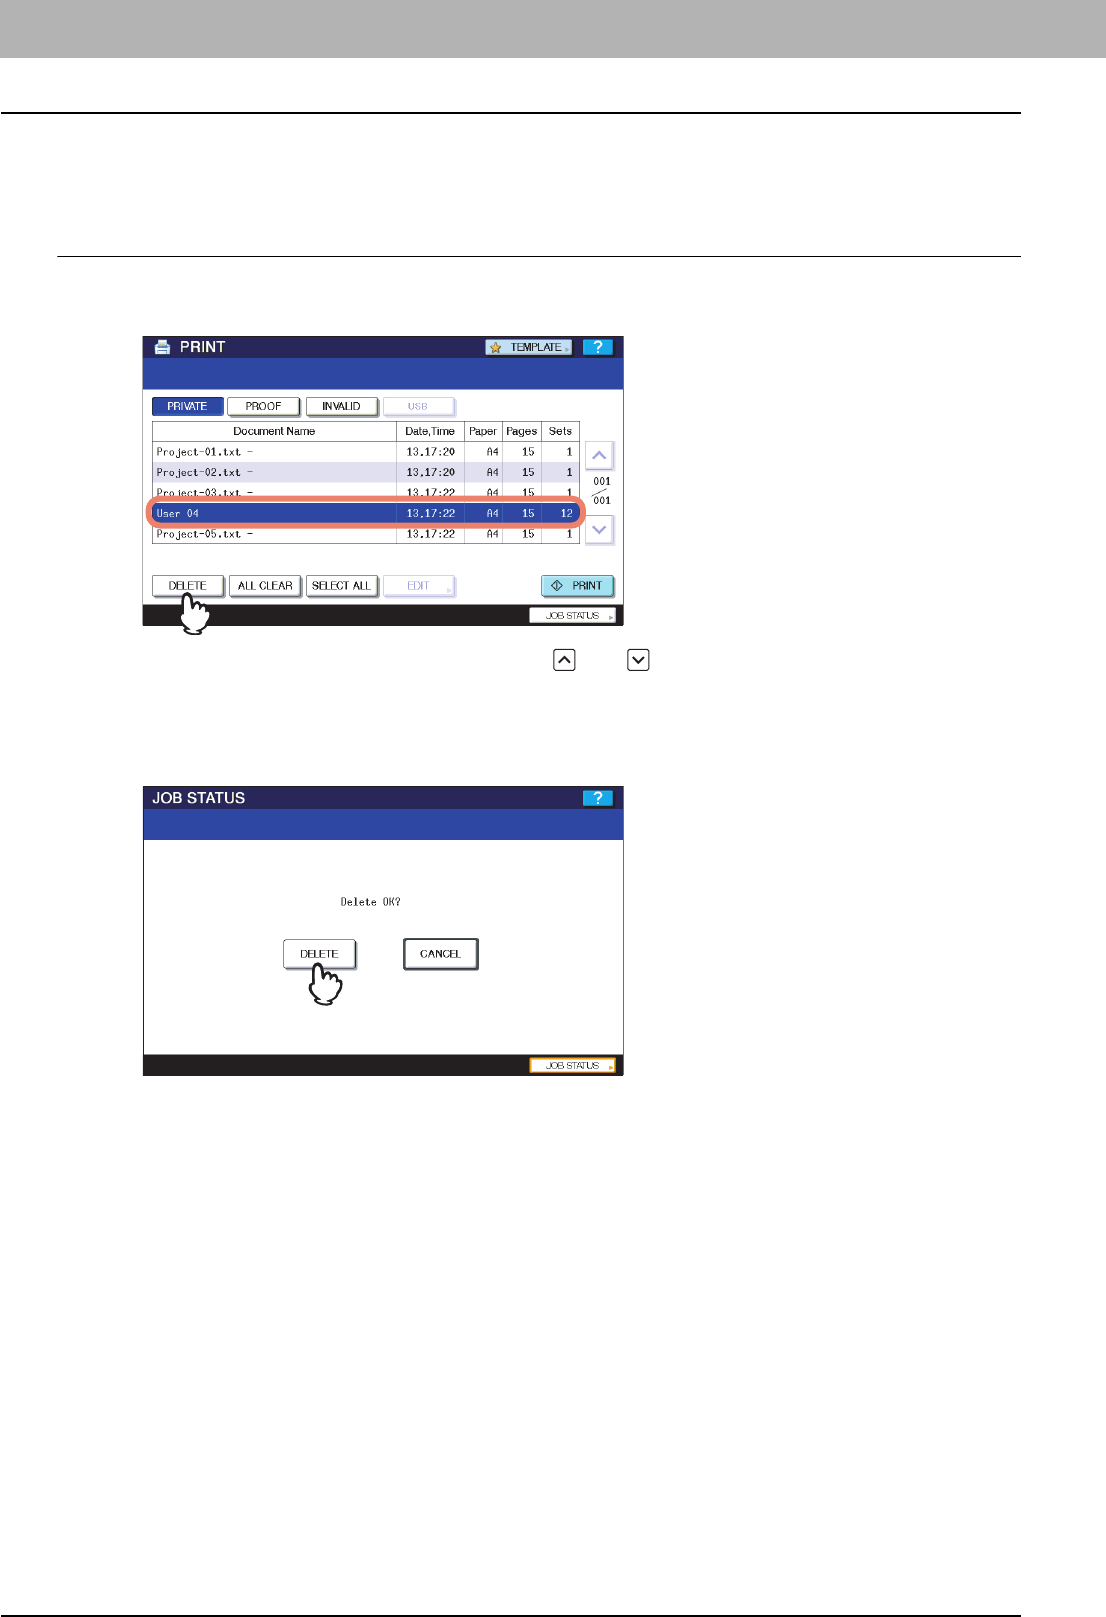
5 MANAGING PRINT JOBS FROM THE CONTROL PANEL
150 Monitoring the Print Job Status
Deleting Private Print jobs
Follow the procedure below to delete a Private Print job.
Deleting Private Print jobs
1
On the Private Print job list ( P.147), select the job that you want to delete, and then
press [DELETE].
yIf the target job is not displayed on the screen, use and to change between pages.
yIf you want to select all the jobs displayed on the screen, press [SELECT ALL]. To cancel the selection, press
[ALL CLEAR].
2
When “Delete OK?” appears, press [DELETE].
The selected job is deleted.
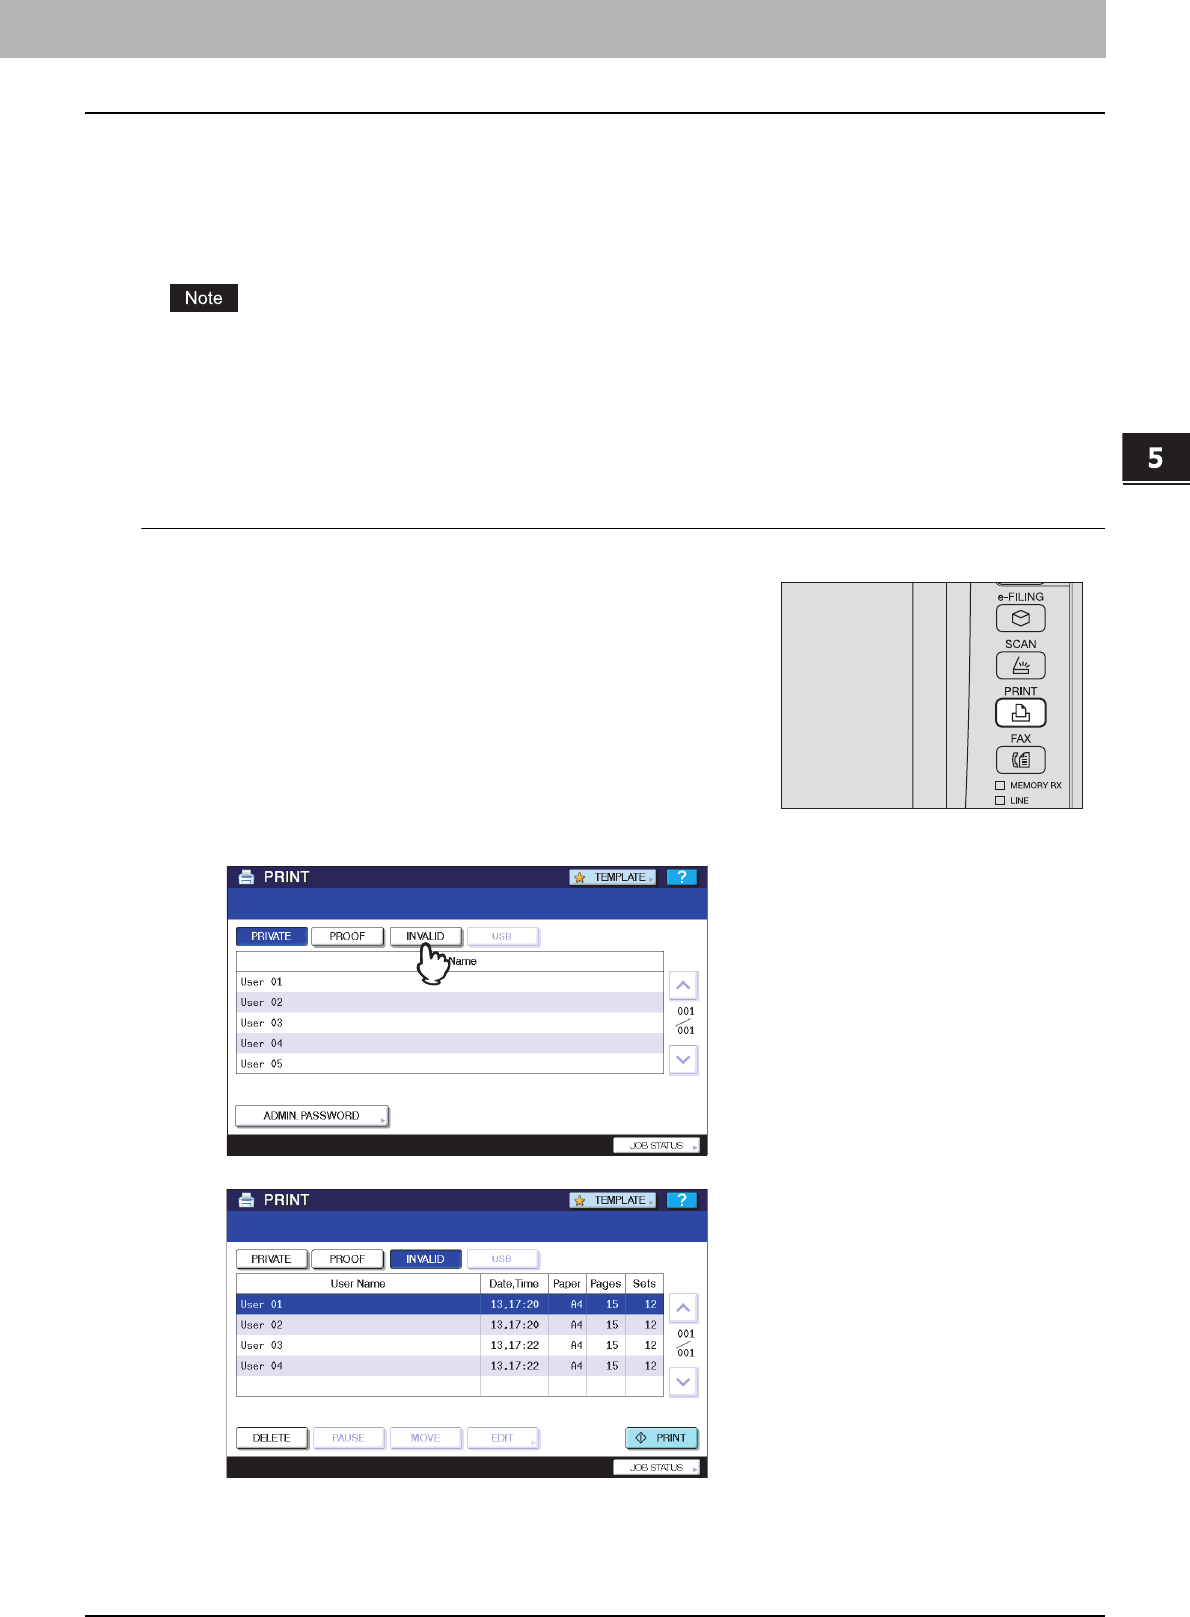
5.MANAGING PRINT JOBS FROM THE CONTROL PANEL
Monitoring the Print Job Status 151
5 MANAGING PRINT JOBS FROM THE CONTROL PANEL
Invalid jobs
An Invalid job refers to a job held due to a wrong or no department code entered for performing the job. If the equipment is
managed by the Department Management feature with the SNMP network services enabled, entering a wrong department
code for printing from the touch panel causes the job to be held as an Invalid job and stored in the Invalid job queue. To
release the job from the queue, enter the correct department code on the [JOBS] tab listing the Invalid jobs.
A print job whose number of copies to print exceeds the limit specified for a particular department code cannot be
printed out. In this case, ask the administrator for help.
Displaying the Invalid job list
Follow the procedure below to display the list of Invalid jobs.
Displaying the Invalid job list
2
Press [INVALID].
The Invalid jobs are listed on the screen.
1
On the control panel, press the [PRINT] button.
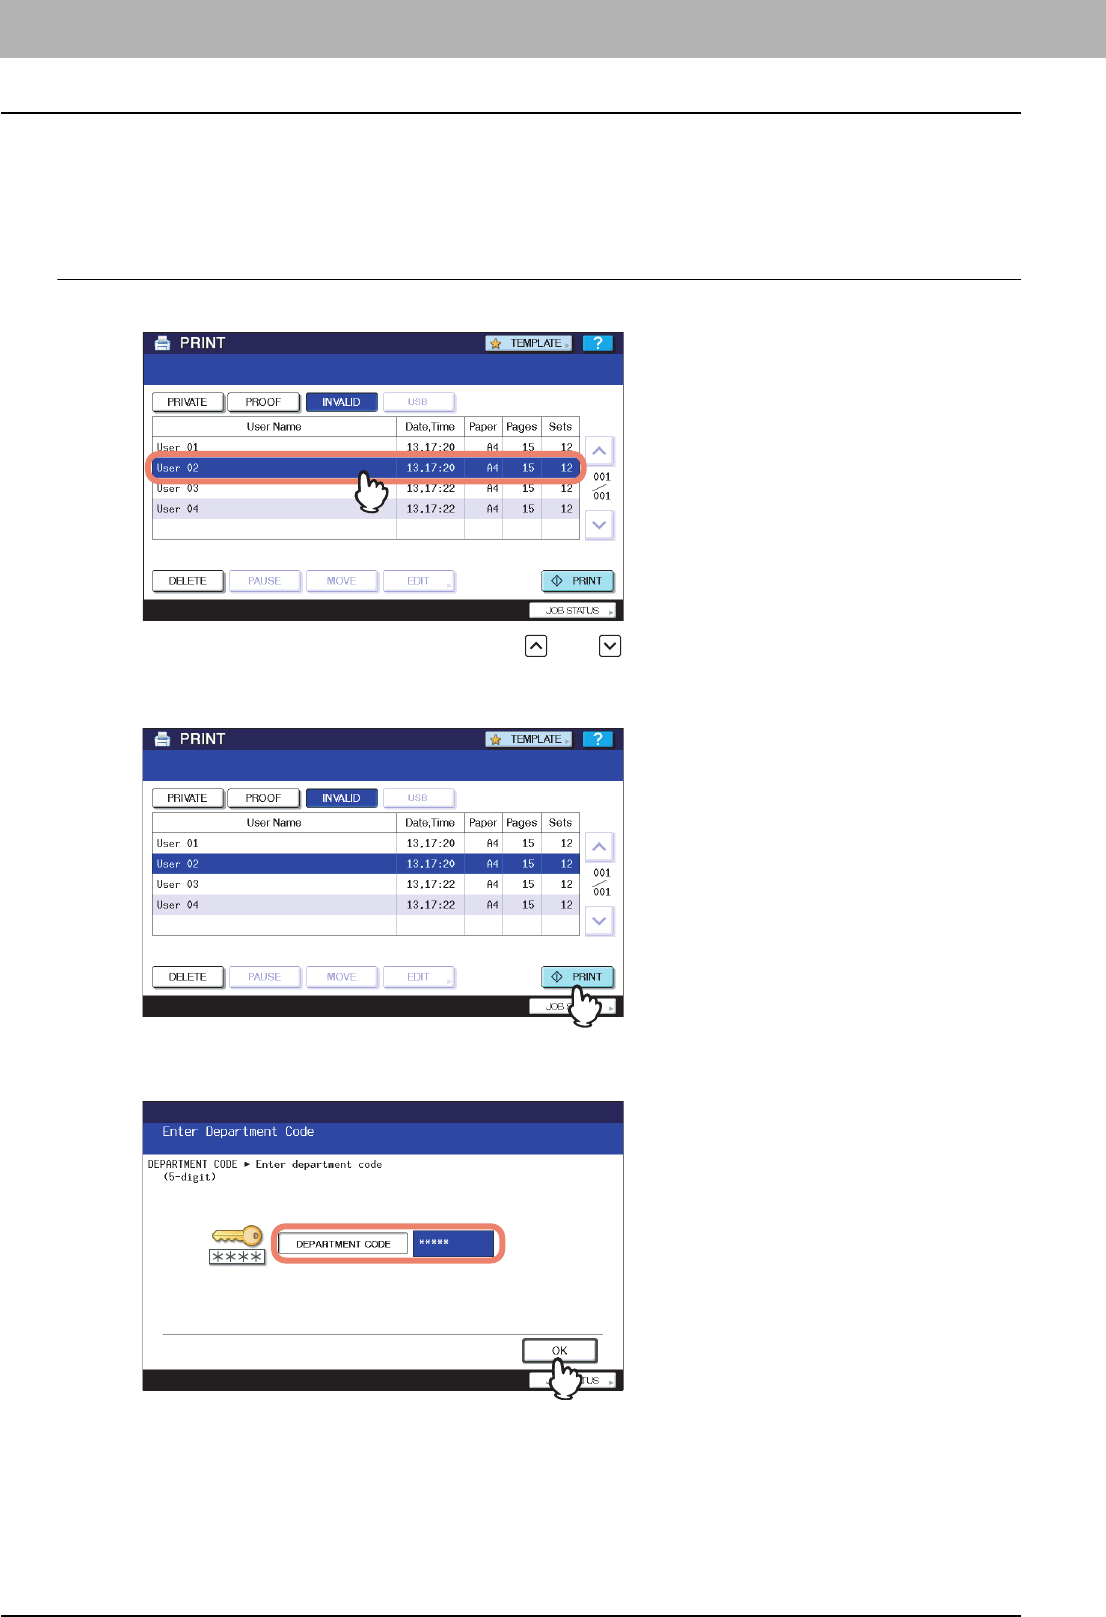
5 MANAGING PRINT JOBS FROM THE CONTROL PANEL
152 Monitoring the Print Job Status
Printing Invalid jobs
If you have entered a wrong department code for printing, you need to re-enter the correct one. Follow the procedure
below.
Printing Invalid jobs
1
On the Invalid job list ( P.151), select the job for printing.
If the target job is not displayed on the screen, use and to change between pages.
2
Press [PRINT].
3
Enter the correct department code with the digital keys, and then press [OK].
Printing is performed.
The job in progress can be monitored from the [JOBS] tab listing the Normal Print jobs ( P.140).
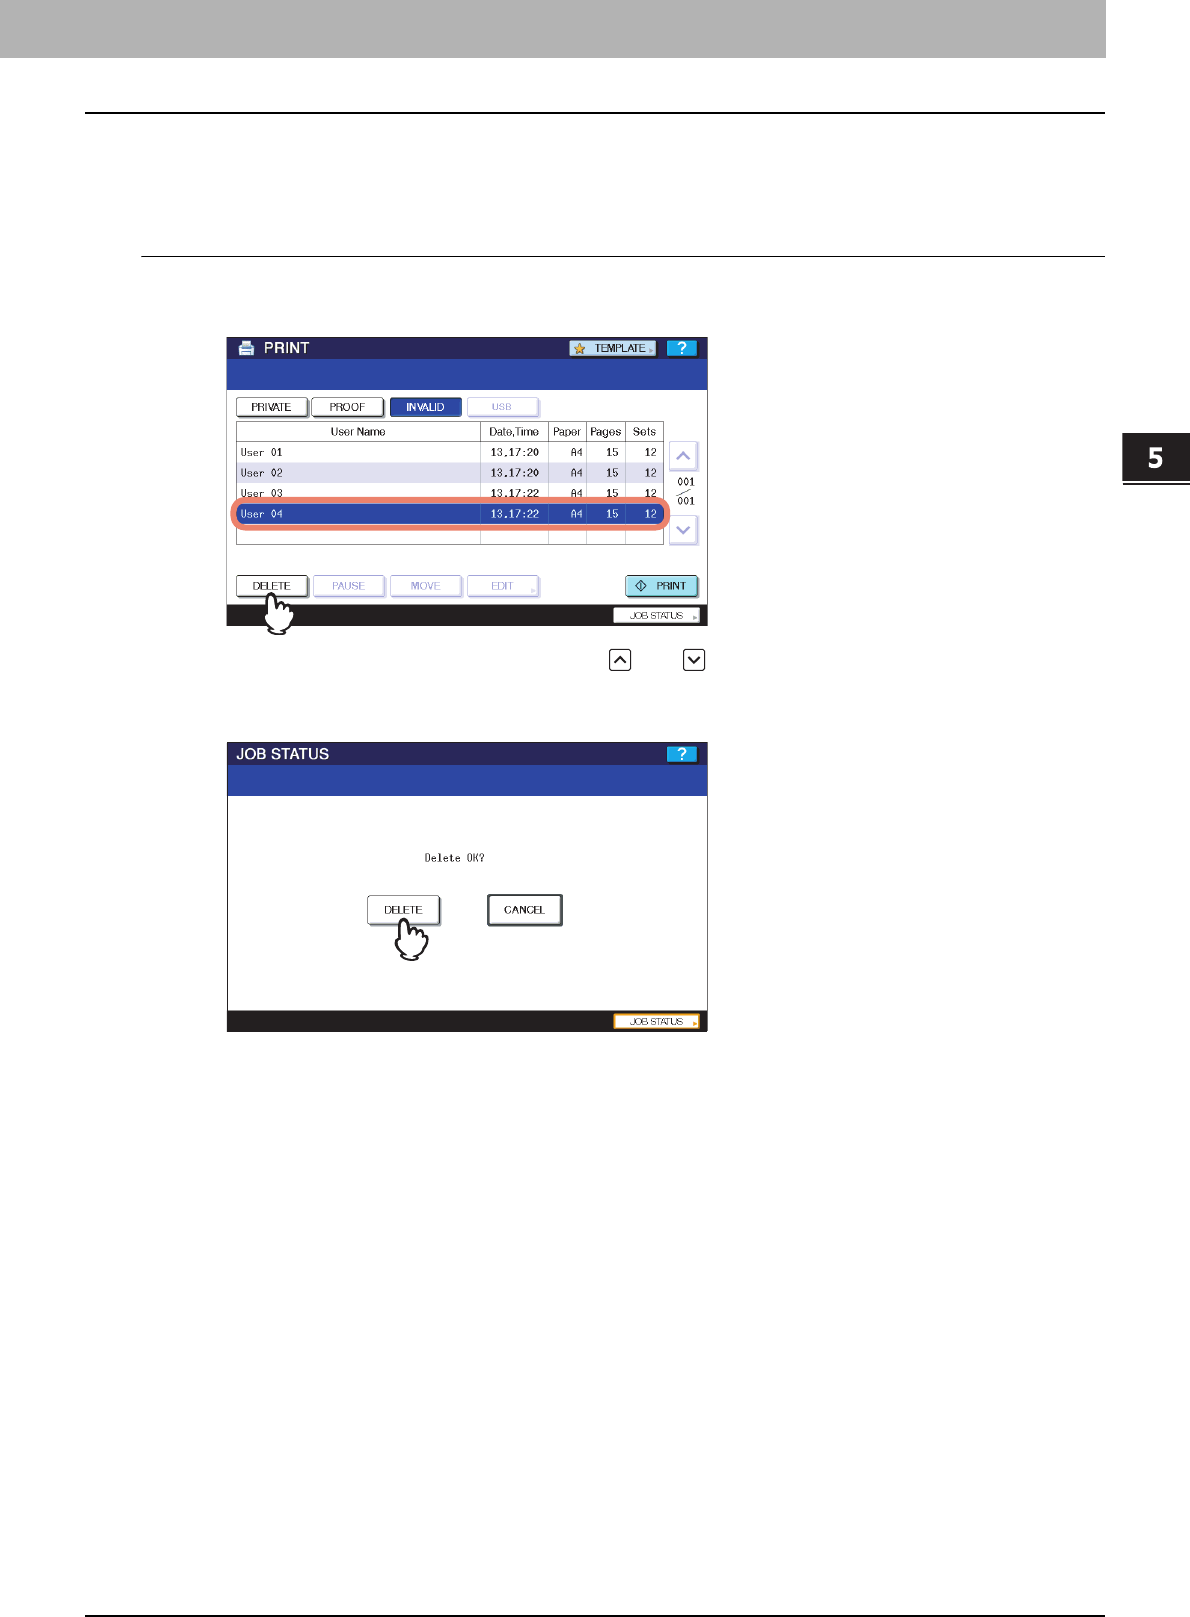
5.MANAGING PRINT JOBS FROM THE CONTROL PANEL
Monitoring the Print Job Status 153
5 MANAGING PRINT JOBS FROM THE CONTROL PANEL
Deleting Invalid jobs
Follow the procedure below to delete an Invalid job.
Deleting Invalid jobs
1
On the Invalid job list ( P.151), select the job that you want to delete, and then press
[DELETE].
If the target job is not displayed on the screen, use and to change between pages.
2
When “Delete OK?” appears, press [DELETE].
The selected job is deleted.
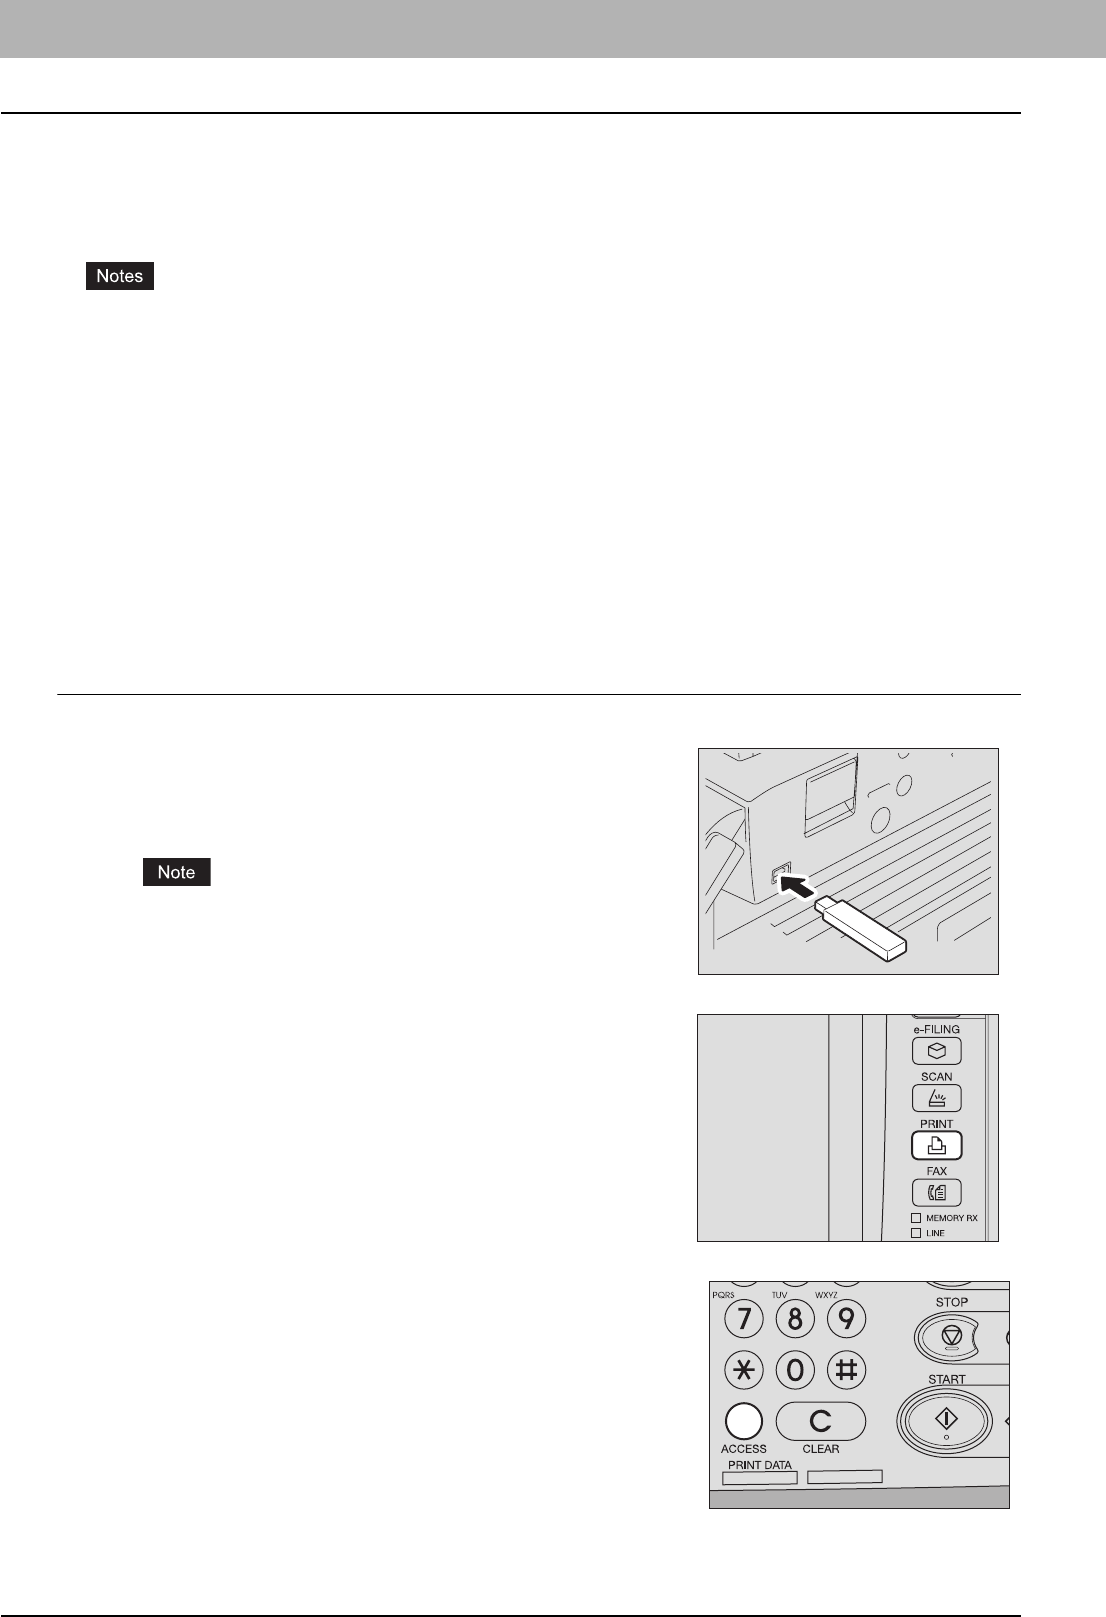
5 MANAGING PRINT JOBS FROM THE CONTROL PANEL
154 Monitoring the Print Job Status
Printing files from USB media (USB Direct Printing)
USB Direct Printing refers to the feature of printing files saved in a USB storage device that is connected to the USB port
on the equipment. With this feature, you can print PDF, encrypted PDF (file extension: “.pdf”), XPS (file extension: “.xps”),
JPEG (file extension: “.jpg” or “.jpeg”), PRN (file extension: “.prn”), and PS (file extension: “.ps”) files.
yUSB Direct Printing requires the USB Direct Print setting to be enabled on TopAccess. For details, refer to the
TopAccess Guide.
yYou cannot specify which page(s) to print. All pages are to be printed.
yPDF file versions 1.3 to 1.7 are supported.
yWith this feature, the equipment can print encrypted PDF files whose encryption level is either “40-bit RC4” or “128-
bit RC4.”
yThe feature does not support encrypted PDF files whose encryption level is [128bit AES], and some files of other
encryption levels may not be printable, either. In this case, print these files from a client computer.
yFor printing the PRN files, the page description languages supported by USB Direct Printing are PostScript (PS3),
Printer Command Language (PCL5e and PCL6), and XML Paper Specification (XPS).
yDo not turn on the equipment when a USB storage device is connected to the port.
yThe USB storage device should meet the following requirements:
- FAT16 and FAT32 formats
- Single-partition (USB media with multiple partitions are not supported.)
- Memory capacity: 2GB maximum
Printing files from USB media
1
Connect your USB storage device to the USB port on
the equipment.
In a few seconds, “FOUND USB DEVICE” appears at the lower left of
the screen.
Do not disconnect the USB storage device when “USB DEVICE in
use Do not remove USB DEVICE” is displayed on the screen.
Removing the device while the message is displayed could destroy
the data in the device or cause a malfunction of the equipment.
2
On the control panel, press the [PRINT] button.
yIf the equipment is managed by the department management
codes, proceed to Step 3.
yIf the equipment is not managed by the department codes, proceed
to Step 5.
3
If the equipment is managed by the department
codes, press the [ACCESS] button on the control
panel.
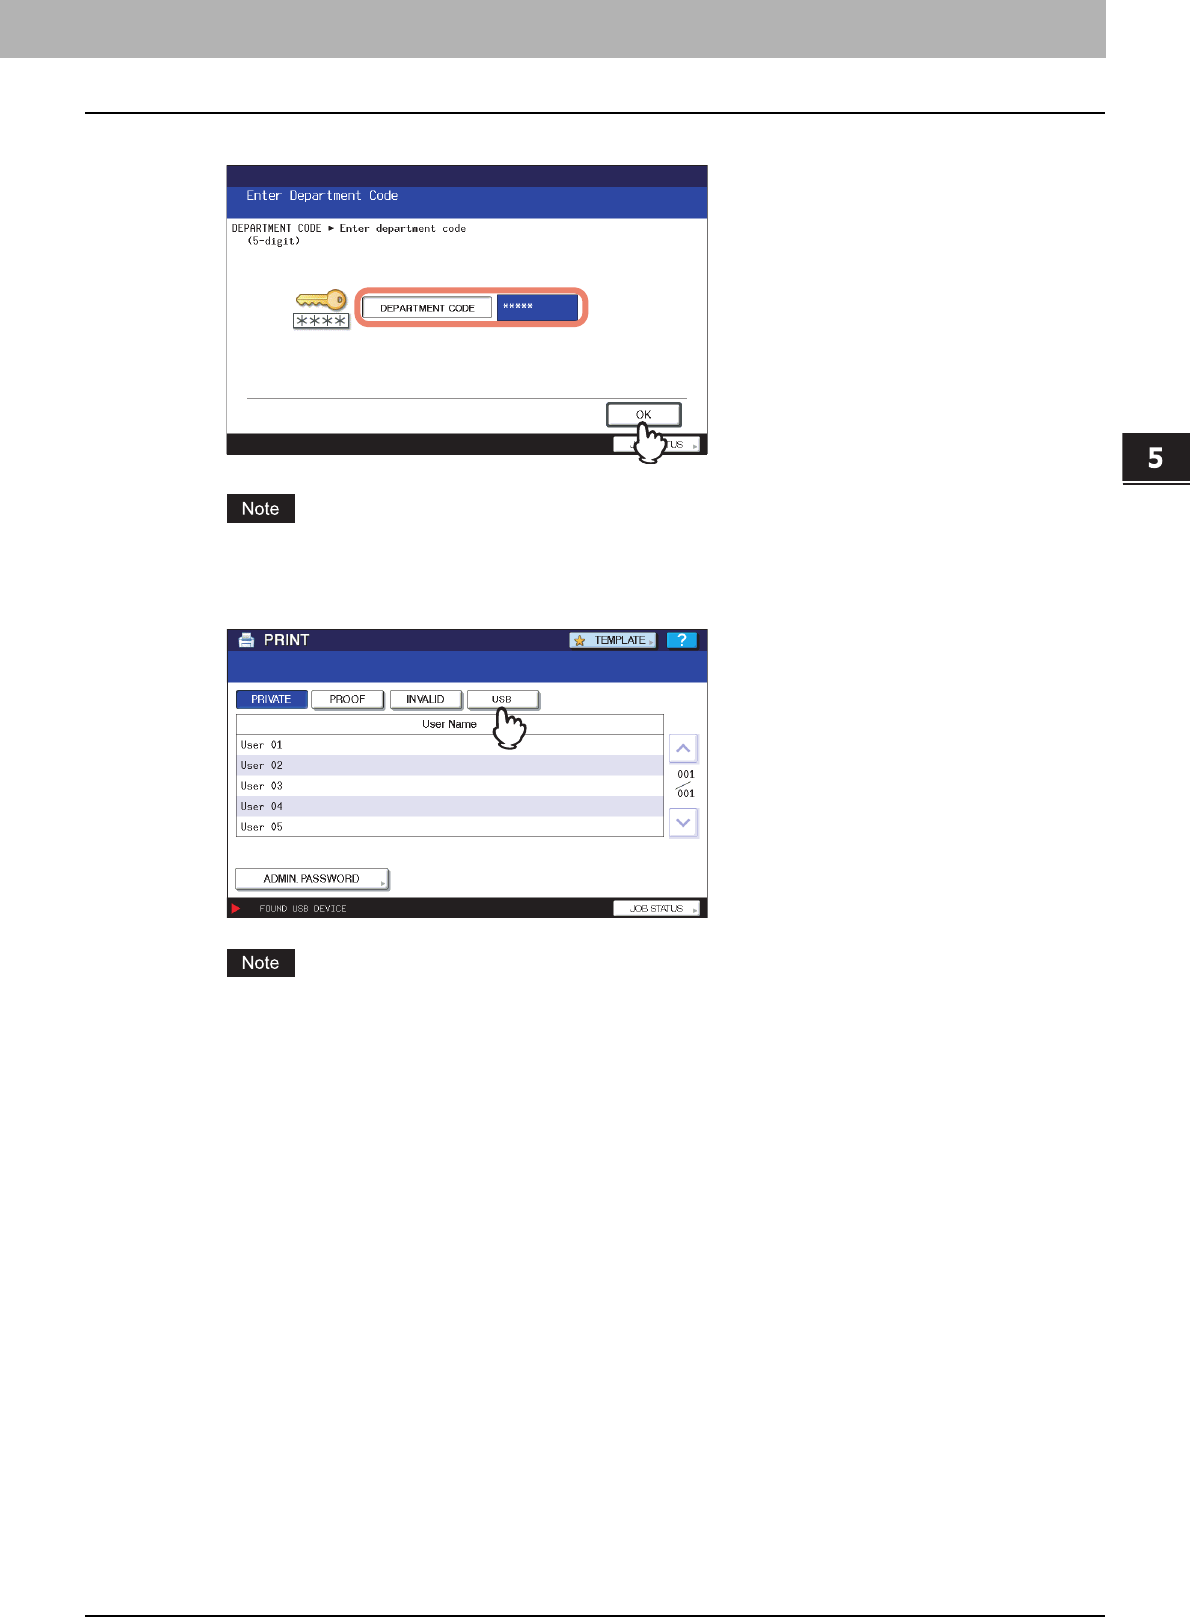
5.MANAGING PRINT JOBS FROM THE CONTROL PANEL
Monitoring the Print Job Status 155
5 MANAGING PRINT JOBS FROM THE CONTROL PANEL
4
Enter the department code using the digital keys, and then press [OK].
The above screen will not be displayed when the equipment is not managed by the department codes. Proceed
to the next step.
5
Press [USB].
Do not disconnect the USB storage device when “USB DEVICE in use Do not remove USB DEVICE” is
displayed on the screen. Removing the device while the message is displayed could destroy the data in the
device or cause a malfunction of the equipment.
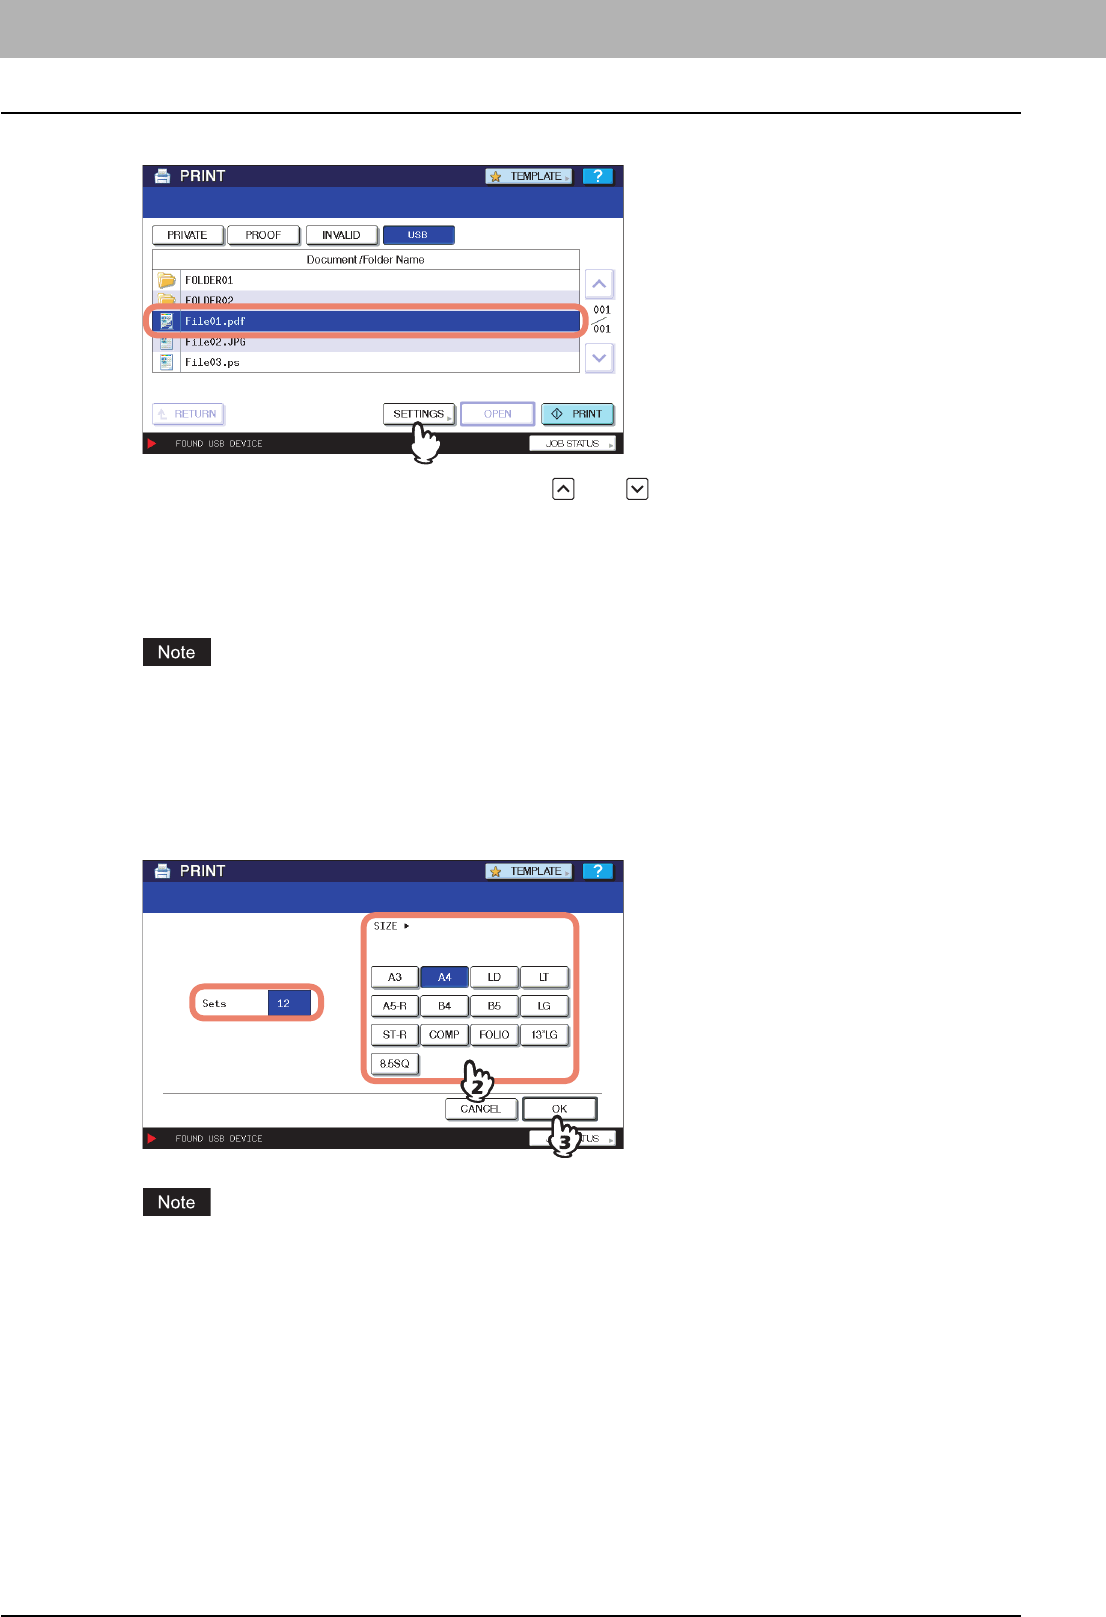
5 MANAGING PRINT JOBS FROM THE CONTROL PANEL
156 Monitoring the Print Job Status
6
On the list of files, select the file that you want to print, and then press [SETTINGS].
yIf the target file is not displayed on the screen, use and to change between pages.
yTo select a file contained in a folder, select the folder and press [OPEN]. On the list of files that appears, select
the desired file to print.
yIf you do not need to change the number of copies to print or the paper size, you can press [PRINT] to start
printing the selected file. If you have selected an encrypted PDF file for which a password has been set,
proceed to Step 9.
Do not disconnect the USB storage device when “USB DEVICE in use Do not remove USB DEVICE” is
displayed on the screen. Removing the device while the message is displayed could destroy the data in the
device or cause a malfunction of the equipment.
7
Specify the following items as required:
1) Using the digital keys, enter the number of copies to print.
2) Select the paper size.
3) Finally, press [OK].
You can select the paper size only when printing a JPEG file. (When multiple JPEG files are to be printed in
sequence, the paper size selected here is used for them.)
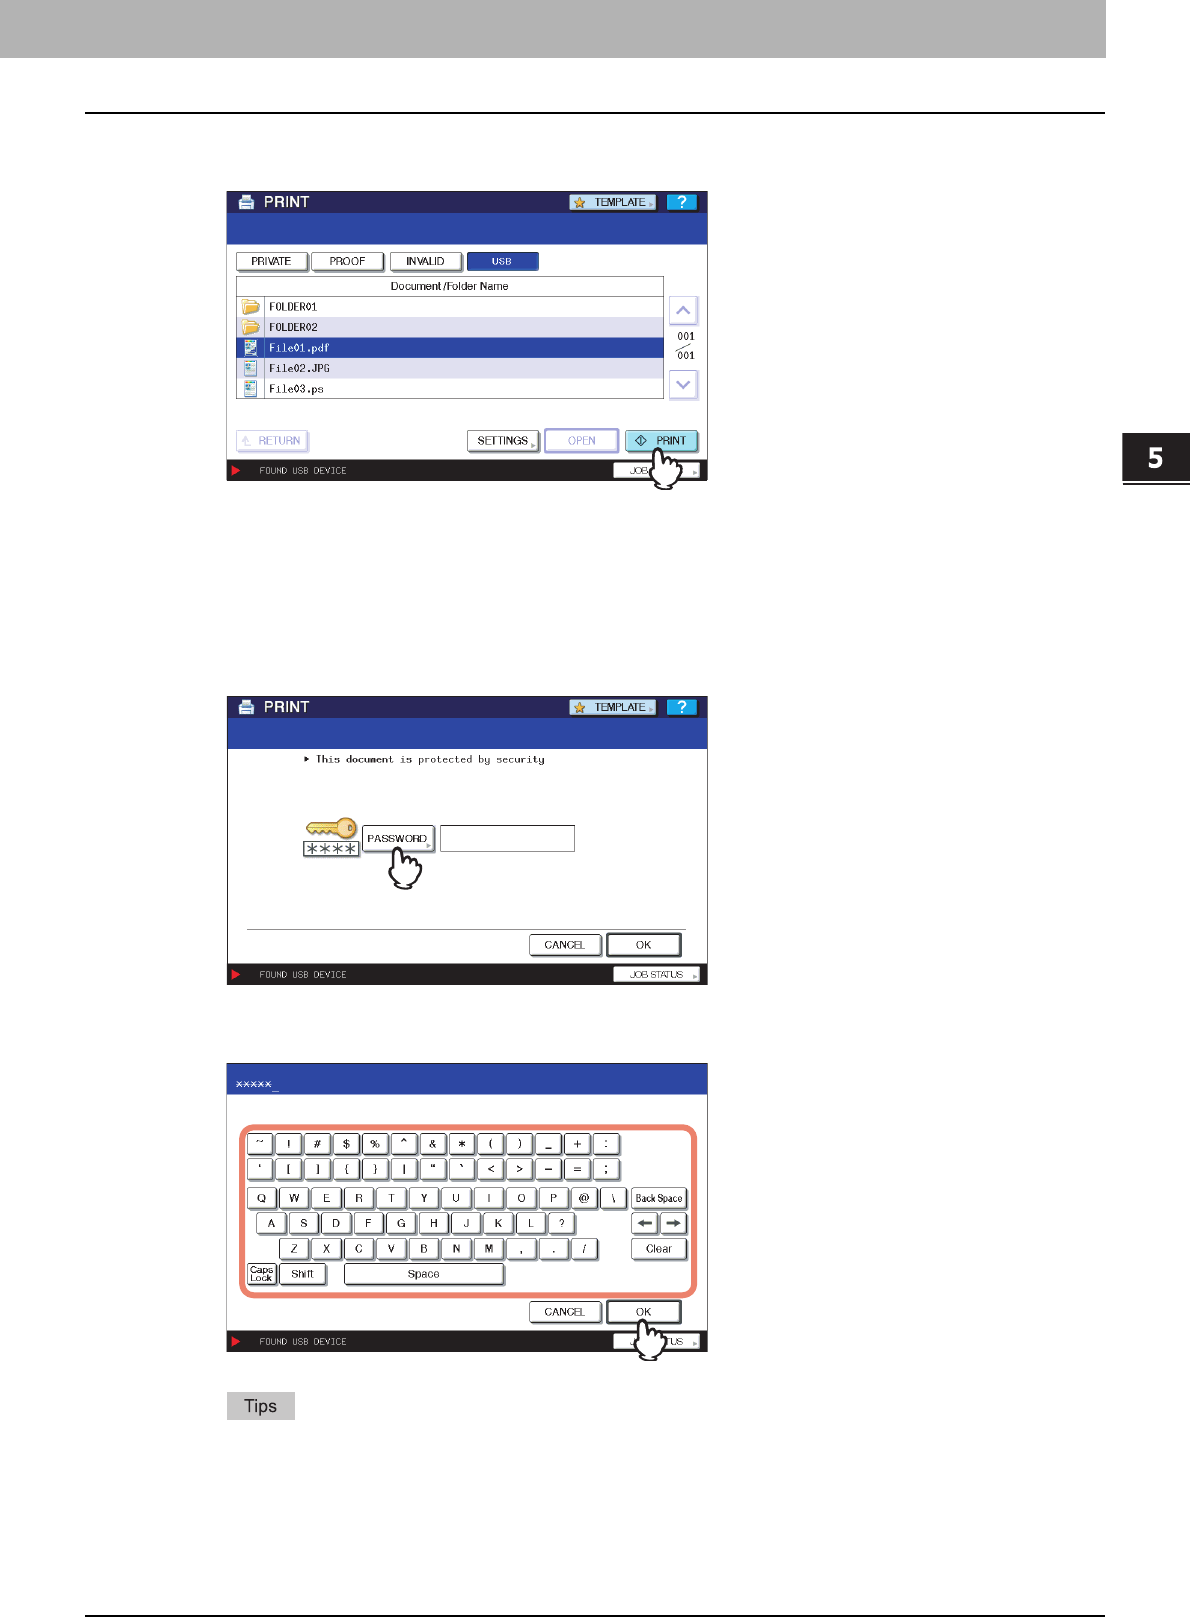
5.MANAGING PRINT JOBS FROM THE CONTROL PANEL
Monitoring the Print Job Status 157
5 MANAGING PRINT JOBS FROM THE CONTROL PANEL
8
Press [PRINT]. If you have selected an encrypted PDF file for which a password has
been set, proceed to Step 8.
yThe equipment starts printing. The printouts are directed to the receiving tray.
yThe job in progress can be monitored from the [JOBS] tab listing the Normal Print jobs.
Before Disconnecting the USB Storage Device:
Make sure that “USB DEVICE in use Do not remove USB DEVICE” is not displayed on the touch panel. If it is, do
not disconnect the USB storage device; removing the device while the message is displayed could destroy the data
in the device or cause a malfunction of the equipment.
9
Press [PASSWORD].
10
Using the on-screen keyboard and the digital keys, enter the user or master password
for the encrypted PDF file, and then press [OK].
yIf the selected encrypted PDF file was created on Adobe Acrobat 6.0 or later, enter the document open
password or permissions password.
yTo print an encrypted PDF file for which “Low Resolution (150 dpi)” is set on Adobe Acrobat, you must enter
the permissions password that was set for the file when it was created.
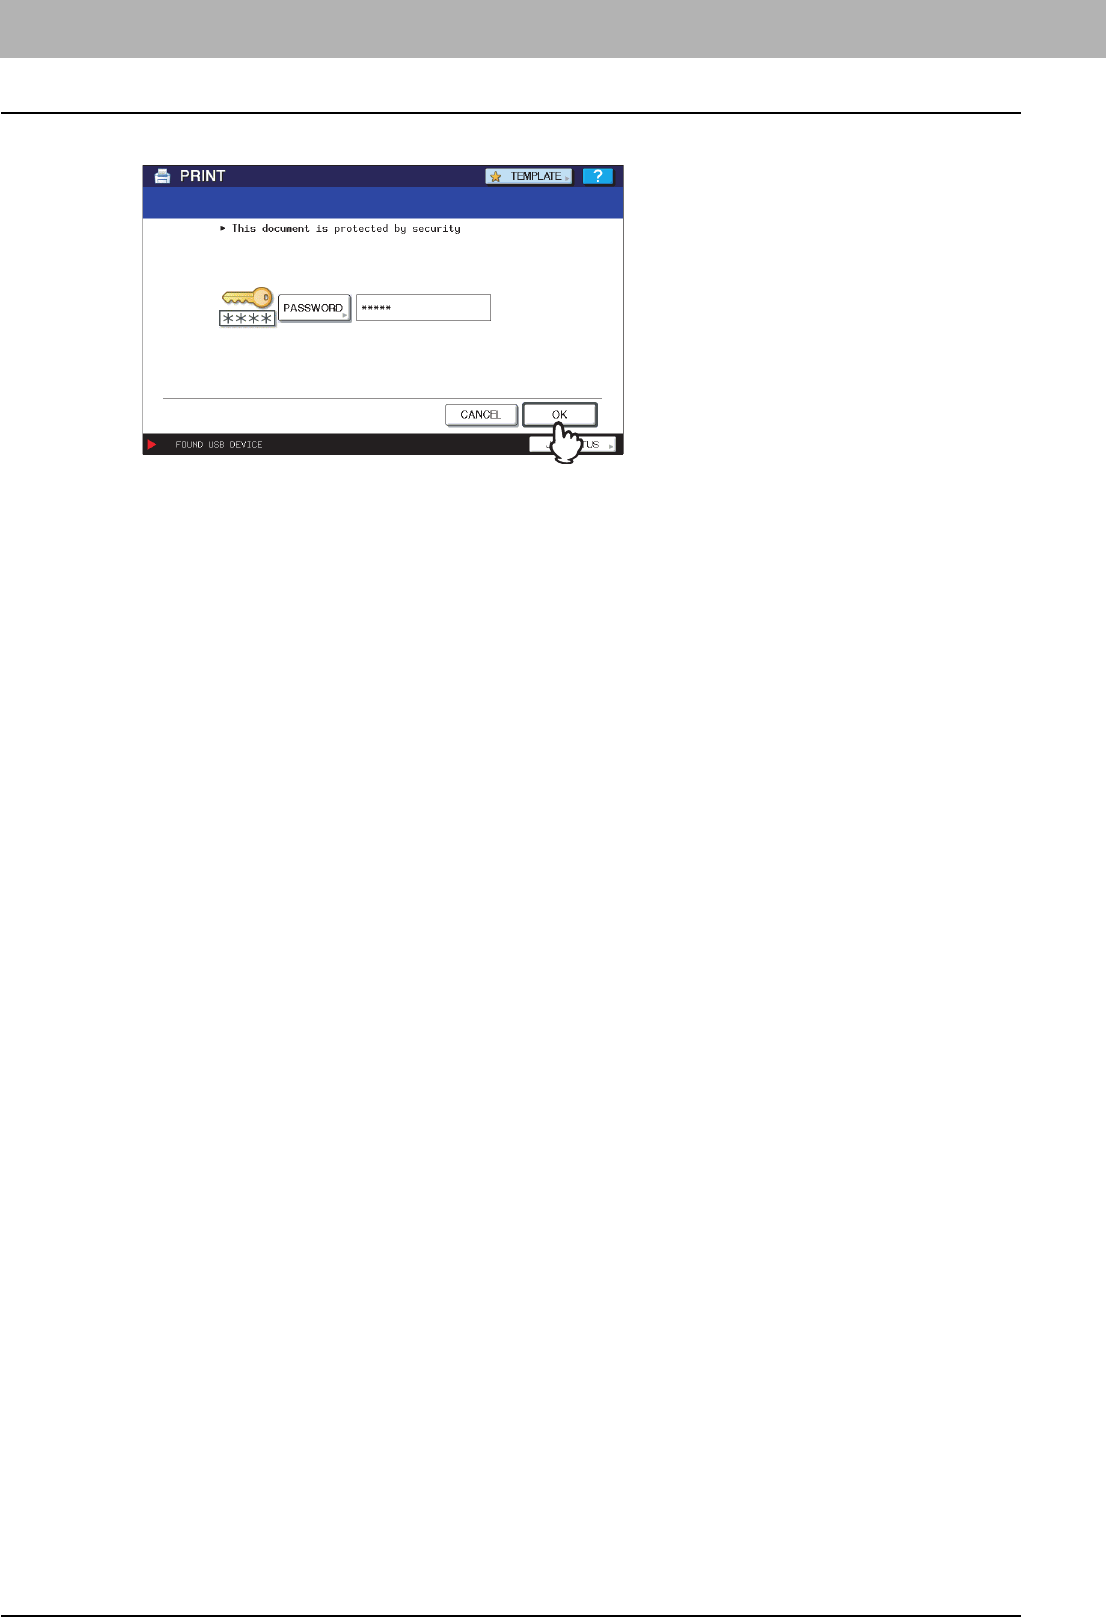
5 MANAGING PRINT JOBS FROM THE CONTROL PANEL
158 Monitoring the Print Job Status
11
Press [OK].
The equipment starts printing. The printouts are directed to the receiving tray.
The job in progress can be monitored from the [JOBS] tab listing the Normal Print jobs.
Before Disconnecting the USB Storage Device:
Make sure that “USB DEVICE in use Do not remove USB DEVICE” is not displayed on the touch panel. If it is, do
not disconnect the USB storage device; removing the device while the message is displayed could destroy the data
in the device or cause a malfunction of the equipment.
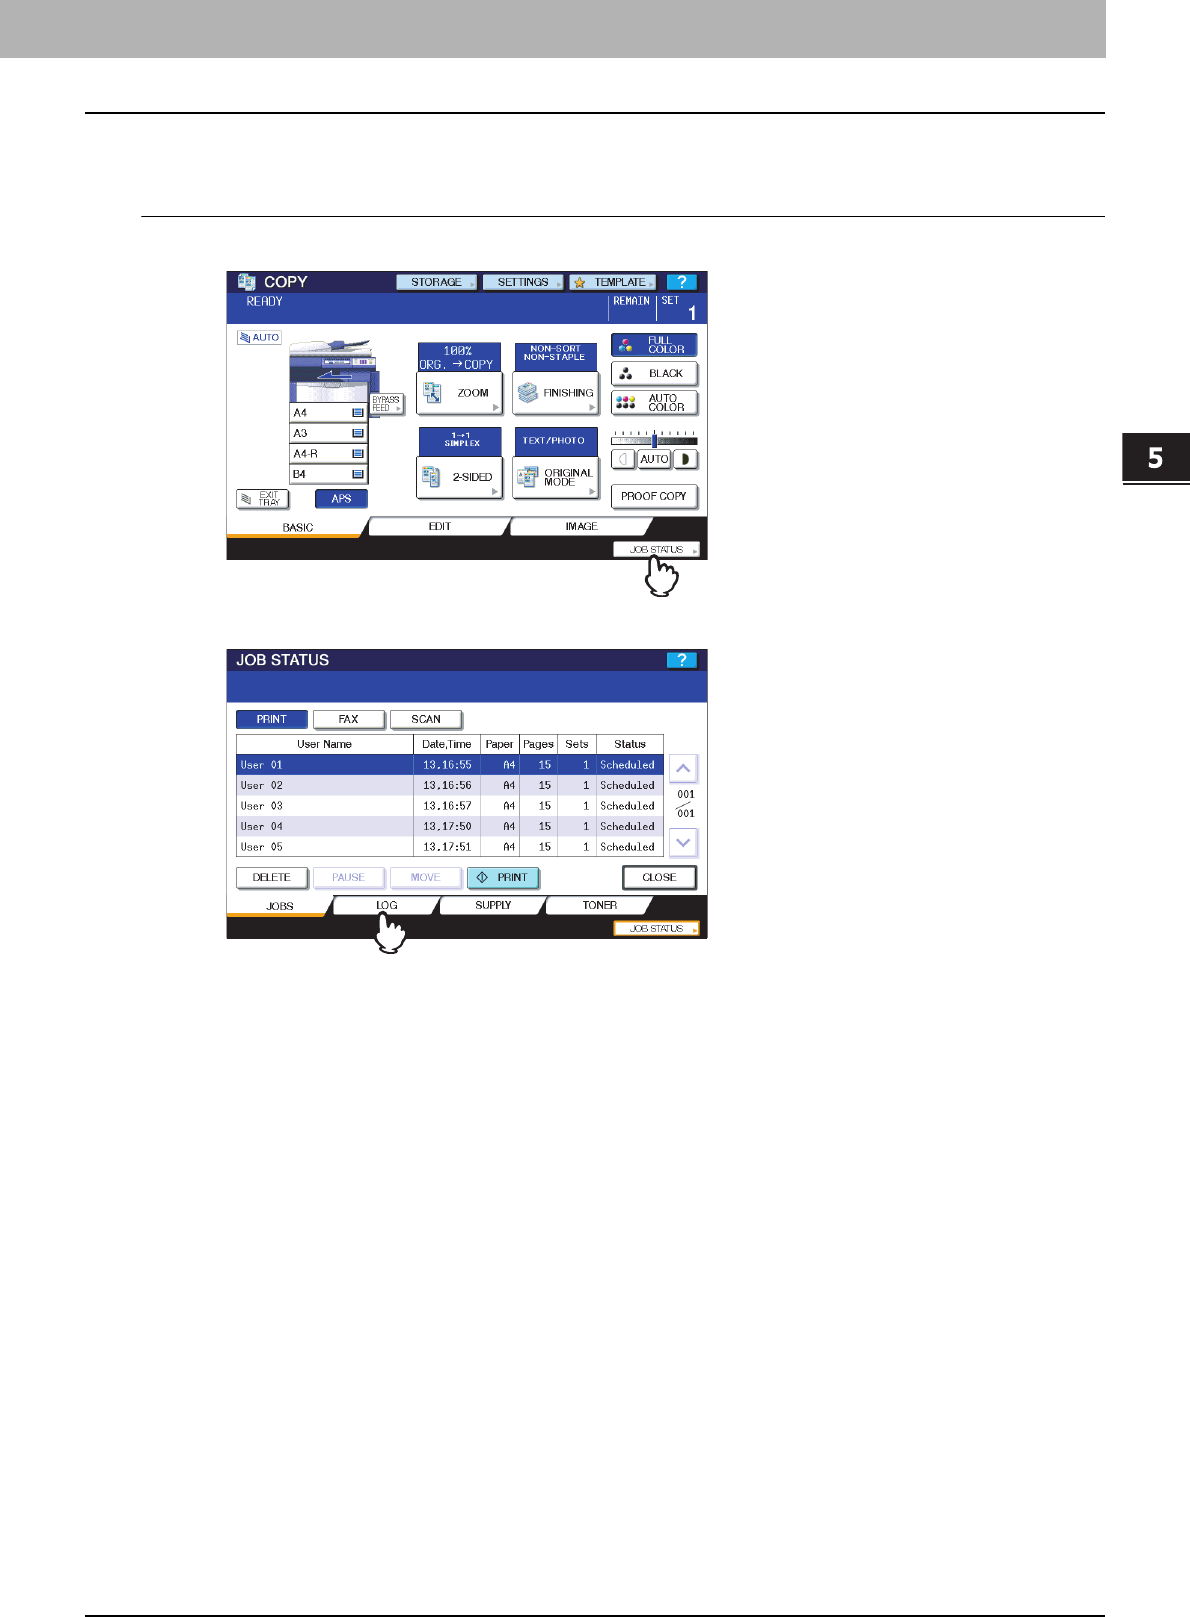
5 MANAGING PRINT JOBS FROM THE CONTROL PANEL
Viewing the Print Job Log 159
Viewing the Print Job Log
You can view the log of print jobs on the touch panel.
Viewing the print job log
1
On the touch panel, press [JOB STATUS].
2
Press [LOG] to display the [LOG] tab.
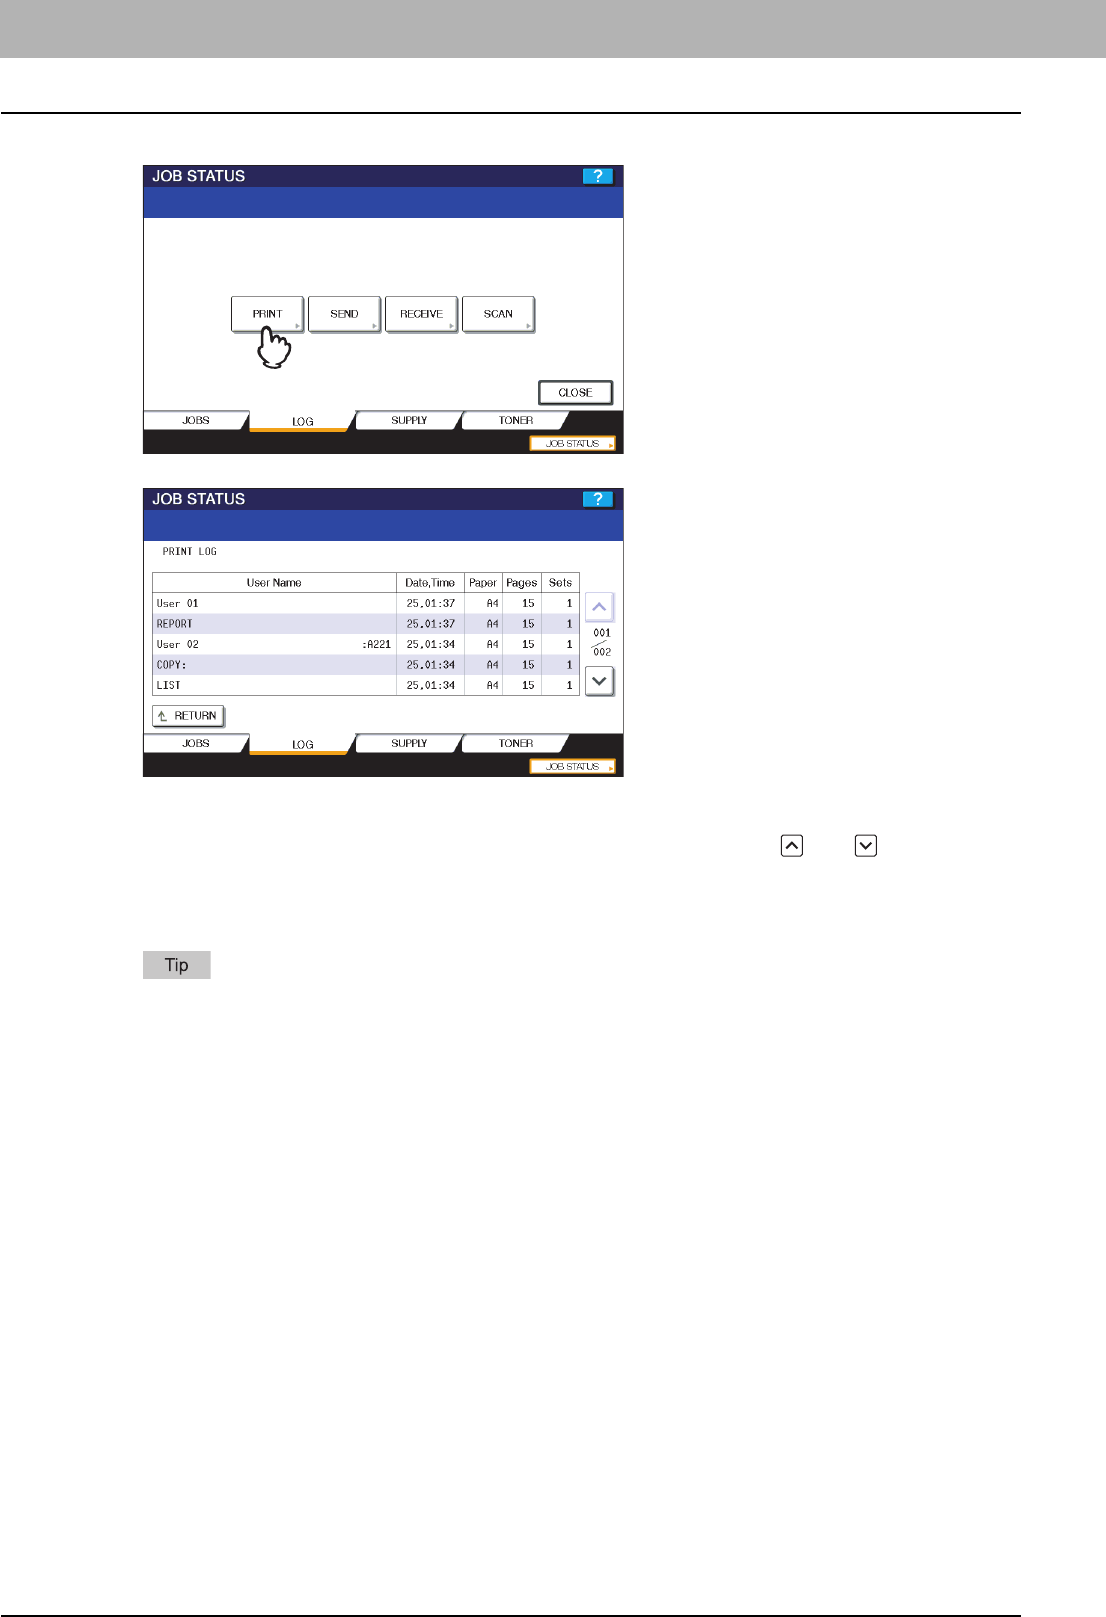
5 MANAGING PRINT JOBS FROM THE CONTROL PANEL
160 Viewing the Print Job Log
3
Press [PRINT].
The Print Log is displayed.
On the Print Log, you can look into each job for its user name, date and time of the event, paper size, the number
of pages, and the number of copies.
Up to 120 jobs can be listed on the log. To display the previous or next page, press and . The number of
jobs displayed on a page varies depending on the equipment used.
To exit from the Print Log screen, press [RETURN].
If the equipment encounters an error while printing, it records and displays an error code in the User Name
column. For details on print job errors and error codes, refer to the Troubleshooting Guide.
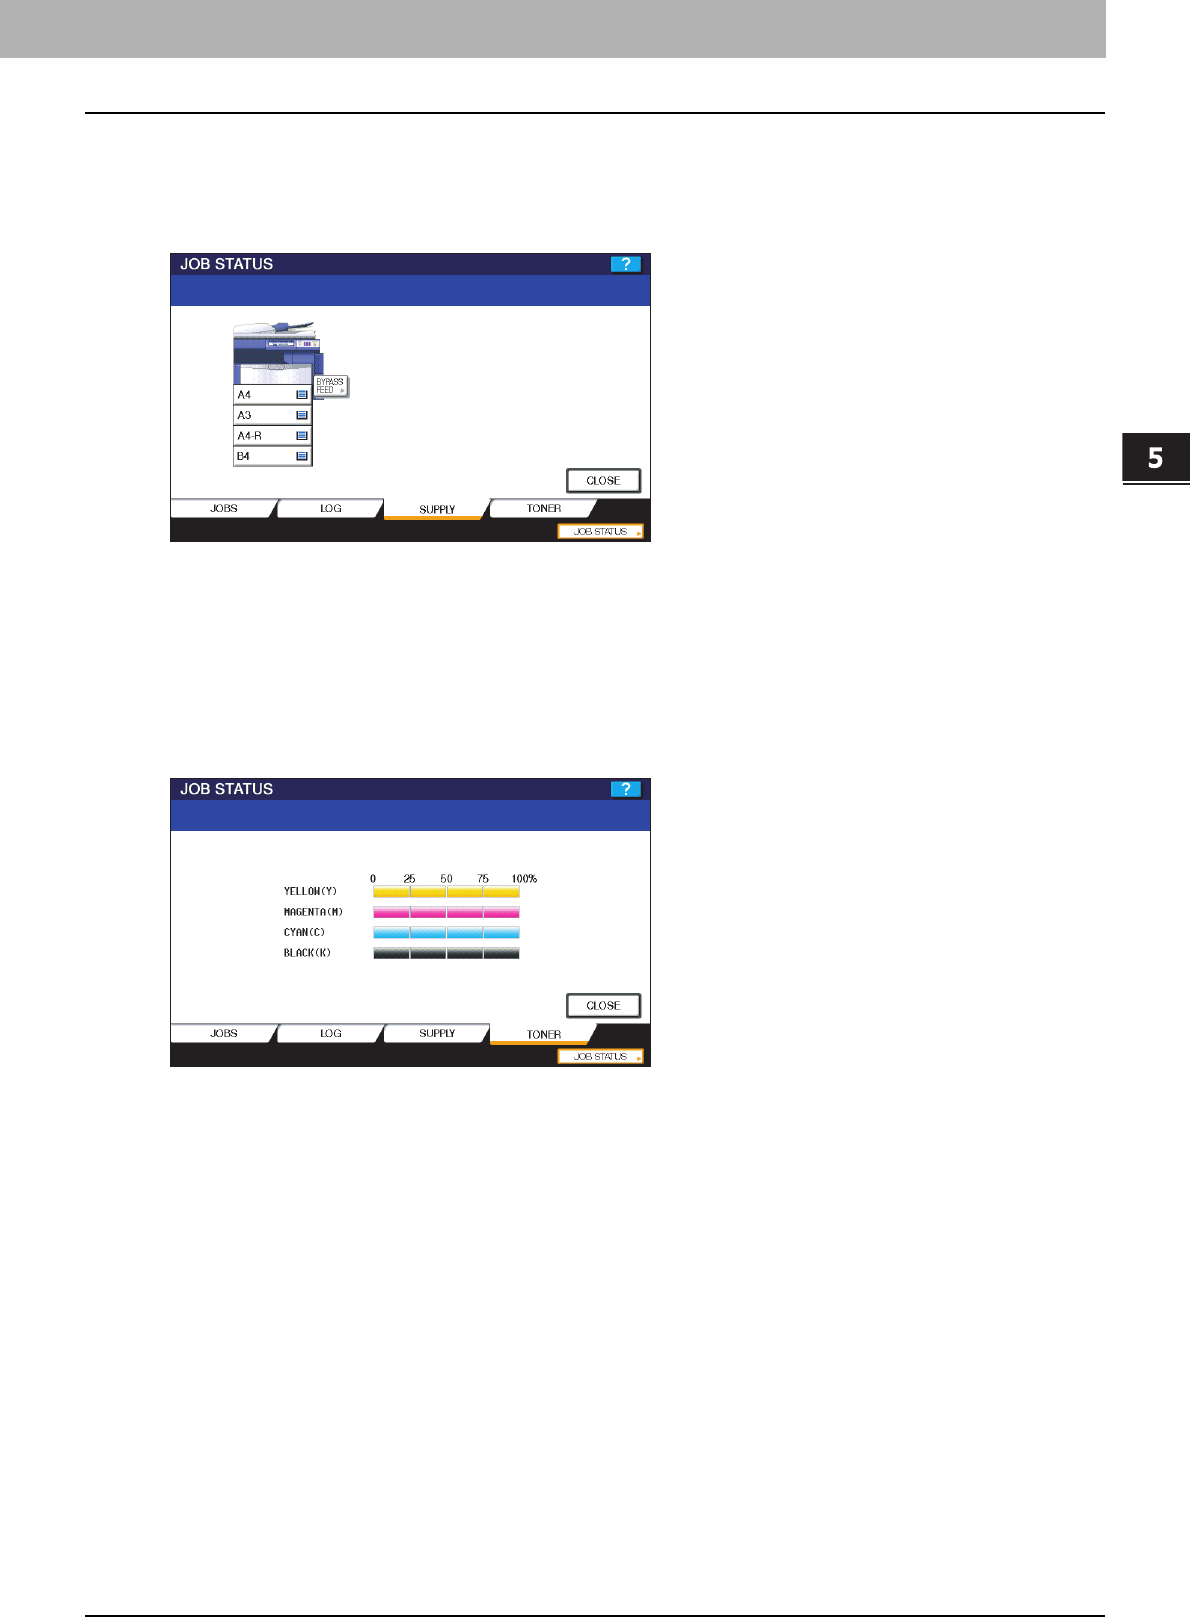
5 MANAGING PRINT JOBS FROM THE CONTROL PANEL
Checking Supplies 161
Checking Supplies
Viewing the drawer status
When the equipment is idle, pressing [JOB STATUS] > [SUPPLY] displays the [SUPPLY] tab. From this tab, you can view
the paper size setting selected for each drawer. If you press [SUPPLY] when printing is in progress, the drawer from which
paper is being fed is highlighted.
If you try to print a document from a client computer, specifying a paper size while none of the drawers or bypass tray on
the equipment has the specified size of paper, a printing error occurs, and [JOB STATUS] blinks. In this case, pressing
[JOB STATUS] displays the [SUPPLY] tab, from which you can learn which drawer needs additional sheets of paper. For
further instructions on how to clear a printing error, refer to the Troubleshooting Guide.
Checking remaining toner levels
Pressing [JOB STATUS] > [TONER] displays the [TONER] tab from which you can check the approximate amount of toner
remaining in the toner cartridges.
If any of the cartridges is low on toner, be sure to get a new cartridge ready for replacement. For instructions on how to
replace toner cartridges, refer to the Quick Start Guide or the Troubleshooting Guide.

6.OTHER PRINTING METHODS
This equipment also supports the following printing methods:
FTP Printing.......................................................................................................................... 164
Email Printing ....................................................................................................................... 165
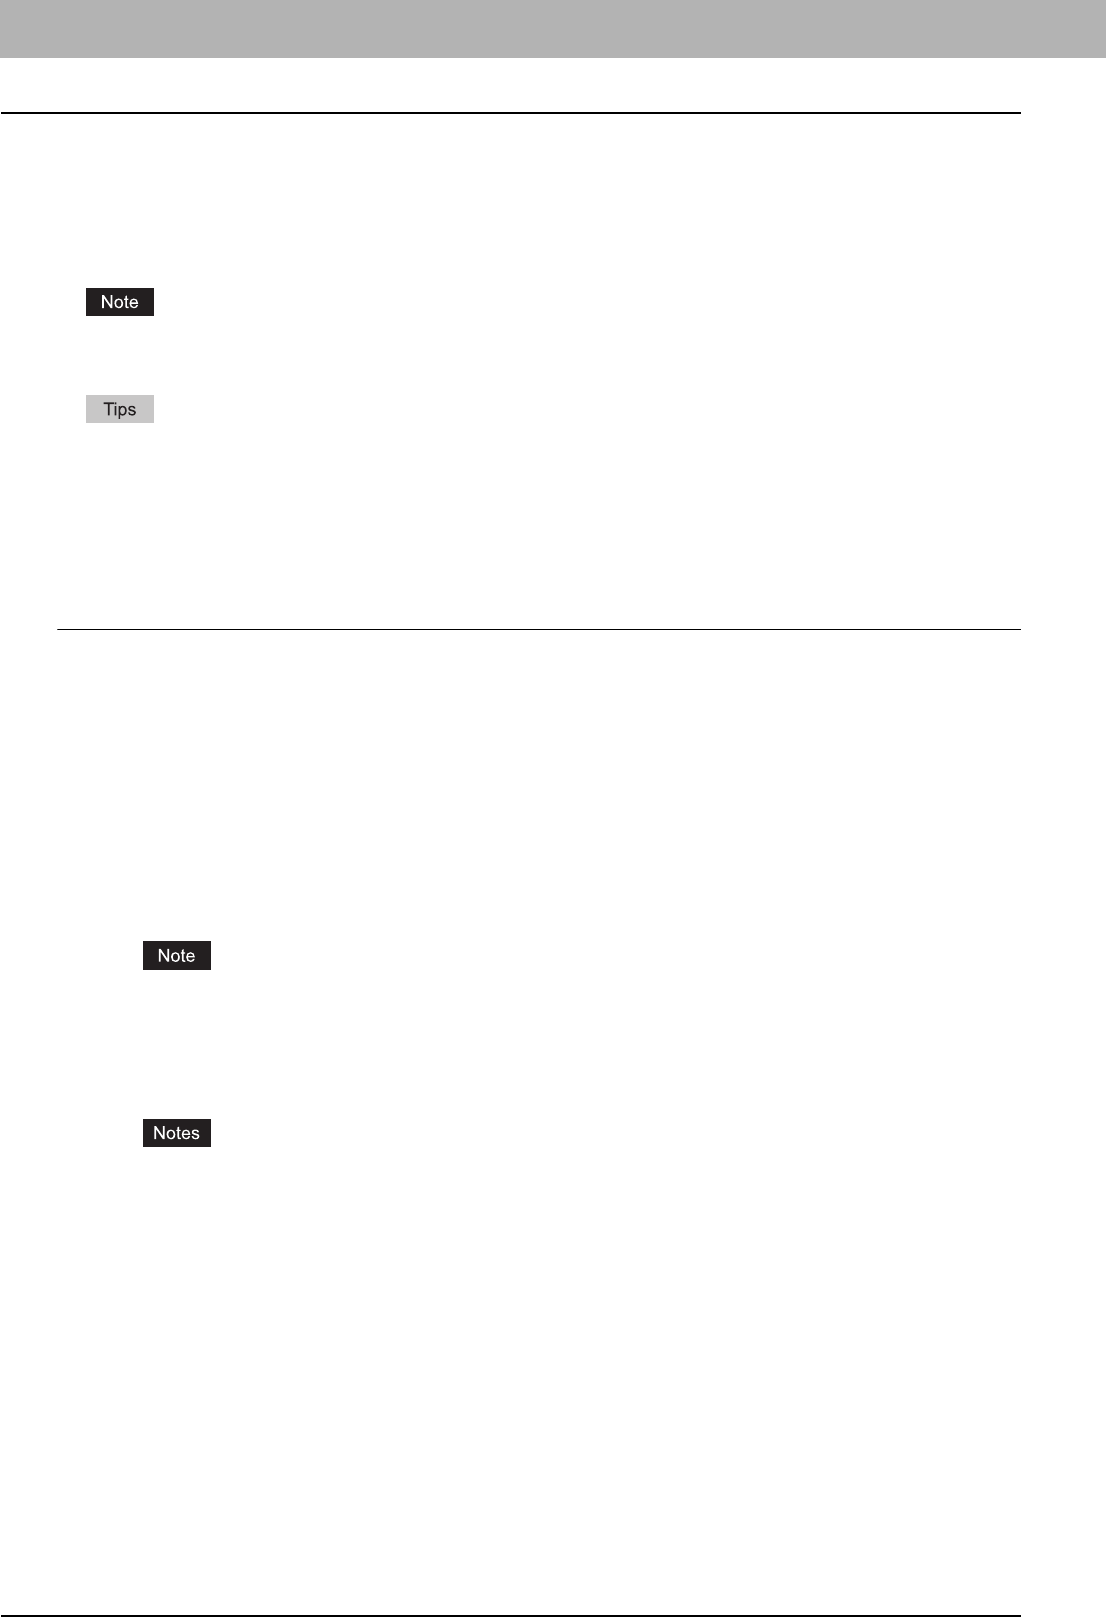
6 OTHER PRINTING METHODS
164 FTP Printing
FTP Printing
FTP printing is available when the FTP print service is enabled on this equipment.
You can print a document by sending the print file to this equipment using the FTP. This equipment can accept the
following files for printing:
yPCL file
yPS file
yTex t f i l e
When the User Management Setting is enabled on the equipment, the print jobs that are sent by FTP printing are
processed as invalid jobs according to the Department Code Enforcement setting.
yIn Windows, you can create the PCL file and PS file using the printer driver. To create the PCL file or PS file,
change the printer port of the printer driver to “FILE:” port and print a document using the printer driver. For more
information about printing to a file, refer to the Windows documentation.
yIn Macintosh, you can create the PS file using the printer driver. To create the PS file, select “File” at the
[Destination] box in the Print dialog box to print. For more information about printing to a file, refer to the Macintosh
documentation.
Printing a file using the FTP command
The procedure below describes the example of printing using the FTP command with the MS-DOS Prompt.
1
Launch the MS-DOS Prompt.
2
Change the current directory to that in which the print file is located.
3
Type following command and press the [Enter] key:
ftp <IP Address>
yIn the <IP Address> section, enter the IP address of this equipment.
4
If it prompts you to enter the user name, enter the FTP Print User Name and press the
[Enter] key.
It prompts you to enter the user name if the FTP Print User Name is assigned by an administrator. Ask your
administrator for the FTP Print User Name.
5
If it prompts you to enter the password, enter the FTP Print Password and press the
[Enter] key.
yIt prompts you to enter the password if the FTP Print User Name is assigned by an administrator. Ask your
administrator for the FTP Print Password.
yIf the FTP Print User Name has been assigned but the FTP Print Password is blank, do not enter when it
prompts you to enter the password and press the [Enter] key.
6
Type the following command and press the [Enter] key:
put <file name>
For example, if the print file name is “sample.ps”:
put sample.ps
7
The file is sent to this equipment and spooled in the queue.
6 OTHER PRINTING METHODS
Email Printing 165
Email Printing
Email printing is available when enabled on this equipment.
You can print a document by sending the print file, as an email attachment, to this equipment using the mail client
software. This equipment can accept only TIFF-FX(Profile S), TIFF-FX(Profile F) and TIFF-FX(Profile J) files for printing:
yWhen the User Management Setting is enabled on the equipment, the print jobs that are sent by Email printing are
processed as invalid jobs according to the Department Code Enforcement setting.
yThe Email print job is printed according to the RX Print settings, Discard Printing and RX Reduction Printing, that
can be set from the [RX PRINT] button in the [FAX] menu on the Control Panel.
When Discard Printing is ON, the part of the print image that exceeds the paper printing area is discarded if the
print image is up to 10 mm larger than the printing area. If the print image is 10 mm or more larger than the printing
area, the print image is printed on the largest paper.
When Discard Printing is OFF, the print image is printed on the largest paper if its length exceeds the paper printing
area.
When RX Reduction Printing is ON, it will be vertically reduced to fit on the paper if the print image is longer than
the paper. When the print image cannot fit in the paper even if the print image is reduced, the print image is printed
on the largest paper.
When RX Reduction Printing is OFF, the print image is printed on the largest paper if its length exceeds the paper
printing area.
Printing a file using the email client
The procedure below gives as example of printing using the Microsoft Outlook Express.
When you send an email message to this equipment to print a file, send the message in plain text format. If you send
an email message in the HTML format, this equipment prints the HTML source code of the message.
1
Open your email application and create new mail message.
2
Enter the email address of the equipment in the To: line.
3
Enter text in the Subject line or leave the Subject line blank.
4
Enter text in the body field.
5
Attach the file you want to print.
6
Send the email.
The header and body of the email will be printed only when the “Print Header” and “Print Message Body” for the
Email print service are enabled on this equipment.

7.APPENDIX
This chapter describe about the following contents.
Internal Fonts List ................................................................................................................ 168
Internal PCL Fonts List.......................................................................................................................................168
Internal PS Fonts List .........................................................................................................................................169
7 APPENDIX
168 Internal Fonts List
Internal Fonts List
Internal PCL Fonts List
0 Courier 40 Helvetica-BoldOblique
1 CG-Times 41 Helvetica-Narrow
2 CG-Times Bold 42 Helvetica-Narrow-Bold
3 CG-Times Italic 43 Helvetica-Narrow-Oblique
4 CG-Times Bold Italic 44 Helvetica-Narrow-BoldOblique
5 CG Omega 45 Palatino-Roman
6 CG Omega Bold 46 Palatino-Bold
7 CG Omega Italic 47 Palatino-Italic
8 CG Omega Bold Italic 48 Palatino-BoldItalic
9 Coronet 49 ITC AvantGarde-Book
10 Clarendon Condensed 50 ITC AvantGarde-BookOblique
11 Univers Medium 51 ITC AvantGarde-Demi
12 Univers Bold 52 ITC AvantGarde-DemiOblique
13 Univers Italic 53 ITC Bookman-Light
14 Univers Bold Italic 54 ITC Bookman-LightItalic
15 Univers Medium Condensed 55 ITC Bookman-Demi
16 Univers Condensed Bold 56 ITC Bookman-DemiItalic
17 Univers Medium Condensed Italic 57 NewCenturySchlbk-Roman
18 Univers Condensed Bold Italic 58 NewCenturySchlbk-Bold
19 Antique Olive 59 NewCenturySchlbk-Italic
20 Antique Olive Bold 60 NewCenturySchlbk-BoldItalic
21 Antique Olive Italic 61 Times-Roman
22 Garamond Antiqua 62 Times-Bold
23 Garamond Halbfett 63 Times-Italic
24 Garamond Kursiv 64 Times-BoldItalic
25 Garamond Kursiv Halbfett 65 ITCZapfChancery-MediumItalic
26 Mrigold 66 Symbol
27 Albertus Medium 67 Symbol PS
28 Albertus Extra Bold 68 Wingdings
29 Arial 69 ITCZapfDingbats
30 Arial Bold 70 Courier Bold
31 Arial Italic 71 Courier Italic
32 Arial Bold Italic 72 Courier Bold Italic
33 Times New Roman 73 Letter Gothic Regular
34 Times New Roman Bold 74 Letter Gothic Bold
35 Times New Roman Italic 75 Letter Gothic Italic
36 Times New Roman Bold Italic 76 CourierPS
37 Helvetica 77 CourierPS Oblique
38 Helvetica-Bold 78 CourierPS Bold
39 Helvetica-Oblique 79 CourierPS BoldOblique
7.APPENDIX
Internal Fonts List 169
7 APPENDIX
Internal PS Fonts List
AlbertusMT-Light Eurostile-ExtendedTwo
AlbertusMT Eurostile-BoldExtendedTwo
AlbertusMT-Italic Geneva
AntiqueOlive-Roman GillSans-Light
AntiqueOlive-Italic GillSans-LightItalic
AntiqueOlive-Bold GillSans
AntiqueOlive-Compact GillSans-Italic
Apple-Chancery GillSans-Bold
ArialMT GillSans-BoldItalic
Arial-ItalicMT GillSans-ExtraBold
Arial-BoldMT GillSans-BoldCondensed
Arial-BoldItalicMT GillSans-Condensed
AvantGarde-Book Goudy
AvantGarde-BookOblique Goudy-Italic
AvantGarde-Demi Goudy-Bold
AvantGarde-DemiOblique Goudy-BoldItalic
Bodoni Goudy-ExtraBold
Bodoni-Italic Helvetica
Bodoni-Bold Helvetica-Oblique
Bodoni-BoldItalic Helvetica-Bold
Bodoni-Poster Helvetica-BoldOblique
Bodoni-PosterCompressed Helvetica-Condensed
Bookman-Light Helvetica-Condensed-Oblique
Bookman-LightItalic Helvetica-Condensed-Bold
Bookman-Demi Helvetica-Condensed-BoldObl
Bookman-DemiItalic Helvetica-Narrow
Candid Helvetica-Narrow-Oblique
Chicago Helvetica-Narrow-Bold
Clarendon-Light Helvetica-Narrow-BoldOblique
Clarendon HoeflerText-Regular
Clarendon-Bold HoeflerText-Italic
CooperBlack HoeflerText-Black
CooperBlack-Italic HoeflerText-BlackItalic
Copperplate-ThirtyTwoBC HoeflerText-Ornaments
Copperplate-ThirtyThreeBC JoannaMT
Coronet-Regular JoannaMT-Italic
Courier JoannaMT-Bold
Courier-Oblique JoannaMT-BoldItalic
Courier-Bold LetterGothic
Courier-BoldOblique LetterGothic-Slanted
Eurostile LetterGothic-Bold
Eurostile-Bold LetterGothic-BoldSlanted
LubalinGraph-Book Univers-CondensedBold
LubalinGraph-BookOblique Univers-CondensedBoldOblique
LubalinGraph-Demi Univers-Extended
LubalinGraph-DemiOblique Univers-ExtendedObl
Marigold Univers-BoldExt
Monaco Univers-BoldExtObl
MonaLisa-Recut Wingdings-Regular
7 APPENDIX
170 Internal Fonts List
NewCenturySchlbk-Roman ZapfChancery-MediumItalic
NewCenturySchlbk-Italic ZapfDingbats
NewCenturySchlbk-Bold
NewCenturySchlbk-BoldItalic
NewYork
Optima
Optima-Italic
Optima-Bold
Optima-BoldItalic
Oxford
Palatino-Roman
Palatino-Italic
Palatino-Bold
Palatino-BoldItalic
StempelGaramond-Roman
StempelGaramond-Italic
StempelGaramond-Bold
StempelGaramond-BoldItalic
Symbol
Taff y
Times-Roman
Times-Italic
Times-Bold
Times-BoldItalic
TimesNewRomanPSMT
TimesNewRomanPS-ItalicMT
TimesNewRomanPS-BoldMT
TimesNewRomanPS-BoldItalicMT
Univers-Light
Univers-LightOblique
Univers
Univers-Oblique
Univers-Bold
Univers-BoldOblique
Univers-Condensed
Univers-CondensedOblique

INDEX 171
INDEX
Numerics
2-Sided Printing .................................................. 29, 68
A
A4 Tab ............................................................... 24, 81
Advanced ..................................................................44
All Colors ..................................................................42
All pages from .................................................. 99, 111
Angle ................................................................. 48, 77
Apply to ....................................................................41
Apply to device color only ...........................................44
B
Background Adjustment .............................43, 102, 116
Basic Tab .............................................. 21, 24, 40, 65
Billing Info .................................................................98
Binding ...................................................................109
Black Over Print ........................................41, 101, 114
Booklet .......................................................... 106, 112
Booklet Center Margin ..................................... 106, 112
Booklet Details ..........................................................32
Booklet Outer Margin ...................................... 106, 112
Booklet Paper Size ......................................... 106, 112
Border ............................................................. 94, 109
Brightness ................................................43, 102, 115
C
Caption .............................................................. 48, 77
Center Watermark ......................................................48
Checking Supplies ...................................................161
CMYK Source Profile .................................................44
Collated ........................................................... 93, 108
Color ................................................................. 26, 48
Color Balance ...........................................42, 102, 115
Color Balance Details .................................................42
Color Conversion .......................................................97
Color Settings ................................................. 100, 113
Color Type ..................................................... 101, 113
ColorMatching ...........................................................98
ColorSync .......................................................... 97, 98
Compress Bitmap ......................................................53
Configuration Settings ................................................10
Configuration Tab .........................................11, 22, 56
Considerations ................................................... 15, 86
Contrast ...................................................43, 102, 115
Copies ............................................................. 93, 108
Copies & Pages .......................................................108
Copy Handling ..............................................28, 67, 68
Cover Page ...................................................... 98, 106
Cover Page Type .......................................................98
Custom .....................................................................81
Custom Paper Size .......................................50, 52, 82
D
Default Menu Setting ..................................................49
Department ...............................................................50
Department Code (DC) ...............10, 13, 102, 119, 120
Destination ...............................................34, 103, 116
Destination Paper Size ........................................ 96, 97
Destination Profile ......................................................44
Detail ........................................................................42
Direction of print ................................................. 30, 72
Disconnecting USB Storage Device .................. 157, 158
Distinguish Thin Lines ...............................41, 101, 113
Do not Print Blank Pages ...........................50, 102, 119
Draw as Outline .................................................. 48, 77
Draw Borders Around Pages ................................ 30, 72
Drawer Settings ........................................................ 58
Drawers ............................................................. 11, 56
Duplicate ............................................................ 36, 75
E
Each Color ............................................................... 42
Effect Tab ....................................................21, 45, 76
Enable SNMP Communication ................................... 57
Encrypted PDF ....................................................... 154
Error Handling .................................................. 99, 110
Export ...................................................................... 51
F
Features .................................................................... 6
Filter .......................................................................... 7
Finisher .............................................................. 11, 56
Finishing ........................................................ 103, 116
Finishing Tab ...................................................... 21, 28
First page from ................................................. 99, 111
Font Name ......................................................... 48, 77
Font Size ........................................................... 48, 77
Fonts Tab ........................................................... 22, 54
Format ............................................................. 95, 110
Format for ................................................................ 88
Functions ................................................................... 6
H
Halftone ...................................................41, 101, 113
Help ......................................................................... 23
Hole Punch ..............................................31, 103, 116
Hole Punch Unit .................................................. 11, 56
How to Print .............................................................. 16
I
Image Attribute ................................................. 43, 102
Image Quality Tab ............................................... 21, 39
Image Quality Type ................................................... 39
Image Shift Width ..........................................26, 37, 81
Image Type .................................................... 101, 114
Import ...................................................................... 51
In page of the order ................................................... 70
In Printer .................................................................. 98
Initial Values ............................................................. 18
Insert Pages .................................................35, 36, 74
Interleave Pages ................................................. 36, 75
Internal Fonts ......................................................... 168
Invalid Jobs
deleting ............................................................... 153
displaying ............................................................ 151
printing ............................................................... 152
J
[JOB STATUS] ....................................................... 159
Jobs
Invalid ................................................................. 151
Normal Print ........................................................ 140
Private Print ........................................................ 147
Proof Print ........................................................... 144
Scheduled Print ................................................... 140
JPEG ..................................................................... 154
L
Layout ............................................................. 93, 108
Layout Direction ................................................ 94, 109
Left to Right Page Layout ................................. 106, 112

172 INDEX
Letter Tab .......................................................... 24, 81
Letterhead Print Mode ................................................50
Limitations .......................................................... 15, 86
Log .........................................................................159
lp command ............................................................124
lptap .......................................................................124
M
Manual Scale ..................................................... 25, 65
Margin ......................................................................33
Menu Tabs ................................................................21
Mirror ........................................................................47
Model Selection .................................................. 11, 56
N
Negative/Positive .......................................................47
Normal Print ..............................................................22
changing order .....................................................143
deleting ................................................................141
pausing ................................................................142
resuming ..............................................................142
Number of Copies ......................................................26
Number of pages per sheet .................................. 30, 72
Number of tabs per Bank ............................................37
O
Orientation ......................................................... 26, 88
Original Image Quality Type ........................................40
Original Paper Size .......................................24, 65, 81
Others Tab ......................................................... 22, 49
Output Document Layout ..................................... 32, 70
Output Format ...........................................................53
Output Options ................................................. 95, 110
Overlay Image .................................................... 46, 78
Override Application Paper Source Settings ........... 12, 58
P
Page Order ..................................................33, 96, 97
Page To Print ............................................................97
Pages .............................................................. 93, 108
Pages per Sheet ............................................... 94, 108
Paper Feed ...................................................... 99, 111
Paper Handling ..........................................................96
Paper Handling Tab ......................................21, 34, 74
Paper Size ................................................................88
Paper Source ............................................................25
Paper Type ...............................................................25
PCL Fonts ...............................................................168
PDF ........................................................................154
PostScript (PS) ........................................................154
PostScript Errors ............................................... 99, 110
PostScript Settings .....................................................50
PPD .................................................................... 7, 14
Preview window .........................................................23
Primary Tab Dialog ....................................................26
Print .........................................................................96
Print Cover Page .......................................................98
Print Document ..........................................................95
Print Error Information ................................................53
Print Job ...................................................................22
Print Mode ..................................................... 102, 119
Print on Both Sides ..................................................109
Print on First Page Only ....................................... 46, 76
Print Options .............................................................18
Print Over the Document ..................................... 46, 78
Print Paper Size ............................................24, 65, 81
Print to Overlay File ............................................. 22, 62
Printer Command Language (PCL) ........................... 154
printer description file ................................................ 14
Printer Drivers ............................................................ 7
Printer Features .............................................. 103, 112
Printer Name ............................................................ 21
Printing on paper larger than standard sizes ................ 82
Priority ..................................................................... 95
Private Print ........................................................ 22, 60
deleting ............................................................... 150
displaying ............................................................ 147
printing ............................................................... 149
PRN ...................................................................... 154
Profile ..........................................................19, 23, 98
Proof Print .......................................................... 22, 61
deleting ............................................................... 146
displaying ............................................................ 144
printing ............................................................... 145
PS ......................................................................... 154
PS Fonts ................................................................ 169
Pure Black ................................................................ 41
Pure Black and Gray ....................................... 101, 114
Pure Gray ................................................................ 41
Q
Quartz Filter ............................................................. 97
R
Remaining from ................................................ 99, 111
Rendering Intent ....................................................... 44
Resolution ................................................................ 41
Restore All Defaults ................................................... 51
Restore Defaults ....................... 23, 41, 42, 43, 44, 57
Reverse page order ................................................... 96
Reverse Page Orientation .......................................... 94
RGB Source Profile ................................................... 44
Rotate 180 degrees ................................................... 46
S
Saturation ................................................43, 102, 115
Save as File ..................................................... 95, 110
Save Current Settings As ........................................... 40
Scale ....................................................................... 88
Scheduled Print .................................................. 22, 59
changing order ..................................................... 143
deleting ............................................................... 141
pausing ............................................................... 142
resuming ............................................................. 142
Scheduler ................................................................. 95
Sharpness ...................................................... 102, 115
Solid .................................................................. 48, 77
Staple ...................................................................... 30
Staple Down the Center ....................................... 33, 71
Status
drawer ................................................................ 161
Job ..................................................................... 140
log ...................................................................... 159
toner ................................................................... 161
Store to e-Filing ............................................22, 63, 64
Style ........................................................................ 48
Substitution Table Edit ............................................... 55
Summary ............................................................... 107
T
Tab Extension ..............................................26, 37, 81
Tab Manufacturer ..........................................26, 37, 81

INDEX 173
Toner Save ..............................................49, 101, 119
TopAccess Link .........................................................50
Transparency ..................................................... 48, 77
Tray Switching .................................................. 99, 110
TrueType Options ......................................................55
Two Sided Printing .....................................................94
Two-Sided .................................................................93
U
Units ..................................................... 27, 33, 37, 48
Update Automatically .................................................57
Update Now ..............................................................57
USB Direct Printing ..................................................154
USB media ..............................................................154
USB strage device ...................................................154
Use Back Cover ..........................................35, 74, 107
Use Black for All Texts ...............................................41
Use Custom Margin ...................................................32
Use Front Cover .........................................34, 74, 106
Use PostScript Passthrough ........................................53
Use Sharpness Filter ..................................................43
Use Tab Paper ..........................................................37
V
Version Information ............................................. 51, 57
W
Watermark ...................................................45, 48, 76
X
X Position .................................................................48
XML Paper Specification (XPS) .................................154
Y
Y Position .................................................................48

174 INDEX
FC-2330C/2820C/2830C/3520C/3530C/4520C
OME08004600
2-17-2, HIGASHIGOTANDA, SHINAGAWA-KU, TOKYO, 141-8664, JAPAN
MULTIFUNCTIONAL DIGITAL COLOR SYSTEMS
Printing Guide
©2008 TOSHIBA TEC CORPORATION All rights reserved
R071220F2900-TTEC
2008-03
