Toshiba Rice Cooker Rc 10Nmf Instruction Manual
2014-12-13
: Toshiba Toshiba-Rice-Cooker-Rc-10Nmf-Instruction-Manual-131568 toshiba-rice-cooker-rc-10nmf-instruction-manual-131568 toshiba pdf
Open the PDF directly: View PDF ![]() .
.
Page Count: 12

TOSHIBA
....
,r.
Toshiba Electric
Rice Cooker/Warmer
(For household use)
Instruction Manual
Model
RC-10NMF
RC-18NMF
RC-10NMFI
RC-18NMFI
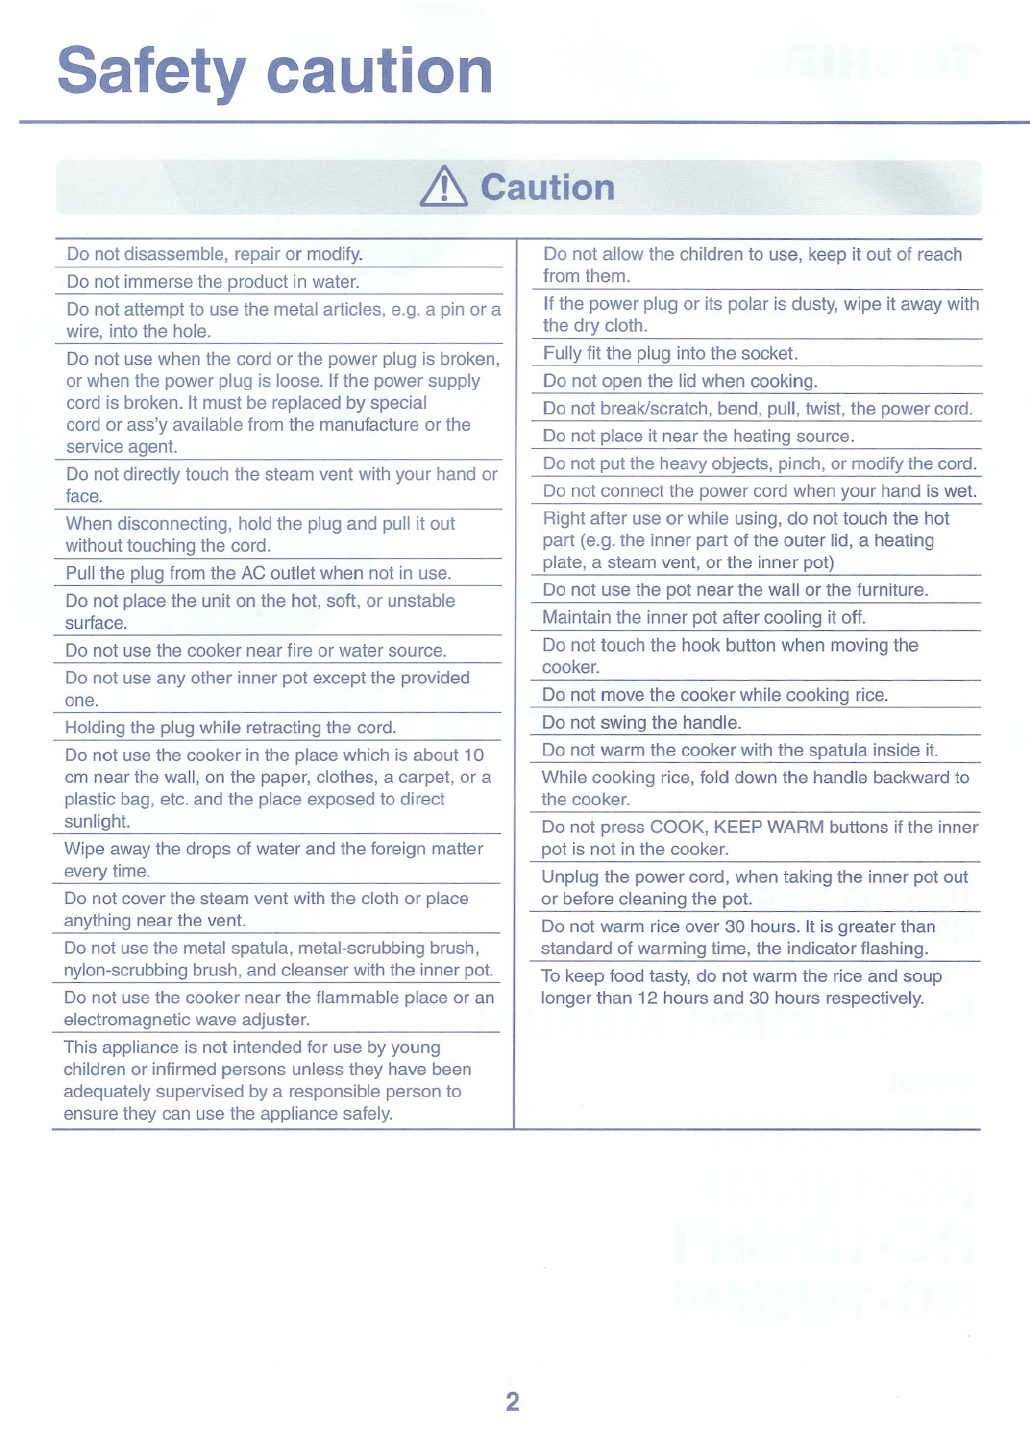
Safety caution
&Caution
Do not disassemble, repair or modify.
Do not immerse the product in water.
Do not attempt to use the metal articles, e.g. a pin or a
wire, into the hole.
Do not use when the cord or the power plug is broken,
or when the power plug is loose. If the power supply
cord is broken. It must be replaced by special
cord or ass'y available from the manufacture or the
service agent.
Do not directly touch the steam vent with your hand or
face.
When disconnecting, hold the plug and pull it out
without touching the cord.
Pull the plug from the AC outlet when not in use.
Do not place the unit on the hot, soft, or unstable
surface.
Do not use the cooker near fire or water source.
Do not use any other inner pot except the provided
one.
Holding the plug while retracting the cord.
Do not use the cooker in the place which is about 10
cm near the wall, on the paper, clothes, a carpet, or a
plastic bag, etc. and the place exposed to direct
sunlight.
Wipe away the drops of water and the foreign matter
every time.
Do not cover the steam vent with the cloth or place
anything near the vent.
Do not use the metal spatula, metal-scrubbing brush,
nylon-scrubbing brush, and cleanser with the inner pot.
Do not use the cooker near the flammable place or an
electromagnetic wave adjuster.
This appliance is not intended for use by young
children or infirmed persons unless they have been
adequately supervised by a responsible person to
ensure they can use the appliance safely.
Do not allow the children to use, keep it out of reach
from them.
If the power plug or its polar is dusty, wipe it away with
the dry cloth.
Fully fit the plug into the socket.
Do not open the lid when cooking.
Do not break/scratch, bend, pull, twist, the power cord.
Do not place it near the heating source.
Do not put the heavy objects, pinch, or modify the cord.
Do not connect the power cord when your hand is wet.
Right after use or while using, do not touch the hot
part (e.g. the inner part of the outer lid, a heating
plate, a steam vent, or the inner pot)
Do not use the pot near the wall or the furniture.
Maintain the inner pot after cooling it off.
Do not touch the hook button when moving the
cooker.
Do not move the cooker while cooking rice.
Do not swing the handle.
Do not warm the cooker with the spatula inside it.
While cooking rice, fold down the handle backward to
the cooker.
Do not press COOK, KEEP WARM buttons if the inner
pot is not in the cooker.
Unplug the power cord, when taking the inner pot out
or before cleaning the pot.
Do not warm rice over 30 hours. It is greater than
standard of warming time, the indicator flashing.
To keep food tasty, do not warm the rice and soup
longer than 12 hours and 30 hours respectively.
2
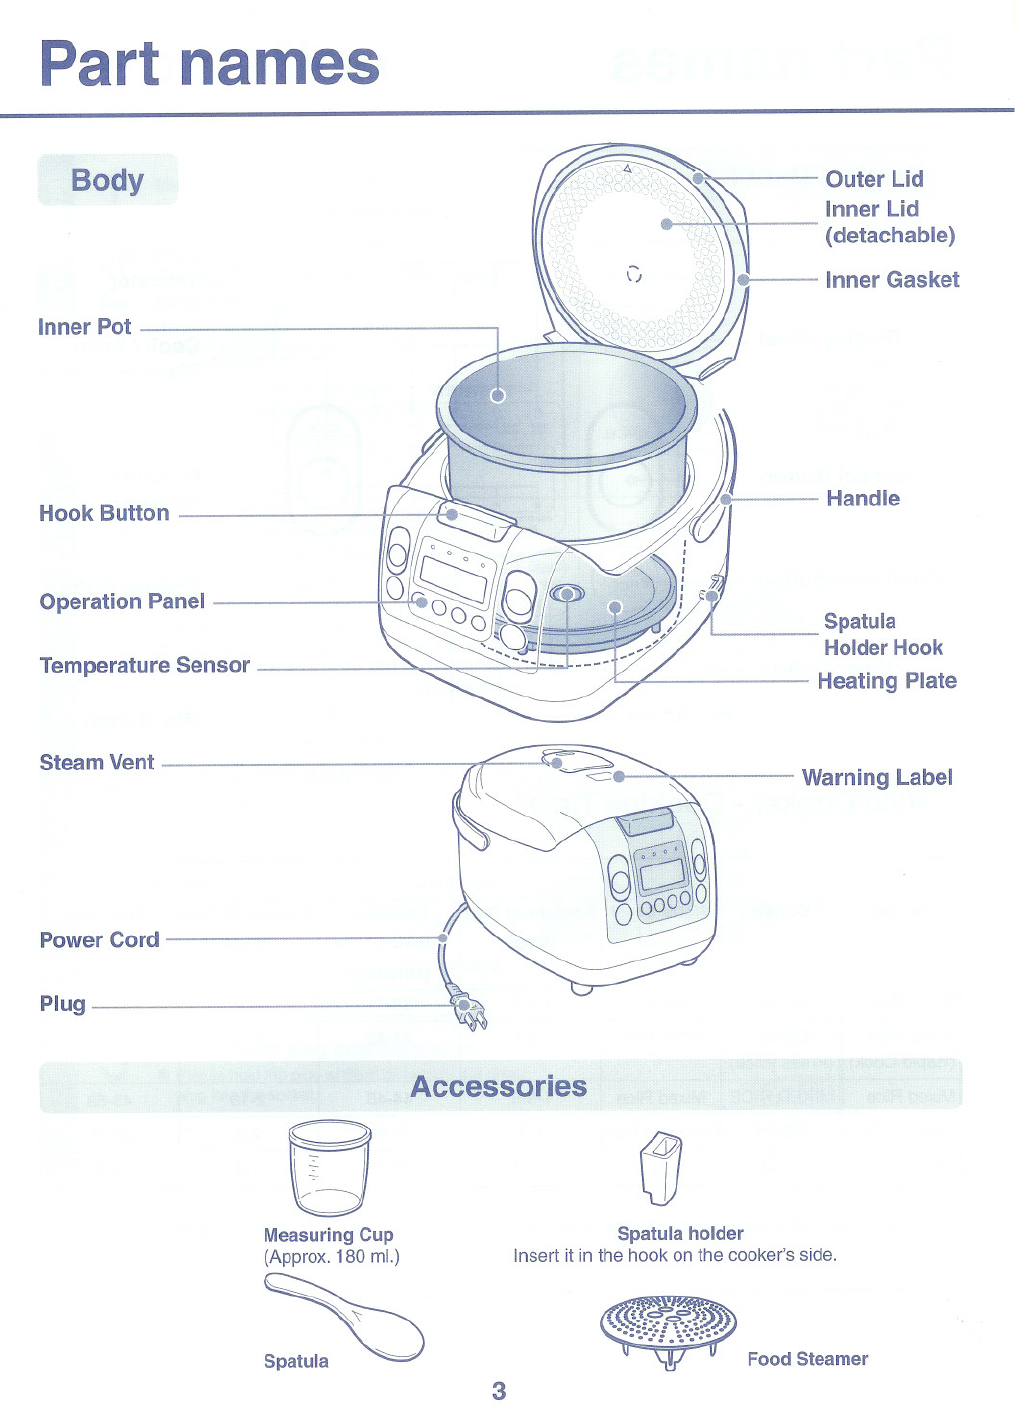
Part names
Body
InnerPot
Hook Button
Operation Panel
Temperature Sensor
Steam Vent
Power Cord
Plug
Accessories
Outer Lid
Inner Lid
(detachable)
Inner Gasket
Handle
Spatula
HolderHook
Heating Plate
Warning Label
Spatula holder
Insert it in the hook on the cooker's side.
Measuring Cup
(Approx.180 ml.)
~.
i"" 0"1
~: z<:Jf.....
.......
. : .~..... Food Steamer
3

Part names
Control Panel
Function
Indicator
Display Panel Cook IKeep
Warm Button
Timer Button
Function
Indicator
Cancel Button
MixedRice Button Congee Button
Menu Button
Hr.Button Min. Button
Rice Cooker - Cooking Time
4
Type 1.0 L Type 1.8 L
Cooking Button Water level Amount of Rice Standard Amount of Rice Standard
Scale (Cup) Cooking Time (Cup) Cooking Time
(Minutes) (Minutes)
White Rice COOK White Rice 1-5.5 38-51 2-10 42-54
White Rice COOK White Rice 1-5.5 34-43 2-10 38-46
(Rapid Cook) (Press twice)
Mixed Rice MIXED RICE Mixed Rice 1-5.5 44-48 2-10 45-58
Glutinous Rice COOK Glutinous Rice 1-3 37-46 2-6 39-46
Congee CONGEE Congee 0.5-1 76-80 1-3 78-83

Preparation
1
:r.1 I
DMeasure the rice with the measuring cup provided.
. Aflat-filledcupofriceisapprox.180ml.
2Quickly rinse the rice until the water
becomes clear.
CDFirstly, fill enough water and mix the rice and
water and rinse the rice, then pour out the water
immediately.
@ Scrub and rinse the rice repeatedly with water until
the water becomes reasonably clear.
. The rice can be rinsed in the inner pot.
3Fill in or pour out water according to the
water level scale of the cooking means
you want.
. Please level the surface of the rice and fill in or pour
out water on a flat surface.
. Fill in or pour out water according to the cooking
means and the cups of the rice. And adjust the
amount of water according to the type of the rice
and your personal taste.
. Example: Cooking 3 cups of rice.
4Place the inner pot inside the body and close the outer lid.
. Please wipe away the water drops and dirt
on the outer of the inner pot, the temperature
sensor, the cooking heating plate and the
inner lid.
. In order to make the inner pot close contact
the cooking heating plate, please turn the
inner pot twice or three times in the directions
as shown by the arrows.
. Make sure that the steam vent works properly.
5Fit the power plug into the socket.
. Please hold the plug while fit or remove the power
plug into the socket.
6Make sure that the time on the display window was set precisely with the present
time.
5

How to adjust the clock
Example: To adjust the current time to 8:31 a.m.
t1
r: ,
. I"".JI1Hold down the Hrs button for more than
1 second.
3
1
22
The clock display flashes.
2Press the Hrs button to adjust the Hour
readings and press the Minbutton to adjust
the Minute readings.
.For Min button, if the button is held down and
not released the setting pace will be 10 minutes.
The clock display flashes.
3Press the CANCEL button.
Clock adjustment is complete and the time counts.
The clock display unflashes.
"., I
- -
L'.-' I
NOTE
.The lithium battery installed inside the cooker will last for 4-5 years at the room temperature of 20°C with the
power plug connected. With the lithium battery, the current time can still display and the set time is still stored
in the memory even though the power plug is disconnected. If the display lights off or 0:00 flashes on the
display, it means that the battery expired.
Even if the current time and the set time disappear, the cooker can cook rice as usual.
(Pressing CANCEL button will stop the flashing of 0:00.)
Never drop the lithium battery into water or charge, disassemble or heat it.
. The clock cannot be set during COOK, WARM and TIMER mode.
.The clock cannot be set if the power plugs (at the power supply side and the body side) are not fully inserted.
. While the clock display is flashing, the clock will not go ahead.
.Time display is 24 Hrs.
.In the operation of the Hrs button, at 0:00 the sound "beep luo luo" will be heard and at 12:00 the sound
"beep luo luo" will be heard twice. In the operation of the Min button, the sound "beep luo luo" will be heard
at 00 minute and the long "bee pee" sound will be heard at 10, 20, 30, 40 and 50 minutes.
6

How to preset time
2
1
Example: To set the timer for cook white rice in 7:30 a.m.
I
.
:r.~ I
1Press the TIMERbutton.
TOSHIBA
~ooeo
-- _00<:0:'-- -
CANCEL - iIftMI
oI'7:3lJ I3
2
The TIMER indicator flashing. The last preset timer
flashing.
,-.""
-
L'.LILI
2Press the Hrs button and Min
button to adjust the preset time.
.If the preset time is the same as
the last one, this step can be
omitted.
. Time display is 24 Hrs.
. Minutebutton willbe added
every 10 minutes.
The TIMER indicator flashing. The preset time in setting.
~ ;
....
TIfv1~R ". '"
-
I._'LI
3Press the COOKbutton.
. Forcookingas cookingmenu
selected.
.During preset time, hold down
the Hrs button to display the
current time.
The timer is set up successfully.
The preset time for this time.
The COOK indicator lights up.
The TIMER indicator lights up.
o .
COOK TIMER ". '"
-
I._'LI
Warming
The "Beep" sounds for 5 times
The KEEP WARM indicator
lights up.
The time that has elapsed
forwarming.
(h: hour)
.
KEEP WARM
7

How to cook (WhiteRice,MixedRice,QuickCookandCongee)
NOTE
. For rapid cook only.
.Rapid cook refers to the cooking method that first shortens the cooking time. Generally, the rice cooked by this
method tastes firmer and has a little water on its surface.
.Use this method when the amount of rice is less than 4 cups for Type 1.0L and 6 cups for Type 1.8L.
Press the COOK button once. The COOK indicator lights up. V Current time
I
.For rapid cook, please press this
button twice.
.In rapid cook, the rapid Indicator will light up. o
COOK .', ,-,
-
'-,.I-f I-f
cooking
.. The COOK indicator is flashing. TThe time (in minutes)
remains for cooking.
.In rapid cook, the rapid Indicator will flash.
. In rapid cook, the time will show 8 minutes ahead.
Steaming
After "Beep" sounds for 5 times
-.. The KEEP WARM indicator
will light up.
"Y The time that has elapsed
for warming.
(h: hour)
.
KEEP WARM
Warming
8

How toe 00 k(Fermentation, Baking/Soup, Boiling Egg and Warming Soup)
Example: Ferment cooking
r 1
Select (Fermentation) press button 8
[- 50]
1~11
FERMENTATION BAKING1
SOUP BOILING
EGG WARMING
SOUP
~)
. SelectcookingmenubyMENUbutton.
.COOK indicator will flashing.
.DuringpressbuttonMENU,screen
displays menu ( -) running change
willoccur.
2Set time cooking by press button 8
[- 60]
.If the Min button is held down and not
released the time setting will be added
10 minutes.
FERMENTATION BAKING1
SOUP BOILfjG
EGG WARMING
SOUP
.The COOK indicator light up.
. Theremainingtimeforcookingshow
59 minutes.
(( ) )
(Sample time setting 60 minutes)
3Start (Cooking) press button [_::...]
Screen displays cooking
ill
FERMENTATION BAKING1
SOUP
BOILING
EGG WARMING
SOUP
~)
;IWhen cooking is finished, it sounds (Beep) for 5 times.
.The machine will be cut off automatically.
.
I
9
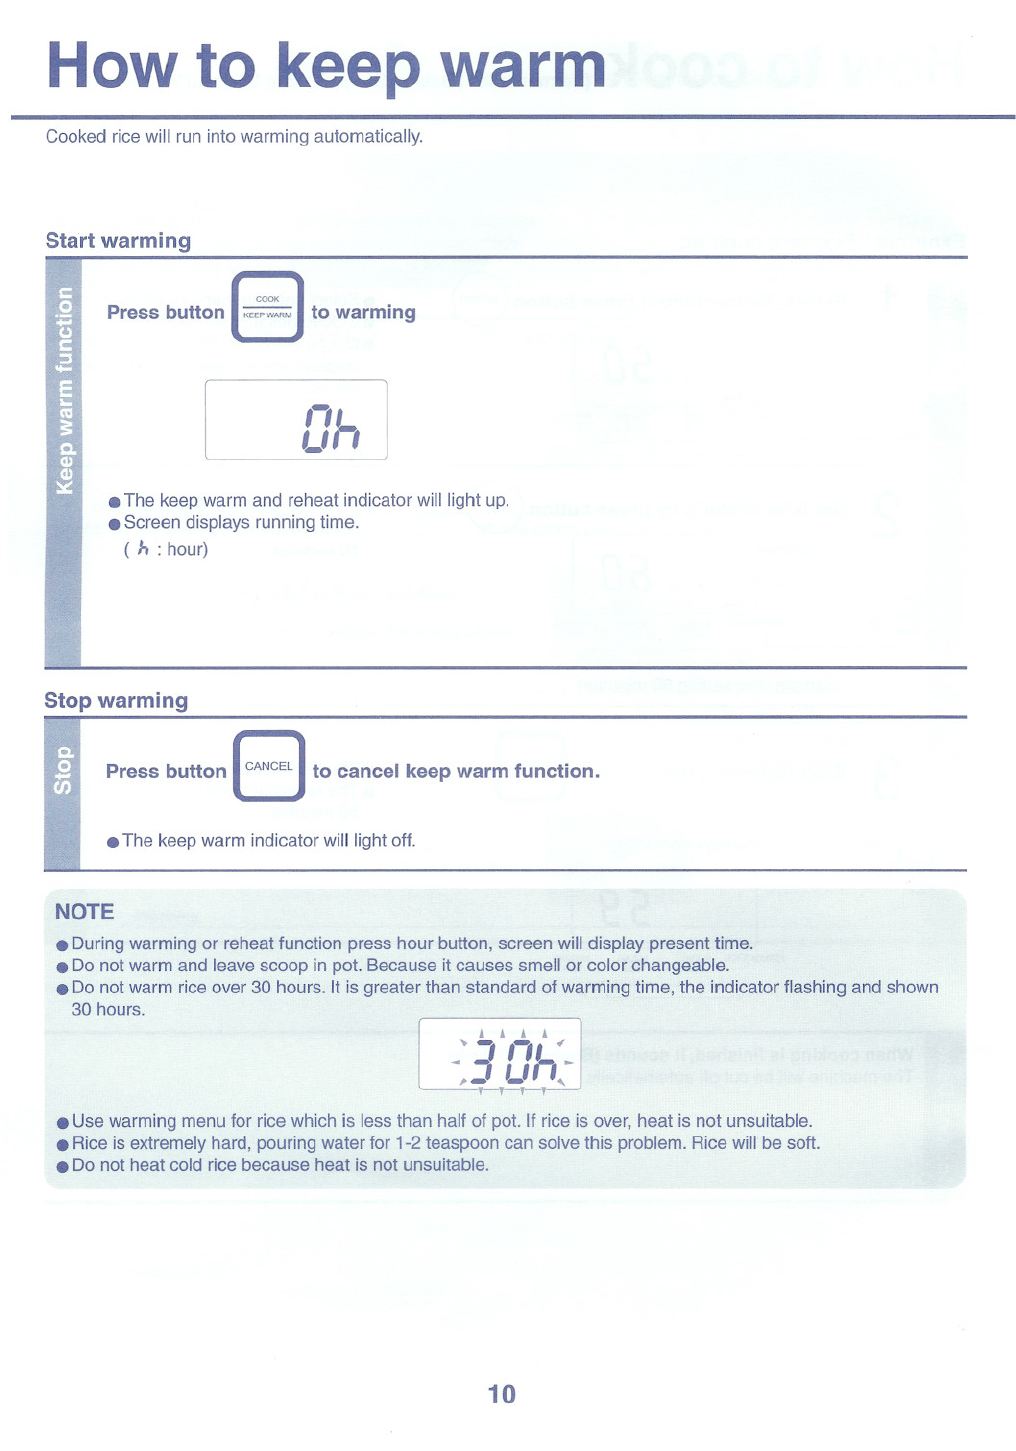
How to keep warm
Cooked rice will run into warming automatically.
Start warming
Press bunon (-'::..Jto warming
I
&
.The keep warm and reheat indicator will light up.
.Screen displays running time.
( h : hour)
Stop warming
I
Press buUon (~'a )tocancel-P warmfunction.
.The keep warm indicator will light off.
NOTE
.During warming or reheat function press hour button, screen will display present time.
. Do not warm and leave scoop in pot. Because it causes smell or color changeable.
.Do not warm rice over 30 hours. It is greater than standard of warming time, the indicator flashing and shown
30 hours.
.Use warming menu for rice which is less than half of pot. If rice is over, heat is not unsuitable.
. Rice is extremely hard, pouring water for 1-2 teaspoon can solve this problem. Rice will be soft.
.Do not heat cold rice because heat is not unsuitable.
10

Maintenance and Specification
Maintenance
Howto detach
1Holdthe holders at the bottom~. .'. '"'
edges of the inner gasket and
'.
'.
.
..
.
'
.
.Holders
pull it towards you. 'c-,,' .
. Donotdetachtheinner =
gasket ifit is not necessary '.
because itmaybe loose. "
How to reassemble
1Fit the upper part of the
inner gasket to the slot on
the outer lid.
. Hold the holders and
liftthe inner gasket up
following the direction
of the'" mark fit it to
reassemble.
. Reassemble only when the
inner gasket is completely dry.
2Push the holders to the
outer lid firmly.
. Ensure the innergasket
fit firmly to the outer lid.
If it does not, the outer
lid cannot be closed.
Outer
lidslot
Upper
parto!
inner
gasket
~.
.
.
'
.
'
.
~
"
,.
," 'i
'. ~.
:;io!
~~
. Please clean the inner gasket after cooking the rice.
. Do not bend or twist the inner gasket It may not fit to the
outer lid or the steam may leak out.
How to detach
1Turnthe steam vent cap
following the arrow
direction.
. Openthe cap by turning
it upwards.
How to reassemble
2Close the cap by aligning
the mark with the groove,
then turn the cap following
the arrow direction.
. Turnthecapuntilthe
clicking sound is heard.
Specifications
Steam {#f~
w.:~~1
Q) Mark
Steam ~
vent cap ~ )12>
Groove
After cooking rice
Clean them with a sponge and
mild dish detergent.
Clean it with a sponge and
mild dish detergent.
. Clean the inner gasket as well.
Washthe steam vent thor-
ou hi .
(Wipe away the dirt and stain
with a damD cloth.
When dirty
Wipe away the dirt and stain
withadamp cloth.
. Donotwashthe potbody
thoroughly.
. Donotwet
. Donotwetthecontrolpanel
and the outer lid.
. Donotpourthewaterdirectly
to thepot.
If there is some grains stuck
on the heating plate firmly,rub
it off with fine sandpaper
(No.600).
Remove some grains of rice
with a cotton bud.
Remove some dirt with a cotton
bud.
Caution: To prevent damage to the appliance
do not use alkaline cleaning agents
when cleaning, use a soft cloth and
mild detergent
* For the power supply 220V a.c. 50Hz
11
Model Power Supply Power Consumption (W) Dimension (Cm) Weight
Cooking time Width Depth Height (Kg)
RC-10 600,560. 25.5 32.8 21.5 3.7
220 - 240 V a.c. 50-60 Hz
RC-18 780,680. 28.0 35.2 24.9 4.5

TOSHIBA .
NRNL 10000000013
