Toshiba Tec Ma 600 1 Users Manual Owner's (EO1 11155A) (ma600om) December 2006
Toshiba Cash Register Electronic Cash Register MA-600_Owners_Manual
2014-12-13
: Toshiba Toshiba-Tec-Ma-600-1-Users-Manual-128146 toshiba-tec-ma-600-1-users-manual-128146 toshiba pdf
Open the PDF directly: View PDF ![]() .
.
Page Count: 188 [warning: Documents this large are best viewed by clicking the View PDF Link!]
- MA-600-1 Owner's Manual
- Table of Contents
- Safety Summary
- OPERATOR’S GUIDE
- TO OUR CUSTOMERS
- ACCESSORIES
- APPEARANCE AND NOMENCLATURE
- MODE LOCK AND MODE SELECTOR KEYS
- DISPLAY
- OUTLINE OF PREPARATION PROCEDURE BEFORE
- KEYBOARD LAYOUT
- FUNCTIONS OF EACH KEY
- CASHIER SIGNING OR CASHIER KEY OPERATIONS
- DAILY OPERATION FLOW
- REGISTERING PROCEDURE AND PRINT FORMAT
- No-Sale
- Receipt-Issue/Non-Issue Selection
- Receipt Post-Issue
- Department Entry
- PLU Entry
- Quantity Extension (Multiplication ) for DEPTS/PLUs
- Repeat Entry
- Single-Item Department or Single-Item PLU Entry
- HASH Department Entry, HASH PLU Entry
- Split Package Pricing
- Item Correct
- Void
- All Void
- Returned Merchandise
- Subtotal (Sale Total Pre-taxed) Read
- Finalizing a Sale
- Multi-Tendering
- Split Tendering
- Sale Paid in Foreign Currencies
- Food Stampable Total Read, Food Stamp Tendering
- Tax Calculation and Print
- Taxable Total (Sale Total With Taxes) Read
- Tax Exemption
- Tax Status or Food Stamp Status Modification
- Manual Tax Entry
- Received-on-Account
- Paid-Out
- Dollar Discount
- Percent Discount, Percent Charge
- Store Coupon
- Vendor Coupon
- Listing Capacity Open
- Non-Add Number Print
- Check Cashing (No-sale cashing of a non-cash media)
- No-Sale Exchange from Foreign Currency to Domestic Currency
- No-Sale Exchange from Domestic Currency to Foreign Currency
- PLU Price Shift Entry ([PRICE SHIFT 1] to [PRICE SHIFT 3] Keys)
- PLU Price Shift Entry ([1st PRICE], [2nd PRICE], [3rd PRICE] Keys)
- Charge Posting: Previous Balance Manual Entry Type
- Consignment Print
- Validation Print
- Sale Finalization by Electronic Fund Transfer (EFT)
- Remote Slip Printer (hardware option) Operation
- When a Power Failure Occurs...
- JOURNAL AND RECEIPT PAPER-END DETECTOR
- PRINTER HEAD OPEN DETECTOR
- REMOTE SLIP PRINTER MOTOR LOCK DETECTOR
- GENERAL MAINTENANCE
- SPECIFICATIONS
- MANAGER’S GUIDE
- OPERATIONS IN “MGR” MODE
- OPERATIONS IN “ - ” MODE
- READ (X) AND RESET (Z) REPORTS
- PROGRAMMING OPERATIONS
- Instructions for Programming
- Character Entries
- Time Setting or Adjustment
- Date Setting or Adjustment
- Store Name Message Programming
- Commercial Message Programming
- Footer Message Programming
- Cashier Name and Status Programming
- Department Table Programming
- Department Name Programming
- Department Group Name Programming
- PLU Table Programming
- PLU Name Programming
- Department Preset Price Setting or Changing
- PLU Preset Price Setting or Changing
- Tax Table Programming
- %+ and %- Preset Rate Setting
- Foreign Currency Exchange Rate Setting
- VERIFICATION OF PROGRAMMED DATA

TEC Electronic Cash Register
MA-600-1 SERIES
Owner's Manual
Copyright © 2006
by TOSHIBA TEC CORPORATION
All Rights Reserved
570 Ohito, Izunokuni-shi, Shizuoka-ken, JAPAN
FCC Notice
This equipment has been tested and found to comply with the limits for a Class B digital device,
pursuant to Part 15 of the FCC Rules. These limits are designed to provide reasonable protection
against harmful interference in a residential installation.
This equipment generates, uses, and can radiate radio frequency energy and, if not installed and
used in accordance with the instructions, may cause harmful interference to radio communications.
However, there is no guarantee that interference will not occur in a particular installation. If this
equipment does cause harmful interference to radio or television reception, which can be determined
by turning the equipment off and on, the user is encouraged to try to correct the interference by one
or more of the following measures:
- Reorient or relocate the receiving antenna.
- Increase the separation between the equipment and receiver.
- Connect the equipment into an outlet on a circuit different from that to which the receiver is
connected.
Changes or modifications not expressly approved by manufacturer for compliance could void the
user’s authority to operate the equipment.
This Class B digital apparatus complies with Canadian ICES-003.
Cet appareil numérique de la classe B est conforme à la norme NMB-003 du Canada.
Caution:
The socket-outlet shall be installed near the equipment and shall be easily accessible.
Attention:
Le socle de prise de courant doit être installé à proximité du matériel et doit être aisément accessible.
CAUTION!
1. This manual may not be copied in whole or in part without prior written permission of TOSHIBA
TEC.
2. The contents of this manual may be changed without notification.
3. Please refer to your local Authorized Service representative with regard to any queries you may
have in this manual.
Safety Summary EO1-11155
(i)
Safety Summary
Personal safety in handling or maintaining the equipment is extremely important. Warnings and Cautions
necessary for safe handling are included in this manual. All warnings and cautions contained in this manual
should be read and understood before handling or maintaining the equipment.
Do not attempt to effect repairs or modifications to this equipment. If a fault occurs that cannot be rectified
using the procedures described in this manual, turn off the power, unplug the machine, then contact your
authorized TOSHIBA TEC representative for assistance.
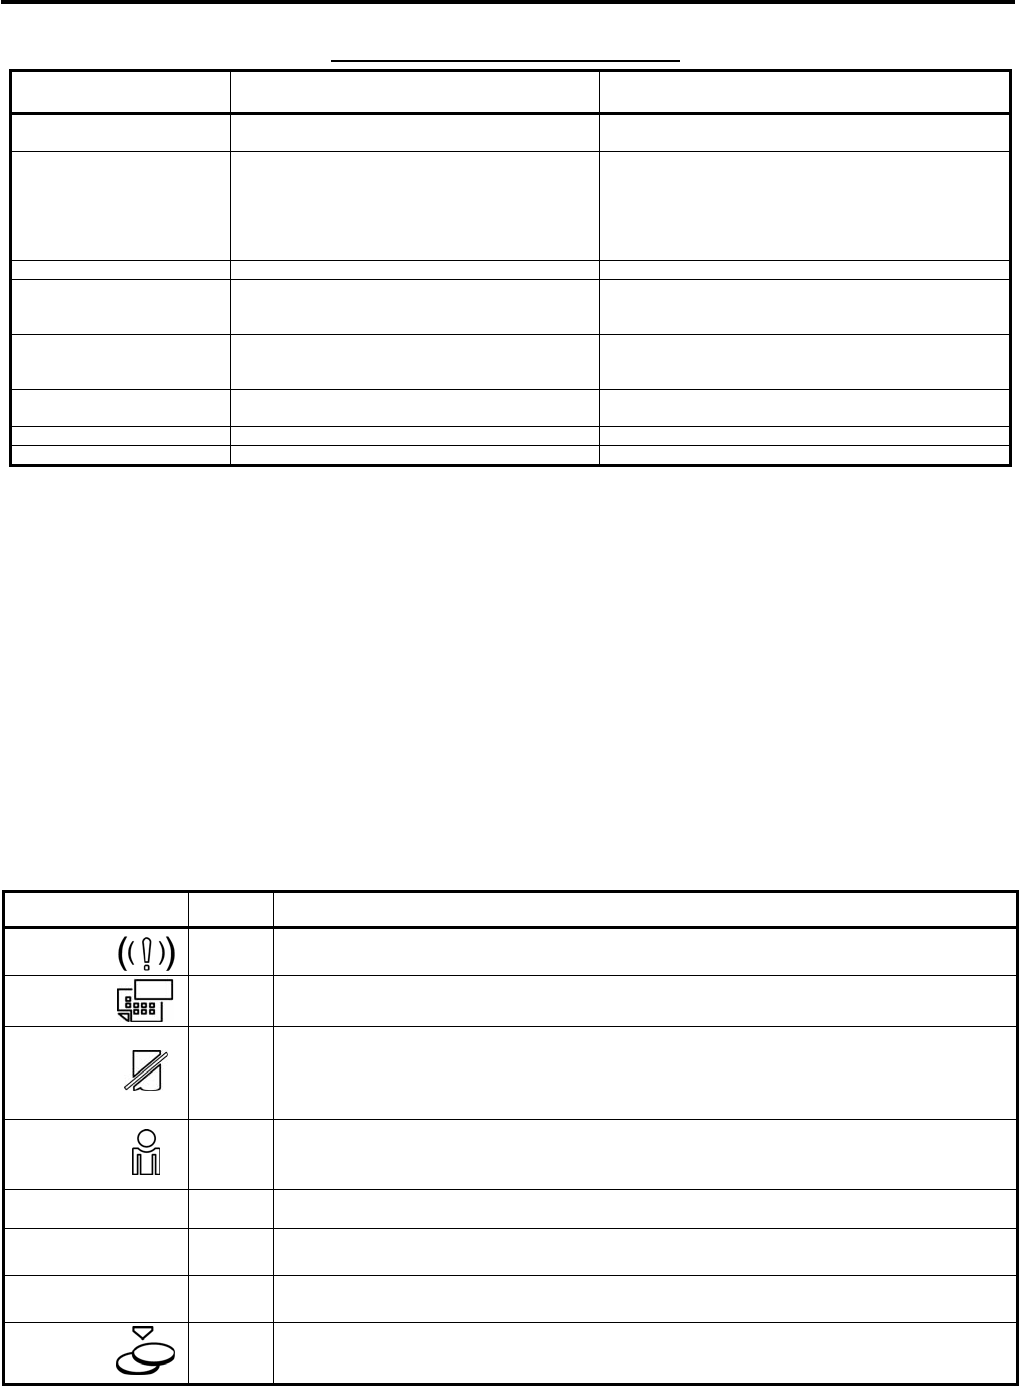
Meanings of Each Symbol
This symbol indicates warning items (including cautions).
Specific warning contents are drawn inside the symbol.
(The symbol on the left indicates a general caution.)
This symbol indicates prohibited actions (prohibited items).
Specific prohibited contents are drawn inside or near the symbol.
(The symbol on the left indicates “no disassembling”.)
This symbol indicates actions which must be performed.
Specific instructions are drawn inside or near the ● symbol.
(The symbol on the left indicates “disconnect the power cord plug from the outlet”.)
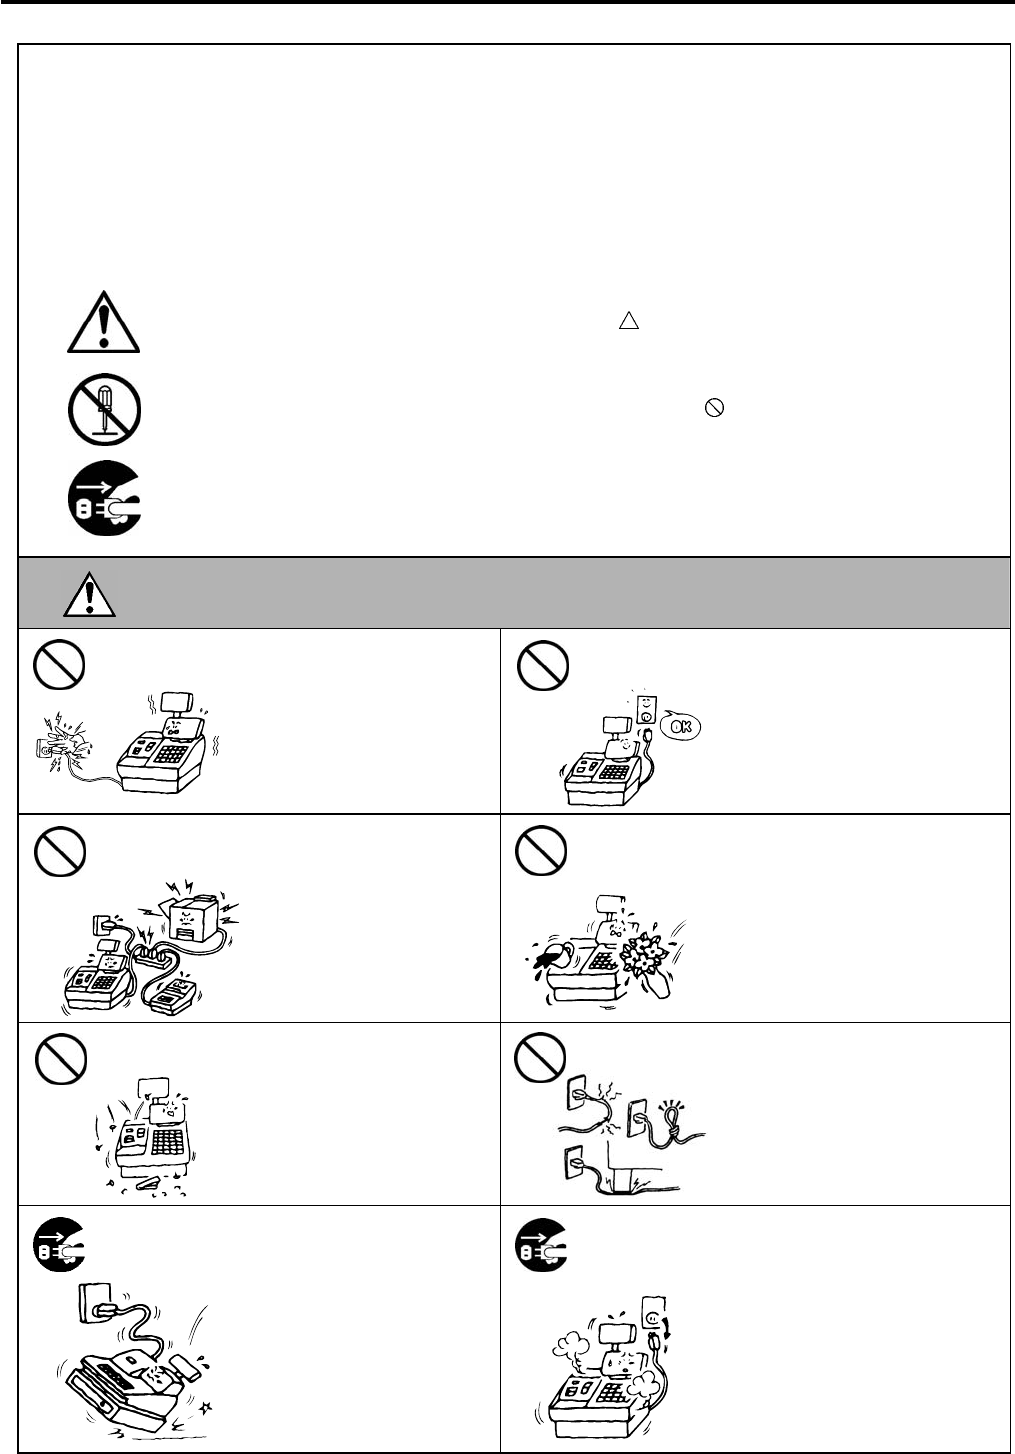
This indicates that there is the risk of death or serious injury if the
machines are improperly handled contrary to this indication.
Do not plug in or unplug the
power cord plug with wet
hands as this may cause
electric shock.
Do not use voltages other than the
voltage (AC) specified on the
rating plate, as this may cause fire
or electric shock.
If the machines share the same
outlet with any other electrical
appliances that consume large
amounts of power, the voltage
will fluctuate widely each time
these appliances operate. Be
sure to provide an exclusive
outlet for the machine as this
may cause fire or electric
shock.
Do not place metal objects or
water-filled containers such as
flower vases, flower pots or mugs,
etc. on top of the machines. If
metal objects or spilled liquid enter
the machines, this may cause fire
or electric shock.
Do not insert or drop metal,
flammable or other foreign
objects into the machines
through the ventilation slits, as
this may cause fire or electric
shock.
Do not scratch, damage or modify
the power cords. Also, do not
place heavy objects on, pull on, or
excessively bend the cords, as this
may cause fire or electric shock.
If the machines are dropped or
their cabinets damaged, first
turn off the power switches and
disconnect the power cord
plugs from the outlet, and then
contact your authorized
TOSHIBA TEC representative
for assistance. Continued use
of the machine in that condition
may cause fire or electric
shock.
Continued use of the machines in
an abnormal condition such as
when the machines are producing
smoke or strange smells may cause
fire or electric shock. In these
cases, immediately turn off the
power switches and disconnect the
power cord plugs from the outlet.
Then, contact your authorized
TOSHIBA TEC representative for
assistance.
W
ARNING
Any other than the
specified AC voltage is
prohibited.
Prohibited
Prohibited
Prohibited
Prohibited
Prohibited
Disconnect
the plug. Disconnect
the plug.
Safety Summary EO1-11155
(ii)
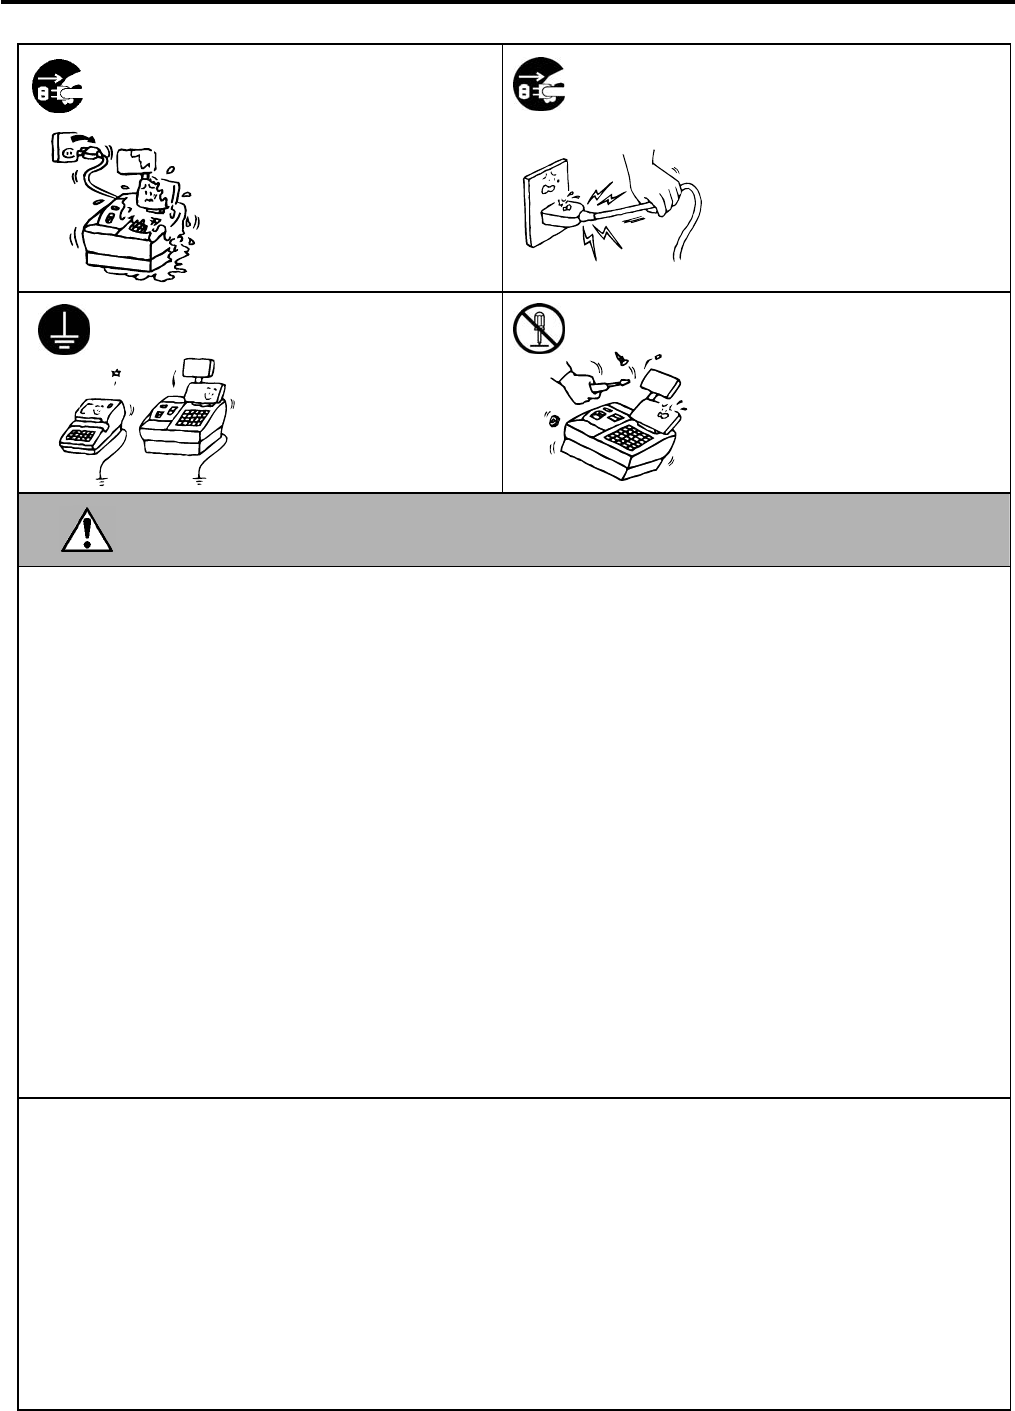
If foreign objects (metal
fragments, water, liquids) enter
the machines, first turn off the
power switches and disconnect
the power cord plugs from the
outlet, and then contact your
authorized TOSHIBA TEC
representative for assistance.
Continued use of the machine in
that condition may cause fire or
electric shock.
When unplugging the power cords,
be sure to hold and pull on the plug
portion. Pulling on the cord portion
may cut or expose the internal wires
and cause fire or electric shock.
Ensure that the equipment is
properly grounded. Extension
cables should also be grounded.
Fire or electric shock could
occur on improperly grounded
equipment.
Do not remove covers, repair or
modify the machine by yourself.
You may be injured by high
voltage, very hot parts or sharp
edges inside the machine.
Unauthorized modification is
prohibited.
This indicates that there is the risk of personal Injury or damage to objects if
the machines are improperly handled contrary to this indication.
Precautions
The following precautions will help to ensure that this machine will continue to function correctly.
● Try to avoid locations that have the following adverse conditions:
* Temperatures out of the specification * Direct sunlight * High humidity
* Shared power source * Excessive vibration * Dust/Gas
● Do not subject the machine to sudden shocks.
● Do not press the keys too hard. Keys will operate correctly if they are touched lightly.
● Clean the cover and keyboard, etc. by wiping with a dry cloth or a cloth soaked with detergent and
wrung out thoroughly. Never use thinner or other volatile solvent for cleaning.
● At the end of the day, turn the power OFF, then clean and inspect the exterior of the machine.
● Try to avoid using this equipment on the same power supply as high voltage equipment or equipment
likely to cause mains interference.
● USE ONLY TOSHIBA TEC SPECIFIED consumables.
● DO NOT STORE the consumables where they might be exposed to direct sunlight, high temperatures, high
humidity, dust, or gas.
● When moving the machine, take hold of the drawer and lift the machine.
● Do not place heavy objects on top of the machines, as these items may become unbalanced and fall
causing injury.
● Do not block the ventilation slits of the machines, as this will cause heat to build up inside the
machines and may cause fire.
● Do not lean against the machine. It may fall on you and could cause injury.
● Place the machine on a stable and level surface.
Request Regarding Maintenance
● Utilize our maintenance services.
After purchasing the machine, contact your authorized TOSHIBA TEC representative for assistance
once a year to have the inside of the machine cleaned. Otherwise, dust will build up inside the
machines and may cause a fire or a malfunction. Cleaning is particularly effective before humid rainy
seasons.
● Our preventive maintenance service performs the periodic checks and other work required to maintain
the quality and performance of the machines, preventing accidents beforehand.
For details, please consult your authorized TOSHIBA TEC representative for assistance.
● Using insecticides and other chemicals
Do not expose the machines to insecticides or other volatile solvents. This will cause the cabinet or
other parts to deteriorate or cause the paint to peel.
CAUTION
Disconnect
the plug.
Connect a
grounding wire.
Disconnect
the plug.
No
disassembling.
OPERATOR’S GUIDE

EO1-11155
MA-600-1 SERIES
TABLE OF CONTENTS
Page
1. TO OUR CUSTOMERS-------------------------------------------------------------------------------- 1- 1
2. ACCESSORIES------------------------------------------------------------------------------------------ 1- 1
3. APPEARANCE AND NOMENCLATURE--------------------------------------------------------- 3- 1
4. MODE LOCK AND MODE SELECTOR KEYS ------------------------------------------------- 4- 1
4.1 Mode Lock------------------------------------------------------------------------------------------------4- 1
4.2 Mode Selector Keys------------------------------------------------------------------------------------4- 1
5. DISPLAY--------------------------------------------------------------------------------------------------- 5- 1
5.1 LCD Display----------------------------------------------------------------------------------------------5- 2
5.2 10-digit 7-segment Numeric Display----------------------------------------------------------------5- 4
5.3 Message Description (Status Lamps)--------------------------------------------------------------5- 4
6. OUTLINE OF PREPARATION PROCEDURE BEFORE OPERATING THE ECR---- 6- 1
6.1 Installing/Replacing the Receipt/Journal Roll-----------------------------------------------------6- 2
7. KEYBOARD LAYOUT --------------------------------------------------------------------------------- 7- 1
8. FUNCTIONS OF EACH KEY------------------------------------------------------------------------- 8- 1
9. CASHIER SIGNING OR CASHIER KEY OPERATIONS------------------------------------- 9- 1
9.1 Cashier Code Entry-------------------------------------------------------------------------------------9- 1
9.2 Cashier Key Method ([CLK] Keys) -----------------------------------------------------------------9- 5
9.3 Training Mode Start and End-------------------------------------------------------------------------9- 6
10. DAILY OPERATION FLOW ------------------------------------------------------------------------ 10- 1
11. REGISTERING PROCEDURE AND PRINT FORMAT-------------------------------------- 11- 1
11.1 No-Sale-------------------------------------------------------------------------------------------------- 11- 2
11.2 Receipt-Issue/Non-Issue Selection--------------------------------------------------------------- 11- 3
11.3 Receipt Post-Issue------------------------------------------------------------------------------------ 11- 4
11.4 Department Entry ------------------------------------------------------------------------------------- 11- 5
11.5 PLU Entry----------------------------------------------------------------------------------------------- 11- 6
11.6 Quantity Extension (Multiplication) for DEPTs/PLUs ----------------------------------------- 11- 7
11.7 Repeat Entry ------------------------------------------------------------------------------------------- 11- 9
11.8 Single-Item Department or Single-Item PLU Entry------------------------------------------- 11-11
11.9 HASH Department Entry, HASH PLU Entry--------------------------------------------------- 11-11
11.10 Split Package Pricing ------------------------------------------------------------------------------- 11-12
11.11 Item Correct ------------------------------------------------------------------------------------------- 11-14
11.12 Void ----------------------------------------------------------------------------------------------------- 11-15
11.13 All Void ------------------------------------------------------------------------------------------------- 11-15
11.14 Returned Merchandise ----------------------------------------------------------------------------- 11-16
11.15 Subtotal (Sale Total Pre-taxed) Read----------------------------------------------------------- 11-16
EO1-11155
MA-600-1 SERIES
Page
11.16 Finalizing a Sale-------------------------------------------------------------------------------------- 11-17
11.17 Multi-Tendering--------------------------------------------------------------------------------------- 11-18
11.18 Split Tendering --------------------------------------------------------------------------------------- 11-18
11.19 Sale Paid in Foreign Currencies------------------------------------------------------------------ 11-19
11.20 Food Stampable Total Read, Food Stamp Tendering -------------------------------------- 11-20
11.21 Tax Calculation and Print -------------------------------------------------------------------------- 11-20
11.22 Taxable Total (Sale Total With Taxes) Read-------------------------------------------------- 11-21
11.23 Tax Exemption---------------------------------------------------------------------------------------- 11-21
11.24 Tax Status or Food Stamp Status Modification ----------------------------------------------- 11-21
11.25 Manual Tax Entry ------------------------------------------------------------------------------------ 11-21
11.26 Received-on-Account ------------------------------------------------------------------------------- 11-22
11.27 Paid-out ------------------------------------------------------------------------------------------------ 11-22
11.28 Dollar Discount --------------------------------------------------------------------------------------- 11-23
11.29 Percent Discount, Percent Charge -------------------------------------------------------------- 11-23
11.30 Store Coupon ----------------------------------------------------------------------------------------- 11-24
11.31 Vendor Coupon--------------------------------------------------------------------------------------- 11-24
11.32 Listing Capacity Open ------------------------------------------------------------------------------ 11-25
11.33 Non-Add Number Print ----------------------------------------------------------------------------- 11-25
11.34 Check Cashing (No-sale cashing of a non-cash media)------------------------------------ 11-26
11.35 No-Sale Exchange from Foreign Currency to Domestic Currency ----------------------- 11-26
11.36 No-Sale Exchange from Domestic Currency to Foreign Currency ----------------------- 11-27
11.37 PLU Price Shift Entry ([PRICE SHIFT 1] to [PRICE SHIFT 3] Keys) -------------------- 11-27
11.38 PLU Price Shift Entry ([1st PRICE], [2nd PRICE], [3rd PRICE] Keys) ------------------ 11-28
11.39 Charge Posting: Previous Balance Manual Entry Type------------------------------------- 11-29
11.40 Consignment Print ----------------------------------------------------------------------------------- 11-31
11.41 Validation Print --------------------------------------------------------------------------------------- 11-31
11.42 Sale Finalization by Electronic Fund Transfer (EFT) ---------------------------------------- 11-32
11.43 Remote Slip Printer (hardware option) Operation-------------------------------------------- 11-46
11.44 When a Power Failure Occurs…----------------------------------------------------------------- 11-47
12. JOURNAL AND RECEIPT PAPER-END DETECTOR-------------------------------------- 12- 1
13. PRINTER HEAD OPEN DETECTOR ------------------------------------------------------------ 13- 1
14. REMOTE SLIP PRINTER MOTOR LOCK DETECTOR ------------------------------------ 13- 1
15. GENERAL MAINTENANCE------------------------------------------------------------------------ 15- 1
15.1 Cleaning the Covers---------------------------------------------------------------------------------- 15- 1
15.2 Removing Jammed Paper -------------------------------------------------------------------------- 15- 1
15.3 When “VOLTAGE ERROR” is displayed...------------------------------------------------------ 15- 1
15.4 Removing the Drawer-------------------------------------------------------------------------------- 15- 1
15.5 Media Slot ---------------------------------------------------------------------------------------------- 15- 2
15.6 Drawer Key--------------------------------------------------------------------------------------------- 15- 2
16. SPECIFICATIONS ------------------------------------------------------------------------------------ 16- 1
1. TO OUR CUSTOMERS EO1-11155
1. TO OUR CUSTOMERS
1- 1
1. TO OUR CUSTOMERS
Thank you for choosing the TEC electronic cash register MA-600 series. This instruction manual provides a
description of the functions and handling of this ECR and should be read carefully to ensure optimum
performance. Since every consideration has been given to safety and reliability, there is no danger of damaging
the machine by incorrect operation.
Please refer to this manual whenever you have any questions concerning the machine. This machine has been
manufactured under strict quality control and should give you full satisfaction. However, if the machine is
damaged during transport or there are any unclear points in this manual, please contact your local TOSHIBA
TEC representative.
• The specifications described in this manual may be modified by TOSHIBA TEC, if necessary.
• Be sure to keep this manual for future reference.
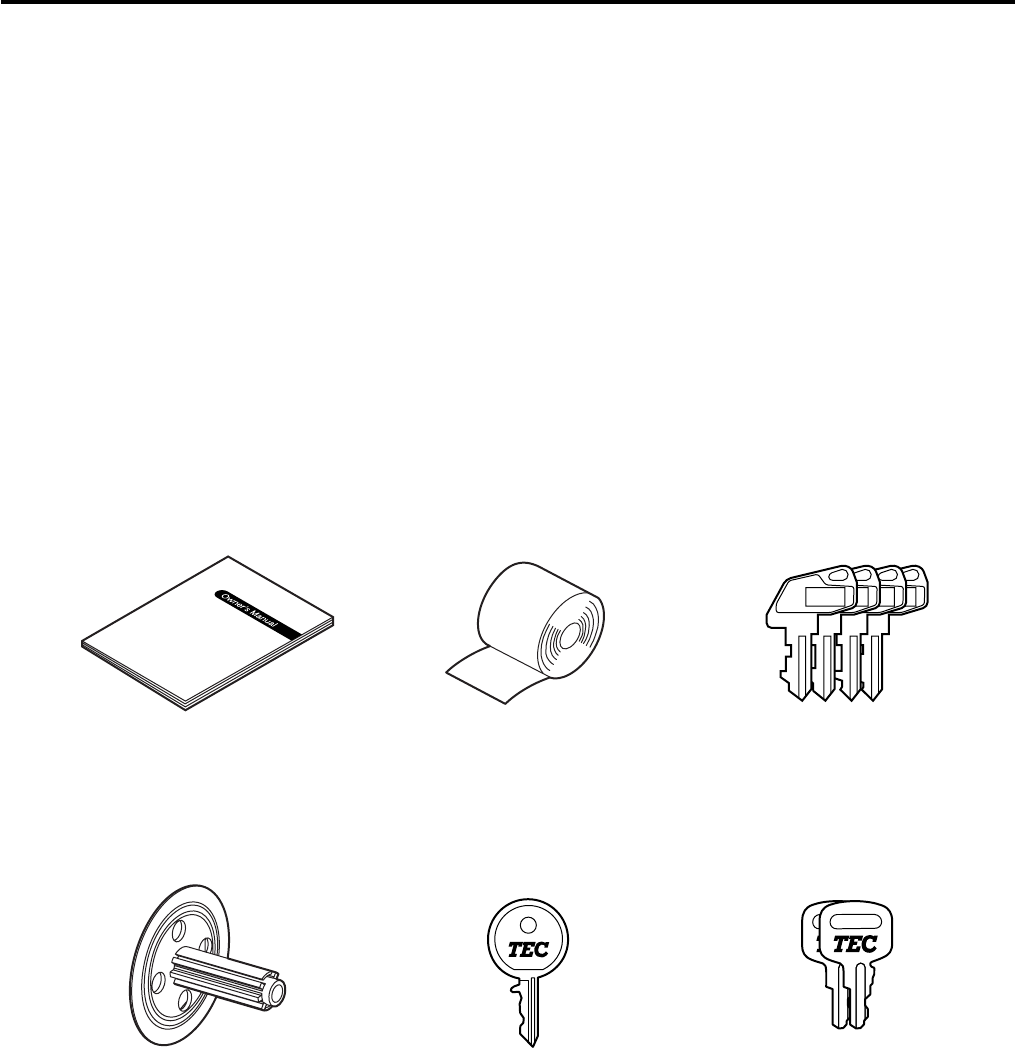
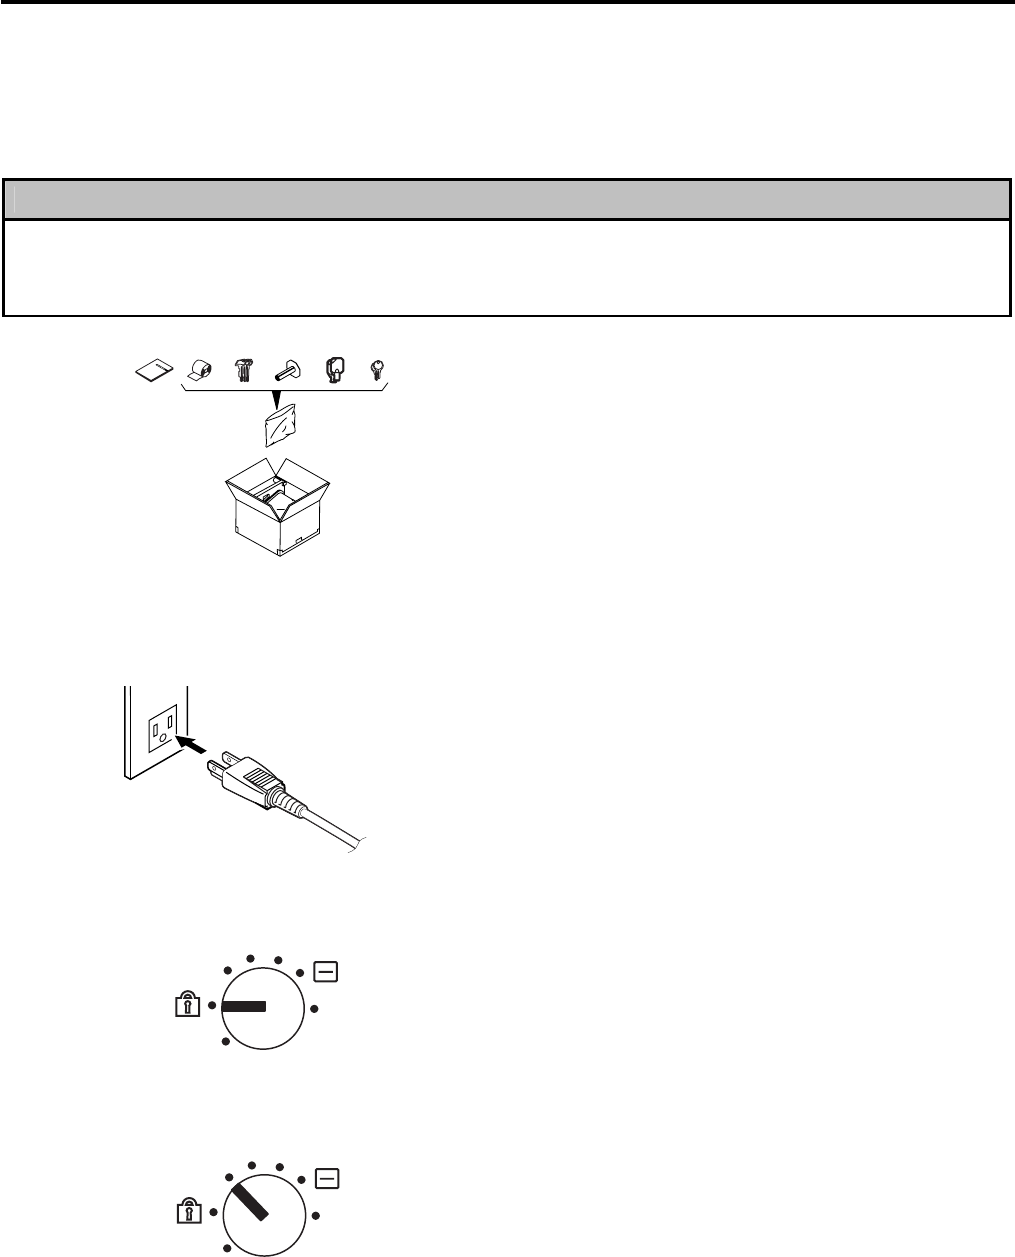
2. ACCESSORIES
Confirm that all the following accessories are contained in the carton. If any accessories are missing or damaged,
contact your nearest TOSHIBA TEC service representative.
S
MA
MGRREG
Journal Take-up Reel (1 pc.) Drawer Key (2 pcs.) Journal Printer Cover Key (2 pcs.)
Owner’s Manual (1 copy) Paper Roll (2 pcs.) Mode Selector Keys
(REG, MGR, MA, S key: 2 pcs. each)
3. APPEARANCE AND NOMENCLATURE EO1-11155
3. APPEARANCE AND NOMENCLATURE
3- 1
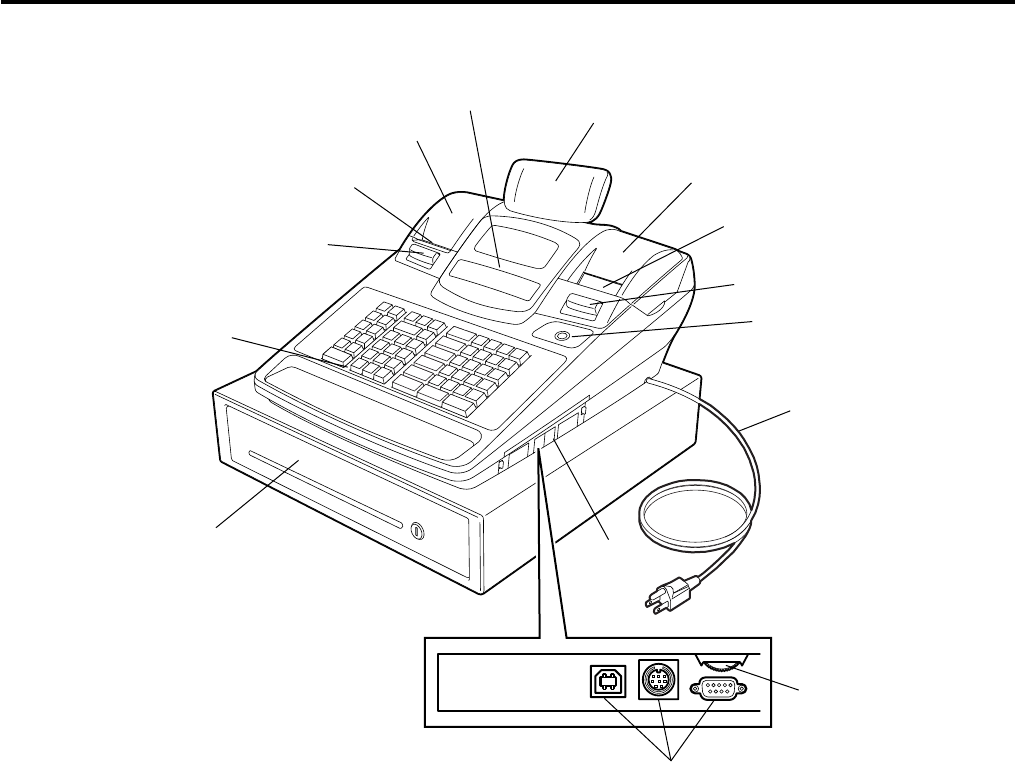
3. APPEARANCE AND NOMENCLATURE
Receipt Cover and Journal Cover
The Receipt Cover is provided for the receipt paper holder and the receipt printer.
The Journal Cover with a lock is provided for the journal paper holder and the journal printer.
Receipt Outlet or Journal Window
The receipt for the finalized sale is issued from the Receipt Outlet.
The operator sees which items have already been entered through the Journal Window.
Mode Lock
Type of register operation is selected by the Mode Lock. (See Section 4.)
Operator Display and Customer Display
The entered contents and the status of the ECR are confirmed on these displays. (See Section 5.)
Keyboard
Sale items are entered through the Keyboard. (See Section 8.)
Interface Connectors (USB Connector, Expansion PLU Keyboard Connector, RS-232C Connector)
The USB Connector allows a connection of a PC. (for maintenance)
The Expansion PLU Keyboard Connector allows a connection of an Expansion PLU Keyboard (PK-2-BM-R).
The RS-232C Connector allows a connection of a Remote Slip Printer.
Brightness Control
To make the LCD display brighter, turn the Brightness Control clockwise. To make it darker, turn the control
counterclockwise.
Customer Display
Mode Lock
Power Cord
Receipt Cover
Receipt Outlet
Journal Window
Keyboard
Drawer
Operator Display
Journal Cover
Release Button
Release Button
Interface Connectors
Brightness Control
Connector Cover
4. MODE LOCK AND MODE SELECTOR KEYS EO1-11155
4.1 Mode Lock
4- 1
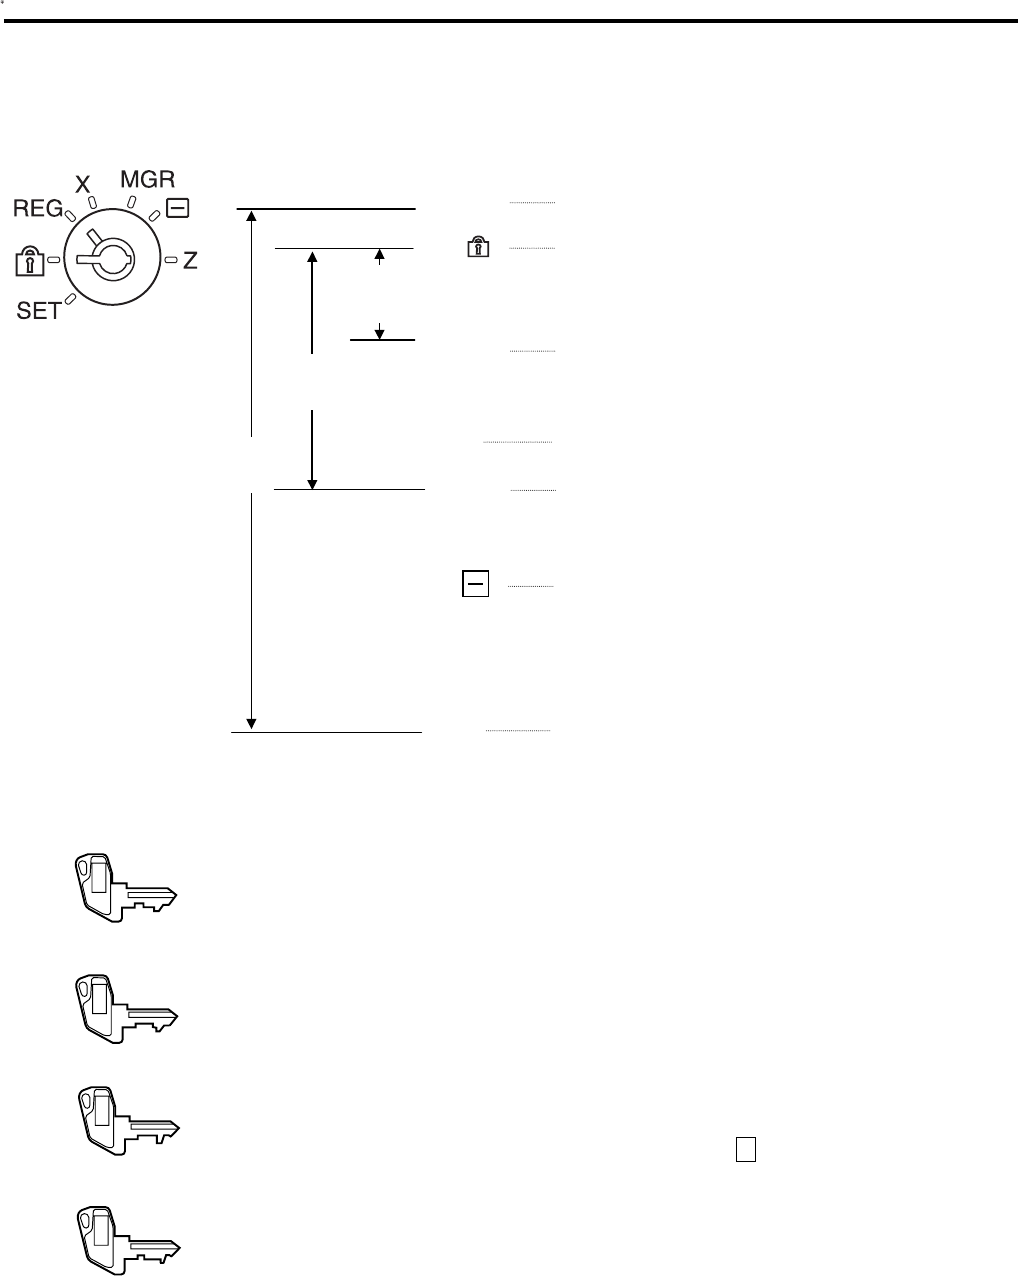
4. MODE LOCK AND MODE SELECTOR KEYS
4.1 Mode Lock
4.2 Mode Selector Keys
REG Key: The REG key is used by the cashier or clerk who operates the ECR.
This key can access the positions of LOCK and REG of the Mode Lock.
MGR Key: The MGR key is used by the store manager. This key can access the
positions of LOCK, REG, X, and MGR.
MA Key: The MA key is used by the owner who will daily supervise the collection
of money and the printout of transactions recorded by the ECR. This
key is also used when programming the ECR. This key can access the
positions of SET, LOCK, REG, X, MGR, - and Z.
S Key: The S key is used by the service person from TOSHIBA TEC
representative to access any position. To prevent programmed data
and sales data from being changed or cleared by mistake, do not use
this key without instructions of our TOSHIBA TEC representative.
The keys may be inserted or pulled out at the “LOCK” or “REG” position.
In the OPERATOR’S GUIDE, functions and operations will be described within the range of the Mode Lock
positions of LOCK and REG using the REG key. Since operations requiring other positions and keys are
controlled by the store manager, they are described in the MANAGER’S GUIDE.
(POSITION)
(FUNCTION)
SET In this position, the ECR will allow programming
operations.
(LOCK position) The register operations are
locked when the Mode Lock is in this mode.
REG Normal cash register operations are carried out in
this mode. However, the operations requiring a
Manager Intervention cannot be performed in this
mode.
X The sale totals in memory can be read and the
programmed data can be verified in this mode.
MGR This position allows to register all normal cash
register operations to be carried out in the “REG”
mode and the operations requiring a Manager
Intervention.
This is the “Negative Mode” which automatically
processes all the entries in the reverse way, i.e.
positive items into negative, and the negative into
positive. It is usually used to return or cancel all
the items once purchased in a sale in the “REG”
or “MGR” mode.
Z All the resettable totals and their respective
counters in memory will be read and reset in this
mode.
MA
Key
RE
G
Key
MGR
Key
REG
MGR
MA
S
5. DISPLAY EO1-11155
5. DISPLAY
5- 1
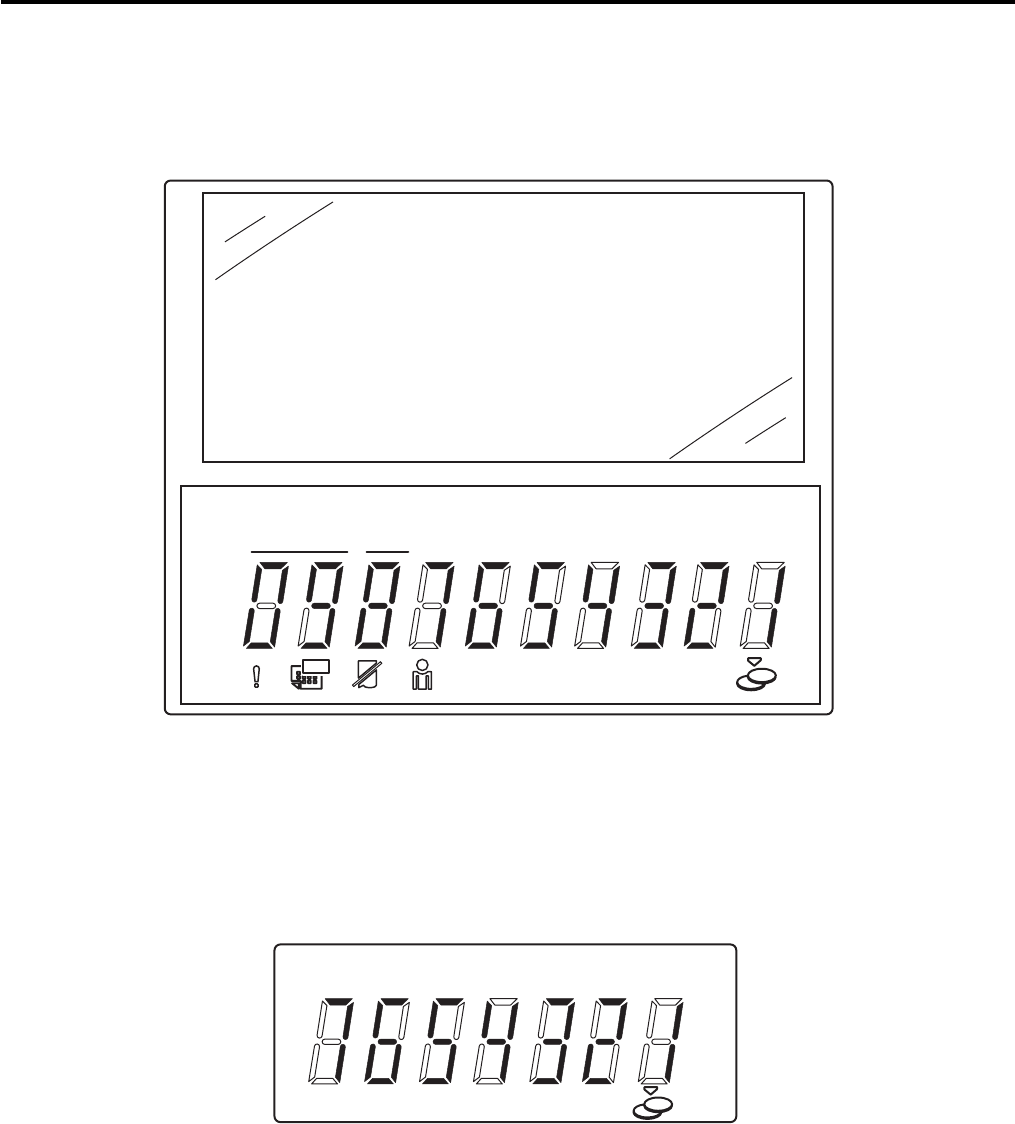
5. DISPLAY
The operator display is located at the top of the ECR just above the keyboard.
OPERATOR DISPLAY (Front Display)
LCD display
10-digit 7-segment
Numeric display
The customer display can be moved horizontally, and thus is fully adjustable according to the position of the
customer.
CUSTOMER DISPLAY (Rear Display)
TL ST
TL ST
DPT X
(
()
)
PC
5. DISPLAY EO1-11155
5.1 LCD Display
5- 2
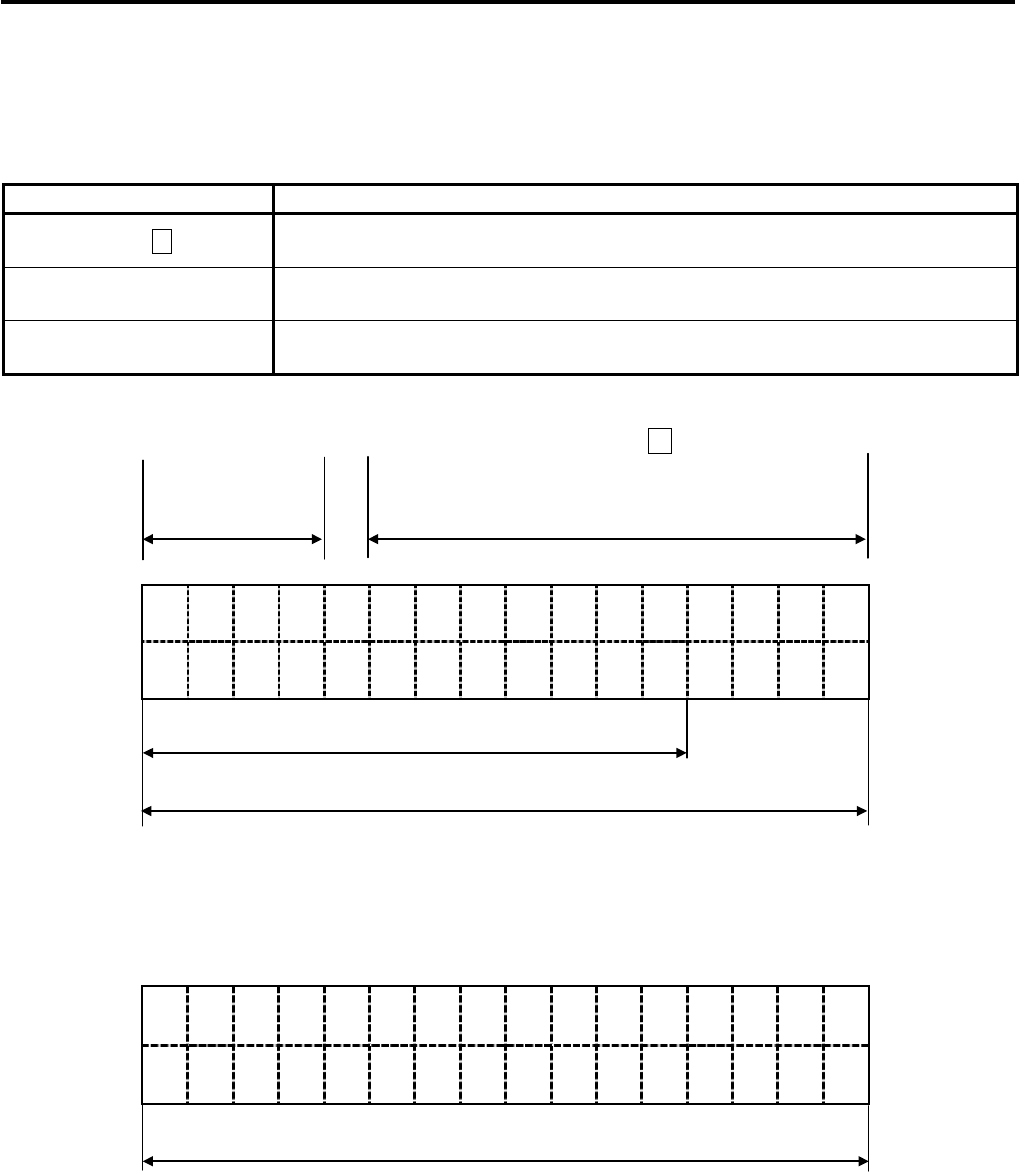
5.1 LCD Display
The LCD display adopts 192 x 64 dot LCD display tubes and displays department name, PLU name, item count,
transaction name, error message, and so on. Numbers of digits and lines to be required vary depending on the
status of the mode lock.
Status of the Mode Lock Description
REG, MGR, - modes Department name, PLU name, item count, transaction name, etc. are displayed
with up to 16 one-byte or 8 two-byte characters per line in two lines.
X, Z modes Read/Reset menus and titles are displayed with up to 24 one-byte or 12 two-byte
characters per line in four lines.
SET mode Programming menu and programmed data are displayed with up to 24 one-byte
or 12 two-byte characters per line in four lines.
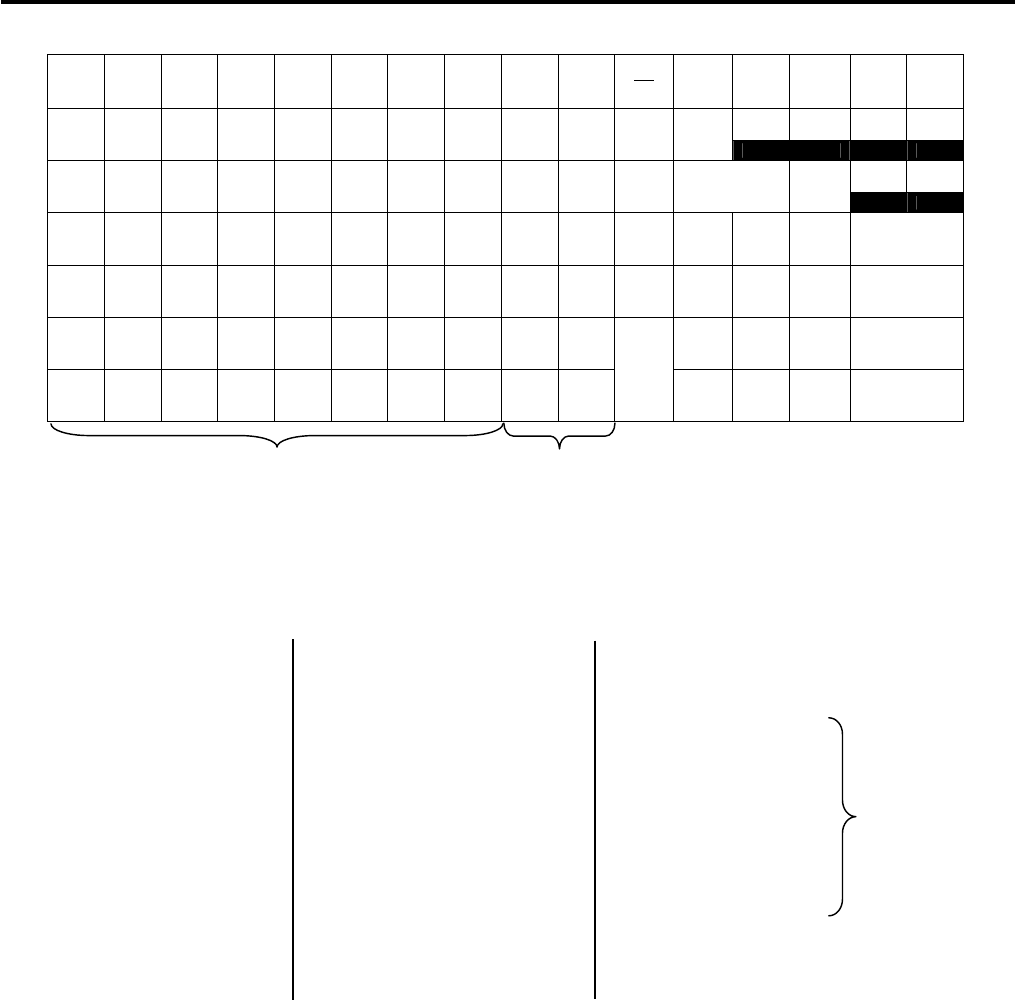
• Digit Range for Various Sales Items (“REG”, “MGR”, “ - ”)
PLU Code
(4 digits Item Count (11 digits in the upper line)
in the upper line)
16
15
14
13
12
11
10
9
8
7
6
5
4
3
2
1
Transaction Name (12 digits in the lower line)
Department/PLU Name (16 digits in the lower line)
• Error Messages (in any mode except “LOCK”)
When an error occurs, an error message (programmable) is displayed with an error buzzer generated (a long
tone).
16
15
14
13
12
11
10
9
8
7
6
5
4
3
2
1
Error Message (16 digits x 2 lines)
Read the error message, depress the [C] key to cancel the error status and tone, operate the sequence again
after removing the cause of the error.
The following table shows the cause of the error.
If the error status cannot be cancelled or an error message not listed in the table on the next page is displayed,
please contact your nearest TOSHIBA TEC representative.

5. DISPLAY EO1-11155
5.1 LCD Display
5- 3
ERROR MESSAGE TABLE
Error Message
(Standard Setting) Cause of the Error Canceling the Error
CASHING PROHIBIT Check cashing prohibition error The depressed key has been programmed with the
status of no-purchase cashing prohibition. Contact
your nearest TOSHIBA TEC representative if
necessary.
CLOSE DRAWER The drawer must be closed before the operation.
Fully close the drawer.
CODE ERROR A specified code has not been programmed at
the PLU entry. Input the PLU code that has been programmed.
COMP QUANTITY Quantity is not entered at a PLU entry even
when the quantity entry compulsion status has
been selected.
Input a quantity.
COMPULSORY CODE No code has been entered where it is
compulsory. Input a specified code.
COMPULSORY SLIP No slip is set when the remote slip print
compulsion for the previous balance entry has
been selected by the program option.
Set a slip paper on the remote slip printer.
CONDITION ERROR Condition error Take a reset report (Z report) prior to performing the
programming operation.
CONSIGNMENT
COMPULSORY Consignment compulsion error Perform a consignment print operation.
COVER OPEN
← RECEIPT Receipt cover open error Fully close the receipt cover, then depress the [C] key.
FIN R/A PROHIBIT Finalizing a Received-on-account entry is
attempted even when it is prohibited. Finalize the Received-on-account entry by another
media key that has been programmed with permission.
FS TL ONLY Food stamp only error Contact your nearest TOSHIBA TEC representative if
necessary.
FS TL PROHIBIT Sale finalization by the food stamp is prohibited.
Contact your nearest TOSHIBA TEC representative if
necessary.
HEAD OPEN
JOURNAL → Journal paper retainer open error Fully close the journal paper ratainer, then depress the
[C] key.
HEAD TEMP ERROR The print head has overheated. Turn off the ECR and contact your nearest TOSHIBA
TEC representative.
MANAGER REQUIRED The operation requires a Manager Intervention. Call your manager to perform the operation in MGR
mode.
MDR COMP When the money declaration feature has been
selected, the issuance of the daily financial
report or prohibited reports is attempted prior to
performing the money declaration operation.
Call your manager to perform a money declaration
operation.
MISC ERROR Other errors
MODE-CH PROHIBIT Mode change is done while any operation is
performed. Return the Mode Lock to a proper position.
NEGATIVE NUMBER Negative balance error when the credit balance
is allowed by the program option. The program option setting is required. Contact your
nearest TOSHIBA TEC representative if necessary.
Or perform the operation in MGR mode.
NO PRICE INPUT The open-price department/PLU entry without
the price entry is attempted. Input a price, then perform the registration operation.
NO RESPONS No response was sent from the EFT terminal,
causing a timeout error on the ECR. Check the status of the EFT terminal, then retry to
perform the operation.
OPERATION ERROR Key sequence or operation procedure error Depress the [C] key, then retry to perform the
operation correctly.
OV_TEND PROHIBIT The depressed key has been programmed with
the status of over-tendering prohibition. Perform a registration operation so as not to result in
over-tendered amount.
PAPER END
JOURNAL → The journal printer runs out of the paper. Replace the journal roll with a new one, then depress
the [C] key.
PAPER END
← RECEIPT The receipt printer runs out of the paper. Replace the receipt roll with a new one, then depress
the [C] key.
PC COMM ERROR File receiving error (when a PC is connected). Retry to perform PC communication.
PIN ERROR Entry of the PIN No. in the EFT transaction
caused an error. Depress the [C] key, then retry to perform the
operation correctly.
PRICE INPUT
PROHIBIT ERROR A price entry is attempted at the preset-price
department/PLU entry. Depress the [OPEN] ([PR OPEN]) key, then input a
price.
PROGRAM ERROR Programming error Contact your nearest TOSHIBA TEC representative.
RECEIPT REQUIRED Prior to the issuance of store receipt, a
subsequent transaction was attempted in an
EFT transaction.
Issue an EFT store receipt, then perform a subsequent
transaction.
RESPONS NG Response from the EFT terminal was not sent
correctly. Retry to perform the EFT transaction operation.
RETURN PROHIBIT Return entry with the [EBT CASH] or [EBT F/S]
key is prohibited by the program option setting. Contact your nearest TOSHIBA TEC representative if
necessary.
5. DISPLAY EO1-11155
5.2 10-digit 7-segment Numeric Display
5- 4
ERROR MESSAGE TABLE (continued)
Error Message
(Standard Setting) Cause of the Error Canceling the Error
SH_TEND PROHIBIT The depressed key has been programmed with
the status of short-tendering prohibition. Perform a registration operation so as not to result in
short-tendered amount.
SLIP OFF LINE Remote slip printer is off line status.
(The remote slip printer is off or the printer cable
is disconnected.)
When this error message is displayed, the [ITEM
CORR] key depression will let a confirmation message
displayed. By following the confirmation message, the
[ITEM CORR] key depression will let the printer
disconnected, meanwhile the [C] key depression will
let the printer remain connected.
SLIP PAPER OUT No slip paper is set. Set a slip paper on the remote slip printer.
TENDER ONLY Tender only error The depressed key has been programmed with the
tender-only status. Contact your nearest TOSHIBA
TEC representative if necessary.
TOTAL ONLY Total only error The depressed key has been programmed with the
total-only status. Contact your nearest TOSHIBA TEC
representative if necessary.
TXBL TL COMP [TXBL TL] key entry compulsion error Depress the [TXBL TL] key prior to the sale
finalization operation.
VALIDATION CMP The operation requires a validation print.
VOLTAGE ERROR Printer voltage error Contact your nearest TOSHIBA TEC representative.
It is recommended to prepare a copy of the above table, and place it near the ECR.
5.2 10-digit 7-segment Numeric Display
(1) Numeric Display
Amount (8 digits) Displays the numeric data such as amount and quantity. When the obtained total or
subtotal amount is 10-digit value, the X and DPT digits are also used for the amount
display. When no entries are under way and the Mode Lock is in the REG position, the
current time is displayed.
DPT (2 digits) Displays a Department Code of a department item just entered. The department name is
also displayed in the LCD display. It remains lit when the entry of the same department
item is repeated.
X (1 digit) Displays the repeat count of the same Department or PLU item. The count is indicated
from the second entry on, and only the lowest digit of the repeat count will be displayed
even when the count exceeds nine (such as “0” for 10, “1” for 11, etc.)
5.3 Message Description (Status Lamps)
Status Lamp Color
Description
ALM
Red Illuminates with the alarm buzzer generated to indicate that the last operation or
numeric entry was an error. To clear the error status, depress the [C] key.
SLIP
Green
Blinks when the program option “slip print compulsory” has been selected. This
lamp does not illuminate even when a slip is set to the slip printer.
R OFF Red
Illuminates when the Receipt-OFF mode is declared by the [LOG/RECEIPT] (or
[RECEIPT]) key. In this condition, no receipts will be issued for a sale to be
entered. It extinguishes by depressing the [LOG/RECEIPT] (or [RECEIPT]) key
again for Receipt-ON mode.
SIGN ON Green
Illuminates only when the Cashier Code Entry method is selected. It illuminates
when a cashier has signed ON. It extinguishes when the cashier has signed
OFF, and the message “LOG” is displayed in the LCD display instead.
PC Green
Illuminates during data communication between the ECR and a PC.
TL Green
Illuminates on a finalizing operation with the total amount displayed when the sale
is finalized without any amount tendered.
ST Green
Illuminates when the [ST] key is depressed, indicating that the displayed amount
is subtotal.
CG
Red When an amount tendering operation is performed, it illuminates with the change
due displayed.
6. OUTLINE OF PREPARATION PROCEDURE BEFORE OPERATING THE ECR EO1-11155
6. OUTLINE OF PREPARATION PROCEDURE BEFORE OPERATING THE ECR
6- 1
6. OUTLINE OF PREPARATION PROCEDURE BEFORE
OPERATING THE ECR
This chapter shows the outline of set-up procedure of the ECR before actually starting the register operation.
WARNING!
1. Be sure to connect the power plug into a rated wall outlet. Failure to do this may cause fire or
electric shock.
2. Do not connect or disconnect the power plug with wet hands as this may cause electric shock.
1. Remove the ECR from the carton. And take out all
the parts and accessories.
2. Place the ECR on a stable and level surface, then
remove the tapes and seals for holding parts or
protecting surface of the ECR.
3. Connect the power plug into a wall outlet. Make
sure that the outlet voltage matches that of the
power required for the ECR.
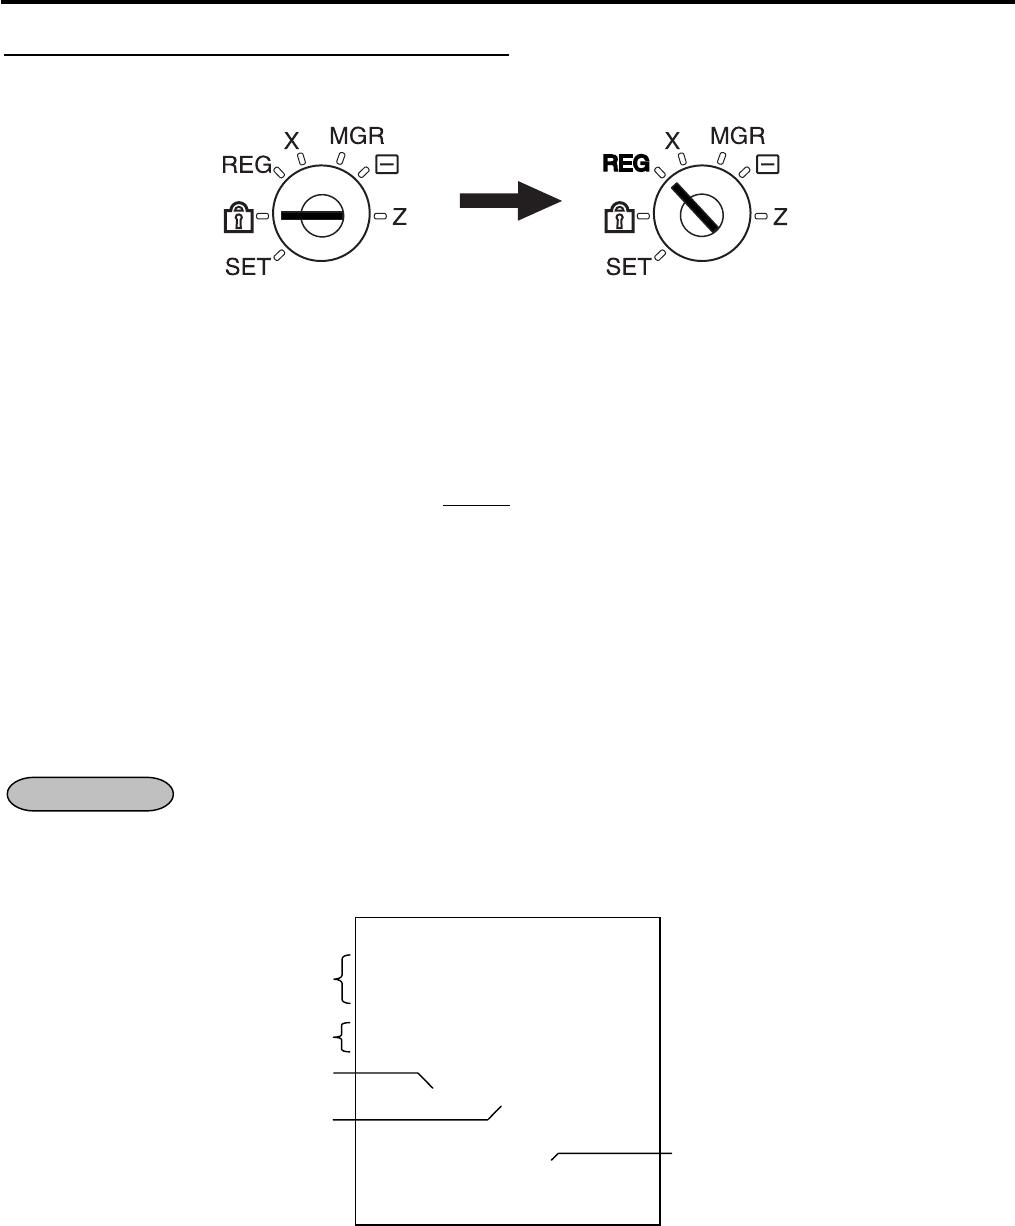
4. Insert the REG key into the mode lock.
5. Turn the mode lock to the REG position and power
on the ECR.
6. Install the receipt and journal rolls. (Refer to the
following section “Installing/Replacing the
Receipt/Journal Roll”.)
S
MA
REG
S
ET
Z
X
R
EG MGR
S
ET
Z
X
R
EG MGR
6. OUTLINE OF PREPARATION PROCEDURE BEFORE OPERATING THE ECR EO1-11155
6.1 Installing/Replacing the Receipt/Journal Roll
6- 2
6.1 Installing/Replacing the Receipt/Journal Roll
WARNING!
1. Never touch the print head and around it just after printing. You may get burned as the print
head becomes very hot during printing.
2. Carefully close the receipt cover so as not to catch your fingers. You may get injured.
3. Do not touch the cutter portion as you may get injured.
CAUTION!
1. Be sure to use the paper which meets the specifications below. Failure to do this may cause a
paper jam and a printer failure.
Media --------------------------------------- Thermal roll paper
Width --------------------------------------- 58 +0/-1 mm
Thickness---------------------------------- 0.06 mm to 0.08 mm
Outside dimension----------------------- 80 mm or less
Recommended thermal paper -------- Only paper rolled onto a core is acceptable, however, the paper end
should not be pasted to the core.
Standard paper: TF60KS-E (Nippon Paper Industries)
PD150R (Oji Paper Co., Ltd)
High-sensitive paper: TF50KS-E4 (Nippon Paper Industries)
Medium-term preserving paper: TP60KS-F1 (Nippon Paper Industries)
P220VBB-1 (MITSUBISHI PAPER MILLS LIMITED)
PD170R (Oji Paper Co., Ltd)
Long-term preserving paper: TP50KJ-R (Nippon Paper Industries)
PD160R-N (Oji Paper Co., Ltd)
AFP-235 (MITSUBISHI PAPER MILLS LIMITED)
HA220AA (MITSUBISHI PAPER MILLS LIMITED)
PD152R (Oji Paper Co., Ltd)
2. Do not pull the receipt being issued during a print operation. When taking an issued receipt, be
sure to confirm that the cutter operation stops. Failure to do this may cause a paper jam or a
printer failure.
3. Be sure to attach the receipt cover before issuing the receipt. Failure to do this may cause a
printer failure.
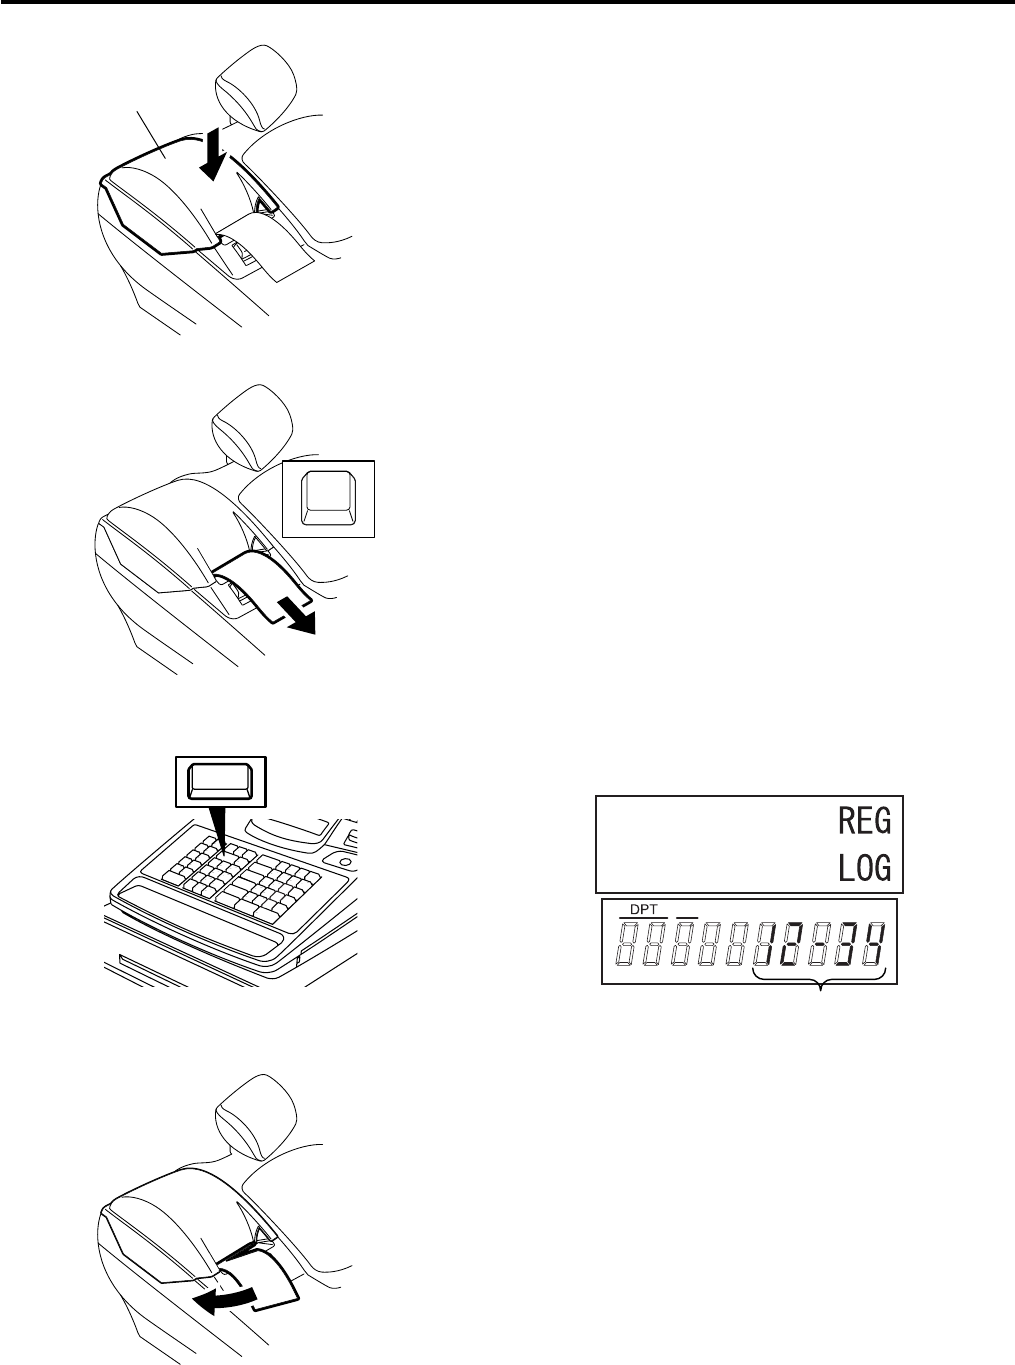
Turn the mode lock to the REG position using the Mode Selector Key to perform the paper roll installation in this
section.
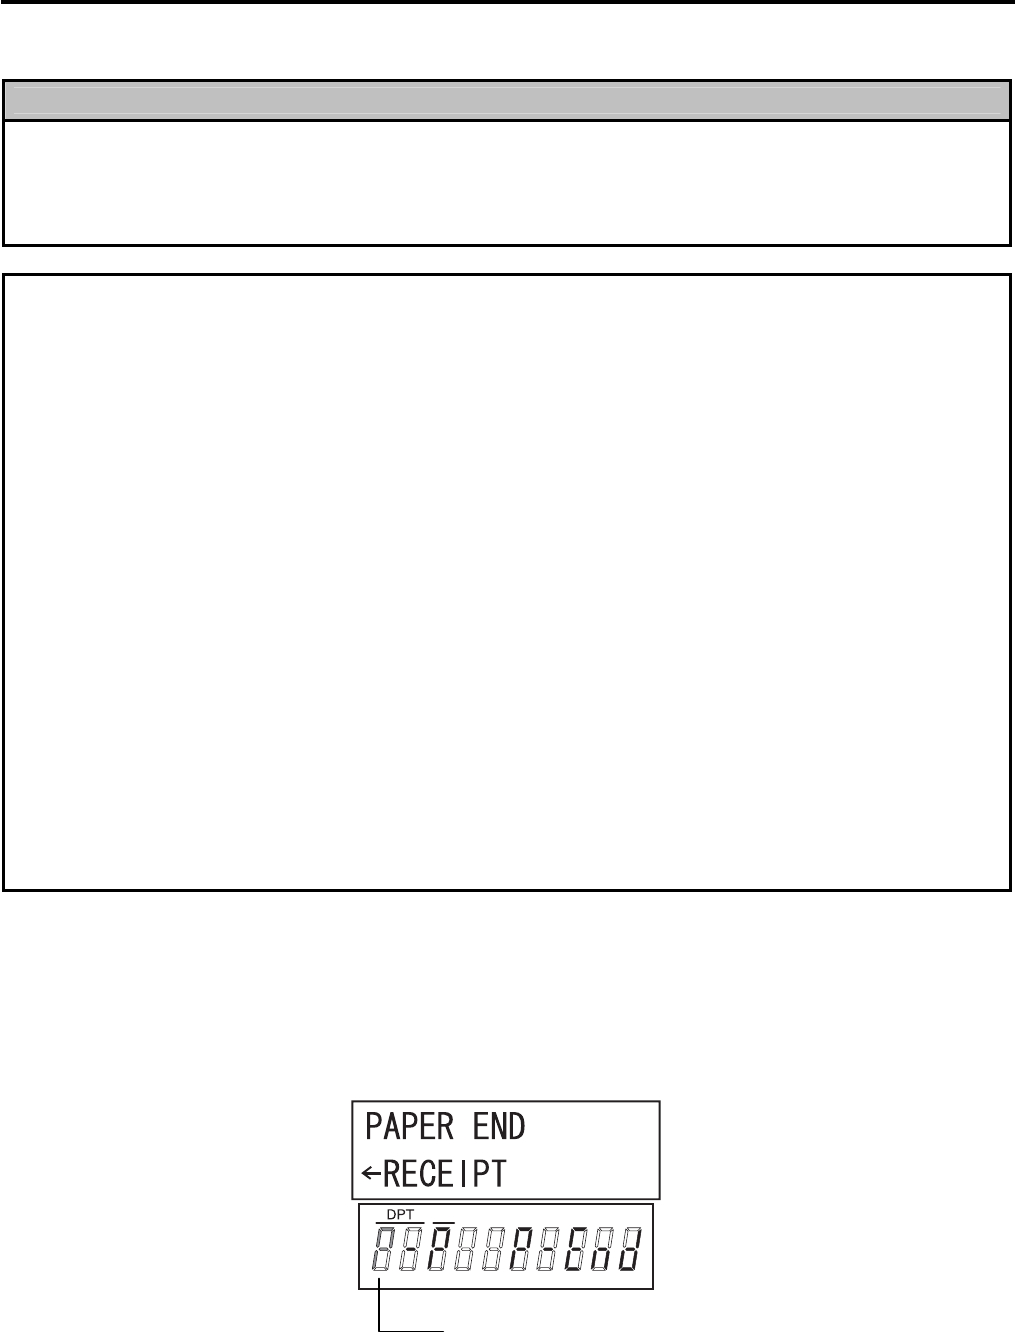
When the receipt roll is installed for the first time or when the receipt paper ends, the following error status is
indicated both on the LCD display and on the 10-digit 7-segment Numeric display. In this case, install or replace
the receipt roll by following the procedure on the next page. (See Installing/Replacing the Receipt Roll.)
X
P blinks on the leftmost digit of the 10-digit 7-segment
Numeric display.
6. OUTLINE OF PREPARATION PROCEDURE BEFORE OPERATING THE ECR EO1-11155
6.1 Installing/Replacing the Receipt/Journal Roll
6- 3
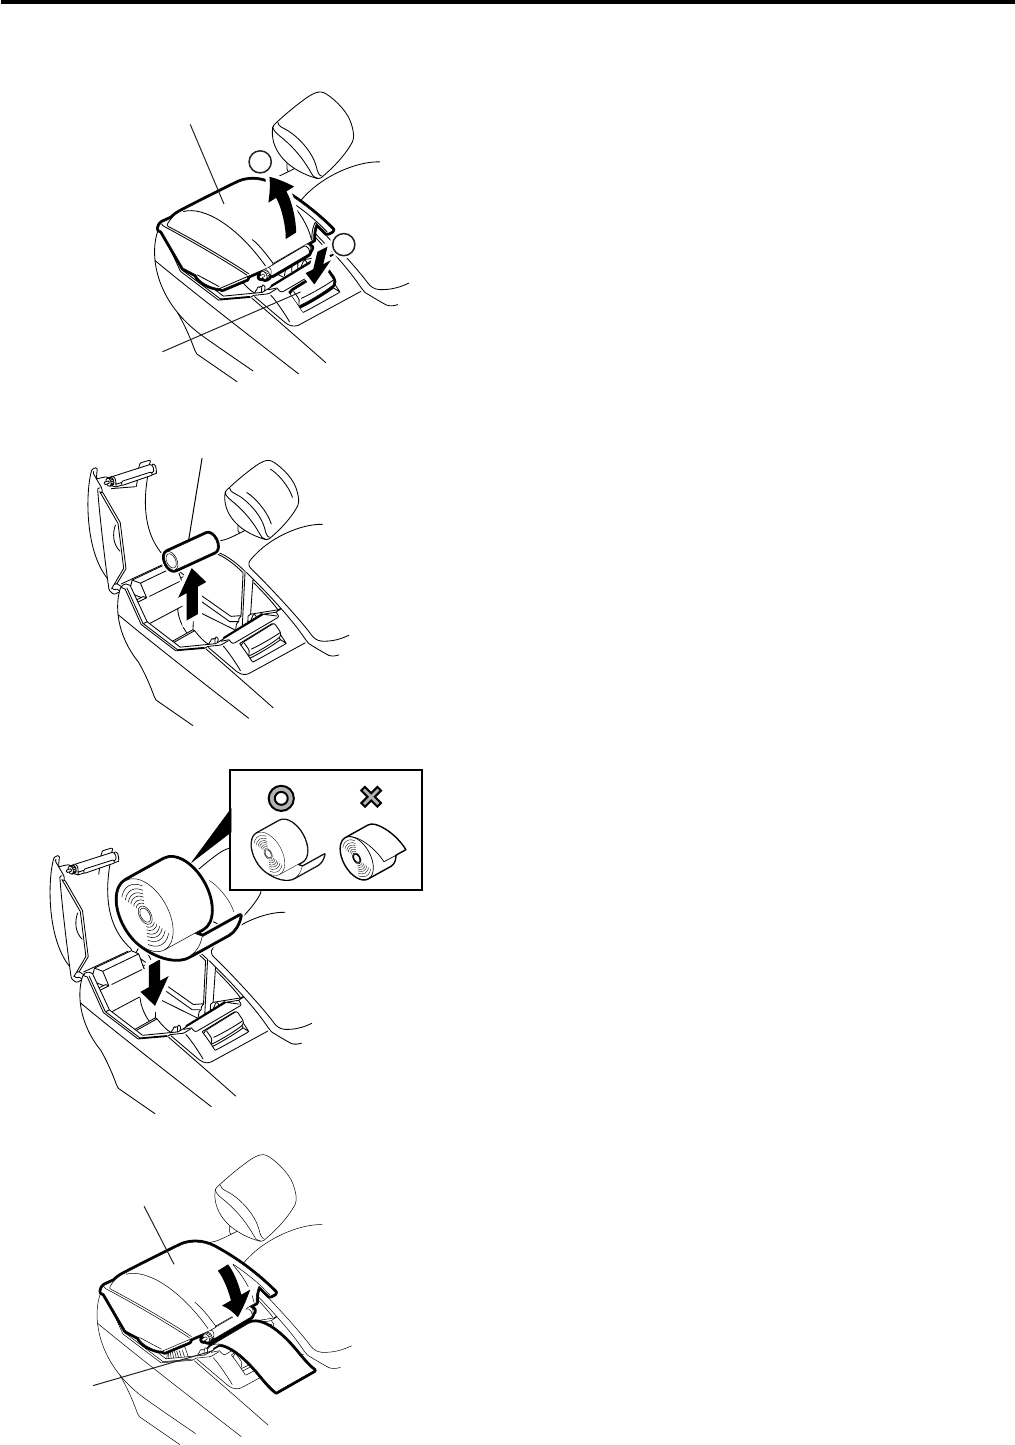
Installing/Replacing the Receipt Roll
1. Push the release button and open the receipt cover.
2. Remove the remaining paper roll or paper core from
the receipt paper holder. (When loading the receipt
paper roll for the first time, go to Step 3.)
3. Load the receipt paper roll so that the beginning of
the paper faces down.
4. Pull the beginning of the receipt paper out from the
receipt outlet. Slowly close the receipt cover while
holding the paper.
2
1
Release Button
Receipt Cover
Paper Core
Receipt Outlet
Receipt Cover
6. OUTLINE OF PREPARATION PROCEDURE BEFORE OPERATING THE ECR EO1-11155
6.1 Installing/Replacing the Receipt/Journal Roll
6- 4
5. Fully close the receipt cover until it clicks.
6. Press and hold the [RF] key for a few seconds and
make sure that the receipt paper is fed correctly. If
it is not fed correctly, start from Step 1 again.
7. Press the [C] key to cancel the error status.
Then the status shown in the figure is displayed.
8. Manually cut the receipt paper which was fed.
Receipt Cover
RF
X
Current time is displayed here.
C
6. OUTLINE OF PREPARATION PROCEDURE BEFORE OPERATING THE ECR EO1-11155
6.1 Installing/Replacing the Receipt/Journal Roll
6- 5
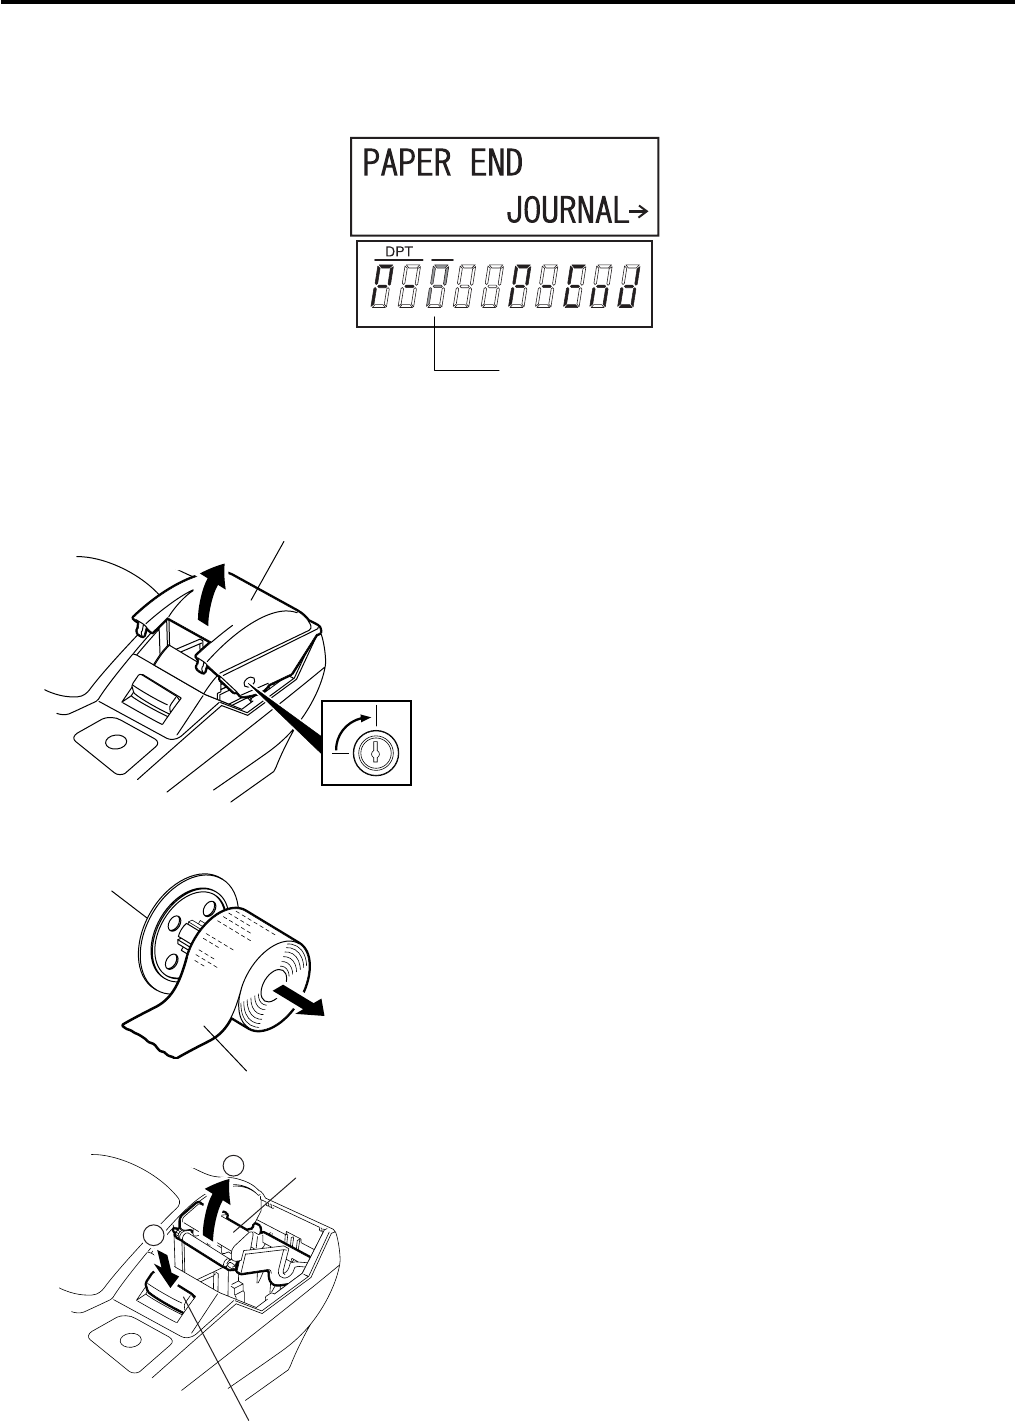
When the journal roll is installed for the first time or when the journal paper ends, the following error status is
indicated both on the LCD display and on the 10-digit 7-segment Numeric display. In this case, install or replace
the journal roll by following the procedure below. (See Installing/Replacing the Journal Roll.)
X
P blinks on the third leftmost digit of the 10-digit 7-
segment Numeric display.
Installing/Replacing the Journal Roll
1. To remove the journal cover, insert the printer
cover key to the journal cover lock, and then turn it
90° clockwise.
2. When installing the journal roll for the first time, go
to Step 3.
When replacing the journal roll, remove the take-
up reel from the holder, then pull the paper out of
the reel.
CAUTION: Never try to pull out the remaining
paper end by hand. It may cause a
paper jam. The remaining paper
should be fully taken up by pressing
the [JF] key.
3. Push the release button to raise the journal paper
retainer.
Journal Cover
Take-up Reel
Journal Paper
2
1
Release Button
Journal Paper Retainer
6. OUTLINE OF PREPARATION PROCEDURE BEFORE OPERATING THE ECR EO1-11155
6.1 Installing/Replacing the Receipt/Journal Roll
6- 6
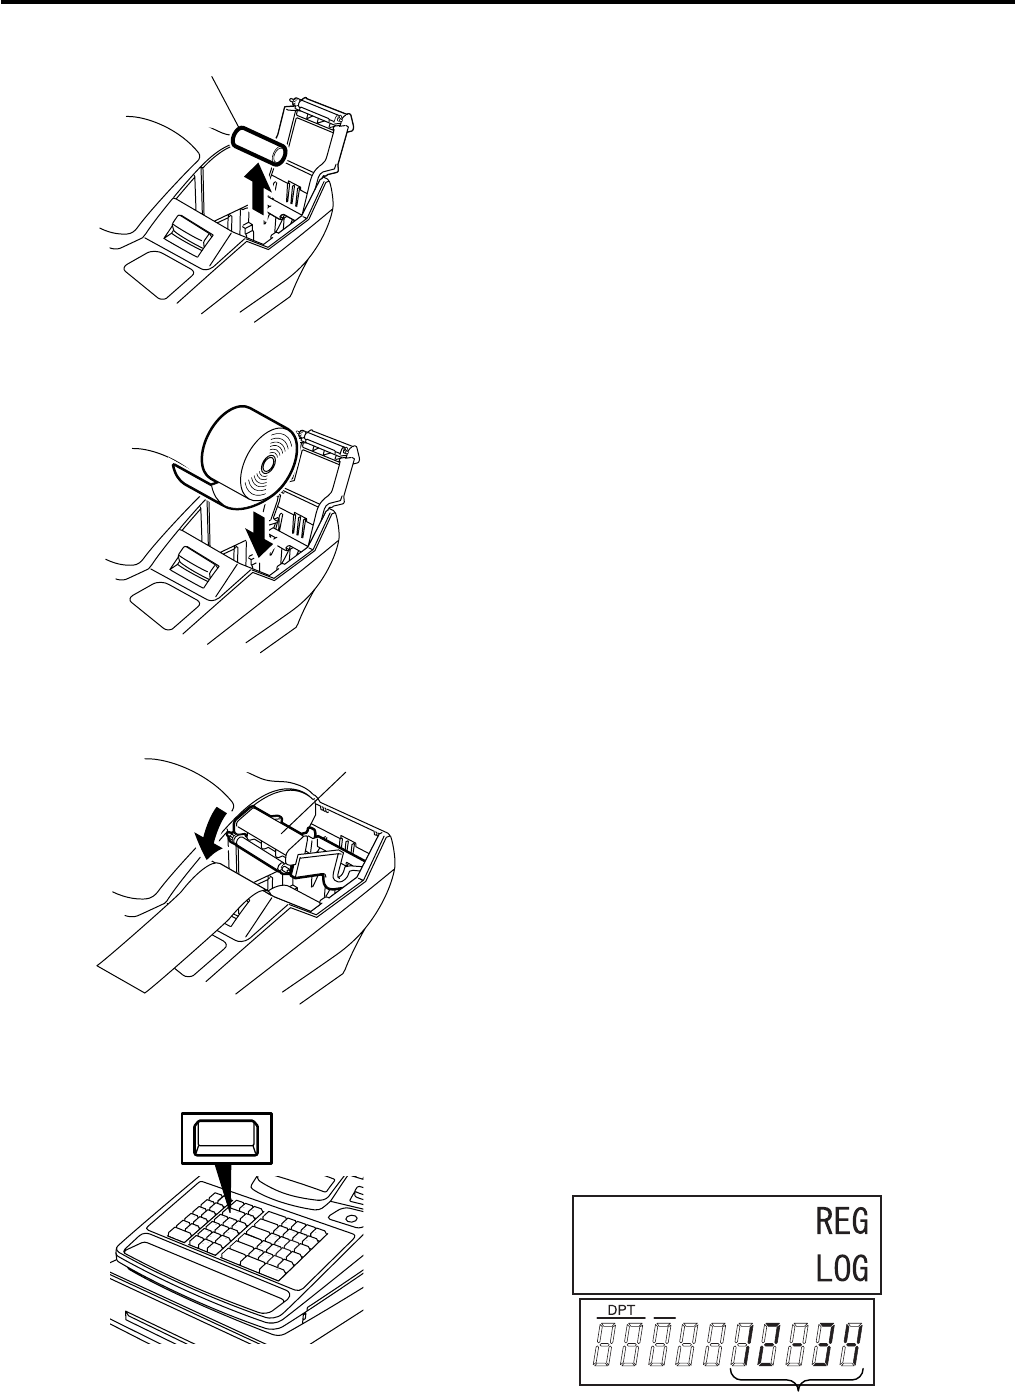
4. When installing the journal roll for the first time, go
to Step 5.
When replacing the journal roll, remove the paper
core from the journal paper holder.
5. Load the journal roll as indicated with the figure on
the left. Then, pull the end of the journal roll until
about 8 inches (about 20 cm) of paper comes out
of the journal outlet.
6. Slowly close the journal paper retainer until it
clicks.
7. Press the [C] key to cancel the error status.
Then the status shown in the figure is
displayed.
Paper Core
Journal Paper Retainer
X
Current time is displayed here.
C

6. OUTLINE OF PREPARATION PROCEDURE BEFORE OPERATING THE ECR EO1-11155
6.1 Installing/Replacing the Receipt/Journal Roll
6- 7
8. Insert the paper end into the slit of the take-up reel
and wind it around the reel twice or three times.
9. Set the take-up reel into the reel holder. Then
press the [JF] key and make sure that the journal
paper is taken up correctly. If it is not taken up
correctly, the take-up reel may not be set into the
reel holder correctly. In this case, retry to set the
take-up reel into the reel holder.
10. Attach the printer cover.
Take-up Reel
Journal Paper
Reel Holder
7. KEYBOARD LAYOUT EO1-11155
7. KEYBOARD LAYOUT
7- 1
7. KEYBOARD LAYOUT
The following are typical keyboard layouts for the MA-600-US series. Since this series is designed to be capable
of programming most of the keys to be placed in the desired place on the keyboard, these are merely examples.
The keyboard of your ECR should have its own layout according to the store’s requirements.
NOTE: For keys assigned two functions such as key, the function on the bottom is activated when
performing a read/reset or programming operation.
-- Ordinary Type Keyboard (US Standard) --
LOG
RECEIPT NS VOID
↑ Del
History
RF JF
1
6
11
PO RECEIPT
ISSUE
RTN
MDSE
↓
ALL
VOID
C TX/M
2
7
12
R/A DOLL
DISC
FS/M
ITEM
CORR
← Rtn
7 8 9
3
8
13
VND
CPN %-
OPEN
@/FOR
→ Dbl
4 5 6
4
9
14
STR
CPN EX
# AMT
Enter A/a
1 2 3
5
10
15
FS TL
TEND
Chg
PLU
0 00 .
ST
AT/TL
CHECK
TEND
Other keys not placed in the keyboard above:
Additional Department Keys (16 to 40)
[000] (Triple-zero Key) PLU Preset-code Keys [TAX]
[%+] [LOG] [PRICE SHIFT 1] to [PRICE SHIFT 3]
[CREDIT 1] and [CREDIT 2] [DP#] [DEBIT]
[PR OPEN] [RECEIPT] [EBT CASH]
[LC OPEN] [CLK 1] to [CLK 8] [EBT F/S]
[CONSIGNMENT] [1st PRICE] [MANUAL CARD#]
[TX2/M] to [TX4/M] [2nd PRICE] [OFFLINE AUTH]
[PB+] [3rd PRICE] [STORE RECEIPT]
[PB-] [CASH 1] to [CASH 3] [POST AUTH]
[TRF] [MISC TEND] [VOUCHER AUTH]
[RPT] [VALIDATE] [BALANCE INQUIRY]
[CUR 1] to [CUR 5] [TXBL TL]
End
?
Keys for the
Electronic Fund
Transfer
specification
LOG
RECEIPT
↑
7. KEYBOARD LAYOUT EO1-11155
7. KEYBOARD LAYOUT
7- 2
-- Flat Type Keyboard (US Standard) --
1
8
15
22
29
36
43
50
1
8
LOG
RECEIPT VOID
ITEM
CORR
ALL
VOID
RF
JF
EX
RTN
MDSE
R/A
PO
2
9
16
23
30
37
44
51
2
9
RECEIPT
ISSUE TX/M
↑ ↓ ← →
Chg
NS
3
10
17
24
31
38
45
52
3
10
%- C
@/FOR
Rtn Enter
4
11
18
25
32
39
46
53
4
11
# 7 8 9 $5.00
5
12
19
26
33
40
47
54
5
12
AMT
4 5 6 $10.00
6
13
20
27
34
41
48
55
6
13
1 2 3 ST
7
14
21
28
35
42
49
56
7
14
PLU
0 00 . AT/TL
PLU Preset-code keys Department
keys
Other keys not placed in the keyboard above:
Additional Department Keys (15 to 40)
[PR OPEN] [PB-] [TXBL TL]
[LC OPEN] [TRF] [TAX]
[FS/M] [RPT] [PRICE SHIFT 1] to [PRICE SHIFT 3]
[VND CPN] [CUR 1] to [CUR 5] [DEBIT]
[STR CPN] PLU Preset-code Keys [EBT CASH]
[FS TL TEND] [LOG] [EBT F/S]
[DOLL DISC] [DP#] [MANUAL CARD#]
[CHECK TEND] [RECEIPT] [OFFLINE AUTH]
[000] (Triple-zero Key) [CLK 1] to [CLK 8] [STORE RECEIPT]
[%+] [1st PRICE] [POST AUTH]
[CREDIT 1] and [CREDIT 2] [2nd PRICE] [VOUCHER AUTH]
[OPEN] [3rd PRICE] [BALANCE INQUIRY]
[CONSIGNMENT] [CASH 1] to [CASH 3]
[TX2/M] to [TX4/M] [MISC TEND]
[PB+] [VALIDATE]
Keys for the
Electronic Fund
Transfer
specification
8. FUNCTIONS OF EACH KEY EO1-11155
8. FUNCTIONS OF EACH KEY
8- 1
8. FUNCTIONS OF EACH KEY
This section briefly describes functions of each key for your quick reference purposes. See the reference pages
in Section 11. REGISTERING PROCEDURE AND PRINT FORMAT for detail operation sequences.
TABLE OF KEY FUNCTIONS
Key Functions
Reference
page
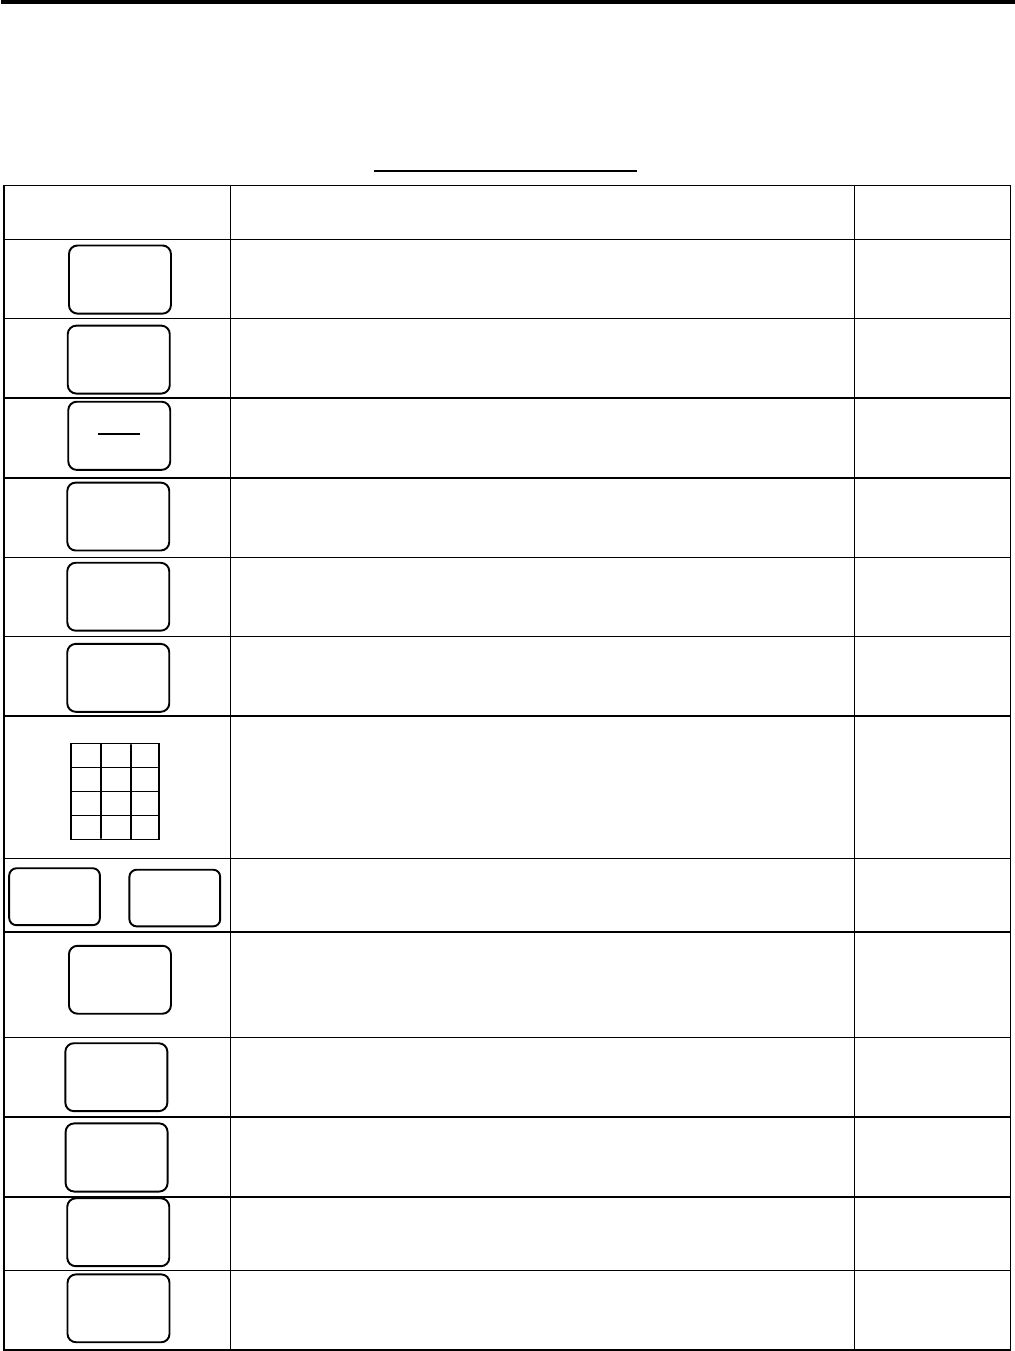
LOG Key
Used in case of Cashier Code Entry Method, to declare start or end
of normal operation by cashier. For details, refer to Section 9.1.
9-1
Receipt Key
Used to change the receipt-ON/OFF mode.
11-3
Log/Receipt Key
This is a dual-function key that has both [LOG] and [RECEIPT]
functions.
See pages for
[LOG] and
[RECEIPT]
Receipt Post-Issue Key
Used to issue the receipt of a sale when the sale has already
finalized in the Receipt-OFF mode.
11-4
Receipt Feed Key
Used to advance the receipt roll and operated by holding it down
until the paper has advanced to the required position.
-----
Journal Feed Key
Used to advance the journal roll in the same fashion as the [RF]
key is used to receipt roll.
-----
Numeric Keys
Used to enter numeric values. Depressing the [00] key once is the
same as depressing the [0] key twice consecutively. Depressing
the [000] key once is the same as depressing the [0] key three
times consecutively. The [ . ] key is used to designate the decimal
point of a percentage rate or a quantity.
-----
to
Department Keys
Used to enter each item, serving for classifying merchandise by
department.
11-5
Department No. Key
Used to access a department by designating the department code,
instead of depressing the specific Department key. With this key
installed, a maximum of 40 departments may be controlled.
See pages for
[DEPT]
PLU (Price Look Up) Key
Used to enter a PLU that is linked to a department.
11-6
Clear Key
Used to clear numeric entries or a declaration key entry.
-----
Non-add Number Print Key
Used to print a non-add number (such as Customer No., Credit
Card No., etc.) on the receipt and journal for future reference.
11-25
No-sale Key
Used to open the cash drawer without relating a sale.
11-2
LOG
RECEIPT
RECEIPT
ISSUE
RF
LOG
RECEIPT
JF
1
40
DP#
PLU
7 8 9
4 5 6
1 2 3
0
00
•
C
#
NS

8. FUNCTIONS OF EACH KEY EO1-11155
8. FUNCTIONS OF EACH KEY
8- 2
Key Functions
Reference
page
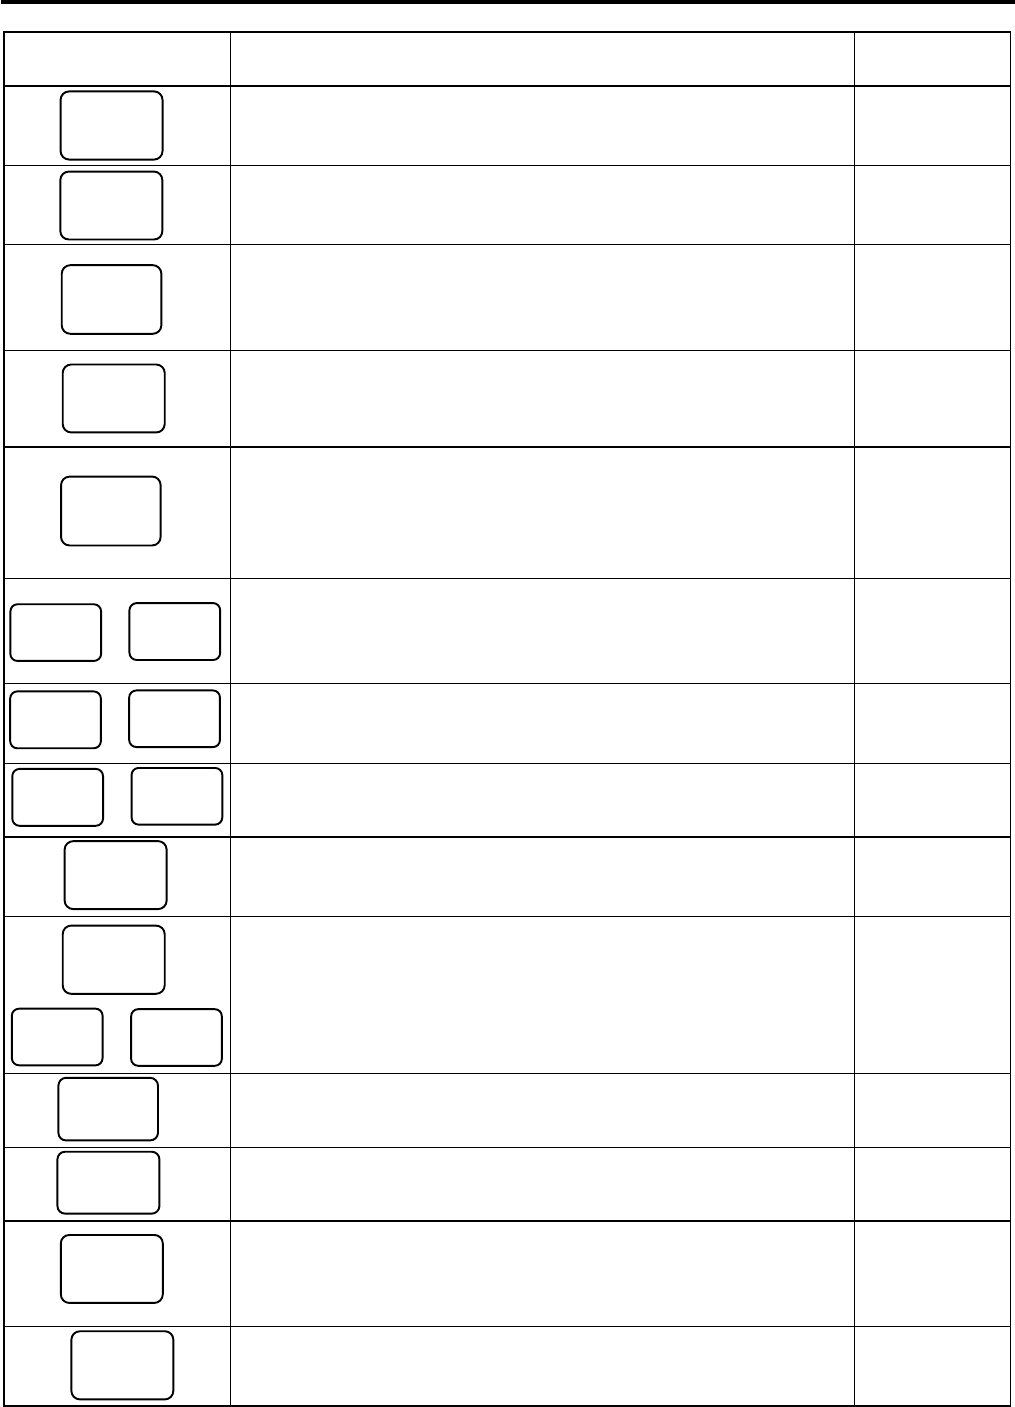
Amount Key
Used to enter a manual amount of PLU item. And also used to
enter an amount or price for an open department when the
department is accessed by the [DP#] key.
11-5 to 11-10,
11-12
Preset Open Key
Used to release a preset-price department or PLU items for a
manual price entry.
11-5 to 11-10
Listing Capacity Open Key
Used to release the high or low amount limit preprogrammed on
each department or PLU.
11-25
Preset and Listing Capacity Open Key
This is a dual-function key that has both [PR OPEN] and [LC
OPEN] functions.
See pages for
[PR OPEN]
and
[LC OPEN].
At-For (Quantity Extension) Key
Used to multiply a department or PLU item entry by a quantity. Also
used to auto-calculate and enter a split-package price or triple
multiplication.
11-7
Vendor Coupon Key
Used to enter the amount of vendor coupons received from the
customer.
11-24
Store Coupon Key
Used to subtract a store coupon amount redeemed through a
department.
11-24
Returned Merchandise Key
Used to refund money to a customer who has returned items
already purchased.
11-16
Dollar Discount Key
Used to subtract an amount from the sale such as a discount during
a sale.
11-23
Percent Charge Key
Used to add a percent rate to a sale.
11-23
Percent Discount Key
Used to subtract a percent rate from a sale.
11-23
Item Correct Key
Used to remove the last item from the bill, printing a line through the
item on the receipt and journal.
11-14, 11-15
Void Key
Used to delete an item entered previously (before the last item) in
the current transaction.
11-15
All Void Key
Used to cancel all the items entered in the current sale.
11-15
Received-on-Account Key
Used to enter payments received on account, i.e. not relating to a
sale.
11-22
Paid-Out Key
Used to record amounts paid out of the cash drawer not relating to
a sale.
11-22
AMT
PR
OPEN
LC
OPEN
OPEN
VND
CPN
STR
CPN
RTN
MDSE
%+
%−
ITEM
CORR
VOID
ALL
VOID
@/FOR
R/A
PO
DOLL
DISC
8. FUNCTIONS OF EACH KEY EO1-11155
8. FUNCTIONS OF EACH KEY
8- 3
Key Functions
Reference
page
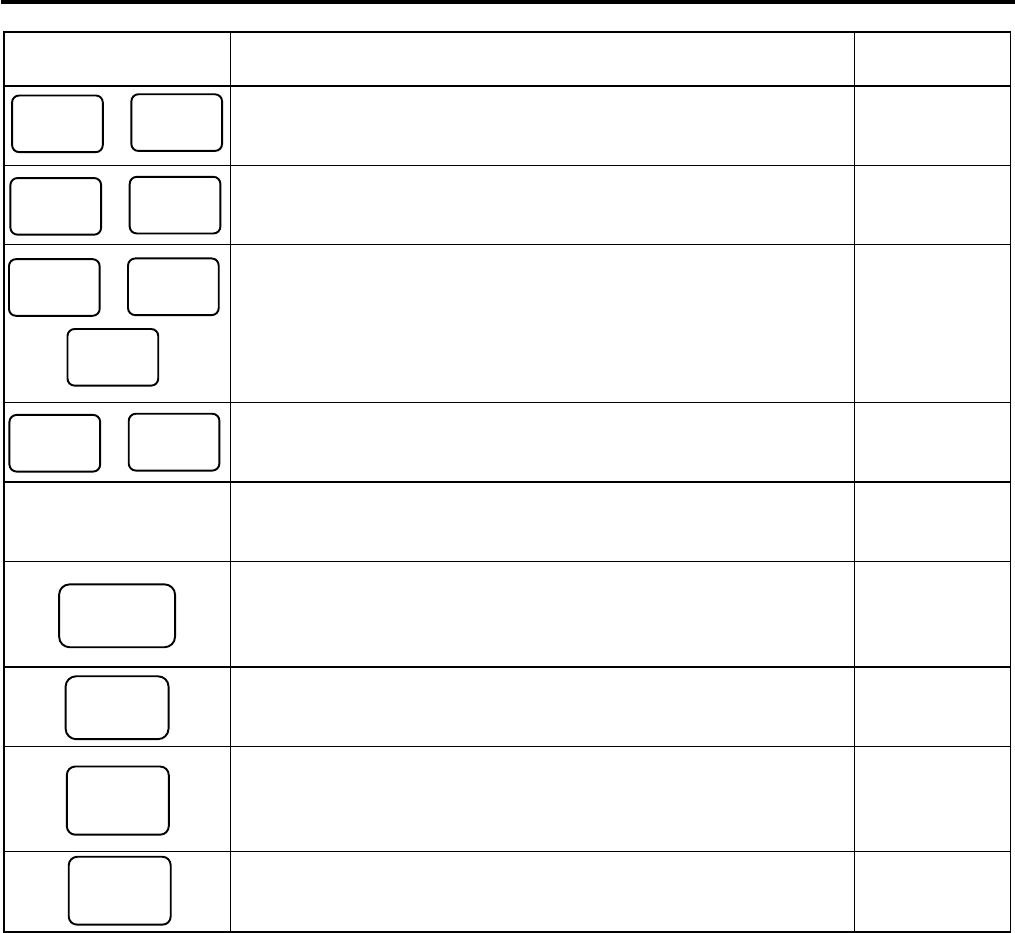
Subtotal Key
Used to obtain subtotal of the current transaction.
11-16
Cash Amount Tendered/Cash Total Key
Used to record all cash paid transactions, and will be able to finalize
a sale operation.
11-17
Check Key
This is one of non-cash media keys, and used to cash a check
when the ECR is outside a sale, or to finalize the transaction as a
check payment.
11-17, 11-18
Charge Key
This is another non-cash media key, and usually programmed as
“Charge Sale Total” key. This key can also be used for payments in
credit cards, if the [CARD No.] key is installed.
11-17
Miscellaneous Media Key
This is one of additional non-cash media keys that may be installed
besides [CHK TEND] and [Chg]. This key has the same functions
and programmabilities as the [CHK TEND] key, and usually used
as Tender-only key.
11-17
,
Credit 1 & Credit 2 Keys
These are additional non-cash media keys that may be installed
besides those already described, according to the requirements of
each store.
11-17
to Cash Payment 1 to 3 Keys
Used for cash-tendering operation with the respective preset
amount.
11-17
or
Previous Balance Keys
Used to enter a previous balance in a charge posting operation.
11-29
Transfer Key
Used to transfer the entire balance in a charge posting operation
with no payment.
11-29
or:
to
Tax Modifier Key(s)
Used to reverse the taxable/non-taxable status on departments,
PLUs, or other tax-status programmable keys. Also used in Tax
Exempt operations.
11-21
Food Stamp Total/Tender Key
This key is used to read the food stampable portion amount of a
sale and to tender an amount in food stamp.
11-20
Tax Exempt Key
Used to declare the exemption of the taxes from the sale.
11-21
Food Stamp Modifier key
Used to reverse the Food Stampable/Non-stampable status of a
Department, PLU, and other function keys programmable with food-
stampable status.
11-21
Repeat Key
Used to repeat a department or PLU item entry.
11-9
ST
AT/TL
Chg
MISC
TEND
PB+ PB-
CREDIT
1
CREDIT
2
TRF
CASH 1
CASH 3
CH
EC
K
TEND
TX/M
TX1/M
TX4/M
EX
FS/M
FS TL
TEND
RPT
8. FUNCTIONS OF EACH KEY EO1-11155
8. FUNCTIONS OF EACH KEY
8- 4
Key Functions
Reference
page
to
Foreign Currency Keys
Used in tendering or exchange with foreign currencies.
11-26, 11-27
to
Cashier 1 to Cashier 8 Keys
Used to declare start or end of normal operation by cashier (instead
of using [LOG/RECEIPT] (or [LOG]) key).
9-1
,
PLU Price Shift Key
Used to shift the PLU price.
11-28
to
Price Shift 1 to 3 Keys
Used in PLU price shift operation.
11-27
PLU Preset-code
Keys
Each of these keys is programmed with a PLU Code. That is,
depressing one of those keys is equal to entering a PLU Code then
depressing the [PLU] key.
See pages for
[PLU]
Consignment Key
Immediately after performing the Department/PLU entry or finalizing
a sale, this key is used for issuing a receipt only for the entry or sale
finalization just performed.
11-31
Validation Key
Used to print an item on a validation slip after finalizing a sale.
Validation print operation is performed on the slip printer.
11-31
Manual Tax Key
Used to enter an irregular tax amount that cannot be calculated on
the basis of the programmed tax table, and to add it to the sale
total.
11-21
Taxable Total Key
Used to obtain the taxable total (the sale total including taxes due)
of the current transaction.
11-21
NOTE: To perform the operations regarding the Electronic Fund Transfer (EFT), the hardware devise to
connect the EFT terminal and the software setup to realize the EFT function are required. For details,
ask your TOSHIBA TEC representative.
CLK 1
CLK 8
3rd
PRICE
1st
PRICE
2nd
PRICE
CUR
1
CUR
5
CONSIGN
MENT
VALI
DATE
TAX
TXBL
TL
PRICE
SHIFT 1
PRICE
SHIFT 3
9. CASHIER SIGNING OR CASHIER KEY OPERATIONS EO1-11155
9.1 Cashier Code Entry
9- 1
9. CASHIER SIGNING OR CASHIER KEY OPERATIONS
9.1 Cashier Code Entry
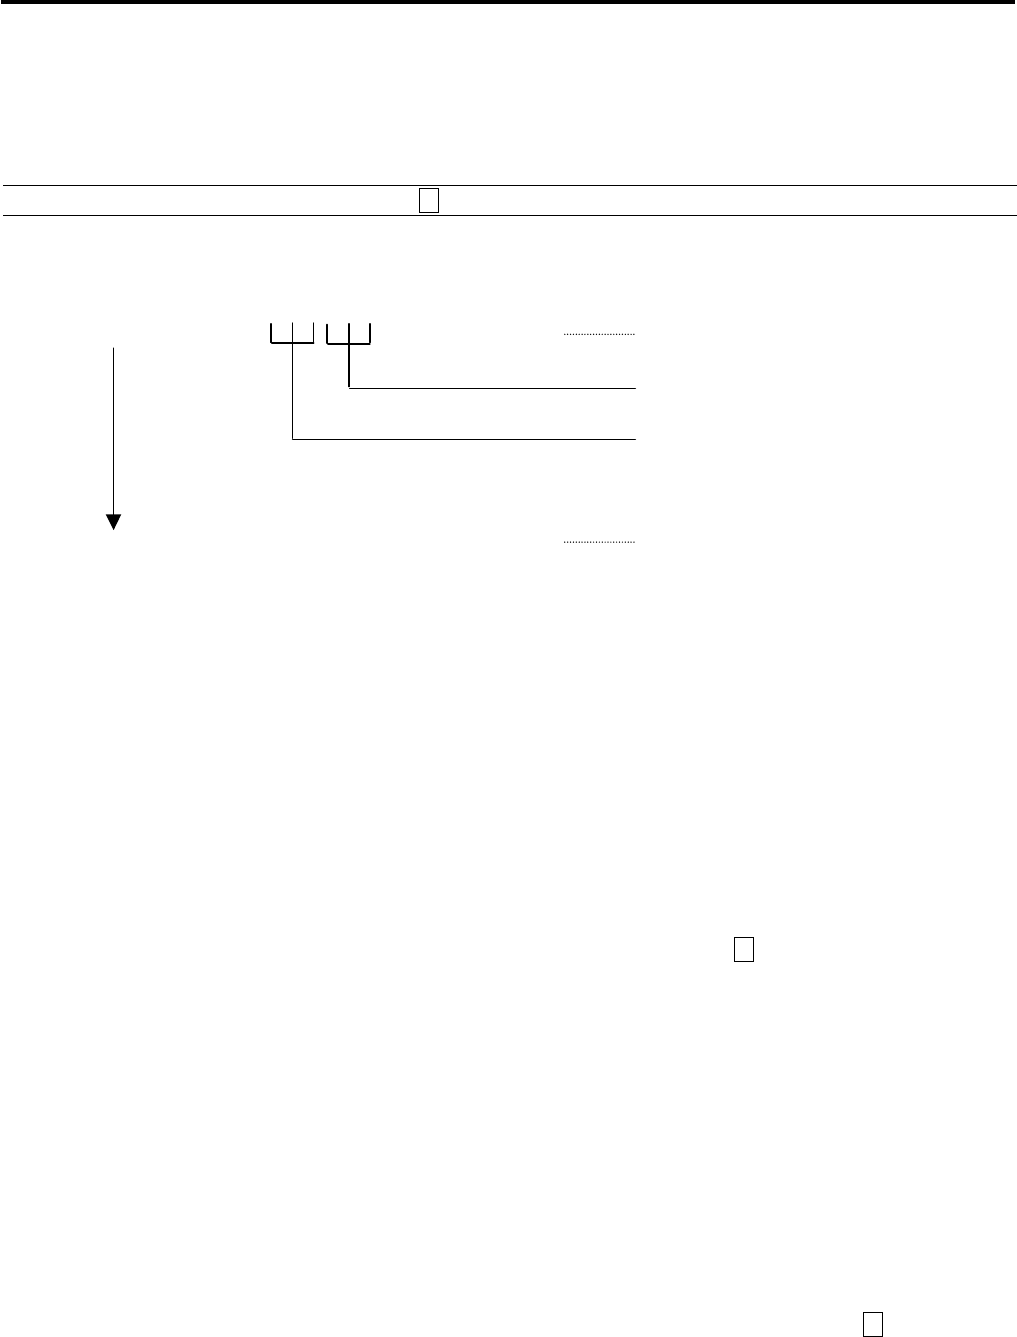
Each cashier will sign-ON or sign-OFF through the [LOG/RECEIPT] (or [LOG]) key.
OPERATION: Mode Lock: REG (or, MGR or “ - “ with Manager Intervention)
([LOG/RECEIPT] = [LOG])
(1) For Single-drawer Machines
Sign-ON [LOG/RECEIPT] A Sign-ON receipt is issued, and sales
entries are now possible.
2-digit cashier code
(01 to 08)
2-digit cashier’s own secret code
(01 to 99) (NOTE 1)
Sign-OFF 0 [LOG/RECEIPT] A Sign-OFF receipt is issued, and no
sales entries will be accepted.
Sign-ON..........to be operated to start the job.
Sign-OFF........to be operated to end the job.
NOTES: 1. As cashier’s own secret code, the code used for Sign-ON just after the issuance of cashier reset
report is programmed. The secret code will be cleared when the cashier reset report is output.
2. At the sign-ON or sign-OFF time, only the journal print is performed and none of the receipt is issued
by the programming option setting.
3 The secret code and the cashier code should be entered in two-digit numeric values. (i.e. Enter “01”
for the code 1.)
(2) Mode Changes with Signing Operations
When Signed-ON:
The Mode Lock position change is allowed within “LOCK”, “REG”, “MGR”, and “ - ”. Changing to any other
position will be an error.
When Signed-OFF:
The Mode Lock may be turned to any position. Therefore, it is best for the cashier (or all the cashiers on a
Multi-drawer Machine) to sign-OFF before the Mode Lock is turned to the “LOCK”, “X”, “Z”, or “SET” position.
NOTE: A program option provides a selection not to print nor issue SIGN ON/SIGN OFF receipt on any signing
operation.
9.2 Cashier Key Method ([CLK] Keys)
When the [LOG/RECEIPT] (or [LOG]) key is not installed, [CLK] keys ([CLK 1] to [CLK 8]; max. 8 keys) may be
provided on the ECR keyboard.
Sale entries will be possible only when one of the [CLK] keys is depressed (in “REG”, “MGR”, or “ - ” mode).
When the same [CLK] key is again depressed, the cashier is in Sign-OFF status.
A program option provides a selection to display or not display the cashier code (1 to 8) of the cashier being
Sign-ON condition at the “DPT” digit on the 7-segment numeric display of the Operator Display.
9. CASHIER SIGNING OR CASHIER KEY OPERATIONS EO1-11155
9.3 Training Mode Start and End
9- 2
9.3 Training Mode Start and End
When you have newly employed cashiers, you may provide some time for them to train their skills of operating
the ECR. You are to start and end the Training Mode. Once entering the Training Mode, a cashier may operate
just as ordinary sale entry operations in “REG” and “MGR” modes except Sign-ON/OFF entry and check track
operation. The data in the Training Mode are processed into the training cashier memory but not affect any
actual sales data in business.
Outside a sale, and in Cashier Signed-OFF condition for CASHIER CODE ENTRY Method
OPERATION FOR TRAINING MODES START
Cashier Code Entry Method
[LOG/RECEIPT] (or [LOG]) .................................... A training-ON receipt is issued.
2-digit cashier code with Training status (01 to 08)
2-digit cashier’s secret code (01 to 99)
Cashier Key Method
Depress the [CLK] key programmed with Training status .... A training-ON receipt is not issued.
ENTRIES IN TRAINING MODE
Registering operations are allowed by the trainees:
All sale or transaction entry operations are possible in the Training Mode,
except: 1) The drawer will not open.
2) The Consecutive No. on the receipt will not be incremented.
3) Print occurs on receipt but not journal.
4) The Remote Slip Printer prints a slip.
5) When performing a validation print, spaces are printed. (i.e. Printing operation is performed but
nothing is printed.)
OPERATION FOR TRAINING MODE END
Code Entry Method
0 [LOG/RECEIPT] (or [LOG]) .................................... A training-OFF receipt is issued.
Cashier Key Method
Change from the current Cashier Key to another Cashier Key.
Now the ECR is in a Signed-OFF condition. You may turn the Mode Lock to any position for its corresponding
operations. To start sale entries, a Cashier Key to ON status or a cashier’s Sign-ON status is again necessary.
CONDITION
9. CASHIER SIGNING OR CASHIER KEY OPERATIONS EO1-11155
9.3 Training Mode Start and End
9- 3
NOTES:
1. In the training mode, a cashier who has been programmed with training status in the cashier code and name
programming is allowed to perform the operation.
2. The secret code and the training cashier code should be entered in two-digit numeric values. (i.e. Enter “01”
for the code 1.)
-- Training Mode Receipt Format --
Training Start (Training Sign-ON) Receipt Training End (Training Sign-OFF) Receipt
Receipt issued in Training Mode
10-20-2006 FRI #3001
∗∗
TRAINING
∗∗
∗∗
ON
∗∗
BROWN 0109 11:06TM
10-20-2006 FRI #3001
∗∗
TRAINING
∗∗
∗∗
OFF
∗∗
BROWN 0109 11:07TM
10-20-2006 FRI #3001
∗∗
TRAINING
∗∗
Tomato $1.00
VEGETABLE $2.30
CASH $
2.30
ITEM 2
∗∗
TRAINING
∗∗
BROWN 0109 11:07TM
Training Mode Header
Entry Contents

10. DAILY OPERATION FLOW EO1-11155
10. DAILY OPERATION FLOW
10- 1
10. DAILY OPERATION FLOW
The following shows a typical daily operation flow on the ECR.
Before Opening the Store ...
• Ensure that the ECR is firmly plugged in the wall
outlet.
• Check if enough portion of paper roll is left.
• Check the time, date, and print condition.
Check the time, date, and print by issuing a No-
sale Receipt. ...
Setting the time or date ...
During Business Hours ...
Opening the store
• Transaction entries on the ECR
• Taking Read (X) Reports periodically.
Closing the store
After Closing the Store ...
• Take Daily Reset (Z) Reports.
• Tear off the print portion of Journal Paper
(optional).
• Leave the drawer open, and turn the Mode Lock to
the LOCK position. However, even in this position,
the power is being supplied.
• Take all the cash and other contents from the
drawer to the office with the torn Journal and
printed Reset Reports.
11. REGISTERING PROCEDURE AND PRINT FORMAT EO1-11155
11. REGISTERING PROCEDURE AND PRINT FORMAT
11- 1
11. REGISTERING PROCEDURE AND PRINT FORMAT
WARNING!
When opening the cash drawer, be careful not to let the drawer hit any person.
Before starting sale entries, read through the following instructions:
TRAINING MODE is available:
If you are a beginner in operating this ECR, ask the store manager for practicing in the TRAINING MODE.
(See Section 9.3)
During your operations, the following may occur:
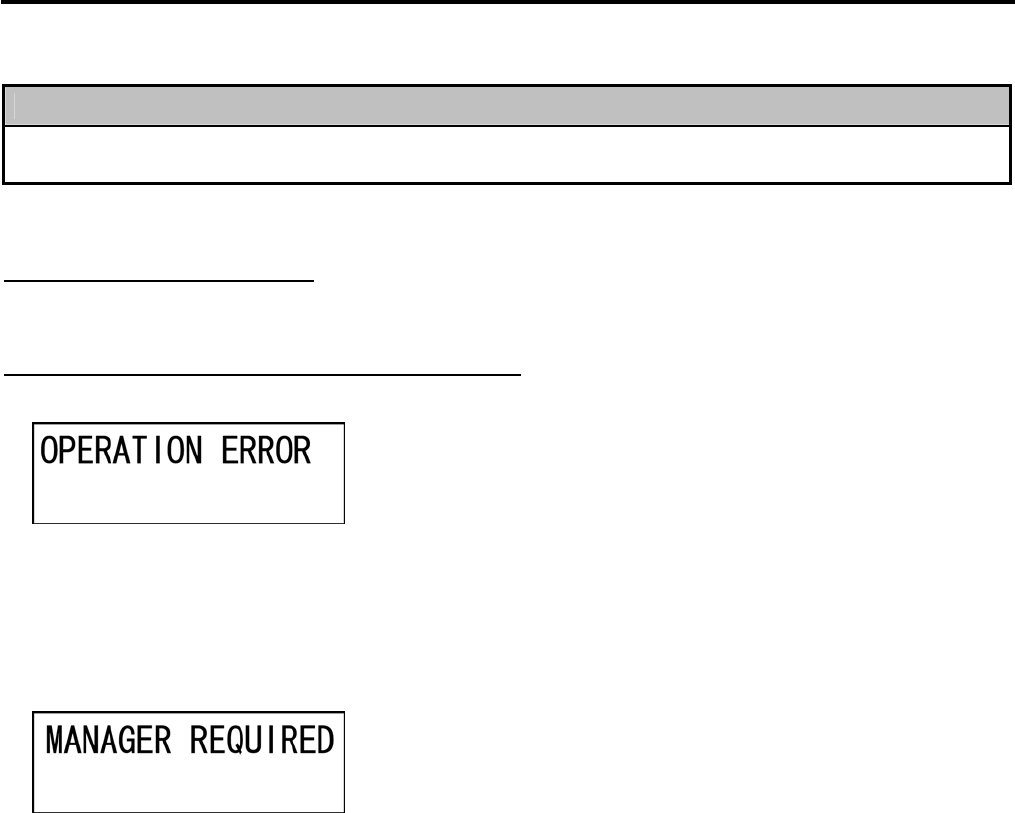
• Errors ...
(This error message is displayed at the time of operation error.)
A tone continuously sounds and an error message appear in the LCD display of the Operator Display.
The keys on the keyboard are locked. In this case, read the Error Message (refer to the ERROR MESSAGE
TABLE, Section 5.1), and depress the [C] key to cancel the error status. Then remove the cause of the error
and perform the operation again.
• Manager Intervention is required ...
(This error message is displayed when a Manager Intervention is
required.)
When the Error Message “MANAGER REQUIRED” (standard setting; programmable) is displayed, it means
that the last key or operation requires a Manager Intervention. Depress the [C] key to cancel the error status,
and call the manager for intervention.
When the manager comes to intervene with an appropriate key, you may perform the operation again. If you
are informed which keys and operations will require Manager Intervention, you can call the manager in advance
before the error occurs.
• Other errors requiring Manager Intervention ...
When an error occurs and you cannot think of the cause or the same error occurs again, call your manager.
11. REGISTERING PROCEDURE AND PRINT FORMAT EO1-11155
11.1 No-Sale
11- 2
CONDITION SETTING TO START SALE ENTRIES
Mode Lock: Insert the REG key and set it to the REG position.
Cashier Sign-ON or Cashier Key to ON status:
If the [LOG/RECEIPT] (or [LOG]) key is installed, you must sign-ON. (See Section 9.1.)
If Cashier Keys are installed, you must set your cashier key to the ON status. (See Section 9.2.)
Now you are ready for sale entries.
On the following pages are patterns of entering operations, and receipt or journal print format samples due to the
operations. In the operation sequence patterns, “| |” indicates an input through the numeric keys, “[ ]”
indicates a depression of the function key, and “---” indicates other registering and/or finalizing operations.
Please note that these are merely sample operations. Especially, the receipt or journal print indications merely
show the standard print format. The actual print format and contents may vary on your machine in accordance
with the differences in specifications, program selections, etc.
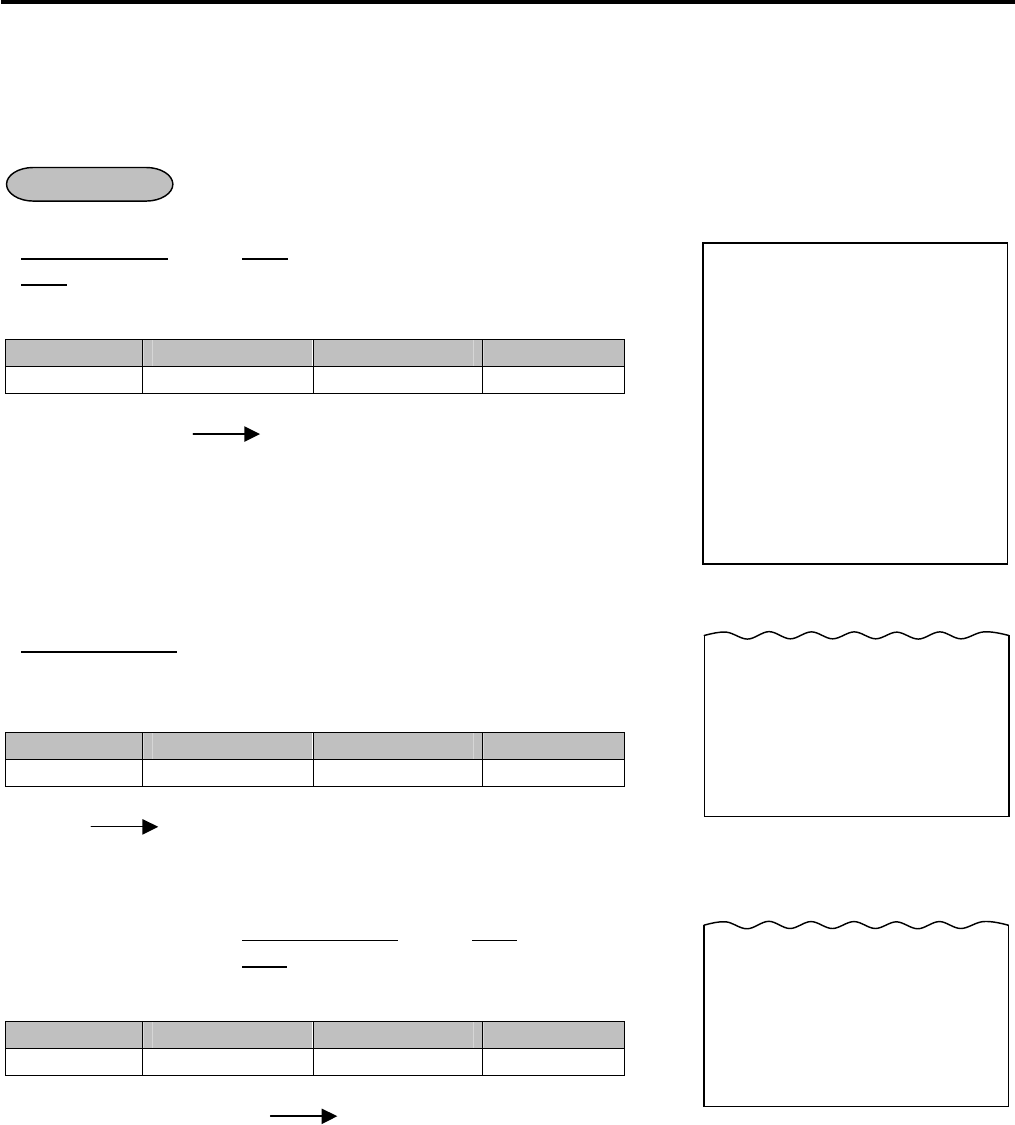
11.1 No-Sale
The no-sale transaction is used to open the cash drawer without relating to any sales, such as for giving change,
testing the receipt/journal print condition, etc.
(Must be operated outside a sale)
[NS] ...................... The drawer opens and a No-sale receipt is issued.
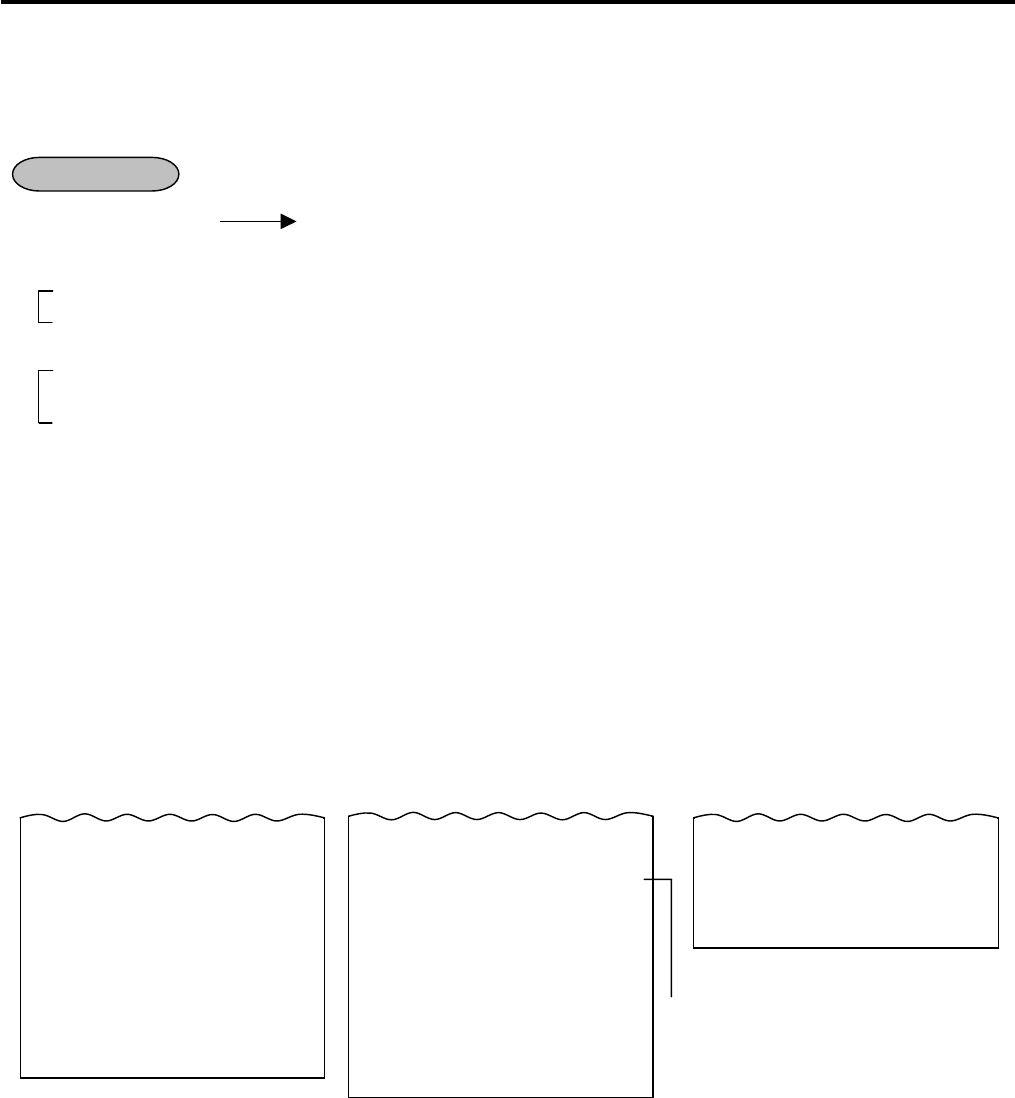
-- Receipt Print Format --
NOTE: The print format samples in this manual are not copies of actual receipts printed on an ECR but are
merely indications of print formats. In those format samples, the bold-face characters indicate
Double-sized Characters on actual receipts issued by the ECR. Also note that each two-byte
character on actual receipts will be printed at the position one-byte space rightward more than in the
print format samples in this manual.
OPERATION
Max.4 lines of Store Name/Message
Max.3 lines of Commercial Message
Date (Day-Month-Year order in this sample)
Day
-
of
-
Week
Name of the Cashier who is operating
the ECR.
Register No.
No-sale Receipt Header
Consecutive No.
Current Time
TEC STORE
1343 PEACH DRIVE
PHONE: 87-6437
Open 8:00am to 7:00pm
Closed: every Wednesday
10-20-2006 FRI #3001
**NO SALE **
JONES 0111 11:26TM
11. REGISTERING PROCEDURE AND PRINT FORMAT EO1-11155
11.2 Receipt-Issue/Non-Issue Selection
11- 3
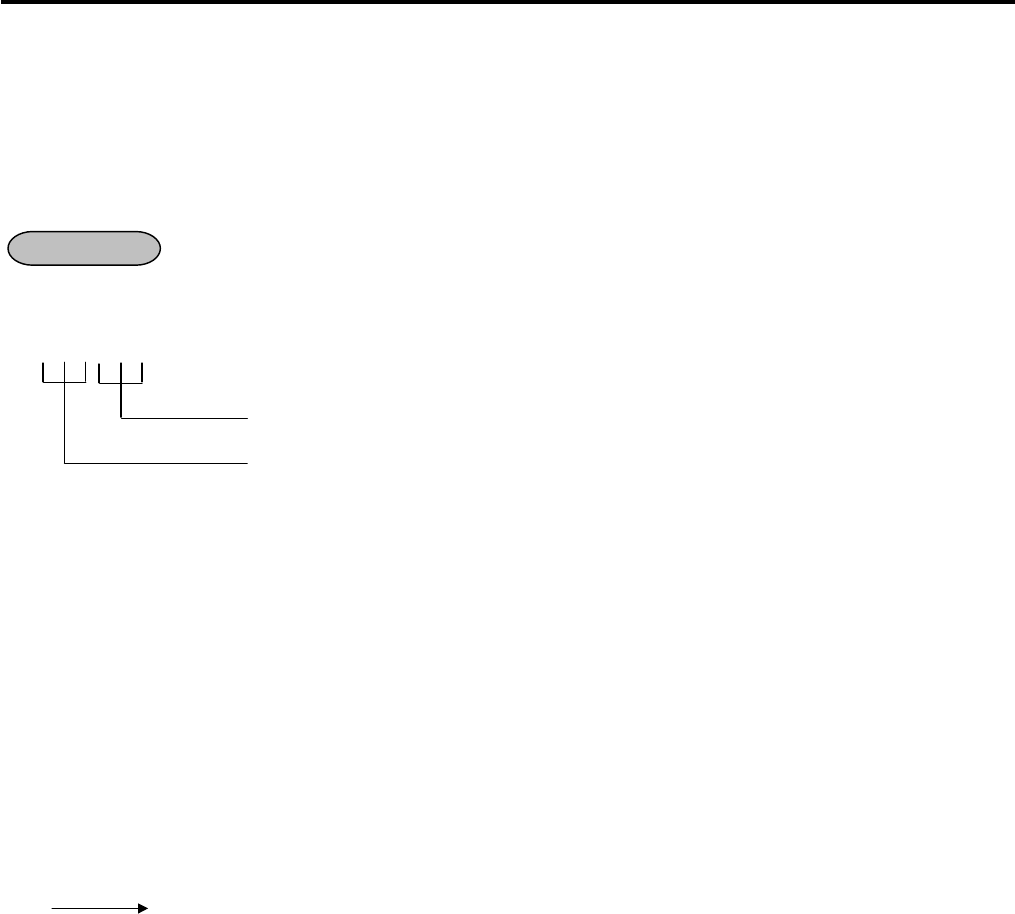
11.2 Receipt-Issue/Non-Issue Selection
Receipts are issued or not issued according to the “R OFF” lamp illuminated/extinguished status on the Operator
Display panel.
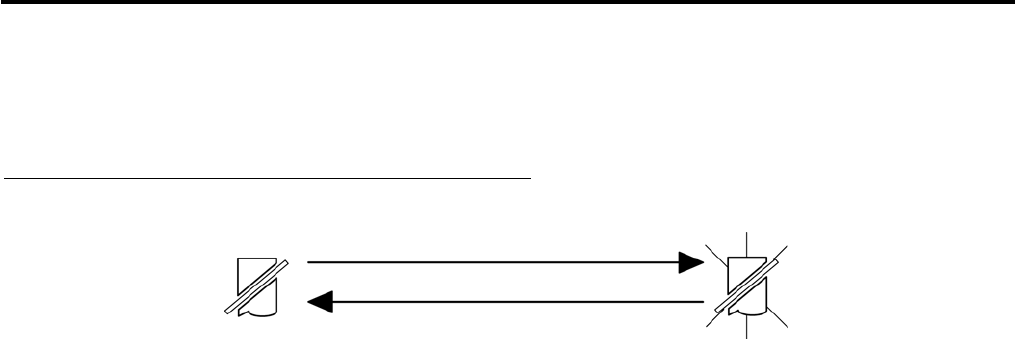
“R OFF” (Receipt OFF) Lamp Status Change Operations ([LOG/RECEIPT] = [RECEIPT]).
Mode Lock may be in any position
[LOG/RECEIPT]
Extinguished [LOG/RECEIPT] Illuminated
Receipt ON Status Receipt OFF Status
NOTES:
1. The “R OFF” lamp status at the starting of a transaction entry decides whether a receipt will be issued for the
transaction or not. Switching the Receipt ON/OFF status during a transaction will not be effective.
2. If a transaction entered with the “R OFF” lamp illuminated and finalized but a receipt is required, the
[RECEIPT ISSUE] (Post-issue Receipt) key can be operated to issue a receipt.
3. Simply depress the [LOG/RECEIPT] key without a numeric entry. If the key is depressed with a prior numeric
entry in REG mode, it may turn out to be a Sign ON or Sign OFF operation (in case of Cashier Code Entry
Method).
4. Receipt-issue or non-issue cannot be selected after a non-add number print.
5. Even when the ECR is in the Receipt-OFF mode, a receipt after taking a reset report is issued.
11. REGISTERING PROCEDURE AND PRINT FORMAT EO1-11155
11.3 Receipt Post-Issue
11- 4
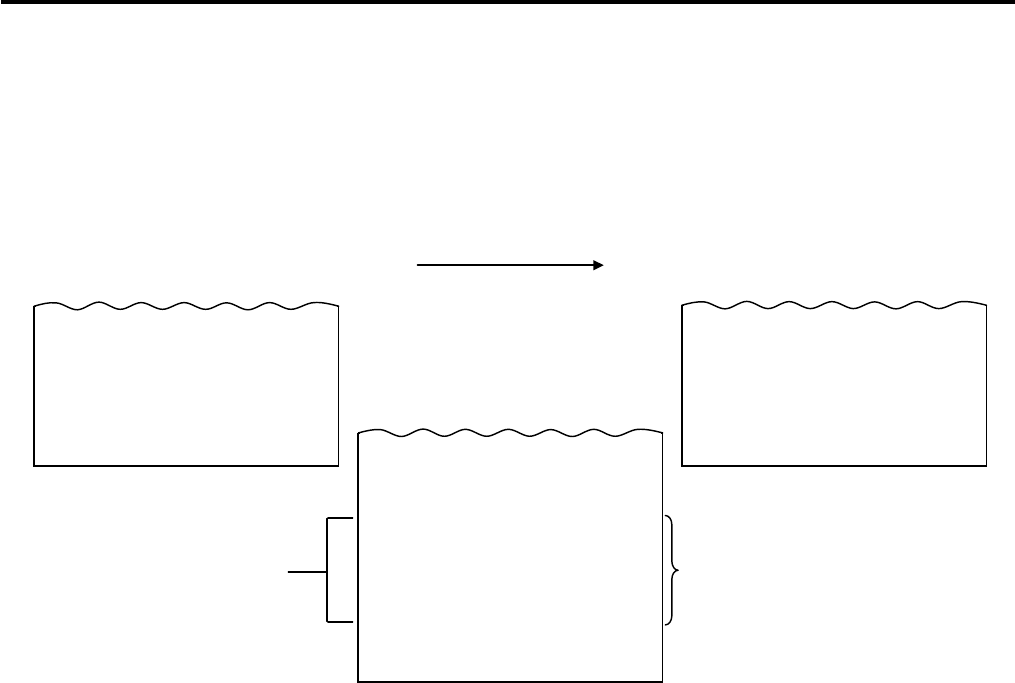
11.3 Receipt Post-Issue
After finalizing a sale, the [RECEIPT ISSUE] key depression leads to an issuance of an itemized receipt for
previous entry. Post-issue receipt is issued only once.
(Must be operated outside a sale)
(A sale is finalized.) [RECEIPT ISSUE]
Programmable options:
• Post-issue receipt is available only when the sale has been finalized with Receipt-OFF mode.
• Available regardless of Receipt-ON/OFF mode (in this case two receipts may be obtained for one sale.)
• Post-issue receipt is itemized receipt for a sale of maximum 30 lines. Exceeding 30 lines, the post-issue
receipt is total-only receipt.
• Post-issue receipt is always total-only receipt regardless of the number of lines of a sale.
NOTES:
1. The post-issue receipt content will not be printed on the Remote Slip Printer.
2. The post-issue receipt is not available for Paid-Out transactions.
3. The post-issue receipt operation is available for the Charge Posting transaction (sale with previous balance).
However, when the Charge Posting transaction is finalized by the [PO] key, the post-issue receipt operation
cannot be performed.
4. The post-issue receipt operation after the received-on-account transaction is possible by the program option,
however, the itemized type post-issue receipt operation is not possible.
5. The validation print operation is not possible after performing the post-issue receipt operation.
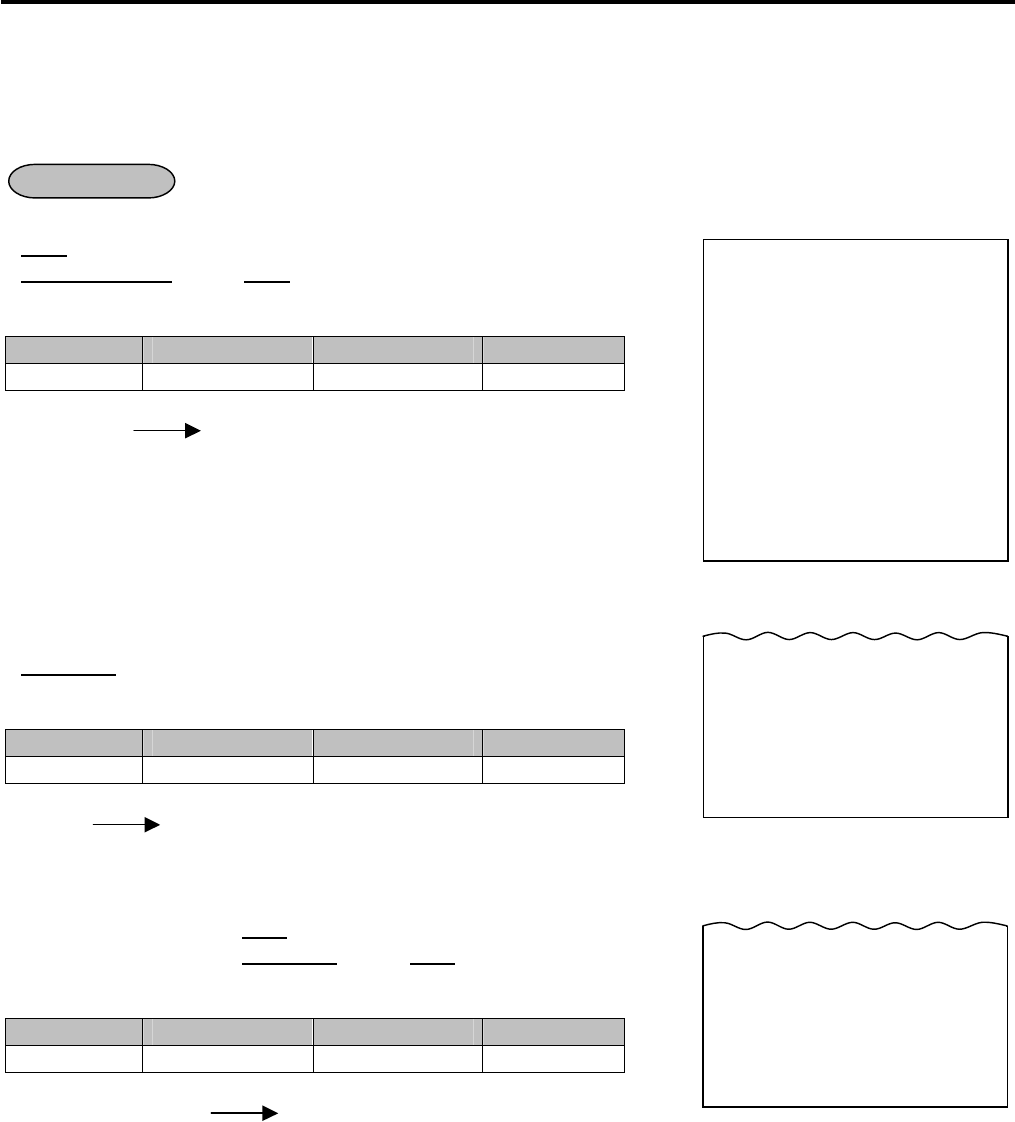
-- Post-issue Receipt --
-- Ordinary Receipt -- Itemized Type Total-only Type
10-20-2006 FRI #3001
VEGETABLE $8.60
2x 1.00@
Tomato $2.00
SUBTL $10.60
TOTAL $
10.60
CATEND $11.00
CHANGE $0.40
ITEM 3
JONES 0316 17:58TM
10-20-2006 FRI #3001
TOTAL $
10.60
JONES 0316 17:58TM
This line is printed only when a post-
issue
receipt is issued after
the Ordinary Receipt is
issued, or the second and subsequent post-
issue receipts are issued.
10-20-2006 FRI #3001
**COPY **
VEGETABLE $8.60
2x 1.00@
Tomato $2.00
SUBTL $10.60
TOTAL $
10.60
CATEND $11.00
CHANGE $0.40
ITEM 3
JONES 0316 17:58TM
OPERATION
11. REGISTERING PROCEDURE AND PRINT FORMAT EO1-11155
11.4 Department Entry
11- 5
11.4 Department Entry
Each department is pre-programmed as the “PRESET” type (with a price programmed) or “OPEN” type (with no
price programmed). Perform an operation depending on the type selected.
Open Department Type -- Receipt Print Format --
• |Price| [Open DEPT]
• |Open-Dept Code| [DP#] |Price| [AMT]
Example:
Department Department Name Department Type Preset Price
DEPT 1 DP01 Open ---
100 [DEPT 1] [AT/TL]
Preset Department Type -- Receipt Print Format --
• [Preset DEPT]
• |Dept Code| [DP#]
Example:
Department Department Name Department Type Preset Price
DEPT 9 DP09 Preset $1.50
[DEPT 9] [AT/TL]
Preset-price Open through Preset Department Type -- Receipt Print Format --
• [OPEN] (or [PR OPEN]) |Price| [Preset DEPT]
• [OPEN] (or [PR OPEN]) |Dept Code| [DP#] |Price| [AMT]
Example:
Department Department Name Department Type Preset Price
DEPT 9 DP09 Preset $1.50
[OPEN] 100 [DEPT 9] [AT/TL]
NOTES:
1. A maximum of 7-digit price can be programmed.
2. For the preset-price open through preset department type, depressing the [OPEN] (or [PR OPEN]) key then
the [Preset DEPT] key without entering its price may cause an error.
OPERATION
TEC STORE
1343 PEACH DRIVE
PHONE: 87-6437
Open 8:00am to 7:00pm
Closed: every Wednesday
10-20-2006 FRI #3001
DP
01 $1.00
CASH $
1.00
ITEM 1
JONES 0110 10:30TM
10-20-2006 FRI #3001
DP
09 $1.50
CASH $
1.50
ITEM 1
JONES 0111 10:32TM
10-20-2006 FRI #3001
DP
09 $1.00
CASH $
1.00
ITEM 1
JONES 0112 10:35TM
11. REGISTERING PROCEDURE AND PRINT FORMAT EO1-11155
11.5 PLU Entry
11- 6
11.5 PLU Entry
Each PLU is preprogrammed as the “PRESET” type (with a price preset) or “OPEN” type (with no price preset).
Perform operation depending on the type selected.
Open PLU Type -- Receipt Print Format --
• |Open-PLU Code| [PLU] |Price| [AMT]
• |Price| [PLU Preset-Code Key] of Preset-PLU
Example:
PLU Code PLU Name PLU Type Preset Price
50 Tomato Open ---
50 [PLU] 100 [AMT] [AT/TL]
Preset PLU Type -- Receipt Print Format --
• |Preset-PLU Code| [PLU]
• [PLU Preset-Code Key] of Preset-PLU
Example:
PLU Code PLU Name PLU Type Preset Price
30 Drink Small-B Preset $1.50
30 [PLU] [AT/TL]
Preset-price Open Entry through Preset PLU Type -- Receipt Print Format --
• [OPEN] (or [PR OPEN]) |Preset-PLU Code| [PLU] |Price| [AMT]
• [OPEN] (or [PR OPEN]) |Price| [PLU Preset-Code Key]
Example:
PLU Code PLU Name PLU Type Preset Price
30 Drink Small-B Preset $1.50
[OPEN] 30 [PLU] 120 [AMT] [AT/TL]
NOTES:
1. A maximum of 4-digit PLU code can be entered. (1 to 9999)
2. A maximum of 7-digit price can be programmed.
3. When the linked department is negative, a negative PLU entry is performed.
OPERATION
TEC STORE
1343 PEACH DRIVE
PHONE: 87-6437
Open 8:00am to 7:00pm
Closed: every Wednesday
10-20-2006 FRI #3001
Tomato $1.00
CASH $
1.00
ITEM 1
JONES 0113 10:37TM
10-20-2006 FRI #3001
Drink Small-B $1.50
CASH $
1.50
ITEM 1
JONES 0114 10:39TM
10-20-2006 FRI #3001
Drink Small-B $1.20
CASH $
1.20
ITEM 1
JONES 0115 10:40TM
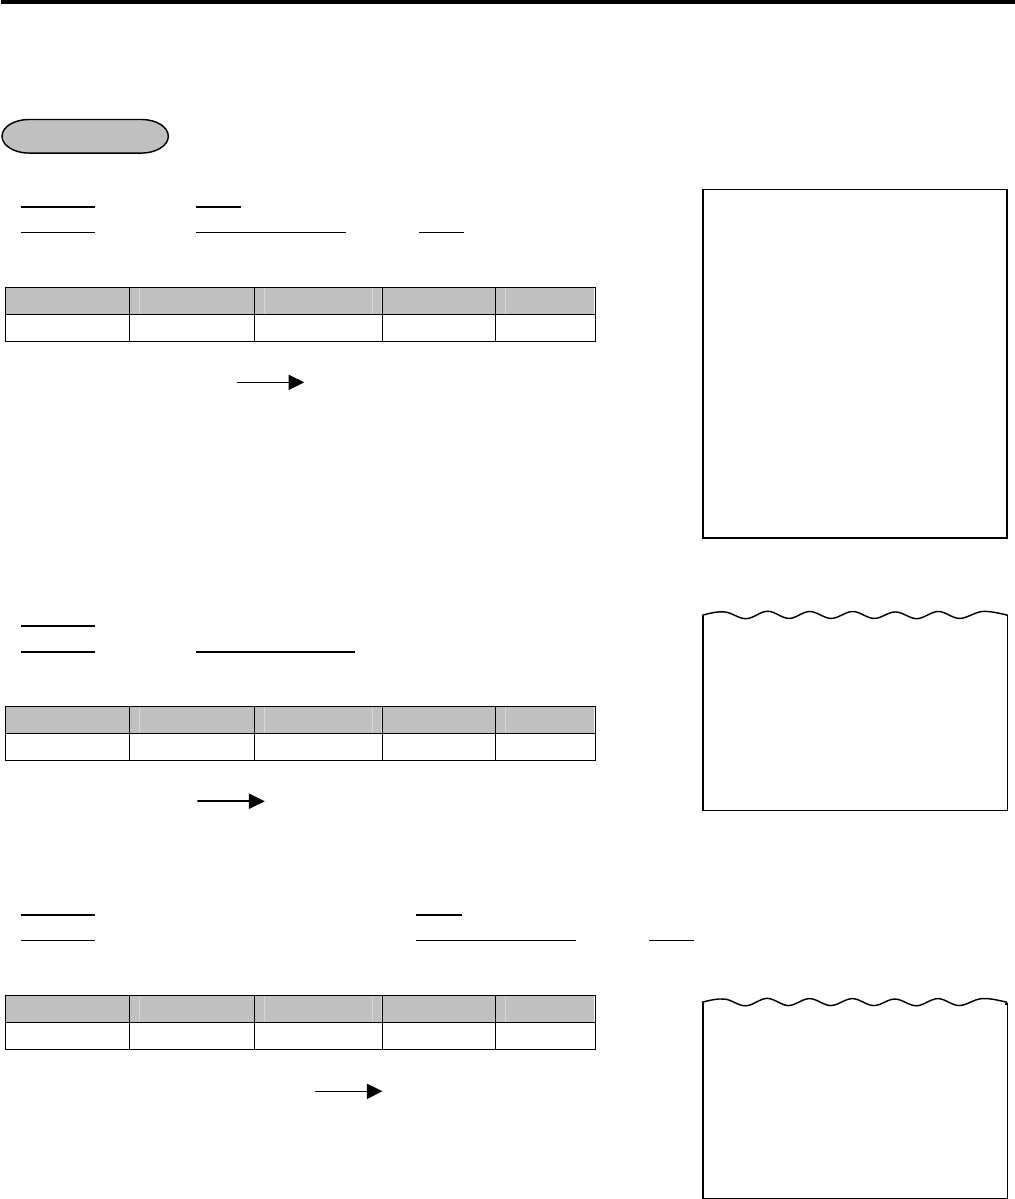
11. REGISTERING PROCEDURE AND PRINT FORMAT EO1-11155
11.6 Quantity Extension (Multiplication ) for DEPTS/PLUs
11- 7
11.6 Quantity Extension (Multiplication ) for DEPTS/PLUs
(1) Department Multiplication
Open Department Type -- Receipt Print Format --
• |Quantity| [@/FOR] |Price| [Open DEPT]
• |Quantity| [@/FOR] |Open-Dept Code| [DP#] |Price| [AMT]
Example:
Department Dept. Name Dept. Type Preset Price
Quantity
DEPT 3 DP03 Open --- 5
5 [@/FOR] 300 [DEPT 3] [AT/TL]
Preset Department Type -- Receipt Print Format --
• |Quantity| [@/FOR] [Preset DEPT]
• |Quantity| [@/FOR] |Preset-Dept Code| [DP#]
Example:
Department Dept. Name Dept. Type Preset Price
Quantity
DEPT 4 DP04 Preset $1.50 6
6 [@/FOR] [DEPT 4] [AT/TL]
Preset-price Open Type
• |Quantity| [@/FOR] [OPEN] (or [PR OPEN]) |Price| [Preset DEPT]
• |Quantity| [@/FOR] [OPEN] (or [PR OPEN]) |Preset-Dept Code| [DP#] |Price| [AMT]
Example: -- Receipt Print Format --
Department Dept. Name Dept. Type Preset Price
Quantity
DEPT 4 DP04 Preset $1.50 4
4 [@/FOR] [OPEN] 120 [DEPT 4] [AT/TL]
OPERATION
TEC STORE
1343 PEACH DRIVE
PHONE: 87-6437
Open 8:00am to 7:00pm
Closed: every Wednesday
10-20-2006 FRI #3001
5x 3.00@
DP
03 $15.00
CASH $
15.00
ITEM 5
JONES 0116 10:42TM
10-20-2006 FRI #3001
6x 1.50@
DP
04 $9.00
CASH $
9.00
ITEM 6
JONES 0117 10:45TM
10-20-2006 FRI #3001
4x 1.20@
DP
04 $4.80
CASH $
4.80
ITEM 4
JONES 0118 10:47TM
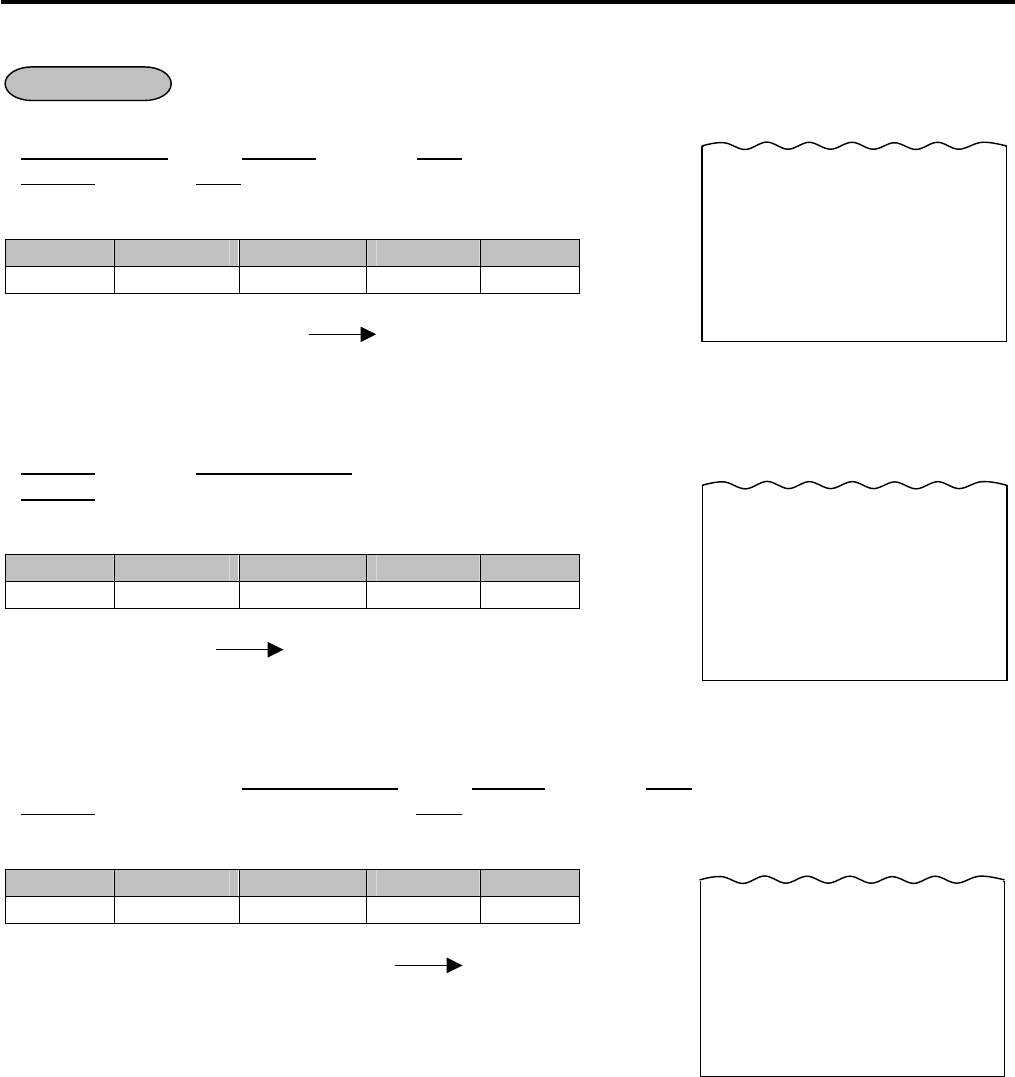
11. REGISTERING PROCEDURE AND PRINT FORMAT EO1-11155
11.6 Quantity Extension (Multiplication ) for DEPTS/PLUs
11- 8
(2) PLU Multiplication
Open PLU Type -- Receipt Print Format --
• |Open-PLU Code| [PLU] |Quantity| [@/FOR] |Price| [AMT]
• |Quantity| [@/FOR] |Price| [PLU Preset-Code Key] of Open-PLU
Example:
PLU Code
PLU Name PLU Type Preset Price
Quantity
100 PLU100 Open --- 5
100 [PLU] 5 [@/FOR] 120 [AMT] [AT/TL]
Preset PLU Type -- Receipt Print Format --
• |Quantity| [@/FOR] |Preset-PLU Code| [PLU]
• |Quantity| [@/FOR] [PLU Preset-Code Key] of Preset-PLU
Example:
PLU Code
PLU Name PLU Type Preset Price
Quantity
200 PLU200 Preset $1.00 10
10 [@/FOR] 200 [PLU] [AT/TL]
Preset-price Open Type
• [OPEN] (or [PR OPEN]) |Preset-PLU Code| [PLU] |Quantity| [@/FOR] |Price| [AMT]
• |Quantity| [@/FOR] [OPEN] (or [PR OPEN]) |Price| [PLU Preset-Code Key] of Preset-PLU
Example: -- Receipt Print Format --
PLU Code
PLU Name PLU Type Preset Price
Quantity
200 PLU200 Preset $1.00 10
[OPEN] 200 [PLU] 10 [@/FOR] 120 [AMT] [AT/TL]
NOTES:
1. Quantity ................. Max. 3 integral + 3 decimal digits (0.001 to 999.999: Use the [ . ] key for entering decimal
digits.)
Price (Unit Price) ... Max. 6 digits
Product .................. Must not exceed 8 digits.
2. When the Quantity is 1-digit integer (1 to 9) followed by a Code-preset Department/PLU key with a price
preset, the [@/FOR] key is omissible.
3. The product obtained by multiplication cannot be repeated.
4. The decimal portion of the Quantity entry itself is processed down to the two digits below the decimal point.
The fraction rounding in this case is fixed to ROUND OFF.
5. You can select the rounding process of the fractions of the product (result of multiplication) by a program
option: ROUND OFF (initial setting), ROUND UP, or ROUND DOWN.
6. The Quantity Extension operation is not possible when the quantity is 0.
OPERATION
10-20-2006 FRI #3001
10x 1.00@
PLU0200 $10.00
CASH $
10.00
ITEM 10
JONES 0120 10:53TM
10-20-2006 FRI #3001
10x 1.20@
PLU0200 $12.00
CASH $
12.00
ITEM 10
JONES 0121 10:55TM
10-20-2006 FRI #3001
5x 1.20@
PLU0100 $6.00
CASH $
6.00
ITEM 5
JONES 0119 10:51TM
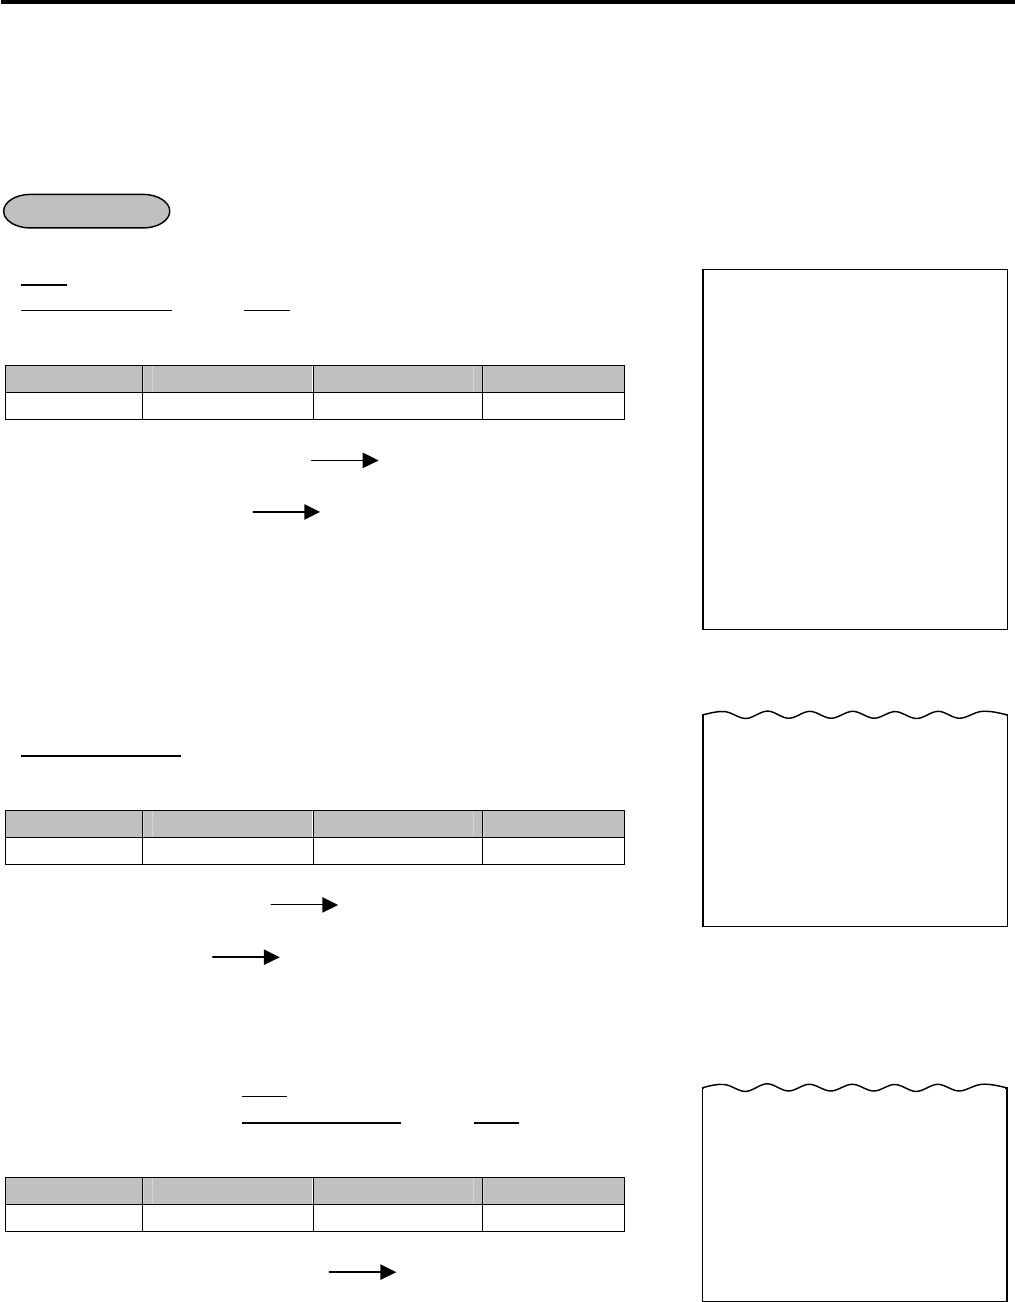
11. REGISTERING PROCEDURE AND PRINT FORMAT EO1-11155
11.7 Repeat Entry
11- 9
11.7 Repeat Entry
To repeat the same item of the last entry, simply depress the last key of the department or PLU entry sequence
or depress the [RPT] key.
(1) Department Repeat
Open Department Type -- Receipt Print Format --
• |Price| [Open DEPT] [Same DEPT] (or [RPT])
• |Open-Dept Code| [DP#] |Price| [AMT] [AMT] (or [RPT])
Example:
Department Department Name Department Type Preset Price
DEPT 1 DP01 Open ---
100 [DEPT 1] [DEPT 1] [DEPT 1] [AT/TL]
or
100 [DEPT 1] [RPT] [RPT] [AT/TL]
Preset Department Type -- Receipt Print Format --
• [Preset DEPT] [Same DEPT] (or [RPT])
• |Preset-Dept Code| [DP#] [DP#] (or [RPT])
Example:
Department Department Name Department Type Preset Price
DEPT 9 DP09 Preset $1.50
[DEPT 9] [DEPT 9] [DEPT 9] [AT/TL]
or
[DEPT 9] [RPT] [RPT] [AT/TL]
Preset-price Open Repeat -- Receipt Print Format --
• [OPEN] (or [PR OPEN]) |Price| [Preset DEPT] [RPT]
• [OPEN] (or [PR OPEN]) |Preset-Dept Code| [DP#] |Price| [AMT] [RPT]
Example:
Department Department Name Department Type Preset Price
DEPT 9 DP09 Preset $1.50
[OPEN] 120 [DEPT 9] [RPT] [RPT] [AT/TL]
OPERATION
TEC STORE
1343 PEACH DRIVE
PHONE: 87-6437
Open 8:00am to 7:00pm
Closed: every Wednesday
10-20-2006 FRI #3001
DP
01 $1.00
DP
01 $1.00
DP
01 $1.00
CASH $
3.00
ITEM 3
JONES 0122 10:57TM
10-20-2006 FRI #3001
DP
09 $1.50
DP
09 $1.50
DP
09 $1.50
CASH $
4.50
ITEM 3
JONES 0123 10:59TM
10-20-2006 FRI #3001
DP
09 $1.20
DP
09 $1.20
DP
09 $1.20
CASH $
3.60
ITEM 3
JONES 0124 11:01TM
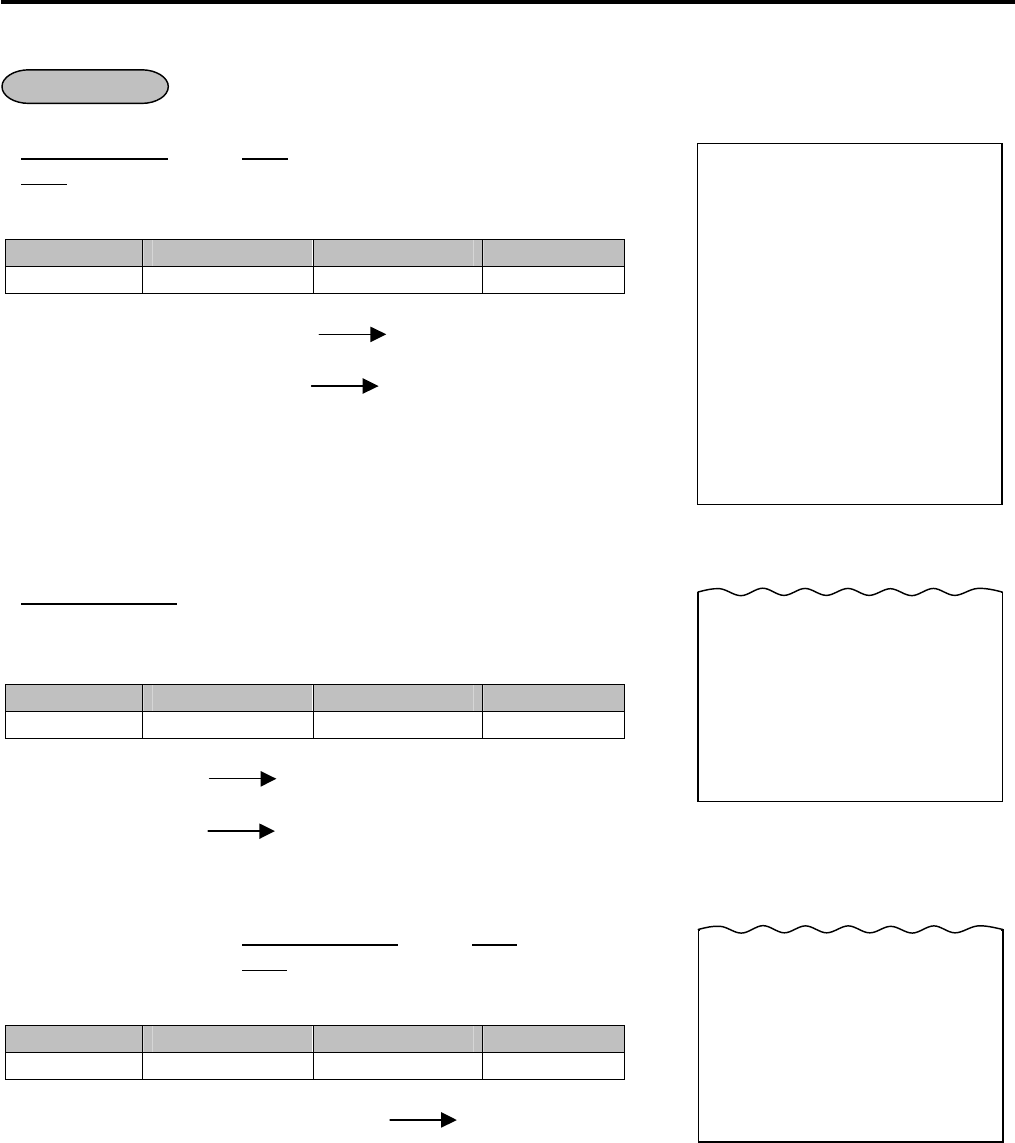
11. REGISTERING PROCEDURE AND PRINT FORMAT EO1-11155
11.7 Repeat Entry
11-10
(2) PLU Repeat
Open PLU Type -- Receipt Print Format --
• |Open-PLU Code| [PLU] |Price| [AMT] [AMT] (or [RPT])
• |Price| [PLU Preset-Code Key] [Same key] (or [RPT])
Example:
PLU Code PLU Name PLU Type Preset Price
50 Tomato Open ---
50 [PLU] 100 [AMT] [AMT] [AMT] [AT/TL]
or
50 [PLU] 100 [AMT] [RPT] [RPT] [AT/TL]
Preset PLU Type -- Receipt Print Format --
• |Preset-PLU Code| [PLU] [Same key] (or [RPT])
• [PLU Preset-Code Key] [Same key] (or [RPT])
Example:
PLU Code PLU Name PLU Type Preset Price
30 Drink Small-B Preset $1.50
30 [PLU] [PLU] [PLU] [AT/TL]
or
30 [PLU] [RPT] [RPT] [AT/TL]
Preset-price Open Repeat -- Receipt Print Format --
• [OPEN] (or [PR OPEN]) |Preset-PLU Code| [PLU] |Price| [AMT] [RPT]
• [OPEN] (or [PR OPEN]) |Price| [PLU Preset-Code Key] [RPT]
Example:
PLU Code PLU Name PLU Type Preset Price
30 Drink Small-B Preset $1.50
[OPEN] 30 [PLU] 100 [AMT] [RPT] [RPT] [AT/TL]
NOTES:
1. If the first item of those repeated is modified with the [LC OPEN] or [TX/M] key, the modified status will be
effective through the last item of the repeated.
2. Please note that the Preset-price Open Repeat using a [Preset DEPT] key or a [PLU Preset-Code Key] can
be repeated by the [RPT] key only.
3. A negative Department or negative PLU item cannot be repeated.
4. The Repeat entry is not possible after performing the Non-add Number Print ([#] key operation).
5. The Repeat entry is not possible after depressing the [RTN MDSE], [STR CPN], or [VOID] key.
OPERATION
TEC STORE
1343 PEACH DRIVE
PHONE: 87-6437
Open 8:00am to 7:00pm
Closed: every Wednesday
10-20-2006 FRI #3001
Tomato $1.00
Tomato $1.00
Tomato $1.00
CASH $
3.00
ITEM 3
JONES 0125 11:03TM
10-20-2006 FRI #3001
Drink Small-B $1.50
Drink Small-B $1.50
Drink Small-B $1.50
CASH $
4.50
ITEM 3
JONES 0126 11:05TM
10-20-2006 FRI #3001
Drink Small-B $1.00
Drink Small-B $1.00
Drink Small-B $1.00
CASH $
3.00
ITEM 3
JONES 0127 11:07TM
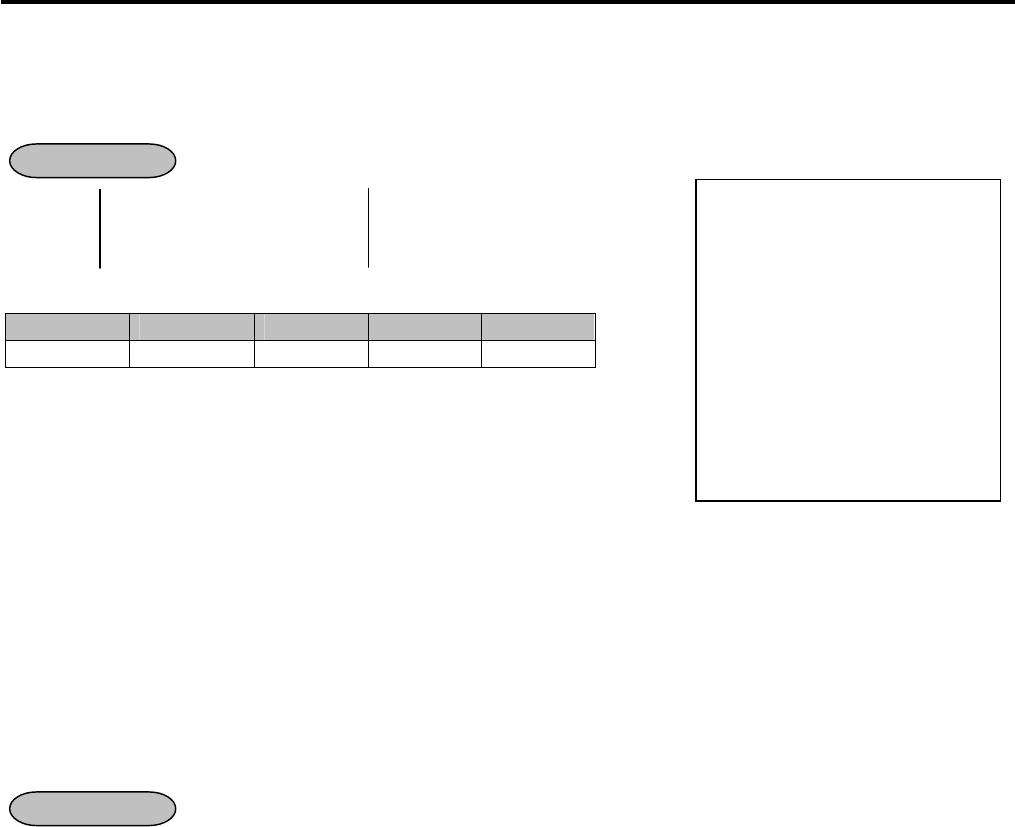
11. REGISTERING PROCEDURE AND PRINT FORMAT EO1-11155
11.8 Single-Item Department or Single-Item PLU Entry
11-11
11.8 Single-Item Department or Single-Item PLU Entry
If a department (or PLU) is programmed with Single-item status, the department (or PLU) entry sequence will
immediately finalize the sale as cash sale when operated outside a sale.
Same as DEPARTMENT ENTRY
PLU ENTRY
QUANTITY EXTENSION
Example:
Department Dept. Name Dept. Type
Preset Price
Status
DEPT 15 DP15 Preset $2.10 Single Item
[DEPT 15]
NOTES:
1. If operated inside a sale, it functions just as an ordinary itemized department or PLU.
2. For the validation print after the Single-Item Department (or PLU) entry, the name and the amount of the
department (or PLU) are printed.
11.9 HASH Department Entry, HASH PLU Entry
This operation is used to enter items which do not directly become sales for the store, such as lottery, postage,
gift wrapping fee, size adjustment fee, utility (payment of electricity and gas), and donation.
Same as DEPARTMENT ENTRY sequence using the Department Key which is programmed as a HASH
department. When a PLU is used for this purpose, the PLU must be programmed to link to a department with
HASH status.
OPERATION
-- Single-item Receipt Print Format --
TEC STORE
1343 PEACH DRIVE
PHONE: 87-6437
Open 8:00am to 7:00pm
Closed: every Wednesday
10-20-2006 FRI #3001
DP
15 $2.10
CASH $
2.10
ITEM 1
JONES 0165 12:30TM
OPERATION
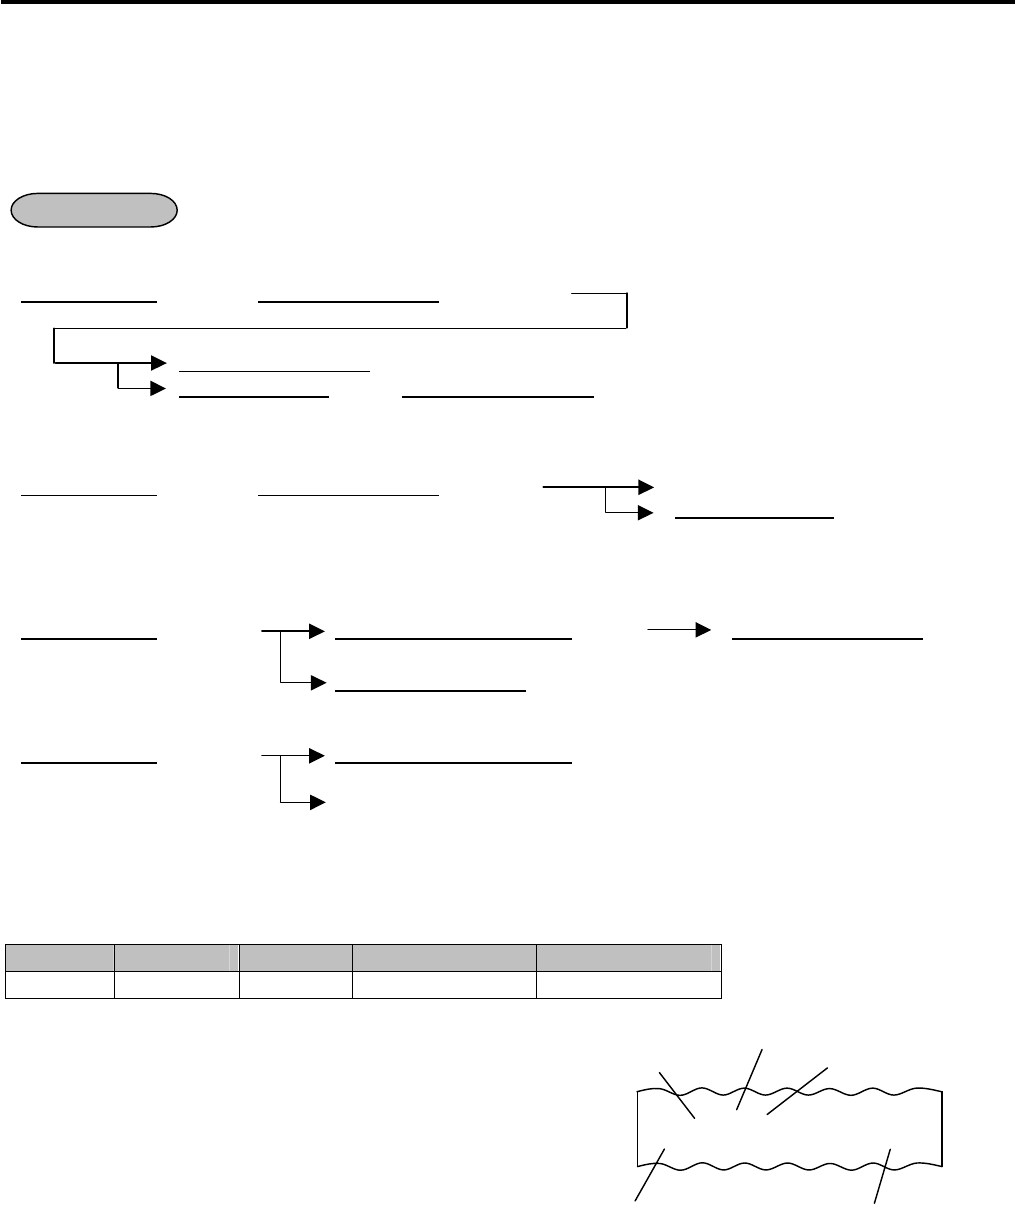
11. REGISTERING PROCEDURE AND PRINT FORMAT EO1-11155
11.10 Split Package Pricing
11-12
11.10 Split Package Pricing (“Q’ty” = Quantity ... in the patterns listed below)
This operation is used for entering individual item of whole package.
For example, one individual item of whole package ($1.00/3 pcs.) can be entered by this operation.
This operation can be performed for PLUs of which whole package quantity is preset.
(1) Department
Open Department
• |Purchased Q’ty| [@/FOR] |Whole Package Q’ty| [@/FOR]
|Whole Package Price| [Open Dept]
|Open-Dept Code| [DP#] |Whole Package Price| [AMT]
Preset Department
• |Purchased Q’ty| [@/FOR] |Whole Package Q’ty| [@/FOR] [Preset Dept]
|Preset-Dept Code| [DP#]
(2) PLU
Open PLU
• |Purchased Q’ty| [@/FOR] |Split-Price Type PLU Code| [PLU] |Whole Package Price| [AMT]
|Whole Package Price| [PLU Preset-code Key] of Split-Price Type
Preset PLU
• |Purchased Q’ty| [@/FOR] |Split-Price Type PLU Code| [PLU]
[PLU Preset-code Key] of Split-Price Type
Example: When two oranges priced at $1 per three pieces are bought (PLU code 150 as shown below), the
fraction of the split package pricing operation is rounded in the Round Up Product method.
PLU Code
PLU Name PLU Type Whole Package Price
Whole Package Qty
150 Orange Preset $1.00 3
2 [@/FOR] 150 [PLU]
OPERATION
Purchased Quantity
Item Name
Whole Package Price
Whole Package Quantity
Purchased Amount
2@ 3/1.00
Orange $0.67T

11. REGISTERING PROCEDURE AND PRINT FORMAT EO1-11155
11.10 Split Package Pricing
11-13
NOTES:
1. Purchased Quantity ....................... max.3 digits integral only
Whole Package Quantity ............... max.3 digits integral only
Whole Package Price .................... max.6 digits
2. One of two fraction rounding methods can be selected for the Split Package Pricing calculations ---
Round Up PRODUCT (initial setting) or Round Up UNIT PRICE.
When two items priced at $1 per three are bought as shown in the example on the previous page;
1) In case of Round Up UNIT PRICE
1 ÷ 3 = 0.33333…..→ 0.34
0.34 × 2 = 0.68
2) In case of Round Up PRODUCT
(100 ÷ 3) × 2 = 0.66666…..→ 0.67
This optional method is applied for the quantity less than whole package quantity.
Accordingly, when five oranges are bought, the three out of five are priced at $1 (equal to the whole package
price) and the price of the remaining two is calculated according to the optional method.
If the Round Up UNIT PRICE method is used, the price will be $1.68.
If the Round Up PRODUCT method is used, the price will be $1.67.
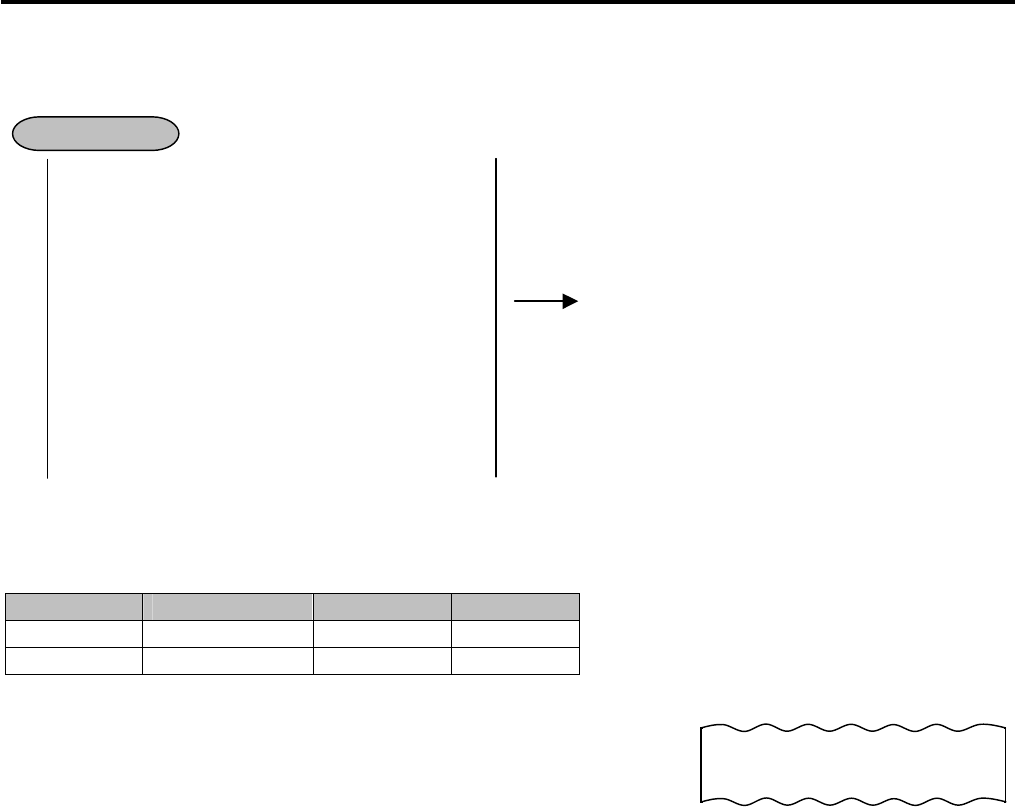
11. REGISTERING PROCEDURE AND PRINT FORMAT EO1-11155
11.11 Item Correct
11-14
11.11 Item Correct
The Item Correct operation is used for deleting an item which was just entered.
DEPARTMENT ENTRY
PLU ENTRY
REPEAT ENTRY
QUANTITY EXTENSION
RETURNED MERCHANDISE
AMOUNT DISCOUNT [ITEM CORR]
PERCENT CHARGE/DISCOUNT
STORE COUPON
VENDOR COUPON
Previous Balance Entry
RECEIVED-ON-ACCOUNT Item
PAID-OUT Item
Example: When the [DEPT4] key instead of the [DEPT3] key is incorrectly depressed in the following
transaction, the Item Correct operation is performed for deleting the entry of the [DEPT4] key.
Department Department Name Purchased Qty
Price
DEPT 1 DP01 3 $1.20
DEPT 3 DP03 1 $2.00
3 [@/FOR] 120 [DEPT1]
200 [DEPT4]
[ITEM CORR]
NOTES:
1. When [ITEM CORR] is depressed after a Repeat entry, only the last item of those repeated will be deleted.
2. When [ITEM CORR] is depressed after a Quantity Extension entry, the entire product (result of multiplication)
will be deleted.
3. When the Item Correct operation is performed, “CORR ↑“ is printed on the journal, but the deleted item is not
printed on the receipt.
4. The Validation Print operation is possible after the Item Correct operation.
5. The Item Correct operation is not possible after the Validation Print operation.
OPERATION
-- Journal Print Format --
DP
04 $2.00
CORR ↑
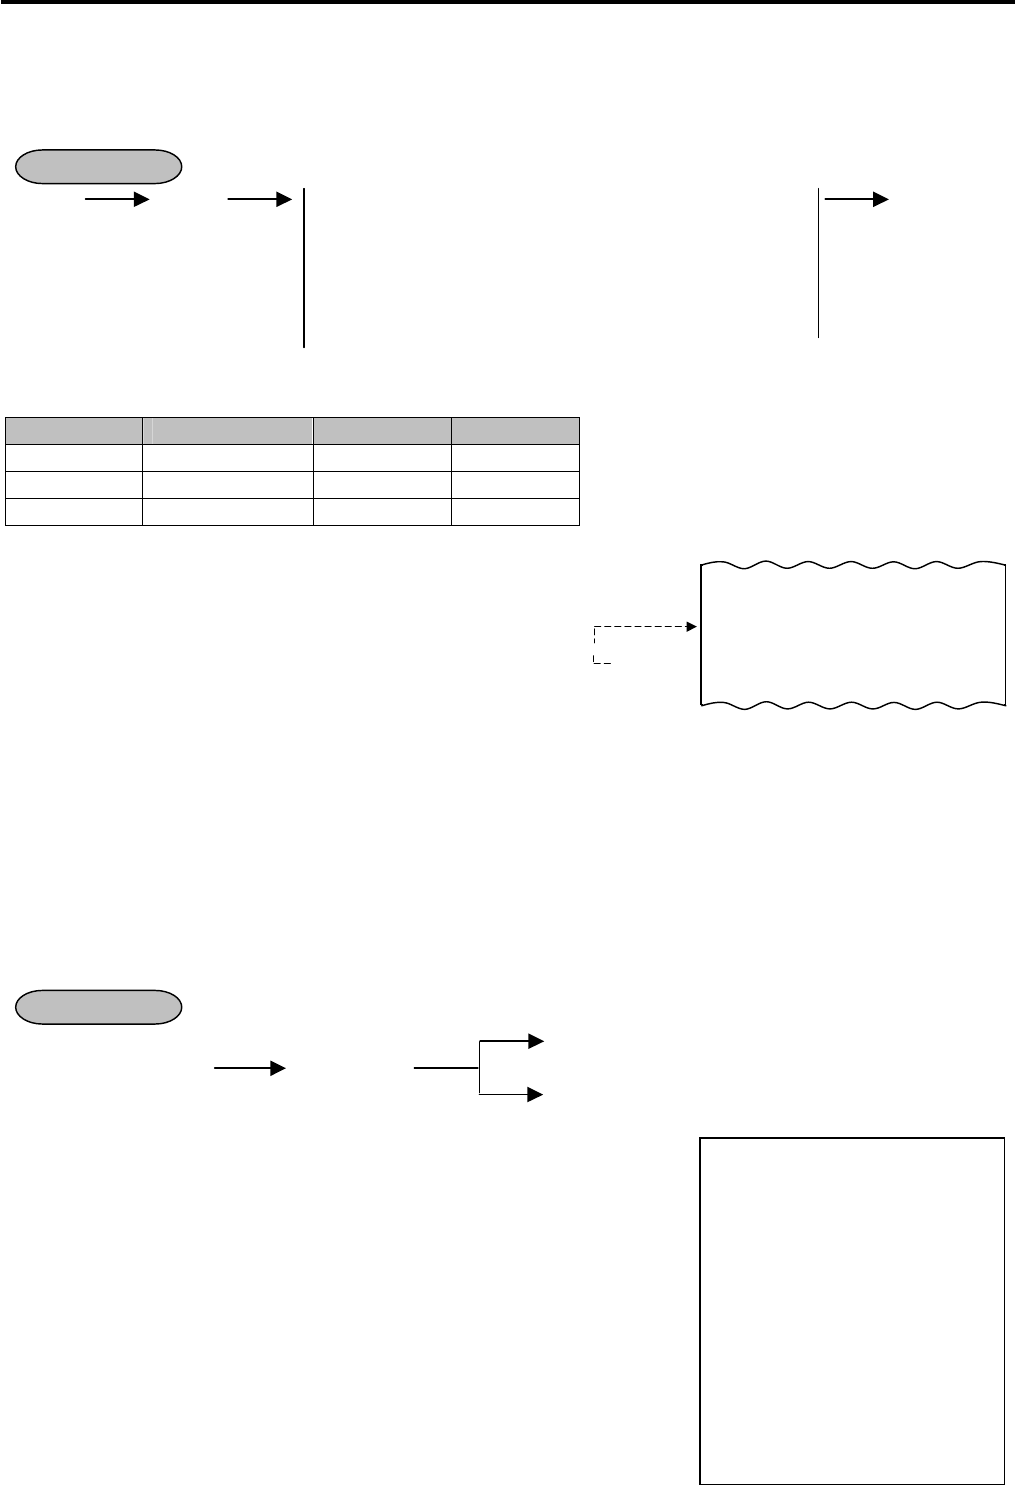
11. REGISTERING PROCEDURE AND PRINT FORMAT EO1-11155
11.12 Void
11-15
11.12 Void
The Void operation is used to delete an item already entered before the last item within the current sale.
Such items cannot be deleted by the [ITEM CORR] key any longer.
- - - [VOID] DEPARTMENT ENTRY - - -
PLU ENTRY
QUANTITY EXTENSION
SPLIT PACKAGE PRICING
Percent Discount/Charge on a Department or PLU Item
(NOTE 2)
Example: After DEPT4 is entered in the following transaction, the Void operation is performed for canceling the
entry of DEPT3.
Department Department Name Purchased Qty
Price
DEPT 1 DP01 3 $1.20
DEPT 3 DP03 1 $2.00
DEPT 4 DP04 1 $1.50
3 [@/FOR] 120 [DEPT 1]
200 [DEPT 3]
150 [DEPT 4]
[VOID]
200 [DEPT 3]
NOTES:
1. An amount exceeding the sale total cannot be entered unless the “Credit Balance” option is selected.
2. When an item previously entered with a percent discount or percent charge is cancelled, the item can be
voided with the percent discount/charge by attaching the [VOID] key to the same entry procedure as previous
entry.
11.13 All Void
When the current transaction being entered is found to be canceled before finalizing it, All Void can be operated
to delete all the items entered in the transaction.
[ITEM CORR] to execute ALL VOID
Sale Item Entries [ALL VOID]
[C] to cancel ALL VOID
NOTES:
1. All Void is possible if the current transaction contains 20 items or less.
2. All Void is also possible to delete a charge posting sale of PB Entry.
3. The All Void cannot be operated after an [EX] or [FS TL TEND] key entry
or during a Received-on-Account or Paid-Out transaction.
OPERATION
-- Receipt Print Format --
voids
Void Entry
3x 1.20@
DP
01 $3.60
DP
03 $2.00
DP
04 $1.50
VOID
DP
03 -2.00
OPERATION
-- Receipt Print Format --
TEC STORE
1343 PEACH DRIVE
PHONE: 87-6437
Open 8:00am to 7:00pm
Closed: every Wednesday
10-20-2006 FRI #3001
DP
01 $3.00
DP
02 $1.30
SUBTL $4.30
**ALL VD **
JONES 0209 15:41TM
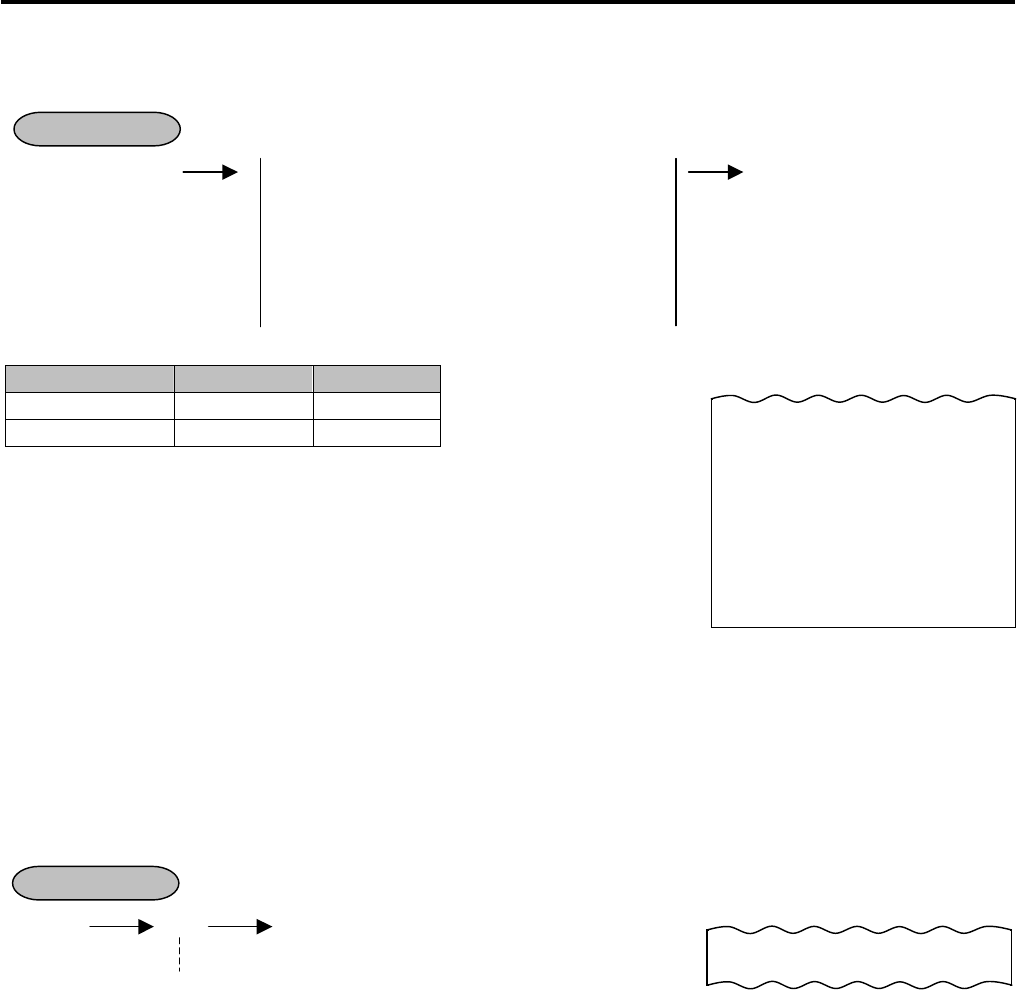
11. REGISTERING PROCEDURE AND PRINT FORMAT EO1-11155
11.14 Returned Merchandise
11-16
11.14 Returned Merchandise
The Returned Merchandise operation is used for returning an item which was once purchased.
[RTN MDSE] DEPARTMENT ENTRY - - -
PLU ENTRY
QUANTITY EXTENSION
SINGLE-ITEM DEPARTMENT/PLU ENTRY
Percent Discount/Charge on a Department
or PLU Item (NOTE 3)
Example:
Item to be returned
Name Price
DEPT 1 DP02 $1.45
DEPT 3 DP03 $1.00
[RTN MDSE]
145 [DEPT 1]
[RTN MDSE]
100 [DEPT 3]
[AT/TL]
NOTES:
1. This operation cannot be performed for Negative Departments/PLUs.
2. The Repeat entry is not possible in this operation.
3. When an item once purchased with a percent discount or percent charge is returned, the item can be returned
with the percent discount/charge by attaching the [RTN MDSE] key to the same entry procedure as purchase.
11.15 Subtotal (Sale Total Pre-taxed) Read
- - - [ST] - - -
OPERATION
-- Receipt Print Format --
OPERATION
The sale total (pre-taxed) of the items so far entered is
displayed (and printed if so programmed), but the sale is
not finalized. Additional item entries are allowed, if any.
-- Receipt Print Format --
SUBTL $6.00
10-20-2006 FRI #3001
RTN
DP
01 -1.45
RTN
DP
03 -1.00
CASH -
2.45
ITEM -2
JONES 0211 15:45TM
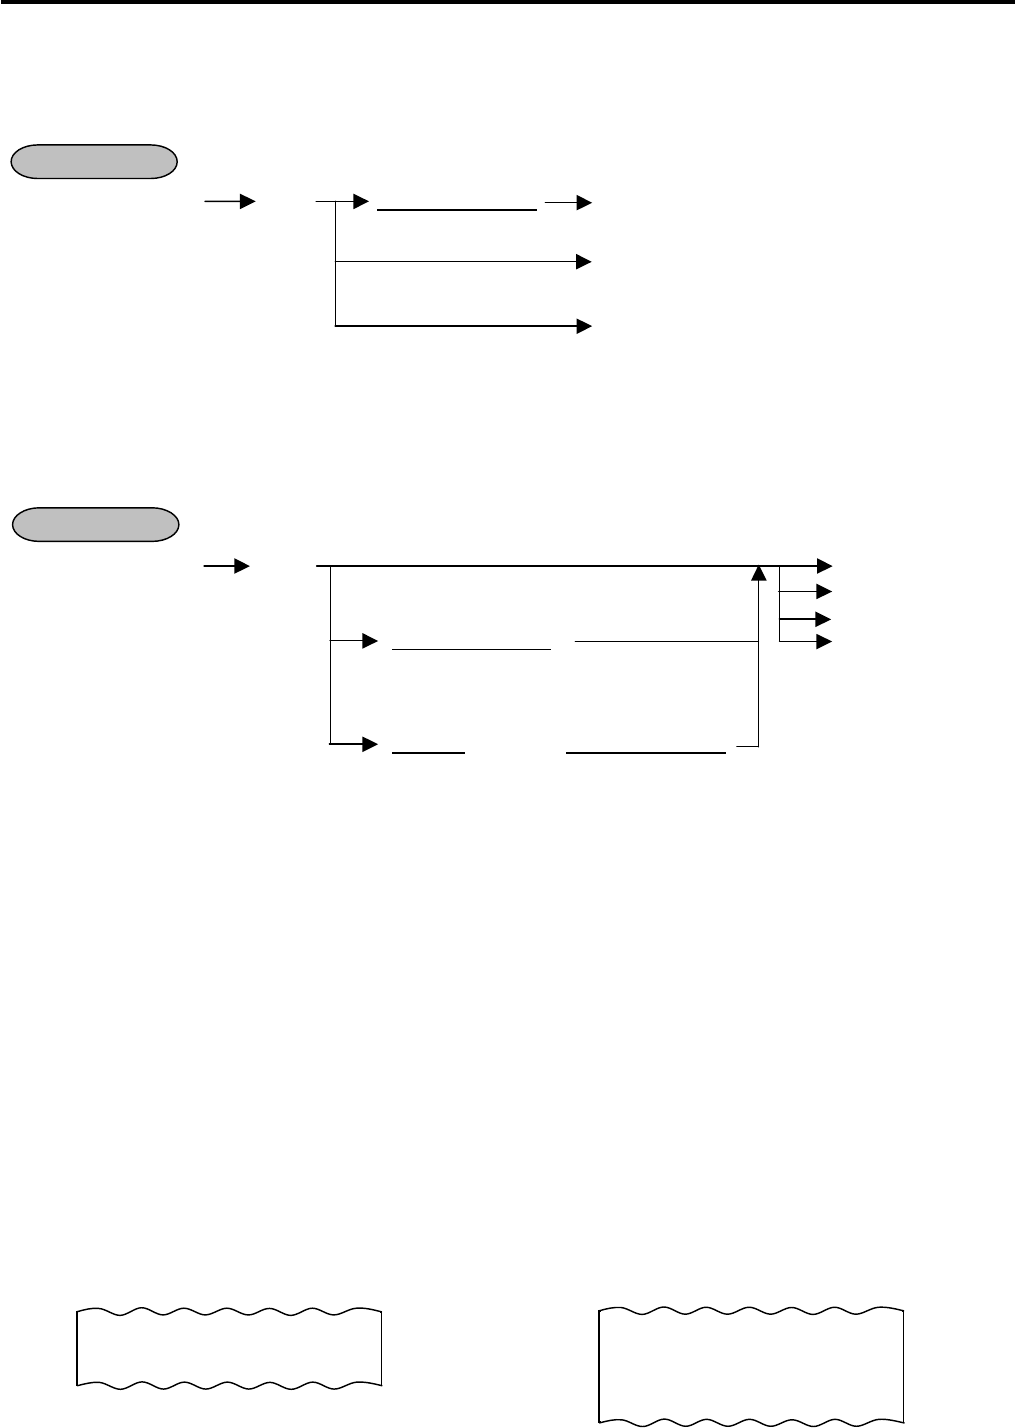
11. REGISTERING PROCEDURE AND PRINT FORMAT EO1-11155
11.16 Finalizing a Sale
11-17
11.16 Finalizing a Sale
11.16.1 Cash Tender
A tendered amount entry is performed here.
Sale Item Entries ([ST]) |Tendered Amount| [AT/TL]
Finalize with tendering
and change calculation
[AT/TL]
finalize without tendering
[CASH 1] to [CASH 3] (Cash payment 1 to 3)
NOTE: Depression of the [CASH 1] to [CASH 3] keys on which a cash amount has not been preset causes an
error.
11.16.2 Media Tender
A sale finalization operation with each media key is performed here.
Sale Item Entries ([ST]) [CHECK TEND]
finalize without tendering [Chg]
[MISC TEND]
|Tendered Amount| Other media keys
finalize with tendering and ([CREDIT 1],
change calculation [CREDIT 2])
|Quantity| [@/FOR] |Tendered Amount|
max. 3 digits max. 8 digits
NOTES:
1. ECR works in two different ways according to a tendered amount.
1) Tendered amount is equal to sale total or more.
The CG lamp illuminates and the change due is displayed. Also, the drawer opens and a receipt is issued.
Sale total, tendered amount, change due, (and tax) are printed.
2) Tendered amount is less than sale total. (short tendering)
The ST lamp illuminates and the balance due is displayed.
Sale total, tendered amount, (and tax) are printed, however, the sale total and tax are printed at the first time
of tendering only.
2. The above operation causes an error when the declaration key or the point key is depressed.
3. The above operation causes an error when a non-cash media key has been programmed with Total-only
status. Also a negative balance sale causes an error.
4. When the [ST] key entry compulsion has been set, the above operation should be performed after the [ST]
key.
5. When the media keys are programmed with the validation-compulsory status, the drawer opens after the
Validation Print operation.
-- Receipt Print Format --
(Cash Total) (Cash Tender)
OPERATION
SUBTL $8.48
CASH $
8.48
SUBTL $8.48
TOTAL $
8.48
CATEND $10.00
CHANGE $1.52
OPERATION
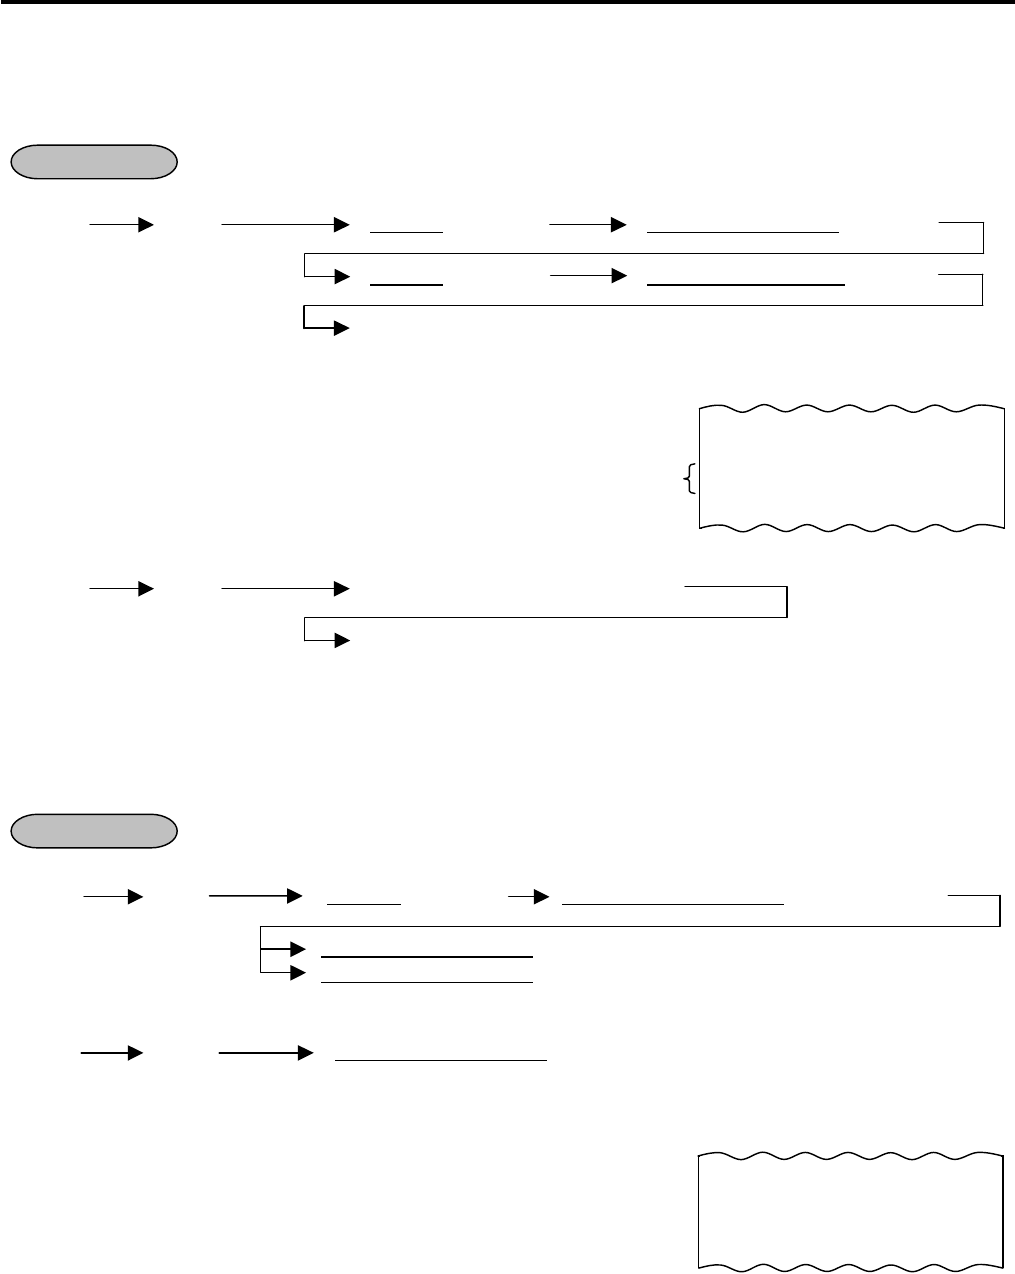
11. REGISTERING PROCEDURE AND PRINT FORMAT EO1-11155
11.17 Multi-Tendering
11-18
11.17 Multi-Tendering
Short-tendering repeated multiple times by the same media (allowed only when the media key is programmed to
allow short-tendering).
Example (1)
- - - ([ST]) (|Quantity| [@/FOR]) |1st Amount Tendered| [MEDIA]
(|Quantity| [@/FOR]) |2nd Amount Tendered| [MEDIA]
Repeat if not yet finalized.
Example (2)
- - - ([ST]) [CASH 1] (or [CASH 2], [CASH 3])
[CASH 1] (or [CASH 2], [CASH 3])
11.18 Split Tendering
Short-tendering repeated multiple times by the different media keys (allowed only when the media keys are
programmed to allow short-tendering).
Example (1)
- - - ([ST]) (|Quantity| [@/FOR]) |Check Amount Tendered| [CHECK TEND]
|Cash Amount Tendered| [AT/TL] ... Check & Cash
|Cash Amount Tendered| [AT/TL] [Chg] ... Check, Cash, & Charge
Example (2)
- - - ([ST]) |Cash Amount Tendered| [AT/TL] [Chg] ... Cash & Charge
NOTES:
1. In both MULTI-TENDERING and SPLIT TENDERING operations, the
sale is finalized and a receipt is issued on reaching the sale total amount.
2. When the [ST] key entry compulsion has been set, the above operation
should be performed after the [ST] key.
3. Multi-Tendering and Split Tendering operations are possible during a
Received-on Account entry.
4. Multiplication of tendered amount entry using the media key is possible, however, that using the [AT/TL] (or
[CASH 1] to [CASH 3]) key is not possible.
5. Depression of the [CASH 1] to [CASH 3] keys on which a cash amount has not been preset causes an error.
6. When the media keys are programmed with the validation-compulsory status, the drawer opens after the
Validation Print operation.
OPERATION
OPERATION
-- Receipt Print Format --
SUBTL $8.48
TOTAL $
8.48
CHECK $5.00
CASH $3.48
-- Receipt Print Format --
Multi-tendering by
[AT/TL]
key
Change due, as the result of the 2nd amount tendered
SUBTL $8.48
TOTAL $
8.48
CATEND $5.00
CATEND $5.00
CHANGE $1.52

11. REGISTERING PROCEDURE AND PRINT FORMAT EO1-11155
11.19 Sale Paid in Foreign Currencies
11-19
11.19 Sale Paid in Foreign Currencies
- - - [ST] [CUR1] Amount Tendered in ([CUR1])
Foreign Currency
[AT/TL]
NOTES:
1. The [CUR 2] to [CUR 5] keys operate the same as [CUR 1], except that each of these keys has its own
exchange rate programmed corresponding to each foreign currency.
2. The fraction process method at the exchange is fixed to Round OFF.
3. The foreign currency keys cannot be used to finalize Received-on-Account payments, Paid-out items, or
charge posting (sale with previous balance).
4. When a tendering by a foreign currency occurs during a short-tendered condition, the [ST] key will not be
mandatory.
5. When the [AT/TL] key or other media key has been programmed as “Total-only” key, the entry of amount
tendered in foreign currency causes an error.
6. When an amount limit has been programmed, the foreign currency amount converted into a domestic
currency is checked.
7. To exchange the domestic currency amount to the foreign currency one, multiply the amount by the
exchange rate.
8. The sale finalization using the [FS TL TEND] key is not possible.
-- Receipt Print Format --
OPERATION
Optional Print Amount Tendered in CUR1
CUR1 Exchange Rate
SUBTL $8.48
TOTAL $
8.48
CUR1 9.50∗
1.0914∗
CATEND $9.31
CHANGE $0.83
Mandatory for a
sale paid in foreign
currencies.
Displays the
equivalent value in
Foreign Currency 1.
Display the entered
foreign currency
amount.
Other media keys may be used if paid in that media.
(The media key must be programmed to allow
tendering in this case.)
Sale is finalized by media total.
(The media key must be programmed to allow totalling in this case.)
Displays the amount
converted into
domestic currency
amount.
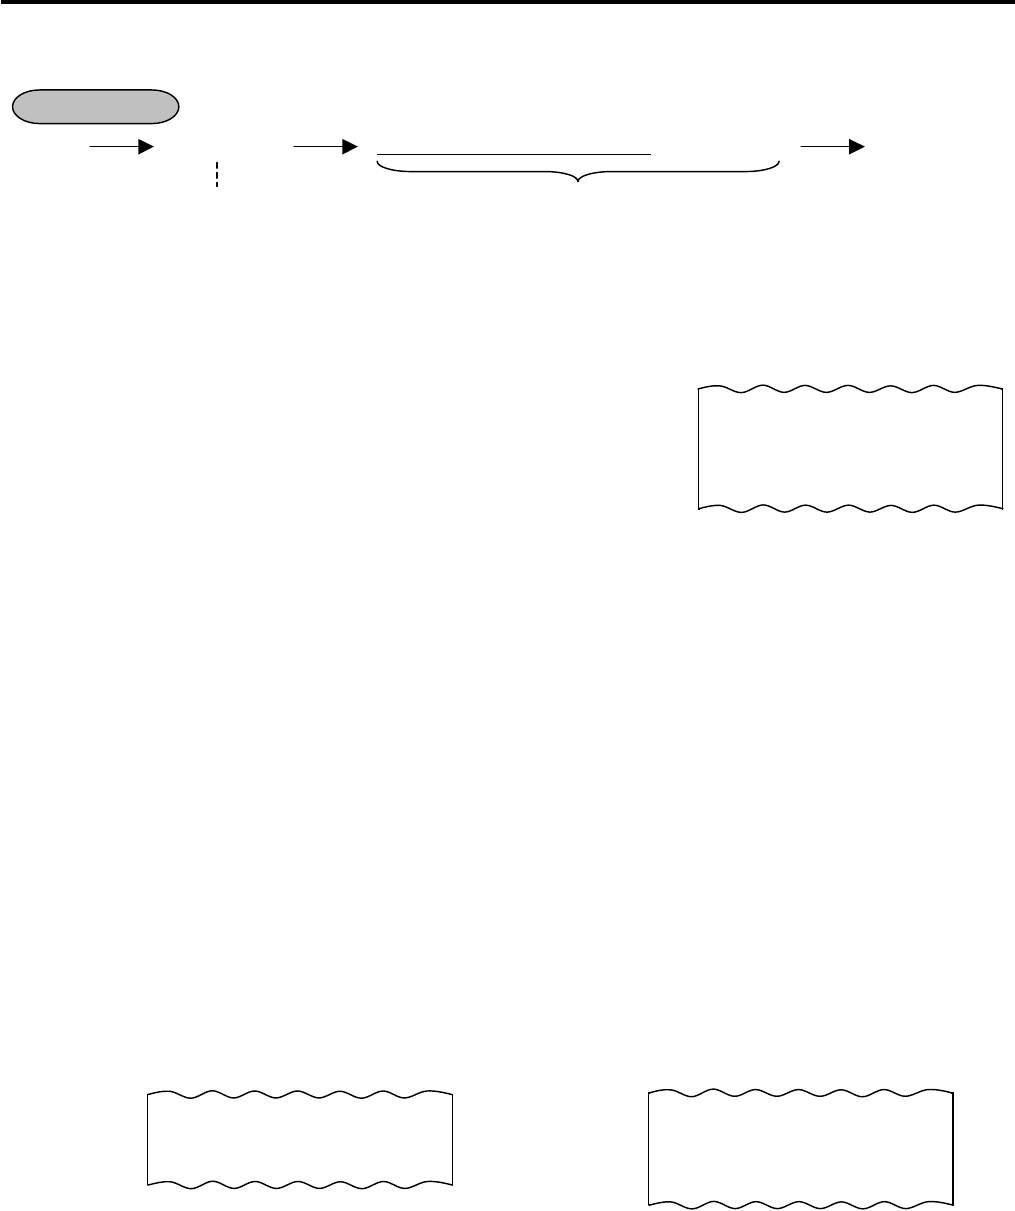
11. REGISTERING PROCEDURE AND PRINT FORMAT EO1-11155
11.20 Food Stampable Total Read, Food Stamp Tendering
11-20
11.20 Food Stampable Total Read, Food Stamp Tendering
- - - [FS TL TEND] |Food Stamp Tendered Amount| [FS TL TEND] - - -
... When the Food Stamp tendered amount is less than the sale total, the sale is not finalized with the balance
still due displayed. Then it can be finalized with cash or other media total or tendering operations.
NOTES: 1. Food Stamp feature is unavailable for the area where inclusive tax feature is used.
2. Any of the following features can be selected by the program option.
1) Normal
The amount including the food stampable tax can be paid by Food Stamp.
2) Illinois
Only the amount paid by Food Stamp is exempted from the food stampable tax.
3) New Jersey
All food stampable tax is exempted regardless of the amount of Food Stamp.
3. Change in unit of $ is paid by Food Stamp, and ¢ is paid by cash.
11.21 Tax Calculation and Print
Your ECR has been programmed with proper tax tables (tax breaks and/or tax rates).
Each department or PLU has been programmed with proper tax status, i.e. taxable or non-taxable status of each
Tax (of maximum 4 taxes of Tax 1 to Tax 4).
On finalizing a sale, the taxes due are automatically calculated and printed on the receipt, and thus added to the
sale.
Whether all taxes (Tax 1 to Tax 4) are consolidated into one line print or individually printed in separate lines is a
program option.
-- Receipt Print Format --
OPERATION
Displays the Food
Stampable Total Tendering in Food Stamp
(This must be operated first of all the
payments in finalizing the sale if food
stamps are part of the payment.)
Entire Sale Total
Food Stampable Total
Food Stamp Tendered Amount
Change in Cash
Change in Food Stamp
TOTAL $
12.72
FS/TL $12.72
F-STMP $15.00
CHANGE $0.28
FS CHG $2.00
Example of
Consolidated
Print Line
Example of
Separate Print
Lines
SUBTL $15.00
TAX1 $0.60
TAX2 $0.25
CASH $
15.85
SUBTL $15.00
TAX $0.85
CASH $
15.85
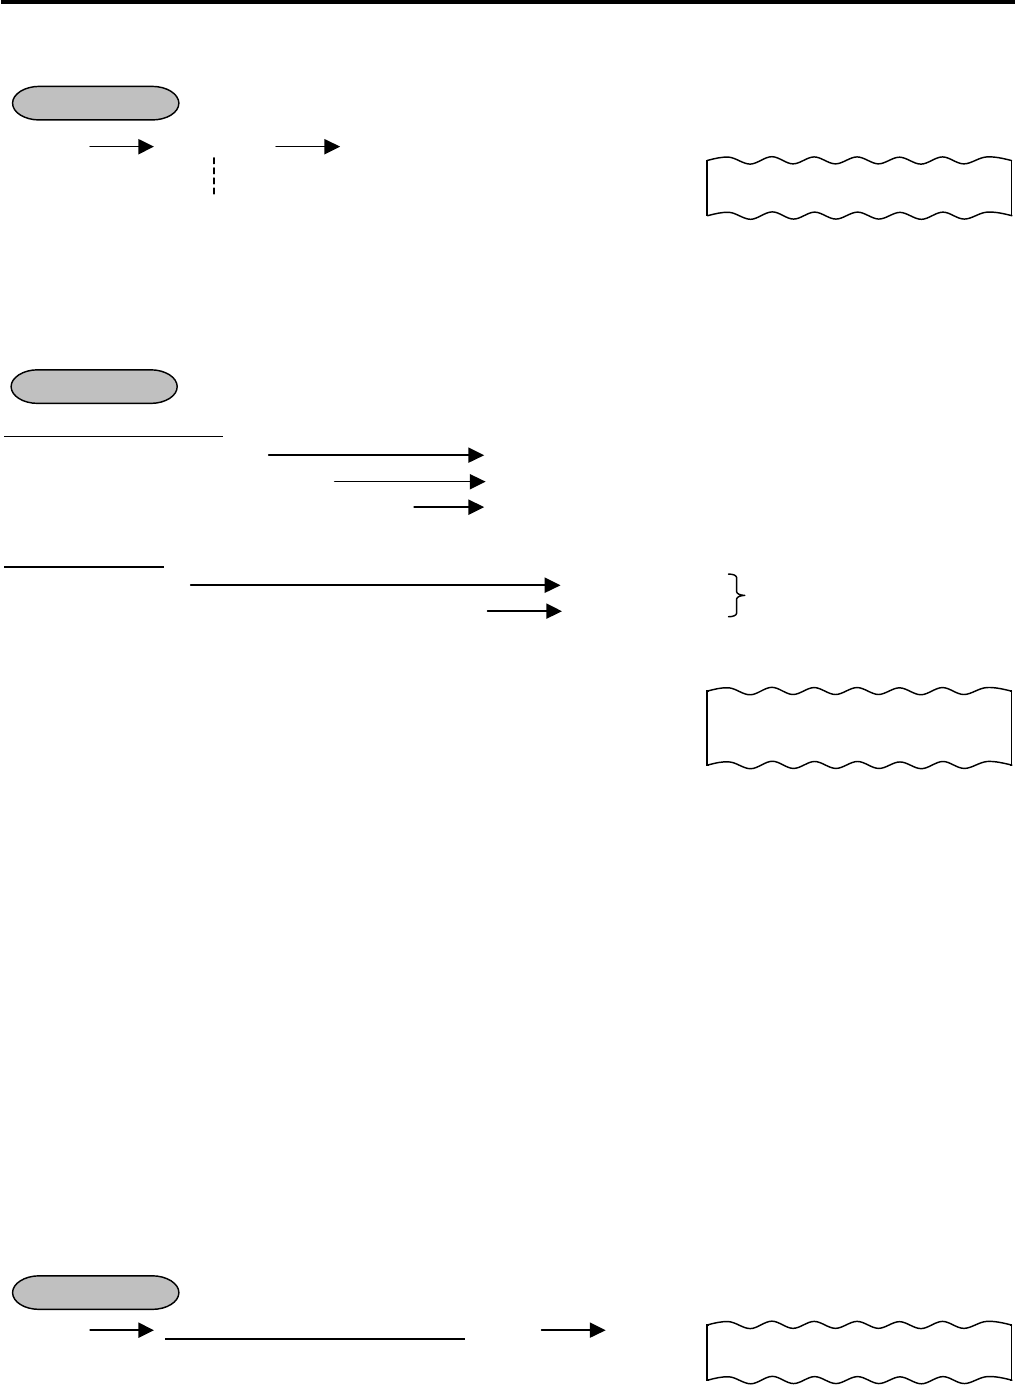
11. REGISTERING PROCEDURE AND PRINT FORMAT EO1-11155
11.22 Taxable Total (Sale Total With Taxes) Read
11-21
11.22 Taxable Total (Sale Total With Taxes) Read
- - - [TXBL TL] - - -
11.23 Tax Exemption
Selective Tax Exemption
Examples) [TX1/M] [EX] Sale Finalization ... to exempt from Tax 1 only
[TX1/M] [TX2/M] [EX] Sale Finalization ... to exempt from Tax 1 & Tax 2
[TX1/M] [TX2/M] [TX3/M] [EX] Sale Finalization ... to exempt from Tax 1, Tax 2, & Tax 3
All Tax Exemption
[EX] Sale Finalization
[TX1/M] [TX2/M] [TX3/M] [TX4/M] [EX] Sale Finalization
NOTES:
1. On depressing [EX], the sale total including the tax(es) not to be exempted is displayed and pre-taxed amount
of the sale portion subject to the tax exemption is printed.
2. After the Tax Exemption operation, only the Sale Finalization is possible.
3. The Tax Exemption operation is not possible for inclusive taxes.
4. Whether Canada tax is subject to the tax exemption is judged even after the [EX] key operation.
11.24 Tax Status or Food Stamp Status Modification
Depress [TX/M] (or [TX1/M], [TX2/M], [TX3/M], [TX4/M]) prior to or any time during the entry sequence of the
required Department, PLU, or any other tax-status-programmable item ([DOLL DISC], [%-], [%+], [STR CPN],
[VND CPN]). The taxable status is reversed to non-taxable, and vice versa.
The [FS/M] key operates the same to reverse from the Food Stampable status to non-stampable, and vice versa,
of the required item.
11.25 Manual Tax Entry (where irregular tax amount addition is applied)
- - - |Irregular Tax Amount to be Added| [TAX] - - -
OPERATION
The sale total including taxes due of the items so far entered
is displayed (and printed if so programmed), but the sale is
not finalized. Additional item entries are allowed, if any.
-- Receipt Print Format --
TXBL TL $22.13
OPERATION
to exempt from all taxes
-- Receipt Print Format --
Pre-taxed amount of the sale portion subject to Tax1
Pre-taxed amount of the sale portion subject to Tax2 TAX1EX $1.50
TAX2EX $6.00
OPERATION
-- Receipt Print Format --
TAX5 $0.50
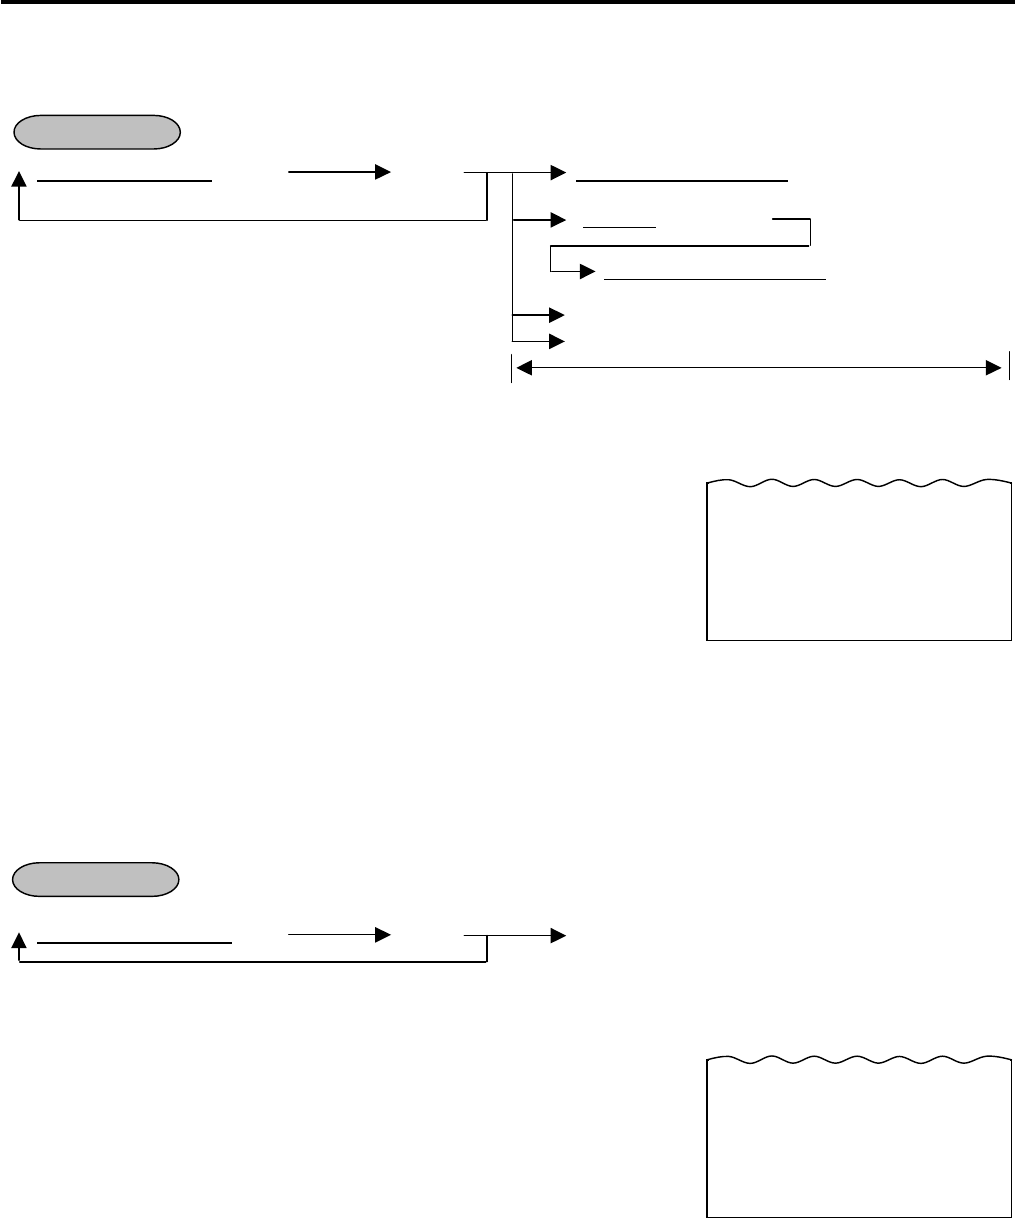
11. REGISTERING PROCEDURE AND PRINT FORMAT EO1-11155
11.26 Received-on-Account
11-22
11.26 Received-on-Account
A received-on-account transaction is used to identify money which is in the drawer but not relating to a sale.
|Amount of Payment| [R/A] ([ST]) |Cash Amount Tendered| [AT/TL]
Max. 7 digits (if paid in cash)
(|Quantity| [@/FOR])
|Check Amount Tendered| [CHECK TEND]
(if paid in Check)
[Chg] (if processed into charge account)
Other Media Finalization
NOTES:
1. The media keys used for this operation must be programmed to allow
received-on-account entries.
2. MULTI-TENDERING and SPLIT-TENDERING (already described) are
also applied to the finalization of received-on-account payments.
3. The All Void operation is not possible during a Received-on-Account
transaction.
4. When the media keys to be used for sale finalization are programmed
with the validation-compulsory status, the drawer opens after the
Validation Print operation.
11.27 Paid-Out
A paid-out transaction is used when money is removed from the drawer without totaling to a sale.
(Must be operated outside a sale)
|Amount to be paid out| [PO] ([ST]) [AT/TL]
NOTES:
1. Only [AT/TL] can finalize paid-out amounts (i.e. must always be paid
out in cash).
2. The All Void operation is not possible during a Paid-Out transaction.
3. Post-issue receipt is not available after the Paid-Out operation.
4. The validation print operation is possible after the [PO] or [AT/TL] key
operation.
Repeatable if multiple amounts are received in one
receipt sequence.
This portion is the same as SALE FINALIZATION BY
MEDIA KEYS already described.
OPERATION
-- Receipt Print Format --
R/A $5.00
R/A $3.00
SUBTL $8.00
CASH $
8.00
JONES 0301 17:46TM
OPERATION
Repeatable if multiple amounts to be paid out are
recorded in one receipt sequence.
PO $4.50
PO $3.20
SUBTL $7.70
TOTAL $
7.70
JONES 0302 17:46TM
-- Receipt Print Format --

11. REGISTERING PROCEDURE AND PRINT FORMAT EO1-11155
11.28 Dollar Discount
11-23
11.28 Dollar Discount
- - - Dept or PLU item entry
(for discount from an individual item)
|Amount| [DOLL DISC] - - -
- - - [ST]
(for discount from the sale total)
-- Receipt Print Format --
(for discount from an individual item) (for discount from the sale total)
NOTES:
1. This operation can be performed both inside a sale and outside a sale. (The “credit balance” option is
ignored.) The dollar discount amount exceeding the subtotal amount can be entered.
For the department or PLU programmed with taxable or food stampable status, the amount exceeding each
subtotal amount can also be entered.
When the taxable or food stampable amount is negative, the Dollar Discount operation is performed on it.
2. When the discount amount limit has been programmed, the Dollar Discount operation on the discount amount
exceeding the limit is not possible in REG mode. As the discount amount limit is not effective in MGR and -
modes, the Dollar Discount operation on a maximum of 7-digit discount amount is possible.
3. After performing a dollar discount operation, neither the Dollar Discount operation nor the Percent
Charge/Discount operation is possible.
11.29 Percent Discount, Percent Charge
Dept or PLU entry [%-] (or [%+])..................for the preset rate
Positive Previous Balance entry (credit balance)
[ST] |Rate| [%-] (or [%+])........for the manual rate
-- Receipt Print Format --
NOTES:
1. Rate ............................................... 0.001 to 99.999 (%).
2. When no rate is preset, the value of rate should be entered.
3. When the Dept or PLU item entry is modified with [RTN MDSE] or [VOID], the following % entry will also be
modified with [RTN MDSE] or [VOID].
4. A % entry will cause an error if operated after a Negative Department/PLU or [TXBL TL].
5. Even when the rate is preset, an inputted numeric value will be activated as a rate. (Entry of the numeric
value 0 causes an error.)
6. A % entry after obtaining a subtotal is usually allowed only once. However, it can be programmed to allow
multiple times. (Ask your TOSHIBA TEC representative.)
OPERATION
OPERATION
DP
01 $1.00
DISC -0.05 SUBTL $21.00
DISC -1.00
DP
03 $3.40
%-
5% -0.17
SUBTL $6.00
%-
10% -0.60
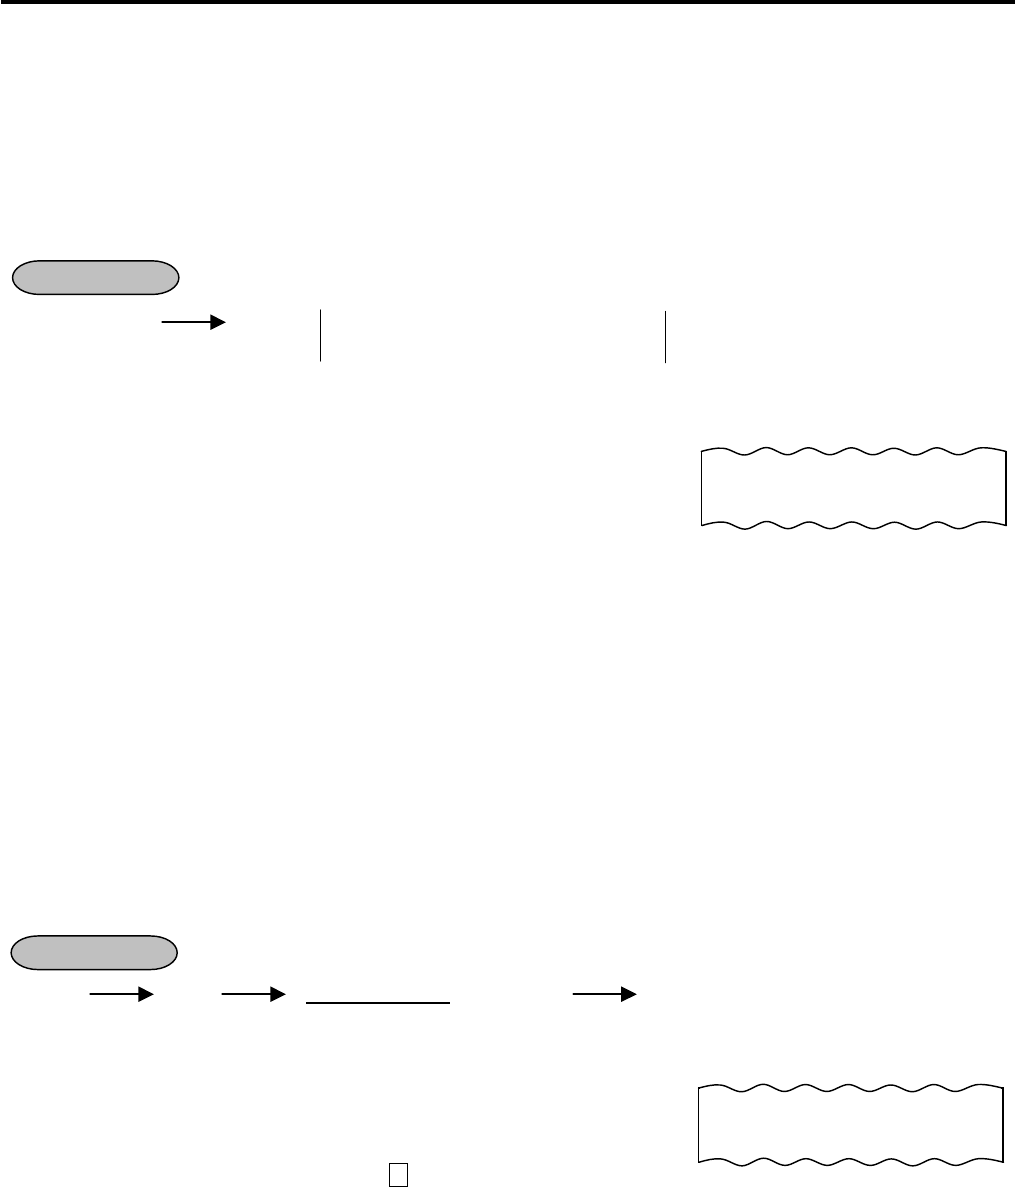
11. REGISTERING PROCEDURE AND PRINT FORMAT EO1-11155
11.30 Store Coupon
11-24
7. You can select the rounding process of the fractions of the product (result of % calculation) from ROUND OFF
(initial setting), ROUND UP, and ROUND DOWN. (Ask your TOSHIBA TEC representative.)
8. If the subtotal amount is zero or negative after the [ST] key, a % entry causes an error.
For the department or PLU programmed with taxable or food stampable status, if the subtotal amount is
negative, a % entry causes an error.
11.30 Store Coupon
[STR CPN] Follow DEPARTMENT ENTRY
QUANTITY EXTENSION for DEPTs
NOTES:
1. The [STR CPN] key operation is possible anytime before depressing
the department key.
2. The Store Coupon operation is possible during a sale, however, the
operation resulting in a negative subtotal is not possible. By the
program option setting, the operation outside a sale and that resulting in
a negative subtotal will be possible.
3. The amount should be between the high amount limit and the low amount limit which are preprogrammed on
the department. When the [LC OPEN] key is depressed, the high amount limit and the low amount limit for
the department will be extended with two higher digits and one lower digit.
4. The Store Coupon operation is not possible for PLUs.
5. The Store Coupon operation is not possible for negative departments.
6. The Store Coupon operation causes an error when the [RTN MDSE] or [VOID] key is depressed.
7. The Quantity Extension operation using an integer is possible. That using a quantity with a decimal point is
prohibited.
8. The Percent Charge/Discount and the Amount Discount operation are not possible for the Store Coupon
operation sequence.
11.31 Vendor Coupon
- - - ([ST]) |Coupon Amount| [VND CPN] - - -
NOTES:
1. The declaration key operation is possible anytime before depressing the
[VND CPN] key.
2. When the amount limit for the [VND CPN] key is preset, the coupon
amount exceeding the limit cannot be entered in REG mode. As the
amount limit is not effective in MGR and - modes, the Vendor Coupon
operation for a maximum of 7-digit amount is possible. These settings
cannot be cancelled by the [LC OPEN] key.
3. The Quantity Extension operation is not possible.
4. The vendor coupon operation can be performed both inside a sale and outside a sale. (The “credit balance”
option is ignored.) The vendor coupon amount exceeding the subtotal amount can be entered.
For the department or PLU programmed with taxable or food stampable status, the amount exceeding each
subtotal amount can also be entered.
When the taxable or food stampable amount is negative, the Vendor Coupon operation is performed on it.
OPERATION
-- Receipt Print Format --
S.CPN
DP
01 -0.50
OPERATION
-- Receipt Print Format --
SUBTL $8.00
V.CPN -4.00
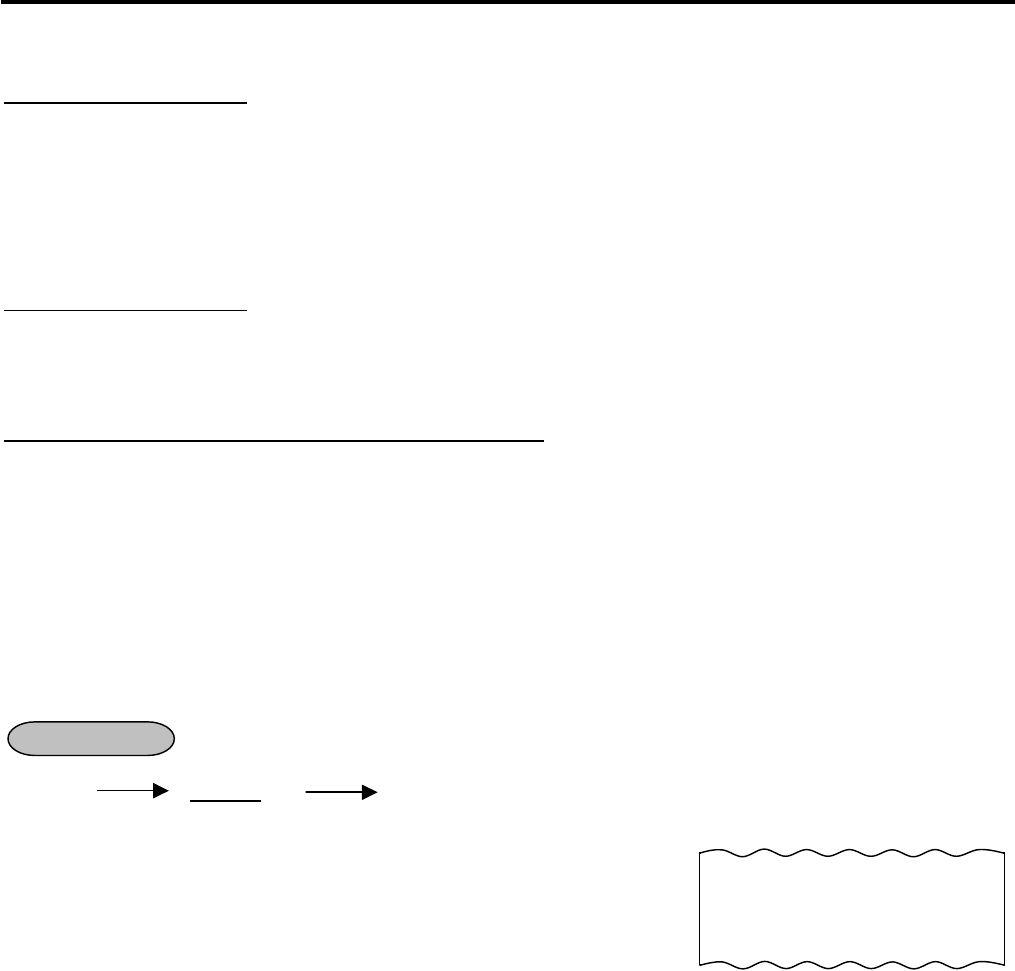
11. REGISTERING PROCEDURE AND PRINT FORMAT EO1-11155
11.32 Listing Capacity Open
11-25
11.32 Listing Capacity Open
For Departments and PLUs
Depress [OPEN] (or [LC OPEN]) prior to or any time during an entry of an open-department, open-PLU, or
preset-open department or PLU sequence (including REPEAT and QUANTITY EXTENSION entries). Please
note that the [OPEN] (or [LC OPEN]) key must be pressed, at latest, before the final key of the entry sequence.
The High Amount Limit for the department or PLU will be extended with two higher digits, and the Low Amount
Limit will be extended with one lower digit. For entering an amount still exceeding these limits, you must call for a
Manager Intervention.
For Media Tender Amounts
Depress [OPEN] (or [LC OPEN]) before or after the amount but Media Key. The High Amount Limit for the
media tendering will be extended with one higher digit. In need of still exceeding this limit, you must call for a
Manager Intervention.
For Amounts through [DOLL DISC], [VND CPN], [STR CPN]
To exceed their limits, you must always call for a Manager Intervention. The [OPEN] (or [LC OPEN]) key will not
be effective. As for the [STR CPN] key only, the amount is limited by both High Amount Limit of the department
through which the store coupon amount is entered and the amount limit for [STR CPN]. That is, when an amount
cannot be entered using [OPEN] (or [LC OPEN]), you must call for a Manager Intervention.
11.33 Non-Add Number Print
Non-add numbers can be entered and printed for future references, to indicate codes or numbers of customers,
media Checks, credit cards, etc. The entered numbers do not affect any sale total data.
(allowed any time during a sale or transaction)
( - - - ) |Number| [#] - - -
Max.18 digits.
NOTES:
1. When “012300” [#] is entered, “#12300” will be printed.
2. The Item Correct operation is not possible in the Non-add No. Print sequence.
3. No-sale exchange after the [#] key entry is prohibited by the program option setting.
4. The Non-add No. Print operation is possible only once in a sale transaction by the program option setting.
5. The Repeat, Dollar Discount, Percent Charge/Discount, and Receipt Post-Issue operations are not possible
after performing the Non-add No. Print operation.
6. The symbol # and the entered code are indicated on the leftmost digits of the LCD display. (When a 16-digit-
or-more code is entered, the lower 15 digits are displayed.)
OPERATION
Non-add No. Print
-- Receipt Print Format --
#1234
PO $6.50
PO $7.50
TOTAL $
14.00
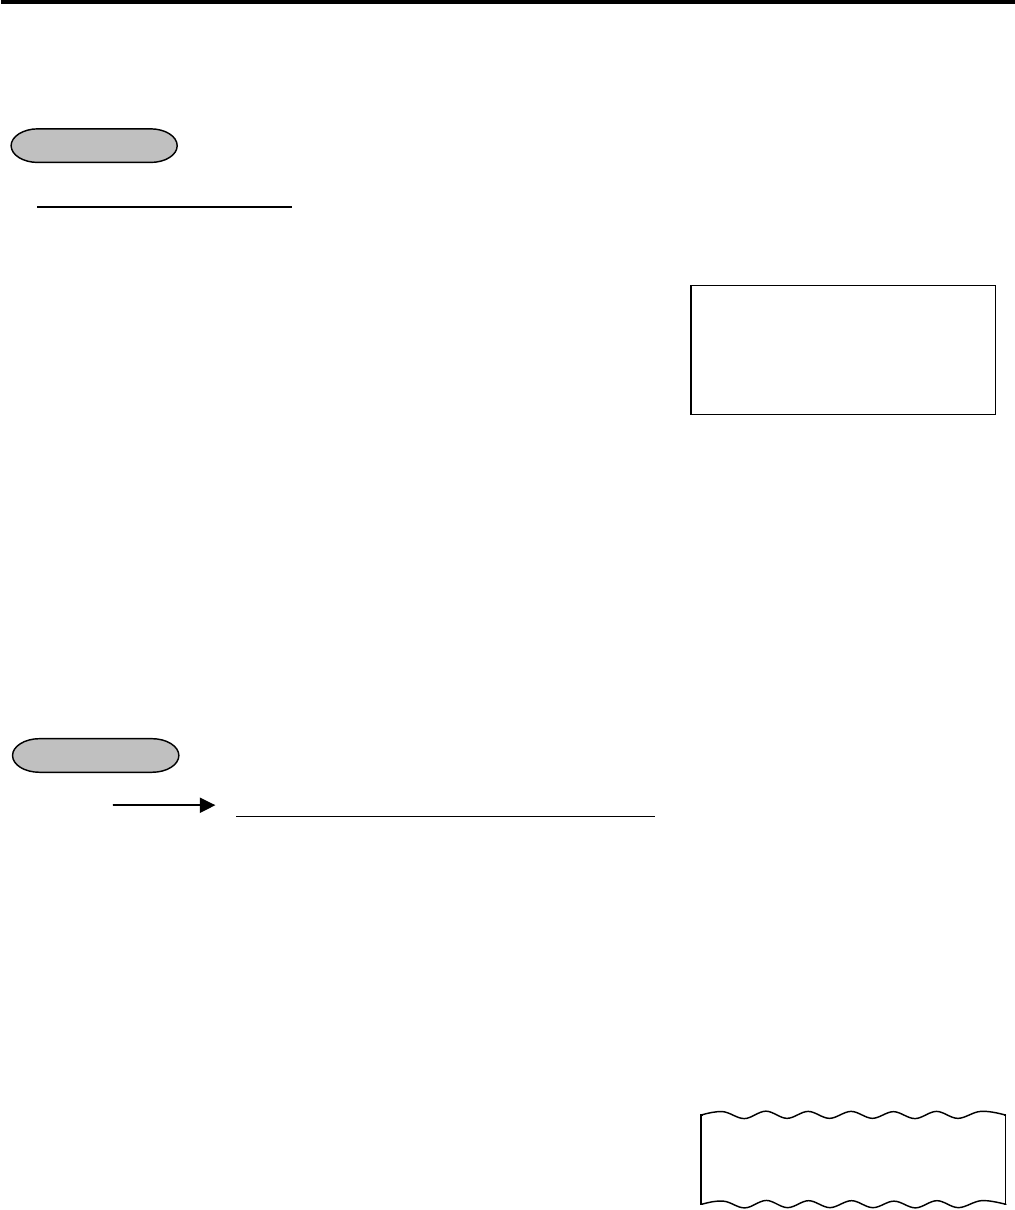
11. REGISTERING PROCEDURE AND PRINT FORMAT EO1-11155
11.34 Check Cashing (No-sale cashing of a non-cash media)
11-26
11.34 Check Cashing (No-sale cashing of a non-cash media)
This operation is performed when a check is changed with cash.
(Must be operated outside a sale)
|Check Amount to be Cashed| [CHECK TEND] ... The drawer opens to enable the exchange.
Max. 8 digits
Example) To encash the check for $10.00.
1000 [CHECK TEND]
NOTES:
1. Other non-cash media keys may be used for this
purpose if programmed to allow no-purchase
cashing.
2. Post-issue receipt is not available after the Check Cashing operation.
3. The food stamp cannot be changed with cash.
4. The validation print operation after the check cashing operation is possible.
5. When the media keys are programmed with the validation-compulsory status, the drawer opens after the
Validation Print operation.
6. Sale finalization by the EFT is possible only when the [DEBIT] or [EBT CASH] key has been programmed
with the status “EFT media” in the EFT key status setting. If not, ordinary sale finalization is performed.
11.35 No-Sale Exchange from Foreign Currency to Domestic Currency
(Must be operated outside a sale)
[CUR 1] |Amount of Foreign Currency 1 to be exchanged| [NS]
... The drawer opens to enable exchange. The domestic currency amount equivalent to the entered foreign
currency amount is displayed.
NOTES:
1. The [CUR 2] to [CUR 5] keys operate the same.
2. The fraction process method is fixed to Round OFF.
3. On the validation after performing the No-Sale Exchange from Foreign Currency to Domestic Currency, the
exchanged amount is printed.
-- Receipt Print Format --
OPERATION
Check Amount Cashed
10-20-2006 FRI #3001
CHECK $
10,00
JONES 0291 17:31TM
-- Receipt Print Format --
OPERATION
Amount of CUR1 to be exchanged
Exchange Rate (optional print)
Domestic Currency amount equivalent to the CUR2
CUR1 10.00
1.0914∗
CHANGE $9.16
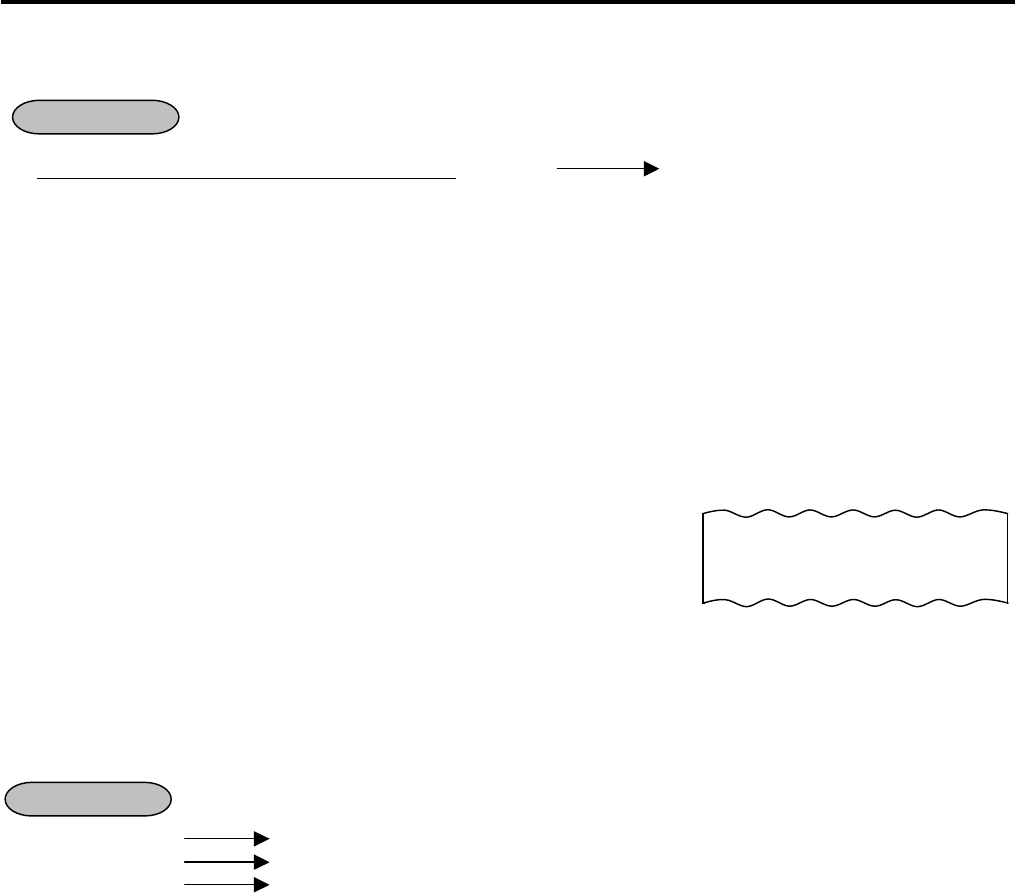
11. REGISTERING PROCEDURE AND PRINT FORMAT EO1-11155
11.36 No-Sale Exchange from Domestic Currency to Foreign Currency
11-27
11.36 No-Sale Exchange from Domestic Currency to Foreign Currency
(Must be operated outside a sale)
|Amount of Domestic Currency to be exchanged| [CUR 1] [NS]
... The drawer opens to enable exchange. The foreign currency amount equivalent to the entered domestic
currency amount is displayed.
NOTES:
1. The [CUR 2] to [CUR 5] keys operate the same.
2. This operation (exchange from domestic to foreign currencies) may be prohibited by a program option.
3. The fraction process method is fixed to Round Off.
4. On the validation after performing the No-Sale Exchange from Domestic Currency to Foreign Currency, the
exchanged amount is printed.
-- Receipt Print Format --
11.37 PLU Price Shift Entry ([PRICE SHIFT 1] to [PRICE SHIFT 3] Keys)
Depressing the [PRICE SHIFT] key designates a PLU item, adding the printed number (1 to 3) to an entered PLU
code.
[PRICE SHIFT 1] PLU Entry (To enter a PLU item of the entered code plus 1)
[PRICE SHIFT 2] PLU Entry (To enter a PLU item of the entered code plus 2)
[PRICE SHIFT 3] PLU Entry (To enter a PLU item of the entered code plus 3)
Example) When the PLU Code 200 is designated after the [PRICE SHIFT 2] is depressed, this sales
transaction will result in the sales item entry of the PLU Code 202.
NOTES:
1. Depressing the [C] key immediately after the [PRICE SHIFT] key results in the cancellation of the PLU Price
Shift Entry.
2. The [PRICE SHIFT] key can be depressed any number of times before the PLU entry. The last depressed
[PRICE SHIFT] key becomes effective.
3. The Repeat entry after depressing the [PRICE SHIFT] key is not possible.
OPERATION
Domestic Currency amount to be exchanged
Exchange Rate of CUR3 (optional print)
CUR1 amount equivalent to the domestic currency amount
CATEND $1.00
1.445∗
CUR1 1.45
OPERATION
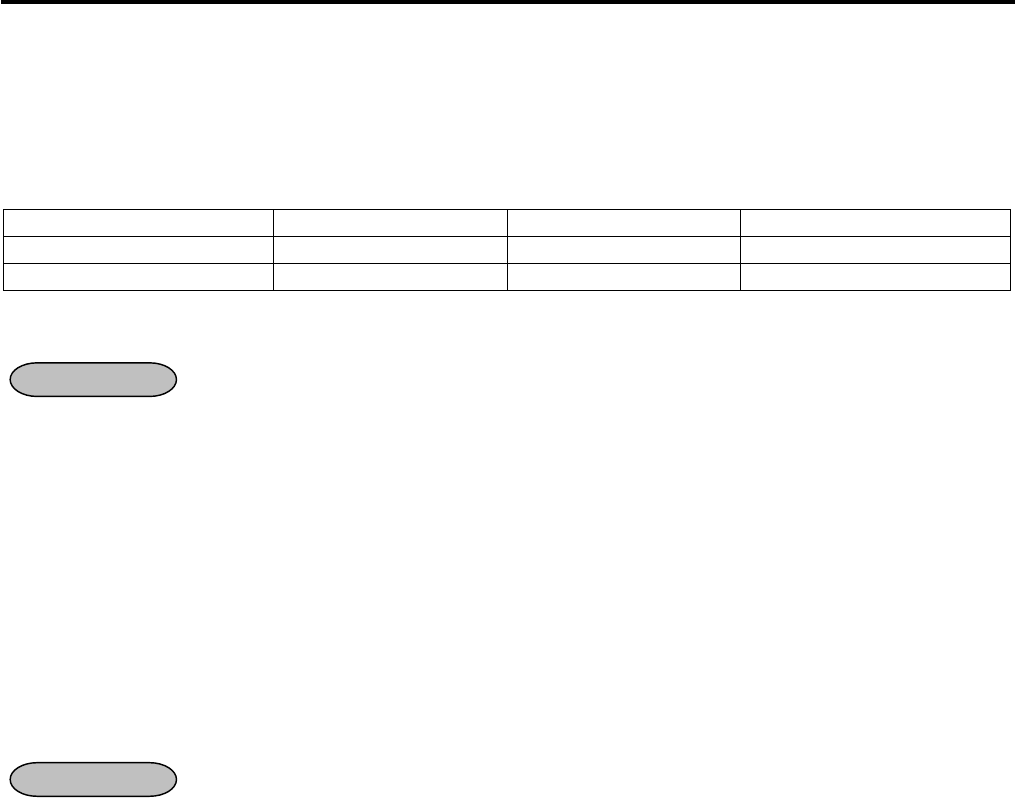
11. REGISTERING PROCEDURE AND PRINT FORMAT EO1-11155
11.38 PLU Price Shift Entry ([1st PRICE], [2nd PRICE], [3rd PRICE] Keys)
11-28
11.38 PLU Price Shift Entry ([1st PRICE], [2nd PRICE], [3rd PRICE] Keys)
Up to three different unit prices can be programmed for each PLU and you can select either of the following two
features.
The price shift function is used when switching the PLU price by time period.
Example) Regular price is programmed on the 1st price, bargain price is on the 2nd price, and discount price is
on the 3rd price.
1st price 2nd price 1st price 3rd price
Regular price Bargain price Regular price Discount price
From opening time to 13:00
From 13:00 to 15:00 From 15:00 to 19:00 From 19:00 to closing time
11.38.1 Price Shift Entry “Keeping the shifted Price Level” Feature
• (1st price) [2nd PRICE] (2nd price)
• (2nd price) [3rd PRICE] (3rd price)
• (3rd price) [2nd PRICE] (2nd price)
NOTES:
1. The price mode can be shifted by the price shift key depression, however, it remains unchanged by the mode
change.
2. During a price shift declaration, neither receipt print nor journal print is performed.
3. Current price level can be displayed by the program option.
4. The price shift function can be selected between “Keeping the shifted price level” and “Effective only for one
PLU entry” by the program option.
11.38.2 Price Shift Entry “Effective only for One PLU Entry” Feature
• [2nd PRICE] [PLU]
(2nd price)
• [3rd PRICE] [PLU]
(3rd price)
• [PLU] [2nd PRICE] [PLU] [PLU] (Repeat)
(1st price) (2nd price)(2nd price)
• [PLU] [3rd PRICE] [PLU] [PLU] (Repeat)
(1st price) (3rd price)(3rd price)
• [PLU] [2nd PRICE] [3rd PRICE] [PLU]
(1st price) (3rd price)
NOTES:
1. Price shift operation is active for the next PLU entry only (except for the Repeat entry). After the PLU entry,
the price mode automatically returns to the 1st price mode.
2. Price shift declaration can be cleared by the [C] key. Also other registrations excepting the PLU entry clear
this condition.
3. For Repeat entry after the price shift declaration, the shifted price is repeated.
4. For Price Shift operation after the [VOID] or [RTN MDSE] key depression, the shifted price is active.
5. During a price shift declaration, neither receipt print nor journal print is performed.
OPERATION
OPERATION
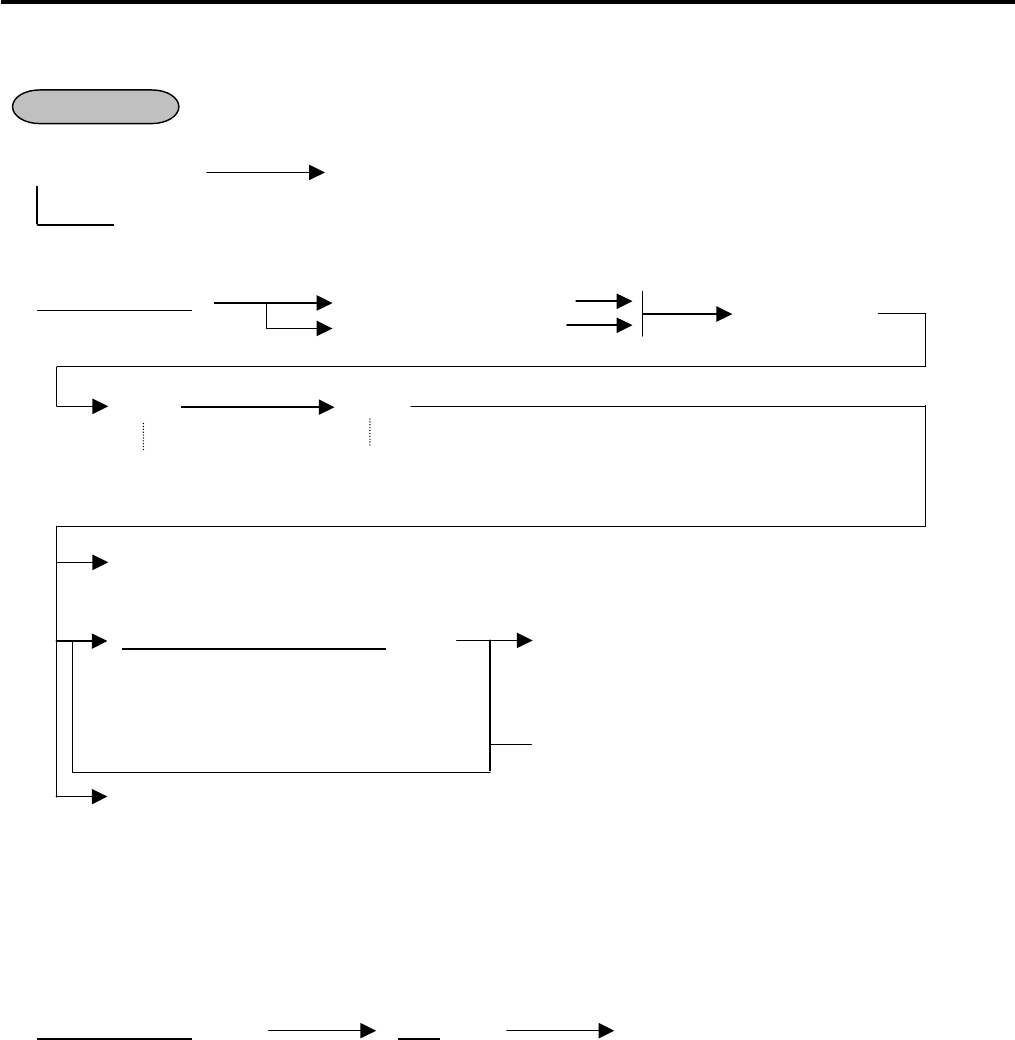
11. REGISTERING PROCEDURE AND PRINT FORMAT EO1-11155
11.39 Charge Posting: Previous Balance Manual Entry Type
11-29
11.39 Charge Posting: Previous Balance Manual Entry Type
(1) To initiate charge posting for a new customer
0 [PB+] (or [PB-]) Follow the line marked with “*” in Operation 2 below.
zero
(2) Charge posting with a previous balance first entered (pre-select) with or without PAYMENT
|Previous Balance| [PB+] (for credit balance) * Sale item
[PB-] (for debit balance) entries, if any.
([ST]) [Chg]
[TRF] ......... to transfer all the balance as a new balance (i.e. no payment for this occasion).
The prior [Chg] key may be omitted in this case.
|Amount Paid for this occasion| [R/A] Media Key operations
(Same as media key operations for RECEIVED-ON
-ACCOUNT payment finalization already described.)
Repeatable if necessary.
[PO] ........... when the balance is negative (debit balance) and must be paid back to the customer in
cash now.
(3) Charge posting with a previous balance entered during a sale (post-select)
A previous balance (including a zero balance for a new customer) may be entered not only before sale items
but also after or between them if the [Chg] key has not been depressed. Multiple previous balance entries
are possible within a sale (for the purpose to sum up multiple accounts into one, etc.).
(4) Percent rate addition to a previous balance
|Previous Balance| [PB+] (|Rate|) [%+] - - -
NOTES: 1. The [%-] key operates the same for percent discounting.
2. The previous balance entered through [PB-] (debit balance) will not allow %+ or %- operation.
3. When the last key is programmed with the validation-compulsory status, the drawer opens after the
Validation Print operation.
OPERATION
Displays the sale total
excluding the previous
balance.
Finalizes the current sale,
displays the entire sale total
including the previous balance.
(The amount to be paid, partially or
entirely, for this occasion.
An excessive amount may be entered,
in which case a debit balance will
result.)
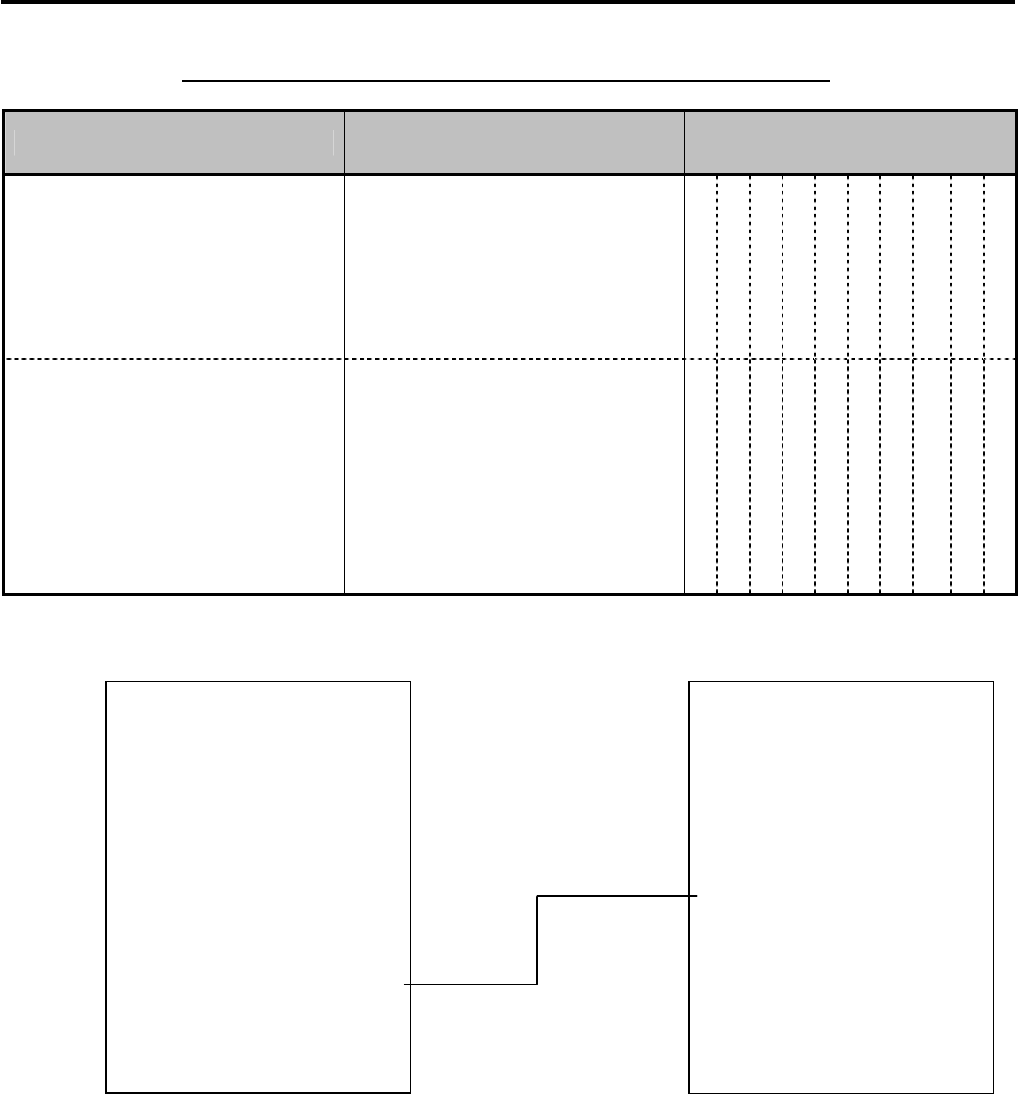
11. REGISTERING PROCEDURE AND PRINT FORMAT EO1-11155
11.39 Charge Posting: Previous Balance Manual Entry Type
11-30
Charge Posting Operation Sample (Previous Balance Manual Entry Type)
OPERATION CONTENTS KEY OPERATION DISPLAY (Lower Row)
To open a new customer account:
Sale Items:
$3.50 Dept.1
$2.40 Dept.3
Finalize this sale.
To transfer all the balance without
payment.
0 [PB+]
350 [DEPT 1]
240 [DEPT 3]
([Chg])
[TRF]
(See Receipt 1 below.)
0
0
1
3
0.
3.
2.
6.
6.
0
5
4
2
2
0
0
0
3
3
The above customer comes to the
store for payment.
All his balance is read.
He will pay all the balance today.
He tenders $7.00 in cash.
The balance of the customer is now
zero.
Give the change to the customer in
cash.
623 [PB+]
(previous balance)
[Chg]
623 [R/A]
700 [AT/TL]
(See Receipt 2 below.)
6.
6.
6.
0.
2
2
2
7
3
3
3
7
-- Receipt Print Format --
Receipt 1 Receipt 2
New Balance is
transferred as PB.
TEC STORE
1343 PEACH DRIVE
PHONE: 87-6437
Open 8:00am to 7:00pm
Closed: every Wednesday
10-20-2006 FRI #3001
PB+
$0.00
DP
01 $3.50
DP
03 $2.40
Chg $
5.90
NEW BAL $
5.90
ITEM 2
JONES 0338 18:26TM
TEC STORE
1343 PEACH DRIVE
PHONE: 87-6437
Open 8:00am to 7:00pm
Closed: every Wednesday
10-20-2006 FRI #3001
PB+
$5.90
Chg $
5.90
R/A $5.90
CATEND $10.00
CHANGE $4.10
NEW BAL $
0.00
ITEM 0
JONES 0339 18:27TM
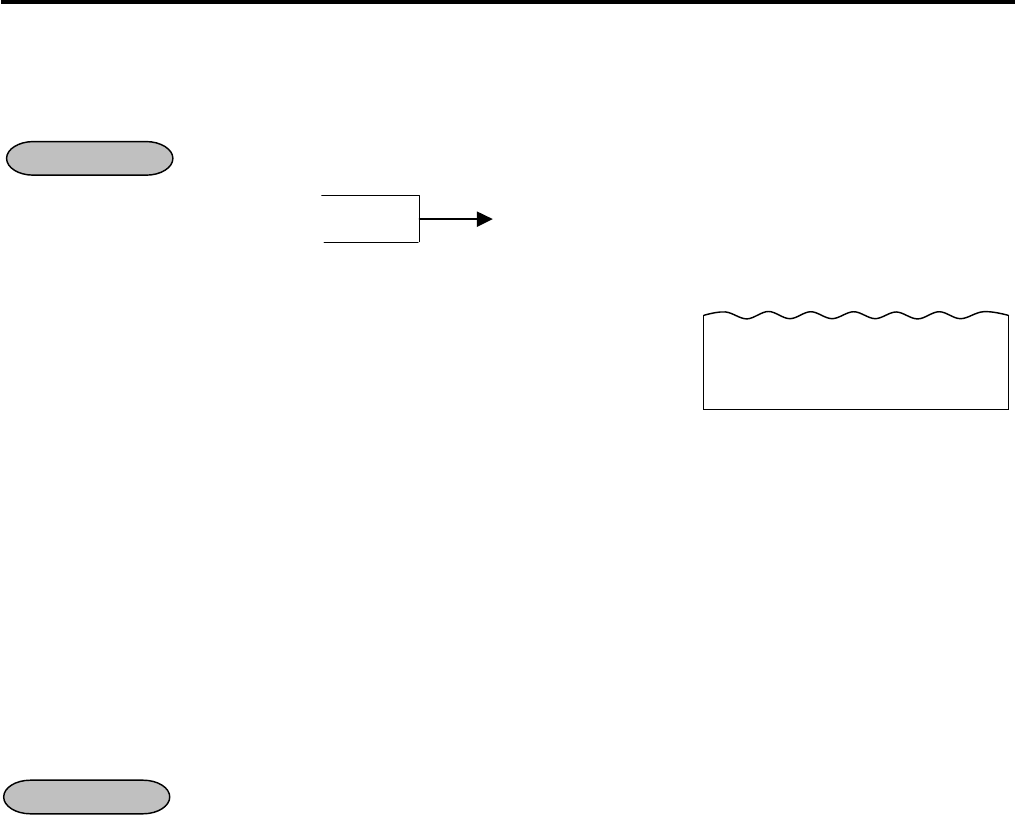
11. REGISTERING PROCEDURE AND PRINT FORMAT EO1-11155
11.40 Consignment Print
11-31
11.40 Consignment Print
Immediately after performing the Department/PLU entry or finalizing a sale, the [CONSIGNMENT] key
depression leads to an issuance of a receipt only for the entry or sale finalization just performed.
Department (or PLU) entry
[CONSIGNMENT]
[AT/TL] (or other Media key)
NOTES:
1. The following options are selectable.
(1) Print/Non-print option selection
• Date
• Consecutive No.
• Cashier name
• Messages on the header/footer portion of the receipt (logo, store message, commercial message)
(2) Frequency of this operation either Multiple times or Single time
2. This operation causes an error after the Non-add Number Print or No-sale transaction.
3. Each key can be programmed with consignment compulsion status by the program option setting.
4. While previously registered contents are printed in process of registration, this operation is not possible.
5. This operation is possible after the sale finalization or Short-tendering operation.
11.41 Validation Print
After performing a sale finalization, insert a validation slip into the validation slot which is provided on the remote
slip printer then depress the [VALIDATE] key, resulting in that the sale amount and the trailer are printed in two
lines.
[VALIDATE]
NOTES:
1. When this operation is performed by a training cashier, the message “TRAINING” is surely printed on the
validation slip.
2. The validation slip should be set to the remote slip printer beforehand.
3. When the validation compulsory status after the issuance of the long receipt is activated, the Validation Print
is performed then the drawer opens.
4. The subtotal amount is printed on the validation after performing the All Void operation.
5. The tendered amount is printed on the validation after tendering food stamps.
6. When the taxable total display by the [ST] key depression has been programmed, not the taxable total
amount but the subtotal amount is printed.
7. While the entered data is printed by the slip printer, if you want to perform a validation print, press the
RELEASE key of the slip printer to replace the slip with the validation slip, then depress the [VALIDATE] key.
8. Characters of character codes 1007, 1206, 1207, 1211, 1500 through 1503, 1506 through 1514 such as Ë,
→, ←, kg, lb, and No are not printed on the validation slip.
OPERATION
OPERATION
-- Receipt Print Format --
**CONSIGNMENT **
DP
03 $2.00
JONES 0340 18:30TM
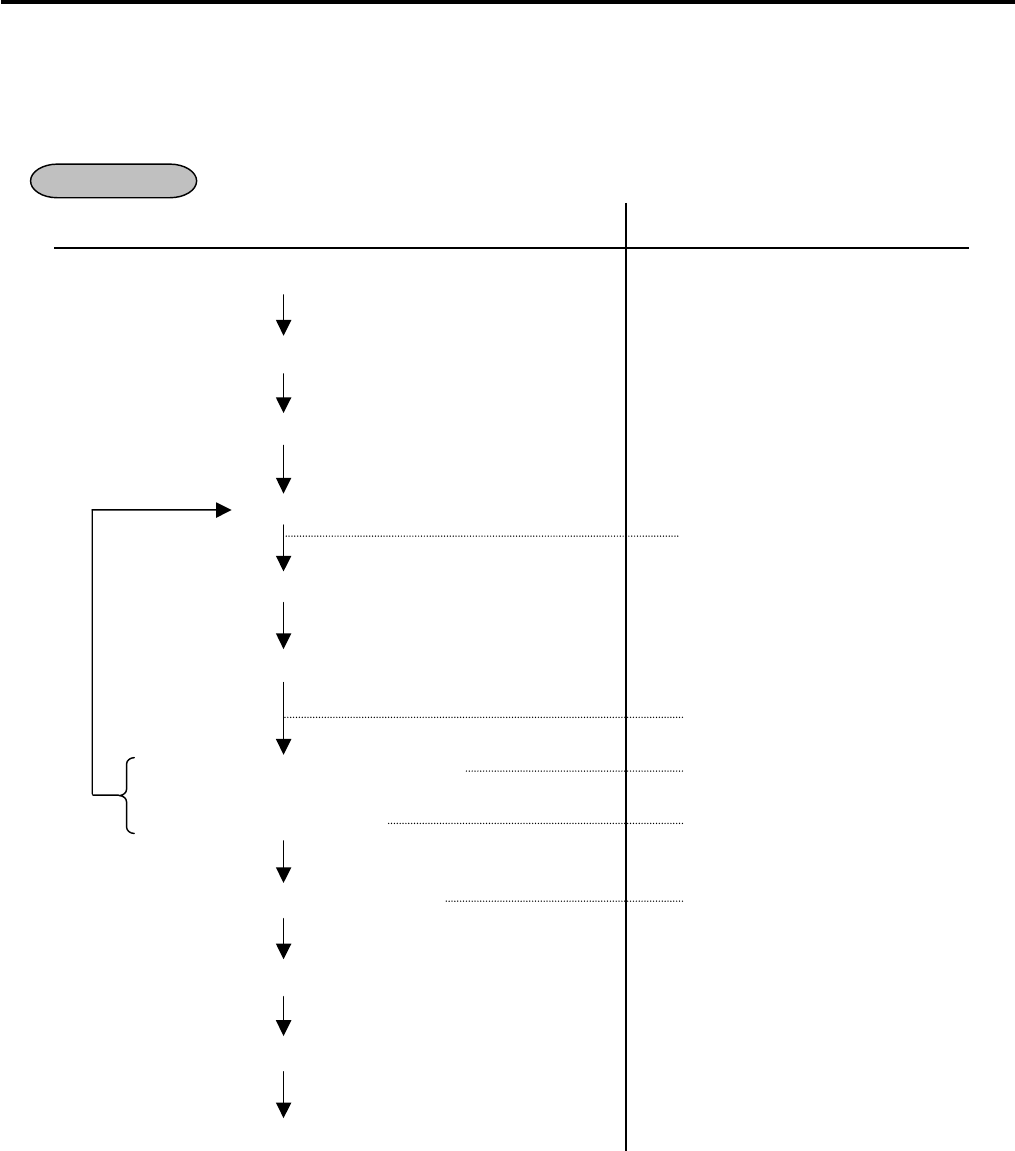
11. REGISTERING PROCEDURE AND PRINT FORMAT EO1-11155
11.42 Sale Finalization by Electronic Fund Transfer (EFT)
11-32
11.42 Sale Finalization by Electronic Fund Transfer (EFT)
Sale transaction by the various cards such as credit card is executed via the EFT terminal.
(1) CREDIT Authorization
Key Operation LCD Display
Sale Entry
([TXBL TL])
(Tendered Amount)
[CREDIT]
SWIPE CARD
([C])
Card Slide
PROCESSING
(in case of no response from EFT) NO RESPONS
or
(in case of decline) DECLINE
Response from the EFT terminal APPROVED
ECR prints a Customer Receipt
[STORE RECEIPT]
ECR prints a Store Receipt
NOTES:
1. At tendering in Foreign Currency, the EFT media cannot be used.
2. Receipt post-Issue operation after finalizing a sale by the EFT is unavailable.
3. Training Cashiers are unacceptable to the EFT terminal.
4. When “PROCESSING” is displayed, none of the operations on the ECR are possible.
5. EFT entry is also available to the partial payment to the received on account and charge posting
transactions.
6. For the EFT function, do not perform any registration in Receipt OFF mode.
7. Store receipt must be issued to perform next transaction or read/reset jobs.
8. Validation print operation after finalizing a sale transaction by the EFT is not possible.
OPERATION
(Max. 7 digits; Omissible if all
the amount is paid, however
depending on the program
option)
Pressing the
[C]
key at this
point will restore the ECR to
the condition being ready for
the [CREDIT] key entry
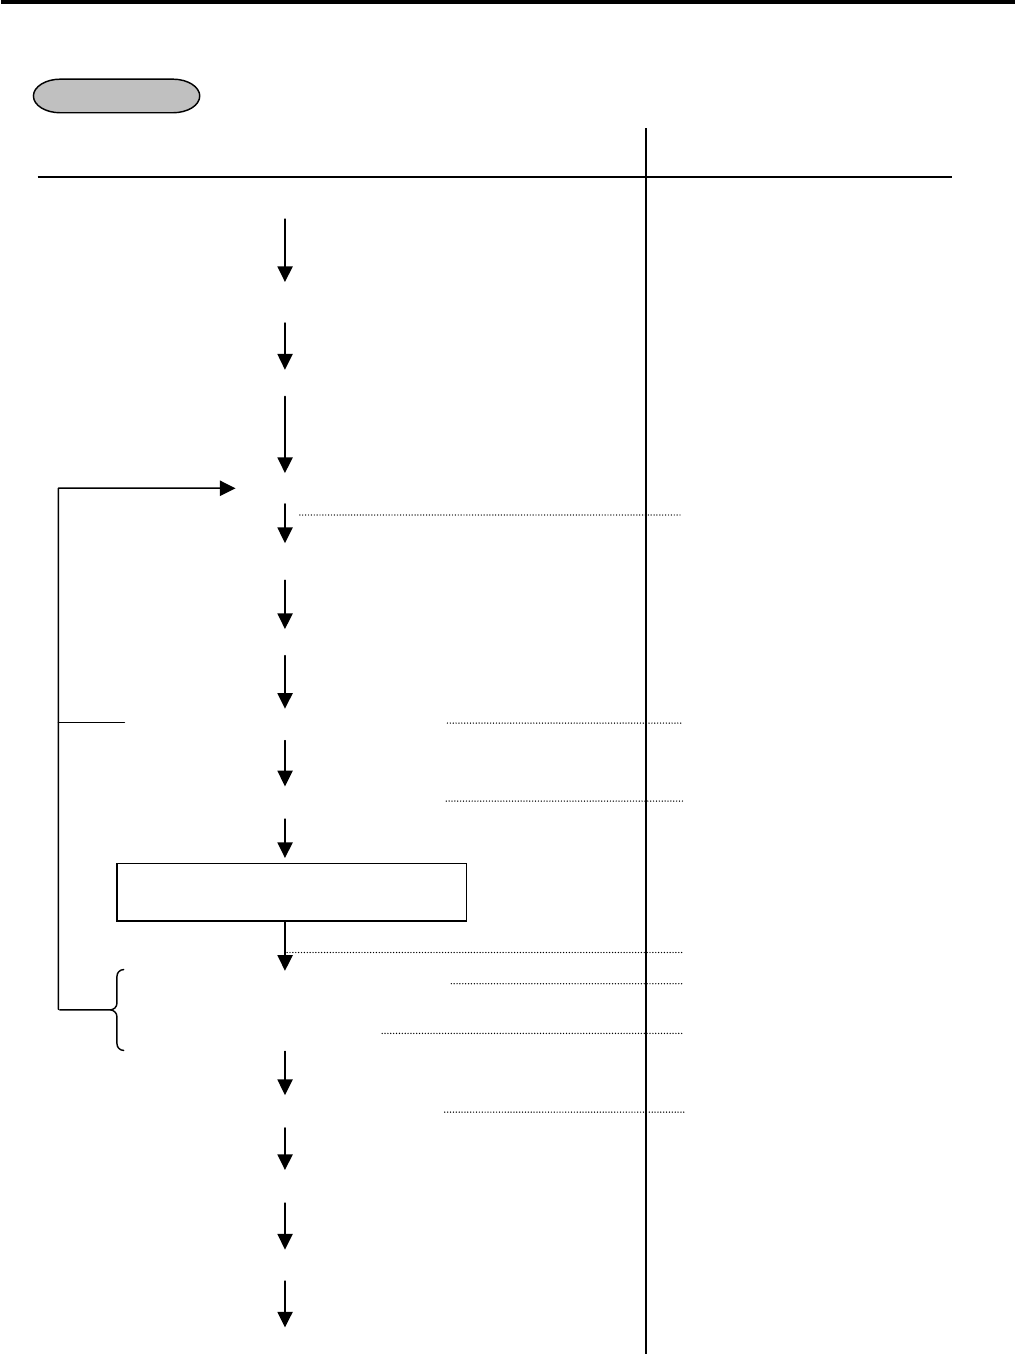
11. REGISTERING PROCEDURE AND PRINT FORMAT EO1-11155
11.42 Sale Finalization by Electronic Fund Transfer (EFT)
11-33
(2) DEBIT Authorization
Key Operation LCD Display
Sale Entry
([TXBL TL])
(Tendered Amount)
[DEBIT]
SWIPE CARD
([C])
Card Slide
(in case of no response from EFT) NO RESPONS
Response from the EFT terminal ENTER PIN#
Input the Pin No. from the Pin Pad
Then depress the [ENTER] key
PROCESSING
(in case of no response from EFT) NO RESPONS
or
(in case of decline) DECLINE
Response from the EFT terminal APPROVED
ECR prints a Customer Receipt
[STORE RECEIPT]
ECR prints a Store Receipt
OPERATION
(Max. 7 digits; Omissible if all
the amount is paid, however
depending on the program
option)
Pressing the
[C]
key at this
point will restore the ECR to
the condition being ready for
the [DEBIT] key entry
ECR wait condition
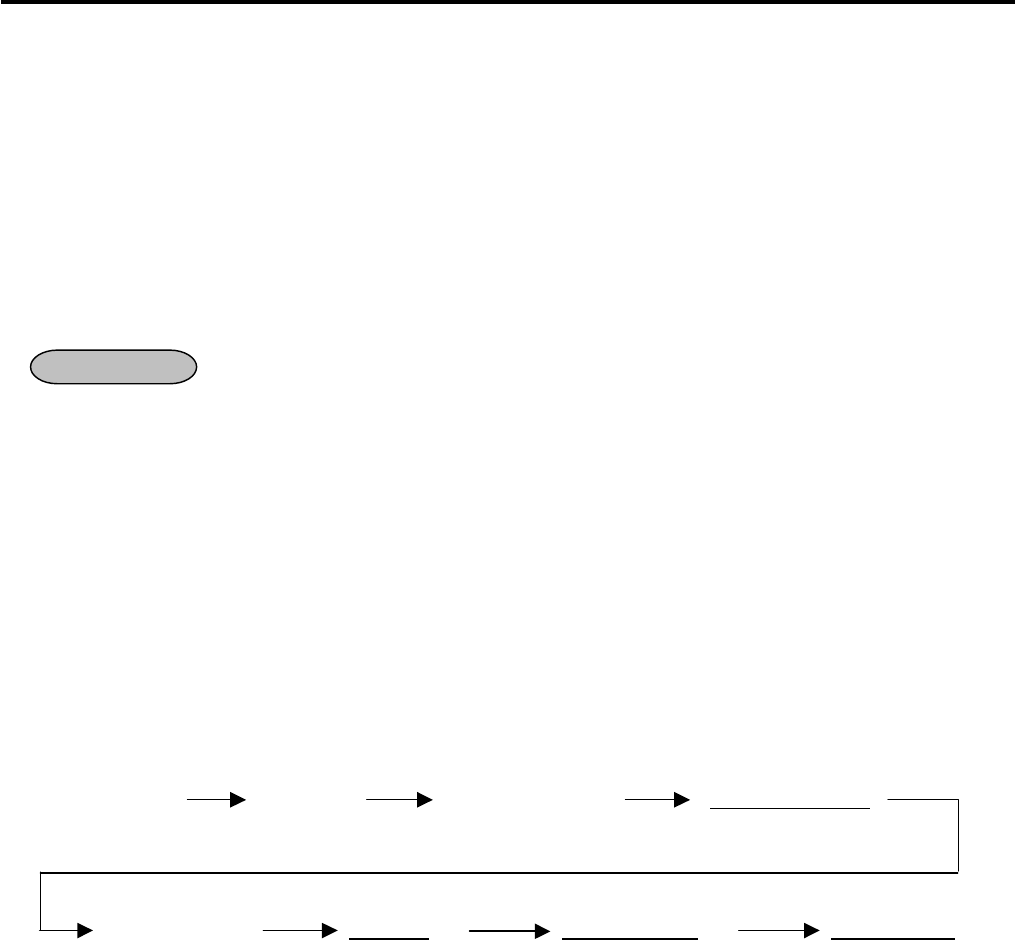
11. REGISTERING PROCEDURE AND PRINT FORMAT EO1-11155
11.42 Sale Finalization by Electronic Fund Transfer (EFT)
11-34
NOTES:
1. At tendering in Foreign Currency, the EFT media cannot be used.
2. Receipt post-Issue operation after finalizing a sale by the EFT is unavailable.
3. Training Cashiers are unacceptable to the EFT terminal.
4. When “PROCESSING” is displayed, none of the operations on the ECR are possible.
5. EFT entry is also available to the partial payment to the received on account and charge posting
transactions.
6. Validation Print operation after finalizing a sale transaction by the EFT is not possible.
7. Finalization of the [DEBIT] key operation in - mode causes an error.
(3) CREDIT/DEBIT Refund
[RTN MDSE] to be continued to the top of “CREDIT/DEBIT Authorization” sequence
NOTES:
1. Receipt post-Issue operation after finalizing a sale by the EFT is unavailable.
2. Training Cashiers are unacceptable to the EFT terminal.
3. Key operation on the ECR is unavailable during the inquiry to the host.
4. Validation Print operation after finalizing a sale transaction by the EFT is not possible.
5. During the Refund operation, finalizing operation by several EFT media keys should not be performed.
(4) Manual Card Number Entry
When the EFT terminal cannot read information contained in a card, the EFT approval entry will be executed
by manually entering the card No. and the expiration date on the ECR.
• EFT Media Key Entry
Sales Item Entry [TXBL TL] [MANUAL CARD#] (|Tendered Amount|)
[EFT Media Key] |Card No.| [#] |Expiration Date| [#] |Security Code| [#]
NOTES:
1. Entry of tendering amount is omissible if a customer pays all the amount.
2. EFT Media Key: [CREDIT] (except for the [DEBIT] key)
3. For the Card No. entry, entering 0 at the beginning of the card No. is valid.
Example) When “00123” is entered, “00123” will be printed.
4. Enforced security code entry can be set by the program option.
OPERATION
Max. 7 digits
NOTE 1
Max. 25 digits
NO
TE 3
Max 4 digits; MM/YY
(Omissible)
NOTE 2
Max 4 digits; (Omissible)
NOTE 4
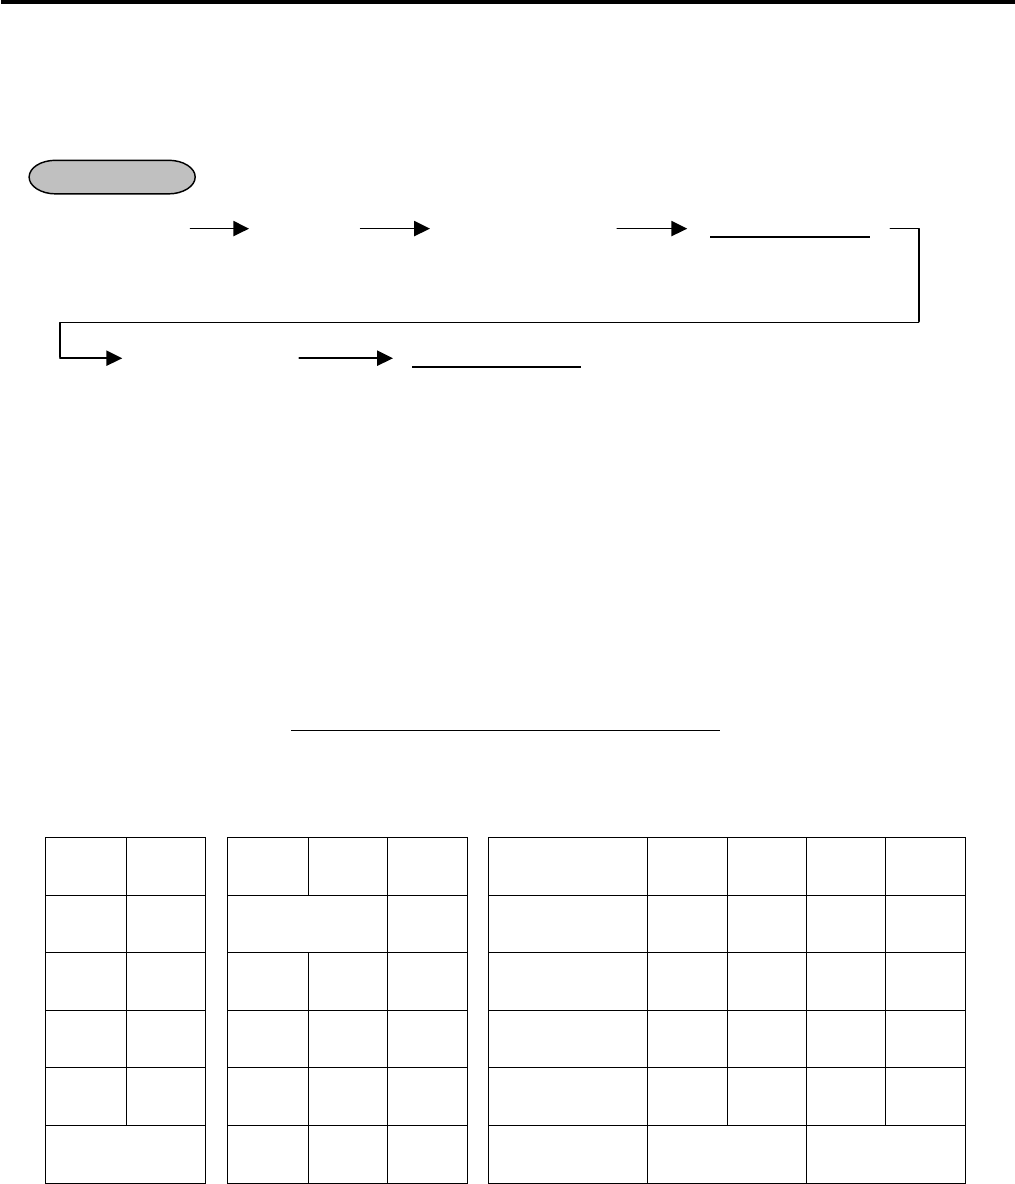
11. REGISTERING PROCEDURE AND PRINT FORMAT EO1-11155
11.42 Sale Finalization by Electronic Fund Transfer (EFT)
11-35
(5) Off Line Authorization
When the EFT system is in trouble and down, the EFT can be finalized on the ECR. To obtain the
authorization code of the EFT approval, you tell the customer’s card data and the amount of purchase to the
EFT authorization company on the telephone.
Sales Item Entry [TXBL TL] [OFFLINE AUTH] (|Tendered Amount|)
or
[FS TL TEND]
[EFT Media Key] (|Authorization Code|) [#]
NOTES:
1. Entry of tendering amount is omissible if a customer pays all the amount.
2. EFT Media Key: [CREDIT], [DEBIT], [EBT CASH], [EBT F/S], [CHECK TEND]
3. Before performing this operation, each EFT Media Key should be programmed with the statuses both “with
EFT process” and “off line authorization is available”. Failure to do this may cause an error.
4. None of store receipt is issued by the Off Line Authorization operation.
5. In Off Line Authorization operation, the Manual Card No. entry is unavailable.
6. The OFF Line Authorization operation is not possible by cashiers with training status.
7. Values 0 to 9 and A to Z should be used to enter the Authorization Code.
Keyboard layout for the Authorization Code entry
The keyboard layout is changed by the [EFT Media Key] depression as shown below.
Accordingly, values 0 to 9 and A to Z can be entered for the Authorization Code.
-- Ordinary Keyboard Type --
A F K P U
C
B G L Q V
7 8 9
C H M R W
4 5 6
D I N S X
#
1 2 3
E J O T Y
0
Z
OPERATION
Max. 7 digits
NOTE 1
NOTE 2
Max. 11 characters
(Omissible)

11. REGISTERING PROCEDURE AND PRINT FORMAT EO1-11155
11.42 Sale Finalization by Electronic Fund Transfer (EFT)
11-36
-- Flat Keyboard Type --
C
# 7 8 9
Q W E R T Y U I O P 4 5 6
A S D F G H J K L 1 2 3
Z X C V B N M
0
(6) Store Receipt
This operation is used for manually issuing the store receipt.
[STORE RECEIPT]
NOTES:
1. Journal print is not performed.
2. In case of the tendering operation (multi- or split-), the [STORE RECEIPT] key can be depressed at the
same number of times as its operation. (Allowed up to 4 times)
3. None of store receipt is issued by the Off Line Authorization operation.
4. The [STORE RECEIPT] key should be programmed with the status “Issuance of store receipt is available.”
in the EFT key status setting. Failure to do this may cause an error.
5. When the host responds decline, the Store Receipt operation causes an error.
OPERATION
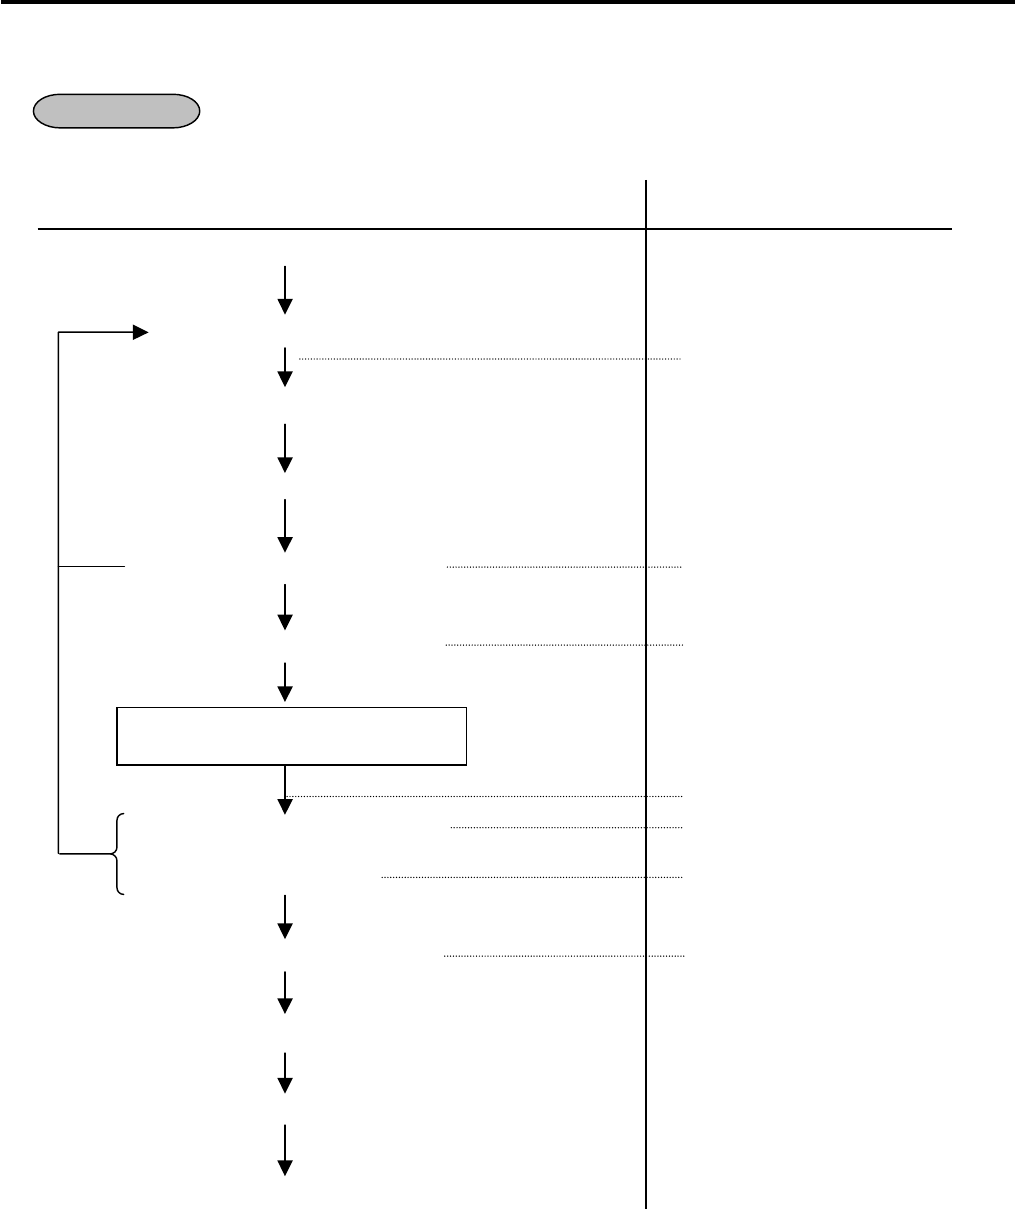
11. REGISTERING PROCEDURE AND PRINT FORMAT EO1-11155
11.42 Sale Finalization by Electronic Fund Transfer (EFT)
11-37
(7) Cashing Authorization
Cashing operation with a Debit card or EBT cash card is performed here.
• Without Card Number Entry
Key Operation LCD Display
Amount to be cashed
[DEBIT] (or [EBT CASH])
SWIPE CARD
([C])
Card Slide
(in case of no response from EFT) NO RESPONS
Response from the EFT terminal ENTER PIN#
Input the Pin No. from the Pin Pad
Then depress the [ENTER] key
PROCESSING
(in case of no response from EFT) NO RESPONS
or
(in case of decline) DECLINE
Response from the EFT terminal APPROVED
ECR prints a Customer Receipt
[STORE RECEIPT]
ECR prints a Store Receipt
OPERATION
(Max. 7 digits)
Pressing the
[C]
key at this point will
restore the ECR to the condition
being ready for the [DEBIT] (or
[EBT CASH]) key entry.
ECR wait condition

11. REGISTERING PROCEDURE AND PRINT FORMAT EO1-11155
11.42 Sale Finalization by Electronic Fund Transfer (EFT)
11-38
• Manual Entry (only for [EBT CASH] key)
[MANUAL CARD#] (|Tendered Amount|) [EBT CASH]
|Card No.| [#] (|Expiration Date|) [#]
NOTES:
1. Before performing this operation, the [DEBIT] (or [EBT CASH]) key should be programmed with the status
“no-purchase cashing is allowed”. Also each EFT Media Key should be programmed with the status “with
EFT process”. Failure to do this may cause an error.
2. For the EFT function, do not perform any registration in Receipt OFF mode.
3. Receipt post-Issue operation after the Cash-only Debit is unavailable.
4. Key operation on the ECR is unavailable during the inquiry to the host.
5. Training Cashiers are unacceptable to the EFT terminal.
6. Store receipt must be issued to perform next transaction or read/reset jobs.
7. EFT Cashing Authorization operation with the [CREDIT], [CHECK TEND], or [EBT F/S] key is not possible.
(This operation in REG or MGR mode works as a no-sale cashing of a non-cash media.)
Max. 7 digits
8 to19 digits
Max 4 digits: MM/YY
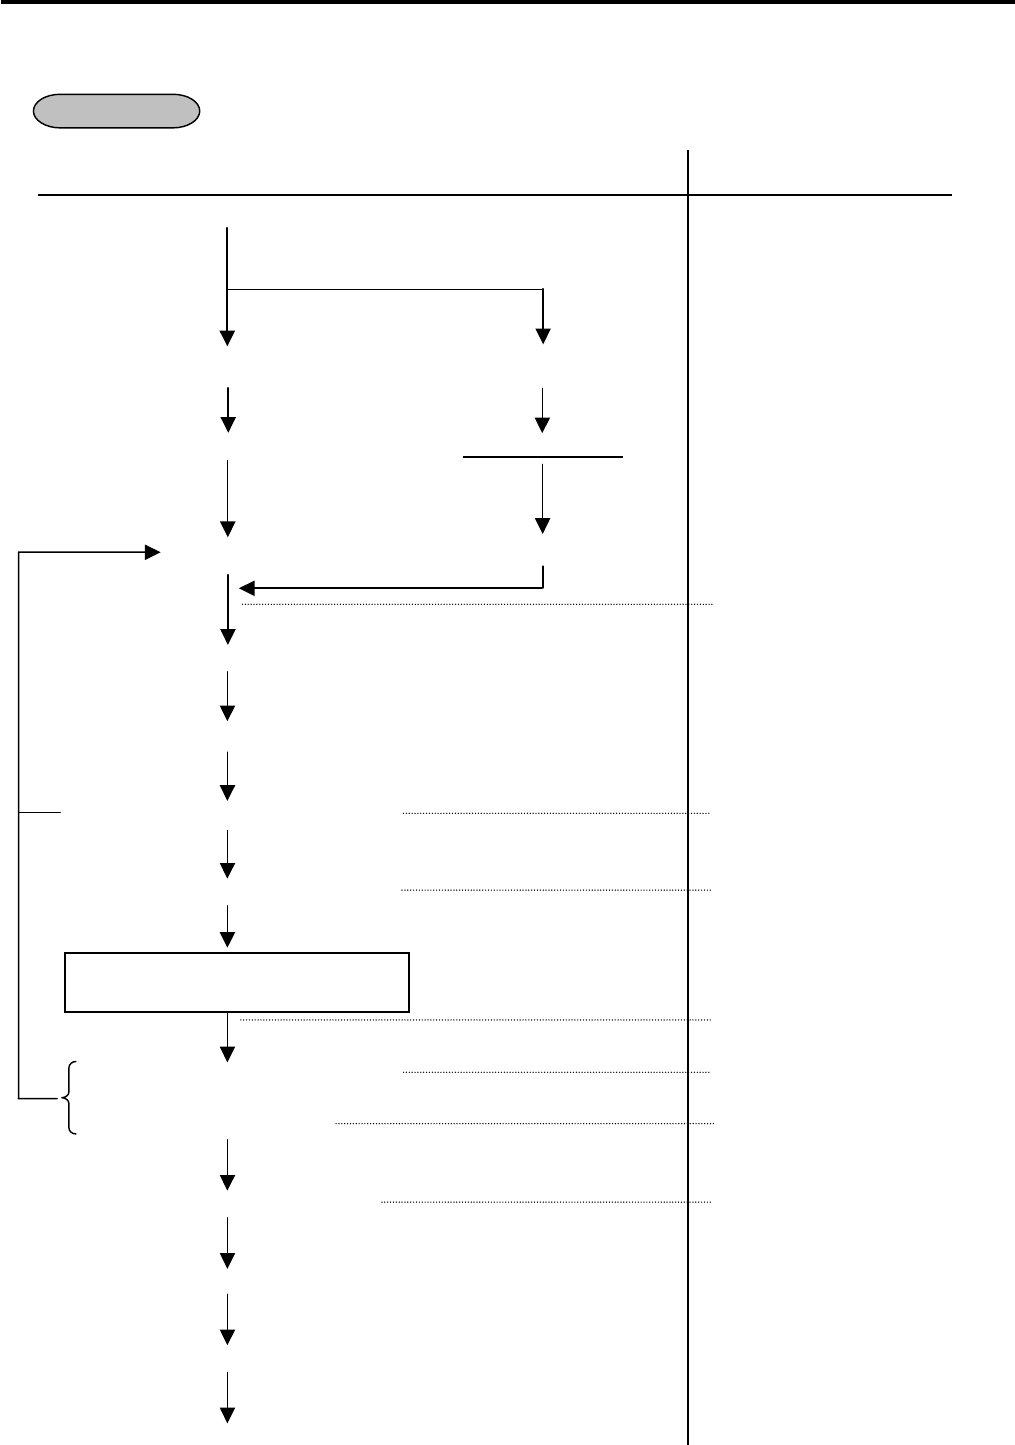
11. REGISTERING PROCEDURE AND PRINT FORMAT EO1-11155
11.42 Sale Finalization by Electronic Fund Transfer (EFT)
11-39
(8) EBT CASH, EBT F/S Purchase
Purchase with an EBT cash card or EBT food stamp card is performed here.
• Without Card Number Entry
Key Operation LCD Display
Sale Entry
([TXBL TL]) [FS TL TEND]
(Tendered Amount) |Tendered Amount|
[EBT CASH] [EBT F/S]
SWIPE CARD
Card Slide
([C])
(in case of no response from EFT) NO RESPONS
Response from the EFT terminal ENTER PIN#
Input the Pin No. from the Pin Pad
then depress the [ENTER] key.
PROCESSING
(in case of no response from EFT) NO RESPONS
or
(in case of decline) DECLINE
Response from the EFT terminal APPROVED
ECR prints a Customer Receipt
[STORE RECEIPT]
ECR prints a Store Receipt
OPERATION
This operation is possible when the
[EBT F/S] key is programmed with the
status “food stamp payment”.
(Max. 7 digits; Omissible
if all the amount is paid,
however depending on
the program option.)
Max. 7 digits
(Must be entered)
Pressing the
[C]
key at this point will rest
ore
the ECR to the condition being ready for the
[EBT CASH] (or [EBT F/S]) key entry.

11. REGISTERING PROCEDURE AND PRINT FORMAT EO1-11155
11.42 Sale Finalization by Electronic Fund Transfer (EFT)
11-40
• Manual Entry
(when the [EBT CASH] or [EBT F/S] key has been programmed with the status “taxable total payment”.)
Sales Entry ([TXBL TL]) [MANUAL CARD#] (|Sale Amount|) [EBT CASH]
([EBT F/S])
|Card No.| [#] (|Expiration Date|) [#]
• Manual Entry
(when the [EBT F/S] key has been programmed with the status “food stamp payment”.)
Sales Entry ([FS TL TEND]) [MANUAL CARD#] |Sale Amount| [EBT F/S]
|Card No.| [#] (|Expiration Date|) [#]
NOTES:
1. Receipt post-Issue operation after finalizing a sale by the EFT is unavailable.
2. Key operation on the ECR is unavailable during the inquiry to the host.
3. Contents of the customer receipt are printed on the journal, but those of the store receipt are not.
4. Up to 4 times of Multi-tendering operation or Split-tendering operation is possible when finalizing a sale
transaction by the EFT, however, the 5 times of the operation causes an error. At this time, the sale
finalization operation is possible only when using the [AT/TL] key or the media keys with the status “without
EFT process”.
5. Sale finalization by the EFT is possible only when the media key has been programmed with the status “EFT
media” in the EFT key status setting. If not, ordinary sale finalization is performed.
6. Training cashiers are unacceptable to the EFT terminal. (Ordinary finalization operation can be performed.)
7. Issuance of the store receipt is selectable by the EFT key status setting.
8. When tendering in foreign currency, the EFT media keys are not accepted.
9. For the EFT function, do not perform any registration in Receipt OFF mode.
10. Multiplication operation for each media with the EFT media keys is not possible.
11. Store receipt must be issued to perform next transaction or read/reset jobs.
12. Validation Print operation after finalizing a sale transaction by the EFT is not possible.
13. Negative balance sale causes an error.
Max. 7 digits
(Omissible)
8 to 19 digits
Max. 4 digits; MM/YY
(Omissible)
Max. 7 digits
(Must be entered)
8 to 19 digits
Max. 4 digits; MM/YY
(Omissible)
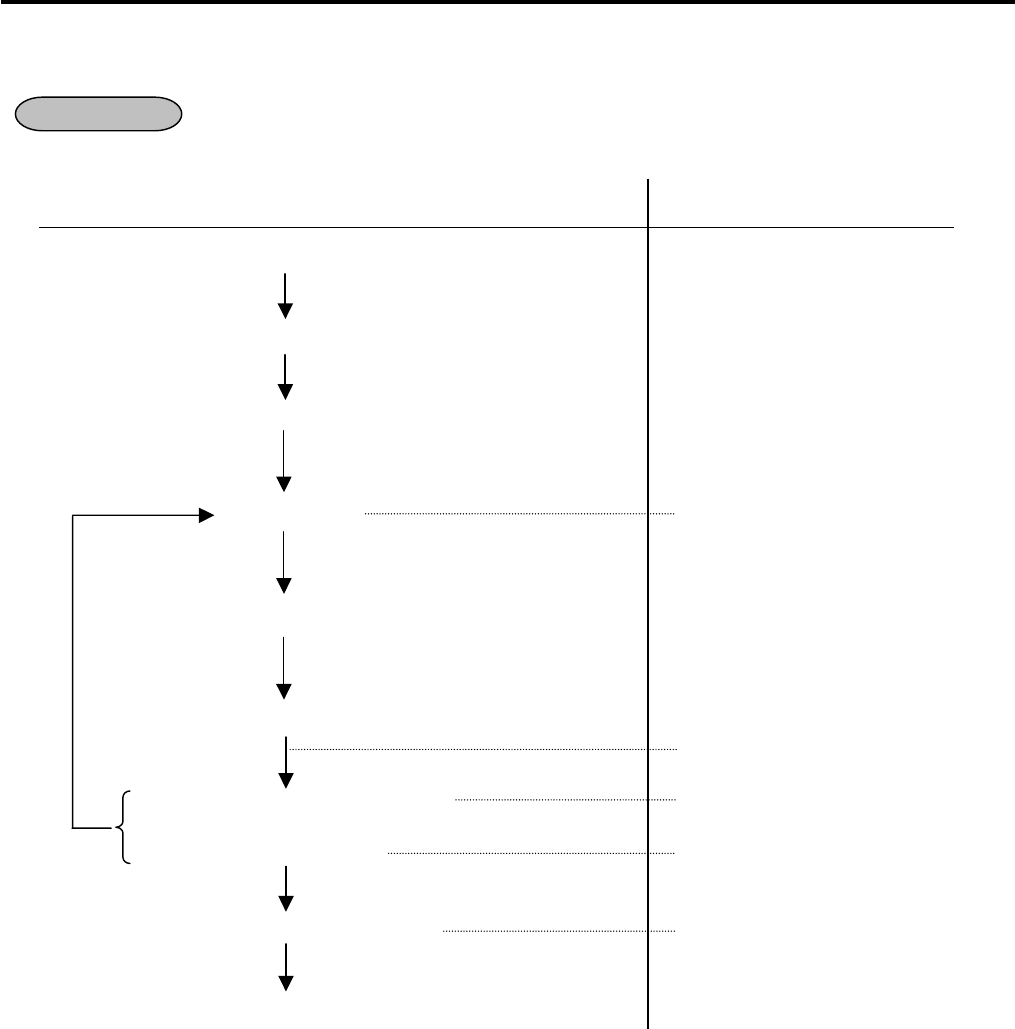
11. REGISTERING PROCEDURE AND PRINT FORMAT EO1-11155
11.42 Sale Finalization by Electronic Fund Transfer (EFT)
11-41
(9) Check Authorization
Sale finalization by a check via the EFT terminal is performed.
• Without Card Number Entry
Key Operation LCD Display
Sale Entry
([TXBL TL])
(Tendered Amount)
[CHECK TEND] SLIDE CHECK
Check Slide
([C])
PROCESSING
(in case of no response from EFT) NO RESPONS
or
(in case of decline) DECLINE
Response from the EFT terminal APPROVED
ECR prints a Customer Receipt
OPERATION
Pressing the
[C]
key at this point will
restore the ECR to the condition being
ready for the [CHECK TEND]
key
entry.
(Max. 7 digits; Omissible if all
the amount is paid, however
depending on the program
option)
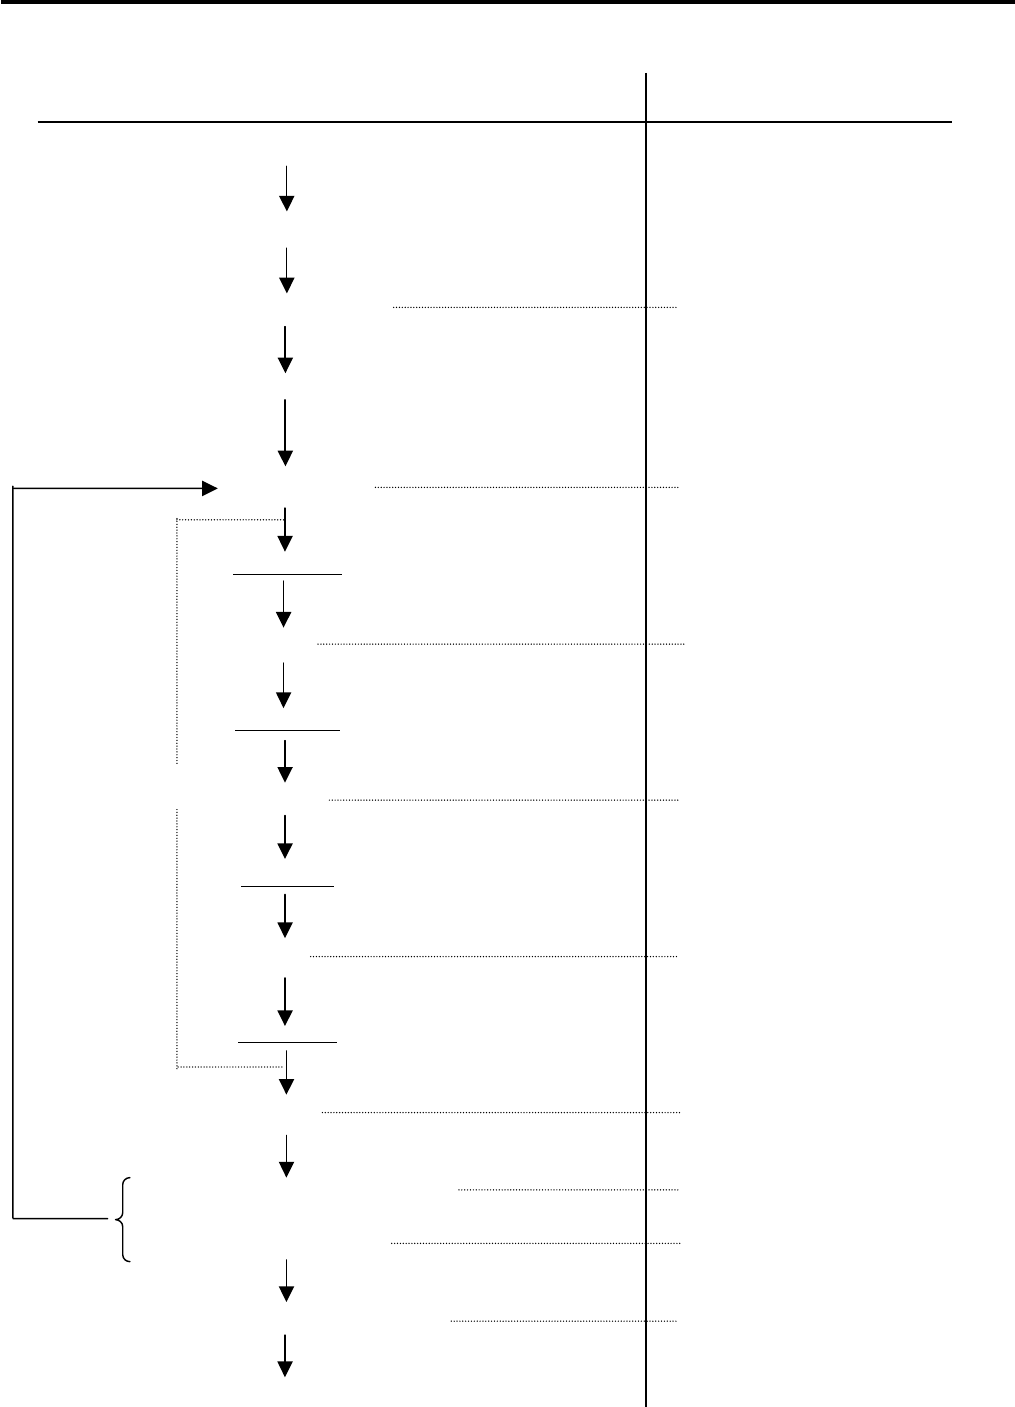
11. REGISTERING PROCEDURE AND PRINT FORMAT EO1-11155
11.42 Sale Finalization by Electronic Fund Transfer (EFT)
11-42
• Manual Entry
Key Operation LCD Display
Sale Entry
([TXBL TL])
[MANUAL CARD#] MANUAL CD
(Tendered Amount)
[CHECK TEND] ENT ACCT NUMBER
|Account No.|
[#] ROUTING NO
|Routing No.|
[#] CHECK NO
|Check No.|
[#] STATE CODE
|State Code|
[#] PROCESSING
(in case of no response from EFT) NO RESPONS
or
(in case of decline) DECLINE
Response from the EFT terminal APPROVED
ECR prints a Customer Receipt
Pressing the
[C]
key at this point
will restore the
ECR to the
condition being
ready for the
[CHECK TEND]
key entry.
(Max. 7 digits; Omissible if all the
amount is paid, however
depending on the program
option)
[C]
Max. 20 digits
Max. 20 digits
Max. 10 digits
2 digits

11. REGISTERING PROCEDURE AND PRINT FORMAT EO1-11155
11.42 Sale Finalization by Electronic Fund Transfer (EFT)
11-43
NOTES:
1. It is possible to cancel this operation prior to the inquiry to the host (i.e. before the message “PROCESSING”
is displayed).
2. Customer receipt is printed, but store receipt is not.
3. Training cashiers are unacceptable to the EFT terminal. (Ordinary finalization operation can be performed.)
When they depress the [MANUAL CARD#] key at the manual entry, it results in an error.
4. As the finalization of the [CHECK TEND] key, only the Check Authorization is possible. (Return operation is
not possible.)
When negative balance sale is given in REG or MGR mode, the finalization of the [CHECK TEND] key
causes an error. Also, this operation causes an error in - mode.
5. This operation is possible only when “check authorization” has been selected for the [CHECK TEND] key
function in the program option setting.
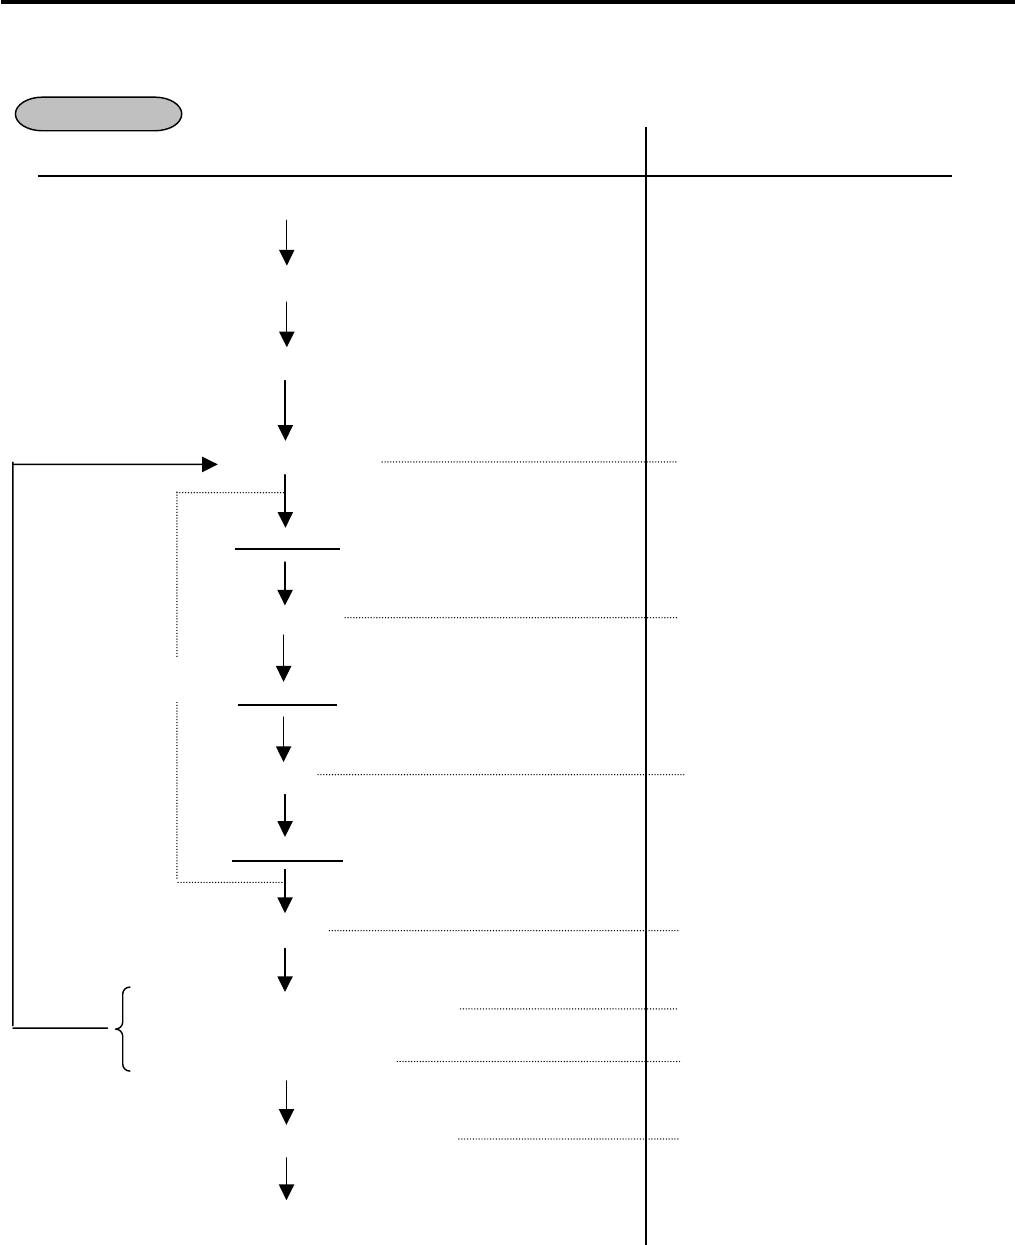
11. REGISTERING PROCEDURE AND PRINT FORMAT EO1-11155
11.42 Sale Finalization by Electronic Fund Transfer (EFT)
11-44
(10) Driver’s License Authorization
Sale finalization by a driver’s license via the EFT terminal is performed.
Key Operation LCD Display
Sale Entry
([TXBL TL])
(Tendered Amount)
[CHECK TEND] LICENSE NUMBER
|License No.|
[#] STATE CODE
|State Code|
[#] BIRTHDATE
|Date of Birth|
[#] PROCESSING
(in case of no response from EFT) NO RESPONS
or
(in case of decline) DECLINE
Response from the EFT terminal APPROVED
ECR prints a Customer Receipt
OPERATION
Pressing the
[C]
key at this point
will restore the
ECR to the
condition being
ready for the
[CHECK TEND]
key entry.
(Max. 7 digits; Omissible if all the
amount is paid, however
depending on the program
option)
[C]
Max. 20 digits
(alphanumeric character)
2 digits
4 digits (MMYY) or 6 digits (MMDDYY)

11. REGISTERING PROCEDURE AND PRINT FORMAT EO1-11155
11.42 Sale Finalization by Electronic Fund Transfer (EFT)
11-45
NOTES:
1. It is possible to cancel this operation prior to the inquiry to the host (i.e. before the message “PROCESSING”
is displayed).
2. Customer receipt is printed, but store receipt is not.
3. Training cashiers are unacceptable to the EFT terminal. (Ordinary finalization operation can be performed.)
4. As the finalization of the [CHECK TEND] key, only the Check Authorization is possible. (Return operation is
not possible.)
When negative balance sale is given in REG or MGR mode, the finalization of the [CHECK TEND] key
causes an error. Also, this operation causes an error in - mode.
5. Date of birth can be entered with 3 digits (MYY) or 5 digits (MDDYY) also.
Example: Entry of January 2000 … 100 [#]
Entry of January 15, 2000 … 11500 [#]
6. This operation is possible only when “driver’s license authorization” has been selected for the [CHECK
TEND] key function in the program option setting.

11. REGISTERING PROCEDURE AND PRINT FORMAT EO1-11155
11.43 Remote Slip Printer (hardware option) Operation
11-46
11.43 Remote Slip Printer (hardware option) Operation
(1) The EPSON Remote Slip Printer TM-U295 may be connected to the ECR as an optional device.
(2) The remote slip printer will operate printing if a slip is properly inserted.
(3) At a registration operation (in REG, MGR, or - mode)
• The remote slip printer will automatically activate printing when the slip has properly been set to the printer
table.
• Remote slip print compulsion for any Previous Balance entry can be selected by the program option.
• When the slip is full during a registration operation, the message “SLIP PAPER OUT” is indicated in the
LCD display and the registration operation is prohibited until another slip is properly set. Data stored in the
slip printer is printed on the slip. Subsequently the [C] key depression extinguishes the message and the
remaining data is printed.
(4) At a Read/Reset operation (in X or Z mode)
• The remote slip printer will automatically activate printing when the slip has properly been set to the printer
table.
• When the slip is full during a registration operation, the message “SLIP PAPER OUT” is indicated in the
LCD display. Data stored in the slip printer is printed on another slip which is properly set. Subsequently
the [C] key depression extinguishes the message and the remaining data is printed.
(5) The gap of the slip inlet is usually opened, and the slip may be inserted or withdrawn freely outside a
receipt/journal print sequence.
When a slip is properly set to the remote slip printer and the ECR is operated, the gap will be closed and
printing will be performed. When the sale is finalized and the receipt is issued, the gap of the remote slip
printer will be opened to allow the slip withdrawal. (The gap keeps closed during sale item entries.)
(6) The RELEASE key on the remote slip printer may be used for opening the closed gap. When pressing this
key during a print operation, the remote slip printer pauses printing and the gap is opened.
(7) Printing on the slip will be performed in the same format of receipt.
(8) If the remote slip printer turns OFF or the cable is disconnected, it may cause a “SLIP OFF LINE” error.
During the error, a connection confirmation message is indicated by the [ITEM CORR] key depression. At
this time, the [ITEM CORR] key depression again will let the slip printer disconnected. The [C] key
depression will remain the slip printer connected.
EPSON Remote Slip Printer TM-U295
Slip Paper
11. REGISTERING PROCEDURE AND PRINT FORMAT EO1-11155
11.44 When a Power Failure Occurs...
11-47
11.44 When a Power Failure Occurs...
If a power failure occurs, all sales data stored in the memory are automatically protected by the battery installed
in the ECR. The battery is rechargeable and it is recharged when the AC power returns. As the power returns,
the ECR revives to continue the work and displays the last item entered before the power failure. However,
please note the following phenomena to occur on the ECR when the power is regained:
1. The printer will work to print the entered data without failure after the power recovery, if any data was being
printed. However, one extra line may be fed on the power recovery depending on the power-recovery timing.
2. The following are the display indications on the power recovery:
ECR CONDITION at the time of Power Failure DISPLAY INDICATION on the Power Recovery
No key-in has been operated. Displays zero. Operations may go on. OUTSIDE A
SALE Numeric or Declaration keys have
been entered but not motorized keys.
Regains the display content that was obtained just
before the power failure. The operations may be
continued.
No Numeric or Declaration keys have
been entered.
DURING A
SALE
Numeric or Declaration keys have
been entered.
Regains the display content that was obtained just
before the power failure. The operations may be
continued.
In case a power failure occurred during printing, after the power recovery, the power failure symbol “**” is printed
in one line.
Example:
-- Journal Print Format --
DP
09 $2.00
DP
09 $1.00
********************************
DP
11 $0.50
SUBTL $2.50
CASH $
2.50
MISC $3.00
CHANGE $0.50
ITEM 2
JONES 0357 18:55TM
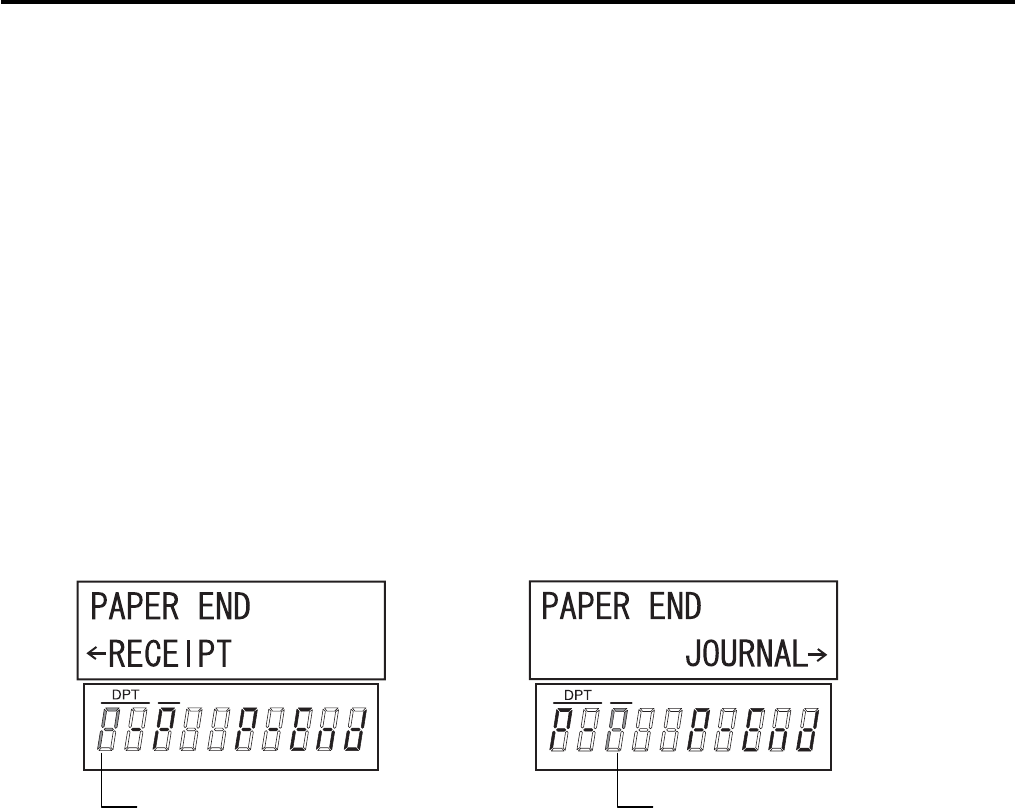
12. JOURNAL AND RECEIPT PAPER-END DETECTOR EO1-11155
12. JOURNAL AND RECEIPT PAPER-END DETECTOR
12- 1
12. JOURNAL AND RECEIPT PAPER-END DETECTOR
(1) This detects when either the journal or receipt paper is coming near the end. It is provided in order to prompt
the operator to replace the old paper roll with a new one.
(2) When the paper roll is out (or the paper has not been set properly), no key operation will be accepted and the
front display will indicate “PAPER END”.
(3) When a new paper roll is set, only the [C] key is allowed to operate. The error message “PAPER END” will be
cleared by the [C] key depression and normal key-in operations will be accepted. If any printing was
suspended, it will continue printing.
(4) If this detector senses a paper-end condition during printing, the printing will stop after the current line printing
is completed.
(5) If the [C] key is depressed in the paper-end condition, it will be ignored. The [C] key depression will be
effective to clear the error message only after the new paper roll is set.
(For further details, refer to Chapter 6.)
Receipt paper end Journal paper end
X
X
P blinks on the leftmost digit of the
10-digit 7-segment Numeric display. P blinks on the third leftmost digit of the
10-digit 7-segment Numeric display.
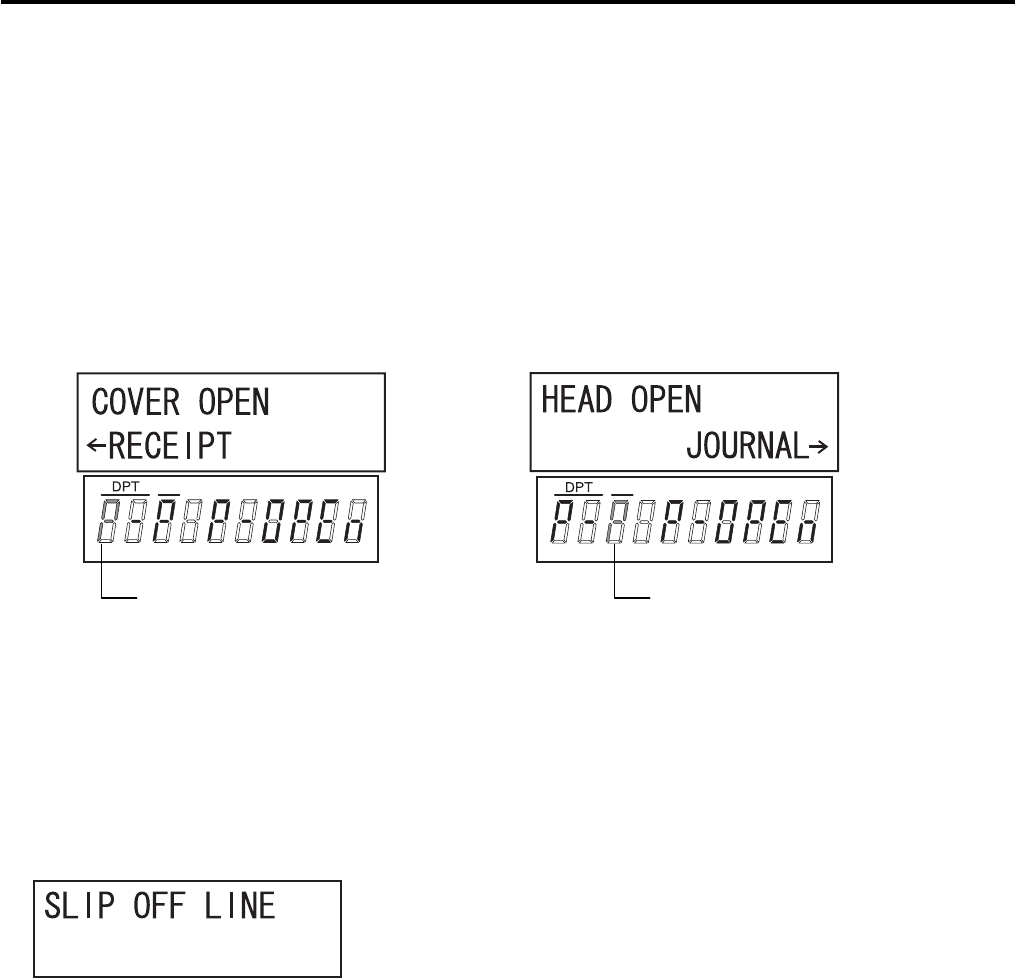
13. PRINTER HEAD OPEN DETECTOR EO1-11155
13. PRINTER HEAD OPEN DETECTOR
13- 1
13. PRINTER HEAD OPEN DETECTOR
(1) This detects the printer head open condition.
(2) When such a condition is detected, the front display indicates “COVER OPEN” (on the receipt printer side) or
“HEAD OPEN” (on the journal printer side) and none of the keys (including [RF] and [JF]) will be accepted.
(3) Close the receipt cover or journal paper retainer.
(4) The error message “COVER OPEN” (on the receipt printer side) or “HEAD OPEN” (on the journal printer side)
will be cleared by the [C] key depression and normal key-in operations will be accepted.
Receipt cover open Journal paper retainer open
X
X
14. REMOTE SLIP PRINTER MOTOR LOCK DETECTOR
(1) This detects the remote slip printer motor lock condition caused by some trouble.
(2) When such a condition is detected, the front display indicates “SLIP OFF LINE” and none of the keys
(including [RF] and [JF]) will be accepted.
(3) To regain the normal condition, turn the powers of the ECR and the remote slip printer to OFF, remove the
cause of the motor lock, and then turn the powers to ON again.
* If the cause cannot be found in the remote slip printer and only the ECR may be required to work temporarily
without the remote slip printer, remove the remote printer cable from the ECR, and turn the power of the ECR
to ON.
P blinks on the leftmost digit of the
10-digit 7-segment Numeric display. P blinks on the third leftmost digit of the
10-digit 7-segment Numeric display.
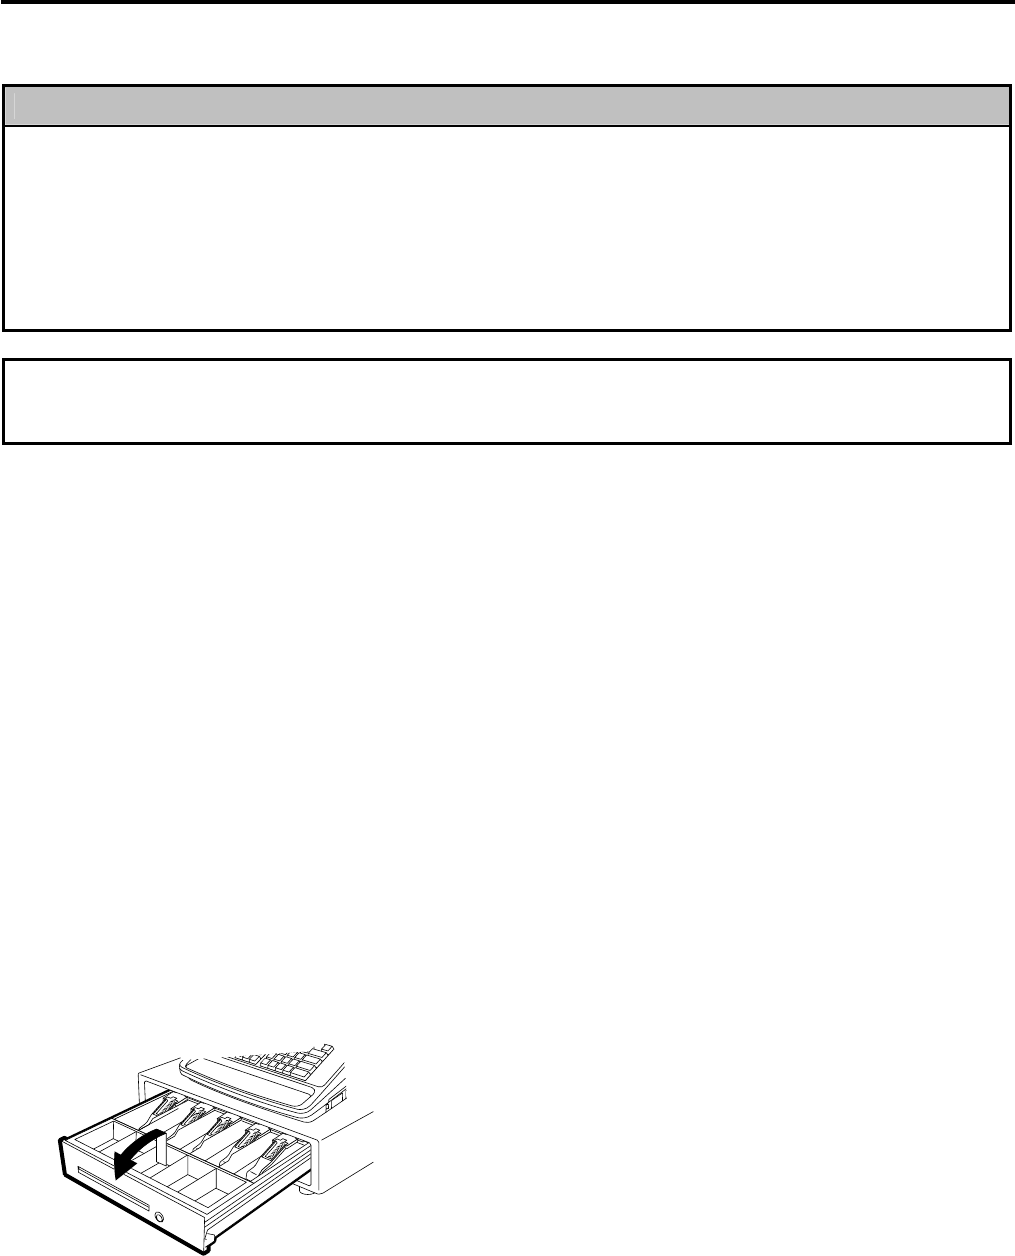
15. GENERAL MAINTENANCE EO1-11155
15.1 Cleaning the Covers
15- 1
15. GENERAL MAINTENANCE
WARNING!
1. DO NOT POUR WATER directly onto the ECR, as this may cause electric shock or fire.
2. The Journal Take-up Motor becomes very hot while printing. To avoid getting burned, never
touch the Journal Take-up Motor.
3. Never touch the print head and around it just after printing. You may get burned as the print
head becomes very hot during printing.
4. Carefully close the receipt cover so as not to catch your fingers. You may get injured.
5. Do not touch the cutter portion as you may get injured.
CAUTION!
Never use an organic solvent like thinners or benzene for cleaning. Using such solvents may
discolor the cover.
15.1 Cleaning the Covers
Wipe the covers with a soft dry cloth slightly moistened with mild detergent. After using detergent for cleaning, be
sure to wipe it off with a slightly moistened cloth.
15.2 Removing Jammed Paper
1) Turn the power OFF and disconnect the power plug from the wall inlet.
2) Open the receipt cover or the journal cover.
3) Remove the jammed paper. DO NOT USE any sharp implement or tool as these will damage the printer.
4) Re-load the receipt roll. (Refer to Section 6.1 Installing/Replacing the Receipt/Journal Roll.)
15.3 When “VOLTAGE ERROR” is displayed...
When “VOLTAGE ERROR” is displayed, a hardware error including printer error could occur. In this case,
immediately disconnect the power plug from the wall inlet the contact your nearest TOSHIBA TEC representative.
15.4 Removing the Drawer
Open the drawer, then take the Money Case out.
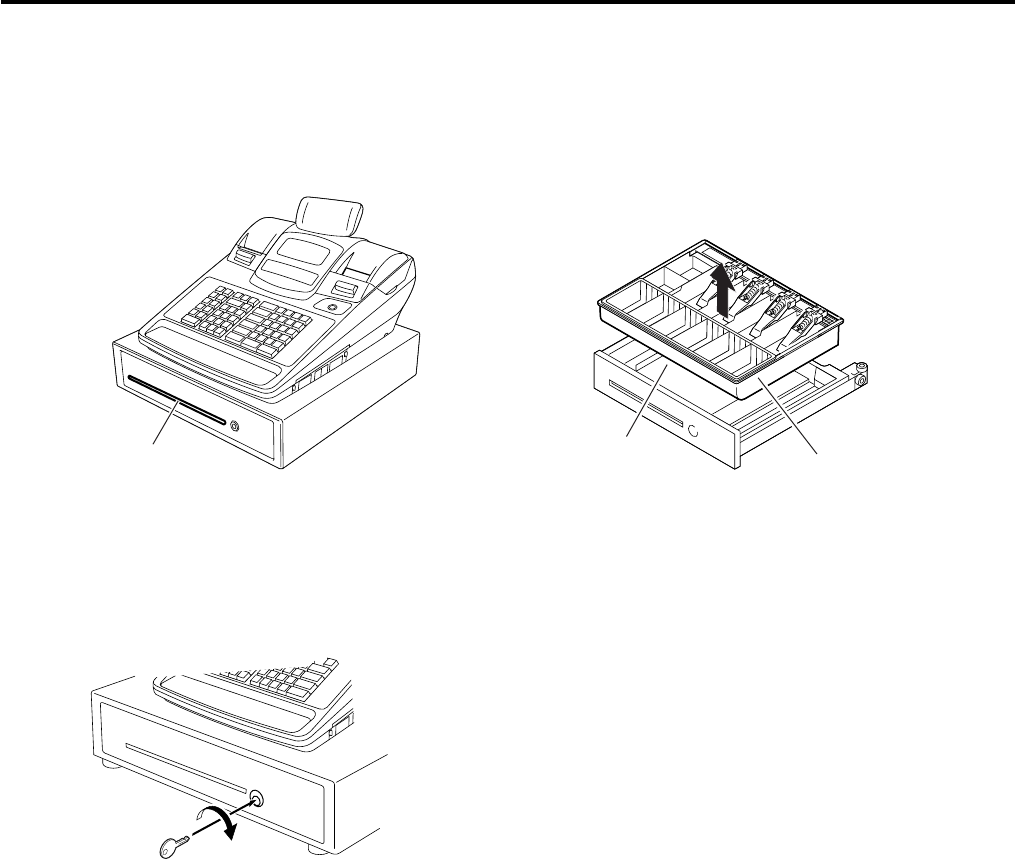
15. GENERAL MAINTENANCE EO1-11155
15.5 Media Slot
15- 2
15.5 Media Slot
The Media Slot provided at the front of the drawer is used to put non-cash media such as check in the drawer
without opening it. The non-cash media put from this slot are kept under the Money Case, therefore you can
keep them in secret.
15.6 Drawer Key
Insert the Drawer Release Key into the Drawer Release
Lock, then turn the key clockwise. The drawer will now
open. The Drawer Release Key can be taken out by
returning it to the original position.
Media Slot Money Case
Non-cash media are kept here.
16. SPECIFICATIONS EO1-11155
16. SPECIFICATIONS
16- 1
16. SPECIFICATIONS
ECR specifications
Item Description
Size 460 mm (width) x 437 mm (depth) x 299 mm (height)
(height including rubber feet)
Height when the customer display is fully raised: 359 mm
Weight Approximately 14.2 Kg
Power required AC 117 V ±10 %; 60 Hz ±10 %
(varies depending on the destination)
Power consumption Standby: 8.2 W (0.12 A), Operating: 45 W (0.5 A)
Ambient temperature 0 °C to 40 °C, 10% to 90% relative humidity
Print method Direct thermal print method
Print speed Max. 60 mm/sec.
Printable digits 32 one-byte characters per line
Printer
Receipt cutting method Manual cutting method
LCD display 192 x 64 dot LCD display tubes are adopted.
SET, X, Z, BLIND mode: Up to 24 one-byte characters in four lines
REG, MGR, - mode: Up to 16 one-byte characters in two lines
Operator
display
Numeric display 10-digit 7-segment display is adopted.
Color: Amount portion (Green)
DPT and X portions (Yellow)
Status lamps (Red or Green)
Customer display 7-digit 7-segment display is adopted.
Color: Amount portion (Green)
Status lamps (Red or Green)
Keyboard Number of keys Ordinary type keyboard: Max. 66 keys
Flat type keyboard: Max. 106 keys
Drawer 460 mm (width) x 400 mm (depth) x 115 mm (height)
(height including rubber feet)
16. SPECIFICATIONS EO1-11155
16. SPECIFICATIONS
16- 2
Paper roll specifications (receipt and journal rolls)
Item Description
Media Thermal roll paper
Width 58 +0/-1 mm
Thickness 0.06 mm to 0.08 mm
Outside dimension 80 mm or less
Recommended thermal paper Only paper rolled onto a core is acceptable, however, the paper end
should not be pasted to the core.
Standard paper:
TF60KS-E (Nippon Paper Industries)
PD150R (Oji Paper Co., Ltd)
High-sensitive paper:
TF50KS-E4 (Nippon Paper Industries)
Medium-term preserving paper:
TP60KS-F1 (Nippon Paper Industries)
P220VBB-1 (MITSUBISHI PAPER MILLS LIMITED)
PD170R (Oji Paper Co., Ltd)
Long-term preserving paper:
TP50KJ-R (Nippon Paper Industries)
PD152R (Oji Paper Co., Ltd)
PD160R-N (Oji Paper Co., Ltd)
AFP-235 (MITSUBISHI PAPER MILLS LIMITED)
HA220AA (MITSUBISHI PAPER MILLS LIMITED)
MANAGER’S GUIDE

EO1-11155
MA-600-1 SERIES
TABLE OF CONTENTS
Page
1. OPERATIONS IN “MGR” MODE------------------------------------------------------------------ 1- 1
1.1 Items Programmed to Require Manager Interventions ----------------------------------------1- 1
1.2 Other Operations Required Manager Interventions---------------------------------------------1- 3
1.3 Post Authorization Operation-------------------------------------------------------------------------1- 3
1.4 EBT F/S Electronic Voucher Purchase ------------------------------------------------------------1- 5
1.5 EBT CASH, EBT F/S Balance Inquiry--------------------------------------------------------------1- 7
2. OPERATIONS IN “ - ” MODE ---------------------------------------------------------------------- 2- 1
2.1 Ordinary Operations In “ - ” Mode-------------------------------------------------------------------2- 1
2.2 Electronic Fund Transfer (EFT) Operation In “ - ” Mode---------------------------------------2- 2
2.3 Prohibitive Operations In “ - ” Mode ----------------------------------------------------------------2- 4
3. READ (X) AND RESET (Z) REPORTS----------------------------------------------------------- 3- 1
3.1 Enabling Read (X) or Reset (Z) Mode -------------------------------------------------------------3- 2
3.2 General Notes On Report Takings------------------------------------------------------------------3- 5
4. PROGRAMMING OPERATIONS ------------------------------------------------------------------ 4- 1
4.1 Instructions for Programming ------------------------------------------------------------------------4- 2
4.2 Character Entries ---------------------------------------------------------------------------------------4- 7
4.3 Time Setting or Adjustment-------------------------------------------------------------------------- 4-12
4.4 Date Setting or Adjustment -------------------------------------------------------------------------- 4-13
4.5 Store Name Message Programming -------------------------------------------------------------- 4-15
4.6 Commercial Message Programming --------------------------------------------------------------4-19
4.7 Footer Message Programming --------------------------------------------------------------------- 4-20
4.8 Cashier Name and Status Programming---------------------------------------------------------4-21
4.9 Department Table Programming -------------------------------------------------------------------4-24
4.10 Department Name Programming------------------------------------------------------------------- 4-32
4.11 Department Group Name Programming----------------------------------------------------------4-33
4.12 PLU Table Programming----------------------------------------------------------------------------- 4-34
4.13 PLU Name Programming ---------------------------------------------------------------------------- 4-44
4.14 Department Preset Price Setting or Changing --------------------------------------------------4-45
4.15 PLU Preset Price Setting or Changing------------------------------------------------------------ 4-46
4.16 Tax Table Programming------------------------------------------------------------------------------ 4-48
4.17 %+ and %- Preset Rate Setting -------------------------------------------------------------------- 4-58
4.18 Foreign Currency Exchange Rate Setting -------------------------------------------------------4-59
5. VERIFICATION OF PROGRAMMED DATA---------------------------------------------------- 5- 1
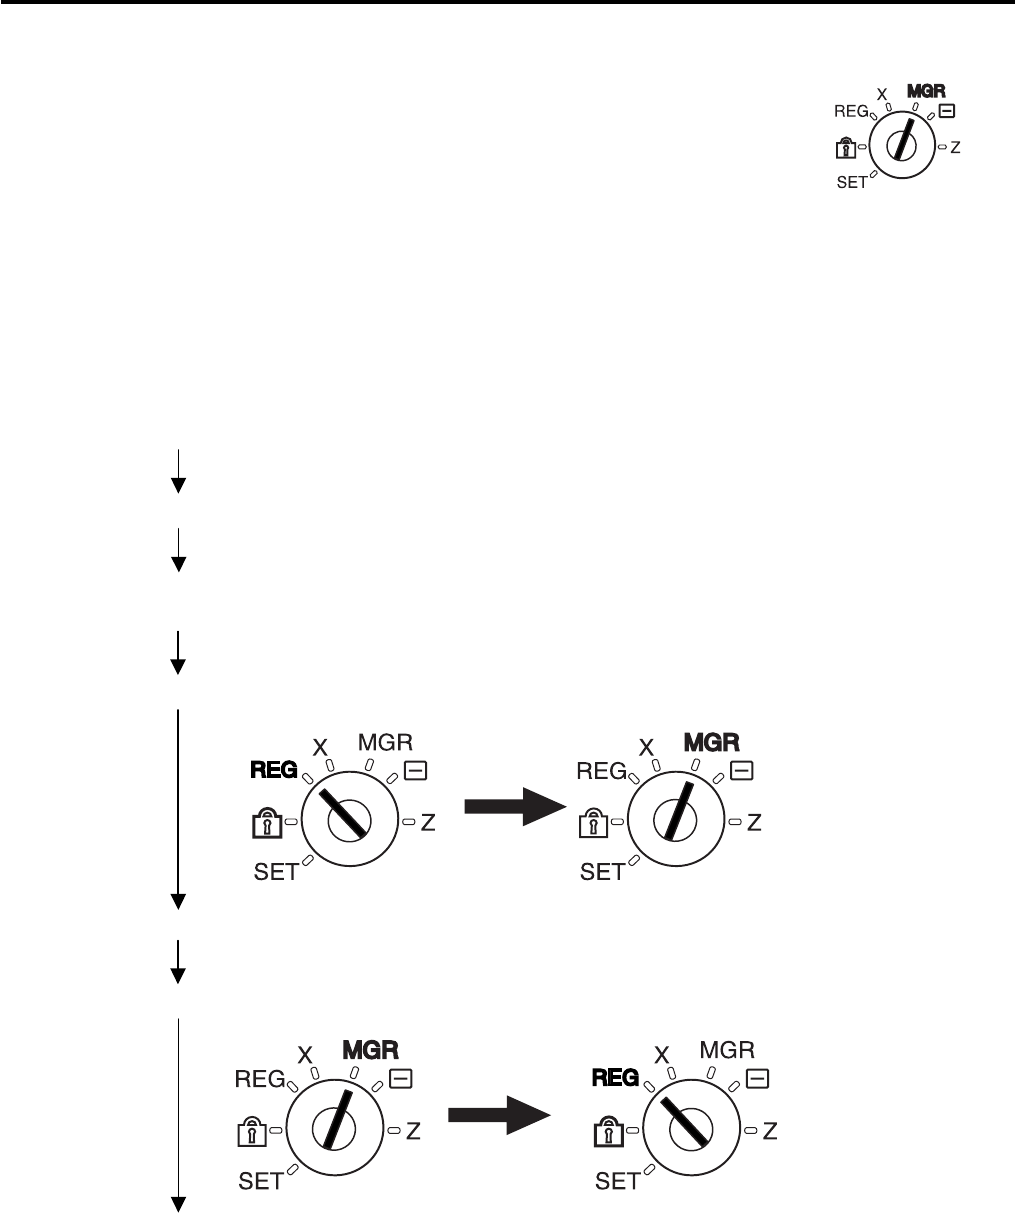
1. OPERATIONS IN “MGR” MODE EO1-11155
1.1 Items Programmed to Require Manager Interventions
1- 1
1. OPERATIONS IN “MGR” MODE
This chapter describes operations to be performed in the “MGR” position of the
Mode Lock, which the manager can access using the MGR or MA key.
1.1 Items Programmed to Require Manager Interventions
During daily sale entry operations, the cashier may call for Manager Interventions. The following is the operation
flow of a Manager Intervention.
1) During operations, the cashier comes across an item that requires a Manager Intervention. The cashier,
already informed of it, may immediately call for a Manager Intervention. Or the cashier, without knowing of it,
attempts the operation but an error occurs. He/She clears the error by the [C] key, and then calls for a
Manager Intervention.
2) The manager goes to the cashier counter with the MGR or MA key.
3) The cashier explains what kind of operation is attempted, and removes the REG key from the Mode Lock at
the “REG” position.
4) The manager inserts the MGR or MA key and turns it to the “MGR” position.
5) The cashier operates the required item.
6) The manager returns the MGR or MA key to the “REG” position and pulls it out.
7) The cashier sets the REG key to the “REG” position again and continues registering operations.
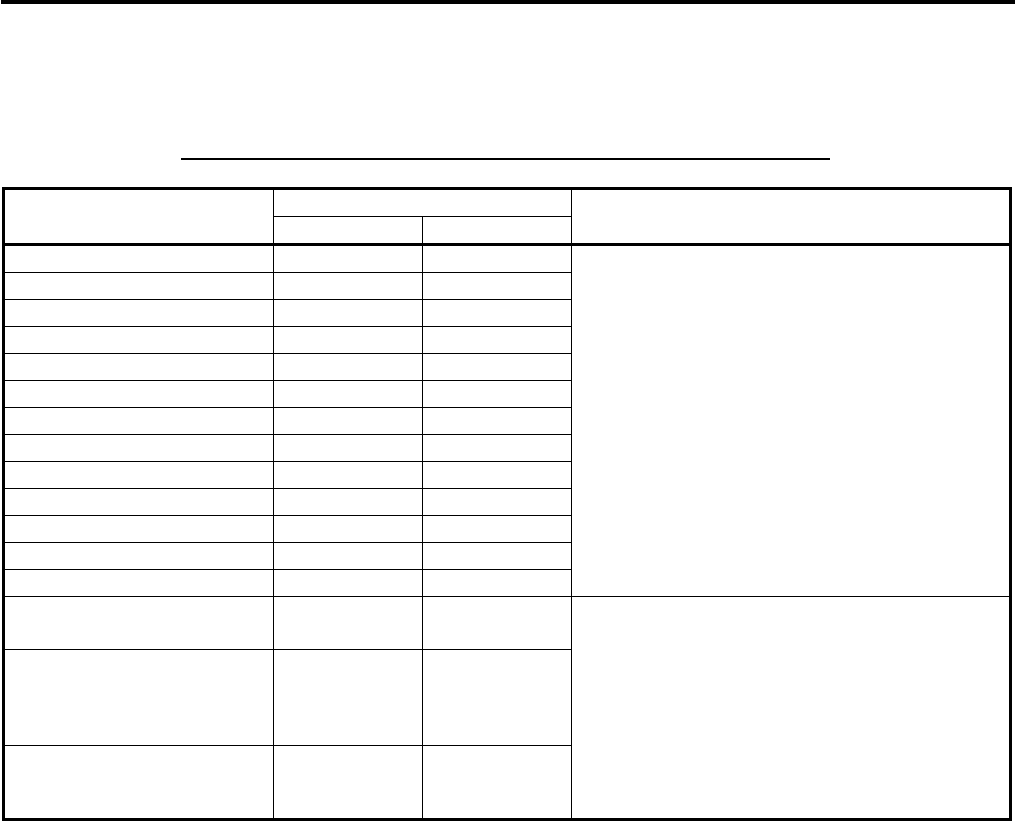
1. OPERATIONS IN “MGR” MODE EO1-11155
1.1 Items Programmed to Require Manager Interventions
1- 2
The following is the table of the keys and operations that are programmable with Manager Intervention. Fill in the
table by marking in the “Not Required” or “Required” column of each item, referring to the documents, etc. listed
in the table.
KEYS/OPERATIONS AND MANAGER INTERVENTION STATUS TABLE
Manager Intervention
Key Not required Required Reference
[DOLL DISC]
[VND CPN]
[STR CPN]
[%] ([% I] , [% II])
[RTN MDSE]
[VOID]
[PO]
[EX]
[NS]
[ALL VOID]
[1st PRICE]
[2nd PRICE]
[3rd PRICE]
As for changing the key status, ask your
TOSHIBA TEC representative.
Credit Balance
(NOTE 1 below)
Negative-balance Sale
Finalization by Media Keys
(except [AT/TL])
(NOTE 2)
Negative Department or
negative PLU Entries
(NOTE 3)
These are program options for each
store.
Ask your TOSHIBA TEC representative for
information and these status changes.
NOTES:
1. The “Credit Balance” means that amount entries through [DOLL DISC], [VOID], [VND CPN], [STR CPN] will
result in over-subtraction of the subtotal amount at the time of the entry through any of those keys. If the
status “Not required” is selected, over-subtraction using these keys will be allowed in the “REG” mode. The
[RTN MDSE] key, negative departments, and negative PLUs are not subject to this “Credit Balance” status
selection.
2. The “Negative-balance Sale” may be caused by:
1. Credit Balance if “Not required” is selected as the above Credit Balance status.
2. Amounts entered through the [RTN MDSE] key.
3. Amounts entered through negative departments or negative PLUs.
4. Other negative amounts.
3. The “Negative Departments or PLUs” are the Departments/PLUs programmed as negative status, but not
normal Departments/PLUs through which Store Coupon or Returned Merchandise amounts are entered.
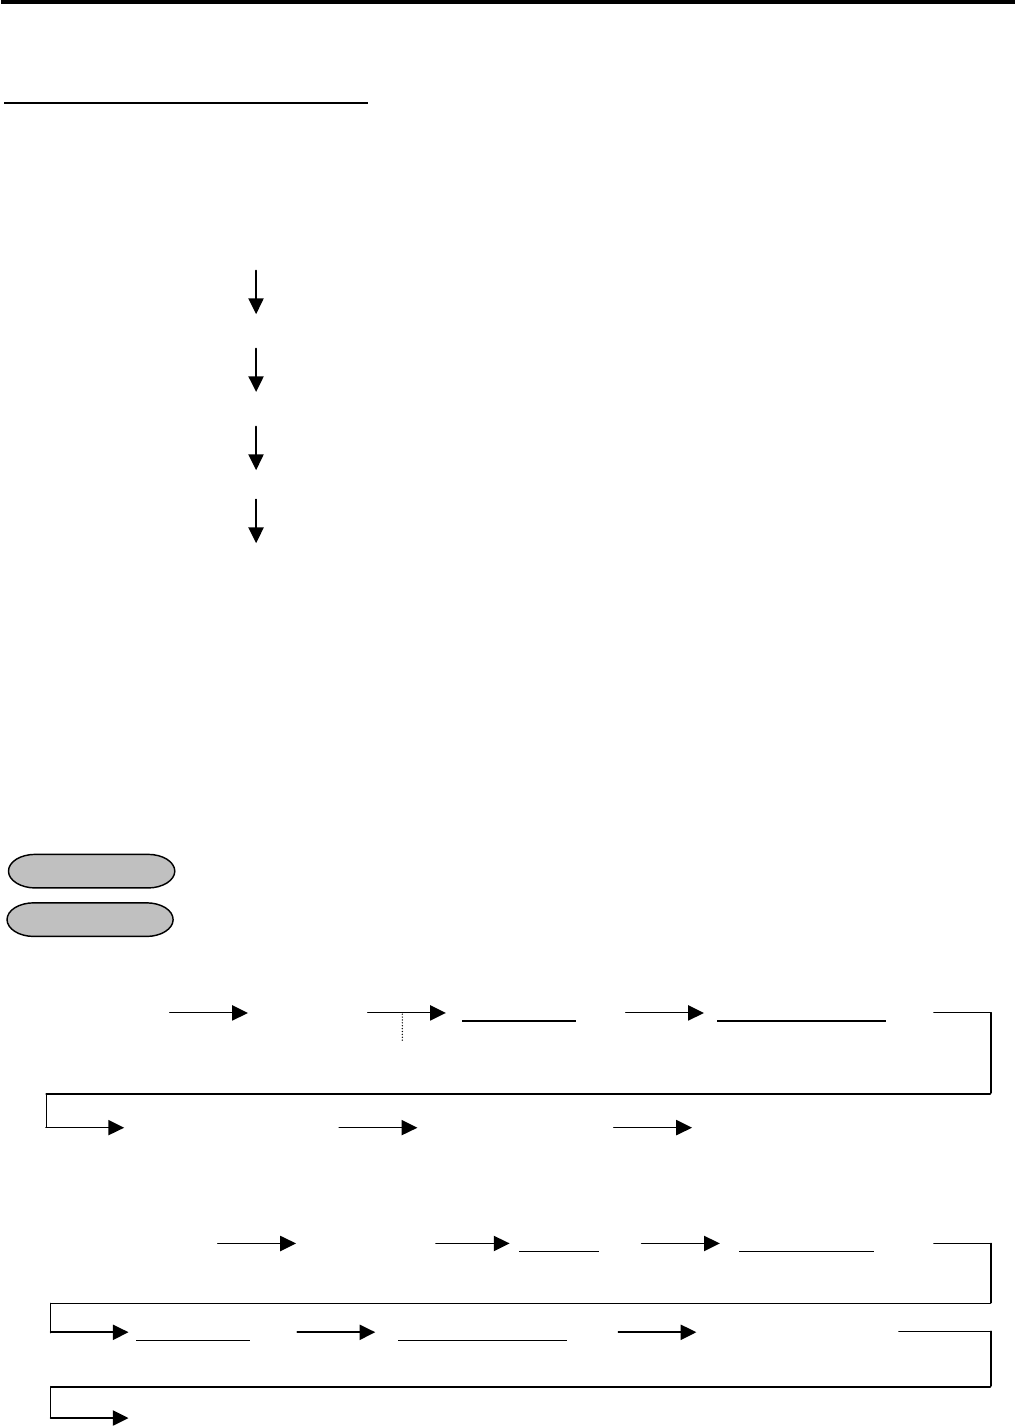
1. OPERATIONS IN “MGR” MODE EO1-11155
1.2 Other Operations Required Manager Interventions
1- 3
1.2 Other Operations Required Manager Interventions
Listing Capacity or Amount Limit Release
Amount Limits may be programmed on Departments/PLUs, Tender Medias, [DOLL DISC], [VND CPN], [STR
CPN]. These limits are programmed to check an excessively high or low amount entry by cashier’s mistake at
the earliest stage. Guide your cashiers as in the following procedure:
(1) During sale entries by the cashier, an error occurs with Error Message “OPERATION ERROR”
(programmable) is displayed.
(2) The cashier clears the error by the [C] key. The cashier confirms the amount and operates the item again.
(3) If the same error occurs again, the cashier attempts to enter the amount using the [OPEN] or [LC OPEN] key.
(4) If the operation results in an error again, the Amount Limit cannot be solved by the [OPEN] or [LC OPEN] key.
(5) The cashier calls for Manager Intervention.
The procedure thereafter is the same as Steps 2) to 7) for the Items Programmed to Require Manager
Interventions (Section 1.1).
In need of information of Amount Limits, ask your TOSHIBA TEC representative.
1.3 Post Authorization Operation
This operation is used for finalizing the EFT sale transaction which was authorized on the off-line ECR.
Any time outside a sale, In a Signed-ON condition
Mode Lock: MGR
• Without Card Number Entry
[POST AUTH] Card Slide |Sale Amount| [#] |Authorization Code| [#]
Max. 7 digits Max. 11 characters
NOTE 1 (Omissible)
EFT terminal responds [STORE RECEIPT] Store Receipt Print
“APPROVAL”.
• With Card Number Entry
[MANUAL CARD#] [POST AUTH] |Card No.| [#] (|Expiration Date|) [#]
Max. 25 digits Max. 4 digits; MM/YY
(Omissible)
|Sale Amount| [#] (|Authorization Code|) [#] [STORE RECEIPT]
Max. 7 digits Max. 11 characters
(Omissible)
Store Receipt Print
OPERATION
CONDITION
ECR wait condition
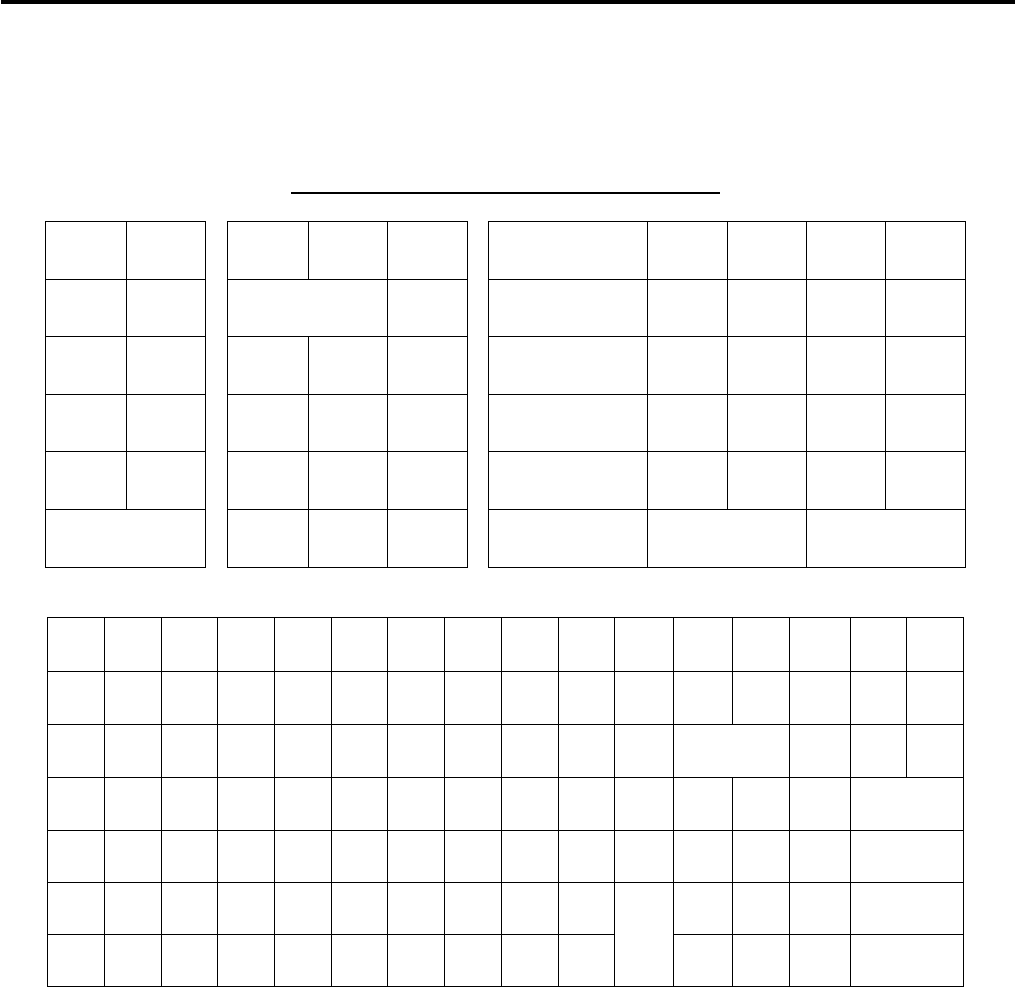
1. OPERATIONS IN “MGR” MODE EO1-11155
1.3 Post Authorization Operation
1- 4
NOTES:
1. Pressing the [C] key at this point will restore the ECR to condition being ready for the [POST AUTH] key
entry.
2. Training cashiers are unacceptable to the EFT terminal.
3. Values 0 to 9 and A to Z should be used to enter the Authorization Code.
Keyboard layout for the Authorization Code entry
-- Ordinary Keyboard Type --
A F K P U
C
B G L Q V
7 8 9
C H M R W
4 5 6
D I N S X
#
1 2 3
E J O T Y
0
Z
-- Flat Keyboard Type --
C
# 7 8 9
Q W E R T Y U I O P 4 5 6
A S D F G H J K L 1 2 3
Z X C V B N M
0
4. None of customer receipt is issued by the Post Authorization operation.
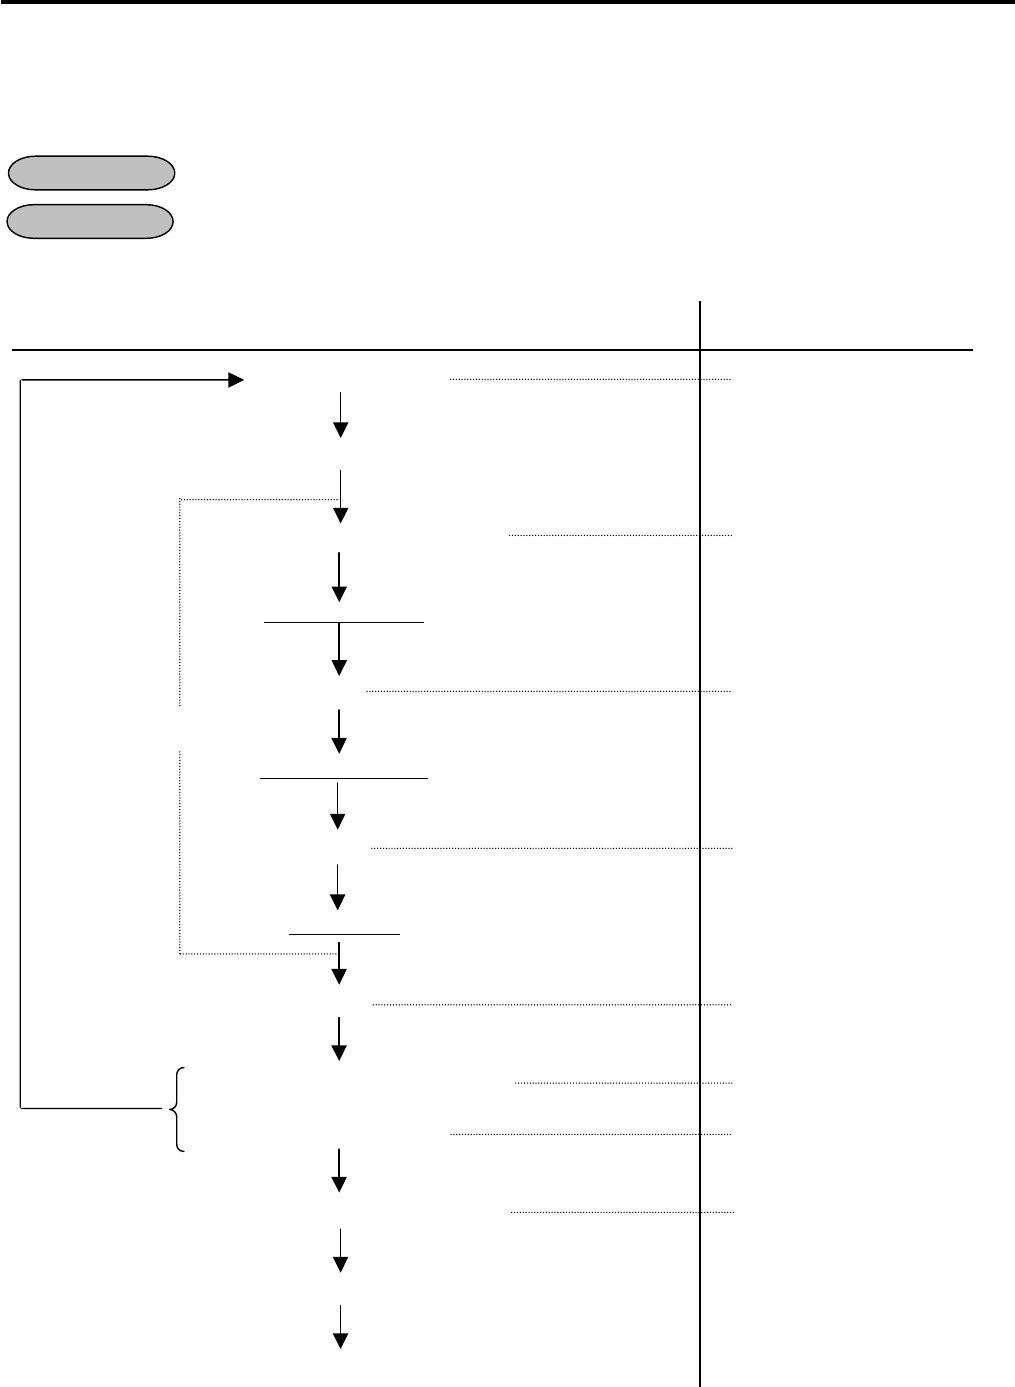
1. OPERATIONS IN “MGR” MODE EO1-11155
1.4 EBT F/S Electronic Voucher Purchase
1- 5
1.4 EBT F/S Electronic Voucher Purchase
In this operation, a sale entry with EBT card is performed on the off-line ECR when the network is down, then the
sale transaction is authorized after the network recovery. (This operation is used for the EBT food stamp.)
Any time outside a sale, In a Signed-ON condition
Mode Lock: MGR
• Without Card Number Entry
Key Operation LCD Display
[VOUCHER AUTH] SWIPE CARD
Card Slide
Response from the EFT terminal ENT AMOUNT
|Tendered Amount|
[#] ENT AUT CD
(|Authorization Code|)
[#] ENT VOUCHER#
(|Voucher No.|)
[#] PROCESSING
(in case of no response from EFT) NO RESPONS
or
(in case of decline) DECLINE
Response from the EFT terminal APPROVED
[STORE RECEIPT]
ECR prints a Store Receipt
OPERATION
CONDITION
Pressing the
[C]
key at this point
will restore the
ECR to the
condition being
ready for the
[VOUCHER
AUTH] key entry.
Max. 7 digits
[C]
Max. 11 characters
(alphanumeric characters);
omissible
Max. 10 digits;
omissible

1. OPERATIONS IN “MGR” MODE EO1-11155
1.4 EBT F/S Electronic Voucher Purchase
1- 6
• With Card Number Entry
[MANUAL CARD#] [VOUCHER AUTH] |Card No.| [#] (|Expiration Date|) [#]
8 to19 digits Max. 4 digits; MM/YY
(Omissible)
|Sale Amount| [#] |Authorization Code| [#] |Voucher No.| [#]
Max. 7 digits Max. 11 characters Max. 10 digits
(alphanumeric characters)
NOTES:
1. It is possible to cancel this operation prior to the inquiry to the host (i.e. before the message “PROCESSING”
is displayed).
2. Training cashiers are unacceptable to the EFT terminal.
3. Values 0 to 9 and A to Z should be used to enter the Authorization Code.
Please use the keyboard layout for the authorization code entry.
(See Section 1.3 Post Authorization Operation, Manager’s Guide.)
4. None of customer receipt is issued by the EBT F/S Electronic Voucher Purchase operation.
5. The Validation Print operation is not possible after performing the EBT F/S Electronic Voucher Purchase
operation.
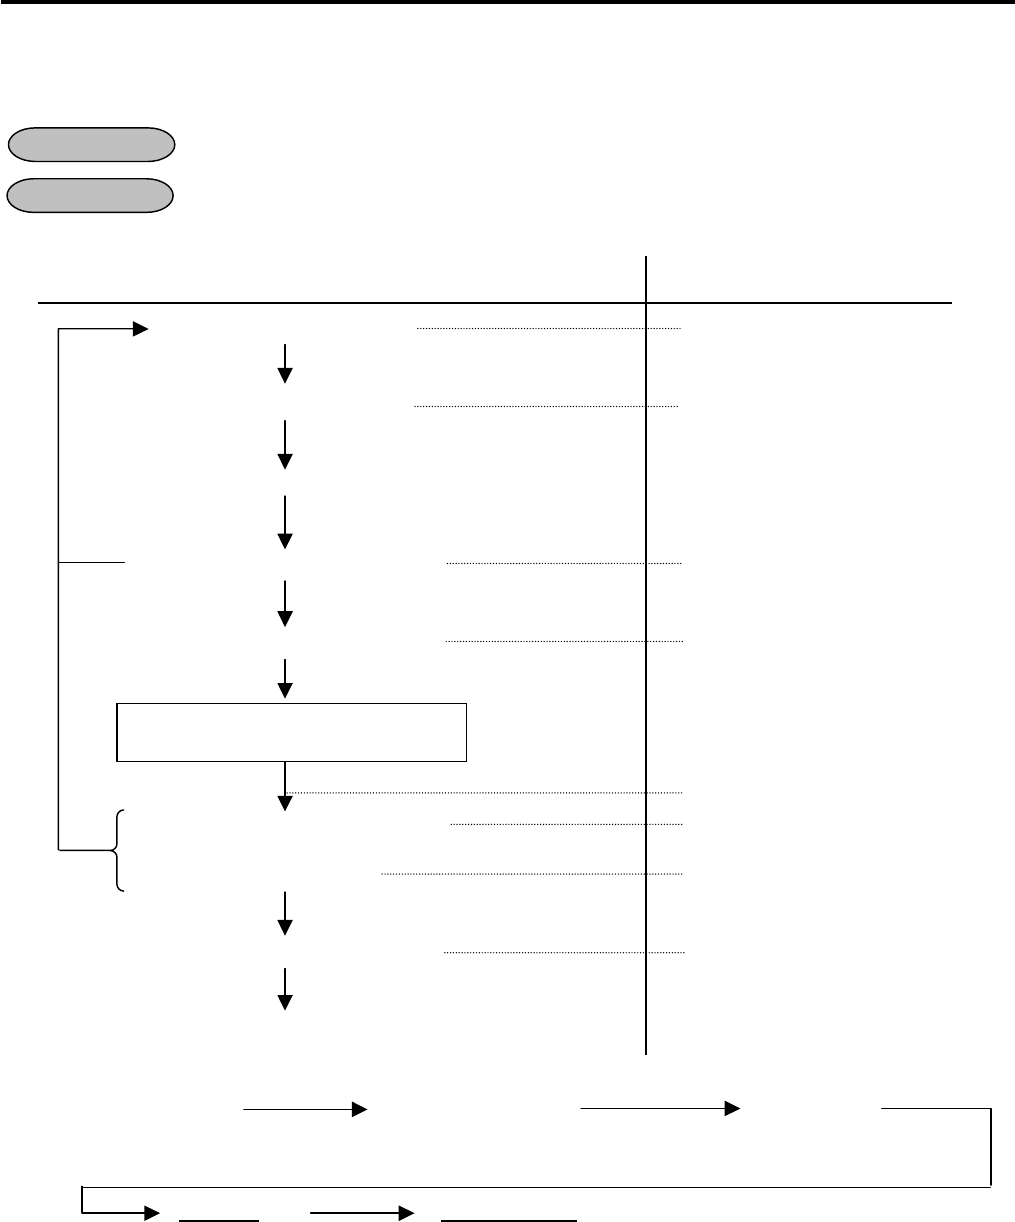
1. OPERATIONS IN “MGR” MODE EO1-11155
1.5 EBT CASH, EBT F/S Balance Inquiry
1- 7
1.5 EBT CASH, EBT F/S Balance Inquiry
This operation is used for inquiring the balance to the host.
Any time outside a sale, In a Signed-ON condition
Mode Lock: MGR
• Without Card Number Entry
Key Operation LCD Display
[BALANCE INQUIRY] BALANCE INQUIRY
[EBT CASH] or [EBT F/S] SWIPE CARD
Card Slide
(in case of no response from EFT) NO RESPONS
Response from the EFT terminal ENTER PIN#
Input the Pin No. from the Pin Pad
Then depress the [ENTER] key
PROCESSING
(in case of no response from EFT) NO RESPONS
or
(in case of decline) DECLINE
Response from the EFT terminal APPROVED
ECR prints a Customer Receipt
• With Card Number Entry
[BALANCE INQUIRY] [MANUAL CARD#] [EBT CASH]
or
[EBT F/S]
|Card No.| [#] (|Expiration Date|) [#]
8 to19 digits Max. 4 digits; MM/YY
(omissible)
NOTES:
1. It is possible to cancel this operation prior to the inquiry to the host (i.e. before the message “PROCESSING”
is displayed).
2. Training cashiers are unacceptable to the EFT terminal.
3. None of store receipt is issued by the EBT CASH, EBT F/S Balance Inquiry operation.
4. The Validation Print operation is not possible after performing the EBT CASH, EBT F/S Balance Inquiry
operation.
OPERATION
CONDITION
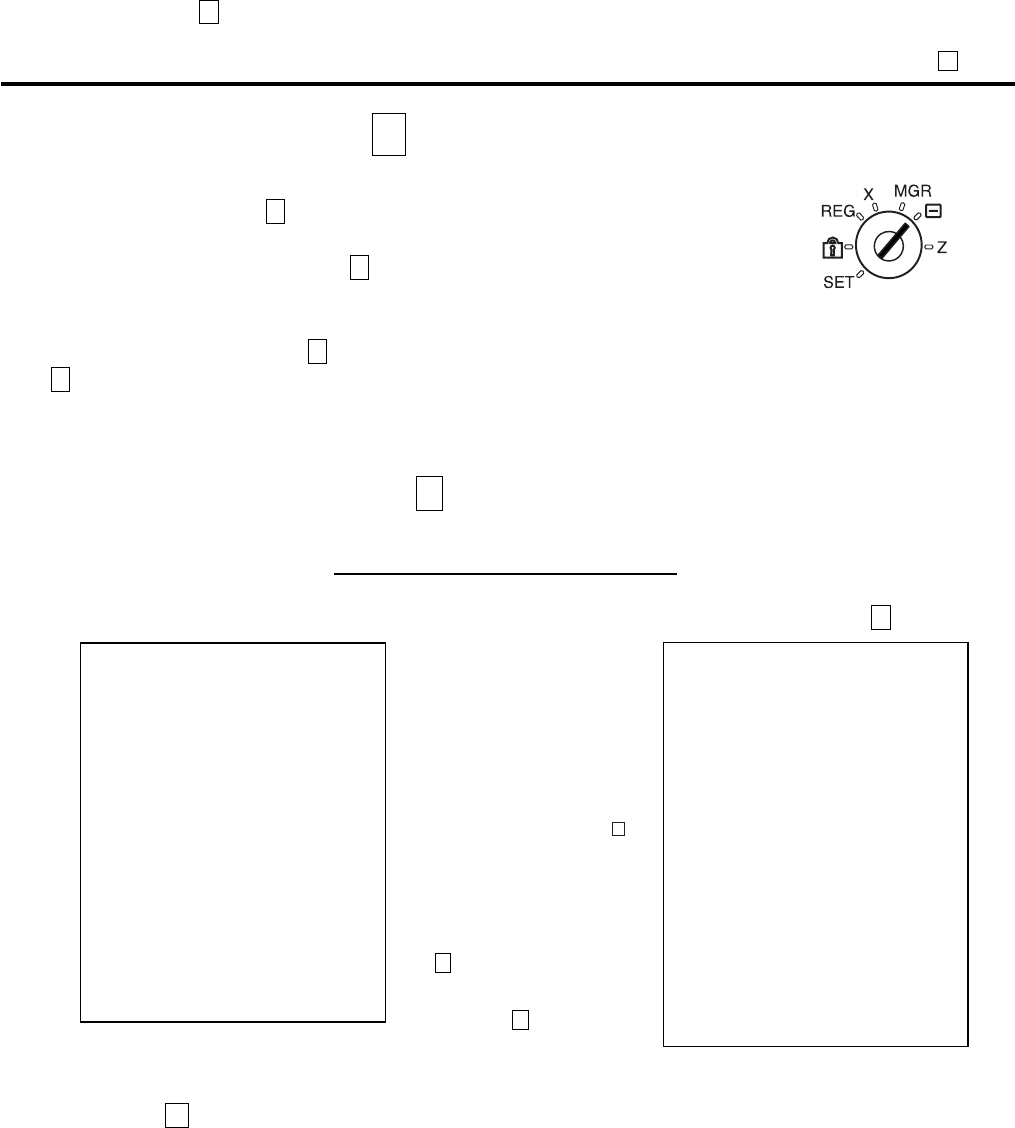
2. OPERATIONS IN “ - ” MODE EO1-11155
2.1 Ordinary Operation in “ – “ Mode
2- 1
2. OPERATIONS IN “ - ” MODE
Instead of using the [RTN MDSE] or [VOID] key in the “REG” or “MGR” mode for
deleting individual items, the “ - ” mode automatically processes positive items into
negative and negative into positive.
To operate, turn the Mode Lock to the “ - ” position using the MA key, and enter the
items, one by one, just as in the “REG” mode, as reading the sale receipt (issued at
the time of the purchase) or tracing the returned items as if in the “REG” mode.
A positive balance resulted in the “ - ” mode indicates the amount to be paid back to the customer.
The “ - ” mode operation may occur from time to time during day, on the cashier’s request, just as in the case of
ordinary Manager Interventions, when a customer comes to the cashier counter to return or cancel all the items
that were once purchased and finalized (in which case the All Void operation is no longer effective).
2.1 Ordinary Operations In “ - ” Mode
OPERATION AND RECEIPT SAMPLE
RECEIPT ISSUED IN “REG” or “MGR” MODE RECEIPT ISSUED IN “ - ” MODE
NOTE: In the “ – “ mode the Listing Capacities and the status requiring Manager Intervention will all be
released, i.e., the same handling as in “MGR” mode.
TEC STORE
1343 PEACH DRIVE
PHONE: 87-6437
Open 8:00am to 7:00pm
Closed: every Wednesday
10-20-2006 FRI #3001
VEGETABLE $2.50
DP
02 $2.50
%-
5% -0.13
CASH $
4.87
ITEM 2
JONES 0375 08:47TM
TEC STORE
1343 PEACH DRIVE
PHONE: 87-6437
Open 8:00am to 7:00pm
Closed: every Wednesday
10-20-2006 FRI #3001
∗∗
REG-
∗∗
VEGETABLE $2.50
DP
02 $2.50
%-
5% -0.13
CASH $
4.87
ITEM 2
∗∗
REG-
∗∗
JONES 0376 08:49TM
These two receipts contain the
same sale items and media
finalization. The operations are
also the same except the Mode
Lock position.
The cashier merely follows the
purchase receipt (on the left) and
enters the same items in the
-
position, finalizing with the same
media in case a customer has
returned or canceled the entire
sale after the cashier had finalized
that sale.
The - mode header ( * REG- * in
this example ) is printed at the top
and the bottom of the sale
contents in the - mode receipt.
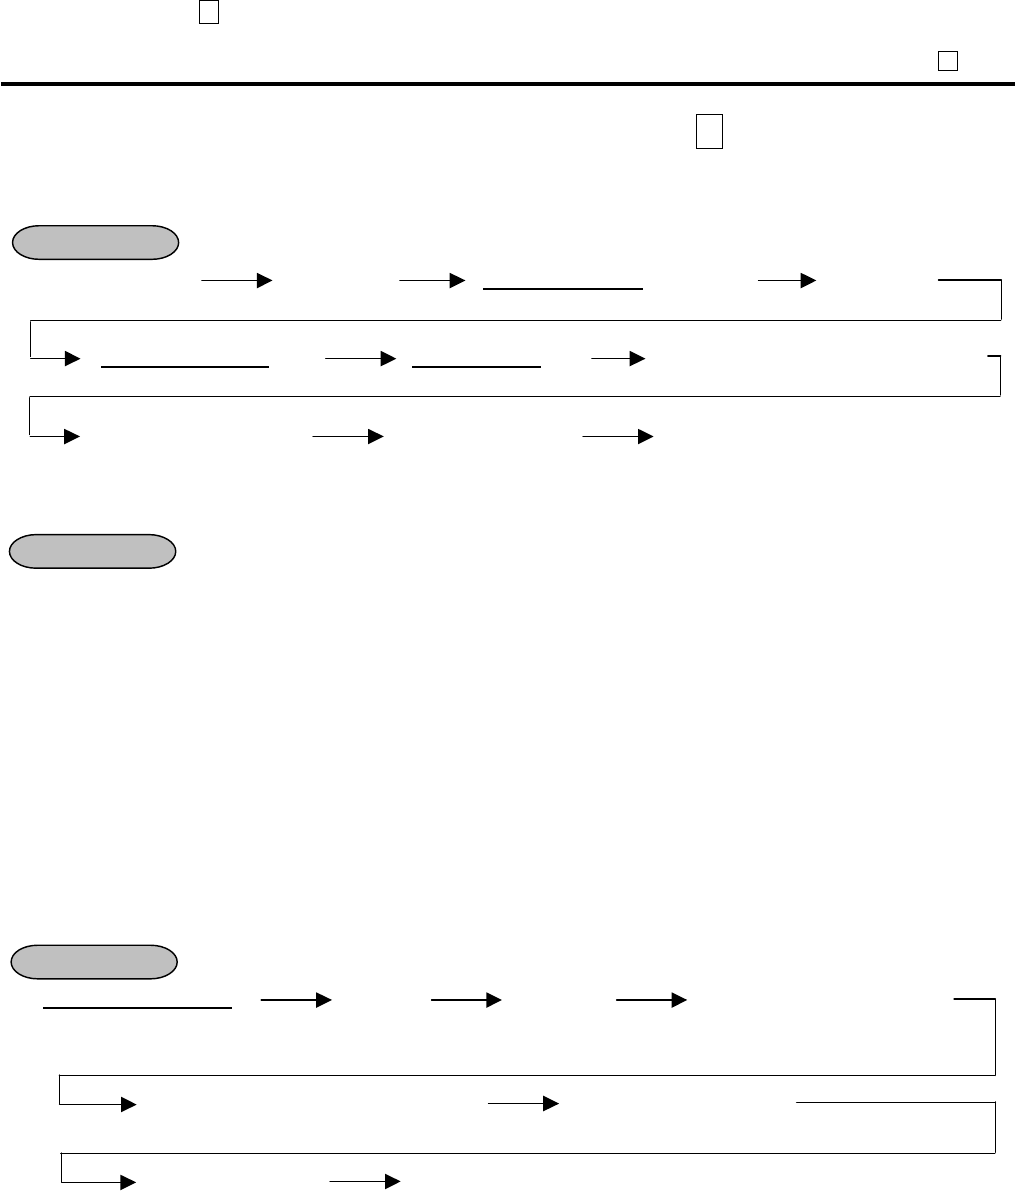
2. OPERATIONS IN “ - ” MODE EO1-11155
2.2 Electronic Fund Transfer (EFT) Operation in “ – “ Mode
2- 2
2.2 Electronic Fund Transfer (EFT) Operation In “ - “ Mode
(1) Void Credit Sale
This operation is performed for canceling credit sale transactions.
Sales Item Entry ([TXBL TL]) (|Tendered Amount|) [CREDIT] Card Slide
(|Authorization Code|) [#] (|Reference No.|) [#] EFT terminal responds “APPROVAL”
Customer Receipt Print [STORE RECEIPT] Store Receipt Print
(2) Void Credit Refund
This operation is performed for canceling credit refund transactions.
[RTN MDSE] to be continued to the top of “Void Credit Sale” sequence
NOTES:
1. Receipt post-Issue operation after finalizing a sale by the EFT is unavailable.
2. Key operation on the ECR is unavailable during the inquiry to the host.
3. Values 0 to 9 and A to Z should be used to enter the Authorization Code.
Please use the keyboard layout for the authorization code entry.
(See Section 1.3 Post Authorization Operation, Manager’s Guide.)
4. In the Receipt-OFF mode, payment by the EFT media cannot be made.
5. The Validation Print operation is not possible after performing the Void Credit Sale or the Void Credit Refund
operation.
(3) Cashing Debit Refund
This operation is performed for canceling debit cashing transactions.
| Amount to be cashed | [DEBIT] Card Slide Input the Pin No. from the
Pin Pad. Then depress the
[ENTER] key.
EFT terminal responds “APPROVAL”. Customer Receipt Print
[STORE RECEIPT] Store Receipt Print
NOTES:
1. Before performing this operation, the [DEBIT] key should be programmed with the status “no-purchase
cashing is allowed”. Also each EFT Media Key should be programmed with the status “with EFT process”.
Failure to do this may cause an error.
2. For the EFT function, do not perform any registration in Receipt OFF mode.
3. Receipt post-Issue operation after the Cashing Debit Refund is unavailable.
4. Key operation on the ECR is unavailable during the inquiry to the host.
5. Training Cashiers are unacceptable to the EFT terminal.
6. Store receipt must be issued to perform next transaction or read/reset jobs.
7. The Validation Print operation is not possible.
8. EFT cashing operation with the [CREDIT], [CHECK TEND], and [EBT F/S] keys is not possible.
OPERATION
Max. 7 digits
Max. 11 characters Max. 16 digits
OPERATION
OPERATION
Max. 7 digits
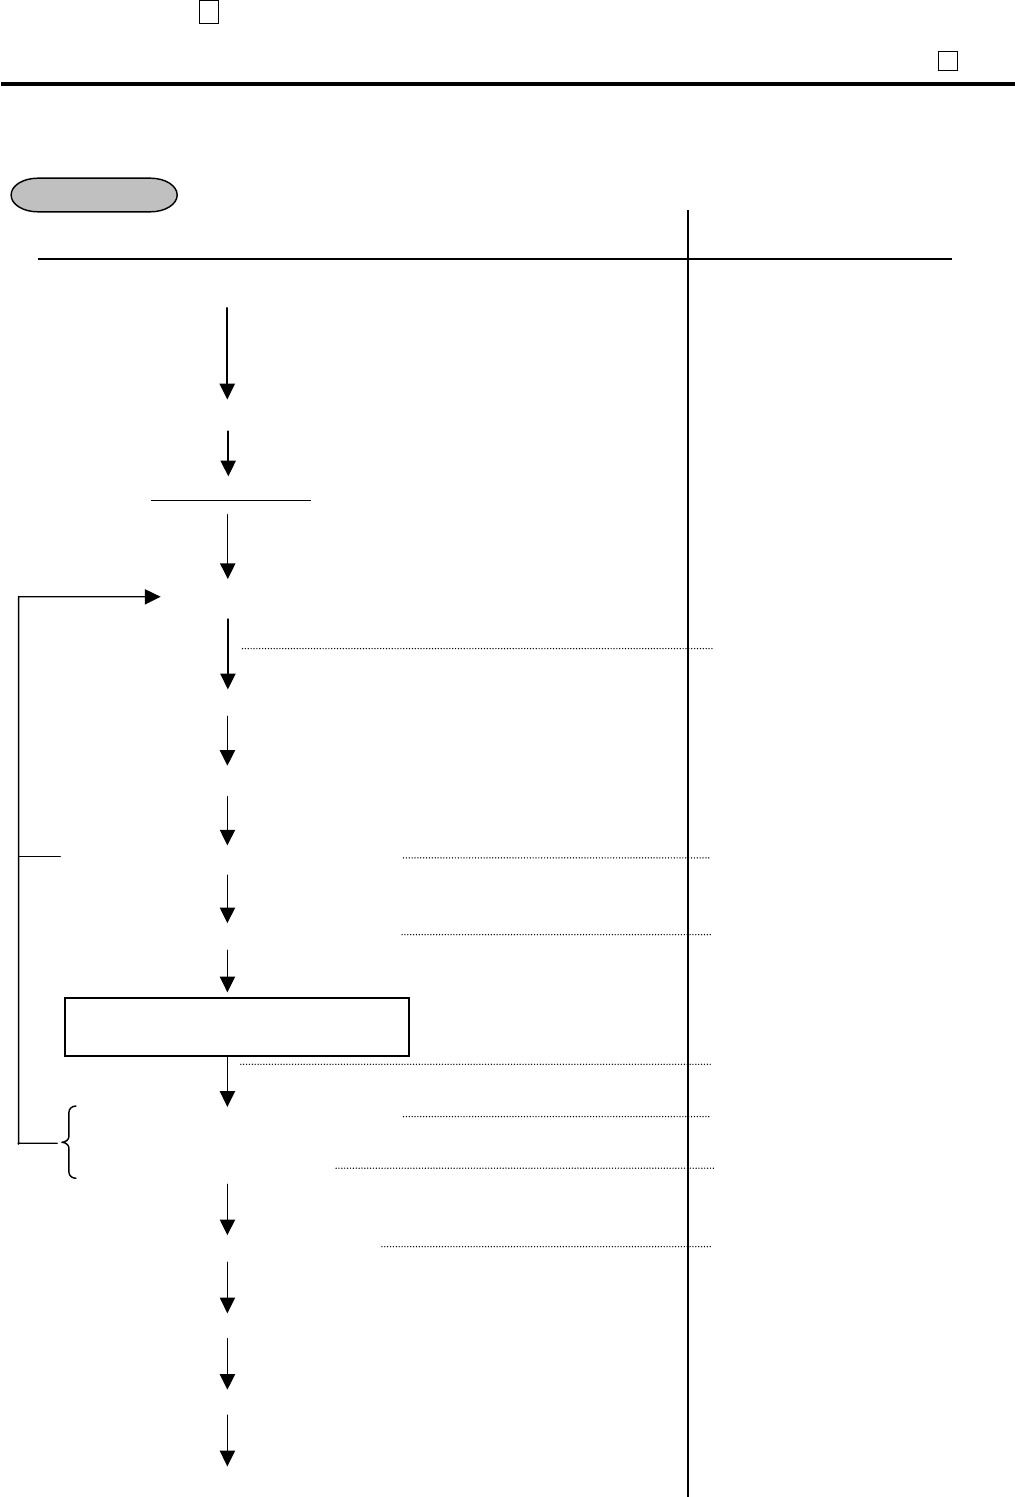
2. OPERATIONS IN “ - ” MODE EO1-11155
2.2 Electronic Fund Transfer (EFT) Operation in “ – “ Mode
2- 3
(4) EBT F/S Return
This operation is performed for canceling EBT F/S transaction.
Key Operation LCD Display
Sale Entry
[FS TL TEND]
|Tendered Amount|
[EBT F/S]
SWIPE CARD
Card Slide
([C])
(in case of no response from EFT) NO RESPONS
Response from the EFT terminal ENTER PIN#
Input the Pin No. from the Pin Pad
then depress the [ENTER] key.
PROCESSING
(in case of no response from EFT) NO RESPONS
or
(in case of decline) DECLINE
Response from the EFT terminal APPROVED
ECR prints a Customer Receipt
[STORE RECEIPT]
ECR prints a Store Receipt
OPERATION
This operation is possible when the
[EBT F/S]
key is programmed with the status “food stamp
payment”.
Max. 7 digits
(Must be entered)
Pressing the
[C]
key at this point will restore
the ECR to the condition being ready for the
[EBT F/S] key entry.
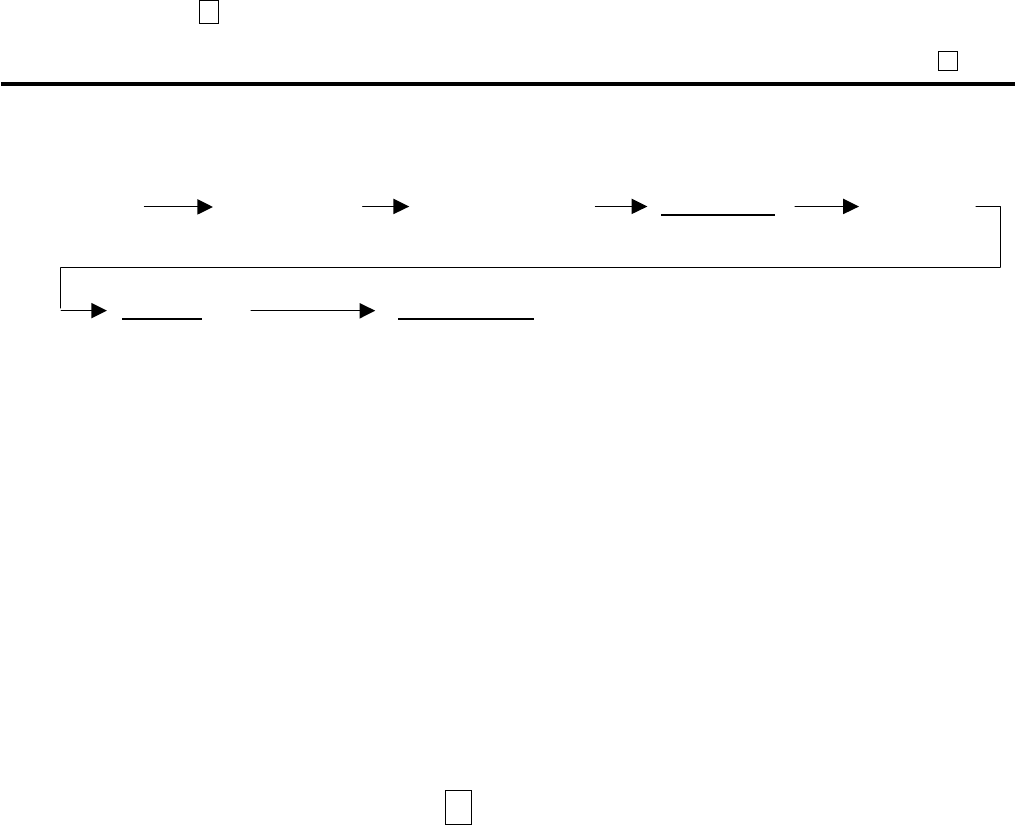
2. OPERATIONS IN “ - ” MODE EO1-11155
2.3 Prohibitive Operations in “ – “ Mode
2- 4
• Manual Entry
(when the [EBT F/S] key has been programmed with the status “food stamp payment”.)
Sales Entry ([FS TL TEND]) [MANUAL CARD#] |Sale Amount| [EBT F/S]
|Card No.| [#] (|Expiration Date|) [#]
NOTES:
1. Receipt post-Issue operation after finalizing a sale by the EFT is unavailable.
2. Key operation on the ECR is unavailable during the inquiry to the host.
3. Contents of the customer receipt are printed on the journal, but those of the store receipt are not.
4. Sale finalization by the EFT is possible only when the media key has been programmed with the status “EFT
media” in the EFT key status setting. If not, ordinary sale finalization is performed.
5. Training cashiers are unacceptable to the EFT terminal. (Ordinary finalization operation can be performed.)
6. Issuance of the store receipt is selectable by the EFT key status setting.
7. When tendering in foreign currency, the EFT media keys are not accepted.
8. For the EFT function, do not perform any registration in Receipt OFF mode.
9. Store receipt must be issued to perform next transaction or read/reset jobs.
10. Validation Print operation at the EBT F/S Return operation is prohibited.
2.3 Prohibitive Operations In “ - ” Mode
• NO-SALE ([NS])
• NO-SALE CASHING OF CHEQUE OR OTHER NON-CASH MEDIAS
• NO-SALE EXCHANGE from Foreign Currency to Domestic Currency, or vice versa
• TRAINING MODE START/END
• RECEIPT POST-ISSUE ([RECEIPT ISSUE])
• CONSIGNMENT PRINT [CONSIGNMENT]
• VALIDATION PRINT [VALIDATE]
Max. 7 digits
8 to 19 digits
Max. 4 digits; MM/YY
(Omissible)
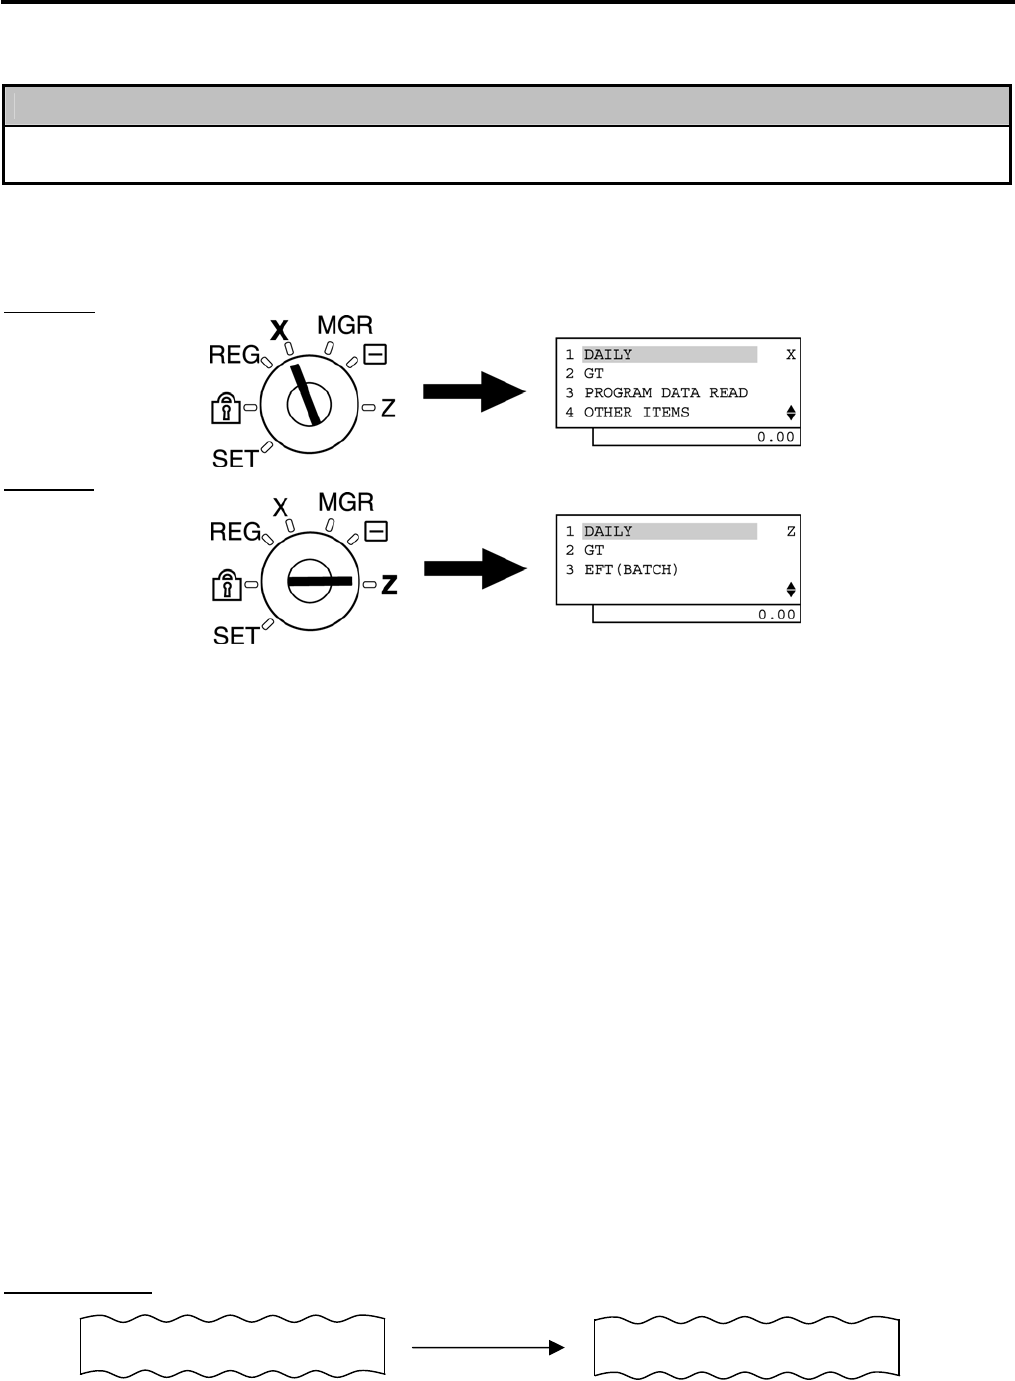
3. READ (X) AND RESET (Z) REPORTS EO1-11155
3. READ (X) AND RESET (Z) REPORTS
3- 1
3. READ (X) AND RESET (Z) REPORTS
WARNING!
When opening the cash drawer, be careful not to let the drawer hit any person.
This chapter describes how to issue X and Z reports and how to read issued receipts.
The X report is issued in X mode and the Z report is in Z mode.
By turning the Mode Lock to the X or Z position, the menu below is displayed, respectively.
In X mode
In Z mode
• X Report
By taking an X report, sales data in a store is consolidated according to department, PLU, hourly range, and
cashier, and cash in drawer is confirmed. Even if the X report is issued, the data such as sale total, customer
count, and item count are protected so that this report can be issued many times a day.
• Z Report
The Z report is issued at the time of closing the sale of the day after closing the store. By issuing a Z report,
the data stored in the ECR such as sale total, customer count, item count of the day are deleted, but they are
stored in the GT memory.
The X and Z reports have exactly the same print content if both are available, except that:
1. The X reports allow to read the sales data but not clear memories, while the Z reports allow to read the sales
data and at the same time all the resettable memories will be cleared when the reports have been issued.
2. The symbol “X...” is printed on the top line of a Daily Read Report, “Z...” on a Daily Reset Report, “GTX...” on
a GT Read Report, and “GTZ...” on a GT Reset Report, as initial settings.
3. A reset count is printed on the bottom of a Z report only.
GT Reports
The print form and items of a GT report are the same as those of its corresponding daily report, except the report
header portion. Please also note that some items provided in the daily report are not provided in its GT reports.
The counters and totals in a GT report are records accumulated for a certain period (week, month, etc.) while
those counters and totals in the daily report are usually records for a day. The accumulated record data in each
GT report will be renewed when its GTZ report has been taken.
Header Example
All Department Read Report (Daily) All Department GT Read Report
Z_DP_ALL
GTZ_DP_ALL
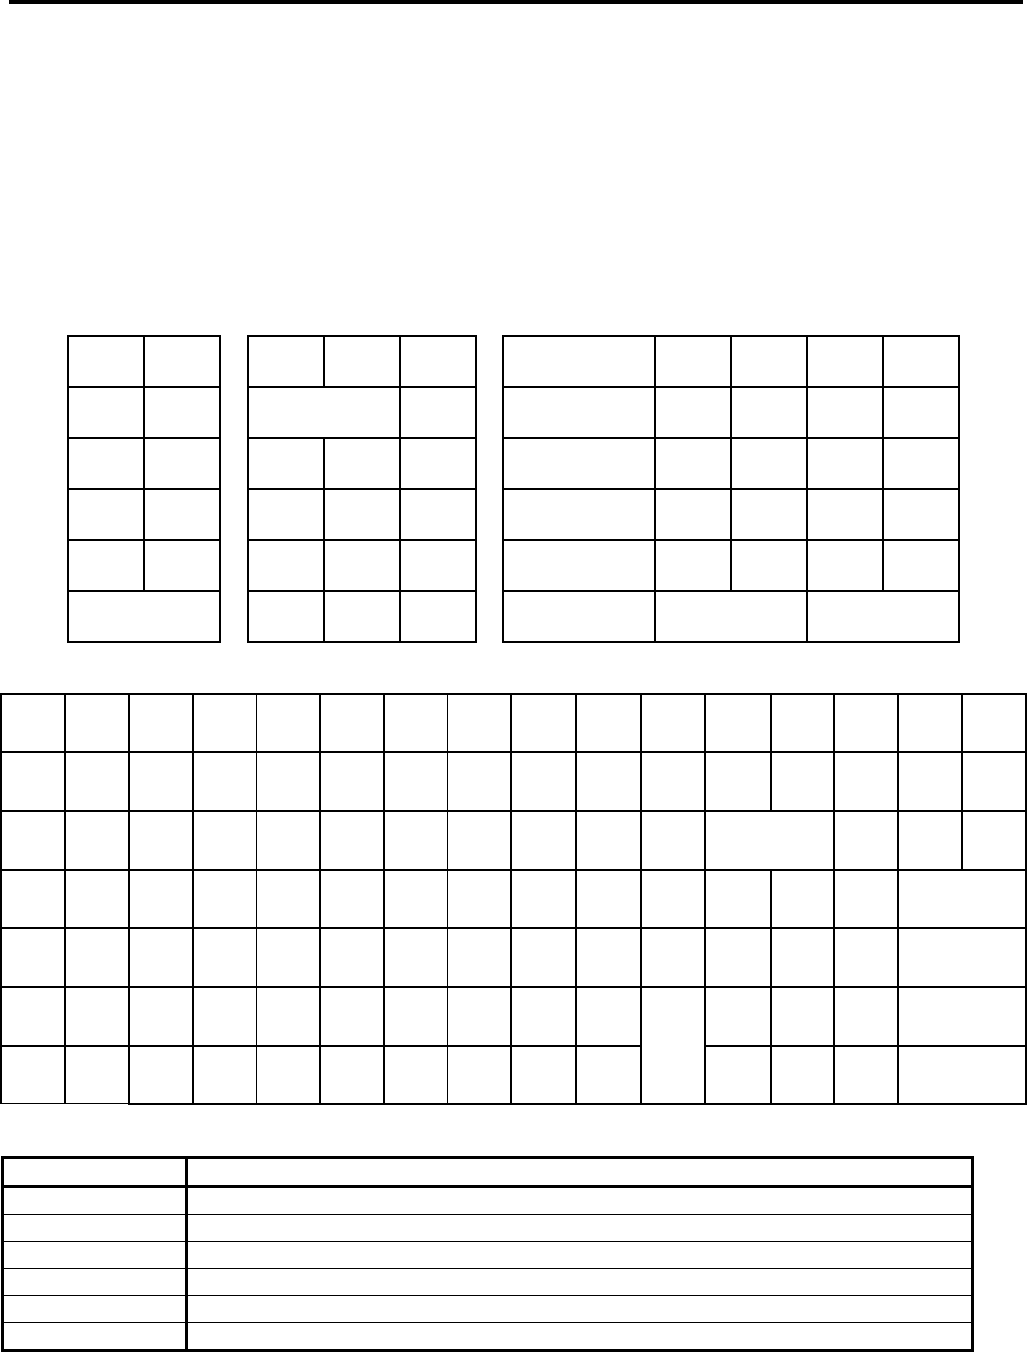
3. READ (X) AND RESET (Z) REPORTS EO1-11155
3.1 Enabling Read (X) or Reset (Z) Mode
3- 2
3.1 Enabling Read (X) or Reset (Z) Mode
The issuance of the read (X) report or reset (Z) report is selected from the corresponding menu item which is
displayed on the LCD display with the [↑] or [↓] key.
For issuing a read (X) report, turn the Mode Lock to the X position with the MGR or MA key. For issuing a reset
(Z) report, turn the Mode Lock to the Z position with the MGR key.
On the MA-600 series, the keyboard layout is automatically changed in three types according to operation to be
performed (ordinary registration, read/reset, programming). The following shows keyboard layouts and functions
of keys required for read/reset operation when the Mode Lock is turned to X or Z position.
Keyboard layout for read/reset
Mode Lock Position: X for read, Z for reset
• Ordinary Type Keyboard
↑
RF JF
↓
C
← Rtn
7 8 9
→ @/FOR
4 5 6
Enter
1 2 3
0 00 .
ST End
• Flat Type Keyboard
RF JF
↑ ↓ ← →
C
@/FOR
Rtn
Enter
5 8 9
4 5 6
1 2 3 ST
PLU
0 00 . End
Functions of keys required for read/reset
Key Function
[ ↑ ] This key is used for moving the cursor upward.
[ ↓ ] This key is used for moving the cursor downward.
[ ← ] This key is used for moving the cursor leftward.
[ → ] This key is used for moving the cursor rightward.
[Enter] This key is used for selecting a desired item after moving the cursor.
[Rtn] This key is used for returning the display to the previous screen.
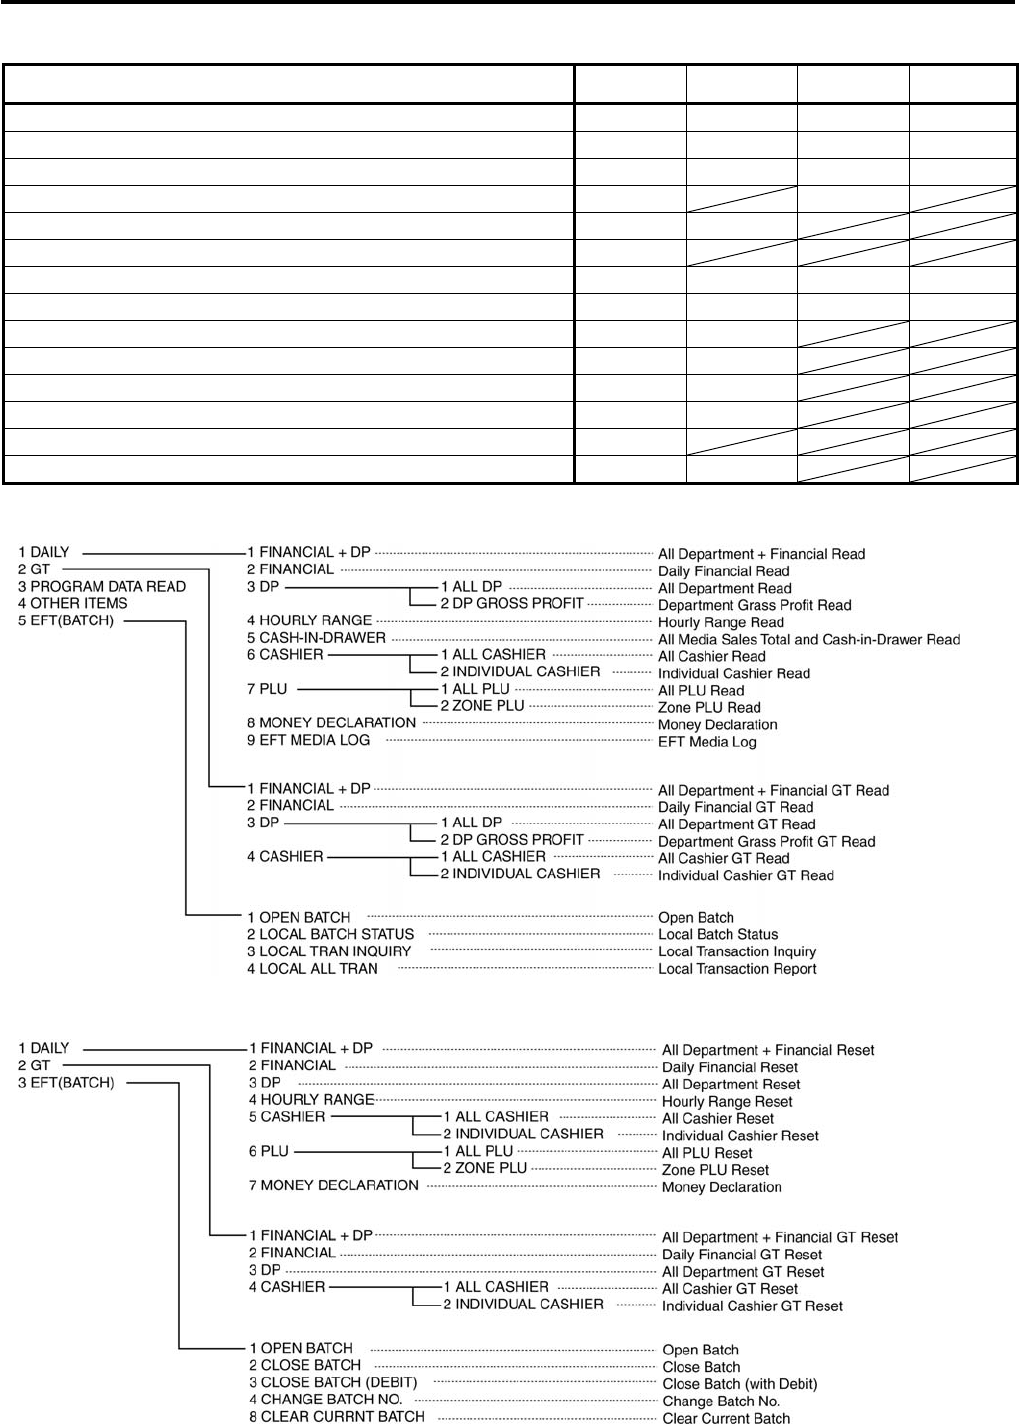
3. READ (X) AND RESET (Z) REPORTS EO1-11155
3.1 Enabling Read (X) or Reset (Z) Mode
3- 3
Read/Reset Menu Table
Report Name X Z GTX GTZ
ALL DEPARTMENT + FINANCIAL READ/RESET O O O O
FINANCIAL READ/RESET O O O O
ALL DEPARTMENT READ/RESET O O O O
DEPARTMENT GROSS PROFIT READ O O
HOURLY RANGE READ/RESET O O
ALL MEDIA SALESTOTAL AND CASH-IN-DRAWER READ O
ALL CASHIER REASD/RESET O O O O
INDIVIDUAL CASHIER READ/RESET O O O O
ALL SALES PERSON READ/RESET O O
ALL PLU READ/RESET O O
ZONE PLU READ/RESET O O
MONEY DECLARATION O O
EFT MEDIA LOG O
EFT BATCH O O
• Read menu
• Reset menu

3. READ (X) AND RESET (Z) REPORTS EO1-11155
3.1 Enabling Read (X) or Reset (Z) Mode
3- 4
TABLE OF OPERATIONS FOR X AND Z REPORTS
Daily Reports
Report Name Mode Lock
Sample Page
ALL DEPARTMENT AND FINANCIAL READ AND RESET
• All Department and Financial Read
• All Department and Financial Reset
X
Z
---
FINANCIAL READ AND RESET
• Financial Read
• Financial Reset
X
Z
3-6
DEPARTMENT READ AND RESET
• All Department Read
• All Department Reset
• Department Gross Profit Read
X
Z
X
3-8
HOURLY RANGE READ AND RESET
• Hourly Range Read
• Hourly Range Reset
X
Z
3-10
ALL MEDIA SALES TOTAL AND CASH-IN-DRAWER READ X 3-11
CASHIER READ AND RESET
• All Cashier Read
• All Cashier Reset
• Individual Cashier Read
• Individual Cashier Reset
X
Z
X
Z
3-12 to 3-13
PLU READ AND RESET
• All PLU Read
• All PLU Reset
• Zone PLU Read
• Zone PLU Reset
X
Z
X
Z
3-14 to 3-15
EFT MEDIA LOG READ AND RESET
• EFT Media Log Read
X
3-18
GT Reports – to be taken on weekly or monthly basis --
Report Name Mode Lock
Sample Page
ALL DEPARTMENT AND FINANCIAL GT READ AND RESET
• All Department and Financial GT Read
• All Department and Financial GT Reset
X
Z
---
FINANCIAL GT READ AND RESET
• Financial GT Read
• Financial GT Reset
X
Z
3-6
DEPARTMENT GT READ AND RESET
• All Department GT Read
• All Department GT Reset
• Department Gross Profit GT Read
X
Z
X
3-8
CASHIER GT READ AND RESET
• All Cashier GT Read
• All Cashier GT Reset
• Individual Cashier GT Read
• Individual Cashier GT Reset
X
Z
X
Z
3-12 to 3-13
3. READ (X) AND RESET (Z) REPORTS EO1-11155
3.2 General Notes On Report Takings
3- 5
3.2 General Notes On Report Takings
1. Daily Financial + All Department Read/Reset Report can be taken by only depressing the [AT/TL] key just
after the Mode Lock is turned to the “X” or “Z” position.
2. Reset reports will be printed on the receipt roll as well as on journal, and issued, regardless of the current
Receipt-ON/OFF status.
3. The [ITEM CORR] (or [VOID]) key may be depressed halfway during printing a report, for the purpose to
abort the receipt issuance (except for some short reports). When a report-abort has been operated for a reset
report, the memory of the report data will not be cleared.
4. The sales data of the following read reports will be cleared when the relevant reset reports are cleared. If
those read reports are necessary, please be certain to take them before the relevant reset reports are taken:
READ REPORT
(with no reset reports provided)
RELEVANT RESET REPORT
that clears the read report data
Department Gross Profit Read All Department Reset
All Media Sales Total and Cash-in-drawer Read Financial Reset
Department Gross Profit GT Read All Department GT Reset
As you notice, “Financial Reset”, “All Department Reset”, and “PLU Reset” reports should be taken after all other
reports (particularly read reports) on the respective levels of daily and GT, so that the required read reports data
may not be cleared by those reset report takings.
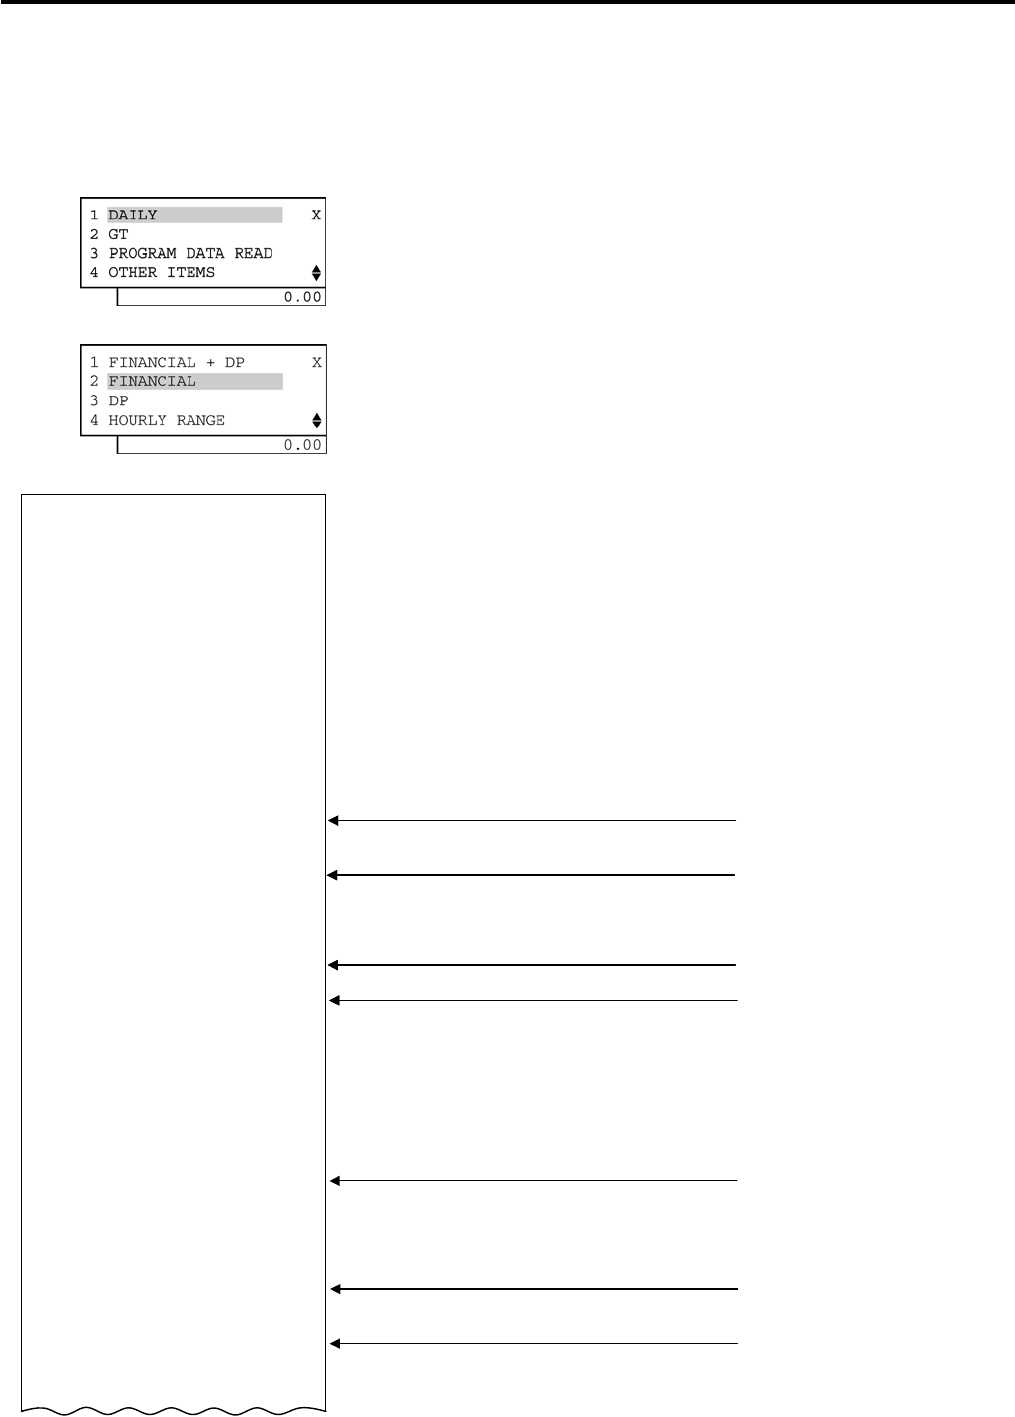
3. READ (X) AND RESET (Z) REPORTS EO1-11155
3.2 General Notes On Report Takings
3- 6
Financial Read or Reset (Daily or GT)
Read Report Sample
• Operation: Mode Lock: X for read
Z for reset
When the ECR is being outside a sale and in X mode, depress the
[1] or [Enter] key.
Select “FINANCIAL” with the [↓] or [↑] key, then depress the [2] or
[Enter] key.
Date, Day-of Week, Store/Register No.
Report Name
Grand Total (non-resettable)
Net GT (non-resettable)
Gross Sale Item Count
& Amount
Net Sale Without Tax Item Count
& Amount
Tax 1 Amount
Manual Tax Amount
Net Sale With Tax Item Count
& Amount
Total of Positive Departments programmed as HASH Dept., Item Count
& Amount
Percent Discount (on Subtotal) Count
& Amount
Vendor Coupon Count
& Amount
Dollar Discount (on Subtotal) Count
& Amount
All-media Sales (including CASH, FS TL, and PB TL)
Customer Count & Amount
Cash Sales
Customer Count & Amount
Check Sales
Customer Count & Amount
Food Stamp Sales
Customer Count & Amount
Received-on-Account Count
& Amount
Paid-Out Count
& Amount
Cash-in-drawer Amount
∗ Check-in-drawer Count
& Amount
∗ Food Stamp-in-drawer Count
& Amount
∗ Food Stamp Change Amount
-- To be continued --
NOTES:
1. The numeric values placed in reports in this manual are merely examples to show the print
format and may not balance correctly.
2. The items attached with “*” outside the receipt frame are printed only on Daily Reports but not
on GT Reports.
3. The print or non-print status of each item on Financial Reports can be programmed.
4. Non-printing of items with zero sales (i.e.,zero skip) can be programmed by a program option.
TEC STORE
1343 PEACH DRIVE
PHONE: 87-6437
Open 8:00am to 7:00pm
Closed: every Wednesday
10-20-2006 FRI #3001
X_FINANCIAL
GT
$346.77
NET GT $309.09
GS
125
$346.77
NS
112
$300.48
TAX1 $17.20
TAX5 $0.50
NS
112
$318.18
HASH DP 1
$1.40
%- 4
$2.34
V.CPN 1
$4.00
DISC 1
$1.00
TOTAL 71CU
$310.49
CASH 71CU
$292.77
CHECK 1CU
$5.00
FS TL 1CU
$12.72
R/A 2
$8.00
PO 8
$37.10
CASH ID $95.02
CHECK ID 2
$15.00
FS ID 1
$13.00
FS CG $0.28
Percent Charge I, II Count & Amount
Tax 2 to 4 Amount
Total of Negative Departments programmed
as HASH Dept., Item Count & Amount
Percent Discount II (on Subtotal) Count &
Amount if two Percent
Discount keys are
installed.
Percent Charge I, II Count & Amount
Tax 2 to 4 Amount
Total of Negative Departments programmed
as HASH Dept., Item Count & Amount
Percent Discount II (on Subtotal) Count &
Amount if two Percent Discount keys are
installed.
Additional Media (MISC, CREDIT, DEBIT,
etc.) Sales data, if any
∗ Loan Amount, Pick Up Count & Amount
∗ Additional Media-in-drawer data, if any
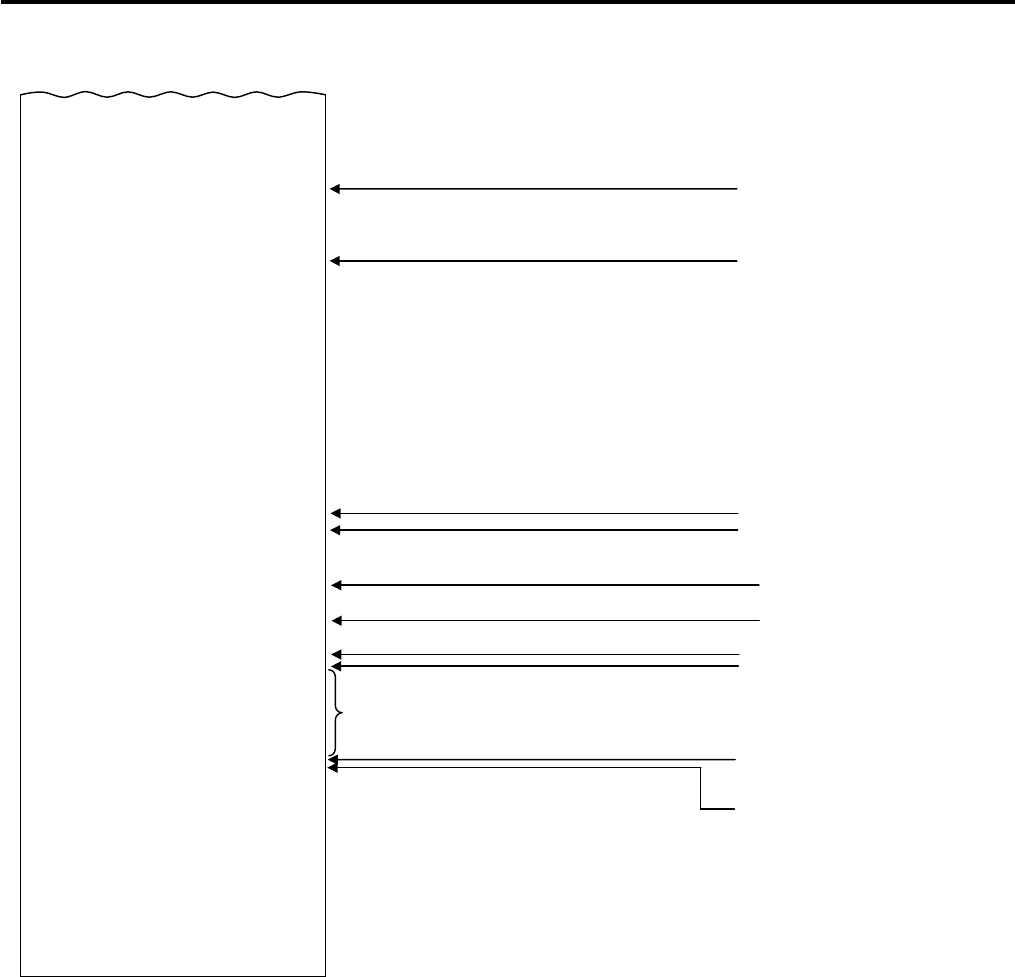
3. READ (X) AND RESET (Z) REPORTS EO1-11155
3.2 General Notes On Report Takings
3- 7
(Financial Read or Reset)
-- Continued --
Item Correct (on positive Depts/PLUs) Count
& Amount
Void Count
& Amount
All Void Count
& Amount
Percent Discount (on Line Items) Count
& Amount
Dollar Discount (on Line Items) Count
& Amount
Store Coupon Item Count
& Amount
Negative Departments Item Count
& Amount
Returned Merchandise Item Count
& Amount
Negative Tax Amount
Negative-balance Sales
Customer Count & Amount
Negative Mode (“ - “ Mode) Count
& Amount
Transfer GT Balance
Transfer - GT
Transfer - Daily
Previous Balance Sales
Customer Count & Amount
Taxable Total 1 (Sale Amount Portion subject to Tax 1 taxation)
Taxable Total 2 (Sale Amount Portion subject to Tax 2 taxation)
Tax Exempted Customer Count
Sale Portion Exempted from Tax 1
∗
∗ The amounts are expressed in the respective currencies’ unit
∗
Sales Item Count per Customer
Net Sale Amount per Customer
∗ No-sale Count
∗ Validation Count
∗ Consignment Count
Financial Reset Report Count (on Reset Reports only)
Receipt Consecutive No., Current Time
CORR 1
$1.00
VOID 1
$1.00
ALL VD 2
$8.60
%- 11
$2.02
DISC 4
$2.00
S. CPN 2
$1.00
-DP TL 1
$1.00
RTN 4
$3.80
-TAX $0.22
-SALE 4CU
$5.37
REG- 2
$7.95
TRF TL $0.03
TRF-GT $0.03
TRF- $0.03
PB TL 1CU
$0.00
TXBL1 $284.98
TXBL2 $58.20
TAX EX 1CU
TAX1EX $10.00
CUR 1 3
150.00
CUR 2 1
5.68
CUR 3 1
1.45
ITEM/CUS 1.58
NS/CUS $4.23
NO SALE 3
VALI CTR 3
CONSIGN CTR 2
0001Z
9999 19:00TM
Miscellaneous Void Count & Amount
Percent Discount II (on Line Items) Count &
Amount if two Percent Discount keys are
installed.
Transfer + GT
Transfer + Daily
Previous Balance R/A, PO Amount
Taxable Total 3, 4
Sales Portion Exempted from Tax 2 to 4
FS EX1 to FS EX4 for Taxes exempted by
tendering food stamps if ILLINOIS or NEW
JERSEY type of food stamp system
∗ Foreign Currencies 4 & 5-in-drawer data if
opened.
Off-line EFT Authorization Count &
Amount (for EFT spec.)
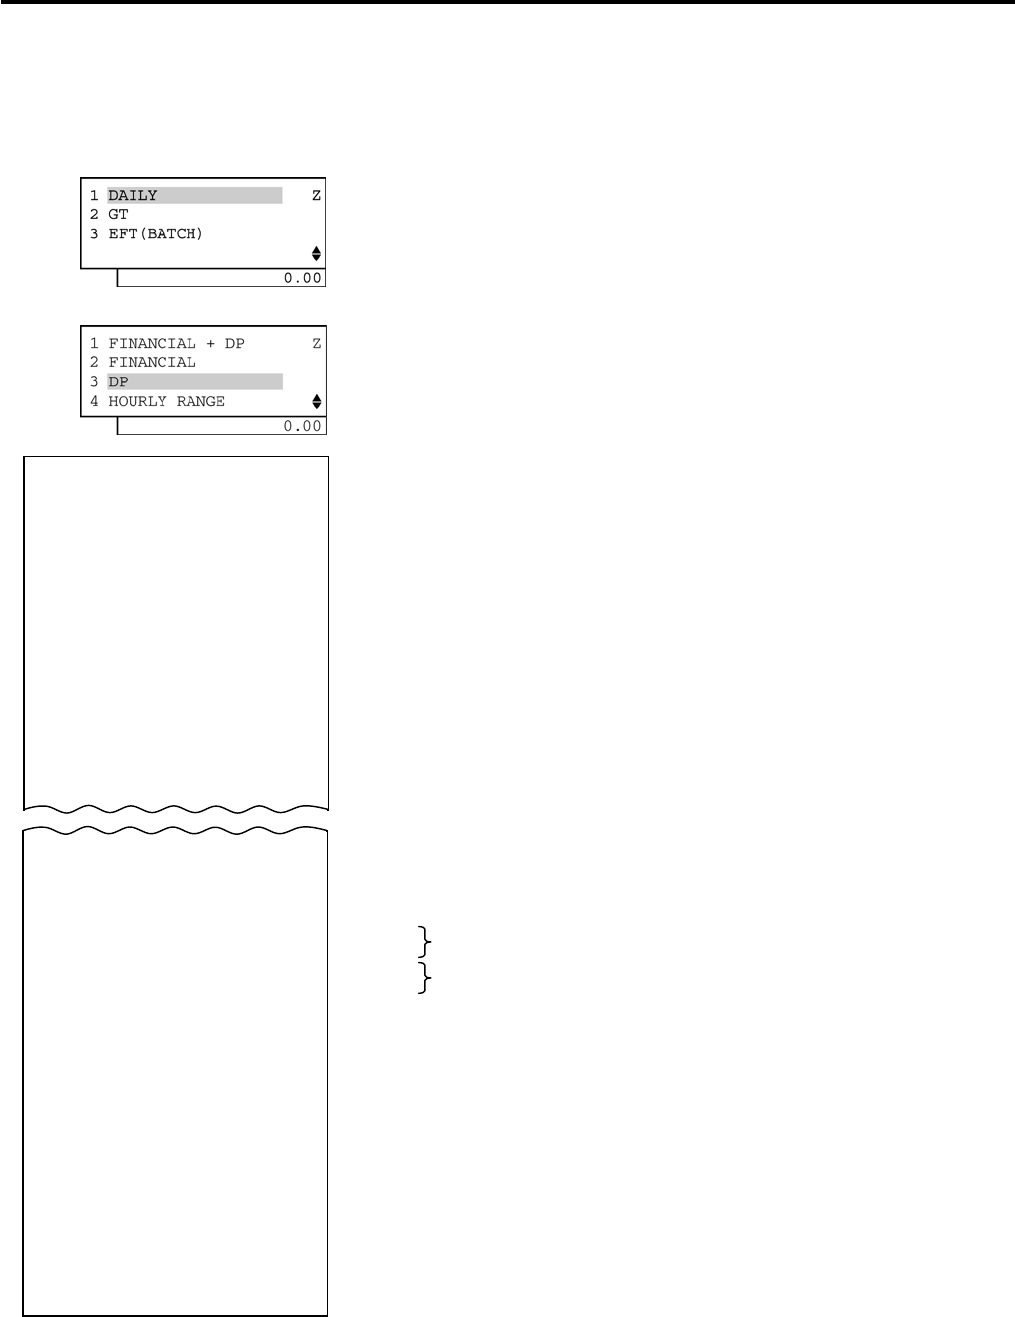
3. READ (X) AND RESET (Z) REPORTS EO1-11155
3.2 General Notes On Report Takings
3- 8
All Department Read or Reset (Daily or GT)
Reset Report Sample
• Operation: Mode Lock: X for read
Z for reset
When the ECR is being outside a sale and in Z mode, depress the
[1] or [Enter] key.
Select “DP” with the [↓] or [↑] key, then depress the [3] or [Enter]
key.
Department Data ↓
Dept. 1 Name
Item Count
Sales % (or Customer Count), Amount (NOTE 1)
Dept. 2 Name
Item Count
Sales % (or Customer Count), Amount
Dept. 15 Name:
Item Count
Sales % (or Customer Count), Amount
Item Count of positive departments
Amount
Item Count of negative departments
Amount
Department Group Data ↓ (NOTE 2)
Group Name, Item Count
Sales Percentage & Amount
Reset Report Count (on Reset Reports only)
TEC STORE
1343 PEACH DRIVE
PHONE: 87-6437
Open 8:00am to 7:00pm
Closed: every Wednesday
10-20-2006 FRI #3001
Z_DP_ALL
VEGETABLE
33
30.30% $101.20
DP
2
20
28.80% $98.50
Same as Department Gross Profit
(Refer to Department
Gross Profit Report)
NOTES:
1. Sales % or Customer Count is selectable by the program option. This report
sample shows sales %.
2. For the read report, department group data printing is selectable by the
program option. It is not printed as standard. For the reset report, it printed
regardless of the program option setting.
DP
15
1
2.05% $1.00
TOTAL 126
$333.98
-TOTAL 1
$1.00
VE&FR
41
46,51% $153.20
DR&BL
14
6,59% $21.70
0001Z
9999 19:00TM

3. READ (X) AND RESET (Z) REPORTS EO1-11155
3.2 General Notes On Report Takings
3- 9
Department Gross Profit Read (Daily or GT)
(Read only)
Read Report Sample
• Operation: Mode Lock: X for read
When the ECR is being outside a sale and in X mode, depress the
[1] or [Enter] key.
Select “DP” with the [↓] or [↑] key, then depress the [3] or [Enter]
key.
Select “DP GROSS PROFIT” with the [↓] or [↑] key, then depress
the [2] or [Enter] key.
Department Name
Gross Profit Rate (%)
& Gross Profit Amount
(The print order is from the Departments of larger Gross
Profit Amount to Departments of less.
Departments with no sales or No Gross Profit Rate (or rate 0,00%) are
not printed in this report.)
Total of all the DEPTs’ Gross Profits read in this report.
(The rate is the average.)
TEC STORE
1343 PEACH DRIVE
PHONE: 87-6437
Open 8:00am to 7:00pm
Closed: every Wednesday
10-20-2006 FRI #3001
X_PROFIT
DAIRY
20.05% $45.00
FISH
14.35% $18.00
FRUIT
12.5% $12.00
MEAT
15% $10.48
VEGETABLE
10% $10.26
CAN FOOD
25% $6.09
BAKERY
23% $6.19
DRINK
18% $3.38
BTL FOOD
21.4% $2.87
SNACK
17% $0.77
DP
14
19% $0.42
SPICE
11% $0.07
TOTAL
16.23% $329.38
9999 19:00TM
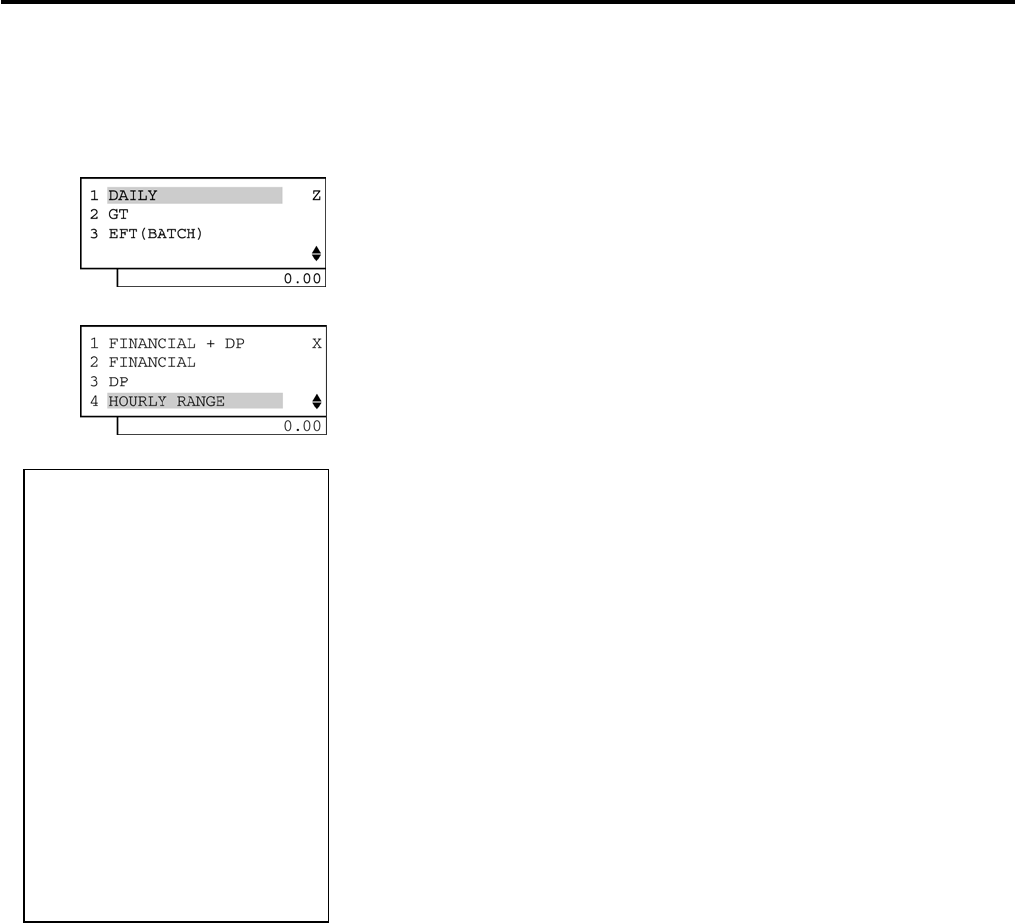
3. READ (X) AND RESET (Z) REPORTS EO1-11155
3.2 General Notes On Report Takings
3-10
Hourly Range Read or Reset (Daily)
Reset Report Sample
• Operation: Mode Lock: X for read
Z for reset
When the ECR is being outside a sale and in Z mode, depress the
[1] or [Enter] key.
Select “HOURLY RANGE” with the [↓] or [↑] key, then depress the
[4] or [Enter] key.
8:01 to 12:00
12:01 to 15:00
15:01 to 19:00 Item Count
Customer Count & Amount
19:01 and thereafter
Hourly Range Reset Report Count (on Reset Reports only)
TEC STORE
1343 PEACH DRIVE
PHONE: 87-6437
Open 8:00am to 7:00pm
Closed: every Wednesday
10-20-2006 FRI #3001
Z_HOURLY
08:00TM
12:00TM
15:00TM 125
26CU $252.23
19:00TM
0001Z
9999 19:05TM

3. READ (X) AND RESET (Z) REPORTS EO1-11155
3.2 General Notes On Report Takings
3-11
All Media Sales Total and Cash-in-Drawer Read (Daily)
(Read only)
Read Report Sample
• Operation: Mode Lock: X for read
When the ECR is being outside a sale and in X mode, depress the
[1] or [Enter] key.
Select “CASH-IN-DRAWER” with the [↓] or [↑] key, then depress the
[5] or [Enter] key.
All Media Sales Total Customer Count
& Amount
Cash-in-drawer Amount
TEC STORE
1343 PEACH DRIVE
PHONE: 87-6437
Open 8:00am to 7:00pm
Closed: every Wednesday
10-20-2006 FRI #3001
X_MEDIA
NS
26CU
$252.23
CASH ID $136.23
9999 19:01TM
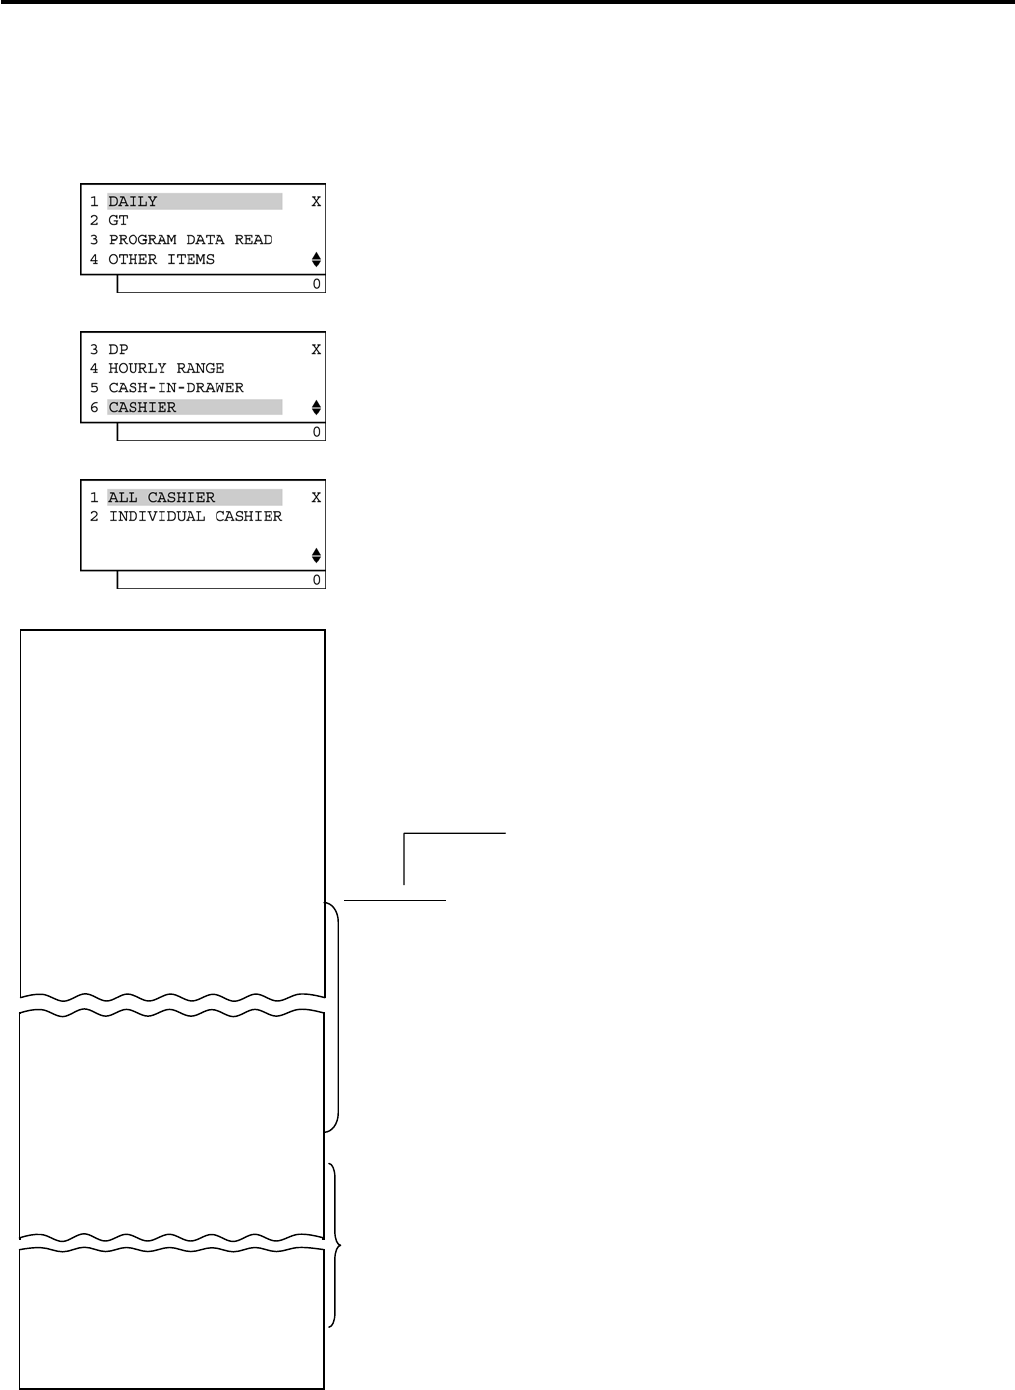
3. READ (X) AND RESET (Z) REPORTS EO1-11155
3.2 General Notes On Report Takings
3-12
All Cashier Read or Reset (Daily or GT)
Read Report Sample
• Operation: Mode Lock: X for read
Z for reset
When the ECR is being outside a sale and in X mode, depress the
[1] or [Enter] key.
Select “CASHIER” with the [↓] or [↑] key, then depress the [6] or
[Enter] key.
Select “ALL CASHIER” with the [↓] or [↑] key, then depress the [1]
or [Enter] key.
In CASHIER SIGNING Method, the ID code here is the 2-digit manager-assign
portion of the Cashier Code
Cashier ID Code & Cashier’s Name
Report for Cashier 1 (Cashier Code: 01, Cashier Name: JONES)
Same contents as Financial Reports except for GT, NET GT and OFFLINE AUTH are not printed
Total per customer
No-sale Count
Validation Count
Consignment Count
Individual Cashier Reset Report Count (on Reset Reports only)
Report for Cashier 4 (Cashier Code: 04, Cashier Name: BROWN (Training Cashier))
Same contents as Financial Reports except for GT, NET GT and OFFLINE AUTH are not printed
Receipt Consecutive No., Current Time
TEC STORE
1343 PEACH DRIVE
PHONE: 87-6437
Open 8:00am to 7:00pm
Closed: every Wednesday
10-20-2006 FRI #3001
X_CLERK
01 JONES
GS
125
$346.77
NS
112
$300.48
TL /CUS $XX.XX
NO SALE 2
VALI CTR 1
CONSIGN CTR 1
0001Z
∗∗
TRAINING
∗∗
04 BROWN
VALI CTR 1
CONSIGN CTR 1
0001Z
9999 19:00TM
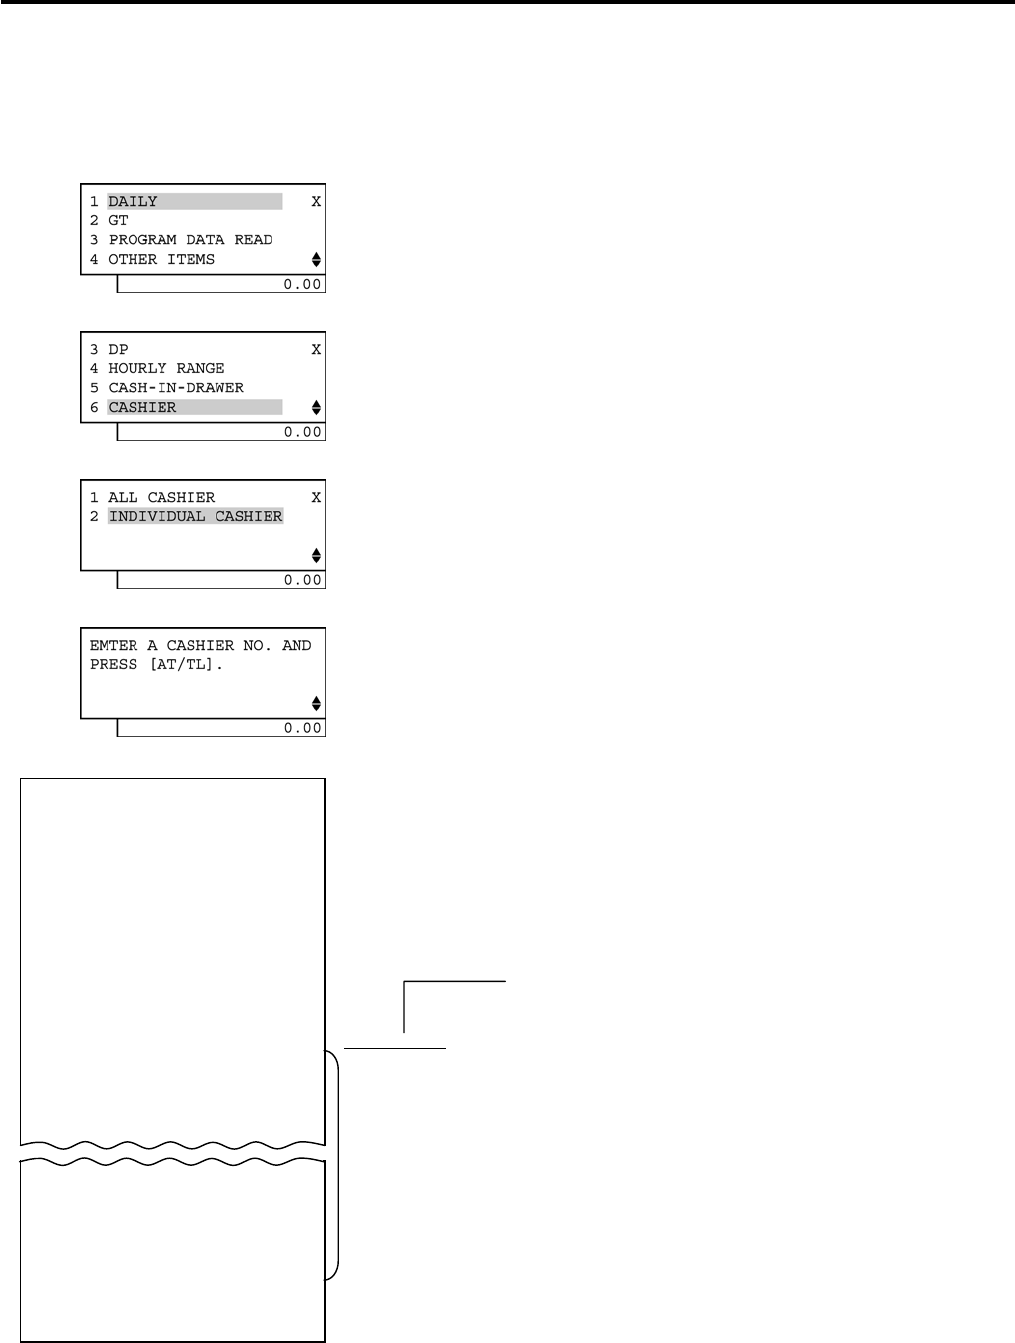
3. READ (X) AND RESET (Z) REPORTS EO1-11155
3.2 General Notes On Report Takings
3-13
Individual Cashier Read or Reset (Daily or GT)
Read Report Sample
• Operation: Mode Lock: X for read
Z for reset
When the ECR is being outside a sale and in X mode, depress the
[1] or [Enter] key.
Select “CASHIER” with the [↓] or [↑] key, then depress the [6] or
[Enter] key.
Select “INDIVIDUAL CASHIER” with the [↓] or [↑] key, then depress
the [2] or [Enter] key.
Input a cashier code (01 to 08) of which report is to be taken, then
depress the [AT/TL] key.
(This guidance message is displayed only when the cashier code
entry method is activated.)
In CASHIER SIGNING Method, the ID code here is the 2-digit manager-assign
portion of the Cashier Code
Cashier ID Code & Cashier’s Name
Report for Cashier 1 (Cashier Code: 01, Cashier Name: JONES)
Same contents as Financial Reports except for GT, NET GT and NEG GT are not printed
Total per customer
No-sale Count
Validation Count
Consignment Count
Individual Cashier Reset Report Count (on Reset Reports only)
Receipt Consecutive No., Current Tim
TEC STORE
1343 PEACH DRIVE
PHONE: 87-6437
Open 8:00am to 7:00pm
Closed: every Wednesday
10-20-2006 FRI #3001
X_CLERK
01 JONES
GS
125
$346.77
NS
112
$300.48
TL /CUS $XX.XX
NO SALE 2
VALI CTR 1
CONSIGN CTR 1
0001Z
9999 19:00TM
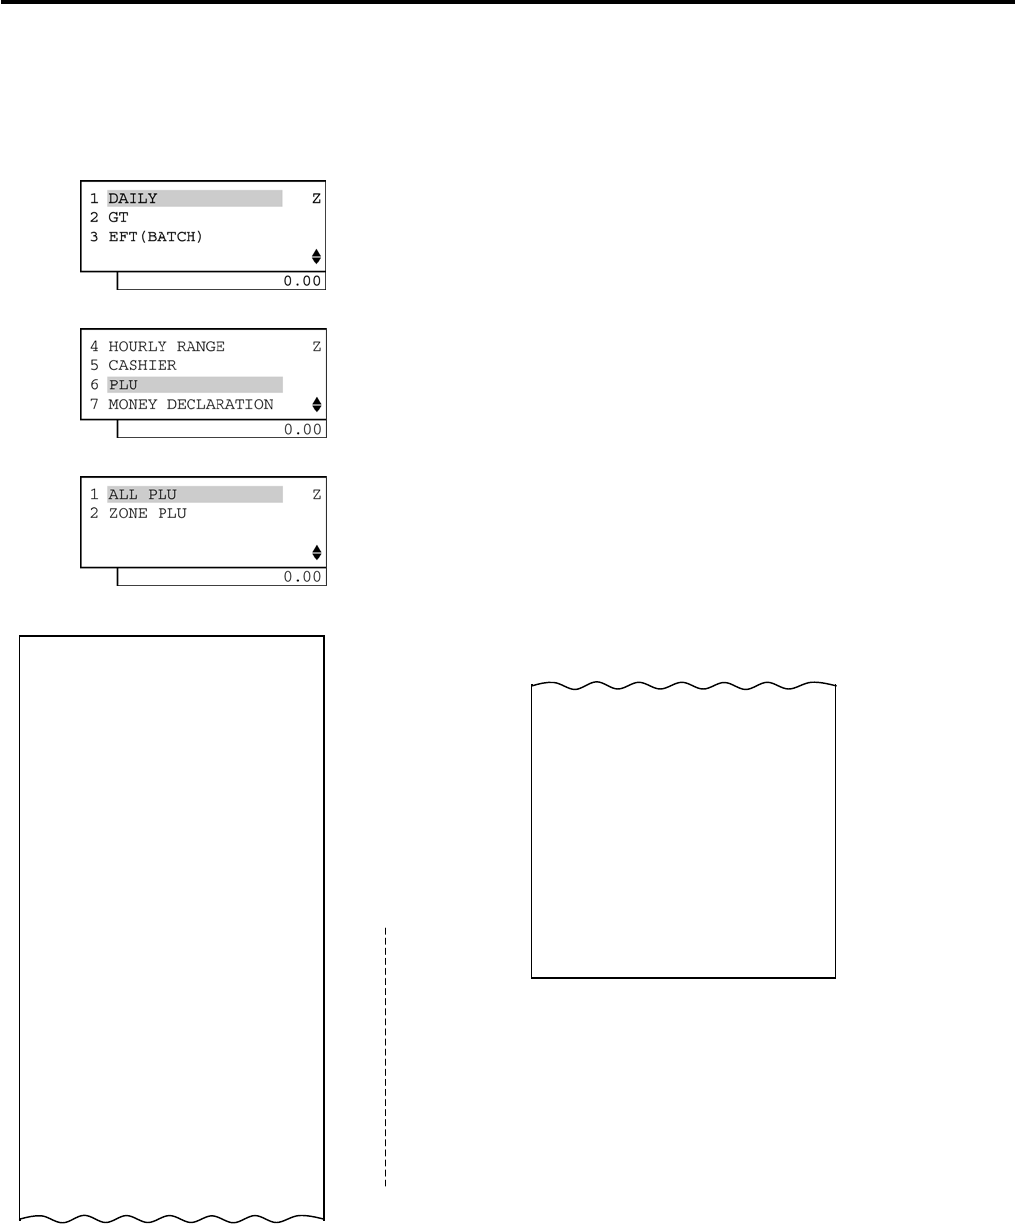
3. READ (X) AND RESET (Z) REPORTS EO1-11155
3.2 General Notes On Report Takings
3-14
All PLU Read or Reset (Daily)
Reset Report Sample
• Operation: Mode Lock: X for read
Z for reset
When the ECR is being outside a sale and in Z mode, depress the
[1] or [Enter] key.
Select “PLU” with the [↓] or [↑] key, then depress the [6] or [Enter]
key.
Select “ALL PLU” with the [↓] or [↑] key, then depress the [1] or
[Enter] key.
PLU Code 1000
Print data in order from
lower to larger numbered Total Item Count and
PLU Code. Amount of all the PLUs
Negative Total Item Count
and Amount of all the PLUs
PLU Code 0100
Name “Tomato” PLU Reset Report Count
Item Count, Amount (on Reset Reports only)
TEC STORE
1343 PEACH DRIVE
PHONE: 87-6437
Open 8:00am to 7:00pm
Closed: every Wednesday
10-20-2006 FRI #3001
Z_PLU_ALL
0001 Tomato
3 $0.50
0002 Lemon
1 $1.00
0101 Milk-Large Pack
1 $1.30
0102 Cheese-Half Pck
13 $2.50
0121 Egg-6 Pack
1 $1.50
0301 Half Rolls-4
1 $0.80
0501 Tuna Can
12 $4.20
0502 Soup Can
4 $1.20
0601 Kiwi Jam
1 $2.20
0701 Drink Small-A
2 $1.20
1000 Small-Btl Depo
4 $0.20
TOTAL 43
$46.60
-TOTAL 0
$0.00
0001Z
9999 19:00TM
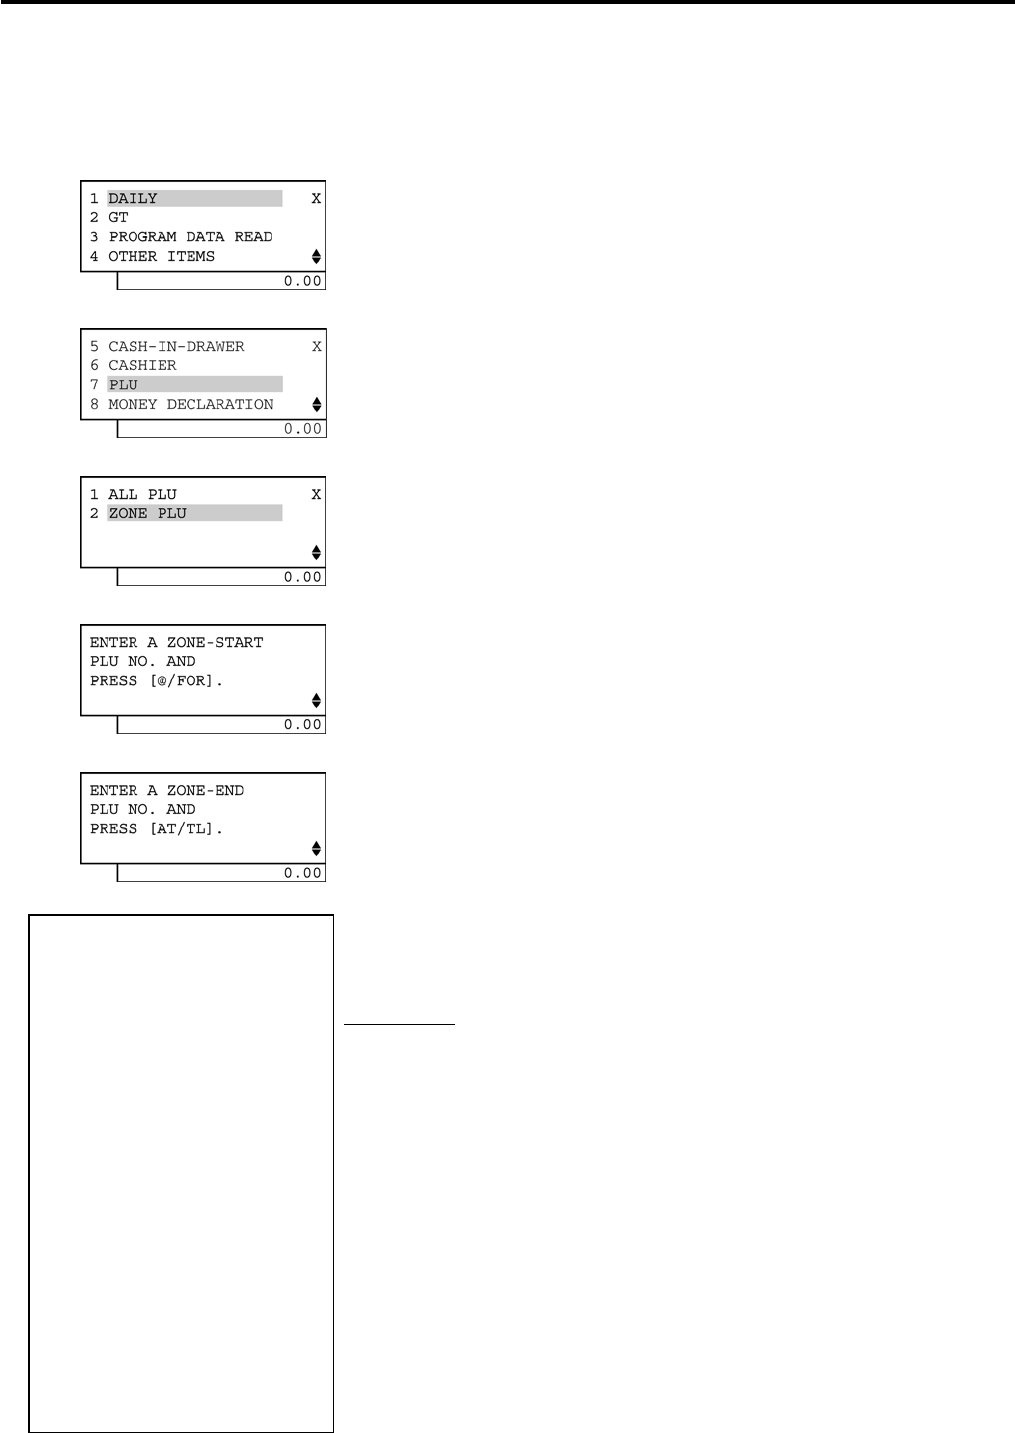
3. READ (X) AND RESET (Z) REPORTS EO1-11155
3.2 General Notes On Report Takings
3-15
Zone PLU Read or Reset (Daily)
Read Report Sample
• Operation: Mode Lock: X for read
Z for reset
When the ECR is being outside a sale and in X mode, depress the
[1] or [Enter] key.
Select “PLU” with the [↓] or [↑] key, then depress the [7] or [Enter]
key.
Select “ZONE PLU” with the [↓] or [↑] key, then depress the [2] or
[Enter] key.
Enter a zone-start PLU code (4 digits), then depress the [@/FOR]
key.
Enter a zone-end PLU code (4 digits), then depress the [AT/TL] key.
For this sample
Mode Lock: X or Z
(for Daily)
0001 [@/FOR]
0100 [AT/TL]
Zone-start PLU Code -> Zone-end PLU Code
PLU Code
PLU Name
Item Count, Amount
Total Item Count and
Amount of Total of all PLUs read in this report
Negative Total Item Count and
Amount of Total of all PLUs read in this report
TEC STORE
1343 PEACH DRIVE
PHONE: 87-6437
Open 8:00am to 7:00pm
Closed: every Wednesday
10-20-2006 FRI #3001
X_PLU_ZONE
0001->0100
0001 Tomato
3 $0.50
0002 Lemon
1 $1.00
TOTAL 4
$1.50
-TOTAL 0
$0.00
9999 19:00TM
NOTE: In Zone PLU Read Reports, PLUs of zero sale will be skipped.
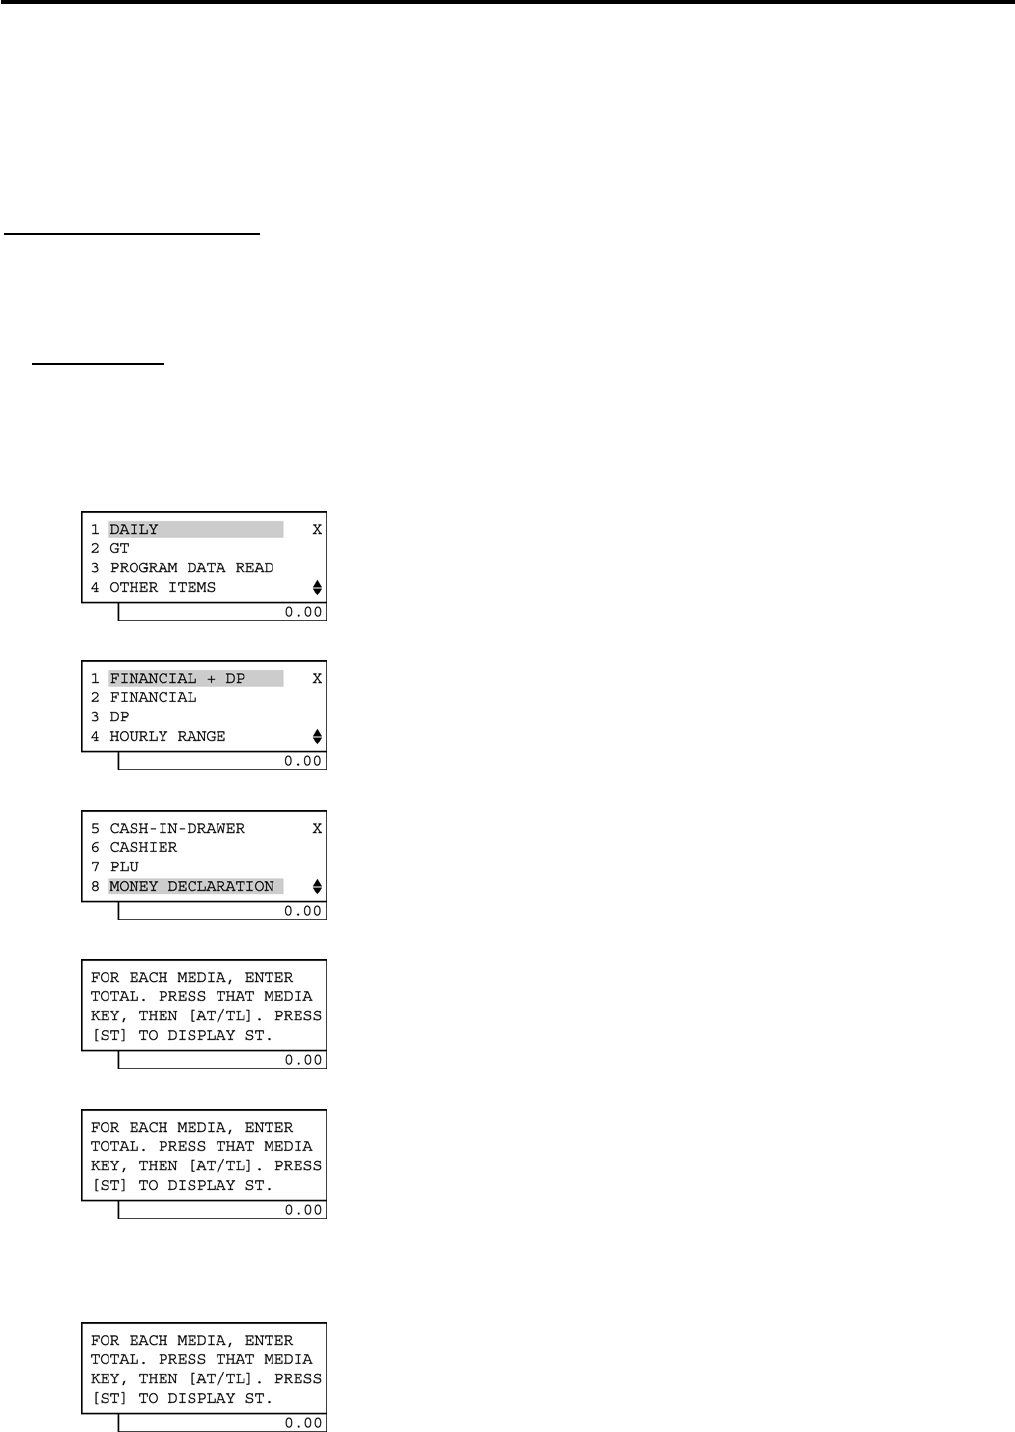
3. READ (X) AND RESET (Z) REPORTS EO1-11155
3.2 General Notes On Report Takings
3-16
Money Declaration
(to be operated when the “Cashier Key” method and the “Money Declaration” option have been selected)
When the Money Declaration feature is selected, each cashier who has operated the ECR on the day must end
with his/her Money Declaration operation. Without performing this, the Daily Financial Report cannot be taken.
All Media Sales Total and Cash-in-drawer Report and Daily All/Individual Cashier Report cannot be taken with
the Money Declaration feature.
Collective Money Declaration
By selecting the program option, money declaration can be performed collectively by a permitted cashier at a
time, without performing money declarations by each cashier. Without this, the Daily Financial Report cannot
be taken.
Key Operation: Mode Lock: X (for Read Mode Money Declaration)
Mode Lock: Z (for Reset Mode Money Declaration)
Example of Read Mode Money Declaration
The cashier sets his/her own cashier key to the ON status.
↓
When the ECR is being outside a sale and in X mode, depress the
[1] or [Enter] key.
↓
Select “8 MOMEY DECLARATION” with the [↓] or [↑] key.
↓
Depress the [8] or [Enter] key.
(The drawer opens.)
↓
Input the numeric value of all media-in-drawer total, then depress the
[AT/TL] key.
↓
Declare each media-in-drawer total by depressing the corresponding
media key. Repeat this alternating the amount and the media key
until all the media-in-drawer total are declared.
↓
([ST] may be depressed to obtain the subtotal of the amounts so far declared.)
↓
After declaring all the media-in-drawer total, depress the [AT/TL]
key.
3. READ (X) AND RESET (Z) REPORTS EO1-11155
3.2 General Notes On Report Takings
3-17
A Money Declaration receipt is issued, printing the media amounts declared and the total of all the medias
declared. It is automatically followed by a Cashier Report of that cashier (X or Z report depending on the
Mode Lock position where the preceding Money Declaration has been performed). When collective money
declaration is performed by a permitted cashier, the Cashier Report is not automatically printed. The Daily
All/Individual Cashier Report operation is available.
In this cashier report, each media-in-drawer total in memory is printed, along with each media amount
difference between the amount declared and the amount in memory.
(Refer to the sample operation and sample print format of MONEY DECLARATION at the end of this chapter.)
Sample Operation in “Z” Mode
(The Cashier Key of the required cashier must be set to ON.)
Manager turns the Mode Lock
to the “Z” position
SAMPLE OPERATION
Mode Lock: Z
Cashier 2 Key ([CLK 2]) to ON.
24514 [AT/TL]
2450 [CHECK TEND]
570 [Chg]
400 [MISC TEND]
[AT/TL]
Money Declaration Count
TEC STORE
1343 PEACH DRIVE
PHONE: 87-6437
Open 8:00am to 7:00pm
Closed: every Wednesday
10-20-2006 FRI #3001
Z_MDR
CASH $245.14
CHECK $24.50
Chg $5.70
MISC $4.00
TOTAL $279.34
SMITH 9999 19:00TM
TEC STORE
1343 PEACH DRIVE
PHONE: 87-6437
Open 8:00am to 7:00pm
Closed: every Wednesday
10-20-2006 FRI #3001
Z_CLERK
02 SMITH
GS
72
$279.34
(Same as ordinary
Cashier Report)
CASH DIF $0.00
CHECK DIF $0.00
Chg DIF $0.00
MISC DIF $0.00
M.DCR 3
001Z
SMITH 9999 19:00TM
Cashier Report automatically follows
(Reset Report in this case)
The money declaration is finalized on
the last [AT/TL] key depression.
A receipt such as shown above is
issued, automatically followed by the
Cashier Daily Reset Report of the
cashier who has just operated the
money declaration.
I
n the Cashier Reset Report, the print contents are
the same as those of Cashier Read or Reset
Reports without the Money Declaration feature,
except that the amount difference of each declared
media will be printed below the media-in-
drawer
totals lines and
the Money Declaration Count (by
that individual cashier) will be printed above the
Cashier Reset Report Count.
Media Difference:
If the difference is zero,
declared media amount
was correct.
If negative, the declared
amount was smaller than
the memory.
If positive, a larger
amount than the memory
was declared.
If the Money Declaration has
been operated in X mode,
the Cashier Report
automatically issued will be
Read Report.
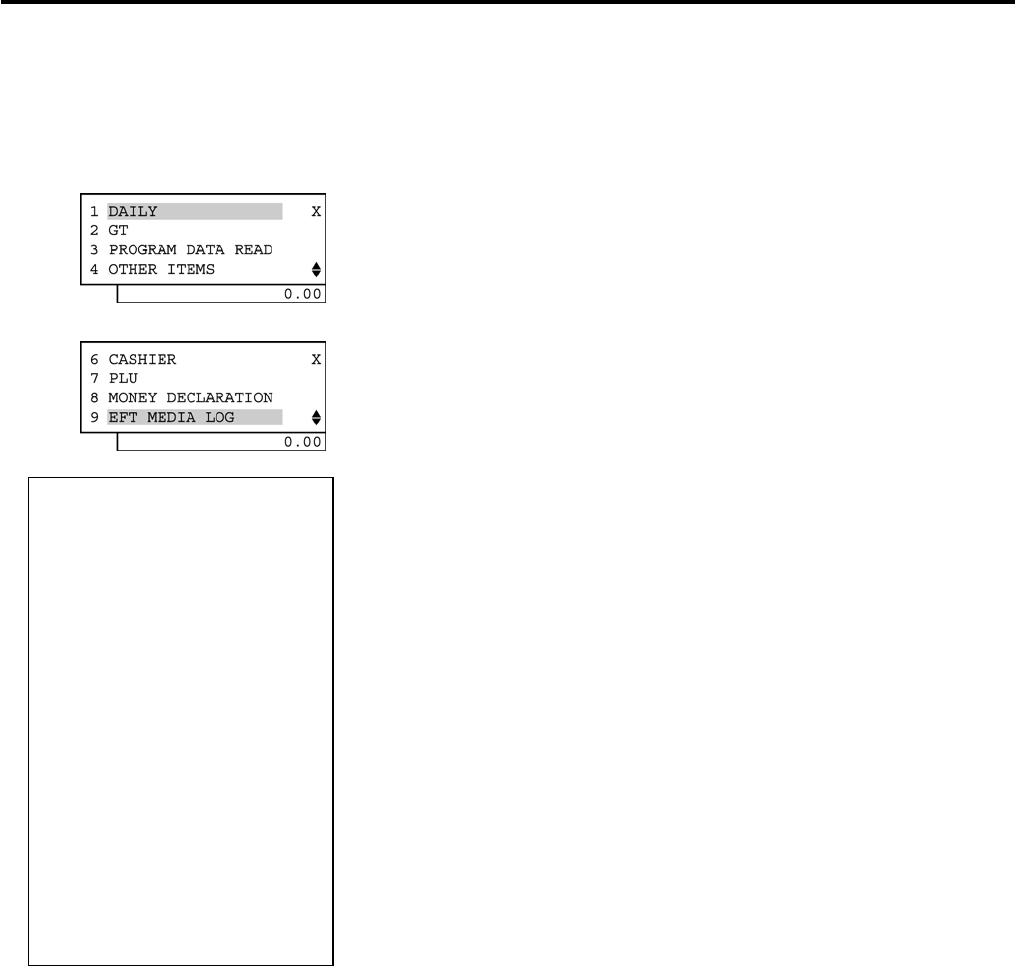
3. READ (X) AND RESET (Z) REPORTS EO1-11155
3.2 General Notes On Report Takings
3-18
EFT Media Log
A report showing amount and frequency for each card is output.
• Operation: Mode Lock: X for EFT media log read
Read Report Sample
When the ECR is being outside a sale and in X mode, depress the
[1] or [Enter] key.
Select “9 EFT MEDIA LOG” with the [↓] or [↑] key, then depress the
[9] or [Enter] key.
AMEX (Amount, Frequency)
VISA
Master Card
Discover
Private Label
Diner’s Club or Carte Blanche
JCB
Debit
EBT F/S
EBT Cash
Total for all card types
NOTES:
1. The ECR sends a local totals report command to the EFT terminal and print the received data is printed.
2. This operation is possible when a connection of EFT terminal has been selected by the program option.
TEC STORE
1343 PEACH DRIVE
PHONE: 87-6437
Open 8:00am to 7:00pm
Closed: every Wednesday
10-20-2006 FRI #3001
X_MEDIA_LOG
2 $526.25 15
3 $373.75 12
4 $226.25 10
5 $52.25 2
6 $39.50 3
7 $27.50 1
8 $22.25 1
9 $26.75 2
10 $12.50 1
11 $10.75 1
99 $1317.75 48
9999 19:01TM
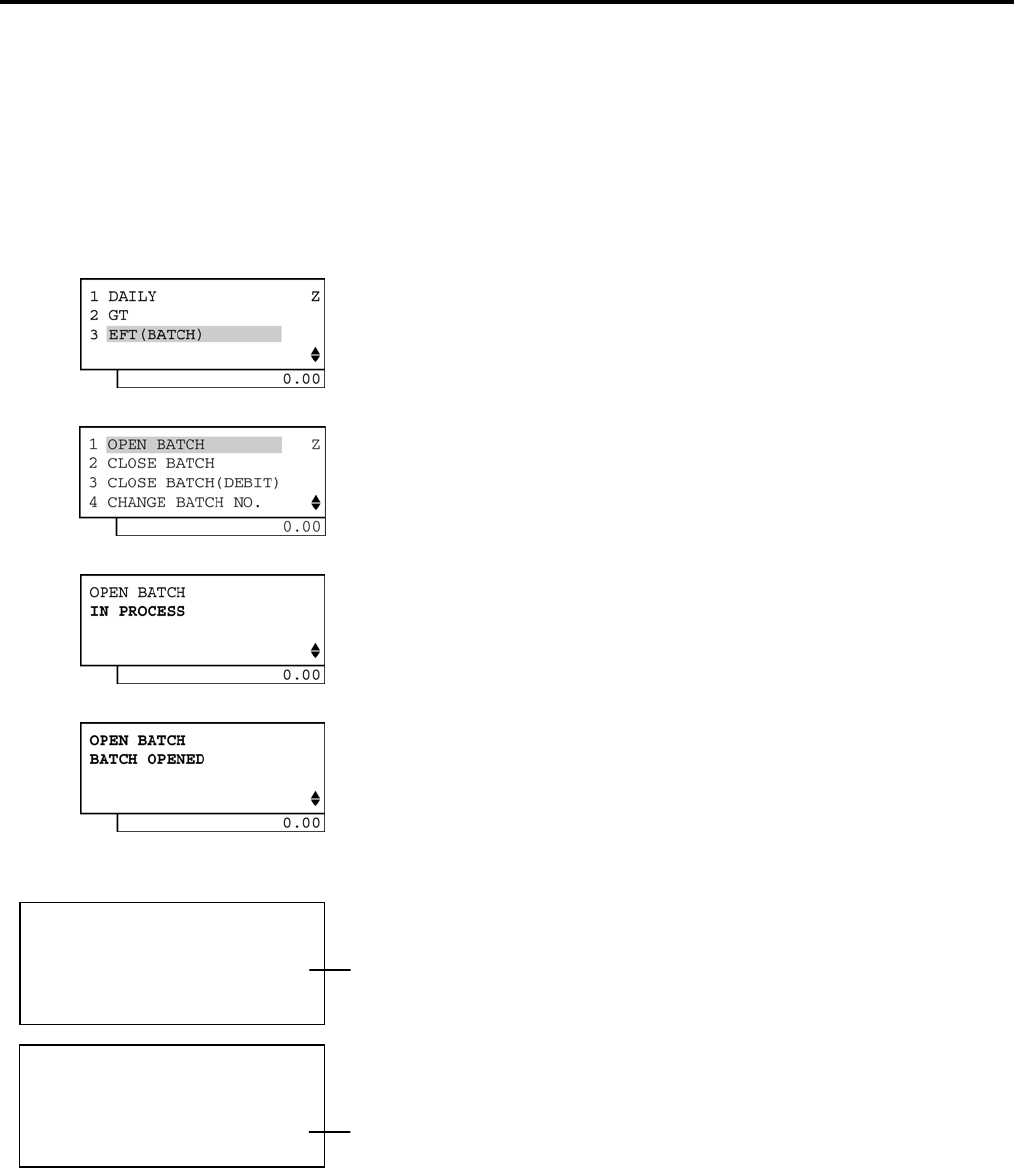
3. READ (X) AND RESET (Z) REPORTS EO1-11155
3.2 General Notes On Report Takings
3-19
EFT Batch
(1) Open Batch
An open batch command is sent to the EFT terminal to declare the use of the batch file.
This operation is performed before the store opens.
Example
• Operation: Mode Lock: X for read
Z for reset
When the ECR is being outside a sale and in Z mode, depress the
[↓] key twice to select “3 EFT(BATCH)”. And depress the [3] or
[Enter] key.
Select “1 OPEN BATCH”, then depress the [1] or [Enter] key.
The open batch is in process.
When the operation was successfully completed, this message is
displayed.
If it was failed, an error message is displayed. (NOTE 1)
Journal Print Format
OK: The operation was successfully completed.
NG: The operation was failed.
This message is printed when Open Batch has already been executed.
NOTE:
When a response from the EFT terminal was not sent correctly, an error message “RESPONS NG” is shown on
the LCD display.
When no response was sent from the EFT terminal within a specified time (standard: 30 seconds), a timeout
error occurs on the ECR and an error message “NO RESPONS” is shown on the LCD display.
OPEN BATCH
OK
9999 07:30TM
CLOSE BATCH
NG
BATCH ALREADY OEPNED
9999 07:30TM
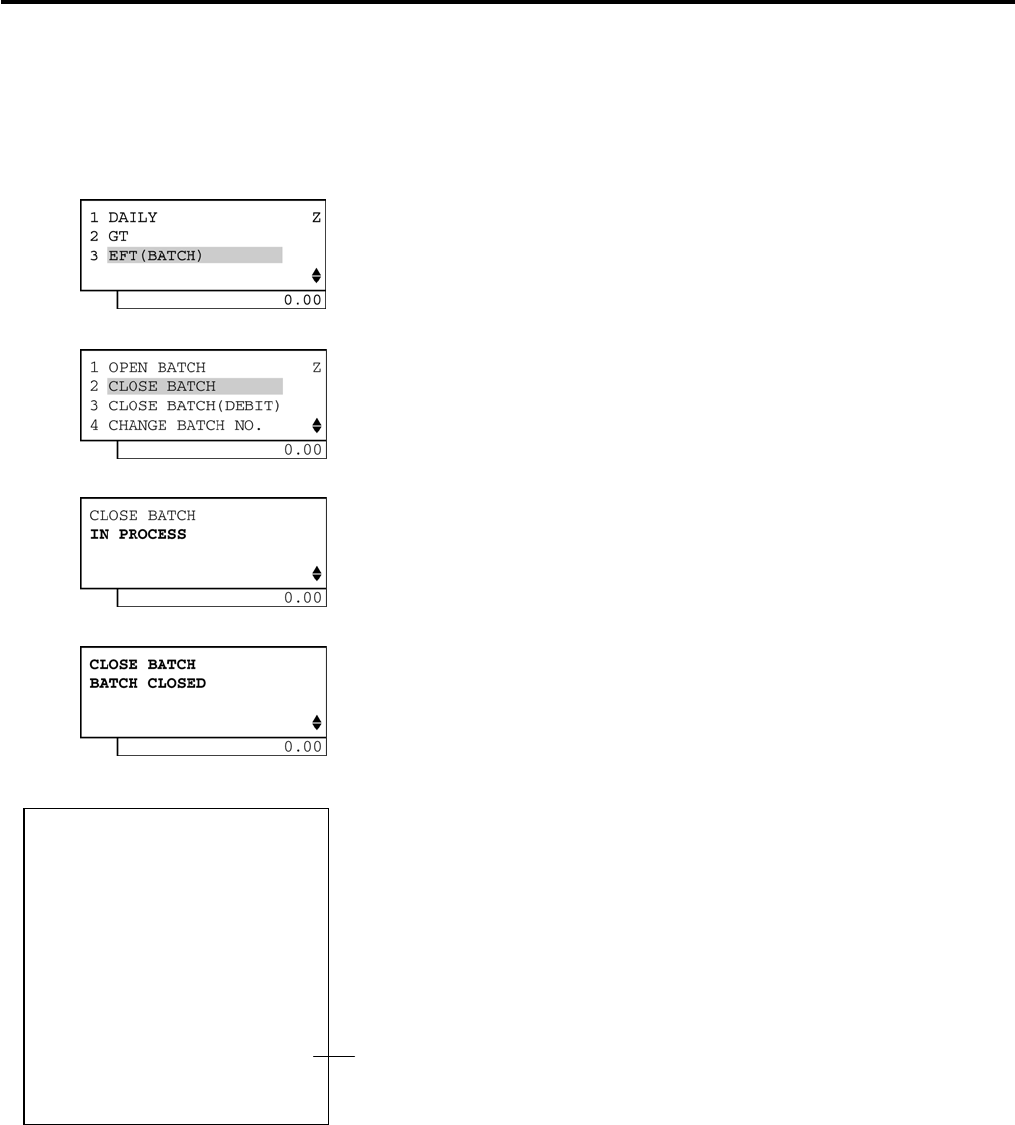
3. READ (X) AND RESET (Z) REPORTS EO1-11155
3.2 General Notes On Report Takings
3-20
(2) Close Batch
A close batch command is sent to the EFT terminal.
Sales transaction of the day is ended and a batch file is sent to the host to make a settlement.
Example
• Operation: Mode Lock: Z for reset (reset only)
When the ECR is being outside a sale and in Z mode, depress the
[↓] key twice to select “3 EFT(BATCH)”. And depress the [3] or
[Enter] key.
Depress the [↓] key to select “2 CLOSE BATCH” and depress the
[2] or [Enter] key.
The close batch is in process.
When the operation was successfully completed, this message is
displayed.
If it was failed, an error message is displayed. (NOTE 2, NOTE 3)
OK: The operation was successfully completed.
NG: The operation was failed.
BATCH ALREADY CLOSED is printed under NG when CLOSE BATCH has already been
executed.
NOTES:
1. After processing, a receipt showing the processing result is issued.
2. When no response was sent from the EFT terminal within a specified time (standard: 10 minutes), a timeout
error occurs on the ECR and an error message “NO RESPONS” is shown on the LCD display.
TEC STORE
1343 PEACH DRIVE
PHONE: 87-6437
Open 8:00am to 7:00pm
Closed: every Wednesday
10-20-2006 FRI #3001
CLOSE BATCH
OK
9999 07:30TM
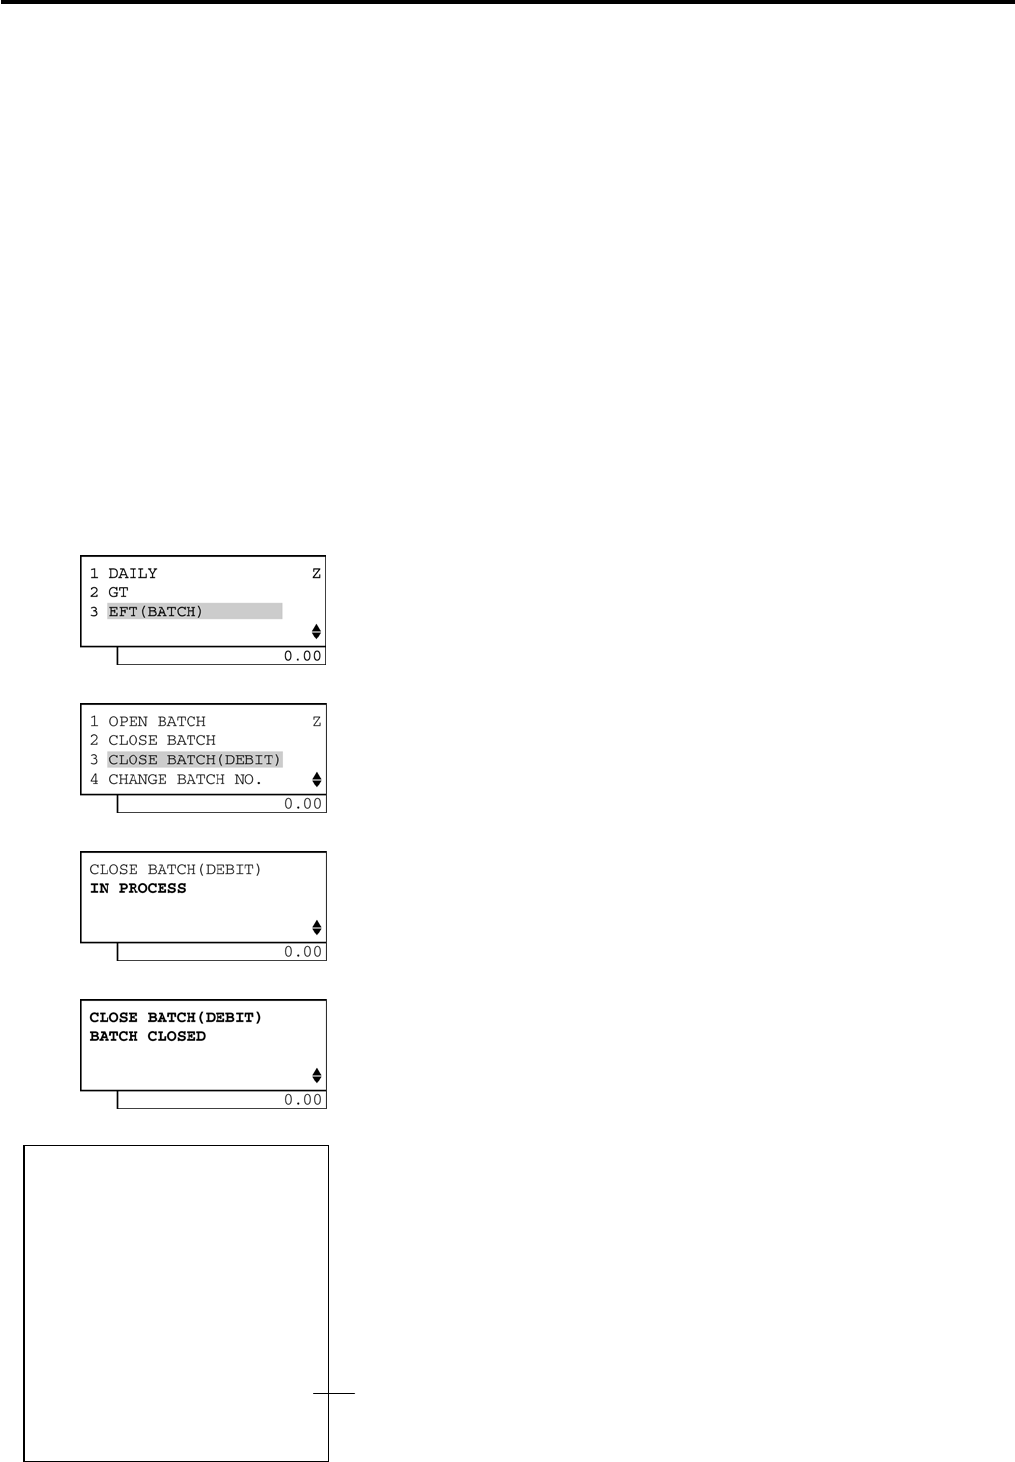
3. READ (X) AND RESET (Z) REPORTS EO1-11155
3.2 General Notes On Report Takings
3-21
3. When a response from the EFT terminal was not sent correctly (i.e. when a sales transaction data was not
correct), an error message “RESPONS NG” is shown on the LCD display.
At this time, follow the procedure below.
Step 1: Ask the hosting company which sales transaction was not correct on the telephone.
Step 2: Take a Local Transaction Inquiry Read Report to confirm the transaction sequence.
(Refer to (7) Local Transaction Inquiry.)
Step 3: Perform a void operation to delete a target item in the sales transaction.
(Refer to Section 11.13 Void, Operator’s Guide.)
Step 4: Retry to enter the deleted item. (Manual card number entry)
Step 5: Perform a Change Batch Number. (Refer to (4) Change Batch Number.)
Step 6: Retry to perform a Close Batch to make a settlement.
(3) Close Batch (with Debit)
A close batch command is sent to the EFT terminal.
Sales transaction of the day is ended and a batch file is sent to the host to make a settlement.
Example
• Operation: Mode Lock: Z for reset (reset only)
When the ECR is being outside a sale and in Z mode, depress the
[↓] key twice to select “3 EFT(BATCH)”. And depress the [3] or
[Enter] key.
Depress the [↓] key twice to select “3 CLOSE BATCH(DEBIT)” and
depress the [3] or [Enter] key.
The close batch (with Debit) is in process.
When the operation was successfully completed, this message is
displayed.
If it was failed, an error message is displayed. (NOTE 2)
NOTES:
1. After processing, a receipt showing the processing result is issued.
2. When no response was sent from the EFT terminal within a specified
time (standard: 10 minutes), a timeout error occurs on the ECR and
an error message “NO RESPONS” is shown on the LCD display.
OK: The operation was successfully completed.
NG: The operation was failed.
BATCH ALREADY CLOSED is printed under NG when CLOSE BATCH has already been
executed.
TEC STORE
1343 PEACH DRIVE
PHONE: 87-6437
Open 8:00am to 7:00pm
Closed: every Wednesday
10-20-2006 FRI #3001
CLOSE BATCH D
OK
9999 07:32TM
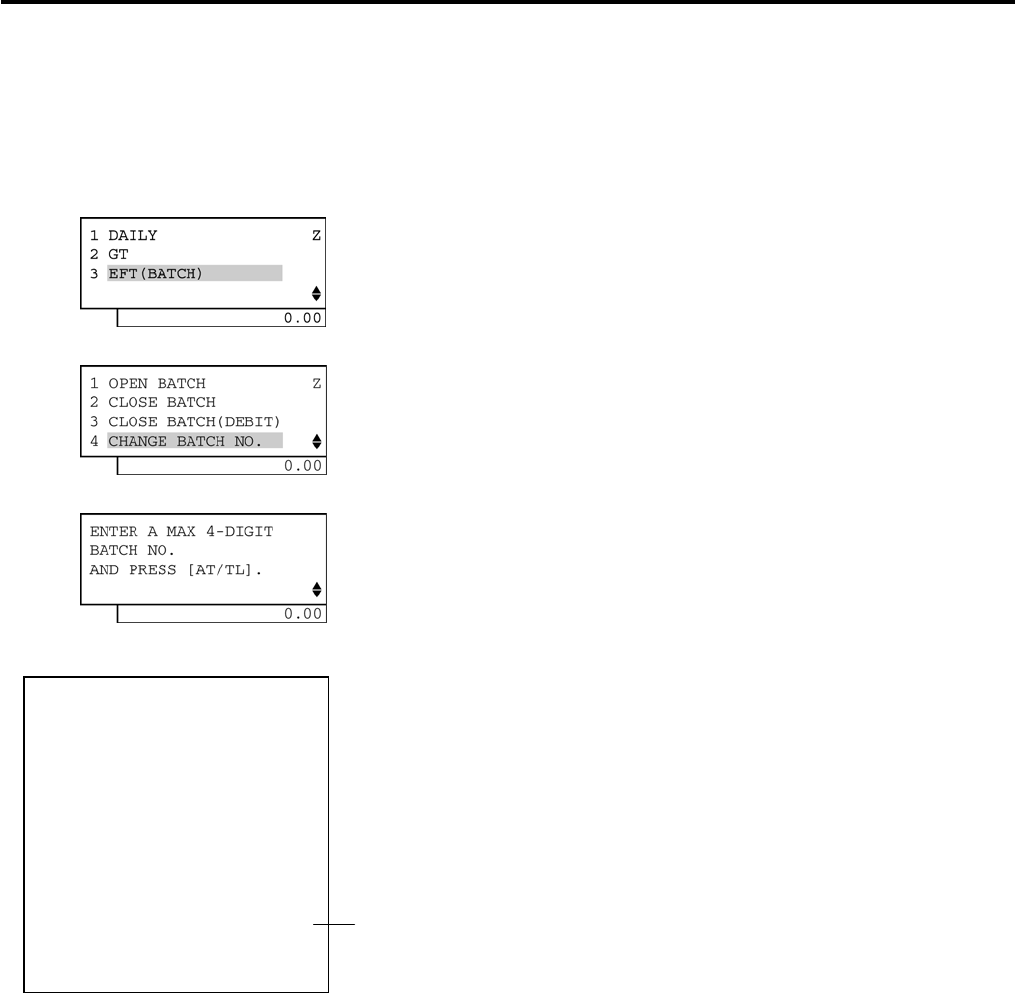
3. READ (X) AND RESET (Z) REPORTS EO1-11155
3.2 General Notes On Report Takings
3-22
(4) Change Batch Number
A close batch command is sent to the EFT terminal.
Sales transaction of the day is ended and a batch file is sent to the host to make a settlement.
Example
• Operation: Mode Lock: Z for reset (reset only)
When the ECR is being outside a sale and in Z mode, depress the
[↓] key twice to select “3 EFT(BATCH)”. And depress the [3] or
[Enter] key.
Depress the [↓] key three times to select “4 CHANGE BATCH NO.”
and depress the [4] or [Enter] key.
Input a maximum of 4-digit batch No. which was specified by the
hosting company, and then depress the [AT/TL] key.
The changed batch No. is printed.
TEC STORE
1343 PEACH DRIVE
PHONE: 87-6437
Open 8:00am to 7:00pm
Closed: every Wednesday
10-20-2006 FRI #3001
CHANGE BATCH
9999
9999 07:34TM
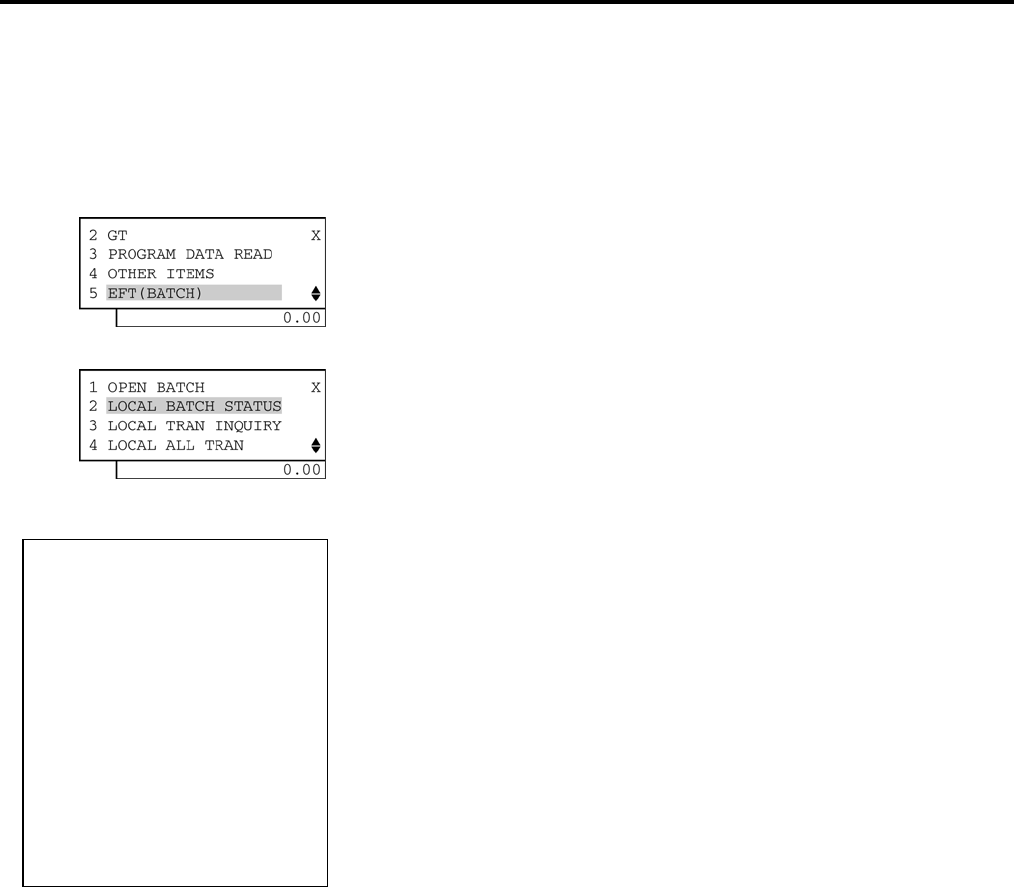
3. READ (X) AND RESET (Z) REPORTS EO1-11155
3.2 General Notes On Report Takings
3-23
(5) Local Batch Status
A local batch status command is sent to the EFT terminal and a response from the EFT terminal is printed out.
(condition check)
Example
• Operation: Mode Lock: X for read
When the ECR is being outside a sale and in X mode, depress the
[↓] key four times to select “5 EFT(BATCH)”. And depress the [5] or
[Enter] key.
Depress the [↓] key to select “2 LOCAL BATCH STATUS”, then
depress the [2] or [Enter] key.
A B C D
E
F G
A: Batch status (0 = Open, C = Closed, P = Pended, X = Incomplete): one character
B: Batch Number: 4 digits
C: Transaction count: 5 digits
D: Item count: 5 digits
E: Batch balance: 7-digit integer + 2-digit decimal
F: Forward transaction count: 5 digits
G: Forward batch balance: 7-digit integer + 2-digit decimal
NOTE:
When no response was sent from the EFT terminal within a specified time (standard: 30 seconds), a timeout
error occurs on the ECR and an error message “NO RESPONS” is shown on the LCD display.
TEC STORE
1343 PEACH DRIVE
PHONE: 87-6437
Open 8:00am to 7:00pm
Closed: every Wednesday
10-20-2006 FRI #3001
BATCH STATUS
X 9999 ZZZZ9 ZZZZ9
_ZZZZZZ9.99
ZZZZ9 _ZZZZZZ9.99
9999 07:38TM
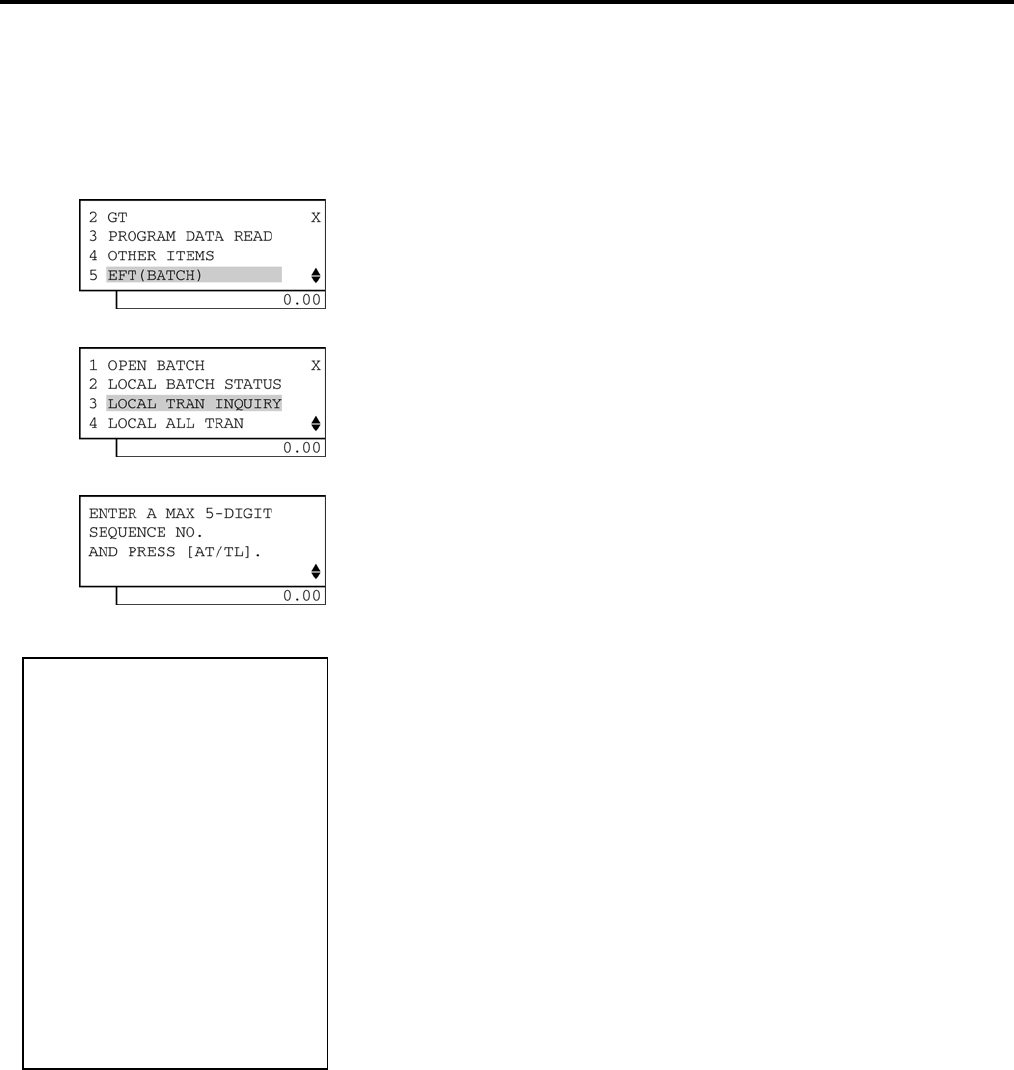
3. READ (X) AND RESET (Z) REPORTS EO1-11155
3.2 General Notes On Report Takings
3-24
(6) Local Transaction Inquiry
A local transaction inquiry command is sent to the EFT terminal and a response from the EFT terminal is
printed out. (for one sales transaction)
Example
• Operation: Mode Lock: X for read
When the ECR is being outside a sale and in X mode, depress the
[↓] key four times to select “5 EFT(BATCH)”. And depress the [5] or
[Enter] key.
Depress the [↓] key twice to select “3 LOCAL TRAN INQUIRY” and
depress the [3] or [Enter] key.
Input a maximum of 5-digit sequence No., and then depress the
[AT/TL] key.
A B C
D E F
G
H
I
J K
Min. No.
of digits Max. No. of
digits Type
A: Transaction sequence number 1 5 N
B: Transaction status 1 1 A
C: Network transaction code 1 3 A
D: Credit card account number 1 19 A
E: Expiration date 4 4 N
F: Card read flag 1 1 A
G: Approval code 1 16 A
H: Reference number 1 16 A
I: Transaction amount 3 11 N
J: Transaction date 6 6 A
K: Transaction time 6 6 A
TEC STORE
1343 PEACH DRIVE
PHONE: 87-6437
Open 8:00am to 7:00pm
Closed: every Wednesday
10-20-2006 FRI #3001
L TRAN INQ.
ZZZZ9 X XXX
ZZZZZZZZZZZZZZZZZZX 9999 X
ZZZZZZZZZZZZZZZX
ZZZZZZZZZZZZZZZX
_ZZZZZZZZ9.99
999999 999999
9999 07:40TM
N=Numeric
A
=Alphanumeric
NOTE:
When no response was sent from the EFT terminal within a specified
time (standard: 30 seconds), a timeout error occurs on the ECR and
an error message “NO RESPONS” is shown on the LCD display.
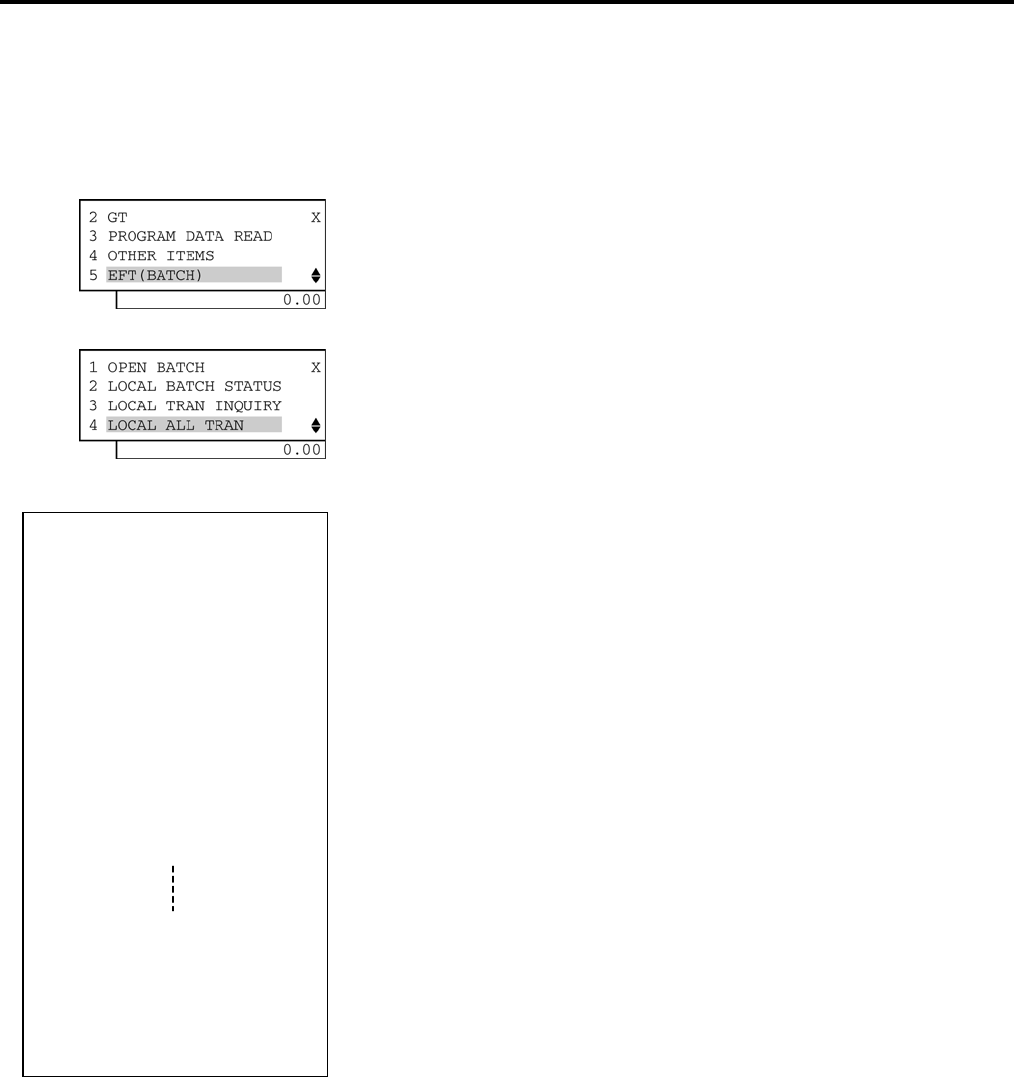
3. READ (X) AND RESET (Z) REPORTS EO1-11155
3.2 General Notes On Report Takings
3-25
(7) Local Transaction Report
A local transaction report command is sent to the EFT terminal and a response from the EFT terminal is
printed out. (for all sales transactions)
Example
• Operation: Mode Lock: X for read
When the ECR is being outside a sale and in X mode, depress the
[↓] key twice to select “5 EFT(BATCH)”. And depress the [5] or
[Enter] key.
Depress the [↓] key three times to select “4 LOCAL ALL TRAN” and
depress the [4] or [Enter] key.
A B C
D E F
G
H
I
J K
Min. No.
of digits Max. No. of
digits Type
A: Transaction sequence number 1 5 N
B: Transaction status 1 1 A
C: Network transaction code 1 3 A
D: Credit card account number 1 19 A
E: Expiration date 4 4 N
F: Card read flag 1 1 A
G: Approval code 1 16 A
H: Reference number 1 16 A
I: Transaction amount 3 11 N
J: Transaction date 6 6 A
K: Transaction time 6 6 A
N=Numeric
A
=Alphanumeric
TEC STORE
1343 PEACH DRIVE
PHONE: 87-6437
Open 8:00am to 7:00pm
Closed: every Wednesday
10-20-2006 FRI #3001
L TRAN ALL
ZZZZ9 X XXX
ZZZZZZZZZZZZZZZZZZX 9999 X
ZZZZZZZZZZZZZZZX
ZZZZZZZZZZZZZZZX
_ZZZZZZZZ9.99
999999 999999
ZZZZ9 X XXX
ZZZZZZZZZZZZZZZZZZX 9999 X
ZZZZZZZZZZZZZZZX
ZZZZZZZZZZZZZZZX
_ZZZZZZZZ9.99
999999 999999
9999 07:40TM
NOTE:
When no response was sent from the EFT terminal within a
specified time (standard: 30 seconds), a timeout error occurs on the
ECR and an error message “NO RESPONS” is shown on the LCD
display.
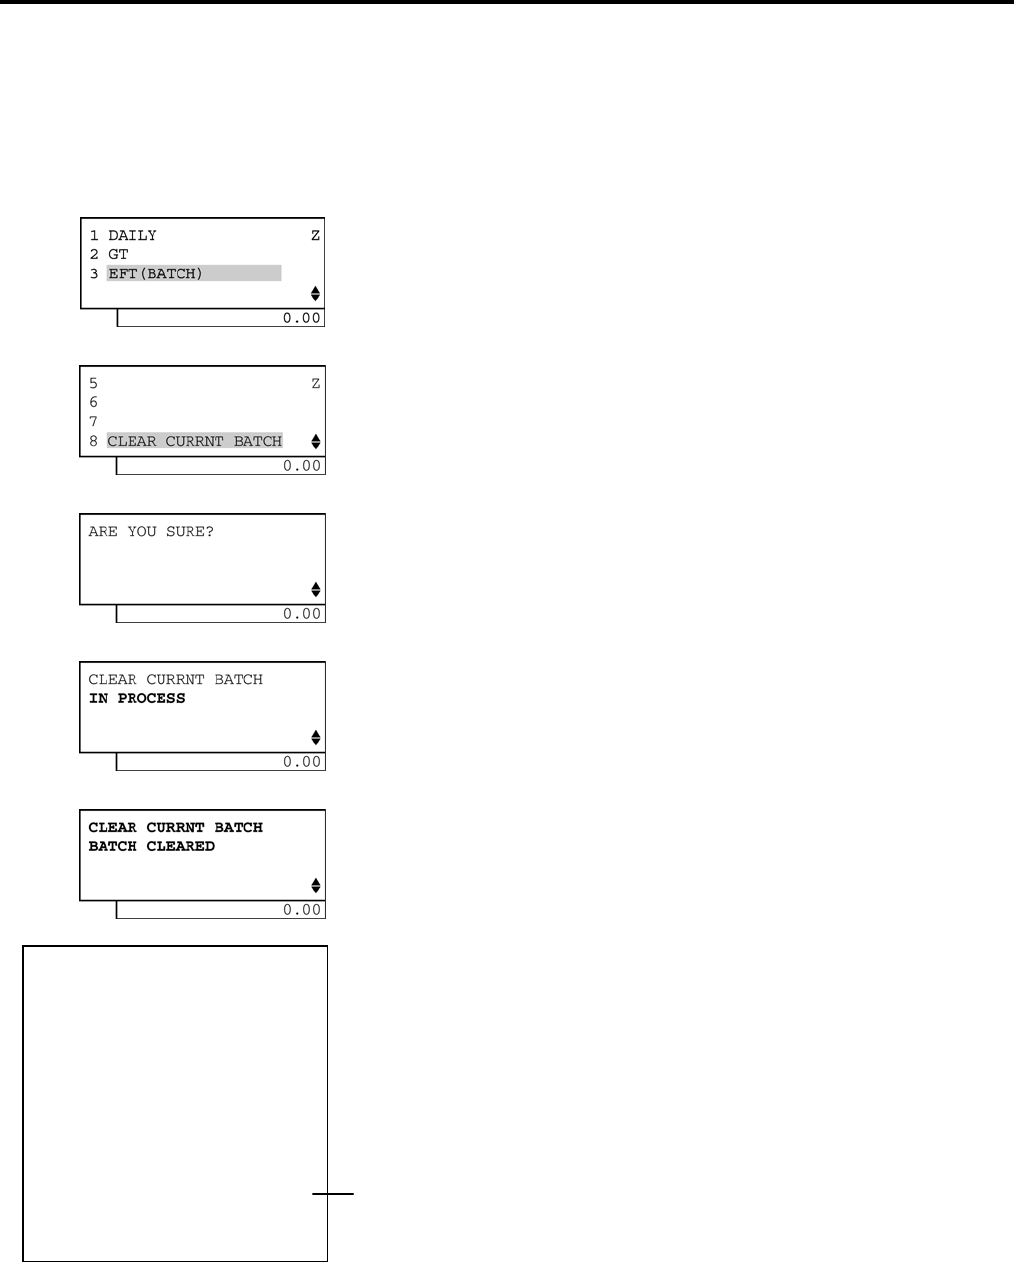
3. READ (X) AND RESET (Z) REPORTS EO1-11155
3.2 General Notes On Report Takings
3-26
(8) Clear Current Batch
A clear current batch command is sent to the EFT terminal and the data in the EFT report is cleared.
This operation is performed for doing maintenance on the EFT terminal.
Example
• Operation: Mode Lock: Z for reset (reset only)
When the ECR is being outside a sale and in Z mode, depress the
[↓] key twice to select “3 EFT(BATCH)”. And depress the [3] or
[Enter] key.
Depress the [↓] key seven times to select “8 CLEAR CURRNT
BATCH” and depress the [8] or [Enter] key.
Depress the [AT/TL] key.
(The display returns to the previous screen by depressing the [Rtn]
key.)
The clear current batch is in process.
When the operation was successfully completed, this message is
displayed.
If it was failed, an error message is displayed. (NOTE 2)
OK: The operation was successfully completed.
NG: The operation was failed.
NOTES:
1. After processing, a receipt showing the processing result is issued.
2. When no response was sent from the EFT terminal within a specified time (standard: 30 seconds), a timeout
error occurs on the ECR and an error message “NO RESPONS” is shown on the LCD display.
TEC STORE
1343 PEACH DRIVE
PHONE: 87-6437
Open 8:00am to 7:00pm
Closed: every Wednesday
10-20-2006 FRI #3001
CLEAR BATCH
OK
9999 07:36TM
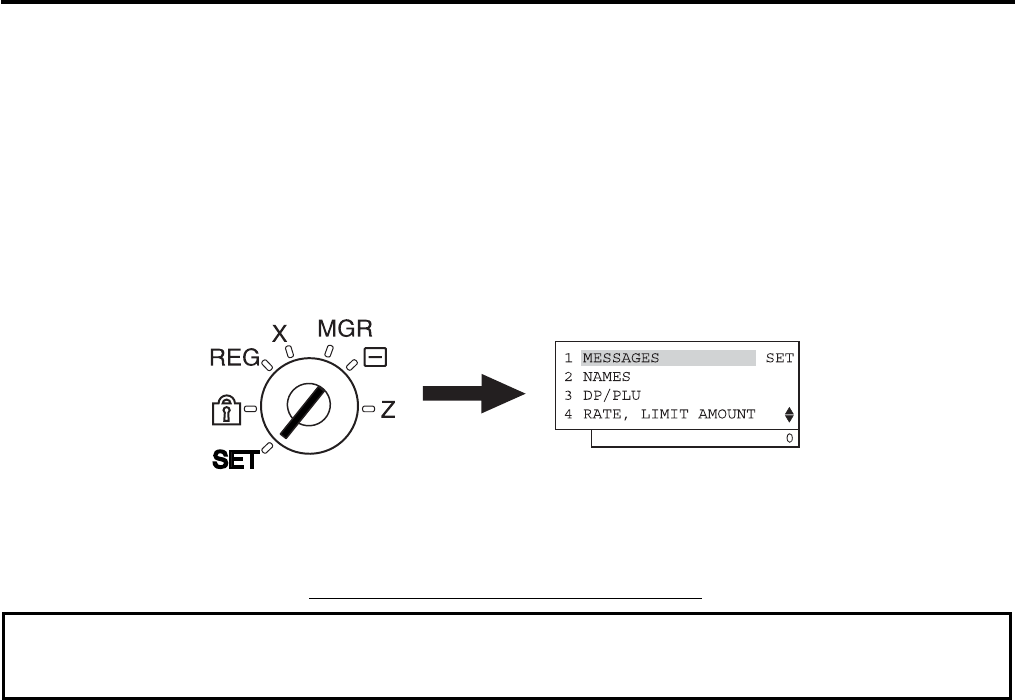
4. PROGRAMMING OPERATIONS EO1-11155
4. PROGRAMMING OPERATIONS
4- 1
4. PROGRAMMING OPERATIONS
This chapter is provided for the store programmer or the store manager who may have to change the
programmed data of the ECR on the daily, weekly, or monthly basis. Usually, all the basic program data required
for your store should be set before delivering the product by your local TOSHIBA TEC representative. However,
in need of changing or adding program data, please refer to this chapter. It is also recommended to read the
OPERATOR’S GUIDE as well as other chapters of the MANAGER’S GUIDE in order to thoroughly understand
the descriptions in this chapter.
By turning the Mode Lock to the SET position with the MA key, the menu below is displayed on the LCD display
so that the ECR is ready to perform a programming operation.
If there are any unclear points or program data other than listed here must be changed or added, please contact
your TOSHIBA TEC representative.
TABLE OF PROGRAMMING OPERATIONS
CAUTION!
Do not perform programming operations which are not described in this chapter. Doing so may cause a
malfunction of the ECR.
(Page)
Instructions for Programming............................................................................................................................... 4- 2
Character Entries ................................................................................................................................................ 4- 7
Time Setting or Adjustment ................................................................................................................................ 4-12
Date Setting or Adjustment................................................................................................................................. 4-13
Store Name Message Programming ................................................................................................................. 4-15
Commercial Message Programming ................................................................................................................... 4-19
Footer Message Programming ........................................................................................................................... 4-20
Cashier Name and Status Programming............................................................................................................ 4-21
Department Table Programming ........................................................................................................................ 4-24
Department Name Programming........................................................................................................................ 4-32
Department Group Name Programming............................................................................................................. 4-33
PLU Table Programming .................................................................................................................................... 4-34
PLU Name Programming.................................................................................................................................... 4-44
Department Preset Price Setting or Changing ................................................................................................... 4-45
PLU Preset Price Setting or Changing ............................................................................................................... 4-46
Tax Table Programming ...................................................................................................................................... 4-48
%+ and %- Preset Rate Setting.......................................................................................................................... 4-58
Foreign Currency Exchange Rate Setting .......................................................................................................... 4-59
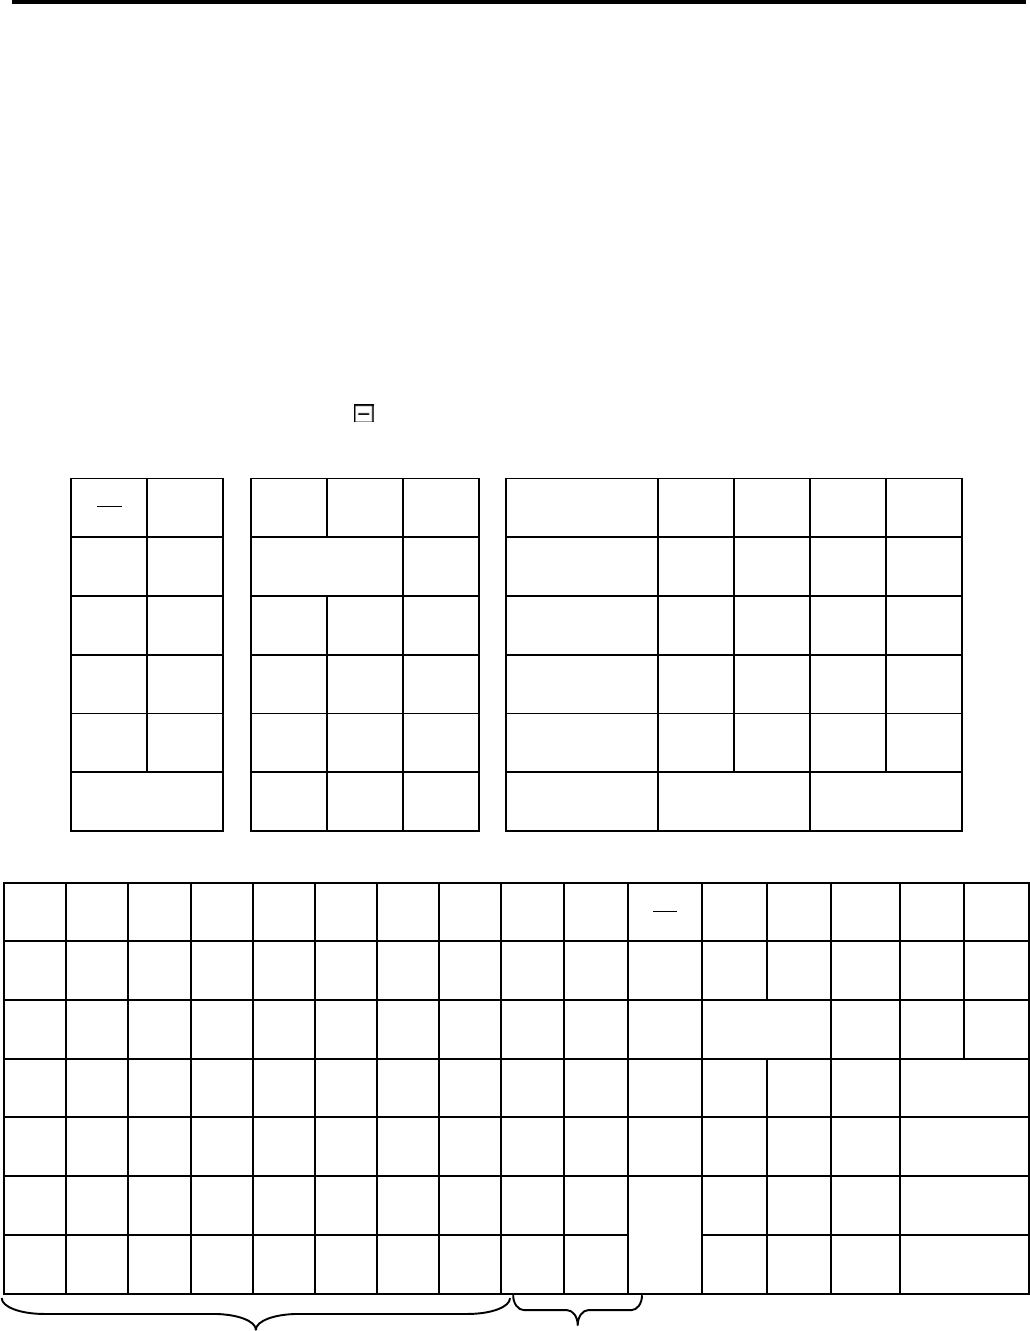
4. PROGRAMMING OPERATIONS EO1-11155
4.1 Instructions for Programming
4- 2
4.1 Instructions for Programming
On the MA-600 series adopting the LCD display, each programming operation is performed by selecting the
corresponding menu item on the LCD display.
The keyboard layout is automatically changed in three types according to operation to be performed (ordinary
registration, read/reset, programming) when the Mode Lock is turned to the corresponding position.
Accordingly, in addition to the character code entry method, the character entries in programming operations are
also performed directly through the ordinary type keyboard.
4.1.1 Types of Keyboard Layouts
The keyboard layout is automatically changed in three types when the Mode Lock is turned to the corresponding
position. That for programming operation is used in this chapter.
(1) Keyboard layout for ordinary registration (It is programmed as default setting.)
Mode Lock Position: REG, MGR,
• Ordinary Type Keyboard
LOG
RECEIPT
NS
VOID
RF JF
1
6
11
PO RECEIPT
ISSUE
RTN
MDSE
ALL
VOID
C TX/M
2
7
12
R/A DOLL
DISC
FS/M
ITEM
CORR
7 8 9
3
8
13
VND
CPN %-
OPEN
@/FOR
4 5 6
4
9
14
STR
CPN EX
# AMT
1 2 3
5
10
15
FS TL
TEND
Chg
PLU
0 00 .
ST AT/TL
CHECK
TEND
• Flat Type Keyboard
1
8
LOG
RECEIPT VOID
ITEM
CORR
ALL
VOID
RF JF
2
9
RECEIPT
ISSUE TX/M
EX RTN
MDSE
R/A
PO
3
10
%- C @/FOR
Chg
NS
4
11
# 7 8 9 $5.00
5
12
AMT
4 5 6 $10.00
6
13
1 2 3 ST
7
14
PLU
0 00 . AT/TL
Department
keys
PLU preset-code keys
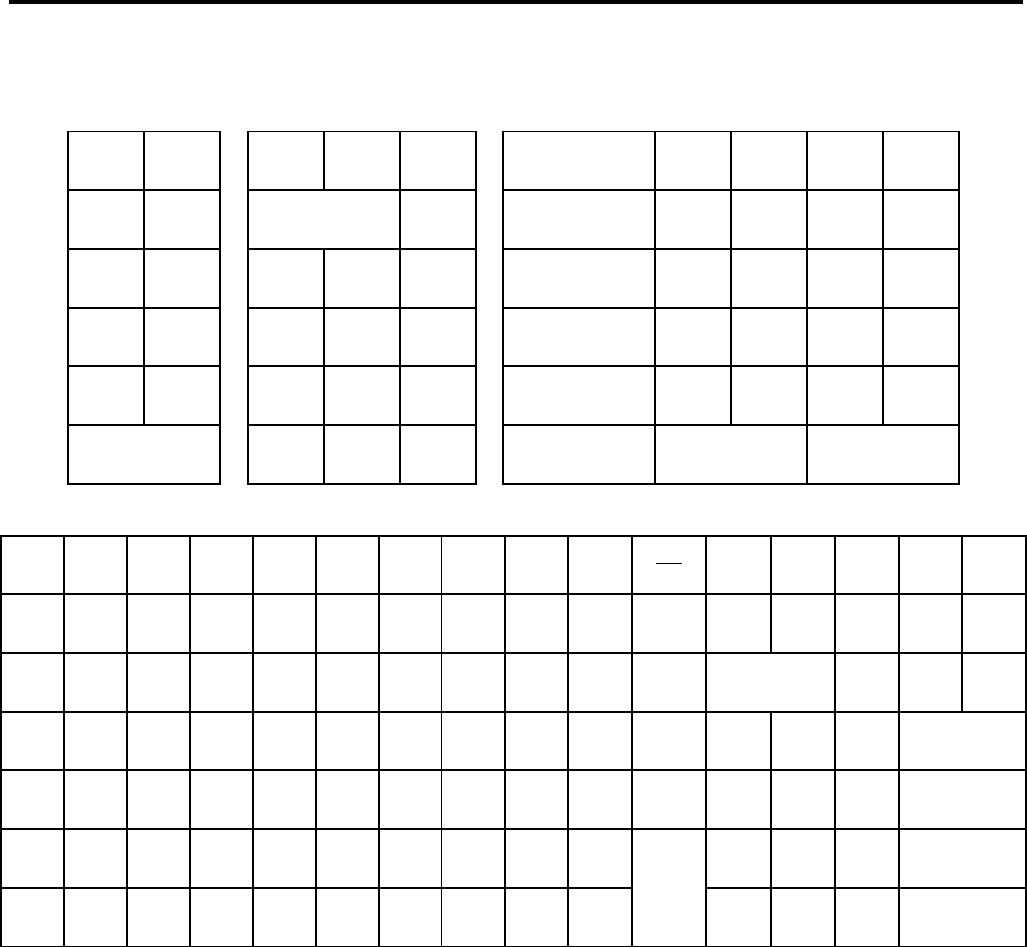
4. PROGRAMMING OPERATIONS EO1-11155
4.1 Instructions for Programming
4- 3
(2) Keyboard layout for programming
Mode Lock Position: SET
• Ordinary Type Keyboard
↑ Del
History
RF JF
A F K P U
↓ ALL
VOID
C
B G L Q V
← Rtn
7 8 9
C H M R W
→ Dbl
4 5 6
D I N S X
Enter
A/a
1 2 3
E J O T Y
PLU
0 00 .
? End Z
• Flat Type Keyboard
! @ # $ % ¢ & Ì ( )
LOG
RECIEPT
Del
ALL
VOID
RF
JF
q w e r t y u i o p
A/a Dbl
↑ ↓ ← →
a s d f g h j k l ” ? C @/FOR
Rtn
Enter
z x c v b n m ’ # 7 8 9
Q W E R T Y U I O P
History 4 5 6
A S D F G H J K L ; 1 2 3 ST
Z X C V B N M SP . /
PLU
0 00 . End

4. PROGRAMMING OPERATIONS EO1-11155
4.1 Instructions for Programming
4- 4
4.1.2 SET Mode Menu
When performing a programming operation, a desired programming item is selected from the menu which is
shown on the LCD display. Programming menu tree is as shown below.
Programming items indicated by boldface are described in this chapter.
1 MESSAGES 4 RATE, LIMIT AMOUNT
1 COMMERCIAL MESSAGE 1 %- RATE (%-/%+)
2 FOOTER MESSAGE 2 NONTXBL AMT LIMIT
3 TAX TABLE
2 NAMES 4 CUR EXCHANGE RATE
1 DP KEY NAME 5 DISC AMT LIMIT
2 DP GROUP NAME 6 TEND AMT LIMIT
3 CASHIER NAME
4 PLU (ITM NO.) NAME 5 BASIC
5 FINANCIAL ITM NAME 1 TIME
6 PRINT ITEM NAME 2 DATE
7 DISPLAY ITEM NAME 3 REGISTER NO.
8 ERROR ITEM NAME 4 HOURLY RANGE
9 X/Z REPORT NAME 5 KEY-IN TONE
3 DP/PLU 6 OTHER
1 DP 1 REPORT PRINT ITEM
1 DP SETTING 2 SYSTEM OPTION
2 UNIT PRICE 3 KEY FUNCTION
3 DIGIT LIMIT (PRICE) 4 CASH KEY AMOUNT
4 KEY STICKER PRINT 5 DRW WARNING TIME
2 PLU 6 RCT PRINT BUFFER
1 PLU SETTING 7 EFT KEY FUNCTION
2 UNIT PRICE 8 EFT INFORMATION
3 ASSIGN TO KEYBOARD 9 EFT INFORMATION 2
4 DELETE (INDIV) 0 CONNECT I/O
5 DELETE (ALL)
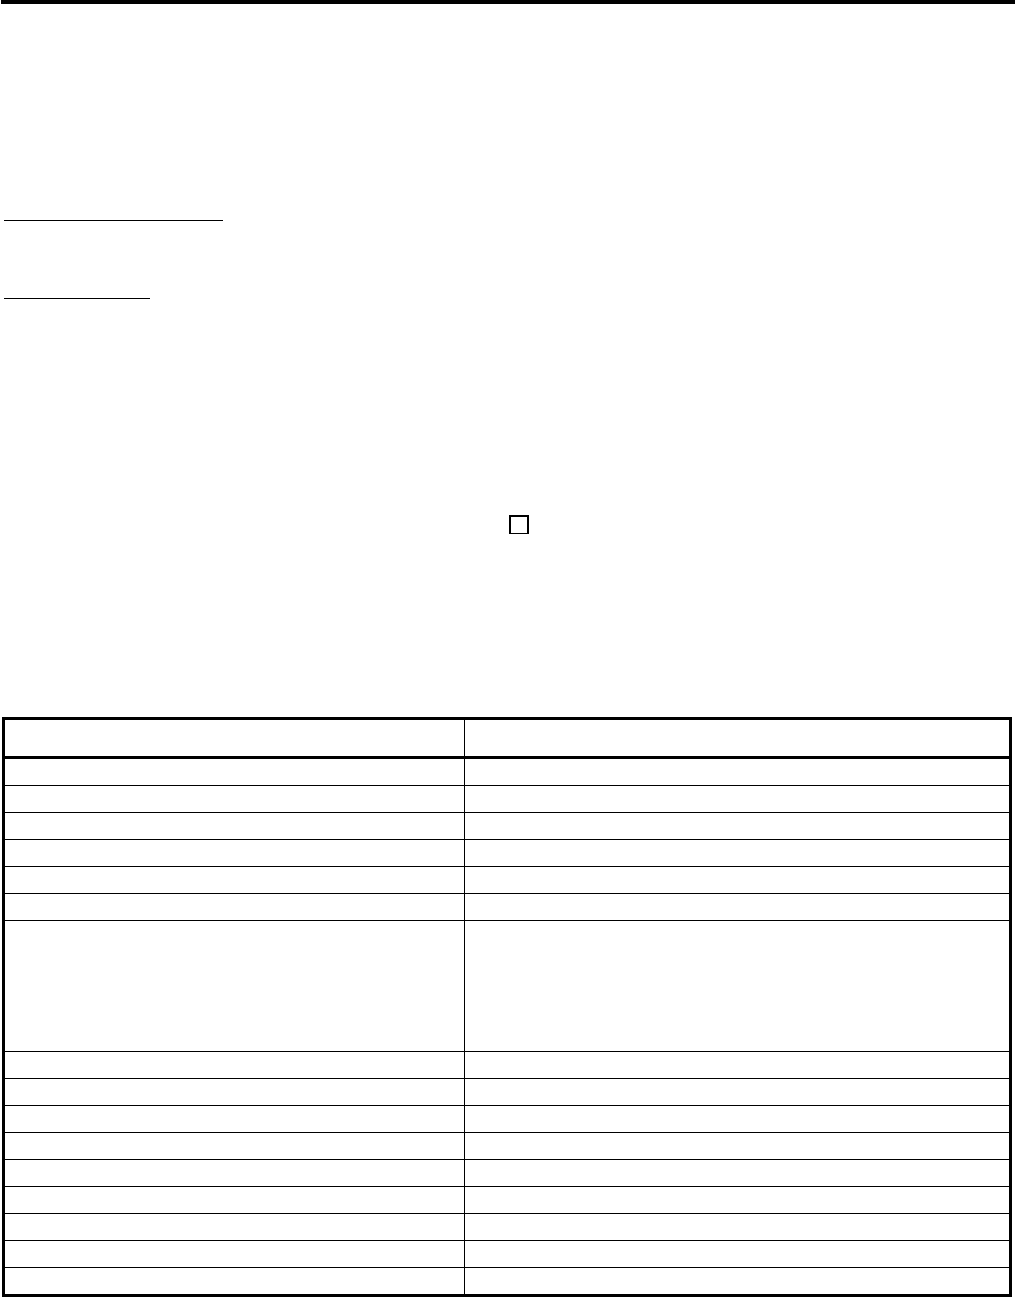
4. PROGRAMMING OPERATIONS EO1-11155
4.1 Instructions for Programming
4- 5
4.1.3 Condition Required for Programming Operations
“CONDITION” is given at the top of each programming operation. The ECR must satisfy this condition to perform
programming operations.
There are two types of conditions:
“Any time outside a sale”
It means that the programming operation is allowed when a sale is finalized before going into any other sale entry.
“After------ reset”
It means that the designated reset report must be taken before entering the programming operation.
And an error will result if the operation is attempted without taking the report. However, the words “After ...
Reset” do not necessarily mean “immediately after ...”.
When the designated reset report has already been taken and then some operations are performed in the SET, X,
or Z mode, the condition “After ... Reset” is still satisfied and the programming operation is still allowed.
On the contrary, when the designated reset report has been taken but then some sales data relating to that
report’s output data are entered in the REG, MGR, or - mode, the programming operation will no longer be
allowed and the same reset report must be taken.
Thus the condition “After ... Reset” indicates that all the sales data relating to the report data must be zero
(except non-resettable memory data). Because of this “CONDITION” requirement, the report data will be
protected from any inconsistencies of sales data entered in the period from a resetting of the report to another
resetting of the same report next time.
Programming operation Required condition
Time Setting or Adjustment Any time outside a sale
Date Setting or Adjustment Any time outside a sale
Store Name Message Programming Any time outside a sale
Commercial Message Programming Any time outside a sale
Footer Message Programming Any time outside a sale
Cashier Name and Status Programming Any time outside a sale
Department Table Programming To change the positive/negative status:
After Department and PLU Daily and GT Resets
To change any other programmed data or to newly
program departments:
Any time outside a sale
Department Name Programming Any time outside a sale
Department Group Name Programming Any time outside a sale
PLU Table Programming Any time outside a sale
PLU Name Programming Any time outside a sale
Department Preset Price Setting or Changing Any time outside a sale
PLU Preset Price Setting or Changing Any time outside a sale
Tax Table Programming After Financial Daily Reset
%+ and %- Preset Rate Setting Any time outside a sale
Foreign Currency Exchange Rate Setting Any time outside a sale
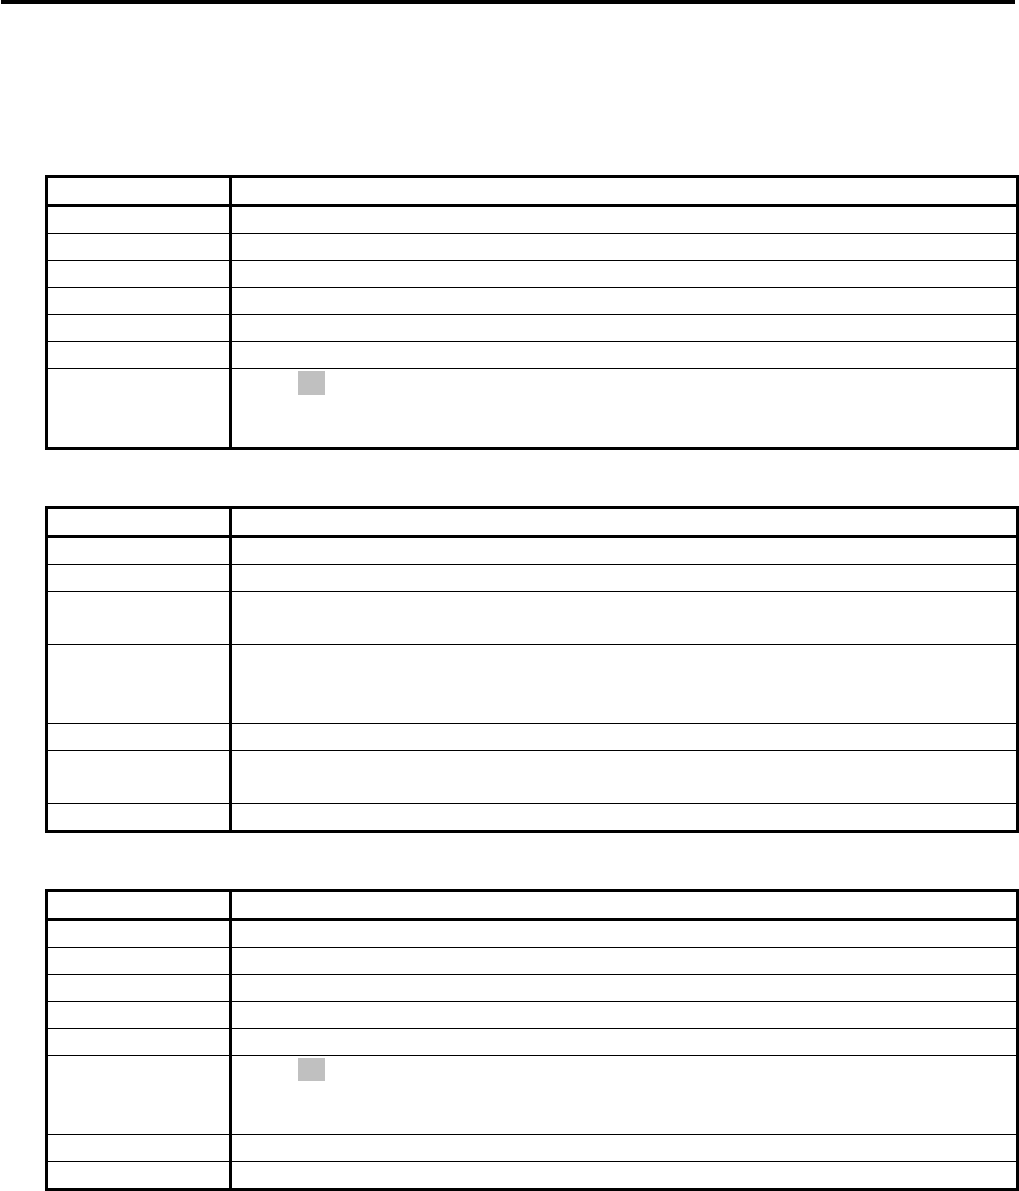
4. PROGRAMMING OPERATIONS EO1-11155
4.1 Instructions for Programming
4- 6
4.1.4 Basic Key Functions
Programming operations in this chapter are performed with the keyboard layout for programming.
1. The following are main keys and their functions to be used in programming operations.
(1) Keys for selecting items on the menu screen
Key Function
[↑] This key is used for moving the cursor upward.
[↓] This key is used for moving the cursor downward.
[←] This key is used for moving the cursor leftward.
[→] This key is used for moving the cursor rightward.
[Enter] This key is used for selecting a desired item after moving the cursor.
[Rtn] This key is used for returning the display to the previous screen.
[?] While ? is shown on the upper-right corner of the LCD display screen, the [?] key
depression results in that a guidance message corresponding to the current operation
appears on the LCD display.
(2) Keys for character entries
Key Function
[→] This key is used for entering a one-byte space.
[C] This key is used for deleting all the entered characters together.
[Dbl] This key is used for switching character mode between “one-byte character” and “two-
byte character” alternately.
[A/a] This key is used for switching between “capital letter” and “small letter” alternately.
The key is effective when entering characters A to Z through the programming
keyboard or PK-2 keyboard (hardware option).
[Del] This key is used for deleting a character.
[#] In the character code entry method, entering a character code then depressing this
key results in that the corresponding character is entered.
[History] This key is used for performing character entries with the name previously entered.
(3) Keys for programming
Key Function
[←] This key is used for selecting a desired item.
[→] This key is used for selecting a desired item.
[C] This key is used for canceling an operation just performed.
[Enter] This key is used for entering a desired item.
[Rtn] This key is used for returning the display to the previous screen.
[?] While ? is shown on the upper-right corner of the LCD display screen, the [?] key
depression results in that a guidance message corresponding to the current operation
appears on the LCD display.
[End] This key is used for ending the current programming operation.
[PLU] This key is used for the PLU programming.
2. Functions of the [C] key:
• When an entered program data is already printed, the [C] key cannot clear if any longer. To correct the
data, re-enter it.
• Before the entered data is printed, the data may be cleared by the [C] key (except in the SFKC
Programming Operation).

4. PROGRAMMING OPERATIONS EO1-11155
4.2 Character Entries
4- 7
3. To clarify the operation flow, definitions of keys of the ECR keyboard are as shown below.
| | --------- Selective numeric value which is entered through the Numeric keys.
[ ]---------- Depression of the function key.
xxxx----------- Fixed numeric value which is entered through the Numeric keys.
Fixed
4.2 Character Entries
There are two methods of character settings for various names and messages:
CHARACTER CODE ENTRY Method and DIRECT CHARACTER ENTRY Method.
CHARACTER CODE ENTRY Method
This method is to set a character by entering a Character Code and depressing the [#] key. The method is
operated only on the ECR keyboard (Ordinary Type or Flat Type).
DIRECT CHARACTER ENTRY Method
This method is to set a character by directly depressing the Character Keys on any of the following keyboard:
• ECR keyboard with the keyboard layout for programming
• PK-2 keyboard (PLU keyboard; hardware option)
By using those character keys, the characters are directly entered. In this manual, sample operations are
attached to most of the programming operations. And at name or message programming portions, characters
except for numeric and special symbols are entered by the DIRECT CHARACTER ENTRY method.
On the following pages, Character Code Tables under the CHARACTER CODE ENTRY Method and two
different keyboards under the DIRECT CHARACTER ENTRY Method are shown. These pages are to be
referred to, every time the “Character Entries” sequence is contained in various programming operations in
this manual.
Read through these pages at least once first, so that you may know the appropriate method of character
entries using the ECR keyboard and/or option keyboards.
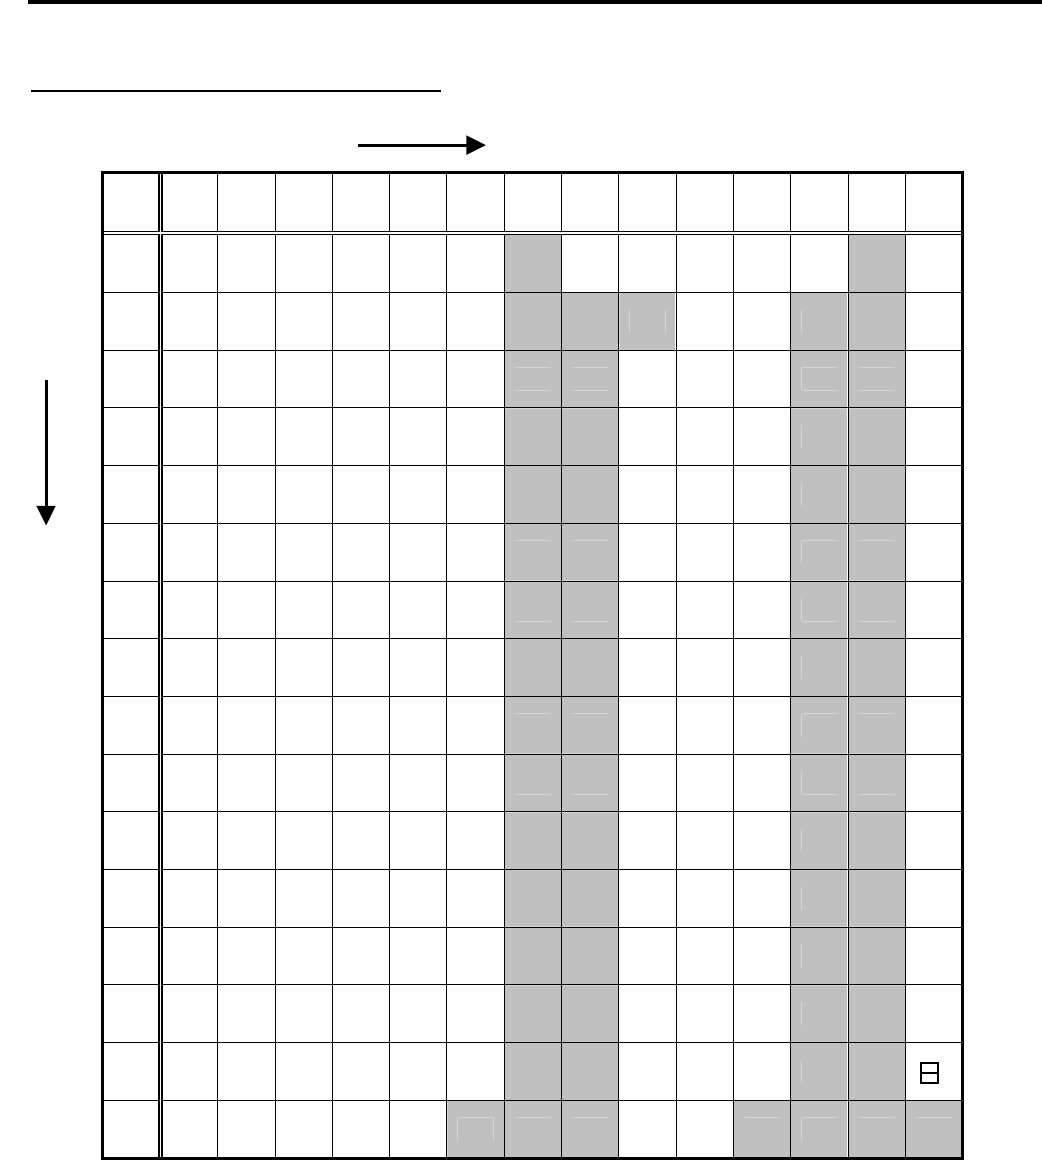
4. PROGRAMMING OPERATIONS EO1-11155
4.2 Character Entries
4- 8
Row
Code
4.2.1 Character Code Entry Method
Character Code Table 1: Standard Characters
2 3 4 5 6 7 8 9 10 11 12 13 14 15
00 SP 0 @ P ` p € á Å \ →
01 ! 1 A Q a q é å ←
02 " 2 B R b r ⎡ í Ø ↓
03 # 3 C S c s ⎦ ó o ↑
04 $ 4 D T d t , ú Æ ½
05 % 5 E U e u • â a ¼
06 & 6 F V f v Ä ê Œ Ì
07 ' 7 G W g w Ë î œ
08 ( 8 H X h x Ö ô β Kg
09 ) 9 I Y i y Ü û ¢ lb
10 * : J Z j z É à £ No
11 + ; K [ k { ä è Φ X
12 , < L ¥ l | ë ì ∑ V
13 - = M ] m } Ï ç ÷ U
14 . > N ^ n ~ ö Ñ ─
15 / ? O _ o ü ñ
NOTE: Characters of those character codes 1007, 1206, 1207, 1211, 1500 through 1503, and 1506 through
1514 cannot be printed on the slip printer.
Column Code

4. PROGRAMMING OPERATIONS EO1-11155
4.2 Character Entries
4- 9
Character Setting Operations
• To set a one-byte character, enter the COL (column) code and then the ROW code, followed by the [#] key.
ex.) To set “%”, enter 205 and depress the [#] key.
To set “kg”, enter1508 and depress the [#] key.
• To set a space instead of a character, enter 200 and depress the [#] key.
• To set two-byte characters, depress the [Dbl] key to declare the two-byte character entry, then enter a
character code, followed by the [#] key. The [Dbl] key declaration is effective until this key is depressed again.
ex.) To set “GROUP” all in two-byte characters:
[Dbl] 407 [#] 502 [#] 415 [#] 505 [#] 500 [#]
G R O U P
Two-byte character declaration
ex.) To set “GROUP”, “G” in two bytes, and “ROUP” in one byte:
[Dbl] 407 [#] [Dbl] 502 [#] 415 [#] 505 [#] 500 [#]
G R O U P
Two-byte character Canceling
declaration the declaration

4. PROGRAMMING OPERATIONS EO1-11155
4.2 Character Entries
4-10
4.2.2 Direct Character Entry Method
Using PK-2 Keyboard (PLU Keyboard; hardware option)
The PK-2 keyboard is used for entering a required PLU code by simply depressing the code-preset key on this
keyboard in REG or MGR mode. In addition, the PK-2 can be used for directly entering characters during the
programming operations that require character settings such as STORE NAME MESSAGE PROGRAMMING,
COMMERCIAL MESSAGE PROGRAMMING, and DEPARTMENT NAME PROGRAMMING.
The following shows the key indications of the PK-2 for the character setting purpose.
Insert the template for this purpose between the film layers that cover the PK-2.
Instead of entering a 3- or 4-digit character code and depressing the [#] key on the ECR keyboard, a simple
depression of the appropriate key on the PK-2 will be the character entry.
All the function keys such as [↑], [↓], [→], [←], [Enter] must be operated on the ECR side. Any characters not
listed on the template may be entered by the CHARACTER CODE ENTRY method on the ECR keyboard. (The
characters even listed on the template may be entered as well by that method.)
The two-byte character declaration is the same as in the CHARACTER CODE ENTRY method.
7 8 9
4 5 6
1 2 3
! @ # $ % ¢ & * ( ) 0
q w e r t y u i o P ~ ^
a s d f g h j k l " _ +
z x c v b n m
' - =
Q W E R T Y U I O P [ ]
A S D F G H J K L ; : ,
Z X C V B N M
space
. / ?
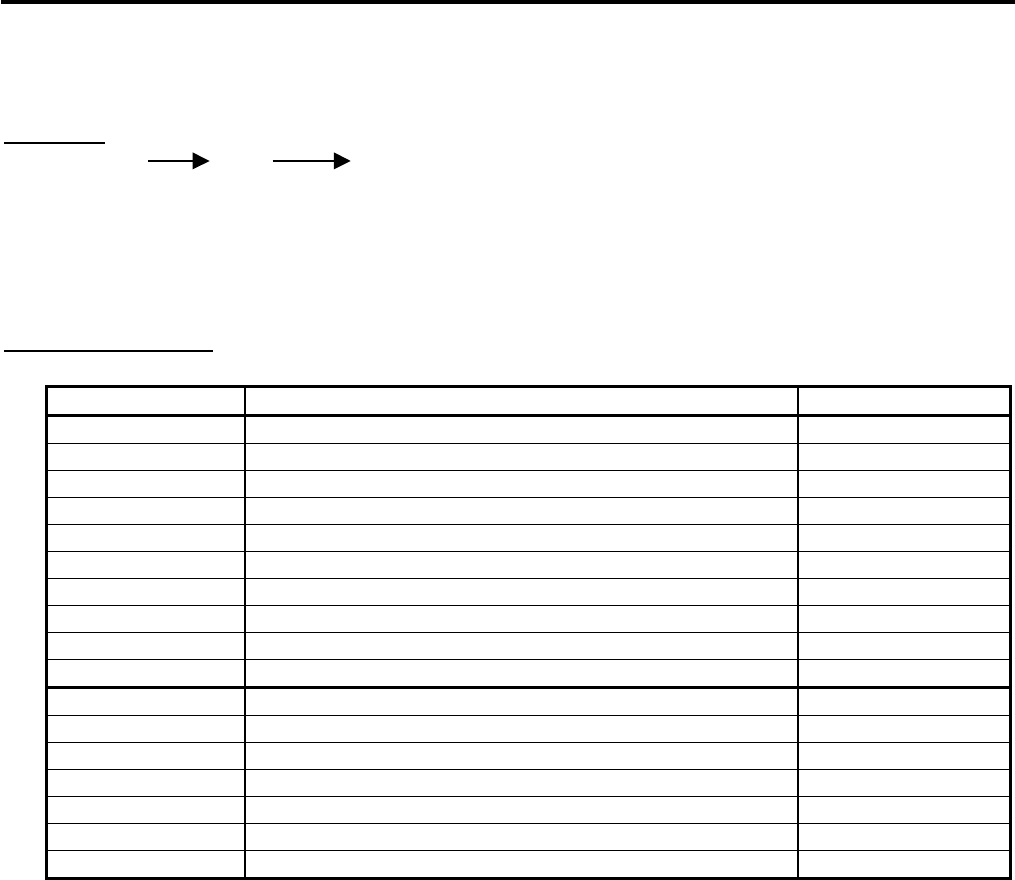
4. PROGRAMMING OPERATIONS EO1-11155
4.2 Character Entries
4-11
4.2.3 How to use the [History] key
The [History] key is used for performing character entries with the name previously entered.
Operation:
[History] ([↓]) [Enter]
1) The [History] key depression will let the most recently programmed name displayed on the LCD display.
2) The [↓] key depression will let the second most recently programmed name displayed. (Up to 10
programmed names will be displayed in reverse chronological order.)
3) The [Enter] key depression will allow the name on the LCD display to be entered.
Example of operation:
When “A LUNCH” for PLU1 and “B LUNCH” for PLU2 are programmed in the PLU name programming.
Key operation Description LCD display
1 [PLU] PLU No.1 setting is declared. PLU0001
[C] The default setting displayed on the LCD display is deleted.
401 [#] The character A is entered. A
[→] A space is entered. A
412 [#] The character L is entered. A L
505 [#] The character U is entered. A LU
414 [#] The character N is entered. A LUN
403 [#] The character C is entered. A LUNC
408 [#] The character H is entered. A LUNCH
[ST] The name of PLU No.1 is entered.
2 [PLU] PLU No.2 setting is declared. PLU0002
[C] The default setting displayed on the LCD display is deleted.
[History] The name of PLU No. 1 just entered is called. A LUNCH
[Enter] The name of PLU No. 1 is entered. A LUNCH
[Del] The character A of “A LUNCH” is deleted. LUNCH
402 [#] The character B is entered instead of the deleted A. B LUNCH
[ST] The name of PLU No.2 is entered.
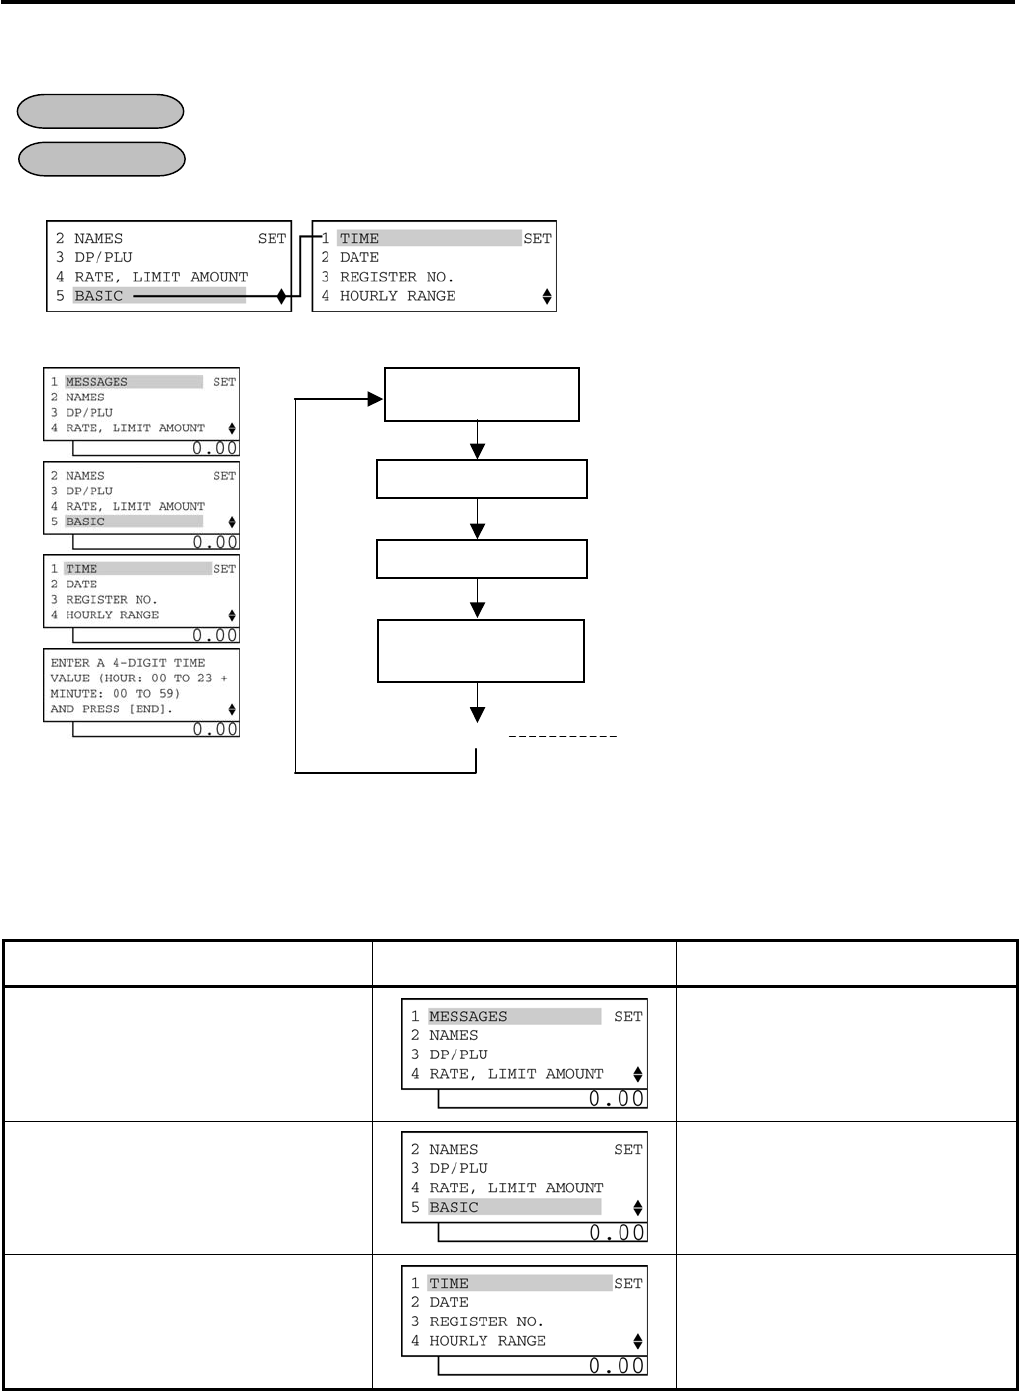
4. PROGRAMMING OPERATIONS EO1-11155
4.3 Time Setting or Adjustment
4-12
4.3 Time Setting or Adjustment
Any time outside a sale
Mode Lock: SET
1) Menu Tree
2) Operation Flowchart
NOTE: If an hour value of more than 23 or a minute value of more than 59 is entered, the current data remains
unchanged by setting or adjusting the time.
3) Example
To set time “1:15 p.m. (13:15)”
Operation LCD Display Remarks
When the ECR is being outside a sale
and in SET mode, depress the [↓] key
four times.
The cursor is moved on to “5 BASIC”.
Depress the [5] or [Enter] key.
“5 BASIC” is selected.
Depress the [1] or [Enter] key.
“1 TIME” is selected.
(continued on the next page)
OPERATION
CONDITION
“
5 BASIC
”
is selected.
Main Menu
“
1 TIME
”
is selected.
ECR is being outside a sale and in
SET
mode.
Depress
[
↓
]
four times then
[Enter]
.
Or Depress [5].
Depress
[1]
or
[Enter]
.
Input a 4-digit time
value.
4
-
digiti
-
time
value (HHMM) (See
NOTE
below.)
[End] This setting is ended. A long receipt is issued
and the display returns to Main Menu screen.
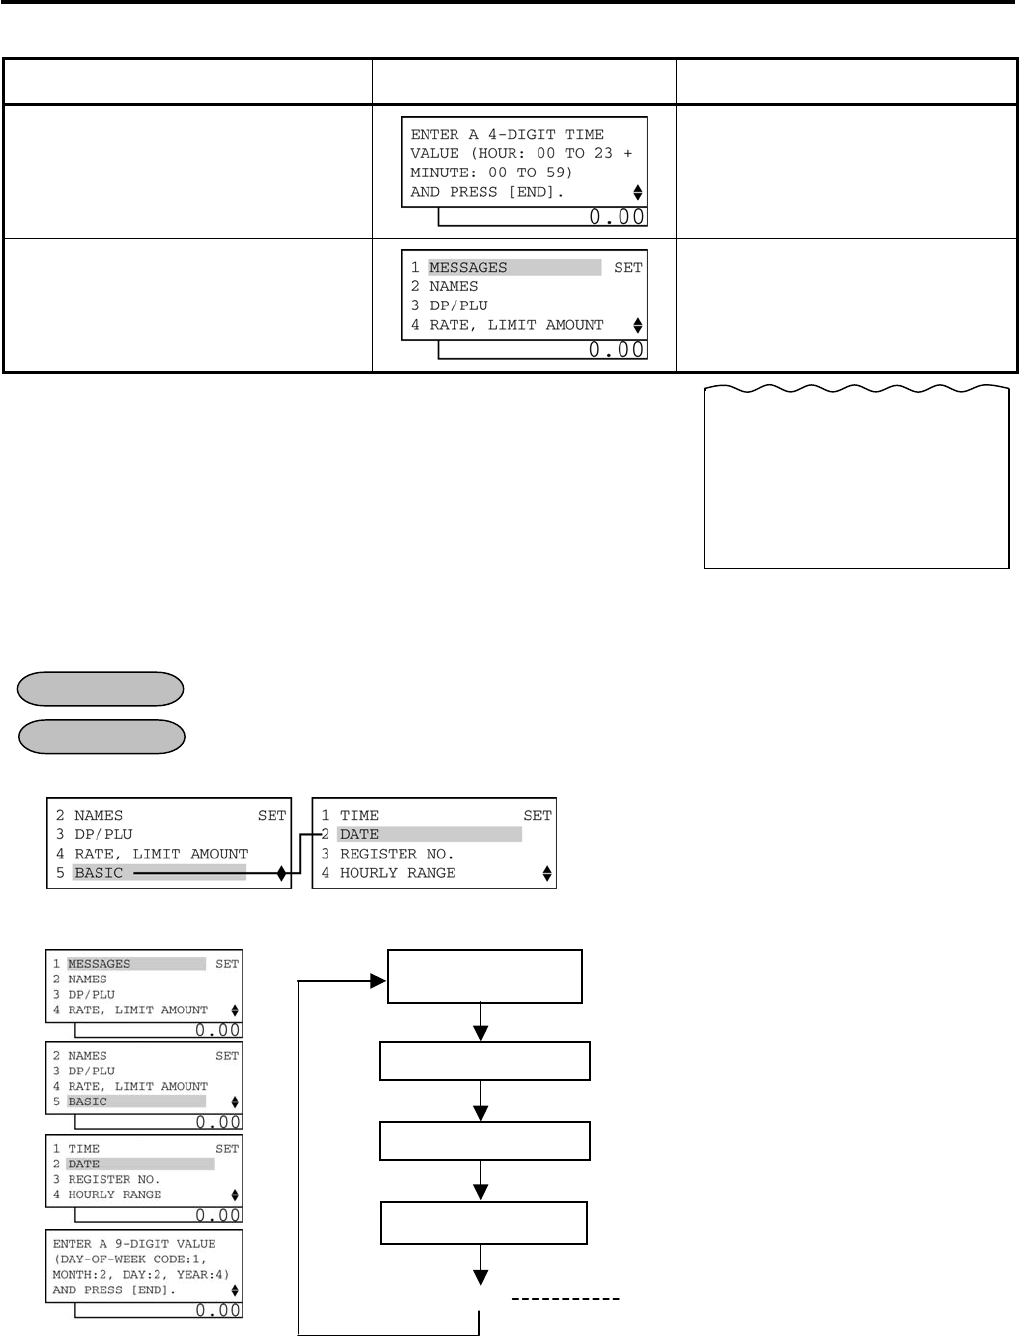
4. PROGRAMMING OPERATIONS EO1-11155
4.4 Date Setting or Adjustment
4-13
(continued from the previous page)
Operation LCD Display Remarks
Input 1315.
The time “13:15” is set.
The [End] key depression allows the
ECR to end this setting.
A long receipt is issued and the display
returns to Main Menu screen.
4.4 Date Setting or Adjustment
Any time outside a sale
Mode Lock: SET
1) Menu Tree
2) Operation Flowchart
NOTE: The date entry order may be Day-Month-Year or Year-Month-Day instead of Month-Day-Year if so
selected in the program option. The “Month-Day-Year” is set as default.
OPERATION
CONDITION
10-20-2006 FRI #0
TIME
13:15TM
0026 13:15TM
“
5 BASIC
”
is selected.
Main Menu
“
2 DATE
”
is selected.
ECR is being outside a sale and in
SET
mode.
Depress
[
↓
]
four times then
[Enter]
.
Or Depress [5].
Depress
[
↓
]
then
[Enter]
.
Or Depress [2].
Input a 9-digit value.
9-digit value
(Day-of-Week Code & MMDDYYYY)
[End] This setting is ended. A long receipt is issued
and the display returns to Main Menu screen.
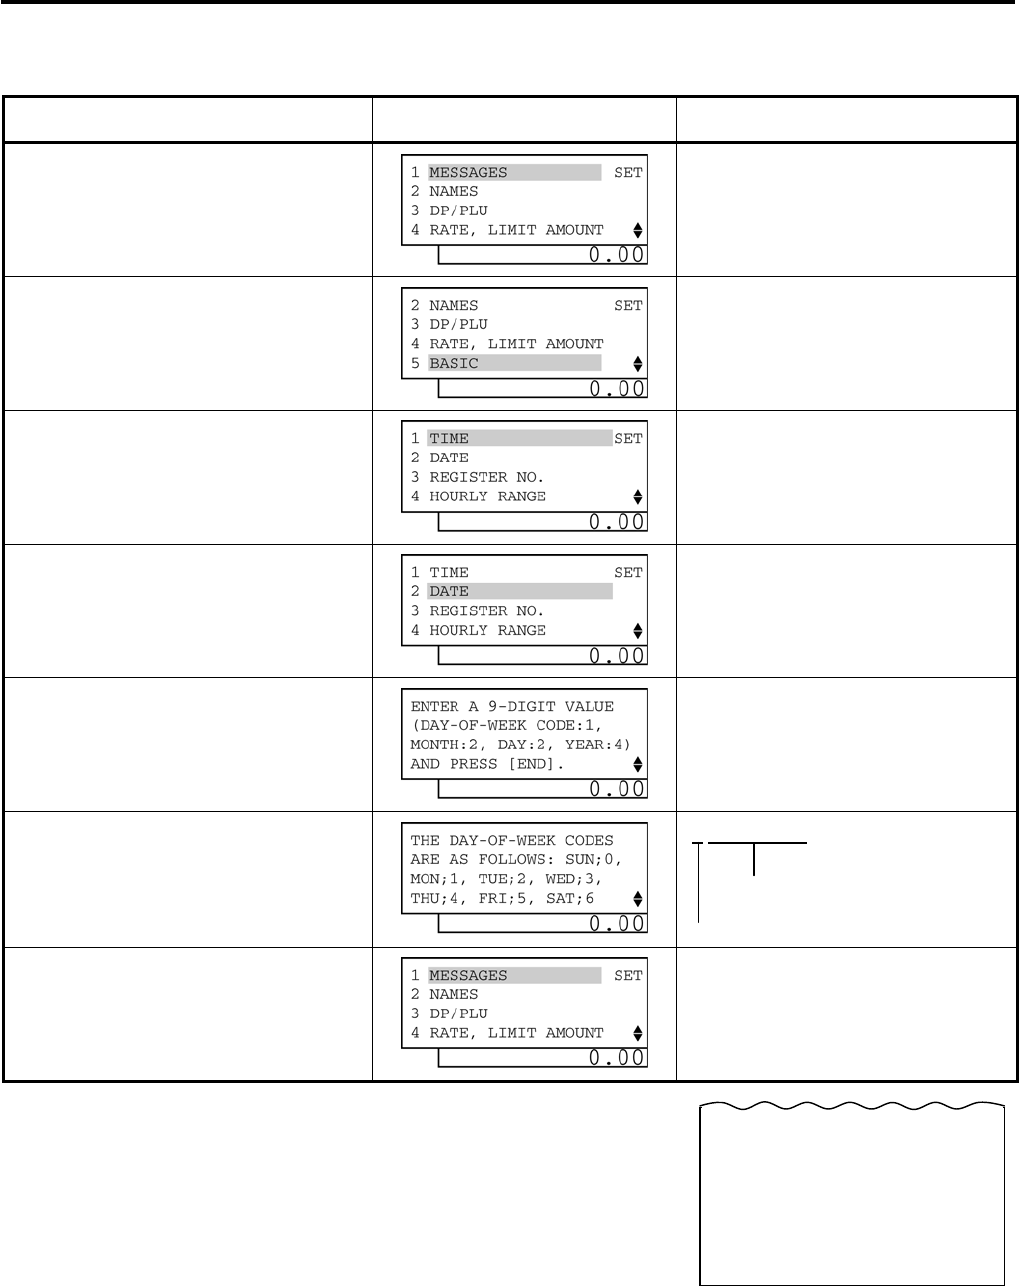
4. PROGRAMMING OPERATIONS EO1-11155
4.4 Date Setting or Adjustment
4-14
3) Example
To set Date “Friday, October 20, 2006”
Operation LCD Display Remarks
When the ECR is being outside a sale
and in SET mode, depress the [↓] key
four times.
The cursor is moved on to “5 BASIC”.
Depress the [5] or [Enter] key.
“5 BASIC” is selected.
Depress the [↓] key.
The cursor is moved on to “2 DATE”.
Depress the [2] or [Enter] key.
“2 DATE” is selected.
Depress the [↓] key.
Input 510202006.
5 10 20 2006
October 20, 2006
Day-of Week Code: 5 = Friday
The [End] key depression allows the
ECR to end this setting.
A long receipt is issued and the display
returns to Main Menu screen.
10-20-2006 FRI #0
DATE
5 10-20-2006
0027 13:15TM
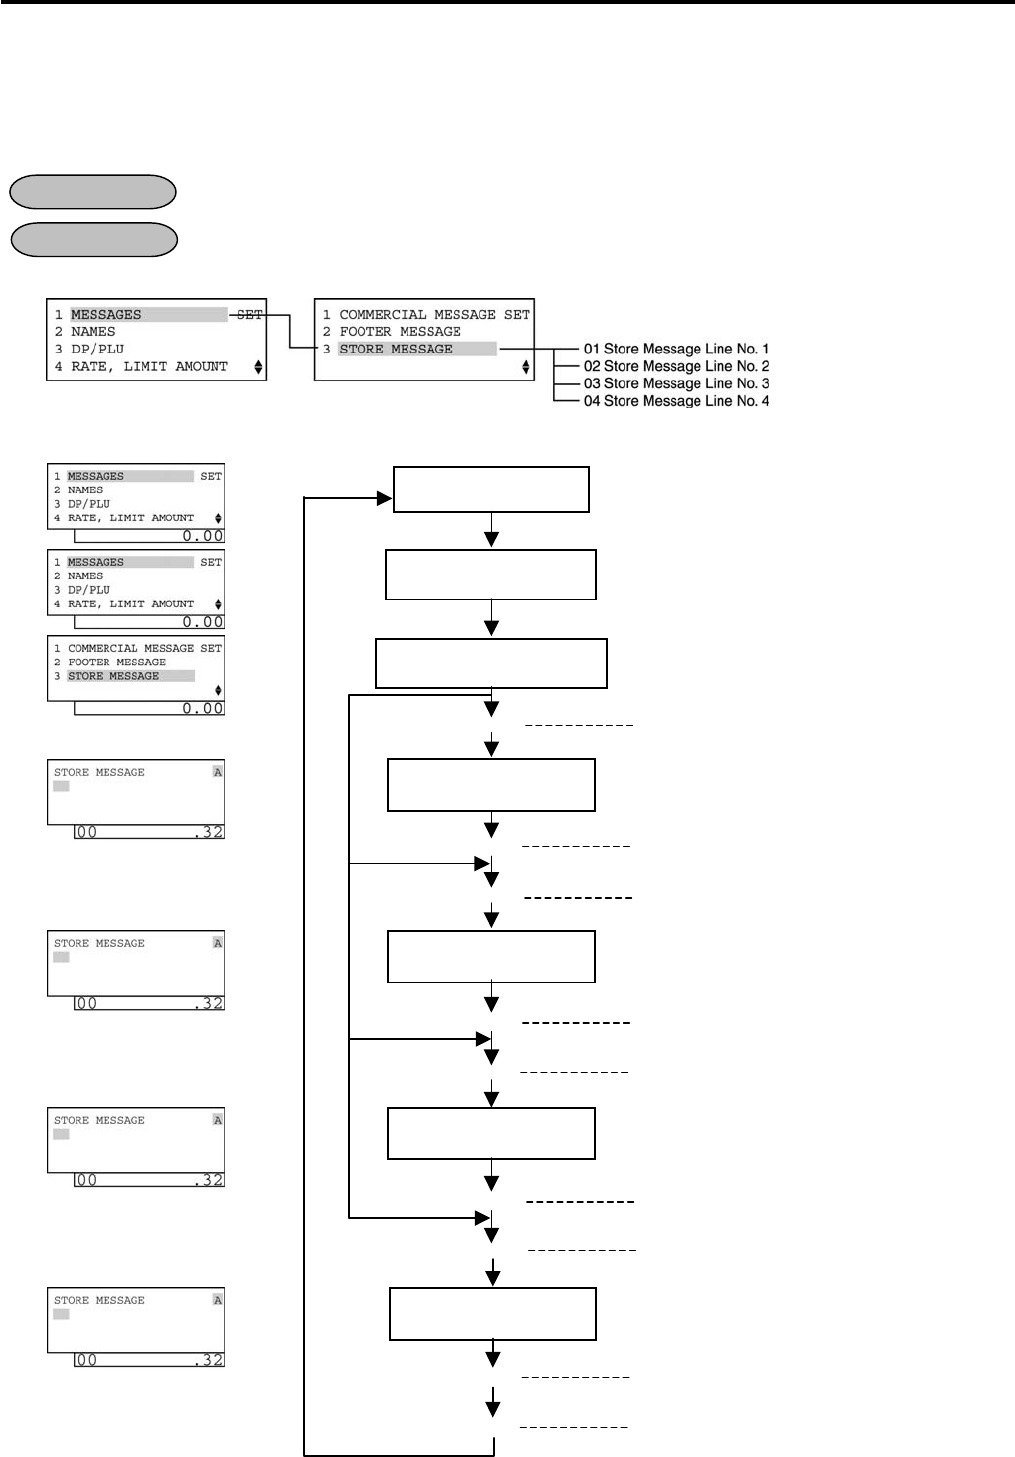
4. PROGRAMMING OPERATIONS EO1-11155
4.5 Store Name Message Programming
4-15
4.5 Store Name Message Programming
A maximum of 128 characters of Store Name Message (32 characters x 4 lines) to be printed on the receipt is
programmed here. This programming is possible only when the store message specification has been selected
by the program option, however, it is not possible when the logo message has been selected.
Any time outside a sale
Mode Lock: SET
1) Menu Tree
2) Operation Flowchart
OPERATION
CONDITION
[Enter]
“
1 MESSAGES
” is
selected.
Main Menu
“
3 STORE
MESSAGE
” is
selected.
Input a message in the
1st line.
Input a message in the
2nd l
ine.
Input a message in the
3rd line.
[Enter]
[Enter]
[Enter]
[Enter]
[Enter]
ECR is being outside a sale and in
SET
mode.
Depress
[1]
or
[Enter]
key.
The 1st line message is entered and the
programmed data is printed.
The ECR enters the 1st line input mode.
Depress
[
3
]
or
[Enter]
key.
The ECR enters the 2nd line input mode.
The ECR enters the 3rd line input mode.
The 2nd line message is entered and the
programmed data is printed.
The 3rd line message is entered and the
programmed data is printed.
A maximum of 32 one
-byte or 16 two-
byte
characters are input.
A maximum of 32 one
-byte or 16 two-
byte
characters are input.
A maximum of 32
one-byte or 16 two-
byte
characters are input.
[End]
This setting is ended. A long receipt is issued
and the display returns to Main Menu screen.
Input a message in the
4th line.
[Enter]
[Enter]
A maximum of 32 one
-byte or 16 two-
byte
characters are input.
The ECR ente
rs the 4th line input mode.
The 4th line message is entered and the
programmed data is printed.
*: To program a message in a
desired line, move the cursor
there with the [↓] key then
depress the [Enter] key.
*

4. PROGRAMMING OPERATIONS EO1-11155
4.5 Store Name Message Programming
4-16
NOTES:
1. For each line, a maximum of 32 one-byte characters or 16 two-byte characters can be entered.
A combination of both types is also available.
2. When blanks are entered for the whole one line, it results in one line feed.
3. When the store name message specification has been selected, the 4-line range assigned for the store name
message is either printed or fed, regardless of any program option selection.
4. Print format for each specification is as shown below.
1) Store Name Logo specification
When Commercial Message is SET When Commercial Message is RESET
2) Store Name Message specification
When Commercial Message is SET When Commercial Message is RESET
(Space)
(Space)
Store Name Logo
Commercial Message
Date, Register No.
Description
(Space)
Store Name Logo
Date, Register No.
Description
(Space)
(Space)
Store Name Message
Commercial Message
Date, Register No.
Description
(Space)
(Space)
Store Name Message
Date, Register No.
Description
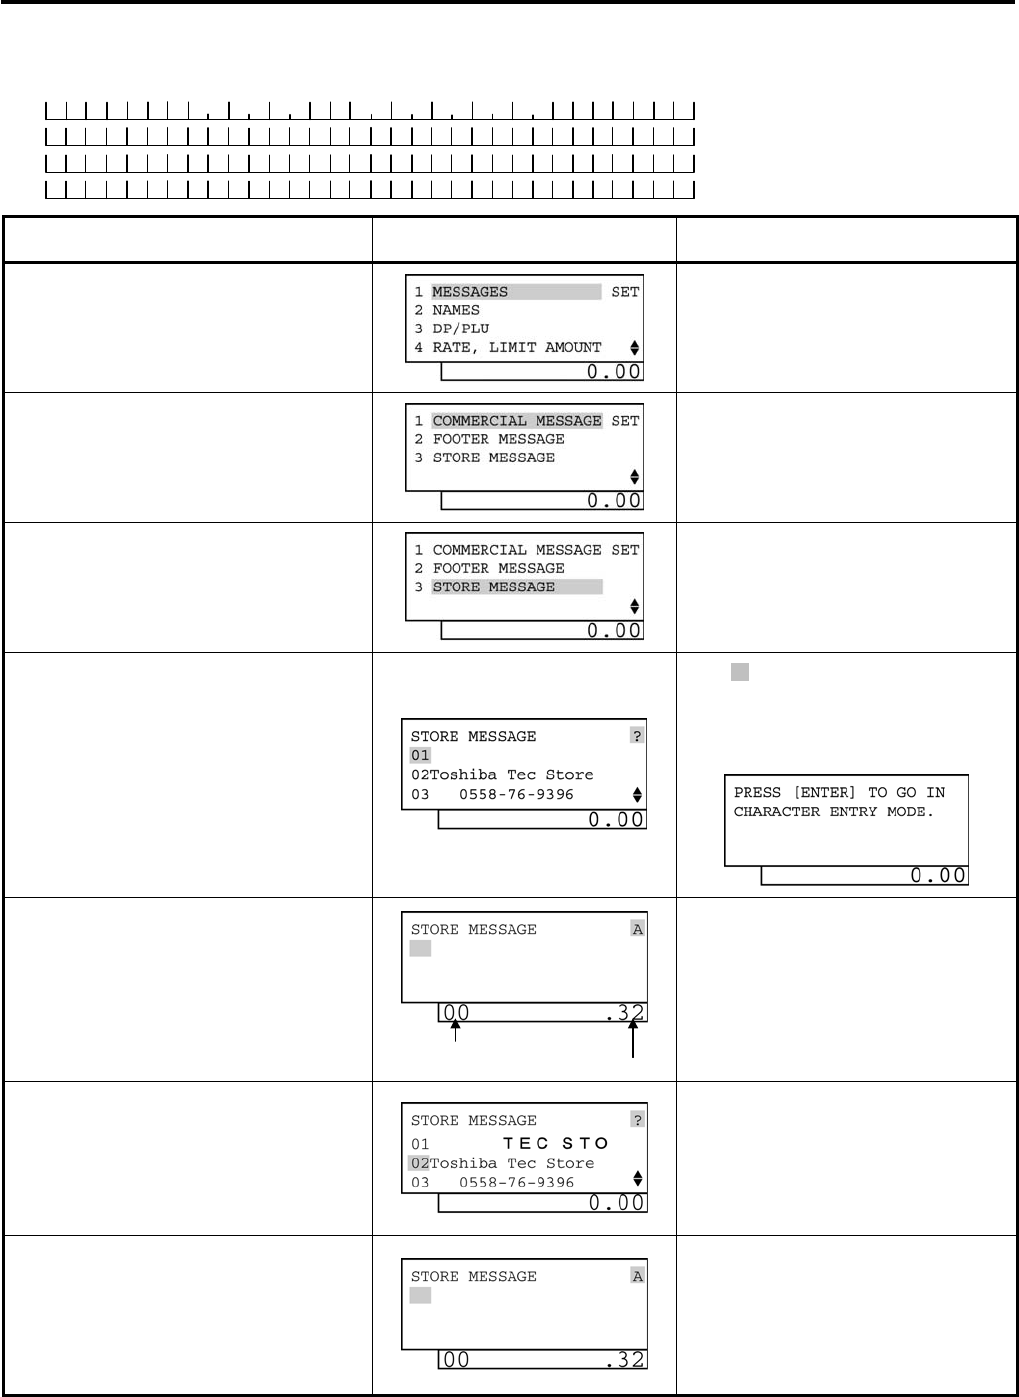
4. PROGRAMMING OPERATIONS EO1-11155
4.5 Store Name Message Programming
4-17
3) Example
To program the following Store Message.
Operation LCD Display Remarks
When the ECR is being outside a sale
and in SET mode, depress the [1] or
[Enter] key.
Depress the [↓] key twice.
The cursor is moved on to “3 STORE
MESSAGE”.
Depress the [3] or [Enter] key.
The message already programmed is
displayed.
While ? is shown on the upper-right corner
of the LCD display screen, the [?] key
depression results in that the following
guidance message appears on the LCD
display.
The [Enter] key depression allows the
ECR to enter the 1st line message
input mode. (The [C] key depression
clears the message already
programmed.) The 1st line message is
input.
To program a message in a desired line,
move the cursor there with the [↓] key then
depress the [Enter] key.
Numbers of programmed characters and of
programmable characters are displayed on
the 7-segment numeric display.
The [Enter] key depression results in
that the input message is entered and
displayed.
When the [Enter] key is depressed, the
message programmed in the 1st line is
printed.
Example of key operation)
[→] [→] [→] [→] [→] [→] [→] [Dbl] [T] [E]
[C] [→] [S] [T] [O] [R] [E] [Enter]
The [Enter] key depression allows the
ECR to enter the 2nd line message
input mode. (The [C] key depression
clears the message already
programmed.) The 2nd line message
is input.
Numbers of programmed characters and of
programmable characters are displayed on
the 7-segment numeric display.
(continued on the next page)
T E C S T O R E
1 3 4 3 P E A C H D R I V E
P H O N E : 8 7 - 6 4 3 7
Line No. 1
Line No. 2
Line No. 3
Line No. 4
Number of programmed characters
Number of programmable characters
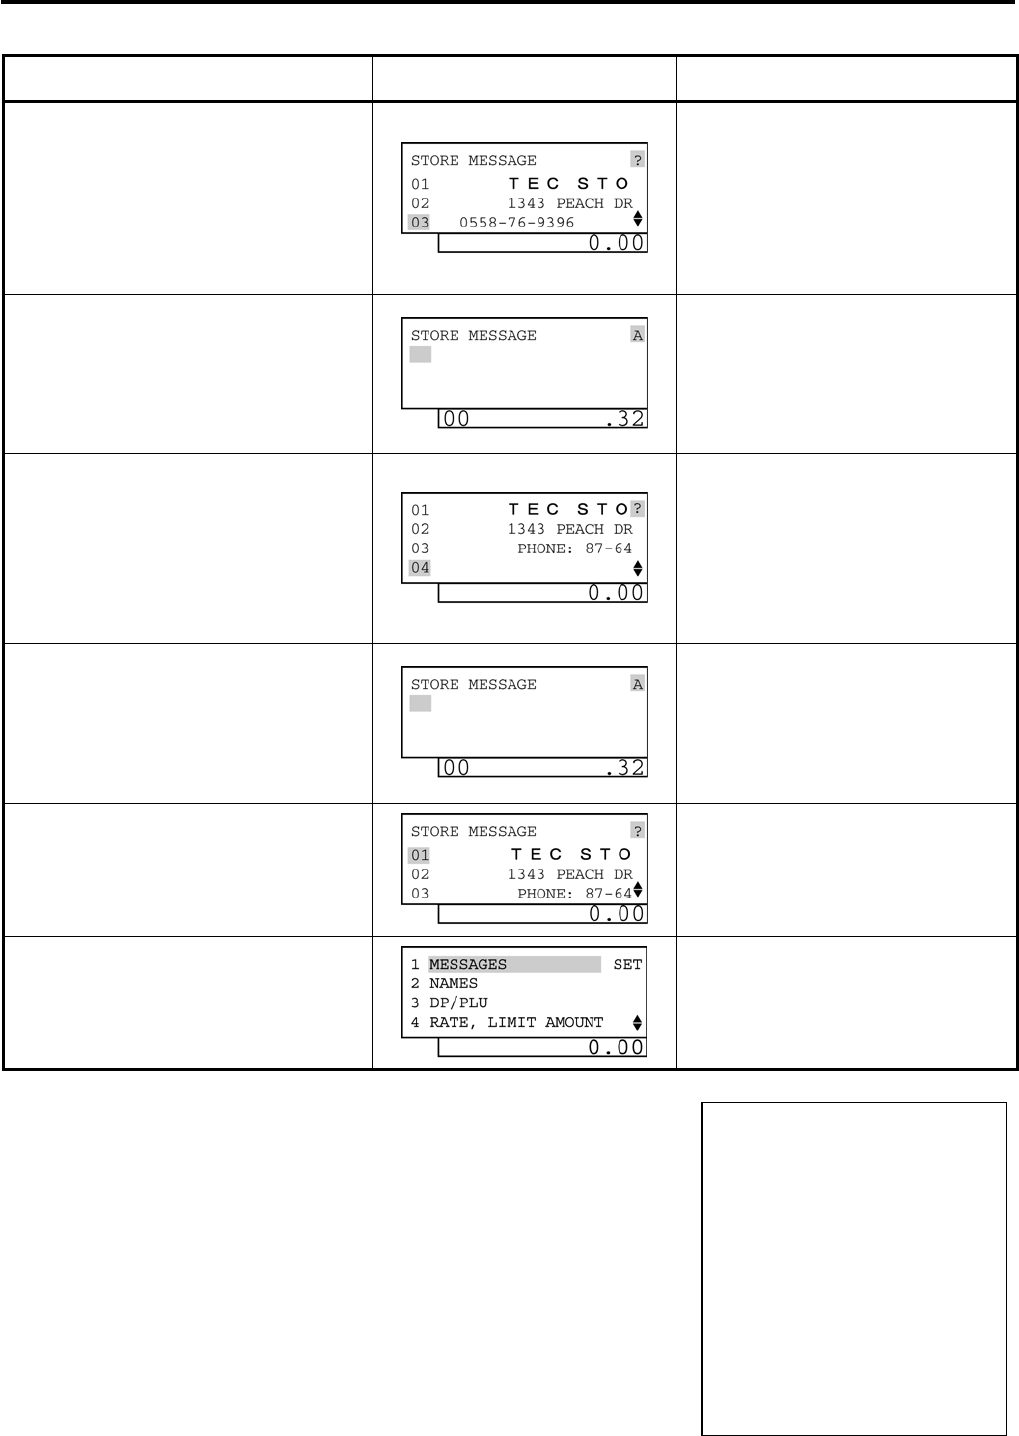
4. PROGRAMMING OPERATIONS EO1-11155
4.5 Store Name Message Programming
4-18
(continued from the previous page)
Operation LCD Display Remarks
The [Enter] key depression results in
that the input message is entered and
displayed.
When the [Enter] key is depressed, the
message programmed in the 2nd line is
printed.
Example of key operation)
[→] [→] [→] [→] [→] [→] [→] [3] [0] [1] [#]
[3] [0] [3] [#] [3] [0] [4] [#] [3] [0] [3] [#] [→]
[P] [E] [A] [C] [H] [→] [D] [R] [I] [V] [E]
[Enter]
The [Enter] key depression allows the
ECR to enter the 3rd line message
input mode. (The [C] key depression
clears the message already
programmed.) The 3rd line message
is input.
Numbers of programmed characters and of
programmable characters are displayed on
the 7-segment numeric display.
The [Enter] key depression results in
that the input message is entered and
displayed.
When the [Enter] key is depressed, the
message programmed in the 3rd line is
printed.
Example of key operation)
[→] [→] [→] [→] [→] [→] [→][→] [P] [H] [O]
[N] [E] [3] [1] [0] [#] [→] [3] [0] [8] [#] [3] [0]
[7] [#] [2] [1] [3] [#] [3] [0] [6] [#] [3] [0] [4]
[#] [3] [0] [3] [#] [3] [0] [7] [#] [Enter]
The [Enter] key depression allows the
ECR to enter the 4th line message
input mode. (The [C] key depression
clears the message already
programmed.) The 4th line message is
input.
Numbers of programmed characters and of
programmable characters are displayed on
the 7-segment numeric display.
The [Enter] key depression results in
that the input message is entered and
displayed.
When the [Enter] key is depressed, the
message programmed in the 4th line is
printed.
Example of key operation)
[Enter] (No message is input.)
The [End] key depression allows the
ECR to end this programming.
A long receipt is issued and the display
returns to Main Menu screen.
NOTE: In the above example, characters except for alphabets are
entered using the character code entry method.
Open 8:00am to 7:00pm
Closed: every Wednesday
10-20-2006 FRI #0
STORE NAME
1
TEC
STORE
2
1343 PEACH DRIVE
3
PHONE: 87-6437
0005 13:15TM
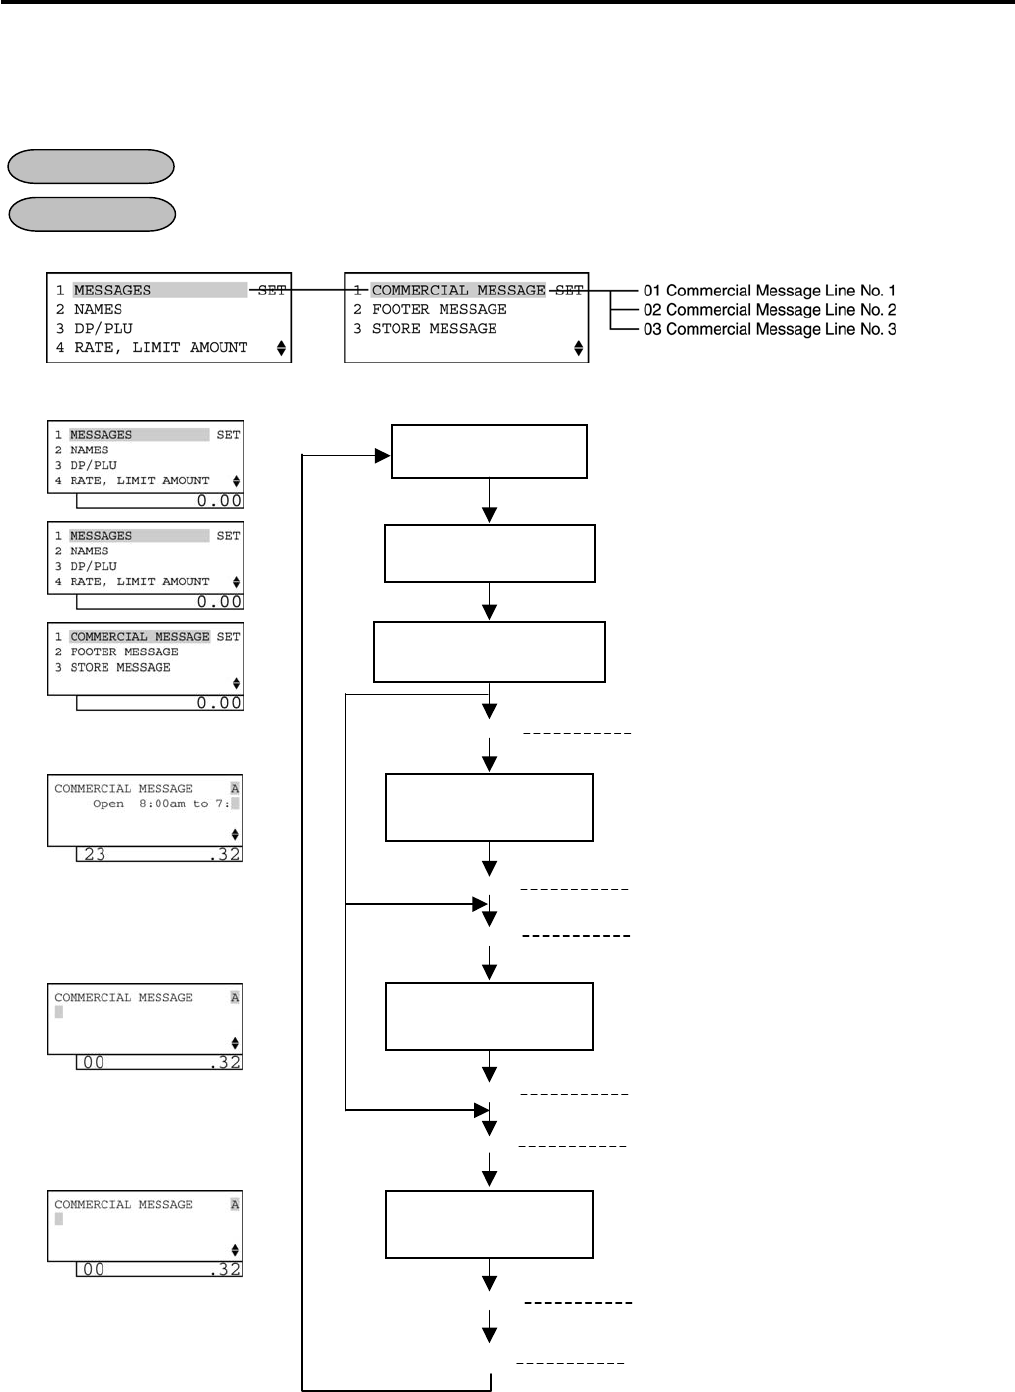
4. PROGRAMMING OPERATIONS EO1-11155
4.6 Commercial Message Programming
4-19
4.6 Commercial Message Programming
A maximum of 96 characters of Commercial Message (32 characters x 3 lines) to be printed on the receipt is
programmed here.
Any time outside a sale
Mode Lock: SET
1) Menu Tree
2) Operation Flowchart
OPERATION
CONDITION
[Enter]
[End]
“1 MESSAGES” is
selected.
Main Menu
“
1 COMMERCIAL
MESSAGE” is selected.
Input a message in
the 1st line.
Input a message in
the 2nd line.
Input a message in
the 3rd line.
[Enter]
[Enter]
[Enter]
[Enter]
[Enter]
ECR is being outside a sale and in
SET
mode.
Depress
[1]
or
[Enter]
key.
The 1st line message is entered and the
programmed data is printed.
The ECR enters the 1st line input mode.
This setting is ended. A long receipt is issued
and the display returns to Main Menu screen.
Depress
[1]
or
[Enter]
key.
The ECR enters the 2nd line input mode.
The ECR enters the 3rd line input mode.
The 2nd line message is entered and the
programmed data is printed.
The 3rd line message is entered and the
programmed data is printed.
A maximum of 32 one
-byte or 16 two-
byte
characters are input.
A maximum of 32 one
-byte or 16 two-
byte
characters are input.
A maximum of 32 one
-byte or 16 two-
byte
characters are input.
*:
To program a message in a desired line, move the cursor there with
the [↓] key then depress the [Enter] key.
*
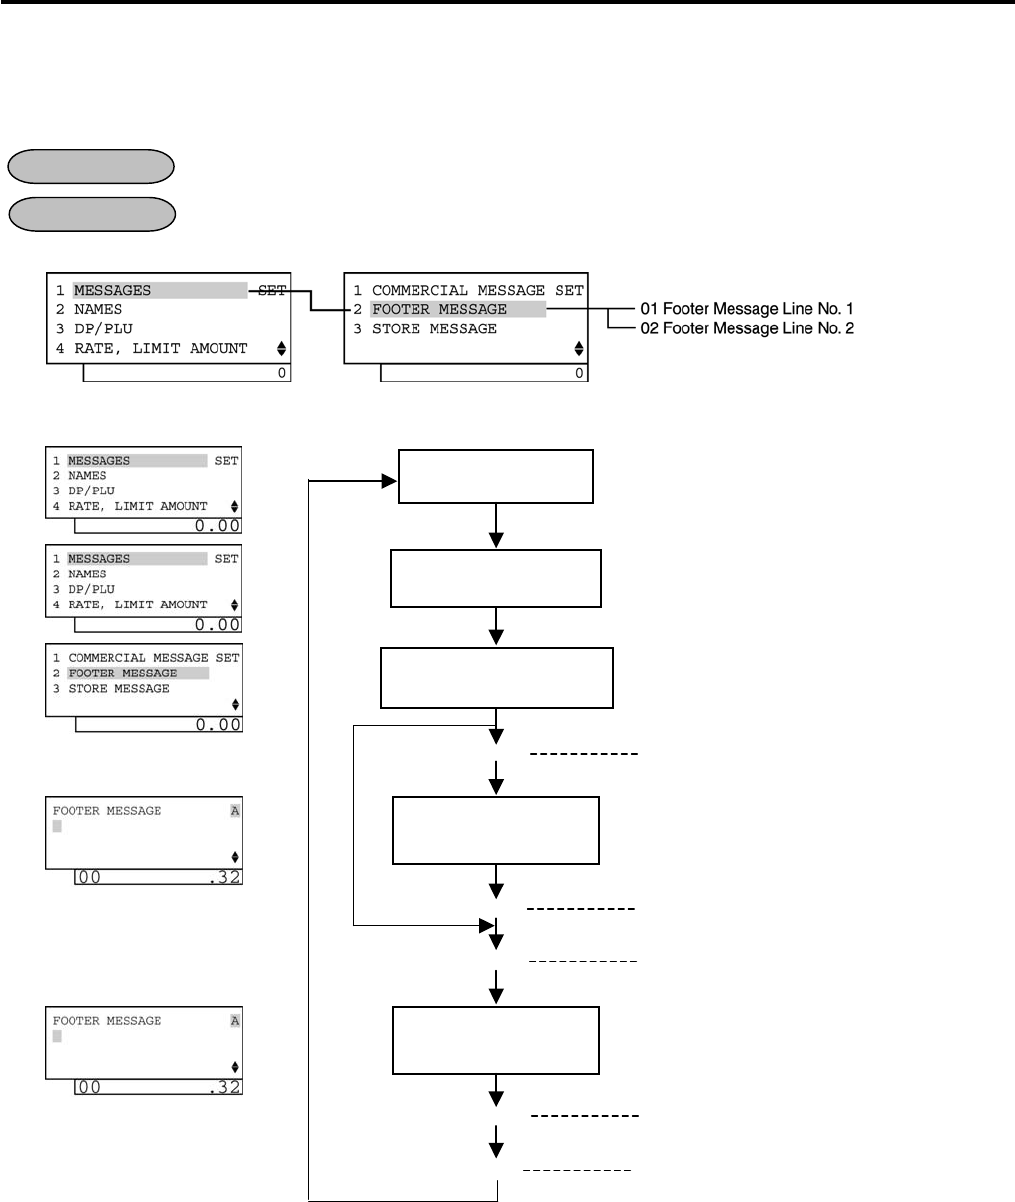
4. PROGRAMMING OPERATIONS EO1-11155
4.7 Footer Message Programming
4-20
4.7 Footer Message Programming
A maximum of 64 characters of Footer Message (32 characters x 2 lines) to be printed on the receipt is
programmed here. This programming is possible only when it has been selected by the program option.
Any time outside a sale
Mode Lock: SET
1) Menu Tree
2) Operation Flowchart
OPERATION
CONDITION
[Enter]
[End]
“1 MESSAGES” is
selected.
Main Menu
“
2 FOOTER MESSAGE
”
is selected.
Input a message in
the 1st line.
Input a message in
the 2nd line.
[Enter]
[Enter]
[Enter]
ECR is being outside a sale and in
SET
mode.
Depress
[1]
or
[Enter]
key.
The 1st line message is entered and the
programmed data is printed.
The ECR enters the 1st line input mode.
This setting is ended. A long receipt is issued
and the display returns to Main Menu screen.
Depress
[
2
]
or
[Enter]
key.
The ECR enters the 2nd line input mode.
The 2nd line message is entered and the
programmed data is printed.
A maximum of 32 one
-byte or 16 two-
byte
characters are input.
A maximum of 32 one
-byte or 16 two-
byte
characters are input.
*:
To program a message in a desired line, move the cursor there with
the [↓] key then depress the [Enter] key.
*
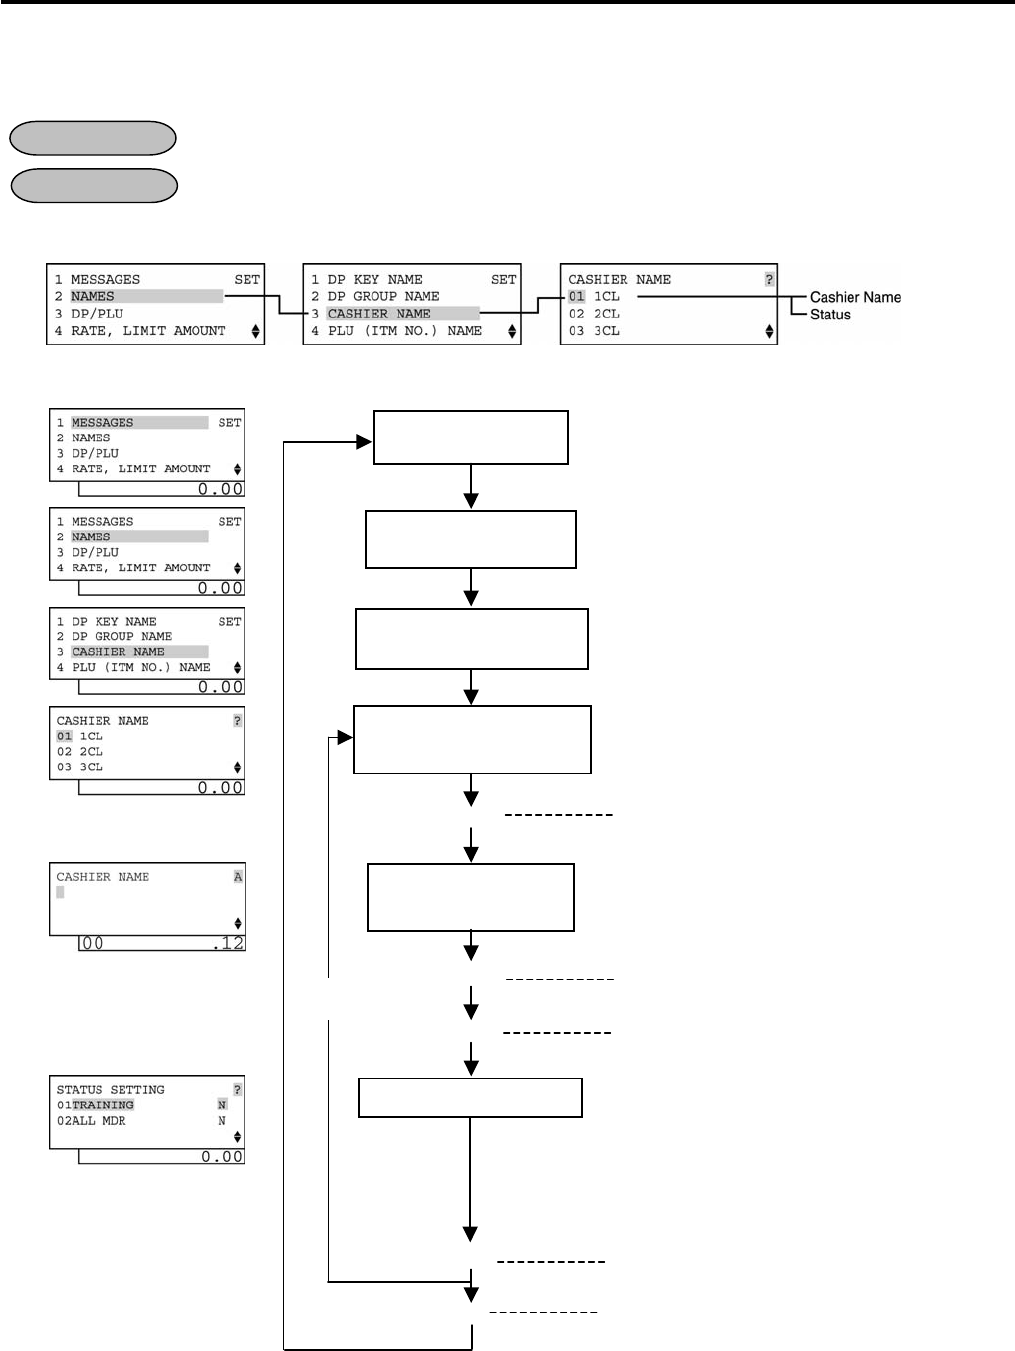
4. PROGRAMMING OPERATIONS EO1-11155
4.8 Cashier Name and Status Programming
4-21
4.8 Cashier Name and Status Programming
Cashier Name and Cashier Status for each cashier can be programmed here.
Any time outside a sale
Mode Lock: SET
1) Menu Tree
2) Operation Flowchart
OPERATION
CONDITION
[Enter]
[End]
“2 NAMES” is
selected.
Main Menu
“
3 CASHIER NAME
”
is
selected.
Select a Cashier to be
programmed.
Input a Cashier
Name.
[Enter]
ECR is being outside a sale and in
SET
mode.
Depress
[
↓
]
then
[Ent
er]
.
Or Depress [2].
The ECR enters character input mode.
Depress
[
↓
]
twice then
[Enter]
.
Or Depress [3].
The Cashier Name is entered and displayed.
A maximum of 12 one
-byte or 6 two-
byte
characters are input.
This setting is ended. A long receipt is issued
and the display returns to Main Menu screen.
Select a Cashier to be programmed with the
[
↑
]
or [↓] key, then depress [Enter].
[Enter]
The ECR enters the cashier status input mode.
Select cashier statuses. Select a cashier status with the
[
↑
]
or
[
↓
]
key, then
depress the [→] key to set/reset the status.
The two statuses below are set/reset.
(N: Reset, Y: Set)
01 Training: If select Y (Set), the cashier will be a
training cashier.
02 All MDR: If select Y (Set), the cashier will be
permitted to perform a money
declaration.
[Enter]
The programmed data is printed.
[Rtn]
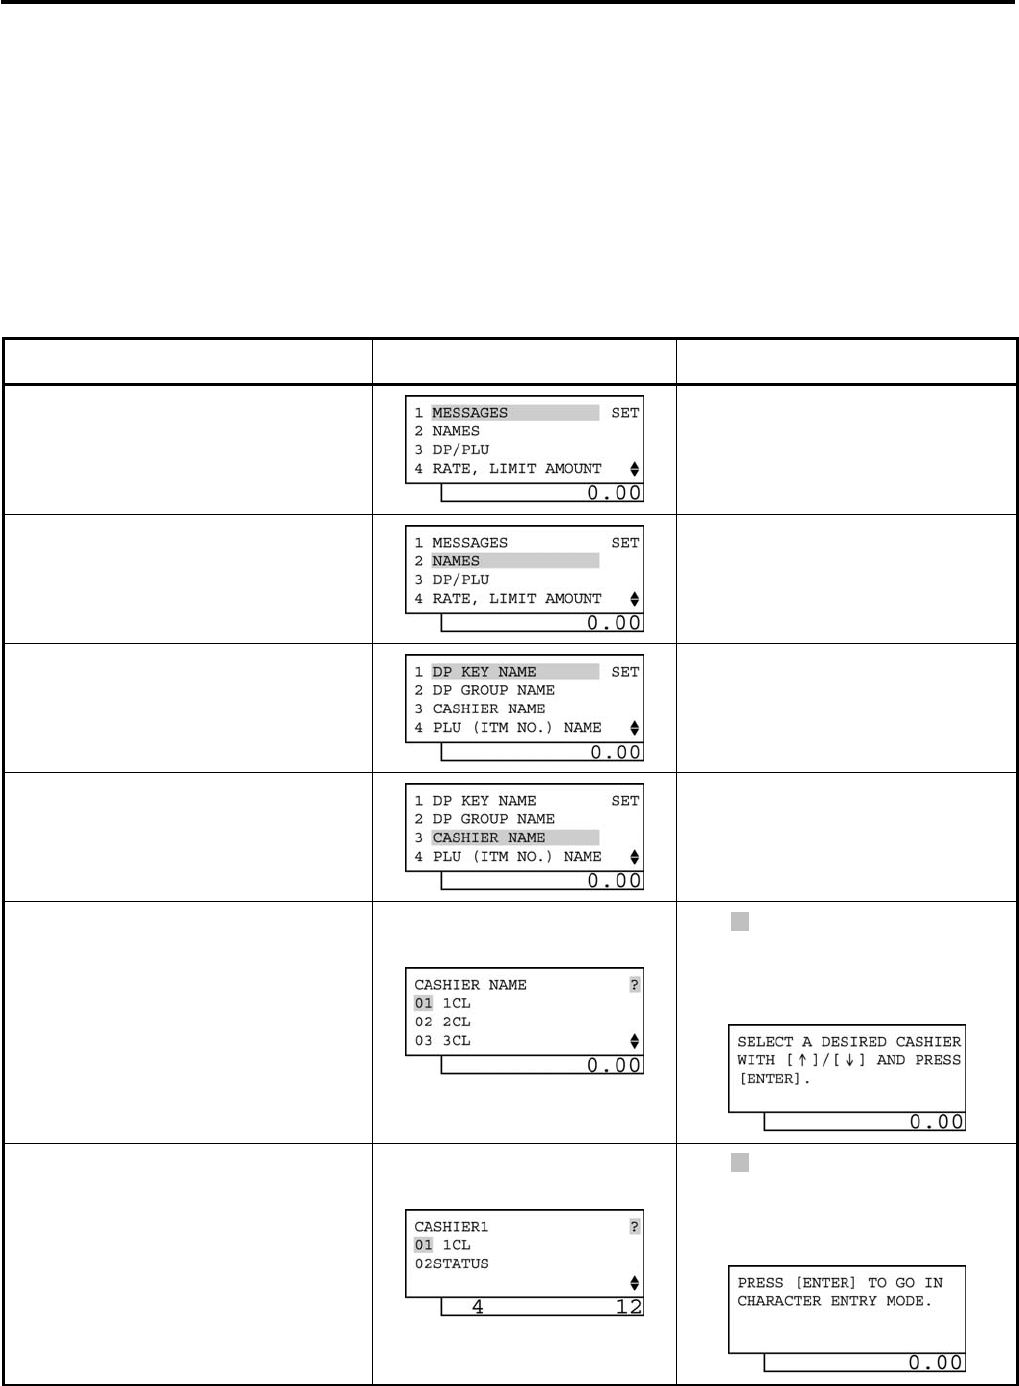
4. PROGRAMMING OPERATIONS EO1-11155
4.8 Cashier Name and Status Programming
4-22
NOTES:
1. Cashiers 1 to 8 are programmed with the names “1CL” to “8CL” as default setting.
2. For the name of each cashier, a maximum of 12 one-byte or 6 two-byte characters can be entered.
A combination of both types is also available.
3. Training entry status is available for every cashier.
4. Prior to the change of cashier status (Normal cashier
→
Training cashier, or Training cashier
→
Normal
Cashier), daily reports and GT reports of this cashier should be taken.
3) Example
To program the following cashier data.
Cashier 1: JONES (cashier name), Training Cashier (status)
Operation LCD Display Remarks
When the ECR is being outside a sale
and in SET mode, depress the [↓] key.
The cursor is moved on to “2 NAMES”.
Depress the [2] or [Enter] key.
“2 NAMES” is selected.
Depress the [↓] key twice.
The cursor is moved on to “3 CASHIER
NAME”.
Depress the [3] or [Enter] key.
“3 CASHIER NAME” is selected.
The cashier name already
programmed is displayed.
While ? is shown on the upper-right corner
of the LCD display screen, the [?] key
depression results in that the following
guidance message appears on the LCD
display.
The [Enter] key depression allows the
ECR to enter Cashier 1 programming
mode menu.
(To program a desired cashier, select
the cashier with the [↓] key then
depress the [Enter] key.)
While ? is shown on the upper-right corner
of the LCD display screen, the [?] key
depression results in that the following
guidance message appears on the LCD
display.
(continued on the next page)
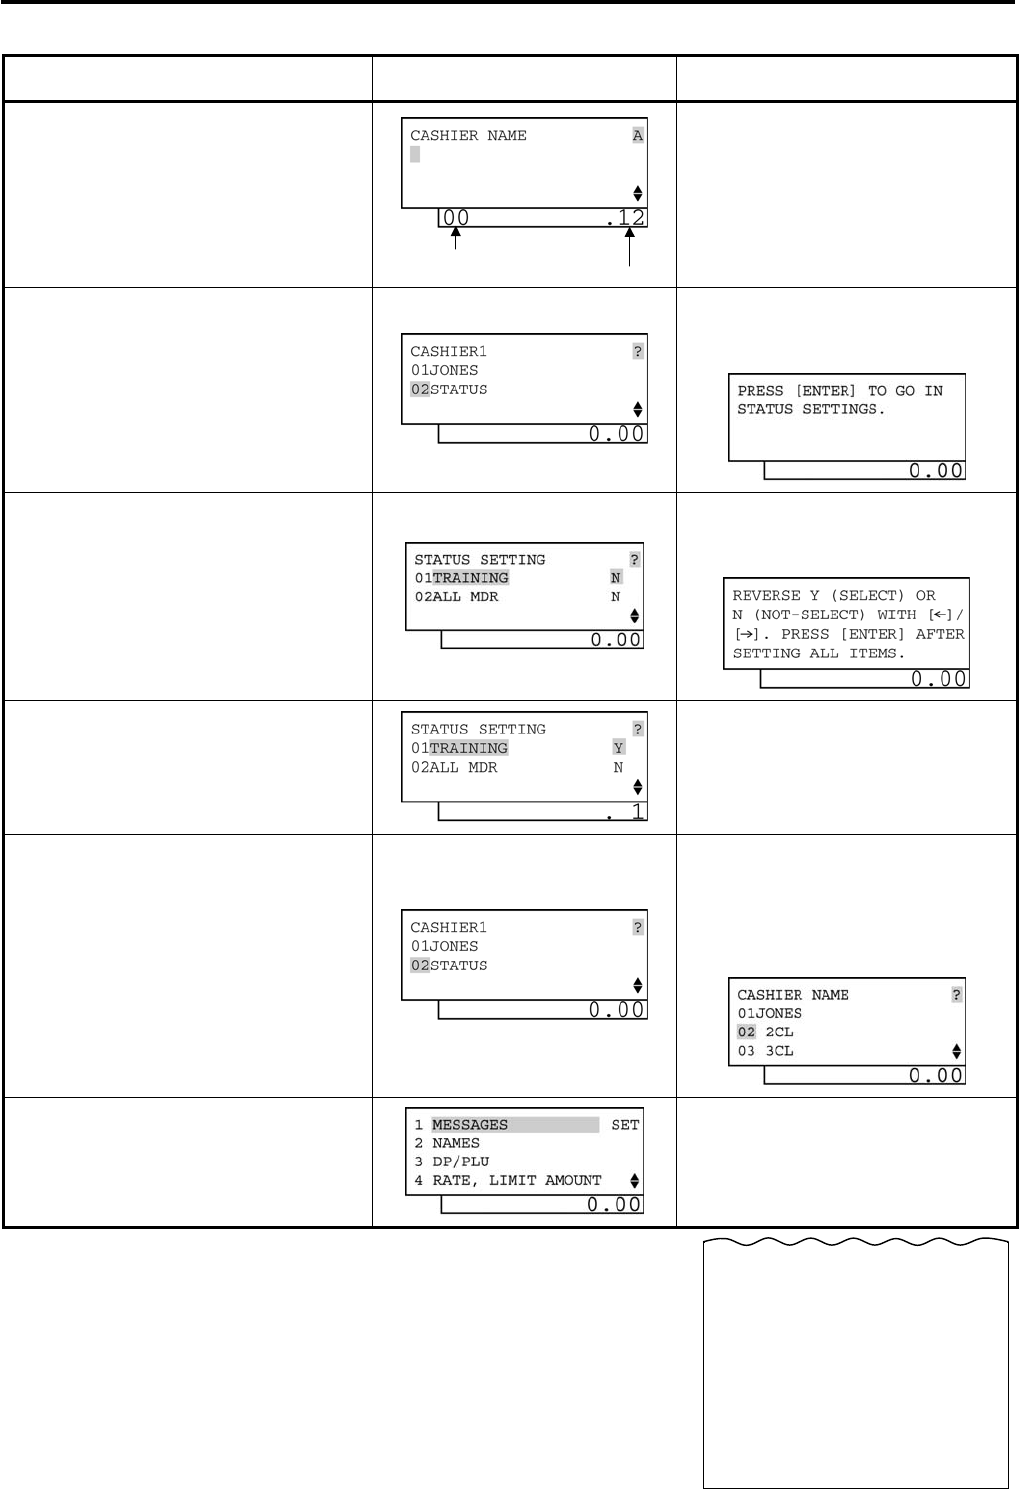
4. PROGRAMMING OPERATIONS EO1-11155
4.8 Cashier Name and Status Programming
4-23
(continued from the previous page)
Operation LCD Display Remarks
The [Enter] key depression allows the
ECR to enter the cashier 1 name input
mode. (The [C] key depression clears
the name already programmed.) The
cashier 1 name is input.
Numbers of programmed characters and of
programmable characters are displayed on
the 7-segment numeric display.
Example of key operation)
[J] [O] [N] [E] [S] [Enter]
The [Enter] key depression results in
that the input name is entered and
displayed.
The [?] key depression results in that the
following guidance message appears on the
LCD display.
The next [Enter] key depression
allows the ECR to enter the cashier 1
status input mode.
The [?] key depression results in that the
following guidance message appears on the
LCD display.
Select the status of 01 TRAINING with
the [→] key.
The [→] key depression results in that the
status is changed from N to Y.
The [Enter] key depression results in
that the Cashier 1 programming data is
entered.
When the [Enter] key is depressed, the
programmed data is printed.
When the [Rtn] key is depressed after the
[Enter] key, the programming operation for
another cashier can be performed.
The [End] key depression allows the
ECR to end this programming.
A long receipt is issued and the display
returns to Main Menu screen.
10-20-2006 FRI #0
CASHIER
01
#01 JONES
#02 1
8
0028 18:22TM
Number of programmed characters
Number of programmable characters
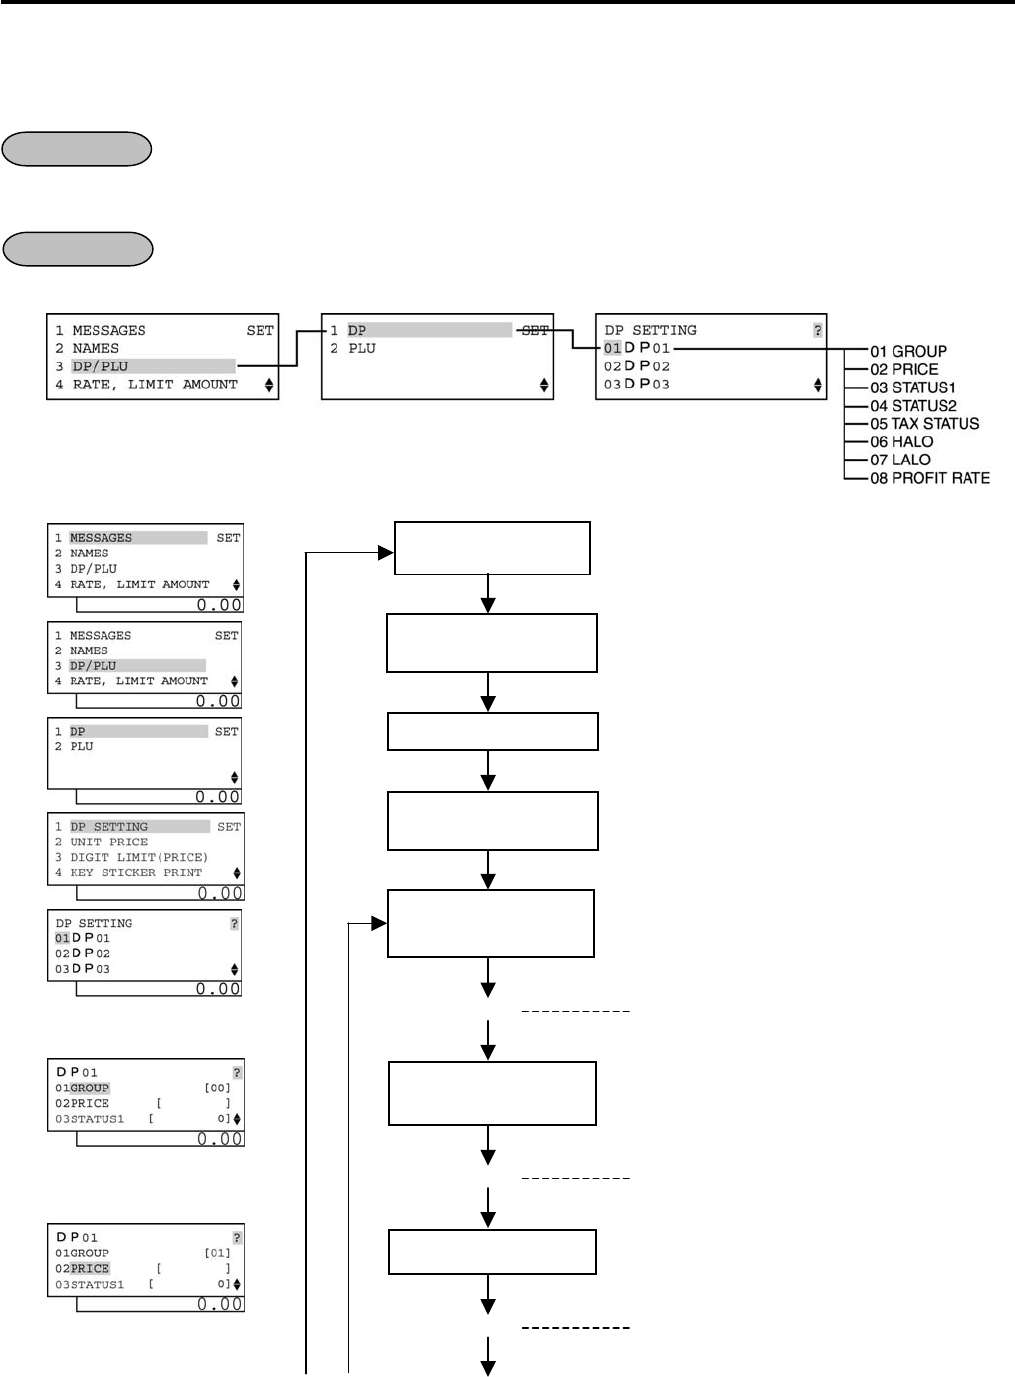
4. PROGRAMMING OPERATIONS EO1-11155
4.9 Department Table Programming
4-24
4.9 Department Table Programming
For each department, memory opening, and department various statuses settings are performed here.
To change the positive/negative status:
After Department and PLU Daily and GT Resets
To change any other programmed data or to newly program departments:
Any time outside a sale
Mode Lock: SET
1) Menu Tree
2) Operation Flowchart
OPERATION
CONDITION
“3 DP/PLU” is
selected.
Main Menu
“
1
DP
”
is selected.
Input a Group No.
(01 to15)
ECR is being outside a sale and in
SET
mode.
Depress
[
↓
]
twice then
[Enter]
.
Or Depress [3].
Department Group No. Setting (See *1.)
Depress
[1]
or
[Enter]
key.
The Group No. is entered and displayed.
Select a department
to be programmed.
[Enter]
“
1
DP SETTING
”
is
selected.
Depress
[1
]
or
[Enter]
key.
Select a department to be programmed with the
[↑] or [↓] key.
The ECR enters detailed setting mode for
department.
[Enter]
Input a preset price.
Preset Price Setting (See *2.)
The preset price is entered and displayed.
[Enter]
(C)
-- continued on the next page --
(A) (B)
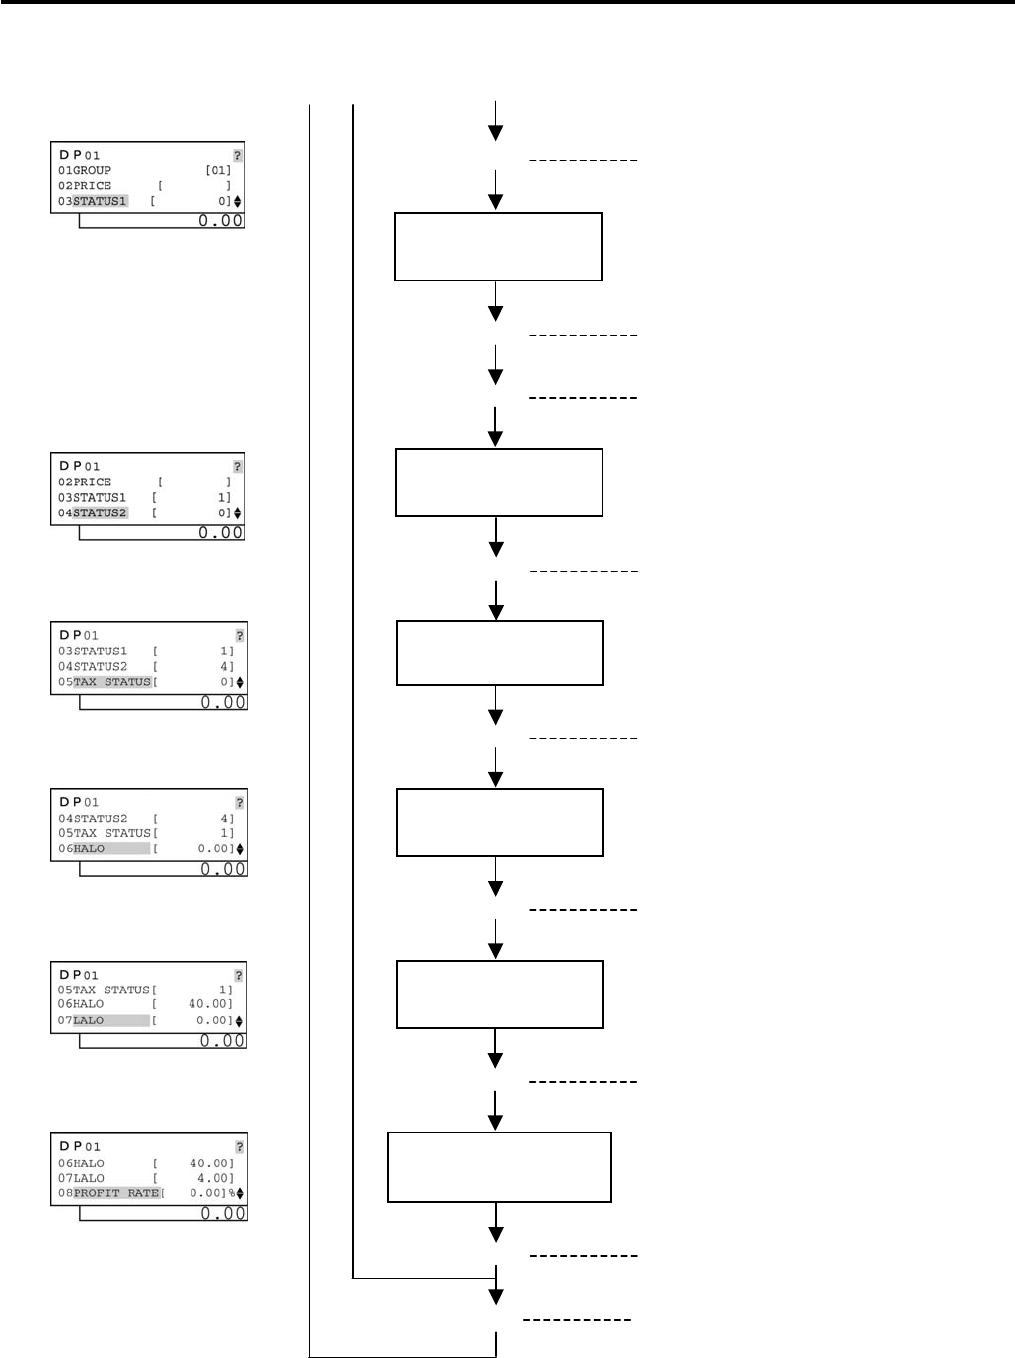
4. PROGRAMMING OPERATIONS EO1-11155
4.9 Department Table Programming
4-25
Input Tax Status(es)
(max.
4
digits)
.
Tax Status
Setting (See *5.)
T
he Tax Status is entered and displayed.
Select desired
department statuses.
[Enter]
Select a department status with the
[
↑
]
or
[
↓
]
key, then depress the [←] or [→] key to
set/reset the status.
The department statuses are entered and
displayed.
[Enter]
Input a High Amount
Limit (max. 7 digits).
High Amount Limit Setting (See *6.)
The High Amount Limit
is entered and
displayed.
[Enter]
-- continued from the previous page --
(C)
[Enter]
The ECR enters Department Status 1 Setting
mode. (See *3.)
[Enter]
The ECR enters Department Status 2 Setting
mode. (See *4.)
Select desired
department statuses.
[Enter]
Select a department status with the
[
↑
]
or
[
↓
]
key, then depress the [←] or [→] key to
set/reset the status.
The department statuses are entered and
displayed.
Input a Low Amount
Limit (max. 7 digits).
Low Amount Limit Setting (See *7.)
The Low Amount Limit
is entered and
displayed.
[Enter]
Input a Gross Profit
Rate (0.01 to 100.00%).
Gross Profit Rate Setting (See *8.)
The
Gross Profit Rate
is entered and displayed.
[Enter]
[End]
This setting is ended. A long receipt is issued
and the display returns to Main Menu screen.
[Rtn]
(A) (B)
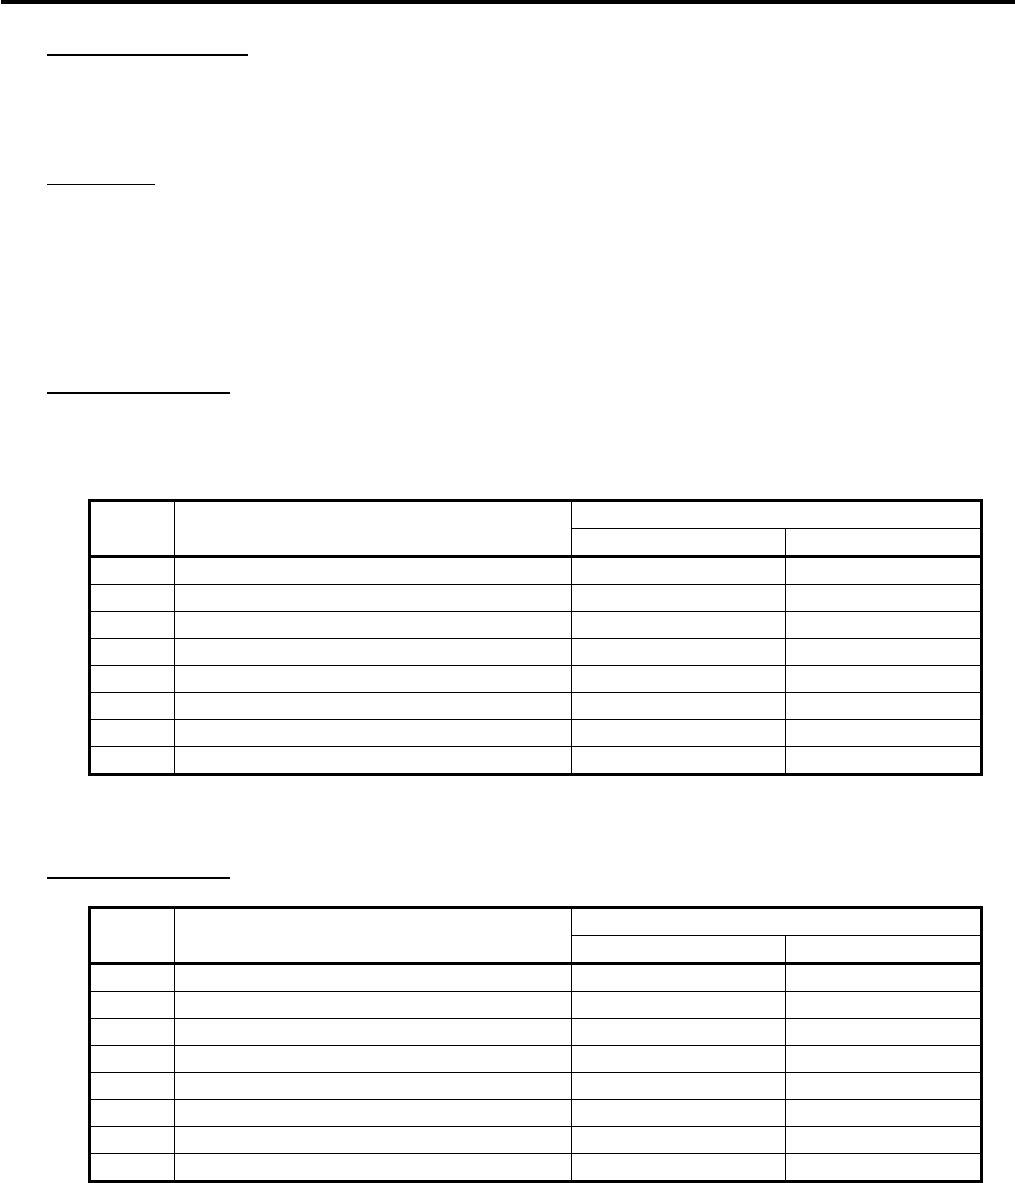
4. PROGRAMMING OPERATIONS EO1-11155
4.9 Department Table Programming
4-26
*1: Department Group No.
• Input a department group code (2 digits: 01 to 15), then depress the [Enter] key.
• To cancel a department group, input 0 then depress the [Enter] key.
• All departments can be programmed in a group. Negative departments are added to the group total.
*2: Preset Price
• For a preset department (preset-price department), enter a maximum of 6-digit price, and depress the
[Enter] key.
1 to 999999 (result: 0.01 to 9999.99)
• A zero-price (0.00) may be preset by entering 0 in the above operation.
• When no numeric value is entered and the [Enter] key is simply depressed, the department will be an
open department (open-price department).
*3: Department Status 1
• The status ON or OFF is selected with the [←] and [→] keys.
• The status change between positive and negative should be performed after performing a
department/PLU daily and GT resets.
• The following shows each department status.
Selective Status
Status
Code Item ON (Y) OFF (N)
1 Single-item or Itemized Receipt Single-item Itemized
2 HASH or Ordinary Department HASH Ordinary
3 Positive or Negative Department Negative Positive
4 Food Stamp Status Yes No
5 -- vacant --
6 -- vacant --
7 Validation Compulsory Compulsory Optional
8 -- vacant --
NOTE:
Code 7: Validation Compulsory status is effective not for the PLU entry but for the department entry.
*4: Department Status 2
• The following shows each department status.
Selective Status
Status
Code Item ON (Y) OFF (N)
1 -- vacant --
2 -- vacant --
3 -- vacant --
4 Tax Symbol “F” Print Print Non-print
5 Canada Non-taxable Quantity Objective Not objective
6 -- vacant --
7 -- vacant --
8 -- vacant --
NOTE:
Code 4: Tax Symbol “F” Print
Tax symbol “F” is printed when this code has been set “ON” to a taxable department. If the Food
Stamp feature has been selected, this symbol “F” will be always printed regardless of this code
status when a food stamp taxable department is entered.
In Canada, some area handles two kinds of taxes; GST and PST.
Status Code 4 (Tax Symbol “F” Print) should be set at the GST status setting.
Tax Symbol “T” ...... PST
Tax Symbol “F” ...... GST

4. PROGRAMMING OPERATIONS EO1-11155
4.9 Department Table Programming
4-27
*5: Tax Status
• Enter one- to four-digit status codes for applicable taxes. Or enter 0 if the department handles non-
taxable items.
[Enter]
0: Non-taxable
1: Tax 1 (Tax 1 taxable)
2: Tax 2 (Tax 2 taxable)
3: Tax 3 (Tax 3 taxable)
4: Tax 4 (Tax 4 taxable)
*6: High Amount Limit
• Enter a maximum of 7 digits to be set as the high amount to be locked out.
Example) To prohibit any amount equal to or larger than 40.00:
4000 [Enter]
(Allows any amount equal to or smaller than 39.99.)
NOTES:
1. Input 0 to cancel the preset limit (i.e. to allow any amount).
2. The limit amount set here will be applied to entries in REG mode only, but not in MGR or - mode.
3. Even if a value other than zero is entered all the digits other than the highest digit, it will be regarded as a
zero.
Example) Entering 4001 to 4999 will all result in setting 4000.
*7: Low Amount Limit
• Enter a maximum of 7 digits to be set as the low amount limit.
Example) To prohibit any amount smaller than 4.00:
400 [Enter]
(Prohibits any amount smaller than 4.00.)
NOTES:
1. Input 0 to cancel the preset limit (i.e. to allow any amount).
2. The limit amount set here will be applied to entries in REG mode only, but not in MGR or - mode.
3. Even if a value other than zero is entered all the digits other than the highest digit, it will be regarded as a
zero.
Example) Entering 401 to 499 will all result in setting 400.
*8: Gross Profit Rate
• Enter the gross profit rate of the department in a maximum of 3 integer digits and 2 decimal digits.
[Enter] or [ . ] [Enter]
0 to 100 (%) 0.01 to 99.99 (%)
• The calculated gross profit will be outputted to the DEPARTMENT GROSS PROFIT REPORT.
• The fraction resulted from the profit calculation will be discarded.
• To cancel the gross profit rate once set, input 0 in place of a specific rate before [Enter]. The
department whose gross profit rate has thus been canceled will not be outputted in the GROSS PROFIT
REPORT.
(More than one code can be entered for combining Tax1 to
Tax4 taxable statuses.
For example, enter 12 to select Tax1 and Tax2 taxable status.)
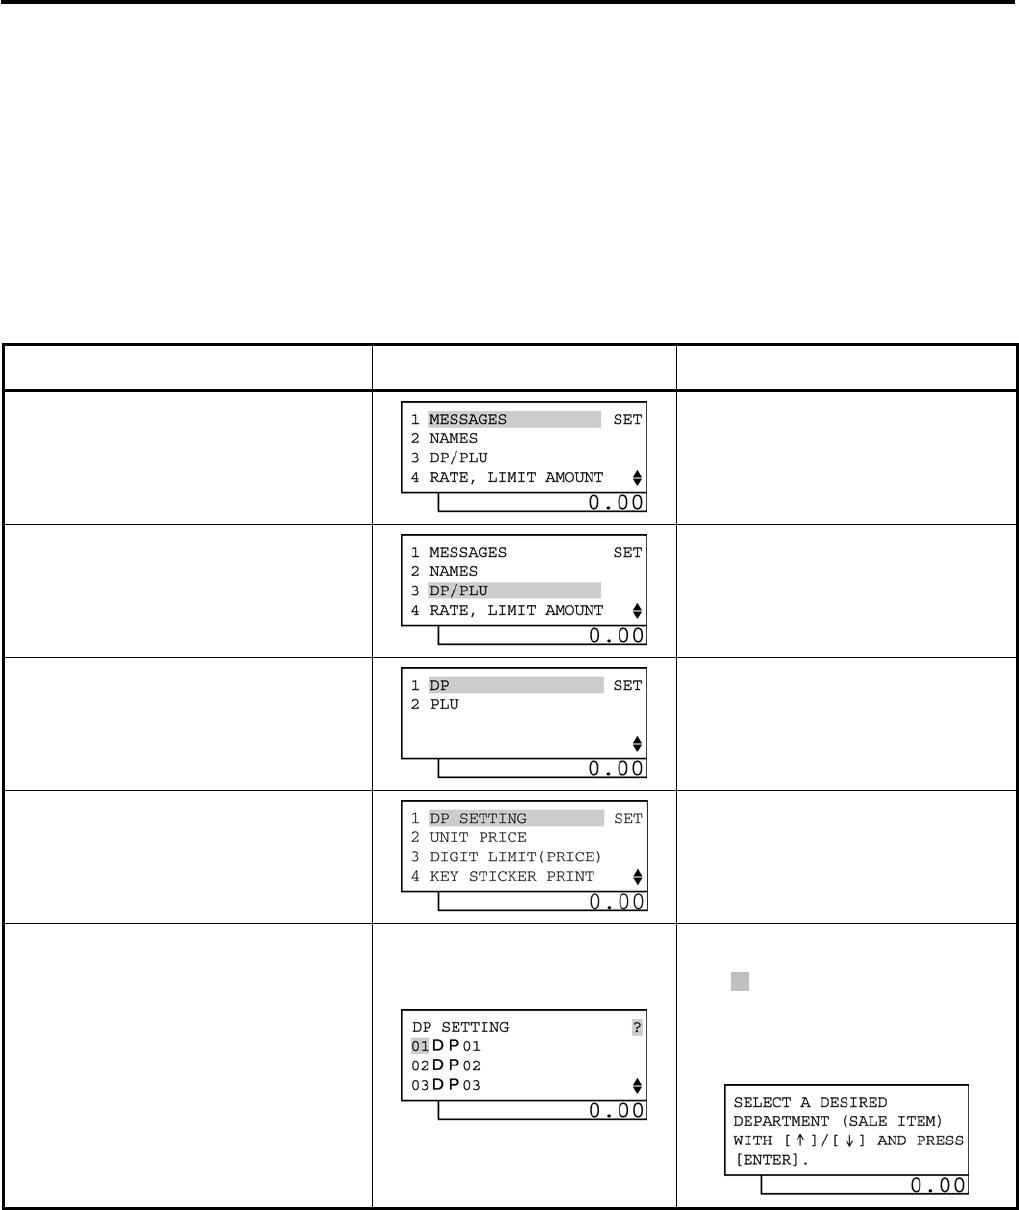
4. PROGRAMMING OPERATIONS EO1-11155
4.9 Department Table Programming
4-28
3) Example
To program the following Department Data
Department Code: 01
Department Group No.: 01
Preset Price: Open
Department Status 1: Single-item receipt
Department Status 2: Tax symbol “F” Print
Tax Status: Tax 1
HALO: $40.00
LALO: $4.00
Gross Profit Rate: 10.00%
Operation LCD Display Remarks
When the ECR is being outside a sale
and in SET mode, depress the [↓] key
twice.
The cursor is moved on to “3 DP/PLU”.
Depress the [3] or [Enter] key.
“3 DP/PLU” is selected.
Depress the [1] or [Enter] key.
“1 DP” is selected.
Depress the [1] or [Enter] key.
“1 DP SETTING” is selected.
Depress the [Enter] key.
Screen <1>: See NOTE below.
Department 01 is selected.
While ? is shown on the upper-right corner
of the LCD display screen, the [?] key
depression results in that the following
guidance message appears on the LCD
display.
(continued on the next page)
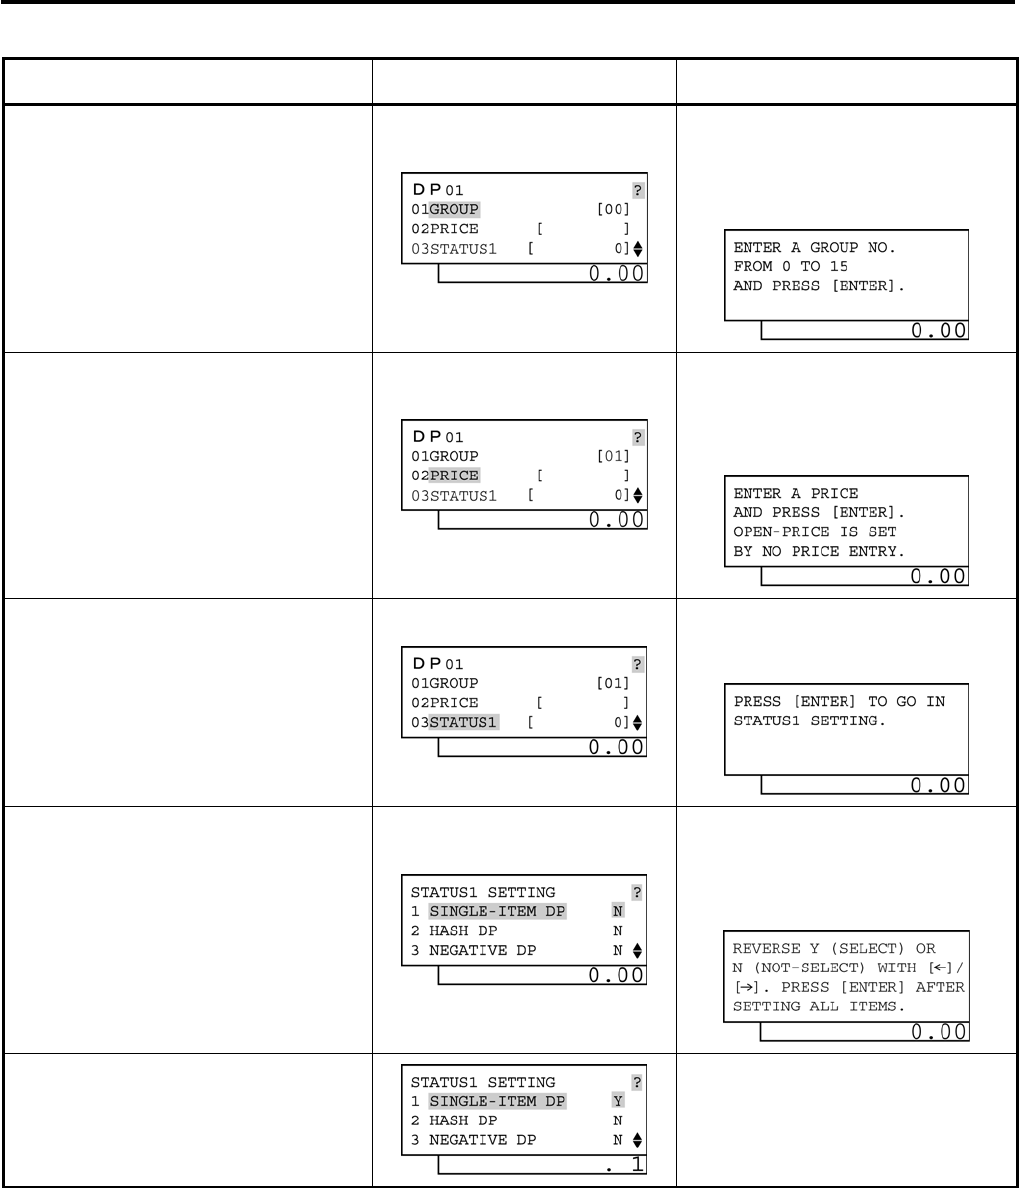
4. PROGRAMMING OPERATIONS EO1-11155
4.9 Department Table Programming
4-29
(continued from the previous page)
Operation LCD Display Remarks
Input 01 (or 1), then depress the
[Enter] key.
Department Group No. 01 is set.
The [?] key depression results in that the
following guidance message appears on the
LCD display.
Depress the [Enter] key.
Open price is set.
The [?] key depression results in that the
following guidance message appears on the
LCD display.
The [Enter] key depression allows the
ECR to enter Department Status 1
setting menu.
The [?] key depression results in that the
following guidance message appears on the
LCD display.
Move the cursor on to a desired status
setting with the [↓] or [↑] key.
“1 SINGLE-ITEM DP” is selected.
The [?] key depression results in that the
following guidance message appears on the
LCD display.
Depress the [→] key.
The [→] key depression results in that the
status is changed from N to Y.
(The ON status of SINGLE-ITEM DP is
selected.)
(continued on the next page)
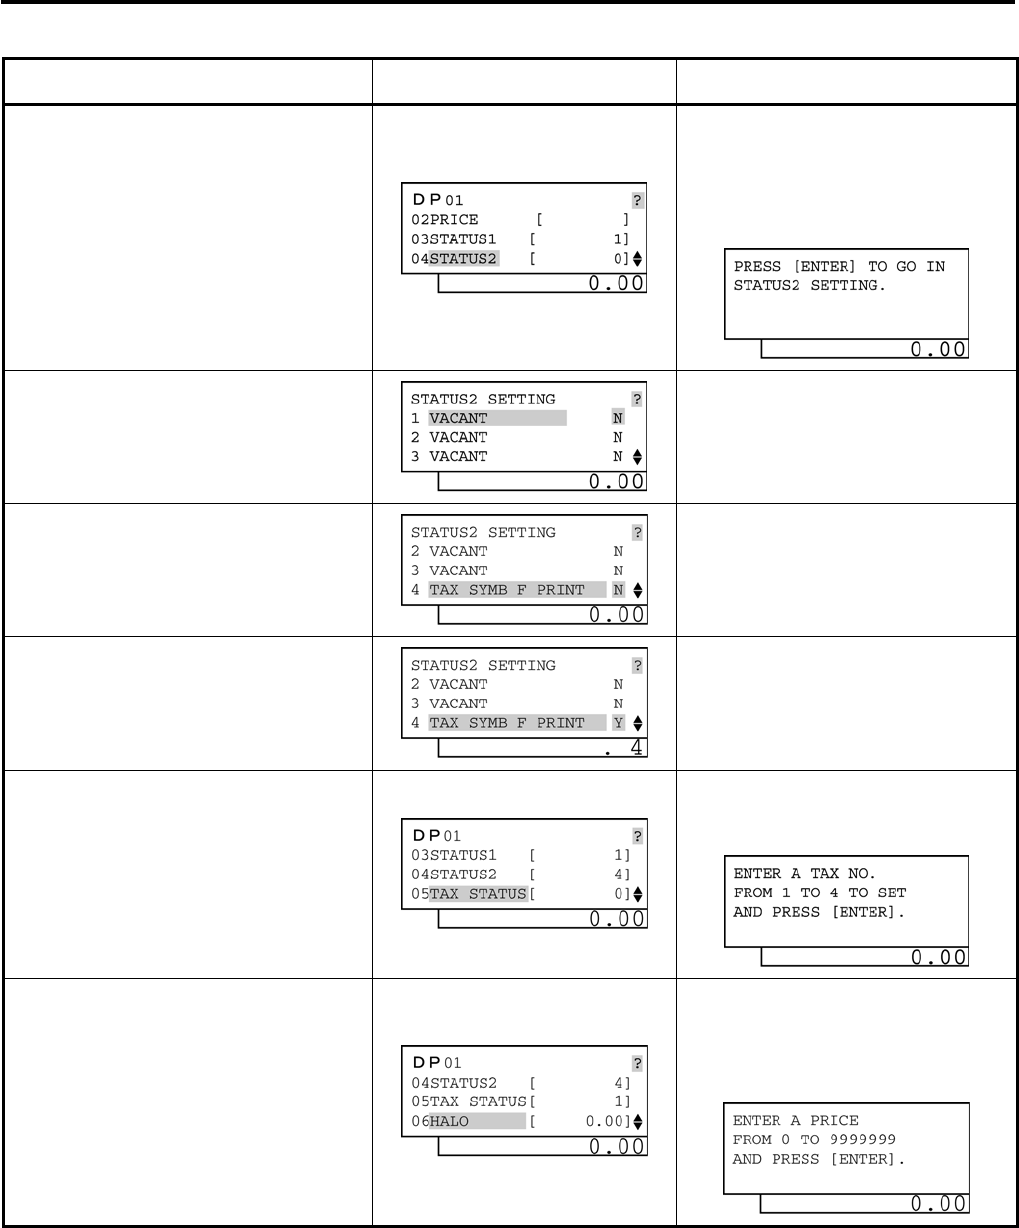
4. PROGRAMMING OPERATIONS EO1-11155
4.9 Department Table Programming
4-30
(continued from the previous page)
Operation LCD Display Remarks
Depress the [Enter] key.
The Department Status 1 is set and the
selected status code is displayed.
The [?] key depression results in that the
following guidance message appears on the
LCD display.
The [Enter] key depression allows the
ECR to enter Department Status 2
setting menu.
Depress the [↓] key three times.
4 TAX SYMB “F” PRINT is selected.
Depress the [→] key.
The [→] key depression results in that the
status is changed from N to Y.
(The ON status of TAX SYMB “F” PRINT is
selected.)
The [Enter] key depression allows the
ECR to enter Tax Status setting menu.
The [?] key depression results in that the
following guidance message appears on the
LCD display.
Input 1, then depress the [Enter] key.
Tax 1 is selected.
The [?] key depression results in that the
following guidance message appears on the
LCD display.
(continued on the next page)
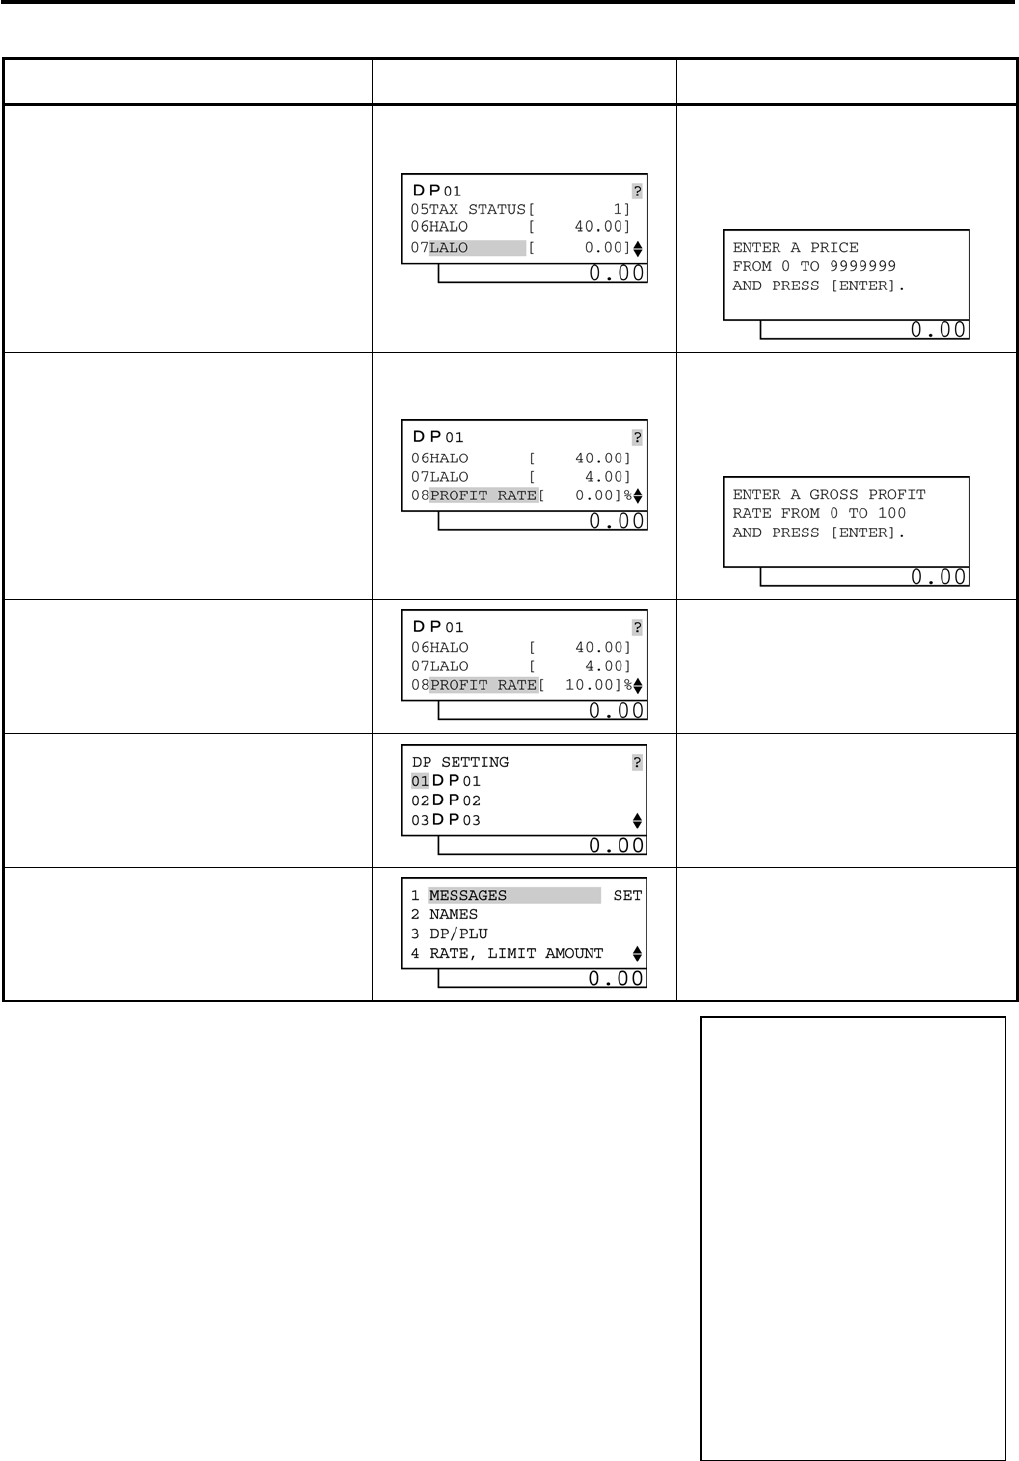
4. PROGRAMMING OPERATIONS EO1-11155
4.9 Department Table Programming
4-31
(continued from the previous page)
Operation LCD Display Remarks
Input 4000, then depress the [Enter]
key.
High amount limit $40.00 is set.
The [?] key depression results in that the
following guidance message appears on the
LCD display.
Input 400, then depress the [Enter]
key.
Low amount limit $4.00 is set.
The [?] key depression results in that the
following guidance message appears on the
LCD display.
Input 10, then depress the [Enter] key.
Gross Profit Rate 10% is set.
Depress the [Rtn] key.
The display returns to the Department
Setting screen.
Move the cursor on to another desired
department with the [↓] or [↑] key, then
depress the [Enter] key.
The [End] key depression allows the
ECR to end this programming.
A long receipt is issued and the display
returns to Main Menu screen.
TEC
STORE
1343 PEACH DRIVE
PHONE: 87-6437
Open 8:00am to 7:00pm
Closed: every Wednesday
10-20-2006 FRI #0
DP
01
DP
01
#01 01
#02 0.00@
#03 1
#04 4
#05 1
#06 $40.00
#07 $4.00
#08 10%
0016 13:37TM
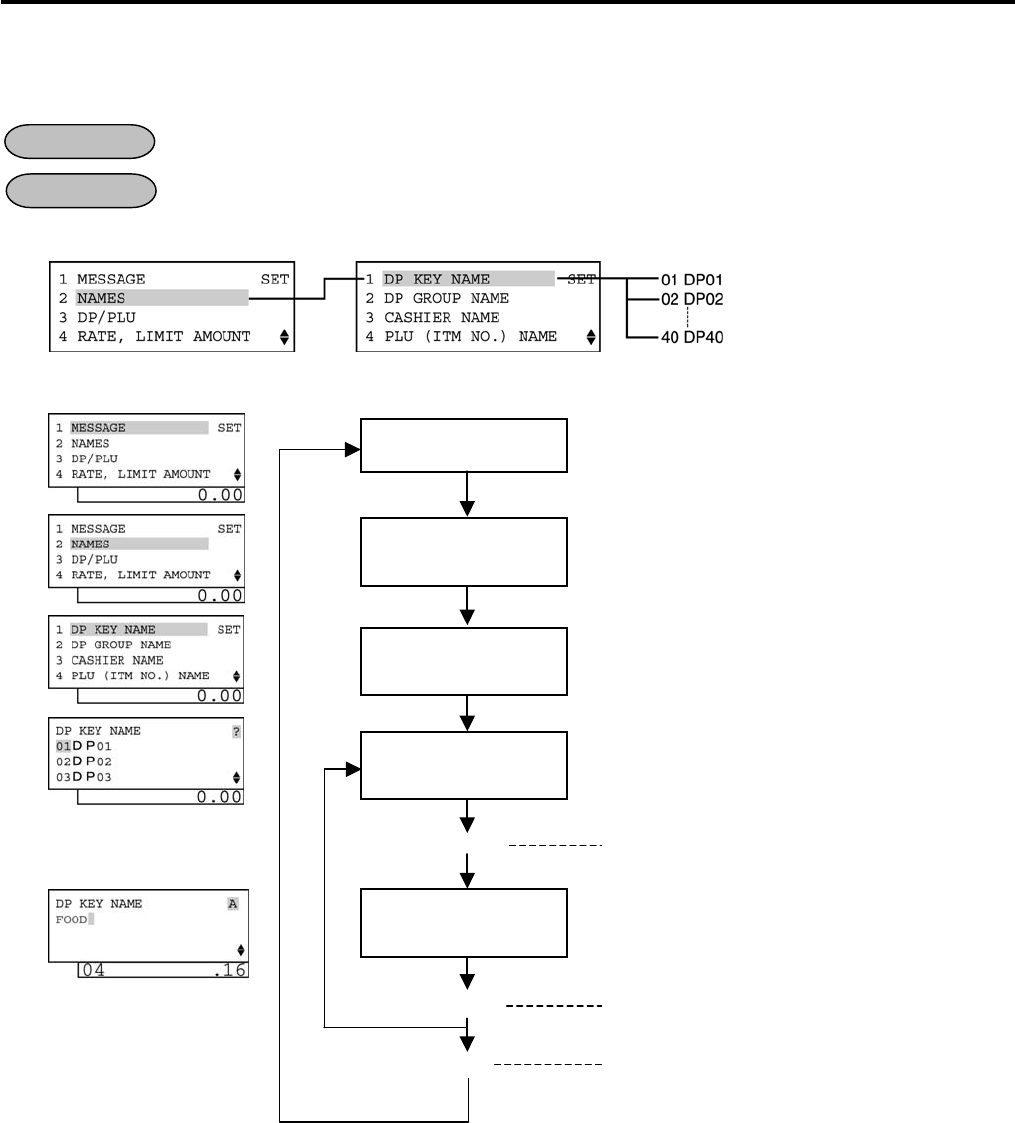
4. PROGRAMMING OPERATIONS EO1-11155
4.10 Department Name Programming
4-32
4.10 Department Name Programming
A maximum of 16 characters of department name is programmed here.
Any time outside a sale
Mode Lock: SET
1) Menu Tree
2) Operation Flowchart
NOTE: A maximum of 16 one-byte characters or 8 two-byte characters can be entered. A combination of
both types is also available.
OPERATION
CONDITION
[Enter]
[End]
“2 NAMES” is
selected.
Main Menu
“1 DP KEY NAME”
is
selected.
Select a department
to be programmed.
Input a Department
Name.
[Enter]
ECR is being outside a sale and in
SET
mode
.
Depress
[
↓
]
then
[Enter]
.
Or Depress [2].
The ECR enters character input mode.
This setting is ended. A long receipt is issued
and the display returns to Main Menu screen.
Dep
ress
[1]
or
[Enter]
key.
The Department Name is entered and the
programmed data is printed.
A maximum of 16 one
-byte or 8 two-
byte
characters are input.
Select a department of which name is to be
programmed with the [↑] or [↓] key.
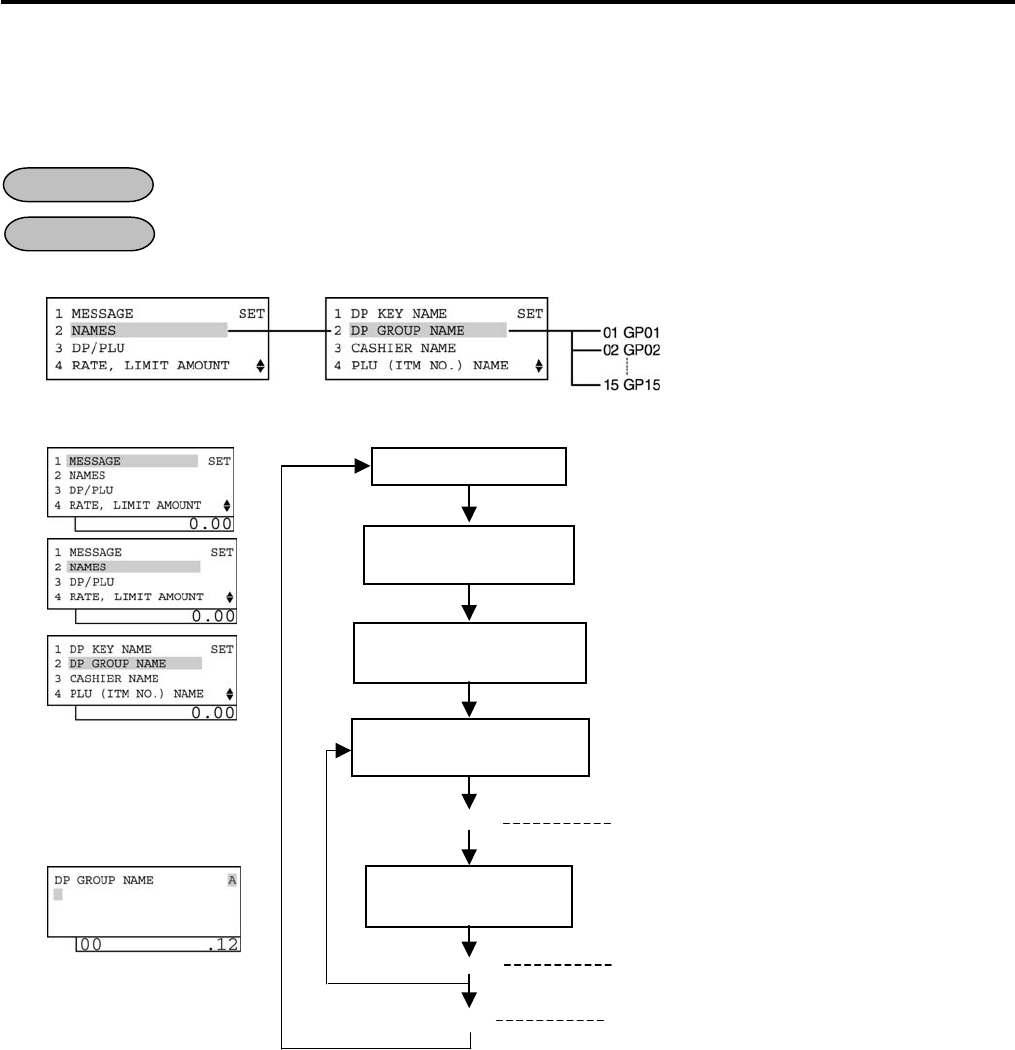
4. PROGRAMMING OPERATIONS EO1-11155
4.11 Department Group Name Programming
4-33
4.11 Department Group Name Programming
In this operation, the name of each Department Group is programmed. Which Departments are linked to each
Group has been set in the DEPARTMENT TABLE PROGRAMMING operation. A maximum of 15 department
groups can be set.
Any time outside a sale
Mode Lock: SET
1) Menu Tree
2) Operation Flowchart
NOTE: A maximum of 12 one-byte characters or 6 two-byte characters can be entered. A combination of both
types is also available.
OPERATION
CONDITION
[Enter]
[End]
“2 NAMES” is
selected.
Main Menu
“
2 DP GROUP NAME
”
is
selected.
Select a Department Group
to be programmed.
Input a Department
Group Name.
[Enter]
ECR is being outside a sale and in
SET
mode.
Depress
[
↓
]
then
[Enter]
.
Or Depress [2].
The ECR
enters character input mode.
This setting is ended. A long receipt is issued
and the display returns to Main Menu screen.
Depress
[
↓
]
then
[E
nter]
.
O
r
Depress
[2]
.
The Department Group Name is entered and
printed.
A maximum of 12 one
-byte or 6 two-
byte
characters are input.
Select a department group of which name is to
be programmed with the [↑] or [↓] key.
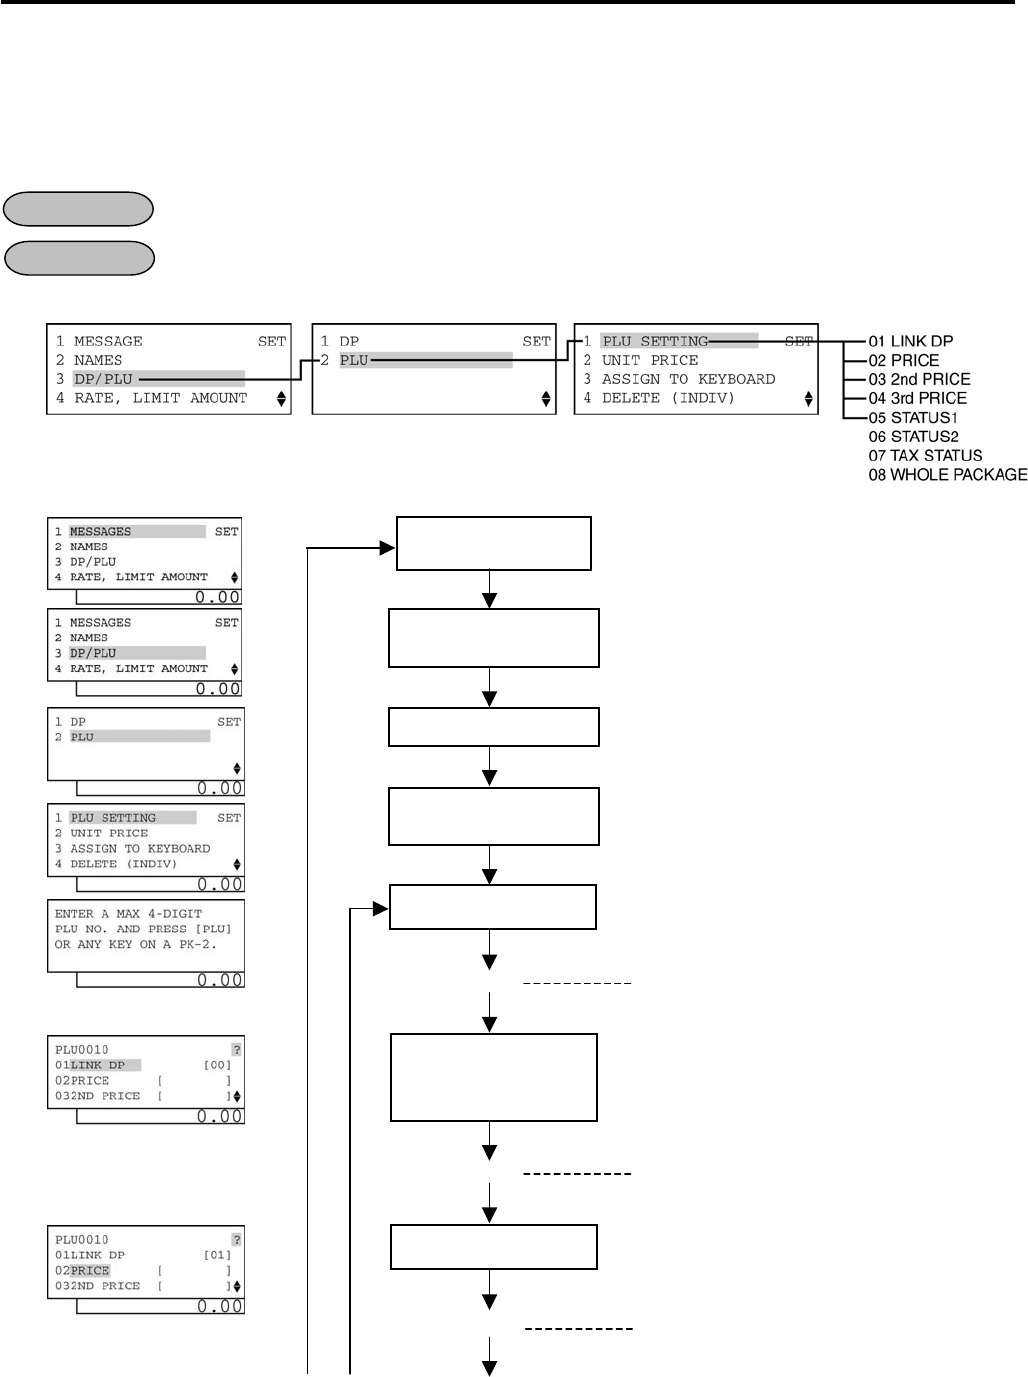
4. PROGRAMMING OPERATIONS EO1-11155
4.12 PLU Table Programming
4-34
4.12 PLU Table Programming
This programming can be operated when new PLU items are to be added, PLU program data is to be changed,
or PLUs are to be deleted.
4.12.1 Programming or Changing
Any time outside a sale
Mode Lock: SET
1) Menu Tree
2) Operation Flowchart
OPERATION
CONDITION
“3 DP/PLU” is
selected.
Main Menu
“
2 PLU
”
is selected.
Input a linked
department code
(01 to 40).
ECR is being outside a sale and in
SET
mode.
Depress
[
↓
]
twice then
[Enter]
.
Or Depress [3].
Linked Department Code Setting (See *1.)
Depress
[
↓
]
then
[Enter]
.
Or Depress [2].
The linked department code is entered and
displayed.
Input a PLU Code.
[PLU]
“
1
PLU SETTING
”
is
selected.
Depress
[1]
o
r
[Enter]
key.
Max. 4 digits: 1 to 9999
The ECR enters detailed setting mode for PLU.
(NOTE 3)
[Enter]
Input a preset price.
Preset Price Setting (See *2.)
(C)
-- continued on the next page --
(A) (B)
The preset price is entered and displayed.
[Enter]
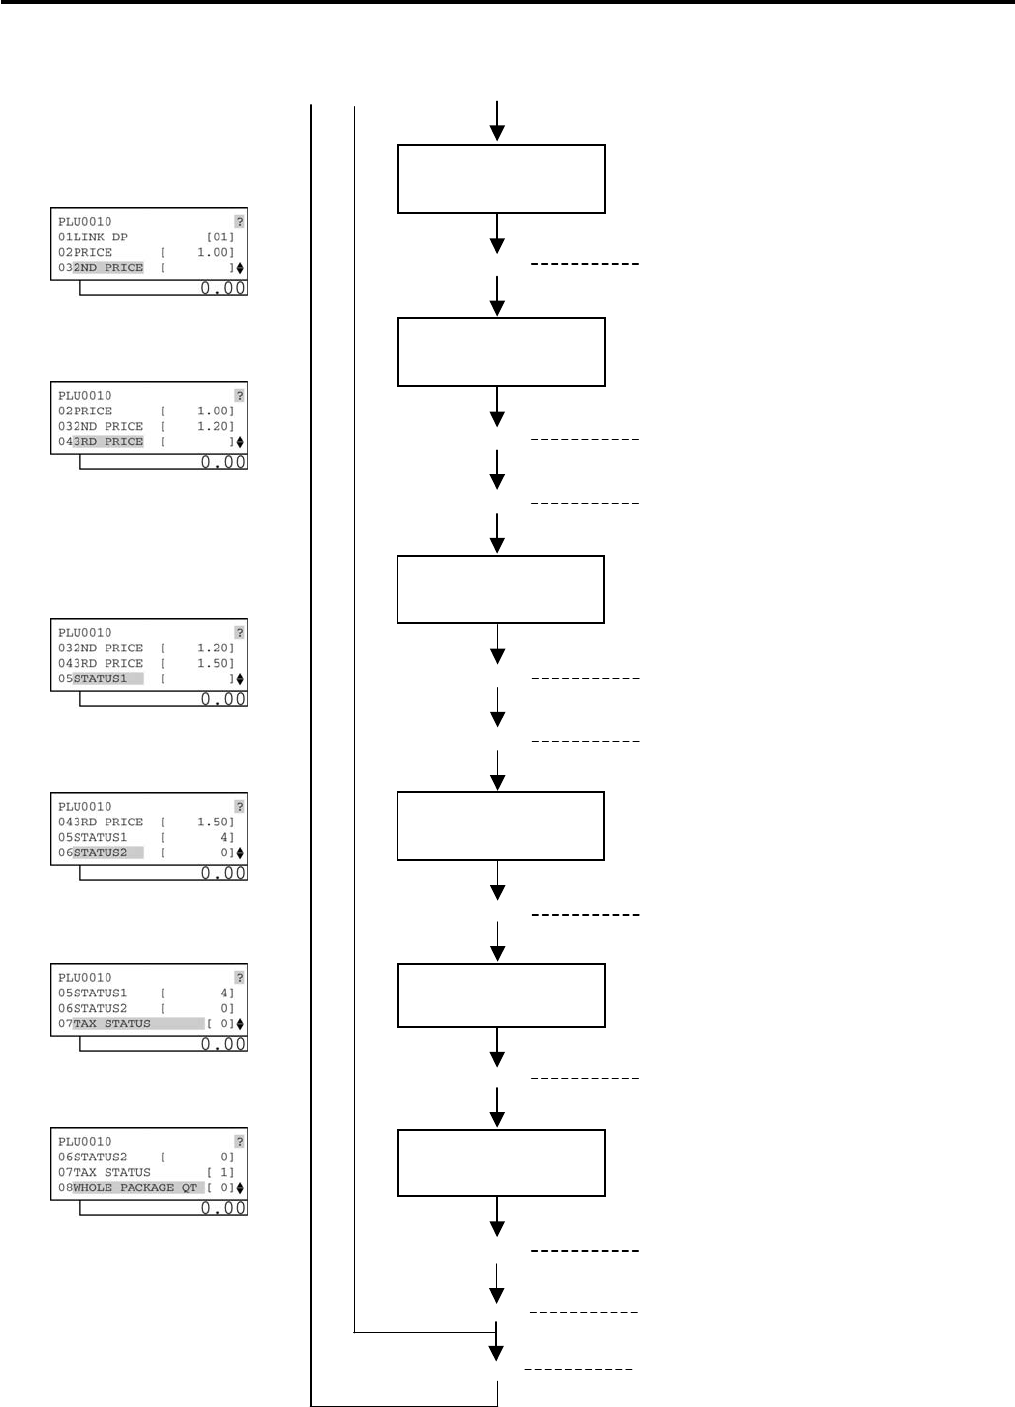
4. PROGRAMMING OPERATIONS EO1-11155
4.12 PLU Table Programming
4-35
Input Tax Status(es)
(max. 4 digits).
Tax Status
Setting (See *7.)
The Tax Status is entered and displayed.
[Enter]
Input a Whole
Package Quantity.
Whole Package Quantity Setting (See *8.)
The Whole Package Quantity t
is entered and
displayed.
[Enter]
-- continued from the previous page --
(C)
Select desired PLU
statuses.
[Enter]
Select a PLU status with the
[
↑
]
or
[
↓
]
key, then
depress the [←] or [→] key to set/reset the
status.
The PLU statuses are entered and displayed.
[End]
This setting is ended. A long receipt is issued
and the display returns to Main Menu screen.
(A) (B)
Input a 2nd preset
price.
2nd Preset Price Setting (See *3.)
The
2nd
preset price is entered and displayed.
[Enter]
Input a 3rd preset
price.
3rd Preset Price Setting (See *4.)
The 3r
d
preset price is entered and displayed.
[Enter]
The ECR enters the PLU Status 1 Setting
mode. (See *5.)
[Enter]
The next PLU code (i.e. the currently
programmed PLU code plus 1) is displayed.
([PLU])
Select desired PLU
statuses.
[Enter]
Select a PLU status with the
[
↑
]
or
[
↓
]
key, the
n
depress the [←] or [→] key to set/reset the
status.
The PLU statuses are entered and displayed.
[Enter]
The ECR enters the PLU Status 2 Setting
mode. (See *6.)
4. PROGRAMMING OPERATIONS EO1-11155
4.12 PLU Table Programming
4-36
NOTES:
1. A maximum of 1,000 PLUs are programmable.
2 If a PLU is linked to a negative department, the PLU is automatically set as negative PLU.
3. The [PLU] key here indicates the key labeled simply as “PLU” but not any PLU preset-code keys.
*1: Linked Department Code
• Enter a 2-digit code of the department to which the PLU is linked.
When the PLU is newly programmed, this entry is compulsory (an error will result if this entry is skipped.)
[Enter]
01 to 40
*2: Preset Price
• For a preset PLU (preset-price PLU), enter a maximum of 6-digit price, and depress the [Enter] key.
1 to 999999 (result: 0.01 to 9999.99)
• A zero-price (0,00) may be preset by entering 0 in the above operation.
• When no numeric value is entered and the [Enter] key is simply depressed, the PLU will be an open PLU
(open-price PLU).
*3: 2nd Preset Price
• For a preset PLU (preset-price PLU), enter a maximum of 6-digit price, and depress the [Enter] key.
1 to 999999 (result: 0.01 to 9999.99)
• A zero-price (0,00) may be preset by entering 0 in the above operation.
• If the 2nd preset price entry is skipped, the 1st preset price will be automatically programmed as the 2nd
preset price.
*4: 3rd Preset Price
• For a preset PLU (preset-price PLU), enter a maximum of 6-digit price, and depress the [Enter] key.
1 to 999999 (result: 0.01 to 9999.99)
• A zero-price (0,00) may be preset by entering 0 in the above operation.
• If the 3rd preset price entry is skipped, the 1st preset price will be automatically programmed as the 3rd
preset price.
*5: PLU Status 1
• The status ON or OFF is selected with the [←] and [→] keys.
• The following shows each PLU status.
Selective Status
Status
Code Item ON (Y) OFF (N)
1 Quantity Entry Compulsion Compulsory Optional
2 -- vacant --
3 -- vacant --
4 Food Stamp Status Yes No
5 -- vacant --
6 -- vacant --
7 -- vacant --
8 -- vacant --
NOTE:
Code 1: Quantity Entry Compulsion
When this status is selected, the quantity entry is always necessary for PLU item entry. However, if
the [3rd PRICE] key is depressed, this status will be ignored.
4. PROGRAMMING OPERATIONS EO1-11155
4.12 PLU Table Programming
4-37
*6: PLU Status 2
• The following shows each department status.
Selective Status
Status
Code Item ON (Y) OFF (N)
1 Price Print Non-print Print
2 -- vacant --
3 -- vacant --
4 Tax Symbol “F” Print Print Non-print
5 Canada Non-taxable Quantity Objective Not objective
6 -- vacant --
7 -- vacant --
8 -- vacant --
NOTE:
Code 1: Price Print
When this status is set to ON (Non-print), PLU price will not be printed. However, when the Quantity
Extension transaction is performed for the PLU, its price will always be printed regardless of this
status selection. Do not set this status code ON.
Code 4: Tax Symbol “F” Print
Tax symbol “F” is printed when this code has been set “ON” to a taxable PLU. If the Food Stamp
feature has been selected, this symbol “F” will always be printed regardless of this code status when
a food stamp taxable department is entered.
In Canada, some area handles two kinds of taxes; GST and PST.
Status Code 4 (Tax Symbol “F” Print) should be set at the GST status setting.
Tax Symbol “T” ...... PST
Tax Symbol “F” ...... GST
*7: Tax Status
• Enter one- to four-digit status codes for applicable taxes. Or enter 0 to cancel the taxable status. (i.e.
Non-taxable status is set to the PLU.)
[Enter]
0: Non-taxable
1: Tax 1 (Tax 1 taxable)
2: Tax 2 (Tax 2 taxable)
3: Tax 3 (Tax 3 taxable)
4: Tax 4 (Tax 4 taxable)
*8: Whole Package Quantity (for Split Package Pricing PLUs)
• Enter a whole package quantity in a maximum of 2 digits (1 to 99). Or enter 0 to cancel the Split
Package Pricing status.
[Enter]
0 to 99
(More than one code can be entered for combining Tax 1 to Tax
4
taxable statuses.
For example, enter 12 to select Tax 1 and Tax 2 taxable status.)
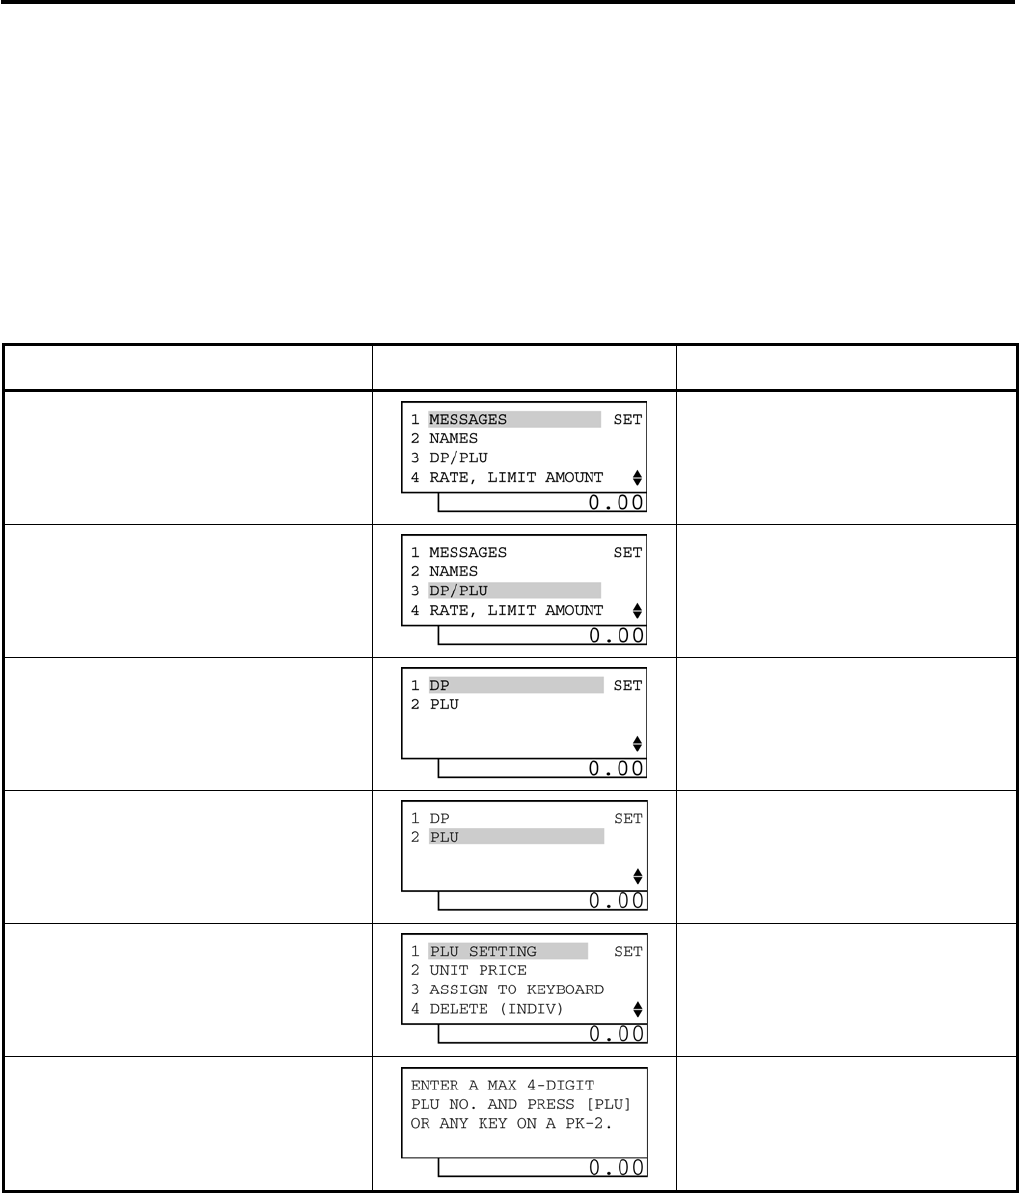
4. PROGRAMMING OPERATIONS EO1-11155
4.12 PLU Table Programming
4-38
3) Example
To program the following PLU data:
PLU Code: 0010
Linked Department: Department 1
Preset Price: $1.00
2nd Preset Price: $1.20
3rd Preset Price: $1.50
PLU Status 1: 4 (Food Stamp Status)
PLU Status 2: None
Tax Status: 1 (Tax 1)
Whole Package Quantity: 3
Operation LCD Display Remarks
When the ECR is being outside a sale
and in SET mode, depress the [↓] key
twice.
The cursor is moved on to “3 DP/PLU”.
Depress the [3] or [Enter] key.
“3 DP/PLU” is selected.
Depress the [↓] key.
The cursor is moved on to “2 PLU”.
Depress the [2] or [Enter] key.
“2 PLU” is selected.
Depress the [1] or [Enter] key.
“1 PLU SETTING” is selected.
Input 0010 (or 10), then depress the
[PLU] key.
PLU Code 0010 is set.
PLU Code: Max. 4 digits (1 to 9999)
(continued on the next page)
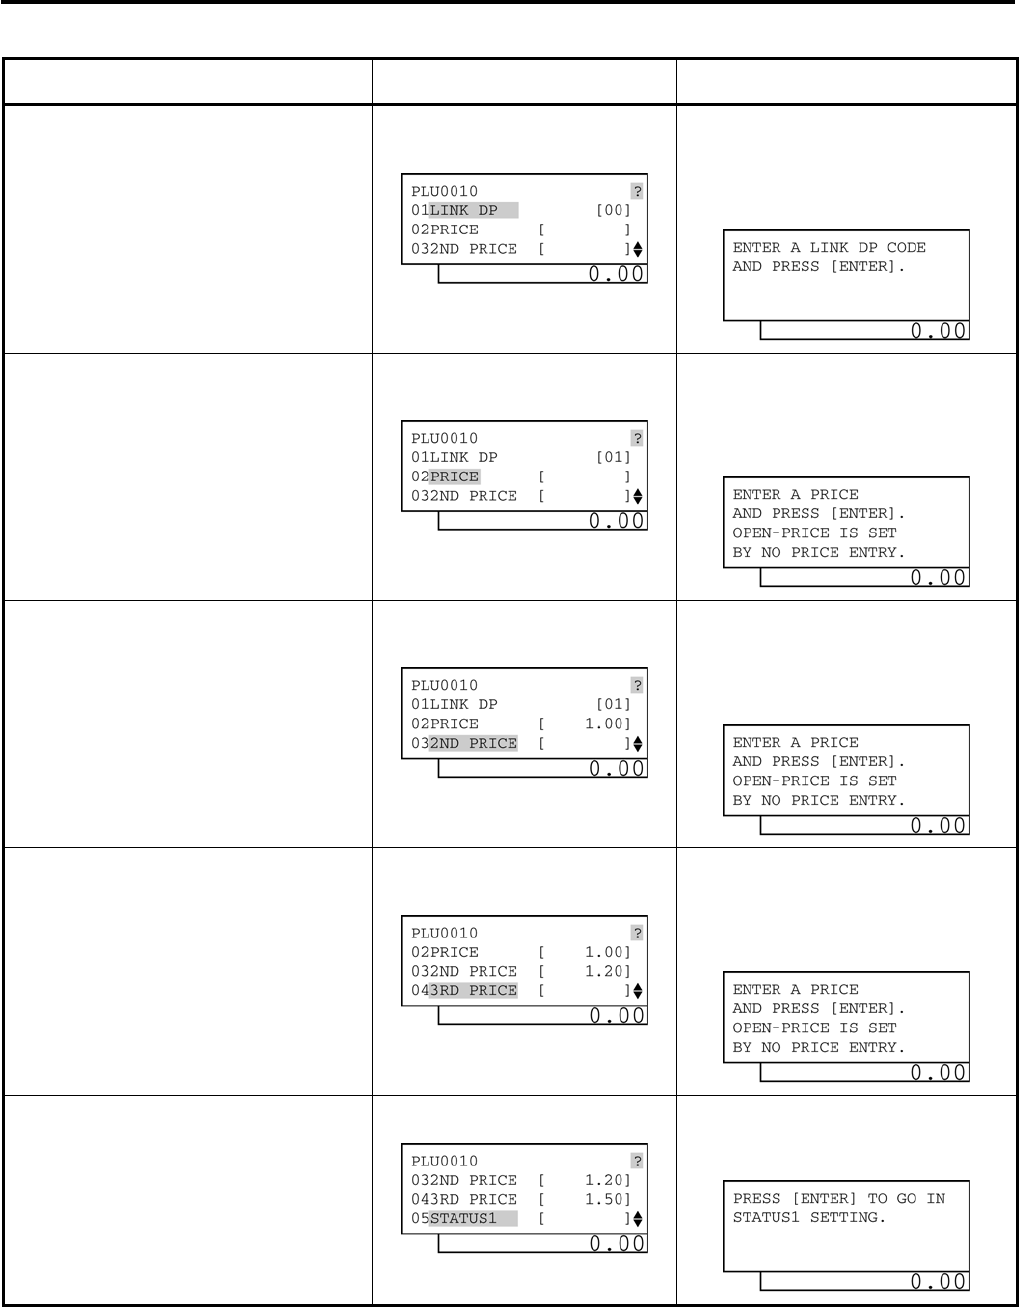
4. PROGRAMMING OPERATIONS EO1-11155
4.12 PLU Table Programming
4-39
(continued from the previous page)
Operation LCD Display Remarks
Input 01 (or 1), then depress the
[Enter] key.
Linked Department 1 is set.
The [?] key depression results in that the
following guidance message appears on the
LCD display.
Input 100, then depress the [Enter]
key.
Preset Price $1.00 is set.
The [?] key depression results in that the
following guidance message appears on the
LCD display.
Input 120, then depress the [Enter]
key.
2nd Preset Price $1.20 is set.
The [?] key depression results in that the
following guidance message appears on the
LCD display.
Input 150, then depress the [Enter]
key.
3rd Preset Price $1.50 is set.
The [?] key depression results in that the
following guidance message appears on the
LCD display.
The [Enter] key depression allows the
ECR to enter PLU Status 1 setting
menu.
The [?] key depression results in that the
following guidance message appears on the
LCD display.
(continued on the next page)
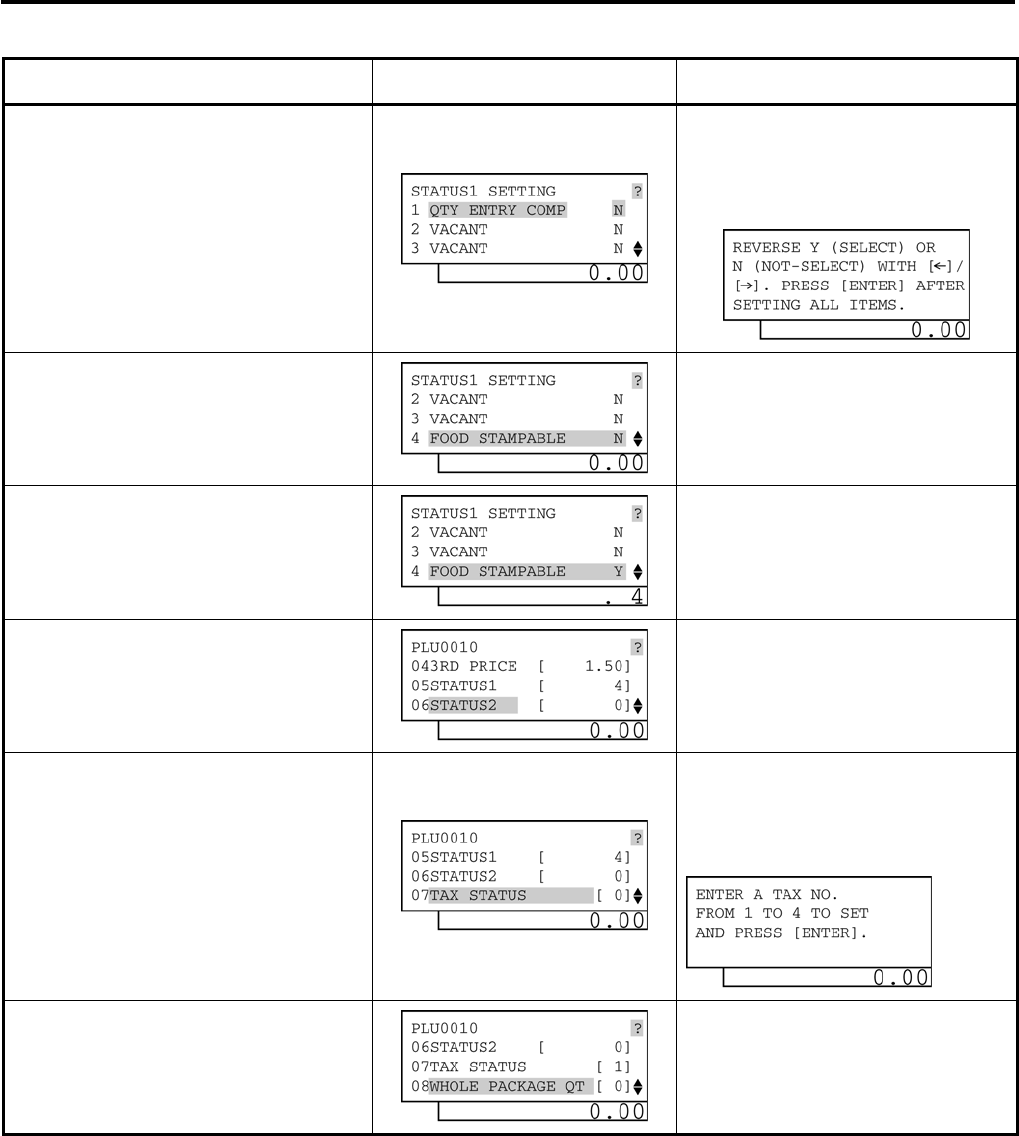
4. PROGRAMMING OPERATIONS EO1-11155
4.12 PLU Table Programming
4-40
(continued from the previous page)
Operation LCD Display Remarks
Depress the [↓] key three times.
“4 FOOD STAMPABLE” is selected.
The [?] key depression results in that the
following guidance message appears on the
LCD display.
Depress the [→] key.
The [→] key depression results in that the
status is changed from N to Y.
(The ON status of FOOD STAMPABLE is
selected.)
Depress the [Enter] key.
The PLU Status 1 is set and the selected
status code is displayed.
Depress the [↓] key.
Depress the [↓] key.
The cursor is move on to “6 TAX STATUS”.
The [?] key depression results in that the
following guidance message appears on the
LCD display.
Input 1, then depress the [Enter] key.
Tax 1 is selected.
(continued on the next page)
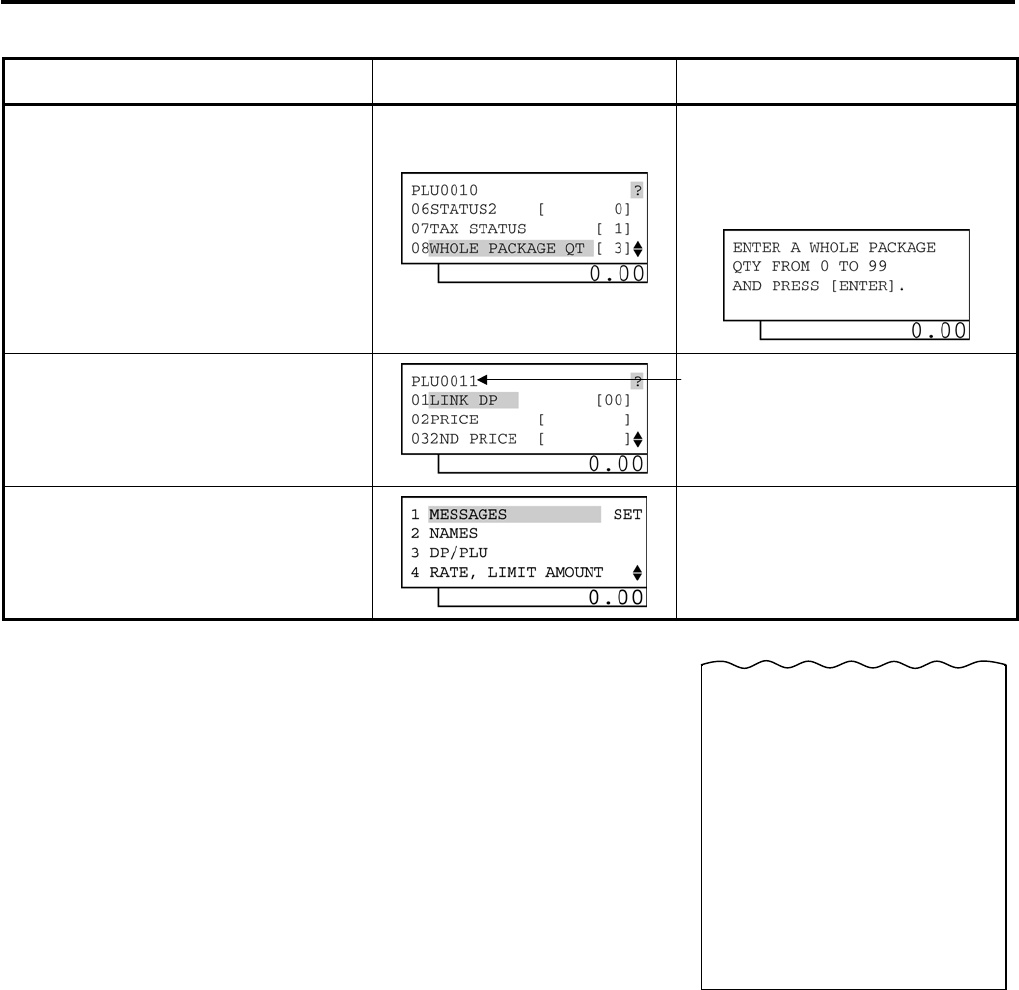
4. PROGRAMMING OPERATIONS EO1-11155
4.12 PLU Table Programming
4-41
(continued from the previous page)
Operation LCD Display Remarks
Input 3, then depress the [Enter] key.
Whole Package Quantity 3 is set.
The [?] key depression results in that the
following guidance message appears on the
LCD display.
The [PLU] key depression completes
the programming for PLU code 0010.
(Addition of new PLUs and changes of
current PLUs can be performed.)
When the [PLU] key is depressed, the next
PLU code (i.e. the currently programmed
PLU code plus 1) is displayed here.
The [End] key depression allows the
ECR to end this programming.
A long receipt is issued and the display
returns to Main Menu screen.
10-20-2006 FRI #0
PLU
0010 PLU0010
#01 01
#02 1.00@
#03 1.20@
#04 1.50@
#05 4
#07 1
#08 3
0001
0020 13:45TM
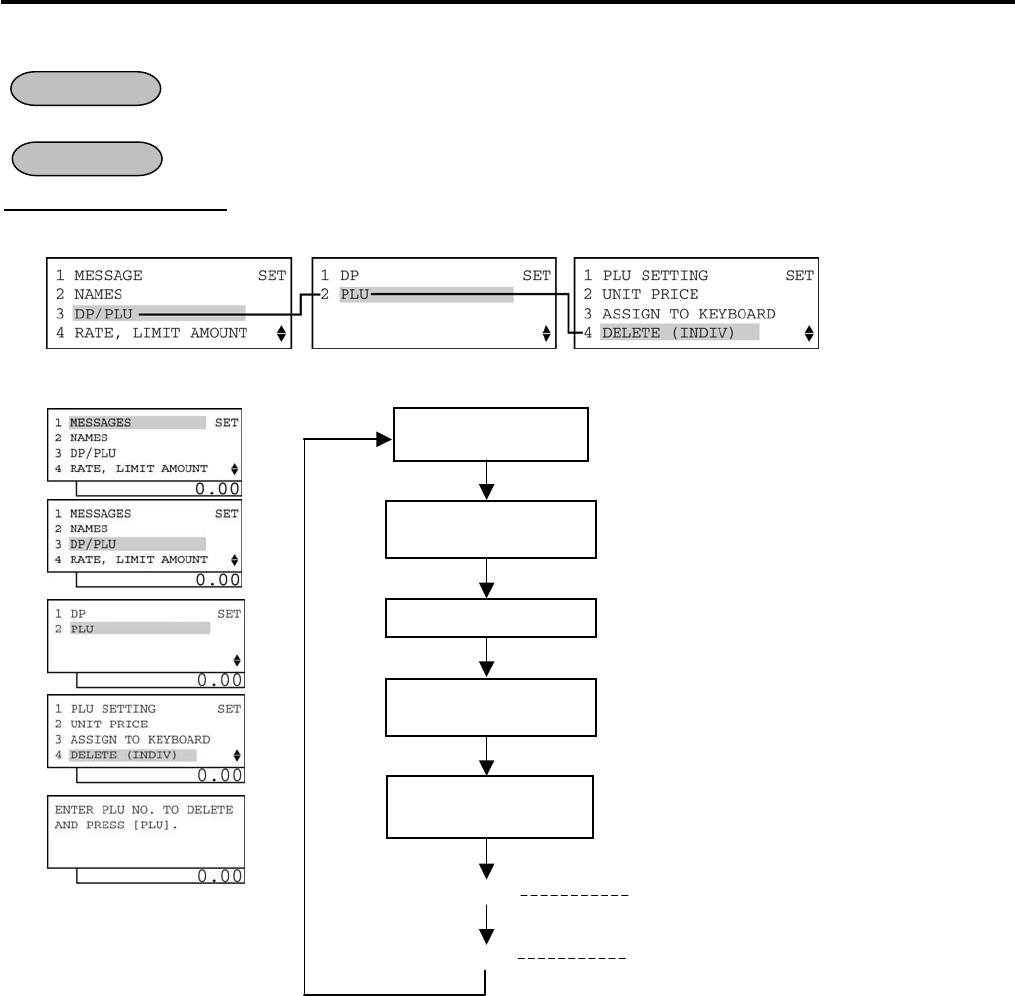
4. PROGRAMMING OPERATIONS EO1-11155
4.12 PLU Table Programming
4-42
4.12.2 Deletion
To delete a PLU with sales data of zero: Any time outside a sale
To delete a PLU with sales data of not zero: After PLU Reset
Mode Lock: SET
Individual PLU Deletion: The programmed PLU data is deleted individually.
1) Menu Tree
2) Operation Flowchart
OPERATION
CONDITION
“3 DP/PLU” is
selected.
Main Menu
“
2 PLU
”
is selected.
ECR is being outside a sale and in
SET
mode.
Depress
[
↓
]
twice then
[Enter]
.
Or Depress [3].
Depress
[
↓
]
then
[Enter]
.
Or Depress [2].
Input a PLU Code to
be deleted.
[PLU]
“
4 DELETE (INDIV)
”
is selected. Depress
[
↓
]
three times then
[Enter]
.
Or Depress [4].
Max. 4 digits: 1 to 9999
The specified PLU is deleted.
[End] This operation is ended. A long receipt is
issued and the display returns to Main Menu
screen.
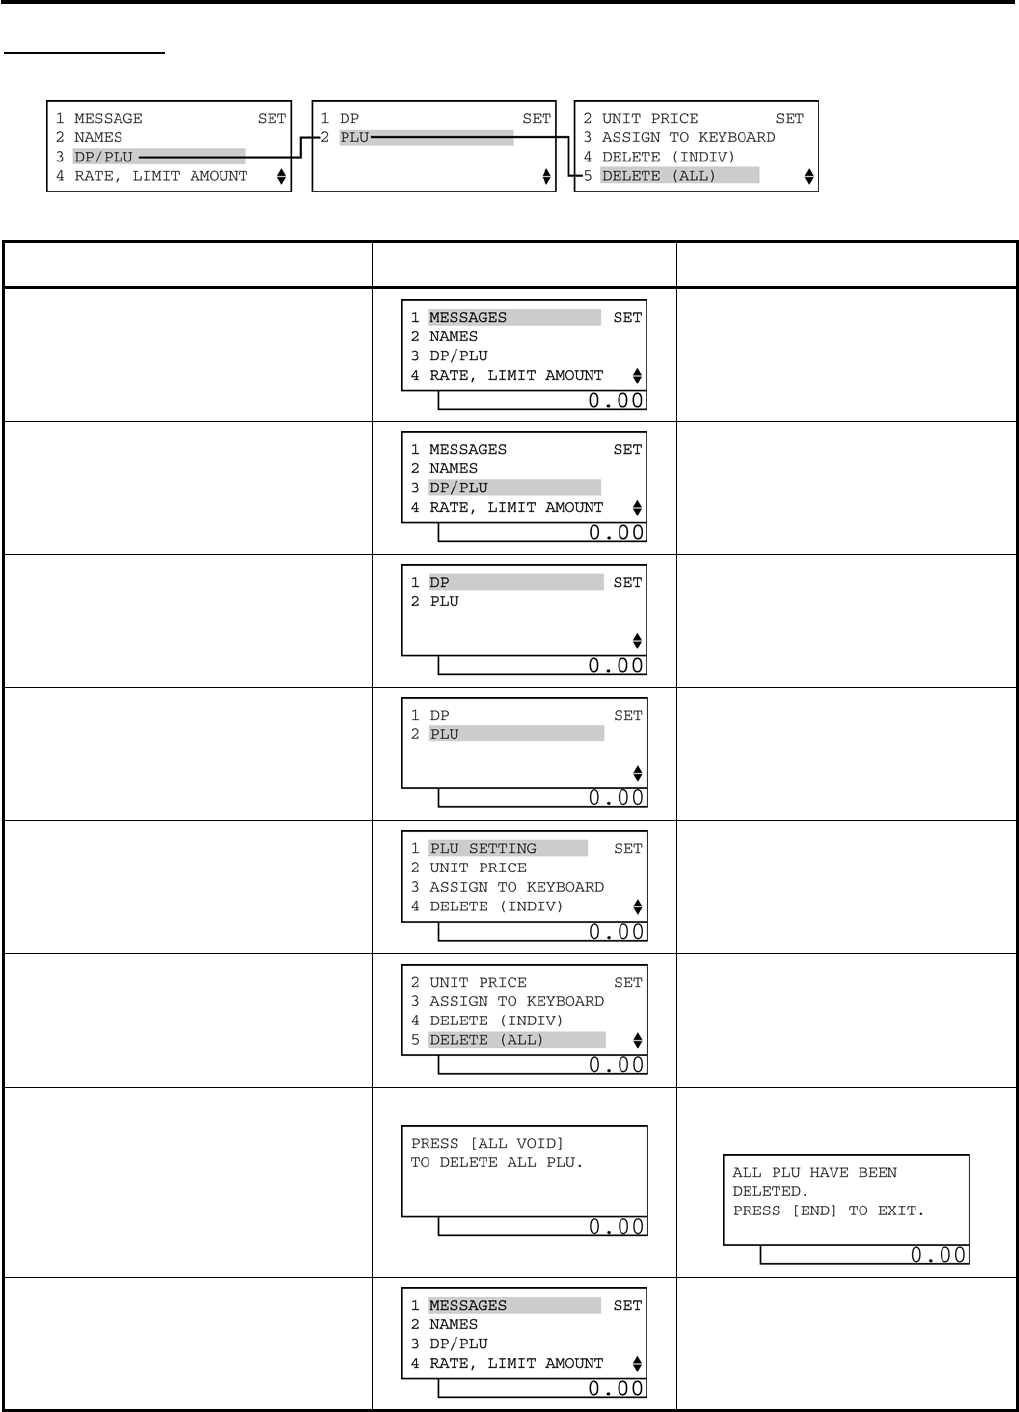
4. PROGRAMMING OPERATIONS EO1-11155
4.12 PLU Table Programming
4-43
All PLU Deletion: The programmed PLU data is deleted entirely.
1) Menu Tree
2) Operation
Operation LCD Display Remarks
When the ECR is being outside a sale
and in SET mode, depress the [↓] key
twice.
The cursor is moved on to “3 DP/PLU”.
Depress the [3] or [Enter] key.
“3 DP/PLU” is selected.
Depress the [↓] key.
The cursor is moved on to “2 PLU”.
Depress the [2] or [Enter] key.
“2 PLU” is selected.
Depress the [↓] key four times.
The cursor is moved on to “5 DELETE
(ALL)”.
Depress the [5] or [Enter] key.
“5 DELETE (ALL)” is selected.
Depress the [ALL VOID] key.
The entire programmed PLU data is deleted,
then the following message is displayed.
The [End] key depression allows the
ECR to end this operation.
A long receipt is issued and the display
returns to Main Menu screen.
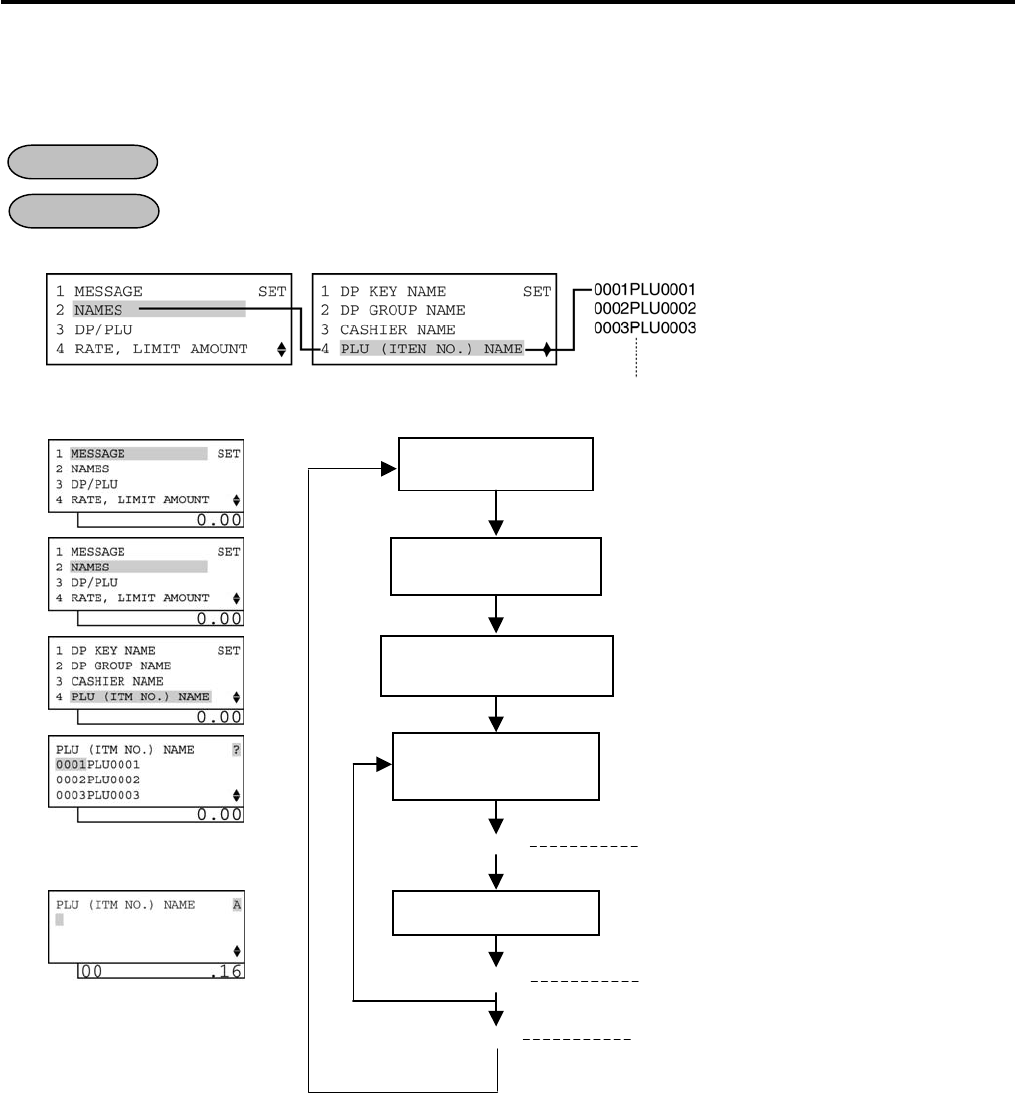
4. PROGRAMMING OPERATIONS EO1-11155
4.13 PLU Name Programming
4-44
4.13 PLU Name Programming
A maximum of 16 characters of name of PLU which was programmed in the PLU Table Programming operation
is set here.
Any time outside a sale
Mode Lock: SET
1) Menu Tree
2) Operation Flowchart
NOTE: A maximum of 16 one-byte characters or 8 two-byte characters can be entered. A combination of
both types is also available.
OPERATION
CONDITION
[Enter]
[End]
“2 NAMES” is
selected.
Main Menu
“4 PLU (ITM NO.)
NAME
” is selected.
Select a PLU to be
programmed.
Input a PLU Name.
[Enter]
ECR is being outside a sale and in
SET
mode.
Depress
[
↓
]
then
[Enter]
.
Or Depress [2].
The ECR enters character input mode.
This setting is ended. A long receipt is issued
and the display returns to Main Menu screen.
Depress
[
↓
]
key three times then
[Enter]
.
Or Depress [4].
The PLU Name is entered
and
printed.
A maximum of 16 one
-byte or 8 two-
byte
characters are input.
Select a PLU of which name is to be
programmed with the [↑] or [↓] key.
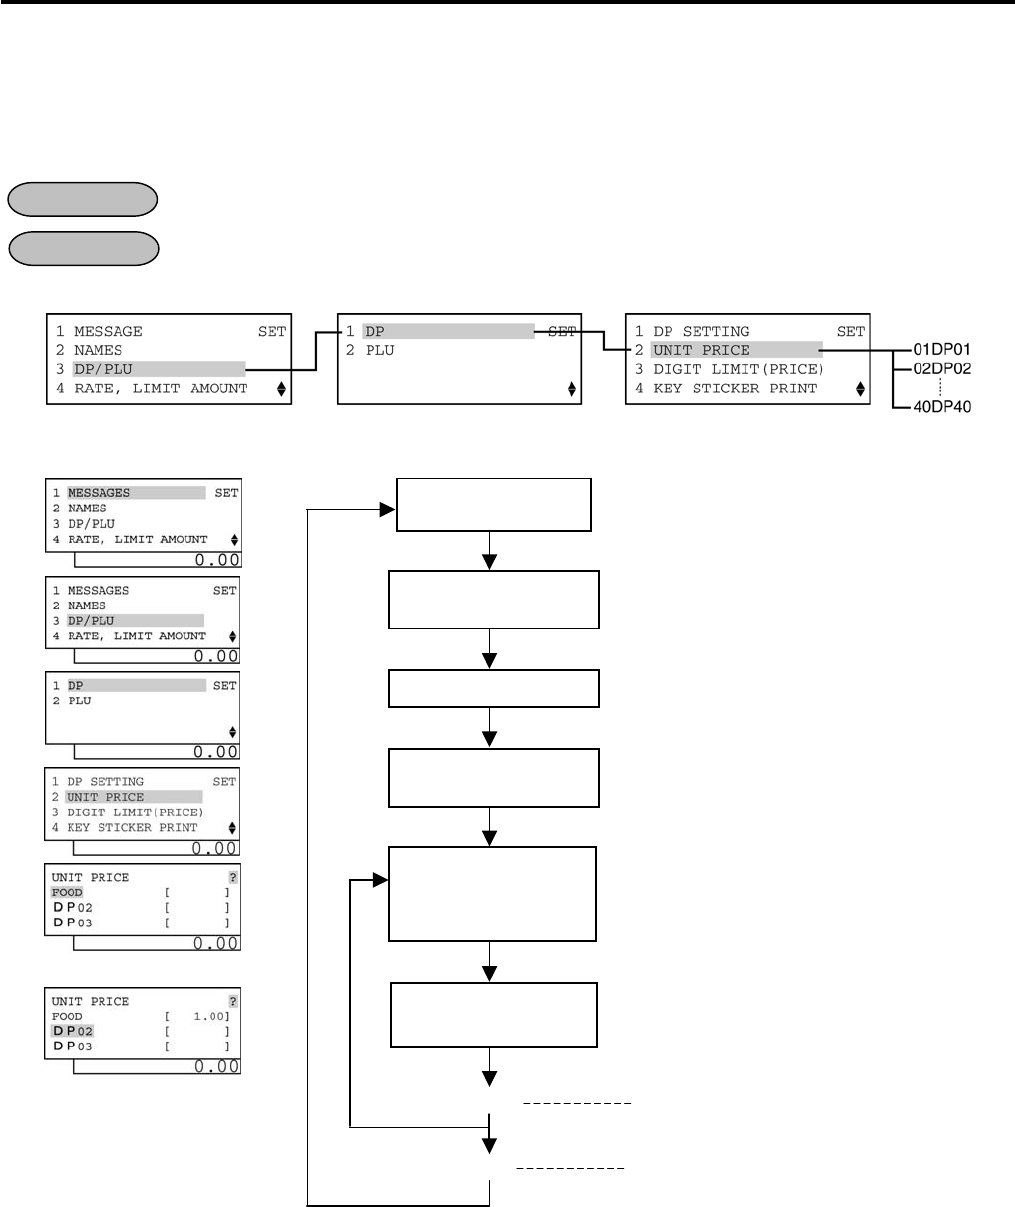
4. PROGRAMMING OPERATIONS EO1-11155
4.14 Department Preset Price Setting or Changing
4-45
4.14 Department Preset Price Setting or Changing
The preset price of each department may be set in the DEPARTMENT TABLE PROGRAMMING already
described. However, in setting or changing the price only but not other programmed data, the following operation
will be more convenient.
Any time outside a sale
Mode Lock: SET
1) Menu Tree
2) Operation Flowchart
NOTE: When inputting 0 then depressing the [Enter] key, a zero price will be set to the department. If none of
unit price value is input then the [Enter] key is depressed, the department will be open (i.e. open-price
department).
OPERATION
CONDITION
“3 DP/PLU” is
selected.
Main Menu
“
1
DP
”
is selected.
Input a unit price
value (max. 6 digits).
ECR is being outside a sale and in
SET
mode.
Depress
[
↓
]
twice then
[Enter]
.
Or Depress [3].
See
NOTE
below.
Depress
[1]
or
[Enter]
key.
The department preset price is entered and
printed.
Select a department
of which unit price is
to be programmed.
“
2
UNIT PRICE
”
is
selected. Depress
[
↓
]
then
[Enter]
.
Or Depress [2].
Select a department of which unit price is
to be
programmed with the [↑] or [↓] key.
[Enter]
[End] T
his setting is ended. A long receipt is issued
and the display returns to Main Menu screen.
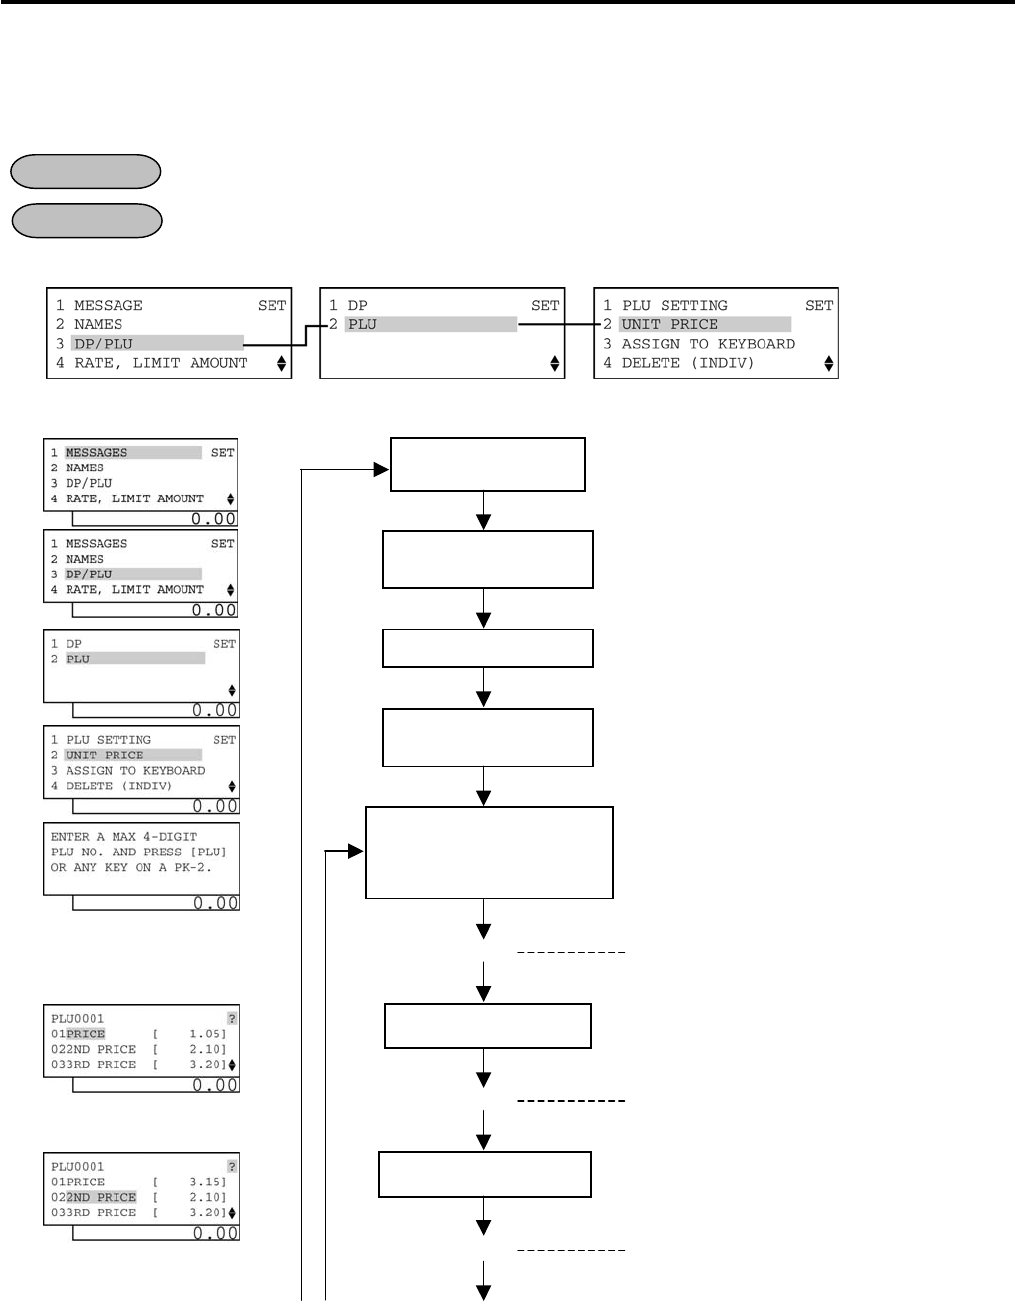
4. PROGRAMMING OPERATIONS EO1-11155
4.15 PLU Preset Price Setting or Changing
4-46
4.15 PLU Preset Price Setting or Changing
The preset price of each PLU may be set in the PLU TABLE PROGRAMMING already described. However, the
following operation will be more convenient in setting or changing the price only (not other programmed data).
Any time outside a sale
Mode Lock: SET
1) Menu Tree
2) Operation Flowchart
OPERATION
CONDITION
“3 DP/PLU” is
selected.
Main Menu
“
2 PLU
”
is selected.
Input 1st preset price.
ECR is being outside a sale and in
SET
mode.
Depress
[
↓
]
twice then
[Enter]
.
Or Depress [3].
Max. 6 digits (0 to 999999) (
NOTE1
)
Depress
[
↓
]
then
[Enter]
.
Or Depress [2].
The 1st preset price is entered and displayed.
Input a PLU Code
of which
PLU preset price is to be
set or changed.
[PLU]
“
2 UNIT PRICE
”
is
selected. Depress
[
↓
]
then
[Enter
]
.
Or Depress [2].
Max. 4 digits: 1 to 9999
(
NOTE 3
)
[Enter]
Input 2nd preset price.
Max. 6 digits (0 to 999999) (
NOTE1
)
(C)
-- continued on the next page --
(A)(B)
The 2nd preset price is entered and displayed.
[Enter]
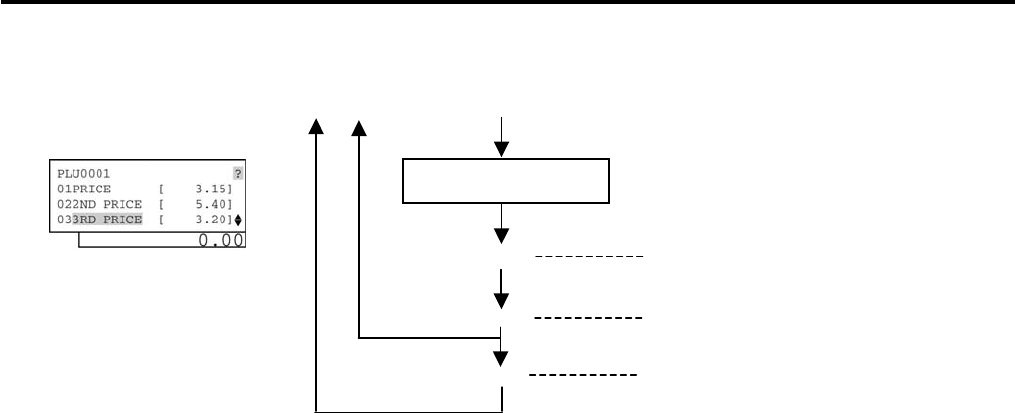
4. PROGRAMMING OPERATIONS EO1-11155
4.15 PLU Preset Price Setting or Changing
4-47
NOTES:
1. When no price is input then the [Enter] key is depressed, the PLU will be open (i.e. open-price PLU).
2. If inputting a nonexistent PLU code that was not programmed in the PLU Table Programming, this may
cause an error.
3. The [PLU] key depression here results in that the next PLU code (i.e. the currently programmed PLU code
plus 1) is displayed. If it does not exist, the guidance message requiring a PLU code input is displayed.
-- continued from the previous page --
(C)
[End]
This setting is ended. A long receipt is issued
and the display returns to Main Menu screen.
(A) (B)
Input 3rd preset price.
Max. 6 digits (0 to 999999) (
NOTE1
)
The 3r
d
preset price is entered and displayed.
[Enter]
The next PLU code (i.e. the currently
programmed PLU code plus 1) is displayed.
([PLU])
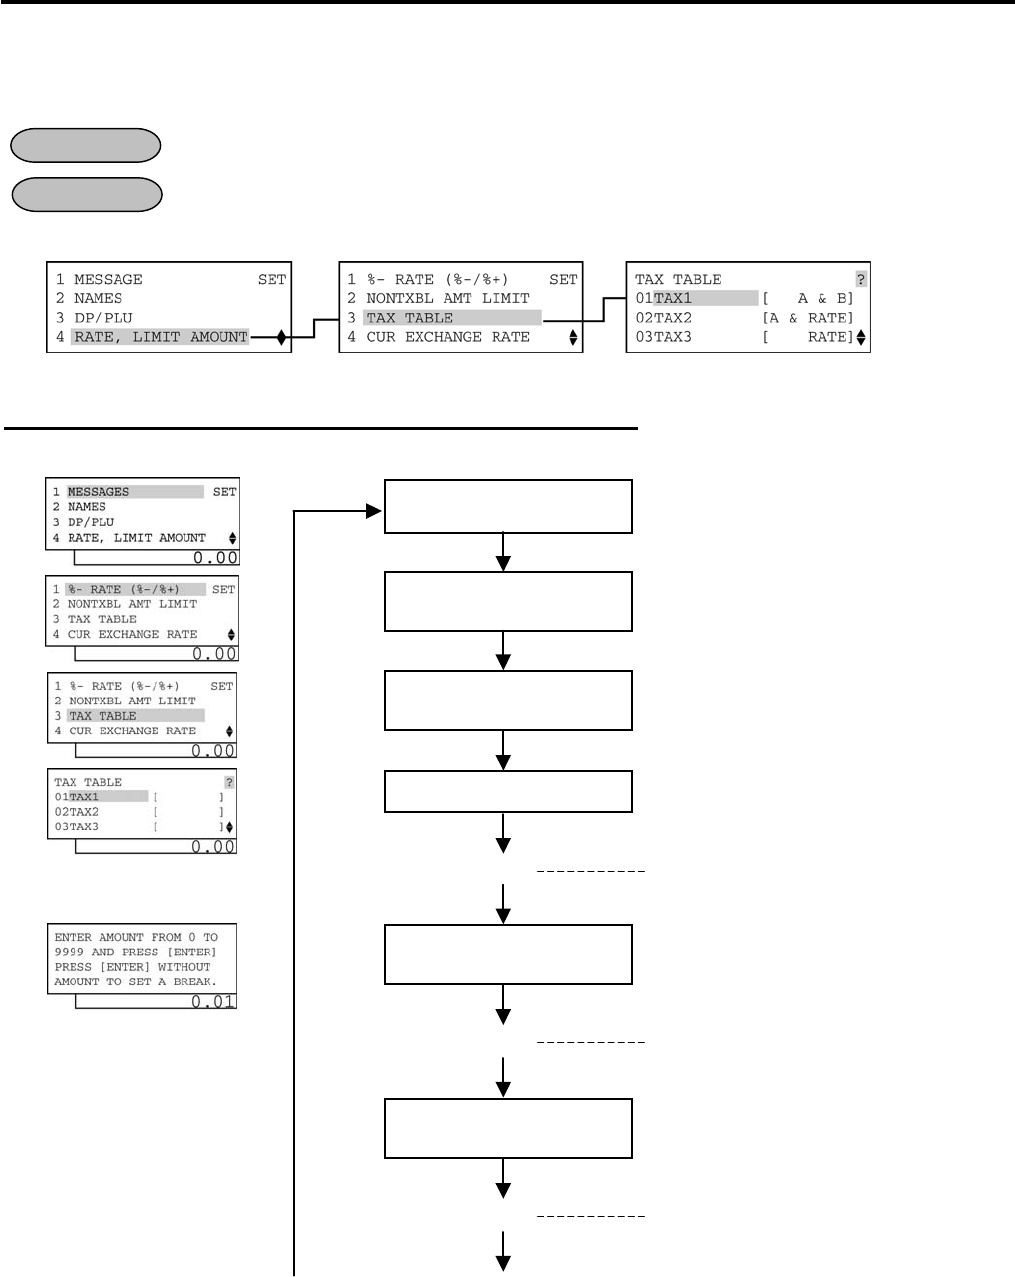
4. PROGRAMMING OPERATIONS EO1-11155
4.16 Tax Table Programming
4-48
4.16 Tax Table Programming
A maximum of four tax tables can be programmed (Tax 1, Tax 2, Tax 3, Tax 4) among three types.
After Financial Daily Reset
Mode Lock: SET
1) Menu Tree
Type 1: Full Breaks (Combination of Non-Cyclic and Cyclic Breaks)
2) Operation Flowchart
OPERATION
CONDITION
“4 RATE, LIMIT
AMOUNT
”
is selected.
Main Menu
“3 TAX TABLE” is
selected.
ECR is being outside a sale and in
SET
mode.
Depress
[
↓
]
three times then
[Enter]
.
Or Depress [4].
Depress
[
↓
]
twice then
[Enter]
.
Or Depress [3].
Input 1.
[Enter]
1: A & B
(Combination of non-cyclic and cyclic breaks)
A&B Break is selec
ted.
(B)
-- continued on the next page --
(A)
Input a maximum of non-
taxable amount.
Max. 4 digits: 1 to 9999 resulting in $0.01 to
$99.99
[Enter]
The
amount is entered.
Input a maximum amount
for 1
¢
tax levied.
Max. 4 digits: 1 to 9999 resulting in $0.01 to
$99.99
[Enter]
The amount is entered.
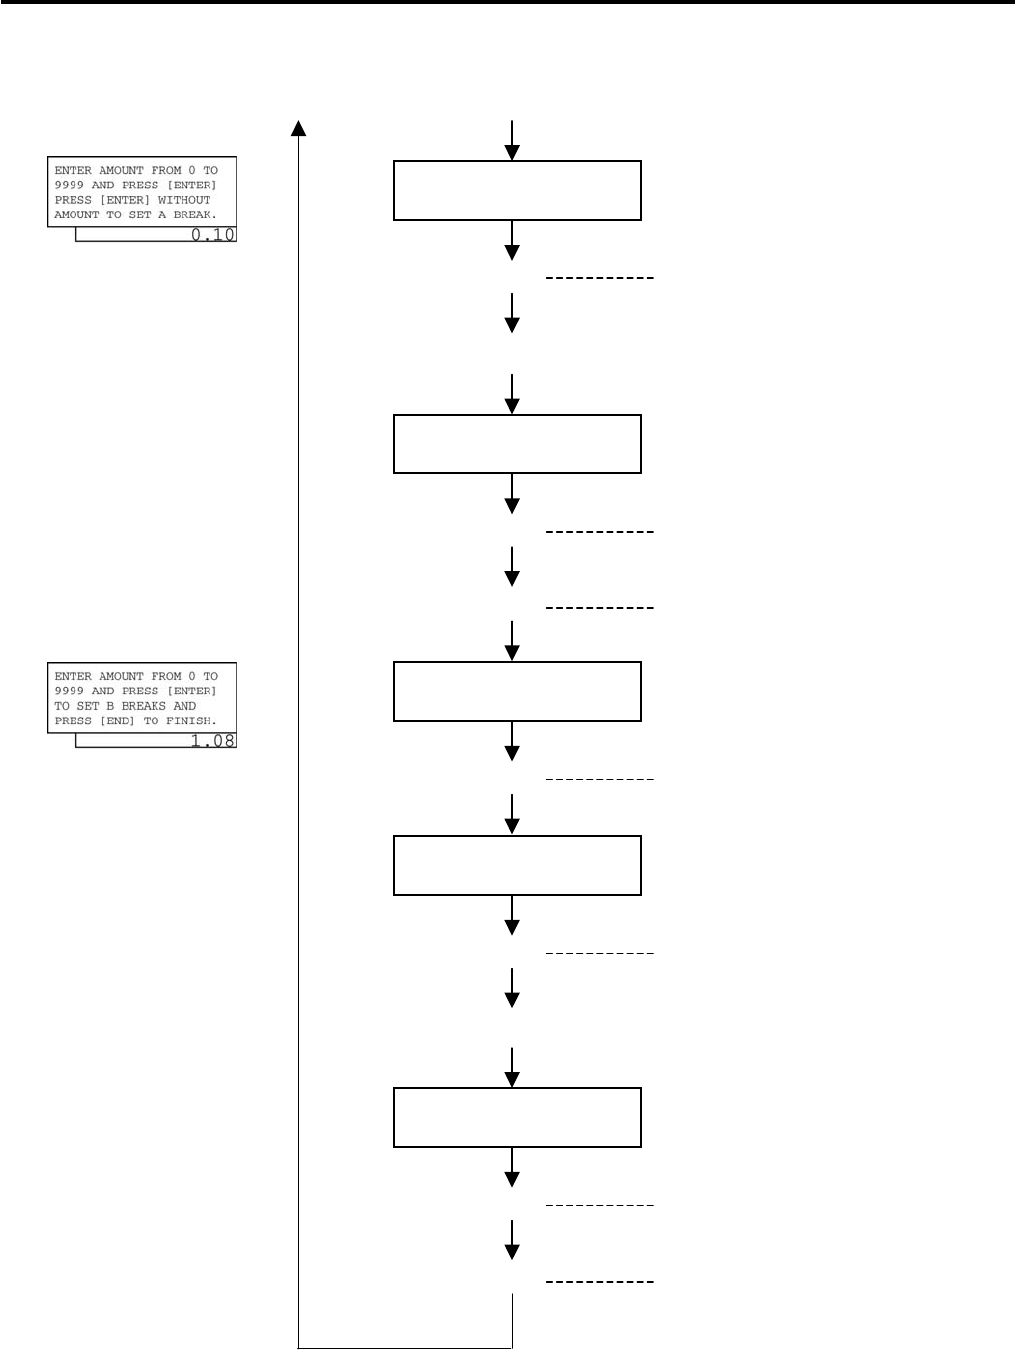
4. PROGRAMMING OPERATIONS EO1-11155
4.16 Tax Table Programming
4-49
Input a maximum amount
for 2
¢
tax levied.
Max. 4 digits: 1 to 9999 resulting in $0.01 to
$99.99
[Enter]
The amount is entered.
[Enter]
“
A
”
break (non
-
cyclic break limit)
Input a maximum amount
for N+1
¢
tax levied.
Max. 4 digits: 1 to 9999 resulting in $0.01 to
$99.99
[Enter]
The amount is entered.
Input a maximum amount
for N+2
¢
tax levied.
Max. 4 digits: 1 to 9999 resulting in $0.01 to
$99.99
[Enter]
The amount is entered.
-- continued from the previous page --
(B)
(A)
Repeat up to the “A”
break.
Input a maximum amount
for N
¢
tax levied.
Max. 4 digits: 1 to 9999 resulting in $0.01 to
$99.99
[Enter]
The amount is entered.
[End]
This setting is ended. A long receipt is issued
and the display returns to Main Menu screen.
Repeat up to the “B”
break.
Input the “B” break
amount.
Max. 4 digits: 1 to 9999 resulting in $0.01 to
$99.99
[Enter]
“B” break (cyclic break limit)
(“B” break – “A” break + Multiple of $1.00:
max. $9.00)
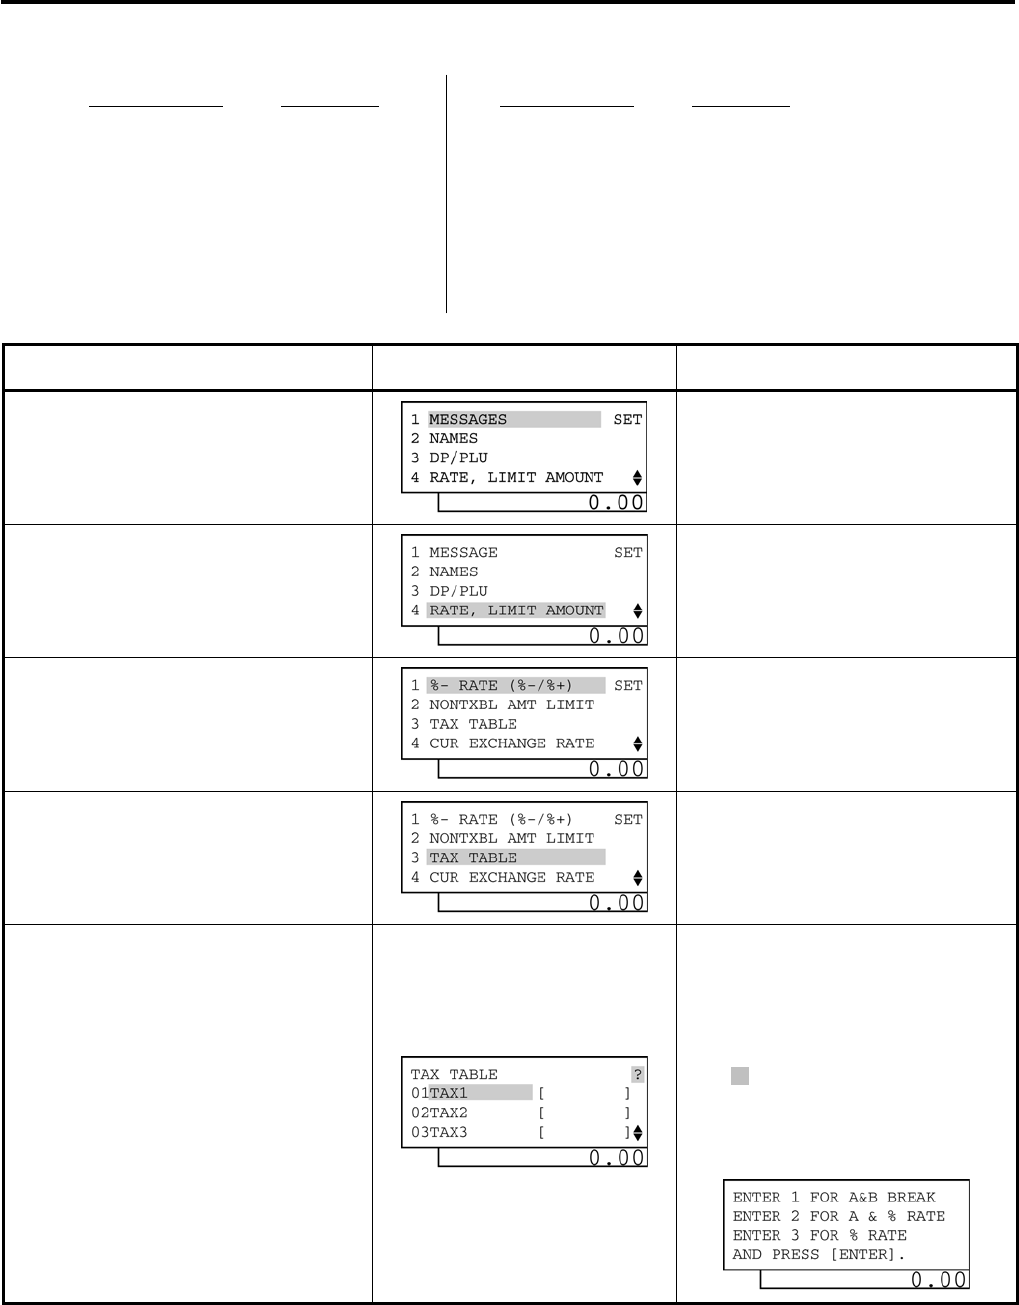
4. PROGRAMMING OPERATIONS EO1-11155
4.16 Tax Table Programming
4-50
3) Example
Tax1 table below is set.
Amount Range Tax Levied Amount Range Tax Levied
$0.00 to $0.10 0¢ $1.09 to $1.24 7¢
$0.11 to $0.22 1¢ $1.25 to $1.41 8¢
$0.23 to $0.39 2¢ $1.42 to $1.58 9¢
$0.40 to $0.56 3¢ $1.59 to $1.74 10¢
$0.57 to $0.73 4¢ $1.75 to $1.92 11¢
$0.74 to $0.90 5¢ $1.93 to $2.08 12¢
$0.91 to $1.08 6¢ ---- “B” Break
---- “A” Break
Operation LCD Display Remarks
When the ECR is being outside a sale
and in SET mode, depress the [↓] key
three times.
The cursor is moved on to “4 RATE, LIMIT
AMOUNT”.
Depress the [4] or [Enter] key.
“4 RATE, LIMIT AMOUNT” is selected.
Depress the [↓] key twice.
The cursor is moved on to “3 TAX TABLE”.
Depress the [3] or [Enter] key.
“3 TAX TABLE” is selected.
Make sure the cursor is shown on
01TAX1.
Tax type which has already been
programmed is displayed.
• A & B: Combination of non-cyclic and cyclic
breaks
• A & RATE: Combination of non-cyclic
breaks and % rate
• RATE: % rate only
While ? is shown on the upper-right corner
of the LCD display screen, the [?] key
depression results in that the following
guidance message appears on the LCD
display.
(continued on the next page)
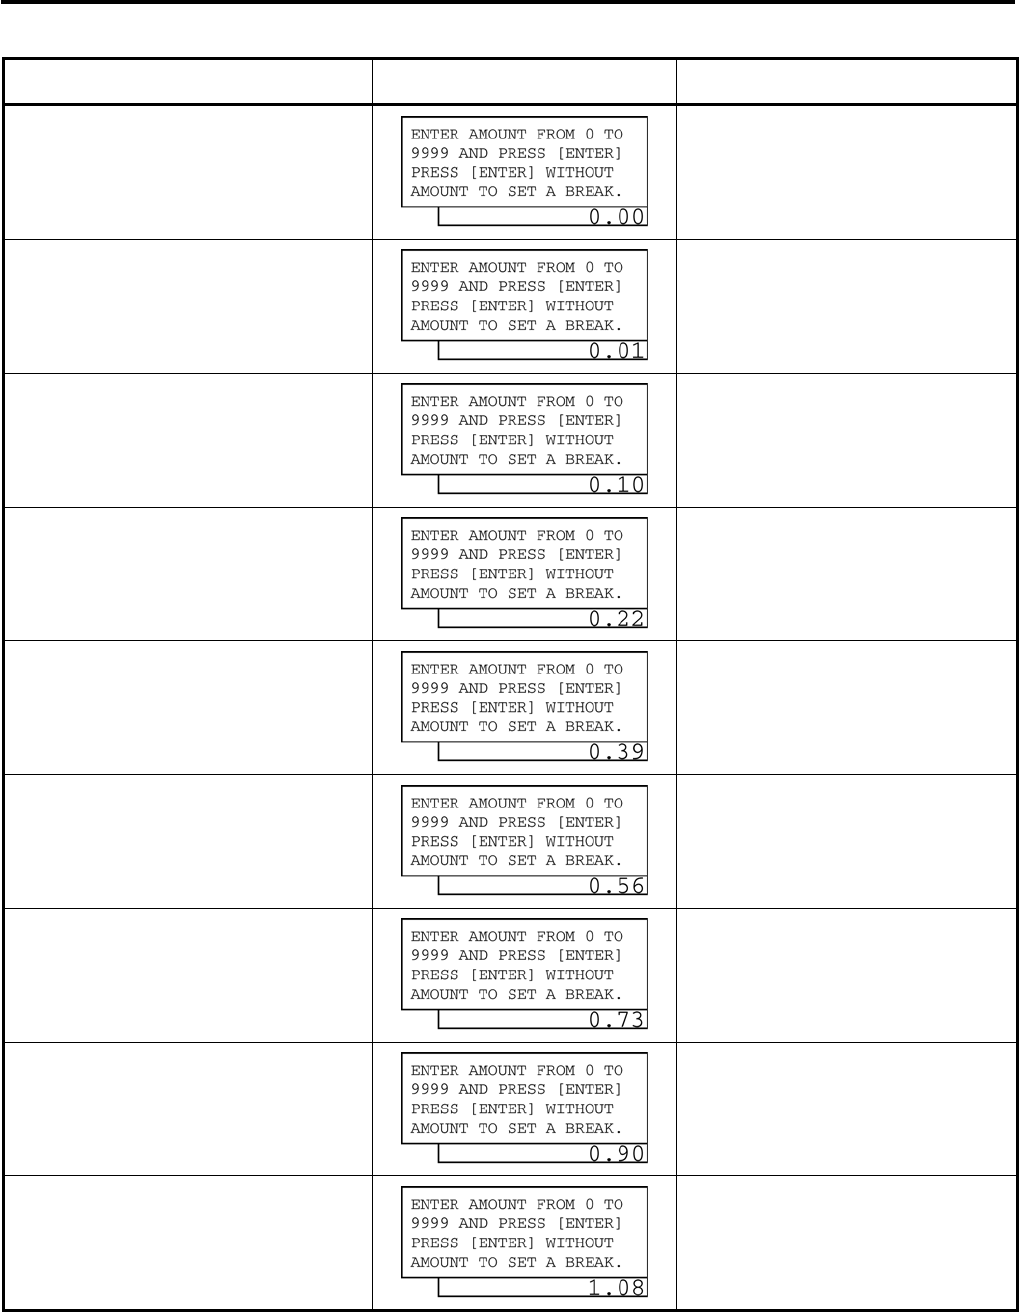
4. PROGRAMMING OPERATIONS EO1-11155
4.16 Tax Table Programming
4-51
(continued from the previous page)
Operation LCD Display Remarks
Input 1, then depress the [Enter] key.
Tax type A & B (Combination of non-cyclic
and cyclic breaks) is selected.
Input 10, then depress the [Enter] key.
($0.00 to $0.10: 0¢ levied)
A maximum of non-taxable amount is set.
Input 22, then depress the [Enter] key.
($0.11 to $0.22: 1¢ tax levied)
A maximum amount for 1¢ tax levied is set.
Input 39, then depress the [Enter] key.
($0.23 to $0.39: 2¢ tax levied)
A maximum amount for 2¢ tax levied is set.
Input 56, then depress the [Enter] key.
($0.40 to $0.56: 3¢ tax levied)
A maximum amount for 3¢ tax levied is set.
Input 73, then depress the [Enter] key.
($0.57 to $0.73: 4¢ tax levied)
A maximum amount for 4¢ tax levied is set.
Input 90, then depress the [Enter] key.
($0.74 to $0.90: 5¢ tax levied)
A maximum amount for 5¢ tax levied is set.
Input 108, then depress the [Enter]
key.
($0.91 to $1.08: 6¢ tax levied)
A maximum amount for 6¢ tax levied is set.
Depress the [Enter] key.
“A” break (non-cyclic break limit) is set.
It is ready to set cyclic breaks.
(continued on the next page)
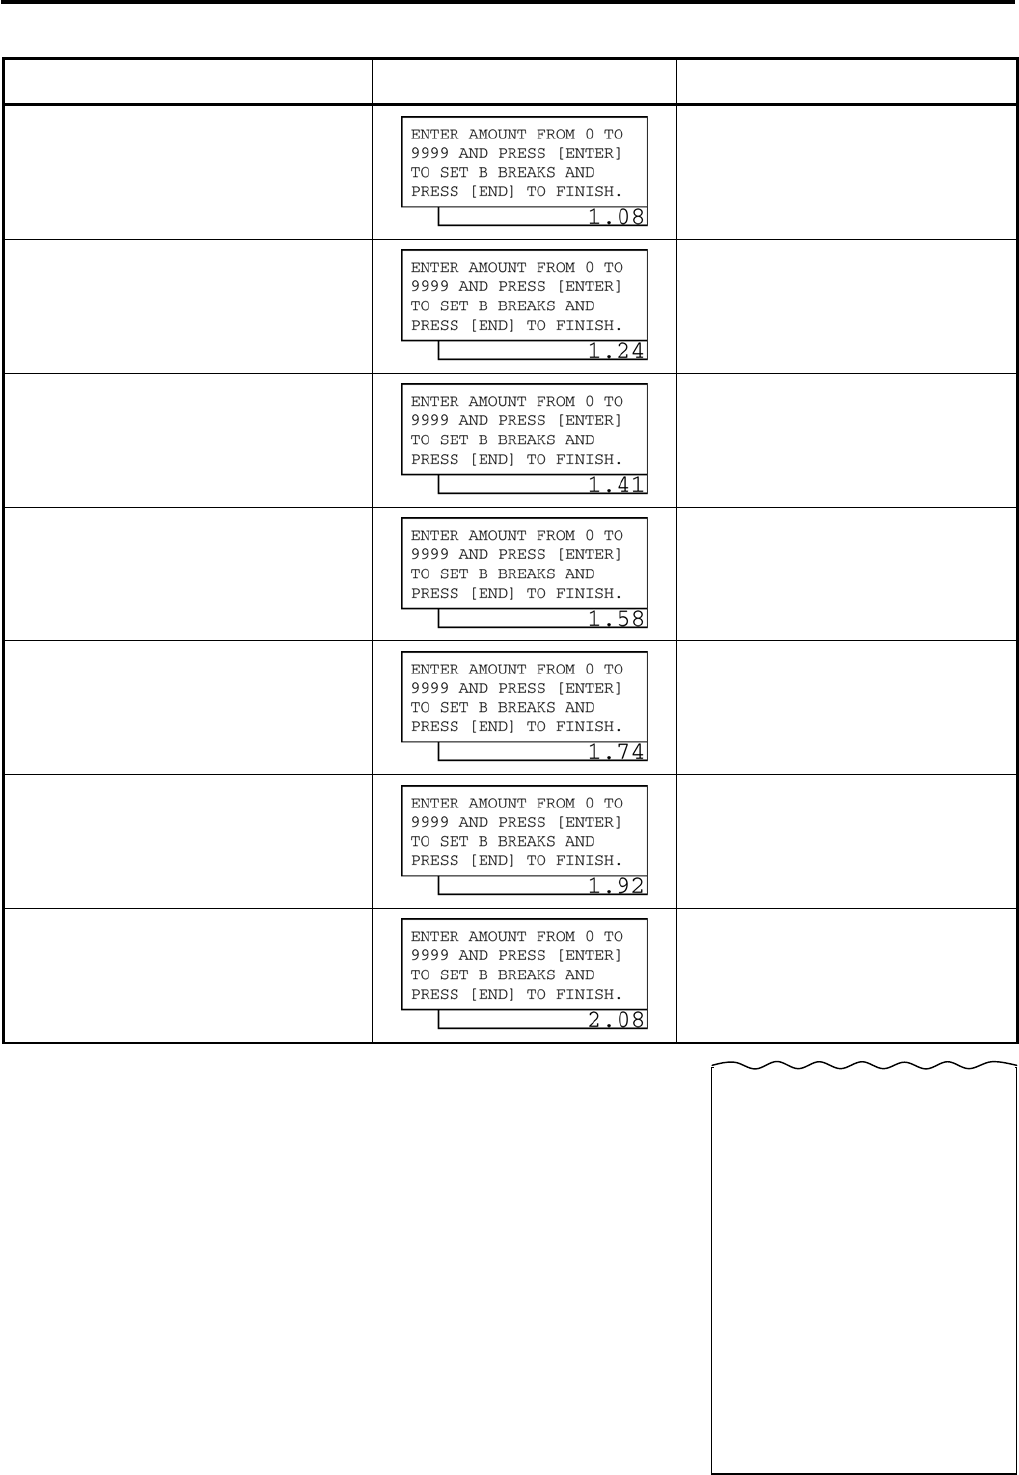
4. PROGRAMMING OPERATIONS EO1-11155
4.16 Tax Table Programming
4-52
(continued from the previous page)
Operation LCD Display Remarks
Input 124, then depress the [Enter]
key.
($1.09 to $1.24: 7¢ levied)
A maximum amount for 7¢ tax levied is set.
Input 141, then depress the [Enter]
key.
($1.25 to $1.41: 8¢ levied)
A maximum amount for 8¢ tax levied is set.
Input 158, then depress the [Enter]
key.
($1.42 to $1.58: 9¢ levied)
A maximum amount for 9¢ tax levied is set.
Input 174, then depress the [Enter]
key.
($1.59 to $1.74: 10¢ levied)
A maximum amount for 10¢ tax levied is set.
Input 192, then depress the [Enter]
key.
($1.75 to $1.92: 11¢ levied)
A maximum amount for 11¢ tax levied is set.
Input 208, then depress the [Enter]
key.
($1.93 to $2.08: 12¢ levied)
A maximum amount for 12¢ tax levied is set.
The [End] key depression allows the
ECR to set “B” break and end this
operation.
“B” break (cyclic break limit) is set.
A long receipt is issued and the display
returns to Main Menu screen.
10-20-2006 FRI #0
TAX TABLE
TAX1
00 $0.10
01 $0.22
02 $0.39
03 $0.56
04 $0.73
05 $0.90
06 $1.08
∗
07 $1.24
08 $1.41
09 $1.58
10 $1.74
11 $1.92
12 $2.08
∗∗
0021 13:47TM
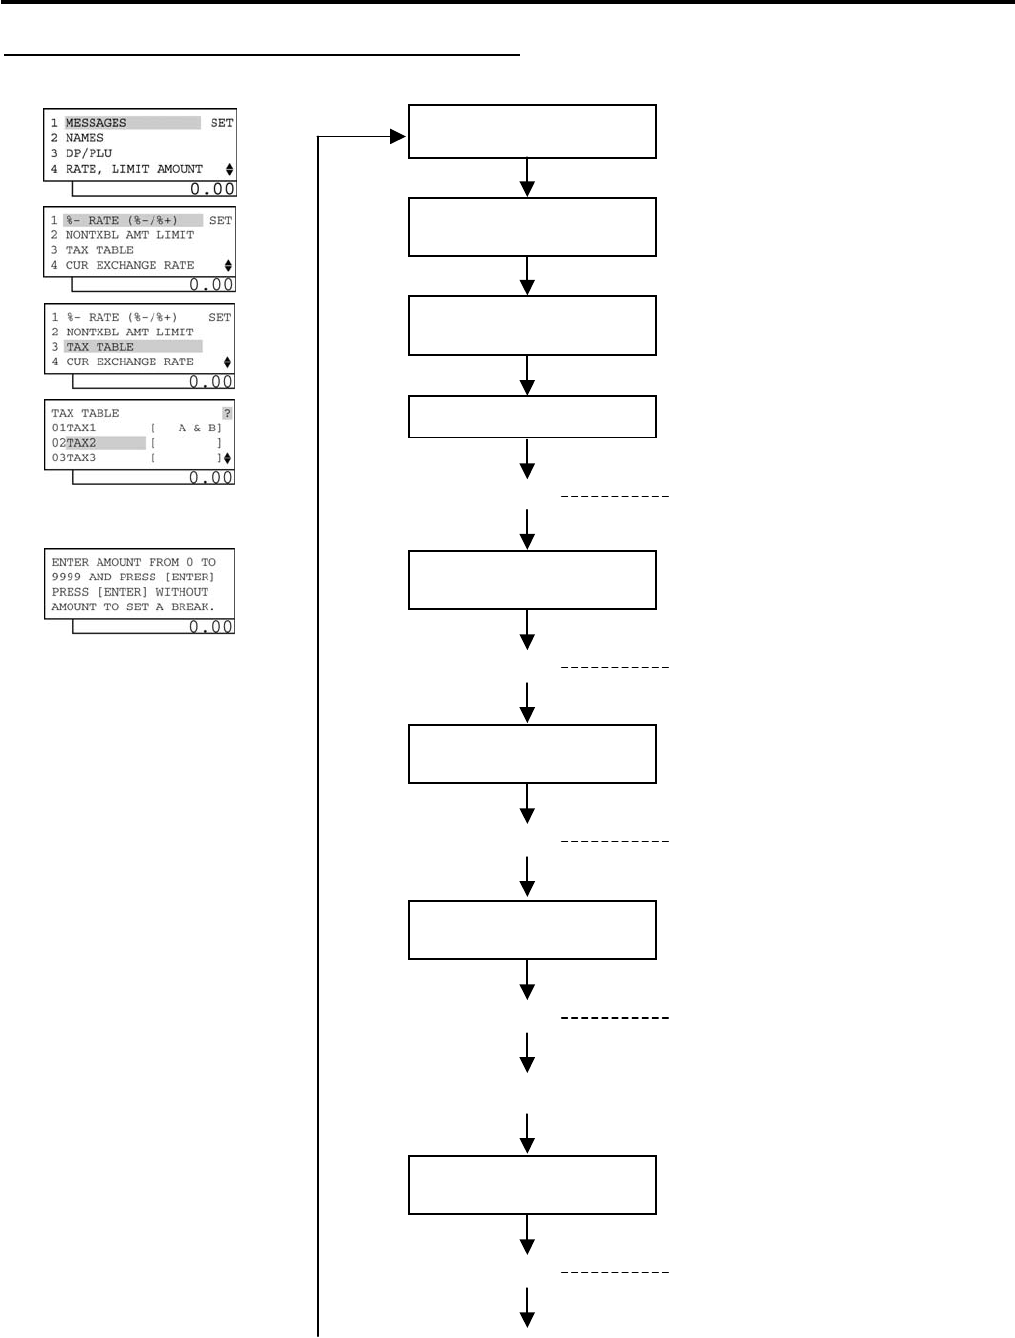
4. PROGRAMMING OPERATIONS EO1-11155
4.16 Tax Table Programming
4-53
Type 2: Combination of Non-Cyclic Breaks and % Rate
2) Operation Flowchart
“4 RATE, LIMIT
AMOUNT
”
is selected.
Main Menu
“3 TAX TABLE” is
selected.
ECR is being outside a sale and in
SET
mode.
Depress
[
↓
]
three times then
[Enter]
.
Or Depress [4].
Depress
[
↓
]
twice then
[Enter]
.
Or Depress [3].
Input 2.
[Enter]
2: A & RATE
(Combination of non-cyclic breaks and % rate)
A & RATE is selected.
(B)
-- continued on the next page --
(A)
Input a maximum of non-
taxable amount.
Max. 4 digits: 1 to 9999 resulting in $0.01 to
$99.99
[Enter]
The amount i
s entered.
Input a maximum amount
for 1
¢
tax levied.
Max. 4 digits: 1 to 9999 resulting in $0.01 to
$99.99
[Enter]
The amount is entered.
Input a maximum amount
for 2
¢
tax levied.
Max. 4 digits: 1 to 9999 resulting in $0.01 to
$99.99
[Enter]
The amount is enter
ed.
Repeat up to the “A” break.
Input a maximum amount
for N
¢
tax levied.
Max. 4 digits: 1 to 9999 resulting in $0.01 to
$99.99
[Enter]
The amount is entered.
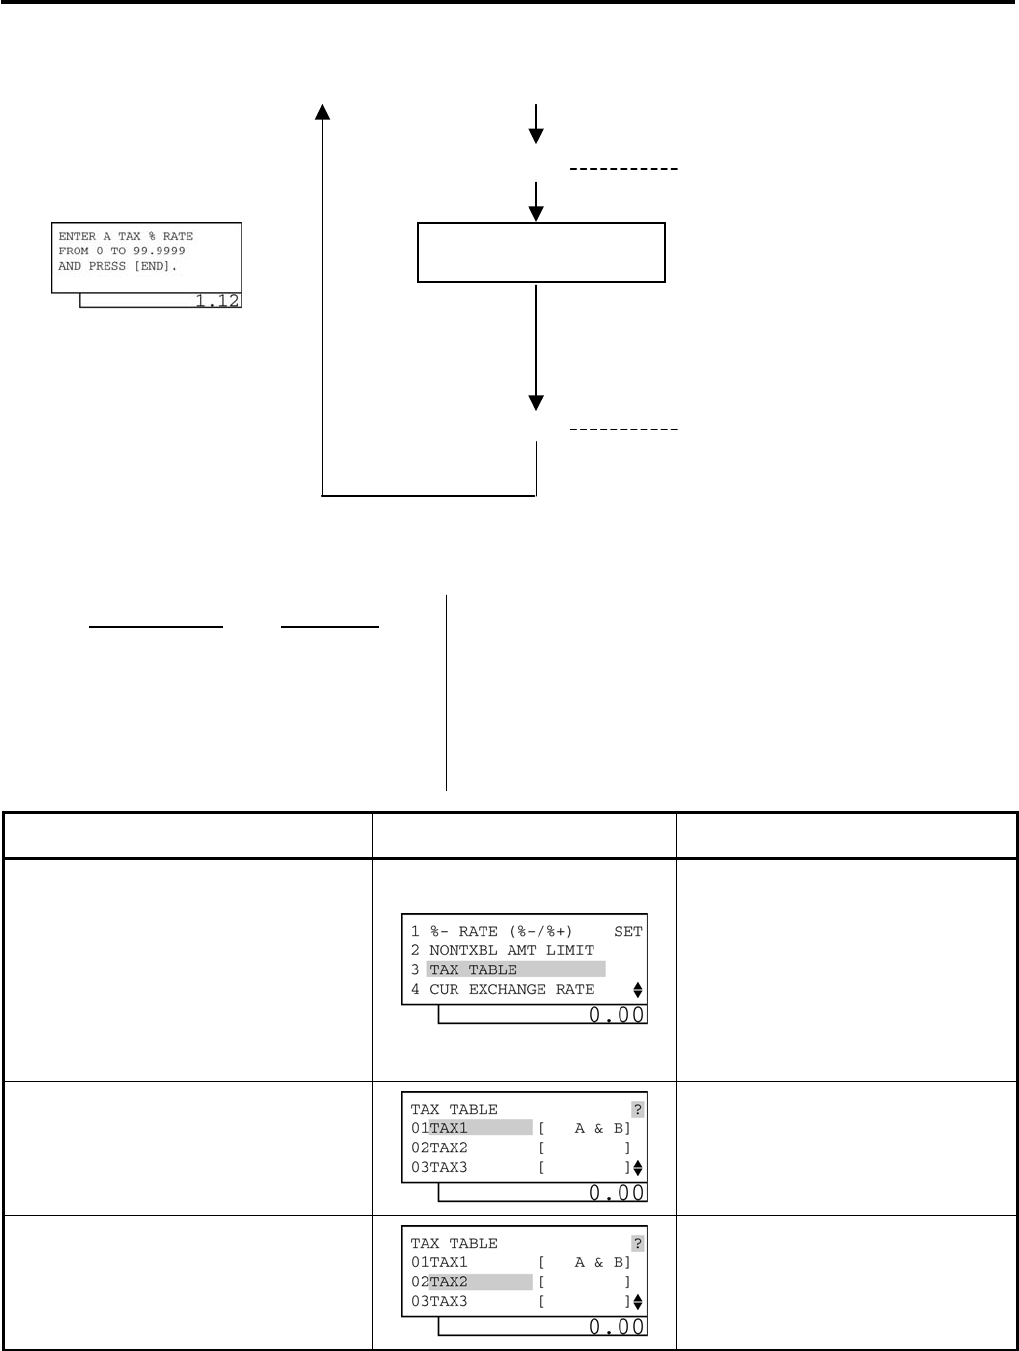
4. PROGRAMMING OPERATIONS EO1-11155
4.16 Tax Table Programming
4-54
3) Example
Tax2 table below is set.
Amount Range Tax Levied
$0.00 to $0.09 0¢ 5% is applied to any amount exceeding the “A” break.
$0.10 to $0.29 1¢
$0.30 to $0.59 2¢
$0.60 to $0.84 3¢
$0.85 to $1.12 4¢
---- “A” Break
Operation LCD Display Remarks
When the ECR is being outside a sale
and in SET mode, depress the [↓] key
three times.
Depress the [4] or [Enter] key.
Depress the [↓] key twice.
Depress the [3] or [Enter] key.
The cursor is moved on to “4 RATE, LIMIT
AMOUNT”.
“4 RATE, LIMIT AMOUNT” is selected.
The cursor is moved on to “3 TAX TABLE”.
“3 TAX TABLE” is selected.
Depress the [↓] key.
Tax type which has already been
programmed is displayed.
Make sure the cursor is shown on
02TAX2.
Tax2 is selected.
(continued on the next page)
[Enter]
“
A
”
break (non
-
cyclic break limit)
Input a tax rate. Tax rate applied when exceeding the “A” break
amount is entered.
(0.0001% to 99.9999%:
Use the [.] key if a dec
imal portion is contained.
Examples:
To set 5%, enter 5.
To set 5.26%, enter 5.26.
The fraction of the amount resulting from this %
rate calculation will be rounded off.)
-- continued from the previous page --
(B)
(A)
[End]
This setting is ended. A long receipt is issued
and the display returns to Main Menu screen.
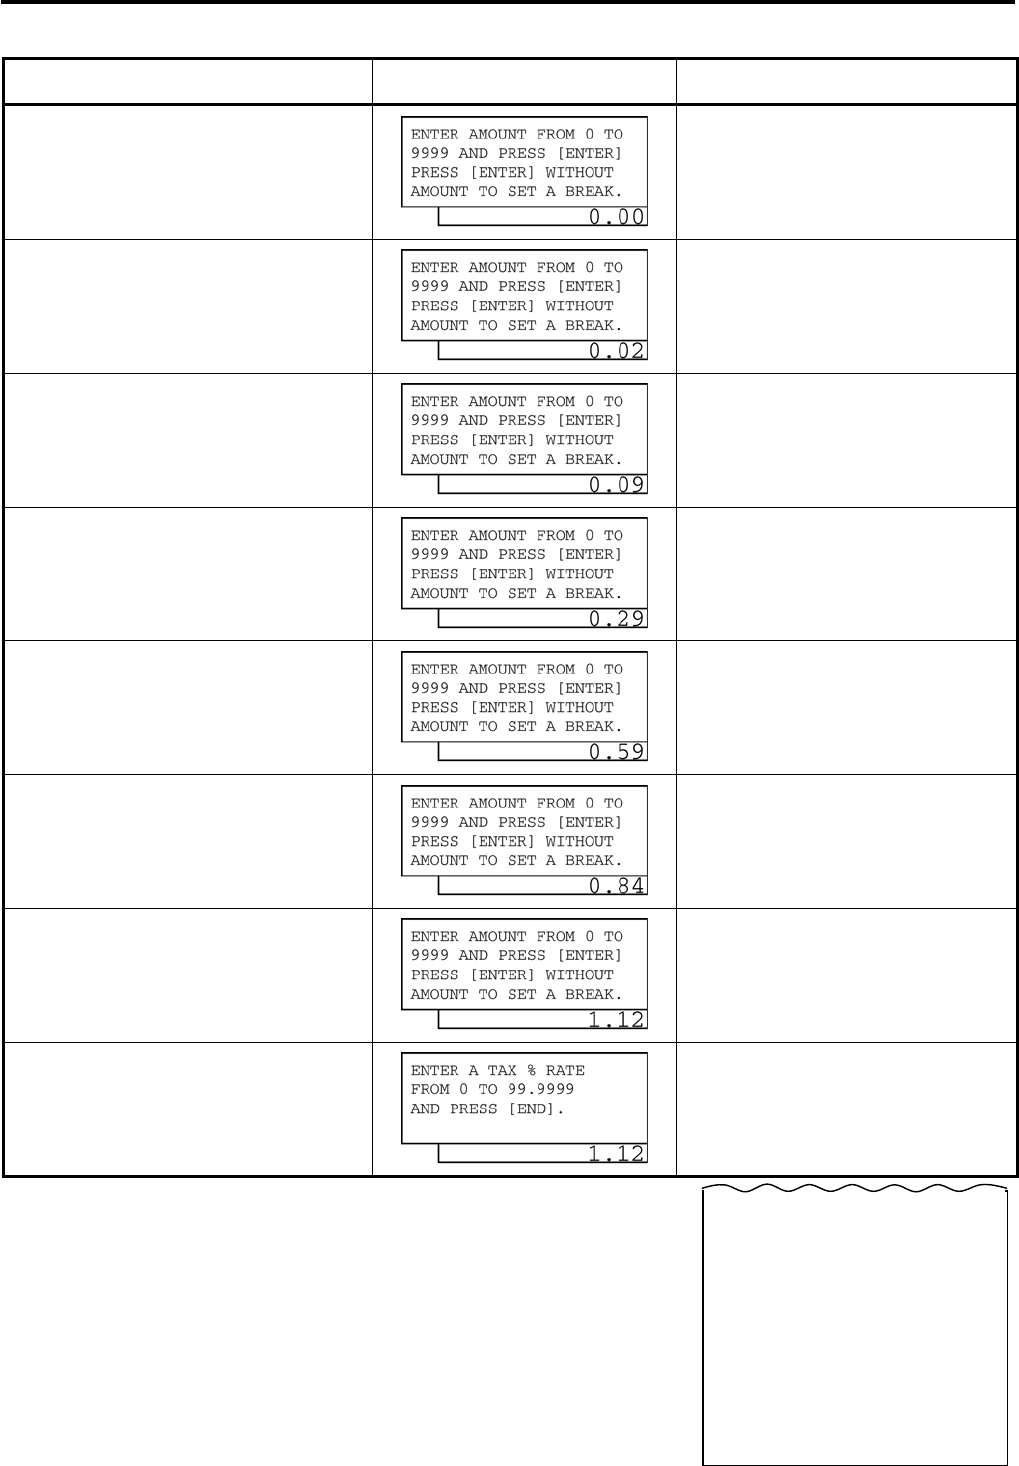
4. PROGRAMMING OPERATIONS EO1-11155
4.16 Tax Table Programming
4-55
(continued from the previous page)
Operation LCD Display Remarks
Input 2, then depress the [Enter] key.
Tax type A & RATE (Combination of non-
cyclic breaks and % rate) is selected.
Input 9, then depress the [Enter] key.
($0.00 to $0.09: 0¢ levied)
A maximum of non-taxable amount is set.
Input 29, then depress the [Enter] key.
($0.10 to $0.29: 1¢ tax levied)
A maximum amount for 1¢ tax levied is set.
Input 59, then depress the [Enter] key.
($0.30 to $0.59: 2¢ tax levied)
A maximum amount for 2¢ tax levied is set.
Input 84, then depress the [Enter] key.
($0.60 to $0.84: 3¢ tax levied)
A maximum amount for 3¢ tax levied is set.
Input 112, then depress the [Enter]
key.
($0.85 to $1.12: 4¢ tax levied)
A maximum amount for 4¢ tax levied is set.
Depress the [Enter] key.
“A” break (non-cyclic break limit) is set.
It is ready to set % rate.
Input 5.
The [End] key depression allows the
ECR to end this operation.
Tax % rate (5%) is set.
A long receipt is issued and the display
returns to Main Menu screen.
10-20-2006 FRI #0
TAX TABLE
TAX2
00 $0.09
01 $0.29
02 $0.59
03 $0.84
04 $1.12
∗
5%
0022 13:49TM
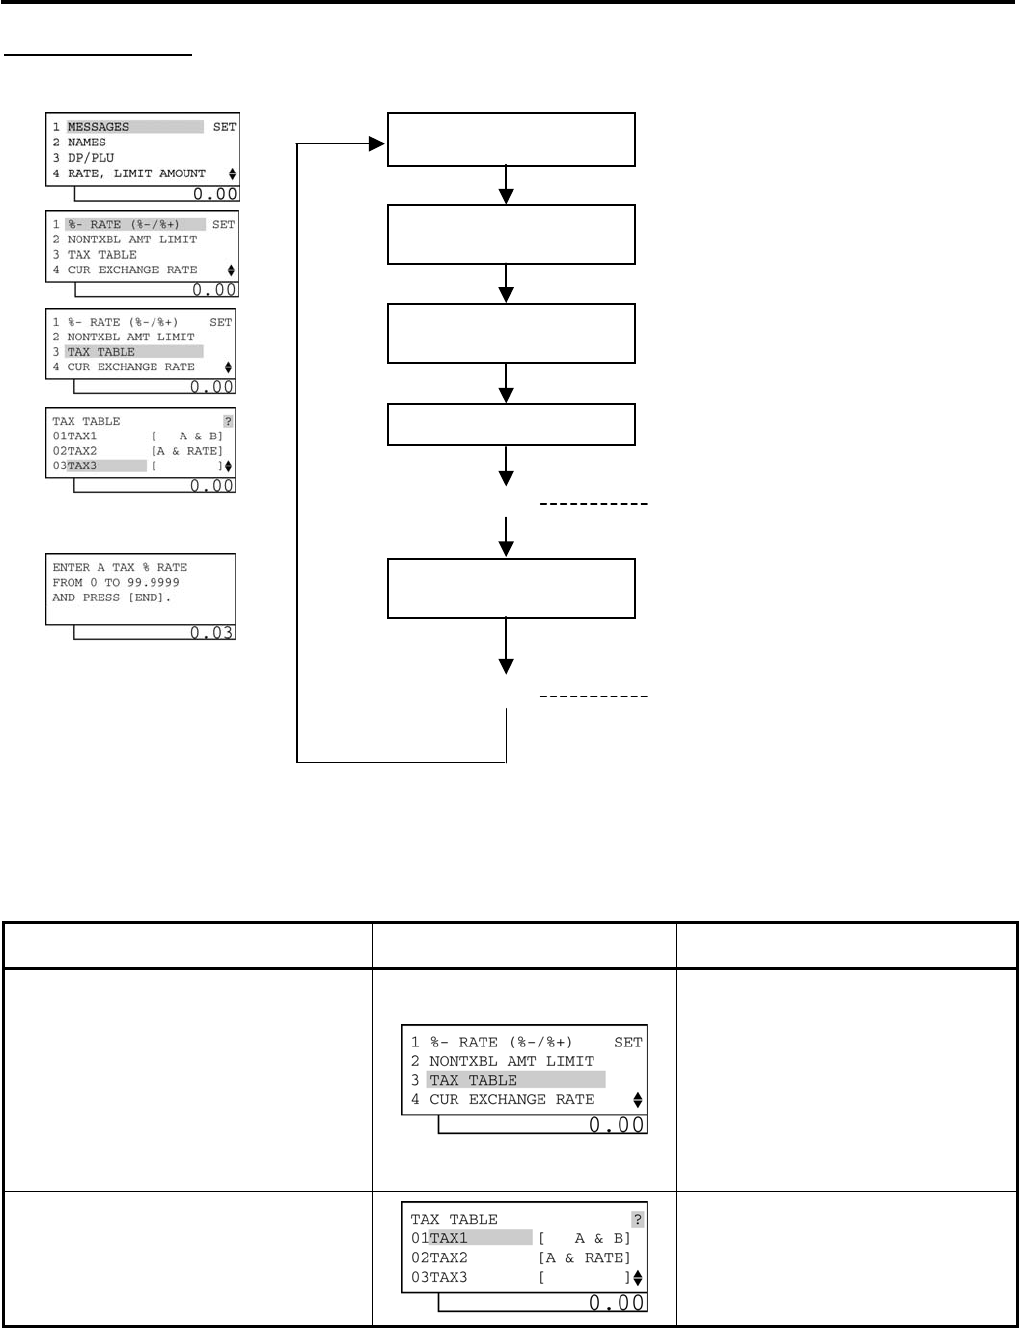
4. PROGRAMMING OPERATIONS EO1-11155
4.16 Tax Table Programming
4-56
Type 3: % Rate only
2) Operation Flowchart
3) Example
Tax3 table below is set.
10% is applied to any sale amount.
Operation LCD Display Remarks
When the ECR is being outside a sale
and in SET mode, depress the [↓] key
three times.
Depress the [4] or [Enter] key.
Depress the [↓] key twice.
Depress the [3] or [Enter] key.
The cursor is moved on to “4 RATE, LIMIT
AMOUNT”.
“4 RATE, LIMIT AMOUNT” is selected.
The cursor is moved on to “3 TAX TABLE”.
“3 TAX TABLE” is selected.
Depress the [↓] key twice.
Tax type which has already been
programmed is displayed.
(continued on the next page)
“4 RATE, LIMIT
AMOUNT
”
is selected.
Main Menu
“3 TAX TABLE” is
selected.
ECR is being outside a sale and in
SET
mode.
Depress
[
↓
]
three times then
[Enter]
.
Or Depress [4].
Depress
[
↓
]
twice then
[Enter]
.
Or Depress [3].
Input 3.
[Enter]
3: RATE (% rate only)
RATE is selected.
Input a tax rate. Tax rate is entered.
(0.0001% to 99.9999%:
Use the [.] key if a decimal portion
is contained.
The fraction of the amount resulting from this %
rate calculation will be rounded off.)
[End]
Th
is setting is ended. A long receipt is issued
and the display returns to Main Menu screen.
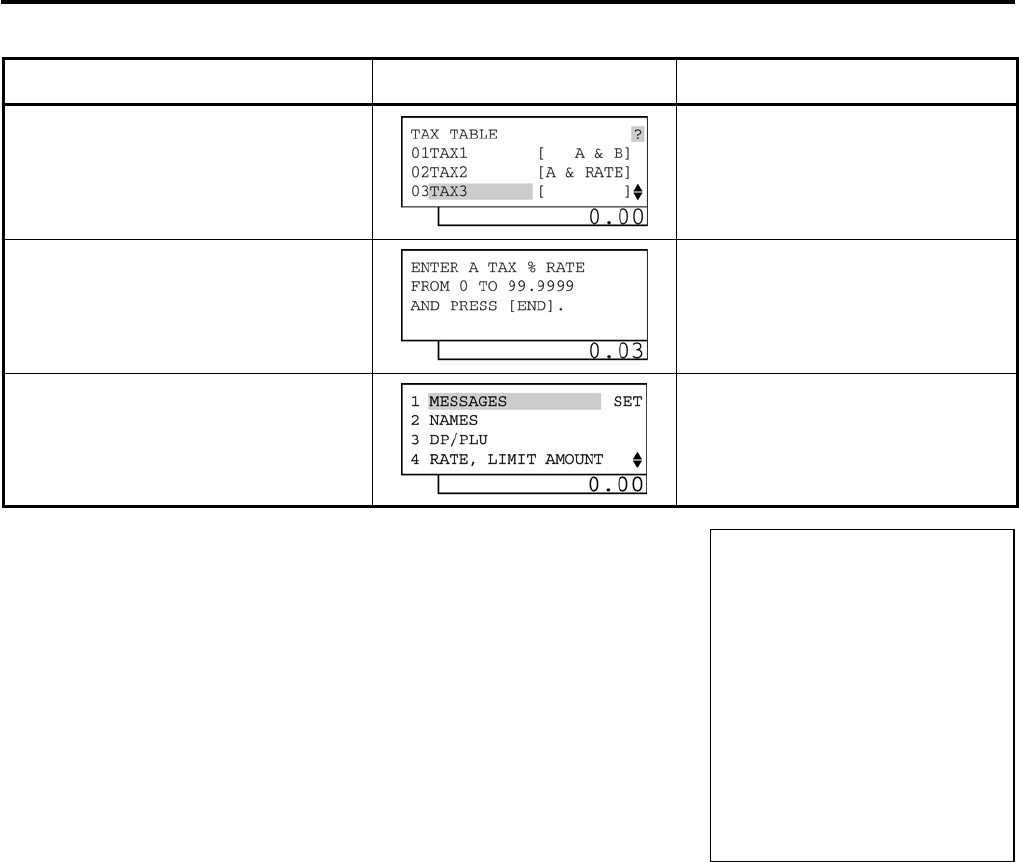
4. PROGRAMMING OPERATIONS EO1-11155
4.16 Tax Table Programming
4-57
(continued from the previous page)
Operation LCD Display Remarks
Make sure the cursor is shown on
03TAX3.
Input 3, then depress the [Enter] key.
Tax3 is selected.
Tax type RATE (% rate only) is selected.
Input 10.
Tax % rate (10%) is entered.
The [End] key depression allows the
ECR to end this operation.
A long receipt is issued and the display
returns to Main Menu screen.
NOTES:
1. The break amount entry must be a maximum of 4 digits (1 to 9999 resulting in $0.01 to $99.99).
2. If multiple tax tables are programmed, the Tax1 table must be set first, then Tax2, Tax3, and Tax4.
The Tax1 table setting will automatically reset all of the old Tax1, Tax2, Tax3 and Tax4 tables if they have
been programmed.
3. A maximum of 99 breaks can be entered for Tax1 to Tax4 tables altogether.
4. For inclusive tax, tax table programming using a rate only is available. Tax table programming using a tax
break is unavailable.
TEC STORE
1343 PEACH DRIVE
PHONE: 87-6437
Open 8:00am to 7:00pm
Closed: every Wednesday
10-20-2006 FRI #0
TAX TABLE
TAX3
10%
0023 13:51TM
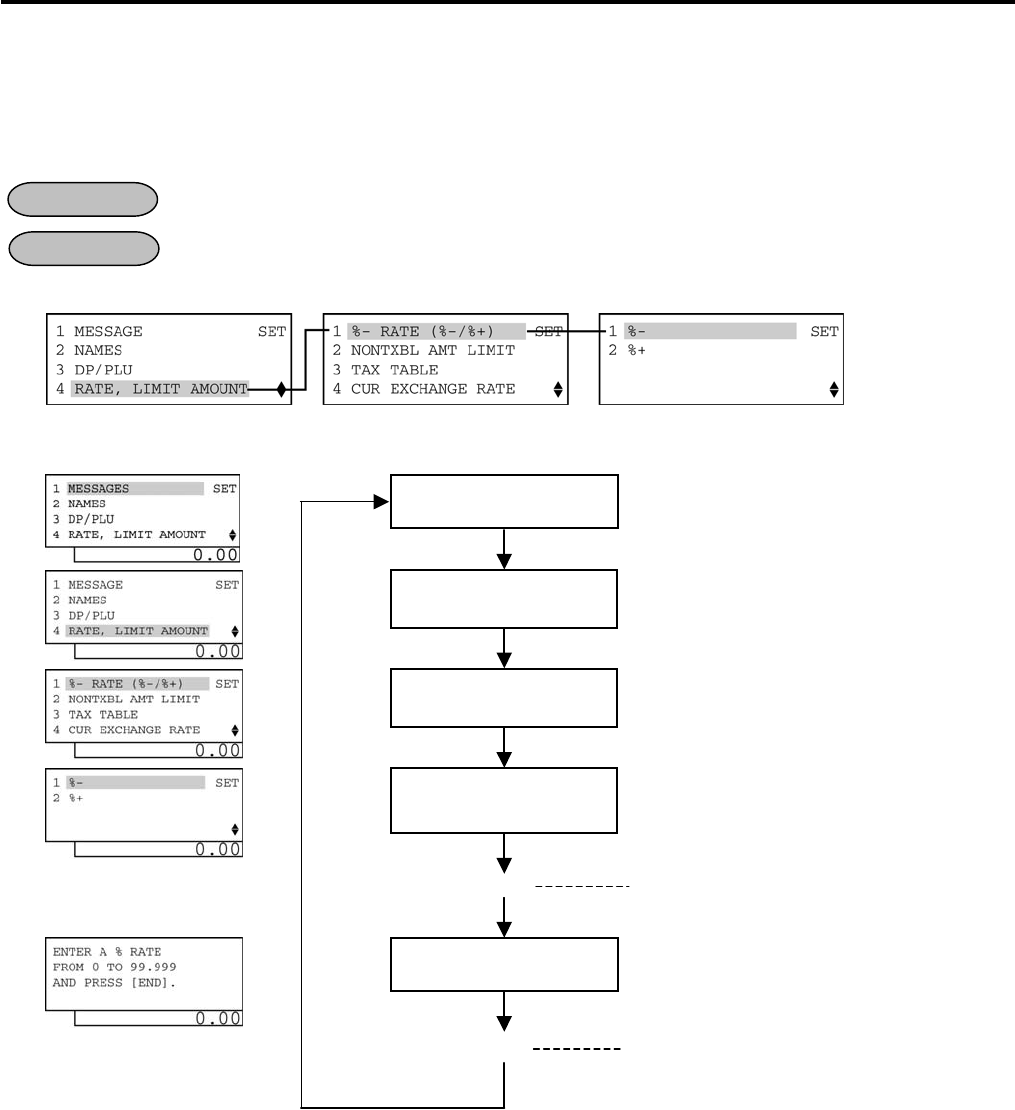
4. PROGRAMMING OPERATIONS EO1-11155
4.17 %+ and %- Preset Rate Setting
4-58
4.17 %+ and %- Preset Rate Setting
A preset rate may be set on each of the [%+] and [%-] keys, one independent rate for each key. Once a rate is
preset, the % key will simply be depressed without a prior rate entry to activate the preset rate. If a rate is
entered prior to the depression of the key, the entered rate (manual rate) will be activated instead.
Any time outside a sale
Mode Lock: SET
1) Menu Tree
2) Operation Flowchart
NOTE: When inputting 0, the % preset rate will be canceled. If doing so, the % preset rate should be set in the
registration operation.
OPERATION
CONDITION
“4 RATE, LIMIT
AMOUNT
”
is selected.
Main Menu
“1 %- RATE (%-/%+)”
is
selected.
Input a preset rate.
ECR is being outside a sale and in
SET
mode.
Depress
[
↓
]
three times then
[Enter]
.
Or Depress [4].
0.001 to 99.999 (%):
Use the [.] key if decimal portion is contained.
(See NOTE below.)
Depress
[1]
or
[Enter]
key.
Select a [%] key which
is to be programmed.
To select
[%
-
]
key, depress
[1]
or
[Enter]
.
To select [%+] key, depress [2] or depress [↓]
then [Enter].
[End]
This setting is ended. A long receipt i
s issued
and the display returns to Main Menu screen.
The preset rate is entered and printed.
[Enter]
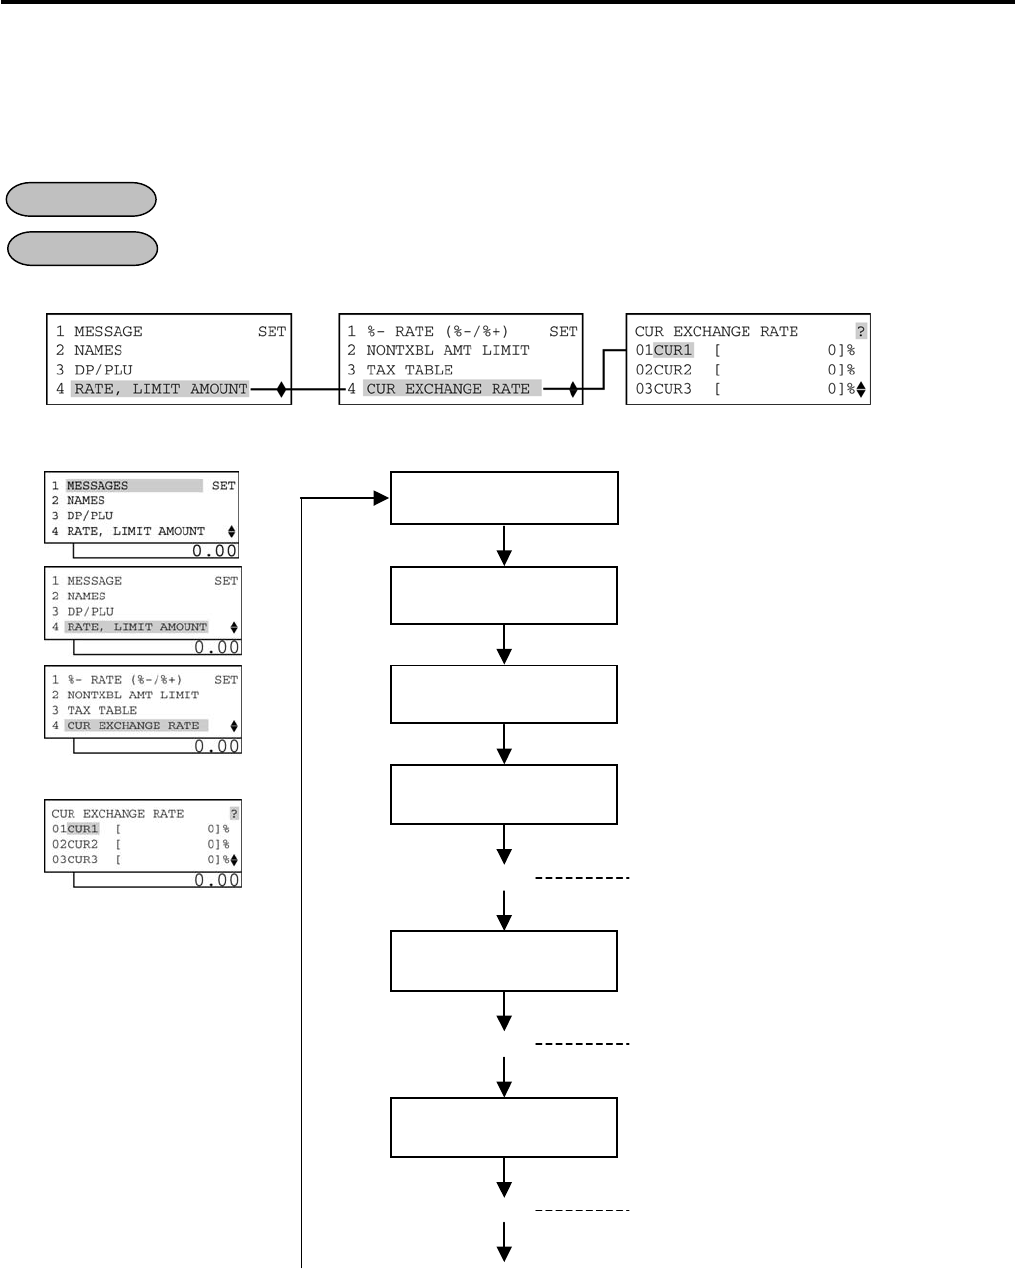
4. PROGRAMMING OPERATIONS EO1-11155
4.18 Foreign Currency Exchange Rate Setting
4-59
4.18 Foreign Currency Exchange Rate Setting
The rate of each foreign currency (corresponding to the [CUR1] to [CUR5] keys) are set in this operation.
By setting a rate on each Foreign Currency Key, reading the sale total and tendering in the foreign currency value
will be possible for sale finalization.
Any time outside a sale
Mode Lock: SET
1) Menu Tree
2) Operation Flowchart
OPERATION
CONDITION
“4 RATE, LIMIT
AMOUNT
”
is selected.
Main Menu
“4 CUR EXCHANGE
RATE
”
is selected.
ECR is being outside a sale and in
SET
mode.
Depress
[
↓
]
three times then
[Enter]
.
Or Depress [4].
Depress
[
↓
]
three times then
[Enter]
.
Or Depress [4].
Input the rate of [CUR1]
key
.
0.000001 to 9999.999999 (%):
Use the [.]
key if decimal portion is contained.
(See NOTE below.)
The exchange rate of the
[CUR1]
key is
entered and printed.
[Enter]
Input the rate of [CUR2]
key
.
0.000001 to 9999.999999 (%):
Use the [.]
key if decimal portion is contained.
(See NOTE below.)
The exchange rate of the
[CUR2]
key is
entered and printed.
[Enter]
Input the rate of [CUR3]
key
.
0.000001 to 9999.999999 (%):
Use the [.]
key if decimal portion is contained.
(See NOTE below.)
The exchange rate of the
[CUR3]
key is
entered and printed.
[Enter]
(B)
-- continued on the next page --
(A)

4. PROGRAMMING OPERATIONS EO1-11155
4.18 Foreign Currency Exchange Rate Setting
4-60
NOTE: When inputting 0, the rate of the foreign currency will be canceled. If doing so, the rate of the foreign
currency should be set in the registration operation.
[End]
This setting is ended. A long receipt is issued
and the display returns to Main Menu screen.
Input the rate of [CUR4]
key
.
0.000001 to 9999.999999 (%):
Use the [.]
key if decimal portion is contained.
(See NOTE below.)
The exchange rate of the
[CUR4]
key is
entered and printed.
[Enter]
Input the rate of [CUR5]
key
.
0.000001 to 9999.999999 (%):
Use the [.] key if decimal
portion is contained.
(See NOTE below.)
The exchange rate of the
[CUR5]
key is
entered and printed.
[Enter]
-- continued from the previous page --
(B)
(A)
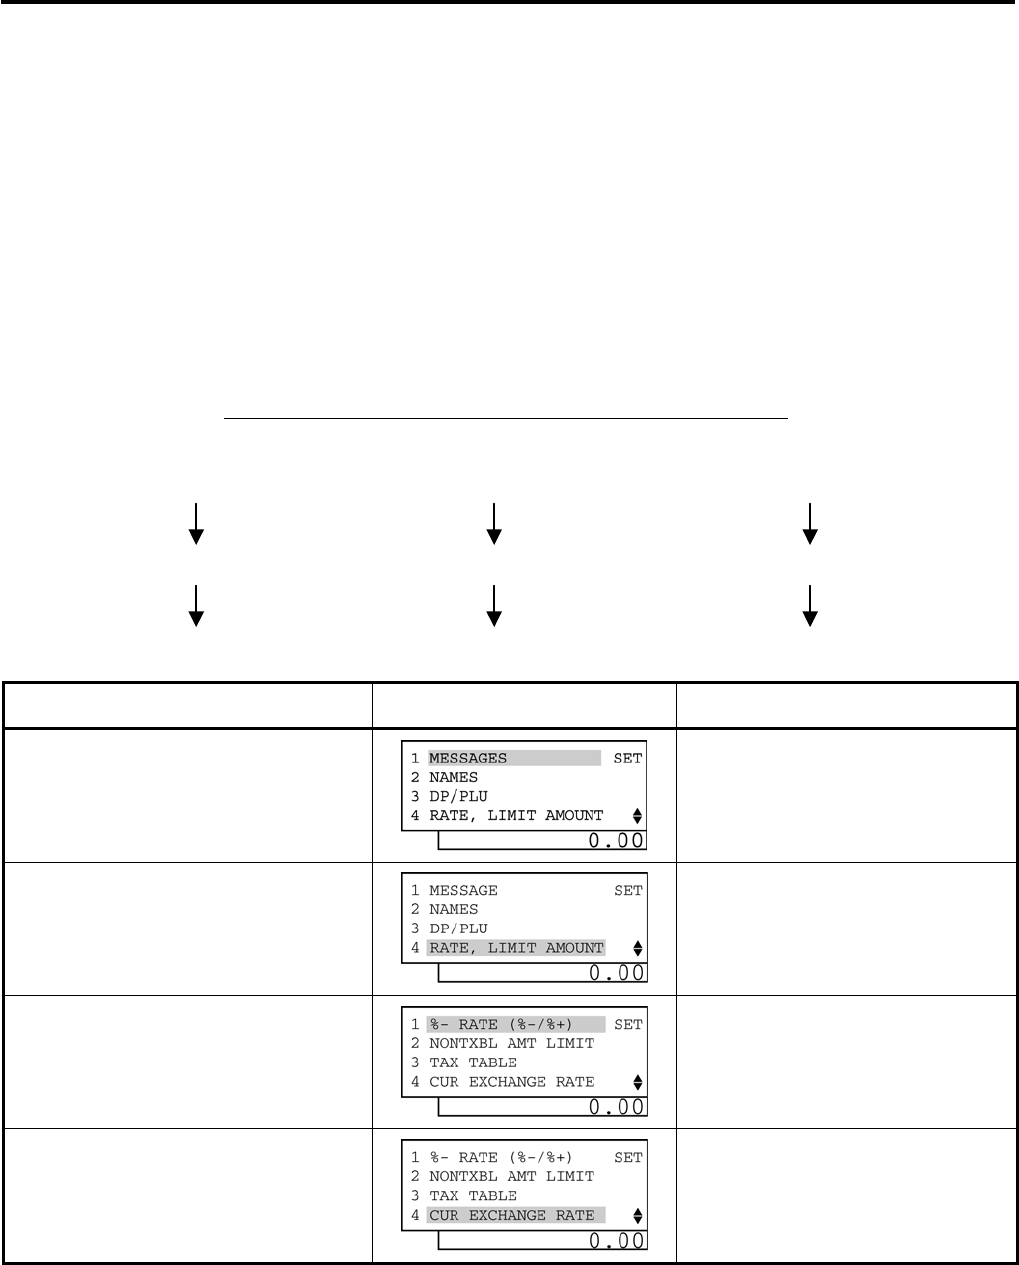
4. PROGRAMMING OPERATIONS EO1-11155
4.18 Foreign Currency Exchange Rate Setting
4-61
Foreign Currency Exchange Rate Calculation
1. The rate must be calculated in the subsidiary currency unit values for both the domestic and the foreign
currencies. (In case of calculating the rate from the domestic to a foreign currency with the same zero-
suppress form, such as from U.S. $ to Euro, it will be no problem even if it is calculated in the main currency
of $ and Euro. However, in case of exchanging from a domestic currency such as $ or Euro to Japanese
yen, or vice versa, this rule must be obeyed; otherwise a wrong rate will result.)
2. Calculate the required foreign currency value equivalent to the domestic currency value “1”. Then the
obtained value is the Exchange Rate value to be entered in the setting operation stated on the previous
page.
3) Example
To set two foreign currency rates:
(The rates here are merely examples, and may be different from the actual rates currently in effect.)
Conditions given for Domestic Currency and Foreign Currencies
(DOMESTIC) (CUR1) (CUR2)
U.S. Dollar EURO Japanese Yen
$1.00 €1.20 ¥137.74
1.20 Cent 1 EURO Cent 1,3774 yen
Operation LCD Display Remarks
When the ECR is being outside a sale
and in SET mode, depress the [↓] key
three times.
The cursor is moved on to “4 RATE, LIMIT
AMOUNT”.
Depress the [4] or [Enter] key.
“4 RATE, LIMIT AMOUNT” is selected.
Depress the [↓] key three times.
The cursor is moved on to “4 CUR
EXCHANGE RATE”.
Depress the [4] or [Enter] key.
“4 CUR EXCHANGE RATE” is selected.
(continued on the next page)
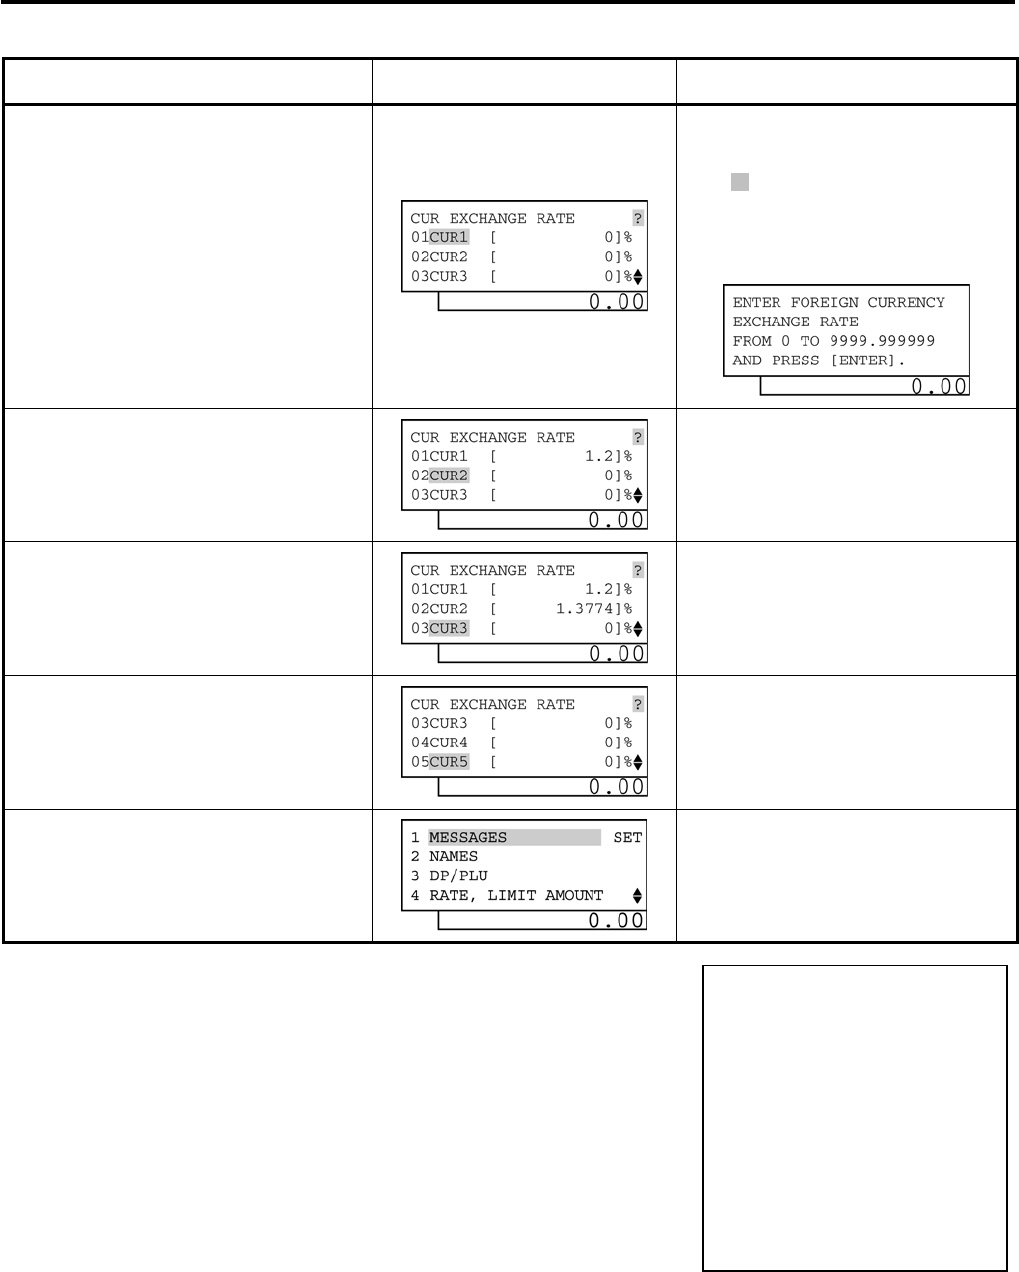
4. PROGRAMMING OPERATIONS EO1-11155
4.18 Foreign Currency Exchange Rate Setting
4-62
(continued from the previous page)
Operation LCD Display Remarks
Make sure the cursor is shown on
01CUR1. Then, input 1.20 and
depress the [Enter] key.
The exchange rate from $ to € is set on the
[CUR1] key.
While ? is shown on the upper-right corner
of the LCD display screen, the [?] key
depression results in that the following
guidance message appears on the LCD
display.
Make sure the cursor is shown on
02CUR2. Then, input 1.3774 and
depress the [Enter] key.
The exchange rate from $ to Japan Yen is
set on the [CUR2] key.
Depress the [↓] key twice.
The cursor is moved on to “05CUR5”.
Make sure the cursor is shown on
05CUR5.
The [End] key depression allows the
ECR to end this setting.
A long receipt is issued and the display
returns to Main Menu screen.
Resetting a Foreign Currency Rate Once Set
Input 0 in place of the Exchange Rate for the Foreign Currency in the setting operation. Then the rate for that
foreign currency will be reset. The rate of the Foreign Currency Key thus reset cannot be used in sales entries.
TEC
STORE
1343 PEACH DRIVE
PHONE: 87-6437
Open 8:00am to 7:00pm
Closed: every Wednesday
10-20-2006 FRI #0
CUR RATE
CUR1 1.2∗
CUR2 1.3774∗
0024 13:53TM
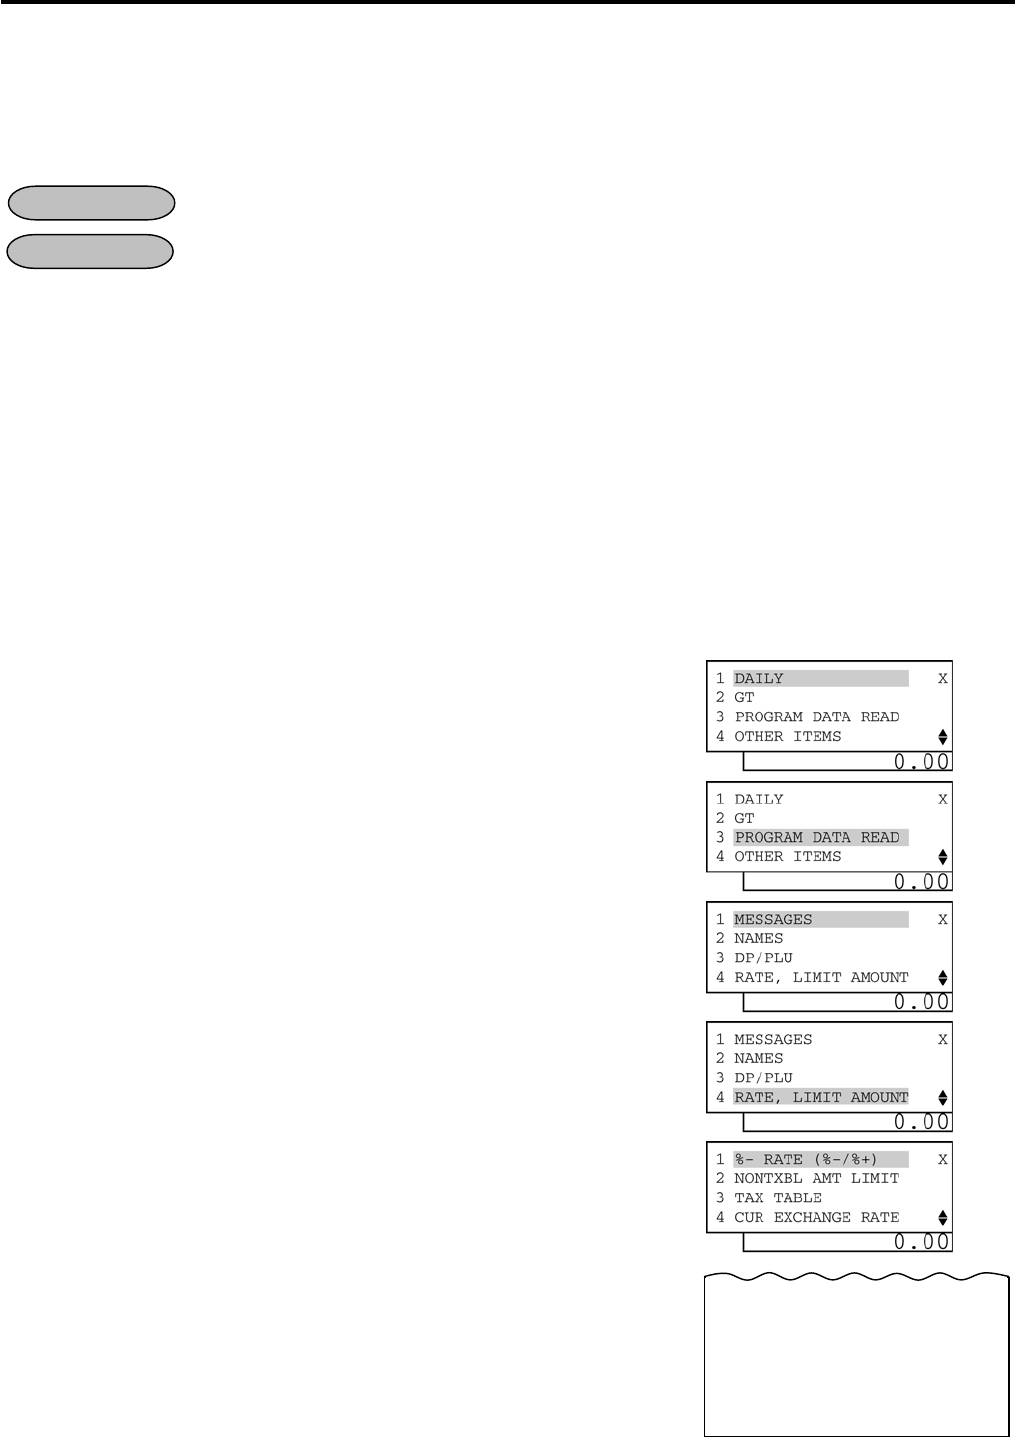
5. VERIFICATION OF PROGRAMMED DATA EO1-11155
5. VERIFICATION OF PROGRAMMED DATA
5- 1
5. VERIFICATION OF PROGRAMMED DATA
The programmed data entered in the preceding chapter can be read for verification purposes.
The print format of each program reading is almost the same as on the program receipt, except that “X” is printed
instead of printing Program Name.
Any time outside a sale
Mode Lock: X or SET
1. Turn the Mode Lock to the X or SET position with the MGR key.
2. In X mode, move the cursor on to 3 PROGRAM DATA READ which is displayed on the LCD display with the
[↓] key, then depress the [Enter] key. In SET mode, move the cursor on to 7 PROGRAM DATA READ, then
depress the [Enter] key.
3. PROGRAM DATA READ menu is shown on the next page. Move the cursor on to a desired item to be
verified with the [↓] key, then depress the [Enter] key.
4. The currently programmed data is printed both on the receipt and on the journal.
NOTE: On depressing the [Enter] key, the programmed data will be printed. To abort printing once started,
depress the [ITEM CORR] key. The reading operation is immediately stopped halfway.
Example)
To verify the preset rates of the [%-] and [%+] keys in X mode.
1. When the ECR is being outside a sale and in X mode, depress
the [↓] key twice to move the cursor on 3 PROGRAM DATA
READ.
2. Depress the [3] or [Enter] key.
3. Depress the [↓] key three times to move the cursor on 4 RATE,
LIMIT AMOUNT.
4. Depress the [4] or [Enter] key.
5. The [1] or [Enter] key depression results in printing.
OPERATION
CONDITION
10-20-2006 FRI #0
X RATE
%- 5%
%+ 3%
0090 16:54TM
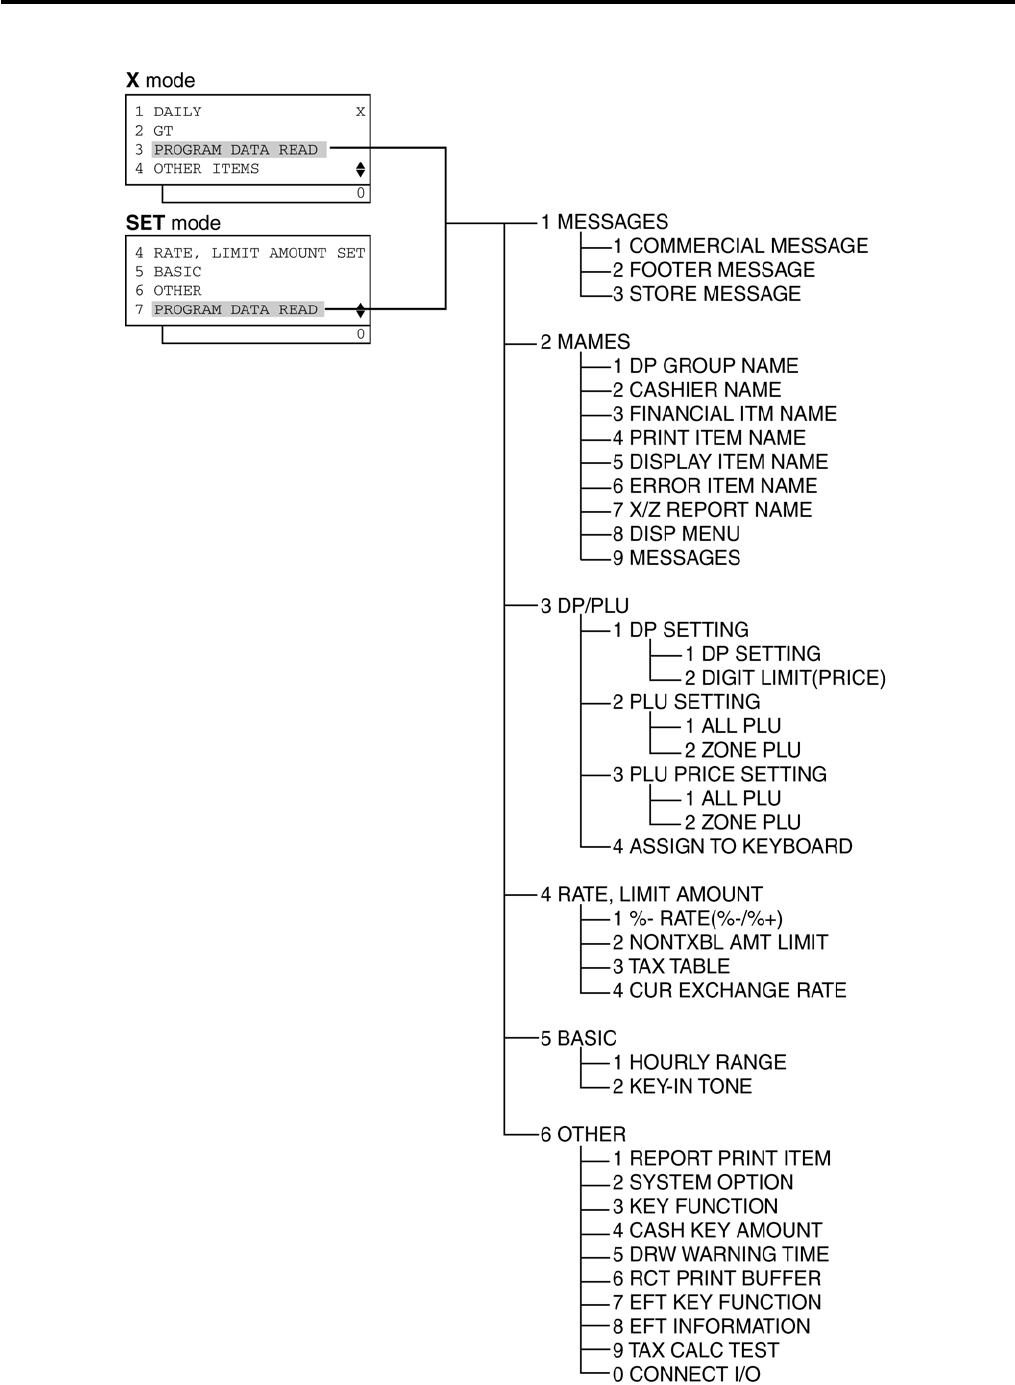
5. VERIFICATION OF PROGRAMMED DATA EO1-11155
5. VERIFICATION OF PROGRAMMED DATA
5- 2
PROGRAM DATA READ menu

EPRINTED IN CHINA
EO1-11155A
