Toy State 90430F27 High Jump RC -2 Asst User Manual
Toy State International Ltd. High Jump RC -2 Asst
User Manual

4
For questions, e-mail our Consumer Service Dept. at
consumerservice@toystate.com
Or Call 1-877-473-8015
www.toystate.com
NOTE:
This device complies with Part 15 of the FCC Rules. Operation is subject to the following two conditions:
(1) this device may not cause harmful interference, and
(2) this device must accept any interference received, including interference that may cause undesired operation.
Warning: Changes or modifications to this unit not expressly approved by the party responsible for compliance could void the user’s
authority to operate the equipment. NOTE: This equipment has been tested and found to comply with the limits for a Class B digital
device, pursuant to Part 15 of the FCC Rules. These limits are designed to provide reasonable protection against harmful interference
in a residential installation. This equipment generates, uses and can radiate radio frequency energy and, if not installed and used
in accordance with the instructions, may cause harmful interference to radio communications. However, there is no guarantee that
interference will not occur in a particular installation. If this equipment does cause harmful interference to radio or television reception,
which can be determined by turning the equipment off and on, the user is encouraged to try to correct the interference by one or more of
the following measures:
- Reorient or relocate the receiving antenna.
- Increase the separation between the equipment and receiver.
- Connect the equipment into an outlet on a circuit different from that to which the receiver is connected.
- Consult the dealer or an experienced radio/TV technician for help.
Contains 1 x 3.7V LiPo battery pack. Requires 3 x 1.5 V AA (LR6) alkaline batteries (not included).
Batteries or battery packs must be recycled or disposed of properly. When this product has reached the
end of its useful life it should not be disposed of with other household waste. The Waste Electrical and
Electronic Equipment Regulations require it to be separately collected so that it can be treated using
the best available recovery and recycling techniques. This will minimize the impact on the environment
and human health from soil and water contamination by any hazardous substances, decrease the resources required to make
new products and avoid using up landfill space. Please do your part by keeping this product out of the municipal waste stream!
The “wheelie bin” symbol means that it should be collected as “waste electrical and electronic equipment”. You can return an old
product to your retailer when you buy a similar new one. For other options, please contact your local council.
FEDERAL COMMUNICATIONS COMMISSION COMPLIANCE
“Modifications not authorized by the manufacturer may void users authority to operate the device.”
This toy and all accessories need to be periodically examined for potential hazards and
any potentially hazardous parts be repaired or replaced.
MANUFACTURER’S NOTE
ATTENTION PARENTS
CLEANING AND MAINTAINING
ENG www.toystate.com
CONTROLLER VEHICLE
Batteries Not Included Included (Non-Removable)
8+
#90430
OWNER’S MANUAL
Brush areas where dirt and dust
get trapped.
Wipe body off with a soft rag or tact cloth. Do not clean vehicle with chemicals or water.
3 x AAA/LR03
RECHARGABLE LiPo
MADE IN SHENZHEN, CHINA
TOY STATE INTERNATIONAL LIMITED
66 MODY ROAD, KOWLOON, HONG KONG
IN THE INTEREST OF BETTER QUALITY AND VALUE, WE ARE CONSTANTLY IMPROVING AND UPDATING OUR PRODUCTS.
CONSEQUENTLY, PICTURES IN THIS INSTRUCTION SHEET MAY SOMETIMES DIFFER FROM THE MODEL ENCLOSED.
WARNING: Not suitable for children under 36 months
due to small parts. Choking hazard.
HOT WHEELS and associated trademarks and
trade dress are owned by, and used under license
from Mattel. ©2014 Mattel. All Rights Reserved.
RADIO CONTROL
JUMP & FLIP
STUNTS!
Important! Carefully read the Owners Manual before play!

After play, always turn vehicle off. Remove batteries from controller when not in use or when storing.
Leakage may occur and cause damage if left for a long period of time.
Full function R/C with spins! Jumps and does flips!
ENG
TROUBLESHOOTING AND CARE FOR R/C VEHICLE
3
Radio waves control the R/C vehicle. Care for your vehicle and it will provide hours of fun!
Avoid water, heat, sand and high impact crashes!
TREAT YOUR R/C VEHICLE WELL
Store in safe place. No direct sunlight. No rain or water. No sand or dust.
No Collisions. R/C vehicle may get stuck on
carpet or grass.
Avoid running 2 vehicles with the same radio control frequencies.
LIMITED RADIO CONTROL RANGE
While R/C vehicle may be visible at a distance, full operational
control may be lost. Hold controller high in the air and direct
vehicle back.
INTERFERENCE
Other radio signals may cause loss of control. Remove vehicle
from an area of interference.
ENG
2
1
OPERATING R/C VEHICLE
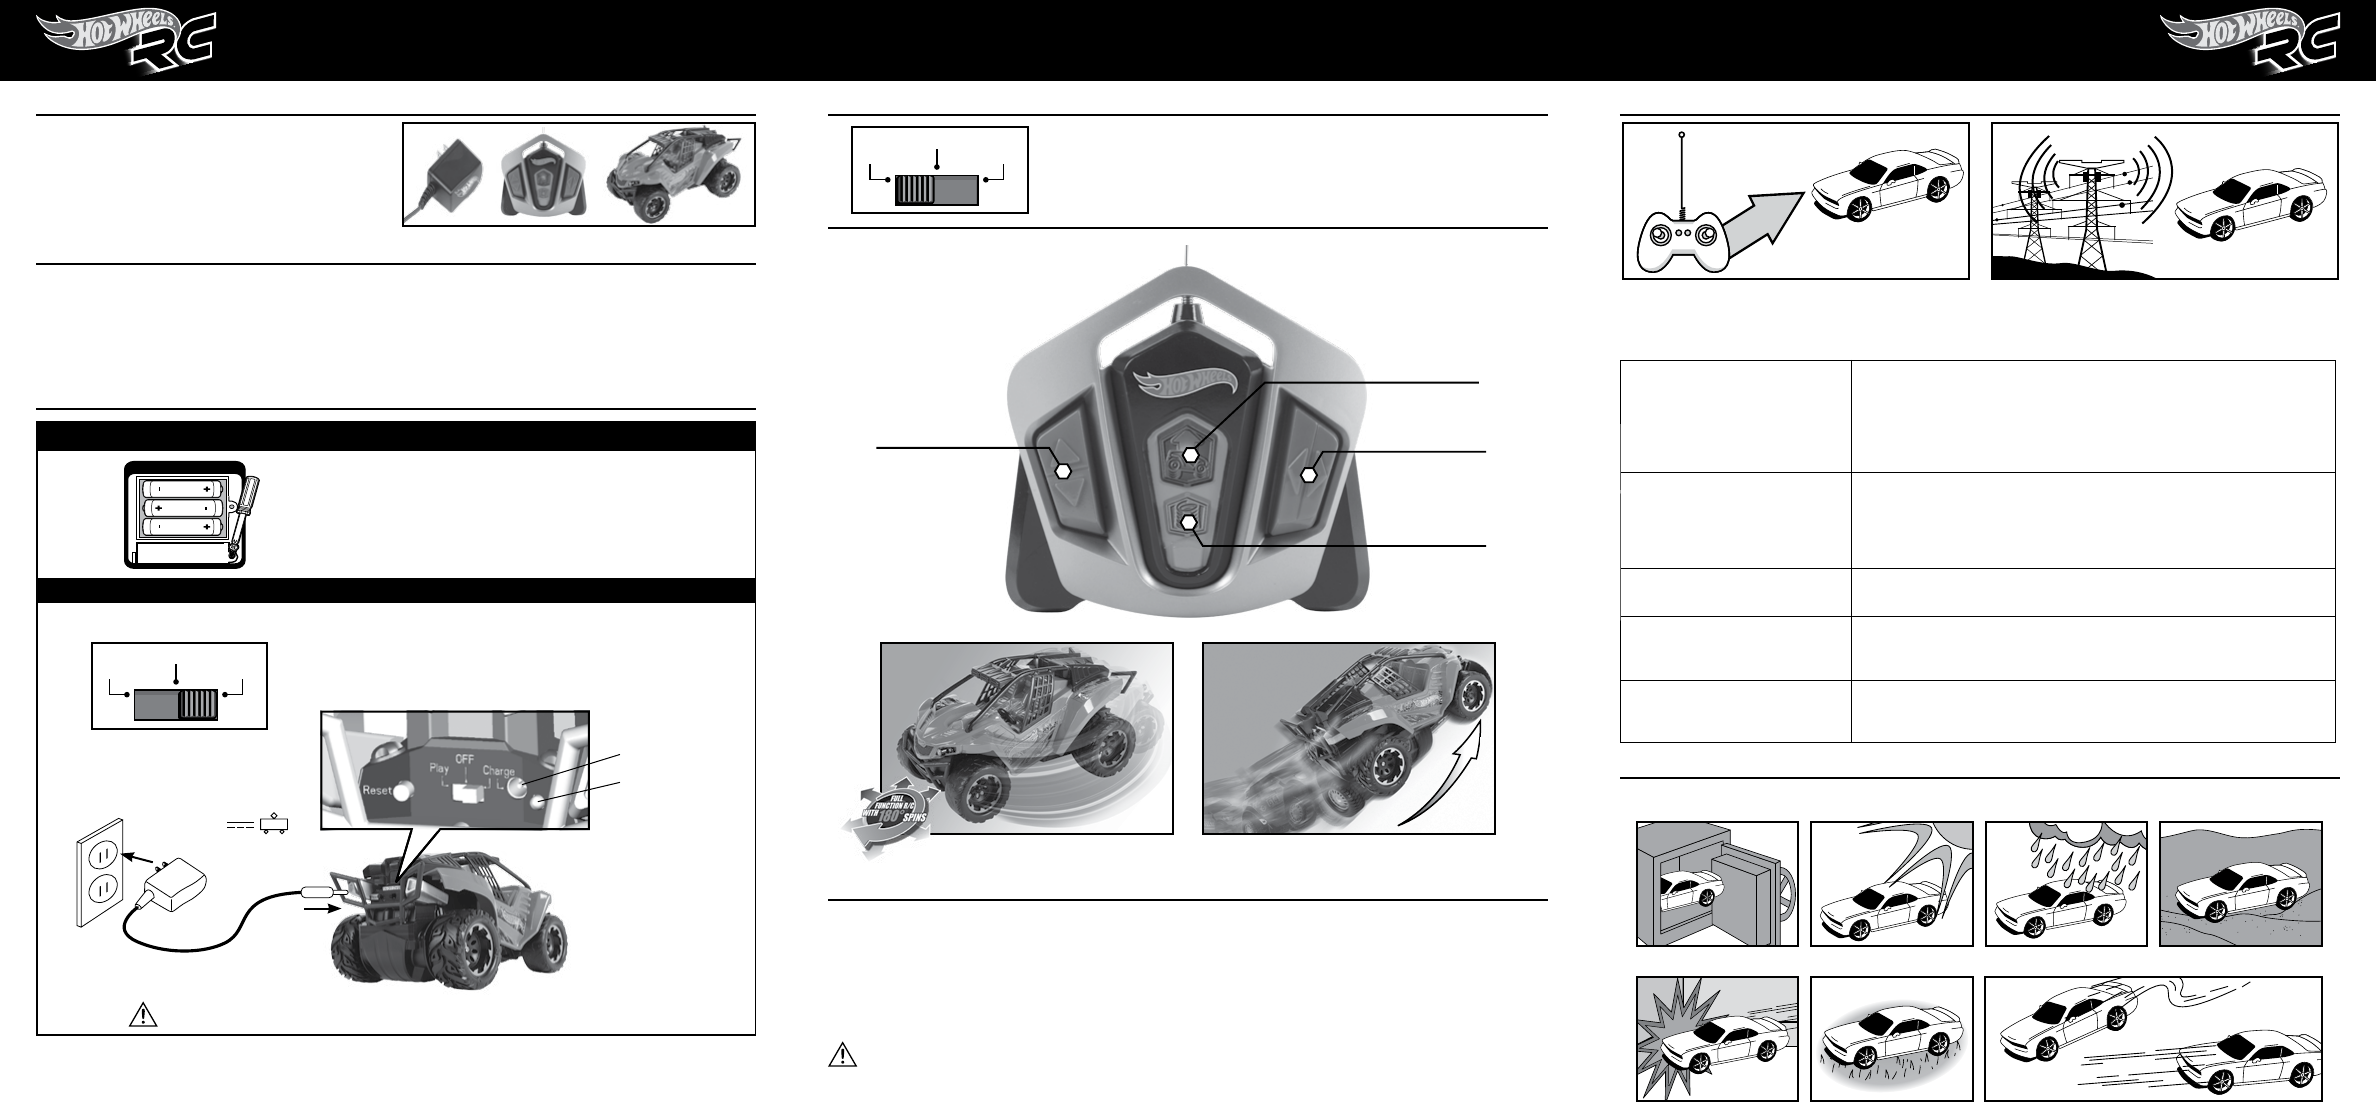
What’s included
Remove the R/C vehicle, controller and charger from the package.
Insert batteries into the controller and use the charger to fully
charge the internal battery in the vehicle to begin play (see “Battery
Installation” section for further details).
ENG ENG
ONOFF
ONOFF
PLAYDEMO OFF
PLAY CHARGEOFF
Play Charge
OFF
Play Charge
OFF
ONOFF
ONOFF
PLA
Y
DEMO OFF
PLAY CHARGEOFF
Play Charge
OFF
Play Charge
OFF
Turn switch located on back of R/C vehicle to the PLAY position (as shown).
Important Battery Information
• Dispose of batteries properly.
• Do not dispose of batteries in fire.
• Use only batteries of the type recommended.
• Do not mix alkaline, standard (carbon-zinc) or rechargeable
(nickel-cadmium) batteries.
CAUTION
• Do not mix old and new batteries.
• Remove batteries from R/C controller if vehicle will not be
used for a long period of time.
• Do not attempt to remove the LiPo battery from the vehicle.
Internal LiPo Battery Removal Instructions: At the end of this product’s life span, the internal battery must be removed by an adult and
recycled. Do not puncture, cut, tear, compress, bend or deform the battery in any way. Ensure the vehicle is turned OFF before removal. Use
a screwdriver to remove 4 screws from the bottom of the vehicle. This separates the body from the chassis. Next, remove 2 more screws
from the chassis to remove the plastic engine cover. The battery is located on the inside of this cover. Pull the battery out and disconnect the
battery from the electronics by pulling on the plastic connector located at the end of the battery wires. Dispose of the battery in accordance
with your local battery recycling or disposal laws.
Jumpin’ Stunts is capable of jumping in the air while flipping. Be careful! The jump up lever on the bottom of the vehicle should not be
placed above, below or near any person, animal or breakable object while turned on.
1. Hit the ‘Wind Spring’ button on the controller. You’ll hear the car prepare to jump by winding an internal spring. The LED light in the
car and controller will start to flash.
2. After a few seconds the lights stop flashing. Now the vehicle is ready to jump!
3. Check that the jump zone is clear of people, animals and breakable objects. Hit the forward or reverse drive button at the same time
as the ‘Jump’ button on the controller for Jumpin’ Stunts!
Note! The vehicle must be driving forward or reverse in order to jump.
HOW TO JUMP
GETTING STARTED
BATTERY INFORMATION
CONTROLLER
R/C VEHICLE
1. Ensure Vehicle is in ‘charge’ mode.
2. Securely plug the charger cable into the charging port.
3. Plug the wall adaptor into an electrical outlet.
The LED light on the rear of the vehicle indicates that it is charging. After a full
charge, the light will go out. This should take about 120 minutes.
Power Supply:
Rating: DC 5.5V, 500mA
WARNING! ONLY USE THE WALL CHARGER INCLUDED TO CHARGE JUMP & FLIP STUNTS!.
1.
3.
2.
1. To remove battery cover, loosen screw to open.
2. Insert 3 “AAA” batteries into the controller. Be sure the + and – are
properly matched.
NOTE: For best performance, always use alkaline batteries only.
• Ensure the “Wind Spring” button has be pushed and the spring has finished winding.
• The vehicle must be driving forward or backward when the jump button is pressed.
• Ensure the vehicle is on a horizontal surface, right side up and the wheels are
touching the ground.
• The car has been left idle for over 1 minute and the spring has automatically unwound.
• Check to ensure the vehicle is in the “PLAY” position and has a charged battery.
• Are the + and – contacts correctly matched in the controller?
• Are the metal contact tabs touching, rusty or dirty in controller?
• Are there batteries in the controller?
• Is the power switch on the vehicle turned on?
• Are the batteries weak or out of power?
• There is radio interference in the area.
• Another R/C vehicle with the same frequency is close by.
• There is radio interference in the area.
• Another R/C vehicle with the same frequency is close by.
• Are the batteries weak or out of power?
• Check batteries. If necessary, replace the controller with new alkaline batteries or
charge the vehicle.
• Push the “reset” button on the back of the vehicle.
R/C VEHICLE
DOES NOT MOVE
R/C VEHICLE
DOES NOT JUMP
R/C VEHICLE
MOVES BY ITSELF
R/C VEHICLE
RUNS SLOWLY
PERFORMANCE DROP,
INCONSISTENT MOVEMENT
OR FAILS TO RUN
TO REPLACE THE BATTERIES
LOOSEN SCREW TO OPEN
1.5V
1.5V
1.5V
Charge port
Charge LED Light
Press button
to jump!
Drive forward
& reverse Spins left
& Right
Press button to
load the spring!
FPO