Configuration Guide For Facebook Portal On Omada Controller 2 6 X
2018-03-30
: Tp-Link Configuration Guide For Facebook Portal On Omada Controller 2 6 X configuration_guide_for_facebook_portal_on_omada_controller_2_6_x configurationguide
Open the PDF directly: View PDF ![]() .
.
Page Count: 13

Configuration Guide
For Facebook Portal Authentication
Omada Controller 2.6.0 or above
1910012389 REV2.6.0
March 2018
CONTENTS
1 Overview ........................................................................................................................................................................1
1.1 Facebook Portal Introduction ...............................................................................................................................................1
1.2 Network Topology for Facebook Portal ..........................................................................................................................2
1.3 Facebook Authentication Process ....................................................................................................................................2
2 Configure Facebook Portal .....................................................................................................................................3
2.1 Upgrade EAPs and Omada Controller .............................................................................................................................3
2.2 Configure Facebook Page ......................................................................................................................................................3
2.3 Adopt EAPs and Create SSID in Omada Controller .................................................................................................5
2.4 Configure Facebook Portal in Omada Controller .......................................................................................................6
3 Test the Configuration Result ................................................................................................................................ 9

Overview
Configuration Guide 1
1 Overview
To help users easily understand and enjoy the Facebook Portal feature, this configuration
guide detailedly introduces what Facebook Portal is and how to configure Facebook Portal.
1.1 Facebook Portal Introduction
In Facebook Portal authentication, when customers connect to your Wi-Fi, they will be
redirected to your Facebook page. To access the internet, customers need to pass the
authentication on the page.
The following introduces the main advantages of Facebook Portal, which may help you
determine whether you should choose Facebook Portal on your network.
Advertising Business
Users connected to your Facebook Wi-Fi will be redirected to your Facebook page
where displays the desired information, such as pictures, videos, announcements
and your phone number for customer feedback. Additionally, users can log in with
their Facebook accounts, check in on your Facebook page and leave a record in the
Timeline, which may help advertise your business.
Simple Network Access Authentication
Some countries and regions require network service providers to authenticate users.
For example, Russia requires all users to be authenticated before accessing the public
Wi-Fi. Facebook Portal is a simple and effective access authentication method. With
Facebook Portal, your customers only need to connect to your SSID and log in to their
Facebook accounts or skip check-in to get authenticated.
Feedback Collection
On your Facebook page, you can collect the customers’ comments, likes and feedback,
which are very helpful for your service quality improvement.

Configuration Guide 2
Overview
1.2 Network Topology for Facebook Portal
The following figure shows the network topology for Facebook Portal.
Switch
PC
EAP
Clients
Facebook Servers
Router
Internet
Omada Controller
1.3 Facebook Authentication Process
The process of accessing the internet via Facebook Portal authentication is as follows:
1) Users connect to the SSID for Facebook Portal and obtain the Facebook authentication
page.
2) On the authentication page, there are two available authentication modes:
•Facebook Login Mode: Users need to log in to their Facebook accounts and check
in on your Facebook page.
•Skip Mode: Users needn’t log in to their Facebook accounts. To get authenticated,
they only need to enter a Wi-Fi code or simply skip the sign link.
3) After authenticated, users will be redirected to the authentication result page. They can
continue to visit your Facebook page.

Configure Facebook Portal
Configuration Guide 3
2 Configure Facebook Portal
This chapter introduces how to configure Facebook Portal. The configuration overview is
as follows:
1) Upgrade EAPs and Omada Controller.
2) Configure Facebook page.
3) Adopt EAPs and create SSID in Omada Controller.
4) Configure Facebook Portal in Omada Controller.
2.1 Upgrade EAPs and Omada Controller
To get the newly developed Facebook Portal feature, make sure that both of your EAPs and
Omada Controller are upgraded to the latest versions:
EAP: The version which supports V2.6.0 or above.
Omada Controller: V2.6.0 or above.
Go to the download center https://www.tp-link.com/en/support/download-center and search
your EAP models and Omada Controller. Then download the latest upgrade files one by
one and upgrade the EAPs and Omada Controller using the proper downloaded files.
2.2 Configure Facebook Page
If you already have a Facebook page, you can skip this section. If not, follow the steps
below to create a Facebook page:
1) Go to the Facebook official website https://www.facebook.com and create a new
account with your email or phone number.
2) Log in with your new account.
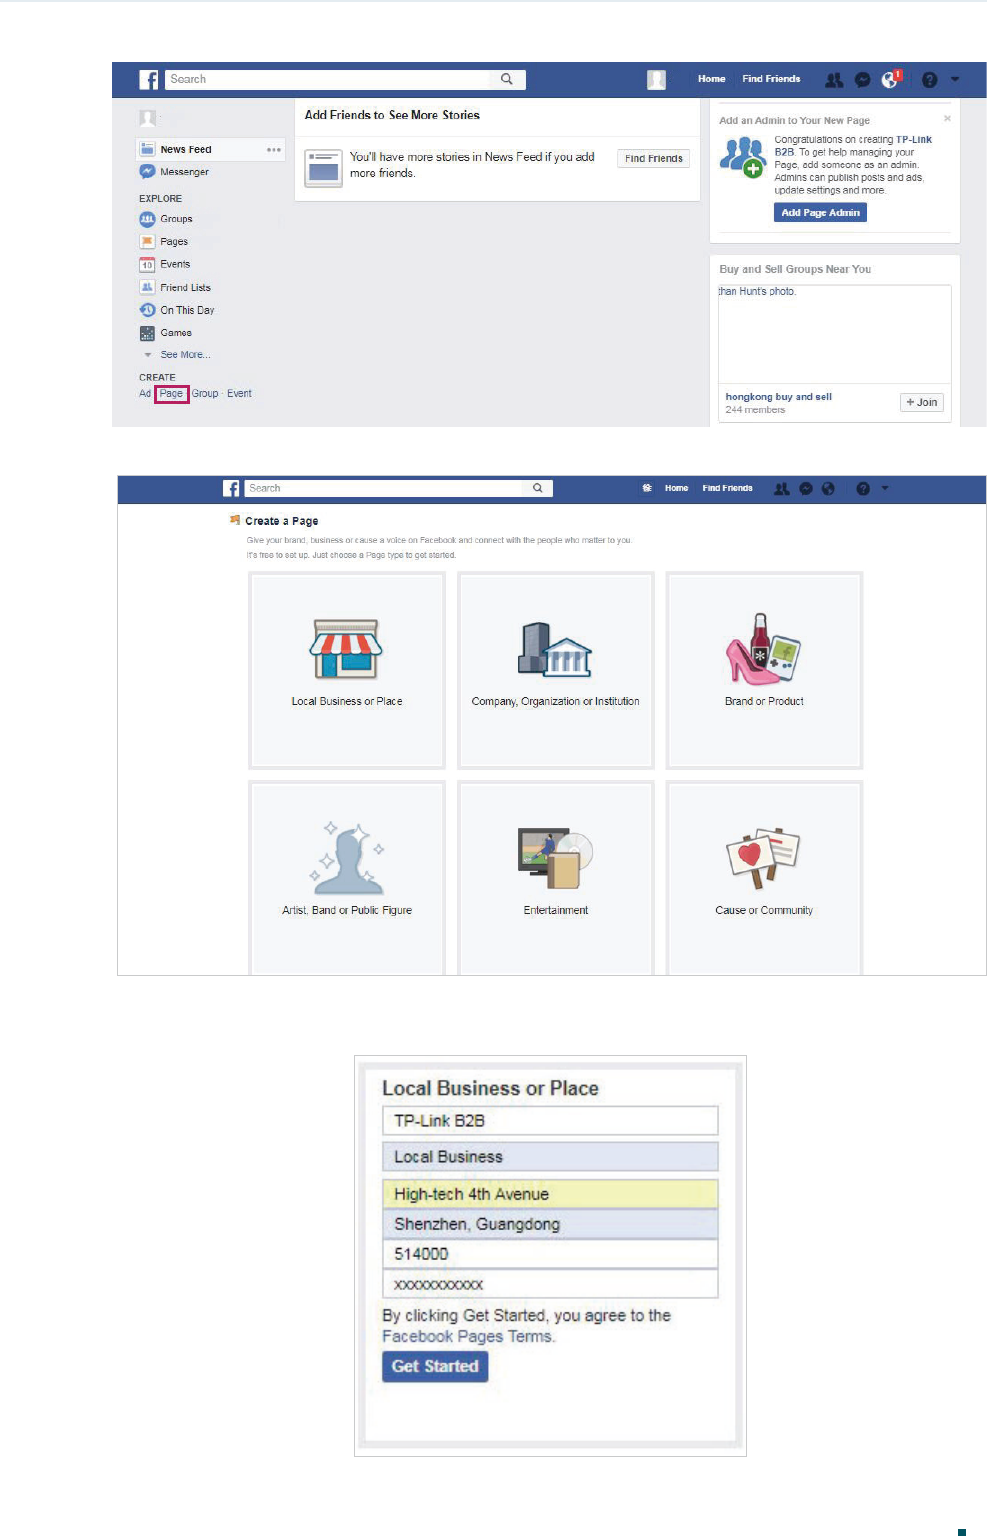
3) In the CREATE section at the bottom left corner, click Page.
Configuration Guide 4
Configure Facebook Portal
4) The following window will appear. Choose a type of Facebook page to be created.
5) Enter the required information and click Get Started. Then the Facebook page will be
created.
Configure Facebook Portal
Configuration Guide 5
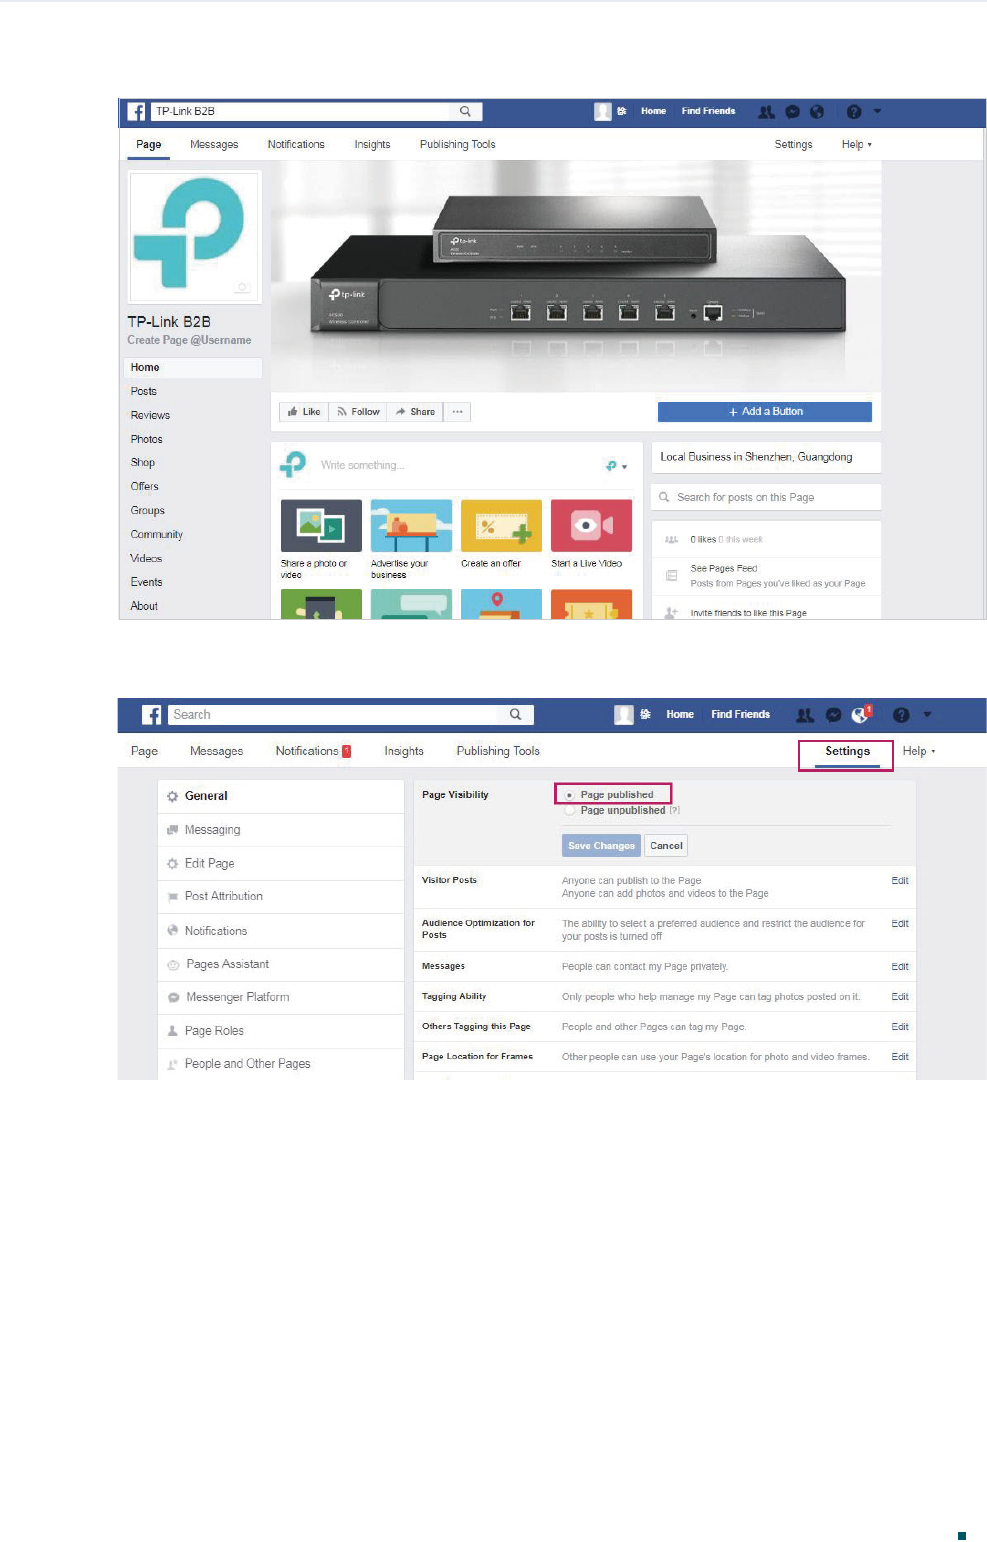
6) Customize your Facebook page according to your actual needs.
7) Go to the Settings page and make sure that Page Visibility is set as Page published,
so that users can access your Facebook page.
2.3 Adopt EAPs and Create SSID in Omada Controller
Follow the steps below to adopt EAPs and create an SSID for Facebook Portal. For detailed
instructions about how to adopt EAPs and create SSID, refer to the User Guide for Omada
Controller, which can be downloaded on the website https://www.tp-link.com/en/download/
EAP-Controller.html.
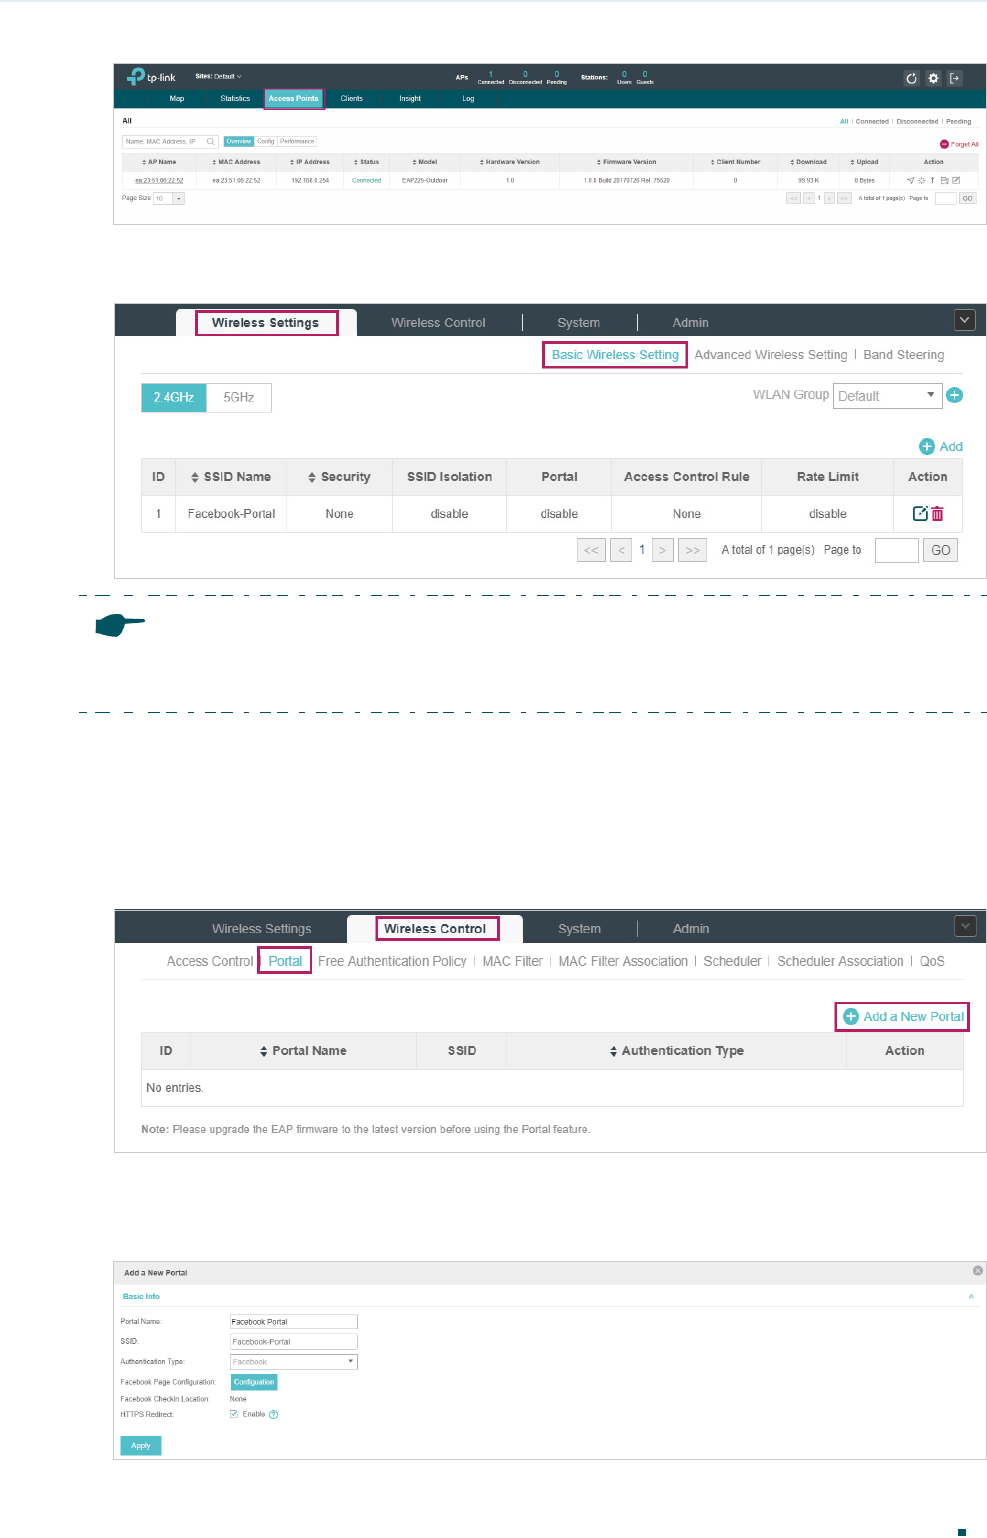
1) Go to the Access Point page and adopt the EAPs on your network.
Configuration Guide 6
Configure Facebook Portal
2) Go to Wireless Settings > Basic Wireless Setting and create SSID for Facebook
Portal.
Note:
To ensure the Omada Controller can communicate with the Facebook servers, you need to set correct
default gateway and DNS for your PC that is installed with the Omada Controller.
2.4 Configure Facebook Portal in Omada Controller
Follow the steps below to configure Facebook Portal:
1) Go to Wireless Control > Portal and click Add a New Portal.
2) The following page will pop up. Specify a name for the Portal, select an SSID, and select
the Authentication Type as Facebook. Click the Configuration button and the Omada
Controller will automatically connect to the Facebook server.
Configure Facebook Portal
Configuration Guide 7
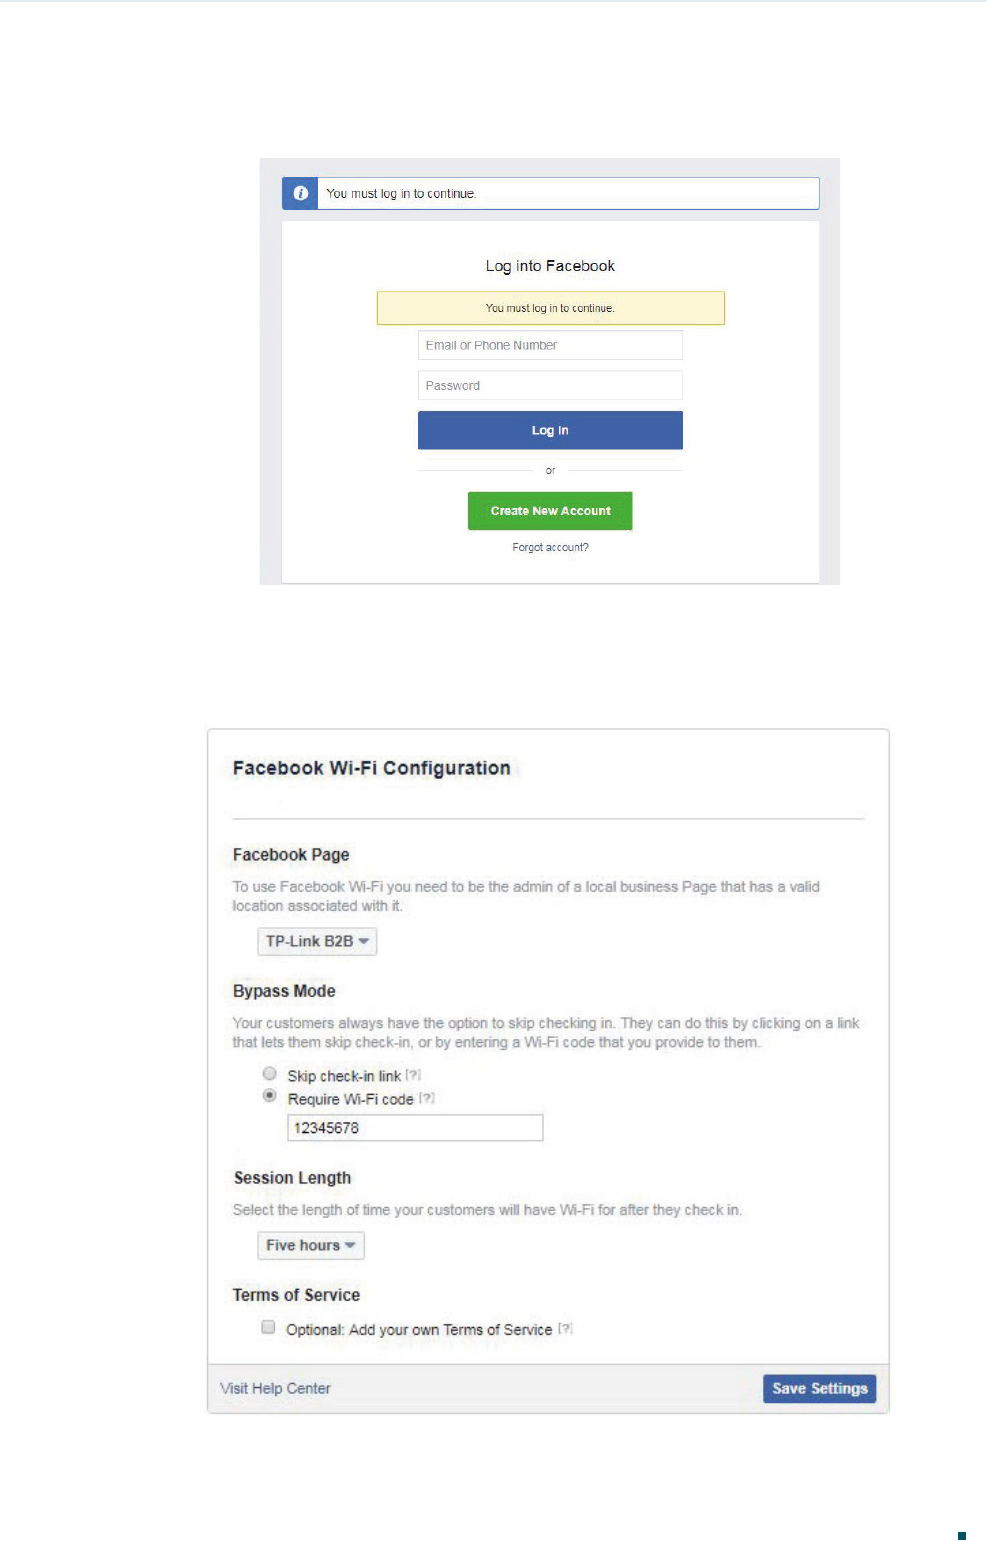
3) If you have been logged in to Facebook, you can skip this step and directly refer to the
step 4). If not, the Facebook login page will appear. Enter your account information to
log in.
4) The following page will appear. Configure the required parameters according to the
help information on the page. For example, select Facebook Page as TP-Link B2B, set
Bypass Mode as Require Wi-Fi code, and set Session Length as Five hours. Click
Save Settings.
Configuration Guide 8
Configure Facebook Portal
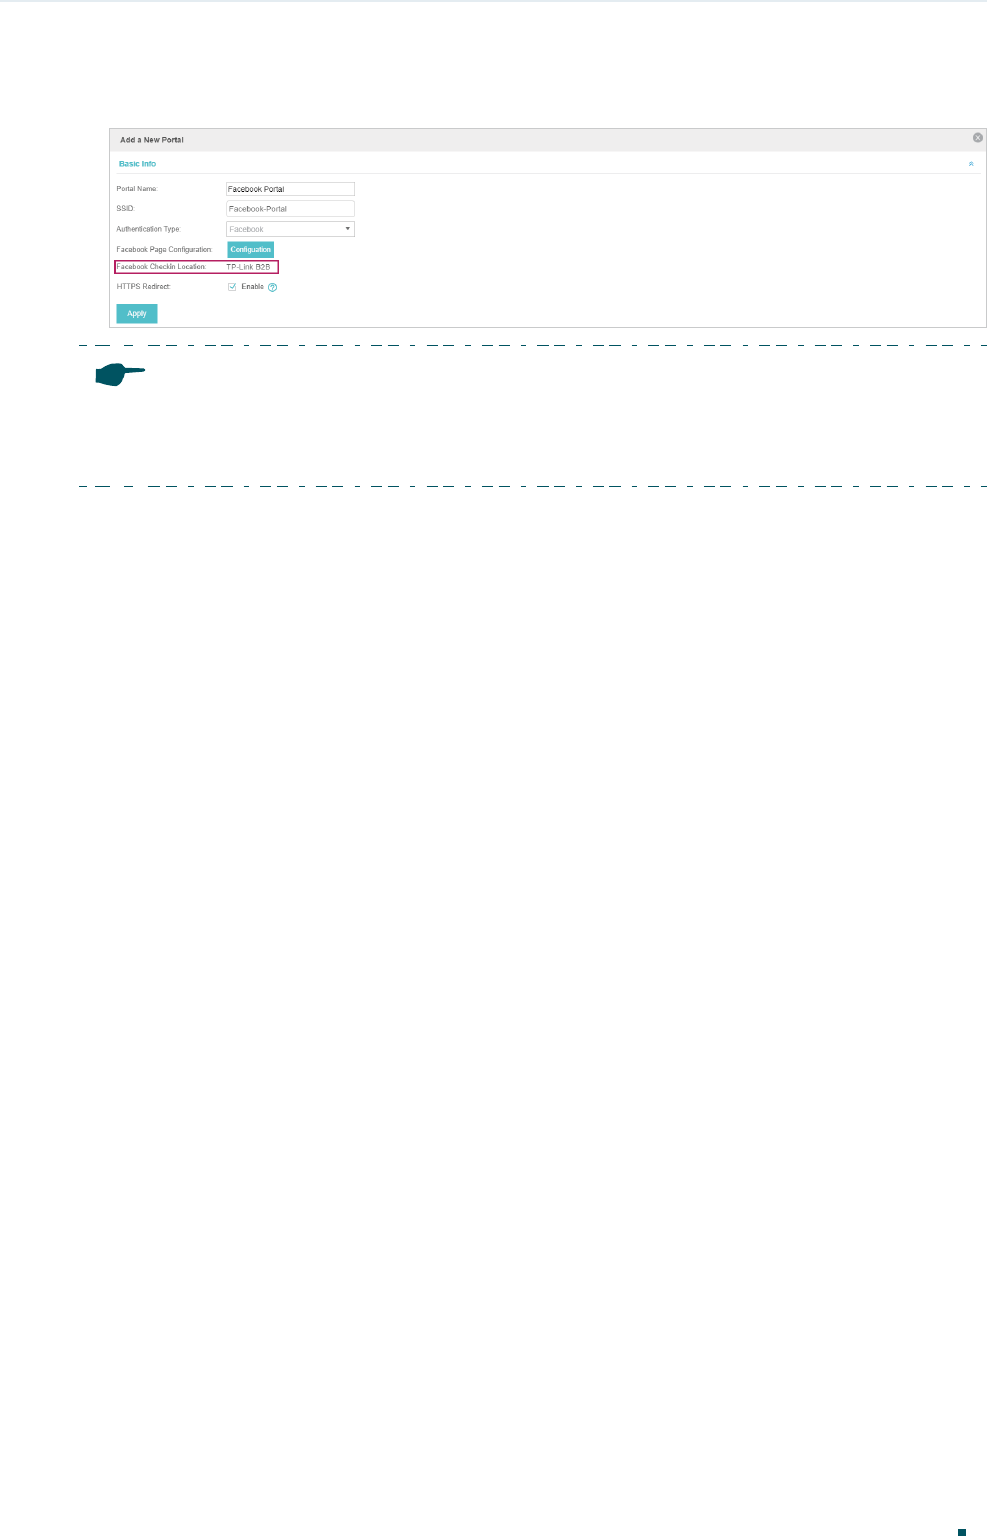
5) After the Facebook page is successfully got by the Omada Controller, the name of the
Facebook Page will be displayed on the page. Click Apply.
Note:
In the background progress, the free authentication policy will be generated automatically to allow
users to visit the Facebook page before authenticated. So you can use the Facebook Portal feature
normally after the above steps are completed.
Test the Configuration Result
Configuration Guide 9
3 Test the Configuration Result
After all configurations are completed, you can follow the steps below to test whether the
Facebook Portal works normally.
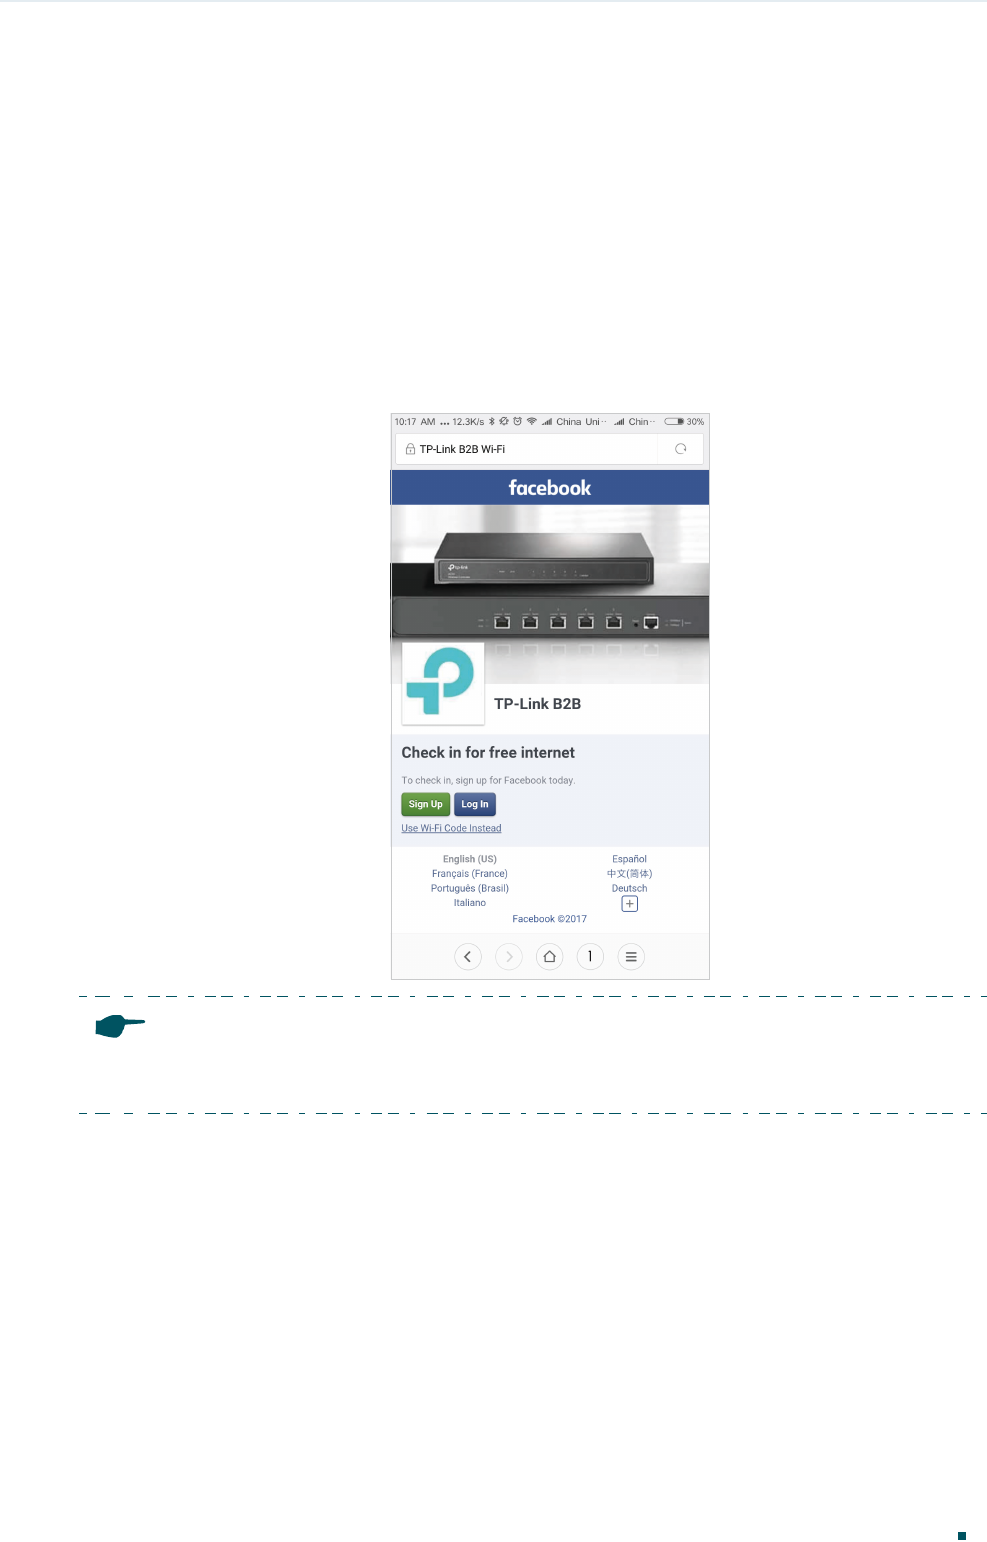
1) Enable the Wi-Fi feature of your mobile phone.
2) Search and connect to the SSID for Facebook Portal.
3) The default web browser on the mobile phone will pop up and the Facebook
authentication page will appear.
Note:
Generally, the web browser pops up automatically. But if the web browser does not pop up, you can
manually launch the web browser and visit any http website. Then the authentication page will appear.
4) To pass the authentication, log in with a Facebook account or choose Use Wi-Fi Code
Instead. For example, you can choose Use Wi-Fi Code Instead.
5) The following page will appear. Enter the Wi-Fi code: 12345678. Click Use Code.
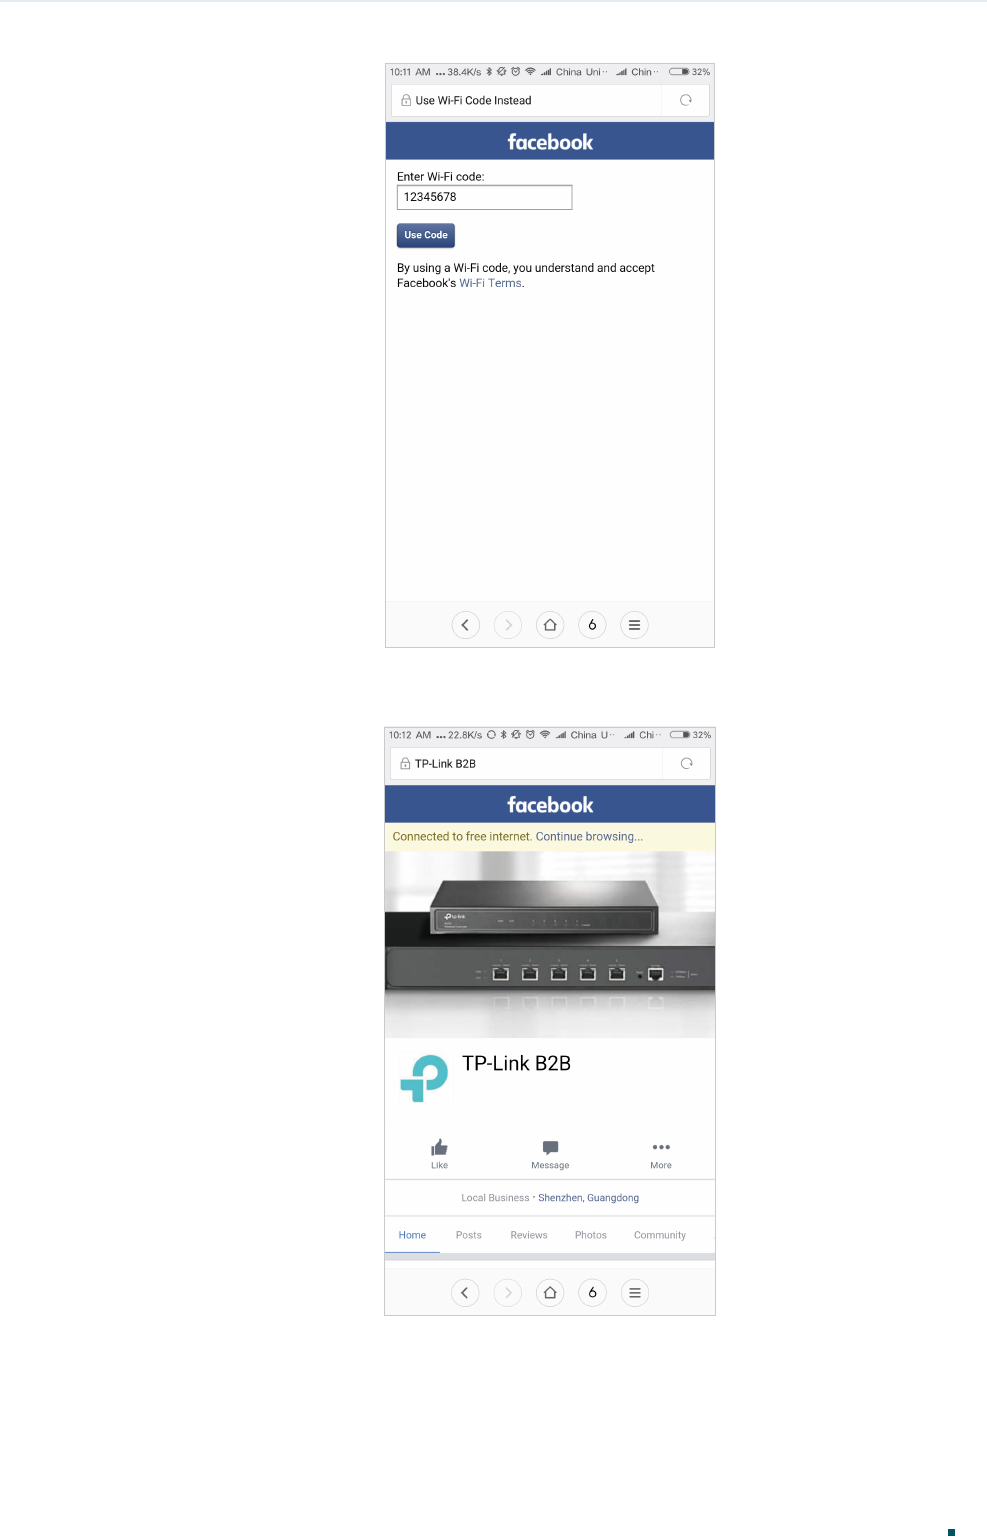
Configuration Guide 10
Test the Configuration Result
6) After authenticated, you will be redirected to the authentication result page, and you
can stay on this page or continue browsing.
If all the steps above are completed, the Facebook Portal feature works normally.

COPYRIGHT & TRADEMARKS
Specifications are subject to change without notice. is a registered trademark
of TP-Link Technologies Co., Ltd. Other brands and product names are trademarks or
registered trademarks of their respective holders.
No part of the specifications may be reproduced in any form or by any means or used to
make any derivative such as translation, transformation, or adaptation without permission
from TP-Link Technologies Co., Ltd. Copyright © 2018 TP-Link Technologies Co., Ltd.. All
rights reserved.
