ZTE Concord II
Zte-Concord-2-Manual zte-concord-2-manual zte-concord-2-manual manuals phones s.theinformr.com 3:
File Type pdf ZTE Concord II ZTE+Concord+II How do I get the User Guide for the Concord II (Z730) with T-Mobile?
2018-01-31
: Tp Zte Concord Ii ZTE Concord II User Manual ZTEGENERAL academy-assets
Open the PDF directly: View PDF ![]() .
.
Page Count: 150 [warning: Documents this large are best viewed by clicking the View PDF Link!]
1
User Manual and Safety Information
Concord
IIT-Mobile
http://www.ztedevice.com

2
1
T - Mobile Concord® II
User Manual and
Safety information
2
Service
If you are a new T-Mobile® customer and your service has not yet been activated,
call Customer Care at 1-800-937-8997 and a T-Mobile Activations representative will
assist you. You will need the following information when activating service:
• YourServiceAgreementandtheagentcodeonyourAgreement.
• Yourname,homeaddress,homephonenumber,andbillingaddress.
NOTE: For business and government accounts, please provide the name of the
organization, the address, and the tax ID.
• YourSocialSecuritynumber,currentdriver’slicensenumber,anddateofbirthfor
credit check purposes.
• Your choice ofT-Mobile rate plan and services. (see www.t-mobile.com for the
latest plan information.)
• SIMserialnumberandIMEInumber.(locatedontheboxbarcodelabel.)
NOTE: By activating service, you acknowledge that you have read, understand, and
agree to be bound by each of T-Mobile’s Terms and Conditions, and your Service
Agreement.
3
About This Manual
LEGAL INFORMATION
Copyright © 2014 ZTE CORPORATION
All rights reserved.
Approved Firmware Versions: Thisdevicewillonlyoperatewithrmwareversions
that have been approved for use by T-Mobile and the device manufacturer. If
unauthorizedrmwareisplacedonthedeviceitwillnotfunction.
No part of this publication may be quoted, reproduced, translated or used in any form
or by any means, electronic or mechanical, including photocopying and microlm,
withoutthepriorwrittenpermissionofZTECorporation.
ZTECorporationreservestherighttocorrecttypographicalerrors,misprintsorupdate
specicationsinthisguidewithoutpriornotice.
The Bluetooth®trademark and logos areownedby the Bluetooth SIG,Inc.and any
useofsuchtrademarksbyZTECorporationisunderlicense.Othertrademarksand
trade names are the property of their respective owners.
The phone is manufactured under license from Dolby Laboratories. Dolby and the
double-D symbol are trademarks of Dolby Laboratories.
We offer self-service for our smart terminal device users. Please visit ZTE official
website (at www.ztedevice.com) for more information on self-service and supported
product models. Information subject to the website.
Version No.: R1.0
EditionTime:2014.02
ManualNo.:081704100265
4
Contents
Service .......................................................................................................... 2
About This Manual ......................................................................................3
Getting Started ...........................................................................................12
GettingtoKnowYourPhone ................................................................................ 12
KnowingtheKeys ................................................................................................14
InstallingtheSIMCard,microSDHCCard,andBattery ....................................... 14
Charging the Battery ............................................................................................17
PoweringOn/Off ...................................................................................................18
Locking/UnlockingtheScreenandKeys.............................................................. 18
UsingtheTouchScreen ....................................................................................... 19
GettingtoKnowtheHomeScreen .......................................................................20
Personalizing .............................................................................................21
ChangingtheSystemLanguage ..........................................................................21
SettingtheDateandTime .................................................................................... 21
ChangingRingtoneandNoticationSound ......................................................... 21
TurningOn/OffTouchSounds ..............................................................................22
Adjusting Volumes ................................................................................................ 22
SwitchingtoSilentMode ......................................................................................22
Applying New Wallpapers .................................................................................... 23
ChangingScreenBrightness ...............................................................................23
ProtectingYourPhoneWithScreenLocks .......................................................... 23
5
ProtectingYourPhoneWithEncryption ............................................................... 24
Knowing the Basics ..................................................................................26
MonitoringthePhoneStatus ................................................................................26
ManagingNotications .........................................................................................27
ManagingShortcutsandWidgets ........................................................................28
OrganizingWithFolders .......................................................................................29
Rearranging the Favorites Tray ............................................................................ 30
EnteringText ........................................................................................................31
EditingText ...........................................................................................................35
OpeningandSwitchingapps ...............................................................................36
Connecting to Networks and Devices .....................................................37
Connecting to Mobile Networks ...........................................................................37
Connecting to Wi-Fi ..............................................................................................38
Connecting to Bluetooth Devices ......................................................................... 40
ConnectingtoYourComputerviaUSB ................................................................ 42
SharingYourMobileDataConnection ................................................................. 43
Connecting to Virtual Private Networks ................................................................45
Phone Calls ................................................................................................47
PlacingandEndingCalls .....................................................................................47
Answering or Rejecting Calls ...............................................................................48
Working With the Call Log ....................................................................................48
Calling Your Contacts ........................................................................................... 50
Checking Voicemail .............................................................................................. 50
6
UsingOptionsDuringaCall .................................................................................51
Managing Multi-party Calls ...................................................................................51
AdjustingYourCallSettings ................................................................................. 52
People ......................................................................................................... 57
Checking Contact Details .....................................................................................57
Adding a New Contact .........................................................................................57
SettingUpYourOwnProle ................................................................................. 58
Importing,Exporting,andSharingContacts ........................................................ 58
Working With Favorite Contacts ...........................................................................59
WorkingWithGroups ...........................................................................................60
SearchingforaContact .......................................................................................61
EditingContacts ................................................................................................... 61
Accounts ....................................................................................................63
Adding or Removing Accounts ............................................................................. 63
ConguringAccountSync .................................................................................... 64
Email ...........................................................................................................65
SetUptheFirstEmailAccount ............................................................................ 65
CheckingYourEmails .......................................................................................... 65
RespondingtoanEmail ....................................................................................... 65
WritingandSendinganEmail .............................................................................. 67
AddingSignaturetoYourEmails.......................................................................... 67
AddingandEditingEmailAccounts ..................................................................... 67
ChangingGeneralEmailSettings ........................................................................ 68
7
GmailTM .......................................................................................................69
OpeningYourGmailInbox ................................................................................... 69
SwitchingAccounts .............................................................................................. 69
WritingandSendingaMessage ..........................................................................69
AddingSignaturetoYourGmailMessages.......................................................... 70
Replying to or Forwarding a Message ................................................................. 70
Working With Received Attachments ................................................................... 71
SearchingforMessages ......................................................................................71
Working With Labels ............................................................................................72
ChangingGmailSettings .....................................................................................73
Messaging ..................................................................................................74
OpeningtheMessagingScreen ...........................................................................74
SendingaTextMessage ......................................................................................74
SendingaMultimediaMessage ........................................................................... 75
Replying to a Message .........................................................................................75
Forwarding a Message .........................................................................................76
Viewing Details About a Message ........................................................................ 76
Deleting Messages or Threads ............................................................................76
ChangingMessagingSettings .............................................................................77
Calendar .....................................................................................................78
ViewingYourCalendarsandEvents .................................................................... 78
CreatinganEvent ................................................................................................79
EditingorDeletinganEvent .................................................................................80
ChangingCalendarSettings ................................................................................80
8
Google+ ......................................................................................................81
OrganizingYourContacts .................................................................................... 81
GettingUpdates ...................................................................................................81
Chatting With Contacts ........................................................................................82
Checking Photos .................................................................................................. 82
CheckingandManagingYourProle ................................................................... 82
OtherFeatures ..................................................................................................... 83
Browser ......................................................................................................84
OpeningtheBrowser ...........................................................................................84
WorkingWithanOpenedPage ............................................................................85
UsingMultipleBrowserTabs ................................................................................ 86
Downloading Files ................................................................................................87
UsingBookmarks ................................................................................................. 87
ViewingYourBrowsingHistory ............................................................................ 88
ChangingBrowserSettings ..................................................................................88
Maps ...........................................................................................................89
ActivatingLocationServices ................................................................................89
GettingYourLocation ........................................................................................... 89
SearchingforaLocation ......................................................................................89
GettingDirectionstoYourDestination ................................................................. 90
Google Now and Search ...........................................................................91
EnablingGoogleNow ..........................................................................................91
SearchingWithText .............................................................................................91
9
SearchingbySpeaking ........................................................................................92
ChangingSearchSettings ...................................................................................92
Camera .......................................................................................................93
Capturing a Photo ................................................................................................93
CustomizingCameraSettings ..............................................................................94
Recording a Video ................................................................................................95
CustomizingCamcorderSettings .........................................................................96
Gallery ........................................................................................................97
OpeningGallery ...................................................................................................97
Working With Albums ........................................................................................... 97
Working With Pictures .......................................................................................... 97
Working With Videos ............................................................................................ 99
Music ........................................................................................................100
Copying Music Files to Your Phone ................................................................... 100
Viewing Your Music Library ................................................................................ 100
Playing Music ..................................................................................................... 101
Managing Playlists .............................................................................................102
Play Music ................................................................................................104
Playing Your Music ............................................................................................. 104
Managing Playlists .............................................................................................106
Video Player .............................................................................................107
OpeningtheVideoLibrary .................................................................................107
Playing and Controlling Videos ..........................................................................107
10
Managing Video Files .........................................................................................107
Sound Recorder .......................................................................................109
Recording a Voice Memo ................................................................................... 109
Playing a Voice Memo ........................................................................................ 109
More Apps ................................................................................................ 110
Clock .................................................................................................................. 110
Calculator ............................................................................................................111
Chrome ...............................................................................................................111
Downloads ..........................................................................................................111
File Manager ...................................................................................................... 112
News and Weather ............................................................................................. 112
NotePad ............................................................................................................. 112
Play Magazines .................................................................................................. 113
Task Manager ..................................................................................................... 113
YouTube ............................................................................................................. 113
Play Store ................................................................................................. 114
BrowsingandSearchingforApps ...................................................................... 114
Downloading and Installing Apps ....................................................................... 114
CreatingaGoogleWalletAccount ..................................................................... 115
Requesting a Refund for a Paid App .................................................................. 115
Managing Your Downloads ................................................................................ 116
Settings .................................................................................................... 117
GeneralSettings ................................................................................................ 117
11
Wireless & Networks .......................................................................................... 119
Device ................................................................................................................120
Personal ............................................................................................................. 121
ACCOUNTS ...................................................................................................... 123
System ...............................................................................................................123
Troubleshooting ......................................................................................124
For Your Safety ........................................................................................129
GeneralSafety ...................................................................................................129
Distraction ..........................................................................................................130
ProductHandling ................................................................................................130
ElectricalSafety .................................................................................................134
Radio Frequency Interference ............................................................................135
ExplosiveEnvironments .....................................................................................136
RadioFrequency(RF)Energy ...........................................................................137
FCC Compliance ................................................................................................138
HearingAidCompatibility(HAC)regulationsforMobilephones ........................139
CTIA Requirements ............................................................................................ 141
Legal .........................................................................................................143
Approved Firmware Versions ............................................................................. 143
InformationAboutSafeguardingHandsets ........................................................ 143
EmergencyDialing ............................................................................................. 144
Additional Information ........................................................................................144
12
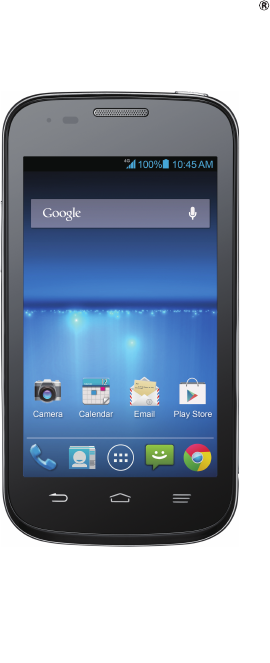
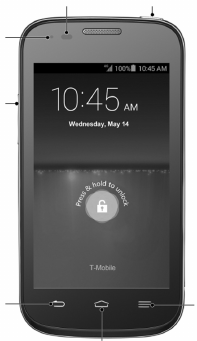
Getting Started
Getting to Know Your Phone
Sensor Power key
Indicator
Volume keys
Back key Menu key
Homekey
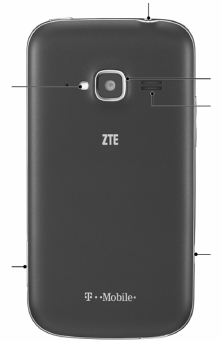
13
Charger/USBjack
Speaker
Camera
Headsetjack
Flash
microSDHC
card slot

14
Knowing the Keys
Key Function
PowerKey
• Pressandholdtoturnonyourphone.
• Pressandholdtorestartyourphone,turnonoroffAirplane
mode, enable silent mode, vibration mode or sound, or to
power off your phone.
• PresstoswitchyourphonetoSleepmode.
• Presstowakeupyourphone.
HomeKey
• TouchtoreturntotheHomeScreenfromanyapplicationor
screen.
• TouchandholdtouseGooglesearch.
• Touchtwicetoseerecentlyusedapplications.
MenuKey Touch to get the options for the current screen.
BackKey Touch to go to the previous screen.
VolumeKeys Press or hold to turn the volume up or down.
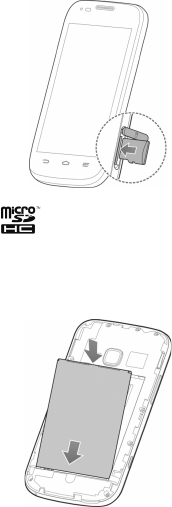
Installing the SIM Card, microSDHC Card, and Battery
SwitchoffyourphonebeforeinstallingorreplacingthebatteryortheSIMcard.The
microSDHCcard(soldseparately)can beinstalledandremovedwhilethephone is
turnedon.UnmountthemicroSDHCcardbeforeremovingit.
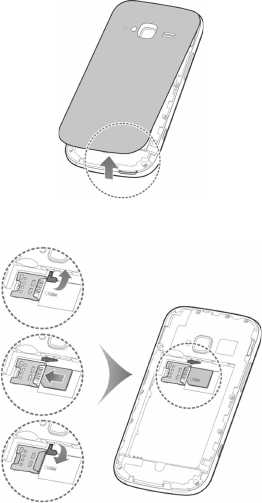
15
1. Remove the back cover.
2. Lifttherubberstopper,theninsertSIMcardintoSIMslot.
16
3. ThemicroSDHCcardcanbeinstalledandremovedwhilethephoneisturnedon.
UnmountthemicroSDHCcardbeforeremovingit.
NOTE: microSDHClogo isatrademarkofSD-3C,LLC.
4. Insert the battery by aligning the metal contacts on the battery with the metal
contacts in the battery compartment. Gently push down on the battery until it
clicks into place.
5. Pressthecovergentlybackintoplaceuntilyouhearaclick.

17
Charging the Battery
Whenyougetyournewphone,you’llneedtochargethebattery.
If the battery is low, there will be a pop-up message on the screen. As you charge
your phone, the screen will tell you the exact battery level each time you wake up
your phone.
WARNING! UseonlyT-mobileapprovedchargersandcables.Theuseofunapproved
accessories could damage your phone or cause the battery to explode.
1. Connecttheadaptertothechargingjack.Ensurethattheadapterisinsertedwith
the correct orientation. Do not force the connector into the charging jack.
2. ConnectthechargertoastandardACwalloutlet.Ifthephoneison,you’llseea
charging icon, such as or , appear on the status bar.
3. Disconnect the charger when the battery is fully charged.

18
Powering On/Off
MakesuretheSIMcardisinyourdeviceandthebatteryischarged.
• PressandholdthePower Key to turn on your phone.
• To turn it off, press and hold the Power Key to open the options menu. Touch
Power off and then touch OK.
Locking/Unlocking the Screen and Keys
Yourphoneallows you to quicklylock the screen andkeys (put the phoneto sleep
mode) when not in use, and to turn the screen back on and unlock it when you need
it.
To lock the screen and keys:
To quickly turn the screen off and lock the keys, press the Power Key.
NOTE: To save battery power, the phone automatically turns off the screen after a
certain period of time when you leave it idle. You will still be able to receive messages
and calls while the phone screen is off.
To unlock the screen and keys:
1. Press the Power Key to turn the screen on.
2. Touch and hold at the center of the screen.
NOTE:If youhaveset anunlockpattern,PINorpasswordfor yourphone(see
chapter Personalizing – Protecting Your Phone With Screen Locks), you’ll need to
drawthepatternorenterthePIN/passwordtounlockyourscreen.
19
Using the Touch Screen
Your phone’stouchscreenletsyoucontrolactions throughavarietyoftouch
gestures.
• Touch
When you want to type using the onscreen keyboard, select onscreen items such
as application and settings icons, or press onscreen buttons, simply touch them
withyournger.
• TouchandHold
To open the available options for an item (for example, a message or link in a
Web page), touch and hold the item.
• SwipeorSlide
To swipe or slide means to quickly drag your finger vertically or horizontally
across the screen.
• Drag
Todrag,pressandholdyourngerwithsomepressurebeforeyoustarttomove
yournger.Whiledragging,donotreleaseyourngeruntilyouhavereachedthe
target position.
• Pinch
Insomeapps(suchasMaps,Browser,andGallery),youcanzoominandoutby
placingtwongers on the screen atonce and pinching them together(tozoom
out)orspreadingthemapart(tozoomin).
• Rotatethescreen
For most screens, you can automatically change the screen orientation from
portrait to landscape by turning the phone sideways.
20
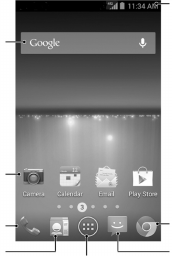
Getting to Know the Home Screen
The home screen is the starting point for your phone’s applications, functions, and
menus. You can customize your home screen by adding application icons, shortcuts,
folders, widgets, and more. Your home screen extends beyond the initial screen.
Swipethescreenleftorrighttodisplayadditionalscreens.
GoogleSearch
Shortcuts
Phone
People
All apps
Messaging
Chrome
Status&Notications
21
Personalizing
Changing the System Language
1. Touch the Home Key > Menu Key > System settings > Language & input >
Language.
2. Selectthelanguageyouneed.
Setting the Date and Time
1. Touch the Home Key > Menu Key > System settings > Date & time.
2. UncheckAutomatic date & time and Automatic time zone if you want to set the
date, time and time zone by yourself.
3. Setthedate,time,timezone,andtime/dateformat.
Changing Ringtone and Notication Sound
You can customize the default ringtone for incoming calls and default notification
sound quickly.
1. Touch the Home Key > Menu Key > System settings > Sound.
2. Touch Phone ringtone or Default notication sound.
3. Scrollthroughtheringtonelistandselecttheringtoneyouwanttouse.
4. TouchOK.
TIP:SeechapterPeople–EditingContacts–SetaRingtoneforaContactforhowto
assign a special ringtone to an individual contact.
22
Turning On/Off Touch Sounds
1. Touch the Home Key > Menu Key > System settings > Sound.
2. Check or uncheck Touch sounds.
Adjusting Volumes
1. Touch the Home Key > Menu Key > System settings > Sound > Volumes.
2. Adjust the volume for music, video, games, and other media, the ringtone and
noticationvolume,andthealarmvolume.
3. Touch OK to save.
TIP: You can adjust the media volume when a media application is in use by pressing
the Volume Up/Down Key. If no media application is active, press the Volume Up/
Down Keytoadjustringtonevolume(ortheearpiecevolumeduringacall).
Switching to Silent Mode
You can set the phone to silent mode by using one of the following methods.
• PressandholdthePower Key and then touch to enable silent mode, touch
to enable silent mode with vibration, or touch to disable silent mode.
• Keep pressingtheVolume Down Key when no media application is active.
When the icon appears in the status bar, the phone is set to silent mode
with vibration. When the icon appears in the status bar, the phone is in silent
mode.
• Touchthe Home Key > Menu Key > System settings > Sound > Silent mode,
and touch Vibrate or Mute.
23
Applying New Wallpapers
YoucansetthewallpaperfortheHomeScreenorLockScreen.
1. Touch the Home Key > Menu Key > Wallpaper.
2. Touch Home or Lock screen.
3. Select a wallpaper source from Gallery, Live Wallpapers, or Wallpapers and
choosetheimageoranimationyouwanttouseasthewallpaper.Somecropping
may be needed for Gallery images.
4. DragtheoutlinetoresizetheimageandtouchOK (forGalleryimages),ortouch
Set wallpaper.
NOTE: Live WallpapersarenotavailablefortheLockScreen.
Changing Screen Brightness
1. Touch the Home Key > Menu Key > System settings > Display > Brightness.
2. Touch AUTO to make the phone adjust the screen brightness automatically, or
adjust the brightness manually.
Protecting Your Phone With Screen Locks
You can protect your phone by creating a screen lock. When enabled, you need to
touch and hold certain icon, draw a pattern or enter a numeric PIN or password to
unlockthephone’sscreenandkeys.
1. Touch the Home Key > Menu Key > System settings > Security.
2. Touch Screen lock.
3. Touch Long press, Pattern, PIN or Password.

24
u Touch Long press to enable screen lock and allow unlock with a ‘touch and
hold’gesture.Youcanunlockthescreenbytouchingandholding on the
display.
u If you touch Pattern, you’re guided to create a pattern you must draw to
unlockthescreen.Thersttimeyoudothis,ashorttutorialaboutcreatingan
unlockpatternappears.Thenyou’repromptedtodrawandredrawyourown
pattern.
u If you touch PIN or Password, you’re prompted to set a numeric PIN or a
password you must enter to unlock your screen.
The next time you turn on your phone or wake up the screen, you must draw your
unlock pattern or enter your PIN or password to unlock it.
IMPORTANT: Screenlockoptionsarelistedintheapproximateorderofthestrength
of their security, starting with None and Long press, which provide no security.
A pattern provides minimal security, although it can be more convenient than the
stronger options.
Protecting Your Phone With Encryption
Youcanencryptallthedataonyourphone:GoogleAccounts,applicationdata,music
and other media, downloaded information, and so on. If you do, you must enter a
numeric PIN or password each time you power on your phone.
WARNING! Encryptionis irreversible.The onlywayto reverttoan unencrypted
phone is to perform a factory data reset, which erases all your data.
Encryption provides additional protection in case your phone is stolen, and may be
required or recommended in some organizations. Consult your system administrator
25
before turning it on. In many cases the PIN or password you set for encryption is
controlled by the system administrator.
Before turning on encryption, prepare as follows:
1. SetalockscreenPINorpassword.
2. Charge the battery.
3. Keepthephoneconnectedtothecharger.
4. Scheduleanhourormorefortheencryptionprocess:youmustnotinterruptitor
you will lose some or all of your data.
When you're ready to turn on encryption:
5. Touch the Home Key > Menu Key > System settings > Security > Encrypt
phone.
6. Readtheinformationaboutencryptioncarefully.
The Encrypt phone button is dimmed if your battery's not charged or your
phone's not plugged in.
If you change your mind about encrypting your phone, touch the Back Key.
WARNING! If you interrupt the encryption process, you will lose data.
7. Touch Encrypt phone.
8. EnteryourlockscreenPINorpasswordandtouch Next.
9. Touch Encrypt phone again.
Theencryptionprocessstartsanddisplaysitsprogress.Encryptioncantakeanhour
or more, during which time your phone may restart several times.
When encryption is completed, you're prompted to enter your PIN or password.
Subsequently, you must enter your PIN or password each time you power on your
phone, to decrypt it.
26
Knowing the Basics
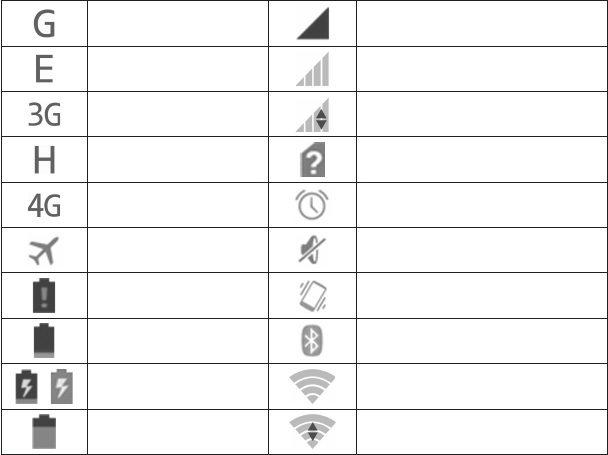
Monitoring the Phone Status
The status bar at the top of the home screen provides phone and service status icons
on the right side. Below are some of the icons you may see.
GPRSconnected No signal
EDGEconnected Signalstrength
3Gconnected Mobile data in use
HSPAconnected NoSIMcardinstalled
4Gconnected Alarm set
Flight mode Ringer off
Battery dead Vibrate mode
Battery low Bluetooth on
/ Battery charging Connected to a Wi-Fi network
Battery partially drained Wi-Fi in use
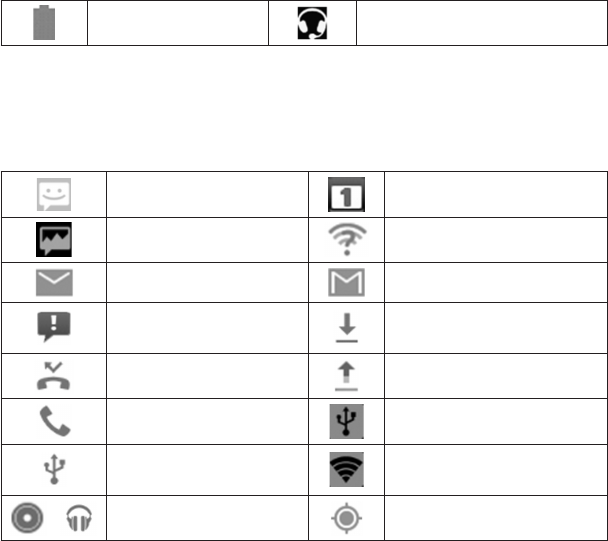
27
Battery full Wired headset connected
Managing Notications
Notication Icons
Thestatusbaratthetopofthe home screen provides notication icons on the left.
Below are some of the icons you may see.
NewSMS Upcomingevent
NewMMS New Wi-Fi network detected
NewEmail NewGmailmessage
ProblemwithSMS/MMS
delivery Downloading data
Missed call Sendingdata
Call in progress USBtetheringison
USBconnected Portable Wi-Fi hotspot or Wi-
Fi direct is on
/ Songisplaying GPSon

28
Open/Close the Notication Panel
Noticationsreportthearrivalofnewmessage,calendarevents,andalarms,aswell
asongoingevents,suchaswhenyou'veconguredyourphoneasa Wi-Fihotspot.
Youcanopenthenoticationpaneltoviewthedetailsofnotications.
• Toopenthenoticationpanel,swipeyourngerdownfromthetopofthescreen.
• Toclosethenoticationpanel,swipeyourngerupfromthebottomofthescreen
or touch the Back Key.
Respond to or Remove a Notication
Inthenoticationpanel,youcanrespondtoanoticationorremovethenotications.
• Torespondtoanotication,justtouchit.
• Toremoveanotication,swipeitleftorright.
• Toremoveallnotications,touch in the top.
• Mostappsthatsendnotifications,suchasGmailandGoogleTalk,have
noticationsettingsthatyoucanadjust.
TIP: Inthenoticationpanel,touch atthetopofnoticationslisttogettothequick
settings menu quickly.
Managing Shortcuts and Widgets
Add Shortcuts and Widgets
1. Touch the Home Key > .
2. Touch APPS or WIDGETS to view the available shortcuts and widgets.
3. TouchandholdashortcutorwidgetanddragittotheHomeScreen.
29
Move Shortcuts or Widgets
1. TouchandholdashortcutorwidgetontheHomeScreen.
2. Drag it to the place you need.
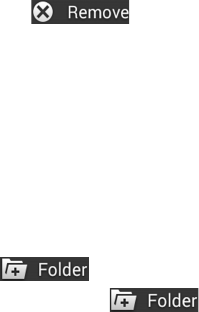
Remove Shortcuts or Widgets
1. TouchandholdashortcutorwidgetontheHomeScreen.
2. Drag it to to remove it.
Adjust Widget Size
1. TouchandholdawidgetontheHomeScreenandthenreleaseit.
2. An outline appears around the widget. Drag the outline to resize the widget.
NOTE: Not all widgets can be resized.
Organizing With Folders
YoucancreatefoldersontheHomeScreenandaddseveralshortcutsinafolder.
Create a Folder
1. Touch and hold the shortcut ontheHomeScreenyouwant to add into a folder
until appears.
2. Drag the shortcut to and release it. A new folder will be created and
the shortcut is added into the folder.
Rename a Folder
1. Touch a folder to open it.
2. Touchthefoldernameeldandenteranewname.

30
Add Shortcuts to a Folder
1. Touch and hold a shortcut and then drag it onto a folder icon.
2. Release the shortcut and it will be added into the folder.
Remove Shortcuts From a Folder
1. Touch a folder to open it.
2. Touch and hold the shortcut you want to remove and then drag it to the Home
Screen.
3. Release the shortcut and it will be removed from the folder.
Rearranging the Favorites Tray
TheHomeScreenincludesacustomizablefavoritestrayatthebottomvisiblefromall
HomeScreens.You can drag apps, shortcuts, folders, and other priorityitemsinor
outofthefavoritestrayforinstantaccessfromanyHomeScreen.
To remove items from the favorites tray:
Touch and hold an item in the favorites tray and drag it out of the tray.
To add items to the favorites tray:
TouchandholdanitemontheHomeScreenanddragitintothefavoritestray.
If the favorites tray is full, you need to remove an item in the tray.

31
Entering Text
Youcanentertextusingtheonscreenkeyboard.Someappsopenitautomatically.In
others, you open it by touching where you want to type. You can touch the Back Key
to hide the onscreen keyboard.
Change Input Methods
1. When you use the onscreen keyboard to enter text, the icon appears on the
noticationbar.
2. OpenthenoticationpanelandtouchChoose input method.
3. Selectaninputmethodyouneed.
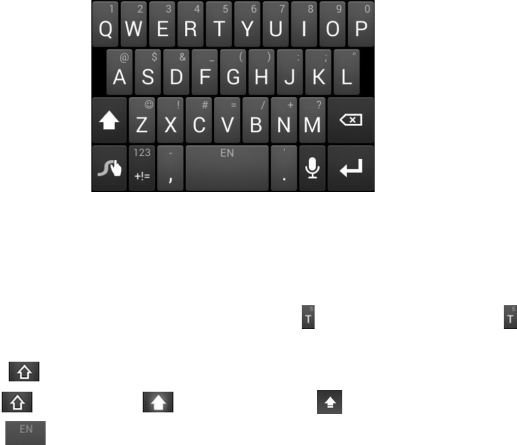
Google Keyboard
TheGoogleKeyboardprovidesalayoutsimilartoadesktopcomputerkeyboard.Turn
the phone sideways and the keyboard will change from portrait to landscape. The
landscape keyboard is not supported in all applications.

32
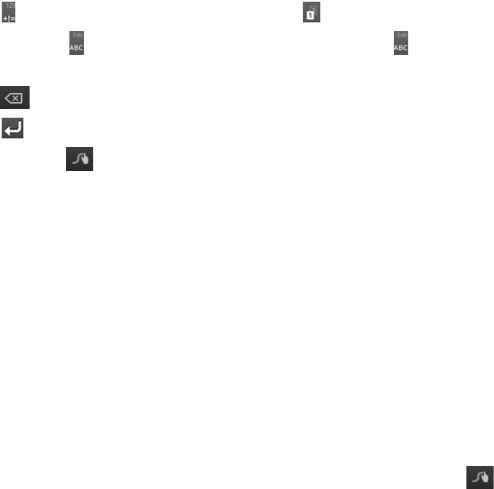
• Touchthealphabetickeystoenterletters.
• Touch to use uppercase or lowercase. This key also changes to indicate the
current case you are using: for lowercase, for uppercase, and when
locked in uppercase.
• Touch to delete the text before the cursor.
• Touch to select numbers and symbols. You can then touch tondmore.
• Touch to start a new line.
• Touch touseGooglevoicetyping.
• Touchandhold and then release it to change the input languages or set up the
Googlekeyboard.
Google Voice Typing
GoogleVoicetypingusestheGooglevoicerecognitionservicetoconvertspeechto
text. You must have a data connection on a mobile or Wi-Fi network to use it.
1. Flick down the status bar when entering text and touch Choose input method,
and then select Google voice typing.
Ortouch toaccessthevoicetypingwhenyouareusingtheGoogleKeyboard.
2. When you see the microphone image, speak what you want to type.
3. You can continue entering text to keep it or to delete it.
TIP: Say "comma," "period," "question mark," "exclamation mark," or "exclamation
point"toenterpunctuation.
33
Swype
The Swype™ keyboard lets you enter words by drawing a path from letter to letter
inonecontinuousmotion.Whenyou lift your nger after the last letterofaword,a
space is automatically added.
• Touch the alphabetic keys to enter letters.Touch and hold a key to enter the
numberorsymbollocatedonthetopofthekey.Keepholdingthekeytobringup
a series of characters available on that key, including associated accented letters,
symbols or numbers.
• Forexample, in English mode,touchand hold to enter5.Keep holding to
openacharacterandnumberlist.YoucanselecttoenterT,or5.
• Touch to use uppercase or lowercase. This key also indicates the current
case: for lowercase, for uppercase, and when locked in uppercase.
• Touch to enter a space. Touch and hold this key to open a pop-up menu for
language selection.
34
• Touch to select numbers and symbols. Touch to enter the alternate symbol
on a key. Touch to go back to enter letters. Touch and hold to open a simple
keyboard with numbers and certain symbols.
• Touch to delete a character before the cursor.
• Touch to start a new line.
• Touchandhold toopentheSwypesettings.
ToentertextviaSwype:
Moveyourngerfromlettertolettertotraceawordwithoutliftingthengeruntilyou
reach the end of the word.
Toentertheword“here”.Putyourngeron“h”,andwithoutlifting,slideitto“e”,and
then to “r”, and back to “e”. When complete, lift your nger off the screen and the
matched words are displayed.
TipsforusingSwypeTextInput:
• Toenterdoubleletters,scribbleslightlyormakealoopontheletter.Forexample,
togetthe"ll"in"hello",scribble(ormakealoop)onthe"l"key.
• Liftyourngerattheendoftheword.Aspaceisaddedautomaticallywhenyou
“Swype”thenextword.
For more information about using Swype and its additional capabilities, including
usingvoiceentryandpersonalizingyourSwypedictionary,touchandhold from
theSwypekeyboarddisplayandthentouchHow to Swype.
Input Settings
Choose input settings by touching the Menu Key > System settings > Language &
inputfromtheHomeScreen.
35
In the KEYBOARD & INPUT METHODS section, you can set the default input
method and choose the settings for input methods.
Editing Text
• Move the insertion point: Touch where you want to type.
The cursor blinks in the new position, and a tab appears below it. Drag the tab to
move the cursor.
• Select text: Touch and hold or double-tap within the text. The nearest word
highlights, with a tab at each end of the selection. Drag the tabs to change the
selection.
• Cut or copy: Selectthetextyouwanttomanipulate.ThentouchtheCut or
Copy button to cut or copy the text to the clipboard.
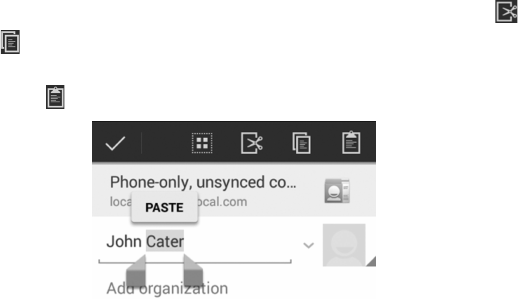
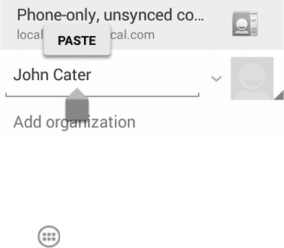
• Replace text with the clipboard text: Selectthetextyouwanttoreplace.Then
touch paste or PASTE.
36
• Insert text from the clipboard: Move cursor to the insertion point and then touch
andholdthetabbelowthecursor.ReleasethengerandtouchPASTE.
Opening and Switching apps
Open an App
1. Touch the Home Key > .
2. Slideleftorrightonthescreenandtouchanapptoopenit.
Switch Between Recently Opened Apps
1. Touch the Home Key twice.
Alistofthenamesandthumbnailsofappsyou’veusedrecentlyopens.Ifyou’ve
beenusingmoreappsrecentlythancantonthescreen,youcanscrollthelist
up and down.
2. Touch a thumbnail to open that app.
NOTE: You can swipe a thumbnail sideways to remove it from the list.
37
Connecting to Networks and Devices
Connecting to Mobile Networks
Select Network Operator
1. Touch the Home Key > Menu Key > System settings > Mobile networks >
Network operators.
2. Touch Search networks to search for all available networks.
3. Touch a network in the network list to register manually. You can also touch
Choose automatically to select preferred network automatically.
Control Mobile Data Use
To enable or disable data access:
1. Touch the Home Key > Menu Key > System settings > Mobile networks.
2. Check Data enabled to enable data access over the mobile network. Clear the
check box to disable data access.
To get data services when roaming:
1. Touch the Home Key > Menu Key > System settings > Mobile networks.
2. Check Data roaming.
IMPORTANT: Dataroamingmayincursignicantroamingcharges.
Use 2G Network Only to Save Power
1. Touch the Home Key > Menu Key > System settings > Mobile networks.
2. Check Use only 2G networks to save battery power.

38
Set Access Point Names
ToconnecttotheInternetyoucanusethedefaultAccessPointNames(APN).Andif
you want to add a new APN, please contact the service provider to get the necessary
information.
1. Touch the Home Key > Menu Key > System settings > Mobile networks >
Access Point Names.
2. Touch .
3. Touch each item to enter the information you get from your service provider.
4. TouchtheMenu Key > Save to complete.
TIP: To set the APN to default settings, touch the Menu Key > Reset to default.
Connecting to Wi-Fi
Wi-Fi is a wireless networking technology that can provide Internet access at
distances of up to 100 meters, depending on the Wi-Fi router and your surroundings.
Turn Wi-Fi On and Connect to a Wi-Fi Network
1. Touch the Home Key > Menu Key > System settings > Wi-Fi.
2. SlidetheWi-Fi switch to the ON position to turn on Wi-Fi.
3. Touch a network name to connect to it.
4. Ifthenetworkissecured,enterthepasswordandtouchConnect.
NOTE: Your phone automatically connects to previously used Wi-Fi networks when
they are in range.
Get Notied of Open Networks
1. Touch the Home Key > Menu Key > System settings > Wi-Fi.
2. SlidetheWi-Fi switch to the ON position.
39
3. Touch the Menu Key > Advanced.
4. CheckNetwork notication.
When Wi-Fi is on, you receive notications in the Status bar when your phone
detectsanopenWi-Finetwork.Unchecktheoptiontoturnoffnotications.
Add a Wi-Fi Network
YoucanaddaWi-Finetworkifthenetworkdoesnotbroadcastitsname(SSID),orto
add a Wi-Fi network when you are out of range.
To connect to a secured network,you rst needto get the security details from the
network's administrator.
1. Touch the Home Key > Menu Key > System settings > Wi-Fi.
2. SlidetheWi-Fi switch to the ON position.
3. Touch +.
4. Enter the network SSID (name). If necessary, enter security or other network
congurationdetails.
5. TouchSave.
Forget a Wi-Fi Network
You can make your phone forget about the details of a Wi-Fi network that you added
- for example, if you don’t want the phone to connect to it automatically or if it is a
network that you no longer use.
1. Touch the Home Key > Menu Key > System settings > Wi-Fi.
2. SlidetheWi-Fi switch to the ON position.
3. Touch the Wi-Fi network name and then touch Forget.

40
Connecting to Bluetooth Devices
Bluetooth® is a short-range wireless communication technology. Phones or other
devices with Bluetooth capabilities can exchange information wirelessly within a
distance of about 10 meters. The Bluetooth devices must be paired before the
communication is performed.
Turn Bluetooth On/Off
1. Touch the Home Key > Menu Key > System settings > Bluetooth.
2. SlidetheBluetooth switch to the ON or OFF position.
When Bluetooth is on, the icon will appear in the status bar.
Make Your Phone Visible
In order to work with other phones or devices that have Bluetooth, you need to
makeyourphone‘visible’tothem.
1. Touch the Home Key > Menu Key > System settings > Bluetooth.
2. SlidetheBluetooth switch to the ON position.
3. Touch your device name on the top of the screen to make your phone visible or
invisible.
NOTE: Touch the Menu Key > Visibility timeout to set the Bluetooth visibility timeout
of your phone.
Change the Device Name
1. Touch the Home Key > Menu Key > System settings > Bluetooth.
2. Slidethe Bluetooth switch to the ON position if Bluetooth is off.
3. Touch the Menu Key > Rename phone.
4. EditthenameandtouchRename.

41
Pair With Another Bluetooth Device
1. Touch the Home Key > Menu Key > System settings > Bluetooth.
2. SlidetheBluetooth switch to the ON position if Bluetooth is off.
Your phone automatically scans for and displays the IDs of all available Bluetooth
devices in range. You could touch SEARCH FOR DEVICES if you want to scan
again.
3. Touch the device you want to pair with.
4. ConrmthattheBluetoothpasskeysarethesamebetweenthetwodevicesand
touch Pair. Alternately, enter a Bluetooth passkey and touch Pair.
Pairing is successfully completed when the other device accepts the connection
or the same passkey is entered.
NOTE: The Bluetooth passkey may be xed for certain devices, such as headsets
andhandsfreecarkit.Youcantryentering0000or1234(themostcommon
passkeys), or refer to the documents for that device.
Unpair From a Bluetooth Device
You can make your phone forget its pairing connection with another Bluetooth device.
Toconnecttothedeviceagain,youmayneedtoenterorconrmapasscodeagain.
1. Touch the Home Key > Menu Key > System settings > Bluetooth and make
sure Bluetooth is turned on.
2. In the list of paired devices, touch the icon beside the Bluetooth device you
want to unpair from.
3. Touch Unpair.
42
Connecting to Your Computer via USB
You can connect your phone to a computer with a USB cable and transfer music,
pictures, and other les in both directions. Your phone stores these les in internal
storageoronaremovablemicroSDHCcard.
If you are using USB tethering, you must turn that off before you can use USB to
transferlesbetweenyourphoneandcomputer.
Connect Your Phone to a Computer via USB
1. ConnectyourphonetothePCwithaUSBcable.
2. OpentheNoticationpanelandtouchConnected as an installer.
3. Choose one of the following options:
u Charge only: StopallUSBfunctions.LetsyouchargeyourphoneviaUSB.
u USB mass storage:XPrecommended.Letsyoutransferlesbetweenyour
computerandexternalSDHCcardonAndroiddevices.
u Install driver: Select this option when features (Connect to PC software,
Mediadevice)enabledforthersttime,orwhenthey’reunavailable.
u Connect to PC software: Install apps or manage data on the phone via PC
software.
u Media device (MTP): LetsyouusephoneasUSBstorageandtransferles
when it is connected to Windows PC or Mac.
u Camera (PTP): Lets you use camera software to transfer pictures from phone
to PC.
43
Disconnect Your Phone From the Computer
Todisconnectthephonefromthecomputer,simplyunplugtheUSBcablewhenyou’
renished.
Remove the microSDHC Card From Your Phone
Ifyouneedtoremove themicroSDHC cardwhilethephoneis on,you should
unmountitrst.
1. Touch the Home Key > Menu Key > System settings > Storage.
2. ScrolldownandtouchUnmount SD card > OK.
3. YoucansafelyremovethemicroSDHCcardfromthephone.
Sharing Your Mobile Data Connection
You can share your phone’s data capabilities through tethering or by activating the
mobile hotspot feature to create a portable Wi-Fi hotspot.
Share Your Mobile Data Connection via USB
YoucanaccesstheInternetonyourcomputerviatheUSBtetheringfeatureofyour
phone. The feature needs data connection on a mobile network and may result in
data charges.
NOTE:IfyourphonehasamicroSDHCcardorUSBstorage,youcan’tmountiton
yourcomputerwhileUSBtethered.
1. ConnectyourphonetoyourcomputerwithaUSBcable.
2. Touch the Home Key > Menu Key > System settings > More.
3. Check USB tethering. A new network connection will be created on your
computer.
44
NOTE: To stop sharing your data connection, uncheck USB tethering or disconnect
theUSBcable.
Share Your Mobile Data Connection via Bluetooth
IfyourcomputercanobtainanInternetconnectionviaBluetooth,you cancongure
your phone to share its mobile data connection with your computer.
1. Pair your phone with your computer via Bluetooth.
2. CongureyourcomputertoobtainitsnetworkconnectionviaBluetooth.Formore
information, please see your computer's documentation.
3. Touch the Home Key > Menu Key > System settings > More.
4. Check Bluetooth tethering. Your computer is now sharing your phone's data
connection.
5. Tostopsharingyourdataconnection,uncheckBluetooth tethering.
Share Your Mobile Data Connection as a Wi-Fi Hotspot
Youcanshareyourphone’sdataconnectionwithotherdevicesbyturningyourphone
into a portable Wi-Fi hotspot. You must have qualifying service on your account in
ordertousetheMobileHotSpotfeature.
NOTE: When the portable Wi-Fi hotspot feature is enabled, you cannot use your
phone’sapplicationstoaccesstheInternet via its Wi-Fi connection.Youstillremain
connected to the Internet via your mobile data network.
1. Touch the Home Key > Menu Key > System settings > More > Tethering &
portable hotspot.
2. Check Mobile Hotspot.
Afteramoment,thephonestartsbroadcastingitsWi-Finetworkname(SSID).
45
3. Onanotherdevice,locateyourphoneviaWi-Fiandconnectwithittostartusing
thephone’smobiledata.
NOTE: To stop sharing your data connection, uncheck Mobile Hotspot.
Rename or Secure Your Wi-Fi Hotspot
You can change the name of your phone's Wi-Fi network name (SSID) and secure
your portable Wi-Fi hotspot.
1. Touch the Home Key > Menu Key > System settings > More > Tethering &
portable hotspot > Mobile HotSpot settings > Congure Mobile Hotspot.
2. Setyournameandsecurityoptionsasfollows:
u Network SSID:EnteroreditanetworkSSID(name)thatotherdevicessee
when scanning for Wi-Fi networks.
u Channel: SelectthechanneloftheWi-Fihotspot.
u Security: Choose a security option: None (not recommended), WPA PSK
or WPA2 PSK(otheruserscanaccessyourmobilehotspotonlyiftheyenter
the correct password). When you select WPA PSK or WPA2 PSK, touch the
Passwordeldtoeditthesecuritypassword.
3. Touch Save to save your settings.
Connecting to Virtual Private Networks
Virtualprivatenetworks(VPNs)allowyouto connect totheresourcesinsidea
secured local network. VPNs are commonly deployed by corporations, schools, and
other institutions to let people access local network resources when not on campus,
or when connected to a wireless network.
46
Depending on the type of VPN you are using, you may be required to enter your login
credentials or install security certicates before you can connect to your VPN. You
can get this information from your network administrator.
Add a VPN
1. Touch the Home Key > Menu Key > System settings > More > VPN.
2. Touch +andllintheinformationprovidedbyyournetworkadministrator.
3. Touch Save.
The VPN is added to the list on the VPN screen.
Connect to a VPN
1. Touch the Home Key > Menu Key > System settings > More > VPN.
2. Touch the VPN that you want to connect to.
3. When prompted, enter any requested credentials, and then touch Connect.
Whenyouareconnected,theVPNconnectediconappearsintheStatusbar.
Modify a VPN
1. Touch the Home Key > Menu Key > System settings > More > VPN.
2. Touch and hold the VPN that you want to modify.
3. Touch Edit prole and edit the VPN settings you want.
4. TouchSave.
Delete a VPN
1. Touch the Home Key > Menu Key > System settings > More > VPN.
2. Touch and hold the VPN that you want to delete.
3. Touch Delete prole.
47
Phone Calls
You can place calls from the Phone app, the People app, or other apps or widgets
that display contact information. Wherever you see a phone number, you can usually
touch it to dial.
Placing and Ending Calls
Place a Call by Dialing
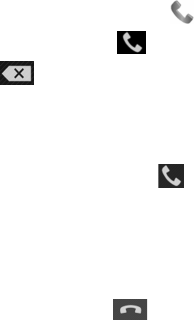
1. Touch the Home Key > .
2. In the dialer tab , enter the phone number with the on-screen keypad. Touch
to delete incorrect digits.
NOTE: As you enter digits, your phone searches for contacts that match. If you
see the number you want to dial, touch it to place the call immediately without
entering the rest of the number.
3. Touch the Phone icon below the keypad to dial.
TIP: To make an international call, touch and hold the 0 key to enter the plus (+)
symbol. Next, enter the country code, followed by the city/area code and then the
phone number.
End a Call
During a call, touch on the screen.

48
Answering or Rejecting Calls
When you receive a phone call, the Incoming Call screen opens, displaying the Caller
ID or the information about the caller that you've entered in People. You can answer
or reject the call, or reject it with a text message.
Answer a Call
When you receive a phone call, drag over to answer the call.
NOTE: To silence the ringer before answering the call, press the Volume Keys up or
down.
Reject a Call
When you receive a phone call, drag over to reject the call.
You can also drag over to reject the call and send a preset text message to
the caller.
TIP: To edit the text response from within the Phone app, touch the Menu Key >
Settings > Quick responses.
Working With the Call Log
The Call Log is a list of all the calls you've placed, received, or missed. It provides a
convenient way to redial a number, return a call, or add a number to your Contacts.
To open the call log, you can touch the Home Key > > .

49
Place a Call From the Call Log
1. Openthecalllog.
2. Touch a number for more information about the call, or touch beside it to call
back.
Add a Call Log Number as a Contact
1. Openthecalllog.
2. Touch a number to view more call information.
3. Touch .
4. Toaddthenumbertoanexistingcontact,touchacontactinthelist.Toaddanew
contact, touch CREATE NEW CONTACT.
Take Other Actions on a Call Log Entry
1. Openthecalllog.
2. Touch a number to view more call information. While viewing the call details, you
can:
u Touch the number to call it.
u Touch the Menu Key > Edit number before call to edit the number in the
dialer before calling it.
u Touch to send a message.
u If the number belongs to a contact you have, touch to view contact details.
Delete the Call Log
1. Openthecalllog.
2. Touch the Menu Key > Select item(s).

50
3. Touch the call log items you want to delete and then touch > OK to delete the
call logs.
NOTE: You can also touch a number in the call log screen, and touch the Menu Key
> Remove from call log to delete the call log of the number.
Calling Your Contacts
Call a Contact
1. Touch the Home Key > and then touch the Contact tab .
2. Flick the screen up or down to view all your contacts with phone numbers.
TIP: You can search for a contact by touching on the screen.
3. Touch a contact or number to call it.
Call a Favorite Contact
1. Touch the Home Key > and then touch the Contact tab .
2. Your favorite contacts and frequently called contacts or numbers are listed at the
top of the screen. Touch a contact or number to call it.
Checking Voicemail
If you have set the phone to divert certain calls to the voicemail, callers can leave
voicemailmessageswhentheycannotreachyou.Here’showtocheckthemessages
they left.
1. Touch the Home Key > .
2. Touch and hold 1 Key in the dialer.
3. Follow the voice prompts to listen to and manage your voicemail messages.

51
NOTE: To set your voicemail service, touch the Menu Key > Settings > Voicemail
in the dialer and touch the voicemail settings you want to change. For detailed
information, please contact the service provider.
Using Options During a Call
During a call, you will see a number of onscreen options. Touch an option to select it.
• Touch to turn on or off the speaker.
• Touch to mute or unmute your microphone.
• Touch to hold or unhold the current call.
• Touch tomakeanothercallseparatelyfromtherstcall,whichisputonhold.
• Touch to switch to the dialer, for example to enter a code.
• Touch to merge the separate calls into a single conference call.
• Touch to end the current call.
WARNING! Because of higher volume levels, do not place the phone near your ear
during speakerphone use.
Managing Multi-party Calls
When the call waiting and three-way call features are available, you can switch
between two calls or set up a conference call.
NOTE: The call waiting and three-way call features need network support and may
result in additional charges. Please contact T-Mobile for more information.
52
Switch Between Current Calls
Whenyou’reonacall,yourphonescreeninformsyouthatanothercalliscomingin
and displays the caller ID.
To respond to an incoming call while you’re on a call:
Drag over toanswerthecall.(Thisputstherstcalleronholdandanswers
the second call.)
To switch between two calls:
Touch on the screen or touch the Menu Key > Swap.
Set Up a Conference Call
With this feature, you can talk to two people at the same time.
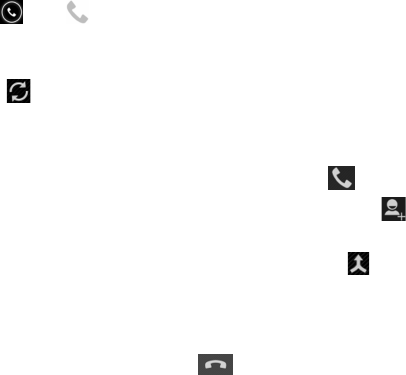
1. Onthedialerscreen,enteranumberandtouch .
2. Onceyouhaveestablishedtheconnection,touch and dial the second
number.(Thisputstherstcalleronholdanddialsthesecondnumber.)
3. Whenyou’reconnectedtothesecondparty,touch .
If one of the people you called hangs up during your call, you and the remaining caller
stay connected. If you initiated the call and are the rst to hang up, all callers are
disconnected.
To end the conference call, touch .
Adjusting Your Call Settings
Use Fixed Dialing Numbers
FixedDialingNumbers(FDN)allowsyoutorestrictoutgoingcallstoa limitedsetof
phone numbers.

53
1. Touch the Home Key > > Menu Key > Settings > Fixed Dialing Numbers.
2. The following options are available:
u Enable FDN: Input the PIN2 code to enable the FDN feature.
u Change PIN2: Change the PIN2 code for FDN access.
u FDN list: Manage the FDN list.
NOTE: ThePIN2codeisprovided byyourcarrier.EnteringanincorrectPIN2
code more times than allowed can get your SIM card locked. Contact T-Mobile for
assistance.
Edit Quick Response to Rejected Callers
1. Touch the Home Key > > Menu Key > Settings > Quick responses.
2. Touch the text message to edit it.
Set Voicemail
1. Touch the Home Key > > Menu Key > Settings > Voicemail.
2. Touch service to select voicemail service provider. Your carrier is the default.
3. Touch Setup > Voicemail number to edit the voicemail number if necessary.
Set TTY Mode
SelectaTTYmodeforyourphonetoworkwithateletypewriter,orturnTTYoff.
1. Touch the Home Key > > Menu Key > Settings > TTY mode.
2. Touch TTY Off to turn the feature off, or touch TTY Full, TTY HCO, or TTY VCO
to select a mode for your phone to work with the teletypewriter. Consult your
teletypewritermanufacturer’smanualifnecessary.

54
Set DTMF Tones
YoucansetthelengthofDual-tonemulti-frequency(DTMF)signaltones.
1. Touch the Home Key > > Menu Key > Settings > DTMF Tones.
2. Touch Normal or Long.
Set Speed Dials
You can touch and hold the 1 ~ 9 key from the dialer to call the corresponding speed
dial number.
The number key 1 is reserved to speed dial your voicemail.
To assign a speed dial key:
1. Touch the Home Key > > Menu Key > System settings > Speed dial.
2. Touch a speed dial key.
3. Enteraphonenumberorselectonefromthecontactlist.
4. TouchOK.
Use Wi-Fi Calling
With Wi-Fi Calling you can send and receive calls and messages over a Wi-Fi
network using your existing T-Mobile service. Touch the Home Key > > Menu
Key > Settings > Wi-Fi Calling > Help or contact T-Mobile for details.
Bar Certain Calls
Call barring feature allows you to forbid certain types of calls from your phone.
1. Touch the Home Key > > Menu Key > Settings > Call Barring Settings.
2. Settherestrictionofspecictypesofcallsfromyourphone.

55
Forward Incoming Calls
Call forwarding feature allows you to forward your incoming calls to another phone
number.
1. Touch the Home Key > > Menu Key > Settings > Call forwarding.
2. Touch an available option ( Always forward, Forward when busy, Forward
when unanswered, or Forward when unreachable) to enable it.
Other Options
1. Touch the Home Key > > Menu Key > Settings > Additional settings.
2. Touch Caller ID to choose whether your number is displayed when someone
receivesyouroutgoingcall.OrcheckCall waitingtogetnotiedofincomingcalls
during a call.
NOTE: Please contact T-Mobile to check whether the caller ID and call waiting
features are available.
Internet Call Settings
To add an Internet calling account:
1. Touch the Home Key > > Menu Key > Settings >SIP Accounts.
2. Touch ADD ACCOUNT.
3. FollowtheinstructionsfromyourInternetcallingserviceprovidertocongurethe
settings for your account.
4. TouchSAVE.

56
To congure which calls use Internet calling:
You can congure your phone to place all calls using Internet calling (when you’re
connected to a Wi-Fi network), just calls to Internet calling addresses, or to ask each
time you place a call.
1. Touch the Home Key > > Menu Key > Settings.
2. Touch Use Internet calling.
3. Touch the Internet calling option you want.
To congure your phone to receive Internet calls:
Bydefault,yourphoneisconguredtomakeInternetcalls,butnottoensurethatyou
willreceivethem.ButyoucancongureyourphonetolistenforInternetcallsmadeto
an Internet calling account you added to your phone.
1. Touch the Home Key > > Menu Key > Settings > SIP Accounts.
2. Check Receive incoming calls. Checking this setting will reduce your battery life
between charges.

57
People
You can add contacts on your phone and synchronize them with the contacts in your
Googleaccountorotheraccountsthatsupportcontactsyncing.
To see your contacts, touch the Home Key > . From there, you can touch the
tabs on the top of the screen to quickly switch to the contact groups or favorite
contacts .
Checking Contact Details
1. Touch the Home Key > and touch the all contacts tab to access your
contact list.
2. Scrollthroughthelisttoviewallyourcontacts.
3. Touch a contact to view its details.
TIP: If you have a lot of contacts stored, you'll see a slider when you touch the right
side of the screen. To go directly to a letter, touch and hold the slider and drag it to a
letter.
Adding a New Contact
1. Touch the Home Key > and touch the all contacts tab .
2. Touch to add a new contact.
3. Touch theaccounteldnearthetopofthescreento choose where tosavethe
contact. If a sync account is selected, the contacts will be synced automatically
with your account online.

58
4. Enterthecontactname,phonenumbers,emailaddresses,andotherinformation.
5. TouchDONE to save the contact.
Setting Up Your Own Prole
You can create your own name card in your phone.
1. Touch the Home Key > and touch the all contacts tab .
2. Touch Set up my prole or your name, whichever is at the top of the contact list.
3. EdityourproleinformationandtouchDONE.
Importing, Exporting, and Sharing Contacts
Youcanimport/exportcontactsfrom/toyourSIMormicroSDHCcard.Thisis
especially useful when you need to transfer contacts between different devices. You
canalsoquicklyshareyourcontactsusingBluetooth,EmailorMessaging,etc.
Export Contacts to the SIM Card
1. Touch the Home Key > .
2. Touch the Menu Key > Import/export > Export to SIM card.
3. Touch OK.
Import Contacts From storage
1. Touch the Home Key > .
2. Touch the Menu Key > Import/export > Import from storage.
3. Selectanaccountinwhichtosavethecontacts.
4. TouchtoselectthevCardleyouneedandthentouchOK.

59
Export Contacts to storage
1. Touch the Home Key > .
2. Touch the Menu Key > Import/export > Export to storage.
3. Thephonewillpromptyouwiththenameofthe vCard le.Touch OK to create
theleonthemicroSDHCcard.
Share Contacts
1. Touch the Home Key > and touch the all contacts tab .
2. Touch the Menu Key > Import/export > Share visible contacts.
3. Choose to share the contacts via Bluetooth, Drive, Email, Gmail or Messaging.
Working With Favorite Contacts
In the favorite contacts tab, you can nd your favorite contacts and frequently
contacted contacts.
Add a Contact to Favorites
YoucanaddthecontactsusedfrequentlytoFavorites,soyoucanndthemquickly.
1. Touch the Home Key > and touch the all contacts tab .
2. Touch a contact and then touch next to the contact name.
Remove a Contact From Favorites
1. Touch the Home Key > and touch the favorite contacts tab .
2. Touch a favorite contact and then touch next to the contact name.

60
Working With Groups
View Your Contact Groups
1. Touch the Home Key > and touch the contact groups tab .
2. Scrollthroughthelisttoviewthepresetgroupsandanygroupsyouhavecreated.
3. Touch a group to view its members.
Set Up a New Group
1. Touch the Home Key > and touch the contact groups tab .
2. Touch to create a new group.
3. Touch the account eld on the top of the screen to choose an account for the
group.
4. EnterthegroupnameandtouchDONE.
5. Touch and select the contacts you wish to be the group members.
6. Touch .
Delete a Group
1. Touch the Home Key > and touch the contact groups tab .
2. Touch a group and then touch the Menu Key > Disband group.
3. Touch OK to disband the group. The contacts in the group will not be deleted.

61
Edit a Group
1. Touch the Home Key > and touch the contact groups tab .
2. Touch a group and then touch the Menu Key.
3. Touch Rename grouptoeditthegroupname.Ortouch Select item(s) to select
themembersyoudon’tneedandremovethem.
Searching for a Contact
1. Touch the Home Key > .
2. Touch at the bottom of the screen.
3. Input the contact name you want to search for. The contacts matched will be
listed.
Editing Contacts
Edit Contact Details
1. Touch the Home Key > .
2. Touch a contact you need to edit and then touch the Menu Key > Edit.
3. EditthecontactandtouchDONE.

62
Set a Ringtone for a Contact
Assign a special ringtone to a contact, so you know who is calling when you hear the
ringtone.
1. Touch the Home Key > .
2. Touch a contact you want to set a ringtone for and then touch the Menu Key >
Set ringtone.
NOTE:Thecontactmustbesavedonthephone,nottheSIMcard.
3. SelectaringtoneyoulikeandtouchOK.
Delete a Contact
1. Touch the Home Key > .
2. Touch a contact you want to delete and touch the Menu Key > Delete.
3. Touch OKtoconrm.
63
Accounts
Adding or Removing Accounts
YoucanaddmultipleGoogleAccountsandMicrosoftExchangeActiveSyncaccounts.
You may also add other kinds of accounts, depending on the apps installed on your
phone.
Add an Account
1. FromtheHomeScreen,touchtheMenu Key > System settings > Add account.
2. Touch the type of account you want to add.
3. Follow the onscreen steps to enter the information about the account. Most
accounts require a username and password, but the details may vary. You
may also need to obtain some information from IT support or your system
administrator.
When the account is successfully added, it is displayed in the ACCOUNTS list.
Remove an Account
Removing an account will delete it and all information associated with it from your
phone, such as emails and contacts.
1. FromtheHomeScreen,touchtheMenu Key > System settings.
2. Touchtheaccount(suchasGoogle).
3. SelectanexactaccountandtouchtheMenu Key > Remove account > Remove
account.
64
Conguring Account Sync
Congure Auto Sync Setting
1. Touch the Home Key > Menu Key > System settings > Data usage.
2. Touch the Menu Key and check or uncheck Auto-sync data.
u When automatic sync is turned on, changes you make to information on your
phone or on the web are automatically synced with each other.
u When auto sync is turned off, you need to sync manually to collect emails,
updates, or other recent information.
Sync Manually
1. Touch the Home Key > Menu Key > System settings.
2. TouchthetypeandthentheaccountyouwanttosyncintheACCOUNTSsection.
3. Touch the Menu Key > Sync now.Ortouchthetypesofinformationyouwantto
sync.
Change an Account’s Sync Settings
1. Touch the Home Key > Menu Key > System settings.
2. TouchthetypeandthentheaccountintheACCOUNTSsection.TheSyncscreen
appears, showing a list of information the account can sync.
3. When auto-sync is turned on, check or uncheck items as you need. Checked
types of information on the phone and the web will be kept in auto-sync.

65
Email
Touch intheHomeScreenandselectEmail.Useittoreadandsendemailsfrom
servicesotherthanGmail.
Set Up the First Email Account
1. When you open Email forthersttime,enteryouremailaddressandpassword.
2. Touch Next to let the phone retrieve the network parameters automatically.
NOTE: You can also enter these details manually by touching Manual setup or
when automatic setup fails.
3. Followtheon-screeninstructionstonishthesetup.
Your phone will show the inbox of the email account and start to download email
messages.
Checking Your Emails
Your phone can automatically check for new emails at the interval you set when
setting up the account.
You can also check new emails manually by touching inanyoftheemailaccount’
s boxes.
Responding to an Email
You can reply to or forward a message that you receive. You can also delete
messages and manage them in other ways.

66
Reply to or Forward an Email
1. OpentheemailyouwanttoreplytoorforwardfromInbox.
2. Touch the icons at the bottom to reply or forward the email.
u Touch to reply to the sender.
u Touch to reply to the sender and all recipients of the original email.
u Touch to forward the email to someone else
3. Typeyouremail.Ifforwarding,entertheemailaddress(es)yourwanttoinclude.
4. Touch .
Mark an Email as Unread
You can return a read email to the unread state—for example, to remind yourself to
read it again later. You can also mark a batch of emails as unread.
• Whilereadingamessage,touchtheMenu Key > Mark as unread.
• Whileinamessagelist(forinstance,theinbox),touchthecheckboxesbeforethe
messages and then touch .
Delete an Email
You can delete an email from its folder. You can also delete a batch of emails.
• Whilereadingamessage,touch > OK.
• Whileinamessagelist(forinstance,theinbox),touchthecheckboxesinfrontof
the messages and then touch > OK.

67
Writing and Sending an Email
1. OpenyouremailInboxandtouch .
NOTE: If you have more than one email account added on the phone, touch the
sender line to select the account you want to use for sending the message.
2. Enteracontactnameoremailaddressin the ‘To’eld.Separateeachrecipient
with a comma. You can also touch to select recipients from your contacts.
3. Entertheemailsubjectandcomposetheemailtext.
4. TouchtheMenu Key > Attach letoadd audioles,images,videosandother
typesoflesasattachments.
5. Touch at the top right of the screen to send the message.
Adding Signature to Your Emails
You can set a few lines of plain text as signature for every outgoing email message
from an account, such as your name and contact information.
1. OpentheEmail app.
2. Touch the Menu Key > Settings and select the account you want to add
signature to.
3. Touch Signature and enter the text.
4. TouchOK.
Adding and Editing Email Accounts
Add an Email Account
Aftersettingupyourrstemailaccount(seeEmail–SetUptheFirstEmailAccount),
you can add more email accounts and manage them separately.
68
1. OpenEmail to get the Inbox screen.
2. Touch the Menu Key > Settings and touch ADD ACCOUNT at the top right of
the screen.
3. Setuptheaccountasyouwouldwiththerstone.
Edit an Email Account
You can change a number of settings for an account, including how often you check
foremail,howyou’renotiedofnewmails,anddetailsabouttheserverstheaccount
uses to send and receive mails.
1. OpenEmail to get the Inbox screen.
2. Touch the Menu Key > Settings and touch the account whose settings you want
to change.
3. Make the changes you want and touch the Back Keywhenyou’renished.
Remove an Email Account
1. OpenEmail to get the Inbox screen.
2. Touch the Menu Key > Settings and touch the account you want to remove.
3. Touch Remove account > OK.
Changing General Email Settings
Generalsettingsapplytoallemailaccountsyouadd.
1. OpenEmail to get the Inbox screen.
2. Touch the Menu Key > Settings > General.
3. Make the changes you want and touch the Back Keywhenyou’renished.

69
GmailTM
After you sign in to your Google account on the phone, you can send and retrieve
GmailmessageswiththeGmail app.
Opening Your Gmail Inbox
Touch intheHomeScreenandselectGmail. The Inbox screen appears.
Ifyouhaven’tsignedin,youwillbepromptedtodosoorcreateanewaccount.
Touch the Menu Key > Refresh to refresh your Inbox and download new messages.
Switching Accounts
Gmaildisplaysconversations,messages,andsettingsfromoneGoogleaccountata
time.IfyouhavesignedintomorethanoneGoogleaccountonyourphone,youcan
switch accounts and view information in each account.
1. From your Inbox, touch at the top of the screen.
2. Touchtheaccountyouwanttosee.Theaccount’sInboxwillopen.
Writing and Sending a Message
1. OpenyourGmailInboxandswitchtotheaccountyouwanttouseforsendingthe
message.
2. Touch .
3. Enteracontactnameoremailaddressin the ‘To’eld.Separateeachrecipient
with a comma.
4. Entertheemailsubjectandcomposetheemailtext.

70
5. To attach an image, touch the Menu Key > Attach picture/Attach video and
selectale.
6. Touch at the top right of the screen to send the message.
Adding Signature to Your Gmail Messages
YoucansetafewlinesofplaintextassignatureforeveryoutgoingGmailmessage.
ThesignatureyousetonthephoneisindependentofthesignatureyouuseforGmail
on the web.
1. OpentheGmail app.
2. Touch the Menu Key > Settings and select the account you want to add
signature to.
3. Touch Signature and enter the text.
4. Touch OK.
Replying to or Forwarding a Message
1. OpentheGmailmessageyouwanttoreplytoorforwardtoanotherperson.
2. Do the following as you need.
u To reply to the sender, touch .
u To reply to the sender and all recipients of the original message, touch >
Reply all.
u To forward the message, touch > Forward.
3. Edityourmessageandtouchthesendicon .

71
Working With Received Attachments
Whenamessagehasan attachment,Gmaildisplays informationaboutit inthe
ATTACHMENTS section of the email.
Depending on the attachment type, the applications installed on your phone as well
as your settings, you may touch to preview, view, or save the attachment.
TIP: For documents with multiple pages, touching the Preview option will only
download the pages you view, while touching other options may download the entire
leandcostmoretimeanddata.
Searching for Messages
You can search for messages using words that appear in addresses, subjects, labels,
or contents.
NOTE: Ifyousearchwhilethephonedoesn’thaveanactiveInternetconnection,only
messages synchronized onto your phone can be searched.
1. OpentheGmail app and touch .
2. Enterthewordstosearchforandtouchthesearchkeyonthescreenkeyboard.
As you type, suggestions may appear below the search eld. You can touch a
suggestion to search for it right away.
3. In the search results, touch the message you need and work with it just as you
wouldwithanyGmailmessage.
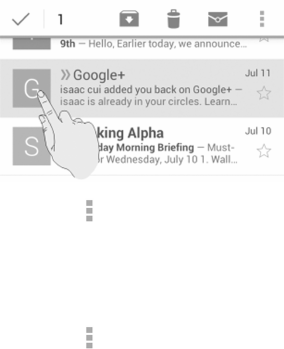
72
Working With Labels
Message labels include both labels you create and default labels such as Sent,
Starred, and Outbox. You can organize your emails by labeling them or adding stars
to them. Labels also help you sort your messages, just like folders.
To label or change labels:
1. OpentheGmail app and touch in the message list the sender images at the left
side of the messages you want to label.
2. At the top of the screen, touch > Change labels.
3. Check or uncheck labels in the new screen and touch OK.
To add stars to messages:
1. OpentheGmail app and touch in the message list the sender images in front of
the messages you want to star.
2. At the top of the screen, touch > Add star.

73
To view messages by label:
1. Openthe Gmail app and touch .
2. Touch a label below ALL LABELS to view messages with that label.
Changing Gmail Settings
Touch the Menu Key > Settings in any Gmail screen to change General settings,
whichapplytoallGmailaccounts,orothersettingsthatonlyapply tospecific
accounts.
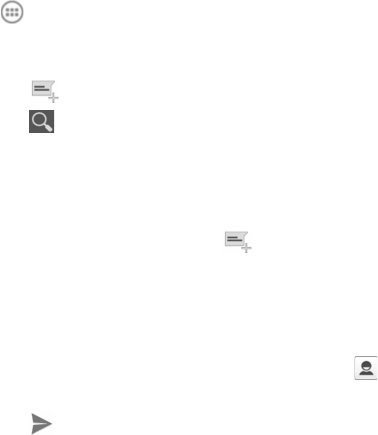
74
Messaging
YoucanuseMessagingtoexchangetextmessages(SMS)andmultimediamessages
(MMS).
Opening the Messaging Screen
Touch intheHomeScreenandselectMessaging.
The Messaging screen opens, where you can create a new message, search for
messages, or open an ongoing message thread.
• Touch to write a new text or multimedia message.
• Touch to search for a message using keywords.
• Touch an existing message thread to open the conversation you’ve had with a
certain number.
Sending a Text Message
1. OntheMessaging screen, touch at the bottom.
2. Add recipients by one of the following ways.
u Touch the To field and manually enter the recipient’s number the contact
name. If the phone presents a few suggestions, touch the one you want to
add.
u Selectrecipientsfromyourcontactsbytouching .
3. Touch the Type messageeldandenterthecontentofyourtextmessage.
4. Touch .

75
Sending a Multimedia Message
1. OntheMessaging screen, touch at the bottom.
2. Entertherecipientandthetextofthe message,asyoudowhen sendingatext
message. You can also include email addresses as recipients.
3. Touch the Menu Key > Add subject to add a message subject.
4. Touchthepaperclipicon toattachaletothemessage.
5. Touch .
NOTE: When you enter an email address as a recipient, add a subject, or attach a
file, the message is automatically converted to a multimedia message. When you
delete such information, the message is converted to a text message.
Replying to a Message
Messages you receive are appended to existing threads of the same number. If the
new message comes from a new number, a new thread is created.
1. OntheMessaging screen, touch the thread that has the message you want to
reply to.
2. Type your reply in the text box at the bottom. You can touch the attach icon if
youwanttoreplywithanMMS.
3. Touch .

76
Forwarding a Message
1. Onthe Messaging screen, touch the thread that has the message you want to
forward.
2. Touch and hold the message.
3. Touch Forward in the menu that opens.
4. Enterarecipientforthemessageandeditthecontentifyouwant.
5. Touch .
Viewing Details About a Message
1. Touch and hold a message in a thread.
2. Touch View details to see information about the message, such as message
type, sender, or date.
Deleting Messages or Threads
To delete messages in a thread:
1. OntheMessaging screen, touch a thread.
2. Touch the Menu Key > Select item(s).
3. Touch the messages you want to delete. The ones you touch will have a check in
the box in front of them.
4. Touch at the bottom.
5. TouchDelete.

77
To delete message threads:
1. OntheMessaging screen, touch and hold one thread you want to delete.
2. If there are more threads you want to delete, touch them one by one.
3. Touch at the bottom.
4. TouchDelete.
Changing Messaging Settings
Touch the Menu Key > Settings in the Messaging screen to change Messaging
settings.

78
Calendar
Calendaron thephoneworks with theweb-based GoogleCalendarservicefor
creating and managing events, meetings, and appointments. It also works with the
MicrosoftExchangeActiveSynccalendaronceyousignintoyourExchangeaccount
on the phone.
To open Calendar, touch intheHomeScreenandselectCalendar.
Viewing Your Calendars and Events
Select Visible Calendars
1. OpentheCalendar app.
2. Touch the Menu Key > Calendars to display.
3. In the new screen, touch the calendars to check the calendars you want to see or
uncheckthecalendarsyou’dliketohide.
EventsfromhiddencalendarsarenotshownintheCalendarapp.
Change Calendar Views
You can view your calendars in different forms. The app offers four views: Month,
Week, Day, and Agenda.
To change calendar views, touch the view shown at the bottom.
You can also change to Day view from Month view by touching any day in the grid.

79
• InMonthview,swipeverticallytoseeearliermonthsandlatermonths.
• InWeekor Dayview,swipehorizontally toseeearlierweeks/days and later
weeks/days.
• Whenyou are viewing earlier or later days,weeks, or months,touch at the
top to quickly switch to today.
View Event Details
In Agenda, Day, or Week view, touch an event to view its details.
In Month view, touch a day to switch to Day view. Then touch an event to view its
details.
Creating an Event
1. In any Calendar view, touch to open an event details screen for a new event.
You can also touch a spot in Day or Week view twice to add an event to that time
spot.
2. Adddetailsabouttheevent.Enteraname,location,time span,andother
additional details about the event.
NOTE: If you have more than one calendar, you can choose the calendar to
which to add the event by touching the current calendar above the Event name
box.
3. Touch SAVE at the top of the screen to save the new event.

80
Editing or Deleting an Event
1. Find the event you want to edit or delete.
2. Open its details screen (see ViewingYour Calendars and Events – View Event
Details in this chapter).
3. Do one of the following as you need.
To… do…
Edittheevent, touch at the bottom of the screen. Touch SAVE to save your
changes.
Delete the event, touch at the bottom of the screen and then touch OK.
Changing Calendar Settings
TochangeCalendarsettings,openaCalendarview(Day,Week,Month,orAgenda).
Then touch the Menu Key > Settings.
You can change General settings, which apply to all accounts, or other settings that
onlyapplytospecicaccounts.

81
Google+
Google+is a social networking serviceofferedby Google. The Google+ application
on your phone enables you to manage your data, chat with online contacts, organize
them in different circles, and share your selected information.
Touch intheHomeScreen and selectGoogle+. The first time you open the
Google+app,selectthephoto&videobackupandcontactsyncoptions.
Organizing Your Contacts
1. OpentheGoogle+ app.
2. Touch > People.
3. Touch and enter the person you want to search for or select a suggested
person, and then touch Add or Follow.
4. If you touched Add, select the circle the person should be added to and touch
OK, or touch Create a new circle to set up new circles.
Getting Updates
1. OpentheGoogle+ app.
2. Touch > Home.
3. Swipe up or down to see different information shared with you by other users.
Touch to choose what groups of information are shown.
u Nearby shows posts shared with you by users near your current location.
u All, Acquaintances, Family, Following, circles and Friends show updates
frompeopleyou’veaddedtoyourcircles.

82
u What’s hot showspopularpostsonGoogle+.
Chatting With Contacts
YoucanchatwithyourGoogle+contactsthroughinstantmessagingandvideocall.
1. Touch > Hangouts in the Google+ app or touch from the home screen >
Hangouts.
2. Touch"+"atthetoprighttocreateanewHangout.
3. Type the person's name, email address, phone number, or choose a circle. You
can also select one of your contacts from the list below the search box.
4. Atthebottomofthescreen,toucheitherMessage or Video call.
For chatting with messages, enter the text and touch to send the message.
Checking Photos
You can see your own photo albums and those shared by other users.
Touch > Photos in the Google+ app to see all available albums.
Checking and Managing Your Prole
1. Touch > Prole in the Google+ app.
2. Touch the ABOUTtabtoseeyourproleandeditthem.

83
Other Features
• Communities: A community is where people gather for the sharing and
discussion of a common topic. Touch > Communities in the Google+ app to
searchandjoinallkindsofonlinecommunitiesontheGoogle+network.
• Events: Touch > Events in the Google+ app to manage your social calendar.
You can add events, invite people, and then share photos in real-time from the
event.
• Locations: Touch > Locations in the Google+ app to see your friends
locationsonthemapandcongureyourlocationsharingsettings.

84
Browser
Use Browser to view web pages and search for information.
Opening the Browser
Touch intheHomeScreenandselectBrowser to start this function. The last web
page you were viewing is displayed. If you have not used Browser recently, your
home page opens.
Browser also opens when you touch a web link - for example, in an email or a text
message.
Open a Web Page or Search the Web
1. OpentheBrowser app.
2. Touch the address box at the top of the web page.
3. Entertheaddress(URL)ofawebpage.Or,entertermsyouwanttosearchfor.
You can also touch to search by voice.
4. TouchaURLorsearchsuggestionortouchGo on the keyboard to open the web
page or search results.
TIP: Touch the X at the bottom if you want to stop opening the page.
Set the Homepage
Your home page opens when you open a new browser tab, and when you start
Browser after restarting your phone or after not using the app for a while.
1. Openthepageyouwanttosetasyourhomepage.
2. Touch the Menu Key > Settings > General > Set homepage.
3. Touch Current page or one of the following options.

85
u Blank page: Openbrowsertabwithoutopeningawebpagebydefault.This
can make new Browser tabs open more quickly.
u Default page: SetthefactorydefaultURLasthehomepage.
u Most visited sites:Everynewbrowsertabdisplaysalistofyourfrequently
visited sites for you to choose from.
u Site Navigation: SettheNavigatorsiteasthehomepage.
u Other: TypeaURLasthehomepage.
Get Information About the Current Page
Touch the page icon, to the left of the address box.
Working With an Opened Page
While viewing most web pages, you can do the following operation.
• Scroll:Swipethescreeninanydirection.
• Zoomout:Touchthescreenwithtwongersandpinchthemtogether.
• Zoomin:Touchthescreenwithtwongersandspreadthemapart.
• Goback:Touch to return to the page you’ve viewed previously in the same
window.
• Goforward:Touch .
• Refreshthepage:Touchtheaddressboxandthentouch .
• Findtextonthepage:TouchtheMenu Key > Find on page and type the terms
you want to search for.
• Send the page URL to friends:Touch the Menu Key > Share page and select
howyouwanttosendtheURL.
• Followalink:Touchalinkonthewebpagetoopenit.

86
• Savethe pageforoffline reading:TouchtheMenu Key > Save for offline
reading. You can touch the Menu Key > Bookmarks > SAVED PAGES to read
them.
TIPS:
• Besides links, Browser also recognizes some phone numbers, addresses, and
similar information for you to act on. Try touching them and see what happens.
Using Multiple Browser Tabs
Youcanopenseveralwebpagesatthesametime(onepageineachtab)andswitch
between them freely.
To open a new browser tab:
1. Touch the tabs icon at the bottom of the screen.
2. Touch + at the top right of the screen. A new browser window opens and the
homepage is loaded.
To switch between tabs:
1. Touch the tabs icon at the bottom of the screen.
2. Swipeverticallytoscrollthroughthelistofopenedtabs.
3. Touch the thumbnail of the tab you want to open.
TIP: SwipeathumbnailhorizontallyortouchitsX to close the tab.
To use incognito tab for privacy browsing:
Pages you view in incognito tabs won’t appear in your browsing history or search
history. No trace will be left on your phone once you close the tab.
1. Touch the tabs icon at the bottom of the screen.
2. Touch the Menu Key > New incognito tab.

87
Downloading Files
Touchandholdanimageoralinktoaleortoanotherwebpage.Inthemenuthat
opens, touch Save image or Save link.
Thedownloadedlesaresavedtoyourphoneorthememorycard.Youcanviewor
open them in the Downloadsapp( > Downloads).
Using Bookmarks
SavewebURLsasbookmarkstoopenthemeasilyinthefuture.
To open a bookmark, touch the Menu Key > Bookmarks in a browser tab and then
touch the bookmark.
Bookmark a Web Page
1. Openthewebpage.
2. Touch the Menu Key > Save to bookmarks.
3. Editthebookmarklabelandaddressifnecessary,orchooseadifferentaccount.
NOTE: To change the place where the bookmark stored, please touch the name
beside Add to.
4. TouchOK.
Edit a Bookmark
1. Touch the Menu Key > Bookmarks.
2. Touch and hold the bookmark to edit.
3. Touch Edit bookmark.
4. Edit the label, address, account, or location of the bookmark in the dialog that
opens.
88
5. Touch OK.
NOTE: Preinstalled bookmarks may not be edited.
Delete a Bookmark
1. Touch the Menu Key > Bookmarks.
2. Touch and hold the bookmark to delete.
3. Touch Delete bookmark.
4. TouchOK.
NOTE: Preinstalled bookmarks may not be deleted.
Viewing Your Browsing History
1. OpentheBrowserappandtouchtheMenu Key > Bookmarks.
2. Touch the HISTORY tab.
3. Touch a time span to view the web pages you browsed during then. You can
touch an item to reopen the web page.
Changing Browser Settings
YoucancongureanumberofBrowsersettingstocustomizethewayyoubrowsethe
web, including several that you can use to control your privacy.
To open the Browser settings screen, touch the Menu Key > Settings.

89
Maps
Activating Location Services
TondyourlocationonGoogleMaps,youmusthavelocationservicesturnedonyour
phone.
1. Touch the Home Key > Menu Key > System settings > Location access.
2. Selectthelocationoptionsyouwanttouse.
Turn on Access to my location to ask your permission use your location
information;checkGPSsatellitestouse GPS satellites to determine your
location. Check Wi-Fi & mobile network location to use Wi-Fi and mobile
networks to determine your approximate location.
Getting Your Location
1. Touch intheHomeScreenandselectMaps.
2. Touch at the bottom.
The map centers on a blue blinking dot that indicates your location.
Searching for a Location
1. Touch intheHomeScreenandselectMaps.
2. Entertheplaceyou’relookingforinthesearchboxatthetop.Youcanenteran
address, a city, or a type of business or establishment, for example, “museums
inShanghai.”Asyouenterinformation,suggestionsfromyourprevioussearches
and from popular searches appear in a list below the search box. You can touch a
suggestion to search for it.

90
TIP: You can also touch beside the search box to use voice search.
3. Touch the search icon on the keyboard. Red points indicating search results
appear on the map.
4. Toucharedpointtoopenacardat thebottomwithsummaryinformationabout
the location.
Slidethecarduptondmoreinformationaboutthelocationaswellasoptionsfor
getting directions and more.
Getting Directions to Your Destination
Maps can provide directions for travel by foot, public transportation, or car.
1. Touch intheHomeScreenandselectMaps.
2. Touch beside the search box.
3. Select the mode of transportation and then enter a start and end point. If your
locationisfound,itwillappearinthestartpointeldbydefault.
As suggested routes appear, touch one to see it on the map. Slide the bottom
card up to see the route directions in a list.
NOTE: Touch (Start)touseGoogleMaps Navigation (beta)andgetturn-by-turn
voice directions.

91
Google Now and Search
Youcansearchforinformationon the web or on yourphoneusingGoogle Search,
getinformationwhenyouneedwithGoogleNowwithoutsearching,orperformcertain
tasks by speaking.
Enabling Google Now
GoogleNowgetsyoujusttherightinformationatjusttherighttime.Ittellsyoutoday’
sweatherbeforeyoustartyourday,howmuchtrafctoexpectbeforeyouleavefor
work,andmore.YoucanturnGoogleNowonorofffromwithintheGoogleapp.
ThersttimeyouopentheGoogleapp,seeabriefexplanationofhowGoogleNow
works and touch Next. When you see Yes, I’m in, choose it to begin.
1. Touch the Home Key > > Google.
2. Touch the Menu Key > Settings.
3. SlidetheON/OFF switch next to Google Now.
Searching With Text
You can search for information by entering text.
1. Touch intheHomeScreenandselectGoogle.
2. Enterthe terms you want to search for in the searchbox and touchthe search
key on the keyboard, or touch a search suggestion that appears below the search
box.

92
Searching by Speaking
You can also search the web or perform certain tasks by speaking.
1. Touch the Home Key > > Google.
2. Touchthemicrophoneicontotherightofthesearchbox,orjustsay‘Google’.
NOTE: You can also touch the Home Key > > Voice Search.
3. Speakthetermsyouwanttosearch for orthequestionyouwanttoask.When
you’renishedspeaking,yourspeechisanalyzedandthesearchisinitiated.
Changing Search Settings
Openthe Google app and touch the Menu Key > Settings tosetGoogleNow,
notifications,mystuff (youraddressesand interestsforGoogleNowin orderto
deliver relevant information when you need it), voice and phone search options, and
to change privacy settings for your account.

93
Camera
You can use your phone to take photos and record videos. Photos and videos are
storedonthephone’smemorycardorinthephone’sinternalstorage.Youcancopy
them to your computer or access them in the Gallery app.
Capturing a Photo
1. Touch intheHomeScreenandselectCamera.
2. Aim the camera at the subject and make any necessary adjustment.
Number Function
1Turnon/offash.
2Selectthecoloreffect.
3Switchbetweennormalandothermode.
4Change the camera settings.
5 Holdthesliderandslidetozoominorout.

94
6View photos and videos you have captured.
7 Capture a photo.
8Switchtothecamcorder.
3. Lightly touch the capture button .
Customizing Camera Settings
Before taking a photo, you can touch to open the following camera setting options.
Grid Turnon/offgrid.
Shuttertones Selectyourpreferredshuttertone.
Picture size Adjust picture size.
Self-timer Adjust timing photo.
Image settings Adjust exposure, brightness, contrast, saturation, and
sharpness.
White balance
Selecthowthecameraadjustscolorsindifferentkindsof
light to achieve the most natural looking colors for your
shots, or allow the camera to adjust the white balance
automatically.
ISO SetISOasISO-100,ISO-200,ISO-400,ISO-800.
Auto-review Adjust the review time.
Geo-tagging Setwhetheryourlocationinformationisstoredornotwith
each photo you take.
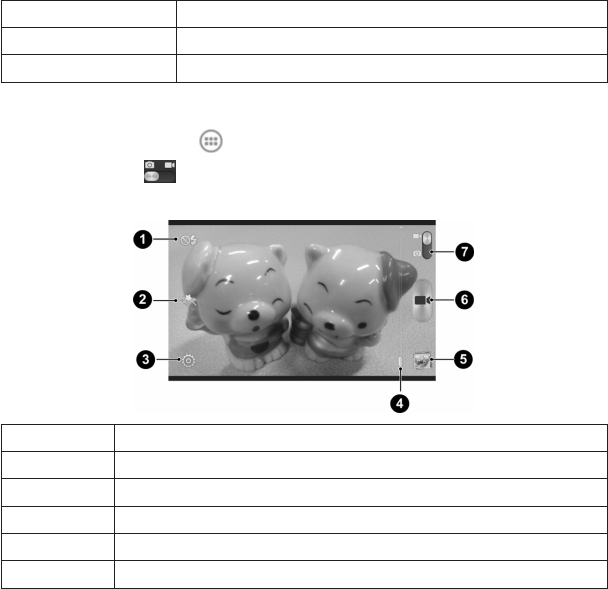
95
Anti-banding Setanti-bandasauto,50Hzor60Hz.
Storagelocation Selectwheretostorethepictureyoutake.
Restore defaults Restore camera to default settings.
Recording a Video
1. Touch the Home Key > > Camera.
2. Slidetheswitch to open the camcorder.
3. Aim the camera at the subject and make any necessary adjustment.
Number Function
1Turnon/offash.
2Selectthecoloreffect.
3 Change the camcorder settings.
4 Holdthesliderandslidetozoominorout.
5View photos and videos you have captured.
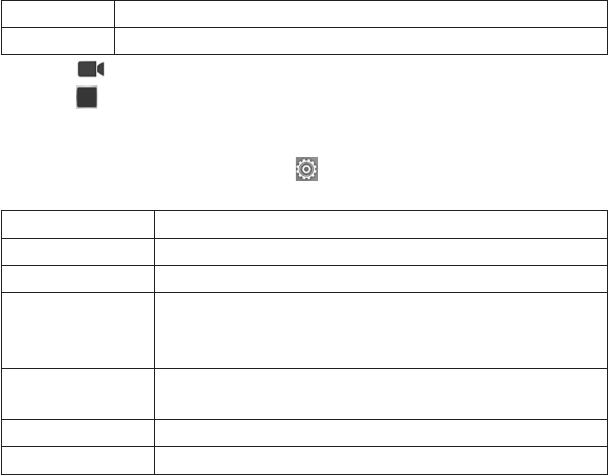
96
6 Startorstoprecordingavideo.
7Switchtothecamera.
4. Touch to start recording.
5. Touch to stop recording.
Customizing Camcorder Settings
Before recording a video, you can touch to open the following camcorder setting
options.
Video quality Choose the video quality.
Silentcamcorder Turnon/offsilentcamcorder.
Time lapse Setthelapsetimefortakingphoto.
White balance
Selecthowthecameraadjustscolorsindifferentkindsoflight
to achieve the most natural looking colors for your videos, or
allow the camera to adjust the white balance automatically.
Geo-tagging Setwhetheryourlocationinformationisstoredornotwith
each video you record.
Storagelocation Selectwheretostorethevideoyoutake.
Restore defaults Choose restore default camera settings.

97
Gallery
Opening Gallery
Touch intheHomeScreenandselectGallery to view albums of your pictures and
videos.
Working With Albums
When you open Gallery, all pictures and videos on your phone are displayed in a
number of albums.
To view album contents:
Touch an album to view the pictures and videos it contains.
To share albums:
1. Touch and hold an album until it is selected.
2. Touch more albums that you want to share.
3. Touch at the top of the screen and select how you want to share the albums.
To delete albums:
1. Touch and hold an album until it is selected.
2. Touch more albums that you want to delete.
3. Touch > OK.
Working With Pictures
Touch a picture in an album to view the picture in full screen. Double-touch the
picture,orpinchtwongerstogetherorspreadthemaparttozoomoutorin.Slideleft
or right to view other pictures in the album.
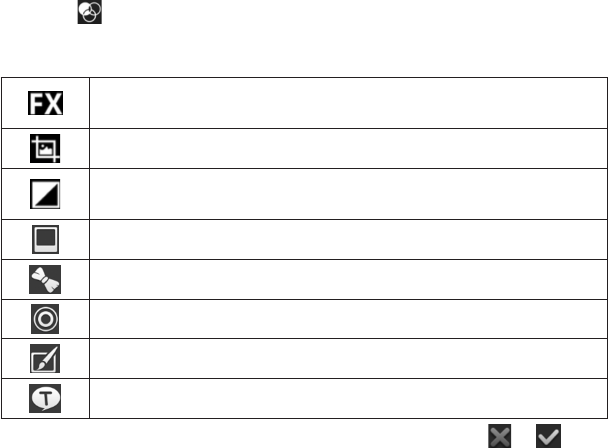
98
Retouch Your Pictures
You can edit any photos you took and some other pictures in Gallery. The changed
picture is saved in the same album, while the original image is never affected.
1. Touch whileviewingapicture infullscreentoopentheEditinterface.Ifthe
iconisinvisible,touchthescreenrst.
2. Touch the icons along the bottom of the screen to edit the picture.
Apply effects such as bleach, blue crush, contrast, instant, and old
photo.
Crop, straighten, mirror, or rotate the picture.
Adjustlllight,emphasizehighlightorshadows,orsettoautoadjust
and so on.
Add border or bright.
Add body or article decorate.
Add circle or rectangle blur.
Add doodle.
Input text you want to show on the picture.
3. Toundoorredothechangesyou’vemadetothepicture,touch or at the
top of the screen.
4. TouchSave to save the new picture to the same album.

99
Share Your Pictures
1. Touch an album in the gallery and then touch a picture.
2. Touch at the bottom of the screen. If the icon is invisible, touch the screen
rst.
3. Selecthowyouwanttosharethepicture.
Working With Videos
Play Videos
1. Touch an album in the gallery and then touch the thumbnail of a video.
2. Touch at the center to start playing. Touch the video to view the playback
controls.
Share Videos
1. Touch an album in the gallery and then touch the thumbnail of a video.
2. Touch at the bottom of the screen. If the icon is invisible, touch the screen
rst.
3. Selecthowyouwanttosharethevideo.

100
Music
Touch in the Home Screen and select Music to play audio les stored on your
phone. Music supports a wide variety of audio formats, so it can play music you
purchase from online stores, and so on.
Copying Music Files to Your Phone
BeforeusingMusic,youneedtocopyordownloadaudiolestoyourphone.
Copy From a Computer
1. ConnectyourphoneandthecomputerwithaUSBcable.
2. Touch Media device (MTP)(ifsupportedonthePC)orCamera (PTP) to browse
thelesinthephonestorageandonthemicroSDHCcard.
3. CopythemusiclefromthePCandpasteittothephonestorageormicroSDHC
card.
Download From the Internet
Youcandownloadmusicleswhenbrowsingwebpages.SeeDownloadingFiles.
Viewing Your Music Library
Touch intheHomeScreenandselectMusic and your music library is displayed.
Allyouraudiolesarecatalogedaccordingtotheinformationstoredintheles.
Touch the tabs at the screen to view your music library organized by Songs,
Playlists, Folder, Albums, Artists or Genre.
Set a Song as the Default Ringtone
The song will be used as the ringtone for all incoming calls, except those from
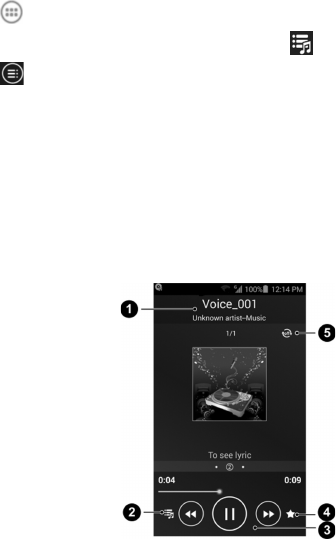
101
contactstowhomyouhaveassignedspecial ringtones(seePeople–Editing
Contacts–SetaRingtoneforaContact).
1. Touch intheHomeScreenandselectMusic to see the music library.
NOTE: If you are in the playback screen, touch to return to the music library.
2. Touch next to a song in any list.
3. In the menu that opens, touch Use as ringtone.
TIP: Ifthesongisbeingplayedandyou’reintheplaybackscreen,youcantouch
the Menu Key > Use as ringtone.
4. Touch Phone Ringtone or Notication Ringtone.
Playing Music
Touch a song in the music library to listen to it. The following playback screen
appears.

102
Number Function
1Songandartistinformation.
2 Touch to open the music library.
3Playbackcontrol.Skipsongsorpauseandresumeplayback.Dragthe
slider to jump to any part of the song.
4Add to my favorite playlist.
5Touch to toggle repeat mode.
Managing Playlists
Createplayliststoorganizeyourmusiclesintosetsofsongs,sothatyoucanplay
the songs you like in the order you prefer.
Create a Playlist
1. Touch next to the song in the music library.
2. In the menu that opens, touch Add to playlist.
3. Touch New.
4. TypetheplaylistnameandtouchSave.
The playlist is created and the song you selected is added to the playlist.
Add a Song to a Playlist
1. Touch next to the song in the music library.
2. In the menu that opens, touch Add to playlist.
3. Touch the name of the playlist you want the song added to.

103
Remove a Song From a Playlist
1. Touch the Playlists tab in the music library to see all the playlists.
2. Openaplaylist.
3. Touch the Menu Key > Multi Select.
4. Touchthesongorsongsyouwanttoremove.
5. Touch .
Delete or Rename a Playlist
1. Touch the Playlists tab in the music library to see all the playlists.
2. Touch next to a playlist and touch Rename Playlist or Delete Playlist in the
menu that opens.
NOTE: These options may not be available for certain automatically created playlists.

104
Play Music
The Play Musicapplication( )workswithGoogleMusic,Google’sonlinemusic
store and streaming service. You can stream via mobile data or Wi-Fi and listen to
you favorite songs that you’ve added to your online Google Music library. You can
alsoplayaudiolesyou’vecopieddirectlytoyourphonefromacomputer.
NOTE: TheavailabilityofGoogle Musicisdependenton your region.Ifitis not
available, or you don’t have a mobile data or Wi-Fi connection, you can only play
music stored on your phone.
Playing Your Music
Touch intheHomeScreenandselectPlay Music. If you are prompted, select an
account to access its online music library.
The app searches your online library and your phone for music and playlists before
displaying your combined music library, organized by GENRES, ARTISTS, ALUMS,
and SONGS. You can touch > My Library / Playlists to view all the music and
playlists. To changes views of your library, swipe left or right.
Touch a song to play it. When the song is playing, touch the summary information at
the bottom to display the playback screen.
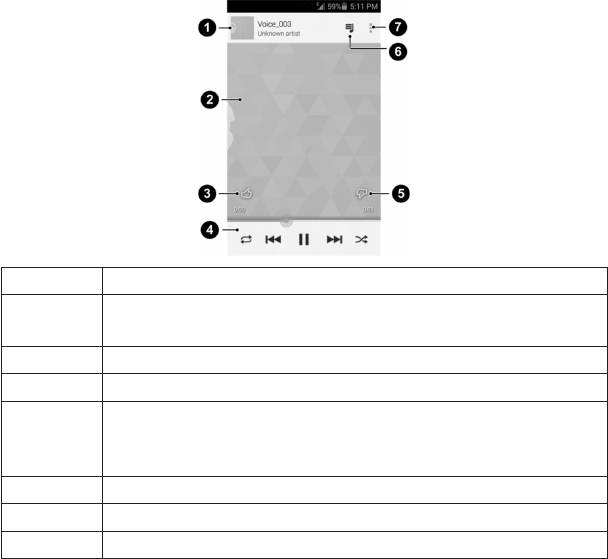
105
Number Function
1Songandartistinformation.Touchordragdowntoreturntothemusic
library.
2 Album artwork.
3Givethesongathumbs-up.
4
Playbackcontrol.Skipsongs,pauseandresumeplayback,use
shufeorrepeat.Dragtheprogressbartojumptoanypartofthe
song.
5 Givethesongathumbs-down.
6 Touchtoseethecurrentplaylist(queue).
7Getmoreoptions.

106
You can still control the music when you are not in the playback screen.
• InthemusiclibraryofthePlay Music app, touch the summary information at the
bottom of the screen to restore the playback screen.
• In other apps, ick down the notication panel. Touch the song title to restore
theplaybackscreen,orjustpause/resumeplaybackorskiptothenext/previous
song.
• Whenthescreenislocked,thesonginformation,albumcoveraswellasplayback
controlisdisplayedontopofthescreen.Youcanpause/resumeplaybackorskip
songs.
Managing Playlists
Createplayliststoorganizeyourmusiclesintosetsofsongs,sothatyoucanplay
the songs you like in the order you prefer.
To create a playlist or add a song to a playlist:
Touch next to the song and select Add to playlist.
To remove songs from a playlist:
1. Touch > Playlists in the Play Music app and select a playlist.
2. Touch next to the song.
3. SelectRemove from playlist.
To delete a playlist:
1. Touch > Playlists in the Play Music app.
2. Touch next to the playlist you want to delete.
3. Touch Delete in the menu that opens.
4. TouchOKtoconrm.

107
Video Player
Usethevideoplayertoplayvariouskindsofvideos.
Opening the Video Library
Touch intheHomeScreenandselectVideo Player to view your video library.
Playing and Controlling Videos
Touch a video in the video library to play it. Rotate the phone on its side to watch the
video in landscape view.
Touch the video to show the playback controls. You can pause and resume the
playback, or jump to any part of the video, adjust video brightness, hide the control
panel and more.
Managing Video Files
To delete videos:
1. Touch and hold a video in the video library.
2. To remove more videos, touch them.
3. Touch > Delete at the bottom left of the screen.
4. TouchOKtoconrm.
To share videos:
1. Touch and hold a video in the video library.
2. To share more videos, touch them.
3. Touch at the bottom right of the screen and select how you want to share
them.

108
To rename a video:
1. Touch next to the video you want to rename.
2. Touch Rename.
3. Type the new video name and touch OK.
To view details of a video:
1. Touch next to the video you want to view the details of.
2. Touch Details.
109
Sound Recorder
Sound Recorder enables you to record voice memos and listen to them whenever
you like.
Recording a Voice Memo
1. Touch intheHomeScreenandselectSound Recorder.
2. Touch to start recording. Touch to cancel recording if you change your
mind.
3. Touch to stop recording. The memo is automatically saved.
Ifyoudon’twanttosavethememoafterrecordingit,touch > OK to delete it.
Playing a Voice Memo
To play a memo you just recorded:
Touch at the bottom of the screen.
To play any saved memo:
1. Touch at the top right of the screen to see all recordings.
2. Touch the title of a memo to play it.

110
More Apps
Clock
Setalarmsorturnthephoneintoabedsideclock.
Set a New Alarm
1. Touch intheHomeScreenandselectClock.
2. Touchadefaultalarmtocongureit,ortouch at the bottom of the screen to
create a new alarm.
3. Touch each item to set up the alarm options, such as time, repeat, and alarm
sound.
4. TouchSAVE to save and exit.
Use Bed Clock
Bed clock displays the current time and the next alarm.
1. Touch intheHomeScreenandselectClock.
2. If necessary, touch the Menu Key > Bed Clock Preferences in the Alarm screen
to set up bed clock options. Then touch the Back Key to return to the Alarm
screen.
u Enable bed clock: Turn on or off the bed clock function.
u Bed clock never sleeps:Keepthebedclockscreenturnedonwhen
charging the phone.
3. Touch the Menu Key > Bed Clock to open the bed clock screen.

111
Stopwatch and Countdown
1. Touch Stopwatch / Countdown tab in Clock app to use the stopwatch or
countdown.
2. Stopwatchallowsyoutorecordlaptimes,whileCountdownallows you to set a
time and count down to zero.
World Time
1. Touch World time tab to check local time for cities around the world.
2. Touch + at the bottom to add a new city or country.
Calculator
Touch intheHomeScreenandselectCalculator.
TIP: Touch or to switch between different panels. You can also hold the
phone on its side to see all of the calculator buttons.
Chrome
UseGoogleChrome to browse the Internet. Chrome on your phone can sync
bookmarks,browsinghistory,andopenedtabsfromyourGoogleaccount.
Downloads
The Downloads app keeps a record of the files you have downloaded using the
Browser, Email, or Gmail app.
Touch intheHomeScreenandselectDownloadstochecktherecord.
• Touchaletoopenitwiththeappropriateapplications.
• Touchandholdale,orchecktheboxinfrontofit,todeleteorshareit.

112
File Manager
Quicklyaccessallofyourimages,videos,audioclips,andothertypesoflesonyour
phone and on the memory card.
Touch intheHomeScreenandselectFile Manager. Touch the folder name at the
top of the screen to switch between the memory card storage and the phone storage.
News and Weather
News & Weather offers weather forecasts and news stories about common topics.
You can also customize the news topics that are displayed.
Touch in the Home Screen and select News & Weather. Swipe left or right to
view the weather forecasts and news headlines under different news topics.
Touch the Menu Key to refresh news and forecast data, or to change the settings.
NotePad
Touch intheHomeScreenandselectNotePad to save and view your text notes.
Touch to create a new note. Then enter your text and touch Save to save it.
Touch a note to view its entire contents. You can also delete it, share it, or change its
title.

113
Play Magazines
Touch in the home screen and select Play Magazines to access the digital
magazinesyouhavepurchasedfromtheGooglePlayStore.
Task Manager
Touch intheHomeScreenandselectTask Manager to view or stop applications.
• TouchataskintheTasks tab to switch to its screen, abort it, or see its details.
• TouchtheApps tab to manage all the apps on your phone.
• TouchtheResources tab to view the real-time system resources information.
YouTube
Touch intheHomeScreenandselectYouTube.
You can watch YouTube videos or upload your own.

114
Play Store
Touch in the Home Screen and select Play Store. You can buy or rent music,
books, movies, and apps and download them to your phone.
Browsing and Searching for Apps
You can browse apps by category and sort them in different ways. Touch a top-level
category, such as Games and touch an app from any subcategory.
Youcanalsosearchforappsusinganapp’snameordescription,orthedeveloper’s
name. Just touch and enter the search terms.
Downloading and Installing Apps
Whenyoundtheappyouareinterestedinthroughbrowsingorsearching,touchit
to open its details screen, where more information about the app is displayed.
1. Touch INSTALL (free apps) or the price (paid apps). If the app is not free, you
needtosignintoyourGoogleWalletaccountandselectapaymentmethod.
CAUTION:Onceinstalled,someappscanaccessmanyfunctionsorasignicant
amount of your personal data. The Play Store will show you what the app can
access. Touch ACCEPT to proceed, or touch the Back Key to cancel.
2. Wait for the app to be downloaded and installed automatically. Payment needs to
be authorized before paid apps start downloading.
The app is successfully installed when the icon appears in the status bar. You
canndthenewappaftertouchingtheHome Key > .

115
Creating a Google Wallet Account
You must have a Google Wallet account associated with your GoogleAccount to
purchaseitemsfromtheGooglePlayStoreapp.
Do one of the following:
• Onyourcomputer,gotocheckout.google.comtocreateaGoogleWalletaccount.
• ThersttimeyouuseyourphonetobuyanitemfromGooglePlayStore,you’re
promptedtoenteryourbillinginformationtosetupaGoogleWalletaccount.
WARNING: When you’veusedGoogleWalletoncetopurchase itemsfromthe
GooglePlay Store app, thephone remembers yourpassword so you don’t need to
enter it the next time. For this reason, you should secure your phone to prevent others
from using it without your permission.
Requesting a Refund for a Paid App
Ifyouarenotsatisedwithanapp,youcanaskforarefundwithin15minutesofthe
purchase. Your credit card is not charged and the app is uninstalled from your phone.
Ifyouchangeyourmind,youcaninstalltheappagain,butyoucan’trequestarefund
asecondtime.Fordetails,pleasereadthePlayStorehelpinformation.
1. Touch the Home Key > > Play Store.
2. Touch the Menu Key > My apps.
3. Touch the app to uninstall for a refund. The details screen for the app opens.
4. TouchRefund and then touch Uninstall. Your app is uninstalled and the charge
is cancelled.
116
Managing Your Downloads
After you’ve downloaded and installed an app, you can rate it, view it in a list with
yourotherdownloadedapps,congureittoupdateitselfautomatically,andsoon.
View Your Downloaded Apps
1. OntheAppsscreenofPlayStore,touchtheMenu Key > My Apps.
2. Your list of installed apps opens. You can touch one to rate it, uninstall it, request
a refund and so on.
Uninstall an App
1. OntheAppsscreenofPlayStore,touchtheMenu Key > My Apps.
2. Touch an app to open its details screen.
3. Touch Uninstall > OK.

117
Settings
Touch intheHomeScreenandselect Settings. The Settings app contains most
ofthetoolsforcustomizingandconguringyourdevice.
General Settings
Airplane Mode
In the Settings app, Slide the Airplane mode switch to the ON position to turn on
Airplanemode.Allthephone’sradiosthattransmitvoiceordataareturnedoff.
Wi-Fi
TurnWi-FionoroffandconfigureyourWi-Ficonnections.SeeConnectingto
Networks and Devices – Connecting to Wi-Fi.
Bluetooth
TurnBluetoothonoroffandcongureyourBluetoothconnections.SeeConnectingto
Networks and Devices – Connecting to Bluetooth Devices.
Mobile Networks
Control mobile data use, select mobile network and set access point names. See
Connecting to Networks and Devices – Connecting to Mobile Networks.
Sound
Adjustvolumes(seePersonalizing–AdjustingVolumes),togglesoundandmute(see
SwitchingtoSilentMode),setupringtoneandnoticationsound(seePersonalizing
– Changing Ringtone and Notication Sound), and select system sounds (refer to
TurningOn/OffTouchSounds).
118
Display
• Brightness: Setthebrightnessofthedisplay.
• Wallpaper: SelectabackgroundimagefortheHomeScreen.
• Auto-rotate screen: Rotate the screen display as you rotate the phone.
• Sleep: Setthelengthoftimeofinactivitybeforethescreenturnsoff.
• Daydream: Turn on or off daydream.
• Font size: Setthefontsizeofthetextonthescreen.
Date and Time
Set date, time, time zone, and how date and time are displayed. You can also use
network-provided data.
Language and Input
• Language: Selectalanguageandregionforyoursystem.
• Spell checker:Selectspellcheckerandchangeitssettings.
• Personal dictionary: Addnewwordstothephone’sdictionaryorremovewords
from the dictionary. The words you add are used for spelling check and word
suggestion.
• KEYBOARD & INPUT METHODS: Congure text input settings. See Knowing
theBasics–EnteringText–TouchInputSettings.
• Voice Search:
u Language: Selectthe language you use whenentering text by speaking or
searching by speaking.
u Speech output: Selecttosetthespeechoutput.
u Block offensive words:Replaceoffensivewordswithasterisk(*)whenyou
useGooglevoicerecognitiontotranscribeyourvoiceintotext.
119
u Hotword detection: ClicktosayGoogletolaunchvoicesearch.
u Download ofine speech recognition:Enablevoiceinputwhileofine.
u Bluetooth headset: Records audio through Bluetooth headset if available.
• Text-to-speech output:
u PREFERRED ENGINE:Selectthespeechsynthesisengineyouwanttouse
or change its settings.
u Speech rate: Selecthowquicklyyouwantthesynthesizertospeak.
u Listen to an example: Play a brief sample of the speech synthesizer, using
your current settings.
• Pointer speed: Selecthowfastthe pointer/mouseshould scrollwhen you
connect the phone to a trackpad or mouse accessory.
Wireless & Networks
Data Usage
Touch the ON/OFF switch to turn on or off mobile data.
You can check how much data has been used during the time cycle you set, set a
mobile data limit and warning, see what apps have been using mobile data, or restrict
background data for individual apps.
Tethering and Smartphone Mobile Hotspot
Shareyourphone’smobiledataconnectionwithPCsorotherdevicesviaUSBorWi-
Fi.SeeConnectingtoNetworksandDevices–SharingYourMobileDataConnection.
VPN
Set up and connect to virtual private networks. See Connecting to Networks and
Devices – Connecting to Virtual Private Networks.
120
USB Tethering
Share your phone’s mobile data connection with PCs or other devices via a USB
cable. SeeConnectingtoNetworksandDevices–SharingYourMobileData
Connection–ShareYourMobileDataConnectionviaUSB.
Bluetooth Tethering
Shareyourphone’smobiledataconnectionwithPCsorotherdevicesviaBluetooth.
SeeShareYourMobileDataConnectionviaBluetooth.
Wi-Fi calling
With Wi-Fi Calling you can send and receive calls and messages over a Wi-Fi
networkusingyourexistingT-Mobileservice.SeeUseWi-FiCalling.
Device
Storage
Check memory information for your memory card and internal storage.
• Unmount SD card:Unmountthememorycardfromyourphonesothatyoucan
safely remove the card while the phone is on.
• Erase external SD card:Erasealldataonyourmemorycardandprepareitfor
use with your phone.
Battery
Check how much power remains for the battery and what has been using the battery.
121
Apps
Seeappsinstalledonyourphoneandmanagethem.
Touch an app in the DOWNLOADED, RUNNING, or ALL tab to see its information.
You can stop the app, uninstall the app, clear data and cache, or move the app
between the internal storage and the memory card.
NOTE: Not all applications can be moved or uninstalled.
Connect to PC
Touchtosetthe connectiontypefor yourphone.SeeConnectYourPhone toa
ComputerviaUSB.
Personal
Location Access
Activatelocationservicestodetermineyourlocation.SeeMaps,Navigation,Places
andLatitude–ActivatingLocationServices.
Select Wi-Fi & mobile network to use Google’s location service to estimate your
location faster.
Security
• Screen lock: Lock the screen with none, long press, pattern, PIN, or password.
SeePersonalizing–ProtectingYourPhoneWithScreenLocks.
• Owner info: Setthetextthatyoumaydisplayonthelockscreen.
• Encrypt phone: Encrypt your data on the phone to protect your privacy. See
Personalizing–ProtectingYourPhoneWithEncryption.
122
• Set up SIM / RUIM card lock:
u Lock SIM card: Activate or deactivate the PIN lock to require PIN before
accessingtheSIMcard.
u Change SIM PIN: ChangethePINusedtoaccesstheSIMcard.
• Make passwords visible: Display passwords as you enter them.
• Device administrators: View or deactivate apps you have authorized to be
device administrators.
• Unknown sources: Check this option to permit installation of apps from sources
otherthanthePlayStore.
• Verify apps: Disallow or warn before installation of apps that may cause harm.
• Storage type:Setstoragetype.
• Trusted credentials: DisplaytrustedCAcerticates.
• Install from SD card: Installcerticatesfromthememorycard.
• Clear credentials: Deleteallcerticates.
Backup and Reset
• Back up my data: Back up app data, Wi-Fi passwords, and other settings to
GoogleserversafteryousignintoyourGoogleaccount.
• Automatic restore: Restore previously backed up settings and data when you
reinstall an app.
• Factory data reset: Reset your phone to factory default settings. All your
personal data from the phone’s internal storage will be erased. You can also
erase the data on the memory card during the process.
• Collect Diagnostics: Collect diagnostics data for troubleshooting.
123
ACCOUNTS
Add account
Manage your accounts and synchronization. Touch Add account to sign in to or
create accounts on your phone.
Touch an account type to see that type of accounts you have added and adjust the
accounts settings.
System
Accessibility
Congureaccessibilityplug-insonyourphone,suchasusingTalkBack for low-vision
users.
About Phone
View phone status and legal information. You can also upgrade your phone system
from update packages copied to the storage card.

124
Troubleshooting
If you encounter problems while using the phone, or if it performs abnormally, you
can refer to the chart below. If your particular problem cannot be resolved using the
information in the chart, contact the dealer where you purchased the phone.
Problem Possible causes Possible solution
Poor reception
The network signal is too weak
at your current location, for
example, in a basement or near
a tall building, because wireless
transmissions can not effectively
reach it.
Move to a location where
the network signal can be
properly received.
The network is busy at the current
time(forexample,duringpeak
times, there may be too much
networktrafctohandleadditional
calls).
Avoid using the phone at
such times, or try again
after waiting a short time.
You are too far away from a base
station for your service provider.
You can request a service
area map from your service
provider.

125
Problem Possible causes Possible solution
Echoornoise
Poor network link quality on the
part of your service provider.
Endthecallanddialagain.
You may be switched to a
better-quality network link
or phone line.
Poor local telephone line quality.
Endthecallanddialagain.
You may be switched to a
better-quality network link
or phone line.
Unabletoselect
certain features
Your service provider does not
support these features, or you
have not applied for services that
provide these features.
Contact your service
provider.
Battery not
charging
The battery or battery charger is
damaged. Contact the dealer.
Thephone’stemperatureisbelow
0°Corhigherthan45°C.
Adjust the battery charging
environment to avoid
extremes of temperature.
Poor contact between the battery
and charger.
Check all connectors to
make sure all connections
have been properly made.

126
Problem Possible causes Possible solution
Shortened
standby time
The standby time is related to
your service provider system
conguration.Thesamephone
used with different service
providers’systemswillnotprovide
exactly the same length of standby
time.
If you are located in an
area where signaling is
weak, temporarily power
off the phone.
The battery is depleted. In high
temperature environments, battery
life will be shortened.
Useanewbattery.
If you are not able to connect
to the network, the phone will
continue to send out signals as it
attempts to locate a base station.
Doing so consumes battery power
and will consequently shorten
standby time.
Change your location to
one where the network is
accessible, or temporarily
turn off your phone.
Cannot turn your
phone on Battery power has been depleted. Rechargethephone’s
battery.

127
Problem Possible causes Possible solution
SIMcarderror
SIMcardmalfunctionordamage. TaketheSIMcardtoyour
service provider for testing.
SIMcardinsertedimproperly. InserttheSIMcard
properly.
DebrisontheSIMcardcontacts.
Useasoft,drycloth
tocleantheSIMcard
contacts.
Unabletoconnect
to the network
SIMcardinvalid. Contact your service
provider.
Youarenotwithinthenetwork’s
service area.
Check the service area
with your service provider.
Poor signal.
Move to an open space, or
if you are inside a building,
move closer to a window.
PIN Code blocked You have entered an incorrect PIN
code three consecutive times.
Contact your service
provider. If the service
providerprovidestheSIM
card’sPUKcode,usethe
PUKcodetounlockthe
SIMcard.

128
Problem Possible causes Possible solution
Unabletoenter
information into
the phonebook
Thephonebook’smemoryis
already full.
Delete unnecessary data
from the contacts.
Phone crashes,
reboots, freeze,
or cannot be
powered on
Somethird-partysoftwareisnot
compatible with your phone.
Reset the phone to factory
status.
Entersafetymodeand
uninstall the software that
may cause the problem.
Upgradethephone
software.

129
For Your Safety
General Safety
Don’tmakeorreceive
handheld calls while driving.
Never text while driving.
Don’tuseatgasstations.
Keepyourphoneatleast15
mm away from your ear or
body while making calls.
Your phone may produce a
brightorashinglight.
Smallpartsmaycause
choking. Don’tdisposeofyourphonein
re.
Your phone can produce a
loud sound.
To prevent possible hearing
damage, do not listen at high
volume levels for long periods.
Avoid contact with anything
magnetic. Avoid extreme temperatures.
Keepawayfrompacemakers
and other electronic medical
devices.
Avoidcontactwithliquids.Keep
your phone dry.
Turn off when asked to
in hospitals and medical
facilities.
Don’ttakeyourphoneapart.

130
Turn off when told to in
aircrafts and airports. Onlyuseapprovedaccessories.
Turn off when near explosive
materials or liquids. Don’trelyonyourphonefor
emergency communications.
Distraction
Driving
Full attention must be given to driving at all times in order to reduce the risk of
an accident. Using a phone while driving (even with a hands free kit) can cause
distraction and lead to an accident. You must comply with local laws and regulations
restricting the use of wireless devices while driving.
Operating Machinery
Full attention must be given to operating machinery in order to reduce the risk of an
accident.
Product Handling
General Statement on Handling and Use
You alone are responsible for how you use your phone and any consequences of its
use.
You must always turn off your phone wherever the use of a phone is prohibited.
Useofyourphoneissubjecttosafetymeasuresdesignedtoprotectusersandtheir
environment.
131
• Alwaystreatyourphoneanditsaccessorieswithcareandkeepitinacleanand
dust-free place.
• Keep the screen and camera lens clean. Unclean screen or camera lens may
slow down the phone's reaction to your operations or lower image quality.
• Cleanthedeviceand itsaccessorieswithasoftmaterialsuchascleaningcloth
for eyeglass lenses. Do not use alcohol or other corrosive substances for cleaning
or allow them to get inside.
• Donotexposeyour phoneor itsaccessoriestoopenflames orlit tobacco
products.
• Donotexposeyourphoneoritsaccessoriestoliquid,moistureorhighhumidity.
• Donotdrop,throwortrytobendyourphoneoritsaccessories.
• Donotpaintyourphoneoritsaccessories.
• Do not attempt to disassemble your phone or its accessories. Only authorized
personnel can do so.
• Donotexposeoruseyourphoneoritsaccessoriesinaenvironmentwithorthat
can reach extreme temperatures, minimum - [5] and maximum + [50] degrees
Celsius.
• Do not place your phone inside or near heating equipments or high pressure
containers, such as water heaters, microwave ovens, or hot cooking utensils.
Otherwise,yourphonemaybedamaged.
• Pleasechecklocalregulationsfordisposalofelectronicproducts.
• Donotcarryyourphoneinyourbackpocketasitcouldbreakwhenyousitdown.
132
Small Children
Do not leave your phone and its accessories within the reach of small children or
allow them to play with it.
They could hurt themselves or others, or could accidentally damage the phone.
Your phone contains small parts with sharp edges that may cause an injury or may
become detached and create a choking hazard.
Demagnetization
To avoid the risk of demagnetization, do not allow electronic devices or magnetic
media to be close to your phone for a long time.
Electrostatic Discharge (ESD)
DonottouchtheSIMcard’smetalconnectors.
Antenna
Do not touch the antenna unnecessarily.
Normal Use Position
When placing or receiving a phone call, hold your phone to your ear, with the bottom
towards your mouth.
Air Bags
Do not place a phone in the area over an air bag or in the air bag deployment area as
anairbaginateswithgreatforceandseriousinjurycouldresult.
Storethephonesafelybeforedrivingyourvehicle.
133
Seizures/Blackouts
Thephonecanproduceabrightorashinglight.Asmallpercentageofpeoplemay
be susceptible to blackouts or seizures (even if they have never had one before)
when exposed to flashing lights or light patterns such as when playing games or
watching video. If you have experienced seizures or blackouts or have a family history
of such occurrences, please consult a physician.
Repetitive Strain Injuries
To minimize theriskofRepetitiveStrainInjury(RSI)whentextingorplayinggames
with your phone:
• Donotgripthephonetootightly.
• Pressthebuttonslightly.
• Use the special features which are designed to minimize the times of pressing
buttons, such as Message Templates and Predictive Text.
• Takemanybreakstostretchandrelax.
Emergency Calls
This phone, like any wireless phone, operates using radio signals, which cannot
guarantee connection in all conditions. Therefore, you must never rely solely on any
wireless phone for emergency communications.
Loud Noise
This phone is capable of producing loud noises, which may damage your hearing.
Turn down the volume before using headphones, Bluetooth stereo headsets or other
audio devices.
134
Phone Heating
Your phone may become warm during charging and during normal use.
Electrical Safety
Accessories
Useonlyapprovedaccessories.
Do not connect with incompatible products or accessories.
Take care not to touch or allow metal objects, such as coins or key rings, to contact or
short-circuit in the battery terminals.
Never puncture the surface of the battery with sharp objects.
Connection to a Car
Seekprofessionaladvicewhenconnectingaphoneinterfacetothevehicleelectrical
system.
Faulty and Damaged Products
Do not attempt to disassemble the phone or its accessories.
Onlyqualiedpersonnelcanserviceorrepairthephoneoritsaccessories.
Ifyourphone (oritsaccessories)hasbeensubmergedinwater,punctured, or
subjected to a severe fall, do not use it until you have taken it to be checked at an
authorized service center.
135
Radio Frequency Interference
General Statement on Interference
Care must be taken when using the phone in close proximity to personal medical
devices, such as pacemakers and hearing aids.
Pacemakers
Pacemakermanufacturersrecommend thataminimumseparation of15cmbe
maintained between a mobile phone and a pacemaker to avoid potential interference
with the pacemaker. To achieve this, use the phone on the opposite ear to your
pacemaker and do not carry it in a breast pocket.
Hearing Aids
People with hearing aids or other cochlear implants may experience interfering noises
when using wireless devices or when one is nearby.
The level of interference will depend on the type of hearing device and the distance
from the interference source. Increasing the separation between them may reduce
the interference. You may also consult your hearing aid manufacturer to discuss
alternatives.
Medical Devices
Please consult your doctor and the device manufacturer to determine if operation of
your phone may interfere with the operation of your medical device.
136
Hospitals
Turn off your wireless device when requested to do so in hospitals, clinics or health
care facilities. These requests are designed to prevent possible interference with
sensitive medical equipment.
Aircraft
Turn off your wireless device whenever you are instructed to do so by airport or airline
staff.
Consult the airline staff about the use of wireless devices onboard the aircraft. If your
deviceoffersa‘ightmode’,thismustbeenabledpriortoboardinganaircraft.
Interference in Cars
Please note that because of possible interference with electronic equipment, some
vehicle manufacturers forbid the use of mobile phones in their vehicles unless a
hands-free kit with an external antenna is included in the installation.
Explosive Environments
Gas Stations and Explosive Atmospheres
In locations with potentially explosive atmospheres, obey all posted signs to turn off
wireless devices such as your phone or other radio equipment.
Areas with potentially explosive atmospheres include fueling areas, below decks on
boats, fuel or chemical transfer or storage facilities, and areas where the air contains
chemicals or particles, such as grain, dust, or metal powders.
137
Blasting Caps and Areas
Power off your mobile phone or wireless device when in a blasting area or in areas
posted power off “two-way radios” or “electronic devices” to avoid interfering with
blasting operations.
Radio Frequency (RF) Energy
Thisdevicemeetsthegovernment’srequirementsforexposuretoradiowaves.
This device is designed and manufactured not to exceed the emission limits for
exposureto radiofrequency(RF)energysetbytheFederalCommunications
CommissionoftheU.S.Government:
The exposure standard for wireless mobile devices employs a unit of measurement
known as the SpecicAbsorption Rate, or SAR.The SAR limit set by the FCC is
1.6W/kg.*TestsforSARareconductedusingstandardoperatingpositionsaccepted
bytheFCCwiththedevicetransmittingatitshighestcertiedpowerlevelinalltested
frequencybands.AlthoughtheSARisdeterminedatthehighestcertiedpowerlevel,
theactualSAR level of the devicewhileoperating can be wellbelowthe maximum
value. This is because the device is designed to operate at multiple power levels so
as to use only the poser required to reach the network. In general, the closer you are
to a wireless base station antenna, the lower the power output.
ThehighestSARvalueforthedeviceasreportedtotheFCCwhentestedforuseat
theearis1.14W/kgandwhenwornonthebody,asdescribedinthisuserguide,is
1.32W/kg(Body-wornmeasurementsdifferamongdevicemodels,dependingupon
available enhancements and FCC requirements.)
While there may be differences between the SAR levels of various devices and at
various positions, they all meet the government requirement.
138
The FCC has granted an EquipmentAuthorization for this device with all reported
SARlevelsevaluatedasincompliancewiththeFCCRFexposureguidelines.SAR
informationonthisdeviceisonlewiththeFCCandcanbefoundundertheDisplay
Grantsectionofhttp://www.fcc.gov/oet/ea/fccid/aftersearchingon:
FCCID:SRQ-ZTEZ730
For body worn operation, this device has been tested and meets the FCC RF
exposure guidelines for use with an accessory that contains no metal and the
positionsthehandsetaminimumof1.0cmfromthebody.Useofotherenhancements
may not ensure compliance with FCC RF exposure guidelines. If you do no t use a
body-worn accessory and are not holding the device at the ear, position the handset a
minimum of 1.0 cm from your body when the device is switched on.
FCC Compliance
Thisdevicecomplieswith part 15 oftheFCCRules.Operationissubject to the
followingtwoconditions:(1)Thisdevicemaynotcauseharmfulinterference,and(2)
this device must accept any interference received, including interference that may
cause undesired operation.
Caution:Changesormodicationsnotexpresslyapprovedbythemanufacturercould
voidtheuser’sauthoritytooperatetheequipment.
NOTE:ThisequipmenthasbeentestedandfoundtocomplywiththelimitsforaClass
Bdigitaldevice,pursuanttopart15oftheFCCRules.Theselimitsaredesignedto
provide reasonable protection against harmful interference in a residential installation.
This equipment generates, uses and can radiate radio frequency energy and, if not
139
installed and used in accordance with the instructions, may cause harmful interference
to radio communications. However, there is no guarantee that interference will not
occur in a particular installation. If this equipment does cause harmful interference to
radio or television reception, which can be determined by turning the equipment off
and on, the user is encouraged to try to correct the interference by one or more of the
following measures:
— Reorient or relocate the receiving antenna.
— Increase the separation between the equipment and receiver.
— Connect the equipment into an outlet on a circuit different from that to which the
receiver is connected.
— Consultthedealeroranexperiencedradio/TVtechnicianforhelp.
Hearing Aid Compatibility (HAC) regulations for Mobile phones
In 2003, the FCC adopted rules to make digital wireless telephones compatible
with hearing aids and cochlear implants. Although analog wireless phones do not
usually cause interference with hearing aids or cochlear implants, digital wireless
phones sometimes do because of electromagnetic energy emitted by the phone's
antenna, backlight, or other components. Your phone is compliant with FCC HAC
regulations(ANSIC63.19-2011).Whilesomewirelessphonesareusednearsome
hearing devices (hearing aids and cochlear implants), users may detect a buzzing,
humming, or whining noise. Some hearing devices are more immune than others
to this interference noise and phones also vary in the amount of interference they
generate. The wireless telephone industry has developed a rating system for wireless
phonestoassisthearingdeviceusersinndingphonesthatmaybecompatiblewith
140
their hearing devices. Not all phones have been rated. Phones that are rated have
the rating on their box or a label located on the box. The ratings are not guarantees.
Results will vary depending on the user's hearing device and hearing loss. If your
hearing device happens to be vulnerable to interference, you may not be able to use
a rated phone successfully. Trying out the phone with your hearing device is the best
way to evaluate it for your personal needs.
This phone has been tested and rated for use with hearing aids for some of the
wirelesstechnologiesthat ituses.However,there may besomenewerwireless
technologies used in this phone that have not been tested yet for use with hearing
aids. It is important to try the different features of this phone thoroughly and in
different locations, using your hearing aid or cochlear implant, to determine if you
hear any interfering noise. Consult your service provider or the manufacturer of this
phone for information on hearing aid compatibility. If you have questions about return
or exchange policies, consult your service provider or phone retailer.
M-Ratings:PhonesratedM3orM4meetFCCrequirementsandarelikelytogenerate
lessinterference to hearingdevicesthanphonesthat are notlabeled.M4isthe
better/higherofthetworatings.
T-Ratings:PhonesratedT3orT4meetFCCrequirementsandarelikelytobemore
usablewithahearingdevice’stelecoil(“TSwitch”or“TelephoneSwitch”)thanunrated
phones.T4isthebetter/higherofthetworatings.(Notethatnotallhearingdevices
have telecoils in them.)
141
YourphonemeetstheM3/T4levelrating.
Hearing devices may also be rated. Your hearing device manufacturer or hearing
health professional may help you nd this rating. For more information about FCC
HearingAidCompatibility,pleasegotohttp://www.fcc.gov/cgb/dro.
CTIA Requirements
a) Do not disassemble or open crush, bend or deform, puncture or shred.
b) Do not modify or remanufacture, attempt to insert foreign objects into the battery,
immerse or expose to water or other liquids, expose to re, explosion or other
hazard.
c) Onlyusethebatteryforthesystemforwhichitisspecied
d) Only use the battery with a charging system that has been qualified with the
system per CTIA Certication Requirements for Battery System Compliance to
IEEE 1725. Use of an unqualied battery or charger may present a risk of re,
explosion, leakage, or other hazard.
e) Do not short circuit a battery or allow metallic conductive objects to contact
battery terminals.
f) Replace the battery only with another battery that has been qualified with the
systemperthis standard, IEEE-Std-1725. Use ofanunqualifiedbatterymay
presentariskofre,explosion,leakageorotherhazard.
g) Promptly dispose of used batteries in accordance with local regulations
h) Battery usage by children should be supervised.
142
j) Avoid dropping the phone or battery. If the phone or battery is dropped, especially
on a hard surface, and the user suspects damage, take it to a service center for
inspection.
k) Improperbatteryusemayresultinare,explosionorotherhazard.
ForthosehostdevicesthatutilizeaUSBportasachargingsource,thehostdevice's
user manual shall include a statement that the phone shall only be connected to
CTIA certied adapters, products that bear the USB-IF logo or products that have
completedtheUSB-IFcomplianceprogram.
143
Legal
Approved Firmware Versions
Thisdevicewillonlyoperatewithrmwareversionsthathavebeenapprovedforuse
byT-Mobile and the devicemanufacturer.If unauthorized rmware isplacedon the
device it will not function.
Information About Safeguarding Handsets
T-Mobile encourages customers to take appropriate measures to secure their devices
and invites them to take advantage of the features available on this device to help
secure it from theft and/or other unauthorized access and use. This device has a
lockingfunction(e.g.,user-denedcodesorpatterns)thatcanserveasarstlineof
defense against unauthorized use or access to stored information. Preloaded security
applications that allow customers to track or locate misplaced devices can be found
on several T-Mobile devices. Lost or stolen devices should be immediately reported to
T-Mobile so that proper measures can be taken to protect accounts.
For additional information, visit: www.t-mobile.com/devicesecurity and http://www.
t-mobile.com/Company/PrivacyResources.aspx.
144
Emergency Dialing
Although all phones are equipped with 9-1-1 emergency calling, this phone may or
maynotpermititslocationtobeapproximatedduringa9-1-1call.*
*Availability of this feature depends on upgrades to the (a) wireless network and
(b)9-1-1callingsystemthatarerequiredtobeinstalledbythelocal9-1-1response
agency orpublicsafetyansweringpoint(PSAP);theseupgradesmaynotbe
available everywhere within our wireless coverage area or your roaming area. This
approximationofthephone’slocation and the transmittaloflocationinformationare
subject to emergency situations, transmission limits, network problems/limitations,
interconnecting carrier problems, your phone, buildings/tunnels, signal strength and
atmospheric/topographicalconditions,andmaybecurtailed, interrupted, dropped or
refused.Thephone’sapproximatelocationistransmittedtothelocal9-1-1response
agency or PSAP while the call is in progress; this approximation is intended solely
toaidthePSAPindispatchingemergencyassistanceortolimitthesearchareafor
emergency services personnel. You should not rely solely on a phone for essential
communications(suchasa medicalorotheremergency).Please seeT-Mobile’
s Terms and Conditions and Privacy Policy for additional service restrictions and
details.
Additional Information
Useofsomecontent orfeaturesmayincurseparate, additionalchargesand/or
require qualifying service, or access to a Wi-Fi connection.
145
Smartphone Mobile HotSpot (Tethering): Qualifying service required. Plan
data allotment applies. Roaming and on-network data allotments differ; see your
selectedservicefordetails.UseofconnecteddevicessubjecttoT-MobileTermsand
Conditions.
Messaging/Data: You will be charged for all messaging and data sent by or to
you through the network, regardless of whether or not data is received. Character
length/le size of messages/attachments may be limited. T-Mobile is not liable for
contentofmessages/attachmentsorforanyfailures,delaysorerrorsinanyT-Mobile
generatedalertsornotications.Yourdatasession,plan,orservicemaybeslowed,
suspended, terminated, or restricted if you use your service in a way that interferes
with or impacts our network or ability to provide quality service to other users, if you
roamforasignicantportionofyourusage,orifyouuseadisproportionateamount
of bandwidth during a billing cycle. You may not use your plan or device for prohibited
uses.
Downloads/Applications: T-Mobile is not responsible for any third party content
or Web site you may be able to access using your device. Additional charges may
apply; not all downloads available on all devices. You obtain no rights in downloads;
duration of use may be limited and downloads may be stored solely for use with your
device. T-Mobile is not responsible for any download lost due to your error. T-Mobile
is not responsible for Apps, including download, installation, use, transmission failure,
interruption or delay, third party advertisements you may encounter while using an
App, alterations any App may make to the functionality of your device, including any
changes that may affect your T-Mobile plan, service, or billing, or any content
or website you may be able to access through an App.
146
Hearing Aid Compatibility: This phone has been tested and rated for use with
hearingaidsforsomeofthewirelesstechnologiesthat ituses.However,theremay
be some newer wireless technologies used in this phone that have not been tested
yet for use with hearing aids. It is important to try the different features of this phone
thoroughly and in different locations, using your hearing aid or cochlear implant,
to determine if you hear any interfering noise. Consult your service provider or the
manufacturer of this phone for information on hearing aid compatibility. If you have
questions about return or exchange policies, consult your service provider or phone
retailer.
Wi-Fi: Device will not transition between Wi-Fi and the cellular network. Devices using
wireless connections may be vulnerable to unauthorized attempts to access data
and software stored on the device. Plan data allotment applies to use by connected
devices sharing Wi-Fi. Use of connected devices subject to T-Mobile’sTerms and
Conditions.
Wi-Fi Calling: Wi-Fi connection required; may decrement plan minutes. See your
selected service for details.
Devicesandscreenimagesaresimulated.SeebrochuresandTerms and
Conditions (including arbitration provision) at T-Mobile.com, for rate plan
information, charges for features and services, and restrictions and details, including
important limitations on availability and reliability of 9-1-1 emergency service
when using Wi-Fi calling.

147
148
User Manual and Safety Information
Concord
IIT-Mobile
http://www.ztedevice.com
