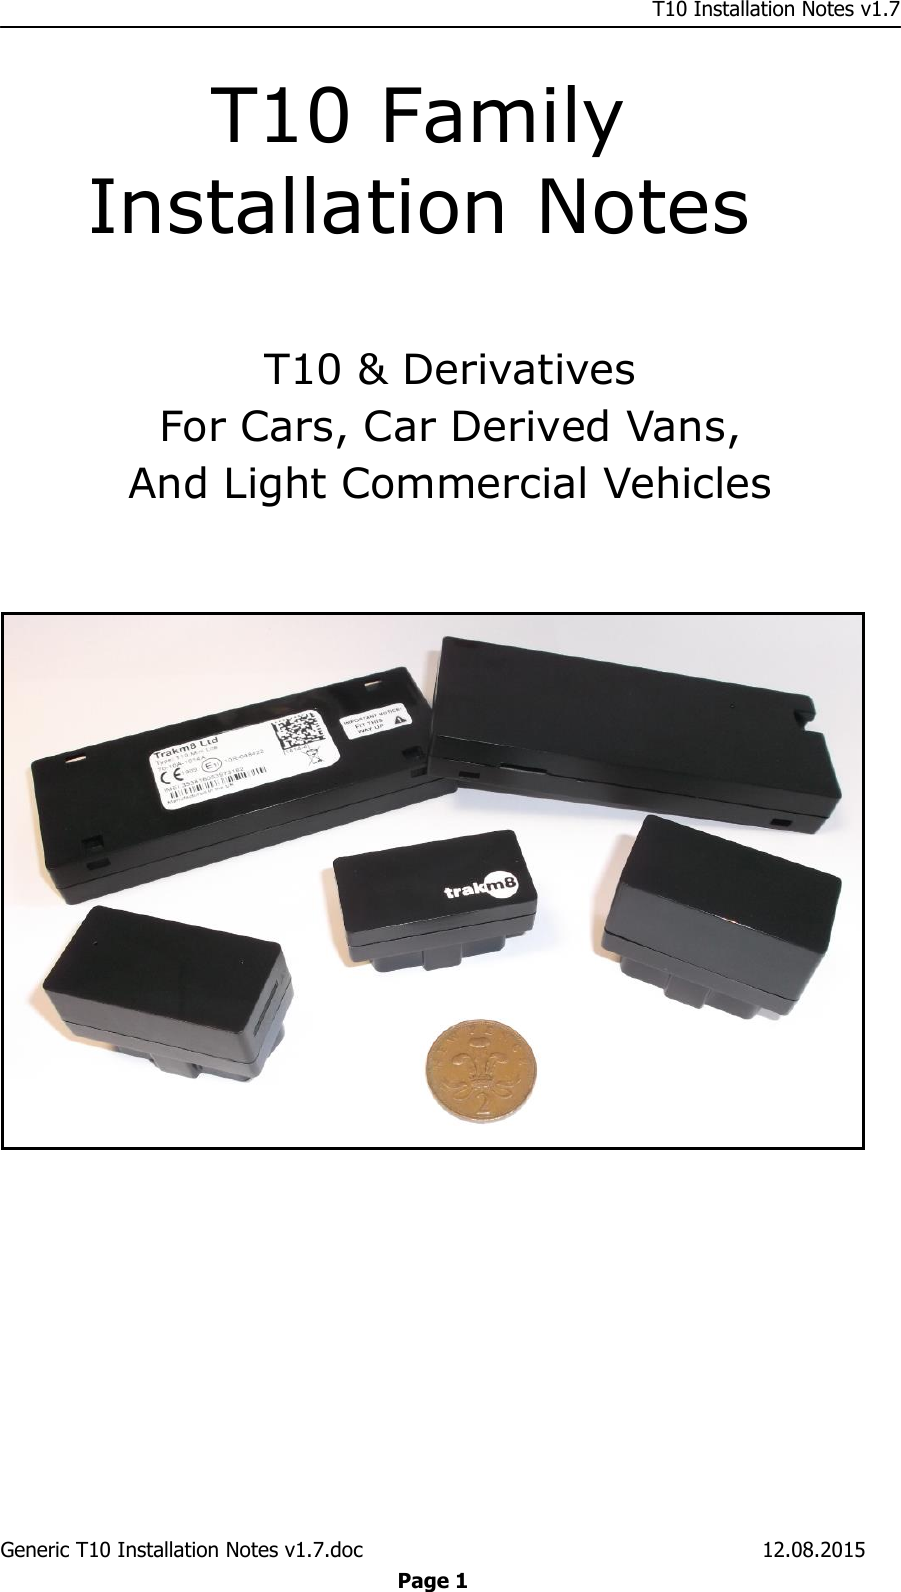
Trakm8 T10MICROBLE Vehicle Telematics Device, T10-Micro BLE model 60-08A User Manual TrakM8 Prospectus

Interactive Projects Ltd. Vehicle Telematics Device, T10-Micro BLE model 60-08A TrakM8 Prospectus
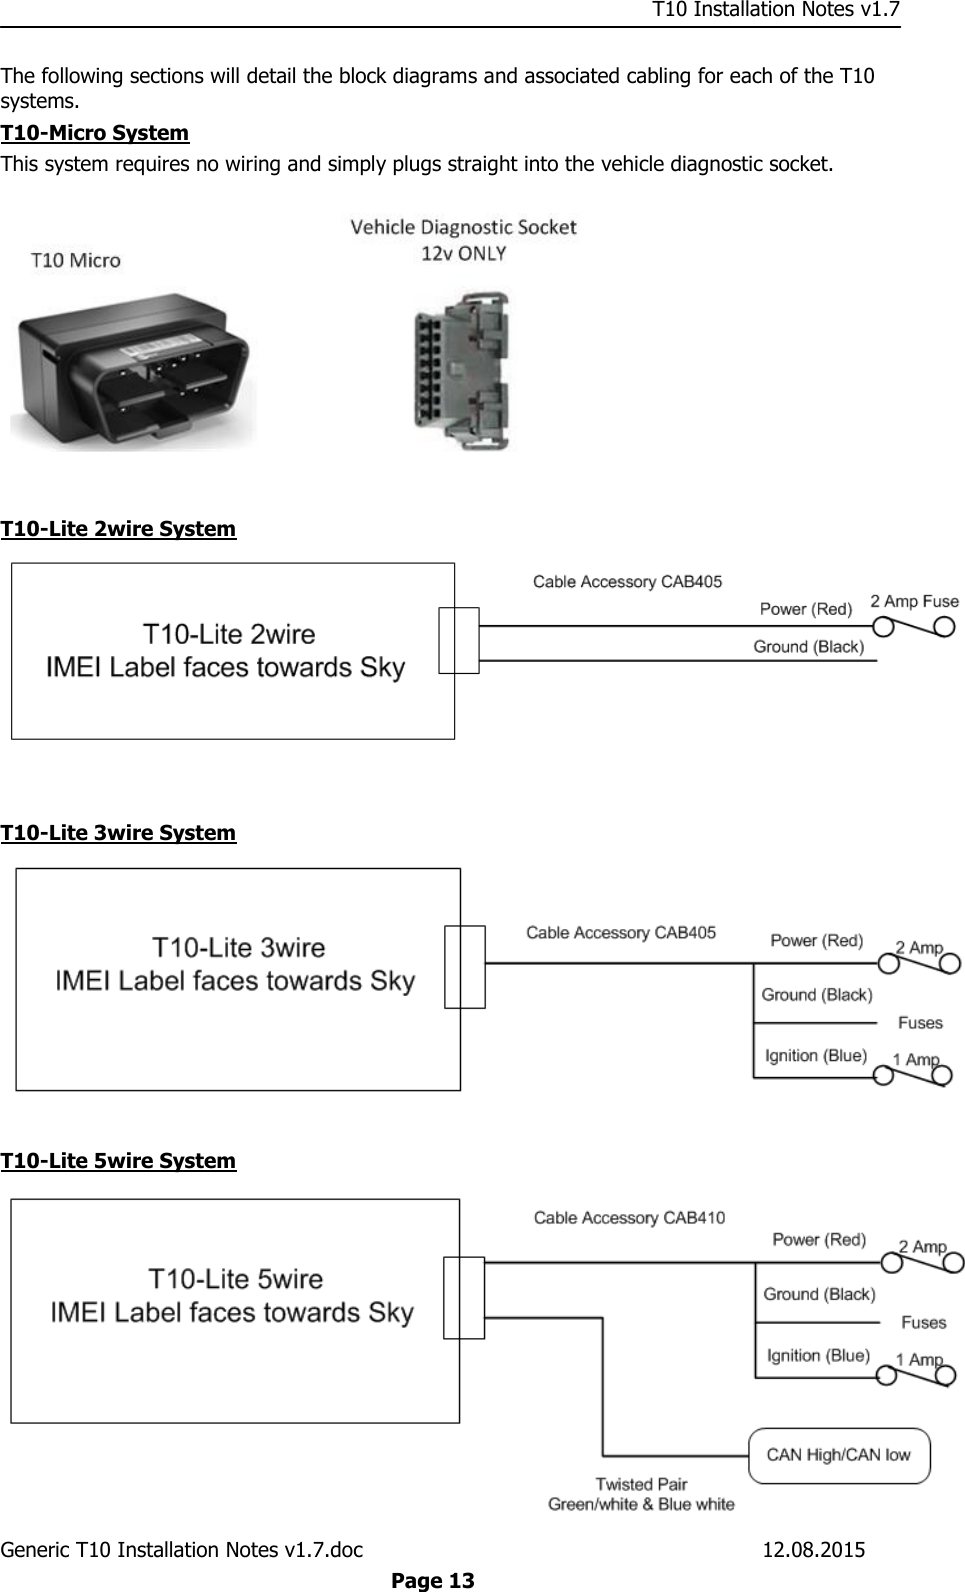
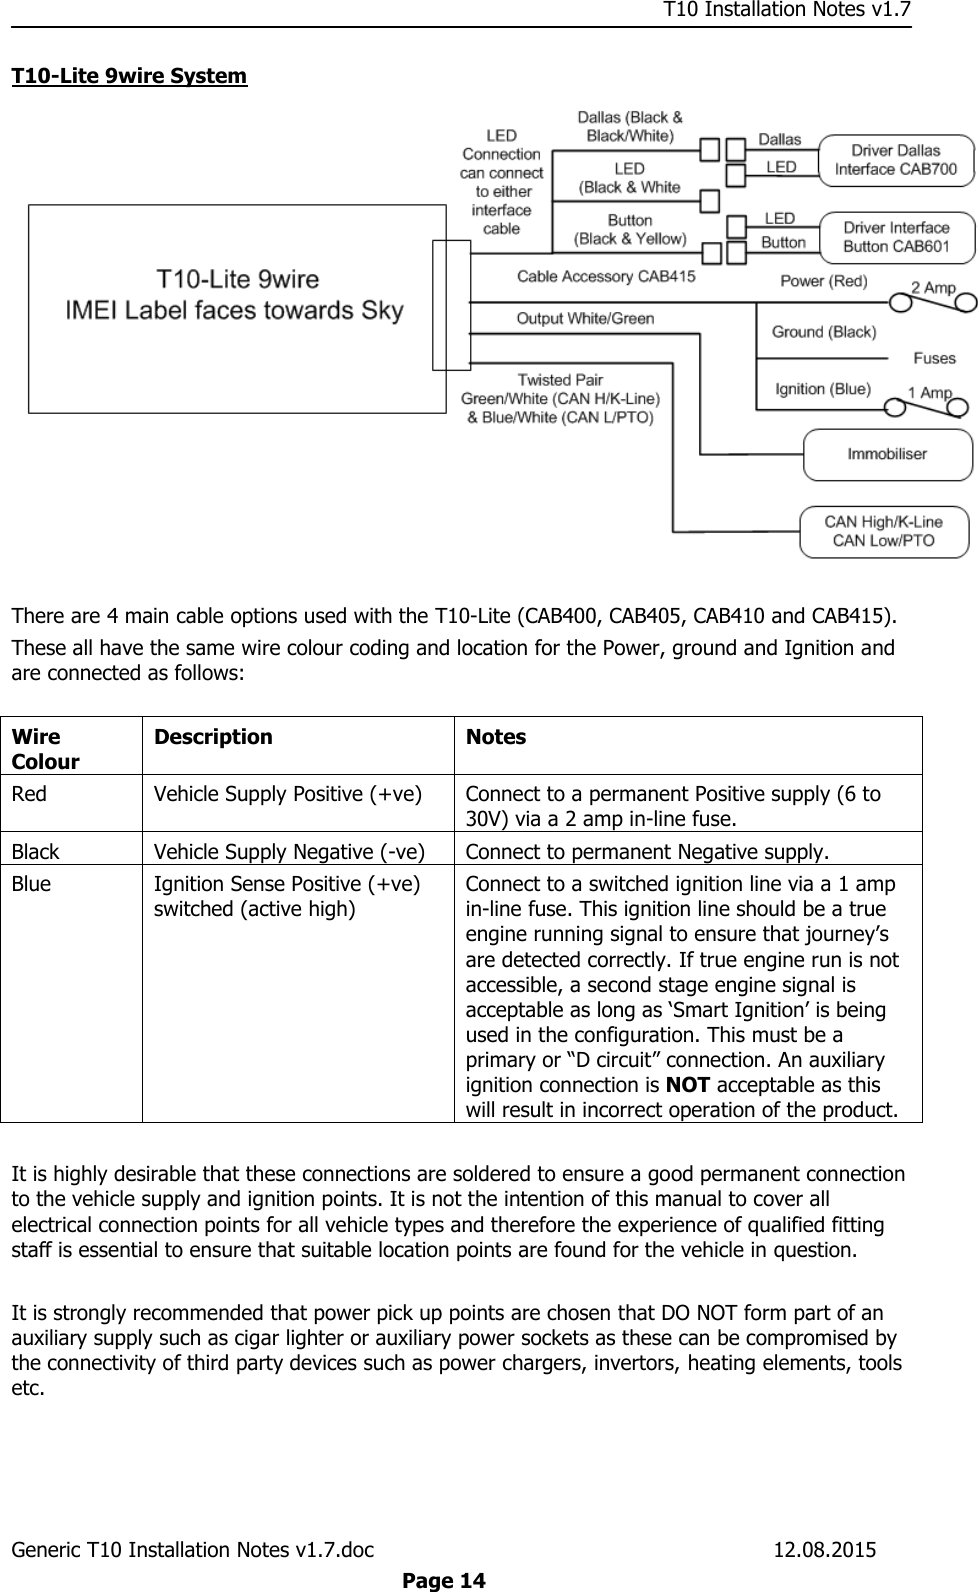
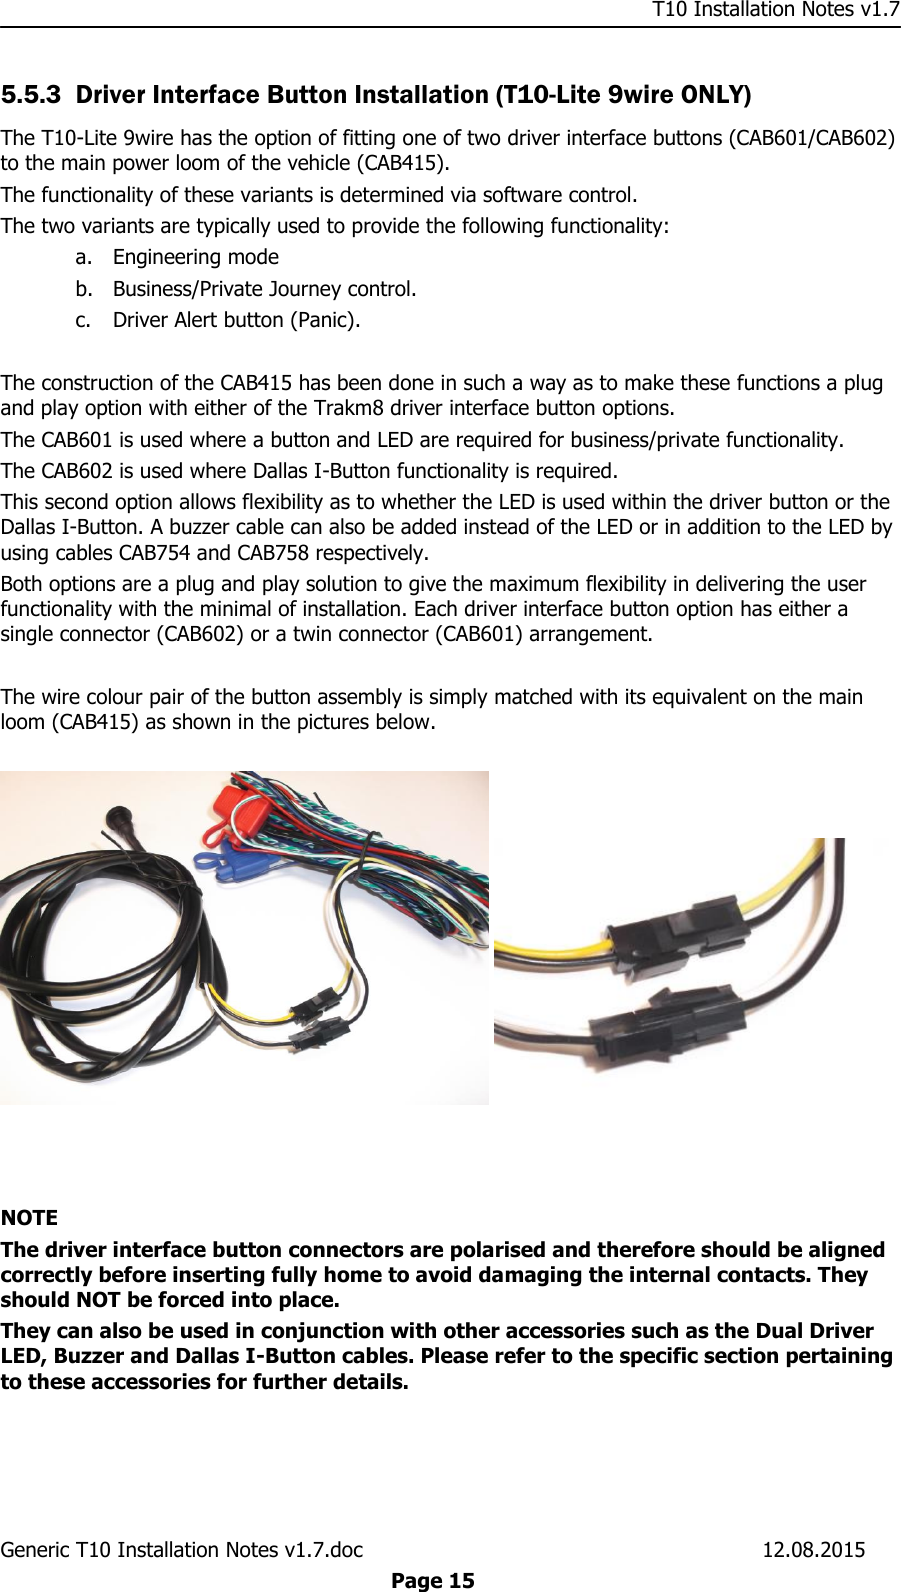
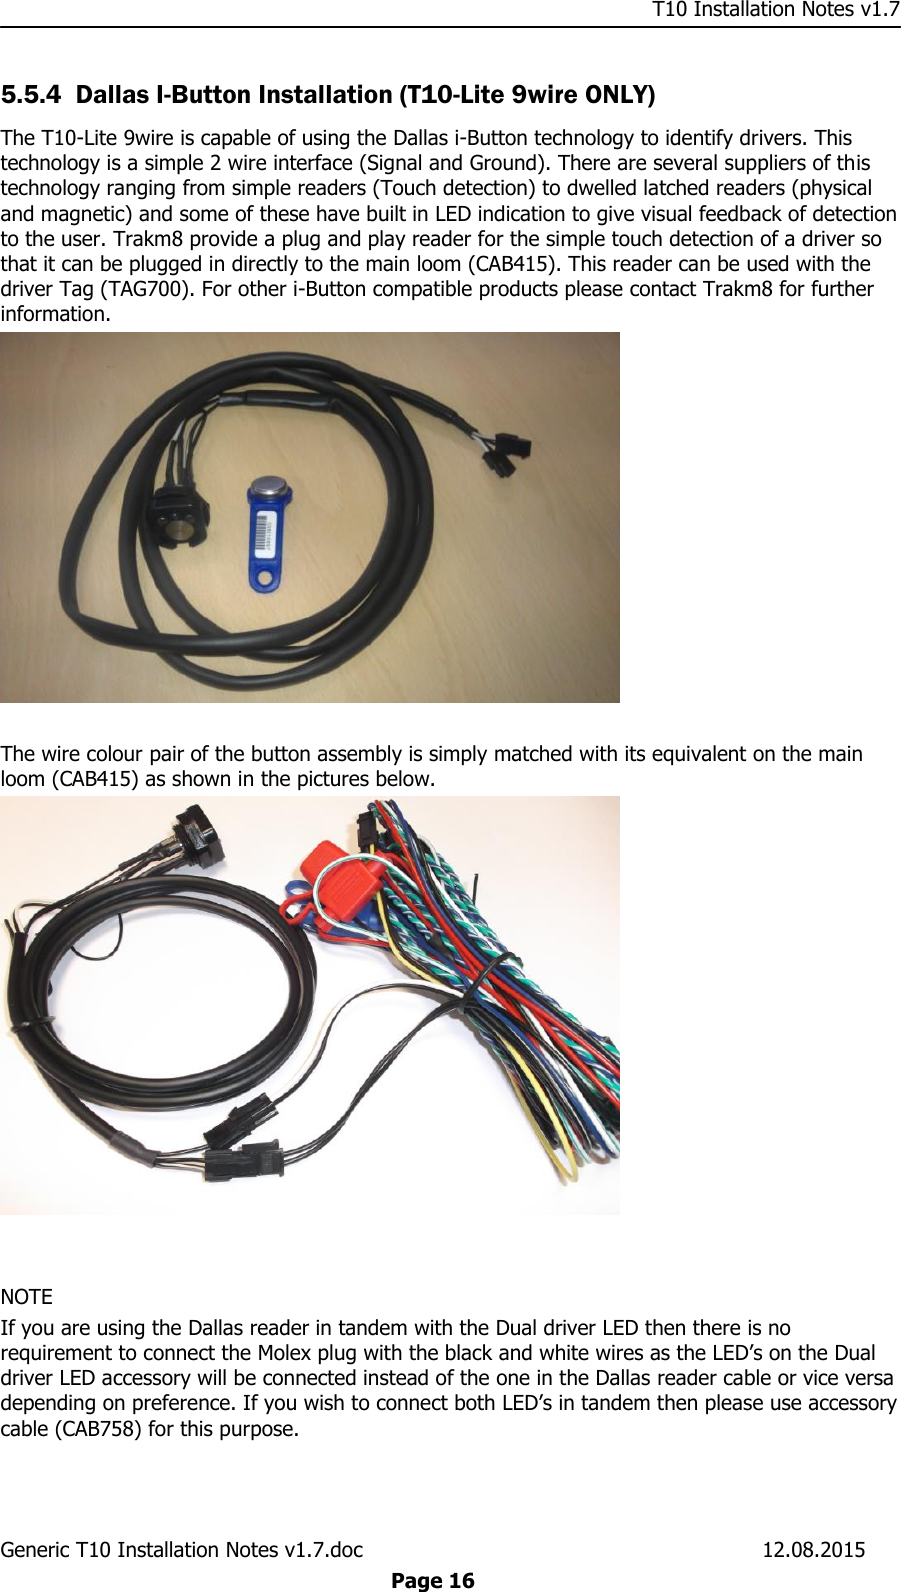
Contents

Users Manual

    T10 Installation Notes v1.7 Generic T10 Installation Notes v1.7.doc    12.08.2015  Page 1 T10 Family Installation Notes  T10 & Derivatives For Cars, Car Derived Vans, And Light Commercial Vehicles
    T10 Installation Notes v1.7 Generic T10 Installation Notes v1.7.doc    12.08.2015  Page 2 Table of Contents 1 Contact Information  3 2 Document Revision History  4 3 Preface  5 3.1 Safety Information .....................................................................................................5 Product Certification ............................................................................................................6 4 The T10 Family  8 4.1 T10-Micro..................................................................................................................8 4.2 T10-Lite ....................................................................................................................8 5 Installation  8 5.1 T10-Lite Variants .......................................................................................................8 5.2 SIM Card ................................................................................................................. 10 5.2.1 Before fitting the SIM card ................................................................................. 10 5.2.2 Fitting the SIM card .......................................................................................... 10 5.3 Backup Battery ........................................................................................................ 11 5.4 Mounting the T10-Lite .............................................................................................. 11 5.5 T10-Lite Wiring and Connections .............................................................................. 11 5.5.1 Cables and Accessory Options ............................................................................ 12 5.5.2 Power Ground and Ignition Installation .............................................................. 12 5.5.3 Driver Interface Button Installation (T10-Lite 9wire ONLY) .................................. 15 5.5.4 Dallas I-Button Installation (T10-Lite 9wire ONLY) .............................................. 16 5.5.5 Inputs Installation (T10-Lite 9wire ONLY) ........................................................... 17 5.5.6 Output Installation (T10-Lite 9wire ONLY) .......................................................... 18 5.5.7 Immobiliser Feature (T10-Lite 9wire ONLY) ........................................................ 18 5.5.8 CAN Installation – Vehicle (T10-Micro v4, T10-Lite 5wire & 9wire) ....................... 19 5.5.9 Cable Assemblies .............................................................................................. 21 5.5.10 Engineering Mode ............................................................................................. 22 Appendix A –T10 Records  24 Appendix B – Abbreviations and Glossary Of Terms  25
    T10 Installation Notes v1.7 Generic T10 Installation Notes v1.7.doc    12.08.2015  Page 3 1 Contact Information  All initial communication or enquiries should be made to:  Trakm8 Limited Lydden House Wincombe Business Park Shaftesbury Dorset SP7 9QJ UK  International Tel:  +44 (0) 1747 858444 International Fax:  +44 (0) 1747 858222 E-mail      support@trakm8.com
    T10 Installation Notes v1.7 Generic T10 Installation Notes v1.7.doc    12.08.2015  Page 4 2 Document Revision History  Document Issue Date of Issue Reason/Description of Change 1.0 1.1 1.2 1.3 1.4 1.5 1.6 1.7 4th April 2014 5th January 2015 3rd March 2015 11th March 2015 12th March 2015 25th March 2015 23rd April 2015 12th August 2015 Draft Issue. First Release includes T10-Micro, T10 MiniLite and T10 Lite. Second Release Includes additional accessories and abbreviations Additional Safety, temperature and Battery information Product name references T10-Lite updates. Additional T10-Lite updates, K-Line and FCC/IC information. Additional FCC, IC, VCA and K-line user information
    T10 Installation Notes v1.7 Generic T10 Installation Notes v1.7.doc    12.08.2015  Page 5 3 Preface Failure to comply with the following Warnings, Approval and Safety information may invalidate warranty, certification or type approval of this product. 1. WARNING! Current FCC and regulations limit the EIRP of mobile devices to 2 W.  A 20 cm (7.87 inch) separation distance between the T10 unit and all persons must be maintained at all times. “To comply with Industry Canada RF radiation exposure limits for general population, the antenna(s) used for this transmitter must be installed such that a minimum separation distance of 20cm is maintained between the radiator (antenna) and all persons at all times and must not be co-located or operating in conjunction with any other antenna or transmitter.” 2. Any attempt to make modifications not expressly approved by Trakm8 may invalidate the warranty and the user’s authority to use the equipment. 3. Unauthorised modification to this equipment or associated accessories is forbidden without the express permission and agreement from the product manufacturer. 4. This equipment should not be operated in hazardous environments i.e. areas that contain explosive materials or flammable vapours. 5. This equipment should not be operated within aircraft or in close proximity to medical equipment. 6. Internal components containing beryllium oxide may be used in this equipment. Dust from this material is a health hazard if inhaled or allowed to come into contact with the skin. Great care must be taken when handling these components.  7. This equipment is restricted to temperature ranges depending on the build spec of the hardware: a. -40C to +85C (if not fitted with Backup battery) b. 0C to +45C (if fitted with backup battery) The unit will still operate outside of these limits but the battery charging circuitry will be inhibited to protect the battery. 3.1 Safety Information Please adhere to the following Safety and Installation information at all times. T10-Micro 2 Tier Supply Voltage:  +6V minimum to +15V maximum. T10-Micro 1/3 tier Supply Voltage:  +6V minimum to +30V maximum. T10-Lite Supply Voltage:    +6V minimum to +30V maximum. T10-Micro 1/2/3 Tier Current at:   12V/24V <= 500mA – fit a 2A inline fuse. T10-Lite Current at:      12V/24V <= 500mA – fit a 2A inline fuse. T10-Micro/T10-Lite Battery charging peak < 1 Amp at 12V. T10-Micro/T10-Lite Battery charging peak < 1 Amp at 24V.  Note: Fuses should be placed in all power lines as close as possible to the vehicle supply source. (Supply fuse: 2A, Ignition Fuse: 1A) These are supplied as an integral part of the T10 cable range: (CAB400, CAB405, CAB410, and CAB415). The currents indicated above are worst case scenario when the device is transmitting at peak power and are typically a lot lower than shown.  NB  Important  -  The  telemetry  unit’s  power  supply  for  the  vehicle  installation  MUST  utilise  a permanent  power  feed  that  is  NOT  subject  to  battery  isolation  ‘kill  switch’  technology.  If  the vehicle  is  fitted  with  battery  isolation  ‘kill  switch’  technology,  then  the  permanent  power  feed MUST be taken directly from the vehicles battery terminals or the permanently powered terminal
    T10 Installation Notes v1.7 Generic T10 Installation Notes v1.7.doc    12.08.2015  Page 6 of the isolation switch. If the battery isolation device is a negative earth isolator, the –Ve Ground connection must be taken from a chassis earth point to prevent potential feedback through the telemetry unit when the isolation switch is activated.  The commissioning desk MUST be informed if the vehicle has a negative earth isolation switch fitted as an internal battery backup unit may be required to be fitted during the installation process if one is not supplied as standard. NB.* All electrical connections should be checked and confirmed with the use of a multi-meter. THE RATINGS OF THESE FUSES SHOULD NOT BE EXCEEDED AT ANY TIME WARNING! This equipment may only be located in a position where it cannot interfere with the normal operation of the vehicle or present a hazard to the driver or passengers. Care must also be taken in the routing of all cables so that the insulation does not become worn or damaged. Product Certification The product can be marketed within the European Community.  Below are the approval references: European Approval  R&TTE Directive 1999/5/EC Trakm8  Limited  hereby  declares  that  the  T10-Micro  and  T10-Lite  are  in  compliance with  the  essential  requirements  and  other  relevant  provisions  of  Directive  1999/5/EC (R&TTE Directive). As part of the requirements of the R&TTE directive the  T10-Micro and T10-Lite have been designed to operate on the European GSM 900 MHz and DCS 1800 MHz GSM/GPRS frequency bands. The  T10-Micro  and  T10-Lite  products  are  compliant  with  the  following  standards and/or normative documents: EN60950-1: 2006 / A11: 2009 / A1: 2010 / A12: 2011, EN62311:  2008, EN301489-1:   V1.9.2 : 2011, EN301489-3:   V1.4.1 : 2002, EN301489-17: V2.1.1 : 2009, EN300328:    V1.7.1 : 2006, EN300440-2: V1.4.1 : 2010, EN300220-2: V2.3.1 : 2010, EN301511:    V9.0.2 : (2002-11).  The declaration of conformity (DOC) can be supplied on application or downloaded from our web site at www.trakm8.com.   CE – marking (T10-Micro and T10-Lite) The  T10-Micro  and  T10-Lite  products  contain  a  u-blox  SARA  G340/G350  radio  module whose  associated  Notified  Body  number  is  1909.  The  product  contains  the  following marking:
    T10 Installation Notes v1.7 Generic T10 Installation Notes v1.7.doc    12.08.2015  Page 7 USA and Canada Approval  FCC – Marking (T10-Micro) The T10-Micro complies with Part 15 of the FCC Rules and contains the following markings.  FCCID:SMGT10MICROBLE Operation of the product is subject to the following two conditions: 1. This device may not cause harmful interference. 2. This device must accept any interference received, including interference that may cause undesirable operation.   IC – Marking (T10-Micro) The T10-Micro complies with Industry Canada licence exempt RSS Standard(s) and contains the following markings: IC:20171-T10MICROBLE Operation of the product is subject to the following two conditions: 1. This device may not cause harmful interference. 2. This device must accept any interference received, including interference that may cause undesirable operation.  VCA Approval   “E” – Marking (T10-Micro 2 Tier) The  T10-Micro  has  been  approved  by  the  VCA  directive  for  automotive  use  in accordance with EMV 2004/104/EG and contains the following marking:    “E” – Marking (T10-Micro 3 Tier) The T10-Micro 3 Tier is currently undergoing approvals.   “E” – Marking (T10-MiniLite/T10-Lite 3/5 wire) The T10-Lite 3/5 wire has been approved by the VCA directive for automotive use in accordance with EMV 2004/104/EG and contains the following marking:  This product was formerly known as T10-MiniLite and has now been bannered under the T10-Lite group as a 3 wire or 5 wire device.   “E” – Marking (T10-Lite 9 wire) The  T10-Lite  9  wire  has  been  approved  by  the  VCA  directive  for  automotive  use  in accordance with EMV 2004/104/EG and contains the following marking:
    T10 Installation Notes v1.7 Generic T10 Installation Notes v1.7.doc    12.08.2015  Page 8  4 The T10 Family The T10 family consists of a range of products to meet the demanding requirements of modern day telematics. In summary these variations have been categorised into two sub families called: a. T10-Micro b. T10-Lite (2/3/5/9 wire) 4.1 T10-Micro The T10-micro is a plug and play product designed to be inserted into the vehicle ECU Diagnostic socket (J1962) which usually is accessible within the driver cockpit area and can be accessed without the need of specialised tools. This product does not require the involvement of a specialised fitter and can usually be fitted by the end user. Units that are supplied with a customer SIM fit option should follow the same SIM fitting process as described for the T10-Lite. 4.2 T10-Lite The T10-Lite exists as 4 variants (2wire, 3wire, 5wire, 9wire) and requires the specialised knowledge of fitting electrical equipment to vehicles. The T10-Lite 2/3/5wire devices (formerly known as T10-MiniLite) which are very similar in size to the T10-Lite 9 wire product but contain the following additional hardware features over the T10-Lite 2/3/5wire device: 1. A larger backup battery (1500mAH). 2. Addition of a Driver Interface Button (Cable CAB601). 3. Addition of a Driver Identification Dallas interface (Cable CAB700). 4. Addition of an Output to drive an immobilisation relay. 5. Addition of a PTO Input (NONE CAN variant ONLY). 6. Additional CAN Protocols (ISO 9041, KW2000) 5 Installation  5.1 T10-Lite Variants Before you begin installing and commissioning the system please ensure that you have read this manual thoroughly referring to any supplementary information provided for the T10 as required. This document covers the T10 platform Control Unit and its connections through the following process: 1. Recommended Sequence 2. Fitting the SIM 3. Mounting the Unit 4. Wiring and connections i. Power, Ground and Ignition (ALL variants ex 2wire – Power/Ground ONLY) ii. CAN (T10-Lite 5 wire & 9wire) iii. Driver Button (T10-Lite 9 wire ONLY) iv. Driver Identification (T10-Lite 9 wire ONLY) v. PTO Input (T10-Lite 9 wire ONLY) vi. Output (T10-Lite 9 wire ONLY)
    T10 Installation Notes v1.7 Generic T10 Installation Notes v1.7.doc    12.08.2015  Page 9 Important Notes! When using the T10 platform you should remember the following: 2. In order for GPS to function correctly, the T10 must have a clear view of the sky in order to receive data from the satellites. Should this view be obscured, e.g. the vehicle is parked in a metal-clad building then the performance of the T10 platform may be impeded. Wherever possible it is preferable to park the vehicle in a location where the antenna will have a clear all round view of the sky.   3. Whenever you disconnect the T10 platform from the power supply it may lose its stored data and so may take up to 30 minutes to obtain a GPS fix when you plug it back in. The T10 platform may also lose certain other information from its memory particularly if the optional backup battery is not fitted. Please ensure that you take this into consideration when having the vehicle serviced, as the vehicle battery connections are often removed during some service procedures. Tell the service technician that you have a T10 fitted and request that if possible they use a “vehicle memory saver” plugged into the cigarette lighter socket – this type of device will support both the T10 and your vehicle radio system whilst the vehicle battery is removed.  WARNINGS 1. Do not smoke or use open flames when working near the vehicle. 2. Ensure that the vehicle’s electrical cables, hydraulic lines, fuel lines, and safety equipment are not damaged during the installation. 3. Ensure that normal control and operation of the vehicle is not impaired by the installation, particularly the brakes and steering.  Ensure that the airbag operation is not obstructed.   The following installation sequence is recommended. Please refer to the detailed instructions elsewhere in this document for further details.  1. Plan the whole installation and determine suitable locations, mounting arrangements and cable routes for all hardware items. 2. Fit SIM card (if not supplied pre-installed).  Please note that the SIM must be inserted correctly and any SIM PIN code must be removed using a mobile phone. 3. Temporarily mount the main T10 unit with the IMEI label facing the sky to optimise GPS performance and wire the Power and Ignition Sense feeds leaving the in-line fuses out. (See section 5.4.2) 4. If the unit requires driver interface button refer to section 5.4.3. 5. If the unit requires Dallas interface connections refer to section 5.4.4. 6. If the unit requires an Input refer to section 5.4.5. 7. If the unit requires an output/immobiliser fitted refer to section 5.4.6 & 5.4.7. 8. If the unit is a CAN compatible unit refer to section 5.4.8. NOTE The CAN interface is ONLY active once the unit has detected an ignition sense. 9. Temporarily fit the main fuse in the unit and observe the LED on the unit for GPS/GPRS/CAN 10. Permanently mount the main T10.  11. Commission and test the system.
    T10 Installation Notes v1.7 Generic T10 Installation Notes v1.7.doc    12.08.2015  Page 10 5.2 SIM Card The SIM card fitting process is identical for the entire family range of products. 5.2.1 Before fitting the SIM card 1. If you have not already registered your SIM card with the mobile network, you should do this before proceeding. Please refer to the appropriate mobile network operator instructions on how you do this. 2. Make a note of the number on the SIM card (ESN) as well as a note of your Voice & Data telephone numbers. There is a convenient space in Appendix B – T10 where you can record this information.  3. Ensure that a PIN number does not protect the SIM card. If this is the case, it must be removed before inserting it into the T10 platform – this can be done by inserting the SIM into a suitable mobile telephone and then following your mobile telephone instruction booklet.  5.2.2 Fitting the SIM card Important Note! The T10 range of products has been designed with SIM security in mind and as such incorporates measures to prevent the SIM from being easily removed from the unit. It is therefore important to ensure the appropriate SIM card is fitted the correct way because once fitted it is extremely difficult to remove the covers of the enclosure to rectify this. The SIM cradle used in the T10 is of the micro design (small footprint) and therefore requires the use of a micro SIM card. Most SIM providers are providing SIM cards of this new design and they are usually supplied within a carrier card incorporating both styles.  You simply snap out the appropriate size of your choice.   1. The SIM card is inserted into the product with the gold contacts facing downwards and the chamfered corner facing outermost as shown below. Ensure the SIM card is pushed home fully within its holder until it drops slightly into its resting place slightly below the slot line.
    T10 Installation Notes v1.7 Generic T10 Installation Notes v1.7.doc    12.08.2015  Page 11  5.3 Backup Battery The T10-Lite products can be supplied with a Li-ion Polymer 3.7v 1500mAh backup battery for operational scenarios where the main power can be removed or the main power is required to be monitored and alerted against in the event of a disconnection. This Battery can ONLY be fitted/replaced as part of the production process of the unit and is NOT a user fit/replacement feature. It MUST be returned to Factory for replacement. 5.4 Mounting the T10-Lite You may choose to mount the Control Unit somewhere covertly e.g. in the boot, under the parcel-shelf or under the dashboard. Suitable mechanical fixings such as cable ties can be used (not supplied). WARNINGS:  1. Your T10 Platform must be securely mounted in a location where it cannot interfere with the normal operation of the vehicle. It must NOT be located in a position where the cables or the Control Unit become a hazard to the driver or passengers.  2. Under no circumstances may any part of the T10 system be installed inside the engine compartment area. 3. For correct calibration of the accelerometer functions it is imperative that the unit is securely mounted such as to maximise the auto calibration procedures on board the unit. This is best achieved with the unit mounted flat in either the horizontal or vertical plane.  5.5 T10-Lite Wiring and Connections Important Notes! 1. Unauthorised changes or alterations to the equipment or the installation will invalidate certification issued by the Approved Accreditation Body and could also affect the vehicle manufacturer’s warranty. 2. The notes below should be read in conjunction with the T10 Block Diagrams. 3. All wiring should be professionally connected to the vehicle electrics via soldered connections using automotive grade fuse holders and fuses. 4. All wiring should be safely secured to avoid damage from, or chaffing by, any hot or moving parts. 5. Position the wiring carefully to avoid the possibility of snagging or impact damage during the normal use of the vehicle. 6. Before any holes are drilled, check that no parts, wires, pipes or tanks could be damaged at the exit point of the hole. Suitable grommets must be used where wires are routed through body panels to prevent chaffing and short circuits to the chassis. 7. Leave the in-line fuses out of their holders until the installation is complete.
    T10 Installation Notes v1.7 Generic T10 Installation Notes v1.7.doc    12.08.2015  Page 12 5.5.1 Cables and Accessory Options The T10 family has various cable assemblies and accessories depending on how the product is to be Installed and used: T10-Micro The T10-Micro has No Accessories as this is a plug and play device connecting into the J1962 connector of the vehicle.  T10-Lite 2wire, 3wire, 5wire The T10-Lite 2 through 5 wire has the following cable options:  1. 2 Wire Cable (Part No. CAB400). (No Ignition wire required). 2. 3 Wire Cable (Part No. CAB405). (Ignition wire option). 3. 5 Wire Cable (Part No. CAB410). (Ignition Wire and CAN option). 4. 5 wire to J1962 Ribbon Cable (Part No. CAB420). 5. 5 wire CAN T-Piece (Part No CAB425).  T10-Lite 9wire The T10-Lite 9wire has the following cable options:  1. 9 Wire Cable (Part No. CAB415). 2. Generic CAN T-Piece (CAB782). 3. Driver Interface Button/LED (Part No CAB601). 4. Driver Interface Button ONLY (No LED) (Part No CAB602). 5. 5 metre extension for remote mounting of CAB601/2 (part No CAB606). 6. Dallas Driver Identification Interface (Part No CAB700)(works with TAG700). 7. Dallas Buzzer/LED Y adaptor (Part No CAB758). 8. Large Buzzer (Part No CAB754). 9. External LED (Part No CAB760).  For further information please contact Orders@trakm8.com  5.5.2 Power Ground and Ignition Installation The T10-Micro and T10-Lite 2 wire hardware do not require connection to a vehicle ignition sense. Both of these devices use the on board accelerometer device to sense movement and as such incorporate a logical ignition/journey detection process. This methodology although reliable can be flawed in slow moving traffic and also by the Start/Stop technology of modern day vehicles. It is therefore advisable that where possible a wire ignition sense is implemented.
    T10 Installation Notes v1.7 Generic T10 Installation Notes v1.7.doc    12.08.2015  Page 13 The following sections will detail the block diagrams and associated cabling for each of the T10 systems. T10-Micro System This system requires no wiring and simply plugs straight into the vehicle diagnostic socket.    T10-Lite 2wire System    T10-Lite 3wire System   T10-Lite 5wire System
    T10 Installation Notes v1.7 Generic T10 Installation Notes v1.7.doc    12.08.2015  Page 14 T10-Lite 9wire System   There are 4 main cable options used with the T10-Lite (CAB400, CAB405, CAB410 and CAB415). These all have the same wire colour coding and location for the Power, ground and Ignition and are connected as follows:  Wire Colour Description Notes Red Vehicle Supply Positive (+ve) Connect to a permanent Positive supply (6 to 30V) via a 2 amp in-line fuse. Black Vehicle Supply Negative (-ve) Connect to permanent Negative supply. Blue Ignition Sense Positive (+ve) switched (active high)   Connect to a switched ignition line via a 1 amp in-line fuse. This ignition line should be a true engine running signal to ensure that journey’s are detected correctly. If true engine run is not accessible, a second stage engine signal is acceptable as long as ‘Smart Ignition’ is being used in the configuration. This must be a primary or “D circuit” connection. An auxiliary ignition connection is NOT acceptable as this will result in incorrect operation of the product.  It is highly desirable that these connections are soldered to ensure a good permanent connection to the vehicle supply and ignition points. It is not the intention of this manual to cover all electrical connection points for all vehicle types and therefore the experience of qualified fitting staff is essential to ensure that suitable location points are found for the vehicle in question.   It is strongly recommended that power pick up points are chosen that DO NOT form part of an auxiliary supply such as cigar lighter or auxiliary power sockets as these can be compromised by the connectivity of third party devices such as power chargers, invertors, heating elements, tools etc.
    T10 Installation Notes v1.7 Generic T10 Installation Notes v1.7.doc    12.08.2015  Page 15 5.5.3 Driver Interface Button Installation (T10-Lite 9wire ONLY) The T10-Lite 9wire has the option of fitting one of two driver interface buttons (CAB601/CAB602) to the main power loom of the vehicle (CAB415).  The functionality of these variants is determined via software control.  The two variants are typically used to provide the following functionality: a. Engineering mode b. Business/Private Journey control. c. Driver Alert button (Panic).  The construction of the CAB415 has been done in such a way as to make these functions a plug and play option with either of the Trakm8 driver interface button options. The CAB601 is used where a button and LED are required for business/private functionality. The CAB602 is used where Dallas I-Button functionality is required.  This second option allows flexibility as to whether the LED is used within the driver button or the Dallas I-Button. A buzzer cable can also be added instead of the LED or in addition to the LED by using cables CAB754 and CAB758 respectively. Both options are a plug and play solution to give the maximum flexibility in delivering the user functionality with the minimal of installation. Each driver interface button option has either a single connector (CAB602) or a twin connector (CAB601) arrangement.  The wire colour pair of the button assembly is simply matched with its equivalent on the main loom (CAB415) as shown in the pictures below.        NOTE The driver interface button connectors are polarised and therefore should be aligned correctly before inserting fully home to avoid damaging the internal contacts. They should NOT be forced into place. They can also be used in conjunction with other accessories such as the Dual Driver LED, Buzzer and Dallas I-Button cables. Please refer to the specific section pertaining to these accessories for further details.
    T10 Installation Notes v1.7 Generic T10 Installation Notes v1.7.doc    12.08.2015  Page 16 5.5.4 Dallas I-Button Installation (T10-Lite 9wire ONLY) The T10-Lite 9wire is capable of using the Dallas i-Button technology to identify drivers. This technology is a simple 2 wire interface (Signal and Ground). There are several suppliers of this technology ranging from simple readers (Touch detection) to dwelled latched readers (physical and magnetic) and some of these have built in LED indication to give visual feedback of detection to the user. Trakm8 provide a plug and play reader for the simple touch detection of a driver so that it can be plugged in directly to the main loom (CAB415). This reader can be used with the driver Tag (TAG700). For other i-Button compatible products please contact Trakm8 for further information.   The wire colour pair of the button assembly is simply matched with its equivalent on the main loom (CAB415) as shown in the pictures below.    NOTE If you are using the Dallas reader in tandem with the Dual driver LED then there is no requirement to connect the Molex plug with the black and white wires as the LED’s on the Dual driver LED accessory will be connected instead of the one in the Dallas reader cable or vice versa depending on preference. If you wish to connect both LED’s in tandem then please use accessory cable (CAB758) for this purpose.
    T10 Installation Notes v1.7 Generic T10 Installation Notes v1.7.doc    12.08.2015  Page 17   5.5.5 Inputs Installation (T10-Lite 9wire ONLY) The T10-Lite 9wire product has a single Input (Pin 9) and it is of a digital type. It is not configurable and it is NOT capable of processing analogue signals. It is ONLY available in the 70-30 hardware code range and the CAN twisted pair of wires take on NEW functionality (See Can section).  Digital Input Specification The Input (Blue/White tracer) is capable of monitoring automotive signals in the signal range from -30v to +30v. The input is deemed to have “GONE HIGH” when the voltage is greater than 6v and “GONE LOW” when the voltage is less than 6v (including the open circuit state see below). Therefore the connection of the input wire into a vehicle circuit varies depending on the voltage of the circuit being monitored and the direction of state change you are wishing to detect. In the open circuit state the T10-Lite input is in the low state and therefore careful consideration must be given when wiring up the input to ensure the change of state produces the required trigger you are after especially if you want to detect both the “GOES HIGH” and “GOES LOW” state change.  Below are some examples of monitoring circuit state changes. Signal Transition from 0V to +12v/+24v If the input monitoring is a signal or switch circuit that is producing the actual voltage transition then the input wire can be connected directly to the circuit and it should be possible to detect both state transitions.  Signal Transition from open circuit to +12v/+24v If the input monitoring requires the detection of a switch closing to supply (+12v/+24v) then the input is simply wired to the normally open side the switch.  Signal Transition from >6v to +12v/+24v If the input monitoring requires the detection of a voltage change that does not transition below 6v then a potential divider is required to drop the lower voltage state into the triggering region. To keep the current drain to a minimum then the combined resistance value should be greater than 10K to keep the current below 1mA.  Signal Transition from open circuit to 0V If the input monitoring requires the detection of both state transitions of a switch switching from open circuit to ground, then a pull up resistor is required to generate the “GOES HIGH” state when the switch becomes open circuit. Again the resistor value should be greater than 10K to keep the current drain to a minimum when the circuit is closed.
    T10 Installation Notes v1.7 Generic T10 Installation Notes v1.7.doc    12.08.2015  Page 18 5.5.6 Output Installation (T10-Lite 9wire ONLY) The T10-Lite 9wire product has a single dedicated output. This output (0) can be controlled automatically via driver authorisation protocol and therefore can be used as security immobilisation devices. (See example in the Immobiliser section). If the immobilisation function is NOT required then both of the outputs can either be controlled directly via command or automatically by EVENT triggers within the I/O control module.  Output Specification The T10-Lite 9wire output incorporates an automotive grade open collector FET devices driving the output to ground when active. It is capable of sinking up to 500mA and is therefore suitable for driving lamps, buzzers and relays as required.  5.5.7 Immobiliser Feature (T10-Lite 9wire ONLY) Important Notes! 1. Unless local law permits the T10-Lite Immobiliser MUST NOT be connected in such a way that it would be possible to disable the vehicle whilst it is under way. The immobiliser must be wired in such a way that it is only breaking a cranking circuit of the vehicle. Careful consideration must be observed when choosing this circuit as modern vehicles usually have these types of circuit monitored by the ECU of the vehicle. This could lead to a malfunction of the vehicle’s own monitoring system and may invalidate the manufacturer’s warranty if the correct circuit is not chosen. (If in doubt then please contact the vehicle manufacturer for advice). 2. Should all power (main power and battery backup if fitted) be removed from the T10-Lite then the T10-Lite Immobiliser will default to a “FAIL ON” condition such that the vehicle can still be started.
    T10 Installation Notes v1.7 Generic T10 Installation Notes v1.7.doc    12.08.2015  Page 19    5.5.8 CAN Installation – Vehicle (T10-Micro v4, T10-Lite 5wire & 9wire) The CAN (vehicle) protocols supported are as follows: 1. EOBDII (via J1962) (Cars and Light Commercial Vehicles)(CAN Micro’s & 9 wire 70-35A). 2. K-Line (CAN Micro’s & 9 wire – 70-30A hardware). 3. ISO 9041 (CAN Micro’s & 9 wire – 70-30A hardware). Cars and Light Commercial Vehicles All petrol engine vehicles manufactured since 2000 should be EOBD compliant. Some manufacturers began incorporating On-Board Diagnostic systems as early as 1994, however not all are 100% compliant. All diesel engine vehicles are expected to have support from 2004. There are currently 5 CAN communication protocols of which 3 are currently supported by the T10 range of CAN compatible products. The 5 communication protocols are as follows: • ISO 9141. • Keyword 2000 (K-Line) (originally a European protocol). • J1850 PWM (pulse width modulated) protocol used by Ford. • J1850 VPW (variable pulse width modulated) used by General Motors in USA. • CAN (Controller Area Network) European Standard. It is the 1st (ISO 9141) 2nd (K-Line)(T10-Micro v4) and 5th format (“CAN 11/29 bit addressing”) that is currently supported by the T10-Micro and T10-Lite. If you are in doubt of the format available on your vehicle then it is advisable to seek professional advice before connecting. 1. You can use a CAN diagnostics meter to interrogate CAN format and there are various types available in the market place. If you require further information on one of these devices then please contact Trakm8 sales. 2. It is normally possible to tell which protocol is in use on a specific vehicle by examining the diagnostic socket of the vehicle. (J1962 connector as shown below)  This is usually found within the driver or passenger compartment of the vehicle as the connector by design has to be easily located by the service engineer when the vehicle goes in for service.  • If the J1962 diagnostic socket has a pin in the 7th & 15th position, then the vehicle uses either the ISO 9141 or Keyword 2000 protocol. Connect the wire in the 7th or 15th position to the  • If the J1962 diagnostic socket has a pin in the 2nd & 10th position, then the vehicle uses one of the SAE J1850 protocols. • If the J1962 diagnostic socket has a pin in the 6th & 14th position, then the vehicle is likely to use the CAN protocol. Connect the wire in the 6th position (CANH) to the Green/white stripe wire and the wire in the 14th position (CANL) to the Blue/white stripe wire in the T10 wiring loom.
    T10 Installation Notes v1.7 Generic T10 Installation Notes v1.7.doc    12.08.2015  Page 20 NOTE IF the J1962 connector does NOT have an open center slot in the middle of the connector then it is NOT 12v Compatible. When the center slot of the connector contains an obstruction this is indicative of the system being 24v operation and the obstruction is designed to prevent 12v systems from being connected to 24v. NOTE For cars and light commercial vehicles, there is an additional CAN Adaptor T-Piece (CAB782) available.  The CAN Adaptor T-Piece (CAB782) provide a non-intrusive method of connecting to the J1962 socket (where possible). It has a separate J1962 Socket which replaces the vehicles own socket, allowing a diagnostic tool to be connected without having to disconnect the T-Piece.  If using the T-Piece, the replacement J1962 socket may not fit back into the original socket location on the vehicle, for this situation a mounting bracket is also supplied. This can be fixed to the original location or screwed down securely using suitable mounting hardware to keep it in place. It is important to note that the T-piece is not compatible with all vehicle types due to the fact that some manufactures use J1962 sockets that are molded to a bracket or even part of the ECU itself. Under these circumstances a direct connection is your only option. The wiring details are shown below: EOBD (5wire (70-15A-XXXXA/70-20A-XXXXA) and 9wire (70-35A-XXXXA) models J1962 connector Pin 6 = CAN High to the Green/White tracer (Pin 8). J1962 connector Pin 14 = CAN Low to the Blue/White tracer (Pin 9). K-LINE (9wire PTO model (70-30A-XXXXA) ONLY) J1962 connector Pin 7 = K-Line to the Green/White tracer (Pin 8).  Testing  Once installed, the equipment should be tested to ensure that it is operating satisfactorily and that the positions of the installed items do not impair the driver’s ability to control and operate the vehicle in any way. Follow the vendor specific commissioning procedure to ensure that your T10 is communicating data to the host server. The T10 ranges of products ALL have a single RED LED to give visual indication to the fitter/user. These visual indications are as follows:  LED Indication Meaning SOLID (On permanently) The unit is carrying out a communication session with the configuration server to check for any upgrades. If this persists for several minutes then this usually is an indication that a configuration/firmware upgrade is in progress. Fast Flashing The unit is in the initialising phase and has not yet communicated with the server and/or not yet acquired a GPS fix. Trilling and Flashing and Pulsing The unit has communicated with the server and acquired a 3D GPS fix and is ready for journey operation. The LED during periods of awake will indicate GSM/GPRS/GPS and CAN status as described in engineering screen 1.  The flashing sequences will also be dependent on whether the vehicle is in a journey and also whether it is a CAN installation. (See Engineering mode). Fast Blip every 20 secs The unit is asleep and conserving power.
    T10 Installation Notes v1.7 Generic T10 Installation Notes v1.7.doc    12.08.2015  Page 21 5.5.9 Cable Assemblies The following section is a quick reference guide to all of the Main Cable looms used within the T10 Family. T10-Micro Cables There are no cables associated with the T10-Micro.  T10 MiniLite Cables  2 way Molex Connector  Pin Outs (CAB400) Pin Wire Colour Function Description 1 Red Power V+ (6v to 30v) Vehicle Power - 12/24V 2 Blue Digital Input (Voltage sensing) Ignition input  3 way Molex Connector  Pin Outs (CAB405) Pin Wire Colour Function Description 1 Red Power V+ (6v to 30v) Vehicle Power - 12/24V 2 Blue Digital Input (Voltage sensing) Ignition input 3 Black GND Signal Ground (1-Wire)  5 way Molex Connector  Pin Outs (CAB410) Pin Wire Colour Function Description 1 Red Power V+ (6v to 30v) Vehicle Power - 12/24V 2 Blue Digital Input (Voltage sensing) Ignition input 3 Black GND Signal Ground (1-Wire) 4 Green / White CAN-H CAN High connection 5 Blue / White CAN-L CAN Low connection
    T10 Installation Notes v1.7 Generic T10 Installation Notes v1.7.doc    12.08.2015  Page 22 T10-Lite Cable  9 way Molex Connector  Pin Outs (CAB415) Pin No. Function Connector Cable/wire Colour Implementation 1 Power Red Fused & protected power input, 12/24V 2 Ignition Blue Protected logic level clamped input 3 Ground (Power) Black Ground connection 4 Dallas 1-Wire Black/White IO with open collector drive with 4k7 pull-up to 4V4 5 LED (Buzzer) White Switched 4V4 Power feed via 100R series resistor  6 Bus/Priv Button Yellow Protected logic input with 3v3 pull-up 10k resistor 7 Immobiliser White/Green Open collector output 8 CAN-H/K-Line Green/White CAN High  (70-35A) /  K-Line (70-30A) 9 CAN-L/ PTO input Blue/White CAN Lo (70-35A) / PTO input (70-30A  5.5.10 Engineering Mode The T10-Lite has an engineering mode to assist installation and test engineers out in the field. Engineering Mode is entered by issuing the SETENG command for the T10-Micro and T10-Lite products. The T10-Lite product can use the driver interface button (CAB601) to enter engineering mode. To enter engineering mode press the driver interface button >10 times.  The led will come on solid for a short period indicating that it is in engineering mode.  It will then flash once indicating that it is in screen one.  While in engineering mode a single press of the driver interface button will advance to the next screen. To leave engineering mode repeat the pressing of the driver button > 10 times. Engineering screen 1 (GSM/GPRS/GPSCAN connectivity indication)  0 trill = no network coverage  1 trill = GSM ok  2 trill = GSM & GPRS ok  3 trill = GSM, GPRS & Jabber connection connected ok And   0 flash = No GPS coverage  1 flash = 1 satellite, time fix possible  2 flash = 2D GPS fix  3 flash = 3D GPS fix And  0 Pulse = No CAN connection   1 Pulse = CAN Connection  2 Pulse = RPM Detected, Engine Running   Engineering screen 2 (Ignition detection)  Led On Ignition On  Led Off Ignition Off  Engineering screen 3 (External power detection) You must have the internal Battery connected for this screen to operate correctly  Led On Ext Power present  Led Off Ext power absent
    T10 Installation Notes v1.7 Generic T10 Installation Notes v1.7.doc    12.08.2015  Page 23  Engineering screen 4 (Internal Battery detection) You must have the internal Battery connected with external power and have had the ignition on at least once for this screen to function correctly  Led On Internal Battery  Led Off Internal Battery not connected  Engineering screen 5 (Tremble Device detection)  Led Pulses when vehicle/device is shaken indicates trembler operational  Led does NOT pulse when the vehicle is shaken indicates trembler non operational  Engineering screen 6 (Normal Tag Detection)  Not supported in T10   Engineering screen 7 (Authorized Tag Detection)   Not supported in T10   Engineering screen 8 (GPS Satellite Quality) This screen provides a visual indication as to the quality of the GPS fix. The led is flashed once for each satellite that the receiver can see where the signal strength (RSSI) is > 35dbm. The unit is deemed to have a good quality fix if the number of satellites visible above 35dbm is greater than 4.  Engineering screen 9 (CAN RPM Detection)  This screen displays whether the T10 is detecting the RPM PID signal >100 on the CAN bus.  Led ON CAN RPM PID detected above zero.  Led OFF CAN RPM PID not detected or detected as zero.  Engineering screen 10 (Serial Port 0 RX Activity) Not supported in T10   Engineering screen 11 (Serial Port 1 RX Activity)  Not supported in T10   Engineering screen 12 (Dallas Button Activity) Not supported in T10   Engineering screen 13 (Driver Behaviour Dual LED) Not supported in T10
    T10 Installation Notes v1.7 Generic T10 Installation Notes v1.7.doc    12.08.2015  Page 24  Appendix A –T10 Records  Information Source Record details here T10 Activation Key Issued by your T10 platform supplier  T10 IMEI number Label on bottom of Control Unit  T10 Mobile Network Name SIM packaging  T10 Mobile number (Voice) Obtained during SIM registration process  T10 Mobile number (Data) - optional Obtained during SIM registration process  SIM Card number (ESN) Printed on SIM or on Control Unit packaging when supplied pre-installed  Mobile network Customer Services telephone number Obtained during SIM registration process  T10 password Defaults to NOTACTIVE  Notes:             As we constantly strive to improve our products, all specifications are subject to change without notice.  The information provided herein is believed to be correct at time of going to press.  Copyright ® 2011 Trakm8 Limited
    T10 Installation Notes v1.7 Generic T10 Installation Notes v1.7.doc    12.08.2015  Page 25 Appendix B – Abbreviations and Glossary Of Terms A list of abbreviated terms and their meanings are supplied here: GSM  -  Global System for Mobiles. GPS  -  Global Positioning Satellites. GPRS  -  General Packet Radio Service. CAN  -  Controller Area Network. PTO  -  Power take off. FCC  -  Federal Communications Commission IC  -  Industry Canada R&TTE  -  Radio equipment and Telecommunications Terminal Equipment VCA  -  Vehicle Certification Agency ECU  -  Electronic Control unit SIM  -  Subscriber Identity Module PIN  -  Personal identification number EOBD  -  European On Board Diagnostics ISO  -  International Organization for Standards LED  -  Light Emitting Diode PWM  -  Pulse Width Modulated VPW  -  Variable Pulse Width RSSI  -  Received Signal Strength Indicator RPM  -  Revs Per Minute PID  -  Parameter Identifier 2D  -  Two Dimensional 3D  -  Three Dimensional ESN  -  Electronic Serial Number

Navigation menu