TranSystem IB1 Bluetooth GPS Receiver User Manual iBlue 941107
TranSystem Bluetooth GPS Receiver iBlue 941107
Users Manual
Bluetooth GPS Receiver
i-Blue
User’s Manual
Published on 26-Oct-2005
8029407001A

2
Table of Contents
Chapter 1 Before you begin 3
1.1 Appearance 4
1.2 Checking the package content 4
Chapter 2 Getting started 5
Step 1 Charging Your Battery 5
Step 2 Turn on the power switch 5
Step 3 Connecting your handheld device with i-Blue 6
Step 4 Load your GPS mapping or routing software 8
Step 5 Starting the application 9
Chapter 3 3. How to test your Bluetooth GPS Receiver ? 9
3.1 Software Installation 9
3.2 GPS Test 10
Appendices 11
Appendix A. LED Display 11
Appendix B. Power Save Mode 12
Appendix C. Specification 14
Appendix D. Frequently Asked Questions 15
Appendix E. How to change battery 16
Appendix F. Helpful tips 18
Appendix G. Disclaimer and limitation of liability 18
Appendix H. FCC Notices 19
Appendix I. IC Caution 19
Appendix J. CE Notices 20
3
1. Before you begin
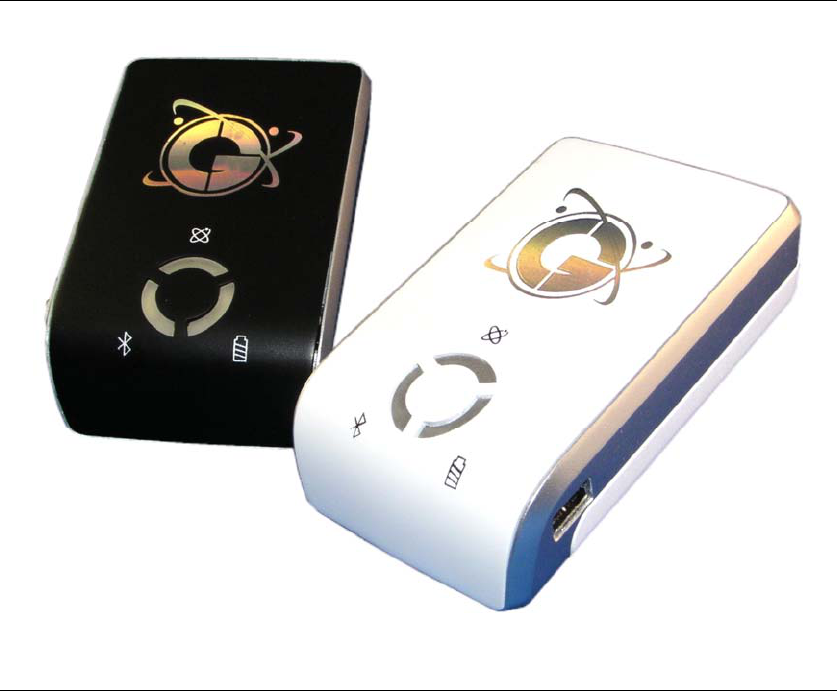
Thank you for purchasing the Bluetooth GPS Receiver, i-Blue, a global
positioning system receiver with Bluetooth wireless technology. i-Blue is
well suited to system integrations including PDA, smart phone, Tablet PC
and Notebook PC with Bluetooth devices. It can satisfy a wide variety of
applications such as PDA and smart phone navigation, automotive vehicle
tracking, personal positioning and sporting. With the dimension of 69.6(L)
x 47.3(W) x 19.2(H) mm and weight only 72g (w/ battery), i-Blue is an
ideal solution to carry along everywhere.
i-Blue’s rechargeable battery can save satellite information such as the
status of the satellite signal, most recent location and the data and time of
its last use. The low-power design has extended the operation time up to
30 hours and brought you the most convenient and longest usage of its
kind. With the lead-free production process (starting Jan. 1, 2006), i-Blue
is the most environmentally friendly wireless GPS receiver in the market.
4
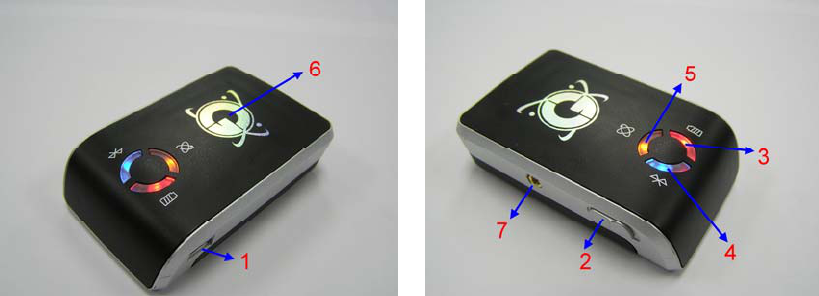
1.1 Appearance
1. Power jack (mini USB type)
2. Power switch
3. Battery status LED (red/green)
4. Bluetooth status LED (blue)
5. GPS status LED (orange)
6. Internal antenna
7. External antenna port (MMCX)
1.2 Checking the package content
Congratulations on your purchase of the i-Blue with built-in Lithium
rechargeable battery. Before you start using i-Blue, please make sure if
your package includes the following items. If any item is damaged or
missing, please contact your dealer at once.
- Bluetooth GPS Receiver - i-Blue x 1
- CD disc with the User’s Manual and the Testing Program x 1
- Retractable USB Cable x 1
- Traveler Power Adapter x 1
- DC cigarette lighter adapter x 1
- Lithium rechargeable battery x 1
- User’s manual x 1
- Warranty card x 1
*Unit package contents may vary depending on countries without prior
notice.
5
2. Getting started
Please follow the procedure step by step.
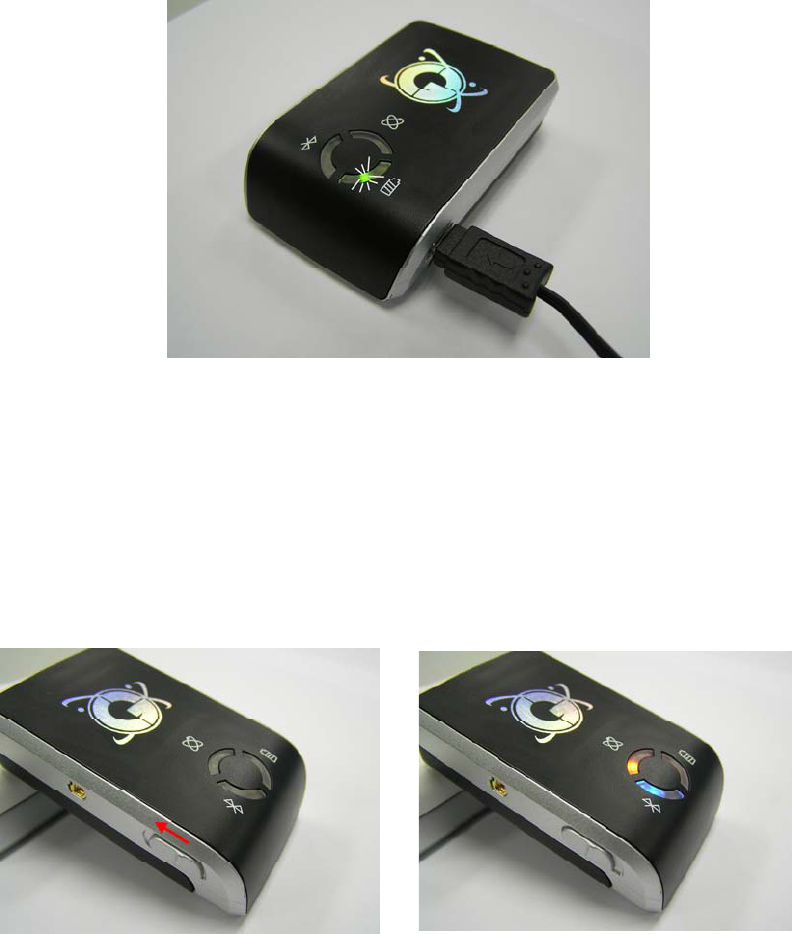
Step 1 Charging Your Battery
For the 1st time you use the i-Blue, please charge battery until it is full
(the LED turns off). Take the power cable and connect it to the power
jack (mini USB type). This will begin to charge the battery. The LED that
represents the battery is the right-most battery icon (shown in below).
- If the LED is red, that means battery power is critically low. Charge
immediately.
- If the LED is green, that means battery is charging now.
- If the LED is off, that means battery is fully charged.
Step 2 Turn on the power switch
Before After
6
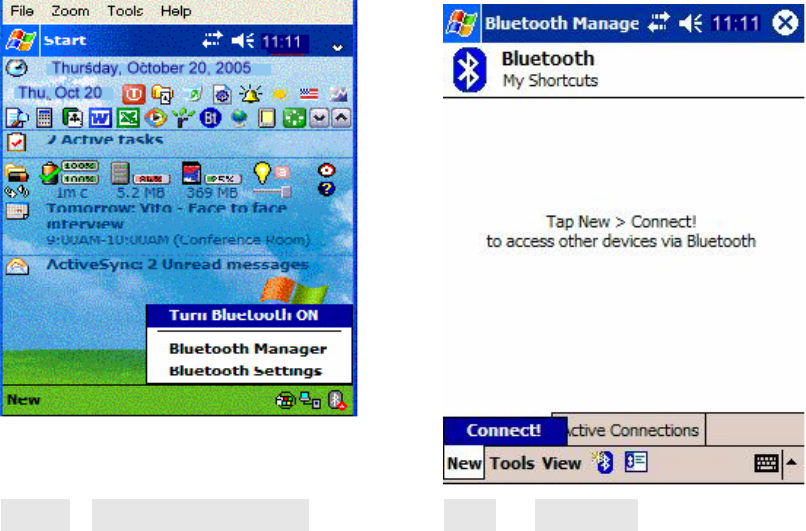
Step 3 Connecting your handheld device with i-Blue
Please refer to the user manual of PDA to enable the Bluetooth
connectivity. If the connection between your device and i-Blue is
successful, the blue LED of i-Blue will be blinking.
Below, we provide a common procedure of software installation to set up
your PDA. (For other PDA, the steps may be a little bit different.
Bluetooth Manager is one of popular program used for Bluetooth device.)
-->
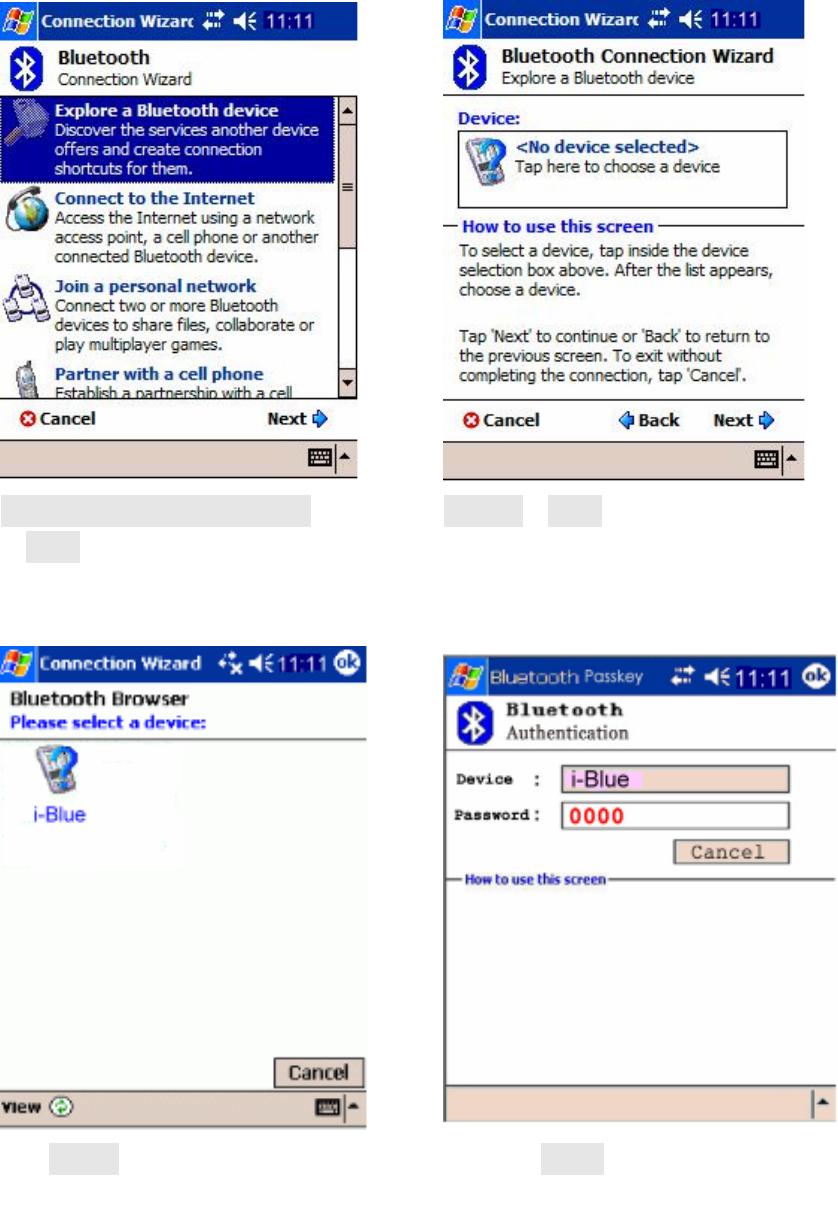
Start -> Bluetooth Manager New -> Connect!
1. Open “Bluetooth Manager” on pocket pc, and establish new
connection.
7
-->
Explore A Bluetooth device
->Next
Device->Next
2. Explore A Bluetooth device.
-->
Tap i-Blue Passkey 0000 (if your PDA ask
for the passkey)
3. Find the Bluetooth device “i-Blue”, click it, and then enter passkey.
8
-->
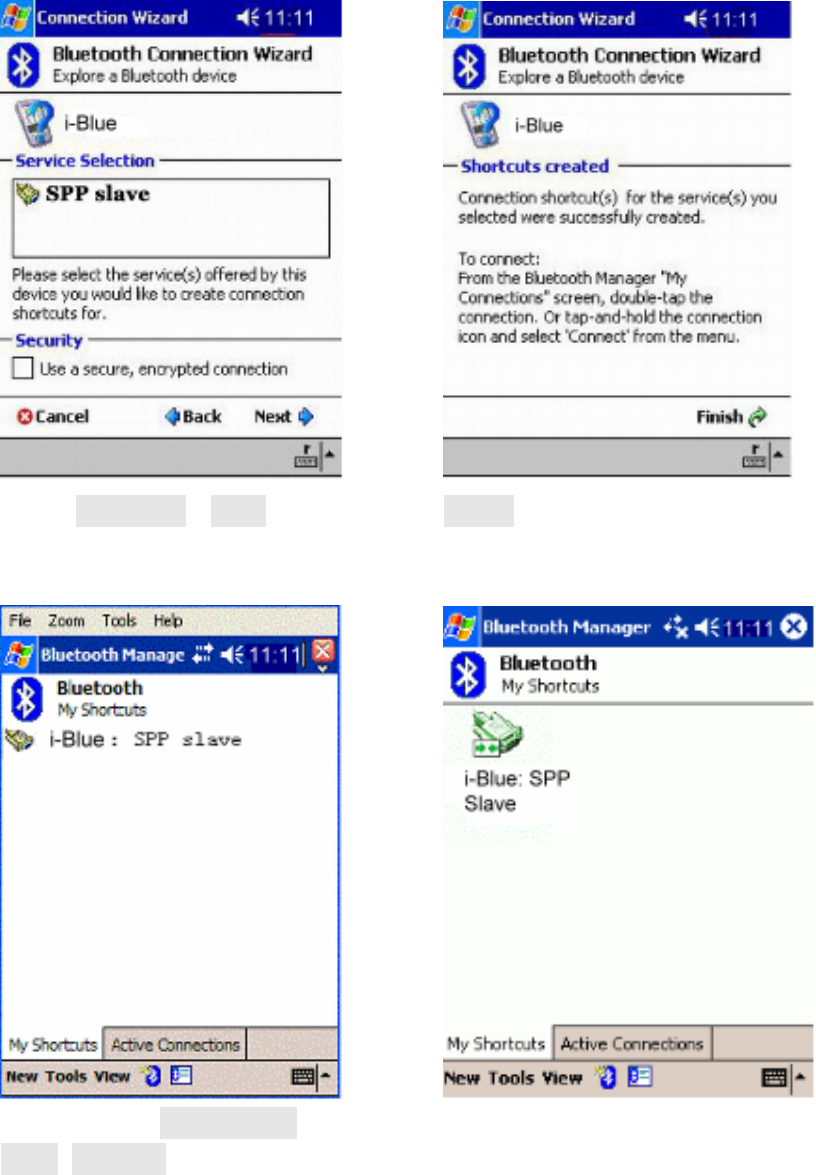
Select SPP slave->Next Finish
4. Connect to Serial Port Profile (SPP) Slave
Tap and Hold i-Blue: SPP
slave, Connect
Done
5. Finish Bluetooth Manager Setup
Step 4 Load your GPS mapping or routing software, along
with the corresponding maps of the areas that you plan to travel to.
9
Step 5 Start the application and select the correct COM port & baud
rate.
Note: The Bluetooth device in most of the applications has an
“auto-detect” feature so that you do not need to select the Baud Rate.
3. How to test your Bluetooth GPS Receiver ?
The testing program only supports the Microsoft Windows CE & Pocket
PC based PDA platform.
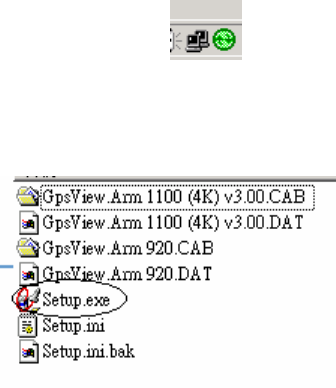
3.1 Software Installation
You have to first synchronize the PDA and your PC, and run the
“Setup.exe” to execute the installation procedure of GpsView testing
program (via PC and ActiveSync).
1. Synchronize the PDA and your PC.
2. Run the “Setup.exe”.
10
3. Execute the installation.
3.2 GPS Test
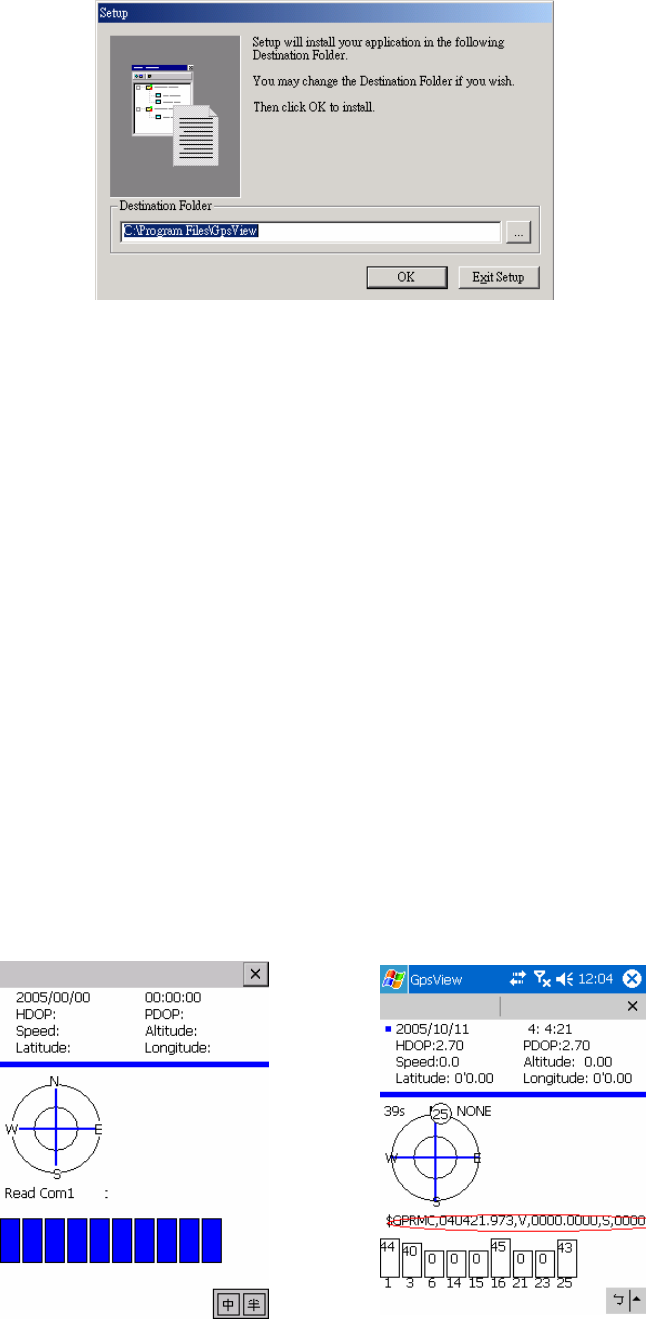
Once you have completed the setup of your Bluetooth device, you may
check to see if your GpsView software is attempting to fix your position.
You can do this by opening your GPS software. If it fails, you should
select the correct COM port and Baud Rate (115200) to start receiving
GPS data. Shortly, you will see the GPS code running as in the picture
below. This signifies that your Bluetooth device is functioning properly.
Note: The Bluetooth device in most of the applications has an
“auto-detect” feature so that you do not need to select the Baud Rate.
3.2.1 Executing GPS Demo Program
Execute the “GpsView” by double clicking GPS Demo icon in programs
menu.
3.2.2 GPS Demo Screen
1. Initial 2. Doing auto scan
11
Appendices
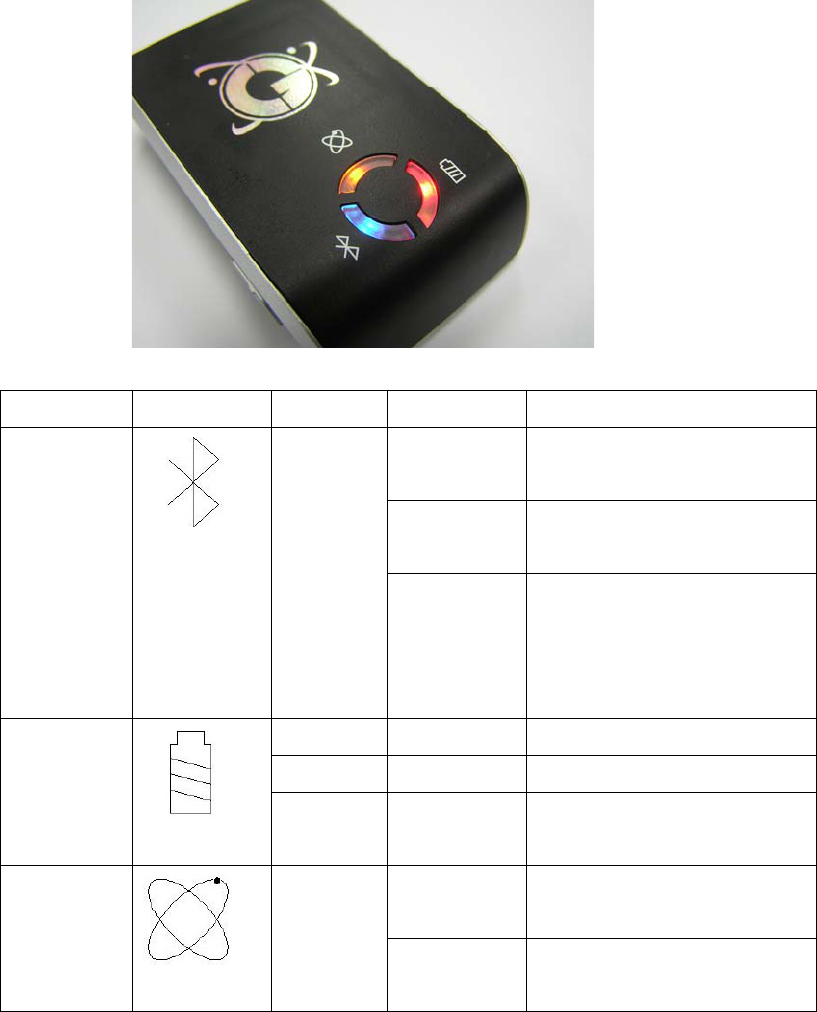
Appendix A. LED Display
The Bluetooth GPS Receiver has three LED lights, one is Bluetooth
Status LED, the 2nd one is Battery Status LED, the 3rd one is GPS Status
LED. The status table of LED shows as follows:
Category SYMBOL COLOR STATUS Function
Always
on:
Not connected to any
Bluetooth devices yet
Slowly
blinking:
Power save mode (1
time / 3 seconds)
Bluetooth
Status
LED
Blue
Quickly
blinking:
Bluetooth is connected
and ready for data
transmission (1 time /
second)
Red Blinking: The battery is too low
Green Light On: The battery is charging
Battery
Status
LED None Light Off: The battery is fully
charged
Always
on:
Detecting satellites,
GPS position not fix
GPS
Status
LED
Orange
Blinking: GPS position is fixed,
Navigation
12
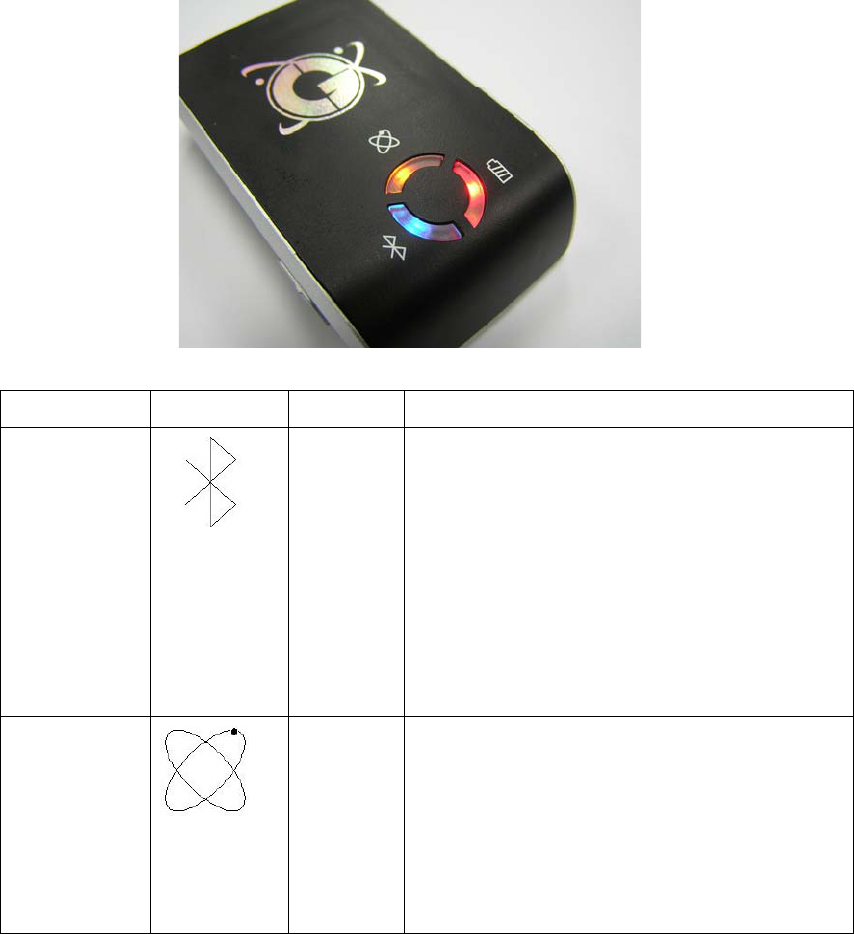
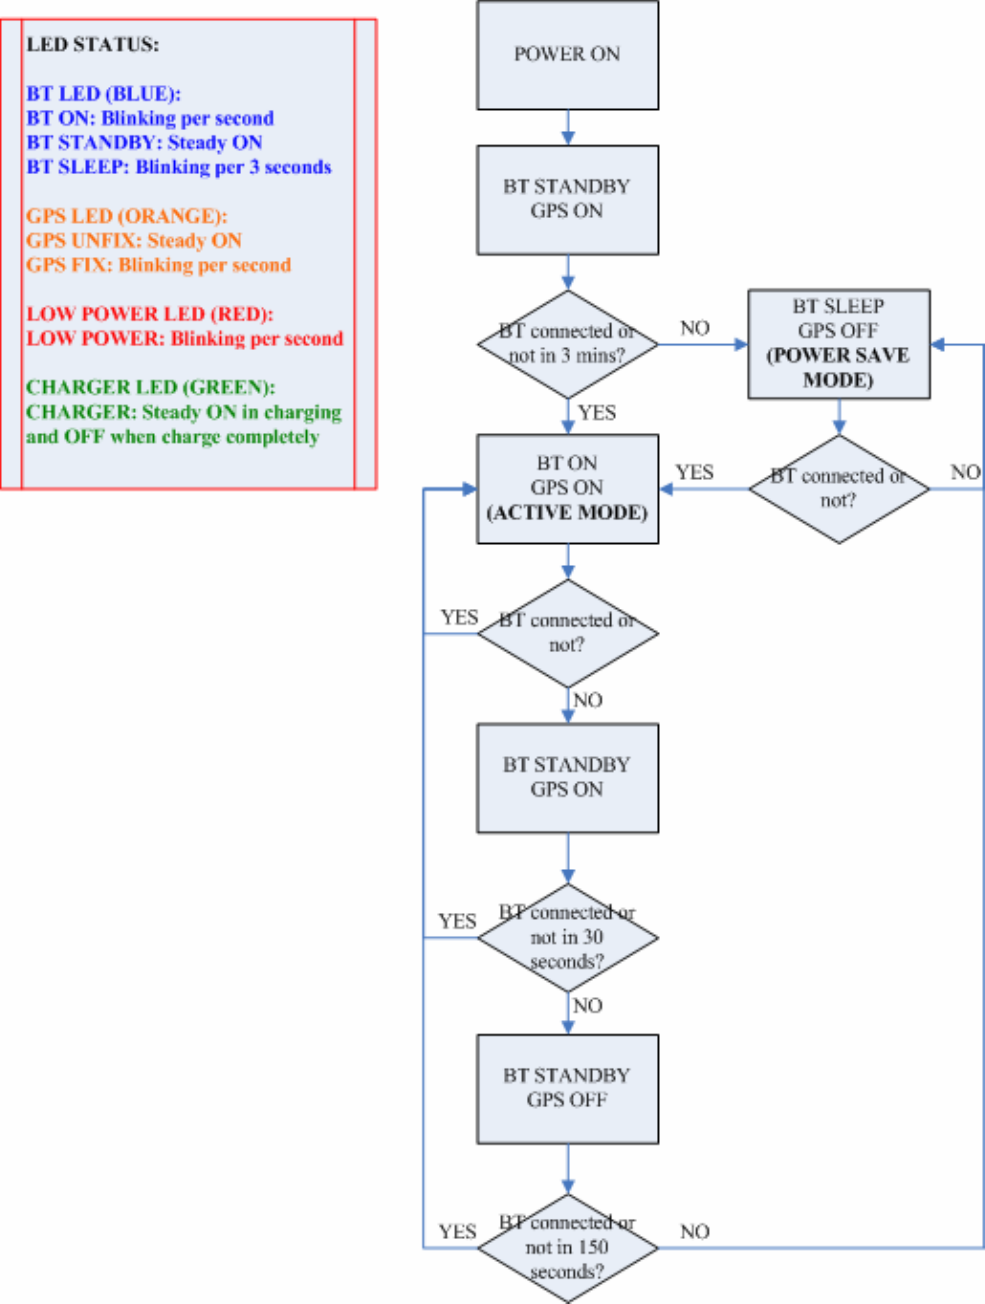
Appendix B. Power Save Mode
i-Blue supports power save mode. It can automatically enter the sleeping
mode after your turning off the Bluetooth connectivity, thus you can
always power it on with very low power consumption.
In power save mode, if the connection between your device and i-Blue is
successful, i-Blue will wake up itself and the blue LED of i-Blue will be
quickly blinking again (every 1 sec) and the orange LED of i-Blue will
also be on.
Category SYMBOL COLOR Description
Bluetooth
Status
LED
Blue 1. If Bluetooth connectivity is lost,
the blue LED turns off after 3
minutes and then i-Blue will enter
the power save mode. The blue
LED will blink every 3 seconds.
2. If re-connect with a Bluetooth
device, the blue LED will blink
every seconds. i-Blue wakes up.
GPS Status
LED
Orange 1. When power on, the orange LED
is on for 3 minutes.
2. Every time when the device is
disconnected for 30 sec, the
orange LED light will be off and
then enter the sleeping mode.
13

14
Appendix C. Specification
General
GPS technology NEMERIX GPS Module
Frequency L1, 1575.42 MHz
C/A Code 1.023 MHz chip rate
Channels 16 channels all in view tracking
Sensitivity -155 dBm
Receiver Accuracy
Position 1.2 meters Static CEP 50,
3.0 meters Static CEP 95;
1.3 meters Static Altitude 50,
3.8 meters Static Altitude 95
Velocity 0.1 m/sec, without SA
Time ±100ns synchronized to GPS time
Datum
Datum WGS-84
Acquisition Time
Hot start 5 sec, average
Warm start 34 sec, average
Cold start 46 sec, average
Reacquisition <3sec
Protocol
GPS Output Data NMEA 0183 (V3.01) - GGA, GSA, GSV,
RMC(default); VTG, GLL (optional)
Baud rate 115200 bps, Data bit: 8, Stop bit: 1
(Default)
Limitations
Acceleration Limit <2G
Altitude Limit <18,000 meters
Velocity Limit <515 meters/sec.
Jerk Limit 20 m/sec.
Power
Battery Built-in rechargeable 1050mAh Lithium
battery
Operation Current 25mA@3.7V(w/o Bluetooth)
35mA@3.7V(w/ Bluetooth)
Operation Time Up to 30 hrs, after fully charged.

15
Charging Time 3hrs. (Typical)
Physical
Characteristics
Dimension 69.6mm x 47.3mm x 19.2mm
Weight 72g
Temperature
Operating -10℃ ~ 60℃
Storage -20℃ ~ 85℃
Humidity 5% to 95% non-condensing
Appendix D. Frequently Asked Questions
Q: The GPS Demo software GpsView doesn’t seem to be making any
connections with my Bluetooth GPS receiver. How do I make it work?
A: You will need to make sure your PDA is paired with Bluetooth device.
Follow the section “Chapter 2. Getting started > Step 3 Connecting your
handheld device with the i-Blue” to make sure that your PDA is
recognizing the Bluetooth GPS receiver properly. If so, you will need to
connect with the device by going to the Bluetooth Manager and
double-tapping on the i-Blue icon.
Q: My Bluetooth GPS Receiver seems to be receiving the satellite signals,
but I am unable to establish a connection between the receiver and my
PDA. How can I make a connection?
A: Go to the Bluetooth Manager on your PDA. Locate the “i-Blue: SPP
Slave” icon and tap and hold. A pop-up menu will appear, select Delete.
Next, perform a soft reset on your PDA.
Once your PDA has finished resetting itself, go back to the Bluetooth
Manager screen and perform the typical setup and connection procedures
for your Bluetooth receiver (for help with connection please review the
section “Chapter 2 Getting started > Step 3 Connecting your handheld
device with the i-Blue”).
16
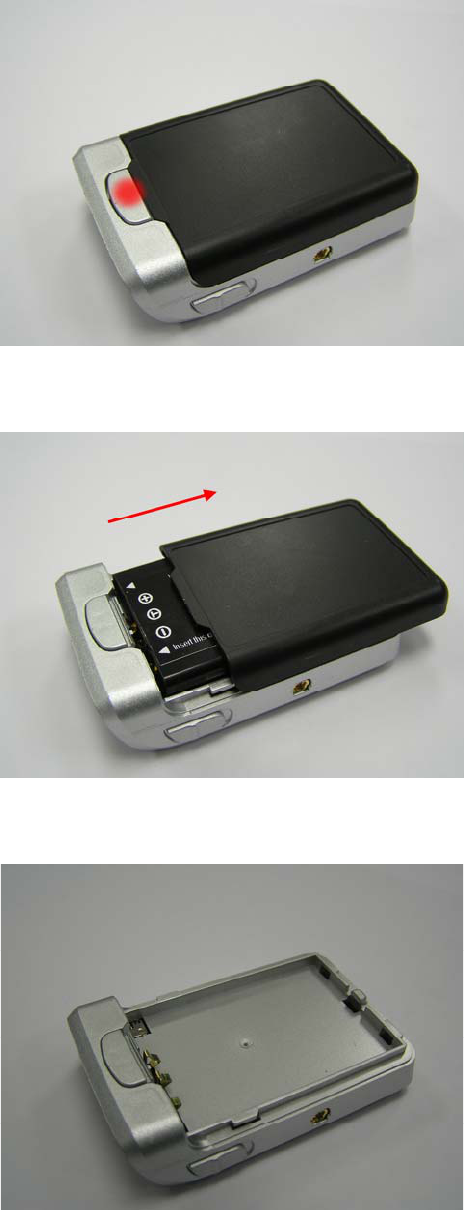
Appendix E. How to change battery
Figure 1 Press the button
Figure 2 Open the cover of battery
Figure 3 Take out the battery
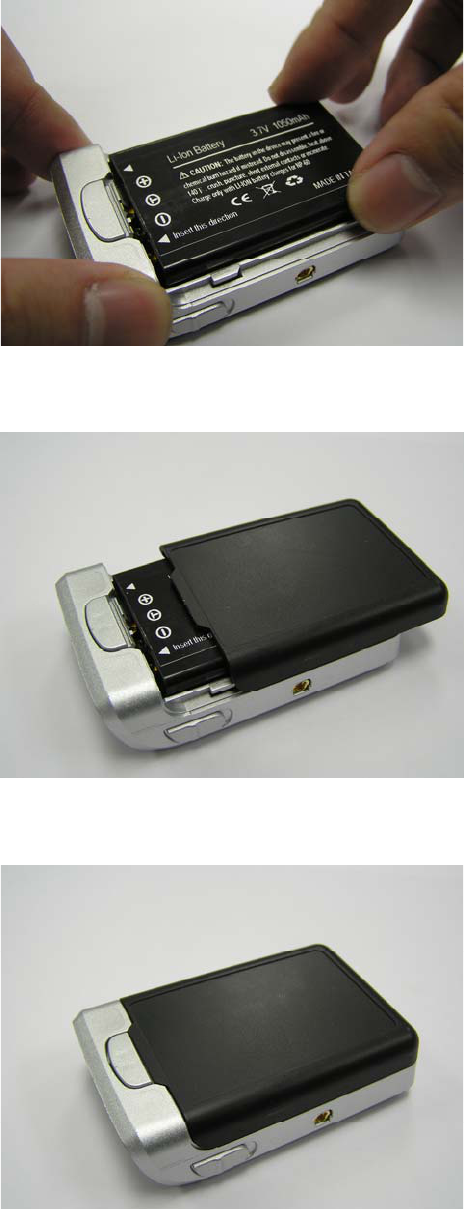
17
Figure 4 Fit new battery into i-Blue
Figure 5 Slide the cover of battery to close
Figure 6 Done
18
Appendix F. Helpful tips
Your i-Blue should be treated with care and properly maintained to
ensure the best performance. Keep in mind these helpful tips when using
your receiver:
- Some vehicles having heavy metallic sun protecting coating on windshields,
which may affect signal receptions
- Driving in and around high buildings may affect signal receptions.
- Driving under tunnels or in buildings may affect signal receptions.
- Low battery of a PDA or of an i-Blue may affect signal receptions.
- Please check the correct “COM” and “Baudrate” of your PDA.
- In general, any GPS receiver performs best in open space where it can see
clean sky. Also weather will affect GPS reception – rain & snow contribute
to worse sensitivity.
- i-Blue output data updates every second, thus the actual position and the
position in your map may have time delay. This may happen when you drive
at higher speed or make a turn around a corner.
- Note that i-Blue may not work indoors where it can not see the sky.
- For the 1st time you use the i-Blue, it will take 5 to 10 minutes to get the
satellite constellation and fix your position, this is called “Cold Start”. If you
replace the battery, i-Blue will do Cold Start again.
- If your i-Blue can’t fix your position for more than 20 minutes, we suggest
you change to another open space and then try again.
Appendix G. Disclaimer and limitation of liability
- For safety, keep the i-Blue and all accessories out of small children’s reach.
- We assume no responsibility for any damages and loss resulting from the use
of this manual and also by deletion of data as a result of malfunction, dead
battery, or misuse of the product in any way.
- Use only the supplied and approved accessories. Unauthorized accessories,
antenna, modifications or attachments could damage the i-Blue, and may
violate regulations governing radio devices.
- Use a dry, clean soft cloth to clean the unit. Do not use harsh cleaning
solvents, chemicals, or strong detergents.
- Do not drop, shake, or knock the i-Blue. Rough handling can break the
connector, jack, and internal electronic circuit board. This will cause
19
non-recoverable damage to the product.
- Please do not leave alone the i-Blue in hot area. High temperature can
shorten the life of electronic devices, and melt or drape certain plastics.
- Please do not expose your i-Blue to temperature higher than 185℉ (85℃)to
prevent any accidents which might damage the rechargeable battery at high
temperature. Also, do not leave your i-Blue in your car under direct sunlight
while not in use.
- Do not store the i-Blue in cold environment. Otherwise when the unit warms
up to its normal operational temperature, moisture can severely damaging
the mini circuit boards inside.
- Do not attempt to open the i-Blue yourself. Unauthorized hacking may
damage the unit, and void your warranty.
Appendix H. FCC Notices
This device complies with part 15 of the FCC rules. Operation is subject
to the following two conditions:
1. This device may not cause harmful interface, and
2. This device must accept any interference received, including
interference that may cause undesired operation.
FCC RF Exposure requirements:
This device and its antenna(s) must not be co-located or operation in
conjunction with any other antenna or transmitter.
NOTE: THE MANUFACTURER IS NOT RESPONSIBLE FOR ANY
RADIO OR TV INTERFERENCE CAUSED BY UNAUTHOURIZED
MODIFICATION TO THIS EQUIPMENT. SUCH MODIFICATIONS
COULD VOID THE USER’S AUTHORITY TO OPERATE THE
EQUIPMENT.
Appendix I.
IC Caution
The installer of this radio equipment must ensure that the antenna is
located or pointed such that it does not emit RF field in excess of Health
Canada limits for the general population; consult Safety Code 6,
obtainable from Health Canada's website.
"www.hc-sc.gc.ca/rab"

20
Appendix J. CE Notices
Is herewith confirmed to comply with the requirements set out in the
Council Directive on the Approximation of the Laws of the Member
States relating to Electromagnetic Compatibility (89/336/EEC),
Low-voltage Directive (73/23/EEC) and the Amendment Directive
(93/68/EEC), the procedures given in European Council Directive
99/5/EC and 89/3360EEC.
The equipment was passed. The test was performed according to the
following European standards:
- EN 300 328-2 V.1.2.1 (2001-08)
- EN 301 489-1 V.1.4.1 (2002-04) / EN 301 489-17 V.1.2.1 (2002-04)
- EN 50371: 2002
- EN 60950: 2000