Trane US 9125051 Translator HW5800 to Z-Wave User Manual
Trane US, Inc. Translator HW5800 to Z-Wave
Trane US >
User manual
Andersen® VeriLock™ to Z-Wave
Translator Module
The Andersen VeriLock to Z-Wave Translator Module enables door/
window status monitoring, alerts and complete home automation
integration with Nexia.
For help with this product, please call Andersen Customer Service:
855-337-8806. For help with your Nexia account, please call Nexia
Customer Service: 877-451-7278.
Required Components
The following are required components in a VeriLock system with Nexia™ Home
Intelligence integration.
Begin Here
Before starting, please watch the “VeriLock Translator Setup” video on the Nexia™
Home Intelligence YouTube Channel.
Create Your Nexia Account
1. Use your web browser to visit www.mynexia.com.
2. Select Sign Up Now.
3. Complete all information on the Create Your Account page.
4. On the Choose Your Device page, select:
✔Bridge
✔VeriLock Translator
Enroll Your Bridge
5. Proceed through the Bridge preparation steps. Ensure that you have a Nexia
Bridge, Bridge power supply and Ethernet cable. DO NOT connect the Bridge to
power until prompted.
6. When prompted online, enter the 12-digit MAC address printed on the yellow label
on the Nexia Bridge.
7. When prompted online, connect the Bridge to power and Connect the Bridge to
your router using an Ethernet cable.
8. Allow the Bridge setup to complete.
Add Your VeriLock Translator
9. Proceed online through the preparation steps for your VeriLock Translator.
10. While the 4-minute timer is running, plug your VeriLock Translator into an outlet
within 30 feet of your Nexia Bridge. If a success message is not shown within one
minute, try pressing and releasing the VeriLock Translator round Z-Wave button
while the 4-minute timer is still running.
NEXIA
NEXIA
Nexia
Bridge
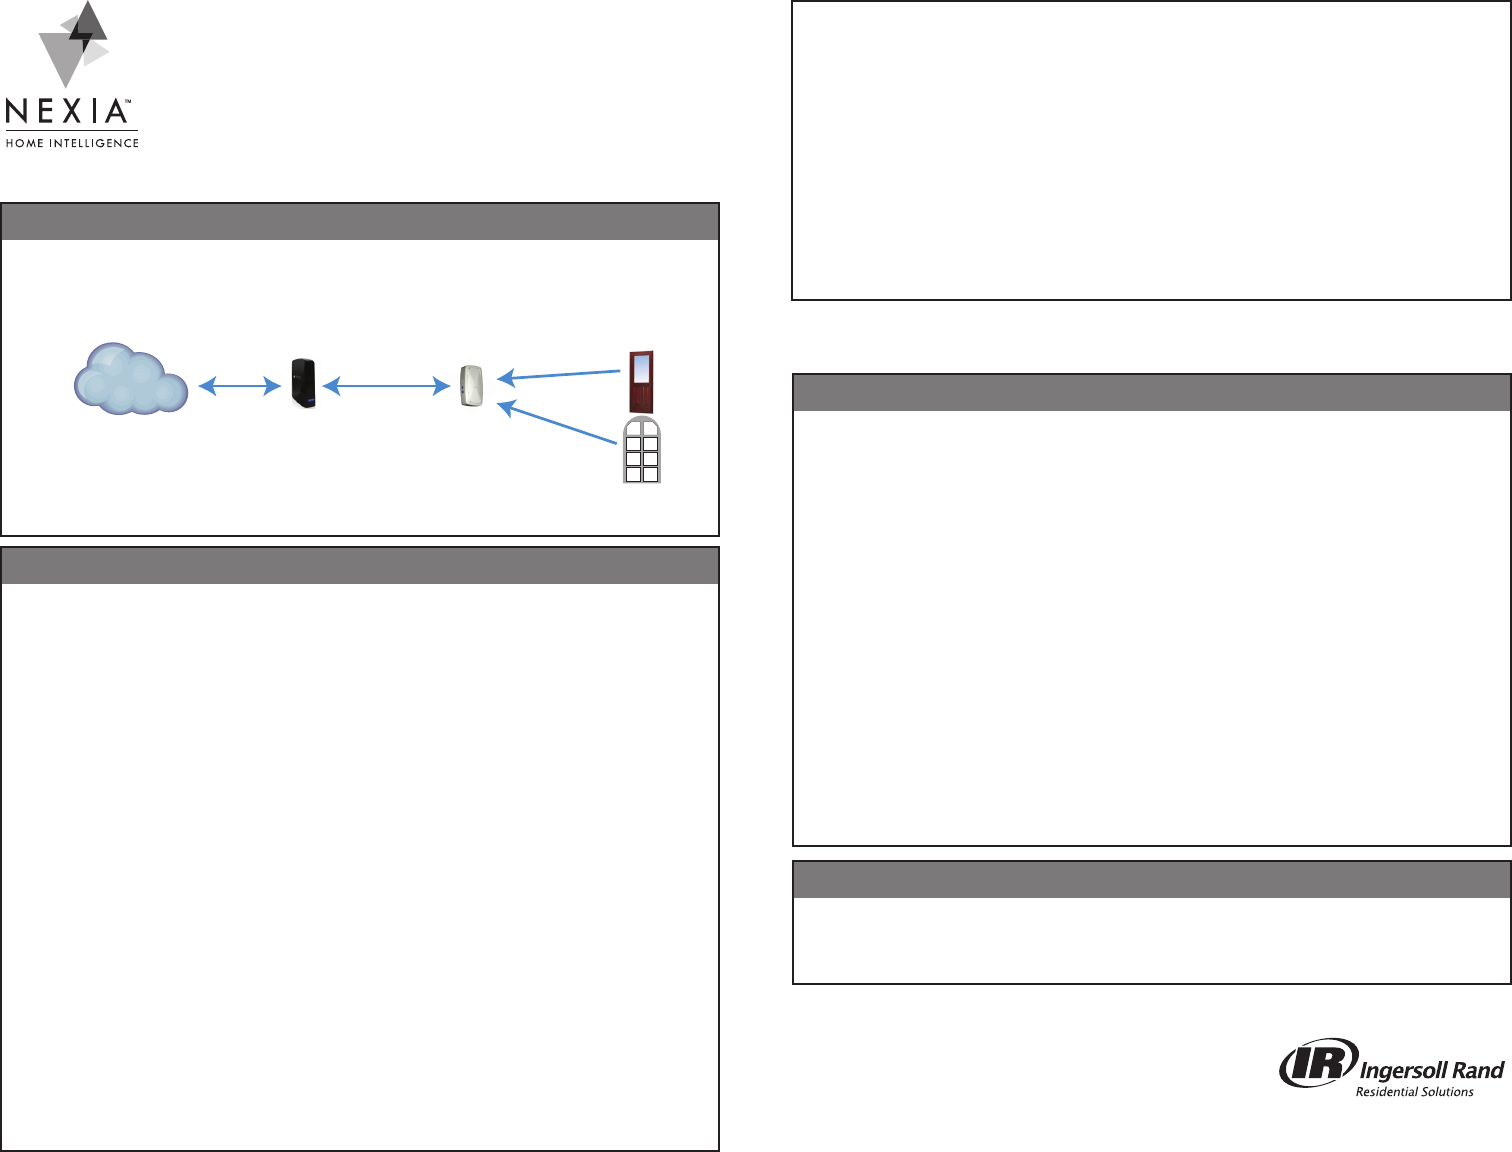
Your Nexia Account
Nexia Bridge transmits information between your Nexia account and your
home’s Z-Wave devices
VeriLock Translator listens to VeriLock sensors and transmits information
to the Nexia bridge
VeriLock Sensors transmit locked/unlocked and opened/closed information for
doors and windows
VeriLock
Translator VeriLock
Sensors
For detailed setup instructions, please go to www.MyNexia.com and click Help, then
click Andersen VeriLock.
Technical Specications
For Indoor Use only, 120VAC, 60Hz, Audible Buzzer: 70 dB @3m max
Visual Indicators: Green, Yellow, Red LEDs
Basic Troubleshooting
With any wireless system, variables in home construction and environment can impact
communications quality. If your system is not working as expected, please start with
the following troubleshooting tips.
• If you have any other wireless transmitters, such as a baby monitor, temporarily
disable the transmitter and re-test Nexia operation.
• In the Nexia web portal, go to Edit Home, Advanced. Press Test Connection for
the VeriLock Translator. Communications quality should be at least 70%. If not, try
locating your VeriLock Translator closer to the Nexia bridge. Optimal performance is
usually achieved when the translator is within 30 feet of your Nexia bridge. Additional
Z-Wave repeaters can be used to improve Z-Wave communications quality.
• Use the VeriLock Translator diagnostics mode to conrm sensor communications
are recognized by the translator. Honeywell 5800 series repeaters can be used to
improve sensor to translator communication.
• Ensure VeriLock sensor battery pull strips have been removed.
• Ensure VeriLock sensor batteries are fresh.
Prepare the Nexia Mobile App
11. Download the Nexia™ Home Intelligence app onto your mobile device (Android,
iOS or Windows Phone are currently supported).
12. Open the Nexia app.
13. Select Sign In. Enter the same username and password you created for your
Nexia account.
14. Create a 4-digit PIN.
Add VeriLock Sensors
15. From the app, select Add VeriLock Sensor.
16. After adding all sensors, use Nexia to monitor sensor status and send alerts for
each of your VeriLock Sensors.
© 2014 Ingersoll Rand
Printed in USA
18-HD76D1-1 10/14
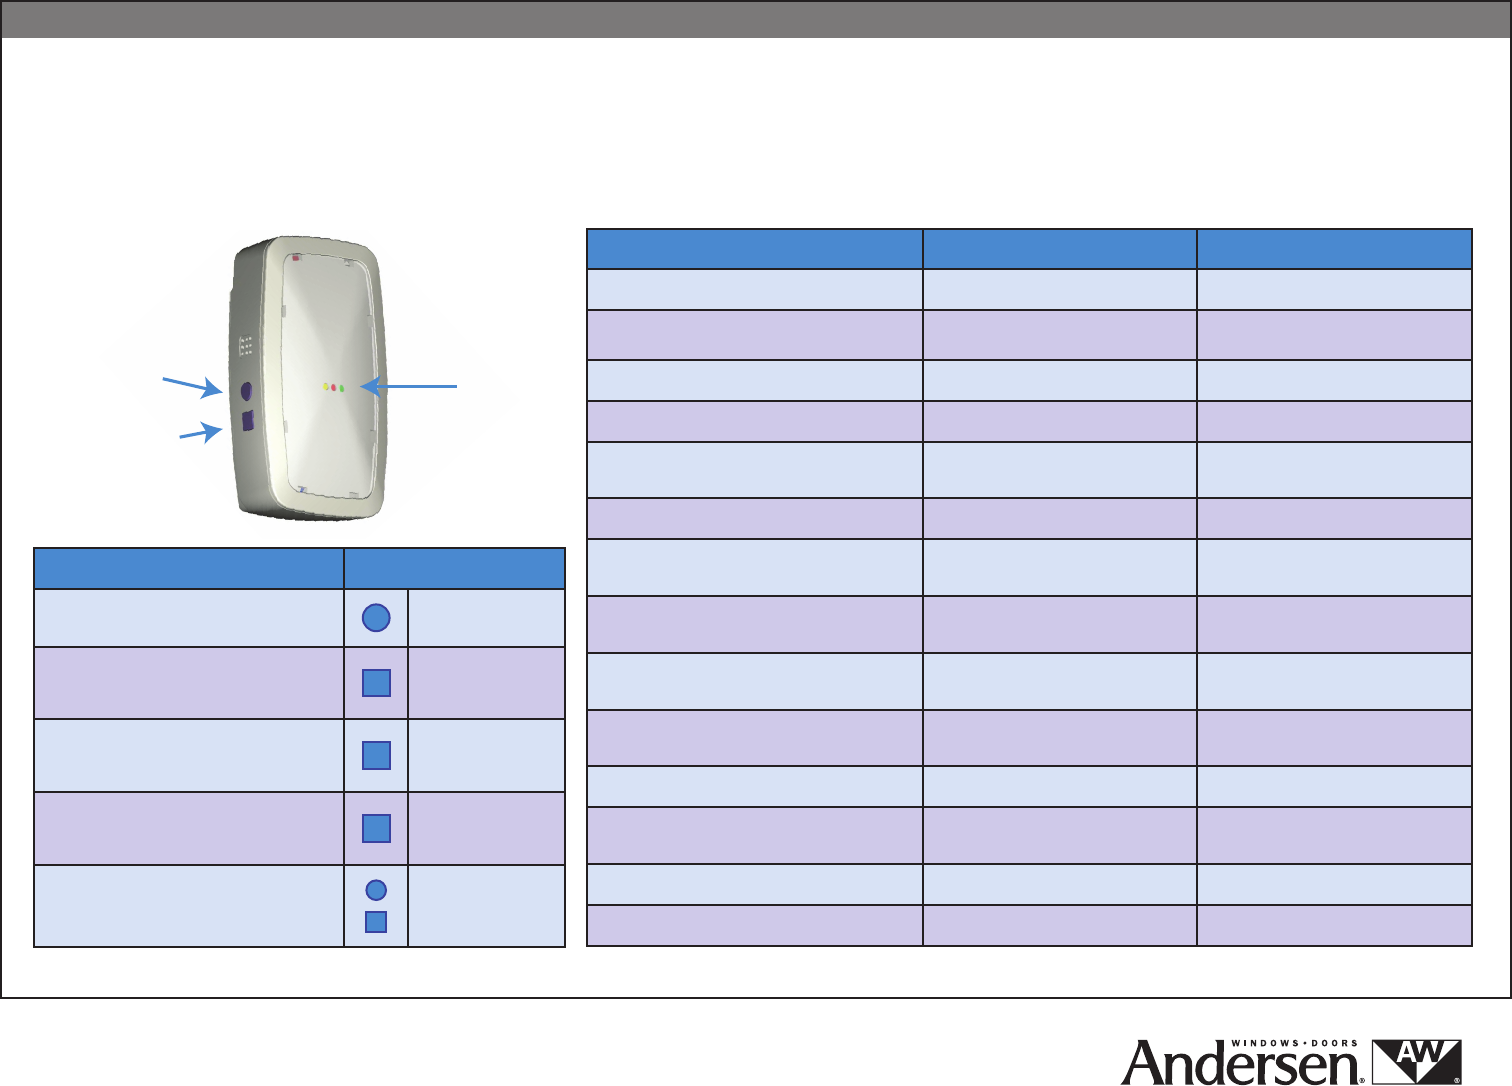
Andersen® VeriLock™ Translator — Summary of Operation
Z-Wave
Button
Status
LEDs
Multi-Purpose
Button
Action Button
Add or Remove Translator to or from
Z-Wave Network
Z-Wave button:
Tap once
Start or Cancel Sensor Enrollment Mode
Multi-Purpose
button: Hold for 3
seconds
Change Beeper Volume
Multi-Purpose
button: Tap to
Change
Start or Stop Diagnostics Mode
Multi-Purpose
button: Hold for 10
seconds
Reset Device To Factory Settings Both buttons: Hold
for 15 seconds
Status LED Indications Beeper
Add/Remove Translator: In Process Yellow: Slow Blink 1 Beep
Add/Remove Translator: Success Yellow: Fast Blink 3 Beeps
Add/Remove Translator: Failed Red: Fast Blink 1 Beep
Normal Operation: Attached to a Network Yellow: On Solid
Normal Operation: Not Attached to a
Network Yellow: Off
Sensor Enrollment: In Process Green: Slow Blink 1 Beep
During Enrollment: Message detected from
new sensor 1 Beep
During Enrollment: Message detected from
enrolled sensor 2 Beeps
Sensor Enrollment:
Success Green: Blink 1 Second 3 Beeps
Sensor Exclusion:
Success Green: Fast Blink Twice 1 Beep
Sensor Enrollment/Exclusion: Failed Red: Fast Blink 1 Beep
Diagnostics Mode All Colors: Alternate Blinking 5
Seconds then Turn On Solid 3 Beeps
Diagnostics: Enrolled Sensor Message* Green: Blink 1 Second
Diagnostics: Non-enrolled Sensor Message Green and Red: Blink 1 Second
This product can be included and operated in any Z-Wave network with
other Z-Wave certied devices from other manufacturers and/or other
applications. All non-battery operated nodes within the network will act
as repeaters regardless of vendor to increase reliability of the network.
* Diagostics Mode: Provides audible and visual feedback when any VeriLock sensor message is detected.
Use for testing whether VeriLock sensors are powered and in range of the VeriLock translator.
Andersen Corporation manufactures and supports the limited warranty of Andersen products
with VeriLock technology.
“Z-Wave” is a registered trademark of the Z-Wave Alliance. “Andersen”, the AW logo and
“VeriLock” are trademarks of Andersen Corporation and are used with permission. All rights
reserved.
Printed in USA Limited Publication Release18-HD75D1-1-EN Rev. 10/14
This translator is recommended for use with Z-Wave® networks and Z-Wave certied devices.
1. To nd an Andersen supported Z-Wave network provider, and the translator installation instructions for their network, go to andersenwindows.com/verilock.
2. Select a Z-Wave self-monitoring service provider icon to link to that provider’s site; follow the setup instructions provided. Setting up communication between Andersen
VeriLock® sensors and the translator enables self-monitoring of Andersen windows and patio door status and the integration with a Z-Wave based home automation system.
For help with Andersen VeriLock sensors or the Andersen VeriLock translator, please call Andersen Customer Service: 855-337-8806.
FCC Statement
This device complies with part 15 of the FCC Rules. Operation is subject to the following two conditions: (1) this device may not
cause harmful interference, and (2)this device must accept any interference received, including interference that may
cause undesired operation.
This equipment has been tested and found to comply with the limits for a Class B digital device, pursuant to Part 15 of the FCC
Rules. These limits are designed to provide reasonable protection against harmful interference in a residential installation.
This equipment generates, uses and can radiate radio frequency energy and, if not installed and used in accordance with the
instructions, may cause harmful interference to radio communications. However, there is no guarantee that
interference will not occur in a particular installation.
If this equipment does cause harmful interference to radio or television reception, which can be determined by turning the equipment
off and on, the user is encouraged to try to correct the interference by one or more of the following measures:
-- Reorient or relocate the receiving antenna.
-- Increase the separation between the equipment and receiver.
-- Connect the equipment into an outlet on a circuit different from that to which the receiver is connected.
-- Consult the dealer or an experienced radio/TV technician for help.
Changes or modifications not expressly approved by the party responsible for compliance could void your authority to operate the
equipment.
Canada – Industry Canada (IC)
This device complies with Industry Canada’s licence-exempt RSSs. Operation is subject to the following two conditions:
(1) This device may not cause interference; and
(2) This device must accept any interference, including interference that may cause undesired operation of the device.
Cet appareil est conforme aux CNR exemptes de licence d'Industrie Canada . Son fonctionnement est soumis aux deux conditions
suivantes :
( 1 ) Ce dispositif ne peut causer d'interférences ; et
( 2 ) Ce dispositif doit accepter toute interférence , y compris les interférences qui peuvent causer un mauvais fonctionnement de
l'appareil.