Trane US CONT8245 COLOR WIFI Z-WAVE THERMOSTAT User Manual part 2
Trane US, Inc. COLOR WIFI Z-WAVE THERMOSTAT part 2
Trane US >
Contents
- 1. User manual part 1
- 2. User manual part 2
User manual part 2
page 16 824 User Guide
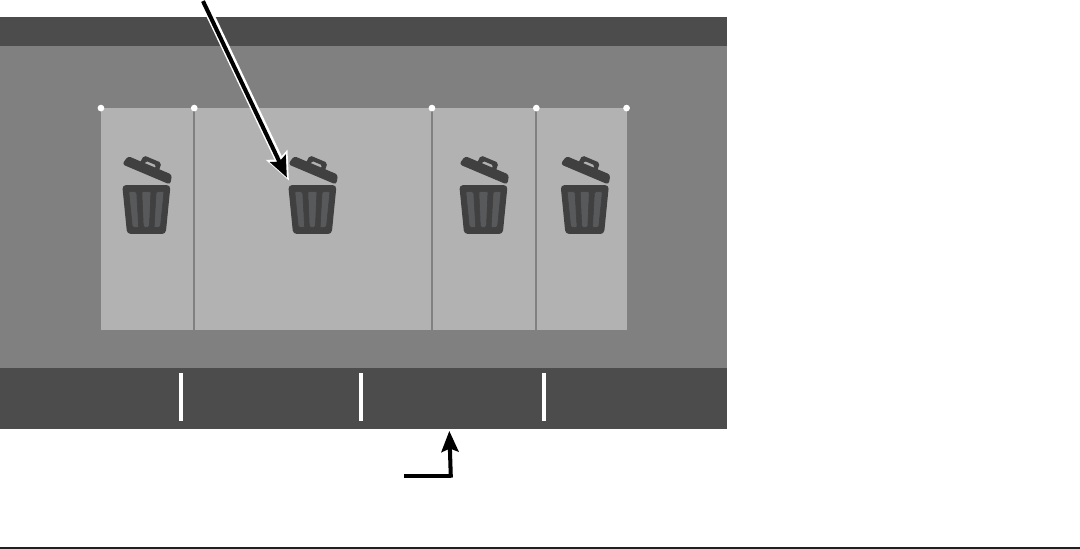
Deleting Periods
1. From the Schedule Screen press DELETE
PERIOD, the Delete Periods Screen is
displayed.
2. Press the TRASH CAN icon in the Period(s)
you wish to delete. Note that each day must
have at least one Period.
3. Press APPLY to save your changes and
return to the Schedule Screen. The changes
should be reected in the display.
Deleting Periods
Delete Periods
6:00 am 8:00 am 6:00 pm 10:00 pm
78º
70º
85º 78º
70º
82º
62º62º
Wake Away Home Sleep
Apply Cancel
Press Apply to save
changes and exit
Press the trash can to mark a period for deletion
Navigate to delete Periods by pressing: Home Screen > Menu > Schedules > Delete Period

012-5060-05 page 17012-5060-05 page 17
Note: These functions require Scheduling to be
enabled. To enable Scheduling, go to HOME >
MENU > SCHEDULES > ENABLE SCHEDULE.
Hold Until
Follow these steps to override a schedule until a
specied time.
1. Press in the INDOOR TEMPERATURE area
to reveal the Temperature Control Panel.
2. To change the Cooling Set Point, press the
blue COOLING SET POINT. The Mode
Indicator will display blue wavy lines.
Use the UP and DOWN Arrows to adjust the
Set Point to the desired temperature.
3. To change the Heating Set Point, press
the red HEATING SET POINT. The Mode
indicator will display red wavy lines.
Use the UP and DOWN Arrows to adjust the
Set Point to the desired temperature.
4. To change the duration of the Hold, press
in the STATUS AREA. The day will appear
in bold type.
5. Use the UP and DOWN arrows to select the
day when the hold will cancel.
6. Press in the STATUS AREA again to toggle
to the Time setting. The Time will appear in
bold type.
7. Use the UP and DOWN arrows to select the
time when the hold will cancel.
8. Press in the INDOOR TEMPERATURE area
to return to the Home Screen.
9. The words “Holding Until” will appear under
the Indoor Temperature.
Hold Permanently
Follow these steps to permanently override a
schedule. The changes you make will be held
until you cancel the hold.
1. Press in the INDOOR TEMPERATURE area
to reveal the Temperature Control Panel.
2. To change the Cooling Set Point, press the
blue COOLING SET POINT. The Mode
Indicator will display blue wavy lines.
Use the UP and DOWN Arrows to adjust the
Set Point to the desired temperature.
3. To change the Heating Set Point, press
the red HEATING SET POINT. The Mode
Indicator will display red wavy lines.
Use the UP and DOWN Arrows to adjust the
Set Point to the desired temperature.
4. Press HOLD PERM. The words “Hold Perm”
will appear in bold type.
5. Press in the INDOOR TEMPERATURE area
to return to the Home Screen.
The display will indicate Hold Permanently
below the Indoor Temperature.
Cancelling an Override
To cancel Permanent Hold or Hold Until, follow
these steps.
1. Press in the INDOOR TEMPERATURE area
to reveal the Temperature Control Panel.
2. To cancel Hold Until, press HOLD UNTIL
and the words “Hold Until” will dim.
To cancel Permanent Hold, press HOLD
PERM. The words “Hold Perm” will dim.
3. Press in the INDOOR TEMPERATURE area
to return to the Home Screen.
The words “Following Schedule” will appear
below the Indoor Temperature.
Overriding Schedules

page 18 824 User Guide
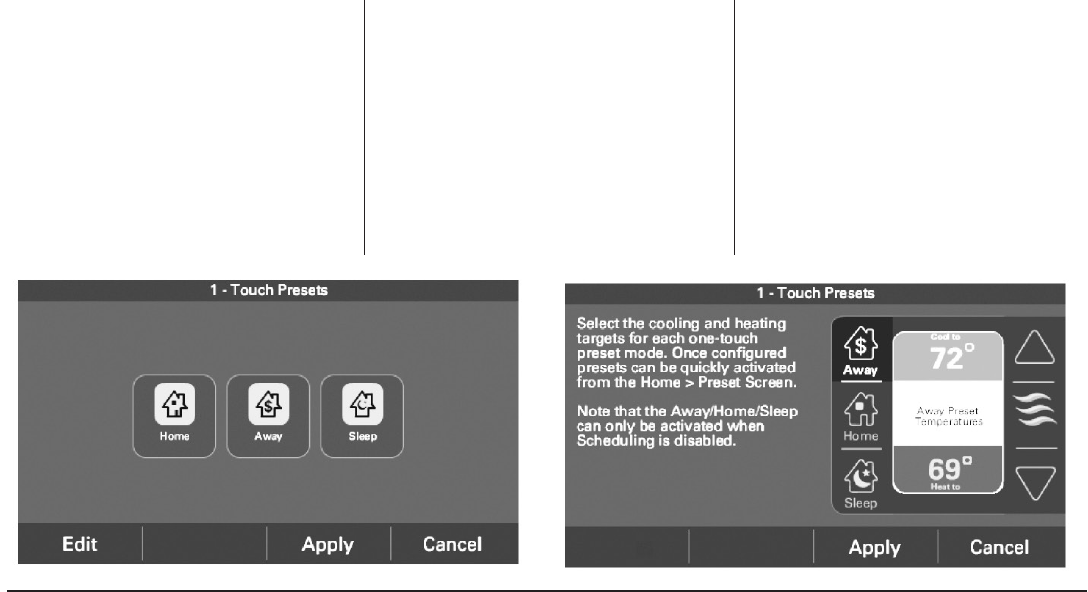
1-Touch Presets provide predetermined Heating
and Cooling Set Points for Home, Away and Sleep
time periods.
Note: 1-Touch Presets require Scheduling to be
disabled. To disable Scheduling, go to HOME >
MENU > SCHEDULES > DISABLE SCHEDULE.
When scheduling is disabled, heating and
cooling set points are maintained indenitely.
When a temperature change is desired, the user
must manually adjust the Gold 824 Control to the
new setting.
Conguring 1-Touch Presets
1. To change the Cooling Set Point, press the
blue COOLING SET POINT to activate the
setting. The current System Mode indicator
will display blue wavy lines.
Use the UP and DOWN Arrows to adjust the
Set Point to the desired temperature.
2. To change the Heating Set Point, press the
red HEATING SET POINT area to activate
the setting. The current System Mode
indicator will display red wavy lines.
Use the UP and DOWN Arrows to adjust the
Set Point to the desired temperature.
3. Repeat the process for Home and Sleep settings.
Conguring 1-Touch Presets
82º
62º
Away
Away
Away Preset
Temperatures
$
Home
Sleep
Press to
increase active
set point
Press to
decrease active
set point
Cooling Set Point
(press to change)
Press Away, Home
or Sleep to adjust
presets
Heating Set Point
(press to change)
Indicates current
mode
Navigate to Conguring 1-Touch Presets by pressing:
Home Screen > Menu > Settings > 1-Touch Presets
4. Press APPLY, then HOME to return to the
Home Screen.
Note that when Scheduling is enabled, only the
Away preset is available and can be used for
energy savings.
012-5060-05 page 19
Conguring 1-Touch Presets
1-Touch Presets provide predetermined Heating
and Cooling Set Points for Home, Away and Sleep
time periods.
Note: 1-Touch Presets require Scheduling
to be disabled. To disable Scheduling, go to
HOME>MENU>SCHEDULES>DISABLE
SCHEDULE, or if scheduling is disabled touch icon
on home screen.
When scheduling is disabled, heating and cooling
set points are maintained indenitely. When a
temperature change is desired, the user must
manually adjust the
Gold 824
Control to the new
setting.
Conguring 1-Touch Presets
1. To change the Cooling Set Point, press the
blue COOLING SET POINT to activate the
setting. The current System Mode indicator
will display blue wavy lines.
Use the UP and DOWN Arrows to adjust the
Set Point to the desired temperature.
2. To change the Heating Set Point, press the
red HEATING SET POINT area to activate the
setting. The current System Mode indicator
will display red wavy lines.
Use the UP and DOWN Arrows to adjust the
Set Point to the desired temperature.
3. Repeat the process for Home and Sleep
settings.
4. Press APPLY, then HOME to return to the
Home Screen.
Note that when Scheduling is enabled, only the
Away preset is available and can be used for energy
savings.
page 20 824 User Guide
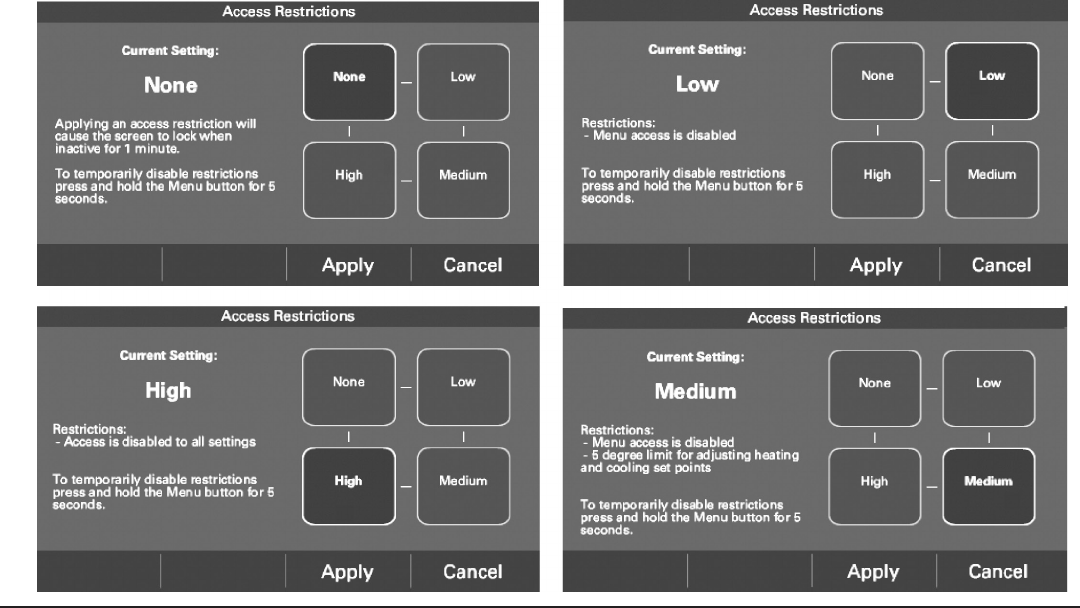
Setting Access Restrictions
To select access restrictions press: Home Screen > Menu > Settings >
Screen > Access Restrictions
012-5060-05 page 21
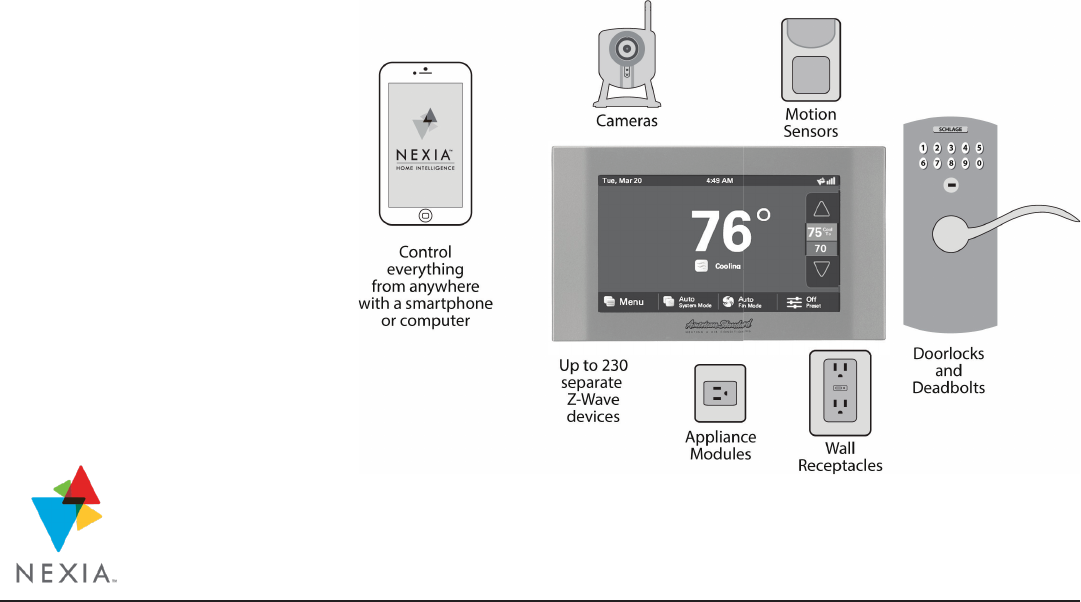
When enrolled to a Nexia™ smart home account,
the Gold 824 is a Z-Wave Plus security-enabled
device that can serve as a central hub for an
entire network of home automation devices from
dierent manufacturers and product categories,
including all non-battery powered devices that
will act as repeaters on your network. The Gold
824 can display local weather conditions, ve-
day forecasts and National Weather Service
warnings and alerts. See the section on Including
Z-Wave Devices for more information on taking
advantage of this functionality.
A basic Nexia™ smart home account subscription
is included with the Gold 824 Control at no
additional charge.
Note: Adding additional devices may add charges
to your Nexia™ smart home account.
To create your Nexia™ smart home account go to
www.NexiaHome.com/as.
Nexia™ smart home

page 22 824 User Guide
Network Setup
There are three ways to connect the Gold 824
Control to a local network:
Option 1. Wi-Fi connection Option 2. WPS for Wi-Fi connection
Wi-Fi Step 1. Navigate Home > Menu > Settings > Network > Connect
to WiFI Network. Select your network.
WPS Step 1. Press the WPS button on your router, then return to your Gold
824 Control and press the WIFI PROTECTED SETUP button on the Wireless
Network screen. Press NEXT.
Wi-Fi Step 2. Enter your Password then press CONNECT.
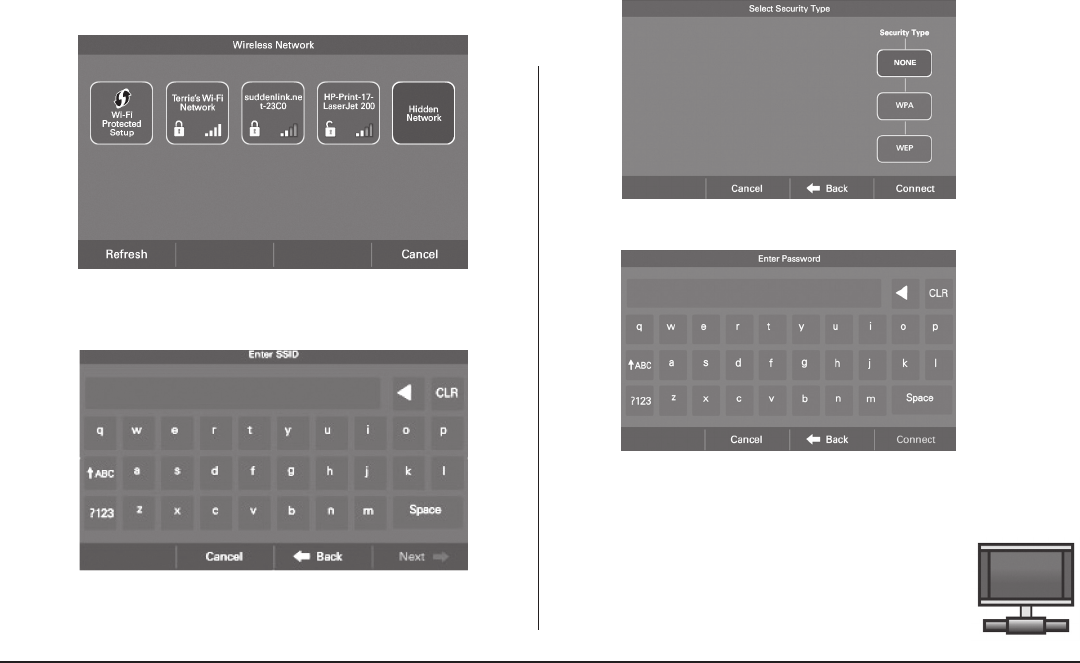
012-5060-05 page 23
Hidden WiFi Step 2. Enter the name of the network you would like to connect
to then press Next
Hidden WiFi Step 3. Select the security type for this network. If you select
None, press Connect.
Hidden WiFi Step 4. If you select WPA or WEP, you will need to enter a
password, then CONNECT.
Hidden WiFi Step 1. Press Hidden Network which will be at the end of the
list of available networks. If there are more than eight networks, you will
need to scroll to the next page.
Option 3. Hidden Wi-Fi network connection
Option 4. Ethernet connection
The Gold 824 also features an Ethernet jack on the back and
may be connected to a router using CAT5 cable. The control
will recognize an Ethernet connection. If an Ethernet cable
is connected the User Wizard will skip the Wireless setup
screens and display the Nexia Registration screen next.
page 24 824 User Guide
A Nexia registration button is located on the Menu screen of the Gold 824.
After the control is registered with Nexia the button may be used to add
devices or remove devices from a Z-Wave network.
Z-Wave Settings may be used to add or remove Z-Wave devices before
connecting the control (thermostat) to a local area Wi-Fi network and
registering the control with Nexia smart home.
An installer can now add all of the Z-Wave devices a customer has purchased
into the control’s Built in Nexia Bridge prior to connecting the control to the
homeowner’s local area network and registering the control with Nexia. All of
the Z-Wave devices will need to be installed in the home and congured with
Nexia smart home prior to use.
If the Z-Wave devices are added prior to connecting the control with the
homeowners local area network and then registered with Nexia, the Nexia
portal will recognize all of the pre-enrolled devices after registration is
complete, making enrollment easy and fast.
Nexia™ Registration
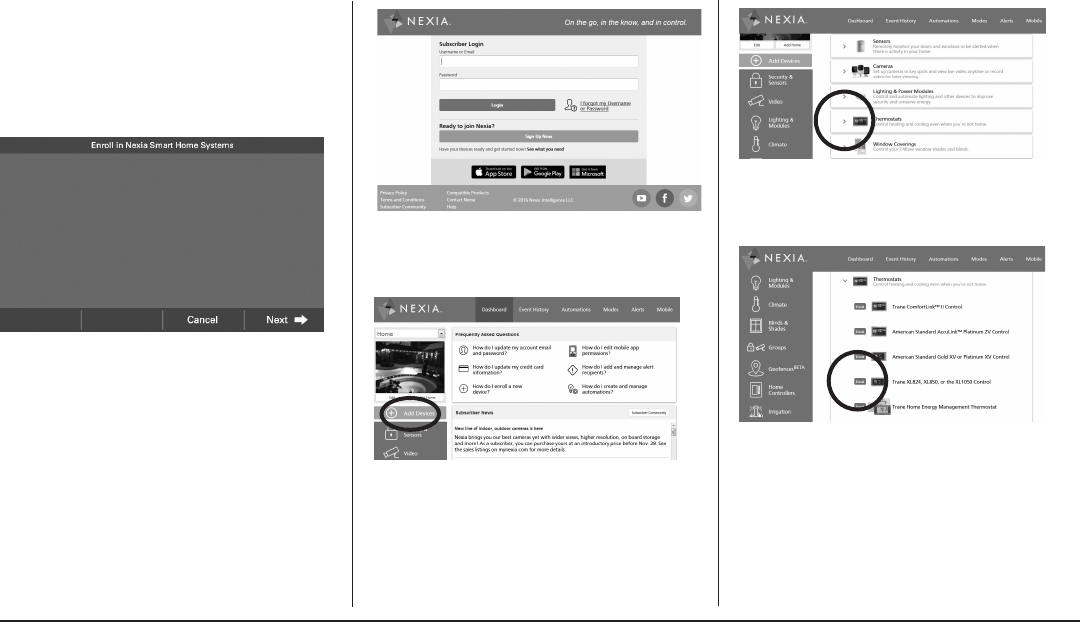
012-5060-05 page 25
Step 2. Select SIGN UP NOW to set up an
account or log in to an existing account.
Step 5. Select the ENROLL button for Gold
824 Control.
Step 4. Select the THERMOSTATS drop down
arrow.
Step 3.
From the Nexia Dashboard select ADD
DEVICES.
Nexia™ Registration
To control your home climate system from your
web enabled smartphone, tablet or computer
and follow these steps.
Your Gold 824 comes equipped with remote climate access from Nexia™
Smart Home Systems:
• Control your home climate from your smartphone
• View local weather
• Receive alerts
Go to www.mynexia.com to set up your account before proceeding.
Nexia™ Registration
Step 1. Go to www.mynexia.com and set up a
Nexia account. If you already have an account, log
in and go to Step 3.
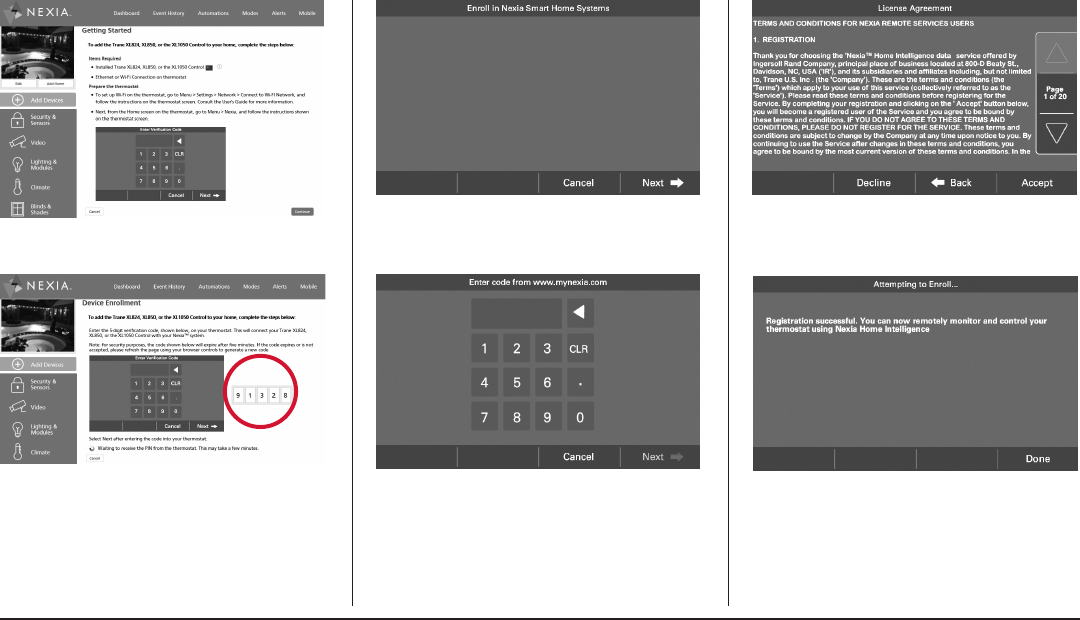
page 26 824 User Guide
Step 7.
Nexia will generate a Pin Code. Record the
Pin Code.
Step 6. Press CONTINUE.
Step 10.
Read the License Agreement, then ACCEPT or
DECLINE.
Step 9. Enter the Pin Code and Press NEXT. Step 11. Registration successful. Press DONE.
Step 8.
Return to the
Gold 824
control and Press
NEXT.
Your Gold 824 comes equipped with remote climate access from Nexia™
Smart Home Systems:
• Control your home climate from your smartphone
• View local weather
• Receive alerts
Go to www.mynexia.com to set up your account before proceeding.
Nexia™ Registration
012-5060-05 page 27
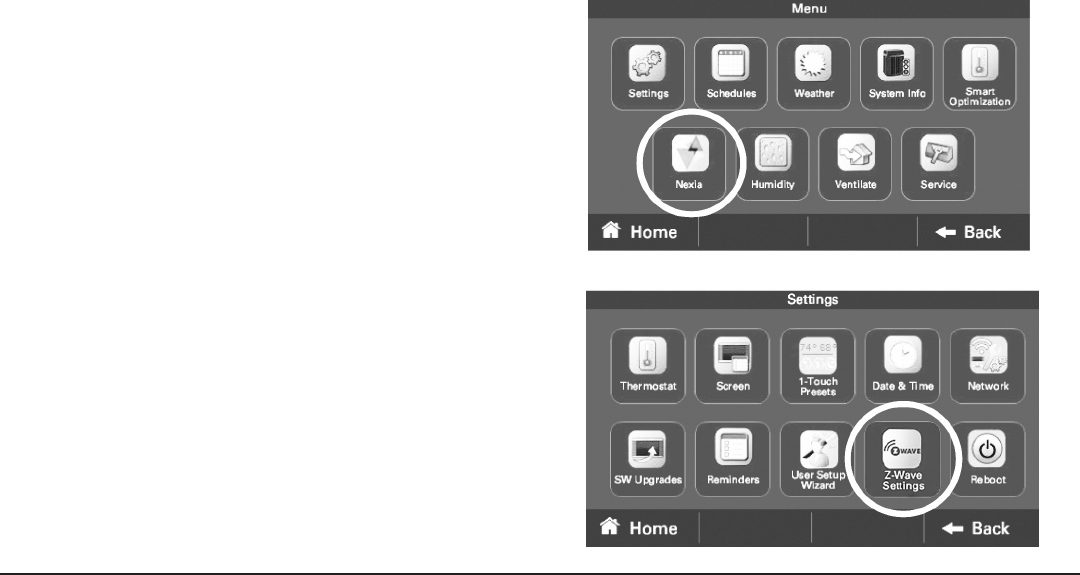
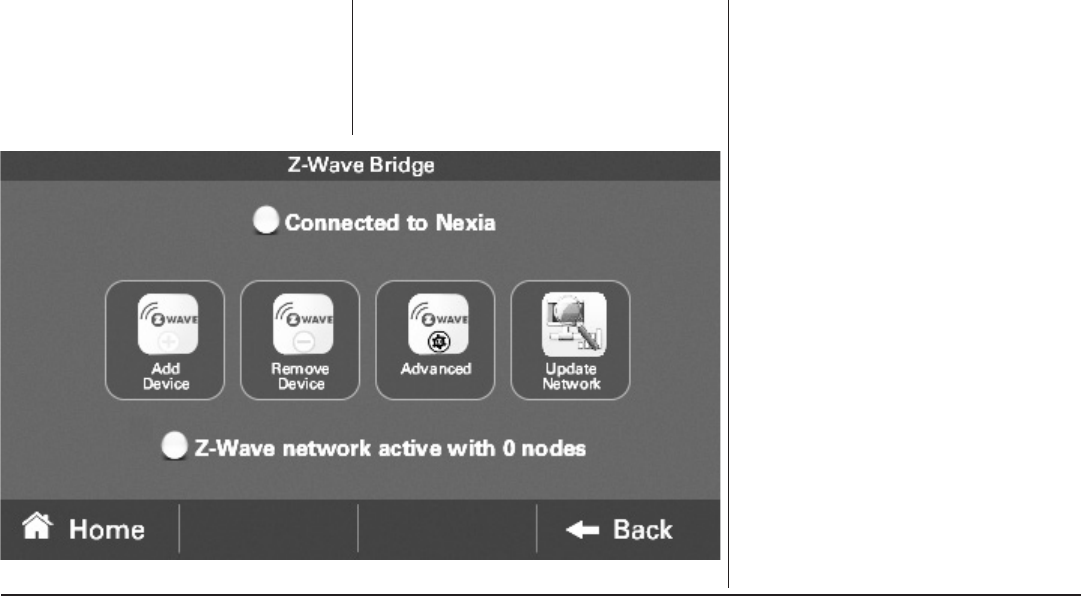
Adding/Removing Z-Wave Devices (via Gold 824)
To select Adding/Removing Z-Wave Devices press:
Home Screen > Menu > Nexia
Your Gold 824 is designed to integrate seamlessly
with a Nexia™ smart home system.
Adding Z-Wave Devices
1. From the HOME Screen, press MENU, then
press NEXIA.
2. Press ADD DEVICE and follow the device
manufacturer’s instructions for setting the
Z-Wave device into learn mode. You will have
four minutes to set the device into learn mode
after pressing the ADD DEVICE button.
Removing Z-Wave Devices
1. From the HOME Screen, press MENU, then
press NEXIA.
2. Press REMOVE DEVICE and follow the
manufacturer’s instructions for setting the
Z-Wave device into learn mode. You will have
four minutes to set the device into learn mode
after pressing the REMOVE DEVICE button.
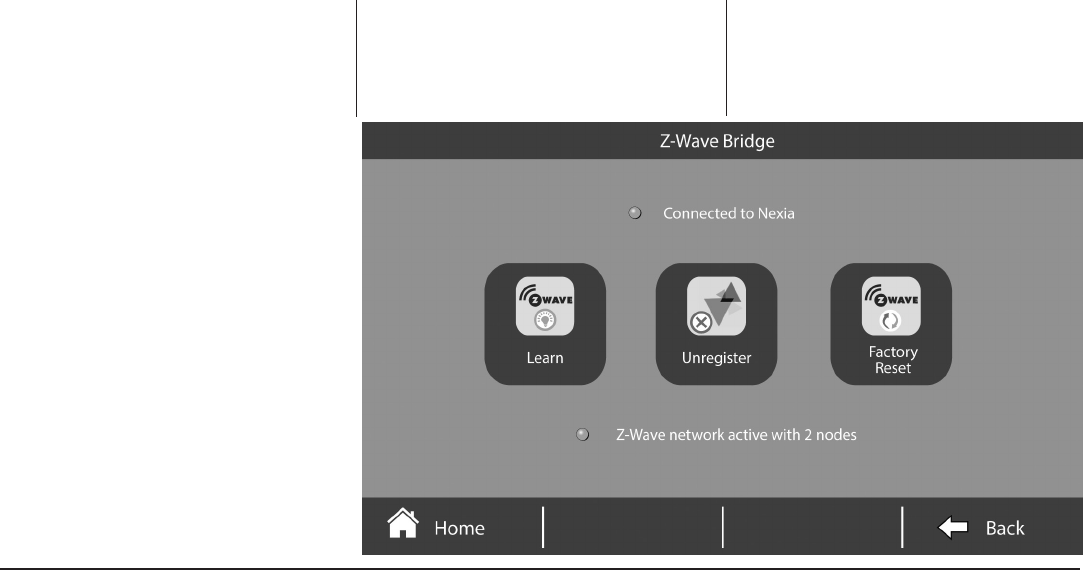
Advanced Z-Wave Settings
Press ADVANCED for advanced Z-Wave functions
including unregistering your bridge from Nexia or
factory resetting your bridge. See the Advanced
Z-Wave Settings section for more information.
Update Network
Press UPDATE NETWORK to update the network
of your bridge. Updating the network can generate
a lot of Z-Wave trac over the network and can take
up to 15 minutes to complete.
page 28 824 User Guide
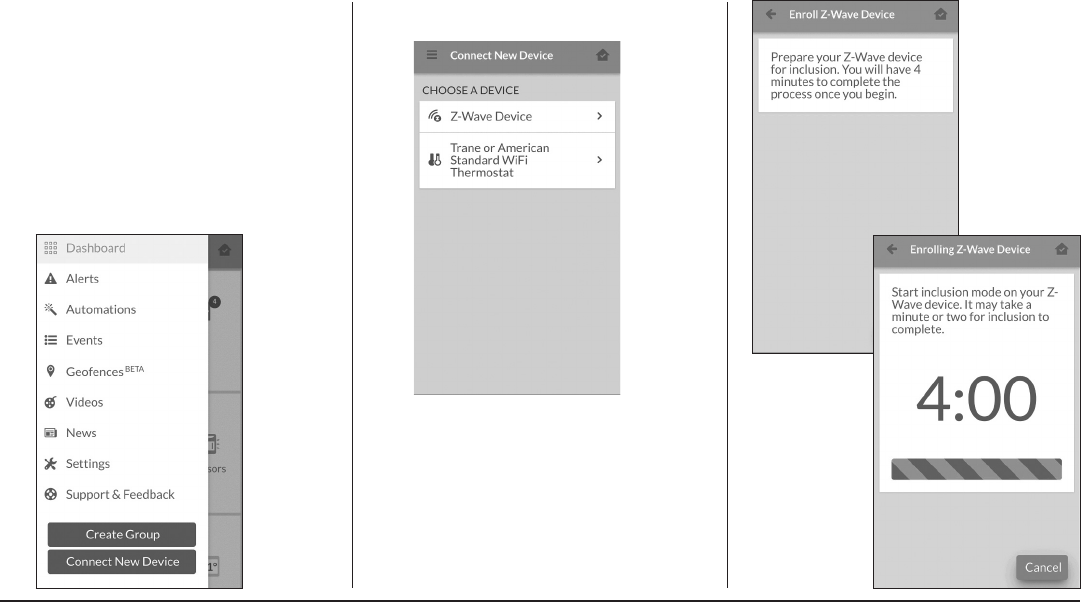
Alternatively, your Gold 824 allows you to add
Z-Wave devices using the Nexia app on your mobile
device.
Adding Z-Wave Devices
1. Start the Nexia app.
2. Press the menu button in the top left corner.
3. At the bottom of this slide out menu, press
Connect New Device.
4. Select Z-Wave Device.
5. When prompted, prepare the device to be
added to the Z-Wave network by following
the device manufacturer’s instructions to
put device into add mode. You will have four
minutes to complete this process.
Adding Z-Wave Devices (via mobile app)
012-5060-05 page 29
Advanced Z-Wave Settings
Nexia’s ADVANCED SETTINGS screen contains
three very powerful functions. Each of these
functions is very specic and should be approached
with a measure of caution. They cannot be
“undone.”
Learn
To add the bridge to an existing network, follow
your primary controller’s instructions to put the
primary controller into Add Mode. Then press the
Learn button on the bridge.
This function copies a new Z-Wave network to the
bridge from another controller. This function is not
allowed if your bridge is a primary controller with
included Z-Wave devices.
Unregister
Removes the bridge from Nexia. All remote control
features will be disabled.
Factory Reset
Resets all Z-Wave information and removes all
devices from the bridge. If this bridge is the primary
controller for your network, resetting it will result
in all the devices in your network being removed.
Following the reset, it will be necessary to remove
and then add all of the devices back to your
network.
Bridge Information
If this bridge is being used as a secondary or
inclusion controller in the network, please reset this
bridge only in the event that the primary controller
is missing or otherwise inoperable.
Navigate to Advanced Z-Wave Settings Screen by pressing:
Home Screen > Menu > Nexia > Advanced
page 30 824 User Guide
Advanced Z-Wave Settings
Terminology
The following terms may be used interchangeably by other
devices, manufacturers, and Nexia.
ADD Add, include, inclusion, enroll, connect
REMOVE Remove, exclude, exclusion
COPY Copy, learn, replicate, replication
Other Information
• Basic Command Class:
This device ignores Basic Set/Get
commands.
This device controls other
devices with OFF (0x00) and ON
(0xFF) as a minimum.
Association Group Information Table
Group Prole
Command Class
and Command
List
Group
Name
Max
Number of
Devices
Trigger
1General:
Lifeline
Device Reset
Locally
Notication
Lifeline 5 Factory Reset

012-5060-05 page 31
Smart Optimization
The Gold 824 Control is equipped with Smart
Optimization. By executing a series of blower and
active call on/o tests, Smart Optimization will
customize the Gold 824 Control to each unique
environment and increase the accuracy of the
sensed indoor temperature and overall system
performance.
Smart Optimization is enabled by default and will
automatically execute approximately 18 hours
after initial power up. Smart Optimization takes
90 minutes to complete and during the process,
heating and cooling operations are disabled. The
screen will indicate that the Gold 824 Control is in
Smart Optimization mode.
To delay Smart Optimization for an additional 18
hours, touch the Gold 824 Control Screen and
hold for ve seconds.
To disable Smart Optimization altogether,
navigate to Home>Smart Optimization and
select Disable and press Apply.
To enable Smart Optimization, navigate to
Home>Smart Optimization and select Enable
and press Apply. Smart Optimization will execute
in approximately 18 hours.
To manually trigger Smart Optimization, rst
disable, then re-enable the feature.
Other Features
Automatic Software Updates
When the Gold 824 is connected to a Nexia™
smart home account, software updates will
occur automatically and do not require user
intervention.
Note: Internet services are required for automatic
software updates.

FCC Notice
INFORMATION TO USER
This device complies with Part 15 of the FCC
Rules. Operation is subject to the following two
conditions: (1) This device may not cause harmful
interference and (2) This device must accept any
interference received, including interference that
may cause undesired operation. The antenna(s)
used for this transmitter must be installed to
provide a separation distance of at least 20 cm
from all persons and must not be co-located or
operating in conjunction with any other antenna
or transmitter.
This equipment has been tested and found to
comply with the limits for Class B Digital Device,
pursuant to Part 15 of the FCC Rules. These limits
are designed to provide reasonable protection
against harmful interference in a residential
installation. This equipment generates and
can radiate radio frequency energy and, if
not installed and used in accordance with the
instructions, may cause harmful interference
to radio communications. However, there is no
guarantee that interference will not occur in a
particular installation. If this equipment does
cause harmful interference to radio or television
reception, which can be determined by turning
the equipment o and on, the user is encouraged
to try to correct the interference by one or more
of the following measures.
Reorient or relocate the receiving antenna
Increase the separation between the equipment
and receiver
Connect the equipment into an outlet on a
circuit dierent from that to which the receiver
is connected
Consult the dealer or an experienced radio/TV
technician for help
Any changes or modications not expressly
approved by the party responsible for compliance
could void the user’s authority to operate the
equipment.
IC NOTICE
This device complies with Industry
Canada's license-exempt RSSs. Operation is
subject to the following two conditions:
(1) this device may not cause interference, and
(2) this device must accept any interference,
including interference that may cause undesired
operation of the device.
Le présent appareil est conforme aux
CNR d’Industrie Canada's applicables aux
appareils radio exempts de licence.
L’exploitation est autorisée aux deux
conditions suivantes :
(1) l’appareil ne doit pas produire de
brouillage, et
(2) l’utilisateur de l’appareil doit accepter
tout brouillage radioélectrique subi, même si
le brouillage est susceptible d’en
compromettre le fonctionnement.
Notices
The manufacturer has a policy of continuous product and
product data improvement and it reserves the right to
change design and specifications without notice.
Representative-only illustrations included in this document.
April 2018
012-5060-05