Trane Variable Refrigerant Flow System Outdoor Unit Series Installation And Maintenance Manual VRF SVN34A EN 02/01/2013 / Installation, Operation,
2015-04-02
: Trane Trane-Variable-Refrigerant-Flow-System-Outdoor-Unit-Series-Installation-And-Maintenance-Manual-684410 trane-variable-refrigerant-flow-system-outdoor-unit-series-installation-and-maintenance-manual-684410 trane pdf
Open the PDF directly: View PDF ![]() .
.
Page Count: 68
- Introduction
- Model Number Description
- Preparing for Installation
- Unit Installation
- Refrigerant Piping
- Electrical Wiring
- Leak Testing Pipe Connections
- Vacuum Procedure for the System
- Insulating Refrigerant Pipes
- Refrigerant Charging
- Control System
- Pre-Start Checks
- Test Operation
- Automatic refrigerant detection operation
- Troubleshooting
- Warranty For Trane Advantage™ VRF Systems and Related Accessories
SAFETY WARNING
Only qualified personnel should install and service the equipment. The installation, starting up, and
servicing of heating, ventilating, and air-conditioning equipment can be hazardous and requires specific
knowledge and training. Improperly installed, adjusted or altered equipment by an unqualified person could
result in death or serious injury. When working on the equipment, observe all precautions in the literature
and on the tags, stickers, and labels that are attached to the equipment.
Variable Refrigerant Flow System
Outdoor Unit Series
February 2013 VRF-SVN34A-EN
Installation, Operation,
and Maintenance
Models: (HP, 208–230 V) (HP, 460 V) (HR, 208–230 V) (HR, 460V)
4TVH072B300NB 4TVH072B400NB 4TVR072B300NB 4TVR072B400NB
4TVH096B300NB 4TVH096B400NB 4TVR096B300NB 4TVR096B400NB
4TVH120B300NB 4TVH120B400NB 4TVR120B300NB 4TVR120B400NB
4TVH144B300NB 4TVH144B400NB 4TVR144B300NB 4TVR144B400NB
DB68-03592A(1)
© 2013 Trane All rights reserved VRF-SVN34A-EN
Introduction
Read this manual thoroughly before operating or servicing
this unit.
Warnings, Cautions, and Notices
Safety advisories appear throughout this manual as
required. Your personal safety and the proper operation of
this machine depend upon the strict observance of these
precautions.
Important Environmental Concerns
Scientific research has shown that certain man-made
chemicals can affect the earth’s naturally occurring
stratospheric ozone layer when released to the
atmosphere. In particular, several of the identified
chemicals that may affect the ozone layer are refrigerants
that contain Chlorine, Fluorine and Carbon (CFCs) and
those containing Hydrogen, Chlorine, Fluorine and Carbon
(HCFCs). Not all refrigerants containing these compounds
have the same potential impact to the environment. Trane
advocates the responsible handling of all refrigerants-
including industry replacements for CFCs such as HCFCs
and HFCs.
Important Responsible Refrigerant Practices
Trane believes that responsible refrigerant practices are
important to the environment, our customers, and the air
conditioning industry. All technicians who handle
refrigerants must be certified. The Federal Clean Air Act
(Section 608) sets forth the requirements for handling,
reclaiming, recovering and recycling of certain refrigerants
and the equipment that is used in these service procedures.
In addition, some states or municipalities may have
additional requirements that must also be adhered to for
responsible management of refrigerants. Know the
applicable laws and follow them.
Copyright
This document and the information in it are the property of
Trane and may not be used or reproduced in whole or in
part, without the written permission of Trane. Trane
reserves the right to revise this publication at any time and
to make changes to its content without obligation to notify
any person of such revision or change.
Trademarks
All trademarks referenced in this document are the
trademarks of their respective owners.
The three types of advisories are defined as follows:
WARNING Indicates a potentially hazardous
situation which, if not avoided, could
result in death or serious injury.
CAUTIONsIndicates a potentially hazardous
situation which, if not avoided, could
result in minor or moderate injury. It
could also be used to alert against
unsafe practices.
NOTICE Indicates a situation that could result in
equipment or property-damage only.
WARNING
Proper Field Wiring and Grounding
Required!
Failure to follow code could result in death or serious
injury. All field wiring MUST be performed by qualified
personnel. Improperly installed and grounded field
wiring poses FIRE and ELECTROCUTION hazards. To
avoid these hazards, you MUST follow requirements for
field wiring installation and grounding as described in
NEC and your local/state electrical codes.
WARNING
Personal Protective Equipment (PPE)
Required!
Failure to wear proper PPE for the job being undertaken
could result in death or serious injury. Technicians, in
order to protect themselves from potential electrical,
mechanical, and chemical hazards, MUST follow
precautions in this manual and on the tags, stickers,
and labels, as well as the instructions below:
• Before installing/servicing this unit, technicians
MUST put on all PPE recommended for the work
being undertaken. ALWAYS refer to appropriate
MSDS sheets and OSHA guidelines for proper PPE.
• When working with or around hazardous chemicals,
ALWAYS refer to the appropriate MSDS sheets and
OSHA guidelines for information on allowable
personal exposure levels, proper respiratory
protection, and handling recommendations.
• If there is a risk of arc or flash, technicians MUST put
on all PPE in accordance with NFPA 70E or other
country-specific requirements for arc flash
protection, PRIOR to servicing the unit.
Table of Contents
VRF-SVN34A-EN 3
Introduction . . . . . . . . . . . . . . . . . . . . . . . . . . . . . . . . . . . . . . . . . . . . . . . . . . . . . . . . . . . . 2
Warnings, Cautions, and Notices . . . . . . . . . . . . . . . . . . . . . . . . . . . . . . . . . . . . . 2
Important Environmental Concerns . . . . . . . . . . . . . . . . . . . . . . . . . . . . . . . 2
Important Responsible Refrigerant Practices . . . . . . . . . . . . . . . . . . . . . . . 2
Model Number Description . . . . . . . . . . . . . . . . . . . . . . . . . . . . . . . . . . . . . . . . . . . . . . 5
Preparing for Installation . . . . . . . . . . . . . . . . . . . . . . . . . . . . . . . . . . . . . . . . . . . . . . . . 6
Unit Dimensions and Weight . . . . . . . . . . . . . . . . . . . . . . . . . . . . . . . . . . . . . . . . 6
Service Clearances . . . . . . . . . . . . . . . . . . . . . . . . . . . . . . . . . . . . . . . . . . . . . . . . . 8
Outdoor Unit Combinations . . . . . . . . . . . . . . . . . . . . . . . . . . . . . . . . . . . . . . . . . 9
Accessories . . . . . . . . . . . . . . . . . . . . . . . . . . . . . . . . . . . . . . . . . . . . . . . . . . . . . . 11
Moving the Outdoor Unit . . . . . . . . . . . . . . . . . . . . . . . . . . . . . . . . . . . . . . . . . . 12
Location Considerations . . . . . . . . . . . . . . . . . . . . . . . . . . . . . . . . . . . . . . . . . . . 13
Unit Installation . . . . . . . . . . . . . . . . . . . . . . . . . . . . . . . . . . . . . . . . . . . . . . . . . . . . . . . 15
Base Recommendations . . . . . . . . . . . . . . . . . . . . . . . . . . . . . . . . . . . . . . . . . . . 15
Minimizing Vibration . . . . . . . . . . . . . . . . . . . . . . . . . . . . . . . . . . . . . . . . . . . . . . 15
Water Management Recommendations . . . . . . . . . . . . . . . . . . . . . . . . . . . . . . 16
Securing the Outdoor Unit . . . . . . . . . . . . . . . . . . . . . . . . . . . . . . . . . . . . . . . . . 17
Condenser Air Discharge Duct (optional) . . . . . . . . . . . . . . . . . . . . . . . . . . . . . 18
Wind/Snow Prevention Duct Installation (optional) . . . . . . . . . . . . . . . . . . . . 19
Refrigerant Piping . . . . . . . . . . . . . . . . . . . . . . . . . . . . . . . . . . . . . . . . . . . . . . . . . . . . . 20
Selecting Refrigerant Piping . . . . . . . . . . . . . . . . . . . . . . . . . . . . . . . . . . . . . . . . 20
Heat Pump Applications . . . . . . . . . . . . . . . . . . . . . . . . . . . . . . . . . . . . . . . 20
Heat Recovery Applications . . . . . . . . . . . . . . . . . . . . . . . . . . . . . . . . . . . . 22
Identifying Branch Joints . . . . . . . . . . . . . . . . . . . . . . . . . . . . . . . . . . . . . . 24
Pipe Minimum Thickness and Temper Grade Based on Pipe Size . . . . . 25
Storing Refrigerant Piping . . . . . . . . . . . . . . . . . . . . . . . . . . . . . . . . . . . . . . . . . 26
Evacuating Refrigerant . . . . . . . . . . . . . . . . . . . . . . . . . . . . . . . . . . . . . . . . . . . . 26
Installing Refrigerant Piping . . . . . . . . . . . . . . . . . . . . . . . . . . . . . . . . . . . . . . . . 26
Overview . . . . . . . . . . . . . . . . . . . . . . . . . . . . . . . . . . . . . . . . . . . . . . . . . . . 26
Pipe Cutting . . . . . . . . . . . . . . . . . . . . . . . . . . . . . . . . . . . . . . . . . . . . . . . . . 27
Nitrogen Flushing While Brazing . . . . . . . . . . . . . . . . . . . . . . . . . . . . . . . . 27
Flared Pipe Connections . . . . . . . . . . . . . . . . . . . . . . . . . . . . . . . . . . . . . . . 28
Connecting Piping to the Outdoor Unit . . . . . . . . . . . . . . . . . . . . . . . . . . . 29
Connecting Branch Joints . . . . . . . . . . . . . . . . . . . . . . . . . . . . . . . . . . . . . . 30
Refrigerant Piping Installation Examples: Heat Pump . . . . . . . . . . . . . . . 32
Refrigerant Piping Installation Examples: Heat Recovery . . . . . . . . . . . . 35
Electrical Wiring . . . . . . . . . . . . . . . . . . . . . . . . . . . . . . . . . . . . . . . . . . . . . . . . . . . . . . . 37
Power Wiring . . . . . . . . . . . . . . . . . . . . . . . . . . . . . . . . . . . . . . . . . . . . . . . . . . . . . 39

4 VRF-SVN34A-EN
Grounding . . . . . . . . . . . . . . . . . . . . . . . . . . . . . . . . . . . . . . . . . . . . . . . . . . . . . . . 42
Communications Wiring . . . . . . . . . . . . . . . . . . . . . . . . . . . . . . . . . . . . . . . . . . . 43
Leak Testing Pipe Connections . . . . . . . . . . . . . . . . . . . . . . . . . . . . . . . . . . . . . . . . . . 45
Vacuum Procedure for the System . . . . . . . . . . . . . . . . . . . . . . . . . . . . . . . . . . . . . . 47
Insulating Refrigerant Pipes . . . . . . . . . . . . . . . . . . . . . . . . . . . . . . . . . . . . . . . . . . . . 48
Refrigerant Charging . . . . . . . . . . . . . . . . . . . . . . . . . . . . . . . . . . . . . . . . . . . . . . . . . . . 49
Calculating Refrigerant . . . . . . . . . . . . . . . . . . . . . . . . . . . . . . . . . . . . . . . . . . . . 50
Charging Refrigerant . . . . . . . . . . . . . . . . . . . . . . . . . . . . . . . . . . . . . . . . . . . . . . 52
Control System . . . . . . . . . . . . . . . . . . . . . . . . . . . . . . . . . . . . . . . . . . . . . . . . . . . . . . . . 53
System Monitoring . . . . . . . . . . . . . . . . . . . . . . . . . . . . . . . . . . . . . . . . . . . . . . . . 54
System Configuration: DIP and Rotary Switches . . . . . . . . . . . . . . . . . . . . . . 54
System Configuration: Buttons K1–K4 . . . . . . . . . . . . . . . . . . . . . . . . . . . . . . . 58
Pre-Start Checks . . . . . . . . . . . . . . . . . . . . . . . . . . . . . . . . . . . . . . . . . . . . . . . . . . . . . . . 61
Test Operation . . . . . . . . . . . . . . . . . . . . . . . . . . . . . . . . . . . . . . . . . . . . . . . . . . . . . . . . 62
Automatic refrigerant detection operation . . . . . . . . . . . . . . . . . . . . . . . . . . . . . . . 64
Troubleshooting . . . . . . . . . . . . . . . . . . . . . . . . . . . . . . . . . . . . . . . . . . . . . . . . . . . . . . . 65
Warranty For Trane Advantage™ VRF Systems and Related Accessories . . . 66
Basic Warranty . . . . . . . . . . . . . . . . . . . . . . . . . . . . . . . . . . . . . . . . . . . . . . . . . . . 66
Exclusions and Limitations . . . . . . . . . . . . . . . . . . . . . . . . . . . . . . . . . . . . . . . . . 66

VRF-SVN34A-EN 5
Model Number Description
Digit 1: Refrigerant
Digit 2: Brand name
Digit 3: System type
Digit 4: Functional Type
Outdoor Unit
Digit 5: Reserved for future use
Digit 6, 7, 8: Nominal capacity
(Btu/h x 1,000)
Digit 9: Major development
sequence
Digit 10: Electric power supply
characteristics
Digit 11: Coil fin protection
Digit 12: Reserved for future
use
Digit 13: Region of sale
Digit 14: Minor design sequence
4TVS0086B300NA
1234567891011121314
4 = R410A
T = Trane
V = Variable Refrigerant Flow
T = Cooling Only, Digital Scroll (VRF)
F = Cooling Only, DC Inverter (VRF)
S = Heat Pump, Digital Scroll (VRF)
H = Heat Pump, DC Inverter (VRF)
R = Heat Recovery (3-pipe), DC
Inverter (VRF)
K = Heat Recovery (3-pipe), Digital
Scroll (VRF)
0 = Standard
036 = 36,000 Btu/h
048 = 48,000 Btu/h
060 = 53,000 Btu/h
072 = 72,000 Btu/h
096 = 96,000 Btu/h
120 = 120,000 Btu/h
144 = 144,000 Btu/h
B = Second development sequence
(Samsung)
1 = 220/60/1
3 = 208–230/60/3
4 = 460/60/3
6 = 220/60/3
0 = Standard
B = Blue fin
C = Corrosion resistant
0 = Not currently used
N = North America (UL or ETL)
A = First design sequence
B = Second design sequence

6 VRF-SVN34A-EN
Preparing for Installation
Unit Dimensions and Weight
Table 1. Unit dimensions and weight
Unit type
Unit model
number
Dimensions
(WxHxD)
in. (mm)
Weight
lb (kg)
Shipping
dimensions
(WxHxD)
in. (mm)
Shipping weight
lb (kg)
Heat Pump
(203–230 V)
4TVH0072B300NB 34.6x66.7x30.1
(880x1695x765) 425.5 (193) 37.3x75.3x32.8
(948x1912x832) 460.8 (209)
4TVH0096B300NB
51.0x66.7x30.1
(1295x1695x765)
623.9 (283) 53.7X75.3x32.8
(1363x1912x832)
665.8 (302)
4TVH0120B300NB
4TVH0144B300NB 657.0 (298) 698.9 (317)
Heat Recovery
(203–230 V)
4TVR0072B300NB 34.6x66.7x30.1
(880x1695x765) 425.5 (193) 37.3x75.3x32.8
(948x1912x832) 460.8 (209)
4TVR0096B300NB
51.0x66.7x30.1
(1295x1695x765)
637.1 (289) 53.7X75.3x32.8
(1363x1912x832)
679.0 (308)
4TVR0120B300NB
4TVR0144B300NB 672.4 (305) 714.3 (324)
Heat Pump
(460 V)
4TVH0072B400NB 34.6x66.7x30.1
(880x1695x765) 436.5 (198) 37.3x75.3x32.8
(948x1912x832) 471.8 (214)
4TVH0096B400NB
51.0x66.7x30.1
(1295x1695x765)
540.1 (245) 53.7X75.3x32.8
(1363x1912x832)
582.0 (264)
4TVH0120B400NB
4TVH0144B400NB 672.4 (305) 714.3 (324)
Heat Recovery
(460 V)
4TVR0072B400NB 34.6x66.7x30.1
(880x1695x765) 445.3 (202) 37.3x75.3x32.8
(948x1912x832) 480.6 (218)
4TVR0096B400NB
51.0x66.7x30.1
(1295x1695x765)
553.4 (251) 53.7X75.3x32.8
(1363x1912x832)
595.2 (270)
4TVR0120B400NB
4TVR0144B400NB 692.3 (314) 734.1 (333)
VRF-SVN34A-EN 7
Preparing for Installation
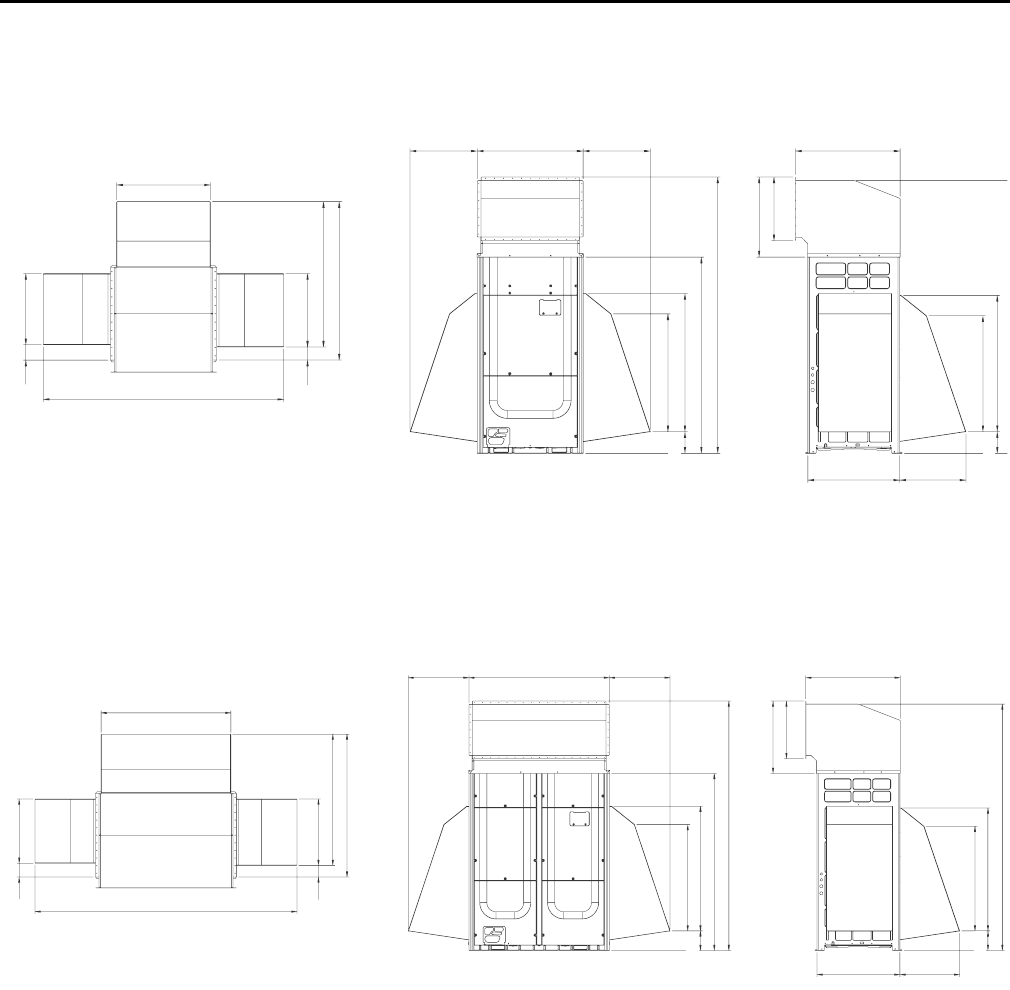
Figure 1. Dimensional drawing: 4TVH072****/4TVR072****
Figure 2. Dimensional drawing: 4TVH096/120/144****/4TVR096/120/144****
782 (30.79)
560 (22.05) 880 (34.05) 560 (22.05) 871 (34.29)
765 (30.12) 550 (21.65)
2300 (90.55)
668 (26.30)
532 (20.94)
2271 (89 41)
1134 (44.65)
965 (37.99)
180 (7.09)
1632 (64.25)
1150 (45.28)
980 (38.58)
180 (7.09)
2000 (78.74)
127 (5) 593 (23.35)
1318 (51.89)
1210 (47.64)
612 (24.09)
108 (4.25)
Units: mm (inches)
A
A: Optional condenser air discharge duct
B: Optional wind/snow protection duct
A
B
B
B
BBB
1197 (47.13)
2415 (95.08)
560 (22.05) 560 (22.05)1295 (50.98)
593 (23.35)127 (5)
1318 (51.89)
1210 (47.64)
612 (24.09)
108 (4.25)
2300 (90.55)
1632 (64.25)
1150 (45.28)
980 (38.58)
180 (7.09)
871 (34.29)
765 (30.12) 550 (21.65)
668 (26.30)
532 (20.94)
2271 (89.41)
1134 (44.65)
965 (37.99)
180 (7.09)
Units: mm (inches)
AA
B
BB
BBB
A: Optional condenser air discharge duct
B: Optional wind/snow protection duct
8 VRF-SVN34A-EN
Preparing for Installation
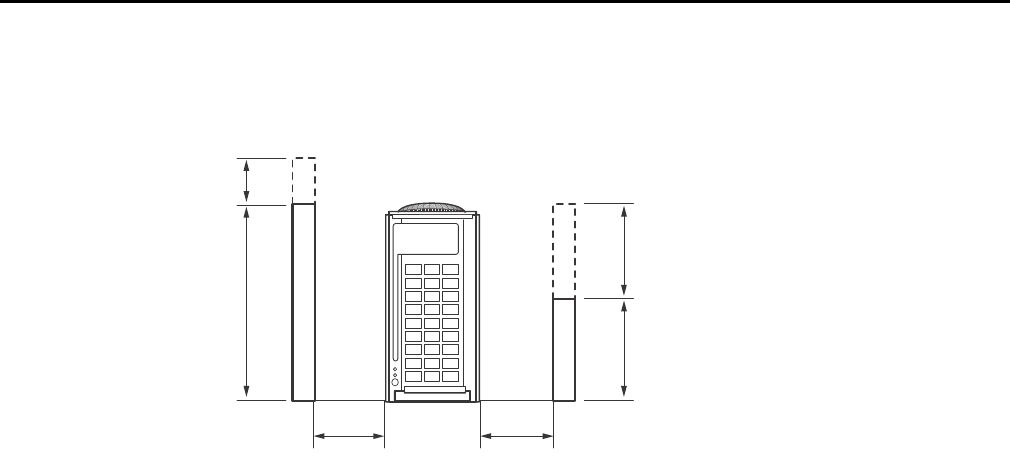
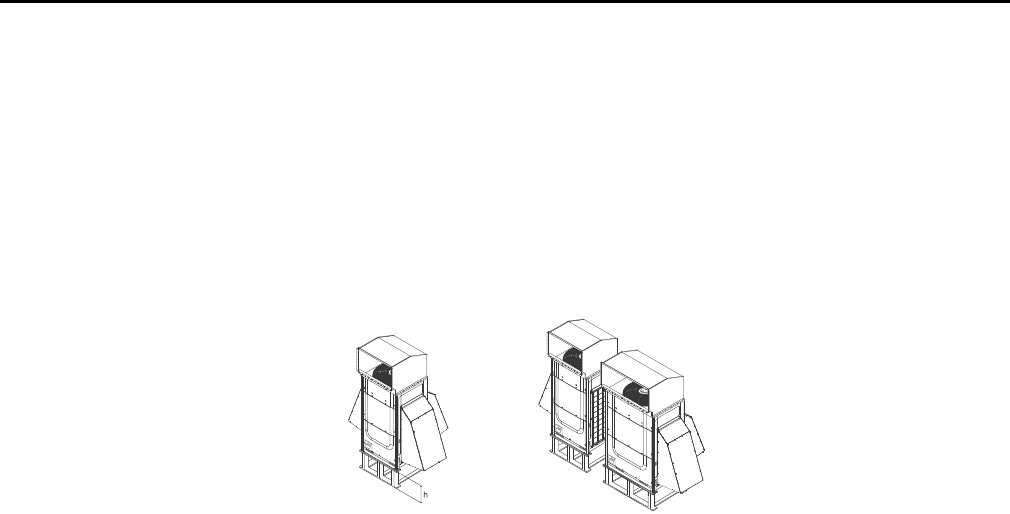
Service Clearances
Install units as shown in the illustrations below, observing ventilation and service requirements.
Space requirements are based on cooling mode operation and an outdoor temperature of 95°F
(35°C). More space is required if the outdoor temperature is higher than 95°F (35°C) or if the area
is easily heated by solar radiation.
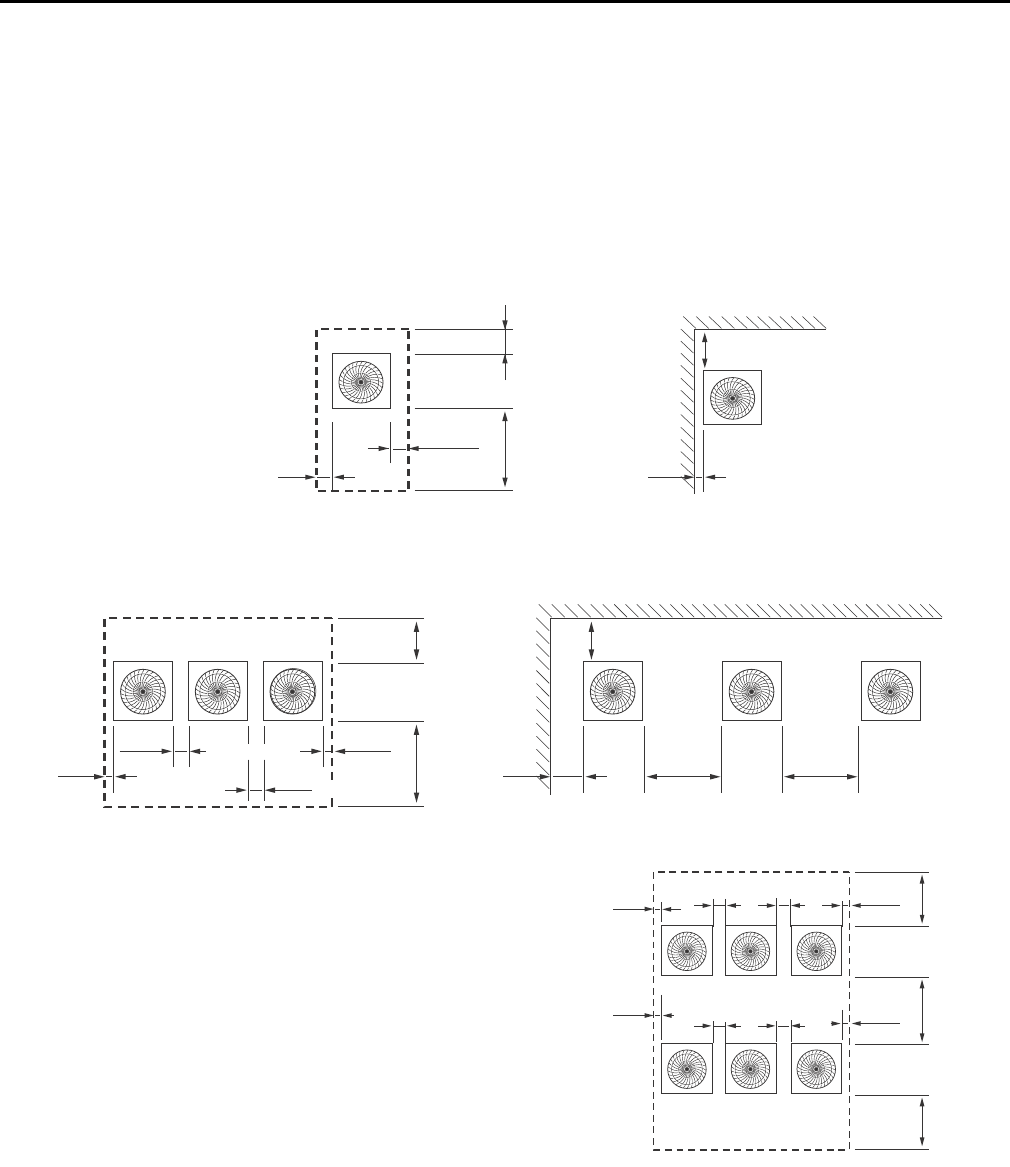
Figure 3. Minimum service clearances for single and multiple units
4 (100)
S2: 4 (100)
S1: 20 (500)
4 (100)
12 (300)
4 (100)
Example 1: Single unit inside pit Example 2: Single unit inside wall
Front
Front
S1: 20 (500)
16 (400) 16 (400)
4 (100)4 (100)4 (100)4 (100)4 (100)4 (100)
4 (100)
S2: 12 (300)
8 (200)
12 (300)
4 (100)
4 (100)
20 (500)
4 (100)
4 (100)
4 (100) 4 (100)
4 (100)
24 (600) 20 (500)
Notes:
Units: inches (mm)
S1 = Front service clearance
S2 = Back service clearance
See Figure 4, p. 9 for details.
You may install multiple outdoor units with a minimum 1 in.
(20 mm) of space between them, but reduced capacity may
occur depending on the installation environment.
Clearance requirements are waived for any unit sides that have
wind/snow protection ducts installed on them, due to the
wind/snow protection duct size, which exceeds clearance
requirements.
Front
Example 3: Multiple units inside pit Example 4: Multiple units inside wall
Example 5: Multiple units inside pit
Front
Front
Front
VRF-SVN34A-EN 9
Preparing for Installation
Figure 4. Dimension limits for pit
Outdoor Unit Combinations
Use the following table to determine the size and number of outdoor units needed to achieve the
capacity requirements.
Follow these guidelines:
• Make sure to use indoor units that are compatible with the outdoor unit.
• The minimum capacity of an indoor unit is 7.5 MBH (7500 Btu/h).
• Indoor units can be connected within the ranges indicated in Ta b l e 2 and Table 3.
• If the total capacity of the connected indoor units exceeds the indicated maximum capacity, the
cooling and heating capacity of the indoor unit may decrease.
• You can connect a maximum of 64 indoor units to the outdoor unit. The maximum quantity of
connectable indoor units is 64 because the outdoor unit supports a maximum of 64
communication addresses.
• If you choose to select outdoor unit combination other than the ones in Ta b l e 2 or Table 3, the
total capacity of connected indoor units is allowed to be 50%–130% of the outdoor unit capacity:
[0.5 x total outdoor unit capacity total connected indoor unit capacity 1.3 × total outdoor unit
capacity].
Front side
Front wall height recommendation: 60 in. (1500 mm) maximum.
Back wall height recommendation: 20 in. (500 mm) maximum.
Side wall height is unlimited.
If a wall exceeds the recommended height, an additional clearance of half of the exceeded height should be added
to the service clearance. (Clearances are given in Figure 3, p. 8).
S1 = Front service clearance
S2 = Back service clearance
h1 = Wall height in excess of 60 in. (1500 mm)
h2 = Wall height in excess of 20 in. (500 mm)
S1+h1/2 S2+h1/2
60 (1500) h1
20 (500)
h2
Note: This figure refers to Figure 3, examples 1, 3, 5.
10 VRF-SVN34A-EN
Preparing for Installation
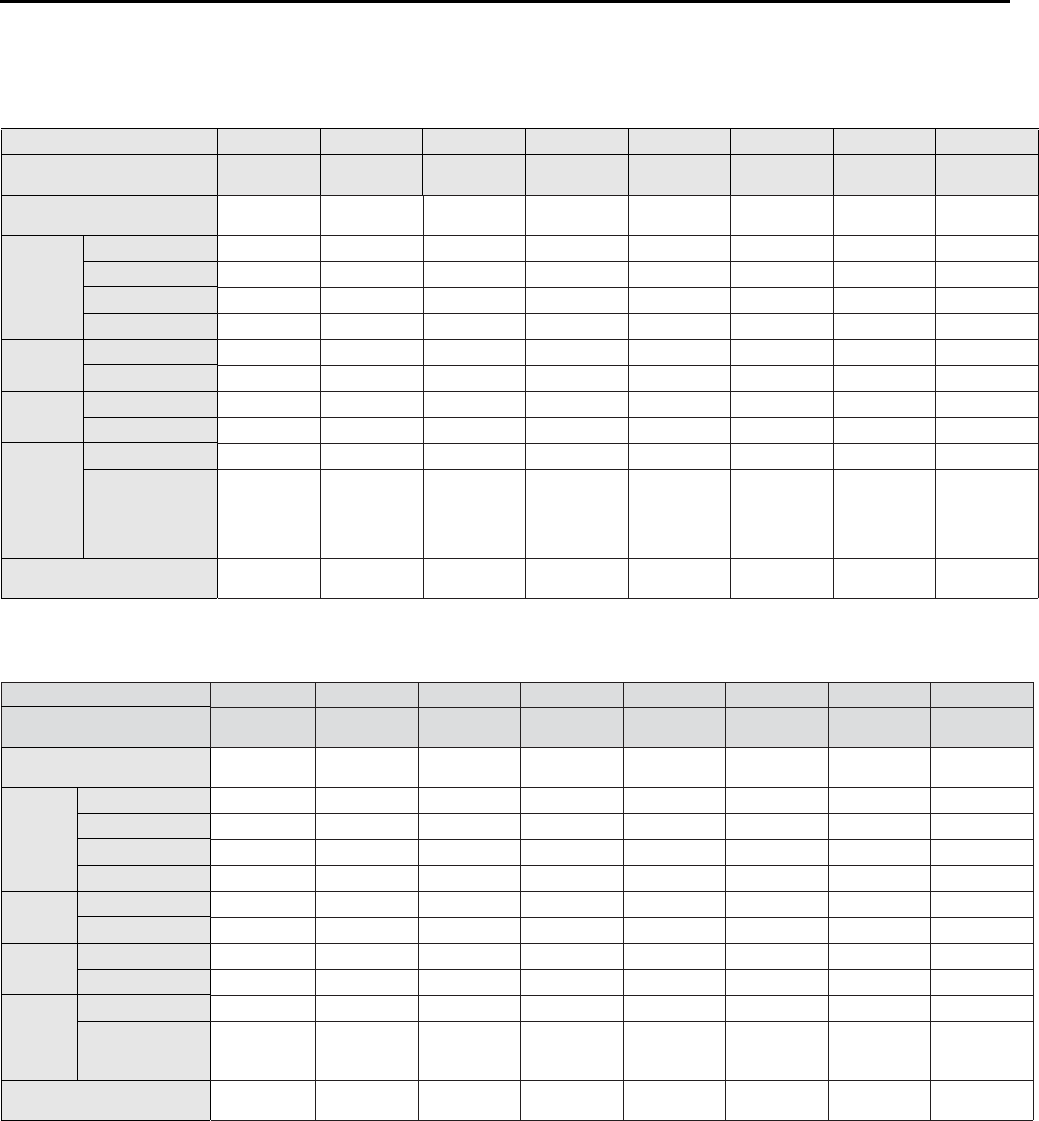
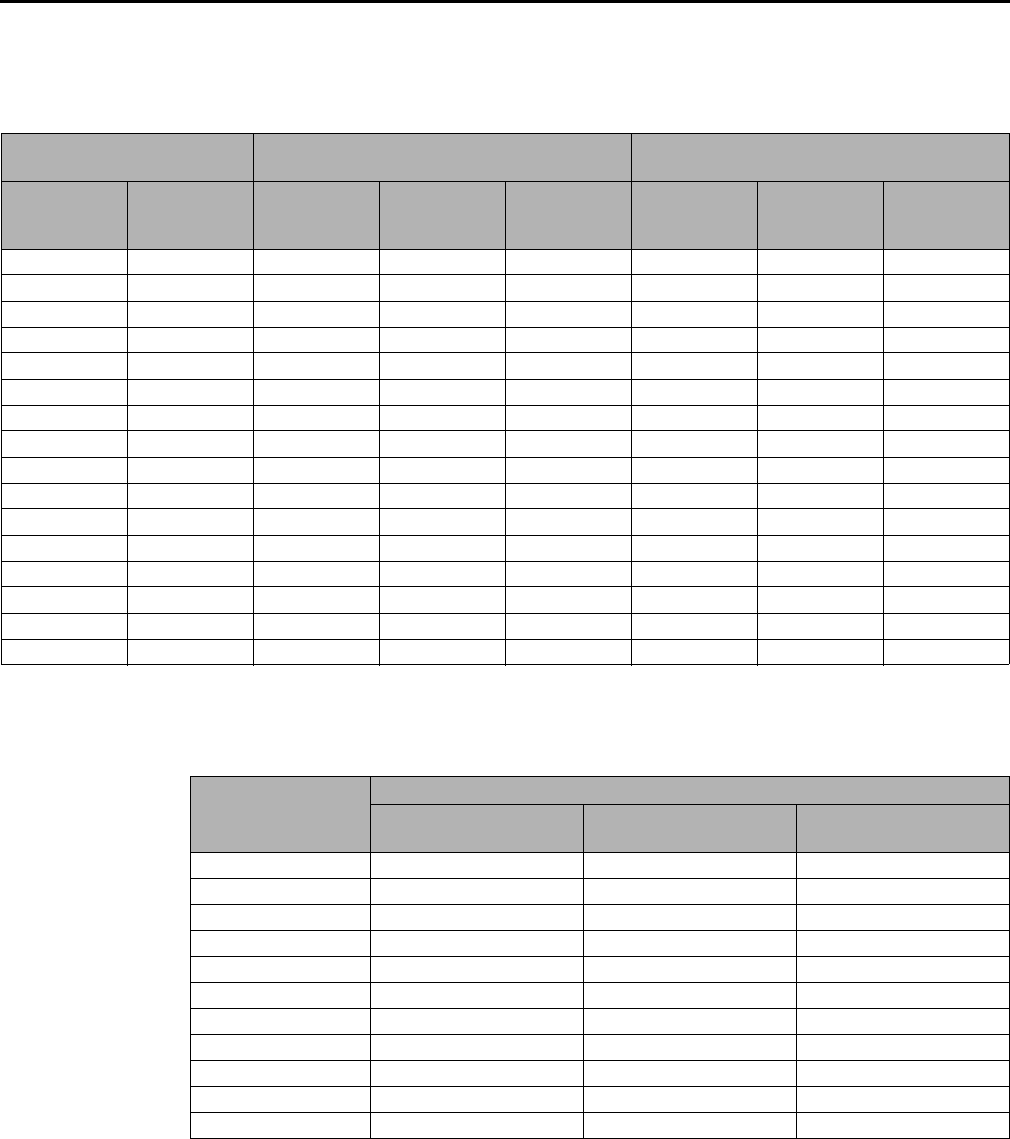
Table 2. Outdoor unit combinations: 6–20 ton capacity
Capacity 6 ton 8 ton 10 ton 12 ton 14 ton 16 ton 18 ton 20 ton
Outdoor unit
combination
number 4TV*0072***** 4TV*0096***** 4TV*0120***** 4TV*0144***** 4TV*0168***** 4TV*0192***** 4TV*0216***** 4TV*0240*****
Total number
of
individual
outdoor
units 11112222
Combined
outdoor
unit
4TV*0072***** 1111
4TV*0096***** 11
4TV*0120***** 112
4TV*0144***** 11
Nominal
Capacity
Cooling (Btu/h) 72000 96000 120000 144000 168000 192000 216000 240000
Heating (Btu/h) 81000 108000 135000 162000 189000 216000 243000 270000
Rated
Capacity
Cooling (Btu/h) 69000 92000 114000 138000 161000 183000 207000 228000
Heating (Btu/h) 77000 103000 129000 154000 180000 206000 231000 258000
Total
capacity
of
connected
indoor
units
(cooling)
Minimum (Btu/h) 36000 48000 60000 72000 84000 96000 108000 120000
Maximum (Btu/h) 93600 124800 156000 187200 218400 249600 280800 312000
Maximum number
of
connectable
indoor units 12 16 20 25 29 33 37 41
Table 3. Outdoor unit combinations: 22–36 ton capacity
Capacity 22 ton 24 ton 26 ton 28 ton 30 ton 32 ton 34 ton 36 ton
Model name for
Combination 4TV*0264***** 4TV*0288***** 4TV*0312***** 4TV*0336***** 4TV*0360**** 4TV*0384***** 4TV*0408**** 4TV*0432*****
Total number
of
individual
outdoor
units 2 2333333
Combine
d outdoor
unit
4TV*0072
***** 111
4TV*0096***** 1
4TV*0120***** 1121
4TV*0144***** 12112123
Nominal
capacity
Cooling (Btu/h) 264000 288000 312000 336000 360000 384000 408000 432000
Heating (Btu/h) 297000 324000 351000 378000 405000 432000 459000 486000
Rated
capacity
Cooling (Btu/h) 252000 276000 299000 321000 345000 366000 390000 414000
Heating (Btu/h) 283000 308000 334000 360000 385000 412000 437000 462000
Total
capacity
of
indoor
units
(cooling)
Minimum (Btu/h) 132000 144000 156000 168000 180000 192000 204000 216000
Maximum (Btu/h) 343200 374400 405600 436800 468000 499200 530400 561600
Maximum number
of
connectable
indoor units 45 49 54 58 62 64 64 64
VRF-SVN34A-EN 11
Preparing for Installation
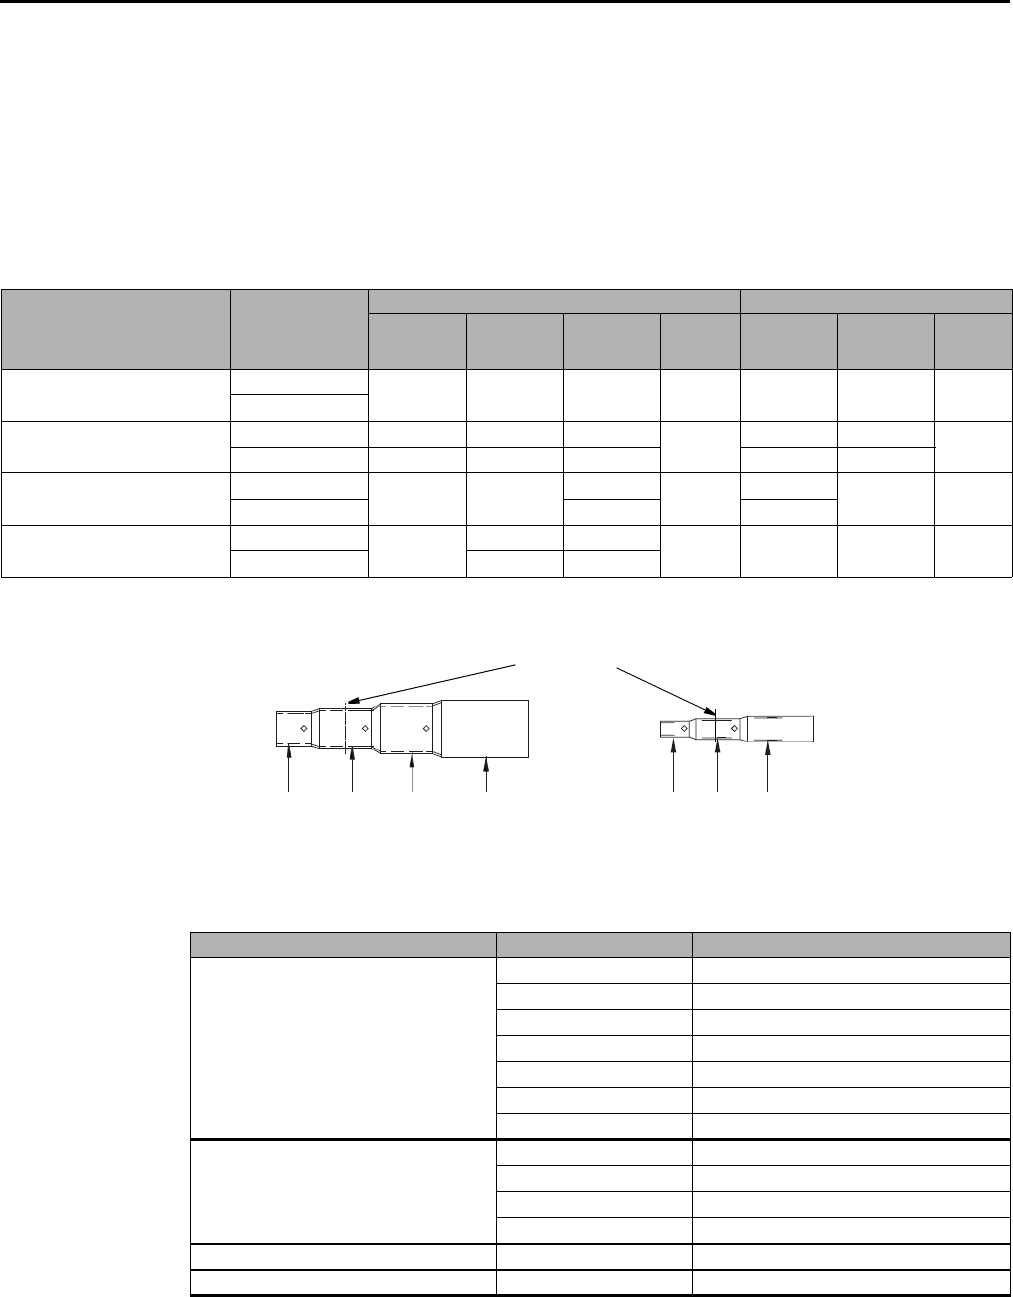
Accessories
Accessories that ship with the unit are:
• Instruction manual
• Brand label and instruction sheet
• Pipe installation sockets (see Ta bl e 4 and Figure 5).
Figure 5. Pipe installation sockets
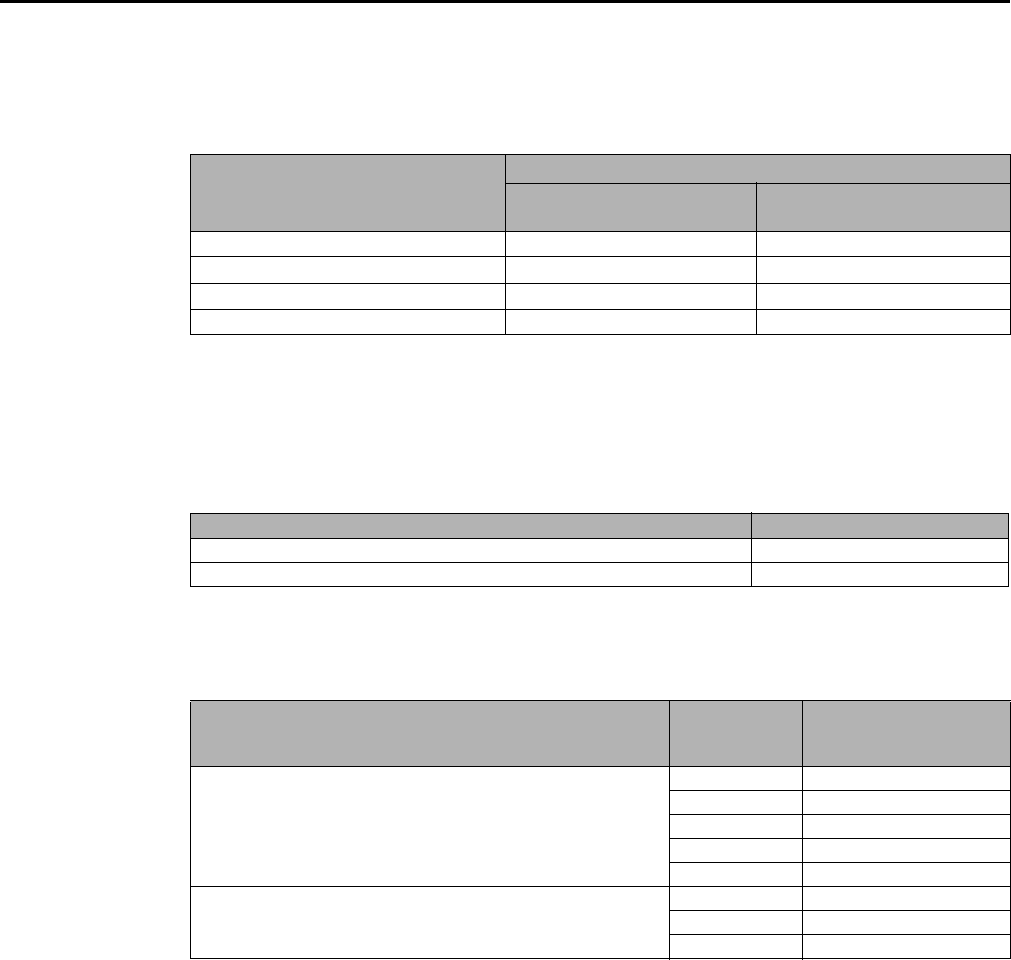
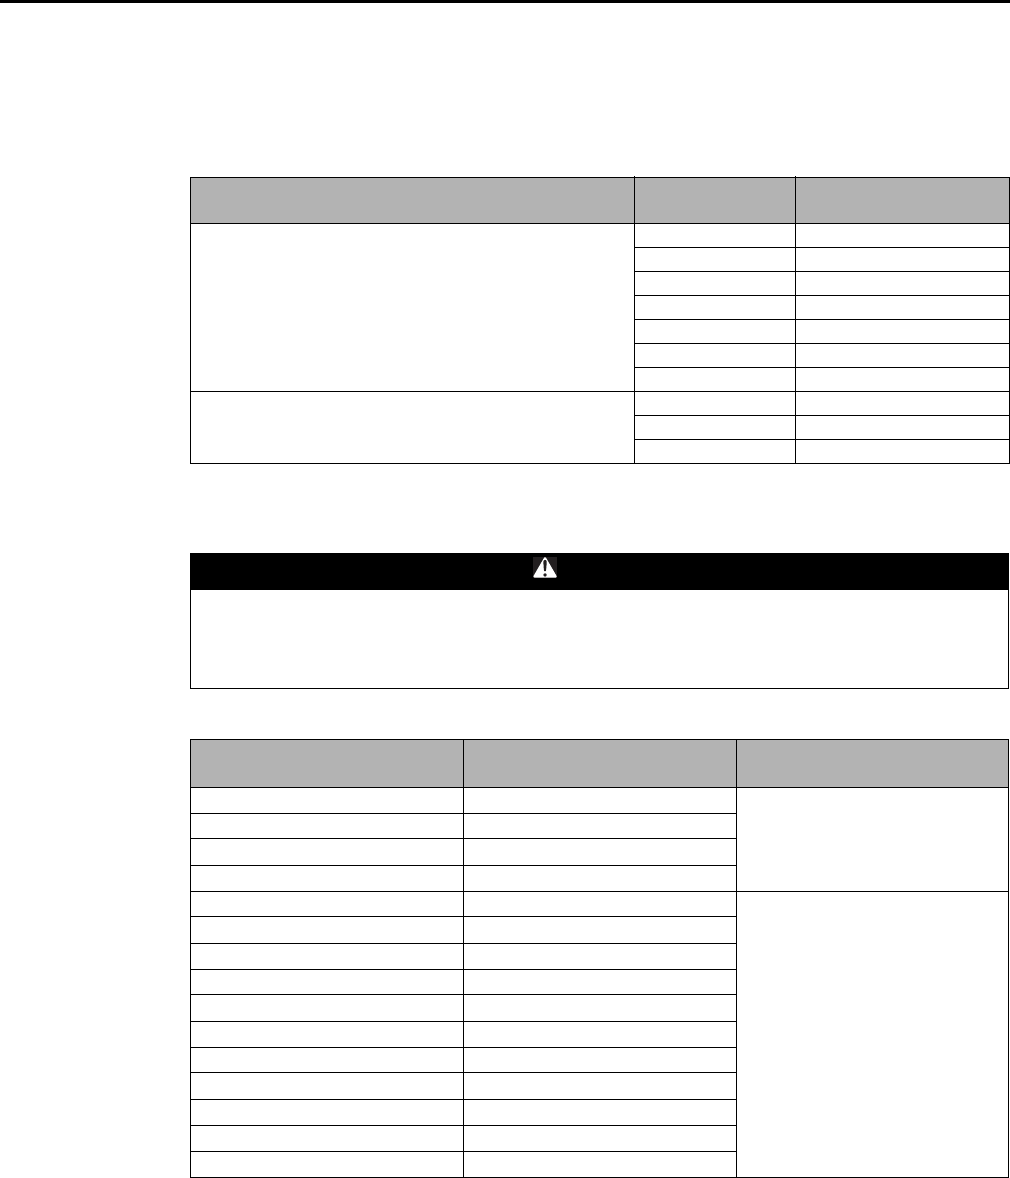
Ta bl e 5 shows optional accessories for outdoor units.
Table 4. Pipe installation socket size chart
Model number Connection type
Heat recovery Heat pump
Gas Liquid
High-
pressure
gas
Socket
needed Gas Liquid
Socket
needed
4TV*0072***** (6 ton) Unit connection 3/4 in. 3/8 in. 5/8 in. No 3/4 in. 3/8 in. No
Field connection
4TV*0096***** (8 ton)(a) Unit connection 1-1/8 in. 1/2 in. 7/8 in. Yes 1 in. 1/2 in. Yes
Field connection 7/8 in. 3/8 in. 3/4 in. 7/8 in. 3/8 in.
4TV*0120***** (10 ton)(a) Unit connection 1-1/8 in. 1/2 in. 7/8 in. Yes 1 in. 1/2 in. Yes
Field connection 3/4 in. 1-1/8 in.
4TV*0144***** (12 ton)(a) Unit connection 1-1/8 in. 5/8 in. 1-1/8 in. Yes 1-1/8 in. 1/2 in. No
Field connection 1/2 in. 7/8 in.
(a) Cut socket as needed for 8, 10, and 12 ton units.
Cutting line
ID3/4 in.
ID7/8 in.
ID 1 in.
ID 1-1/8 in. ID3/8 in. ID 5/8in.
ID 1/2 in.
Table 5. Optional accessories
Accessory Model number Specification
Y-joint
4YDK1509B0051A 51 MBH and below
4YDK2512B0138A Over 51–136 MBH
4YDK2812B0160A Over 136–154 MBH
4YDK2815B0240A Over 154–240 MBH
4YDK3419B0336A Over 240–336 MBH
4YDK4119B0468A Over 336–461 MBH
4YDK4422B0999A Over 461 MBH
Y-joint
(high-pressure gas for heat recovery units)
4YDK1500B0080A 76 MBH and below
4YDK2500B0240A Over 76–240 MBH
4YDK3100B0468A Over 240–461 MBH
4YDK3800B0999A Over 461 MBH
Y-joint for outdoor unit 4TDK3819B0000A 456 MBH and below
High-pressure Y-joint for outdoor unit 4TDK3100B0000A 456 MBH and below
12 VRF-SVN34A-EN
Preparing for Installation
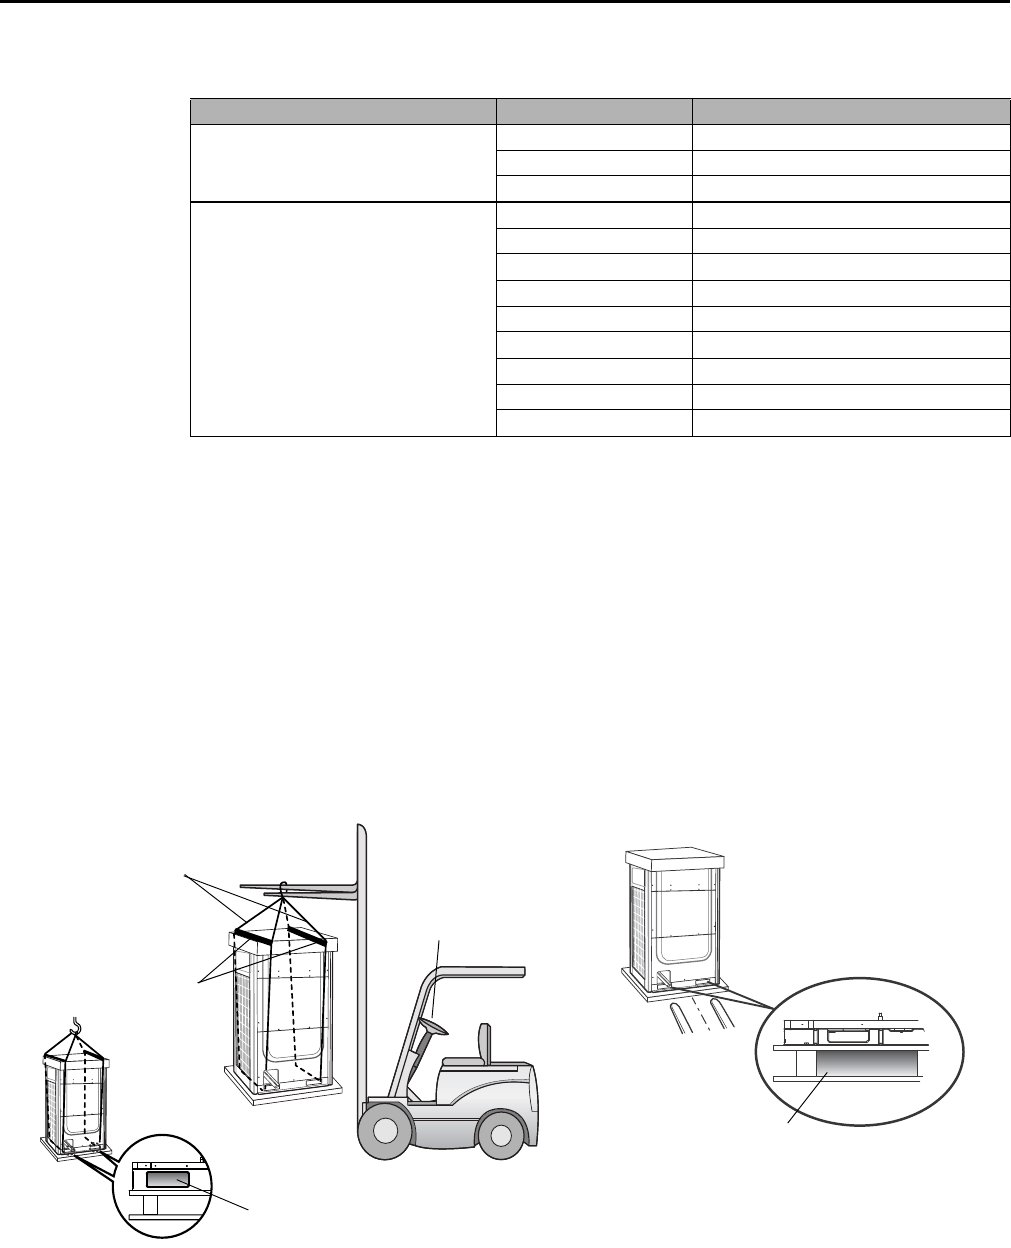
Moving the Outdoor Unit
Follow these guidelines when moving the outdoor unit:
• Before moving the outdoor unit, determine a path that can support its weight.
• Do not lay the unit on its side and do tip it more than 30 degrees.
• Take care to avoid injury while moving the unit; the surface of the heat exchanger is sharp.
– If moving the unit with a crane, fasten the wire rope as shown in the figure below. To protect
damage or scratches to the unit, use a spreader bar.
– If moving the unit with a forklift, carefully insert forks into the forklift holes at the bottom of
the outdoor unit. Be careful with to avoid damaging the unit with the forklift.
Distribution header
4HJK2512B0159A 154 MBH and below (for 4 rooms)
4HJK3115B0241A 240 MBH and below (for 8 rooms)
4HJK3819B0998A Over 240 MBH (for 8 rooms)
Electronic expansion valve (EEV) kit(a)
4EEVEVA24SA000 Below 12 MBH (for 1 indoor unit)
4EEVEVA32SA000 Over 18 MBH (for 1 indoor unit
4EEVXDA24K132A 7‐15.5MBH(for 2 indoor units )
4EEVXDA24K200A 7‐15.5MBH(for 2 indoor units)
4EEVXDA32K200A 17-31 MBH (for 2 indoor units)
4EEVXDA24K232A 7‐15.5MBH(for 3 indoor units)
4EEVXDA24K300A 7‐15.5MBH(for 3 indoor units)
4EEVXDA32K224A 17-31 MBH (for3indoorunits)
4EEVXDA32K300A 17-31 MBH (for3indoorunits)
(a) Required for indoor units that do not have internal EEVs. Refer to the EEV kit installation guide (VRF-SVN43) for detailed
information.
Table 5. Optional accessories (continued)
Accessory Model number Specification
Moving with a crane Moving with a forklift
Holes for wire cable
to pass through
Holes for inserting forklift
Wire cables
Holes for wire cable
to pass through
Spreader bars
VRF-SVN34A-EN 13
Preparing for Installation
Location Considerations
Choose an installation location based on the following considerations.
• Install the outdoor unit:
– On a supporting structure that can bear the weight of the outdoor unit. The supporting
structure can be a base on the ground, on a waterproof roof, or in a pit.
– With sufficient clearances around the unit for service and repairs.
– On a flat surface that does not collect water
– In a well ventilated location
– Away from strong wind
– Away from direct exposure to rain or snow
– Where there is no risk of flammable gas leakage
– Where there is no exposure to salt, machine oil, sulfide gas, or corrosive environmental
conditions
– Away from sea breeze
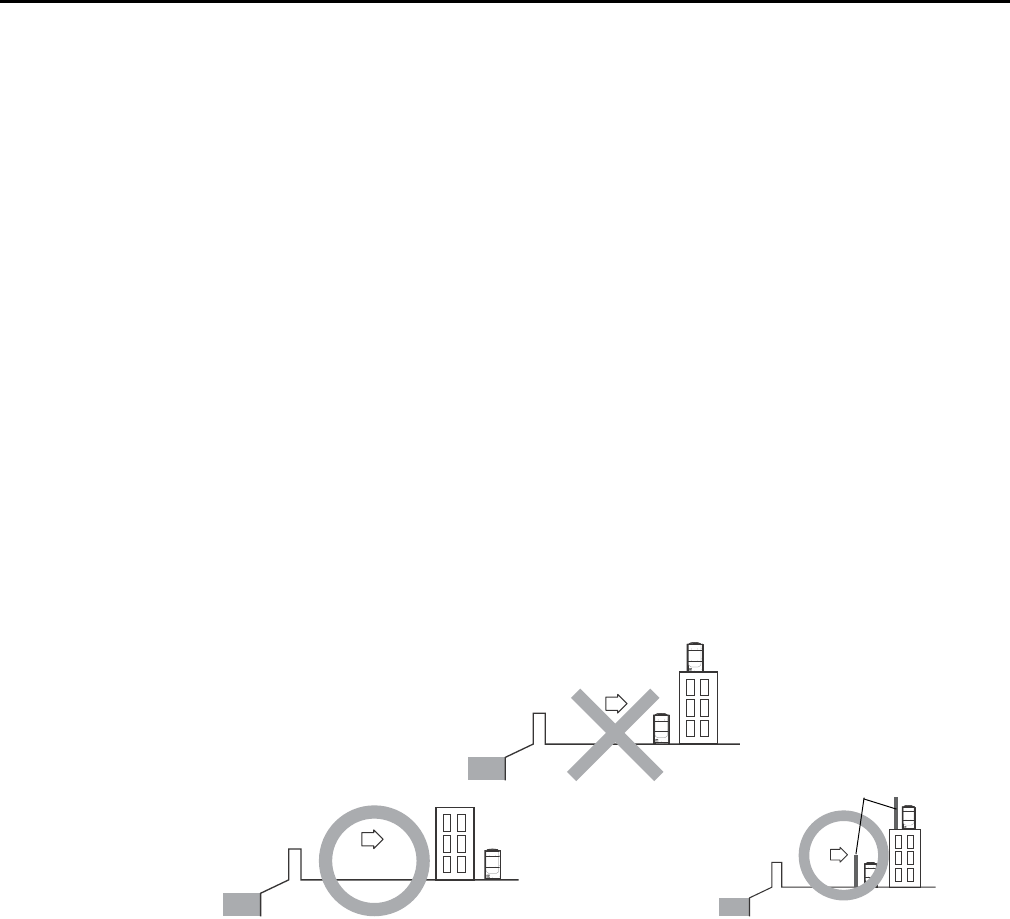
Note: For seacoast applications, block the unit from direct exposure to sea breeze by installing
the outdoor unit (ODU) behind a structure (such as a building) or a protective wall that
is 1.5 times higher than the unit, leaving 28 in. (700 mm) of space between the wall and
unit for air circulation. Consult an installation expert about taking anti-corrosion
measures, such as removing salinity on the heat exchanger and applying a rust inhibitor
more frequently than once a year.
– At least 9.84 ft (3 m) away from equipment that generates electromagnetic waves.
– Away from interfering sources, such as radio, computer, and stereo equipment.
– Far enough away from people living and working nearby so that hot discharge air or noise
do not disturb them.
– Away from inflammable materials.
• Ensure that condensate water generated by the outdoor unit can drain smoothly away from the
unit.
• Install the power and communication cables in a separately installed enclosure.
• If installing on a high place such as a roof, a fence or guard rail should be installed around it
to safeguard from falls.
• If there is a potential for accumulated snow to block the air inlet or heat exchanger, install the
unit on a base higher than the highest possible snow accumulation.
Sea Sea
Sea
Sea breeze
Sea breeze
Protection wall
Sea breeze
ODU
ODU
ODU
ODU
ODU

14 VRF-SVN34A-EN
Preparing for Installation
• R-410A refrigerant is a safe, nontoxic and nonflammable refrigerant. However, if there is a
concern about a dangerous level of refrigerant concentration in the case of refrigerant leakage,
add extra ventilation.
• Avoid installing the outdoor unit where corrosive gases, such as sulfur oxides, ammonia, and
sulfurous gas, are produced. If unavoidable, consult with an installation specialist about using
a corrosion-proof or anti-rust additive to protect the unit coils.
• Apply corrosion protection and any other protective coatings to the unit as appropriate to the
environment.
VRF-SVN34A-EN 15
Unit Installation
Unit Installation
Follow these guidelines for installing the outdoor unit.
Important: The manufacturer is not responsible for damage incurred for installations that have
not followed these guidelines.
The outdoor unit must be installed:
– On a horizontally level surface.
– On a surface that is strong enough to support the unit and to minimize noise.
Base Recommendations
A supporting base for the outdoor unit:
• Is typically made of concrete.
• Should typically be 1.5 times larger than the bottom of the outdoor unit. However, for
installations that are subject to snow accumulation, the base should be no larger than the
bottom of the unit.
• Should be 8 in. (200 mm) or higher to protect the outdoor unit from rain water or other
conditions that may cause damage to the unit.
Note: The height of the base or, if the unit is installed on a frame (see “Minimizing Vibration”
p. 15), the height of the base plus the frame should be greater than the highest expected
snowfall.
• If necessary, has wire mesh or steel bars added to the concrete to prevent damages or cracks.
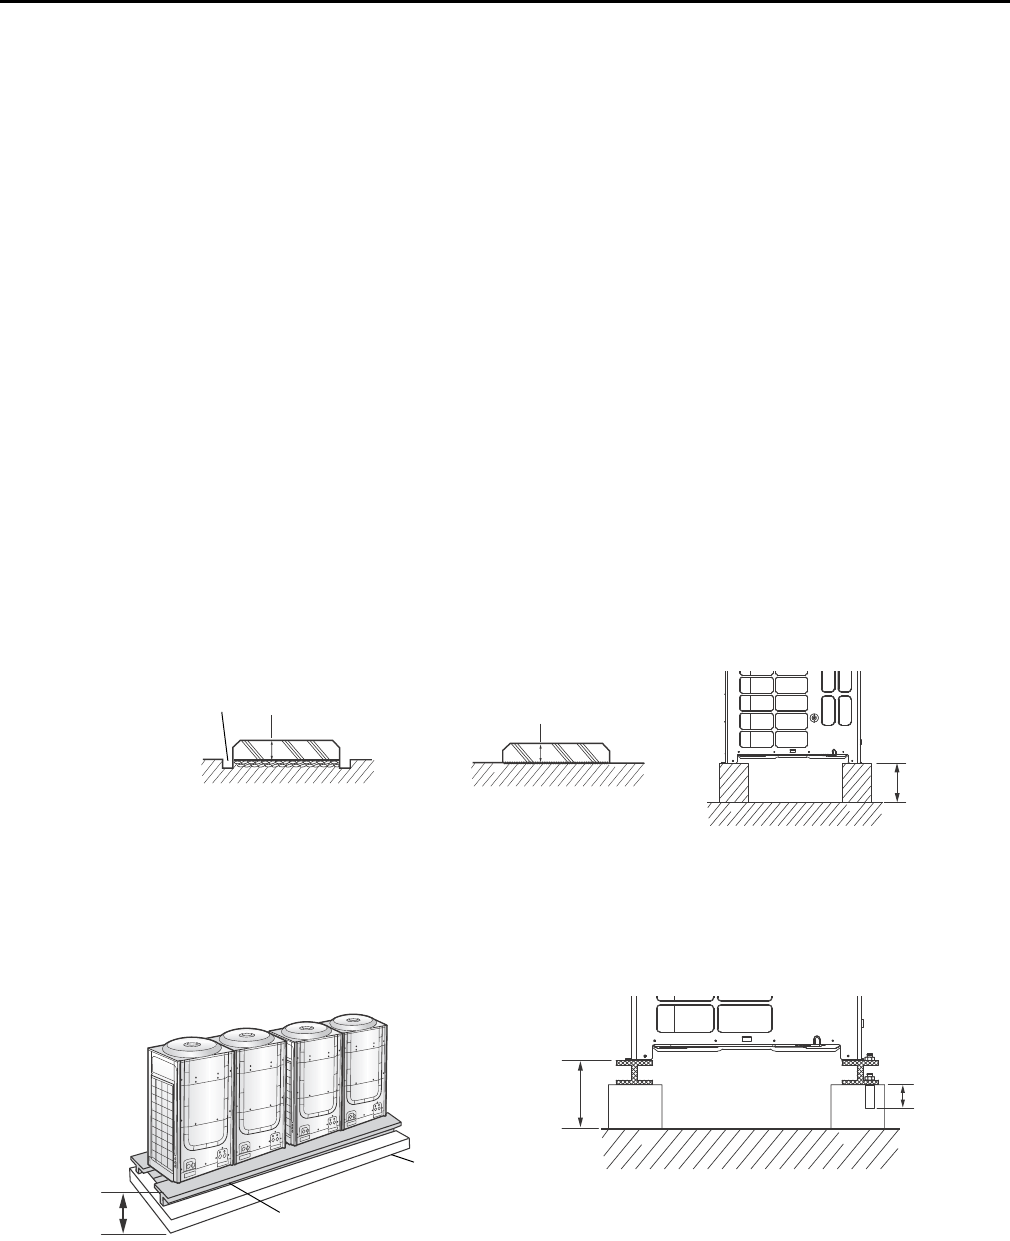
Minimizing Vibration
To minimize outdoor unit vibrations, use a vibration-minimizing structure such as an H-beam
frame, a vibration-isolation frame, or an isolation pad (thickness > 1 in. [20 mm]). The load-bearing
force of the structure must be 787 lbf (3.5 kN).
Ground installation Base installation: Surface of
base must be horizontally level
Raised base
8 in. (200 mm) min.
8 in. (200 mm)
Drain pit
Base
H-beam or vibration-isolation frame
8 in. (200 mm)
minimum
8 in. (200 mm)
minimum 2 in. (50 mm)
minimum
H-beam frame on concrete supports
16 VRF-SVN34A-EN
Unit Installation
After installing a vibration-isolation frame, loosen the bolts so that the isolators are capable of
absorbing vibrations (refer to the figure below).
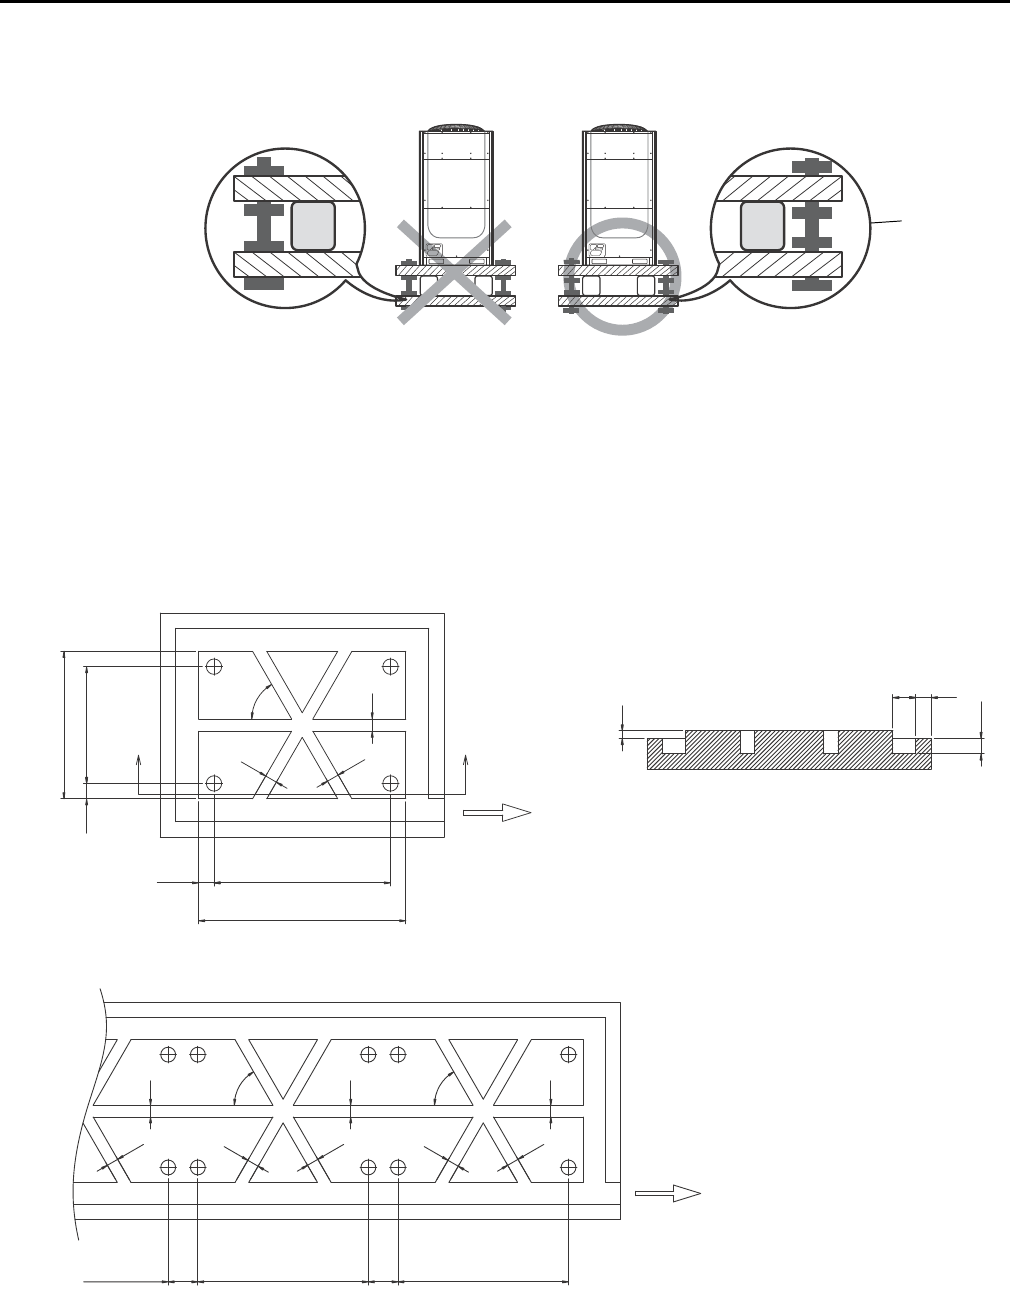
Water Management Recommendations
If the outdoor unit base is on ground level, construct a drainage pit around it to prevent the drain
water from collecting near the unit.
• Use wire mesh or steel bar for constructing the drainage pit.
• Construct the pit with a slope of 1:50.
Figure 6. Water management for single-unit installation
Figure 7. Water management for multiple-unit installation
Vibration-isolation frame
Ensure that
bolts are loose.
37.80 (960)
39.92 (760)
3.94 (100)
3.94 (100)
X
B
A
X’
3.15 (80)
3.15 (80)
3.15 (80)
60°
1.97 (50)
5.91 (150) 3.94 (100)
3.94
(100)
Notes:
• Units: inch (mm)
• Refer to Ta ble 7 for A and B.
Drainage direction
(slope: 1/50)
X - X’ section
3.15 (80)
3.15 (80)
3.15 (80)
3.15 (80)
3.15 (80)
3.15 (80)
3.15 (80)
3.15 (80)
60°
60°
7.87
(200)
7.87
(200)
BB
Notes:
• Units: inch (mm)
•Refer to Ta b le 7 for A and B.
Drainage direction
(slope: 1/50)
VRF-SVN34A-EN 17
Unit Installation
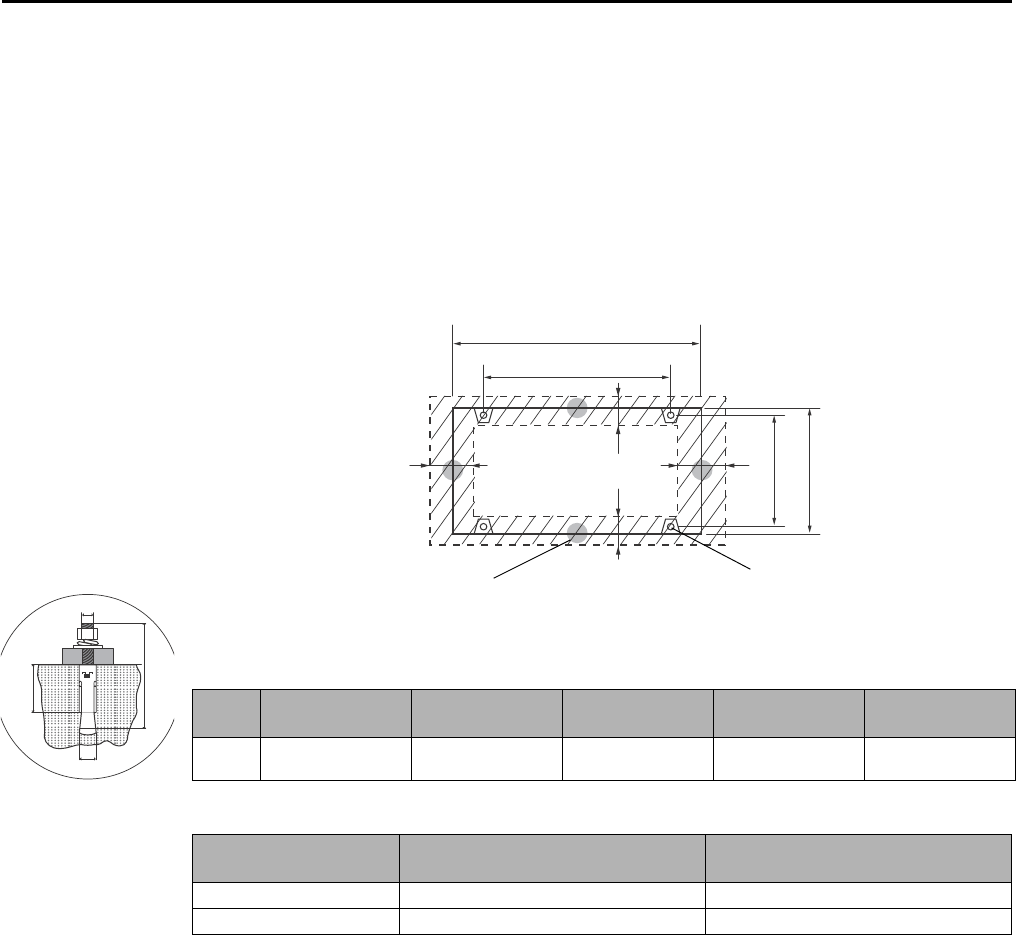
Securing the Outdoor Unit
Secure the outdoor unit firmly to the base with anchor bolts (see Figure 8 and Tabl e 6).
• Use zinc-plated or stainless steel nuts and bolts.
• It must be able to withstand the wind speed of 67 mph (30 m/s).
• Use a rubber washer between the bolt and the outdoor unit to prevent bimetallic corrosion.
• If you cannot attach the outdoor unit to the base, secure it from the side or to an additional
structure.
Figure 8. Bolt hole sizes and locations for mounting the outdoor unit
Table 6. Anchor specification
Size
(m)
Drill bit
diameter (a)
Anchor length
(b)
Sleeve length
(c) Insertion depth
Fastening
torque
10 mm 1/2 in. (14 mm) 3 in. (75 mm) 1-1/2 in. (40 mm) 2 in. (50 mm) 265.5 in·lbf
(30 N·m)
Table 7. Unit and bolt dimensions
Dimensions
4TVH072*****
4TVR072*****
4TVH096/120/144*****
4TVR096/120/144*****
Unit width (A) 37.01 in. (940 mm) 53.15 in. (1350 mm)
Distance between bolts (B) 29.13 in. (740 mm) 45.28 in. (1150 mm)
A
B
Isolation mounts:
4 holes, 0.71 (18)
Outdoor unit:
4 holes, 0.47 (12)
2.13 (54)
30.0 (761)
31.6 (803)
Notes:
•Units: inch (mm)
•Refer to Table 7 for A and B.
•Refer to the blueprints in the
technical data book for hole
specifications for mounting.
a
b
c
m

18 VRF-SVN34A-EN
Unit Installation
Condenser Air Discharge Duct (optional)
A discharge duct can be installed on the outdoor unit to prevent foreign substances from entering
the unit.
The static pressure of the discharge duct should be within the standard specification of 0.02 inches
of water (78.45 Pa) when installing the duct.
If it is difficult to provide a minimum of 6.56 ft (2 m) of space between the air outlet and nearby
obstacles, direct the discharge air horizontally from the fan.
CAUTION
Sharp Edges!
Working with galvanized sheet metal involves working with sharp edges. To avoid being cut,
technicians MUST put on all necessary Personal Protective Equipment (PPE), including gloves
and arm guards.
If you remove the fan guard to install the discharge duct, make sure to install a safety net on
the duct outlet to prevent foreign substances from entering the unit and to prevent the risk of
personal injury from sharp fan blades.
Examples of condenser air discharge ducts
Discharge air
Discharge air
Suction air
Grille/louvers
Upper floor
Balcony Mechanical room
VRF-SVN34A-EN 19
Unit Installation
Wind/Snow Prevention Duct Installation (optional)
A wind/snow prevention should be installed:
• In snowy regions, to prevent snow from accumulating on the outdoor unit and the risk of
accumulated frost, which may interfere with normal heating operation.
• In windy regions, such as near a sea shore, to protect the unit from humid air.
Install the duct so that:
• The discharge air and prevailing wind are not going the same direction.
• The discharge air is not directed to the enclosed area.
• Height (h) of the frame or base should be higher than the heaviest expected snowfall.
20 VRF-SVN34A-EN
Refrigerant Piping
Refrigerant Piping
This section contains information on selecting, storing, and connecting refrigerant piping.
Selecting Refrigerant Piping
Refrigerant piping diameter, thickness, and temper is selected according to length, as specified in
this section.
Notes:
• Use insulated, unwelded, degreased, and deoxidized copper pipe (Cu-DHP type according
to ISO 1337 or UNI EN 12735-1) suitable for an operating pressure of at least 609.15 psi
(4200 kPa) and a burst pressure of at least 3002.28 psi (20,700 kPa). Copper pipe for hydro-
sanitary applications is unsuitable.
• If there is a risk of decreased performance caused by pipe length, use piping that is one
size larger than that specified in this section.
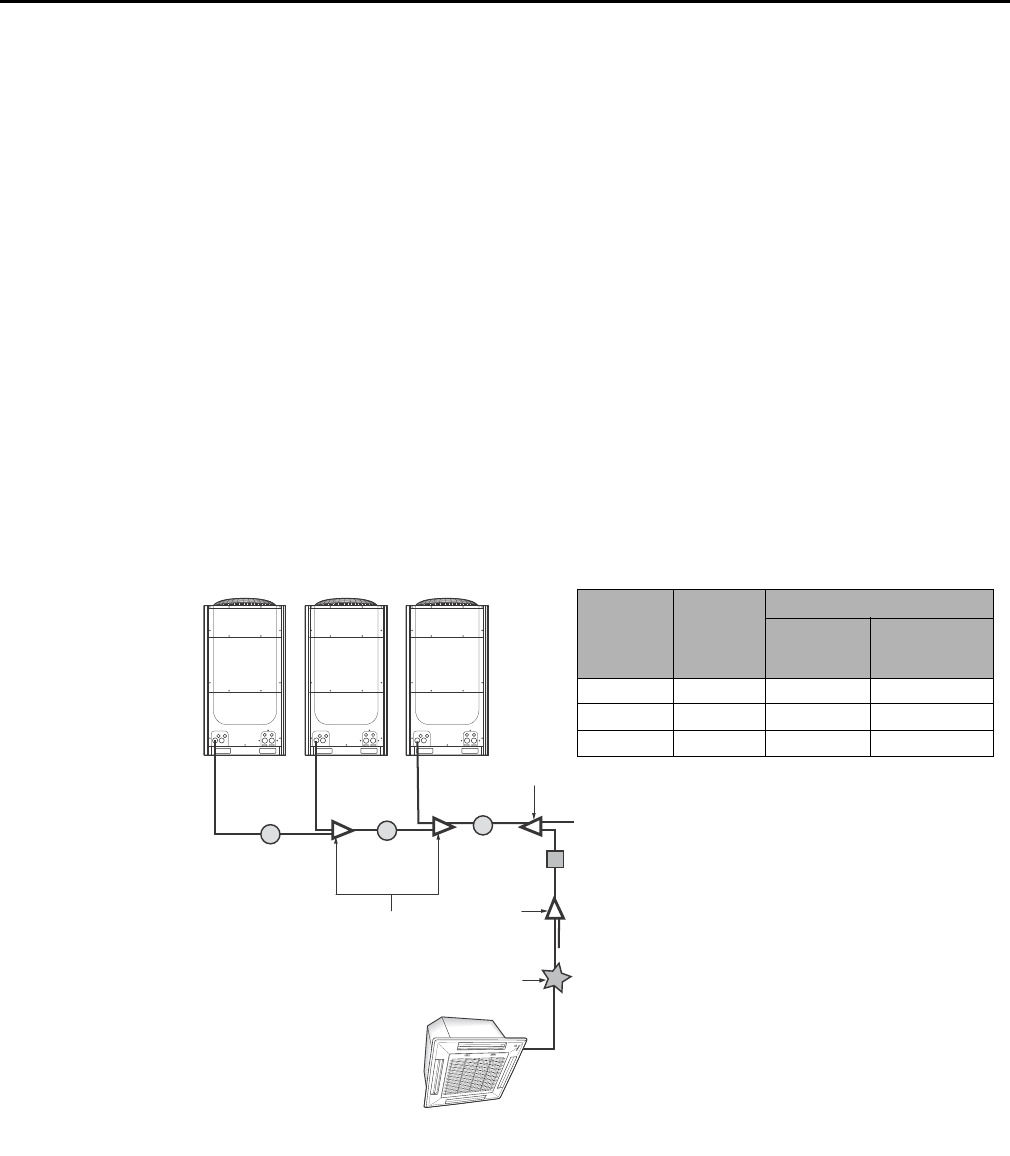
Heat Pump Applications
The example in Figure 9 shows a 26-ton capacity heat pump system with pipe diameters specified.
Figure 9. Heat pump system example
A(2) B
C
A(3)
A(1)
D
E
F
10 ton10 ton 8 ton 8 ton
Outdoor
unit
capacity
(ton)
Pipe A
Pipe size (OD)
Liquid
in. (mm)
Gas
in. (mm)
10 A(1) 1/2 (12.70) 1-1/8 (28.58)
18 A(2) 5/8 (15.88) 1-1/8 (28.58)
26 A(3) 3/4 (19.05) 1-3/8 (34.92)
Key
A(1): Select based on individual outdoor unit capacity (Table 8, p. 21).
A(2): Select based on the sum of outdoor unit capacity behind the first outdoor unit multi-connection (Ta ble 8 , p. 2 1).
A(3): Select based on the sum of outdoor unit capacity before the first branch joint (Table 8, p. 21).
B: Pipes between branch joints (Table 9, p. 21)
C: Outdoor joints between outdoor units (Table 14, p. 24)
D: First branch joint (Table 15, p. 24))
E: Branch joints to indoor units (Table 16, p. 25))
F: Pipe size between branch joints and indoor units (Table 13, p. 24)
VRF-SVN34A-EN 21
Refrigerant Piping
Use Tab le 8 to determine the size of the main pipes based on pipe length. (Refer to A in Figure 13,
p. 32)
Use Ta bl e 9 to determine the size of pipes between branch joints. (Refer to B in Figure 13, p. 32.)
Table 8. Outdoor unit main pipe size based on pipe length (A)
Outdoor unit
capacity
Main pipe size (OD)
when pipe length is 295.3 ft (90 m)
Main pipe size (OD)
when pipe length > 295.3 ft (90 m)
Ton MBH
Liquid
in. (mm)
Gas
in. (mm)
Liquid
in. (mm)
Gas
in. (mm)
6 72 3/8 (9.52) 3/4 (19.05) 1/2 (12.70) 7/8 (22.22)
8 96 3/8 (9.52) 7/8 (22.22) 1/2 (12.70) 1 (25.4)(a)
10 120 1/2 (12.70) 1-1/8 (28.58) 5/8 (15.88) 1-1/8 (28.58)
12 144 1/2 (12.70) 1-1/8 (28.58) 5/8 (15.88) 1-1/4 (31.75)(b)
14 168 5/8 (15.88) 1-1/8 (28.58) 3/4 (19.05) 1-1/4 (31.75)(b)
16 192 5/8 (15.88) 1-1/8 (28.58) 3/4 (19.05) 1-1/4 (31.75)(b)
18 216 5/8 (15.88) 1-1/8 (28.58) 3/4 (19.05) 1-1/4 (31.75)(b)
20 240 5/8 (15.88) 1-1/8 (28.58) 3/4 (19.05) 1-1/4 (31.75)(b)
22 264 3/4 (19.05) 1-3/8 (34.92) 7/8 (22.22) 1-1/2 (38.1)(c)
24 288 3/4 (19.05) 1-3/8 (34.92) 7/8 (22.22) 1-1/2 (38.1)(c)
26 312 3/4 (19.05) 1-3/8 (34.92) 7/8 (22.22) 1-1/2 (38.1)(c)
28 336 3/4 (19.05) 1-3/8 (34.92) 7/8 (22.22) 1-1/2 (28.1)(c)
30 360 3/4 (19.05) 1-5/8 (41.28) 7/8 (22.22) 1-5/8 (41.28)
32 384 3/4 (19.05) 1 5/8 (41.28) 7/8 (22.22) 1-5/8 (41.28)
34 408 3/4 (19.05) 1 5/8 (41.28) 7/8 (22.22) 1-5/8 (41.28)
36 432 3/4 (19.05) 1 5/8 (41.28) 7/8 (22.22) 1-5/8 (41.28)
(a) If 1 (25.4) pipe is not available on site, use 1 1/8 (28.58) pipe.
(b) If 1-1/4(31.75) pipe is not available on site, use 1 3/8 (34.92) pipe.
(c) If 1-1/2 (38.1) pipe is not available on site, use 1 5/8 (41.28) pipe.
Table 9. Pipe size between branch joints (B)
Indoor unit
total capacity
(MBH)
Branch pipe size (OD) when pipe is
147.6 ft (45 m)
Branch pipe size (OD) when pipe is
147.6–295.3 ft (45–90 m)
Liquid
in. (mm)
Gas
in. (mm)
Liquid
in. (mm)
Gas
in. (mm)
Less than 51 3/8 (9.52) 5/8 (15.88) 1/2 (12.70) 3/4 (19.05)
51-75.9 3/8 (9.52) 3/4 (19.05) 1/2 (12.70) 7/8 (22.22)
76-95.9 3/8 (9.52) 7/8 (22.22) 1/2 (12.70) 1 (25.4)(a)
(a) If 1 (25.4) pipe is not available on site, use 1-1/8 (28.58) pipe.
96-135.9 1/2 (12.70) 1-1/8 (28.58) 5/8 (15.88) 1-1/8 (28.58)
136-153.9 1/2 (12.70) 1-1/8 (28.58) 5/8 (15.88) 1-1/4 (31.75)(b)
(b) If 1-1/4 (31.75) pipe is not available on site, use 1-3/8 (34.92) pipe.
154-239.9 5/8 (15.88) 1-1/8 (28.58) 3/4 (19.05) 1-1/4 (31.75)(b)
240-335.9 3/4 (19.05) 1-3/8 (34.92) 7/8 (22.22) 1-1/2 (38.1)(c)
(c) If 1-1/2 (38.1) pipe is not available on site, use 1-5/8 (41.28) pipe.
336–460.9 3/4 (19.05) 1-5/8 (41.28) 7/8 (22.22) 1-5/8 (41.28)
461–577 3/4 (19.05) 1 5/8 (41.28) 7/8 (22.22) 2-1/8 (53.98)
22 VRF-SVN34A-EN
Refrigerant Piping
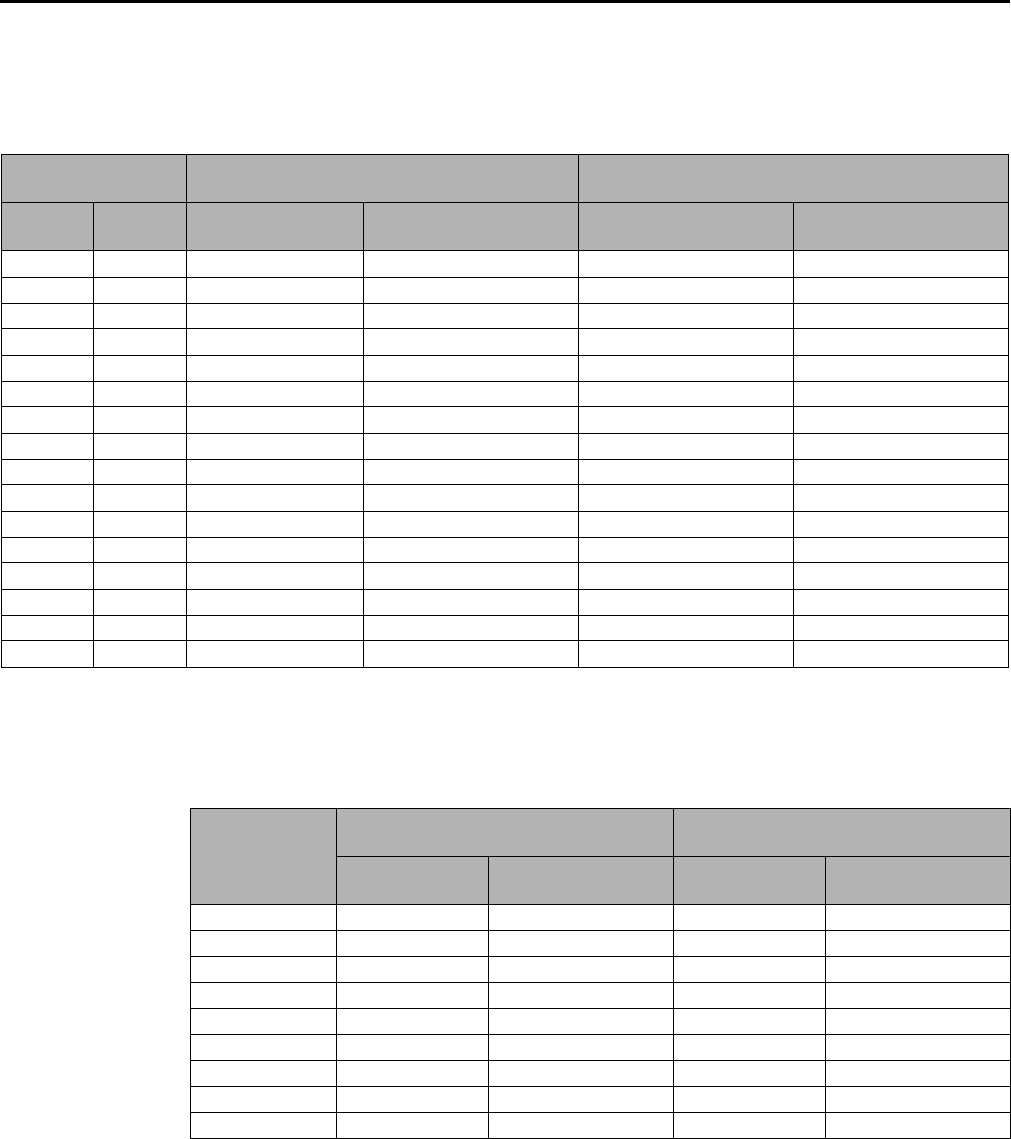
Use Tabl e 10 to determine the size for pipes between branch joints and indoor units. (Refer to F in
Figure 13, p. 32.)
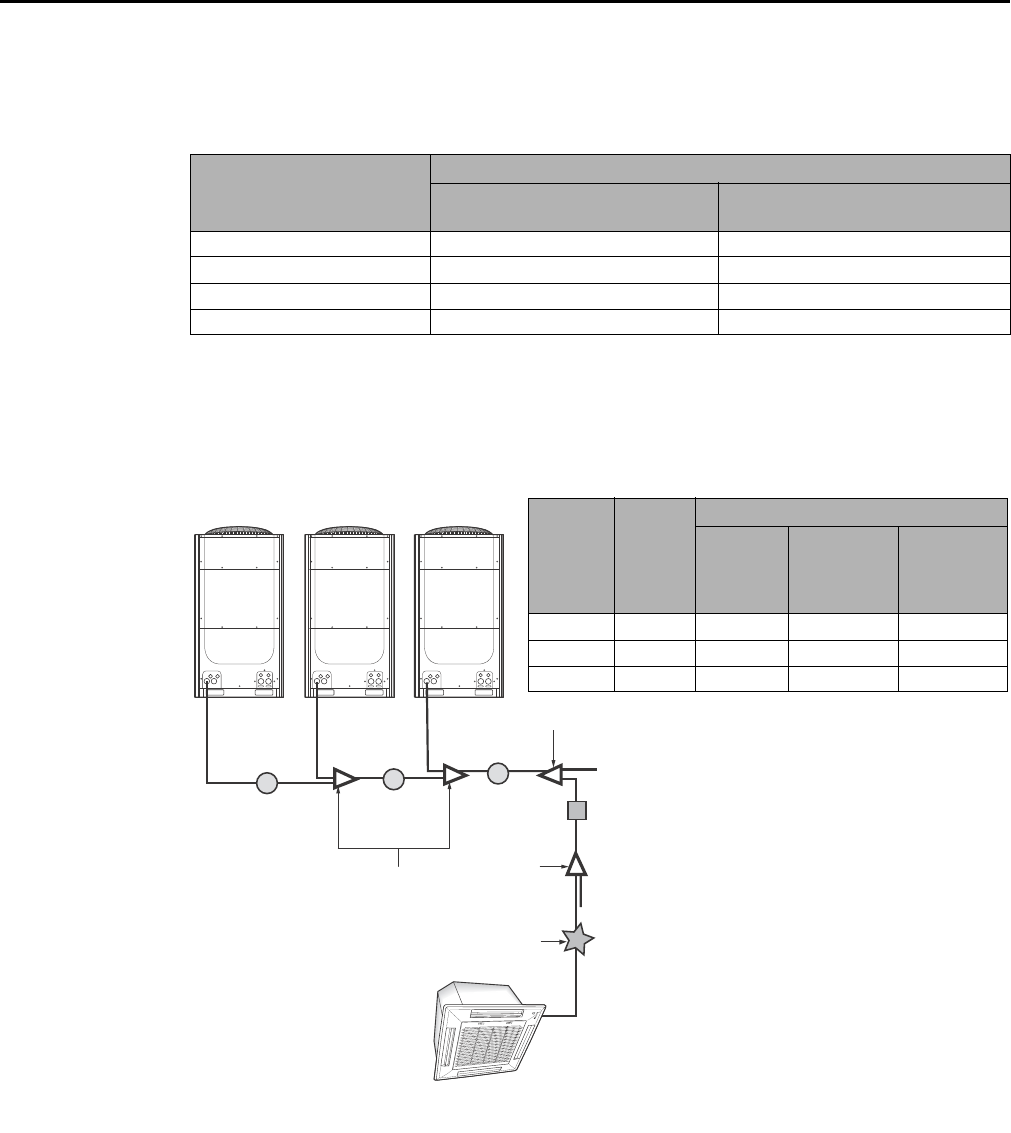
Heat Recovery Applications
The example in Figure 10 shows a 26-ton capacity heat recovery system with pipe diameters
specified.
Figure 10. Heat recovery system example
Table 10. Pipe size between the branch joint and indoor unit (F)
Indoor unit capacity
(MBH)
Pipe size (OD)
Liquid
in. (mm)
Gas
in. (mm)
Less than 20 1/4 (6.35) 1/2 (12.70)
24-52 3/8 (9.52) 5/8 (15.88)
68–78 3/8 (9.52) 3/4 (19.05)
78–96 3/8 (9.52) 7/8 (22.22)
A(2) B
C
A(3)
A(1)
D
E
F
10 ton10 ton 8 ton 8 ton
Outdoor
unit
capacity
(ton)
Pipe A
Pipe size (OD)
Liquid
in. (mm)
Gas
in. (mm)
High-
pressure
gas
in. (mm)
10 A(1) 1/2 (12.70) 1-1/8 (28.58) 7/8 (22.22)
18 A(2) 5/8 (15.88) 1-1/8 (28.58) 1-1/8 (28.58)
26 A(3) 3/4 (19.05) 1-3/8 (34.92) 1-1/8 (28.58)
Key
A(1): Select based on individual outdoor unit capacity (Table 11, p. 23).
A(2): Select based on the sum of outdoor unit capacity behind the first outdoor unit multi-connection (Table 11, p. 23).
A(3): Select based on the sum of outdoor unit capacity before the first branch joint (Table 11, p. 23).
B: Pipes between branch joints (Table 12, p. 23)
C: Outdoor joints between outdoor units (Table 14, p. 24)
D: First branch joint (Table 15, p. 24))
E: Branch joints to indoor units (Table 16, p. 25))
F: Pipes between branch joints and indoor units (Table 13, p. 24)
VRF-SVN34A-EN 23
Refrigerant Piping
Use Ta bl e 11 to determine the size of the main pipes (A in Figure 10, p. 22) based on pipe length.
Use Tabl e 1 2 to determine the size of pipes between branch joints. (Refer to B in Figure 10, p. 22.)
Table 11. Outdoor unit main pipe size based on pipe length (A)
Outdoor unit capacity
Main pipe size (OD)
when pipe length is 295.3 ft (90 m)
Main pipe size (OD)
when pipe length > 295.3 ft (90 m)
Ton MBH
Liquid
in. (mm)
Gas
in. (mm)
High-
pressure gas
in. (mm)
Liquid(a)
in. (mm)
Gas
in. (mm)
High-
pressure gas
in. (mm)
6 72 3/8 (9.52) 3/4 (19.05) 5/8 (22.22) 1/2 (12.70) 3/4 (25.4) 5/8 (22.22)
8 96 3/8 (9.52) 7/8 (22.22) 3/4 (25.4) 1/2 (12.70) 7/8 (22.22) 3/4 (25.4)
10 120 1/2 (12.70) 1-1/8 (28.58) 7/8 (22.22) 5/8 (15.88) 1-1/8 (28.58) 7/8 (22.22)
12 144 1/2 (12.70) 1-1/8 (28.58) 7/8 (22.22) 5/8 (15.88) 1-1/8 (28.58) 7/8 (22.22)
14 168 5/8 (15.88) 1-1/8 (28.58) 7/8 (22.22) 3/4 (19.05) 1-1/8 (28.58) 7/8 (22.22)
16 192 5/8 (15.88) 1-1/8 (28.58) 1-1/8 (28.58) 3/4 (19.05) 1-1/8 (28.58) 1-1/8 (28.58)
18 216 5/8 (15.88) 1-1/8 (28.58) 1-1/8 (28.58) 3/4 (19.05) 1-1/8 (28.58) 1-1/8 (28.58)
20 240 5/8 (15.88) 1-1/8 (28.58) 1-1/8 (28.58) 3/4 (19.05) 1-1/8 (28.58) 1-1/8 (28.58)
22 264 3/4 (19.05) 1-3/8 (34.92) 1-1/8 (28.58) 7/8 (22.22) 1-3/8 (34.92) 1-1/8 (28.58)
24 288 3/4 (19.05) 1-3/8 (34.92) 1-1/8 (28.58) 7/8 (22.22) 1-3/8 (34.92) 1-1/8 (28.58)
26 312 3/4 (19.05) 1-3/8 (34.92) 1-1/8 (28.58) 7/8 (22.22) 1-3/8 (34.92) 1-1/8 (28.58)
28 336 3/4 (19.05) 1-3/8 (34.92) 1-1/8 (28.58) 7/8 (22.22) 1-3/8 (34.92) 1-1/8 (28.58)
30 360 3/4 (19.05) 1-5/8 (41.28) 1-3/8 (34.92) 7/8 (22.22) 1-5/8 (41.28) 1-3/8 (34.92)
32 384 3/4 (19.05) 1-5/8 (41.28) 1-3/8 (34.92) 7/8 (22.22) 1-5/8 (41.28) 1-3/8 (34.92)
34 408 3/4 (19.05) 1-5/8 (41.28) 1-3/8 (34.92) 7/8 (22.22) 1-5/8 (41.28) 1-3/8 (34.92)
36 432 3/4 (19.05) 1-5/8 (41.28) 1-3/8 (34.92) 7/8 (22.22) 1-5/8 (41.28) 1-3/8 (34.92)
(a) Increase the liquid pipe by one size if the pipe length > 295.3 ft (90 m), as specified in this column.
Table 12. Pipe size between branch joints (B)
Indoor unit total
capacity
(MBH)
Branch pipe size (OD)
Liquid
in. (mm)
Gas
in. (mm)
High-pressure gas
in. (mm)
Less than 51 3/8 (9.52) 5/8 (15.88) 5/8 (15.88)
51-75.9 3/8 (9.52) 3/4 (19.05) 5/8 (15.88)
76-95.9 3/8 (9.52) 7/8 (22.22) 3/4 (19.05)
96-114.9 1/2 (12.70) 1-1/8 (28.58) 3/4 (19.05)
115-153.9 1/2 (12.70) 1-1/8 (28.58) 1-1/8 (28.58)
154–171.9 5/8 (15.88) 1-1/8 (28.58) 1-1/8 (28.58)
172-239.9 5/8 (15.88) 1-1/8 (28.58) 1-1/8 (28.58)
240-335.9 3/4 (19.05) 1-3/8 (34.92) 1-1/8 (28.58)
336–359.9 3/4 (19.05) 1-5/8 (41.28) 1-1/8 (28.58)
360–460.9 3/4 (19.05) 1 5/8 (41.28) 1-3/8 (34.92)
461–577 3/4 (19.05) 1 5/8 (41.28) 1-3/8 (34.92)
24 VRF-SVN34A-EN
Refrigerant Piping
Use Ta ble 13 to determine the size for the pipes between branch joints and indoor units. (Refer to
F in Figure 10, p. 22.)
Identifying Branch Joints
Use Ta bl e 14, Tabl e 15 , and Tab l e 1 6 to identify branch joint models.
Note: High-pressure Y-joints are for heat recovery outdoor unit models only, as noted in each
table.
Use Ta bl e 15 to select the first branch joint according to outdoor unit capacity. (Refer to D in
Figure 9, p. 20 (heat pump) or Figure 10, p. 22 (heat recovery.)
Table 13. Pipe size between the branch joint and indoor unit (F)
Indoor unit capacity (MBH)
Pipe size (OD)
Liquid
in. (mm)
Gas
in. (mm)
Less than 20 1/4 (6.35) 1/2 (12.70)
24-52 3/8 (9.52) 5/8 (15.88)
68–78 3/8 (9.52) 3/4 (19.05)
78–96 3/8 (9.52) 7/8 (22.22)
Table 14. Branch joint between outdoor units (C)
Branch joint between outdoor units (C) Model
Y-joint 4TDK3819B0000A
High-pressure gas Y-joint (for heat recovery models) 4TDK3100B0000A
Table 15. First branch joint according to outdoor unit capacity (D)
First branch joint (D)
Outdoor unit
capacity
(ton) Model
Y-joint
6, 8, 10 4YDK2512B0138A
12 4YDK2812B0160A
14, 16, 18, 20 4YDK2815B0240A
22, 24, 26, 28 4YDK3419B0336A
30, 32, 34, 36 4YDK4119B0468A
High-pressure gas Y-joint (for heat recovery models)
6 4YDK1500B0080A
8–20 4YDK2500B0240A
22–36 4YDK3100B0468A
VRF-SVN34A-EN 25
Refrigerant Piping
Use Ta bl e 16 to select the branch joints connected after the first branch, according to the total
capacity of all indoor units connected after the branch. (Refer to E in Figure 9, p. 20 (heat pump) or
Figure 10, p. 22 (heat recovery).)
Pipe Minimum Thickness and Temper Grade Based on Pipe Size
Ta bl e 17 specifies thickness and temper grade based on pipe diameter.
Table 16. Branch joints connected after the first branch, according to total indoor unit capacity (E)
Branch joints after the first branch (E)
Total indoor unit
capacity (MBH) Model
Y-joint
Less than 51 4YDK1509B0051A
51—135.9 4YDK2512B0138A
136—153.9 4YDK2812B0160A
154—239.9 4YDK2815B0240A
240—335.9 4YDK3419B0336A
336—460.9 4YDK4119B0468A
461 and over 4YDK4422B0999A
High-pressure gas Y-joint (for heat recovery models)
Less than 76 4YDK1500B0080A
76—239.9 4YDK2500B0240A
240—461 4YDK3100B0468A
CAUTION
Risk of Pipes Breaking!
If pipes with a diameter larger than 3/4 in. (19.05 mm) are specified, use semi-hard (C1220T-
1/2H) or hard (C1220T-H) copper piping. If a softer copper pipe (C1220T-O) is used, the pipe may
break due to its low pressure resistance and cause personal injury.
Table 17. Refrigerant pipe minimum thickness and temper grade
Outer diameter
in. (mm)
Minimum thickness
in. (mm) Temper grade
1/4 (6.35) 0.028 (0.70)
Annealed
(C1220T-O)
3/8 (9.52) 0.028 (0.70)
1/2 (12.70) 0.031 (0.80)
5/8 (15.88) 0.039 (1.00)
3/4 (19.05) 0.035 (0.9)
Drawn
(C1220T-1/2H or C1220T-H)
7/8 (22.22) 0.035 (0.9)
1 (25.40) 0.039 (1.0)
1-1/8 (28.58) 0.043 (1.1)
1-1/4 (31.75) 0.043 (1.1)
1-3/8 (34.92) 0.048 (1.35)
1-1/2 (38.10) 0.053 (2.0)
1-5/8 (41.28) 0.056 (1.43)
1-3/4 (44.45) 0.063 (2.10)
2 (50.80) 0.079 (2.00)
2-1/8 (53.98) 0.083 (2.10)
26 VRF-SVN34A-EN
Refrigerant Piping
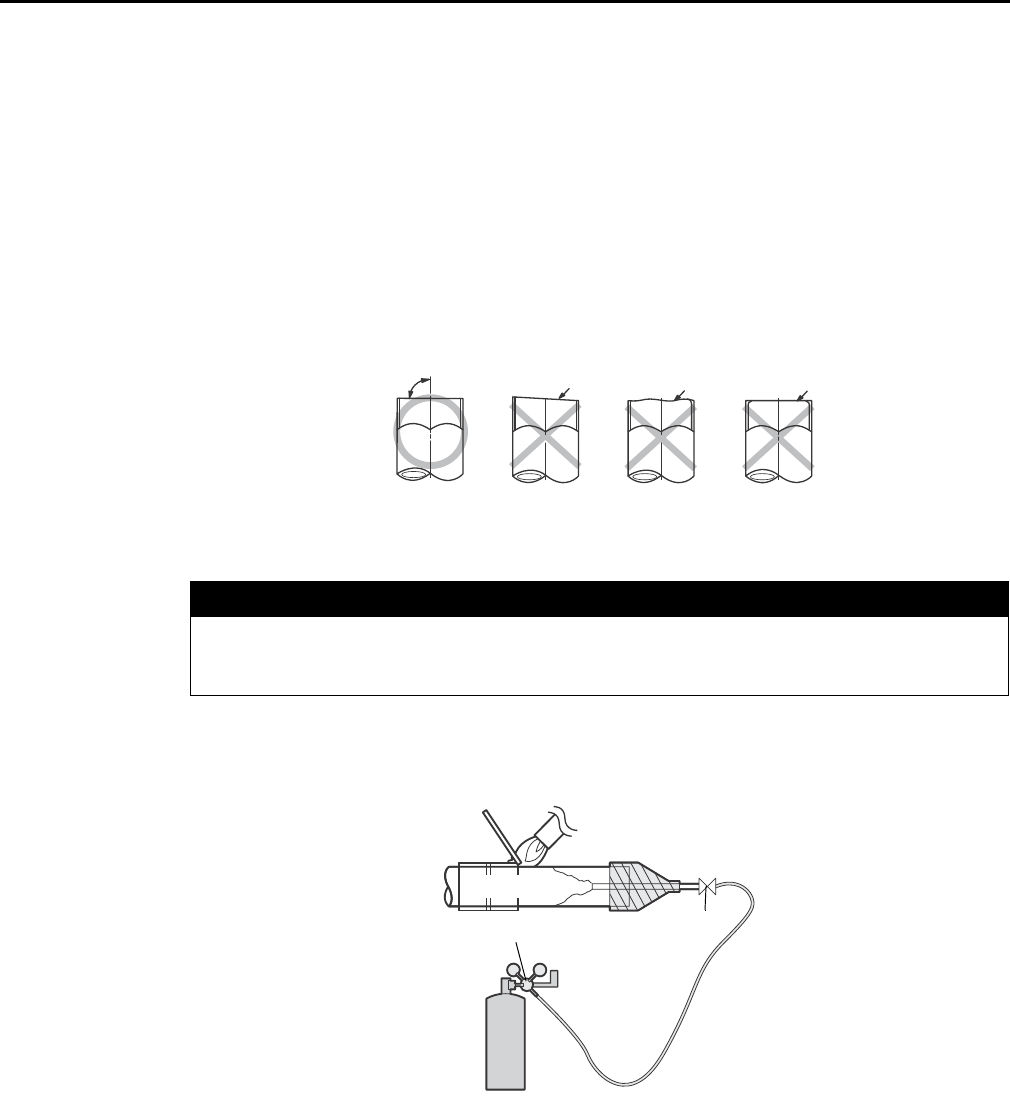
Storing Refrigerant Piping
To prevent foreign materials or water from entering the pipe, storing method and sealing method
(especially during installation) is very important. Apply correct sealing method depending on the
environment (see Tabl e 1 8).
Evacuating Refrigerant
The outdoor unit ships with the following amount of refrigerant. Evacuate the unit of all ship-with
refrigerant before installing refrigerant piping.
Installing Refrigerant Piping
Overview
1. Cut or extend field-supplied piping as needed. To extend pipes, braze or using flared pipe
connections (not supplied). Refer to “Pipe Cutting” p. 27, “Nitrogen Flushing While Brazing”
p. 27, and “Flared Pipe Connections” p. 28.)
2. Make sure that pipes are free of dirt, debris, and moisture, and do not leak. (Refer to “Leak
Testing Pipe Connections” p. 45).
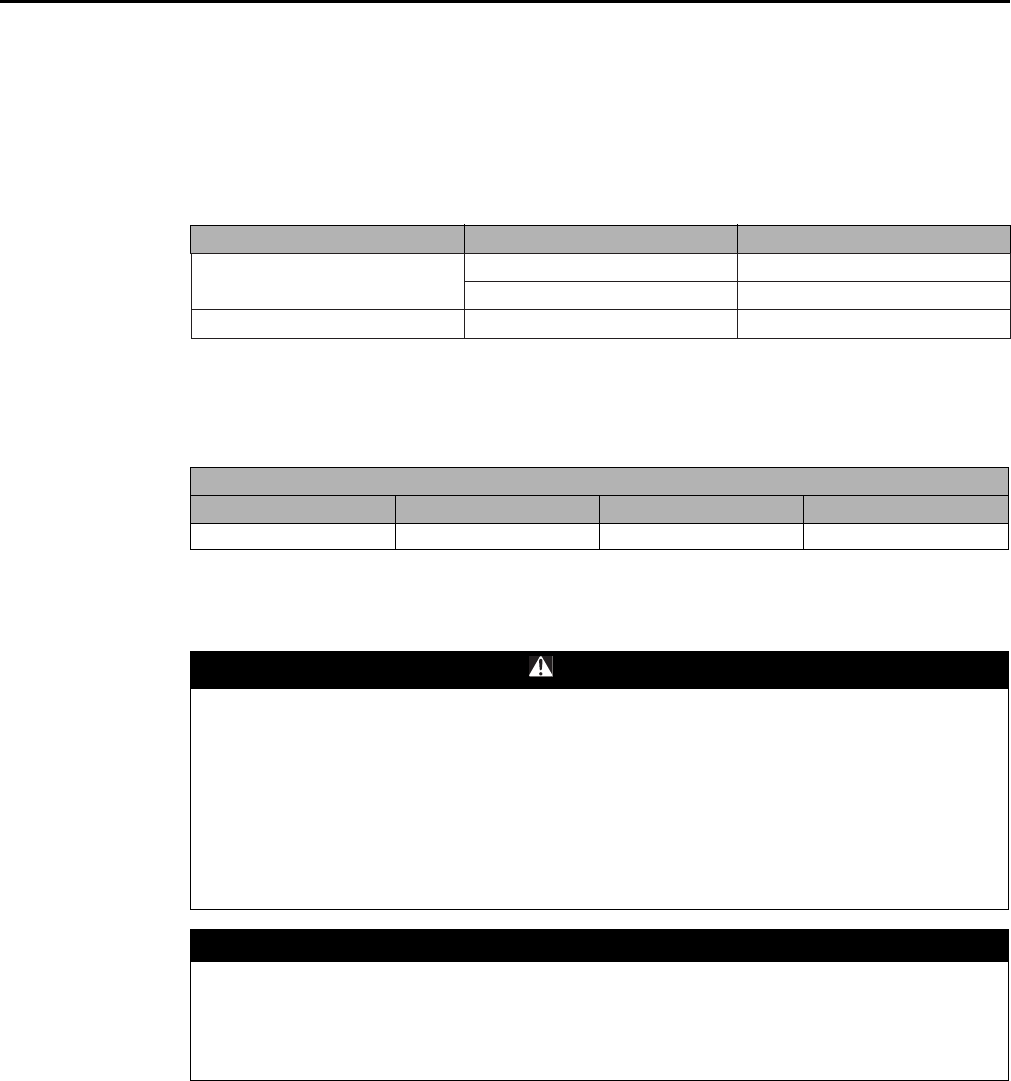
Table 18. Refrigerant pipe storage factors
Storage location
Storage
time
Sealing
type
Outdoor
Longer than one
month
Pipe
pinch
Shorter than one
month Taping
Indoor — Taping
Ship-with refrigerant amount by unit type
6 ton unit 8 ton unit 10 ton unit 12 ton unit
12.1 lbs 16.3 lbs 16.3 lbs 19.2 lbs
WARNING
Hazard of Explosion and Deadly Gases!
Failure to follow all proper safe refrigerant handling practices could result in death or serious
injury. Never solder, braze or weld on refrigerant lines or any unit components that are above
atmospheric pressure or where refrigerant may be present. Always remove refrigerant by
following the guidelines established by the EPA Federal Clean Air Act or other state or local
codes as appropriate. After refrigerant removal, use dry nitrogen to bring system back to
atmospheric pressure before opening system for repairs. Mixtures of refrigerants and air under
pressure may become combustible in the presence of an ignition source leading to an
explosion. Excessive heat from soldering, brazing or welding with refrigerant vapors present
can form highly toxic gases and extremely corrosive acids.
NOTICE:
System Component Damage!
Do not remove the seal caps from refrigerant connections, or open the service valves until
prepared to braze refrigerant lines to the connections. Excessive exposure to atmosphere (> 5
min.) may allow moisture or dirt to contaminate the system, damaging valve seals and causing
ice formation in system components.
VRF-SVN34A-EN 27
Refrigerant Piping
3. Braze or use flared pipe connections to install piping. Refer to “Connecting Piping to the
Outdoor Unit” p. 29) and to “Connecting Branch Joints” p. 30.
Pipe Cutting
Required tools:
•Pipe cutter
•Reamer
• Pipe holder
1. Using a pipe cutter, cut the pipe so that the cut edge is at 90° to the side of the pipe.
2. Use a reamer to remove all burrs at the cut edge.
See examples of correctly and incorrectly cut pipes.
Nitrogen Flushing While Brazing
While brazing refrigerant pipes, flush them with nitrogen gas. Use a pressure regulator to maintain
a flow rate of 1.76 ft3/h (0.05 m3/h) or more.
Figure 11. Nitrogen flushing while brazing refrigerant pipes
Correct: 90º Oblique Rough Burr
NOTICE
Avoid Unit Damage!
Never braze pipe connections without performing nitrogen flushing. Failure to perform this
procedure will damage the unit, resulting in capacity loss and reduced long-term reliability.
Flowmeter
Pressure regulator
Stop valve
Nitrogen
Nitrogen
28 VRF-SVN34A-EN
Refrigerant Piping
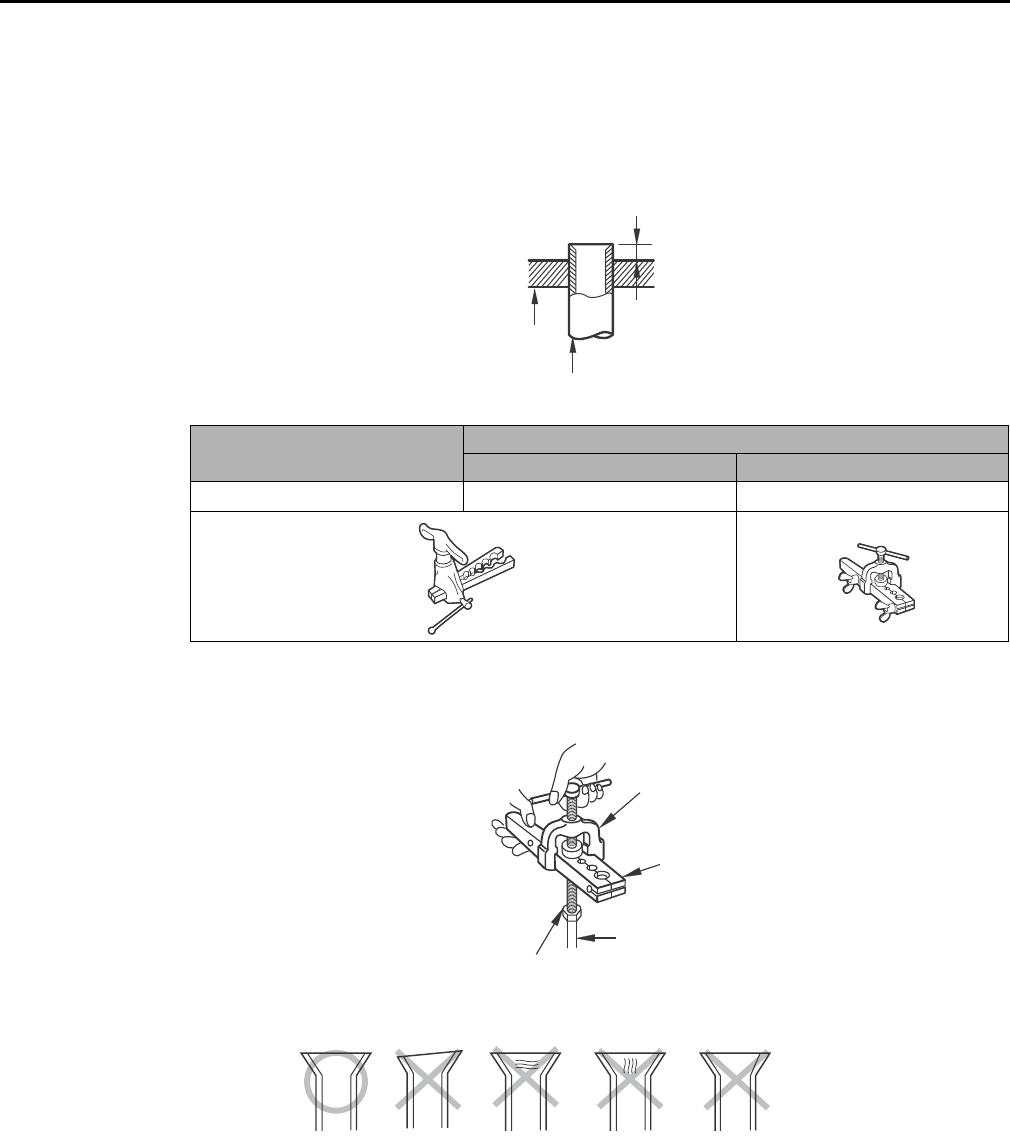
Flared Pipe Connections
Clutch type and wing nut type flare tools are available for flared pipe connections.
1. Slide the flare nut over the pipe to be flared.
2. Slide the end of the pipe into the hole on the flaring bar that fits the pipe, leaving a length of
pipe, determined by tool type (see table), extending above the flaring bar. Clamp it down.
3. Attach the yoke to the flaring bar, centering the conical part over the end of the pipe that is
extending above the flaring bar.
4. Tighten the yoke securely to flare the end of the pipe.
5. Remove the pipe. The end of the pipe that you flared should look like the end of a trumpet. See
examples of correctly and incorrectly flared pipes.
R-410A clutch type Conventional flare tool
Clutch type Wing nut type
0–0.020 in. 0.04–0.06 in. 0.06–0.08 in.
Length of pipe extending above flare bar
Pipe
Flaring
bar
Yoke
Flaring bar
Copper pipe
Flare nut
Inclined Damaged
surface
Uneven
thickness
Correct Cracked
VRF-SVN34A-EN 29
Refrigerant Piping
6. Align the pipes and tighten the flare nuts manually and then with a spanner torque wrench,
applying the torque according to pipe dimensions:
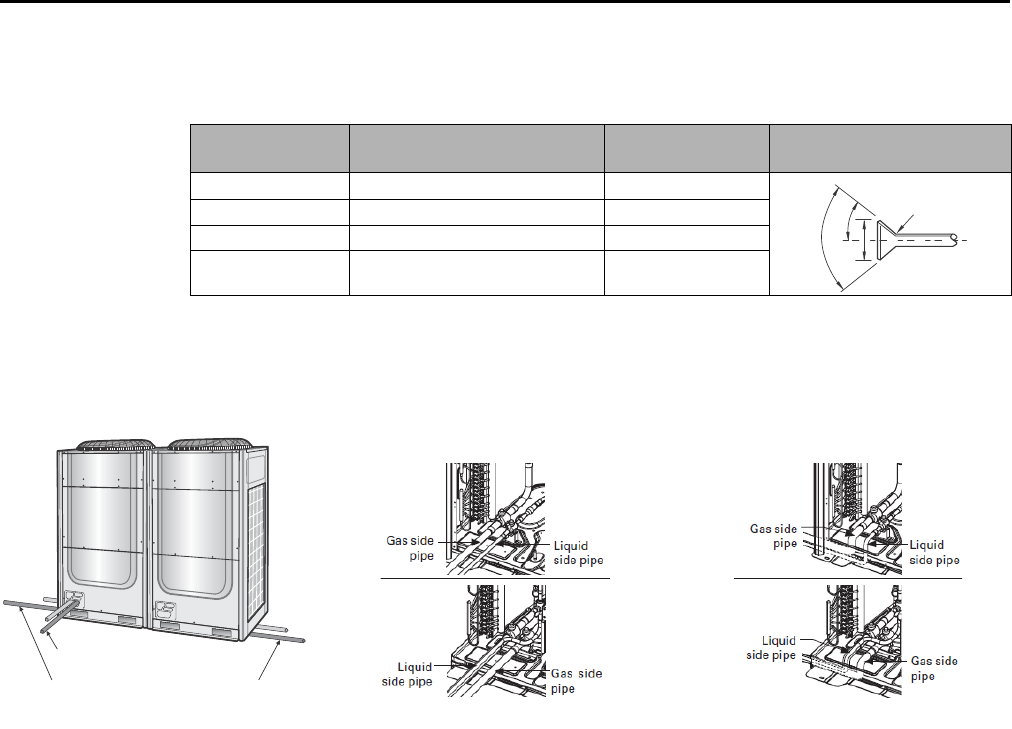
Connecting Piping to the Outdoor Unit
Important: Ensure that all pipe connections are accessible for servicing and maintenance.
Pipes can be connected to the outdoor unit at the front, bottom left, or bottom right of the unit, as
shown in the following figure:
1. Remove the pipe cover from the outdoor unit.
2. Remove knock-outs from only the holes that you are going to use. Unused holes should remain
closed to prevent damage to the unit.
•Take care to prevent damage to the exterior of the unit.
•Remove burrs from knock-out hole edges and apply rust inhibitor.
3. Connect the pipes to the outdoor unit using flared connections or by brazing. If brazing the pipe
connection, avoid damaging the service valve by wrapping it with a wet cloth as shown in
Figure 12, p. 30.
•Avoid damaging the temperature sensor.
•Ensure that the connected pipes do not touch each other or make contact with the unit.
4. After making electrical connections (see “Electrical Wiring” p. 37) and insulating the pipes (see
“Insulating Refrigerant Pipes” p. 48), replace the pipe cover and close the remaining gap.
Outer diameter
in. (mm)
Connection
torque (ft·lb)
Flare dimension
(in.) Flare shape (in.)
1/4 (6.35) 10.3–13.3 ft·lb 0.34–0.36
3/8 (9.52) 25.1–31.0 ft·lb 0.50–0.52
1/2 (12.70) 36.1–45.0 ft·lb 0.64–0.65
5/8 (15.88) 50.2–60.5 ft·lb 0.76–0.78
R.016–.031
45°±2°
90°±2°
Left side Right side
Front side
Pipe connections
Heat pump
Heat recovery

30 VRF-SVN34A-EN
Refrigerant Piping
Figure 12. Protecting the unit and temperature sensor while brazing the pipe connection
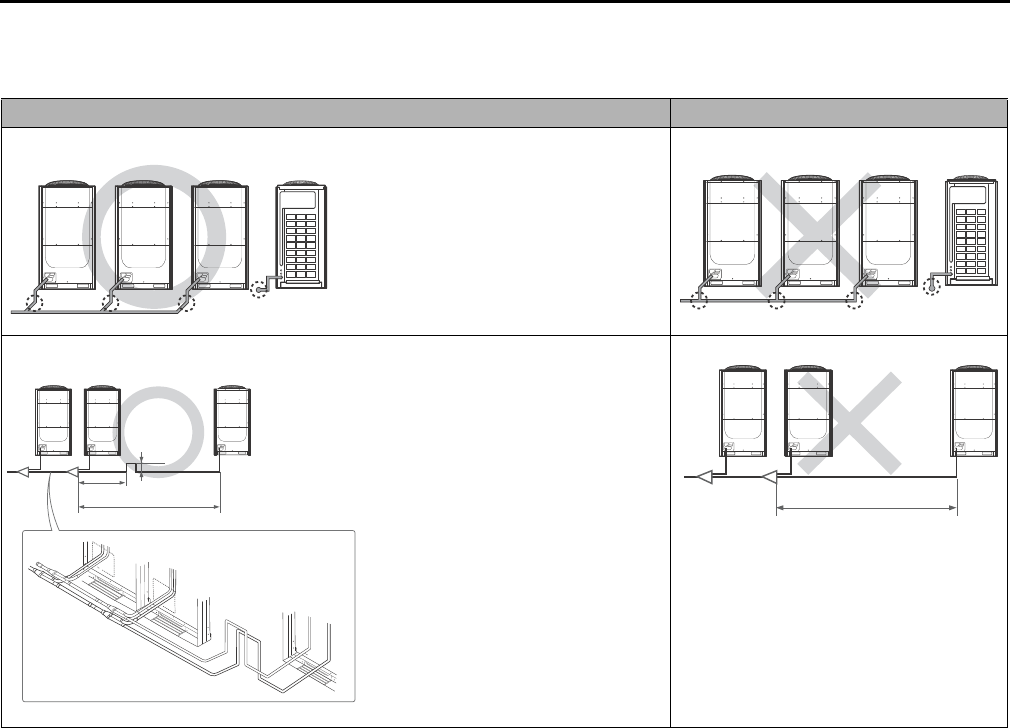
Connecting Branch Joints
Important: Ensure that all pipe connections are accessible for servicing and maintenance. For
optimal refrigerant distribution, use only factory joints.
Install outdoor joints as needed to connect multiple outdoor units to one another and Y-joints
connect the outdoor unit(s) to indoor units. See the branch joint installation manual (VRF-SVN41)
for details.
Note: Outdoor units can be installed in any order.
Damp towel
Damp towel
Table 19. Connecting outdoor units with branch joints
Correct installation Incorrect installation
Refrigerant pipes must be connected in parallel with the unit.
Branch joint should be
connected at the same or lower
level as the refrigerant pipes
leaving the outdoor unit.
Unit straight section should
be 12 in. (300 mm)
VRF-SVN34A-EN 31
Refrigerant Piping
Branch joints between outdoor units must be installed horizontally.
Table 19. Connecting outdoor units with branch joints (continued)
Correct installation Incorrect installation
8–12 in. (200–300 mm)
6.56 ft (2 m)
3.3 ft (1 m)
If the piping length between the outdoor
unit and the branch joint exceeds 6.56 ft
(2 m), install a vertical trap that is 8–12 in.
(200-300 mm) high.
32 VRF-SVN34A-EN
Refrigerant Piping
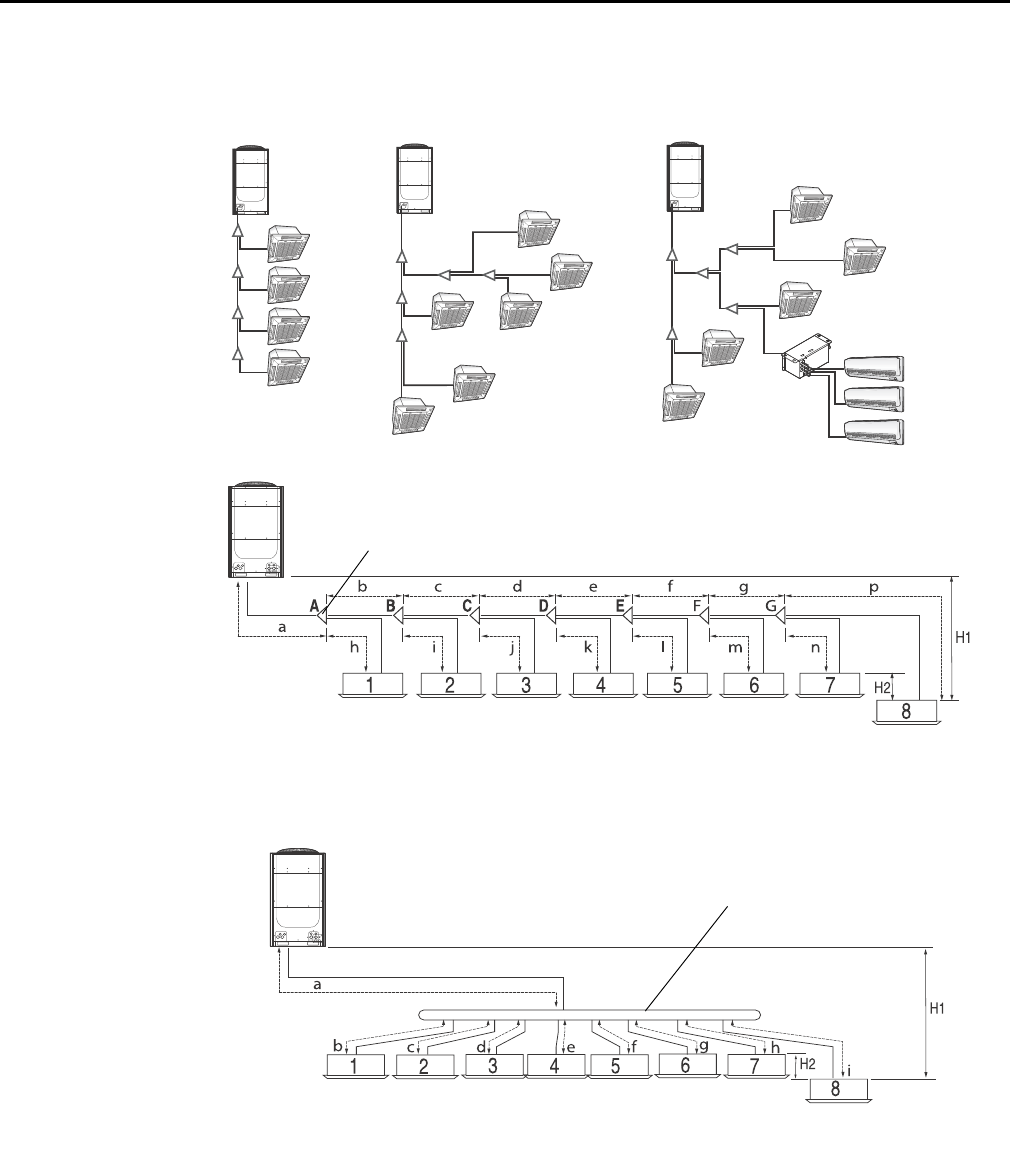
Refrigerant Piping Installation Examples: Heat Pump
Figure 13. Single installation with Y-joint: Heat pump
Figure 14. Single installation with distribution header: Heat pump
Outdoor unit
Indoor units
Y-joint
Outdoor unit
Distribution header
Indoor units

VRF-SVN34A-EN 33
Refrigerant Piping
Figure 15. Single installation with Y-joint and distribution header: Heat pump
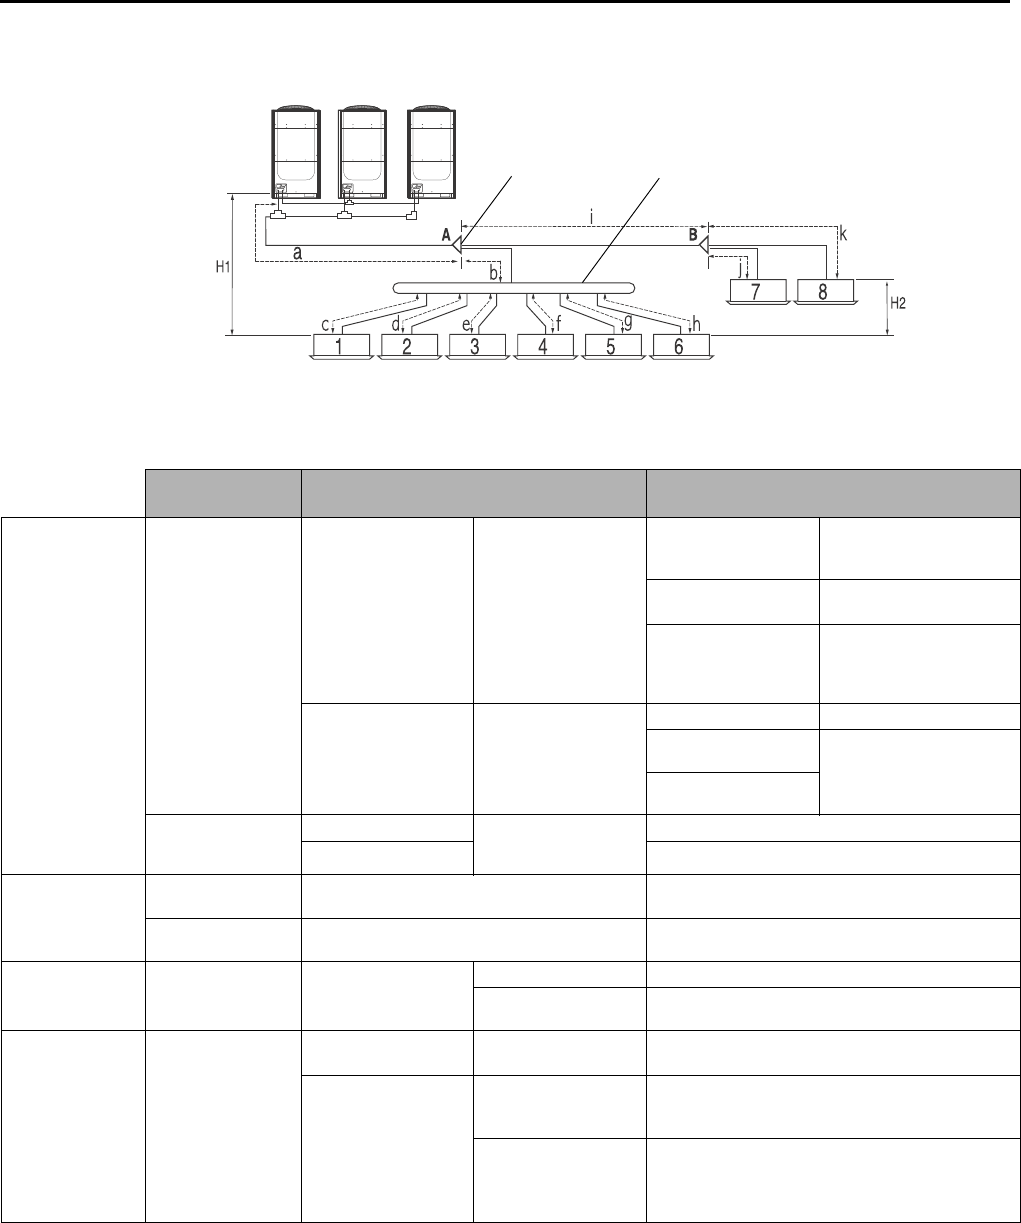
Figure 16. Module installation with Y-joint: Heat pump
Figure 17. Module installation with distribution header: Heat pump
Outdoor unit
Indoor units
Y-joint Distribution header
Outdoor units
Y-joint
Indoor units
Outdoor units Distribution header
Indoor units
34 VRF-SVN34A-EN
Refrigerant Piping
Figure 18. Module installation with Y-joint and distribution header: Heat pump
Outdoor units
Distribution header
Indoor units
Y-joint
Table 20. Maximum allowable refrigerant piping length and height differences for heat pump installations
Piping location
Piping length and height differences
(ft [m]) Notes/Examples
Maximum
allowable piping
length
Outdoor unit to
indoor unit
Actual length
[equivalent length](a)
656 ft (200 m) and
below
[722 ft (220 m) and
below]
Y-joint only
a+b+c+d+e+f+g+p ≤656
[722] ft
(200 [220] m)
Distribution header
only
a+i ≤ 656 [722] ft
(200 [220] m)
Y-joint and distribution
header
a+b+h ≤ 656 [722] ft (200
[220] m
a+i+k ≤ 656 [722] ft (200
[220] m
Total piping length 3281 ft (1000 m) or
less
Y-joint only
Distribution header
only a+b+c+d+e+f+g+p+h+i
≤3281 ft (1000 m)
Y-joint and distribution
header
Between outdoor
units (module
installation)
piping length
33 ft (10 m) or less
r ≤ 33 ft (10 m), s ≤ 33 ft (10 m), t ≤ 33 ft (10 m)
Equivalent length r ≤ 43 ft (13 m), s ≤ 43 ft (13 m), t ≤ 43 ft (13 m)
Maximum
allowable piping
height difference
Outdoor unit to
indoor unit 361/131 ft (110/40 m)(b) H1 ≤ 164/131 ft (50/40 m)
Indoor unit to indoor
unit 164 ft (50 m) or less H2 ≤ 164 ft (50 m)
Maximum length
after branch joint
First branch joint to
farthest indoor unit piping length
148 ft (45 m) or less b+c+d+e+f+g+p ≤ 148 ft (45 m), i ≤ 148 ft (45 m)
(148–295 ft (45–90 m) Required conditions must be satisfied (see Table 21,
p. 35)
Electronic
expansion valve
(EEV) kit(c)
Actual piping length
6.6 ft (2 m) or less 4EEVEVA24SA000
4EEVEVA32SA000 For 1 indoor unit
66 ft (20 m) or less
4EEVXDA24K132A
4EEVXDA24K200A
4EEVXDA32K200A
For 2 indoor units
4EEVXDA24K232A
4EEVXDA24K300A
4EEVXDA32K224A
4EEVXDA32K300A
For 3 indoor units
(a) Equivalent length Y-joint: 1.64 ft (0.5 m); distribution header: 3.28 ft (1 m).
(b) If the indoor unit is at a higher level than outdoor unit, the allowable height difference is 131 ft (40 m). If the indoor unit is located at a lower level than
the outdoor unit, the allowable height difference is 361 ft (110 m). If the height difference exceeds 164 ft (50 m), request engineering support from Trane.
(c) Required for indoor units that do not have internal EEVs. Refer to the EEV kit installation guide (VRF-SVN43) for detailed information.
VRF-SVN34A-EN 35
Refrigerant Piping
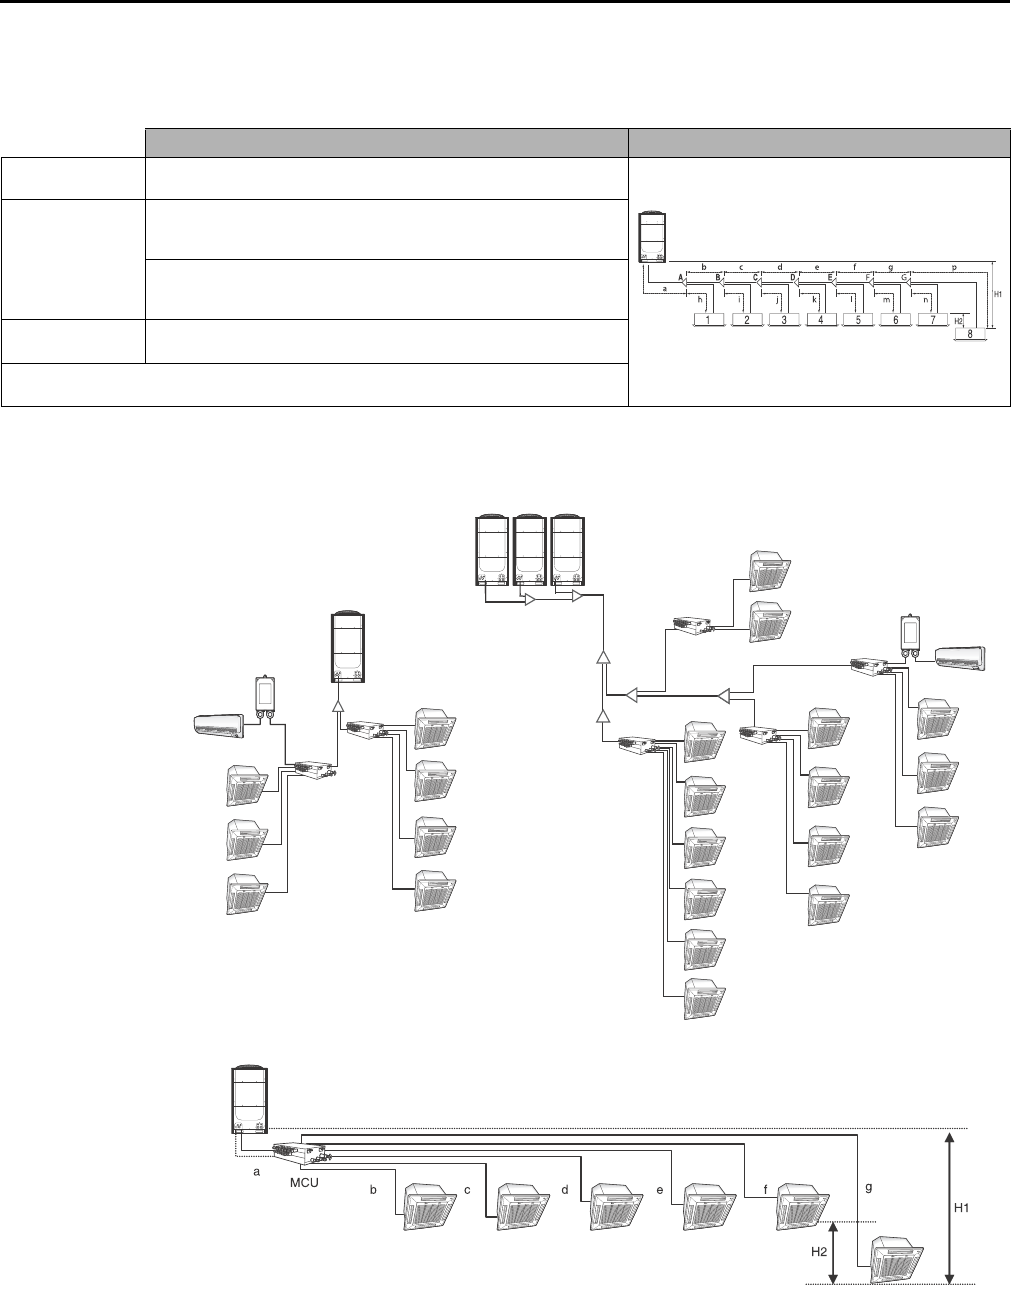
Refrigerant Piping Installation Examples: Heat Recovery
Figure 19. Installation with Y-joints: Heat recovery
Figure 20. Installation with MCU: Heat recovery
Table 21. Required condition (note toTable 20, p. 34)
Condition Example
First branch joint to
farthest indoor unit
148 ft (45 m) ≤ b+c+d+e+f+g+p ≤ 295 ft (90 m): branch pipes (b,
c, d, e, f, g) size must be increased by 1 size
Total length of
extended pipe
If the size of the pipe between the first branch joint and the outdoor
unit is not increased by 1 size,
a+(b+c+d+e+f+g)x2+h+i+k+l+m+n+p ≤ 3281 ft (1000 m)
If the size of the pipe between the first branch joint and the outdoor
unit is increased by 1 size, a+(b+c+d+e+f+g)x2+h+i+k+l+m+n+p
> 3281 ft (1000 m)
Each Y-joint to
each indoor unit h, i, j, ... p ≤ 148 ft (45 m)
Difference between [the distance of the outdoor unit to the farthest indoor unit] and the
nearest indoor unit and ≤148 ft (45 m), (a+b+c+d+e+g+p) ≤ 148 ft (45 m)
4MCUCUY4NCE000
4MCUCUY4NCE000
4MCUCUY4NCE000
4MCUCUY4NCE000
4MCUCUY4NCE000
4MCUCUY4NCE000
36 VRF-SVN34A-EN
Refrigerant Piping
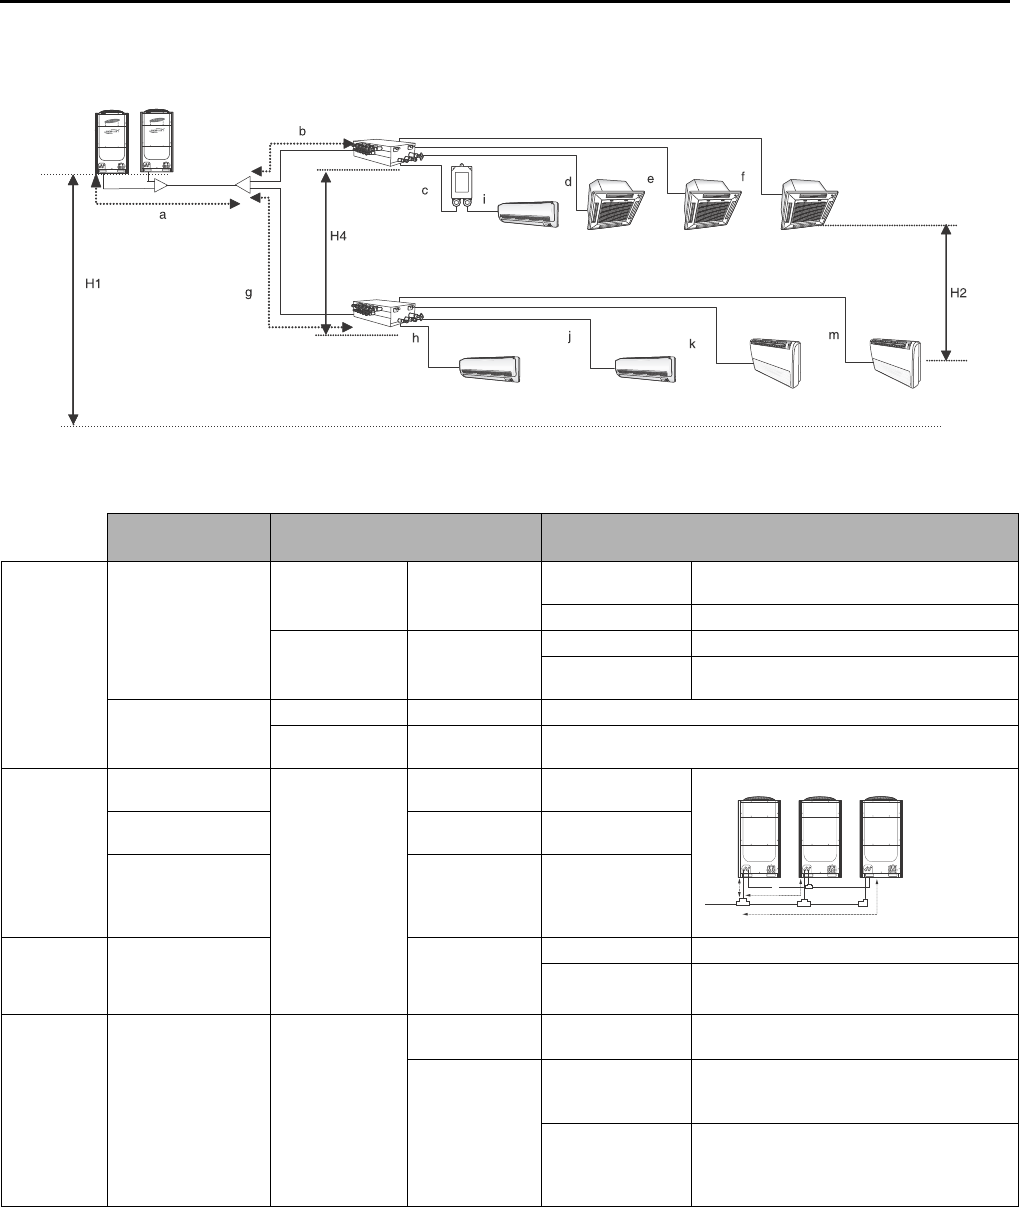
Figure 21. Installation with MCU and Y-joint: Heat recovery
Table 22. Maximum allowable refrigerant piping length and height differences for heat recovery installations
Piping location
Piping length and height
differences Notes/Examples
Maximum
allowable
piping
length
Outdoor unit to indoor
unit
Piping [equivalent
length](a)
656 [722] ft
(200 [220] m)
MCU only a+b+c+d+e+f+g ≤ 256 [722] ft (200
[220] m)
Y-joint and MCU a+g+m ≤ 656 [722] ft (200 [220] m)
Total piping length 3281 ft (1000 m)
MCU only a+b+c+d+e+f+g ≤ 3281 ft (1000 m)
Y-joint and MCU a+b+c+d+e+f+g+p+h+i+j+k+m ≤ 3281 ft
(1000 m)
Between outdoor
units (module
installation)
Piping length 33 ft (10 m) r ≤ 33 ft (10 m), s ≤ 33 ft (10 m), t ≤ 33 ft (10 m)
Equivalent piping
length 43 ft (13 m) r ≤ 43 ft (13 m), s ≤ 43 ft (13 m), t ≤ 43 ft (13 m)
Maximum
allowable
piping
height
difference
Outdoor unit to indoor
unit
Piping
361 [131] ft
(110 [40] m)(b)
H1 ≤ 361 [131] ft
(110 [40] m)
Indoor unit to indoor
unit 49 ft (15 m) H2 ≤ 49 ft (15 m)
MCU to MCU 49 ft (15 m) H4 ≤ 49 ft (15 m)
Maximum
allowable
length after
branch joint
First branch joint to
farthest indoor unit 148 ft (45 m)
MCU only 148 ft (45 m)
Y-joint and MCU g+m ≤ 148 ft (45 m)
Electronic
expansion
valve (EEV)
kit(c)
Indoor unit Actual piping
length
6.6 ft (2 m) or less 4EEVEVA24SA000
4EEVEVA32SA000 For 1 indoor unit
66 ft (20 m) or
less
4EEVXDA24K132A
4EEVXDA24K200A
4EEVXDA32K200A
For 2 indoor units
4EEVXDA24K232A
4EEVXDA24K300A
4EEVXDA32K224A
4EEVXDA32K300A
For 3 indoor units
(a) Equivalent piping length—Y-joint: 1.64 ft (0.5 m); distribution header: 3.28 ft (1 m); MCU: 3.28 ft (1 m).
(b) If the indoor unit is at a higher level than outdoor unit, the allowable height difference is 131 ft (40 m). If the indoor unit is located at a lower level than
the outdoor unit, the allowable height difference is 361 ft (110 m). If the height difference exceeds 164 ft (50 m), request engineering support from Trane.
(c) Required for indoor units that do not have built-in EEVs. Refer to the EEV kit installation guide (VRF-SVN43) for detailed information.
t
s
r
VRF-SVN34A-EN 37
Electrical Wiring
Electrical Wiring
Observe the following precautions when making electrical connections.
• Make all electrical connections in accordance with electrical codes and ordinances.
• Multi-pole circuit breaker or disconnect is required to fully isolate the unit from all power.
• Install circuit breakers/disconnects in accordance with local and national codes.
• Select the power cable in accordance with relevant local and national regulations.
• Power cable specifications are based on the following conditions: underground/ambient
temperature of 86ºF (30ºC), single multi-conductor cables.
Note: If conditions are different from these, consult an electrical installation expert and re-
select the power cable. If the length of power cable exceeds 164.04 ft (50 m), re-select
the power cable considering the voltage drop.
• Use a power cable made out of incombustible material for the insulator (inner cover) and the
sheath (outer cover).
• All wiring must be protected from weather and damage.
• Do not use power cable that has exposed wire.
• Do not disconnect or change the factory wiring inside the unit.
• Provide strain relief for power and communication cables.
• Unbalanced power must be maintained within 10% of supply rating among all indoor units or
the unit will stop and an error code will be generated. (Significantly unbalanced power may
shorten the life of the system.)
• Maintain a distance of 2 in. (50 mm) or more between power and communication cables to
prevent interference.
WARNING
Hazardous Voltage!
Disconnect all electric power, including remote disconnects before servicing. Follow proper
lockout/tagout procedures to ensure the power can not be inadvertently energized. Failure to
disconnect power before servicing could result in death or serious injury.
NOTICE
Use Copper Conductors Only!
Unit terminals are not designed to accept other types of conductors. Failure to use copper
conductors could result in equipment damage.
38 VRF-SVN34A-EN
Electrical Wiring
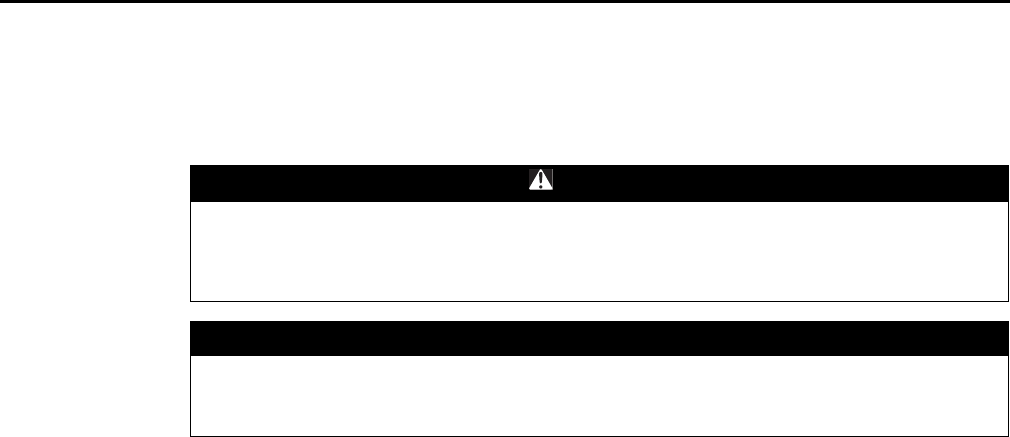
Figure 22. Typical system installation wiring
Outdoor unit (main) Outdoor unit (sub)
Ground
Power cable Power cable
Power cable
Communication
cable between
outdoor units
Communication between
outdoor units
circuit
breaker or
disconnect
Communication between
Ground Ground
outdoor and indoor units
Communication between
outdoor and indoor units
Power cable
Indoor unit
Indoor unit
Indoor unit
Ground
Ground
Ground
Outdoor unit (sub)
circuit
breaker or
disconnect
circuit
breaker or
disconnect
circuit
breaker or
disconnect
Wired
remote
controller
Wired
remote
controller
Wired
remote
controller
Power cable
Communication cable
Ground cable
Detail of cable knock-outs
See Figure 23,
p. 40 for details
Notes:
• Remove burrs from the knock-out hole.
• Use cable conduit and bushing to prevent cables from being damaged when passing
through the knock-out holes.
• Apply rust-resistant paint around the knock-out hole.
VRF-SVN34A-EN 39
Electrical Wiring
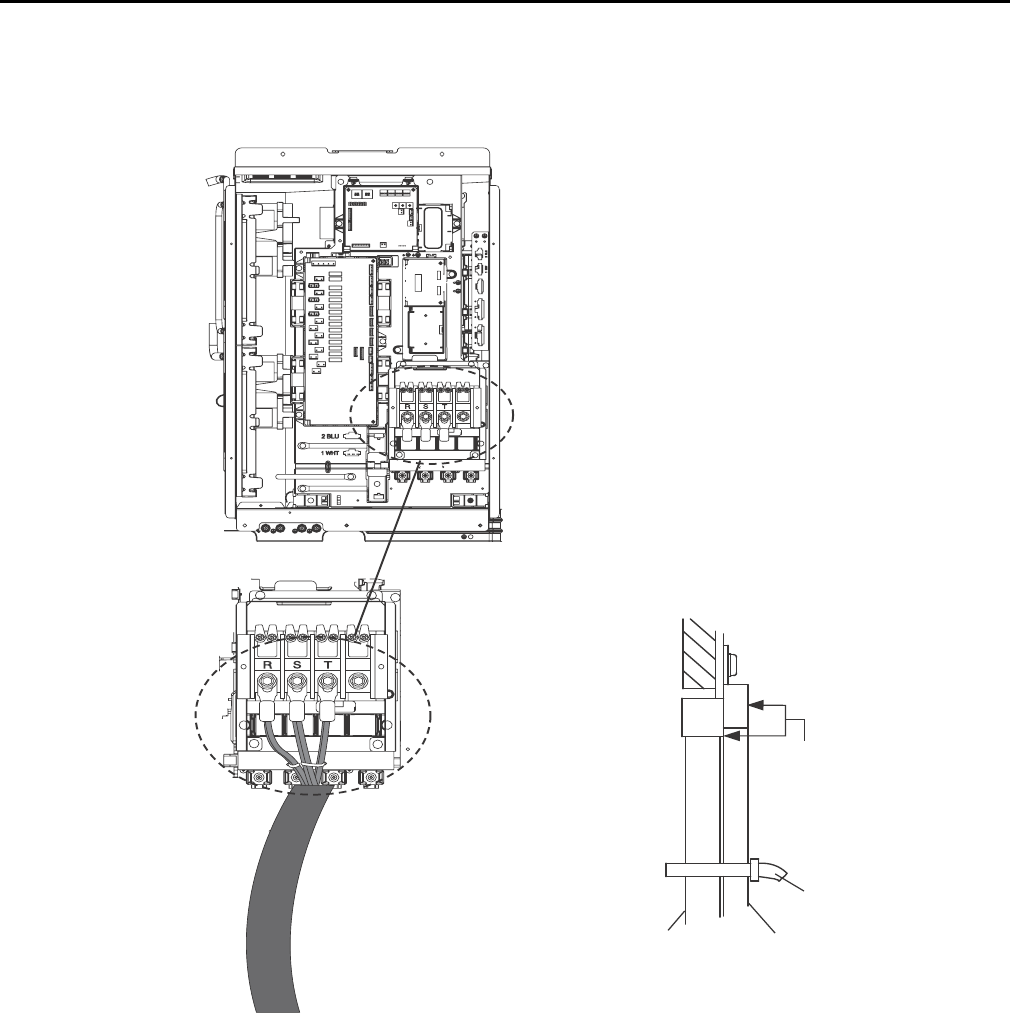
Power Wiring
Follow this procedure:
1. Refe r to Table 24 and Table 25, p. 41 for power cable and circuit breaker specifications. Refer to
Table 23, p. 39 for conduit specifications.
2. Cut the power cable to an appropriate length and connect it to the terminals in the power supply
box with a solderless ring terminal (see Figure 23, p. 40).
3. If two cables are connected to one terminal, place the cables back to back with the thin cable
upward and the thick cable downward, as shown in the detail in Figure 23.
4. Secure the cable(s) with a cable tie and provide strain relief.
5. Replace the cover on the terminal board.
Note: Make sure that the section of the power supply cable that has the sheath removed is
inside the power supply box. If this is not possible, connect the power cable conduit to
the power supply box.
6. Pull the power cable through the designated knock-out at the bottom right of the outdoor unit
(see Figure 22, p. 38 for details).
WARNING
Avoid Risk of Fire or Explosion!
Do not let the power cable come into contact with the pipes inside the outdoor unit. If the
power supply cable touches the pipes, the vibration of the compressor will be transferred to
the pipes and can damage the power supply cables or pipes. The damage could result in fire or
explosion, causing death or serious injury.
Screw Tightening torque for terminal Power cable
M4 0.9–1.1 lbf/ft (1.2–1.5 N.m) Single-phase 208-230 V/460 V power cable
M8 4.1–5.4 lbf/ft (5.5–7.3 N.m) Three-phase 208-230 V/460 V power cable
Table 23. Cable conduit specifications
Name Temper grade Application conditions
Flexible PVC conduit PVC If conduit is installed indoors and not exposed to outside
elements (embedded in concrete)
Class 1 flexible conduit Galvanized steel sheet If conduit is installed indoors but exposed to outside
elements
Class 1 PVC-coated flexible
conduit
Galvanized steel sheet and
soft PVC compound If conduit is installed outdoors and requires waterproofing
40 VRF-SVN34A-EN
Electrical Wiring
Figure 23. Power wiring connections
Solderless
ring terminal
Thin cable
Thick cable
Cable tie
Detail for connecting
two cables to one terminal
Power terminal location

VRF-SVN34A-EN 41
Electrical Wiring
Table 24. Circuit breaker and power cable specifications—Heat pump/heat recovery: 208–230 V
Capacity
Model
Units
Module 1 Module 2 Module 3
RLA FLA
Power
supply RLA FLA
Power
supply RLA FLA
Power
supply
Hz V
Comp
1
Comp
2Fan1 Fan2 MCA MOP
Comp
1
Comp
2
Fan
1
Fan
2MCA MOP
Comp
1
Comp
2
Fan
1
Fan
2MCA MOP
6 ton 4TV*072B300NB 60 208/230 14.3 4.0 28.0 35
8 ton 4TV*0096B300NB 60 208/230 12.5 12.5 3.0 3.0 37.8 50
10 ton 4TV*0120B300NB 60 208/230 14.8 14.8 3.0 3.0 43.0 50
12 ton 4TV*0144B300NB 60 208/230 17.4 17.4 3.0 3.0 52.6 70
14 ton 4TV*0168B300NB 60 208/230 14.3 4.0 28.0 35 12.5 12.5 3.0 3.0 37.8 50
16 ton 4TV*0192B300NB 60 208/230 14.3 4.0 28.0 35 14.8 14.8 3.0 3.0 43.0 50
18 ton 4TV*0216B300NB 60 208/230 14.3 4.0 28.0 35 17.4 17.4 3.0 3.0 52.6 70
20 ton 4TV*0240B300NB 60 208/230 14.8 14.8 3.0 3.0 43.0 50 14.8 14.8 3.0 3.0 43.0 50
22 ton 4TV*0264B300NB 60 208/230 14.8 14.8 3.0 3.0 43.0 50 17.4 17.4 3.0 3.0 52.6 70
24 ton 4TV*0288B300NB 60 208/230 17.4 17.4 3.0 3.0 52.6 70 17.4 17.4 3.0 3.0 52.6 70
26 ton 4TV*0312B300NB 60 208/230 14.3 4.0 28.0 35 12.5 12.5 3.0 3.0 37.8 50 17.4 17.4 3.0 3.0 52.6 70
28 ton 4TV*0336B300NB 60 208/230 14.3 4.0 28.0 35 14.8 14.8 3.0 3.0 43.0 50 17.4 17.4 3.0 3.0 52.6 70
30 ton 4TV*0360B300NB 60 208/230 14.3 4.0 28.0 35 17.4 17.4 3.0 3.0 52.6 70 17.4 17.4 3.0 3.0 52.6 70
32 ton 4TV*0384B300NB 60 208/230 14.8 14.8 3.0 3.0 43.0 50 14.8 14.8 3.0 3.0 43.0 50 17.4 17.4 3.0 3.0 52.6 70
34 ton 4TV*0408B300NB 60 208/230 14.8 14.8 3.0 3.0 43.0 50 17.4 17.4 3.0 3.0 52.6 70 17.4 17.4 3.0 3.0 52.6 70
36 ton 4TV*0432B300NB 60 208/230 17.4 17.4 3.0 3.0 52.6 70 17.4 17.4 3.0 3.0 52.6 70 17.4 17.4 3.0 3.0 52.6 70
Notes:
• RLA is based on AHRI 1230 cooling standard condition (indoor temperature: 80ºF (26.7ºC) DB/67ºF (19.46ºC) WB; outdoor temperature: 95ºF
(35ºC) DB.
• Voltage tolerance is ± 10%.
• Maximum allowable voltage between phases is 2%.
• Refer to module combination table for independent units information.
• Abbreviations: RLA: Rated load ampere; FLA: Full load ampere; MCA: Minimum circuit amperes ; MOP: Maximum overcurrent protective device
(amperes).
Table 25. Circuit breaker and power cable specifications—Heat pump/heat recovery: 460 V
Capacity
Model
Units
Module 1 Module 2 Module 3
RLA FLA
Power
supply RLA FLA
Power
supply RLA FLA
Power
supply
Hz V
Comp
1
Comp
2
Fan
1
Fan
2MCA MOP
Comp
1
Comp
2
Fan
1
Fan
2MCA MOP
Comp
1
Comp
2
Fan
1
Fan
2MCA MOP
6 ton 4TV*0072B400NB 60 460 9.5 2.0 16.4 20
8 ton 4TV*0096B400NB 60 460 11.5 1.5 1.5 19.0 25
10 ton 4TV*0120B400NB 60 460 14 1.5 1.5 21.7 30
12 ton 4TV*0144B400NB 60 460 10.1 10.1 1.5 1.5 26.4 40
14 ton 4TV*0168B400NB 60 460 9.5 2.0 16.4 35 11.5 1.5 1.5 19.0 25
16 ton 4TV*0192B400NB 60 460 9.5 2.0 16.4 20 14 1.5 1.5 21.7 30
18 ton 4TV*0216B400NB 60 460 9.5 2.0 16.4 20 10.1 10.1 1.5 1.5 26.4 40
20 ton 4TV*0240B400NB 60 460 14 1.5 1.5 21.7 30 14 1.5 1.5 21.7 30
22 ton 4TV*0264B400NB 60 460 14 1.5 1.5 21.7 30 10.1 10.1 1.5 1.5 26.4 40
24 ton 4TV*0288B400NB 60 460 10.1 10.1 1.5 1.5 26.4 40 10.1 10.1 1.5 1.5 26.4 40
26 ton 4TV*0312B400NB 60 460 9.5 2.0 16.4 20 11.5 1.5 1.5 19 25 10.1 10.1 1.5 1.5 26.4 40
28 ton 4TV*0336B400NB 60 460 9.5 2.0 16.4 20 14 1.5 1.5 21.7 30 10.1 10.1 1.5 1.5 26.4 40
30 ton 4TV*0360B400NB 60 460 9.5 2.0 16.4 20 10.1 10.1 1.5 1.5 26.4 40 10.1 10.1 1.5 1.5 26.4 40
32 ton 4TV*0384B400NB 60 460 14 1.5 1.5 21.7 30 14 1.5 1.5 21.7 30 10.1 10.1 1.5 1.5 26.4 40
34 ton 4TV*0408B400NB 60 460 14 1.5 1.5 21.7 30 10.1 10.1 1.5 1.5 26.4 40 10.1 10.1 1.5 1.5 26.4 40
36 ton 4TV*0432B400NB 60 460 10.1 10.1 1.5 1.5 26.4 40 10.1 10.1 1.5 1.5 26.4 40 10.1 10.1 1.5 1.5 26.4 40
Notes:
• RLA is based on AHRI 1230 cooling standard condition (indoor temperature: 80ºF (26.7ºC) DB/67ºF (19.46ºC) WB; outdoor temperature: 95ºF
(35ºC) DB.
• Voltage tolerance is ± 10%.
• Maximum allowable voltage between phases is 2%.
• Refer to module combination table for independent units information.
• Abbreviations: RLA: Rated load ampere; FLA: Full load ampere; MCA: Minimum circuit amperes ; MOP: Maximum overcurrent protective device
(amperes).
42 VRF-SVN34A-EN
Electrical Wiring
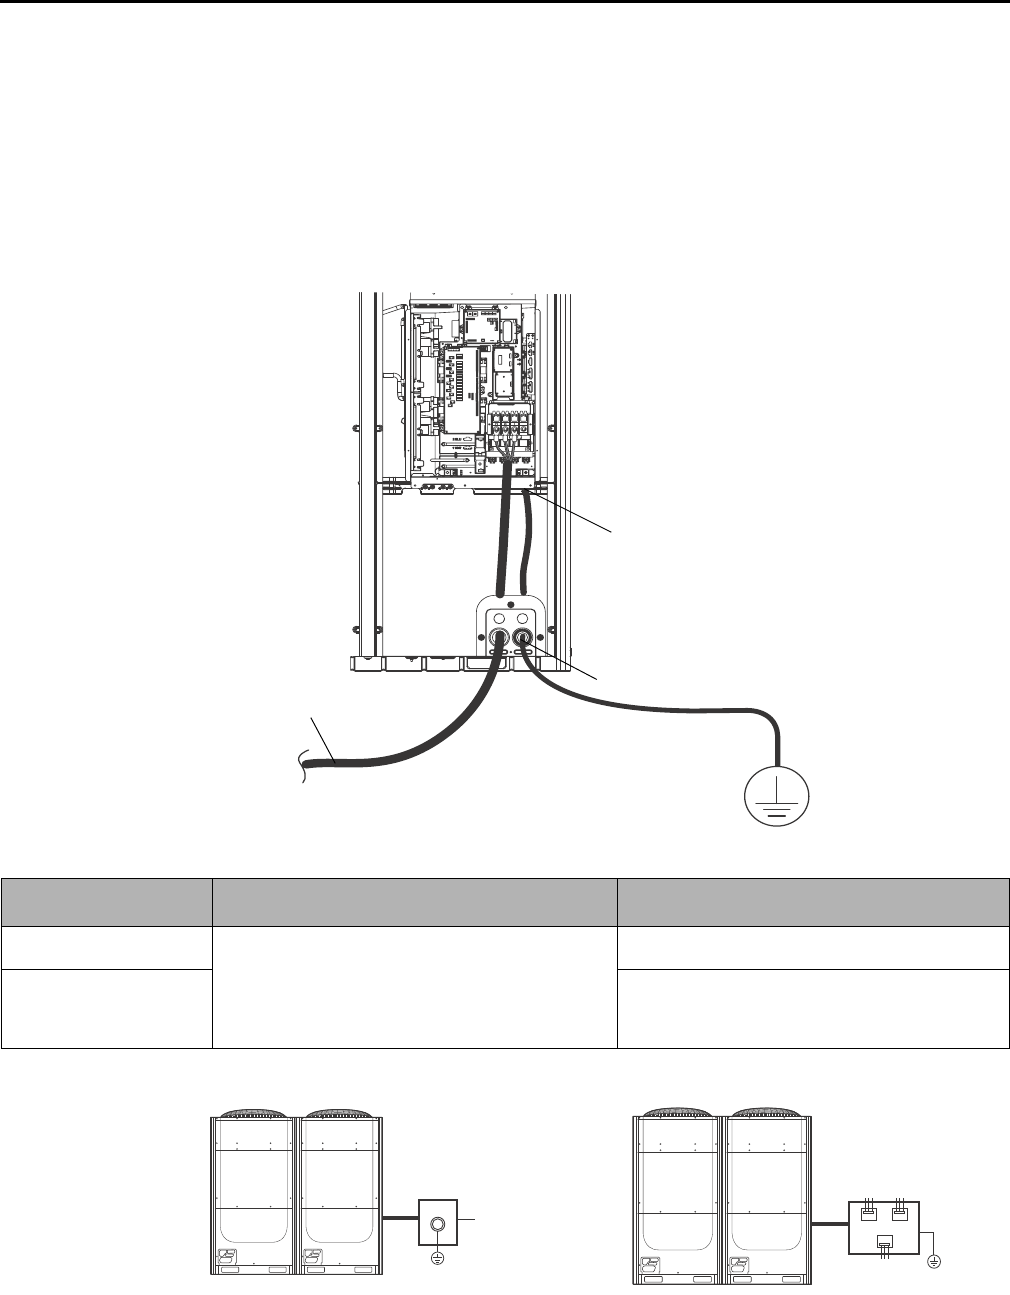
Grounding
Important: Grounding must be done by a qualified electrician.
1. Select rated grounding cable by referring to the outdoor unit power cable specifications
(Table 24, p. 41 and Table 25, p. 41).
2. Connect the grounding cable to the grounding hole inside the power supply box and pull it
through the designated grounding knock-out (see Figure 24 for details).
Figure 24. Grounding cable connection location
Figure 25. Outdoor unit grounding examples
Grounding cable connection hole
Grounding cable knock-out
Power cable
Table 26. Grounding resistance requirements
Power condition at
installation site High or average humidity Low humidity
Voltage to ground is ≤ 150 V • Ensure that the grounding resistance is <100 .
• If a circuit breaker is installed that disconnects the
circuit within 0.5 seconds, the allowable grounding
resistance is 30–500 .
• Ideally, grounding resistance should be <100 and
should not exceed 250 .
Voltage to ground is > 150 V
• Ensure that the grounding resistance is <100 .
• If a circuit breaker is installed that disconnects the
circuit within 0.5 seconds, the allowable grounding
resistance is 30–500 .
Exclusive grounding terminal
(attached to a structure)
Grounding at the
electrical panel
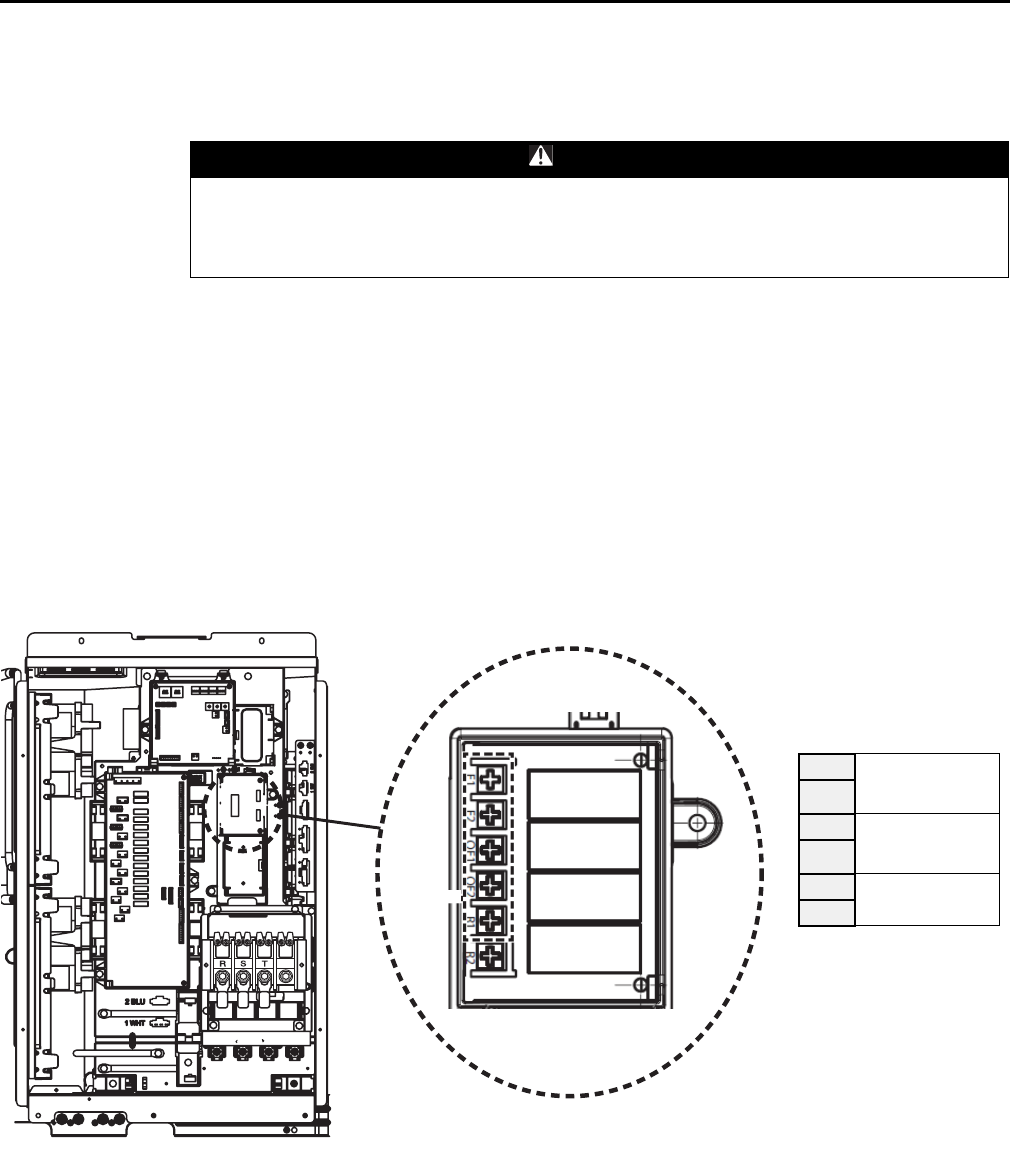
VRF-SVN34A-EN 43
Electrical Wiring
Communications Wiring
Connect the communications wiring as shown in Figure 26.
•Refer to Ta b l e 23, p. 39 for conduit specifications.
• Refer to BAS-SVX51 for communication wiring specifications and best practices.
Notes:
• Ensure that more than 1 in. (20 mm) of the outer sheath of the power and communication
cable conduit are inside the electrical component box.
• To reduce interference, ensure that power and communication cables run in parallel or,
if crossing is necessary, cross at 90 degrees.
•The communication cable between outdoor units and between indoor and outdoor units
has no polarity.
Figure 26. Communications board and wiring terminals
WARNING
Hazardous Voltage!
Disconnect all electric power, including remote disconnects before servicing. Follow proper
lockout/tagout procedures to ensure the power can not be inadvertently energized. Failure to
disconnect power before servicing could result in death or serious injury.
F1 Communication
between outdoor
and indoor units
F2
OF1 Communication
between outdoor
units
OF2
R1 Higher-level
controls
R2
Terminal identification
Communication wiring
terminals
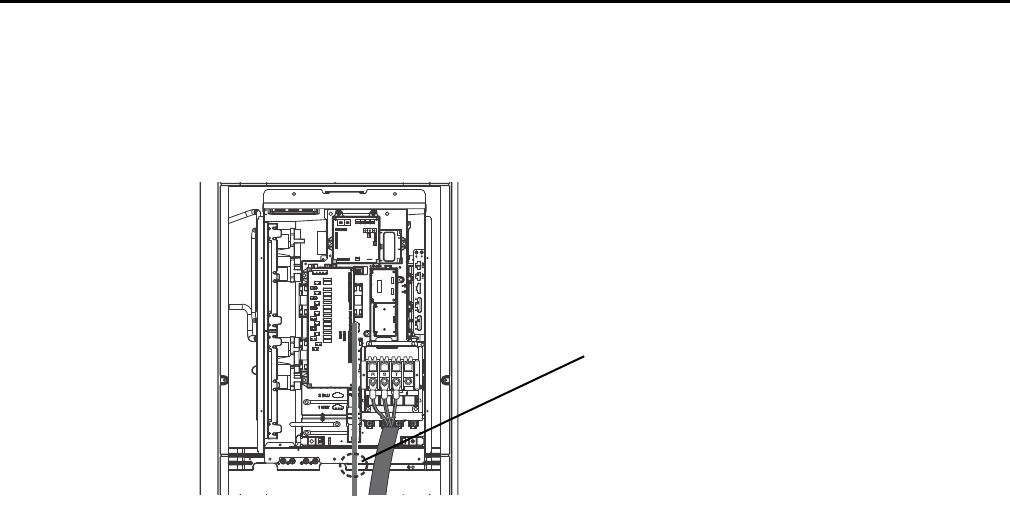
44 VRF-SVN34A-EN
Electrical Wiring
To provide strain relief, secure the communications cable with a clamp in the location shown in
Figure 27.
Figure 27. Communications cable clamping location
Pull the communications cable through the designated knock-out at the bottom right of the outdoor
unit (see Figure 22, p. 38 for details).
Communications clamping location
VRF-SVN34A-EN 45
Leak Testing Pipe Connections
Leak Testing Pipe Connections
Before leak testing pipe connections, read all safety precautions and notes.
Notes:
• All required piping pressure tests must be completed in accordance with national and/or
local codes.
• When leak-testing refrigerant systems, observe all safety precautions.
• Leak test only one circuit at a time to minimize system exposure to potentially harmful
moisture in the air.
• Use R-410A refrigerant gas as a tracer for leak detection and use oil-pumped dry nitrogen
to develop required test pressures.
• Use tools for R-410A to prevent the inflow of foreign substances and reduce the risk of
high pressure.
• Do not remove the valve core of the charging port.
• Perform the leak test with the service valve of the outdoor unit closed.
WARNING
Confined Space Hazards!
Do not work in confined spaces where refrigerant or other hazardous, toxic or flammable gas
may be leaking. Refrigerant or other gases could displace available oxygen to breathe, causing
possible asphyxiation or other serious health risks. Some gases may be flammable and or
explosive. If a leak in such spaces is detected, evacuate the area immediately and contact the
proper rescue or response authority. Failure to take appropriate precautions or to react properly
to such potential hazards could result in death or serious injury.
WARNING
Explosion Hazard!
Never use an open flame to detect gas leaks. It could result in an explosion. Use a leak test
solution for leak testing. Failure to follow recommended safe leak test procedures could result
in death or serious injury or equipment or property-only-damage.
Use only dry nitrogen with a pressure regulator for pressurizing unit. Do not use acetylene,
oxygen or compressed air or mixtures containing them for pressure testing. Do not use
mixtures of a hydrogen containing refrigerant and air above atmospheric pressure for pressure
testing as they may become flammable and could result in an explosion. Refrigerant, when
used as a trace gas should only be mixed with dry nitrogen for pressurizing units. Failure to
follow these recommendations could result in death or serious injury or equipment or
property-only damage.
Do not exceed unit nameplate design pressures when leak testing system. Failure to follow
these instructions could result in an explosion causing death or serious injury.
NOTICE
Refrigerant Pipe Damage!
When performing a leak test, use a pressure regulator to prevent an excess amount of nitrogen
(over 594.6 psi [4.1 MPa]) from entering the pipes. If the pipe is filled with over the specified
amount of nitrogen in a short time, pipes may be damaged.
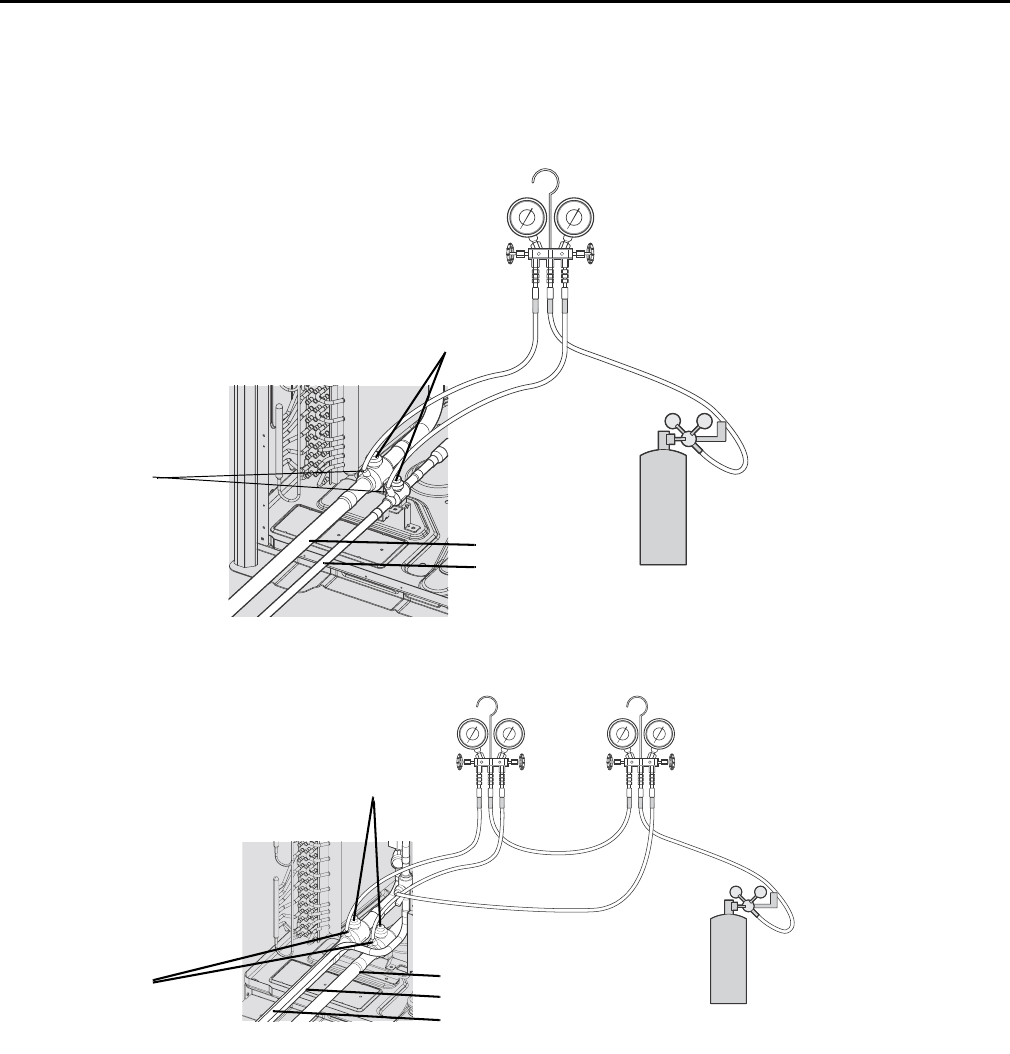
46 VRF-SVN34A-EN
Leak Testing Pipe Connections
Use the following procedure for leak testing pipe connections. Refer to Figure 28.
Figure 28. Leak testing pipe connections
1. Apply pressure to the liquid side pipe and gas side pipe (when installing outdoor units in
module) with nitrogen gas at 4.1 MPa (594.6 psi).
2. Keep it for minimum 24 hours to check if pressure drops. After applying nitrogen gas, check for
a change in pressure, using a pressure regulator.
3. If the pressure drops, check for gas leakage. If the pressure is changed, apply soap water to
check for leakage and check the pressure of the nitrogen gas again.
4. Maintain 145 psi (1.0 MPa) of the pressure before performing vacuum drying and check for
further gas leakage. After checking the first gas leakage, maintain 145 psi (1.0 MPa) to check for
further gas leakage.
Low-pressure side
Nitrogen
Heat pump
Heat recovery
Nitrogen
High-pressure side
Filling ports
Gas pipe
Liquid pipe
Service valves
High-pressure gas pipe
Filling ports
Service valves
Gas pipe
Liquid pipe
Low-
pressure
side
High-
pressure
side
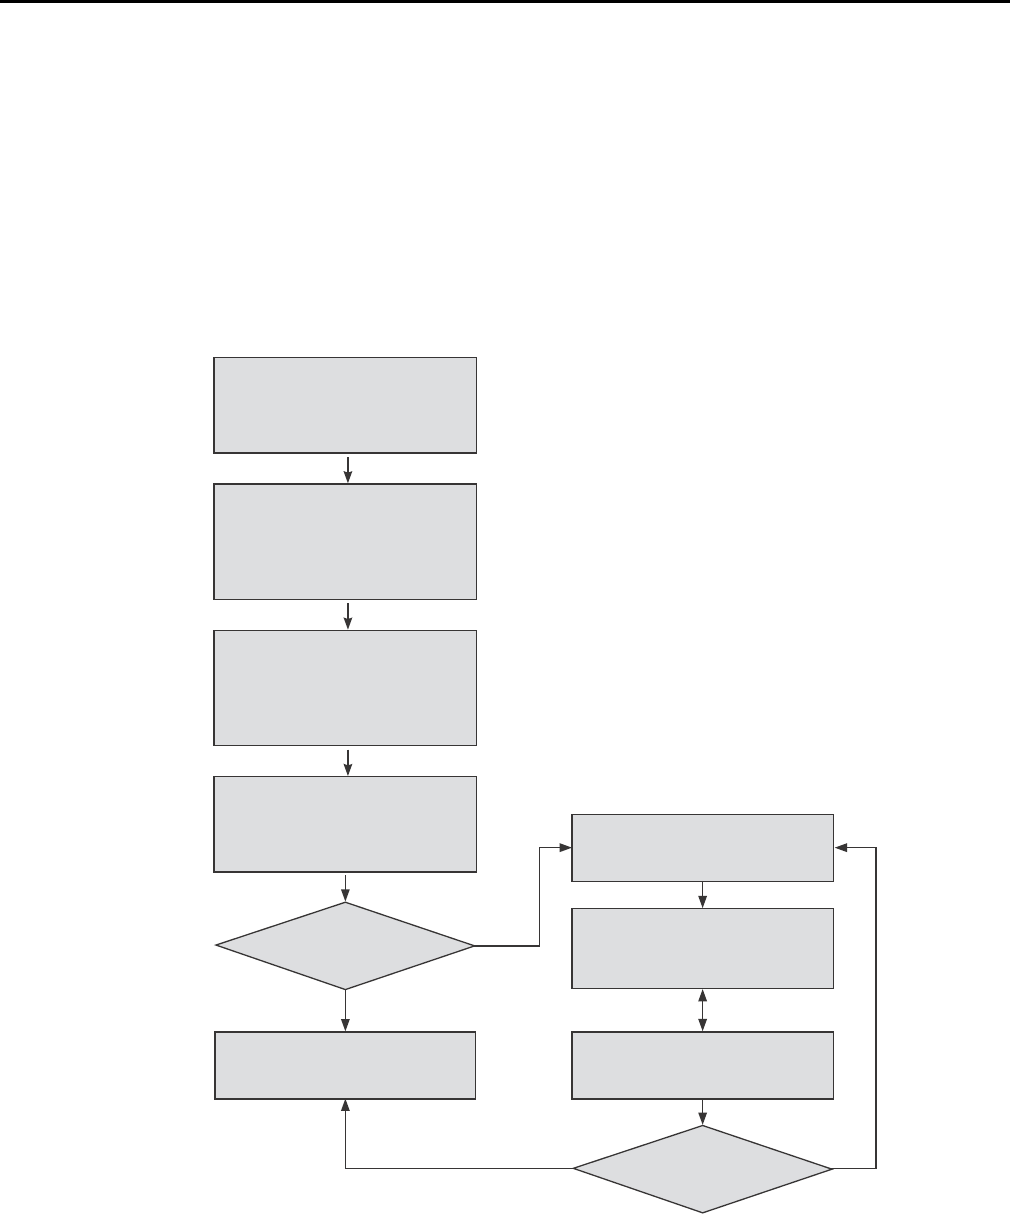
VRF-SVN34A-EN 47
Vacuum Procedure for the System
Vacuum Procedure for the System
After performing a leak test, follow this vacuum procedure:
• Use tools for R-410A to prevent the inflow of foreign substances and resist against internal
pressure.
• Use a vacuum pump that allows vacuuming under 29.7 inH2O.
• Use a vacuum pump with a check valve to prevent pump oil from flowing backward while the
vacuum pump is stopped.
• Completely close the liquid-gas side service valve of the outdoor unit.
Connect the manifold gauge to
the liquid side pipe and gas side
pipe (when installing outdoor
units in module).
When installing outdoor units in module, connect the manifold gauge
to liquid side pipe and the gas side pipe.
Perform vacuum drying of the
liquid side pipe and gas side
pipe (when installing outdoor
units in module) using a vacuum
pump.
Make sure that check valve is installed to prevent pump oil from
flowing into the pipe.
While the vacuum gauge
pressure is less than 29.7 inWC,
perform the vacuum
drying for more than 1 hour and
close the valve.
Vacuum pressure must be checked with the vacuum gauge.
After vacuum pump stops,
check whether the pressure is
maintained within 29. 7 inWC
for an hour.
Charge additional refrigerant to the
pipe
No
Perform vacuum drying again
Check for gas leakage
Vacuum destruction
Apply nitrogen gas to the pipe at
pressure of 7.25 psi (0.05 MPa).
Yes
No
Over 29.7 inWC
Pressure increase
Yes
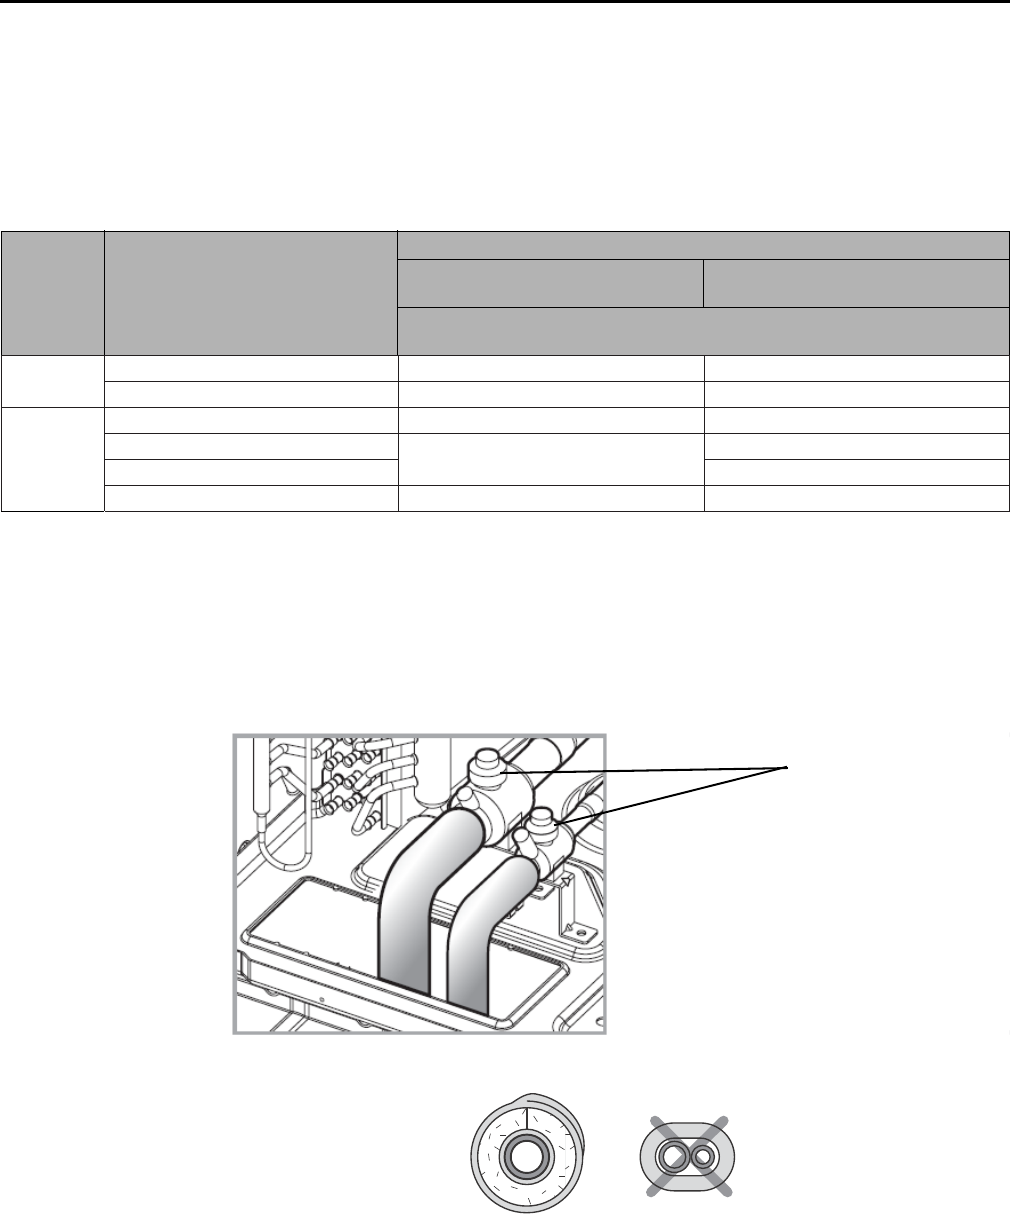
48 VRF-SVN34A-EN
Insulating Refrigerant Pipes
Insulating Refrigerant Pipes
After determining that there are no leaks in the refrigerant pipes, insulate them as described:
1. Use Table 27 to select the insulation thickness according to pipe size and humidity conditions.
2. Wrap insulation around the entire surface of each pipe, including the refrigerant pipes from the
indoor unit to the service valves inside the outdoor unit, the branch joints, distribution header,
and connection points on each pipe.
Note: For details on insulating branch joints, refer to the branch joint installation manual (VRF-
SVN41).
•Do not wrap the gas and liquid refrigerant pipes together.
•Overlap insulation to avoid gaps.
•Avoid compressing the insulation as much as possible.
Table 27. Pipe insulation selector
Pipe
Pipe size
in. (mm)
Insulation Type
Standard conditions
86°F (30°C), 85%
High humidity conditions(a)
86°F (30°C), over 85%
EPDM or NBR
(in. (mm)
Liquid pipe 1/4 (6.35) – 3/8 (9.52) 3/8 (9) 3/8 (9)
1/2 (12.70) – 2 (50.80) 1/2 (13) 1/2 (13)
Gas pipe(b)
1/4 (6.35) 1/2 (13) 3/4 (19)
3/8 (9.52) – 1 (25.40) 3/4 (19) 1.0 (25)
1-1/8 (28.58) – 1-3/4 (44.45) 1-1/4 (32)
2 (50.80) 1.0 (25) 1-1/2 (38)
(a) When installing insulation in any of the following environments, use insulation required for high humidity conditions: Buildings with close proximity to
bodies of water or hot springs or on the side of a hill in which the building is partly covered by earth; ceilings frequently exposed to moisture such as
in restaurants, saunas, swimming pools, and corridors of dormitories or studios near a frequently-used outdoor exit; buildings with no ventilation system.
(b) Internal temperature of gas pipe is higher than 248°F (120°C).
Service valves
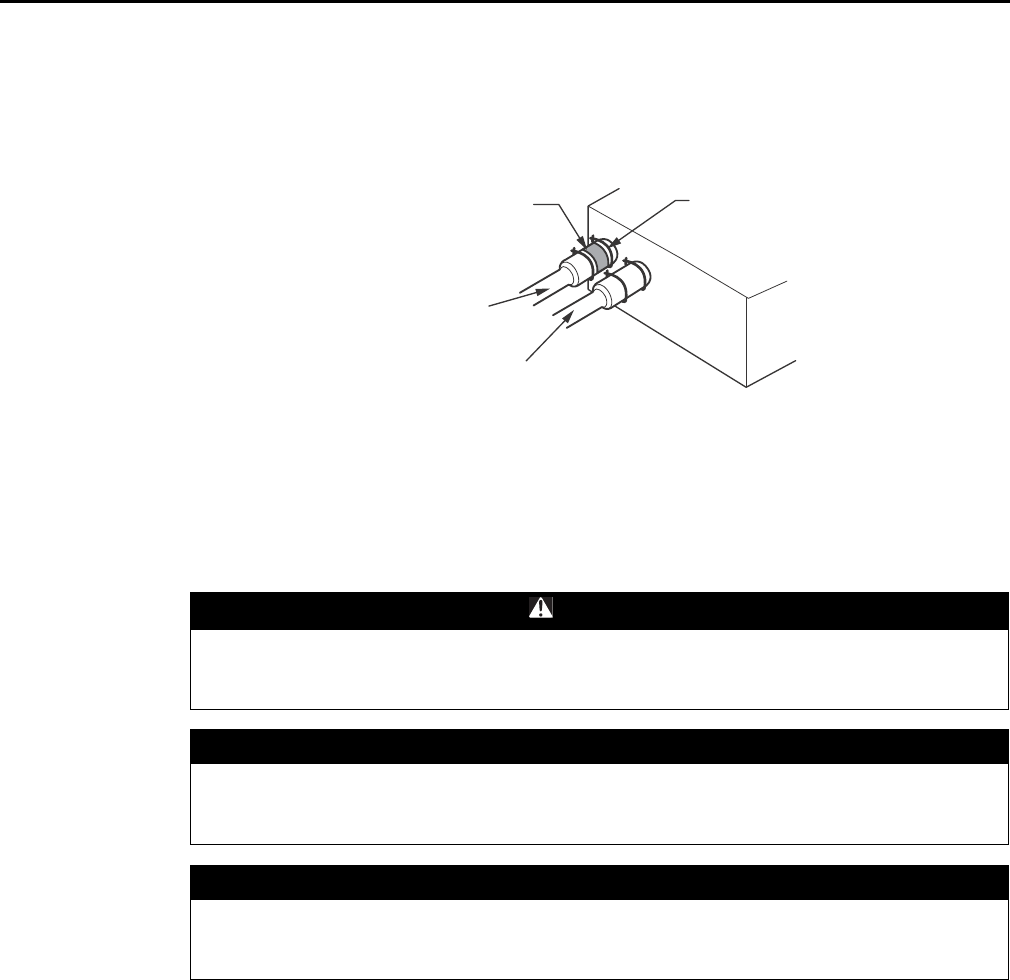
VRF-SVN34A-EN 49
Refrigerant Charging
•Be sure there are no cracks or deformities in the insulation at bends in pipes.
•If necessary double the insulation to prevent condensation from forming in warm or humid
areas.
3. Clamp insulation tightly to the pipes.
4. Cut off excess insulation.
Refrigerant Charging
After vacuuming and leak testing the system, charge the system with refrigerant as explained in
the following procedure:
1. Calculate the correct amount of refrigerant using Table 28, p. 50 through Table 31, p. 51.
2. Open the liquid and gas service valves and add the liquid refrigerant, making sure the
refrigerant bottle is held in an upright position. Use a scale to determine that the correct amount
has been added.
3. Close the refrigerant container immediately after adding the refrigerant.
Clamp
Insulation
Gas side pipe
Liquid side pipe
WARNING
Hazard of Explosion and Deadly Gases!
Do not heat the refrigerant container to speed up the charging process. An explosion could
result, resulting in death or serious injury.
NOTICE
Risk of Unit Malfunction!
Do not leave the front panel open while charging refrigerant. If the front panel is open, the
amount charged into the unit will be incorrect.
NOTICE
Unit Component Damage!
Open the gas side and liquid side service valves completely after charging the refrigerant. If
you operate the unit with the service valves closed, the unit may be damaged.
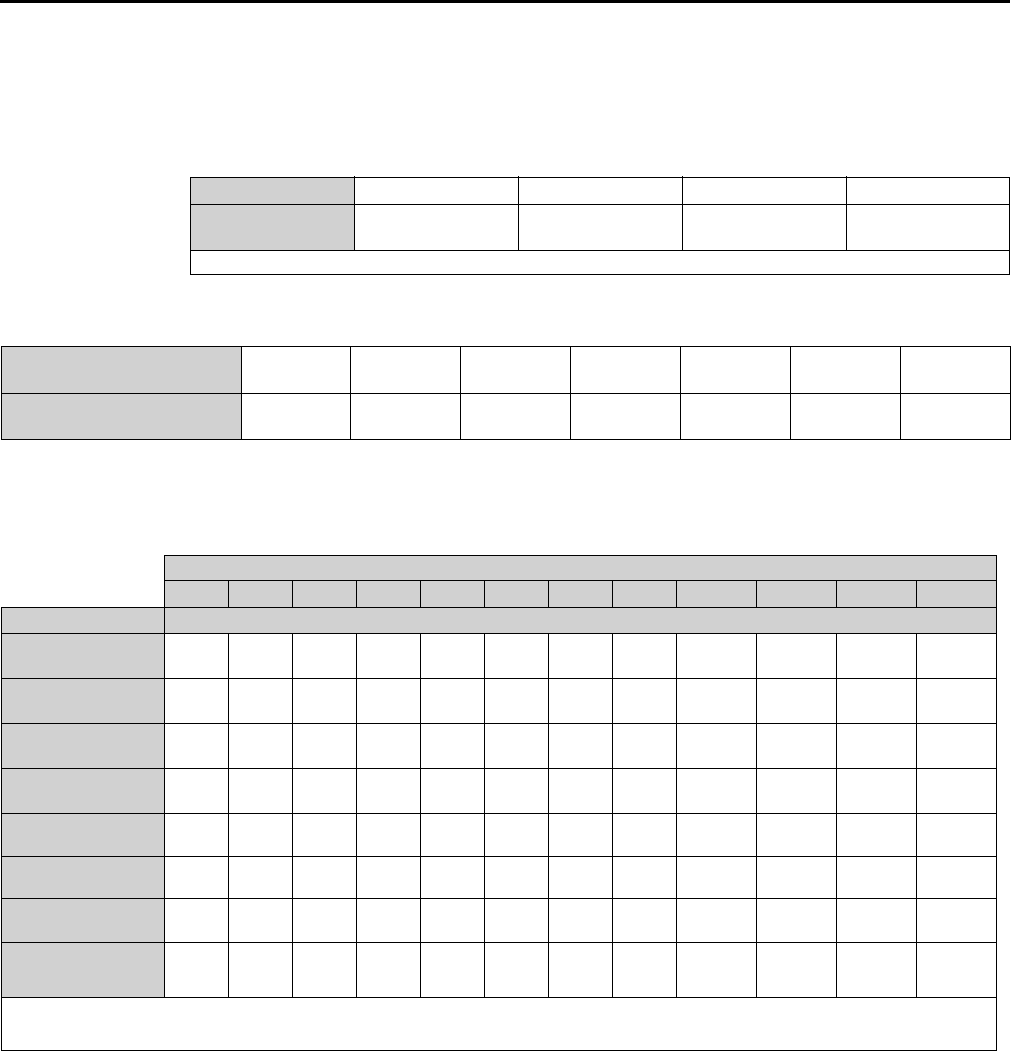
50 VRF-SVN34A-EN
Refrigerant Charging
Calculating Refrigerant
Table 28. Initial refrigerant quantity for each outdoor unit model
Model 4TV*0072***** 4TV*096***** 4TV*120***** 4TV*144*****
Initial refrigerant
quantity: lb (kg) 12.1 (5.5) 16.3 (7.4) 16.3 (7.4) 19.2 (8.7)
Note: Add the initial refrigerant quantity shown in this table to the refrigerant calculated in Table 29 through Table 31, p. 51.
Table 29. Refrigerant quantity according to liquid pipe diameter and length (a)
Diameter of liquid pipe:
in. (mm) 1/4 (6.35) 3/8 (9.52) 1/2 (12.7) 5/8 (15.88) 3/4 (19.05) 7/8 (22.23) 1 (25.4)
Additional refrigerant
quantity: lb/ft (kg/m) 0.013 (0.02) 0.040 (0.06) 0.084 (0.125) 0.121 (0.18) 0.181 (0.27) 0.235 (0.35) 0.356 (0.53)
Note: For an indoor unit with a factory-installed EEV, the quantity of refrigerant in addition to the quantity based on the unit capacity (Tab le 28) is 0.0067 lb/ft
regardless of the pipe size.
Table 30. Refrigerant quantity for each indoor unit (b)
Capacity (MBH)
7. 5 99.5 12 18 20 24 30 36 48 76.8 96
Model Refrigerant quantity: lb (kg)
1-way cassette
(4TVE00**B100NB)
0.55
(0.25)
0.55
(0.25)
0.55
(0.25)
Mini 4-way cassette
(4TVB00**B100NB)
0.82
(0.37)
0.82
(0.37)
0.82
(0.37)
0.82
(0.37)
4-way cassette
(4TVC00**B100NB)
0.99
(0.45)
0.99
(0.45)
0.99
(0.45)
1.52
(0.69)
1.52
(0.69)
1.52
(0.69)
Slim duct
(4TVL00**B100NB)
0.53
(0.24)
0.53
(0.24)
0.53
(0.24)
0.99
(0.45)
0.99
(0.45)
0.93
(0.42)
0.93
(0.42)
1.37
(0.62)
MSP duct
(4TVD00**B100NB)
0.62
(0.28)
0.62
(0.28)
1.19
(0.54)
1.19
(0.54)
1.50
(0.68)
HSP duct
(4TVA00**B100NB)
1.50
(0.68)
1.50
(0.68)
2.60
(1.18)
2.60
(1.18)
High-wall
(4TVW00**B100NB)
0.53
(0.24)
0.53
(0.24)
0.53
(0.24)
0.79
(0.36)
0.79
(0.36)
0.79
(0.36)
Convertible
ceiling/floor
(4TVX00**B100NB)
0.86
(0.39)
0.86
(0.39)
Notes:
• Additional refrigerant charging of MCU is 1.1 lb (0.5 kg) for every MCU kit.
• For an indoor unit with an AHU kit, add 0.04 lb (0.018 kg) of refrigerant for 1 MBH capacity of the AHU kit.
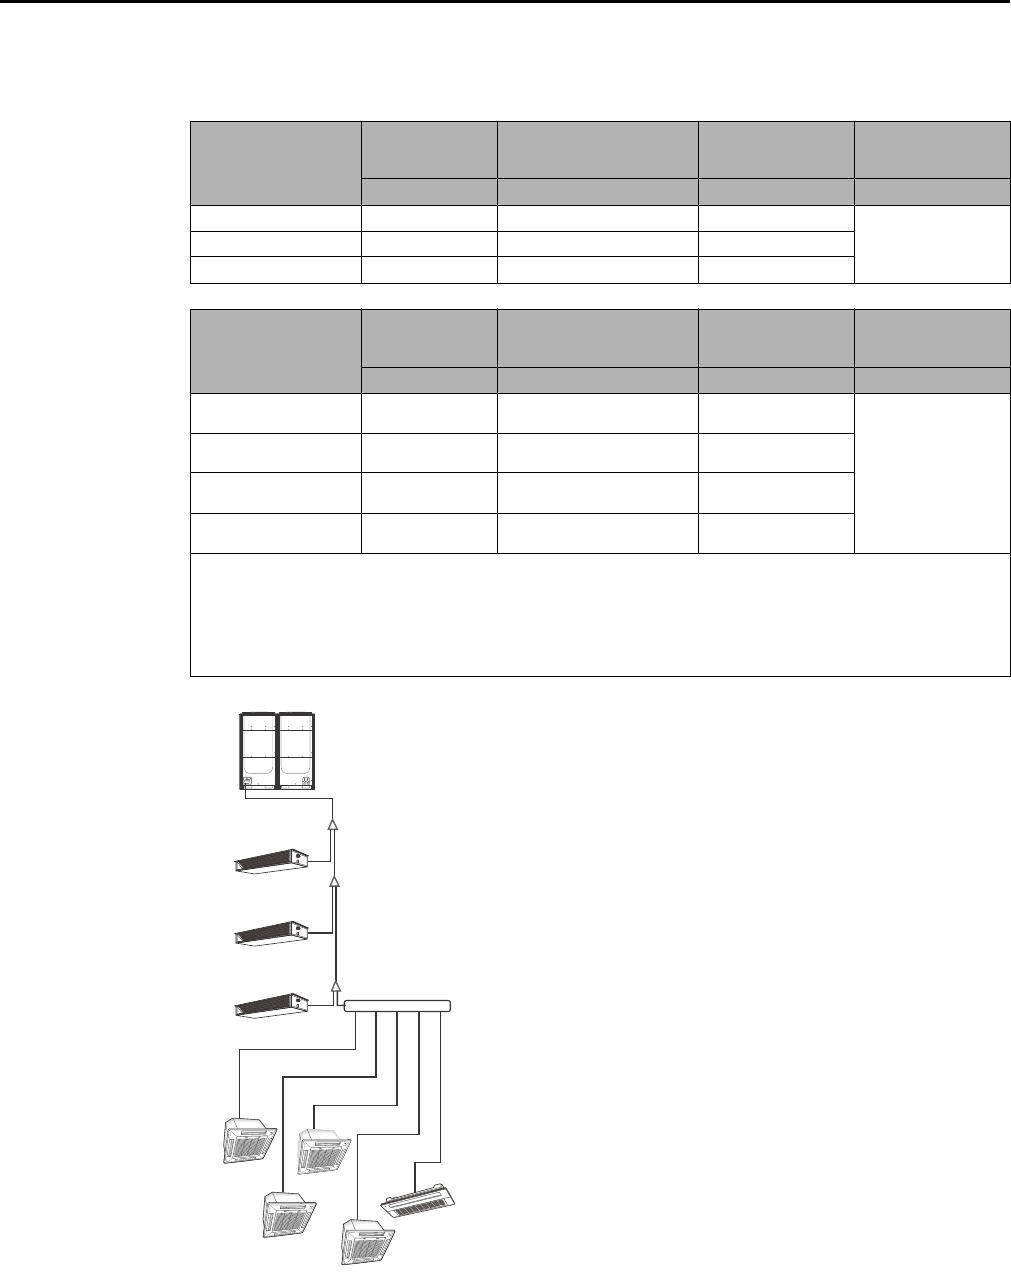
VRF-SVN34A-EN 51
Refrigerant Charging
Example:
Table 31. Calculation example for refrigerant amount additional to basic unit amount
Liquid pipe (a)
diameter
in. (mm)
Pipe length (ft)
Refrigerant amount
(lb/ft)
from Table 29, p. 50)
Additional
refrigerant
amount (lb)
Total additional
refrigerant (lb)
(1) (2) (1) x (2) (1) x (2)
1/4 (6.35) 114.8 0.013 1.49
12.193/8 (9.52) 164.0 0.040 6.56
1/2 (12.70) 49.2 0.084 4.13
Indoor unit (b)
model
Number of units
Refrigerant amount
(lb/each)
from Table 30, p. 50)
Additional
refrigerant
amount (lb)
Total additional
refrigerant (lb)
(1) (2) (1) x (2) (1) x (2)
4-way cassette
(4TVC00**B100NB) 4 0.99 3.96
7.02
Slim duct
(4TVL00**B100NB) 2 0.99 1.98
Slim duct
(4TVL00**B100NB) 1 0.53 0.53
1-way cassette
(4TVE00**B100NB) 1 0.55 0.55
Notes:
• The total amount of refrigerant in the system must not exceed 220 lb (100 kg). If the refrigerant weight exceeds this amount,
separate the modules into smaller modules (or units) so that the maximum weight is not exceeded. For example, for 4TV*144*****,
the basic amount of refrigerant is 19.1 lb (8.7 kg). Therefore, the total amount of additional refrigerant (a) + (b) should not exceed
200.9 lb (91.3 kg
• For each MCU kit, additional refrigerant charging is 1.1 lb (0.5 kg).
•For an indoor unit with an AHU kit, add 0.04 lb (0.018 kg) of refrigerant for 1 MBH capacity of the AHU kit.
• When calculating refrigerant for heat recovery apps, make sure you add
144 MBH
1/2 (12.7), 16.4 (5)
1/2 (12.7), 16.4 (5)
12 MBH
24 MBH
24 MBH
18 MBH
18 MBH
18 MBH
12 MBH
18 MBH
Units:
Pipe diameter: in. (mm)
Pipe length: f (m)
1/2 (12.7), 16.4 (5)
1/4 (6.35), 16.4 (5)
3/8 (9.52), 32.8 (10)
1/4 (6.35), 49.2 (15)
1/4 (6.35), 32.8 (10)
1/4 (6.35), 16.4 (5)
3/8 (9.52), 32.8 (10)
3/8 (9.52), 32.8 (10)
3/8 (9.52), 32.8 (10)
3/8 (9.52), 32.8 (10)
Note: For heat recovery systems, add 1.1 lb (0.5 kg)
additional refrigerant for each MCU kit.
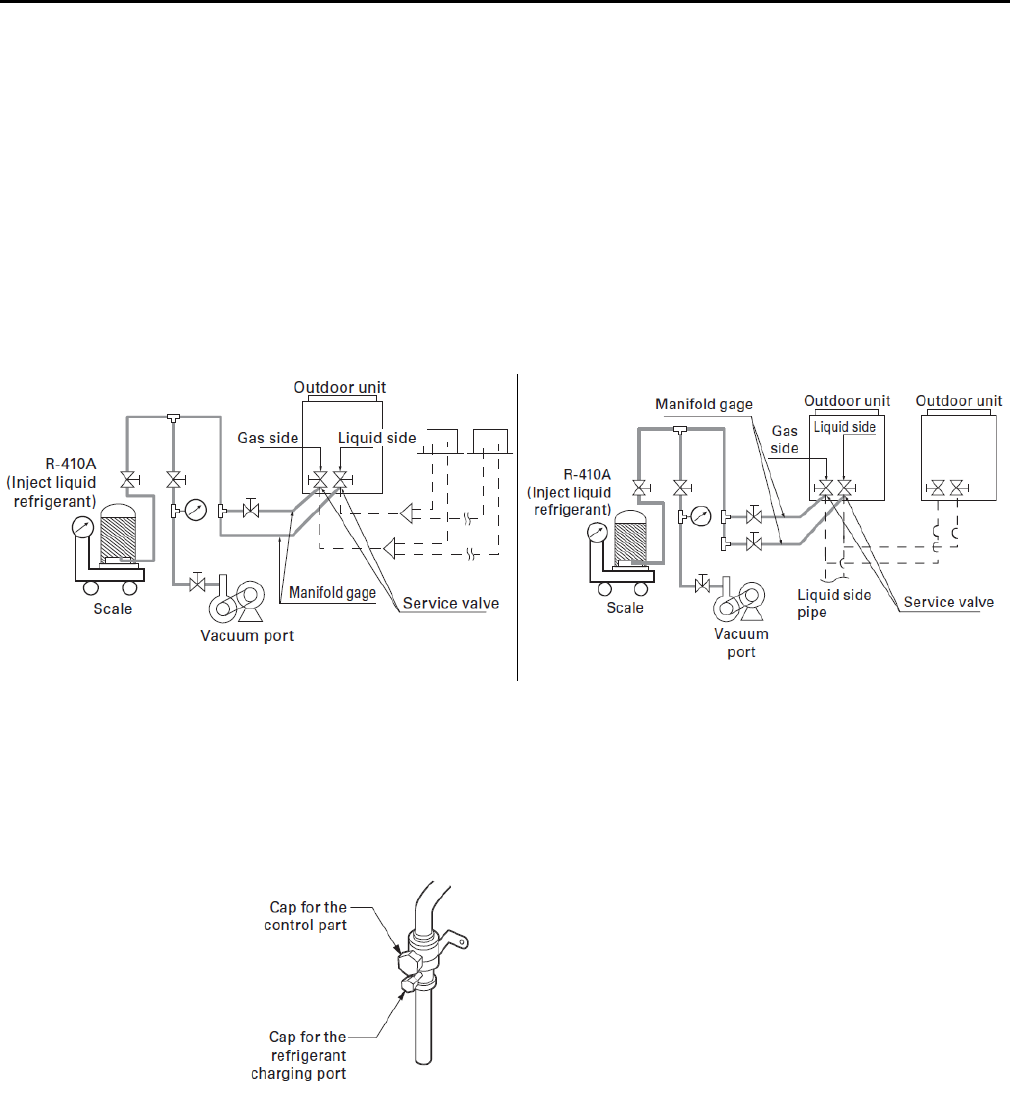
52 VRF-SVN34A-EN
Refrigerant Charging
Charging Refrigerant
To charge refrigerant:
1. With the unit still in a vacuum, open the manifold gauge valve connected to the liquid side
service valve and add the liquid refrigerant.
2. If you are unable to add all of the refrigerant needed into the liquid side, close the liquid side,
remove the liquid manifold hose, then open the gas valve.
3. Press K2 once to initiate refrigerant charging in cooling mode.
4. To determine if the amount of refrigerant added is correct, use the automatic refrigerant
function (see Figure , p. 64).
Figure 29. Charging additional refrigerant
5. After charging the refrigerant, close both caps as shown in the figure below.
•Tightening torque for refrigerant port cap: 7.4–8.9 lbf-ft (10–12 N-m)
•Tightening torque for control cap: 14.8–18.4 lbf-ft)
•Opening/closing torque for the valve (> 3/4 in. [19 mm]): 7.4 lbf-ft (10 N-m)
Single installation Module installation
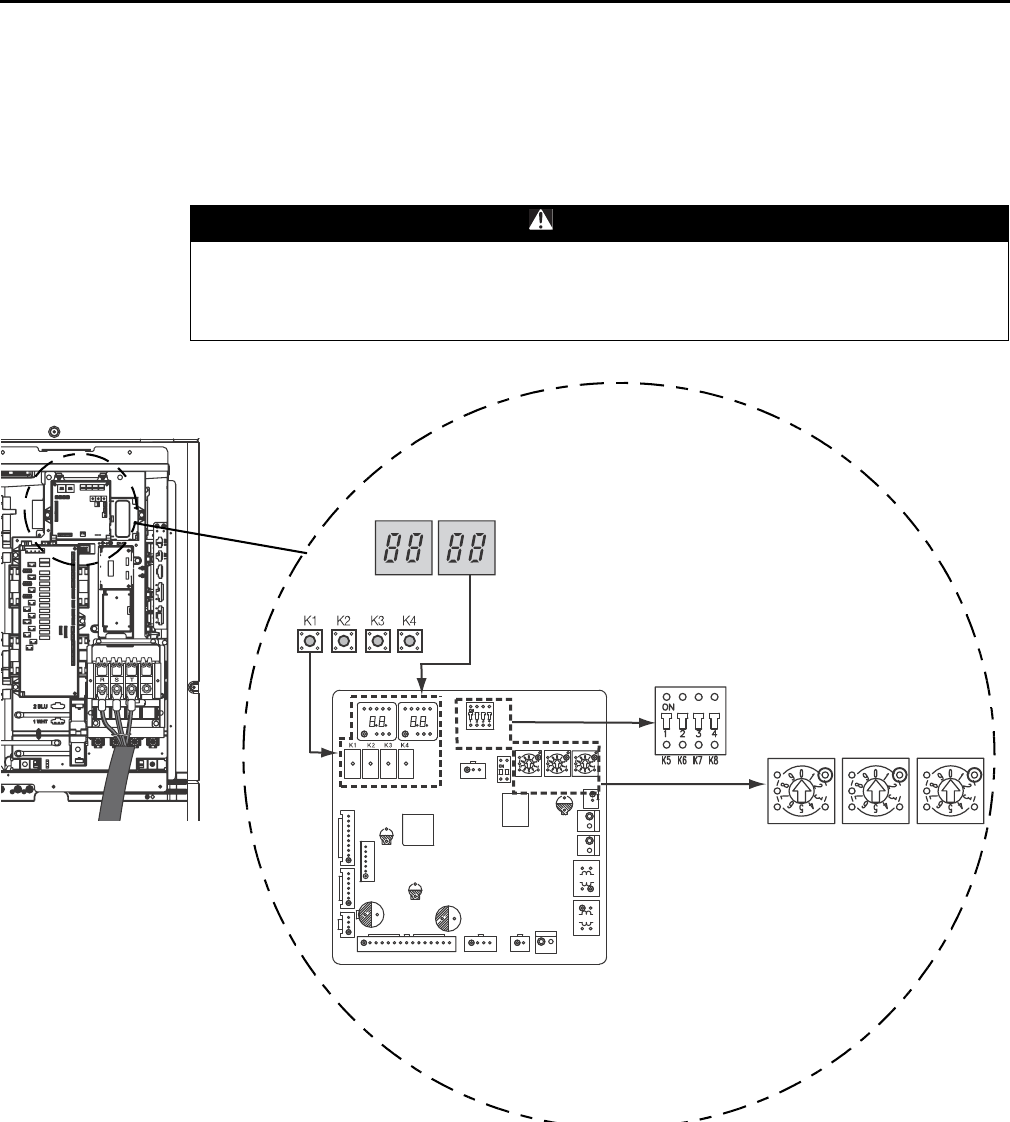
VRF-SVN34A-EN 53
Control System
Control System
The control board (Fig 28) contains, a 4-digit display, a DIP switch, three rotary switches, and four
buttons, as shown in Figure 30. Their functions are explained in this section.
Figure 30. Control board
WARNING
Hazardous Voltage!
Before making contact with the inverter circuit board, wait for at least 15 minutes after
powering down the outdoor unit to allow the unit to fully discharge high DC voltage. Failure to
allow the high DC voltage to discharge completely could result in death or serious injury.
SW57
SW51 SW52
TENS
DIGIT
ONES
DIGIT
MCU
ONE
TEN MCU
SW53
SW53
4-digit display
Buttons
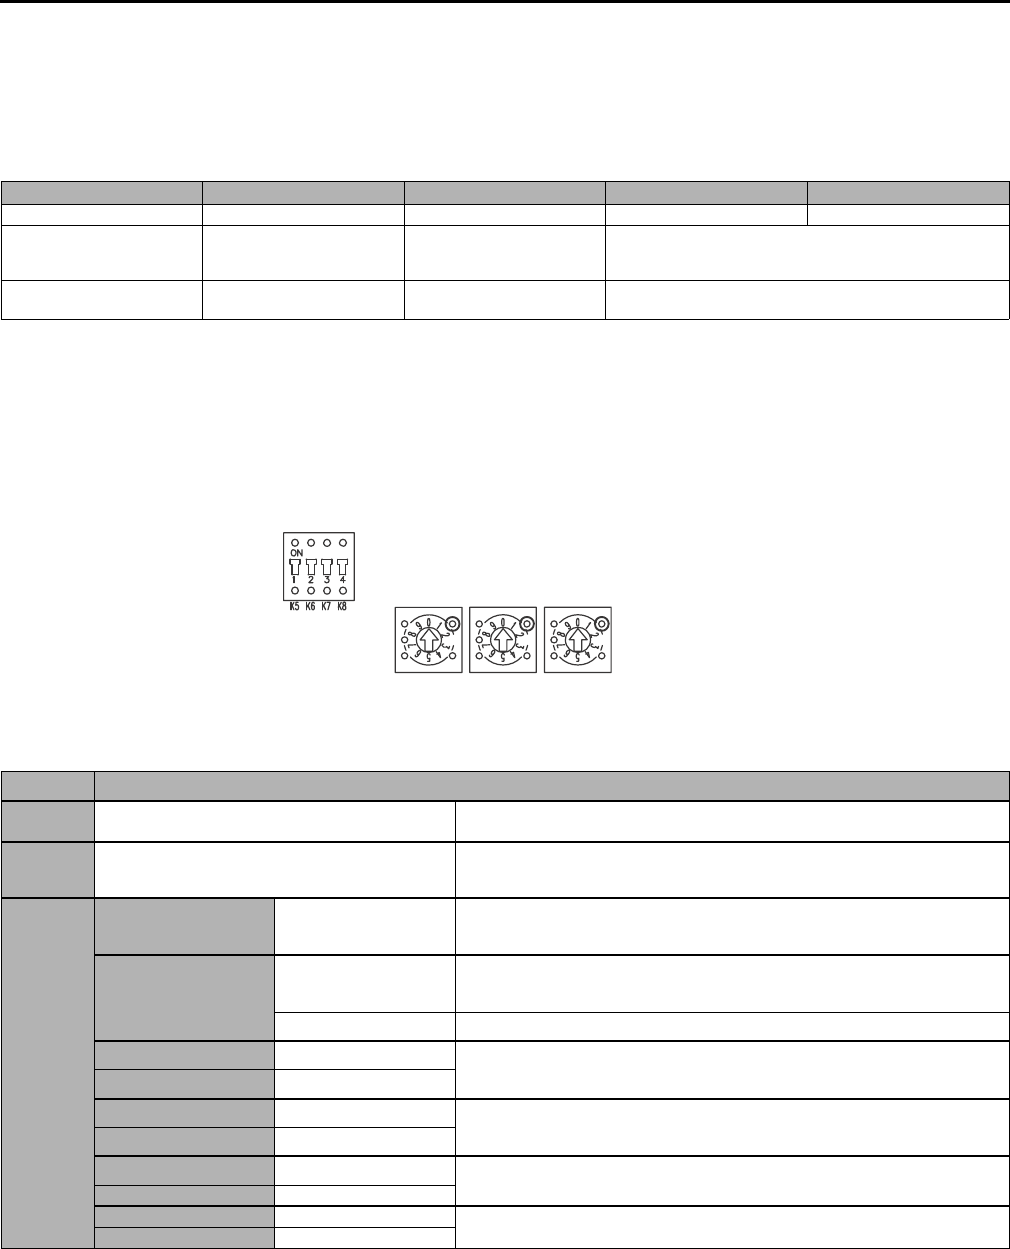
54 VRF-SVN34A-EN
Control System
System Monitoring
The 4-digit display indicates system power and communication status.
System Configuration: DIP and Rotary Switches
The outdoor unit control board contains one DIP switch and three rotary switches (Figure 31). Use
them to configure the system as described in Table 33.
Figure 31. Switches on outdoor unit control board
Table 32. 4-digit display
Event Digit 1 Digit 2 Digit 3 Digit 4
Power up(a) “8”“8”“8”“8”
Establishing
communication between
outdoor and indoor units
“A” “d” Number of connected indoor units
Transmit/receive
(normal operation)
Indoor unit: “A”
MCU(b): “C”
Indoor unit: “0”
MCU: “1” Unit address (decimal number)
(a) 4-digit display example showing power-up is shown in Figure 30.
(b) Mode change unit.
SW53
SW57
SW51 SW52
TENS
DIGIT
ONES
DIGIT
MCU
Table 33. System configuration using control board switches
Switch(a) Function description and notes
SW51/
SW52 Use to set total number of installed indoor units Set at main outdoor unit only.
Note: For example, if 12 indoor units are installed, SW51: 1, SW52: 2.
SW57 Use to set total number of connected MCUs
Set at main outdoor unit only.
Note: For example, if 3 MCUs are installed, SW57: “3”.
If 10 MCUs are installed, SW57: “A”.
SW53
K5 Off Not used. Default: Off
K6
On
Enables maximum capacity restriction for cooling operation.
Use to re
strict excessive capacity increase when operating indoor
units
with small
capacity.
Off Disables maximum capacity restriction for cooling operation.
K7 On
Use to set outdoor unit address: No.
1 (main unit)(b)
K8 On
K7 On
Use to set outdoor unit address: No.
2 (sub-unit 1)
K8 Off
K7 Off
Use to set outdoor unit address: No.
3 (sub-unit 2)
K8 On
K7 Off Not used
K8 Off
(a) For illustration of switches, refer to Figure 31.
(b) For module installations, one outdoor unit needs to be designated as the main unit. The remaining outdoor units must be designated as sub-units.
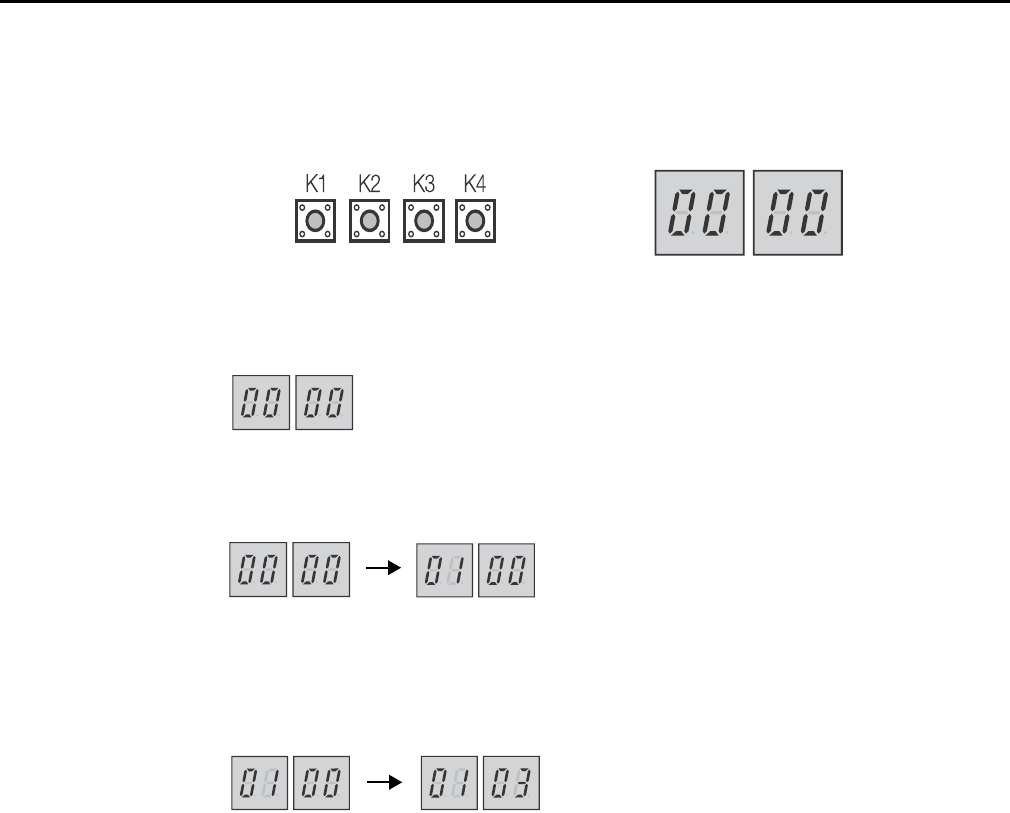
VRF-SVN34A-EN 55
Control System
The control board has four buttons, K1–K4, and a 4-digit display for configuring system options.
Figure 32. Buttons and 4-digit display on the outdoor unit control board
To set options:
1. When the unit is not operating, press and hold K2 (5 seconds) to enter the option setting mode.
The 4-digit display will appear as shown. (If compressor cut-off is enabled, digit 4 will be “1”
or “2”.)
2. To select a different option, press K1 repeatedly until the number representing the selected
option appears for digits 1 and 2. (See the “Digit 1” and “Digit 2” columns in Ta bl e 34, p. 56 for
the list of option numbers.) For example, choose “01” on the main outdoor unit to select the
cooling capacity correction option.
3. To change the value for the option selected in Step 2, press K2 repeatedly for 1 second until the
number representing the selected value appears for digits 3 and 4. (See the “Digit 3” and “Digit
4” columns in Table 34, p. 56 for the list of values.)
For example, if you select “01” for digits 1 and 2, and “04” for digits 3 and 4, the cooling capacity
correction selection is 50–53.6°F (10–12°C).
4. To save the value you have selected in Step 3, press and hold the K2 for 5 seconds. The 4-digit
display will blink as it enters tracking mode. The selected value will be saved when the display
returns to normal.
Note: To the previous value instead of saving the selection, press and hold K1 (5 seconds). To
restore the factory default, press and hold K4 while in the option setting mode.
Buttons 4-digit display
Digits 1 and 2 change to the number representing the
selected option.
Digits 3 and 4 change to the number representing the
selected value.
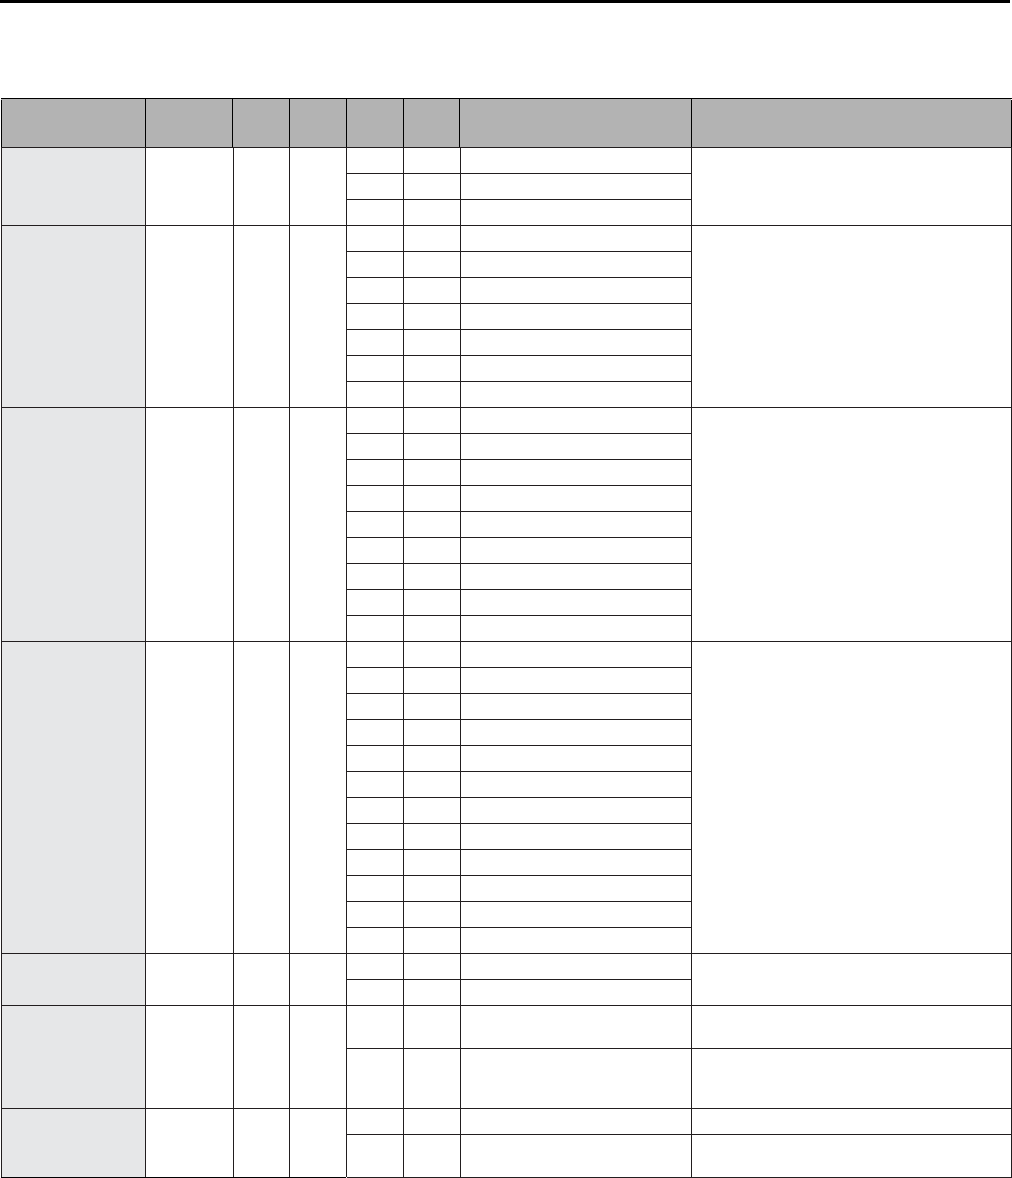
56 VRF-SVN34A-EN
Control System
Table 34. Options and corresponding settings
Option
Outdoor
unit
Digit
1
Digit
2
Digit
3
Digit
4Value Comments
Emergency
operation for
compressor
malfunction
Single 0 0
00
Disabled (factory
default)
E560 will occur if all compressors are set to
malfunction state.
01
Compressor
1: malfunction state
02
Compressor
2: malfunction state
Cooling capacity
correction Main 0 1
00
44.6-48.2 (7-9): factory
default
Targeted evaporating tempera
ture: °F(°
C).
When low temperature value
is
set, indoor unit
discharged
air
temperature
will decrea
se.
0 1 41-44.6 (5-7)
0 2 48.2-51.8 (9-11)
0 3 50-53.6 (10-12)
0 4 51.8-55.6 (11-13)
0 5 53.6-57.2 (12-14)
0 6 55.4-59 (13-15)
Heating capacity
correction Main 0 2
00
435.1 (3.0): factory
default
Targeted high pressure
: psi (MPa).
When
low
pressure value
is set,
discharged
air
temperature
of the
indoor unit
will
decrease
.
0 1 362.6 (2.5)
0 2 377.1 (2.6)
0 3 391.6 (2.7)
0 4 406.1 (2.8)
0 5 420.6 (2.9)
0 6 449.6 (3.1)
0 7 464.1 (3.2)
0 8 478.6 (3.3)
Current restriction
rate Single 0 3
00
100%: factory
default
Enabling this setting may decrease cooling and
heating performance.
0195%
0290%
0385%
0480%
0575%
0670%
0765%
0860%
0 9 55%
1050%
11
No
restriction
Oil collecting
interval Main 0 4 00
Factory
default
01
Shortens interval
by 1/2
Temperature for
triggering
defrost
operation
Main
05
00
Disable snow prevention function
(factory
default)
01
Enable when installation is in a
humid area such as near a river
or lake
Outdoor unit
fan
speed correction
Single 06
00
Factory
default
0
1
Increase fan
speed to maximum
value
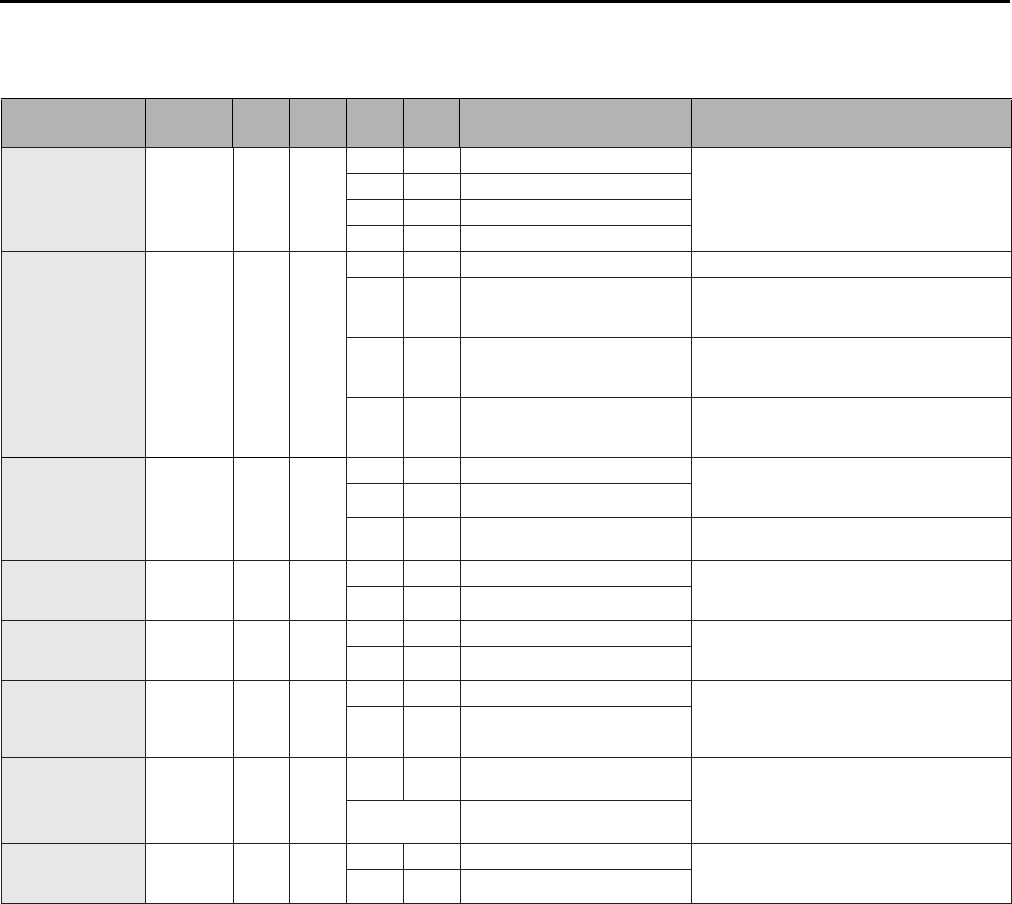
VRF-SVN34A-EN 57
Control System
Night-time
silent
mode Main
07
00
Disabled (factory
default)
01Level 1
02Level 2
03Level 3
High-head
condition
setting Main 0 8
00
Disabled (factory
default)
01
Case 1: height difference type 1
(indoor unit is lower than
outdoor unit)
When the outdoor unit
is
131.23–262.47
ft (
40–
80 m)
above the indoor
unit.
02
Case 2: height difference type 1
(indoor unit is lower than
outdoor unit)
When the outdoor unit
is
more than 262.47 ft.
(
80 m)
above the indoor
unit.
03
Height difference type 2
(outdoor unit is lower than
indoor unit)
When the indoor unit
is more than
98.43 ft
(30 m)
above the outdoor
unit.
Long piping
condition
(a) Main 0 9
0 0 Disabled (factory default) When the equivalent length of the farthest
indoor unit from the outdoor unit is between
328.08–557.74 (100–170 m).
01Level 1
02Level 2
When equivalent length
of
farthest
indoor
unit
from the outdoor unit
is
over 557.74 ft (
170 m).
Energy saving
mode Main 1 0
0 0 Disabled (factory default) If enabled, energy saving mode triggers
when the room temperature reaches
setpoint while operating in heating mode.
01Enabled
Rotation defrost(b) Main 1 1
0 0 Disabled (factory default) If enabled, continuous heating operation is
possible but heating performance will
decrease during rotation defrost operation.
01Enabled
Expand operational
temperature
range
for
cooling
operation
(b)
Main 1 2
0 0 Disabled (factory default) If enabled, continuous cooling operation is
possible even in low temperature condition
down to 5°F (-15°C), but MCU noise will
increase.
01Enabled
Channel address Main 1 3
AUAutomatic setting (factory
default) Used for centralized control.
0–15 Manual setting for channel:
0–15
Snow
accumulation
prevention control
Main 1 4
0 0 Enabled (factory default) If enabled, the fan may rotate when the unit
is not operating.
01Disabled
(a) Enabling this setting is unnecessary if high-head condition is set.
(b) Heat recovery only.
Table 34. Options and corresponding settings (continued)
Option
Outdoor
unit
Digit
1
Digit
2
Digit
3
Digit
4Value Comments
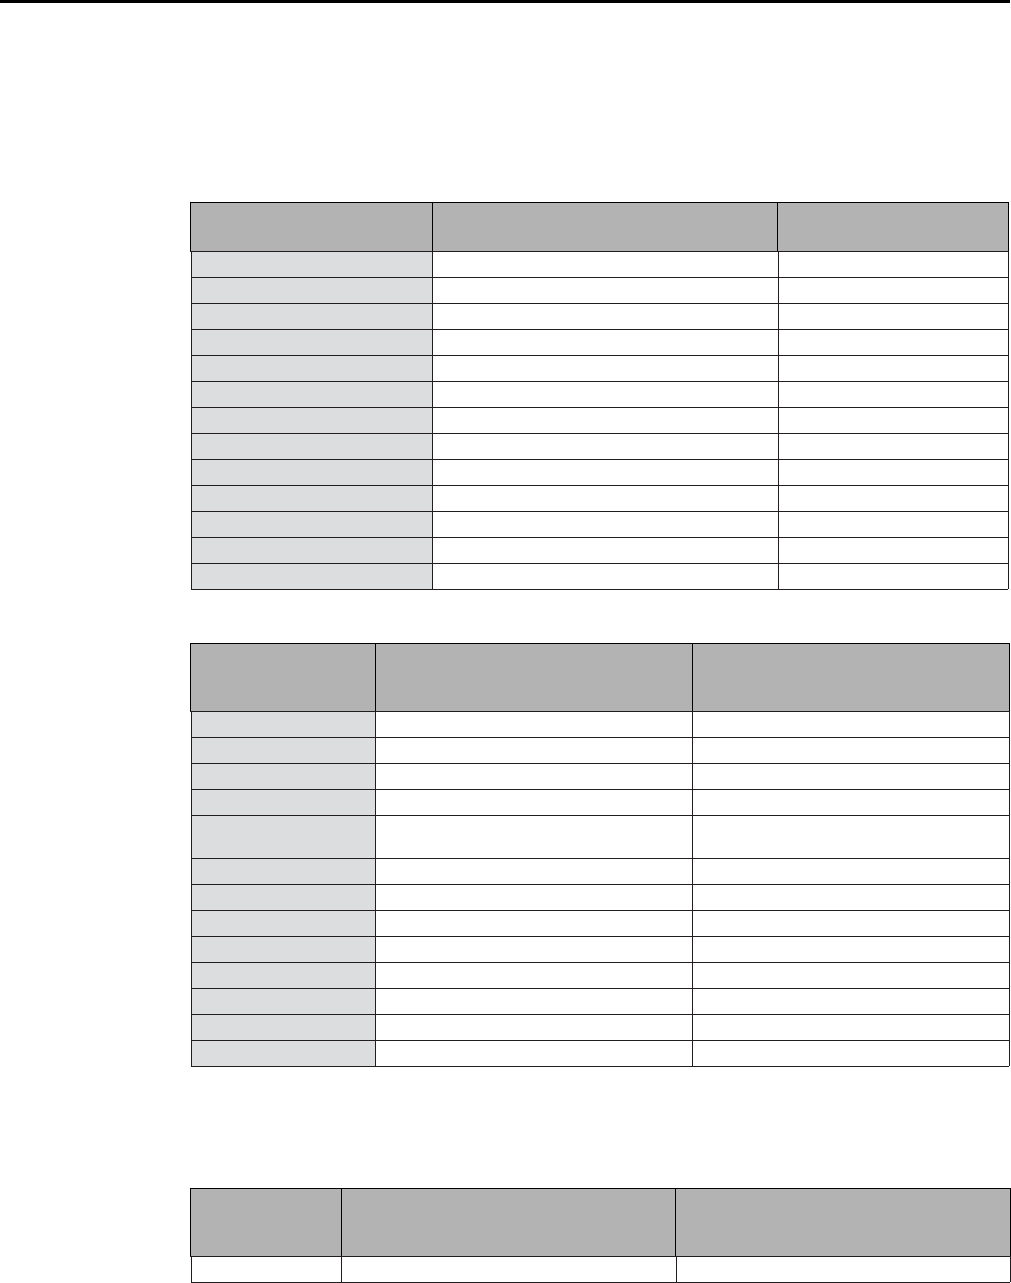
58 VRF-SVN34A-EN
Control System
System Configuration: Buttons K1–K4
Buttons K1 and K2 are used to initiate system operations. The 4-digit display responds as shown
in the last column of the following tables.
Table 35. Button K1
Number of times button
K1 is pressed Operation 4-digit display
1 (hold for 5 seconds) Test operation
K - K- Blank - Blank
1
Refrigerant
charging in heating
mode
K - 1 - Blank - Blank
2
Te s t o p e r a t i o n
in heating mode
K - 2 - Blank - Blank
3
Pump out
in heating
mode (Outdoor unit address
1)
K - 3 - Blank - 1
4
Pump out
in heating
mode (Outdoor unit address
2)
K - 3 - Blank - 2
5
Pump out
in heating
mode (Outdoor unit address
3)
K - 3 - Blank - 3
6
Pump out
in heating
mode (Outdoor unit address
4)
K - 3 - Blank - 4
7
Vacuuming (Outdoor unit address
1)
K - 4 - Blank - 1
8
Vacuuming (Outdoor unit address
2)
K - 4 - Blank - 2
9
Vacuuming (Outdoor unit address
3)
K - 4 - Blank - 3
10
Vacuuming (Outdoor unit address
4)
K - 4- Blank - 4
11
Vacuuming
(All)
K - 4- Blank - A
12
End
operation
—
Table 36. Button K2
Number of times
button K2 is
pressed Operation 4-digit display
1
Refrigerant
charging in
cooling
mode
K - 5 - Blank - Blank
2
Te s t o p e r a t i o n
in
cooling
mode
K - 6 - Blank - Blank
3
Pump down
all
units
in
cooling
mode
K - 7 - Blank - Blank
4
Pipe inspection (heat pump: test
operation)
K - 8 - Blank - Blank
5
Checking the amount
of refrigerant
K - 9 - X - X
(last digits may differ depending on status)
6
Discharge
mode
(a)
(a) Discharge mode may not operate normally if an error code occurs. If an E464 or E364 occurs, do not use the discharge
mode because the power element may be damaged.
K - A - Blank - Blank
7Forced defrost
K - B - Blank - Blank
8
Forced
oil collection
K - C - Blank - Blank
9 Inverter check compressor 1(b)
(b) If button K2 is pressed the specified number of times and the inverter check is not successful, an error code will appear
on the 4-digit display.
K - D - Blank - Blank
10 Inverter check for compressor 2(b)
K - E - Blank - Blank
11 Inverter check for fan 1(b)
K - F - Blank - Blank
12 Inverter check for fan 2(b)
K - G - Blank - Blank
13 End operation —
Table 37. Button K3
Number of
times button K3
is pressed Operation 4-digit display
1
Initialize (reset)
operation
Same
as
power up: “8888”
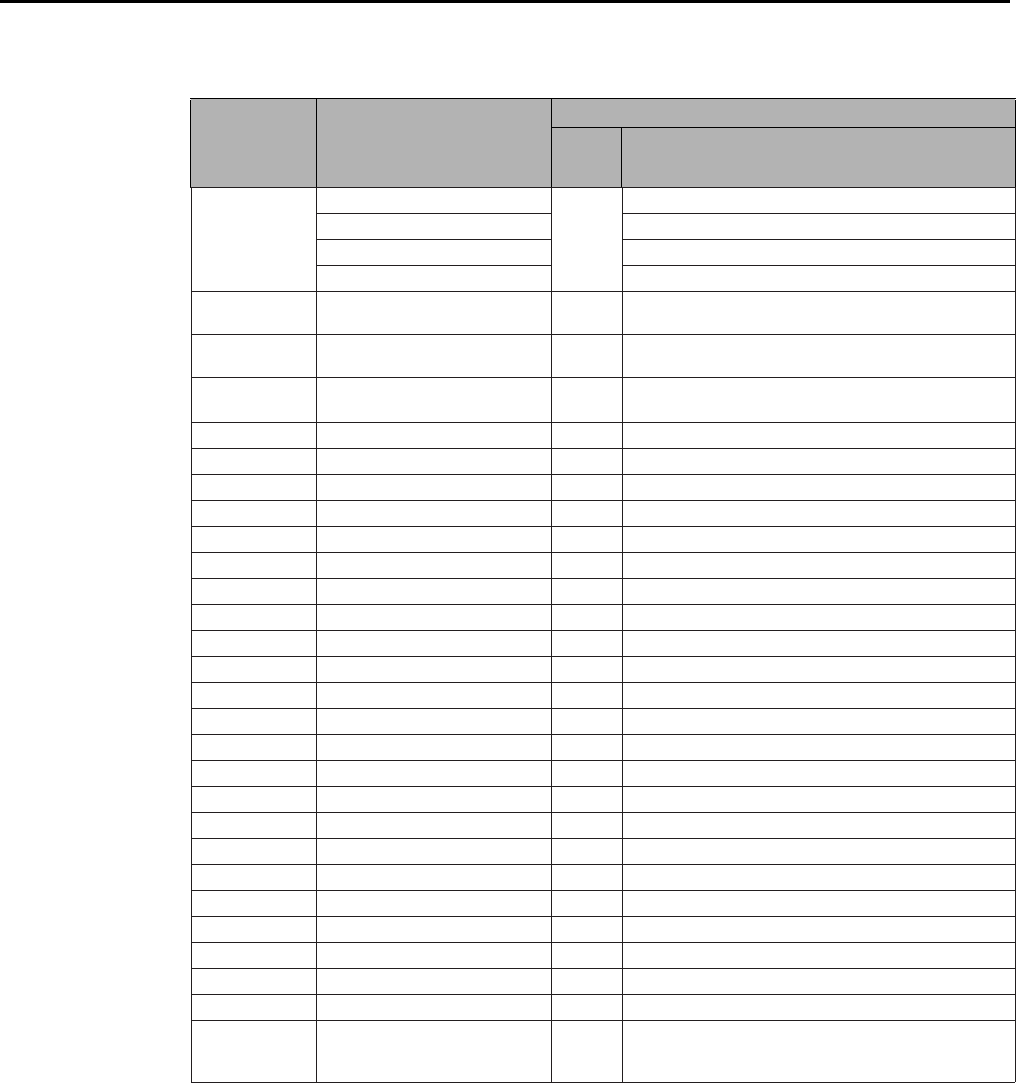
VRF-SVN34A-EN 59
Control System
Table 38. Button K4
Number of
times button
K4 is
pressed Operation
4-digit display
Digit 1 Digits 2, 3, 4
1
4TV*0072***** (6 ton)
1
Off, 0, 8
4TV*0096***** (8 ton) Off, 1, 0
4TV*0120***** (10 ton) Off, 1, 2
4TV*0144***** (12 ton) Off, 1, 4
2
Command frequency
of
the
compressor
12 120 Hz → 1, 2, 0
3
Command frequency
of
the
compressor
23 120 Hz → 1, 2, 0
4
High pressure
4 220.46 psi (1.52 MPa) → 1, 5, 2
5
Low pressure
5 62.37 psi (0.43 MPa)
→ 0, 4, 3
6
Discharge temperature
of COMP1 6 188.6°F (87°C)
→ 0, 8, 7
7
Discharge temperature
of COMP2 7 188.6°F (87°C)
→ 0, 8, 7
8
IPM temperature
of COMP1 8 188.6°F (87 ?)
→ 0, 8, 7
9
IPM temperature
of COMP2 9 188.6°F (87 ?) → 0, 8, 7
10
CT sensor value
of COMP1 A 2 A → 0, 2, 0
11
CT sensor value
of COMP2 B 2 A → 0, 2, 0
12
Suction
temperature C
-43.6°F
(-42°C) → -, 4, 2
13
COND Out
temperature D
-43.6°F
(-42°C) → -, 4, 2
14
Temperature
of
liquid
pipe E
-43.6°F
(-42°C)
→ -, 4, 2
15
TOP temperature
of COMP1 F
-43.6°F
(-42°C)
→ -, 4, 2
16
TOP temperature
of COMP2 G
-43.6°F
(-42°C)
→ -, 4, 2
17
Outdoor
temperature H
-43.6°F
(-42°C)
→ -, 4, 2
18
ESC inlet
temperature I
-43.6°F
(-42°C)
→ -, 4, 2
19
ESC outlet
temperature J
-43.6°F
(-42°C)
→ -, 4, 2
20
Main EEV1
step K
2
000
steps
→ 2, 0, 0
21
Main EEV2
step L
2
000
steps
→ 2, 0, 0
22 ESC EEV step M
3
00
steps
→ 3, 0,
0
23 HR EEV step N
3
00
steps
→ 3, 0,
0
24
Fan step (SSR
or BLDC) O 13
steps
→ 0, 1,
3
25
Current frequency
of COMP1 P
12
0
Hz →
1
,
2
,0
26
Current frequency
of COMP2 Q
12
0
Hz →
1
,
2
,0
27 Suction 2 temperature (HR) R
-43.6°F
(-42°C) →-, 4, 2
28 Master indoor unit address S
If master indoor unit is not selected → Blank, N, D
If indoor unit No. 1 is selected as master indoor unit →
0, 0, 1
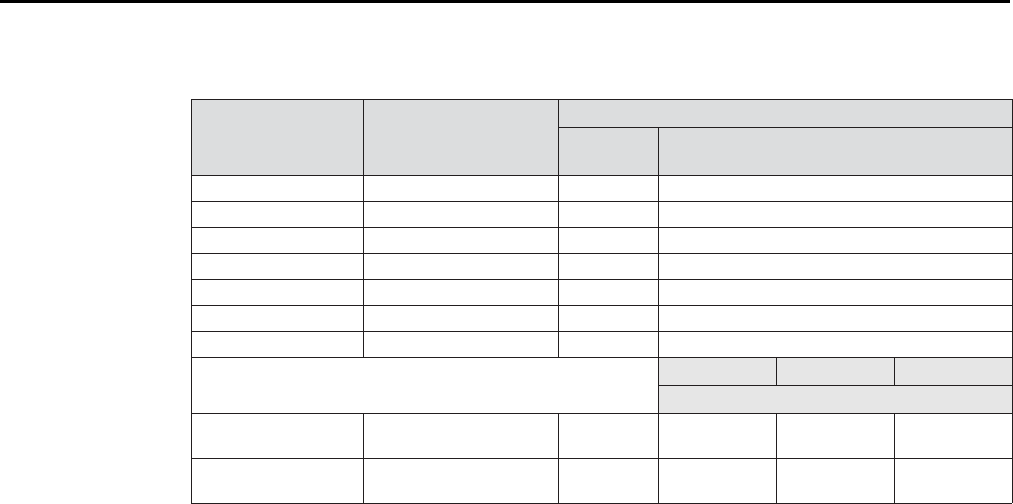
60 VRF-SVN34A-EN
Control System
Table 39. Button K4 (pressed and held for 3 seconds)
Number of times
K4 is pressed and
held 3 seconds Software version
4-digit display: toggles between (1) and (2)
Device
(1) Version (2): examples
1
Main circuit board
version
“MAIN” “1412”
2
Hub circuit board
version
“HUB” “1412”
3
Inverter
1 version “INV1” “1412”
4
Inverter
2 version “INV2” “1412”
5
Fan
1
version
“FAN1” “1412”
6
Fan
2
version
“FAN2” “1412”
7
EEP
version
“EEP” “1412”
Digit 1 Digit 2 Digit 3, 4
Address (example)
8(a) Automatically assigned
unit addresses “AUTO” Indoor unit: “A”
MCU: “C”
Indoor unit: “0”
MCU: “1” “07”
9(a) Manually assigned unit
addresses “MAIN” Indoor unit: “A”
MCU: “C”
Indoor unit: “0”
MCU: “1” “15”
(a) Toggles between indoor unit and MCU.
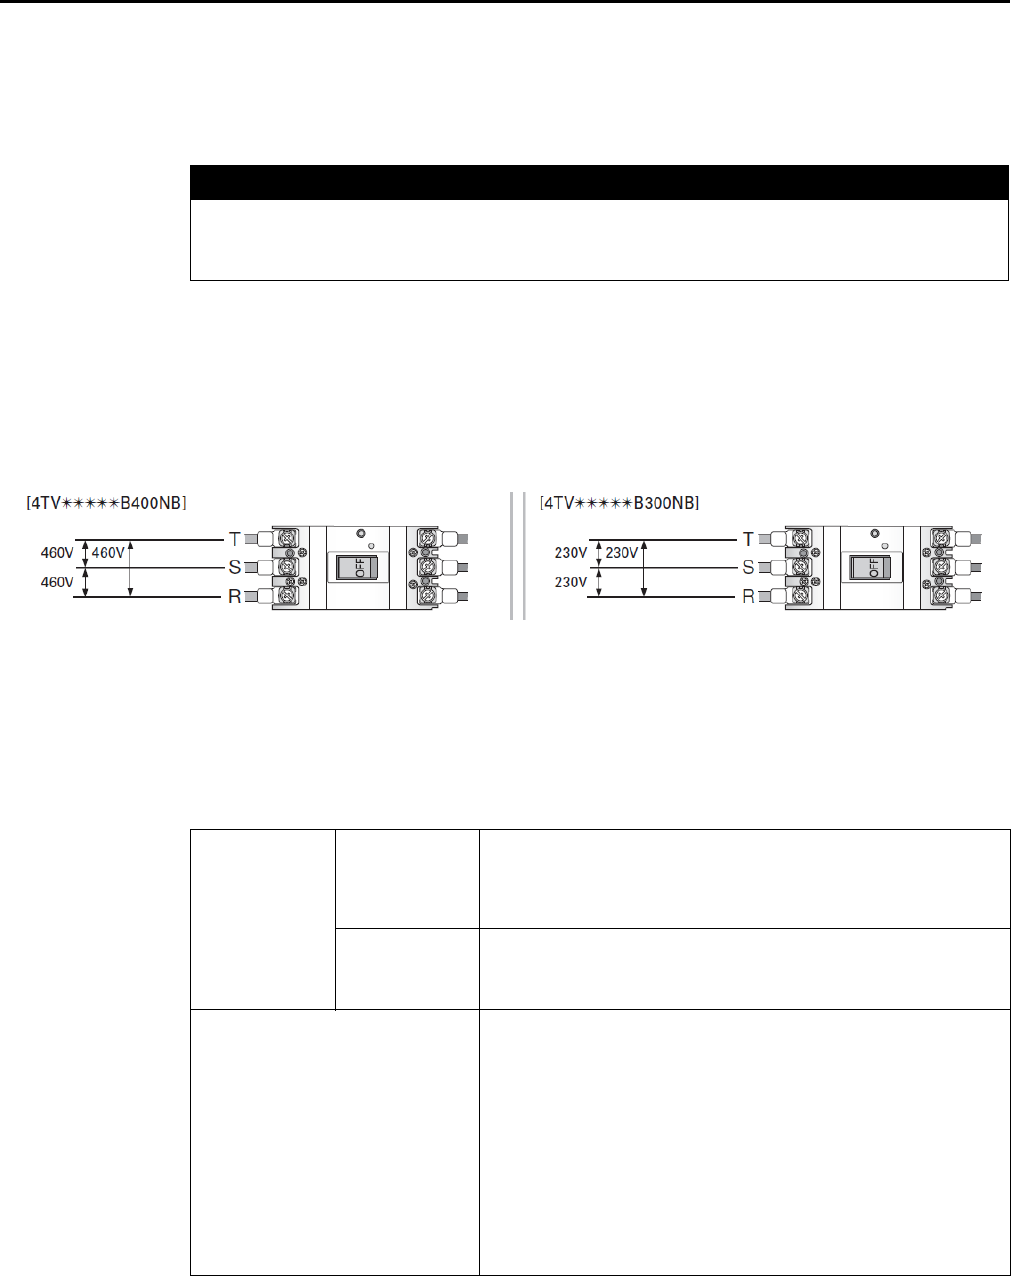
VRF-SVN34A-EN 61
Pre-Start Checks
Pre-Start Checks
After installation and before the test operation is conducted, perform the following pre-start checks:
1. Ensure that the power and communication cables of the indoor and outdoor units are properly
connected.
2. Before supplying power, use a 500 Vdc (4TV*****B400NB) or 600 Vdc (4TV*****B300NB)
insulation resistance tester to measure the power terminal (3 phase: R, S, T) and the outdoor
unit grounding. The resistance measurement should be over 30 M.
3. Before supplying the power, use a voltmeter and phase tester to check the voltage and the phase
between wires (R-S, S-T, T-R): 460 V (TV*****B400NB) or 230 V (4TV*****B300NB).
4. Ensure that the indoor units are connected.
5. The protection system cuts power to the PCB for overvoltage when N phase is cross-wired to
the R, S, and T terminals. Check the power connection from N phase if the PCB is not turned on.
6. Check for a short-circuit between the communication terminal and ground.
7. Ensure that the pre-start checklist (Tab l e 40) has been completed.
NOTICE
Avoid Damage to the Communication Circuit!
Do not measure the communication terminal with an insulation tester. Doing so will damage
the communication circuit.
Table 40. Pre-start checklist
Installation
Outdoor unit
• Have you checked the external surface and the inside of the outdoor unit?
• Is there any possibility of short circuit due to the heat of an outdoor unit?
• Is the place well-ventilated and meets recommended requirements for
clearances and service?
• Is the outdoor unit installed securely to withstand the external force?
Indoor unit
• Have you checked the external surface and the inside of the indoor unit?
• Is there enough space for service?
• Have you ensured that the center of the indoor unit is installed
horizontally and is level?
Refrigerant pipe
• Have you selected the correct pipes?
• Are the liquid and gas valve open?
• Is the total number of connected indoor units within the allowable range?
• Are the length and the height difference between the refrigerant pipes
within the allowable range?
• Are the branch joints properly installed?
• Has the connection of liquid and gas pipes been correctly performed?
• Have you selected correct insulator for pipes and insulated them
correctly?
• Is the pipe or connection part properly insulated?
• Is the quantity of the additional refrigerant correctly weighed in? (You
must record the amount of
• additional refrigerant charging on the service record paper placed outside
the outdoor unit.)
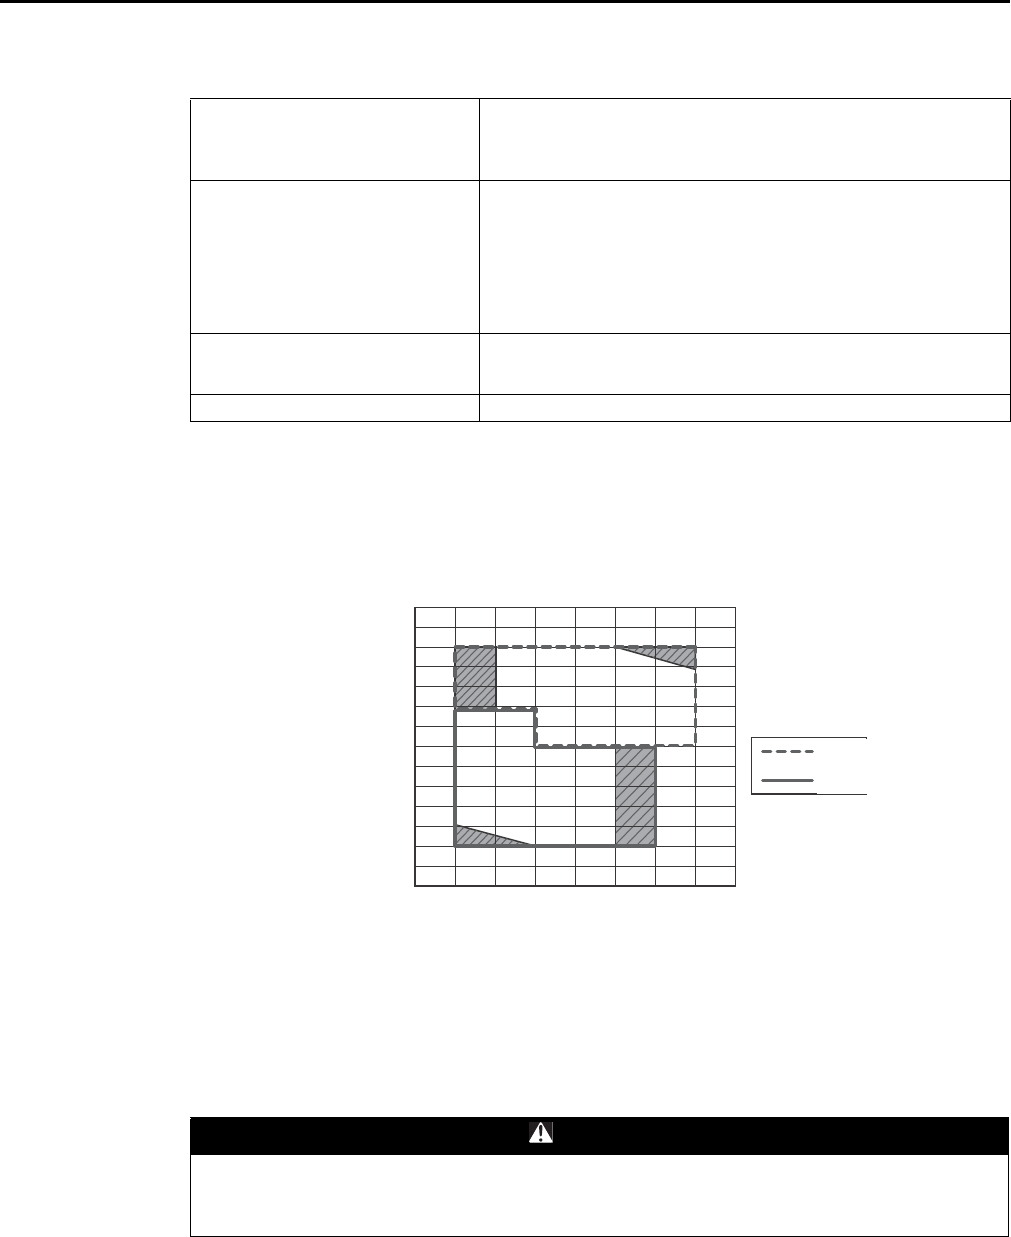
62 VRF-SVN34A-EN
Test Operation
Test Operation
Perform the test operation after all pre-start checks have been completed (See “Pre-Start Checks”
p. 61) and within the following temperature conditions:
Drain pipe
• Have you checked whether the drain pipes of the indoor unit and outdoor
unit are connected together?
• Have you completed the drain test?
• Is the drain pipe properly insulated?
Electrical
• Are the power cable and communication cable tightened firmly on the
terminal board within the rated torque recommendations?
• Have you checked for cross connection of the power and communication
cables?
• Have the outdoor unit been properly grounded??
Is shielded cable used for the communication cable?
• Is the wire length within the recommended limit?
• Is the wiring route correct?
Setting address
• Are the address of the indoor and outdoor units properly set?
• Are the address of the indoor and outdoor units properly set (when using
multiple remote controllers)?
Option • Ensure that the isolation frame is correctly installed.
Table 40. Pre-start checklist
WARNING
Hazardous Voltage, Rotating Components!
Do not operate the product with the panel or duct outlet protection net off. There is risk of
personal injury from parts that rotate or contain high voltage.
50 (122)
40 (104)
30 (86)
20 (68)
10 (50)
0 (32)
-10 (14)
-20 (-4)
5 (41) 10 (50) 15 (59) 20 (68) 25 (77) 30 (86) 35 (95) 40 (104) 45 (113)
Cooling
Heating
Outdoor temperature: °C (°F)
Indoor temperature: °C (°F)
Notes:
• During the test operation, cooling/heating modes are selected automatically.
• In the temperature range marked with hashed lines, system protection control may trigger during operation. (If this
occurs, the test operation may be difficult to judge correctly.
• When the temperature is outside of the guaranteed range, test operation accuracy of may decrease to the borderline
area shown in the graph.
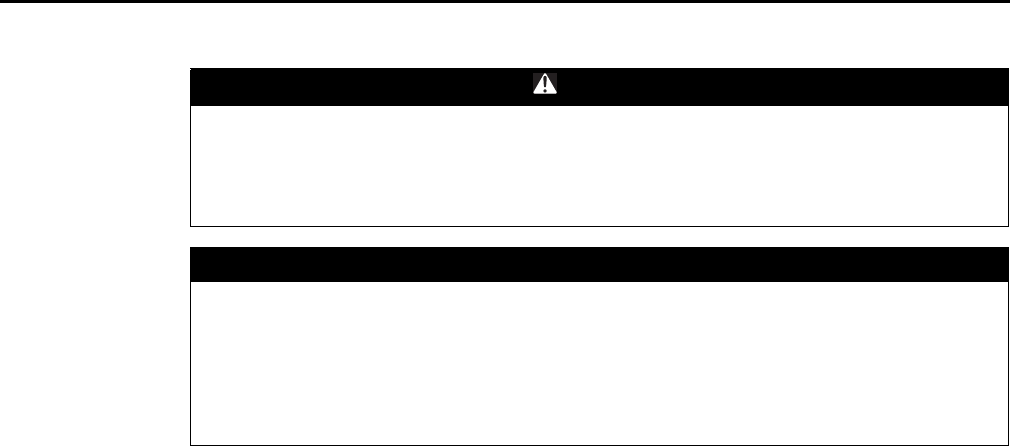
VRF-SVN34A-EN 63
Test Operation
1. Provide power to the outdoor unit at least 6 hours before operating it.
Notes: When power is supplied to the outdoor unit, it will check for and verify communications
with the indoor units.
2. Ensure that the front of the outdoor unit is closed.
3. Press and hold button K1 for 5 seconds to run the test operation (see Ta b l e 35, p. 58.)
•While the test operation is running and after the communication check, UP (UnPrepared)
appears on the digital display and the compressor is restricted from operating. The display
will clear automatically when the test operation is completed.
•The test operation may proceed from 20 minutes to maximum 2 hours depending on the
operating status.
•During the test operation, noise may occur due to valve inspection. (Examine the unit if
abnormal noise continually occurs.)
4. If error codes E503, E505, or E506 occur during the test operation, refer to “Error code E503”
p. 65 or “Error code E505 and E506” p. 65. If any other errors occur or if an inspection is needed,
refer to the service manual.
5. When the test operation ends, use VRF Enterprise Management Software or VRF Auto-
Commissioning Tool to issue a test results report. If any items in the report are marked with an
“inspection required” sign, refer to the service manual for information on correcting the items
and run the test operation again.
6. Ensure the following:
•The system has the correct refrigerant amount (see “Automatic refrigerant detection
operation” p. 64) after the unit has been operating in cooling mode for at least 30 minutes
•Cooling/heating operation runs normally.
•Air flow direction and fan speed of indoor units runs normally.
•There are no abnormal operating noises from indoor or outdoor units.
•During cooling operation, the indoor units drain properly.
7. Use VRF Enterprise Management Software to check operating status details.
8. Explain to the user how to use the indoor unit, and leave indoor unit manual with the user for
their reference.
CAUTION
Risk of Burn or Frostbit!
Refrigerant pipe may be hot or cold during or right after the operation depending on the status
of the refrigerant which flows through the refrigerant pipe, compressor, and other parts of the
refrigerant cycle. Do not touch the refrigerant pipe during or right after the operation to avoid
getting burned our frostbit.
NOTICE
Avoid Unit Damage!
Wait at least 5 minutes before turning off the main power after the inspection test is finished. If
you do not, water leakage or other problems may occur.
Wait at least 6 hours after power is supplied to the outdoor unit before operating it to allow
time for the crank case heater to pre-heat. If the crank case heater is not pre-heated before
operation, unit parts are at risk of being seriously damaged.

64 VRF-SVN34A-EN
Automatic refrigerant detection operation
Automatic refrigerant detection operation
Use the refrigerant amount detection operation after operating the product in cooling mode for at
least 30 minutes.
• If the unit operation cycle is unstable, the refrigerant detection operation may end before it is
completed.
• The refrigerant detection operation result may be inaccurate if
– If the refrigerant detection operation is run after the unit has been shut down for a long
period of time.
– If the unit installation environment causes the unit to trigger protection controls.
After the refrigerant detection operation is complete, take the following actions:
• If the amount of refrigerant is excessive, discharge 5% of the detected amount and restart the
refrigerant amount detection operation.
• If the amount of refrigerant is insufficient, add 5% of the detected amount and restart the
refrigerant amount detection operation.
• If the degree of supercooling is insufficient, add 10% of the detected amount of refrigerant and
restart the refrigerant amount detection operation.
• If the result is unavailable, check that the refrigerant detection operation was executed within
the guaranteed temperature range. Perform a test operation to determine if there are any other
problems with the system.
Start
Press the K2 button 5 times
Detect amount of refrigerant
Judge the amount of
refrigerant
Judge the amount of
refrigerant
Satisfy the temperature
condition
Satisfy the temperature
condition
Detect amount of refrigerant
Input VRF Technicial Utilities signal
End
Normal
Judgment
not available
(Normal) (Excessive) (Insufficient) (Judgment not
available)
Excessive
amount of
refrigerant
Insufficient
amount of
refrigerant
Insufficient
degree of
supercooling
Input VRF Auto-Commissioning
Tool signal
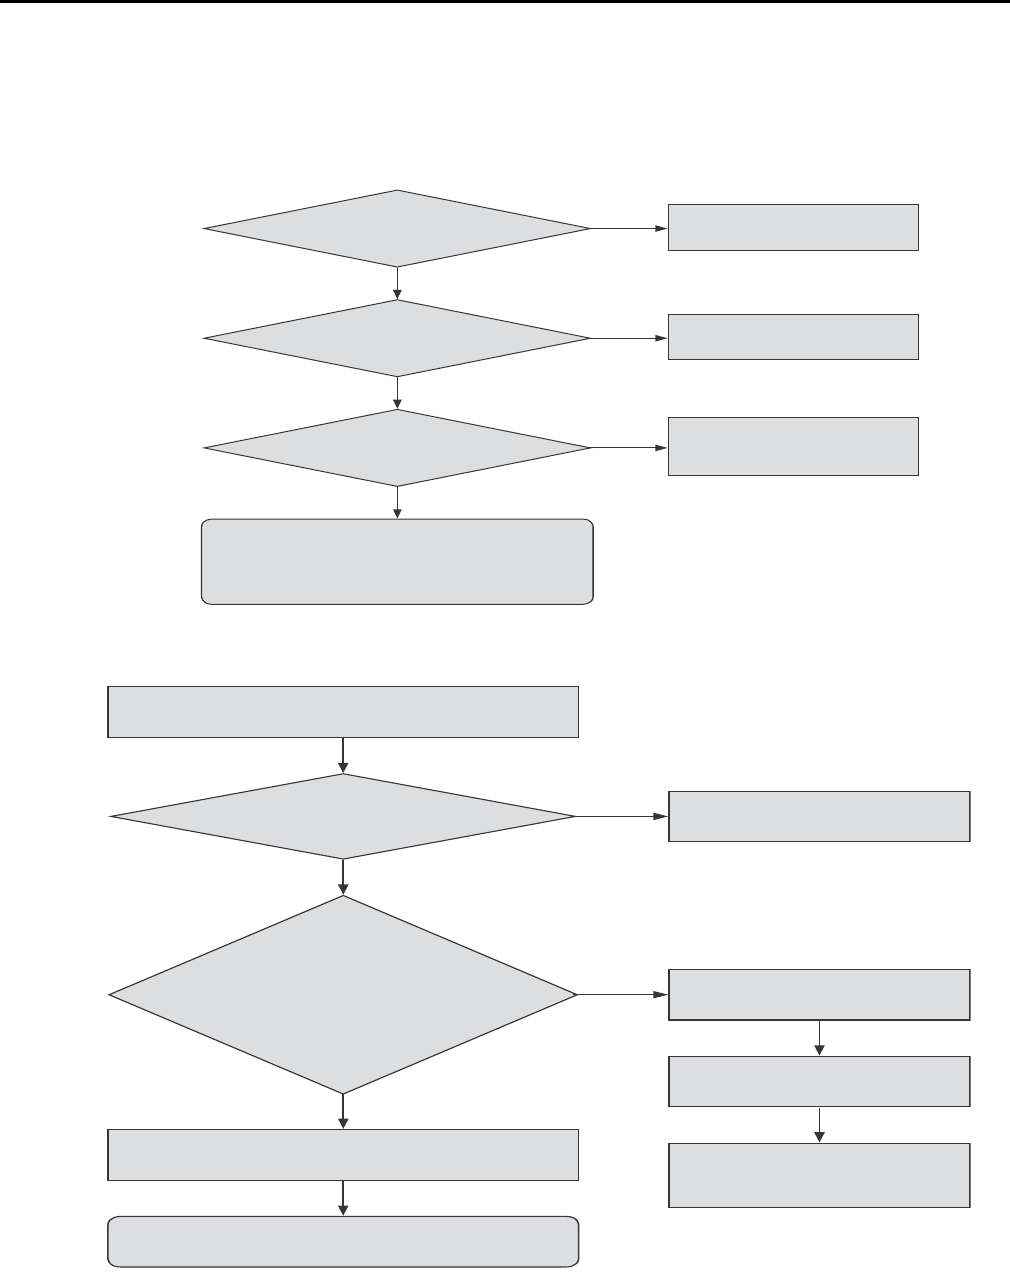
VRF-SVN34A-EN 65
Troubleshooting
Troubleshooting
Error code E503
Error code E505 and E506
Is the service valve
of the outdoor unit
opened?
Open the service valve of
the outdoor unit.
Is the 4-way valve and
main EEV operating
normally?
Check the 4-way valve
and Main EEV.
Check for leakage on the
system. Perform vacuuming /
charge refrigerant.
Is the quantity of
refrigerant appropriate?
1. Run the test operation for more than 30 minutes.
2. Run Fan mode for more than 10 minutes.
3. Restart the test operation.
No
No
No
Ye s
Ye s
Ye s
Enable vacuum mode on all outdoor units.
Is the service valve of the outdoor unit opened? Open the service value of the
outdoor unit.
Does the input sensor value of the installed
outdoor unit satisfy:
Max/min value difference of low pressure >2
Max/min value difference of high pressure >2
Reset the outdoor unit.
Disable vacuum mode on all outdoor units.
Run test operation.
End
Analyze cycle data. Check the input
sensor; replace if defective.
No
No
Ye s
Ye s

66 VRF-SVN34A-EN
Warranty For Trane Advantage™ VRF Systems and Related Accessories
Warranty For Trane Advantage™ VRF Systems and
Related Accessories
Products Covered. This warranty is extended by Trane, and applies to all Trane Advantage™ VRF
systems and accessories for these products which are sold by Trane and applied in accordance with
Trane specifications.
Basic Warranty
The warrantor warrants for a period of 12 months from the initial start-up or 18 months from date
of shipment, whichever is less, against failure due to defects in material and manufacture and that
it has the capacities and ratings set forth in Company’s catalogs and bulletins (“Warranty”).
If the following conditions are met, the warrantor extends this basic warranty period to five (5)
years from date of start-up:
• The system is designed using an approved application tool (VRF Select).
• The system is installed by a contractor who has successfully completed a Trane factory training
class.
• A verified commissioning report from the Trane VRF Commissioning Tool is submitted.
Exclusions and Limitations
Exclusions from this Warranty include damage or failure arising from: wear and tear; corrosion,
erosion, deterioration; modifications made by others to the Equipment; repairs or alterations by
a party other than Company that adversely affects the stability or reliability of the Equipment;
vandalism; neglect; accident; adverse weather or environmental conditions; abuse or improper
use; improper installation; commissioning by a party other than Company; unusual physical or
electrical or mechanical stress; operation with any accessory, equipment or part not specifically
approved by Company; refrigerant not supplied by Company; and/or lack of proper maintenance
as recommended by Company. Company shall not be obligated to pay for the cost of lost
refrigerant or lost product. Company's obligations and liabilities under this Warranty are limited to
furnishing replacement equipment or parts, at its option, FCA (Incoterms 2000) factory or
warehouse (f.o.b. factory or warehouse for US domestic purposes) at Company-designated
shipping point, freight-allowed to Company's warranty agent's stock location, for all non-
conforming Company-manufactured Equipment (which have been returned by Customer to
Company. Returns must have prior written approval by Company and are subject to restocking
charge where applicable. Equipment, material and/or parts that are not manufactured by Company
are not warranted by Company and have such warranties as may be extended by the respective
manufacturer. COMPANY MAKES NO REPRESENTATION OR WARRANTY, EXPRESS OR IMPLIED,
REGARDING PREVENTION OF MOLD/MOULD, FUNGUS, BACTERIA, MICROBIAL GROWTH, OR
ANY OTHER CONTAMINATES. No warranty liability whatsoever shall attach to Company until
Customer’s complete order has been paid for in full and Company's liability under this Warranty
shall be limited to the purchase price of the Equipment shown to be defective. EXCEPT FOR
COMPANY’S WARRANTY EXPRESSLY SET FORTH HEREIN, COMPANY DOES NOT MAKE, AND
HEREBY EXPRESSLY DISCLAIMS, ANY WARRANTIES, EXPRESS OR IMPLIED CONCERNING ITS
PRODUCTS, EQUIPMENT OR SERVICES, INCLUDING, WITHOUT LIMITATION, ANY WARRANTY
OF DESIGN, MERCHANTABILITY OR OF FITNESS FOR A PARTICULAR PURPOSE, OR OTHERS
THAT ARE ALLEGED TO ARISE FROM COURSE OF DEALING OR TRADE.
Additional warranty protection is available on an extra-cost basis and must be in writing and
agreed to by an authorized signatory of the Company. Additional terms and conditions of warranty
coverage are applicable for refrigeration equipment. If you wish further help or information
concerning this warranty, contact: Trane—Warrantor, 2701 Wilma Rudolph Blvd., Clarksville, TN
37040.

VRF-SVN34A-EN 67
Warranty For Trane Advantage™ VRF Systems and Related Accessories

optimizes the performance of homes and buildings around the world. A business of Ingersoll Rand, the leader in
creating and sustaining safe, comfortable and energy efficient environments, offers a broad portfolio of advanced
controls and HVAC systems, comprehensive building services, and parts. For more information,
has a policy of continuous product and product data improvement and reserves the right to change design and specifications without notice.
We are committed to using environmentally
conscious print practices that reduce waste.
© 2013 Trane All rights reserved
VRF-SVN34A-EN 01 Feb 2013
New
