Tranwo Technology TTA-47T Wireless Color Outdoor Camera User Manual 47Tmal generic SUMMER
Tranwo Technology Corp Wireless Color Outdoor Camera 47Tmal generic SUMMER
User Manual
Product Layout/Figures des produits/Vista General del Producto
/Produktübersicht/Profilo del prodotto
Setting UP/Installation/Instalación/Einrichtung/Configurazione
User's Manual
Manuel d'utilisation
Manual del Usuario
Benutzerhandbuch
Manuale utente
December 2003
P/N: 408-000211-00
Figures and Quick Guide/
/
Figures et guide rapide
Figuras y Guía Rápido/Abbildungen und Schnellanleitung
/Figure e guida rapida
7
1
2
4
5
6
Fig. 1
3
3
Positioning the camera/Positionnement de la caméra
/Montaje de la cámara/Befestigung der Kamera
/Posizionamento della telecamera
Mounting on a ceiling/Fixation à un plafond/Montaje en el techo
/Befestigung an einer decke/montaggio a soffitto
86mm
Longitudinal turn (Tilt)/Rotation longitudinale (inclinaison)
/Giro longitudinal (Inclinación)/Vertikales Drehen (Kippen)
/Rotazione longitudinale (Inclinazione)
Horizontal turn (Pan)/Rotation horizontale (panoramique)
/Giro Horizontal (Panorámica)/Horizontales Drehen (Schwenken)
/Rotazione orizzontale (Panoramica)
Fig. 5
Fig. 8
Power Supply/Alimentation/Alimentación/Stromversorgung
/Alimentazione elettrica
Fine Tuning/Ajustement/Ajuste Fino/Ausrichtung/Sintonia fine
86mm
Fig. 3
Fig. 4
Remove the seal by using a screwdriver to push it.
/Retirez le cache en utilisant un tournevis pour le
pousser.
/Tire del precinto con un destornillador para sacarlo.
/Entfernen Sie das Siegel, indem Sie es mit einem
Schraubenzieher hereindr ken.
/Per rimuovere il fermo, fare pressione con un
cacciavite.
üc
Fig. 7
Fig. 6
Cable Entry Hole
/
/Agujero de Entrada del Cable
/Kabelloch
/Foro d'ingresso del cavo
Trou d'entrée du câble
Release Liner
/Doublure
/Revestimiento protector
/Klebebandstreifen
/Adesivo fissante
Waterproof Tape
/Ruban étanche
/Cinta impermeable
/Wasserdichtes Klebeband
/Nastro resistente all'acqua
2.4 GHz Wireless Color Outdoor Camera
English
11
3
3
22
What You Get
One camera
One power adapter
Fixing screws and masonry plugs
Warterproof tape
This User's Manual
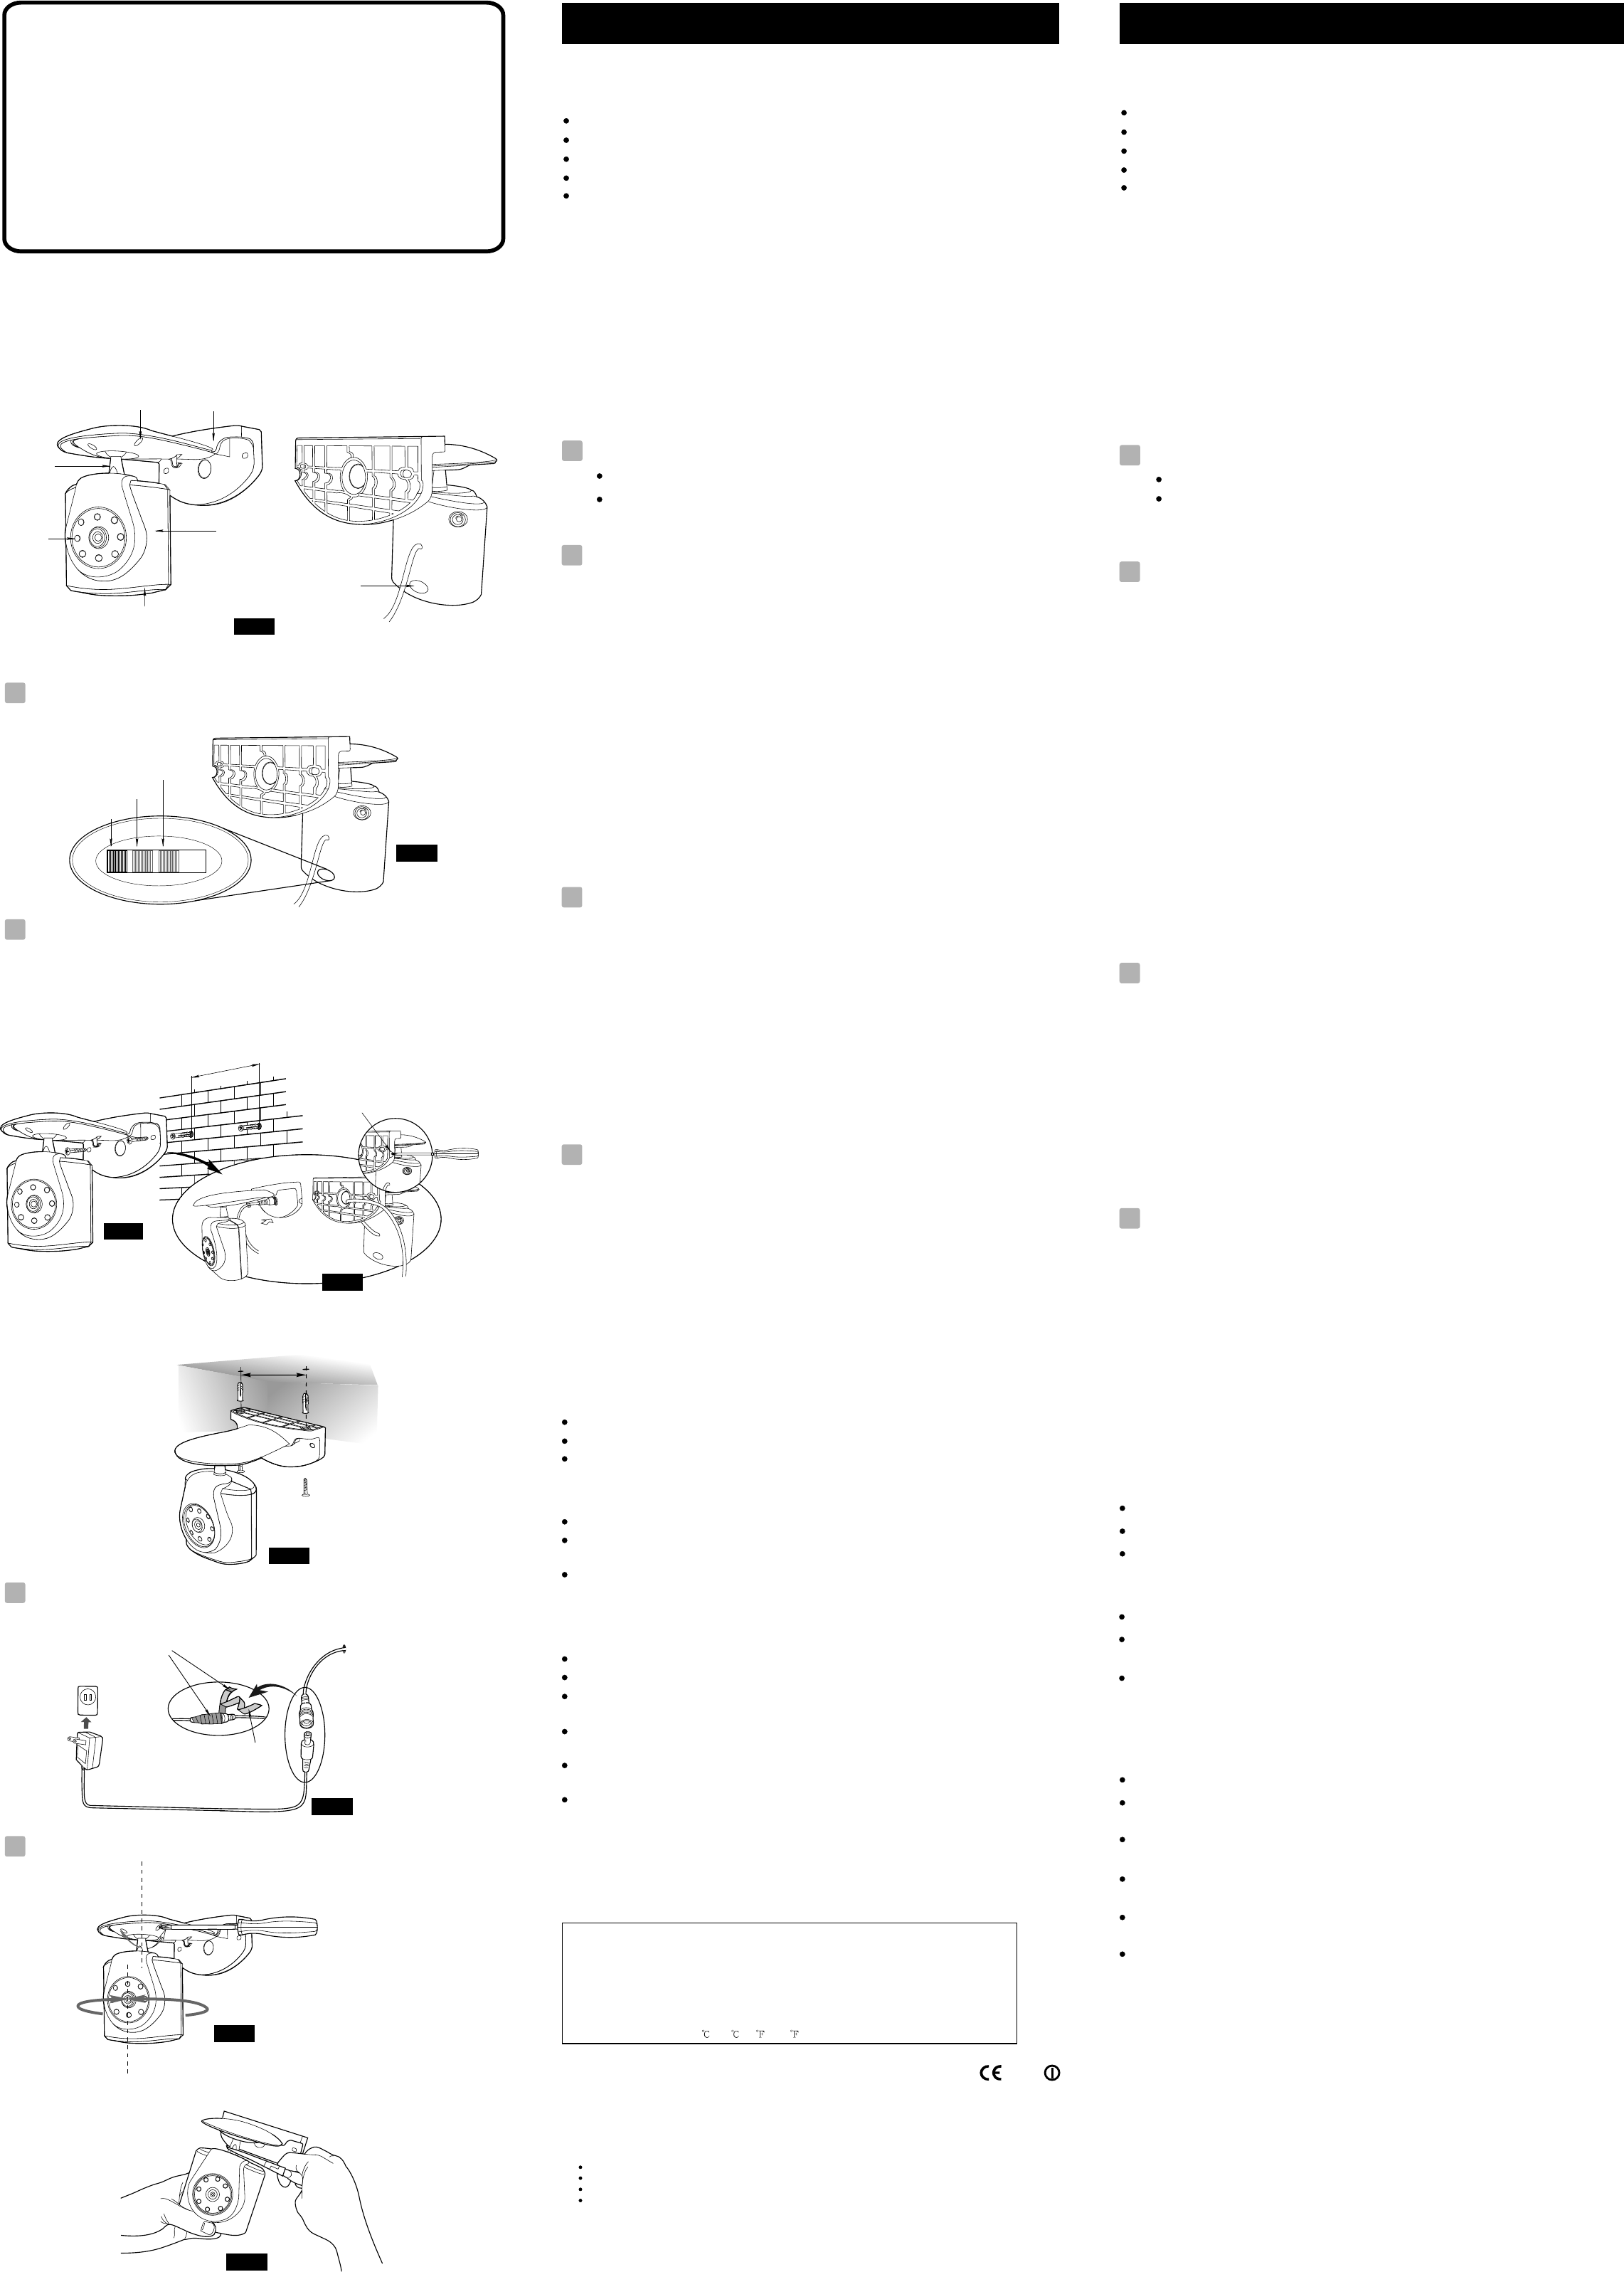
Product Layout (Fig. 1)
1. Mounting bracket
2. Screw for Fixing Angle
3. Pivot
4. Infrared LEDs (Eight LEDs provide infrared light for night vision.)
5. Microphone
6. Camera body
7. Channel selection switches
Setting UP
Select Channels
The camera and monitor/receiver MUST BE set at the same channel.
Select the channel on the camera by sliding the slide switches on the
back of the camera, see Fig. 2. (Remove the rubber plug at the bottom
of the back of camera, slide the switches by using a screwdriver.)
Setting up the Camera
The camera can be mounted either to a wall or ceiling. The monitor/receiver
reception should be tested before fixing the camera in place. Have one
person hold the camera in the proposed mounting position while another
checks the reception on the TV/monitor. If interference or other problems are
present, refer to the "Troubleshooting" section of this manual. You may need
to select a different location to mount the camera.
1. Drill two holes 86mm apart in a line, at the camera mounting position.
2. Fix the camera to the wall or ceiling using the masonry plugs and fixing
screws supplied. See Fig. 3 and Fig 5.
Note: There is a hole on the bracket, you can thread the cable from the
camera through the hole and insert the cable into the groove on the
back of the bracket, then fix the camera on to the wall. See Fig. 4.
3. Select a suitable location to drill a cable entry hole. Depending on the
location, this can be through the house wall or through a door or
window frame.
4. Push the cable through the cable entry hole. We recommend using a
plastic bag to protect the plug on the end of the cable from dust and
damage. Pull the rest of the cable inside.
Power Supply
1. Connect the plug of the power adapter with the Power In socket of the
cable from the camera. Make sure power plugs are pushed all the way in.
2. Plug the AC adapter into a wall outlet. See Fig. 6.
How to use the waterproof tape
After connecting the plug of the power adapter with the Power In socket of
the cable from the camera, you can use the provided waterproof tape to
prevent moisture and dirt getting inside.
1. Remove the release liner and wrap the waterproof tape in a spiral
around the plug and socket. Wrap the tape with enough tension to
obtain conformability on the surface.
2. Overlap by at least half the width of the tape so it bonds to itself, while
removing the release liner. See Fig. 6.
Fine Tuning
1. Adjust the camera's viewing angle according to the illustrations of Fig. 7.
2. Loosen the screw on the bottom of bracket by using a screwdriver.
3. Rotate the camera to make adjustments.
4. When satisfied with the picture coverage, retighten the screw
Note: After adjusting the viewing angle, make sure the camera body is
attached to the pivot of the bracket tightly. If it is loose, use one hand
to hold the camera body steady, and with the other hand, use pliers to
pinch the flat surfaces on the pivot, swivel the pivot clockwise to
tighten. See Fig. 8.
Troubleshooting
If you are not getting any signal at all
Make sure power plugs are pushed all the way in
Check all cable connections
Check the CHANNEL switches on both camera and receiver/monitor are set
to the same number
If the signal is poor, or there is interference
Change the channel on both camera and receiver/monitor and make them the same.
If there is a microwave oven in use in the path between the camera and
receiver/monitor, remove the microwave oven or turn it off
Make sure the camera and receiver/monitor are within range of each other
(range of approximately 300 feet; 100 meters in a clear line of sight)
Care and Maintenance
Keep all its parts and accessories out of the reach of young children
Camera performance can be adversely affected by fingerprints or dirt on the lens.
Do not attempt to open the case. Non-expert handling of the device may
damage it
Operate this product using only the power supply included with it or
provided as an accessory
Do not overload electrical outlets or extension cords as this can result in fire
or electric shock
Do remember that you are using public airwaves when you use the system
and that sound and video may be broadcast to other 2.4 GHz receiving
devices. Conversations, even from rooms near the camera, may be
broadcast. To protect the privacy of your home, always turn the camera off
when not in use.
Specifications
0678
Specifications subject to change without notice
Frequency 2.4 GHz
Antenna Built-in omni-directional antenna
Channel 3 selectable channels
A/V mod/demod. method FM
Image Sensor Color CMOS image sensor
Effecti ve pix els EIA: 510 (H) x 492 (V); CCIR: 628 (H) x 582 (V)
Lens f 5.6mm, F 1.8
Dimensions 10.5(W) x 13(H) x 11.5(D) cm; (4.1 x 5.1 x 4.5 inches) With mounting bracket
Weight 300g (10.6 ounces)
Power DC 9V, 500mA
Operating temperature -10 ~ 40 (14 ~ 104 )
FCC Statement
This equipment has been tested and found to comply with the limits for a Class B digital device, pursuant to Part 15 of the FCC Rules.
These limits are designed to provide reasonable protection against harmful interference in a residential installation. This equipment
generates, uses and can radiate radio frequency energy and, if not installed and used in accordance with the instructions, may cause
harmful interference to radio communications. However, there is no guarantee that interference will not occur in a particular
installation. If this equipment does cause harmful interference to radio or television reception, which can be determined by turning
the equipment off and on, the user is encouraged to try to correct the interference by one or more of the following measures:
Reorient or relocate the receiving antenna
Increase the separation between the equipment and receiver
Connect the equipment into an outlet on a circuit different from that to which the receiver is connected
Consult the dealer or an experienced radio/TV technician for help
FCC Label Compliance Statement:
This device complies with Part 15 of the FCC Rules. Operation is subject to the following two conditions: (1) this device may not
cause harmful interference, and (2) this device must accept any interference received, including interference that may cause undesired
operation.
Note: The manufacturer is not responsible for any radio or TV interference caused by unauthorized modifications to this equipment.
Such modifications could void the user's authority to operate the equipment.
Ce que vous avez
Un adaptateur d'alimentation
Figures des produits (Fig. 1)
1. Support de fixation
2. Vis de l'angle de fixation
3. Pivot
4. Voyants infrarouges (Huit voyants pour fournir une lumière infrarouge pour
la lumière nocturne.)
5. Microphone
6. Corps de la caméra
7. Commutateur de sélection du canal
Installation
Sélection des canaux
La caméra et le récepteur/moniteur DOIVENT ÊTRE définis au même canal.
Sélectionnez le canal sur la caméra en déplaçant le commutateur à
l'arrière de la caméra, (Retirez le cache en caoutchouc en
bas de l'arrière de la caméra, puis déplacez le commutateur à l'aide d'un
tournevis.)
Installation de la caméra
La caméra peut être fixée soit sur un mur ou à un plafond. La réception du
moniteur/récepteur devrait être testée avant de fixer la caméra en place.
Demandez à quelqu'un de maintenir la caméra contre le mur dans la zone
de montage sélectionnée pendant que vous contrôlez la réception sur le
moniteur/téléviseur. Si des interférences ou d'autres problèmes
surviennent, consultez la section de dépannage. Vous devrez peut-être
choisir un autre emplacement pour monter la caméra.
1. Faites deux trous à 86 mm de distance et alignés, là où la caméra doit
être installée.
2. Fixez la caméra au mur ou au plafond en utilisant les chevilles de
maçonnerie et les vis de fixation fournies. Voir Fig. 3, 5.
Remarque: Le support a un trou, vous pouvez faire passer le câble de
la caméra au travers du trou et l'insérer dans la fente à l'arrière du
support, puis fixez la caméra au mur. Voir Fig. 4.
3. Sélectionnez un emplacement approprié pour faire un trou d'entrée
pour le câble. Selon l'emplacement, ceci peut être fait dans le mur de la
maison ou au travers du cadre d'une porte ou d'une fenêtre.
4. Faites passer le câble au travers de son trou d'entrée. Il est
recommandé d'utiliser un sac plastique pour protéger la fiche à
l'extrémité du câble de la poussière et des dégradations. Tirez le reste
du câble à l'intérieur.
Alimentation
1. Connectez le câble d'extension au câble de la caméra.
2. Connectez le câble d'extension à une prise murale. Assurez-vous que
les prises d'alimentation sont enfoncées à fond. Voir Fig. 6.
Comment utiliser le ruban étanche
Après avoir connecté la prise de l'adaptateur d'alimentation à la prise
d'alimentation du câble de l'appareil photo, vous pouvez utiliser le ruban
étanche fourni pour éviter à l'entrée de l'humidité et de la poussière.
1. Retirez la doublure et enroulez le ruban étanche en spirale autour des
prises. Entourez le ruban assez tendu pour qu'il s'ajuste à la surface.
2. Faites chevaucher le ruban d'au moins la moitié de sa largeur pour qu'il
adhère à lui-même, tout en retirant la doublure. Voir Fig. 6.
Ajustement
Dépannage
Si vous n'avez aucun signal
Assurez-vous que les prises d'alimentation sont enfoncées à fond
Vérifiez toutes les connexions de câble
Contrôlez que CANAL de la caméra et du récepteur/moniteur sont définis
au même numéro.
En cas de mauvais signal ou d'interférence
Réglez le même canal sur la caméra et le récepteur/moniteur.
i un four à micro-ondes en cours d'utilisation se trouve entre la caméra et
le récepteur/moniteur, retirez-le ou éteignez-le.
ssurez-vous que la caméra et le récepteur/moniteur ne sont pas trop
éloignés l'une de l'autre (approximativement 100 mètres de portée par une
ligne de vue dégagée).
Soin et entretien
Gardez tous les composants et accessoires hors de portée de jeunes enfants.
Les performances de la caméra peuvent être amoindries par des marques de
doigts ou des saletés sur l'objectif.
N'essayez pas d'ouvrir le boîtier. Une manipulation non expérimentée de
l'appareil peut l'endommager.
Ne faites fonctionner ce produit qu'avec l'adaptateur d'alimentation inclus
ou fourni comme accessoire.
Ne surchargez pas les prises électriques ou les cordons d'extension, car cela
peut causer des feux ou des électrocutions
Une caméra
Vis de fixation et chevilles de maçonnerie
Ce manuel d'utilisation
Ruban étanche
voir Fig. 2.
1. Ajustez l'angle de vue de la caméra selon les illustrations de Fig 7.
2. Desserrez la vis au-dessous du support avec un tournevis.
3. Faites tourner la caméra pour effectuer des ajustements.
4. Lorsque vous êtes satisfaits de la couverture de l'image, resserre la vis.
Remarque: Après l'ajustement de l'angle de vue, assurez-vous que le
corps de la caméra est fixé solidement au pivot du support. S'il est
lâche, utilisez une main pour maintenir le corps de la caméra et avec
l'autre main, utilisez des pinces pour serrer les surfaces plates sur le
pivot, faites tourner le pivot dans le sens horaire pour serrer. Voir Fig.
8.
S
A
Veuillez vous rappeler que vous utilisez les ondes publiques lorsque vous
mettez le système en opération, et que le son et la vidéo peuvent donc être
transmis vers d'autres appareils de réception à 2.4 GHz. Les conversations,
même si elles ont lieu dans des pièces différentes de celle où se trouve la
caméra, peuvent donc être transmises. Afin de protéger votre vie privée,
veillez donc à toujours mettre la caméra hors tension lorsqu'elle n'est pas
utilisée.
Français
4
4
1
1 2 3 4
Channel 1
Channel 2
Channel 3
Fig. 2
Select Channels/Sélection des canaux/Selección de Canales
/Auswahl von Kanälen/Selezione dei canali
2
Mounting on a wall/Fixation sur un mur/Montaje en la pared
/Befestigung an einer wand/Montaggio a parete
4
Was Sie erhalten
Eine Kamera
Ein Netzgerät
Befestigungsschrauben und Dübel
Wasserdichtes Klebeband
Dieses Benutzerhandbuch
Produktübersicht (Abb. 1)
1. Befestigungshalterung
2. Schraube zum Fixieren des Winkels
3. Drehzapfen
4. Infrarot-LEDs (Acht LEDs bieten Infrarotlicht für Nachtansicht.)
5. Mikrofon
6. Kamerakörper
7. Kanalauswahlschalter
Einrichtung
Auswahl von Kanälen
Die Kamera und das Empfangsgerät/der Monitor MÜSSEN auf den
gleichen Kanal eingestellt sein.
Stellen Sie den Kanal auf der Kamera ein, indem Sie die Schieberegler
auf der Rückseite der Kamera verstellen, siehe Abb. 2. (Entfernen Sie
die Gummiabdeckung unten auf der Rückseite der Kamera und
verstellen die Regler mit Hilfe eines Schraubenziehers.)
Befestigung der Kamera
Die Kamera kann entweder an einer Wand oder einer Decke befestigt
werden. Vor Montage der Kamera sollten Sie den Empfang des
Monitors/Empfangsgeräts testen. Bitten Sie jemanden, die Kamera am
ausgewählten Befestigungsbereich gegen die Wand zu halten, während
Sie den Empfang auf dem Monitor/Fernseher prüfen. Wenn Interferenzen
oder andere Probleme auftreten, ziehen Sie den Abschnitt Fehlerbehebung
zu Rate. Sie müssen u.U. einen anderen Platz im Zimmer zur
Kameramontage auswählen.
1. Bohren Sie an der gewünschten Position für die Kamera zwei Löcher
auf einer Linie im Abstand von 86mm.
2. Befestigen Sie die Kamera an der Wand oder der Decke mit Dübeln und
den bereitgestellten Schrauben. Siehe Abb. 3, 5.
Hinweis: In der Befestigungshalterung gibt es ein Loch, durch das
Sie das Kabel der Kamera stecken können. Führen Sie das Kabel dann
durch die Rille auf der Rückseite der Halterung und befestigen die
Kamera an der Wand/Decke. Siehe Abb. 6.
3. Wählen Sie einen geeigneten Ort zum Bohren des Lochs, durch das Sie
das Kabel durch Hauswand, Tür oder Fensterrahmen etc. führen
können.
4. Führen Sie das Kabel durch das Loch. Der Stecker sollte dabei mit
einer Plastiktüte vor Staub und Beschädigung geschützt werden.
Ziehen Sie das ganze Kabel durch das Loch.
Stromversorgung
1. Verbinden Sie ein Verlängerungskabel mit dem Kabel der Kamera.
2. Stecken Sie das Verlängerungskabel in eine Netzsteckdose. Gehen Sie
sicher, dass alle Stecker vollständig eingesteckt sind. Siehe Abb. 6.
Benutzen des wasserdichten Klebebandes
Nachdem Sie den Stecker des Netzteils mit dem Anschluss des
Kamerakabels verbunden haben, können Sie das bereitgestellte
wasserdichte Klebeband benutzen, um zu verhindern, dass Feuchtigkeit
und Schmutz eindringt.
1. Lösen Sie den Klebebandstreifen und wickeln das wasserdichte
Klebeband um den Stecker und den Anschluss. Wickeln Sie das Band
fest herum, um eine glatte Oberfläche zu erhalten.
2. Lassen Sie es mindestens um die Hälfte überlappen, so dass es festsitzt,
und entfernen Sie das den Klebebandstreifen. Siehe Abb. 15.
Ausrichtung
1. Stellen Sie den Ansichtwinkel der Kamera so ein, wie in Abb. 7 gezeigt.
2. Lockern Sie die Schrauben auf der Unterseite der Halterung mit einem
Schraubenzieher.
3. Drehen Sie die Kamera, um sie auszurichten.
4. Wenn Sie mit dem gezeigten Bild zufrieden sind, ziehen Sie die
Schrauben wieder fest.
Hinweis: Gehen Sie nach dem Ausrichten des Ansichtwinkels sicher,
dass der Kamerakörper fest mit dem Drehzapfen der Halterung
verbunden ist. Wenn die Kamera locker ist, halten Sie sie mit einer
Hand fest und drehen mit der anderen Hand unter Verwendung einer
Zange den Drehzapfen im Uhrzeigersinn fest. Siehe Abb. 8.
Problembehebung
Wenn Sie überhaupt kein Signal erhalten
Gehen Sie sicher, dass alle Stecker vollständig eingesteckt sind.
Überprüfen Sie alle Kabelverbindungen.
Vergewissern Sie sich, dass der KANAL-Auswahlschalter auf der Kamera
und dem Empfangsgerät/Monitor auf die gleiche Nummer gesetzt ist.
Wenn das Signal schlecht ist oder es Störungen gibt
Ändern Sie den Kanal auf der Kamera und dem Empfangsgerät/Monitor auf
die gleiche Nummer ab.
Befindet sich ein eingeschalteter Mikrowellenherd im Pfad zwischen der
Kamera und dem Empfangsgerät/Monitor, entfernen Sie die Mikrowelle
oder schalten Sie sie aus.
Vergewissern Sie sich, dass die Kamera und das Empfangsgerät/der
Monitor sich innerhalb des jeweiligen Empfangsbereichs befinden (bei
klarer Sichtlinie liegt der Bereich bei ca. 100 Metern (300 Fuß).
Pflege und Instandhaltung
Bewahren Sie Teile und Zubehör außerhalb der Reichweite von
Kleinkindern auf
Die Leistung der Kamera kann durch Fingerabdrücke oder Schmutz auf
dem Objektiv beeinträchtigt werden.
Versuchen Sie nicht, das Gehäuse zu öffnen, da das Gerät durch
unsachgemäße Behandlung beschädigt werden kann.
Betreiben Sie dieses Produkt nur mit dem bereitgestellten Netzteil oder
dafür vorgesehenem Zubehör.
Überbeanspruchen Sie Netzsteckdosen oder Verlängerungskabel nicht, da
dies Feuer oder elektrischen Schlag auslösen kann.
Denken Sie daran, dass Sie öffentliche Wellenlängen benutzen, wenn Sie
das System verwenden, und dass Ton und Video zu anderen 2,4 GHz-
Empfangsgeräten übertragen werden kann. Unterhaltungen, selbst in der
Nähe der Kamera, können übertragen werden. Schalten Sie zum Schutz
Ihrer Privatsphäre Ihre Kamera immer aus, wenn Sie sie nicht benutzen.
Deutsch
Contenuto della scatola
Una telecamera
Un adattatore di alimentazione
Viti di fissaggio e tasselli a espansione
Nastro resistente all'acqua
Questo Manuale Utente
Profilo del prodotto (Fig. 1)
1. Staffa di montaggio
2. Vite di fissaggio angolare
3. Perno
4. LED a raggi infrarossi (Otto LED forniscono luce a raggi infrarossi per
riprese notturne.)
5. Microfono
6. Corpo telecamera
7. Interruttori di selezione canali
Configurazione
Selezione dei canali
La videocamera e il ricevitore/monitor DEVONO ESSERE impostati
sullo stesso canale.
Selezionare il canale sulla telecamera facendo scorrere gli appositi
interruttori, situati sul retro della telecamera, vedi Fig. 2. (Rimuovere il
tappo di gomma presente sul retro della telecamera, in basso e far
scorrere gli interruttori servendosi di un cacciavite.)
Posizionamento della telecamera
La telecamera può essere montata a parete o a soffitto. Prima di
posizionare la videocamera è opportuno verificare la corretta ricezione del
monitor/ricevitore. Controllare la ricezione del monitor/televisore con
l'aiuto di un assistente, che manterrà la videocamera sollevata e appoggiata
alla parete, nella posizione scelta per il montaggio. In caso di interferenze
o problemi di altro tipo, fare riferimento alla sezione Risoluzione dei
problemi. Potrebbe essere necessario posizionare la videocamera in un
punto diverso della stanza.
1. Aprire due fori alla distanza di 86mm l'uno dall'altro, in linea retta, in
corrispondenza della posizione di montaggio della telecamera.
2. Fissare la telecamera alla parete o al soffitto mediante i tasselli a
espansione e le viti di fissaggio in dotazione. Vedi Fig. 3, 5.
Nota: nella staffa di montaggio vi è un foro: è possibile far passare il cavo
della telecamera attraverso il foro e sistemarlo nella scanalatura presente
dietro la staffa, quindi fissare la telecamera alla parete. Vedi Fig. 4.
3. Scegliere una posizione adatta in cui aprire un foro per l'ingresso del
cavo. Secondo i casi, si può praticare il foro su una parete o sul telaio di
una porta o di una finestra.
4. Spingere il cavo attraverso l'apposito foro d'ingresso. Si raccomanda di
usare un involucro di plastica per proteggere la spina, all'estremità del
cavo, da polvere e danneggiamenti. Tirare verso l'interno il resto del cavo.
Alimentazione elettrica
1. Collegare il cavo di prolunga al cavo della telecamera.
2. Avvicinare il cavo di prolunga ad una presa a muro e inserire la spina
nella stessa. Assicurarsi che le spine siano ben inserite nelle relative
prese di corrente. Vedi Fig. 6.
Uso del nastro resistente all'acqua
Dopo aver collegato la spina dell'adattatore di corrente con lo spinotto del
cavo della fotocamera, è possibile utilizzare il nastro resistente all'acqua
fornito in dotazione per evitare l'introduzione di umidità e sporcizia.
1. Rimuovere l'adesivo di fissaggio e avvolgere il nastro resistente
all'acqua a spirale intorno alla spina e allo spinotto. Avvolgere il nastro
facendo una leggera tensione in modo che aderisca bene alla superficie.
2. Durante la rimozione dell'adesivo di fissaggio, sovrapporre almeno la
metà della larghezza del nastro in modo che rimanga ben fisso. Vedi Fig.
6.
Sintonia fine
1. Regolare l'angolo visuale della telecamera secondo le illustrazioni di
Fig. 7.
2. Allentare la vite alla base della staffa servendosi di un cacciavite.
3. Ruotare la telecamera per effettuare degli aggiustamenti.
4. Quando si è soddisfatti della copertura d'immagine offerta dalla
telecamera, serrare nuovamente la vite.
Nota: dopo avere regolato l'angolo visuale, assicurarsi che il corpo
della telecamera sia fissato saldamente al perno della staffa. Se è
allentato, tenere fermo il corpo della telecamera con una mano e con
l'altra mano usare un paio di pinze per tenere le superfici piatte ferme
sul perno, quindi ruotare il perno in senso orario per stringerlo. Vedi
Fig. 8.
Soluzione dei problemi
Se non si ottiene alcun segnale
Assicurarsi che le spine siano ben inserite nelle relative prese di corrente.
Verificare che tutti i cavi siano ben collegati.
Controllare che i selettori CHANNEL sulla videocamera e sul
ricevitore/monitor siano impostati sullo stesso numero.
Se il segnale è debole o vi sono interferenze
Cambiare il canale sia sulla videocamera che sul ricevitore/monitor
sintonizzandoli sullo stesso canale.
Se tra la videocamera e il ricevitore/monitor è posizionato un forno a
microonde in funzione, rimuoverlo o spegnerlo.
Assicurarsi che videocamera e monitor si trovino a una distanza adeguata
(100 metri senza ostacoli).
Pulizia e manutenzione
Tenere tutte le parti e gli accessori fuori dalla portata dei bambini
Le prestazioni della telecamera possono essere condizionate negativamente
da impronte o sporcizia accumulata sulla lente.
Non tentare di aprire il mobile. Se manipolato da persone non esperte,
l'apparecchio potrebbe danneggiarsi.
Utilizzare questo prodotto servendosi unicamente del suo cavo di
alimentazione o di cavi forniti come accessori
Non sovraccaricare le prese di corrente o i cavi di prolunga, poiché
potrebbero derivarne incendi o scosse elettriche.
Il sistema trasmette le informazioni mediante radioonde pubbliche, pertanto
i dati audio e video potrebbero raggiungere altri dispositivi di ricezione a 2,4
GHz. È quindi possibile che vengano trasmesse via radio anche le
conversazioni provenienti da stanze attigue a quella in cui è posizionata la
fotocamera. Per tutelare la privacy, spegnere sempre la fotocamera quando
non utilizzata.
Italiano
Contenido del paquete
Un adaptador de corriente
Vista General del Producto (Fig. 1)
1. Soporte de Montaje
2. Tornillo de Fijación de Ángulo
3. Pivote
4. LEDs de infrarrojo (Ocho LEDs para proveer luz infrarroja para visión
nocturna)
5. Micrófono
6. Cuerpo de la Cámara
7. Interruptores de selección de canales
Instalación
Selección de Canales
La cámara y el receptor/monitor DEBEN ESTAR establecidos en el
mismo canal.
Seleccione el canal de la cámara deslizando los interruptores en la
parte trasera de la misma, vea la Fig. 2. (Quite el tapón de goma de la
parte inferior trasera de la cámara, deslice los interruptores usando un
destornillador.)
Montaje de la cámara
La cámara puede instalarse en una pared o en el techo. Pruebe la recepción
del monitor/receptor antes de fijar la cámara en una ubicación
determinada. Pida a alguien que apoye la cámara contra la pared en el área
de instalación seleccionada mientras Ud. prueba la recepción en el
monitor/TV. Si se producen interferencias u otros problemas, consulte la
sección Solución de problemas. Es posible que tenga que seleccionar una
ubicación diferente en la habitación para instalar la cámara en la pared.
1. Taladre dos agujeros separados 86 mm, en la posición de montaje de la
cámara.
2. Sujete la cámara en la pared o al techo usando los tornillos y bujes
suministrados. Vea la Fig. 3, 5.
Nota: Hay un agujero en el soporte, puede tender el cable desde la
cámara a través de ese agujero e insertarlo en la ranura en la parte
trasera del soporte y luego sujetar la cámara a la pared. Vea la Fig. 4.
3. Seleccione un local apropiado para taladrar un agujero de entrada del
cable. Dependiendo de la ubicación, esto podría ser a través de la
pared de la casa o a través de un marco de puerta o de ventana.
4. Introduzca el cable a través del agujero de entrada. Se recomienda usar
una bolsa de plástico para proteger el enchufe macho en la extremidad
del cabo contra el polvo y daños. Tire del resto del cable hacia adentro.
Alimentación
1. Conecte el cable de extensión al cable de la cámara.
2. Tienda el cable de extensión hacia un tomacorriente en la pared y
conéctelo. Asegúrese de que los enchufes estén totalmente conectados.
Vea la Fig. 6.
Ajuste Fino
1. Ajuste el ángulo de visión de la cámara como se muestra en la Fig. 7
2. Afloje el tornillo en la parte inferior del soporte con un destornillador.
3. Gire la cámara para hacer los ajustes.
4. Cuando esté satisfecho con el encuadre, vuelva a apretarlo.
Nota: Después de ajustar el ángulo de visión, asegúrese de que el
cuerpo de la cámara esté firmemente apretado en el pivote del soporte.
Si está flojo, agarre el cuerpo con una de las manos y, con la otra use
alicates para apretar las superficies planas en el pivote, gire el pivote
en sentido horario para apretarlo. Vea la Fig. 8.
Solución de problemas
Si no recibe ninguna señal
Asegúrese de que los enchufes estén totalmente conectados.
Compruebe todas las conexiones de los cables.
Compruebe que los interruptores CHANNEL (Canal) de la cámara y del
receptor/monitor estén colocados en el mismo número.
Si la señal es mala, o si hay interferencia
Cambie de canal en la cámara y en el receptor/monitor y establezca el
mismo número en ambos.
i hay un horno microondas en uso en la trayectoria que va de la cámara al
receptor/monitor, retire el horno microondas o apáguelo.
Asegúrese de que la cámara y el receptor/monitor estén dentro del alcance
de funcionamiento (alcance de unos 100 metros [300 pies] siguiendo una
línea de visión clara).
Cuidados y Mantenimiento
Mantenga todas las piezas y accesorios fuera del alcance de los niños.
Las huellas digitales y la suciedad en la lente de la cámara pueden
perjudicar su rendimiento.
No intente abrir la carcasa. El manejo inadecuado del dispositivo puede
dañarlo.
Opere este producto usando solamente los accesorios de alimentación
eléctrica suministrados.
No sobrecargue las tomas o cables de extensión eléctricos pues podría
resultar en incendio o choque eléctrico.
Una cámara
Tornillos de fijación y bujes
Cinta impermeable
Este Manual del Usuario
Cómo utilizar la cinta impermeable
Después de haber conectado el adaptador en entrada Power del cable de la
cámara, puede usar la cinta impermeable suministrada para evitar el
ingreso de la suciedad y de la humedad.
1. Quite el revestimiento protector y aplique la cinta en espiral alrededor
del enchufe y del tomacorriente. Aplique la cinta con una tensión
suficiente para sellar toda la superficie.
2. Traslape por lo menos la mitad de la anchura de la cinta para que adhiera
a si misma mientras quita el revestimiento protector. Vea la Fig. 6.
.
S
Tenga siempre en cuenta que está utilizando la banda de uso público
general al usar el sistema y que el sonido y el video pueden ser transmitidos
a otros dispositivos receptores de 2,4 GHz. Conversaciones, aun de una
sala a otra cerca de la cámara pueden ser transmitidas. Para proteger la
privacidad de su casa, apague la cámara cuando no está en uso.
Español
1
1
3
3
2
2
4
4
1
3
2
4