Tranwo Technology TTD-52R 2.4 GHz Digital Wireless USB Dongle User Manual D4752B manual 2 3 FCC preliminary
Tranwo Technology Corp 2.4 GHz Digital Wireless USB Dongle D4752B manual 2 3 FCC preliminary
Users Manual Revised
2.4 GHz Digital Wireless
USB Camera
User's Manual
Preliminary Version 2.3

Contents
1 Package Content
2 Product Layout
USB Receiver
Camera
3 PC System Requirements
4 Camera Setup
4.1 Power Supply
4.2 Fine Tuning
4.3 Night Light / Night Vision
5 Receiver Setup
5.1 Windows Detect & Install New Device
5.2 Driver Installation
5.3 Skype Resident Program Installation
5.4 Monitoring Software
5.5 Pairing
6 Details on the Skype Resident Program Installation
7 Troubleshooting
8 Care and Maintenance
9 Specifications
2.4 GHz Digital Wireless USB Camera

ENGLISH
1
1
3
4
5
6
7
8
2
MIC
Light
9
10
11
1
2
3
4
1. Package Content
One Camera One USB Receiver One Power Adapter CD-ROM
This User's Manual
2. Product Layout
USB Receiver
1. Antenna
2. Camera indicator LEDs
3. Camera switch
/ Pairing button*
4. USB plug
Note: For Pairing, see
section 5.5
Camera
1. Antenna
2. Power indicator LED
3. Infrared LEDs
4. Lens
5. Supporting stand
6. Night-light / IR control
/ pairing button
7. Night-light
8. Microphone
9. Battery compartment
10. Power ON / OFF switch
11. Power adapter socket
3. PC System Requirements
Windows XP(SP2 or higher) or Windows Vista
Skype 3.0 or higher
R R
R
2
Pentium-IV 1.6GHz or higher (recommended)
256 MB RAM of system memory or higher (recommended)
One available USB port (preferably USB2.0)
Graphics Card (Must support DirectX 9.0c)
Sound Card (AC97 compatible sound card)
1GB Free HD Space
CD-ROM Drive (For software installation)
4. Camera Setup
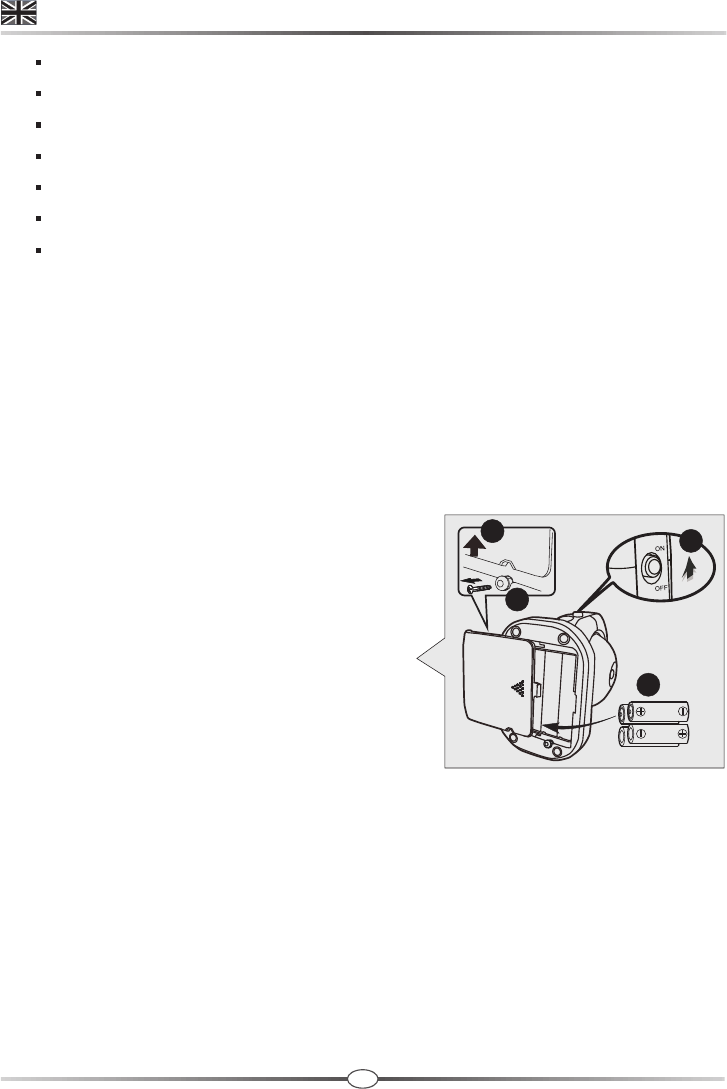
4.1 Power Supply
The camera uses either 4 AAA-Size batteries (alkaline battery recommended)
or the household AC power current.
Loading the Batteries
1.
2. Open the battery compartment cover.
3. Insert 4 AAA-size batteries (follow the
plus (+) and minus (-) signs inside the
battery compartment).
4. Close the battery compartment cover,
and make sure it is locked securely.
Note 1: Do not mix old batteries with new
ones.
Note 2: Remove the batteries from the camera if you do not plan to use
it for a prolonged period of time.
5. Slide the POWER switch to the ON position. The LED on the camera
will light up (red light).
Note : When battery power is sufficient, the light is constantly red ;
.
Loosen the screw on the bottom of the camera by using a screw driver.
when
the battery is low, the LED light will start blinking
3
4
22
11
ENGLISH
3
ON
OFF
2
1
3
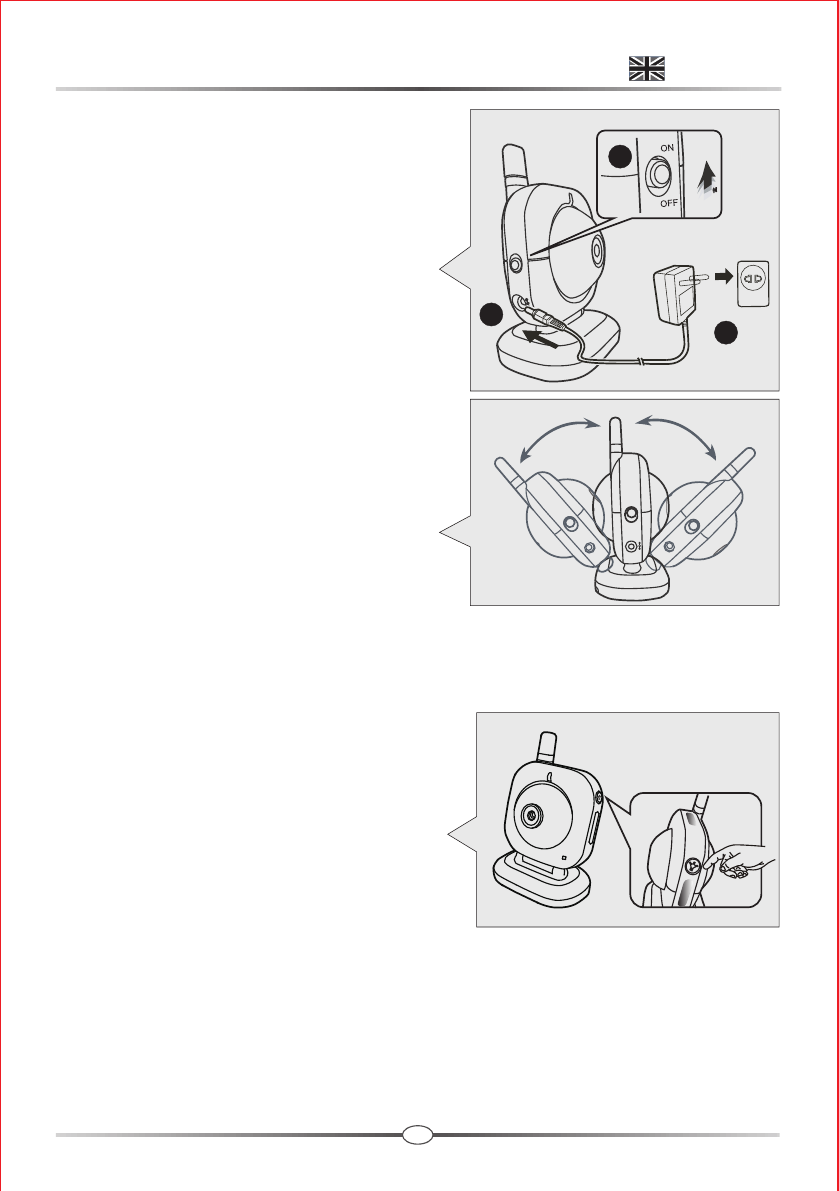
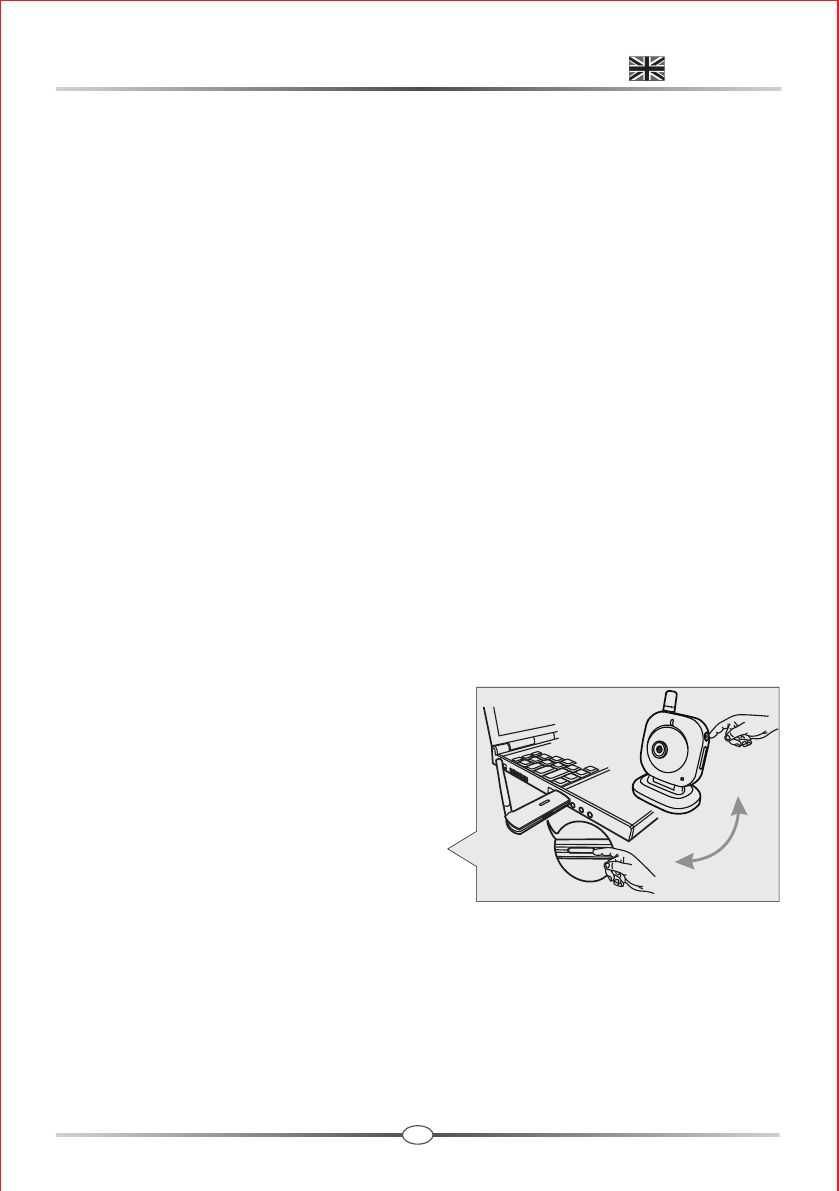
Using AC Power
1. Plug one end of the provided power
adapter into a wall outlet and the other
end into the bottom of the camera.
Note: Use the adapter labeled
OUTPUT: 6V DC with the
camera.
2. Slide the ON/OFF switch to the ON
position. The LED on the camera will
light up (red light).
4.2 Fine Tuning
Place the camera in a convenient location,
point the lens towards the observation
area and adjust the angle by rotating the
lens head.
4.3 Night Light / Night Vision
Press the night light button, the night light LEDs will remain ON.
The camera has nine high-intensity infrared
LEDs for picking up clear images in unlit
locations.
Note: Press the night light button, the
image changes automatically into
the night vision mode.
5. Receiver Setup
There are 2 CD disks in the package, Disk 1: USB driver software / Skype
resident program software, Disk 2: AP monitoring software.
Please follow the steps below to setup USB receiver.
Light
MIC
Light
ENGLISH
4
Driver Installation
5.1 Windows detect & install new device
Make sure the OS of PC is Windows XP
and the version is above (or equal) SP2.
(Windows Vista is allowable).
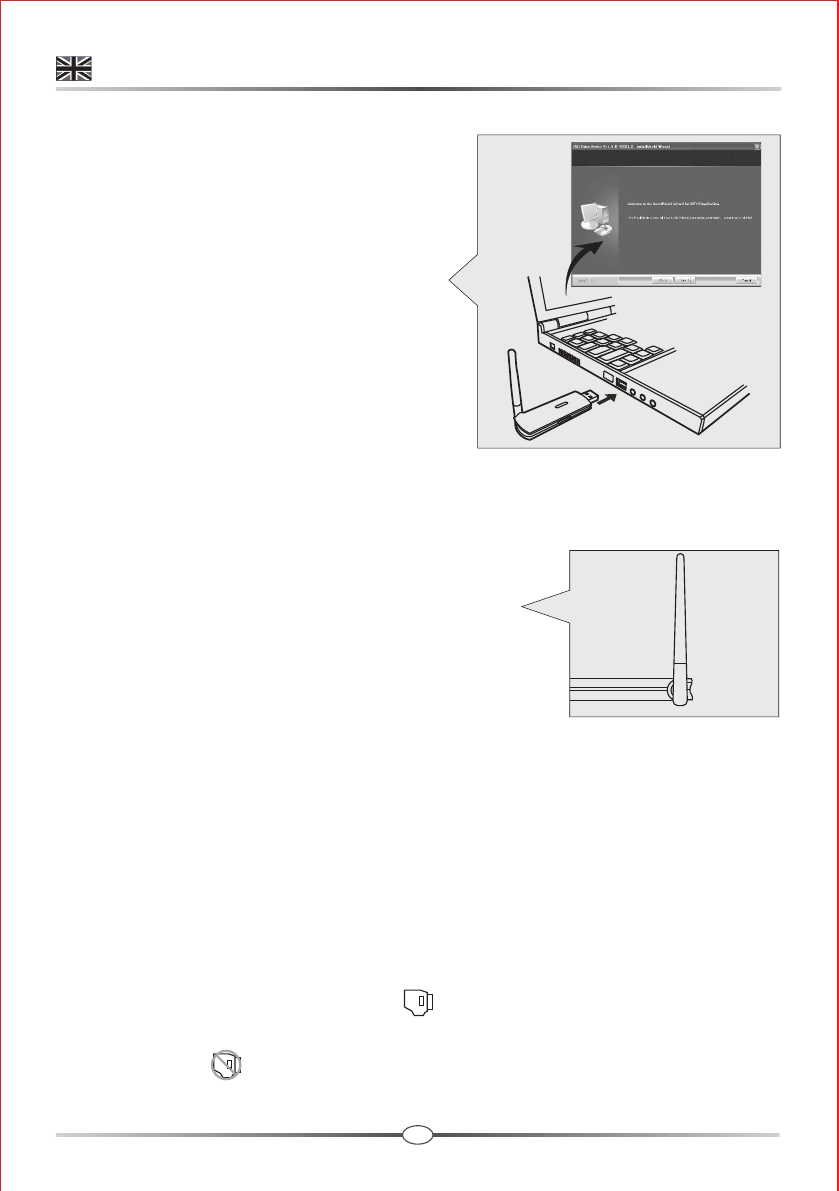
1. Insert the USB Receiver into one USB
port of PC and the "Found New
Hardware wizard" screen will appear.
Note: If the device has been searched
and the screen isn't showed,
please follow 5.2-2.
2. Choose "Install the software auto
matically(Recommended)" in this screen and click "Next". (The wizard
will detect & install the device automatically.)
3. Click "Finish" to complete the device installation.
Note: In order to let the USB receiver get the
best function, we propose strongly to
consult the figure while you are
operating.
5.2 Driver installation (Disk 1)
1. Insert the provided CD-ROM into your CD-ROM drive of PC and access to
D:\Driver\ (Where D is the letter of your CD-ROM drive).
2. Double-click the execution file named "RFVideoClassUSB20PCCam_
v5.8.5003.X.exe" and the "Welcome to the InstallShield Wizard for
USB Video Device" screen will appear.
3. Follow the steps and click"Finish" to complete the driver installation.
4. Restart the computer, you can use the USB Receiver correctly now.
Note 1: When the USB driver is well installed and the USB Receiver plug in
the computer, you can find icon on the task tray. If the USB
Receiver unplug from the computer, the icon displays with a cross
mark .
ENGLISH
Receiver
5
5.3 Skype resident program installation (Disk 1)
You can watch senior citizen or disabled people through Skype from remote
location.
1. Please download and setup Skype software from www.skype.com
(free software).
2. Insert the provided CD-ROM into your CD-ROM drive of PC and access to
D:\RemoteMonitor-Skype\ (Where D is the letter of your CD-ROM drive).
3. Double-click the execution file named "rm_e_s.exe" and the "Welcome
to the Remote Monitoring Setup Wizard" screen will appear.
4. Follow the steps and click"Finish" to complete the driver installation.
Note: For further details on the "Skype resident program installation", see the
following section 6 .
5.4 Monitoring Software (Disk 2)
For further details on the "Monitoring software installation", please consult the
manual file in the monitoring software disk .
5.5 Pairing
If you have trouble with your USB camera,
try the following section 7, or try the
following steps:
1. Make sure the camera is turned on, the
power LED of the camera is red.
2. Press and hold the Pairing Button on
the side of the receiver for about 2
seconds, the LED light will start blinking
for about 5 seconds.
3. Press the night light button on the
camera during the LED light of the receiver is blinking. When the night light
on the camera flash three times, please release the button.
4. The pairing is finished.
ENGLISH
MIC
Light
6
6. Details on the Skype Resident Program
Installation
6.1 Permit remote monitoring program to access Skype
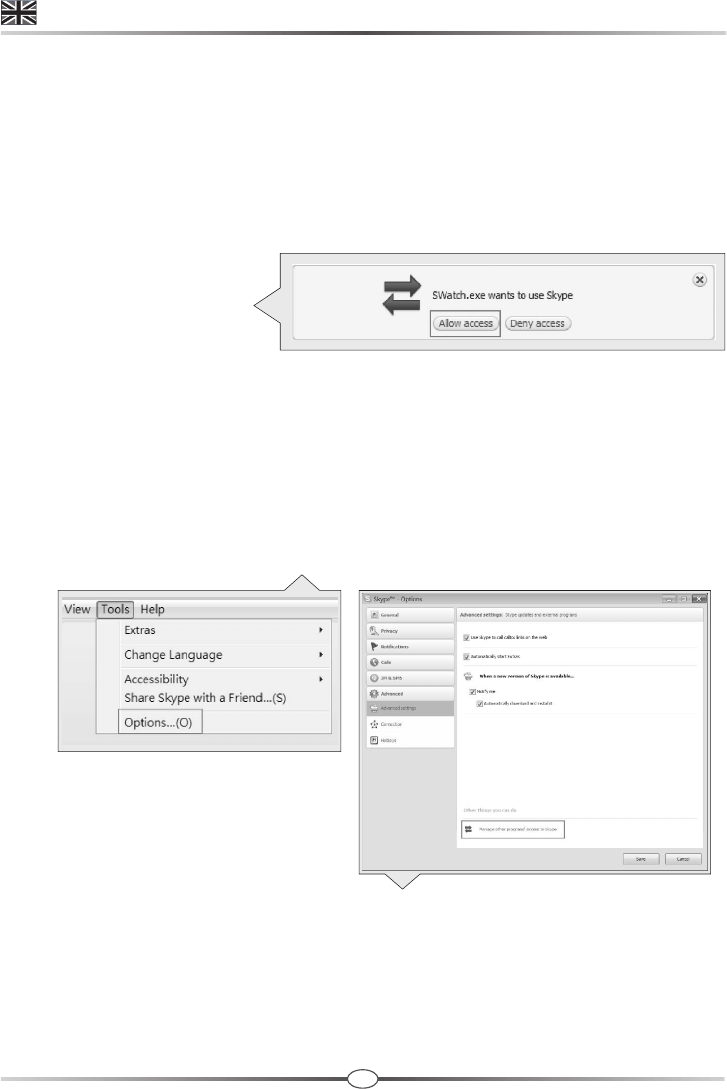
At the first launch of Remote Monitoring program, Skype displays a pop-up
message asking allow Remote Monitoring program to access Skype.
Please click Allow access
button to permit Remote
Monitoring program to
connect to Skype.
In case if you click Deny access button, or forgot to click Allow access
button, you can enable Remote Monitoring program to access Skype
by following steps below.
1. Select Skype's menu command Tools Options to open the Options
dialog box.
2. In the Options dialog box, go to the Advanced tab, click the link
"Manage other program's access to Skype" to open the Manage API
Access Control dialog box.
ENGLISH
7
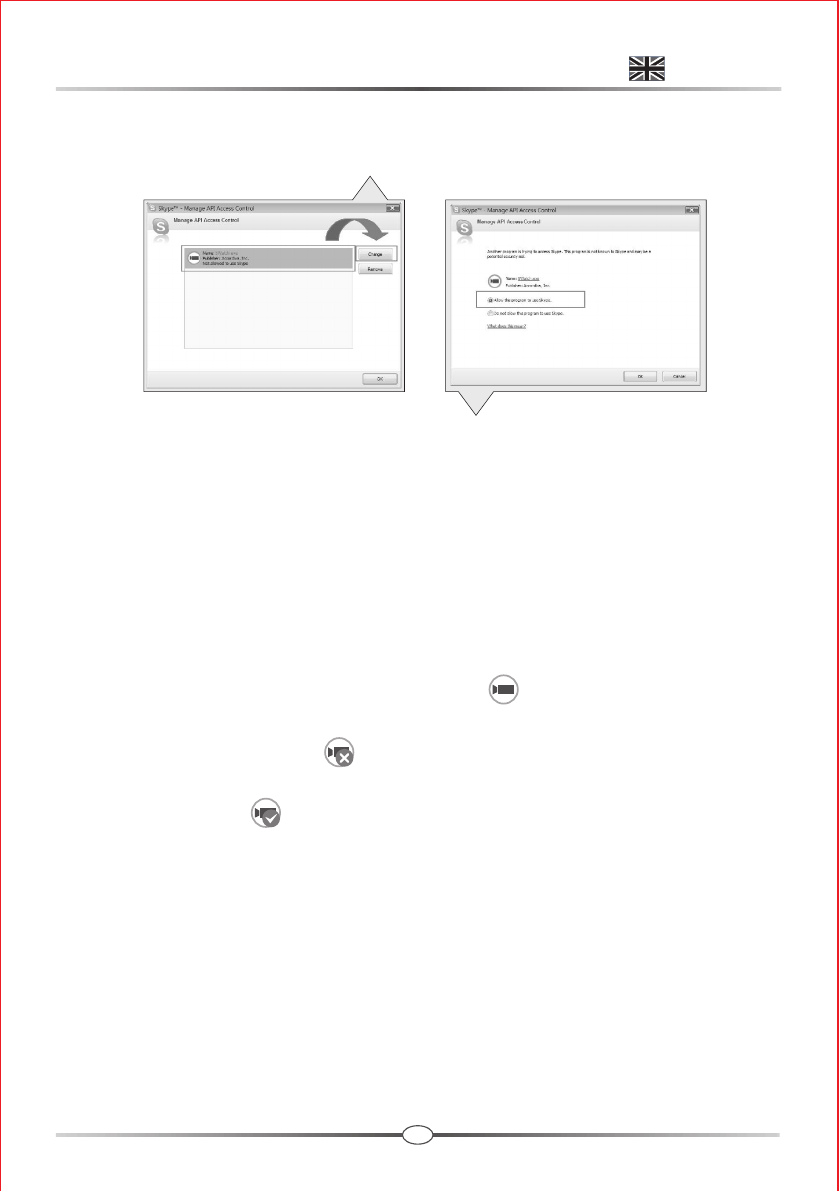
3. In the Manage API Access Control dialog box, find program name
"SWatch.exe". If the program's state is "Not allowed to use Skype",
click Change button.
4. In the dialog box, select the option "Allow this program to use Skype ",
and then click OK button to close the dialog box.
5. Click Save button to close the Options dialog box and confirm the setting
change.
6.2 Remote monitoring program operation
Three states of program icon
When the Remote Monitoring program is well installed and launched,
you can find its program icon on the task tray .
If the camera's USB dongle unplug from the computer, the program icon
displays with a cross mark .
When the Remote Monitoring function is enabled, the program icon displays
with a check mark .
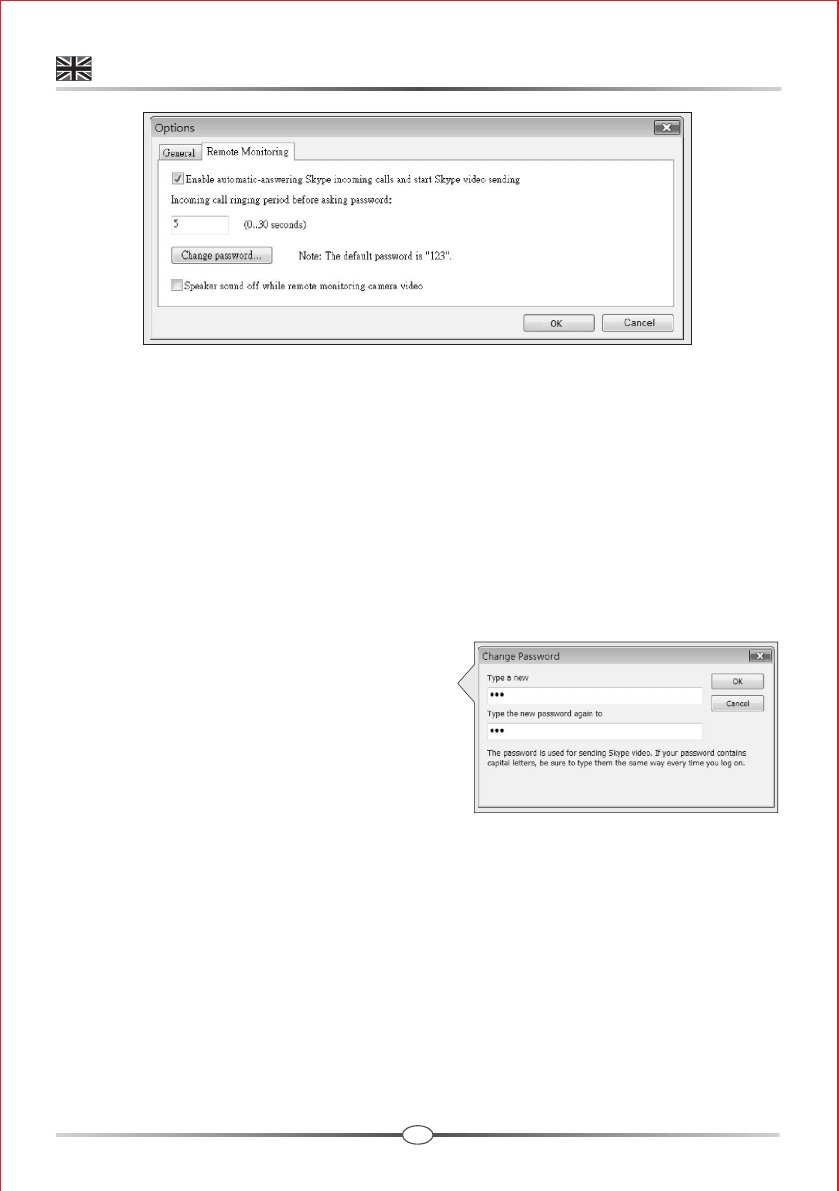
Remote Monitoring setting
In the Remote Monitoring tab, you can enable/disable remote monitoring
function, change password, set the waiting length to answer a call, and
sound off speaker when auto-answer a call.
ENGLISH
8
3. Change password
The password is used for verifying the
identity before sending Skype video.
The default password is "123'. You can
click Change password button to open
Password dialog box to change the
password string.
4. Speak sound off while remote monitoring camera video
Sound off speaker during sending Skype video. The function is useful if
you don't want to get attention during watching camera video remotely.
6.3 Interact with Skype to watch camera remotely
You can set up camera to monitor secure area remotely.
Setup camera
1. Turn on the computer and make sure the USB receiver plugged to
the computer securely. Adjust the camera view to watch the security area.
1. Enable automatic-answering Skype incoming calls and start Skype
video sending
Check the option to enable the function of Remote Monitoring.
Remote Monitoring program will auto-answer Skype calls and ask for a
password to start sending Skype video.
2. Incoming call ringing period before asking password
Specify the time length to wait to answer an incoming call. The waiting
length can be from 0 to 30 seconds.
ENGLISH
9
2. Run Skype program and the Remote Monitoring program.
3. Enable the remote monitoring function of Remote Monitoring program.
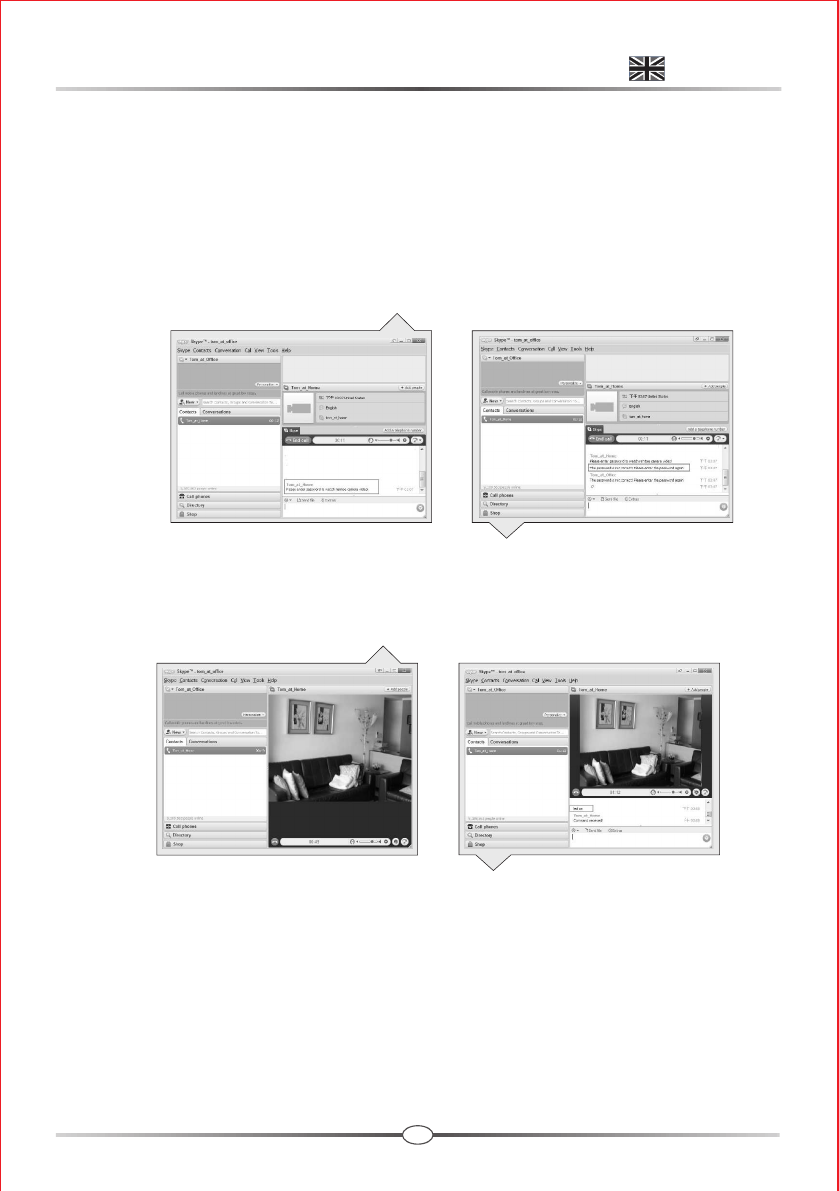
Watch camera video remotely
1. Make a Skype call to the name that hosts the Skype on the computer with
camera monitoring the security area.
2. After several ringing, the call will be answered with a chat message asking
for a password.
3. If the password you enter is not correct, a chat message will ask you to
enter password again.
4. When the password gets passed, the remote came video will display.
5. You can enter commands in Skype chat box to switch cameras, turn on/off
Infra-red lights. If the command is correct and accepted, a message
"Command received!" will be returned.
ENGLISH
10
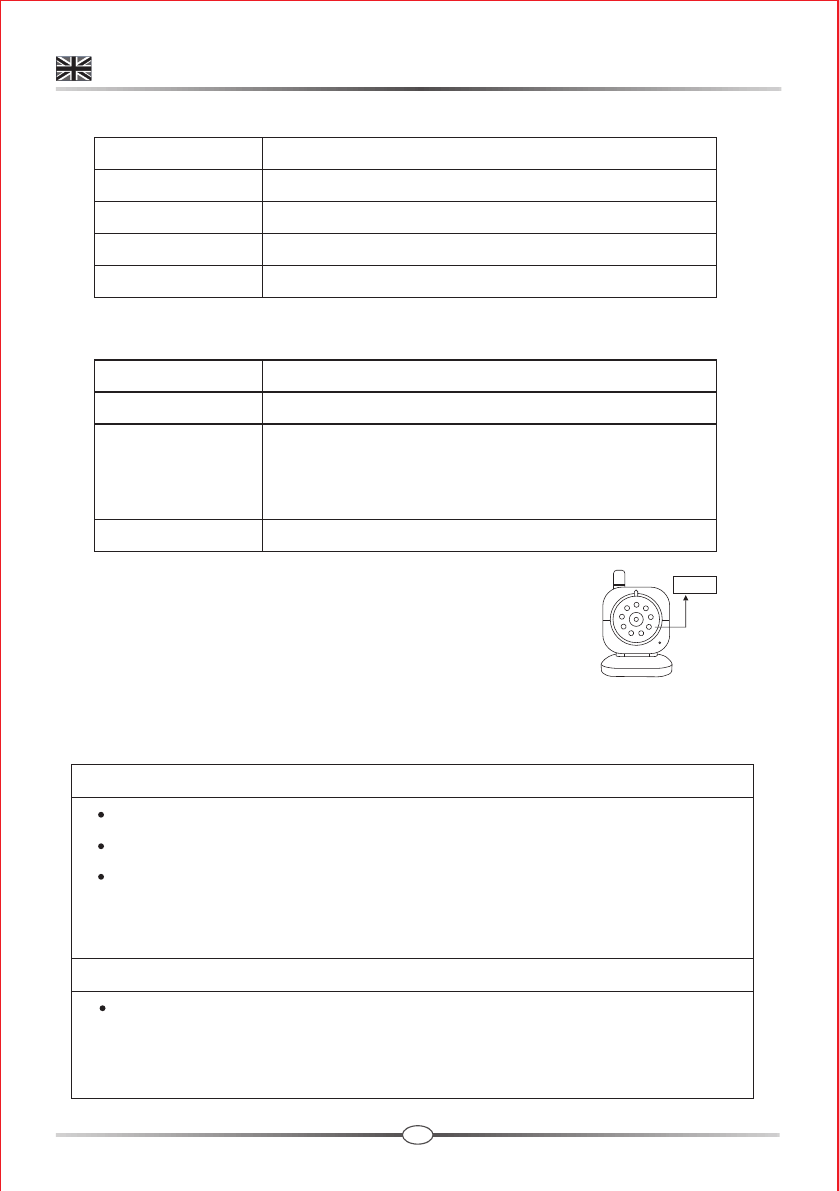
Note: The "LED" means the infrared light of the indoor
camera. See the figure
The following table lists the available commands and their descriptions.
The following table lists the available commands are for indoor camera only.
*
Command Description
CAM1
CAM2
CAM3
CAM4
LED ON*
LED OFF*
LED AUTO*
LED MANUAL*
Display the video of camera 1
Display the video of camera 2
Display the video of camera 3
Display the video of camera 4
Turn on the infra-red light
Turn off the infra-red light
Set the infra-red light to auto-mode. The
infra-red light turns on if the lighting condition
is not good
Set the infra-red light to manual mode
LEDs
7. Troubleshooting
You don't get a signal at all
Make sure the camera and the computer are turned on.
Make sure the power plugs are pushed all the way in.
If the camera is powered by batteries, replace all batteries
with new ones.
If the signal is poor, or there is interference
Make sure the camera and the USB receiver are within range of each
other (range of approximately 450 feet; 150 meters in a clear line of
sight).
ENGLISH
11
8. Care and Maintenance
Keep all parts and accessories out of children's reach.
Fingerprints or dirt on the lens surface can adversely affect camera
performances. Avoid touching the lens surface with your fingers.
Should the lens become dirty, use a blower to blow off dirt and dust,
or a soft, dry cloth to wipe off the lens.
Keep the camera dry. Precipitation, humidity, and other liquids contain
minerals will corrode electronic circuits.
Do not use or store in dusty, dirty areas.
Do not store in hot areas. High temperatures can shorten the life of
electronic devices and warp or melt certain plastics.
Do not store in very cold areas. When the system warms up (to its normal
temperature), moisture can form inside the case, which may damage
electronic circuit boards.
Do not attempt to open the case. Non-expert handling of the device may
damage the system.
Avoid dropping or strong shocks.
Operate this product using only with the power supply included or
provided as an accessory.
Do not overload electrical outlets or extension cords this can result in fire
or electric shocks.
9. Specifications
Specifications subject to change without notice
Camera
Frequency
Antenna
Transmission distance
Modulation
Image Sensor
Lens
IR LED
Dimensions
Weight
Power
Operating temperature
Receiver
Frequency 2.4 GHz
Antennas Mono-pole antenna
Modulation GFSK, FHSS
Dimensions 3.1(W) x1(H) x 8.4(D) cm
Weight 16g
Power USB port
Operating temperature 0 ~ 40 (32 ~ 104 )
2.4 GHz
Mono-pole antenna
150 M (Line of Sight)
GFSK, FHSS
Color CMOS image sensor
f 3.0mm, F 2.4
9 pcs
8.4(W) x 12.4(H) x 6.1(D) cm
175g
DC 6V, 800mA or 4 AAA alkaline
batteries
0 ~ 40 (32 ~ 104 )
0413
This device is for indoor use only
ENGLISH