Tranwo Technology TTD-80T Wireless digital child tracker User Manual Manual P1
Tranwo Technology Corp Wireless digital child tracker Manual P1
Contents
- 1. Manual P1
- 2. Manual P2
- 3. Manual P3
Manual P1

What You Get
Product Layout
Important Information
Setting Up
Set up the Child Unit
Set up the Parent Unit
Check the connection
Using the Child Tracker
Channel selection function
Adding Child units
Removing Child units
Battery low indicator
Directional indicator function
Warning range setup
Find function
Features
Troubleshooting
Technical Specification
Care and maintenance
.........................................
1
........................................
2
.............................
4
................................................
5
...........................
...........................
...........................
5
8
9
...........................
10
...................
11
.................................
13
............................
13
.............................
14
................
14
.............................
16
.........................................
17
..................................................
19
......................................
20
..........................
21
..........................
21
1
Parent Unit
Child Unit
Child Unit charger
Child Unit charger main power adapter
LIR2450 Li+ 3.6V rechargeable battery for Child Unit
2 x AAA 1.5V non rechargeable alkaline batteries for Parent Unit
User’s Manual
What You Get
..........................
..........................

2
Product Layout
1
3
4
5
2
6
7
8
9
2
1
2
3
5
6
4
7
8
9
10
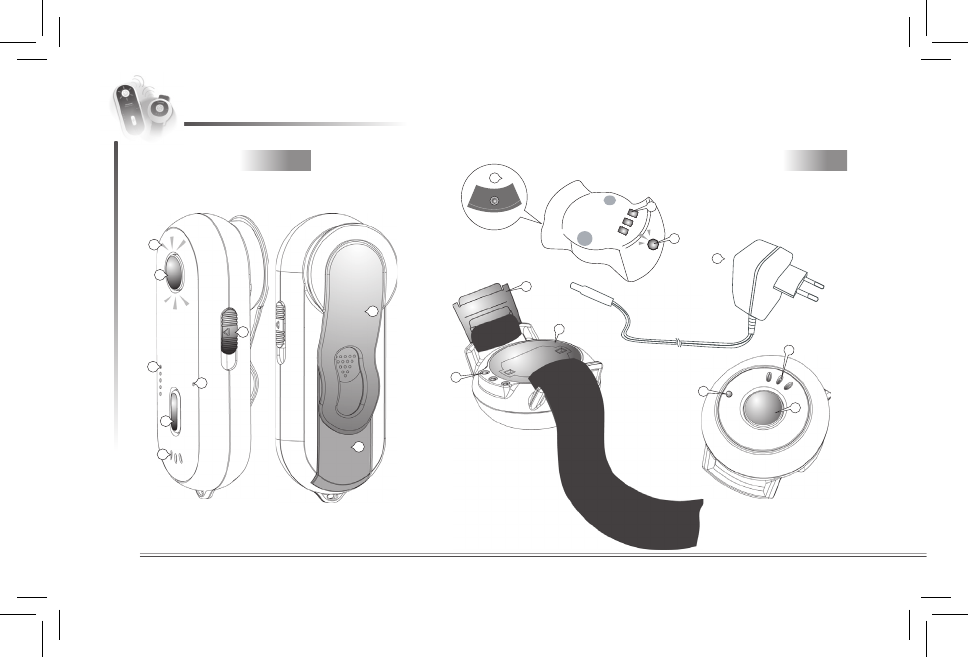
A, Parent Unit Fig. 1 B, Chid Unit Fig. 2
3
What You Get
Find button/Initiation child unit button
Directional indicator LED
Channel indicator LED
Channel selection button/Deletion child unit button
Speaker
Power/battery low indicator LED
Power off/warning range <near/normal/far> switch
Belt clip
battery cover
charge sensor
Battery cover
Clasp
Power/battery low indicator LED
Speaker
Find button/lnitiation child unit button
Charger sensor
Charger indicator LED
power adapter jack
Charger main power adapter
A, Parent Unit Fig. 1 B, Chid Unit Fig. 2
1
2
3
4
5
6
7
8
9
1
2
3
4
5
6
7
8
9
10

4
Setting UpImportant Information
1. If traveling abroad, make sure that the voltage shown on the mains power
adapter corresponds to the local mains power before connection to the
power supply.
2. To prevent electric shock, do not open the case of the Child Unit and Parent
Unit (except battery covers)
3. Risk of explosion if batteries are replaced by an incorrect type. For the Child
Unit, always use LIR2450 3.6V Li+ rechargeable battery. For the Parent
Unit, suggestion use AAA non rechargeable 1.5V alkaline batteries.
5
Setting UpImportant Information
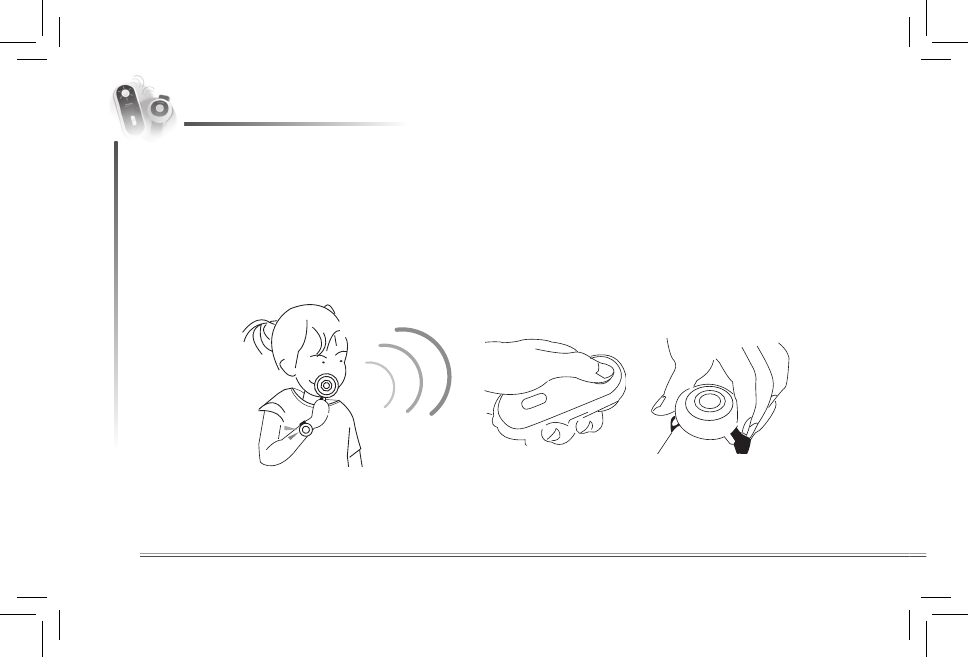
Set up the Child Unit
When you use this product for the rst time, please charge it.
1. How to install the batteries
(1)Insert the two belt clips into the battery cover on the back of the Child unit and then
open the battery cover by turning it counterclockwise.
(2) Install the LIR2450 battery into the battery cover and turn the belt clips clockwise to
combine the battery cover with the Child unit. (Please note the poles when installing
batteries.) In the meantime, the Power LED will light red.
6
Setting Up
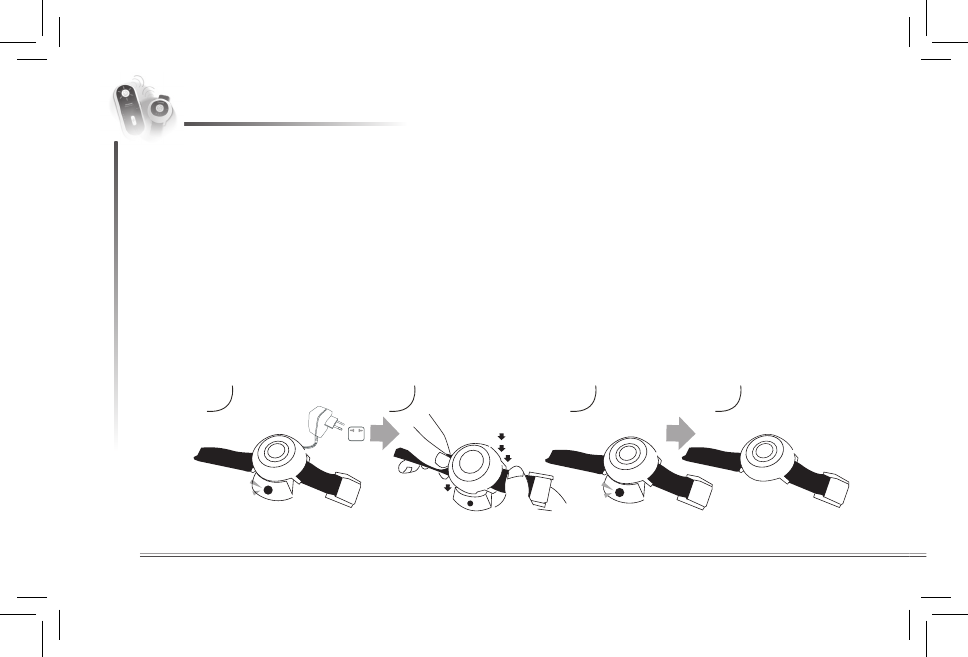
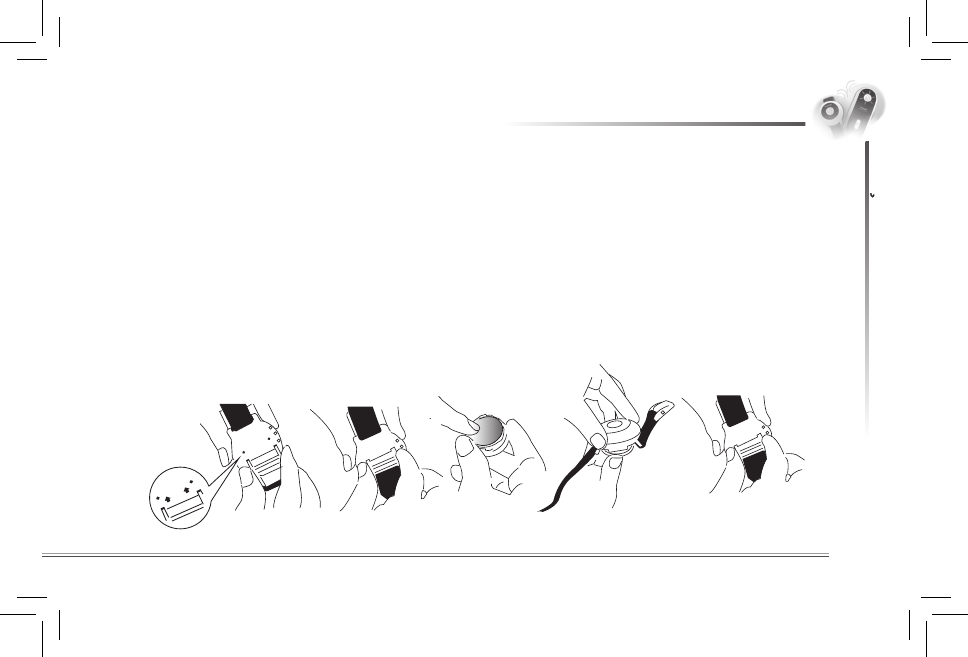
2.How to charge
OK
1 2 3 4
(1) Insert the Charger Adapter into the power socket.
(2) Connect the Charger Adapter with the Charger. In the meantime, the Charger
indicatorwillashredandgreenforthreetimesrespectivelyandthengoout.
(3) Connect the Child unit to the Charger in the direction as illustrated, and the
Charger indicator will light red to indicate that it is being charged. When
the Charger indicator lights green, it indicates the battery is charged complete
ly. (The battery shall be charged fully within three hours depending on how
much power left in it.)
(4) When the battery is completely charged, you can remove the Child unit from
the Charger.
7
Setting Up
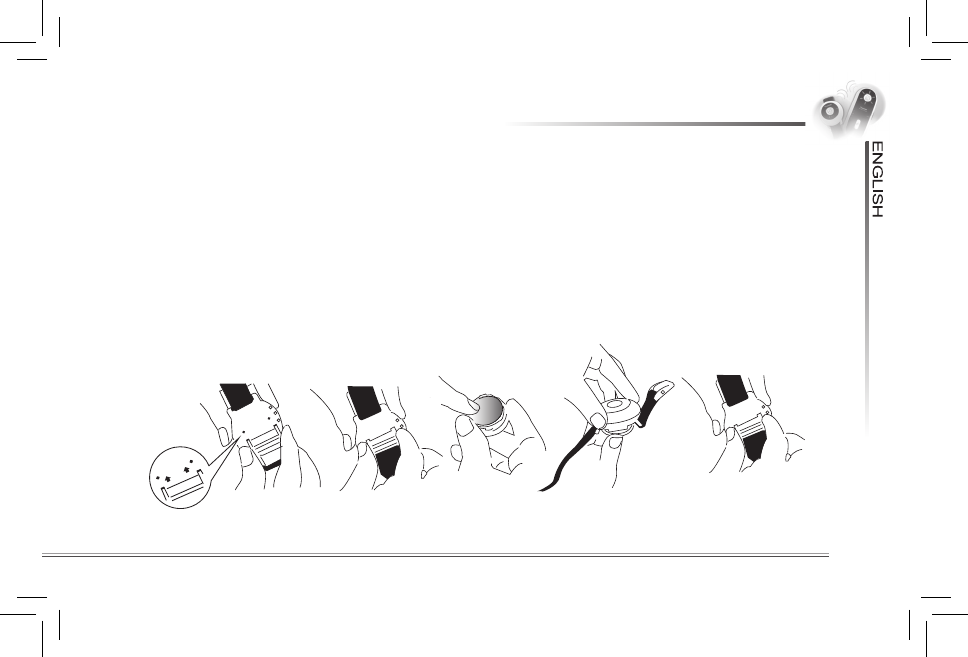
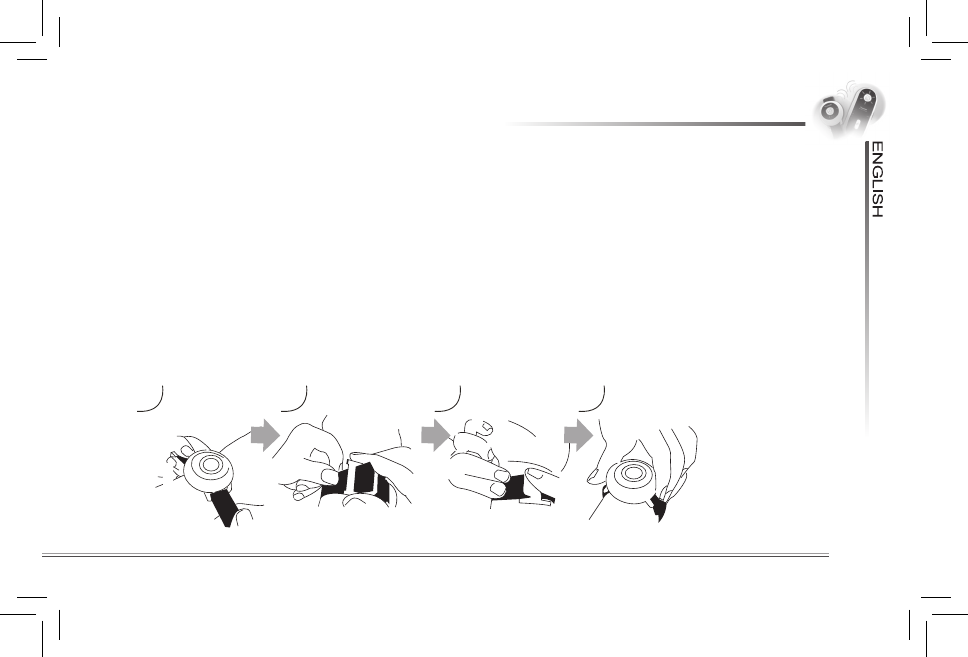
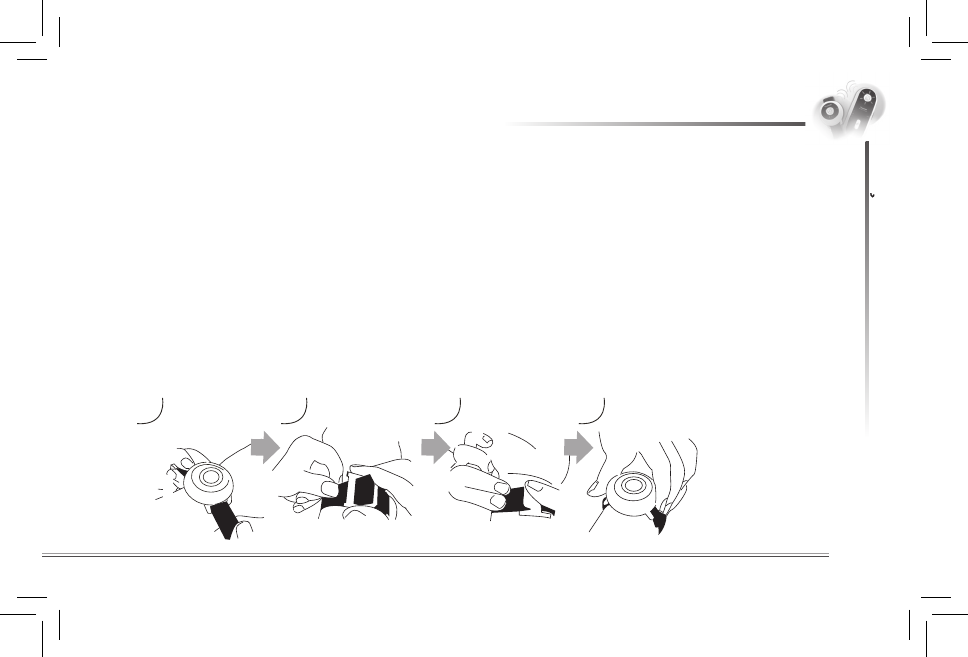
3. How to use the belt
(1) Put the Child unit on the wrist as illustrated.
(2) Wind the end of the belt without the clasp around your wrist and thread the clip
on the inside. And then adjust the belt to the right tension.
(3)Clicktheclasptoxthelengthofthebelt.
(4)Foldupthetailofthebeltandstickitonthexedbelt.
1 2 3 4
OK
8
Setting Up
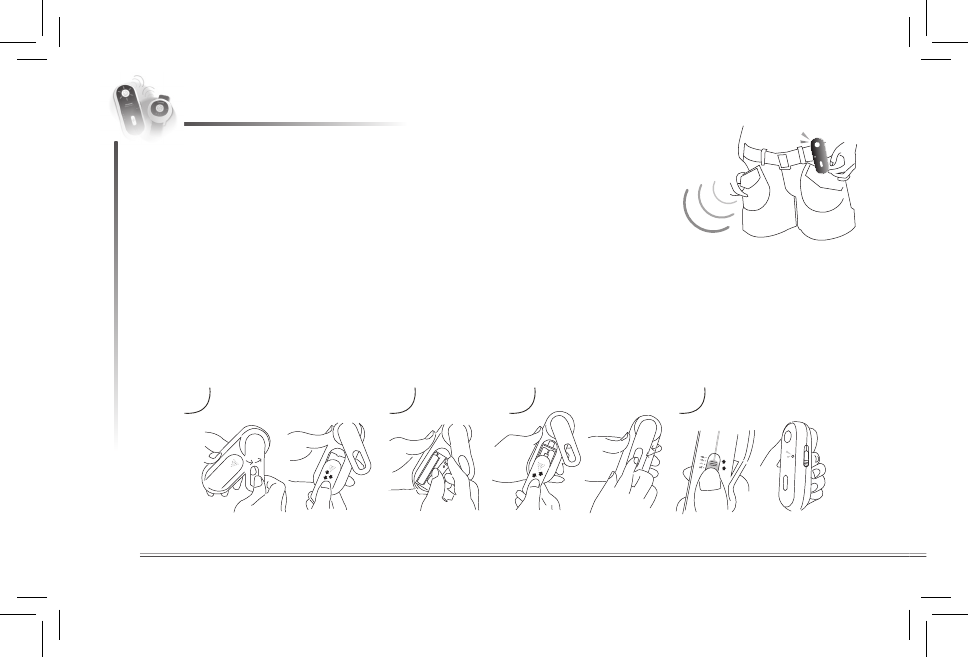
Set up the Parent Unit
1.Open the battery cover in the direction as illustrated.
2.Install two AAA alkaline batteries in the battery cave in the
right direction based on its pole.
3.Close the battery cover on the Parent unit.
4.Turn the OFF switch of the Parent unit to any distance of the warning
range: near, normal or far. At this moment, the Power LED will light red.
5. You can wear the Parent unit on your waist.
1 2 3 4
9
Setting Up
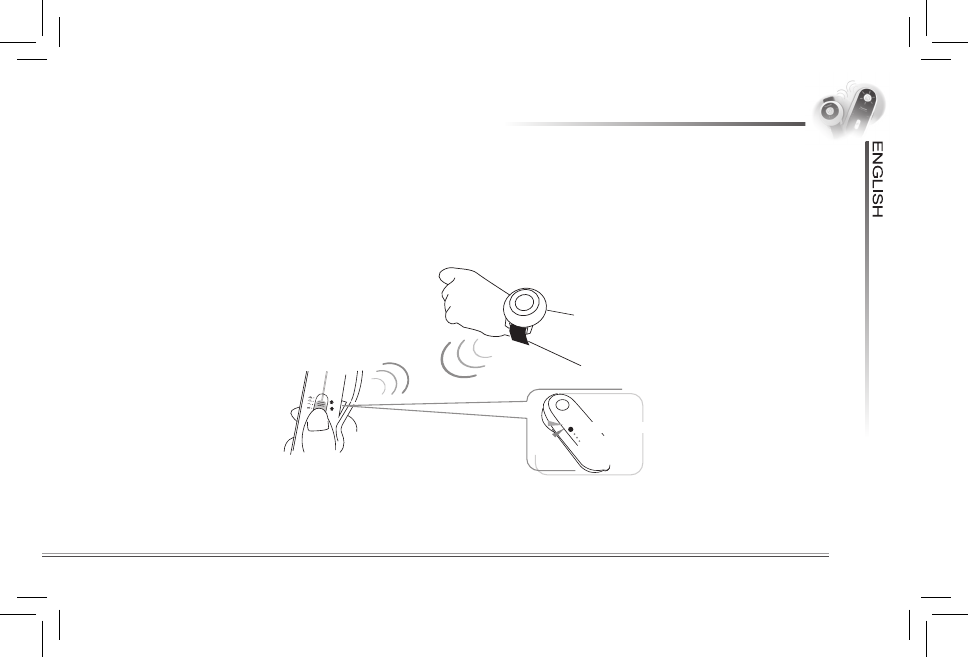
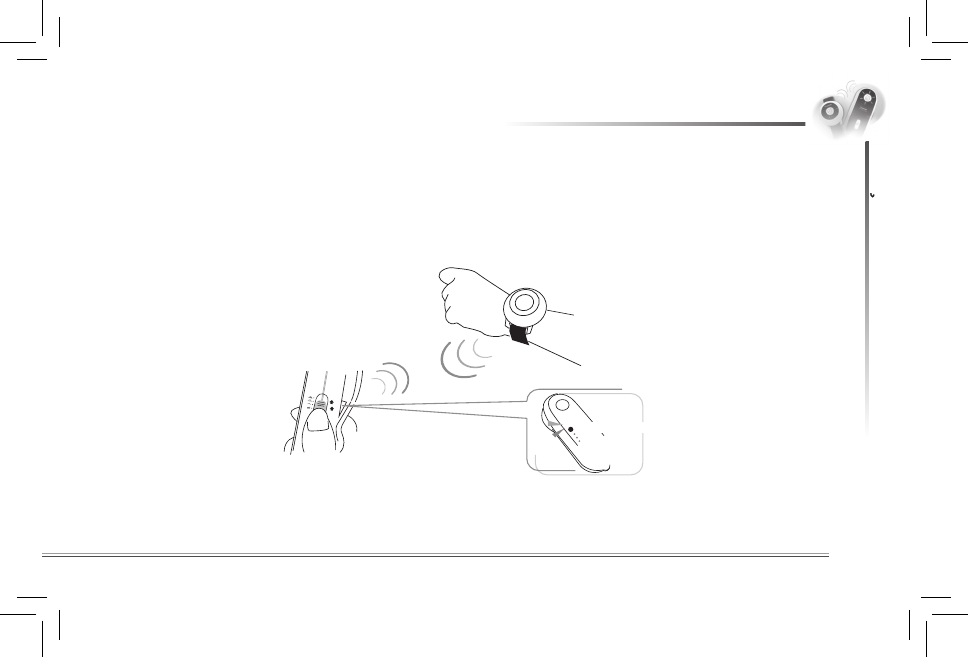
Check the connection
When the Parent unit and the Child unit are interconnected, the channel 1 indicator
lightingredandthedirectionindicatorashingbluesuggesttheconnectioniscorrect.
OK
channel
1
LED
10
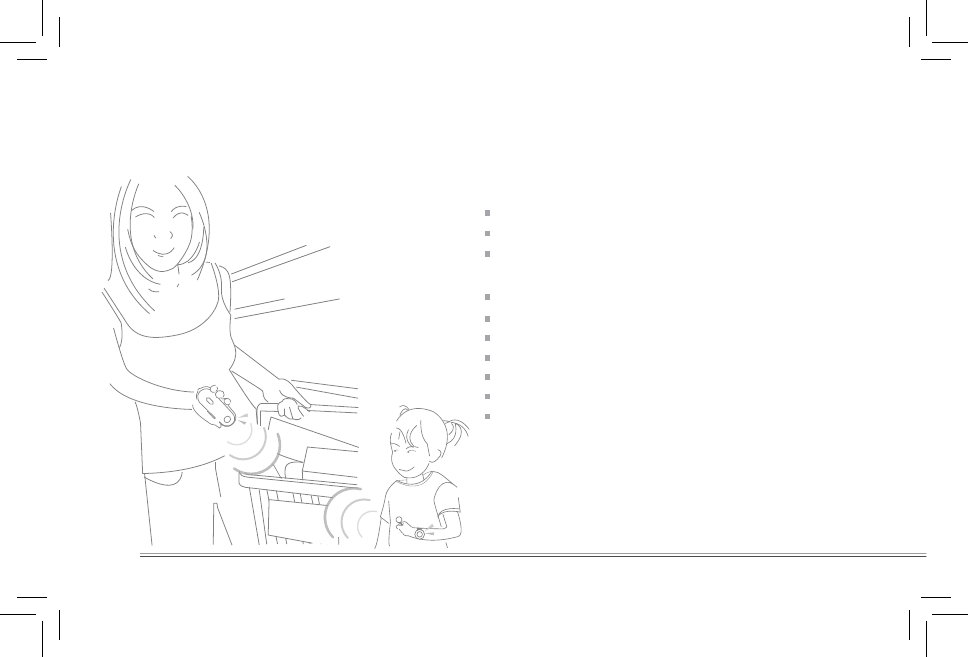
Using the Child Tracker
Please do not put the Child unit in the pocket when you use it. Please wear the Child
unit on your child’s wrist to get the best direction indication. When the Parent unit is
searching the Child unit, please hold the Parent unit tightly in a horizontal position to get
the best direction indication.
11
Using the Child Tracker
The Parent Unit can be connected up to 4 Child units
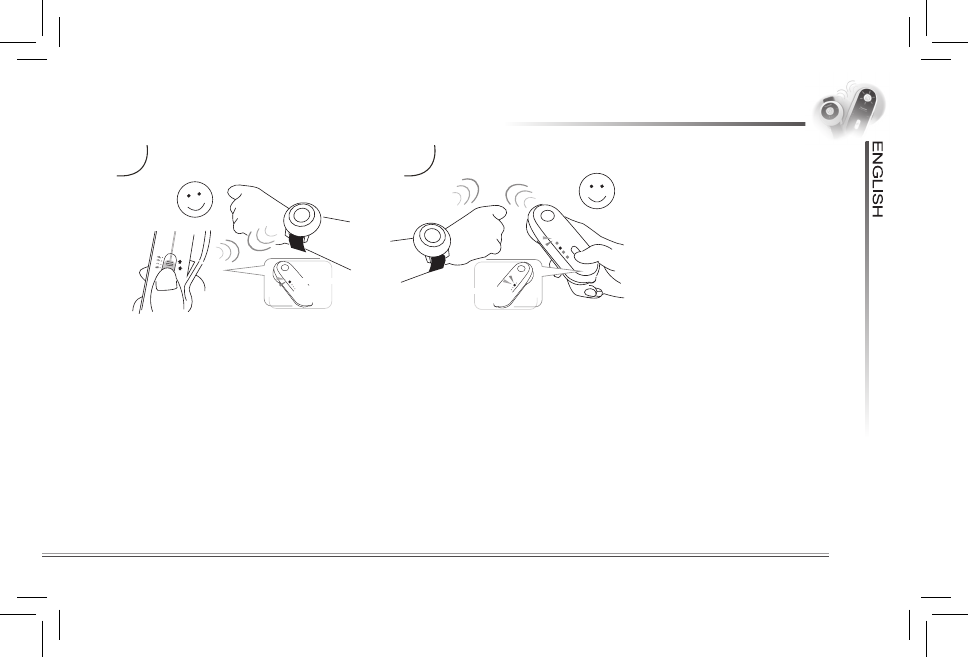
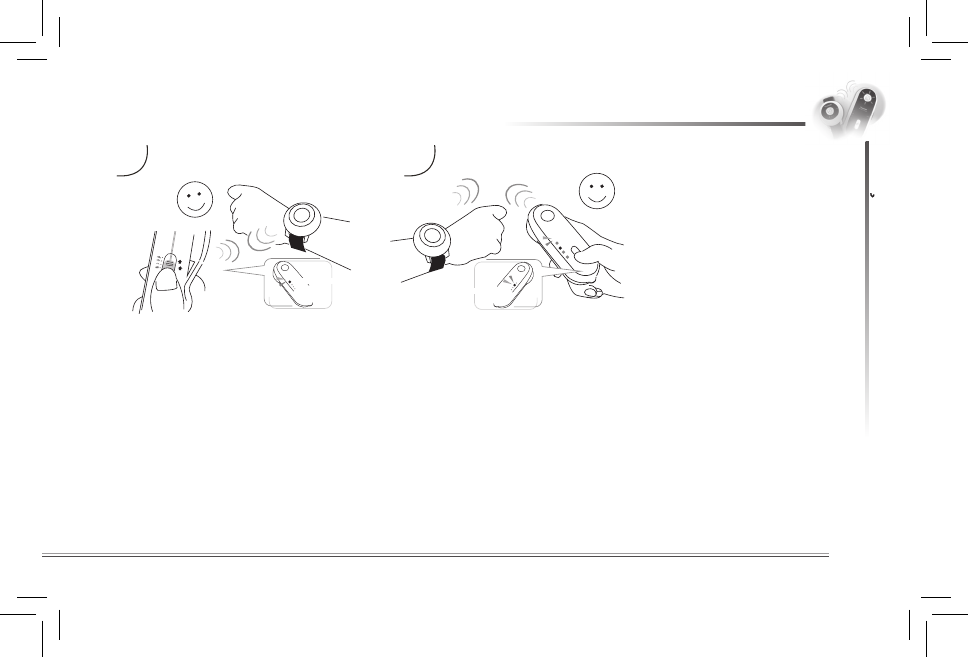
a. When you only have one Child unit:
If the Parent unit is corresponding to only one Child unit, the Child unit and the Parent
unit will be set as channel 1 internally. When the Child unit is within the warning range of
the Parent unit, the channel 1 LED will light red. When the Child unit is out of the warning
range of the Parent unit, the channel 1LEDwillashredandthebuzzerwillbeep.Atthe
moment,youcanpresschannelselectionbuttonorndbuttontoturnoffthebuzzer.Because
there’s only one Child unit, when you press channel selection button the channel won’t
be switched.
1 2
channel 1 LED
B
e
B
e
channel 1 LED
Channel selection function

12
Using the Child Tracker
channel 1 LED
Be
Be
Be
channel 3 LED
35m
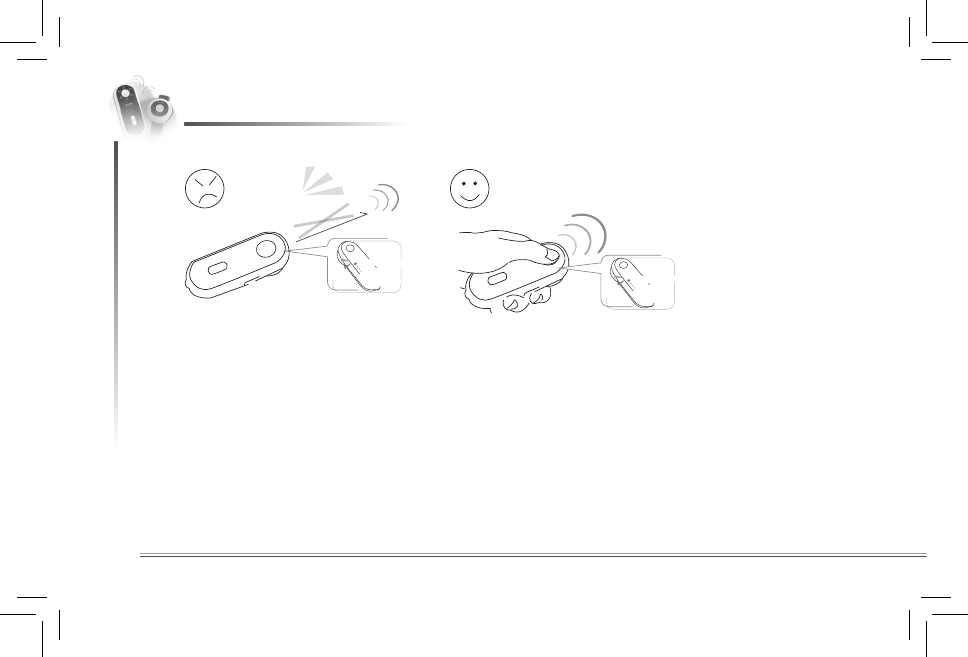
b. When there are several Child units:
If the Parent unit is corresponding to several Child units, you can press channel selection
button to select the Child unit you want to monitor. When the selected Child unit is
within the warning range, the channel LED will light red. When the selected Child
unitisoutofthewarningrange,thechannelLEDwillashred.OtherchannelLEDs
oftheParentunitcorrespondingtoconguredChildunitswilllightgreenwhen
the Child units are within the warning range. When the Child units are out of the
warningrangebutwithinthemonitoringrange,theLEDwillashgreen.Whenthe
Child units are out of valid monitoring range, the channel LED will go out.
13
Using the Child Tracker
Adding Child units
When you want to add more Child units to the Parent unit, hold both
the Find button /initiation child unit button of the Parent unit and the
desired Find button/ initiation child unit button of the Child unit for 8
seconds. Then the buzzers of both Parent and Child units will beep
to inform you the Child unit is added. The channel of newly added
Child unit will automatically be set at the lowest channel that hasn’t
been set.
Removing Child units
When you want to remove any Child units from the Parent unit, please
hold the channel selection button/deletion child unit button for 8 seconds.
Then the buzzer of the Parent unit will beep to inform you the Child
unit is removed. Please note that when you complete removing, the
Child unit and the Parent unit can not be connected. If you want to
connect them, please repeat the steps described in Adding Child
Units. to connect them, please repeat the steps described in Adding
Child Units.
B
e
channel 2 LED
Be
channel
2
LED
14
Using the Child Tracker
a. Parent unit:
Whenthebatterypowerislow,thePowerLEDwillashredasawarning,please
replace with new batteries.
b. Child Unit:
Whenthebatterypowerislow,thePowerLEDwillashredasawarning,pleaseput
the Child unit in the charger to charge the battery. It is recommended that the batteries
shall be removed to extend the battery life when not used.
Battery low indicator
Directional indicator function
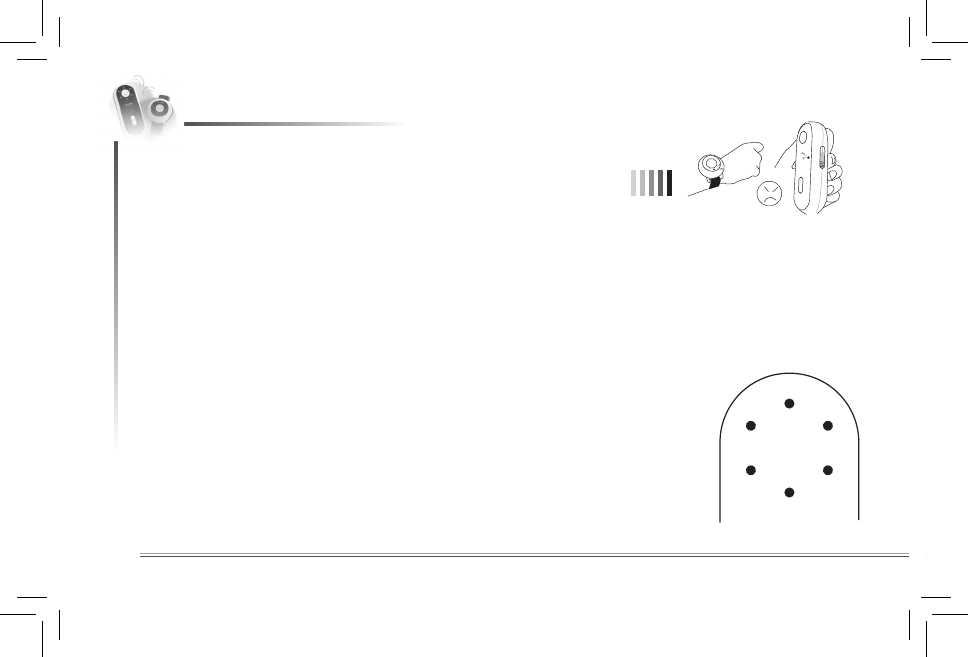
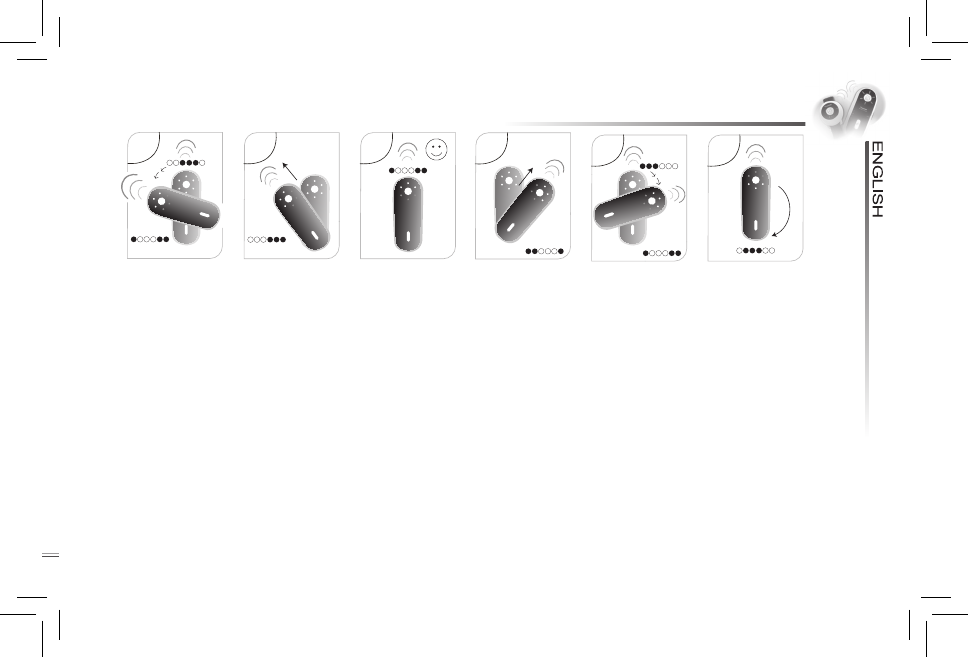
There are 6 blue LED indicators on the Parent unit as shown in
thegure.WhenthreeoftheLEDsareashingatthesametime,
it suggests that the Child unit is in this direction with an angle of
120 degrees. When only one of the LEDs is ashing, it suggests
that the Child unit is in this direction with an angle of 60 degrees.
When all the 6 LEDs go off, it suggests that the Child unit is out of
the monitoring range. In this case, the Channel indicator becomes
red.
1 5
2 4
3
6
15
Using the Child Tracker
1 5
2 4
3
6
a
1 2 6
2 3 4
c
2 3 4
e
32 4
4 5 6
b
21 3
d
3 4 5
f
1 5 6
a
1 2 6
2 3 4
c
2 3 4
e
32 4
4 5 6
b
21 3
d
3 4 5
f
1 5 6
a. When Indicator 1ashesorIndicator1, 2 and 6ashatthesametime,itindicatesthemonitoredChildunitsis
in the relative position of the left-half of the Parent unit. At this moment, please stay where you are and
hold the Parent unit. Then turn counterclockwise until LED 2, 3 or 4 lights up.
b. When Indicator 2ashesorIndicator1, 2 and 3ashatthesametime,itindicatesthemonitoredChildunitsis
in the relative position of the front left of the Parent unit. At this moment, please hold the Parent unit and
move toward front-left to search for the Child unit.
c. When Indicator 3ashesorIndicator 2, 3 and 4ashatthesametime,itindicatesthemonitoredChildunitsis
in the relative position of the front of the Parent unit. At this moment, please hold the Parent unit and
move forward to search for the Child unit.
d. When Indicator 4ashesorIndicator3, 4 and 5ashinthesametime,itindicatesthattheChildunitsbeing
monitored is in the relative position of the front right of the Parent unit. In the meantime, please hold the Parent
unit and move front-right to search for the Child unit.
e. When Indicator 5ashesorIndicator4, 5 and 6ashatthesametime,itindicatesthemonitoredChildunitsis
in the relative position of the right-half of the Parent unit. At this moment, please stay where you are and
hold the Parent unit. Then turn clockwise until LED 2, 3 or 4 lights up.
f. When Indicator 6ashesorIndicator 1, 5 and 6ashatthesametime,itindicatesthemonitoredChildunits
is in the relative position of the back of the Parent unit. At this moment, please hold the Parent unit and turn
180 degree.
Note: The LEDs will be ashing quicker when the Parent unit is getting closer to the Child unit. Meanwhile, when the Parent unit is getting further
away from the Child unit, the LEDs will be ashing slower.
16
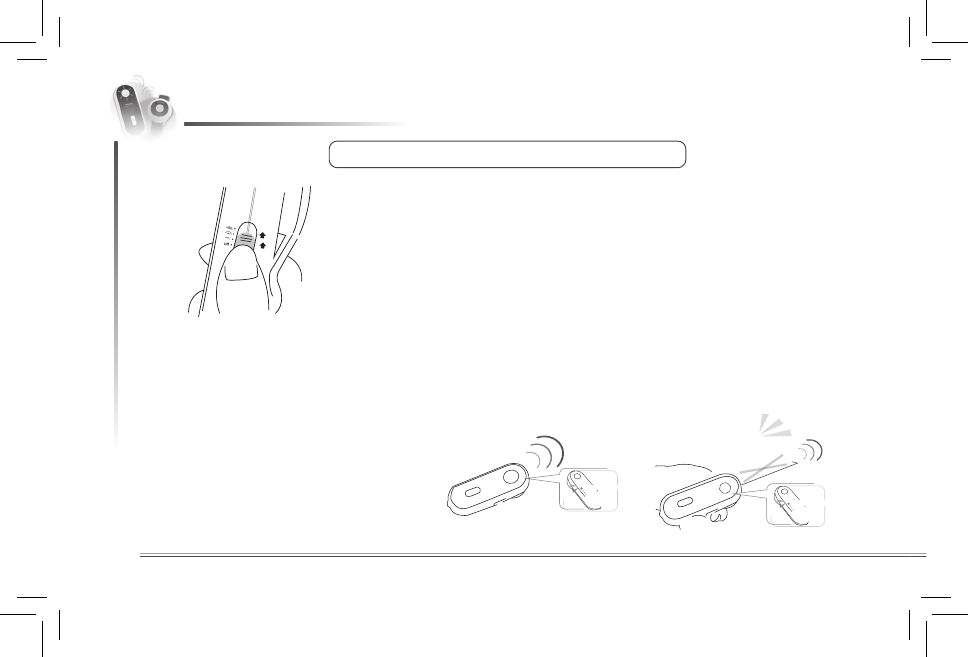
There is a Power and Warning Range (Far, Normal and Near) switch
on the lateral side of the Parent unit. When the switch is turned to
), it indicates the warning range is set at 5~10m. When the switch is
turned to )), it’s 8~20m. When the switch is turned to ))), it indicates
the warning range is set at the farthest, i.e. 15~30m. The user can set
the distance of the warning range based on the environment and re-
quirement. When the distance between the Child unit and the Parent unit
is within the warning range, the channel LED will light red or green. When the distance
between the Child unit and the Parent unit is out of the warning range, the channel LED
willashredorgreenandthebuzzeroftheParentunitwillbeepasawarning.Atthismo-
ment, you can press Find button
or channel selection button
Using the Child Tracker
)
5~10m
) )
8~20m
) ) )
15~30m
channel
3
LED
Be
Be
Be
channel
1
LED
35m
to turn off the buzzer. Then press
channel selection button again
to select the desired channel
of the direction to monitor.
Warning range setup
17
Using the Child Tracker
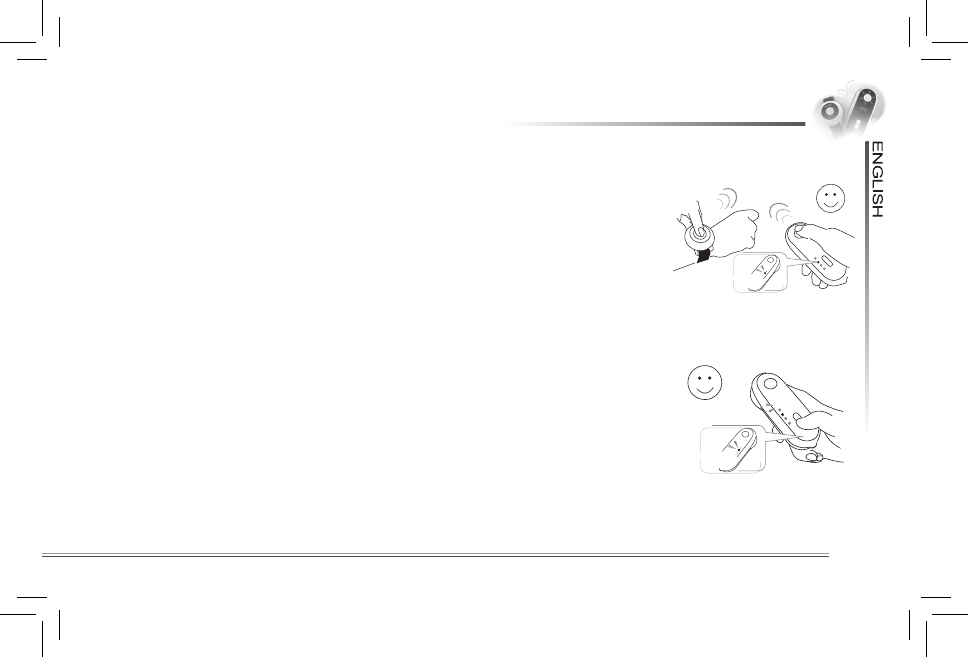
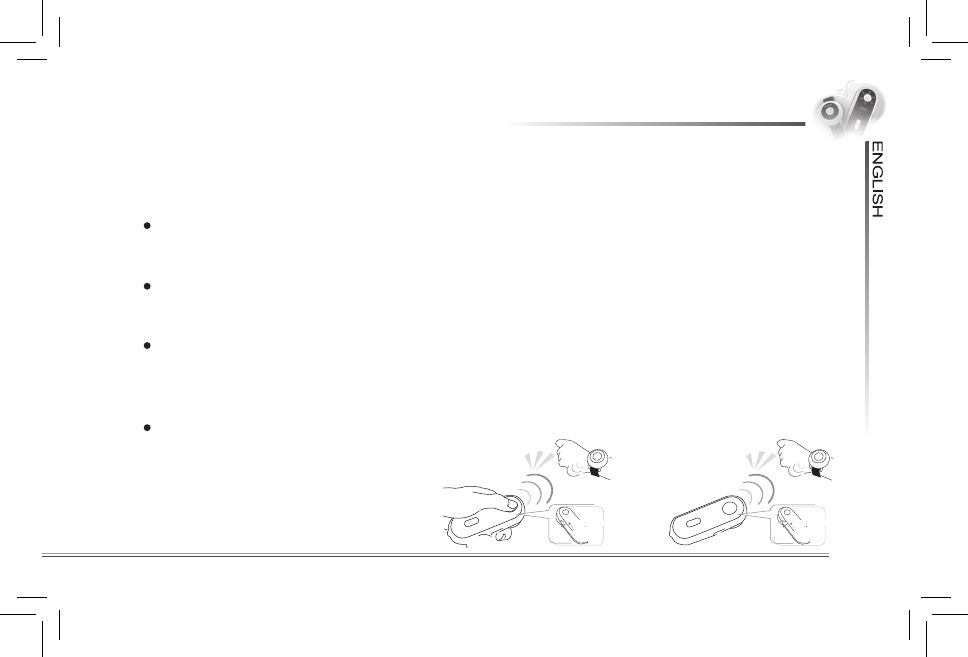
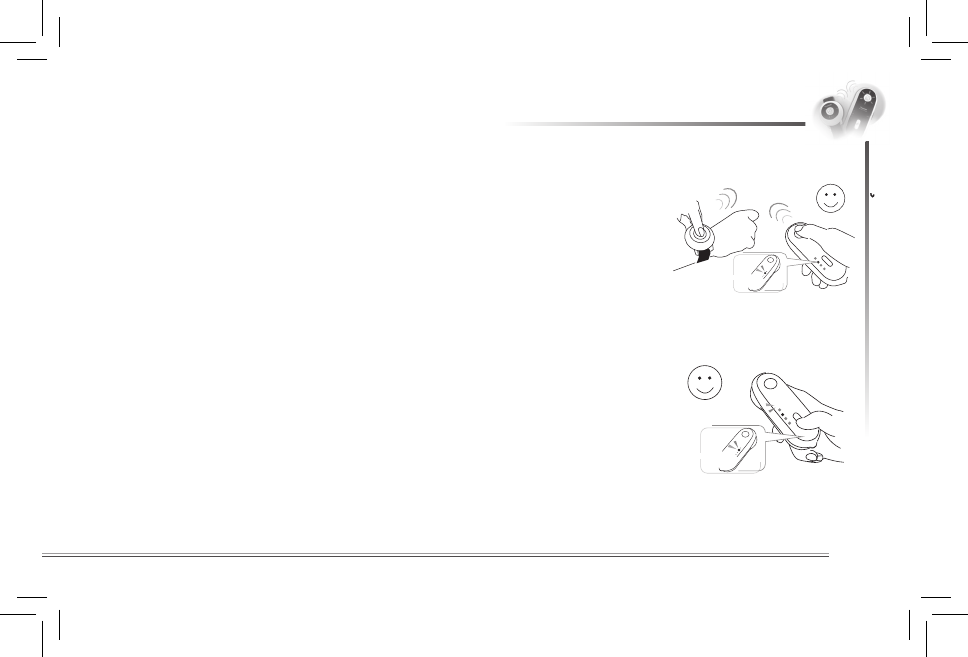
a. How to use the Parent unit to call the Child unit:
When you use the Parent unit to search for the Child unit, in addition to the directional
LED indicators, you can also do so by pressing the Find button.
When you press the Find button, the buzzers in the Child and Parent units will beep. You
canalsondtheChildunitbyfollowingthebeepsound.
The beep sound will become quicker if the Parent unit is getting closer to the Child unit.
Meanwhile, when the Parent unit is getting further away from the Child unit, the beep
sound will become slower.
You can turn off the buzzers on the Child and Parent units by pressing the Find button
again on the Parent unit.
Be
B
e
Be
channel
1
LED
channel
1
LED
Warning range setup Find function
18
Using the Child Tracker
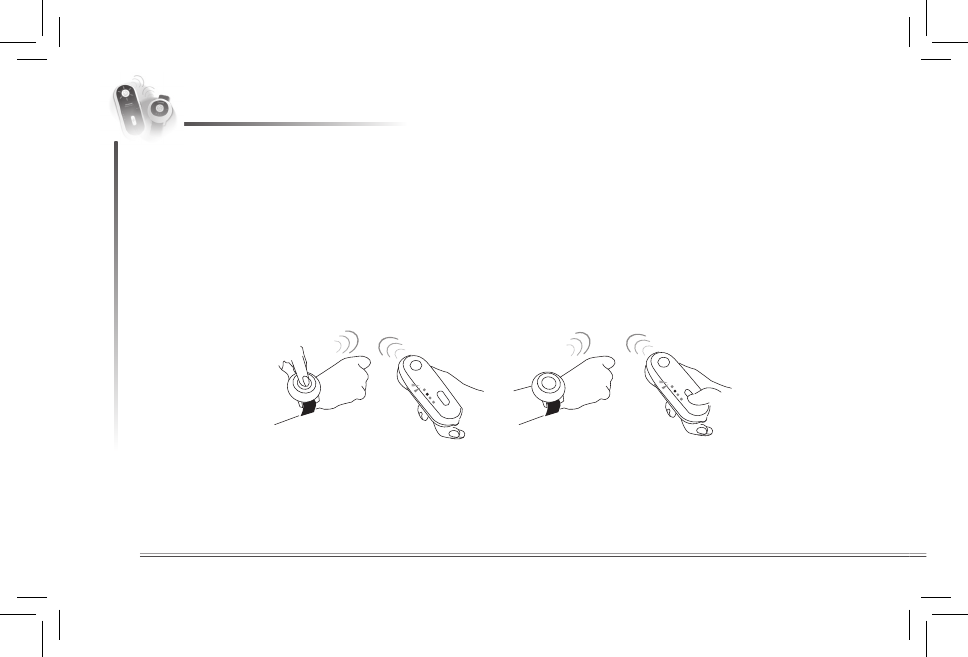
b. How to use the Child unit to call the Parent unit:
The user can also use the Child unit to call the Parent unit actively. When the Find
button on the Child unit is pressed, the buzzer on the Parent unit will beep as a warning.
At this moment, if the Find button or channel selection button on the Parent unit is
pressed, the buzzer will turn off.
Be
B
e
Be
Be
B
e
Be
19
Features
Bothunitsfullyportablewithupto50mrange.
LEDs to guide the parent to the child nistantly.
Each parent unit is capable of monitoring 4 separate child units.
When the ParentunitisgettingclosertotheChildunit,theLEDswillbeashingquickerand
the beep sound will become quicker.
Setting warning range - You can set distance between Child Unit and Parent Unit (Near
range / Normal range / Far range).
The user can use the Child unit to call the Parent unit actively.
Lowpowerdetection-Whenthebatterypowerislow,thepowerLEDwillashredasa
warning.

20
Troubleshooting
If you are not getting any signal at all
Please check if you turn on the power switch on the Parent unit.
Please check if the power LED on the Parent unit lights red. If not, please check whether the
batteries are installed in the right direction.
If the batteries installed in the Parent unit are in the right direction, please replace with new
batteries.
Please check if the power LED on the Child unit lights red. If not, please check whether the
batteries are installed in the right direction.
If the batteries installed in the Child unit are in the right direction, please put the Child unit on
the charger to charge the battery.
If the power LED of both the Child unit and Parent unit light red but the channel LED is not lit,
please add Child units by following the procedures described above.
There’s something wrong with the direction indication
Please make sure that the child wears the Child unit on his or her wrist to get the best direction
indication.
Please make sure that when you use the Parent unit to search the direction of the Child unit,
you have held the Parent unit tightly in a horizontal position to get the best direction indication.
The direction indication may be slightly inaccurate if the user uses this product in a smaller and
enclosed room. It is ideal for uses in public places, such as parks or shopping malls.

21
Technical Specification/
Care and maintenance
System
Radio Frequency 2477.5 to 2482.5 MHz, Direct Sequence Spread Spectrum
Operating Range Typical 50 meters/150 feet light of sight
Warning Range 5 to 30 meters/15 to 90 feet
Parent Unit
Power Supply 2 x AAA 1.5V non rechargeable alkaline batteries
Dimension W:45mm H:45mm D:11.5mm
Weight 50g
Operating temperature 0 C ~ 40 C (32 F ~ 104 F )
Child Unit
Power Supply 1 x AC power adapter DC 6V 200 mA
1 x LIR2450 Li+ 3.6V rechargeable battery
Dimension W:45mm H:110mm D:140mm
Weight 34g
Operating temperature 0 C ~ 40 C (32 F ~ 104 F )
Care and maintenance
Remove batteries from the unit if you do not plan to use it for a period of time.
Dispose of used batteries in an environmentally friendly manner.
Cleanthechildnderwithadumpcloth.
Specicationsaresubjecttochangewithoutnotice.
Technical Specication
Ce Que Vous Obtenez
Légende des fonctions
Informations importantes
Installation
Installation de l’Unité Enfant
Installer l’Unité Parents
Contrôlez la connexion
Utilisation du Traqueur Enfant
Fonction de choix des Canaux
Ajouter des Unités Enfant
Retirer des Unités Enfant
Indicateur de faibles batteries
Indicateur de Fonction directionnelle
Installation de l’Avertissement de
Fonction de Trouver
Caractéristiques
Dépannage
............................
23
...........................
24
.......................
26
...............................................
27
.............
.........................
..........................
27
30
31
................
32
.............
33
.......................
35
........................
35
..............
36
...
36
..........
38
..............................
39
.....................................
41
............................................
42
23
FRANCAIS
Unité Parents
Unité Enfant
Chargeur d’Unité Enfant
Prise d’Adaptateur de chargeur d’Unité Enfant
Batterie rechargeable LIR2450 Li+ 3.6V pour l’Unité Enfant
2 piles alcalines non rechargeables AAA 1.5V pour l’Unité Parent
Manuel Utilisateur
Ce Que Vous Obtenez
.......................
.............
................
...
24
Légende des fonctions
1
3
4
5
2
6
7
8
9
2
1
2
3
5
6
4
7
8
9
10
A, Unité Parent Fig. 1 B, Unité Enfant Fig. 2
Fig. 1
25
FRANCAIS
Légende des fonctions
Bouton trouver Bouton d’initiation Unité Enfant
Indicateur de direction LED
Indicateur de Canal LED
Bouton de sélection de Canal/bouton efface Unité Enfant
Haut parleur
Puissance/indicateur de batterie de faible puissance
Arrêt puissance/signal de proximité près/normal/
Attache de ceinture
couvercle de batteries
capteur de charge
couvercle de batteries
Attache
Puissance/indicateur de batterie
haut Parleur
Bouton de trouver/bouton
Capteur du Chargeur
Indicateur de chargeur LED
fiche de prise d’adaptateur
Prise d’adaptateur du Chargeur
A, Parent Unit Fig. 1
1
2
3
4
5
6
7
8
9
1
2
3
4
5
6
7
8
9
10
A, Unité Parent Fig. 1 B, Unité Enfant Fig. 2
LED
de faible puissance LED
d’invitation Unité Enfant

26
Informations importantes
1. Si vous voyagez à l’étranger, assurez-vous que la tension montrée sur la prise de
l’adaptateur correspond à la puissance de forces locale avant le raccordement
à l’alimentation d’énergie.
2. Pour empêcher toute décharge électrique, n’ouvrez pas le boitier de l’Unité
Enfant et de l’Unité Parent (à part les couvercles des compartiments batteries)
3. Pour prévenir tout risque d’explosion n’utilisez pas de batteries d’un type incor
rect. Pour l’Unité Enfant, utilisez toujours la batterie rechargeable LIR2450 de 3.6V
Li+. Pour l’Unité Parent, nous recommandons des piles alcalines non recharge
ables de 1.5V AAA.
27
FRANCAIS
Installation
Installation de l’Unité Enfant
Quand vous employez ce produit pour la première fois, veuillez le mettre en charge.
1. Comment installer les batteries
(1) insérez les deux barrettes de ceinture dans le couvercle de batterie au le dos de l’Unité
Enfant et puis ouvrez le couvercle de batterie en le tournant dans le sens contraire des
aiguilles d’une montre.
(2) Installez la batterie LIR2450 dans le couvercle de batterie et tournez les barrettes de
ceinture dans le sens des aiguilles d’une montre pour combiner le couvercle de batterie
avec l’Unité Enfant. (Veuillez notez les pôles +/- en installant la batterie.) A ce moment,
la lumière LED rouge de puissance s’allume.

28
Installation
2. Comment charger
OK
1 2 3 4
(1) Insérez l’Adaptateur de Chargeur dans la prise électrique.
(2)Branchezl’AdaptateurdeChargeurauChargeur.L’indicateurdechargeur
clignotera rouge et vert trois fois respectivement et puis s’éteindra.
(3) Reliez l’Unité Enfant au Chargeur comme illustré, et l’indicateur de Charge
passera au rouge pour indiquer qu’il est en Charge. Quand les voyants
l’indicateur de Charge passe au vert, cela indique que la batterie est chargée
complètement. (La batterie sera chargée entièrement dans un délai de suivant
le degré de charge restant dans la batterie.)
(4) Lorsque la batterie est complètement chargée, vous pouvez débrancher l’Unité
Enfant du chargeur.
29
FRANCAIS
Installation
3. Comment utiliser la ceinture
(1) Mettez l’Unité Enfant sur le poignet comme illustré.
(2) Enroulez l’extrémité de la ceinture sans l’attache autour de votre poignet et enlezles
barrettes à l’intérieur. Et ajustez alors la ceinture sur à la bonne tension.
(3)Cliquezl’attachepourxerlalongueurdelaceinture.
(4)Pliezlaqueuedelaceintureetcollez-lasurlaceinturexe.
1 2 3 4
OK

30
Installation
Installer l’Unité Parents
1. Ouvrez le couvercle des piles dans la direction suivant
l’illustration.
2. Installez les deux piles alcalines AAA. dans l’emplacement
des piles dans la bonne direction basée sur les pôles +/-.
3. Fermez le couvercle des piles sur l’Unité Parents.
4. Tournez le commutateur de l’Unité Parents à n’importe quelle distance
de la gamme d’avertissement : près, normale ou loin. Alors, la lumière LED rouge
de la puissance s’allume.
5. Vous pouvez porter l’Unité Parents à votre taille.
1 2 3 4
31
FRANCAIS
Installation
Contrôlez la connexion
Lorsque l’Unité Parents et l’Unité Enfant sont interconnectés, l’indicateur du canal 1
s’allumera en rouge, et l’indicateur de direction clignotera en bleu, ce qui indique que
la connexion est correcte.
OK
channel
1
LED

32
Utilisation du Traqueur Enfant
Veuillez ne pas mettre l’Unité Enfant dans sa poche quand vous l’employez. Veuillez
passer l’Unité Enfant sur le poignet de votre enfant pour obtenir une meilleure indication de
direction. Quand l’Unité Parents trouver l’Unité Enfant, tenez svp l’Unité Parents étroitement
en position horizontale pour obtenir une meilleure indication de direction.
33
FRANCAIS
Utilisation du Traqueur Enfant
Fonction de choix des Canaux
L’Unité Parents peut être reliée jusqu’à 4 Unités Enfant
a. Quand vous avez seulement une Unité Enfant :
1 2
channel 1 LED
B
e
B
e
channel 1 LED
Si l’Unité Parents ne correspond qu’à une Unité Enfant, l’Unité Enfant et l’Unité Parents seront
placées sur le canal 1 intérieure. Quand l’Unité Enfant est dans la marge d’avertissement
de l’Unité Parents, la LED du canal 1 s’allumera en rouge. Quand l’Unité Enfant est hors
de la gamme d’avertissement de l’Unité Parents, le LED du canal 1 clignotera rouge et
le bipper fera bip-bip. Vous pouvez alors appuyer sur le bouton de choix de canal ou
le bouton de recherche pour arrêter le bipper. Puisqu’il n’y a seulement qu’une unité
d’enfant, quand vous appuyer sur le choix de canal, le canal ne sera pas commuté.
34
Utilisation du Traqueur Enfant
channel 1 LED
Be
Be
Be
channel 3 LED
35m
b. Quand il y a plusieurs Unités Enfant :
Si l’Unité Parent correspond à plusieurs l’Unités Enfant, vous pouvez appuyer sur le
bouton de choix de canal pour choisir l’Unité Enfant que vous voulez surveiller. Quand
l’Unité Enfant choisie est dans la marge d’avertissement, le LED rouge du canal,
s’allumera. Quand l’unité choisie d’enfant est hors de la gamme d’avertissement,
le LED du canal clignotera en rouge. Les autres LED des canaux de l’Unité Parents
correspondantauxl’UnitéEnfantconguréess’allumerontenvertquandlesUnités
Enfant sont dans la marge d’avertissement. Quand les Unité Enfant sont hors de la
gamme d’avertissement mais dans la marge de surveillance, le LED vert clignotera.
Quand les unités d’enfant sont hors de gamme de surveillance valide, le canal LED
s’éteindra.
35
FRANCAIS
Utilisation du Traqueur Enfant
Ajouter des Unités Enfant
Quand vous voulez ajouter plus d’Unité Enfant à l’Unité Parents, re-
tenez les boutons Trouver/initiation Unité enfant de l’Unité Parents et
le bouton désiré de Trouver de l’Unité Enfant pendant dix secondes.
Puis les bippers des Unités Parents et Enfant feront bip-bip pour vous
informer que l’Unité Enfant est ajoutée. Le canal de la nouvelle Unité
Enfant supplémentaire sera automatiquement placé sur le canal le
plus bas restant.
Retirer des Unités Enfant
Quand vous voulez retirer une des Unité Enfant à partir de l’Unité Par-
ents, retenez svp le bouton de choix de canal/effacement Unité en-
fant pendant dix secondes. Alors le bipper de l’unité de parents fera
bip-bip pour vous informer que l’Unité Enfant est enlevée. Veuillez
noter quand vous retirer complètement, l’Unité Enfant et l’Unité Par-
ents ne peuvent pas être connectées. Si vous voulez les relier, répétez
svp les étapes décrivant l’ajout d’Unités d’enfant.
B
e
channel 2 LED
Be
channel
2
LED