Tranwo Technology TTD-91R Digital Wireless Color Baby Monitor User Manual D4291 manual Generic p8 cation
Tranwo Technology Corp Digital Wireless Color Baby Monitor D4291 manual Generic p8 cation
users manuel

User's Manual
Digital 7'' LCD
Audio / Video Baby Monitor
X 代表10, IV 代表4, XIV 代表14, XV 代表15.I=1 II=2 III=3 IV=4 V=5 VI=6 VII=7 VIII=8 IX=9 X=10
Ⅰ,Ⅱ,Ⅲ,Ⅳ,Ⅴ,Ⅵ,Ⅶ,Ⅷ,Ⅸ,Ⅹ,ⅩⅠ,ⅩⅡ,ⅩⅢ,ⅩⅣ,ⅩⅤ,ⅩⅥ,ⅩⅦ,ⅩⅧ,ⅩⅨ,ⅩⅩ.
X 代表10, IV 代表4, XIV 代表14, XV 代表15.I=1 II=2 III=3 IV=4 V=5 VI=6 VII=7 VIII=8 IX=9 X=10
Ⅰ,Ⅱ,Ⅲ,Ⅳ,Ⅴ,Ⅵ,Ⅶ,Ⅷ,Ⅸ,Ⅹ,ⅩⅠ,ⅩⅡ,ⅩⅢ,ⅩⅣ,ⅩⅤ,ⅩⅥ,ⅩⅦ,ⅩⅧ,ⅩⅨ,ⅩⅩ.
i
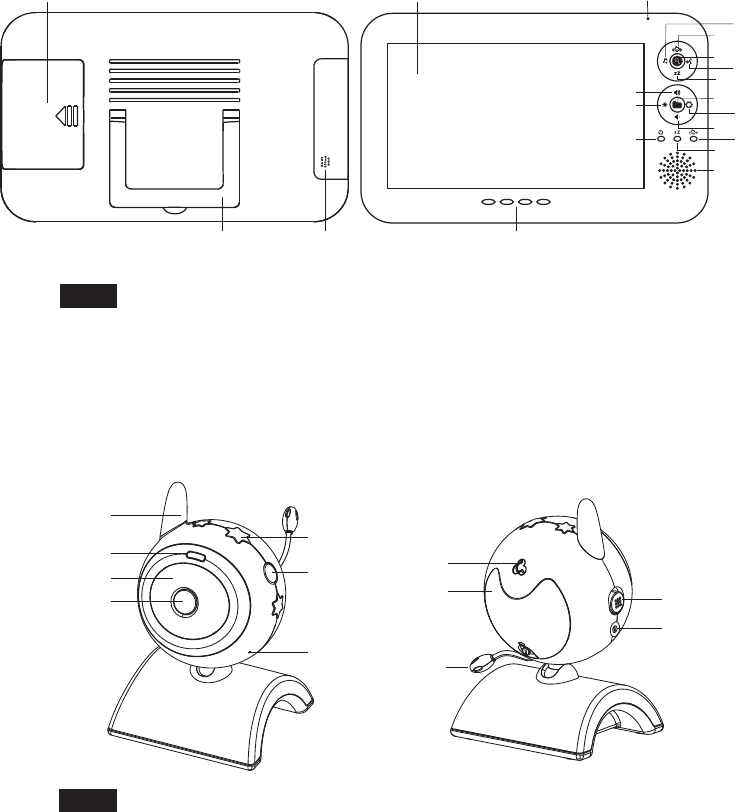
Product Layout
Figures and Quick Guide
Monitor
Camera
9
12
10
11
8
5
6
7
1
2
3
4
18
2019
1
17
2
9
16
3
6
11
13
5
4
7
12
14
15
8
10
Fig. 1
Fig. 2
X 代表10, IV 代表4, XIV 代表14, XV 代表15.I=1 II=2 III=3 IV=4 V=5 VI=6 VII=7 VIII=8 IX=9 X=10
Ⅰ,Ⅱ,Ⅲ,Ⅳ,Ⅴ,Ⅵ,Ⅶ,Ⅷ,Ⅸ,Ⅹ,ⅩⅠ,ⅩⅡ,ⅩⅢ,ⅩⅣ,ⅩⅤ,ⅩⅥ,ⅩⅦ,ⅩⅧ,ⅩⅨ,ⅩⅩ.

Setup
1
Fig. 3
Fig. 4
ii
Camera Setup
1.1 Power Supply
Loading the Batteries
Using AC Power
X 代表10, IV 代表4, XIV 代表14, XV 代表15.I=1 II=2 III=3 IV=4 V=5 VI=6 VII=7 VIII=8 IX=9 X=10
Ⅰ,Ⅱ,Ⅲ,Ⅳ,Ⅴ,Ⅵ,Ⅶ,Ⅷ,Ⅸ,Ⅹ,ⅩⅠ,ⅩⅡ,ⅩⅢ,ⅩⅣ,ⅩⅤ,ⅩⅥ,ⅩⅦ,ⅩⅧ,ⅩⅨ,ⅩⅩ.
iii
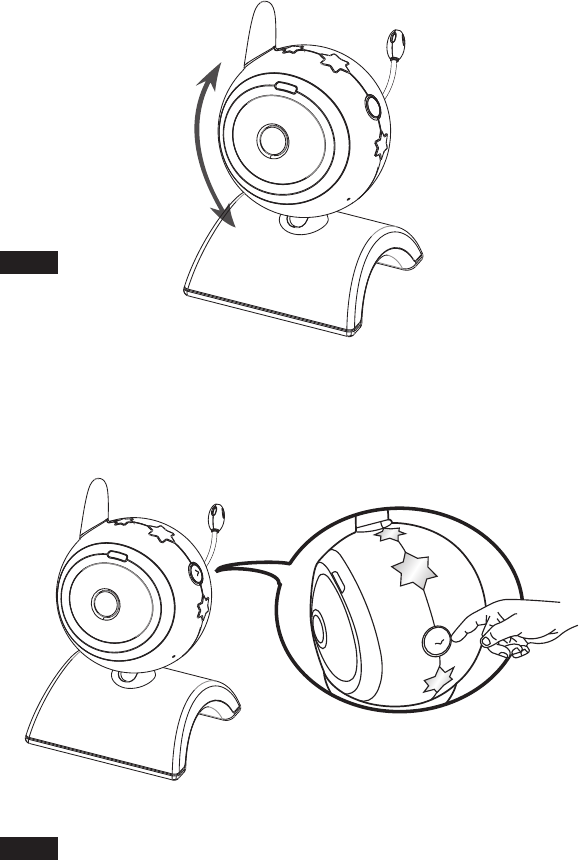
Fig. 5
1.2 Fine Tuning
1.3 Night light
Fig. 6
X 代表10, IV 代表4, XIV 代表14, XV 代表15.I=1 II=2 III=3 IV=4 V=5 VI=6 VII=7 VIII=8 IX=9 X=10
Ⅰ,Ⅱ,Ⅲ,Ⅳ,Ⅴ,Ⅵ,Ⅶ,Ⅷ,Ⅸ,Ⅹ,ⅩⅠ,ⅩⅡ,ⅩⅢ,ⅩⅣ,ⅩⅤ,ⅩⅥ,ⅩⅦ,ⅩⅧ,ⅩⅨ,ⅩⅩ.
iv
2Monitor Setup
Power Supply
2.1
Loading the Battery
Using AC Power
Fig. 9
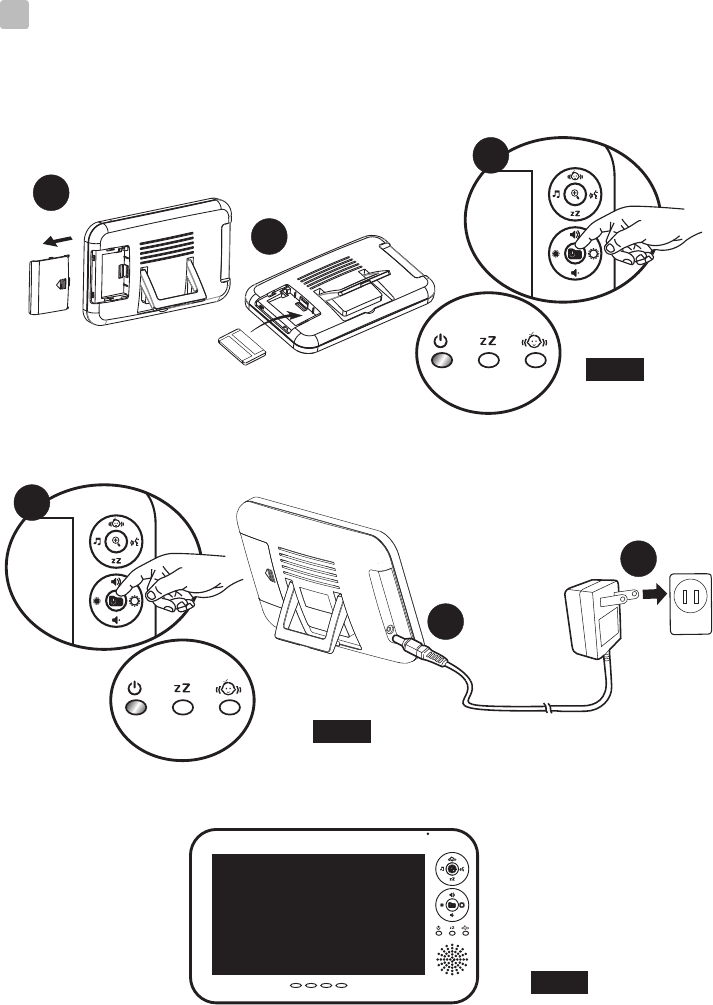
Fig. 7
1
2
3
3
Fig. 8
OUT OF RANGE
1
2
X 代表10, IV 代表4, XIV 代表14, XV 代表15.I=1 II=2 III=3 IV=4 V=5 VI=6 VII=7 VIII=8 IX=9 X=10
Ⅰ,Ⅱ,Ⅲ,Ⅳ,Ⅴ,Ⅵ,Ⅶ,Ⅷ,Ⅸ,Ⅹ,ⅩⅠ,ⅩⅡ,ⅩⅢ,ⅩⅣ,ⅩⅤ,ⅩⅥ,ⅩⅦ,ⅩⅧ,ⅩⅨ,ⅩⅩ.

v
2.4 VOX (voice-operated transmission) Function
Fig. 12
2.3 Brightness Setting
Fig. 11
2.2 Volume Setting
Fig. 10
X 代表10, IV 代表4, XIV 代表14, XV 代表15.I=1 II=2 III=3 IV=4 V=5 VI=6 VII=7 VIII=8 IX=9 X=10
Ⅰ,Ⅱ,Ⅲ,Ⅳ,Ⅴ,Ⅵ,Ⅶ,Ⅷ,Ⅸ,Ⅹ,ⅩⅠ,ⅩⅡ,ⅩⅢ,ⅩⅣ,ⅩⅤ,ⅩⅥ,ⅩⅦ,ⅩⅧ,ⅩⅨ,ⅩⅩ.
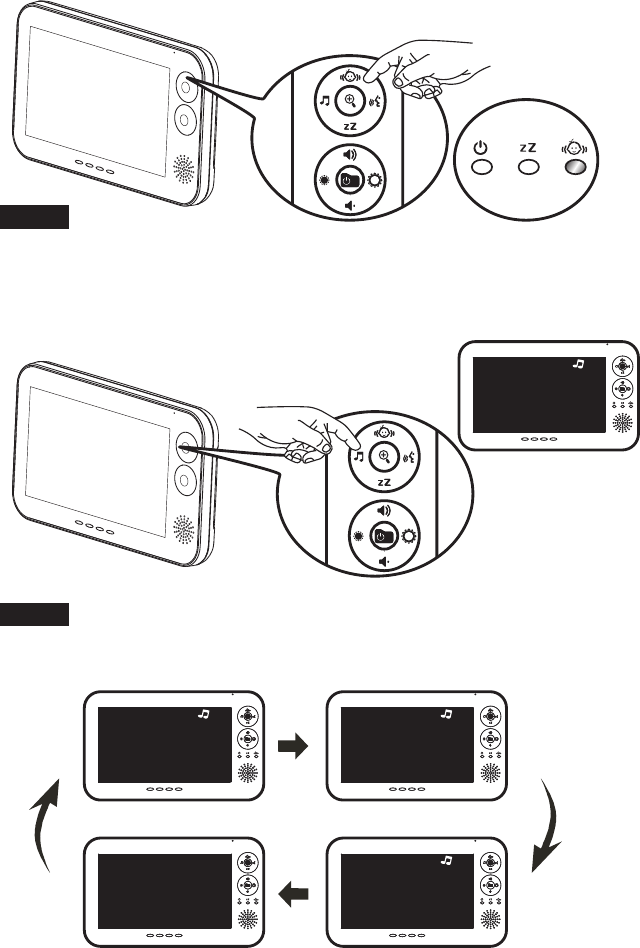
2.6 Music Function
Fig. 14
2.5 Motion Detection Function
Fig. 13
vi
1
1 2
13
X 代表10, IV 代表4, XIV 代表14, XV 代表15.I=1 II=2 III=3 IV=4 V=5 VI=6 VII=7 VIII=8 IX=9 X=10
Ⅰ,Ⅱ,Ⅲ,Ⅳ,Ⅴ,Ⅵ,Ⅶ,Ⅷ,Ⅸ,Ⅹ,ⅩⅠ,ⅩⅡ,ⅩⅢ,ⅩⅣ,ⅩⅤ,ⅩⅥ,ⅩⅦ,ⅩⅧ,ⅩⅨ,ⅩⅩ.
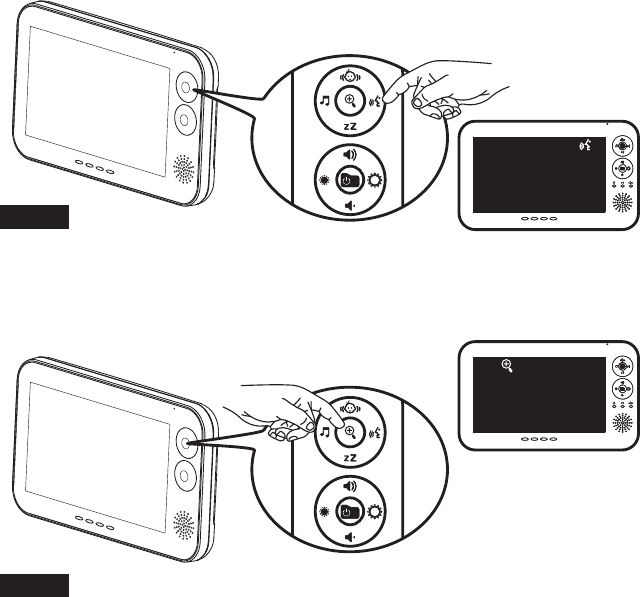
2.8 Zoom In Function
Fig. 16
2.7 Talkback Function
Fig. 15
vii
X 代表10, IV 代表4, XIV 代表14, XV 代表15.I=1 II=2 III=3 IV=4 V=5 VI=6 VII=7 VIII=8 IX=9 X=10
Ⅰ,Ⅱ,Ⅲ,Ⅳ,Ⅴ,Ⅵ,Ⅶ,Ⅷ,Ⅸ,Ⅹ,ⅩⅠ,ⅩⅡ,ⅩⅢ,ⅩⅣ,ⅩⅤ,ⅩⅥ,ⅩⅦ,ⅩⅧ,ⅩⅨ,ⅩⅩ.
3Menu Options
3.2 Temperature Setting
Fig. 19
3.1 Camera Selection
Fig. 18
Fig. 17
viii
X 代表10, IV 代表4, XIV 代表14, XV 代表15.I=1 II=2 III=3 IV=4 V=5 VI=6 VII=7 VIII=8 IX=9 X=10
Ⅰ,Ⅱ,Ⅲ,Ⅳ,Ⅴ,Ⅵ,Ⅶ,Ⅷ,Ⅸ,Ⅹ,ⅩⅠ,ⅩⅡ,ⅩⅢ,ⅩⅣ,ⅩⅤ,ⅩⅥ,ⅩⅦ,ⅩⅧ,ⅩⅨ,ⅩⅩ.
Motion Detection Sensitivity
3.3
3.5 ADD/DEL Camera
3.4 VOX Sensitivity
ix
Fig. 22
Fig. 21
Fig. 20
X 代表10, IV 代表4, XIV 代表14, XV 代表15.I=1 II=2 III=3 IV=4 V=5 VI=6 VII=7 VIII=8 IX=9 X=10
Ⅰ,Ⅱ,Ⅲ,Ⅳ,Ⅴ,Ⅵ,Ⅶ,Ⅷ,Ⅸ,Ⅹ,ⅩⅠ,ⅩⅡ,ⅩⅢ,ⅩⅣ,ⅩⅤ,ⅩⅥ,ⅩⅦ,ⅩⅧ,ⅩⅨ,ⅩⅩ.
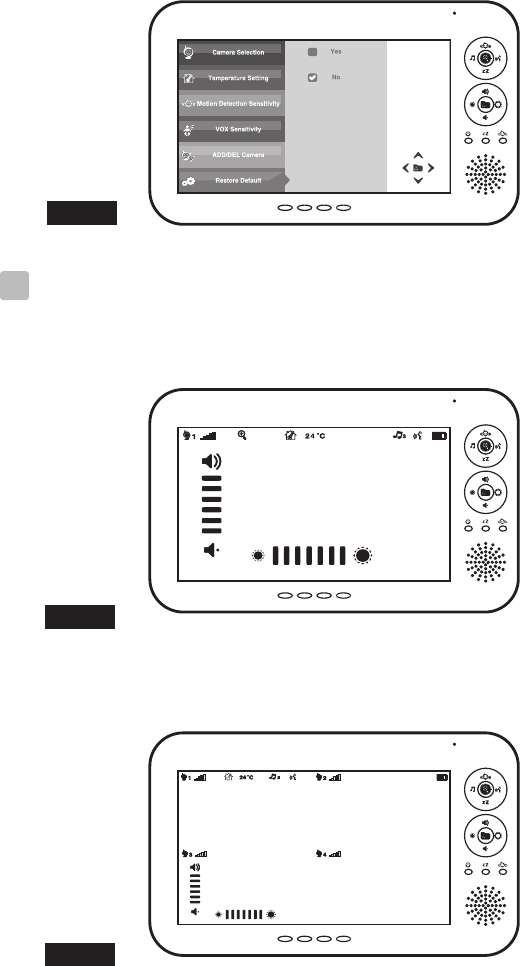
Fig. 25
Fig. 24
Fig. 23
4Screen Display
Restore Default
3.6
Single Mode
4.1
Quad Mode
4.2
x
X 代表10, IV 代表4, XIV 代表14, XV 代表15.I=1 II=2 III=3 IV=4 V=5 VI=6 VII=7 VIII=8 IX=9 X=10
Ⅰ,Ⅱ,Ⅲ,Ⅳ,Ⅴ,Ⅵ,Ⅶ,Ⅷ,Ⅸ,Ⅹ,ⅩⅠ,ⅩⅡ,ⅩⅢ,ⅩⅣ,ⅩⅤ,ⅩⅥ,ⅩⅦ,ⅩⅧ,ⅩⅨ,ⅩⅩ.

1
Package Content
Product Layout
Monitor (Fig. 1)
1.
2.
3.
4.
5.
6.
7.
8.
9.
10.
11.
12.
13.
14.
15.
16.
17.
18.
19.
20.
Camera (Fig. 2)
1.
2.
3.
4.
5.
6.
7.
8.
9.
10.
11.
12.
One Camera
One Monitor
Two Power Adapters
Battery for Monitor ( 3.7V 1050mAH Li-ion )
This User's Manual
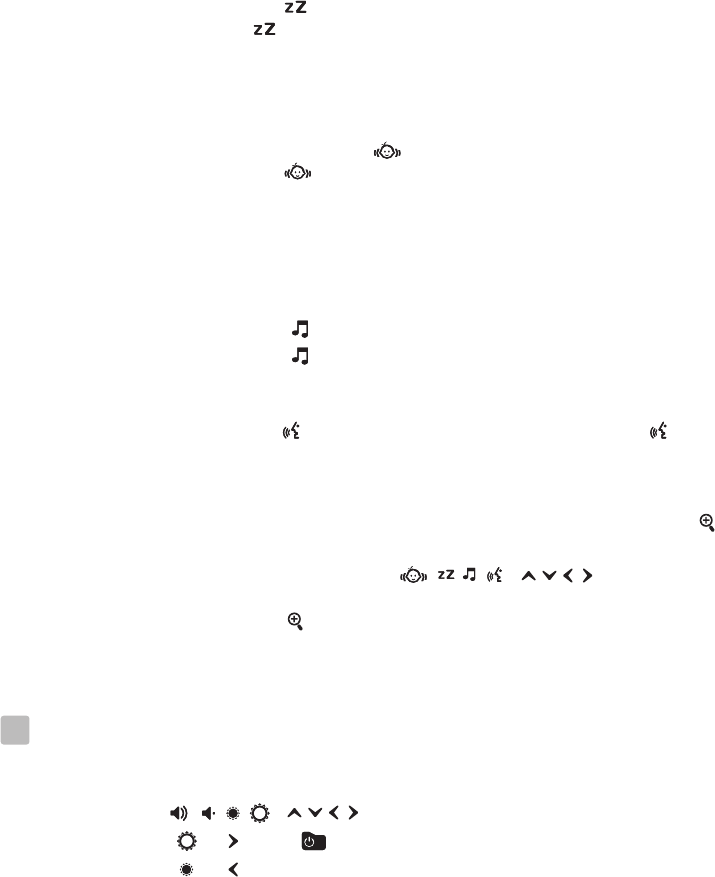
LCD screen
Microphone
Music selection (Zoom in : left) button
Zoom (Camera selection in quad mode) button
Motion detection (Zoom in : up) button
Talkback (Zoom in : right) button
VOX (Zoom in : down) button
Brightness down (Menu : left/exit) button
Power (Menu) button
Volume up (Menu : up) button
Brightness up (Menu : right/ok) button
Volume down (Menu : down) button
Motion detection indicator LED
VOX indicator LED
Power indicator LED
Speaker
Volume indicator LEDs
Battery compartment
Holder
Power adapter plug
Antenna
Power indicator LED
Infrared LEDs
Lens
Night-light
Night-light button
Microphone
Speaker
Battery compartment
Temperature sensor
Power ON/OFF switch
Power adapter plug
ENGLISH
X 代表10, IV 代表4, XIV 代表14, XV 代表15.I=1 II=2 III=3 IV=4 V=5 VI=6 VII=7 VIII=8 IX=9 X=10
Ⅰ,Ⅱ,Ⅲ,Ⅳ,Ⅴ,Ⅵ,Ⅶ,Ⅷ,Ⅸ,Ⅹ,ⅩⅠ,ⅩⅡ,ⅩⅢ,ⅩⅣ,ⅩⅤ,ⅩⅥ,ⅩⅦ,ⅩⅧ,ⅩⅨ,ⅩⅩ.

2
Setup
Power Supply
The camera uses either 4 AAA-Size batteries (alkaline battery recommended)
or the household AC power current.
Loading the Batteries
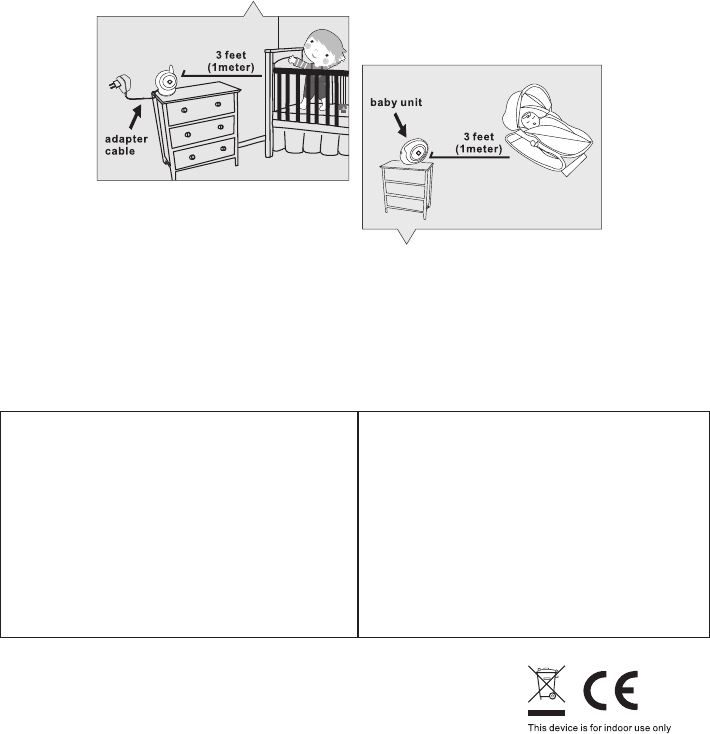
1. Open the battery compartment cover on the rear of the camera. See Fig. 3.
2. Insert 4 AAA-size batteries (follow the plus (+) and minus (-) signs inside
the battery compartment). See Fig. 3.
3. Close the battery compartment cover, and make sure it is locked securely.
Note 1: Do not mix old batteries with new ones.
Note 2: Remove the batteries from the camera if you do not plan to use it for
a prolonged period of time.
4. Slide the POWER switch to the ON position. The LED on the camera
will light up ( green light). See Fig. 3.
Note : When the battery is low, the LED light will start blinking.
Using AC Power
1. Plug one end of the provided power adapter into a wall outlet and the other
end into the bottom of the camera. See Fig. 4.
Note : Use the adapter labeled OUTPUT: 6V DC with the camera.
2. Slide the ON/OFF switch to the ON position. The LED on the camera should
light up (green light). See Fig. 4.
Fine Tuning
Place the camera in a convenient location, point the lens towards the observation
area and adjust the angle by rotating the lens head. See Fig. 5.
Night light
Press the night light button, the night light LEDs will remain ON. See Fig. 6.
Night vision
The camera has nine high-intensity LEDs for picking up clear images in the
dark. When the built-in photo sensor detects low ambient light levels, the LEDs
will automatically activate.
Camera Setup
1.1
1
1.2
1.3
1.4
X 代表10, IV 代表4, XIV 代表14, XV 代表15.I=1 II=2 III=3 IV=4 V=5 VI=6 VII=7 VIII=8 IX=9 X=10
Ⅰ,Ⅱ,Ⅲ,Ⅳ,Ⅴ,Ⅵ,Ⅶ,Ⅷ,Ⅸ,Ⅹ,ⅩⅠ,ⅩⅡ,ⅩⅢ,ⅩⅣ,ⅩⅤ,ⅩⅥ,ⅩⅦ,ⅩⅧ,ⅩⅨ,ⅩⅩ.

3
Temperature sensor can measure room temperature on camera side and the room
temperature indicator will be displayed on the screen of the monitor unit.
Room temperature measurement
1.5
Power Supply
current.
Loading the Battery
1. Open the battery compartment cover on the rear of the monitor. See Fig. 7.
2. Insert the battery with the metal facing the battery compartment. See Fig 7.
3. Close the battery compartment cover, and make sure it is locked securely.
4. Press the POWER button to turn on the monitor . See Fig 7.
Note 1: When power is sufficient, the light is green ; When battery is low,
the red LED light will start blinking.
Note 2: Remove the battery from the monitor if you do not plan to use it for a
prolonged period of time.
Note 3: Press the POWER button and keep it around 3 seconds to turn off
the monitor.
Using AC Power
1. Plug one end of the provided power adapter into a wall outlet and the other end
into the bottom of the monitor. See Fig. 8.
Note : Use the adapter labeled OUTPUT: 6V DC with the monitor.
2. Press the POWER button to turn on the monitor . See Fig 8.
Note 1: When charging starts, and "Power" LED will appear blue .
If charging is finished (fully charged), the "Power" LED will turn green.
Note 2: "OUT OF RANGE" would be displayed on the LCD screen if the
monitor is exceeds the range (unlink).is exceeds the range (unlink).
See Fig. 9.
Note 3: Press the POWER button and keep it around 3 seconds to turn off
the monitor.
Volume Setting
Press the volume selection button & to adjust volume level. See Fig. 10.
Brightness Setting
Press the Brightness selection button & to adjust brightness. See Fig. 11.
Monitor Setup
The monitor uses 3.7V 1050mAH (Li-ion) battery or the household AC power
2.1
2
2.2
2.3
X 代表10, IV 代表4, XIV 代表14, XV 代表15.I=1 II=2 III=3 IV=4 V=5 VI=6 VII=7 VIII=8 IX=9 X=10
Ⅰ,Ⅱ,Ⅲ,Ⅳ,Ⅴ,Ⅵ,Ⅶ,Ⅷ,Ⅸ,Ⅹ,ⅩⅠ,ⅩⅡ,ⅩⅢ,ⅩⅣ,ⅩⅤ,ⅩⅥ,ⅩⅦ,ⅩⅧ,ⅩⅨ,ⅩⅩ.
VOX ( Voice-activation transmission) function
1.
but the VOX LED will remain ON (green). See Fig 12.
2. When the sound from the camera reaches the set level (See Fig 21), the
screen will turn on automatically. It will turn off again after 30 seconds.
Motion Detection Function
1. on the monitor unit
2.
Music Function
You can play the music with the camera (three pieces of music) .
1.
2.
Talkback Function
Press the talkback button to speak through the camera unit, and the icon
will then be displayed on screen. See Fig. 15.
Zoom in Function
1. When the monitor is in single mode (screen display), press the zoom button
can set video at double size. See Fig. 16.
2. When the video is in double size, the ( ) buttons
can be used to view the parts outside on the monitor unit screen.
3. Press the zoom button again to return to normal size.
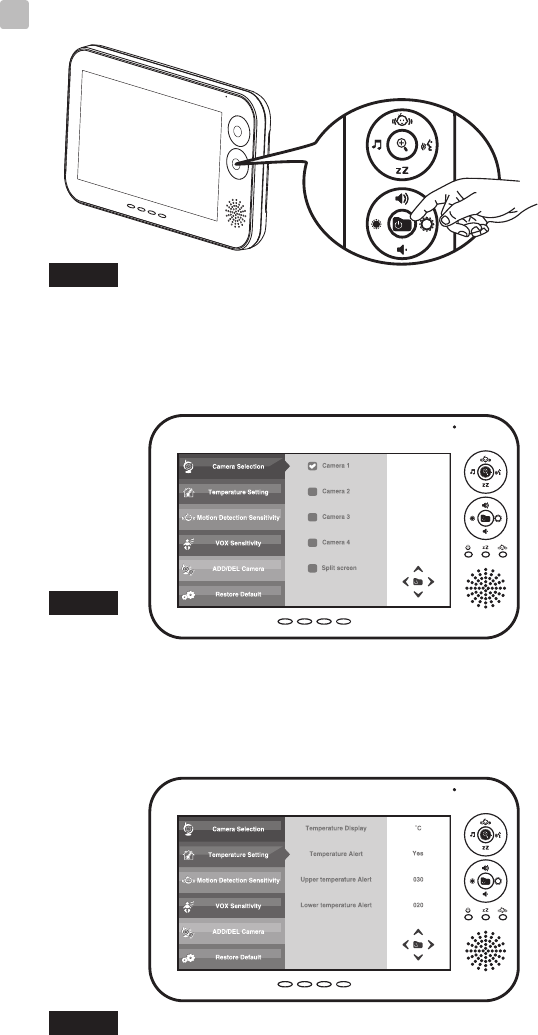
Menu Options
1. Press the power/menu button on the monitor unit to display the menu
on the screen. See Fig. 17.
2. Use the ( ) buttons to navigate through the menu.
3. Press the ( ) or ( ) buttons to confirm a setting.
4. Press the ( ) button to exit the menu.
5. The main menu contains 6 submenus.
Press the VOX button on the monitor unit. This will turn off the screen
.
.
Press the motion detection button , and then the
motion detection LED will remain ON (green). See Fig. 13.
When the baby or object movement from the camera side reaches the
setting level, a warning sound will be emitted from the monitor unit.
Press the music button , the camera will play music. See Fig. 14.
Press the music button again, the camera will play the next song.
4
2.4
2.5
2.6
2.7
2.8
3
X 代表10, IV 代表4, XIV 代表14, XV 代表15.I=1 II=2 III=3 IV=4 V=5 VI=6 VII=7 VIII=8 IX=9 X=10
Ⅰ,Ⅱ,Ⅲ,Ⅳ,Ⅴ,Ⅵ,Ⅶ,Ⅷ,Ⅸ,Ⅹ,ⅩⅠ,ⅩⅡ,ⅩⅢ,ⅩⅣ,ⅩⅤ,ⅩⅥ,ⅩⅦ,ⅩⅧ,ⅩⅨ,ⅩⅩ.
5
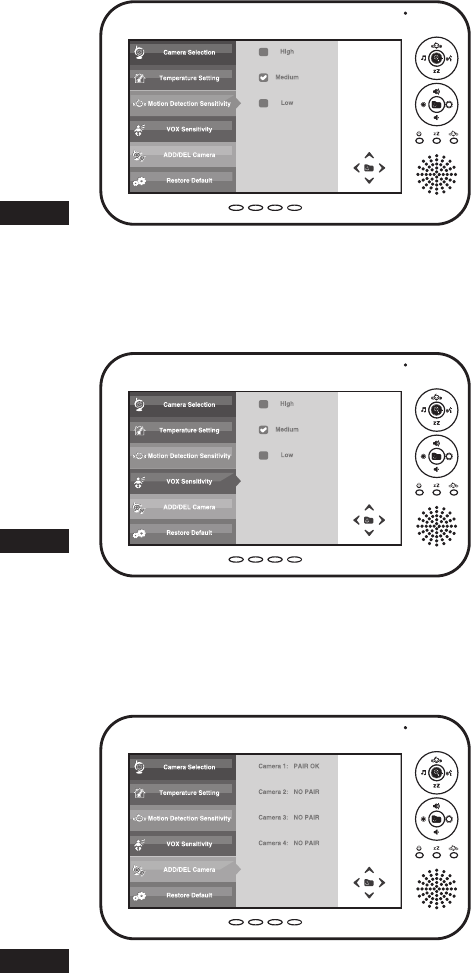
Camera Selection
In this submenu you can switch between multiple cameras. You also can select
"Split screen" item to display the video of all 4 cameras simultaneously in
quad mode. See Fig. 18.
Temperature Setting
1. In this submenu you can choose the temperature unit between degrees
Celsius or degrees Fahrenheit. See Fig. 19.
2. You can set the temperature range of the temperature alert. If you select
"Yes" to enable the temperature alert and the temperature is outside the
range,
Motion Detection Sensitivity
This submenu lets you choose the motion detection sensitivity level.
Please set an appropriate level in your environment. See Fig. 20.
VOX Sensitivity
This submenu lets you choose the VOX (voice-activation transmission)
sensitivity level. With the level set to high, the microphone will detect
lower sounds. See Fig. 21.
ADD/DEL Camera
The system comes with a camera unit that has already been paired with the
monitor unit. The pairing function gives each baby unit a separate channel
on the monitor unit. This is necessary for configuring additional camera units.
See Fig. 22.
1. If you want to add a new camera, please choose which number of cameras
you want to add, and then select "Yes" item on "Add camera" function.
Please also press and keep the night-light button on camera side at the same
time.
2. If you want to delete a paired camera, please choose which number of
cameras you want to delete, and then select "Yes" item on "Delete camera"
function.
Restore Default
Select "Yes" to reset the monitor unit to factory default settings.
All menu settings will then be reset. See Fig. 23.
Note 1: Pairing settings will not be affected by a reset.
Note 2: When you select "Yes" to reset the monitor, the monitor will turn off
automatically. Please press the POWER button to turn on the monitor
again.
a warning sound will be emitted from the monitor unit.
3.1
3.2
3.3
3.4
3.6
3.5
X 代表10, IV 代表4, XIV 代表14, XV 代表15.I=1 II=2 III=3 IV=4 V=5 VI=6 VII=7 VIII=8 IX=9 X=10
Ⅰ,Ⅱ,Ⅲ,Ⅳ,Ⅴ,Ⅵ,Ⅶ,Ⅷ,Ⅸ,Ⅹ,ⅩⅠ,ⅩⅡ,ⅩⅢ,ⅩⅣ,ⅩⅤ,ⅩⅥ,ⅩⅦ,ⅩⅧ,ⅩⅨ,ⅩⅩ.

6
You can select single mode or quad mode in camera selection function of
submenu. See Fig 18.
Single Mode
1. Each of the indicator icons will be displayed on the position of the screen.
See Fig. 24.
(1) Camera number indicator
(2) Signal strength indicator
(3) Zoom in indicator
(4) Temperature alert on/off indicator
(5) Room temperature indicator
(6) Music indicator
(7) Talkback indicator
(8) Battery indicator
(9) Volume indicator
(10) Brightness indicator
2. When the monitor is in single mode, press the zoom button can set video
at double size, and then press the ( ) buttons can be
used to view the parts outside on the monitor unit screen.
Quad Mode
1. Each of the indicator icons will be displayed on the position of the screen.
See Fig. 25.
(1) Camera number indicator
(2) Signal strength indicator
(3) Temperature alert on/off indicator
(4) Room temperature indicator
(5) Music indicator
(6) Talkback indicator
(7) Battery indicator
(8) Volume indicator
(9) Brightness indicator
2. Press the zoom (camera selection in quad mode) button on the monitor unit
and you can select the sound from which cameras you prefer.
3. When the sound from the camera reaches the set level of VOX sensitivity
(See Fig 21), the sound of the monitor will switch to this camera
automatically in quad mode.
4. If you enable VOX, motion detection or temperature alert function and one
of the cameras is triggered by the functions, the sound of the monitor will
switch to this camera automatically in quad mode.
Monitor Setup
.
.
4
4.1
4.2
X 代表10, IV 代表4, XIV 代表14, XV 代表15.I=1 II=2 III=3 IV=4 V=5 VI=6 VII=7 VIII=8 IX=9 X=10
Ⅰ,Ⅱ,Ⅲ,Ⅳ,Ⅴ,Ⅵ,Ⅶ,Ⅷ,Ⅸ,Ⅹ,ⅩⅠ,ⅩⅡ,ⅩⅢ,ⅩⅣ,ⅩⅤ,ⅩⅥ,ⅩⅦ,ⅩⅧ,ⅩⅨ,ⅩⅩ.
7
You don't getting any signal at all
Ÿ
ŸMake sure the power plugs are pushed all the way in.
ŸIf the camera/monitor is powered by batteries, replace all batteries with
new ones.
If the signal is poor, or there is interference
ŸIf there is a microwave oven in use in the path between the camera and
monitor, remove the microwave oven or turn it off.
ŸMake sure the camera and the monitor are within range of each other
(range of approximately 800 feet; 250 meters in a clear line of sight).
ŸIf the power LED is on but only voice signal input is detected, the monitor
can be in voice-activated mode. Press the VOX button to turn on the screen.
Care and Maintenance
ŸKeep all parts and accessories out of children's reach.
Ÿ Fingerprints or dirt on the lens surface can adversely affect camera
performances. Avoid touching the lens surface with your fingers.
Ÿ Should the lens become dirty, use a blower to blow off dirt and dust, or a
soft, dry cloth to wipe off the lens.
Ÿ Keep the camera dry. Precipitation, humidity, and other liquids contain
minerals will corrode electronic circuits.
Ÿ Do not use or store in dusty, dirty areas.
Ÿ Do not store in hot areas. High temperatures can shorten the life of
electronic devices and warp or melt certain plastics.
Ÿ Do not store in very cold areas. When the system warms up (to its normal
temperature), moisture can form inside the case, which may damage
electronic circuit boards.
Ÿ Do not attempt to open the case. Non-expert handling of the device may
damage the system.
Ÿ Avoid dropping or strong shocks.
Ÿ Operate this product using only with the power supply included or provided
as an accessory.
Ÿ Do not overload electrical outlets or extension cords this can result in fire
or electric shocks.
Ÿ Do remember that you are using public airwaves when you use the system
and that sound and video may be broadcast to other 2.4 GHz receiving
devices. Conversations, even from rooms near the camera, may be
broadcast.To protect the privacy of your home, always turn the camera off
when not in use.
Troubleshooting
Make sure the camera and the monitor are turned on.
X 代表10, IV 代表4, XIV 代表14, XV 代表15.I=1 II=2 III=3 IV=4 V=5 VI=6 VII=7 VIII=8 IX=9 X=10
Ⅰ,Ⅱ,Ⅲ,Ⅳ,Ⅴ,Ⅵ,Ⅶ,Ⅷ,Ⅸ,Ⅹ,ⅩⅠ,ⅩⅡ,ⅩⅢ,ⅩⅣ,ⅩⅤ,ⅩⅥ,ⅩⅦ,ⅩⅧ,ⅩⅨ,ⅩⅩ.
8
Warning: Changes or modifications to this unit not expressly approved by
the party responsible for compliance could void the user authority to operate
the equipment.
To comply with FCC RF exposure compliance requirements, a separation
distance of at least 20 cm must be maintained between theantenna of this
device and all persons.
This Transmitter must not be co-located or operating in conjunction with
any other antenna or transmitter.
FCC Statement
Caution
This equipment has been tested and found to comply with the limits for a Class
B digital device, pursuant to Part 15 of the FCC Rules. These limits are
designed to provide reasonable protection against harmful interference in a
residential installation. This equipment generates, uses and can radiate radio
frequency energy and, if not installed and used in accordance with the
instructions, may cause harmful interference to radio communications.
However, there is no guarantee that interference will not occur in a particular
installation. If this equipment does cause harmful interference to radio or
television reception, which can be determined by turning the equipment off and
on, the user is encouraged to try to correct the interference by one or more of the
following measures:
Reorient or relocate the receiving antenna
Increase the separation between the equipment and receiver
Connect the equipment into an outlet on a circuit different from that to
which the receiver is connected
Consult the dealer or an experienced radio/TV technician for help
FCC Label Compliance Statement:
This device complies with Part 15 of the FCC Rules. Operation is subject to the
following two conditions: (1) this device may not cause harmful interference,
and (2) this device must accept any interference received, including interference
that may cause undesired operation.
X 代表10, IV 代表4, XIV 代表14, XV 代表15.I=1 II=2 III=3 IV=4 V=5 VI=6 VII=7 VIII=8 IX=9 X=10
Ⅰ,Ⅱ,Ⅲ,Ⅳ,Ⅴ,Ⅵ,Ⅶ,Ⅷ,Ⅸ,Ⅹ,ⅩⅠ,ⅩⅡ,ⅩⅢ,ⅩⅣ,ⅩⅤ,ⅩⅥ,ⅩⅦ,ⅩⅧ,ⅩⅨ,ⅩⅩ.
Monitor
Frequency
Antenna
Modulation
Display
Display colors
Brightness Control
VOX
Dimensions
Weight
Power
Operating temperature
2.4 GHz
Monopole antenna
GFSK, FHSS
7" TFT LCD
Full-color
Volume Control 7 steps
Voice activation
20.8(W) x12.5(H) x 2.7(D) cm
404g
DC 6V, 800mA or Li battery
0℃ ~ 40℃ (32℉ ~ 104℉)
This item is in compliance with the essential requirements and other relevant provisions of Directive 1999/5/EC.
Specifications
Specifications subject to change without notice
Camera
Frequency
Antenna
Transmission distance
Modulation
Image Sensor
Lens
IR LED
Dimensions
Weight
Power
Operating temperature
2.4 GHz
Dipole antenna
250 M (Line of Sight)
GFSK, FHSS
Color CMOS
f 3.0mm, F 2.4
9 pcs
10(W) x 15.8(H) x 9(D) cm;
209g
DC 6V, 800mA or 4 AAA alkaline
batteries
0℃ ~ 40℃ (32℉ ~ 104℉)
To prevent deaths and injuries associated with
baby monitor cords :
Ÿ
baby at least 3 feet (1 meter) away.
It's important even if your baby is not yet standing or mobile.
ŸUse a wireless baby monitor to avoid risk of strangulation.
ŸNever use extension cords with AC adapters. Only use the AC adapters
provided.
Following the safety tips
Make sure the baby unit and AC adapter cords are always out of reach of the
Note :
9
X 代表10, IV 代表4, XIV 代表14, XV 代表15.I=1 II=2 III=3 IV=4 V=5 VI=6 VII=7 VIII=8 IX=9 X=10
Ⅰ,Ⅱ,Ⅲ,Ⅳ,Ⅴ,Ⅵ,Ⅶ,Ⅷ,Ⅸ,Ⅹ,ⅩⅠ,ⅩⅡ,ⅩⅢ,ⅩⅣ,ⅩⅤ,ⅩⅥ,ⅩⅦ,ⅩⅧ,ⅩⅨ,ⅩⅩ.
X 代表10, IV 代表4, XIV 代表14, XV 代表15.I=1 II=2 III=3 IV=4 V=5 VI=6 VII=7 VIII=8 IX=9 X=10
Ⅰ,Ⅱ,Ⅲ,Ⅳ,Ⅴ,Ⅵ,Ⅶ,Ⅷ,Ⅸ,Ⅹ,ⅩⅠ,ⅩⅡ,ⅩⅢ,ⅩⅣ,ⅩⅤ,ⅩⅥ,ⅩⅦ,ⅩⅧ,ⅩⅨ,ⅩⅩ.
X 代表10, IV 代表4, XIV 代表14, XV 代表15.I=1 II=2 III=3 IV=4 V=5 VI=6 VII=7 VIII=8 IX=9 X=10
Ⅰ,Ⅱ,Ⅲ,Ⅳ,Ⅴ,Ⅵ,Ⅶ,Ⅷ,Ⅸ,Ⅹ,ⅩⅠ,ⅩⅡ,ⅩⅢ,ⅩⅣ,ⅩⅤ,ⅩⅥ,ⅩⅦ,ⅩⅧ,ⅩⅨ,ⅩⅩ.
408-000706-00
TTD-4291
2 0 1 3 . 1 . 1 7
X 代表10, IV 代表4, XIV 代表14, XV 代表15.I=1 II=2 III=3 IV=4 V=5 VI=6 VII=7 VIII=8 IX=9 X=10
Ⅰ,Ⅱ,Ⅲ,Ⅳ,Ⅴ,Ⅵ,Ⅶ,Ⅷ,Ⅸ,Ⅹ,ⅩⅠ,ⅩⅡ,ⅩⅢ,ⅩⅣ,ⅩⅤ,ⅩⅥ,ⅩⅦ,ⅩⅧ,ⅩⅨ,ⅩⅩ.