Tranzeo Wireless Technologies TR-CPE WIRELESS NETWORKING DEVICE User Manual 20030108XI 500 QIG v 1 6 Tranzeo
Tranzeo Wireless Technologies, Inc WIRELESS NETWORKING DEVICE 20030108XI 500 QIG v 1 6 Tranzeo
users manual

Unit 13 – 11720 Stewart Crescent,
Maple Ridge, B.C. Canada V2X 9E7
Phone (604) 460-6002 Fax (604) 460-6005
www.tranzeo.com
Revision 5/1/2003 Page 1 of 20
Tranzeo TR-CPE
Quick Start Guide
Introduction
This next-generation wireless LAN device – the TRANZEO TR-CPE, brings Ethernet-like performance to
the wireless realm. Fully compliant with IEEE802.11b standard, the TRANZEO TR-CPE also provides
powerful features such as the Windows-based configuration utility, and WEP security. Maximize network
efficiency while minimizing your network investment and maintenance costs.

Unit 13 – 11720 Stewart Crescent,
Maple Ridge, B.C. Canada V2X 9E7
Phone (604) 460-6002 Fax (604) 460-6005
www.tranzeo.com
Revision 5/1/2003 Page 2 of 20
Tranzeo TR-CPE
Quick Start Guide
FCC Statement
This device complies with Part 15 of the FCC rules. Operation is subject to the following two conditions: (1)
this device may not cause harmful interference, and (2) this device must accept any interference received,
including interference that may cause undesired operation.
Note: The Manufacturer is not responsible for any Radio or TV interference caused by una uthorized
modifications to this equipment. Such modifications could void the user’s authority to operate the
equipment.
• This equipment has been tested and found to comply with the limits for a Class A digital devices
pursuant to part 15 of the FCC Rules. These limits are designed to provide reasonable protection
against harmful interference when the equipment is operated in a commercial environment.
• This equipment generates, uses, and can radiate radio frequency energy and, if not installed and used
in accordance with the instruction manual, may cause harmful interference to radio communication.
• Operation of this equipment in residential area is likely to cause harmful interference in which case
the user will be required to correct the interference at this own expense.
• The user should not modify or change this equipment without written approval from Tranzeo
Wireless.
• . Modification could void authority to use this equipment.
• For the safety reason, people should not work in a situation which RF Exposure limits be exceeded.
To prevent the situation happening, people who work with the antenna should be aware of the following
rules:
1. Install the antenna in a location where a distance of 20 cm from the antenna may be maintained.
2. While installing the antenna in the location, please do not turn on the power of wireless card.
3. While the device is working, please do not contact the antenna.
4. RF exposure: The antenna used for this transmitter must not be co-located or operating in
conjunction with any other antenna or transmitter”

Unit 13 – 11720 Stewart Crescent,
Maple Ridge, B.C. Canada V2X 9E7
Phone (604) 460-6002 Fax (604) 460-6005
www.tranzeo.com
Revision 5/1/2003 Page 3 of 20
Tranzeo TR-CPE
Quick Start Guide
Table Of Contents
Introduction 1
Product Kit 4
LED Definition 5
Activity 5
Description 5
Power Supply 5
Installing the TRANZEO TR-CPE 6
Site Selection 6
Tools Required to Install 6
Connecting the Ethernet Cable 7
Attaching the Mounting Bracket 9
Connect the Power Cable 9
Configuring the TRANZEO TR-CPE 10
Wireless Station Adapter Utility 10
Assigning the ESSID 11
Assigning the Adapter’s Name 12
Assigning the Rate 12
Assigning the IP Address 12
Assigning the subnet mask 12
Assigning the default gateway 12
Password 12
Default 12
Firmware Upgrade Utility 16
Web Management 17
Warranty 18
Limitation of Warranty 18

Unit 13 – 11720 Stewart Crescent,
Maple Ridge, B.C. Canada V2X 9E7
Phone (604) 460-6002 Fax (604) 460-6005
www.tranzeo.com
Revision 5/1/2003 Page 4 of 20
Tranzeo TR-CPE
Quick Start Guide
Hardware Installation
Product Kit
Before installation, make sure that you have the following items:
The TR CPE x 1
DC Power Adapter x 1
Power over Ethernet Adapter x 1
Ethernet Boot x 1
Ethernet Boot Tightening Bracket x 1
Mounting Bracket x 1
Ket Nuts (With Washer Attached) x 8
U-Bolt w/ 2 Nuts x 1
RJ-45 Patch Cable x 1
Product CD x 1
Spare Ethernet Boot Gasket x 1
If any of the above items is not included or damaged, please contact your local dealer for support.
Note: If any of the above items are missing or damaged, contact your local dealer for support.
Unit 13 – 11720 Stewart Crescent,
Maple Ridge, B.C. Canada V2X 9E7
Phone (604) 460-6002 Fax (604) 460-6005
www.tranzeo.com
Revision 5/1/2003 Page 5 of 20
Tranzeo TR-CPE
Quick Start Guide
Mechanical Description
LED panel of the Wireless LAN Smart Access Point:
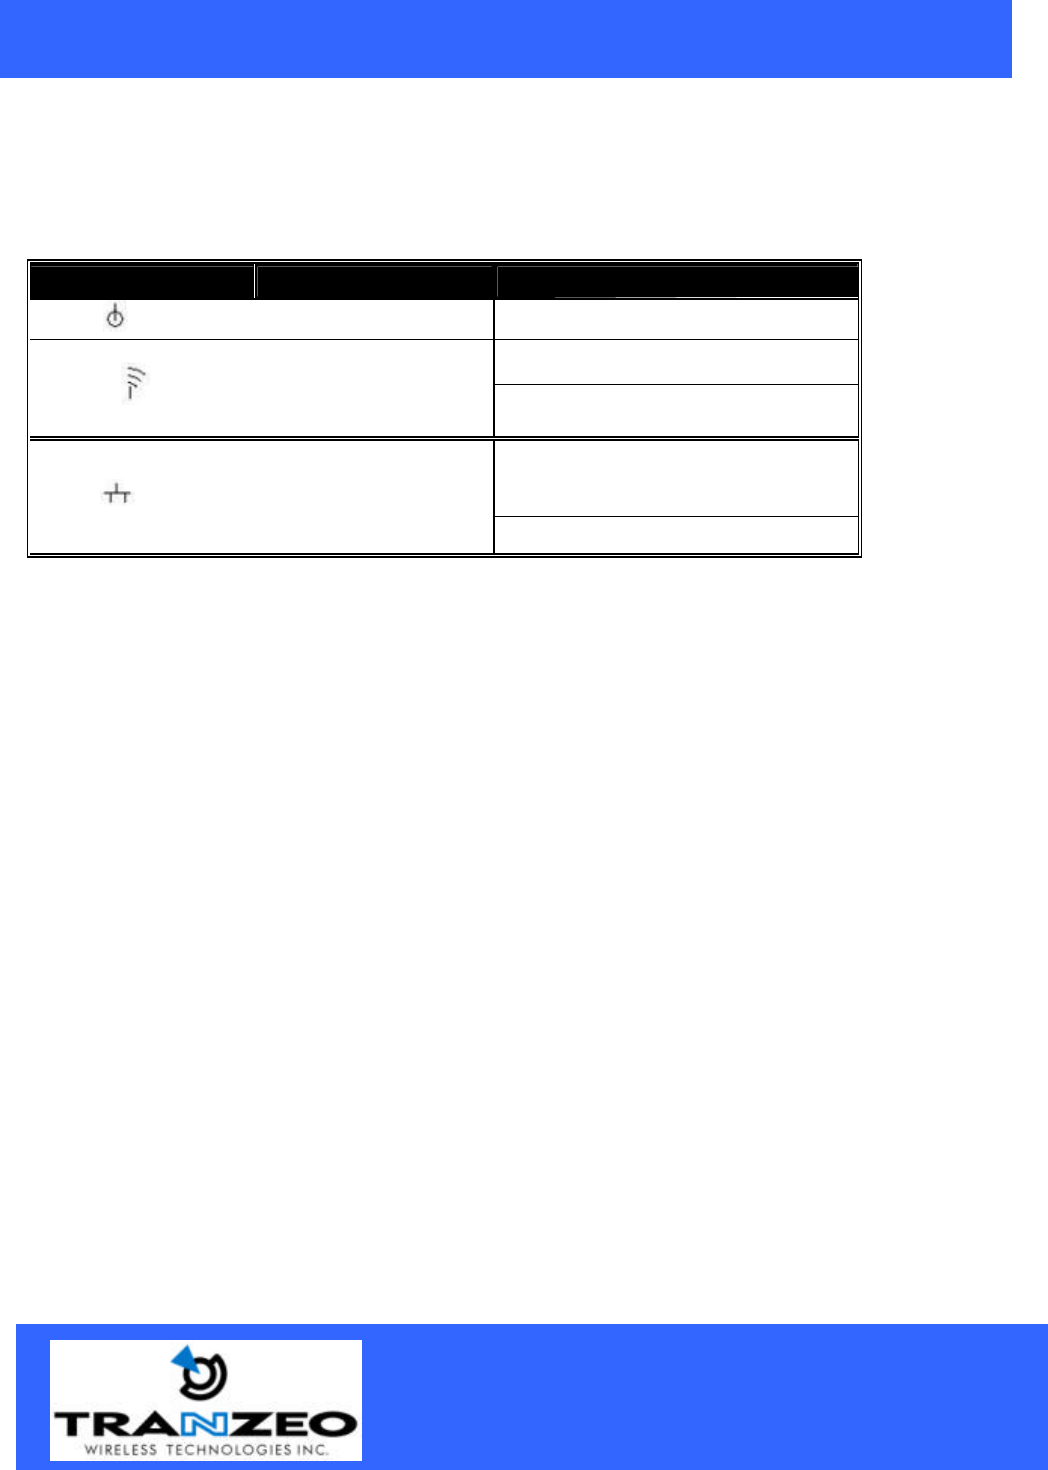
The following table provides an overview of each LED activity:
LED Definition Activity Description
PWR Green Power enabled
Off: No Wireless LAN traffic activity
WLAN Green On: Associated to the Wireless AP
and Wireless LAN traffic activity.
Off: No Ethernet traffic activity
Flashing: Wired LAN traffic activity
LAN Green
On: Connect to the Ethernet.
Power Supply
ONLY use the power adapter supplied with the TR-CPE. Otherwise, the product may be damaged.
Unit 13 – 11720 Stewart Crescent,
Maple Ridge, B.C. Canada V2X 9E7
Phone (604) 460-6002 Fax (604) 460-6005
www.tranzeo.com
Revision 5/1/2003 Page 6 of 20
Tranzeo TR-CPE
Quick Start Guide
Installing the TRANZEO TR-CPE
Take the following steps to set up your TRANZEO CPE.
Site Selection
Before installation, determine the TR Units location. Proper placement of the unit is critical to ensure
optimum radio range and performance. You may use the Site Survey and Access Points Browser utility (The
utilities included with the wireless PC Card) to choose a proper placement for your unit. Place your unit
within the line of sight of the Access Point. Obstructions may impede performance of the unit.
Tools Required to Install
• One 3/8 wrench
• One RJ-45 Crimper
• A suitable length of Cat 5 Cable to bring the signal from the unit to the Power over Ethernet Adaptor
• RJ-45 Jacks
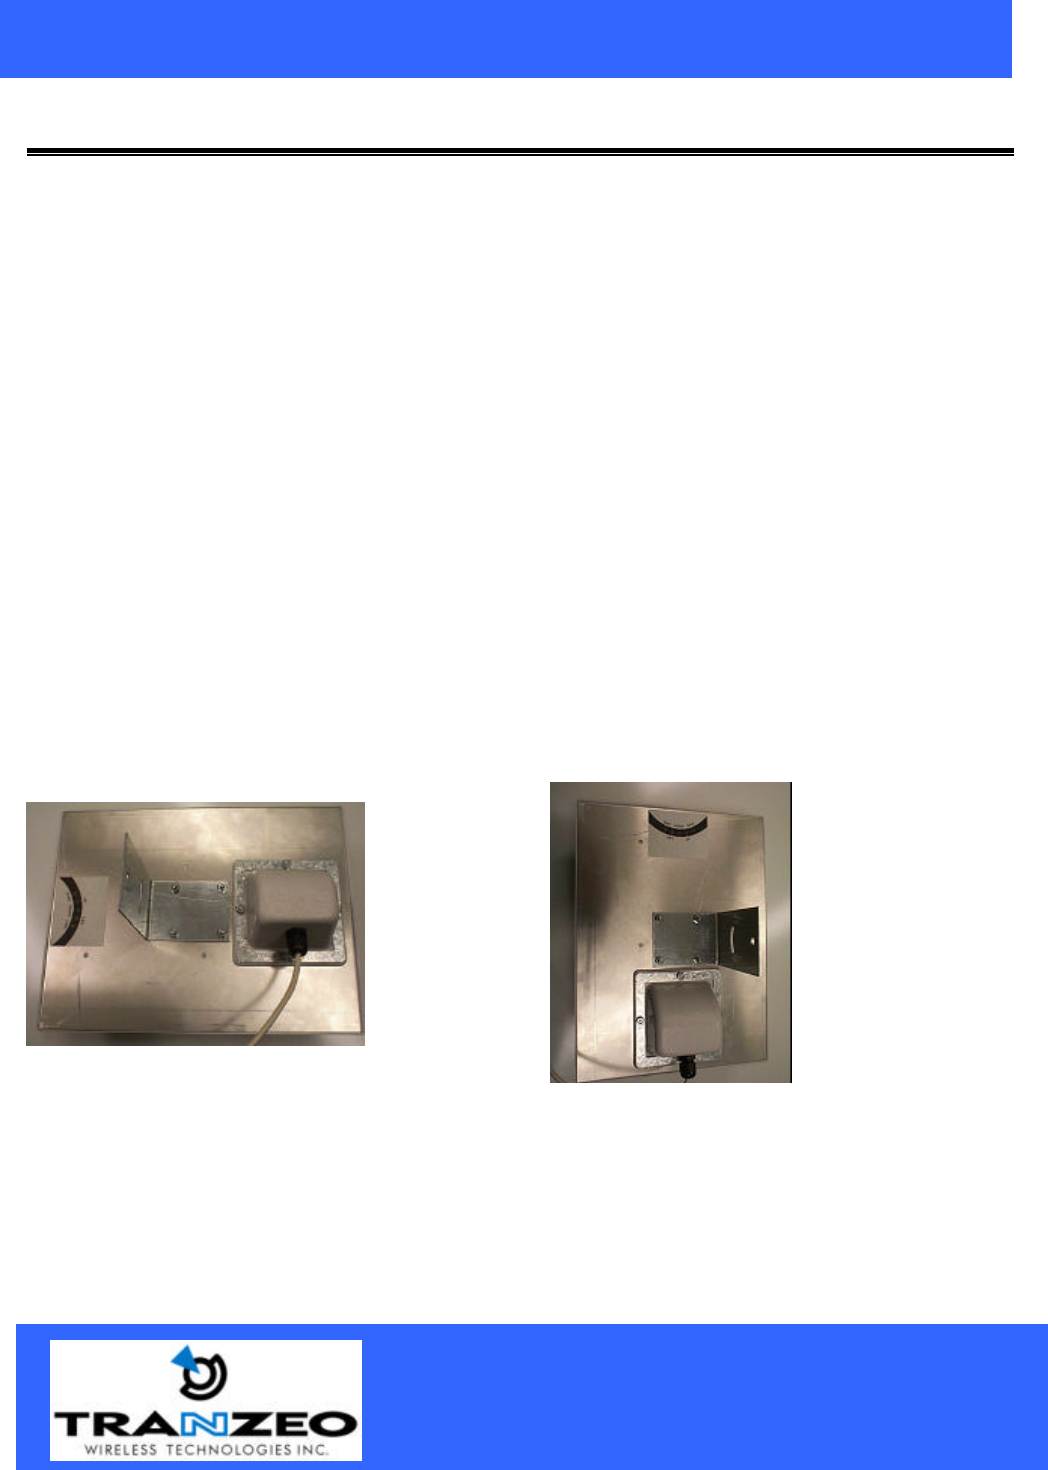
Before installing, you must determine if you will be installing the unit in a horizontal or vertical orientation.
The TR CPE model can be mounted in either orientation. The Ethernet boot should always be placed so
that the cable runs toward the ground for maximum environmental protection.
Vertical Orientation Horizontal Orientation
Unit 13 – 11720 Stewart Crescent,
Maple Ridge, B.C. Canada V2X 9E7
Phone (604) 460-6002 Fax (604) 460-6005
www.tranzeo.com
Revision 5/1/2003 Page 7 of 20
Tranzeo TR-CPE
Quick Start Guide
Connecting the Ethernet Cable
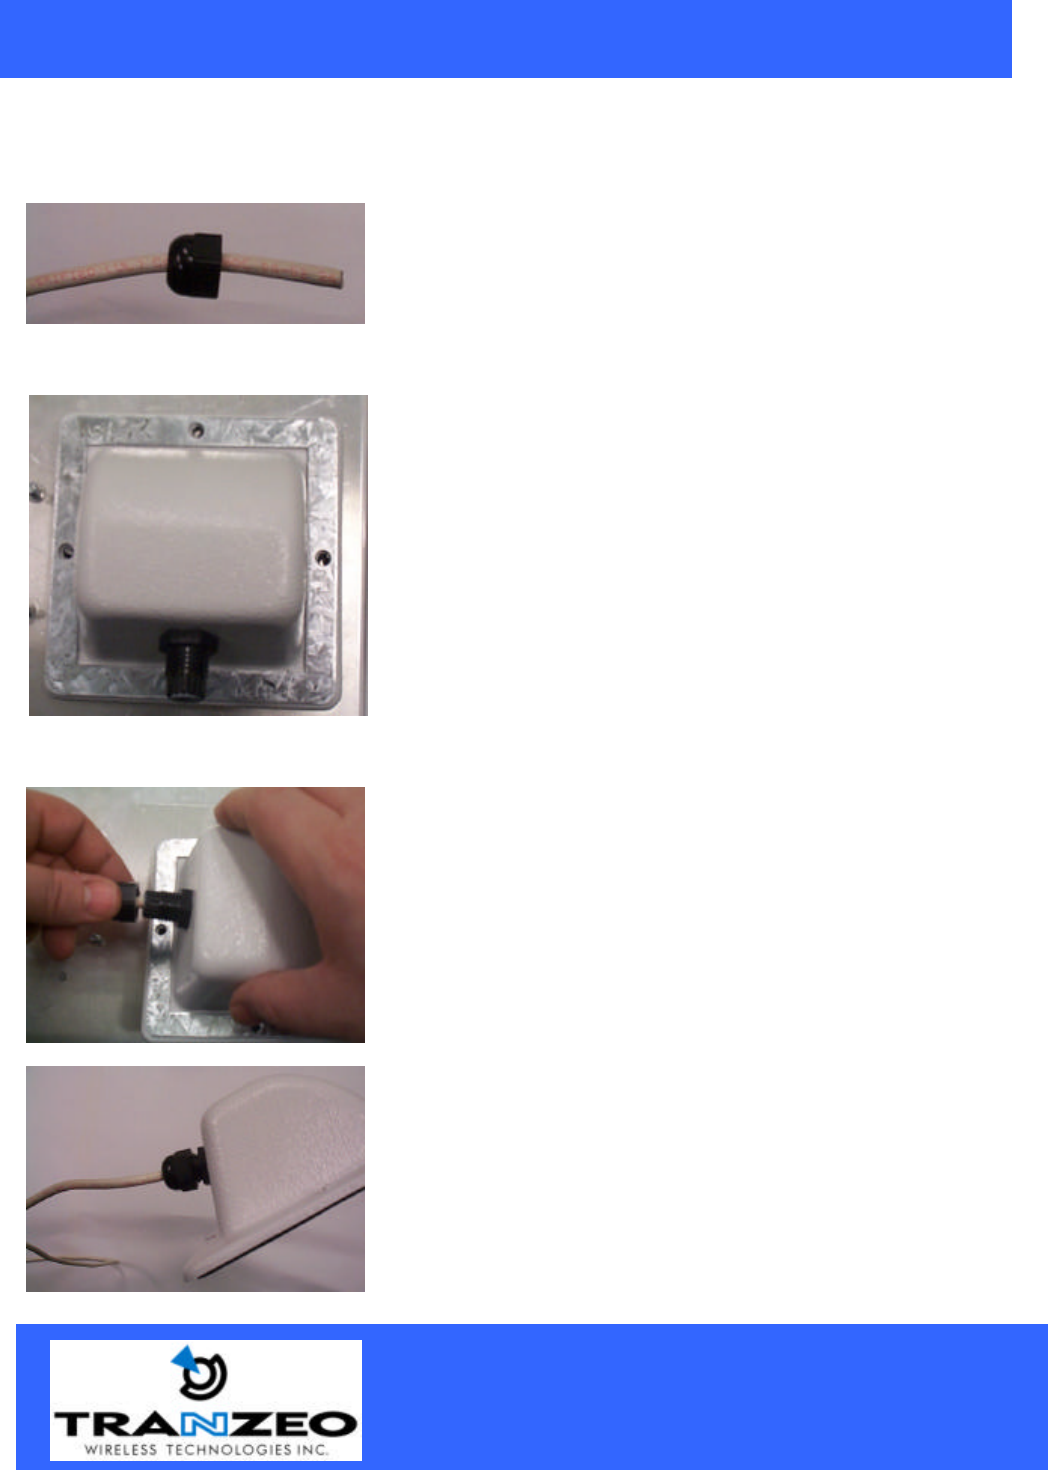
Step 1
Place the Ethernet Boot Cover over the end of your Cat 5 Cable.
Step 2
Step 3
Insert the Cat 5 Cable and tighten the Boot Cover. Be sure to pull
through enough cable to reach the RJ-45 connector with an RJ-45
jack attached.
Hands tighten only. DO NOT OVERTIGHTEN as you may damage
the environment seal.
Attach tightening bracket around on top of the Ethernet
Boot. This is easiest to do before you attach the CAT 5
cable.
Unit 13 – 11720 Stewart Crescent,
Maple Ridge, B.C. Canada V2X 9E7
Phone (604) 460-6002 Fax (604) 460-6005
www.tranzeo.com
Revision 5/1/2003 Page 8 of 20
Tranzeo TR-CPE
Quick Start Guide
Step 4
Place the Ethernet boot over the 4 Screw Posts. The screws should just barely
clear the tightening bracket. Apply 4 Ket nuts to the screw posts and tighten until
the metal plate makes full contact with the Ethernet boot. Do not over tighten.
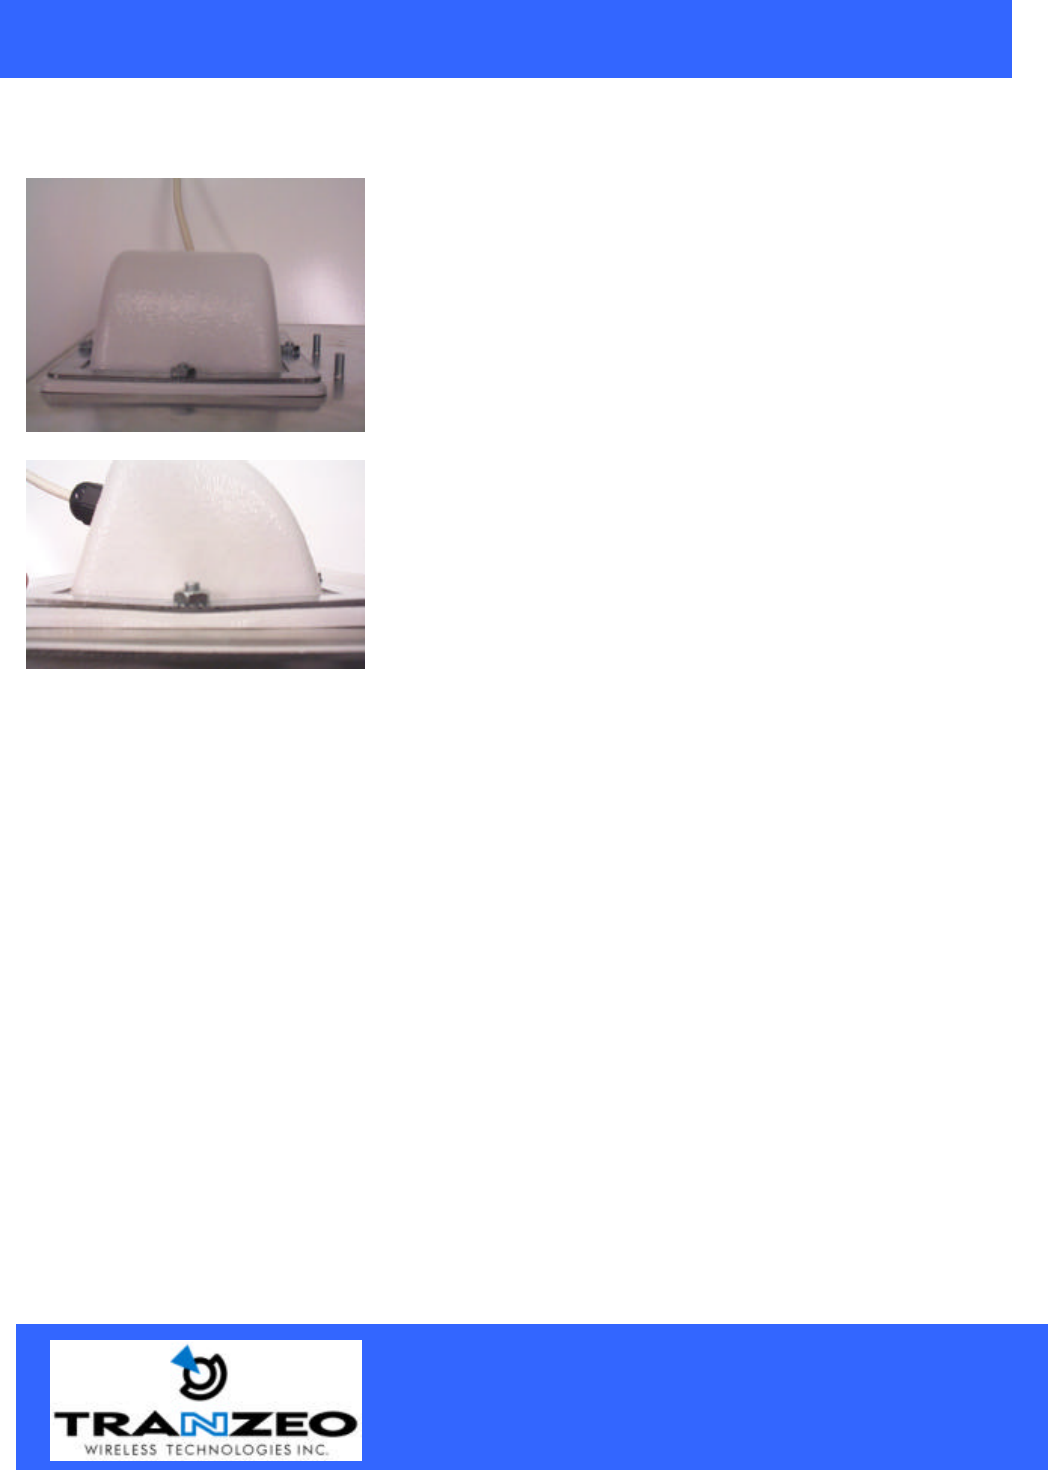
This is an example of over tightening. Over tightening connections
like this may crack the boot and will compromise the gasket seal.
Over tightening is not covered by warranty.
Unit 13 – 11720 Stewart Crescent,
Maple Ridge, B.C. Canada V2X 9E7
Phone (604) 460-6002 Fax (604) 460-6005
www.tranzeo.com
Revision 5/1/2003 Page 9 of 20
Tranzeo TR-CPE
Quick Start Guide
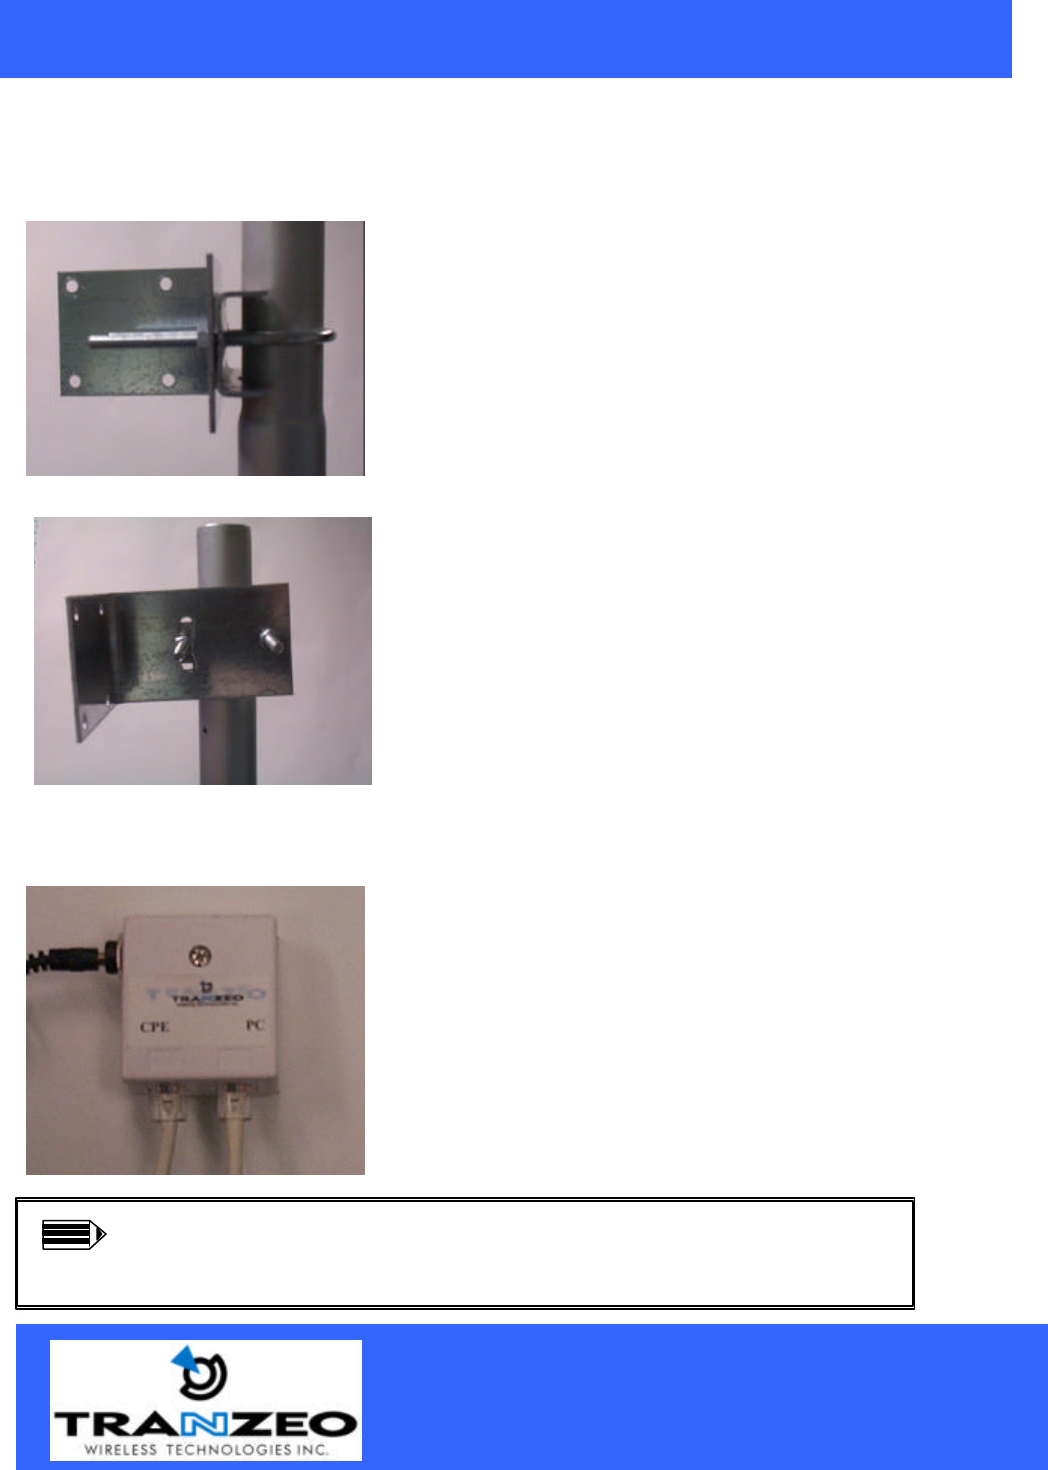
Attaching the Mounting Bracket
Step 1
As shown below, the U-Bolt is designed to mount around a pole.
Tighten bolts sufficiently to prevent any movement.
Step 2
Down or up tilt can be adjusted by using the swinging the unit
before tightening the U-Bolt.
Connect the Power Cable
Connect the power adapter to the power socket on the Power over
Ethernet Adaptor, and plug the other end of the power into an
electrical outlet. Plug the RJ-45 Cable from the unit into the POE.
The TR-CPE will be powered on and all five indicators on the top
panel will flash in sequence to test the functionality of the indicators.
NOTE: ONLY use the power adapter supplied with the TR-CPE.
Otherwise, the product may be damaged.
Note 1: ONLY use the power adapter supplied with the TR-CPE.
Otherwise, the product may be damaged.

Unit 13 – 11720 Stewart Crescent,
Maple Ridge, B.C. Canada V2X 9E7
Phone (604) 460-6002 Fax (604) 460-6005
www.tranzeo.com
Revision 5/1/2003 Page 10 of 20
Tranzeo TR-CPE
Quick Start Guide
Configuring the TRANZEO TR-CPE
The TRANZEO TR-CPE allows configuration either via the configuration utility, known as Wireless Station
Adapter Utility, and Web Management.
Wireless Station Adapter Utility
The following gives instructions guiding you through the installations of the Wireless Station Adapter
Utility.
1. Insert the Product CD into the CD-ROM drive on your computer.
2. Browse to the CD ROM and open the TR-CPE Folder.
3. Open the TR-CPE 1.6 Utility folder.
4. Double click on the “Utility Setup” icon.
5. Follow the on-screen instructions to install the Wireless Station Adapter Utility.
6. Upon completion, execute the TR-CPE Utility, and it will browse for all of the TR-CPE’s available on the
network.
7. Select the TR-CPE you want to configure. Enter the default password and click the LOGIN button. You
will be able to view/make configuration of the TR-CPE Utility as you desire.
Note: The default password to get access to the TR-CPE Utility is “default”.
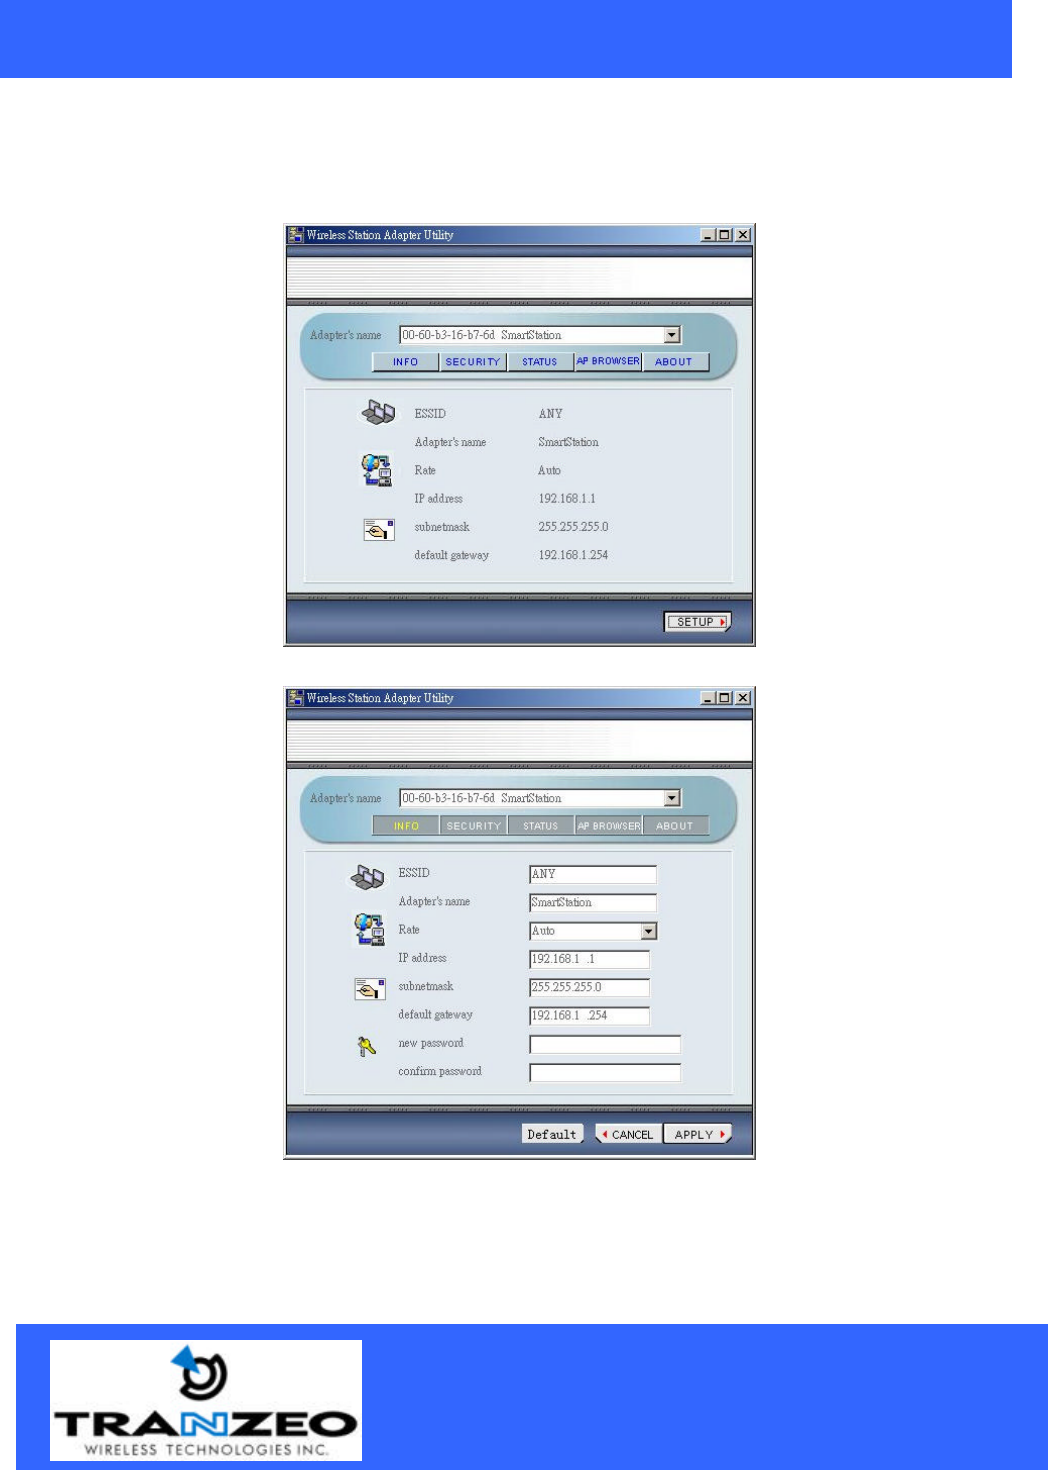
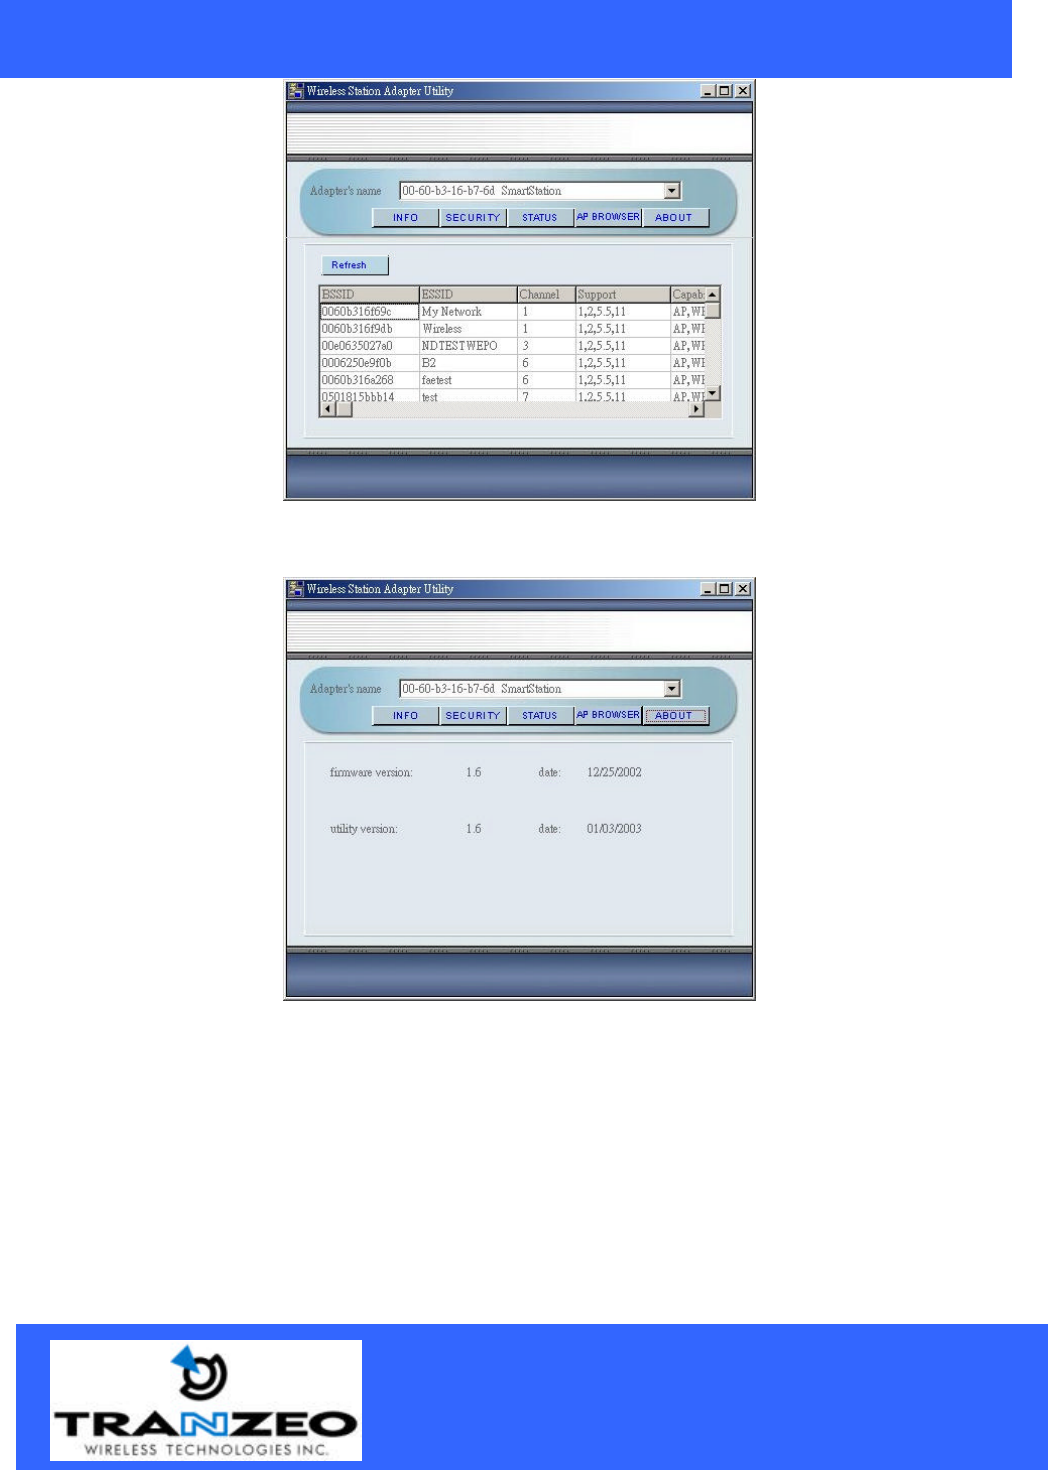
The Wireless Station Adapter Utility provides 5 items for you to monitor and configure the Wireless LAN
Station: INFO, SECURITY, STATUS, AP BROWSER and ABOUT.
Unit 13 – 11720 Stewart Crescent,
Maple Ridge, B.C. Canada V2X 9E7
Phone (604) 460-6002 Fax (604) 460-6005
www.tranzeo.com
Revision 5/1/2003 Page 11 of 20
Tranzeo TR-CPE
Quick Start Guide
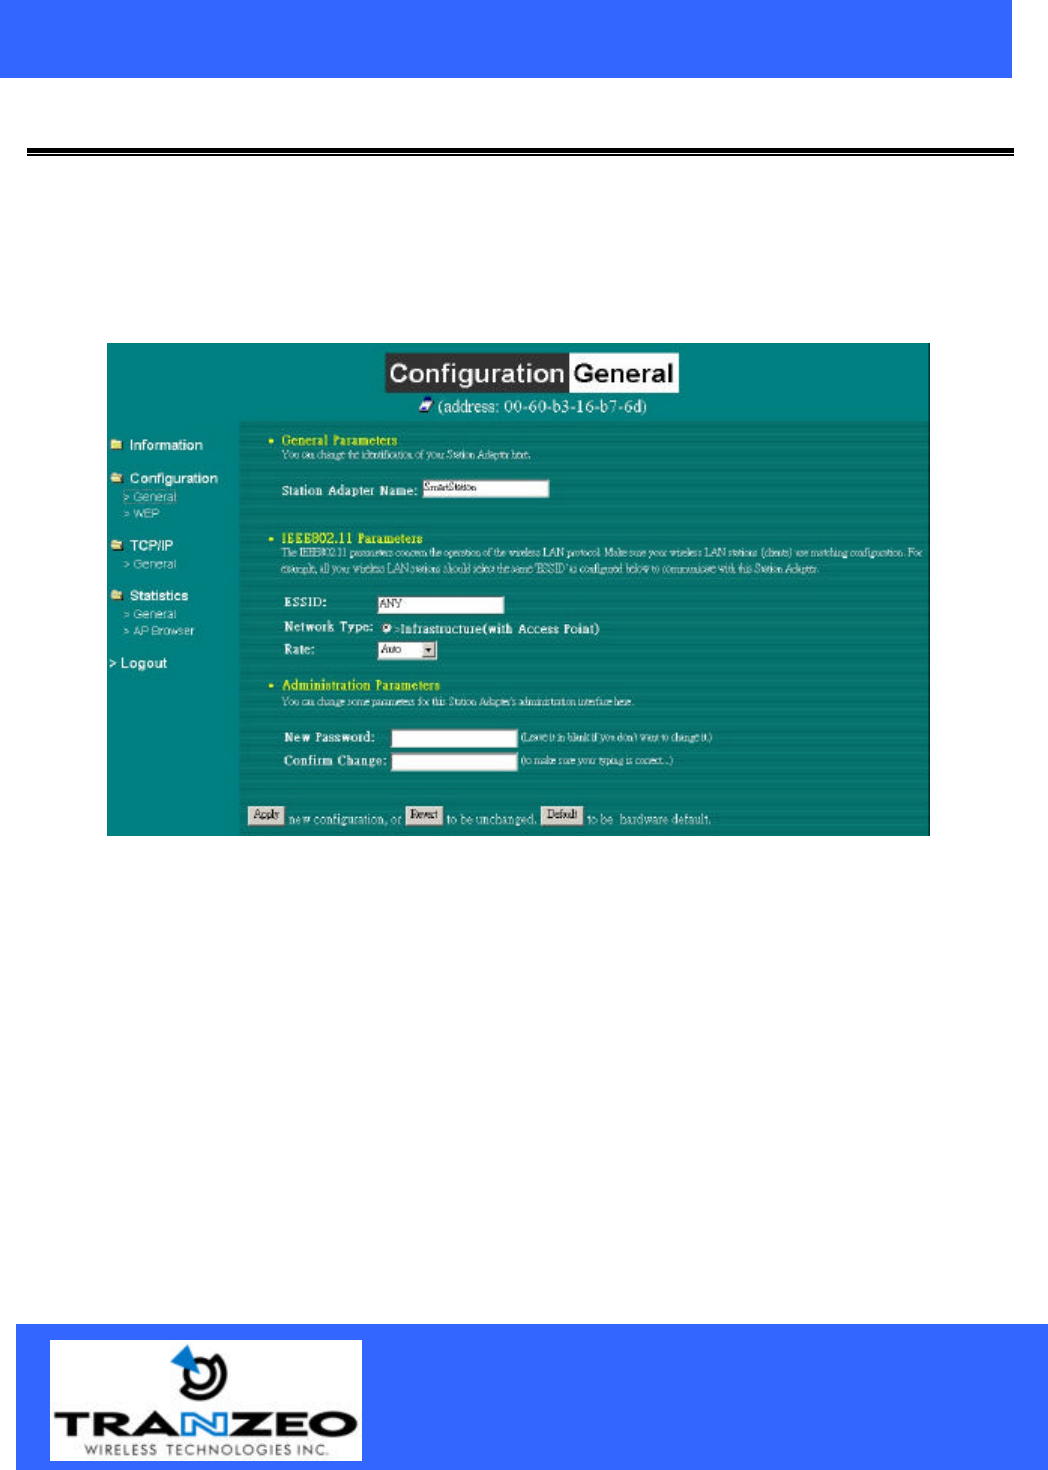
INFO:
This item shows the current information on the TR-CPE such as ESSID, Adapter’s name, Rate, IP Address,
subnet mask, and default gateway.
You may click the SETUP button to configure those parameters.
Assigning the ESSID
The ESSID is a unique ID used by Access Points and Stations to identify a wireless LAN. Wireless
clients associating to any Access Point must have the same ESSID. The default ESSID is ANY. The
ESSID can have up to 32 characters.

Unit 13 – 11720 Stewart Crescent,
Maple Ridge, B.C. Canada V2X 9E7
Phone (604) 460-6002 Fax (604) 460-6005
www.tranzeo.com
Revision 5/1/2003 Page 12 of 20
Tranzeo TR-CPE
Quick Start Guide
Assigning the Adapter’s Name
Assign specificity a unique name for the TR-CPE.
Assigning the Rate
TR-CPE provides various data rate options for you to select. Data rates options include 1 Mbps, 2
Mbps , 5.5 Mbps , 11 Mbps, and Auto. In most networking scenarios, you will see that the factory-set
default “Auto” will prove the most throughput.
Assigning the IP Address
Assign an IP address to your TR-CPE if you wish to configure the TR-CPE via the Web Management.
Consult your network administrator to obtain an available IP address (
the default IP address is
192.168.1.1). For further setup please refer to the following section.
Assigning the subnet mask
Assign a subnet mask to your TR-CPE if you wish to configure the TR-CPE via the Web Management.
Consult your network administrator to obtain an available subnet mask. For further setup please refer to
the following section.
Assigning the default gateway
Assign a default gateway to your TR-CPE if you wish to configure the TR-CPE via the Web
Management. Consult your network administrator to obtain an available default gateway.
Password
It is highly recommended tha t you assign a new password to your TR-CPE for safety issue. Enter the
new password in the New Password and Confirm Password fields respectively.
After setting the parameters, click the APPLY button to make the changes take effect. To return the previous
page, click the CANCEL button.
Default
You may click on Default button to enable you to restore the TR-CPE’s default settings.
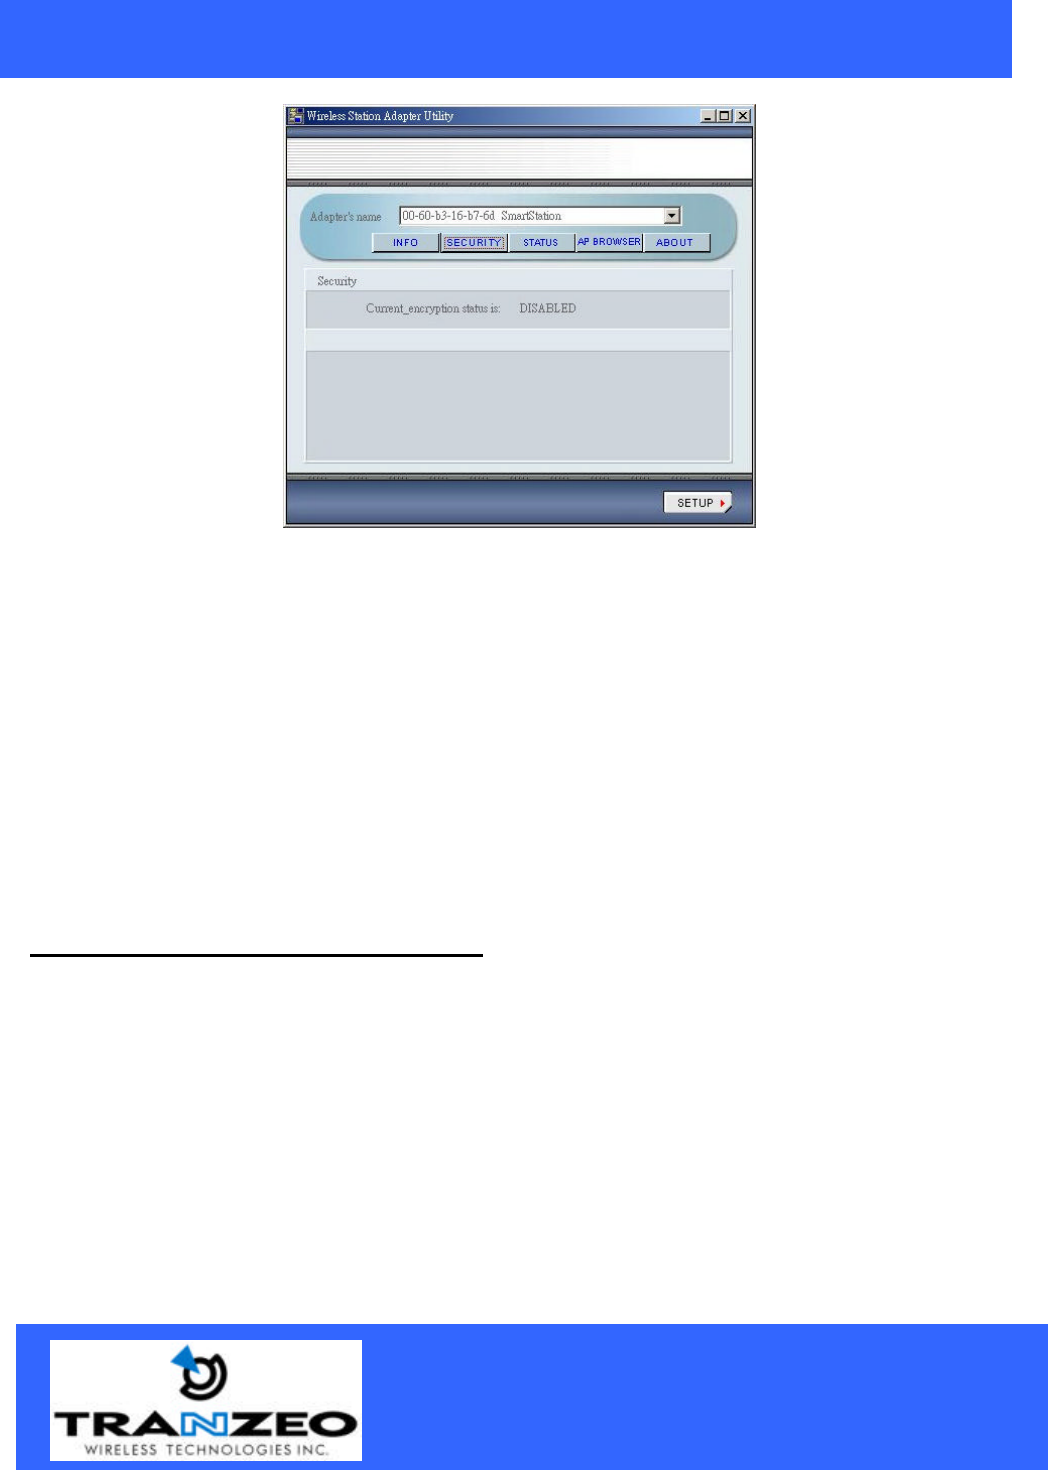
SECURITY:
To prevent unauthorized wireless stations from accessing data transmitted over the network, the TR-CPE
offers the following levels of security options.
- Data Encryption, known as WEP (Wired Equivalent Privacy), encrypts wireless data transmitted via
wireless medium.
Click the Security page you will see the current security status of the TR-CPE. Click the SETUP button
and you may then enable the security function.
Unit 13 – 11720 Stewart Crescent,
Maple Ridge, B.C. Canada V2X 9E7
Phone (604) 460-6002 Fax (604) 460-6005
www.tranzeo.com
Revision 5/1/2003 Page 13 of 20
Tranzeo TR-CPE
Quick Start Guide
WEP
To enable the WEP encryption, select the encryption type, either 40 bit or 128 bit, Key Format ASCII, Hex,
or Passphrase. Then enter a WEP Key in the EDIT Key field.
For 40 bit encryption you may choose:
n ASCII: 5 characters (case sensitive) ranging from “a-z”, “A-Z” and “0-9” (e.g. MyKey)
n Hex: 10 hexadecimal digits in the range of “A-F”, “a-f” and “0-9” (e.g. 11AA22BB33)
For 128 bit encryption you may choose:
n ASCII: 13 characters (case sensitive) ranging from “a-z”, “A-Z” and “0-9” (e.g. MyKey12345678)
n Hex: 26 hexadecimal digits in the range of “A-F”, “a-f” and “0-9” (e.g.
00112233445566778899AABBCC).
Create Encryption Keys by Using a Passphrase
Step 1. To create encryption keys by using a passphrase, select key format either 40 bit or 128 bit and enter
Passphrase.
Step 2. Type a character string in the Passphrase to generate key field, then click Generate . As you type, the
utility uses an algorithm to generate 4 keys automatically.
Step 3. Select one key from the Edit Key and click Apply button to make the setting take effect.
Unit 13 – 11720 Stewart Crescent,
Maple Ridge, B.C. Canada V2X 9E7
Phone (604) 460-6002 Fax (604) 460-6005
www.tranzeo.com
Revision 5/1/2003 Page 14 of 20
Tranzeo TR-CPE
Quick Start Guide
After defining the WEP keys, click the APPLY button to make the configuration take effect.
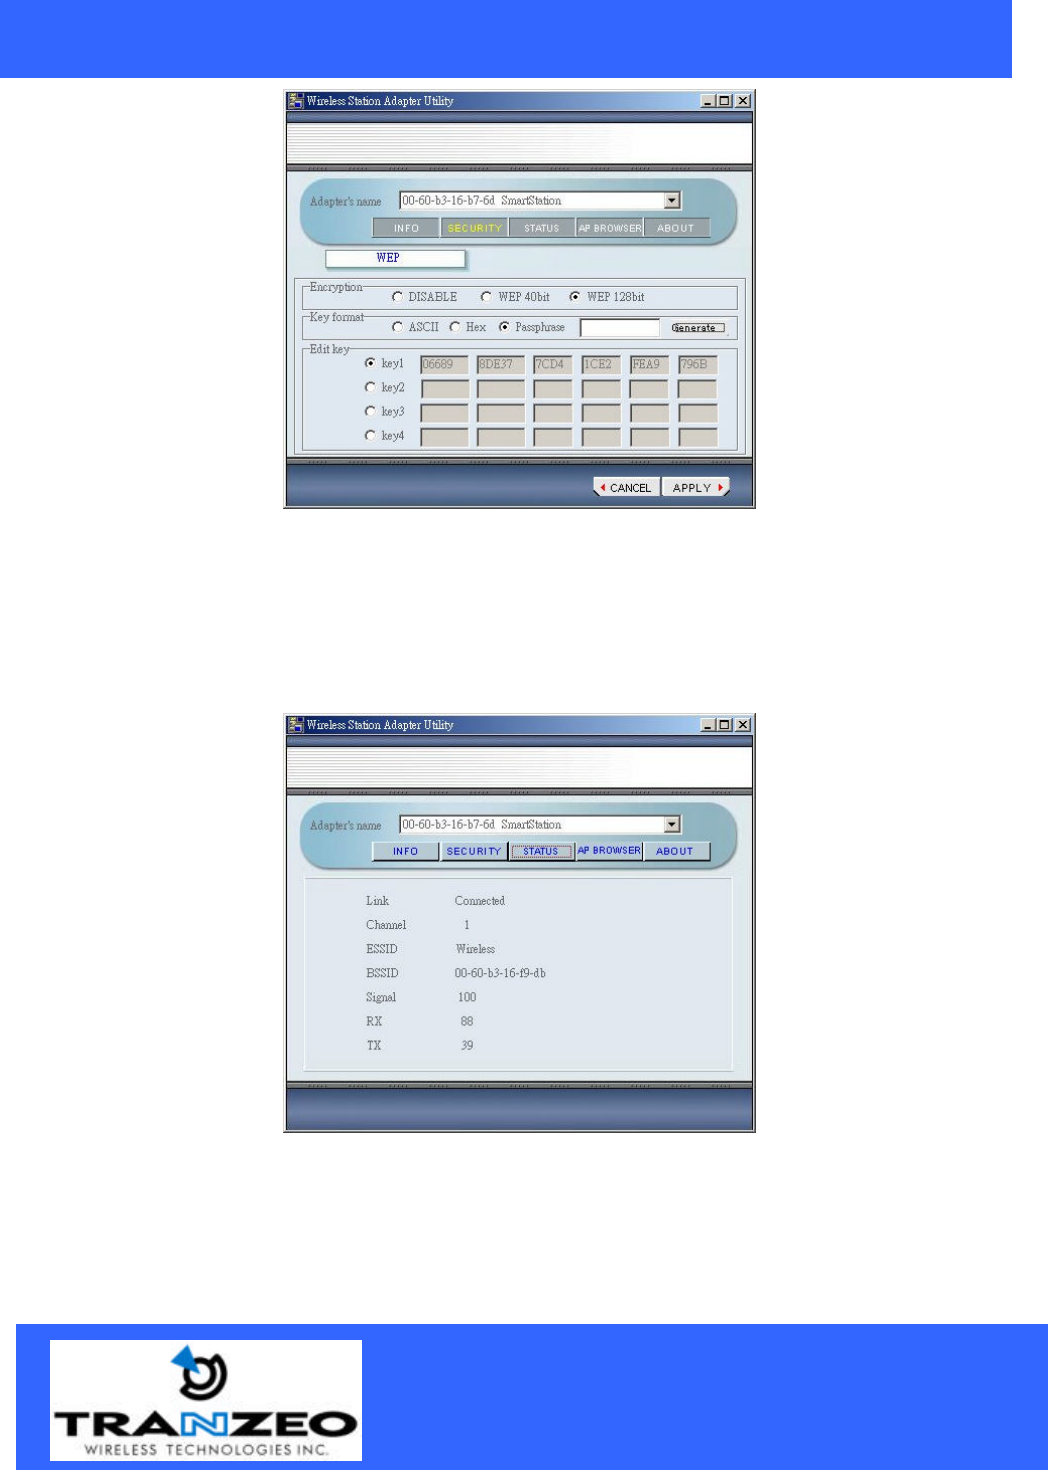
STATUS:
The STATUS item allows you to monitor the general information of the Access Point with which TR-CPE is
communicating, such as the Link status, Channel, ESSID, BSSID, Signal, RX and TX.
AP BROWSER:
By clicking the Refresh button, the AP Browser will reload and display the available Access Points around
the working environment. Besides showing the BSSID of each Access Point, it also displays ESSID,
Channel, Support and Capability. The AP Browser can have up to 16 Access Points.
Unit 13 – 11720 Stewart Crescent,
Maple Ridge, B.C. Canada V2X 9E7
Phone (604) 460-6002 Fax (604) 460-6005
www.tranzeo.com
Revision 5/1/2003 Page 15 of 20
Tranzeo TR-CPE
Quick Start Guide
ABOUT:
The About button display the version of the TR-CPE Utility software and firmware version of the TR-CPE.
Unit 13 – 11720 Stewart Crescent,
Maple Ridge, B.C. Canada V2X 9E7
Phone (604) 460-6002 Fax (604) 460-6005
www.tranzeo.com
Revision 5/1/2003 Page 16 of 20
Tranzeo TR-CPE
Quick Start Guide
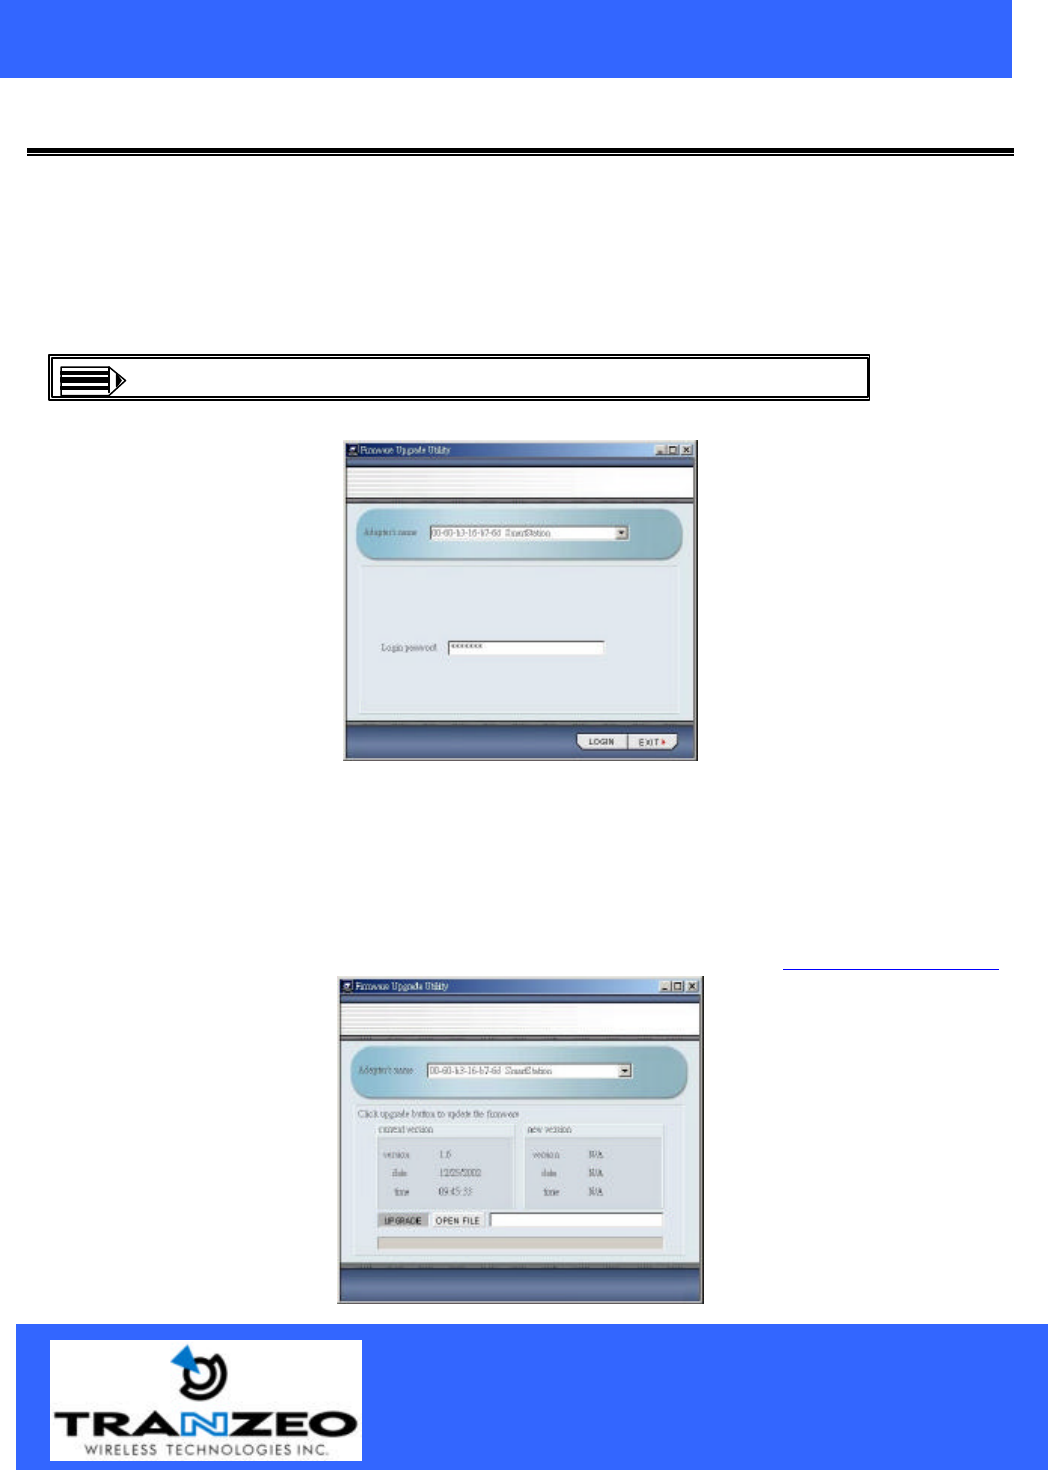
Firmware Upgrade Utility
When you finished the installation of the TR-CPE utility, you will find the Firmware upgrade utility in the
TR-CPE utility Programs Folder. When you start the Firmware upgrade utility, it will browse for all of the
TR-CPE’s available on the network.
Select the TR-CPE you want to upgrade. Enter the password and click the LOGIN button. You will be able
to upgrade Firmware of the TR-CPE utility as you desire.
Note: The default password to get access to the TR-CPE is “default”.
Upgrade
This item is used for uploading the newest firmware of the Access Point. You may either enter the file name
in the entry field or browse the file by clicking the Open File button.
After choose the correctly file, click the Upgrade button to make the Firmware upgrade take effect. For
information about the release of the newest firmware, check the Tranzeo website at http://www.tranzeo.com.
Unit 13 – 11720 Stewart Crescent,
Maple Ridge, B.C. Canada V2X 9E7
Phone (604) 460-6002 Fax (604) 460-6005
www.tranzeo.com
Revision 5/1/2003 Page 17 of 20
Tranzeo TR-CPE
Quick Start Guide
Web Management
The built-in Web Management provides you with a set of user-friendly graphical user interface to manage
your TR-CPE. With the assigned IP address of the TR-CPE, you may get access to the TR-CPE via a web
browser (e.g., Netscape Navigator 3.0 ~ 4.5 or MS Internet Explorer 4.0) to monitor and configure the
TR-CPE.
Technical Support
You can find the most recent software and updated user documentation will be updated periodically on the
Tranzeo Web site. If you have difficulty resolving the problem while installing or using the 11Mbps
TRANZEO TR-CPE, please contact your Tranzeo dealer for support.

Unit 13 – 11720 Stewart Crescent,
Maple Ridge, B.C. Canada V2X 9E7
Phone (604) 460-6002 Fax (604) 460-6005
www.tranzeo.com
Revision 5/1/2003 Page 18 of 20
Tranzeo TR-CPE
Quick Start Guide
This page outlines Tranzeo Wireless, Inc's RMA policy and will guide you on what to do in case an RMA
is required.
Warranty
1. Tranzeo Wireless manufactured products are warranted against defects in material and workmanship for a period of one
year from date of purchase, under normal use.
2. Tranzeo Wireless will repair or replace a product that was found to be defective by Tranzeo during the warranty period at
its discretion.
a. During the first 10 days of warranty period a Tranzeo Wireless customer will receive new replacement product
in place of defective product.
b. After 10 days, Tranzeo Wireless at its option, either repair or replace defective product with refurbished product.
3. All non-Tranzeo manufactured products carry the OEM's warranty, which is passed on by Tranzeo Wireless.
4. This warranty does not cover dealer labor cost for removing and reinstalling the machine for repair nor for any
expendable parts that are readily replaced in normal use.
5. The sole responsibility of Tranzeo Wireless Systems under this warranty shall be limited to repair of this product, or
replacement thereof, at the sole discretion of Tranzeo Wireless Systems.
Limitation of Warranty
This warranty does not apply if the Product
(a) has been opened and/or altered, except by Tranzeo Wireless technical personnel,
(b) has not maintained in accordance with instructions supplied by Tranzeo Wireless,
(c) has not been subjected to abnormal physical or electrical stress, misuse, negligence, or accident;
(d) removal of serial number label, or
(e) equipment sold under resale agreements, i.e. Amplifiers, Antennas.
Warranty Disclaimer
Except in only the limited express warranty set forth above, there are no expressed or implied warranties of merchantability and
fitness for a particular purpose. In no event will Tranzeo Wireless Systems be liable for any direct, special, or consequential
damages arising out of, or in connection with, the delivery, use, inability to use, or performance of this product.

Unit 13 – 11720 Stewart Crescent,
Maple Ridge, B.C. Canada V2X 9E7
Phone (604) 460-6002 Fax (604) 460-6005
www.tranzeo.com
Revision 5/1/2003 Page 19 of 20
Tranzeo TR-CPE
Quick Start Guide
Who do I contact for an RMA?
To discuss your technical difficulties and request an RMA # please call the Technical Support Center at 604-460-6002 or email
rma@tranzeo.com.
Warranty Repair
(a) Your RMA number is valid for 15 days only.
(b) If the product is not received within 15 days, the RMA will be cancelled.
(c) Tranzeo Wireless will carefully test and evaluate all returned products and will repair or replace defective products that
are under warranty at no charge.
(d) If the malfunction is due to a manufacturing defect, it will be repaired, tested, aligned and calibrated as necessary, with
strict adherence to factory specified procedures and parts, to working order.
(e) If the malfunction is due to an issue not covered by warranty, a $35.00 evaluation fee will be charged, plus the actual
costs of the repair. Tranzeo’s current shop rate is 70.00 per hour, plus parts.
(f) When your unit is returned to you, you must restore configuration and or applications before full use can resume.
(g) If the product cannot be repaired, a refurbished replacement product will be provided.
(h) However, if Tranzeo Wireless cannot duplicate the problem or condition causing the return, the unit will be returned to
the customer at the customers cost as: "No Problem Found" and a $35.00 evaluation fee will be charged.
(i) Repaired or replaced product will be subject to the original warranty period but not less than 30 days.
(j) All items must be shipped pre-paid. Tranzeo Wireless will not accept any collect packages. Tranzeo will pay the
shipping to return your products. We recommend insuring the package using the values from our commercial invoice.

Unit 13 – 11720 Stewart Crescent,
Maple Ridge, B.C. Canada V2X 9E7
Phone (604) 460-6002 Fax (604) 460-6005
www.tranzeo.com
Revision 5/1/2003 Page 20 of 20
Tranzeo TR-CPE
Quick Start Guide
(k) Be sure to package the items well. Original packaging should be used for shipping. Tranzeo is not responsible for
further damage caused to the unit due to inadequate packaging.
(l) We require that you use UPS Air to ship your RMA. UPS Air includes all brokerage charges, making it the most cost
effective method of shipping to Canada. Tranzeo will not accept any packages that arrive with charges owing.
(m) Be sure to include the password for each device. Any device that arrives without a password may be subject to a $25
rebuilding charge per unit.
What do I include in the box?
Returned product must be complete, in original package and include all components. All returned product must reference the
RMA # on the outside of the box. A returned product without clearly marked RMA# will be refused and returned to sender.
How should I ship it?
(a) We required that you use UPS Air to ship your RMA.
(b) Products returned for warranty repair or out -of-warranty replacement, must be marked with a valid RMA number and
shipped FOB Destination, Prepaid.
(c) Approximate turnaround time is 7 business days for warranty repairs and replacements.
(d) Shipping Time is generally 7 business days to any location in the United States.
(e) Tranzeo Wireless will refuse any item that does not have an RMA# clearly marked on the outside of the box.
(f) All RMA items shipped to Tranzeo Wireless must be freight prepaid. Tranzeo Wireless will pay the return freight via
similar service. Custom er is responsible for payment of any shipping upgrades.
(g) Tranzeo Wireless is NOT responsible for any damage to the products during transit by the shipping company.
All claims for shipment errors must be made within 3 days after receipt of shipment