Trek Bicycle 553852 Flare RT/Ion 200 RT User Manual
Trek Bicycle Corporation Flare RT/Ion 200 RT Users Manual
Users Manual
Ion Pro RT
Ion 200 RT
Flare RT
www.bontrager.com
BT17_IONPRORT__ION200RT_FLARERT_V3 PN 572345
About this manual
This manual is for Bontrager lights Ion Pro RT,
Ion 200 RT (headlights) and Flare RT (tail light).
RT indicates light is rechargeable and remote
controllable when paired with Bontrager Transmitr
remote, PN 502865, another ANT+ compatible
device, or through Bluetooth on a phone.
The light may be hot and could cause a burn
or damage material it may contact. Do not
activate (turn on) light in enclosed area. Avoid
accidental wireless activation.
WARNING
Please read the additional Warning, page 2, before
using this light.
Specifications
• Ion Pro RT: 4800 mAh, 3.6 Vdc, 17.3 Wh,
lithium Ion battery
• Ion 200RT and Flare RT: 420mAh, 3.7 Vdc,
1.6 Wh lithium polymer battery
For more information
If you need help not offered by this manual, talk to
your Bontrager retailer or visit trekbikes.com.
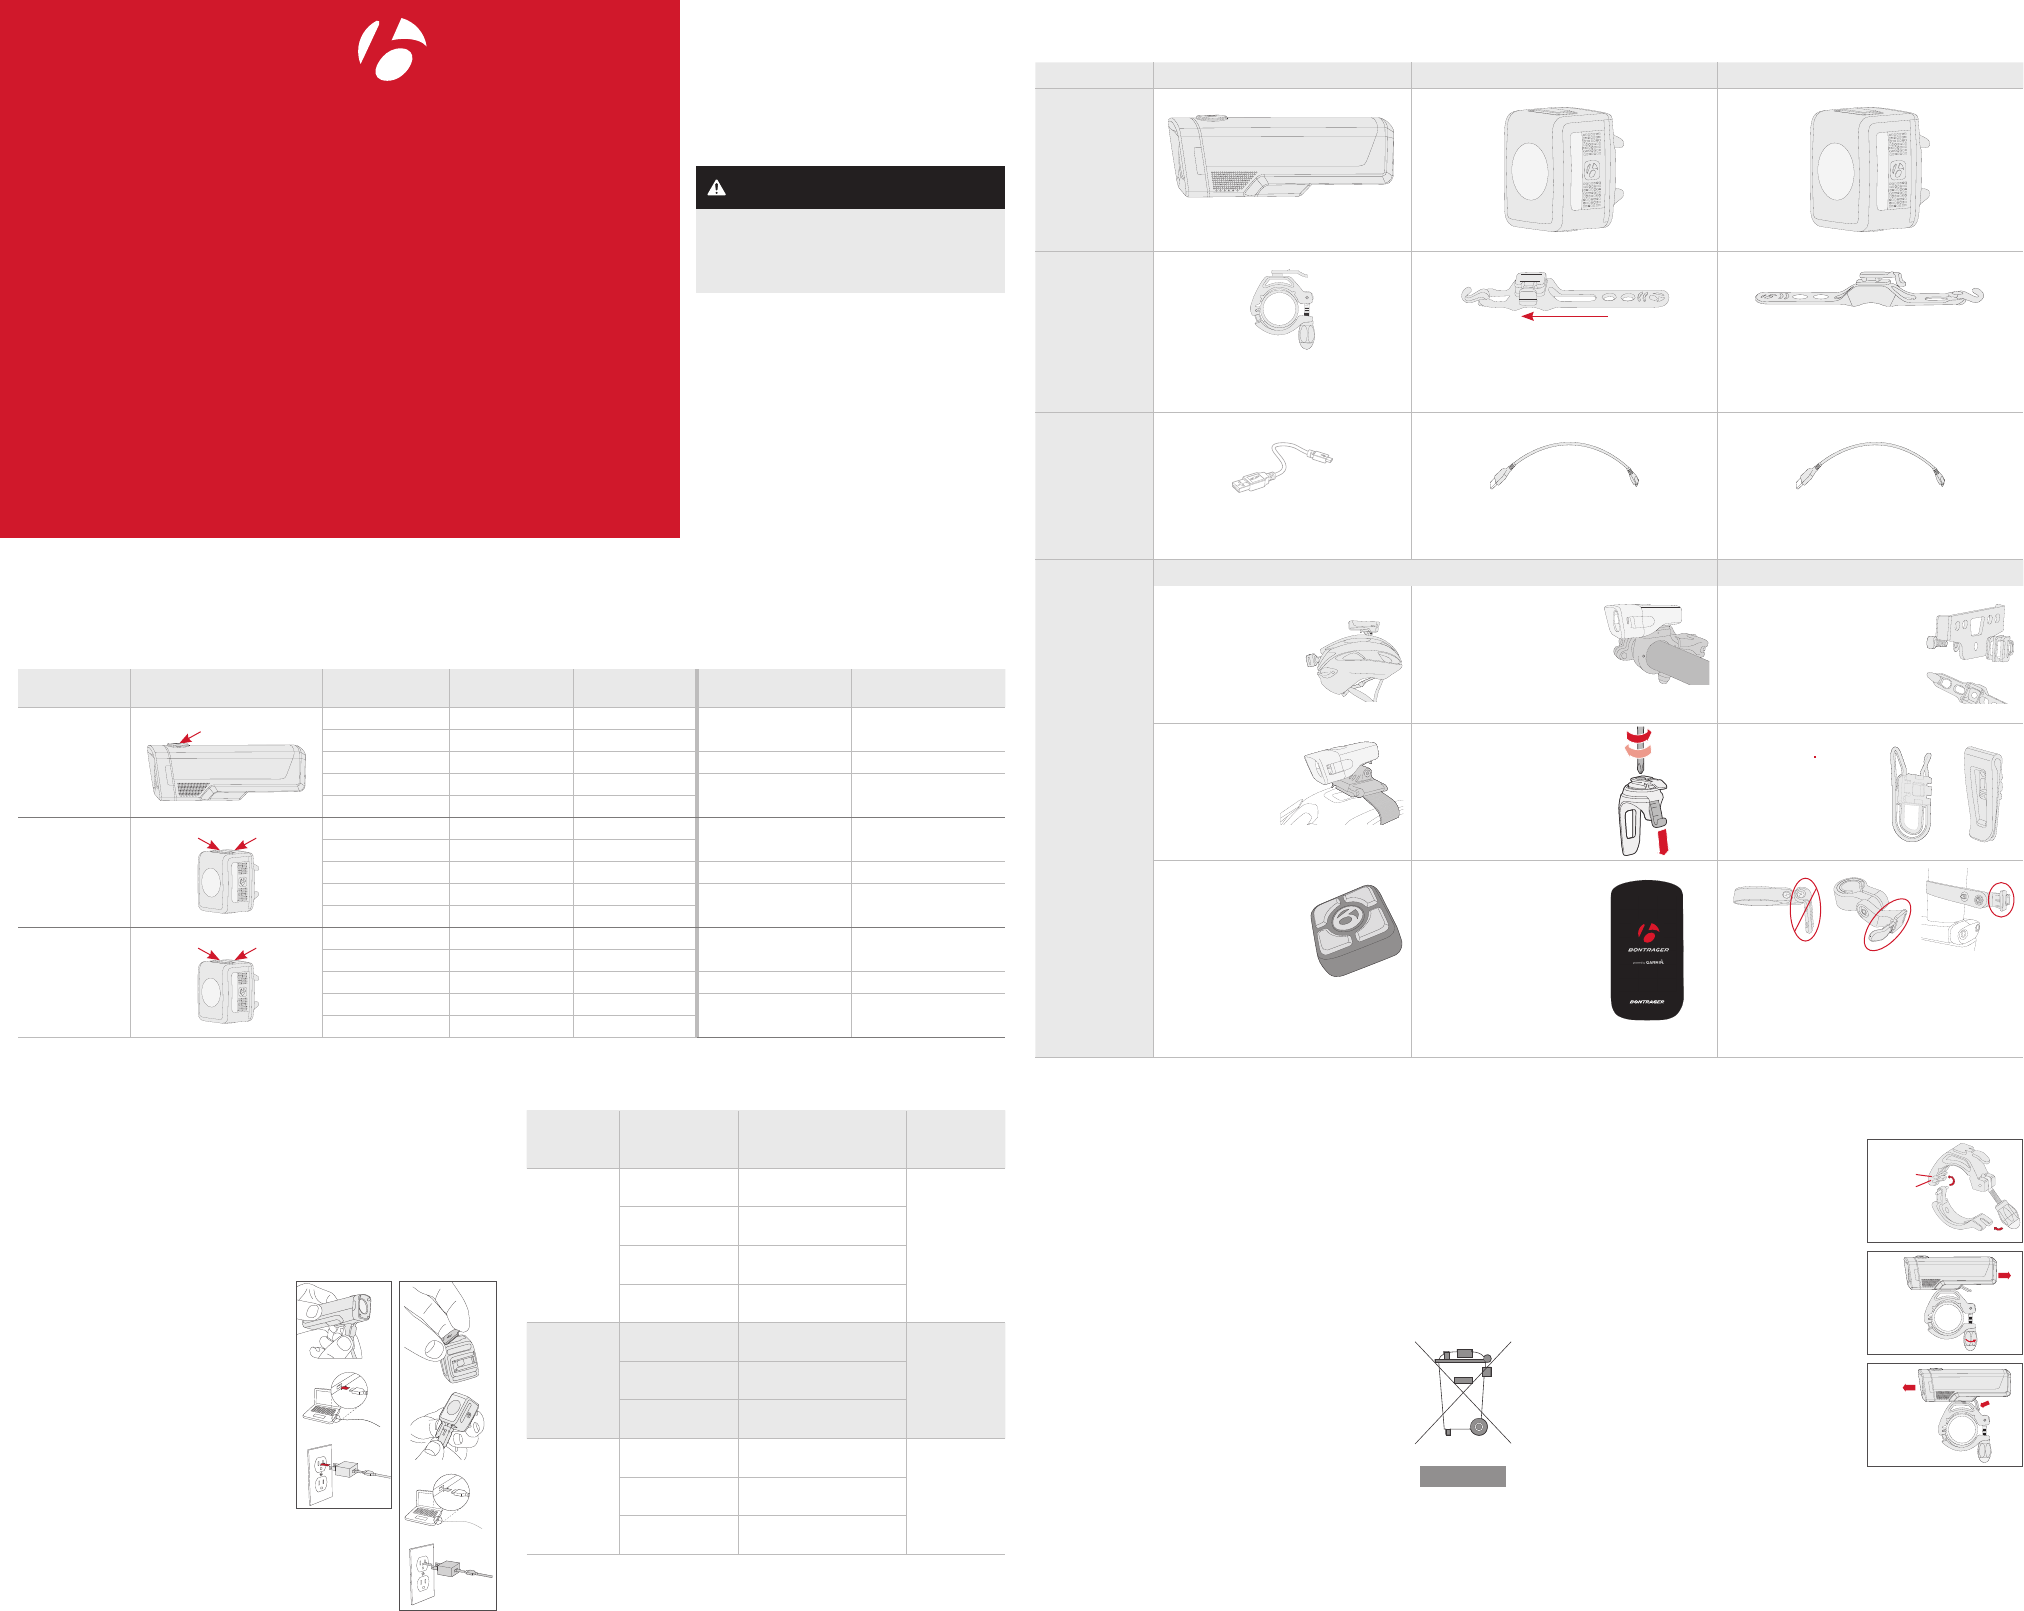
List of parts
You may have purchased one or more of the following lights.
Ion Pro RT Ion 200 RT Flare RT
Light
Mount
25.4 - 35.0mm Adjustable Bar Mount
with shim PN W552375
Front of bike
Quick Connect 0˚ Mounting Bracket
PN W527649
*Fits 22.2mm to 35mm bars.
Quick Connect 16˚ Bracket for tail light
PN W533846
Mounts to the seatpost or a rack.
Charging Cable
Fast Charge Micro USB Cable
PN W559136, (4-wire)
Charger Cable PN W327765, (2-wire) Charger Cable PN W327765, (2-wire)
Accessories
(purchase
separately)
Head Lights Tail Lights
Helmets (Blendr mount system)
*Circuit Model 21764
Rally Model 21797
Lithos Model 505969
22.2-31.8mm Adjustable
Bar Mount
PN W530421
Rack attachment
Use an 8mm M5 bolt and
washer, PN 537061 with Quick
Connect 16˚ bracket supplied,
or with complete rack mount
kit, PN 552376
Bontrager
Helmet Bracket
PN 428462
22.2-35.0mm Adjustable
Sync Bracket
Model 418921
Seat Pack Clips
Metal, PN 424905
Plastic, PN W528503
Transmitr Remote
Model 502865
*Compatible with all
Bontrager RT lights.
Bontrager Garmin Edge
1030 GPS Computer
Model 21831
Speed Concept Attachment
Take off the reflector mounting bracket,
PN W327560 and replace the end with the Flare
Round Mounting Kit interface, PN 418932
*
22.2
25.4
31.8
35.0
1
3
2
Basic operation (see Table 1)
To turn on, double click (similar to a computer mouse) the power button. To turn off, press and hold the power button.
To change mode, quick-press the power button.
NOTE: When turned on Ion Pro RT, Ion 200 RT and the Flare RT will return to the last active mode.
Battery charging and care (see Table 2)
Although the light is charged at the factory, it is recommended to charge it
before first use.
To charge the battery
IMPORTANT: For best results, charge at room temperature in a dry place. Use
a quality CE or UL approved USB charger rated for 500 mA or greater. Avoid
extreme conditions including wet, cold, or extremely hot.
1. Open the USB port cover.
2. Plug the Micro charger cable into the
USB port on the light.
3. Plug the cable into a computer or
wall adapter.
4. When the charge is complete, unplug
the Micro charger cable and close the USB
port cover.
IMPORTANT: Ensure the USB cover
is latched before riding in rain or in wet
conditions. If the USB cover is not closed,
damage to the light may occur.
Table 2. Battery charging and care
Model
Power Button/
Status LED
Color
Charge, %
Charge
Duration
(hours)
Ion Pro RT
Red Flash1<25%
Yellow Flash125% - 75% 73
Green Flash175% - 99% 15
Green Steady2 100%
Ion 200 RT
Red Flash 0% - 75%
2
Green Flash 75% - 99%
Green Steady2 99% - 100%
Flare RT
Red Flash 0% - 75%
2
Green Flash 75% - 99%
Green Steady2 99% - 100%
1Flashes fast (2 Hz) with 4 wire USB cable and a 500mA charger, or slow
(1 Hz) with 2 wire USB cable
2When fully charged, status led remains steady for 1 minute then turns off
3Requires a 4 wire USB cable, supplied, and a 500mA charger
Ion Pro RT
Ion 200 RT
or
Flare RT
OR
OR
Caring for the battery
Store the light at room temperature in a dry place. Avoid moisture, or extreme
hot or cold.
Store the light in the charged condition. Avoid ‘deep discharge’. Battery life will
decrease if the battery is stored in a fully discharged condition.
Over time, the run time of the battery will diminish. Expect about 500 full
charges, depending on care. After a full life, the battery will continue to charge
but with a lower run time. When the run time is unsatisfactory, do not open the
case of the light or incinerate; please recycle.
Traveling with the battery
Li-ion batteries cannot be shipped by air due to airline regulations. When
traveling by air, place the light in your carry-on.
Recycling
Please recycle the battery. In the US, you can find out
where to do this at www.call2recycle.org
This symbol on the product(s) and / or accompanying
documents means that used electrical and electronic
products should not be mixed with general household
waste. For proper treatment, recovery and recycling, outside
the US, please take this product(s) to designated collection
points. Alternatively, in some countries you may be able to
return your products to your local retailer upon purchase of
an equivalent new product. Disposing of this product correctly will help save
valuable resources and prevent any potential negative effects on human health
and the environment, which could otherwise arise from inappropriate waste
handling. Please contact your local authority for further details of your nearest
designated collection point. Penalties may be applicable for incorrect disposal
of this waste, in accordance with your national legislation.
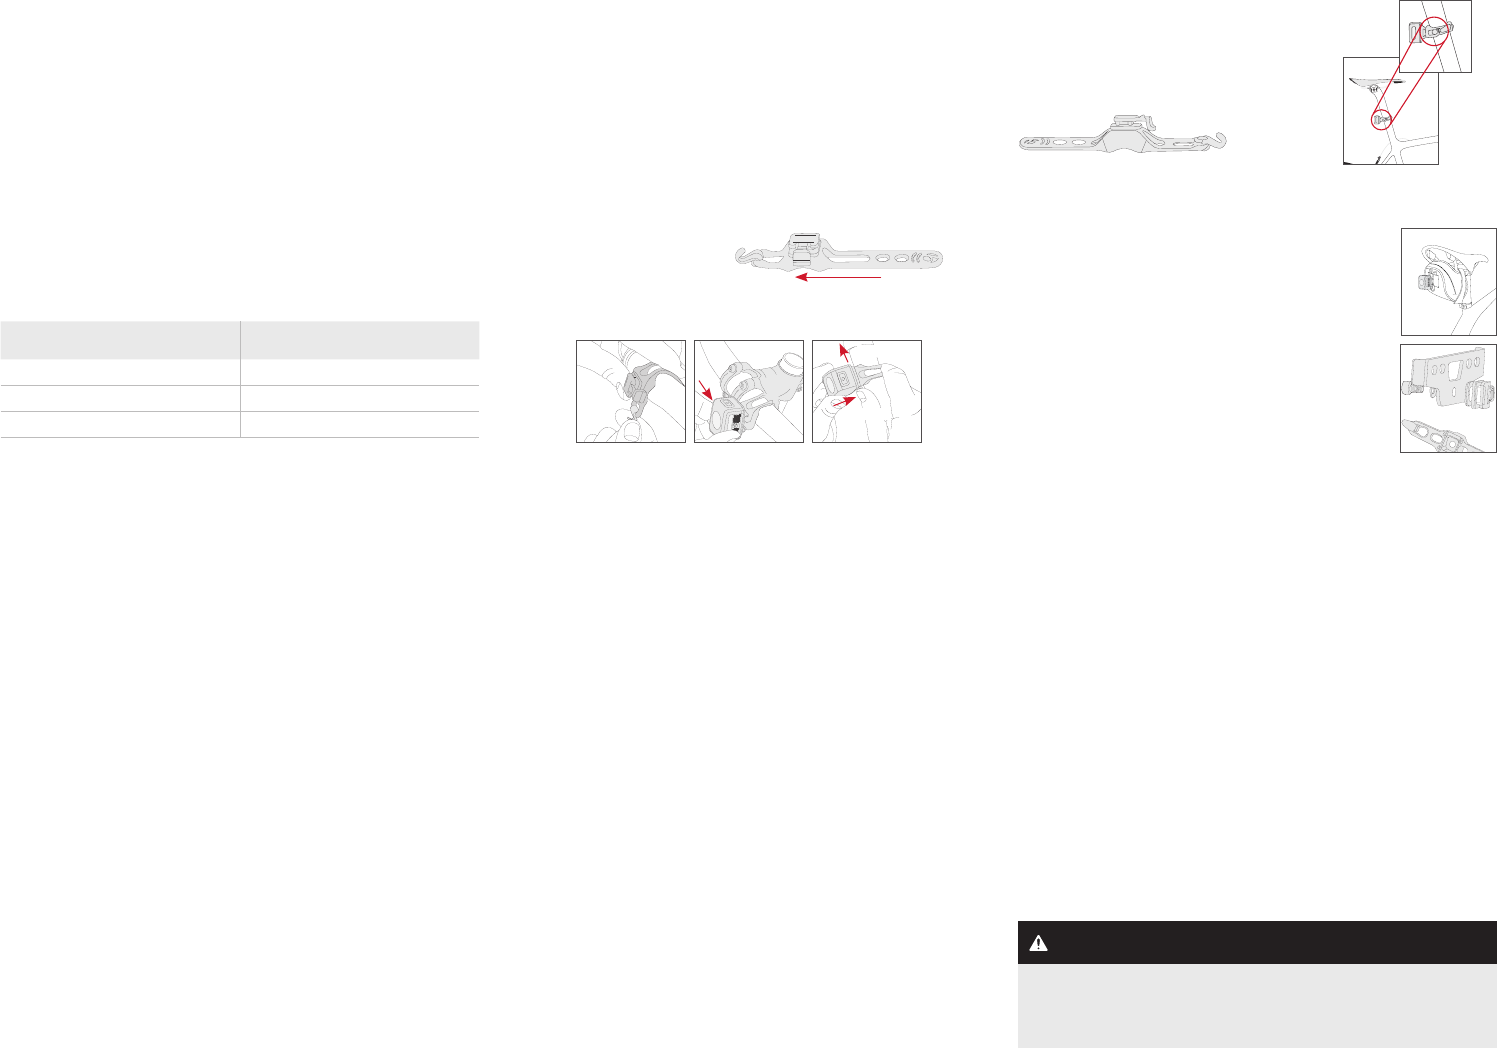
Ion Pro RT information, installation,
and special features
Installation
1. Loosen knob and open.
2. Adjust for bar size (31.8mm or 35mm).
3. Close and tighten knob.
4. Slide light onto mount until it locks in place.
NOTE: Use provided shim to fit 25.4 bars.
Removal
5. Press down.
6. Slide light to remove.
Low battery feature
When the battery charge drops below 5% the
light automatically adjusts the output brightness
to 50 lumens. This extends the light output for an
additional 30 minutes.
Locking/Unlocking the mode
Turn on and select the desired mode, then press
and hold the power button 8 seconds to select it.
The light will turn off and the main LED will flash once. To unlock, repeat the
process.
Reset
To reset the light to factory default settings, with the light on, press and hold
the power button for 15 seconds. The main LED will flash once at 8 seconds,
and again at 15 seconds. Release the button after the second flash.
Wireless Communication
The light is shipped with ANT+ and Bluetooth wireless connectivity enabled.
To disable, with the light off, press and hold the power button for 15 seconds.
The main LED will flash once at 8 seconds, and again at 15 seconds. Release
the button after the second flash.
NOTE: The status LED flashes blue every 15 seconds when wireless
is enabled.
31.8mm
35mm
1.
2.
3.
4.
5.
6.
Table 1. Modes, runtimes, and battery life
Model Power Button/Status LED Mode Max Output
(lumens)
Runtime
(hours)2
Power Button/Status
LED Color Battery Life, %
Ion Pro RT Power / Status LED Button High 1300 1.5 Green Steady 25 to 100%
Medium 800 3
Low 400 6 Red Steady 5 to 25%
Night Flash 200 26 Red Flashing Less than 5%
Day Flash 300 22
Ion 200 RT Power Button Status LED High 200 1.5 Green Steady 25 to 100%
Medium 100 3
Low 5 14.5 Red Steady 5 to 25%
Night Flash 5 30 Red Flashing Less than 5%
Day Flash1100 12
Flare RT Power Button Status LED Day Flash190 6 Green Steady 25 to 100%
All Day Flash145 12
Night Flash 5 15 Red Steady 5 to 25%
Day Steady125 4.5 Red Flashing Less than 5%
Night Steady 5 13.5
1Supports auto brightness. 2Not including 30 minute low battery feature
Pairing to the Transmitr Remote, Bontrager Garmin Edge®
GPS computer or select Garmin Edge® computers
The Transmitr Remote (or select Garmin Edge computers, sold separately)
allows remote control of the light. This feature is only available on the Ion Pro RT,
Ion 200 RT, and the Flare RT as well as other compatible Transmitr lights.
For more complete instructions, refer to the Transmitr manual at
bontrager.com. For Garmin related instruction and a complete listing of
compatible Edge devices visit support. garmin.com.
Before starting, place the remote and all lights within a small area. Move 15 feet
from other Transmitr / ANT+ compatible lights to prevent unintentional pairing. If
a light is unintentionally paired, restart the pairing process at the beginning.
NOTE: All pairings must be done in a single session. After pairing is
finished, pairing any additional lights will require that you repeat the entire
pairing procedure.
1. Place the light close to the Transmitr Remote (within 15cm / 6in).
2. Quick-press the power button on the light to turn it on, then quick-press to
turn it off again.
NOTE: After completing this step, do not press the power button on the light
again until pairing is complete.
3. Press-and-hold the center button on the Transmitr Remote for at least 8
seconds. When the corner buttons flash, release the center button.
4. While the remote searches for a light, its center button flashes red. When
the Transmitr Remote finds a light, the center button on the remote will change
from red to green, and the found light will flash.
5. While the found light is still flashing, quick-press the button on the Transmitr
Remote to which you would like to pair the light. The selected button will glow,
and the found (paired) light will stop flashing and turn off.
NOTE: After the pairing, the center button on the remote will flash red until the
Transmitr Remote finds another available light.
6. Repeat Step 4 and Step 5 for each additional light to be paired.
To exit pairing
1. When all lights are paired, quick-press the center button on the remote. The
button will stop flashing and turn off.
To verify pairing
1. Quick-press the center button on the remote to turn on all paired lights.
2. Press-and-hold the center button to turn off all of them.
3. Turn on each light individually. Quick-press each paired button on the remote
to turn on the individual light(s).
4. Press-and-hold the same button to turn off the light.
Using the Transmitr Remote
To turn on all lights
ON: Quick-press the center button.
OFF: Press and hold the center button.
To turn on an individual light
ON: Quick-press the corner button that controls the light.
OFF: Press and hold the same button.
To change modes of an individual light
Each quick-press of a button that controls a light will cycle through the modes.
Seeing battery power status of the light on the remote
When a corner button is pressed, the center button will show the battery status
of the light
To see battery power status on the remote
When a corner button is pressed, the center button will show the battery status
of the light.
Center Button Color Battery Life, %
Flashing red Less than 5
Red Between 5 and 25
Green More than 25
Transmitr App
For additional configuration, control, and firmware update capability, download
our iOS App from the App Store or Android App from Google Play.
Ion 200 RT information, installation,
and special features
Installation
To attach with the Quick Connect 0˚ offset bracket
1. Place the quick connect on the handlebar with the hook in front.
2. Stretch the strap under the bar and connect to the hook.
NOTE: Use the second hook to latch excess strap.
3. Slide the Ion 200 RT onto the bracket until it clicks. The power button
should be facing up and the lens of the light should be perpendicular to
the road.
Removal
Press down on the tab and
slide the light away from
the lever.
Alternatively, you can
remove the entire quick-connect bracket, with the light attached.
2. Remove
1. Press
Low battery feature
When the battery charge drops below 5% the light automatically adjusts the
output brightness to 5 lumens. This extends the light output for an additional
30 minutes.
Locking/Unlocking the mode
Turn on and select the desired mode, then press and hold the power button
8 seconds to select it. The light will turn off and the main LED will flash once.
To unlock, repeat the process.
Auto brightness
The light is shipped with an ambient light sensor enabled. The light
automatically changes modes with ambient light conditions. It changes from
Day Flash to High Steady. To disable, with the light off, press and hold the
power button 8 seconds. The light will flash once.
NOTE: When auto brightness is enabled, all modes are manually accessible.
Reset
To reset the light to factory default settings, with the light on, press and hold the
power button for 15 seconds. The main LED will flash once at 8 seconds, and
again at 15 seconds. Release the button after the second flash.
Wireless Communication
The light is shipped with ANT+ and Bluetooth wireless connectivity enabled.
To disable, with the light off, press and hold the power button for 15 seconds.
The main LED will flash once at 8 seconds, and again at 15 seconds. Release
the button after the second flash.
NOTE: The status LED flashes blue every 15 seconds when wireless
is enabled.
Flare RT information, installation,
and special features
Installation
To attach with the Quick Connect 1
16˚ offset bracket
IMPORTANT: The seatpost/saddle icon shows that
the lens is oriented perpendicular to the ground to optimize visibility.
NOTE: Use the second hook to latch any excess strap.
To attach to a seat pack
Attach the seat pack clip to the bag loop. To optimize visibility,
ensure the light lens is oriented perpendicular to the ground.
To attach to a rack
Remove the quick connect clip from the rubber strap and
attach to a rack with a M5 bolt and washer, sold separately,
PN 537061.
Low battery feature
When the battery charge drops below 5% the light
automatically adjusts the output brightness and begins
to flash. This extends the light output for an additional
30 minutes.
Locking/Unlocking the mode
Turn on and select the desired mode, then press and hold the power button
8 seconds to select it. The light will turn off and the main LED will flash once.
To unlock, repeat the process.
Auto brightness
The light is shipped with an ambient light sensor enabled. The light
automatically changes modes with ambient light conditions. It changes from
Day Flash or All Day Flash to Night Flash, OR Day Steady to Night Steady. To
disable, with the light off, press and hold the power button 8 seconds. The light
will flash once.
NOTE: When auto brightness is enabled, Day Flash, All Day Flash and Day
Steady are manually accessible.
Reset
To reset the light to factory default settings, with the light on, press and hold the
power button for 15 seconds. The main LED will flash once at 8 seconds, and
again at 15 seconds. Release the button after the second flash.
Wireless Communication
The light is shipped with ANT+ and Bluetooth wireless connectivity enabled.
To disable, with the light off, press and hold the power button for 15 seconds.
The main LED will flash once at 8 seconds, and again at 15 seconds. Release
the button after the second flash.
NOTE: The status LED flashes blue every 15 seconds when wireless
is enabled.
A bicycle without correct lights and reflectors might be difficult for other
people to see, and you might not be able to see. If you cannot see, or other
people cannot see you, you could have an accident. Make sure your lights
operate correctly and that batteries are charged.
WARNING
Front of bike
Trek Bicycle Corporation contact information:
North America
Trek Bicycle Corporation
801 West Madison Street
Waterloo, WI 53594 USA
Tel: 800-313-8735
Europe
Bikeurope BV
Ceintuurbaan 2-20C
3847 LG Harderwijk
The Netherlands
Tel: +31 (0)33 45 09 060
Australia
Trek Bicycle Corp. Au.
8 Townsville Street
(Level One)
Fyshwick (ACT)
2609 AU
Tel: +61 (02) 61 732 400
Statements of Regulatory Compliance
FCC Compliance
Ion Pro RT FCC ID: 2AHXD552373
Ion 200 RT/Flare RT FCC ID: 2AHXD553852
This device complies with part 15 of the FCC Rules. Operation is subject to the
following conditions: (1) this device may not cause harmful interference, and (2)
this device must accept any interference received, including interference that
may cause undesired operation.
NOTE: This equipment has been tested and found to comply with the limits
for a Class B digital device, pursuant to Part 15 of the FCC Rules. These limits
are designed to provide reasonable protection against harmful interference
in a residential installation. This equipment generates uses and can radiate
radio frequency energy and, if not installed and used in accordance with
the instructions, may cause harmful interference to radio communications.
However, there is no guarantee that interference will not occur in a particular
installation.
This product may cause interference to radio equipment and should not be
installed near maritime safety communications equipment or other critical
navigation or communication equipment operating between 0.45-30 MHz.
If this equipment does cause harmful interference to radio or television
reception, which can be determined by turning the equipment off and on, the
user is encouraged to try to correct the interference by one or more of the
following measures:
— Reorient or relocate the receiving antenna.
— Increase the separation between the equipment and receiver.
— Connect the equipment into an outlet on a circuit different from that to
which the receiver is connected.
— Consult the dealer or experienced radio / TV technician for help.
NOTES: TREK BICYCLE CORPORATION IS NOT RESPONSIBLE FOR
ANY RADIO OR TV INTERFERENCE CAUSED BY UNAUTHORIZED
MODIFICATIONS TO THIS EQUIPMENT. ANY CHANGES OR
MODIFICATIONS NOT EXPRESSLY APPROVED BY TREK BICYCLE
CORPORATION OF THIS DEVICE COULD VOID THE USER’S AUTHORITY
TO OPERATE THE DEVICE.
Industry Canada Compliance
Ion Pro RT - (P/N 552373)
IC ID: 21334-552373
Ion 200 RT (P/N 553853)
IC ID: 21334-553852
Flare RT (P/N 553852)
IC ID: 21334-553852
CAN ICES-3(B)/NMB-3(B)
This device complies with Industry Canada license-exempt RSS standard(s).
Operation is subject to the following two conditions: (1) this device may not
cause interference, and (2) this device must accept any interference, including
interference that may cause undesired operation of the device.
Leprésent appareil est conforme aux CNR d’Industrie Canada applicable aux
appareils radio. Exempts de licence. L’exploitation est autorisée aux deux
conditions suivantes:
(1) l’appareil ne doit pas produire de brouillage, et (2) l’utilsateur de l’appareil
doit accepter tout brouillage radioélectrque subi, meme si le brouillage est
susceptible d’en compromettre le fonctionnement.
This Ion Pro RT lighting equipment complies with FCC and IC radiation
exposure limits set forth for an uncontrolled environment. The radiated output
power of the Ion Pro RT Wireless Device is below the Industry Canada (IC)
radio frequency exposure limits, when used as directed in this manual (Note:
attaching this light to a helmet changes the absorption characteristics of the
light-body system). This equipment is in direct contact with the body of the user
under normal operating conditions. This transmitter must not be colocated or
operating in conjunction with any other antenna or transmitter. Status of the
listing in the Industry Canada’s REL (Radio Equipment List) can be found at the
following web address:
http://www.ic.gc.ca/app/sitt/reltel/srch/ nwRdSrch.do?lang=eng
Additional Canadian information on RF exposure also can be found at the
following web address: http://www.ic.gc.ca/eic/site/smt-gst.nsf/eng/sf08792.
html
Cet appareil est conforme aux limites d’exposition à la fréquence radio (FR) d’IC
et de FCC. La puissance de sortie émise par l’appareil de sans fil Ion Pro RT
est inférieure à la limite d’exposition aux fréquences radio d’Industry Canada
(IC). Cet appareil est en contact direct avec l’utilisateur dans des conditions
normales d’utilisation. L’émetteur ne doit pas être co-implémenté ou utilisé
conjointement avec une autre antenne ou un autre émetteur. Ce périphérique
est homologué
pour l’utilisation au Canada. Pour consulter l’entrée correspondant à l’appareil
dans la liste d’équipement radio (REL - Radio Equipment List)d’Industry
Canada rendez-vous sur:
http://www.ic.gc.ca/app/sitt/reltel/srch/nwRdSrch. do?lang=fra
Pour des informations supplémentaires concernant l’exposition aux RF au
Canada rendezvous sur:
http://www.ic.gc.ca/eic/site/smt-gst.nsf/fra/sf08792.html
European Union Compliance
Ion Pro RT and Ion 200 RTdo not comply with German StVZO regulations!
Trek Bicycle Corporation and Bontrager hereby declare that the wireless device
identified as
‘Ion Pro RT’, ‘Ion 200 RT’ and ‘Flare RT’are in compliance with the following
European Directives:
• Radio Equipment Directive 2014/53/EU
(Ion Pro RT only)
• EMC Directive 2014/30/EU
• Low Voltage Directive 2014/35/EU (Ion Pro RT only
• RoHS Directive 2011/65/EU
The full text of the EU declaration of
conformity is available from your dealer,
or at the following internet address:
http://www.bontrager.com/support