Trekstor I Beat Vision Dm Quick Guide QG IBVISION V1 10 INT 060922
i-Beat Vision DM - Quick Guide QG_i-beat_vision_dm_v1-10_all Free User Guide for TrekStor Player, Manual
2015-08-20
: Trekstor Trekstor-I-Beat-Vision-Dm-Quick-Guide-799121 trekstor-i-beat-vision-dm-quick-guide-799121 trekstor pdf
Open the PDF directly: View PDF ![]() .
.
Page Count: 72

– 2 –
DE
– 2 –
KURZANLEITUNG
Wir gratulieren Ihnen zum Kauf des TrekStor i.Beat vision und sind sicher, dass Sie viel Freude mit diesem
Produkt haben werden.
Windows 98 Benutzer finden den für das Gerät erforderlichen Treiber auf der beigelegten CD.
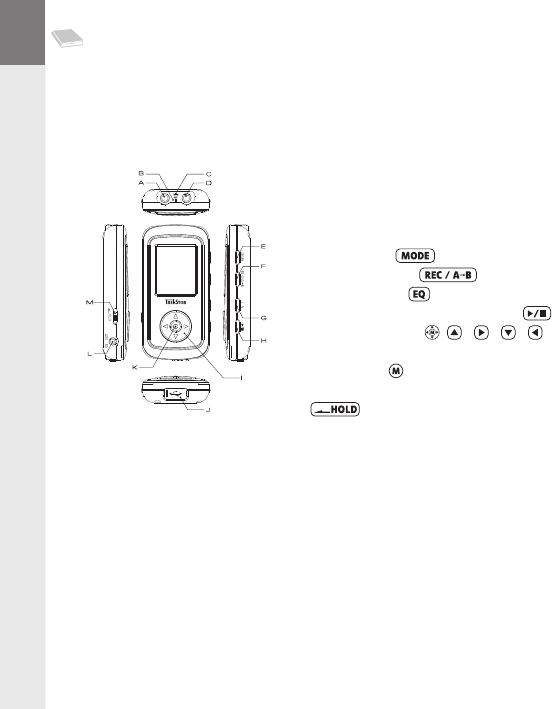
1) Bedienungselemente des TrekStor i.Beat vision
2) Laden des TrekStor i.Beat vision
Bitte laden Sie den i.Beat vision vor der ersten Benutzung mindestens 3 Stunden auf. Sobald Sie das Gerät
mit einem PC verbinden, wird es automatisch aufgeladen. Nach spätestens 3 Stunden ist der Akku geladen und
der Ladevorgang wird automatisch beendet, um ein Überladen zu vermeiden.
Hinweis: Die maximale Akkulaufzeit wird erst nach ca. 10 Ladezyklen erreicht.
3) Verbinden des TrekStor i.Beat vision mit einem PC
Hinweis für Benutzer von Windows 98: Installieren Sie zuerst den auf der mitgelieferten CD befindlichen Treiber,
bevor Sie den i.Beat vision an Ihren PC anschließen!
Nutzen Sie das mitgelieferte USB-Anschlusskabel und schließen Sie den i.Beat vision an einen USB-
Anschluss Ihres PCs an. Ihr Betriebssystem erkennt automatisch den i.Beat vision und fügt auf dem
"Arbeitsplatz" einen "Wechseldatenträger" hinzu.
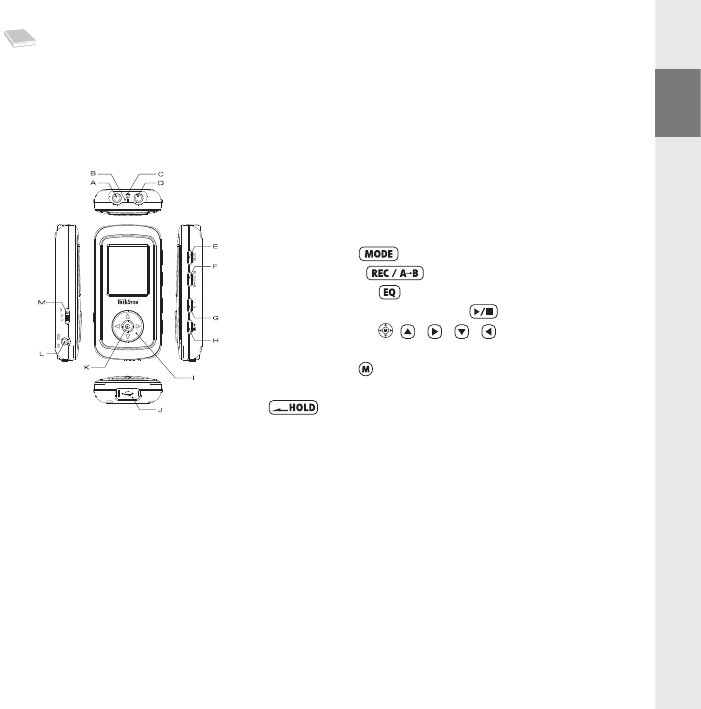
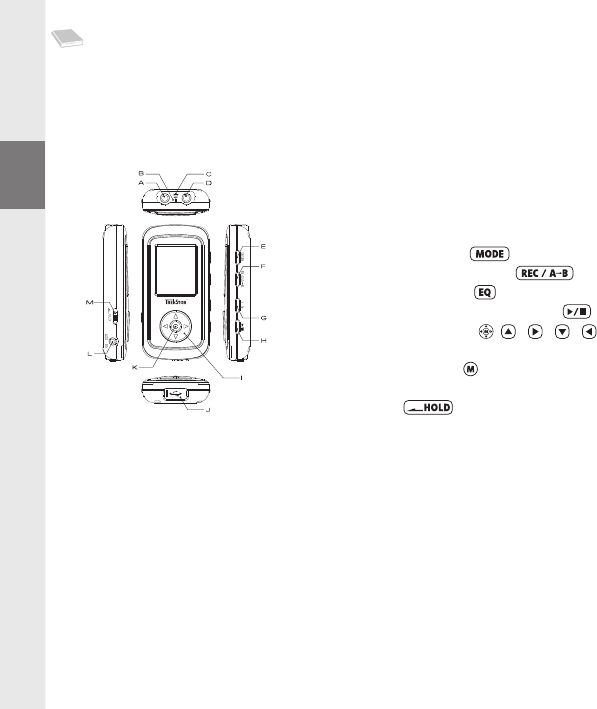
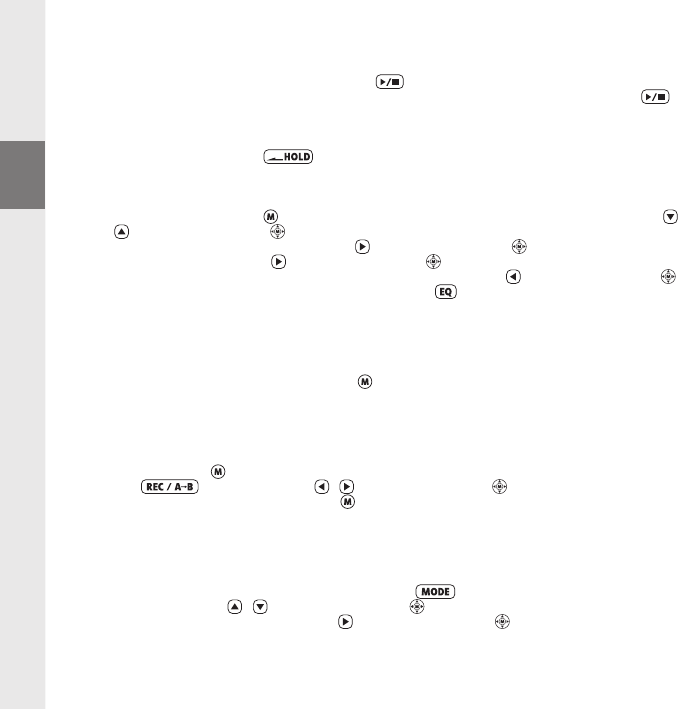
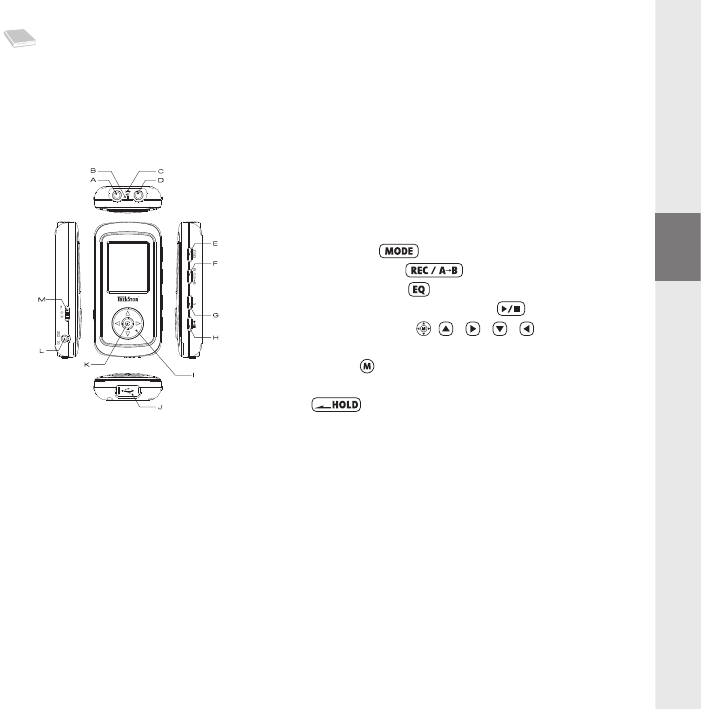
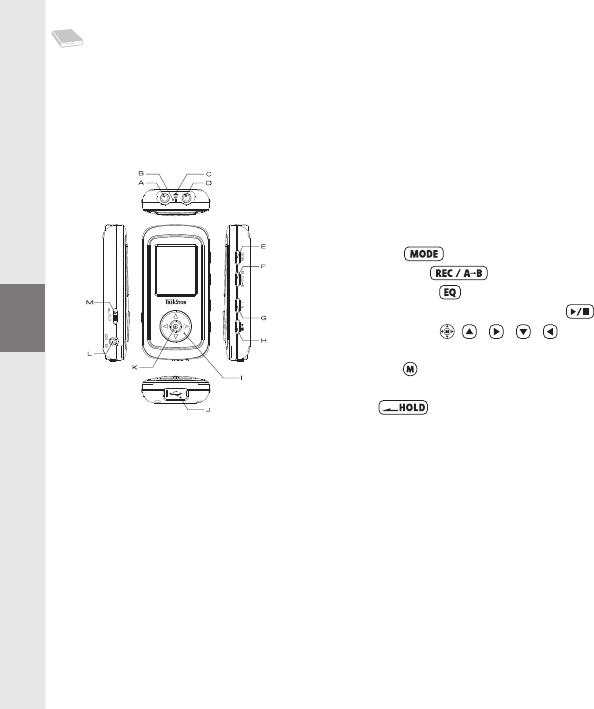
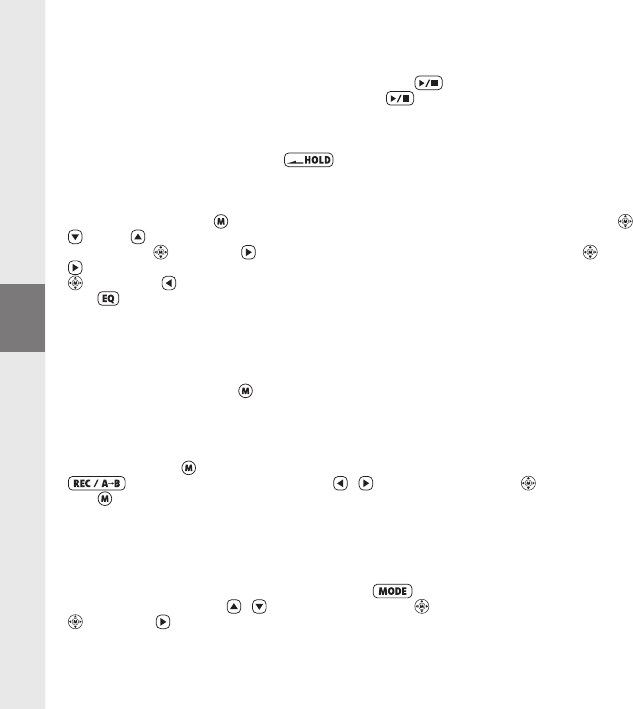
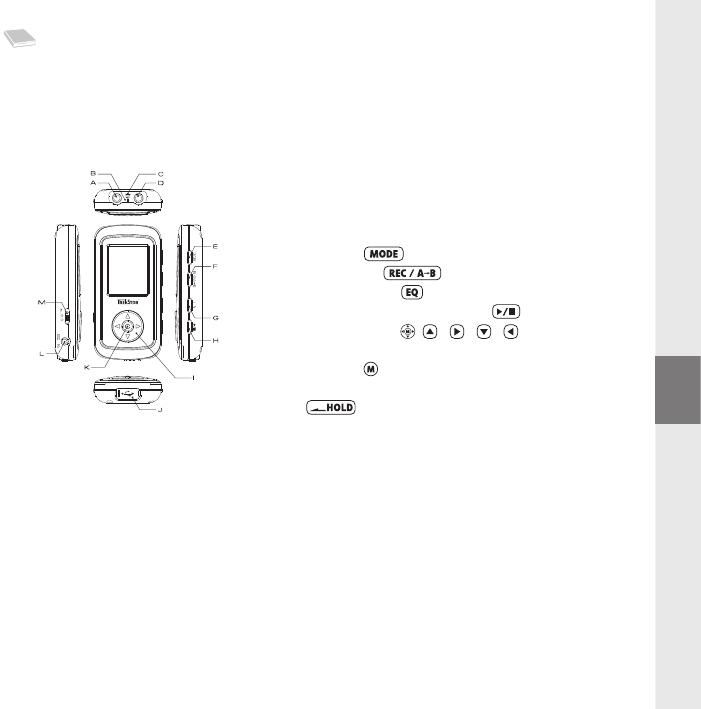
A Line-In-Anschluss
B Mikrofon
C Öse zur Befestigung des Umhängebands
D Kopfhöreranschluss
E Modus-Taste
F Aufnahme-Taste
G Equalizer-Taste
H Wiedergabe / Pause / Stop-Taste
I Navigationskreuz ( / / / )
J USB-Anschluss
K Menü-Taste
L USB-Host-Anschluss
M -Schieber (Tastensperre)

– 3 –
– 3 –
DE
4) Datenaustausch mit TrekStor i.Beat vision
Nicht kopiergeschützte Dateien
a) Markieren Sie die gewünschten Dateien (z. B. MP3) mit der Maus. Kopieren Sie diese durch Drücken der
rechten Maustaste ("Kopieren").
b) Wählen Sie im "Arbeitsplatz" den Wechseldatenträger "TrekStor i.Beat vision" aus.
c) Drücken Sie die rechte Maustaste und wählen Sie die Option "Einfügen", um den Kopiervorgang zu
starten. Nach Abschluss des Kopiervorgangs sind die Daten auf dem i.Beat vision vorhanden.
WMA-DRM9-geschützte Dateien
Zum Kopieren DRM9-geschützter Dateien müssen Sie diese über den Windows Media® Player
kopieren (Referenzversion: Windows Media® Player 9).
a) Verbinden Sie den MP3-Player mit Ihrem Computer und starten Sie den Windows Media® Player.
b) Klicken Sie links in der Taskleiste auf "Auf CD oder Gerät kopieren".
c) Ziehen Sie die gewünschten Musikdateien (WMA) in die Liste "Zu kopierende Objekte" auf
der linken Seite.
d) Wählen Sie im Pulldown-Menü rechts oben den MP3-Player unter "Objekte auf dem Gerät" aus.
e) Klicken Sie dann rechts oben auf die Schaltfläche "Kopieren". Die ausgewählte Musik wird anschließend
automatisch auf Ihren MP3-Player kopiert.
5) Abmelden und Trennen des TrekStor i.Beat vision
Windows 98 (SE) Suchen Sie den i.Beat vision im "Gerätemanager" (unter "Laufwerke") und klicken
Sie das Gerät mit der linken Maustaste an. Wählen Sie den Menüpunkt "Entfernen" aus. Jetzt können Sie den
i.Beat vision vom PC trennen.
Windows 2000/ME/XP Klicken Sie mit der linken Maustaste unten rechts in der "Taskleiste" auf das Symbol
"Hardware sicher entfernen". Wählen Sie aus dem erscheinenden Kontextmenü den Punkt "USB-Massen-
speichergerät – Laufwerk entfernen" durch Klicken mit der linken Maustaste aus. Jetzt können Sie den
i.Beat vision vom PC trennen.
Hinweis: Befolgen Sie bitte den empfohlenen Abmeldevorgang um Schäden am Gerät oder Datenverlust zu vermeiden!
– 4 –
DE
– 4 –
6) Bedienung des TrekStor i.Beat vision
Ein- und Ausschalten
Zum Einschalten des i.Beat vision halten Sie die -Taste für ca. 2 Sekunden gedrückt. Um den
i.Beat vision wieder auszuschalten halten Sie die -Taste ebenfalls für ca. 2 Sekunden gedrückt.
Hinweis: Stellen Sie sicher, dass beim Ausschalten keine Audio-, Video- oder Bild-Datei wiedergegeben, aufgenommen
bzw. angezeigt wird.
Hinweis: Achten Sie darauf, dass sich der -Schieber in der rechten Position befindet, die Tastensperre muss
also ausgeschaltet sein.
Ordner-Navigation
Drücken Sie kurz die -Taste um in die Ordner-Navigation zu gelangen. Durch Drücken des Navigations-
kreuzes nach unten oder oben wird die nächste oder vorhergehende Datei markiert. Um die ausge-
wählte Datei abzuspielen drücken Sie bitte das Navigationskreuz nach rechts . Um in einen Unterordner
zu wechseln, drücken Sie das Navigationskreuz nach rechts , wenn der Ordner markiert (blau hinterlegt)
ist. Um wieder in das Hauptverzeichnis zurückzukehren drücken Sie das Navigationskreuz nach links .
Navigieren Sie wie gewohnt weiter. Durch Drücken der -Taste verlassen Sie die Ordner-Navigation.
Hinweis: In der Ordner-Navigation werden nur die aktuellen Dateien des gerade ausgewählten Modus angezeigt
(d. h. es werden nur Musik-Dateien angezeigt, sofern Sie sich im Modus "Musik" befinden).
Um in die erweiterte Ordner-Navigation zu gelangen, in der alle Dateien der verschiedene Modi angezeigt
werden, müssen Sie die -Taste 2-mal kurz drücken. In der erweiterten Ordner-Navigation können Sie, egal
in welchen Modus Sie sich gerade befinden, eine beliebige Datei aus einem anderem Modus starten.
Datei oder Ordner löschen
Achten Sie darauf, dass keine Datei wiedergegeben wird, wenn Sie eine Datei bzw. Ordner löschen möchten.
Drücken Sie kurz die -Taste um in die Ordner-Navigation zu gelangen. Zum Löschen drücken Sie bitte die
-Taste. Wechseln Sie mit Hilfe der Tasten / des Navigationskreuzes auf "Ja" und bestätigen
Sie die Sicherheitsabfrage durch Drücken der -Taste.
Hinweis: Ein Ordner muss leer sein, wenn er gelöscht werden soll!
Die verschiedenen Modi
Der i.Beat vision besitzt verschiedene Modi (Musik, FM Radio, Aufnahme, Multimedia, Bilder, Text, USB
Host). Um in einen Modus zu gelangen, halten Sie die -Taste ca. eine Sekunde lang gedrückt. Wählen
Sie durch Drücken der / -Tasten des Navigationskreuzes den gewünschten Modus aus und bestätigen
Sie Ihre Auswahl durch Drücken des Navigationskreuzes nach rechts .
Hinweis: Stellen Sie sicher, dass Sie bei der Umschaltung keine Audio-, Video- oder Bild-Datei wiedergegeben, aufge-
nommen bzw. angezeigt wird.
– 5 –
– 5 –
DE
Modus: Musik
Wechseln Sie bitte in den "Musik"-Modus.
• Wiedergabe
Drücken Sie kurz die -Taste, um die Wiedergabe einer Audiodatei zu starten.
• Pause
Drücken Sie kurz die -Taste, um die Wiedergabe anzuhalten. Durch ein erneutes Drücken der
-Taste wird die Wiedergabe fortgesetzt.
• Titel wechseln
Durch kurzes Drücken des Navigationskreuzes nach rechts oder links können Sie den aktuellen
Titel wechseln. Drücken Sie das Navigationskreuz nach rechts , um zum nächsten Titel zu wechseln.
Drücken Sie das Navigationskreuz nach links , um zum vorhergehenden Titel zu wechseln.
• Vor- / Zurückspulen innerhalb eines Titels
Durch längeres Drücken des Navigationskreuzes nach rechts oder links können Sie innerhalb
eines Titels spulen. Drücken Sie das Navigationskreuz nach rechts um vorzuspulen. Drücken Sie das
Navigationskreuz nach links um zurückzuspulen.
Hinweis: Je länger Sie die / -Tasten des Navigationskreuzes in eine Richtung gedrückt halten, desto
schneller spult das Gerät.
• Lautstärke anheben / absenken
Drücken Sie kurz das Navigationskreuz nach oben bzw. nach unten , um die Lautstärke
anzuheben bzw. abzusenken.
Hinweis: Je länger Sie die / -Tasten des Navigationskreuzes in eine Richtung gedrückt halten, desto
schneller wird die Lautstärke angehoben bzw. abgesenkt.
Modus: FM Radio
Wechseln Sie bitte in den "FM Radio"-Modus.
Hinweis: Bitte schließen Sie stets Ihre Kopfhörer an den i.Beat vision an, da das Kopfhörerkabel als Antenne
für das interne Radio dient.
• Automatischer Sendersuchlauf mit Speicherung
Drücken Sie kurz die -Taste, um den automatischen Sendersuchlauf zu aktivieren. Während der Suche
werden alle empfangstarken Sender abgespeichert. Drücken Sie die -Taste, um den automatischen
Sendersuchlauf abzubrechen.
– 6 –
DE
– 6 –
• Manueller Sendersuchlauf mit Speicherung
Drücken Sie kurz die -Taste, um vom Speicherplatz-Modus "Senderspeicher" in den manuellen
Sendersuchlauf zu gelangen. Durch kurzes Drücken der / -Tasten können Sie die Empfangsfrequenz
um jeweils 0,05 MHz ändern. Wenn Sie die / -Tasten ausreichend lange gedrückt halten, wird auto-
matisch bis zum nächst besten empfangbaren Sender gesucht. Um den ausgewählten Sender zu speichern,
drücken Sie die -Taste, wählen mit den / -Tasten einen Senderspeicherplatz aus und
bestätigen Sie die Speicherung durch Drücken der -Taste.
• Eingespeicherte Sender wechseln
Durch kurzes Drücken der / -Tasten im Speicherplatz-Modus "Senderspeicher" können Sie zwischen
den vorhandenen Speicherplätzen wechseln.
• Aufnehmen vom FM Radio
Drücken Sie die -Taste länger als eine Sekunde, um die Aufnahme vom FM Radio zu starten.
Drücken Sie kurz die -Taste, um die Aufnahme zu beenden.
Hinweis: Alle FM-Radio-Aufnahmen werden im "AUFNAHME"-Ordner, Unterordner "FM_RADIO" gespeichert.
Modus: Aufnahme
Wechseln Sie bitte in den "Aufnahme"-Modus.
Mit Hilfe des Navigationskreuzes können Sie verschiedene Einstellungen zur Aufnahme einstellen. Durch
Drücken der / -Tasten wechseln Sie zwischen den Einstellungen. Durch Drücken der / -Tasten
können Sie die Einstellungen ändern.
• Aufnahme über Line-In
Über den Line-In Eingang können Sie ein externes Gerät (z. B. ein CD-Player) anschließen, um davon direkte
Aufnahmen durchzuführen. Wählen Sie "LINE-IN" als Quelle aus und bestätigen Sie durch Drücken der
-Taste. Drücken Sie kurz die -Taste, um die Aufnahme zu starten. Beenden Sie die Aufnahme, in
dem Sie erneut die -Taste kurz drücken.
Hinweis: Alle Line-In Aufnahmen werden im "AUFNAHME"-Ordner, Unterordner "LINEIN" gespeichert.
• Aufnahme über Mikrofon
Über das integrierte Mikrofon können Sie Sprachaufnahmen durchführen. Wählen Sie "MIKRO" als Quelle
aus und bestätigen Sie durch Drücken der -Taste. Drücken Sie kurz die -Taste um die Aufnahme
zu starten. Beenden Sie die Aufnahme, in dem Sie erneut die -Taste kurz drücken.
Hinweis: Alle Sprachaufnahmen werden im "AUFNAHME"-Ordner, Unterordner "MIKROFON" gespeichert.
– 7 –
– 7 –
DE
Modus: Multimedia
Wechseln Sie bitte in den "Multimedia"-Modus.
Im "Multimedia"-Modus können Sie Movie-Dateien (*.TOM) anschauen. Zur Erstellung von Movie-Dateien im
TOM-Format verwenden Sie bitte den auf der CD beigefügten "TOM-Transcoder".
Die Bedienung im "Multimedia"-Modus ist identisch mit der Bedienung des "Musik"-Modus. Durch Drücken
der -Taste während der Wiedergabe erscheint ein OSD-Menü.
Modus: Bilder
Wechseln Sie bitte in den "Bilder"-Modus.
Wählen Sie über das Navigationskreuz eine Bilddatei (*.jpg) in der Ordner-Navigation aus und starten Sie
diese durch Drücken der -Taste. Drücken Sie das Navigationskreuz nach rechts bzw. links , um zum
nächsten bzw. vorhergehenden Bild zu wechseln.
Drücken Sie kurz die -Taste, um eine Diashow zu starten. Durch kurzes Drücken des Navigationskreuzes
nach oben oder unten können Sie die Anzeigedauer eines Bildes bei der Diashow ändern. Durch er-
neutes Drücken der -Taste beenden Sie die Diashow.
Hinweis: Alle Bilder müssen im JPG-Format vorliegen. Größere Bilder werden automatisch verkleinert dargestellt, was
zu längeren Ladezeiten führen kann.
Modus: Text
Wechseln Sie bitte in den "Text"-Modus.
Wählen Sie eine Textdatei (*.txt) in der Ordner-Navigation aus und starten Sie diese durch Drücken der
-Taste. Drücken Sie das Navigationskreuz nach unten bzw. oben , um den Text zeilenweise
zu lesen. Drücken Sie das Navigationskreuz nach rechts bzw. links , um den Text seitenweise zu
lesen. Drücken Sie kurz die -Taste, um ein automatisches Laden des Textes (seitenweise) ein- bzw.
auszuschalten. Durch kurzes Drücken des Navigationskreuzes nach oben oder unten können
Sie die Anzeigedauer des Textes einstellen.
– 8 –
DE
– 8 –
Modus: USB Host
Wechseln Sie bitte in den "USB Host"-Modus.
Im Display erscheint die Meldung "Warte auf USB-Verbindung". In diesem Modus können Sie Dateien von
einem anderen USB-Gerät auf den i.Beat vision kopieren. Schließen Sie dazu den im Lieferumfang ent-
haltenen USB Host-Adapter an den USB Host-Anschluss am i.Beat vision an, und verbinden Sie das
gewünschte USB-Gerät mit dem USB Host-Adapter. Nach kurzer Zeit erkennt der i.Beat vision das ange-
schlossene USB-Gerät, welches als "Device" in der Ordner-Navigation angezeigt wird. Mit Hilfe des Navigations-
kreuzes können Sie wie gewohnt auf die Dateien des angeschlossenen USB-Geräts zugreifen. Drücken Sie
die -Taste, um eine Datei auf den i.Beat vision zu kopieren und bestätigen Sie den Kopiervorgang mit
"Ja" ebenfalls durch Drücken der -Taste.
Hinweis: Alle kopierten Dateien befinden sich im "USBHOST"-Ordner.
Hinweis: Aufgrund der sehr großen Auswahl an verschiedenen USB-Geräten kann TrekStor die Kompatibilität nicht
mit Geräten aller Hersteller zusichern. In der Regel sollte der Datentransfer mit anderen Geräten jedoch problemlos
funktionieren.
7) Einstellungen
Drücken Sie für eine Sekunde lang die -Taste, um das Einstellungsmenü aufzurufen. Navigieren Sie mit Hilfe
des Navigationskreuzes durch die verschiedenen Einstellungen (Allgemeines, Display, Timer, Modi, Klang,
Aufnahme und System) und bestätigen Sie Ihre Auswahl durch Drücken der -Taste.
Hinweis: Bitte beachten Sie, dass die Ordner-Navigation nicht aktiviert sein darf.
8) Support und Kontakt
Sollten Sie Fragen zu unseren Produkten haben oder Hilfestellung benötigen, so können Sie sich gerne an
unseren Email- oder Telefonsupport wenden. Die Kontaktdaten können Sie der Rückseite dieser Kurzanleitung
oder unserer Webseite unter http://www.trekstor.de/support entnehmen.
Hinweise:
• Dieser MP3-Player ist für den mitgelieferten Kopfhörer (Impedanz von 32 Ohm) optimiert. Die Verwendung anderer Kopfhörer mit geringerer
Impedanz kann u. U. zur Beschädigung des MP3-Players oder auch des Kopfhörers führen.
• Achtung: Dieses Gerät kann hohe Lautstärken erzeugen. Um Hörschäden zu vermeiden, sollten Sie nicht längere Zeit mit hoher Lautstärke hören.
Nicht im Straßenverkehr benutzen.
• Von der Nutzung von USB-Kabeln mit Leitungslängen von mehr als 3 m sollte abgesehen werden.
Der Hersteller behält sich das Recht vor, das Produkt ständig weiter zu entwickeln. Diese Änderungen können ohne direkte Beschreibung
in dieser Kurzanleitung vorgenommen werden. Informationen in dieser Kurzanleitung müssen somit nicht den Stand der technischen
Ausführung widerspiegeln.
Der Hersteller garantiert nur die Eignung für die eigentliche Bestimmung dieses Produktes. Weiter ist der Hersteller nicht für Beschädigungen
oder Verlust von Daten und deren Folgeschäden verantwortlich.
Copyright © 2006 TrekStor GmbH & Co. KG. Alle Rechte vorbehalten. Bei weiteren erwähnten Produkt- oder Firmenbezeichnungen handelt
es sich möglicherweise um Warenzeichen oder Markennamen der jeweiligen Inhaber.
– 9 –– 9 –
EN
QUICK GUIDE
Thank you for buying the TrekStor i.Beat vision. We are confident that this product will be the source
of much enjoyment.
Windows 98 users can find the driver necessary for the device on the accompanying CD.
1) Controls for the TrekStor i.Beat vision
2) Charge the TrekStor i.Beat vision
Charge the i.Beat vision for at least three hours before using it for the first time. The device starts charging
as soon as you connect it to a PC. The battery is charged after a maximum of three hours; charging automatically
stops to prevent overcharging.
Note: The maximum battery life is only reached after approximately 10 charging cycles.
3) Connecting the TrekStor i.Beat vision to a PC
Note for users of Windows 98: First install the driver from the accompanying CD before connecting the
i.Beat vision to your PC.
Use the provided USB connection cable to connect the i.Beat vision to a USB port in your PC. Your
operating system will immediately recognize the i.Beat vision and will add a "Device with Removable
Storage" under "My Computer".
A Line-in jack
B Microphone
C Loop for attaching the neck strap
D Earphone jack
E Mode button
F Record button
G Equalizer button
H Playback / pause / stop button
I Navigation cross ( / / / )
J USB port
K Menu button
L USB host port
M switch (button lock)

– 10 –
EN
– 10 –
4) Exchanging data with the TrekStor i.Beat vision
Files that are not copy-protected
a) Select the desired files (such as MP3) with the mouse. Copy these files by clicking them with
your right mouse button and then selecting "Copy".
b) Under "My Computer", select the device with removable storage, "TrekStor i.Beat vision".
c) Click it with your right mouse button, and select "Paste" to start copying. After copying is over,
the data will be available on the i.Beat vision.
WMA DRM9-protected files
To copy DRM9-protected files, you need to copy them using Windows Media® Player
(reference version: Windows Media® Player 9).
a) Connect your MP3 player to your computer, and start Windows Media® Player.
b) Left-click the task bar on "Copy to CD or Device".
c) Drag the desired music files (WMA) to the list "Items to Copy" on the left.
d) In the pulldown menu at the top right, select the MP3 player under "Items on Device".
e) Then click the "Copy" button at the top right. The selected music will then be automatically
copied to your MP3 player.
5) Logging off and disconnecting the TrekStor i.Beat vision from the PC
Windows 98 (SE) Look for i.Beat vision under "Device Manager" (under "Drives"), and click the device
with the left mouse button. Select the menu item "Remove". You can now disconnect the i.Beat vision
from the PC.
Windows 2000/ME/XP Click with the left mouse button at the bottom right on the task bar, click the symbol
"Safely Remove Hardware". In the context menu that appears, click the left mouse button on "Safely Remove
Mass Storage Device – Drive" to select it. You can now disconnect the i.Beat vision from the PC.
Note: Please follow the recommended logoff procedure to prevent damage to the device or data loss.
– 11 –
– 11 –
EN
6) Using the TrekStor i.Beat vision
Turning the device on and off
To turn on the i.Beat vision, hold down the button for approximately 2 seconds. To turn off the
i.Beat vision, also hold the button for approximately 2 seconds.
Note: When you turn the device off, make sure that no audio, video or image file is playing, recording or displayed.
Note: Make sure that the switch is in the right position, i.e., that the key lock is turned off.
Folder Navigation
Quickly press the button to go to Folder Navigation. Press the navigation cross down or up to
select the next or prior file. To play the selected file, press the navigation cross to the right . To switch
to a subfolder, press the navigation cross to the right after the folder is selected (blue background).
To return to the main directory, press the navigation cross to the left . Continue navigation as usual.
Press the button to leave Folder Navigation.
Note: In Folder Navigation, only the current files of the most recently selected mode are displayed (i.e., only music
files are displayed when you are in the "Music" mode).
To go to the expanded Folder Navigation where all the files of the different modes are displayed, you need to
press the button twice quickly. In the expanded Folder Navigation, you can start any file from a different
mode, no matter which mode you are in.
Deleting files or folders
Make sure that no file is playing when you want to delete a file or folder. Quickly press the button to go
to the Folder Navigation. Press the button to delete a file or folder. Use the / buttons of the
navigation cross to select "Yes", and confirm the security prompt by pressing the button.
Note: A folder must be empty before it can be deleted.
Different modes
The i.Beat vision has different modes (music, FM radio, record, multimedia, pictures, text, USB host). To go
to a mode, hold the button for approximately one second. Press the / buttons of the navigation
cross to select the desired mode, and confirm your selection by pressing navigation cross to the right .
Note: When you switch modes, make sure that no audio, video or image file is playing, recording or displayed.
– 12 –
EN
– 12 –
Mode: Music
Switch to "Music" mode.
• Playback
Briefly press the button to start playing back an audio file.
• Pause
Briefly press the button to stop playback. Repress the button to continue playback.
• Change song
Briefly press the navigation cross to the right or left to change the current song. Press the navi-
gation cross to the right to switch to the next song. Press the navigation cross to the left to
switch to the preceding song.
• Rewind / fast-forward within a song
Hold down the navigation cross to the right or left to fast-forward or rewind within a song. Press
the navigation cross to the right to fast-forward. Press the navigation cross to the left to rewind.
Note: The longer you hold the / buttons of the navigation cross in one direction, the faster the device
will go forward or rewind.
• Volume increase / volume decrease
Briefly press the navigation cross up or down to increase or decrease the volume.
Note: The longer you hold the / buttons of the navigation cross in one direction, the faster the volume
will increase or decrease.
Mode: FM radio
Switch to "FM Radio" mode.
Note: Always connect your earphones to the i.Beat vision since the earphone cable serves as an antenna for
the internal radio.
• Automatic station search with memory
Briefly press the button to activate the automatic station search. The station with the strongest reception
will be saved during the search. Briefly press the button to stop the automatic station search.

– 13 –
– 13 –
EN
• Manual station search with memory
Briefly press the button to go from "Station Memory" mode to manual station search. Briefly press
the / buttons to change the reception frequency by 0.05 MHz. After pressing the / buttons for
a sufficient length of time, the device automatically searches for the station with the next best reception.
To save the selected station, press the button, select a station memory with the / buttons,
and confirm that it should be saved by pressing the button.
• Change saved stations
Briefly press the / buttons in "Station Memory" mode to switch between the available memories.
• Recording FM radio
Press the button longer than one second to start recording FM radio. Briefly press the
button to end recording.
Note: All FM radio recordings are saved under the "RECORD" folder in the "FM" subfolder.
Mode: Record
Switch to "Record" mode.
Use the navigation cross to make different recording settings. Press the / buttons to switch between
settings. Press the / buttons to change settings.
• Line-In recording
You can connect an external device to the Line-In jack (such as a CD player) and directly record from it. Select
"LINE-IN" as the source, and confirm by pressing the button. Briefly press the button to start
recording. Stop recording by pressing the button.
Note: All Line-In recordings are saved under the "RECORD" folder in the "LINEIN" subfolder.
• Recording with the microphone
You can record your voice using the integrated microphone. Select "MICRO" as the source, and confirm by
pressing the button. Briefly press the button to start recording. Stop recording by pressing
the button.
Note: All voice recordings are saved under the "RECORD" folder in the "VOICE" subfolder.
– 14 –
EN
– 14 –
Mode: Multimedia
Switch to "Multimedia" mode.
You can watch movie files (*.TOM) in "Multimedia" mode. To create movie files in TOM format, please use the
"TOM transcoder" on the accompanying CD.
The device is operated the same way in "Multimedia" mode as it is in "Music" mode. Press the button
during playback to display an OSD menu.
Mode: Pictures
Switch to "Picture" mode.
Use the navigation cross to select a picture file (*.jpg) in Folder Navigation, and display it by pressing the
button. Press the navigation cross to the right or left to go to the next or previous picture. Briefly
press the button to start a slide show. Briefly press the navigation cross up or down to change the
length a slide is shown in the slide show. Stop the slide show by pressing the button.
Note: All pictures must be in JPG format. Large pictures are automatically shown smaller which can lengthen the
loading time.
Mode: Text
Switch to "Text" mode.
Select a text file (*.txt) in Folder Navigation, and display it by pressing the button. Press the navigation cross
down or up to read the text line by line. Press the navigation cross right or left to read the
text page by page. Briefly press the button to automatically turn text loading on or off (page-wise). Briefly
press the navigation cross up or down to change the length of time a text is shown.
– 15 –
– 15 –
EN
Mode: USB host
Switch to "USB host" mode.
In the display, the message appears: "Wait for USB connection". In this mode, you can copy files from another
USB device to the i.Beat vision. Connect the USB host adapter included in the delivery to the USB host
connection in the i.Beat vision, and connect the desired USB device to the USB host adapter.
The i.Beat vision quickly detects the connected USB device that is displayed as a "Device" in the Folder
Navigation. Use the navigation cross to access as usual the files in connected USB device. Press the
button to copy a file to the i.Beat vision, and confirm the copying process with "Yes" by pressing
button again.
Note: All copied files are in the "USBHOST" folder.
Note: Given the very wide variety of different USB devices, TrekStor cannot guarantee compatibility with devices from
every manufacturer. Usually, however, there is no problem transferring data from other devices.
7) Settings
Press the button for one second to retrieve the settings menu.
Use the navigation cross to navigate through the different settings (General, Display, Timer, Modes, Sound,
Record and System), and confirm your selection by pressing the button.
Note: Folder Navigation may not be activated.
8) Support and contact
If you have questions regarding our products or need help, please contact use through our e-mail or
telephone support. The contact data can be found on the back of these quick guides or on our website
at http://www.trekstor.de/support.
Note:
• This MP3 player is optimized for the provided earphones (32 Ohm impedance). Using other earphones with a lower impedance can damage the
MP3 player or earphone, especially MP3 players with 2 earphone jacks.
• Note: This device can produce high volumes. To prevent hearing loss, do not listen to high volumes for long periods. Do not use in street traffic.
• Do not use USB cables longer than 3 meters.
The manufacturer retains the right to continuously improve the product. These changes may be made without being directly described in
these quick guides. For this reason, the information provided in these guick guides may not reflect the current state of the art.
The manufacturer only guarantees suitability for the product"s intended purpose. In addition, the manufacturer is not responsible for
damages or loss of data and subsequent consequences.
Copyright © 2006 TrekStor GmbH & Co. KG. All rights retained. Other cited product or company names may be trademarks or brand names
of the respective owner.
– 16 –
FR
– 16 –
GUIDE ABRÉGÉ
Nous vous félicitons pour l’achat du TrekStor i.Beat vision et nous sommes certains que vous allez avoir
beaucoup de plaisir avec ce produit.
Les utilisateurs de Windows 98 trouveront le pilote nécessaire à l’utilisation de cet appareil sur le CD ci-joint.
1) Eléments de commande du TrekStor i.Beat vision
2) Chargement du TrekStor i.Beat vision
Avant la première utilisation, chargez le i.Beat vision pendant au moins 3 heures. Dès que vous
connectez l’appareil à un PC, il se charge automatiquement. Au bout de 3 heures maximum, la batterie est
chargée et la procédure de chargement se termine alors automatiquement afin d’éviter une surcharge.
Remarque : la capacité maximale de la batterie n’est atteinte qu’après environ 10 cycles de charge.
3) Connexion du TrekStor i.Beat vision à un PC
Remarque pour les utilisateurs de Windows 98 : installez en premier lieu le pilote se trouvant sur le CD livré avant
de raccorder le i.Beat vision à votre PC !
Utilisez le câble de raccordement USB livré et raccordez le i.Beat vision à un port USB de votre PC.
Votre système d’exploitation détecte automatiquement le i.Beat vision et ajoute un « Disque amovible »
sur le « Bureau ».
A Prise Line-In
B Microphone
C Œillet pour la fixation de la bandoulière
D Prise pour écouteurs
E Touche de modes
F Touche d’enregistrement
G Touche d’égaliseur
H Touche de lecture / pause / stop
I Croix de navigation ( / / / )
J Prise USB
K Touche de menu
L Prise hôte USB
M Curseur (clé de verrouillage)

– 17 –
– 17 –
FR
4) Echange de données avec TrekStor i.Beat vision
Fichier sans protection de copie
a) Marquez les fichiers souhaités avec la souris (MP3 par ex.). Copiez ces derniers en appuyant sur
le bouton droit de la souris (« Copier »).
b) Sur le « Bureau », sélectionnez le disque local « TrekStor i.Beat vision ».
c) Appuyez sur le bouton droit de la souris et sélectionnez l’option « Insérer » afin de lancer la procédure de
copie. Après clôture de la procédure de copie, les données sont enregistrées sur le i.Beat vision.
Fichiers protégés par la fonction WMA-DRM9
Pour copier des fichiers protégés par DRM9, vous devez tout d’abord copier ces derniers par l’intermédiaire
de Windows Media® Player (version de référence : Windows Media® Player 9).
a) Reliez le lecteur MP3 avec votre ordinateur et démarrez Windows Media® Player.
b) Dans la barre des tâches, cliquez sur « Copier sur un CD ou un périphérique ».
c) Déplacez les fichiers musicaux souhaités (WMA) dans la liste « Musique à copier » sur le côté gauche.
d) Dans le menu déroulant apparaissant en haut à droite, sélectionnez le lecteur MP3 sous
« Musique sur le périphérique ».
e) Cliquez ensuite en haut à droite sur le bouton « Copier ». La musique sélectionnée est ensuite
automatiquement copiée sur le lecteur MP3.
5) Déconnexion et séparation du TrekStor i.Beat vision du PC
Windows 98 (SE) Recherchez le i.Beat vision dans le « Gestionnaire de périphériques » (sous « Disques »)
et cliquez sur le périphérique avec le bouton gauche de la souris. Cliquez sur le point de menu « Supprimer ».
Vous pouvez maintenant déconnecter le i.Beat vision du PC.
Windows 2000/ME/XP Avec le bouton gauche de la souris, cliquez en bas à droite dans la « barre des
tâches » sur le symbole « Déconnexion ou éjection de matériel ». Un menu contextuel est affiché.
Sélectionnez ici le point « Périphérique de stockage de masse USB – Supprimer le disque » en cliquant sur le
bouton gauche de souris. Vous pouvez maintenant déconnecter le i.Beat vision du PC.
Remarque : pour éviter des détériorations sur l’appareil et des pertes de données, suivez scrupuleusement la procédure
de déconnexion recommandée !
– 18 –
FR
– 18 –
6) Utilisation du TrekStor i.Beat vision
Allumer et éteindre
Pour allumer le i.Beat vision, maintenez la touche enfoncée pendant environ 2 secondes. Pour
éteindre de nouveau le i.Beat vision, appuyez également pendant environ 2 secondes sur la touche .
Remarque : lorsque vous éteignez l’appareil, assurez-vous que aucun fichier audio, vidéo ou image ne soit diffusé,
enregistré ou affiché.
Remarque : veillez à ce que le curseur se trouve dans la position de droite, c’est-à-dire que la clé de
verrouillage soit désactivée.
Navigation de dossiers
Appuyez brièvement sur la touche afin d’accéder à la navigation de dossiers. Appuyez sur la touche bas
ou haut de la croix de navigation et le fichier suivant ou précédent est sélectionné. Pour lancer la lecture
du fichier sélectionné, appuyez sur la touche droite de la croix de navigation . Pour passer dans un sous-
dossier, appuyez sur la touche droite de la croix de navigation lorsque le dossier est sélectionné (sur fond
bleu). Afin de revenir dans le répertoire principal, appuyez sur la touche gauche de la croix de navigation .
Continuez à naviguer comme à l’habitude. Appuyez sur la touche pour quitter la navigation de dossiers.
Remarque : dans la navigation de dossiers, seuls les fichiers actuels du mode actuellement sélectionné sont affichés
(c’est-à-dire seuls des fichiers musicaux sont affichés, à condition que vous vous trouviez en mode « Music »).
Afin d’accéder à la navigation de dossiers étendue, dans laquelle se trouve tous les fichiers des différents modes,
vous devez brièvement appuyer 2 fois sur la touche . Dans la navigation de dossiers étendue, vous pouvez
démarrer un fichier quelconque à partir d’un autre mode, quel que soit le mode dans lequel vous vous trouviez
actuellement.
Effacer un fichier ou un dossier
Veillez à ce que aucun fichier ne soit diffusé lorsque vous souhaitez effacer un fichier ou un dossier. Appuyez
brièvement sur la touche afin d’accéder à la navigation de dossiers. Pour effacer un dossier/fichier, appuyez
sur la touche . A l’aide des touches / de la croix de navigation , passez sur « Yes » et confirmez
la requête de sécurité en appuyant sur la touche .
Remarque : un dossier doit impérativement être vide lorsqu’il doit être effacé !
Les différents modes
L’appareil i.Beat vision possède différents modes (Musique, Radio FM, Enregistrement, Multimédia, Images,
Texte, Hôte USB). Pour accéder à un mode, maintenez la touche enfoncée pendant environ une seconde.
En appuyant sur les touches / de la croix de navigation , sélectionnez le mode souhaité et confirmez
votre sélection en appuyant sur la touche droite de la croix de navigation .
Remarque : lorsque vous changez de mode, assurez-vous que aucun fichier audio, vidéo ou image ne soit diffusé,
enregistré ou affiché.
– 19 –
– 19 –
FR
Mode : Musique
Passez dans le mode « Music ».
• Lecture
Appuyez sur la touche pour démarrer la lecture d’un fichier audio.
• Pause
Appuyez brièvement sur la touche pour stopper la lecture. En appuyant de nouveau sur la touche
, la lecture est poursuivie.
• Changer de titre
Vous pouvez changer de titre en appuyant brièvement sur la touche droite ou gauche de la croix
de navigation . Appuyez sur la touche droite de la croix de navigation pour passer au titre
suivant. Appuyez sur la touche gauche de la croix de navigation pour passer au titre précédent.
• Avancer / rembobiner dans un titre
Vous pouvez vous déplacer dans un titre en appuyant plus longuement sur la touche droite ou gauche
de la croix de navigation . Appuyez sur la touche droite de la croix de navigation pour avancer
dans un titre. Appuyez sur la touche gauche de la croix de navigation pour reculer dans un titre.
Remarque : plus vous maintenez les touches / de la croix de navigation enfoncée dans une direction,
plus l’appareil reculera/avancera vite.
• Monter/baisser le volume
Appuyez brièvement sur les touches haut ou bas de la croix de navigation pour augmenter ou
réduire le volume
Remarque : plus vous maintenez les touches / de la croix de navigation enfoncée dans une direction,
plus le volume sera rapidement augmenté ou réduit.
Mode : Radio FM
Passez dans le mode « FM Radio ».
Remarque : veillez toujours à raccorder vos écouteurs au i.Beat vision étant donné que le câble des écouteurs
sert en même temps d’antenne pour la radio interne.
• Recherche automatique de station avec mémorisation
Appuyez brièvement sur la touche pour activer la recherche automatique de stations. Pendant la
recherche, toutes les stations avec le signal le plus puissant sont mémorisées. Appuyez brièvement sur la
touche pour interrompre la recherche automatique de stations.
– 20 –
FR
– 20 –
• Recherche manuelle de station avec mémorisation
Appuyez brièvement sur la touche afin d’accéder à la recherche manuelle de stations à partir
du mode d’emplacement de mémorisation « Station Memory ». En appuyant brièvement sur les
touches / , vous pouvez respectivement changer la fréquence de réception de 0,05 MHz. Si vous
maintenez les touches / assez longtemps enfoncées, l’appareil recherche automatiquement la
station suivante avec le signal le plus puissant. Pour mémoriser la station sélectionnée, appuyez sur la
touche , sélectionnez l’emplacement de mémorisation de la station avec les touches /
et confirmez la mémorisation en appuyant sur la touche .
• Modifier des stations mémorisées
En appuyant brièvement sur les touches / dans le mode d’emplacement de mémorisation « Station
Memory », vous pouvez permuter entre les emplacements de mémorisation existants.
• Enregistrement à partir de Radio FM
Appuyez sur la touche pendant plus d’une seconde afin de lancer l’enregistrement à partir de
la radio FM. Appuyez brièvement sur la touche pour mettre fin à l’enregistrement.
Remarque : tous les enregistrements de la Radio FM sont mémorisés dans le dossier « RECORD », sous-dossier
« FM ».
Mode : Enregistrement
Passez dans le mode « Record ».
Vous pouvez régler différents paramètres d’enregistrement à l’aide de la croix de navigation . Appuyez
sur les touches / pour permuter entre les paramètres. Appuyez sur les touches / pour modifier
les paramètres.
• Enregistrement via Line-In
De l’entrée Line-In, vous pouvez brancher un appareil externe (un lecteur de CD par ex.) et exécuter des
enregistrements directs à partir de cet appareil. Sélectionnez « LINE-IN » comme source et confirmez en
appuyant sur la touche . Appuyez brièvement sur la touche pour lancer l’enregistrement.
Terminez l’enregistrement en appuyant brièvement sur la touche .
Remarque : tous les enregistrements Line-In sont mémorisés dans le dossier « RECORD », sous-dossier « FM ».
• Enregistrement avec le microphone
Vous pouvez effectuer des enregistrements vocaux par l’intermédiaire du microphone intégré.
Sélectionnez « MICRO » comme source et confirmez en appuyant sur la touche . Appuyez brièvement
sur la touche pour lancer l’enregistrement. Terminez l’enregistrement en appuyant
brièvement sur la touche .
Remarque : tous les enregistrements vocaux sont mémorisés dans le dossier « RECORD », sous-dossier « VOICE ».
– 21 –
– 21 –
FR
Mode : Multimédia
Passez dans le mode « Multimedia ».
Dans le mode « Multimedia » vous pouvez visualiser des fichiers de films (*.TOM). Pour créer des fichiers de
films au format TOM, utilisez le « TOM transcoder » contenu sur le CD ci-joint.
L’utilisation du mode « Multimedia » est identique à l’utilisation du mode « Music ». Un menu OSD apparaît
lorsque vous appuyez sur la touche pendant la lecture.
Mode : Images
Passez dans le mode « Picture ».
Sélectionnez un fichier image (*.jpg) dans la navigation de dossiers à l’aide de la croix de navigation et
démarrez ce dernier en appuyant sur la touche . Appuyez sur la touche droite ou gauche de la croix
de navigation pour passer à l’image suivante ou précédente. Appuyez brièvement sur la touche pour
lancer la séance de diapos. Appuyez brièvement sur la touche haut ou bas de la croix de navigation
pour modifier la durée d’affichage d’une image lors de la séance de dias. Vous terminez la séance de diapos
en appuyant de nouveau sur le bouton .
Remarque : toutes les images doivent exister au format JPG. De grandes images sont automatiquement réduites, ce
qui peut conduire à des délais de chargement plus longs.
Mode : Texte
Passez dans le mode « Text ».
Sélectionnez un fichier texte (*.txt) dans la navigation de dossiers et démarrez ce dernier en appuyant sur la
touche . Appuyez sur la touche bas ou haut de la croix de navigation pour lire le texte par ligne.
Appuyez sur la touche droite ou gauche de la croix de navigation pour lire le texte par page.
Appuyez brièvement sur la touche pour activer ou désactiver un chargement automatique du texte
(par page). Appuyez brièvement sur le bouton haut ou bas de la croix de navigation pour modifier
la durée d’affichage du texte.
– 22 –
FR
– 22 –
Mode : Hôte USB
Passez dans le mode « USB host ».
Le message « Wait for USB connection » apparaît sur l’écran. Dans ce mode, vous pouvez copier desfichiers
d’un autre appareil USB sur i.Beat vision. A cet effet, raccordez l’adaptateur hôte USB livré avec l’appareil
à la prise hôte USB de i.Beat vision. Raccordez ensuite l’appareil USB souhaité avec l’adaptateur hôte USB.
Après un bref délai, i.Beat vision détecte l’appareil USB raccordé qui est affiché dans la navigation de
dossiers comme « Device ». A l’aide de la croix de navigation , vous pouvez accéder comme à l’habitude aux
fichiers de l’appareil USB raccordé. Appuyez sur la touche , afin de copier un fichier sur i.Beat vision et
confirmez la procédure de copie avec « Yes » en appuyant également sur la touche .
Remarque : tous les fichiers copiés sont enregistrés dans le dossier « USBHOST ».
Remarque : en raison du choix très étendu d’appareils USB, TrekStor n’est pas en mesure de garantir la compatibilité
avec les appareils de tous les fabricants. En règle générale, le transfert de données devrait cependant fonctionner
sans problème avec d’autres appareils.
7) Paramètres
Appuyez sur la touche pendant une seconde afin d’appeler le menu des paramètres.
A l’aide de la croix de navigation , parcourez les différents paramètres (Général, Ecran, Minuteur, Modes,
Sonorité, Enregistrement et Système) et confirmez votre sélection en appuyant sur la touche .
Remarque : notez que la navigation de dossiers ne doit pas être activée.
8) Assistance technique et contact
Vous avez des questions concernant nos produits ou vous avez besoin d’aide, n’hésitez alors pas à vous
adresser à notre service d’assistance technique par e-mail ou par téléphone. Nous répondrons avec plaisir à
vos questions. Les coordonnées de contact figurent au dos de ce guide abrégé ou sur notre site Internet à
l’adresse http://www.trekstor.de/support.
Remarques :
• Ce lecteur MP3 est optimisé pour les écouteurs livrés avec l’appareil (impédance de 32 ohms). En particulier sur des lecteurs MP3 avec 2 sorties
d’écouteurs, l’utilisation d’autres écouteurs avec une faible impédance peut entraîner dans certains cas la détérioration du lecteur MP3 ou
également des écouteurs.
• Attention : cet appareil peut générer des intensités sonores importantes. Afin d’éviter des troubles auditifs, il est déconseillé d’écouter de manière
prolongée avec des intensités sonores élevées. Il est interdit d’utiliser l’appareil pendant la circulation routière.
• L’utilisation de câbles USB d’une longueur supérieure à 3 m est déconseillée.
Le fabricant se réserve le droit de poursuivre le développement du produit en permanence. Ces modifications peuvent être réalisées
sans description directe dans ce guide abrégé de l'utilisateur. Les informations contenues dans ce guide abrégé ne reflètent donc pas
impérativement l'état d'exécution technique.
Le fabricant garantit uniquement la fonctionnalité pour la définition intrinsèque de ce produit. En outre, le fabricant n’endosse aucune
responsabilité concernant les dommages ou pertes de données subis ainsi que les conséquences en résultant.
Copyright © 2006 TrekStor GmbH & Co. KG. Tous droits réservés. Toutes les autres désignations de produits ou de firmes citées sont dans
certains cas des marques déposées ou des noms de marques du propriétaire respectif.
– 23 –– 23 –
IT
GUIDA RAPIDA
Congratulazioni per l’acquisto di TrekStor i.Beat vision. Questo prodotto sarà sicuramente motivo di
grande soddisfazione.
Per gli utenti di Windows 98 è disponibile il driver specifico per questo apparecchio sul CD fornito in allegato al prodotto.
1) Comandi di TrekStor i.Beat vision
2) Caricamento di TrekStor i.Beat vision
Prima di procedere al primo impiego, ricaricare i.Beat vision per almeno 3 ore. Non appena si collega
l’apparecchio al PC, la ricarica si avvia in modo automatico. Dopo al massimo 3 ore, la batteria è completa-
mente ricaricata ed il processo di ricarica viene concluso in modo automatico per evitare un sovraccarico.
Nota: la durata massima della batteria si ottiene solo dopo circa 10 cicli di ricarica.
3) Collegamento di TrekStor i.Beat vision ad un PC
Nota per gli utenti Windows 98: installare innanzitutto il driver che si trova nel CD fornito in allegato prima di
collegare i.Beat vision al PC.
Utilizzare il cavo di collegamento USB fornito in allegato al prodotto e collegare i.Beat vision ad una
connessione USB disponibile sul PC. Il sistema operativo individua in modo automatico i.Beat vision
e aggiunge a "Risorse del computer" una "Periferica di archiviazione di massa".
A Connessione line-in
B Microfono
C Occhiello per il fissaggio della banda a tracolla
D Connessione per cuffie
E Pulsante modalità
F Pulsante registrazione
G Pulsante equalizzatore
H Pulsante riproduzione / pausa / stop
I Crocetta di navigazione ( / / / )
J Connessione USB
K Pulsante menu
L Connessione USB Host
M Levetta (blocco pulsanti)

– 24 –
IT
– 24 –
4) Scambio di dati con TrekStor i.Beat vision
File non protetti da copia
a) Evidenziare i file desiderati (ad. es. MP3) con il mouse. Copiarli premendo il pulsante destro del mouse ("Copia").
b) Selezionare la periferica di archiviazione di massa "TrekStor i.Beat vision" all’interno delle
"Risorse del computer".
c) Premere il pulsante destro del mouse e selezionare l’opzione "Incolla" per avviare il processo
di copia. Al termine del processo di copia, i dati saranno presenti su i.Beat vision.
File protetti WMA DRM9
Per copiare i file protetti DRM9 è necessario eseguire la copia con Windows Media® Player
(versione di riferimento: Windows Media® Player 9).
a) Collegare il lettore MP3 al computer e lanciare Windows Media® Player.
b) Fare clic a sinistra nella barra delle applicazioni su "Copia su CD o dispositivo".
c) Trascinare i file audio desiderati (WMA) nell’elenco "Elementi da copiare" sul lato sinistro.
d) Selezionare nel menu a discesa a destra in alto il lettore MP3 in "Elementi nel dispositivo".
e) Fare clic in alto a destra sul pulsante "Copia". A questo punto la musica selezionata viene copiata sul lettore
MP3 in modo automatico.
5) Disinstallazione di TrekStor i.Beat vision e scollegamento dal PC
Windows 98 (SE) cercare il dispositivo in "Gestione periferiche" (in "Periferiche") e fare clic sulla periferica
con il pulsante sinistro. Selezionare la voce del menu "Rimuovi". A questo punto è possibile scollegare
i.Beat vision dal PC.
Windows 2000/ME/XP fare clic con il pulsante sinistro mouse a destra in basso sulla "barra delle applicazioni"
sull’icona "Rimozione sicura dell’hardware". Dal menu contestuale che viene visualizzato su schermo
selezionare la voce "Rimozione sicura Periferica di archiviazione di massa USB" facendo clic con il pulsante
sinistro del mouse. A questo punto è possibile scollegare i.Beat vision dal PC.
Nota: seguire il processo di disinstallazione suggerito per evitare di causare danni alla periferica o eventuali perdite
di dati.
– 25 –
– 25 –
IT
6) Funzionamento di TrekStor i.Beat vision
Attivazione e disattivazione
Per attivare i.Beat vision, tenere premuto il pulsante per 2 secondi circa. Per disattivare nuovamente
i.Beat vision, tenere il premuto pulsante per 2 secondi circa.
Nota: accertarsi che in fase di disattivazione non siano in corso processi di riproduzione, registrazione o
visualizzazione di file audio, video o immagine.
Nota: accertarsi che la levetta si trovi nella posizione a destra e che il blocco pulsanti sia disattivato.
Navigazione a cartelle
Premere rapidamente il pulsante per accedere alla navigazione a cartelle. Premendo la crocetta di navi-
gazione verso il basso o verso l’alto si seleziona il file successivo o quello precedente. Per riprodurre
il file selezionato, premere la crocetta di navigazione verso destra . Per passare ad una sottocartella,
premere la crocetta di navigazione verso destra se la cartella è selezionata (visualizzata in blu). Per ritornare
nuovamente nella directory principale, premere la crocetta di navigazione verso sinistra . A questo punto
è possibile continuare a navigare come sempre. Premendo nuovamente il pulsante si esce dalla navigazione
a cartelle.
Nota: nella navigazione a cartelle sono visualizzati solamente i file correnti relativi alla modalità selezionata (vale a
dire che sono visualizzati solamente i file di musica, se ci si trova in modalità "Music").
Per accedere alla navigazione a cartelle estesa, in cui sono visualizzati tutti file relativi alle diverse modalità, è
necessario premere rapidamente il pulsante 2 volte. A prescindere dalla modalità in cui ci si trova, nella
navigazione a cartelle estesa è possibile lanciare il file desiderato a partire da un’altra modalità.
Eliminazione file o cartelle
Si noti che non è possibile riprodurre nessun file se si desidera eliminare un file o una cartella. Premere
rapidamente il pulsante per accedere alla navigazione a cartelle. Per effettuare l’eliminazione, premere
il pulsante . Utilizzando i pulsanti e della crocetta di navigazione selezionare "Yes" e
confermare la richiesta di conferma premendo il pulsante .
Nota: se si deve eliminare una cartella, questa deve essere vuota.
Le diverse modalità
i.Beat vision dispone di diverse modalità di funzionamento (musica, radio FM, registrazione, multimedia,
immagini, testo, USB host). Per accedere ad una modalità, tenere premuto il pulsante per un secondo
circa. Con i pulsanti / della crocetta di navigazione selezionare la modalità desiderata e confermare la
selezione premendo la crocetta di navigazione verso destra .
Nota: accertarsi che non siano in corso processi di riproduzione, registrazione o visualizzazione di file audio, video o
immagine durante la commutazione da una modalità all’altra.
– 26 –
IT
– 26 –
Modalità: musica
Passare alla modalità "Music".
• Riproduzione
Premere rapidamente il pulsante per avviare la riproduzione di un file audio.
• Pausa
Premere rapidamente il pulsante per arrestare la riproduzione. Premendo nuovamente il pulsante
viene fatta avanzare la riproduzione.
• Scorrimento brani
Premendo rapidamente la crocetta di navigazione verso destra o verso sinistra è possibile
passare al brano corrente. Premere la crocetta di navigazione verso destra per passare al brano
successivo. Premere la crocetta di navigazione verso sinistra per passare al brano precedente.
• Avanzamento / riavvolgimento di un brano
Premendo più a lungo la crocetta di navigazione verso destra o verso sinistra è possibile far
avanzare o riavvolgere il brano corrente. Premere la crocetta di navigazione verso destra per
effettuare l’avanzamento. Premere la crocetta di navigazione verso sinistra per effettuare il
riavvolgimento.
Nota: il dispositivo esegue avanzamenti e riavvolgenti tanto più rapidi quanto più a lungo rimangono premuti
i pulsanti / della crocetta di navigazione .
• Aumento / riduzione del volume
Premere rapidamente la crocetta di navigazione verso l’alto o verso il basso per aumentare o
ridurre il volume.
Nota: il dispositivo aumenta o riduce il volume tanto più rapidamente quanto più a lungo rimangono premuti
i pulsanti / della crocetta di navigazione in una direzione.
Modalità: FM Radio
Passare alla modalità "FM Radio".
Nota: collegare sempre le cuffie ad i.Beat vision perché il cavo delle cuffie funge da antenna per la radia interna.
• Ricerca automatica emittente con salvataggio
Premere rapidamente il pulsante per abilitare la ricerca automatica emittente. Durante la ricerca sono
memorizzate tutte le emittenti con una forte ricezione. Premere il pulsante per interrompere la
ricerca automatica emittente.
– 27 –
– 27 –
IT
• Ricerca emittente manuale con salvataggio
Premere rapidamente il pulsante per accedere alla ricerca automatica emittente a partire dalla
modalità di memorizzazione "Station Memory". Premendo rapidamente i pulsanti / è possibile
modificare la frequenza di ricezione di 0,05 MHz per volta. Se si tengono premuti i pulsanti / per
un periodo di tempo abbastanza prolungato, viene effettuata una ricerca sino all’emittente successiva
dotata della migliore ricezione. Per memorizzare l’emittente selezionata, premere i pulsante ,
selezionare uno spazio in memoria con i pulsanti / e confermare l’operazione di salvataggio
premendo il pulsante .
• Scorrimento delle emittenti memorizzate
Premendo rapidamente i pulsanti / in modalità di memorizzazione "Station Memory", è possibile
scorrere le diverse posizioni di memoria presenti.
• Registrazione dalla radio FM
Premere il pulsante più a lungo di un secondo per avviare la registrazione dalla radio FM.
Premere rapidamente il pulsante per terminare la registrazione.
Nota: tutte le registrazioni radio FM sono salvate nella cartella "RECORD", sottocartella "FM".
Modalità: registrazione
Passare alla modalità "Record".
Con la crocetta di navigazione è possibile impostare le diverse configurazioni per effettuare le registrazioni.
Premendo i pulsanti / è possibile scorrere le diverse impostazioni. Premendo i pulsanti / è possibile
modificare le diverse impostazioni.
• Registrazione con line-in
Con l’ingresso Line-In è possibile collegare un dispositivo esterno (ad es. un lettore CD) per eseguire
registrazioni direttamente da quest’ultimo. Selezionare "LINE IN" come sorgente e confermare la selezione
premendo il pulsante . Premere rapidamente il pulsante per avviare la registrazione. Terminare
la registrazione premendo rapidamente il pulsante ancora una volta.
Nota: tutte le registrazioni Line In sono salvate nella cartella "RECORD", sottocartella "LINEIN".
• Registrazione con microfono
Con il microfono integrato è possibile eseguire le registrazioni del parlato. Selezionare "MICRO" come
sorgente e confermare la selezione premendo il pulsante . Premere rapidamente il pulsante
per avviare la registrazione. Terminare la registrazione premendo rapidamente il pulsante
ancora una volta.
Nota: tutte le registrazioni del parlato sono salvate nella cartella "RECORD", sottocartella "VOICE".
– 28 –
IT
– 28 –
Modalità: multimedia
Passare alla modalità "Multimedia".
In modalità "Multimedia" è possibile visualizzare file di filmati (*.TOM). Per la realizzazione di file di filmati in
formato TOM, utilizzare "TOM transcoder" presente sul CD fornito in allegato al prodotto.
Il funzionamento in modalità "Multimedia" è identico al funzionamento della modalità "Music". Premendo il
pulsante durante la riproduzione viene visualizzato un menu OSD.
Modalità: immagini
Passare alla modalità "Picture".
Con la crocetta di navigazione selezionare un file immagine (*.jpg) nella navigazione a cartelle e lanciarlo
premendo il pulsante . Premere la crocetta di navigazione verso destra o verso sinistra per passare
all’immagine successiva o a quella precedente.
Premere rapidamente il pulsante per avviare una presentazione di diapositive. Premendo rapidamente la
crocetta di navigazione verso l’alto o verso il basso è possibile modificare la durata della visualizza-
zione di un’immagine nel corso di una presentazione di diapositive. Premendo nuovamente il pulsante si
termina la presentazione di diapositive.
Nota: tutte le immagini devono essere in formato JPG. Le immagini di dimensioni maggiori sono rappresentate in
scala ridotta in modo automatico, operazione che può provocare tempi di caricamento maggiori.
Modalità: testo
Passare alla modalità "Text".
Selezionare un file di testo (*.txt) nella navigazione a cartelle e lanciarlo premendo il pulsante . Premere la
crocetta di navigazione verso il basso o verso l’alto per leggere il testo riga per riga. Premere la cro-
cetta di navigazione verso destra o verso sinistra per leggere il testo pagina per pagina. Premere
rapidamente il pulsante per attivare o disattivare il caricamento automatico del testo (pagina per pagina).
Premendo rapidamente la crocetta di navigazione verso l’alto o verso il basso è possibile impostare
la durata della visualizzazione del testo.
– 29 –
– 29 –
IT
Modalità: USB Host
Passare alla modalità "USB host".
Sul display viene visualizzato il messaggio "Wait for USB connection". In questa modalità è possibilecopiare i
dati di un’altra periferica USB su i.Beat vision. Per completare questa operazione collegare l‘adattatore USB
Host incluso nel volume di consegna alla connessione USB Host presente su i.Beat vision e collegare la
periferica USB all’adattatore USB Host. Dopo un alcuni istanti i.Beat vision individua la periferica USB
collegata che viene visualizzata come "Device" all’interno della navigazione a cartelle. Con la crocetta di navi-
gazione è possibile avere accesso, come sempre, ai file della periferica USB collegata. Premere il pulsante
per copiare un file su i.Beat vision e confermare il processo di copia con "Yes" premendo il pulsante .
Nota: tutti i dati copiati si trovano nella cartella "USBHOST".
Nota: a causa della vasta gamma di periferiche USB, TrekStor non è in grado di garantire la compatibilità con i
dispositivi di tutti i produttori. Tuttavia il trasferimento dati con altri dispositivi dovrebbe funzionare in generale in
modo corretto.
7) Impostazioni
Premere il pulsante per un secondo per richiamare il menu di configurazione.
Utilizzando la crocetta di navigazione scorrere le diverse impostazioni (generale, display, timer, modalità,
audio, registrazione e sistema) e confermare la selezione premendo il pulsante .
Nota: accertarsi che la navigazione a cartelle non sia abilitata.
8) Supporto e contatto
In caso si desideri porre eventuali domande in merito ai prodotti o fosse necessario un eventuale supporto, è
possibile rivolgersi all’assistenza telefonica o via e-mail. I dati relativi al contatto sono disponibili sul retro della
presente guida rapida o sul sito internet all’indirizzo http://www.trekstor.de/support.
Nota:
• Il lettore MP3 è ottimizzato per l’impiego delle cuffie in dotazione (impedenza pari a 32 Ohm). L’impiego di altre cuffie con un’impedenza minore
può provocare eventuali danni del lettore MP3 o anche delle cuffie stesse, in particolare nel caso dei lettori MP3 dotati di 2 uscite per cuffie.
• Attenzione: questo apparecchio è in grado di generare elevate intensità di volume. Per evitare eventuali danni all’udito, si sconsiglia un ascolto
prolungato con intensità di volume elevate. Non utilizzare nel traffico stradale.
• Si consiglia di evitare l’impiego di cavi USB con una lunghezza superiore ai 3 m.
Il produttore si riserva il diritto di effettuare ulteriori operazioni di miglioramento del prodotto in modo costante. Le modifiche possono
essere apportate senza fornirne una descrizione diretta all’interno della presente guida rapida. Le informazioni contenute nella presente
guida rapida non corrispondono necessariamente allo stato della versione tecnica.
Il produttore garantisce esclusivamente l’idoneità alle effettive disposizioni del presente prodotto. Il produttore non è inoltre responsabile
per i danni o le perdite di dati ed i danni secondari da essi derivanti.
Copyright © 2006 TrekStor GmbH & Co. KG. Tutti i diritti riservati. Nel caso siano presenti riferimenti ad eventuali prodotti o aziende, si tratta
di marchi di fabbrica o dei nomi dei marchi dei rispettivi proprietari.
– 30 –
ES
– 30 –
GUÍA RÁPIDA
Felicidades por la compra del TrekStor i.Beat vision. Estamos seguros de que disfrutará mucho tiempo
con este producto.
Los usuarios de Windows 98 encontrarán los controladores necesarios para el equipo en el CD suministrado.
1) Elementos de manejo del TrekStor i.Beat vision
2) Carga del TrekStor i.Beat vision
Antes de utilizar el i.Beat vision por primera vez, cargue la batería al menos 3 horas. Nada más conectar
el equipo a un PC, se carga automáticamente. La batería se carga en un máximo de 3 horas, y el proceso de
carga concluye de forma automática para evitar la sobrecarga.
Nota: La capacidad máxima de carga no se alcanza hasta haber recargado y descargado la batería unas 10 veces.
3) Conexión del TrekStor i.Beat vision con un PC
Nota para usuarios de Windows 98: ¡Instale primero los controladores suministrados en el CD antes de conectar el
i.Beat vision al PC!
Utilice el cable de conexión USB suministrado y conecte el i.Beat vision a un puerto USB del PC. El sistema
operativo reconocerá automáticamente el i.Beat vision y añadirá en "Mi PC" un "disco extraíble".
A Conexión de línea
B Micrófono
C Ojal para fijar la correa para colgar
D Conexión de los auriculares
E Tecla de modo
F Tecla de grabación
G Tecla de ecualizador
H Tecla de reproducción / pausa / detener
I Tecla de navegación ( / / / )
J Puerto USB
K Tecla de menú
L Puerto host USB
M Interruptor (bloqueo de teclas)

– 31 –
– 31 –
ES
4) Intercambio de datos con el TrekStor i.Beat vision
Archivos no protegidos contra copia
a) Marque los archivos deseados con el ratón (por ejemplo, MP3). Cópielos haciendo clic con el
botón derecho del ratón y seleccionando "Copiar".
b) En "Mi PC", seleccione el disco extraíble "TrekStor i.Beat vision".
c) Haga clic con el botón derecho del ratón y seleccione la opción "Pegar" para comenzar el
proceso de copia. Una vez finalizada la copia, los archivos estarán disponibles en el i.Beat vision.
Archivos protegidos por WMA-DRM9
Para copiar archivos protegidos por WMA-DRM9 deberá copiarlos con el Windows Media® Player
(versión de referencia: Windows Media® Player 9).
a) Conecte el reproductor de MP3 con el ordenador y abra Windows Media® Player.
b) A la izquierda de la barra de tareas, haga clic en "Copiar en CD o dispositivo".
c) Arrastre los archivos de música deseados (WMA) a la lista "Elementos para copiar" en la parte izquierda.
d) Seleccione en el menú desplegable de la derecha el reproductor de MP3 en "Elementos en el dispositivo".
e) A continuación, haga clic en el botón "Copiar" situado arriba a la derecha. La música seleccionada se
copia automáticamente en el reproductor de MP3.
5) Desconexión y retirada del TrekStor i.Beat vision del PC
Windows 98 (SE) Busque el i.Beat vision en el "Administrador de dispositivos" (en "Unidades") y haga
clic en el dispositivo con el botón izquierdo del ratón. Seleccione la opción del menú "Desinstalar". Ahora
puede retirar el i.Beat vision del PC.
Windows 2000/ME/XP Haga clic con el botón izquierdo del ratón en el símbolo "Quitar hardware con
seguridad" situado abajo a la derecha en la "barra de tareas". En el menú contextual que aparece, seleccione
"Dispositivo de almacenamiento masivo USB" y haga clic en "Detener" con el botón izquierdo del ratón.
Ahora puede retirar el i.Beat vision del PC.
Nota: ¡Siga el proceso de desconexión recomendado para evitar daños en el equipo o la pérdida de datos!
– 32 –
ES
– 32 –
6) Manejo del TrekStor i.Beat vision
Encendido y apagado
Para encender el i.Beat vision, mantenga pulsada la tecla durante 2 segundos. Para apagar el
i.Beat vision, mantenga pulsada igualmente la tecla unos 2 segundos.
Nota: Antes de apagar el equipo, asegúrese de que no se está reproduciendo, grabando ni mostrando ningún archivo
de audio, vídeo o imagen.
Nota: Tenga en cuenta que el interruptor ha de encontrarse en la posición derecha, es decir, el bloqueo de
teclas ha de estar desactivado.
Navegación de carpetas
Pulse brevemente la tecla para poder navegar por las carpetas. Pulsando la tecla de navegación abajo
o arriba , se marcará el archivo siguiente o anterior. Para reproducir el archivo seleccionado, pulse la tecla
de navegación a la derecha . Para pasar a una subcarpeta, pulse la tecla de navegación a la derecha
cuando la carpeta esté marcada (fondo azul). Para volver a la carpeta principal, pulse la tecla de navegación
a la izquierda . Siga navegando normalmente. Para salir del modo de navegación de carpetas, pulse la
tecla .
Nota: Durante la navegación de carpetas se muestran los archivos del modo seleccionado actualmente (es decir, se
mostrarán archivos de música si se encuentra en el modo "Music").
Para utilizar la función de navegación avanzada de carpetas en la que se muestran todos los archivos de los
distintos modos, pulse la tecla 2 veces. Con la función de navegación avanzada de carpetas puede abrir los
archivos de cualquier modo, independientemente del modo actual en el que se encuentre.
Eliminar archivo o carpeta
Asegúrese de que no se está reproduciendo un archivo cuando quiera eliminar un archivo o carpeta. Pulse
brevemente la tecla para poder navegar por las carpetas. Para eliminar un archivo o carpeta, pulse la tecla
. Seleccione "Yes" mediante las teclas / de la tecla de navegación y confirme pulsando la
tecla .
Nota: ¡La carpeta ha de estar vacía si desea eliminarla!
Los distintos modos
El i.Beat vision dispone de varios modos (música, radio FM, grabación, multimedia, imágenes, texto, host
USB). Para activar un modo, mantenga pulsada la tecla durante un segundo. Seleccione el modo
deseado pulsando las teclas / de la tecla de navegación y confirme pulsando la tecla de navegación
a la derecha .
Nota: Antes de cambiar de modo, asegúrese de que no se está reproduciendo, grabando ni mostrando ningún
archivo de audio, vídeo o imagen.
– 33 –
– 33 –
ES
Modo: Música
Cambie al modo "Music".
• Reproducción
Pulse brevemente la tecla para comenzar la reproducción de un archivo de audio.
• Pausa
Pulse brevemente la tecla para detener la reproducción. Pulsando otra vez la tecla se reanuda la
reproducción.
• Cambio de título
Pulsando brevemente la tecla de navegación a la derecha o a la izquierda puede cambiar el
título actual. Pulse la tecla de navegación a la derecha para cambiar al título siguiente. Pulse la tecla
de navegación a la izquierda para cambiar al título anterior.
• Rebobinado / avance rápido de un título
Manteniendo pulsada la tecla de navegación a la derecha o a la izquierda puede rebobinar o
avanzar el título en reproducción. Pulse la tecla de navegación a la derecha para avanzar. Pulse la
tecla de navegación a la izquierda para rebobinar.
Nota: Cuanto más tiempo mantenga pulsadas la teclas o de la tecla de navegación , más rápido será
el rebobinado o avance.
• Ajuste del volumen
Pulse brevemente la tecla de navegación arriba o abajo para subir o bajar el volumen.
Nota: Cuanto más tiempo mantenga pulsadas la teclas o de la tecla de navegación , más rápido se
subirá o bajará el volumen.
Modo: Radio FM
Cambie al modo "FM Radio".
Nota: Conecte siempre los auriculares al i.Beat vision, ya que el cable de los auriculares actúa de antena de radio.
• Búsqueda automática de emisoras y memorización
Pulse brevemente la tecla para activar la búsqueda automática de emisoras. Durante la búsqueda se
memorizarán todas las emisoras con una señal fuerte. Pulse la tecla para detener la búsqueda auto-
mática de emisoras.
– 34 –
ES
– 34 –
• Búsqueda manual de emisoras y memorización
Pulse brevemente la tecla para cambiar del modo "Station Memory" a la búsqueda manual
de emisoras. Pulsando brevemente las teclas / puede modificar la frecuencia recibida en intervalos
de 0,05 MHz. Si mantiene pulsadas las teclas / , se buscará automáticamente la siguiente emisora
con una buena señal. Para memorizar la emisora seleccionada, pulse la tecla , seleccione una
posición de memoria con las teclas / y confirme pulsando la tecla .
• Cambio entre emisoras memorizadas
Pulsando brevemente las teclas / en el modo de posiciones de memoria puede cambiar entre las
emisoras memorizadas.
• Grabación de radio FM
Pulse la tecla durante más de un segundo para iniciar la grabación de radio FM.
Pulse brevemente la tecla para finalizar la grabación.
Nota: Todas las grabaciones de radio FM se guardan en la carpeta "RECORD", subcarpeta "FM".
Modo: Grabación
Cambie al modo "Record".
Mediante la tecla de navegación puede configurar las opciones de grabación. Pulse las teclas / para
cambiar entre las distintas opciones. Pulse las teclas / para modificar las opciones.
• Grabación en línea
A través de la entrada en línea puede conectar un equipo externo (por ejemplo, un reproductor de CD) y
grabar directamente del mismo. Seleccione "LINE-IN" como fuente y confirme pulsando la tecla . Pulse
brevemente la tecla para iniciar la grabación. Para finalizar la grabación, vuelva a pulsar breve-
mente la tecla .
Nota: Todas las grabaciones en línea se guardan en la carpeta "RECORD", subcarpeta "LINEIN".
• Grabación desde micrófono
A través del micrófono integrado es posible realizar grabaciones de voz. Seleccione "MICRO" como fuente y
confirme pulsando la tecla . Pulse brevemente la tecla para iniciar la grabación. Para finalizar la
grabación, vuelva a pulsar brevemente la tecla .
Nota: Todas las grabaciones de voz se guardan en la carpeta "RECORD", subcarpeta "VOICE".
– 35 –
– 35 –
ES
Modo: Multimedia
Cambie al modo "Multimedia".
En el modo "Multimedia" puede reproducir archivos de película (*.TOM). Para crear archivos de película en
formato TOM, utilice el "TOM transcoder" en el CD suministrado.
El manejo en el modo "Multimedia" es igual que en el modo "Music". Al pulsar la tecla durante la repro-
ducción, aparece un menú OSD.
Modo: Imágenes
Cambie al modo "Picture".
Con la tecla de navegación , seleccione un archivo de imagen (*.jpg) de una carpeta y ábralo pulsando la
tecla . Pulse la tecla de navegación a la derecha o a la izquierda para cambiar a la imagen siguiente
o anterior.
Pulse brevemente la tecla para iniciar una presentación de diapositivas. Pulsando la tecla de navegación
arriba o abajo puede modificar el tiempo que ha de visualizarse una imagen durante la presentación.
Vuelva a pulsar la tecla para finalizar la presentación de diapositivas.
Nota: Todas las imágenes han de estar en formato JPG. Las imágenes grandes se reducirán automáticamente para
poder visualizarlas, lo que conlleva un tiempo de carga más largo.
Modo: Texto
Cambie al modo "Text".
Seleccione un archivo de texto (*.txt) de una carpeta y ábralo pulsando la tecla . Pulse la tecla de navegación
abajo o arriba para leer el texto línea a línea. Pulse la tecla de navegación a la derecha o a la
izquierda para leer el texto página a página.
Pulse brevemente la tecla para activar o desactivar la carga automática del texto (página a página). Pulsando
la tecla de navegación arriba o abajo puede modificar el tiempo que ha de visualizarse el texto.

– 36 –
ES
– 36 –
Modo: Host USB
Cambie al modo "USB host".
En pantalla aparece el mensaje "Wait for USB connection". En este modo puede copiar archivos de un-
dispositivo USB al i.Beat vision. A tal fin, conecte el adaptador host USB suministrado al puerto host
USB del i.Beat vision y conecte el dispositivo USB deseado con el adaptador host USB. Al poco tiempo,
i.Beat vision reconocerá el dispositivo USB conectado, que aparece como carpeta "Device" en el menú.
Con la tecla de navegación puede acceder normalmente a los archivos del dispositivo USB conectado.
Pulse la tecla para copiar un archivo al i.Beat vision y confirme con "Yes" pulsando también la tecla .
Nota: Todos los archivos copiados se encuentran en la carpeta "USBHOST".
Nota: Debido al gran número de dispositivos USB existentes, TrekStor no puede garantizar la compatibilidad con los
dispositivos de todos los fabricantes. Sin embargo, la transmisión de datos con otros dispositivos no suele suponer
un problema.
7) Opciones
Mantenga pulsada la tecla durante un segundo para entrar en el menú de opciones.
Navegue con la tecla de navegación a través de las distintas opciones (general, pantalla, temporizador,
modos, sonido, grabación y sistema) y confirme pulsando la tecla .
Nota: Asegúrese de que la opción de navegación de carpetas no esté activada.
8) Asistencia técnica y contacto
Si tiene preguntas acerca de nuestros productos o necesita ayuda, puede ponerse en contacto con el soporte
técnico a través de correo electrónico o teléfono. Los datos de contacto se encuentran en la parte posterior
de esta guía rápida o en nuestra página web http://www.trekstor.de/support.
Notas:
• Este reproductor de MP3 está optimizado para los auriculares suministrados (impedancia de 32 ohmios). La utilización de otros auriculares con
una impedancia más baja, en particular, con reproductores de MP3 con 2 salidas para auriculares, podría dañar el reproductor de MP3 o incluso
los auriculares.
• Atención: Este equipo puede generar un alto volumen. Para evitar daños auditivos, no utilice un volumen alto durante un tiempo prolongado. No
utilice el equipo mientras esté conduciendo.
• Se recomienda no utilizar cables USB de más de 3 m de longitud.
El fabricante se reserva el derecho de continuar desarrollando el producto. Estos cambios podrán incluirse en esta Guía rápida sin hacer
mención especial de ello. Por tanto, la información contenida en la presente Guía rápida puede no coincidir con el estado técnico de la
última versión.
El fabricante garantiza el producto únicamente para un uso conforme con su destino. Asimismo, el fabricante no se responsabilizará de los
daños o la pérdida de datos, ni de los daños resultantes.
Copyright © 2006 TrekStor GmbH & Co. KG. Todos los derechos reservados. Se hace constar que los otros nombres de productos y empresas
podrían ser marcas registradas propiedad de sus respectivos fabricantes.
– 37 –– 37 –
PT
BREVE MANUAL DE OPERAÇÃO
Damos-lhe os parabéns pela compra do TrekStor i.Beat vision e temos a certeza que irá desfrutar do
seu produto.
Os utilizadores do Windows 98 podem encontrar o controlador necessário para o aparelho no CD em anexo.
1) Elementos de comando do TrekStor i.Beat vision
2) Carregamento do TrekStor i.Beat vision
Antes de utilizar pela primeira vez, carregue o i.Beat vision, pelo menos, durante 3 horas. Assim que o
aparelho esteja ligado a um PC, ele é automaticamente carregado. Após, o mais tardar, 3 horas a bateria fica
carregada e o processo de carregamento termina automaticamente, a fim de evitar um sobrecarregamento.
Nota: O tempo de carregamento máximo só é atingido após aprox. 10 ciclos de carregamento.
3) Ligação do TrekStor i.Beat vision a um PC
Indicação para utilizadores do Windows 98: Instale, em primeiro lugar, o controlador que se encontra no CD
fornecido, antes de ligar o i.Beat vision ao seu PC!
Utilize o cabo de ligação USB fornecido e ligue o i.Beat vision à porta USB do seu PC. O seu sistema
operativo reconhece automaticamente o i.Beat vision e adiciona a "O meu computador" um "Suporte
de troca de dados".
A Ligação Line-In
B Microfone
C Olhal para fixação da correia
D Ligação de auscultadores
E Tecla de modo
F Tecla de gravação
G Tecla do equalizador
H Tecla de reprodução / pausa / stop
I Botão de navegação ( / / / )
J Porta USB
K Tecla do menu
L Ligação USB Host
M Botão (bloqueio de teclas)

– 38 –
PT
– 38 –
4) Troca de dados com o TrekStor i.Beat vision
Ficheiros não protegidos contra cópia
a) Seleccione os ficheiros pretendidos (p. ex. MP3) com o rato. Copie-os premindo o botão direito
do rato ("Copiar").
b) Seleccione em "O meu computador" o suporte de troca de dados "TrekStor i.Beat vision".
c) Prima o botão direito do rato e seleccione a opção "Colar" para iniciar o processo de cópia.
No final do processo de cópia, os dados encontram-se no i.Beat vision.
Ficheiros protegidos no formato WMA-DRM9
Para copiar ficheiros protegidos no formato DRM9 tem de o fazer com o Windows Media® Player
(versão de referência: Windows Media® Player 9).
a) Ligue o leitor de MP3 ao seu computador e inicie o Windows Media® Player.
b) Clique à esquerda na barra de tarefas em "Copiar para CD ou dispositivo".
c) Arraste os ficheiros de música (WMA) pretendidos para lista "Itens a copiar" no lado esquerdo.
d) No menu Pulldown em baixo à direita seleccione o leitor de MP3 em "Itens no dispositivo".
e) Clique em cima à direita no botão "Copiar". A música seleccionada é automaticamente copiada em
seguida para o seu leitor de MP3.
5) Terminar sessão e desligar o TrekStor i.Beat vision do PC
Windows 98 (SE) Procure o i.Beat vision no "Gestor de dispositivos" (em "Unidades") e clique no
aparelho com o botão esquerdo do rato. Seleccione o item do menu "Remover". Agora pode retirar o
i.Beat vision do seu PC.
Windows 2000/ME/XP Clique com o botão esquerdo do rato em baixo à direita na "Barra de tarefas" no
símbolo "Remover o hardware com segurança". Do menu de contexto exibido seleccione o item "Remover
unidade de armazenamento em massa USB" clicando com o botão esquerdo do rato. Agora pode retirar o
i.Beat vision do seu PC.
Nota: Siga o processo de encerramento recomendado a fim de evitar danos no aparelho ou perda de dados!
– 39 –
– 39 –
PT
6) Operação do TrekStor i.Beat vision
Ligação e desconexão
Para ligar o i.Beat vision mantenha premida a tecla durante aprox. 2 segundos. Para voltar a desligar
o i.Beat vision, mantenha também premida a tecla durante aprox. 2 segundos.
Nota: Certifique-se de que, ao desligar, não estão a ser reproduzidos, gravados ou exibidos quaisquer ficheiros de
áudio, vídeo ou imagem.
Nota: Preste atenção para que o botão se encontre na posição à direita, o bloqueio de teclas está, assim,
desligado.
Navegação de pastas
Prima por breves momentos a tecla para chegar à navegação de pastas. Premindo o botão de navegação
para baixo ou para cima é seleccionado o ficheiro seguinte ou o anterior. Para reproduzir o ficheiro
seleccionado prima o botão de navegação para a direita . Para mudar para uma subpasta, prima o botão
de navegação para a direita , quando a pasta estiver seleccionada (realçada a azul). Para voltar ao directório
principal prima o botão de navegação para a esquerda . Continue a navegar como habitualmente.
Premindo a tecla sai da navegação de pastas.
Nota: Na navegação de pastas são indicados apenas os ficheiros actuais do modo já seleccionado (i. e. só são
indicados ficheiros de música, desde que se encontre no modo "Music").
Para chegar à navegação de pastas alargada, em que são exibidos todos os ficheiros dos diferentes modos,
deve premir por breves momentos a tecla 2 vezes. Na navegação de pastas alargada pode iniciar um ficheiro
qualquer de um outro modo, não importando o modo em que se encontra.
Apagar ficheiro ou pastas
Preste atenção para que não esteja a ser reproduzido nenhum ficheiro quando pretender apagar um ficheiro
ou pasta. Prima por breves momentos a tecla para chegar à navegação de pastas. Para apagar, prima a
tecla . Com a ajuda das teclas / do botão de navegação seleccione "Yes" e confirme a
pergunta de segurança premindo a tecla .
Nota: Uma pasta tem de estar vazia para poder ser apagada!
Os diferentes modos
O i.Beat vision possui diferentes modos (música, rádio FM, gravação, multimédia, imagens, texto, USB
Host). Para chegar a um modo, mantenha premida a tecla durante aprox. um segundo. Premindo as
teclas / do botão de navegação selecciona o modo pretendido e confirma a sua selecção premindo
o botão de navegação para a direita .
Nota: Certifique-se de que, ao mudar, não estão a ser reproduzidos, gravados ou exibidos quaisquer ficheiros de
áudio, vídeo ou imagem.
– 40 –
PT
– 40 –
Modo: Música
Mude para o modo "Music".
• Reprodução
Prima a tecla , para iniciar a reprodução de um ficheiro áudio.
• Pausa
Prima por breves momentos a tecla para interromper a reprodução. Ao premir novamente a
tecla a reprodução é retomada.
• Mudança de faixa
Premindo por breves momentos o botão de navegação para a direita ou para a esquerda pode
mudar a faixa actual. Prima o botão de navegação para a direita , para mudar para a faixa seguinte.
Prima o botão de navegação para a esquerda , para mudar para a faixa anterior.
• Avançar / retroceder dentro de uma faixa
Ao premir o botão de navegação para a direita ou para a esquerda pode deslocar-se dentro de
uma faixa. Prima o botão de navegação para a direita para avançar. Prima o botão de navegação
para a esquerda para retroceder.
Nota: Quanto mais tempo permanecerem premidas num sentido as teclas / do botão de navegação ,
mais rápido avança o aparelho.
• Aumentar / diminuir o volume
Prima por breves momentos o botão de navegação para cima ou para baixo , para aumentar ou
diminuir o volume.
Nota: Quanto mais tempo permanecerem premidas num sentido as teclas / do botão de navegação ,
mais rápido o volume é aumentado ou diminuído.
Modo: Rádio FM
Mude para o modo "FM Radio".
Nota: Ligue sempre os seus auscultadores ao i.Beat vision, pois o cabo dos auscultadores serve de antena
para o rádio interno.
• Procura automática de emissora com memorização
Prima por breves momentos a tecla para activar a procura automática de emissoras. Durante a procura
são memorizadas todas as emissoras recebidas. Prima a tecla para interromper a procura automática
de emissoras.
– 41 –
– 41 –
PT
• Procura manual de emissora com memorização
Prima por breves momentos a tecla , para chegar ao modo de memória "Station Memory" na
procura manual de emissoras. Premindo por breves momentos as teclas / pode alterar a frequência
de recepção para 0,05 MHz. Se mantiver premidas as teclas / durante tempo suficiente, é efectuada
automaticamente a procura da próxima emissora com boa recepção. Para memorizar a emissora seleccio-
nada, prima a tecla , seleccione o local de memória da emissora com as teclas / e confirme
a memorização, premindo a tecla .
• Mudar de emissora memorizada
Premindo por breves momentos as teclas / no modo de memória "Station Memory" pode mudar
entre os locais da memória existentes.
• Gravar a partir do rádio FM
Prima a tecla durante mais do que um segundo, para iniciar a gravação a partir do rádio FM.
Prima por breves momentos a tecla para terminar a gravação.
Nota: Todas as gravações por rádio FM são memorizadas na pasta "RECORD", subpasta "FM".
Modo: Gravação
Mude para o modo "Record".
Com a ajuda do botão de navegação pode definir as diferentes configurações de gravação. Premindo as
teclas / muda entre as configurações. Premindo as teclas / pode alterar as configurações.
• Gravação por Line-In
Através da entrada Line-In pode ligar um aparelho externo (p.ex. um leitor de CD) e efectuar daí gravações
directas. Seleccione "LINE-IN" como fonte e confirme, premindo a tecla . Prima por breves momentos a
tecla para iniciar a gravação. Termine a gravação, premindo novamente por breves momentos a
tecla .
Nota: Todas as gravações por rádio FM são memorizadas na pasta "RECORD", subpasta "LINEIN".
• Gravação por microfone
Pode efectuar gravações de voz através do microfone integrado. Seleccione "MICRO" como fonte e
confirme, premindo a tecla . Prima por breves momentos a tecla para iniciar a gravação.
Termine a gravação, premindo novamente por breves momentos a tecla .
Nota: Todas as gravações de voz são memorizadas na pasta "RECORD", subpasta "VOICE".
– 42 –
PT
– 42 –
Modo: Multimédia
Mude para o modo "Multimedia".
No modo "Multimedia" pode visualizar os ficheiros Movie (*.TOM). Para criar ficheiros Movie em formato TOM
utilize o "TOM transcoder" incluído no CD.
A operação no modo "Multimedia" é idêntica à operação no modo "Music". Premindo a tecla durante a
reprodução surge um menu OSD.
Modo: Imagens
Mude para o modo "Picture".
Seleccione com o botão de navegação um ficheiro de imagem (*.jpg) na navegação de pastas e inicie-o,
premindo a tecla . Prima o botão de navegação para a direita ou para a esquerda , para mudar
para a imagem seguinte ou anterior.
Prima por breves momentos a tecla para iniciar uma apresentação de diapositivos. Premindo por breves
momentos o botão de navegação para cima ou para baixo pode alterar a duração de exibição de
uma imagem na apresentação de diapositivos. Premindo novamente a tecla termina a apresentação de
diapositivos.
Nota: Todas a imagens têm de estar gravadas no formato JPG. Imagens maiores são representadas automaticamente
numa versão reduzida, o que pode aumentar a duração do carregamento.
Modo: Texto
Mude para o modo "Text".
Seleccione um ficheiro de texto (*.txt) na navegação de pastas e inicie-o, premindo a tecla . Prima o botão
de navegação para baixo ou para cima , para ler o texto linha a linha. Prima o botão de navegação
para a direita ou para a esquerda , para ler o texto página a página.
Prima por breves momentos a tecla , para activar ou desactivar um carregamento automático do texto
(página a página). Premindo por breves momentos o botão de navegação para cima ou para baixo
pode alterar a duração de exibição do texto.

– 43 –
– 43 –
PT
Modo: USB Host
Mude para o modo "USB host".
No visor surge a mensagem "Wait for USB connection". Neste modo pode copiar ficheiros de um outroaparelho
USB para o i.Beat vision. Para isso, ligue o adaptador USB Host incluído no material fornecido à ligação
USB Host do i.Beat vision, e conecte o aparelho USB pretendido ao adaptador USB Host. Após breves
momentos, o i.Beat vision reconhece o aparelho USB ligado, que é indicado como "Device" na navegação
de pastas. Com a ajuda do botão de navegação pode aceder, como habitualmente, aos ficheiros do aparelho
USB ligado. Prima a tecla , para copiar um ficheiro para o i.Beat vision e confirme o processo de cópia
com "Yes", premindo a tecla .
Nota: Todos os ficheiros copiados encontram-se na pasta "USBHOST".
Nota: Devido à extensa variedade de diferentes aparelhos USB, a TrekStor não garante a compatibilidade com
aparelhos de todos os fabricantes. Porém, geralmente, a transferência de dados com outros aparelhos deve
efectuar-se sem problemas.
7) Configurações
Prima durante um segundo a tecla , para consultar o menu de configurações.
Com a ajuda do botão de navegação navegue pelas diferentes configurações (geral, visor, temporizador,
modos, som, gravação e sistema) e confirme a sua selecção, premindo a tecla .
Nota: Preste atenção para o facto de a navegação de pastas não poder estar activada.
8) Assistência e contacto
Se tiver dúvidas acerca dos nossos produtos ou se necessitar de ajuda, contacte a nossa assistência por E-mail
ou por telefone. Os dados para contacto podem ser consultados no verso deste breve manual de instruções
ou no nosso Website em http://www.trekstor.de/support.
Notas:
• Este leitor MP3 está optimizado para os aucultadores fornecidos (impedância de 32 Ohm). A utilização de outros auscultadores com impedância
inferior pode, sobretudo em leitores MP3 com 2 saídas de auscultadores, provocar, entre outros, danos no leitor MP3 ou mesmo nos auscultadores.
• Atenção: Este aparelho pode atingir elevados volumes de som. Para evitar danos auditivos, não deve utilizá-lo durante muito tempo com o
volume alto. Não utilizar no meio do tráfego rodoviário.
• Deve evitar-se a utilização de cabos USB com mais de 3 m de comprimento.
O fabricante reserva-se o direito de desenvolver continuamente o produto. Estas alterações podem ser efectuadas sem descrição directa
neste manual. As informações contidas neste manual não são obrigadas a reflectir o estado da versão técnica.
O fabricante garante apenas a qualificação para a determinação deste produto. Além disso, o fabricante não se responsabiliza por danos ou
perdas de dados nem por danos consequentes.
Copyright © 2006 TrekStor GmbH & Co. KG. Todos os direitos reservados. Outros nomes de produtos ou de empresas referem-se,
eventualmente, a marcas registadas ou nomes de marcas do respectivo detentor.
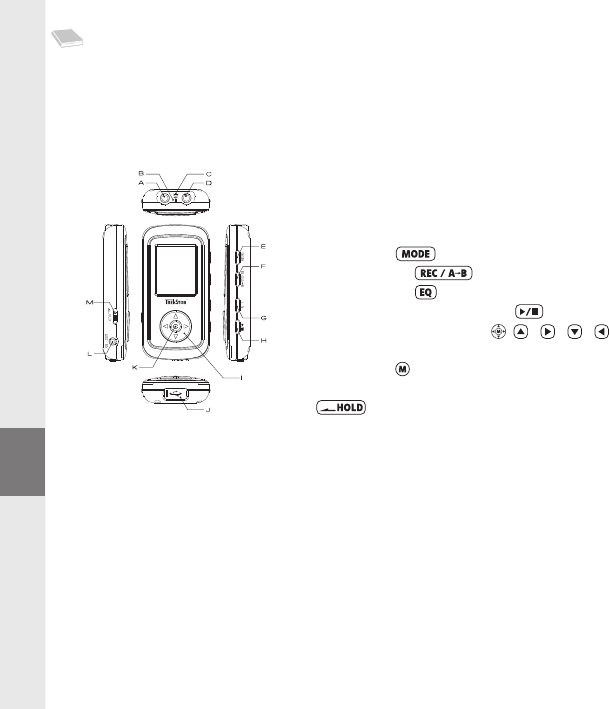
– 44 –
NL
– 44 –
BEKNOPTE HANDLEIDING
Wij feliciteren u met de aanschaf van de TrekStor i.Beat vision en zijn ervan overtuigd dat u veel plezier
zult hebben met dit product.
Gebruikers van Windows 98 kunnen de noodzakelijke driver voor dit apparaat vinden op de geleverde CD-rom.
1) Bedieningselementen van de TrekStor i.Beat vision
2) Opladen van de TrekStor i.Beat vision
Voordat u de i.Beat vision voor de eerste keer in gebruik neemt, moet u deze eerst ten minste drie uur
opladen. Zodra u het apparaat met een PC verbindt, wordt deze automatisch opgeladen. Na ca. 3 uur is de accu
opgeladen en wordt de laadprocedure automatisch beëindigd om te voorkomen dat de accu wordt overladen.
Opmerking: De maximale (optimale) gebruikstijd van de accu wordt na ca. 10 keer opladen bereikt.
3) De TrekStor i.Beat vision verbinden met een PC
Opmerking voor gebruikers van Windows 98: Installeer eerst de driver die u op de geleverde CD kunt vinden, voordat
u de i.Beat vision op uw PC aansluit!
Gebruik de geleverde USB-aansluitkabel en sluit de i.Beat vision aan op een USB-aansluiting van uw PC.
Uw gebruikssysteem detecteert automatisch de i.Beat vision en voegt vervolgens automatisch een
"Lokale schijf" (lokaal station) aan "Deze computer" toe.
A Line-In-aansluiting
B Microfoon
C Bevestigingsoog van het halskoord
D Hoofdtelefoonaansluiting
E Mode-toets
F Opname-toets
G Equalizer-toets
H Weergave / pauze / stop-toets
I Navigatiekruis (pijltoetsen) ( / / / )
J USB-aansluiting
K Menu-toets
L USB-hostaansluiting
M -regelaar (toetsblokkering)

– 45 –
– 45 –
NL
4) Data-uitwisseling met de TrekStor i.Beat vision
Bestanden die niet tegen kopiëren zijn beveiligd
a) Markeer met de muis de gewenste bestanden, (bijv. MP3). Kopieer deze door op de rechter muisknop te
drukken ("Kopiëren").
b) Selecteer in "Deze computer" de lokale schijf "TrekStor i.Beat vision".
c) Druk op de rechter muisknop en selecteer de optie "Invoegen" om het kopiëren te starten.
Als het kopiëren voltooid is, staan de bestanden op de i.Beat vision.
WMA-DRM9-beveiligde bestanden
U kunt DRM9-beveiligde bestanden kopiëren via Windows Media® Player
(referentieversie: Windows Media® Player 9).
a) Sluit de MP3-Player aan op uw computer en start Windows Media® Player.
b) Klik links in de taakbalk op "Kopiëren naar CD of apparaat".
c) Sleep de gewenste muziekbestanden (WMA) naar de lijst "Te kopiëren items" op de linkerpagina.
d) Selecteer in het vervolgmenu rechtsboven de MP3-Player onder "Items op apparaat".
e) Klik vervolgens rechtsboven op de knop "Kopiëren". De geselecteerde muziek wordt aansluitend
automatisch naar uw MP3-Player gekopieerd.
5) De TrekStor i.Beat vision afmelden en loskoppelen van de PC
Windows 98 (SE) Zoek in "Apparaatbeheer" de i.Beat vision (onder "stations") en klik vervolgens met de
linker muisknop het apparaat aan. Selecteer het menupunt "Verwijderen". Nu kunt u de i.Beat vision
loskoppelen van uw PC.
Windows 2000/ME/XP Klik met de linker muisknop rechtsonder in de "taakbalk" op het symbool "Hard-
ware veilig verwijderen". Selecteer uit het geopende contextmenu de optie "USB-apparaat voor massaopslag –
station verwijderen" door hierop met de linker muisknop te klikken. Nu kunt u de i.Beat vision loskoppelen
van uw PC.
Opmerking: Wij adviseren u om de aanbevolen afmeldprocedure te volgen om schade aan het apparaat of om
dataverlies te voorkomen!

– 46 –
NL
– 46 –
6) Bediening van de TrekStor i.Beat vision
In- en uitschakelen
Voor het inschakelen van de i.Beat vision drukt u gedurende ca. 2 seconden op de -toets. Om de
i.Beat vision weer uit te schakelen, drukt u opnieuw gedurende ca. 2 seconden op de -toets.
Opmerking: Controleer of tijdens het uitschakelen geen audio-, video- of beeldbestand wordt afgespeeld,
opgenomen resp. weergegeven.
Opmerking: Let er op dat de -regelaar zich geheel rechts bevindt en dat de toetsblokkering is
uitgeschakeld.
Map-navigatie
Druk kort op de -toets om de map-navigatie te openen. Door op de toets naar beneden of naar boven
van het navigatiekruis te drukken, wordt het volgende of vorige bestand gemarkeerd. Om het geselecteerde
bestand af te spelen, drukt u op het navigatiekruis naar rechts . Om naar een submap te gaan, drukt u
op het navigatiekruis naar rechts als de map gemarkeerd (blauw) is. Om weer terug te keren naar de
hoofddirectory drukt u op het navigatiekruis naar links . Ga door met navigeren zoals hiervoor is be-
schreven. U verlaat de map-navigatie door op de -toets te drukken.
Opmerking: In de map-navigatie worden alleen de huidige bestanden van de zojuist geselecteerde modus
weergegeven (dit betekent dat er alleen muziekbestanden worden weergegeven, als u zich bevindt in de modus
"Music").
Om de uitgebreide map-navigatie te openen, waarin alle bestanden in de verschillende modi worden
weergegeven, moet u twee keer kort op de -toets drukken. In de uitgebreide map-navigatie kunt u,
ongeacht de modus een willekeurig bestand vanuit een andere modus starten.
Bestand of map wissen
Let erop dat er geen bestand wordt weergegeven op het moment dat u een bestand resp. map wilt wissen.
Druk kort op de -toets om de map-navigatie te openen. Druk op de -toets om te wissen. Schakel
met behulp van de / -toetsen van het navigatiekruis op "Yes" en bevestig de extra vraag door te
drukken op de -toets.
Opmerking: Een map moet leeg zijn als deze moet worden gewist!
De verschillende modi
De i.Beat vision beschikt over verschillende modi (muziek, FM-radio, opname, multimedia, foto’s, tekst,
USB-host). Om een modus te openen, drukt u gedurende ca. 1 seconde op de -toets.
Selecteer met behulp van de / -toetsen van het navigatiekruis de gewenste modus en bevestig uw
keuze door op de -toets (naar rechts) van het navigatiekruis te drukken.
Opmerking: Controleer of tijdens het omschakelen geen audio-, video- of beeldbestand wordt afgespeeld,
opgenomen resp. weergegeven.
– 47 –
– 47 –
NL
Modus: Muziek
Schakel eerst naar de "Music"-modus.
• Weergave
Druk kort op de -toets om de weergave van een audiobestand te starten.
• Pauze
Druk kort op de -toets om de weergave te onderbreken. Druk nogmaals op de -toets om de
weergave weer voort te zetten.
• Titel wisselen
Door kort op de toets naar rechts of naar links van het navigatiekruis te drukken, kunt u de
huidige titel wisselen. Druk naar rechts op het navigatiekruis om naar de volgende titel te gaan.
Druk naar links op het navigatiekruis om naar de vorige titel te gaan.
• Vooruit- / terugspoelen binnen een titel
Door kort op de toets naar rechts of naar links van het navigatiekruis te drukken, kunt u binnen
een titel spoelen. Druk op de toets naar rechts van het navigatiekruis om vooruit te spoelen. Druk
op de toets naar links van het navigatiekruis om terug te spoelen.
Opmerking: Des te langer u op de / -toetsen van het navigatiekruis in een bepaalde richting drukt,
des te sneller spoelt het apparaat.
• Volume harder / zachter
Druk kort op de toets naar boven resp. naar beneden van het navigatiekruis om het volume
harder of zachter te stellen.
Opmerking: Des te langer u op de / -toetsen van het navigatiekruis in een bepaalde richting drukt,
des te sneller wordt het volume harder resp. zachter gesteld.
Modus: FM-radio
Schakel eerst naar de "FM Radio"-modus.
Opmerking: Sluit altijd uw hoofdtelefoon op de i.Beat vision aan, omdat de kabel van de hoofdtelefoon als
antenne voor de interne radio wordt gebruikt.
• Automatisch zenders zoeken met geheugenopslag
Druk kort op de -toets om het automatisch zoeken naar zenders te activeren. Tijdens het zoeken
worden alle zenders geschikt voor ontvangst opgeslagen. Druk kort op de -toets om het automatisch
zoeken naar zenders te annuleren.
– 48 –
NL
– 48 –
• Handmatig zenders zoeken met geheugenopslag
Druk kort op de -toets om de geheugenmodus "Station Memory" bij het handmatig zoeken van
zenders te openen. Door kort op de / -toetsen te drukken, kunt u de ontvangstfrequentie telkens
met 0,05 MHz wijzigen. Als u lang op de / -toetsen drukt, wordt automatisch naar de beste zender
gezocht die geschikt is voor ontvangst. Om de geselecteerde zenders op te slaan, drukt u op de
-toets, selecteert u met de / -toetsen een geheugenplaats en bevestigt u vervolgens
het opslaan door op de -toets te drukken.
• Opgeslagen zenders wisselen
Door kort op de / -toetsen in de geheugenmodus "Station Memory" te drukken, kunt u tussen de
beschikbare geheugenplaatsen schakelen.
• Opnemen van FM-radio
Druk gedurende ten minste één seconde op de -toets om de opname van FM-radio te starten.
Druk kort op de -toets om de opname te beëindigen.
Opmerking: Alle FM-radio-opnamen worden in "RECORD"-map, submap "FM" opgeslagen.
Modus: Opname
Schakel eerst naar de "Record"-modus.
Met behulp van het navigatiekruis kunt u de verschillende instellingen voor de opname instellen. Door op
de / -toetsen te drukken, schakelt u tussen de instellingen. Door op de / -toetsen te drukken, kunt
u de instellingen wijzigen.
• Opname via Line-In
Via de Line-In-ingang kunt u een extern apparaat (bijv. een CD-speler) aansluiten en direct opname
hiervan maken. Selecteer "LINE-IN" als bron en bevestig dit door op de -toets te drukken. Druk kort
op de -toets om de opname te starten. Beëindig de opname door nogmaals kort op de
-toets te drukken.
Opmerking: Alle Line-In-opnamen worden in "RECORD"-map, submap "LINEIN" opgeslagen.
• Opname via microfoon
Via de geïntegreerde microfoon kunt u spraakopnamen maken. Selecteer "MICRO" als bron en bevestig dit
door op de -toets te drukken. Druk kort op de -toets om de opname te starten. Beëindig de
opname door nogmaals kort op de -toets te drukken.
Opmerking: Alle spraakopnamen worden in "RECORD"-map, submap "VOICE" opgeslagen.
– 49 –
– 49 –
NL
Modus: Multimedia
Schakel eerst naar de "Multimedia"-modus.
In de "Multimedia"-modus kunt u movie-bestanden (*.TOM) bekijken. Voor het maken van moviebestanden in
TOM-indeling moet u de "TOM transcoder" op de geleverde CD-rom gebruiken.
De bediening in de "Multimedia"-modus is identiek aan de bediening in de "Music"-modus. Door op de
-toets te drukken tijdens de weergave verschijnt een OSD-menu.
Modus: Foto’s
Schakel eerst naar de "Picture"-modus.
Selecteer met behulp van het navigatiekruis een beeldbestand (*.jpg) in de map-navigatie en start deze
door op de -toets te drukken. Druk op de toets naar rechts resp. naar links van het navigatiekruis
om naar de volgende resp. vorige foto te gaan.
Druk kort op de -toets om de diavoorstelling te starten. Door kort op de toets naar boven of naar
beneden van het navigatiekruis te klikken, kunt u de weergaveduur van een foto tijdens de dia-
voorstelling wijzigen. Door nogmaals op de -toets te drukken, beëindigt u de diavoorstelling.
Opmerking: Alle foto’s moeten een JPG-indeling hebben. Grotere foto’s worden automatisch verkleint, hetgeen
langere downloadtijden kan geven.
Modus: Tekst
Schakel eerst naar de "Text"-modus.
Selecteer een tekstbestand (*.txt) in de map-navigatie en start deze door op de -toets te drukken. Druk op de
toets naar beneden resp. naar boven van het navigatiekruis om de tekst per regel te lezen. Druk op de
toets naar rechts resp. naar links van het navigatiekruis om de tekst per pagina te lezen. Druk kort op de
-toets om het automatisch laden van de tekst (per pagina) in- resp. uit te schakelen. Door kort op de toets
naar boven of naar beneden van het navigatiekruis te klikken, kunt u de weergaveduur van de tekst
instellen.
– 50 –
NL
– 50 –
Modus: USB-host
Schakel eerst naar de "USB host"-modus.
In het display verschijnt de melding "Wait for USB connection". In deze modus kunt u bestanden van eenander
USB-apparaat kopiëren naar de i.Beat vision. Sluit hiertoe de in de leveringsomvang meegeleverde USB-
hostadapter aan op de USB-hostaansluiting van de i.Beat vision en verbindt vervolgens het gewenste
USB-apparaat met de USB-hostadapter. Na korte tijd zal de i.Beat vision het aangesloten USB-apparaat
detecteren en als "Device" in de map-navigatie weergeven. Met behulp van het navigatiekruis kunt u
zoals u bent gewend teruggrijpen op de bestanden van het aangesloten USB-apparaat. Druk op de -toets
om een bestand naar de i.Beat vision te kopiëren en bevestig de kopieerprocedure met "Yes" door te
drukken op de -toets.
Opmerking: Alle gekopieerde bestanden bevinden zich in de "USBHOST"-map.
Opmerking: Door de zeer grote keuze aan verschillende USB-apparaten kan TrekStor niet de compatibiliteit met
apparaten van alle fabrikanten garanderen. In principe moet de datatransfer met andere apparaten echter geen
enkel probleem geven.
7) Instellingen
Druk gedurende één seconde op de -toets om het menu Instellingen te openen.
Navigeer met behulp van het navigatiekruis door de verschillende instellingen (Algemeen, Display, Timer,
Modi, Geluid, Opname en Systeem) en bevestig uw keuze door op de -toets te drukken.
Opmerking: Let er op dat de map-navigatie niet mag zijn geactiveerd.
8) Ondersteuning en contact
Mocht u vragen hebben betreffende onze producten of hulp nodig hebben, kunt u zich via onze e-mail of
telefonische ondersteuning aan ons wenden. De contactgegevens kunt u op de achterzijde van deze beknopte
handleiding of op onze website onder http://www.trekstor.de/support vinden.
Opmerking:
• Deze MP3-player is geoptimaliseerd voor de meegeleverde hoofdtelefoon (impedantie van 32 Ohm). Het gebruik van andere hoofdtelefoons met
geringe impedantie kan met name bij MP3-spelers met twee hoofdtelefooningangen, onder bepaalde omstandigheden tot beschadiging van de
MP3-speler of hoofdtelefoon leiden.
• Waarschuwing: Dit apparaat kan een hoog volume bereiken. Om schade aan het gehoor te voorkomen, mag u niet gedurende een langere tijd
naar een hoog volume luisteren. Gebruik de i.Beat vision niet in het verkeer.
• Wij adviseren u om USB-kabels langer dan 3 meter niet te gebruiken.
De fabrikant behoudt zich het recht voor om het product continu verder te ontwikkelen. Deze wijzigingen kunnen zonder directe
beschrijving in deze beknopte handleiding worden aangebracht. Informatie in deze beknopte handleiding hoeft hierdoor niet overeen te
komen met de stand van de technische uitvoering.
De fabrikant staat garant voor het product voor zover deze wordt gebruikt zoals bedoeld. Verder is de fabrikant niet aansprakelijk voor
beschadigingen of dataverlies en de bijkomende gevolgschade.
Copyright © 2006 TrekStor GmbH & Co. KG. Onder voorbehoud van alle rechten. Bij overige vermelde producten- of bedrijfsaanduidingen
gaat het mogelijkerwijs om handelsmerken of merknamen van de desbetreffende eigenaren.
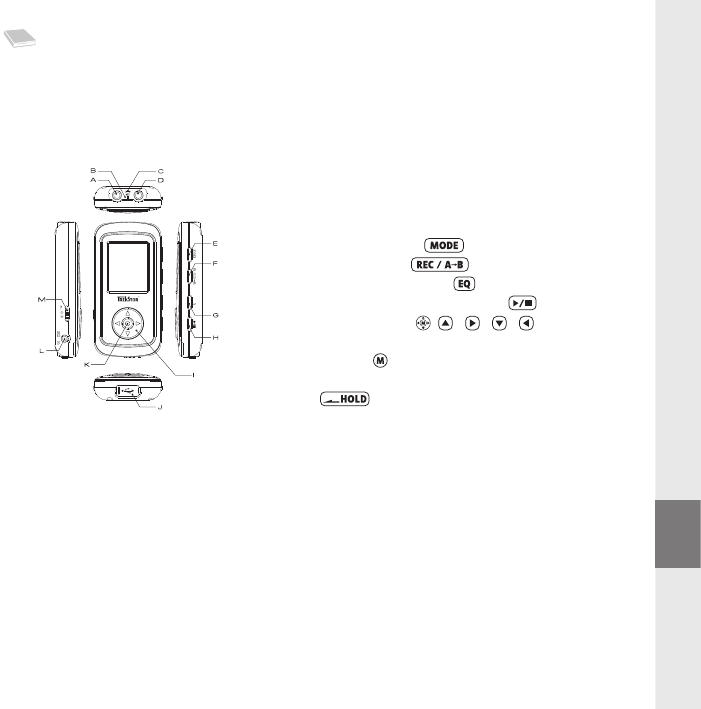
– 51 –– 51 –
PL
KRÓTKA INSTRUKCJA
Gratulujemy Państwu zakupu odtwarzacza TrekStor i.Beat vision – jesteśmy pewni, że urządzenie to
będzie Państwu dobrze służyć przez długi czas.
Użytkownicy Windows 98 znajdą wymagany sterownik na załączonej płycie CD.
1) Elementy obsługi odtwarzacza TrekStor i.Beat vision
2) Ładowanie odtwarzacza TrekStor i.Beat vision
Przed pierwszym użyciem należy ładować odtwarzacz i.Beat vision przez co najmniej 3 godziny.
W momencie podłączenia urządzenia do komputera rozpoczyna się automatyczne ładowanie. Po
maksymalnie 3 godzinach akumulator jest naładowany i ładowanie zostaje automatycznie przerwane,
aby zapobiec przeładowaniu.
Wskazówka: Maksymalny czas pracy akumulatora uzyskiwany jest dopiero po ok. 10 cyklach ładowania.
3) Podłączanie odtwarzacza TrekStor i.Beat vision do komputera
Wskazówka dla użytkowników Windows 98: Przed podłączeniem odtwarzacza i.Beat vision do komputera
należy najpierw zainstalować sterownik dostarczony na załączonej płycie CD!
Za pomocą dostarczonego przewodu USB podłączyć odtwarzacz i.Beat vision do portu USB komputera.
System operacyjny rozpoznaje automatycznie podłączony odtwarzacz i.Beat vision i w oknie
„Mój komputer” dodaje nowy „Dysk wymienny”.
A wejście Line In
B mikrofon
C ucho do zamocowania paska do zawieszenia na szyi
D gniazdo słuchawek
E przycisk wyboru trybu
F przycisk nagrywania
G przycisk korektora dźwięku
H przycisk odtwarzania / pauza / stop
I przycisk nawigacyjny ( / / / )
J złącze USB
K przycisk menu
L złącze USB Host
M suwak (blokada przycisków)

– 52 –
PL
– 52 –
4) Wymiana danych z TrekStor i.Beat vision
Dane nie chronione przed kopiowaniem
a) Zaznaczyć myszą żądane pliki (np. MP3). Skopiować je, naciskając prawy przycisk myszy („Kopiuj”).
b) W oknie „Mój komputer” wybrać dysk wymienny „TrekStor i.Beat vision”.
c) Nacisnąć prawy przycisk myszy i wybrać opcję „Wklej”, aby rozpocząć kopiowanie. Po zakończeniu
kopiowania dane są zapisane w odtwarzaczu i.Beat vision.
Dane chronione zgodnie z WMA-DRM9
Dane chronione zgodnie z DRM9 należy kopiować za pomocą programu Windows Media® Player (wersja
zastosowana w instrukcji: Windows Media® Player 9).
a) Podłączyć odtwarzacz MP3 do komputera i uruchomić program Windows Media® Player.
b) Kliknąć po lewej stronie na pasku zadań „Kopiuj na dysk CD lub do urządzenia”.
c) Pociągnąć żądane pliki muzyczne (WMA) na listę „Elementy do skopiowania” po lewej stronie.
d) W menu rozwijanym po prawej stronie na górze wybrać odtwarzacz MP3 w punkcie
„Elementy w urządzeniu”.
e) Kliknąć po prawej stronie na górze przycisk „Kopiuj”. Wybrane utwory zostaną automatycznie
skopiowane do odtwarzacza MP3.
5) Wylogowanie i odłączanie odtwarzacza TrekStor i.Beat vision od komputera
Windows 98 (SE) Należy odszukać i.Beat vision w „Menedżerze urządzeń” (w punkcie „Stacje dysków”)
i kliknąć urządzenie lewym przyciskiem myszy. Wybrać punkt „Usuń”. Teraz można odłączyć i.Beat vision
od komputera.
Windows 2000/ME/XP Kliknąć lewym przyciskiem myszy na symbol „Bezpieczne usuwanie sprzętu” na
pasku zadań u dołu po prawej stronie. W wyświetlonym menu kliknąć lewym przyciskiem myszy polecenie
„Usuń masowe urządzenie magazynujące USB”. Teraz można odłączyć i.Beat vision od komputera.
Wskazówka: Aby zapobiec uszkodzeniom urządzenia lub utracie danych, należy stosować się do zalecanej
procedury odłączania!
– 53 –
– 53 –
PL
6) Obsługa odtwarzacza TrekStor i.Beat vision
Włączanie i wyłączanie
Aby włączyć odtwarzacz i.Beat vision, należy nacisnąć przycisk i przytrzymać go przez ok. 2 sekundy.
Aby wyłączyć odtwarzacz i.Beat vision, należy również nacisnąć przycisk i przytrzymać go przez
ok. 2 sekundy.
Wskazówka: Należy upewnić się, że podczas wyłączania nie jest odtwarzany, nagrywany lub wyświetlany żaden
plik audio, wideo lub graficzny.
Wskazówka: Należy upewnić się, że suwak znajduje się w pozycji prawej, czyli że blokada przycisków jest
wyłączona.
Nawigacja w folderach
Nacisnąć krótko przycisk , aby rozpocząć nawigację w folderach. Aby zaznaczyć następny lub poprzedni plik,
należy nacisnąć przycisk nawigacyjny w dół lub w górę . Aby odtworzyć wybrany plik, należy nacisnąć
przycisk nawigacyjny w prawo . Aby przejść do podkatalogu, należy nacisnąć przycisk nawigacyjny
w prawo , gdy żądany podkatalog jest zaznaczony (podświetlonyna na niebiesko). Aby powrócić do katalogu
głównego, należy nacisnąć przycisk nawigacyjny w lewo . Dalsza nawigacja odbywa się analogicznie.
Aby wyjść z nawigacji folderów, należy nacisnąć przycisk .
Wskazówka: W nawigacji folderów wyświetlane są tylko pliki należące do wybranego aktualnie trybu pracy
(np. w trybie pracy „Music” wyświetlane są tylko pliki muzyczne).
Aby przejść do rozszerzonego trybu nawigacji folderów, w którym wyświetlane są wszystkie pliki poszczególnych
trybów pracy, należy dwa razy krótko nacisnąć przycisk . W rozszerzonym trybie nawigacji folderów można
niezależnie od bieżącego trybu pracy uruchomić dowolny plik należący do innego trybu pracy.
Usuwanie pliku lub folderu
Przed skasowaniem pliku lub folderu należy upewnić się, że żaden plik nie jest aktualnie odtwarzany. Nacisnąć
krótko przycisk , aby rozpocząć nawigację w folderach. W celu usunięcia pliku nacisnąć przycisk .
Strzałkami / przycisku nawigacyjnego wybrać „Yes” i potwierdzić zapytanie
przyciskiem .
Wskazówka: Usuwany folder musi być pusty!
Tryby pracy odtwarzacza
Odtwarzacz i.Beat vision posiada różne tryby pracy (muzyka, radio FM, nagrywanie, multimedia, grafiki,
tekst, USB Host). Aby włączyć żądany tryb pracy urządzenia, należy nacisnąć przycisk i przytrzymać
go przez ok. 1 sekundę. Za pomocą strzałek / przycisku nawigacyjnego wybrać żądany tryb pracy
i potwierdzić wybór, naciskając prawą strzałkę przycisku nawigacyjnego .
Wskazówka: Należy upewnić się, że podczas przełączania nie jest odtwarzany, nagrywany lub wyświetlany żaden
plik audio, wideo lub graficzny.
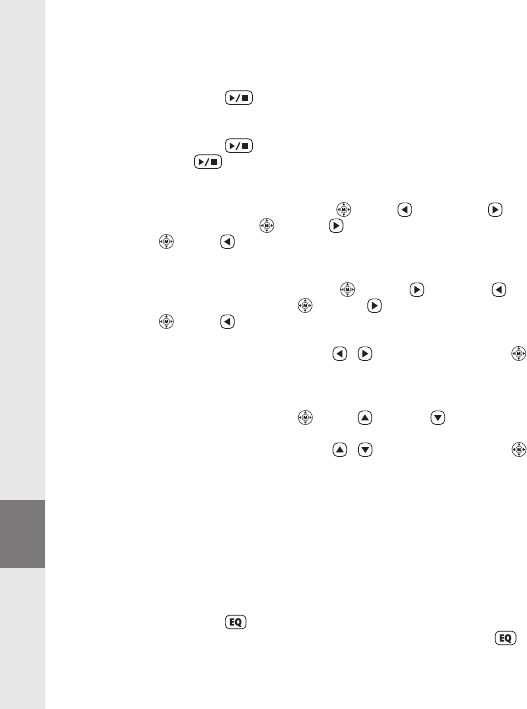
– 54 –
PL
– 54 –
Tryb pracy: Muzyka
Przełączyć się na tryb pracy „Music”.
• Odtwarzanie
Nacisnąć krótko przycisk , aby rozpocząć odtwarzanie pliku audio.
• Pauze
Nacisnąć krótko przycisk , aby zatrzymać odtwarzanie. Aby kontynuować odtwarzanie, nacisnąć
ponownie przycisk .
• Zmiana utworu
Krótkie naciśnięcie przycisku nawigacyjnego w lewo lub w prawo pozwala zmienić utwór.
Nacisnąć przycisk nawigacyjny w prawo , aby przejść do następnego utworu. Nacisnąć przycisk
nawigacyjny w lewo , aby przejść do poprzedniego utworu.
• Przewijanie utworu do przodu/do tyłu
Dłuższe naciśnięcie przycisku nawigacyjnego w prawo lub w lewo pozwala przewijać bieżący
utwór. Nacisnąć przycisk nawigacyjny w prawo , aby przewinąć utwór do przodu. Nacisnąć przycisk
nawigacyjny w lewo , aby przewinąć utwór do tyłu.
Wskazówka: Im dłużej przytrzymuje się strzałki / przycisku nawigacyjnego w jednym kierunku, tym
szybsze jest przewijanie.
• Zwiększanie/zmniejszanie głośności
Nacisnąć krótko przycisk nawigacyjny w górę lub w dół , aby zwiększyć lub zmniejszyć głośność.
Wskazówka: Im dłużej przytrzymuje się strzałki / przycisku nawigacyjnego w jednym kierunku, tym
szybsze jest zwiększanie lub zmniejszanie głośności.
Tryb pracy: Radio FM
Przełączyć się na tryb pracy „FM Radio”.
Wskazówka: Należy zawsze podłączać słuchawki do odtwarzacza i.Beat vision, ponieważ przewód
słuchawek służy jako antena wbudowanego radia.
• Automatyczne wyszukiwanie i programowanie stacji
Nacisnąć krótko przycisk , aby rozpocząć automatyczne wyszukiwanie stacji. Podczas wyszukiwania
programowane są wszystkie najlepiej odbierane stacje. Nacisnąć przycisk , aby przerwać automatyczne
wyszukiwanie stacji.
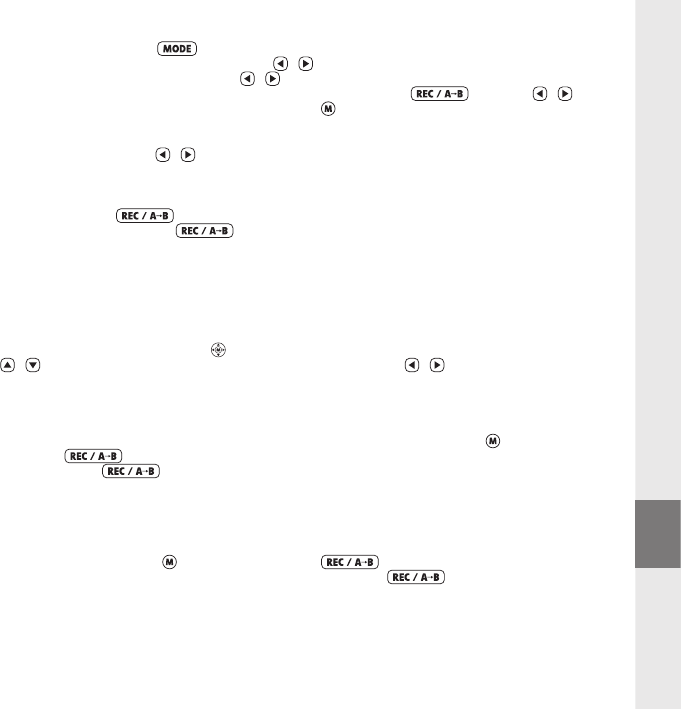
– 55 –
– 55 –
PL
• Ręczne wyszukiwanie i programowanie stacji
Nacisnąć krótko przycisk , aby przełączyć się z trybu zaprogramowanych stacji na ręczne
wyszukiwanie stacji. Naciskać krótko przyciski / , aby zmieniać częstotliwość odbioru o 0,05 MHz.
Po dłuższym przytrzymaniu przycisków / odtwarzacz automatycznie wyszukuje kolejną najlepiej
odbieraną stację. Aby zapisać wybraną stację, należy nacisnąć przycisk , strzałkami /
wybrać miejsce zapisu i potwierdzić zapis przyciskiem .
• Przełączanie zaprogramowanych stacji
Naciskać krótko przyciski / w trybie zaprogramowanych stacji, aby przełączać się pomiędzy
zaprogramowanymi stacjami.
• Nagrywanie z radia FM
Nacisnąć przycisk i przytrzymać przez ponad jedną sekundę, aby rozpocząć nagrywanie z radia
FM. Nacisnąć krótko przycisk , aby zakończyć nagrywanie.
Wskazówka: Wszystkie nagrania z radia FM zapisywane są w folderze „RECORD” i podkatalogu „FM”.
Tryb pracy: Nagrywanie
Przełączyć się na tryb pracy „Record”.
Za pomocą przycisku nawigacyjnego można dokonywać różnych ustawień nagrywania. Naciskając strzałki
/ można przełączać się pomiędzy ustawieniami. Naciskając strzałki / można zmieniać wybrane
ustawienie.
• Nagrywanie przez wejście Line In
Do wejścia Line In można podłączyć urządzenie zewnętrzne (np. odtwarzacz płyt CD) i nagrywać
bezpośrednio z niego. Wybrać jako źródło nagrania „LINE-IN” i potwierdzić przyciskiem . Nacisnąć krótko
przycisk , aby rozpocząć nagrywanie. Aby zakończyć nagrywanie, należy ponownie nacisnąć
krótko przycisk .
Wskazówka: Wszystkie nagrania z wejścia Line In zapisywane są w folderze „RECORD” i podkatalogu „LINEIN”.
• Nagrywanie przez mikrofon
Za pomocą wbudowanego mikrofonu można nagrywać głos. Wybrać jako źródło nagrania „MICRO”
i potwierdzić przyciskiem . Nacisnąć krótko przycisk , aby rozpocząć nagrywanie. Aby
zakończyć nagrywanie, należy ponownie nacisnąć krótko przycisk .
Wskazówka: Wszystkie nagrania głosowe zapisywane są w folderze „RECORD” i podkatalogu „VOICE”.
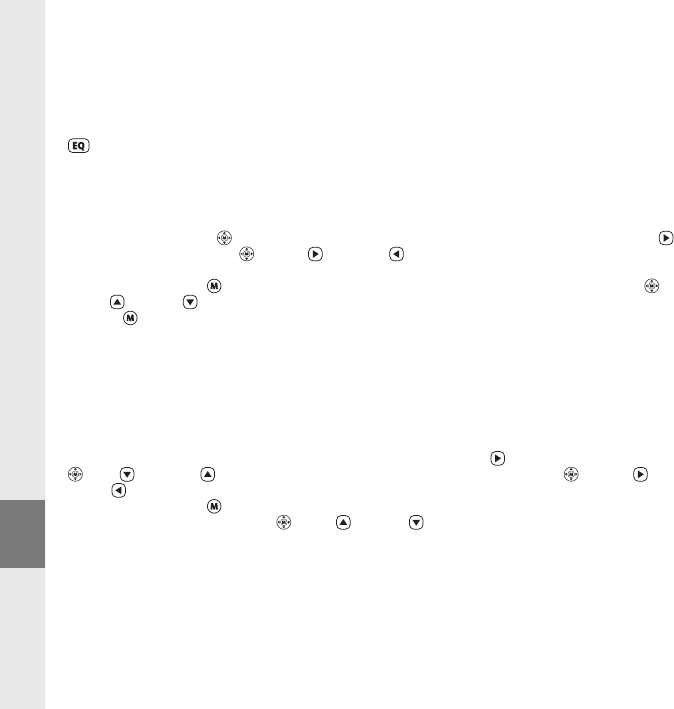
– 56 –
PL
– 56 –
Tryb pracy: Multimedia
Przełączyć się na tryb pracy „Multimedia”.
W trybie pracy „Multimedia” można oglądać pliki filmowe (*.TOM). Do tworzenia plików filmowych w formacie
TOM można wykorzystać załączony na płycie CD program „TOM transcoder”.
Obsługa w trybie pracy „Multimedia” jest identyczna z obsługą w trybie pracy „Music”. Naciśnięcie przycisku
podczas odtwarzania wyświetla menu ekranowe.
Tryb pracy: Grafiki
Przełączyć się na tryb pracy „Picture”.
Przyciskiem nawigacyjnym wybrać w nawigacji folderów plik graficzny (*.jpg) i uruchomić go przyciskiem .
Nacisnąć przycisk nawigacyjny w prawo lub w lewo , aby przejść do następnego lub poprzedniego
pliku graficznego.
Nacisnąć krótko przycisk , aby rozpocząć pokaz slajdów. Krótkie naciśnięcie przycisku nawigacyjnego
w górę lub w dół pozwala zmienić czas wyświetlania grafiki w pokazie slajdów. Ponowne naciśnięcie
przycisku kończy pokaz slajdów.
Wskazówka: Wszystkie pliki graficzne muszą być w formacie JPG. Większe grafiki są automatycznie zmniejszane,
co może prowadzić do wydłużenia czasu ładowania.
Tryb pracy: Tekst
Przełączyć się na tryb pracy „Text”.
Wybrać w nawigacji folderów plik tekstowy (*.txt) i uruchomić go przyciskiem . Nacisnąć przycisk nawigacyjny
w dół lub w górę , aby przewijać tekst wierszami. Nacisnąć przycisk nawigacyjny w prawo lub
w lewo , aby przewijać tekst stronami.
Nacisnąć krótko przycisk , aby włączyć lub wyłączyć automatyczne przewijanie tekstu (stronami). Krótkie
naciśnięcie przycisku nawigacyjnego w górę lub w dół pozwala zmienić czas wyświetlania tekstu.
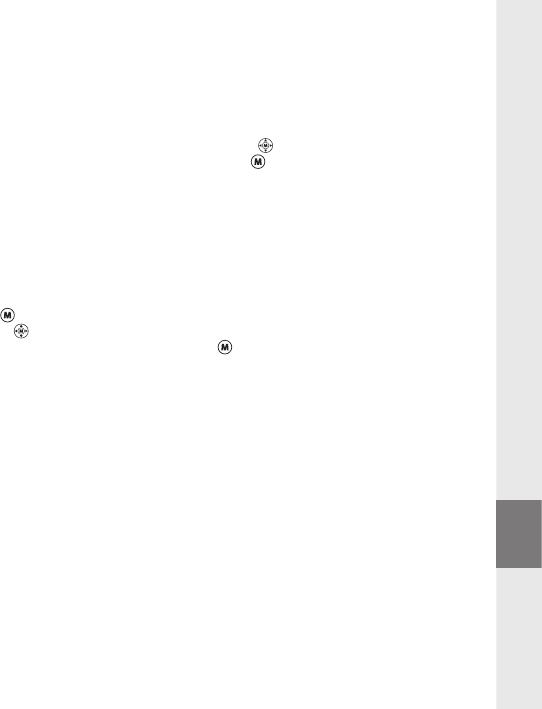
– 57 –
– 57 –
PL
Tryb pracy: USB Host
Przełączyć się na tryb pracy „USB host”.
Na wyświetlaczu pojawi się komunikat „Wait for USB connection”. W tym trybie można kopiować pliki z innego
urządzenia USB na odtwarzacz i.Beat vision. W tym celu należy podłączyć załączony adapter USB Host do
złącza USB Host na odtwarzaczu i.Beat vision i podłączyć żądane urządzenie USB do adaptera USB Host.
Po krótkiej chwili odtwarzacz i.Beat vision rozpoznaje podłączone urządzenie USB, które wyświetlane jest
w nawigacji folderów jako „Device”. Za pomocą przycisku nawigacyjnego można teraz zwyczajnie uzyskać
dostęp do plików na podłączonym urządzeniu USB. Nacisnąć przycisk , aby skopiować plik do odtwarzacza
i.Beat vision i potwierdzić.
Wskazówka: Wszystkie skopiowane pliki znajdują się w folderze „USBHOST”.
Wskazówka: Ze względu na bardzo dużą ilość dostępnych na rynku urządzeń USB firma TrekStor nie może
zagwarantować kompatybilności z urządzeniami wszystkich producentów. Z reguły wymiana danych z innymi
urządzeniami powinna jednak działać bezproblemowo.
7) Ustawienia
Nacisnąć krótko przycisk , aby wyświetlić menu ustawień.
Przyciskiem nawigacyjnym wybierać poszczególne ustawienia (Ogólne, Wyświetlacz, Zegar, Tryby pracy,
Dźwięk, Nagrywanie i System) i potwierdzać wybór przyciskiem .
Wskazówka: Należy upewnić się, że nie jest włączona nawigacja folderów.
8) Pomoc techniczna i kontakt
W przypadku pytań dotyczących naszych produktów lub jeżeli potrzebują Państwo porady, prosimy skorzystać
z naszej pomocy technicznej poprzez e-mail lub telefonicznie. Dane kontaktowe podane są na odwrocie
niniejszej instrukcji lub w naszej witrynie internetowej pod adresem http://www.trekstor.de/support.
Wskazówki:
• Odtwarzacz MP3 jest zoptymalizowany dla załączonych słuchawek (impedancja 32 omy). Stosowanie słuchawek o mniejszej impedancji może
prowadzić, szczególnie w przypadku odtwarzaczy MP3 z dwoma wyjściami słuchawek, m.in. do uszkodzenia odtwarzacza lub słuchawek.
• Uwaga: Urządzenie może wytwarzać sygnał o dużej głośności. Aby uniknąć uszkodzenia słuchu, nie należy słuchać przez dłuższy czas sygnału o
dużej głośności. Nie używać w u ulicznym.
• Nie należy stosować przewodów USB o długości przekraczającej 3 metry
Producent zastrzega sobie prawo do ciągłego rozwoju produktu. Zmiany te mogą być wprowadzone bez uwzględnienia ich w niniejszej
instrukcji. Informacje zawarte w instrukcji nie muszą więc oddawać stanu technicznego wersji urządzenia.
Producent gwarantuje jedynie, że produkt nadaje się do stosowania zgodnie z przeznaczeniem. Ponadto producent nie odpowiada
za uszkodzenia lub utratę danych oraz za ich skutki.
Copyright © 2006 TrekStor GmbH & Co. KG. Wszystkie prawa zastrzeżone. Inne wymienione tu nazwy produktów i firm mogą być znakami
towarowymi lub markami ich właścicieli.
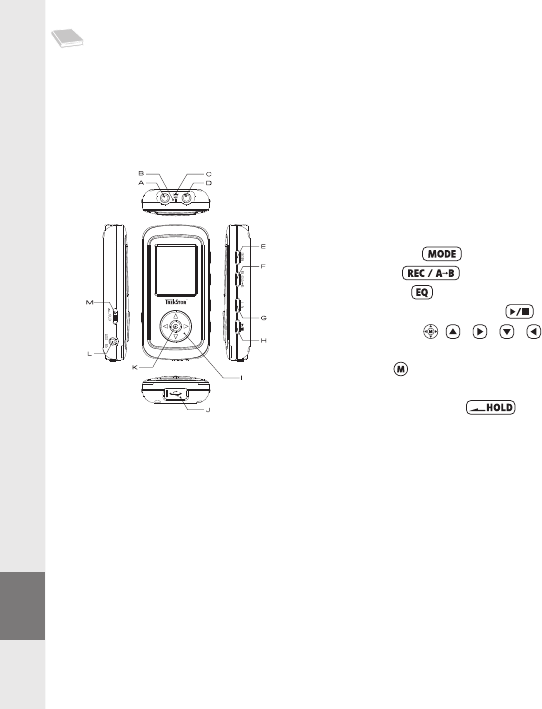
– 58 –
HU
– 58 –
RÖVID ÚTMUTATÓ
Gratulálunk Önnek a TrekStor i.Beat vision megvásárlásához, és biztosak vagyunk abban, sok öröme
lesz az eszköz használatával.
A Windows 98 felhasználók a készülékhez szükséges illesztőprogramot a mellékelt CD-n találják meg.
1) A TrekStor i.Beat vision kezelőszervei
2) A TrekStor i.Beat vision feltöltése
Kérjük, hogy i.Beat vision készülékét az első használat előtt legalább 3 órán át töltse fel. Amikor az eszközt
összekapcsolja egy PC-vel, az automatikusan feltöltődik. Legkésőbb 3 óra múlva az akkumulátor teljesen fel van
töltve és a töltési folyamat a túltöltés elkerülésére automatikusan befejeződik.
Megjegyzés: A maximális akkumulátor használati idő csak mintegy 10 töltési ciklus után érhető el.
3) A TrekStor i.Beat vision összekapcsolása PC-vel
Megjegyzés Windows 98 felhasználóknak: Telepítse először a készülékkel kapott CD-n lévő illesztőprogramot, mielőtt
az i.Beat vision-t a PC-re köti!
Használja fel ezután a kapott USB csatlakozókábelt: kösse rá az i.Beat vision-t a PC egyik USB-portjára.
Az operációs rendszer automatikusan felismeri az i.Beat vision-t és a "Saját gépen" hozzáad egy
"Cserélhető lemezt".
A line in csatlakozó
B mikrofon
C fül a nyakpánt rögzítéséhez
D fejhallgató-csatlakozó
E üzemmód gomb
F felvétel gomb
G ekvalizer gomb
H lejátszás / szünet / stop gomb
I navigációs gomb ( / / / )
J USB-csatlakozó
K menü gomb
L USB-host csatlakozó
M tolókapcsoló (gombzár)

– 59 –
– 59 –
HU
4) Adatcsere a TrekStor i.Beat vision készülékkel
Nem másolásvédett fájlok
a) Jelölje ki az egérrel a kívánt (pl. MP3) fájlokat. Másolja le ezeket a jobb egérgomb meg-ny omásával
("Másolás").
b) A "Saját gépen" válassza ki a "TrekStor i.Beat vision" cserélhető lemezt.
c) Nyomja meg a jobb egérgombot és válassza ki a "Beillesztés" opciót a másolási folyamat indítására.
A másolás befejezése után az adatok rendelkezésére állnak az i.Beat vision eszközön.
WMA/DRM9 védett fájlok
A DRM9 védett fájlok másolásához azokat a Windows Media® Player-en át kell másolni
(referenciaverzió: Windows Media® Player 9).
a) Kösse össze az MP3-kejátszót a számítógéppel és indítsa el a Windows Media® Player-t.
b) Kattintson a bal gombbal a tálca "Írás CD-re / lejátszóra" ikonjára.
c) Húzza át a kívánt zenefájlokat (WMA) a "Másolandó elemek" listába a bal oldalon.
d) A legördülő menüben jobbra fenn válassza ki az MP3-lejátszót az "A lejátszóeszköz tartalma" listából.
e) Kattintson ezután jobbra felül a "Másolás" gombra. A kiválasztott zene ezután automatikusan az
MP3-lejátszóra kerül a másolással.
5) Kilépés és a TrekStor i.Beat vision eltávolítása a PC-ről
Windows 98 (SE) Keresse meg az i.Beat vision eszközt a "Vezérlőpult" programban (a "Meghajtók")
között, majd kattintson az eszközre a bal egérgombbal. Válassza ki az "Eltávolít" menüpontot. Most
leválaszthatja az i.Beat vision-t a PC-ről.
Windows 2000/ME/XP A bal egérgombbal kattintson a tálca jobb alsó részén lévő "Hardver biztonságos
eltávolítása" szimbólumra. A felbukkanó menüben válassza ki az "USB háttértároló eszköz – meghajtó eltávolítása"
pontot úgy, hogy rákattint a bal egérgombbal. Most leválaszthatja az i.Beat vision-t a PC-ről.
Megjegyzés: Kérjük, kövesse a javasolt kilépési folyamatot az eszköz sérülése vagy az adatvesztés elkerülésére!
– 60 –
HU
– 60 –
6) A TrekStor i.Beat vision kezelése
Be- és kikapcsolás
Az i.Beat vision bekapcsolásához a gombot tartsa mintegy két másodpercig lenyomva. Az
i.Beat vision kikapcsolásához a gombot tartsa szintén mintegy két másodpercig lenyomva.
Megjegyzés: Ügyeljen arra, hogy a kikapcsolás közben audio-, video- vagy képfájlok lejátszása, felvétele ill.
megjelenítése ne történjen.
Megjegyzés: Ügyeljen arra, hogy a tolókapcsoló a jobb oldali pozícióban legyen, azaz a gombzár ki
legyen kapcsolva.
Mappakezelés
Nyomja meg röviden az gombot, hogy belépjen a mappakezelésbe. A navigációs gombot lefelé
vagy felfelé megnyomásával a következő vagy az előző fájlt jelölheti ki. A kiválasztott fájl lejátszásához
nyomja meg a navigációs gombot jobbra: . Az almappába váltáshoz nyomja meg a navigációs gombot
jobbra , amikor a mappa ki van jelölve (kék alapon jelenik meg). A fő könyvtárba való visszatéréshez nyomja
meg a navigációs gombot balra . Navigáljon a szokásos módon tovább. Az gomb megnyomásával
kilép a mappakezelésből.
Megjegyzés: A mappakezelésben csak az éppen kiválasztott üzemmód fájljai jelennek meg (azaz csak zenefájlok
láthatók, amennyiben a "Music" üzemmódban van).
A bővített mappakezelésbe való belépéshez, amelyben a különböző üzemmódok összes fájlja megjelenik, az
gombot kétszer kell megnyomnia. A bővített mappakezelésben függetlenül attól, melyik üzemmódban van
éppen, tetszőleges fájlt indíthat el másik üzemmódból.
Fájl vagy mappa törlése
Ügyeljen arra, hogy ne folyjon éppen fájl lejátszása, amikor fájlt ill. mappát kíván törölni. Nyomja meg röviden
az gombot, hogy belépjen a mappakezelésbe. A törléshez nyomja meg a gombot. Váltson
a navigációs gomb / gombjaival az "Yes"-re és a biztonsági kérdést válaszolja meg az gomb
megnyomásával.
Megjegyzés: A mappának üresnek kell lennie, ha törölni kívánja!
Az egyes üzemmódok
Az i.Beat vision különféle üzemmódokkal rendelkezik (zene, FM-rádió, felvétel, multimédia, kép, szöveg,
USB host). Az üzemmódba való belépéshez a gombot tartsa kb. egy másodpercig lenyomva. Válassza
ki a navigációs gomb / gombjainak megnyomásával a kívánt üzemmódot, majd erősítse meg
választását a navigációs gomb jobbra való megnyomásával.
Megjegyzés: Ügyeljen arra, hogy az átkapcsolás közben audio-, video- vagy képfájlok lejátszása, felvétele ill.
megjelenítése ne történjen.
– 61 –
– 61 –
HU
Üzemmód: Zene
Kérjük, váltson a "Music" üzemmódba.
• Lejátszás
Nyomja meg röviden a gombot az audiofájl lejátszásának indításához.
• Szünet
Nyomja meg röviden az gombot a lejátszás megállításához. A gomb ismételt megnyomására a
lejátszás folytatódik.
• Szám váltása
A navigációs gomb rövid jobbra vagy balra megnyomásával zeneszámot válthat. A navigációs
gombot nyomja meg jobbra a következő számra váltáshoz. Az előző számra váltáshoz a navigációs
gombot nyomja meg balra .
• Előre- / hátracsévélés egy számon belül
A navigációs gomb hosszabb jobbra vagy balra megnyomásával egy számon belül csévélhet.
A navigációs gombot nyomja meg jobbra az előre csévéléshez. A navigációs gombot nyomja
meg balra a visszacsévéléshez.
Megjegyzés: Minél tovább tartja lenyomva a navigációs gomb / gombját, annál gyorsabban csévél az
eszköz.
• Hangerő növelése / csökkentése
Nyomja meg röviden a navigációs gombot felfelé ill. lefelé a hangerő növeléséhez ill.
csökkentéséhez.
Megjegyzés: Minél tovább tartja lenyomva a navigációs gomb / gombját, annál gyorsabban
növekszik ill. csökken a hangerő.
Üzemmód: FM-rádió
Kérjük, váltson az "FM Radio" üzemmódba.
Megjegyzés: Kérjük, mindig csatlakoztassa a fejhallgatót az i.Beat vision eszközre, mert a fejhallgató-kábel
a belső rádió antennájaként szolgál.
• Automatikus adópásztázás tárolással
Nyomja meg röviden az gombot az automatikus adópásztázás elindításához. A pásztázás során
az összes jól vehető adó bekerül a memóriába. Nyomja meg röviden a gombot az automatikus
adópásztázás leállításához.
– 62 –
HU
– 62 –
• Manuális adópásztázás tárolással
Nyomja meg röviden a gombot, hogy az "Station Memory" memóriahely-üzemmódból a manuális
adópásztázásba belépjen. A / gomb rövid megnyomásával a vételi frekvenciát 0,05 MHz-es
lépésekben módosíthatja. Ha a / gombot kellően hosszan tartja nyomva, a készülék automatikusan
megkeresi a következő legjobban fogható adót. A kiválasztott adó tárolásához nyomja meg a
gombot, válasszon ki egy adó memóriahelyet a / gombokkal, majd erősítse meg a tárolást az
gomb megnyomásával.
• Váltás a tárolt adók között
Az "Station Memory" memóriahely-üzemmódban a / gomb rövid megnyomásával válthat a
beprogramozott memóriahelyek között.
• Felvétel az FM-rádióról
Nyomja meg egy másodpercnél hosszabb ideig a gombot az FM-rádióról való felvétel indításához.
Nyomja meg röviden a gombot a felvétel megállításához.
Megjegyzés: Minden FM-rádió felvétel a "RECORD"-mappába, az "FM"almappába kerül.
Üzemmód: Felvétel
Kérjük, váltson a "Record" üzemmódba.
A navigációs gomb segítségével különböző felvételi beállításokat végezhet el. A / gomb
megnyomásával válthat a beállítások között. A / gomb megnyomásával módosíthatja a beállításokat.
• Felvétel a line-in bemeneten át
A line-in bemeneten át külső eszköz (pl. CD-lejátszó) csatlakoztatható és arról közvetlenül felvétel készíthető.
Válassza ki a "LINE-IN"-t forrásként, majd erősítse meg választását az gomb megnyomásával. Nyomja meg
röviden a gombot a felvétel elindításához. A felvétel befejezéséhez nyomja meg újra röviden a
gombot.
Megjegyzés: Minden Line-In felvétel a "RECORD"-mappába, az "LINEIN" almappába kerül.
• Felvétel a mikrofonnal
A beépített mikrofonnal beszédfelvétel készíthető. Válassza ki a "MICRO"-t forrásként, majd erősítse meg
választását az gomb megnyomásával. Nyomja meg röviden a gombot a felvétel elindításához.
A felvétel befejezéséhez nyomja meg újra röviden a gombot.
Megjegyzés: Minden beszédfelvétel a "RECORD"-mappába, a "VOICE" almappába kerül.
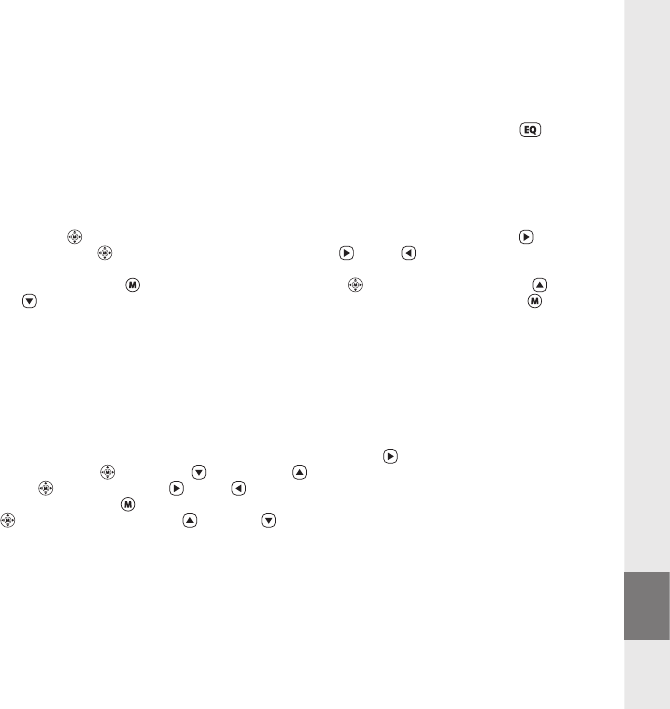
– 63 –
– 63 –
HU
Üzemmód: Multimédia
Kérjük, váltson a "Multimedia" üzemmódba.
A "Multimedia" üzemmódban movie-fájlokat (*.TOM) nézhet meg. A movie-fájlok TOM-formátumban való
elkészítéséhez kérjük használja a CD-n mellékelt "TOM transcoder" programot.
A "Multimedia" üzemmódban a kezelés azonos a "Music" üzemmódban érvényes kezeléssel. Az gomb
lejátszás közbeni megnyomására OSD-menü jelenik meg.
Üzemmód: Képek
Kérjük, váltson a "Picture" üzemmódba.
Válasszon ki a navigációs gombbal egy képfájlt (*.jpg) a mappakezelésben, és indítsa el azt a gomb
megnyomásával. A navigációs gombot nyomja meg jobbra ill. balra a következő ill. előző képre
váltáshoz.
Nyomja meg röviden az gombot a diavetítés elindításához. A navigációs gomb rövid felfelé vagy
lefelé megnyomásával módosíthatja a kép megjelenésének időtartamát a diavetítés során. Az gomb
ismételt megnyomására a diavetítés befejeződik.
Megjegyzés: Minden képnek JPG-formátumban kell rendelkezésre állnia. A nagyobb képek automatikusan
kicsinyítve jelennek meg, ami hosszabb betöltési időhöz vezethet.
Üzemmód: Szöveg
Kérjük, váltson a "Text" üzemmódba.
Válasszon ki egy szövegfájlt (*.txt) a mappakezeléssel, és indítsa el azt a gomb megnyomásával. A
navigációs gombot nyomja meg lefelé ill. felfelé a szöveg soronkénti olvasásához. A navigációs
gombot nyomja meg jobbra ill. balra a szöveg oldalankénti olvasásához.
Nyomja meg röviden az gombot a szöveg (oldalankénti) automatikus betöltésének be- ill. kikapcsolásához.
A navigációs gomb rövid felfelé vagy lefelé megnyomásával beállíthatja a szöveg megjelenésének
időtartamát.
– 64 –
Üzemmód: USB-host
Kérjük, váltson az "USB host" üzemmódba.
A kijelzőn megjelenik a "Wait for USB connection" üzenet. Ebben az üzemmódban fájlokat másolhatmásik
USB-eszközről az i.Beat vision készülékre. Ehhez csatlakoztassa a készülékkel szállított USB Host adaptert
az i.Beat vision USB Host csatlakozójára, és kösse össze a kívánt USB-eszközt az USB Host adapterrel.
Rövid idő múlva az i.Beat vision felismeri a csatlakoztatott USB-eszközt, amely a mappakezelésben mint
"Device" (eszköz) jelenik meg. A navigációs gomb segítségével a szokott módon kezelheti a csatlakoztatott
USB-eszköz fájljait. Nyomja meg az gombot, hogy a fájlt az i.Beat vision eszközre másolja, majd a
másolási eljárást erősítse meg az "Yes"-nel, szintén az gomb megnyomásával.
Megjegyzés: Minden másolt fájl az "USBHOST"-mappában található.
Megjegyzés: A különféle USB-eszközök nagy száma miatt a TrekStor nem garantálhatja a kompatibilitást az
összes gyártó minden eszközével. Általában azonban az adatátvitel más eszközökkel gond nélkül végrehajtható.
7) Beállítások
Nyomja meg egy másodpercre az gombot a beállítások menüjének elindításához.
A navigációs gomb segítségével navigáljon az egyes beállításokon keresztül (Általános, Kijelző, Időzítő,
Üzemmódok, Hangszín, Felvétel és Rendszer), majd erősítse meg választását az gomb megnyomásával.
Megjegyzés: Kérjük ügyeljen arra, hogy a mappakezelésnek nem szabad aktiválva lennie.
8) Vevőszolgálat és kapcsolat
Amennyiben kérdése van termékeinkről vagy segítségre van szüksége, kérjük forduljon e-mail-ben vagy
telefonon vevőszolgálatunkhoz. A kapcsolati adatokat ezen rövid útmutató hátoldalán, vagy honlapunkon
http://www.trekstor.de/support találja meg.
Megjegyzések:
• Ez a MP3-lejátszó készülék az együttszállított fülhallgatóhoz (impedancia 32 Ohm) van optimálisan beállítva. Más, alacsonyabb impedanciájú
fülhallgató alkalmazása különösen két fülhallgató kimenettel rendelkező MP3-lejátszóknál bizonyos körülmények között az MP3-lejátszó készülék
vagy a fülhallgató meghibásodásához is vezethet.
• Figyelem: ez a készülék magas hangerő előállítására képes. Halláskárosodás elkerülésére javasoljuk, hogy hosszabb ideig ne hallgassa magas
hangerővel. Ne használja az utcai forgalomban.
• 3 m-nél hosszabb USB-kábel használata nem ajánlott.
A gyártó fenntartja a jogot a termék folyamatos továbbfejlesztésére. Az ilyen módosítások a jelen rövid útmutatóban való közvetlen leírás
nélkül végrehajthatók. Így a jelen rövid kezelési útmutatónak nem szükséges a műszaki kivitelezés állapotát tükröznie.
A gyártó csupán a jelen termék tulajdonképpeni rendeltetésre való alkalmasságát garantálja. Ezen túlmenően a gyártó nem felelős az
adatok sérüléséért vagy elvesztéséért, valamint a következménykárokért.
Copyright © 2006 TrekStor GmbH & Co. KG. Minden jog fenntartva. Ezentúl említett termék- vagy cégmegnevezések esetében a mindenkori
tulajdonosok védjegyéről vagy márkanevéről lehet esetleg szó.
– 64 –
HU
IL
– 71 –
IL
– 70 –
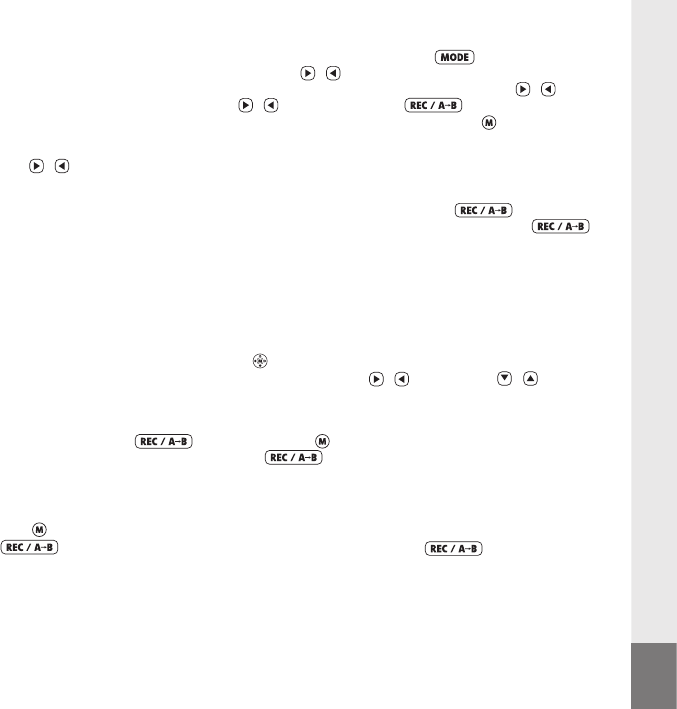
IL
– 69 –
– 68 –
IL
– 68 –

IL
– 67 –

IL
– 66 –

IL
�
�
– 65 –
TrekStor GmbH & Co. KG
Kastanienallee 8-10 · D-64653 Lorsch · Germany · www.trekstor.de
QG-IBVISION-DM-V1.10-INT-060922
Support
AT
BE
CH
DE
ES
FR
HU
IT
LU
NL
PL
PT
UK
GR
TR
RU
Hotline E-Mail Language
+49 431 - 24 89 45 70** support.at@trekstor.de German
+49 431 - 24 89 45 80** support.en@trekstor.de English
+49 431 - 24 89 45 73** support.ch@trekstor.de German
01805 - TREKSTOR*
01805 - 87 35 78 67* support.de@trekstor.de German
+49 431 - 24 89 45 76** support.es@trekstor.de Spanish
+49 431 - 24 89 45 74** support.fr@trekstor.de French
+49 431 - 24 89 45 79** support.en@trekstor.de English
+49 431 - 24 89 45 75** support.it@trekstor.de Italian
+49 431 - 24 89 45 72** support.lu@trekstor.de German, French
+49 431 - 24 89 45 81** support.en@trekstor.de English
+49 431 - 24 89 45 77** support.pl@trekstor.de Polish
+49 431 - 24 89 45 78** support.en@trekstor.de English
+49 431 - 24 89 45 71** support.uk@trekstor.de English
+49 431 - 24 89 45 82** support.en@trekstor.de English
+49 431 - 24 89 45 83** support.en@trekstor.de English
+49 431 - 24 89 45 84** support.en@trekstor.de English
* 12 Cent/Min. (14 Cent/Min. ab dem 01.11.2006) aus dem deutschen Festnetz der DTAG
** Please check with your local telephone provider for connection costs.
