Trimble 614 Geo Explorer 2008 : XM/XT/XH User Manual GeoExpl2008 UserGde ENG
Trimble Navigation Ltd Geo Explorer 2008 : XM/XT/XH GeoExpl2008 UserGde ENG
Trimble >
Contents
- 1. User Manual Part One
- 2. User Manual Part Two
- 3. User Manual Part Three
User Manual Part Two

2 Getting Started
34 GeoExplorer 2008 Series User Guide

CHAPTER
3
GeoExplorer 2008 Series User Guide 35
Using the Windows Mobile Operating
System 3
In this chapter:
QParts of the screen
QUsing the stylus
QStatus indicators
QPre-installed programs
QAccessing help
QEntering information
QPersonalizing the handheld
QMessaging
The GeoExplorer 2008 series handheld is
powered by the Windows Mobile 6 Classic
operating system.
This chapter describes the main features of the
Windows Mobile operating system.
3 Using the Windows Mobile Operating System
36 GeoExplorer 2008 Series User Guide
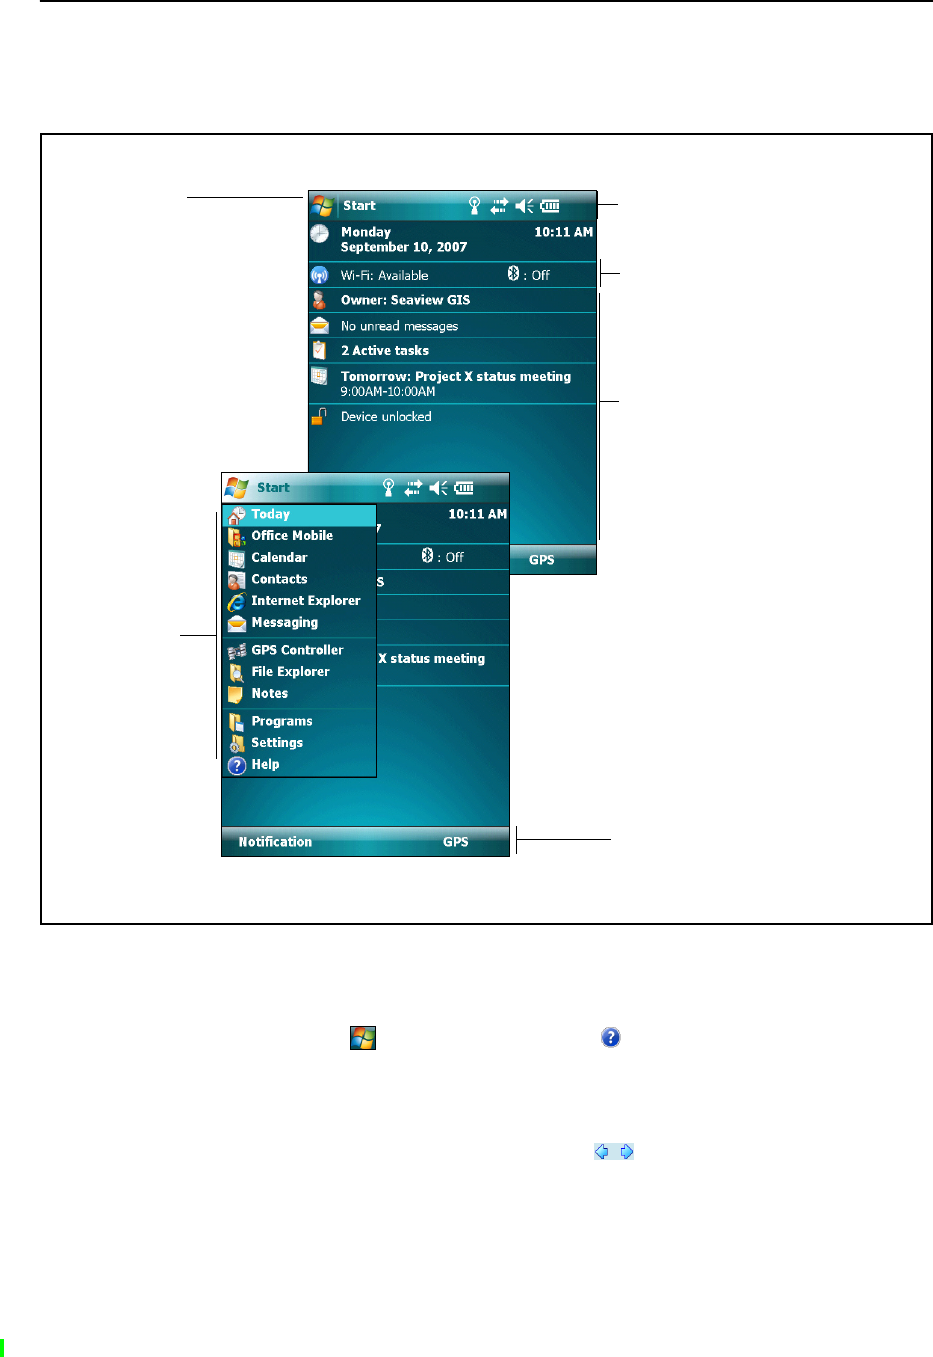
Parts of the screen
The main parts of the screen are shown below.
Accessing help
To access help, tap / Help or, if available, tap in the application window. If there
is an application running, context-sensitive help for the current screen appears. To
view the main Help Contents page, tap the Contents softkey in the menu bar.
Help files installed on the handheld work in the same way as a Web page. Tap
hyperlinks to navigate around the help and use to retrace your steps. Tap View /
Contents to return to the Contents page for the application, and tap View / All Installed
Help to return to the main Contents page.
Start menu
Tap any item on
the menu to
open it.
Start button
Tap to open the Start menu,
where you can access
programs and system
controls.
Title bar
Contains status icons for important
system functions.
Menu bar
Contains softkeys providing
access to applications, menus,
and notifications.
Today screen
Summarizes your
appointments, tasks, notes, and
e-mails for the day. Tap any
item to open it.
Wireless LAN and Bluetooth
icons
Show status of integrated radios.
Tap either icon to access the
Wireless Manager.
GeoExplorer 2008 Series User Guide 37
Using the Windows Mobile Operating System 3
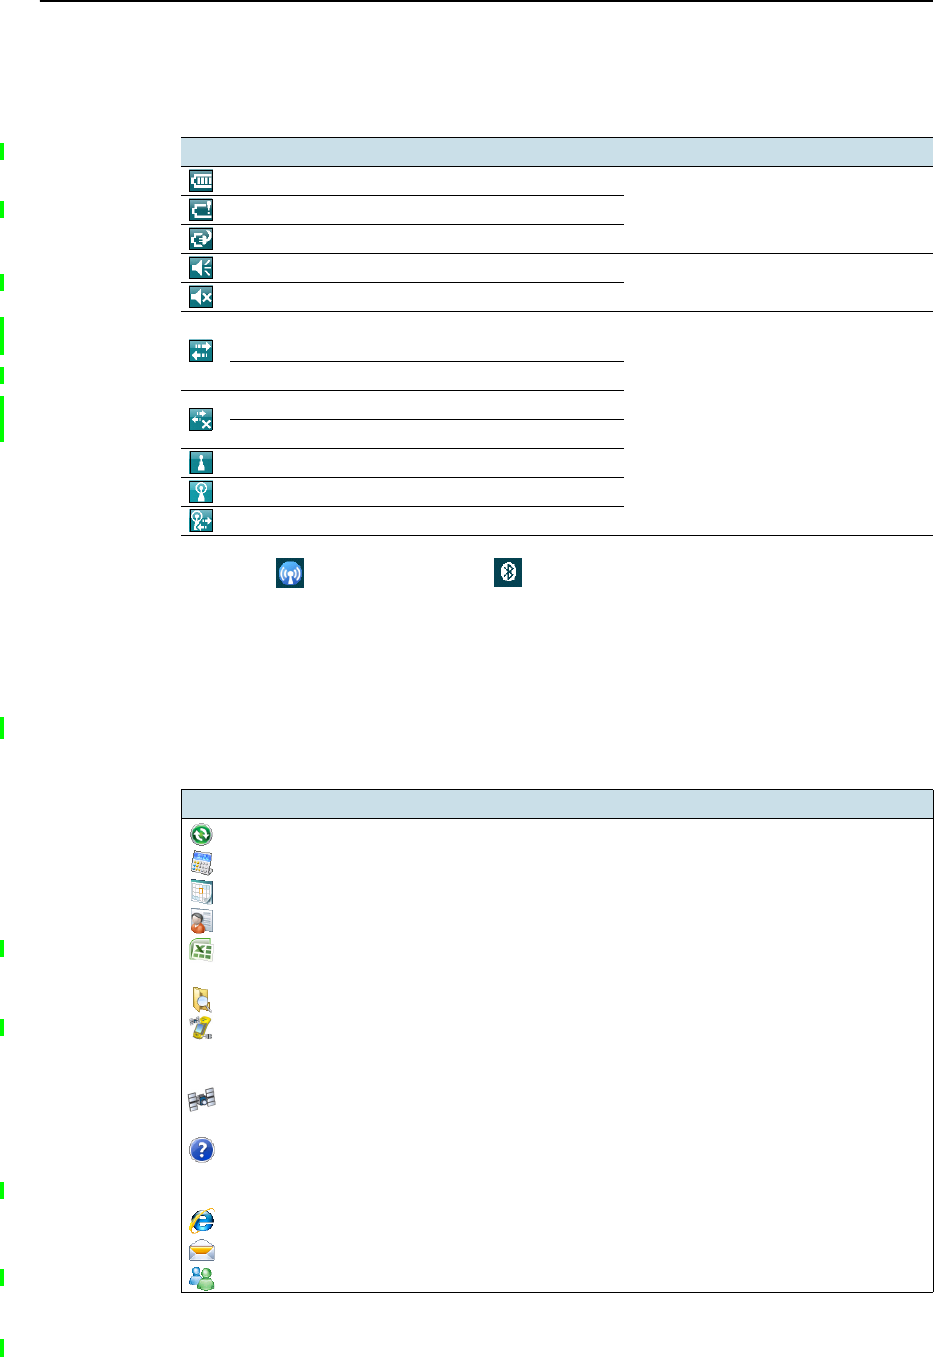
Status indicators
Status indicators that appear in the title bar at the top of the screen are as follows:
The Wi-Fi and Bluetooth icons on the Today screen show the status of each
radio. Tap the icon to access the Wireless Manager and turn on or turn off the radio.
Pre-installed programs
Programs that are pre-installed on the GeoExplorer 2008 series handheld are as
follows:
Icon Tap icon to...
Battery level
check battery levelLow battery (20% or less remaining)
Battery charging/using external power
Speaker is on change volume
Speaker is off
Connected to ActiveSync or the Windows
Mobile Device Center (WMDC) on a computer
configure the connection or access
the Wireless Manager
Connected to a Bluetooth-enabled phone
Disconnected from ActiveSync or WMDC
Disconnected from a Bluetooth-enabled phone
Wireless LAN radio is on
A wireless LAN is detected
Sending or receiving wireless signals
Program Function
ActiveSync Synchronize information between the handheld and a computer.
Calculator Perform basic arithmetic functions.
Calendar Keep track of appointments and arrange meetings.
Contacts Keep track of your friends and colleagues.
Excel Mobile From the Start menu, tap Office Mobile and then tap Excel Mobile.
Use Excel Mobile to create and edit Excel spreadsheets.
File Explorer View and manage files.
GPS Connector Located in Settings / Connections, it allows you to configure
communications between the handheld’s integrated GPS receiver
and external devices.
GPS Controller Configure and view status information for the integrated GPS
receiver.
Help View help. If there is an application running, context-sensitive
help for the current screen appears. To view the main Help
Contents page, tap the Contents softkey in the menu bar
Internet Explorer Browse the World Wide Web.
Messaging Write, send, and receive e-mail messages.
Messenger Send instant messages using Windows Live™ Messenger.
3 Using the Windows Mobile Operating System
38 GeoExplorer 2008 Series User Guide
For more information about using any of this software, refer to the Help for the
software. See Accessing help, page 36.
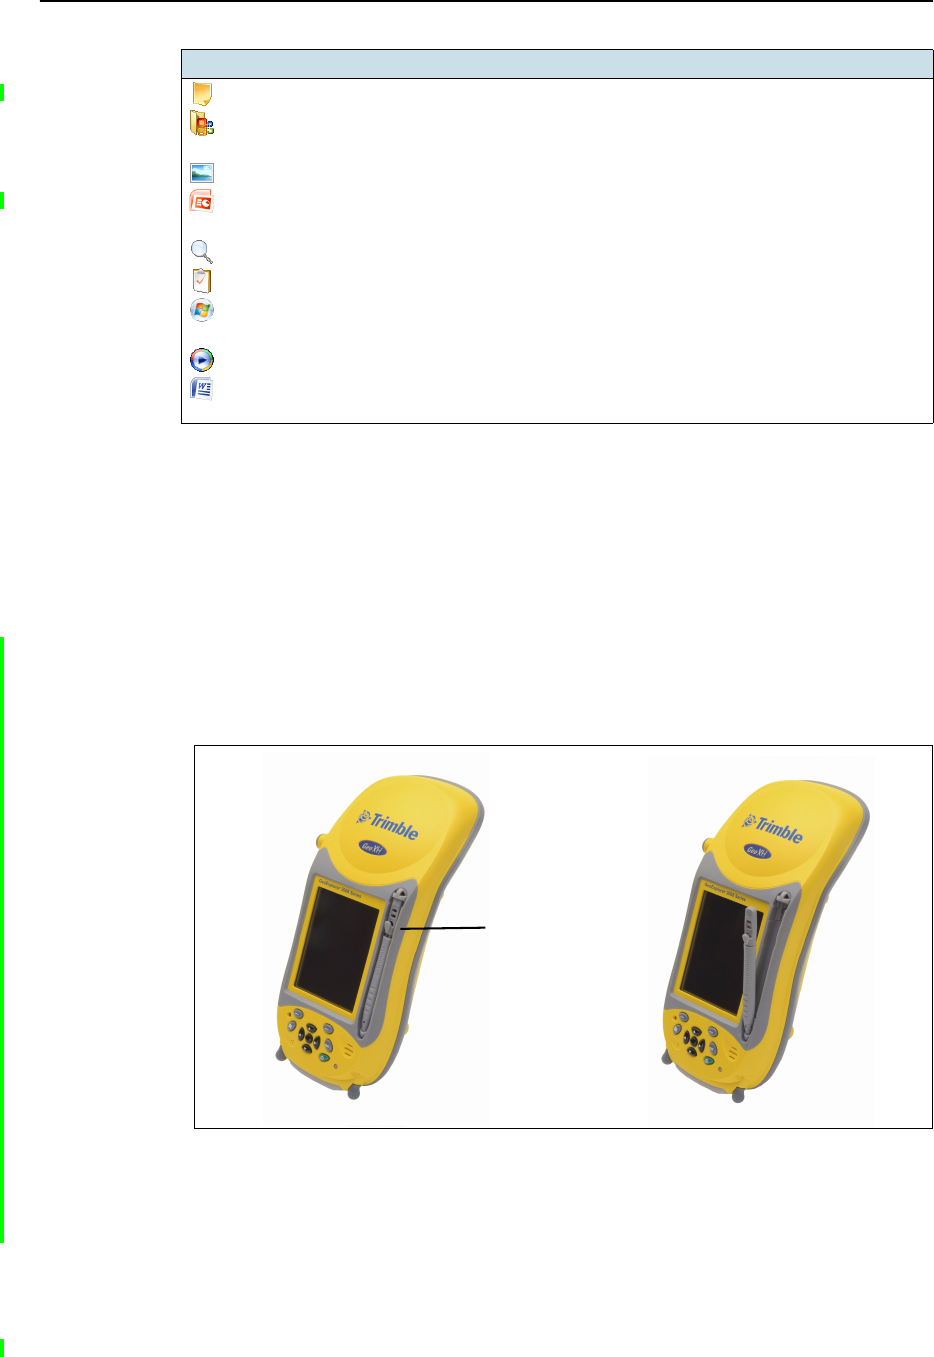
Using the stylus
Removing and replacing the stylus
To remove the stylus from its holder on the front of the handheld, press the spring on
the stylus downwards and then lift the stylus forward, as shown.
To insert the stylus into its holder on the front of the handheld, insert the tip of the
stylus into the lower retainer with the Trimble logo on the stylus facing out. Then press
the spring on the stylus downwards and insert the top of the stylus below the top
retainer.
Notes Create handwritten, typed, or recorded notes.
Office Mobile Provides access to these Office Mobile applications: Excel Mobile,
PowerPoint Mobile, and Word Mobile.
Pictures and Videos Take, view, and edit pictures, or record and launch video clips.
PowerPoint Mobile From the Start menu, tap Office Mobile and then tap PowerPoint
Mobile. Use PowerPoint® Mobile to view slide show presentations.
Search Search for a file or item stored on the handheld.
Tasks Keep track of your tasks.
Windows Live Access Windows Live services, including e-mail, instant messenger
and Internet search.
Windows Media Play Windows Media® or MP3 audio and video files.
Word Mobile From the Start menu, tap Office Mobile and then tap Word
Mobile. Use Word Mobile to create and edit Word documents.
Program Function
stylus spring
GeoExplorer 2008 Series User Guide 39
Using the Windows Mobile Operating System 3
Interacting with the handheld
To interact with the handheld, use the stylus to tap on the touch screen.
Actions you can perform with the stylus are as follows:
If at any time the touch screen does not respond correctly to stylus taps, realign it. For
more information, see Screen, page 47.
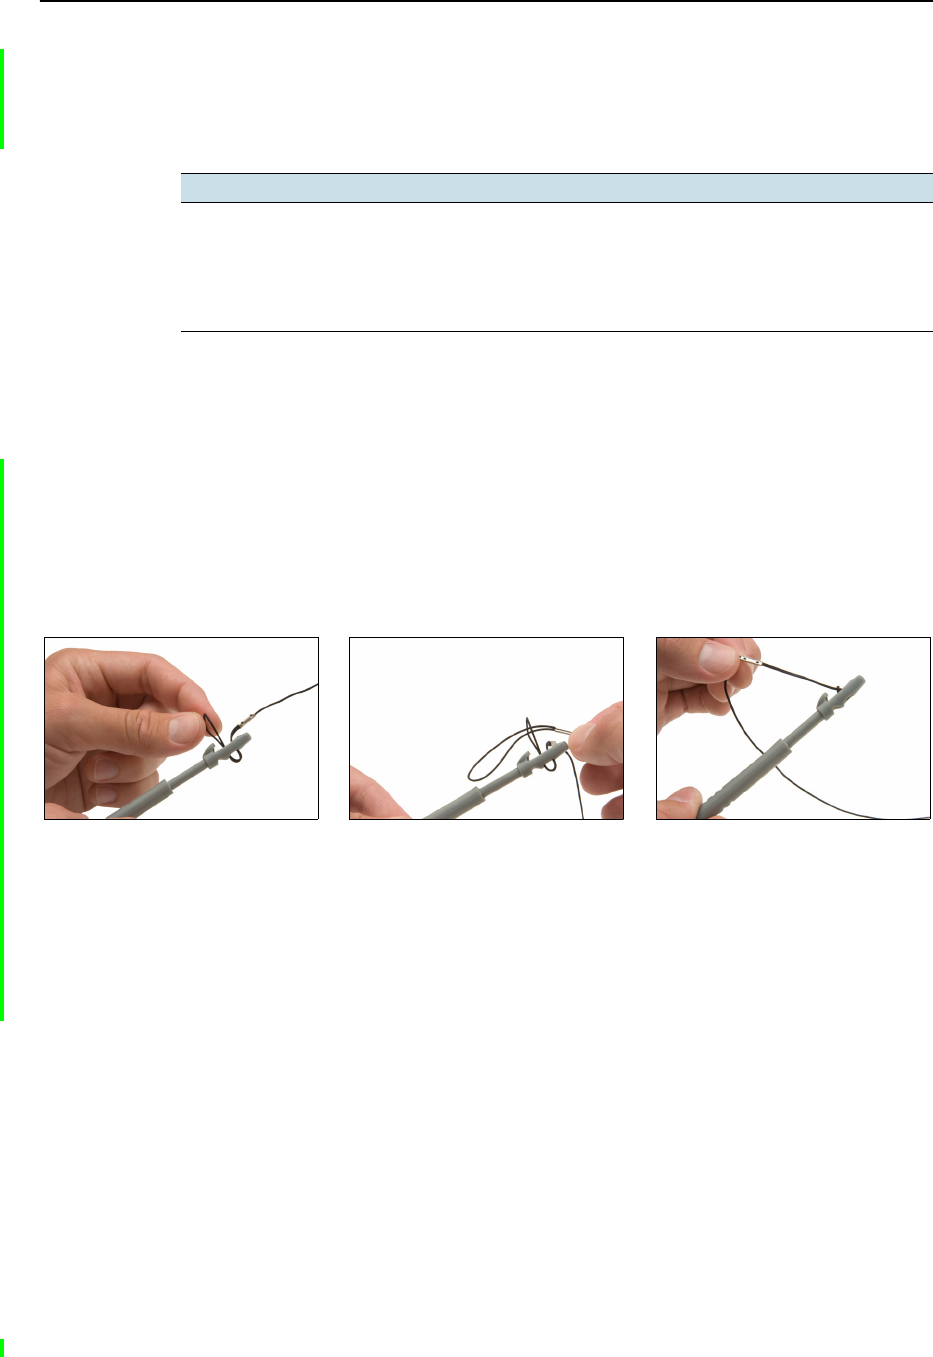
Tethering the stylus to the handheld
To attach a tether to the stylus:
1. Hold the stylus with the Trimble logo facing upwards and insert the end of the
tether down through one of the two holes in the top of the stylus and then back
up through the other hole.
2. Insert the other end of the tether through the loop and pull until the knot in the
tether is tight.
3. Attach the tethered stylus to the handheld as described below.
To attach a tethered stylus to the handheld, feed the end of the tether through the top
of the stylus retainer on the handheld and then feed the end of the stylus through the
loop until the knot in the tether is tight.
Action Definition
Tap Touch the screen once with the stylus to open items and select options.
Tap and hold Tap and hold the stylus on an item to see a list of actions available for that
item. On the pop-up menu that appears, tap the action you want to perform.
Drag Hold the stylus on the screen and drag across the screen to select text and
images. Drag in a list to select multiple items.
3 Using the Windows Mobile Operating System
40 GeoExplorer 2008 Series User Guide
Entering information
Depending on the program you are using, you can enter information in several ways, as
described below:
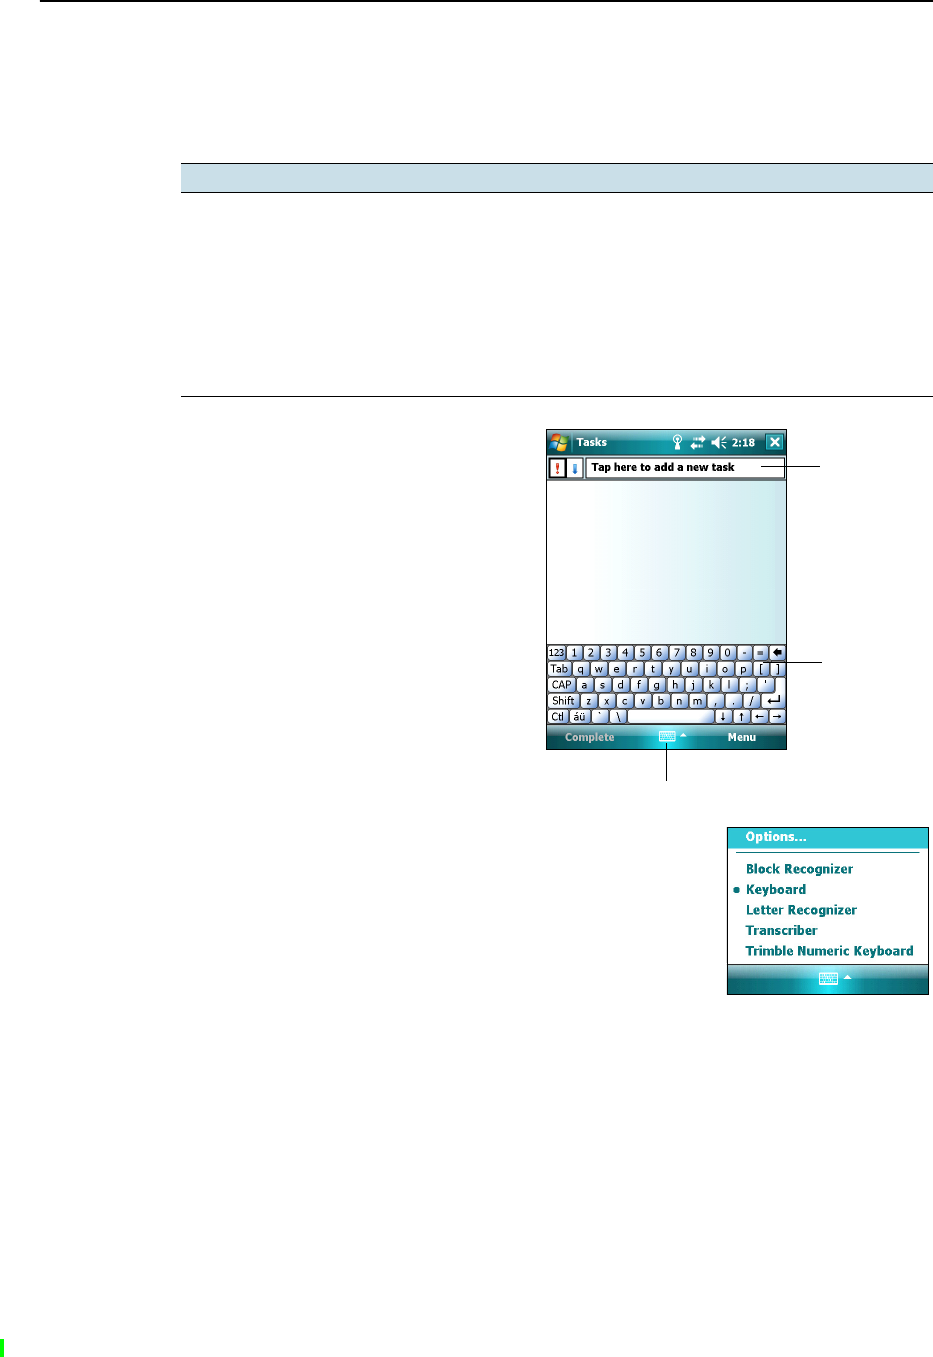
Selecting an input panel
Use an input panel to type or to write
on the screen.
The Input Panel button automatically
appears in the menu bar of any
application.
To display the currently selected input
panel, tap a text box in the application,
or tap the Input Panel button.
To select an input panel, tap the Input
Selector arrow next to the Input Panel
button and then tap the input panel
you want to use:
•To use the on-screen keyboard,
tap Keyboard.
•To write directly onto the screen and have the
handwritten words and symbols converted into typed
characters, tap Letter Recognizer or another input
panel that supports writing on the screen.
•To configure options for the selected input panel, tap
Options.
Input method Description
Synchronizing Use Microsoft connection management software to exchange
information between the handheld and an office computer.
For more information, see Chapter 4, Connecting to an Office
Computer.
Typing Use the Keyboard input panel to enter typed text by tapping keys on
the on-screen keyboard.
Writing Use the stylus like a pen to write directly on the screen.
Recording Create a stand-alone recording or embed a recording into a note.
Textbox
Input Panel button
Keyboard
input panel

GeoExplorer 2008 Series User Guide 41
Using the Windows Mobile Operating System 3
Using the on-screen keyboard
To enter characters, use the stylus to tap the keys on the keyboard. When you finish
entering text in a field, tap to accept the text you have entered and then move to
the next field.
To enter special characters, tap to display keyboards containing numbers and
symbols. To switch back to the main keyboard, tap again.
To hide the keyboard, tap the keyboard icon again.
BTip – To make the keys larger, tap the Input Selector arrow and then tap Options. In the
Input method list, select Keyboard and then tap Large Keys.
Writing directly on screen
When you select Letter Recognizer, you can write individual letters, numbers, and
punctuation in the Letter Recognizer input panel and have them converted into typed
text.
BTip – For help with writing characters with Letter Recognizer, tap the question mark near
the writing area.
When you select Transcriber, you can write anywhere on the screen using the stylus.
The Microsoft Transcriber software converts your handwriting to text. You can use it
to enter notes in a text editor such as Notes.
Transcriber has a number of tools and modes that allow you to customize how it
works. These tools and modes are controlled from the Transcriber keyboard.
For more information, refer to the Transcriber Help.

3 Using the Windows Mobile Operating System
42 GeoExplorer 2008 Series User Guide
Making a recording
You can create a stand-alone voice note or you can add a recording to a note. Then you
can work with voice notes in the same way that you work with notes.
To make a recording:
1. Tap / Programs / Notes.
2. Do one of the following:
–To create a stand-alone recording, in the
screen displaying the list of notes, tap the
Record button to begin recording.
–To add a recording to a note, create or open
a note and then tap the Record button
to begin recording.
BTip – If you do not see the Recording toolbar, tap Menu /
View Recording Toolbar.
Note – The GeoExplorer 2008 series handheld’s microphone is on the front of the
handheld, in the keypad area. The microphone will capture voice notes when you are
holding the handheld in front of you. In noisy environments, you may need to move the
handheld closer to you or to the source of the sounds you want to record.
3. When you finish recording, tap the Stop button
.
If you are creating a stand-alone recording, an
icon appears in the note list.
If you are recording in an open note, an icon
appears in the note. Tap OK to return to the note
list.
To play a recording, tap the recording in the note list or
open the note and then tap the icon in the note.
GeoExplorer 2008 Series User Guide 43
Using the Windows Mobile Operating System 3
Personalizing the handheld
Use the controls in the Settings area to customize the handheld. The following
examples describe controls that are available.
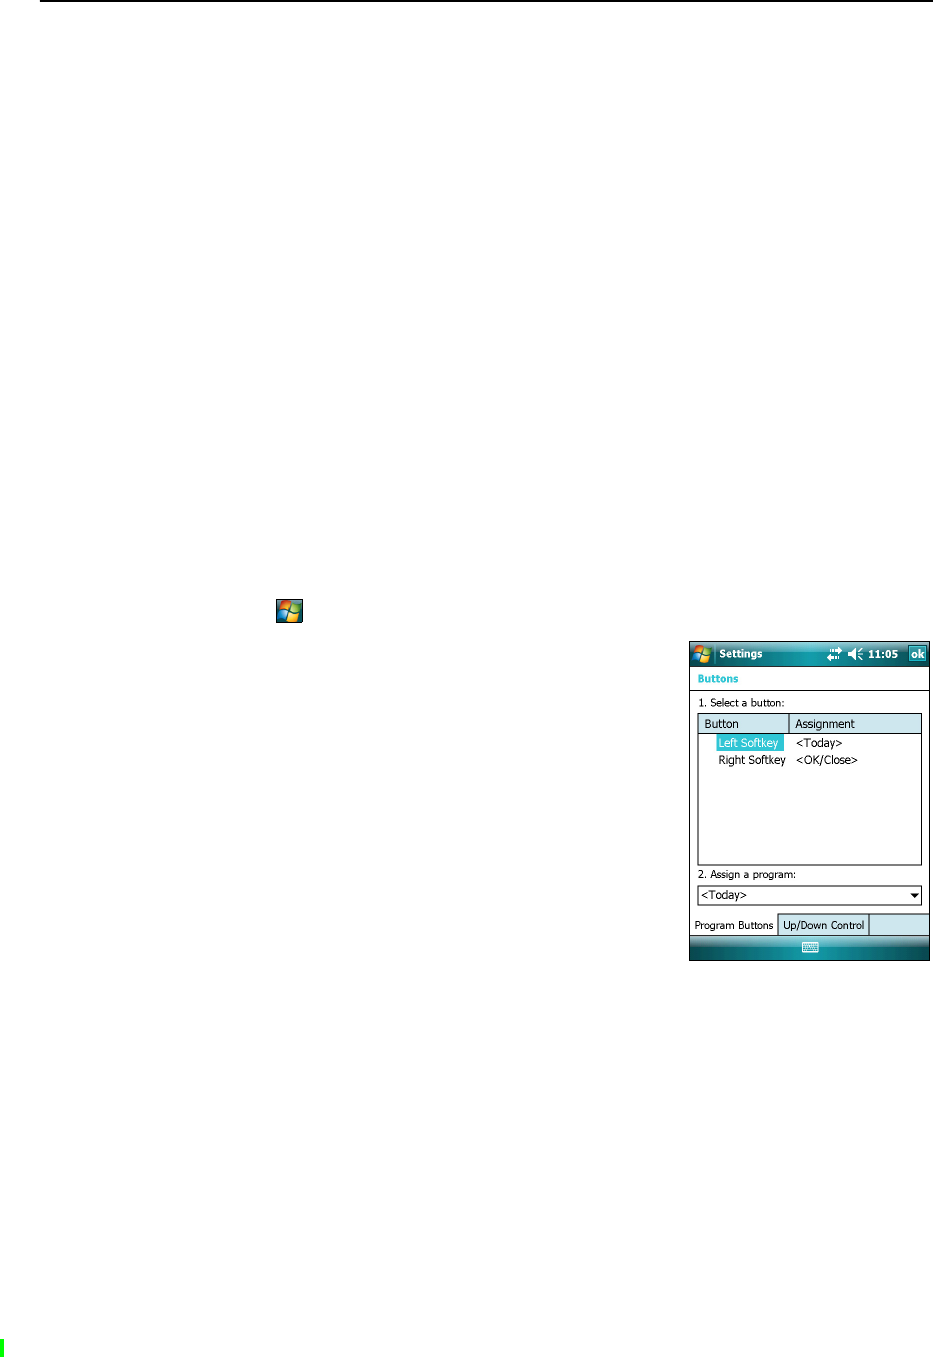
Buttons
Use the Buttons control to assign the action you want to be performed when you press
the left or right application key.
By default, these keys perform the same action as the left and right softkeys in the
menu bar. Alternatively, program these keys to perform a selected action.
Application buttons can be programmed to perform one of the following types of
actions:
•Run a selected application, for example Messaging or Calendar.
•Act as a software button, for example an OK/Close button or a scroll button.
•View a selected screen, or part of a screen, for example return to the Today
screen or launch the Context menu or Input panel.
To open the Buttons control:
•Tap / Settings /Personal / Buttons.
To specify an action for the button:
1. Tap the Program Buttons tab.
2. Tap a button in the list to select it.
3. From the Assign a program drop-down list, select
the action you want to occur when you press the
button or tap the softkey.
4. Tap OK.
3 Using the Windows Mobile Operating System
44 GeoExplorer 2008 Series User Guide
Today
Use the Today control to change the display theme that controls the appearance of the
Today screen, and to customize which items appear on the Today screen.
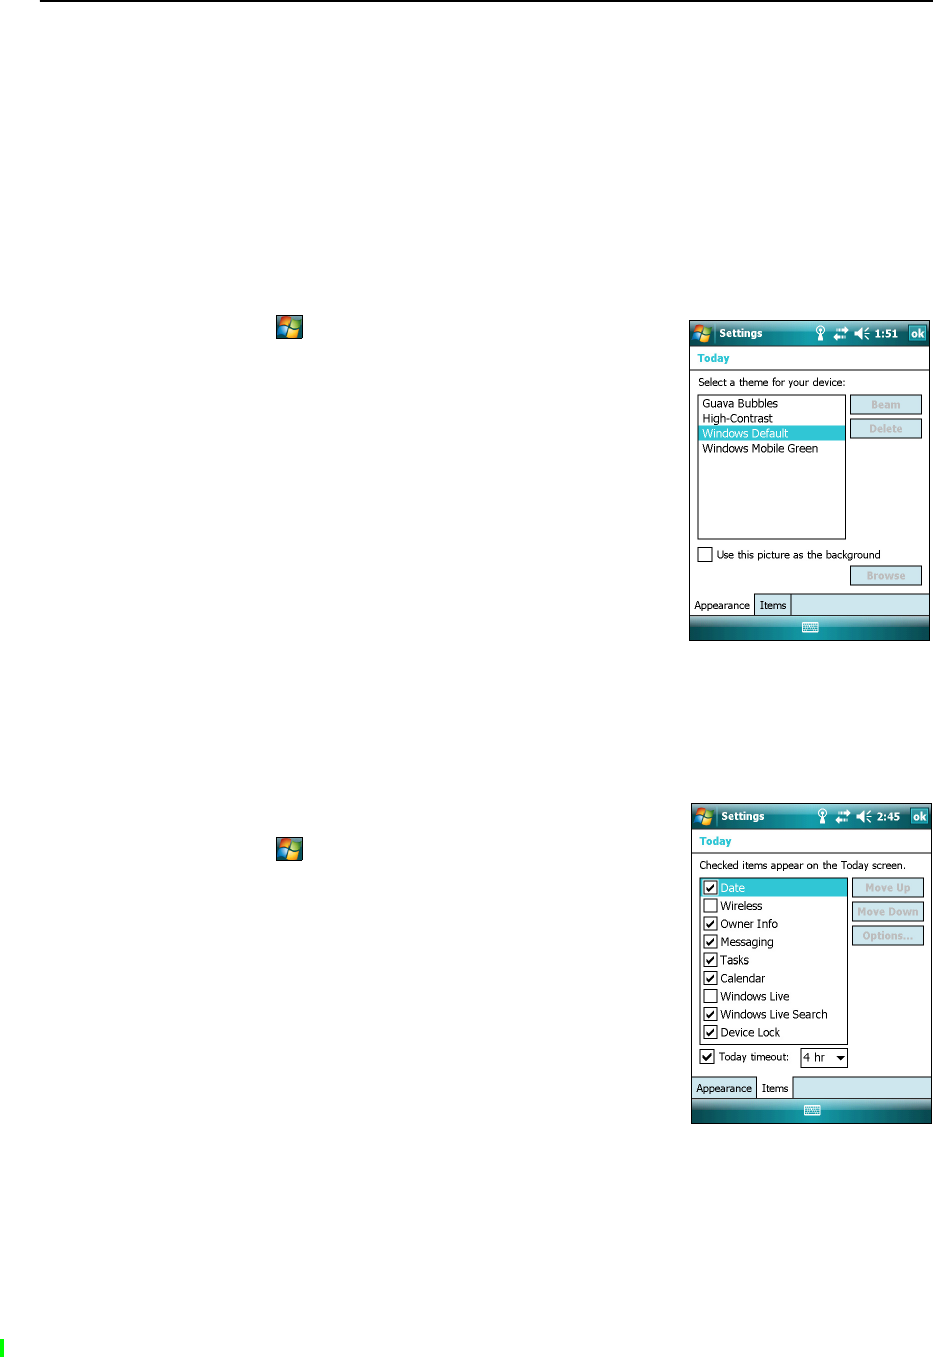
Appearance
You can use a theme to customize the background picture on the Today screen, the
color of the title and menu bars, menus, and messages.
To change the display theme:
1. Tap / Settings /Personal / Today.
2. Tap the Appearance tab.
3. Do one of the following:
–To use a predefined theme, select it from the
list.
–To select the picture that you want to display
in the Today screen background, select the Use
this picture as the background check box. Then
tap Browse to search for a file on the
handheld.
4. Tap OK.
Items
You can choose the items that appear on the Today screen, and the order that they
appear in.
To change the items that appear on the Today screen:
1. Tap / Settings /Personal / Today.
2. Tap the Items tab.
3. Select or clear the check boxes to show or hide the
Today screen items.
4. Use the Move Up and Move Down buttons to
change where the selected item appears on the
Today screen.
5. Tap OK.

GeoExplorer 2008 Series User Guide 45
Using the Windows Mobile Operating System 3
Set the time zone
In the Today screen, tap the clock icon . The Clock
Settings screen appears. Tap the Time tab, select the Home
option and then select the correct time zone.
Device lock
Use the Device Lock option on the Today screen to lock the screen and keypad while
the handheld remains turned on.
To lock the device, tap Device unlocked in the Today screen. The Today screen shows
Device locked, and Unlock appears in the left corner of the menu bar.
Once the handheld is locked, the screen and most of the keys do not respond until the
handheld is unlocked. The exceptions are the Power key and the Reset button, which
always respond when pressed.
Communication with external devices such as a GPS receiver, or external sensors used
by GPS field software, is not interrupted by locking the handheld. This means that you
can keep using the GPS field software when the handheld is locked. For example, you
could lock the device so that you can safely transport it between features, while
keeping the software connected to the GPS receiver so that you can continue recording
GPS positions.
To unlock the device, tap the Unlock notification in the left corner of the Today screen
menu bar and then tap Unlock.
You can help to keep your data secure by requiring a password each time the handheld
is turned on. Tap / Settings /Personal / Lock to set a password or to change
password settings.
Power
To open the Power control, do one of the following:
•Tap the battery icon in the title bar of the Today screen.
•Tap / Settings /System / Power.
Tap th e Battery tab to check the battery level (see Checking the level of battery power,
page 26).
Tap th e Advanced tab to set the time before the handheld turns off when idle (see
Suspend mode, page 28).
3 Using the Windows Mobile Operating System
46 GeoExplorer 2008 Series User Guide
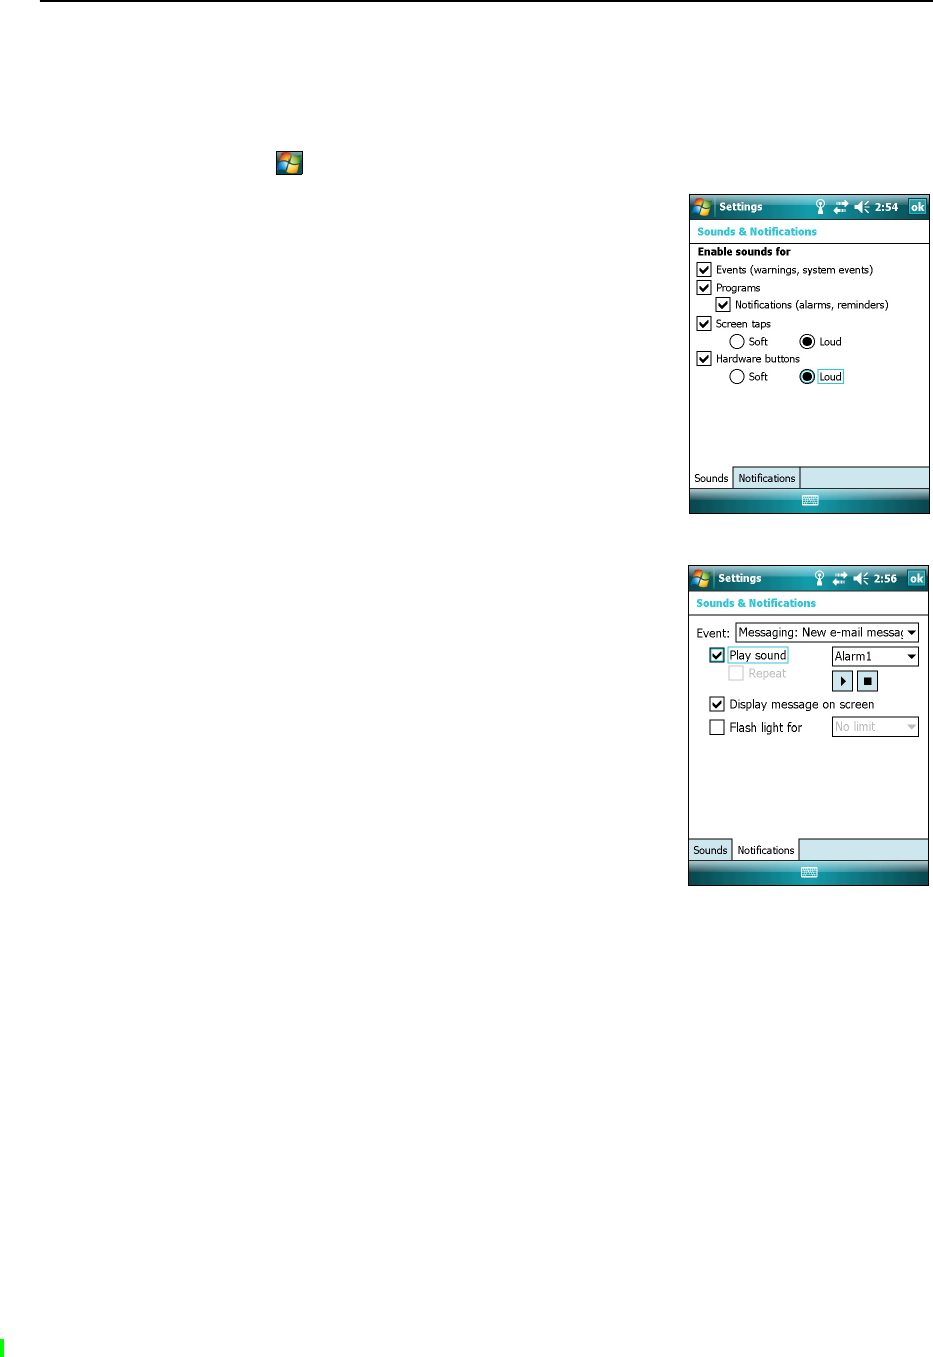
Sounds and notifications
Use the Sounds & Notifications control to set preferences for the speaker volume and
system sounds. To open the Sounds & Notifications control:
•Tap / Settings /Personal /Sounds & Notifications.
To turn on or turn off sounds:
1. Tap the Sounds tab.
2. Select or clear the check boxes to enable or disable
categories of sounds.
3. If you select the Screen taps or Hardware buttons
check boxes, select the Soft or Loud option to
control the volume of the sounds.
4. Tap OK.
You can use predefined schemes to customize sounds, or
you can create your own sound schemes.
To specify a sound scheme:
1. Tap the Notifications tab.
2. From the Event drop-down list, select an event.
3. Select the type of notification you want to receive
for that event.
4. Tap OK.
GeoExplorer 2008 Series User Guide 47
Using the Windows Mobile Operating System 3
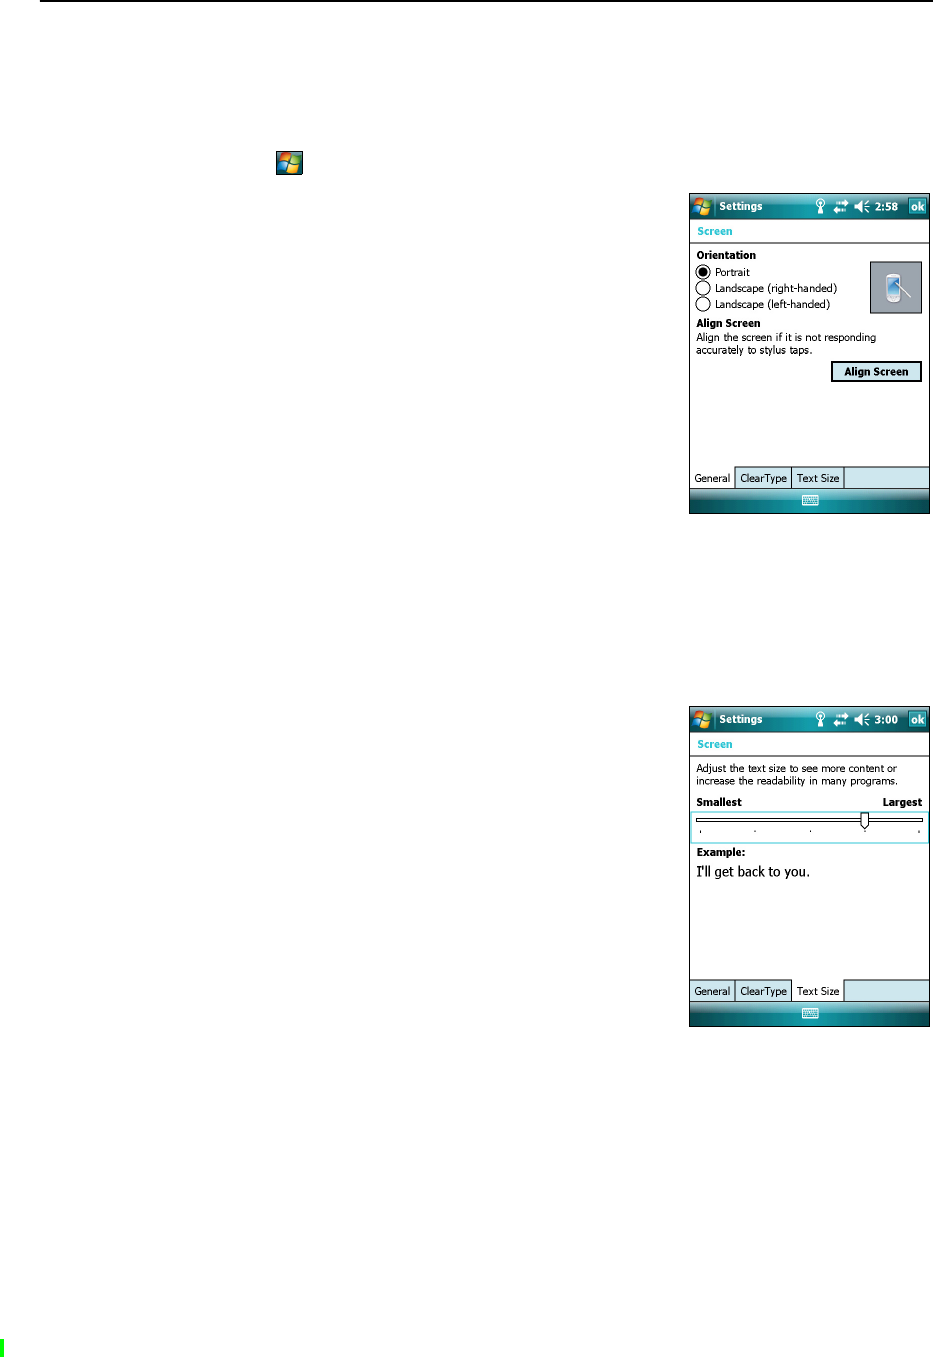
Screen
Use the Screen control to align the touch screen or to change the appearance of text on
the screen. To open the Screen control:
•Tap / Settings /System / Screen.
To change the screen settings:
1. Tap the General tab.
2. To change the orientation of the screen, select an
option in the Orientation group.
3. To start the alignment sequence for the touch
screen, tap Align Screen.
4. Tap OK.
Note – To align the screen at any time, press and hold the
Power button for 1 second until the Power menu appears
and then tap Align Screen.
Using ClearType font smoothing can make text easier to
read on the screen.
To enable ClearType:
1. Tap the ClearType tab and then select the Enable ClearType check box.
2. Tap OK.
To change the size of text on screen:
1. Tap the Text Size tab.
2. Tap and drag the slider control to the left to make
text smaller, or to the right to make text larger.
The example text below the slider shows how the
text will appear on screen.
3. Tap OK.
3 Using the Windows Mobile Operating System
48 GeoExplorer 2008 Series User Guide
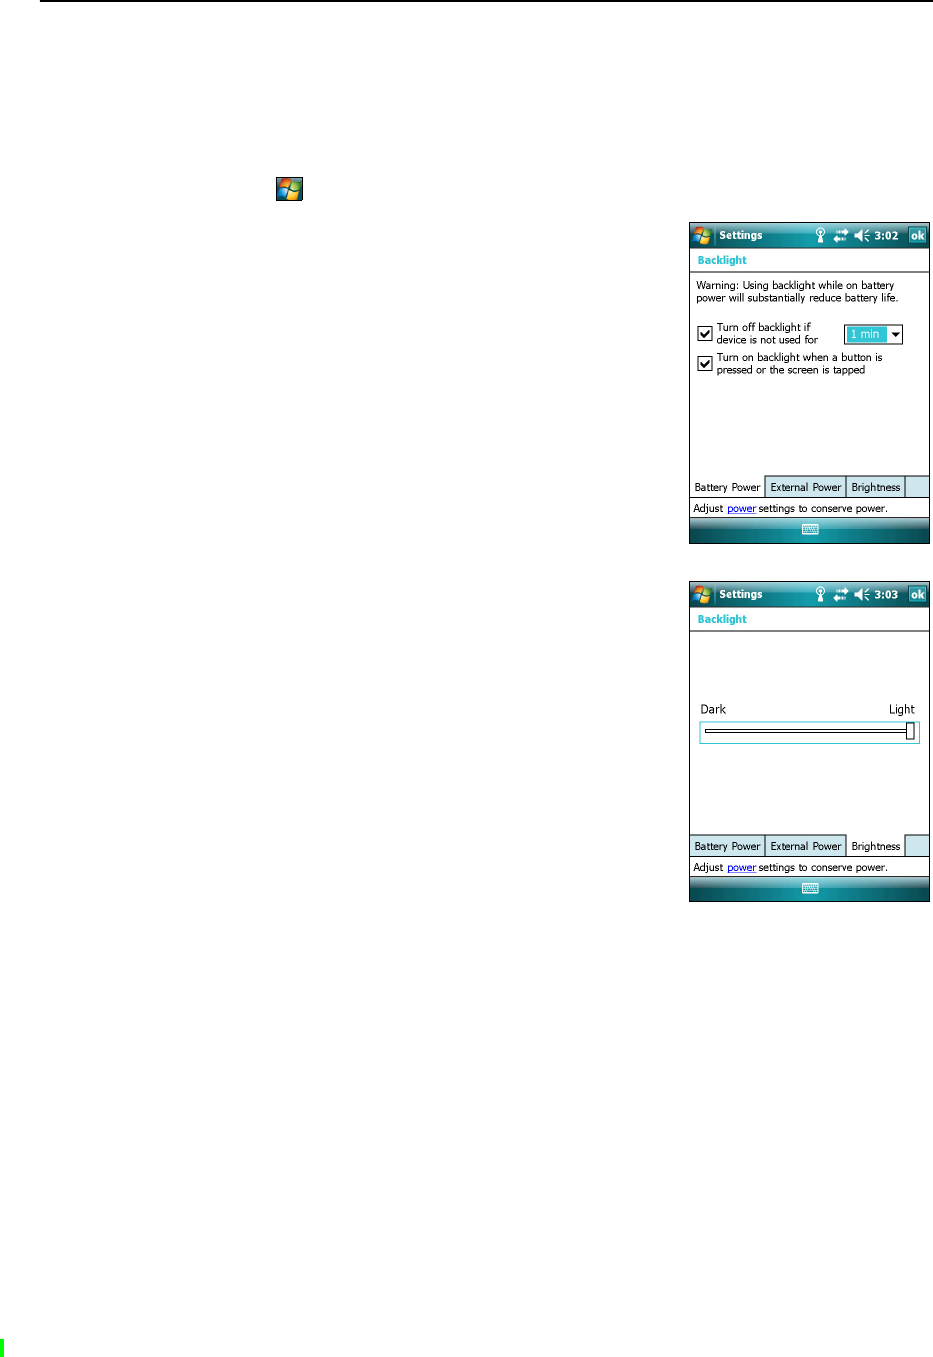
Backlight
The backlight makes the screen easier to read in low light, but uses extra power. Use
the Backlight control to configure power-saving settings for the backlight. To open the
Backlight control:
•Tap / Settings /System / Backlight.
To set the backlight to automatically turn off:
1. To automatically turn off the backlight when the
handheld is idle and is using battery power, tap the
Battery Power tab. Select the Turn off backlight
check box and then select a time from the
drop-down list.
2. To automatically turn off the backlight when the
handheld is idle and is using external power, tap
the External Power tab. Select the Turn off backlight
check box and then select a time from the
drop-down list.
3. Tap OK.
To change the brightness:
1. Tap the Brightness tab.
2. Tap and drag the slider control to the left to make
the backlight darker, or to the right to make the
backlight brighter.
3. Tap OK.

GeoExplorer 2008 Series User Guide 49
Using the Windows Mobile Operating System 3
Messaging
Use Messaging to send and receive receive e-mail messages using the GeoExplorer
2008 series handheld. Messaging is the equivalent of your e-mail Inbox.
To use e-mail, you can do one of the following:
•Synchronize e-mail messages with Microsoft Exchange or Microsoft Outlook®
on an office computer.
•Send and receive e-mail messages by connecting directly to an e-mail server
through an ISP or a network.
Synchronizing e-mail messages
You can synchronize e-mail messages on the handheld and the computer.
CCAUTION – When you delete a message on the handheld, it is deleted from the office
computer the next time you synchronize the devices.
To synchronize e-mail, you must enable Inbox synchronization in the ActiveSync
software. For more information, refer to the ActiveSync Help on the office computer.
During synchronization:
•Messages are copied from the mail folders of Exchange or Outlook on the office
computer to the Messaging folder on the handheld. By default, you will receive
messages from the past 3 days only, the first 100 lines of each message, and file
attachments of less than 100 KB in size.
•E-mail messages in the Outbox folder on the handheld are transferred to
Exchange or Outlook, and then sent from those programs.
•E-mail messages in subfolders in other e-mail folders in Outlook are
synchronized only if they were selected for synchronization in the ActiveSync
software.
To send and receive e-mail for a synchronized Exchange or Outlook account, connect
the handheld to the office computer. Synchronization automatically begins, and the
handheld sends and receives e-mail.
3 Using the Windows Mobile Operating System
50 GeoExplorer 2008 Series User Guide
Connecting directly to an e-mail server
In addition to synchronizing e-mail messages with an office computer, you can send
and receive e-mail messages by connecting to an e-mail server.
Before you can send and receive e-mail, you must create an e-mail account in the
Messaging software.
Note – You must set up an Internet connection on the handheld before you can set up and
use your e-mail account. For more information, see Connecting to a wireless LAN access
point, page 82 or Connecting to a Bluetooth-enabled phone for Internet access or real-time
corrections (including VRS networks), page 88.
If you need to connect to different mailboxes, set up and name a different service for
each connection.
Note – The Messaging software supports only the POP3 and IMAP4 protocols for incoming
mail, and SMTP for outgoing mail.
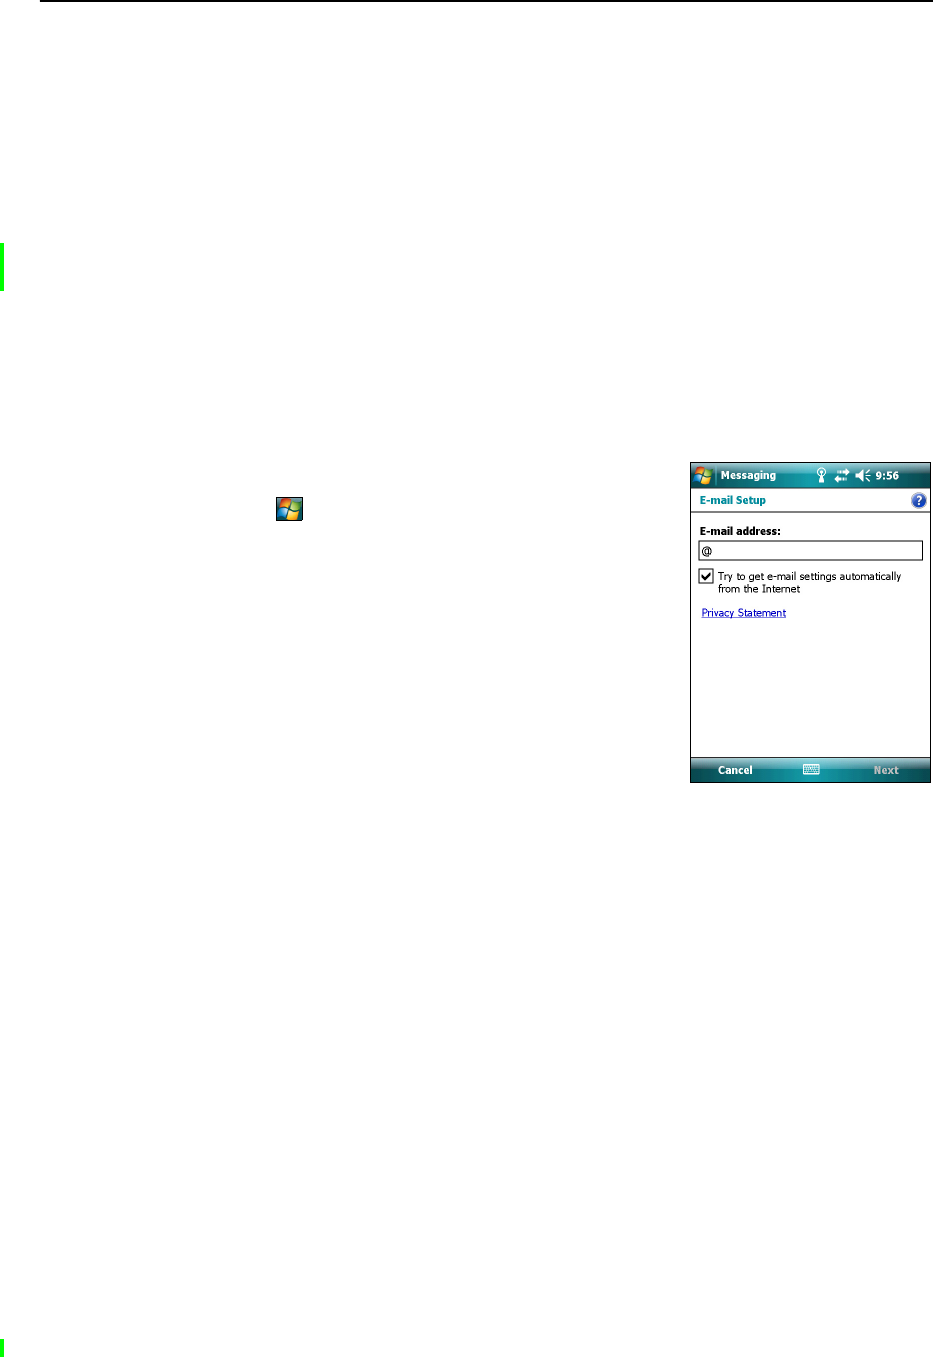
To set up a mail service:
1. Tap / Messaging.
2. Tap New E-mail Account.
3. Enter the e-mail address for your account.
4. To automatically get connection settings for your
e-mail account from the Internet, select the check
box.
5. Tap Next.
6. Follow the steps in the Setup wizard. If the
connection settings are not automatically
downloaded from the Internet, you must enter them using the connection
details supplied by your ISP or network administrator.
Note – You cannot change the account name later.
7. Tap Finish.
8. Tap OK to download mail immediately.
BTip – To receive TerraSync data files by e-mail, edit the settings for the e-mail account you
have set up. To do this, tap Menu and then select Options. In the Accounts tab, tap the
e-mail account you want to use to receive TerraSync files. The E-mail Setup wizard
appears. Tap Next until you reach the last page of the wizard. From the Message
download limit drop-down list, select Entire message.
When you connect the handheld to the e-mail server, new messages are downloaded
to the Messaging folder, messages in the Outbox folder are sent, and messages that
have been deleted on the e-mail server are removed from the Messaging folder.
Messages received directly from an e-mail server are linked to the e-mail server rather
than an office computer. When you delete a message on the handheld, it is also deleted
from the e-mail server the next time you connect the handheld to the e-mail server.

GeoExplorer 2008 Series User Guide 51
Using the Windows Mobile Operating System 3
You can work online or offline. When working online, you read and respond to
messages while connected to the e-mail server. Messages are sent as soon as you tap
Send, which saves space on the handheld.
When working offline, you can disconnect from the e-mail server after you download
new message headers or partial messages and then decide which messages to
download completely. The next time you connect, Messaging downloads the complete
messages you have marked for retrieval and sends any messages that you have written.

3 Using the Windows Mobile Operating System
52 GeoExplorer 2008 Series User Guide

CHAPTER
4
GeoExplorer 2008 Series User Guide 53
Connecting to an Office Computer 4
In this chapter:
QConnection management
software
QConnecting the handheld to a
computer
QManaging the connection using
the Windows Mobile Device
Center
QManaging the connection using
ActiveSync technology
QInstalling software onto the
handheld
Connect the GeoExplorer 2008 series handheld
to an office computer to transfer information,
settings, and files from one device to the other, or
to install software onto the handheld.
You can connect the handheld to a computer
using the USB cable or a Bluetooth wireless link.
To protect your data, Trimble recommends that
you regularly copy important data to an office
computer.

4 Connecting to an Office Computer
54 GeoExplorer 2008 Series User Guide
Connection management software
To install software onto a Windows Mobile powered device, or to copy files between
the handheld and a computer, you must connect the device to an office computer. If
the computer is running:
•the Windows Vista® operating system, use the Windows Mobile Device Center
to manage the connection.
•the Windows® XP or 2000 operating system, use ActiveSync technology to
manage the connection.
Note – You must install the Windows Mobile Device Center or ActiveSync technology onto
the computer before you connect the handheld.
This connection management software also enables you to synchronize office
applications on an office computer with the handheld.
CCAUTION – The available space on the handheld is small compared to an office computer.
To avoid accidentally synchronizing the handheld with a large amount of data on the
office computer, Trimble recommends that you either connect to the handheld without
forming a partnership, or that you limit the information types and amount of data that
is synchronized.
CCAUTION – Synchronizing data is designed to keep the same data on both the office
computer and the handheld. Exercise care when resynchronizing applications after
deleting data from one computer, as resynchronizing will delete the same information
from the other computer.
For more information see one of the following:
•Managing the connection using the Windows Mobile Device Center, page 56
•Managing the connection using ActiveSync technology, page 57.
Installing the Windows Mobile Device Center
The Windows Vista operating system includes a basic connectivity driver for Windows
Mobile powered devices. This driver allows you to transfer files from the handheld to
an office computer.
To install software onto a Windows Mobile powered device, you must install Windows
Mobile Device Center 6 onto an office computer.
A copy of the Windows Mobile Device Center is provided on the GeoExplorer 2008
Series Getting Started Disc. Alternatively, go to
www.microsoft.com/windowsmobile/devicecenter.mspx to download the latest
version from the Microsoft website.

GeoExplorer 2008 Series User Guide 55
Connecting to an Office Computer 4
Installing ActiveSync technology
A copy of ActiveSync technology is provided on the GeoExplorer 2008 Series Getting
Started Disc. Alternatively, go to
www.microsoft.com/windowsmobile/activesync/default.mspx to download the latest
version from the Microsoft website.
Connecting the handheld to a computer
To connect the GeoExplorer 2008 series handheld to a computer:
1. Make sure that the handheld and the computer are switched on.
2. Make sure you have installed the appropriate connection management software
onto the computer (see Connection management software, page 54).
3. To form a connection, do one of the following:
–Use the handheld's integrated Bluetooth radio to establish a wireless serial
link to a Bluetooth-enabled computer. For more information, see
Connecting to an office computer to use ActiveSync technology, page 97.
–Use a USB connection:
a. Connect the USB data cable to the USB port on the support module.
b. Connect the other end of the USB data cable to a USB port on the
computer.
c. Place the handheld in the support module. For information about how
to do this, see Getting Started, page 21.
4 Connecting to an Office Computer
56 GeoExplorer 2008 Series User Guide
When the handheld and the computer are connected, you can manage the
connection through a window that appears on the office computer. See one of
the following:
–Managing the connection using the Windows Mobile Device Center,
page 56
–Managing the connection using ActiveSync technology, page 57
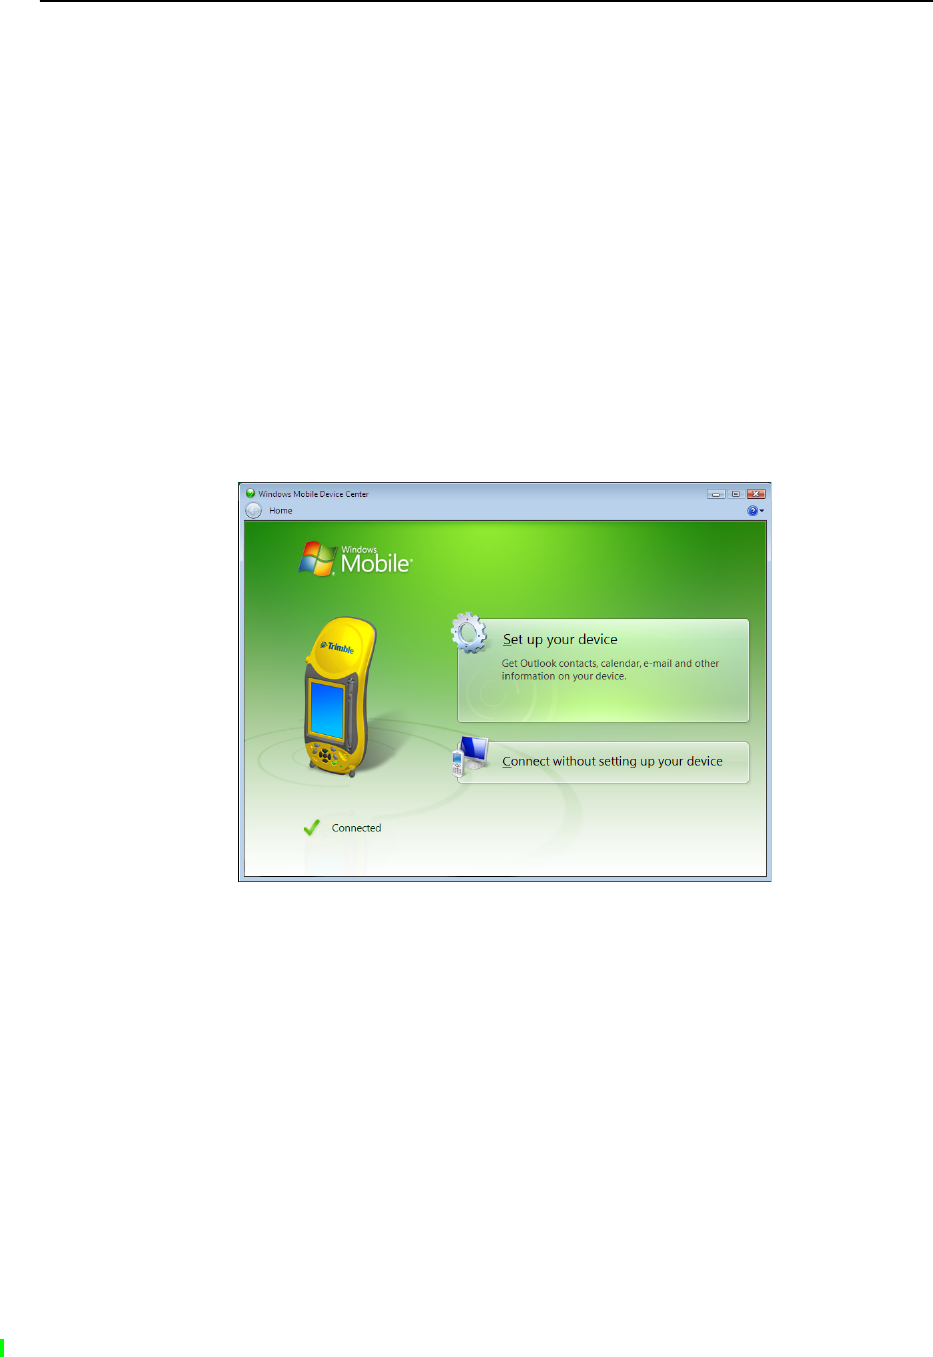
Managing the connection using the Windows Mobile Device
Center
1. Connect the handheld to the computer (see page 55).
2. If the Autoplay window appears, close the window.
3. The Windows Mobile Device Center window displays the message Connected:
Note – If the connection is not made automatically, check that the connection is enabled in
the Windows Mobile Device Center software and on the handheld. For more information,
see Troubleshooting, page 113.
4. Do one of the following:
–To synchronize files and data between the handheld and a computer, click
Set up your device and then follow the instructions on screen.
–To transfer data between the handheld and the computer without
synchronizing the devices, click Connect without setting up your device.
5. To transfer files between the computer and the handheld, click File
Management. A Windows Explorer-type window appears, displaying files stored
on the handheld. Copy and paste files to other locations on the computer, or
from the computer to the handheld.
GeoExplorer 2008 Series User Guide 57
Connecting to an Office Computer 4
6. To install software onto the handheld, see Installing software onto the handheld,
page 59.
7. To uninstall software from the handheld, click Programs and Services and then
click Add/Remove Programs.
BTip – If the Add/Remove Programs option does not appear below Programs and Services,
click More. The Add/Remove Programs option appears.
For more information, refer to the Windows Mobile Device Center Help.
BTip – If the GPS Pathfinder Office software is installed on the office computer, you can
configure the Connection Manager utility in the GPS Pathfinder Office software to
automatically detect when you connect a GeoExplorer 2008 series handheld to the
computer. This enables you to automatically transfer data from the TerraSync software,
differentially correct the data, and then export it to a GIS. For more information, refer to
the GPS Pathfinder Office Software Help.
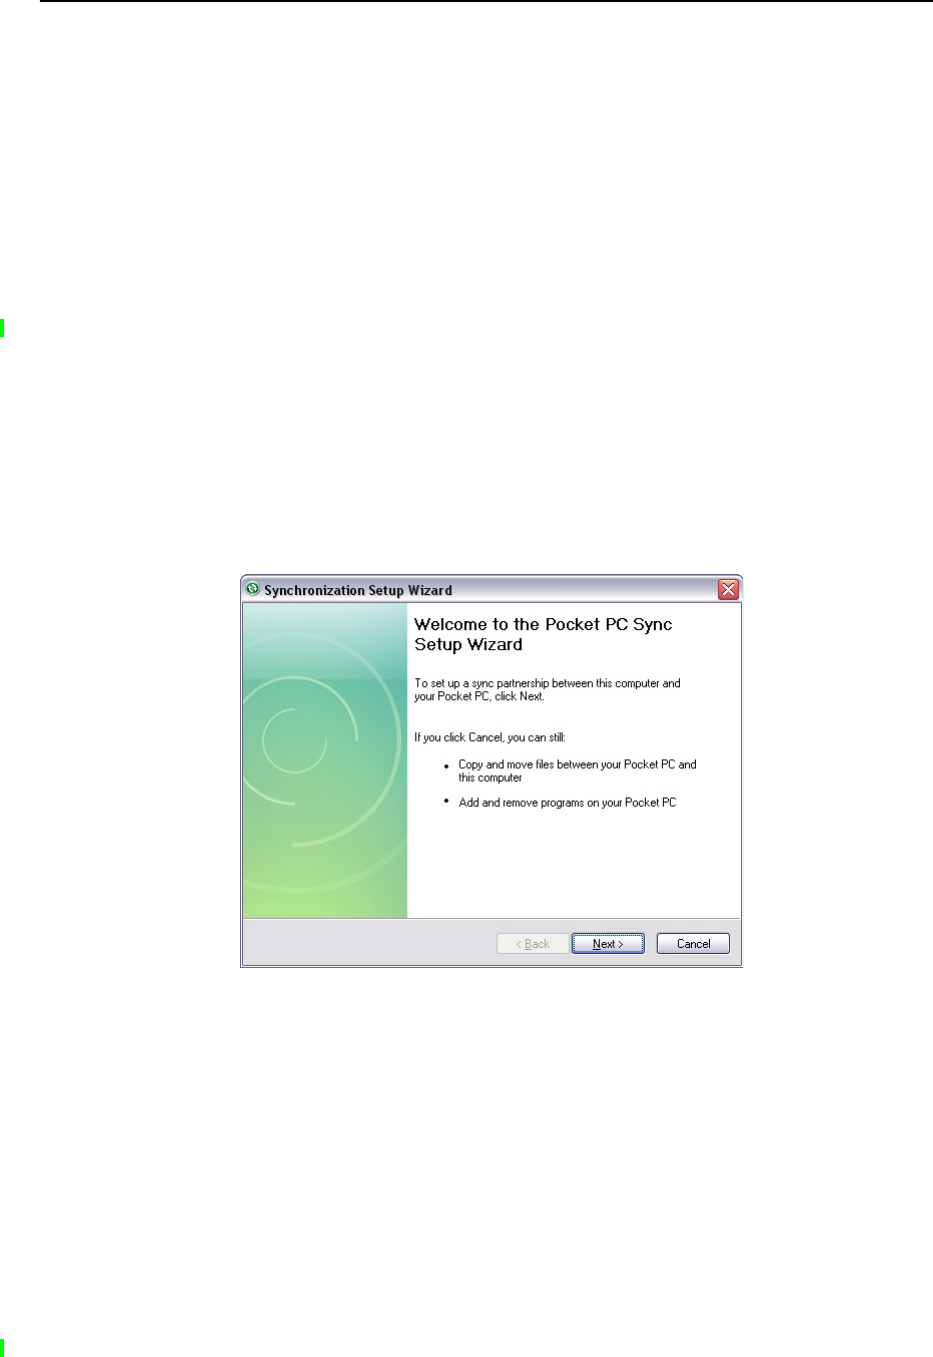
Managing the connection using ActiveSync technology
1. Connect the handheld to the computer (see page 55). The Synchronization Setup
Wizard appears:
Note – If the connection is not made automatically, check that the connection is enabled in
the ActiveSync software and on the handheld. For more information, see Troubleshooting,
page 113.
2. Do one of the following:
–To synchronize files and data between the handheld and a computer, click
Next and then follow the instructions in the Synchronization Setup Wizard.
–To transfer data between the handheld and the computer without
synchronizing the devices, click Cancel to close the wizard.
4 Connecting to an Office Computer
58 GeoExplorer 2008 Series User Guide
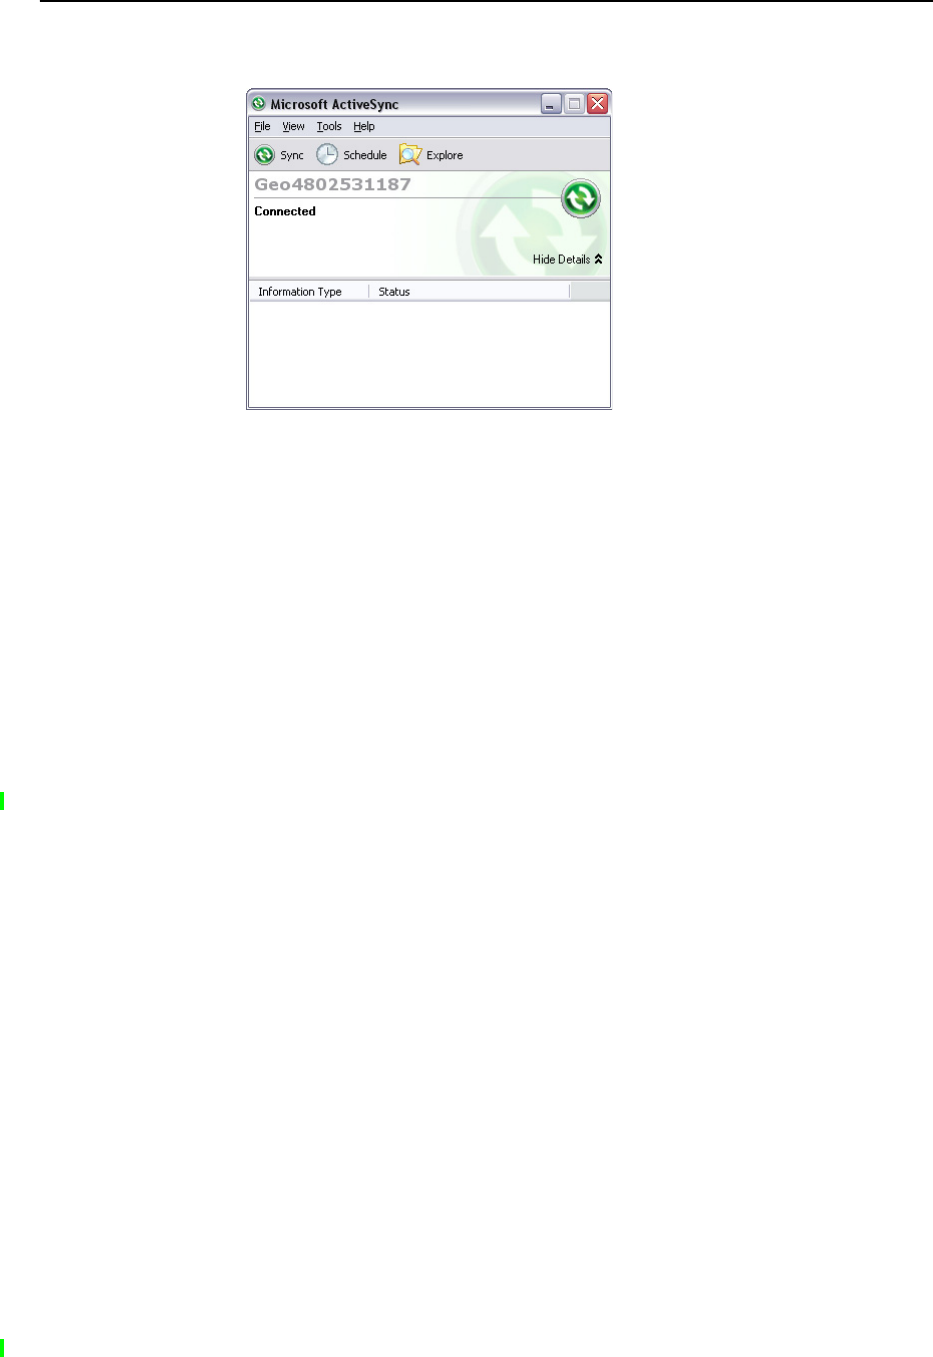
3. The Microsoft ActiveSync window displays the message Connected:
4. To transfer files between the computer and the handheld, click Explore. A
Windows Explorer-type window appears, displaying files stored on the
handheld. Copy and paste files to other locations on the computer, or from the
computer to the handheld.
5. To install software onto the handheld, see Installing software onto the handheld,
page 59.
6. To uninstall software from the handheld, select Add/Remove Programs from the
Tools menu. Clear the check box beside the program you want to remove and
then click OK.
For more information, refer to the ActiveSync Help.
BTip – If the GPS Pathfinder Office software is installed on the office computer, you can
configure the Connection Manager utility in the GPS Pathfinder Office software to
automatically detect when you connect a GeoExplorer 2008 series handheld to the
computer. This enables you to automatically transfer data from the TerraSync software,
differentially correct the data, and then export it to a GIS. For more information, refer to
the GPS Pathfinder Office Software Help.

GeoExplorer 2008 Series User Guide 59
Connecting to an Office Computer 4
Installing software onto the handheld
Before you begin, refer to the installation instructions provided with the software.
Some software installations are specifically designed to run on a Windows Mobile
powered device. To install software that has a Windows Mobile installation setup:
1. Connect the handheld to a computer (see page 55).
2. Copy the installation files to a folder on the handheld.
3. Browse to the folder on the handheld. Tap and hold the installation setup file
and then select Run.
4. If prompted after installation, perform a soft reset of the handheld (see page 29).
To install software that is provided on a CD, or as an installation setup that runs on an
office computer:
1. Connect the handheld to a computer (see page 55).
2. If the software is provided on a CD, insert the software CD into the office
computer.
3. Run the installation setup.
4. If prompted, select the install option for a Windows Mobile powered device.
Once the software is installed on the computer, it is automatically transferred to
the handheld.
Note – If an memory card is inserted in the handheld, the card appears as an installation
location option. Trimble recommends that you install software to the handheld’s storage
memory, not to a memory card. If you install software to a card and then remove the card
from the handheld, the software will not be available for use.
5. If prompted after installation, perform a soft reset of the handheld (see page 29).

4 Connecting to an Office Computer
60 GeoExplorer 2008 Series User Guide

CHAPTER
5
GeoExplorer 2008 Series User Guide 61
Using the GPS receiver 5
In this chapter:
QSupported GPS field software
QConfiguring the GPS field
software to connect to the
receiver
QUsing the GPS field software
QEnsuring the accuracy of your GPS
data
QDifferential GPS explained
QOutputting GPS data to external
equipment
The GeoExplorer 2008 series handheld includes
an integrated GPS receiver that enables you to
collect GPS data for incorporating into a GIS or
for managing assets.
The Global Positioning System (GPS) is a
satellite-based positioning system consisting of a
constellation of operational NAVSTAR satellites
that orbit the earth every 12 hours. This system
provides worldwide, all-weather, 24-hour time
and position information.
Note – To receive signals from GPS satellites, the
handheld must have a clear view of the sky. GPS
positions may not always be available, particularly
in or near buildings, in vehicles, or under tree
canopy.

5 Using the GPS receiver
62 GeoExplorer 2008 Series User Guide
Supported GPS field software
You can use the GeoExplorer 2008 series handheld with any of the software products
described below.
TerraSync software
You can install version 3.21 or later of the TerraSync software on a GeoExplorer 2008
series handheld. Use the software to collect and maintain GIS and GPS data.
To install the TerraSync software, either insert the TerraSync Software CD in the
CD-ROM drive of a computer and use the menus provided, or run the downloaded
setup file. To obtain an installation code for installation, you must register your copy of
the software online. Detailed installation instructions are provided in the TerraSync
Software Getting Started Guide.
ESRI ArcPad software and the Trimble GPScorrect extension
You can install version 7.1.0 or later of the ESRI ArcPad software on a GeoExplorer 2008
series handheld. Use the software to collect and maintain GIS and GPS data. Detailed
installation instructions for ESRI ArcPad software are provided in the ArcPad
documentation.
To be able to differentially correct ArcPad GPS data, install version 2.41 or later of the
Trimble GPScorrect extension for ESRI ArcPad software on a GeoExplorer 2008 series
handheld.
You must install the ArcPad software before you install the GPScorrect extension.
Note – Make sure your version of the GPScorrect extension is compatible with the version
of ArcPad software you are using. For more information, go to
www.trimble.com/gpscorrect_ts.asp, click Support Notes and then search for the Mapping
and GIS Product Compatibility List Support Note.
To install the GPScorrect extension, either insert the Trimble GPScorrect Extension for
ESRI ArcPad Software CD in the CD-ROM drive of a computer and use the menus
provided, or run the downloaded setup file. Detailed installation instructions are
provided in the Trimble GPScorrect Extension Getting Started Guide.
GPS Controller software
The GPS Controller software is pre-installed on the GeoExplorer 2008 series handheld.
Use the software to configure and monitor the status of the internal GPS receiver.

GeoExplorer 2008 Series User Guide 63
Using the GPS receiver 5
Other GPS field applications
You can use the GeoExplorer 2008 series handheld with a custom application
developed using version 2.31 or later of the Trimble GPS Pathfinder Tools Software
Development Kit (SDK).
You can also use the GeoExplorer 2008 series handheld with any GPS field software
that accepts NMEA messages.
TrimPix technology
You can install version 1.20 or later of the TrimPix™ technology on a GeoExplorer 2008
series handheld. Use TrimPix technology to quickly and easily add high quality digital
photographs to your GIS data collection workflow.
Note – To use TrimPix technology, you must have a compatible high resolution
WiFi-capable Nikon digital camera.
For more information, go to www.trimble.com/mgis_trimpix.shtml.
Configuring the GPS field software to connect to the receiver
The first time you use GPS field software on the handheld, you may need to specify
which GPS COM port to connect to.
GPS COM ports
The integrated GPS receiver has three COM ports for communicating with software on
the handheld and with external devices. Two ports are for outputting GPS data, and
one port is for receiving real-time corrections into the receiver.
To use GPS, open the appropriate GPS COM port. The type of communication used for
each port is described below:
Note – COM1 is a standard serial port that connects to external devices. For more
information, see Connecting to other devices using the serial clip, page 109.
Port Function Description
COM2 NMEA Outputs NMEA-0183 messages. NMEA is a standard GPS
communication protocol used by many GPS applications.
The handheld outputs the following NMEA messages: GGA, GLL, GSA,
GSV, RMC, VTG, ZDA. All messages are output at a one-second interval.
COM3 TSIP Outputs and receives TSIP messages. TSIP (Trimble Standard Interface
Protocol) is used by Trimble GPS applications, and is also supported by
some other GPS applications.
COM4 Real-time
corrections
Receives real-time correction messages. If you are using an external
correction source connected to COM1 or a Bluetooth port, the
corrections must be redirected to COM4. For more information, see
Using real-time corrections from an external correction source,
page 70.
5 Using the GPS receiver
64 GeoExplorer 2008 Series User Guide
Connecting to the COM port
Details of how to configure different types of GPS field software to connect to the GPS
COM port are as follows:
Using the GPS field software
The GPS Controller software is pre-installed on all GeoExplorer 2008 series handhelds
and enables you to check the current GPS status, or to configure the integrated GPS
receiver.
Depending on the GPS field software you have installed, the default GPS field software
will be GPS Controller, TerraSync, or the Trimble GPScorrect extension for ESRI
ArcPad software.
Note – GPS Controller duplicates the status and setup features of TerraSync software and
the Trimble GPScorrect extension for ESRI ArcPad software. If one of these applications is
installed, it runs instead of GPS Controller when you tap the GPS softkey in the menu bar
of the Today screen. For more information about these applications, refer to the
documentation for the application.
Depending on the GPS field software you have installed, you can use the software to
configure settings such as GPS, real-time correction, and antenna settings. You may
also be able to use the software to connect to a real-time correction source, configure
logging settings, and collect features. For more information, refer to the rest of this
chapter and the documentation for the GPS field software.
GPS field software Configuration details
GPS Controller Run GPS Controller. The software automatically activates the
integrated GPS receiver on COM3.
TerraSync Run Terrasync. The software automatically activates the integrated
GPS receiver on COM3.
ArcPad with the
GPScorrect extension
When the Trimble GPScorrect extension is installed, the extension
automatically configures the ArcPad software to use the integrated
GPS receiver on COM3 using the Trimble GPScorrect protocol.
To connect to GPS, tap the GPS button and then tap Yes.
To configure a real-time DGPS source, or to view status information,
run the GPScorrect extension. To do this, tap the GPScorrect button
in the Trimble toolbar.
ArcPad 7 without the
GPScorrect extension
1. In ArcPad, tap the GPS drop-down menu and then select
GPS Preferences from the drop-down menu. Tap the GPS tab.
2. In the Protocol field, select NMEA 0183.
3. In the Port field, select COM2.
4. Tap OK.
5. Tap the GPS button and then tap Yes.
NMEA application Configure the software to connect to GPS on COM2 and then use the
Connect or Activate GPS command.
TSIP application Configure the software to connect to GPS on COM3 and then use the
Connect or Activate GPS command.
GeoExplorer 2008 Series User Guide 65
Using the GPS receiver 5
Starting the GPS field software
Do one of the following:
•From the Today screen, tap the GPS softkey in the menu bar.
•Tap / Programs and then select the GPS field software, for example GPS
Controller.
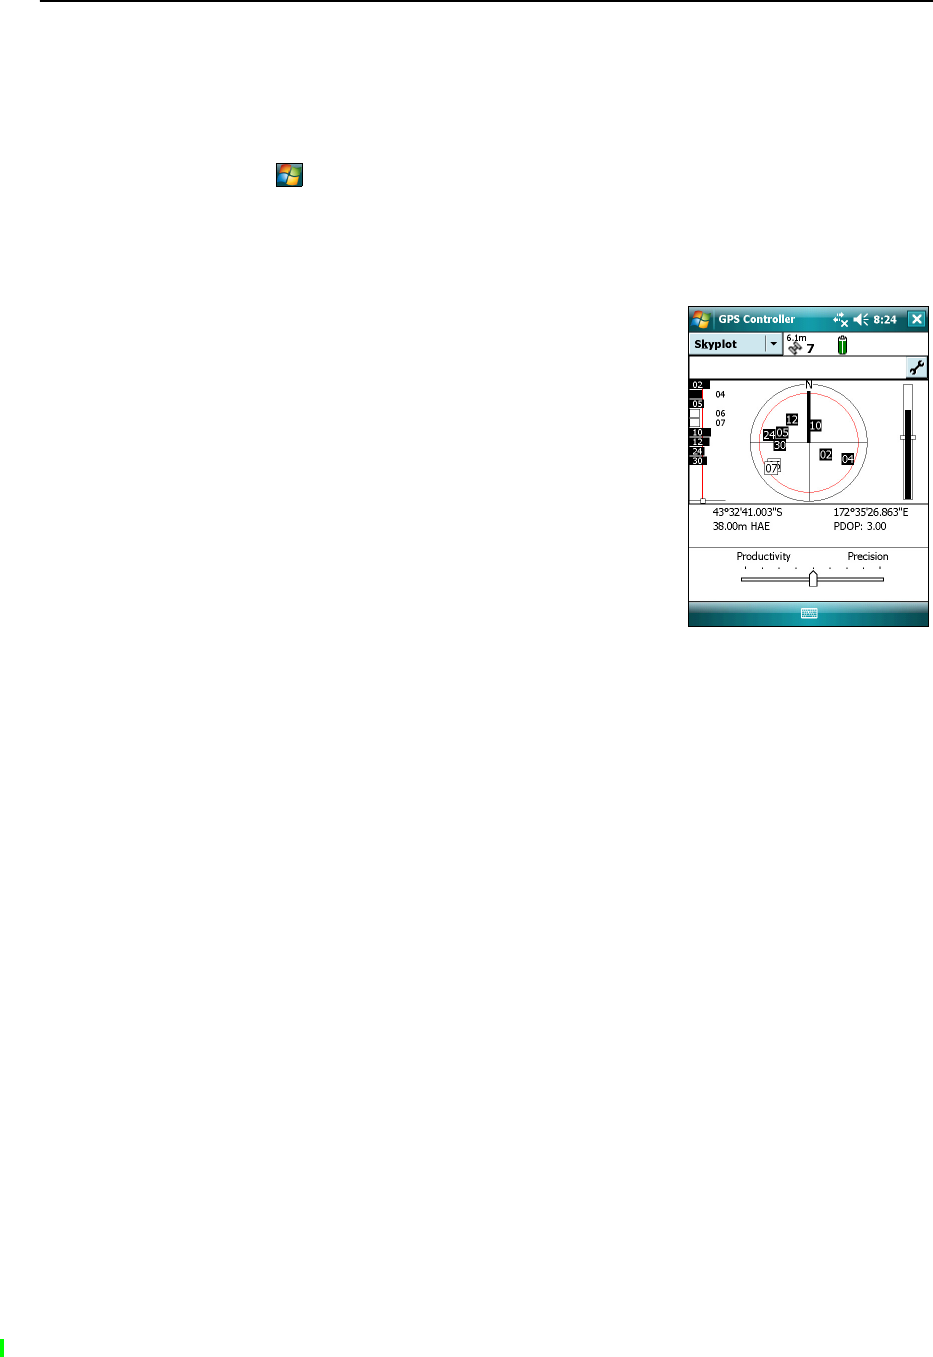
When you first open any Trimble GPS field software, the Skyplot section is displayed.
Viewing available GPS satellites
Use the graphical Skyplot section or the Satellite Info
section in the Trimble GPS field software to view
detailed GPS information, and to adjust the quality and
yield of the GPS positions you are receiving.
Note – To receive signals from GPS satellites, the handheld
must have a clear view of the sky. GPS positions may not
always be available, particularly in or near buildings, in
vehicles, or under tree canopy.
Resetting the GPS receiver
Trimble GPS field applications all have options to reset the receiver to:
•delete the almanac
•delete information stored on the last known position
•restart the receiver
•reset the GPS receiver to factory default settings

5 Using the GPS receiver
66 GeoExplorer 2008 Series User Guide
Ensuring the accuracy of your GPS data
GeoExplorer 2008 series handhelds are high performance GPS receivers that calculate
very accurate GPS positions.
To correct errors in the collected data and to further improve the accuracy of the GPS
positions, use differential GPS. Differential GPS (DGPS) requires one or more
additional receivers, called base stations or reference stations, which are located at
known points. Data collected at the base stations is used to determine GPS
measurement errors and compute corrections to these errors. These corrections are
then applied to data collected in the field either in real time or during postprocessing.
For more information, see Differential GPS explained, page 74.
The three different models in the GeoExplorer 2008 series offer three levels of DGPS
accuracy:
•The GeoXM handheld provides reliable accuracy to within 1 to 3 meters with
real-time or postprocessed differential correction. To achieve this level of
accuracy, the DGPS infrastructure needs to provide single-frequency (L1) GPS
corrections from a base station within 500 km.
•The GeoXT handheld uses EVEREST multipath rejection technology to provide
submeter accuracy with differential correction. To achieve this level of accuracy,
the DGPS infrastructure needs to provide single-frequency (L1) GPS corrections
from a base station within 200 km. The GeoXT handheld can achieve better
postprocessed DGPS accuracy by using longer occupations, a dual-frequency
(L1/L2) GPS base station within 80 km, and carrier postprocessing techniques.
•The GeoXH handheld uses EVEREST multipath rejection technology as well as
H-Star technology to provide decimeter (10 cm) to subfoot (30 cm) accuracy
with real-time or postprocessed differential correction.
To achieve decimeter accuracy in real time, the DGPS infrastructure needs to
provide dual-frequency (L1/L2) GPS corrections, either from a VRS™ network
or from a base station within 30 km. When using a single base station within 30
to 80 km, typical real-time accuracy is subfoot or better. When postprocessing,
decimeter accuracy is achieved when using a single base station within 30 km,
and subfoot accuracy is achieved when using a single base station within 30 to
80 km (or three base stations at a distance of up to 200 km).
When using an external Zephyr antenna during data collection, postprocessed
accuracy improves to 20 cm when using a single base station within 30 to 80 km
(or three base stations at a distance of up to 200 km).
Where the DGPS infrastructure does not meet subfoot accuracy requirements
( for example, the base station provides L1 corrections only, or is at a distance
greater than recommended), the GeoXH handheld typically achieves submeter
accuracy.
Note – To achieve decimeter or subfoot accuracy with a GeoXH handheld, data must be
collected using Trimble field software (TerraSync software, the GPScorrect extension for
ESRI ArcPad software, or a custom application developed using the GPS Pathfinder Tools
Software Development Kit).
GeoExplorer 2008 Series User Guide 67
Using the GPS receiver 5
The list below identifies the most important settings and techniques that you can use
in the field to improve the accuracy of your data:
Note – This list assumes that you are using Trimble GPS field software, and lists items in
order of most important to less important.
1. If you are using TerraSync software to collect data, use accuracy-based logging.
For more information, see page 67.
2. Use real-time differential corrections. If you are using a GeoXH handheld and
have access to dual-frequency corrections from a VRS network, use the
corrections from the VRS network. For more information, see page 68.
3. Configure the GPS settings for the receiver to increase the precision of your data,
and to minimize the effect of atmospheric interference and poor satellite
geometry. For more information, see page 71.
4. Connect to an external antenna, if you have one. For more information,
see page 72.
5. If you are using a GeoXT handheld, configure the data collection software to log
carrier data. If you are using a GeoXH handheld, the data collection software
logs H-Star data, by default. For more information, see page 73.
6. Plan GPS data collection around the times of the day when satellite geometry is
best. For more information, see page 73.
Using accuracy-based logging
If you are using the TerraSync software, use accuracy-based logging to ensure that only
GPS positions that meet the specified estimated accuracy are logged. GPS positions
that do not meet your accuracy requirements are not logged.
Note – Accuracy estimates for streaming (dynamic) GPS positions may not be as good as
those for static GPS positions.
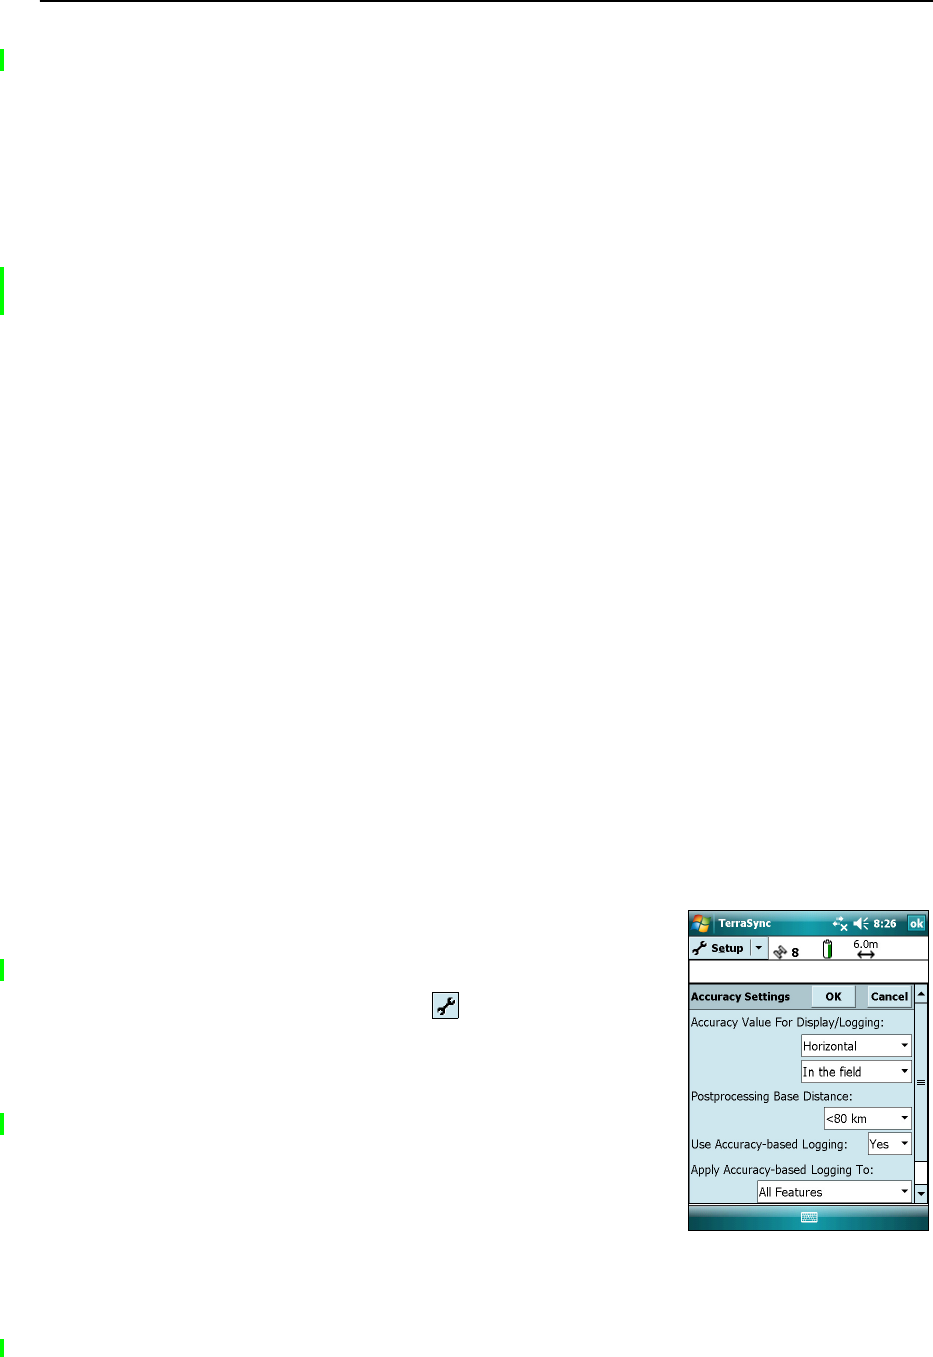
To configure accuracy-based logging in the TerraSync software:
1. In the Setup section of the TerraSync software, tap
Logging Settings. The Logging Settings form
appears.
2. Tap the Setup button below the Accuracy
Settings field. The Accuracy Settings form appears.
3. In the Accuracy Value For Display/Logging fields,
select the parameters that will be used to
determine the estimated accuracy:
–Select whether to use the horizontal or
vertical accuracy of the current GPS position.

5 Using the GPS receiver
68 GeoExplorer 2008 Series User Guide
–Select In the field to use the current estimated accuracy (recommended if
you are using a real-time correction source), or select Postprocessed to use
the predicted estimated accuracy that will be achieved after the field data
has been postprocessed.
4. If you selected Postprocessed, select the estimated distance to the base station
that will be used for postprocessing from the Postprocessing Base Distance field.
If you will use more than one base station (during H-Star processing), specify
the estimated distance to the closest base station.
5. Set the Use Accuracy-based Logging field to Yes. The settings fields for
accuracy-based logging appear.
6. In the Apply Accuracy-based Logging To field, select the feature types that you
want to log only if the GPS positions meet your required accuracy.
7. In the Required Accuracy field, select the estimated accuracy that is required
before GPS positions are logged.
8. Tap OK.
Note – Accuracy settings do not affect GPS positions that are used for navigation. GPS
positions are still calculated by the GPS receiver and are available for navigation.
Connecting to a real-time differential correction source
Use a real-time differential GPS (DGPS) source to give you better accuracy as you
collect data. For more information about how real-time differential GPS works, see
Differential GPS explained, page 74.
Using real-time corrections from an Internet source
DGPS corrections are often broadcast over the Internet. For example, corrections
generated by a VRS network are commonly broadcast over an Internet server. A VRS
network uses data from several base stations to provide rover receivers with
corrections that are generally more accurate than corrections from a single base
station. Alternatively, you can connect to a server that provides DGPS corrections from
a single base station.
For information on how to connect to the Internet and receive real-time corrections
from an Internet server, see Connecting to a Bluetooth-enabled phone for Internet
access or real-time corrections (including VRS networks), page 88.
GeoExplorer 2008 Series User Guide 69
Using the GPS receiver 5
Using SBAS corrections
The GeoExplorer 2008 series handheld has an integrated receiver that uses Satellite
Based Augmentation Systems (SBAS) correction messages to improve the accuracy
and integrity of GPS data.
The default SBAS tracking mode is Auto. In Auto mode, the receiver tracks or locks
onto the most powerful satellite signal. The GPS receiver can track two SBAS satellites
at the same time in Auto or Custom mode. It uses corrections from only one SBAS
satellite at a time, but tracking two satellites can improve the availability of SBAS
real-time corrections. For example, if you are working in environments where obstacles
may block the direct line of sight to the SBAS satellite, there is less chance of signal loss
if you are tracking more than one SBAS satellite.
Note – To turn off multiple SBAS satellite tracking, select Custom mode and then deselect
all other SBAS satellites except for the satellite you want to track.
The receiver tracks SBAS satellites according to your geographical location:
•Wide Area Augmentation System (WAAS) satellites are tracked in the
Continental United States including Alaska, and parts of Canada and Mexico.
•European Geostationary Navigation Overlay Service (EGNOS) satellites are
tracked in Europe.
•MTSAT Satellite-based Augmentation System (MSAS) satellites are tracked in
Japan.
You can configure the receiver to use particular SBAS satellites in the Integrated SBAS
Settings form of the Trimble GPS field software. Select the Custom option in the
Tracking Mode field and then enable or disable tracking for any specific satellite.
Note – If you have other Trimble GPS field software installed, configure real-time
correction settings in that application instead of the GPS Controller software.
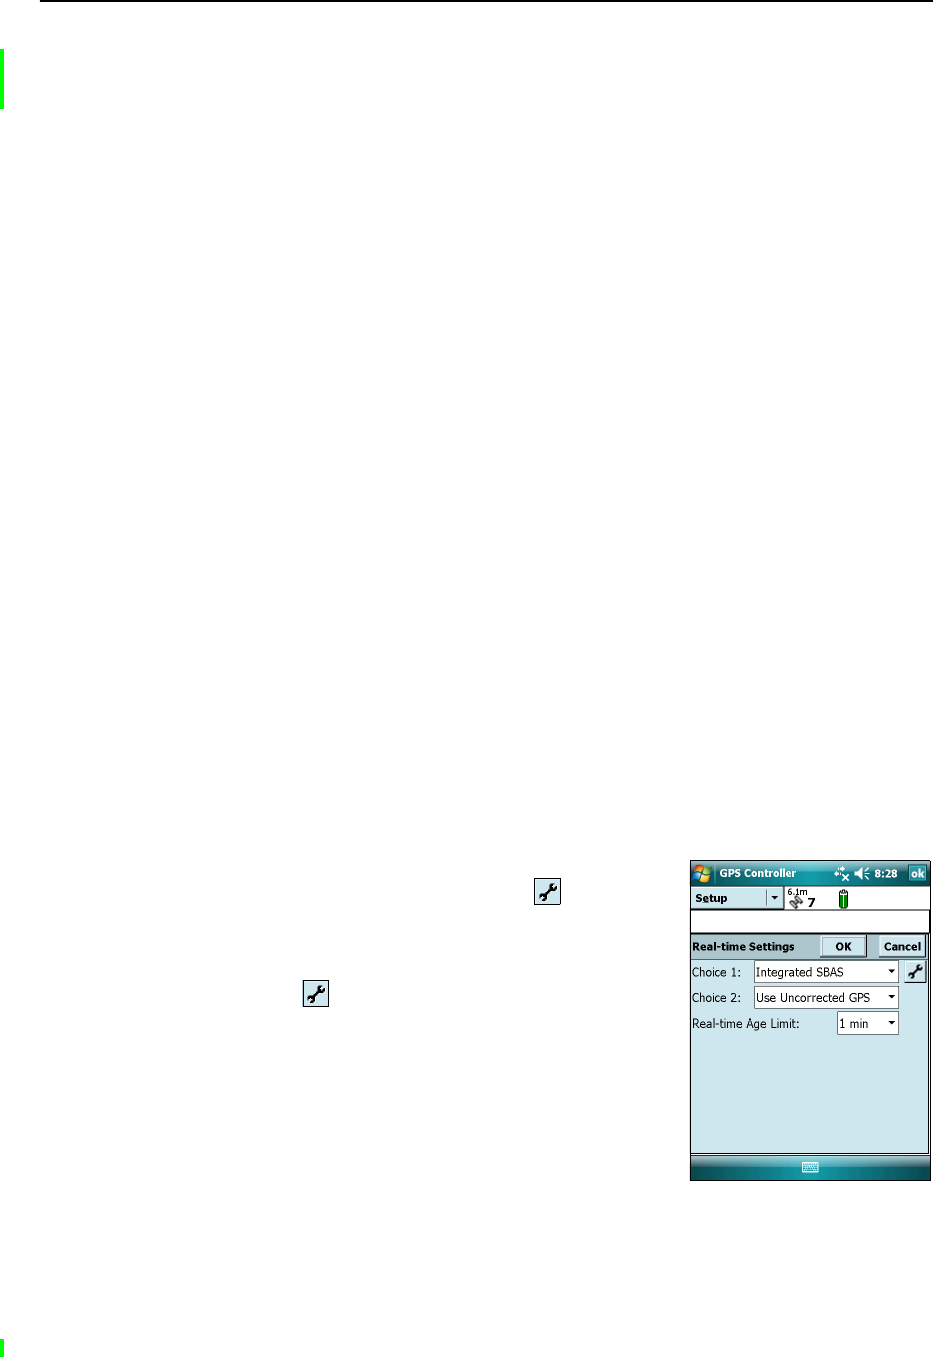
To use SBAS corrections:
1. In the GPS field software, open the Real-time
section and tap the Setup button .
2. In the Choice 1 field, select Integrated SBAS.
3. To select particular satellites, tap the Setup
button next to the Choice 1 field. Select
Custom tracking mode and then enable or disable
tracking of particular satellites. Tap OK to return
to the Real-time Settings screen.
4. In the Choice 2 field, specify whether to use
uncorrected positions, or to stop using GPS
positions, if corrections are not available.
5. Tap OK.
5 Using the GPS receiver
70 GeoExplorer 2008 Series User Guide
Using real-time corrections from an external correction source
You can improve the accuracy of your data by using real-time corrections from an
external correction source, such as a GeoBeacon receiver or a DGPS radio. Connect the
external correction source to a Bluetooth port (see page 86) or to the optional serial
clip (see page 109). Use the GPS field software to set up and monitor the real-time input
source that you want to use.
The integrated GPS receiver communicates only through its GPS COM ports (COM2,
COM3, and COM4). Trimble GPS field software, such as TerraSync and GPS Controller,
automatically redirects input from an external correction source connected to COM1
or to a Bluetooth port to the real-time GPS COM port (COM4).
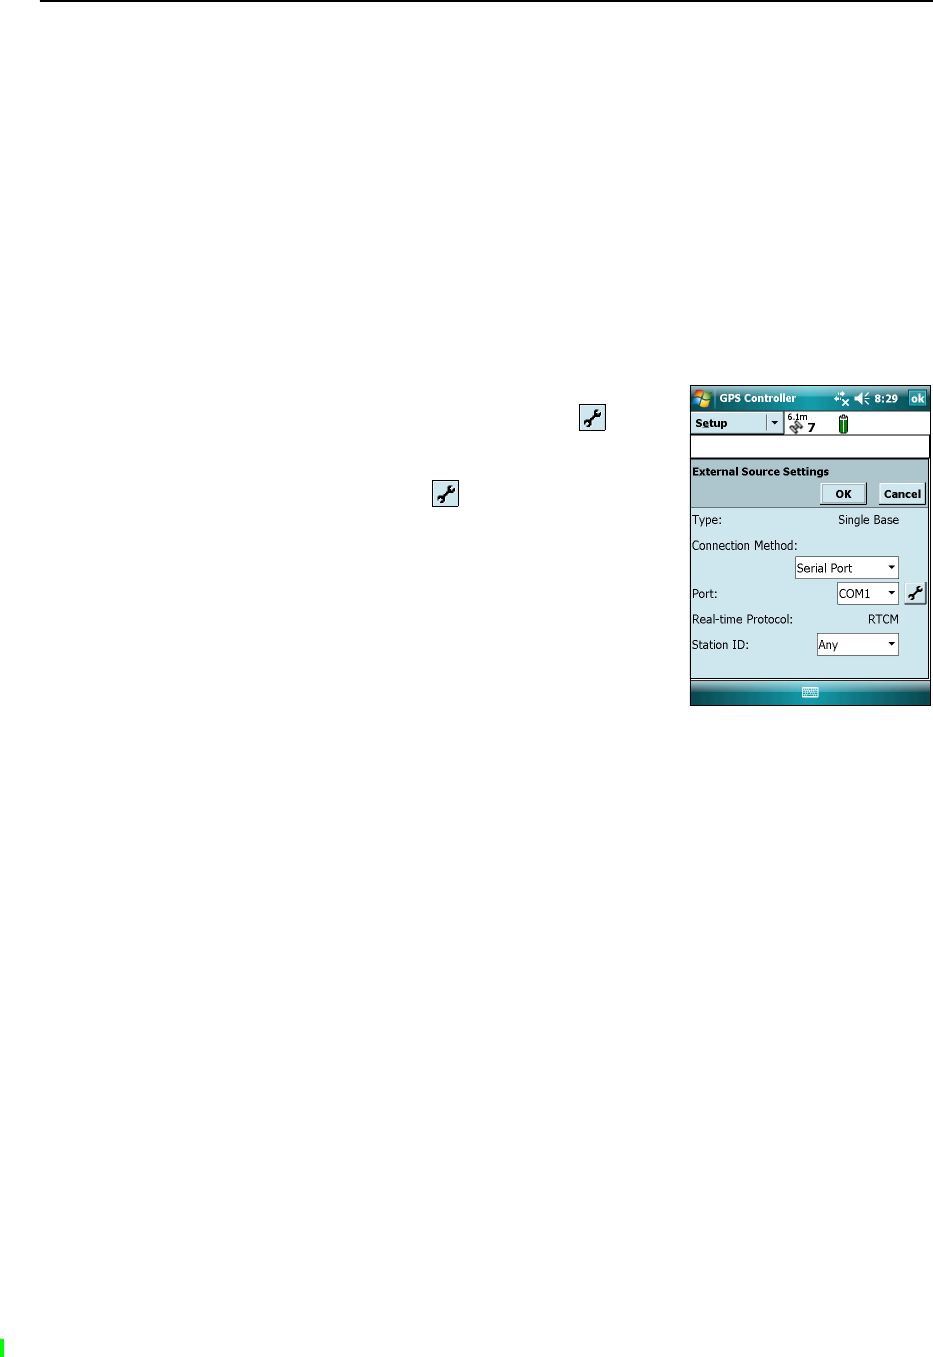
To set up an external correction source in the Trimble GPS field software:
1. In the GPS field software, open the Real-time
section and then tap the Setup button .
2. In the Choice 1 field, select External Source.
3. Tap the Setup button next to the Choice 1
field.
4. In the Connection Method field, select Serial Port.
5. In the Port field, select the COM port to use. If you
are using:
–the serial clip, select COM 1.
–a Bluetooth wireless connection, select the
COM port you configured for the Bluetooth
connection in the COM Ports tab of the Bluetooth manager.
6. Tap OK.
To set up an external correction source for use with non-Trimble GPS field software:
1. In the Trimble GPS Controller software, configure the GPS receiver to use
real-time corrections on COM4. For more information, see the steps above.
2. In the GPS Connector software, manually redirect the real-time correction
source to COM4 by tapping Setup then select the real-time source from the drop
down list.
3. Configure your data collection software to monitor and use real-time
corrections as required.
Note – To receive real-time corrections, the GPS Connector software must remain running
on the handheld.
GeoExplorer 2008 Series User Guide 71
Using the GPS receiver 5
Configuring GPS settings
Note – This section describes the GPS Settings form in the GPS Controller software and the
Trimble GPScorrect extension.
Use the GPS Settings form in the Trimble GPS field software to configure the GPS
quality settings you require. The lower the GPS quality settings, the more productive
you are likely to be, as the GPS receiver will track more satellites and be better able to
calculate a GPS position. The stricter the GPS quality settings, the more precise the
GPS positions that are calculated.
Note – If you are using the TerraSync software version 3.21 or later, Trimble recommends
that you use accuracy-based logging (see page 67) to control the quality of the GPS
positions logged. Use the default GPS quality settings and let the TerraSync software
manage the logging of positions based on your required accuracy.
By default, the handheld is configured to receive satellite signals in most conditions.
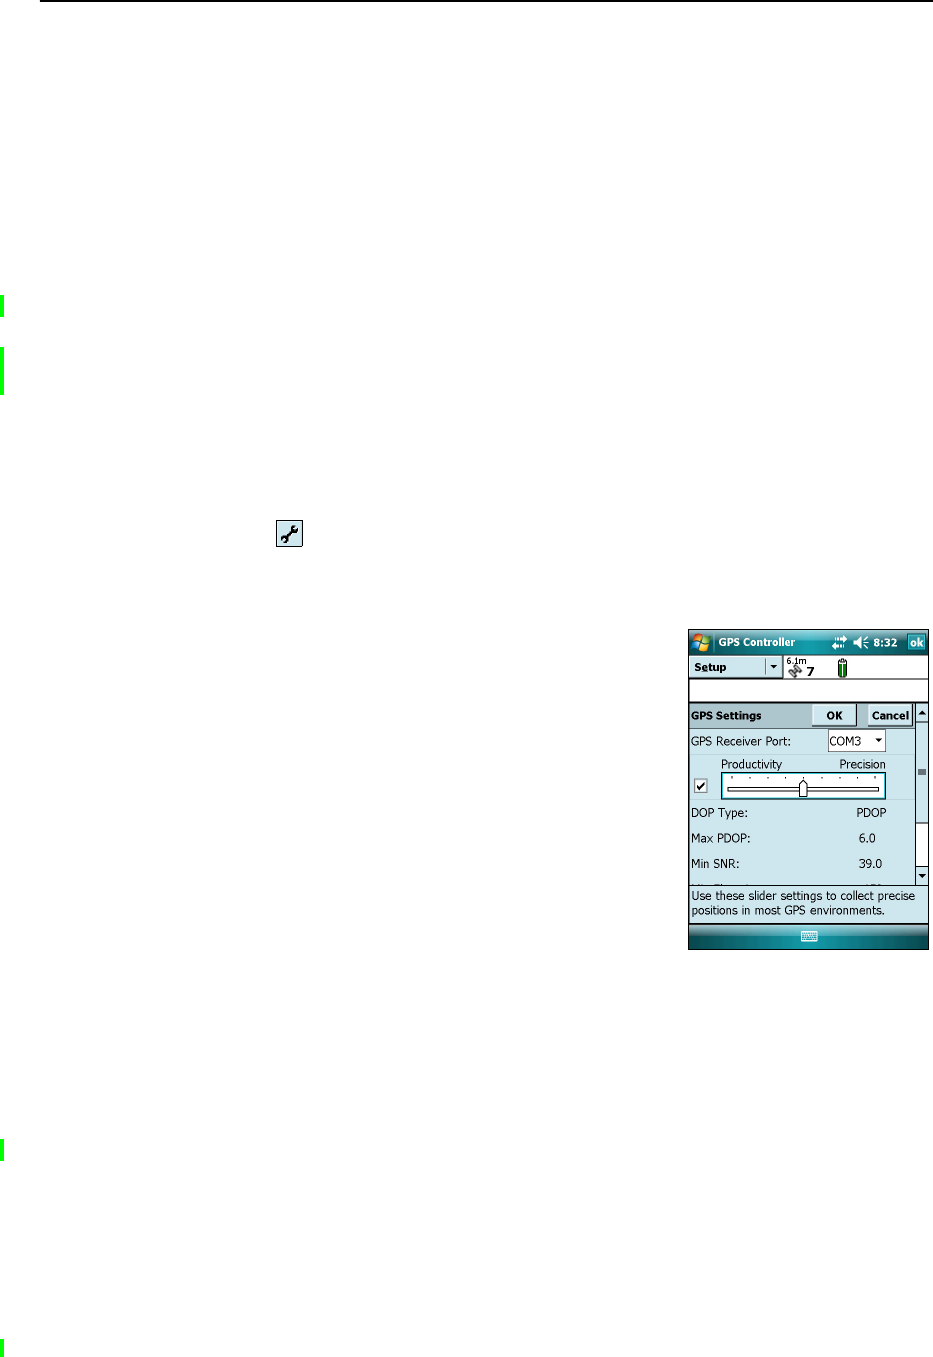
To open the GPS Settings form, do one of the following:
•Tap GPS Settings in the Setup section.
•Tap in the Skyplot, Satellite Info, or Plan section.
Selecting predefined settings using the GPS slider
Use the GPS slider to select predefined GPS quality
settings.
Select the slider check box. The slider control appears on
the GPS slider, and some fields in the form become
read-only. The values in these fields change as the slider
control position changes.
Drag the slider control to the left to decrease the GPS
quality requirements and to include more satellites when
calculating GPS positions. Drag it to the right to improve
the GPS quality and exclude satellites that do not meet
the precision requirements from GPS position
calculations.
Selecting custom GPS settings
To select custom GPS quality settings, clear the slider check box. The slider control
disappears from the GPS slider, and the remaining fields change to editable numeric
fields. To specify the required GPS quality settings, enter values in these fields. For
more information about each field, see Recommended GPS settings for maximum
precision, page 124.
5 Using the GPS receiver
72 GeoExplorer 2008 Series User Guide
Connecting to an external antenna
The GeoExplorer 2008 series handheld has an internal antenna, which is suitable for
use in most conditions.
If you have a GeoXM or a GeoXT handheld, you can also connect a Hurricane or an
external patch antenna for when you work in a vehicle. For improved yield under
canopy, you can use a Hurricane antenna, or a patch antenna with a ground plane.
If you have a GeoXH handheld, you can connect an external Zephyr antenna for
improved accuracy when you collect data for postprocessing using H-Star technology.
Configure antenna settings in the GPS field software, once you have connected the
external antenna to the handheld.
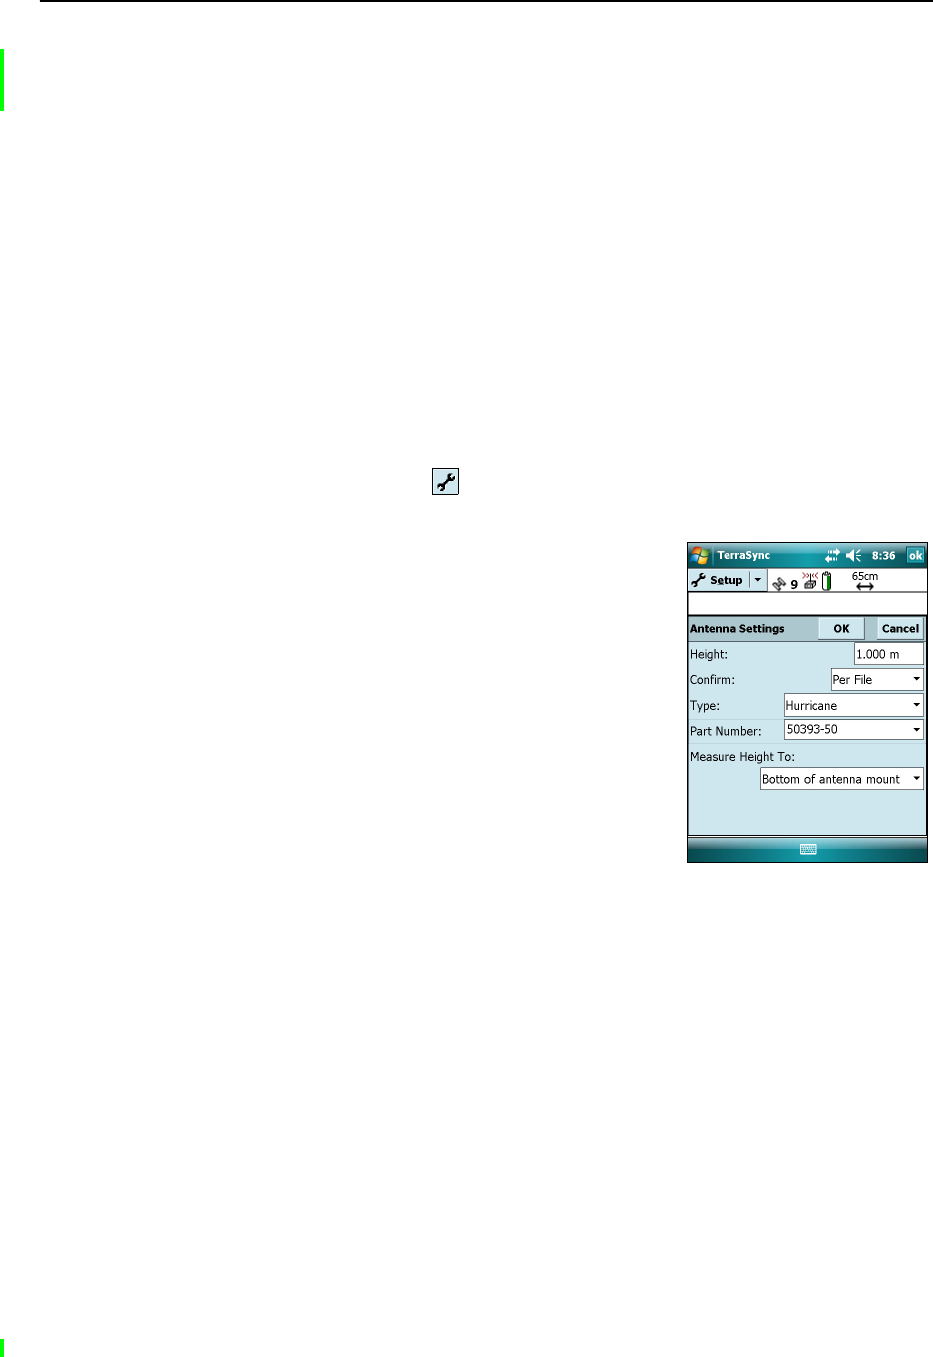
To configure antenna settings in the TerraSync software:
1. In the Setup section of the TerraSync software, tap Logging Settings. The
Logging Settings form appears.
2. Tap the Setup button next to the Antenna Height field. The Antenna Settings
form appears.
3. In the Height field, specify the height of the GPS
antenna that is connected to the GPS position.
4. In the Confirm field, select how often the software
will ask you to confirm the configured antenna
height during data collection.
5. In the Type field, select the type of antenna that is
connected. The number in the Part Number field is
automatically updated when you select the
antenna type.
6. In the Measure Height To field, select the point on
the antenna that you have measured the height to.
7. Tap OK to return to the Logging Settings form.
GeoExplorer 2008 Series User Guide 73
Using the GPS receiver 5
Logging carrier data
When you log carrier data, the GPS receiver logs additional data as well as GPS
position records. The additional data is used during postprocessing to improve the
accuracy of the GPS positions.
If you are using a GeoXH handheld, H-Star carrier data is logged by default. If you are
using a GeoXT handheld, carrier data is not logged by default. If you want higher levels
of accuracy and are willing to log data for 10 minutes or more while maintaining
continuous lock on at least four satellites, you can configure the GPS field software to
log carrier data.
To configure carrier data logging in the TerraSync
software:
1. In the Setup section of the TerraSync software, tap
Logging Settings. The Logging Settings form
appears.
2. In the Log Carrier Data field, select the data logging
option for the type of handheld you are using:
–If you are using a GeoXT, select Yes.
–If you are using a GeoXH, make sure Auto is
selected.
3. Tap OK.
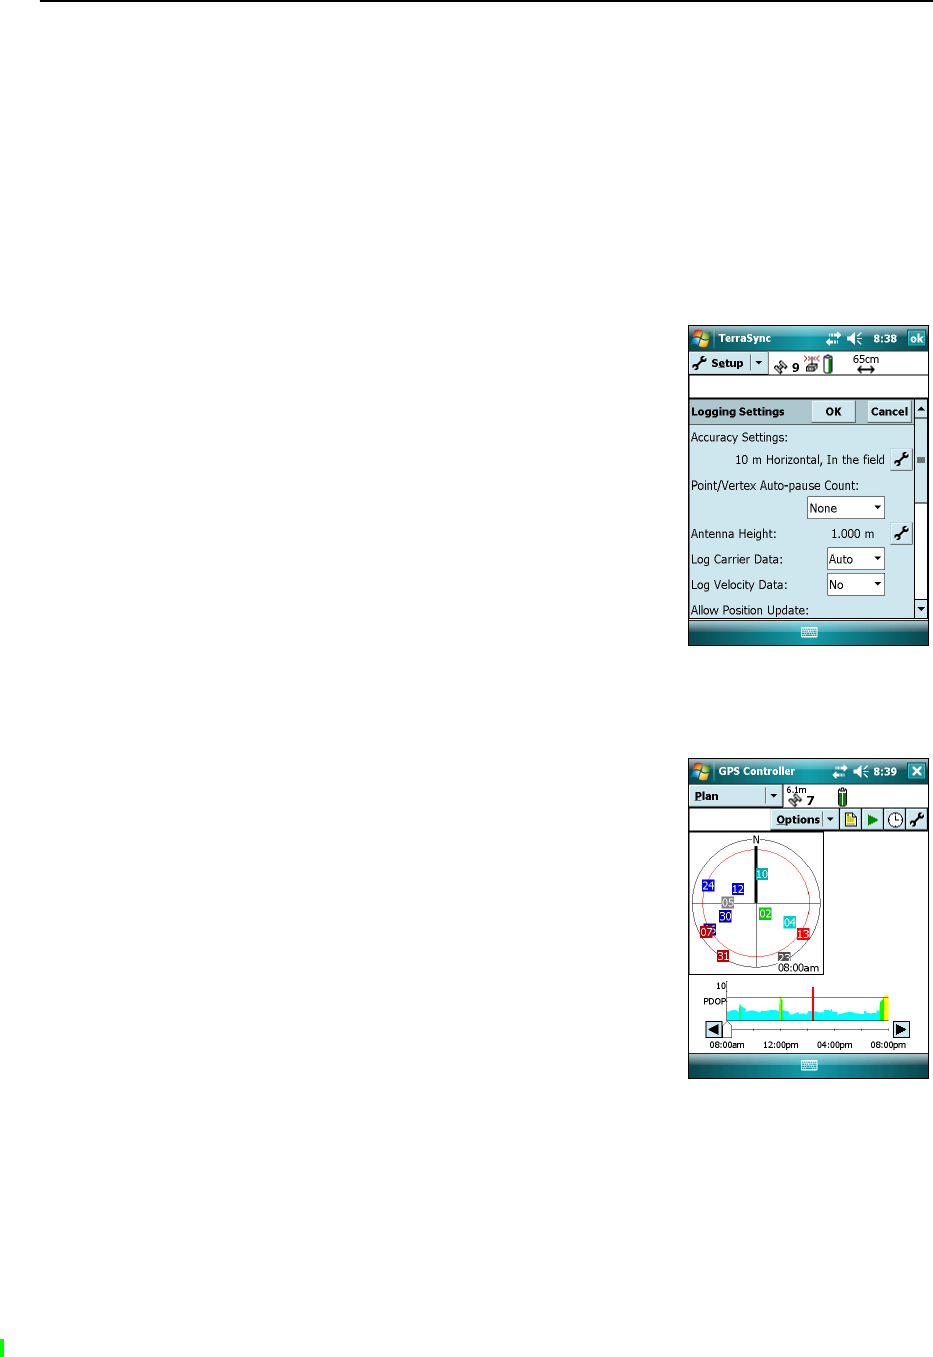
Planning a data collection session
To maximize productivity, plan GPS data collection
around the times of the day when satellite geometry is
best. The GPS Controller software includes a Plan
section with an animated skyplot and DOP (satellite
geometry) graph for your position for the next 12 hours.
In the Plan section, you can check the planning skyplot
as you play a session, then use the timeline to zoom in
on times when geometry is poor. As you adjust GPS
settings, the Plan section is updated, so you can see the
effect of different quality control settings.
Note – If you have other Trimble GPS field software
installed, use the planning feature in that application
instead of the GPS Controller software.

5 Using the GPS receiver
74 GeoExplorer 2008 Series User Guide
Differential GPS explained
Use differential GPS to correct errors in your collected data. Differential GPS (DGPS)
requires one or more additional receivers, called base stations or reference stations,
which are located at known points. Data collected at the base stations is used to
determine GPS measurement errors and compute corrections to these errors. An
unlimited number of mobile GPS receivers, called rovers, collect GPS data at unknown
locations within the vicinity of the base station. Errors common at both the base
station and the rover receiver are corrected with DGPS either in real time or during
postprocessing.
Real-time DGPS
In real-time DGPS, the base station calculates and broadcasts the error for each
satellite as each measurement is received, enabling you to apply corrections while in
the field and collect accurate GPS data. DGPS corrections are available from a variety
of public and commercial sources. They can be generated and broadcast in real-time
by privately or self-owned GPS base stations, or by a wide range of government
agencies.
Real-time DGPS sources include external beacon and radio sources, as well as Satellite
Based Augmentation Systems (SBAS) such as WAAS in the US and EGNOS in Europe,
and VRS networks. SBAS and VRS networks use multiple base stations to calculate the
DGPS corrections that are then delivered to the user from a Geostationary satellite
(SBAS) or from a radio or cellular phone (VRS networks).
Factors that affect real-time DGPS accuracy include how often the corrections are
updated, how far you are from the base station, and whether the coordinate system
used by the correction source matches the coordinate system used by the GPS receiver.
Postprocessed DGPS
In postprocessed DGPS, the collected GPS data is transferred to an office computer,
and measurements from the base station are downloaded. You can postprocess GPS
data collected with Trimble GPS field software using:
•the GPS Pathfinder Office software version 4.10 (with the latest updates) or
later.
•the Trimble GPS Analyst extension for ESRI ArcGIS software version 2.10 (with
the latest updates) or later.
Typically, postprocessed DGPS uses only one base station. However, when
differentially correcting data collected with GeoXH receivers using H-Star technology,
you can select multiple base stations to correct the file against for improved accuracy.
Factors that affect the accuracy of postprocessed DGPS include the type of receiver
and antenna used at the base station, the distance between the base station and the
location where the rover data was collected, the accuracy of the base station position,
and the logging interval at the base station.