Trimble 96410 PDA User Manual Trimble Field Inspector Software User Guide
Trimble Navigation Ltd PDA Trimble Field Inspector Software User Guide
Trimble >
Contents
- 1. Users Manual 1
- 2. Users Manual 2
Users Manual 2

8.
Follow the
s
t
e
p
s
in
the Setup
w
i
zar
d
.
If
t
h
e
connection
se
tt
in
gs
are
not
automatically downloaded from
t
h
e
I
n
t
e
rn
et,
you
mu
s
t
enter
t
h
em
using
t
h
e
connection details supplied by your
I
S
P
or n
e
t
work
admin
i
s
t
r
a
to
r
.
Note – You cannot change the account name
late
r
.
9.
Tap
Finish
.
10. Tap
OK to
download mail
im
m
e
di
at
ely
.
B
Tip – To receive
TerraSync
data files by email, edit the
s
e
ttings
for
t
h
e email account
yo
u
have set up. To do this, tap Menu and then
s
e
lect
Op
ti
on
s
. In the
Acco
un
t
s
tab,
t
a
p
th
e
e-mail
ac
co
un
t
you want to use to receive
TerraSync
files. The Email Setup wizard appea
rs.
Tap Next
until
you reach the
las
t
page of
t
h
e wizard. From
t
h
e Message
download
li
mit
drop-down
list, select Entire
message
.
When you co
nn
e
c
t
the handheld
to
the email
ser
ver
,
new messages are
downloaded
to
the Messaging
fol
d
er
,
messages
in
t
h
e
O
u
t
b
o
x
folder are sent, and
messages
that
hav
e
been deleted on the email server are removed from the Messaging
fo
l
d
er
.
Messages
r
e
ce
i
v
ed
dir
e
ct
l
y
from an email server are
linked
to
t
h
e
email
server
r
a
t
h
er
t
h
a
n
an office co
m
p
u
t
e
r
.
When you
d
e
l
e
t
e
a message on
t
h
e
h
a
n
d
h
e
l
d
,
it
i
s
a
l
s
o
d
e
l
e
t
e
d
from
t
h
e
email server
t
h
e
next
tim
e
you co
nn
e
c
t
t
h
e
handheld
to
the email
ser
ver
.
You can work online or o
ff
l
in
e.
When working
onlin
e,
you read and respond
to
messages
while connected
to
t
h
e
email
se
r
v
e
r
.
Messages
are sent as soon as you
tap
Se
nd
,
which saves space on
t
h
e
hand
h
e
l
d
.
When working
o
ff
l
in
e,
you can disconnect from the email server af
t
er
you
download
new message headers
or partial
messages and
t
h
en
dec
i
de
which messages
to
download
co
m
p
le
te
l
y
.
The
n
e
x
t
t
i
m
e
you connect, Messaging downloads
t
h
e
co
m
p
l
e
t
e
messages
you have marked for retrieval and sends any
messages
that
you have
w
r
it
t
en
.
Voice calls
Use the
TNJ32
handheld
to
make and receive phone
cal
l
s.
You can enter a number
to
dial
using the
k
e
ypa
d
,
or select a number from your
C
o
nt
a
c
t
s
l
i
s
t
.
To make a phone
c
a
ll
:
1.
Make sure
that
a
S
I
M
card
i
s
i
n
s
t
a
ll
e
d
.
See
I
n
s
t
al
l
i
ng
and removing the
S
I
M
car
d
,
page
26
.
2.
Make sure
that
the phone
i
s
t
u
rn
ed
on
.
See
Turning on and
turning off
t
h
e
integrated
r
adio
s
,
page
49
.
1.
On the Home
scr
e
en
,
do one of
t
h
e
following:
– Tap
/
Pho
n
e
.
–
Tap the Phone
it
em
,
and
t
h
en
tap
t
h
e
Phone
item
ag
ain
.
Ju
no
Ser
i
es
Han
dheld
s
Us
er
Gu
ide
41
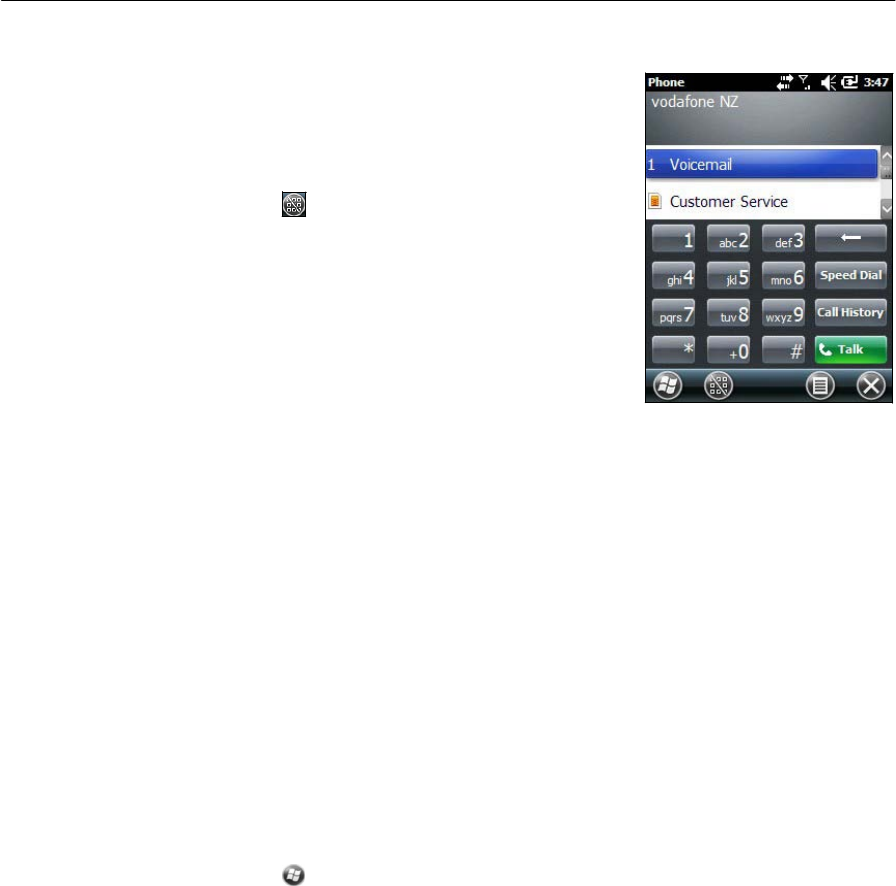
2.
On the Phone screen which appears, do one
of
the
f
o
ll
ow
i
n
g
::
–
Use the keypad
to
dial a phone number
and
then
t
a
p
Ta
l
k
.
–
Tap
to
hide the keypad and select
an
option from the
l
i
s
t
of previously
dialled
numb
ers.
A
l
t
e
rnati
v
ely
,
t
a
p
the
l
e
ft
s
o
f
t
k
e
y
,
t
a
p
the
r
e
q
u
ir
ed
con
t
act
and
t
h
en
tap
Ca
ll
.
Note – When you make or
r
e
ce
ive
a voice
call
,
the
sc
r
een
automatically
l
o
ck
s,
and the touch
screen cannot be
u
s
ed
unless you use
the Unlock (left)
sof
t
ke
y
or Call End
(right)
sof
t
ke
y
.
To answer a phone
cal
l
,
press the
Start call
button or
the left
so
f
t
k
e
y
.
Note – When you answer a voice ca
ll
,
the
sc
r
ee
n
i
s
blank.
To end a phone cal
l
,
press
t
h
e
End call
button
or
t
h
e
right
s
o
ftk
e
y
.
Phone
settin
gs
Note – You
mu
s
t
have a SIM card
in
the handheld to
access
and change the phone
se
tt
ings.
You can change
the ring
t
yp
e
,
ring tone, and keypad
s
o
und
.
If
r
equir
ed
,
you can also
set
a PIN for the
S
I
M
ca
r
d
,
or change the
t
yp
e
of
n
e
t
work
or the name of the
n
e
t
work
you
want
to
co
nn
e
c
t
to
.
1.
To access Phone
Set
t
in
g
s
,
do one of the
fo
ll
ow
in
g:
–
Tap the modem
s
t
a
t
u
s
icon on the
t
i
tl
e
bar of
t
h
e
Home screen and
t
h
en
tap
Se
tt
i
n
g
s
.
– Tap
/
Se
tt
i
ngs
/
Pe
r
s
o
n
a
l
/
P
ho
n
e.
2.
Do any of
t
h
e
f
o
llo
w
i
n
g:
–
Select
t
h
e
Sounds
t
a
b
to
set
the required ring
t
y
p
e
,
ring
ton
e
,
and
ke
yp
ad
sound
.
–
Select
t
h
e
Se
c
u
r
i
t
y
t
a
b
to
set a
P
I
N
,
change
t
h
e
P
I
N
,
or set
t
h
e
handheld
to
require a PIN
to
be entered every
tim
e
t
h
e
phone
i
s
used
.
For
mor
e
information on
set
t
ing
a
P
I
N
,
see
Set
t
ing
a PIN on
t
h
e
TNJ32
hand
h
e
l
d
,
page
50
.
–
Select
t
h
e
GS
M/UM
T
S
t
a
b
to
select a
p
a
r
t
icul
ar
t
yp
e
of network
to
co
nn
e
c
t
to. By default,
G
SM
/
U
M
T
S
i
s
selected and
t
h
e
phone
will
co
nn
e
c
t
to
e
i
th
er
that
i
s
a
v
a
i
l
a
bl
e.
A
l
t
e
rnati
v
ely
you can specifically select GSM or
U
M
T
S
from
t
h
e
drop-down
m
e
nu
.
–
Select
t
h
e
Network tab
to
view which
n
e
t
work
you are
co
nn
e
c
t
ed
to or
manually select a
d
es
i
r
e
d
n
e
t
wor
k.
42
Juno Series
Handhelds User Guide
Te
x
t
m
e
ss
a
g
i
n
g
Use the phone
functionality on the
TNJ32
handheld
to
send and receive
t
e
xt
me
ss
ag
es
.
1.
Make sure
that
a
S
I
M
card
i
s
i
n
s
t
a
ll
e
d
.
See
I
n
s
t
al
l
i
ng
and removing the
S
I
M
car
d
,
page
26
.
2.
Make sure
that
the phone
i
s
t
u
rn
ed
on
.
See
Turning on and
turning off
t
h
e
integrated
r
adio
s
,
page
49
.
3.
Do one of
t
h
e
following:
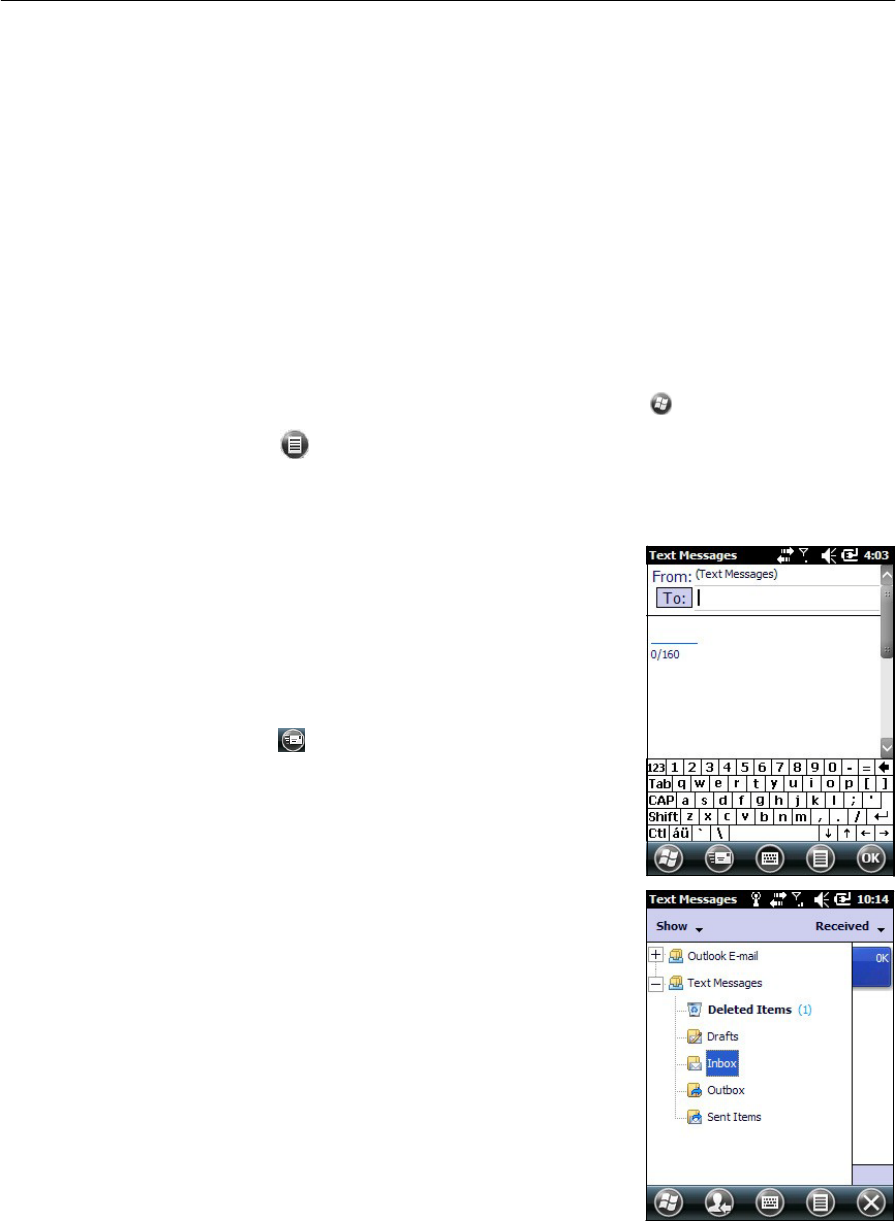
•
To send a
t
e
x
t
m
ess
ag
e:
a.
On
t
h
e
Home
scr
een
,
select
t
h
e
Text item
(thi
s
shows Text
M
ess
ages
:
x
unr
ea
d
,
or No New messages).
A
l
t
e
r
n
a
t
i
v
e
l
y
,
tap
/
Te
x
t
b.
Tap
/
New
.
c.
To enter a contact
numb
er
,
make sure
that
t
h
e
cursor
i
s
flashing
in
t
h
e
To
field and
t
h
en
do one of the
fo
ll
o
w
in
g:
–
Use the keyboard
to
enter a phone
numb
er.
–
Select Menu
/
Add
R
e
c
i
p
i
e
n
t
to
select a
number from your
C
o
nt
ac
t
s
.
d
.
Tap
in
t
h
e
message area
(
t
h
e
cursor
w
i
ll
flash) and
t
h
en
en
t
e
r
t
h
e
t
e
x
t
using
t
h
e
k
eyboa
r
d
.
e.
Tap
to
send
t
h
e
m
ess
ag
e.
•
To access
your
t
e
x
t
message
f
o
l
d
e
r
s
.
a.
On
t
h
e
Home
sc
r
een
,
select the Text
item
(th
i
s
may show Text Messages: x
unr
e
ad
,
or
No New messages)
and then
t
a
p
ag
ain
.
b.
Click the Inbox drop-down
arrow
.
c.
Click the required folder
to
view
messages
in
that f
o
l
d
e
r
.
Ju
no
Ser
i
es
Han
dheld
s
Us
er
Gu
ide
43

Connecting to an office
computer
C
o
nn
e
c
t
the
J
u
no
series handheld
to
an office computer
to
transfer
inform
ation
,
set
t
in
g
s
,
and files from one
d
e
v
i
ce
to
the
oth
e
r
,
or
to
ins
t
al
l
software onto
t
h
e
hand
h
e
l
d
.
You can
co
nn
e
c
t
the handheld
to
a computer using the
USB cable or a
Bluetooth
wireless
l
i
nk
.
C CAUTION – When
u
s
ing
the
USB
port
at the
bottom
of the handheld, make sure that
it
is
kept dry.
W
a
t
e
r
damage may
cause
the
USB
connection to fail and the handheld will
no
t
conne
c
t
to
t
h
e
of
f
i
ce
computer
.
To
pr
ot
e
c
t
your d
a
t
a
,
T
r
imbl
e
recommends
that
you regularly copy
important
data
to
an office co
m
p
u
t
e
r
.
Connection management
softwar
e
To ins
t
al
l
software onto a Windows
embedded
hand
h
e
l
d
,
or
to
copy files
b
e
t
w
een
th
e
handheld and a
co
m
p
u
t
e
r
,
you
m
u
s
t
co
n
nec
t
t
h
e
dev
i
c
e
to
an office co
m
p
u
t
e
r
.
If
t
h
e
co
m
p
u
t
e
r
i
s
ru
nn
i
n
g
:
•
the Windows 7 or Windows
V
i
s
t
a
®
operating
s
y
s
t
em
,
use
the Windows
M
o
b
i
l
e
Device
C
e
n
t
e
r
to
manage
t
h
e
co
nn
ec
t
i
o
n
.
•
the
Win
dow
s
®
XP
or
2000
operating
s
y
s
t
em
,
use
A
c
ti
v
e
S
y
nc
t
e
chno
log
y
to
manage
t
h
e
c
on
n
ec
tio
n
.
Note – You
mu
s
t
in
s
t
a
ll
the
W
i
ndo
w
s
Mobile Device
C
e
nte
r
or
A
c
t
i
veS
y
n
c
technology
o
n
t
o
the computer be
f
o
r
e
you connect the
handhe
l
d
.
This connection management software also enables you
to
synchronize o
ff
i
c
e
applications on an office computer
with
the hand
h
el
d
.
C CAUTION – The available
space
on the handheld
i
s
s
m
al
l
compared to an office
comput
er
.
To avoid accidentally synchronizing the handheld with a large amount
of
data on
t
h
e
office
computer, Trimble recommends that you either
co
nn
ec
t
to the handheld
with
out
forming
a
partnership
,
or that you limit the
information
types and amount of data
tha
t
i
s
synchronized.
C CAUTION – Synchronizing data is designed to keep the
s
a
me
data on both the
of
fice
computer and the handheld.
Exerc
i
se
care when
resynchronizing applica
t
ions a
fter
deleting
data from one computer,
as
resynchronizing
will delete the same
info
rmatio
n
from
the other
c
o
m
pu
t
er
.
For more information
see one of
t
h
e
fo
ll
owing
:
•
Managing the connection using the Windows Mobile
D
e
v
i
c
e
C
e
nt
er
,
page 45
•
Managing the connection using
A
c
ti
v
e
S
y
nc
t
e
c
h
no
l
o
g
y
,
page
46
.
44
Juno Series
Handhelds User Guide

Installing
the Windows Mobile Device Center
The Windows
7
and Windows
V
i
s
t
a
operating
s
y
s
t
ems
include a
b
a
s
i
c
co
nn
e
c
ti
v
i
t
y
driver for Windows
embedded handhelds.
This driver allows you
to
transfer
f
i
l
es
from
the handheld
to
an office co
mput
er
.
To ins
t
al
l
software onto a Windows
embedded
hand
h
el
d
,
you mus
t
ins
t
al
l
W
i
ndow
s
Mobile
Device
C
e
n
t
e
r
o
n
t
o
an office co
m
p
u
t
e
r
.
To download
t
h
e
l
a
t
es
t
version from the Microsoft
webs
it
e,
go
to
www.micr
o
so
f
t
.c
om/w
indow
s
mo
b
i
l
e
/d
e
v
ic
ec
ent
e
r
.
ms
px
.
Installing
ActiveSync
te
chnology
To download
t
h
e
l
a
t
es
t
version from the Microsoft
webs
it
e,
go
to
www.micr
o
so
f
t
.c
om/w
indow
s
mo
b
i
le
/
a
c
t
i
v
es
yn
c
/
de
f
a
u
l
t
.
m
s
px
.
Connecting the handheld to a
computer
To connect
t
h
e
J
uno
series
handheld
to
a
co
mput
er
:
1.
Make sure
that
the handheld and the computer are switched
on
.
2.
Make sure you have in
s
t
al
l
ed
t
h
e
appropriate connection management
s
o
f
t
war
e
onto the computer
(see
Connection
manag
e
m
e
n
t
so
ft
war
e
,
page 44).
3.
To form a
co
nn
e
c
tion
,
do one of the
fol
l
ow
in
g:
–
Use a USB
co
nn
e
c
t
i
o
n
:
a.
C
o
nn
e
c
t
t
h
e
USB
d
a
t
a
cable
to
the USB
port on
t
h
e
hand
h
e
l
d
.
b.
C
o
nn
e
c
t
t
h
e
other end of the USB
d
a
t
a
cable
to
a USB
port on
t
h
e
co
m
p
u
t
e
r
.
–
Use
the handheld's integrated
Blu
etoo
t
h
radio
to
es
t
a
bli
s
h
a
w
i
r
e
l
ess
serial
link to
a Bluetooth-enabled
co
mp
ut
er
.
For more
information
,
see
Connecting
to
an office computer using Bluetooth
w
i
r
el
ess
t
e
chno
log
y
,
page
67
.
When the handheld and
t
h
e
computer are co
nn
e
c
t
ed
,
you can manage
t
h
e
connection
t
h
r
o
ug
h
a window
that
appears
on the office
co
mput
er
.
See one
of
the
f
o
ll
ow
in
g
:
–
Managing the connection using the Windows Mobile D
e
v
i
c
e
C
e
nt
er
,
page
45
–
Managing the connection using ActiveSync
t
e
chno
log
y
,
page 46
Managing the connection using the Windows Mobile Device Center
1.
Conn
e
c
t
t
h
e
handheld
to
the computer
(see page 45).
2.
If
t
h
e
Autoplay window
appears, close the
w
i
ndow
.
3.
The
W
i
ndo
w
s
Mobile Device
C
e
nte
r
window displays the
message
Connected
:
Ju
no
Ser
i
es
Han
dheld
s
Us
er
Gu
ide
45

Note – If the
co
nn
e
c
t
i
o
n
i
s
not made
automa
tic
a
lly
,
check
that the connection
i
s
enabled
in
the
W
i
nd
o
w
s
M
o
bil
e
D
e
v
i
ce
Center software and on the
ha
nd
hel
d
.
For more
inform
at
i
o
n
,
see
Troubleshooting,
page
84
.
4.
Do one of
t
h
e
fo
ll
owing
:
–
To synchronize files and data
b
e
t
w
een
t
h
e
handheld and a
co
mput
er
,
click
S
e
t
up your
dev
i
ce
and
t
h
en
follow
t
h
e
ins
t
r
uctions
on
scr
e
en
.
–
To
t
r
ans
f
er
d
a
t
a
between the handheld and the computer
without
synchronizing
t
h
e
devices,
click
Connect
w
i
thout
se
tt
i
n
g
up your
dev
i
ce
.
5.
To transfer
f
i
l
es
between
t
h
e
computer and the hand
h
eld
,
click
Fi
l
e
Ma
n
a
g
e
m
e
n
t
.
A Windows Explorer-type window
appears,
displaying
f
i
l
es
s
t
or
ed
on the
hand
h
e
l
d
.
Copy and
pa
s
t
e
f
i
l
es
to
other locations on the
co
mput
er
,
or
from the
computer
to
t
h
e
ha
ndh
el
d
.
6.
To
ins
t
al
l
s
o
f
t
wa
r
e
onto the
hand
h
e
l
d
,
see
I
n
s
t
al
l
i
n
g
s
o
f
t
w
a
r
e
onto the
ha
ndh
el
d
,
page
47
.
7.
To
unins
t
al
l
software from the hand
h
e
ld
,
click Programs and
Services and
then
click
Ad
d
/
Re
m
ov
e
Pr
o
g
r
a
ms
.
B
Tip – If the Add/Remove Programs
option
does
not
appear below Programs and Services,
click More. The Add/Remove Programs
option
app
e
ars.
For more in
fo
rma
t
i
o
n
,
refer
to
t
h
e
Wind
ow
s
Mo
b
i
l
e
D
e
v
i
c
e
C
e
n
t
e
r
He
l
p
.
B
Tip – If the
GPS P
a
thfinder
Office
s
o
ft
ware
is installed on the
of
fi
c
e
co
mpu
t
e
r
, you can
configure
the Connection Manager
utility
in the
GPS P
a
thfinder
Office
s
o
ft
ware
to
automatically
detect when you connect a Juno
series
handheld
to
the computer. This
enable
s
you to
automatically
tr
a
n
s
f
e
r
da
t
a
from
the
TerraSync
s
o
ft
w
a
r
e,
di
ff
e
r
e
n
ti
ally
correct
t
h
e data, and then
expor
t
it
to a
GIS.
For more
information,
refer to the GPS
Pathfinder
Office Software He
lp
.
Managing the connection using ActiveSync
te
chnology
1.
Conn
e
c
t
t
h
e
handheld
to
the computer
(see page 45). The
S
y
n
c
hr
o
n
i
z
at
io
n
Se
t
u
p
Wizard app
e
ars
:
Note – If the
co
nn
e
c
t
i
o
n
i
s
not made
automa
tic
a
lly
,
check
that the connection
i
s
enabled
in
the Ac
ti
v
eS
y
n
c
technology and on the
handh
e
l
d
.
For more
info
rm
ation
,
see
T
r
oub
l
es
h
oo
t
in
g,
page
84
.
2.
Do one of
t
h
e
fo
ll
owing
:
–
To synchronize files and data
b
e
t
w
een
t
h
e
handheld and a
co
mput
er
,
click
Next
and
t
h
en
follow the in
s
t
r
uctions
in
the
S
y
n
c
hr
o
n
i
z
at
io
n
S
e
t
u
p
W
i
zar
d
.
–
To
t
r
ans
f
er
d
a
t
a
between the handheld and the computer
without
synchronizing
t
h
e
devices,
click
Cancel to
close the
w
i
za
r
d
.
3.
The
M
i
c
r
o
s
oft
Act
i
veS
y
nc
window displays the
message
Connected
:
46
Juno Series
Handhelds User Guide

4.
To transfer
f
i
l
es
between
t
h
e
computer and the hand
h
e
l
d
,
click
Explor
e
.
A
Windows Explorer-type window
appears,
displaying
f
i
l
es
s
t
or
ed
on
t
h
e
ha
ndh
el
d
.
Copy and
p
a
s
t
e
f
i
l
es
to
other locations on the
co
mput
er
,
or from
t
h
e
computer
to
the hand
h
eld
.
5.
To in
s
t
al
l
s
o
f
t
war
e
onto the
hand
h
e
l
d
,
see
I
n
s
t
al
l
i
ng
software onto
t
h
e
hand
h
e
l
d
,
page
47
.
6.
To
unin
s
t
al
l
s
o
f
t
wa
r
e
from the
hand
h
e
l
d
,
select
Add
/
Re
mo
ve
Programs from
t
h
e
To
o
l
s
m
enu
.
Clear
t
h
e
check box
b
es
i
d
e
the program you want
to
remove
and
then click
OK
.
For more
i
n
f
o
r
m
a
t
i
o
n
,
refer
to
t
h
e
Ac
t
i
veS
y
n
c
H
e
lp
.
B
Tip – If the
GPS P
a
thfinder
Office
s
o
ft
wa
re
is installed on the office computer, you can
c
on
f
i
gu
r
e the Connection Manager
utility
in the
GPS P
a
thfinder
Office
s
o
ft
wa
re
to
automatically
detect when you connect a Juno
se
rie
s
handheld to the
c
o
m
pu
t
er
. This
enable
s
you to
automatically transfer
data
from
the
TerraSync
sof
t
ware
,
dif
f
ere
n
t
i
a
l
ly
correct
t
h
e data, and then export
it
to a
GIS.
For more
information,
refer
to
the GPS
Pathfinder
Office Software He
lp
.
Installing software
onto the
handheld
Before you
b
e
gin
,
refer
to
the ins
t
al
l
a
tion
ins
t
r
u
ction
s
provided
with
t
h
e
s
o
ft
wa
r
e.
Some
s
o
f
t
war
e
ins
t
a
l
lations
are specifically
d
es
i
gn
ed
to
run on a
Windows
Emb
ed
d
ed
H
a
ndh
e
l
d
.
To ins
t
al
l
software on a Windows Embedded
H
a
ndh
e
ld:
1.
Co
nn
ec
t
t
h
e
handheld
to
a computer
(see page 45).
2.
Copy
t
h
e
i
n
s
t
a
lla
t
i
o
n
files
to
a folder on
t
h
e
h
a
n
d
he
ld
.
3.
Browse
to
t
h
e
folder on
t
h
e
h
a
n
d
h
e
ld
.
Tap and hold
t
h
e
i
n
s
t
a
lla
t
i
o
n
se
t
u
p
file
and
t
h
en
select
Run
.
4.
If
p
r
o
m
p
t
e
d
after
i
n
s
t
a
lla
t
i
o
n
,
perform a
so
f
t
r
ese
t
of
t
h
e
handheld
(see page 22).
To ins
t
a
ll
software
that
i
s
provided on a
C
D
,
or as an in
s
t
al
l
a
ti
on
setup
that
runs on
an
office co
m
p
u
t
e
r
:
1.
Co
nn
ec
t
t
h
e
handheld
to
a computer
(see page 45).
2.
If
t
h
e
software
i
s
provided on
a
C
D
,
inser
t
the
so
f
t
war
e
CD
into
t
h
e
o
ff
i
c
e
co
m
p
u
t
e
r
.
3.
Run
t
h
e
in
s
t
a
lla
t
i
o
n
se
t
u
p.
4.
If
prompt
ed
,
select
t
h
e
ins
t
al
l
option for a Windows
embedded
ha
ndh
el
d
.
O
n
c
e
t
h
e
s
o
f
t
war
e
i
s
ins
t
al
l
ed
on the
co
mput
er
,
it
i
s
automatically transferred
to
t
h
e
ha
n
d
h
e
l
d
.
Note –
If
a memory card is inserted
in
the
handheld
,
the card appears as an
in
s
tallat
i
o
n
loca
t
i
o
n
opt
i
o
n
.
Trimble recommends that you install software to the handheld’s
stor
ag
e
me
mo
r
y
,
not to a memory car
d
.
If
you
i
n
s
t
all
software to a card and then
r
e
mo
ve
the
c
a
r
d
from the
ha
nd
hel
d
,
the software
will not
be
avail
abl
e
for u
s
e.
5.
If
p
r
o
m
p
t
e
d
after
i
n
s
t
a
lla
t
i
o
n
,
perform a
so
f
t
r
ese
t
of
t
h
e
handheld
(see page 22).
Ju
no
Ser
i
es
Han
dheld
s
Us
er
Gu
ide
47

Using the
integrated
radios to connect to other
devices
The
J
u
no
se
ri
es
handheld includes an integrated Wi-Fi radio and an
int
eg
r
at
ed
Bluetooth radio, and provides a number of options for connecting
to
n
e
t
work
s
and
other
de
v
i
ces.
In
add
i
tion
,
t
h
e
TNJ32
handheld includes an in
t
e
gr
at
ed
GSM/UMTS
for
sending and receiving
d
a
t
a
,
and
s
u
pp
or
t
s
voice calls and
t
e
xt
m
ess
ag
in
g.
To use
W
i
-F
i
,
t
h
e
Bluetooth radio, or
t
h
e
GSM/UMTS
,
you need
to turn it
on
(
see
Turning on and
turning
off the integrated radios
be
l
o
w)
.
Using a data connection from your local cellular
prov
i
d
er
,
t
h
e
TNJ32
hand
h
e
ld
’s
integrated GSM/UMTS can be used
to
co
nn
e
c
t
to
the
I
n
t
er
n
et
to
receive
r
eal-tim
e
corrections from
a
VR
S
™
network, send and receive
messages
(including
emai
l
,
SMS
,
or
instant
messages), or
to
send and receive
f
i
l
es
and other
d
a
t
a
to
and from
t
h
e
o
ff
i
c
e
dir
e
ctl
y
in
t
h
e
f
i
el
d
.
You can also use
t
h
e
handheld’s integrated Wi-Fi radio
to
co
nn
e
c
t
to
t
h
e
Internet or a
corp
o
r
a
t
e
n
e
t
work
using a
con
n
ec
t
ion
to
a Wi-Fi
access
point
(also known
a
s
“
hotsp
ots
”
).
Alt
ernati
v
ely
,
you can use Bluetooth
w
i
r
el
ess
t
e
chno
log
y
to
co
nn
e
c
t
to
the
Internet
using a cellular phone. You can also connect dir
e
ctl
y
to
other Blu
e
too
t
h-ena
b
l
e
d
d
e
v
i
ce
s
such as a GeoBeacon
r
e
ceiver
,
a
l
a
ser
r
a
ngef
ind
er
,
or a barcode scanner
,
that
are
within
range (typically
within
5
m to
10
m
of the hand
h
e
l
d
).
This section describes how
to
enable the
r
a
dio
s
,
and the main
co
nn
e
c
ti
v
i
t
y
options
available.
Use
t
h
e
table below
to
identify the w
i
r
el
ess
connection
t
yp
e
you want
to
make and then follow the
s
t
e
p
s
pr
ov
i
d
ed
.
Connection method
To...
Se
e...
TNJ32 GSM/UMTS Connect to a cellular
network
page
52
Wi-Fi Connect to a Wi-Fi
access
point
page
54
Bluetooth
wi
rel
ess
tech
nol
og
y
Co
nn
e
c
t
to
a
no
t
h
e
r
Bluetooth-enabled
de
vice
(paired and
non-paired
co
nnection
s)
Connect to a
Bluetooth-enabled
phone for
I
n
ternet
access
page
55
page
61
Connect to a
Bluetooth-enabled
serial device
page
66
Co
nn
e
c
t
to an office computer to use ActiveSync
tec
hno
l
ogy
page
67
Beam files to or from another device
page
70
Wi-Fi or
B
l
ue
toot
h
wireless
technology,
or
TNJ32 GSM/UMTS
Access
a corporate
network through
your
Internet
co
nn
ecti
on
page
70
Deactivating
the wireless
r
a
dios
Note –
If
you are unsure about whether the
J
u
no
series handheld
r
a
d
i
o
s
are approved fo
r
use
in
your countr
y
,
check with your
T
r
imbl
e
r
ese
ll
er
.
48
Juno Series
Handhelds User Guide

Use
the Radio Activation Manager software
to
d
ea
c
ti
vat
e
the integrated Wi-Fi
and/or
Bluetooth radio, or
to
r
ea
c
ti
vat
e
t
h
e
radios
if
t
h
e
y
have been
d
ea
c
ti
v
a
t
ed
.
The
R
a
d
i
o
Activation Manager software runs on an office co
mput
er
.
The
l
a
t
es
t
copy of the
s
o
f
t
war
e
i
s
available for download from
t
h
e
T
r
imbl
e
web
s
it
e.
Go
to
www
.t
r
imbl
e.c
o
m/s
uppor
t.
s
h
tml
,
click the
link
for your receiver
t
y
p
e
(TNJ31,
or
TNJ32), click
Do
w
n
l
o
a
d
s
,
click
Juno
se
ri
es
and then click
R
a
d
i
o
Activation
Ma
n
a
g
e
r
.
Turning on and
turning
off the
integrated
r
a
dios
You can use the
W
i
r
el
ess
Manager application
to turn
on and
turn
off the
J
un
o
ser
i
es
handheld’s Wi-Fi
or
Bluetooth
r
a
d
i
o
s
,
or
t
h
e
TNJ32
handheld’s GSM/UMTS
(
see
Us
i
n
g
t
h
e
W
i
re
l
ess
M
a
n
ag
e
r
,
b
e
low
).
You can also
turn
on or
turn
off
t
h
e
Bluetooth radio from
within
t
h
e
Bluetooth
application
(see
Turning on and
turning
off the Bluetooth radio from
within th
e
Bluetooth
ap
plication
,
page
51).
To make
t
h
e
J
un
o
se
r
i
es
handheld visible
to
o
t
he
r
B
l
ue
t
oo
t
h
-
e
n
a
b
l
e
d
devices
and
enable them
to
connect,
see page
52
.
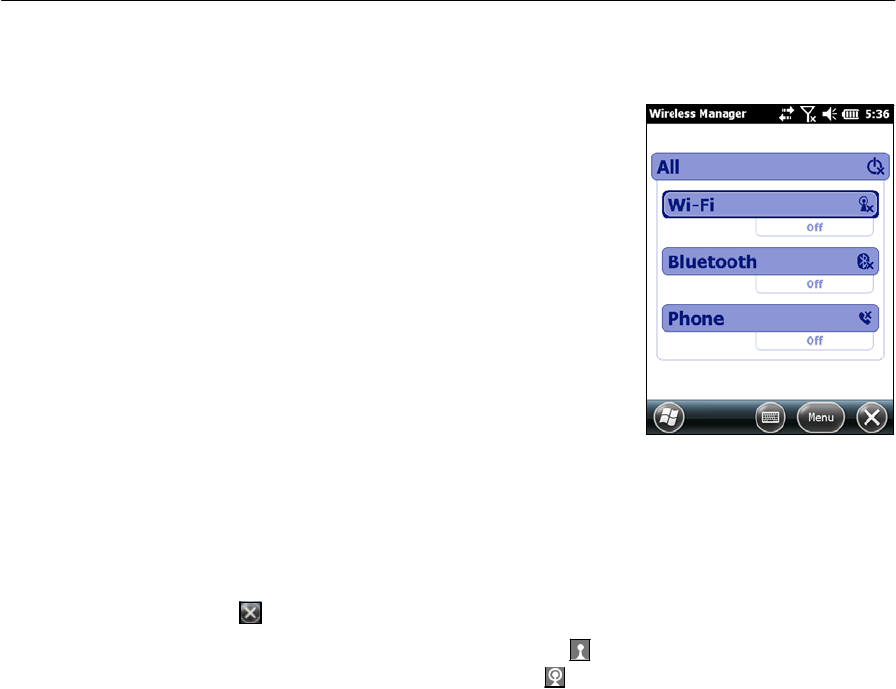
Using the Wireless
Manager
You can use the
W
i
r
el
ess
Manager application
to turn
on and
turn
off the
J
un
o
ser
i
es
handheld’s Wi-Fi radio and/or Bluetooth radio, and
t
h
e
TNJ32
handheld’s
GSM/UMTS
.
You can
turn
on and
turn
off any of
t
h
e
radios at the same
tim
e
,
or
control
each
ind
i
v
i
dual
l
y
.
To open
t
h
e
W
i
r
e
l
ess
M
a
na
g
er
,
do one of the
fol
l
ow
in
g:
•
Tap
t
h
e
title
b
a
r
,
t
a
p
any of the radio icons and then
t
a
p
Wireless
Manager
.
•
Tap
/
S
e
tti
n
g
s
/
Connections
/
Wi
re
l
ess
M
a
n
a
g
e
r
.
Turn on the Wi-Fi radio and/or Bluetooth radio
to
be able
to
co
nn
e
c
t
to
other d
e
v
i
ce
s
or n
et
w
o
r
k
s
.
Turn on the
TNJ32
handheld’s phone
functionality
to
be able
to
send and
r
e
ce
i
v
e
t
e
xt
m
ess
ages
,
and make and
r
e
ce
i
v
e
voice
ca
ll
s.
Turn off the Wi-Fi
r
a
dio
,
Blu
e
t
oo
t
h
radio, an
d
/
or
phone
(
TNJ32
handheld only)
to
prevent the handheld from sending or receiving
w
i
r
el
ess
s
i
g
n
al
s.
B
Tip – To conserve power, turn
off
the radios when
not
in
use.
Ju
no
Ser
i
es
Han
dheld
s
Us
er
Gu
ide
49
To turn on or turn
off
the radios u
s
i
n
g
the Wireless Mana
ger
1.
Open
t
h
e
W
i
r
e
l
ess
Manager
(see
a
b
ove
)
.
2.
Do one of
t
h
e
fo
ll
owing
:
Note – The Phone
option a
pp
l
i
es
only to the
TNJ32
handh
e
ld
.
–
Tap
All
at the top of the screen to
turn
on
t
h
e
r
a
dio
s
,
or
to turn
off all
t
h
e
radios
if
t
h
ey
ar
e
already
on
.
–
Tap
Wi-Fi
,
Bluetooth
,
or
Phone to turn on
t
h
e
radio
that
you want
to
use
,
or
to turn off
t
h
e
radio
if it
i
s
already
o
n
.
The
s
t
at
us
fields below the
Wi-Fi
bu
tt
on
,
t
h
e
Bluetooth
but
t
on
,
and the
Phone
button
change from Off when
t
h
e
radios are
t
u
rn
ed
on and show the
current
s
t
at
e
of
t
h
e
radio. The Wi-Fi
s
t
at
us
field
shows
Co
nn
e
c
t
i
ng
or
Av
a
i
l
a
b
l
e
,
th
e
Bluetooth
s
t
at
us
field
shows On
or
Vi
s
i
b
l
e
,
and the
Phone
s
t
at
us
field
shows
On
or the name of the cellular
n
e
t
w
o
r
k
that
you are
co
nn
e
c
t
e
d
t
o
.
3.
Tap
to
exi
t
t
h
e
W
i
r
e
les
s
M
a
na
g
e
r
.
A
f
t
e
r
you
turn
on
t
h
e
Wi-Fi radio, the Wi-Fi
icon
appears
in
the
title
bar
to
ind
i
cat
e
that
the Wi-Fi radio
i
s
enabl
ed
.
A second
icon
appears
if
a Wi-Fi network
i
s
det
e
ct
ed
,
and a
Notification for the detected network may appear
in
the left
s
o
f
t
key
.
Configuring
phone
s
e
tti
ngs
(TNJ32 handheld
onl
y
)
You can help
to
keep data secure by configuring your SIM card
with
a PIN
(
p
erson
a
l
identification
number). You
will
need
to
enter the PIN each
tim
e
you want
to
use
th
e
ph
on
e.
M
o
s
t
SIM cards are preset
with
a PIN
that
i
s
a
ss
i
g
n
ed
by your
w
i
r
el
ess
service
prov
i
d
er
.
You
will
need
to
enter
thi
s
PIN
first.
Se
tti
ng
a
PIN
on the TNJ32 h
a
nd
held
To set a
P
I
N
,
t
h
e
phone
mu
s
t
already be
t
u
rn
ed
on
.
1.
Open
t
h
e
W
i
r
e
l
ess
Manager (see
ab
ov
e
).
2.
Tap Menu
/
Phone
S
e
tt
in
gs
/
Se
c
u
r
i
t
y
.
50
Juno Series
Handhelds User Guide
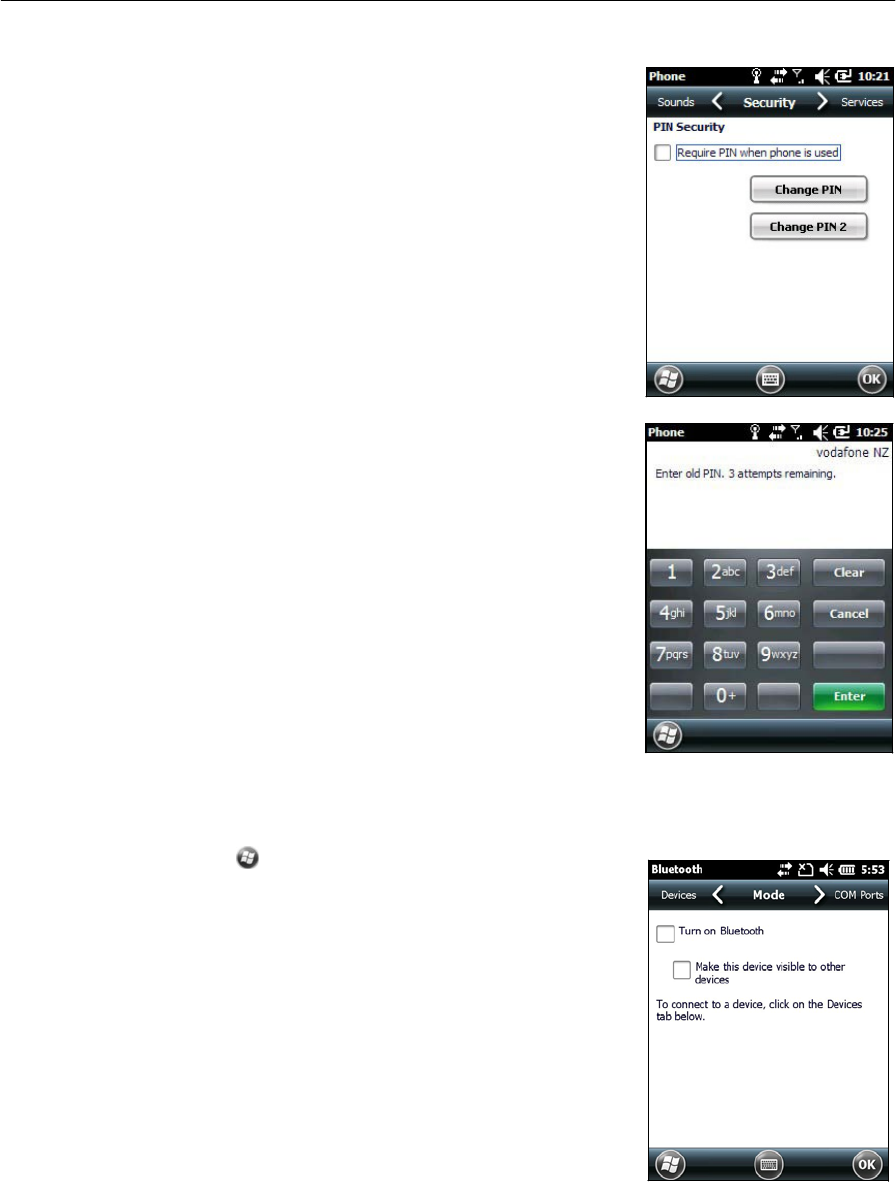
3.
To configure
t
h
e
phone
to
always require a
P
I
N
,
select Require PIN when phone
i
s
u
se
d
.
4.
Enter the preset PIN
as
s
i
gn
ed
by your
w
i
r
el
ess
service
pr
ov
i
d
er
.
5.
Tap
OK
.
To change a
P
I
N
:
1.
Tap
Change
PIN
.
2.
Enter the current PIN and then
t
a
p
Ente
r
.
3.
E
n
t
e
r
a new PIN and
t
h
en
tap
Ent
e
r
.
Turning on and
turning
off the
Bluetooth
radio
from within
the
Bl
uetoo
t
h
application
1.
Tap
/
S
e
tti
n
g
s
/
Bluetoo
t
h
.
2.
Tap
t
h
e
Mode
ta
b.
3.
Selec
t
t
h
e
Turn on Bluetooth check box
to turn on
the radio, or clear
th
i
s
check box
to turn
off
th
e
rad
i
o
.
4.
Tap
OK
.
Note –
If
the
int
e
gr
at
ed
Bluetooth radio is
dea
c
t
i
v
a
t
e
d
,
t
h
e
message
Problem with Bluetooth hardware
may app
e
ar
when you try to turn on the Bluetooth radio or
di
sc
ov
er
de
vi
c
es
.
Ju
no
Ser
i
es
Han
dheld
s
Us
er
Gu
ide
51

Making the handheld visible (discoverable) to other
Bluetooth
device
s
To allow other Bluetooth-enabled
de
v
i
c
es
to
co
nn
e
c
t
to
t
h
e
J
u
no
series
hand
h
e
l
d
,
or
i
f
the handheld
will
not
co
nn
e
c
t
to
or pair
with
ano
t
h
er
d
e
v
i
ce
you are
at
t
emptin
g
to
co
nn
e
c
t
to, you mus
t
make the handheld visible
(t
hi
s
i
s
sometimes referred
to
as
“d
i
s
cov
e
r
a
b
l
e
”)
.
To make
t
h
e
handheld
vi
s
i
ble
to
o
t
he
r
devices
:
1.
Tap
/
Se
tt
i
n
g
s
/
Blue
t
oo
t
h
.
2.
Tap
t
h
e
Mode
ta
b.
3.
Selec
t
t
h
e
Turn on Bluetooth check box,
if it
i
s
not
already
sel
e
ct
ed
.
This
enabl
es
t
h
e
integrated Bluetooth
r
a
dio.
4.
Selec
t
t
h
e
Make
t
h
i
s
d
e
v
i
ce
v
i
s
i
bl
e
to other
dev
i
ces
check
b
o
x
.
5.
Tap
OK
.
Connecting to a cellular
network from
the modem (TNJ32
only)
Use
t
h
e
TNJ32
handheld’s GSM/UMTS
to
co
nn
e
c
t
to
a cellular network
and
access
the
I
n
t
e
rn
et
or a company
n
e
t
wor
k.
Use
thi
s
t
y
p
e
of connection
to
access a
background map
ser
ver
,
or for Internet
and email
ac
c
ess
.
To
co
nn
e
c
t
to
a cellular
n
et
work
,
you mus
t
:
1.
Configure the connection
to
the
n
e
t
w
ork.
2.
C
o
nn
e
c
t
to
the cellular
n
e
t
wor
k.
Before you begin
t
h
e
s
t
e
p
s
b
elow
,
T
r
imbl
e
recommends
that
y
o
u
:
•
make sure
that
a SIM card
i
s
inser
t
ed
in
the hand
h
el
d
.
See
I
n
s
t
al
lin
g
and
removing the SIM
car
d
,
page
26
.
•
confirm that
t
h
e
modem can access
t
h
e
I
n
te
rn
e
t
d
i
r
e
c
t
l
y
.
If
n
e
ces
s
a
r
y
,
contact
your service provicer and
confirm whether you
m
u
s
t
enter a user
nam
e
,
p
a
ss
w
o
r
d
,
and domain
d
e
t
a
i
l
s
when co
nn
e
c
tin
g
.
•
make sure
that
you have the
co
rr
e
c
t
APN (Access Point Name) from
your
cellular
pr
ov
ider
.
Step 1: Configure the conn
ection
To set
up an automatic
co
nfiguration
:
1.
Tap
/
S
e
tti
n
g
s
/
Co
nn
ec
t
i
o
n
s
/
Wireless
Ma
n
a
g
e
r
.
If
t
h
e
Phone
i
s
Off,
tap
Phone
to turn it
on
.
Close the
W
i
r
e
l
ess
M
a
nag
e
r
.
2.
Tap
/
Se
tt
i
n
g
s
/
Connections
/
Co
nnec
t
io
n
s
.
3.
On the
Conn
e
c
t
i
ons
scr
e
en
,
on
t
h
e
Tasks
t
a
b
,
t
a
p
Auto
mat
i
ca
lly
co
nfigur
e
co
nn
ec
t
i
o
n
.
52
Juno Series
Handhelds User Guide

The
d
e
v
i
ce
holds a
d
a
t
a
b
a
se
of
t
h
e
mo
s
t
common cellular providers and
t
h
e
co
rr
e
c
t
connection
se
tt
in
gs.
The handheld
will
a
tt
e
mpt
to
identify the
S
I
M
vendo
r
.
4.
If
t
h
e
S
I
M
vendor
i
s
r
eco
gn
i
se
d
co
rr
ec
t
l
y
,
tap
Next to
co
n
t
in
ue.
The co
nn
ec
t
i
o
n
set
t
in
gs
are set up
a
utomatical
l
y
.
The process
t
a
k
es
about 30
se
co
nd
s.
If
t
h
e
SIM
i
s
not
automatically
d
e
t
e
ct
ed
,
or the vendor
se
tt
in
gs
are
not known
you
will
need
to
set up
t
h
e
configuration
manual
l
y
.
Go
to
To set up a
ma
nu
a
l
co
n
f
ig
u
r
a
t
i
o
n
:
be
l
o
w
.
To set up a manual co
nfiguration
:
1.
Tap
/
S
e
tti
n
g
s
/
Connections
/
Wireless
M
a
n
a
g
er
.
If
t
h
e
Phone
i
s
Off, tap Phone
to turn it
on
.
2.
Tap
/
Se
tt
i
n
g
s
/
Connections
/
Co
n
nec
t
i
ons
.
3.
Under Tasks,
t
a
p
Add a new modem
co
nnec
t
io
n
.
4.
Enter a name for the
co
nnection
,
for example
My Connection.
5.
In
t
h
e
Se
l
e
c
t
a modem
fie
l
d
,
se
lec
t
Cellular
L
i
ne
and then
t
a
p
Ne
xt
.
6.
Enter the APN provided by your cellular provider (check
with
your provider
first
for
co
rr
e
c
t
se
t
tin
gs,
some
providers
have multipl
e
APN
set
ti
n
gs
).
7.
Tap
Ne
xt
.
8.
E
n
t
e
r
a username password and domain
if
required (check
with
your p
r
ovid
er
,
t
h
ese
are
o
f
t
en
not
required).
If not
r
equir
ed
,
l
ea
v
e
these
fields
empt
y
.
9.
Tap
Finished
.
Step 2: Connect to the cellular
network:
1.
Tap
/
S
e
tti
n
g
s
/
Connections
/
Wireless
M
a
n
a
g
er
.
If
t
h
e
Phone
i
s
Off, tap Phone
to turn it
on
.
Close
t
h
e
W
i
r
e
l
ess
M
a
na
g
e
r
.
2.
Tap
/
Se
tt
i
n
g
s
/
Connections
/
Co
n
nec
t
i
ons
.
3.
Under Tasks,
t
a
p
Manage
ex
i
s
t
i
ng
co
nnec
t
io
n
s
.
The configured co
nn
ec
t
i
o
n
s
a
r
e
li
st
e
d
.
4.
Tap and hold the connection
that
you want
to
use.
Tap Connect from
t
h
e
pop-up
me
nu
.
The
t
ask
bar shows
t
h
e
“connecting”
ic
on
,
for example
.
When
t
h
e
connection
i
s
op
en/e
s
t
abli
sh
ed
,
t
h
e
t
a
s
k
bar shows
t
h
e
“connected”
ic
on
,
for
example
. The icons shown depend on
t
h
e
network—see
Ne
t
w
o
r
k
a
n
d
modem
s
t
at
us
indicators,
page 29 for
full
detai
l
s.
Once
co
nn
e
c
t
ed
,
open an
ap
pl
i
c
ation
,
for
e
x
ample
,
I
n
t
er
n
et
E
x
plor
er
,
to
t
es
t
th
e
co
nn
e
c
tion
.
Some
applications automatically launch
t
h
e
con
n
ec
t
i
o
n
when you
s
ta
r
t
the
ap
plica
t
ion
,
if
a current connection
i
s
not
already
es
t
a
bli
s
h
ed
.
Ju
no
Ser
i
es
Han
dheld
s
Us
er
Gu
ide
53

Connecting to a Wi-Fi
access
point
To
co
nn
e
c
t
to
a
Wi-Fi
access point, you
mus
t
:
1.
Set
up the Wi-Fi
co
nn
e
c
tion
2.
C
o
nn
e
c
t
to
the Wi-Fi n
e
t
work
or access
p
o
int
.
Note –
If
you have
in
s
ta
ll
e
d
a personal certificate on the
handheld
,
you do not need to
se
t
up the w
i
r
e
l
ess
co
nne
c
t
i
o
n
manually as
d
e
scr
i
b
e
d
in
S
t
ep
1.
To connect to the network
o
r
access point go to Step 2:
Connecting
to
t
h
e
network or
access
point
.
Step 1: Setting up the Wi-Fi
co
nne
ctio
n
1.
Make sure
that
the
J
u
no
ser
i
es
handheld’s Wi-Fi radio
i
s
enabled (see page 49).
2.
Tap
/
S
e
tti
n
g
s
/
Co
nn
ec
t
i
o
n
s
/
Wireless
Ma
n
a
g
e
r
.
3.
Tap
Menu
and
t
h
en
se
lec
t
Wi
-
F
i
S
e
tti
n
g
s
.
Any
n
e
t
work
s
that
you have already
co
nf
i
g
ur
ed
are
d
i
s
p
la
y
e
d
in
t
h
e
l
i
s
t
of preferred
n
e
t
w
o
r
ks
.
4.
To add a new
n
e
t
w
o
r
k,
t
a
p
Add
N
e
w
.
To
c
h
a
n
g
e
t
h
e
set
t
in
gs
for an existing
n
e
t
wor
k,
t
a
p
t
h
e
network.
5.
Enter the name of the
n
e
t
work
and
ot
h
e
r
connection d
e
t
a
i
l
s
and then
t
a
p
Ne
xt
.
6.
Do one of
t
h
e
following
–
To use
a
u
th
entica
t
i
on
,
select
th
e
a
u
t
hentication
method from
t
h
e
A
u
th
ent
i
c
ation
li
s
t
.
–
To use
d
a
t
a
en
cryption
,
select an encryption
m
e
t
h
o
d
from the
Data
En
cr
y
p
t
i
o
n
li
st
.
–
To automatically
use a network
key
,
select
t
h
e
check box for The key
i
s
autom
at
i
c
a
lly
pr
ov
i
d
e
d
.
O
t
h
e
r
w
i
s
e,
enter
t
h
e
Network key and the Key
i
nd
e
x
.
7.
Tap
Ne
xt
.
8.
For increased
se
cur
i
t
y
,
select
t
h
e
Use IEEE 802.1x
n
e
t
w
o
r
k
access
control
ch
e
c
k
box and then configure additional
a
u
th
entica
t
i
on
inform
ation
.
9.
Tap
Finish
.
Step 2: Connecting to the
network
or
access
po
in
t
1.
Disconnect
t
h
e
USB data cable, as
t
h
e
handheld
prioriti
z
es
a USB
co
nn
e
c
tion
over a Wi-Fi co
nnect
i
on
.
2.
Bring the handheld
within
range of
t
h
e
network or
access
point.
When a Wi-Fi connection
i
s
d
e
t
e
ct
ed
,
the access
point
icon
appears on
th
e
ti
tl
e
bar
,
and a
notification
message
appears on
t
h
e
l
e
f
t
s
o
ftk
e
y
.
54
Juno Series
Handhelds User Guide

If
t
h
e
access
point icon or the notification
does
not
app
ear
,
use the
W
i
r
el
ess
Manager
to turn
off and
t
h
en
turn
back on
t
h
e
Wi-Fi radio. When the
Wi-Fi
radio
i
s
t
u
rn
ed
on
,
any
n
e
t
work
s
or access points
within
range are detected
and
t
h
e
icon and notification
a
pp
e
ar
.
3.
Tap the access
point
icon on the
t
i
tl
e
b
a
r
,
or
t
a
p
Not
i
fica
tion
,
or press
t
h
e
left
so
ft
k
e
y
.
A popup message shows
t
h
e
available
n
et
work
s
.
4.
Select
t
h
e
n
e
t
work
you want
to
co
nn
e
c
t
to
and
t
h
en
t
a
p
OK
or press he
left
so
ft
k
e
y
.
5.
Selec
t
The
I
n
t
e
rn
e
t
(or work
v
i
a
a VPN) or Work and
t
h
en
t
a
p
Connect
or
pr
ess
the
l
e
f
t
s
o
f
tke
y
.
6.
If
a Network Log On screen appears, enter your user name,
p
a
ss
w
o
r
d
,
and
domain information and then
t
a
p
OK
on the
l
e
ft
so
ftk
e
y
.
When the handheld
i
s
co
nn
e
c
t
ed
to
the
n
e
t
work
or access point,
t
h
e
Wi-Fi
connected
icon
appears
in
t
h
e
ti
t
l
e
bar
.
7.
Star
t
using the program you want
to
use
,
for example Windows Explorer
M
o
b
i
l
e
or
I
n
t
e
r
n
et
E
xplor
er
.
Note – To disconnect from the network or an
access
point at any
t
im
e,
turn off
th
e
handheld’s
wi
r
el
ess
radio. To do
thi
s
,
tap
t
itl
e
bar
,
tap the
C
o
nn
ect
i
v
ity
i
co
n
on the
pull-
down
l
i
s
t
,
se
lec
t
Wi
re
l
ess
Ma
n
a
g
e
r
and then tap the
Wi-Fi
but
t
on
.
B
To delete a Wi-Fi connection, tap and hold the connection in
t
h
e Wireless
t
a
b
of the Wi-Fi
Set
t
ings
s
c
reen
and then
s
e
lect
Remove Settings.
Connecting to a
Bluetooth-enabled device
The
J
u
no
ser
i
es
handheld has an integrated Bluetooth radio
that
you can use
to
es
t
a
bli
s
h
a
w
i
r
ele
ss
connection
to
other Bluetooth d
e
v
i
ce
s
that
are
within
r
a
nge
.
Using a Bluetooth
co
nn
ectio
n
,
you can communicate
with
de
v
i
ces
such as
cellular
ph
on
es
,
office computers, o
t
h
er
handhelds, and Bluetooth-enabled
l
a
ser
r
a
n
g
ef
ind
ers
and barcode scann
ers
.
You can also communicate
with
peripheral d
e
v
i
ce
s
that
u
se
Bluetooth adaptors
ins
t
ead
of serial or
USB
co
nn
e
c
tion
s.
The
J
un
o
ser
i
es
handheld can
a
c
t
as a
Blu
e
to
o
t
h
cl
i
e
nt
d
e
v
i
c
e
.
The co
n
c
e
p
t
of
cli
e
nt
d
e
v
i
ces
i
s
explained
in
detail b
e
l
o
w
.
Ju
no
Ser
i
es
Han
dheld
s
Us
er
Gu
ide
55
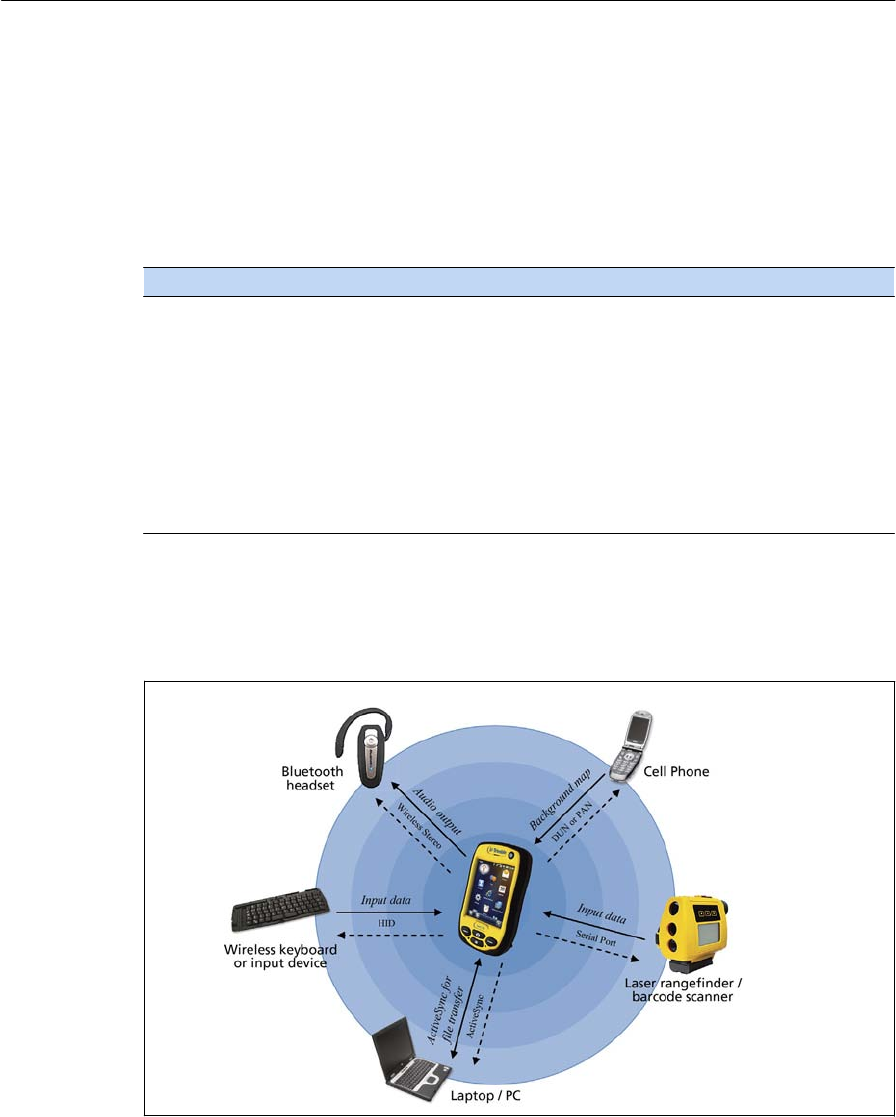
Connecting to a
Bluetooth
device as a
c
li
e
nt
You can use
t
h
e
J
uno
series
handheld
as a
client
device
,
which uses
se
r
v
i
c
es
offered
by
Bluetooth ho
s
t
de
v
i
ces
that
are
within
range.
In
general the
hos
t
device
provides
information
to
t
h
e
client
device
,
but in
some cases
the
cli
e
nt
initiat
es
the
co
nn
e
c
tion
and also
provides information
to
the ho
s
t
d
e
v
i
ce.
The
se
r
v
i
c
es
used by a
J
un
o
se
r
i
es
handheld when co
nn
e
c
t
i
n
g
as a
B
l
u
e
t
oo
t
h
c
l
i
e
n
t
a
r
e
:
Service
D
e
scr
iption
Dialup
Ne
tworki
ng
(DUN)
Personal
Area
Networking
(
P
AN)
Connects the handheld to a cellular phone or modem for
di
al
-
up
network
or
Internet
access.
Connects to
Bluetooth network
access
points or
pho
ne
s
that
support
the
Personal Area
Network/Network
Access (PAN)
profile.
Serial
Port
Emulates an
RS-232
serial (COM)
port
on the
han
dh
el
d
.
ActiveSync
Enables
an ActiveSync connection to a
co
m
pu
t
e
r
.
In
pu
t
Device (HID) Connects the handheld to a physical
input
device, such
as
a
keyb
o
a
r
d
.
Wireless Stereo Connects to
Bluetooth
A2DP (Advanced Audio
Distribution Profile)
head
phon
es.
A client can co
nn
e
c
t
to
a
number of different
services
provided by different
h
o
s
t
s.
Th
e
number of
a
c
ti
ve
connections
a
t
any one
tim
e
affects the speed of the
co
nn
e
c
tions.
Figure
1.4 shows
t
h
e
handheld co
nn
e
c
t
e
d
to
different
t
y
p
es
of ho
s
t
d
e
v
i
ce
s
us
in
g
Bluetooth
w
i
r
e
les
s
t
e
c
hnol
o
g
y
.
Figure 1.4
J
uno
series
handheld
B
l
u
e
too
t
h
cli
e
n
t
co
nnection
s
56
Juno Series
Handhelds User Guide

In
F
i
gur
e
1.4,
t
h
e
dashed arrows
indica
t
e
the client
d
e
v
i
ce—
t
hat
i
s
,
the
J
un
o
serie
s
h
a
n
d
h
e
l
d
—co
n
nec
t
i
n
g
to
hos
t
devices
.
The Bl
ue
t
oo
t
h
profile (or service) used for
t
h
e
con
n
ec
t
i
o
n
i
s
shown
b
e
t
w
ee
n
t
h
e
a
rr
ows
,
for
ex
a
m
p
l
e
,
t
h
e
DUN service
i
s
used for a
connection
to
a cell phone, and
t
h
e
Se
r
i
a
l
Port
service
i
s
used for a serial
co
nn
e
c
tion
to
a barcode scanner or laser
r
a
ng
ef
i
n
der
.
The solid arrows indicate
t
h
e
flow of information
between
d
e
v
i
ce
s.
For example,
when
the
J
un
o
series
handheld connects
as a
cl
i
e
n
t
to:
•
a cellphone, the handheld
uses
t
h
e
DUN or PAN
ho
s
t
service
provided by
th
e
phone
to
access
t
h
e
I
n
t
e
rn
et
and background map
d
a
t
a
.
•
a
laptop computer or office
co
mput
er
,
the d
e
v
i
c
es
use
t
h
e
A
c
ti
v
eS
y
nc
service
to
exchange
information
to
and from either d
e
v
i
c
e.
•
Blu
e
to
o
t
h
h
eadph
on
es
,
t
h
e
handheld uses the
W
i
r
el
ess
Stereo
ho
s
t
ser
vice
provided by the
headphones
to
play audio
f
i
le
s
and
s
y
s
t
em
s
o
und
s
.
Setting up a
Bluetooth
conn
ection
To use
another Bluetooth-enabled
d
e
v
i
ce
with
the
J
u
no
ser
i
es
ha
ndh
el
d
,
you
must
form a Bluetooth connection between the
two
d
e
v
i
ce
s
,
during which you select
t
h
e
t
yp
e
of
ser
v
i
c
e
to
use for
t
h
e
co
nn
e
c
tion
.
This d
ef
i
n
es
how
t
h
e
de
v
i
c
es
w
i
ll
co
mmuni
c
a
t
e
with
each
o
t
h
e
r
.
A
f
t
er
forming the Bluetooth connection between the
d
e
v
i
c
es
you may need
to
configure
set
t
ings
for
t
h
e
connection such
as the COM
port for
the field software
to
use,
or the number for the phone
to
di
al
.
You
mus
t
then
co
nn
e
c
t
to
t
h
e
other d
e
v
i
ce
using
t
h
e
ap
p
r
o
p
ri
a
t
e
software
a
pp
l
ica
t
ion
.
To
co
nn
ec
t
t
h
e
J
uno
series
handheld
to
another Bluetooth-enabled
d
e
v
i
ce,
you can use
either a paired connection or a non-paired co
nn
ec
tio
n
.
Note –
If
you are
co
nn
ect
i
ng
to a phone, skip
thi
s
se
c
t
i
o
n
and go
to Connecting
to
a
Bluetooth-enabled phone for
I
n
t
e
rn
et
access on page 61
,
where the pairing step
i
s
described as part of the procedure for
co
nn
ec
t
i
ng
to a
pho
n
e.
T
r
imbl
e
recommends using a paired
co
nn
e
c
tion
,
if
pairing
i
s
s
u
pp
or
t
ed
by
t
h
e
other
d
e
v
i
ce,
as a
paired connection creates a more secure connection and
mak
es
reconnecting
to
t
h
e
d
e
v
i
ce
eas
i
er
.
For more
information
,
see Pairing
with
a
Bl
u
e
tooth-
enabled device
be
l
o
w
.
Some
d
e
v
i
ce
s
do
not
s
u
pp
or
t
paired co
nn
e
c
tions
.
Use a
non-paired connection
if th
e
device does
not
have a
k
eyb
oar
d
,
and
if
you know
that
t
h
e
de
v
i
ce
does
not
automatically
exchange a
pre-programmed
passkey during pairing. For
mor
e
inform
ation
,
see
Se
tt
i
n
g
up a
co
nn
ec
t
i
o
n
to
a
non-paired
device
,
page
59
.
To
co
nn
ec
t
t
h
e
J
un
o
se
r
i
es
handheld
to
t
h
e
o
t
he
r
device
,
do one of
t
h
e
f
o
ll
o
w
in
g:
•
Pair
with
a Bluetooth-enabled
d
e
v
i
ce
(see
below)
•
Set up
a connection
to
a non-paired
d
e
v
i
ce
(see page 59
)
Ju
no
Ser
i
es
Han
dheld
s
Us
er
Gu
ide
57
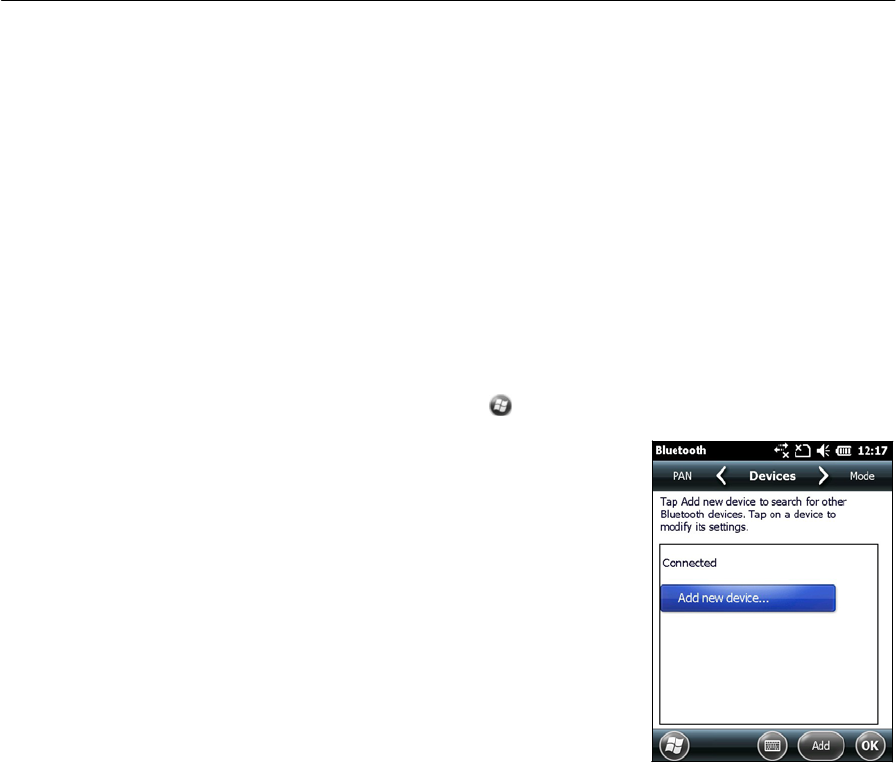
P
a
ir
ing
with a
Bluetooth-enabled dev
i
ce
Pairing
t
h
e
handheld
with
another Bluetooth-enabled
d
e
v
i
c
e
cr
ea
t
es
a
permanent
se
c
u
r
i
t
y
bond
be
t
w
ee
n
t
h
e
devices
,
which helps
to
exchange
information
sec
u
r
e
l
y
between
t
h
e
d
e
v
i
ce
s.
The paired relationship
i
s
es
t
a
bli
s
h
ed
when
two
d
e
v
i
c
es
cr
eat
e
and exchange a
link
k
ey
.
Once
t
h
e
r
e
la
t
i
ons
h
i
p
i
s
es
ta
b
l
i
s
he
d
,
t
h
e
handheld and
t
h
e
other Bluetooth d
e
v
i
c
e
only need
to
have
th
e
i
r
Bluetooth radios
t
u
rn
ed
on to
e
x
cha
n
ge
information
;
t
h
e
y
do
not
need
to
be
visible
to
other d
e
v
i
ce
s.
To pair
with
a Bluetooth
d
e
v
i
ce
:
1.
Make sure that the handheld and the Bluetooth
d
e
v
i
c
e
you want to pair
with
ar
e
within
five meters of
each
o
t
h
e
r
,
and
that
the
B
l
u
e
t
oo
t
h
radio
in
each
d
e
v
i
c
e
i
s
tu
r
n
e
d
o
n
.
2.
On
t
h
e
J
u
no
series handheld,
tap
/
S
e
tti
n
g
s
/
Bluetoo
t
h
.
3.
In
t
h
e
Devices
ta
b
,
tap Add new
device
.
T
h
e
handheld
searches for other Bluetooth de
v
i
ce
s
and displays them
in
the
li
st
.
If
t
h
e
d
e
v
i
c
e
you are
trying
to
co
nn
e
c
t
i
s
not
d
i
s
p
l
a
yed
in
the
l
i
s
t
,
ensure
that
the d
e
v
i
c
e
i
s
on
and
within
range and then
t
a
p
Refresh to
search
for devices
aga
i
n
.
4.
Tap
t
h
e
name of the
d
e
v
i
c
e
you want
to
pair
with
and
t
h
en
t
a
p
Next
on the
right
s
o
f
t
key
.
5.
In
t
h
e
Passcode
f
i
el
d
,
enter a passcode of
bet
w
e
en
1 and 16
c
har
ac
t
e
r
s
.
If
you are
con
n
ec
t
i
ng
t
o
:
–
a
d
e
v
i
c
e
with
a
k
e
yp
ad
,
enter a passcode
of
your
c
h
o
i
c
e
.
–
a
d
e
v
i
c
e
without a
k
e
yp
ad
,
but
you know
that
t
h
e
d
e
v
i
c
e
has a
pre-programmed
passcode
that will
be
e
x
chan
ged
,
enter
that
passcode
on
the
J
un
o
se
r
i
es
h
a
n
d
h
e
l
d
Note – T
r
i
m
bl
e
recommends that you enter only
nu
m
b
ers
,
as some
d
e
v
i
c
es
do not
su
pp
ort
passcodes that
in
clud
e
l
e
tt
e
r
s.
6.
Tap
Ne
xt
.
7.
When
prompt
ed
,
enter
t
h
e
same passcode on the other
d
e
v
i
c
e.
8.
On
t
h
e
h
a
n
d
h
e
ld
,
tap
t
h
e
name of o
t
he
r
device
.
The
Pa
rt
n
e
rship
S
e
tt
ing
s
scr
e
en
app
e
a
r
s
.
9.
If
r
eq
u
ir
ed
,
change the name of the
d
e
v
i
c
e
in
t
h
e
Di
s
p
l
a
y
Name
fie
l
d
.
10.
S
el
e
c
t
t
h
e
service(s) you want
to
use
with
t
h
i
s
d
e
v
i
c
e.
For example,
if
you
ar
e
connecting
to:
–
a
Bluetooth-enabled phone
to
co
nn
e
c
t
to
t
h
e
I
n
t
er
n
et
and receive
r
eal-tim
e
corrections or download background maps,
sele
c
t
D
i
alup
N
e
t
w
o
r
k
i
ng
(DUN)
.
58
Juno Series
Handhelds User Guide

–
a serial
d
e
v
i
c
e,
such as a GeoBeacon receiver or a
l
a
ser
r
a
n
g
ef
ind
er
,
sel
e
ct
Se
r
i
a
l
P
o
r
t
.
–
a
co
m
p
u
t
e
r
to
access
A
c
t
i
ve
S
y
n
c
t
e
c
hn
o
l
o
g
y
(or WMDC),
se
lec
t
Ac
t
i
v
e
Sy
n
c
.
Note – Only
Acti
v
e
S
y
n
c
shows
on the
Wind
ow
s
embedded
ha
nd
h
e
l
d
.
S
e
l
e
ct
Acti
ve
S
y
n
c
even
if
you use
the WMDC on the desktop
co
m
p
ut
e
r
.
Note – For more information on the
t
y
p
es
of
d
e
v
i
ces
that the
J
u
no
se
r
ies
handheld
can
connect
to
,
and the supported Bluetooth
se
r
v
ices,
see
Connecting to
a
Bluetooth d
e
v
i
ce
a
s
a client, page
56
.
11. Tap
Sa
ve
.
12. Tap
OK to
close the Bluetooth
application
.
13.
Tap to
c
l
ose
t
h
e
S
e
tti
n
g
s
scr
e
en
.
You have now
c
r
e
a
t
e
d
a partnership
be
t
wee
n
t
h
e
J
u
no
series handheld and
t
h
e
other
Bluetooth-enabled
d
e
v
i
c
e
so
that
t
h
e
y
can co
mmuni
c
at
e.
To
s
t
ar
t
using
t
h
e
co
nn
ec
t
i
o
n
,
you
m
u
s
t
co
m
p
le
t
e
t
h
e
co
n
f
ig
u
r
a
t
ion
s
t
e
p
s
for that
t
y
p
e
of connection
and
then
co
nn
e
c
t
to
the d
e
v
i
c
e
.
For more
inform
ation
,
se
e:
•
Connecting
to
a
Blu
e
too
t
h-ena
b
l
e
d
phone for
I
n
t
e
rn
et
acc
ess
,
page 61
•
Connecting
to
a
Bl
u
e
too
t
h-ena
b
l
e
d
serial
d
e
v
i
c
e
,
page 66
•
Connecting
to
an office co
m
p
u
t
er
using Bl
u
e
too
t
h
w
i
r
e
le
ss
t
e
c
hn
olog
y
,
page 67
B
Tip – You only need
to
pair
t
h
e handheld with a device before you
co
nnec
t
to the device
for the
fir
s
t
ti
me
.
Se
tti
ng
up a connection to a
non-p
a
i
r
ed
dev
i
ce
S
e
tt
in
g
up a connection
to
a non-paired
d
e
v
i
ce
enables you
to
co
nn
e
c
t
to
a
d
e
v
i
c
e
that
does not allow you
to
enter a passcode on the
d
e
v
i
c
e,
or
that
does
not
automatically
exchange a
pre-programmed
passkey
during
pa
i
r
i
n
g
.
To set up a non-paired connection
to
a Bluetooth-enabled
d
e
v
i
c
e:
1.
Make sure
that
the handheld and the Bluetooth d
e
v
i
c
e
you want
to
co
nn
e
c
t
to
are
within
five meters of
each
oth
er
,
and
that
the Bluetooth radio
in
each
d
e
v
i
ce
is
t
u
rned
o
n
.
2.
Tap
/
Se
tt
i
n
g
s
/
Blue
t
oo
t
h
.
Ju
no
Ser
i
es
Han
dheld
s
Us
er
Gu
ide
59
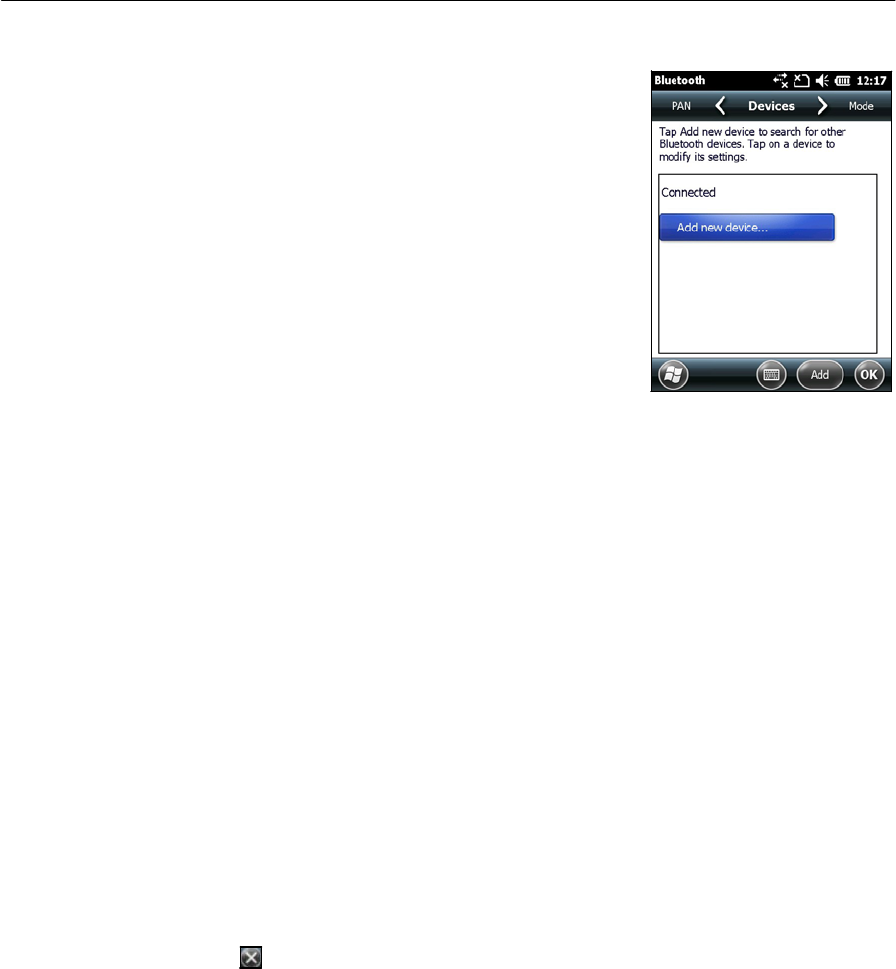
3.
In
t
h
e
Devices
ta
b
,
tap Add new
device
.
T
h
e
handheld
searches for other Bluetooth de
v
i
ce
s
and displays them
in
the
li
st
.
4.
Tap
t
h
e
name of
t
h
e
device you wa
n
t
to
co
nn
ec
t
to
and then
t
a
p
Nex
t
.
The Enter
Passcode screen
app
ears
.
5.
Tap
Next without
entering a
p
a
ss
code
.
6.
If
prompted
to
add the
d
e
v
i
ce
to
your d
e
v
i
c
e
li
s
t
,
tap
No
.
7.
On the
hand
h
e
l
d
,
tap
t
h
e
name of
t
h
e
o
t
h
e
r
device
.
The
Par
t
n
e
rship
S
e
tt
i
n
gs
screen
ap
p
e
a
r
s.
8.
If
r
eq
u
ir
ed
,
change the name of the
d
e
v
i
c
e
in
t
h
e
Di
s
p
l
a
y
Name
fie
l
d
.
9.
Select
t
h
e
service(s) you want
to
use
with
t
h
i
s
d
e
v
i
c
e.
For example,
if
you
ar
e
connecting
to:
–
a
Bluetooth-enabled phone
to
co
nn
e
c
t
to
t
h
e
I
n
t
er
n
et
and receive
r
eal-tim
e
corrections or download background maps,
sele
c
t
D
i
alup
N
e
t
w
o
r
k
i
ng
(DUN)
.
–
a serial
d
e
v
i
c
e,
such as a GeoBeacon
r
e
ce
i
ver
or a
l
a
ser
r
a
n
g
ef
ind
er
,
sele
ct
Se
r
i
a
l
P
o
r
t
.
–
a
co
m
p
u
t
e
r
to
access
A
c
t
i
ve
S
y
nc
(or
W
M
D
C
)
,
se
lec
t
Acti
v
e
S
y
n
c
.
Note – Only ActiveSync
shows on the
W
i
nd
o
w
s
embedded
ha
nd
h
e
l
d
.
S
e
l
e
ct
Acti
v
e
S
y
n
c
even
if
you use the WMDC on the desktop
co
m
p
u
t
er
.
Note – For more information on the
t
y
pes
of
d
e
v
i
c
es
that the
J
u
no
se
r
ies
handh
e
l
d
c
a
n
connect to, and the supported Bluetooth
se
r
v
ices,
see
Connecting to
a
Bluetooth d
e
v
i
c
e
a
s
a
c
l
ient
,
page
56
.
10. Tap
Finish
.
11. Tap
OK to
close the Bluetooth
a
pplica
t
ion
.
12.
Tap to
close the
S
e
tti
n
g
s
scr
een
.
You have now created a
par
t
n
e
r
s
h
i
p
b
e
t
w
een
the
J
uno
series
handheld and the
oth
e
r
Bluetooth-enabled
d
e
v
i
c
e
so
that
they can co
mmunicat
e
.
To
s
t
ar
t
using
t
h
e
co
nn
ec
t
i
o
n
,
you
m
u
s
t
co
m
p
le
t
e
t
he
co
n
f
ig
u
r
a
t
i
o
n
s
t
ep
s
for that
t
y
p
e
of
co
nn
ec
t
i
o
n
a
n
d
then
co
nn
e
c
t
to
the d
e
v
i
ce.
For more
information
,
se
e:
•
Connecting
to
a Bluetooth-enabled phone for
I
n
t
er
n
et
a
c
ce
ss
,
page 61
•
Connecting
to
a Bluetooth-enabled serial
d
e
v
i
c
e,
page 66
•
Connecting
to
an office computer using Bluetooth
w
i
r
el
ess
t
e
chno
log
y
,
page 67
60
Juno Series
Handhelds User Guide

Connecting to a
Bluetooth-enabled
phone for
Internet
access
If
your model of
J
u
no
series
handheld
does
not contain
an integrated GSM/UMTS
,
you
can use
t
h
e
handheld’s Bluetooth radio
to
co
nn
e
c
t
to
a Bluetooth-enabled
c
e
ll
ul
ar
phone and
t
h
en
co
nn
e
c
t
to
t
h
e
I
n
t
ern
et.
Use
thi
s
t
y
p
e
of connection
to
access a
background map
ser
ver
,
or for Internet
and email
ac
c
ess
.
Note – Some
c
e
llul
a
r
phones
support the Bluetooth PAN (Personal Area
N
e
t
w
o
r
kin
g
)
se
r
v
ice
as well as the Bluetooth DUN
(Dialup
N
e
t
w
o
r
k
i
ng
)
service. Because
DUN
connections are more
co
mmo
n
,
t
h
i
s
section assumes you are
mak
i
ng
a dialup
n
e
t
w
o
r
k
connection
with
the Bluetooth-enabled
phone.
For information
on setting up a PAN
se
r
v
ice,
see
Connecting
to
t
h
e
I
n
t
e
rn
et
t
h
r
o
u
g
h
a Bluetooth-enabled phone using
t
h
e
Bl
u
e
tooth
PAN
p
r
o
f
i
l
e,
page
64
.
To
co
nn
e
c
t
to a
Blu
etoo
t
h-ena
bl
ed
phone using a
Bluetooth DUN (Dialup Net
wor
kin
g
)
co
nn
ec
t
i
o
n
,
you
m
u
s
t
:
1.
Conn
e
c
t
t
h
e
J
un
o
series
handheld
to
a Bluetooth-enabled phone and
then
configure the connection
to
the dialup
n
e
t
wor
k.
2.
Conn
e
c
t
to
t
h
e
I
n
t
e
rn
et
using the dialup
n
e
t
wor
k.
3.
Configure
t
h
e
software
to
use
t
h
e
co
nnect
i
o
n
.
For example, you
m
u
s
t
co
n
f
igu
r
e
t
h
e
GNSS
field software
to
use map
d
a
t
a
r
e
c
e
i
v
ed
from
t
h
e
I
n
t
e
rn
et
sour
ce
,
or
you mus
t
se
t
up the Messaging application
to
send and receive email using
t
h
e
co
nn
ec
t
i
o
n
.
Note –
B
e
fo
r
e
you begin the
s
t
eps
b
e
lo
w
,
T
r
imbl
e
recommends that you confirm that
th
e
phone can access
the Internet
dir
e
c
t
ly
.
If
n
e
ces
s
ar
y
,
contact the cellular phone
p
r
ov
id
e
r
and
co
n
f
i
r
m
whether you
m
u
s
t
enter a
u
se
r
na
m
e
,
pa
ss
w
o
r
d
,
and
do
ma
i
n
de
ta
i
l
s
w
h
e
n
co
nne
c
t
i
n
g
an
ext
e
r
n
al
d
e
v
i
ce
to the phone
u
s
i
n
g
Bluetooth dialup
n
e
t
w
o
r
king.
Step 1: Connecting the handheld to the phone and
configuring
the connection
t
o
the dialup
net
w
ork
1.
Make sure
that
the handheld and the Bluetooth d
e
v
i
c
e
you want
to
co
nn
e
c
t
to
are
within
five meters of
each
oth
er
,
and
that
the Bluetooth radio
in
each
d
e
v
i
ce
i
s
t
u
rn
ed
on
.
For more
information
,
see
Turning on and
turning off
t
h
e
integrated
r
adio
s
,
page
49
.
2.
On the
handh
e
ld
,
tap
/
Se
tt
i
n
g
s
/
Co
n
nec
t
i
ons
/
Co
n
nec
t
i
ons
.
3.
Below My
I
S
P
,
tap Add a new modem
co
nnec
t
io
n
.
Ju
no
Ser
i
es
Han
dheld
s
Us
er
Gu
ide
61
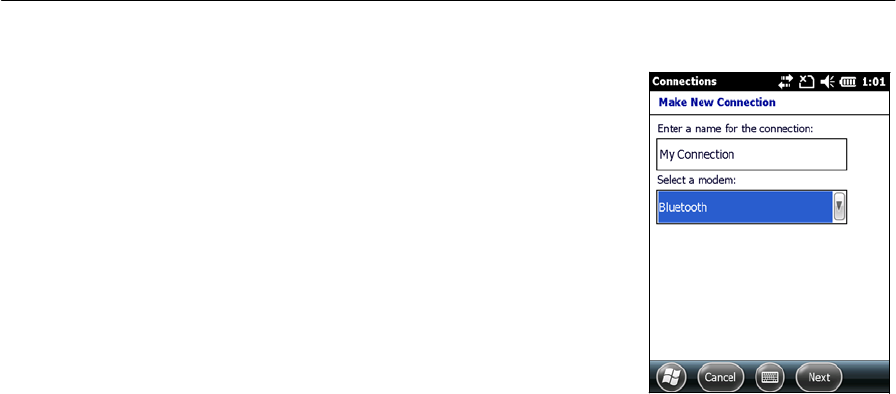
4.
Enter the name for the co
nn
e
c
tion
.
For
e
x
ampl
e,
enter
t
h
e
name of
t
h
e
phone or
t
h
e
VRS
n
e
t
work
that
you
will
co
nn
e
c
t
t
o
.
5.
From the
Se
l
e
c
t
a
M
o
d
e
m
drop-down
l
i
s
t
,
sel
e
ct
Blu
e
to
oth
and then
t
a
p
Ne
xt
.
6.
If
t
h
e
phone you want
to
co
nn
e
c
t
to
i
s
:
–
li
s
t
ed
,
go
to
Step 7 be
l
o
w
.
– not
l
i
s
t
ed:
a. Tap Add new
device
.
The
hand
h
e
l
d
sea
r
ch
es
for other Bluetooth
d
e
v
i
ce
s
and
displays them
in
t
h
e
li
s
t
.
If
t
h
e
handheld’s integrated Bluetooth radio
i
s
t
urn
ed
off,
it
i
s
now
automatically
t
u
rn
ed
on
.
b. From
t
h
e
li
s
t
of available
d
e
v
i
ce
s,
select the
d
e
v
i
c
e
you want
to
co
nn
e
c
t
to
and
t
h
en
t
a
p
Ne
xt
.
c. To pair
with
the phon
e
,
enter a passcode of your choice
that
you
w
i
ll
eas
i
l
y
remember onto
t
h
e
handheld and then tap
Ne
xt
.
d
.
When prompted by
t
h
e
phone, enter
t
h
e
same password and
then
acce
p
t
t
h
e
con
n
ec
t
i
o
n
.
e. On
t
h
e
J
un
o
series
hand
h
e
l
d
,
t
a
p
Advanced
to
open the
P
a
r
t
n
ership
S
e
tt
i
n
g
s
s
cre
e
n
.
Make sure
that
D
i
alup
N
e
t
w
o
r
k
i
n
g
(DUN) is
se
lec
t
e
d
and
t
h
en
t
a
p
Sa
ve
.
You have now created a
par
t
n
e
rsh
i
p
between
t
h
e
J
uno
series
handheld
and
t
h
e
phone so
that
they can co
mmunica
t
e.
7.
From the My
C
o
nn
e
c
t
i
o
n
s
li
s
t
,
select
t
h
e
phone
that
you want
to
configure
t
h
e
connection
to.
8.
Enter the
GPRS access
number for the
I
n
t
e
rn
e
t
.
Two of
t
h
e
common
GPRS access
numbers for cellular phones on
GSM
n
e
t
work
s
are *99***1# and *99#.
If
these access numbers do not
w
o
r
k
,
contact
t
h
e
cellular phone provider
to
o
b
t
a
in
the appropriate number
to
u
s
e.
Note – You do not need to
se
t
up dialling
rules or change the
I
n
t
e
rn
e
t
connection
se
tt
i
n
gs
on the phone. The
conne
c
t
i
o
n
se
tt
i
ngs
you enter on the handheld are
passed to the
pho
n
e
to use
for
t
h
i
s
co
nnec
t
io
n
.
9.
Tap
Ne
xt
.
62
Juno Series
Handhelds User Guide

10. Unless
t
h
e
phone provider confirmed
that
you
m
u
s
t
enter user name,
pas
s
w
o
r
d
,
and domain
set
t
in
gs
to
access the
I
n
t
er
n
et
,
t
a
p
Finish
without entering
any
information
in
thi
s
scr
e
en
.
Oth
e
r
w
is
e
:
a.
Enter the required
information
.
b.
If
t
h
e
phone provider has told you
that
you need
to
change
t
h
e
baud
ra
t
e
or
other
se
tt
ings
for
t
h
e
co
nnect
i
on
,
tap
A
dva
nced
,
configure
t
h
ese
settings
and then
t
a
p
OK
.
c.
Tap
Fin
i
sh
.
You are returned
to
the Connections
scr
e
en
.
You have now configured the dialup
n
e
t
wor
kin
g
co
nnection
.
Step 2: Connecting to the
Internet
using the dialup
network
1.
On the
h
a
n
d
h
e
l
d
,
go
to
the Connections
scr
e
en
,
if it
i
s
not already open
(tap
/
S
e
tti
n
g
s
/
Connections
/
Co
nnec
t
io
n
s
)
.
2.
Below My
I
S
P
,
tap Manage
ex
i
s
t
i
ng
co
nnec
t
io
n
s
.
3.
Tap and hold the connection you want
to
use and
t
h
en
select
Co
nnec
t
.
4.
Unless
t
h
e
phone provider confirmed
that
you
m
u
s
t
enter user
nam
e
,
pas
s
w
o
r
d
,
and domain
set
t
in
gs
to
access the
I
n
t
er
n
et
,
t
a
p
OK
without entering
any
information
in
thi
s
scr
e
en
.
O
t
h
er
w
i
s
e,
enter the required
information
and
then
tap
OK
.
5.
If
t
h
e
phone
prompt
s
for confirmation
to
co
nn
e
c
t
to
the
I
n
t
e
rn
et,
accept
t
h
e
co
nn
ec
t
i
o
n
.
The phone dials the configured
GPRS access
number and
t
h
en
connects
to
t
h
e
In
t
e
r
n
e
t
.
A
C
o
nn
e
c
ti
v
i
t
y
notification
appears on the handheld
as
t
h
e
co
nn
e
c
t
i
on
i
s
b
e
in
g
mad
e
.
A
f
t
e
r
t
h
e
connection
i
s
made you are
r
e
t
u
rn
ed
to
the My
I
S
P
scr
e
en
.
To
confirm that
the Juno
se
r
i
es
handheld
i
s
co
nn
e
c
t
e
d
to
t
h
e
p
h
o
n
e
,
or
to
c
h
e
c
k
t
h
e
s
t
atu
s
of
t
h
e
connection at any
tim
e,
tap the
ti
tl
e
bar and then tap
t
h
e
C
o
nn
e
c
ti
v
i
t
y
icon on the pull-down
li
s
t
.
The notification
shows the name of
th
e
current
co
nn
e
c
tion
,
and the
tim
e
elapsed
s
i
nce
t
h
e
connection was made.
To
hide
t
h
e
n
o
tif
i
cation
,
t
a
p
Hide
.
Note –
If
you have an
a
c
t
i
v
e
Wi-F
i
co
nn
e
c
tion
,
the
co
nn
e
c
tiv
i
ty
i
co
n
appears
a
s
in
s
t
e
a
d
.
6.
Tap
OK to
close the My
I
S
P
scr
e
en
.
7.
Tap
OK to
close the
Co
n
nec
t
i
ons
/
Tasks
scr
e
en
.
8.
Tap
to
close the
Co
n
nec
t
i
ons
scr
e
en
.
Ju
no
Ser
i
es
Han
dheld
s
Us
er
Gu
ide
63

To check the connection
s
t
a
t
u
s
at any
tim
e,
t
a
p
the
tit
l
e
bar and
t
h
en
tap
t
h
e
required
s
t
atu
s
icon on the pull-down
li
s
t
.
To end the connection at any
tim
e,
tap
t
h
e
ti
tl
e
b
a
r
,
tap
t
h
e
required
s
t
at
us
icon on
th
e
pull-down
l
i
s
t
and then
t
a
p
Disconnect
.
To
co
nn
e
c
t
to
a corporate
n
e
t
work
or Intranet,
see page
70
.
To send and
r
e
c
e
i
v
e
email
m
ess
ag
es
,
see
Me
ss
ag
i
n
g
,
page
39
.
S
t
ep 3:
C
o
n
f
ig
uring
the
GNSS
field
software
to use data received
from the
Internet
so
ur
c
e
Now
that
you have connected
t
h
e
J
u
no
series handheld
to
t
h
e
I
n
terne
t
,
you
m
u
s
t
configure
t
h
e
software
to
use
the connection
to
receive
d
a
t
a
.
To use
r
e
al-
t
ime
corrections
in
Trimble field
s
o
ft
war
e
,
and background map data
in
t
h
e
TerraSync
so
f
t
war
e
,
refer
to
t
h
e
Trimble field software
do
cum
e
nt
a
t
ion
on
www
.t
rimbl
e.c
om
:
•
For
t
h
e
TerraSync
s
o
ft
war
e
,
go
to
ht
t
p
://www
.t
rimbl
e.c
om/mapp
i
ngG
I
S/T
e
rr
aS
yn
c.as
px
?dt
I
D
=
t
e
chnical_s
u
pp
or
t
•
For
t
h
e
GPS
Controller
so
ft
wa
r
e
,
go
to
ht
t
p
://www
.t
rimbl
e.c
om/s
uppor
t
_t
rl
.as
p?N
a
v
=C
ollecti
o
n-32
054
Reconnecting to the
Int
e
rnet
To
r
e
co
nn
e
c
t
to
the
I
n
t
e
rn
et
at any
tim
e
after
se
t
tin
g
up
t
h
e
co
nn
e
c
tion
,
r
e
p
e
a
t
th
e
steps
listed under
S
t
e
p
2:
Connecting
to
the
I
n
t
e
r
n
et
using
t
h
e
dialup n
e
t
work
on
page
63
.
Connecting
to
the
Internet
through a
Bl
uetoo
t
h-enab
led
phone using
the
Bluetooth
PAN
pr
ofile
This
sec
t
ion
describes how
to
set up a Bluetooth Personal Area
N
e
t
work
(PAN)
connection for
I
n
t
e
rn
et
a
cc
ess
,
using Bl
ue
t
oo
t
h
-
e
n
a
b
le
d
cellular pho
n
e
.
The PAN service
i
s
not
available on the
TNJ32
handheld model which has
an
in
t
e
gr
at
ed
modem
.
Making a Bluetooth PAN connection
with
a Bluetooth-enabled cellular phone
i
s
s
i
mil
a
r
to
making a
Bluetooth Dialup Networking (DUN) connection
(see
Con
n
ect
i
ng
to
a Bluetooth-enabled phone for
I
n
t
e
rn
et
a
c
ce
ss
,
page 61),
in that it
enables
th
e
handheld
to
access
t
h
e
I
n
t
e
rn
et.
If
PAN connections are
s
u
pp
or
t
e
d
by your
cellular
phone, the advantages of using a PAN connection rather than a DUN connection
a
r
e:
•
PAN connections are
eas
i
er
to
set
up.
•
PAN connections
automa
t
i
cal
l
y
attempt
to
r
e
co
nn
e
c
t
when the handheld
i
s
resumed from being suspended or
shu
t
d
o
wn
.
To access
t
h
e
I
n
t
e
r
n
et
using a
B
l
u
e
t
o
ot
h
PAN
connection
to
a
Bl
u
e
t
o
ot
h
-ena
b
led
cellular phone, you
mu
s
t
:
64
Juno Series
Handhelds User Guide

1.
Pair
t
h
e
J
u
no
series
handheld
with
a cellular phone
that
s
u
pp
or
t
s
the
Bluetooth
PAN
p
r
o
f
i
l
e
.
2.
Enable the PAN connection on the
hand
h
e
l
d
.
Step 1:
P
a
ir
i
n
g
with
the cellular
ph
o
n
e
1.
Make sure that the handheld and the Bluetooth
d
e
v
i
c
e
you want to pair
with
ar
e
within
five
m
e
t
ers
of each
ot
h
er
,
and
that
the Bluetooth radio
in
each
d
e
v
i
c
e
i
s
tu
r
n
e
d
o
n
.
2.
On the
J
uno
series
handheld,
tap
/
S
e
tti
n
g
s
/
Bluetoo
t
h
.
3.
In
t
h
e
Devices
ta
b
,
t
a
p
Add new
device
.
The handheld searches for
oth
e
r
Bl
u
e
to
o
t
h
de
v
i
ces
and
d
i
s
p
l
a
y
s
them
in
t
h
e
l
i
s
t
.
If
t
h
e
d
e
v
i
ce
you are
trying
to
co
nn
e
c
t
i
s
not
displayed
in
the
l
i
s
t
,
ensure
that
t
h
e
de
v
i
c
e
i
s
on and
within
range and then
t
a
p
Re
f
r
es
h
to
search for
d
e
v
i
c
es
ag
ain
.
4.
Tap
t
h
e
name of
t
h
e
d
e
v
i
c
e
you
w
a
n
t
to
pair
with
and
t
h
e
n
t
a
p
Next
on the
r
i
g
h
t
so
ft
k
e
y
.
5.
In
t
h
e
Passcode
f
i
el
d
,
enter a passcode of your choice
(
b
e
t
we
en
1 and 16
char
a
c
t
e
rs
)
.
Note – T
r
i
m
bl
e
recommends that you enter only
nu
m
b
ers
,
as some
d
e
v
i
c
es
do not
su
pp
o
r
t
passcodes that
in
clud
e
l
e
tt
e
r
s.
6.
Tap
Next
on
t
h
e
right
so
ftk
e
y
.
7.
When
prompt
ed
,
enter
t
h
e
same passcode on
t
h
e
o
t
h
er
de
v
i
c
e.
On
t
h
e
hand
h
e
l
d
,
the
P
a
rt
ner
s
h
i
p
Se
tt
i
ngs
screen
a
pp
ears
.
8.
If
r
equir
ed
,
change the name of the
d
e
v
i
c
e
in
t
h
e
Di
s
p
l
a
y
Name
fie
l
d
.
9.
Selec
t
t
h
e
Network
Access Point check
bo
x
.
The boxes for other
se
r
v
i
c
es
o
ff
e
r
e
d
by
t
h
e
phone can be
un
ch
e
c
k
ed
.
10. Tap
Finish
on
t
h
e
right
so
ftk
e
y
.
Step 2:
E
nab
lin
g
the
PAN
conn
ection
1.
In
t
h
e
PAN tab of
t
h
e
Bluetooth application on the hand
h
e
l
d
,
select the
c
e
ll
ular
phone you jus
t
co
nn
e
c
t
e
d
to
from the drop-down
l
i
s
t
and
t
h
en
select
t
h
e
En
abl
e
PAN
co
nn
e
c
t
i
o
n
check bo
x.
The
s
t
a
t
u
s
field
in
t
h
e
PAN
t
a
b
shows
t
h
e
progress of
t
h
e
co
nn
e
c
tion
.
Wait
until
t
h
e
Status field
shows
C
o
nn
e
c
t
ed
.
2.
Check
t
h
e
cellular phone and
if
prompt
ed
,
allow
t
h
e
co
nn
e
c
tion
.
The
or
icon
in
t
h
e
title
bar changes
to
.
3.
Tap
OK to
close the Bluetooth
application
.
4.
Tap
to
close the
S
e
tti
n
g
s
scr
ee
n
.
Ju
no
Ser
i
es
Han
dheld
s
Us
er
Gu
ide
65
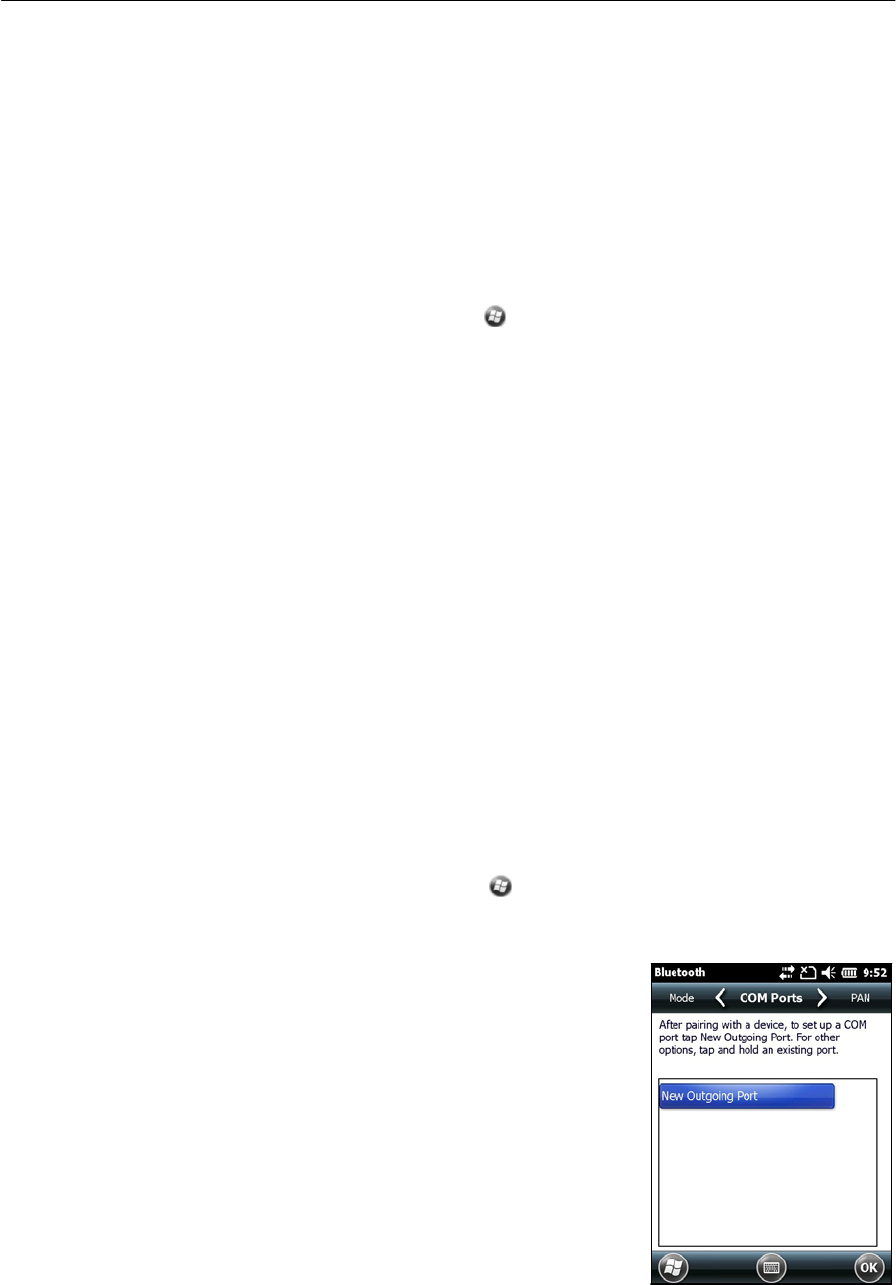
5.
If
t
h
e
Establishing
C
o
nn
e
c
t
i
o
n
popup message appears on
t
h
e
h
a
ndheld
,
se
lect
The
I
n
t
e
rnet
(or work
v
i
a
a VPN)
or
Work and then
t
a
p
Conn
ect
,
or
di
s
m
i
ss
th
e
mes
s
ag
e
.
6.
St
ar
t
using the program you want
to
use,
for example Windows Explorer
M
o
bi
l
e
or
I
n
t
e
r
n
et
E
x
pl
or
er
.
To check
t
h
e
connection
s
t
at
us
at any
tim
e
,
tap the
tit
l
e
bar and
t
h
en
on
t
h
e
pull-down
li
s
t
t
a
p
t
h
e
required connection
i
c
on
.
The Bluetooth PAN connection appears as
"N
e
t
w
o
r
k
Car
d
".
To end
t
h
e
connection at any
tim
e,
t
a
p
/
Se
tt
i
n
g
s
/
B
l
ue
too
t
h
.
In
the PAN tab,
clear
the Enable PAN connection check
b
o
x.
Connecting to a
Bluetooth-enabled
ser
i
al
dev
i
c
e
Use Bluetooth
w
i
r
el
ess
t
e
chn
olog
y
to
r
e
ce
i
v
e
d
a
t
a
from a Bluetooth-enabled
serial
device, such as a
laser
r
a
ngefi
n
der
.
To
co
n
nec
t
to
a
Bl
ue
t
ooth
-
e
n
a
b
le
d
serial
d
e
vice
,
you
m
u
s
t
:
1.
C
o
nn
e
c
t
to
the Bluetooth-enabled serial
d
e
v
i
c
e.
2.
Configure the COM
port
on the handheld
to
use for the
co
nn
e
c
t
i
on
.
3.
If
n
e
ce
ss
ar
y
,
configure
t
h
e
GNSS
field software
to
use data received from
th
e
serial
d
e
v
i
c
e.
Step 1: Connecting to the
B
l
u
e
to
oth
-en
able
d
ser
i
al
dev
i
ce
C
o
nn
e
c
t
the handheld
to
t
h
e
Bluetooth-enabled
d
e
v
i
ce,
selecting the
Se
r
i
a
l
Port
service
if it
i
s
not
already selected (see
Connecting
to
a Bluetooth-enabled
d
e
v
i
ce,
page
55).
Step 2:
Configuring
the
COM
port to
use on the ha
nd
held
1.
On
t
h
e
J
u
no
series handheld,
tap
/
S
e
tti
n
g
s
/
Bluetoo
t
h
.
2.
Tap
t
h
e
COM
P
o
r
t
s
ta
b
.
3.
Tap New Outgoing
Port
.
4.
Select
t
h
e
de
v
i
c
e
you want
to
set up
t
h
e
connection
to
and then
t
a
p
Nex
t
.
5.
S
e
l
e
ct
the COM
port
on the
J
un
o
se
r
i
es
h
a
n
d
h
el
d
to
use for
t
h
e
connect
i
o
n
.
The
J
un
o
series
handheld has five COM
p
or
t
s
(
CO
M
0
,
CO
M
1
,
CO
M
2
,
CO
M
3
,
and
CO
M
8
)
available for connections out
to Bluetooth-
enabled
se
r
i
a
l
devices
.
66
Juno Series
Handhelds User Guide

6.
Do one of
t
h
e
following:
–
To communicate
with
any
d
e
v
i
ce,
for example
if
you have formed
thi
s
connection without pairing
to
a
d
e
v
i
ce,
clear
t
h
e
Se
c
u
r
e
Co
nn
e
c
t
i
o
n
check
bo
x.
–
To
co
mm
unic
a
t
e
only
with
devices
with
which
t
h
e
handheld
has a
Bluetooth par
t
n
ersh
i
p,
select
t
h
e
Se
c
u
r
e
Co
nn
e
c
t
i
o
n
check
b
o
x
.
7.
Tap
Finish
.
8.
Tap
OK to
close the Bluetooth
application
.
9.
Tap
to
c
l
ose
t
h
e
S
e
tti
n
g
s
scr
e
en
.
Step 3: Configuring the
GNSS
field
software
to use data
f
r
om
the
se
r
i
a
l
d
evice
Once you configure the connection between
t
h
e
J
u
no
series
handheld and
t
h
e
Bluetooth-enabled serial
d
e
v
i
ce,
you
mu
s
t
configure the
s
o
f
t
w
a
r
e
to
use
th
e
connection
to
r
e
ce
i
v
e
d
a
t
a
.
To use a
Bluetooth-enabled
e
x
t
er
n
al
sensor such as a
l
a
ser
rangefinder or a
b
a
r
co
d
e
scanner
in
TerraSync
s
o
ft
war
e
,
refer
to
t
h
e
T
e
rr
a
S
ync
software
d
oc
u
m
e
n
t
a
t
ion
on
ht
t
p
://www
.trimble.c
om/mappin
gG
I
S/T
e
rr
aS
ync.as
px
?d
t
ID
=
t
e
c
hn
ica
l_
s
u
pp
o
r
t
Connecting to an office computer using
Bluetooth
wir
e
l
e
ss
technology
I
n
s
t
ead
of using a USB or serial cable
to
physically co
nn
e
c
t
to
an office co
mput
e
r
,
you
can use Bluetooth
w
i
r
el
ess
t
e
chno
log
y
to
co
nn
e
c
t
to
ActiveSync
t
e
chno
log
y
or
t
h
e
Windows Mobile
Device
C
e
n
t
e
r
on a
B
l
ue
t
oo
t
h
-
e
n
a
b
le
d
office co
m
p
u
t
e
r
.
Note – Not all Bluetooth
d
e
v
i
c
es
and Bluetooth management software
s
u
pp
o
r
t
Activ
e
S
y
n
c
co
nnec
t
io
n
s
.
Check with the
manu
fac
t
u
r
e
r
of the of
f
i
ce
computer for
co
mpa
t
ibil
it
y
.
Note – The exact
s
t
eps
required may vary
d
ep
e
nd
i
n
g
on the of
f
i
ce
co
m
p
ut
e
r
.
To
co
nn
e
c
t
to
a
office computer
to
use
Acti
v
e
S
y
nc
or WMDC
with
a
Blu
e
to
oth
co
nn
ec
t
i
o
n
,
you
m
u
s
t
:
1.
Set
up the connection
to
t
h
e
co
mput
er
.
2.
C
o
nn
e
c
t
to
ActiveSync or WMDC using Bluetooth
w
i
r
el
ess
t
e
chno
log
y
.
Step 1: Setting up the connection to the
computer
1.
From the Bluetooth user interface on the office co
mput
er
,
make sure
that th
e
computer allows
i
t
self
to
be discovered by
o
t
h
er
Blu
e
to
o
t
h
d
e
v
i
ce
s.
2.
Configure ActiveSync
t
e
chno
log
y
or WMDC on the office computer
to
co
nn
e
c
t
to
t
h
e
co
rr
e
c
t
Bluetooth p
o
r
t
.
The
s
t
e
p
s
required depend on
t
h
e
op
e
r
ating
s
y
s
t
em
ins
t
al
l
ed
on the office
co
mput
er
.
If
t
h
e
office computer
i
s
u
s
in
g:
•
t
h
e
Windows
7
or Windows
V
i
s
t
a
operating
s
y
s
t
em
:
Ju
no
Ser
i
es
Han
dheld
s
Us
er
Gu
ide
67
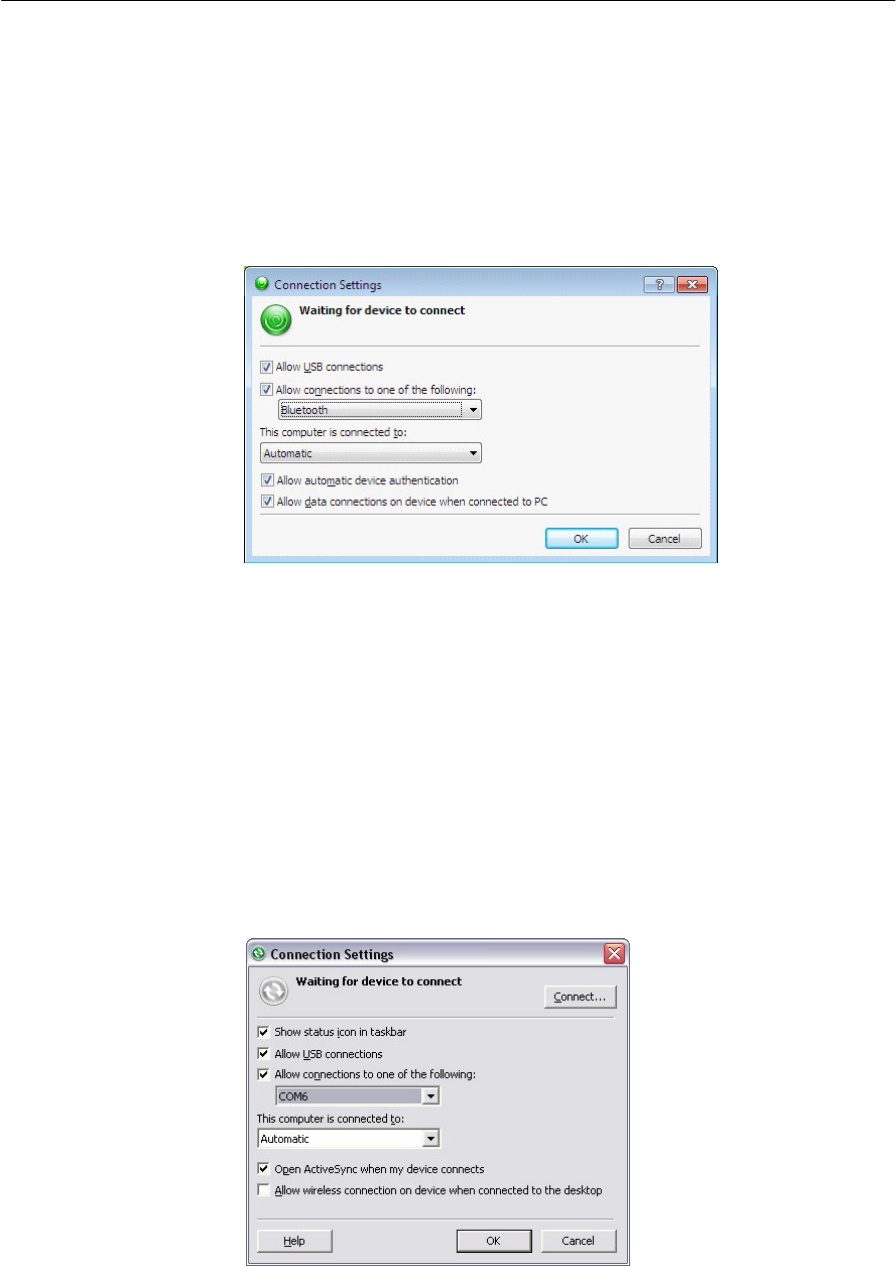
a.
From
t
h
e
Start menu on
t
h
e
office co
m
p
u
t
e
r
,
se
l
e
c
t
Control
P
a
ne
l
/
Wind
ow
s
Mo
b
i
l
e
D
e
v
i
c
e
C
e
n
t
e
r
.
If
you have previously connected
to
a device
(using
USB or
a
n
o
t
he
r
connection method), the Windows Mobile D
e
v
i
c
e
Center screen for
t
h
i
s
de
v
i
ce
may
s
h
o
w
.
In th
i
s
case,
select
Mobile
D
e
v
i
c
e
Set
t
in
gs.
The
C
on
n
e
c
ti
on
S
e
tti
n
g
s
dialog
ap
p
e
ars:
b.
Se
l
e
ct
the Allow
co
nn
ect
i
o
n
s
to one of the
follow
i
ng
check bo
x
.
c
.
From
t
h
e
l
i
s
t
,
select
Bl
u
e
too
t
h
and then click
OK
.
•
t
h
e
Windows
XP
oper
a
t
in
g
s
y
s
t
em
:
a.
From
t
h
e
Bluetooth user interface on
t
h
e
office co
mput
er
,
identify
th
e
virtual
COM
port
of the of the ho
s
t
Bluetooth
Ser
i
al
P
o
r
t
or Local
S
e
r
v
ic
e
and ensure
that
t
h
i
s
i
s
enabl
ed
.
In
thi
s
example, the
virtual
COM
port
i
s
CO
M
5
.
b.
St
ar
t
t
h
e
A
c
ti
v
e
S
y
nc
t
e
chn
olog
y
on
t
h
e
office co
mput
er
.
c.
S
e
l
e
c
t
File
/
Co
nn
ec
t
i
o
n
S
e
tt
in
gs
.
The
C
on
n
e
c
ti
on
S
e
tti
n
g
s
dialog
ap
p
e
ars:
d.
S
e
l
e
c
t
t
h
e
Allow
co
nn
ect
i
o
n
s
to one of the
follow
i
ng
check bo
x
.
68
Juno Series
Handhelds User Guide
e.
From the
li
s
t
,
select
t
h
e
COM
port that
you selected
in
Step a and then
click
OK
.
Note –
B
e
fo
r
e
you try to form a Bluetooth
co
nnec
t
i
o
n
from the
J
u
no
ser
i
es
handh
e
l
d
to
t
h
e
of
f
i
ce
co
mpute
r
,
you
mu
s
t
correctly configure the Bluetooth host
se
r
i
a
l
port and
A
c
t
i
veS
y
n
c
technology on the office
co
mpute
r
.
3.
On the
handh
e
ld
,
tap
/
Se
tt
i
n
g
s
/
B
l
ue
too
t
h
.
4.
In
t
h
e
Devices
ta
b
,
t
a
p
Add new
device
.
The handheld searches for
oth
e
r
Bl
u
e
to
o
t
h
de
v
i
ces
and
d
i
s
p
l
a
y
s
them
in
t
h
e
l
i
s
t
.
5.
Tap
t
h
e
name of
t
h
e
computer you want
to
co
nn
e
c
t
to
and then tap
Ne
xt
.
6.
When
prompt
ed
,
enter a passcode of your choice
that
you
will
eas
i
l
y
r
e
m
e
mb
er
on the
h
an
d
h
e
l
d
.
7.
E
n
t
e
r
t
h
e
same passcode on
t
h
e
office co
m
p
u
t
e
r
.
8.
On
t
h
e
h
a
n
d
he
ld
,
se
l
e
c
t
t
h
e
Ac
t
i
v
e
Sy
n
c
check box
in
t
h
e
l
i
s
t
of services
provided
by
t
h
e
computer and then tap
Finish
.
Note – The checkbox on the
handh
e
l
d
s
t
ill
shows
Act
i
v
e
Sy
n
c
,
even
if
the
o
ff
i
c
e
computer
i
s
running the W
i
nd
o
w
s
7 or
W
i
ndows
V
i
sta
o
p
e
r
ating
system and you are using the
W
M
D
C
.
You have now created a
par
t
n
e
rsh
i
p
b
e
t
w
een
t
h
e
J
un
o
series
handheld and
t
h
e
office computer
so
that
they can co
mm
un
i
c
a
t
e
.
9.
Tap
OK to
close the Bluetooth
application
.
10.
Tap to
c
l
ose
t
h
e
S
e
tti
n
g
s
scr
e
en
.
11.
To connect, go
to
Step 2 be
l
o
w
.
Note
that
t
h
e
check box on
t
h
e
handheld
s
h
o
w
s
Act
i
v
e
Sy
n
c
even
if
t
h
e
office computer
i
s
running
t
h
e
Windows 7 or
W
i
ndow
s
V
i
s
t
a
operating
s
y
s
t
em
and you are using the
W
M
D
C
.
Step 2: Connecting to
Act
i
v
eSync
using
Bluetooth
wir
e
l
e
ss
te
chno
l
ogy
1.
On the
J
uno
series
handheld,
tap
/
Act
i
v
e
S
y
n
c
.
Note – Only
Acti
v
e
S
y
n
c
shows
on the
Wind
ow
s
embedded
ha
nd
h
e
l
d
.
S
e
l
e
ct
Acti
ve
S
y
n
c
even
if
you use
the WMDC on the desktop
co
m
p
ut
e
r
.
2.
Tap
Menu
and
t
h
en
se
lec
t
Connect
v
i
a
B
l
u
e
t
oo
th
.
On the
J
u
no
series
hand
h
el
d
,
a message box shows
t
h
e
s
t
at
us
of
t
h
e
co
nn
e
c
tion
as
it
i
s
mad
e
.
3.
When the connection
to
the office computer
i
s
s
u
cc
ess
ful
,
you are returned
to
t
h
e
A
c
ti
v
e
S
y
nc
application on the hand
h
e
l
d
.
4.
Tap
to
cl
ose.
The
con
nectivi
t
y
icon
in
t
h
e
s
t
at
us
bar shows
,
or if
Wi-Fi
i
s
con
n
ec
t
e
d
.
To check the
st
a
t
u
s
of the
co
nn
e
c
t
i
on
,
t
a
p
the
t
i
tl
e
bar and then
t
a
p
t
h
e
co
nn
ec
t
i
vi
t
y
icon on
t
h
e
pull-down
l
i
s
t
.
Ju
no
Ser
i
es
Han
dheld
s
Us
er
Gu
ide
69
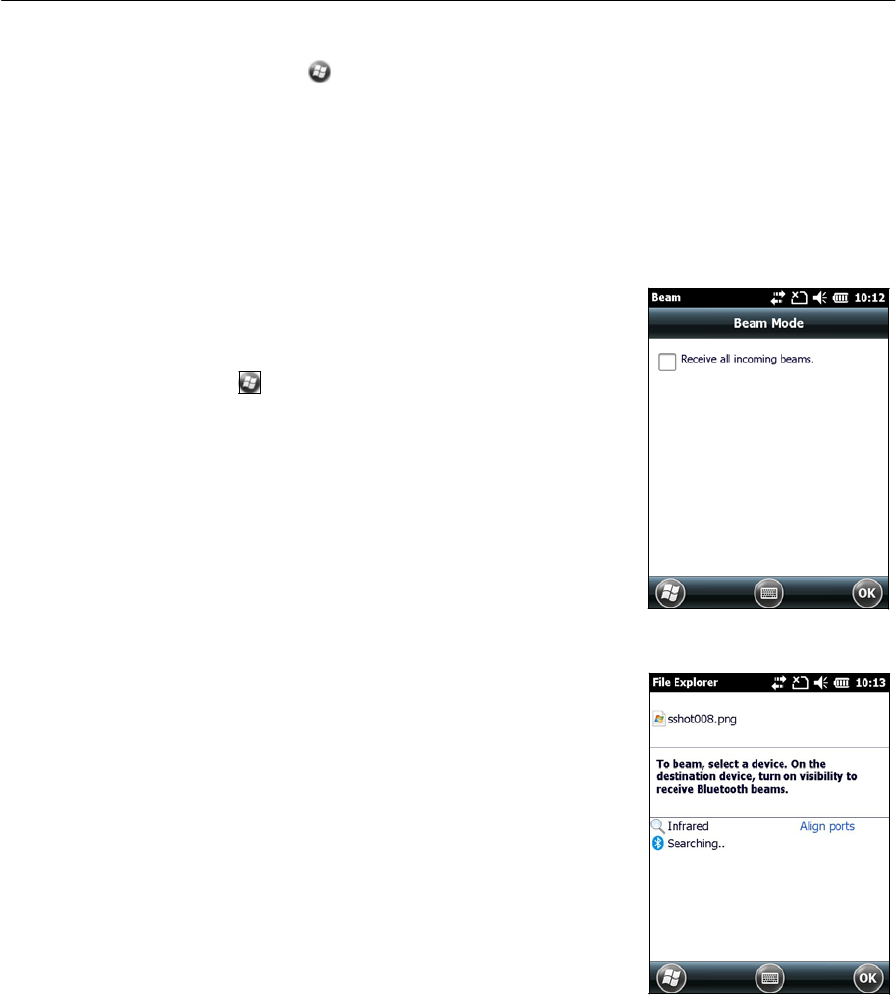
To d
i
s
co
nn
e
c
t
,
t
a
p
/
Act
i
v
e
S
y
n
c
on
t
h
e
handheld and
t
h
e
n
se
lec
t
Menu
/
D
i
sco
nnec
t
.
Beaming files to or
from
another
device
You can beam
f
i
le
s,
co
nt
a
c
t
s
,
t
ask
s
,
and appointments b
e
t
w
e
en
the handheld
a
n
d
a
n
o
t
h
e
r
device
.
To receive beamed files from ano
t
he
r
device
:
1.
Make sure
that
the
J
u
no
ser
i
es
hand
h
e
l
d
’s
in
t
e
gr
at
ed
Bluetooth radio
i
s
t
urn
ed
on
(
see
page 51).
2.
Tap
/
S
e
tti
n
g
s
/
Co
nnec
t
io
n
s
/
Bea
m
.
3.
Selec
t
t
h
e
Receive
all
i
n
co
mi
ng
beams check
box
and
t
h
en
t
a
p
OK
.
4.
When
ano
t
he
r
device
a
t
te
m
pts
to
beam a
file
,
you are prompted
to
accept
t
h
e
f
i
l
e
.
To
r
e
c
e
i
v
e
the
f
i
l
e
,
t
a
p
Ye
s
.
Note – All
in
com
i
ng
files are
auto
mat
i
cally
saved
in
th
e
My Documents folder on the
ha
nd
h
el
d
.
To send beamed
f
i
l
es
to
another d
e
v
i
c
e:
1.
Make sure
that
the
J
u
no
ser
i
es
hand
h
e
l
d
’s
in
t
e
gr
at
ed
Bluetooth radio
i
s
t
urn
ed
on
(see page 51).
2.
On
t
h
e
J
u
no
series handheld, open F
i
le
E
x
pl
o
r
e
r
and go
to
the file you want
to
send
.
3.
Tap and hold the file and
t
h
en
select Beam
F
i
le
.
The handheld scans for nearby
d
e
v
i
ce
s.
4.
Tap
t
h
e
d
e
v
i
c
e
you want
to
send
the file to.
T
h
e
file
i
s
se
n
t
to
t
h
e
device.
A message
r
e
p
o
r
t
s
Done or
Failed
,
depending
on
t
h
e
outcome of
t
h
e
file
tr
ans
f
er
.
Accessing
a corporate
network
through your
Internet connection
Use a
Virtual
Private Network (VPN) connection
to
access a
corporate network
or
In
t
r
a
n
e
t
.
Before you
b
e
gin
,
obtain the following information from your network admini
s
t
r
a
tor
:
•
user name and
pas
s
w
o
r
d
•
domain
n
a
m
e
•
ho
s
t
name or IP address of the VPN
server
To access a
co
rpo
r
a
t
e
ne
t
w
o
r
k
t
h
r
ough
your
Internet
co
nn
ec
t
i
o
n
,
you
m
u
s
t
:
70
Juno Series
Handhelds User Guide
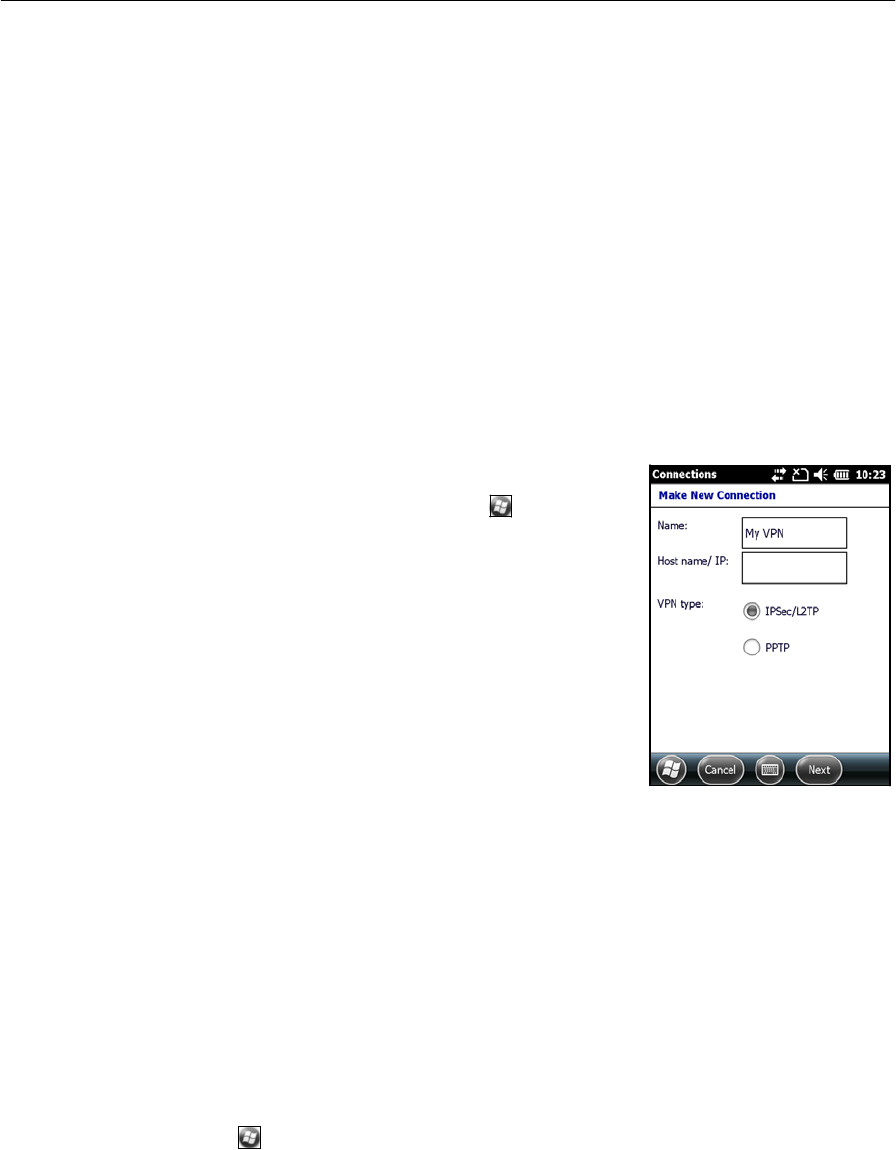
1.
Set up an
Internet
connection on the hand
h
e
l
d
.
2.
Set up a VPN
co
nn
e
c
tion
.
3.
Co
nn
ec
t
to
t
h
e
co
rpo
r
a
t
e
ne
t
w
o
r
k
or
I
n
t
r
a
n
e
t
.
Step 1:
Se
tti
ng
up an
Internet
connection on the han
d
h
e
l
d
Do one of the
fol
l
ow
in
g:
•
Set up a
Wi-Fi connection
to
an access
point
.
For more
inform
ation
,
see page
54
.
•
Conn
e
c
t
to
t
h
e
Internet
using the internal GSM/UMTS
(
TNJ32
only).
For
more
inform
ation
,
see page
52
.
•
Conn
e
c
t
to
t
h
e
I
n
t
e
rn
et
using a Bluetooth-enabled phone. For
m
o
r
e
information
,
see page
61
.
Step 2: Setting up a
VPN
co
nn
ection
1.
On the
J
uno
series
handheld,
tap
/
S
e
tti
n
g
s
/
Co
nnec
t
i
o
n
s
/
Co
nn
ec
t
i
o
n
s
.
2.
From
t
h
e
My Work Network
li
st
,
t
a
p
Add a new V
P
N
se
r
v
e
r
connec
tion
.
3.
Follow the in
s
t
r
u
cti
o
ns
in
the
Ma
k
e
New
Co
nnec
t
i
o
n
wiz
a
r
d
.
4.
Tap
Finish
.
Step 3: Connecting to the
co
rpor
a
t
e
network
or
In
tr
a
n
et
To
co
nn
e
c
t
to
t
h
e
corporate network or
I
n
tr
an
e
t
,
simply
s
t
ar
t
using
Internet
E
x
plor
er
.
The Windows Embedded Handheld operating
s
y
s
t
em
automatically
co
ntr
o
l
s
whether
the VPN connection
i
s
u
s
ed
,
depending on whether
t
h
e
URL contains a
period
.
For
example,
the URL www.trimble.com contains
p
er
i
o
d
s,
and so the connection
to
thi
s
w
ebs
i
t
e
i
s
made without using the VPN co
nn
e
c
tion
.
H
o
w
e
v
e
r
,
an address
to
a
n
e
t
work
computer or file
server
that
does
not contain
periods automatically
s
t
ar
t
s
t
h
e
VPN
co
nn
ec
t
i
o
n
.
If
you need
to
use
t
h
e
VPN connection
to
access URL addresses
that
contain
p
er
i
o
d
s
,
specify exceptions for
t
h
e
addresses
that
are
within
t
h
e
corpor
a
t
e
n
e
t
work
.
To do
t
h
is:
1.
Tap
/
S
e
tti
n
g
s
/
Connections
/
Co
nnec
t
io
n
s
.
2.
Tap
t
h
e
Advanced
ta
b.
Ju
no
Ser
i
es
Han
dheld
s
Us
er
Gu
ide
71
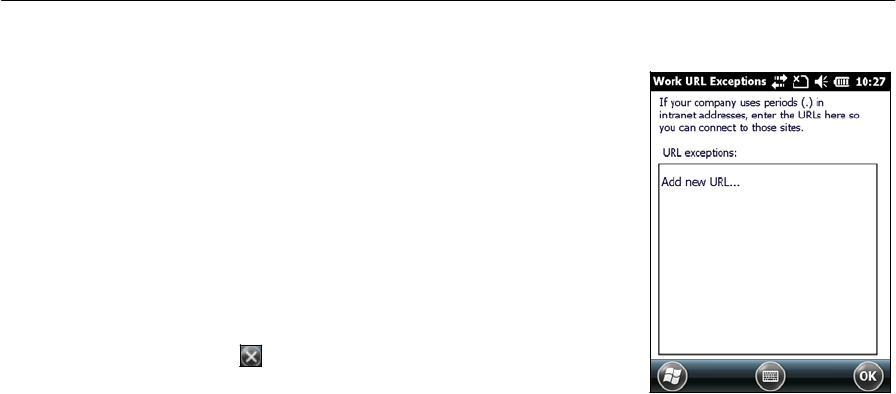
3.
Tap
Exce
pt
ions
.
The Work URL
E
x
c
e
p
t
i
o
n
s
scr
e
en
app
e
a
r
s
.
4.
Tap Add new URL
.
5.
Enter the URL and
t
h
en
tap
OK
.
6.
Repeat Step 4 and Step 5 as
r
e
q
ui
r
ed
.
7.
Tap
OK to
return
to
the Advanced tab of
t
h
e
Co
n
nec
t
i
ons
sc
r
e
en
.
8.
Tap
OK to
close the Connections
scr
e
en
.
9.
Tap
to
close the
S
e
tti
n
g
s
scr
een
.
72
Juno Series
Handhelds User Guide

Using the
GNSS
r
eceiver
The
J
u
no
ser
i
es
handheld includes an integrated
GNSS
r
e
c
e
i
ver
that
enables you
to
collect
GNSS
d
a
t
a
for incorporating
into
a
G
I
S
or for managing
a
s
set
s
.
The
int
e
g
r
at
ed
receiver tracks only Global Positioning
S
y
s
t
em
(GPS)
s
a
t
e
ll
it
es
.
GPS
i
s
a
sa
t
e
ll
i
t
e-based
pos
i
t
i
o
n
i
n
g
s
y
s
t
em
co
ns
i
s
t
i
ng
of a cons
t
e
lla
t
i
on
of
o
p
er
a
ti
ona
l
NA
V
S
T
A
R
sat
el
l
it
es
that
orbit
the
ear
t
h
every 12 hours. This
s
y
s
t
em
pr
ov
i
d
es
w
o
rl
d
w
id
e,
al
l-w
eather
,
24-hour
tim
e
and
p
o
s
i
tion
information
.
Note – To
r
e
ce
i
v
e
s
i
g
n
al
s
from GPS
sat
e
llit
es,
the
handh
e
l
d
must have a clear
v
i
e
w
of
th
e
sky
.
GNSS
p
o
s
i
ti
on
s
may not always
be
av
ail
abl
e,
particularly
in
or near
b
u
i
l
d
i
ng
s,
in
v
e
hi
cl
es
,
or un
d
e
r
tree
can
o
p
y
.
Supported
GNSS
field
softwa
r
e
Depending on
t
h
e
GNSS field
so
f
t
wa
r
e
you have
i
n
s
t
a
lled
,
t
h
e
de
f
a
u
l
t
GNSS
field
s
o
f
t
war
e
will
be GPS
Cont
rol
l
e
r
,
TerraSync, or the
T
r
imbl
e
G
P
S
c
orr
e
ct
e
x
t
e
n
s
ion
for
Esri ArcPad
so
ft
war
e
.
The GPS
Con
t
r
o
ller
software enables you
to
check
t
h
e
cu
rr
en
t
GNSS
s
t
a
t
us
,
or
to
configure
t
h
e
int
eg
r
a
t
ed
GNSS
r
e
ce
i
ver
,
and
to
configure
GNSS
output
set
t
ings
for
third
p
a
r
t
y
GNSS
applications.
To ins
t
al
l
t
h
e
GPS
Controller software, go
to
www
.
t
r
i
m
b
l
e.co
m/s
u
pp
o
r
t.s
h
t
m
l
.
Click
GPS
Controller and
t
h
en
click
D
o
wnlo
a
d
s.
Click
t
h
e
link
for the version you want
to
in
s
t
al
l
and then follow the in
s
t
r
uctions
in
the
I
n
s
t
a
l
lation
w
i
za
r
d
.
Depending on
t
h
e
GNSS field
so
f
t
wa
r
e
you have
ins
t
al
l
e
d
,
you can use
t
h
e
software
to
configure
set
t
ings
such as GNSS,
real-time
co
rr
e
c
tion
,
and
a
n
t
enna
se
tt
in
gs.
You
may
also be able
to
use
t
h
e
software
to
co
nn
e
c
t
to
a real-time correction source,
co
nfigur
e
logging
set
t
in
gs
,
and collect
feat
ur
es
.
For more
inform
ation
,
refer
to
t
h
e
r
es
t
of
thi
s
chapter and
t
h
e
documentation for
t
h
e
GNSS
field
s
o
ft
wa
r
e
.
Starting
the
GNSS
field
softwar
e
Tap
/
Programs and then
select the
GNSS
field
s
o
ft
war
e
,
for example
Te
rr
a
S
y
n
c
.
W
h
en
you
first
open any
T
r
imbl
e
GNSS
field
so
ft
war
e
,
the
S
kyplot
section
i
s
di
s
p
l
a
y
e
d
.
Ju
no
Ser
i
es
Han
dheld
s
Us
er
Gu
ide
73
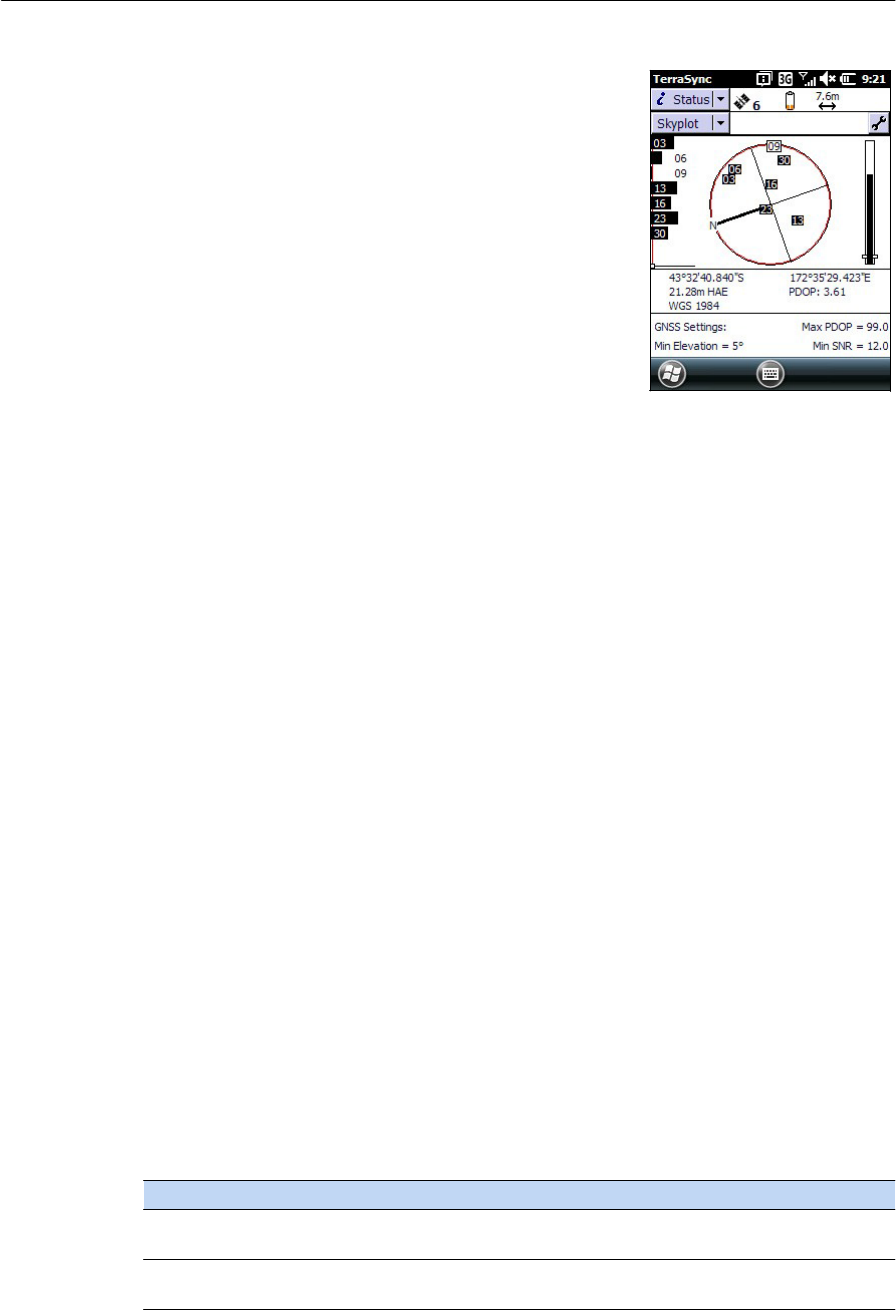
Viewing available
GPS
satellites
Use
t
h
e
graphical
S
kyplot
section or the
S
a
t
el
l
it
e
Info
section
in
the installed
T
ri
m
bl
e
GNSS
field software
to
view detailed GNSS in
f
o
rm
a
t
i
o
n
.
Note – To
r
e
ce
iv
e
s
i
gnal
s
from
GPS
sat
e
llit
es
,
the
ha
nd
hel
d
m
u
s
t
have a clear view of the
s
k
y
.
GPS
po
s
i
t
i
o
n
s
may
not
always
be
avai
l
a
b
l
e,
particularly
in
or
n
e
a
r
b
u
i
l
di
ngs,
in
ve
h
ic
l
es
,
or under
t
r
ee
ca
nopy
.
Filled (black)
boxes
r
ep
r
ese
n
t
sa
t
e
ll
i
t
es
that
t
h
e
r
ec
eiv
e
r
i
s
using
to
compute
i
t
s
current
GPS
p
o
s
i
tion
.
Unfilled
(w
hi
t
e
)
boxes represent
sat
e
ll
it
es
that
t
h
e
r
e
ce
i
ver
i
s
g
e
tt
in
g
s
i
g
n
al
s
from but
i
s
not
using because the
s
i
gnal
s
are too weak.
In
the example shown
h
e
r
e
,
eig
h
t
sat
el
li
t
es
are being
tracked and
seven
of
t
h
ese
sa
t
e
ll
i
t
es
are
b
e
i
n
g
used
to
comp
u
t
e
GPS
pos
i
t
i
ons
.
Note – Numbers with no box
r
epr
ese
n
t
satellites that are
avail
abl
e,
but that the software
i
s
not
r
e
ce
i
v
ing
s
i
gnal
s
fr
o
m
.
Your c
u
rr
e
n
t
GPS
p
o
s
i
t
i
o
n
i
s
d
i
s
p
l
a
y
e
d
at
t
h
e
bottom of
t
h
e
scr
e
en
.
B
Tip – For detailed
information
on satellite positions and signal strengths, use
t
h
e
Sate
llit
e
information
screen
in the
Statu
s
sec
t
io
n.
Resetting the
GNSS
r
e
ceiver
T
r
imbl
e
GNSS
field applications all
have options
to
reset the receiver
to:
•
delete
t
h
e
a
l
ma
n
a
c
•
d
e
l
e
t
e
information
s
t
or
ed
on
t
h
e
l
a
s
t
known
p
o
s
i
tion
•
r
es
t
ar
t
t
h
e
r
e
c
e
i
ver
•
r
ese
t
the
GNSS
receiver
to
factory d
e
fa
ul
t
set
t
in
g
s
Configuring
the
GNSS
field
software
to conne
c
t
to the
r
ecei
ver
The
first
tim
e
you use GNSS
field
so
f
t
war
e
on
t
h
e
hand
h
e
l
d
,
you may need
to
co
nfigur
e
the
s
o
f
t
w
a
r
e
to
co
nn
e
c
t
to
CO
M
4
,
which
i
s
the
GNSS
port on
t
h
e
ha
ndh
el
d
.
Connecting to the
COM
po
rt
Details of how
to
configure
d
if
f
er
en
t
t
y
pes
of GNSS
field software
to
co
nn
ec
t
to
t
h
e
GNSS COM
port
are as
f
o
l
low
s
:
GNSS field
software Configuration de
tail
s
GPS
Controller
Run
GPS
Controller.
The
so
ft
ware
automatically
activates
t
h
e
in
tegra
t
ed
GNSS
receiver on COM4.
TerraSync Run Terrasync. The software
automatically
activate
s
the
integrated
GNSS
receiver on
COM4.
74
Juno Series
Handhelds User Guide
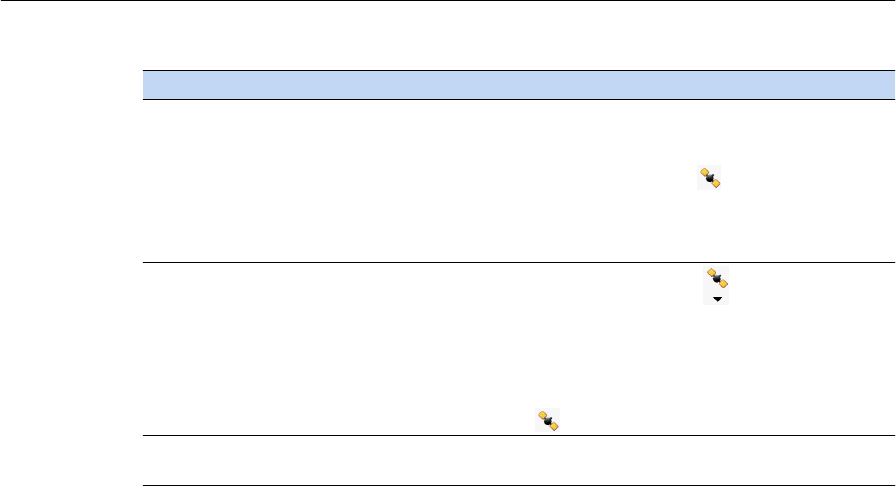
GNSS
field software Configuration
de
tail
s
ArcPad with
the
GPScorrect
extension
ArcPad
without
th
e
GPScorrect
extension
When the Trimble
GPScorrect
extension
i
s
installed, the
exte
n
s
io
n
automatically
configures the ArcPad software to use the
i
n
teg
r
ated
GNSS
receiver on COM4
u
s
in
g
the Trimble
GPScorrect
p
roto
c
ol
.
•
To connect to
GNSS,
tap the GPS
button
and then tap
Ye
s
.
•
To
configure
a real-time
DGNSS
source, or to view status
information,
run the
GPScorrect
extension. To do this, tap
the
GPScorrect
button
in the Trimble
toolbar
.
10. In ArcPad, tap the GPS
drop-down
m
e
nu
and then select
GPS
Preferences
from
the
drop-down
menu. Tap the
GPS
tab.
11. In the Protocol
field,
select NMEA 0183.
12. In the Port field, select COM4.
13. Tap OK.
14. Tap the GPS
button
and then tap
Ye
s
.
NMEA
app
li
c
ati
on
C
on
fi
gu
re
the software to connec
t
to
GNSS
on COM4 and then use
the Connect or
Activate
GPS
co
mmand
.
Ensuring the accuracy of your
GNSS
da
ta
The
J
u
no
ser
i
es
handheld has an integrated
GNSS
r
e
c
e
i
ver
that
provides
a
ccur
a
t
e
p
o
s
i
tion
in
g
with
real-time differential correction b
e
t
w
een
two
and five
m
e
t
e
rs,
or
pos
t
p
r
oces
se
d
accuracy
b
e
t
w
ee
n
one and
t
h
r
ee
me
te
r
s
.
The accuracy
that
you o
b
t
a
in
from your
J
un
o
series
handheld
i
s
affected by a
number
of factors, including whether the data
i
s
differentially
co
rr
e
c
t
e
d
in
real-time or
af
t
e
r
data co
ll
e
ction
,
and the
a
v
ai
l
abi
l
i
t
y
of GPS
sat
el
li
t
es
in
t
h
e
sky when you collect
th
e
da
ta
.
The
li
s
t
below
identifies the most
important
set
t
ings
and
t
e
chniqu
es
that
you can use
in
t
h
e
field
to
improve the accuracy of your
d
a
ta
:
1.
If
you are
using TerraSync software
to
collect
da
ta
,
use accuracy-based
logging.
2.
Use
real-time d
i
ff
e
r
e
n
t
i
a
l
SBAS
cor
r
ec
t
i
o
n
s.
For more
i
n
f
o
rma
t
ion
,
see page
75
.
3.
Plan GNSS
data collection around
t
h
e
times of the day when sat
e
ll
it
e
g
e
om
et
r
y
is
bes
t
.
For more
i
n
f
o
r
m
a
t
i
o
n
,
refer
to
t
h
e
TerraSync software Getting
S
t
a
r
te
d
Guide
on
ht
t
p
://www
.trimble.c
om/mappin
gG
I
S/T
e
rr
aS
ync.as
px
?d
t
ID
=
t
e
c
hn
ica
l_
s
u
pp
o
r
t
Connecting to a
real-time differential correction
sour
c
e
Use a
real-time differential
GNSS (DGNSS) source
to
g
i
ve
you
be
tt
e
r
accuracy
as
you
collect d
a
t
a
.
For more information about how real-time differential
GNSS
w
o
r
k
s
,
see
Differential
GNSS
e
x
pl
ain
e
d
,
page
76
.
Ju
no
Ser
i
es
Han
dheld
s
Us
er
Gu
ide
75

Using
SBAS
corr
ections
The
J
u
no
se
ri
es
handheld has an integrated
GNSS
receiver
that
uses
S
a
t
el
l
it
e
Bas
ed
Augmentation
S
y
s
t
ems
(SBAS)
correction
messages
to
improve
t
h
e
accuracy
and
in
t
e
gri
t
y
of GNSS
data
.
The SBAS
t
r
a
c
kin
g
mode
i
s
Auto.
In
Auto
mode, the receiver
t
r
a
c
k
s
or locks onto
th
e
mo
s
t
powerful
sat
el
li
t
e
s
i
g
n
a
l
.
The GNSS
receiver can
track two
SBAS
sat
e
ll
it
es
at
th
e
same
tim
e
in
Auto mode.
It
uses
corrections from only one
SBAS
sat
el
li
t
e
at a
tim
e,
but
tracking
two
s
at
e
ll
it
es
can improve the
a
v
ai
labi
li
t
y
of SBAS
real-time
co
rr
e
c
tions
.
For
example,
if
you are working
in
environments where
obs
t
acl
es
may block the dir
e
ct
lin
e
of
s
i
g
h
t
to
t
h
e
SBAS
sat
el
l
i
t
e,
t
h
er
e
i
s
l
ess
chance of
s
i
gnal
loss
if
you are
t
r
acking
mor
e
than one SBAS
s
a
t
e
ll
it
e.Th
e
receiver tracks
SBAS
sat
el
li
t
es
according
to your
geographical
lo
c
a
tion
:
•
Wide Area Augmentation
S
y
s
t
em
(WAAS) sat
e
l
li
t
es
are
t
r
ack
ed
in
t
h
e
Continental United
States
including
Ala
s
ka
,
and
p
a
r
t
s
of Canada and
M
e
xi
co
.
•
European
Ge
o
s
t
a
tionar
y
Navigation
Overlay
Service
(EG
N
O
S
)
sat
el
li
t
es
ar
e
tracked
in
Eur
o
p
e
.
•
M
T
S
A
T
S
a
t
e
ll
it
e-b
a
sed
Augmentation
S
y
s
t
em
(
M
S
A
S)
sat
e
ll
it
es
are
tracked
in
Ja
p
a
n
.
Note –
If
you have other
T
r
i
m
bl
e
GNSS
f
i
el
d
software
in
stal
l
e
d
,
configure
r
e
al-
t
im
e
cor
r
e
c
t
i
o
n
se
tt
i
ngs
in
that
ap
plicat
i
o
n
instead of the
GPS
C
o
ntr
o
ll
e
r
soft
w
a
r
e
.
For
further
information
,
refer
to
the
T
r
imbl
e
field
s
o
f
t
war
e
documentation
on
www
.t
rimbl
e.c
om
:
•
For
t
h
e
TerraSync
s
o
ft
war
e
,
go
to
ht
t
p
://www
.t
rimbl
e.c
om/mapp
i
ngG
I
S/T
e
rr
aS
yn
c.as
px
?dt
I
D
=
t
e
chnical_s
u
pp
or
t
•
For
t
h
e
GPS
Controller
so
ft
wa
r
e
,
go
to
ht
t
p
://www
.t
rimbl
e.c
om/s
uppor
t
_t
rl
.as
p?N
a
v
=C
ollecti
o
n-32
054
Differential
GNSS
explained
Use
differential
GNSS
to
co
rr
e
c
t
errors
in
your collected d
a
ta
.
Differential
G
N
SS
(DGNSS) requires one
or more additional
r
e
ce
i
v
ers,
called base
s
t
a
t
io
ns
or
r
ef
er
en
c
e
s
t
ations
,
which are located at known
p
o
int
s
.
D
a
t
a
collected at
t
h
e
base
s
t
ations
i
s
used
to
d
e
t
e
rmin
e
GNSS
measurement errors and compute corrections
to
t
h
ese
errors.
An
unlimited number of mobile
GNSS
r
e
ce
i
v
e
r
s,
called
rov
e
r
s
,
collec
t
GNSS data a
t
unknown
l
oc
a
t
i
o
n
s
within
the vicinity of the
base
s
t
a
t
ion
.
Errors common at both
t
h
e
base
s
t
ation
and the rover receiver are co
rr
e
c
t
e
d
with
DGNSS either
in
real
tim
e
or
during
p
o
stp
r
oc
es
si
n
g
.
Real-time DGNSS
In
real-time
DGNSS, the base
s
t
ation
calculates and broadcasts
t
h
e
error for
each
sa
t
e
ll
it
e
as
each measurement
i
s
r
e
ceiv
ed
,
enabling you
to
apply corrections while
in
the field and
co
ll
e
c
t
accurate GNSS
d
at
a
.
DGNSS
corrections are available from a
76
Juno Series
Handhelds User Guide

vari
e
t
y
of public and commercial
sources. They can be
g
e
n
e
r
a
t
e
d
and
b
r
oadcas
t
in
r
e
al
-
t
im
e
by privately or self-owned
GNSS base
s
t
ation
s
,
or by a
wide
range
of
government
ag
enci
es.
Real-time DGNSS
corrections can be used on
t
h
e
J
u
no
series
handheld from
S
a
t
e
ll
it
e
Based
Augmentation
S
y
s
t
ems
(SBAS) such as WAAS
in
t
h
e
US and EGNOS
in
E
ur
o
p
e
.
SBAS uses multipl
e
base
s
t
ations
to
calculate
t
h
e
DGNSS
corrections
that
are
then
d
el
i
ver
ed
to
the user from a
Ge
o
s
t
a
tionar
y
sat
el
li
t
e.
Factors
that
af
f
e
c
t
real-time
DGNSS accuracy include how
o
f
t
e
n
t
h
e
corrections ar
e
up
d
a
t
e
d
,
how far you are from
t
h
e
base
s
t
ation
,
and whether the coordinate
s
y
s
t
em
used by
t
h
e
correction source matches the coordinate
s
y
s
t
em
used by the
G
N
SS
rec
e
iv
e
r
.
P
o
s
t
pr
ocessed
DGNSS
In
p
o
s
t
pro
c
es
sed
D
G
N
SS
,
t
h
e
collected
GNSS
d
a
t
a
i
s
t
r
an
s
f
err
e
d
to
an office co
mput
er
,
and measurements from
t
h
e
base
s
t
ation
are
download
ed
.
You can
p
o
s
t
pr
oc
ess
G
N
SS
data collected
with
Trimble
GNSS
field
so
f
t
war
e
u
s
in
g:
•
t
h
e
GPS
Pathfinder
O
ff
i
ce
so
f
t
war
e
•
t
h
e
T
r
imbl
e
GPS
A
n
al
y
s
t
extension for Esri
A
r
cG
I
S
Desktop
s
o
ft
war
e
Factors
that
affect
t
h
e
accuracy of
p
o
s
t
pr
oc
es
sed
DGNSS include
t
h
e
t
y
p
e
of
r
e
ceiv
e
r
and
a
n
t
enna
used at
t
h
e
base
s
t
ation
,
t
h
e
d
i
s
t
a
n
ce
between
t
h
e
base
s
t
ation
and
th
e
location where
t
h
e
rover data was co
ll
e
ct
ed
,
the accuracy of
t
h
e
base
s
t
ation
p
o
s
i
tion
,
and the logging interval at the base
s
t
ation
.
For more
information
,
refer
to
t
h
e
documentation provided
with
t
h
e
po
s
t
pr
oc
ess
i
ng
so
ft
w
a
r
e
.
Postprocessed
real-time
DGNSS
The accuracy of
pos
i
t
i
o
n
s
using
t
h
e
J
u
no
se
r
i
es
handheld
i
s
within
one
to
t
h
r
ee
m
e
t
e
r
s
p
o
s
t
pro
c
es
sed
,
or two
to
five meters
with
real-time differential
co
rr
e
c
tion
.
Th
e
accuracy of real-time
SBAS
co
rr
e
c
t
ed
positions
can be improved to one to three
m
e
t
ers
with
p
o
stp
r
oc
es
si
n
g
.
If
your d
a
t
a
f
i
l
es
co
n
t
ain
autonomous (uncorrected) positions
as
well
as
r
e
al-tim
e
corrected
pos
i
t
i
o
n
s,
T
r
i
m
b
l
e
recommends
that
you
pos
t
p
r
oc
ess
t
h
e
da
ta
.
During
p
o
s
t
pro
c
ess
i
n
g
,
you can choose whether
to
co
rr
e
c
t
only autonomous p
o
s
i
tions
,
or
all
pos
i
t
i
o
n
s
.
Configuring
NMEA
output
You can use the
J
uno
series
handhelds integrated
GNSS
receiver
with
any GNSS
field
s
o
f
t
wa
r
e
that
accepts NMEA
m
ess
ag
es
.
Ju
no
Ser
i
es
Han
dheld
s
Us
er
Gu
ide
77
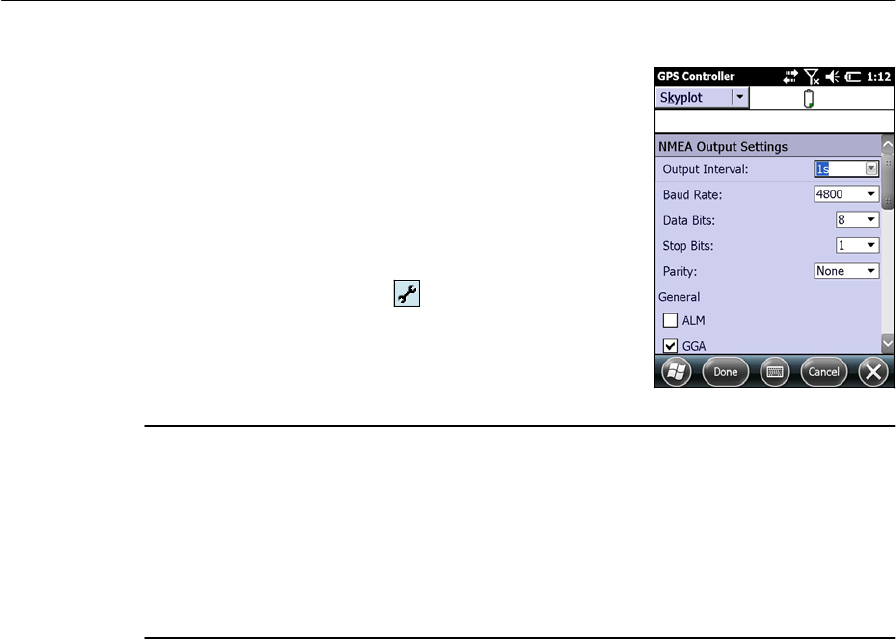
To configure the NMEA data output
set
t
in
g
s
,
use
th
e
GPS
Controller
so
ft
war
e
.
The
so
f
t
war
e
i
s
provided
fr
ee
from
t
h
e
T
r
imbl
e
webs
i
t
e.
For more
information
,
see
Su
ppor
t
e
d
GNSS
field
s
o
ft
war
e
,
page
73
.
To configure NMEA d
a
t
a
o
u
t
p
u
t
:
1.
In
t
h
e
GNSS
S
e
tt
i
n
g
s
form
,
set
t
h
e
NMEA
Output
field
to
On
.
2.
Tap
t
h
e
Setup button that
appears next
to th
e
NMEA Output
fie
l
d
.
The NMEA Output
S
e
tt
in
gs
app
e
a
r
s
.
3.
Configure
t
h
e
NMEA message
output
se
tt
in
gs.
C CAUTION – NMEA
s
t
anda
rd
dic
t
at
es
that a baud rate
of
4800bps should be
u
s
ed
for
NMEA
mes
s
ages.
Depending on the number of satellites being tracked
t
h
e amount
of
data being captured at once may often
cause
the 4800 bit limit to be ex
cee
d
e
d
.
Buf
f
er
s
have been added which allow
t
h
e data to be stored and then
sen
t
when
it
is
abl
e
to. This avoids data
c
o
rrupti
on,
but may delay delivery of data, and positions may
t
ake as
long
as
8
seconds
to be sent from
t
h
e time
at
which they were
originally rec
orded
.
If you need 4800bps
output,
Trimble suggest
s
that
you
try to
minimise the e
ff
e
ct
by
reducing the amount
of
NMEA data being sent, for example, by
dropping out NMEA
sentences
from
the NMEA
s
trea
m.
4.
Tap
Done
.
For more in
fo
rma
t
i
o
n
,
refer
to
t
h
e
GPS
C
o
ntr
o
ll
e
r
H
e
lp
.
78
Juno Series
Handhelds User Guide
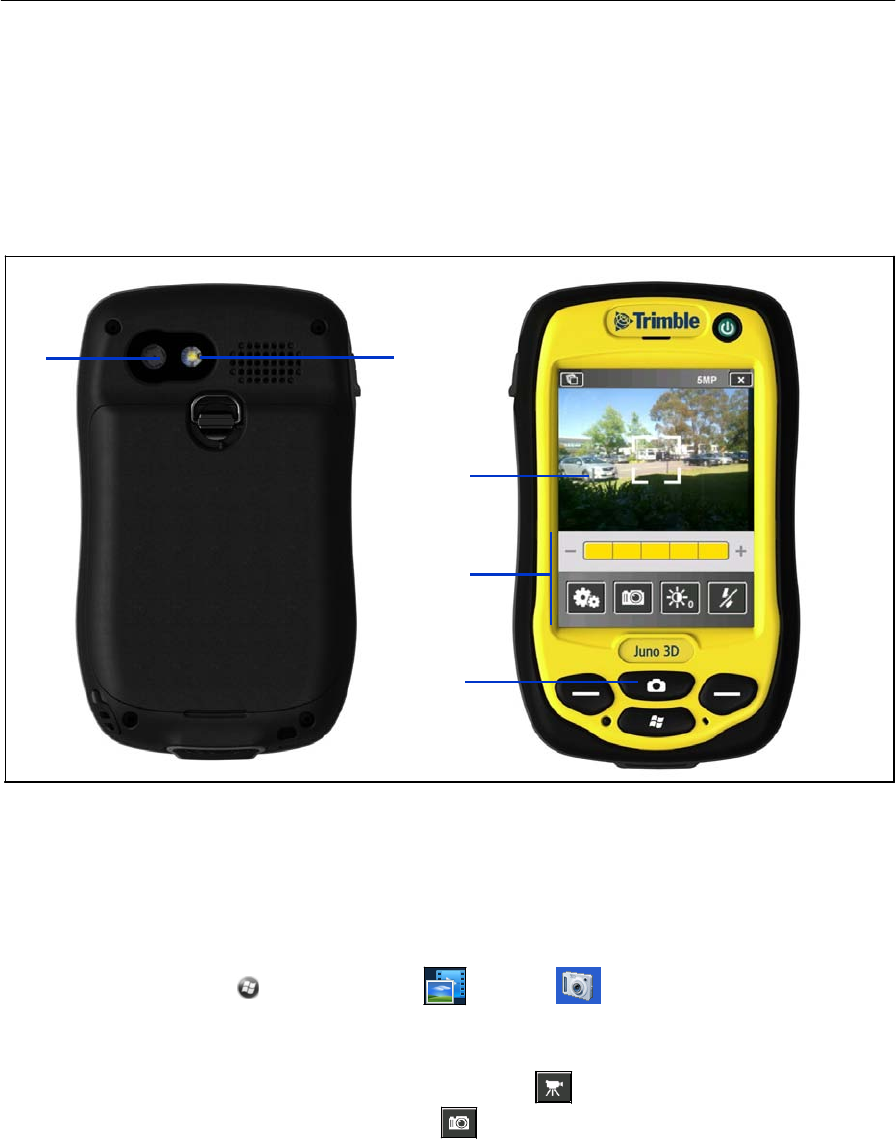
Using the
camer
a
The
J
u
no
ser
i
es
handheld contains an integrated
d
i
gi
t
a
l
camer
a
,
which you can use
to
capture pictures
or video.
Parts of the camera
Lens Flash
(TNJ32
on
ly)
Pr
ev
ie
w
wi
nd
ow
Camera
set
ting
co
nt
rol
Camera
bu
tton
Figure 1.5
J
uno
s
eries handheld – camera
contro
ls
Starting
the camera
application
To
s
t
ar
t
the
ca
m
e
r
a
,
do one of the
fol
l
ow
in
g:
1.
P
r
ess
the
Camera
button on the
front
of the
h
an
d
h
e
l
d
.
2.
Tap
/
Pi
c
t
u
r
es
&
V
i
d
e
o
s
/
Camera
.
The camera
a
pp
l
ica
t
i
o
n
i
s
s
t
arted
in
Camera mode or
Video mode
,
depending on
wh
a
t
mode was
l
a
s
t
used
.
If in
Camera
mode
,
tap
t
h
e
Video mode
icon to
s
w
i
t
ch
to
video
mo
de
.
If in Video
mode
,
tap
t
h
e
Camera mode
icon to
s
w
i
t
c
h
to
camera mode
.
Ju
no
Ser
i
es
Han
dheld
s
Us
er
Gu
ide
79
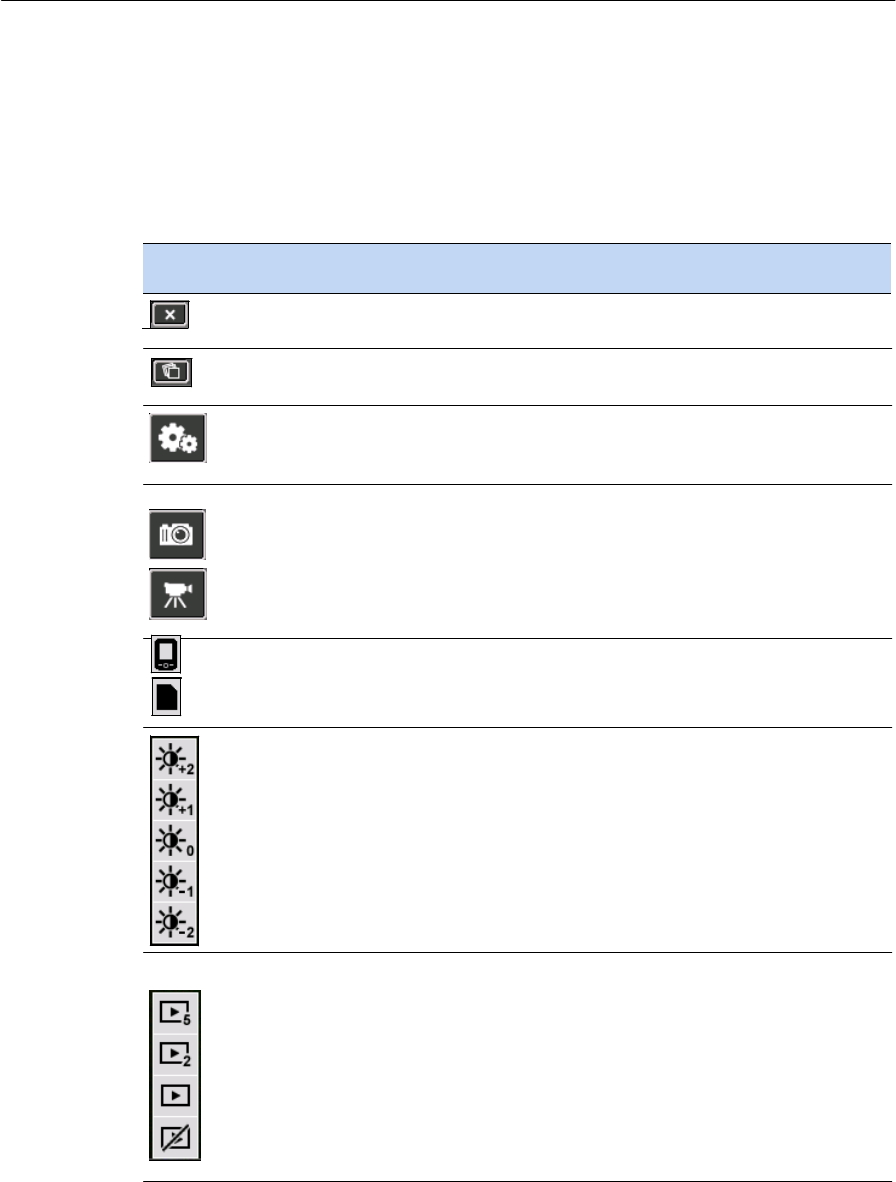
Camera
se
tti
ng
s
The camera’s current set
t
in
gs
are displayed
as icons on the
scr
e
en
.
Tap
t
h
e
required
icon
to
change
i
t
s
set
t
in
g.
The available
set
t
ings
vary depending on whether you are
in
Camera mode or
V
i
d
e
o
mode.
Ico
n
Setting
Camera mode /
Video
mode
Exi
t
camera
ap
p
lica
t
io
n
B
o
t
h
Access
P
i
ctu
r
e
s
& Videos
Bo
th
Settings.
Both
Operating mo
de:
•
Image
cap
t
ur
e
•
V
i
d
e
o
c
a
p
t
u
r
e
File storage
lo
cati
on
:
•
Device
memory
•
Memory
c
a
r
d
Bo
th
Bo
th
Brightness
adjustment.
Tap the + numbers
to lighten the
image; tap the - numbers to darken the
i
mag
e.
Bo
th
Replay time. Tap the time you would like for the image
or
video replay to remain on screen:
•
5
s
e
c
ond
s
•
2
s
e
c
ond
s
• until
you
prompt
the image or video to clo
s
e
•
no
repl
ay
Bo
th
80
Juno Series
Handhelds User Guide
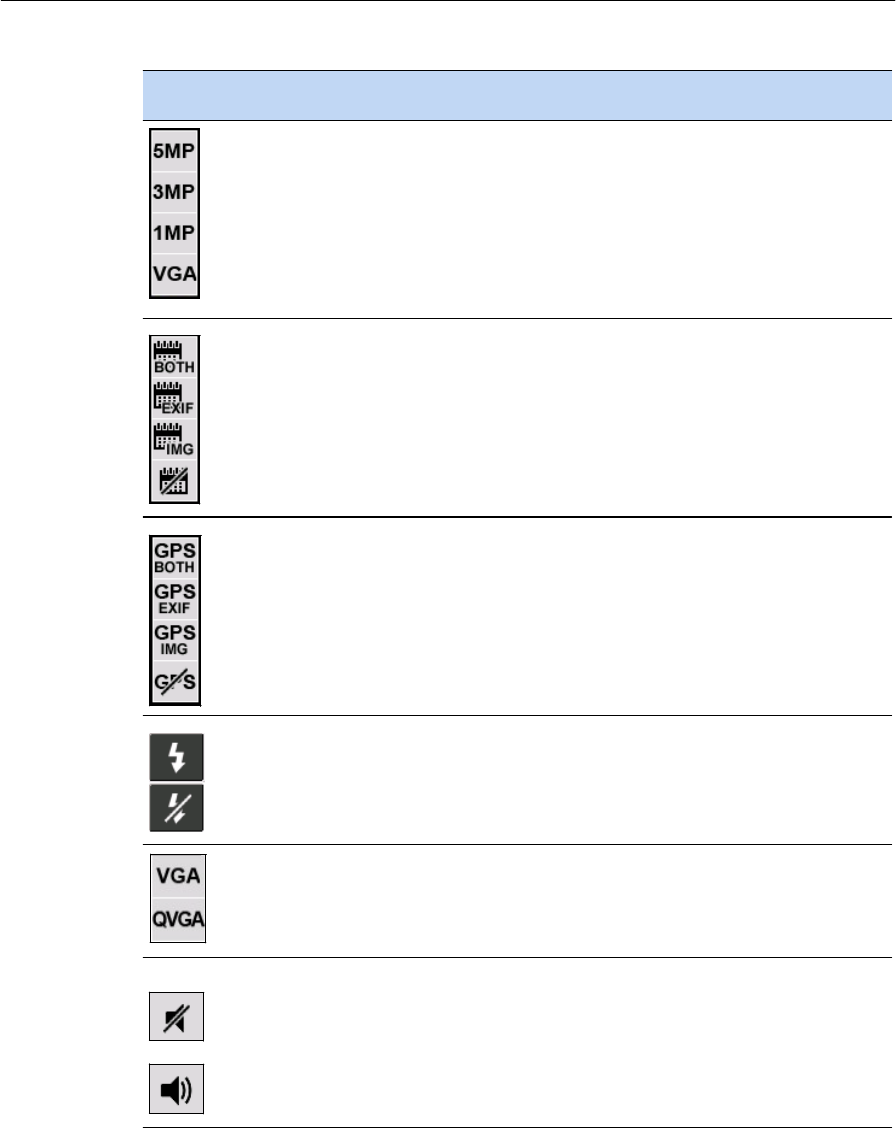
\
Icon
Setting
Camera mode /
Video
mode
Re
sol
ut
i
on
•
VGA = video
gra
phi
cs
array 640 x 480
•
5MP (2592 x 1944)
•
3MP (2048 x 1536)
•
1MP (1280 x 960)
Note – The larger the
resolution,
the larger the file size.
The selected resolutions displays at the top of the screen.
Show date stamp. Tap to select:
•
Date stamp on the image and in the
file
EXIF
header
•
Date stamp in the
file
EXIF
h
ead
er
•
Date stamp on the
im
age
•
No date stamp
Camera
mo
de
onl
y
Camera
mo
de
onl
y
Show
GPS
stamp (decimal degrees). Tap to select:
•
GPS
stamp on the image and in the
file
EXIF
he
ade
r
•
GPS
stamp in the
file
EXIF
h
ead
er
•
GPS
stamp on the
i
m
age
•
No
GPS
stamp
Camera
mo
de
onl
y
Fl
as
h
•
O
n
•
O
ff
Re
sol
ut
i
on
•
VGA: video
gra
phi
cs
array 640 x 480
•
QVGA: quarter video graphics array 320 x 240
Camera
mo
de
onl
y
Video mode
o
nl
y
Mute
•
O
n
•
O
ff
Video mode
o
nl
y
Using the camera in Camera
mo
de
To
t
ak
e
a
p
i
ctur
e,
press
t
h
e
Camera
b
u
tt
on
.
As the camera has
autofo
cus
,
there
i
s
a
s
l
igh
t
delay
b
e
t
w
ee
n
p
r
ess
i
ng
t
h
e
Camera
button
and the photo being
tak
e
n
.
You
know
that
you have successfully taken
t
h
e
pictur
e
when you hear
t
h
e
'click'.
Ju
no
Ser
i
es
Han
dheld
s
Us
er
Gu
ide
81
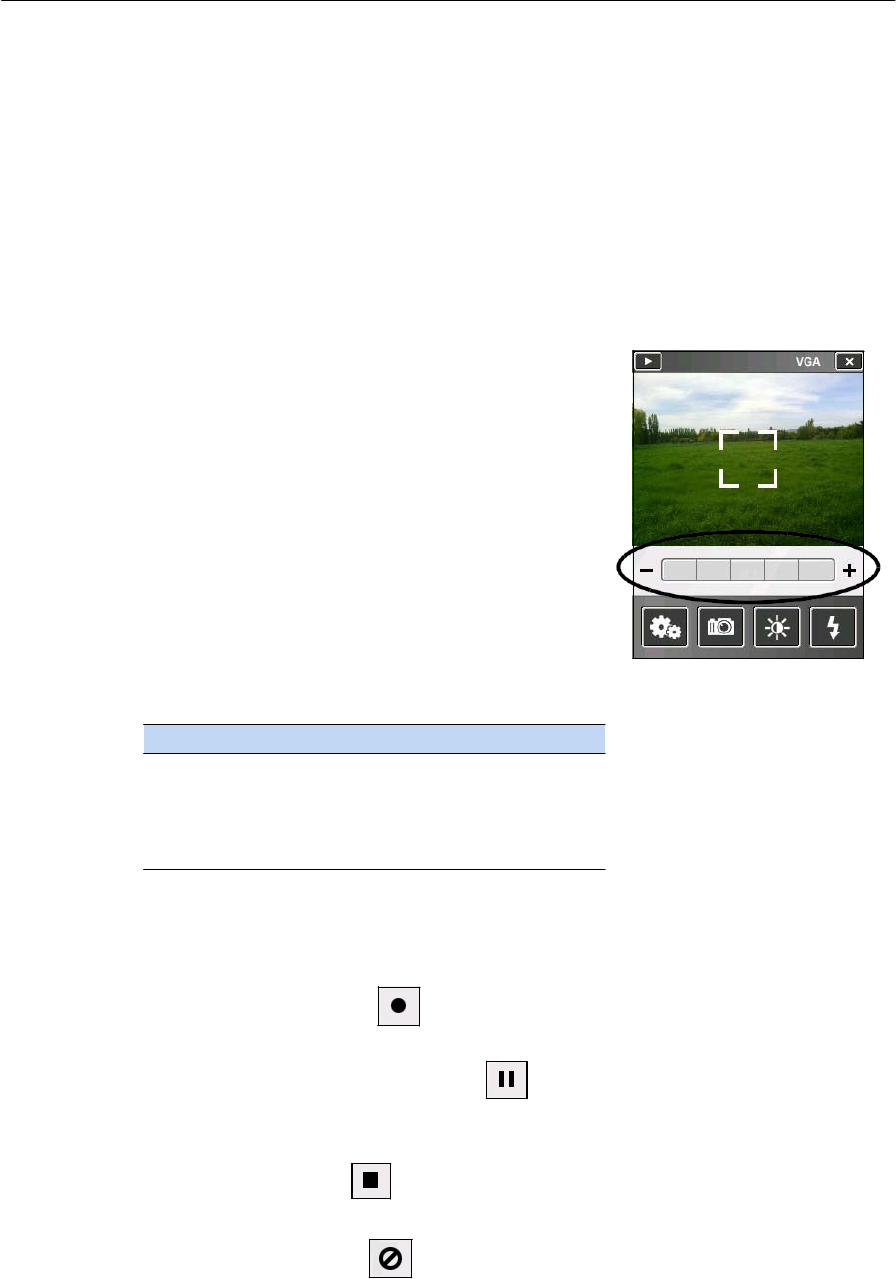
Half-press the
Camera
button
to
focus, and
t
h
en
fully
press
t
h
e
Camera
button
to
tak
e
the
photo.
When fo
cus
s
i
n
g,
the focus square on
t
h
e
preview
screen (see below)
will
change
co
lor
:
•
W
h
i
t
e
-
at
t
empting
to focus
•
Red
-
cannot
focus
•
Green
-
focus
locked
Using the Zoom
functi
on
The Zoom function can only be used
in
Cam
e
r
a
mo
d
e
.
To
adjus
t
the current zoom
l
e
v
e
l
,
do one
of
the
fol
l
ow
in
g:
•
t
ap
- to
zoom out, or +
to
zoom in
.
•
t
a
p
the desired zoom level on the
b
a
r
.
•
press the
left
softkey to zoom out, or
t
h
e
right
softkey
to
zoom in
.
As you zoom in
,
each segment of the bar
turns
y
e
ll
o
w
,
to
indicate
t
h
e
level of zoo
m
.
The level
of
total zoom available depends on the resolution
that
you
use
;
t
h
e
greater
t
h
e
current camera
r
es
o
lution
t
he
less you
will
be able
to
zoom in
:
Resolution
Zoom
ca
pab
ili
t
y
VGA 1 - 2x
1MP 1 - 2x
3MP 1 - 1.2x
5MP -
Using the camera in Video
mode
To start
recording
a
v
i
d
e
o
,
do one of
t
h
e
f
o
ll
o
w
i
n
g
:
•
tap
t
h
e
Record
icon
•
press the
Camera button
To pause recording, tap the pause
icon
.
To resume recording, tap
t
h
e
pause
icon
aga
i
n
.
To
s
t
o
p
recording a
video
,
do one of
t
h
e
f
o
ll
o
w
i
n
g
:
•
tap
t
h
e
Stop
icon
•
press the
Camera button
•
tap
t
h
e
Delete
icon
82
Juno Series
Handhelds User Guide

No
t
e
– Only use the
D
e
l
e
t
e
i
co
n
if
you are certain that you want to discard
th
e
re
co
r
d
i
n
g
.
Managing images
To view and manage
i
mag
es
,
do one of
t
h
e
following:
– tap
/
Pi
c
t
u
r
es
&
V
i
d
e
o
s
.
–
tap the Pictures
&
V
i
d
e
o
s
icon in
t
h
e
top left of
t
h
e
camer
a
application
s
c
r
e
en
.
The Pictures &Videos
screen
ap
p
ears.
Ju
no
Ser
i
es
Han
dheld
s
Us
er
Gu
ide
83

T
r
oubleshooting
Use
t
h
i
s
section
to
identify and
s
o
l
v
e
common problems
that
may occur when
us
in
g
the
J
u
no
ser
i
es
hand
h
e
l
d
.
P
l
ea
se
read
thi
s
section before you co
nt
a
c
t
t
e
chnical
suppo
r
t
.
Power issues
Problem Cause
So
luti
on
The handheld does
no
t
turn
on.
The battery is flat. Recharge the battery
(see
page
17
).
The battery cover is off. Replace the battery cover
.
The
screen
i
s
blank. The handheld
i
s
tu
rned
off.
The handheld
h
a
s
l
o
c
ked
up
.
Press
the Power
button
to turn on
t
he
h
a
nd
he
ld
.
Reset
the handheld
(see
Reset
t
in
g
the handh
e
l
d
,
page
22
).
The handheld
i
s
not
ch
arging
.
The battery
power
percentage bar does
no
t
appear in the
Po
wer
control.
The charge level of
the
battery drops when
the
handheld
i
s
turned
off.
A fully charged
battery
does not last a full day
.
The
internal
temperatu
r
e
has risen above
the
allowed maximum
fo
r
charging the
battery
.
The battery has
0%
power
.
The handheld was left
in
Suspend mode or was
left
fully charged
for
a
long
duration.
The
internal
temperatu
r
e
has risen above
the
allowed maximum
fo
r
optimum battery
performance. The
handheld and
ba
tte
ry
were
operating
in a
hot
env
i
ro
nmen
t.
The handheld and
ba
tte
ry
were
operating
in a very
cold
environment.
The battery has reached
or exceeded
i
s
maxi
mum
charge
cycles
/
lifespa
n
.
Do one or all of the
fol
l
o
win
g:
•
Turn
off
the
integrated
radios before charging
the
h
a
nd
he
ld
.
•
S
u
s
pen
d
the handheld before
cha
rgi
ng
.
•
Remove the handheld from any external
heat
sou
r
ce
s
(for example, sunlight). The handheld
wil
l
automatically start
charging again when
th
e
internal temperature h
a
s
dropped below the
rang
e
for charging the
battery
.
Recharge the battery
(see
page 17
).
Once the
battery
level is above 0%, the battery power percentage
bar
reappears. Tap / Settings /
System
/ Power / Battery
to
view the level of power
remaining
in the
batt
ery
.
Before storing the handheld, completely shut down
the
handheld
(see
Turning on and
turning off
t
h
e
ha
n
d
h
e
l
d
,
page 21
).
Then store the handheld
a
s
recommended
(
s
ee
St
o
r
ag
e,
page
14
).
Remove the handheld and battery from any
external
heat
sources
(for example,
su
nlig
ht).
Using the handheld in cold
temperatures
consumes
additional
battery power and so shortens battery
life
between charges. Keep a spare charged battery
wh
en
working
in low
t
e
m
p
e
r
at
ure
s
.
Replace the
battery
.
84
Juno Series
Handhelds User Guide

Backlight issues
Problem Cause
So
lution
The back
li
gh
t
does
no
t
come on when you
ta
p
the screen or
press
a
bu
tto
n.
The
backl
i
gh
t
i
s
not set
to
turn on in the
B
ack
li
gh
t
control.
Tap / Settings /
System
/
Bac
k
li
gh
t
to view
the
Ba
ck
lig
h
t
control, and make sure
th
at:
•
t
h
e
Turn on
b
ack
li
gh
t
when a
button
is pressed
or
the screen is tapped check box is
sel
ected.
•
t
he
brightness is not set to Dark in the
Bri
gh
t
ness
tab.
The screen
i
s
blank
or
The
bac
kli
gh
t
i
s
off. Tap the
screen
or
pre
ss
a
bu
tto
n
.
hard to see. The
bac
kli
gh
t
level needs
to be
adjusted.
Tap / Settings /
System
/
Bac
k
li
gh
t
to view
the
Ba
ck
lig
h
t
control and then adjust the slider in
the
Bri
gh
t
ne
ss
tab.
Touch screen issues
Problem Cause
So
lu
tio
n
The touch
sc
reen
does not respond
t
o
The touch
screen
i
s
incorrectly
al
i
gned.
Realign the screen
(see
page
37
).
stylus taps. The touch
screen
i
s
locked. To unlock
t
he
t
o
uc
h
screen,
t
a
p
Unlock in the menu bar
of
the Home screen.
The handheld has
lo
cked
up
.
The screen
i
s
blank. The handheld is
turne
d
off.
Rese
t
t
he
handheld
(
s
ee
Rese
t
tin
g
the
h
an
d
h
e
l
d
,
page
22
).
Press
the Power
button
to turn on the
ha
ndh
e
l
d.
The battery is flat. Recharge the battery
(see
page
17
).
The handheld has
lo
cked
up
.
Rese
t
t
he
handheld
(
s
ee
Rese
t
tin
g
the
h
an
d
h
e
l
d
,
page
22
).
A voice call is active. The screen will become active and visible again when
the
call
i
s
ended.
See
Voice c
a
ll
s
,
page
41
.
The screen
i
s
hard
to
see.
The back
li
gh
t
level nee
d
s
to be
adjusted.
Open the Backlight control and then adjust the
backlight
level
(see
Back
l
i
ght
,
page
38
).
The
backlight
is off. Tap the screen to turn on the
backlight.
You are unable to
see
parts
of
an
a
p
pl
ica
t
io
n
wi
nd
ows
when the screen is
in
landscape
o
r
ie
ntati
on
.
The selected display
th
eme
do
e
s
not
have
e
nough
contrast.
Some applications are designed for
portrait orientation
only. To view the entire
ap
pl
i
c
atio
n
window,
change
th
e
screen display to
por
trait.
Selec
t
the High-Contrast display theme. Tap / Settings /
Personal / Today, select the High-Contrast theme and
then
tap OK.
Ju
no
Ser
i
es
Han
dheld
s
Us
er
Gu
ide
85

Keypad issues
Problem Cause
So
lu
ti
on
Pressing
the
ap
pl
ica
t
io
n
key does
not activate
the
function
shown
on
the sof
t
key above
it.
The hardware
ap
pl
i
c
atio
n
key has been
pro
g
ramme
d
to run another program
or
to
perform
another
action.
Do one
of
the
fo
ll
o
win
g:
•
Tap the touchscreen softkey to activate the
function
s
h
own
on the
softkey
.
•
Re-program the
a
ppl
i
c
ati
on
key to
perform
the same
action
as
the touchscreen softkey. To do this, tap /
Settings / Personal / Buttons, select the
button to
reprogram
and
t
h
e
n
select <Left Softkey> or
<Right
Softkey
>.
Memory card issues
Problem Cause
Sol
u
tio
n
The handheld does
no
t
recognize a memory card.
Files
on the memory card
are
not
visible or are
not
able to be
op
e
n
ed
.
The handheld
d
oe
s
no
t
support
SDIO
(SD
input/output)
cards.
Fi
l
e
s
have been
encrypte
d
on
another device and
ha
ve
a .menc
file
ex
tensi
on
.
Use
a microSD or
microSDHC
memory card
.
Remove encryption from the files
(see
Encr
yptin
g
files on memory c
a
r
d
s
,
page
25
).
Connection issues
Windows Mobile Device Center
Problem Cause
So
lution
Windows Mobile Device
Center will
not
con
n
ect
to the
handheld.
The connection is
no
t
initiated
a
u
tom
a
tica
ll
y.
The Windows
Mob
il
e
Device Center
software
does not recognize
the
Juno
series
handheld
h
a
ndhel
d.
The connection is
no
t
enabled in
Win
dows
Mobile Device
Ce
n
t
e
r
on the
co
m
pu
t
er
.
Disconnect the
USB
cable from the
c
ompu
t
er
and
th
en
reconnect the handheld to the computer..
Alternatively,
in
the Windows Mobile Device Center software on the
of
fice
computer, select Mobile Device Settings /
Co
nn
e
c
tio
n
Settings
.
Restart the
of
f
i
ce
computer. Disconnect the
USB
cable
from
the handheld, reset
it
(see
Reset
t
in
g
t
h
e
handh
e
l
d
,
page 22
)
and then reconnect the cable to the
han
dh
e
l
d
.
In the Windows Mobile Device Center software on
th
e
office computer, click Mobile Device Settings /
Co
nn
e
c
tio
n
Settings. If you are
u
s
in
g:
•
t
he
USB
data cable, make sure
that
the Allow USB
connection check box is selected from the
drop-down
list.
•
a
Bluetooth
connection, make sure that the
correct
port
for
Bluetooth
is
s
e
lected
.
Then open the
Bl
ueto
oth
control on the handheld. In the
Device
s
tab, tap
the
partnership
and in the
services
list make
s
u
re
that
the
ActiveSync check box is
sel
e
cted
.
86
Juno Series
Handhelds User Guide

Problem Cause
So
lu
ti
on
The con
n
ec
ti
on
is
no
t
enabled on
th
e
h
a
nd
he
ld
.
The
h
a
nd
he
ld
connection
settings
con
f
li
ct
with
n
e
tw
ork
settings or
VPN
client
soft
ware.
On the handheld, tap / Programs / ActiveSync / Menu /
Co
nn
e
c
t
ion
s
.
Make sure that the Synchronize all
PCs
u
s
in
g
this connection check box is selected, and that the
correct
option
is
selec
t
ed.
I
f
you are
u
s
in
g
the
USB
data cable,
u
s
e
the
USB
to
PC
utility
to change the connection method
t
h
e
handheld
use
s
to connect to the Windows Mobile Device Center on
th
e
co
m
pu
t
e
r
.
Tap / Settings / Connections /
USB
to
PC
Utility
.
Clear the Enable advanced
network functionality
check
bo
x.
The handheld
stop
s
u
s
i
ng
the
default
RNDIS
method
to
connect to the Windows Mobile Device
Cen
t
er
.
ActiveSync
tec
h
nology
Problem Cause
So
lu
ti
on
ActiveSync
technology
will
no
t
connect to
the
h
a
ndhel
d.
The connection
i
s
no
t
initiated
a
u
tom
a
ti
cal
l
y.
ActiveSync does
not
recognize the Juno
series
handheld
ha
ndh
eld.
An
incompatible
versi
on
of ActiveSync
technology
is
installed.
The connection
i
s
no
t
enabled in ActiveSync
on the
comp
uter
.
The connection
i
s
no
t
enabled in ActiveSync
on the
han
dh
el
d
.
The
h
a
n
dhe
ld
connection
settings
conflict with
network
settings or
VPN
client
software.
Disconnect the
USB
cable from the
co
mpu
t
e
r
and
the
n
reconnect the handheld
to
the
co
m
pu
t
e
r
.
Alternatively,
in
th
e
ActiveSync
technology
on the office computer, select
File /
Co
nn
e
c
t
i
on
Se
tti
ng
s
and then tap Co
nne
c
t
.
Restart the office computer.Disconnect the
USB
cable from
the
handheld,
re
se
t
it
(
s
ee
Reset
t
in
g
the handh
e
ld
,
page 22
)
an
d
t
h
e
n
re
c
onn
ec
t
t
h
e
handheld to the
computer
.
ActiveSync version 4.5 and later is
compatible
with the Juno
series
handheld handheld. If version 4.5 or later of
th
e
ActiveSync
technology
is not installed on the
o
f
fi
ce
com
p
ute
r
,
you can install
it
from
t
h
e
Juno
Series
Getting Started Disc.You
can also
download
the latest version from the
M
i
crosoft
website.
In the ActiveSync
technology
on the
of
f
i
ce
computer, click
File /
Co
nn
e
c
t
i
on
Se
tti
ng
s
.
If you are
usi
ng
:
•
t
he
sup
po
r
t
module, make sure
that
the Allow USB
connec
t
i
ons
check box is selected from the
drop-down list
.
•
a
Bluetooth
connection, make sure that the correct port
for
Bluetooth
i
s
selected. Then open the
Bluetooth
control
on
the handheld. In the
Devices
tab, tap the
partnership
and
in
the
services
lis
t
make sure that the
Ac
ti
veS
ync
check
bo
x
i
s
se
le
cte
d
.
On the handheld, tap /
Pro
g
r
am
s
/ ActiveSync / Menu /
Connections. Make sure that the Synchronize all
PCs
using
this
connection check box is selected, and that the correc
t
option
i
s
selected.
I
f
you are using the
USB
data cable,
u
s
e
the
USB
to
PC
utility to
change the connection method the handheld
uses
to con
n
e
c
t
to ActiveSync on the computer. Tap / Settings /
Connections /
USB
to
PC
Utility.
Clear the Enable
ad
vance
d
network functionality
check
bo
x.
The handheld stops using the
default
RNDIS
method
to
connect to the ActiveSync
technology
.
Ju
no
Ser
i
es
Han
dheld
s
Us
er
Gu
ide
87

Network
connections
Problem Cause
So
lu
ti
on
The
Bl
ueto
oth
connection with
th
e
cellular phone
sud
d
e
nly
ends.
Unable to connect
to
another Juno series
ha
ndhel
d.
If you change the
p
roxy
set
t
in
gs
of
the
handheld
wh
il
e
connected to a
ce
ll
ul
ar
phone, the
ce
ll
ula
r
phone ends
the
c
onn
ecti
on
.
Data encryption
settings
are set
incorr
ectly
.
Make any changes to proxy settings before connecting to a
mobile
d
e
vi
ce.
When setting up a peer-to-peer ad-hoc
network
with a
WEP
encryption,
set a
Network
Key, rather than leaving
the
key blank to be provided
au
to
m
a
ti
ca
lly
.
Bluetooth
wireless
technology
Problem Cause
So
lu
ti
on
The handheld
c
a
nn
ot
discover a
n
earb
y
Bluetooth
de
vice.
The COM
port that
yo
u
assigned to a serial
port
service
is not available
in
your
a
p
pl
ica
t
io
n.
The
Bl
ueto
oth
connection
fa
il
s
while
in
use.
The device
i
s
out
of
range
.
Bluetooth
wir
e
l
e
ss
technology
is
no
t
enabled on one or
bo
th
devices.
The device has not
been
made
Discov
erable
.
The
ap
pl
ica
t
io
n
cann
ot
recognize ports
if they
are added after
t
h
e
ap
pl
ica
t
io
n
op
e
ns.
The
Bluetooth
device
ha
s
moved
out of
ra
ng
e.
The
Bluetooth
radio has
lost the
connection.
Bluetooth file transfer
interrupts the
c
onn
ecti
on
.
Move the dev
i
ce
s
closer to each other and then scan
aga
in
.
Make sure
that
the
Bluetooth
radio is turned on, on
both
the handheld
(
s
ee
page 51
)
and
t
h
e
o
t
he
r
Bl
ue
to
oth
dev
i
ce
.
Make sure that the
Bluetooth
device has been
mad
e
Disco
verab
le.
Exi
t
from the
a
pp
li
c
ati
on
,
add the
port
and then run
the
app
l
ica
t
i
on
agai
n
.
Move the dev
i
ce
s
closer to each other. The devices
sh
ou
ld
reconnect
a
u
to
m
a
t
i
ca
lly
.
If
they do
not,
s
e
l
e
ct
the
Bluetooth
device in the
Device
s
tab. Tap and hold
th
e
device name and then select Delete. Tap New to discover
the device
a
g
ain.
Turn
off
the
Bluetooth
radio on the handheld and
then
turn on the
Bluetooth
radio
(
s
ee
page
51
).
When you
t
r
ansfer large image or data
fi
le
s,
oth
er
Bluetooth
co
nn
ecti
on
s
may stop responding. To avo
i
d
problems, close other
Bluetooth
co
nnection
s
befo
re
transferring
large
files.
Wi-Fi
connections
Problem Cause
So
lu
ti
on
The “New
Netwo
r
k
Detected”
not
i
fication
The Wi-Fi radio is off. Tap the wireless icon in the Home screen or go to
the
Wireless Manager and make sure Wi-Fi is
on.
does
not
ap
pea
r
automatically
.
The handheld
i
s
out
of
range of the
ne
twork.
Move
to within
range
of
the
network,
then tap /
Settings /Connections
/Network
Ca
rd
s
and then setup
the
co
nn
e
c
t
i
on
.
88
Juno Series
Handhelds User Guide

Problem Cause
So
lu
ti
on
The handheld cann
ot
connect to a secure site.
You cannot con
f
ig
ure
a
n
Internet connection.
Within
range of
more
than one
network, you
are
not
connecting
to
the
network
you
wo
ul
d
prefer to use.
The “New
Netwo
r
k
Detected”
notification
ap
pea
r
s
but the
menu
bar and soft key
options
are
not
dis
p
la
ye
d.
The date on
th
e
handheld is
in
correct.
The radio is
co
nne
ctin
g
to the
first network
signal
it
has received.
Some
app
li
c
ati
on
s
are
not fully
compatible
with all
feature
s
of
the
Windows
Embe
dd
ed
Handheld 6.5
Professional
operating
system.
Check that the handheld has the date set correctly on
the
Home screen. If
t
h
e
d
a
t
e
is incorrect, tap the clock icon
on
the Home screen and then adjust the date and
ti
me.
Tap / Settings /
Co
nn
e
c
t
ion
s
/
Network
Card
s
.
Tap
an
d
hold the
network
you would
p
r
e
f
er
to
u
s
e
and
t
h
e
n
select
Co
nn
ect
.
Use
the
app
li
c
ati
on
bu
tton
s
on the keypad,
as
they map
to
the soft keys in the menu
bar:
•
To
dismiss
t
h
e
notification,
press
the right
application
button
on the
keyp
ad.
•
To connect to the
network,
press
the left
applicat
ion
bu
tto
n
.
Alternatively,
se
lec
t
a Windows Embedded
Hand
held
ap
pl
ica
t
io
n
from the Start menu, such
as
the Home screen
or File Explorer, and the menu bar and soft keys will
be
displayed
correctly
.
WAPI
issues (China
only)
Problem Cause
So
lu
ti
on
I
f
you use Windows Live
and register your
email
address, the
f
o
llowing
message
appears:
Unable to establish the
Internet connection to
Windows Live services.
Please check your Internet
setting and ensure the
mobile service you paid for
includes this data service.
Please contact your mobile
services supplier if you need
any help.
Micro
s
oft
email
an
d
contacts are not
supported
over a WAPI con
n
ecti
on
.
Sw
it
ch
to a cellular connection (TNJ32
h
a
ndh
e
ld
only) or a
Wi
-
F
i
con
n
e
c
tio
n
.
Audio issues
Problem Cause
So
lu
ti
on
Poor sound from
the
ea
rp
i
e
ce.
W
a
t
e
r
ha
s
pooled in
the
ea
rp
ie
c
e.
Turn the handheld so that
it
i
s
face-down, then shake
it
to expel the water from the earpiece cavity
.
Ju
no
Ser
i
es
Han
dheld
s
Us
er
Gu
ide
89

GNSS
receiver issues
Problem Cause
So
lu
tio
n
The handheld
i
s
not
receiving
GNSS
positions
.
NM
E
A
data
in
clu
d
e
s
autonomous
positions.
The
integrated
GNSS
receiver is not
activated.
The
GNSS
COM
port
is
already in
u
s
e.
Only
on
e
ap
pl
i
c
atio
n
at a
time
can
have the
port
op
e
n
.
The
GNSS
field
software
i
s
u
s
i
ng
the wrong GNSS
COM
po
rt.
Not enough satel
li
t
es
are
visible.
Wait
for real-time is
selected in the
GNSS
field
software and
the
integrated
receiver
i
s
waiting
to
re
ce
ive
real-time
c
o
rrections.
Handheld is lying on a
metal surface.
The
integrated
GNSS
receiver
outputs
autonomous
posi
t
io
ns
when
real
-time
corrections are
un
av
aila
bl
e.
Use
the Connect or Activate
GNSS
command in
the
GNSS
field software to open the
GNSS
COM port
and
activate the
integrated
GNSS
receiver. For
more
information,
see
Using the
GNSS
r
e
ceiver
,
page
73
.
Do the
following:
•
E
xit
the software that is using the
GNSS
COM
po
rt
and then retry in your
ap
pl
ica
t
io
n.
•
Check
that
a
GNSS
a
p
pl
ica
t
io
n
is
not running
in
th
e
background. Tap / Settings / Memory, select
Running Programs, and then select and close
an
y
GNSS
a
pp
li
c
ati
on
s
you are
not
u
s
in
g.
Co
nn
e
c
t
to COM4.
Move to a location where the receiver
ha
s
a clear
view
of the sky and ensure the antenna is not
obstructed.
I
f
you are collecting data for postprocessing, clear
the
wait for
r
e
al-
t
ime
selection.
Check that the real-time correction source
i
s
se
tu
p
correctly
(see
Connecting
to
a real-time
diff
er
ential
co
rr
ec
t
i
o
n
source, page
75
).
The design and location of the
GNSS
antenna
ha
ve
been maximized for
GNSS
recep
t
io
n
in a typical user
environment.
Locating the handheld on a metal surface
without
being in contact with the user may
cau
s
e
a
de
crea
s
e
or
loss
of
satellite
reception.
Hold the handheld for
optimum reception.
C
on
f
ig
ure
the NMEA
app
li
c
ati
on
to
filter
ou
t
non-DGNSS
posi
t
i
ons.
90
Juno Series
Handhelds User Guide

Real-time
DGNSS
issues
Problem Cause
So
lu
ti
on
The handheld is
no
t
receiving SBAS
real-time
corrections
The
SBAS
satellite
is
obstructed from
view
.
You are outside
th
e
WAAS,
EGNOS,
or MSAS
coverage are
a.
Check the location
of
the
SBAS
satellite
in the
Skyp
lo
t
section of the
GNSS
field software, and
if
possible move to a
different
l
o
ca
ti
on
.
Wide Area
Augmentation
System (WAAS)
satellites are
tracked in the
C
on
t
in
en
ta
l
United State
s
including
Al
ask
a,
and in southern parts of Canada.
European Geostationary
Navigation
Overlay
Service (EGNO
S
)
satellites are tracked in Europe.
MTSAT
Satellite-based
Augmentation
System
(MSAS)
satellites are tracked in
J
a
pan.
Ju
no
Ser
i
es
Han
dheld
s
Us
er
Gu
ide
91
Required Notices to the User
Radio apparatus shall comply with the requirements to include required notices or statements to the
user of equipment with each unit of equipment model offered for sale.
The required notices are specified in the RSS documents (including RSS-Gen) applicable to the
equipment model. These notices are required to be shown in a conspicuous location in the user
manual for the equipment, or to be displayed on the equipment model. If more than one notice is
required, the equipment model(s) to which each notice pertains should be identified. Suppliers of radio
apparatus shall provide notices and user information in both English and French.
User Manual Notice for Licence-Exempt Radio Apparatus
User manuals for licence-exempt radio apparatus shall contain the following or equivalent notice in a
conspicuous location in the user manual or alternatively on the device or both.
This device complies with Industry Canada licence-exempt RSS standard(s). Operation is subject to
the following two conditions: (1) this device may not cause interference, and (2) this device must
accept any interference, including interference that may cause undesired operation of the device.
Le présent appareil est conforme aux CNR d'Industrie Canada applicables aux appareils radio
exempts de licence. L'exploitation est autorisée aux deux conditions suivantes : (1) l'appareil ne doit
pas produire de brouillage, et (2) l'utilisateur de l'appareil doit accepter tout brouillage radioélectrique
subi, même si le brouillage est susceptible d'en compromettre le fonctionnement.
Industry Canada - Class B This digital apparatus does not exceed the Class B limits for radio noise
emissions from digital apparatus as set out in the interference-causing equipment standard entitled
“Digital Apparatus,” ICES-003 of Industry Canada.
Cet appareil numérique respecte les limites de bruits radioélectriques applicables aux appareils
numériques de Classe B prescrites dans la norme sur le matérial brouilleur: “Appareils Numériques,”
NMB-003 édictée par l’Industrie.
RF exposure warning:
1. This Transmitter must not be co-located or operating in conjunction with any other antenna or
transmitter.
2. This equipment complies with FCC RF radiation exposure limits set forth for an uncontrolled
environment. This equipment should be installed and operated with a minimum distance of 20
centimeters between the radiator and your body.
Avertissement d'exposition RF:
1. Cet émetteur ne doit pas n'être coïmplanté ou opération en même temps qu'aucune autre antenne
ou émetteur.
2. Cet équipement est conforme aux limites d'exposition de rayonnement de la FCC rf déterminées
pour un environnement non contrôlé. Cet équipement devrait être installé et actionné avec une
distance minimum de 20 centimètres entre le radiateur et votre corps.

TrimbleNavigationLtd.
935 Stewart Drive, Sunnyvale, CA 94088-3642 U.S.A.
Tel: 408 481-8284 ; Fax: 408 481-7866
DECLARATIONOFCONFORMITY
WeTrimbleNavigationLtd.,935StewartDrive,Sunnyvale,CA94088‐3642U.S.A.,
declareunderoursoleresponsibilitythatproduct(PDA,TNJ31)towhichthis
declarationrelatesisinconformitywiththefollowingstandard(s)orothernormative
document(s).
It complies with the essential requirements of article and the other relevant provisions
of the R&TTE Directive, when used for its intended purpose.
*RF : EN 300 328 V1.7.1
EN 300 440-1 V1.6.1
EN 300 440-2 V1.4.1
*EMC : EN 301 489-1 V1.8.1
EN 301 489-3 V1.4.1
EN 301 489-17 V2.1.1
EN 55022:2006 +A1:2007, Class B
EN 55024:1998 +A1:2001 +A2:2003
*Safety Test : EN 60950-1:2006+A11:2009
EN 62311:2008
Christchurch,NewZealand
Jan.18,2012Bruce Maule
(Placeanddateofissue)(nameofsignatureorequivalentmarketingof
authorizedperson)