Trimble RNGR2410 Ranger/TSC3 User Manual part 1 of 2
Trimble Navigation Limited Ranger/TSC3 part 1 of 2
Trimble >
Contents
- 1. Users Manual
- 2. User Manual
- 3. User Manual part 1 of 2
- 4. User Manual part 2 of 2
User Manual part 1 of 2
OK
Fn
F1
F2
F3
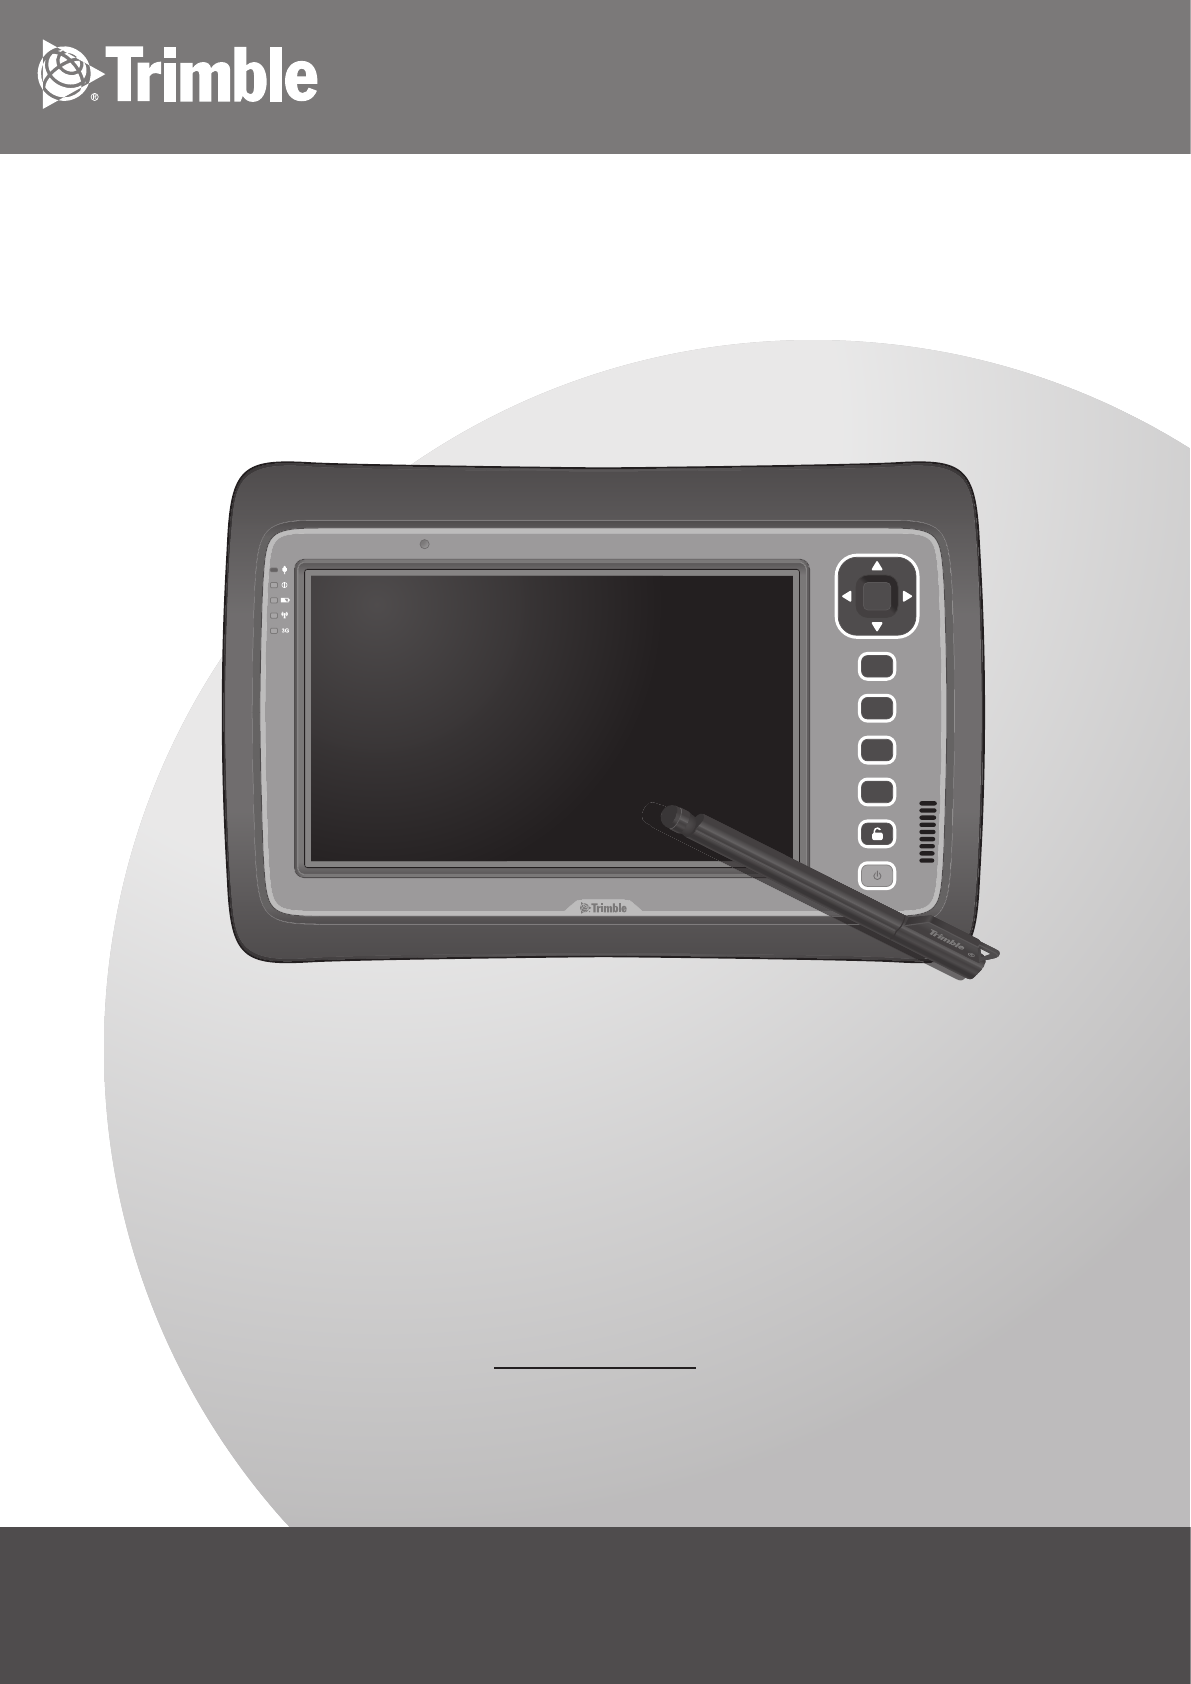
Rugged Tablet Computer
Yuma 2
User's Manual
© 2012 Trimble Navigation Limited. All rights reserved.
TRADEMARKS
Trimble and the Globe & Triangle logo are trademarks of Trimble Navigation Limited, registered in the
United States Patent and Trademark Ofce and in other countries. Yuma 2 is a trademark of Trimble
Navigation.
Microsoft, Windows, and the Windows logo are either registered trademarks or trademarks of
Microsoft Corporation in the United States and/or other countries. Microsoft products are licensed to
OEMs by Microsoft Licensing, Inc., a wholly owned subsidiary of Microsoft Corporation.
The Bluetooth® word mark and logos are registered trademarks owned by Bluetooth SIG, Inc.
All other brand and product names are trademarks or registered trademarks of their respective
owners.
NOTE
Display images shown may vary slightly from actual display. Information in this manual is subject to
change without notice.

i
Contents
CHAPTER 1: Getting Started .............................................................1-1
Unpacking ........................................................................................1-2
Device Overview ..............................................................................1-3
Front View ................................................................................. 1-3
Rear View .................................................................................1-5
Bottom View .............................................................................. 1-6
Installing the Stylus ..........................................................................1-7
Removing the Stylus .................................................................1-7
Installing the SIM Card .....................................................................1-8
Installing the Battery Packs ..............................................................1-9
Connecting to AC Power ..................................................................1-10
Turning the Tablet Computer On and Off .........................................1-11
Turning On ................................................................................1-11
Turning Off ................................................................................1-12
CHAPTER 2: Operating Your Tablet Computer ................................2-1
Using the Touch Screen ...................................................................2-2
Calibrating the Screen ..............................................................2-3
Using the Input Panel .......................................................................2-4
Opening the Input Panel ...........................................................2-5
Managing the Input Panel .........................................................2-5
Using the Control Panel ...................................................................2-6
Using the Hotkeys .....................................................................2-6
Using the Hotkey Conguration Tool ........................................2-7
Adjusting Volume ......................................................................2-11
Adjusting Screen Brightness .....................................................2-11
Using Wireless LAN .........................................................................2-12
Turning the Wireless Antenna On and Off ................................2-12
Connecting to a Wireless Network ............................................2-13

ii
Using Bluetooth ................................................................................2-14
Turning the Bluetooth Adapter On and Off ................................2-14
Pairing with Bluetooth Devices .................................................2-14
Conguring Bluetooth Settings .................................................2-17
Using 3G Network ............................................................................2-18
Connecting to 3G Network ........................................................2-18
Using AirCard® Watcher ............................................................2-19
Conguring AirCard® Watcher Settings .....................................2-21
Using GPS ........................................................................................2-24
Position .....................................................................................2-24
Satellites ...................................................................................2-25
Using the Accelerometer / Compass ................................................2-26
Activating the Accelerometer ....................................................2-26
Using the Compass ..................................................................2-26
Using the Camera ...........................................................................2-28
Opening the Camera ................................................................2-28
Shooting Photos .......................................................................2-29
Recording Videos .....................................................................2-30
Playing Videos ..........................................................................2-31
Working With Photos ................................................................2-32
Working with Videos .................................................................2-38
Managing Camera Application Settings ....................................2-42
CHAPTER 3: Expanding Your Tablet Computer ..............................3-1
Connecting USB Devices .................................................................3-2
Connecting HDMI Devices ...............................................................3-3
Connecting Audio Devices ...............................................................3-4
CHAPTER 4: Managing Power ..........................................................4-1
Battery Pack .....................................................................................4-2
Charging the Battery Pack ........................................................4-2
Checking the Battery Level .......................................................4-3
Replacing the Battery Pack ......................................................4-4
Power Management .........................................................................4-5
Power Saving Tips ............................................................................4-6
CHAPTER 5: Using BIOS Setup and System Recovery ..................5-1
BIOS Setup ......................................................................................5-2
When to Use .............................................................................5-2
How to Use ...............................................................................5-2

iii
CHAPTER 6: Maintenance and Troubleshooting .............................6-1
Taking Care of the Tablet Computer .................................................6-2
Location Guidelines ..................................................................6-2
General Guidelines ...................................................................6-2
Cleaning Guidelines ..................................................................6-2
Touchscreen Guidelines ...........................................................6-2
Troubleshooting ................................................................................6-3
APPENDIX A: Specications .............................................................A-1
Tablet Computer Specications ........................................................A-1
APPENDIX B: Regulatory Information .............................................. B-1
Important Information .......................................................................B-2
Safety Information (EN) ............................................................B-3
Safety Information (FR) ............................................................B-4
About the Batteries ...................................................................B-5
About the Adapter ....................................................................B-5
FCC Regulations ..............................................................................B-6
RF Exposure Information (SAR) ......................................................B-7
IC Regulations ..................................................................................B-7
Important Note ..........................................................................B-8

iv
Preface
This manual contains information that will help you operate this rugged
tablet computer. It is divided into six chapters and two appendices.
• Chapter 1: Getting Started, takes you through the process of setting up
your tablet computer and identifying its external components.
• Chapter 2: Operating Your Tablet Computer, tells you how to use the
tablet computer’s components and features.
• Chapter 3: Expanding Your Tablet Computer, provides information on
installing and using peripheral devices.
• Chapter 4: Managing Power, provides information on power
management.
• Chapter 5: Using BIOS Setup and System Recovery, describes the
BIOS Setup utility that congures the tablet computer’s BIOS settings and
system recovery utility that reinstalls Windows to the tablet computer.
• Chapter 6: Maintenance and Troubleshooting, provides information on
caring for your tablet computer, and gives solutions to common problems
you may encounter when using the tablet computer.
• Appendix A, provides technical specications of the Tablet Computer.
• Appendix B, provides regulatory information and safety notices on your
tablet computer.

v
Notational Conventions
Throughout this manual, the following conventions are used to distinguish
elements of text.
NOTE: Identies additional information that requires special attention.
TIP: Identies additional information that provides optional methods for ease of use.
CAUTION: Identies important information that, if not followed, may result in loss of data or
damage to the tablet computer..
WARNING: Identies important information that, if not followed, may result in damage to
properties or danger to users.
Hardware and keyboard keys are shown in a bold typeset. For example:
Press the F1 key to complete.
A title, command, setup item, value, option, or button that you can see on the
screen is shown in boldface. For example:
Select When I press the power button, set it to Shut down, and then tap
the Save changes button.

1-1Getting Started
CHAPTER 1
Congratulations on purchasing this rugged tablet computer. The rugged design
allows you to use it in harsh outdoor environments. You can use it under blazing
heat, subzero cold, driving rain or dusty surroundings – places you could not
take a consumer-grade tablet computer.
This chapter tells you step by step how to get the tablet computer up and
running. You will nd instructions for the following procedures:
• Unpacking
• Device Overview (An Explanation of External Components and their
Functions)
• Installing the Stylus
• Installing the SIM Card
• Installing Battery Packs and Connecting to AC Power
• Turning the Tablet Computer On and Off
Getting Started
1-2 Getting Started
Unpacking
After unpacking the shipping carton, you should nd these standard items.
Inspect all items. If any item is damaged or missing, notify your dealer
immediately.
√ Tablet Computer √ Battery Pack x 2
OK
Fn
F1
F2
F3
√ Power Adapter √ Power Cord and Plugs
√ Stylus √ Tether for Stylus
√ Cleaning Cloth
√ Screen Protector Film
√ Windows 7 Certicate of Authenticity Label (COA)
√ Quick Start Guide
Keep the shipping carton and packaging materials in case you need to ship or
store the tablet computer in the future.
NOTE: Actual items may slightly differ depending on the model you purchased.
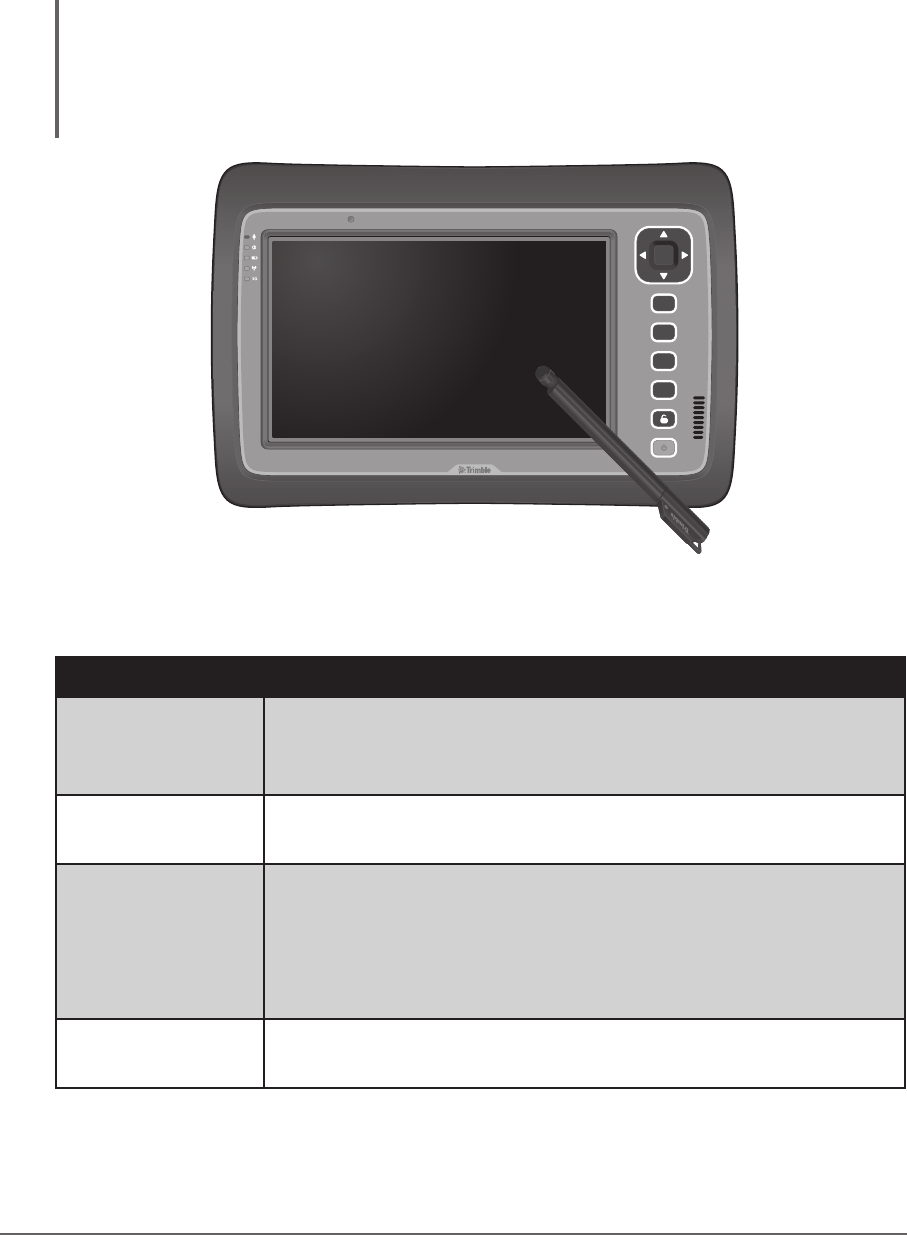
1-3Getting Started
Device Overview
Front View
OK
Fn
F1
F2
F3
2
5 6
8
9
10
11
12
14
7
13
3
4
1
No. Item Description
1Microphone Use for talking and other interactive
applications.
2LED Indicators Shows the current status of the tablet
computer.
Power • Solid green: Tablet computer is turned on
• Blinking green: Tablet computer is in
sleep mode.
• Off: Tablet computer is turned off.
Battery • Solid amber: Battery is charging
• Solid greeen: Battery is fully charged.
• Blinking red: Battery power is low.
Wireless Solid green: Wireless antenna is enabled.
Off: Wireless antenna is disabled.
3G Solid green: 3G data connection is active.
Off: 3G data connection is inactive.
Note: 3G LED is not available in all models.
1-4 Getting Started
No. Item Description
3Touch Screen Displays and receives information for the
tablet computer.
4Kensington Lock Provides lock mechanism security.
5Ambient Light Detector Detects surrounding light and adjusts the
screen brightness according to the ambient
light.
6Directional Buttons Serves as the up / down / left / right arrow
keys.
7OK Button Serves as the Enter key.
8Fn (Function) Button • Press to display the button functions and
toggle between Button Setting A, B, and C.
• Press Fn + F1 / F2 / F3 to open the
corresponding applications. For example:
• Fn + F1: Virtual keyboard
• Fn + F2: Internet Explorer
• Fn + F3: ALS Auto/Manual
9F1 Button Press to launch Windows Help.
10 F2 Button Press to launch F2 command in Windows.
11 F3 Button Press to launch F3 command in Windows.
12 Speaker Sends out sound and voice from your tablet
computer.
13 Pad Lock Button Press to access the log-in menu, similar as
pressing Ctrl + Alt + Del on a computer.
14 Power Button • Short press to turn the tablet computer on.
• When powered on, short press to enable
sleep mode.
• When powered on, long press to turn the
tablet computer entirely off.
1-5Getting Started
Rear View
6
1 4
6
5
2 3 5
7
No. Item Description
1 Eyelet Holds the tether strap.
2Stylus Holder Stores the stylus.
3Camera Flash Provides ash lighting for use with the
camera.
4CMOS Camera Allows you to use the camera features.
5Battery Capacity
Indicator
Press the button to light the battery capacity
LEDs. More lit LEDs indicate more battery
power. The LEDs automatically go off after 5
seconds.
6Battery Packs Supplies power to your tablet computer when
external power is not connected.
7SIM Card Slot Stores the SIM card which provides 3G data
connection to your tablet computer.

1-6 Getting Started
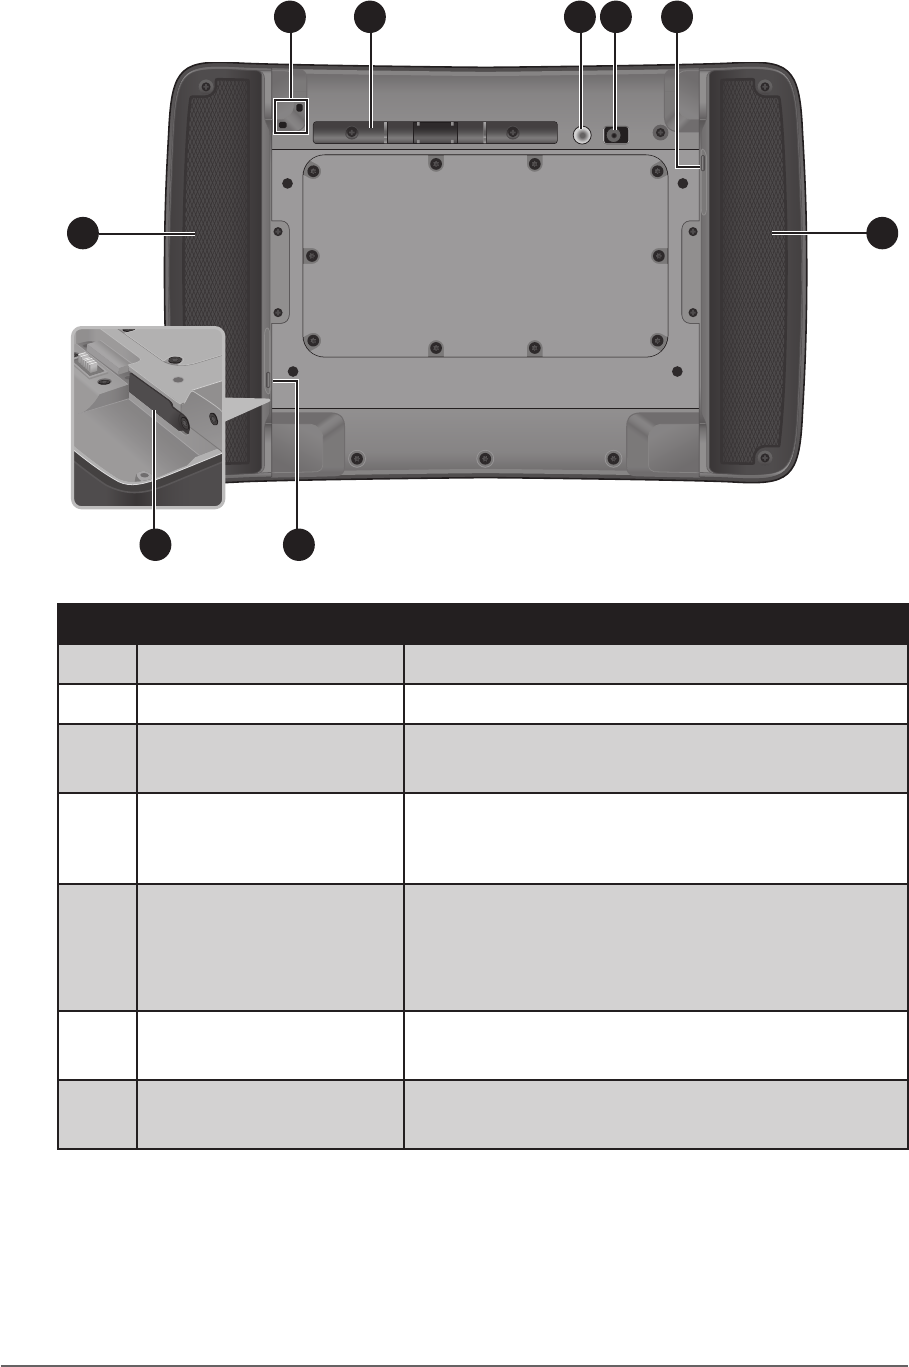
Bottom View
21 4 5
5
6
With Battery Packs Removed
With Battery Packs
3
3
No. Item Description
1Audio Connector
(Line in / Line out)
Connects to a set of headphones, external
speakers, or an audio recording device with
3.5 mm jack.
2HDMI Connector Connects to an HDMI device such as an
external monitor.
3Docking Holes Docking holes to support a docking station
(optional).
4Docking Connector Connects to a docking station (optional).
5 USB Ports Each port connects to a USB device, such as
a USB ash drive, mouse, printer, keyboard,
etc.
6Power Connector Connects to the AC adapter.
1-7Getting Started
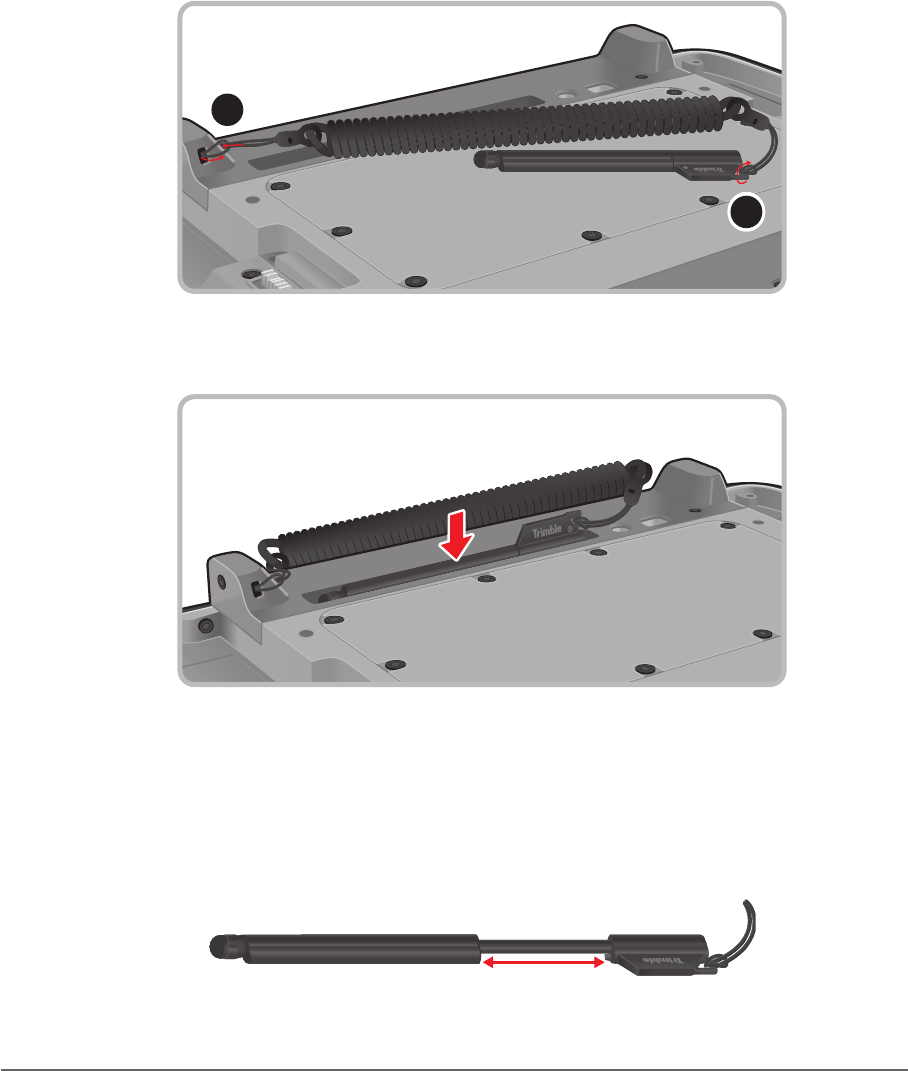
Installing the Stylus
Your tablet computer comes with a stylus for use with the touch screen.
The stylus holder at the back of the tablet computer provides a convenient place
to store the stylus.
Perform the following to prepare and install the stylus to your tablet computer:
1. Loop one end of the tether to the stylus eyelet.
2. Loop the other end of the tether to the tablet computer eyelet.
2
1
3. Push the stylus on the stylus holder until it locks into place.
Removing the Stylus
Lift the stylus by its tab to remove it from the stylus holder.
For convenience of use, pull the tab to extend the stylus length.
1-8 Getting Started
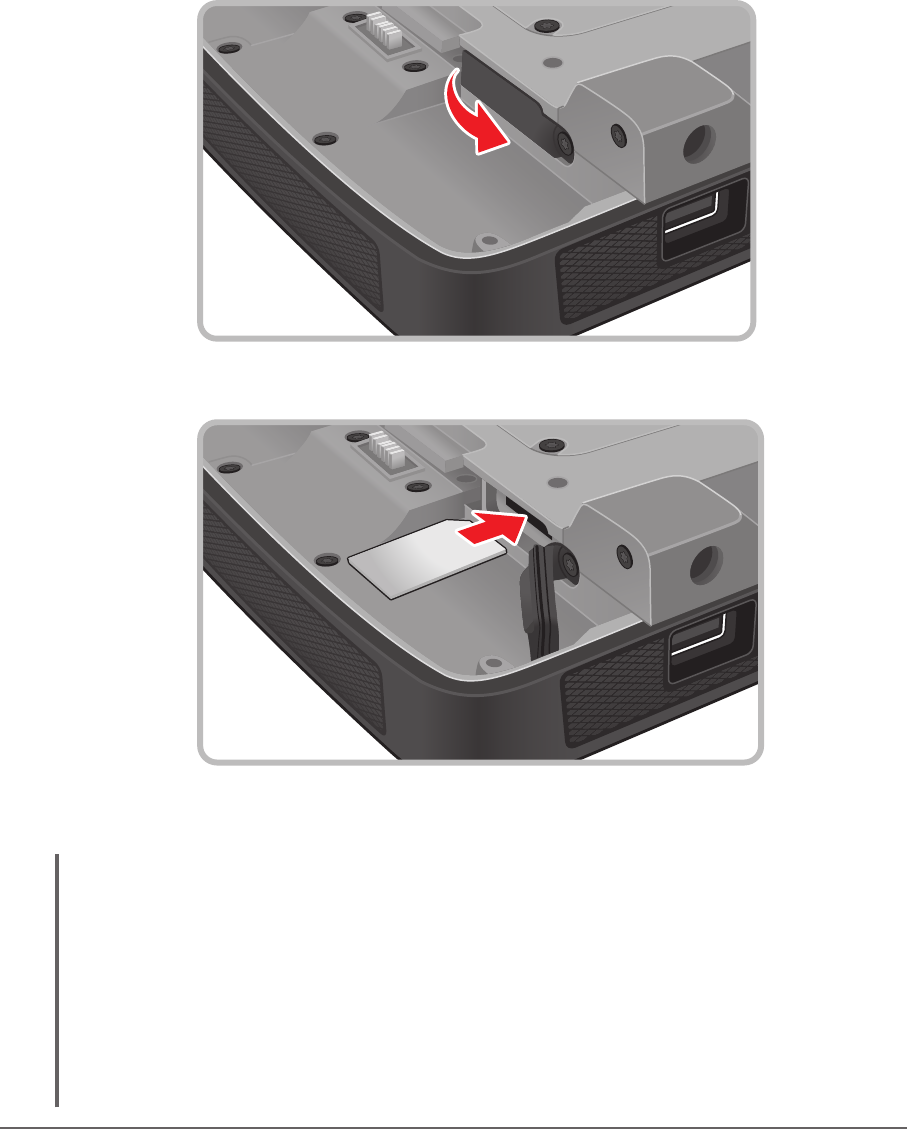
Installing the SIM Card
The tablet computer supports data connection using 3G SIM cards.
Perform the following to install the SIM card to your tablet computer:
1. With battery packs removed, locate the SIM card slot on the back of the
tablet computer.
2. Open the SIM card slot cover.
3. Insert the SIM card with the gold contacts facing down.
4. Close the SIM card slot cover.
NOTE:
• SIM cards must be purchased separately.
• CDMA and GSM SIM cards are supported.
• To avoid damage to the card and ensure network connectivity, turn off the device
power before installing or removing the SIM card.
• For more information on connecting to 3G network, see”Using 3G Network” on page
2-18.
1-9Getting Started
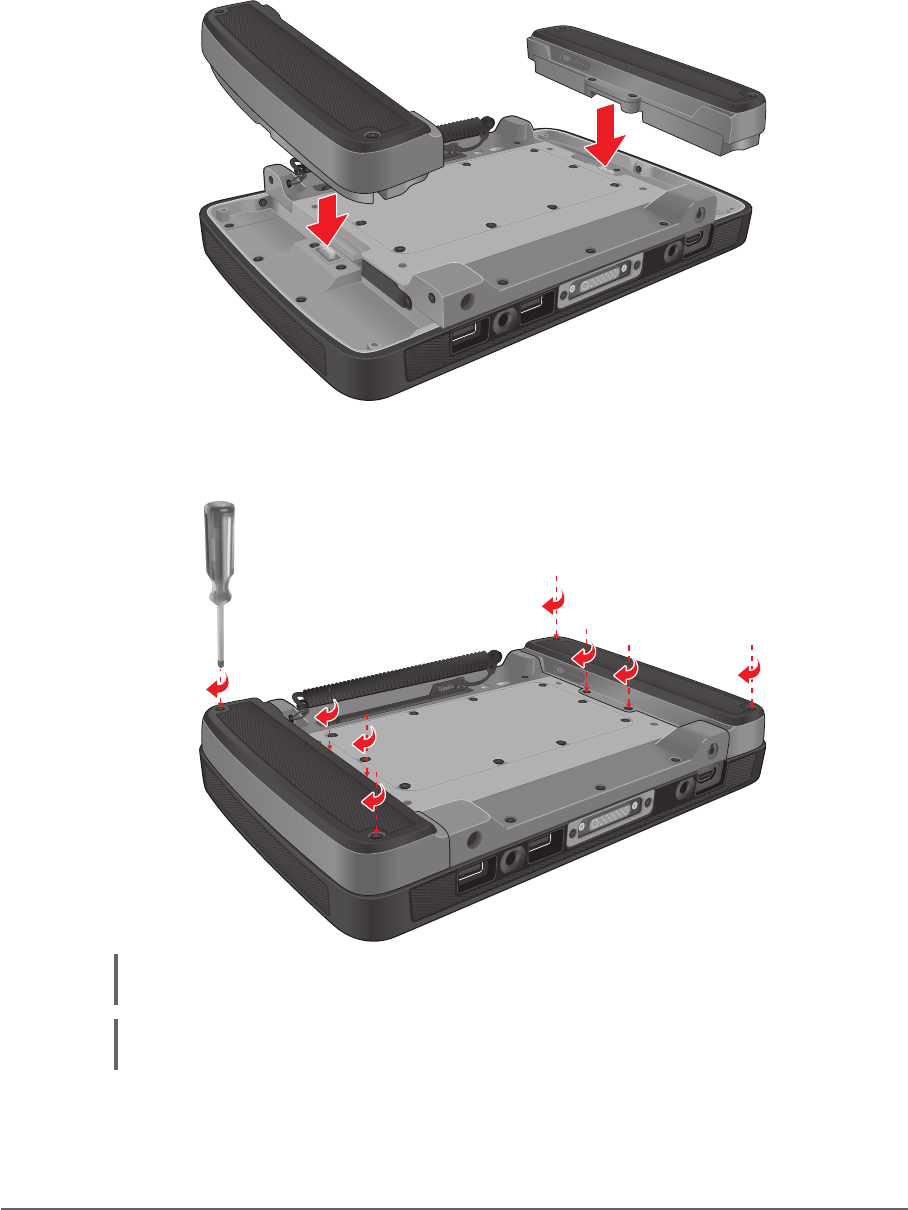
Installing the Battery Packs
Perform the following to install the battery packs to your tablet computer.
1. Place the tablet computer face down on a at even surface.
2. Fit the two battery packs into place on both sides.
3. Using a small Phillips #1 screwdriver, secure the four screws on each
battery taking care not to over tighten.
NOTE: For best results, use a small number 1 Phillips screwdriver.
CAUTION: Do not over torque the screws when installing the batteries.
4. Connect the tablet computer to AC power to charge the battery packs. See
“Connecting to AC Power” on page 1-10.
1-10 Getting Started
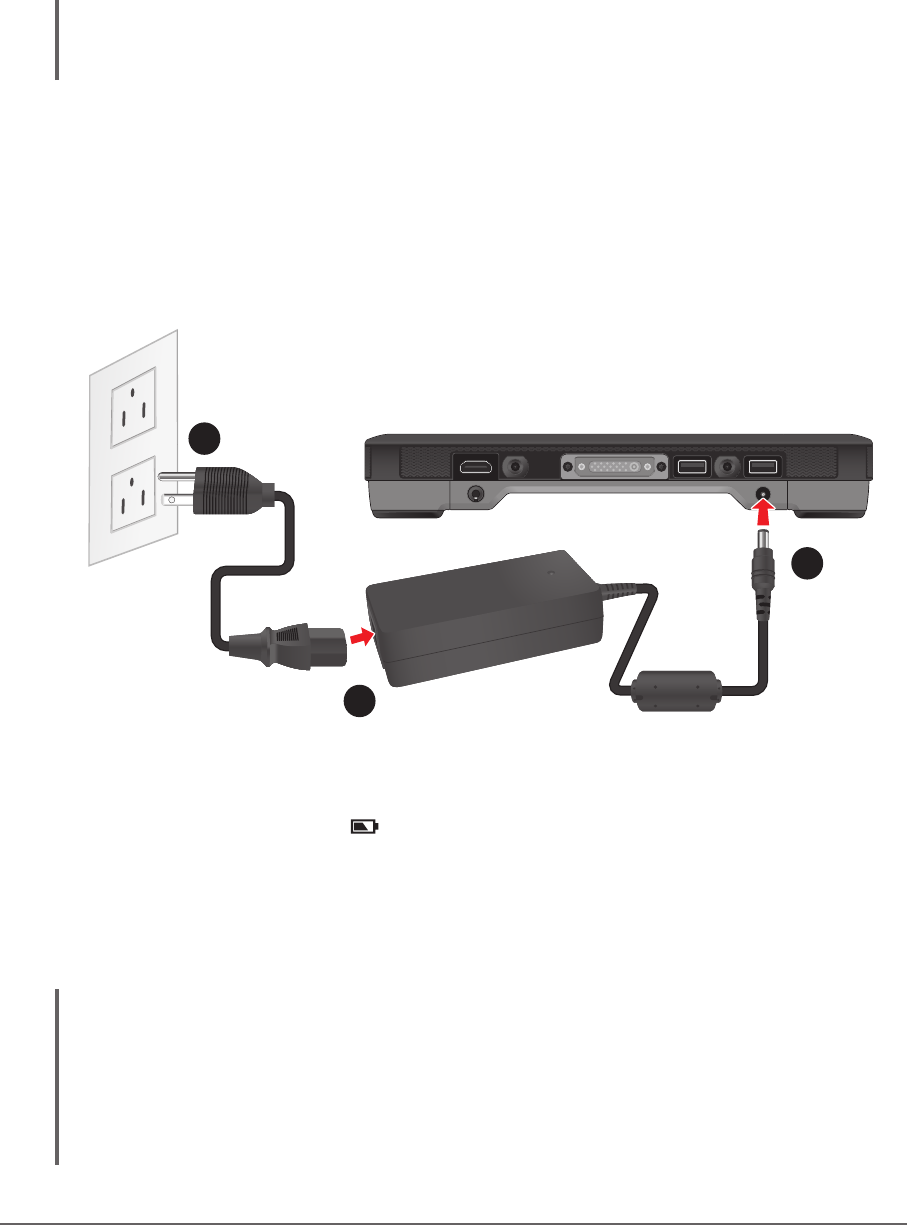
Connecting to AC Power
The tablet computer operates either on the external AC power or internal
battery power. It is recommended to use AC power when you start up the tablet
computer for the rst time.
CAUTION: Use only the AC adapter included with your tablet computer. Using other AC
adapters may damage the tablet computer.
Perform the following to connect the tablet computer to AC power:
1. With the battery packs installed, plug the DC cord of the AC adapter into
the power connector of the tablet computer.
2. Plug the female end of the AC power cord into the AC adapter.
3. Then plug the male end of the AC power cord into an electrical outlet.
1
2
3
When the AC adapter is connected, the battery packs are charging. The
battery LED indicator ( ) shows shows three different states:
• Solid amber: Battery is charging
• Solid greeen: Battery is fully charged.
• Blinking red: Battery power is low.
CAUTION:
• When you disconnect the AC adapter, disconnect from the electrical outlet rst and
then from the tablet computer. A reverse procedure may damage the AC adapter or the
tablet computer.
• When unplugging the connector, always hold the plug head. Never pull on the cord.

1-11Getting Started
Turning the Tablet Computer On and Off
Turning On
1. Make sure that the tablet computer is either connected to AC power or the
battery packs are charged.
2. Press the power button . Notice the screen remains blank for 8 ~ 10
seconds but the power LED lights up.
OK
Fn
F1
F2
F3
The power LED indicator ( ) shows two different states:
• Solid green: Tablet computer is turned on
• Blinking green: Tablet computer is in sleep mode.
• Off: Tablet computer is turned off.
In cold temperature environments, the power LEDs will light up after 2
seconds.
1-12 Getting Started
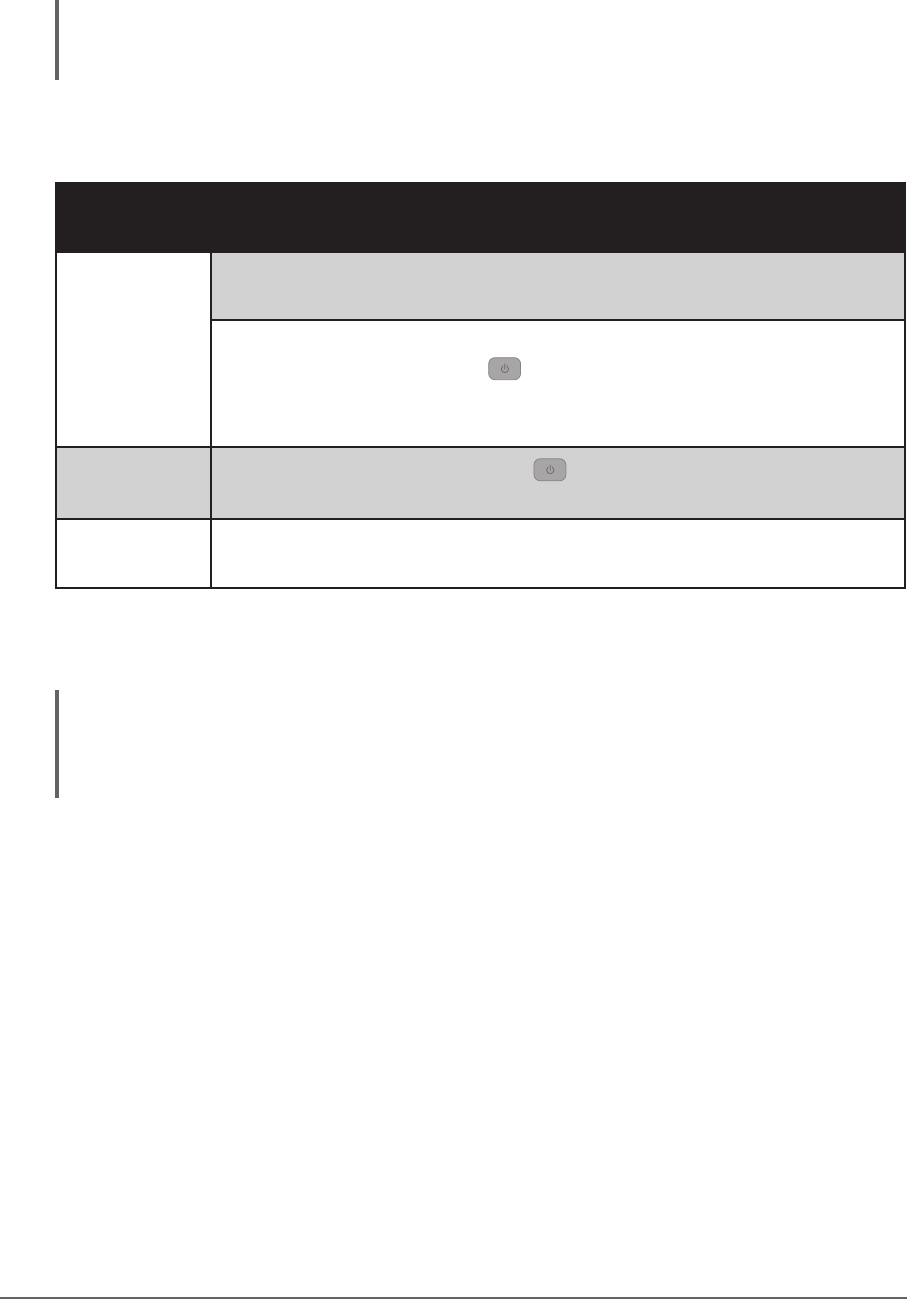
Turning Off
To turn off the tablet computer, use the “Shut Down” command of your
operating system.
CAUTION: Wait until the screen is black and the LED activity has ceased before turning the
computer back on. This may take 5 seconds or longer.
When you nish a working session, you can stop the tablet computer by
shutting it down or leaving the tablet computer in Sleep or Hibernation mode:
To stop in
this mode... Do this...
Off Use the Windows Start Menu and follow the shut down
procedure.
You can force the tablet computer to turn off by pressing and
holding the power button for more than 6 seconds. This is
not the recommended method, but may be necessary if the
system is locked up.
Hybrid Sleep Short press the power button or use the Windows Start
Menu to put the tablet computer in Hybrid Sleep mode.
Hibernation Use the Windows Start Menu to put the tablet computer in
hibernation mode.
Press the power button to resume or turn on the tablet computer from any of
these modes. See “Power Management” on page 4-5 for more information.
NOTE: By conguring the BIOS Setup Utility, you can have the tablet computer automatically
start up or resume when the external AC power is plugged in. See “BIOS Setup” on page
5-2 for more information.

2-1Operating Your Tablet Computer
CHAPTER 2
This chapter provides information about the use of the tablet computer and
describes the operating basics of these components and features:
• Touch Screen
• Input Panel
• Control Panel
• Wireless LAN Features
• Bluetooth Features
• 3G Network Features
• GPS Features
• Accelerometer / Compass Features
• Camera
Operating Your Tablet
Computer
2-2 Operating Your Tablet Computer
Using the Touch Screen
The touch screen is a touch-sensitive device that allows you to control and
make selections on the tablet computer by controlling the location of the pointer
on the screen.
CAUTION:
• Do not use sharp, pointed objects or rough gloves on the touch screen. These objects
may scratch the screen. Use only the spring-tip end of the stylus, the tip of your nger
or woven ber, conductive gloves suitable for touch screens.
OK
Fn
F1
F2
F3
Here are some common terms that you should know when using the touch
screen.
Term Action
Tap Tap gently on the touch screen to select or open an item.
Tapping is the same as clicking the left mouse button of a
PC.
Double-tap Rapidly tap twice on the touch screen. This action is
similar to double-clicking the left mouse button of a PC.
Tap and hold Tap and hold the stylus lightly on the display. A big circle
appears to indicate that a pop-up menu will soon appear.
Lift up the stylus and a pop-up menu appears. Select the
desired function. This action is similar to a right mouse
click on a PC.
Drag Hold the stylus on the screen and drag across the screen
to select text and images or move icons to a new location.
For more customized stylus settings, go to Start > Control Panel > Pen and
Touch.
2-3Operating Your Tablet Computer
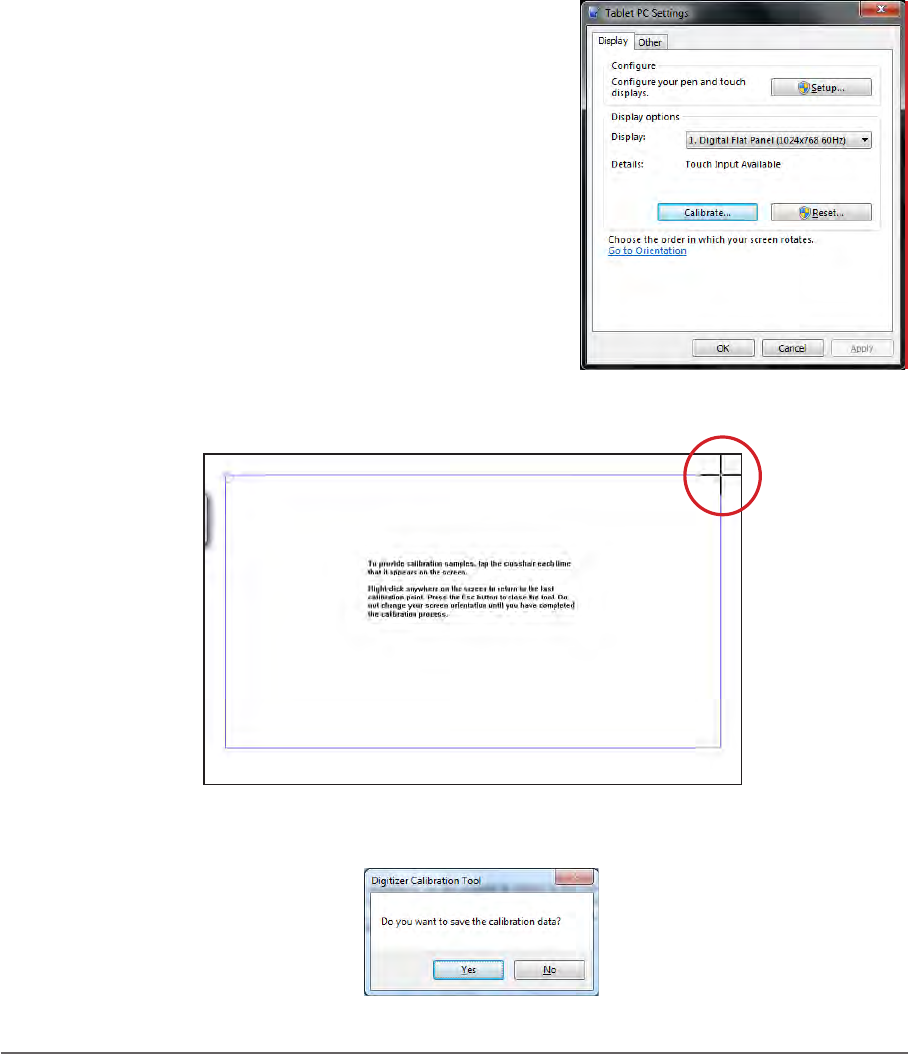
Calibrating the Screen
When there is a noticeable discrepancy in the placement of the stylus on the
screen and the indicated position of the on-screen pointer, re-calibrate the
screen.
There are two types of calibrations:
• Reset: This resets the screen calibration to the factory default settings.
• Manual Calibration: This allows users to manually calibrate the screen.
To reset the screen calibration
Perform the following to reset the screen calibration to its default settings:
1. Tap Start > Control Panel > Tablet PC
Settings.
2. On the Display tab, tap Reset.
To manually calibrate the screen
Perform the following to manually calibrate the
screen:
1. Tap Start > Control Panel > Tablet PC
Settings.
2. On the Display tab, tap Calibrate.
3. Tap the cross-hair with the stylus as it moves around the screen.
4. When calibration is complete, tap Yes to close the calibration utility screen.
2-4 Operating Your Tablet Computer
Using the Input Panel
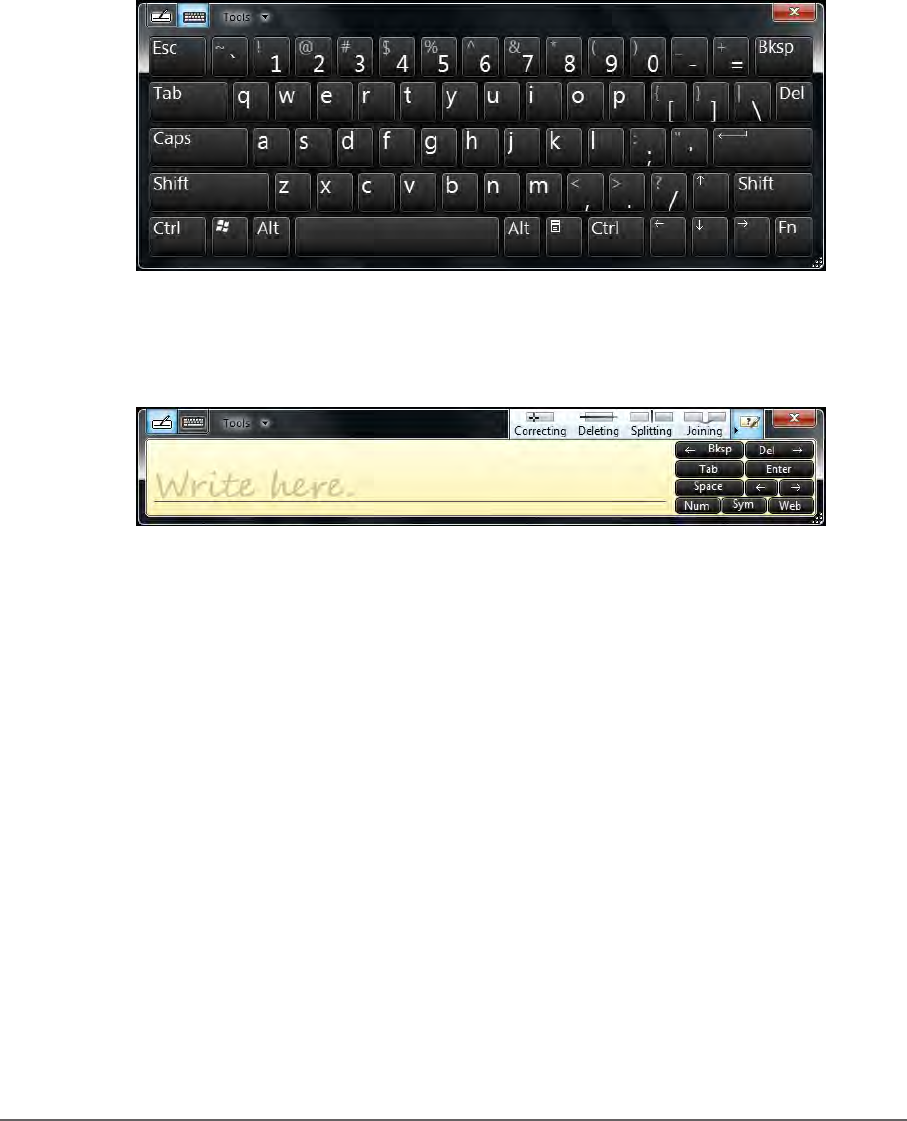
The Tablet Computer Input Panel is a virtual keyboard that allows you to enter
text and perform various keyboard functions.
There are two types of Input Panels for you to use:
• Touch Keyboard
Allows you to enter text by tapping the keys with the stylus, like pressing the
keys on a standard keyboard.
• Writing Pad
Allows you to write on the writing pad, like writing on a piece of paper. Your
handwriting will be converted into typed text.
2-5Operating Your Tablet Computer
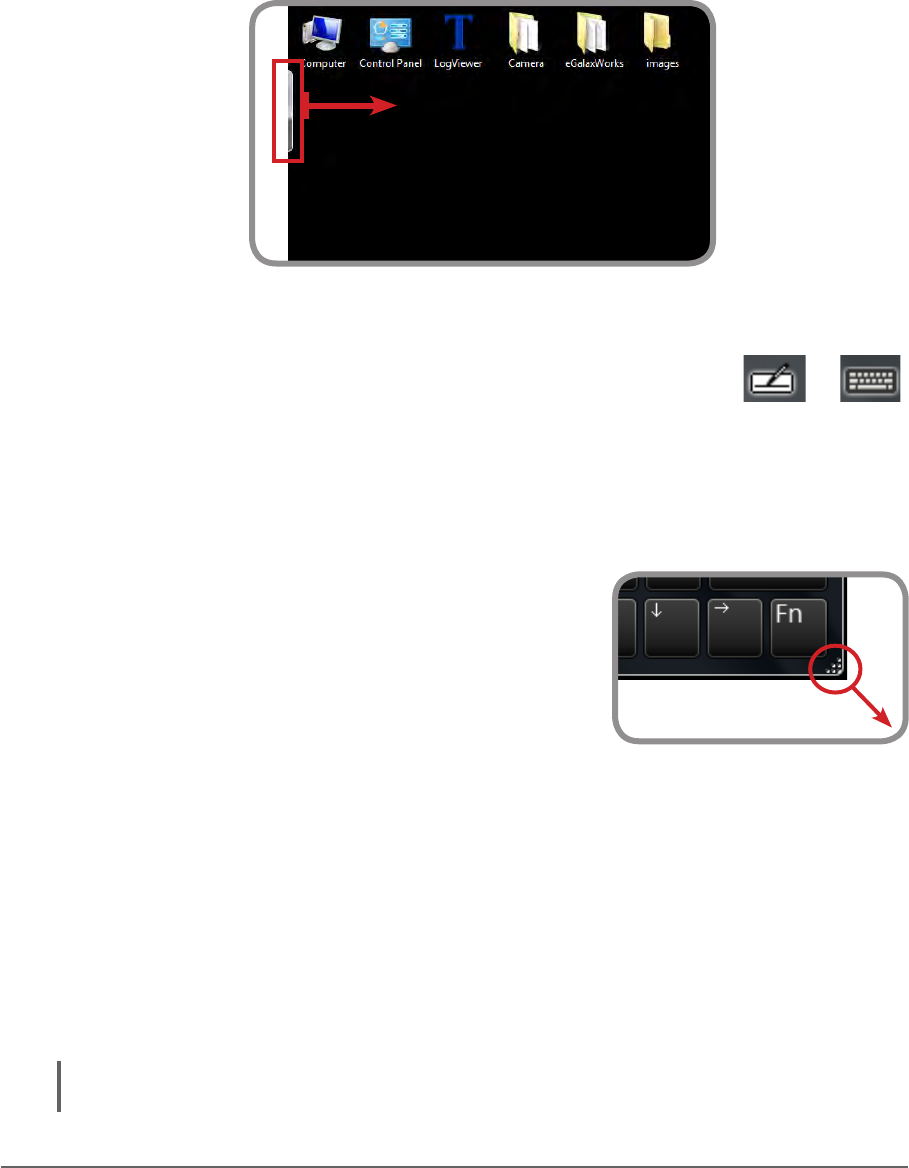
Opening the Input Panel
To open the Input Panel
There are two ways to open the Input Panel.
• Press Fn + F1
• From the left side of the screen, drag the edge of the Input Panel towards
the center.
To switch between keyboards
To switch between the Touch Keyboard and the Writing Pad, tap or
at the upper left corner of the Input Panel.
Managing the Input Panel
To change the Input Panel size
To increase the size of the Input Panel, select
the lower right corner of the Input Panel and drag.
To position the Input Panel
The Input Panel oats on top of the screen by default. To move the Input Panel
to an area on the screen, place the stylus on the title bar and drag the Input
Panel to a new location on the screen.
To dock the Input Panel
You can dock the Input Panel to so that it is anchored at the top or the bottom of
the screen. On the Input Panel, tap Tools > Docking, and tap Dock at top of
screen or Dock at bottom of screen.
NOTE: For more information on using the Input Panel, see Windows’ online help.
2-6 Operating Your Tablet Computer
Using the Control Panel
The Control Panel provides shortcuts for you to utilize the applications and
functions of your Tablet Computer, such as opening an application, adjusting the
brightness setting or volume, and others.
Using the Hotkeys
Press and release the Fn key to temporarily display the Hotkey Information
screen. The buttons have four settings: Setting Default, Setting A, Setting B,
and Setting C.
By pressing a hotkey or a combination, you can open an application, enable
functions, or bring up the Input Panel.
By default, the following hotkeys are congured with the corresponding
applications:
Hotkeys Applications to Access
Setting Default
(Main Level)
▲ / ▼ / ◄ / ► Up, Down, Left, Right
F1 Windows Help
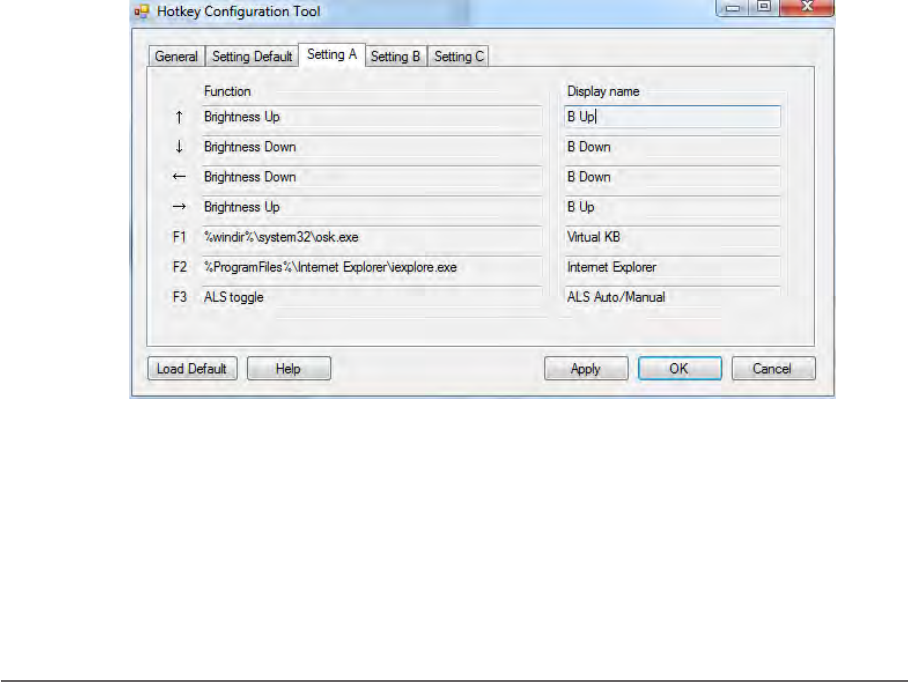
Setting A
(First Level)
Fn + ▲ / ▼ / ◄ / ► Adjust Brightness
Fn + F1 Virtual Keyboard (Input Panel)
Fn + F2 Internet Explorer
Fn + F3 ALS Auto/Manual
OK
Fn
F1
F2
F3
Press to display the
Hotkey Information screen
Press to enter sleep mode
Press to access the log-in
menu or Task Manager
2-7Operating Your Tablet Computer
Hotkeys Applications to Access
Setting B
(Second Level)
Fn + Fn + ▲ / ▼ / ◄ / ► Adjust Volume
Fn + Fn + F1 Wi
Fn + Fn + F2 Bluetooth
Fn + Fn + F3 3G
Setting C
(Third Level)
Fn + Fn + Fn +
▲ / ▼ / ◄ / ► Up, Down, Left, Right
Fn + Fn + Fn + F1 F1
Fn + Fn + Fn + F2 F2
Fn + Fn + Fn + F3 Microsoft Website
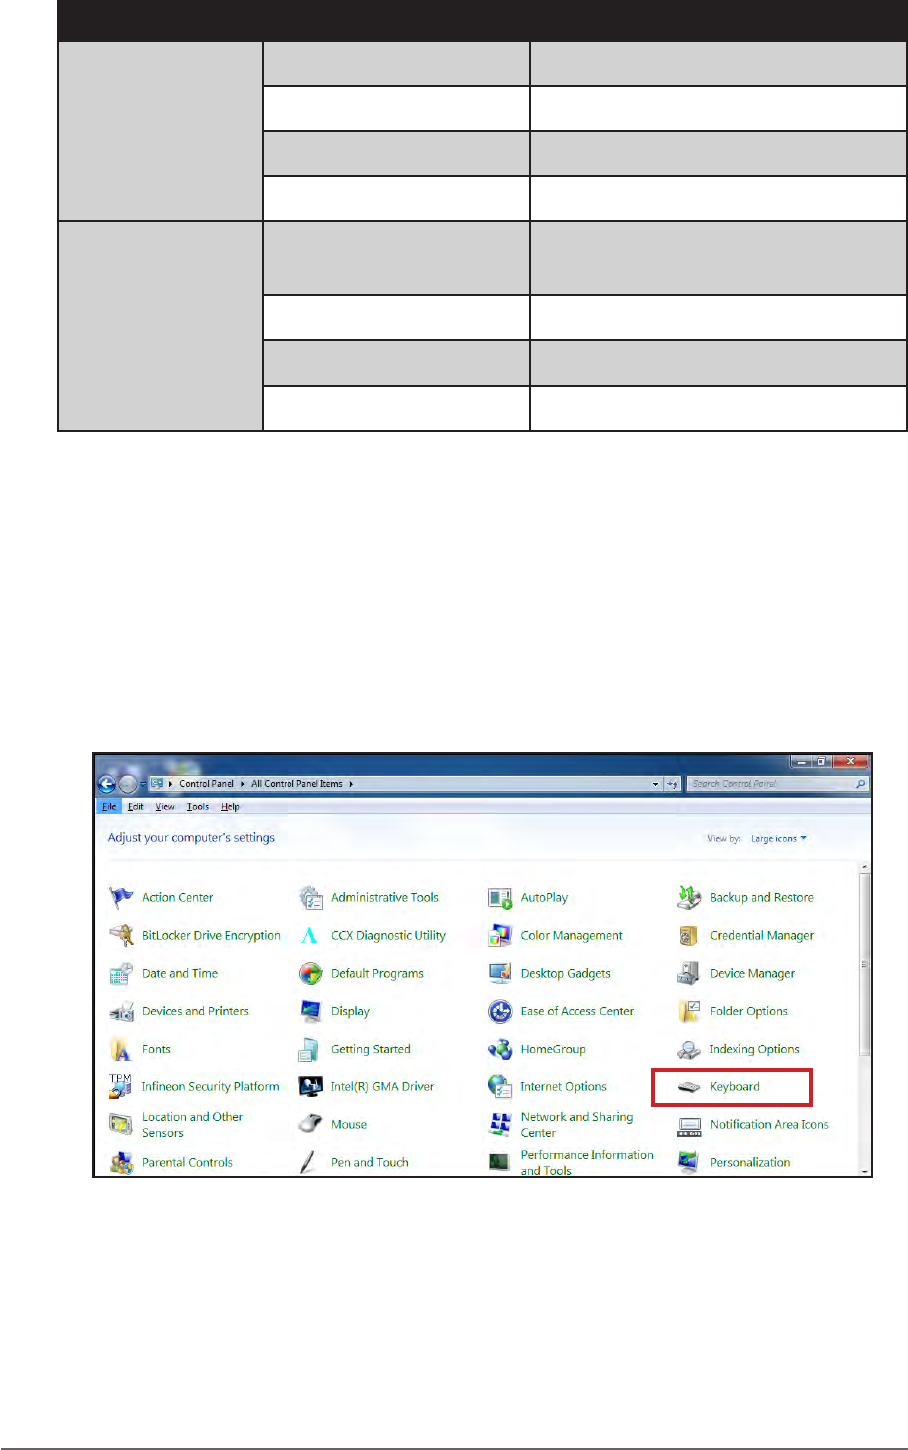
Using the Hotkey Conguration Tool
To suit your needs, you can modify the associated applications or commands to
hotkey combinations using the Hotkey Conguration Tool.
To Open the Hotkey Conguration Tool
1. Tap Start > Control Panel > Keyboard.
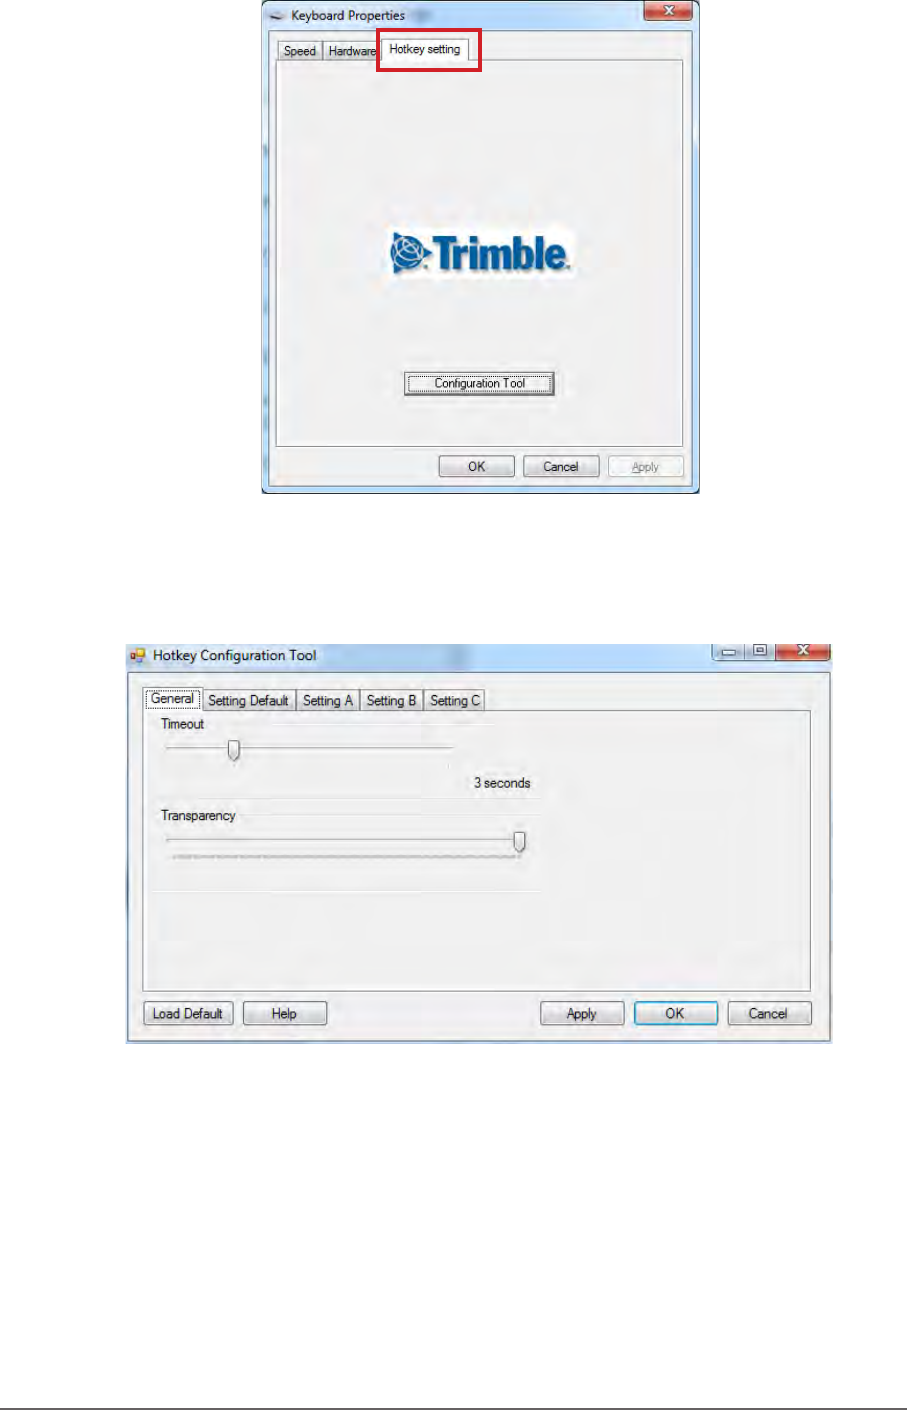
2-8 Operating Your Tablet Computer
2. The Keyboard Properties screen appears. Tap the Hotkey setting tab.
3. Tap Conguration Tool to open the Hotkey Conguration Tool screen.
The Hotkey Conguration Tool has ve page tabs:
• General: To congure the hotkey screen timeout and transparency.
• Setting Default: To congure the main hotkeys.
• Setting A: To congure the rst level hotkey combination.
• Setting B: To congure the second level hotkey combination.
• Setting C: To congure the third level hotkey combination.
2-9Operating Your Tablet Computer
To adjust screen timeout and transparency
1. Open the Hotkey Conguration Tool.
2. On the General tab, do the following:
• Slide the Timeout bar to the left or right to decrease or increase the
Function key screen timeout (in seconds).
• Slide the Transparency bar to the left or right to adjust the Function
key screen transparency.
3. Tap Apply to apply changes.
To congure the hotkeys
1. Open the Hotkey Conguration Tool.
2. Tap one of the following tabs:
• Setting Default: To congure the main level hotkeys ▲, ▼, ◄, ►,
F1, F2, F3 on the control panel.
• Setting A: To congure the rst level hotkeys. First level hotkeys refer
to hotkey combination Fn + ▲ / ▼ / ◄ / ► / F1 / F2 / F3.
• Setting B: To congure the second level hotkeys. Second level hotkeys
refer to hotkey combination Fn + Fn + ▲ / ▼ / ◄ / ► / F1 / F2 / F3.
• Setting C: To congure the third level hotkeys. Third level hotkeys refer
to hotkey combination Fn + Fn + Fn + ▲ / ▼ / ◄ / ► / F1 / F2 / F3.
2-10 Operating Your Tablet Computer
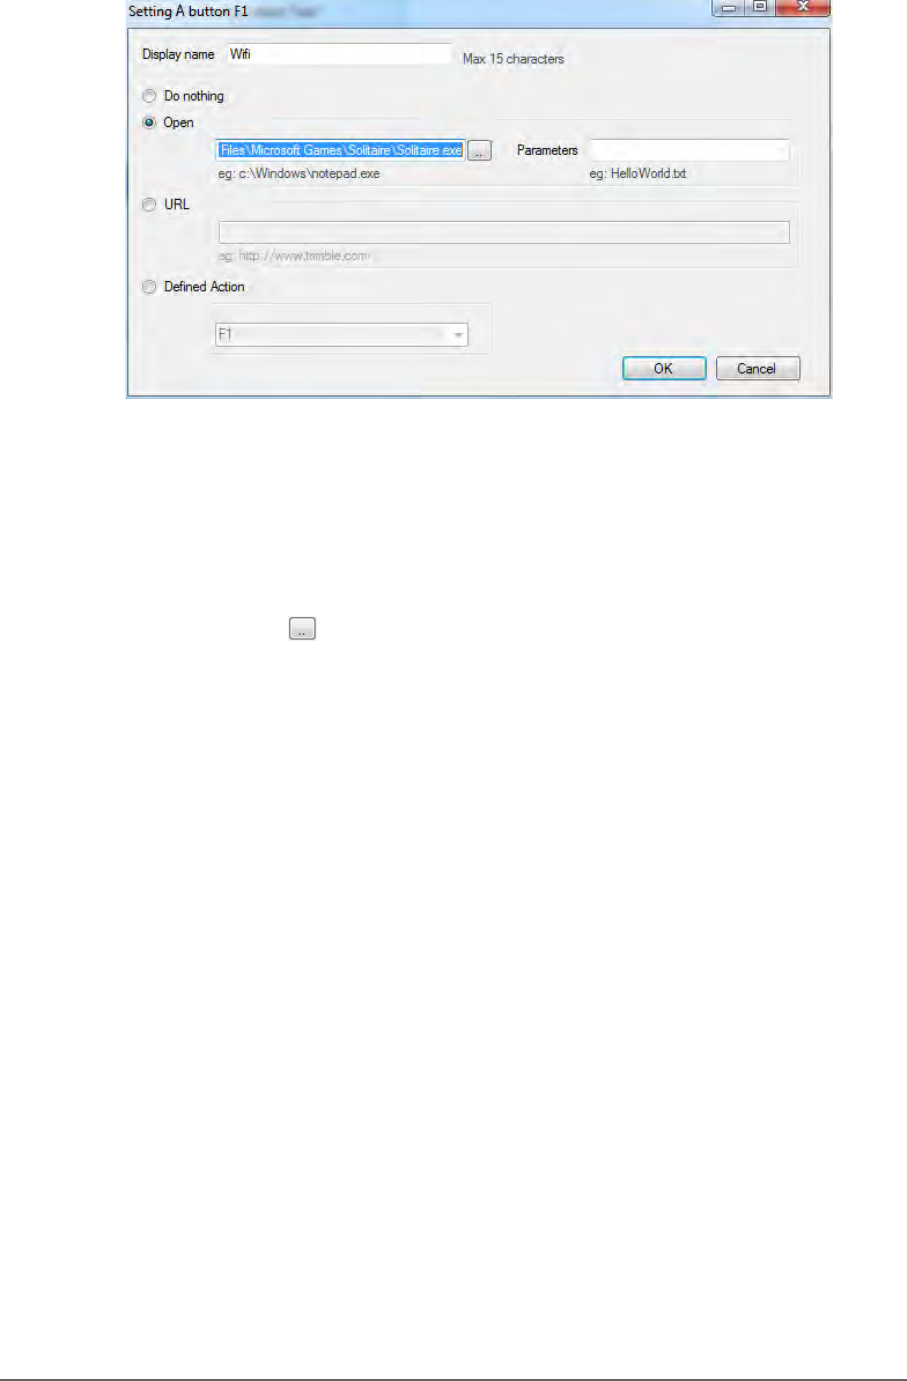
3. Tap the eld box of the hotkey that you want to modify. The screen below
appears.
4. On the Display name box, type a name for the hotkey (maximum of 15
characters only).
5. Tap one of the following buttons:
• Do nothing: To do nothing when the hotkey is pressed.
• Open: To assign an application that will open when the hotkey is
pressed. Tap to select the application.
• URL: To set a URL address that will open when the hotkey is pressed.
Type the URL address on the box.
• Dened Action: To perform an action or command when the hotkey is
pressed. Tap the box and select the action or command from the list.
6. Tap OK to go back the previous screen.
7. Tap OK to close the screen.

2-11Operating Your Tablet Computer
Adjusting Volume
By default, you may perform the following to adjust the volume of your Tablet
Computer:
• To increase volume, press Fn + Fn, then press ▲ or ► repeatedly.
• To decrease volume, press Fn + Fn, then press ▼ or ◄ repeatedly.
Adjusting Screen Brightness
By default, you may perform the following to adjust the screen brightness of
your Tablet Computer:
• To increase brightness, press Fn, then press ▲ or ► repeatedly.
• To decrease brightness, press Fn, then press ▼ or ◄ repeatedly.

2-12 Operating Your Tablet Computer
Using Wireless LAN
Your Tablet Computer has a built-in wireless antenna which automatically
detects wireless networks that are within range.
It takes approximately 30 seconds for your Tablet Computer to make a
successful wireless connection and approximately 10 seconds to disconnect.
Turning the Wireless Antenna On and Off
By default, the wireless antenna is turned on. In case you need to turn the
wireless antenna on or off, perform the following:
1. Tap Start > Control Panel > Windows Mobility Center.
2. To turn the wireless antenna on or off, tap Turn wireless on or Turn
wireless off.
2-13Operating Your Tablet Computer
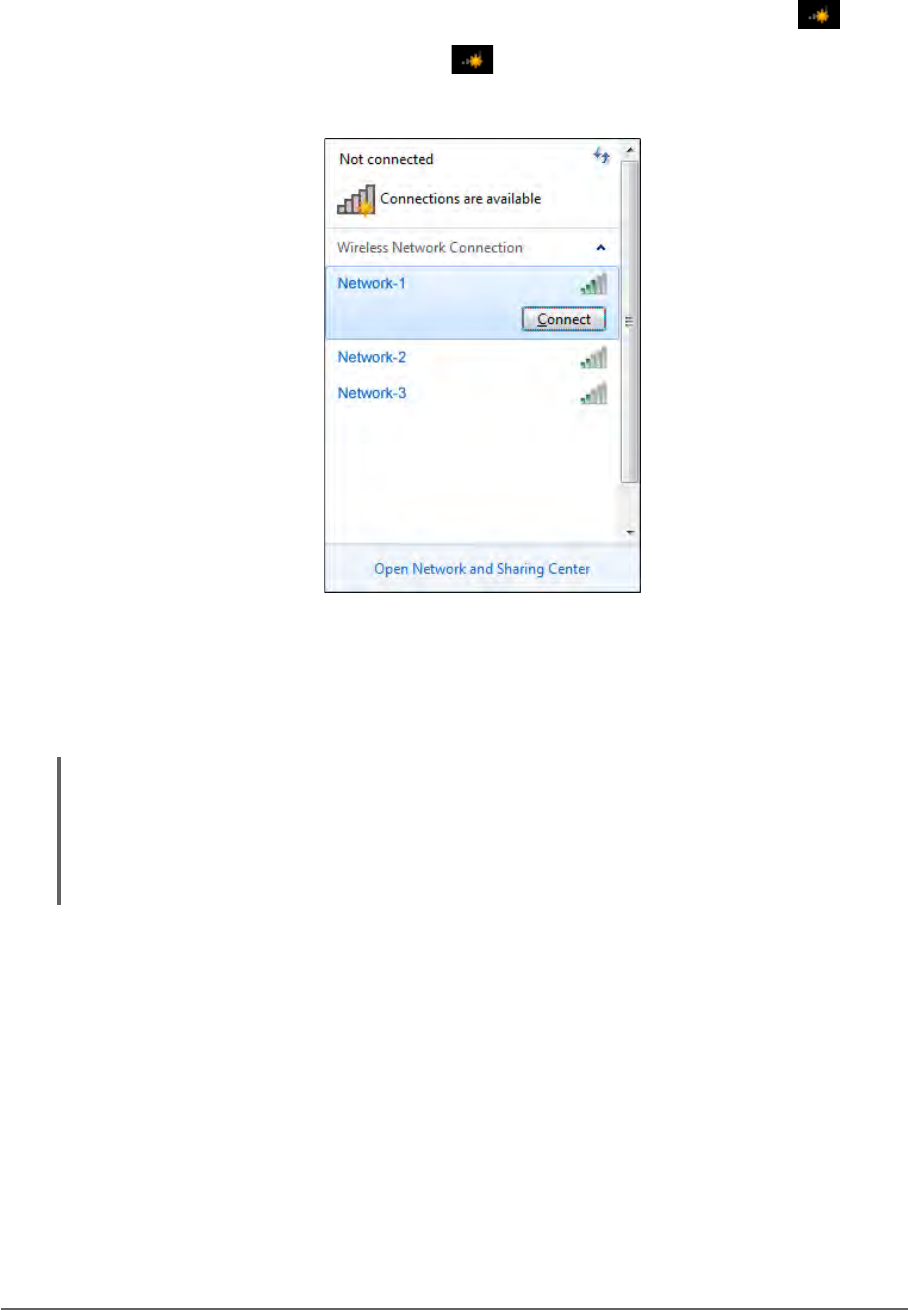
Connecting to a Wireless Network
Perform the following to connect to a wireless network:
1. Make sure that the wireless radio is “on” (The Wireless LED indicator in
solid green and the Wireless network icon on the taskbar shows ).
2. Tap the Wireless Network icon ( ) on the taskbar.
3. In the list of available networks, tap a network.
4. Tap Connect.
5. If the network requires authentication, enter the security key or
passphrase.
NOTE:
• Once you are connected to a wireless network, Windows saves the network prole and
will automatically connect to that network when it is in range.
• For more information on connecting to a wireless network, see Window’s online help.
2-14 Operating Your Tablet Computer
Using Bluetooth
Your Tablet Computer has integrated Bluetooth capability for short-range
wireless communication between Bluetooth-enabled devices.
By default, the Bluetooth feature is enabled as indicated by the Bluetooth icon
() on the taskbar; but your Tablet Computer is not visible to other devices.
To make your Tablet Computer visible, check the Discovery box in Bluetooth
settings (see “Conguring Bluetooth Settings” on page 2-17).
Turning the Bluetooth Adapter On and Off
In case you need to turn the Bluetooth adapter on or off, perform the following:
1. Tap the Bluetooth On ( ) or Bluetooth off ( off) icon on the taskbar.
2. A pop up menu appears. Tap Turn adapter on or Turn adapter off.
NOTE: If the Bluetooth icon is not shown on the taskbar, tap Start > Devices and Printers.
Under Devices, tap and hold the Bluetooth adapter icon, a pop up menu appears. Tap Blue-
tooth settings, then check Show the Bluetooth icon in the notication area, and tap OK.
Pairing with Bluetooth Devices
Before you can pair with Bluetooth devices for the rst time, you need to add
and save the device prole to your Tablet Computer.
To add and pair a Bluetooth device
Perform the following to pair your Tablet Computer with Bluetooth devices:
1. Make sure the Bluetooth adapter is on as indicated by the Bluetooth icon
( ) on the taskbar.
2. Tap the Bluetooth icon ( ) to display a pop up menu.
2-15Operating Your Tablet Computer
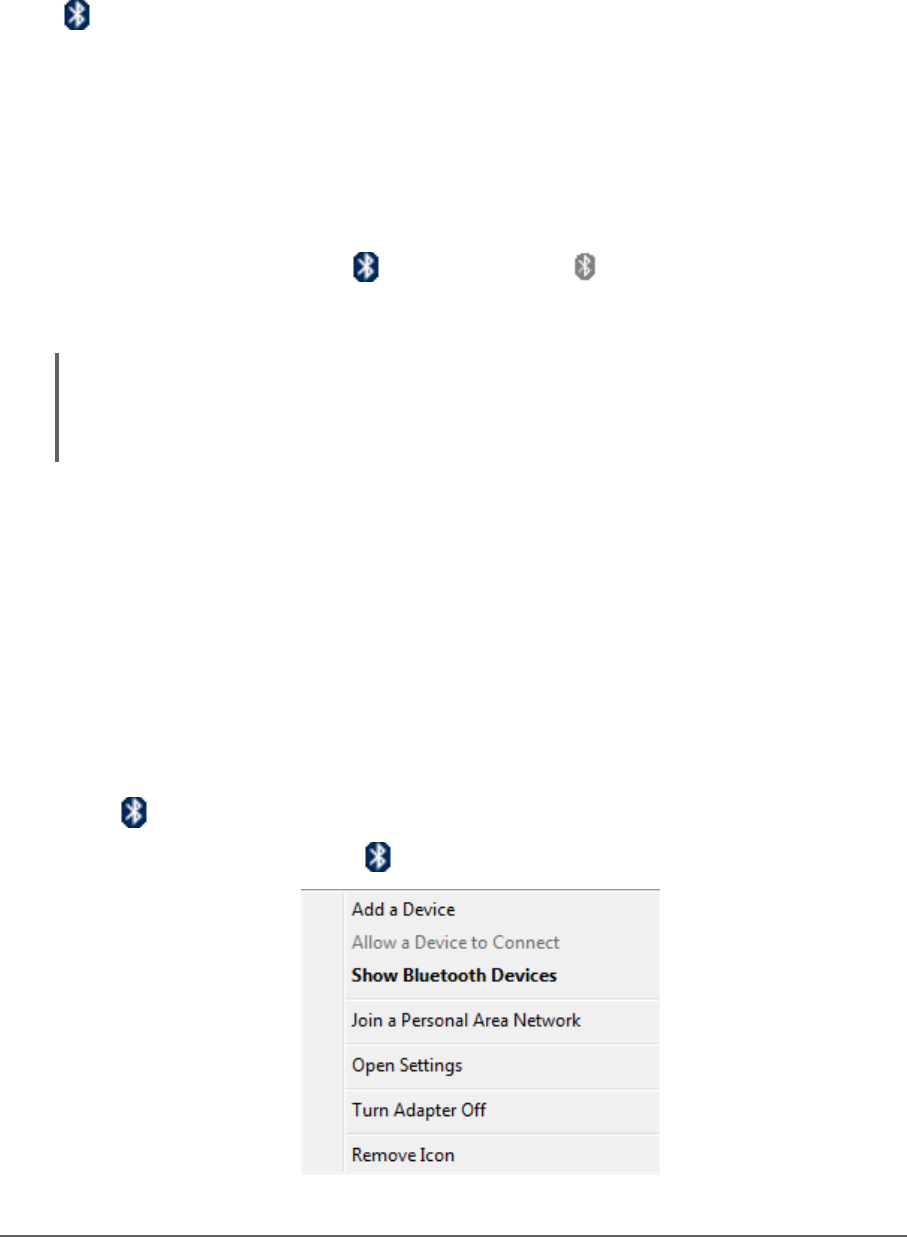
3. Tap Add a Device. The Tablet Computer will scan for Bluetooth devices
within range.
4. Tap the device you want to pair with, then tap Next.
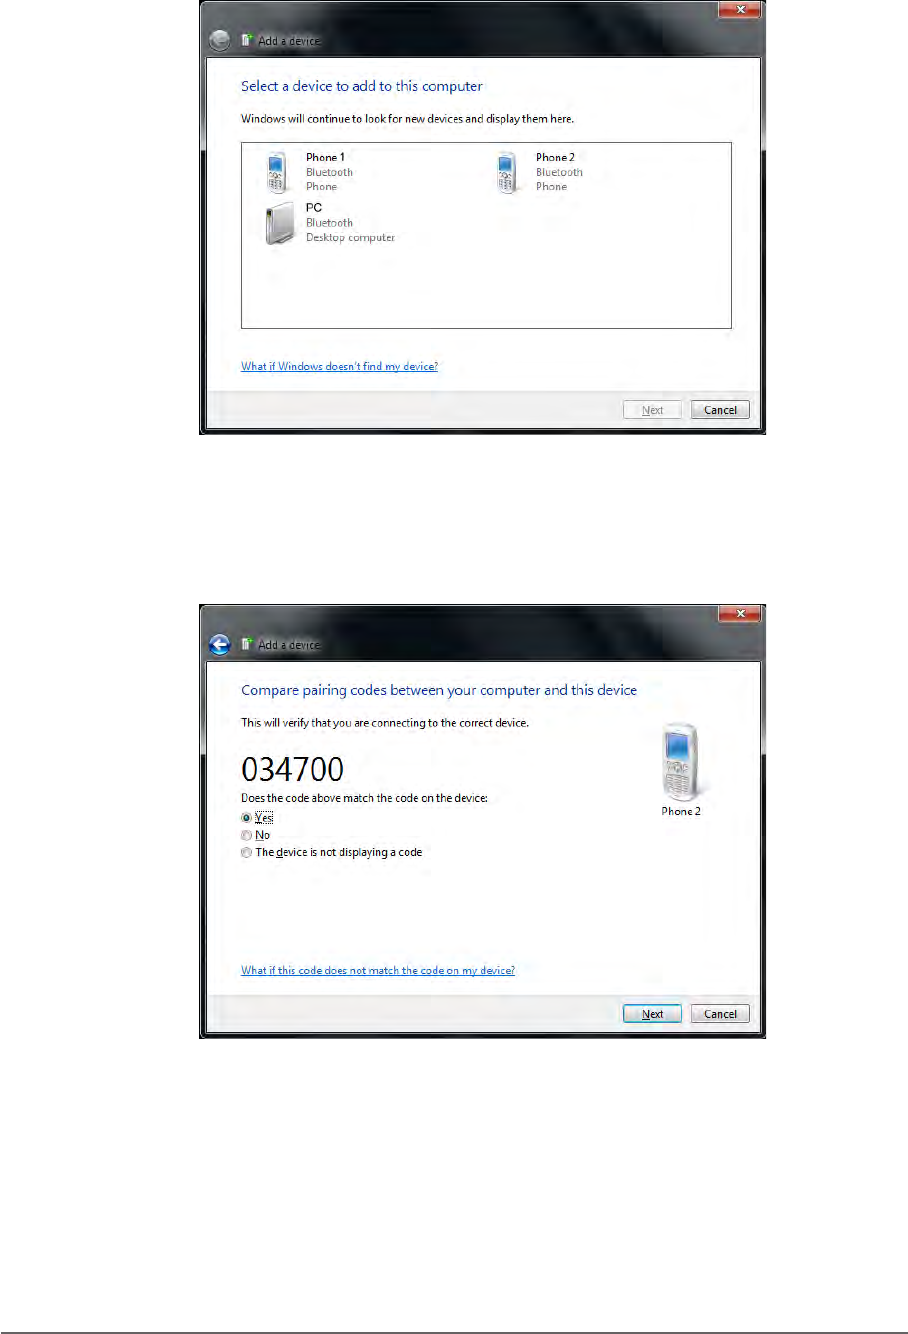
5. Depending on the device you are pairing, you may be prompted to enter
or verify the pairing code. The pairing code entered or shown on your
Tablet Computer and the Bluetooth device must be the same. Tap Next to
continue.
2-16 Operating Your Tablet Computer
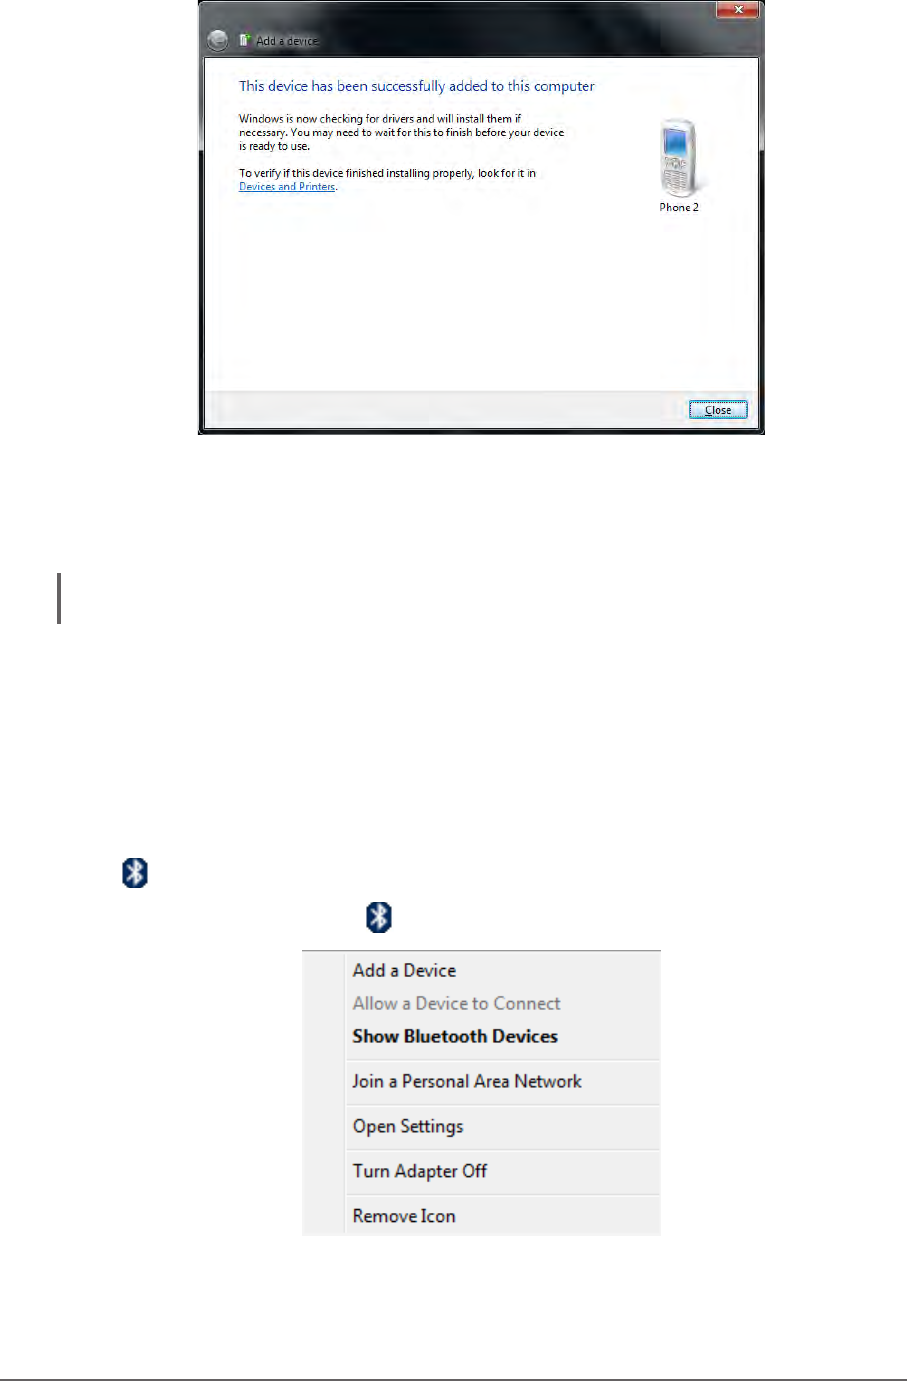
6. Windows will check for the device driver and install, if necessary. Tap
Close to close the screen.
Depending on the paired Bluetooth device, you may use your Tablet Computer
speakers to listen to music played from the Bluetooth device, transfer les, and
more.
NOTE: For more information on using Bluetooth features, see Windows online help.
To reconnect to a Bluetooth device
Once a Bluetooth device has been paired with your Tablet Computer, you do
not need to enter or verify the pairing code as you did the rst time.
To reconnect to a Bluetooth device, perform the following:
1. Make sure the Bluetooth adapter is on as indicated by the Bluetooth icon
( ) on the taskbar.
2. Tap the Bluetooth icon ( ) to display a pop up menu.
3. Tap Show Bluetooth Devices.
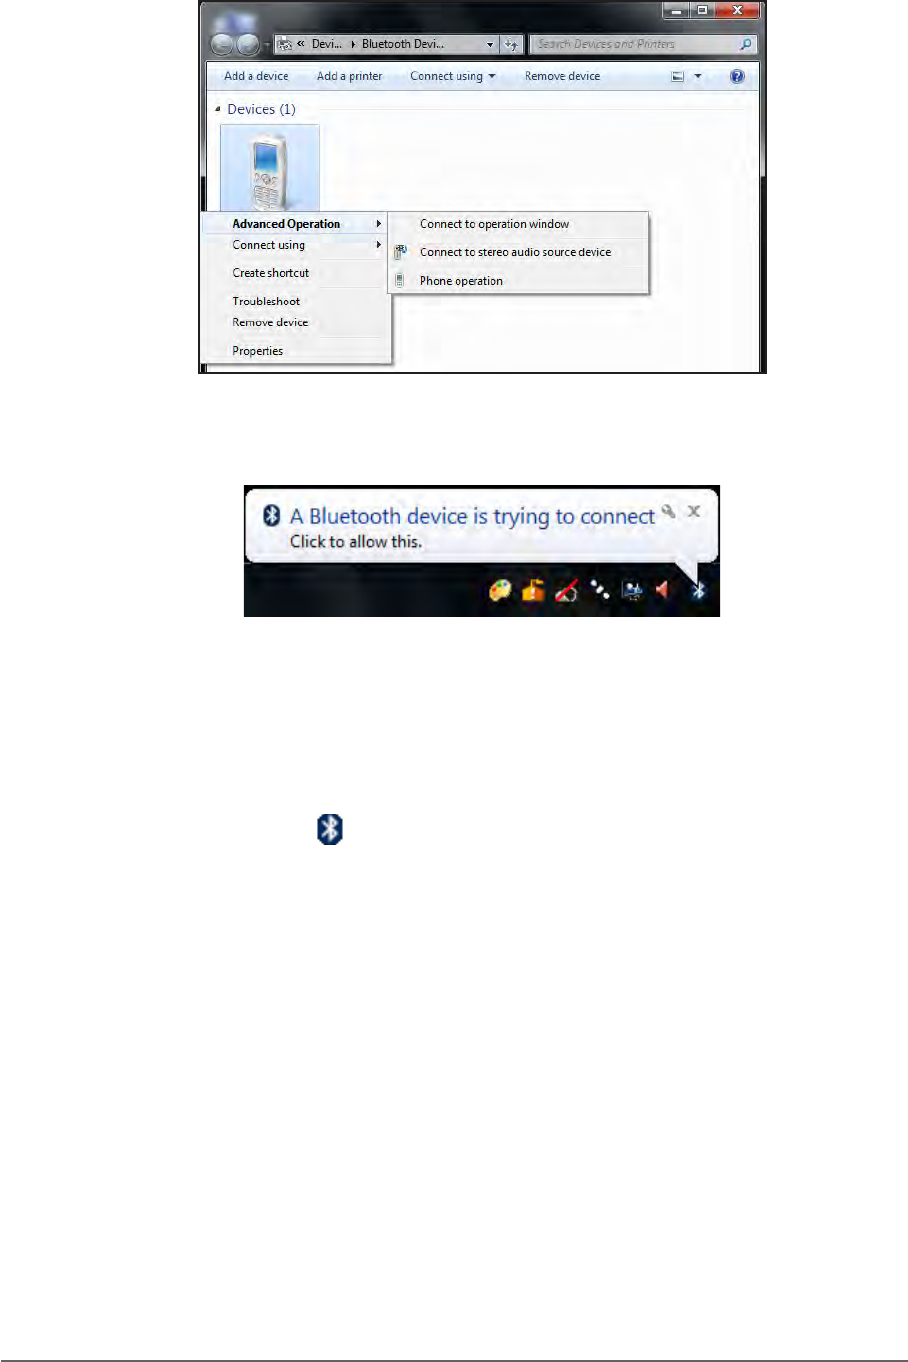
2-17Operating Your Tablet Computer
4. Tap and hold the Bluetooth device to display the pop up menu.
5. Tap Advanced Operation, then tap the applicable connection operation.
When a Bluetooth device wants to pair with your Tablet Computer, a pop up
message appears on the taskbar, tap the message to pair with the device.
Conguring Bluetooth Settings
The Bluetooth Settings allows you to congure how you want to connect to
Bluetooth devices, sync data, and other options. To access the settings, tap and
hold the Bluetooth icon ( ) on the taskbar, and tap Open Settings.
2-18 Operating Your Tablet Computer
Using 3G Network
Your Tablet Computer may have 3G network capabilities that provide wireless
connection to the Internet using a SIM card with data subscription.
NOTE: The 3G network feature is an optional item.
Connecting to 3G Network
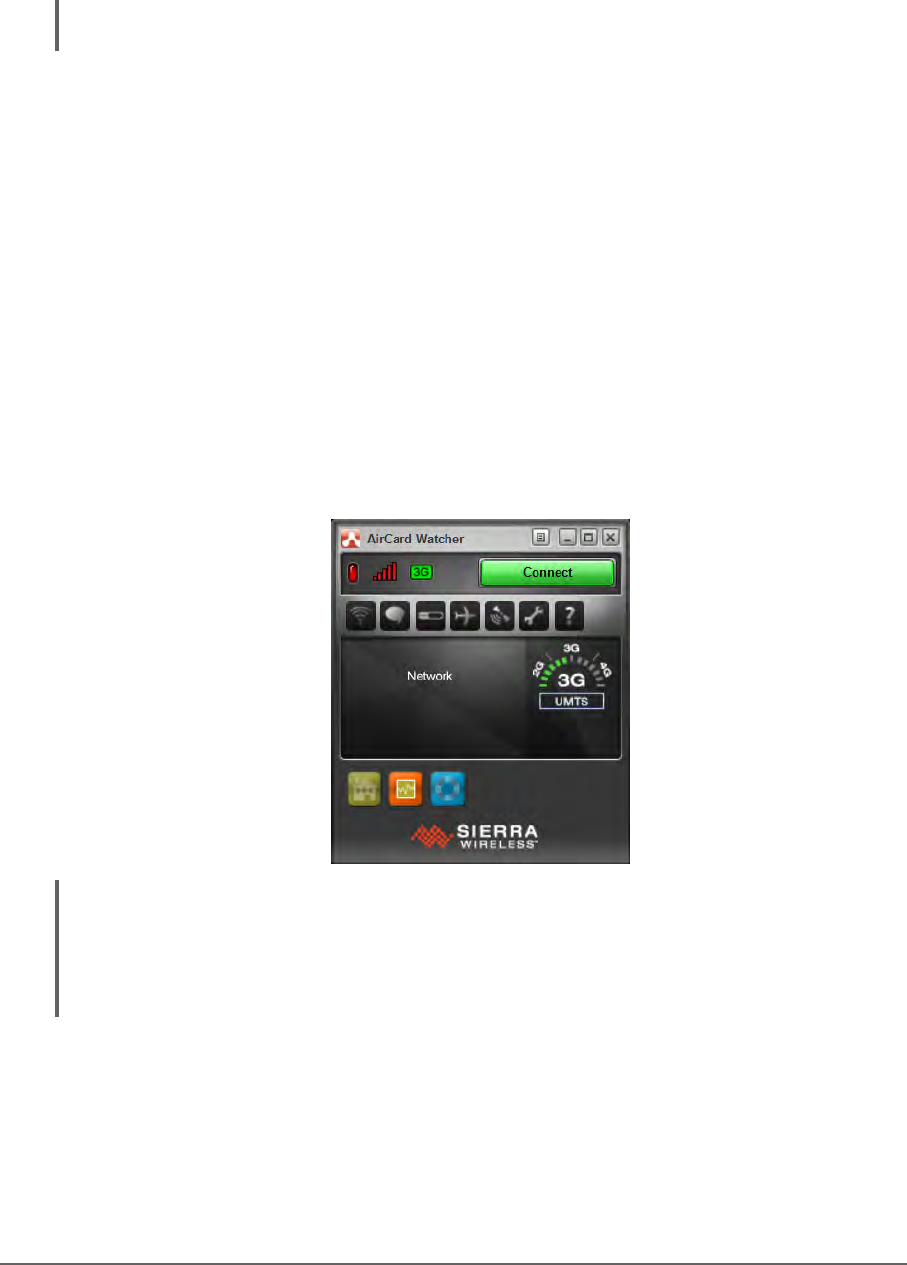
Your Tablet Computer comes with Sierra Wireless AirCard® Watcher, an
application that allows you to connect to the Internet using your SIM card and
keeps you informed of your wireless connection status. Perform the following to
connect to your 3G network:
1. Install a SIM card to your Tablet Computer (see “Installing the SIM Card”
on page 1-8).
2. Open the AirCard® Watcher application (tap Start > All Programs > Sierra
Wireless > AirCard Watcher).
The application detects the SIM card and displays network information on
the AirCard® Watcher main screen.
TIP: To open AirCard® Watcher faster, create a desktop shortcut icon or congure one of the
hotkeys to open the application (see “Using the Hotkeys” on page 2-6). Alternatively, you
can set AirCard® Watcher to open and connect automatically with your 3G network (see
“To congure 3G network proles” on page 2-22).
3. Tap Connect to connect to the 3G network.
Once connected, the AirCard® Watcher main screen displays the network
connection information, such as signal strength, connection speed, and
bitrate transfer. For more information on using the application, see “Using
AirCard® Watcher” on page 2-19.
2-19Operating Your Tablet Computer
Using AirCard® Watcher
The AirCard® Watcher main screen
1
2
8
9
3
410
5
6
11
7
No. Item Description
1 3G On/Off • Green: 3G network is on.
• Red: 3G network is off.
Signal Strength • Green: Indicates the network signal
strength. More lit bars indicates stronger
signal.
• Red: No signal.
Network Type Indicates the network connection type.
2 Toolbar Tap an icon to access the function.
Wireless Prole Tap to view and modify wireless network
prole.
SMS Tap to open SMS Express to send and
receive SMS messages on your Tablet
Computer.
NOTE: Your data plan subscription must support this
feature to be able to send and receive SMS messages
on your Tablet Computer.
History Tap to view the usage history and clear the
bitrate counters.
Airplane Mode Tap to enable airplane mode. When this
feature is enabled, the icon turns red. Tap the
icon again or tap Turn Radio On to disable
airplane mode.
2-20 Operating Your Tablet Computer
No. Item Description
2 AirCard GPS Tap to open AirCard GPS Monitor.
Settings Tap to access the AirCard® Watcher settings.
See “Conguring AirCard® Watcher Settings”
on page 2-21.
Help Tap to view the help le.
3Network Name Displays the name of the SIM card network
provider.
4Data Transfer Rate Displays the upstream and downstream
transfer information.
5 Home Tap to open the Sierra Wireless website.
6 Speed Graph Tap to display a graphical table of the data
transfer speed.
7 Menu Tap to access the application menu.
Minimize Tap to minimize the application to the system
tray.
Restore Tap to toggle the display between full view
and compact view.
Close
8Connect / Disconnect
Button
Tap to connect or disconnect from the 3G
network.
9Network Info A graphical display of the network connection
type.
10 Speed Indicates the network connection speed.
11 Customer Support Tap to open Sierra Wireless support website.
2-21Operating Your Tablet Computer
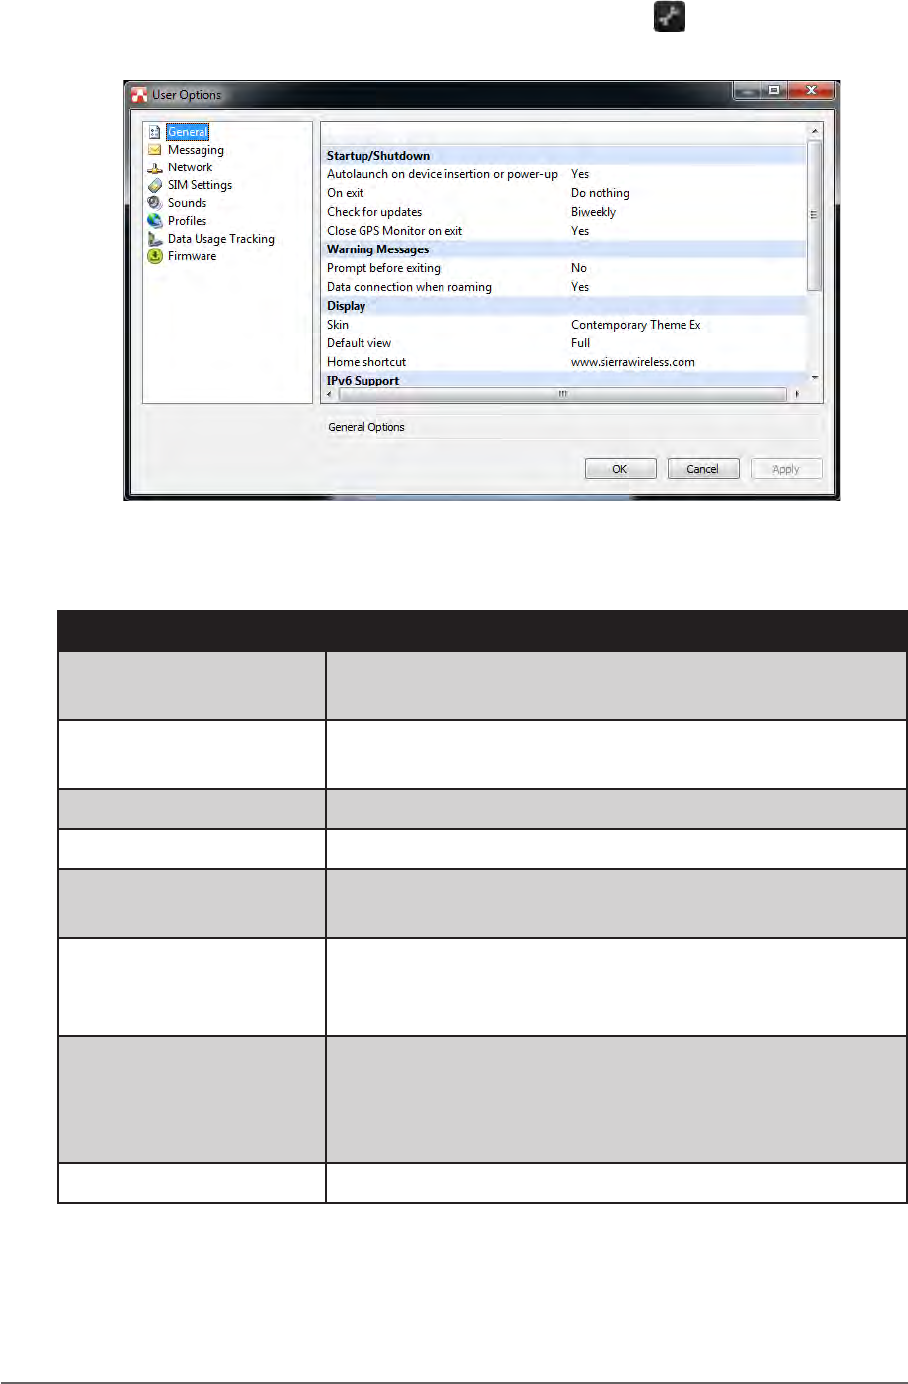
Conguring AirCard® Watcher Settings
On the AirCard® Watcher main screen, tap the Settings ( ) icon to display the
screen below.
Tap a menu item on the left panel to display the corresponding settings on the
right. The following menus are available:
Menu Description
General Congures startup/shutdown settings, warning
messages, display properties, and others.
Messaging Congures message settings such as service center
number, default storage, and message notication.
Network Congures network mode and radio technology.
SIM Settings Enables SIM security settings.
Sounds Enables sound alert when network is connected,
disconnected or when a new message is received.
Proles Congures network proles and auto-connect
functions. See “To congure 3G network proles” on
page 2-22.
Data Usage Tracking Enables data usage tracking and congures data
subscription rate plan settings. This feature is useful
when you have limited data rate plan to help you
monitor and control your Internet usage.
Firmware Displays rmware information.
2-22 Operating Your Tablet Computer
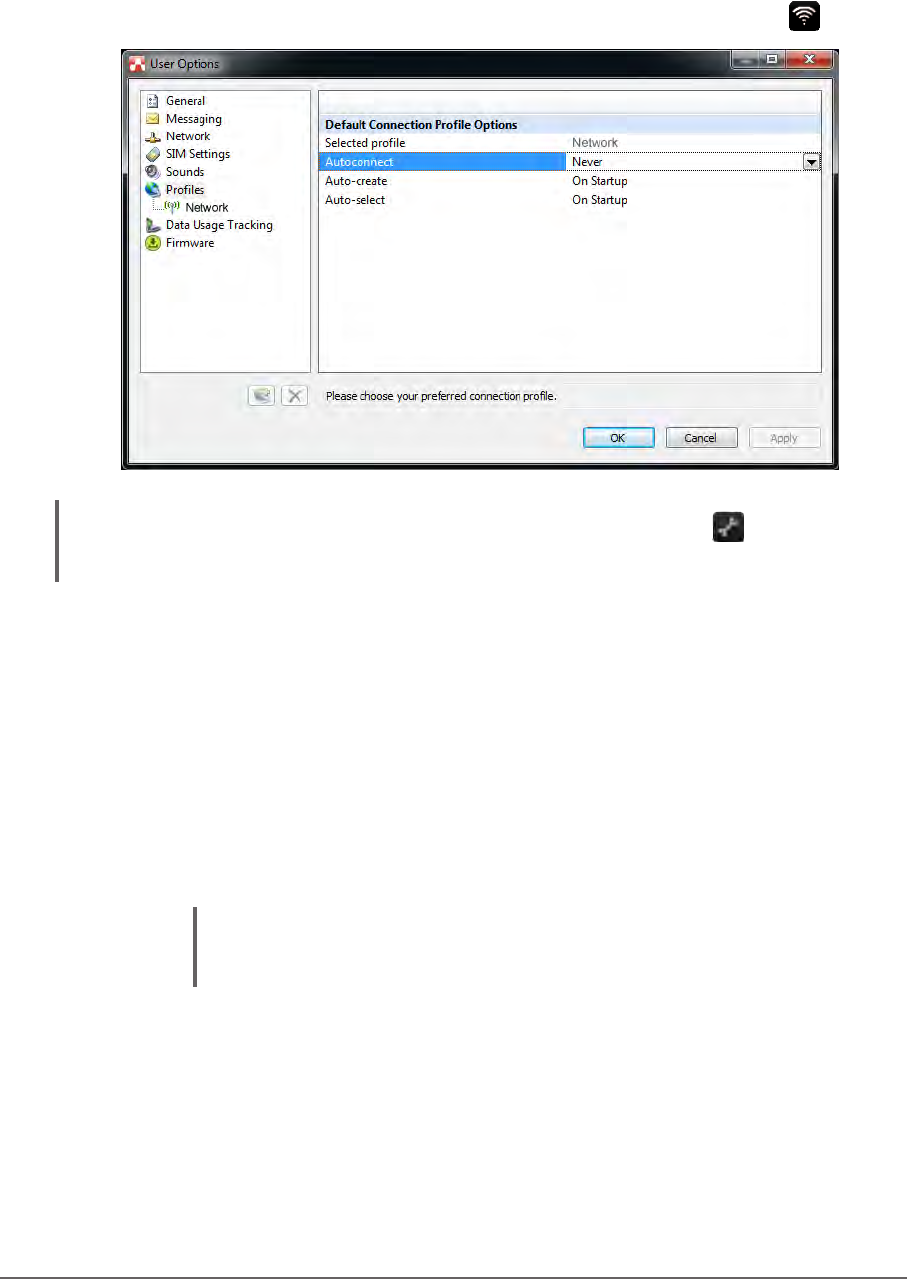
To congure 3G network proles
Once a SIM card is used in your Tablet Computer, its network prole is created.
You can view network information, such as prole name, access point name
(APN), TCP/IP settings, and more. You can also set AirCard® Watcher to
automatically connect to the 3G network at startup.
1. On the AirCard® Watcher main screen, tap the Wireless Prole ( ) icon.
NOTE: Alternatively, you can also access the Proles menu, by tapping , and then
Proles on the left panel.
2. On the Proles menu, the following items are displayed:
• Selected prole: Displays the name of your 3G network.
• Autoconnect: Tap the eld and then select one of the following:
• Never: Do not auto-connect to network.
• While not roaming: Automatically connects to network while within
the local network coverage.
• Always (even when roaming): Automatically connects to network
even when roaming outside the local network coverage.
NOTE: Connecting to your network while roaming may incur additional
charges. Check with your service provider for details.
• Auto-create: Tap to automatically create a connection prole when
using a new SIM card.
• Auto-select: Tap to automatically select the best connection prole for
the current SIM.
3. Tap Apply to save the settings.

2-23Operating Your Tablet Computer
4. To view the SIM card information, tap the network name on the left panel.
5. Tap OK to close the screen.
2-24 Operating Your Tablet Computer
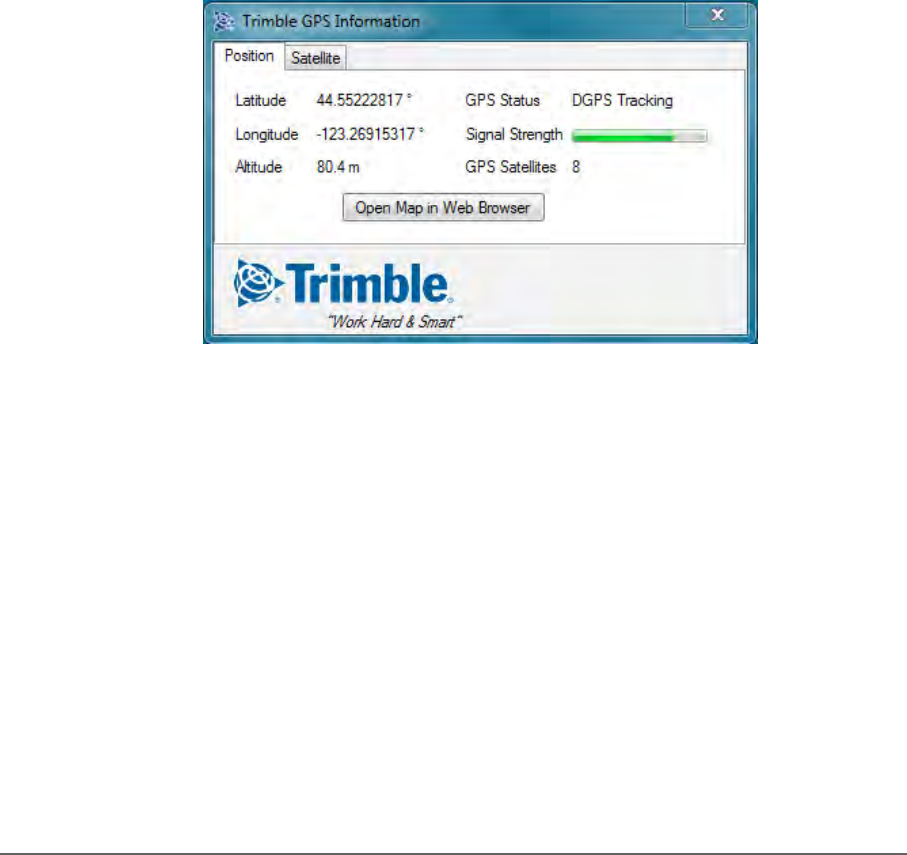
Using GPS
Your Tablet Computer has a GPS (Global Positioning System) receiver module
built in and includes the Trimble GPS Information software.
Trimble GPS Information is an application that allows you to manage the
following:
• Position
• Satellites
To open Trimble GPS Information, tap Start > All Programs > Trimble >
Trimble GPS Information.
Position
The Position tab provides an overview of your location and system status. Click
the Open Map in Web Browser button to view your location on the map.
2-25Operating Your Tablet Computer
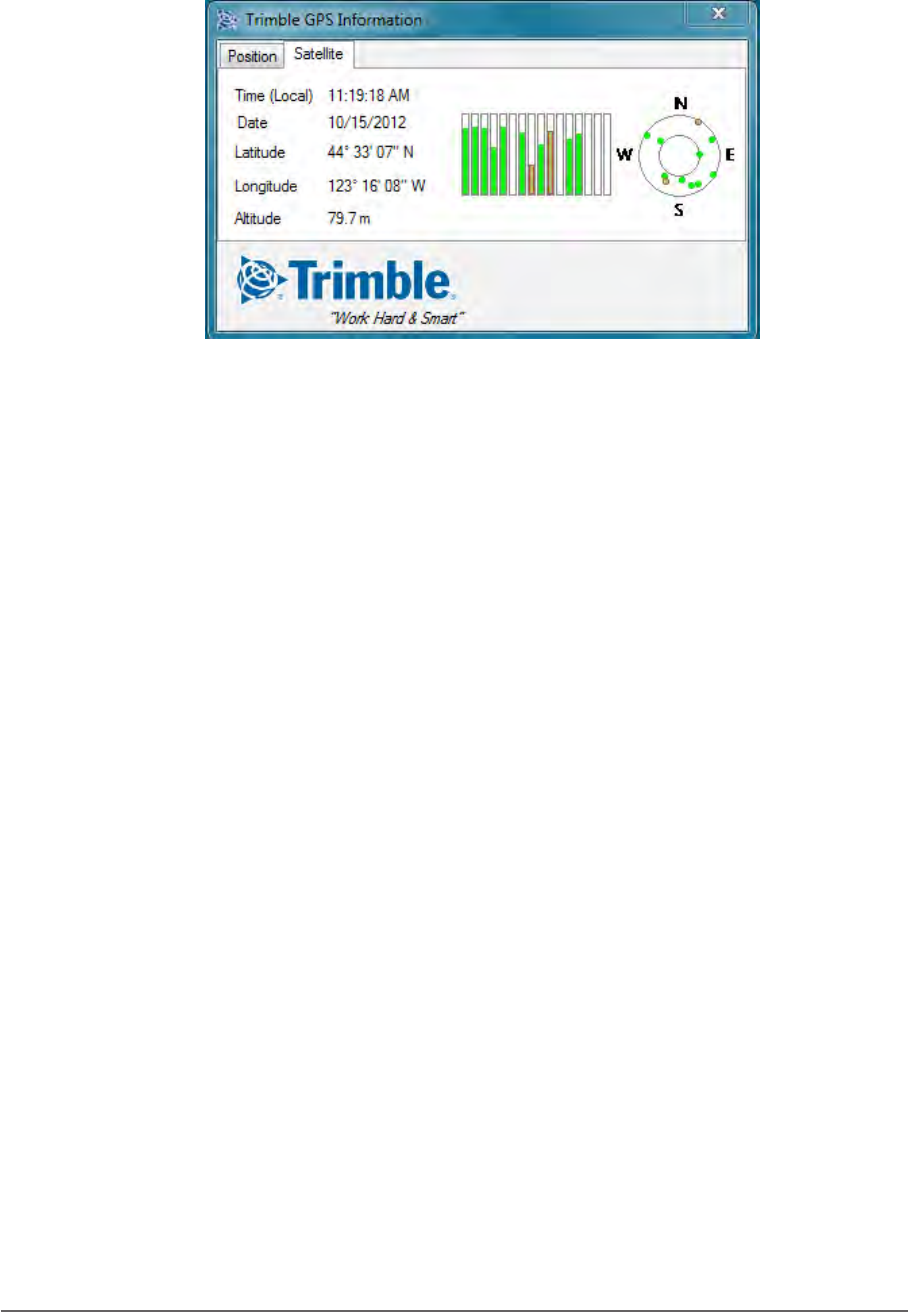
Satellites
The Satellites tab displays the coordinates of your location as viewed from the
satellites, including the date and time and satellite altitude.
2-26 Operating Your Tablet Computer
Using the Accelerometer / Compass
Your Tablet Computer has a built in accelerometer sensor and comes with a
compass application. The accelerometer detects your location, surroundings,
and more. You can use the compass application to point the direction to where
you are heading.
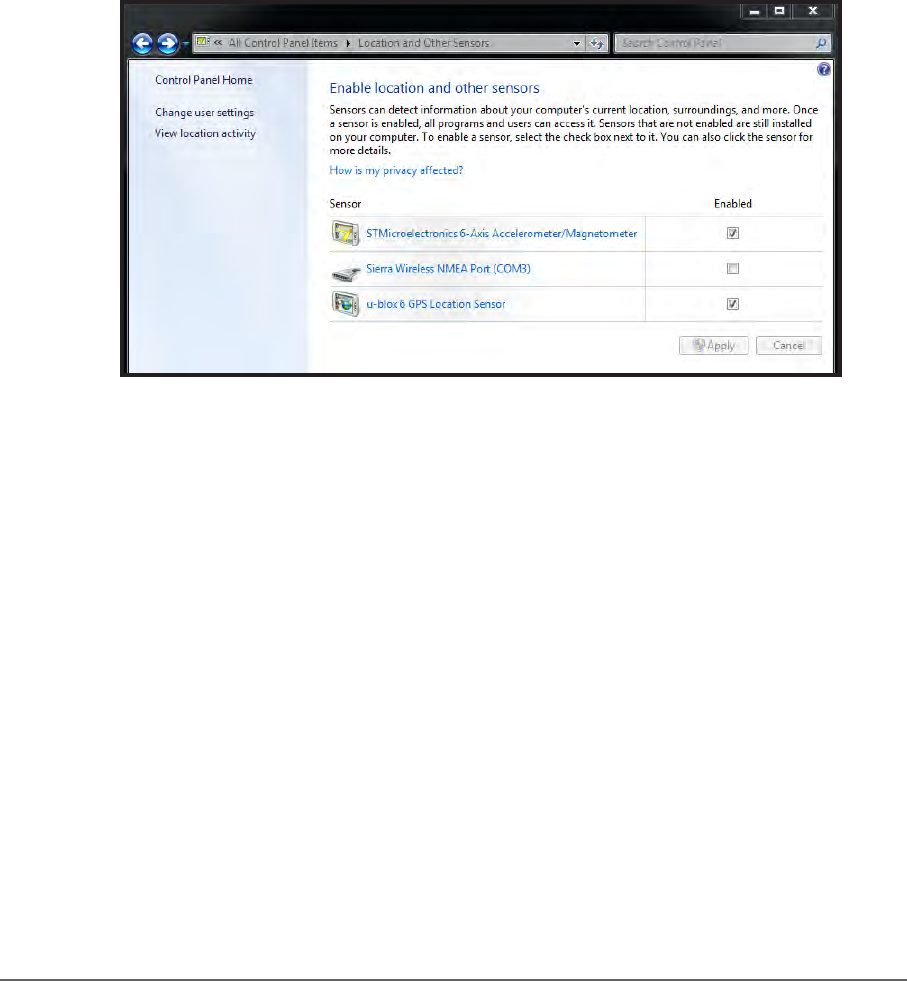
Activating the Accelerometer
By default, the accelerometer is enabled on your Tablet Computer. However, if
you need to disable and re-enable this feature again, perform the following:
1. Tap Start > Control Panel > Location and Other Sensors.
2. On the STMicroelectronics 6-Axis, Accelerometer/Magnetometer
Enabled box, tap to enable or disable this feature.
3. Tap the Apply button to save changes.
Using the Compass
The Sensor Control Application is a compass application that points the
direction to where you are heading just like a mechanical compass does.
To open the compass application, tap Start > All Programs >
STMicroelectronics > Sensor Control Application.
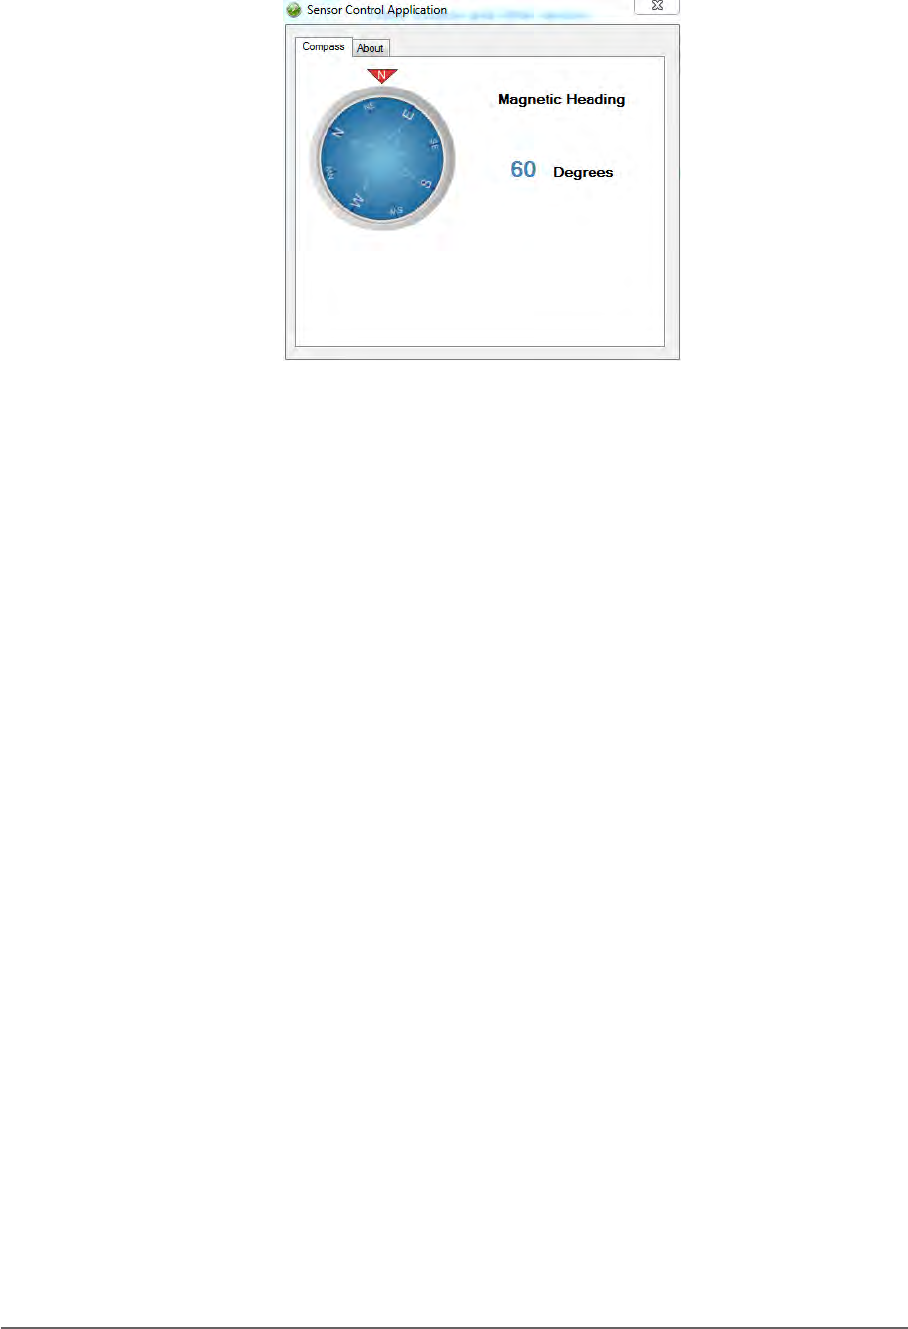
2-27Operating Your Tablet Computer
To use the compass
Hold the Tablet Computer with both hands in front of you. Face the direction to
where you are heading. The screen displays your direction.
To recalibrate the compass
Rotate and then turn the Tablet Computer to recalibrate the compass.
2-28 Operating Your Tablet Computer
Using the Camera
Your Tablet Computer has a built-in camera for taking photos and videos.
Photos can be captured with GPS location data.
Opening the Camera
1. Tap Start > All Programs > Trimble > Camera > Camera. The camera
screen appears.
2. Tap the screen to show the camera control buttons.
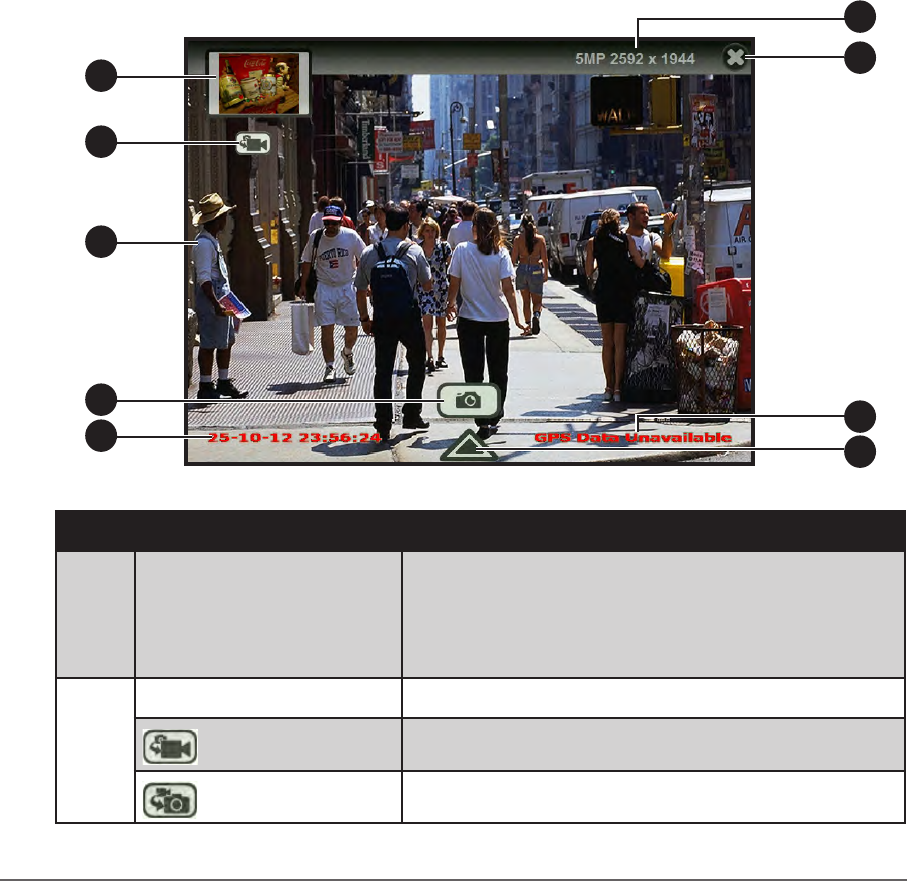
The Camera Screen
The camera has two capture modes: Photo mode and Video mode. By default,
the camera opens to Photo mode. Below is the Photo mode camera screen,
similar screen appears in Video mode.
7
6
9
4
1
2
3
58
No. Item Description
1Preview Thumbnail • Displays the thumbnail of the last captured
photo or video.
• Tap to open the captured photo or video
le for viewing.
2Change Mode Icon Toggles between video and photo modes.
Video mode Tap to change to video mode.
Photo mode Tap to change to photo mode.
2-29Operating Your Tablet Computer
No. Item Description
3Camera Screen Shows the object to capture.
4 Shutter Button • Indicates the camera is in photo mode.
• Tap the shutter button to capture a photo.
Record Button • Indicates the camera is in video mode.
• Tap the record button to record a video.
5Date Stamp Indicates date stamping is included when
capturing photos.
NOTE: Available only in Photo mode.
6Resolution • Indicates the current camera resolution.
• Tap repeatedly to change to a different
resolution setting.
7 Close Button Tap to close the camera.
8GPS Tag Indicates GPS tagging is included when
capturing photos.
NOTE: Available only in Photo mode.
9 Menu Button Tap to display the camera menu.
Shooting Photos
1. Open the camera.
2. Focus on your subject.
3. Tap to capture the photo.
To change the photo resolution
• To change the photo resolution, repeatedly tap the resolution on the
upper-right corner of the screen. The available options vary depending on
the current aspect ratio setting. See “To set the aspect ratio and resolution”
on page 2-34.
To switch to Video mode
• To switch to Video mode, tap .
To congure photo settings
• To congure the photo settings, tap . See “Working With Photos” on
page 2-32 for more information.
2-30 Operating Your Tablet Computer
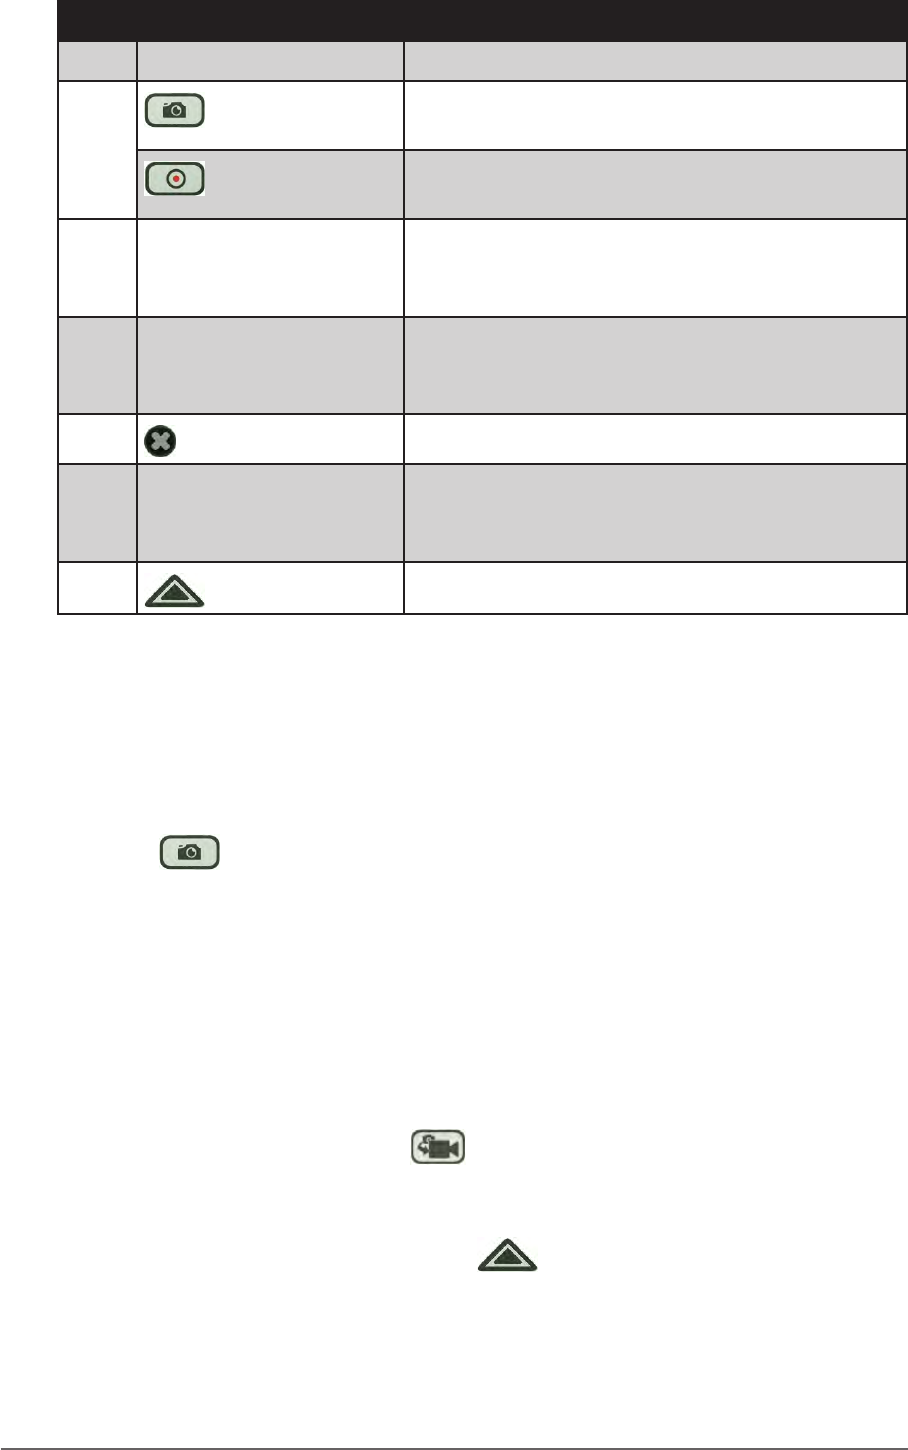
Recording Videos
1. Open the camera.
2. Tap to change to Video mode.
3. Focus on your subject.
4. Tap to start the recording. The recording screen appears.
5. To pause the recording, tap . Then tap to resume the
recording.
6. When done, tap to stop the recording.
2-31Operating Your Tablet Computer
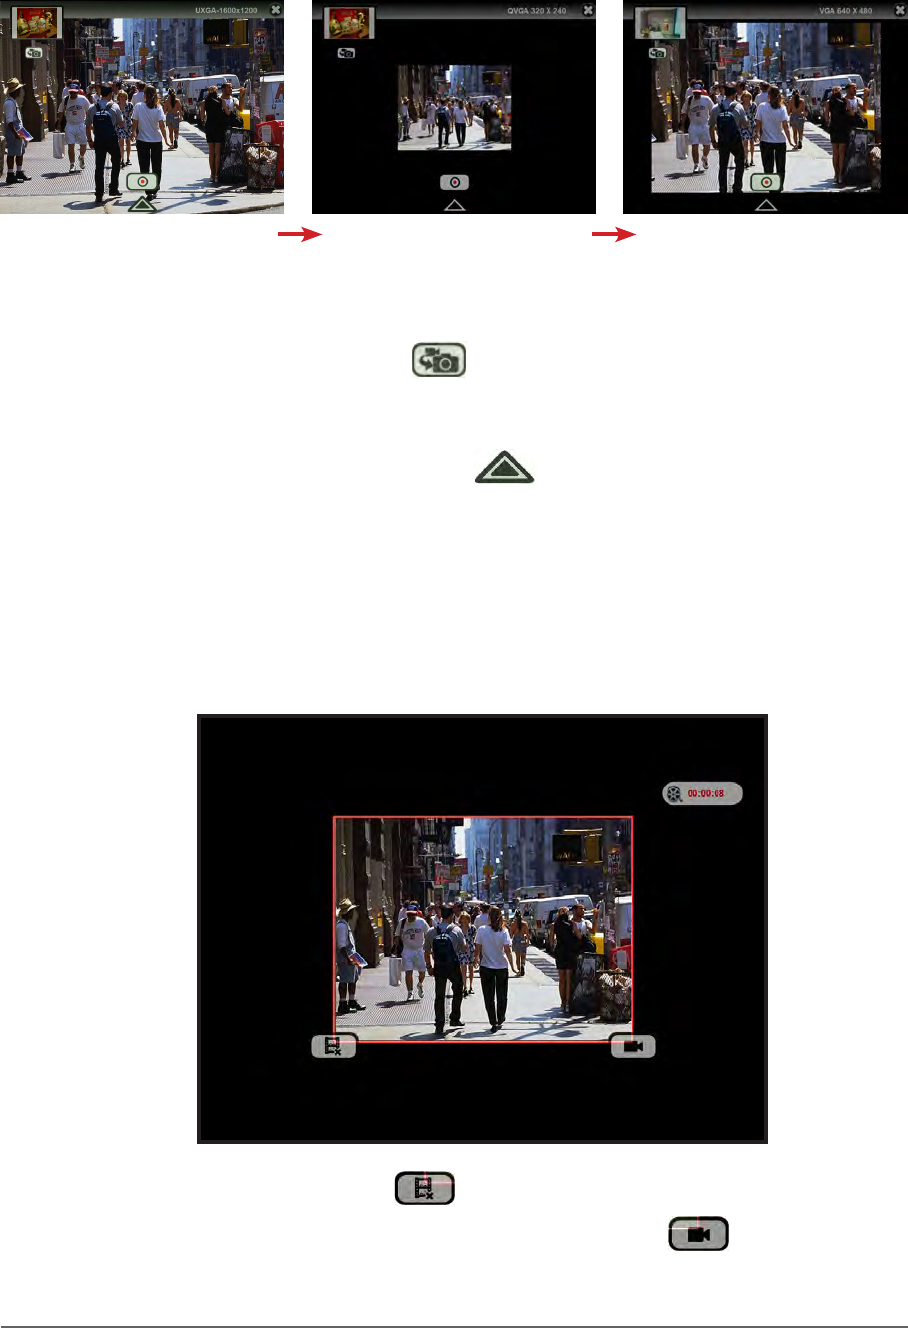
To change the video resolution
• To change the video resolution, tap the resolution on the upper-right corner
of the screen to toggle the settings:
UXGA 1600 x 1200 QVGA 1600 x 1200 VGA 1600 x 1200
To switch to Photo mode
• To switch to Photo mode, tap .
To congure video settings
• To congure the video settings, tap . See “Working with Videos” on
page 2-38 for more information.
Playing Videos
When Video Review is enabled in video settings, the video is automatically
previewed after the recording stops.
• To delete the recording, tap .
• To save the recording and close the video review, tap .