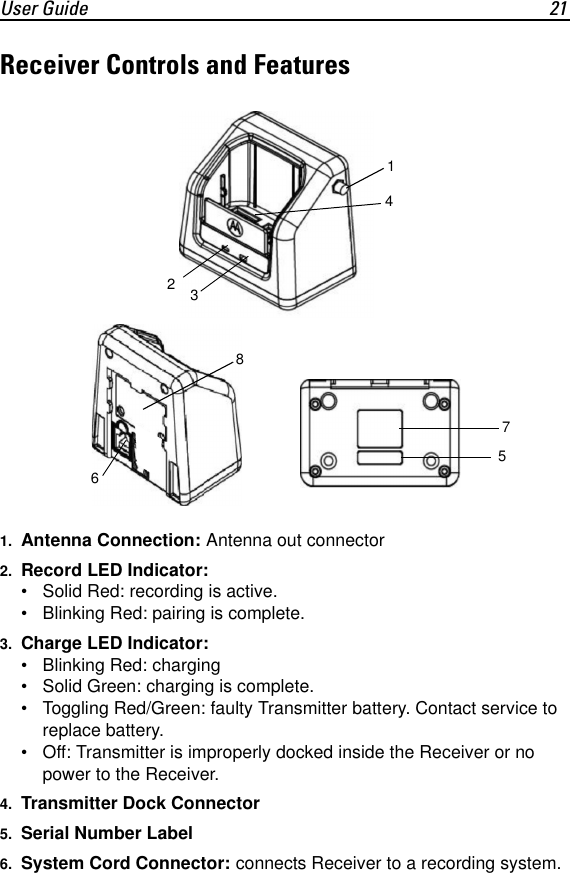
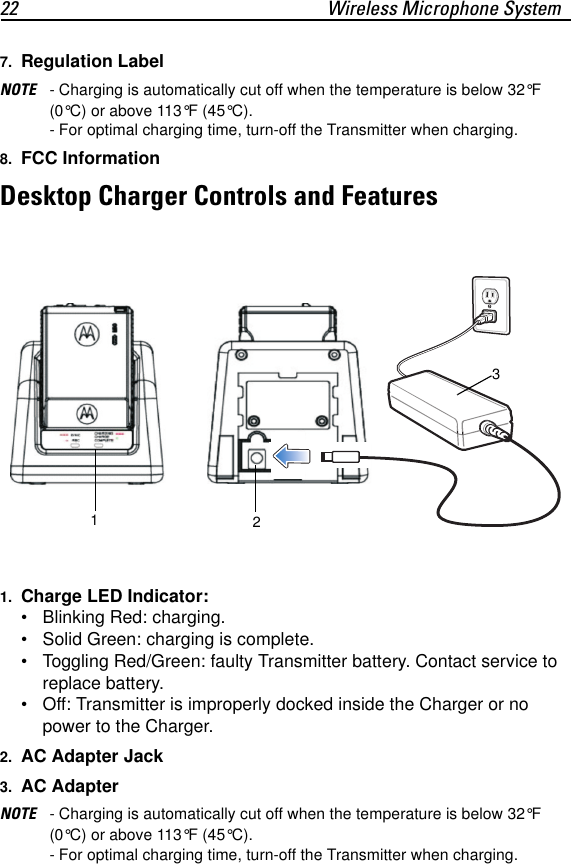
Trinus Systems CCR24RMOT Wireless Microphone System - Base Receiver User Manual Wireless Mic for UL

Trinus Systems Inc. Wireless Microphone System - Base Receiver Wireless Mic for UL

Users Manual

Wireless Microphone SystemUser Guide
2 Wireless Microphone System© 2010 MOTOROLA, INC. All rights reserved.Motorola reserves the right to make changes to any product to improve reliability, function, or design.Motorola does not assume any product liability arising out of, or in connection with, the application or use of any product, circuit, or application described herein.No license is granted, either expressly or by implication, estoppel, or otherwise under any patent right or patent, covering or relating to any combination, system, apparatus, machine, material, method, or process in which Motorola products might be used. An implied license exists only for equipment, circuits, and subsystems contained in Motorola products.MOTOROLA and the Stylized M Logo are registered trademarks of Motorola, Inc. Other product names mentioned in this manual may be trademarks or registered trademarks of their respective companies and are hereby acknowledged. © Motorola, Inc. 2010. April, 14, 2010SupportMotorola, Inc.1301 E. Algonquin Road, Schaumburg, IL 60196 U.S.A.Inside the USA and Canada, call Motorola System Support Center at 1-800-221-7144.
User Guide 3Safety and General InformationProduct Safety and RF Exposure for Electronic Devices with RF Transmit and Receive CapabilityElectronic devices - Where this term is specified, it refers to both the handheld/ body worn wireless microphone and the base. The microphone and base will be referred to individually where appropriate.RF Energy Exposure Awareness and Control Information and operational Instructions for General Population Use.Note: This electronic device is authorized for general population/consumer use.This electronic device uses electromagnetic energy in the radio frequency (RF) spectrum to provide communications between two or more users over a distance. It uses radio frequency (RF) energy or radio waves to send and receive data. RF energy is one form of electromagnetic energy. Other forms include, but are not limited to, sunlight and x-rays. RF energy, however, should not be confused with these other forms of electromagnetic energy, which when used improperly, can cause biological damage. Very high levels of x-rays, for example, can damage tissues and genetic material.Experts in science, engineering, medicine, health, and industry work with organizations to develop standards for safe exposure to RF energy. These standards provide recommended levels of RF exposure for both workers and the general public. These recommended RF exposure levels include substantial margins of protection.All Motorola electronic devices with transmit and receive capability are designed, manufactured, and tested to ensure they meet government-established RF exposure levels. In addition, manufacturers BEFORE USING THIS ELECTRONIC DEVICE, READ THIS BOOKLET WHICH CONTAINS IMPORTANT OPERATING INSTRUCTIONS FOR SAFE USAGE AND RF ENERGY AWARENESS AND CONTROL INFORMATION AND OPERATIONAL INSTRUCTIONS FOR COMPLIANCE WITH RF ENERGY EXPOSURE LIMITS IN APPLICABLE NATIONAL AND INTERNATIONAL STANDARDS.ALSO READ THE OPERATIONAL INSTRUCTIONS FOR SAFE USAGE. CAUTION
4 Wireless Microphone Systemalso recommend specific operating instructions to users of those electronic devices.These instructions are important because they inform users about RF energy exposure and provide simple procedures on how to control it.Please refer to the following websites for more information on what RF energy exposure is and how to control your exposure to assure compliance with established RF exposure limits:http://www.fcc.gov/oet/rfsafety/rf-faqs.htmlhttp://www.osha.gov/SLTC/radiofrequencyradiation/ index.htmlCCR24TMOTThis device was evaluated for typical hand-held (held-to-face) operations with 2.5cm spacing from the front of the radio.For hand-held operation, the radio should be held 2.5cm from the user’s face in order to comply with FCC RF exposure requirements. (1g Head SAR: 0.088mW/g)For body worn operation, this tracker has been tested and meets the FCC RF exposure guidelines when used with the accessories supplied for this product.(1g Body SAR: 0.131mW/g) Use of other accessories may not ensure compliance with FCC RF exposure guidelines. CCR24RMOTThis equipment complies with FCC radiation exposure limits set forth for an uncontrolled environment. This equipment should be installed and operated with minimum distance 20cm between the radiator & your body. This transmitter must not be co-located or operating in conjunction with any other antenna or transmitter.Federal Communication Commission (FCC) Regulations (US markets only)The FCC rules require manufacturers to comply with the FCC RF energy exposure limits for electronic devices with transmit and receive capability before they can be marketed in the U.S. When those electronic devices are used as a consequence of employment, the FCC requires users to be fully aware of and able to control their exposure to meet occupational requirements. Exposure awareness can be facilitated by the use of a
User Guide 5product label directing users to specific user awareness information. Your Motorola electronic device has a RF Exposure Product Label. Do not remove this RF Exposure Label from the device.Also, your Motorola user manual, or separate safety booklet includes information and operating instructions required to control your RF exposure and to satisfy compliance requirements.Compliance with RF Exposure StandardsYour Motorola electronic device is designed and tested to comply with a number of national and International standards and guidelines (listed below) for human exposure to radio frequency electromagnetic energy. This electronic device complies with the IEEE (FCC) and ICNIRP exposure limits for general population/uncontrolled RF exposure environments.Your Motorola electronic device complies with the following RF energy exposure standards and guidelines: • United States Federal Communications Commission, Code of Federal Regulations; 47 CFR part 2 sub-part J • American National Standards Institute (ANSI) / Institute of Electrical and Electronic Engineers (IEEE) C95. 1-1992 • Institute of Electrical and Electronic Engineers (IEEE) C95.1-1999 Edition • International Commission on Non-Ionizing Radiation Protection (ICNIRP) 1998 • Ministry of Health (Canada) Safety Code 6. Limits of Human Exposure to Radiofrequency Electromagnetic Fields in the Frequency Range from 3 kHz to 300 GHz, 1999 • Australian Communications Authority Radiocommunications (Electromagnetic Radiation - Human Exposure) Standard, 2003  • ANATEL ANNEX to Resolution No. 303 of July 2, 2002 "Regulation of limitation of exposure to electrical, magnetic and electromagnetic fields in the radio frequency range between 9 KHz and 300 GHz" and "Attachment to resolution # 303 from July 2, 2002"
6 Wireless Microphone SystemRF Exposure Compliance and Control Guidelines and Operating InstructionsTo control your exposure and ensure compliance with the general population/uncontrolled environment exposure limits, always adhere to the following procedures:Guidelines • User awareness instructions should accompany this electronic device when transferred to other users. • Do not use this electronic device if the operational requirements described herein are not met.Operating InstructionsWireless Microphone • When worn on the body, always place the microphone in a Motorola-approved clip, holder, holster, case, or body harness for this product. Using approved body-worn accessories is important because the use of non-Motorola-approved accessories may result in exposure levels, which exceed the IEEE/ICNIRP general population/uncontrolled environment RF exposure limits. • If you are not using a body-worn accessory and are not using the microphone in the intended use position, then ensure the antenna and the microphone are kept 2.5 cm (one inch) from the body when transmitting. Keeping the electronic device at a proper distance is important because RF exposures decrease with increasing distance from the antenna.Wireless Microphone BaseThe base complies with FCC RF exposure limits set forth for an uncontrolled environment. The base should be installed and operated with a minimum distance of 20cm between the antenna and all persons.Approved AccessoriesUse only Motorola-approved supplied or replacement antennas and accessories. Use of non-Motorola approved antennas and accessories may exceed IEEE/ICNIRP RF exposure guidelines.
User Guide 7For a list of Motorola-approved antennas and other accessories please see your dealer.FCC Grant of Equipment AuthorizationFCC ID: ROYCCR24TMOT, ROYCCR24RMOTIndustry Canada Grant of Equipment AuthorizationIC: 5479A-CCR24TMOT, 5479A-CCR24RMOTThe term IC before the radio certification number only signifies that Industry Canada technical specifications were met.Additional InformationFor additional information on exposure requirements or other training information, visit http://www.motorola.com/rfhealthElectromagnetic Interference/CompatibilityNOTE: Nearly every electronic device is susceptible to electromagnetic interference (EMI) if inadequately shielded, designed or otherwise configured for electromagnetic compatibility.FacilitiesTo avoid electromagnetic interference and/or compatibility conflicts, turn off your electronic device in any facility where posted notices instruct you to do so. Hospitals or health care facilities may be using equipment that is sensitive to external RF energy.AircraftWhen instructed to do so, turn off your electronic device when on board an aircraft. Any use of an electronic device must be in accordance with applicable regulations per airline crew instructions.Medical DevicesPacemakersThe Advanced Medical Technology Association (AdvaMed) recommends that a minimum separation of 15 cms (6 inches) be maintained between an electronic device with transmit and receive capability and a pacemaker. These recommendations are consistent with those of the U.S.
8 Wireless Microphone SystemFood and Drug Administration.Persons with pacemakers should: • ALWAYS keep the electronic device more than 15 cms from their pacemaker when the electronic device is turned ON.  • Not carry the electronic device in the breast pocket. • Turn the electronic device OFF immediately if you have any reason to suspect that interference is taking place.Hearing AidsSome electronic devices may interfere with some hearing aids. In the event of such interference, you may want to consult your hearing aid manufacturer to discuss alternatives.Other Medical DevicesIf you use any other personal medical device, consult the manufacturer of your device to determine if it is adequately shielded from RF energy. Your physician may be able to assist you in obtaining this information.OPERATIONAL WARNINGSFor Vehicles With Air BagsRefer to vehicle manufacturer's manual prior to installation of your electronic device with RF transmit/receive capability to avoid interference with air bag wiring.Do not place an electronic device in the area over an air bag or in the air bag deployment area. Air bags inflate with great force. If an electronic device is placed in the air bag deployment area and the air bag inflates, the electronic device may be propelled with great force and cause serious injury to occupants of the vehicle.Potentially Explosive Atmospheres(Explosive atmospheres refers to hazard classified locations that may contain hazardous gas, vapors, or dusts.)Turn off your electronic device prior to entering any area with a potentially explosive atmosphere, unless it is an electronic device type especially qualified for use in such areas as "Intrinsically Safe" (for example, Factory Mutual, CSA, UL, CENELEC or ATEX Approved). Do !WARNING
User Guide 9not remove, install, or charge batteries in such areas. Sparks in a potentially explosive atmosphere can cause an explosion or fire resulting in bodily injury or even death.The areas with potentially explosive atmospheres referred to above include fuelling areas such as below decks on boats, fuel or chemical transfer or storage facilities, areas where the air contains chemicals or particles, such as grain, dust or metal powders. Areas with potentially explosive atmospheres are often but not always posted.Blasting Caps And Blasting AreasTo avoid possible interference with blasting operations, turn off your electronic device when you are near electrical blasting caps, in a blasting area, or in areas posted:"Turn off two-way radio or electronic devices". Obey all signs and instructions.OPERATIONAL CAUTIONSAntennasDo not use any electronic device that has a damaged antenna. If a damaged antenna comes into contact with your skin, a minor burn can result.BatteriesAll batteries can cause property damage and/or bodily injury such as burns if a conductive material such as jewelry, keys, or beaded chains touch exposed terminals.The conductive material may complete an electrical circuit (short circuit) and become quite hot. Exercise care in handling any charged battery, particularly when placing it inside a pocket, purse, or other container with metal objects.CAUTION: Risk of explosion if battery is replaced by an Incorrect type. Displace of used batteries according to the Instruction. RepairContact your local dealer for assistance Regarding repairs and service CAUTION
10 Wireless Microphone SystemA repair constitutes something done internally to the unit that would bring it back to its original condition.Items not considered as repairs are those in which an action is performed on a unit which does not require the outer casing of the unit to be opened in a manner which exposes the internal electrical circuits of the unit. European Union (EU) Waste of Electrical and Electronic Equipment (WEEE) directiveThe European Union's WEEE directive requires that products sold into EU countries must have the crossed out trashbin label on the product (or the package in some cases). As defined by the WEEE directive, this cross-out trashbin label means that customers and end-users in EU countries should not dispose of electronic and electrical equipment or accessories in household waste. Customers or end-users in EU countries should contact their local equipment supplier representative or service centre for information about the waste collection system in their country.Battery use and safety• Motorola recommends that you always use Motorola-approved batteries and chargers.The warranty does not cover damage caused by non-Motorola approved batteries and/or chargers.Caution: Use of an unqualified battery or charger may present a risk of fire, explosion, leakage, or other hazard. Improper battery use, or use of a damaged battery, may result in a fire, explosion, or other hazard.• Battery usage by children should be supervised.• New batteries or batteries stored for a long time may take more time to charge.• Charging precautions: When charging your battery, keep it near room temperature. Never expose batteries to temperatures below 0°C (32°F) or above 45°C (113°F) when charging.• Always take your transmitter with you when you leave your vehicle.• When storing your battery, keep it in a cool, dry place.
User Guide 11• It is normal over time for battery life to decrease, and for the battery to exhibit shorter runtime between charges or require more frequent or longer charging times.• Avoid damage to your battery and/or transmitter. Do not disassemble, open, crush, bend, deform, puncture, shred, or submerge the battery or transmitter.• Avoid dropping the battery or transmitter, especially on a hard surface. If your battery or transmitter has been subjected to such damage, take it to a Motorola Authorized Service Center before using.• Keep away from heat sources.• Never expose your battery to heat sources. Do not attempt to dry a wet or damp battery with an appliance or heat source, such as a hair dryer or microwave oven.• Avoid direct exposure to summer sun for prolonged periods.Regulatory InformationRadio Frequency Interference Requirements-FCCThis equipment has been tested and found to comply with the limits for a Class B digital device, pursuant to Part 15 of the FCC rules. These limits are designed to provide reasonable protection against harmful interference in a residential installation. This equipment generates, uses and can radiate radio frequency energy and, if not installed and used in accordance with the instructions, may cause harmful interference to radio communications. However there is no guarantee that interference will not occur in a particular installation. If this equipment does cause harmful interference to radio or television reception, which can be determined by turning the equipment off and on, the user is encouraged to try to correct the interference by one or more of the following measures: • Reorient or relocate the receiving antenna. • Increase the separation between the equipment and Receiver. • Connect the equipment into an outlet on a circuit different from that to which the Receiver is connected.
12 Wireless Microphone System • Consult the dealer or an experienced radio/TV technician for help.Radio Transmitters (Part 15)THIS DEVICE COMPLIES WITH PART 15 / RSS-GEN OF THE FCC/IC RULES. OPERATION IS SUBJECT TO THE FOLLOWING TWO CONDITIONS: (1) THIS DEVICE MAY NOT CAUSE HARMFUL INTERFERENCE, (2) THIS DEVICE MUST ACCEPT INTERFERENCE RECEIVED, INCLUDING INTERFERENCE THAT MAY CAUSE UNDESIRED OPERATION.Radio Frequency Interference Requirements - CanadaThis Class B digital apparatus complies with Canadian ICES-003.Cet appareil numérique de la classe B est conforme à la norme NMB-003 du Canada.Radio Frequency and Power Radio: VHF, Freq Band:2.4GHz, Rated Power: 200mW
User Guide 13System OverviewThe Wireless Microphone System functions as a remote microphone in an Audio or Digital Video Recording (DVR) system.The Wireless Microphone System enable users to comfortably take part in public safety activities where a wireless microphone is required. The microphone also serves as a trigger for a remote recording system. The system features a 2.4GHz FHSS wireless microphone with excellent operating range of up to 1000 feet line-of-sight.The wireless microphone (Transmitter) uses a built-in microphone or an auxiliary corded microphone.The user wears the corded microphone on the lapel and triggers a recording by pressing a button on the Transmitter. The Transmitter features an automatic gain adjustment to properly match the level of voice.The Transmitter sends audio over 1000 feet in line-of-sight conditions and activates the recording of a camera situated inside a vehicle. The Transmitter is powered by rechargeable battery and operates for over 14 hours after a 3.5 hour charge cycle.The Receiver can easily be installed inside a vehicle and also serves as a power charger for the Transmitter.The wireless system supports 95 communication channels, allowing 95 users to communicate on the same scene without interfering with each other.The Transmitter also comes with an optional desktop charger for back office charging.
14 Wireless Microphone SystemAbout this GuideThis guide provides basic information on the following topics: • Package Contents on page 14 • Transmitter Controls and Features on page 18 • Receiver Controls and Features on page 21 • Transmitter Indications on page 20 • Desktop Charger Controls and Features on page 22 • Getting Started on page 23 • Operation on page 23 • Troubleshooting on page 24 • Specifications on page 26Package ContentsAfter opening the shipping box, inspect the contents. You should have received the following:1. Transmitter 2. Receiver3. Wired/Lapel Microphone4. Mounting Bracket for Receiver with Screws5. Battery6. Leather Pouch7. External Antenna8. System Cord9. This User Guide10.Desktop Charger (option)11.Desktop Charger AC Adapter (option)Inspect the equipment for damage. If you are missing any equipment or if you find any damaged equipment, contact Motorola Support immediately. See Service Information on back cover for contact information.
User Guide 15
16 Wireless Microphone SystemInstalling the ReceiverTo mount the Receiver:1. Use the Mounting Bracket to mark the screws location.2. Use the three supplied screws to secure the Mounting Bracket.3. Slide the back side of the Receiver onto the Mounting Bracket.4. Connect the System Cord to the System Cord Connector on the back of the Receiver.5. Connect the System Cord to the recording unit.System CordReceiverMounting BracketRecording Unit Antenna
User Guide 17Installing the Receiver AntennaTo install the Receiver antenna:1. Determine the mounting location for the antenna.NOTE The Receiver antenna is installed on flat surface, in an upright position.2. Use standard glass cleaner and a soft cloth to clean the installation surface.3. Remove the protective film from the back of the antenna and attach the antenna to the installation surface. Firmly press on the antenna to adhere the antenna to the desired location.4. Route the antenna cable to the Receiver.
18 Wireless Microphone SystemTransmitter Controls and Features1. Built-in Microphone2. Power Switch: use to turn the Transmitter on and off. When powering on, all LEDs turn on for three seconds and the Transmitter beeps and/or vibrates for three seconds.3. Record Button: press to start recording. The Record button starts both audio and video recording.4. Mute Button: press to mute / un-mute the microphone during operation.5. Mode Button: press this button to select between the following operation modes: Beep (default), Vibrate, Vibrate & Beep or Covert mode.134 567891011REC MUTEMIC12OFF - ON213
User Guide 19NOTE - In Covert mode, beeping, vibrating and all LEDs indications remain turned off.- The Transmitter is reset to Beep mode when turned off and again on.6. Lapel Microphone Jack: this jack accepts the micro-mini 2.5mm mono plug of the Wired/Lapel Microphone.7. Record LED Indicator: illuminates red when recording is active. The LED flashes red when Mute is activated.8. Out of Range LED Indicator: illuminates amber when the Transmitter is out of range. The Transmitter beeps once every 10 seconds. NOTE - Remaining out of range for more than two hours enters the Transmitter to Sleep Mode and turns off the LED. To restore operation, press any button. - To remain within the operating range, always remain within line-of-sight of 1000 feet from the Receiver. 9. Low Battery LED Indicator: • Solid Amber: power is low. The Transmitter continuously beeps for five seconds. Charge the Transmitter.• Off (during operation): proper battery level.10.Battery Compartment DoorNOTE Battery installation or replacement should only be performed by a qualified technician.11.Serial Number Label12.Regulatory Label13.Lapel Microphone: A Lapel Microphone is a small personal microphone clipped to the clothing within a foot of the mouth. The Lapel Microphone connects to the Lapel Microphone Jack.IMPORTANT The Lapel Microphone must be used in a distance of more than 4 inches from the user mouth to prevent audio degradation.
20 Wireless Microphone SystemTransmitter IndicationsSound Indication LED Indication DescriptionBeeps and/or vibrates for three secondsAll LEDs turn on for three secondsPower on in processRecord LED flashes red Mute modeBeeps once every 10 seconds.Out of Range LED is on Out of range. Remain within line-of-sight of 1000 feet from ReceiverContinuously beeps Low Battery LED is on Low battery. Charge microphone
User Guide 21Receiver Controls and Features1. Antenna Connection: Antenna out connector2. Record LED Indicator: • Solid Red: recording is active.• Blinking Red: pairing is complete.3. Charge LED Indicator: • Blinking Red: charging• Solid Green: charging is complete.• Toggling Red/Green: faulty Transmitter battery. Contact service to replace battery.• Off: Transmitter is improperly docked inside the Receiver or no power to the Receiver.4. Transmitter Dock Connector5. Serial Number Label6. System Cord Connector: connects Receiver to a recording system.12345678
22 Wireless Microphone System7. Regulation LabelNOTE - Charging is automatically cut off when the temperature is below 32°F (0°C) or above 113°F (45°C). - For optimal charging time, turn-off the Transmitter when charging.8. FCC InformationDesktop Charger Controls and Features1. Charge LED Indicator:• Blinking Red: charging.• Solid Green: charging is complete.• Toggling Red/Green: faulty Transmitter battery. Contact service to replace battery.• Off: Transmitter is improperly docked inside the Charger or no power to the Charger.2. AC Adapter Jack3. AC AdapterNOTE - Charging is automatically cut off when the temperature is below 32°F (0°C) or above 113°F (45°C). - For optimal charging time, turn-off the Transmitter when charging.123
User Guide 23Getting Started1. Switch on the Transmitter (the power switch is at the bottom of the Transmitter). All LEDs lit for three seconds and three beeps are emitted or/and the Transmitter vibrates.2. Dock the Transmitter inside the Receiver base. The Record LED Indicator on the Receiver blinks red once to confirm that pairing with the Receiver is completed.NOTE When using the Transmitter for the first time, turn-off the Transmitter and leave it in the Receiver base to charge for at least 3.5 hours.3. Remove the Transmitter from the Receiver base.4. Attache the Transmitter to your shirt or plug the Lapel Microphone into the jack on the Transmitter and clip the Microphone onto your lapel.IMPORTANT The Transmitter or Lapel Microphone must be used in a distance of more than 4 inches from the user mouth to prevent audio degradation.5. Place the Transmitter inside the pouch and clip the pouch to your belt.Operation • To switch the Transmitter on/off - use the power switch at the bottom of the Transmitter. • To start recording - press the Record button. Confirm visually that the Record LED indicator has turned solid red. • To mute the microphone - press the Mute button to mute or unmute. • To set Vibrate mode - from Beep mode (default mode), press the Mode button once. • To set Beep and Vibrate mode - from beep mode (default mode), press the Mode button twice. • To mute the Transmitter and maintain all LED indicators turned off - from Beep mode (default mode), press the Mode button three times.NOTE Turn off the Transmitter when not in use for long periods of time.
24 Wireless Microphone SystemTroubleshootingProblem Check ListNo sound is recorded  • Make sure the Transmitter is powered on. • Make sure the Transmitter’s battery is charged (Low Battery LED Indicator is turned off). • Make sure the Record LED Indicator on the Receiver blinks red once to confirm pairing when docked inside the Receiver. • Make sure recording is active (Press the Record button - the Record LED indicator is turned on). • Make sure the Transmitter is not muted. (Toggle the Mute button). • Make sure the built-in microphone on the Transmitter is not obstructed. • Make sure the Wired/Lapel Microphone (if used) is properly plugged into the Transmitter. • Make sure the Out of Range LED Indicator is turned off. • Check the power cord connection to the Receiver. • Check the system cord connection to the Receiver. • Check the antenna connection to the Receiver. • Check the incoming audio at the recording system.Poor reception, static, noise, distorted sound • Try to maintain 1000 feet line-of-sight between Transmitter and Receiver. • Check for radio interference with other equipment on site.No status indications coming from the Transmitter • Make sure the Transmitter is powered on. • Remove the Transmitter out of Covert mode (see Transmitter Controls and Features on page 18).
User Guide 25Care and Maintenance • To maintain the capacity of the Transmitter battery, drain the battery once every six months by leaving the unit turned on and then recharging to full capacity again. • Avoid excessive heat. Do not leave the Transmitter or Receiver in the hot sun, or near other sources of high temperature. • Do not attempt to open the equipment. No user-serviceable parts are inside. • Contact service to remove the batteries from the Transmitter when you store the unit for a long time. • Wipe the Transmitter periodically with a cotton swab. Wet the tip of a cotton swab with water and squeeze the excess water from the swab before using. • Use a dry cloth and/or air flow to dry the Receiver or desktop charger in case of fluid drip. • Use a vacuum cleaner to remove dust from Receiver or desktop charger.CAUTION Remove power from the desktop charger before cleaning.
26 Wireless Microphone SystemSpecificationsPower: Transmitter: Lithium Ion battery 3.7V DC (Motorola BT90) / 1800mA, Receiver: 12V DC, / 850mA maximum current when charging. Desktop Charger: Input Voltage: 12V DC Output Voltage: 3.7V DC, Power Supply unit: Input: 110/220V AC 60Hz, 1.25A.Power Consumption: Min 100mW, Max 446mWCommunication Range:  1000 feetFrequency: 2.4GHz FHSS with 2,400 ~ 2,483MHzNumber of Channel: 95 ChannelsChannels Space: 864KHzSpeech Coder: 32Kbits/sec ADPCM transcoder Type of Modulation: GFSK Modulation Data Rate: 576Kbps Time Division DuplexReceiver Sensitivity: -88 ~ -96 dBm Typical: -92 ~ -94 dBm Talk Time: Over 12 Hours (with full battery)Charge Time:  3.5 Hours (When Transmitter power switch  is off and charging start point is 3.6 voltage)Temperature Range: Operating: 4°F ~ 140°F (-20°C ~ 60°C)Storage: 4°F ~ 140°F (-20°C ~ 60°C)Dimensions (L x W x H): Transmitter: 54mm x 27mm x 73mm (2.13” x 1.06” x 2.87”)Receiver: 89.5mm x 57mm x 85mm (3.52” x 2.24” x 2.66”)Specifications are subject to change without notification.
User Guide 27
If you have a problem using the equipment, contact your facility’s Technical or Systems Support. If there is a problem with the equipment, they will contact the Motorola System Support Center at: 1-800-221-7144Motorola, Inc.1301 E. Algonquin Road, Schaumburg, IL 60196 U.S.A.http://www.motorola.comMOTOROLA and the Stylized M Logo and Symbol and the Symbol logo are registered in the U.S. Patent and Trademark Office. All other product or service names are the property of their registered owners. © Motorola, Inc. 2010 all Rights Reserved6802987C37 Revision A- October 2010@6802987C37@Service Information

Navigation menu