Contents
- 1. User Manual
- 2. user manual
User Manual
TRULY Netpad Tablet PC
N701 Series Manual
Suitable for the following models:
N701 N701E N701G N701EG
N701T N701W N701TG N701WG
Netpad N701 Series Manual
Guide to safe and effective use
For safe and effective use, please read carefully
the following information before use.
When using the files in the T-Flash card, do not pull out the card so as to avoid
damage to the memory card or the machine.
When using the headset, please make sure the headset volume is within the
acceptable range to avoid damage to your hearing.
Always pay full attention during driving. Checking navigation system screen
during driving may lead to serious traffic accident. In order to avoid accident,
please pull over the car before operating the GPS system. The map data inside
the GPS system may be different from actual road conditions, so it can only be
used as a reference. Please use the system in compliance with actual traffic
rules. The Company will not be held responsible for any traffic accident or
other accident caused by the use of the system.
Do not let the machine and its accessories come into contact with liquid or
moisture environment.
Do not place the machine in the environment with too high or too low
temperature.
Do not place the machine aside the flame or lighted cigar or cigarette.
Do not paint or varnish the machine.
Do not drop or throw the machine.
Do not place the machine at where the temperature may exceed 60°C such as on
the car dashboard, window sill or behind the glass exposed to direct sunlight etc.
Do not attempt to disassemble the machine, and do not repair the machine and
accessories without authorization.
The charging voltage of the machine is 5.0V. Please confirm before use.
Do not use any charger not specified by the manufacturer of the machine,
otherwise there will be potential danger.
Use only a damp or anti-static cloth to clean the machine. Do not use dry cloth
or cloth with static to wipe the machine.
- 1-
As the components such as LCD are breakable parts, please take good care
and do not let the machine under impact or strong compression.
Do not let children play with the machine or its accessories. Children are
likely to cause injury to themselves or others, and may inadvertently
damage the machine or its accessories.
Do not freely uninstall the application in the system so as to avoid that the
machine or part of the feature is not functional.
The adapter of this product should not be subjected to water splashing or
water droplets, and items filled with liquid such as vase should not be
placed on the adapter.
- 2-
Content
- 3-
1. Before use…………………………………………………… -4-
1.1 The appearance and various parts…………………………………… -4-
1.2 Before use …………………………………………………………… -5-
1.2.1 Buttons ………………………………………………………… -5-
1.2.2 Batteries …………………………………………………………. -5-
1.2.3 MICRO SD card …………………………………………………. -5-
1.2.4 SIM or USIM card ………………………………………………. -5-
2. Main interface operation and setting ……………………………………… -7-
2.1 Main interface ……………………………………………………… -8-
2.2 Task bar and task bar icon ……………………………………………… -9-
2.3 Setting ……………………………………………………………… -10-
2.3.1 Wi-Fi connection ………………………………………...……… -10-
2.3.2 3G network connection…………………………………………… -12-
2.3.3 Sound and display ………………………………………………… -17-
2.3.4 Location and security …………………………………………… -18-
2.3.5 Application ……………………………………………………… -18-
2.3.6 Account and synchronization ………………………………………. -19-
2.3.7 SD card and system memory ……………………………………… -20-
2.3.8 Language and keyboard ………………………………………… -20-
2.3.9 Date and events …………………………………………………… -20-
2.4.0 About the mobile multimedia …………………………………… -21-
3. Electronic Market ………………………………………………………… -22-
3.1 Login and use of the Electronic Market …………………………… -22-
4. Browser ………………………………………………………………… -25-
5. GPS and MAPS ………………………………………………………… -26-
5.1 MAPS ………………………………………………………………… -26-
5.2 GPS maps …………………………………………………………… -27-
Appendix I: Technical Data ……………………………………………… -28-
Appendix II: Technical Data ……………………………………………… -29-
1.2.5 Connecting the computers ……………………………………… -6-
1 0 1 1 1 2 1 3
5
3
1
2
4
6
7
8
9
1 4
1.1 The appearance and various parts
Figure 1.1 Appearance
1.Before use
1, 2: Speaker
3: Back button
4: Headphone jack
5: MENU button
6: Main interface button
7: On/Off button
8: HDMI port
9: MICRO SD card
10: Power charging port
11: USIM/SIM card port (suitable for models with 3G function)
12: USB port
13: Reset button
14: MIC
- 4-
1.2Before use
1.2.1 Buttons
On/Off button: in the shutdown mode, short press this button to perform
power on operation; in the power on mode, short press this
button to let the machine be in the sleep mode; long press this
button to enter the mode switch dialogue interface, where you
can select shutdown option to shut off the machine.
Menu button: press this button to a pop-up menu of the program in the
current interface.
Back button: press this button to back to the last interface. Repeatedly press the
back button can exit the program and return to the main interface.
Reset button:
Main interface button: short press this button to quickly return to the system's
main interface and long press to recall
the last running program for quick access.
Tip: During using, if you do not know how to operate, press the "menu
Button" or "back button" will definitely help
1.2.2 Batteries
This machine uses 4500mAh polymer battery. During the charging the
following matters should be paid attention to:
1. The charging voltage of the machine is 5.0V. Please confirm before use to
avoid damage to the machine and other dangers;
2. If the battery is too low, the machine will automatically shut down. Please
charge the battery. The machine can be charged in both the power on or
power off mode;
3. When the machine is being charged in the power on mode, the battery icon
in the task bar will display the charge mode;
4.When the charging is completed, please pull out the plug and unplug the
charger from the power outlet;
Charging time: it needs 4.5 hours to charge with standard charger in the
shutdown mode. If charging in the power on mode, due to the simultaneous
consumption of electricity, it needs more time to fully charge the battery.
Using time: 3-4 hours' continuous use (the specific using time depends on the
using function and machine settings).
1.2.3 MICRO SD card
This machine supports 32GB or lower MICRO SD card. Because some applications
require the support of SD card, it is suggested to configure with a SD card.
Tip: When accessing the files in the SD card, do not pull out the card, so as to
avoid damage to the SD card. To remove the SD, please firstly uninstall the SD
card in the "Settings/SD card and mobile phone memory”
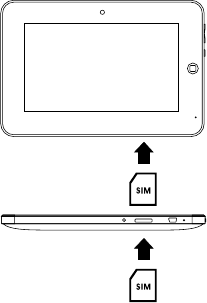
1.2.4 USIM or SIM card
When selecting 3G network services, you need to purchase a USIM/SIM card
from network providers (respectively for WCDMA or EVDO network), which
contains detailed purchasing information, such as personal identification
number (PIN) and optional services.
- 5-
Press the reset button to comeback the machine from abrormity,
and then turn on the machine via.press the power button.
- 6-
To install the USIM or SIM card:
1. Please turn off the machine.
2. Insert the USIM/SIM card into the machine with the gold contact point
downward.
3. Push the USIM/SIM card into the card slot until it locks into place.
To remove the USIM/SIM card:
1. Please turn off the machine.
2. Gently push inward the USIM/SIM card until it is detached from th
e machine.
3. Pull out the USIM/SIM card from the USIM/SIM card slot.
Note: Do not insert the MICRO SD card into the USIM/SIM card slot.
Figure 1.2 Presentation of USIM/SIM card insertion
1.2.5 Connecting the computers
The operation of files in the SD card such as add, delete and so on can be
done through USB connection. Before connecting there should be a SD card in
the machine.
1. Connect the machine to the PC via USB cable.
2. When the USB connection icon appears in the task bar, press and hold the task
bar and drop down to open the task bar (when the task bar is open, you can not
press and hold the task bar to drop down again. The next figure is only an
indication).
3. Open the USB connection message and select "Load", then you can operate
the files in the SD card as the operation of U disk. And you can also copy
files to the SD card.
2.Main interface operation and setting
After turning on and unlocking, the machine will enter the system main interface.
This section describes some of the basic operation of the main interface and
machine settings, mainly including the creation and deleting of shortcuts, switch
between interfaces, wallpaper replacement, task bar, the machine language
environment settings, WI-FI and 3G network settings etc.
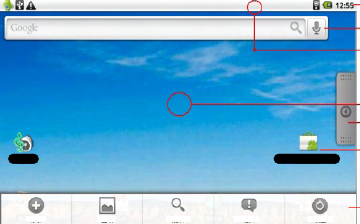
2.1 Main interface
The main interface operations are shown as below figure. The main interface
menu will appear after pressing the menu button on the main interface. The main
interface has three pages. Press and hold the interface and drag to switch the
pages, and each page can be defined of different functions according to individual
needs. For example: when defining a page as game page, the effective page
will contain only the shortcut to games.
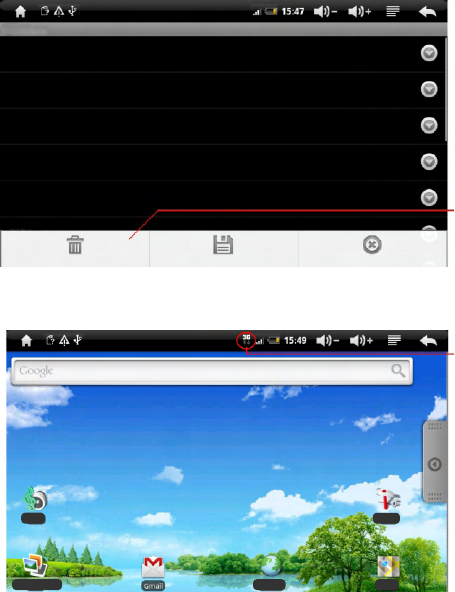
Figure 2.1 Graphical presentation of the operation of the main interface
Task bar
Shortcut
Press and drop down to
open the task bar
Press and drag to the left and
right to switch the main interface
Programs list
Shortcut
Menu of main interface
Music Electronic Market
Add Wallpaper Search Notice Setting
Click the program interface switch button to switch between the main interface
and the program interface. The program interface shows the icons of all the
installed applications.
You can create a shortcut for some frequently used program in the main interface.
Press an icon and do not release, the interface will automatically switch to the
main interface, and then drag the icon to an appropriate location to set such icon
as a shortcut of the main interface and place it in the main interface.
- 7-
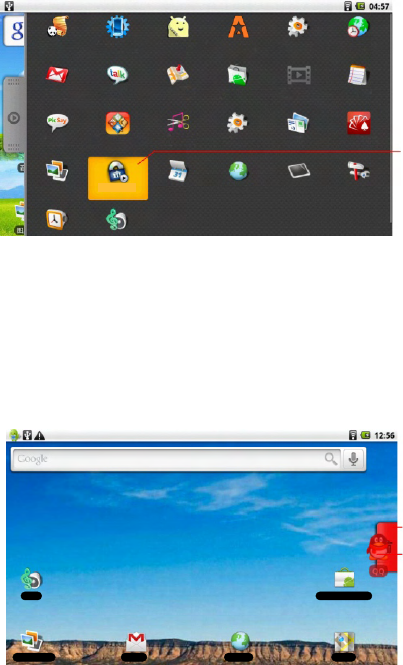
Figure 2.2 Create shortcuts in the main interface
The unnecessary main interface shortcut icon can be dragged to the recycle
bin to delete. The deleting of the shortcut icon does not affect the program's use.
Recycle bin will be formed by the interface switch button after pressing the
shortcut icon.
Figure 2.3 To delete a shortcut
Panda reading AppManager
Advanced Task
Manager free ASTRO Dev tools Global Ti me
Gmail Google Ta lk Market Mediapiayer N ot e pad
PicSay Quickoff ic e Ringdroid Spare parts
Google maps
Sending message Straight flush game
(high-end version)
Photo gallery Meridian Player Calendar Browser Touch screen calibration Setting
(Press and hold, th e
inte rface will auto mati call y
swit ch to the main in te rface,
and th en drag to the appropriate
locati on and rele ase.)
Recycle bin is located at
the button area of the
Program list
Drag the shortcut to the
Recycle bin
Music Electronic Market
Photo gallery Gmail Browser Map
- 8-
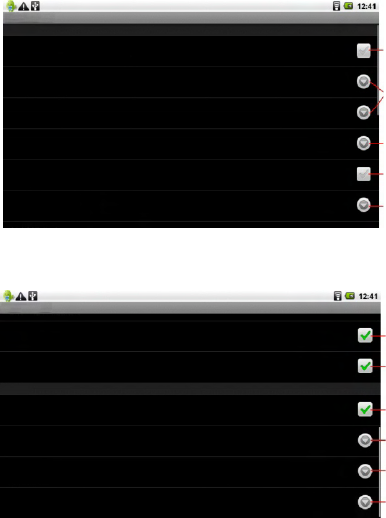
2.2 Task bar and task bar icon
The taskbar interface displays the current system time, battery status,
WI-FI status, applications, USB connectivity and other information.
Table 1 Task bar icon and the meaning
Figure 2.4 Task bar interface
New message
Data download
GPS status
Download completed
Agent events
Alarm
Audio playing
Data synchronizing
SD card space not enough
WI-FI connection
Battery change indication
Charging
No SD card
Flight mode (WI-FI off)
USB connection
Mute icon
Warning
3G network and signal
Task bar icon and the meaning
August 6, 2010
Connected USB debugging
Choose to disable the USB debugging.
Ongoing
card is not normally removed
Please uninstall the SD card and then remove it to avoid data loss
Click to clear
the notification
message
Ongoing task
Task start time
Notification
message
- 9-
Notice
2.3 Setting
You can adjust the machine state to fit the individual's using habits through
machine settings. Wi-Fi, 3G network connection, sound, brightness, machine
pattern lock, system language, applications management and more can be set
in the settings.
Figure 2.5 Setting interface
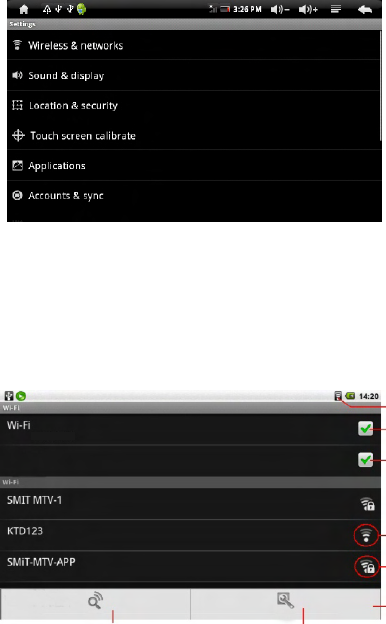
2.3.1 Wi-Fi connection
Enter the "Settings/wireless and network" to set the Wi-Fi, and
the Android system's powerful networking capabilities after the network
connection.
Figure 2.6 Wi-Fi setup interface
Setting
Wireless and ne twork
Sound and display
Location and safety
Applications
Account and synchronization
Privacy
Connected to SMIT MTV-1
Settings
Network notification
Notify me when there is an open network available
Network
Connected
Open network
Protected by WPA2
Scan
Re-scan the network
Advanced settings
Advanced settings for Wi-Fi
Icon showing that Wi-Fi
is connected
Turn off or turn on Wi-Fi
Notification options
The network is not
encrypted
White curve is the
signal strength
The network is encrypted
Encryption method is on
the left side
Wi-Fi menu
- 10-
Experience
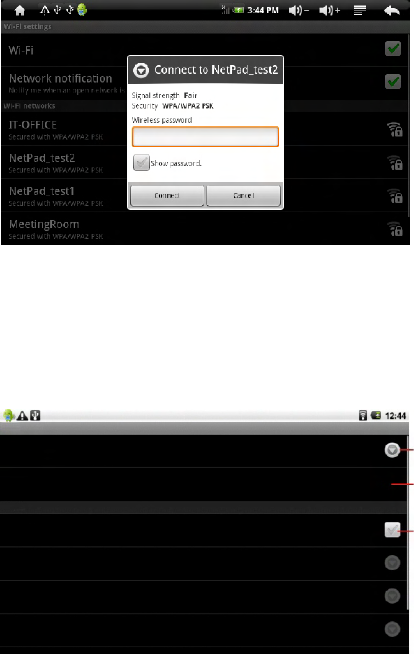
Figure 2.7 Wi-Fi password connection interface
Some Wi-Fi network settings are not the same as the initial settings of the
machine. You can press the "menu button" in the "Wi-Fi settings interface"
and then enter the advanced settings to adjust the machine to adapt to the
appropriate Wi-Fi networks.
Figure 2.8 Wi-Fi advanced settings interface
- 11-
Set when the Wi-Fi
will be in sleep mode
MAC address of
the machine
Set whether the
machine will
automatically
obtain IP
Advanced settings
Wi-Fi sleep mode strategy
Specify the desired time to switch from the Wi-Fi to mobile phone data
MAC address
00.11.F6.8B.0E.AA
IP settings
Use static IP
IP address
Gateway
Netmask
2.3.2 3G network connection
Please firstly insert the 3G USIM/SIM card into the USIM/SIM card port at
the underside of the machine at the power-off status. After turning on the
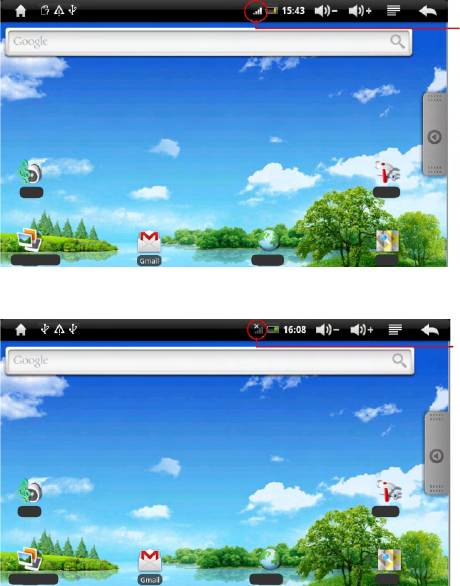
machine, if the 3G network signal is successfully detected, the icon shown in
Figure 2.9 will be displayed in the system task bar:
Figure 2.9 3G signal icon
If the 3G network signal is not detected, the icon shown in Figure 2.10 will
be displayed in the system task bar:
Figure 2.10 3G signal icon is not detected
Touch the "Settings" in the main menu to enter the system setting interface.
Touch the "wireless and network settings" option to select the "mobile network"
in the interface, and then select the "access point name.”
- 12-
3G network signal
is successfully
received
3G network is
not detected
Please turn off
the machine and
check whether
the USIM/SIM
card is
inserted correctly
Music Setting
Photo gallery Browser Map
Music Setting
Photo gallery Browser Map
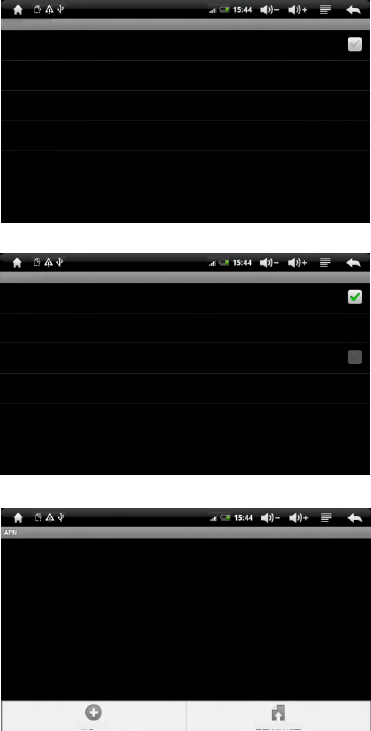
Figure 2.11 Wireless and network settings
Figure 2.12 Mobile network settings
Figure 2.13 Set the access point name
- 13-
Wireless and network settings
Wi-Fi
Turn on the Wi-Fi
Wi-Fi settings
Set and manage wireless access points
Virtual private network settings
Set and manage virtual private network
Mobile network
Setting roaming, network, APN options
Mobile network settings
Data roaming
Connect to data service when roaming
Access point name
Use only 2G network
Network operators
Select a network operator
New APN Reset to default settings
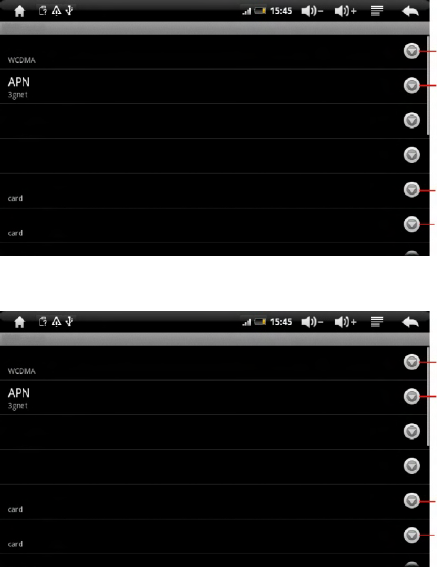
Press the system's "menu" button in the "access point settings" interface and the
APN settings menu will pop up. Then select the "new APN" option. Figure 2.14
shows the access point setting mode of the China Unicom WCDMA 3G network,
and Figure 2.15 shows the access point setting mode of the China Telecom EVDO
3G network. Please select the corresponding network access point settings
according to the configured 3G network module of the machine.
Configure the access point information in accordance with the information shown
in the figure, and keep other options as the default settings.
Figure 2.14 WCDMA access point settings
Figure 2.15 EVDO access point settings
Users can set
the name
The name of the
China Unicom
WCDMA network
access is 3gnet
Card for entering
the username
Card for entering
the password
Users can set
the name
The name of the
China Telecom
EVDO network
access is ctnet
Card for entering
the username
Card for entering
the password
Modify the access point
Name
Agent
(Not set)
Port
(Not set)
Username
Password
Server
Modify the access point
Name
Agent
(Not set)
Port
(Not set)
Username
Password
Server
- 14-
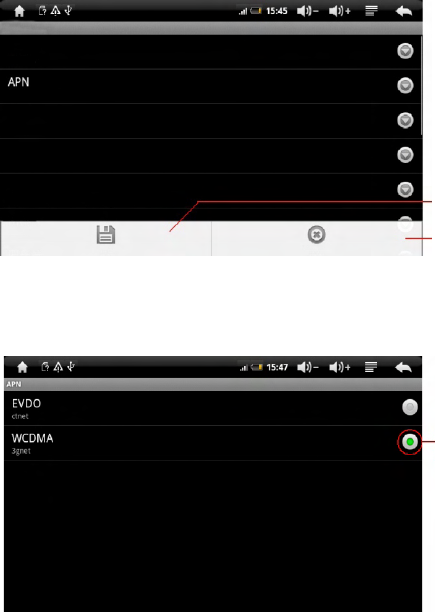
After completion of the network access point settings, click the system's "menu"
button and then click the "save" button on the screen to save the current APN
settings. If you do not need the current settings, click the "abandon" button.
Figure 2.16 Save the current access point settings
After successful settings, the just set APN access point can be seen in the APN
list. Click the circular button on the right of the corresponding APN (the center
of selected button is green) to initiate the connection to the 3G wireless networks.
Figure 2.17 Select the 3G network access point to be used
APN currently
used
Save the current APN
settings and exit the
current settings page
Abandon the current
APN settings and exit
the current settings
page
- 15-
Modify the access point
Name
WCDMA
Agent
(Not set)
Port
(Not set)
Username
Card
3gnet
If you need to delete the APN access point, please click the APN name in the
APN list and enter the "modify the access point" setting interface and click the
system's "menu" button to select the "delete APN" option.
Figure 2.18 Delete APN
After a successful connection to the 3G network, the icon shown in Figure
2.18 will be displayed in the system task bar.
Figure 2.18 3G network is successfully connected
Delete the APN
setting
3G network has
been successfully
connected
- 16-
Modify the access point
Name
EVDO
APN
Ctnet
Agent
(Not set)
Port
(Not set)
Username
Card
Password
Delete APN Save Abandon
Music
Photo gallery Browser Map
Setting
2.3.3 Sound and display
In this interface you can adjust the volume and display-related items, such as
mute, media volume, screen brightness, time required for entering the power
saving mode when the machine is not under operation and so on.
Figure 2.9 Volume and display interface 1
Figure 2.10 Volume and display interface 2
System mute
Volume regulation
System tone settings
This item is not valid
Set notification tone
This item is not valid
Set whether to open SD
card insertion notification
Set whether to use the
gravity sensing
Window animation
settings
Brightness adjustment
Machine sleep mode
settings
- 17-
Sound and display settings
Sound settings
Mute mode
All sounds are set to mute except that of the media and the alarm clock
Ring volume
Set the volume of system and notification
Media volume
Set the volume of music and video
System tone
Set default system tone
System vibration
System tone vibration
Notification tone
Set default notification tone
Sound and display settings
Touch feedback
Vibrate when pressing soft buttons and when carrying out some UI interact
SD card notification
Play SD card notification sounds
Display settings
Direction
Automatically change the display direction when rotating the mobile
Phone
Animation
Show all window animation
Brightness
Adjust screen brightness
Screen standby
Adjust the delay before the automatic screen lock
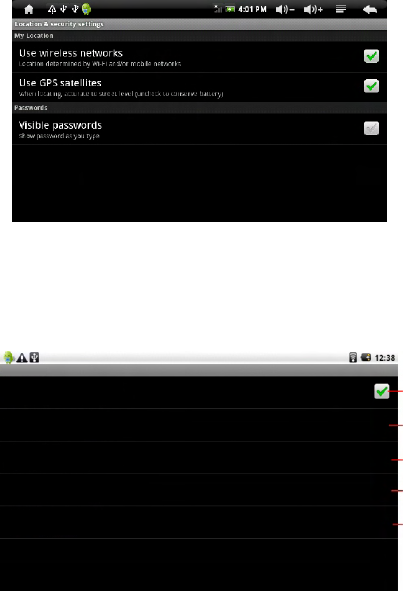
2.3.4 Location and security
To use the GPS positioning, please make sure the "enable GPS satellites setting"
is on. If do not use GPS for a long time, you can turn off this option to save power.
When setting the unlock pattern password, please make sure to keep in mind the
pattern to avoid that the machine can not be unlocked when there is need to use.
Figure 2.12 Security and location interface
2.3.5 Application
When installing some programs with unknown source, you need to set the
machine to allow the installation of program with unknown source, but this may
bring risk of virus to the machine, so please confirm the security of program
before installation.
Figure 2.13 Program management interface
- 18-
Select this option to
allow the installation
of program from the
SD card
This item is not valid
Management of
installed programs
Management of
running programs
Development related
matters
Application settings
Unknown source
Allowed to install applications not provided by the Electronic Market
Quick start
Set shortcut to start the application
Manage applications
Manage and remove installed applications
Running services
View and control currently running services
Development
Setting up the application development options
Open the "using wireless network", and you can view the IP address used by
the machine and the location on the Google Maps.
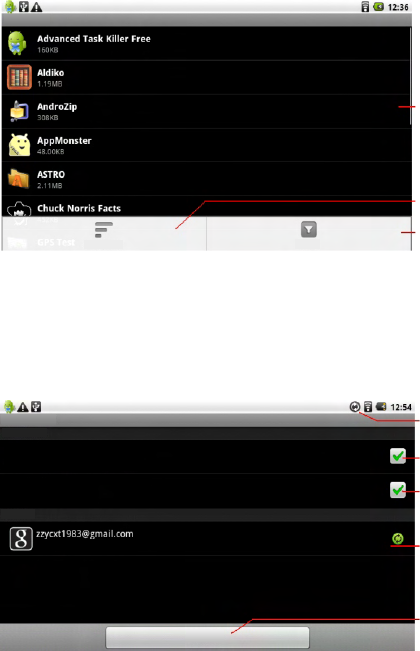
Enter the "management application", and you can view relevant information of
the application, and you can also delete unwanted applications.
Figure 2.14 The list of applications
2.3.6 Account and synchronization
Manage Google account and set network synchronization of Gmail, calendar
and contacts of the account.
Figure 2.11 Account management interface
Click and enter the
program list to carry
out operation such
as delete, etc.
Sort list
Select the program
to be displayed
Synchronizing data
Allow the program
to be updated at any
time
Set whether to
automatically
synchronize account
data
Existing account
Add a new account
- 19-
Sorting by size Filter
Account and synchronization settings
Conventional synchronization settings
Background data
You can synchronize applications and send and receive data at any time
Automatic synchronization
Application automatically synchronize data
Manage account
Synchronization is turned on
Add account
Management of applications
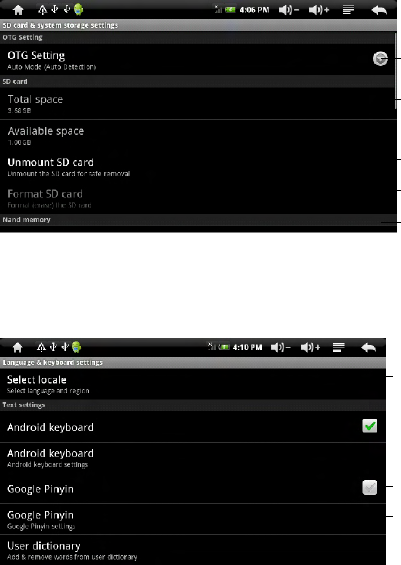
2.3.7 SD card and system memory
You can view the SD card and remaining space of the built-in Flash as well
as manage the SD card in this interface.
Figure 2.15 T-Flash card and the storage management interface
2.3.8 Language and keyboard
You can set language, keyboard and input method of the machine at the
region and text settings.
Figure 2.17 Region and text settings
2.3.9 Date and events
You can set the display method of date and time of the machine in this interface.
You can also set whether to automatically match to the network time.
- 20-
Total size of SD card
Remaining space
of SD card
Uninstall the SD card
from the machine
Format the SD card
(need to uninstall first)
Remaining space of the
built-in FLASH in the
machine
System language
selection. Chinese
is in the final position
Keyboard selection
option. You can use
the Chinese input when
clicking this option
Input method setting
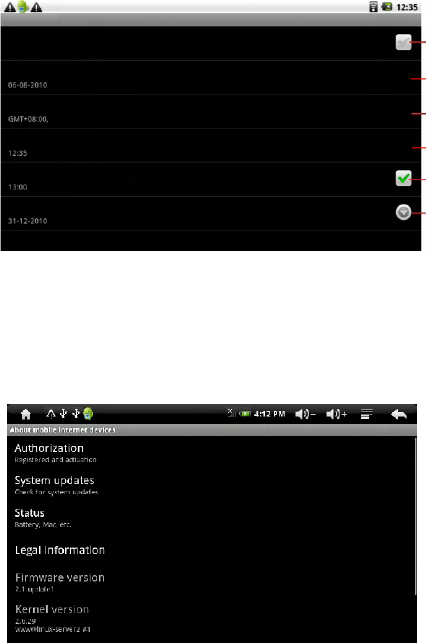
Figure 2.16 Set the date and time
2.4.0 About mobile multimedia
You can view the machine's firmware version, system version, MAC address,
machine production number and other relevant information in the "About"
interface.
Figure 2.18 Machine information
Set whether to
automatically
synchronize time
Date setting
Time zone
setting
Time setting
Time display
format
Date display
format
- 21-
Date and time settings
Automatic
Using the valued provided by the network
Setting the date
Select time zone
China standard time
Setting the time
Use 24-hour format
Select the date format
3. Electronic Market
Market offers a large variety of software to the user for experiencing and using,
which generally can be divided into two versions (paid and free) to meet the
different needs of different users. Software in the Market are provided,
maintained and updated by software engineers from around the world.
Figure 3.1 Login interface
Login and use of the Market
3. 1
Before using the Market, please make sure the date is correct and the
Wi-Fi is connected successfully.
When initial using the Market or using after the account unbundling, you need
to log in using the Gmail account. If you do not have a Gmail account, you can
apply through PC or directly click the "create" button to apply for a new
Google account. Please keep in mind the account and account retrieve
condition after successful application.
Enter the Market main interface after the completion of login.
Application: applications will be displayed according to category, and you can
choose the application that you want to download according to the category;
Game: games will be displayed according to category, and you can choose to
download different games;
Download contents: to manage the downloaded applications and applications
that used to be downloaded and view the updates of the installed applications.
- 22-
Add Google account
No Google account?
Create
Login
Already has a Google account?
Back
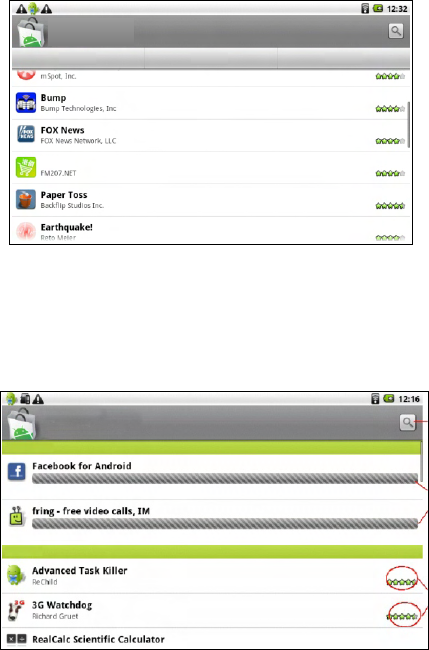
Figure 3.2 Market main interface
Download content shows the installation status of the selected software.
Yellow bar refers to the downloading software. The one with "installed"
shown on the right refers to the installed software, and the one with "free"
shown on the right refers to free software not installed. If the installed so
ftware has update, it will show the "updates available" information which
you can click to update the software.
Tasks waiting
for download
- 23-
Electronic Market
Applications Games Download content
Hong Kong price
Free
Free
Free
Free
Free
Download content
Download is undergoing
Download is starting
Download is starting
Update available
Free
Download content
Program
search
Program
status
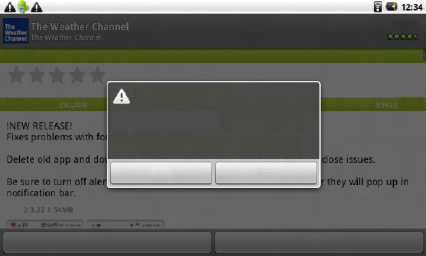
Figure 3.4 Uninstalling the software
If you do not want to use any software or the software can not meet demand,
you can choose uninstall such software. For the final step in the uninstall
process, you need to choose a reason of uninstalling the software to complete
the uninstall process. Please choose the reason to provide help for the
software writer to improve the software.
- 24-
Uninstall application
The Weather Channel will be removed
from this mobile phone.
You can install the product once again in
your mobile phone for free
OK Cance
Open Uninstall
My rating
Rating
Download times
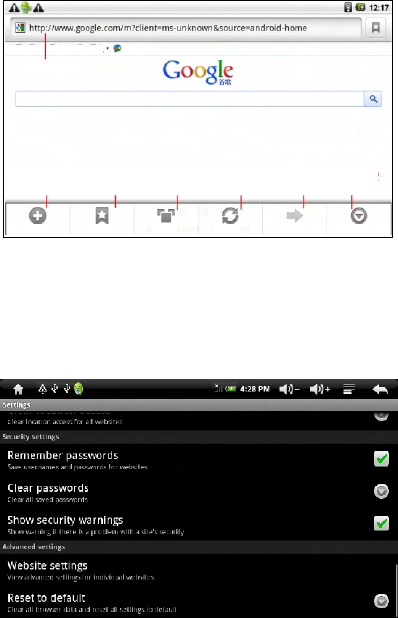
Figure 5.1 Browser menu interface
You can open a new window, switch window and close the window through
the "window management".
The settings of browser are similar to that of PC. Press the "menu button" in the
browser interface in the browser press and select the "more/settings" to enter
the browser settings. In the settings interface you can set the browser home
page, close page, manage password, manage privacy and manage security. You
can also restore the browser to factory settings.
Create a new
window
Open bookmark
interface and history
New window Bookmark
4. Browser
Before using a browser, please make sure that the WI-FI connection is normal.
Press the "menu button" in the browser main interface and the browser menu
will pop up. The specific functions are shown as below.
Figure 5.2 Browser settings
Webpage Pictures Peripheral Nformation More
Address bar
Window
management Refresh the page Go into the
previous page
Browser settings
management
Window Refresh Forward More
Clear all browser data and reset all settings to default
- 25-
5. GPS and MAPS
The maps in this machine include GPS maps and MAPS. GPS maps are mainly
used for navigation, which has the advantage of accurately locating the
machine's real-time position. Meanwhile, the MAPS is more convenient in
searching the map, which can be viewed through the map or satellite. When
viewing in the satellite mode, you can clearly see the geographical environment
of the surrounding on the map, but MAPS's machine positioning uses a Wi-Fi IP
address, therefore the location shown on the map may not match the actual
location.
5.1 MAPS
MAPS is a map system comes with the Android system, whose map data is
downloaded through the network in real time. The data will be cleared after the
closure of the map, so please make sure the Wi-Fi network is connected
properly before using the MAPS.
Press the menu button on the map, and you can complete the address search,
route planning, layer selection and other functions.
MAPS can display three layers: satellite layer, standard layer and road
condition layer. The road condition layer can cover the standard layer or the
satellite layer.
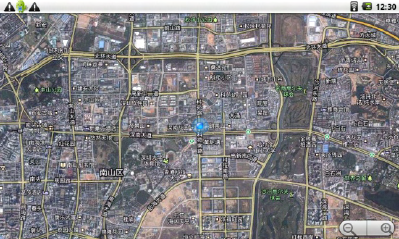
The satellite layer is a satellite aerial view of the maps, by which you can view
the geographical details of the surrounding. The map data will take a long time
to update, so it may have a greater difference from the actual environment.
Figure 6.1 MAPS's satellite layer
- 26-
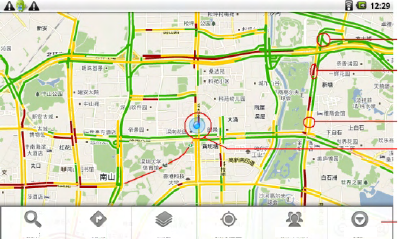
The standard layer has little difference from the GPS map.
After adding the road condition layer, you can view the real-time traffic
conditions of major roads in order to choose a relatively smooth road.
Figure 6.3 Display of the standard layer + road condition layer
Green indicates
smooth road
surface
Brown indicates
road block or
red traffic light
Yellow indicates
a busy road
Location of the
machine IP
Menu
5.2 GPS maps
GPS map uses the global positioning system to position the location, so the
positioning is more accurate and suitable for car navigation
Check the navigation system screen during driving may lead to serious traffic
accidents. To avoid accidents, please pull over the car before operating the
GPS system. The map data inside the GPS system may be different from actual
road conditions, so it can only be used as a reference. Please use the system in
compliance with actual traffic rules. The Company will not be held responsible
for any traffic accident or other accident caused by the use of the system.
Driving in the building intensive areas and under the viaduct, and the weather
change or turning off of the satellite signals and other factors may affect the
receiving of GPS signals, resulting in the positioning failure or inaccurate
positioning, navigation failure, system dysfunction and other phenomenon.
GPS is a U.S. Government-owned global satellite positioning system. The
system and the Company or its agents can not guarantee its positioning
accuracy at all times.
During operation, please follow the operating rules and requirements of related
mobile devices, otherwise the system may not function properly or stop
responding. In these cases please restart the system. See GPS manual for
detailed using method.
- 27-
Search Route Layer My Location Adding vertical
and horizontal
- 28-
Appendix I: Technical Data
Product Specifications
Product name Netpad
Screen 800*480 WVGA resolution 7 TFT touch screen
Processor ARM11 + DSP
Operating
system Android 2.1
Program running
memory 256MB DDR
Built-in memory 2-32GB(can choose)
SD card slot Supports standard MicroSD CARD
WiFi WiFi802.11 b/g
GPS
Receiving frequency: 1575.42MHz (L1 band C/A code)
(suitable for N701G N701EG N701WGN 701TG models)
3G network
WCDMA (suitable for N701W N701WG models)
EVD O/CDM A200 0 (suitable for N701 E N701 EG mode ls)
TD-SCDMA (suitable for N701T N701TG models)
Batteries Polymer rechargeable battery 4500mAh
Power adapter Input: 100-240V AC
Output: DC 5V, 2A
Supported
languages Chinese, English, German, French, Spanish, Italian
Transmission
method USB 2.0
Operating temperature: 0-40°C
Storage temperature: -10-60°C
Temperature
Main frame size 203.5*136.5*15.5mm
Weight The non-3G module weights 430g

Appendix II: Technical Data
Audio and Video Specifications
Category Description
Audio playing Format: mp3, wav, arm, ogg
Video playing Format: 3gp, mp4, avi, mpeg, wmv
Play time
Audio
Video
More than 6 hours of continuous playing
More than 4 hours of continuous playing
- 29-

tested frequency bands. Although the SAR is determined
- 30-
designed and manufactured not to
exceed the emission limits for exposure to
radiofrequency (RF) energy set by the Federal
Communications Commission of the U.S. Government.
These limits are part of comprehensive
guidelines and establish permitted levels of RF energy
for the general population. The guidelines
are based on standards that were developed by
independent scientific organizations through
periodic and thorough evaluation of scientific studies.
The standards include a substantial safety
margin designed to assure the safety of all persons,
regardless of age and health. The exposure
of measurement known as the Specific
Absorption Rate, or SAR. The SAR limit set by the FCC
is 1.6 W/kg.
transmitting at its highest certified power level in all
Your Natpad is a radio transmitter and receiver. It is
at the highest certified power level, the
well below the maximum value. This is
power levels so as to use only the power
required to reach the network. In general, the closer you
are to a wireless base station antenna, the
available for sale to the public, it must be tested
and certified to the FCC that it does not exceed the limit
established by the government adopted
requirement for safe exposure. The tests are performed
in positions and locations (e.g., at the ear
and worn on the body) as required by the FCC for each
model. The highest SAR value for this
differences between the SAR levels of various USB WIFI
and at various positions, they all meet the
government requirement for safe exposure. The FCC
has granted an Equipment Authorization for
evaluated as in compliance with the FCC RF
exposure guidelines. SAR information on this model
the Display Grant section of http://www.fcc.gov/ oet/fccid
after searching on FCC ID: ZM2-N701.
Tests for SAR are conducted with the Netpad
this model Netpad with all reported SAR levels
actual SAR level of the Netpad while operating can be
standard for wireless mobile Netpad employs a unit
Netpad is on file with the FCC and can be found under
because the Netpad is designed to operate at multiple
model Netpad when tested for use at the body is
lower the power output. Before a Netpad model is
1.572 W/Kg While there may be

Truly Industrial (Shanwei) Co., Ltd.
Address: Industrial City, North Dongchong Rd.,
Shanwei, Guangdong Province, China
Fax: 0660-3380759
E-mail: service.sale@truly.com.cn
http://www.truly.com.hk
Free advisory hotline: 400-830-1989
Headquarters: Truly International Holdings Limited
Address: Building 2, Chung Shun Knitting Centre, 1-3
Wing Yip Street, Kwai Chung, New Territories, Hong Kong
Tel: (852) 2487 9803
Fax: (852) 2146 5756, 2480 0018, 2480 0126
http://www.truly.com.hk
Free advisory hotline: 400-830-1989