Tsann Kuen Enterprise TSKM250XX Microwave Oven User Manual M2501SEHS UL manual 080717
Tsann Kuen Enterprise Co., Ltd. Microwave Oven M2501SEHS UL manual 080717
user manual

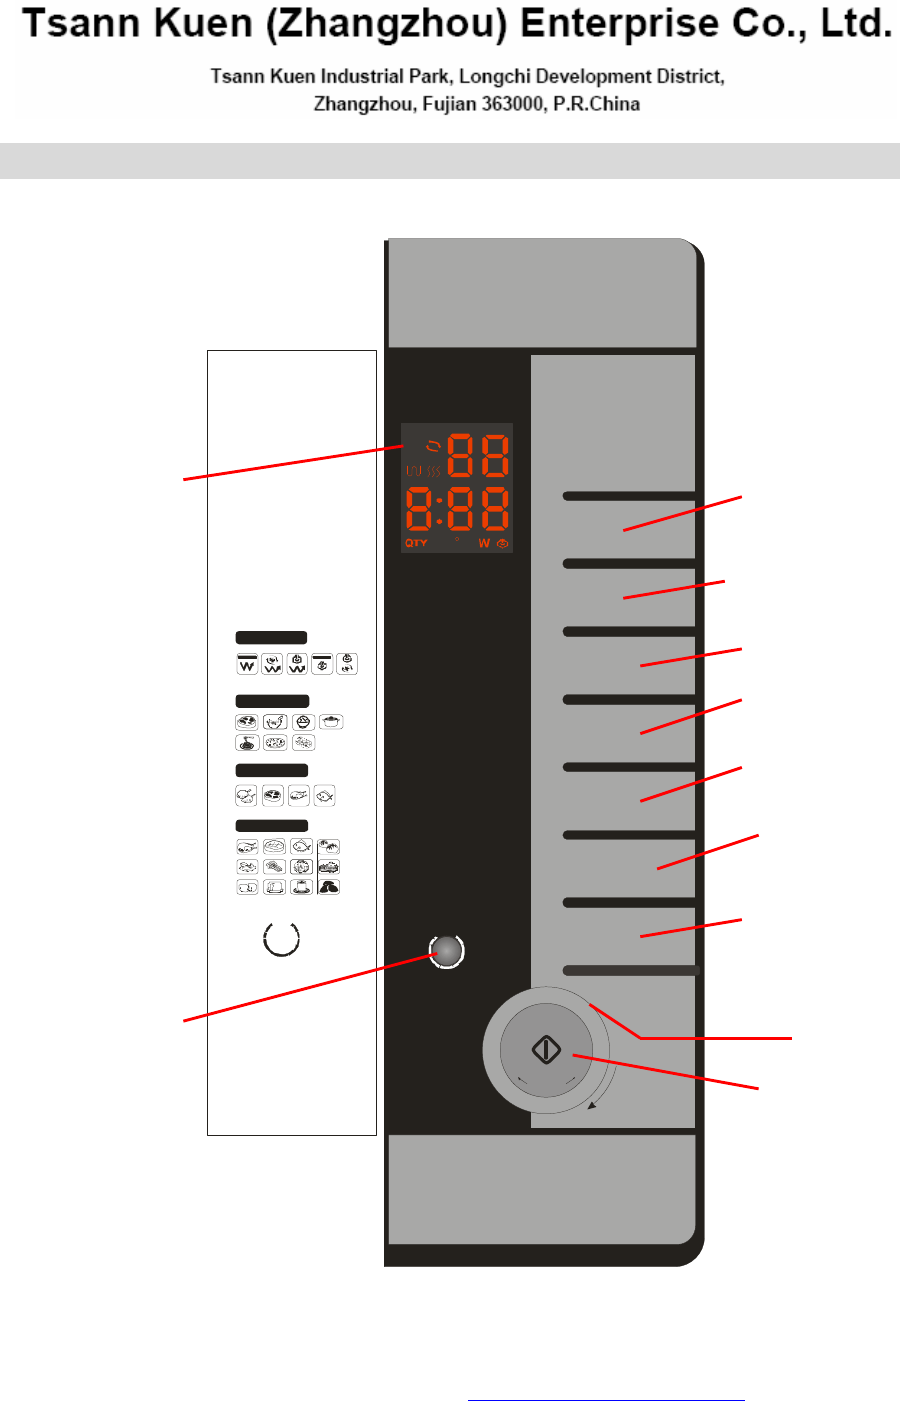

1. Display
2. Clock& independent Timer button
3. Power setting button
4. Grill setting button
5. Convection setting button
6. Steam + Clean up control button
7. Combi setting button: Combi-1 is microwave+ grill; Combi-2 is microwave+
convection;Combi-3 is microwave+ steam;Combi-4 is grill+ steam;Combi-5 is
convection+ steam
8. Auto cook: Express cook on 7 levels C-1----C-7;Defrost cook on 4 levels
D-1----D-4;Steam cook on 12 levels S-1----S-12
9. Stop/Clear +Child safety control button
10. Start and Quick reheat (+30 seconds) button
11. Setting cooking time or weight control button
Technical characteristics
Model TSK-M2501REHS/SEHS
Power Supply 120VAC, 60Hz, ClassⅠ
Power Consumption:
Maximum power
Microwaves power
Grill power
Convection power
Steam power
1500W
1200W
1300W
1500W
800W
Microwave Output power 800W
Frequency 2450MHz
Input Current 15A
Volume 25L
Accessories
Drive
Ring bearing
Turntable
This fixture is located in the middle of the oven, beneath the turntable.
It is connected with the motor and drives the turntable round.
This component is placed in the middle of the oven, beneath the turntable.
It has rollers to support the turntable while leaving it free to rotate.
This glass plate is placed on the ring bearing in the middle of the oven and
must be engaged with the drive. It can be used for all types of cooking.
Containers containing food to be cooked or to collect particles and juices
produced by food during cooking are placed on the turntable. It is easily
removed for cleaning.
PDF created with FinePrint pdfFactory Pro trial version http://www.pdffactory.com

Never heat up the turntable without food as else the ring bearing and the drive can be
damaged
The appliance is for household use only and not suitable for professional use! The
instruction manual must be read carefully and kept at a safe place!
Check your microwave:The appliance should be taken out of the packaging. Remove all
packaging material and check the appliance if there is any damage like broken door handles
or cracks at the door. If there are any damages contact your trader. Never use the
appliance when it is damaged!
Installation
Preparation
Unpack the accessories, wash them and wipe them off carefully.
Position the ring bearing and then the turntable in the center of the oven.
l The turntable must be properly engaged with the drive.
Connecting
² Check that the supply voltage marked on the type label matches the voltage of your
supply. The label indicates the nominal supply voltage of the appliance, e.g.220-230V.
² Ensure that the current marked on your electricity meter and circuit breaker/fuse is at
least 15 Amperes.
² Finally, for proper safety, it is essential to connect your appliance to an outlet socket
with an earth connection in accordance with electrical installation regulations and
standards.
² Position the appliance in such a way that the supply socket is readily accessible so that
it can be easily disconnected.
² You should also ensure that you could gain access to your circuit breaker/fuse.
l It is imperative to comply with the above instructions regarding the electrical
supply.
PDF created with FinePrint pdfFactory Pro trial version http://www.pdffactory.com
Position
On a worktop: position the appliance on a flat and stable surface, capable of supporting the
oven and its contents. The oven must be handled with care, remembering that the control
panel side is the heavier.
If positioned in a corner, leave a gap of at least 5cm from the walls and 15cm above the
oven.
Install the appliance away from any source of heat such as a traditional oven or radiator. It
has been designed and tested for use in ambient temperatures up to 35℃.
l Ensure that the ventilation holes of the appliance are not obstructed.
PDF created with FinePrint pdfFactory Pro trial version http://www.pdffactory.com

19. Before using the steam feature, please insert the water tank and stay it for 60s after
adding water, and then switch on the appliance.
20. If you use the steam feature again when you haven’t use it for a long time, please insert
the water tank and stay it for 30s after adding water, and then empty water in the steam
generator and put it in place and stay it for 60s, after that, you can switch on the
appliance.
21. After cooking by using the steam feature, please use “clean up” function for self-clean,
or wipe up the interior of cavity immediately.
22. If you often use the steam feature to do cooking, please wipe up the steam generator
and water tank timely and clean up the collecting slot.
23. Do not touch the surface of the steam generator while the steam feature is working.
24. Do not pull out the steam generator while working. The steam generator can only be
pulled out for cleaning or servicing.
25. Do not immerse the steam generator into the water for cleaning.
26. If you often use the steam feature to do cooking, Please cleanout the steam generator
with lemony acid once per three months.
27. After cleaning the water collect slot, when you put it back to the oven, please keep your
two hands close to the two sides of the water collect slot, and put it upward into the
oven, at the same time, keep the water collect slot horizontal.
28. The egg-steamed rack can only be used for steaming eggs in the method of the solo
steam feature. Do not use the microwave feature or other. While using the
egg-steamed rack, you can select S-12 auto cook in Auto steam cook.
29. When the appliance is operated in the combination mode, children should only use the
under adult supervision due to the temperatures generated.
PDF created with FinePrint pdfFactory Pro trial version http://www.pdffactory.com

Please read them carefully.
Your appliance can be used to defrost, reheat and cook foods much faster than is possible
with traditional cooking methods.
Foods
Forbidden foods:
If you choose a cooking method using microwaves, you should never:
Ø Attempt to fry food—it is impossible to control the temperature of the oil and other
fats—fire risk.
Ø Attempt to cook or warm up eggs in their shells, hard-boiled eggs with or without their
shells or snails—they may explode.
Ø Attempt to cook food in an intact shell (e.g. chestnuts) or hard skin (tomatoes, potatoes,
sausages)—always make a slit.
Food temperatures:
l The action of microwaves is such that only the food is heated. The container
may, therefore, remain cold or cool while the food that it contains is burning
out.
To avoid any risk of burning, always stir before serving and check the temperature carefully
before serving—especially to children.
Shake feeding bottles well and try a few drops on the back of your wrist to check the
temperature.
Preparing food for cooking:
Before warming feeding bottles and small pots, remove teats and covers.
Remember to cover the food in order to:
Ø Avoid any splashing of the oven cavity
Ø Retain sufficient moisture for cooking
Heating liquids:
When heating liquids, a sudden overflow may occur when you take the container to remove
it from the appliance. In fact, when the temperature reaches boiling point, steam tends to
remain trapped in the liquid until it is disturbed.
To avoid this superheating effect and the consequent risk of scalding, always place a plastic
spoon in the liquid to be heated.
Containers and materials
Below, you will find details of the various types of containers, which can be used or must not
be used for the chosen cooking method.
“micro” mode (microwaves)
Use containers suitable for microwave cooking.
A container can easily be tested for microwave “transparency”:
Place the empty container on the turntable together with a glass of water and run the oven
for one minute at maximum power.
After one minute:
• if the container is cold, it is “transparent” and can be used for microwave cooking,
PDF created with FinePrint pdfFactory Pro trial version http://www.pdffactory.com

• if the container is warm or hot it is absorbent and must not be used for microwave
cooking.
Never use hermetically sealed containers.
Remember to remove covers and stoppers from feeding bottles, jars, bottles and plastic
containers.
Disposable containers
Never leave the appliance to run unsupervised when using disposable containers in
plastic, paper or other inflammable materials.
If you see smoke appear, keep the oven door closed and disconnect your appliance.
Metal containers
Never use metallic materials and containers for microwave cooking.
You can, however, use your appliance to heat or defrost certain preparations in metallic
trays, provided the height of the tray does not exceed 4 cm, not including the cover.
With regard to the cover, follow the instructions on the package. It will have to be removed or
left in place, as the case may be. If not indicated otherwise, play safe and remove it.
Center the tray(s) on the turntable, leaving at least 1 cm clearance from the oven walls. If
there are several trays, space them at least 2 cm apart.
l Use only containers that can withstand both microwaves and high temperatures.
Summary of containers and materials permitted and not permitted in “micro” mode
Materials Containers Suitable for
micro-waves
Remarks
METAL
Aluminium foil In certain cases May be used in small quantities to
protect certain parts of the food from
overcooking. Risk of electric arcing if
the foil is too close to the oven walls
or
you have used too much.
Aluminium tray In certain cases See “Metal containers”, above
Metal sheet No Risk of electric arcing and fire
Freezer bag ties No Risk of electric arcing and fire
GLASS
Heat-resistant glass Yes Perfectly suitable
Glass with metal-based
decoration (gold, lead
etc.)
No Risk of electric arcing
Fine glassware No May break or crack if heated suddenly
PLASTIC
Plastic containers Yes Perfectly suitable if the plastic is
heat-resistant.
Certain plastics may be prone to
deformation or discoloration after
PDF created with FinePrint pdfFactory Pro trial version http://www.pdffactory.com
repeated use.
Do not seal closed.
Plastic film Yes Can be used to retain moisture and
prevent spitting. The plastic must not
touch the food during cooking.
Puncture the plastic to allow excess
vapour to escape.
Use oven gloves to remove the plastic
film after cooking (risk of burns from
hot vapour escaping from the
container).
DISPOSABLE CONTAINER MATERIALS FORBIDDEN IN GRILL AND FAN OVEN MODES
Polystyrene cups or
packaging
Yes Can be used for heating liquids and
foods for a short time. Overheating
could melt the polystyrene, which
would then become mixed with the
food.
Paper bag No Fire-risk
Paper plates, cups,
napkins or absorbent
paper.
Yes May be used for heating and brief
cooking
Grease-proof paper Yes Can be used to retain moisture and
prevent spitting.
Short cooking times.
Recycled paper No Risk of electric arcing
PORCELAIN
Porcelain containers Yes Perfectly suitable except with
metal-based decoration (gold, lead
etc.).
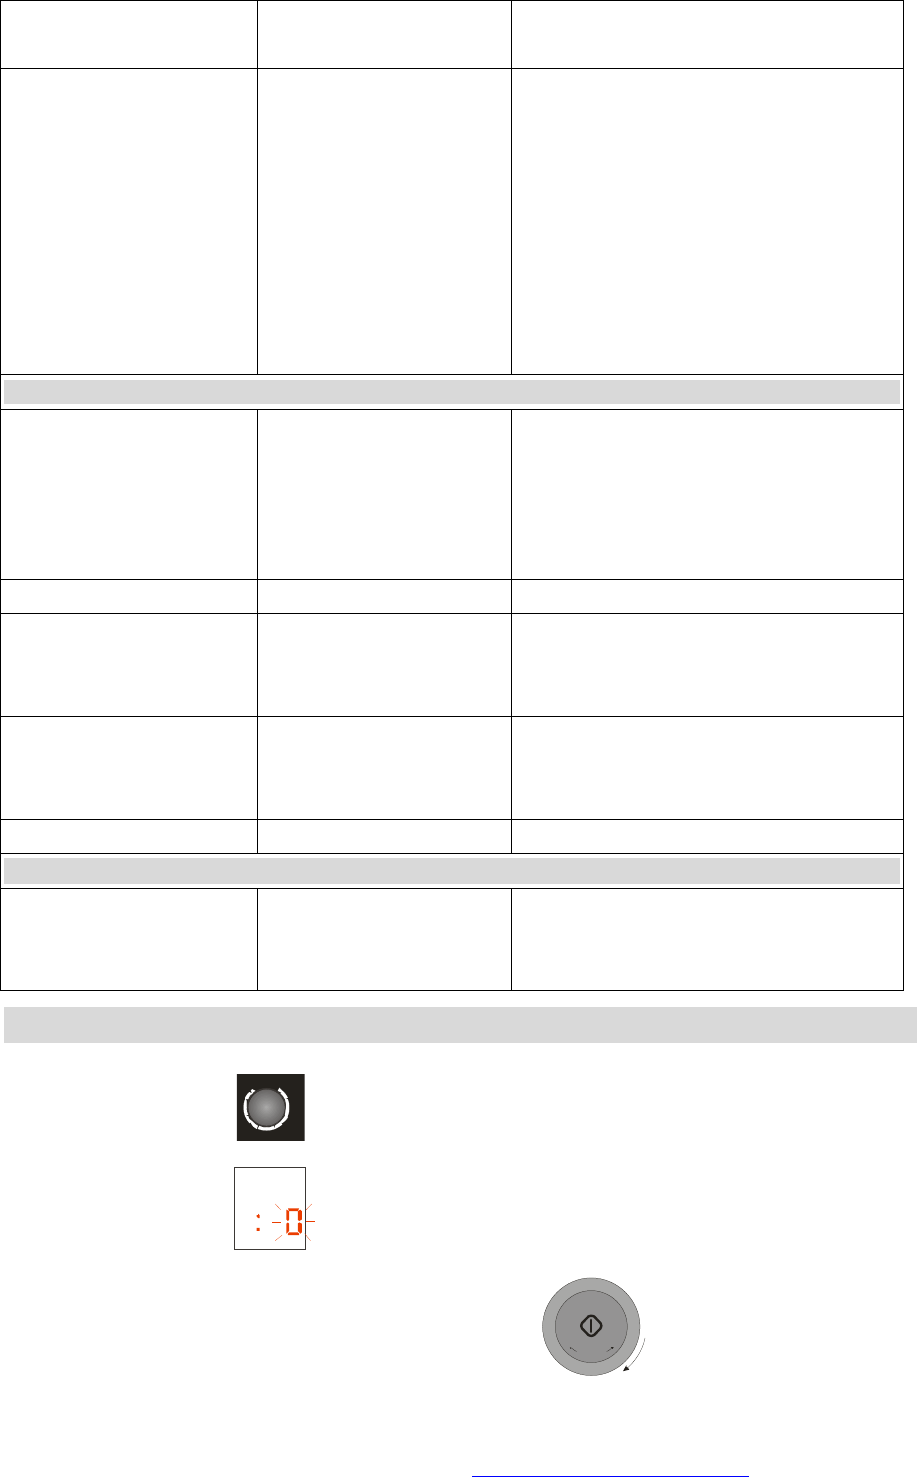
Using the time Function
Press the clock button
T
I
M
E
one time, and choose TIMER function.
The display will show:
Adjust to the desired time by turning the rotary knob.
T
I
M
E
/
W
E
I
G
H
T
+
+
3
0
S
E
C
+
PDF created with FinePrint pdfFactory Pro trial version http://www.pdffactory.com
The display will show:
Press the START button
+
3
0
S
E
C
+
, and the countdown will start.
The display will show:
At the end of countdown, the oven will beep 4 times. If you do not press any button or open
the oven at the end of countdown, it will beep 3 times every minute.
Setting the time
Press the clock button
T
I
M
E
twice, the “0” indication for the hours will blink. The display
will show
Adjust the hours by turning the rotary knob
T
I
M
E
/
W
E
I
G
H
T
+
+
3
0
S
E
C
+
The display will show
Press the clock button
T
I
M
E
to enter the minutes setting.
The “00” indication for the minutes will blink.
The display will show
Adjust the minutes by turning the rotary knob
T
I
M
E
/
W
E
I
G
H
T
+
+
3
0
S
E
C
+
Press the clock button to enter the minutes setting.
PDF created with FinePrint pdfFactory Pro trial version http://www.pdffactory.com
The clock setting ends.
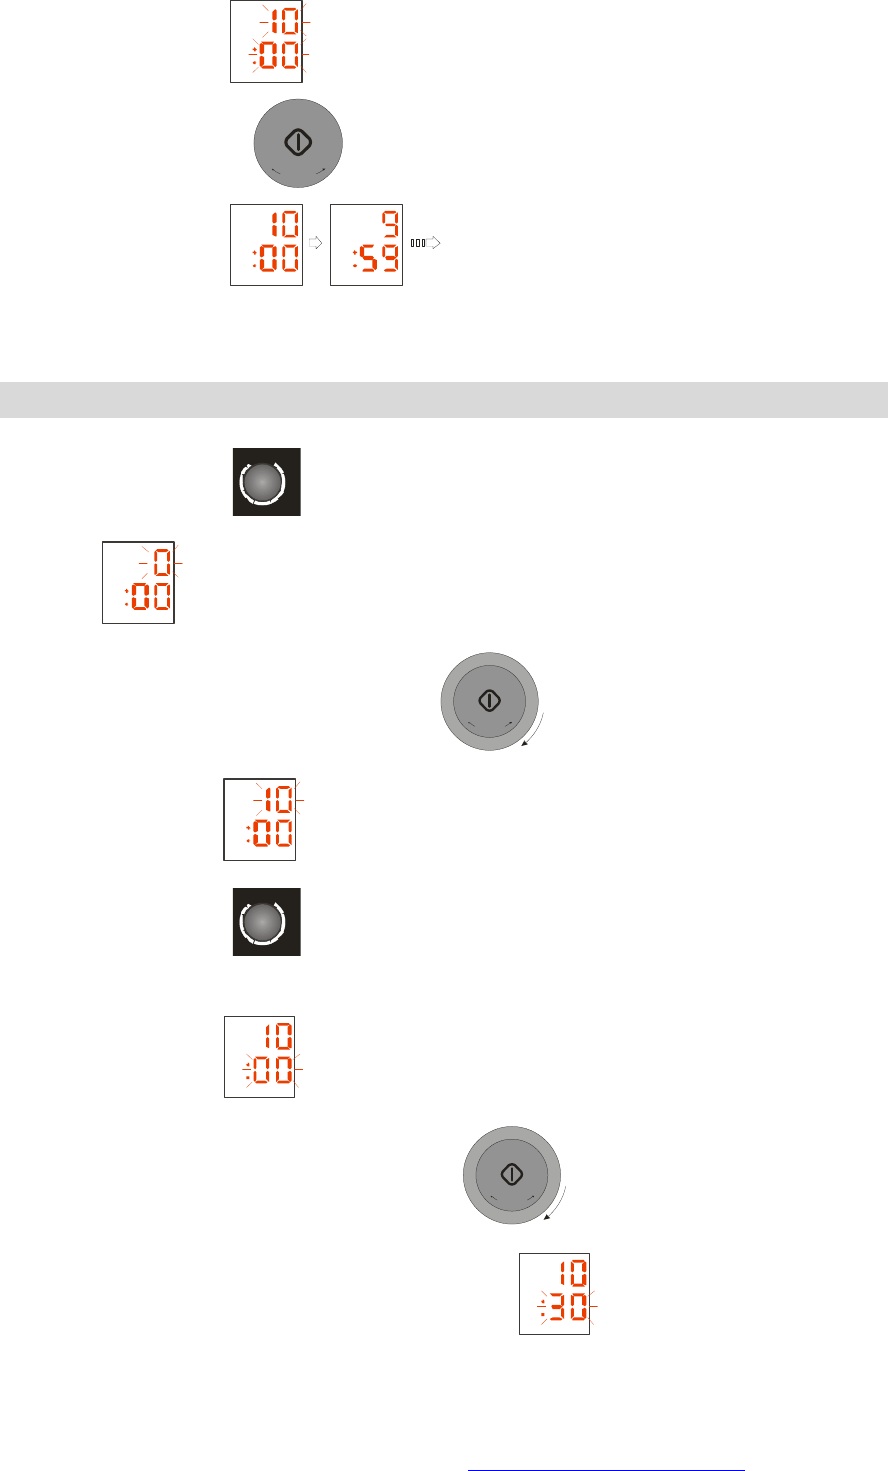
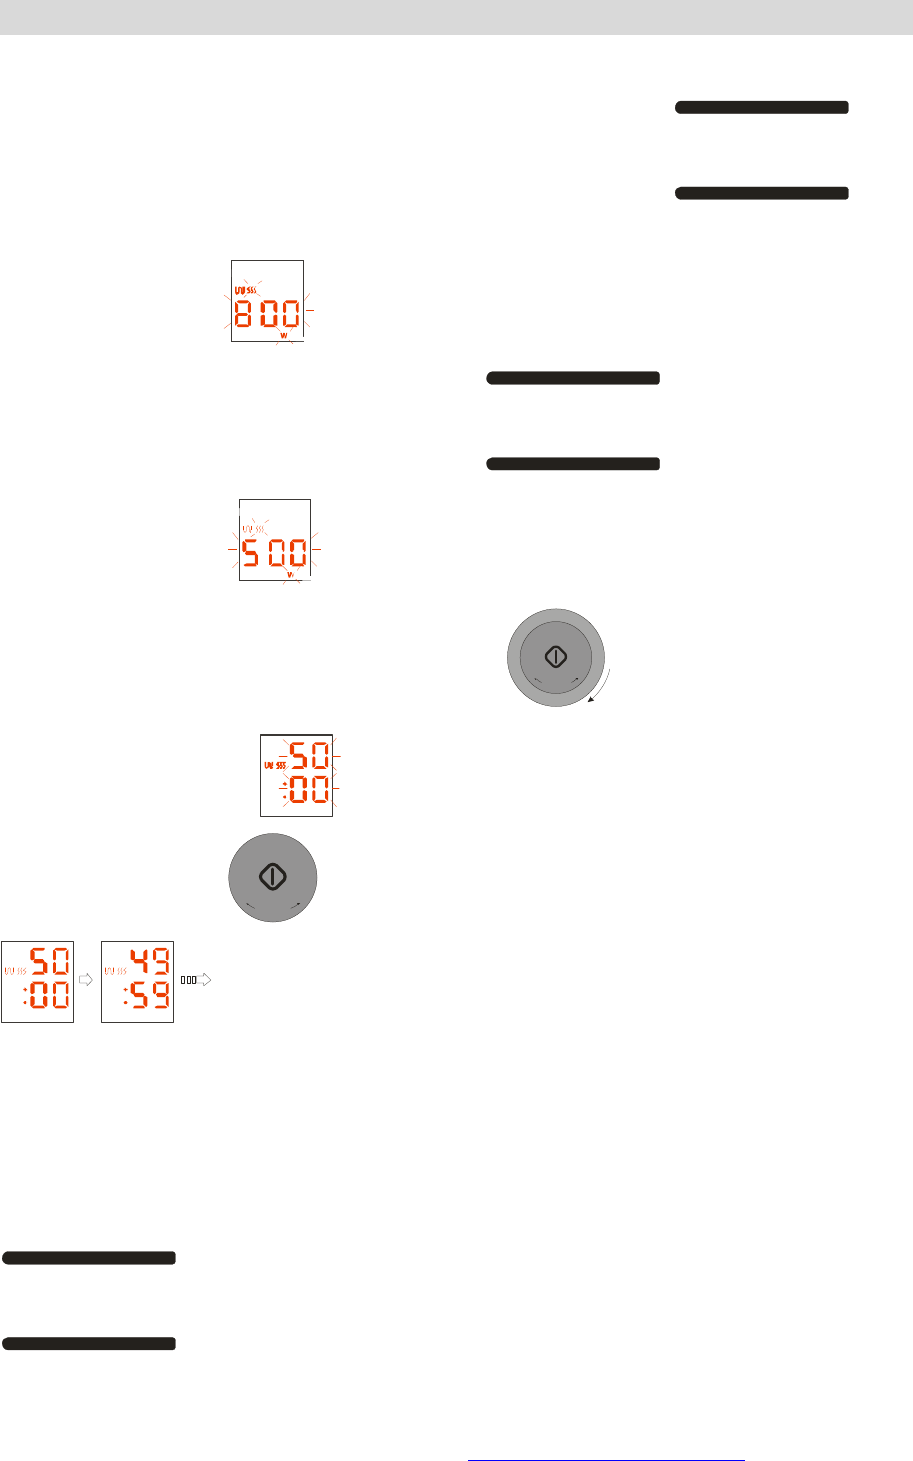
Microwave Cooking
Setting the power by pressing the power level button.
POWER LEVEL
The display will show
Setting the cooking time by turning the rotary knob.
T
I
M
E
/
W
E
I
G
H
T
+
+
3
0
S
E
C
+
The display will show
Press the Start button
+
3
0
S
E
C
+
, and the oven will start cooking.
The display will show
By default, the oven runs at maximum power. If you wish to use maximum power, there is no
need to make a power setting. If you wish to use a reduced power setting, select it by
pressing the POWER button
POWER LEVEL
, 5 power levels are available: 800W, 550W,
400W, 250W, 100W.
At the end of cooking, the oven will beep 4 times. If you do not press any button or open the
oven at the end of cooking, it will beep 3 times every minute. During cooking, if you open the
door, the oven will stop.
Using the Grill function
Press the Grill button
GRILL
PDF created with FinePrint pdfFactory Pro trial version http://www.pdffactory.com
The display will show
Setting the cooking time by turning the rotary knob.
T
I
M
E
/
W
E
I
G
H
T
+
+
3
0
S
E
C
+
The display will show
Press the Start button
+
3
0
S
E
C
+
and the oven will start cooking
The display will show
At the end of cooking, the oven will beep 4 times, If you do not press any button or open the
oven at the end of cooking, it will beep 3 times every minute.
The heating element will be off at the time of cooking time left 15 seconds. During cooking, if
you open the door, the oven will stop.
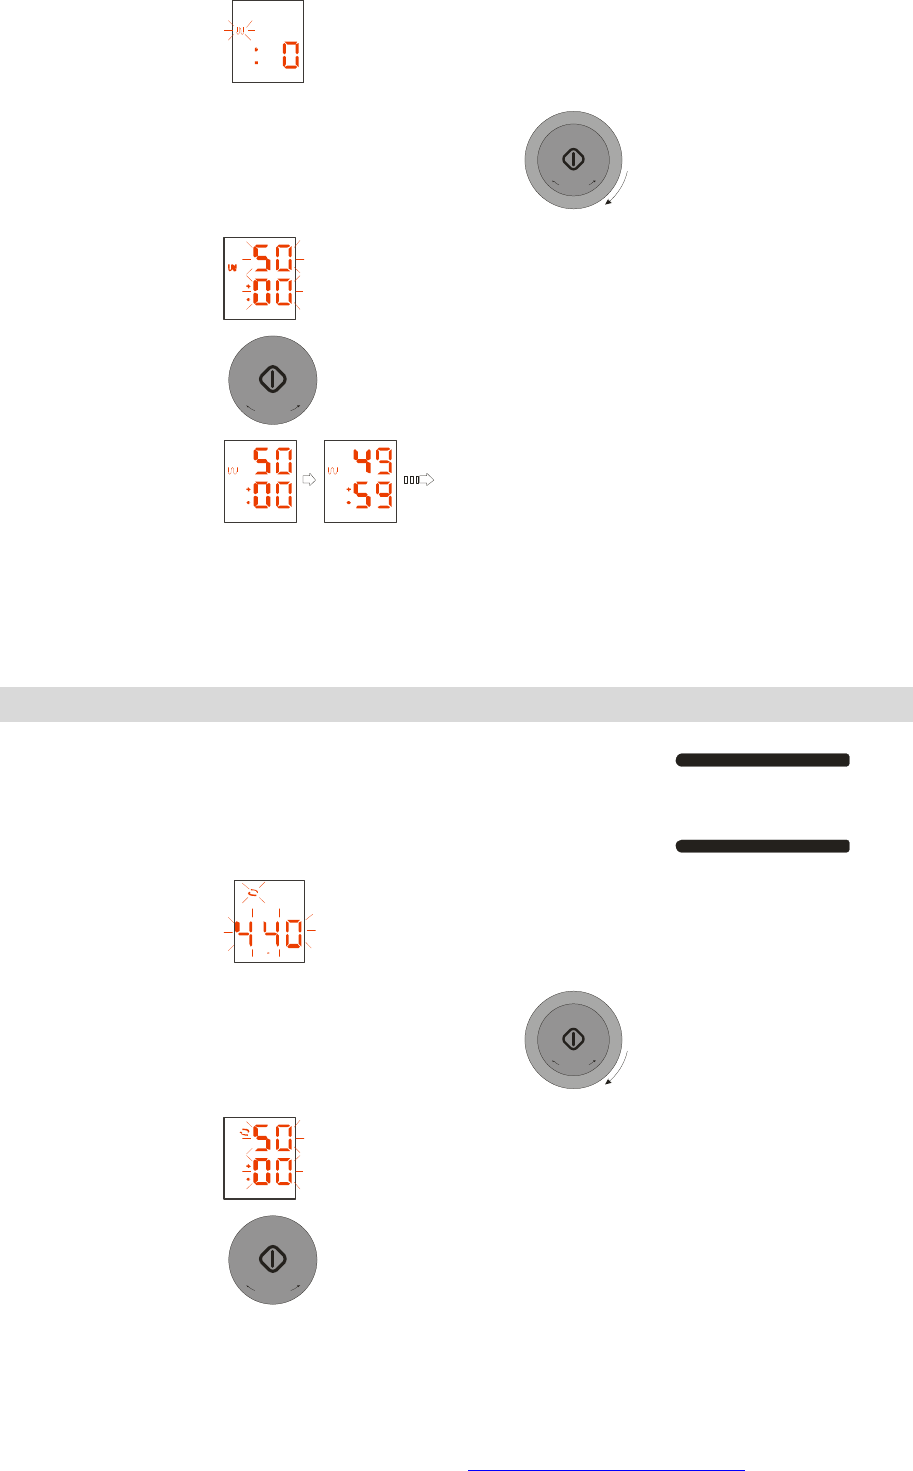
Using Convection function
Setting the convection temperature by press the convection button
CONV.
The display will show F
Setting the cooking time by turning the rotary knob.
T
I
M
E
/
W
E
I
G
H
T
+
+
3
0
S
E
C
+
The display will show
Press the Start button
+
3
0
S
E
C
+
, and the oven will start cooking.
PDF created with FinePrint pdfFactory Pro trial version http://www.pdffactory.com
The display will show
At the end of cooking, the oven will beep 4 times. If you do not press any button or open the
oven at the end of cooking, it will beep 3 times every minute, 7 convection temperature
levels are available: 440℉, 400℉, 360℉, 320℉, 280℉, 240℉, 200℉. The heating element
will be off at the time of cooking time left 15 seconds. During cooking, if you open the door,
the oven will stop.
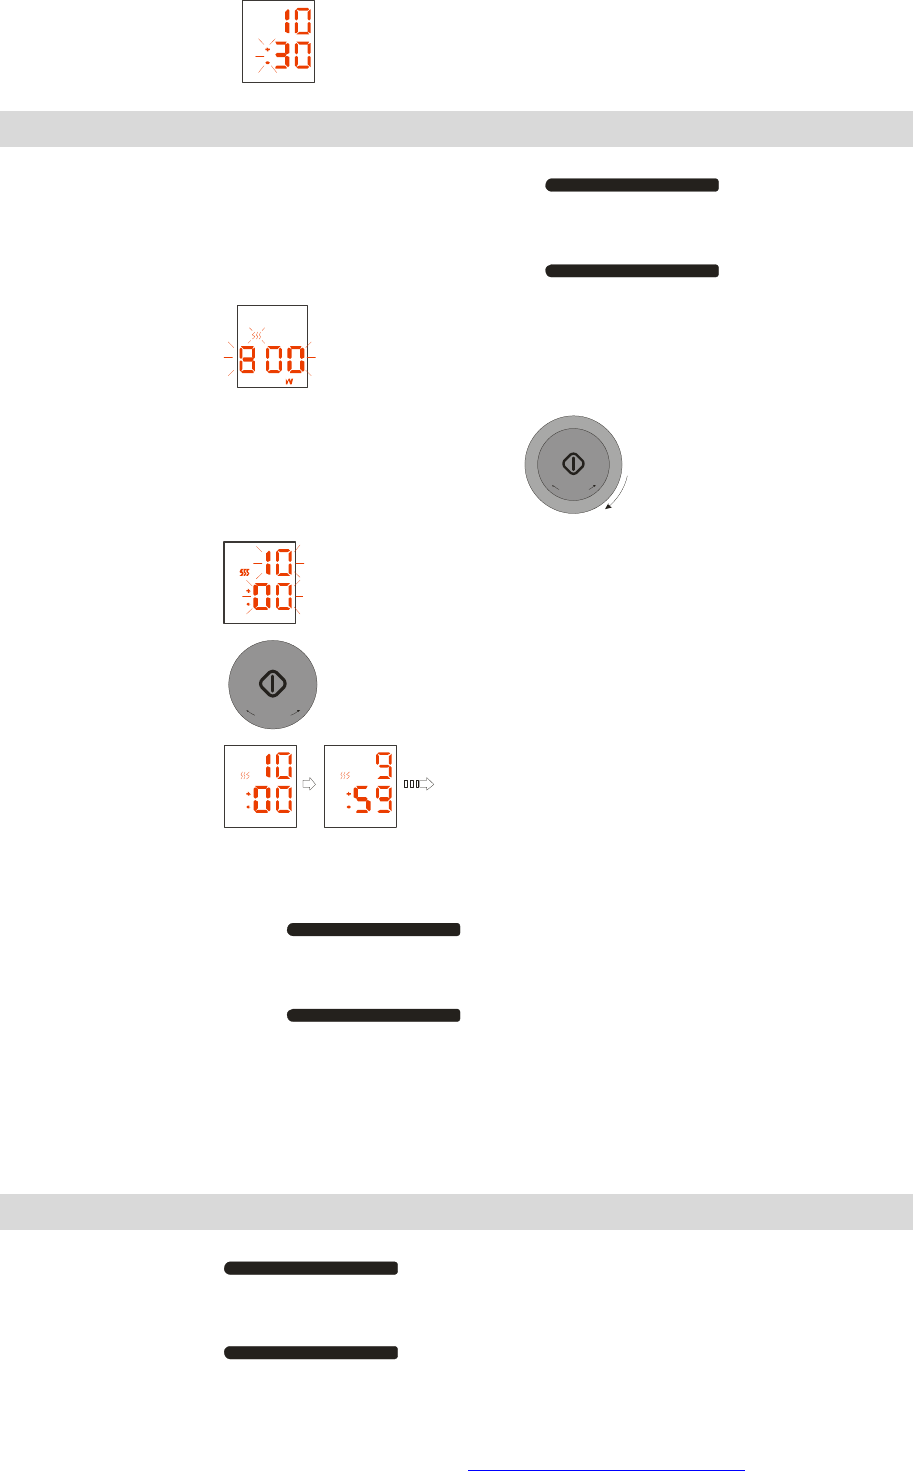
Using Steam function
Press the steam button
STEAM
CLEAN UP
The display will show
Setting the cooking time by turning the rotary knob.
T
I
M
E
/
W
E
I
G
H
T
+
+
3
0
S
E
C
+
The display will show
Press the Start button
+
3
0
S
E
C
+
, and the oven will start cooking.
The display will show
At the end of cooking, the oven will beep 4 times. If you do not press any button or open the
oven at the end of cooking, it will beep 3 times every minute.
While it don’t have water in the water tank, the oven will beep 8 times, if you do not adding
water all the while, it will beep 4 times every minute.
During cooking , if you open the door, the oven will stop.
PDF created with FinePrint pdfFactory Pro trial version http://www.pdffactory.com
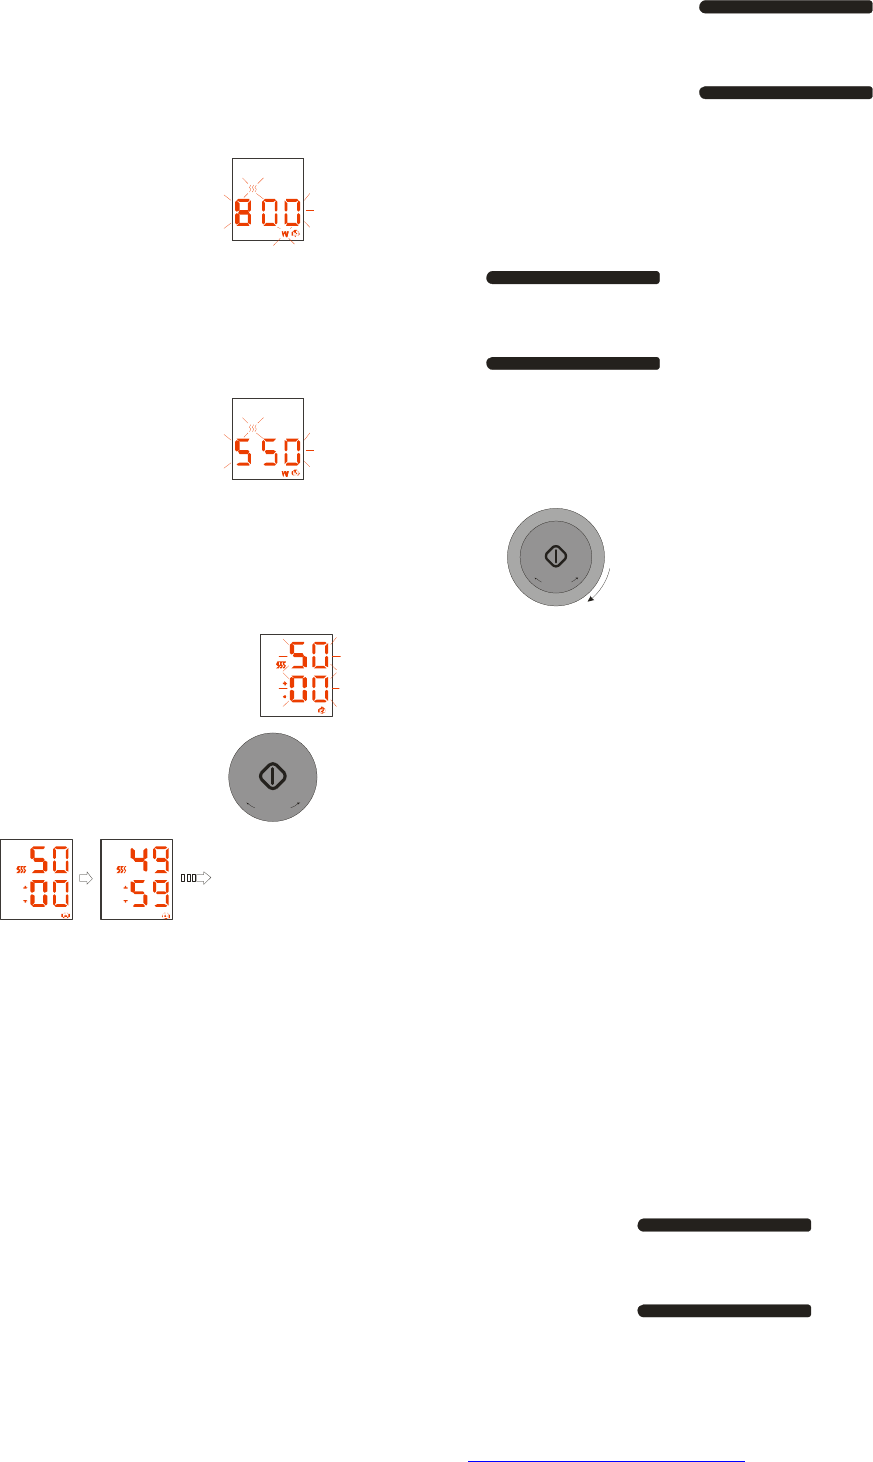
Using Combi function
1) Microwave+ Grill
Setting the Microwave+ Grill function by pressing the combi button
COMBI
one
time.
The display will show
Setting the power by pressing the power button
POWER LEVEL
two times or more
The display will show
Setting the cooking time by turning the rotary knob
T
I
M
E
/
W
E
I
G
H
T
+
+
3
0
S
E
C
+
and the display will show
Press the Start button
+
3
0
S
E
C
+
, and the oven will start cooking and the display will show
At the end of cooking, the oven will beep 4 times, If you do not press any button or open the
oven at the end of cooking, it will beep 3 times every minute, 5 power levels are available:
800W, 550W, 400W, 250W, 100W. The heating element will be off at the time of cooking
time left 15 seconds. During cooking, if you open the door, the oven will stop.
2) Microwave+ Convection
Setting the Microwave+ Convection function by pressing the combi button
COMBI
two times.
PDF created with FinePrint pdfFactory Pro trial version http://www.pdffactory.com

The display will show F
Setting the convection temperature by pressing the convection button
CONV.
two times or more
The display will show F
Setting the power by pressing the power button
POWER LEVEL
one time or more
the display will show
Setting the cooking time by turning the rotary knob
T
I
M
E
/
W
E
I
G
H
T
+
+
3
0
S
E
C
+
The display will show
Press the Start button
+
3
0
S
E
C
+
, and the oven will start cooking.
The display will show
At the end of cooking, the oven will beep 4 times. If you do not press any button or open the
oven at the end of cooking, it will beep 3 times every minute,
7 convection temperature levels are available: 440℉, 400℉, 360℉, 320℉, 280℉, 240℉,
200℉. 5 power levels are available: 800W, 550W, 400W, 250W, 100W.
The heating element will be off at the time of cooking time left 15 seconds. During cooking, if
you open the door, the oven will stop.
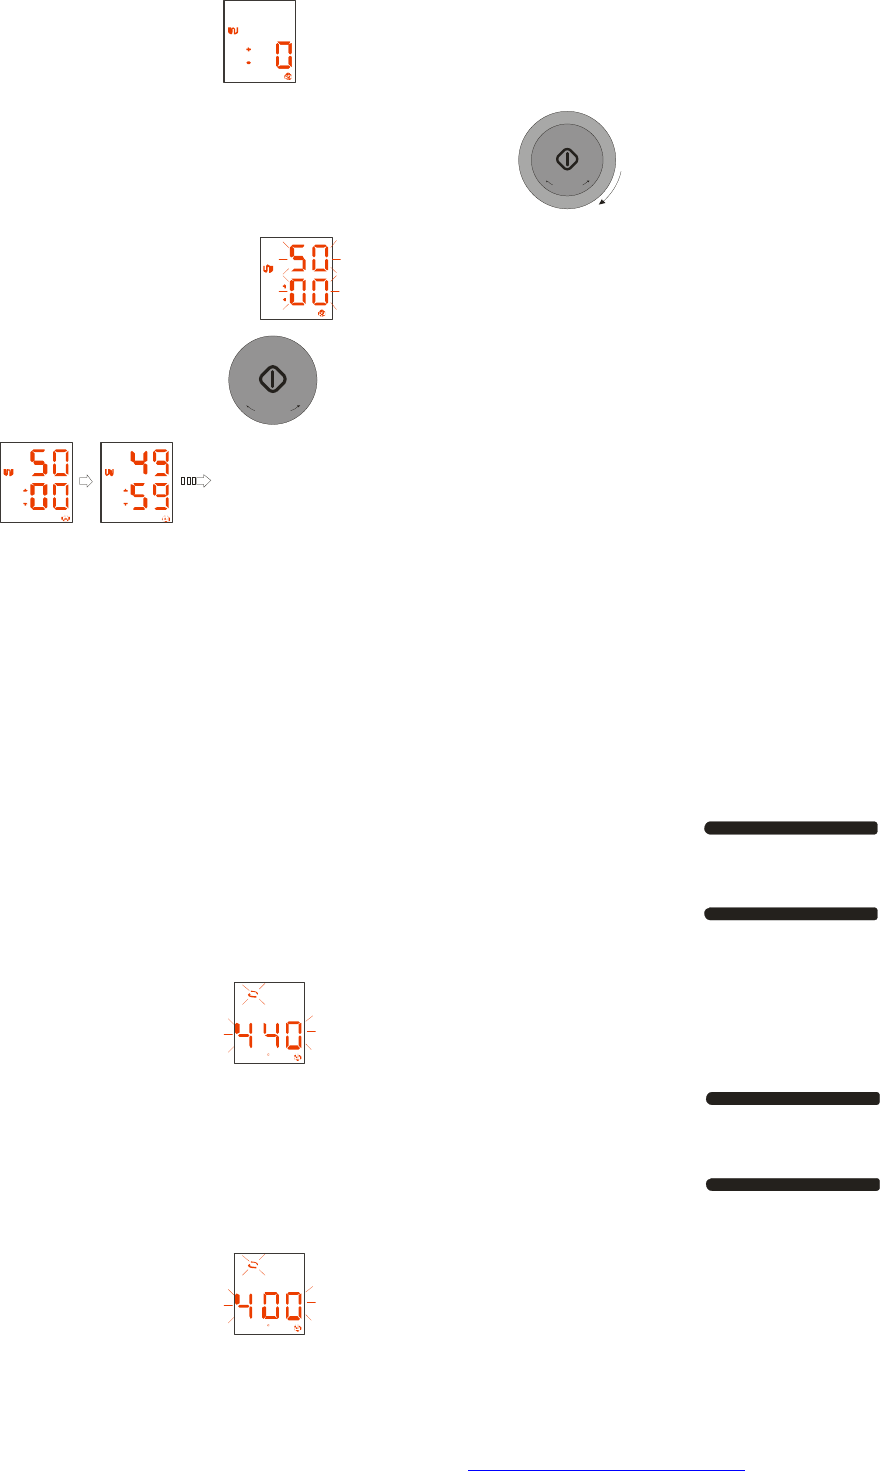
3) Microwave+ Steam
PDF created with FinePrint pdfFactory Pro trial version http://www.pdffactory.com
Setting the Microwave+ Steam function by pressing the combi button
COMBI
three times.
The display will show
Setting the power by pressing the power button
POWER LEVEL
two times or more
The display will show
Setting the cooking time by turning the rotary knob
T
I
M
E
/
W
E
I
G
H
T
+
+
3
0
S
E
C
+
and the display will show
Press the Start button
+
3
0
S
E
C
+
, and the oven will start cooking and the display will show
5 power levels are available: 800W,550W,400W,250W,100W.
At the end of cooking, the oven will beep 4 times. If you do not press any button or open the
oven at the end of cooking, it will beep 3 times every minute.
While it don’t have water in the water tank, the oven will beep 8 times, if you do not adding
water all the while, it will beep 4 times every minute.
During cooking ,if you open the door, the oven will stop.
4) Grill + Steam
Setting the Grill + Steam function by pressing the combi button
COMBI
four
times.
PDF created with FinePrint pdfFactory Pro trial version http://www.pdffactory.com
The display will show
Setting the cooking time by turning the rotary knob
T
I
M
E
/
W
E
I
G
H
T
+
+
3
0
S
E
C
+
and the display will show
Press the Start button
+
3
0
S
E
C
+
, and the oven will start cooking and the display will show
At the end of cooking, the oven will beep 4 times. If you do not press any button or open the
oven at the end of cooking, it will beep 3 times every minute. The heating element will be off
at the time of cooking time left 15 seconds.
While it don’t have water in the water tank, the oven will beep 8 times, if you do not adding
water all the while, it will beep 4 times every minute.
During cooking, if you open the door, the oven will stop.
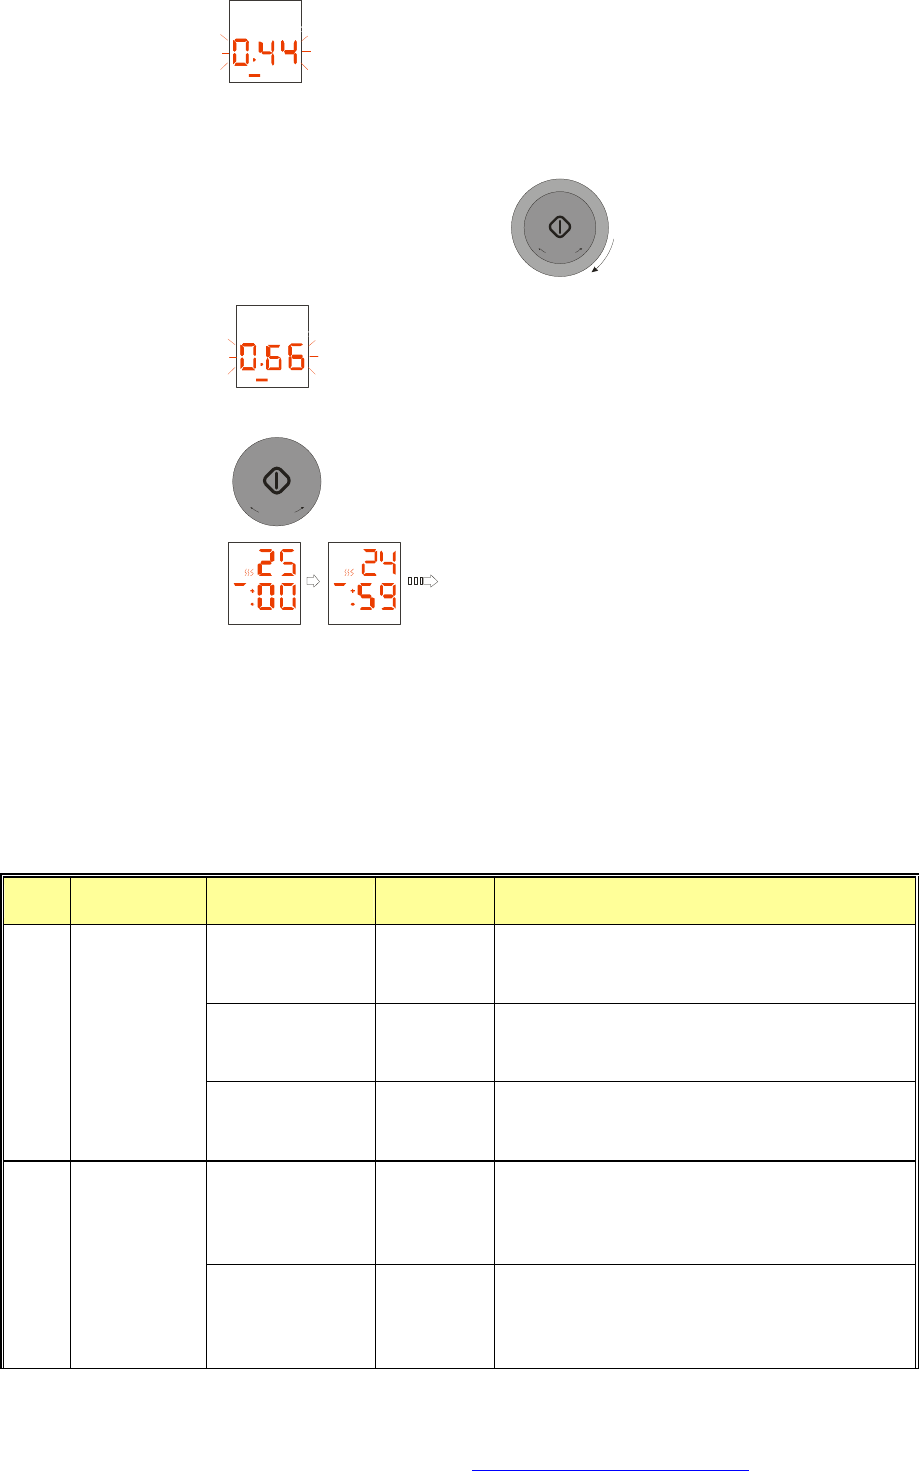
5) Convection + Steam
Setting the Convection+ Steam function by pressing the combi button
COMBI
five times.
The display will show F
Setting the convection temperature by pressing the convection button
CONV.
two times or more
The display will show F
PDF created with FinePrint pdfFactory Pro trial version http://www.pdffactory.com

Setting the cooking time by turning the rotary knob
T
I
M
E
/
W
E
I
G
H
T
+
+
3
0
S
E
C
+
The display will show
Press the Start button
+
3
0
S
E
C
+
, and the oven will start cooking.
The display will show
At the end of cooking, the oven will beep 4 times. If you do not press any button or open the
oven at the end of cooking, it will beep 3 times every minute.
7 convection temperature levels are available: 440℉, 400℉, 360℉, 320℉, 280℉, 240℉,
200℉. The heating element will be off at the time of cooking time left 15 seconds.
While it don’t have water in the water tank, the oven will beep 8 times, if you do not adding
water all the while, it will beep 4 times every minute.
During cooking, if you open the door, the oven will stop.
Using Auto Express cook
Function
Setting the Auto cook by pressing the Express/Defrost/Steam cook button
EXPRESS
DEFROST COOK
STEAM
one time.
The display will show lb
Setting the food ingredient by truning the rotary knob
T
I
M
E
/
W
E
I
G
H
T
+
+
3
0
S
E
C
+
the display will show
Press the Start button
+
3
0
S
E
C
+
PDF created with FinePrint pdfFactory Pro trial version http://www.pdffactory.com
the display will show
Setting the food weight by turning the rotary knob
T
I
M
E
/
W
E
I
G
H
T
+
+
3
0
S
E
C
+
The display will show
Press the Start button
+
3
0
S
E
C
+
, and the oven will start cooking.
The display will show
At the end of cooking, the oven will beep 4 times. If you do not press any button or open the
oven at the end of cooking, it will beep 3 times every minute. The heating element will be off
at the time of cooking time left 15 seconds. During cooking, if you open the door, the oven
will stop.
Auto Cook program (the cooking time is not final!)
Auto Express Cook List:
Type
Food pounds/QTY Total time
Sked
1.1 lb 28 min 1. microwave 800W 8 min.;
2. microwave 550W 20 min.
1.65 lb 38 min 1. microwave 8800W 10 min.;
2. microwave 550W 28 min.
c-1 BRAISED
PORK
2.2 lb 47 min 1. microwave 800W 12 min.;
2. microwave 550W 35 min.
0.22 lb
(+1000ml water)
21 min 1. microwave 800W 10 min.;
2. microwave 550W 8 min..
3. microwave 800W 3 min.
c-2 PORRIDGE
0.44 lb
(+1800ml water)
28 min 1. microwave 800W 15 min.;
2. microwave 550W 10 min..
3. microwave 800W 3 min.
PDF created with FinePrint pdfFactory Pro trial version http://www.pdffactory.com

0.44 lb
(+400ml water) 23 min
1. microwave 800W 5 min.
2. microwave 400W 4.5 min.
3. microwave 800W 4.5 min.
4. microwave 500W 9 min.
0.66 lb
(+500ml water) 25 min
1. microwave 800W 6 min.
2. microwave 400W 5.5 min.
3. microwave 800W 4.5 min.
4. microwave 500W 9 min.
c-3 RICE
1.1 lb
(+700ml water) 30 min
1. microwave 800W 8 min.
2. microwave 500W 7 min.
3. microwave 800W 5 min.
4. microwave 500W 10 min.
0.88 lb
(+800ml water) 23 min 1. microwave 800W 8 min.;
2. microwave 550W 15 min.
1.76 lb
(+1200ml water)
35 min 1. microwave 800W 15 min.
2. microwave 550W 20 min.
c-4 STEW
2.65 lb
(+1600ml water)
43 min 1. microwave 800W 18 min.
2. microwave 550W 25 min.
0.44 lb
(+800ml water) 10 min 1. microwave 800w 7 min.; pause
2. microwave 800W 3 min.
0.66 lb
(+900ml water) 13 min 1. microwave 800W 9 min. pause
2. microwave 800W 4 min.
c-5 NOODLES
0.88 lb
(+1000ml water)
17 min 1. microwave 800W 12 min. pause
2.microwave 800W 5 min.
0.44 lb 20 min 1. preheat(conv.440℉)10 min. >pause
2. conv.440℉ 10 min.
0.88 lb 23 min 1. preheat(conv.440℉)10 min. >pause
2. conv.440℉ 13 min.
c-6 COOKLE
1.1 lb 25 min 1. preheat(conv.440℉)10 min. >pause
2. conv.440℉ 15 min.
0.66 lb 23 min 1. preheat(conv.440℉) 10 min. >pause
2. conv.440℉ 8 min.;
3. grill 5 min.
c-7 BAKE
1.1 lb 25 min 1. preheat(conv.440℉)10 min. >pause
2. conv.440℉ 10 min.;
3. grill 5 min.
PDF created with FinePrint pdfFactory Pro trial version http://www.pdffactory.com

1.65 lb 30 min 1. preheat(conv.440℉)10 min. >pause
2. conv.440℉ 15 min.;
3. grill 5 min.
Using Auto Defrost cook
Function
Setting the Auto cook by pressing the Express /Defrost /Steam cook button
EXPRESS
DEFROST COOK
STEAM
two times.
The display will show lb
Setting the food ingredient by truning the rotary knob
T
I
M
E
/
W
E
I
G
H
T
+
+
3
0
S
E
C
+
the display will show
Press the Start button
+
3
0
S
E
C
+
the display will show
Setting the food weight by turning the rotary knob
T
I
M
E
/
W
E
I
G
H
T
+
+
3
0
S
E
C
+
the display will show
Press the Start button
+
3
0
S
E
C
+
and the oven will start cooking.
PDF created with FinePrint pdfFactory Pro trial version http://www.pdffactory.com
The display will show
Defrost program (the defrost time is not final):
Auto Defrost Cook List:
Food Weight (pounds)
Total time Turn over time Power
0.45 lb 4:30 2:00 Micro. 250W
0.65 lb 5:32 2:30 Micro. 250W
0.85 lb 7:25 3:11 Micro. 250W
1.10 lb 8:15 4:12 Micro. 250W
1.30 lb 10:10 5:10 Micro. 250W
1.50 lb 12:06 6:11 Micro. 250W
1.75 lb 14:13 7:12 Micro. 250W
2.00 lb 16:15 8:13 Micro. 250W
2.20 lb 18:10 9:14 Micro. 250W
2.40 lb 20:26 10:15 Micro. 250W
2.65 lb 22:14 11:00 Micro. 250W
2.85 lb 24:23 12:17 Micro. 250W
3.10 lb 26:05 13:18 Micro. 250W
3.30 lb 28:27 14:19 Micro. 250W
3.50 lb 29:04 15:20 Micro. 250W
3.75 lb 30:09 16:03 Micro. 250W
4.00 lb 32:12 17:23 Micro. 250W
4.20 lb 33:16 18:31 Micro. 250W
JOINT MEAT
4.40 lb 34:30 19:28 Micro. 250W
0.45 lb 4:07 2:10 Micro. 250W
0.65 lb 6:17 3:11 Micro. 250W
0.85 lb 8:20 4:12 Micro. 250W
1.10 lb 10:10 5:20 Micro. 250W
1.30 lb 12:30 6:21 Micro. 250W
1.50 lb 14:10 7:22 Micro. 250W
1.75 lb 16:40 8:23 Micro. 250W
2.00 lb 18:35 9:24 Micro. 250W
2.20 lb 20:20 10:00 Micro. 250W
2.40 lb 21:30 10:26 Micro. 250W
2.65 lb 22:10 11:00 Micro. 250W
STEAK/CHOPS
2.85 lb 23:26 11:40 Micro. 250W
PDF created with FinePrint pdfFactory Pro trial version http://www.pdffactory.com
3.10 lb 24:23 12:05 Micro. 250W
3.30 lb 25:20 12:26 Micro. 250W
3.50 lb 26:12 13:00 Micro. 250W
3.75 lb 27:26 13:30 Micro. 250W
4.00 lb 28:25 14:00 Micro. 250W
4.20 lb 29:15 14:30 Micro. 250W
4.40 lb 30:20 15:10 Micro. 250W
0.45 lb 3:05 1:51 Micro. 250W
0.65 lb 4:39 2:47 Micro. 250W
0.85 lb 6:11 3:00 Micro. 250W
1.10 lb 7:23 3:32 Micro. 250W
1.30 lb 8:53 4:33 Micro. 250W
1.50 lb 11:30 5:16 Micro. 250W
1.75 lb 12:30 6:00 Micro. 250W
2.00 lb 13:30 6:30 Micro. 250W
2.20 lb 14:20 7:06 Micro. 250W
2.40 lb 15:48 7:28 Micro. 250W
2.65 lb 17:30 8:15 Micro. 250W
2.85 lb 19:30 9:03 Micro. 250W
3.10 lb 20:10 10:00 Micro. 250W
3.30 lb 21:10 10:48 Micro. 250W
3.50 lb 22:47 11:21 Micro. 250W
3.75 lb 24:46 12:00 Micro. 250W
4.00 lb 25:21 12:36 Micro. 250W
4.20 lb 26:10 13:16 Micro. 250W
WHOLE POULTRY
4.40 lb 28:10 14:25 Micro. 250W
0.45 lb 6:00 2:00 Micro. 250W
0.65 lb 9:00 3:00 Micro. 250W
0.85 lb 12:00 4:00 Micro. 250W
1.10 lb 15:00 5:00 Micro. 250W
1.30 lb 16:00 5:00 Micro. 250W
1.50 lb 18:00 6:00 Micro. 250W
1.75 lb 20:00 6:00 Micro. 250W
2.00 lb 22:00 7:00 Micro. 250W
2.20 lb 24:00 7:00 Micro. 250W
2.40 lb 26:00 8:00 Micro. 250W
2.65 lb 28:00 9:00 Micro. 250W
CHICKEN
QUARTERS
2.85 lb 30:00 9:00 Micro. 250W
PDF created with FinePrint pdfFactory Pro trial version http://www.pdffactory.com

3.10 lb 32:00 10:00 Micro. 250W
3.30 lb 36:00 12:00 Micro. 250W
3.50 lb 38:00 12:00 Micro. 250W
3.75 lb 40:00 13:00 Micro. 250W
4.00 lb 42:00 14:00 Micro. 250W
4.20 lb 44:00 15:00 Micro. 250W
4.40 lb 45:00 15:00 Micro. 250W
At the end of cooking, the oven will beep 4 times. If you do not press any button or open the
oven at the end of cooking, it will beep 3 times every minute.
During cooking, if you open the door, the oven will stop.
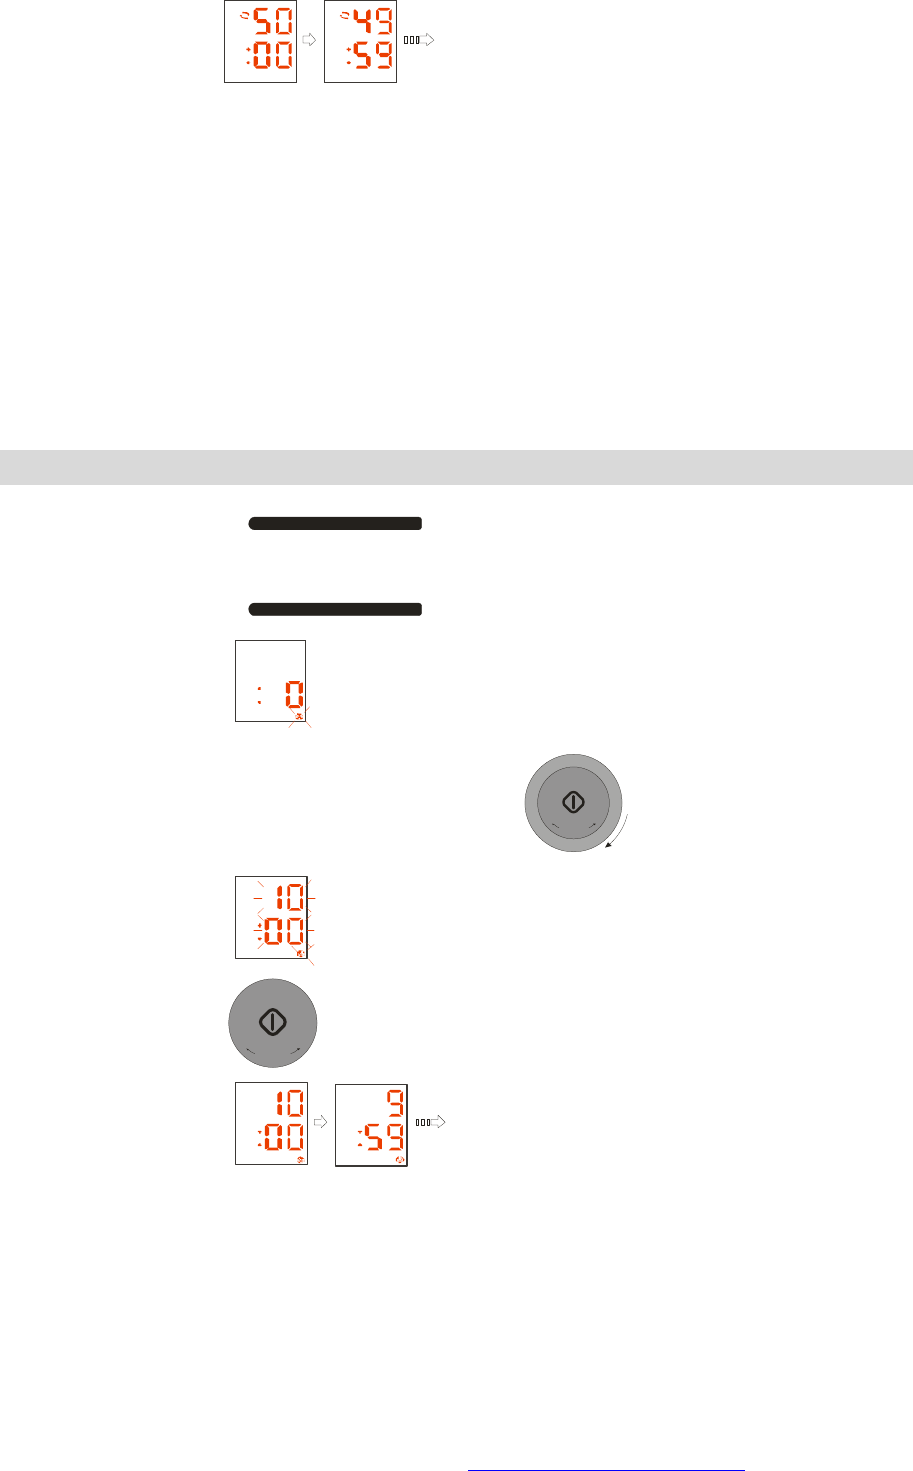
Using Auto
Steam cook Function
Setting the Auto cook by pressing the EXPRESS/Defrost/Steam cook button
EXPRESS
DEFROST COOK
STEAM
three times.
The display will show
Setting the food ingredient by truning the rotary knob
T
I
M
E
/
W
E
I
G
H
T
+
+
3
0
S
E
C
+
the display will show
Press the Start button
+
3
0
S
E
C
+
to display food weight,
The display will show
Setting the food weight by truning the rotary knob
T
I
M
E
/
W
E
I
G
H
T
+
+
3
0
S
E
C
+
PDF created with FinePrint pdfFactory Pro trial version http://www.pdffactory.com

The display will show lb
Press the Start button
+
3
0
S
E
C
+
, and the oven will start cooking
The display will show
At the end of cooking, the oven will beep 4 times. If you do not press any button or open the
oven at the end of cooking, it will beep 3 times every minute. While it don’t have water in the
water tank, the oven will beep 8 times, if you do not adding water all the while, it will beep 4
times every minute. During cooking, if you open the door, the oven will stop.
Auto Steam Cook List:
Type
Food pounds/QTY
Total time
Sked
1.1 lb 27 min 1. conv.440℉ 12min.;
2. steam + conv.440℉ 3min.; (combi. Type)
3. conv.440℉ 12min.
1.65 lb 31 min 1. conv. 440℉ 15min.;
2. conv.440℉ + steam 3min.; (combi. Type)
3. conv. 440℉ 13min.
2.2 lb 35 min 1. conv. 440℉ 17min.;
2. conv. 440℉+ steam 4min.; (combi. Type)
3. conv.440℉ 14min.
2.75 lb 40 min 1. conv.440℉ 20min.;
2. conv. 440℉+ steam 5min.; (combi. Type)
3. conv.440℉ 15min.;
s-1 CHIINCKEN
3.3 lb 46 min 1. conv. 440℉ 24min.;
2. conv. 440℉ +steam 6min.(combi. Type)
3. conv. 440℉ 16min.
1 QTY
(0.36 lb) 18 min 1. conv. 440℉ preheat 10min.;
2. steam+conv. 440℉ 8min. (combi. Type)
2 QTY
(0.7 lb) 19.5 min 1. conv. 440℉ preheat 10min.;
2. steam+conv. 440℉ 9.5min. (combi. Type)
s-2 STEAK
3 QTY
(1.0 lb) 21 min 1. conv. 440℉ preheat 10min.;
2. steam+conv.440℉ 11min. (combi. Type)
s-3 STEAM FISH
0.66 lb 7 min 1. microwave 550W+steam 4 min.; (combi. Type)
2. steam 1 min.;
3. microwave 550W+steam 2 min.. (combi. Type)
PDF created with FinePrint pdfFactory Pro trial version http://www.pdffactory.com

0.99 lb 15 min 1. microwave 800W+steam 5 min.; (combi. Type)
2. steam 2 min.;
3. microwave 800W+steam 8 min.; (combi. Type)
1.33 lb 20 min 1. microwave 800W+steam 7 min.; (combi. Type)
2. steam 3 min.;
3. microwave 800W+steam 10 min.; (combi. Type)
2 QTY 5 min 1. steam 2 min.;
2. microwave 800W+steam 1 min.; (combi. Type)
3. steam 2 min.
4 QTY 5 min 1. steam 2 min.;
2. microwave 800W+steam 1 min.; (combi. Type)
3. steam 2 min.
s-4 FROZEN
BAOZI/MAN
TOU
6 QTY 6 min 1. steam 2 min.;
2. microwave 800W+steam 1 min.; (combi. Type)
3. steam 3 min.
9 QTY 12 min steam 12 min
12 QTY 14 min steam 14 min
s-5 STEAM
DUMPLINGS
16 QTY 18 min steam 18 min
0.22 lb 3.5 min microwave 550W + steam 3.5 min. (combi. Type)
s-6 STEAM
VEGETABLE
S 0.44 lb 4.5 min microwave 550W+steam 4.5 min. (combi. Type)
0.22 lb 11 min 1. steam 8 min.;
2. microwave 550W 1.5 min.;
3. steam 1.5 min.
0.33 lb 13 min 1. steam 8 min.;
2. microwave 550W 2 min.;
3. steam 3 min.
s-7 STEAM
BROCCOLI
0.44 lb 14 min 1. steam 8 min.;
2. microwave 550W 3 min.;
3. steam 3 min.
0.55 lb 8 min microwave 800W+steam 8 min. (combi. Type)
1.1 lb 11 min microwave 800W+steam 11 min. (combi. Type)
s-8 FROZEN
CORN 1.65 lb 13 min microwave 800W+steam 13 min. (combi. Type)
0.77 lb 19 min 1. steam 6 min.
2. microwave 800W+conv.440℉ 5 min. (combi. Type)
3. conv.440℉ 8 min.
s-9 POTATO
1.55 lb 21 min 1. steam 6 min.
2. microwave 800W+conv.440℉ 6 min. (combi. Type)
3. conv.440℉ 9 min.
PDF created with FinePrint pdfFactory Pro trial version http://www.pdffactory.com
2.2 lb 23 min 1. steam 6 min.
2. microwave 800W+conv.440℉ 7 min.; (combi. Type)
3. conv.440℉ 10 min.
0.55 lb 25 min 1. conv. 360℉ 20 min.;
2. conv. 400℉ 5 min.
S-10
CAKE
1.1 lb 48.5 min
1. conv. 360℉ 7 min.
2. steam 1 min.;
3. conv. 360℉ 5 min.
4. steam 30 sec.;
5.conv. 360℉ 35 min.
1 QTY
(+100ml
water) 12 min 1. microwave 400W + steam 2 min.;
2. steam 10 min.
2 QTY
(+200ml
water) 18 min 1. microwave 400W + steam 3 min.; (combi. Type)
2. steam 15 min.
s-11
EGG
POTAGE
3 QTY
(+400ml
water) 24 min 1. microwave 400W + steam 4 min.; (combi. Type)
2. steam 20 min.
2 QTY 15 min steam 15 min
4 QTY 16 min steam 16 min
s-12
STEAM EGG
7 QTY 17 min steam 17 min
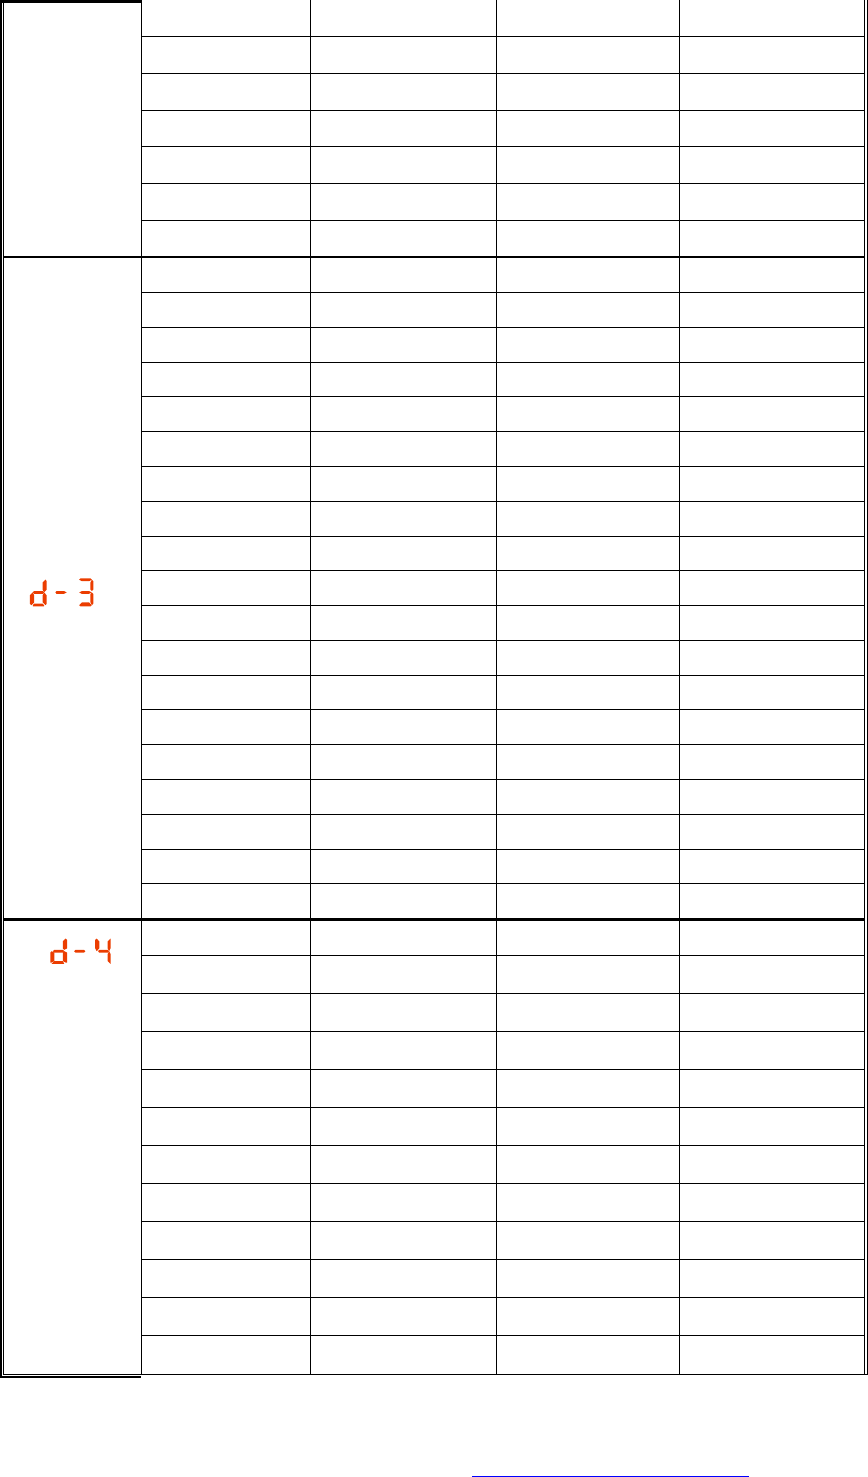
Activating the Clean up
To lock: Keep the steam/clean up button
STEAM
CLEAN UP
pressed for long time. The
display will show , Press the Start button
+
3
0
S
E
C
+
and the oven will start cooking
The display will show
If you press the STOP/CANCEL button
STOP/CLEAR
CHILD LOCK
, the display will return to clock
time.
PDF created with FinePrint pdfFactory Pro trial version http://www.pdffactory.com
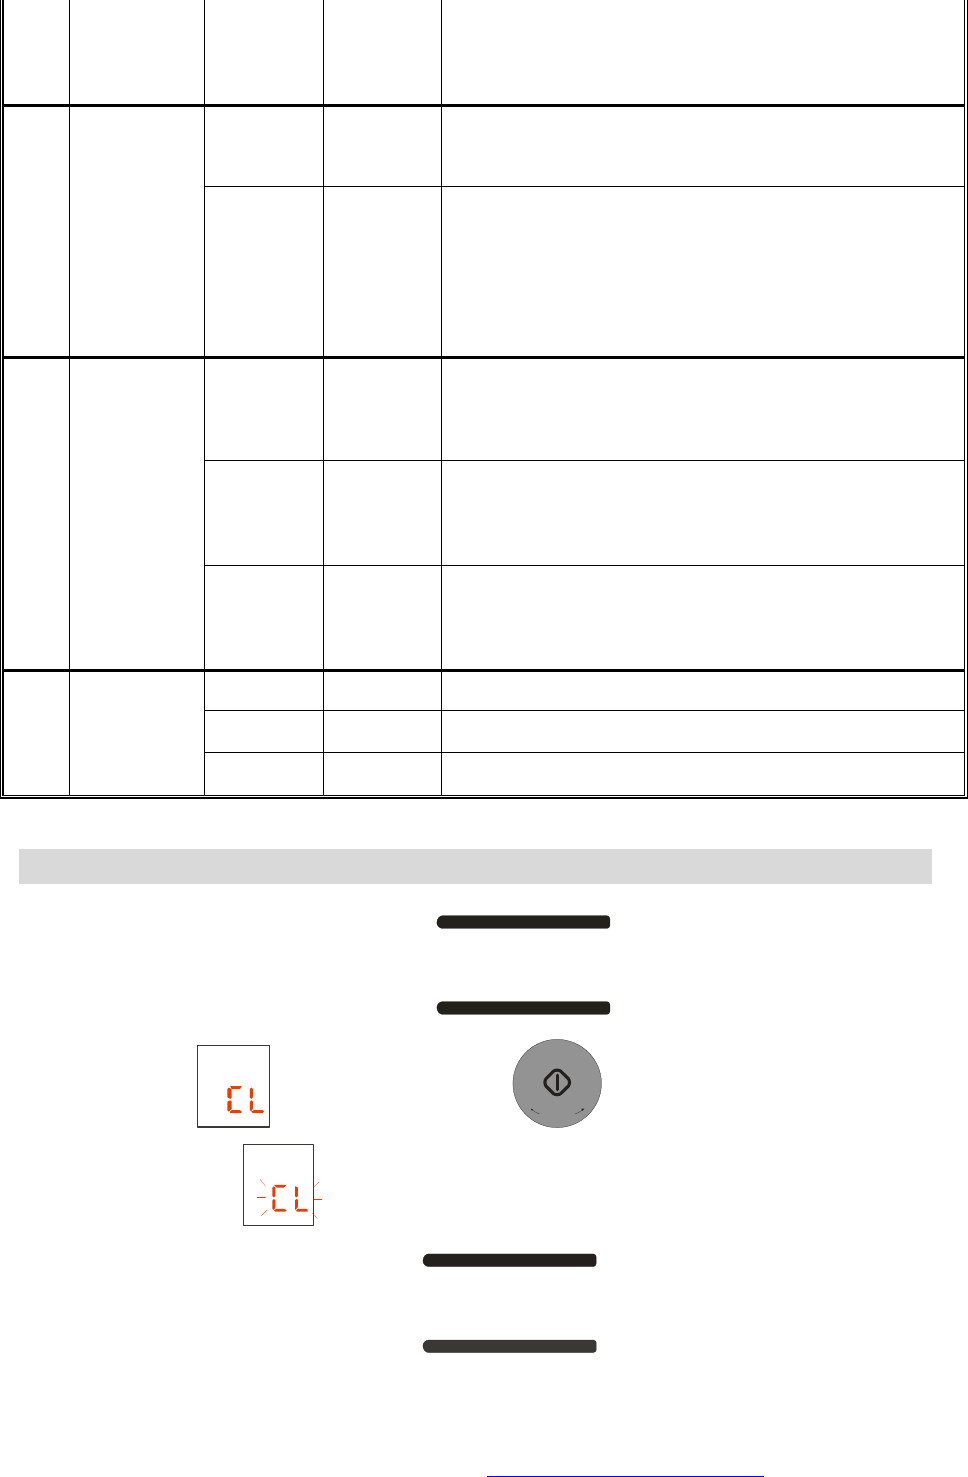
Activating the Child Safety
To lock: Keep the STOP/CANCEL button
STOP/CLEAR
CHILD LOCK
pressed for long time. The
display will show , and after 2sec the display will return to clock time.
When the button are locked, if you press any button, the display will show , and after
2sec, the display will return to clock time.
To unlock in the same way, keep the STOP/CANEL button
STOP/CLEAR
CHILD LOCK
pressed for
long time.
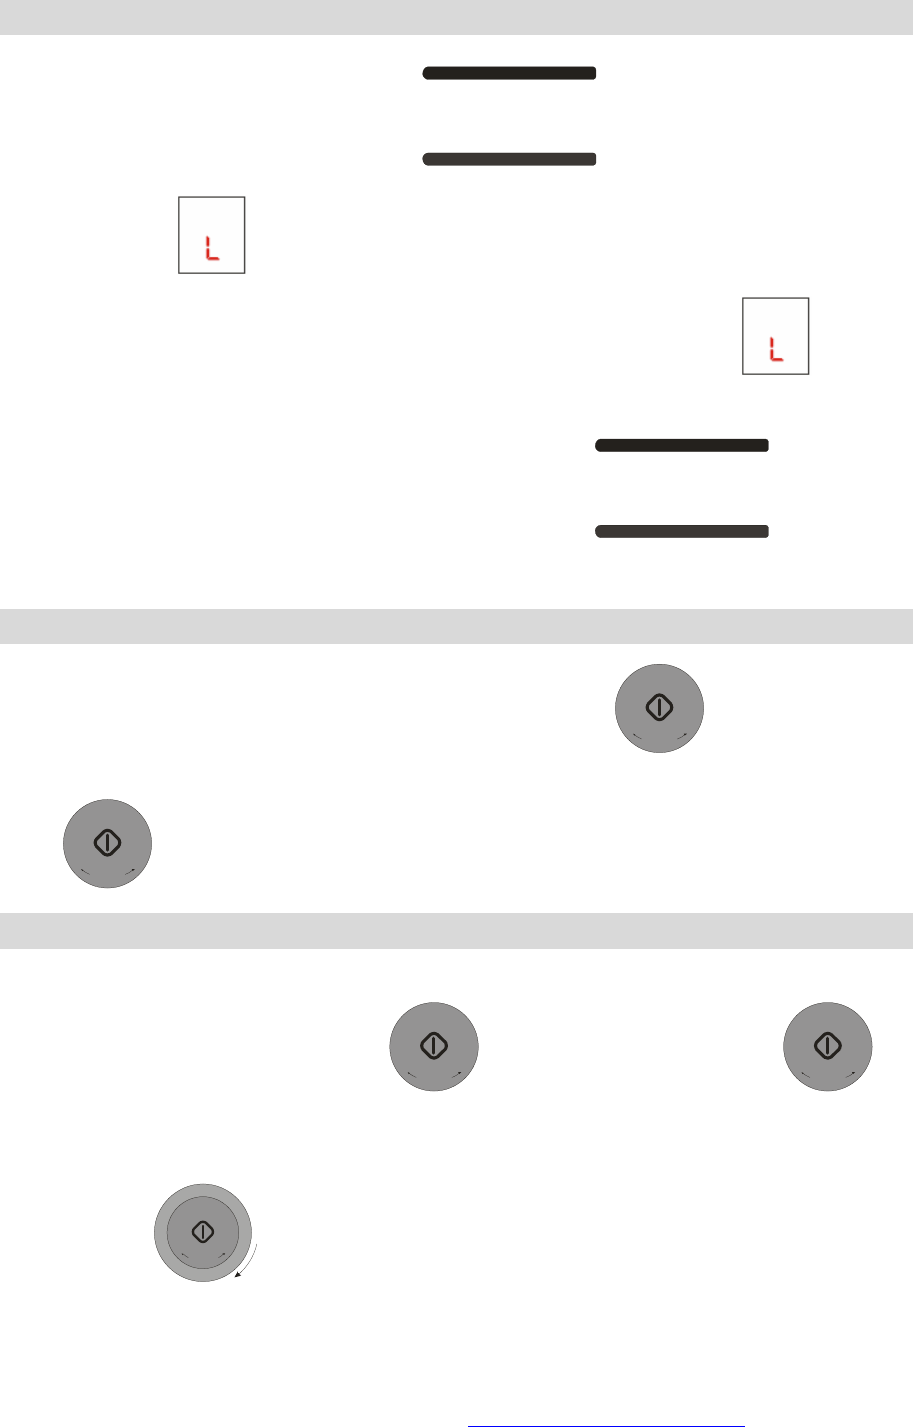
Using
Quick Start Function
When the display is showing the clock time, press the button
+
3
0
S
E
C
+
, the oven will start
cooking at microwave 800W for 30 seconds. Each time you press the “START”
button
+
3
0
S
E
C
+
, the time shown on the display will increase by 30 seconds.
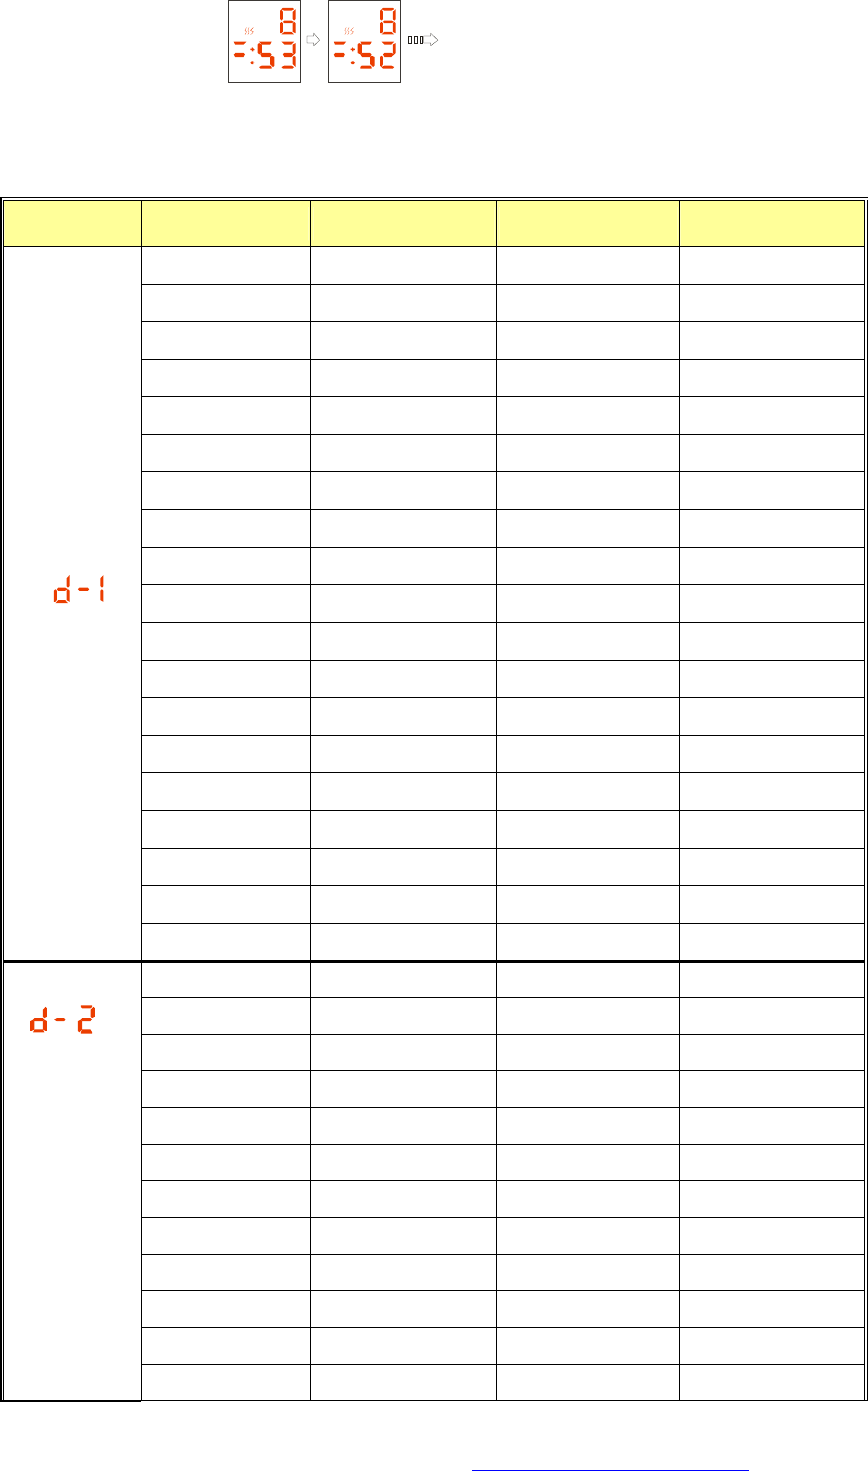
Adjusting the cooking time
When using the oven, you may need to make slight adjustments to the cooking time.
This can be done by using “start+30s”
+
3
0
S
E
C
+
. Press the “start+30s” button
+
3
0
S
E
C
+
one or more times. Each time you press the button, the time show on the display will
increase by 30 seconds.
Turn the knob
T
I
M
E
/
W
E
I
G
H
T
+
+
3
0
S
E
C
+
clockwise one grid, and the time will increase by 10 seconds.
PDF created with FinePrint pdfFactory Pro trial version http://www.pdffactory.com

Turn the knob
T
I
M
E
/
W
E
I
G
H
T
+
+
3
0
S
E
C
+
anticlockwise one grid, and the time will decrease by 10
seconds.
The maximum time can be increased to 60:00.
You cannot make the adjustment to the auto cook and auto defrost time.
Others
When you set the function, press the STOP/CLEAR button the display will return to clock
time.
When the oven is cooking, press the STOP/CLEAR button
STOP/CLEAR
CHILD LOCK
one time,
and the oven will pause; press the STOP/CLEAR button
STOP/CLEAR
CHILD LOCK
again, the oven
will stop cooking and the display will return to clock time.
Each time you press the button, the oven will beep once.
When NTC is abnormal or fail to run, The display will show
Cleaning
The following parts of your microwave must be cleaned regularly to avoid any accumulation
of food particles and grease.
• The inner and outer surfaces of your appliance,
• The door and its seals,
• The drive, the ring bearing and the turntable.
l Failure to maintain the oven in a clean condition could lead to deterioration
of the surface that could adversly affect the life of the appliance and possibly
result in a hazardous situation.
l Make sure that the door closes correctly.
Clean the outer surfaces with a soft cloth and soapy water. Rinse and dry carefully.
Remove any particles or stains inside your appliance or on the ring bearing with a soapy
cloth. Rinse and dry carefully.
To help dislodge food particles and eliminate bad smells, put a glass of lemon juice diluted
in water on the turntable and run your appliance for 2 minutes at maximum power. The
PDF created with FinePrint pdfFactory Pro trial version http://www.pdffactory.com

steam will soften the dirty marks. Rinse and dry.
The grill element hinges down to make it easier to clean the roof of the oven.
Take care not to allow water to run into the ventilation holes.
Never use abrasive or solvent cleaners.
Clean the door seals carefully, making sure that:
• There is no accumulation of particles,
• Nothing prevents the door from closing properly.
Clean the inside of your appliance after every use with a suitable detergent.
l Always allow your oven to cool down before cleaning it.
PDF created with FinePrint pdfFactory Pro trial version http://www.pdffactory.com