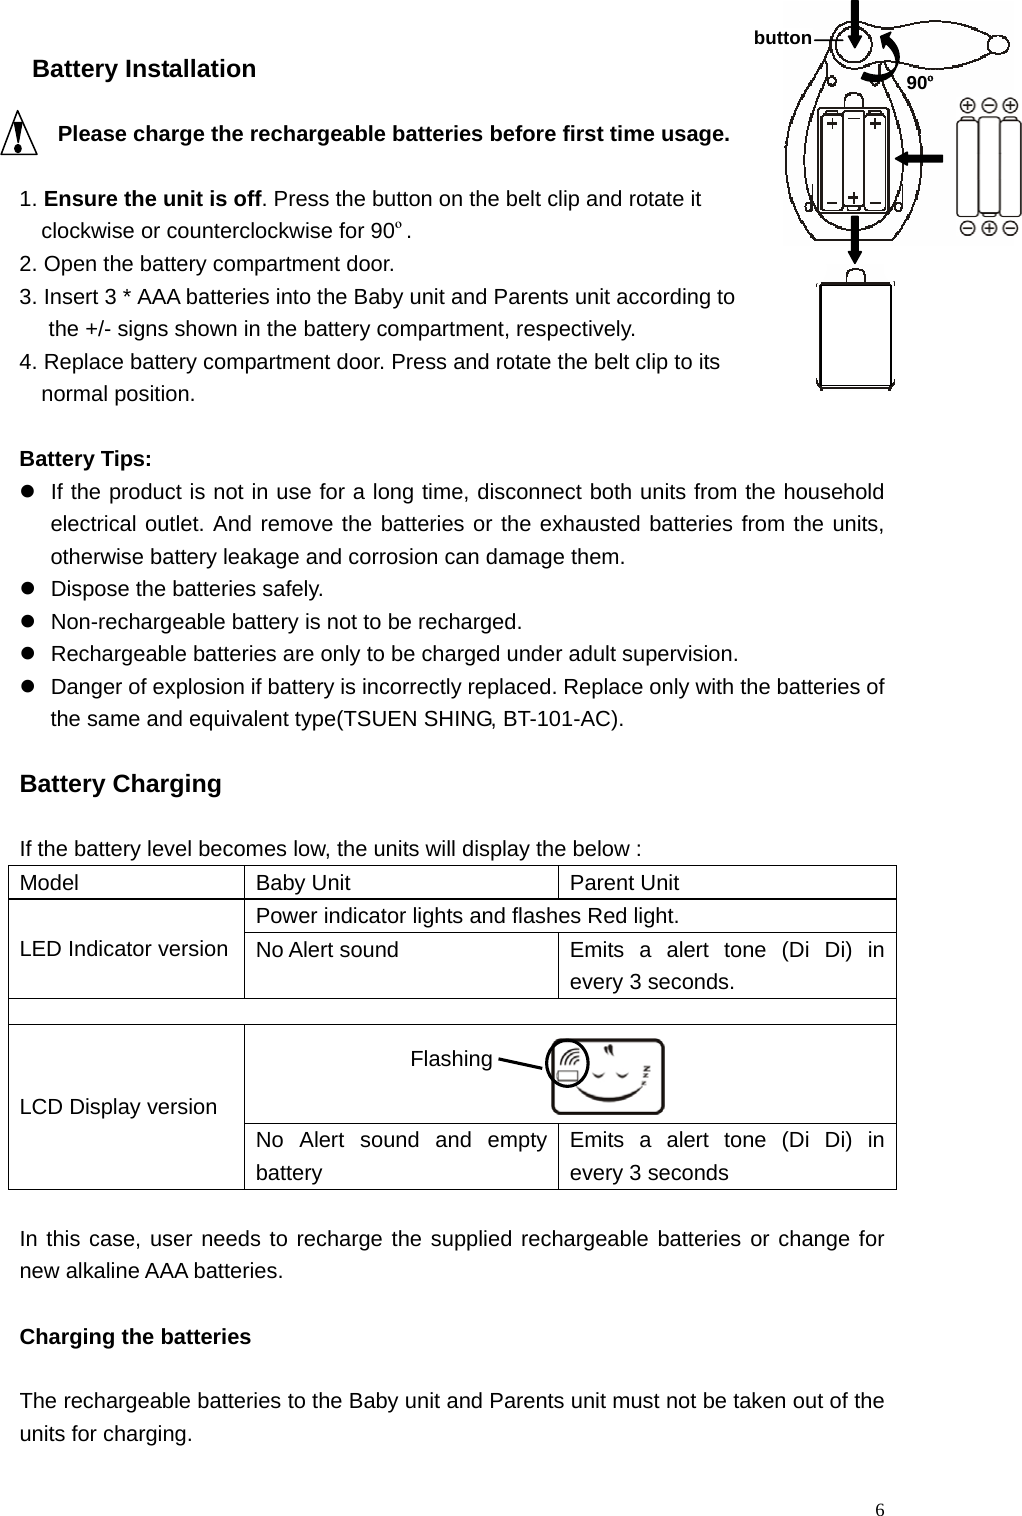
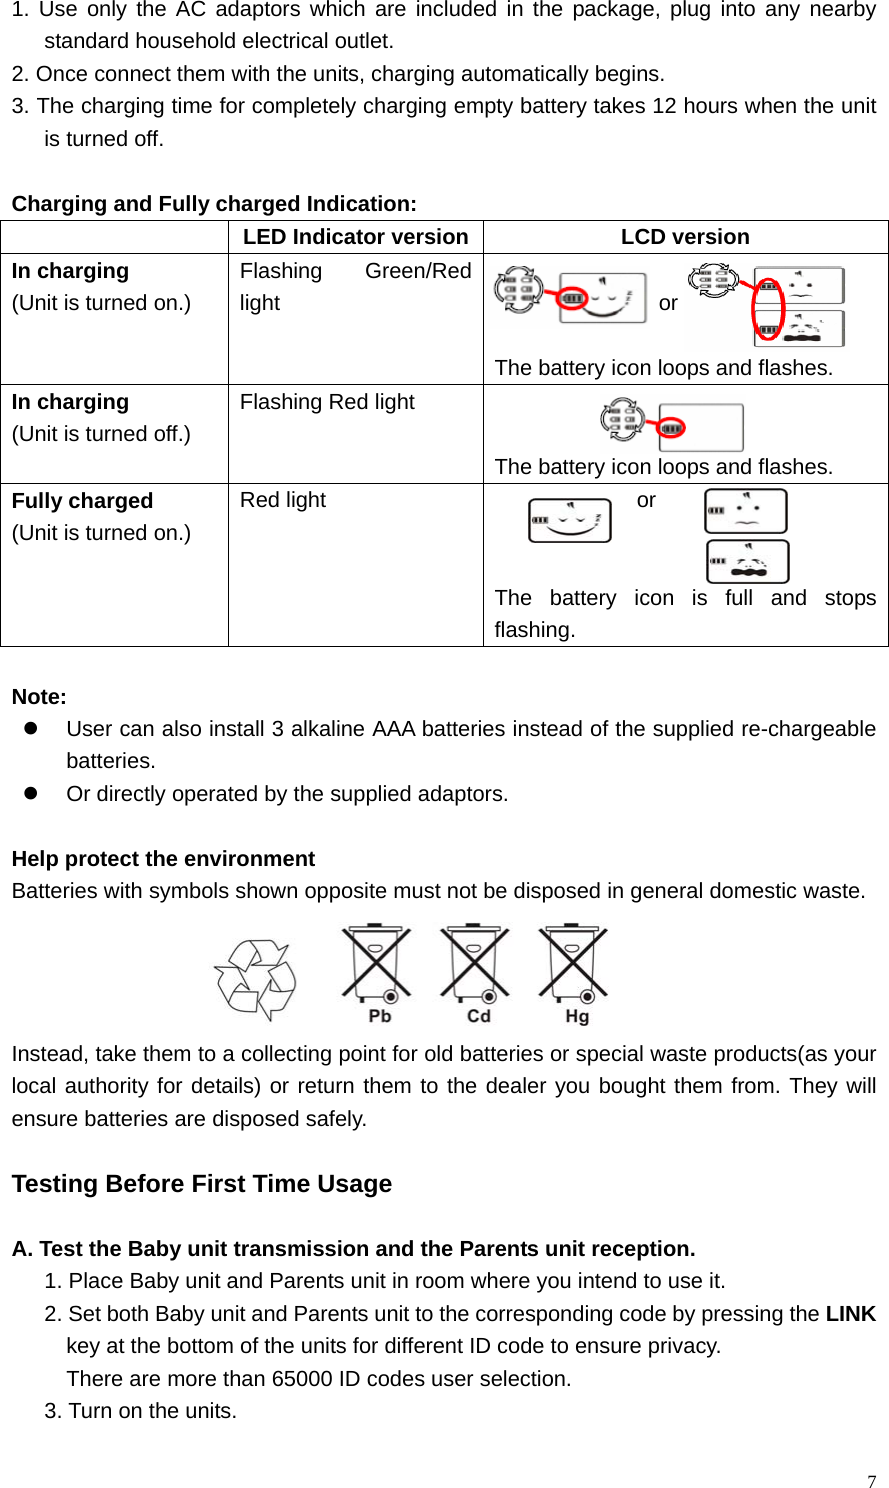
Tsuen Shing BM-148TX 2.4GHz DIGITAL BABY PHONE (WITH LCD/ WITH LED) User Manual users manual

Tsuen Shing Enterprises Limited 2.4GHz DIGITAL BABY PHONE (WITH LCD/ WITH LED) users manual

users manual

  1BM-148 USER MANUAL   TABLE OF CONTENTS  Safety Precautions……………………………………………………………………………… Content and Features…………………………………………………………………………… Indication LCD version : Main LCD Screen ………………………………………………………….. LED Indicator version: Color Index of Power Indicator………………………………..… Battery Installation………………………………………………….. Battery Charging……………………………………………………. Testing Before First Time Usage……………………………………………………………….. Operations Procedures………………………………………………………………………….. How to operate 2 way communication between Parents unit and Baby unit……………… Trouble Shooting…………………………………………………………………………………. Technical Specifications………………………………………………………………………….  Congratulations You have just purchased a quality baby monitor. Please read the instructions thoroughly before using the monitor system and keep it for future reference.  Safety Precautions                                               When using this unit, basic Safety Precautions should always be followed to reduce the risk of fire, electric shock, or personal injury. 1. Read and understand all instructions. 2. Follow all warnings and instructions marked on this unit or mentioned in this operation   instruction. 3. Do not use liquid or aerosol cleaners. Use a damp cloth for cleaning. 4. Do not use this unit near water such as bathtub, shower or pool. Immersion of this unit   in water could cause an electrical shock. 5. Place the unit securely on a stable surface. Serious damage and/or injury may result if   the unit falls. 6. Do not cover slots and openings on the unit. They are provided for ventilation and   protection against overheating. 7. Install the unit where no one can step or trip on the cord. 8. Never push any objects through slots in this unit. This may result in the risk of fire or   electric shock. Never spill any liquid on the unit. 9. To reduce the risk of electric shock, do not disassemble this unit. Take the unit to   authorized service center or qualified technician when service or repair work is required. Opening or removing covers may expose you to dangerous voltages or other risks. Incorrect reassembly can cause electric shock when the unit is subsequently used. 10. Do not expose the unit to extreme temperatures such as areas near a hot radiator or stove or in a hot car.
  211. Do not place lighted objects such as candles, cigarettes on the unit.  Caution: This product cannot replace responsible adult supervision. z  This Baby Monitor is intended as an aid. Do not use it as a medical monitor or a substitute for responsible and proper adult supervision.   z  Make sure the Parents unit and adaptor cable are always out of child's reach. Do not place the Baby Unit inside the baby's crib or playpen!  WARNING:  To prevent the risk of fire or electrical shock, do not expose this unit to rain or any type of moisture.   Content and Features  LCD version:                 LED Indicator version:              Baby unit : Parents unit AC Adaptor   for Baby unit AC Adaptor for Parents unitBaby unitParents unit  Baby unit
  3LCD version          LED Indicator version          1a. LCD Display (for LCD version) 1b. Power Indicator : Red, Green and Orange (for LED Indicator version) 2.  Microphone 3.  Speaker 4.  Belt Clip 5.    Lock / Unlock key 6.  Battery Compartment 7.    Power and Volume Control 8.    AC / DC Power Supply Sock 9.  PAGE key 10. Music Play and Control 11. LINK key  Parents unit : LCD version:         LED Indicator version: 1a 3 4 5678911101213 8765410 9 11 3 2 1b 1a 3 2 8765410 9 11
  4          1a. LCD display (for LCD version) 1b. Power Indicator : Red, Green and Orange (for LED Indicator version) 2. Sound Lights (only for LED Indicator version)       - One or two LEDs lighted up means shallow sound received.       - Three to five LEDs lighted up means louder sound received. 3. Microphone 4. Speaker 5. Belt Clip 6. Lock / Unlock key   7. Battery Compartment 8. Power and Volume Control 9. AC / DC Power Supply Sock 10.TALK key 11.PAGE key 12.Music Play and Control     13.LINK Key  Indication  LCD version : Main LCD Screen              LED Indicator version : Color Index of Power Indicator     “Baby calling” icon : constantly changing display 1b 2 3 4 5678911101213 Out of range alarm iconSelected Music : 01-06 or AL 01-06 : Music 01- Music 06 . The selected song will be playing repeatedly. AL : Play All music – Music is looped from 01 to 06 repeatedly. Battery icon:     Full battery level   Low battery level, reminds you to change the batteries.   Empty and flashing, batteries change is a must. “Baby sleeping” icon : (no signal and energy saving mode)
  5Indication Indicator  Parent unit  Baby unit Red Light  Power is good and no signal  Flashing Red Light  Battery charging when the unit is turned off Low power; Battery charging when the unit is turned off Flashing Red Light with “Di Di” alert in every 3 seconds Low power  N/A Flashing Red Light with “Di” alert in every 1 second Low power and Out of range  N/A Green Light  Power is good and receiving signal Power is good and transmitting signal Flashing Green Light  Battery  charging  and receiving signal. Battery charging and transmitting the signal. Flashing Green Light with “Di” alert in every 1 second. Battery charging when the unit is turned on and out of range N/A Orange Light  Scanning the corresponding code for both units  AC Adaptor: The AC Adaptors are low voltage power source that allow you to use your household electricity to run the Baby Monitor.  Connect the AC Adaptors to the AC Adaptor Jack in the Unit.  Both plug into any standard volt electrical outlet in your home.  It is recommended to turn off the units before plug in or unplug the adaptors. CAUTION: These adaptors were made with a specific design for this product. They cannot be used with any other appliance. Never use a different type of adaptor with this Baby Monitor.  Privacy Protection Always remember that you are using public airwaves when you use the Wireless 2.4GHz Digital Baby Monitor. Sound may be broadcasted to other receiving devices. Conversations, even from rooms near the Baby unit, may be broadcast as well.  CAUTION: To protect your privacy, always turn the system off when not in use. It is possible that the Parents unit may be interfered from other devices in the 2.4GHz frequency range. To minimize this potential problem, more than 65000 ID code have been provided for your use. If you experience interference while using one ID code setting, simply select to another ID code.
  6  Battery Installation  Please charge the rechargeable batteries before first time usage.  1. Ensure the unit is off. Press the button on the belt clip and rotate it         clockwise or counterclockwise for 90º. 2. Open the battery compartment door. 3. Insert 3 * AAA batteries into the Baby unit and Parents unit according to the +/- signs shown in the battery compartment, respectively. 4. Replace battery compartment door. Press and rotate the belt clip to its       normal position.  Battery Tips: z  If the product is not in use for a long time, disconnect both units from the household electrical outlet. And remove the batteries or the exhausted batteries from the units, otherwise battery leakage and corrosion can damage them. z  Dispose the batteries safely.   z  Non-rechargeable battery is not to be recharged. z  Rechargeable batteries are only to be charged under adult supervision. z  Danger of explosion if battery is incorrectly replaced. Replace only with the batteries of the same and equivalent type(TSUEN SHING, BT-101-AC).  Battery Charging  If the battery level becomes low, the units will display the below :   Model  Baby Unit  Parent Unit Power indicator lights and flashes Red light. LED Indicator version  No Alert sound  Emits a alert tone (Di Di) in every 3 seconds.     LCD Display version No Alert sound and empty battery Emits a alert tone (Di Di) in every 3 seconds  In this case, user needs to recharge the supplied rechargeable batteries or change for new alkaline AAA batteries.  Charging the batteries  The rechargeable batteries to the Baby unit and Parents unit must not be taken out of the units for charging.   button 90ºFlashing
  71. Use only the AC adaptors which are included in the package, plug into any nearby standard household electrical outlet. 2. Once connect them with the units, charging automatically begins.   3. The charging time for completely charging empty battery takes 12 hours when the unit is turned off.    Charging and Fully charged Indication:   LED Indicator version LCD version In charging (Unit is turned on.) Flashing Green/Red light                   or                 The battery icon loops and flashes. In charging (Unit is turned off.) Flashing Red light    The battery icon loops and flashes. Fully charged (Unit is turned on.) Red light               or   The battery icon is full and stops flashing.  Note: z  User can also install 3 alkaline AAA batteries instead of the supplied re-chargeable batteries. z  Or directly operated by the supplied adaptors.  Help protect the environment Batteries with symbols shown opposite must not be disposed in general domestic waste.  Instead, take them to a collecting point for old batteries or special waste products(as your local authority for details) or return them to the dealer you bought them from. They will ensure batteries are disposed safely.  Testing Before First Time Usage  A. Test the Baby unit transmission and the Parents unit reception. 1. Place Baby unit and Parents unit in room where you intend to use it.   2. Set both Baby unit and Parents unit to the corresponding code by pressing the LINK key at the bottom of the units for different ID code to ensure privacy. There are more than 65000 ID codes user selection.   3. Turn on the units.
  8-- The LCD displays standby status.(LCD version)   -- The power indicator lights and the power is on.(LED Indicator version)  NOTE:  For the first time usage, turn on both units, they can automatically scan the   corresponding code at once without press any key. If reset the corresponding code for   both units, user has to press the LINK key.     B. Baby unit emission: 1. Place Baby unit in room where you intend to use it. 2. Push the SENSITIVITY switch to a desired position to turn on the Baby unit   transmission. 3. As soon as the Baby unit transmits a signal, then: LCD version  LED Indicator version                                             LCD backlight is activated. Constantly changing display-readouts       4. The transmitter is standby status when no signal is transmitted. LCD version  LED Indicator version  LCD backlight turned off.    C. Parents unit reception: 1. Place Parents unit in room where you intend to use it.   2. Slide the VOLUME switch to a desired position and the unit is ready for reception. 3. If the unit receives a signal,   LCD version  LED Indicator version               constantly changing display-readouts        4. The receiver is standby status when no signal is received.   LCD version  LED Indicator version  LCD backlight turned off.    When you experience interference (buzzing or static, etc.), reset both units to another corresponding code. ( details please refer to P.11 – scan the corresponding code for the units ) Green light Red lightRed lightGreen lightRed light
  9 IMPORTANT!   Test sound reception before use and whenever location of Baby unit is changed. (Refer to Testing Before First Time Usage)  Note: * Position the Baby unit at least 1 meter away from the baby so that the microphone can pick up the child's sound. * Unwrap and fully extend power cord for best transmission if adaptor is used.    Plug the adaptor into the nearest standard household electrical outlet.  Operations Procedures  A. Power On / Off 1. Connect the Parents unit with the AC adaptor. Plug it into the nearby standard electrical   outlet or insert 3 AAA alkaline batteries. 2. Turn on         at the right side upward of the unit, a click sound to be heard indicates the unit is turned on. 3. Turn     downward, a click sound indicates the unit is off.    B. Volume Adjustment Rotate      for adjusting the desired volume level.   1. Turning it upward for increasing volume level; 2. Turning it downward for decreasing volume level.  C. Talk to Baby unit (Only for Parents unit)   TALK key is located at the left side of the Parents unit.   1. Press and hold TALK key to talk to the Baby unit. 2. Release TALK key and return to the receiving status.  D. Music Playing & Select Music (optional) Music play          key is located at the left side of the unit. User can activate the   music play and/or select a desired music to lull the baby to sleep. There are six music for   selecting. 1. Press     key for about 3 seconds to activate the Music Playing function, and Music 1 will be played automatically. 2. Press     key to change music(01-06 or AL), you can hear the demonstration of different music. When you have selected the desired music, do not press     key again.  Note: Selected music will be shown on the top right corner of the LCD screen for LCD version. 3. Press          key for 2 seconds again to turn off the music playing function.  Remarks :   - Baby unit can play music solely when the Parents unit is turned off. But Music play
  10function of Parents unit is not available for use when Baby unit is turned off.     - When pressing the TALK key of Parents unit to talk to Baby unit, the music will be stopped playing.    - Music playing is not interrupted by call ring tone.    E. Sensitivity Level Adjustment (Only for Baby unit) SENSITIVITY slide switch      is located in the battery compartment. Adjust different   detecting sound level sensitivity by switching the SENSITIVITY switch to either Lo   ( normal sensitivity : 1-2 meters) or Hi ( high sensitivity : 2-6 meters) position.  Remarks : The default setting of sensitivity level is Lo.  F. Call Function Both units can make a call ring tone to call one another.   1. Press PAGE key at the left side of the Parents unit or Baby unit one time to call another unit,.  2. Three “BiBi” sound will be heard from Baby unit.   3. Each press PAGE key once, you will hear three “Bi Bi” sound. If no press PAGE key   again, the call ring tone will end.  Remarks:  - When Baby unit call Parents unit, only the Parents unit can be heard three “Bi BI” sound. - When Parents unit call Baby unit, only the Baby unit can be heard three “Bi BI” sound.  G. Low Battery Alert When the unit is in low power, the details please refer to page 6 “Battery Charging” .    Remarks:  -- No low battery alert for Baby unit.   -- No transmission while Baby unit is in low battery.   H. Out of Range Alert (Only for Parents unit) When the connection between Parents and Baby unit is broken , e.g. - One of the units is turned off; - The Baby unit is in low battery;   - The units are detected out of communication range (300m)    LCD version  LED Indicator version  ParentsUnit    with “Di Di Di” alart sound will be heard in every 2 seconds    with “Di” alert sound will be heard in every 1 second Red lightFlashing
 11 Baby Unit      I. Key Lock / Unlock  1. Turn the right-hand key lock side switch                    to LOCK position of unit to lock key. The TALK key, PAGE key and MUSIC key are not available for use. 2. Turn the same switch               to UNLOCK position to unlock all the keys.  J. Belt Clip The Baby unit and Parents unit can both be carried around using the belt clip provided on the rear of each unit.  How to operate 2 way communication between Parents unit and Baby   unit The Baby Phone yields high privacy and almost zero-interference to end users. There are   more than 65000 ID code for user selection with the LINK key positioned at the bottom of   the units.    NOTE:  Only scan the corresponding code for both units, they are able to connect to one   another.   Operating and Setup  A. Scan the Corresponding Code 1. Turn on both units. The Baby unit will emit a random ID code to Parents unit         automatically without pressing any key.   2. Once scanned the corresponding code, the units are ready for use.   The code is recorded even thought you turn off the units or recharge the batteries. Or   else the unit is not for use.  B. LINK key LINK key is located at the bottom of the Parents unit and Baby unit. It is used for   eliminating the corresponding code recorded in the unit and reset a new corresponding   code for the Parents unit and Baby unit. The Parents unit / Baby unit can connect with   another Baby unit / Parents unit with the LINK key to scan a new corresponding code for   them. 1. Ensure both units are turned ON. Press the LINK key of the units with a spiky and   thin object (such as toothpick). 2. Both units begin to scan corresponding code     LCD version  LED Indicator version Red light Flashing
  12Parent unit:    with “Di Di Di” alert sound in every 2 seconds Parent unit:    with “Di” alert sound in every 1 second  Scanning the corresponding code automatically Baby unit:   Baby unit:   Scanned the corresponding code successfully Both units :    Normal status Baby unit       Parent unit     Parent unit:    with “Di Di Di” alart sound will be heard in every 2 seconds Parent unit:    with “Di” alert sound will be heard in every 1 second  Scanned the corresponding code unsuccessfullyBaby unit:    Baby unit:     C. 2-Way Communication Usually, the detected sound is transmitted from the Baby unit to Parents unit. But Parents unit can talk to Baby unit with its TALK key.   1. Press and hold TALK key of Parents unit and talk to the Baby unit. 2. Release the TALK key, the Parents unit is in receiving status and wait for signal from   Baby unit.  Remarks:  When pressing TALK key, the Parents unit does not receive any sound from Baby unit.  D. Music Control After activating Music Play function of both units, as long as one of them adjusts music play or changes music(1-6 or AL), the setting for this function of the other unit will change accordingly.    Trouble shooting   Orange light Orange light FlashingFlashingRed/ Green light still flashing still Orange light still Orange light still flashing
  13Problems Solutions 1. No power  - Unit is turned off.   - Check if the batteries are installed properly.   - Make sure the adaptor is connected to the Unit properly if using the adaptor instead of batteries. - The Unit may be in low battery status, change new batteries. 2. Message not   transmitted.   - Sound sensitivity level of Baby unit is too low, turn the sound sensitivity switch to “HI” position. - Units are out of range or lost connection. Ensure the distance between the units within 300m.   Note: Communication range varies depending on surrounding   conditions such as physical obstructions, interference. - Make sure the TALK key of Parents unit is not pressed. - Make sure the unit is unlocked.   - Ensure both units have already scanned the corresponding     code. 3. No sound signal  - Volume level on Parents unit is set too low. Adjust it to higher volume. - Sound sensitivity level of Baby unit is too low, Turn the      Sound Sensitivity switch to“HI” positions.   - Units are out of range. Ensure the distance between the units within 300m. - Make sure the TALK key of Parents unit is not pressed. - Make sure the unit is not locked key.   - Ensure both units have already scanned the corresponding     code. 4. Received   Conversation or   sound from neighbors.  - Signal interference due to other nursery monitor on the same ID Code or cordless phone used. - Change both units to another ID code by pressing LINK key. 5. Hearing static or rustle from Parent unit. - The both units are positioned too close to each other. Keep away two units at about 1m. - The volume is set too high. Lower the volume at the Parent unit.- Reposition or replace batteries.  Technical Specifications Power Supply Voltage:   Parents unit : 3 AAA batteries or rechargeable batteries & Adaptor: AC120V, DC 7.5V Baby unit      : 3 AAA batteries or rechargeable batteries & Adaptor: AC120V, DC 7.5V  Operation Frequency : 2.401~2.482GHz  Operating Range: up to 300m in ideal conditions  Mic Sensitivity : 1 to 2 meter
  14 FCC Statement:  Caution: The user is cautioned that changes and modifications made to the equipment without the approval of manufacturer could void the user’s authority to operate this equipment.  Notes: This equipment has been tested and found to comply with the limits for a Class B digital device, pursuant to part 15 of the FCC Rules. These limits are designed to provide reasonable protection against harmful interference in a residential installation, this equipment generates, uses and can radiate harmful interference to radio communications. However, there is no guarantee that interference will not occur in a particular installation. If this equipment does cause harmful interference to radio or television reception, which can be determined by turning the equipment off and on, the user is encouraged to try to correct the interference by one or more of the following measures: - Reorient or relocate the receiving antenna. - Increase the separation between the equipment and receiver. - Connect the equipment into an outlet on a circuit different from that to which the   receiver is connected. - Consult the dealer or an experienced radio/TV technician for help.  Exposure to radio frequency energy This device and its antenna must not be co-located or operated in conjunction with any other antenna or transmitter. To comply with FCC RF exposure requirements, only use supplied antenna.

Navigation menu