Turbo Chef Technologies Trubochef I3 Users Manual I5 9227F And Owners Manual.qxp
i3 to the manual 9015c99f-ee66-4951-8c20-b214db57c962
2015-02-03
: Turbo-Chef-Technologies Turbo-Chef-Technologies-Trubochef-I3-Users-Manual-460591 turbo-chef-technologies-trubochef-i3-users-manual-460591 turbo-chef-technologies pdf
Open the PDF directly: View PDF ![]() .
.
Page Count: 34
TM
Owner’s Manual
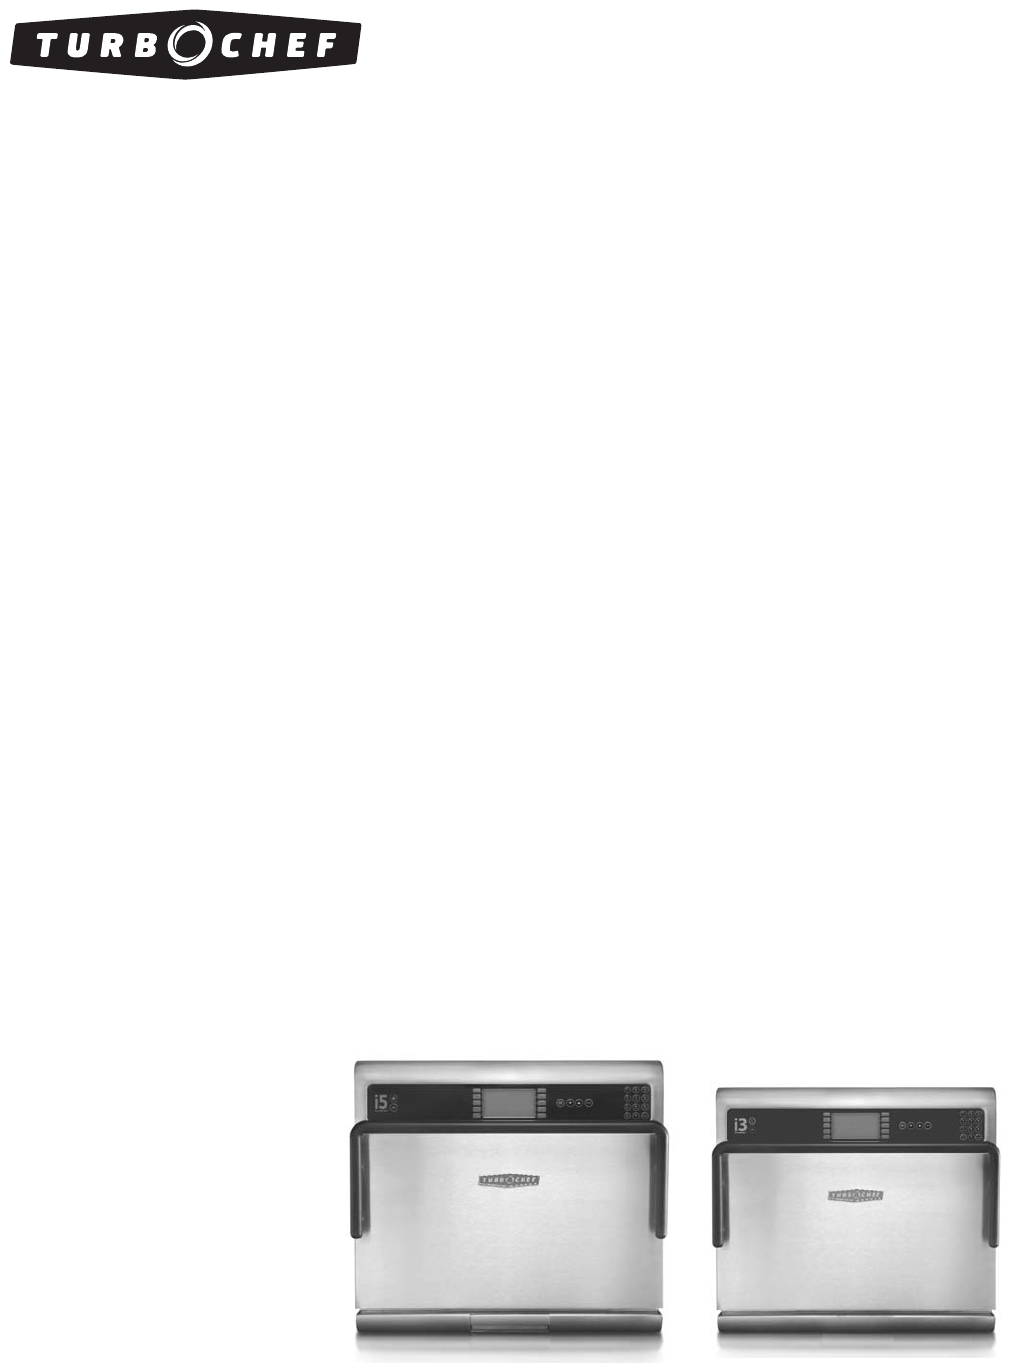
FOR THE TURBOCHEF i5 AND i3 RAPID COOK OVENS
© 2008-2009 TurboChef Technologies, Inc.
TM TM
For further information, call
800.90TURBO
or
+1 214.379.6000
The information contained in this manual is important for the proper installation, use, maintenance,
and repair of this oven. Follow these procedures and instructions to help ensure satisfactory baking
results and years of trouble-free service.
Errors – descriptive, typographic, or pictorial – are subject to correction. Specifications are subject to
change without notice.
Please carefully read this manual and retain it for future reference.
Safety Instructions
General Safety Information i
Reducing Fire Risk i
Grounding Instructions ii
Power Cord Replacement ii
Precautions to Avoid Possible Exposure to Excessive Microwave Energy ii
RF Interference Considerations ii
General Oven Information
Theory of Operation 1
Certifications 1
Dimensions 1
Electrical Specifications - i5 Oven 2
Electrical Specifications - i3 Oven 3
Oven Construction 4
Installation
Unpacking Instructions 4
Lifting and Placing the Oven 4
Installation Near Open Heat Source 5
Voltage Selection 5
Ventilation Requirements 5
Optional Installation Items 6
Oven Carts 6
Stacking Stand 6
Oven Restraint Kit 6
ChefComm Pro® 6
ChefComm Limited 6
Maintenance and Cleaning 7
Oven Controls 10
Cooking 11
Table of Contents
TM
The Info Mode
Overview of the Info Mode 14
Viewing Cook Counts/Time Logs 14
Viewing the Fault Log 15
Viewing the Service Numbers 15
Turning Oven Options On/Off 15
Setting the Date/Time 15
Resetting the Oven 15
Updating the Oven Menu 15
Making a Copy of the Oven Menu 16
Updating the Oven Firmware 16
The Edit Mode
Overview of the Edit Mode 17
Changing Set Temperatures 17
Changing Food Group/Recipe Name 18
Changing Recipe Settings 18
Troubleshooting 19
North America Limited Warranty 21
International Limited Warranty 23

i
SAFETY INSTRUCTIONS
SAVE THESE INSTRUCTIONS
Safety Instructions
Strictly adhere to the following safety precautions to reduce the risk of burns, electric shock, fire, injury, damage to
oven or property near oven, or possible exposure to excessive microwave energy.
General Safety Information
Read all instructions before using this appliance.
Read and follow the specific "Precautions to Avoid Possible Exposure to Excessive Microwave Energy" found on
page ii.
This appliance must be grounded. Connect only to properly grounded outlet. See "Grounding Instructions" found
on page ii.
Install or locate this appliance only in accordance with the provided installation instructions.
Some products such as whole eggs and sealed containers (e.g., closed glass jars) may explode and should not be
heated in this oven.
Use this appliance only for its intended uses as described in this manual.
This appliance should be serviced only by qualified service personnel. Contact the nearest authorized service facility
for examination, repair, or adjustment.
Keep the cord away from heated surfaces.
Use only utensils suitable for use with microwave ovens.
The contents of feeding bottles and baby food jars must be stirred or shaken and the temperature checked before
consumption, in order to avoid burns.
Liquids, such as water, coffee, or tea are able to be overheated beyond the boiling point without appearing to be
boiling. Visible bubbling or boiling when the container is removed from the microwave oven is not always present.
THIS COULD RESULT IN VERY HOT LIQUIDS SUDDENLY BOILING OVER WHEN THE CONTAINER
IS DISTURBED OR A UTENSIL IS INSERTED INTO THE LIQUID.
Appliance is not to be used by children or persons with reduced physical, sensory or mental capabilities, or lack of
experience and knowledge, unless they have been given supervision or instruction.
XDO NOT allow children to use this appliance. Children should be supervised to ensure that they do not play with the
appliance.
XDO NOT use corrosive chemicals or vapors in this appliance - it is not designed for industrial or laboratory use.
XDO NOT operate this appliance if it has a damaged cord or plug, is not working properly, or has been damaged or
dropped. See “Power Cord Replacement” found on page ii.
XDO NOT cover or block any openings on this appliance.
XDO NOT store this appliance outdoors.
XDO NOT use this product near water (e.g., near a kitchen sink, in a wet basement, near a swimming pool).
XDO NOT immerse the cord or plug in water.
XDO NOT let the cord hang over the edge of a table or counter.
XDO NOT use a water jet for cleaning. See “Daily Maintenance” (pages 7-9) for proper cleaning procedures.
Reducing Fire Risk
Remove wire twist-ties from paper or plastic bags used to facilitate cooking in the oven.
If materials inside the oven ignite, keep the oven door closed, turn the oven off, and disconnect the power cord or
shut off power at the fuse or circuit breaker panel.
If smoke is observed, switch off or unplug the oven. Keep the door closed to stifle any flames.
XDO NOT use the cook cavity for storage purposes (e.g., leaving paper products, cooking utensils, or food in the cavity
when not in use).
XDO NOT overcook food. Carefully attend to the oven if paper, plastic, or other combustible materials are placed
inside the oven to facilitate cooking.

Grounding Instructions
This appliance must be grounded. In the event of an electrical short circuit, grounding reduces the risk of
electric shock by providing an escape wire for the electric current. This oven is equipped with a cord that
has a grounding wire with a grounding plug, which must be plugged into an outlet that is properly
installed and grounded. Consult a qualified electrician or serviceman if uncertain about the ability to
follow grounding instructions or if doubt exists as to whether the appliance is properly grounded.
XDO NOT use an extension cord. If the power cord is too short, have a qualified electrician or
serviceman install an outlet near the appliance.
WARNING: Improper grounding can result in risk of electric shock.
Power Cord Replacement
If the power cord is damaged, it must be replaced by the manufacturer, its service agent, or a similarly
qualified person.
Precautions to Avoid Possible Exposure to Excessive Microwave Energy
(a) Do not attempt to operate this oven with the door open since open-door operation can result in
harmful exposure to microwave energy. It is important not to defeat or tamper with the safety
interlocks.
(b) Do not place any object between the oven front face and the door or allow soil or cleaner residue to
accumulate on sealing surfaces.
(c) Do not operate the oven if it is damaged. It is particularly important that the oven door close
properly and that there is no damage to the: (1) Door (bent), (2) hinges and latches (broken or
loosened), (3) door seals and sealing surfaces.
(d) The oven should not be adjusted or repaired by anyone except properly qualified service personnel.
RF Interference Considerations
This oven generates radio frequency signals, and has been tested and determined to be in compliance with
applicable portions of FCC part 18 requirements and to the protection requirements of Council Directive
89/336/EEC on the approximation of the laws of the Member States relating to electromagnetic compati-
bility at the time of manufacture. However, some equipment with sensitivity to signals below these limits
may experience interference.
If your equipment experiences interference:
Increase the physical separation between this oven and the sensitive equipment.
If the sensitive device can be grounded, do so following accepted grounding practices.
If battery-powered microphones are being affected, ensure that the batteries are fully charged.
Keep sensitive equipment on separate electrical circuits if possible.
Route intercom wires, microphone wires, speaker cables, etc. away from the oven.
ii SAFETY INSTRUCTIONS
GENERAL OVEN INFORMATION
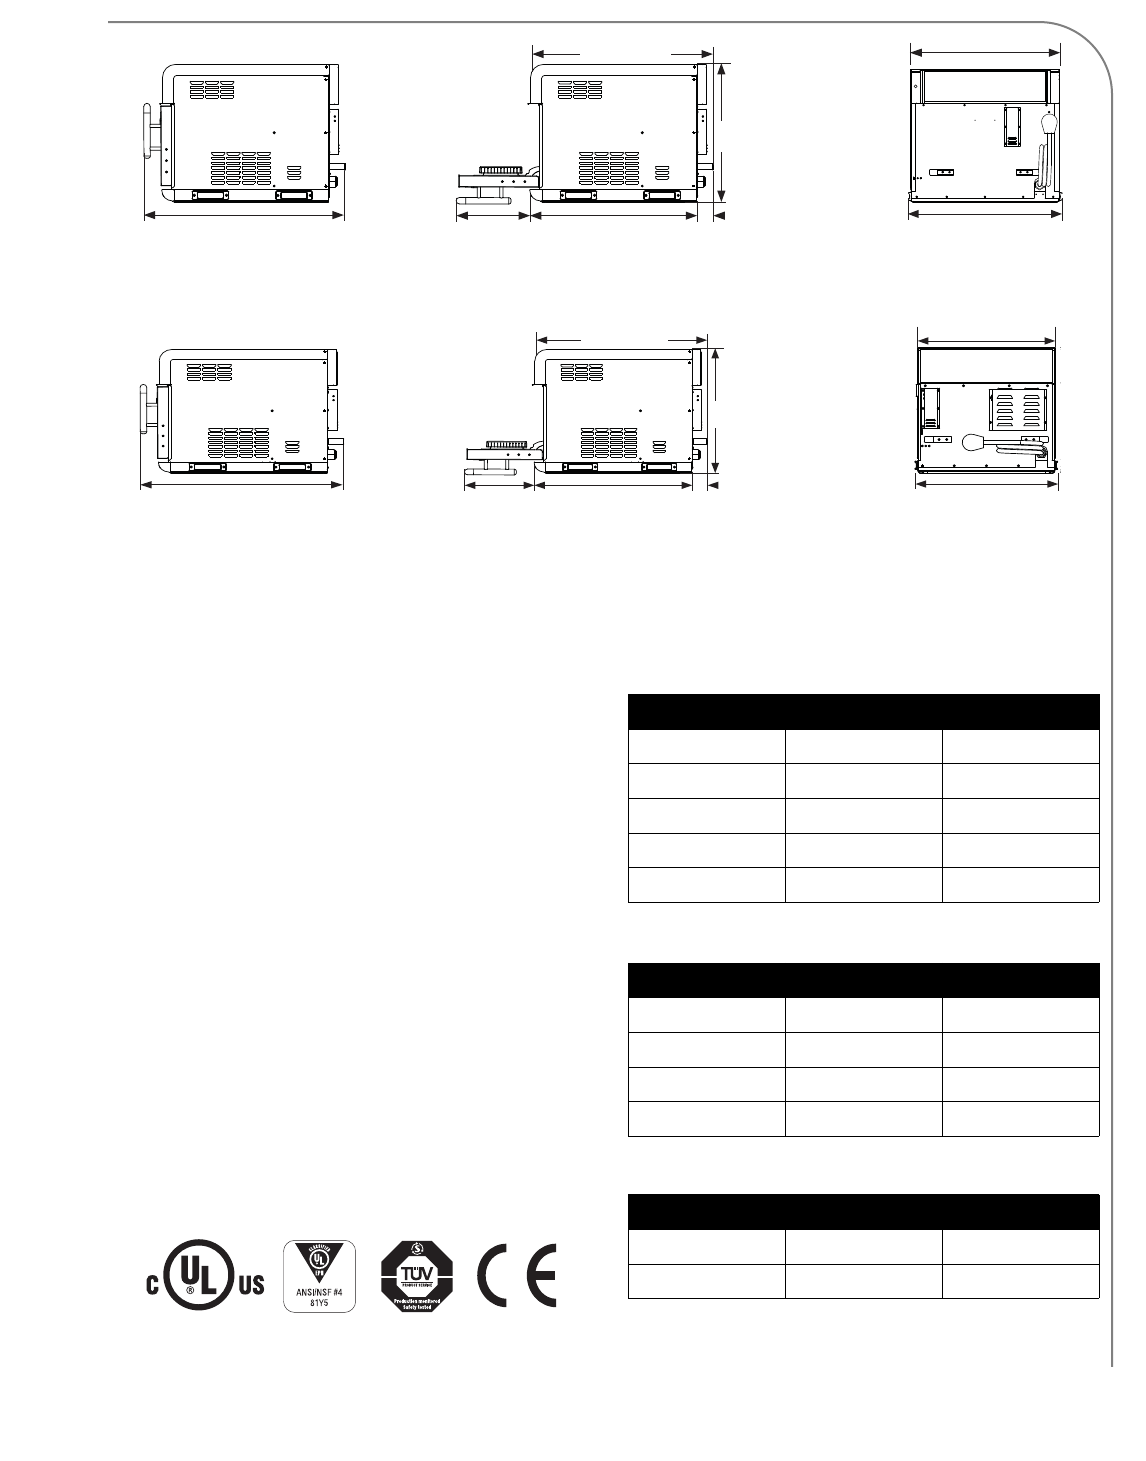
31.1” (790 mm)
28.25” (718 mm)
24.3”
(618 mm)
25.75” (654 mm)
15.15” (385mm) 2.5” (64 mm)
PLUG
28.1” (714 mm)
27.2” (691 mm)
Theory of Operation
Utilizing TurboChef’s patented technology to
rapidly cook food without compromising quality,
the i5 and i3 ovens maximize throughput and
versatility with a large cavity size and ability to
cook with most any metal pan. The control system
precisely coordinates independent top and bottom
impinged airflow with top-launched microwave to
deliver superior quality, throughput, and speed.
Integral catalytic converters allow for UL®-
certified ventless operation.
This manual includes instructions for installing,
cleaning, and operating the i5 and i3 ovens. If you
have questions that are not addressed in this man-
ual, contact Customer Support (800.90TURBO,
+1 214.379.6000) or your Authorized Distributor.
Certifications
cULus, UL EPH, TÜV, CE, FDA
Dimensions
Oven Dimensions
Cook Cavity Dimensions
Clearances
1
Measurement i5 Oven i3 Oven
Height 24.3” (618 mm) 21.25” (540 mm)
Width 28.1” (714 mm) 24.5” (622 mm)
Depth (door closed) 31.1” (790 mm) 31.25” (794 mm)
Depth (door open) 43.4” (1102 mm) 39.65” (1007 mm)
Weight 275 lb. (125 kg) 245 lb. (111 kg)
Measurement i5 Oven i3 Oven
Height 10” (254 mm) 6.9” (175 mm)
Width 24” (610 mm) 19.4” (493 mm)
Depth 16” (406 mm) 14.75” (375 mm)
Volume 2.22 ft3(63 liters) 1.14 ft3(32.3 liters)
Measurement i5 Oven i3 Oven
Top 19” (483 mm) 19” (483 mm)
Sides 2” (51 mm) 2” (51 mm)
Figure 2: i3 Oven Dimensions
31.25” (794 mm)
28.25” (718 mm)
21.25”
(540 mm)
25.75” (654 mm)
11.4” (290 mm) 2.5” (64 mm)
PLUG
24.5” (622 mm)
23.5” (597 mm)
PLUG
PLUG
Figure 1: i5 Oven Dimensions

Multi Phase
i5 DL (USA) model (i5-9500-14-DL)*
208/240 VAC, 60 Hz, 30 amps
Max Input: 9500/11500 watts
Plug: NEMA 15-30P
i5 BD model (i5-9500-16-BD)
220 VAC, 60 Hz, 28 amps
Max Input: 10000 watts
Plug: IEC 309, 4-pin
i5 LD model (i5-9500-15-LD)
220 VAC, 60 Hz, 28 amps
Max Input: 10000 watts
Plug: NEMA 15-30P
i5 EW model (i5-9500-4-EW)
400 VAC, 50 Hz, 19 amps
Max Input: 10000 watts
Plug: IEC 309, 5-pin
i5 AU model (i5-9500-5-AU)
400 VAC, 50 Hz, 19 amps
Max Input: 10000 watts
Plug: Clipsal 5-pin
i5 KW model (i5-9500-12-KW)
400 VAC, 60 Hz, 19 amps
Max Input: 10000 watts
Plug: IEC 309, 5-pin
i5 ED model (i5-9500-3-ED)
230 VAC, 50 Hz, 28 amps
Max Input: 10000 watts
Plug: IEC 309, 4-pin
i5 SD model (i5-9500-13-SD)
230 VAC, 60 Hz, 28 amps
Max Input: 10000 watts
Plug: IEC 309, 4-pin
i5 JD model (i5-9500-9-JD) - 50 Hz
(i5-9500-11-JD) - 60 Hz
200 VAC, 50 or 60 Hz, 25 amps
Max Input: 10000 watts
Plug: PSE-marked, 4-blade
2 GENERAL OVEN INFORMATION
Electrical Specifications - i5 Oven
TurboChef recommends a Type D circuit breaker for all installations outside the US.
* North America models include a voltage sensor that detects 208 or 240 VAC. The voltage sensor does
not compensate for lack-of or over-voltage installations.
Single Phase
i5 US model (i5-9500-1)*
208/240 VAC, 60 Hz, 48 amps
Max Input: 9500/11500 watts
Plug: NEMA 6-50P
i5 BK model (i5-9500-6-BK)
220 VAC, 60 Hz, 48 amps
Max Input: 10000 watts
Plug: IEC 309, 3-pin
i5 LA model (i5-9500-7-LA)
220 VAC, 60 Hz, 48 amps
Max Input: 10000 watts
Plug: NEMA 6-50P
i5 UK model (i5-9500-2-UK)
230 VAC, 50 Hz, 48 amps
Max Input: 10000 watts
Plug: IEC 309, 3-pin
i5 JK model (i5-9500-8-JK) - 50 Hz
(i5-9500-10-JK) - 60 Hz
200 VAC, 50 or 60 Hz, 46 amps
Max Input: 9000 watts
Plug: PSE-marked, 3-blade

GENERAL OVEN INFORMATION
3
Multi Phase
i3 DL (USA) model (i3-9500-14-DL)*
208/240 VAC, 60 Hz, 24 amps
Max Input: 8600/9900 watts
Plug: NEMA 15-30P
i3 BD model (i3-9500-16-BD)
220 VAC, 60 Hz, 24 amps
Max Input: 9100 watts
Plug: IEC 309, 4-pin
i3 LD model (i3-9500-15-LD)
220 VAC, 60 Hz, 24 amps
Max Input: 9100 watts
Plug: NEMA 15-30P
i3 EW model (i3-9500-4-EW)
400 VAC, 50 Hz, 14 amps
Max Input: 9500 watts
Plug: IEC 309, 5-pin
i3 AU model (i3-9500-5-AU)
400 VAC, 50 Hz, 14 amps
Max Input: 9500 watts
Plug: Clipsal 5-pin
i3 KW model (i3-9500-12-KW)
400 VAC, 60 Hz, 14 amps
Max Input: 9500 watts
Plug: IEC 309, 5-pin
i3 ED model (i3-9500-3-ED)
230 VAC, 50 Hz, 24 amps
Max Input: 9500 watts
Plug: IEC 309, 4-pin
i3 SD model (i3-9500-13-SD)
230 VAC, 60 Hz, 24 amps
Max Input: 9200 watts
Plug: IEC 309, 4-pin
i3 JD model (i3-9500-9-JD) - 50 Hz
(i3-9500-11-JD) - 60 Hz
200 VAC, 50 or 60 Hz, 23 amps
Max Input: 8000 watts
Plug: PSE-marked, 4-blade
Electrical Specifications - i3 Oven
TurboChef recommends a Type D circuit breaker for all installations outside the US.
* North America models include a voltage sensor that detects 208 or 240 VAC. The voltage sensor does
not compensate for lack-of or over-voltage installations.
Single Phase
i3 US model (i3-9500-1)*
208/240 VAC, 60 Hz, 40 amps
Max Input: 8300/9600 watts
Plug: NEMA 6-50P, 8/3
i3 BK model (i3-9500-6-BK)
220 VAC, 60 Hz, 40 amps
Max Input: 8800 watts
Plug: IEC 309, 3-pin
i3 LA model (i3-9500-7-LA)
220 VAC, 60 Hz, 40 amps
Max Input: 8800 watts
Plug: NEMA 6-50P
i3 UK model (i3-9500-2-UK)
230 VAC, 50 Hz, 40 amps
Max Input: 9200 watts
Plug: IEC 309, 3-pin
i3 JK model (i3-9500-8-JK) - 50 Hz
(i3-9500-10-JK) - 60 Hz
200 VAC, 50 or 60 Hz, 40 amps
Max Input: 8000 watts
Plug: PSE-marked, 3-blade
4 GENERAL OVEN INFORMATION / INSTALLATION
Figure 3: Hand Grip Locations
Oven Construction
Exterior
- Two-tone stainless steel front, top, and sides
- 304 stainless steel removable grease pan
- Ergonomic door handle
- Rubber seal for surface mounting
- Side handles for lifting
Interior
- 304 stainless steel interior
- Fully-insulated cook chamber
- Removable rack
- Top and bottom jetplates
Installation
Install or locate this appliance only in
accordance with the instructions below.
Unpacking Instructions
1. Remove oven from packaging.
2. Before discarding packaging, check it
thoroughly for accessories, consumables,
and additional literature.
3. Discard packaging.
4. Check cook cavity thoroughly for accessories,
consumables, and additional literature.
5. Discard any packaging in cook cavity.
Lifting and Placing the Oven
WARNING: The i5 oven weighs
approximately 275 lb. (125 kg); the i3 oven
weighs approximately 245 lb. (111 kg). Never
lift with fewer than two people.
WARNING: Lift only from the sides of the
oven, using the provided hand grips. Never lift
the oven from the front and rear or by the
door handle.
WARNING: The oven must be properly
placed on the table or countertop at all times.
TurboChef will not recognize a fallen oven as
a warrantable claim and is not liable for any
injuries that may result.
WARNING: This oven is not intended for
built-in installation (i.e., installing the oven in
any structure that surrounds the oven by five
or more sides). Be sure to provide a minimum
of 2” (51 mm) clearance for all sides and 19”
(483 mm) clearance for the top.
1. Position one or more persons on the left and
right sides of the oven.
2. Place hands into grips (see Figure 3) and lift.
3. Place the oven on a surface that is at least 30”
(762 mm) deep and capable of supporting
- 280 lb. (127 kg) if installing an i5 oven
- 250 lb. (114 kg) if installing an i3 oven
If installing onto an oven cart, make sure the
wheels/casters are locked.
4. Install the oven rack or other provided
cooking surface.
5. Plug in the oven.
NOTE: The oven is primarily serviced through its
top. DO NOT install shelving directly over the
unit. The operator will be responsible for service
charges incurred as a result of added time required
to access the top of the oven.
INSTALLATION
5
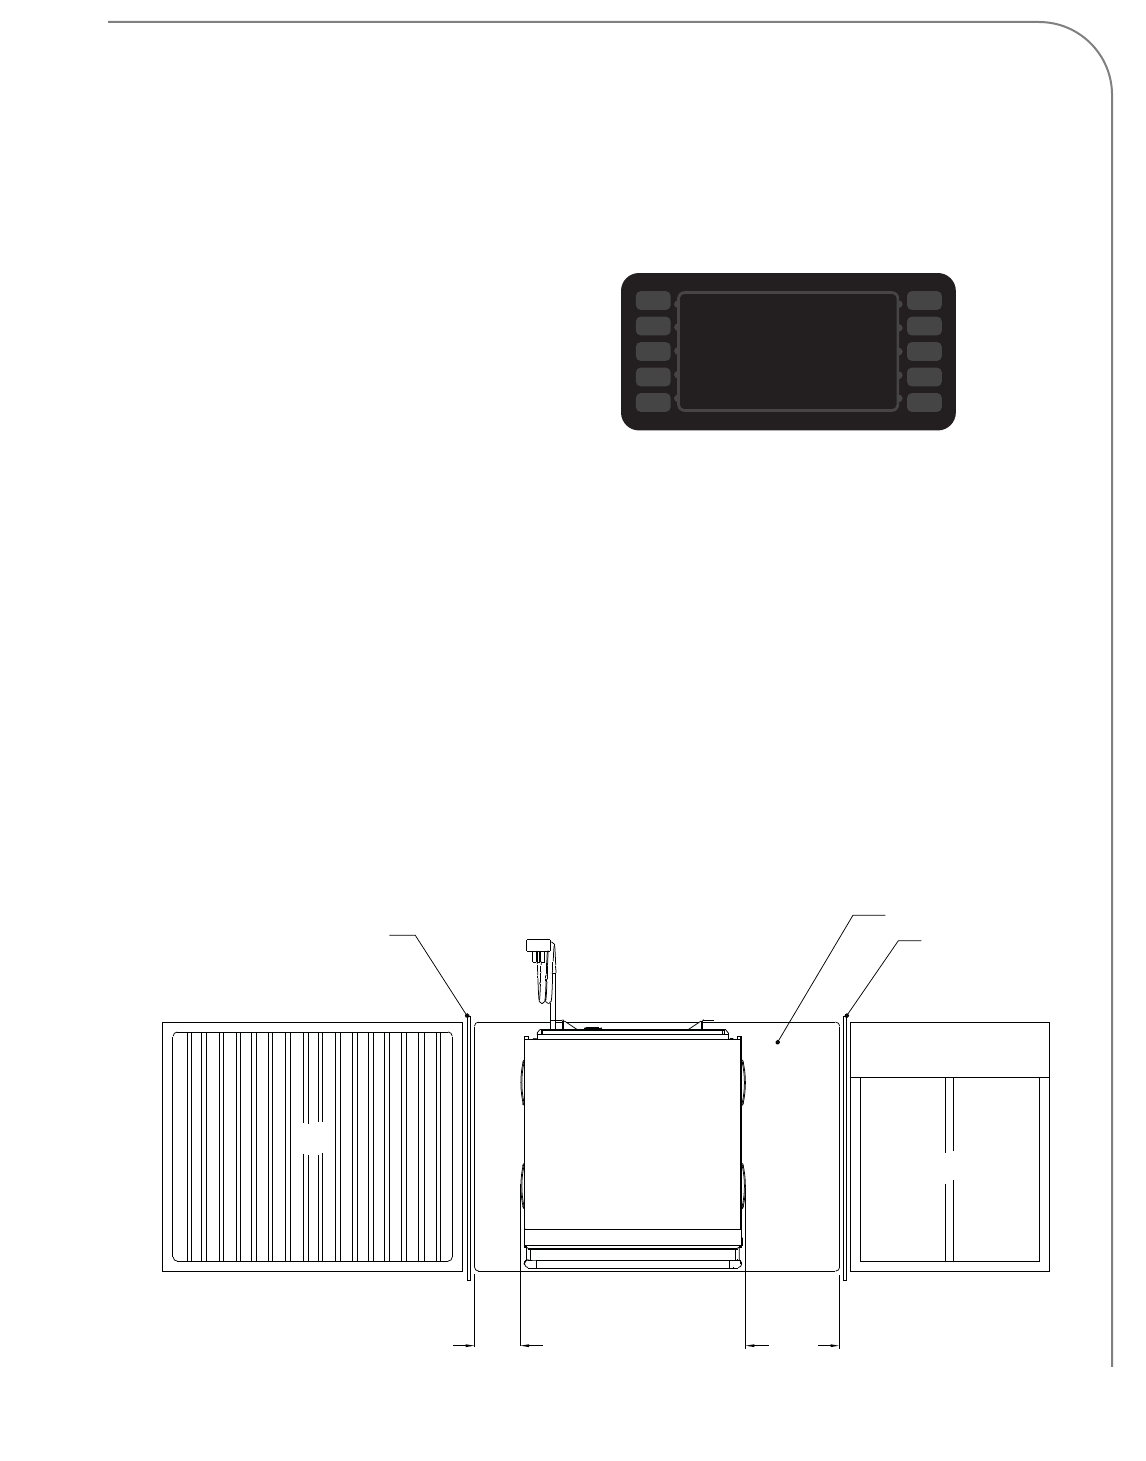
Installation Near Open Heat Source
See Figure 5.
When placing a TurboChef oven near an open heat
source, strictly adhere to the following:
- If the oven is being placed near a grill or stove,
a divider must exist between the oven and the
open heat source, with a minimum of 6” (152
mm) between the oven and the divider.
- If the oven is being placed near a fryer, a
divider must exist between the oven and fryer,
with a minimum of 12” (305 mm) between
the oven and the divider.
- The height of the divider must be greater than
or equal to the height of the oven:
- i5 oven: 24.3” (618 mm)
- i3 oven: 21.25” (540 mm)
- Verify oven location has a minimum 19” (483
mm) clearance on top and minimum 2” (51
mm) of clearance on each side.
Voltage Selection
For North America oven models, the oven will
detect 208 or 240 incoming voltage.
The initial voltage selection is typically completed
before the oven is used by the customer. However,
if incoming voltage for the store is different than
the preset voltage, the operator will be required to
select either 208 or 240 after pressing the On/Off
key to turn on the oven. The correct voltage will be
enlarged on the screen, identifying which option to
select (see Figure 4 below).
Ventilation Requirements
The TurboChef i5/i3 oven has been tested by
Underwriters Laboratory which has concluded that
this oven can be installed and operated ventless for
all food items except for fatty raw proteins, such as
bone-in, skin-on chicken, uncooked hamburger,
fat-laden steaks, etc.
NOTE: In no event shall the manufacturer assume
any liability for damages or injuries resulting from
installations which are not in compliance with the
instructions and codes previously listed.
Figure 4: Selecting Voltage
208 VAC
SELECT VOLTAGE:
240 VAC
Grill
Partition
i5: 24.3” (618 mm)
Above Counter Top
i3: 21.5” (540 mm)
Above Counter Top
TurboChef
i5 or i3 Oven
6”
(152 mm)
Minimum
12”
(305 mm)
Minimum
Deep Fryer
Counter Top / Table
Partition
i5: 24.3” (618 mm)
Above Counter Top
i3: 21.5” (540 mm)
Above Counter Top
Figure 5: Installation Near Open Heat Source
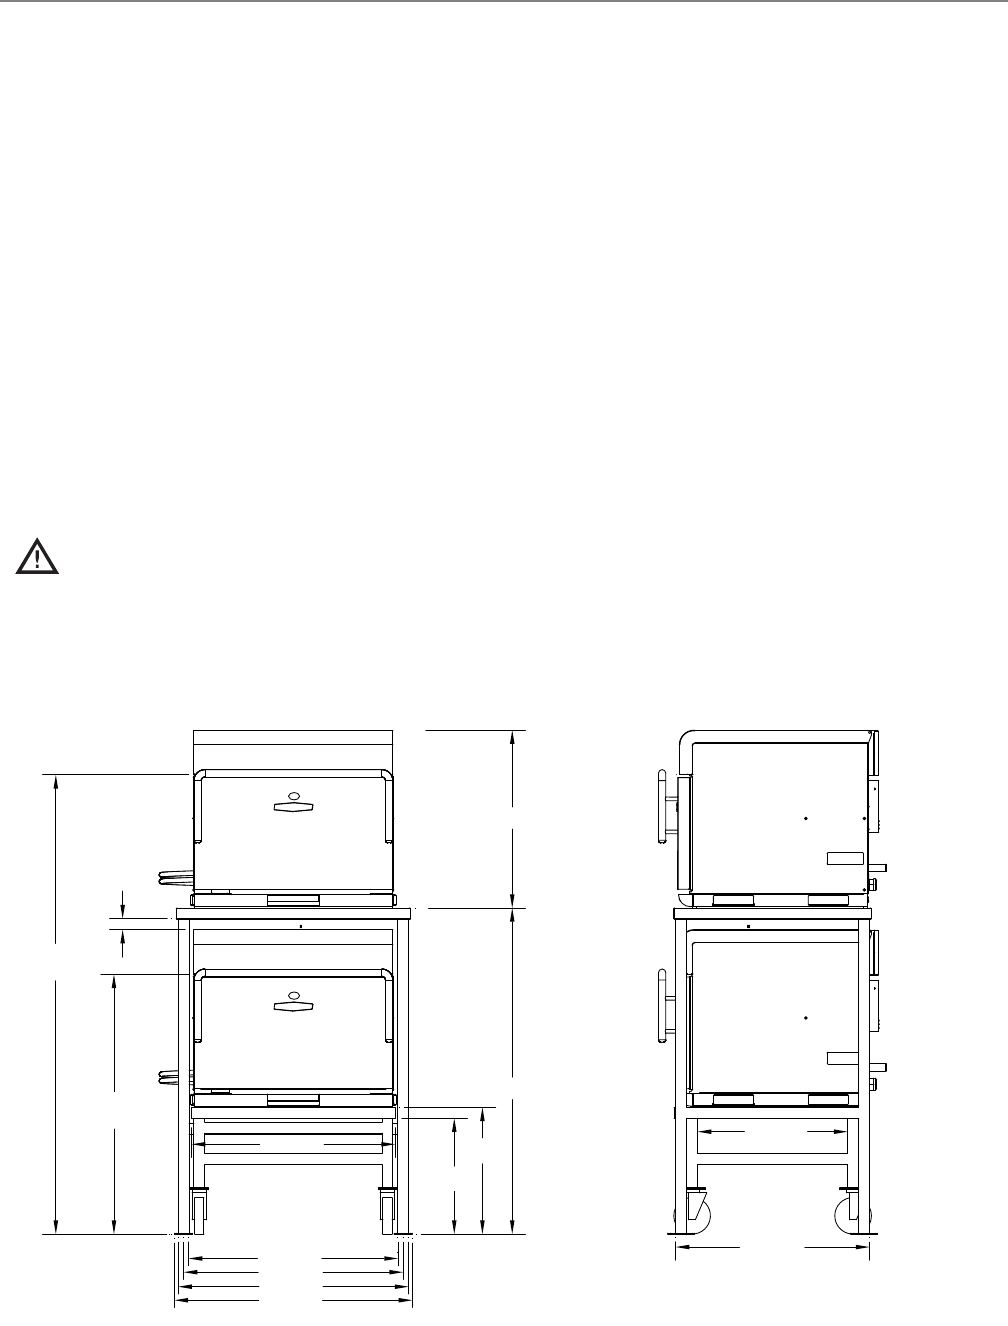
Figure 6: i5 Oven Cart and Stacking Stand Dimensions
6 INSTALLATION
62.7” (1594 mm)
(handle)
35.5” (902 mm)
(handle)
35.5” (706 mm)
28.6” (726 mm)
1.5” (38 mm)
30.0” (762 mm)
31.5” (800 mm)
32.5” (826 mm)
44.6” (1133 mm)
17.3”
(439 mm)
15.8”
(401 mm)
20.5” (521 mm)
26.5” (673 mm)
24.3” (617 mm)
Optional Installation Items
See Figure 6, below and Figure 7, page 7.
TurboChef Oven Cart
- Part Number: NGC-1217-2
- Height: 17.3” (439 mm)
- Width: 27.8” (706 mm)
- Depth: 26.625” (676 mm)
TurboChef Stacking Stand
- Part Number: i5-9369
- Height: 44.6” (1133 mm)
- Width: 32.5” (826 mm)
- Depth: 26.5” (673 mm)
Oven Restraint Kit
Part Number: TC3-0242
WARNING: The Oven Restraint Kit will not
prevent the oven from falling off a countertop
if the oven is pulled off or allowed to slide off
the edge. Installation instructions are included
with the kit.
ChefComm Pro
Part Number: CON-7006
ChefComm Pro empowers any user of a TurboChef
oven to easily and efficiently create menu settings
on your computer and transfer them to your oven
via smart card or USB device. For more informa-
tion, call TurboChef Service at 800.90TURBO or
+1 214.379.6000.
ChefComm Limited
Part Number: CON-7016
ChefComm Limited is a “read-and-transfer only”
version of ChefComm Pro that helps ensure your
carefully-crafted settings are easy to distribute
globally, while providing you the peace of mind
that they will not be altered.
i5
i5
INSTALLATION / MAINTENANCE
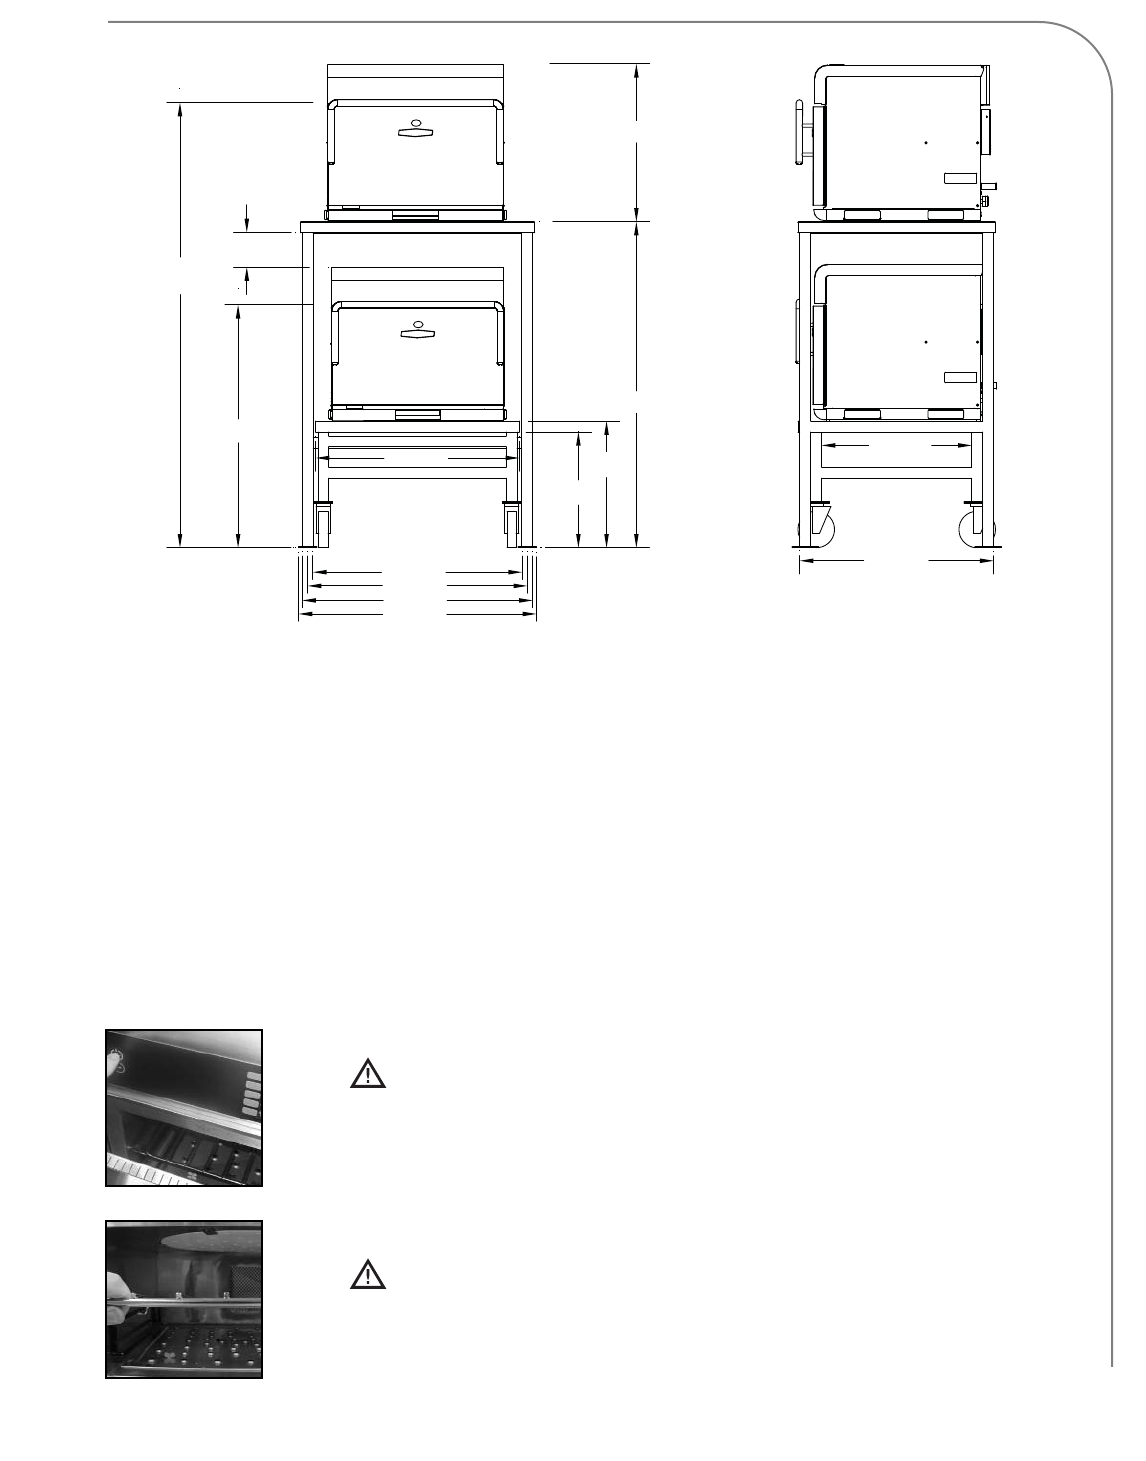
59.7” (1516 mm)
(handle)
32.5” (826 mm)
(handle)
35.5” (706 mm)
28.6” (726 mm)
4.5”
(114 mm)
30.0” (762 mm)
31.5” (800 mm)
32.5” (826 mm)
44.6” (1133 mm)
17.3”
(439 mm)
15.8”
(401 mm)
20.5” (521 mm)
26.5” (673 mm)
21.25” (540 mm)
Figure 7: i3 Oven Cart and Stacking Stand Dimensions
7
Daily Maintenance
The following steps will help maintain your oven. Use only TurboChef Oven Cleaner and Oven Guard. The use
of any other cleaning products can damage critical oven components, resulting in a non-warranty service call.
Supplies and Equipment
- TurboChef Oven Cleaner (Part Number: 103180)
- TurboChef Oven Guard (Part Number: 103181)
- Nylon scrub pad, cleaning towel, disposable gloves, protective eyewear, dust mask (optional), pair of tongs
wrapped with towel (optional - see step 11, page 9)
Step 1: Prepare the Oven
WARNING: The oven operates at approximately 450°F (232°C) and may cause
injury if not allowed to cool properly.
- Turn off the oven by pressing the On/Off key.
- Slightly open the oven door. Cooling takes approximately 40 minutes.
-DO NOT attempt to clean the oven until the oven displays “Oven Off.”
Step 2: Remove and Clean the Wire Rack
WARNING: Be sure the oven interior is cool before you remove the wire rack.
- Wash, rinse, and sanitize the wire rack.
Continued on pages 8-9.
Step 1
Step 2
i3
i3
8 MAINTENANCE
Step 3: Remove and Clean the Lower Jetplate
- Unscrew the two thumb screws on the lower jetplate.
- Lift the lower jetplate by gripping the thumb screws.
- Remove the lower jetplate.
- Wash, rinse, and sanitize the lower jetplate.
CAUTION: DO NOT remove the top ceramic jetplate; breakage will result in
a non-warranty service call.
Step 4: Remove and Clean the Lower Air Diverter
- Remove the lower air diverter.
- Wash, rinse, and sanitize the lower air diverter.
WARNING: DO NOT discard the lower air diverter. The oven will not work
without the lower air diverter installed.
Step 5: Wipe the Oven Interior
- Wipe any large particles from the oven interior with a damp towel.
Step 6: Clean the Oven Interior
- Spray oven cleaner onto the top, bottom, and sides of the oven interior.
CAUTION: DO NOT spray oven cleaner into the perforation on the back oven
wall. Doing so can damage critical oven components, resulting in a
non-warranty service call.
- Allow Oven Cleaner to penetrate stains for five minutes.
- Clean the oven interior with a nylon scrub pad.
CAUTION: DO NOT apply excessive pressure when wiping the top ceramic
jetplate (Figure Step 6.2); breakage will result in a non-warranty service call.
CAUTION: DO NOT remove the top ceramic jetplate; breakage will result in a
non-warranty service call.
Step 7: Clean and Dry the Oven Door
CAUTION: DO NOT spray oven cleaner directly onto the oven door gasket
(Figure Step 7) or saturate it with water.
CAUTION: DO NOT scrub or attempt to clean the oven door gasket (Figure Step
7). Doing so may cause the oven door to misalign, resulting in a non-warranty
service call.
- Clean the oven door with oven cleaner and a nylon scrub pad.
- Wipe the oven door with a damp towel.
Step 8: Rinse the Oven Interior
CAUTION: DO NOT use a hose or water jet for cleaning. Doing so can damage
critical oven components, resulting in a non-warranty service call.
- Rinse the oven interior with clean water.
- Dry the oven interior with a clean towel.
Step 3
Step 4
Step 5
Step 6.1
Gasket
Step 7
Step 8
Step 6.2
Top Jetplate
MAINTENANCE
9
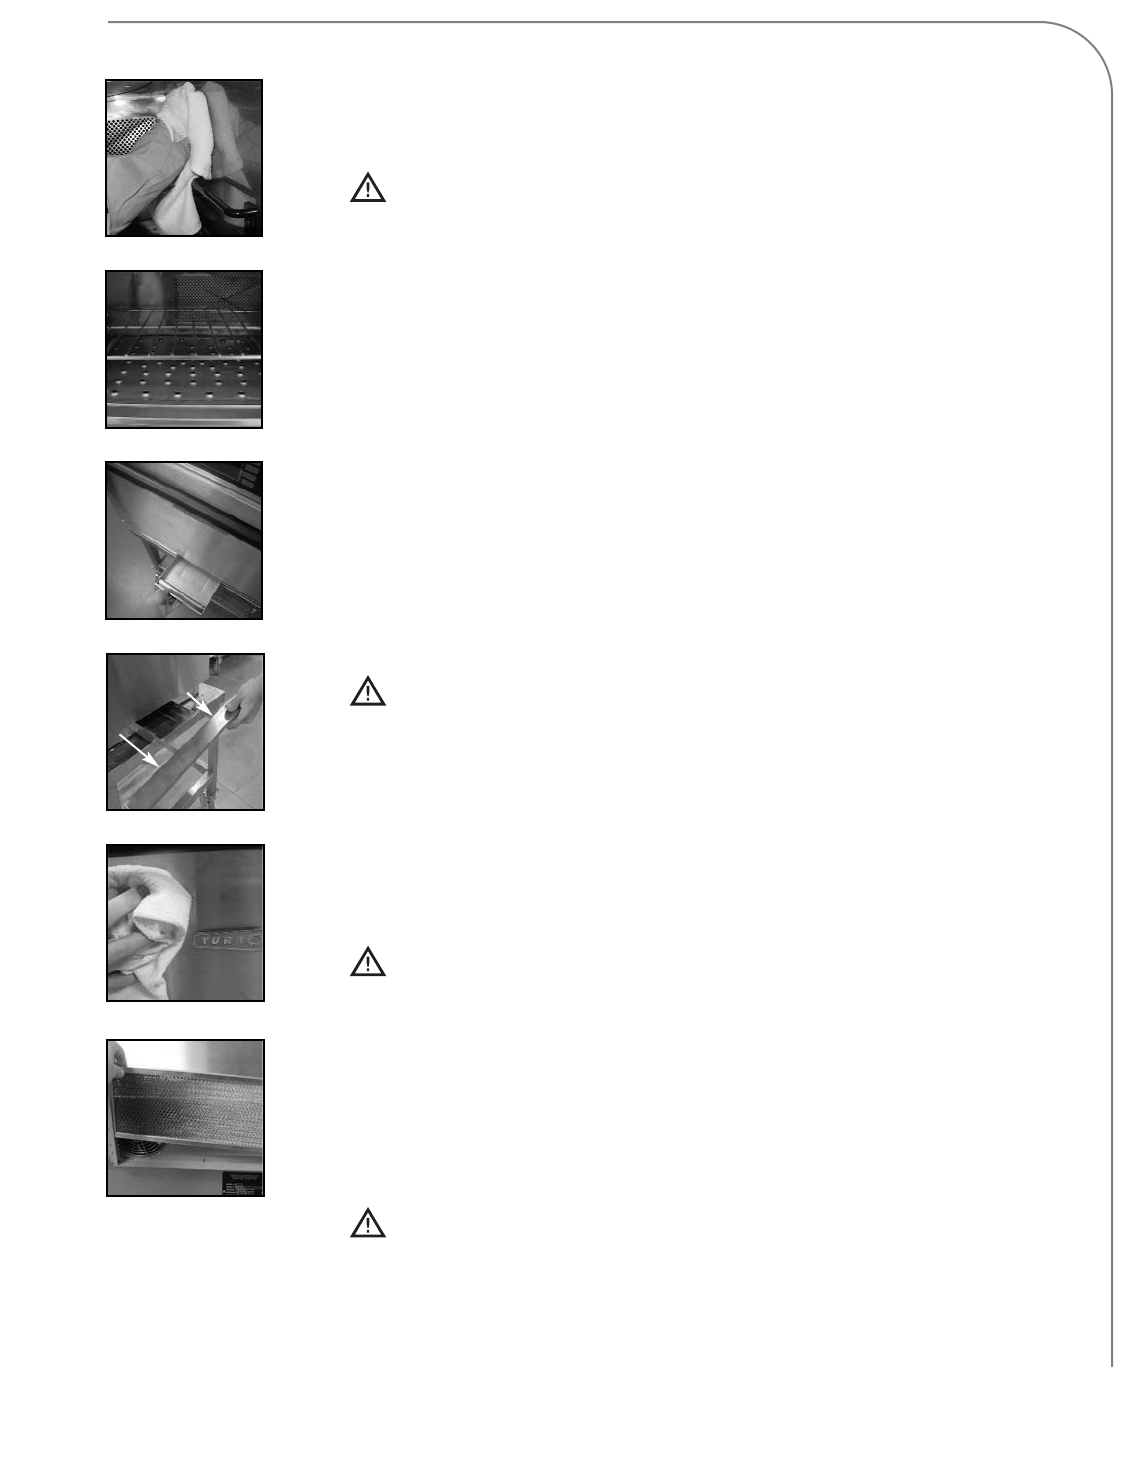
Step 9: Apply TurboChef Oven Guard
- Spray Oven Guard onto a clean towel.
- Wipe the interior oven walls and the inside of the oven door.
CAUTION: DO NOT apply Oven Guard to the oven door gasket. Doing so may
damage the gasket, resulting in a non-warranty service call.
Step 10: Reinstall Components
- Reinstall the lower air diverter.
- Reinstall the lower jetplate. Screw in the two thumb screws to lock the lower
jetplate in place.
- Reinstall the wire rack and close the oven door.
Step 11: Clean the Drain Pan
- Remove the drain pan entirely from the bottom of the oven.
NOTE: If cleaning an i3 oven, remove the lower front panel to access the
drain pan (Figure Step 11: i3 oven). The panel is attached via four clips and
pulls off from the front.
- Using a pair of tongs wrapped with a towel (TurboChef recommendation),
wipe the inside of the drain pan slot.
- Empty, clean, and reinstall the drain pan.
CAUTION: If cleaning an i5 oven, ensure the outer edge of the drain pan is
flush with the oven door (i.e., not sticking out). Failure to do so will damage
the oven door, resulting in a non-warranty service call.
- If cleaning an i3 oven, reinstall the lower front panel. Ensure all four clips on
the lower front panel are engaged and the edge of the panel is flush with the
oven door (i.e., not sticking out).
Step 12: Clean the Oven Exterior
- Wipe the oven exterior with a clean, damp towel.
CAUTION: DO NOT spray chemicals into any openings, such as the louvers
on the side panels or the rear vent catalyst housing. Doing so can damage
critical oven components, resulting in a non-warranty service call.
Step 13: Clean the Air Filter (Once Per Week)
- Remove the air filter from the back panel.
- Wash in dishwasher or rinse with hot water.
-DO NOT use a water jet. Doing so will shorten the life of the filter.
- Reinstall the air filter.
CAUTION: DO NOT operate the oven without the air filter in place.
Step 9
Step 10
Step 11: i5 oven
Step 12
Step 13
Step 11: i3 oven
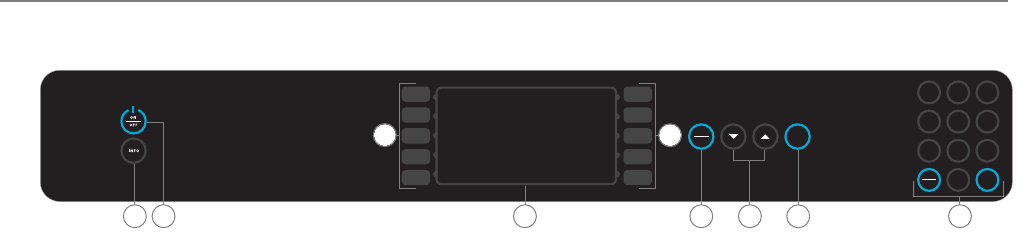
Oven Controls
1. Info Key
When the oven is off or cooling down, press to
access the INFO MODE (see page 14).
2. On/Off Key
Press to turn the oven on (begin warmup) or off
(cool down), or to exit INFO MODE (page 14).
3. Display
The display shows information relevant to the
current oven operation and/or user options.
4. Soft Keys
There are ten soft keys - five to the left and right
of the display. Press a soft key to select an option
adjacent to that key on the display.
NOTE: Soft keys are labeled L1-L5 and R1-R5 in
this manual (where applicable) for easier identifica-
tion and reference.
5. Back/Stop Key
When the oven is cooking, press the Back/Stop key
to immediately terminate a cook cycle.
When the oven is ready to cook (i.e., warmed up
and waiting for a cook command), or in the INFO
MODE (see page 14), press the Back/Stop key to
return to the previous screen.
6. Up and Down Keys
When the oven is ready to cook (i.e., warmed up
and waiting for a cook command), press the Up or
Down key to view additional food groups (if
applicable).
When the oven is in the INFO MODE (see page 14),
press to navigate between screen 1 and 2.
When editing a food item, press to navigate
between editable fields (Figure 32, page 18).
7. Enter Key
Press the Enter key to confirm a setting change in
the Options Screen (Figure 24, page 14), when
saving changes to food item settings (Figure 32,
page 18), or whenever instructed by the oven
screen.
8. Numeric Keypad
Use the numeric keypad to enter access passwords
or modify cook settings (Figure 32, page 18). The
numeric keypad also contains a Back/Stop key and
an Enter key, which are functionally identical to
Items 5 and 7.
BACK
STOP
ENTER
12
ABC
3
DEF
4
GHI
5
JKL
6
MNO
BACK
STOP
ENTER
7
PQRS
8
TUV
9
WXYZ
0
4
12
4
56788
3
Figure 8: Oven Controls
10 OVEN CONTROLS
COOKING
Step 3: Warming Up
During this step, the oven warms to the selected or pre-set temperature.
Step 2: Select Cook Temperature
The oven stores two different cook temperature settings (see page 17 for
more information). Each temperature setting has 10 food groups assigned
to it, each consisting of 10 food items (100 items per temperature
setting). The operator will be able to cook only recipes associated with
the selected temperature setting.
To select a temperature, press the adjacent soft key.
NOTE: If both temperature settings are the same, this screen will be
bypassed and access to all 200 food items will be allowed.
Step 1: Turn the Oven On
When the oven is off (Figure 9), the oven temperature has receded below
150°F (66°C), but the display and keypad remain on.
Press the On/Off key to turn the oven on.
11
OVEN OFF
READY TO CLEAN
500F
350F
SELECT COOK TEMPERATURE
WARMING UP
OVEN TCC = 244F
SET POINT= 500F
Figure 9: Oven Off
Cooking
The oven is preprogrammed with recipe settings at the time of manufacture and is ready to operate out of the
box. If these settings are erased, new menu settings must be either loaded via smart card/USB drive (page 15)
or programmed manually (pages 17-18). The oven will not cook unless settings are present.
Note that the steps below are not always sequential. Typically, multiple items will be cooked before cooling the
oven (Step 10).
Figure 10: Cook Temperature Select
Figure 11: Warming Up
Step 6: Adjusting the Time
The Adjust Time option is turned off by default. If you want the ability
to modify the cook time before each cook cycle, this feature can be
turned on from the “Options” screen (see page 15).
1. If the “Adjust Time” screen appears, change the cook time (if
required) using the number keys.
2. Press Enter or bottom-right softkey to confirm and begin cooking.
Step 5: Ready to Cook
WARNING: Inside of oven and oven door are hot! Use extreme caution.
1. Place the food into the oven.
2. Select a food group by pressing its adjacent soft key (Figure 13), or press
the Up or Down key for additional food groups, if available.
3. Select an item (Figure 14) to cook by pressing its adjacent soft key.
12 COOKING
Step 4: Soaking
Once the oven temperature reaches the set point, the oven will continue
to warm for eight minutes to ensure the cook cavity surfaces absorb
enough heat so as to not affect cooking results. This process is called
“soaking.”
Figure 12: Soaking
Figure 13: Group Select
Figure 15: Adjust Time
Step 7: Cooking
NOTE: To immediately terminate a cook cycle, press the Back/Stop key.
NOTE: If the oven door is opened during a cook cycle, the cycle will
pause until the door is closed and “Resume” is selected.
Figure 16: Cooking
WARMING UP
OVEN TCC = 500F
SET POINT= 500F
08:00
GROUP 1
GROUP 2
GROUP 3
GROUP 4
SP = 500F
GROUP 5
GROUP 6
GROUP 7
GROUP 8
GROUP 9
GROUP 10
RECIPE 1
RECIPE 2
RECIPE 3
RECIPE 4
GROUP 1
RECIPE 5
RECIPE 6
RECIPE 7
RECIPE 8
RECIPE 9
RECIPE 10
ADJUST TIME
START COOK
01:40
COOKING
01:17
Figure 14: Item Select
COOKING
Step 8: Remove Food from Oven
WARNING: Dish and inside of oven/oven door are hot!
Use extreme caution.
Open the oven door and check/remove food.
13
Figure 17: Cooking Done
Step 9: Cook More Option
The “Additional Cooking Options” screen is turned off by default. If you
want the ability to cook a product a little beyond the standard cook time,
you can enable this feature from the “Options” screen (see page 15).
If the “Additional Cooking Options” screen appears and the food product
requires more cooking:
- Select “cook more” if the inside of the food item is undercooked.
- Select “brown more” if the outside of the food item requires more
browning or crispness.
- Select “cook and brown more” if both the inside and outside of the
food item are not done.
- Select “save adjusted time” to save any change to the cook time made
during Step 6. Note that this option is not available if “Adjust Time”
is disabled.
- Select “exit” to return to the food group selection screen.
Figure 18: Cook More
Step 10: Cooling Down
During this step, the oven blows cool air into the cook cavity to return
it to room temperature.
When finished cooking for the day, press the On/Off key to turn the
oven off and begin cooling down.
Figure 19: Cooling Down
PLEASE REMOVE FOOD FROM OVEN
COOKING DONE
ADDITIONAL COOKING OPTIONS
COOK AND BROWN MORE
BROWN MORE
COOK MORE
SAVE ADJUSTED TIME EXIT
COOLING DOWN
PLEASE OPEN OVEN DOOR
288F

THE INFO MODE14
Overview of the Info Mode
The INFO MODE serves four main purposes:
1. To display general oven information.
2. To provide access to TEST MODE and additional
diagnostic tools for service technicians.
3. To turn oven options and features on/off.
4. To update oven settings.
To access the INFO MODE, simply press the Info key
when the oven is either off or cooling down. To toggle
between the Info screen 1 and 2, press the Up or
Down key.
Screen 1 of the INFO MODE (Figure 20) includes:
- Oven serial number
- Oven software version
- Menu part number and revision
- Last temperature selected to cook
- Current electrical compartment temperature
- Counters (scroll by pressing adjacent softkey)
- Operating voltage (USA models only)
- Access to the fault log
- Access to service phone numbers
Screen 2 of the INFO MODE (Figure 21) includes:
- Access to TEST MODE
- Access to the “Options” screen
- Language (set by pressing adjacent softkey - not
available on all models)
- Access to date/time settings
- Sound (press adjacent soft key to increase/decrease
the volume)
- Access to the “Load Menu” screen
Viewing Cook Counter/Time Logs
From the INFO MODE (Figure 20), press the R1 soft key:
- Once to display the cook counter.
- Twice to display total cook time.
- Three times to display total magnetron time.
- Four times to display total “oven on” time.
MENU P/N AND REV
INFO 1
SOFTWARE VERSION
SP: 500F
EC TEMP: 84F
SERIAL NUMBER
FAULT LOGS
VAC = 240
SERVICE NUMBERS
COUNTS SCROLL
SET LANGUAGE
INFO 2
SET OPTIONS
SET DATE/TIME
TEST MODE LOAD MENU
SOUND = = = = = = 7
Figure 20: Info Mode Screen 1
Figure 21: Info Mode Screen 2
F6: EC OT
F8: HX RISE LOW
F1: BLOWER
F2: LOW TEMP
F3: MAG C LOW
F4: MONITOR
F5: MAG OT
FAULT LOG
8
0
0
0
0
F7: RTD OPEN
0
0
0
Figure 22: Fault Log
07/14/07 05:22
F1 FAULT DETAIL
07/14/07 13:54
07/14/07 22:07
07/15/07 08:36
07/18/07 14:35
09/26/07 17:42
12/04/07 20:18
MORE
Figure 23: Fault Detail
EDIT MODE
OVEN OPTIONS
COOK MORE
LOAD MENU
DEMO MODE
ADJ TIME DHCPOFF
ON
ON
OFF
ON
OFF
Figure 24: Options Screen
_
SET DATE/TIME
0 9 / 2 9 / 0 8 2 0 : 3 0
MM / DD / YY HH:MM
CANCEL SAVE
<>
Figure 25: Set Date/Time
R1
R2
R3
R4
R5
L1
L2
L3
L4
L5
R1
R2
R3
R4
R5
L1
L2
L3
L4
L5
R1
R2
R3
R4
R5
L1
L2
L3
L4
L5
R1
R2
R3
R4
R5
L1
L2
L3
L4
L5
R1
R2
R3
R4
R5
L1
L2
L3
L4
L5
R1
R2
R3
R4
R5
L1
L2
L3
L4
L5

THE INFO MODE
15
Viewing the Fault Log
From the INFO MODE (Figure 20), press the R3 soft
key to view the fault log (Figure 22). To view a
detailed log of each fault occurrence (Figure 23),
press the soft key adjacent to the fault code.
Viewing the Service Numbers
From the INFO MODE (Figure 20), press the R4 soft
key to view technical support contact info.
Turning Oven Options On/Off
From screen 2 of the INFO MODE (Figure 21), press
the L2 soft key to access the “Options” screen
(Figure 24). When prompted, enter the password
9 4 2 8 and press the Enter key.
From the “Options” screen, the following oven
options can be turned on or off:
- “Adjust Time” screen (page 12 for more details)
- “Cook More” (Additional Cooking Options)
screen (page 13 for more details)
- Edit Mode (page 17 for more details)
- “Load Menu” screen (see adjacent for more
details)
- Demo Mode (TurboChef use only)
- DHCP (TurboChef use only)
Setting the Date/Time
Having an accurate date and time is important for
logging oven counts, diagnostics, and fault
conditions, should any occur. The oven time and
date are set at the time of manufacture; however,
the operator may at some point be required to
make an adjustment.
From screen 2 of the INFO MODE (Figure 21), press
the L4 soft key to access the “Set Date/Time”
screen (Figure 25).
To set the date and time,
1. Use the L3 and R3 soft keys (middle left and
middle right) to navigate between fields.
2. Use the numeric keypad to enter the month,
day, and year, followed by the hour and
minute.
NOTE: The clock is a 24-hour clock (e.g., 20:30 =
8:30 PM).
3. Select “Save” to save your changes or “Cancel”
to cancel and exit the screen.
NOTE: The oven will not retain the time if it is
left unplugged for two or more weeks.
Resetting the Oven
Resetting the oven is one way to potentially clear
an error message, should one occur. From the
“Cooling Down” or “Oven Off” screen, press and
hold the Info key for five seconds.
Updating the Oven Menu
From screen 2 of the INFO MODE (Figure 21, page
14), press the R1 soft key to access the “Load
Menu” screen (Figure 27, page 16).
NOTE: This feature can be turned on or off via the
“Options” screen (Figure 24).
To load a menu to the oven via smart card,
1. Insert the smart card (Figure 26, page 16).
2. Press the L1 soft key (Figure 27, page 16).
3. Verify the oven beeps and reads “FINISHED”
(Figure 28, page 16).
To load a menu via USB drive,
1. Verify the menu on the USB drive is named
MENU.BIN.
2. Verify the menu on the USB drive is in a folder
named TC_MENUS. This folder must not be a
sub-folder of any other folder.
3. Insert the USB drive (Figure 26, page 16).
4. Press the L4 soft key (Figure 27, page 16).
5. Verify the oven beeps and reads “FINISHED”.
16
Making a Copy of the Oven Menu
To save a copy of the oven menu to a smart card,
1. Insert the smart card (Figure 26).
2. Press the L2 soft key (Figure 27).
3. Verify the oven beeps and reads “FINISHED”.
To save a copy of the oven menu to a USB drive,
1. Insert the USB drive (Figure 26).
2. Press the L5 soft key (Figure 27).
3. Verify the oven beeps and reads “FINISHED”.
Updating the Oven Firmware
Perform this procedure only when an update to the
operating system is required. For menu updates,
see page 15.
From the Oven Off screen,
1. Insert the smart card (see Figure 26). If
multiple smart cards are required, ensure the
correct smart card is loaded first.
2. From the COOLING DOWN or OVEN OFF mode,
press and hold the Info key until the oven
resets (approximately 5 seconds).
3. When the oven beeps one long high tone, the
load was successful. Insert the second card.
4. When the oven restarts and the display turns
on, the update is complete. Remove the smart
card.
NOTE: If the update is unsuccessful, the display
will remain off and the oven will beep one long,
low tone. If this occurs, repeat the above proce-
dure. If the update fails multiple times, contact
TurboChef as a card may be damaged or the
version may be incorrect.
CAUTION: The oven will be inoperable if the
firmware update is unsuccessful!
SAVE TO CARD
LOAD FROM CARD
SAVE TO USB
LOAD FROM USB
Figure 27: Load Menu Screen
SAVE TO CARD
LOAD FROM CARD ++++++++FINISHED
SAVE TO USB
LOAD FROM USB
Figure 28: Loading...Finished
R1
R2
R3
R4
R5
L1
L2
L3
L4
L5
R1
R2
R3
R4
R5
L1
L2
L3
L4
L5
Figure 26: Inserting Smart Card/USB Device
Smart Card
USB Port
Smart Card Reader Slot
THE INFO MODE
THE EDIT MODE
17
Overview of the Edit Mode
The EDIT MODE serves three main purposes:
1. To edit cook temperatures.
2. To edit names of food groups and items.
3. To edit food item settings.
To access the EDIT MODE,
1. Enable it from the “Options” screen (page 15).
2. Press the On/Off key to return the oven to the
“Cooling Down” or “Off” screen.
3. Press the On/Off key again to enter EDIT MODE.
Changing Set Temperatures
The oven can store two set temperatures. By default,
both temperatures are set to 450°F (232°C).
Think of each temperature as a “block” of 10 food
groups with 10 items each, or 100 total food items.
If a menu was loaded via smart card or USB (page
16), the temperatures are already set - they need not
be changed. The set temperature should never be
changed during normal operation.
Changing the set temperatures is not advised as a
solution for products that are over-cooked or under-
cooked. Rather, consult your authorized distributor or
TurboChef Customer Support if recipe settings are
not cooking as desired.
To change a set temperature,
1. Place the oven in EDIT MODE (see adjacent).
2. Select the temperature to change by pressing
the adjacent soft key (Figure 29).
3. Using the numeric keypad, enter the new set
temperature.
4. Press the Enter key to confirm the change, or
the Back/Stop key to cancel.
EDIT TEMP 1 GROUPSEDIT TEMP 1: 500F
EDIT TEMP 2: 350F EDIT TEMP 2 GROUPS
VALID RANGE BETWEEN 350 - 525F
Figure 29: Temperature Edit Screen
R1
R2
R3
R4
R5
L1
L2
L3
L4
L5

18 THE EDIT MODE
Changing Food Group/Recipe Name
To change a food group or recipe name,
1. Place the oven in EDIT MODE (see page 17).
2. Select a “block” of food groups by pressing the
corresponding right-side soft key (Figure 29,
page 17).
3. Select the group that contains the item(s) you
want to edit (Figure 30).
4. Select an item to edit (Figure 31).
5. From the “Food Item Edit” screen (Figure 32), edit
the food group name:
- Use the numeric keypad to change a character.
- Press R1 soft key to advance to next character.
- Press L1 soft key to return to previous
character.
- Press the R3 soft key to save changes.
6. Edit the food item name:
- Press the Down key to move to the “Food Item
Name” field.
- Use the instructions provided in step 5 to
edit the item name.
Changing Recipe Settings
To change food item settings,
1. Place the oven in EDIT MODE (see page 17).
2. Select a “block” of food groups by pressing the
corresponding right-side soft key (Figure 29,
page 17).
3. Select the group that contains the item(s) you
want to edit (Figure 30).
4. Select an item to edit (Figure 31).
5. Use the Down key to move the cursor to the
desired “Event Setting” field (Figure 32).
NOTE: The currently-selected field will be displayed in
the top-right corner of the display. In Figure 32, the
cursor is in the % Time column.
6. Use the number keys to adjust event settings:
- % Time (0-100% in 1% incr.). Sum of
percentages across eight events must equal 100.
- % Top Blower (10-100% in 10% incr.)
- % Bottom Blower (10-100% in 10% incr.)
- % Microwave (0-100% in 10% incr.)
7. Press the Down key or R4 soft key to move the
cursor to the “Total Time” field.
8. Use the number keys to adjust the cook time.
9. Press the R3 soft key to save changes.
NOTE: For the save to take effect, the cursor must be
advanced past the field that was last edited.
10. If desired, press the R5 soft key to test-cook the
new settings. Note that the oven may require
additional warmup time.
11. When all editing is complete, return to the
“Options” screen and turn off the EDIT MODE
(see page 15).
SINGLE
X2
X3
X4
MUFFINS
X6
RECIPE 6
RECIPE 7
RECIPE 8
RECIPE 9
RECIPE 10
Figure 31: Select Item to Edit
EVENT %TIM %TOP %BOT %WAV
1 025 020 020 050
2 025% 040 060 025
3 025 060 040 075
4 025 090 100 010
5 000 010 010 000
6 000 010 010 000
7 000 010 010 000
8 000 010 010 000
TOTAL TIME = 01:40
MUFFINS RECIPE 6
% TOTAL = 100
SP = 450F CC = 455F COOK
TIME
%TIM
SAVE
Figure 32: Food Item Edit Screen
MUFFINS
BISCUITS
BAGELS
PASTRY
BLANK GROUP
BLANK GROUP
BLANK GROUP
BLANK GROUP
BLANK GROUP
BLANK GROUP
SELECT GROUP SCREEN 1
SETPOINT: 500F
Figure 30: Select Food Group
R1
R2
R3
R4
R5
L1
L2
L3
L4
L5
R1
R2
R3
R4
R5
L1
L2
L3
L4
L5
R1
R2
R3
R4
R5
L1
L2
L3
L4
L5
TROUBLESHOOTING
19
Troubleshooting
The following is a list of fault codes and error messages, along with the possible problem(s) that the oven
may be experiencing. Please attempt the recommended action before calling Customer Support
(800.90TURBO, +1 214.379.6000) or your Authorized Distributor.
NOTE: Any fault codes listed in bboollddwill terminate a cook cycle upon discovery. F6 will not terminate a
cook cycle; however, it will alert the user of a possible air circulation problem.
WARNING: Food, oven door, and oven cavity are hot! Use extreme caution when troubleshooting
the issues below.
Issue Possible Cause(s) Resolution
No power to
oven.
- Oven is not plugged in.
- Main circuit breaker is tripped.
- Plug oven in.
- Verify wall circuit breaker is on. Reset
breaker and then power oven back on.
Oven is not
warming up
properly.
- Oven is in OFF state.
- Door is not closed.
- Oven has been switched off at
the main circuit breaker.
- High-limit thermostat tripped
- Press the “On/Off” soft key.
- Close the cook cavity door.
- Place the oven in the OFF state and unplug
the oven – leave for two minutes. Re-plug
in the oven, switch on the isolator/main
power supply, and press “On/Off” key.
- Press the button located in the bottom-
left corner of the oven rear wall to reset
the high-limit thermostat.
Display reads
“Oven Door
Open” and alarm
sounds.
- Food obstruction preventing
door from closing.
- Oven door is open.
- Door switches are out of
alignment.
- Open door and remove obstruction.
- Open and close the door several times.
- Call Customer Support.
Oven is not cook-
ing properly.
- Oven is not clean. (Large
deposits of grease, carbon, or
food debris dilute the
microwave.)
- Incorrect group and/or item
name was selected for the
product.
- Product was not cooked from
correct starting state (for
example, chilled or frozen).
- Rack incorrectly positioned (i5
oven only).
- Lower air diverter is missing.
- Clean the oven following the cleaning
instructions on pages 7-9.
- Check to make sure correct food group
and/or item was selected for the product
being cooked.
- Ensure product was in the correct state
before being placed in the oven.
- Verify the rack is in the correct position.
- Verify the air diverter is installed properly
(pages 7-9).

20 TROUBLESHOOTING
Issue Possible Cause(s) Resolution
FF11:: BBlloowweerr RRuunnnniinngg
SSttaattuuss BBaadd
- Oven power interrupted. - Verify wall circuit breaker is on. Reset
breaker and then power the oven on.
- Place the oven in the OFF state and
unplug the oven – leave for two
minutes. Re-plug in the oven, switch on
the isolator/main power supply, and
press the “On/Off” soft key.
FF22:: CCooookk
TTeemmppeerraattuurree LLooww
- Oven power interrupted.
- Air nozzles on the top/bottom
of the cook cavity are clogged.
- Oven door is out of alignment.
- Defective heater.
- Blower motor not running.
- Oven not fully warmed up.
- Verify wall circuit breaker is on. Reset
breaker and then power oven back on.
- Open oven door and verify the air
nozzles on the top/bottom of the cook
cavity are clean and not clogged.
- Open and close the door several times
and verify oven door is closed.
- Reset high-limit located in the bottom
left corner of the oven rear wall.
- Call Customer Support.
- Repeat warmup and allow oven to idle
for five minutes.
FF33:: MMaaggnneettrroonn
CCuurrrreenntt LLooww
- Microwave circuit defective. - Call Customer Support.
F4: Door Monitor
Defective
- Oven door switches are out of
order.
- Call Customer Support.
FF55:: MMaaggnneettrroonn OOvveerr
TTeemmppeerraattuurree
- Blockage of cool air into the
oven.
- Rear cooling fan exhaust
guard(s) clogged.
- Remove anything that may be obstruct-
ing the flow of cool air into the oven.
- Check rear fans to see if they are free
of debris. Clean as required.
F6 EC Temp - Blockage of cool air into the
oven.
- Rear cooling fan exhaust
guard(s) clogged.
- Remove anything that may be obstruct-
ing the flow of cool air into the oven.
- Check rear fans to see if they are free
of debris. Clean as required.

NORTH AMERICA LIMITED WARRANTY
21
North America Limited Warranty
TurboChef “i5” and “i3” Rapid Cook Oven – North America
The TurboChef rapid cook oven Limited Warranty outlined below is activated upon shipment of your oven. Should you require
additional assistance after reviewing the warranty outlined below, please call TurboChef Customer Support at 800.90TURBO.
Limited Warranty
TurboChef Technologies, Inc. (“TurboChef”) warrants to you, the purchaser, that under normal use the TurboChef rapid cook
oven you have purchased (the “Equipment”) will be free from defects in material and workmanship during the Warranty Period,
subject to the terms and conditions set forth herein. The “Warranty Period” is twelve (12) months from the date the Equipment
is shipped from TurboChef’s U.S. factory or distribution center. This warranty is conditioned upon you promptly notifying
TurboChef of any claims, as provided in the paragraph entitled “Warranty Claims” below, and providing TurboChef with all
data and information requested by TurboChef or its service agents in connection with such claims as well as all necessary access
to your premises and the Equipment. This warranty is made only to the initial purchaser of the Equipment from TurboChef or
its authorized dealer; it is not assignable to subsequent purchasers unless TurboChef consents to such assignment in writing.
Disclaimer of Warranties
Except as provided in the Limited Warranty above, the Equipment is provided “as-is”. TurboChef disclaims all other warranties,
express, statutory or implied, including without limitation, the implied warranties of title, non-infringement, merchantability
and fitness for a particular purpose. TurboChef does not warrant that the Equipment will meet your specifications or needs. You
acknowledge that you are solely responsible for the selection of the Equipment and determining the suitability of the
Equipment for your needs.
Warranty Exclusions
Improper Installation, Operation or Maintenance: Equipment that is not installed, operated and maintained in accordance with
TurboChef’s rapid cook oven owner’s manual (as may be updated by TurboChef from time to time, the “Manual”), a copy of
which is provided to you with the Equipment or otherwise will be furnished to you upon request, is excluded from this warran-
ty. This warranty does not apply to damage or failure which results, in TurboChef’s or its service agent’s sole opinion, from fail-
ure to provide a suitable installation and operating environment (including power and HVAC) and facilities as prescribed by the
Manual, misuse, abuse, accident, neglect, power failure or power surges (over or under voltage), or to damage or failure from
flood, fire, lightning or other natural or man-made disasters, or other Acts of God, or to Equipment that has missing or altered
serial numbers.
Modifications and Repair: Equipment that has been modified or altered by persons other than TurboChef or its service agents,
or Equipment that has had non-approved devices or connection items attached thereto, is excluded from coverage under this
warranty. Repair of the Equipment by anyone other than TurboChef or its authorized service agents will void all warranties on
the Equipment.
Accessories: Accessories and parts (collectively “Accessories”) that are consumed in the normal course of Equipment operation or
maintenance are excluded from this warranty. Failure of or damage to Equipment or components from the use of non-approved
cleaning chemicals, devices or processes is also excluded from this warranty. Accessories may include, but are not limited to,
ceramic cooking platters, paddles and approved cleaning chemicals and devices.
Outstanding Invoices: If the full invoiced amount for Equipment purchased has not been paid within forty-five (45) days from
the invoice date, then TurboChef will have no obligation to honor this or any other warranty on the Equipment until payment
is received in full, including any accrued interest or other charges, has been satisfied, at which time warranty coverage will be
reinstated, but the Warranty Period will not be extended.

22 NORTH AMERICA LIMITED WARRANTY
Warranty Service, Exclusive Remedy
TurboChef will be solely responsible for determining whether or not the Equipment or any component thereof is defective.
Defective components covered by this warranty will be repaired or replaced at TurboChef’s option without charge to you and
such repaired or replacement components will be covered by this warranty for the balance of the Warranty Period. Parts used in
the repair of defective components and replacement components may be new, recovered or rebuilt. At its sole option, TurboChef
may decide to replace defective Equipment covered by this warranty with new, recovered or rebuilt Equipment of equal or greater
capability, and such Equipment will be covered by this Limited Warranty for the balance of the Warranty Period. Defective
Equipment and components will become the property of TurboChef. This paragraph states TurboChef’s sole and exclusive obliga-
tion and liability and your sole and exclusive remedy under this warranty. TurboChef shall not be responsible for a failure to pro-
vide warranty services due to causes beyond TurboChef’s or its service agents’ control.
Warranty Claims
Claims under this warranty must be reported to TurboChef during our normal working hours at 800.90TURBO, or such other
reporting service as TurboChef may designate. Upon receipt of the claim and related information and preliminary
verification that the claim is valid, TurboChef will promptly notify an authorized service agent to contact you and arrange for an
on-site repair visit during the service agent’s normal working hours. Any costs incurred by TurboChef or its service agent associat-
ed with a service agent being refused or unable to gain access to the Equipment on your premises, or a claim not covered by this
warranty, will be charged to you.
Disclaimer of Damages
TurboChef disclaims all incidental, special and consequential damages, including but not limited to loss of use, lost revenue or
profits, or substitute use, suffered by you or any third party, whether arising in contract, tort (including negligence), or otherwise,
resulting from any breach by TurboChef or its service agents of this warranty, or resulting from the manufacture, use, or defects,
of or in the Equipment, even if TurboChef was apprised of the possibility of such damages.
Customer Indemnity
You agree to indemnify, defend and hold TurboChef harmless from all third party claims, demands, judgments, fees and costs
directly or indirectly arising out of or related to your use of the Equipment. You further agree to indemnify and hold TurboChef
harmless from any incidental, consequential or special damages suffered by you, including lost revenue or profits, loss of use, or
substitute use, during periods of Equipment failure or loss of use.
Territory
This warranty is valid in the United States of America, Canada and Puerto Rico.
Governing Law, Entire Warranty
This warranty shall be governed and construed in accordance with the laws of the State of Georgia, USA (except with respect to
its provisions regarding conflicts of laws). The warranty described herein is the complete and only warranty for Equipment and
supersedes all prior oral or written agreements and understandings that may have existed between us relating to Equipment war-
ranties. The terms of this warranty may not be altered, amended or modified except by a signed writing from TurboChef. Any
purported alteration, amendment or modification by a service agent or anyone else will not be enforceable against TurboChef.
Charges for Non-Warranty Service or Rejection of Service Visit
In the event that repairs, replacement or service are provided by TurboChef’s service agents for work not covered by this limited
warranty, customer agrees to pay the service agent directly according to the service agent’s normal scale of charges. In the event
TurboChef is invoiced by the service agent for services not covered under this extended warranty, TurboChef will invoice customer
and customer will pay such invoice based on terms of net 10 days. Customer also agrees to pay any cost incurred by TurboChef or
its service agent associated with a service agent responding to a call for service, but then being refused or unable to gain access to
the Oven on Customer’s premises. Failure to submit payment may, at TurboChef’s discretion, result in TurboChef voiding the bal-
ance of the warranty. In no event will TurboChef authorize service to a store with an outstanding Non-Warranty invoice.

INTERNATIONAL LIMITED WARRANTY
23
International Limited Warranty
This Limited Warranty shall apply to the sales of all TurboChef “i5” and “i3” Series ovens (the “Equipment”)
manufactured by TurboChef Technologies, Inc. (“TurboChef”), and sold to purchasers outside of the United States,
Canada, Puerto Rico, Central and South America by an Authorized Distributor of TurboChef International (the
“Authorized Distributor”).
Limited Warranty
You, the purchaser (“You”) have entered into a sales contract with the Authorized Distributor for the purchase of the
Equipment. This Limited Warranty is made to you by the Authorized Distributor from whom you purchased the
Equipment with the support of TurboChef. Subject to the limitations stated below, the Authorized Distributor warrants
to You that the quantity and specification of the Equipment delivered to You shall be as set out in the Authorized
Distributor’s acceptance of your order and that the Equipment will be free from any material defects in the product and
workmanship for twelve (12) months from the date of installation (the “Warranty Period”), subject to the terms and
conditions set forth herein.
Disclaimer
You acknowledge that You are solely responsible for the selection of the Equipment and determining the suitability of
the Equipment for Your needs. All other warranties, conditions or terms relating to fitness for purpose, quality or condi-
tion of the Equipment, whether expressed or implied by statute or common law or otherwise are excluded to the fullest
extent permitted by law.
The TurboChef Global Warranty System
This Limited Warranty commences upon delivery of the Equipment to Your premises. The Authorized Distributor will
inspect and install the Equipment at Your premises in accordance with TurboChef’s instructions and will record the
serial number of the Equipment, Your contact details, the date and location of installation and the results of the
Authorized Distributor’s inspection. This information will be entered by the Authorized Distributor into the TurboChef
global warranty system and will be used by TurboChef, the Authorized Distributor and its authorized service agents for
the provision of the warranty service.
Warranty Service
During the Warranty Period, any materially defective Equipment will be repaired or replaced free of charge at
TurboChef’s option provided that:
1. You notify the Authorized Distributor from whom You purchased the Equipment and/or TurboChef as soon as rea-
sonably possible after discovery of a defect and in accordance with the warranty claims procedure set out below;
2. You provide the Authorized Distributor from whom You purchased the Equipment and/or TurboChef with all data
and information reasonably requested by TurboChef, the Authorized Distributor or its authorized service agents in
connection with Your warranty claim;
3. You make the Equipment available to TurboChef, the Authorized Distributor or its authorized service agents;
4. The Equipment has been installed by an Authorized Distributor and you have provided all necessary information for
the Authorized Distributor to register the Equipment in the TurboChef global warranty system;
5. The Equipment has been operated and maintained by You in accordance with TurboChef’s “Owner’s Manual” pro-
vided with the Equipment (and as updated by TurboChef);

24 INTERNATIONAL LIMITED WARRANTY
6. You have not used any non-approved devices, accessories, consumables or parts in conjunction with the Equipment;
and
7. Repairs, modifications or alterations have not been attempted other than by TurboChef, an Authorized Distributor or
its authorized service agent.
Neither TurboChef nor the Authorized Distributor assumes any liability for damage caused by Your failure to provide a
suitable installation and operating environment (including power and HVAC) or facilities as prescribed by the Manual,
misuse or abuse or by accident, neglect, power failure or power surges (over or under voltage) howsoever arising.
At its sole option, TurboChef may replace defective Equipment or components with new, recovered or rebuilt
Equipment of equal or greater capability, and such Equipment or components will be warranted by the Authorized
Distributor for the balance of the Warranty Period. Replaced defective Equipment or components will become the
property of TurboChef.
Warranty Claims: Any warranty claim must be made directly in writing either to the Authorized Distributor from
whom You purchased the Equipment or to TurboChef at the following address:
TurboChef Technologies, Inc.
4240 International Parkway, Suite 105
Carrollton, Texas 75007
Phone: +1 214-379-6000
Fax: +1 214-379-6073
The claim must include the serial number of the Equipment and be received by TurboChef on or before the last day of
the Warranty Period. Upon receipt of Your claim, TurboChef will promptly notify an Authorized Distributor or an
authorized service agent to contact You, to verify Your claim and, if necessary, to arrange for an on-site repair visit
during normal working hours.
Consumables and Parts Used with The Equipment: Neither TurboChef nor the Authorized Distributor assumes any
liability for consumables and parts that are used in the normal course of Equipment operation or for failure of or
damage to Equipment or components from the use of non-approved cleaning chemicals, devices or processes.
Charges for Service Not Covered by Limited Warranty: In the event that You request and receive repairs, replacement or
service not covered by this Limited Warranty, You will be invoiced and must pay the Authorized Distributor or author-
ized service agent directly according to its normal scale of charges and business terms.
Product Liability: Neither TurboChef nor the Authorized Distributor assumes any liability for any incidental, special or
consequential damages, including but not limited to loss of use, lost revenue or profits, or substitute use suffered by You
or any third party, whether arising in contract, tort (including negligence), or otherwise resulting from any breach by
TurboChef or the Authorized Distributor of the Limited Warranty provided herein.
Exclusive Remedy: This Limited Warranty states the Authorized Distributors and TurboChef’s sole and exclusive obliga-
tion and liability and your sole and exclusive remedy under this Limited Warranty.
Third Party Rights: The UK Contract (Rights of Third Parties) Act 1999 is excluded from applying to this Limited
Warranty and nothing herein confers or purports to confer on any third party any benefit or any right to enforce any
term of this Limited Warranty.

INTERNATIONAL LIMITED WARRANTY
25
Severability: If any item or provision contained in this Limited Warranty or any part of them (“an offending provision”)
is declared to be or becomes unenforceable, invalid or illegal for any reason whatsoever in any jurisdiction, the other
terms and provisions of this Limited Warranty shall remain in full force and effect in that jurisdiction as if it had been
executed without the offending provision appearing in it and the entire Limited Warranty shall remain in full force and
effect in all other jurisdictions.
Governing Law, Entire, Agreement: This Limited Warranty shall be governed by and construed according to English
law. The application of the United Nations Convention on International Sale of Goods to this Limited Warranty is
expressly excluded. This Limited Warranty may not be altered, amended or modified by the Authorized Distributor or
its service agent, and no representation, alteration, amendment or modification by TurboChef shall be valid unless in a
signed form from TurboChef.

For service or information:
WITHIN NORTH AMERICA CALL
Customer Support at 800.90TURBO
OUTSIDE NORTH AMERICA CALL
+1 214.379.6000 or Your Authorized Distributor
Part Number: i5-9227 / Revision F / May 2009
Country Code: NA/EU
TM
Global Operations
4240 International Pkwy, Suite 105
Carrollton, Texas 75007 USA
+1 214-379-6000 PHONE
+1 214-379-6073 FAX
Customer Support
1-800-90TURBO
+1 214-379-6000
turbochef.com
