Twin Star SSHELF SOUND SHELF User Manual
TwinStar International Inc. SOUND SHELF
User Manual
support@bello.com
A316 1
www.tsicustomerservice.com
www.bello-digital.com
1-888-235-7646
5XJO4UBS*OUFSOBUJPOBM*OD%FMSBZ#FBDI'-
.BEFJO$IJOBt1SJOUFEJO$IJOBt'BCSJDBEPFO$IJOBt*NQSFTPFO$IJOBt'BCSJRVÏFO$IJOFt*NQSJNÏFO$IJOF
Sound Shelf

support@bello.com
A316 2
If at any time you are unclear about the directions and believe you need further assistance, contact
customer service at: 1-888-235-7646 (US/Canada) from 9am – 5pm EST, Monday through Friday.
NEVER EXCEED THE MAXIMUM LOAD CAPACITY OF: 80 lbs (36.3kg) WHEN INSTALLED INTO
2 OR MORE STUDS, CONCRETE OR CONCRETE BLOCK WALLS.
8PPETUVETTIPVMECFwYwBUNJOJNVNwYwNNYNN%FTJHOFEUPCF
NPVOUFEUPwYwXPPETUVETUIBUBSFTQBDFEwPODFOUFS
is speaker shelf was designed to be installed and utilized ONLY as specied in this manual.
Twin-Star International. will not be responsible for failure to assemble as directed or for the
improper assembly, use, or incorrect assembly.
If the mounting bracket will be attached to any structure other than specied in this manual,
only a licensed professional contractor/installer should perform this installation. e
supporting structure must support, at minimum, four times the combined weight of the
mounting bracket and TV. It is the responsibility and liability of the installer to ensure the
suitability of the supporting structure.
Check carefully to ensure that there are no missing or damaged parts. Never use defective parts.
5PSFDFJWFSFQMBDFNFOUPSNJTTJOHQBSUTVOEFSUIJT8BSSBOUZWJTJUPVSXFCTJUFBUXXXCFMMP
EJHJUBMDPNPSDBMMPVS$VTUPNFS4FSWJDF%FQBSUNFOUBU1MFBTFIBWFUIFNPEFM
OVNCFSEBUFDPEFQBSUOVNCFSTBOEZPVSTBMFTSFDFJQUPSPUIFSQSPPGPGQVSDIBTFBWBJMBCMFGPS
reference. We will ship you any necessary replacement parts in the Continental United States or
Canada.
Specications are subject to change without notice.
Precautions
Furniture Guideline
It is best to keep your furniture in a climate-controlled environment. Temperature and humidity
changes can cause fading, warping, shrinking and splitting of wood. It is advised to keep
GVSOJUVSFBXBZGSPNEJSFDUTVOMJHIUBTTVONBZEBNBHFUIFĕOJTI1SPQFSDBSFBOEDMFBOJOH
BUIPNFXJMMFYUFOEUIFMJGFPGZPVSQVSDIBTF'PMMPXJOHUIFTFJNQPSUBOUBOEIFMQGVMUJQTXJMM
enhance your furniture as it ages.
A touch-up pen has been provided to repair any small nicks or scratches that may occur during
assembly or shipping.
We hope you enjoy your purchase for many years. ank you for your purchase!
support@bello.com
A316 3
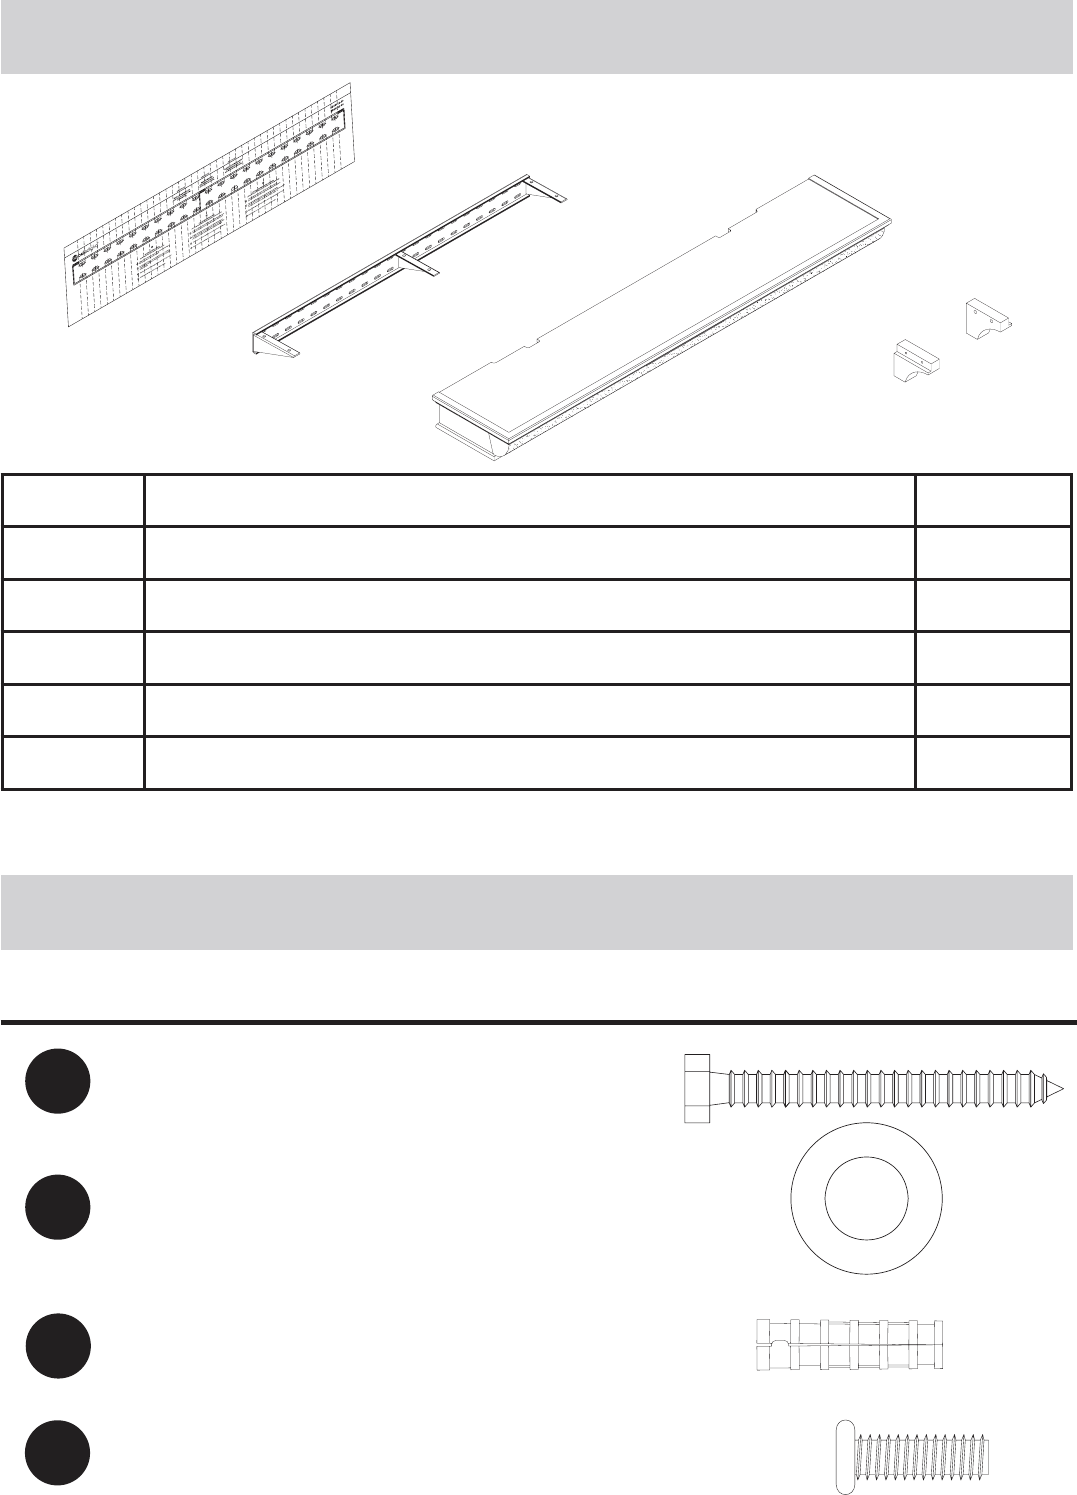
Packing Content
Hardware Kit
1BSU Desciption Qty
A Installation Template 1
BWall Bracket 1
C Sound Shelf 1
D-Fę$PSCFM 1
E Right Corbel 1
A
B
CD
E
1BSU Description Quantity 1JDUVSF
-BH#PMU
JOYJO
DNYDN
Anchor
JOYJO
DNYDN
Washer
PVUFSEJBDNJO
JOOFSEJBDNJO
6
4
BB
AA
6
CC
4
DD
Bolt
0.25 in. x 1.1 in.
DNYDN
support@bello.com
A316
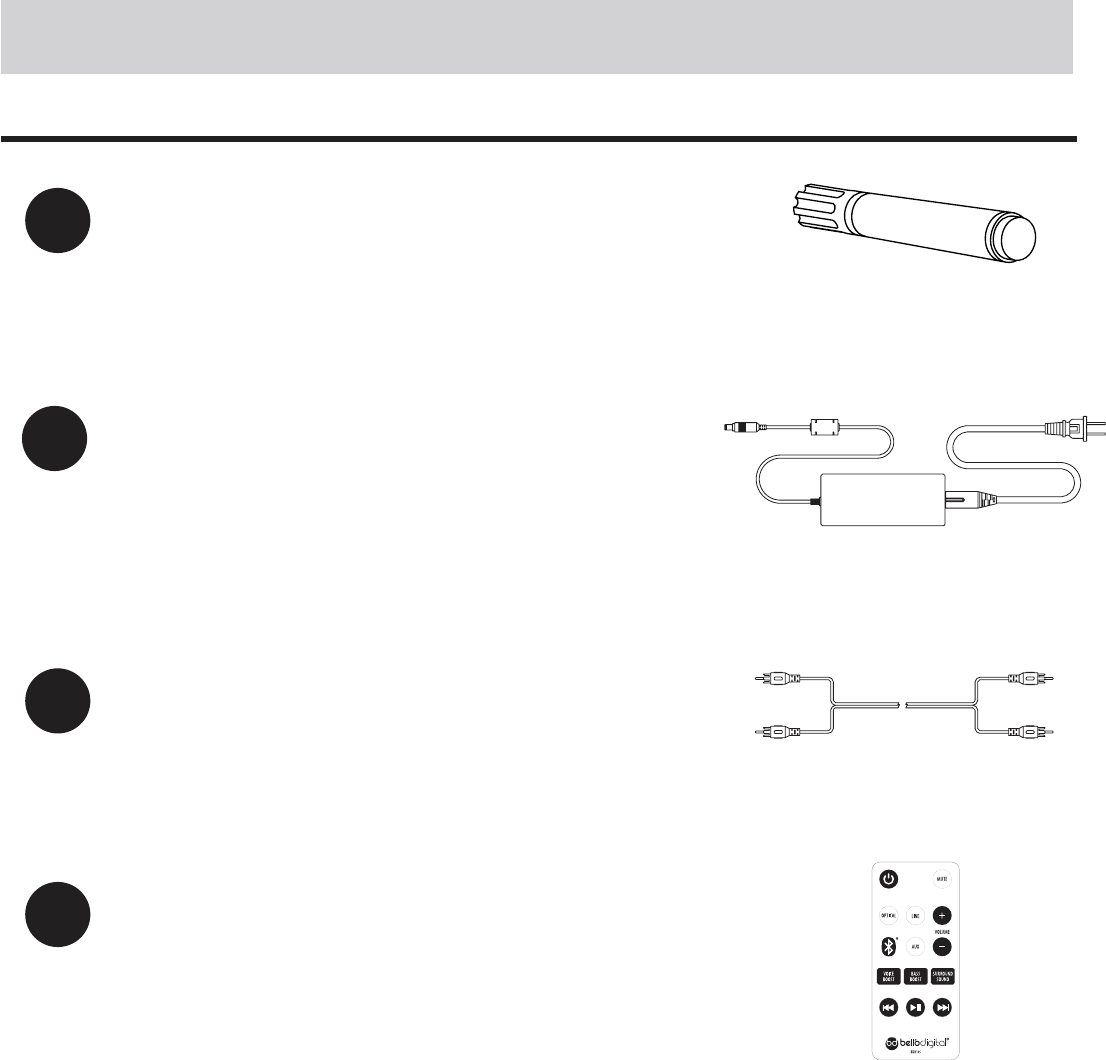
Hardware Kit
1BSU Description Quantity 1JDUVSF
1
FF 5FODI6Q1FO
1
GG Transformer
1
HH RCA
1
II Remote Control
support@bello.com
A316 5
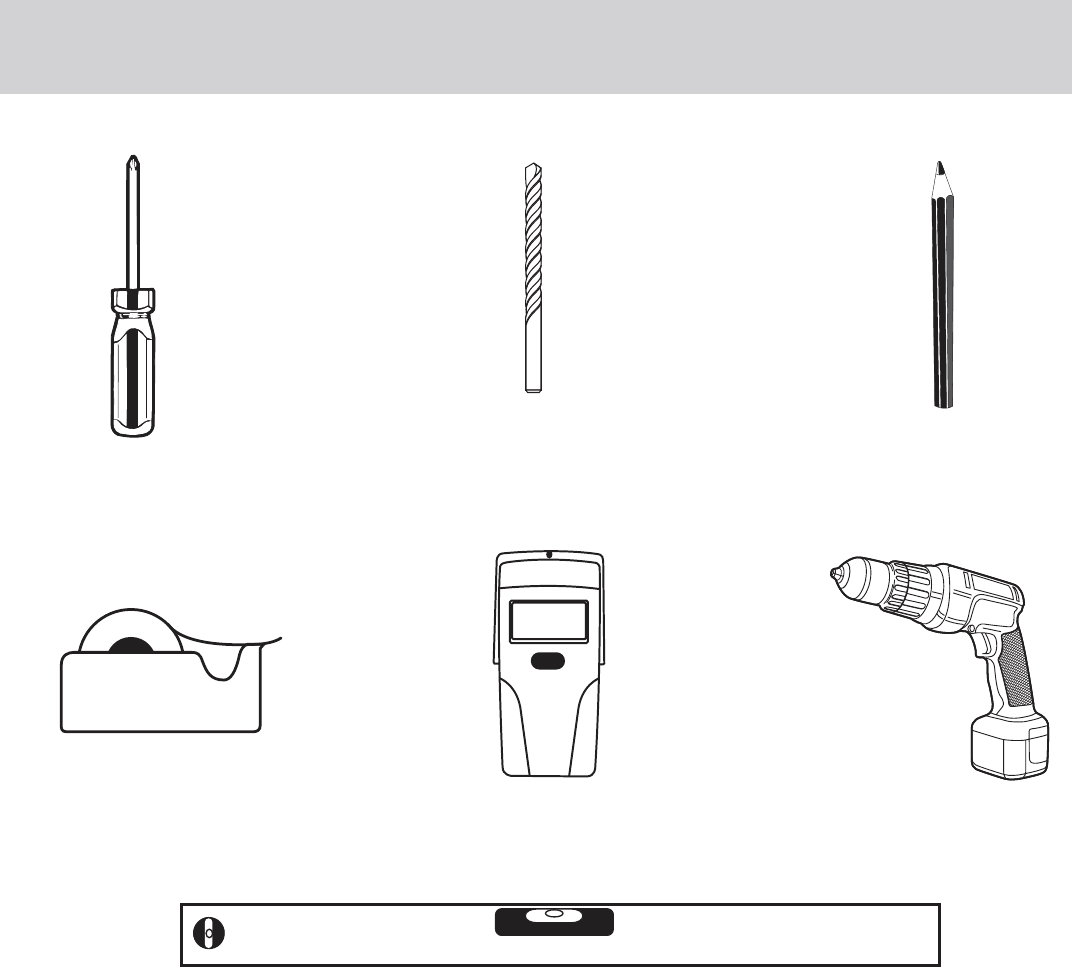
Necessary Tools
1IJMMJQTIFBE
Screwdriver
1FODJM
1/2” Drill Bit
8PPEwNN
.BTPOSZwNN
Masking Tape 4UVE'JOEFS Drill
-FWFM
support@bello.com
A316 6
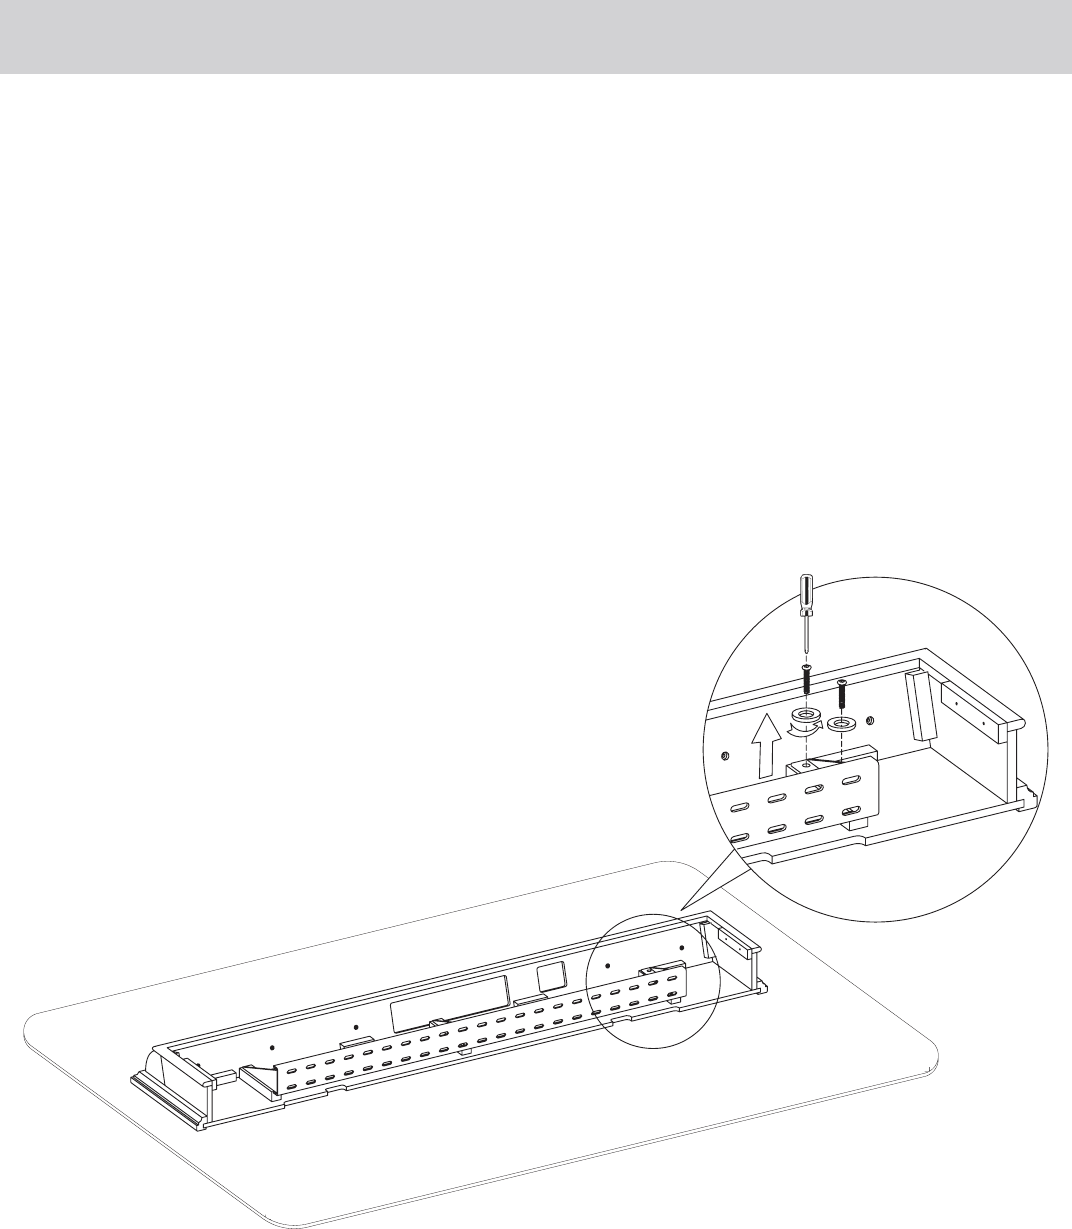
t$BSFGVMMZQMBDFUIFTIFMGVQTJEFEPXOPOBTPęTVSGBDFTPUIFXPPEJTOPUEBNBHFEMPPTFO
the bolt EE on the wall plate and remove the wall plate B from the speaker shelf C.
t,FFQUIFCPMUTBOEXBTIFSTGPSSFJOTUBMMJOHUIFTPVOETIFMGUPUIFXBMMCSBDLFUBęFSUIFXBMM
CSBDLFUIBTCFFOJOTUBMMFEPOUIFXBMMTFFQBHF
Remove the wall plate
support@bello.com
A316 7
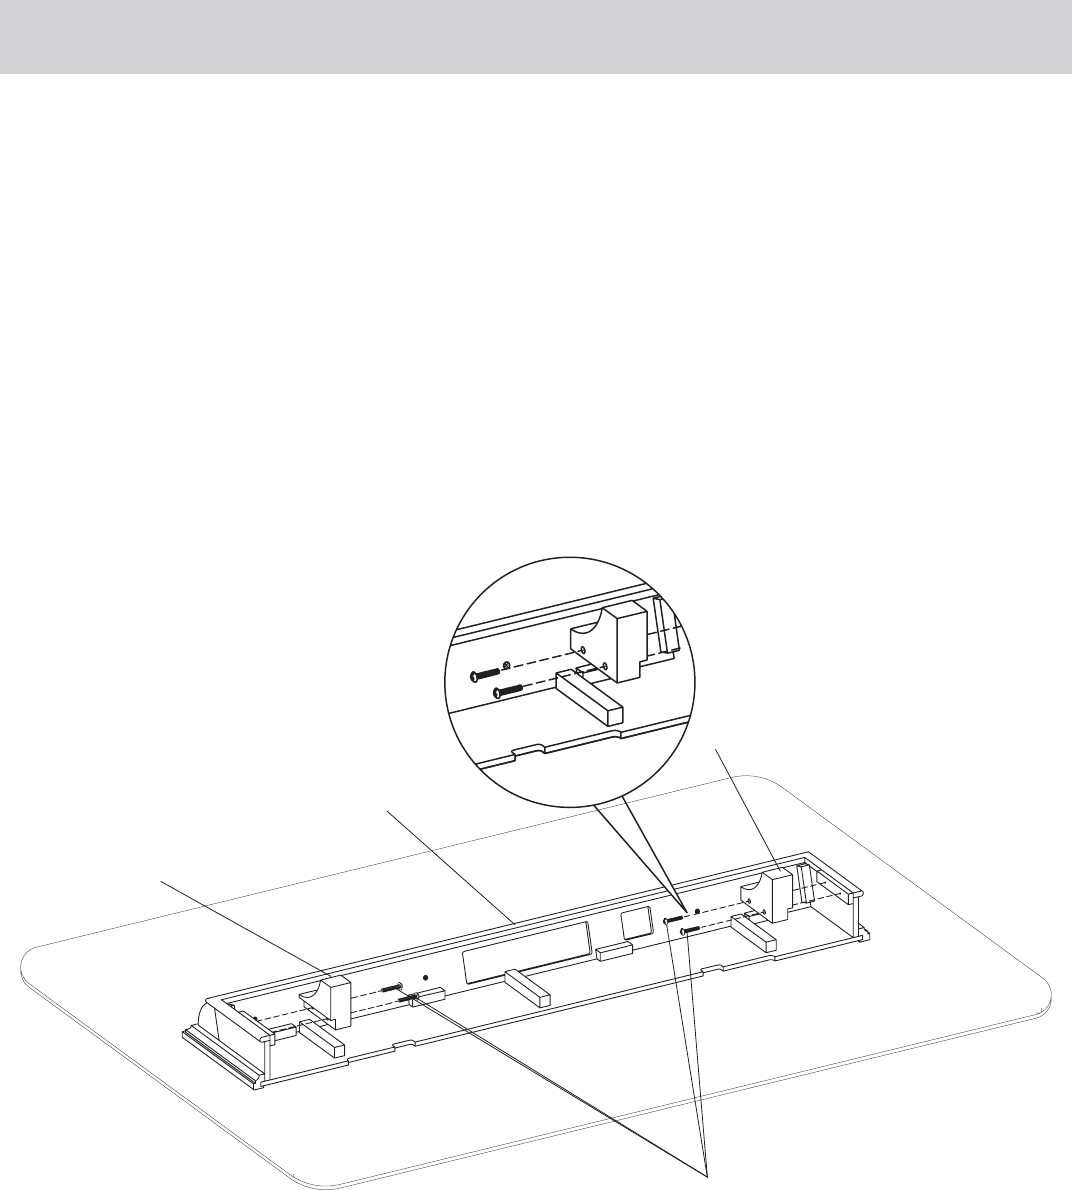
t"UUBDI-Fę$PSCFM%BOESJHIU$PSCFM&UPUIFCBDLPG4PVOE4IFMG$BTTIPXO$BSFGVMMZ
screw the corbels in as shown using screws DD.
Attaching e Corbel
%-Fę$PSCFM
E Right Corbel
C Sound Shelf
DD Bolt
JOYJO
0.35 cm x 1.6 cm
support@bello.com
A316
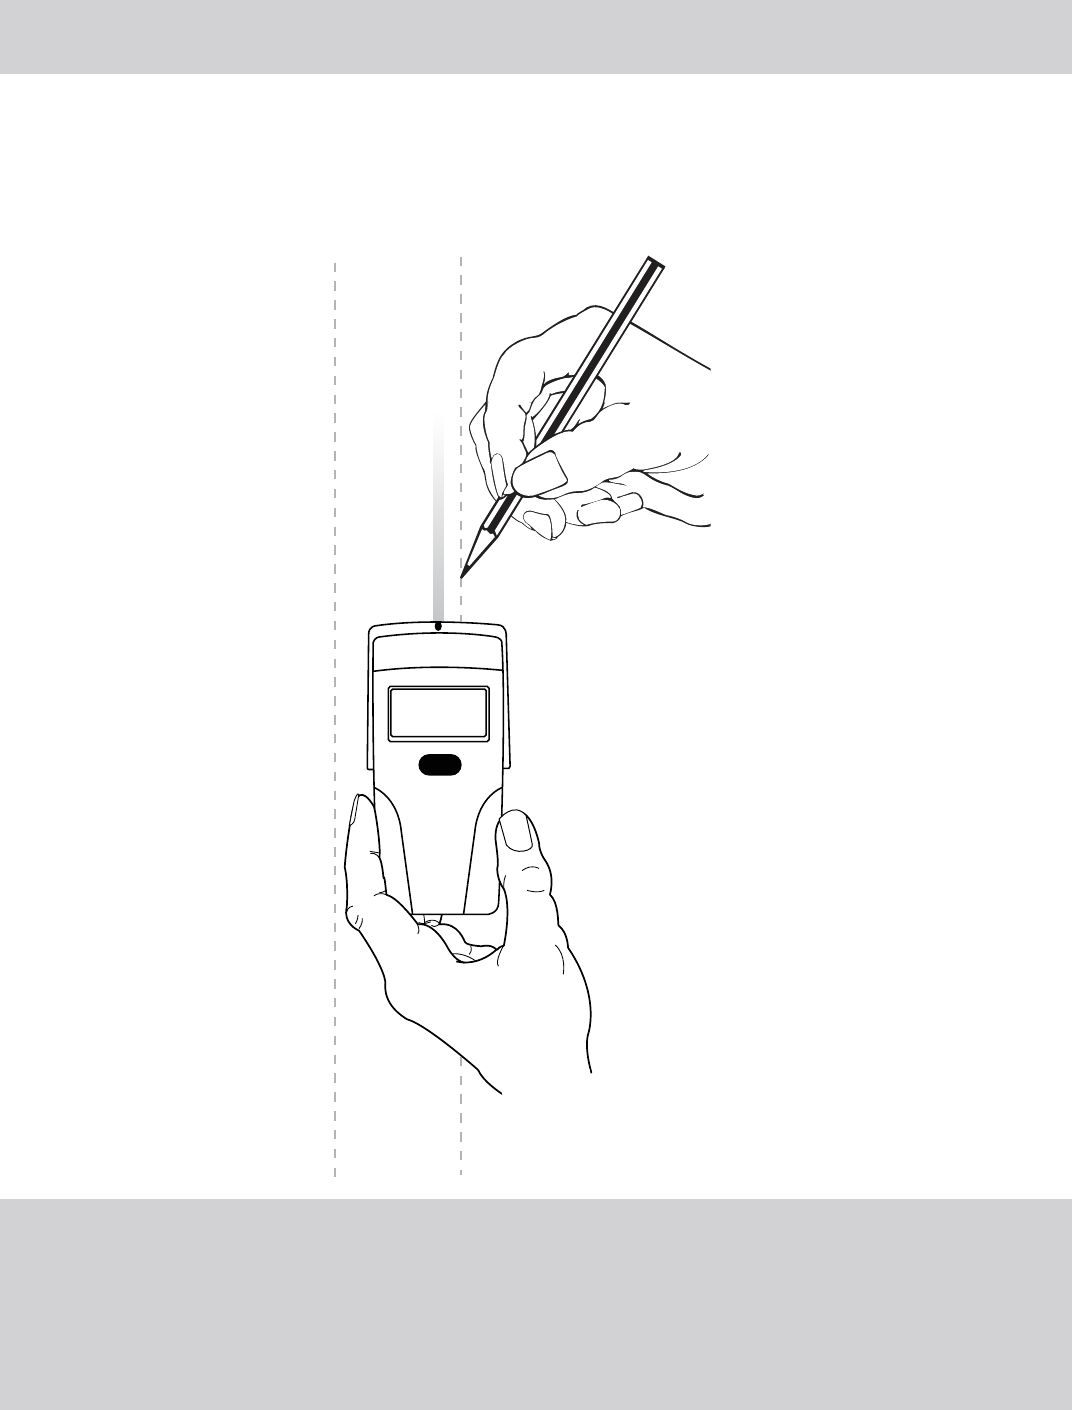
t'*/%5)&800%456%
Using a stud nder, nd the exact location of the studs to which you want to attach the wall
NPVOU.BSLUIFSJHIUBOEMFęTJEFUPEFUFSNJOFUIFDFOUFSPGFBDITUVE
Installing e Sound Shelf Bracket In Wood
FOR WOOD STUD WALLS INSTALLATIONS, SEE PAGE 8.
FOR MASONRY INSTALLATIONS, SEE PAGE 11.
support@bello.com
A316
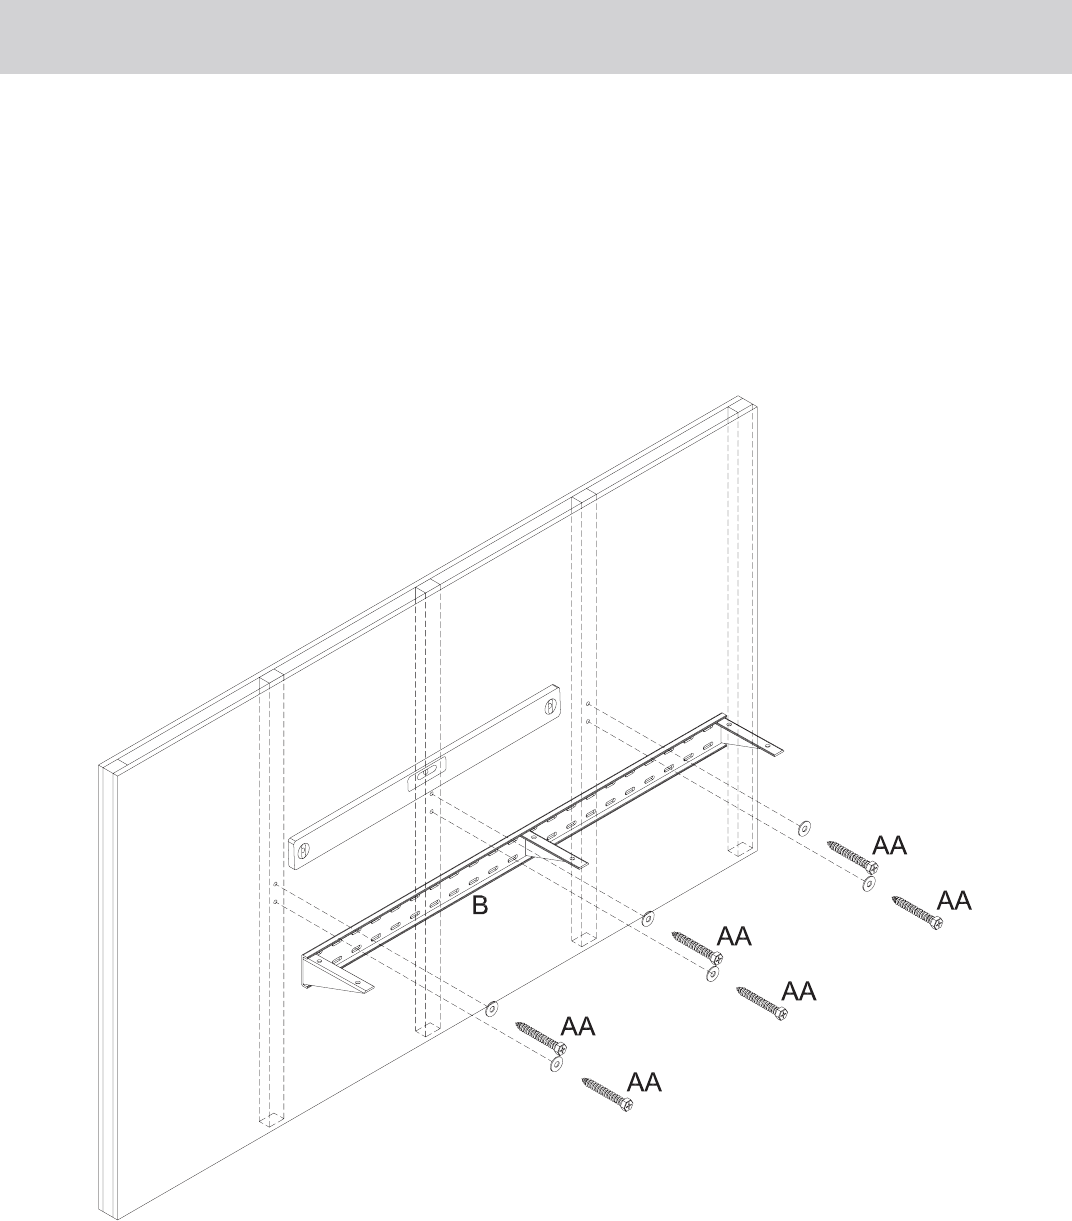
Installing e Sound Shelf Bracket In Wood
A
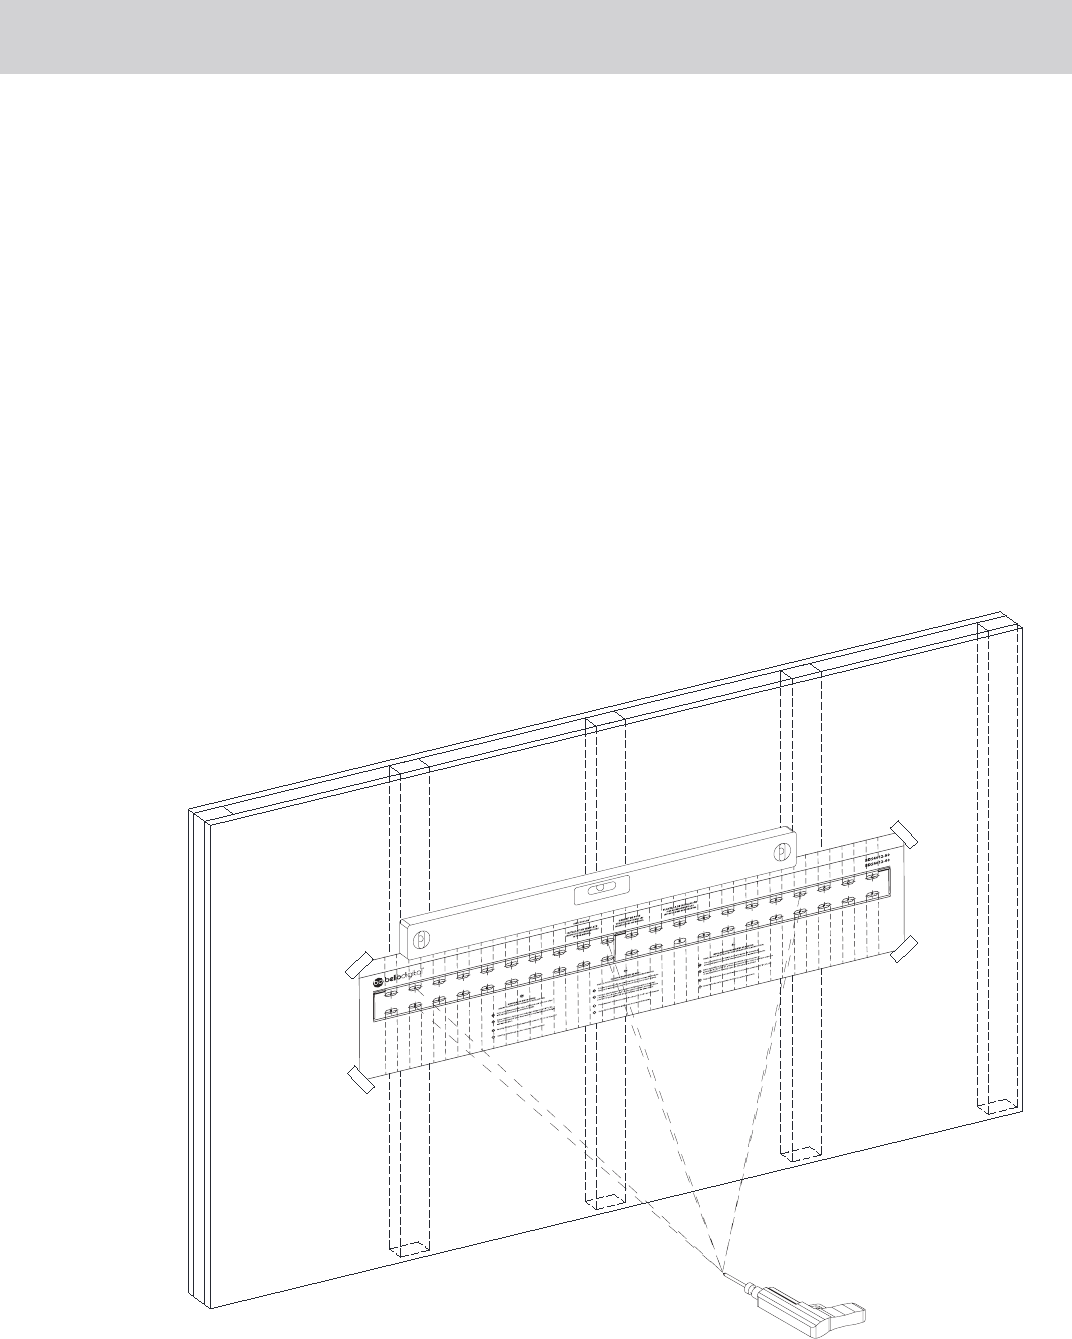
t%&5&3.*/&*/45"--"5*0/-0$"5*0/
Use the Installation Template in order to determine the location on the wall that you want to
install the shelf.
$BSFGVMMZESJMMTJYIPMFTUISPVHIBQQQSPQSJBUFQPJOUTi"wi#wA$i%wi&wBOEi'wJOUIF
installation template.
Mount into 3 studs as shown below. If the bracket will not line up with 3 studs, center the
bracket on 2 studs.
support@bello.com
A316 10
Installing e Sound Shelf Bracket on Wall
t*OTUBMMćF8BMM#SBDLFU
"ęFSZPVIBWFQSFQBSFEUIFIPMFTGPSNPVOUJOHUIF8BMM#SBDLFU#QMBDFUIF8BMM#SBDLFU#
PWFSUIFIPMFTBOETDSFXJOUIF-BH#PMUT""BOEXBTIFS$$BCPVUIBMGXBZ6TFBMFWFM
to make sure the Wall Bracket B is level and make any necessary adjustments. Once straight,
UJHIUFOBMMPGUIF-BH#PMUTDPNQMFUFMZEPOPUPWFSUJHIUFO
CC
CC
CC
CC
CC
CC
support@bello.com
A316 11
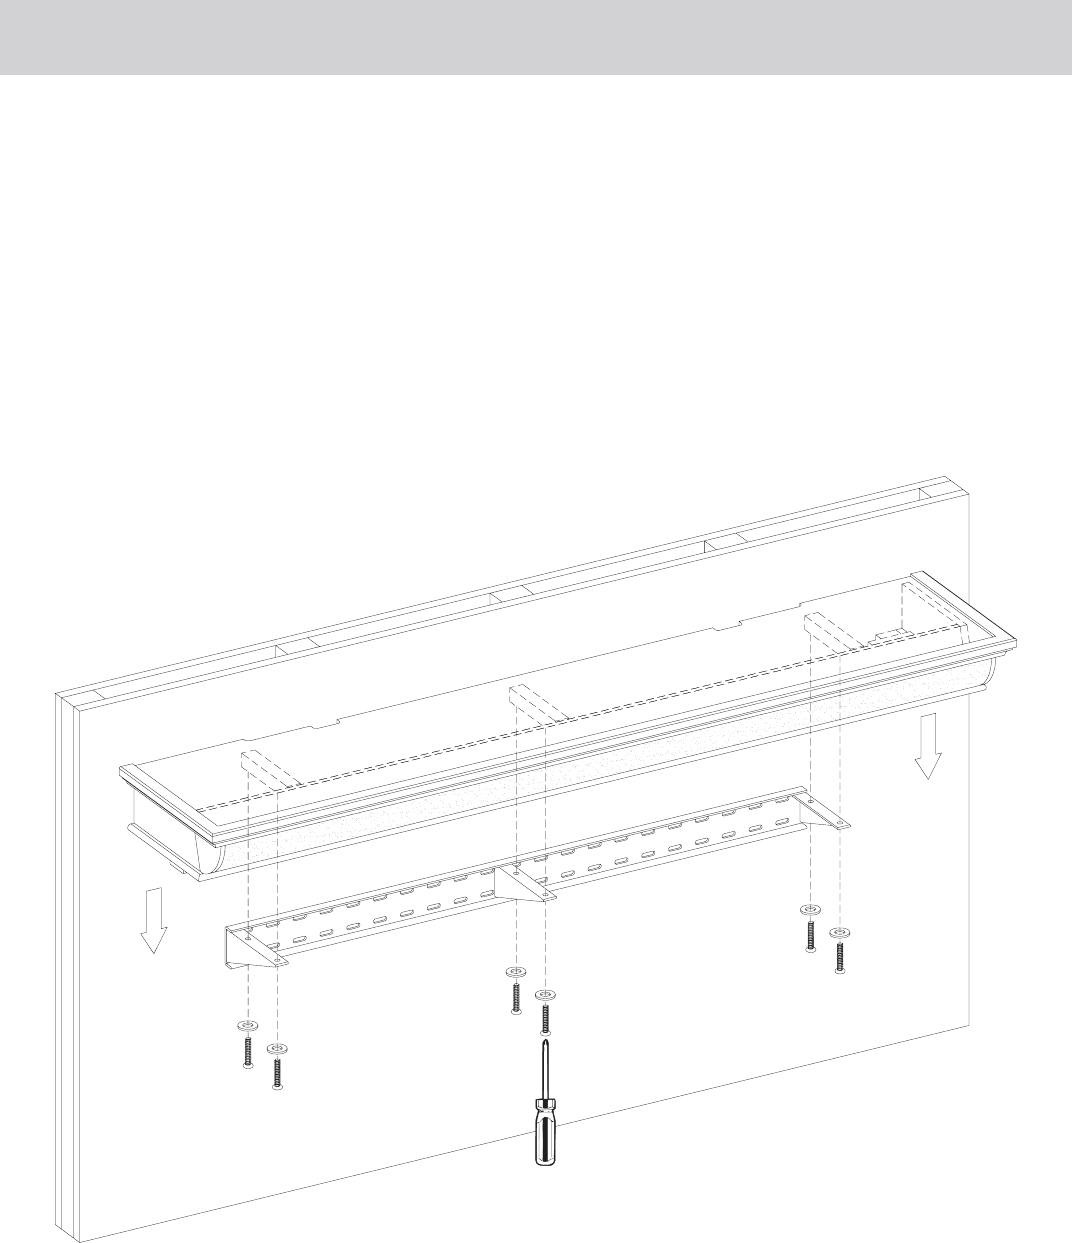
t.PVOUUIF4PVOE4IFMG
8JUIUIFIFMQPGBOBTTJTUBOUMJęUIFTIFMGPOUPUIF8BMM#SBDLFUBTTIPXO
)BWFBOBTTJTUBOUIPMEUIFTIFMGJOQMBDFXIJMFZPVVTFUIFCPMUTBOEXBTIFSTUIBUIBWF
been loosen from the wall bracket from step on page 5, to secure the sound shelf to the wall
CSBDLFU"ęFSJOTUBMMBUJPOBQQMZTPNFMJHIUQSFTTVSFUPUIFTIFMGUPJOTVSFJUJTTUBCMFBOE
properly installed.
Installing e Sound Shelf Onto e Wall Bracket

support@bello.com
A316 12
Installing e Sound Shelf Bracket In Masonry
t%3*--1*-05)0-&4
"ęFSZPVIBWFEFUFSNJOFEZPVSEFTJSFE4PVOE4IFMGMPDBUJPO-JOFVQUIF*OTUBMMBUJPO5FN
plate to ensure you will not drill into any mortar joints. Tape the Installation Template in
QMBDFTFDVSFMZPOUIFXBMMXJUINBTLJOHUBQF6TFB-FWFM$BSFGVMMZESJMMTJYIPMFTVTJOHB
wPSNNNBTPOSZESJMMCJU&BDIIPMFTIPVMECFBUMFBTUwNNEFFQ
%0/05%3*--*/50.035"3+0*/54%3*--)0-&4"5-&"45w..'30.
5)&+0*/5464&"/&8%3*--#*550&/463&015*.6.)0-%*/("#*-*5:%0
/0564&")"..&3%3*--
t*OTFSUUIFBODIPST$$
)BNNFSUIFBODIPST$$JOUPUIFQSFESJMMFEIPMFTPOUIFXBMMVOUJMUIFZBSFĘVTIXJUIUIF
wall.
CC
CC
CC
60mm
2.4
support@bello.com
A316 13
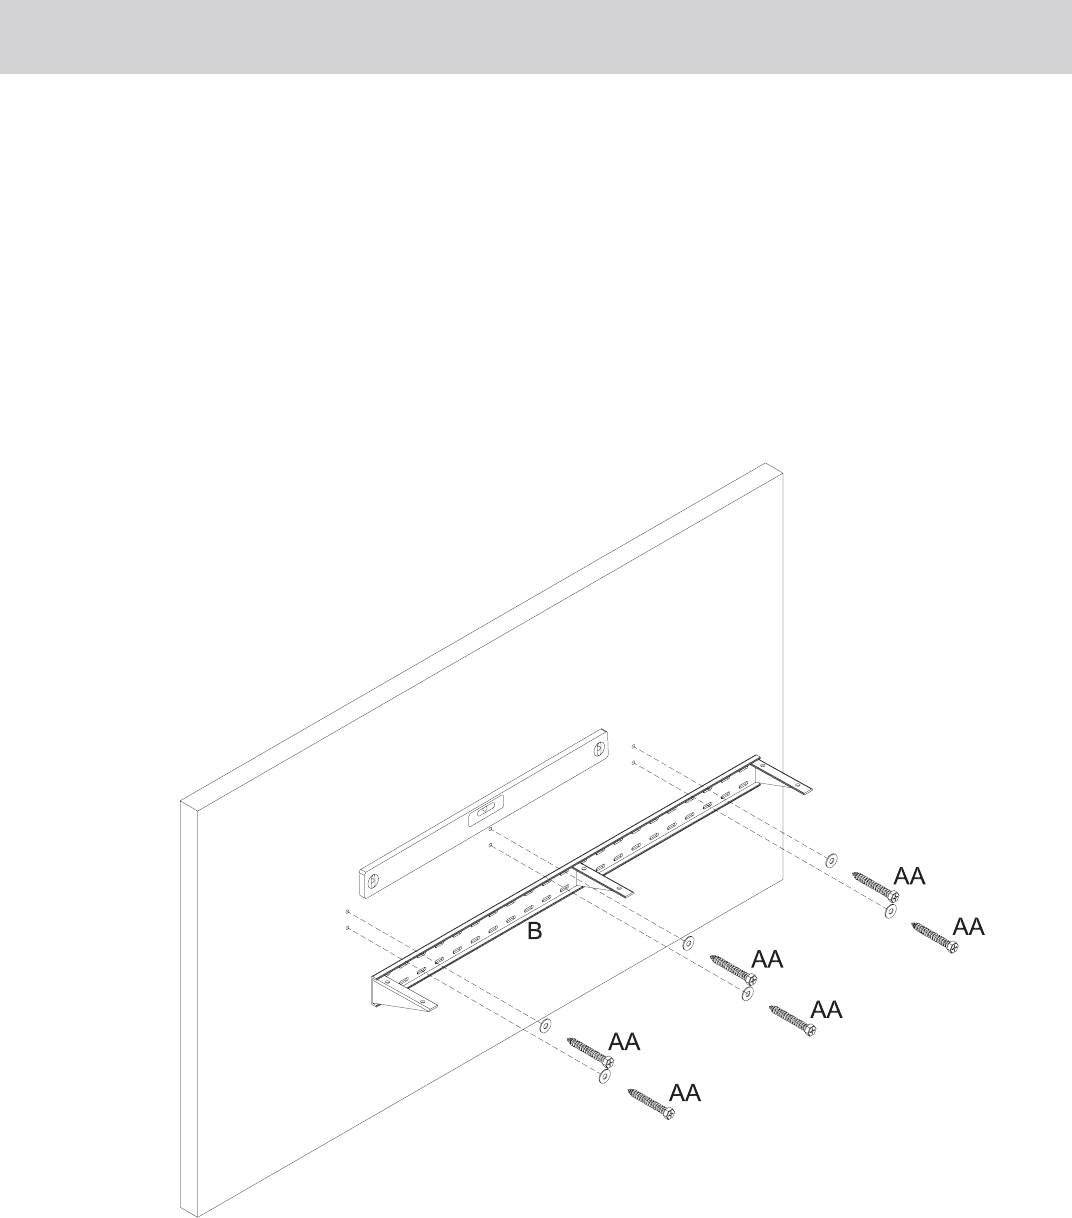
Installing e Wall Bracket To e Wall
t*OTUBMMćF8BMM#SBDLFU
"ęFSZPVIBWFQSFQBSFEUIFIPMFTXJUIBODIPSTGPSNPVOUJOHUIF8BMM#SBDLFU#QMBDFUIF
8BMM#SBDLFU#PWFSUIFIPMFTBOETDSFXJOUIF-BH#PMUT""BOEXBTIFS$$BCPVUIBMGXBZ
Use a level to make sure the Wall Bracket B is level and make anynecessary adjustments.
0ODFTUSBJHIUUJHIUFOBMMPGUIF-BH#PMUTDPNQMFUFMZEPOPUPWFSUJHIUFO
NOTE: If you were only able to use 2 wood studs on the
ESZXBMMJUJTJNQPSUBOUUPDFOUFSUIF8BMM#SBDLFUPO
these 2 studs to evenly support the weight.

support@bello.com
A316
Operation Instruction
Product Specications
Wiring
"69*/3-3$"QMVH"69*/GPSDPOOFDUJOHUPBOBVEJPTPVSDF
2. DC IN - Connect the power supply
-*/&*/-JOFNNJOQVUGPSDPOOFDUJPOUPBOBVEJPTPVSDF
46#800'&30654VCXPPGFSPVUQVUGPSDPOOFDUJOHUPBTVCXPPGFS
015*$"-*/*OQVUUIFDPOTPMFVTJOH0QUJDBMDBCMF
%0/(-&$0//&$503$POOFDUGPSPQUJPOBM#FMMh0%JHJUBMXJSFMFTTTVCXPPGFS
#FMMP%JHJUBM8JSFMFTTTVCXPPGFSDPOOFDUJPO64#QPSU
8JMMQPXFSBOETVQQPSUUSBOTNJUCBTTGSPNPQUJPOBM#FMMh0%JHJUBMXJSFMFTT3'64#
%POHMFUP#FMMPEJHJUBM8JSFMFTT3'4VCXPPGFS
Adapter Input "$7)[
Adapter Output %$7"
1PXFS$POTVNQUJPO 8BUUT
4UBOECZ1PXFS$POTVNQUJPO < 1 W
1FBL.VTJD1PXFS0VUQVU 200 W
support@bello.com
A316 15
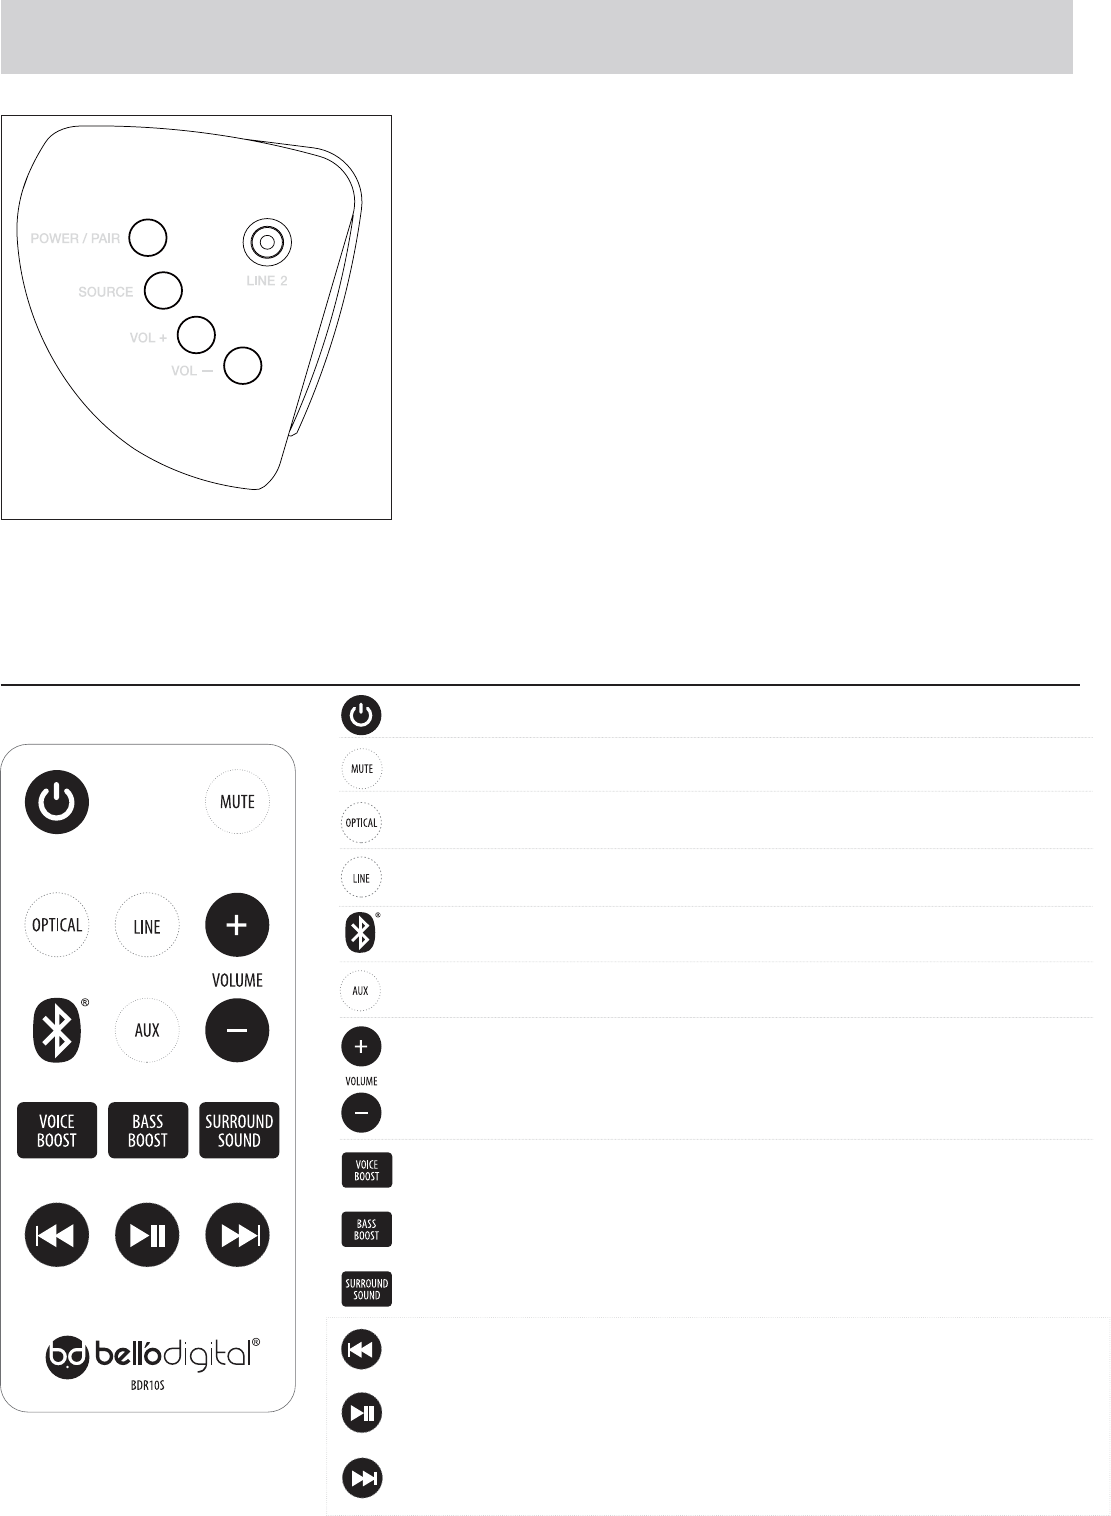
Operation Instruction
108&3#VUUPO5VSOTUIF4PVOE4IFMG
on or o
2. SOURCE Button - To scroll through the
EJČFSFOUJOQVUPQUJPOT
#-6&o#MVFUPPUI
-NN*OQVU
-NN*OQVU
AU - AUX Input
010QUJDBM*OQVU
70-#VUUPOoWPMVNFJODSFBTF
70-#VUUPOWPMVNFEFDSFBTF
$POUSPM1BOFM
Remote Control
1PXFS4UBOECZ
- Mute
- Optical in
-JOFJO1SFTTUPTFMFDU-JOFPS-JOF
#MVFUPPUI)PMEEPXOUPQBJSGPSTFDPOET
- AUX Input
7PMVNF*ODSFBTF
7PMVNF%FDSFBTF
7PJDF#PPTU&OIBODFTEJBMPHJOOPJTZFOWPSPONFOUT
#BTT#PPTU&OIBODFTUIFCBTTTPVOE
4VSSPVOE4PVOE%JHJUBMTVSSPVOETPVOEFČFDUPOPČ
#BDL1SFWJPVT
1MBZ1BVTF
'PSXBSE/FYU
Works with Bluetooth devices only.
/PUF"TIPSUEFMBZJOSFTQPOTF
is normal.
-&%%JTQMBZ'VODUJPO
-JHIU'MBTI
01
--
Blue
AU
00-30
00-30
0/0''
0/0''
0/0''
b
1-
'
support@bello.com
A316 16
Operation Instruction Continued
Select an input: Use the SOURCE Button on the control panel to scroll through the inputs, or
select the input on the remote control.
#MVFUPPUI1BJSJOH1SPDFTT
.BLFTVSFZPVSXJSFMFTTEFWJDFJTSFBEZGPSQBJSJOH*GZPVBSFVOTVSFIPXUPEPUIJTDIFDL
the manual that came with your device.
2) To start the pairing process:
$POUSPM1BOFM1SFTTUIF108&3CVUUPOVOUJMUIF#-6&TUBSUTUPĘBTI
or
3FNPUF1SFTTUIF#-6&5005)CVUUPOVOUJM#-6&TUBSUTUPĘBTI
1BJSJOH4FMFDU#%4#%4POZPVSEFWJDFćF#-6&XJMMTUPQĘBTIJOH
when it is paired.
NOTE: 0OMZEFWJDFDBOQMBZUISPVHIUIFTPVOETIFMGBUBUJNF1MFBTFEJTDPOOFDUUIF
other device if you cannot connect.
%*41-":.&44"(&4
#-6&#MVFUPPUINPEF
-ćJTJTGPSUIFEFWJDFDPOOFDUFEUPUIFNNMJOFJOJOQVUPOUIFCBDLPGUIFTQFBLFS
-ćJTJTGPSUIFEFWJDFDPOOFDUFEUPUIFNNMJOFJOJOQVUPOUIFDPOUSPMQBOFM
AU - is is for the device connected to the RCA Stereo line in input on the back of the
speaker.
01ćJTJTGPSUIFEFWJDFDPOOFDUFEUPUIF0QUJDBMJOJOQVUPOUIFCBDLPGUIFTQFBLFS

support@bello.com
A316 17
Operation Instruction Continued
Learning Function
ćFMFBSOJOHGVODUJPOBMMPXTZPVS4PVOE4IFMGUPCFDPOUSPMMFECZZPVS57SFNPUFDPOUSPM
/PUF3FNPUFNVTUTFOEJOGSBSFETJHOBMT"OZVOVTFECVUUPOPOZPVS57SFNPUFDPOUSPMDBO
CFVTFEUPDPOUSPMUIF4PVOE4IFMG'PSFYBNQMFXIFOZPVDPOOFDUZPVS57UPUIF4PVOE4IFMG
VTJOHUIF3$"4UFSFPDBCMFTPS%JHJUBM'JCFS0QUJD$BCMFUIF57WPMVNFBOENVUFXJMMOP
MPOHFSCFDPOUSPMMFECZUIFSFNPUFUIBUDBNFXJUIJU4PNF57SFNPUFTBMTPDPNFXJUIFYUSB
buttons. ese buttons can also be used for any of the learning options below.
Some of the programmable functions need to be selected from the remote contol as noted
below.
To start the learning function:
t1SFTT108&3and VOL UPHFUIFSGPSTFDPOETUPMFBSONPEFSEL TUBSUTĘBTIJOH
t4FMFDUUIFGVODUJPOUPMFBSO on the control panel or remote.
PćFGVODUJPOCFMPXXJMMĘBTI1PJOUZPVS57SFNPUFBUUIFĘBTIJOH-&%POUIFTPVOE
shelf and hold down the button you want it learn from.
P8IFOMFBSOJOHJTDPNQMFUFUIFGVODUJPOHPFTTPMJEGPSTFDPOETTUPQTĘBTIJOHBOE
simultaneously beeps 2 times. SELXJMMOPXTUBSUĘBTIJOH
:PVDBOOPXTFMFDUUIFOFYUGVODUJPOUPMFBSOPSFOEUIFQSPDFTTCZQSFTTJOHUIF108&3
CVUUJOHBO70-GPSTFDPOET
70-7PMVNFVQ<DPOUSPMQBOFMPSSFNPUFDPOUSPM>
70-7PMVNFEPXO<DPOUSPMQBOFMPSSFNPUFDPOUSPM>
0.VUF<DPOUSPMQBOFMPSSFNPUFDPOUSPM>
0/1PXFS<DPOUSPMQBOFMPSSFNPUFDPOUSPM>
406S4PVSDF<DPOUSPMQBOFM>
-O*O-JOF*O<SFNPUFDPOUSPM>
01U*0QUJDBM<SFNPUFDPOUSPM>
#-6&#MVFUPPUI<SFNPUFDPOUSPM>
"6"VY<SFNPUFDPOUSPM>
#"$5SBDL#BDL<SFNPUFDPOUSPM>
'0S5SBDL'PSXBSE<SFNPUFDPOUSPM>
1-"1MBZ<SFNPUFDPOUSPM>
7#007PJDF#PPTU<SFNPUFDPOUSPM>
##00#BTT#PPTU<SFNPUFDPOUSPM>
46SS4VSSPVOE<SFNPUFDPOUSPM>

support@bello.com
A316
FCC/IC
Battery Replacement
8BSOJOH$IBOHFTPSNPEJĕDBUJPOTUPUIJTVOJUOPUFYQSFTTMZBQQSPWFECZUIFQBSUZSFTQPOTJCMFGPS
DPNQMJBODFDPVMEWPJEVTFSTBVUIPSJUZUPPQFSBUFUIFFRVJQNFOU
/05&ćJTFRVJQNFOUIBTCFFOUFTUFEBOEGPVOEUPDPNQMZXJUIUIFMJNJUTGPS$MBTT#EJHJUBMEFWJDF
QVSTVBOUUPQBSUPGUIF'$$3VMFTćFTFMJNJUTBSFEFTJHOFEUPQSPWJEFSFBTPOBCMFQSPUFDUJPOBHBJOTU
IBSNGVMJOUFSGFSFODFJOBSFTJEFOUJBMJOTUBMMBUJPOćJTFRVJQNFOUHFOFSBUFTVTFTBOEDBOSBEJBUFSBEJP
GSFRVFODZFOFSHZBOEJGOPUJOTUBMMFEBOEVTFEJOBDDPSEBODFXJUIUIFJOTUSVDUJPOTNBZDBVTFIBSNGVM
JOUFSGFSFODFUPSBEJPDPNNVOJDBUJPOT)PXFWFSUIFSFJTOPHVBSBOUFFUIBUJOUFSGFSFODFXJMMOPUPDDVSJOB
QBSUJDVMBSJOTUBMMBUJPO*GUIJTFRVJQNFOUEPFTDBVTFIBSNGVMJOUFSGFSFODFUPSBEJPPSUFMFWJTJPOSFDFQUJPO
XIJDIDBOCFEFUFSNJOFECZUVSOJOHUIFFRVJQNFOUPČBOEPOUIFVTFSJTFODPVSBHFEUPUSZUPDPSSFDUUIF
JOUFSGFSFODFCZPOFPSNPSFPGUIFGPMMPXJOHNFBTVSFT
t3FPSJFOUPSSFMPDBUFUIFSFDFJWJOHBOUFOOB
t*ODSFBTFUIFTFQBSBUJPOCFUXFFOUIFFRVJQNFOUBOEUIFSFDFJWFS
t$POOFDUUIFFRVJQNFOUJOUPBOPVUMFUPOBDJSDVJUEJČFSFOUGSPNUIBUUPXIJDIUIFSFDFJWFSJT
connected.
t$POTVMUUIFEFBMFSPSBOFYQFSJFODFESBEJP57UFDIOJDJBOGPSIFMQ
ćJTEFWJDFDPNQMJFTXJUI1BSUPGUIF'$$3VMFT0QFSBUJPOJTTVCKFDUUPUIFGPMMPXJOHUXPDPOEJUJPOT
ćJTEFWJDFNBZOPUDBVTFIBSNGVMJOUFSGFSFODFBOE
UIJTEFWJDFNVTUBDDFQUBOZJOUFSGFSFODFSFDFJWFEJODMVEJOHJOUFSGFSFODFUIBUNBZDBVTFVOEFTJSFE
operation.
is Class B digital apparatus complies with Canadian ICES-003.
When the remote control stops operating or its range seems reduced, it is time to replace the battery with
a new one.
1. e battery compartment is located on the back end of the remote.
1SFTTBOETMJEFUIFCBUUFSZEPPSPQFOBOESFNPWFUIFPMECBUUFSZ
*OTFSUQD$3CBUUFSZDIFDLJOHUIBUUIFBOETJEFTPGUIFCBUUFSZNBUDIJOTJEFUIFCBUUFSZ
compartment.
3FQMBDFUIFCBUUFSZDPNQBSUNFOUEPPS
$"65*0/
t"MXBZTQVSDIBTFUIFDPSSFDUTJ[FBOEHSBEFPGCBUUFSZNPTUTVJUBCMFGPSUIFJOUFOEFEVTF
t3FQMBDFBMMCBUUFSJFTPGBTFUBUUIFTBNFUJNF
t$MFBOUIFCBUUFSZDPOUBDUTBOEBMTPUIPTFPGUIFEFWJDFQSJPSUPCBUUFSZJOTUBMMBUJPO
t&OTVSFUIFCBUUFSJFTBSFJOTUBMMFEDPSSFDUMZXJUISFHBSEUPQPMBSJUZBOE
t3FNPWFCBUUFSJFTGSPNFRVJQNFOUXIJDIJTOPUUPCFVTFEGPSBOFYUFOEFEQFSJPEPGUJNF
t3FNPWFVTFECBUUFSJFTQSPNQUMZ
/PUF$BVUJPOEPOPUJOHFTUCBUUFSJFT*GCBUUFSJFTBSFTXBMMPXFEJNNFEJBUFMZDBMMQPJTPODPOUSPM

support@bello.com
A316
Care and Maintenance
t6TFBTPęDMFBODMPUIUIBUXJMMOPUTDSBUDIUIFTVSGBDFXIFOEVTUJOH
t6TFPGGVSOJUVSFQPMJTIJTOPUOFDFTTBSZ4IPVMEZPVDIPPTFUPVTFQPMJTIUFTUĕSTUJOBO
inconspicuous area.
t6TJOHTPMWFOUTPGBOZLJOEPOZPVSGVSOJUVSFNBZEBNBHFUIFĕOJTI
t/FWFSVTFXBUFSUPDMFBOZPVSGVSOJUVSFBTJUNBZDBVTFEBNBHFUPUIFĕOJTI
t-JRVJETQJMMTTIPVMECFSFNPWFEJNNFEJBUFMZBTJUNBZEBNBHFUIFGVSOJUVSF6TFBTPę
clean cloth and blot the spill gently. Avoid rubbing.
t"MXBZTVTFQSPUFDUJWFQBETVOEFSIPUEJTIFTBOEQMBUFT)FBUDBODBVTFDIFNJDBMDIBOHFT
that may create spotting within the furniture.
t*GUIFTVQQMZDPSEJTEBNBHFEJUNVTUCFSFQMBDFECZUIFNBOVGBDUVSFSJUTTFSWJDFBHFOUPS
TJNJMBSMZRVBMJĕFEQFSTPOTJOPSEFSUPBWPJEBIB[BSE
t0OMZBRVBMJĕFETFSWJDFQFSTPOTIPVMESFQBJSUIJTQSPEVDU
t%POPUVTFPVUEPPST
t%POPUJOTFSUPSBMMPXGPSFJHOPCKFDUTUPFOUFSUIFTZTUFNBTUIJTNBZDBVTFBOFMFDUSJDTIPDL
re, or damage to the appliance.
t6TFUIJTBQQMJBODFPOMZBTEFTDSJCFEJOUIFNBOVBM"OZPUIFSVTFOPUSFDPNNFOEFECZUIF
manufacturer may cause re, electric shock or injury to persons.
Troubleshooting
130#-&. SOLUTION
1. Sound is distorted.
1a. Decrease the volume.
C*GUIFPSJHJOBMTPVOETPVSDFJTPGQPPSRVBMJUZ
distortion and noise are easily noticed with high-power
speakers.
Try a dierent audio source such as a music CD.
1c. If you are using an external sound source like
PMEFSHFOFSBUJPOPGJ1PEUSZSFEVDJOHUIFPVUQVU
volume on the device itself.
1d.Turn o voice enhance and/or bass enhance.
6OJUHFUTXBSNBęFSFYUFOEFE
play at high volume.
2a. Turn the unit o for a period of time or lower
the volume.
FCC Radiation Exposure Statement
This equipment complied with FCC radiation exposure limits set forth for an uncontrolled
environment. This equipment should be installed and operated with minimum distance
20cm between the radiator & your body.

support@bello.com
A316 20
1-Year Limited Warranty
e manufacturer warrants that your new Media Shelf is free from manufacturing and material defects
for a period of one year from date of puchase, subject to the following conditions and limitations.
1. Install and operate this Electric Appliance in accordance with the installation and operating
instructions furnished with the product at all times. Any unauthorized repair, alteration, willful abuse,
accident, or misuse of the product shall nullify this warranty.
2. is warranty is non-transferable, and is made to the original owner, provided that the purchase was
made through an authorized supplier of the product.
ćFXBSSBOUZJTMJNJUFEUPUIFSFQBJSPSSFQMBDFNFOUPGQBSUTGPVOEUPCFEFGFDUJWFJONBUFSJBMPS
XPSLNBOTIJQQSPWJEFEUIBUTVDIQBSUTIBWFCFFOTVCKFDUFEUPOPSNBMDPOEJUJPOTPGVTFBOETFSWJDF
BęFSTBJEEFGFDUJTDPOĕSNFECZUIFNBOVGBDUVSFSTJOTQFDUJPO
ćFNBOVGBDUVSFSNBZBUJUTEJTDSFUJPOGVMMZEJTDIBSHFBMMPCMJHBUJPOTXJUISFTQFDUUPUIJTXBSSBOUZCZ
SFGVOEJOHUIFXIPMFTBMFQSJDFPGUIFEFGFDUJWFQBSUT
5. Any installation, labor, construction, transportation, or other related costs/expenses arising from
EFGFDUJWFQBSUTSFQBJSSFQMBDFNFOUPSPUIFXJTFPGTBNFXJMMOPUCFDPWFSFECZUIJTXBSSBOUZOPS
shall the manufacturer assume responsibility for same.
6. e owner/user assumes all other risks, if any, including the risk of any direct, indirect or
DPOTFRVFOUJBMMPTTPSEBNBHFBSJTJOHPVUPGUIFVTFPSJOBCJMJUZUPVTFUIFQSPEVDUFYDFQUBTQSPWJEFE
by law.
"MMPUIFSXBSSBOUJFToFYQSFTTFEPSJNQMJFEoXJUISFTQFDUUPUIFQSPEVDUJUTDPNQPOFOUTBOE
accessories, or any obligations/liabilities on the part of the manufacturer are hereby expressly
excluded.
ćFNBOVGBDUVSFSOFJUIFSBTTVNFTOPSBVUIPSJ[FTBOZUIJSEQBSUZUPBTTVNFPOJUTCFIBMGBOZPUIFS
liabilities with respect to the sale of the product.
ćFXBSSBOUJFTBTPVUMJOFEXJUIJOUIJTEPDVNFOUEPOPUBQQMZUPOPOBDDFTTPSJFTVTFEJODPOKVODUJPO
with the installation of this product.
10. is warranty gives you specic legal rights, and you may also have other rights which vary from state
to state.
ćJTXBSSBOUZJTWPJEJG
a. e Media Shelf is subjected to prolonged periods of dampness or condensation.
b. Any unauthorized alteration, willful abuse, accident, or misuse of the product.
D:PVEPOPUIBWFUIFPSJHJOBMSFDFJQUPGQVSDIBTF