Tyco Safety Sensormatic HH2BCS SPREAD SPECTRUM TRANSMITTER User Manual AMB 4020 Hand Held Scanner Deactivator
Tyco Safety Products/Sensormatic SPREAD SPECTRUM TRANSMITTER AMB 4020 Hand Held Scanner Deactivator
USERS MANUAL
AMB-4020 HAND-HELD SCANNER/DEACTIVATOR 8200-0369-04, REV. A
USER’S GUIDE 1 of 9
AMB-4020 Hand-Held Scanner/Deactivator
User’s Guide
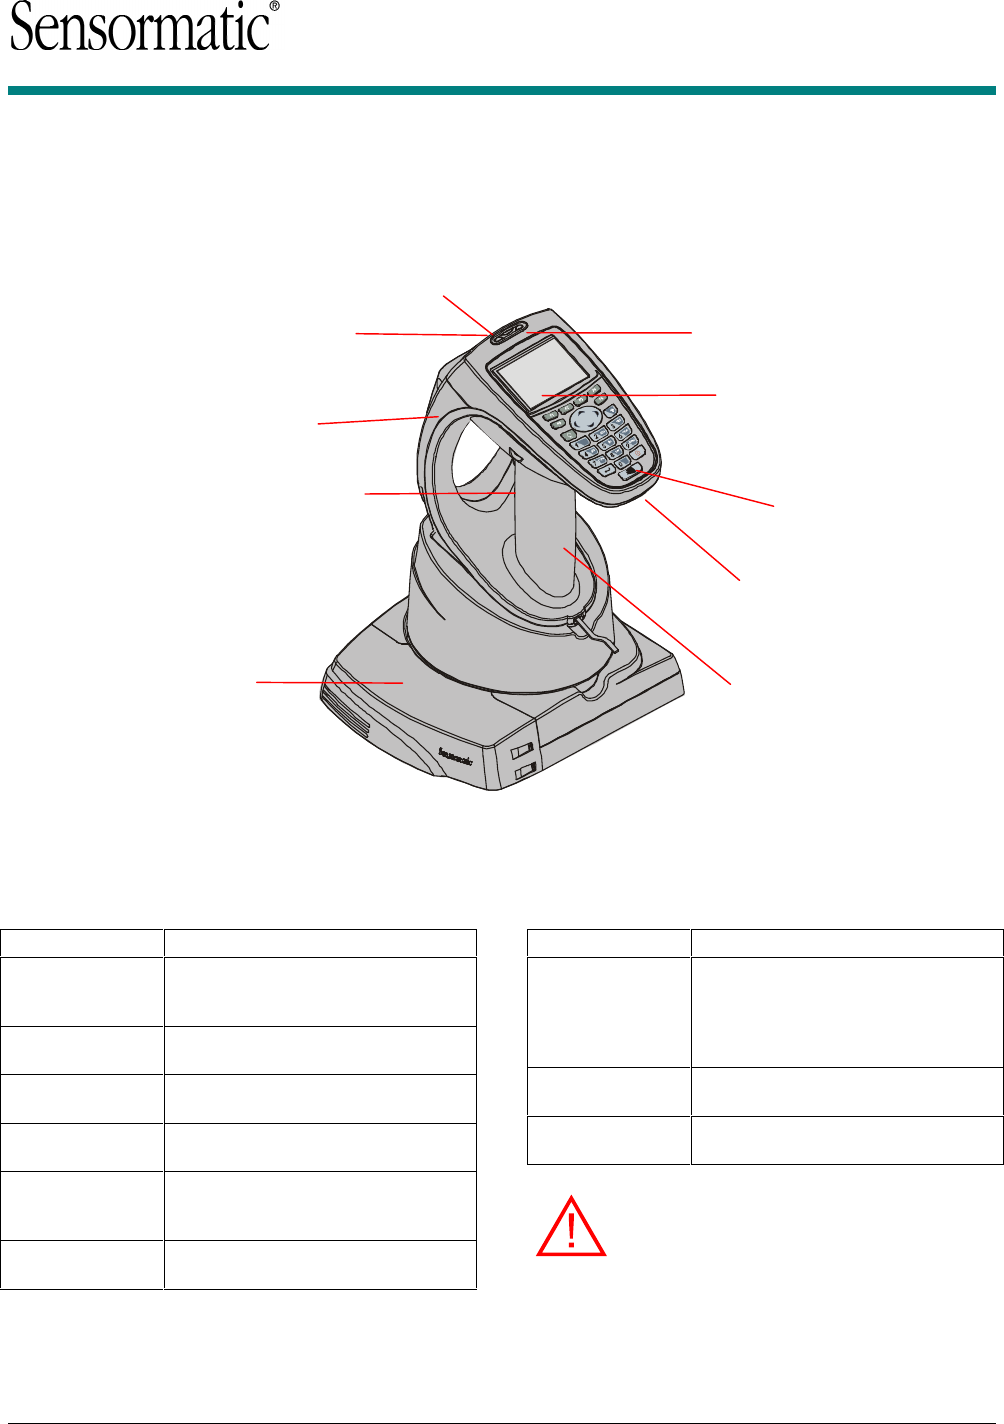
Product Overview
The AMB-4020 hand-held scanner/deactivator is a multi-purpose device used for scanning
barcodes, detecting and deactivating EAS labels, alarm logging, and source tagging
compliance checking. It includes the following features:
© 2004 Sensormatic Electronics Corp.
Feature Function
Base Charging
Station with
security lock
Secures the hand-held unit when
not in use. Keeps unit batteries
optimally charged.
Liquid Crystal
Display Displays prompts and messages
relating to the task at hand.
Keypad Used for entering information. See
the Keypad Overview for details.
LED indicators Red and green lights indicate proper
unit function.
Integrated
Barcode Scanner Used to scan barcodes on receipts,
merchandise, packages and
badges.
Ergonomic Grip Provides comfortable use for a
variety of users.
Feature Function
Integrated EAS
Detector /
Deactivator
Assists in identifying merchandise
that has not been properly
deactivated at the point-of-sale. Also
allows these items to be deactivated
with proof of purchase.
Scanner Trigger Activates the scanner when
needed.
Alternate Scan
Barcode button Activates the barcode scanner
when the unit is stored in its base.
WARNING: Before using this device,
read this manual carefully! Ensure that all
the safety instructions specified within this
manual are continuously observed and
respected during the installation and/or
during the operation of this device.
Liquid Crystal
Display (LCD)
LED indicators
Integrated
Detector/Deactivator
Scanner Trigger
(beneath
keypad)
Base Charging
Station
Ergonomic Grip
Keypad
Alternate Scan
Barcode Button
WARNING!
Laser aperture
-
laser beam
Integrated
Barcode Scanner
AMB-4020 HAND-HELD SCANNER/DEACTIVATOR 8200-0369-04, REV. A
USER’S GUIDE 2 of 9
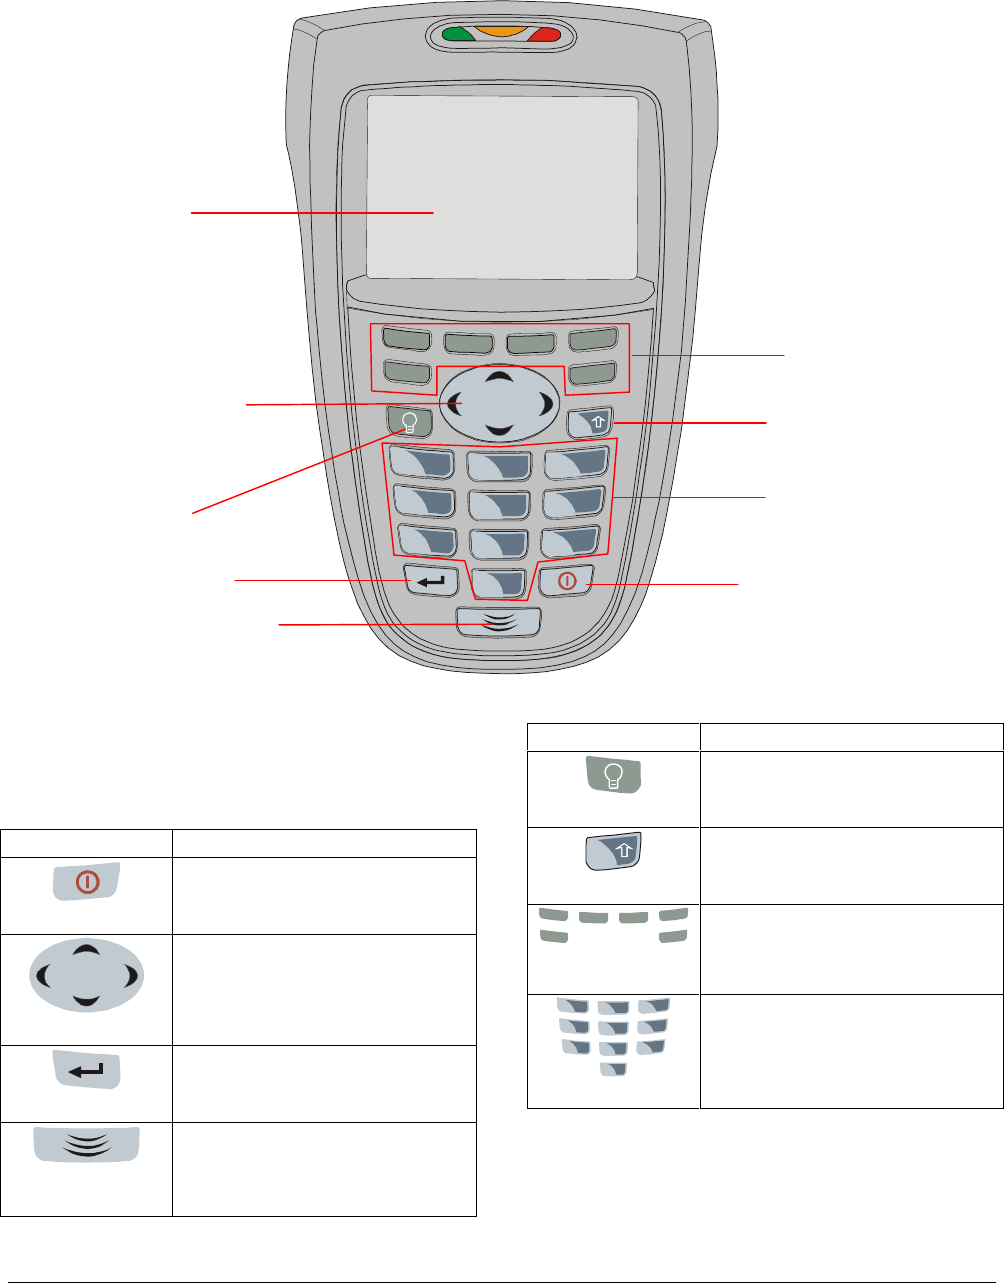
Keypad Overview
F1
F2
F3
F4
F5
F6
1
pqrs
7
9
wxyz
3
def
4
ghi
abc
2
jkl
5
tuv
8
6
mno
0
The buttons on the keypad allow you enter
information about the activity being performed.
Depending upon the software configuration, some
keypad features may not be available.
Button Function
Power
Switches the scanner/deactivator
to standby mode to conserve
power.
Cursor
Moves the cursor around the LCD.
Press an arrow corresponding to
the direction that you want to move
the cursor.
Enter
Makes selections appearing on the
LCD.
Alternate Scan
Barcode
Activates the barcode scanner
when the unit is stored in the base.
Button Function
Backlighting
Turns on LCD backlighting if the
display appears dark.
Alpha Shift Key
Toggles between entering numbers
and alphabetic characters using
the numeric keypad.
F1 F2 F3 F4
F5
F6
Function Keys
Special purpose keys that can be
programmed to perform specific
functions depending upon the
screen displayed.
1
pqrs
7
9
wxyz
3
def
4
ghi
abc
2
jkl
5
tuv
8
6
mno
0
Numeric Keypad
Allows numbers to be manually
entered. Alphabetic characters can
be entered using these buttons
and by pressing the Alpha Shift
key.
Function Keys
(F1 – F6)
Numeric Keypad
(0 – 9)
Power
Cursor Control
(Up/Down/Left/Right)
LCD Backlighting
Ent
er
Alternate Scan
Barcode
LCD
Alphanumeric
Shift Key

AMB-4020 HAND-HELD SCANNER/DEACTIVATOR 8200-0369-04, REV. A
USER’S GUIDE 3 of 9
Contents
Before Using the AMB-4020 Scanner/Deactivator 3
Safe Operation................................................ 3
Laser Device Warnings................................... 3
Avoid Dropping the Scanner/Deactivator ....... 3
Preparing the Scanner/Deactivator ....................... 4
Charging and Securing the
Scanner/Deactivator ....................................... 4
Removing the Scanner/Deactivator from the
Base Charging Station.................................... 4
Using the Scanner/Deactivator ............................. 5
Scanning Barcodes......................................... 5
Detecting/Deactivating EAS Tags and Labels 6
Logging Alarms............................................... 6
Maintenance.......................................................... 6
Glossary ................................................................ 6
Specifications ........................................................ 7
Hand-Held Scanner/Deactivator..................... 7
Base Charging Station.................................... 8
Declarations .......................................................... 9
Before Using the AMB-4020
Scanner/Deactivator
Keep the following precautions in mind when using
the AMB-4020 hand-held scanner/ deactivator.
Safe Operation
IMPORTANT!
This device may be used to locate and deactivate
Ultra•Max® labels on merchandise to help speed
up the checkout process in busy retail
environments. Like many similar devices, the AMB-
4020 scanner/deactivator emits electromagnetic
fields that may affect certain implanted medical
devices.
Since it is impossible to tell which customers may
have an implanted medical device, it should not be
used within 30cm (12in) of a customer’s head and
torso.
Some employees with implanted medical devices
may notice interactions while operating this
equipment. These interactions are ordinarily
transitory and should not be harmful. However, if
the employee feels uncomfortable, a change in
assigned duties should be considered.
Laser Device Warnings
WARNING: Do not stare (look) in the
beam of the laser: It is a Laser Class 2 and
it may produce eye damages.
WARNING: Do not test the device with
the aperture directed to your eyes.
WARNING: It is very important to be
aware that the duration of the laser
radiation emission is longer than the
audible beep that results when the push-
button (trigger) is activated: DO NOT
ATTEMPT TO TURN THE APERTURE
TOWARDS YOUR EYES DURING THE
RADIATION EMISSION. The red beam is
an optical indicator that the radiation is
present and, as long as it is visible, the
scanner shall not be directed towards the
operator or towards any other person’s
eyes.
WARNING: Do not attempt to open the
equipment enclosure! There are no
serviceable parts within this equipment!
Radiation hazard and/or electric shock
may occur! If the unit is defective, return it
to the distributor.
WARNING: Once the equipment is
unpacked, check the integrity of the plastic
enclosure of the hand-held unit; the
enclosure shall be inspected to ensure that
there are no holes, cracks or other paths
that give access to laser or collateral
radiation. If any of the above are observed,
return it to the Manufacture. Do not attempt
to use the device.
WARNING: Use of controls or
adjustments or performance of procedures
other than those specified herein may
result in hazardous radiation exposure.
Avoid Dropping the
Scanner/Deactivator
Always use the attached wrist lanyard to prevent
dropping the scanner/deactivator. Insert your hand
through the loop of the lanyard, and hold the
scanner/deactivator by the grip. If the scanner/
deactivator should slip from your hand, the wrist
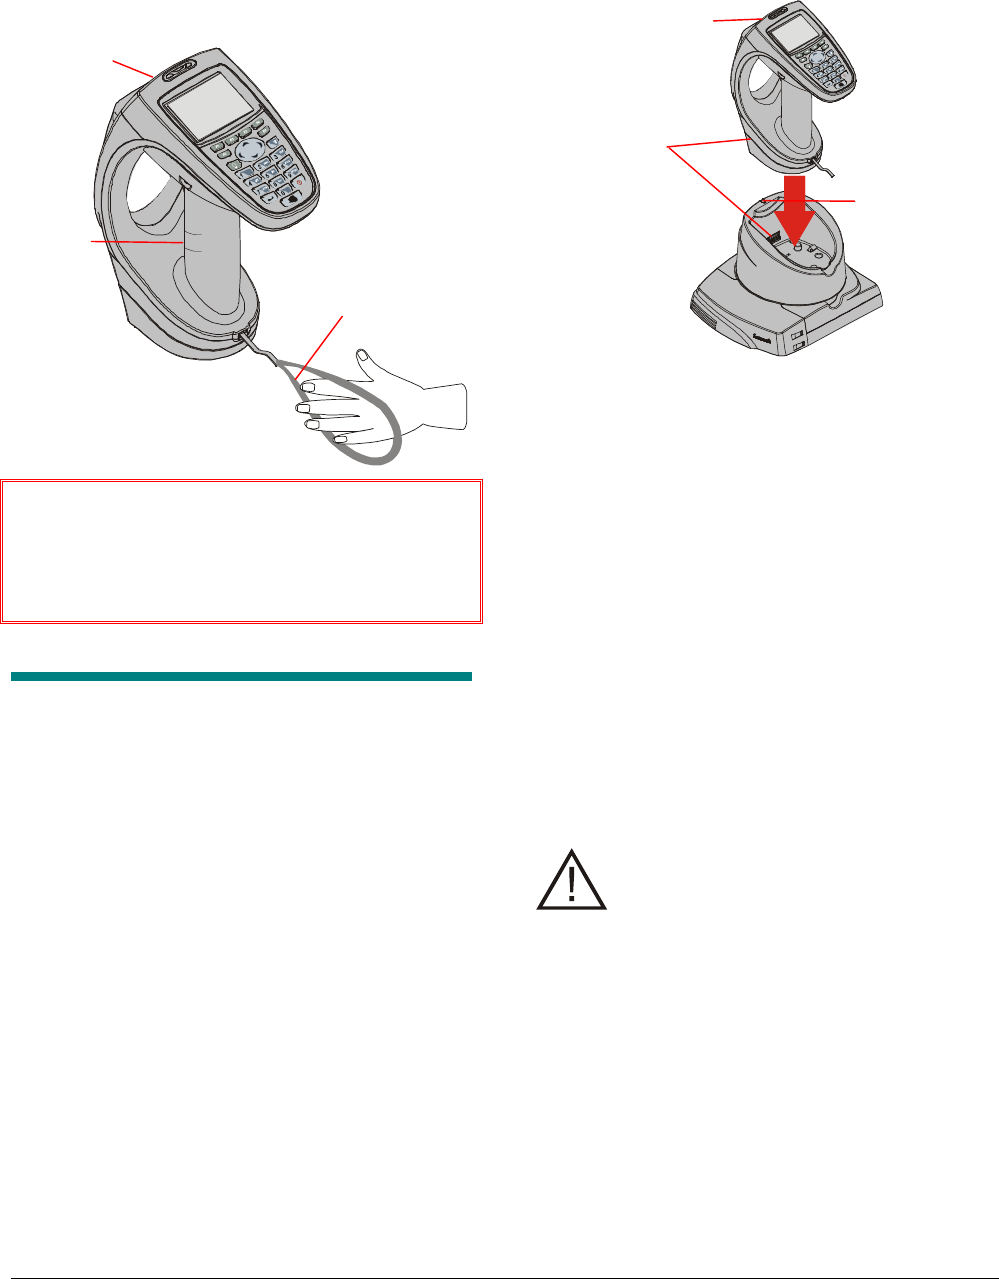
AMB-4020 HAND-HELD SCANNER/DEACTIVATOR 8200-0369-04, REV. A
USER’S GUIDE 4 of 9
lanyard prevents the device from dropping to the
ground.
Figure 1: Using the lanyard.
IMPORTANT! Never use a scanner/deactivator
that has been dropped! The scanner/deactivator
may have damage that is not visible to the user.
Return any scanner/deactivator that has been
dropped to Sensormatic for service.
Preparing the
Scanner/Deactivator
Before using the scanner/deactivator, it must be
charged for a minimum of 2 hours in the base
charging station. Once fully charged, the
scanner/deactivator can operate up to 5 hours in
standby mode without recharging.
Charging and Securing the
Scanner/Deactivator
Follow the steps below to charge and secure the
Scanner/Deactivator. Be sure to charge the unit
before using.
1. Align the scanner/deactivator with the base
charging station.
2. Insert the scanner/deactivator downward into
the base charging station. The contacts on the
scanner/deactivator and inside the base
charging station should meet.
Figure 2: Inserting the Scanner/Deactivator into
the base charging station.
When properly inserted, the scanner/deactivator
locks into the base charging station to prevent
unauthorized use. The charging status LED glows
orange while charging. When fully charged, the
LED glows green.
Note: If the charging status LED is flashing green,
the scanner/deactivator is not properly inserted in
the charging base.
IMPORTANT! To ensure that the scanner/
deactivator remains secure and maintains a
charge, it should be stored in the base charging
station whenever it is not being used.
Removing the
Scanner/Deactivator from the
Base Charging Station
CAUTION: Do not attempt to use
excessive force to remove the
scanner/deactivator from the base
charging station. Use of force may
damage the scanner/deactivator.
Depending on the procedures implemented at your
store, different techniques may be used by
authorized users to remove the scanner/
deactivator from the base charging station:
Entering passcodes
Scanning badges
The scanner/deactivator remains unlocked for 5
seconds. If it is not removed from the base
charging station within that time, the scanner/
deactivator re-locks.
Contacts
Charging
Status LED
Lanyard
Grip
WARNING!
Laser
aperture-
laser
beam
WARNING!
Laser
aperture-
laser beam
AMB-4020 HAND-HELD SCANNER/DEACTIVATOR 8200-0369-04, REV. A
USER’S GUIDE 5 of 9
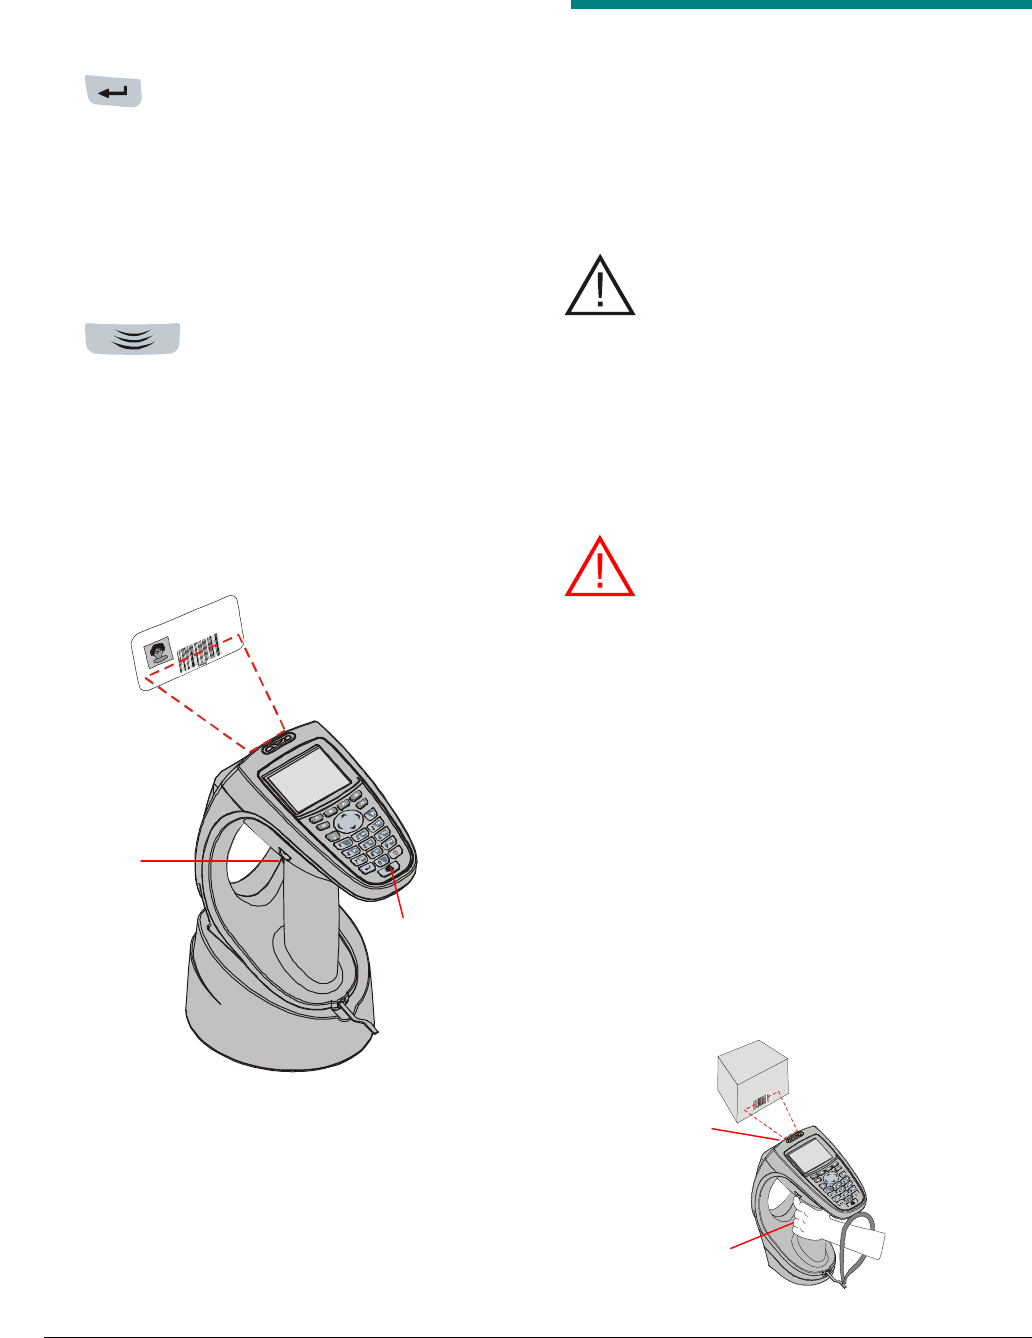
Unlocking with Passcode
1. Enter the passcode using the keypad.
2. Press Enter. If the passcode is
recognized, the scanner/deactivator unlocks from
the base charging station.
Unlocking with Barcode Scan
1. Hold the badge with the barcode near the
scanner window of the scanner/deactivator.
The badge should be approximately 15cm (6in)
from the scanner window.
2. Squeeze the trigger or press
Alternate Scan Barcode. The scanner emits a
red beam of light. If necessary, adjust the
position of the badge until the scanner detects
the barcode. If the barcode is recognized, the
scanner/deactivator unlocks from the base
charging station. See Figure 3.
Figure 3: Scanning a badge to remove from
base.
Using the
Scanner/Deactivator
Once the scanner/deactivator has been removed
from the base charging station, the unit can be
used to scan product barcodes, detect active EAS
tags and labels, and deactivate EAS labels. It can
also be used for alarm logging.
CAUTION: Like many similar devices, the
AMB-4020 scanner/deactivator emits
electromagnetic fields that may affect
certain implanted medical devices. Since it
is impossible to tell which customers may
have an implanted medical device, the
scanner should not be used within 30cm
(12in) of a customer’s head and torso.
Scanning Barcodes
WARNING: The hand-held scanner/
deactivator incorporates a Class 2 laser
scanner that uses a low power, visible light
diode. As with any very bright light source,
such as the sun, avoid staring directly into
the light beam or at its reflection.
Momentary exposure to a Class 2 laser is
not known to be harmful.
1. Locate the barcode on the receipt or
merchandise requiring scanning.
2. Orient the item so the barcode faces the
scanner window.
3. Hold the scanner/deactivator approximately
20 cm (8 in) from the item. Squeeze the
scanner trigger located below the keypad. The
scanner emits a red beam of light. If
necessary, adjust the position of the
scanner/deactivator to read the barcode.
Figure 4: Scanning Merchandise
Squeeze
trigger
to scan barcode
Trigger
Alternate
Scan Barcode
WARNING!
Laser
aperture-
laser beam
AMB-4020 HAND-HELD SCANNER/DEACTIVATOR 8200-0369-04, REV. A
USER’S GUIDE 6 of 9
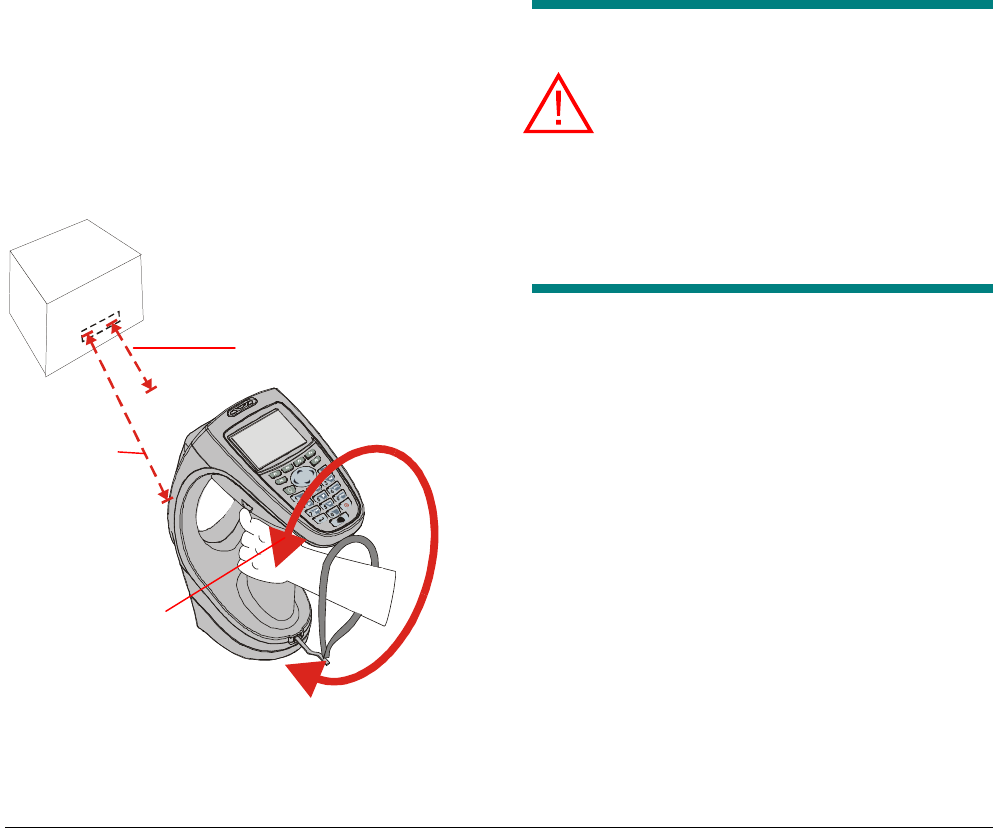
Detecting/Deactivating EAS
Tags and Labels
The scanner/deactivator may be used to detect
EAS tags (hard tags) and labels on merchandise.
The scanner/deactivator is capable of detecting
EAS tags and labels up to 15cm (6in) and
deactivating labels up to 10cm (4in) from the unit.
1. Orient scanner/deactivator towards
merchandise.
2. Use a circular motion to search for active tags
and labels.
3. When an active tag or label is detected, the
scanner/deactivator emits a steady beeping
tone and the green LED illuminates.
4. Continuing with the circular motion, move the
scanner deactivator toward the specific item to
deactivate.
5. Repeat steps 2 through 4 to detect and
deactivate addition items.
Note: If an EAS tag (hard tag) is present on
merchandise with a valid receipt, direct the
customer to return to the register or customer
service for removal if a detacher is not available.
Figure 5: Detecting and deactivating EAS
labels.
Logging Alarms
The scanner/deactivator may be used to log
information about EAS alarms that occur at the
exit. Prompts appear on the scanner/deactivator
LCD.
1. Remove the scanner from its base charging
station.
2. Scan the receipt barcode.
3. Search for the active label or tag.
4. Verify that item causing alarm appears on the
receipt. Scan the product barcode, and
deactivate the label.
5. Repeat steps 3 and 4 until all active tags have
been detected and deactivated.
6. Return the scanner/deactivator to the base
charging station.
Maintenance
WARNING: Use the power button to turn
off the scanner/deactivator before cleaning
so eye damage from the scanner laser
does not occur.
The scanner/deactivator may be cleaned by wiping
it with a soft cloth. Do not use water or any
solvents for cleaning.
Glossary
Aperture: opening in the protective enclosure
through which laser radiation is emitted.
Emission Duration: Duration of a pulse or series
of pulses, or continuous operation, expressed in
seconds, during which human access to laser
radiation is permitted as a result of operation
and/or maintenance of a laser product.
Human Access: means capacity to intercept
laser radiation by any part of the human body
through any opening in the protective enclosure of
the product.
Laser: device that can be made to produce or
amplify electromagnetic radiation within a
specified wavelength by the process of controlled
stimulated emission.
Operator (user): any person, other than a service
person.
Use circular
motion to search
for tags.
Detection
range
(15cm/6in)
Deactivation range
(10cm/4 in)

AMB-4020 HAND-HELD SCANNER/DEACTIVATOR 8200-0369-04, REV. A
USER’S GUIDE 7 of 9
Service person: a person having appropriate
technical training and experience necessary to be
aware of hazards to which that person may be
exposed in performing a task and of measures to
minimize the risks to that person or other persons.
Symbols used within the manual: The symbol
of an exclamation mark inside a triangle
represents important warnings or cautions
concerning health and safety issues.
Specifications
Hand-Held
Scanner/Deactivator
Physical
(HHS/D, Base Charging Station, and Command
Module with Cable Management Enclosure)
Dimensions (L x W x H)................... 196 x 205 x 188 mm
(7.7 x 8 x 7.4in)
Weight ..........................................................1.4kg (50oz)
(Hand-Held Scanner/Deactivator only)
Dimensions (L x W x L)..................... 142 x 113 x 227mm
(5.6 x 4.4 x 8.9in)
Weight (including battery)............................. 964g (34oz)
Display.............................................. Monochrome FSTN
240 pixels (W) x 160 pixels (L)
(1/8 VGA size)
Touch Panel .............................................................. Yes
Backlight.......................................................EL backlight
Main Battery ............................Rechargeable Lithium Ion
1600 mAh (max. 8.4V, nominal 7.4V)
Backup Battery ........................................................None
Performance
Processors..............................Intel® Xscale architecture,
Motorola DSP56F807
Operating Platform........................ Microsoft® Windows®
CE.NET 4.1
Memory......................................................... 32MB RAM/
16MB FLASH
Communications................. 3 internal dedicated RS-232
CF Card Slot..........................................................Type II
Cards Supported...................................802.11b CF card,
Compact Flash Type II
Flash Memory card
Audio ....................................................Transducer piezo
Detection Distance (max).................. 15.25cm (6in)
Deactivation Distance (max) .............................. 10.25cm
(4in)
Operating Time ....................................3 hours with radio
@ 5 scans/minute
Standby Mode............................................. up to 5 hours
Keypad........................................... 25 keys (with cursor),
synthetic elastomer
Barcode Scanner
Integrated 1D decode Bar Code scanner
(CCD E1022 or Laser SE-923)................ UPC/EAN/JAN,
Code 39, Code 93, Code 128,
Interleaved 2 of 5, Discrete 2 of 5,
NW-7, UCC/EAN-128
LED Display ........................................ Upper front center
(Green, yellow, red)
Scan Triggers..............................................Pistol Trigger
Keyboard Scanner Trigger
Environmental
Operating Temperature............................. -10° to +40° C
(14° to 104° F)
Storage Temperature...................................-25° to 70° C
(13° to 158° F)
Environmental Sealing .......................... IP54 Category II
Humidity....................................................5% to 90% RH
(Non-condensing)
Drop Specification:........................................ 1.1m (44in.)
drop to concrete
Ambient Light
Indoor.........................................................450 ft-candles
(4,842 LUX)
Outdoor...................................................8,000 ft-candles
(86,112 LUX)
Electrostatic Discharge (ESD)............... +/-15 kVDC (air);
+/- 8 kVDC (contact)
Wireless Data Communications
Wireless Local Area Network (WLAN) .....................IEEE
standards-based internal
Compact Flash WLAN Card
Data Rate........................................................... 11 Mbps
(direct sequence)
Frequency Range..............................Country dependent;
typically 2.4 to 2.5 GHz
Output Power...............................................100 mW US;
100 mW international
Spreading Technique.............................Direct Sequence
EAS Synchronization ................................... Internal EAS
Sync-Link receiver
with internal antenna
WLAN Antenna .................................................... Internal

AMB-4020 HAND-HELD SCANNER/DEACTIVATOR 8200-0369-04, REV. A
USER’S GUIDE 8 of 9
Peripherals and Accessories
Cradles .........................Single-slot serial charging cradle
with security locking features
Communication/Charging ...................... Charging cradle
with universal power supply;
Ethernet 802.3,
RS-232 ports on cradle
Other Accessories ................................. Optional lanyard
Base Charging Station
Performance
Processor ...................................... Motorola DSP56F807
Operating Platform................................ Sensormatic O/S
Communications............................................. 3 RS-232,
RS-485,
Ethernet 802.3 port
EAS Synchronization....................................Sensormatic
Sync Link Transmitter
Contact Closures.............................................. 2 Output,
1 Input
Audio ............................................................. Transducer
LED Display..........................................One tri-color LED
(amber, green and red)
Environmental
Operating Temperature .............................-10° to +40° C
(14° to 104° F)
Storage Temperature...................................-25° to 70° C
(13° to 158° F)
Environmental Sealing ...........................IP54 Category II
Humidity.................................................... 5% to 90% RH
(Non-condensing)
Ambient Light
Indoor ........................................................450 ft-candles
(4,842 LUX)
Outdoor................................................... 8,000 ft-candles
(86,112 LUX)
Electrostatic Discharge (ESD) ...............+/-15 kVDC (air);
+/- 8 kVDC (contact)
Wireless Data Communications
Wireless Synchronization ......................................... EAS
Sync-Link transmitter
Peripherals and Accessories
Cradles......................... Single-slot serial charging cradle
with Security locking features
(Barcode Scan release feature)
Communication/Charging Cables.............Charging cable
with universal power supply;
Ethernet 802.3;
RS-232 port

AMB-4020 HAND-HELD SCANNER/DEACTIVATOR 8200-0369-04, REV. A
USER’S GUIDE 9 of 9
Declarations
Regulatory Compliance
Electrical Safety....................................UL 60950-1
CAN/CSA C22.2. No. 60950-1
EN60950-1
EMI/RFI ......................................... 47 CFR, Part 15
ICES-003
RSS 210
Hazardous Locations...................... Non-Hazardous
Locations ONLY, Pollution degree 2-as per
EN60950-1/UL60950-1 or equivalent.
FCC COMPLIANCE: This equipment complies with Part 15
of the FCC rules for intentional radiators and Class A digital
devices when installed and used in accordance with the
instruction manual. Following these rules provides reasonable
protection against harmful interference from equipment
operated in a commercial area. This equipment should not be
installed in a residential area as it can radiate radio frequency
energy that could interfere with radio communications, a
situation the user would have to fix at their own expense.
EQUIPMENT MODIFICATION CAUTION: Equipment
changes or modifications not expressly approved by
Sensormatic Electronics Corporation, the party responsible for
FCC compliance, could void the user's authority to operate the
equipment and could create a hazardous condition.
Other Declarations
WARRANTY DISCLAIMER: Sensormatic Electronics
Corporation makes no representation or warranty with respect
to the contents hereof and specifically disclaims any implied
warranties of merchantability or fitness for any particular
purpose. Further, Sensormatic Electronics Corporation
reserves the right to revise this publication and make changes
from time to time in the content hereof without obligation of
Sensormatic Electronics Corporation to notify any person of
such revision or changes.
LIMITED RIGHTS NOTICE: For units of the Department
of Defense, all documentation and manuals were developed at
private expense and no part of it was developed using
Government Funds. The restrictions governing the use and
disclosure of technical data marked with this legend are set
forth in the definition of “limited rights” in paragraph (a) (15)
of the clause of DFARS 252.227.7013. Unpublished - rights
reserved under the Copyright Laws of the United States.
TRADEMARK NOTICE: Ultra•Max and Sensormatic are
trademarks or registered trademarks of Sensormatic
Electronics Corporation. Windows is a registered trademark of
Microsoft Corporation. Other product names mentioned herein
may be trademarks or registered trademarks of Sensormatic or
other companies.
No part of this guide may be reproduced in any form without
written permission from Sensormatic Electronics Corporation.
The explanatory label and the warning label that
are affixed on the equipment are as follows:
RLJ 12/2004