U MEDIA Communications VRE3000 Verizon 5G Home Wi-Fi Extender User Manual
U-MEDIA Communications, Inc. Verizon 5G Home Wi-Fi Extender
User Manual

User guide
Verizon 5G Home Wi-Fi Extender
VRE3000

1
Contents
1. Product Overview .............................................................................................................................. 2
Verizon VRE3000 ...................................................................................................................................................................................... 3
Components and Indicators .................................................................................................................................................................... 3
LED Indicator States .......................................................................................................................................................................... 4
2. Package Content ................................................................................................................................ 5
3. Getting Started .................................................................................................................................. 7
Setting Up the Wi-Fi Extender ................................................................................................................................................................. 8
Step 1. Position your Wi-Fi Extender and Connected Device ......................................................................................................... 8
Step 2. Plug in your Wi-Fi Extender ................................................................................................................................................. 8
Step 3. Connect your Wi-Fi Extender to your router ...................................................................................................................... 9
Step 4. Find the Best Location for Your Wi-Fi Extender with the Extender Placement Tool ...................................................... 10
Step 5. Manage Your Wi-Fi Extender Settings ............................................................................................................................... 12
4. Wi-Fi Extender Settings ................................................................................................................... 13
Using the Admin Website ...................................................................................................................................................................... 14
Signing In to the Admin Website.................................................................................................................................................... 14
The Dashboard ................................................................................................................................................................................ 14
Navigation ....................................................................................................................................................................................... 15
Frequently Used Wi-Fi Extender Settings ............................................................................................................................................. 16
Extended Network Settings ............................................................................................................................................................ 16
Administration Settings .................................................................................................................................................................. 22
The About Screen............................................................................................................................................................................ 25
The Help Screen .............................................................................................................................................................................. 27
5. Troubleshooting .............................................................................................................................. 28
Frequently Asked Questions .................................................................................................................................................................. 29
6. Product Spec. and Regulatory Information ...................................................................................... 33
Product Specifications............................................................................................................................................................................ 34
Hardware Feature ........................................................................................................................................................................... 34
Internal Antenna Specification ....................................................................................................................................................... 34
Firmware Feature List ..................................................................................................................................................................... 34
Operational and Environmental Requirement .............................................................................................................................. 35
Certification/Regulation Requirement .......................................................................................................................................... 35
Regulatory Information .......................................................................................................................................................................... 36

1
Verizon VRE3000
Components and Indicators
Product Overview
1 Product Overview
3
Verizon VRE3000
Your Verizon VRE3000 is a tri-band Wi-Fi extender which works like a bridge between a Wi-Fi router and
Wi-Fi-capable devices (e.g., mobile phones, tablets, laptops, etc.) connected to your Wi-Fi network.
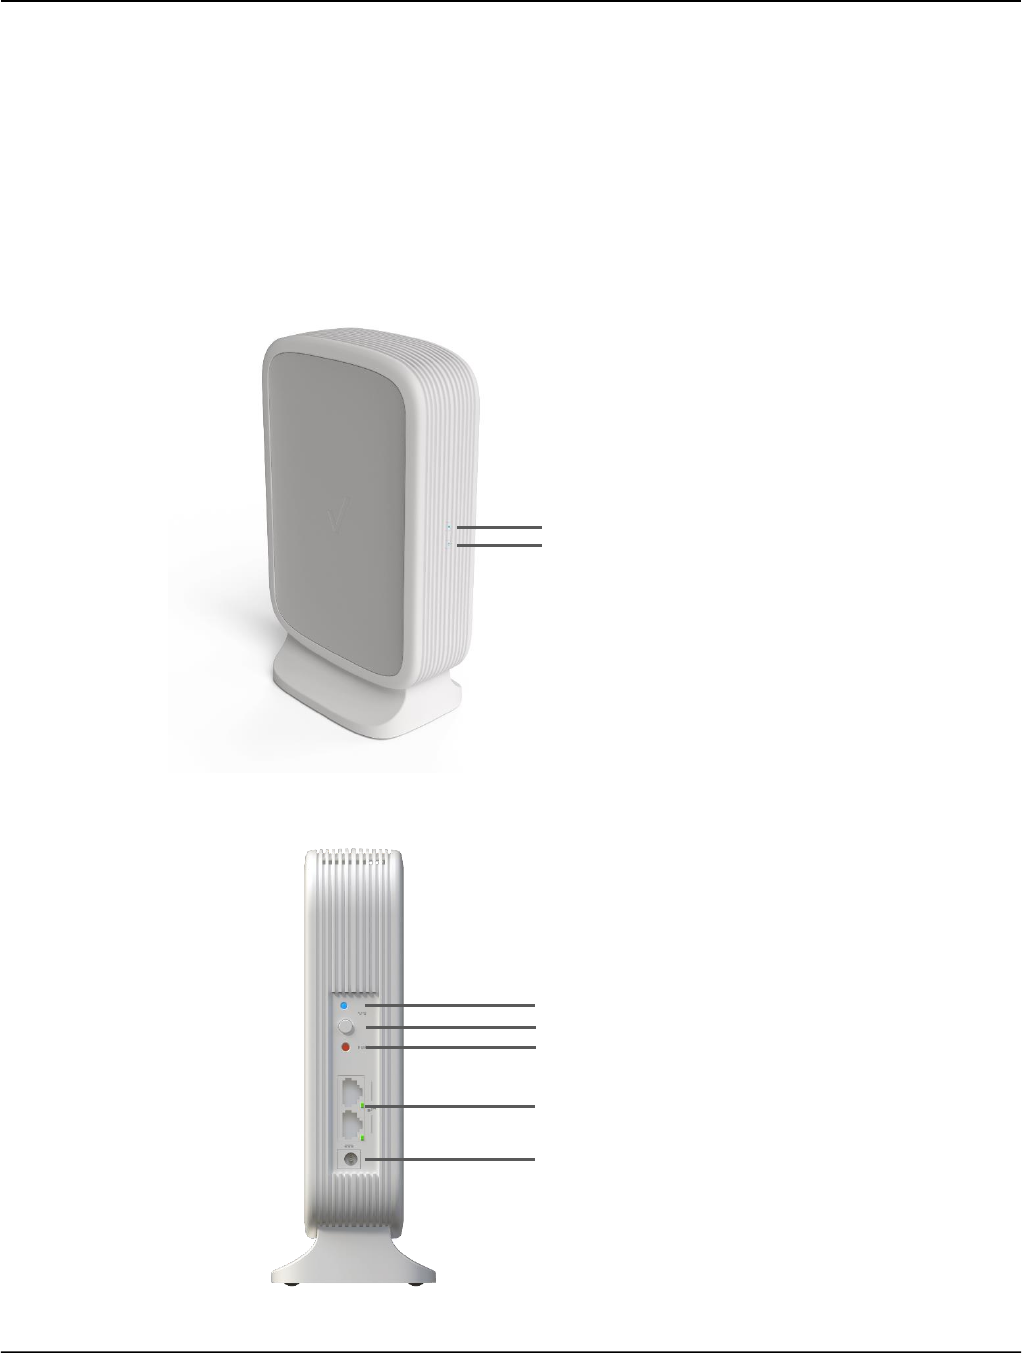
Components and Indicators
Front View
Rear View
2. Power indicator
1. Wi-Fi link indicator
3. WPS indicator
4. WPS button
5. Reset button
7. DC power port
6. Two Ethernet ports and indicators

1 Product Overview
4
1. Wi-Fi link indicator: Indicates 5 GHz connection to network router.
2. Power indicator: Shows if the Extender is on or off.
3. WPS indicator: Shows when Wi-Fi Protected Setup (WPS) is active.
4. WPS button: Use this button to connect your Wi-Fi Extender to your WPS-enabled Wi-Fi router to
extend the network. After setup, you can also use the WPS button to connect WPS-
enabled Wi-Fi devices to the extended network.
5. Reset button: Press this button to reset the Wi-Fi Extender to factory default settings:
Press and hold for at least 10 seconds until the Power indicator turns off. The
Wi-Fi Extender will return to its default settings. It can take around 1 minute
to turn back on.
6. Two Ethernet ports: Use these 2 Gigabit Ethernet RJ-45 LAN ports to connect LAN devices.
7. DC power port: Connect the power adapter that came in the package to the DC power connector.
Note:
The design is complete full set design. User should prohibit to remove anything from the product.
LED Indicator States
LED
STATE
DESCRIPTION
Wi-Fi link indicator
Blinking
Not connected to a Wi-Fi router/ Ready for setup/ Other error
Solid Blue
5 GHz connection with the Wi-Fi router is connected.
Power indicator
Blinking
Rebooting/ Starting up/ Software update.
Solid Blue
Power On
Off
Power Off
WPS indicator
Blinking
Slow flash: WPS setup is available for 2 minutes then it times out.
Fast flash: WPS setup failed.
Solid Blue
Solid for 20 seconds, then turns off: Successful WPS setup.
Off
WPS setup not in process. The light is off most of the time.
Ethernet indicator
Solid Green
An Ethernet device is connected to the Ethernet port.
Note: Devices and software are constantly evolving—the screen images and icons you see here are for reference only.

2. Package Content
S
Package Content
2
2 Package Content
6
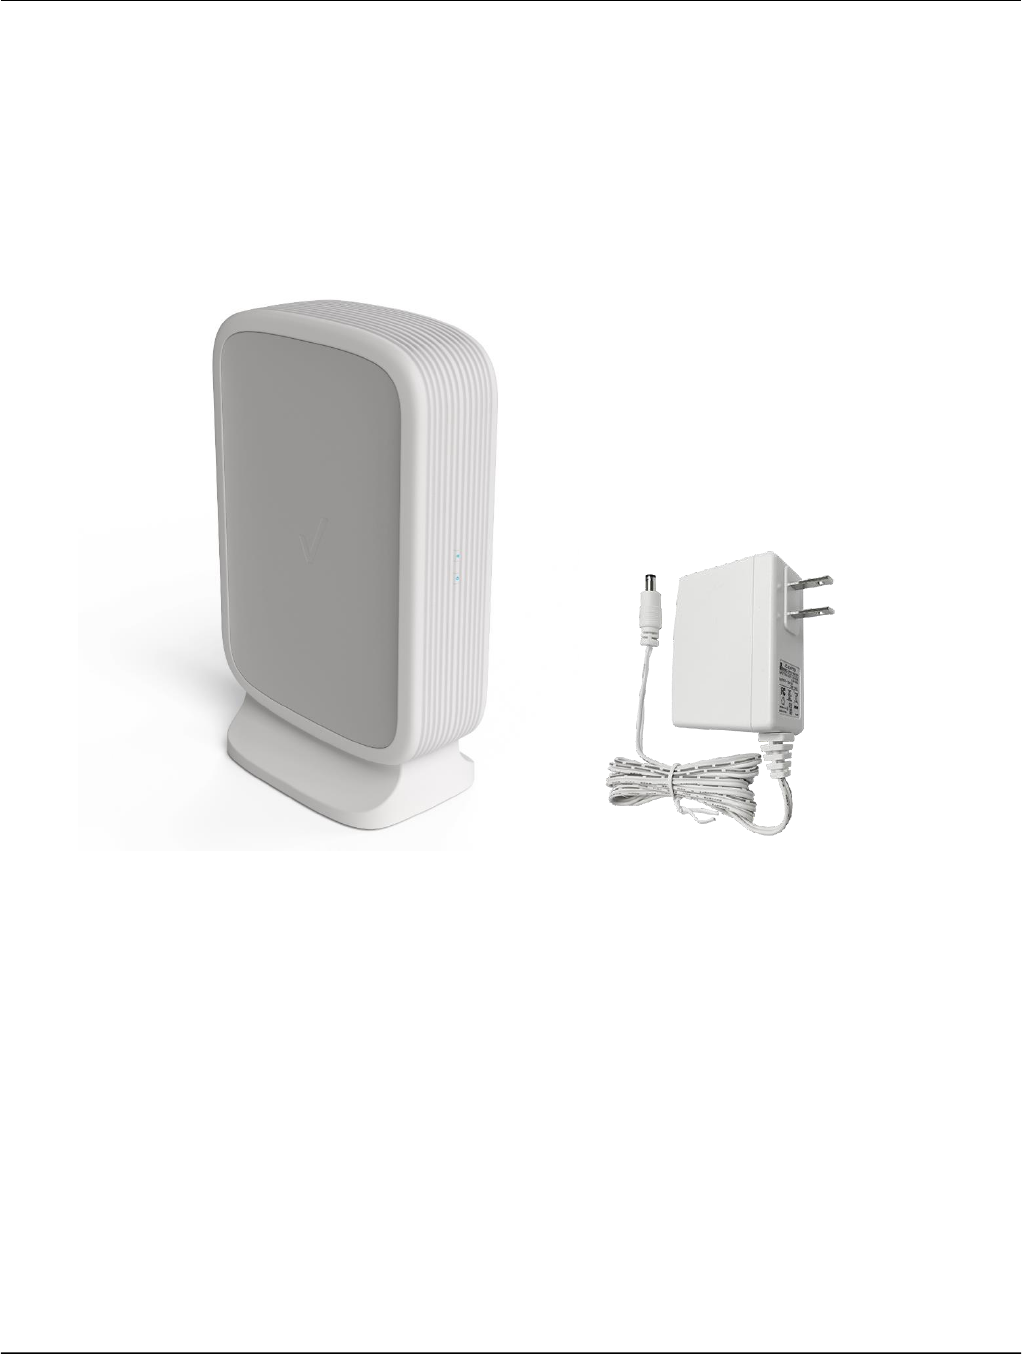
The package includes two parts within one box:
Verizon VRE3000 Wi-Fi Extender
Power Adapter (12V/2A)

3. Getting Started
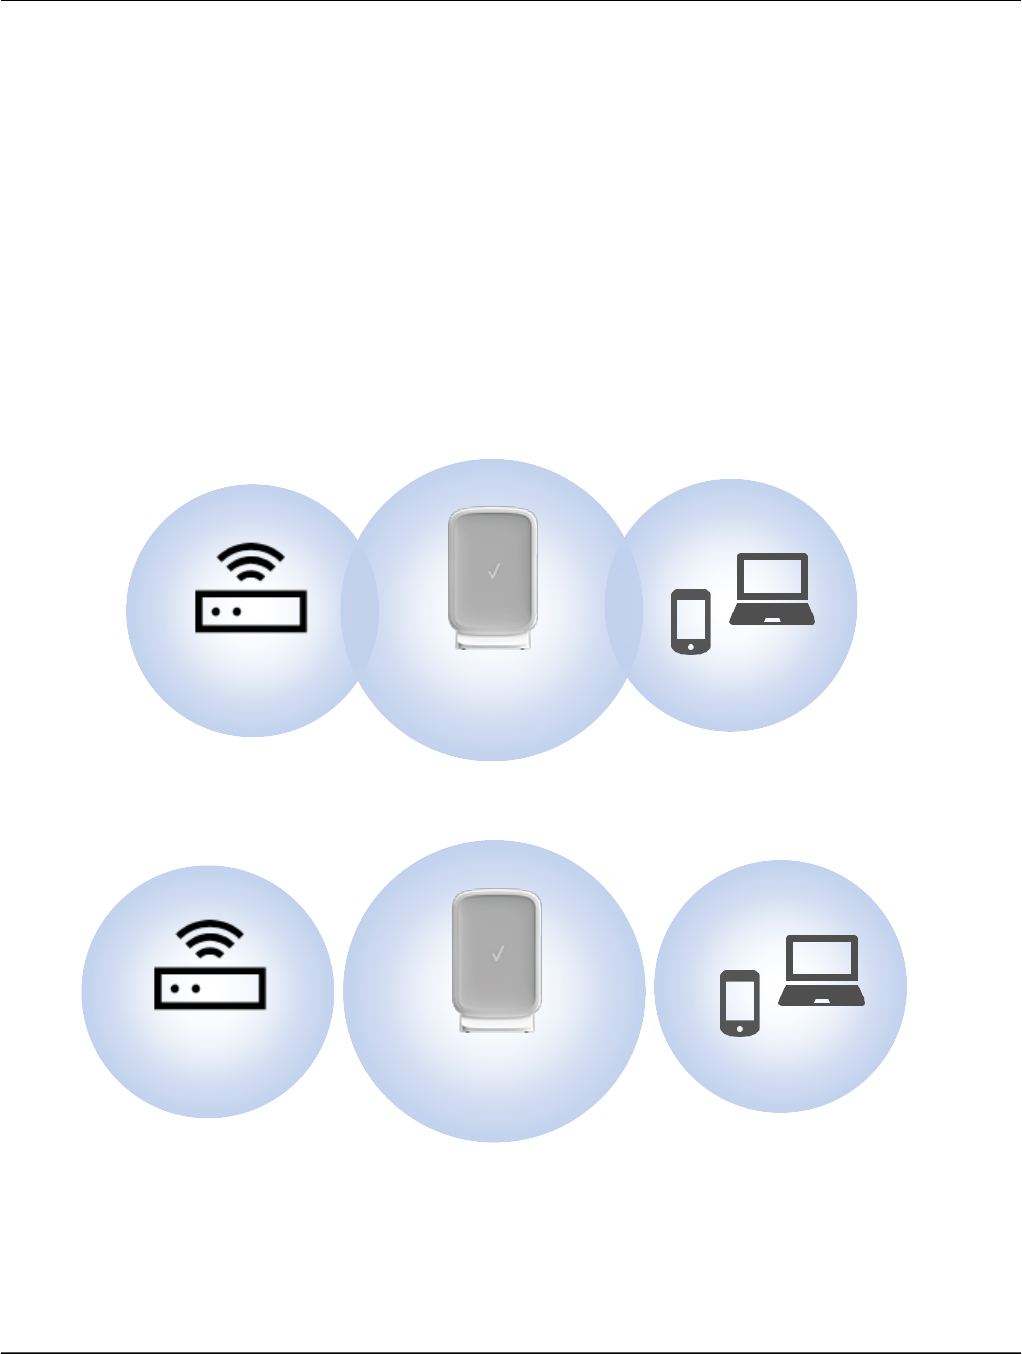
Setup Overview
VRE3000 rang Wi-Fi Extender functions as an access point which repeats existing Wi-Fi signals of your home or office 5GHz band Wi-
Fi allows main network access to Wi-Fi clients and two Ethernet wired device. Refer to figure belo
Wi-Fi Extender
5GHz Band
Wi-Fi Router
Client device
Client device
Client device
3
Getting Started
Setting Up the Wi-Fi Extender
3 Getting Started
8
Setting Up the Wi-Fi Extender
Your VRE3000 Wi-Fi Extender is designed to work with routers that have the 5 GHz Wi-Fi band (Band-1:
5150MHz ~ 5250MHz). Before you begin, make sure that your Wi-Fi router has this band. (Check your
router’s user guide, if you’re not sure.)
Step 1. Position your Wi-Fi Extender and Connected Device
Place your Wi-Fi Extender near your home Wi-Fi router. This will ensure that it’s close enough to connect
to the router’s Wi-Fi network. (If you plan on connecting with WPS, place the Extender so that you can
reach both devices easily.)
You’ll also want the computer (or tablet) that you’ll be using during setup nearby as well. It will need to
connect to your Extender’s Wi-Fi network during setup, or be close enough to be connected with an
Ethernet cable.
Step 2. Plug in your Wi-Fi Extender
Now that your Extender is in position, connect the DC power adapter to the DC power port on the
Extender. Then plug it into an electrical outlet. The power indicator on the Extender will blink while it
starts up. When it’s solid blue it’s ready to proceed.
Wi-Fi Extender
5 GHz Wi-Fi Router
Wi-Fi Devices
Recommended placement
Wi-Fi Extender
5 GHz Wi-Fi Router
Wi-Fi Devices
Devices too far apart
3 Getting Started
9
Note: If you have used this Extender before and want to start fresh, press and hold the reset button for 10
seconds to restore the Extender to its factory default settings. During reset, the Extender will turn off and
on again. Wait until the power indicator stops blinking and turns solid blue before moving to step 3.
Step 3. Connect your Wi-Fi Extender to your router
There are 2 ways to connect your Extender to your router:
Use a Wi-Fi-connected computer or tablet (Recommended)
Use a computer connected to the Extender with an Ethernet cable
Use a Wi-Fi-connected computer or tablet
Note: Before you begin, you may want to make sure that your computer or tablet is set to connect
automatically to your home router’s Wi-Fi network. This will ensure a seamless transition when your
Extender begins extending your home Wi-Fi network.
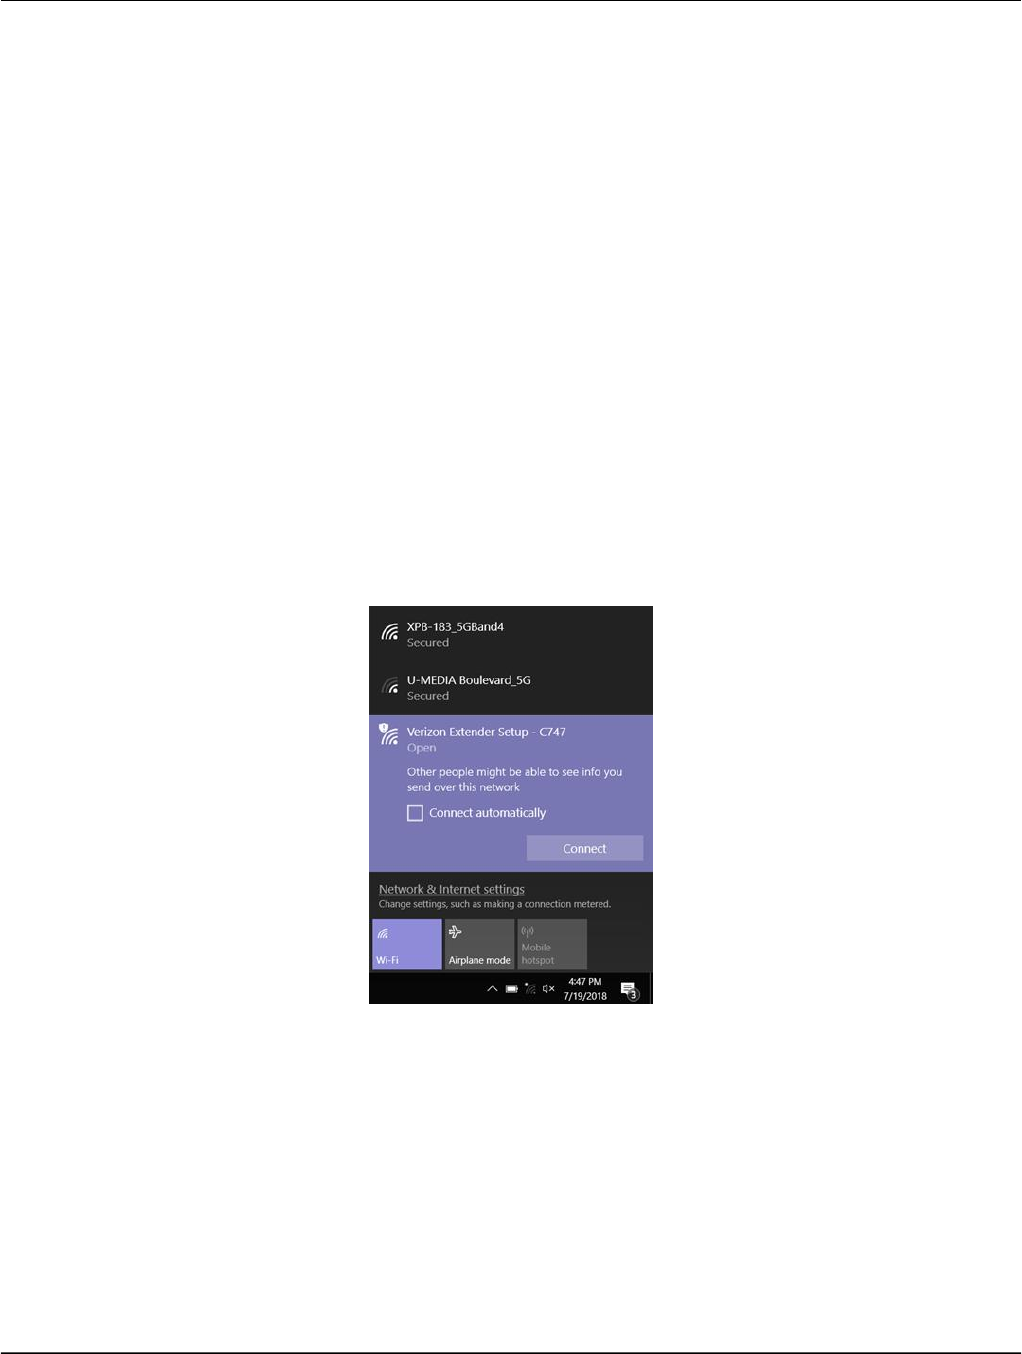
1. Go to your computer or tablet’s list of available Wi-Fi networks and connect to your Extender’s
Wi-Fi network (SSID): Verizon Extender Setup – XXXX.
Note: The XXXX is last four characters of the Extender’s MAC address. You can find your Extender’s full
Default Network Name on the sticker on the bottom of your Extender.
2. On your connected device, open a web browser and enter:
http://verizonre (Windows and Android)
http://verizonre.local (Mac OS X or iOS)
Or try http://192.168.0.250
3. The browser will show the Extender’s Setup Wizard. Follow the onscreen steps to complete setup.

3 Getting Started
10
Use a computer connected to the Extender with an Ethernet cable
You can also connect your computer to one of the Extender’s two Ethernet ports with an Ethernet cable.
Once you’ve connected your computer, open a web browser and enter:
http://verizonre (Windows and Android)
http://verizonre.local (Mac OS X or iOS)
Or try http://192.168.0.250.
The browser will show the Extender’s Setup Wizard. Follow the onscreen steps to complete setup.
Step 4. Find the Best Location for Your Wi-Fi Extender with the Extender Placement
Tool
Now that your Extender is connected to your router’s Wi-Fi network, you can move it to increase the
range of your network. Your Extender’s Admin website has a tool to help you find the best location.
1. If you haven’t already, make sure the device you’ll use to visit the Admin website is connected to your
extended network.
2. If you’ve just completed the Setup Wizard, you can tap Admin Website on the Setup complete! screen
and sign in.
If not, open a web browser and go to one of the addresses below. (You’ll also find these URLs on the
label on the bottom of your Extender.) Then sign in.
http://verizonre (Windows and Android)
http://verizonre.local (Mac OS X or iOS)
Note: If you have trouble connecting to the Admin website, try this:
1. Disconnect the device from the extended network.
2. Move the device closer to the Wi-Fi Extender.
3. Reconnect to the network.
(See Q2. What can I do if I cannot access the Extender’s Admin website? in the Troubleshooting section for more
information.)
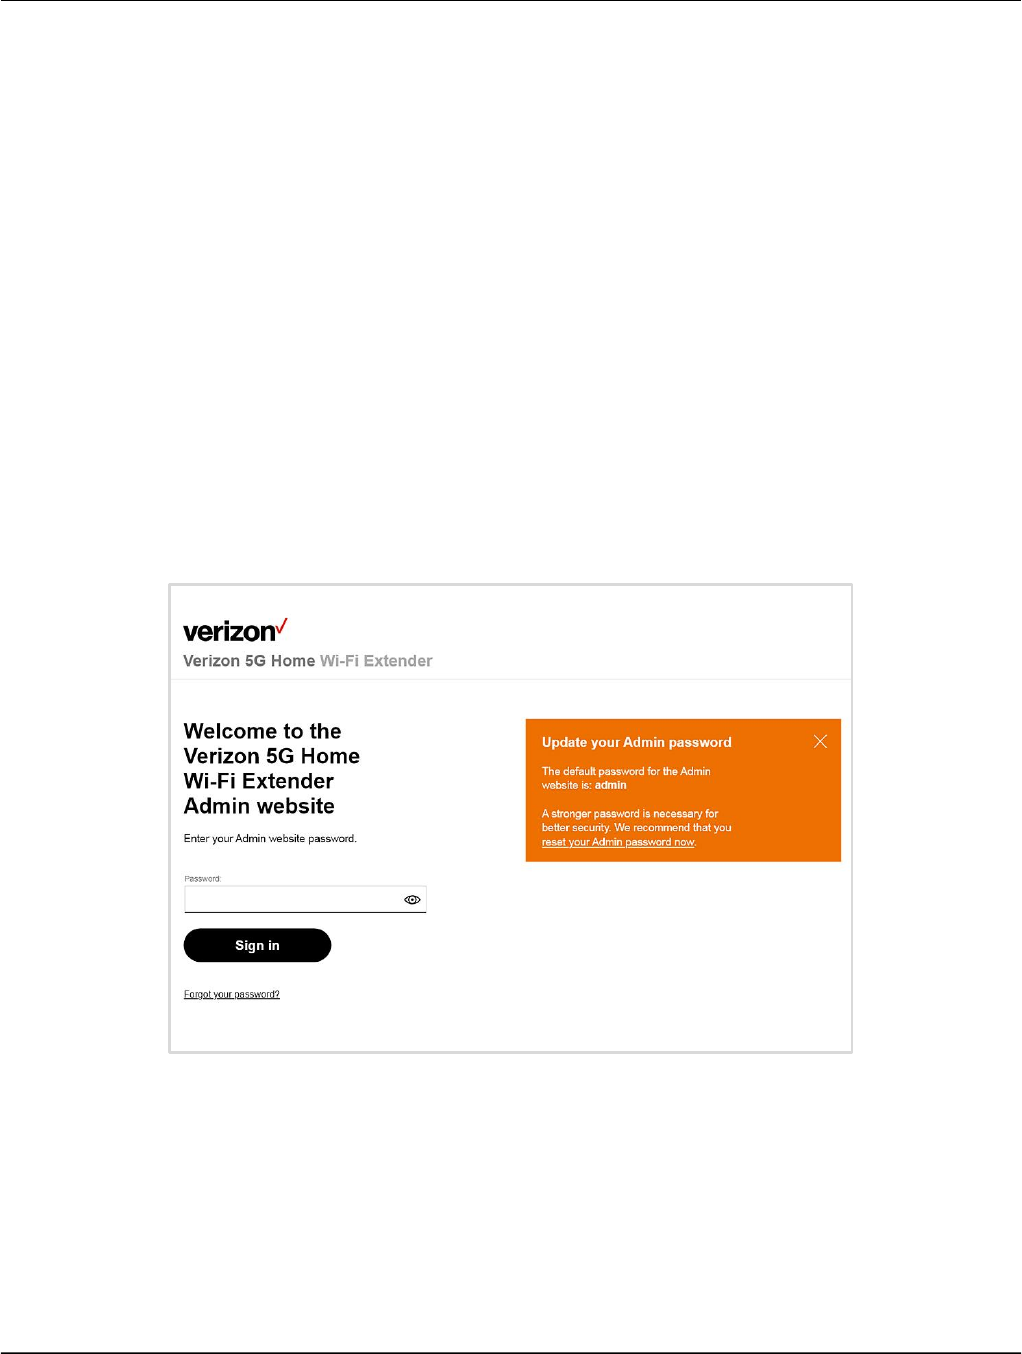
For security, it’s recommended that you change your Admin password at this point.
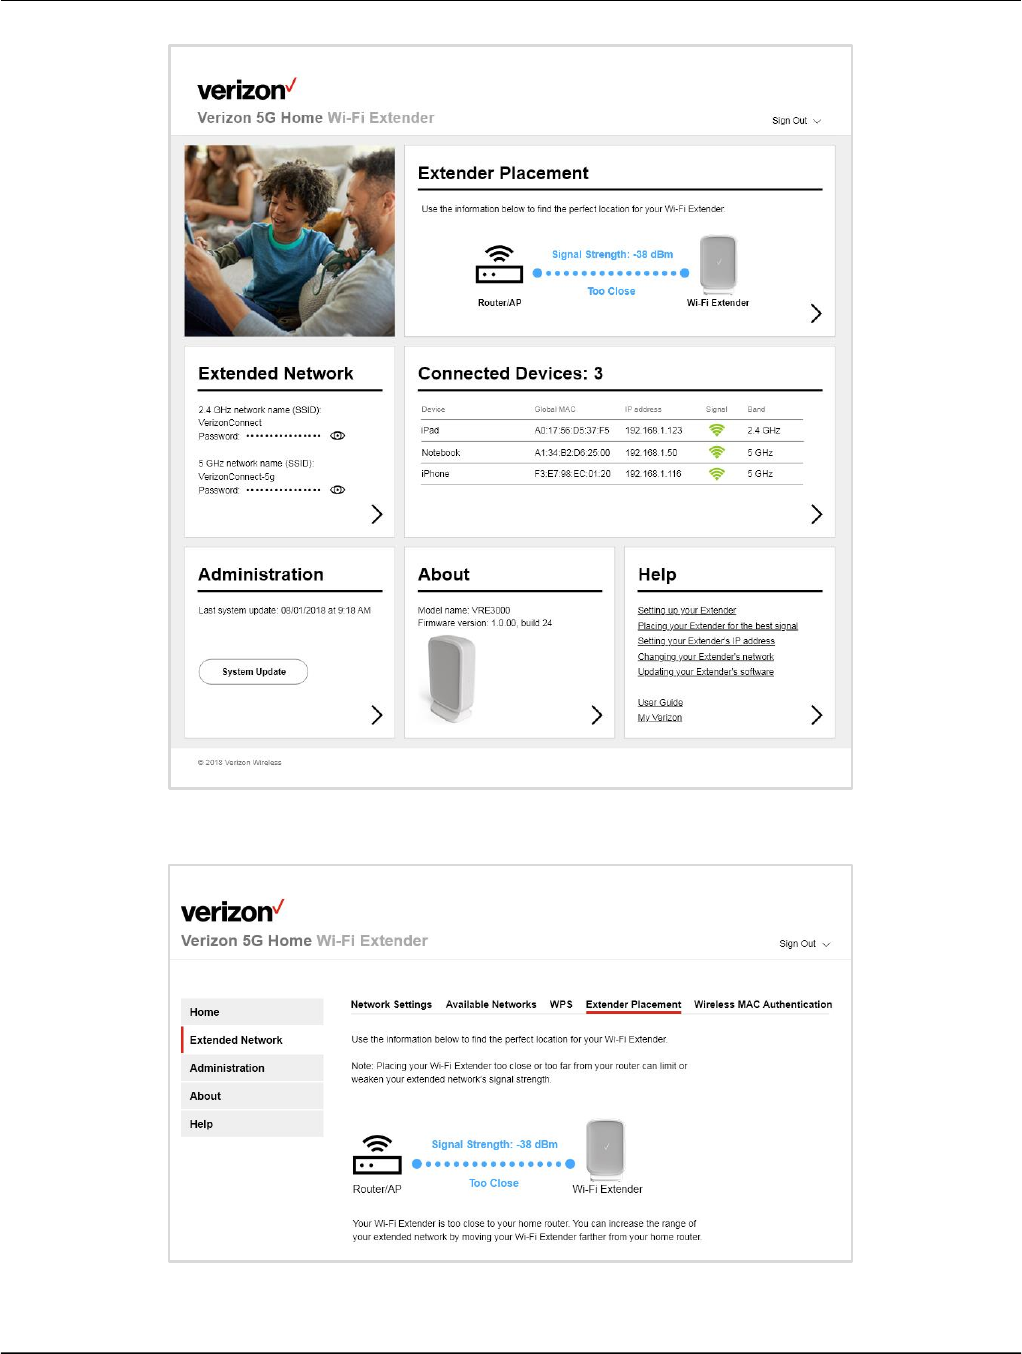
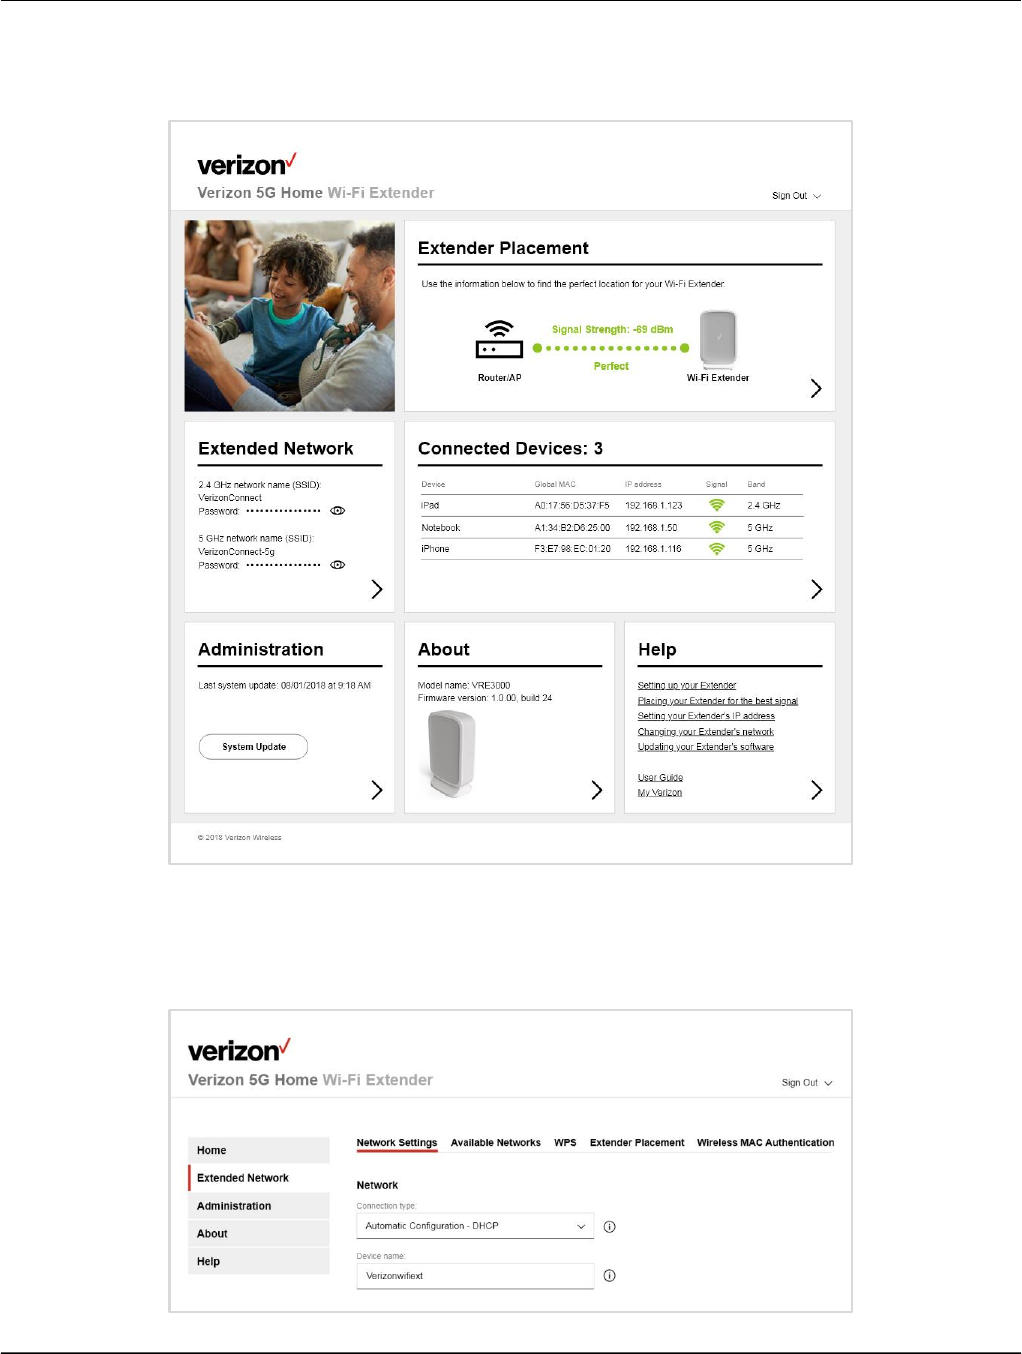
3. After you’ve signed in, you’ll see the Admin website’s Dashboard. The Extender placement card on the
Dashboard will tell you if your Extender is too close, too far, or perfectly placed. Click the > on the card
for more information.
3 Getting Started
11
3 Getting Started
12
4. If your Extender placement isn’t perfect, unplug the Wi-Fi Extender and move it to a location about
halfway between your Wi-Fi router and an area where you’ve had a poor Wi-Fi connection in the past.
Check the Extender Placement screen again and follow the onscreen instructions to adjust your
Extender’s location as needed.
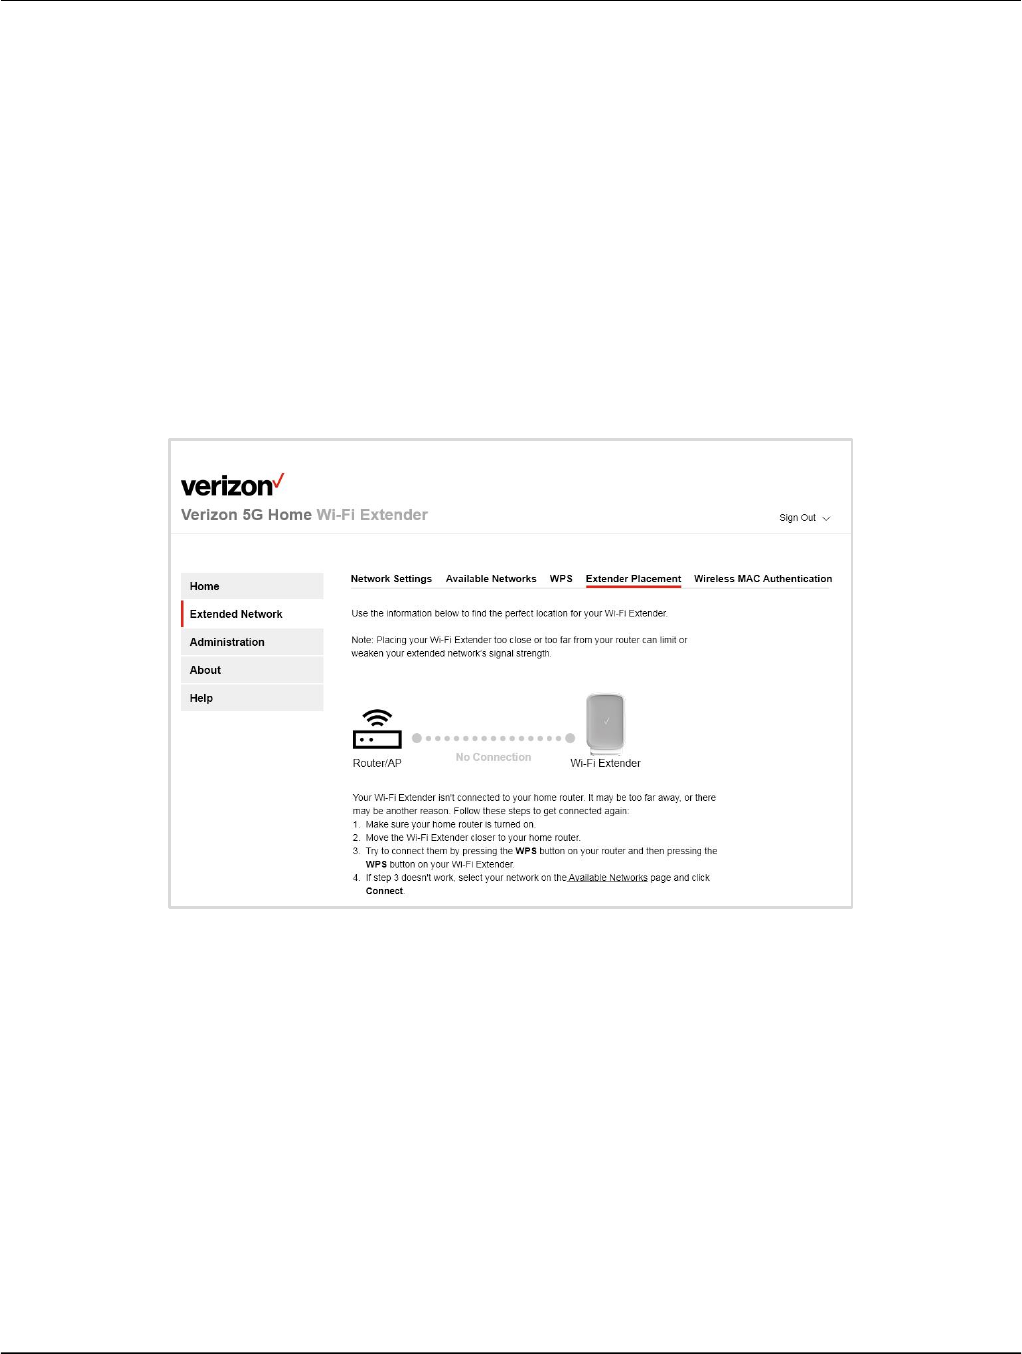
Note: If you’ve placed the Extender so far from your router that it can’t connect, the Extender Placement
tool will show “No Connection” and the Wi-Fi Link indicator on the Extender will blink. For more
information, see the Troubleshooting section of this guide.
Step 5. Manage Your Wi-Fi Extender Settings
Now that your Extender is in the perfect location, you can also use the Admin website to get information
about your Extender — like which Wi-Fi devices are connected to it — and to manage your Extender’s
settings.
Go to Chapter 4 Wi-Fi Extender Settings to learn more.

4
Wi-Fi Extender Settings
Using the Admin Website
Frequently Used Wi-Fi Extender Settings
4 Wi-Fi Extender Settings
14
Using the Admin Website
Use your Wi-Fi Extender’s Admin website to get information about Extender status and manage your
Extender’s settings.
Signing In to the Admin Website
To access the Admin website, your computer or tablet needs to be connected to the Extender either
through the Wi-Fi network or the with an Ethernet cable.
Open a web browser and go to one of the addresses below. Then sign in.
http://verizonre (Windows and Android)
http://verizonre.local (Mac OS X or iOS)
Note: If you have trouble connecting to the Admin website, try this:
1. Disconnect the device from the extended network.
2. Move the device closer to the Wi-Fi Extender.
3. Reconnect to the network.
(See Q2. What can I do if I cannot access the Extender’s Admin website? in the Troubleshooting section for more
information.)
Note: If the password wasn’t changed after setup, the password is still the default password: “admin”.
The Dashboard
From the Dashboard on the Admin website’s Home screen, you can see information on:
Extender placement
The extended network’s network names and passwords
Connected devices
System updates (in the Administration card)
4 Wi-Fi Extender Settings
15
Model name and firmware version (in the About card)
Links to Help topics, the User Guide, and My Verizon (in the Help card)
Navigation
From the Dashboard, tap the > in any card in to go to the screen for that topic. From other pages, tap the
topic in the side bar.
4 Wi-Fi Extender Settings
16
Frequently Used Wi-Fi Extender Settings
Extended Network Settings
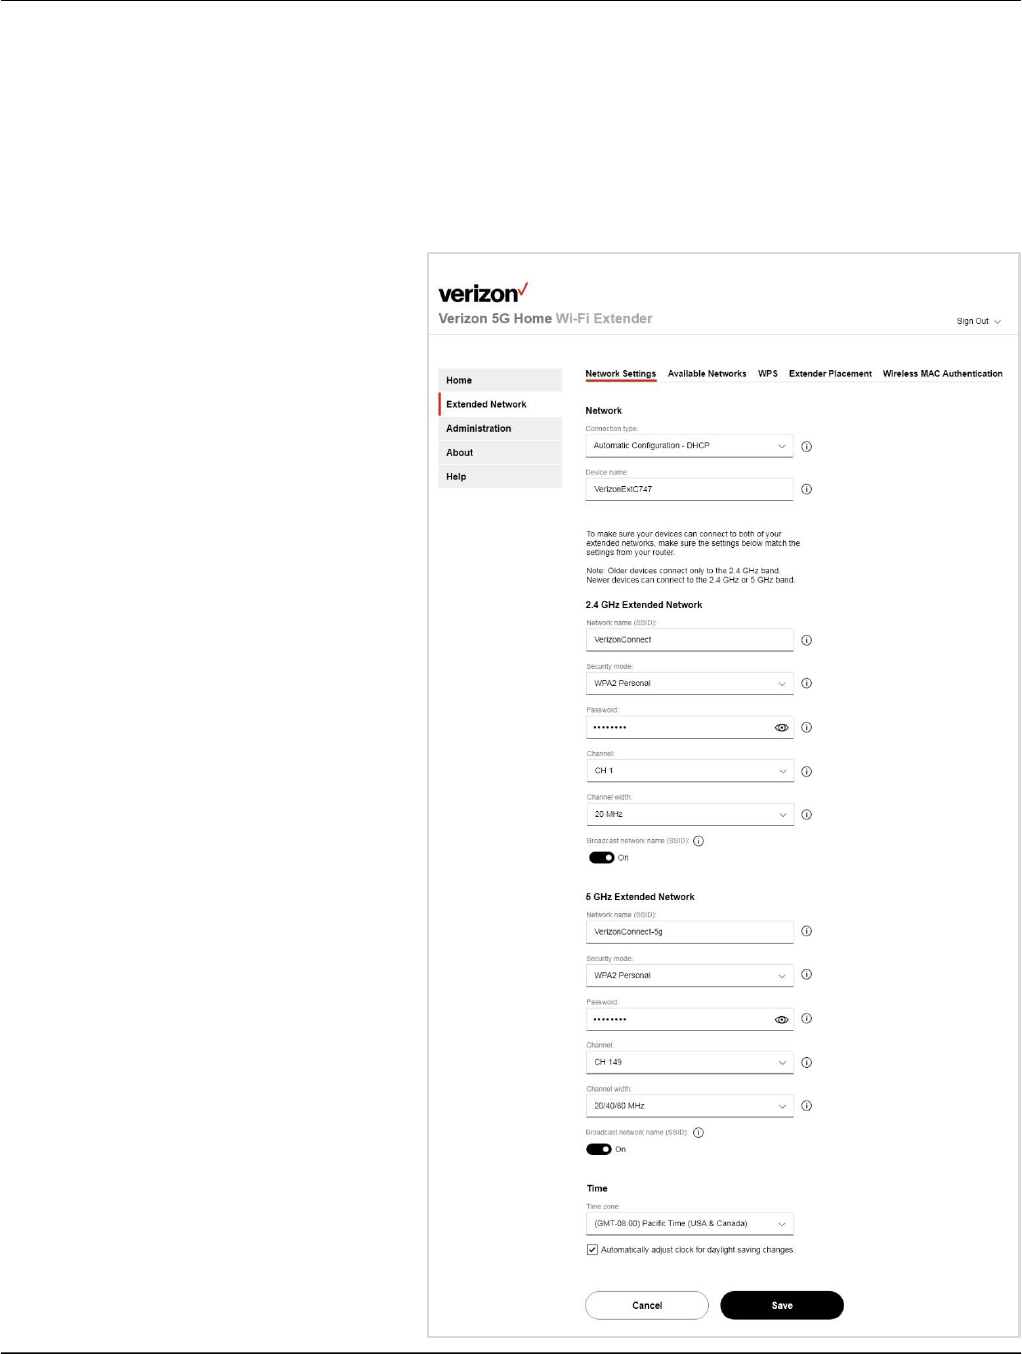
The VRE3000 Wi-Fi Extender supports 2.4 GHz and 5 GHz Wi-Fi networks.
From the Dashboard, click the > in the Extended Network card.
The Extended Network screen is divided
into 5 tabs:
1. Network Settings
2. Available Networks
3. WPS
4. Extender Placement
5. Wireless MAC Authentication
Managing the Extender’s IP Address
You can change the type of connection
between the Wi-Fi Extender and the Wi-
Fi Router (DHCP or Static IP).
1. Go to Extended Network > Network
Settings.
2. Under Network, in the Connection
Type field, select:
Automatic Configuration –DHCP
to have your Wi-Fi Extender's IP
address assigned by your Wi-Fi
router
or
Static IP to use a fixed address to
connect to the internet.
3. Click Save.
Changing the Wi-Fi Extender’s Name
You can change the name of your Wi-Fi
Extender to make it easier to find in a
list of devices. The default device name
is VerizonExtXXXX, where XXXX is the
last four characters of the default MAC
address.
1. Go to Extended Network > Network
Settings.
2. Under Network, enter the new
Device name.
3. Click Save.

4 Wi-Fi Extender Settings
17
Changing the Extended Network Names and Passwords
1. Go to Extended Network > Network Settings.
2. Scroll down. Here you’ll find information for both the 2.4 GHz and 5 GHz extended networks. From
here you can change the Network name (SSID) and Password fields, as well as Security mode,
Channel and Channel width, for each extended network.
3. Click Save.
Note: Wi-Fi devices will disconnect from the extended network when the network name and password
are changed. To avoid interruptions in the connection when moving between the router’s Wi-Fi network
and the extended network, it’s recommended that the network names and passwords of both networks
match.
Turning Off the SSID Broadcast
You can turn off Broadcast network name (SSID) so that the name of the extended network won’t appear
in the list of available networks of nearby Wi-Fi devices. To connect to your network, others will have to
know the network name (SSID) and enter it manually into their Wi-Fi Settings along with the password.
1. Go to Extended Network > Network Settings.
2. Scroll down. Here you’ll find information for both the 2.4 GHz and 5 GHz extended networks. Each
network has its own Broadcast network name (SSID) switch. Click each one to turn it Off.
3. Click Save.
Note: If the router is broadcasting the network name, it will still be detectable to other devices. Consult
your router’s user guide for information on turning off your router’s Broadcast network name (SSID)
setting.

4 Wi-Fi Extender Settings
18
Selecting a Network to Extend
If your Extender becomes disconnected from your router's network, or if you want to change which
network it’s extending, you can choose one from the list of available networks.
1. Go to Extended Network > Available Networks. (You may need to wait while the Extender scans for
available networks.)
2. Follow the onscreen instructions. You can connect with WPS or select a network from the list and
connect using a password.
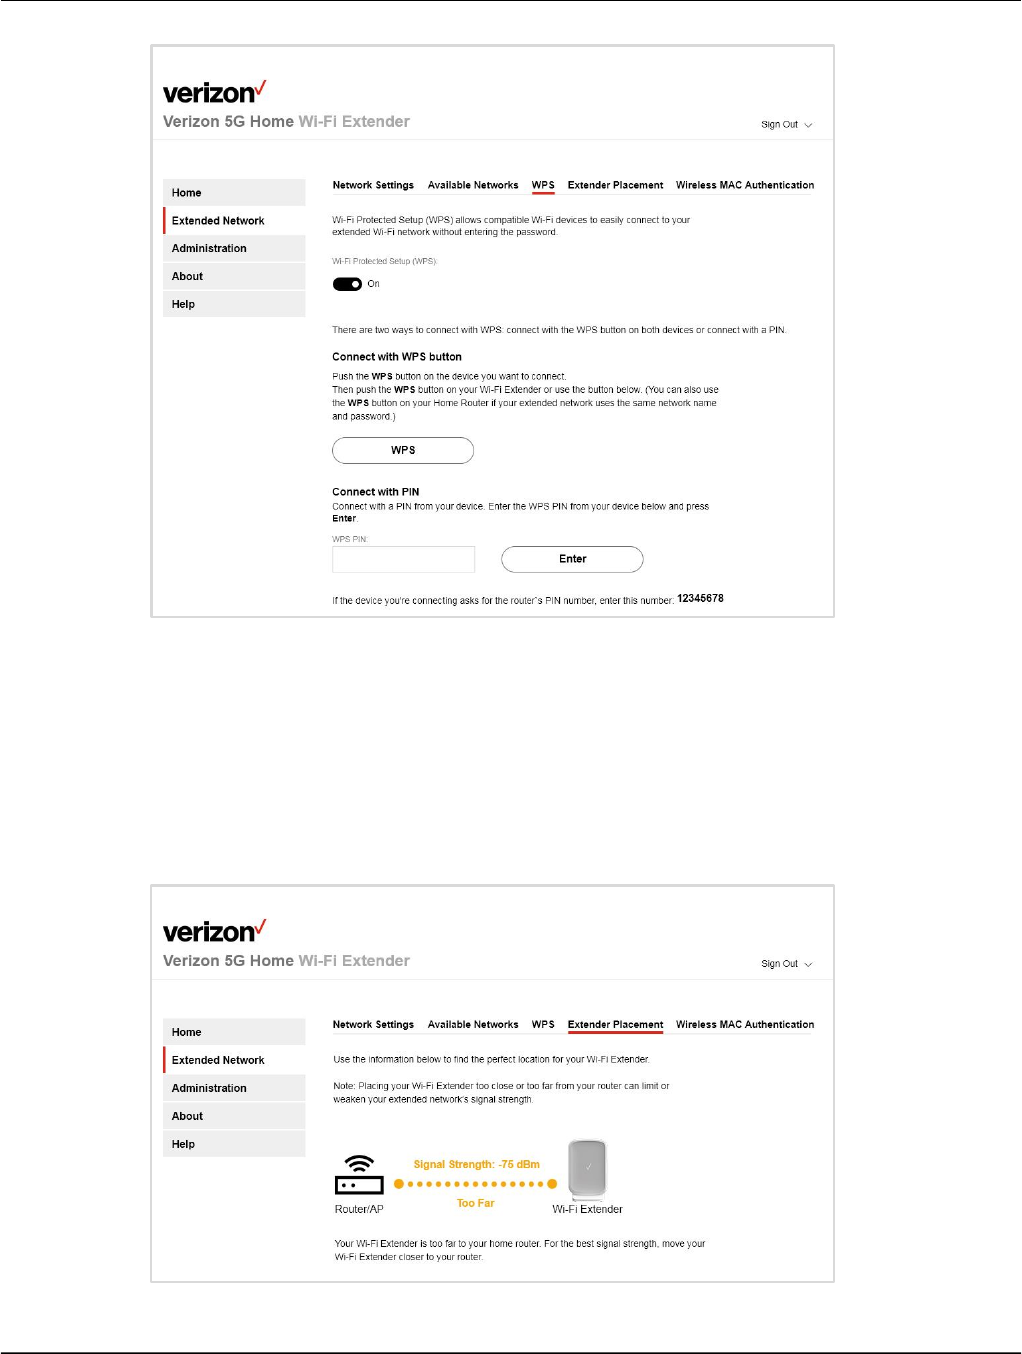
Connecting Devices to the Extended Network with WPS
Wi-Fi Protected Setup (WPS) allows compatible Wi-Fi devices to easily connect to your extended Wi-Fi
network without entering the password.
1. From the Extended Network screen, tap the WPS tab.
2. Turn on Wi-Fi Protected Setup (WPS).
3. Follow the onscreen instructions to Connect with WPS button or Connect with PIN.
Note: If your device asks for a PIN number, you’ll find that on this screen as well.
4 Wi-Fi Extender Settings
19
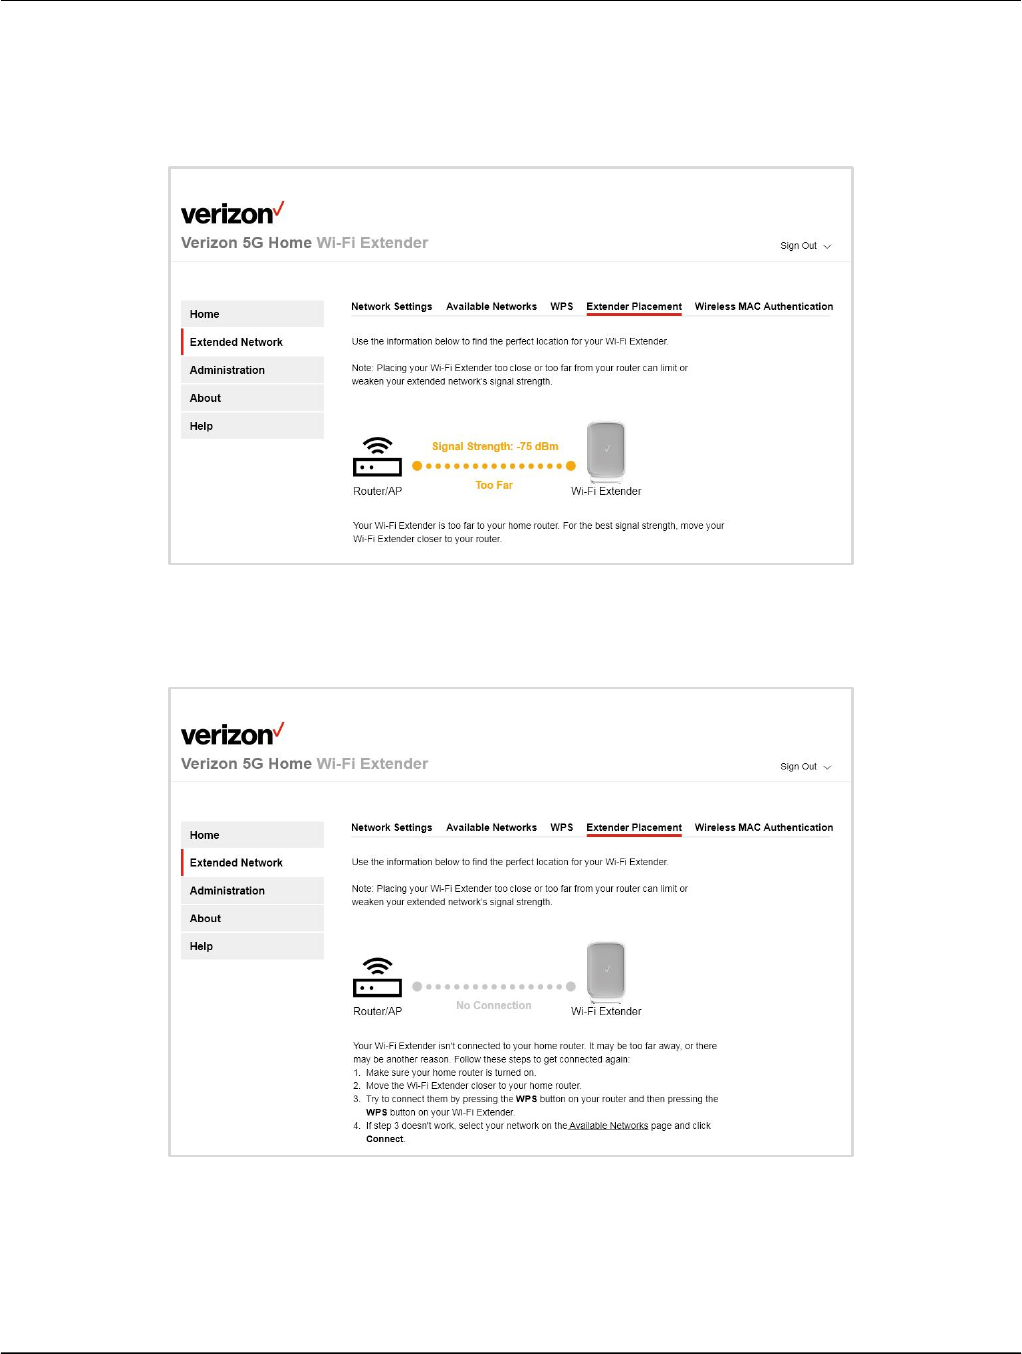
Finding the Best Location for your Wi-Fi Extender
To get the best coverage for your extended network, you need to place your Wi-Fi Extender far enough
from your router to extend coverage, but close enough to have a strong signal. The Extender Placement
tool in the Admin website can help you do that.
1. From the Extended Network screen, tap the Extender Placement tab.
2. The tool will tell you if your Extender is too close, too far, or perfectly placed.
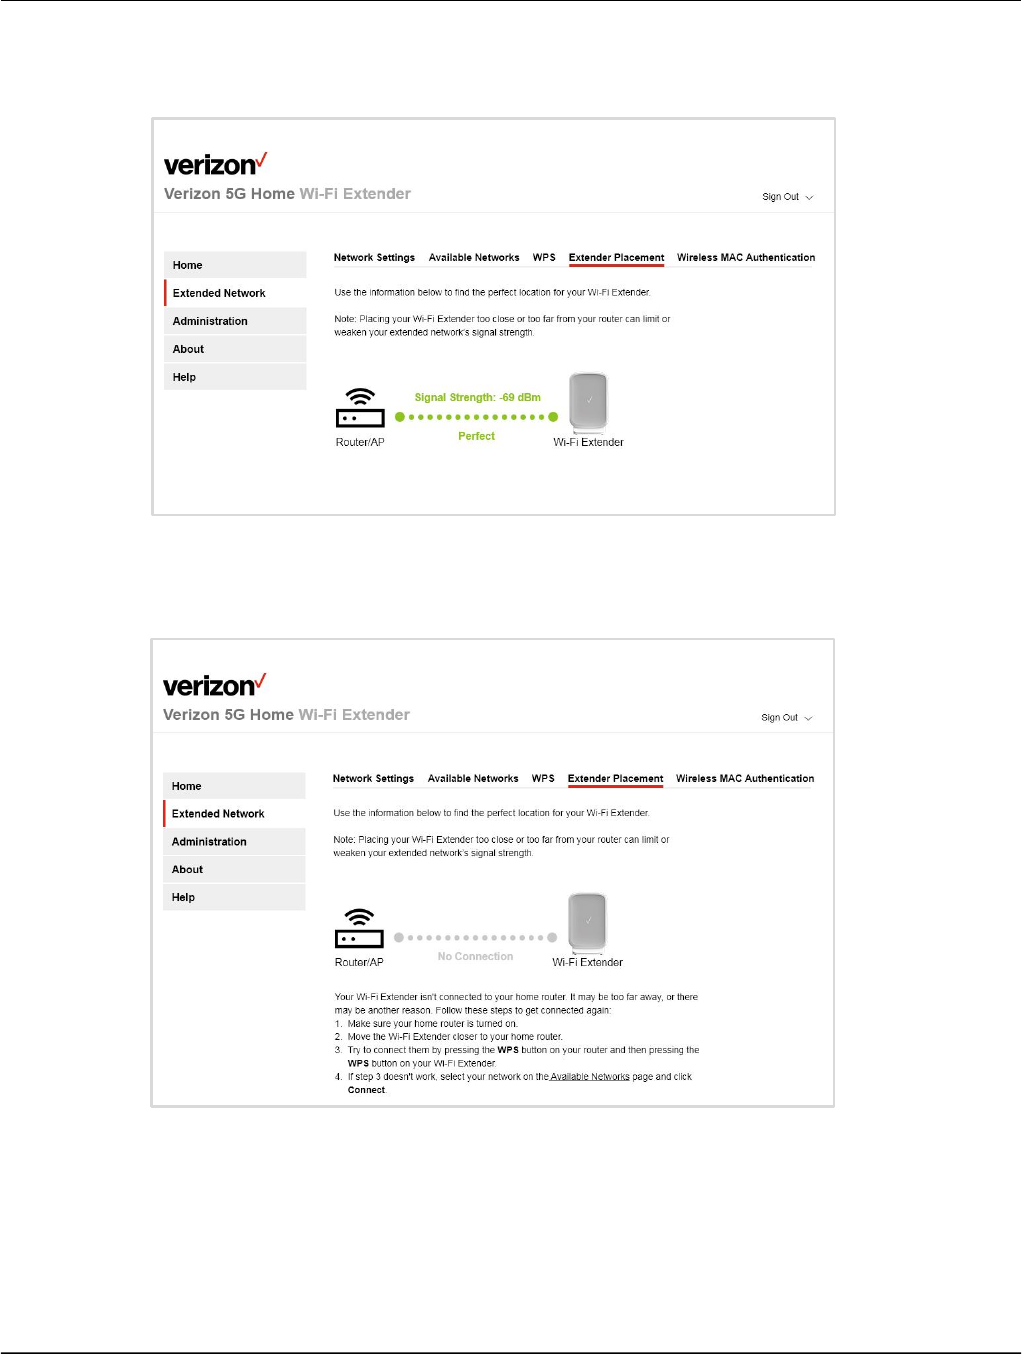
4 Wi-Fi Extender Settings
20
3. If your Extender placement isn’t perfect, follow the onscreen instructions about how to improve its
location. Repeat as needed until it’s perfect.
Note: If you’ve placed the Extender so far from your router that it can’t connect, the Extender Placement
tool will show “No Connection” and the Wi-Fi Link indicator on the Extender will blink. For more
information, see the Troubleshooting section in this guide.
4 Wi-Fi Extender Settings
21
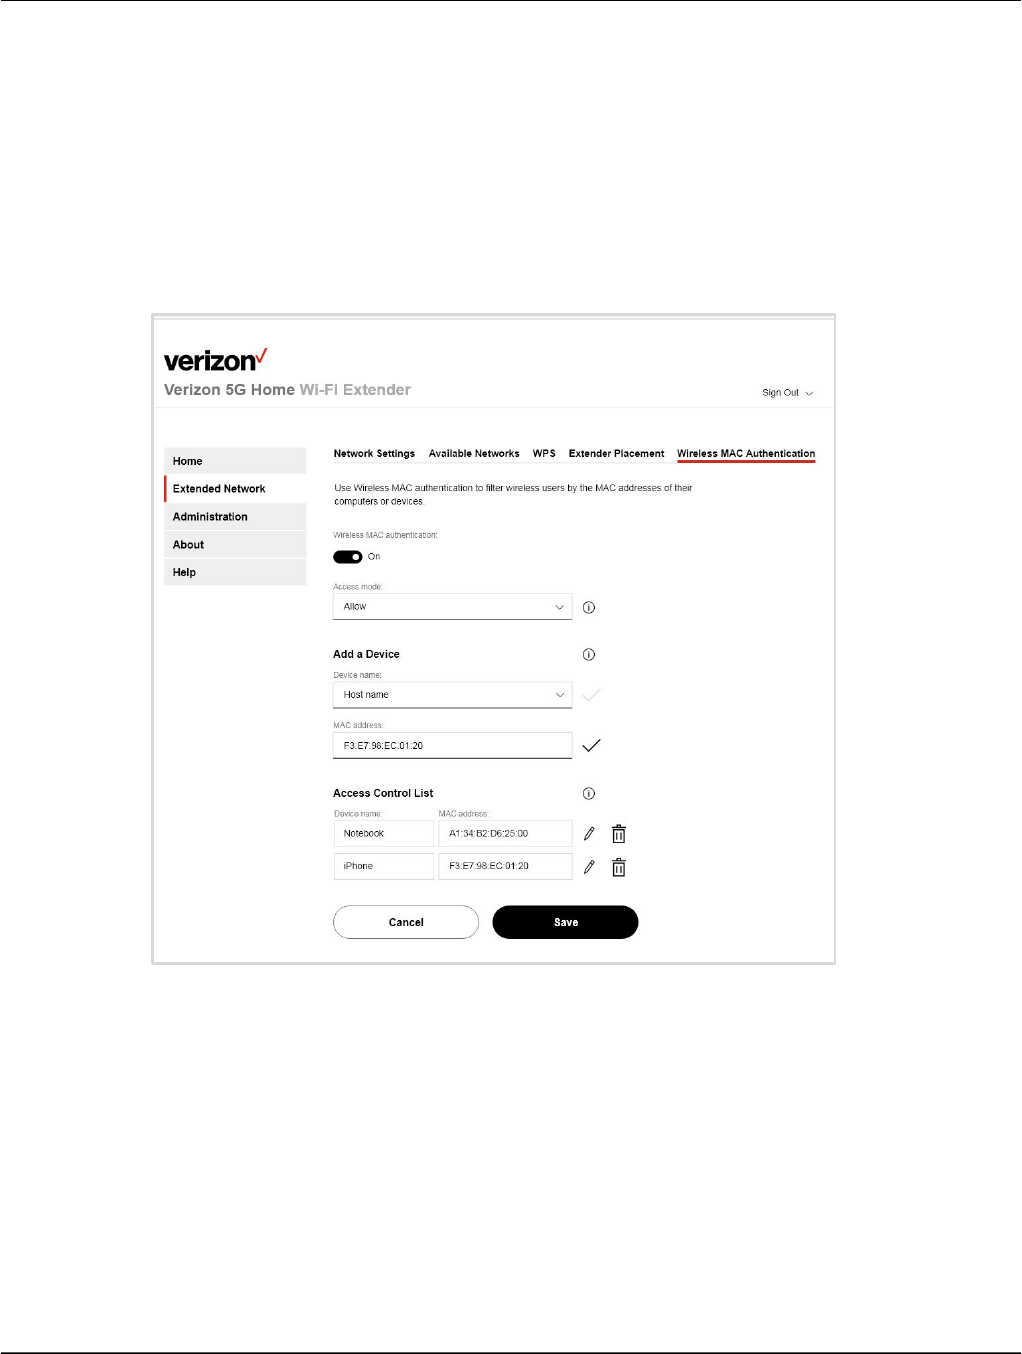
Controlling Access with Wireless MAC Authentication
Wireless MAC authentication can be used to block or allow wireless users by the MAC addresses of their
computers or devices.
1. Go to Extended Network > Wireless MAC Authentication.
2. Turn on Wireless Mac authentication.
3. Under Access mode, select Allow to let only selected devices connect, or select Deny to prevent
selected devices from connecting.
4. Add or remove devices from the Access Control List.
5. Click Save.
4 Wi-Fi Extender Settings
22
Administration Settings
From the Dashboard, click the > in the Administration card or click Administration in the side bar.
The Administration screen is divided into 4 tabs:
1. Admin Password
2. Backup and Restore
3. Activity Log
4. Software Updates
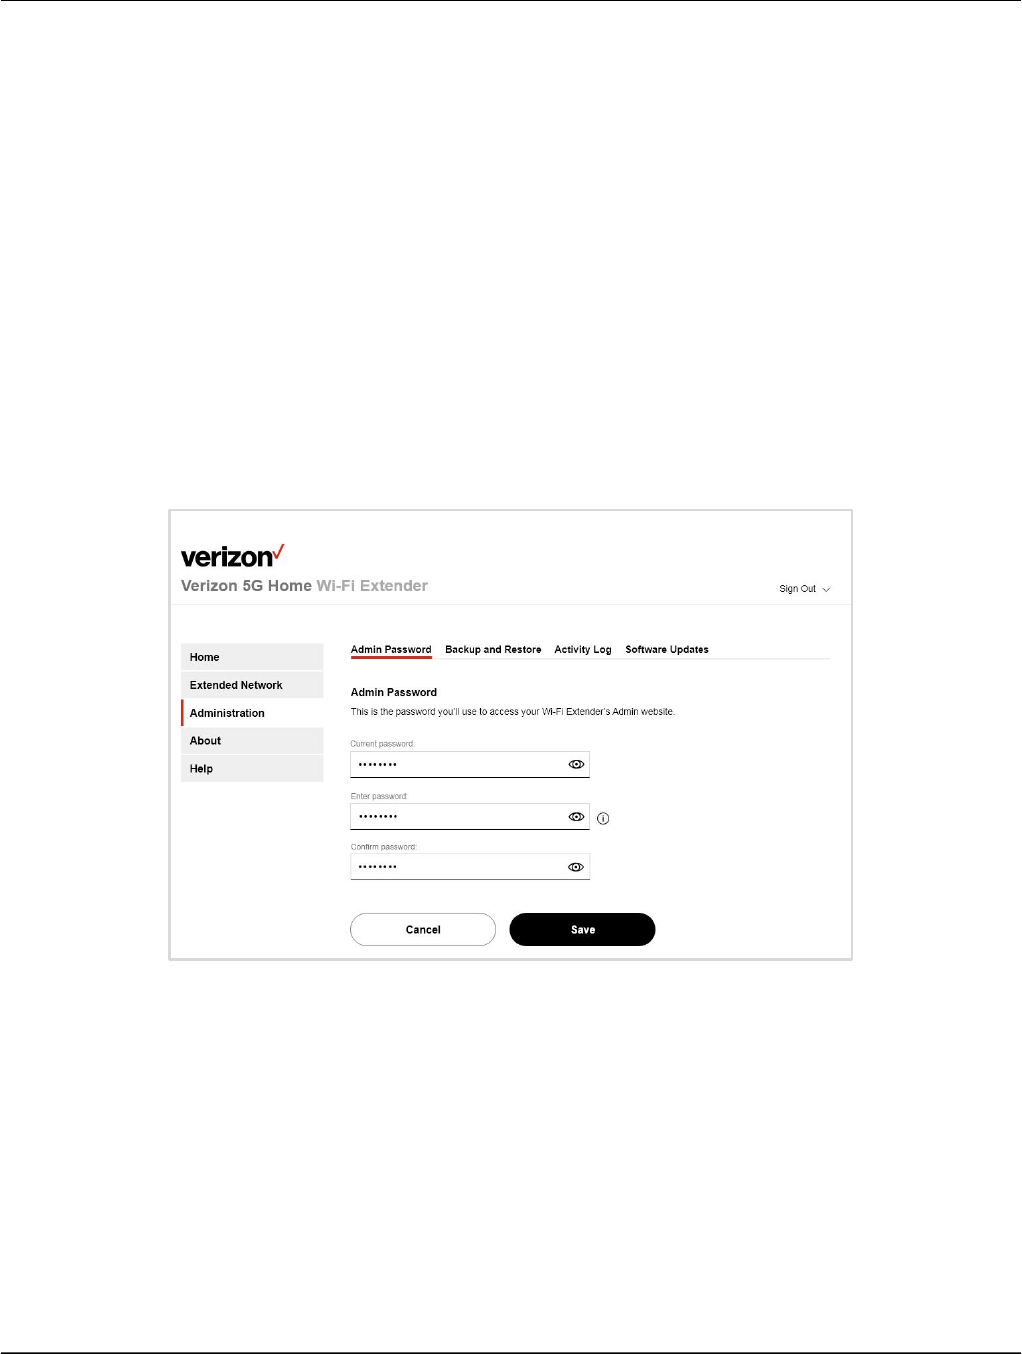
Changing the Admin Password
For better security, we recommend you change the Admin password from the default password.
Note: The factory default sign in password is “admin”.
1. Go to Administration > Admin Password
2. Enter the Current password.
3. Enter and confirm the new password.
4. Click Save.
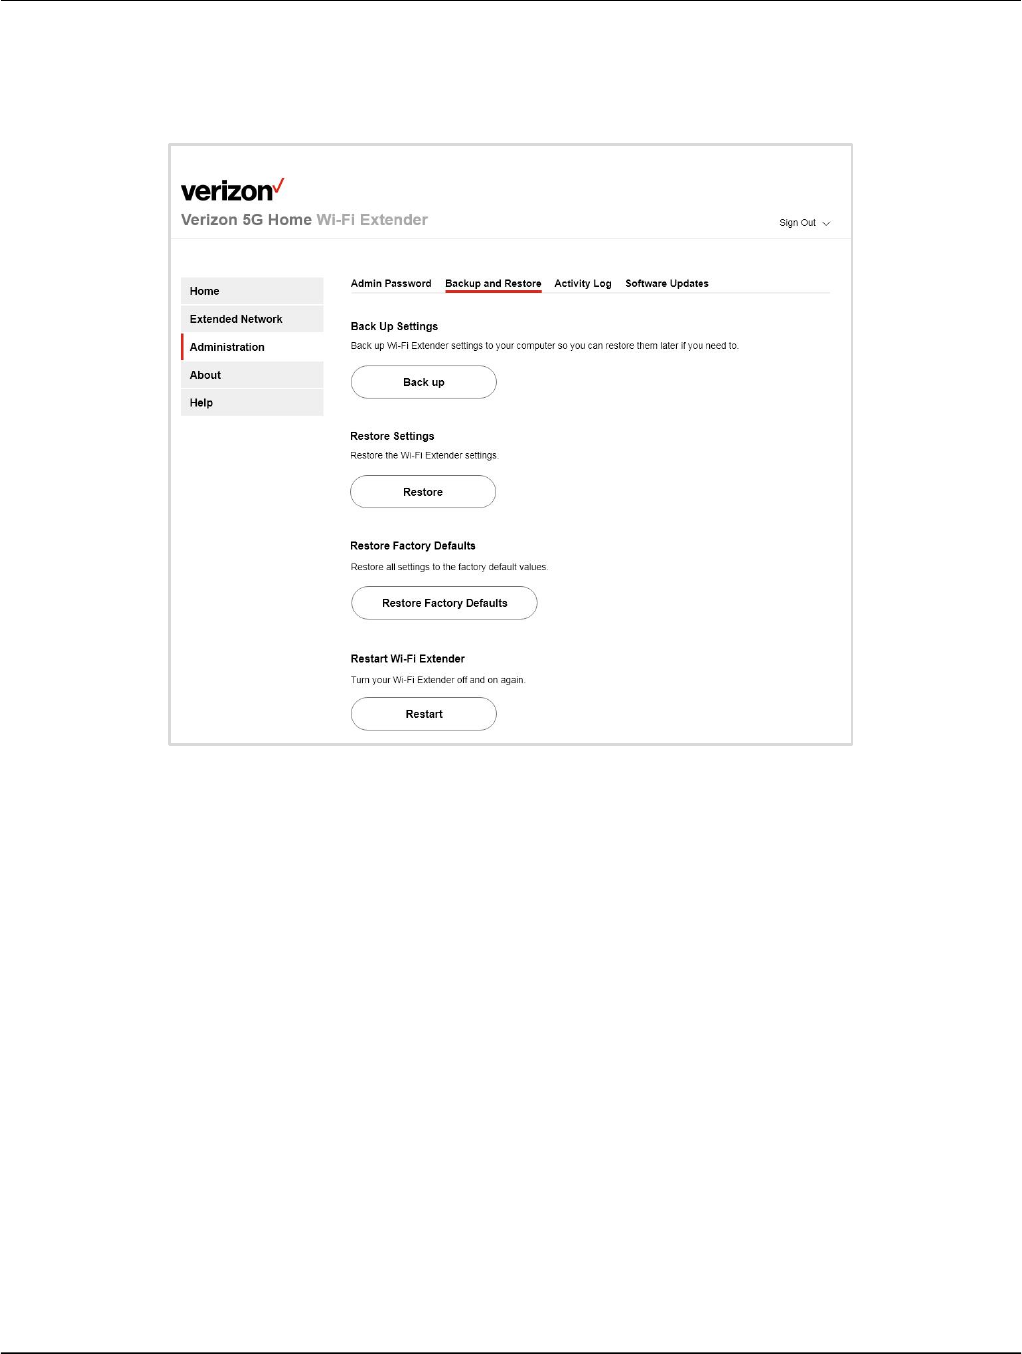
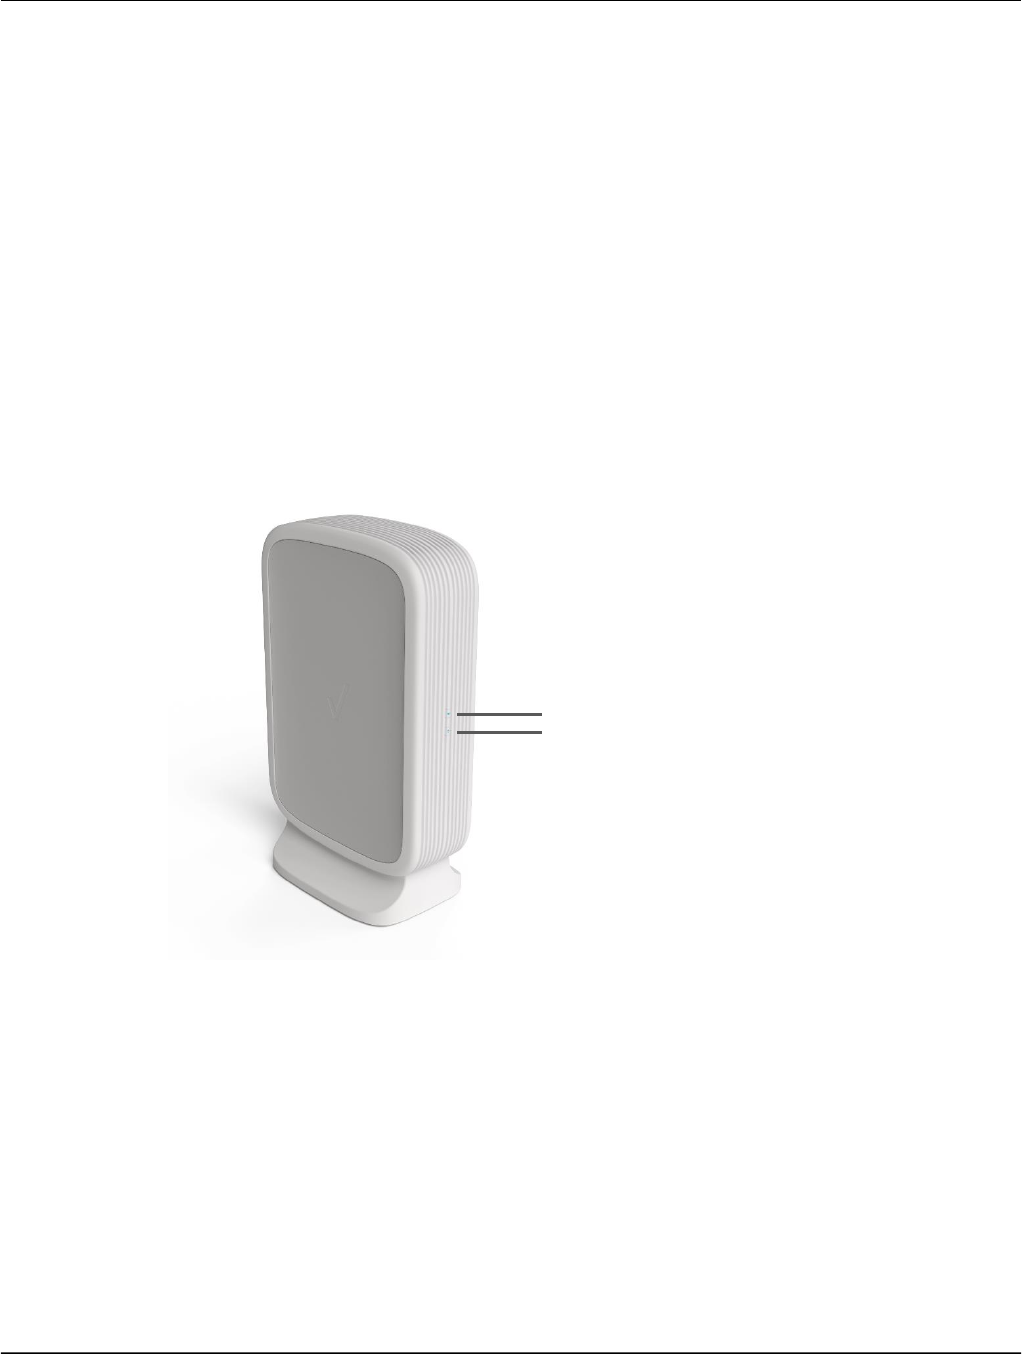
Backing up your Extender’s Settings and Restoring Them
You can create a backup file of your Extender’s settings and save it to your computer. Later, if you have to
reset your Extender’s settings, you can restore them from the saved file.
1. Go to Administration > Backup and Restore.
2. Click Back up and follow the instructions to save a backup file to your computer.
From this same page you can also click:
Restore Settings to restore the Wi-Fi Extender backup settings from the file on your computer.
Restore Factory Defaults to restore all settings to the default values. This will erase all settings on your
Wi-Fi Extender. Devices connected to your extended network may become disconnected.
4 Wi-Fi Extender Settings
23
Note: You can also Restore Factory Settings by pressing the Reset button on the Extender and holding
for 10 seconds.
Restart to turn the Extender off and on again.
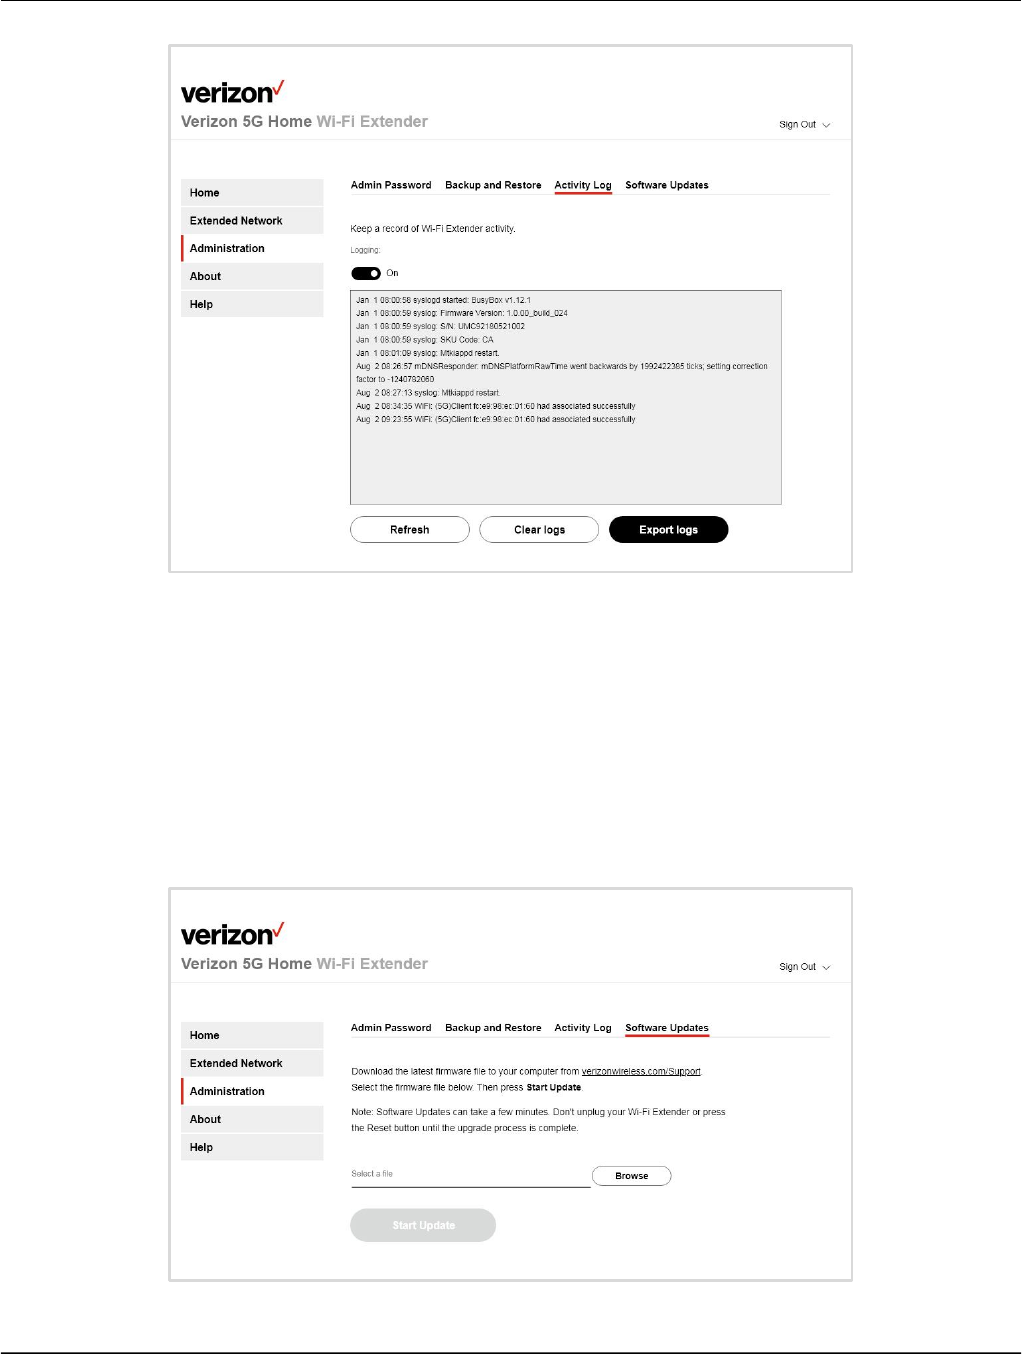
Using Activity Logs
You can keep and download a record of Extender activity.
Go to Administration > Activity Log
To keep a record of Extender activity, turn on Logging.
To download the log, click Export.
4 Wi-Fi Extender Settings
24
Getting Software Updates for Your Extender
Periodically, you’ll want to check for available updates for your Extender.
1. Go to Administration > Software Updates
2. Follow the onscreen instructions to download the update to your computer and update the Extender.
Note: Software updates can take a few minutes. Don't unplug your Wi-Fi Extender or press the Reset
button until the upgrade process is complete.
4 Wi-Fi Extender Settings
25
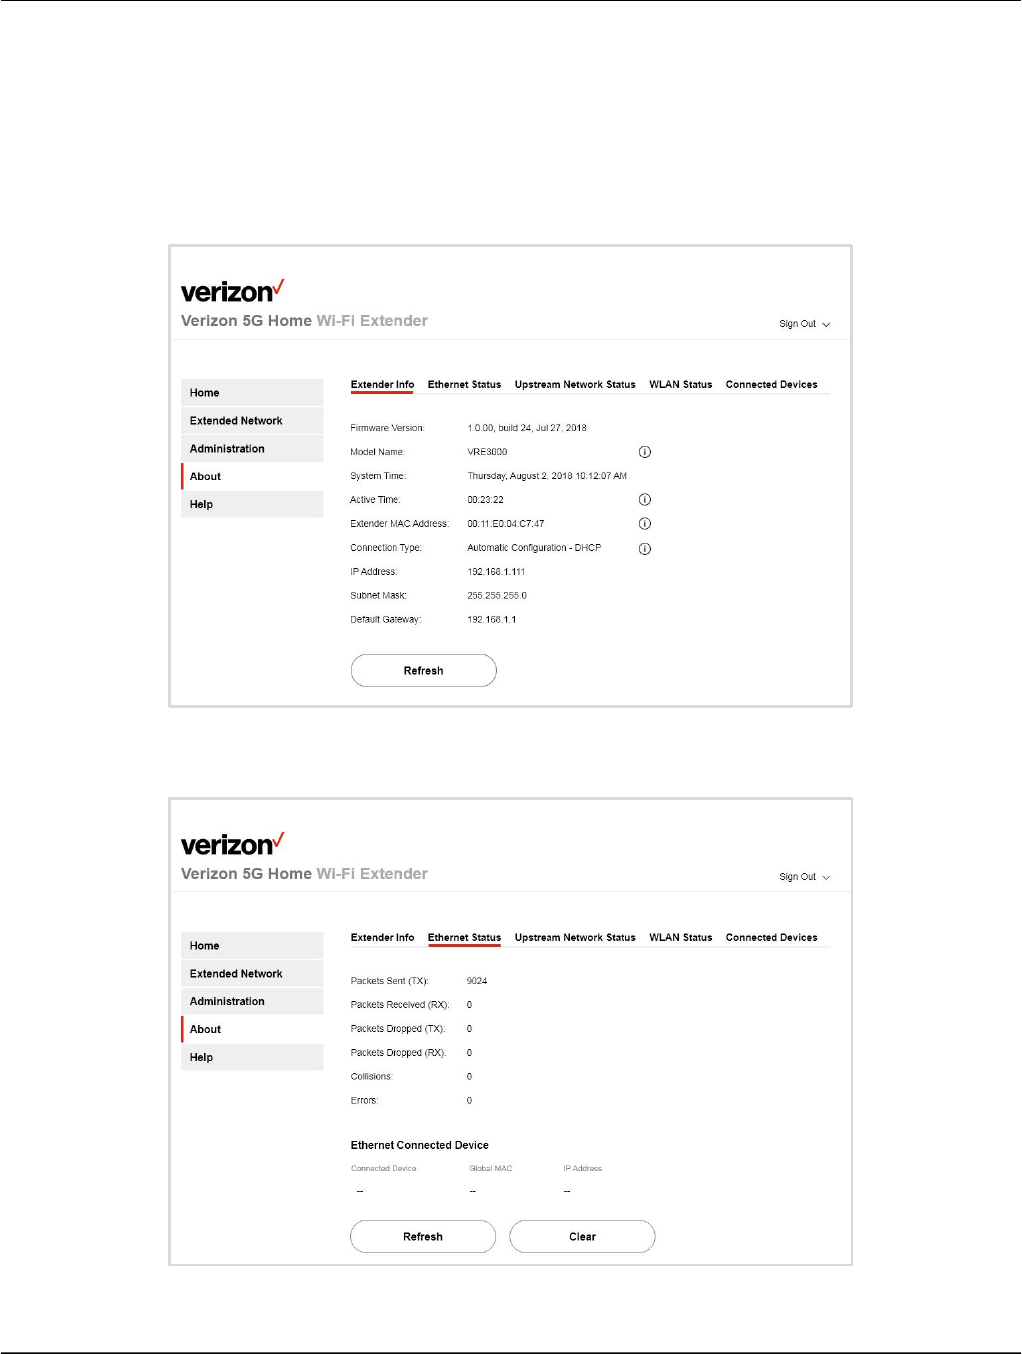
The About Screen
From the Dashboard, click the > in the About card or click About in the side bar.
The About screen is divided into 5 tabs of information about your Extender, its status, and devices
connected to the extended network:
1. Extender Info
2. Ethernet Status
4 Wi-Fi Extender Settings
26
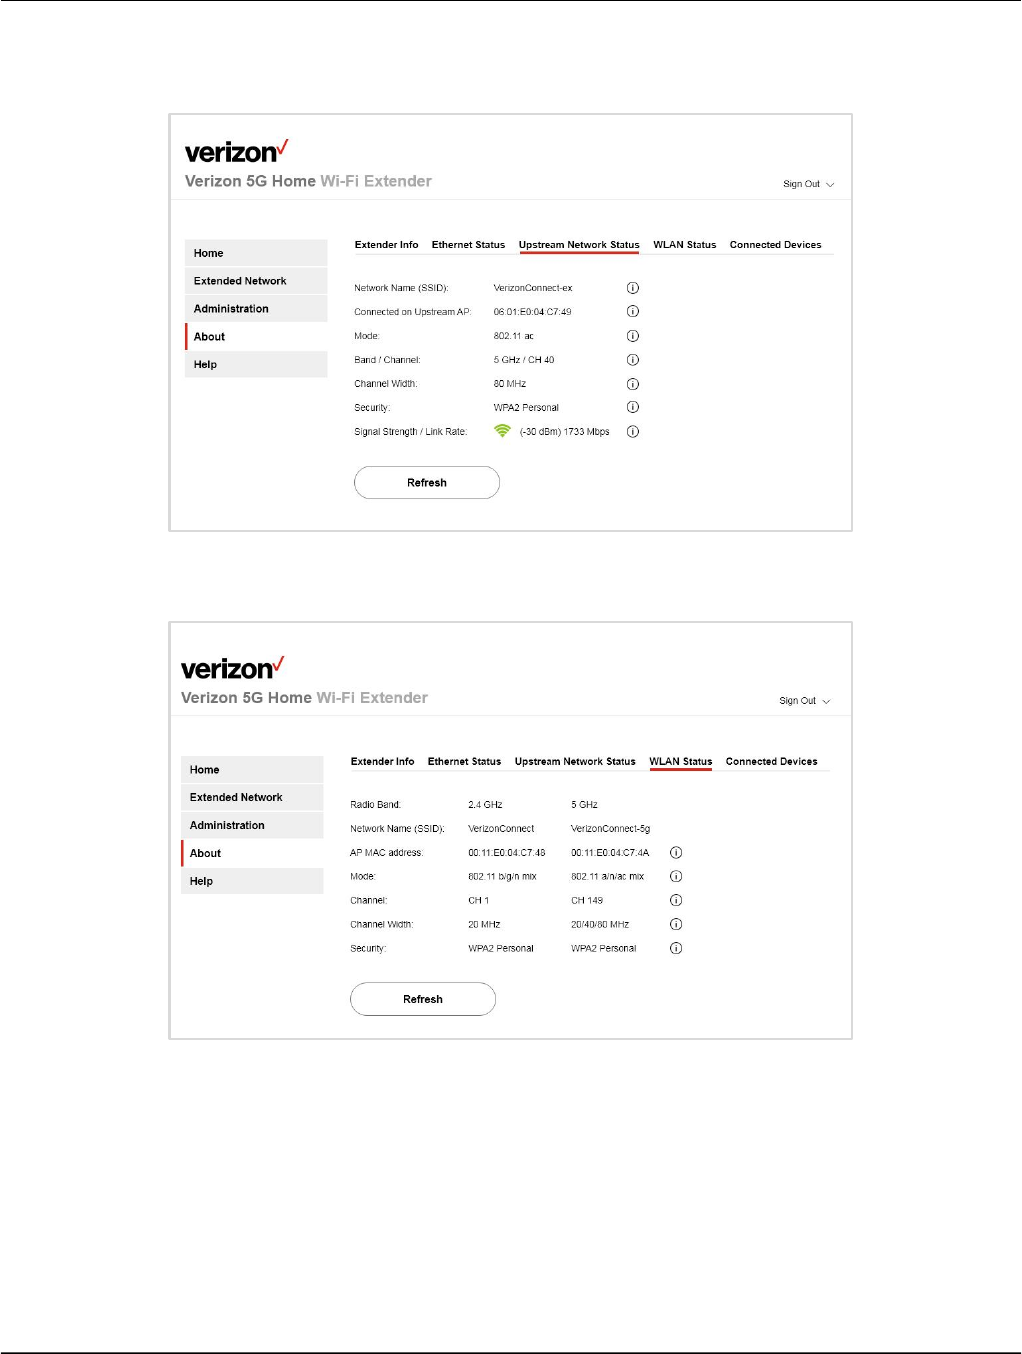
3. Upstream Network Status
4. WLAN Status
4 Wi-Fi Extender Settings
27
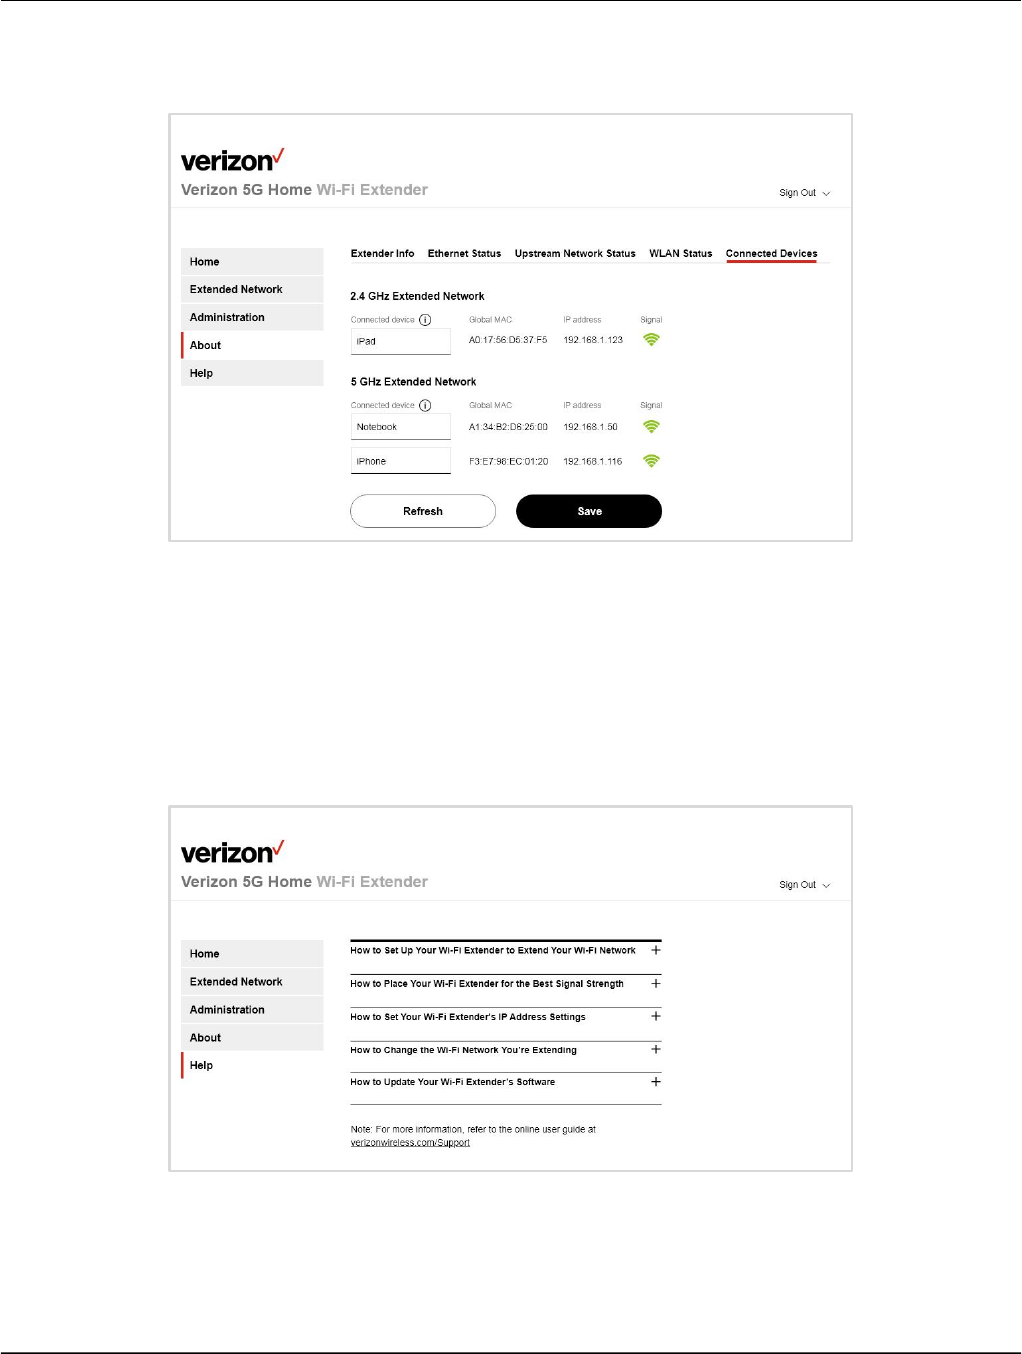
5. Connected Devices
Note: You can rename connected devices on the Connected Devices screen to make them easier to
identify.
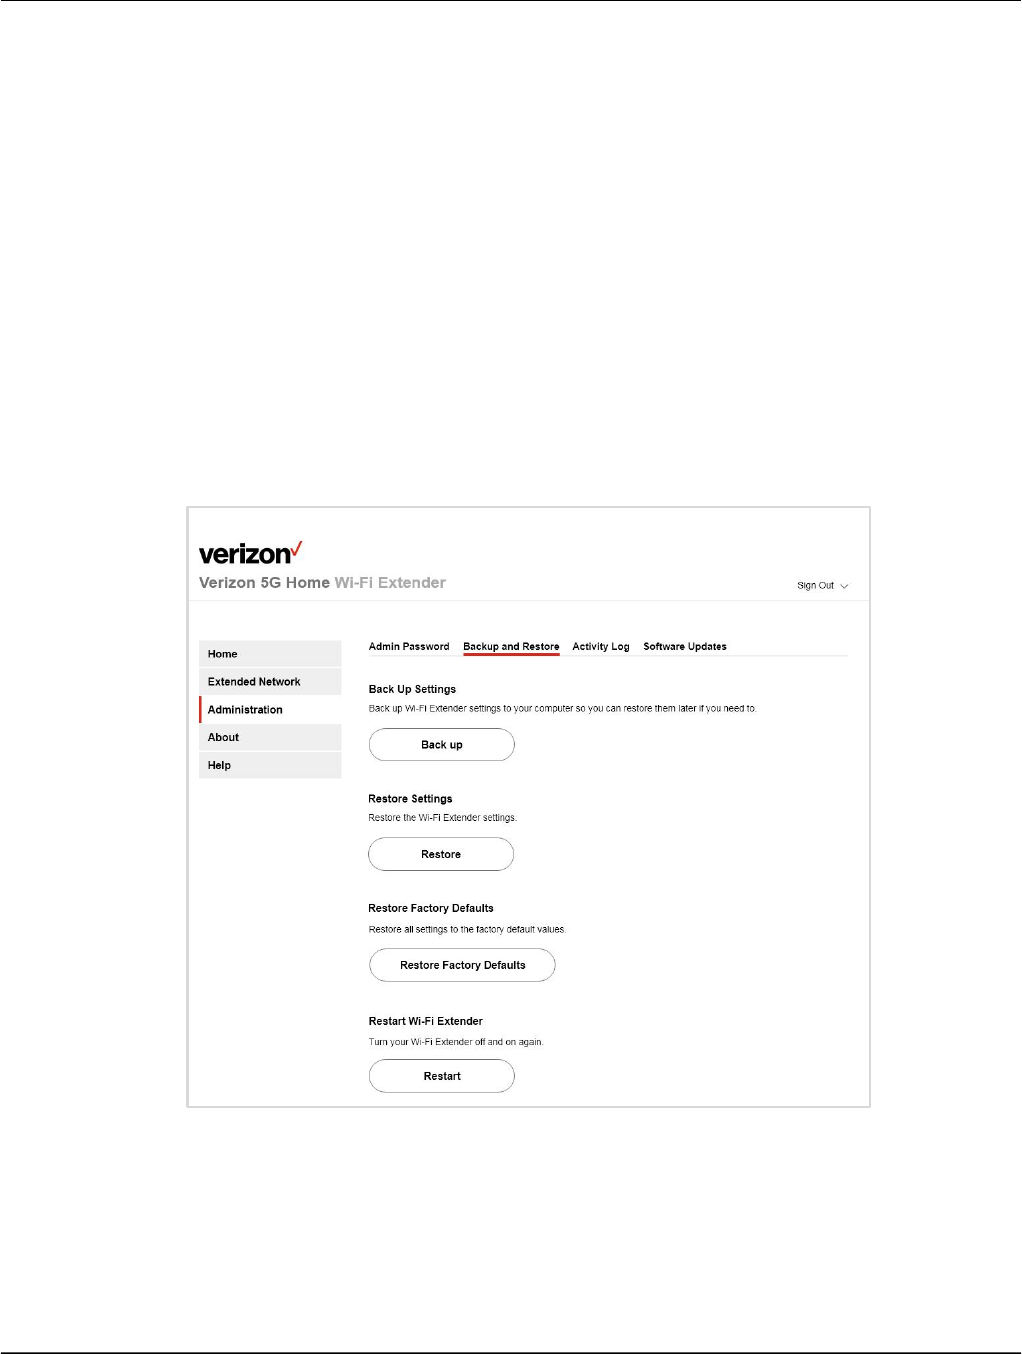
The Help Screen
From the Dashboard, click the > in the Help card or click Help in the side bar.
From here you’ll find instructions on a variety of Help topics and a link to verizonwireless.com/Support.

5. Troubleshooting
Troubleshooting
5
Frequently Asked Questions

5 Troubleshooting
29
Frequently Asked Questions
Q1. How do I know if my computer or tablet is directly connected to the Wi-Fi
Extender?
If your Extender hasn’t been connected to router yet, or has recently been reset: You can check your
computer or tablet’s Wi-Fi settings to see if it’s connected to the Extender’s default Wi-Fi network.
You’ll find the Default Network Name on the sticker on the bottom of the Extender.
If your Extender has been connected to a router: Make sure your device is connected to the extended
network. Then follow the instructions in Chapter 4 Wi-Fi Extender Settings: Using the Admin Website:
Signing In to the Admin Website. If you’re able to connect to the Admin website, your device is
connected to the Extender.
Q2. What can I do if I cannot access the Extender’s Admin website?
1. Make sure you’re connected to the correct Wi-Fi network:
If your Extender isn’t connected to a router or has been reset, connect to the Default Network
listed on the sticker on the bottom of the Extender.
If your Extender is connected to a router, connect to the extended network. (Usually this will have
the same network name and password as your router’s network.)
2. Check your connection:
If your computer or tablet is connected via Wi-Fi:
a. Disconnect the device from the Wi-Fi network.
b. Move the device closer to the Wi-Fi Extender.
c. Reconnect to the network.
If you’re using a computer connected via an Ethernet cable to the Wi-Fi Extender: Make sure that
the cable is connected at both ends.
Q3. What can I do if I forgot my Admin password?
If you haven’t changed the default Admin password, it’s admin.
If you changed the password and forgot it, the only way to access the Admin website is to reset your
Extender to Factory Default Settings. (See Q4.)
Note: Returning your Extender to factory default settings will erase all settings on your Wi-Fi Extender.
Devices connected to your extended network may become disconnected.
Q4. How do I reset my Wi-Fi Extender to its factory default settings?
To reset your Extender from the Extender itself:
1. Press the Reset button on the back of your Extender for at least 10 seconds until the Power indicator
turns off.
5 Troubleshooting
30
2. The Extender will reset to factory default settings and turn back on again.
To reset your Extender from the Admin website:
1. Go to Administration > Backup and Restore.
2. Click Restore Factory Defaults.
Both of these options will erase all the settings on your Wi-Fi Extender. Devices connected to your
extended network may become disconnected.
Note: Before resetting your Extender, you may want to back up your settings, so you can restore them
later.
1. From the Admin website, go to Administration > Backup and Restore.
2. Click Back up and follow the instructions to save a backup file to your computer.
3. Reset your Extender following the steps above.
4. When you’re ready to restore your settings, come back to Administration > Backup and Restore.
5. Click Restore Settings to restore the Wi-Fi Extender backup settings from the file on your computer.
Q5. Why can’t I connect my Wi-Fi Extender to my router using WPS?
Your VRE3000 Wi-Fi Extender is designed to work with routers that have the 5 GHz Wi-Fi band (Band-1:
5150MHz ~ 5250MHz). Before you begin, make sure that your Wi-Fi router has this band. One way to
check is to see if its network name (SSID) ends with “-5g”. (Check your router’s user guide, if you’re not
sure.)
5 Troubleshooting
31
Also, some routers do not support WPS.
But don’t worry. If your router does have the 5 GHz band, but doesn’t have WPS, it’s still easy to connect.
If you’re connecting a router for the first time (or have recently reset your Extender) connect to the
Admin website and follow the instructions in the Setup Wizard to connect manually.
Or in the Admin website, go to Extended Network > Available Networks to select and connect to your
router’s Wi-Fi network.
Q6. I’m connected to the extended network. Why don’t I have an internet connection?
If your device is connected to the extended network, but doesn’t have an internet connection, follow
these steps to troubleshoot the problem:
1. Make sure your Wi-Fi Extender is connected to the Wi-Fi router. Look at the Wi-Fi Link indicator. If the
light is solid blue, you have a connection. If it’s blinking. Move to step 2.
2. Check to see if your Wi-Fi router or modem has internet connection. If it doesn’t, restart your router
or modem.
3. If the problem persists, check your modem ISP connection and restart the modem. (For wireless
modems, make sure the modem is connected to the wireless network. For wired modems, check the
cables connected to your modem.)
4. If your router still doesn’t have an internet connection, contact your ISP (Internet Service Provider) for
assistance.
Q7. How do I know if my Wi-Fi Extender is connected to the Wi-Fi Router?
The quickest way is to look at the Wi-Fi Link indicator:
If it’s solid blue, your Extender is connected to your W-Fi router.
2. Power indicator
1. Wi-Fi link indicator
5 Troubleshooting
32
If it’s flashing, either the Wi-Fi router isn’t avaliable or the Wi-Fi Extender has been reset to default
settings. You can check your Wi-Fi device’s list of available networks. If you see the Extender’s default
network name, Verizon Extender Setup - XXXX, it hasn’t connected to a router yet (or has been reset
to factory default settings.) Follow the instructions in the Getting Started section of this guide to
connect your Extender to your router.
Note: You can see the full Default Network Name on the sticker on the bottom of your Extender.
If your Extender has already connected to a router, but you think it’s lost the connection or you want to
check the quality of the connection, you can check the Extender Placement tool.
1. Sign in to the Extender’s Admin website. On your computer or tablet, open a web browser and enter:
http://verizonre (Windows and Android)
http://verizonre.local (Mac OS X or iOS)
2. You’ll see the Extender Placement tool in the Dashboard. Tap the > in the Extender Placement card for
more information, including steps to follow if the tool says No connection.
Note: For more information on connecting your Wi-Fi Extender to your Router, go to chapter 3 Getting
Started.
Q8. Can the Wi-Fi Extender’s Network Names (SSIDs) be the same as that of my
existing Wi-Fi Router?
Yes. It’s recommended that your Extender’s 2.4 GHz and 5 GHz extended networks’ network names be the
same as your router’s network names. This will enable you to move between your router’s network and
the extended network’s coverage areas without having to switch manually or becoming disconnected.
To manage your Extender’s network names, from the Admin website, go to Extended Network > Network
Settings.
Note: Don’t forget to scroll down and click Save when you’re done.

6
Product Spec. and
Regulatory Information
Product Specifications
Regulatory Information

6 Product Spec. and Regulatory Information
34
Product Specifications
Hardware Feature
Wired Interface
Two 10/100/1000 gigabit Ethernet ports by RJ45 connectors, with auto MDIX sensing, for connecting
Ethernet-capable client devices to the home wireless network.
Wireless Interface
IEEE 802.11ac wireless interface, backward compatible with 802.11a/n
IEEE 802.11b/g/n wireless interface
Tri-band concurrent (2.4 GHz and 2 x 5 GHz)
6 x internal antennas
Wi-Fi Protected Setup (PIN and PBC)
I/O Interface
1 x DC-Jack
2 x 10/100/1000 Gigabit Ethernet ports by RJ45 connectors
2 x Buttons (Reset, WPS)
3 x LED (WPS, Power, Wi-Fi)
Power Supply Specification
Characteristic
Specification
Type
External, switching, barrel jack
Input Voltage
100-240 V
Input Frequency Range
50~60Hz
Output Voltage / Current
DC 12V/2A
Efficiency Level
6
CEC compliant
Yes, Level 6
Internal Antenna Specification
2x2 dual band antenna (2.4 GHz and 5 GHz band)
4x4 single band antenna (5 GHz band)
Firmware Feature List
http Browser-based GUI for user configuration
Setup Wizard with WPS or connect manually
Available Networks for user choosing upstream
Configuration backup and restore

6 Product Spec. and Regulatory Information
35
DHCP server for easy device setup
IPv6 pass through support
Wireless Security (WPA-Personal and WPA2-Personal)
Upgradeable Firmware from GUI
802.11k roaming support
Automatically choose better 5 GHz as dedicated backhaul link
Support DFS channels for both AP and STA mode (future supporting)
Wireless MAC Authentication
Dual Image for fail-safe update
Smart WPS process for both upstream link and client
NTP with Time zone, daylight saving
Extender Placement
NetBIOS/mDNS/URL domain name for web connection
URL redirection while no uplink connection
Activity Log
Only signed image is allowed for FW update
Operational and Environmental Requirement
Operational Temperature: 0o C to 40o C (32o F to 104o F)
Storage Temperature: -20o C to 60o C (-4o F to 140o F)
Operational Humidity: 10% to 80% relative humidity, non-condensing
Storage Humidity: 5% to 90% non-condensing
Certification/Regulation Requirement
FCC (without DFS)
UL 60950-1
802.11ac and 802.11a/b/g/n Wi-Fi certification (AP mode)
WPS certification

6 Product Spec. and Regulatory Information
36
Regulatory Information
Federal Communications Commission (FCC) Statement
This device is for indoor application only.
15.21
You are cautioned that changes or modifications not expressly approved by the part responsible for compliance could void the
user’s authority to operate the equipment.
15.105(b)
This equipment has been tested and found to be within the limits for a Class B digital device, pursuant to part 15 of the FCC Rules.
These limits are designed to provide reasonable protection against harmful interference in a residential environment. This
equipment generates, uses, and can radiate radio frequency energy and, if not installed and used in accordance with the
instructions, may cause harmful interference to radio communications. However, there is no guarantee that interference will not
occur in a particular installation. If this equipment does cause harmful interference to radio or television reception, which can be
determined by turning the equipment off and on, the user is encouraged to try to correct the interference by one or more of the
following measures:
Reorient or relocate the receiving antenna.
Increase the separation between the equipment and the receiver.
Connect the equipment into an outlet on a circuit different from that to which the receiver is connected.
Consult the dealer or an experienced radio/television technician for help.
This device complies with Part 15 of the FCC Rules.
Operation is subject to the following two conditions:
1. This device may not cause harmful interference.
2. This device must accept any interference received, including interference that may cause undesired operation of the device.
FCC RF Radiation Exposure Statement:
1. This Transmitter must not be co-located or operating in conjunction with any other antenna or transmitter.
2. This equipment complies with FCC RF radiation exposure limits set forth for an uncontrolled environment. This equipment should
be installed and operated with a minimum distance of 20 centimeters between the radiator and your body.
Allowed maximum gain (dBi), including antenna cable loss
Frequency Band
Antenna gain (dBi, including cable loss)
2.4 GHz
2.9 dBi
5 GHz (low band)
3.4 dBi
5 GHz (high band)
3.8 dBi
End user product of external antennas available from vendors specified by the equipment supplier. Please contact the equipment
supplier for end user antenna and connector recommendations
RF Exposure Content
FCC Equipment Authorization ID: SI5VRE3000
This device is authorized for use in mobile applications. At least 20 cm (8 in) of separation between the user’s body must be
maintained at all times.