U MEDIA Communications WCB210A Wireless 802.11g Cardbus Card User Manual
U-MEDIA Communications, Inc. Wireless 802.11g Cardbus Card
Users Manual
802.11g/b Wireless CardBus Card
User's Guide
Version 1.0
1
Federal Communication Commission Interference Statement
This equipment has been tested and found to comply with the limits for a Class B digital device,
pursuant to Part 15 of the FCC Rules. These limits are designed to provide reasonable protection
against harmful interference in a residential installation. This equipment generates, uses and can
radiate radio frequency energy and, if not installed and used in accordance with the instructions,
may cause harmful interference to radio communications. However, there is no guarantee that
interference will not occur in a particular installation. If this equipment does cause harmful
interference to radio or television reception, which can be determined by turning the equipment off
and on, the user is encouraged to try to correct the interference by one of the following measures:
- Reorient or relocate the receiving antenna.
- Increase the separation between the equipment and receiver.
- Connect the equipment into an outlet on a circuit different from that
to which the receiver is connected.
- Consult the dealer or an experienced radio/TV technician for help.
FCC Caution: Any changes or modifications not expressly approved by the party responsible for
compliance could void the user's authority to operate this equipment.
This device complies with Part 15 of the FCC Rules. Operation is subject to the following two
conditions: (1) This device may not cause harmful interference, and (2) this device must accept any
interference received, including interference that may cause undesired operation.
IMPORTANT NOTE:
FCC Radiation Exposure Statement:
This device complies with FCC RF Exposure limits set forth for an uncontrolled environment, under
47 CFR 2.1093 paragraph (d)(2).
This transmitter must not be co-located or operating in conjunction with any other antenna or
transmitter.
This device was tested for typical by stander conditions that may occur during use. To comply with
FCC RF exposure requirements a minimum separation distance of 1.6cm must be maintained
between the user’s body and the device, including the antenna.
U-MEDIA declares that WCB-210A, ( FCC ID: SI5WCB210A ) is limited in CH1~CH11 for 2.4 GHz
by specified firmware controlled in U.S.A.
The user is cautioned that this device has approved only for use in laptop configurations.
This equipment has been evaluated to meet the FCC RF exposure requirements (in laptop
configurations) with a maximum SAR (1g) measured for bystander conditions of 0.153W/Kg.
2
Table of Contents
Federal Communications Commission Interference statement ………………..…………………. 1
Chapter 1 Getting Started ……………………………………………………………………………… 4
1.1 About Your 802.11g/b WLAN CardBus Card………………………..................................... .4
1.2 Card Hardware and Utility Installation………......................................................................... 4
1.3 Using the Utility to Configure Your Network........................................................................... 4
1.3.1 Network .............................................................................................................................. 6
1.3.2 Profile ................................................................................................................................. 7
1.3.3 Site Survey......................................................................................................................... 19
1.3.4 Options............................................................................................................................... 22
1.3.5 Version............................................................................................................................... 24
Chapter 2 - Configuring Wireless Security ................................................................................. 25
4.1 Configuring Security.............................................................................................................. 25
4.2 Configuring WEP .................................................................................................................. 25
4.3 Configuring WPA-P SK...........................................................................................................27
4.4 Configuring WPA............................................................................................................... ... 28
4.5 Configuring 802.1x ............................................................................................................ ... 28
4.5.1 Configuring 802.1x – EAP-MD5 ......................................................................................... 29
4.5.2 Configuring 802.1x – EAP-LEAP......................................................................................... 29
4.5.3 Configuring 802.1x – EAP-PEAP......................................................................................... 29
4.5.4 Configuring 802.1x – EAP-TLS ........................................................................................... 31
4.5.5 Configuring 802.1x – EAP-TTLS.......................................................................................... 33

3
Chapter 1 - Getting Started
This chapter introduces the Card and prepares you to use the Wireless Utility.
1.1 About Your 802.11g/b WLAN CardBus Card
The Card is an IEEE 802.11b, and 802.11g compliant wireless LAN adapter. With the Card, you
can enjoy wireless mobility within almost any wireless networking environment.
The following lists the main features of your Card.
9 Your Card can communicate with other IEEE 802.11b/g compliant wireless devices.
9 Automatic rate selection.
9 Standard data transmission rates up to 54 Mbps.
9 Proprietary Atheros transmission rates of 108 Mbps
9 Offers 64-bit, 128-bit and 152-bit WEP (Wired Equivalent Privacy) data encryption for network
security.
9 Supports IEEE802.1x and WPA (Wi-Fi Protected Access).
9 Low CPU utilization allowing more computer system resources for other programs.
9 A built-in antenna.
9 Driver support for Windows XP/2000/ME/98SE
1.2 Card Hardware and Utility Installation
Follow the instructions in the Quick Start Guide to install the Utility and make hardware
connections.
1.3 Using the Utility to Configure Your Network
The following are explanations on how to configure and use the Utility program. For initial
setup, please see the included Quick Start Guide.
After completing the installation procedure, a new icon as shown below will automatically appear in
the lower right tray bar.

4
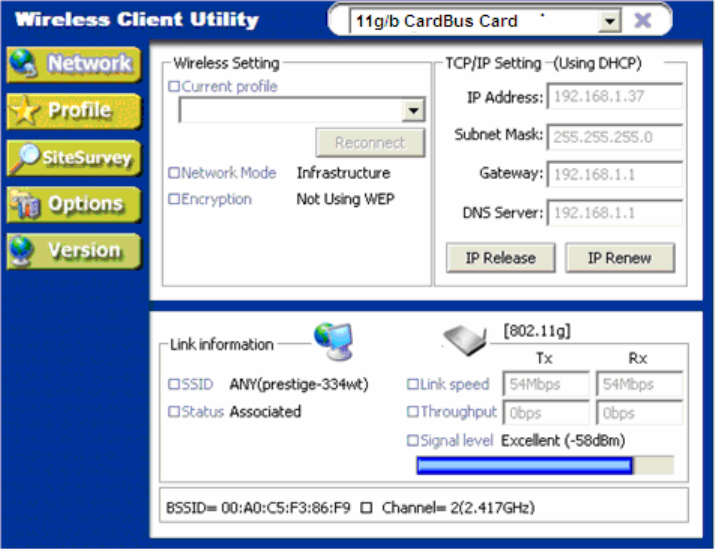
Double-clicking on the icon will display the following wireless utility window.
Each of the pages (Network, Profile, Site Survey, Options, Version) presented in the Wireless
Utility are explained in the following sections.
5
1.3.1 Network
This page shows how the network is presently configured: network mode, information on the
connected AP, TCP/IP, etc. This information cannot be modified in the Network screen.
The “Current Status” (lower) window shows the signal quality, signal strength, channel, etc.
between the client and AP. It is always in view regardless of which page (Network, Profile, Search,
Option, Version) is selected within the Wireless Utility.
6
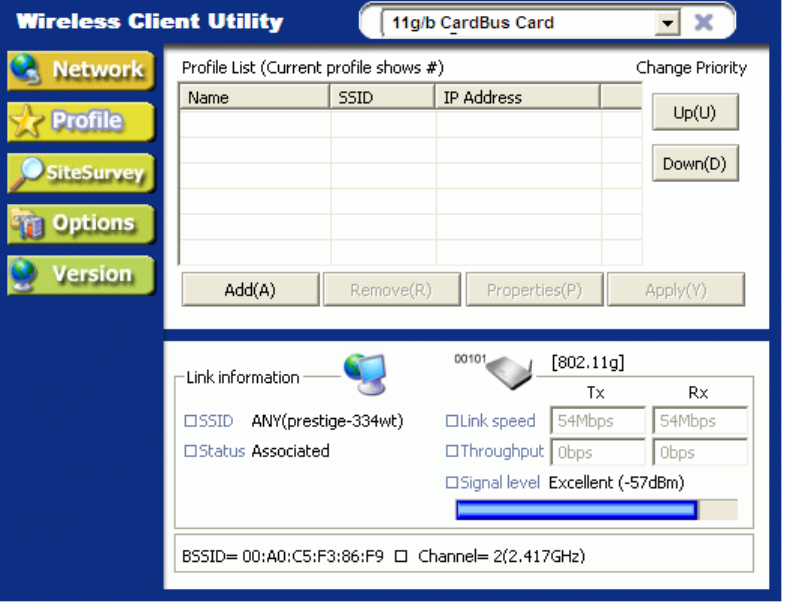
1.3.2 Profile
This page is used to manage connections with Access Points. You can create different
configuration profiles for connections with different APs and SSIDs.
The advantage of saving different profiles is the easiness of quickly changing connections without
having to configure the PC with every single variable each time a connection change is made. Also,
when configuring TCP/IP via the Wireless Utility you do not need to reboot the PC as when TCP/IP
configuration is done via Windows' Control Panel.
Explanation of each button in this page is shown below.
Add
Clicking on this button enables you to create a new profile. The following steps show how this can
be done.
7
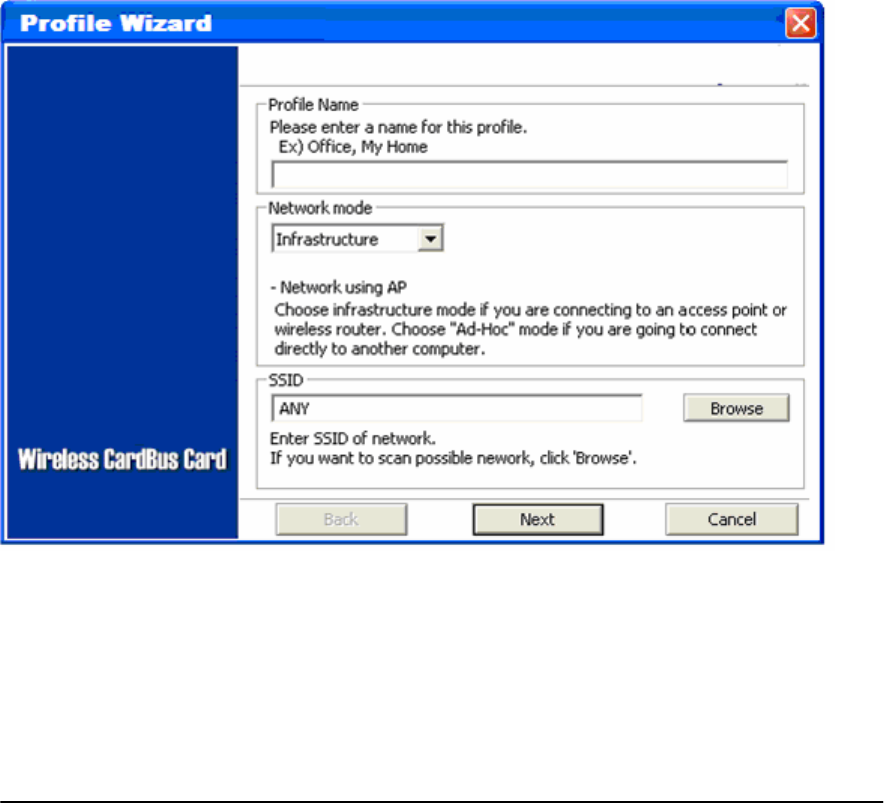
1) Click on [Add] and the following screen will appear.
2) On this screen you will insert some basic settings for your wireless network.
a. [Profile Name] Enter in a descriptive name for this profile.
b. [Network Mode] If connecting to an access point or wireless router, choose “Infrastructure” 3.
If you are going to network one computer directly to another computer without an access point,
then choose “Ad-Hoc”4.
c. [SSID] Select [Browse] The utility will perform a brief site survey and display the results to you.
Click on the SSID5 of the access point you would like to connect to and
3 Infrastructure: You will need an access point to use the Wireless CardBus Card in Infrastructure
mode. Because all communication will be done via the Access Point, the Access Point’s SSID must
be used.
4 Ad-Hoc: In Ad-Hoc mode communication is made peer-to-peer between the client PCs and
without the use of an Access Point. All PCs communicating in an Ad-Hoc should use the same
SSID (whatever your choice is).
8
then click on [Add to Profile]. If the access point you choose has encryption enabled, a window will
pop up reminding you to enter the encryption information on the next page.
If your access point is not listed, close the [Site Survey] window, and type the name of the SSID
into the [SSID] field.
d. Click [Next]. The following screen will appear.
This screen will vary in appearance depending on whether any encryption was detected with your
access point.
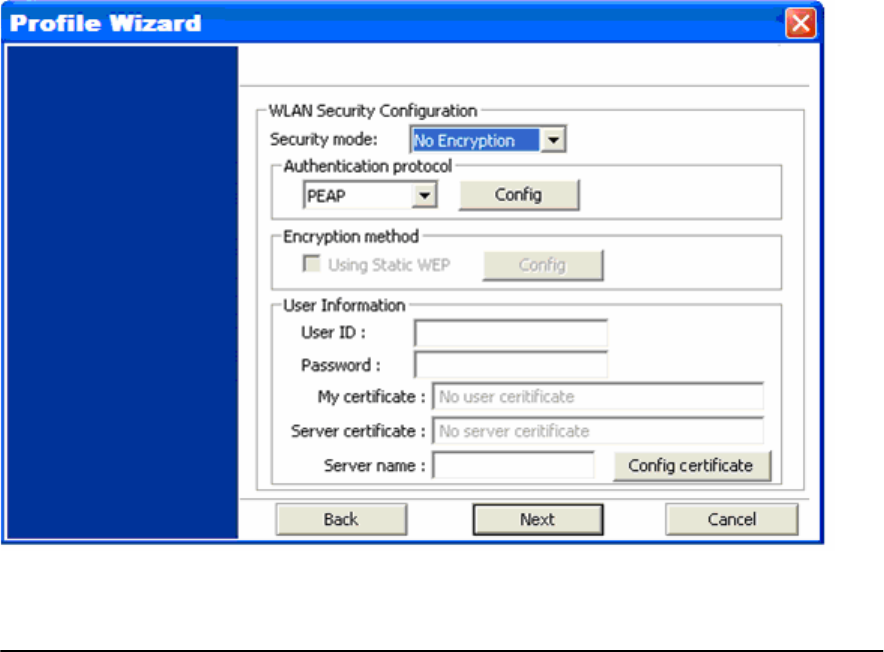
3) Enter in the appropriate security information.
5SSID: The SSID is a group name used by users of a common wireless network. Only those
devices using the same SSID are able to access each other. Also, you must use the same SSID as
the Access Point you want to connect with. SSIDs are case sensitive so take care to make sure
your capitalization matches.
9
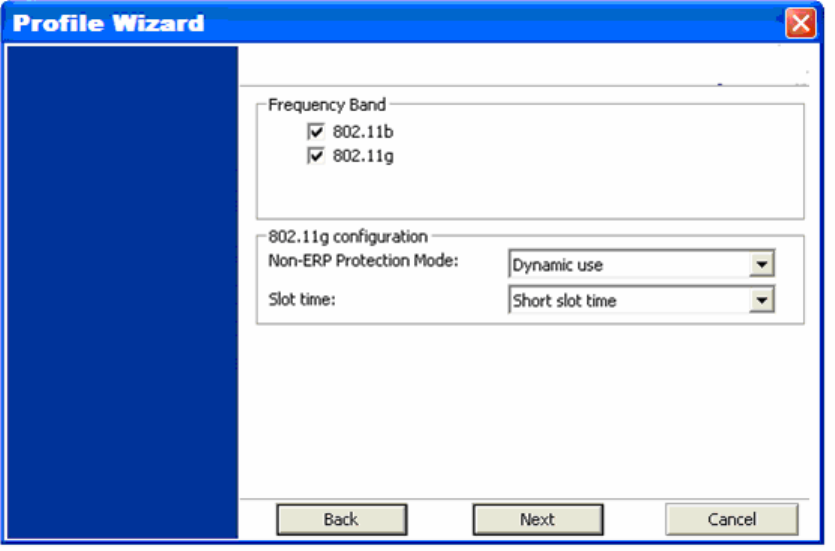
a. Click [Next]. The following screen will appear.
4) On this screen you will configure the wireless modes supported by this profile.
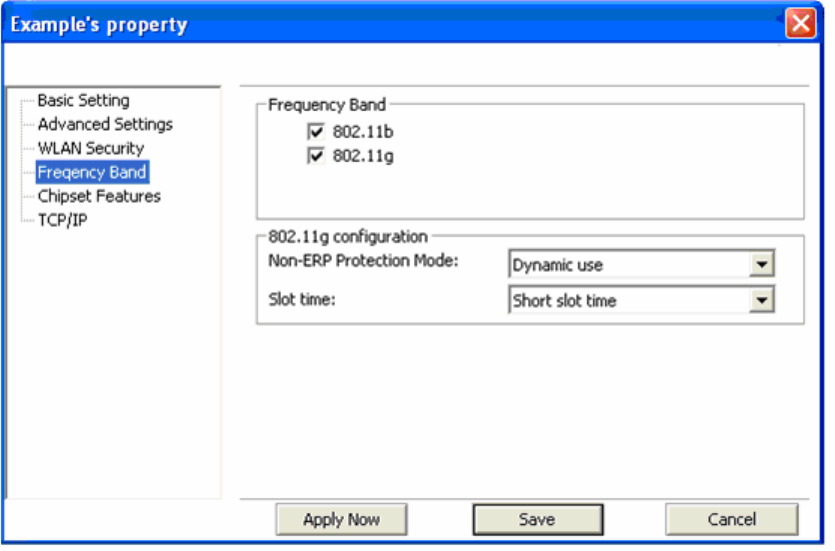
a. Under [Frequency Band], put a check mark next to each wireless protocol you want this profile
to support. If you are unsure of which protocol to choose, leave all checked.
b. For [802.11g Configuration] leave all settings at default unless instructed by your network
administrator to change them.
10
c. Click [Next]. The following screen will appear.
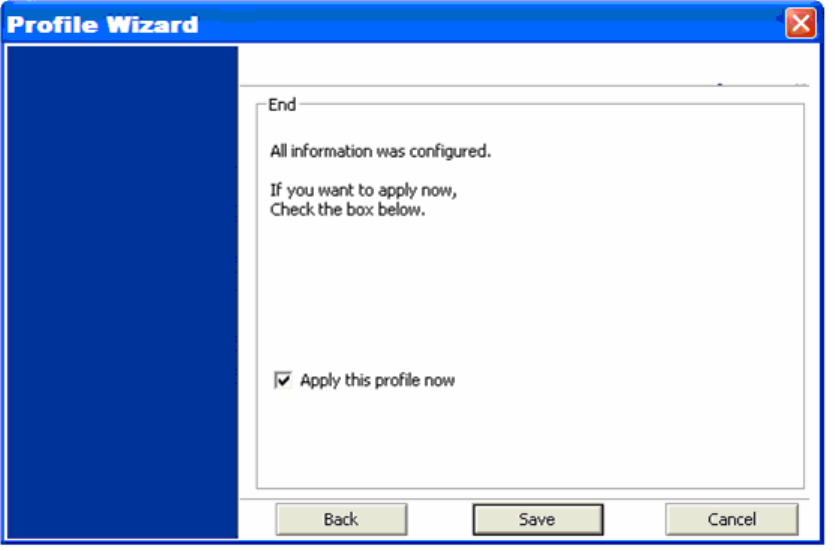
5) Final Step
a. Uncheck the box [Apply this profile now] if you do not want to activate this profile at this
time.
b. Click [Save] to complete the wizard and save the profile you have just created.
Remove
To remove a profile from the “Profile List” select it and then click on [Remove].
Apply
If you want to change the current profile with another profile from the “Profile List”, select the
desired profile and click on [Apply]. The new profile will immediately become the current profile and
you will be connected with its SSID.
Properties
Selecting a profile from the “Profile List” and clicking on [Properties] will allow you to check and/or
modify the properties of the selected profile. Clicking on [Properties] will take you to the following
screen.

11
Each page in [Properties] is explained below.
12
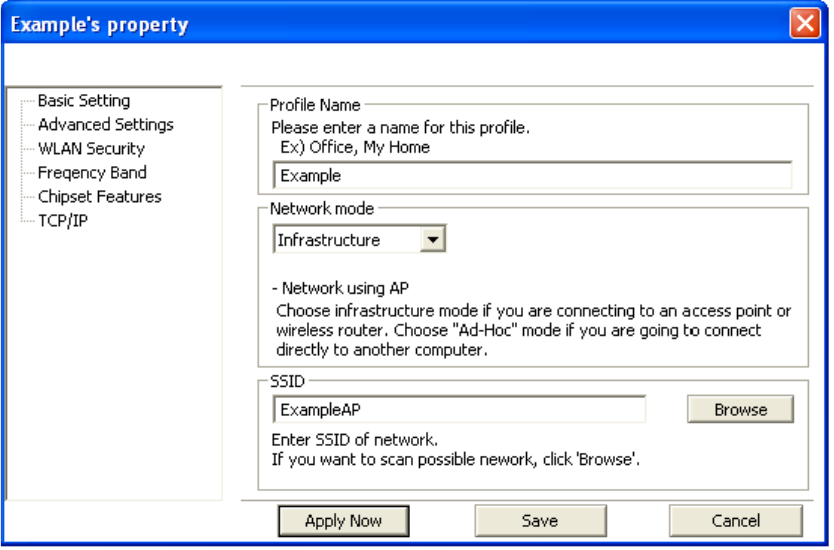
Basic Settings: In this page, you can verify the name of the current profile.
[Profile Name] Allows you to change the name of the current profile.
[Network Mode] Allows you to change between Infrastructure and Ad-Hoc networking modes.
[SSID] Allows you to change the SSID that this profile will associate with. Use the [Browse] button
to perform a site survey and select the SSID from a list of available SSIDs. Keep in mind when
manually entering an SSID that SSIDs are case sensitive.
13
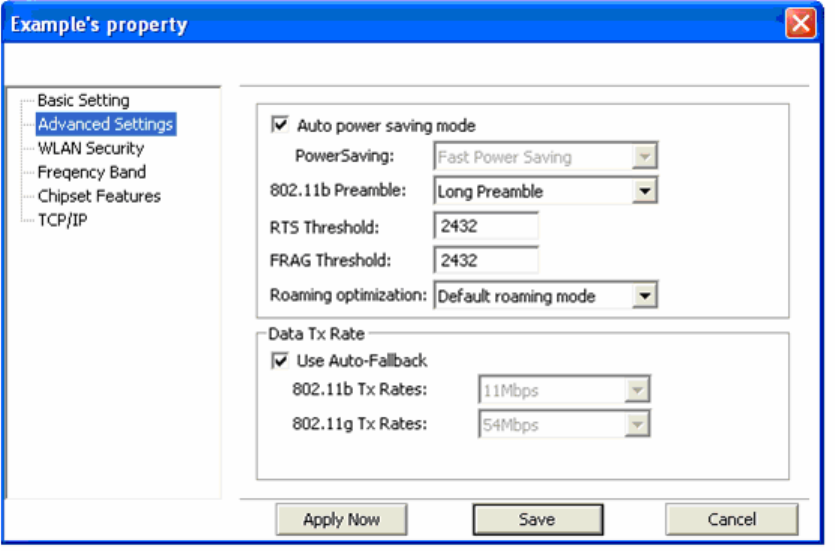
Advanced Settings: This screen allows you to make changes to the default ways the card operates
including advanced 802.11 settings. Unless you are an advanced user and have deep knowledge
about each property on this page, it is recommended that you leave them at the default settings.
14
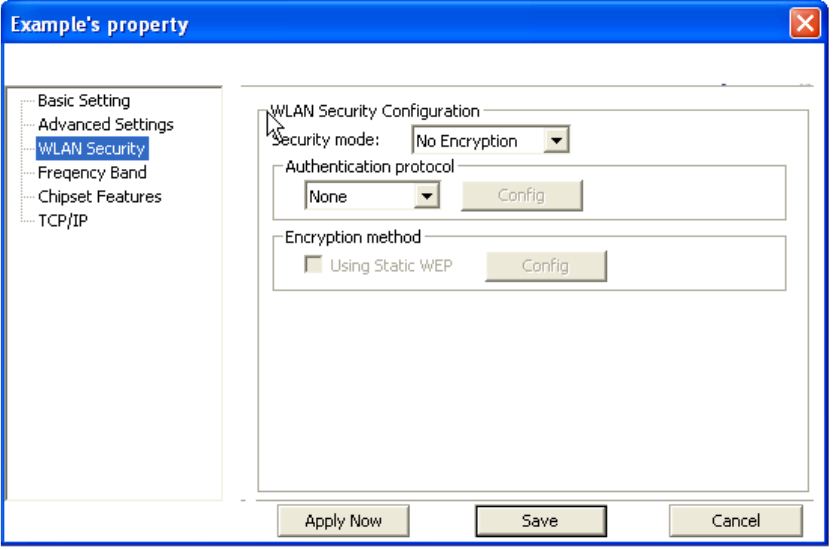
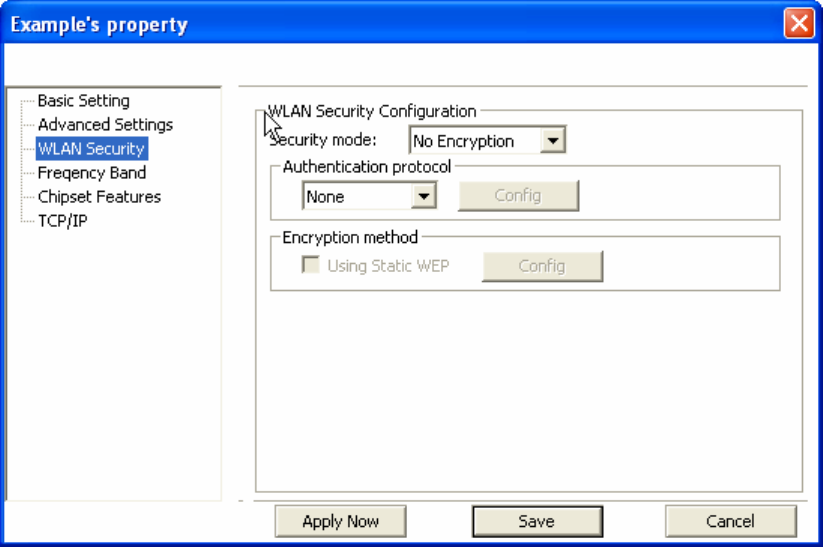
WLAN Security: This screen allows you to configure the security settings of your wireless LAN.
Security Mode
1) No Encryption
All data sent between the AP and the client is left unencrypted and may be viewed by other
wireless devices.
2) WEP
Wired Equivalent Privacy – Encrypts all traffic sent between the AP and the client using a
shared key. When using WEP encryption (available in 64, 128, or 152-bit), only those APs
and PCs using the same WEP Key are allowed to communicate with each other.
3) WPA
Wi-Fi Protected Access – Encrypts all traffic between the access point and the client using
either TKIP or AES encryption. Depending on the authentication protocol selected, each
client must authenticate using their own unique username, password, and security
certificate.
15
To learn more about WPA please see Chapter 2.
4) WPA-PSK
WPA-PSK is a compromise between WPA and WEP. Like WEP, it uses a pre-shared key
that every user of the network must have in order to be able to send and receive data. Like
WPA, it uses either TKIP or AES, which improve greatly over the encryption found in WEP.
We recommend you use WPA or WPA-PSK whenever possible.
Frequency Band: This screen lets you define which 802.11 wireless standards to try to connect to.
It also lets you change some 802.11g behaviors.

16
Chipset Features: This screen allows you to configure advanced features built into the wireless
chipset.
[Tx Power Level] Allows you to adjust the output power of your radio. Reducing output power can
reduce power usage of your laptop and will limit the distance that your wireless signal will reach.
[Antenna Diversity] Defines whether to use both internal antennas. Antenna Diversity usually
provides a higher quality connection.
[Super A] Support for Atheros 108Mbps Super A mode.
[Super G] Support for Atheros 108Mbps Super G mode.
[XR] Support for Atheros Extended Range technology.
[Frame Burst] Allows for faster speeds while maintaining compatibility with other 802.11 devices
which may be on your network.
17
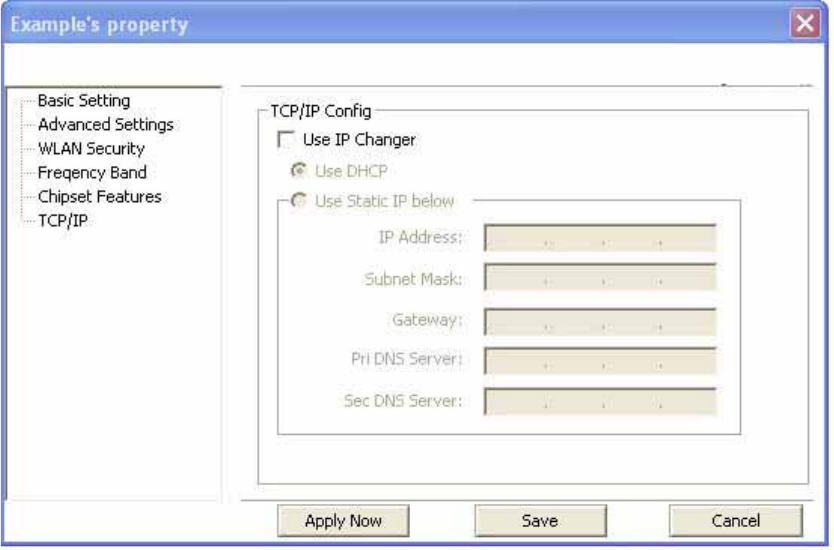
TCP/IP: This allows you to change your TCP/IP settings.
[Use IP Changer] By putting a checkmark in the box, you will overwrite your existing WLAN TCP/IP
configuration and use the IP Changer software built-into the Wirelss Utility. This allows you to
configure TCP/IP settings for each profile.

18
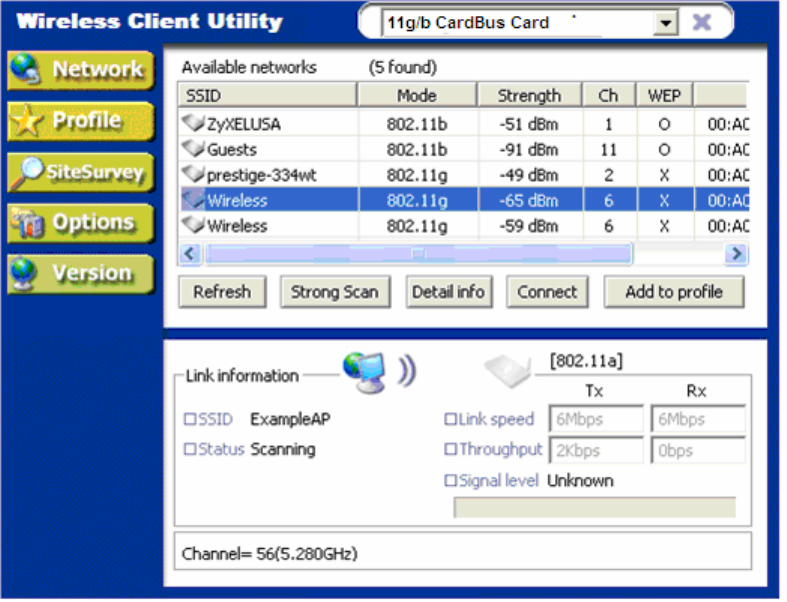
1.3.3 Site Survey
This page shows a list of SSIDs in your vicinity. Information regarding each SSID is also shown:
SSID, mode, signal strength, channel, BSSID (MAC address), data rate, and WEP/WPA status.
Refresh
[Refresh] will scan the vicinity for a certain amount of time and display the scan results.
Strong Scan
[Strong Scan] will continuously scan the vicinity every 2.5 seconds until you click on [Stop], which
appears in place of [Strong Scan] when scanning.
19
Selecting a network from the [Available Networks] list will enable the [Detail Info], [Connect] and
[Add to profile] buttons.
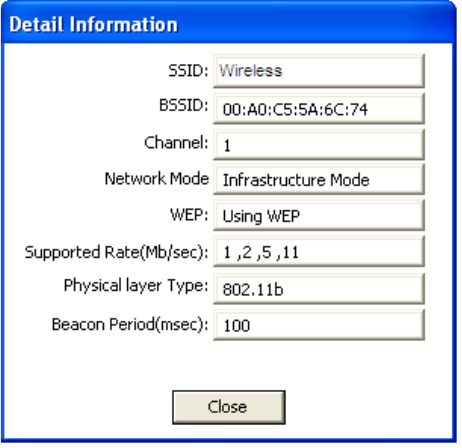
Detail Info
[Detail info] will display the following screen showing the selected device's configuration information.
An alternative to clicking on [Detail info] is double-clicking on the SSID of choice.
21
Connect
[Connect] will immediately connect you with the selected network.
Add to profile
[Add to profile] will have the same effect as clicking on [Add] in the [Profile] page
22
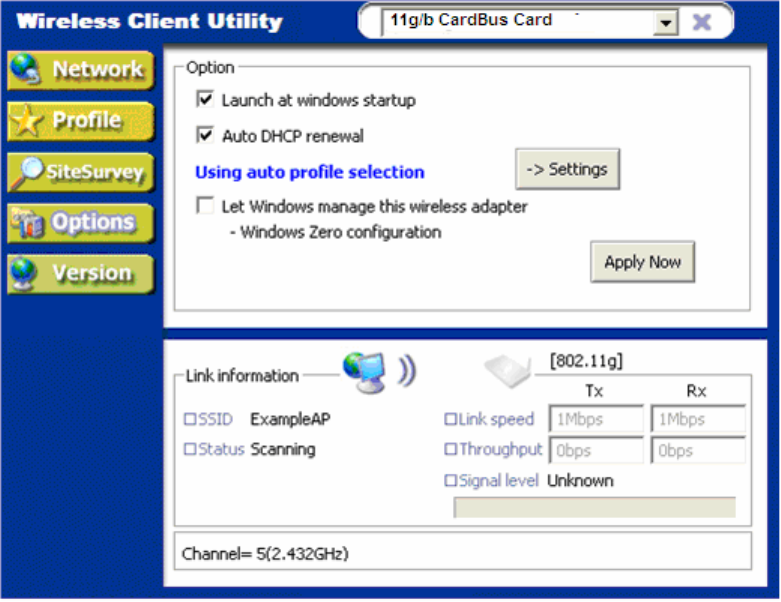
1.3.4 Options
In this page you can configure the behavior of the Wireless utility.
Launch at windows startup
Selecting this option will automatically start the Wireless Utility program whenever you start
Windows.
Auto DH CP renewal
Automatically renews the DHCP information after changing profiles.
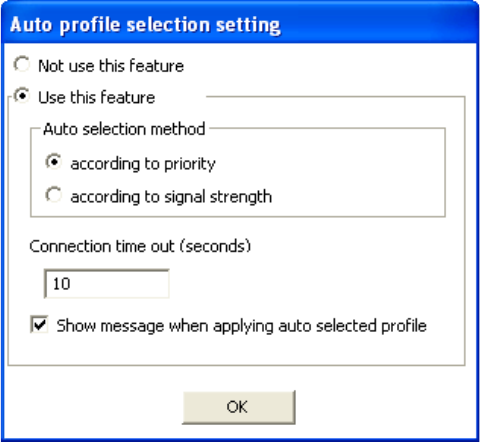
Auto-Pro file Selection
Allows you to define the behavior of the auto-profile selection algorithm. Click [Settings] to
configure.
See following screen shot for options.
23
24
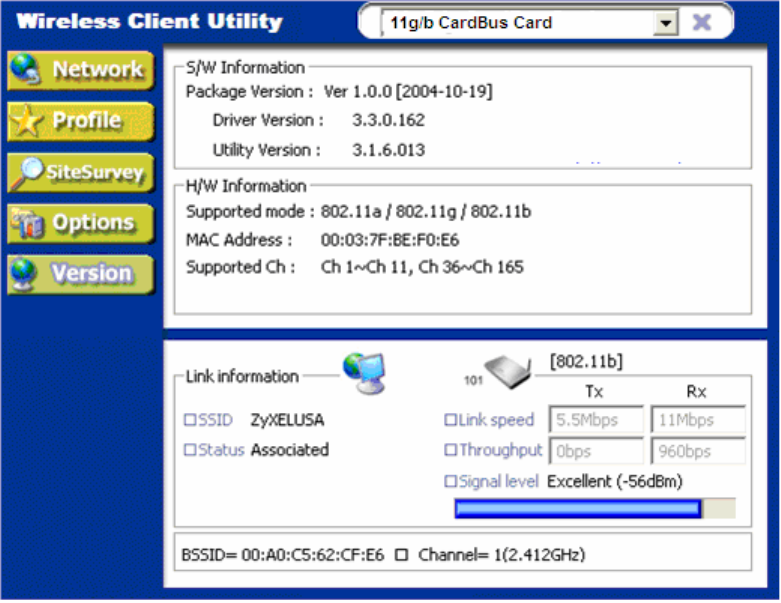
1.3.5 Version
Software and Hardware information of the current client device.
25
Chapter 2 - Configuring Wireless Security
This chapter covers the configuration of security options in the Wireless Utility.
2.1 Configuring Security
You can configure your security settings at any time. Simply select the profile you wish to edit
under the [Profile] tab, select [Properties] and then choose [WLAN Security]. You are also
presented with the option to configure security during the profile creation process. Whether
changing the security settings of an existing profile or creating a new profile, the steps to configure
your security settings remain the same.
2.2 Configuring WEP
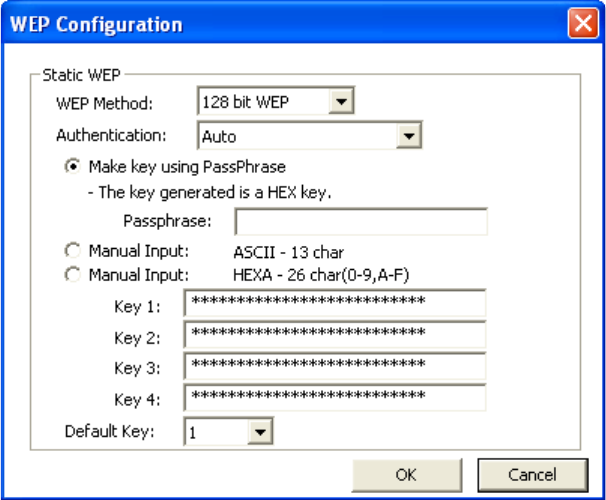
26
1. Select [WEP] under [Security Mode]
2. Put a check mark next to [Using Static WEP]
3. Click [Config]. You will then see the screen below.
4. [WEP Method] Select the correct encryption level to match your access point. Either 64,
128, or 152-bit. The encryption level set her must match the encryption level used by your
access point.
a. [Authentication] You can choose between Auto, Open System, and Shared. Please see
section 2.5 for more information on the different types of authentication. For most installations
choosing “Auto” is the best choice.
b. Enter the WEP key exactly as you did in your access point.
There are three ways of generating a WEP Key:
Make key using PassPhrase: a WEP Key is automatically generated as you type in any
PassPhrase of your choice. Use this feature when you have used a PassPhrase to
generate your WEP key on your access point.
Manual Input (ASCII): You generate your own WEP Key using ASCII characters (5
characters for 64-bit, 13 characters for 128-bit, 16 characters for 152-bit)
27
Manual Input (Hexadecimal): You generate your own WEP Key using hexadecimal
characters (10 characters for 64-bit, 26 characters for 128-bit, 32 characters for 152-bit).
5. Click [OK] to save your settings and return to the previous screen.
6. If you want to use 802.1x authentication with WEP, you will need to configure your 802.1x
settings. Please see section 4.5 for details on configuring 802.1x.
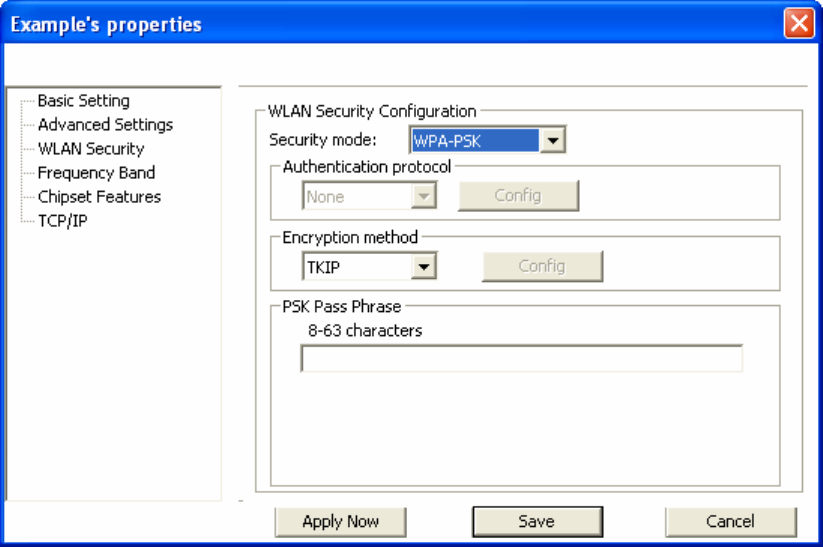
2.3 Configuring WPA-PSK
1. Select [WPA-PSK] under [Security Mode].
2. Select [Encryption method]. You can choose between TKIP or AES. Most access points
use TKIP for WPA-PSK.
3. Under [PSK Pass Phrase] enter the same pass phrase used to configure WPA-PSK on
your access point.
28
2.4 Configuring WPA
1. Select [WPA-PSK] under [Security Mode].
2. Select [Encryption method]. You can choose between TKIP or AES. Most access points
use TKIP for WPA.
3. See section 4.5 for configuring 802.1x for WPA.
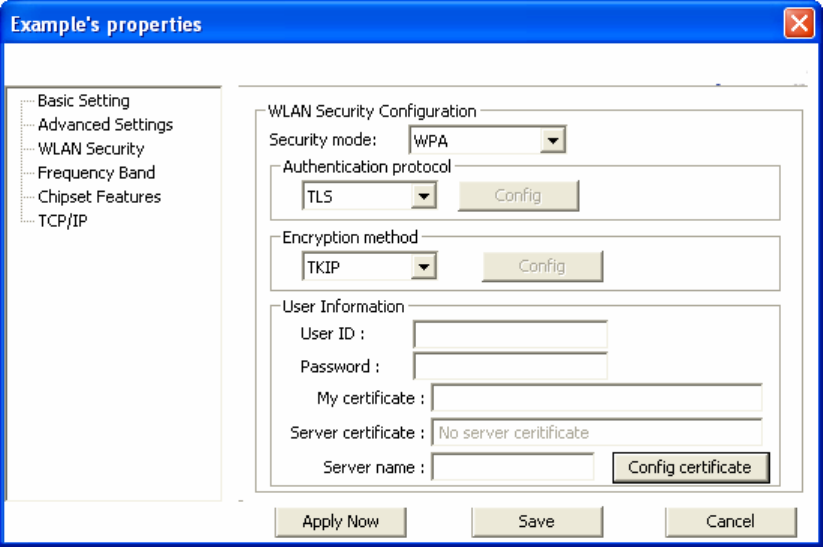
2.5 Configuring 802.1x
1. Choose the EAP method under [Authentication protocol].
2. Depending on the EAP method chosen the options under [User Information] will change.
2.5.1 Configuring 802.1x – EAP-MD5
1. EAP-MD5 is only a choice when use WEP. MD5 is not allowed for WPA.
2. Enter in unique User ID and Password under [User Information]
29
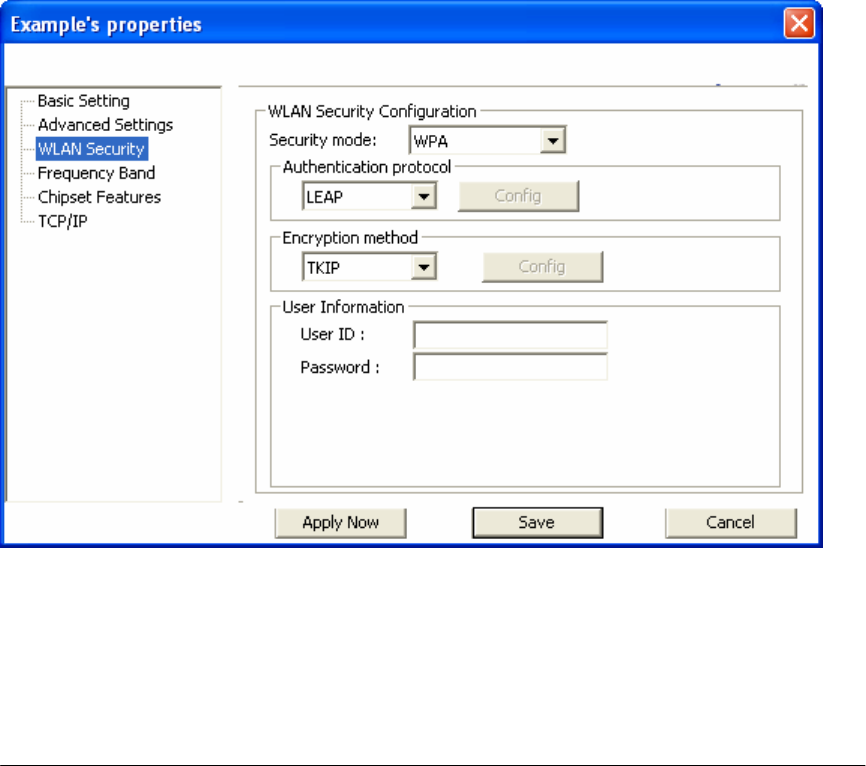
2.5.2 Configuring 802.1x – EAP-LEAP
1. Enter in unique User ID and Password under [User Information]
2.5.3 Configuring 802.1x – EAP-PEAP
1. Click [Config] under [Authentication protocol]
2. Select inner PEAP protocol. You choices are [MS-CHAP v2] or [TLS].
3. Click [OK] to finish and return to the previous screen.
4. Enter in unique User ID and Password under [User Information].
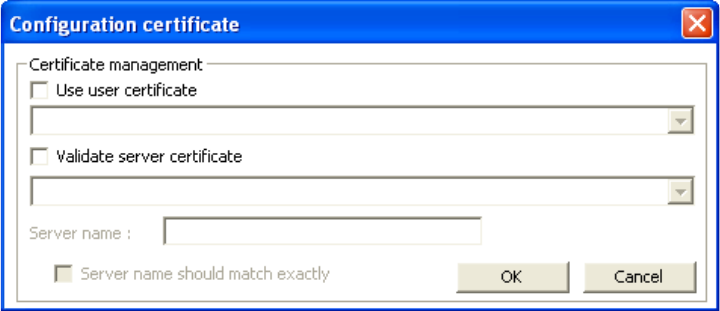
5. If using a user6 or server certificate click [Config certificate]. The following window appears:
6 You must first have a wired connection to a network and obtain the certificate(s) from a certificate
authority (CA). Consult your network administrator for more information.

30
[Use user certificate]: Put a check in the box to activate user certificate. Then select certificate from
the pull down menu.
[Validate server certificate]: Put a check in the box to activate server certificate. Then select the
certificate authority from the pull down menu.
[Server name]: Name of server used for 802.1x authentication.
[Server name should match exactly]: Check this box to force server name to match exactly the
same in the certificate.
6. Click [OK] to finish and return to the previous screen.
31
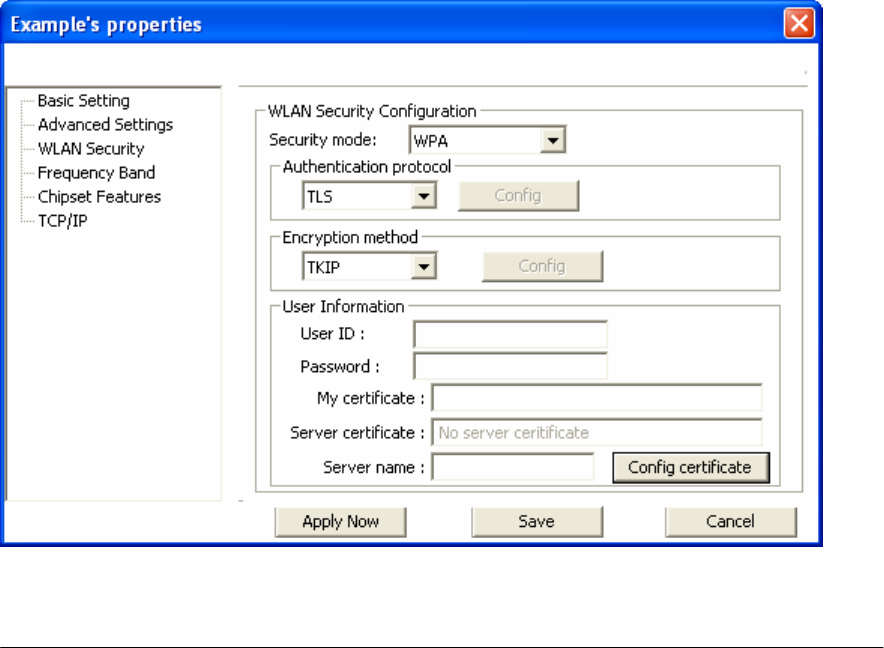
2.5.4 Configuring 802.1x – EAP-TLS
1. Enter in unique User ID and Password under [User Information].
2. TLS requires you to configure both a server and user7 certificate.
3. Click [Config certificate]. The following window appears:
7 You must first have a wired connection to a network and obtain the certificate(s) from a certificate
authority (CA). Consult your network administrator for more information.
32
[Use user certificate]: Put a check in the box to activate user certificate. Then select certificate from
the pull down menu.
[Validate server certificate]: Put a check in the box to activate server certificate. Then select the
certificate authority from the pull down menu.
[Server name]: Name of server used for 802.1x authentication.
[Server name should match exactly]: Check this box to force server name to match exactly the
name in the certificate.
4. Make selections and then click [OK] to finish and return to the previous screen.
33
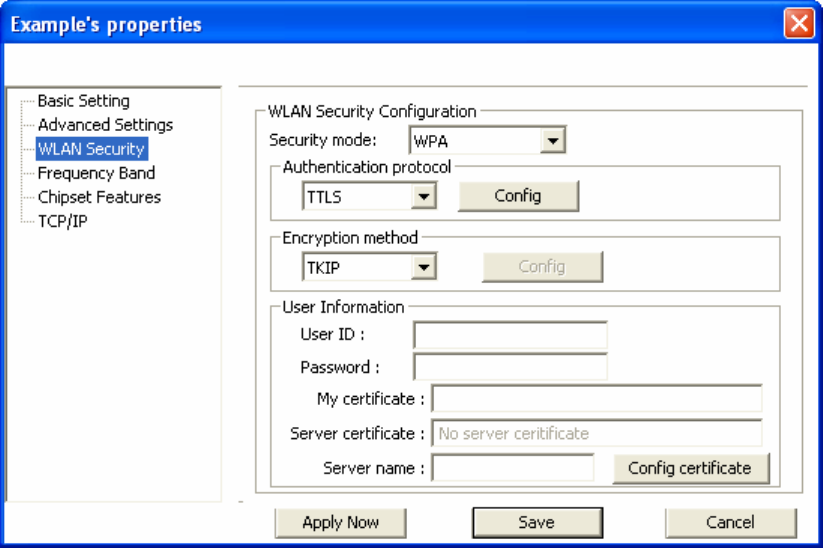
2.5.5 Configuring 802.1x – EAP-TTLS
1. Enter in unique User ID and Password under [User Information].
2. Select inner TTLS protocol. You can choose between [PAP], [CHAP], [MS-CHAP],
[MS-CHAPv2], or [MD5-Challenge].
3. Click [OK] to finish and return to the previous screen.
4. Click [Config certificate]. The following window appears:

34
[Use user certificate]: Put a check in the box to activate user certificate. Then select certificate from
the pull down menu.
[Validate server certificate]: Put a check in the box to activate server certificate. Then select the
certificate authority from the pull down menu.
[Server name]: Name of server used for 802.1x authentication.
[Server name should match exactly]: Check this box to force server name to match exactly the
name in the certificate.
5. Make selections and then click [OK] to finish and return to the previous screen. Server
certificate must be configured for TTLS to work.