U MEDIA Communications WCB360A 802.11g Wireless MIMO CardBus Card User Manual WCB 360A
U-MEDIA Communications, Inc. 802.11g Wireless MIMO CardBus Card WCB 360A
UserManual.wiki
>
U MEDIA Communications
>
WCB360A User Manual
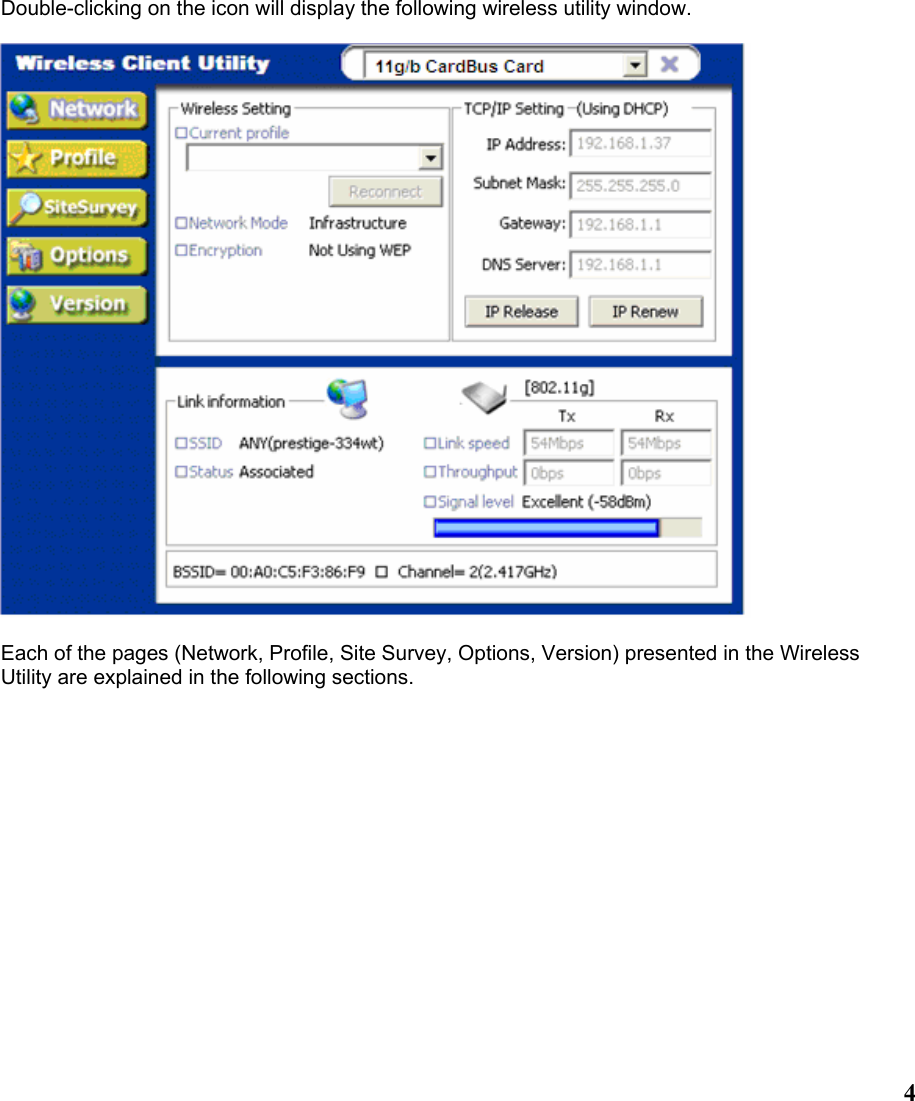
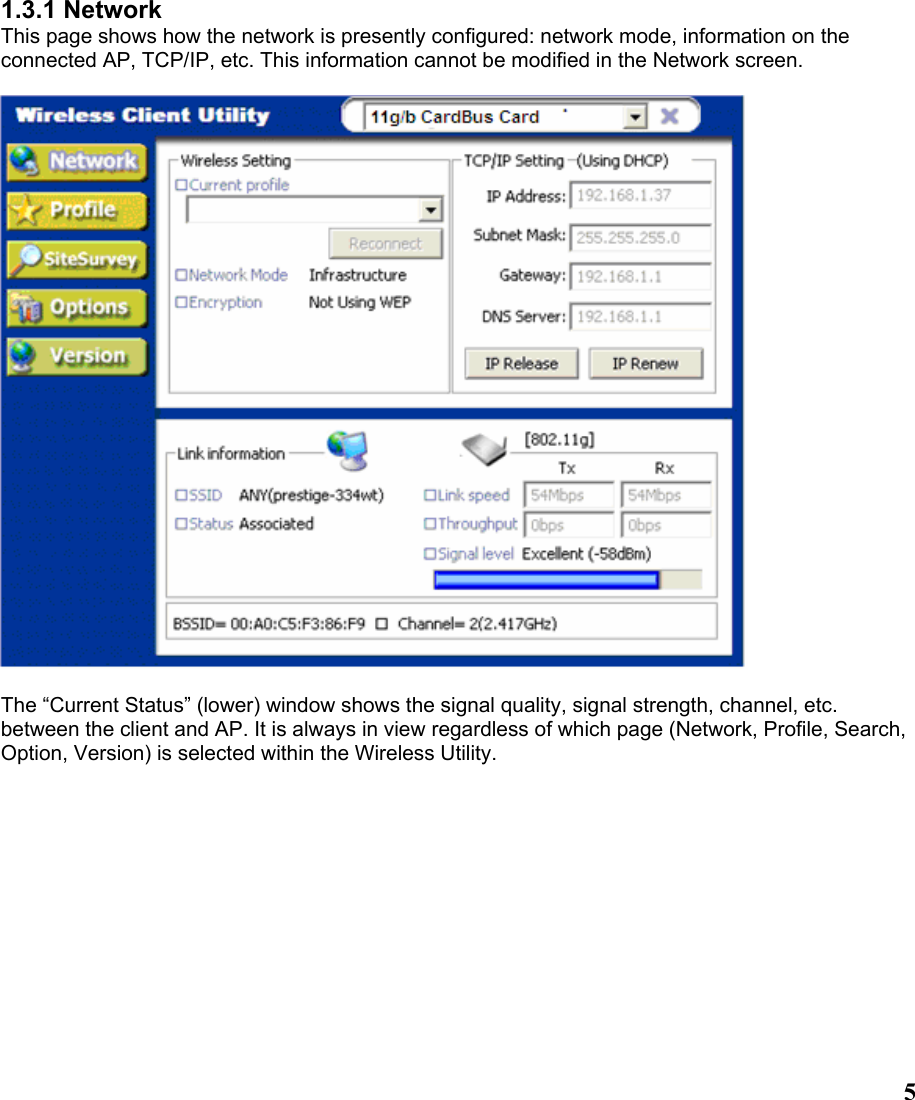
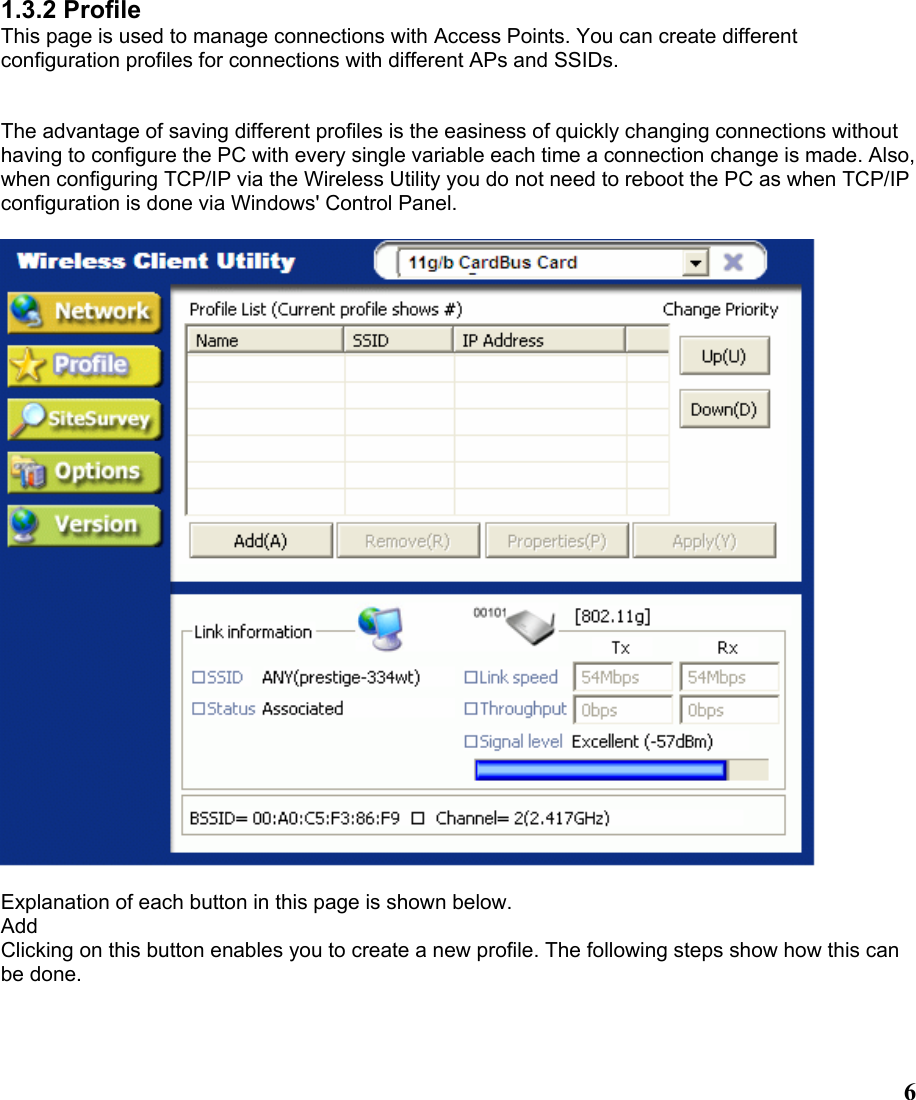
Users Manual
Navigation menu
Upload a User Manual
Namespaces
Wiki Guide
HTML
PDF
Info
Views
User Manual
Discussion / Help
Navigation
![71) Click on [Add] and the following screen will appear. 2) On this screen you will insert some basic settings for your wireless network. a. [Profile Name] Enter in a descriptive name for this profile. b. [Network Mode] If connecting to an access point or wireless router, choose “Infrastructure” 3. If you are going to network one computer directly to another computer without an access point, then choose “Ad-Hoc”4. c. [SSID] Select [Browse] The utility will perform a brief site survey and display the results to you. Click on the SSID5 of the access point you would like to connect to and 3 Infrastructure: You will need an access point to use the Wireless CardBus Card in Infrastructure mode. Because all communication will be done via the Access Point, the Access Point’s SSID must be used. 4 Ad-Hoc: In Ad-Hoc mode communication is made peer-to-peer between the client PCs and without the use of an Access Point. All PCs communicating in an Ad-Hoc should use the same SSID (whatever your choice is).](https://usermanual.wiki/U-MEDIA-Communications/WCB360A/User-Guide-571067-Page-8.png)
![8then click on [Add to Profile]. If the access point you choose has encryption enabled, a window will pop up reminding you to enter the encryption information on the next page. If your access point is not listed, close the [Site Survey] window, and type the name of the SSID into the [SSID] field. d. Click [Next]. The following screen will appear. This screen will vary in appearance depending on whether any encryption was detected with your access point. 3) Enter in the appropriate security information. 5SSID: The SSID is a group name used by users of a common wireless network. Only those devices using the same SSID are able to access each other. Also, you must use the same SSID as the Access Point you want to connect with. SSIDs are case sensitive so take care to make sure your capitalization matches.](https://usermanual.wiki/U-MEDIA-Communications/WCB360A/User-Guide-571067-Page-9.png)
![9a. Click [Next]. The following screen will appear. 4) On this screen you will configure the wireless modes supported by this profile. a. Under [Frequency Band], put a check mark next to each wireless protocol you want this profile to support. If you are unsure of which protocol to choose, leave all checked. b. For [802.11g Configuration] leave all settings at default unless instructed by your network administrator to change them.](https://usermanual.wiki/U-MEDIA-Communications/WCB360A/User-Guide-571067-Page-10.png)
![10c. Click [Next]. The following screen will appear. 5) Final Step a. Uncheck the box [Apply this profile now] if you do not want to activate this profile at this time. b. Click [Save] to complete the wizard and save the profile you have just created. Remove To remove a profile from the “Profile List” select it and then click on [Remove]. Apply If you want to change the current profile with another profile from the “Profile List”, select the desired profile and click on [Apply]. The new profile will immediately become the current profile and you will be connected with its SSID. Properties Selecting a profile from the “Profile List” and clicking on [Properties] will allow you to check and/or modify the properties of the selected profile. Clicking on [Properties] will take you to the following screen.](https://usermanual.wiki/U-MEDIA-Communications/WCB360A/User-Guide-571067-Page-11.png)
![11 Each page in [Properties] is explained below.](https://usermanual.wiki/U-MEDIA-Communications/WCB360A/User-Guide-571067-Page-12.png)
![12Basic Settings: In this page, you can verify the name of the current profile. [Profile Name] Allows you to change the name of the current profile. [Network Mode] Allows you to change between Infrastructure and Ad-Hoc networking modes. [SSID] Allows you to change the SSID that this profile will associate with. Use the [Browse] button to perform a site survey and select the SSID from a list of available SSIDs. Keep in mind when manually entering an SSID that SSIDs are case sensitive.](https://usermanual.wiki/U-MEDIA-Communications/WCB360A/User-Guide-571067-Page-13.png)

![16Chipset Features: This screen allows you to configure advanced features built into the wireless chipset. [Tx Power Level] Allows you to adjust the output power of your radio. Reducing output power can reduce power usage of your laptop and will limit the distance that your wireless signal will reach. [Antenna Diversity] Defines whether to use both internal antennas. Antenna Diversity usually provides a higher quality connection. [Super G] Support for Atheros 108Mbps Super G mode. [XR] Support for Atheros Extended Range technology. [Frame Burst] Allows for faster speeds while maintaining compatibility with other 802.11 devices which may be on your network.](https://usermanual.wiki/U-MEDIA-Communications/WCB360A/User-Guide-571067-Page-17.png)
![17TCP/IP: This allows you to change your TCP/IP settings. [Use IP Changer] By putting a checkmark in the box, you will overwrite your existing WLAN TCP/IP configuration and use the IP Changer software built-into the Wirelss Utility. This allows you to configure TCP/IP settings for each profile.](https://usermanual.wiki/U-MEDIA-Communications/WCB360A/User-Guide-571067-Page-18.png)
![181.3.3 Site Survey This page shows a list of SSIDs in your vicinity. Information regarding each SSID is also shown: SSID, mode, signal strength, channel, BSSID (MAC address), data rate, and WEP/WPA status. Refresh [Refresh] will scan the vicinity for a certain amount of time and display the scan results. Strong Scan [Strong Scan] will continuously scan the vicinity every 2.5 seconds until you click on [Stop], which appears in place of [Strong Scan] when scanning.](https://usermanual.wiki/U-MEDIA-Communications/WCB360A/User-Guide-571067-Page-19.png)
![19 Selecting a network from the [Available Networks] list will enable the [Detail Info], [Connect] and [Add to profile] buttons. Detail Info [Detail info] will display the following screen showing the selected device's configuration information. An alternative to clicking on [Detail info] is double-clicking on the SSID of choice.](https://usermanual.wiki/U-MEDIA-Communications/WCB360A/User-Guide-571067-Page-20.png)
![21 Connect [Connect] will immediately connect you with the selected network. Add to profile [Add to profile] will have the same effect as clicking on [Add] in the [Profile] page](https://usermanual.wiki/U-MEDIA-Communications/WCB360A/User-Guide-571067-Page-22.png)
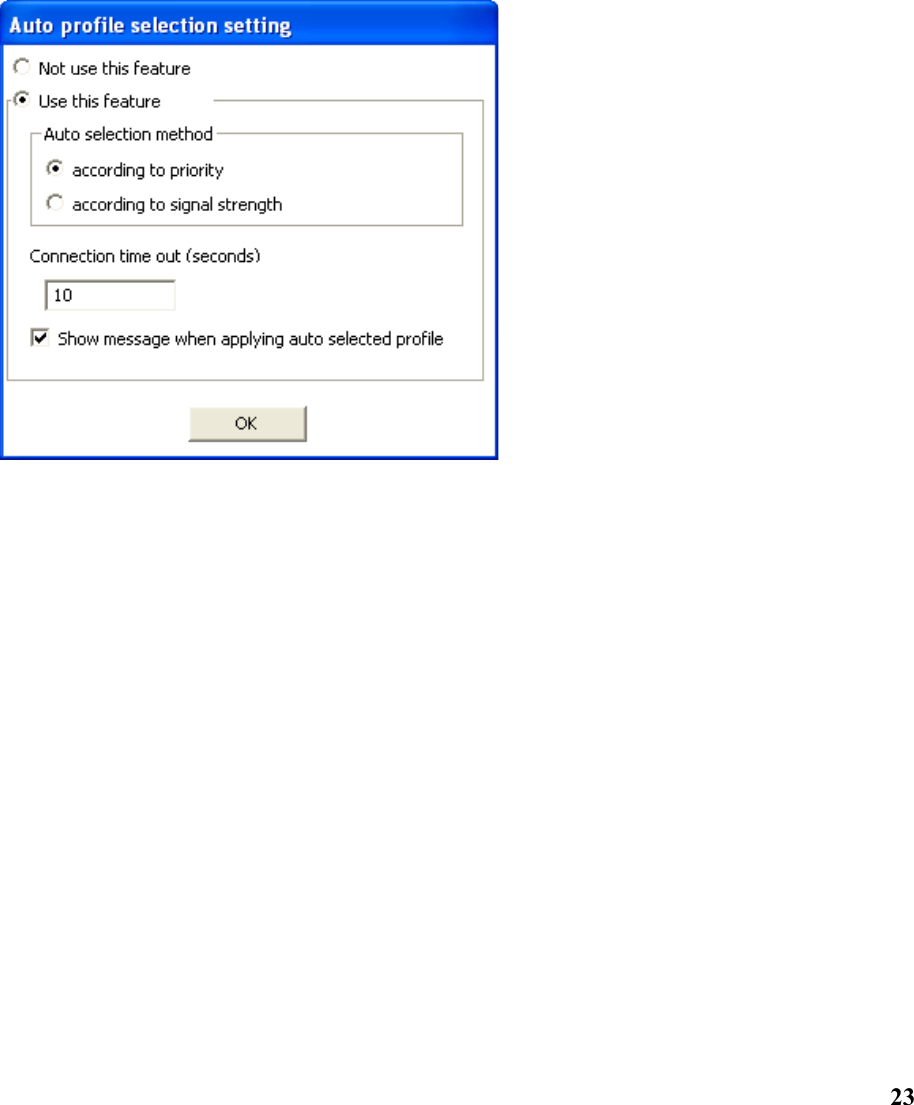
![221.3.4 Options In this page you can configure the behavior of the Wireless utility. Launch at windows startup Selecting this option will automatically start the Wireless Utility program whenever you start Windows. Auto DH CP renewal Automatically renews the DHCP information after changing profiles. Auto-Pro file Selection Allows you to define the behavior of the auto-profile selection algorithm. Click [Settings] to configure. See following screen shot for options.](https://usermanual.wiki/U-MEDIA-Communications/WCB360A/User-Guide-571067-Page-23.png)

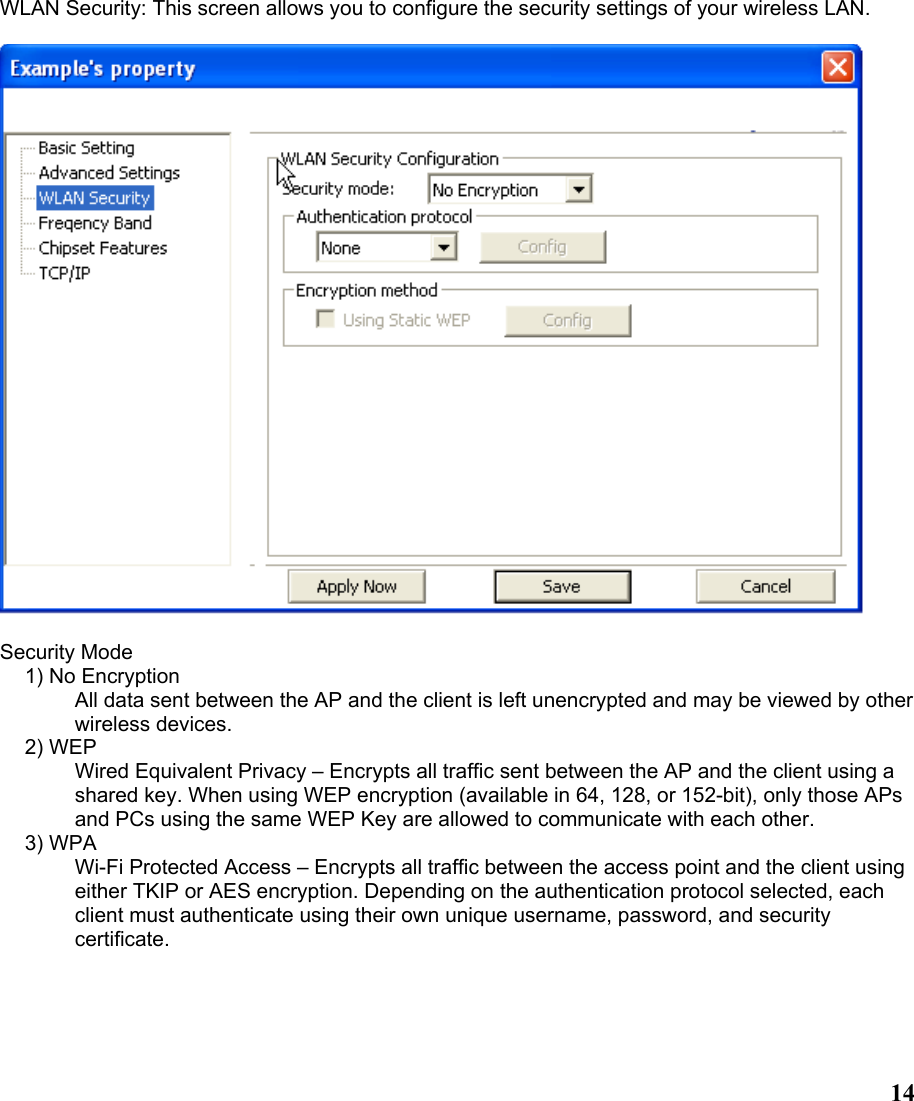
![25Chapter 2 - Configuring Wireless Security This chapter covers the configuration of security options in the Wireless Utility. 2.1 Configuring Security You can configure your security settings at any time. Simply select the profile you wish to edit under the [Profile] tab, select [Properties] and then choose [WLAN Security]. You are also presented with the option to configure security during the profile creation process. Whether changing the security settings of an existing profile or creating a new profile, the steps to configure your security settings remain the same. 2.2 Configuring WEP](https://usermanual.wiki/U-MEDIA-Communications/WCB360A/User-Guide-571067-Page-26.png)
![261. Select [WEP] under [Security Mode] 2. Put a check mark next to [Using Static WEP] 3. Click [Config]. You will then see the screen below. 4. [WEP Method] Select the correct encryption level to match your access point. Either 64, 128, or 152-bit. The encryption level set her must match the encryption level used by your access point. a. [Authentication] You can choose between Auto, Open System, and Shared. Please see section 2.5 for more information on the different types of authentication. For most installations choosing “Auto” is the best choice. b. Enter the WEP key exactly as you did in your access point. There are three ways of generating a WEP Key: Make key using PassPhrase: a WEP Key is automatically generated as you type in any PassPhrase of your choice. Use this feature when you have used a PassPhrase to generate your WEP key on your access point. Manual Input (ASCII): You generate your own WEP Key using ASCII characters (5 characters for 64-bit, 13 characters for 128-bit, 16 characters for 152-bit)](https://usermanual.wiki/U-MEDIA-Communications/WCB360A/User-Guide-571067-Page-27.png)
![27Manual Input (Hexadecimal): You generate your own WEP Key using hexadecimal characters (10 characters for 64-bit, 26 characters for 128-bit, 32 characters for 152-bit). 5. Click [OK] to save your settings and return to the previous screen. 6. If you want to use 802.1x authentication with WEP, you will need to configure your 802.1x settings. Please see section 4.5 for details on configuring 802.1x. 2.3 Configuring WPA-PSK 1. Select [WPA-PSK] under [Security Mode]. 2. Select [Encryption method]. You can choose between TKIP or AES. Most access points use TKIP for WPA-PSK. 3. Under [PSK Pass Phrase] enter the same pass phrase used to configure WPA-PSK on your access point.](https://usermanual.wiki/U-MEDIA-Communications/WCB360A/User-Guide-571067-Page-28.png)
![282.4 Configuring WPA 1. Select [WPA-PSK] under [Security Mode]. 2. Select [Encryption method]. You can choose between TKIP or AES. Most access points use TKIP for WPA. 3. See section 4.5 for configuring 802.1x for WPA. 2.5 Configuring 802.1x 1. Choose the EAP method under [Authentication protocol]. 2. Depending on the EAP method chosen the options under [User Information] will change. 2.5.1 Configuring 802.1x – EAP-MD5 1. EAP-MD5 is only a choice when use WEP. MD5 is not allowed for WPA. 2. Enter in unique User ID and Password under [User Information]](https://usermanual.wiki/U-MEDIA-Communications/WCB360A/User-Guide-571067-Page-29.png)
![292.5.2 Configuring 802.1x – EAP-LEAP 1. Enter in unique User ID and Password under [User Information] 2.5.3 Configuring 802.1x – EAP-PEAP 1. Click [Config] under [Authentication protocol] 2. Select inner PEAP protocol. You choices are [MS-CHAP v2] or [TLS]. 3. Click [OK] to finish and return to the previous screen. 4. Enter in unique User ID and Password under [User Information]. 5. If using a user6 or server certificate click [Config certificate]. The following window appears: 6 You must first have a wired connection to a network and obtain the certificate(s) from a certificate authority (CA). Consult your network administrator for more information.](https://usermanual.wiki/U-MEDIA-Communications/WCB360A/User-Guide-571067-Page-30.png)
![30 [Use user certificate]: Put a check in the box to activate user certificate. Then select certificate from the pull down menu. [Validate server certificate]: Put a check in the box to activate server certificate. Then select the certificate authority from the pull down menu. [Server name]: Name of server used for 802.1x authentication. [Server name should match exactly]: Check this box to force server name to match exactly the same in the certificate. 6. Click [OK] to finish and return to the previous screen.](https://usermanual.wiki/U-MEDIA-Communications/WCB360A/User-Guide-571067-Page-31.png)
![312.5.4 Configuring 802.1x – EAP-TLS 1. Enter in unique User ID and Password under [User Information]. 2. TLS requires you to configure both a server and user7 certificate. 3. Click [Config certificate]. The following window appears: 7 You must first have a wired connection to a network and obtain the certificate(s) from a certificate authority (CA). Consult your network administrator for more information.](https://usermanual.wiki/U-MEDIA-Communications/WCB360A/User-Guide-571067-Page-32.png)
![32 [Use user certificate]: Put a check in the box to activate user certificate. Then select certificate from the pull down menu. [Validate server certificate]: Put a check in the box to activate server certificate. Then select the certificate authority from the pull down menu. [Server name]: Name of server used for 802.1x authentication. [Server name should match exactly]: Check this box to force server name to match exactly the name in the certificate. 4. Make selections and then click [OK] to finish and return to the previous screen.](https://usermanual.wiki/U-MEDIA-Communications/WCB360A/User-Guide-571067-Page-33.png)
![332.5.5 Configuring 802.1x – EAP-TTLS 1. Enter in unique User ID and Password under [User Information]. 2. Select inner TTLS protocol. You can choose between [PAP], [CHAP], [MS-CHAP], [MS-CHAPv2], or [MD5-Challenge]. 3. Click [OK] to finish and return to the previous screen. 4. Click [Config certificate]. The following window appears:](https://usermanual.wiki/U-MEDIA-Communications/WCB360A/User-Guide-571067-Page-34.png)
![34 [Use user certificate]: Put a check in the box to activate user certificate. Then select certificate from the pull down menu. [Validate server certificate]: Put a check in the box to activate server certificate. Then select the certificate authority from the pull down menu. [Server name]: Name of server used for 802.1x authentication. [Server name should match exactly]: Check this box to force server name to match exactly the name in the certificate. 5. Make selections and then click [OK] to finish and return to the previous screen. Server certificate must be configured for TTLS to work.](https://usermanual.wiki/U-MEDIA-Communications/WCB360A/User-Guide-571067-Page-35.png)