U MEDIA Communications WUB500A USB 2.0 802.11 a/b/g Wireless Network Adapter User Manual Dual band WLAN USB Adapter Manual
U-MEDIA Communications, Inc. USB 2.0 802.11 a/b/g Wireless Network Adapter Dual band WLAN USB Adapter Manual
Contents
- 1. DoC revision 2
- 2. Users Manual Revision 2
- 3. DoC Revision 2
- 4. Users Manual Revison 2
Users Manual Revision 2

![8 3. Installing the Dual-band WLAN USB Adapter The following explanation is based on installation of the Dual-band WLAN USB Adapter into a PC running the Windows XP operation system. Installation in PCs running Windows 98SE, Me, 2000 or XP may be slightly different than shown here. 3.1. Connect the Dual-band WLAN USB Adapter into the PC's USB slot. The PC will automatically detect the Dual-band WLAN USB Adapter and display the [Found New Hardware Wizard] window. 3.2. Click on [Cancel] and exit the [Found New Hardware Wizard] window. 3.3. Insert the Installation CD into the PC's CD-ROM drive and run Windows Explorer to locate the file named "Setup.exe" (if CD-ROM drive is D, then the file is under the directory D:\Client). Once found, double-click on "Setup.exe" and the following screen will appear.](https://usermanual.wiki/U-MEDIA-Communications/WUB500A.Users-Manual-Revision-2/User-Guide-483685-Page-8.png)
![9 3.4. Click on [Next] and the utility program will be automatically installed as shown in the following screen. 3.5. The following screen will appear when installation is completed. Click on [Finish] to successfully exit the installation process.](https://usermanual.wiki/U-MEDIA-Communications/WUB500A.Users-Manual-Revision-2/User-Guide-483685-Page-9.png)
![10 4. The Client Utility Program The following are explanations on how to configure and use the Client Utility program. How to Use the Utility Program After completing the above installation and configuration procedures, a new icon as shown below will automatically appear in the lower right tray bar. Double-clicking on the icon will display the following [Client Utility] window. Each of the pages (Network, Profile, Search, Option, Version) presented in the Client Utility is explained in the following sections.](https://usermanual.wiki/U-MEDIA-Communications/WUB500A.Users-Manual-Revision-2/User-Guide-483685-Page-10.png)
![11 [Network] This page shows how the network is presently configured: network mode, information on the connected AP, TCP/IP, etc. This information cannot be modified in the Network screen. The “Current Status” window shows the signal quality, signal strength, channel, etc. between the client and AP. It is always in view regardless of which page (Network, Profile, Search, Option, Version) is selected within the Client Utility.](https://usermanual.wiki/U-MEDIA-Communications/WUB500A.Users-Manual-Revision-2/User-Guide-483685-Page-11.png)
![12 [Profile] This page is used to manage connection with Access Points. You can create different configuration profiles for connections with different APs and SSIDs. The advantage of saving different profiles is the easiness of quickly changing connections without having to configure the PC with every single variable each time a connection change is made. Also, when configuring TCP/IP via the Client Utility you do not need to reboot the PC as when TCP/IP configuration is done via Windows' Control Panel. Explanation of each button in this page is shown below. n Add Clicking on this button enables you to create a new profile. The following steps show how this can be done. 1) Click on [Add] and the following screen will appear. Select the configuration method, [Express Setup] or [Advanced Setup], and follow the on-screen instructions. The following steps are for the [Express Setup]. If you decide to select [Advanced Setup], please refer to section Property shown on pages 21 ~ 23](https://usermanual.wiki/U-MEDIA-Communications/WUB500A.Users-Manual-Revision-2/User-Guide-483685-Page-12.png)
![13 2) Select [Express Setup] and click on [Next]. The following screen will appear. Type in the new profile name for the new wireless connection. 3) Click on [Next] and the following screen will appear.](https://usermanual.wiki/U-MEDIA-Communications/WUB500A.Users-Manual-Revision-2/User-Guide-483685-Page-13.png)
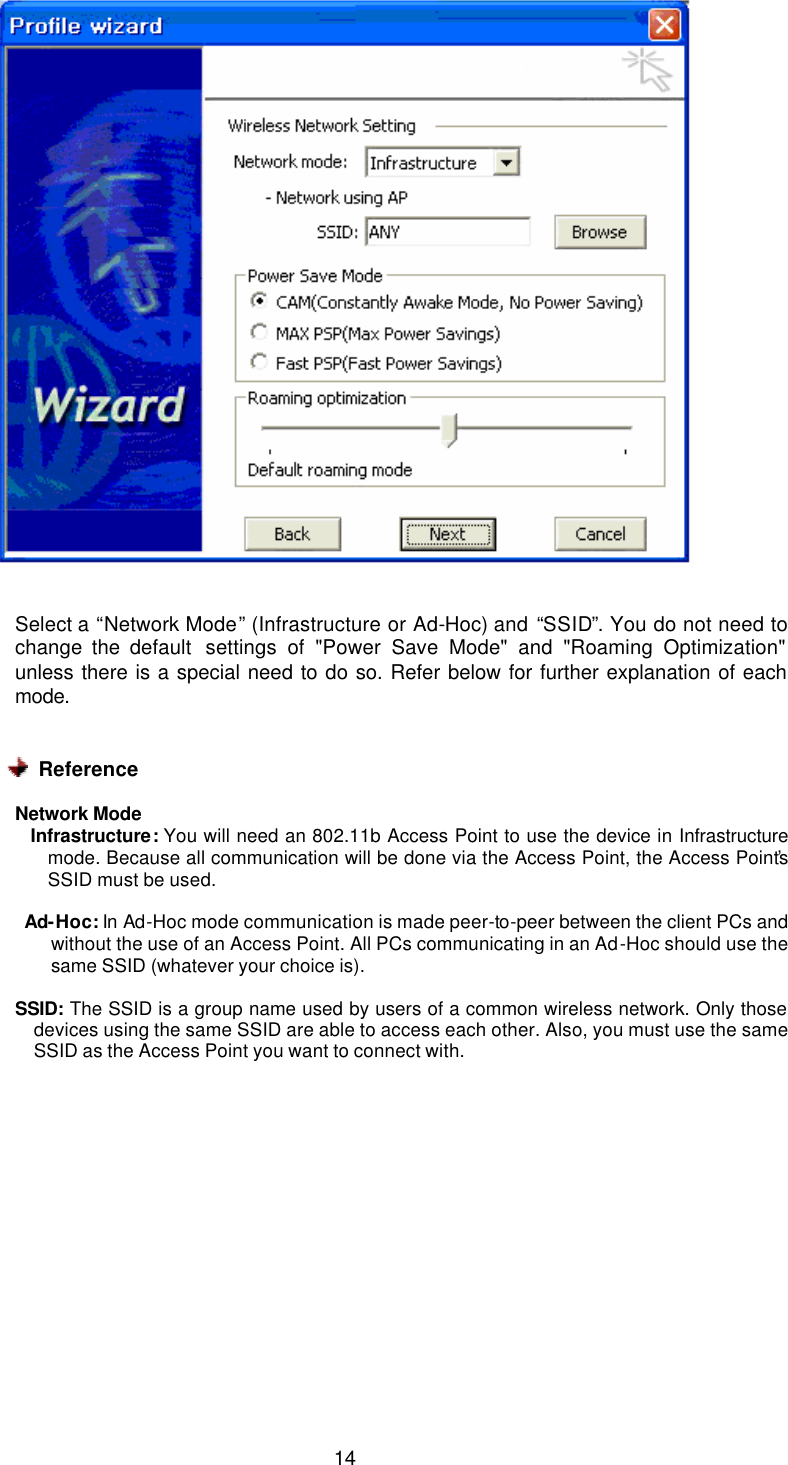
![15 If you do not know the SSID of the devices you want to connect with or want to know the SSIDs of any wireless LAN devices operating in the vicinity, click on [Browse] and the following [Site Survey] screen will appear. Click on [Refresh] to update the list of available SSIDs in the vicinity. [Refresh] will scan the vicinity of a certain amount of time and display the scan results. The site survey list will present you with information containing each device's SSID, signal strength, signal channel, BSSID (MAC address), data rate, and WEP status (on or off). Click on a SSID in the site survey list and click on [Add to profile]. You will then be taken back to the previous [Profile wizard] screen and the selected SSID will be automatically inserted into the SSID input line (in this example: office1) as shown below.](https://usermanual.wiki/U-MEDIA-Communications/WUB500A.Users-Manual-Revision-2/User-Guide-483685-Page-15.png)
![16 4. Click on [Next] and the following screen will appear. Click on [Apply this profile now] to immediately make this profile effective as the current profile and connect to the selected SSID. If you choose to only save the new profile without making it the current profile, do not select this option. 5. Click on [Save] and you will be taken back to the [Profile] page and the new profile automatically added to the “Profile List”.](https://usermanual.wiki/U-MEDIA-Communications/WUB500A.Users-Manual-Revision-2/User-Guide-483685-Page-16.png)
![17 n Remove To remove a profile from the “Profile List” select it and then click on [Remove]. n Apply If you want to change the current profile with another profile from the “Profile List”, select the desired profile and click on [Apply]. The new profile will immediately become the current profile and you will be connected with its SSID.](https://usermanual.wiki/U-MEDIA-Communications/WUB500A.Users-Manual-Revision-2/User-Guide-483685-Page-17.png)
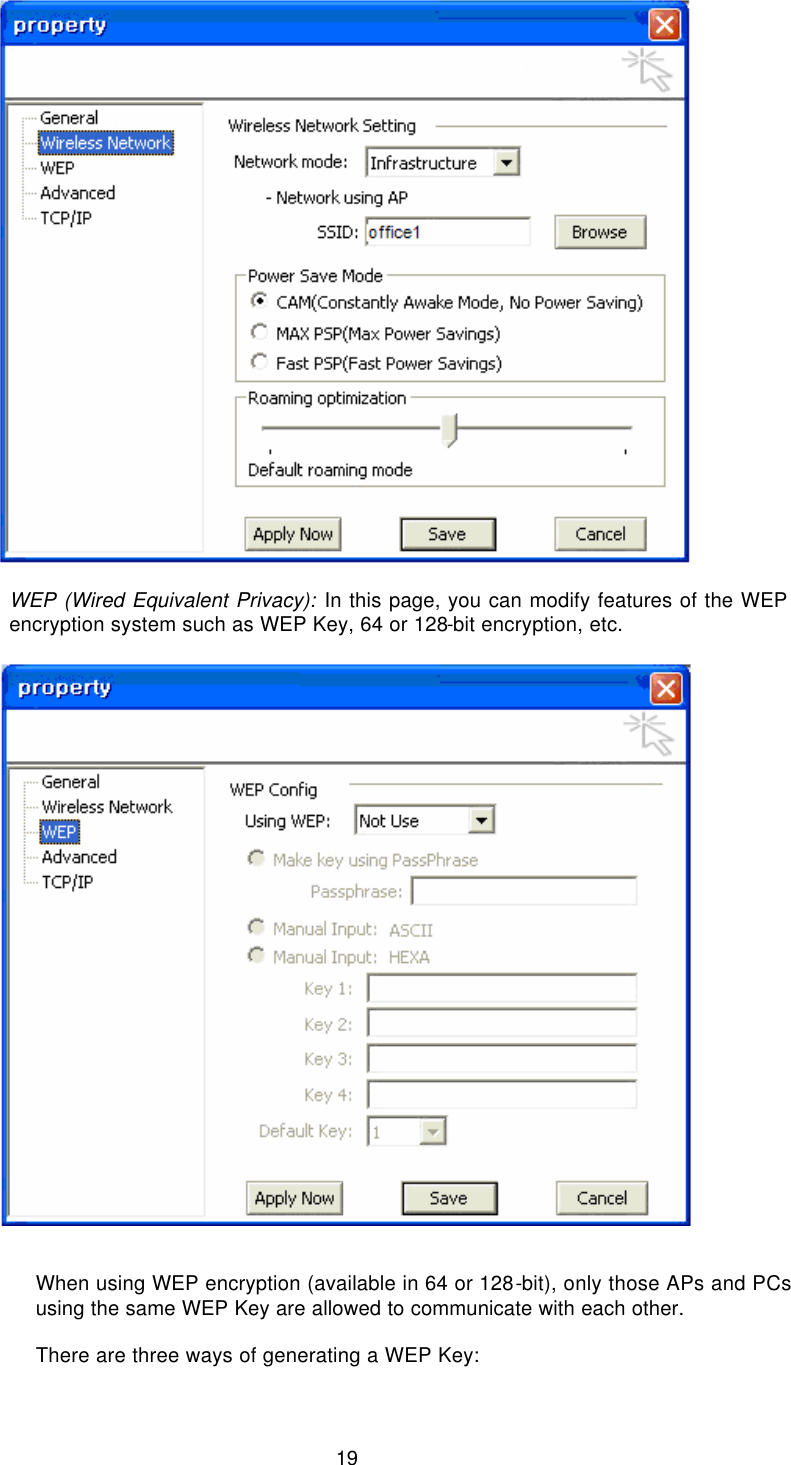
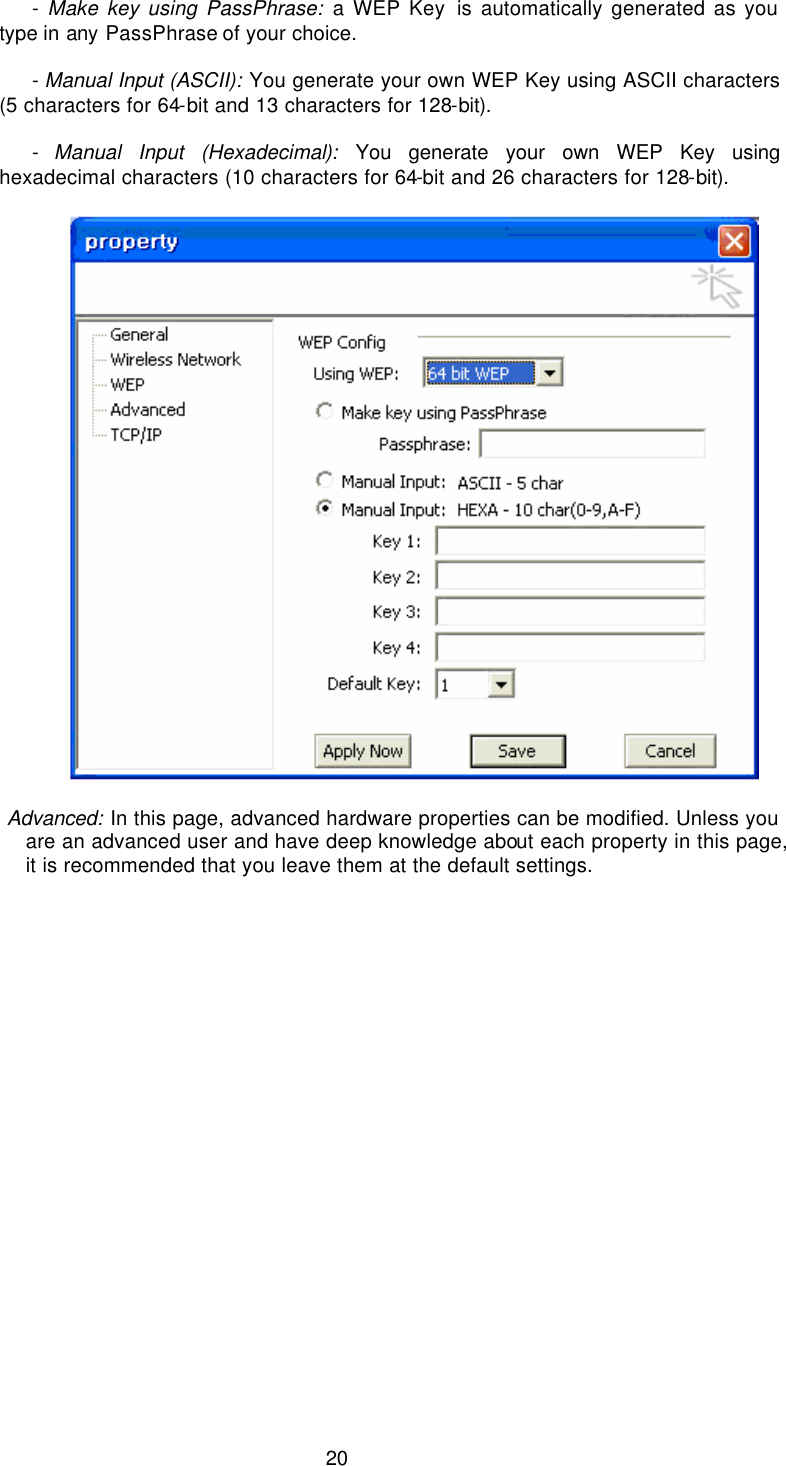
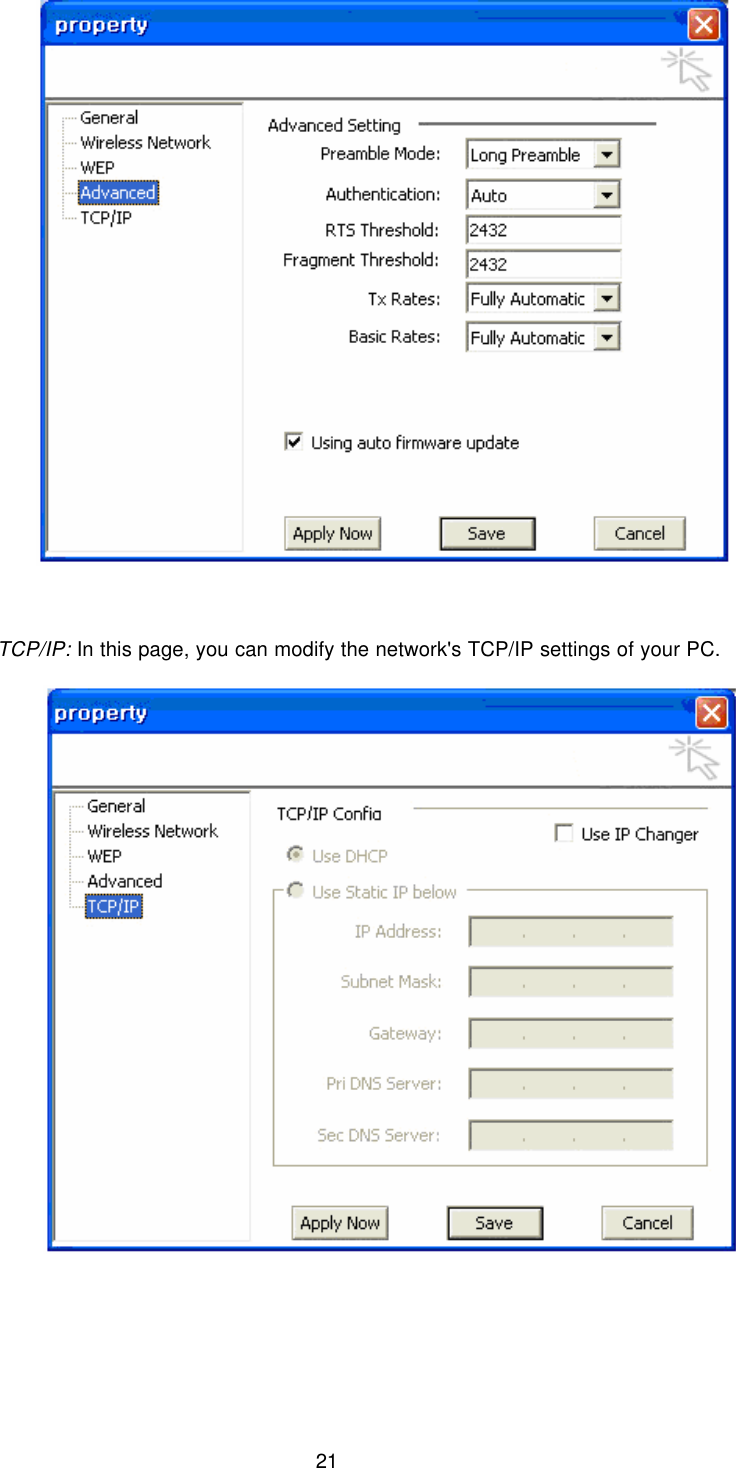
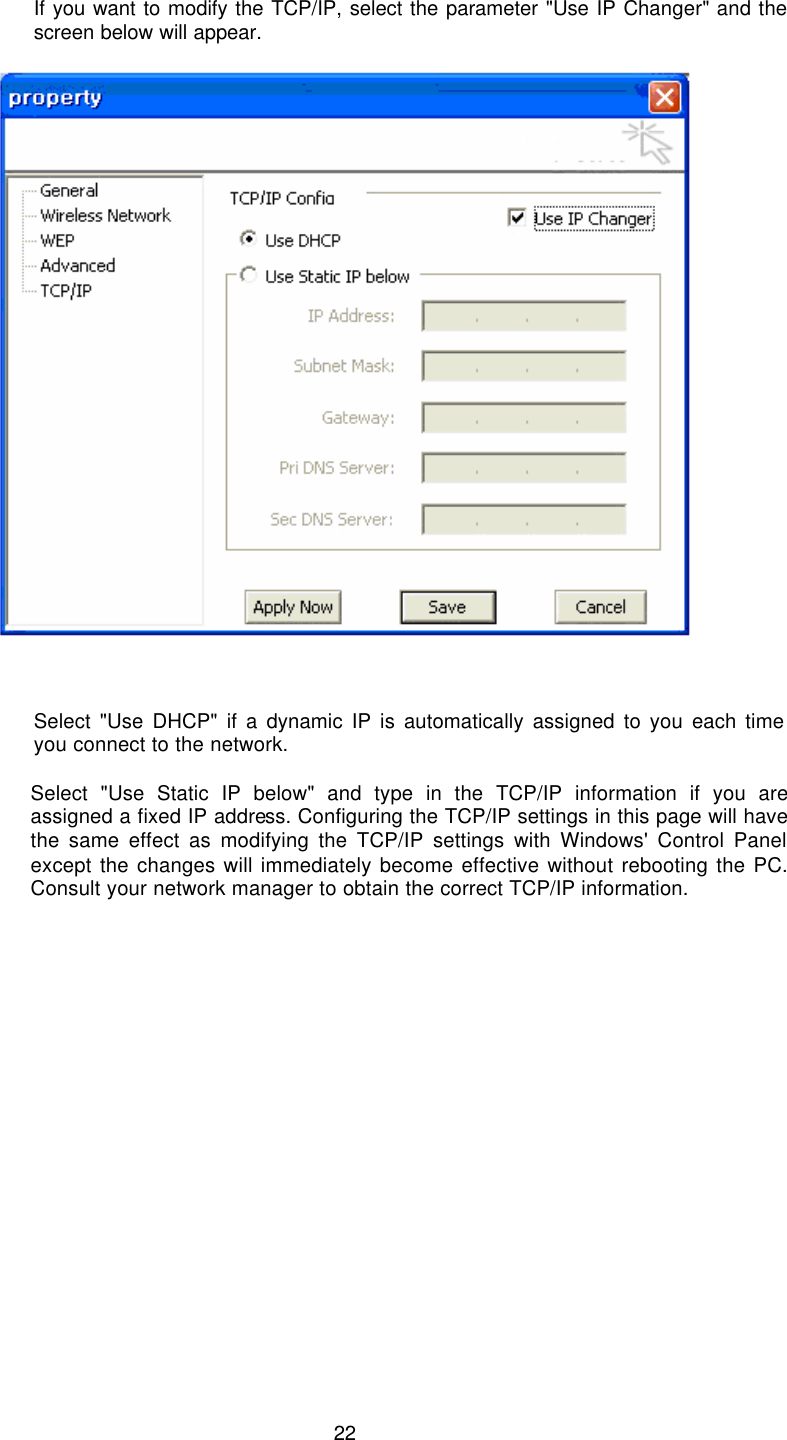
![18 n Property Selecting a profile from the “Profile List” and clicking on [Property] will allow you to check and/or modify the properties of the selected profile. Clicking on [Property] will take you to the following screen. Each page in [Property] is explained below. General: In this page, you can verify the profile name of the current profile. Wireless Network: In this page, you can configure parameters such as Network Mode, SSID, and others.](https://usermanual.wiki/U-MEDIA-Communications/WUB500A.Users-Manual-Revision-2/User-Guide-483685-Page-18.png)
![23 [Site Survey] This page shows a list of SSIDs in your vicinity. Information regarding each SSID is also shown: SSID, signal strength, signal channel, BSSID (MAC address), data rate, and WEP status (on or off). [Refresh] will scan the vicinity of a certain amount of time and display the scan results. [Strong Scan] will continuously scan the vicinity every 2.5 seconds until you click on [Stop], which appears in place of [Strong Scan] when scanning.](https://usermanual.wiki/U-MEDIA-Communications/WUB500A.Users-Manual-Revision-2/User-Guide-483685-Page-23.png)
![24 Selecting a network from the [Available Networks] list will enable the [Detail Info], [Connect] and [Add to profile] buttons. [Detail info] will display the following screen showing the selected device's configuration information. An alternative to clicking on [Detail info] is double-clicking on the SSID of choice. [Connect] will immediately connect you with the selected network.](https://usermanual.wiki/U-MEDIA-Communications/WUB500A.Users-Manual-Revision-2/User-Guide-483685-Page-24.png)
![25 [Add to profile] will have the same effect as clicking on [Add] in the [Profile] page (steps 4.8~4.12).](https://usermanual.wiki/U-MEDIA-Communications/WUB500A.Users-Manual-Revision-2/User-Guide-483685-Page-25.png)
![26 [Option] In this page you can configure various parameters as shown below: [Launch at windows startup] : Selecting this option will automatically start the Client Utility program whenever you start Windows. [Language] : You have the option to select the interface's language between English and Korean. After finishing your parameter settings, click on the [Apply Now] button to immediately apply them.](https://usermanual.wiki/U-MEDIA-Communications/WUB500A.Users-Manual-Revision-2/User-Guide-483685-Page-26.png)
![27 [Version] Software and Hardware information of the current client device being used by your PC are displayed in this page.](https://usermanual.wiki/U-MEDIA-Communications/WUB500A.Users-Manual-Revision-2/User-Guide-483685-Page-27.png)