users manual
a
Analog Devices Canada Ltd.
777 Bay Street, Suite 2303
Toronto, Ontario
CANADA M5G 2C8
Voice: (416) 59x-3200
Fax: (416) 59x-4004
ADSL PCI NIC User Manual
Document Number 20-23000-100
Revision 1.3
01-05-25
This document contains confidential information and is
proprietary to Analog Devices Inc.
No part of this document may be reproduced in any form or by any means
without the prior permission of Analog Devices Inc.
All specifications are subject to change without notice.

Federal Communications Commission (FCC)
Requirements, Part 15
This equipment has been tested and found to comply with
the limits for a class B digital device, pursuant to part 15 of the
FCC Rules. These limits are designed to provide reasonable
protection against harmful interference in a residential
installation.
This equipment generates, uses and can radiate radio
frequency energy and, if not installed and used in accordance
with the instructions, may cause harmful interference to radio
communications. However, there is no guarantee that
interference will not occur in a particular installation. If this
equipment does cause harmful interference to radio or
television reception, which can be determined by turning the
equipment off and on, the user is encouraged to try to correct
the interference by one or more of the following measures:
---Reorient or relocate the receiving antenna.
---Increase the separation between the equipment and
receiver.
---Connect the equipment into an outlet on a circuit
different from that to which the receiver is connected.
---Consult the dealer or an experienced radio/TV
technician for help.
CAUTION: Any changes of modifications not expressly
approved by the grantee of this device could void the
users authority to operate the equipment.

ADSL PCI NIC User Manual Rev 1.3
05/25/01 Analog Devices Proprietary Page 2
Table of Contents
WELCOME TO ADI ADSL PCI NIC ! .................................................................................................3
DOCUMENT ANNOTATIONS .............................................................................................................3
SYSTEM REQUIREMENTS .................................................................................................................3
HARDWARE INSTALLATION ............................................................................................................4
FAMILIARIZING YOURSELF WITH YOUR ADSL BOARD ..............................................................................4
INSTALLING THE ADSL BOARD ..............................................................................................................4
SOFTWARE INSTALLATION .............................................................................................................5
PPPOE (RFC1483) DRIVER INSTALLATION FOR WINDOWS 9X.................................................................6
Device Driver Installation.................................................................................................................6
GUI Configuration ..........................................................................................................................10
Verify the modem.............................................................................................................................14
Uninstall the device driver ..............................................................................................................18
PPPOA (RFC2364) DRIVER INSTALLATION FOR WINDOWS 9X...............................................................19
Device Driver Installation...............................................................................................................19
GUI Configuration ..........................................................................................................................25
Verify the modem.............................................................................................................................29
Uninstall the device driver ..............................................................................................................32
Setup a Connection..........................................................................................................................33
Make a Call.....................................................................................................................................35
CO BOARD...........................................................................................................................................37
PPPOE (RFC1483) CO DRIVER INSTALLATION.....................................................................................37
PPPOA (RFC2364) CO DRIVER INSTALLATION FOR WINDOWS NT4......................................................38
Install the ADSL PCI NIC card, RAS and related services...............................................................38
Setting registry................................................................................................................................43
Creating new user(s) for server side.................................................................................................43
Starting server.................................................................................................................................44
Create an entry in phone book on the client side .............................................................................46
UTILITY PROGRAMS........................................................................................................................50
TROUBLESHOOTING........................................................................................................................51
CHECKLIST ..........................................................................................................................................51
ORDERING INFORMATION.............................................................................................................52
NEXT RELEASE..................................................................................................................................52

ADSL PCI NIC User Manual Rev 1.3
05/25/01 Analog Devices Proprietary Page 3
Welcome to ADI ADSL PCI NIC !
Introduce yourself to the new world of fast Internet. ADI provides a whole new fast and simple
environment for Internet access.
The ADI ADSL board features the following:
• Plug and Play PCI 2.1 interface
• Rate Adaptive ADSL technology that adapts to your connection conditions
• Receive rates up to 10Mbps (downstream) and transmit rates up to 1Mbps (upstream)
Document Annotations
Important Instruction
Special Note
System Requirements
To use the PCI NIC, you PC must have:
• Pentium 133MHz CPU or faster
• Minimum 5MB free space on your hard drive
• 256 color VGA, or higher resolution
• Microsoft NT4 (with Service Pack 5 or later) or Windows 95 / 9x / 9x (2nd Editon) / Me / 2000
• Floppy drive
• CD-ROM drive
ADSL PCI NIC User Manual Rev 1.3
05/25/01 Analog Devices Proprietary Page 4
Hardware Installation
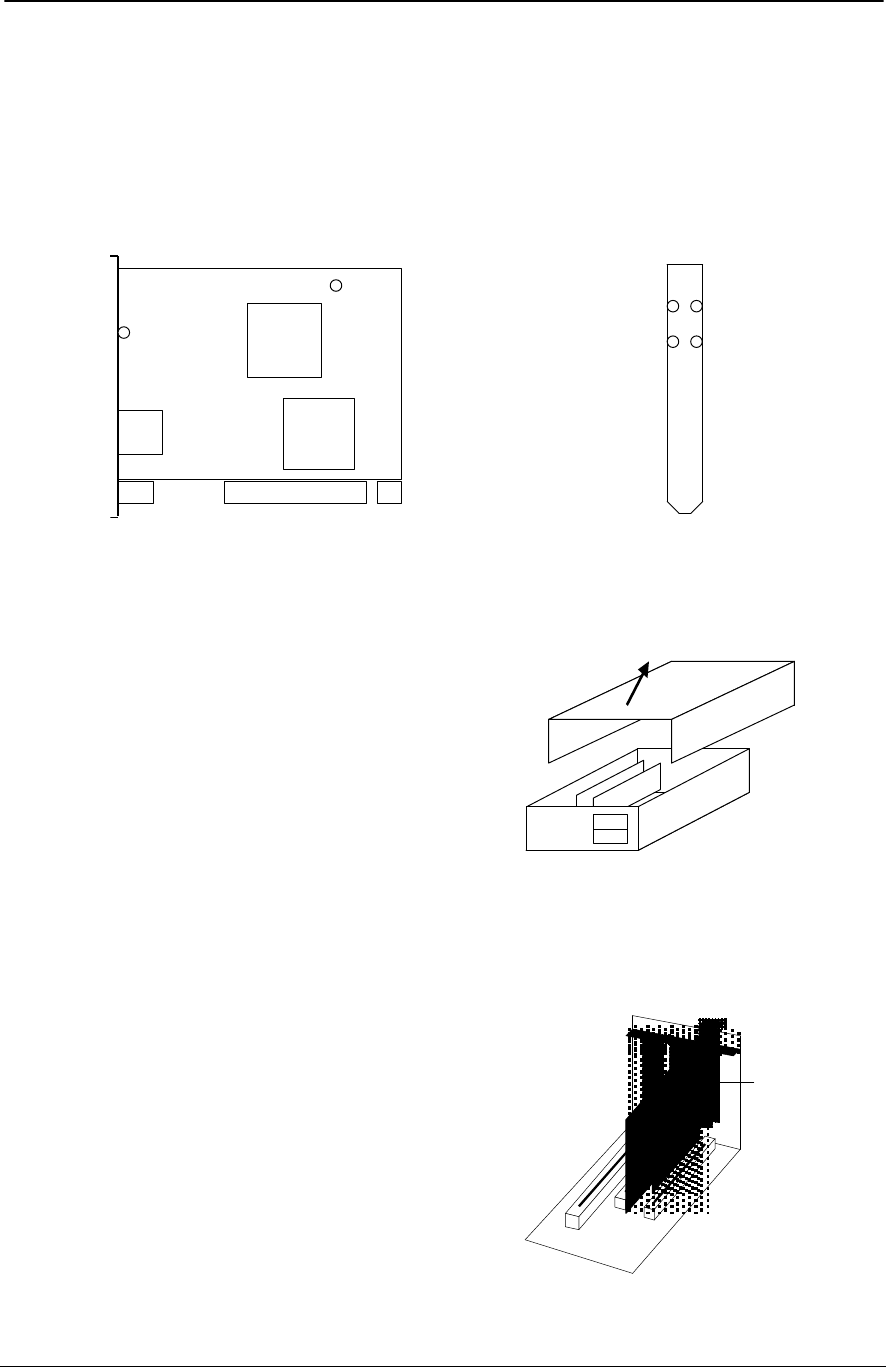
Familiarizing yourself with your ADSL Board
Your ADSL board only has one RJ-11 connector for data connection. POTS splitters or microfilters can
be plugged outside from the board using multiple port phone jacks.
Modem Detect
(on)
Modem Detect / Connect
(blink/on)
CRC Errors
(blink)
Network Data
(blink)
V4.x.x Board
Bracket
Front View
For LEDs
Installing the ADSL Board
To install the board:
1. Switch off your computer and all attached
devices.
2. Touch a metal part of your computer to ground
yourself.
3. Remove the computer cover.
4. Locate a free PCI slot on the computer
motherboard, remove the metal plate from the
slot and put the screw aside.
5. Align the ADSL Board with the PCI slot and
insert the board as shown.
6. Secure the ADSL Board to the PCI slot with the
screw which was removed from the metal plate.
7. Connect your ADSL Board to your wall’s
telephone jack which is connected to your ADSL
service.
8. Replace the computer’s cover.
9. Plug the power cord into the power outlet and
switch on the computer.
LEDs ADSL
Modem
Chipset
PCI
Controller
Bracket
Phone Jack
LEDs
V4.x.x Board
Front View
ISA
SLOT
PCI
SLOT
PCI
SLOT
ADSL card
Installing the ADSL board
Opening your PC

ADSL PCI NIC User Manual Rev 1.3
05/25/01 Analog Devices Proprietary Page 5
Software Installation
Install from CD-ROM
If you receive a zip file containing all the drivers, please unzip the files and burn them into a CD-ROM.
The CD-ROM contains both PPPoEthernet (RFC1483) and PPPoATM (NDISWAN) Windows software
drivers. Both drivers support Windows NT4/95/9x/2000/Me.
Install the latest service pack
It is important to remember to install/reinstall latest service pack for Windows whenever you are adding
components to your system since older system files may be copied back to Windows during installation.
After that you should reboot the machine again.
ADSL PCI NIC User Manual Rev 1.3
05/25/01 Analog Devices Proprietary Page 6
PPPoE (RFC1483) Driver Installation for Windows 9x
For some ADSL networks, they provide the PPP over Ethernet dial-up network services. The supplied
RFC1483 drivers work with third party PPPoE client software such as WinPoet, NTS. Consult your
service provider for the PPPoE client software and its installation guide. This manual only demonstrates
the installation for the RFC1483 drivers which work with other networks.
Device Driver Installation
1. It is important to have a clean Windows 9x setup. It indicates there should not be any conflicted
hardware. The user is encouraged to check:
Start -> Setting -> Control Panel -> System -> Device Manager.
2. There should not be any “yellow warning sign” that complains an improper hardware attached to the
system.
3. Make sure the computer completely power down. Then insert the ADSL PCI NIC card into one of
the PCI slots.
4. Put the Windows 9x original CD-ROM into the CD drive.
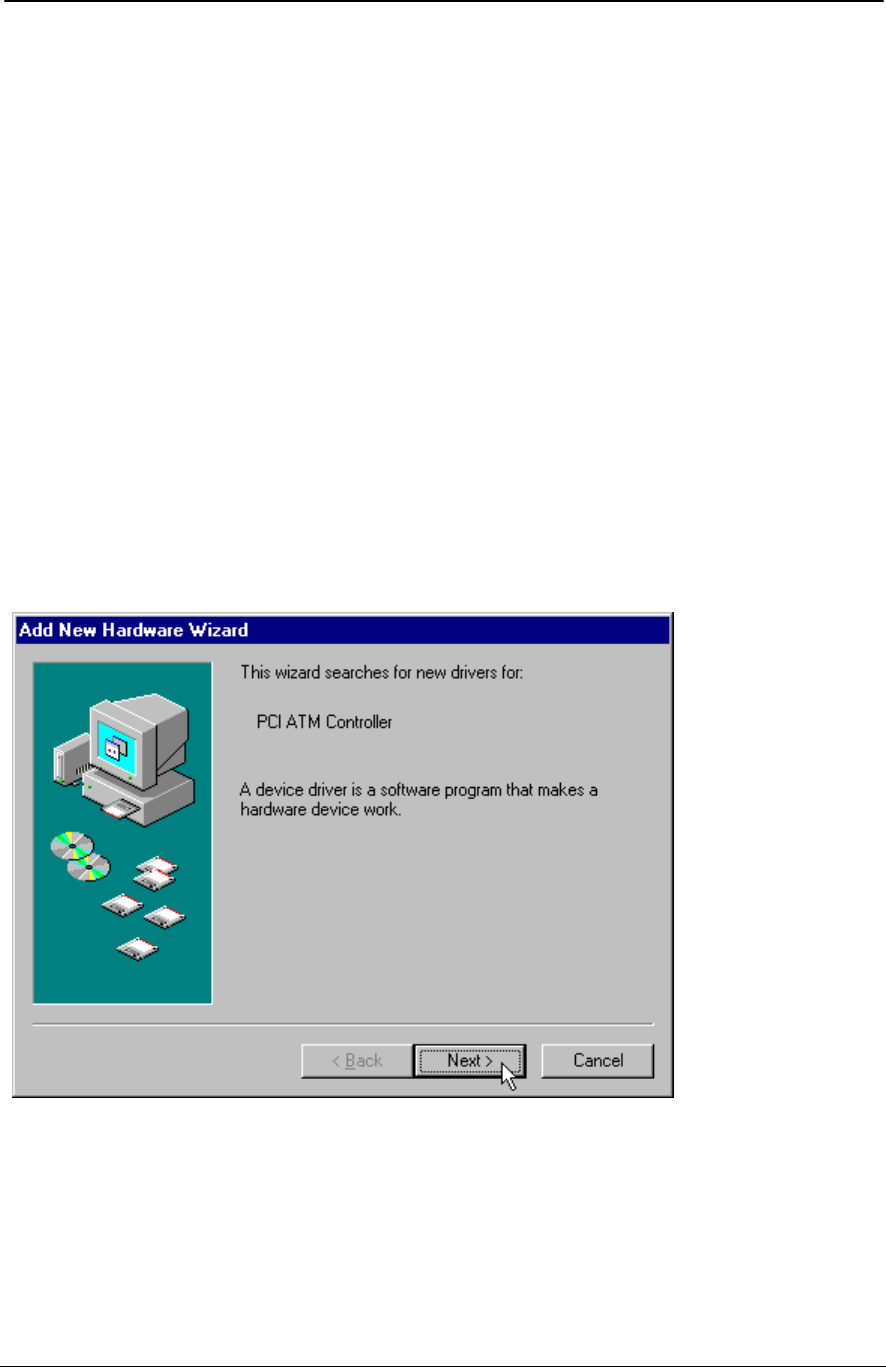
5. Power up the system, you should see the following window while system is searching for new
hardware.
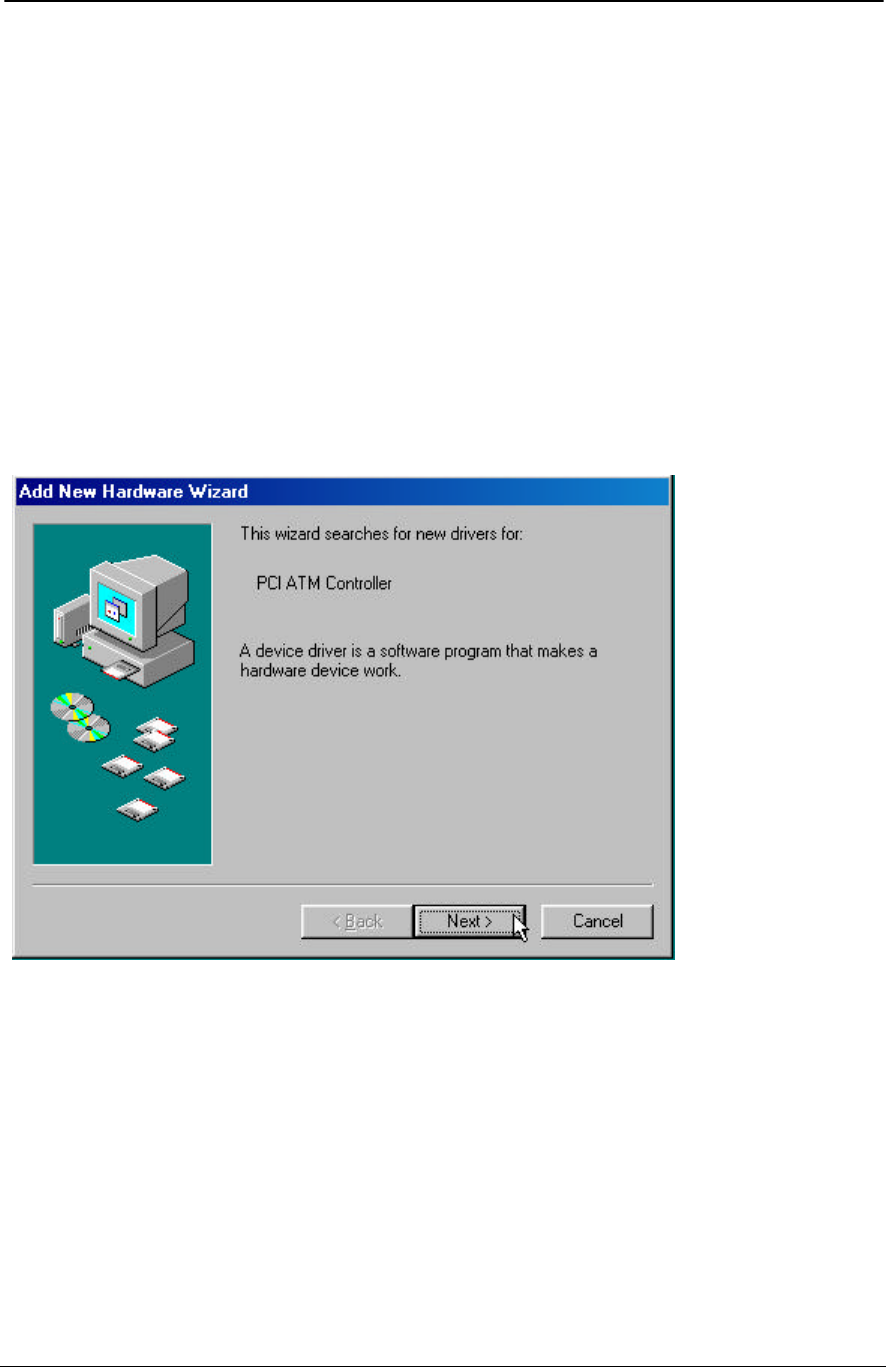
6. Windows 9x will open a window called “Add New Hardware Wizard” to indicate that it found a “PCI
ATM Controller” (ADSL) board. Click “Next” to continue.

ADSL PCI NIC User Manual Rev 1.3
05/25/01 Analog Devices Proprietary Page 7
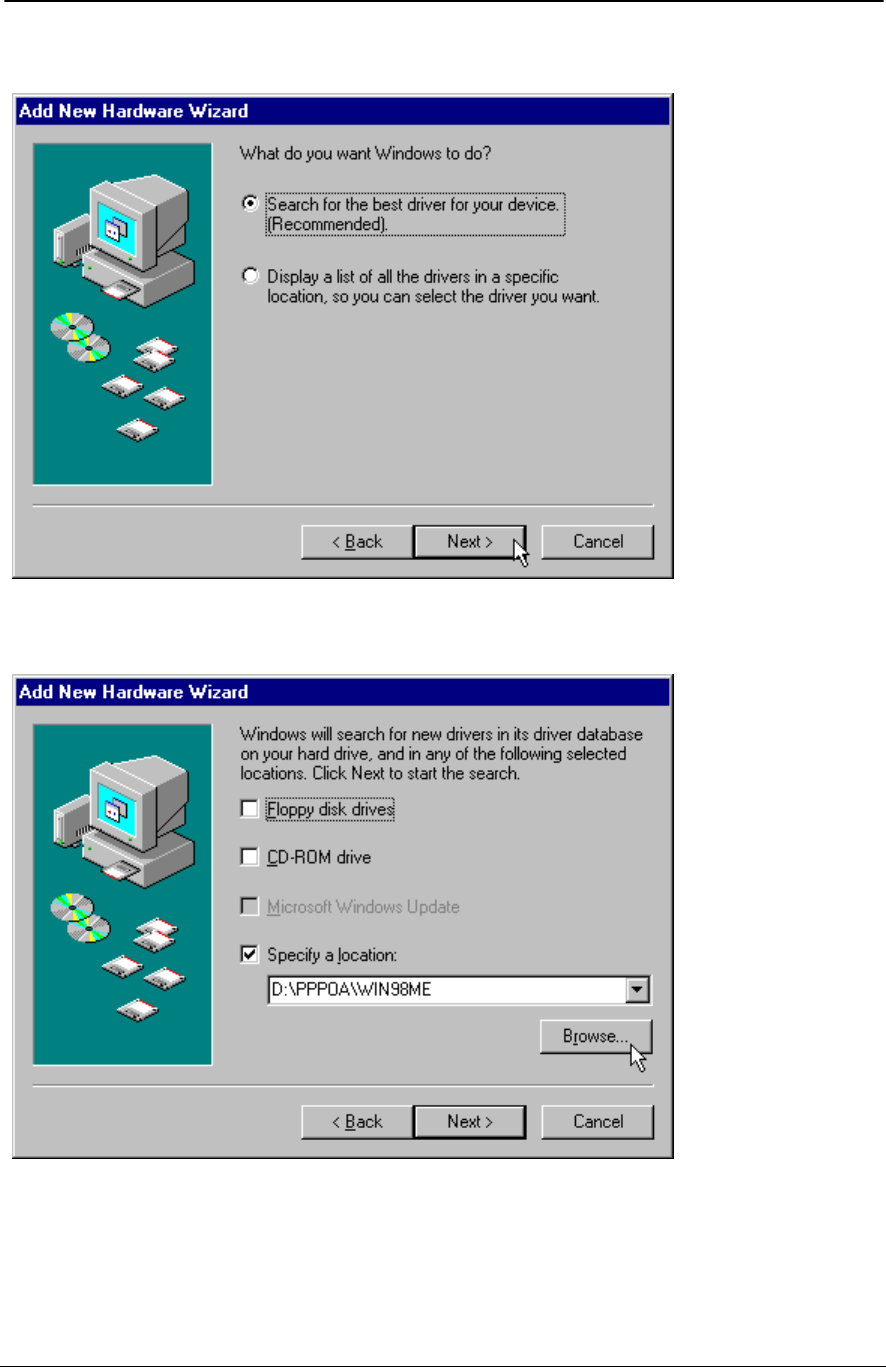
7. Click “Next” to search for the best driver for your device.
8. Select “Specify a location” and browse for the target network protocol and operating system. Then
click “Next”.
ADSL PCI NIC User Manual Rev 1.3
05/25/01 Analog Devices Proprietary Page 8
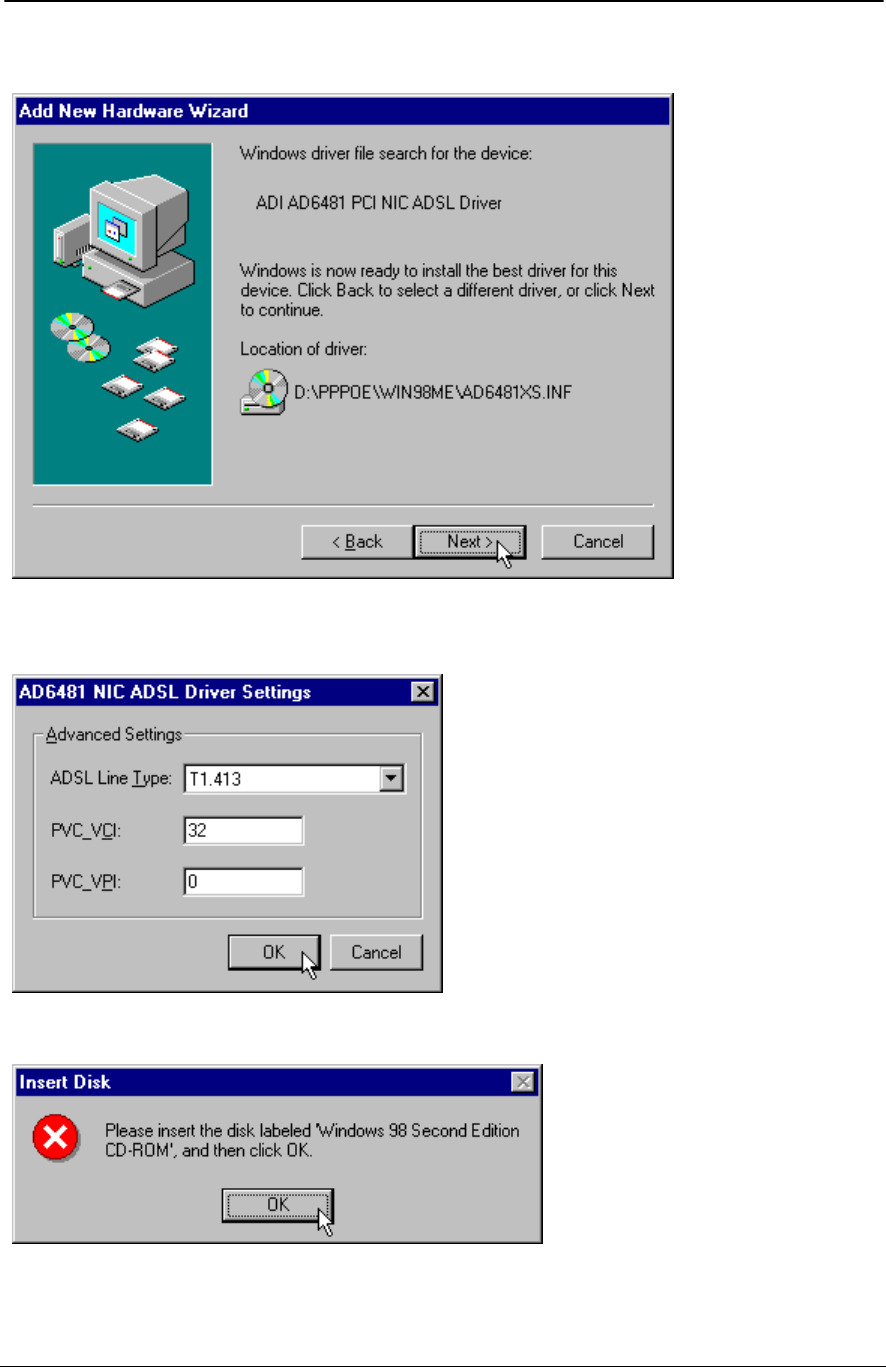
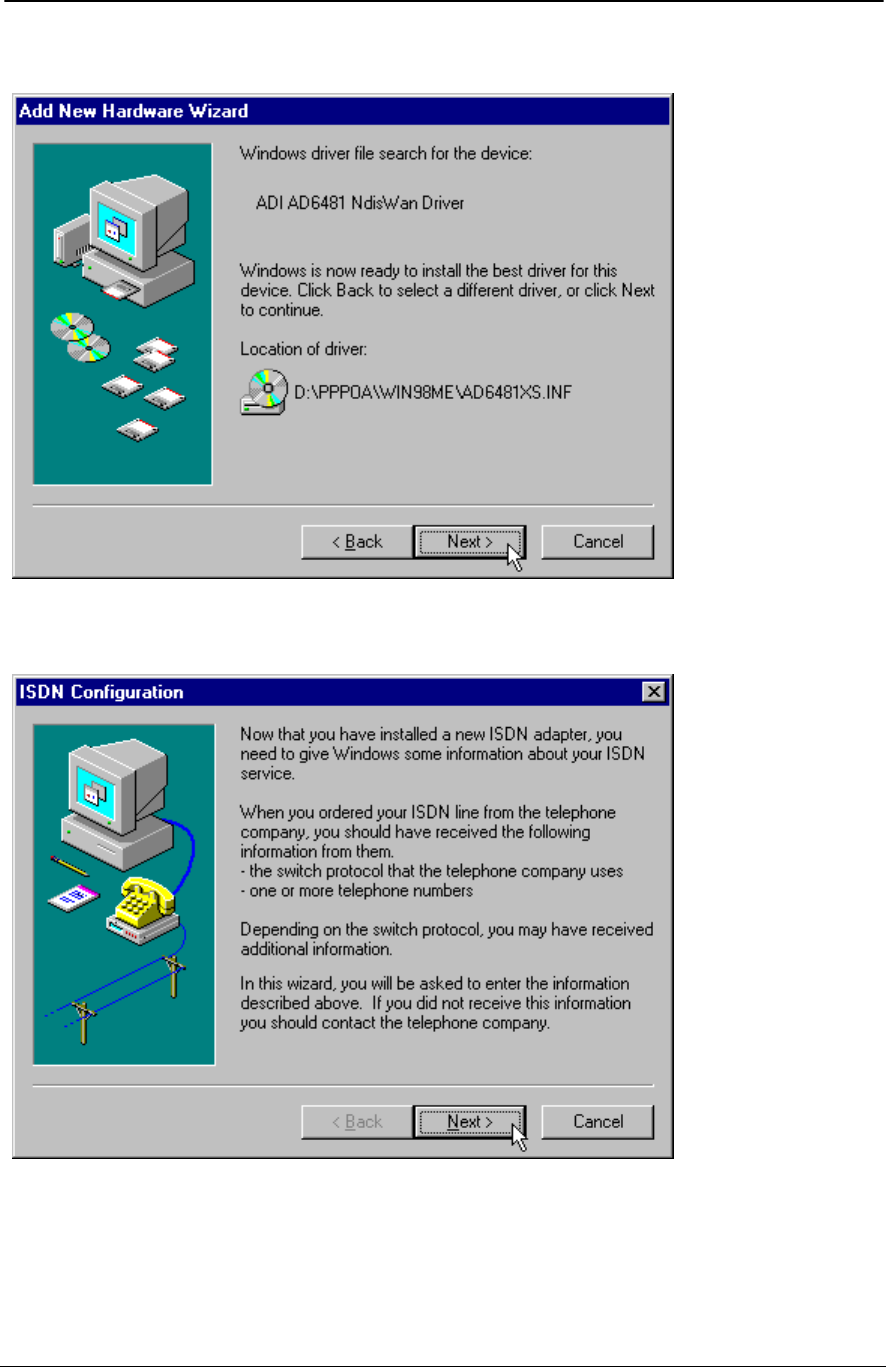
9. Windows should find the selected ADSL device driver configuration file. Click “Next” to continue.
10. New window will let you select the ADSL network option. Consult your service provider or network
administrator for details. Click “OK” when finished.
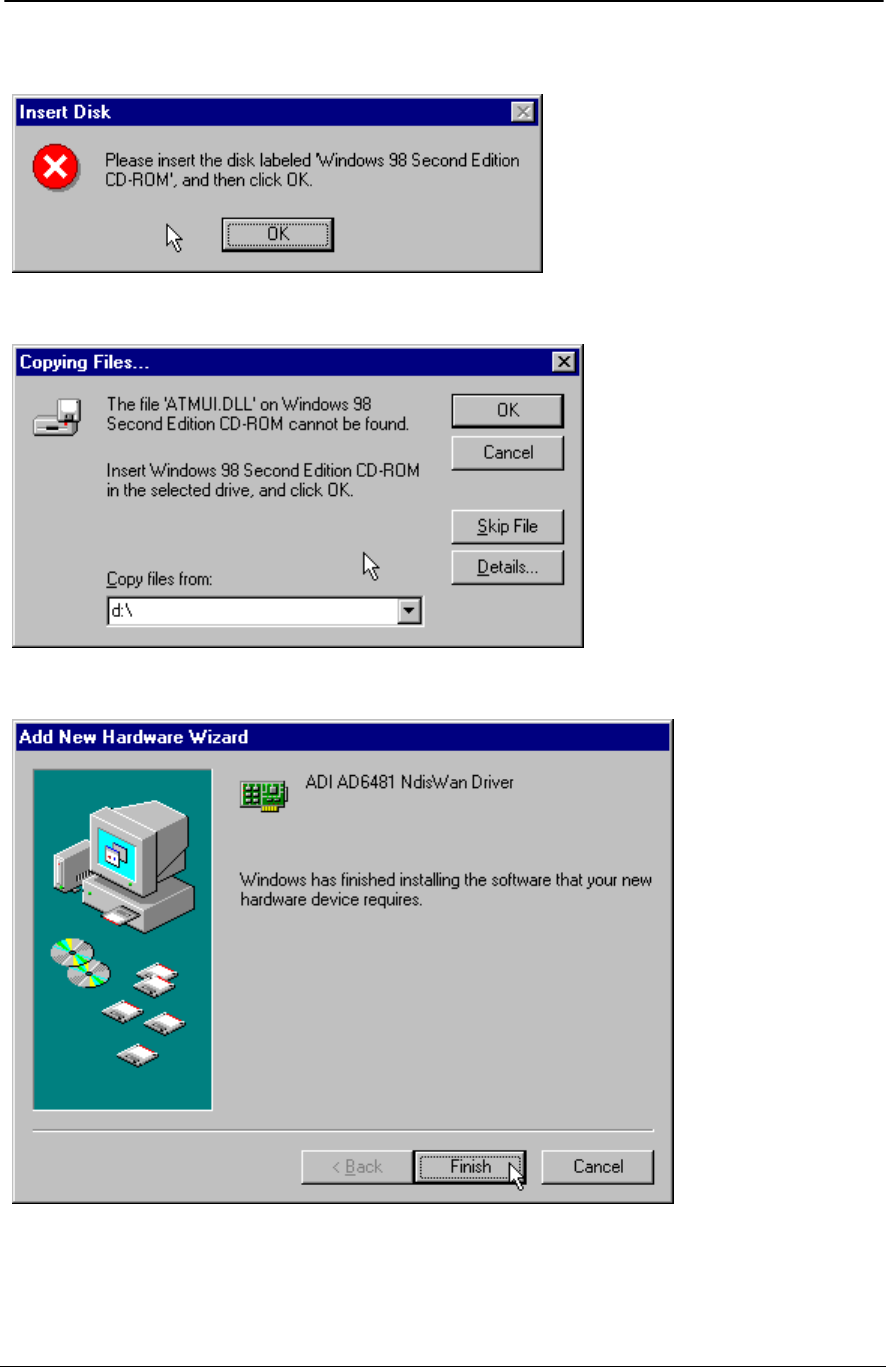
11. Windows will ask for your Windows CD-ROM to install the necessary files. Click “OK” to continue.
ADSL PCI NIC User Manual Rev 1.3
05/25/01 Analog Devices Proprietary Page 9
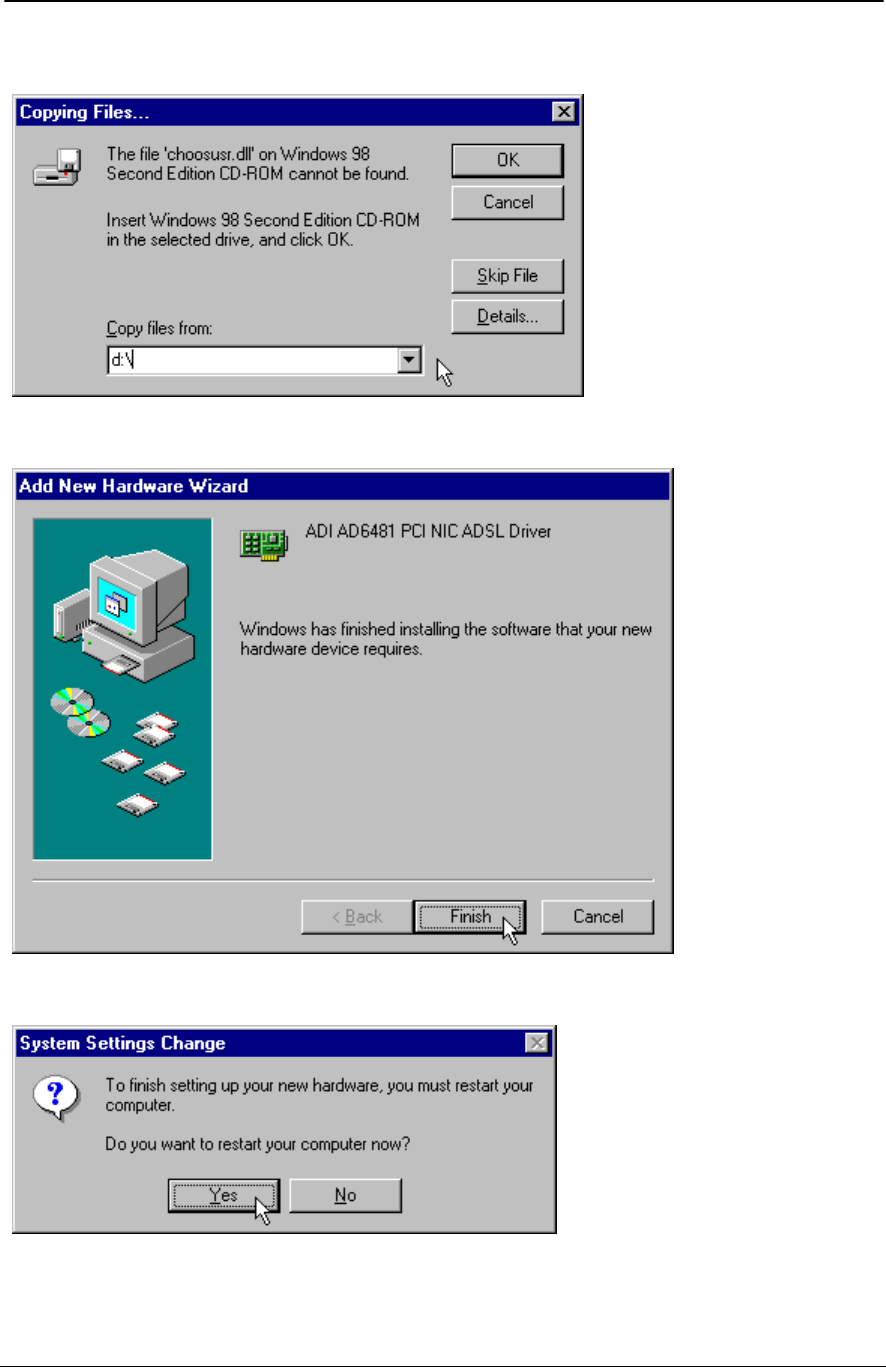
12. Select the location of the CD-ROM drive and click “OK” to continue.
13. Windows has finished the software driver installation, to continue click “Finish”.
14. Click “Yes” to restart Windows.
ADSL PCI NIC User Manual Rev 1.3
05/25/01 Analog Devices Proprietary Page 10
GUI Configuration
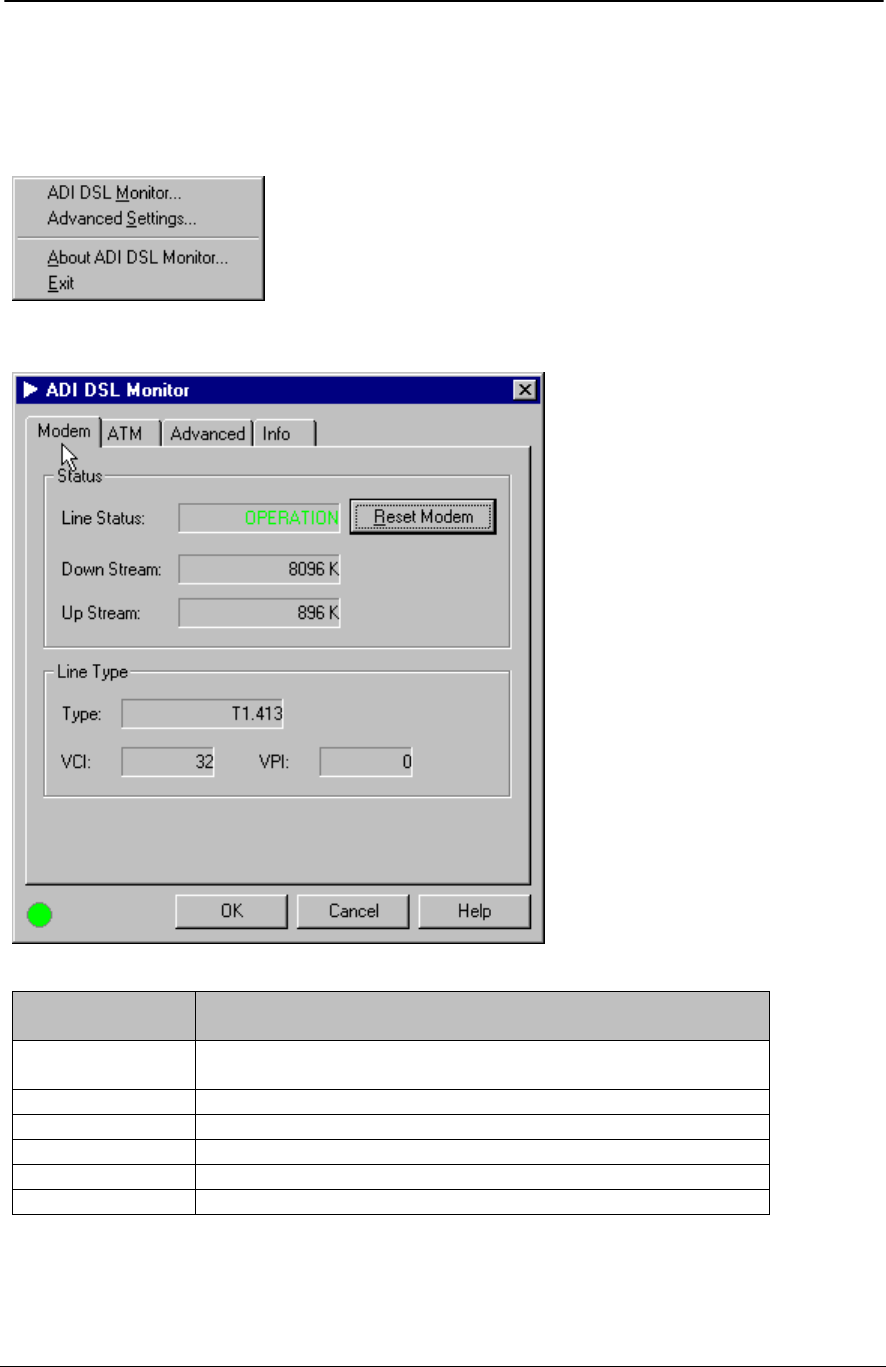
1. From the Windows system icon tray bar (bottom right of the screen), right click to view the ADI DSL
Monitor menu. Click on “ADI DSL Monitor” to open the menu.
2. ADSL modem information are shown here. Modem can be reset by clicking on “Reset Modem” icon.
Modem
Information Field Description
Line Status Status of the modem:
(IDLE, OPERATIONAL, INITIALIZING, FAILED)
Down Stream Downstream data rate negotiated by DSL link (Kbit/s)
Up Stream Upstream data rate negotiated by DSL link (Kbit/s)
Type Choices are ANSI T1.413, G.LITE, G.DMT and Multi-Standard
VCI Virtual Channel Identifier field used in the ATM cell header
VPI Virtual Path Identifier field used in the ATM cell header
ADSL PCI NIC User Manual Rev 1.3
05/25/01 Analog Devices Proprietary Page 11
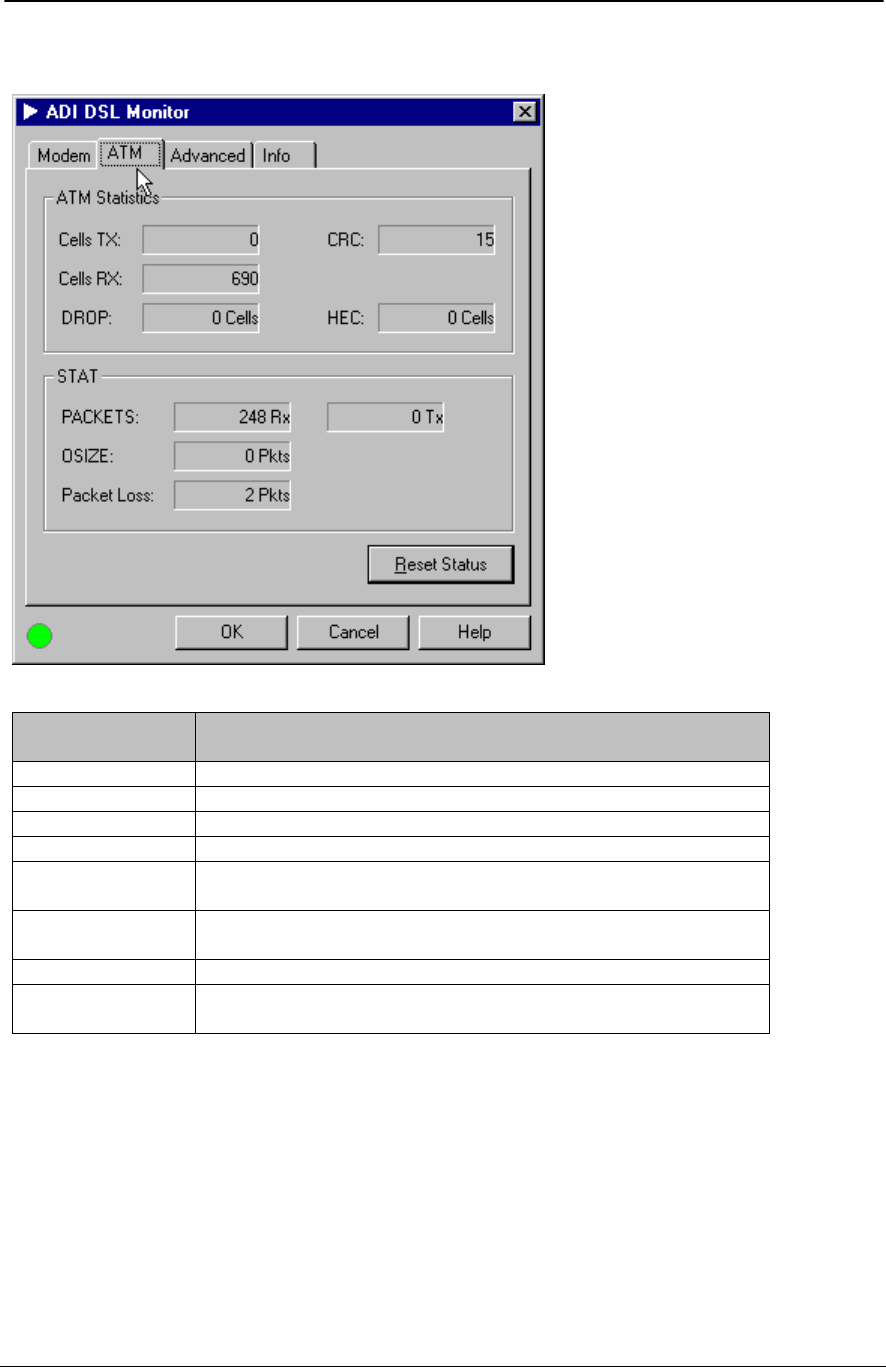
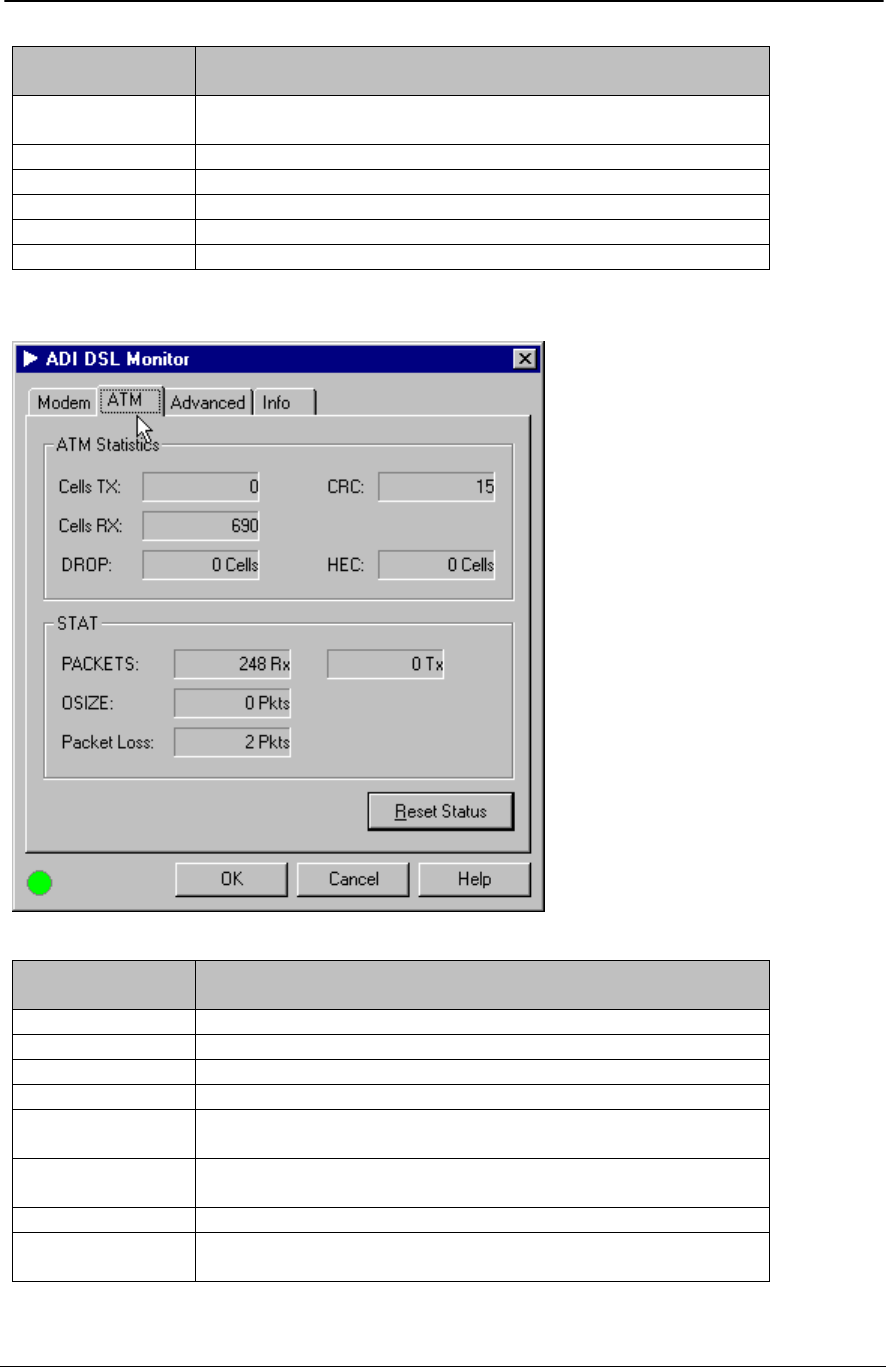
3. ATM statistics are shown here.
ATM
Information Field Description
Cells TX Number of (non-IDLE) ATM cells transmitted since start of link
Cells RX Number of (non-IDLE) ATM cells received since start of link
DROP Number of dropped cells
CRC Number of AAL5 packets with checksum errors
HEC Number of received ATM cells with errors in the ATM cell header
since start of link
Packets Number of AAL5 packets received (Rx) and transmitted (Tx) since
start of link
Oversized Number of oversized packets received
Packet Loss Number of AAL5 packets received that are discarded (due to CRC
errors and oversize)
ADSL PCI NIC User Manual Rev 1.3
05/25/01 Analog Devices Proprietary Page 12
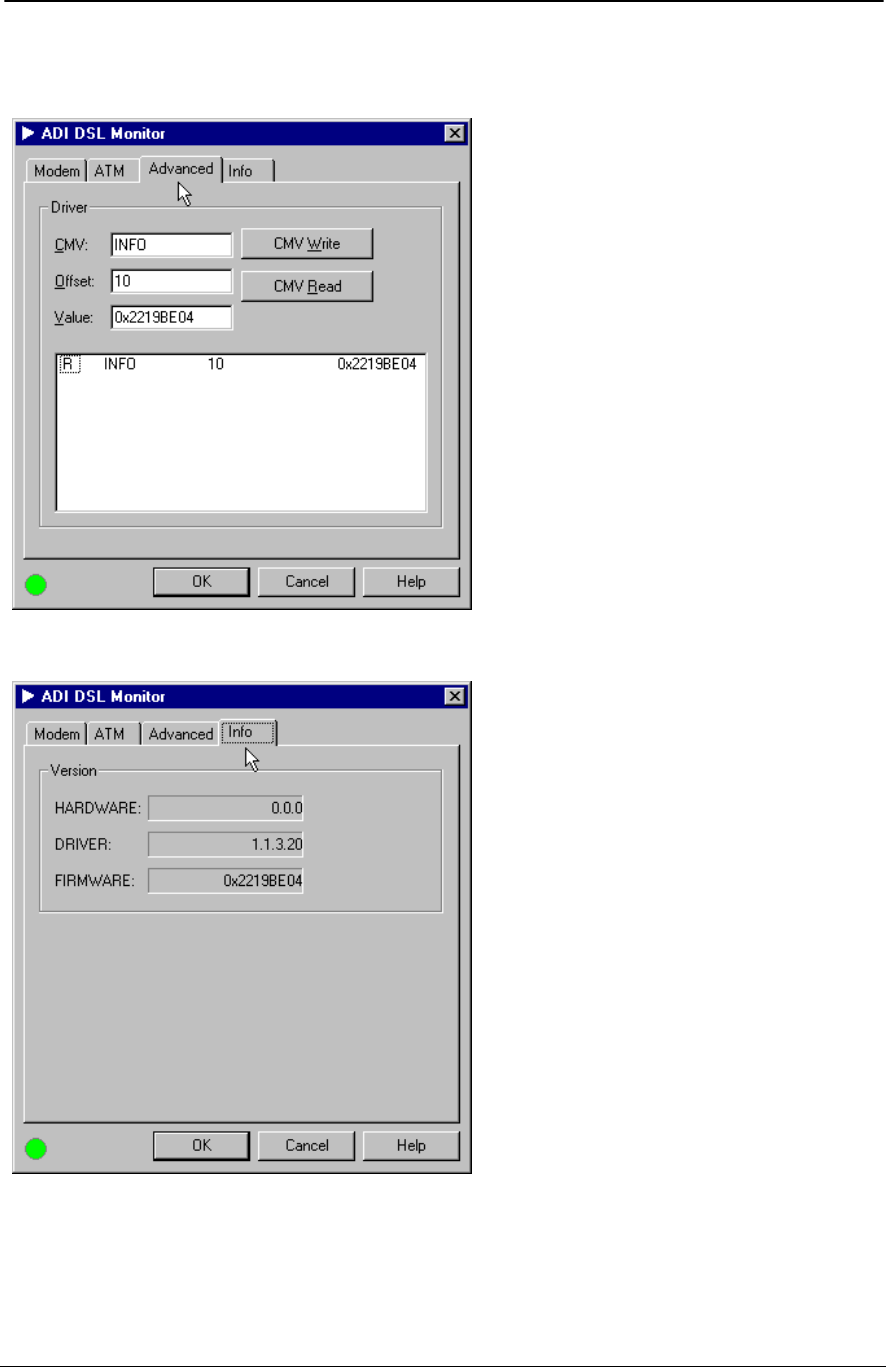
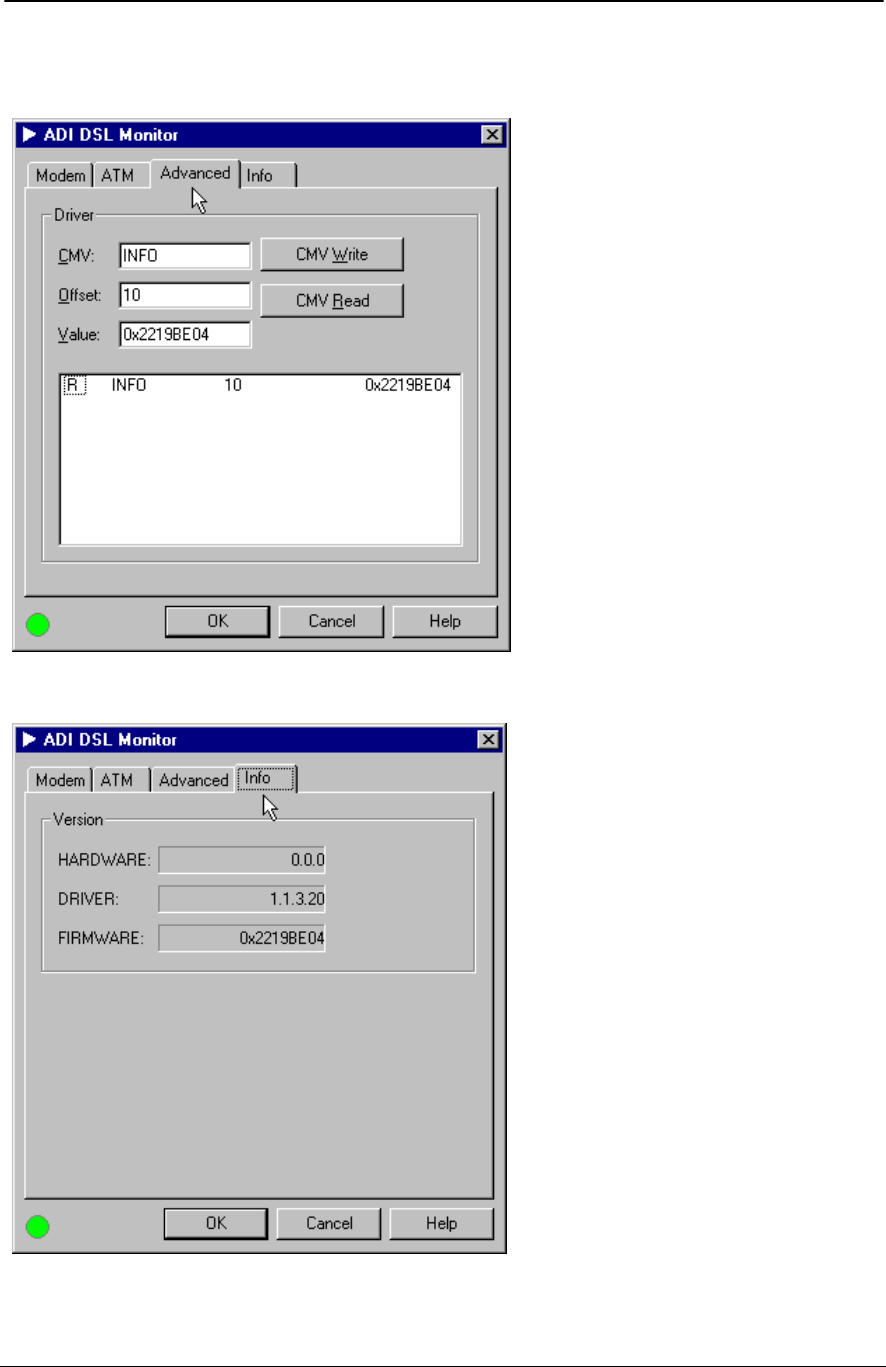
4. Advanced tab is used by advanced users who are familiar with the ADI ADSL modem CMV
(configuration and management variable) command set.
5. Info tab shows the product information.
ADSL PCI NIC User Manual Rev 1.3
05/25/01 Analog Devices Proprietary Page 13
Info Information
Field Description
HARDWARE Board version
DRIVER Windows device driver version
FIRMWARE ADSL modem firmware version
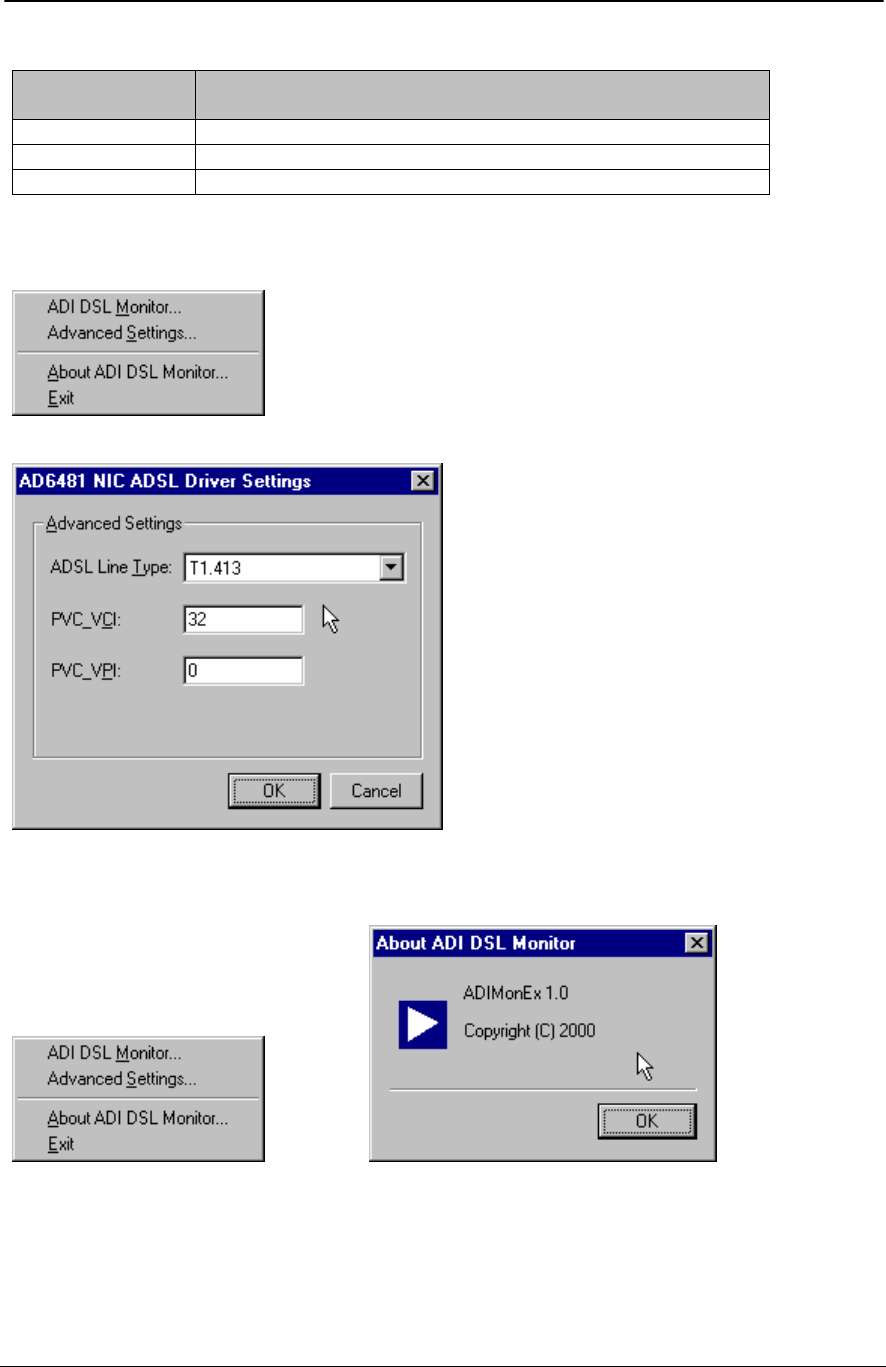
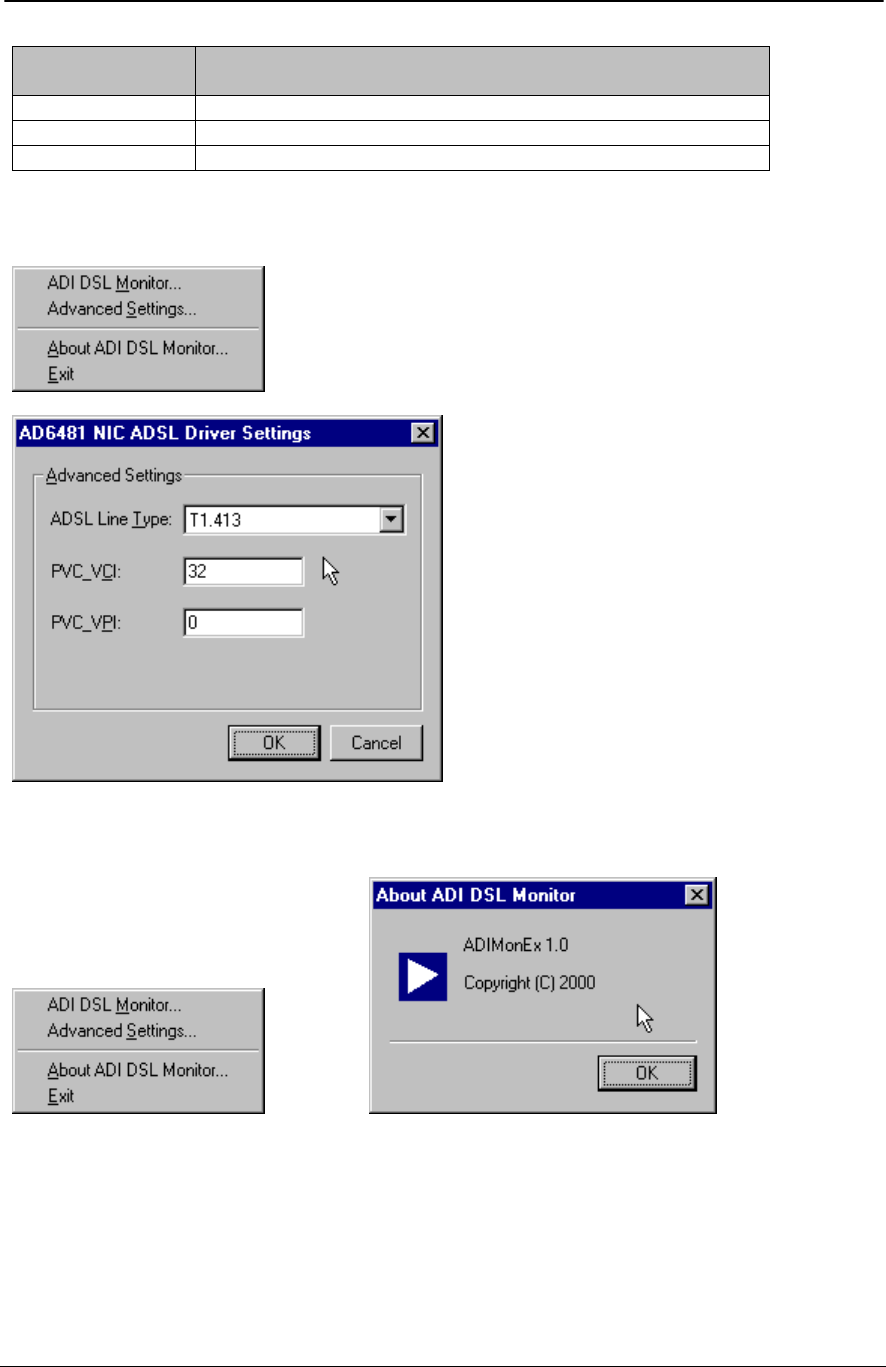
6. Return to the tray icon and click “Advanced Settings”. ADSL Line Type and PVC settings can be
changed from here.
7. ADI DSL Monitor version and copyright information can be shown by clicking “About ADI DSL
Monitor”.
ADSL PCI NIC User Manual Rev 1.3
05/25/01 Analog Devices Proprietary Page 14
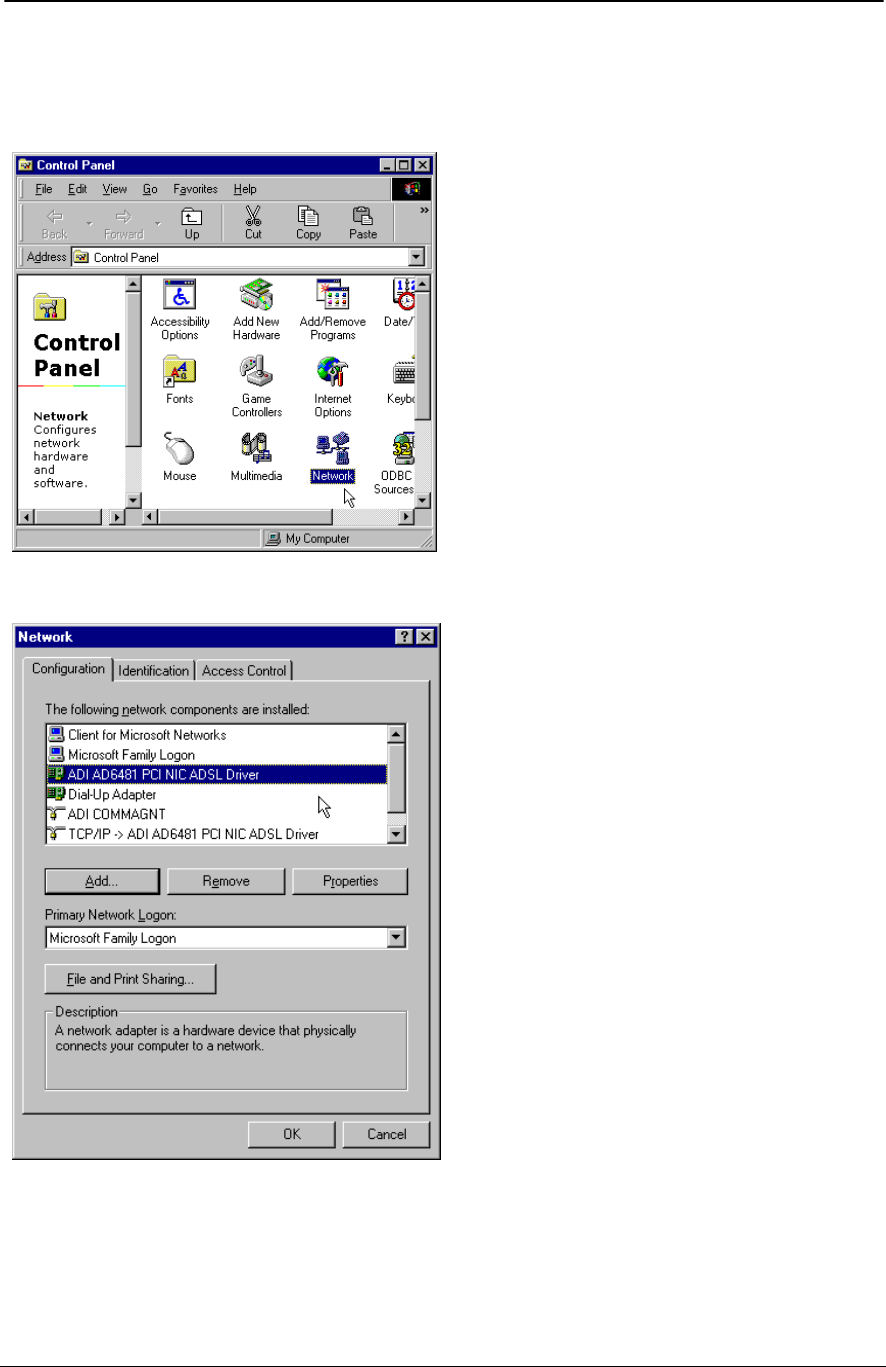
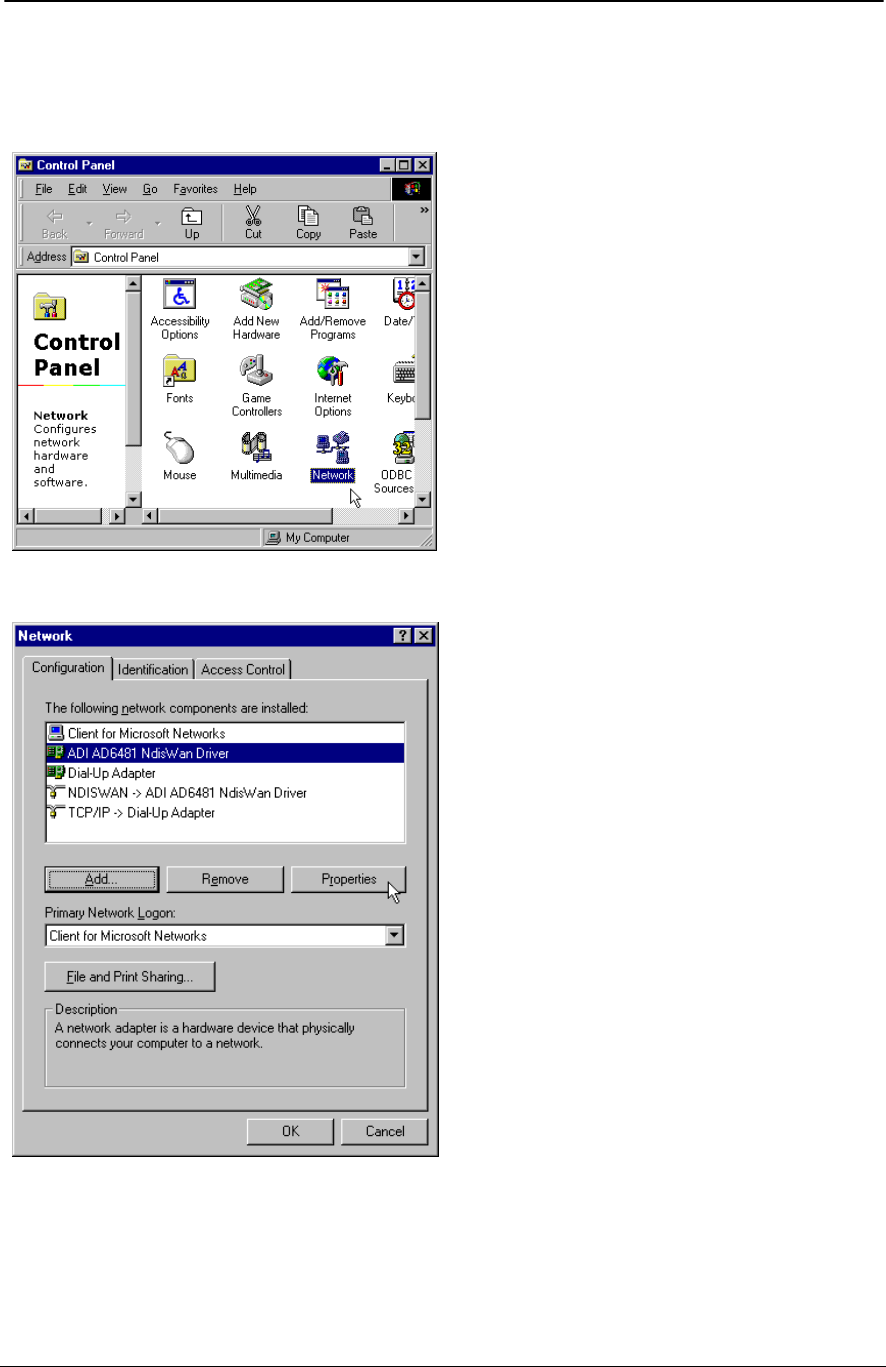
Verify the modem
You may want to check the following screens to ensure proper installation of the modem.
Click on the “Network” icon, ADI PCI NIC ADSL Driver can then be shown.
ADSL PCI NIC User Manual Rev 1.3
05/25/01 Analog Devices Proprietary Page 15
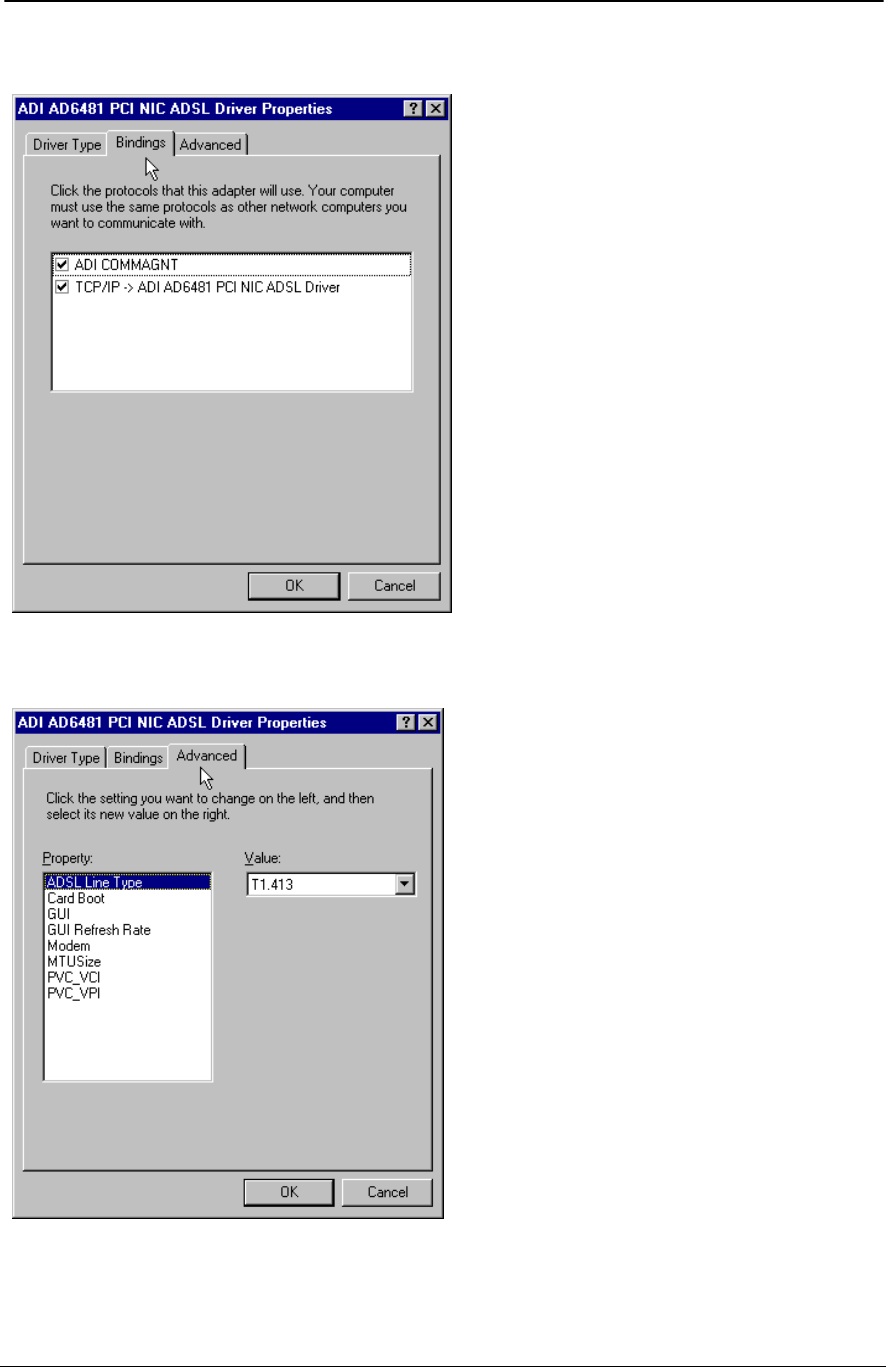
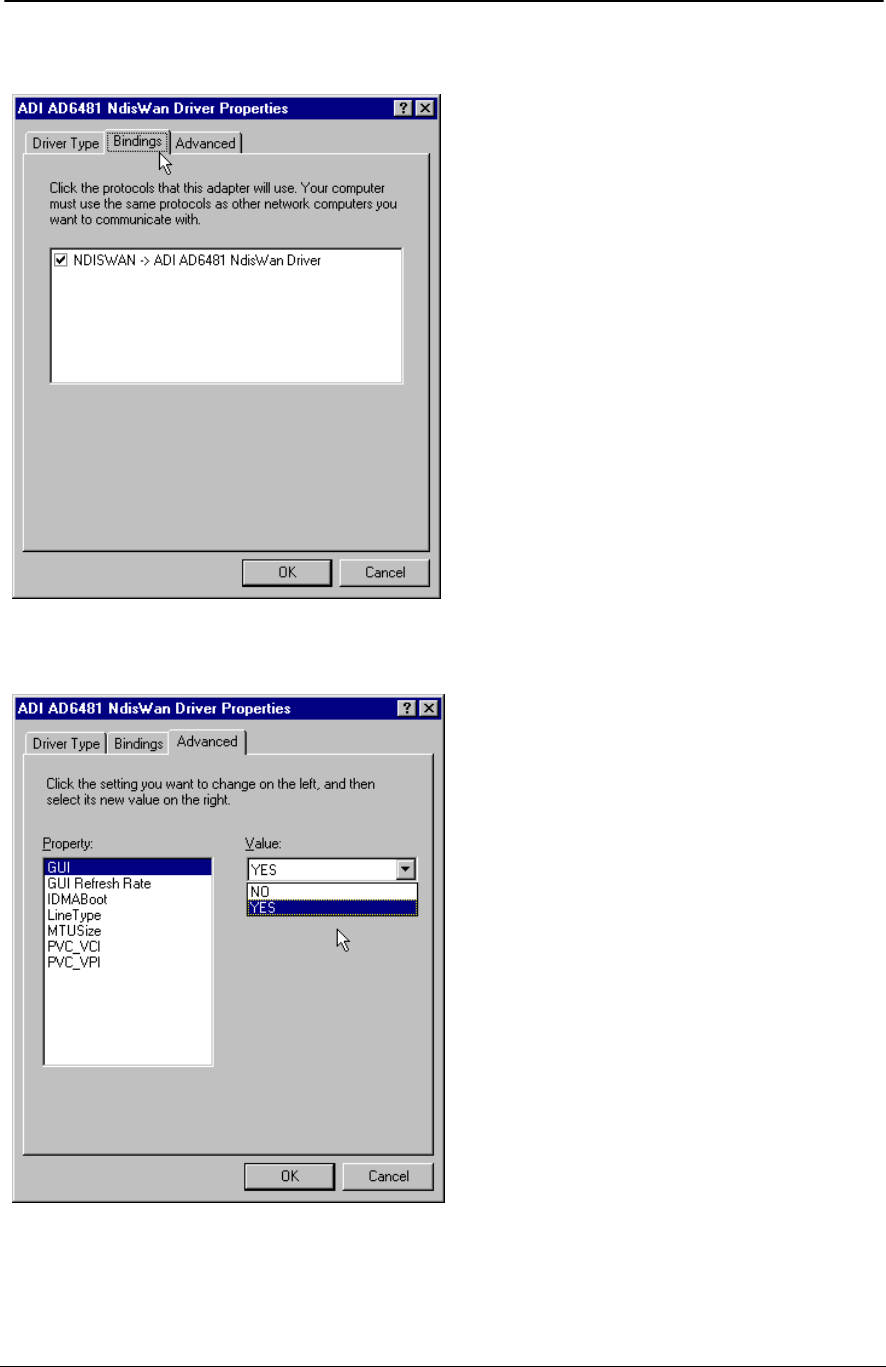
Click on Driver “Properties” and its “Binding” tab.
Modem parameters can also be changed from “Advanced” tab. It is recommended to change these
parameters from the ADI DSL Monitor GUI.
ADSL PCI NIC User Manual Rev 1.3
05/25/01 Analog Devices Proprietary Page 16
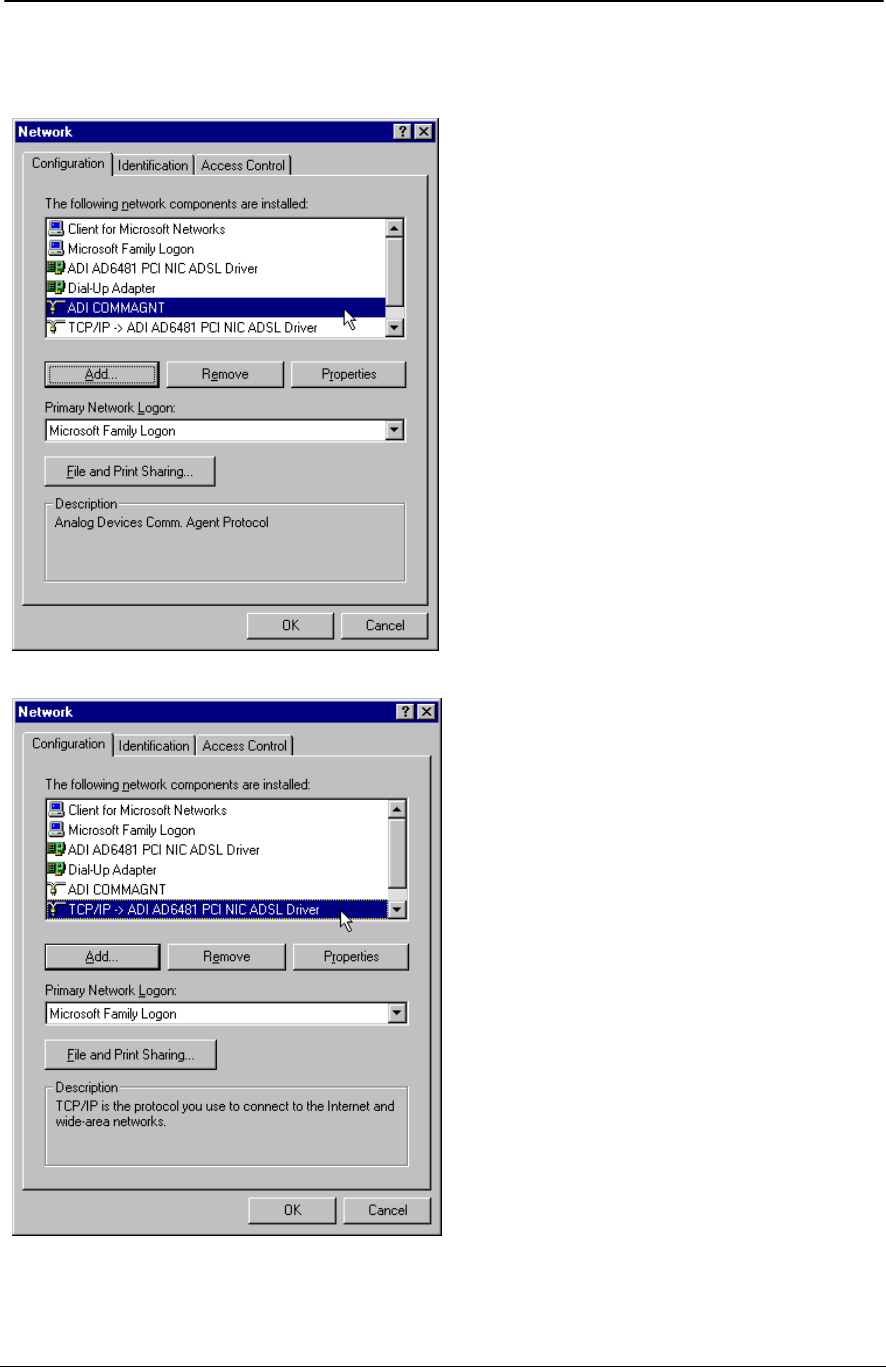
Back to the “Network” panel, ADI Commagent and TCP/IP for the ADI ADSL Driver should also be
shown.

ADSL PCI NIC User Manual Rev 1.3
05/25/01 Analog Devices Proprietary Page 17
Change IP address of the PC, consult your service provider or network adminstrator for the proper IP
address.
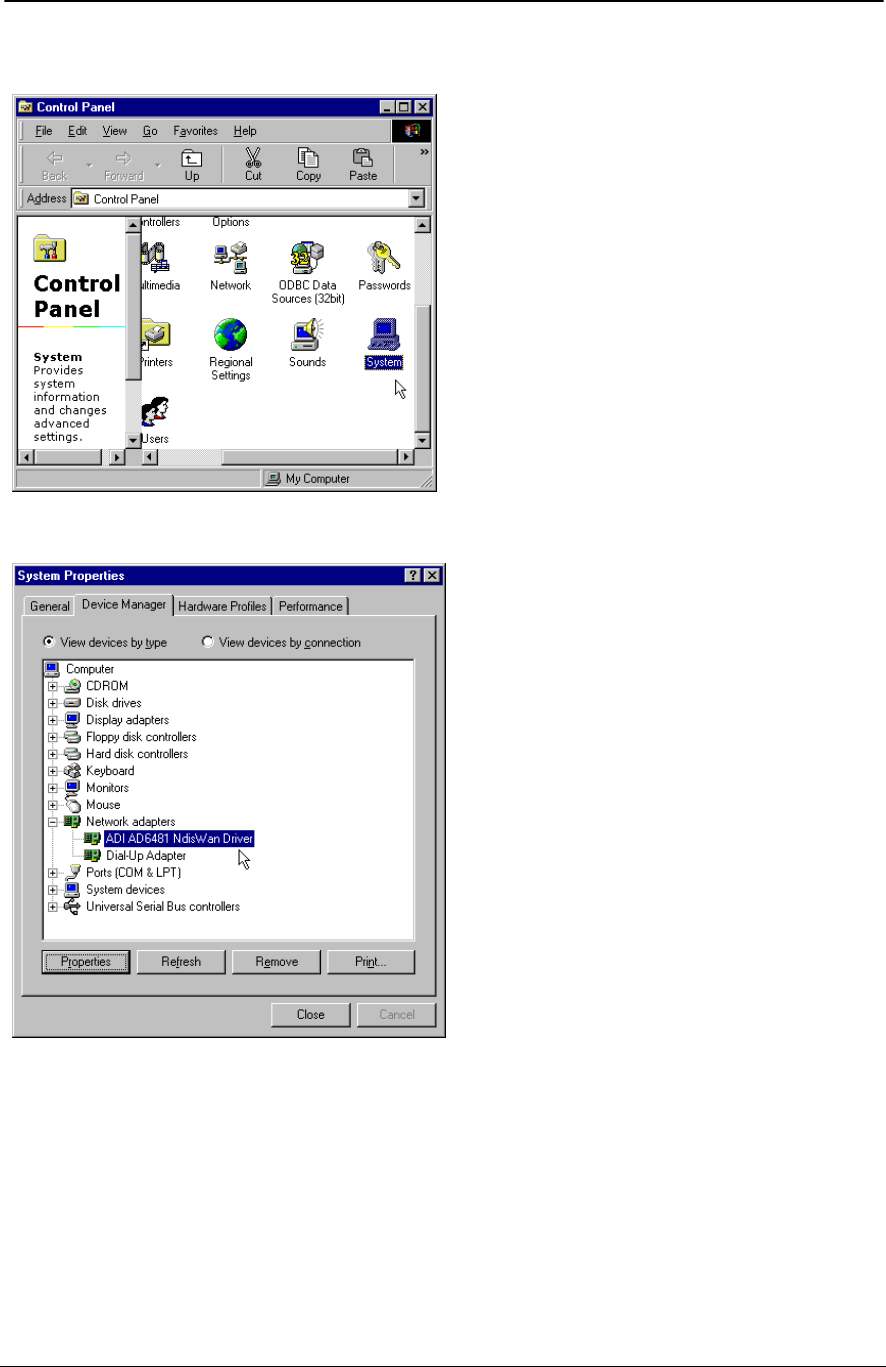
Return to Control Panel and click on “System” icon.
ADSL PCI NIC User Manual Rev 1.3
05/25/01 Analog Devices Proprietary Page 18
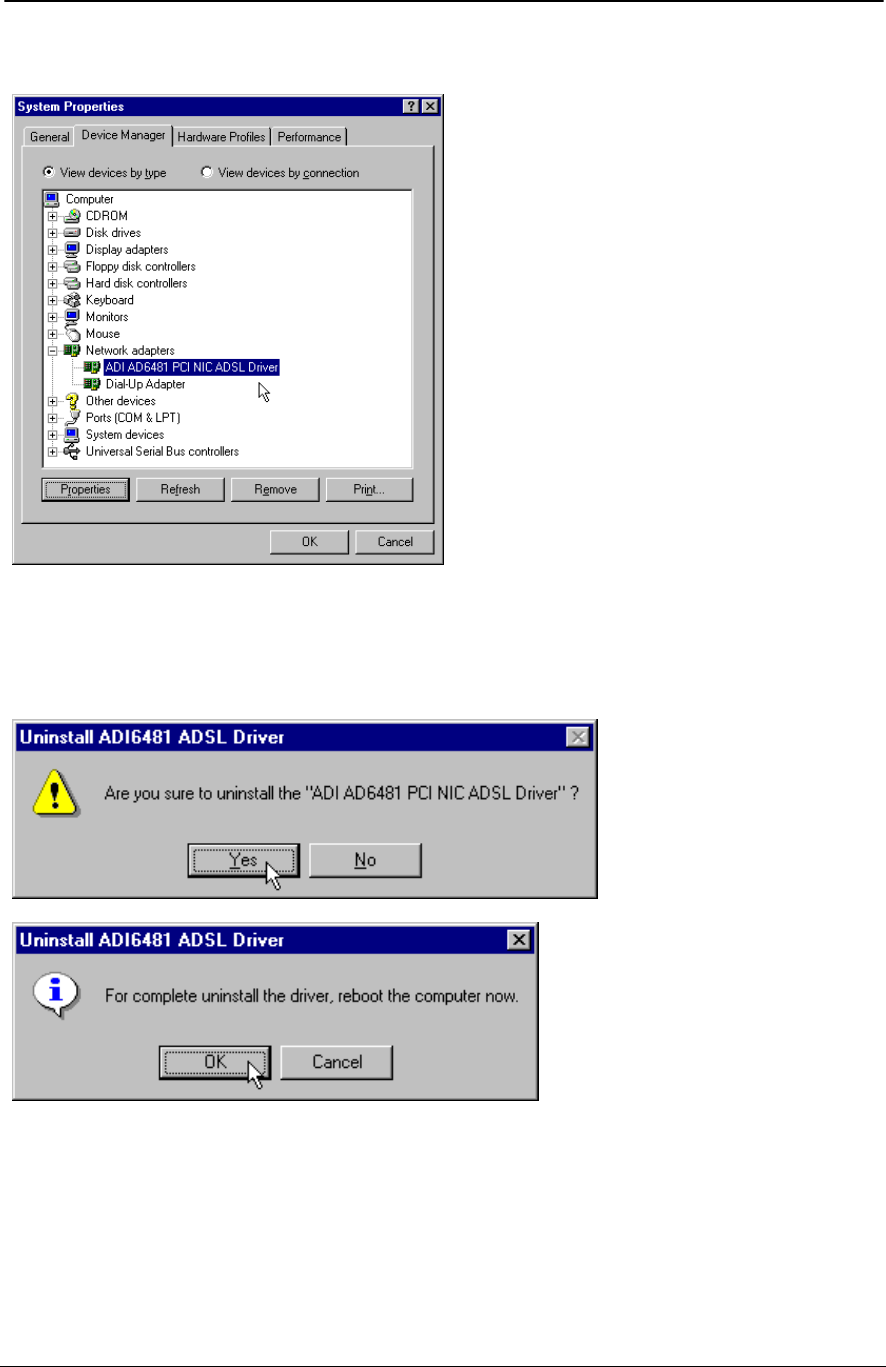
ADI AD6481 PCI NIC ADSL Driver should be shown under the “Network adapters” device class.
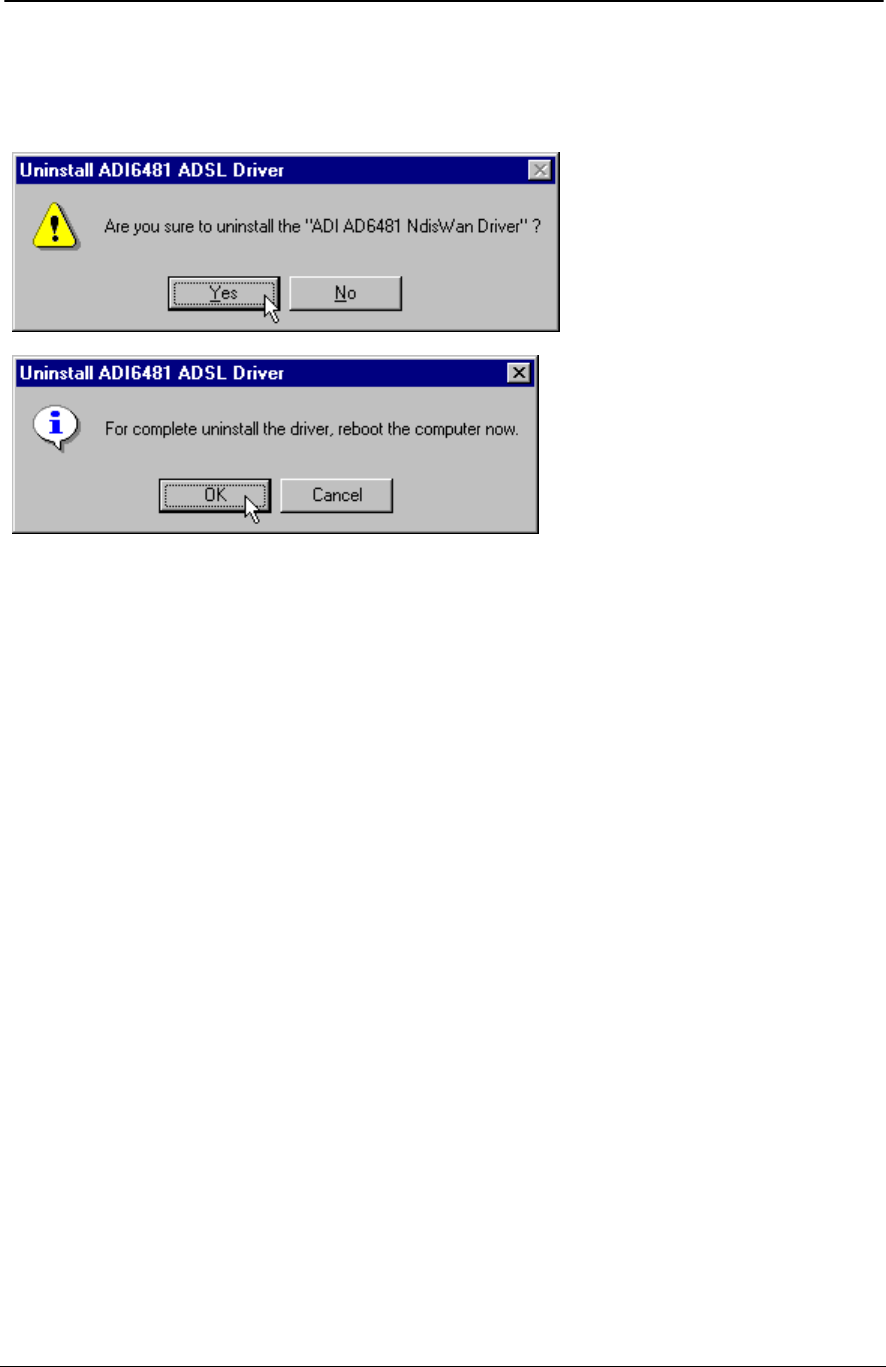
Uninstall the device driver
Click on Start -> Programs -> ADI AD6481 PCI NIC ADSL Driver to uninstall the device driver.
ADSL PCI NIC User Manual Rev 1.3
05/25/01 Analog Devices Proprietary Page 19
PPPoA (RFC2364) Driver Installation for Windows 9x
Device Driver Installation
1. It is important to have a clean Windows 9x setup. It indicates there should not be any conflicted
hardware. The user is encouraged to check:
Start -> Setting -> Control Panel -> System -> Device Manager.
2. There should not be any “yellow warning sign” that complains an improper hardware attached to the
system.
3. Make sure the computer completely power down. Then insert the ADSL PCI NIC card into one of
the PCI slots.
4. Put the Windows 9x original CD-ROM into the CD drive.
5. Power up the system, you should see the following window while system is searching for new
hardware.
6. Windows 9x will open a window called “Add New Hardware Wizard” to indicate that it found a “PCI
ATM Controller” (ADSL) board. Click “Next” to continue.
ADSL PCI NIC User Manual Rev 1.3
05/25/01 Analog Devices Proprietary Page 20
7. Click “Next” to search for the best driver for your device.
8. Select “Specify a location” and browse for the target network protocol and operating system. Then
click “Next”.
ADSL PCI NIC User Manual Rev 1.3
05/25/01 Analog Devices Proprietary Page 21
9. Windows should find the selected ADSL device driver configuration file. Click “Next” to continue.
10. The ADSL PCI NIC card is introduced as an ISDN card with PPP driver. It enables users to use this
NIC card through the Dial-Up Network.
ADSL PCI NIC User Manual Rev 1.3
05/25/01 Analog Devices Proprietary Page 22
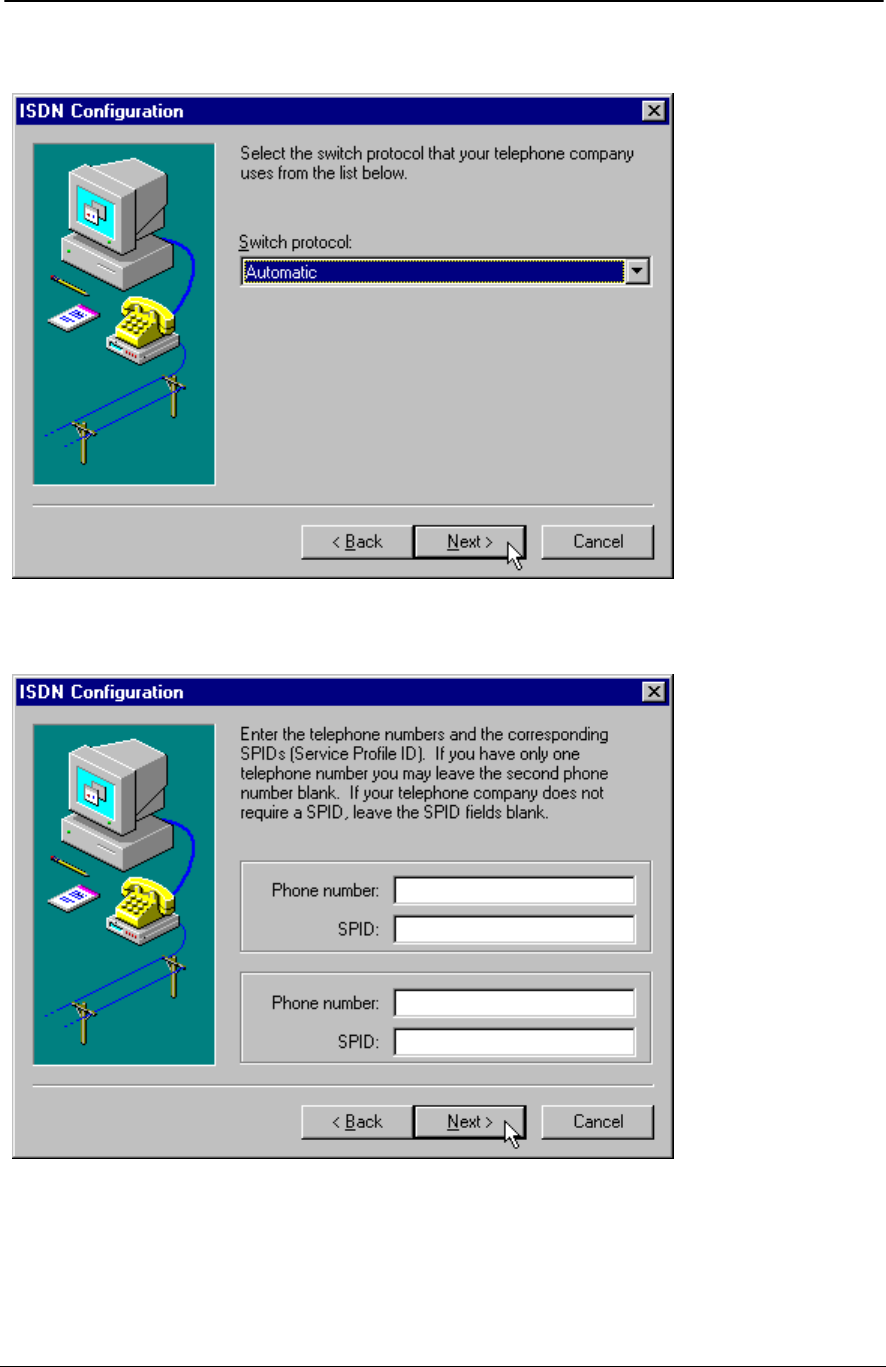
11. Default protocol is “Automatic”, click “Next” to continue.
12. It is not required to enter phone number because the ADSL PCI NIC card is permanently connected to
the Central Office. Click “Next” to continue.

ADSL PCI NIC User Manual Rev 1.3
05/25/01 Analog Devices Proprietary Page 23
13. This window confirms the driver being properly configured, Windows 9x still requires to install its
network components. Click “Finish” to continue.
14. New window will let you select the ADSL network option. Consult your service provider or network
administrator for details. Click “OK” when finished.
ADSL PCI NIC User Manual Rev 1.3
05/25/01 Analog Devices Proprietary Page 24
15. Windows will ask for your Windows CD-ROM to install the necessary files. Click “OK” to continue.
16. Select the location of the CD-ROM drive and click “OK” to continue.
17. Windows has finished the software driver installation, to continue click “Finish”.

ADSL PCI NIC User Manual Rev 1.3
05/25/01 Analog Devices Proprietary Page 25
18. Windows 9x has finished the installation. It requires system reboot to run the driver the first time.
GUI Configuration
1. From the Windows system icon tray bar (bottom right of the screen), right click to view the ADI DSL
Monitor menu. Click on “ADI DSL Monitor” to open the menu.
2. ADSL modem information are shown here. Modem can be reset by clicking on “Reset Modem” icon.
ADSL PCI NIC User Manual Rev 1.3
05/25/01 Analog Devices Proprietary Page 26
Modem
Information Field Description
Line Status Status of the modem:
(IDLE, OPERATIONAL, INITIALIZING, FAILED)
Down Stream Downstream data rate negotiated by DSL link (Kbit/s)
Up Stream Upstream data rate negotiated by DSL link (Kbit/s)
Type Choices are ANSI T1.413, G.LITE, G.DMT and Multi-Standard
VCI Virtual Channel Identifier field used in the ATM cell header
VPI Virtual Path Identifier field used in the ATM cell header
3. ATM statistics are shown here.
ATM
Information Field Description
Cells TX Number of (non-IDLE) ATM cells transmitted since start of link
Cells RX Number of (non-IDLE) ATM cells received since start of link
DROP Number of dropped cells
CRC Number of AAL5 packets with checksum errors
HEC Number of received ATM cells with errors in the ATM cell header
since start of link
Packets Number of AAL5 packets received (Rx) and transmitted (Tx) since
start of link
Oversized Number of oversized packets received
Packet Loss Number of AAL5 packets received that are discarded (due to CRC
errors and oversize)
ADSL PCI NIC User Manual Rev 1.3
05/25/01 Analog Devices Proprietary Page 27
4. Advanced tab is used by advanced users who are familiar with the ADI ADSL modem CMV
(configuration and management variable) command set.
5. Info tab shows the product information.
ADSL PCI NIC User Manual Rev 1.3
05/25/01 Analog Devices Proprietary Page 28
Info Information
Field Description
HARDWARE Board version
DRIVER Windows device driver version
FIRMWARE ADSL modem firmware version
6. Return to the tray icon and click “Advanced Settings”. ADSL Line Type and PVC settings can be
changed from here.
7. ADI DSL Monitor version and copyright information can be shown by clicking “About ADI DSL
Monitor”.
ADSL PCI NIC User Manual Rev 1.3
05/25/01 Analog Devices Proprietary Page 29
Verify the modem
You may want to check the following screens to ensure proper installation of the modem.
Click on the “Network” icon, ADI PCI NIC ADSL Driver can then be shown.
ADSL PCI NIC User Manual Rev 1.3
05/25/01 Analog Devices Proprietary Page 30
Click on Driver “Properties” and its “Binding” tab.
Modem parameters can also be changed from “Advanced” tab. It is recommended to change these
parameters from the ADI DSL Monitor GUI.
ADSL PCI NIC User Manual Rev 1.3
05/25/01 Analog Devices Proprietary Page 31
Return to the Control Panel and click on “System” icon.
The “ADI AD6481 NdisWan Driver” should be shown under the “Network adapters” device class.
ADSL PCI NIC User Manual Rev 1.3
05/25/01 Analog Devices Proprietary Page 32
Uninstall the device driver
Click on Start -> Programs -> ADI AD6481 PCI NIC ADSL Driver to uninstall the device driver.
ADSL PCI NIC User Manual Rev 1.3
05/25/01 Analog Devices Proprietary Page 33
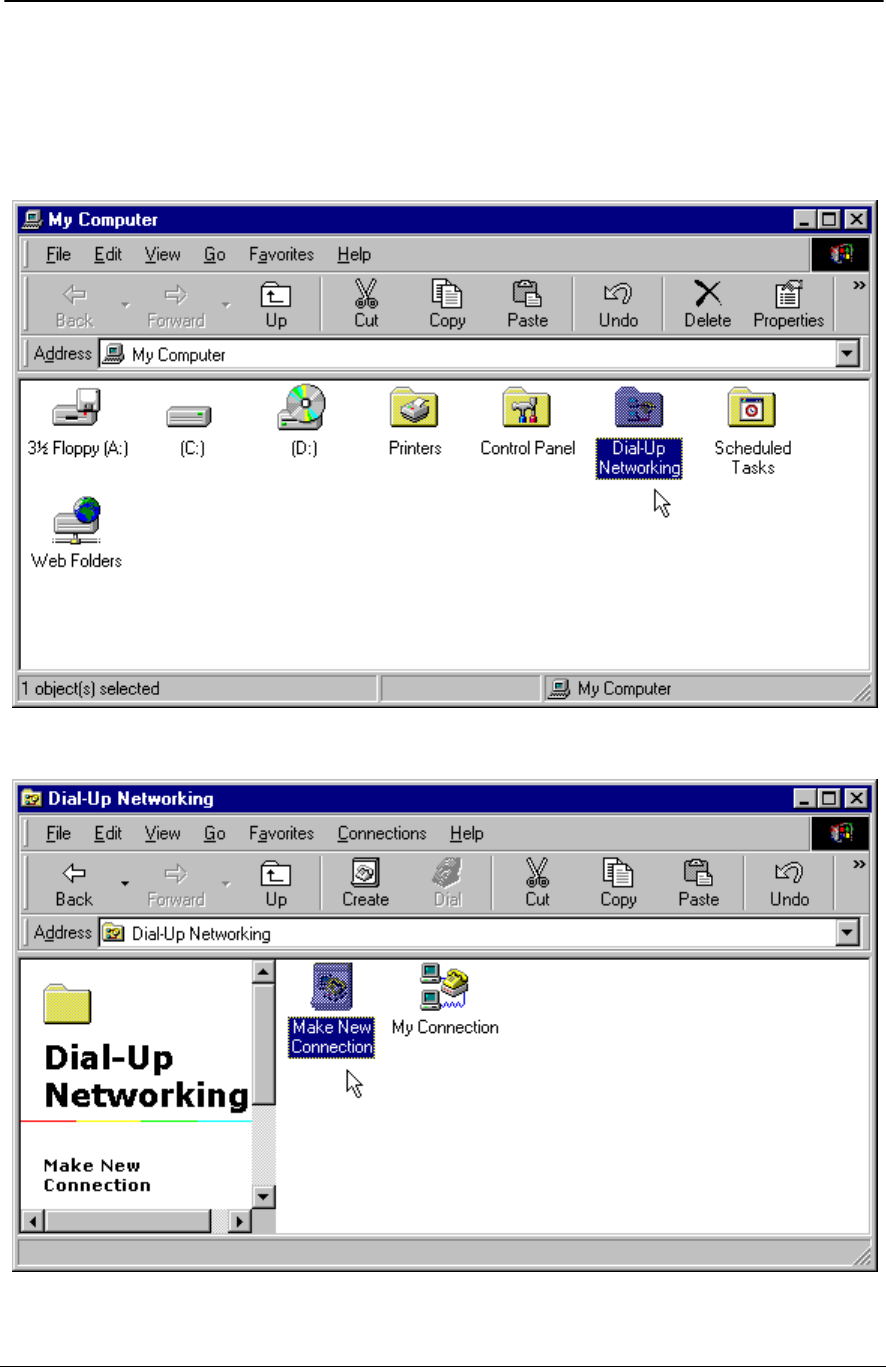
Setup a Connection
1. User is required to set up a dial-up connection before attempting to dial into the server. “Dial-Up
Networking” can be found under “My Computer” on the desktop screen. It can also be opened from
Start -> Program -> Accessories -> Communications.
2. New user is required to make new connection.
ADSL PCI NIC User Manual Rev 1.3
05/25/01 Analog Devices Proprietary Page 34
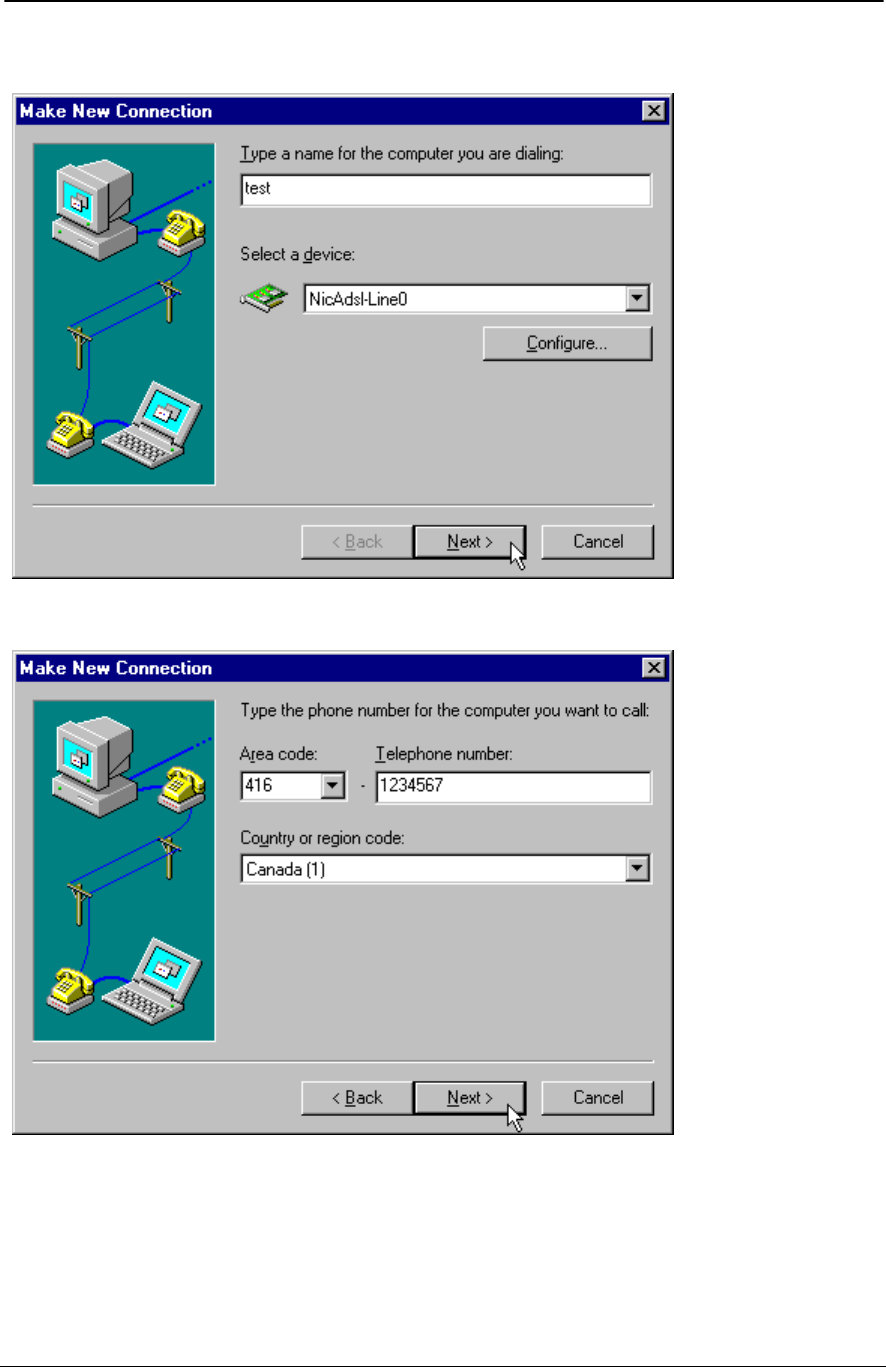
3. Name the connection, and make sure “NicAdsl-Line0” has been chosen for device selection.
4. Phone entries can be entered with dummy numbers.
ADSL PCI NIC User Manual Rev 1.3
05/25/01 Analog Devices Proprietary Page 35
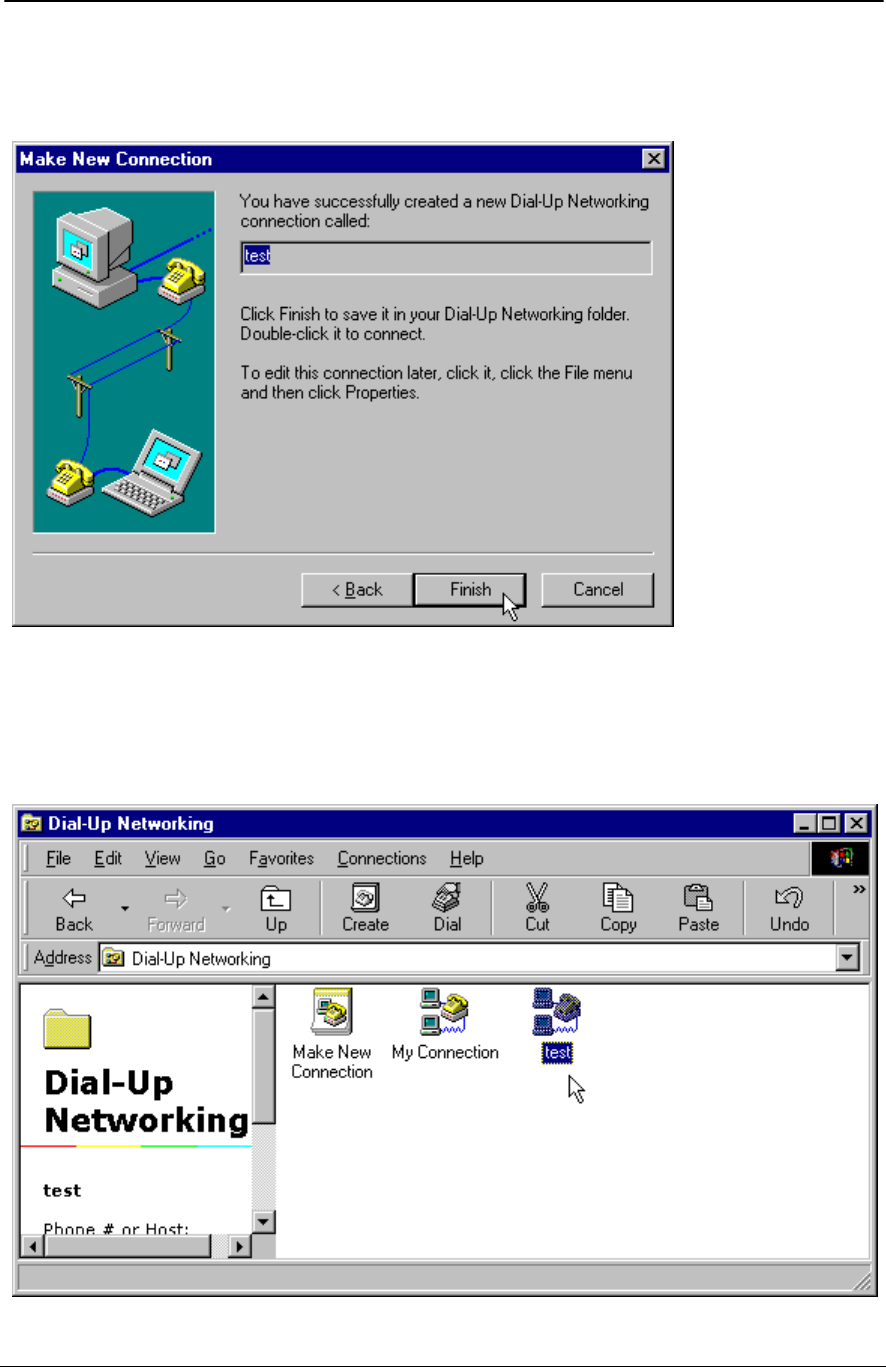
5. Windows 9x will verify whether the connection has successfully been installed. Click “Finish” to
continue. If this is the first time to setup a connection on current Windows 9x, it will install Dial-Up
Networking components. Make sure Windows 9x CD-ROM is inserted in the CD-ROM drive.
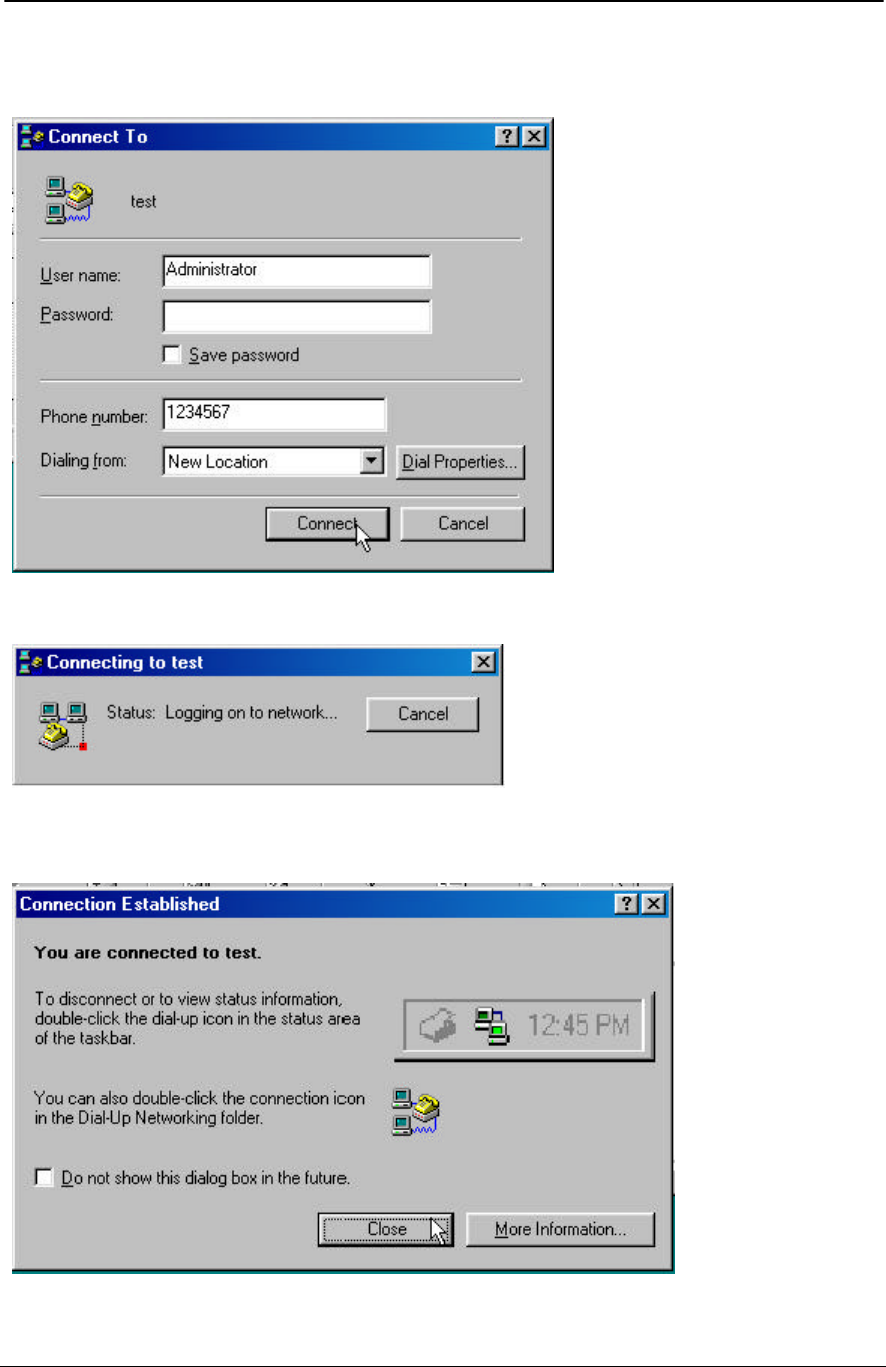
Make a Call
1. After installed the device driver and setup the connection, user can now dial-in to the server. Double
click on the dialing-in computer.
ADSL PCI NIC User Manual Rev 1.3
05/25/01 Analog Devices Proprietary Page 36
2. Correct user name and password should be entered for server authorization. Then click “Connect”.
3. User should see the following window showing the PPP dial-up status.
4. The following window displays a successful connection. IP address has been assigned from the
server.

ADSL PCI NIC User Manual Rev 1.3
05/25/01 Analog Devices Proprietary Page 37
CO Board
For full product evaluation purpose, emulated single channel ADSL CO (central office) PCI NIC card is
available. To install the driver, we recommend to use Windows NT4 Server which provides built-in
server dial-up services and higher file transfer performance.
CO Driver Installation
The procedures apply to both PPPoE (RFC1483) and PPPoA (RFC2364) drivers.
Same driver installation procedures are used like the RT (remote terminal) card.
Change the following parameters from Windows registry:
Modem = 0
IDMABoot = 0
For NT4, run “regedit” from Windows Start bar, the registry entry for the ADSL PCI NIC is located in
HKEY_LOCAL_MACHINE -> System -> CurrentControlSet -> Services -> Nicadsl_? -> Parameters
For Win9x, the registry entry for the ADSL PCI NIC is located in
HKEY_LOCAL_MACHINE -> System -> CurrentControlSet -> Services -> Class -> Net -> ????
Where ???? are numbers assigned by Windows registry.
ADSL PCI NIC User Manual Rev 1.3
05/25/01 Analog Devices Proprietary Page 38
PPPoA (RFC2364) CO Driver Installation for Windows NT4
Install the ADSL PCI NIC card, RAS and related services
The following steps show how to install PPPoA driver under Windows NT4 for server (CO board).
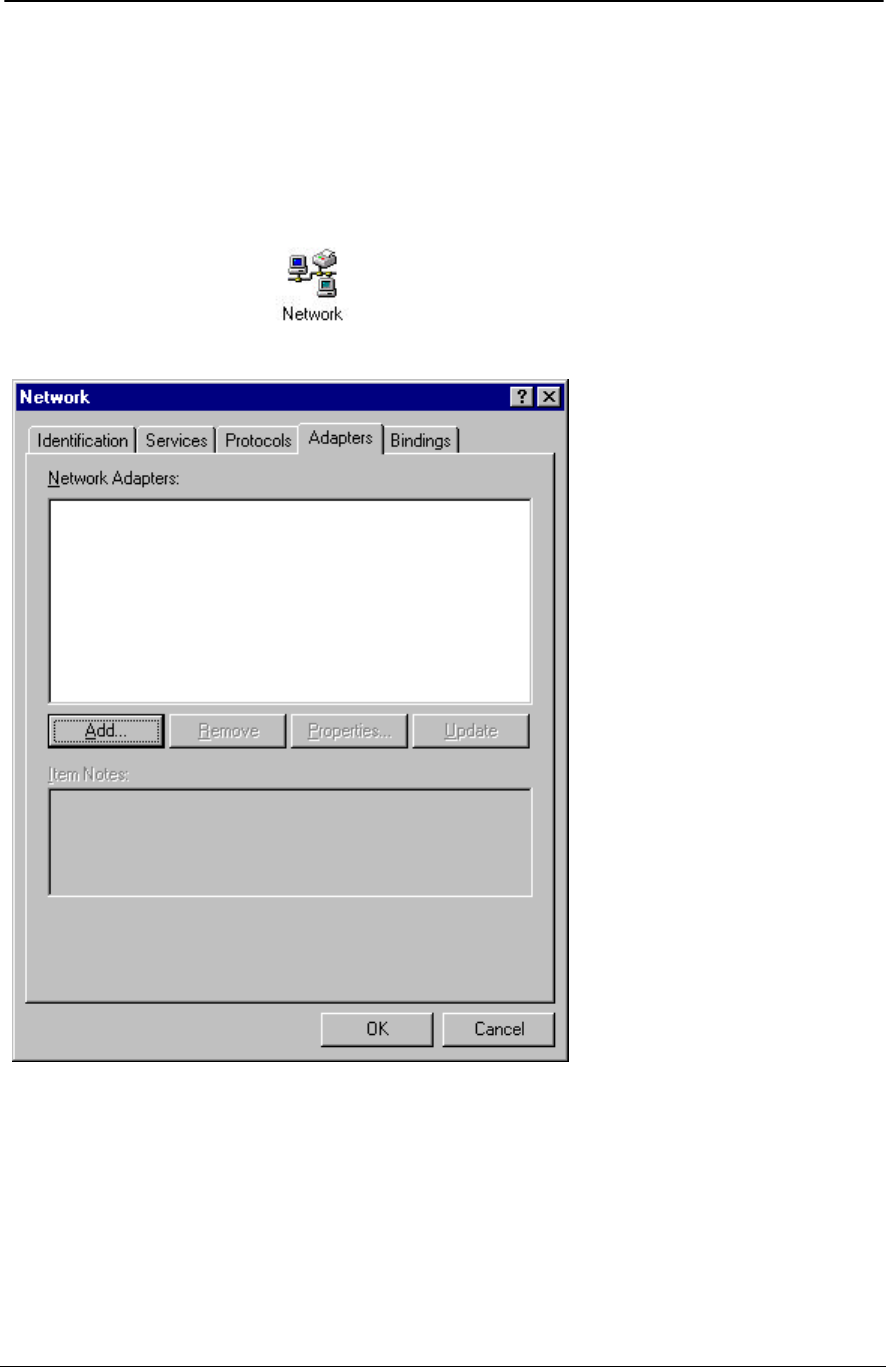
1. Open the Control Panel via the Start -> Settings -> Control Panel. Double click on “Network”.
2. Select “Adapters” tab. Click “Add” then “Have Disk” to locate the driver directory.
ADSL PCI NIC User Manual Rev 1.3
05/25/01 Analog Devices Proprietary Page 39
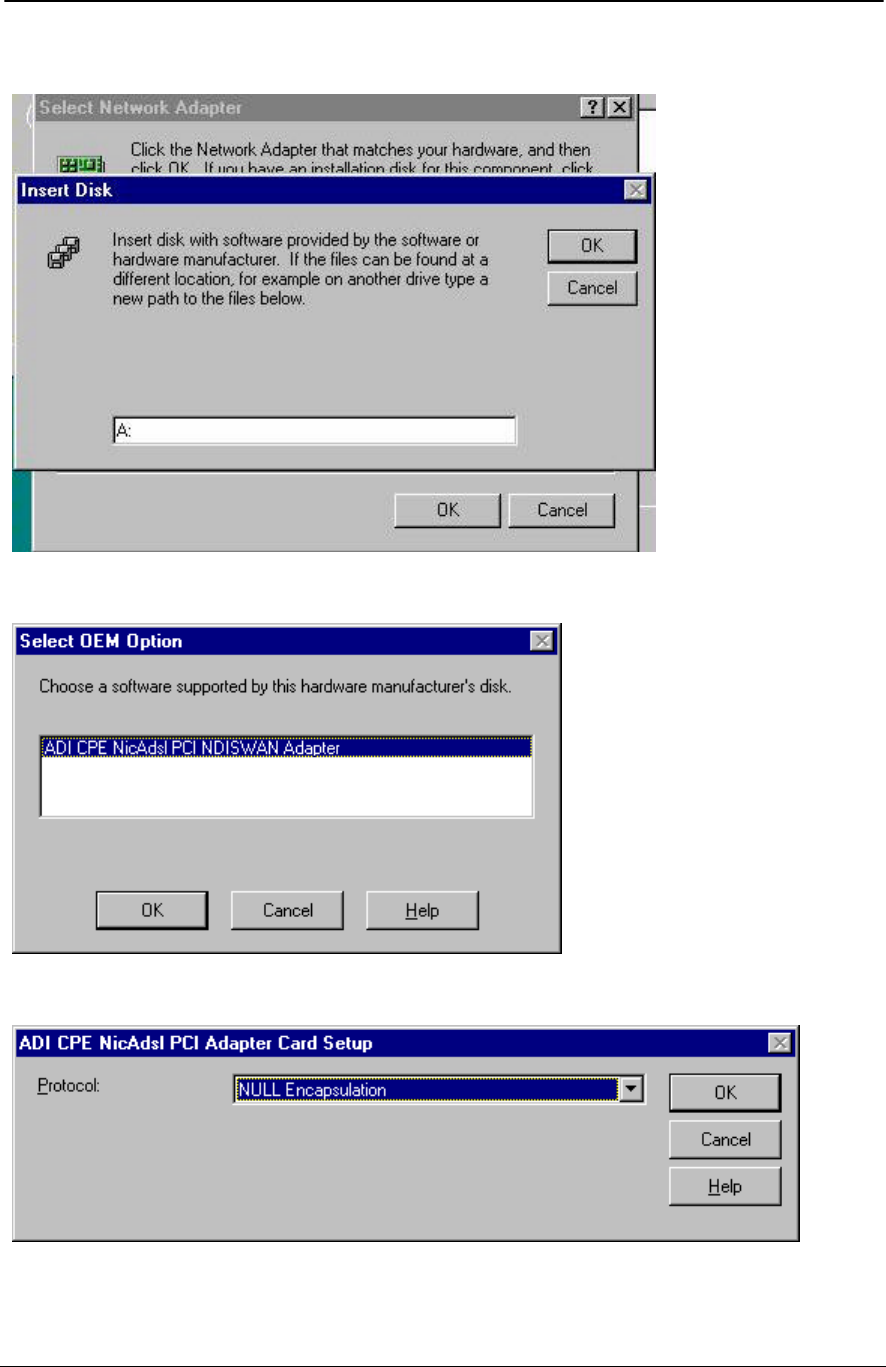
3. Type the driver directory which is located from the CD-ROM. Then click “OK” to continue.
4. Driver name will appear on the following, click “OK” to continue.
5. Choose the appropriate encapsulation scheme and click “OK”.
ADSL PCI NIC User Manual Rev 1.3
05/25/01 Analog Devices Proprietary Page 40
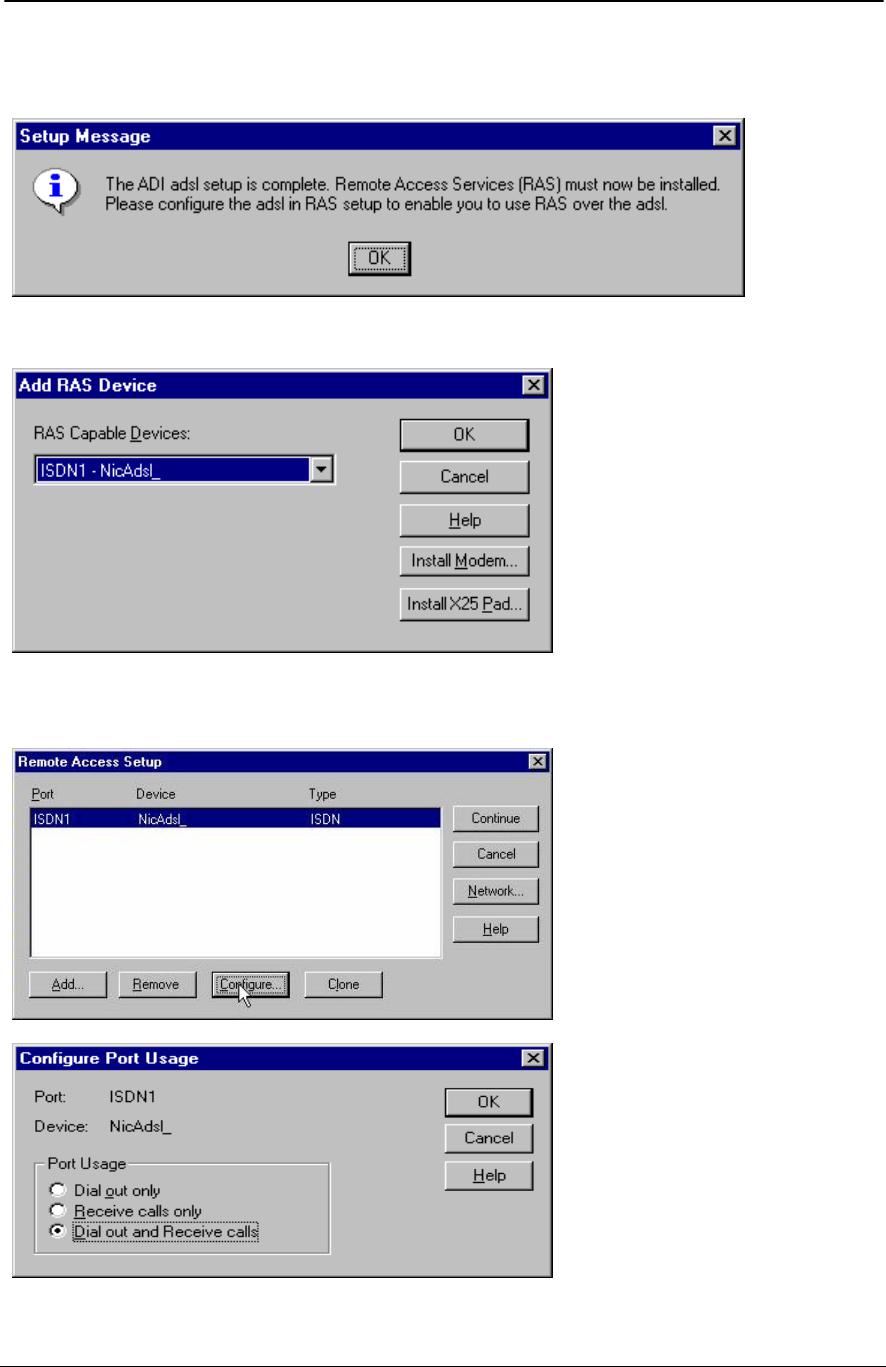
6. Driver installation complete message is shown. Windows will continue to install Remote Access
Service (RAS) automatically by click “OK”.
7. Make sure you see correct name of the device in main page of RAS. Then click “OK”.
8. Click “Configure” to setup RAS for dialing out (client), receiving calls or both together (server).
Click “OK” after finished selection.
ADSL PCI NIC User Manual Rev 1.3
05/25/01 Analog Devices Proprietary Page 41
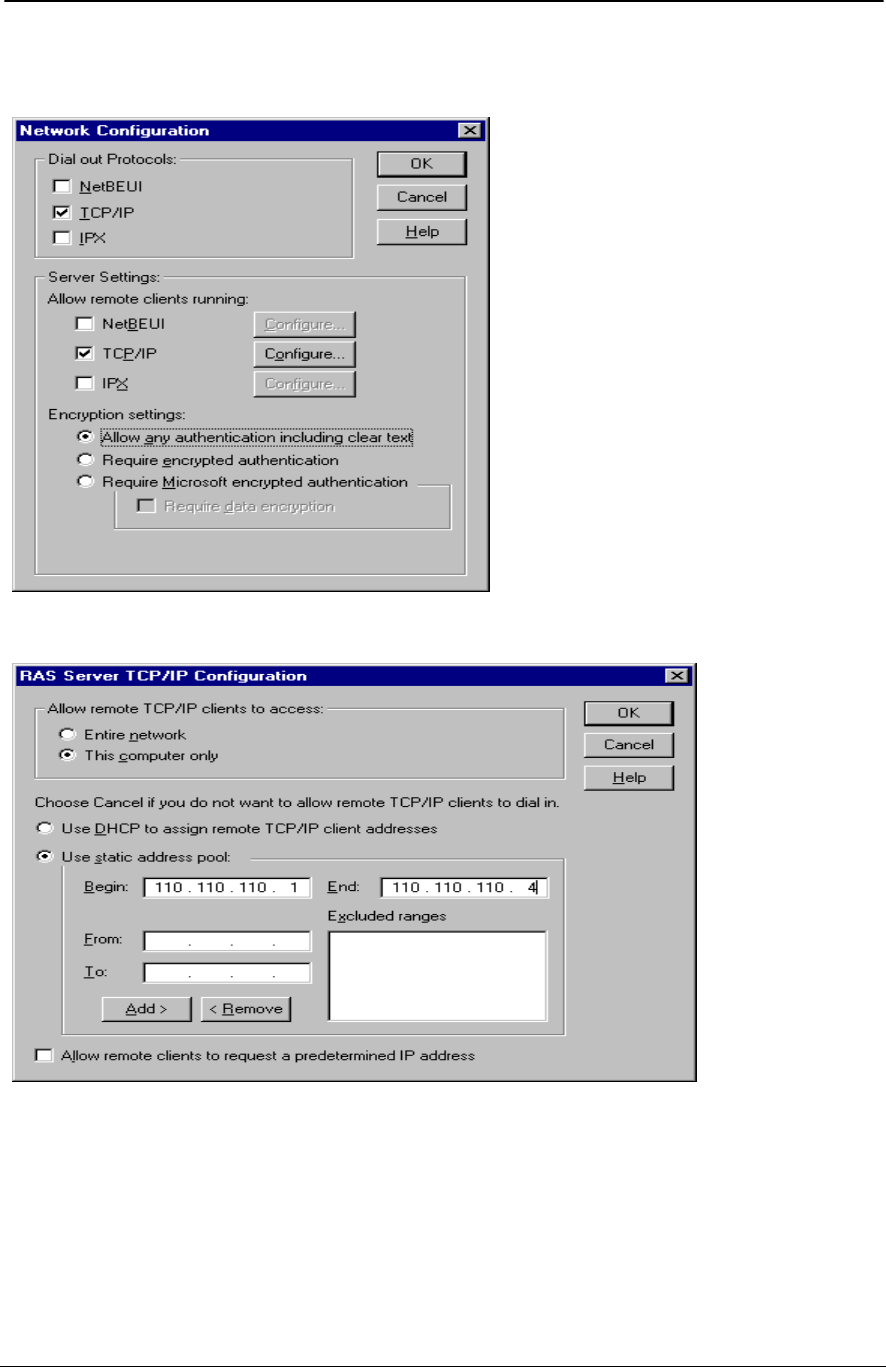
9. Click “Network” icon from “Remote Access Setup” window to configure network for RAS. Click
“Configure” to choose your desired TCP/IP configuration for RAS server.
10. Enter the TCP/IP addresses, click “OK” to continue.
ADSL PCI NIC User Manual Rev 1.3
05/25/01 Analog Devices Proprietary Page 42
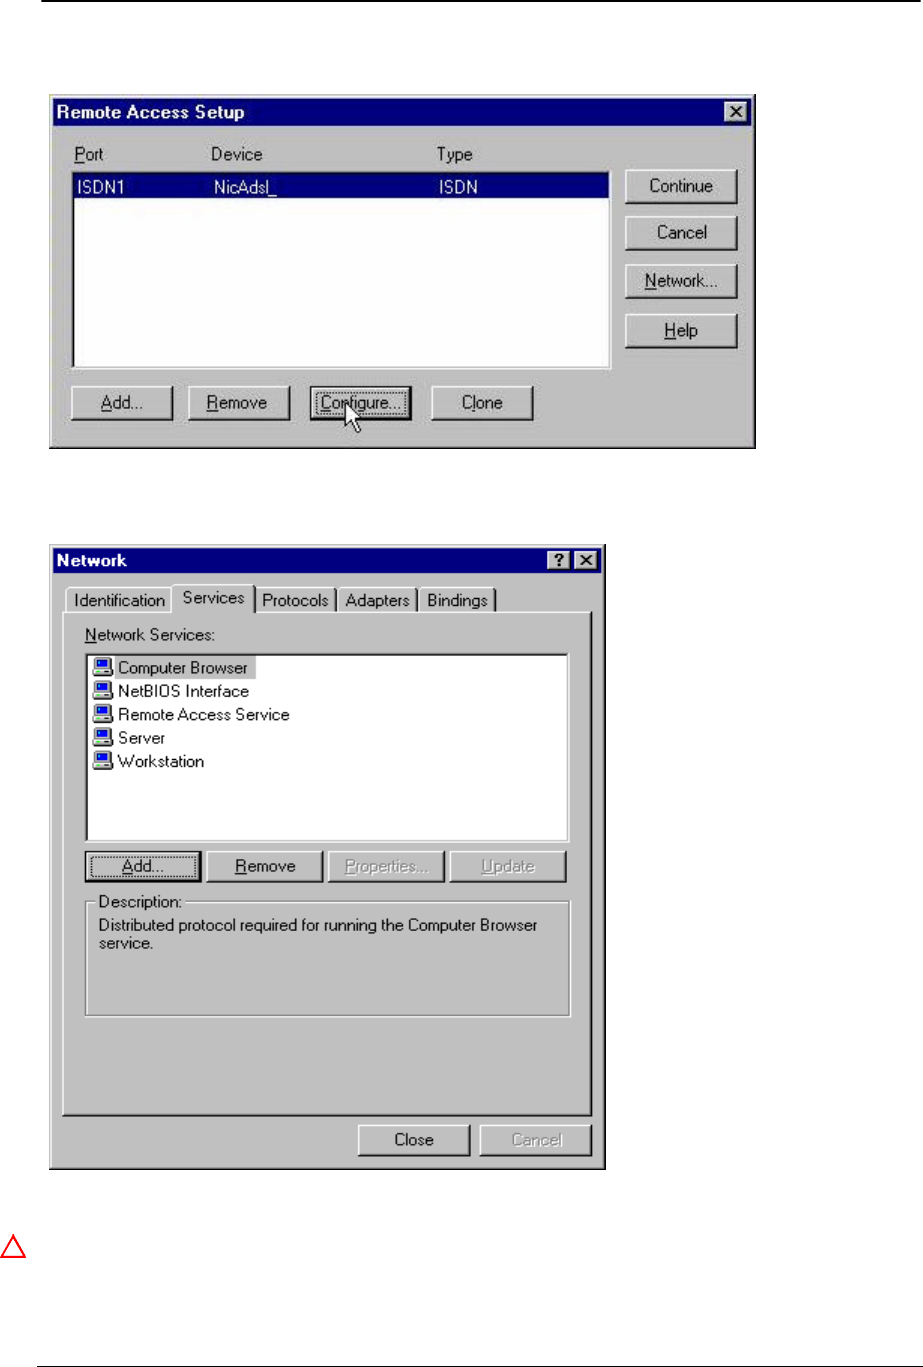
11. After installing RAS, return to the “Remote Access Setup” windows, then click “Continue”.
12. Network panel will be displayed again. Select “Services” tab to install Server, Workstation and
NetBIOS interface. These services are necessary for PPP driver.
13. After installed the ADSL PCI NIC card, RAS and related services, just “Close” the “Network” panel
and reboot the machine.
ADSL PCI NIC User Manual Rev 1.3
05/25/01 Analog Devices Proprietary Page 43
14. It is important to install/reinstall the latest service pack (SP6 or higher) for Windows NT4 whenever
you are adding components to your system since older system files may be copied back to Windows
during installation. After that you should reboot machine again.
Setting registry
After installed the ADSL PCI NIC card, you can set up the desired VPI and VCI in the registry by adding
as DWORD, one for VPI which is PVC_VPI and one for VCI which is PVC_VCI in the following path.
To edit registry, click “Start” then “Run” and “Open” with “regedt32”.
HKEY_LOCAL_MACHINE -> System -> CurrentControlSet -> Services -> Nicadsl_? -> Parameters
Be careful about the other items in the registry and do not try to change any of them.
VPI and VCI for both CO and RT cards should be the same.
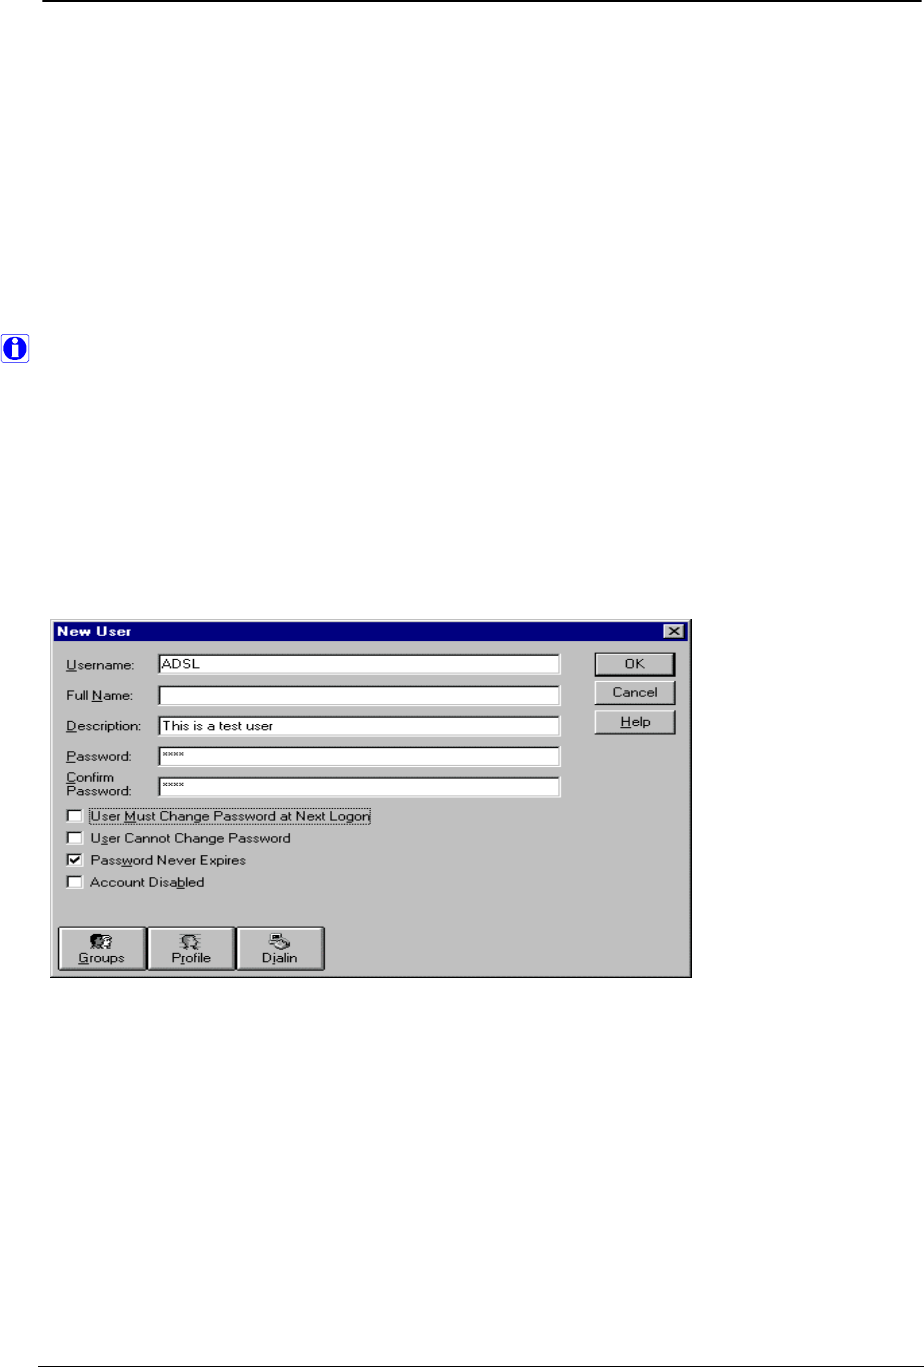
Creating new user(s) for server side
After the service pack is installed, you can create your desired user to be able to dial-in to the server. Do
the following steps:
1. Open “User Manager” via Start -> Programs -> Administrative Tools.
2. Create new user from pull down menu.
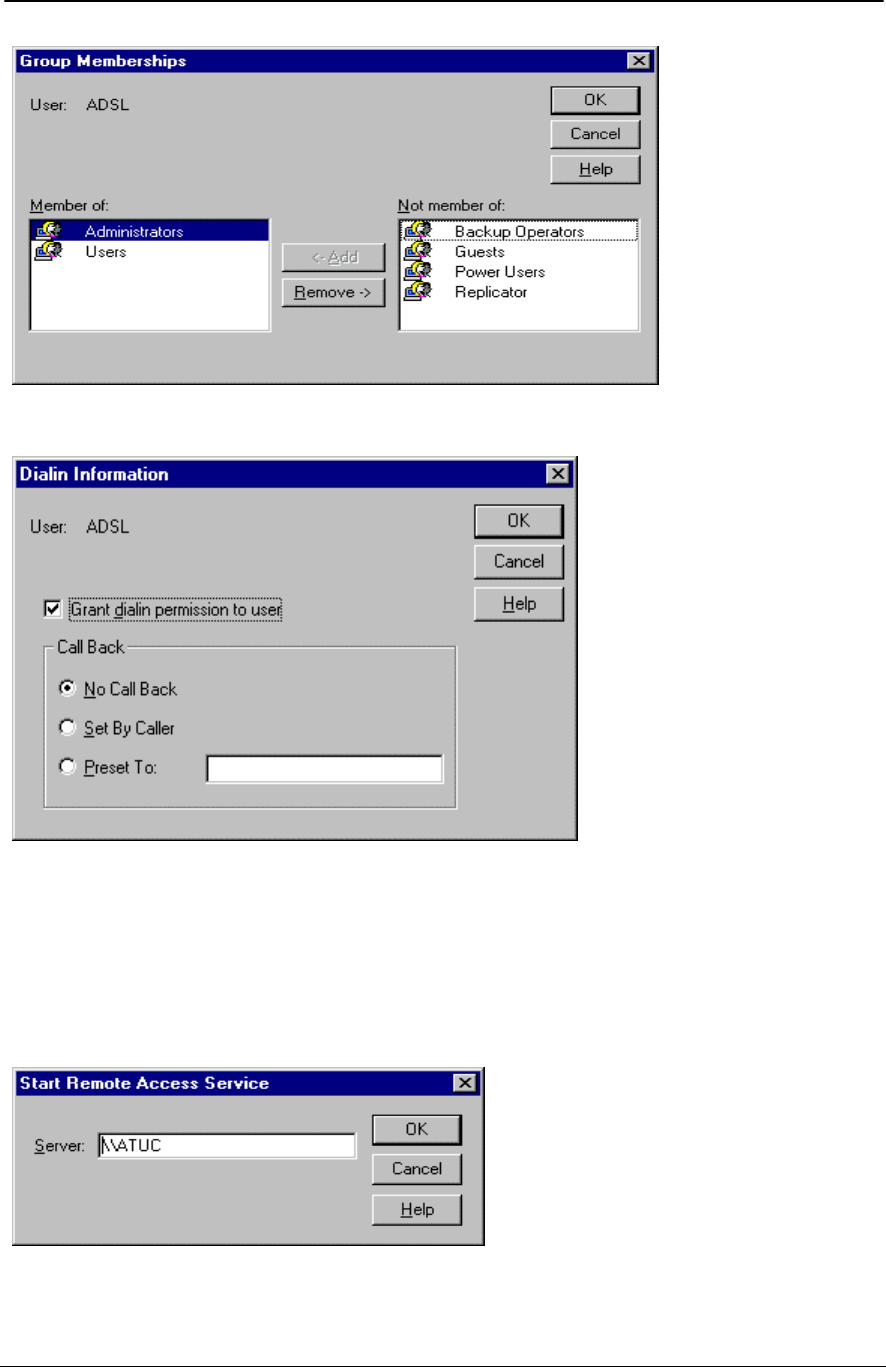
3. Give Administrator permission to new user.
ADSL PCI NIC User Manual Rev 1.3
05/25/01 Analog Devices Proprietary Page 44
4. Grant dial-in permission to new user.
After creating new user on the server side, server setup is completed. Now you can start the server.
Starting server
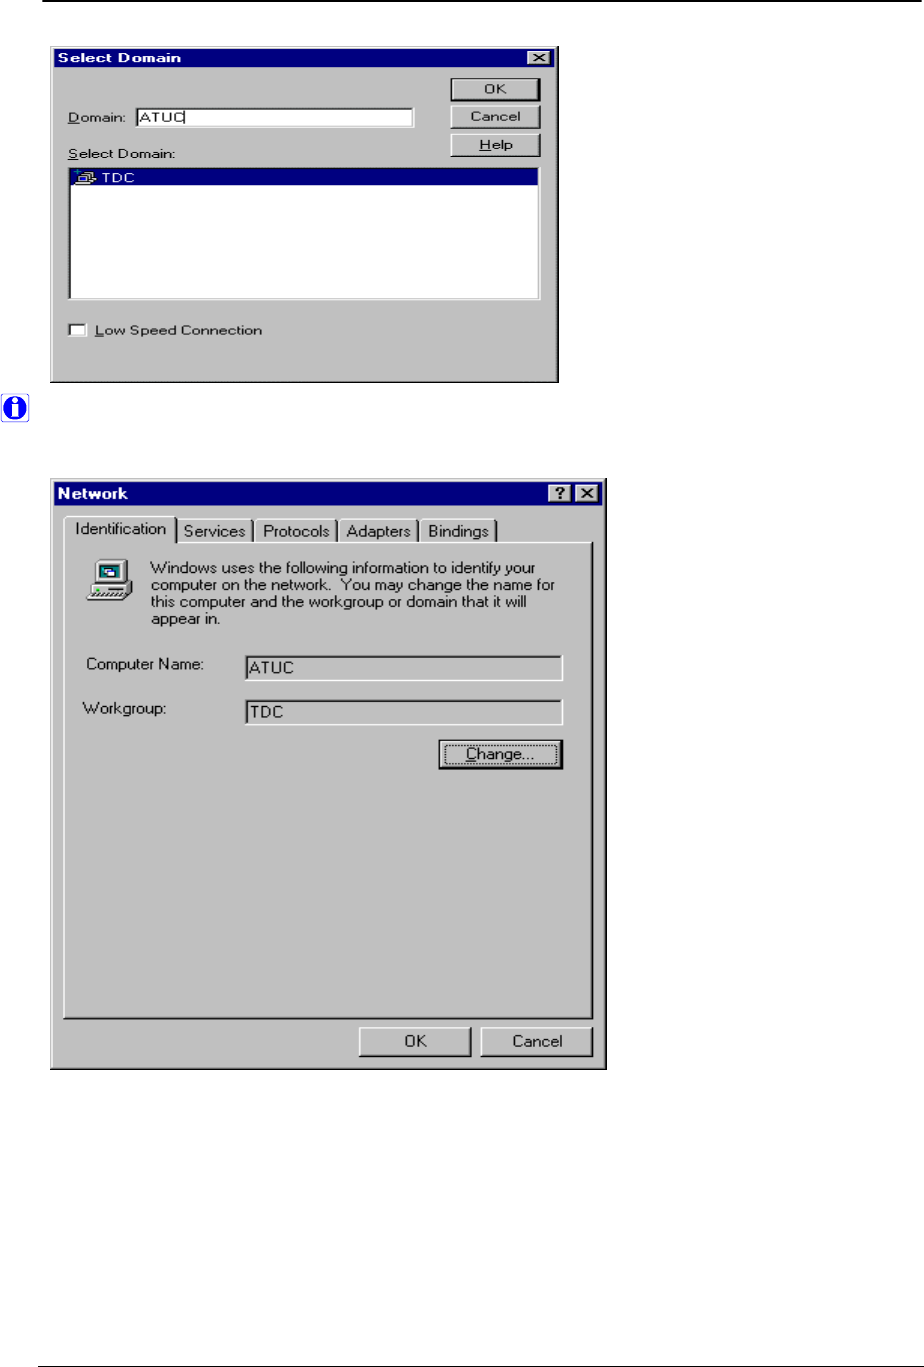
Go to “Administrative Tools” and “Remote Access Admin” and start server for pull down menu. If you
cannot see name of server, just click on “Select Domain/Server” and choose Workgroup and type the
name of the server.
ADSL PCI NIC User Manual Rev 1.3
05/25/01 Analog Devices Proprietary Page 45
You should have unique workgroup for both CO and RT. Workgroup can be changed on the
“Identification” tab of the “Network” panel. Reboot machine after changing workgroup.
ADSL PCI NIC User Manual Rev 1.3
05/25/01 Analog Devices Proprietary Page 46
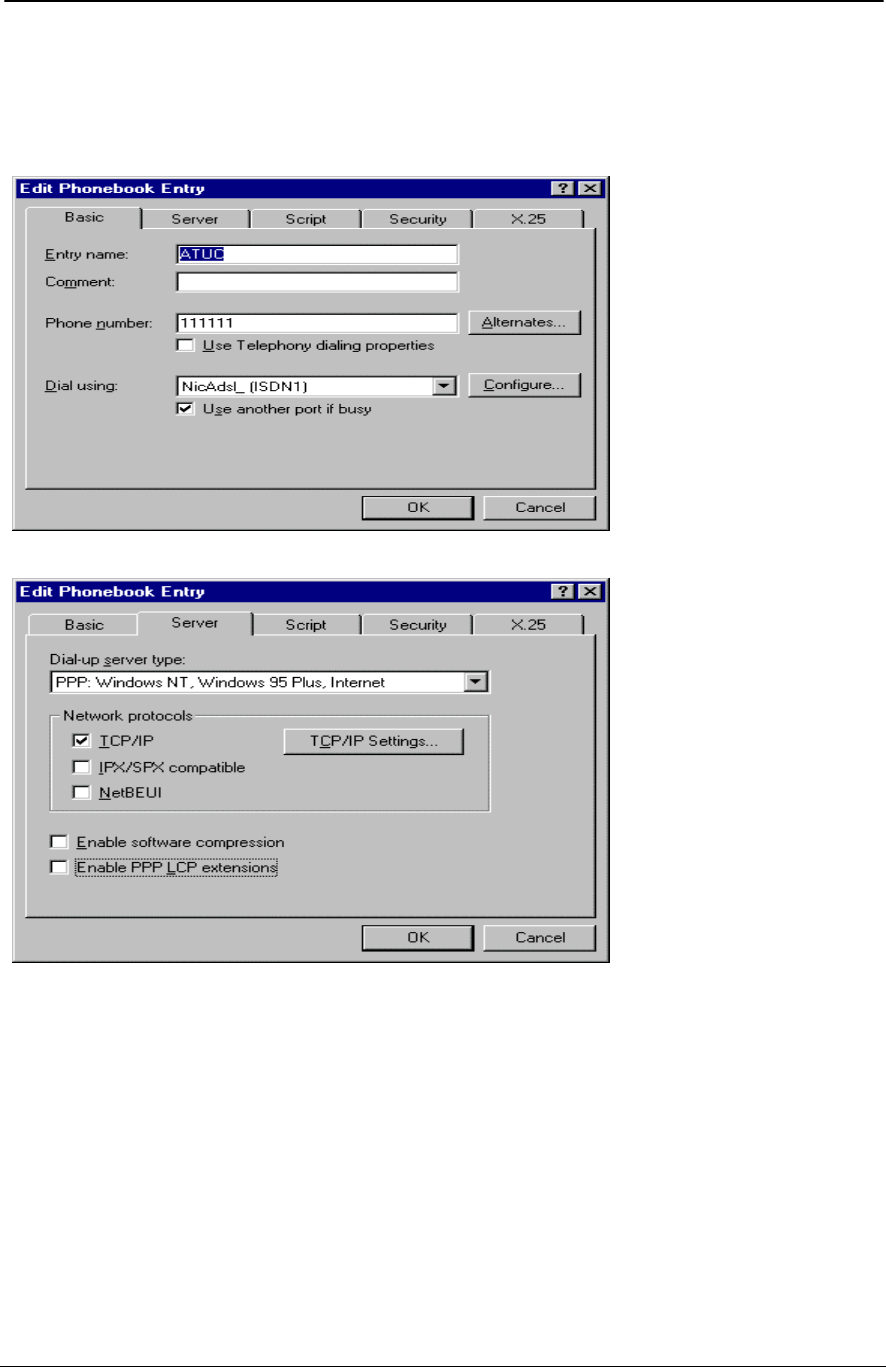
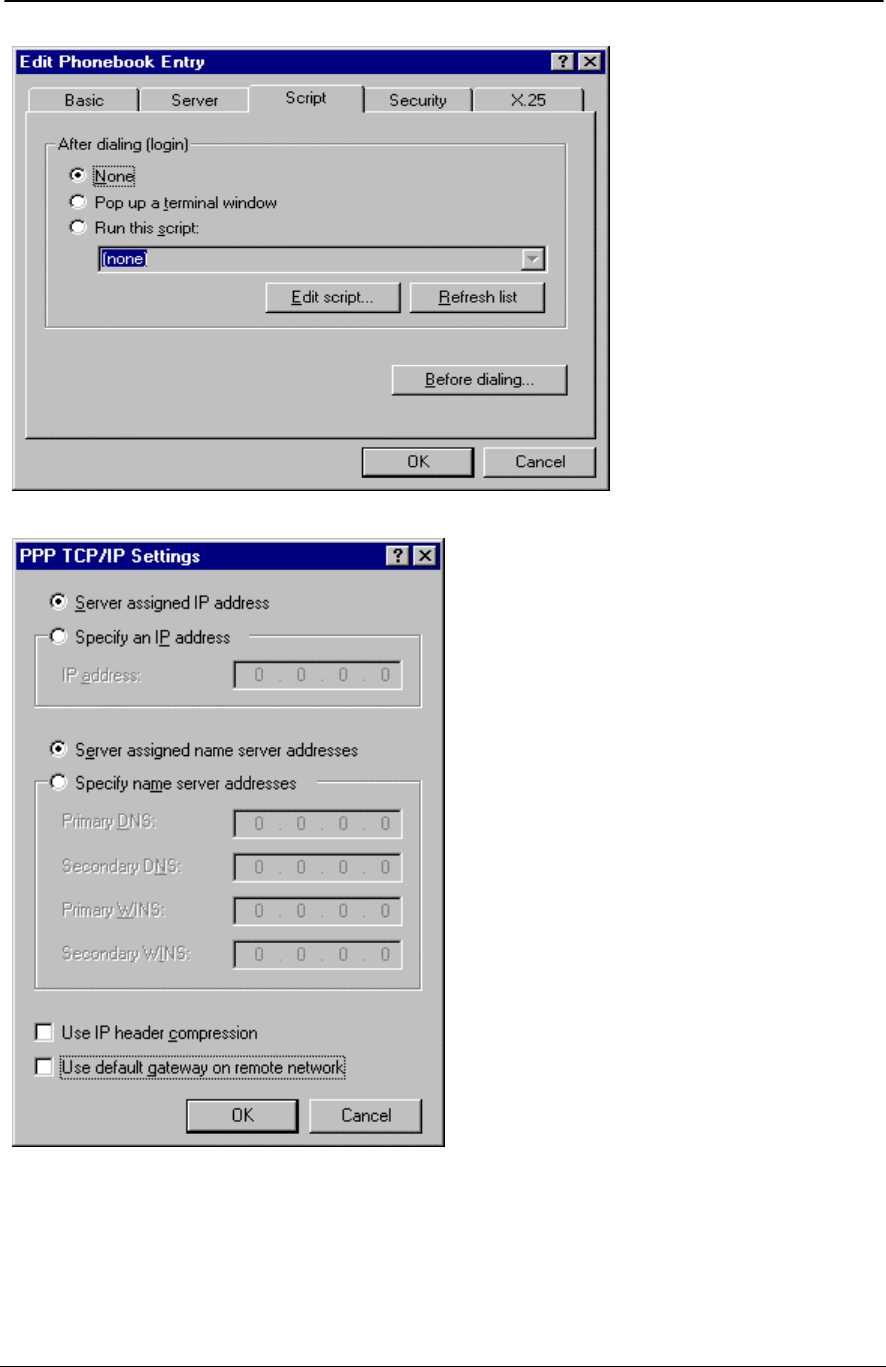
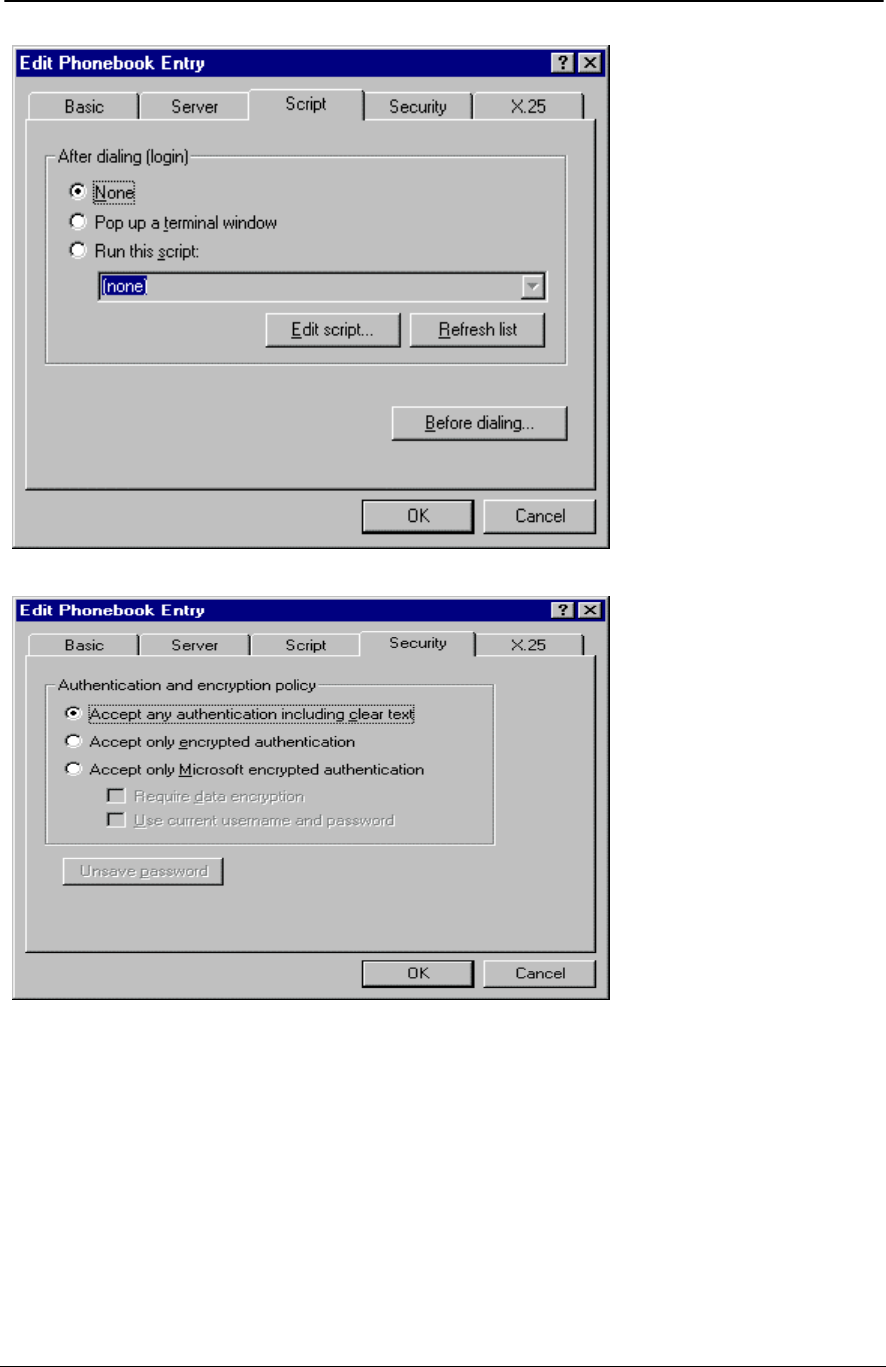
Create an entry in phone book on the client side
Select the “Dial-Up Networking” via Start -> Programs -> Accessories. Add new entry similar to the
following windows with your desired setting.
ADSL PCI NIC User Manual Rev 1.3
05/25/01 Analog Devices Proprietary Page 47
ADSL PCI NIC User Manual Rev 1.3
05/25/01 Analog Devices Proprietary Page 48

ADSL PCI NIC User Manual Rev 1.3
05/25/01 Analog Devices Proprietary Page 49

ADSL PCI NIC User Manual Rev 1.3
05/25/01 Analog Devices Proprietary Page 50
Utility Programs
There are four utility programs supplied with the hardware:
6481Diag is a MS-DOS program that tests different functions of the PCI SAR controller and the NIC
board to determine if they are functioning properly. By running this program from both ends (PCI RT
NIC and PCI CO NIC), end-to-end protocol testing can be done. You need run this program in DOS mode
without Windows operating system loaded.
AdiCmv is a Windows-DOS program that allows user to test the access to ADI PCI NIC device driver.
ADI CMV modem commands can be entered here for low level modem configuration and monitoring.
Windows based CommAgnt driver is required to be installed first.
CMVP is a MS-DOS program which enables ADSL modem configuration and monitoring without
running Windows. It gives fast access to modem when frequent reboot is required during testing.
BootLoad is a MS-DOS program which program on-board Flash for modem firmware upgrade without
removing existing Flash. If IDMA boot (Flashless) is used on the ADSL PCI NIC RT (Remote Terminal)
card, this program will not be used.
All of the above programs can be supplied upon request.

ADSL PCI NIC User Manual Rev 1.3
05/25/01 Analog Devices Proprietary Page 51
Troubleshooting
Checklist
Please use the following checklist to help debugging problems with your ADI PCI NIC product.
Determine if ADI PCI NIC driver is installed correctly.
Open the Network panel in the Control Panel. The ‘ADI PCI NIC PCI Adapter’ entry under the Adapter
tab should exist. This shows that ADI PCI NIC driver is correctly installed.
Determine if modem is trained.
On your ADI PCI NIC board, when LED (Modem Connect) is constantly ON, it indicates that the modem
is correctly linked to the central office modem. If the modem is not trained, please retrain the modem by
rebooting the machine. Full LED description is located in Hardware Installation section of this menu.
Also make sure CO equipment has same modem line type (T1.413, G.DMT or G.LITE) or multi-mode
support.
Determine if CRCs are occurring.
On your ADI PCI NIC board, when LED (CRC Errors) is blinking, it indicates that CRCs are occurring
over the ADSL link. CRCs can cause a reduction in data flow. To remove CRCs, please reset the modem
and check improvement. Modem can be reset from the GUI (ADI ADSL Monitor).
Determine if data flow is occurring.
To determine if data flow is occurring, please execute the program Netstat.exe (e.g. ‘netstat –e’ to view
Ethernet statistics). If data flow is occurring, the values given by Netstat should be increasing every time it
is executed.
Also make sure ATM VC is setup properly. VCI/VPI setting should be matched on both CO and RT
devices.
Determine if your MAC address is valid.
To determine your MAC address, please execute the program ipconfig.exe (e.g. ‘ipconfig /all’). The MAC
address is located on the line ‘Physical Address’. For example:
Physical Address . . . . . . : 00-60-F9-01-02-03
Please report your MAC address to your network administrator or service provider to determine if it is
valid or not. No duplicated address is allowed for all systems in the same network.
Determine if your IP address is valid.
To determine your IP address, please execute the program ipconfig.exe (e.g. ‘ipconfig /all’). The IP
address is located on the line ‘IP Address’. For example:
IP Address . . . . . . . . . : 196.168.0.2
Please report your IP address to your network administrator or service provider to determine if it is valid
or not.

ADSL PCI NIC User Manual Rev 1.3
05/25/01 Analog Devices Proprietary Page 52
Ordering Information
Please contact your local ADI sales representatives to purchase the complete ADSL PCI evaluation kit.
Part Number for ADSL PCI NIC (RT): NRE20MSP930EVR-PCI
Part Number for ADSL PCI NIC (CO): NRE20MSP930EVC-PCI
Next Release
• Add driver installation instructions for Windows NT4, 2000 and Me.
• IDMA boot firmware upgrade procedures on the ADSL PCI NIC RT (remote terminal) board.