UBS Axcera HU5000BTD 5000-Watt UHF Digital Transmitter User Manual axciter Master 3 22 07
UBS-Axcera 5000-Watt UHF Digital Transmitter axciter Master 3 22 07
Contents
- 1. User manual 1
- 2. User manual 2
- 3. User manual 3
- 4. User manual 4
User manual 2
Digital ATSC Exciter-Modulator System Chapter 2,
Installation and Operating Instructions
Axcera Axciter, Rev. 0 28
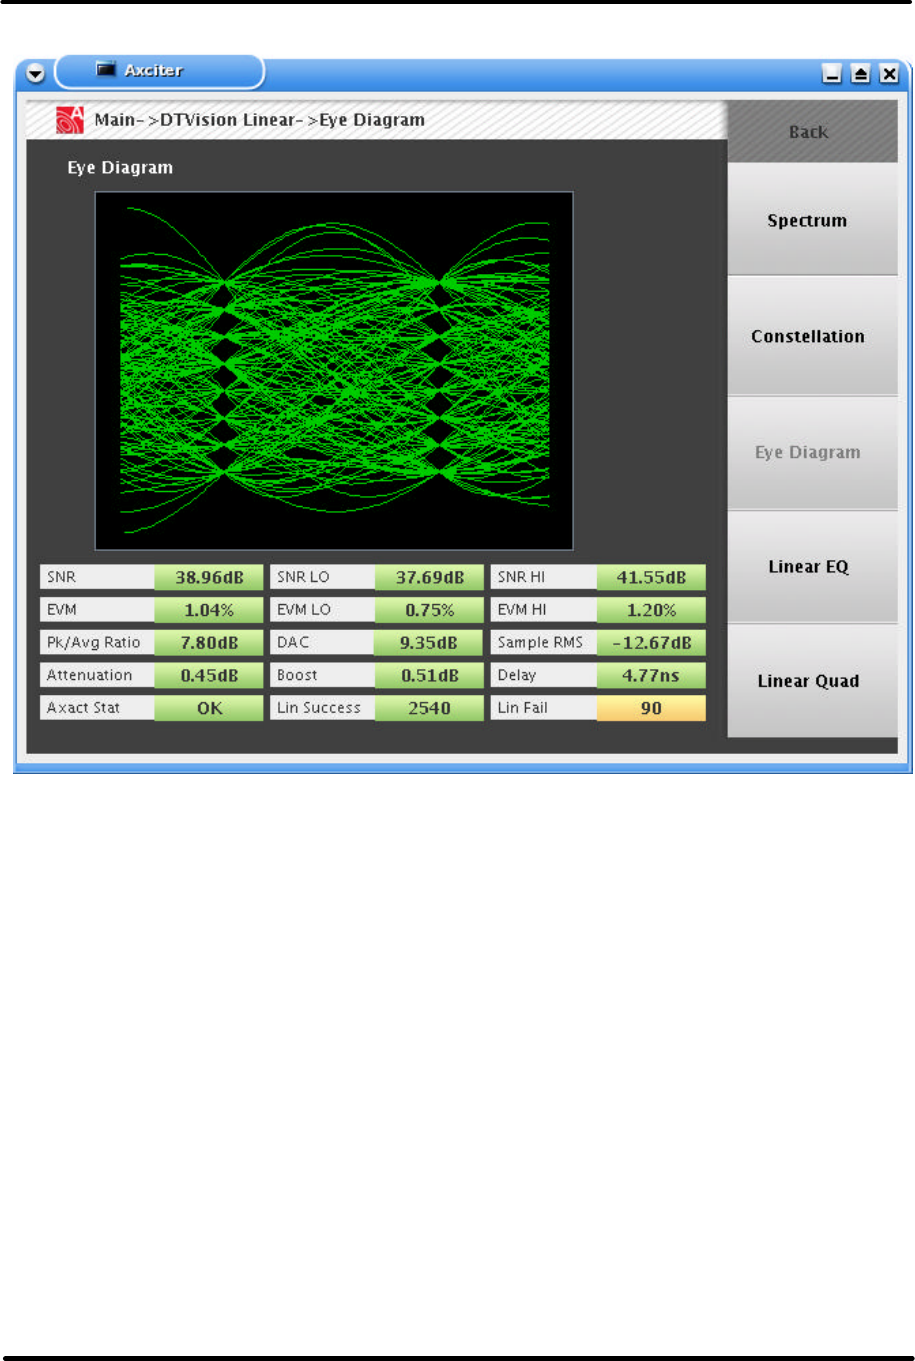
DTVision Eye Screen
I-Signal Eye Display
Graphic display of the eight data amplitude levels. This can be used to
monitor the demodulated 8VSB signal. When signal is precise, the seven
vertical "eyes" will appear (this display shows two sets). Linear or non-linear
distortion in the modulator process will cause incorrect I-signal amplitude at
center of "eye" pattern. Transmitter distortion such as group delay, frequency
tilt, or ripple will cause the "eye" to close and result in receiver data errors.
.
Digital ATSC Exciter-Modulator System Chapter 2,
Installation and Operating Instructions
Axcera Axciter, Rev. 0 29
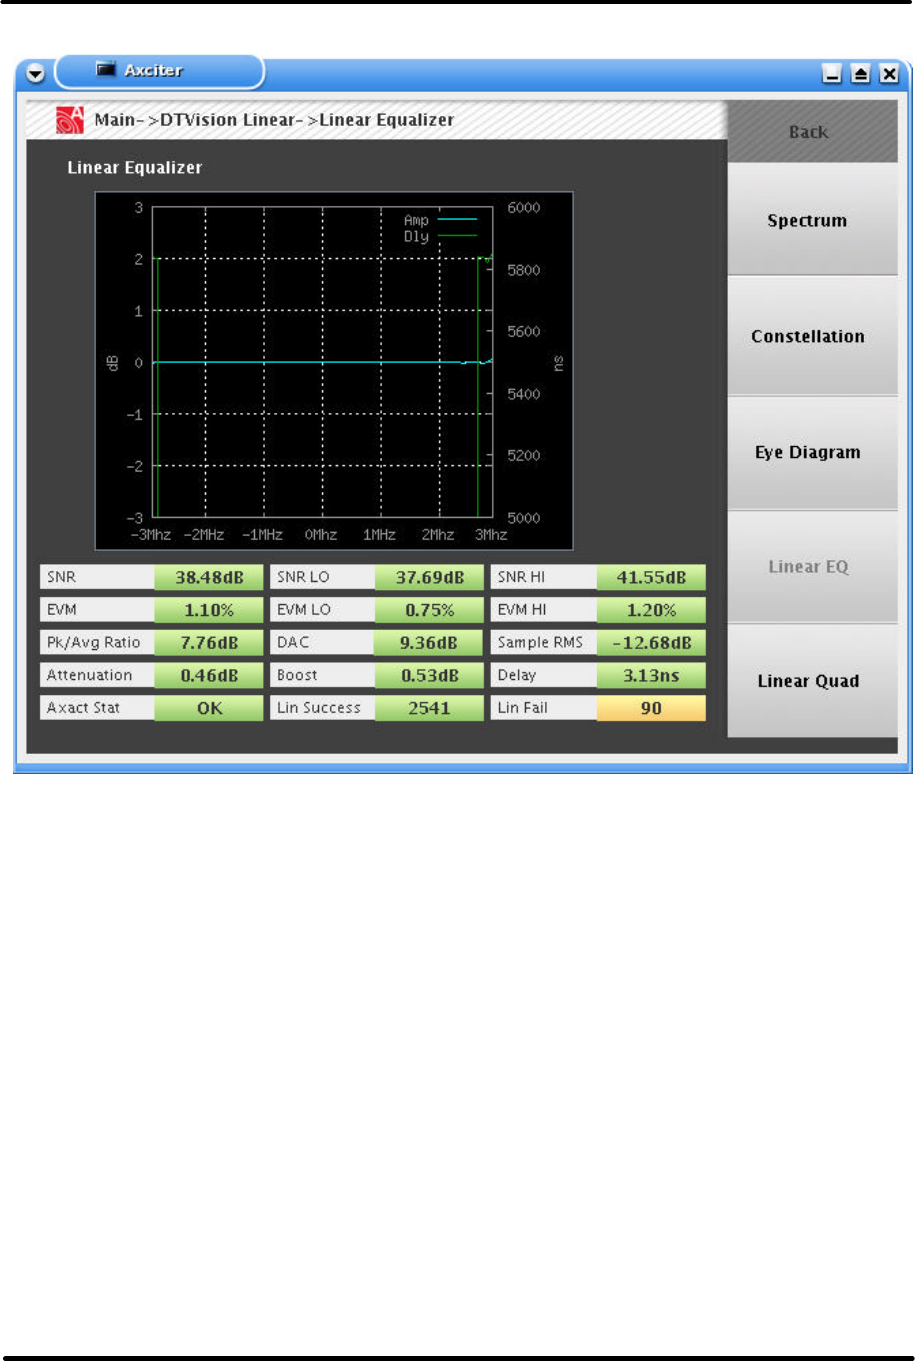
Linear Equalizer Graph
Linear Equalizer Display:
This display shows the characteristics of the linear adaptive equalizer.
The horizontal axis is frequency (0 to 5.38 MHz).
There are two traces on this display. One shows the amplitude of the
equalizer's response in decibels, and the other shows the group delay of the
equalizer in nanoseconds. The vertical scale for the amplitude display is along
the left side of the display. The range is always –3 to +3 decibels. The group
delay scale automatically scales itself to the equalizer data, and the minimum
and maximum values appear along the right side of the scale.
Since this display shows the equalizer characteristics, the channel
(transmitter) characteristics, which are being corrected, will be the inverse of
the equalizer. For example, if the equalizer shows a rising amplitude response
with increasing frequency, then the transmitter has a falling amplitude
response with increasing frequency. The same inverse relationship also holds
with respect to group delay.
In normal operation, the amplitude response will be generally flat, and the
group delay curve will drop off at the frequency extremes (near 0 and 5.38
MHz) because of the channel filter's group delay.
Digital ATSC Exciter-Modulator System Chapter 2,
Installation and Operating Instructions
Axcera Axciter, Rev. 0 30
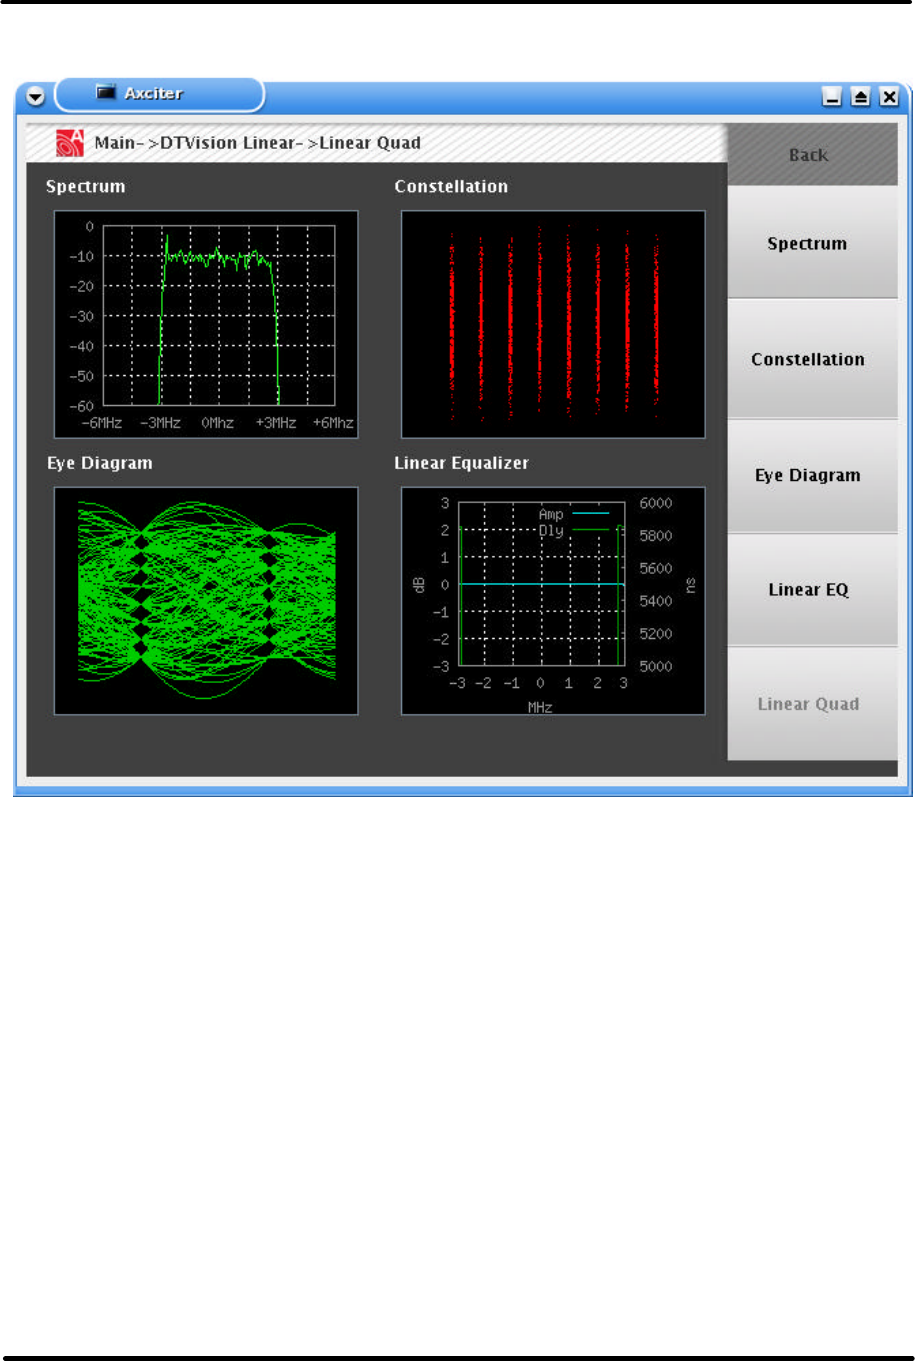
Linear Quad Display Screen

Digital ATSC Exciter-Modulator System Chapter 2,
Installation and Operating Instructions
Axcera Axciter, Rev. 0 31
DTVision Non-Linear - Optional
This section contains information regarding the DTVision Screens. These screens are
optional diagnostic screens. They are not necessary for the operation of the Axciter.
However, they greatly enhance the experience. These graphs provide the same type of
views as an EFA.
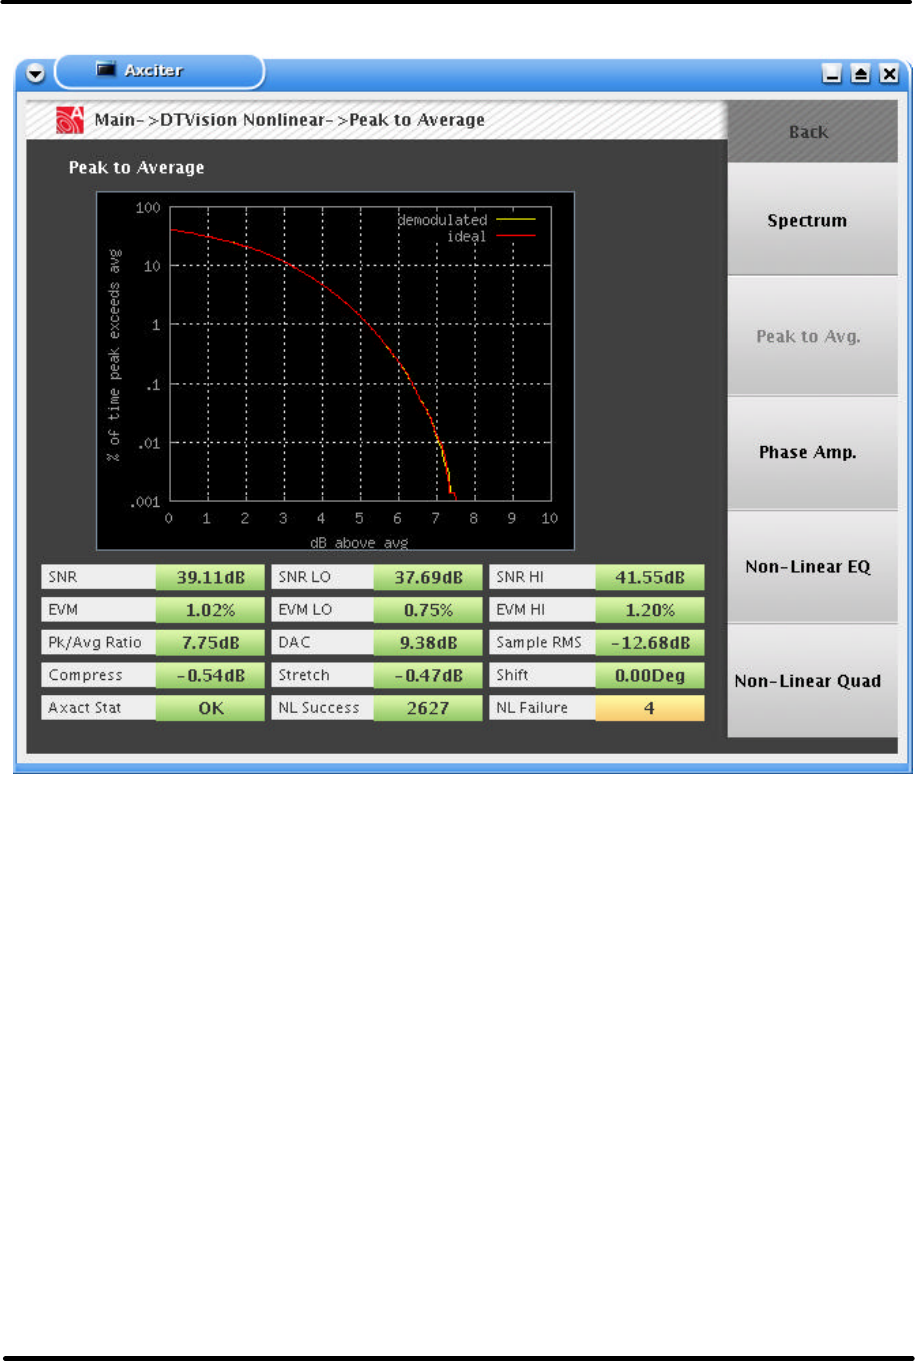
All of the Nonlinear screens have the following reference values displayed
EVM
The error vector magnitude (EVM) value indicates quality of the digital
modulation. EVM is defined as the RMS error at the sampling instants divided
by the RMS of the ideal symbols. The error is expressed as a percentage. As
signal quality increases, this value decreases.
S/N
The transmitted signal quality is also expressed as an in-band signal to noise
ratio, expressed in dB. As signal quality increases, this value will increase
(logarithmically).
DAC Headroom
ever negative, then there is clipping in the IF modulator, nonlinear equalizer,
and/or the DAC. If this happens, lower the unity gain reference point for the
nonlinear equalizer.
EVM
The error vector magnitude (EVM) value indicates quality of the digital
modulation. EVM is defined as the RMS error at the sampling instants divided
by the RMS of the ideal symbols. The error is expressed as a percentage. As
signal quality increases, this value decreases.
S/N
The transmitted signal quality is also expressed as an in-band signal to noise
ratio, expressed in dB. As signal quality increases, this value will increase
(logarithmically).
Digital to Analog Converter (DAC) Headroom
This parameter shows the amplitude (in dB) of the equalized IF signal with
respect to the maximum output from the digital to analog converter (DAC). A
positive value indicates normal operation and no clipping. If this value is ever
negative, then there is clipping occurring in the IF modulator, nonlinear
equalizer, and/or the DAC. If this happens, lower the unity gain reference
point for the nonlinear equalizer.
Peak to Average Ratio
This value shows the peak to average ratio of the transmitted signal. This
value is typically 6 to 8 dB for a perfect signal. A value significantly lower will
indicate peak compression. A small amount of peak compression is normal.
Digital ATSC Exciter-Modulator System Chapter 2,
Installation and Operating Instructions
Axcera Axciter, Rev. 0 32
This parameter shows the amplitude (in dB) of the equalized IF signal with respect to the
maximum output from the digital to analog converter (DAC). A positive value indicates
normal operation and no clipping.
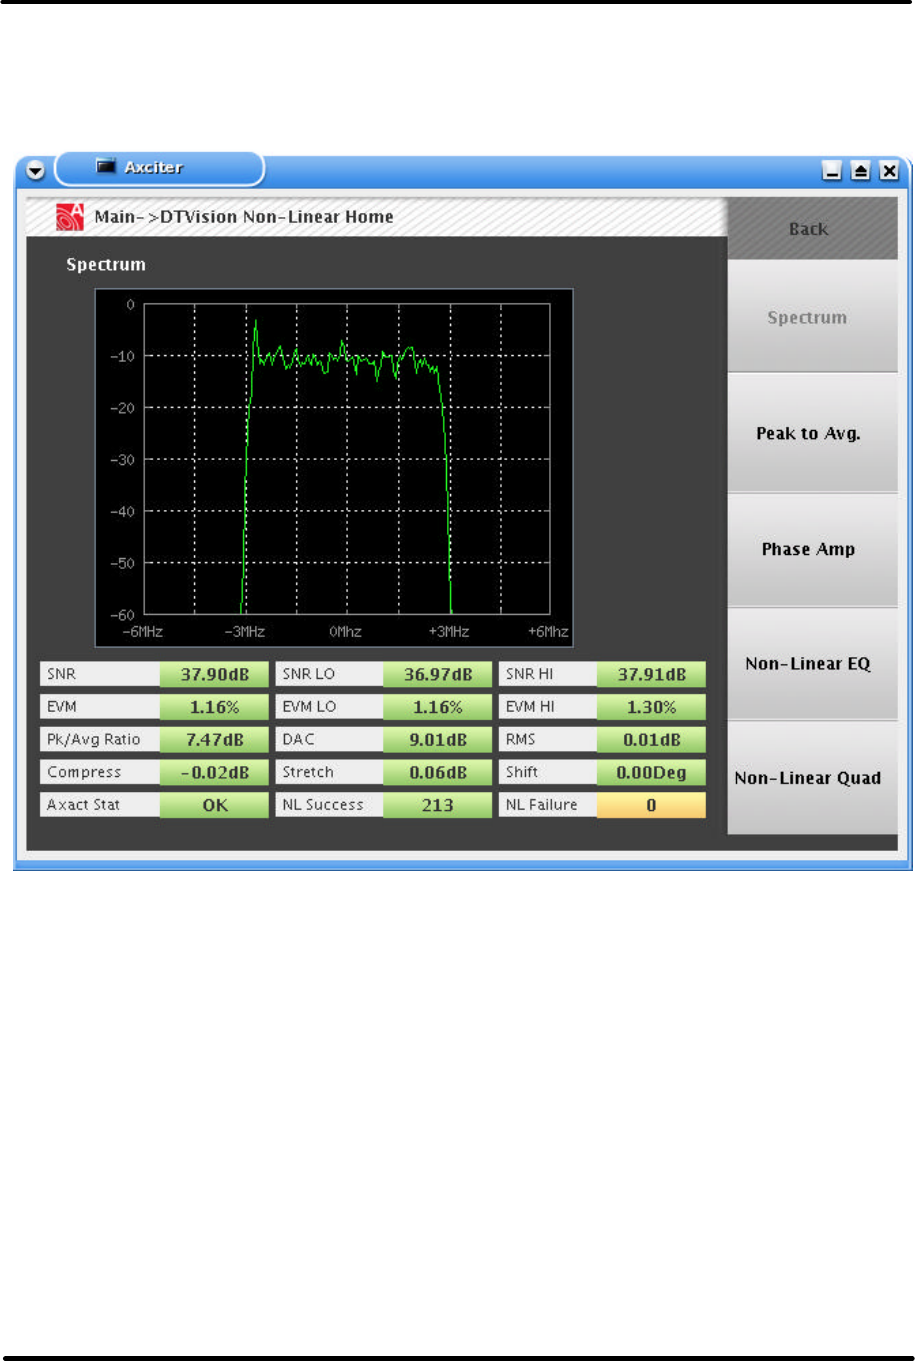
DTVision Non-Linear Home/Spectrum Screen
Digital ATSC Exciter-Modulator System Chapter 2,
Installation and Operating Instructions
Axcera Axciter, Rev. 0 33
DTVision Peak to Average Screen
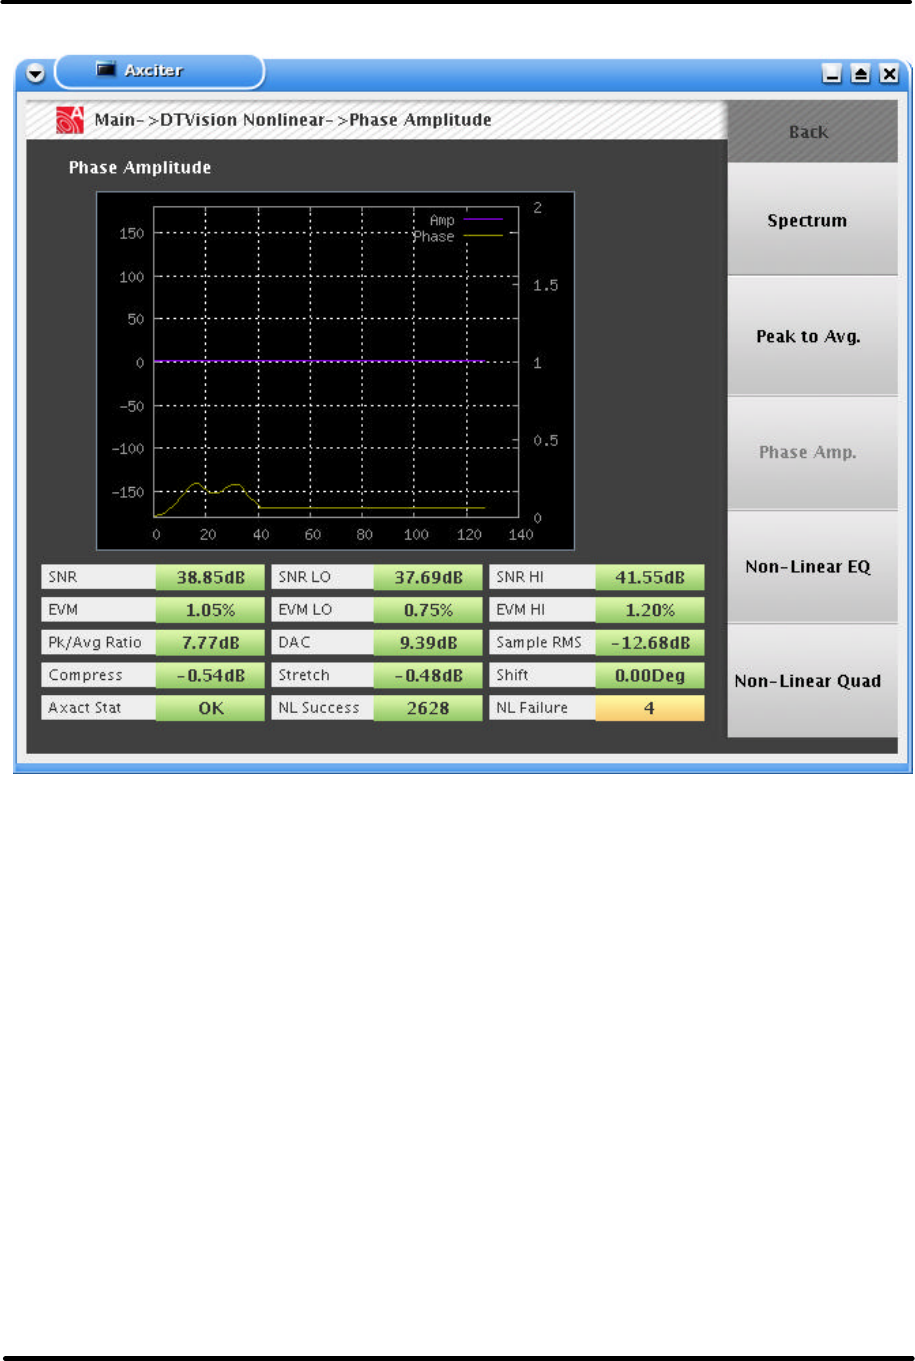
Peak to Average Ratio Display:
This screen shows the peak to average ratio in a statistical fashion. The red
trace shows the ideal signal's peak to average ratio statistics, and the yellow
trace shows the statistics of the transmitter's output.
The curves show the cumulative distribution function of the peak to average
ratio's probability density.
The horizontal scale shows the peak to average ratio measured in decibels.
The vertical scale shows the percentage of the time that the peak to average
ratio exceeds the value on the horizontal scale. The vertical scale is
logarithmic.
When the transmitter is clipping signal peaks, the low probability, high peak to
average portion of the (yellow) curve for the transmitter's output will appear
to the right of the (red) curve indicating the ideal signal.
Digital ATSC Exciter-Modulator System Chapter 2,
Installation and Operating Instructions
Axcera Axciter, Rev. 0 34
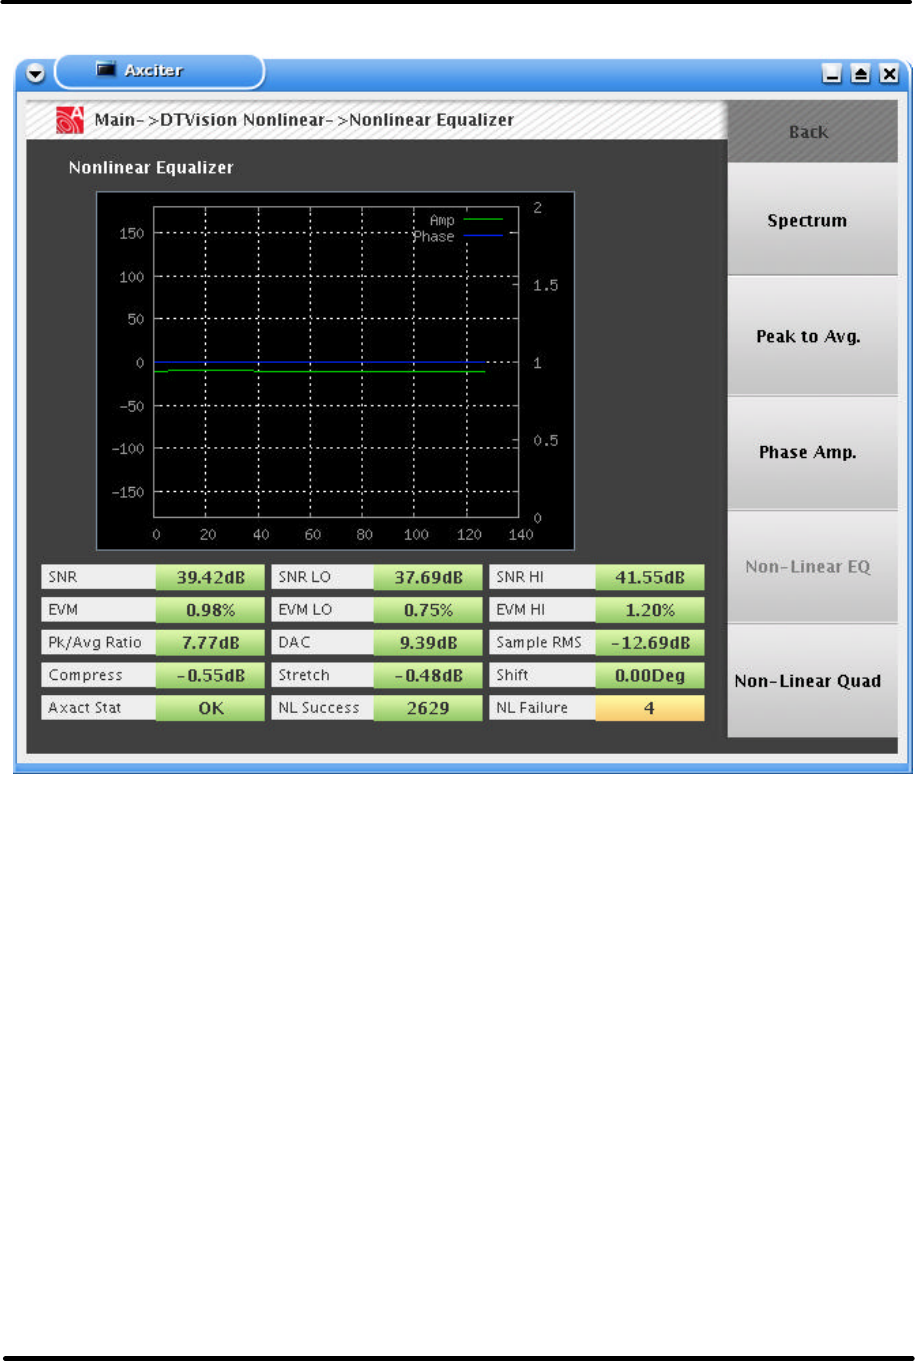
Nonlinear Phase Amplitude Display
Digital ATSC Exciter-Modulator System Chapter 2,
Installation and Operating Instructions
Axcera Axciter, Rev. 0 35
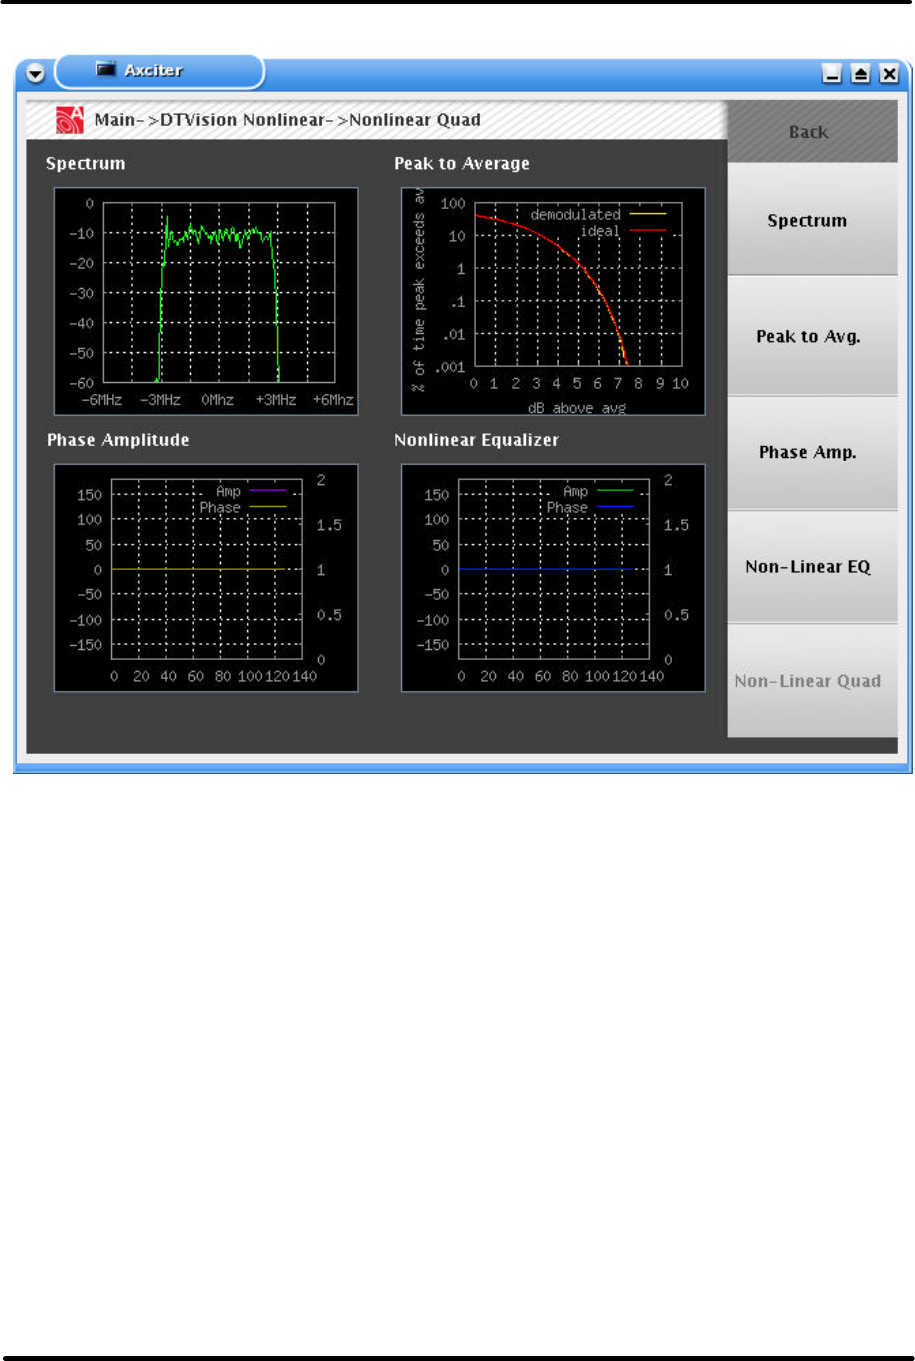
Nonlinear Equalizer Display
Nonlinear Equalizer Display:
This display shows the nonlinear corrections being applied to the signal to
correct for the RF power amplifier’s envelope compression and incidental
phase modulation. The horizontal axis is the ideal RF envelope magnitude. The
yellow magnitude trace shows the instantaneous gain correction being applied
to the signal as a function of the desired envelope amplitude, to correct for
amplitude compression in the power amplifier. The red phase trace shows the
amount of phase correction being applied to correct for the power amplifier’s
incidental phase modulation.
As the ideal amplitude becomes large (corresponding to the right part of the
display), the probability density function of the ideal envelope magnitude
becomes very small or zero. So, data in the right hand portion of the display
will generally be extrapolated. Also, the magnitude equalization characteristic
may also drop off, to accomplish clipping and to prevent overflow of the data
feeding the DAC.
Digital ATSC Exciter-Modulator System Chapter 2,
Installation and Operating Instructions
Axcera Axciter, Rev. 0 36
Nonlinear Quad Display Screen
Digital ATSC Exciter-Modulator System Chapter 2,
Installation and Operating Instructions
Axcera Axciter, Rev. 0 37
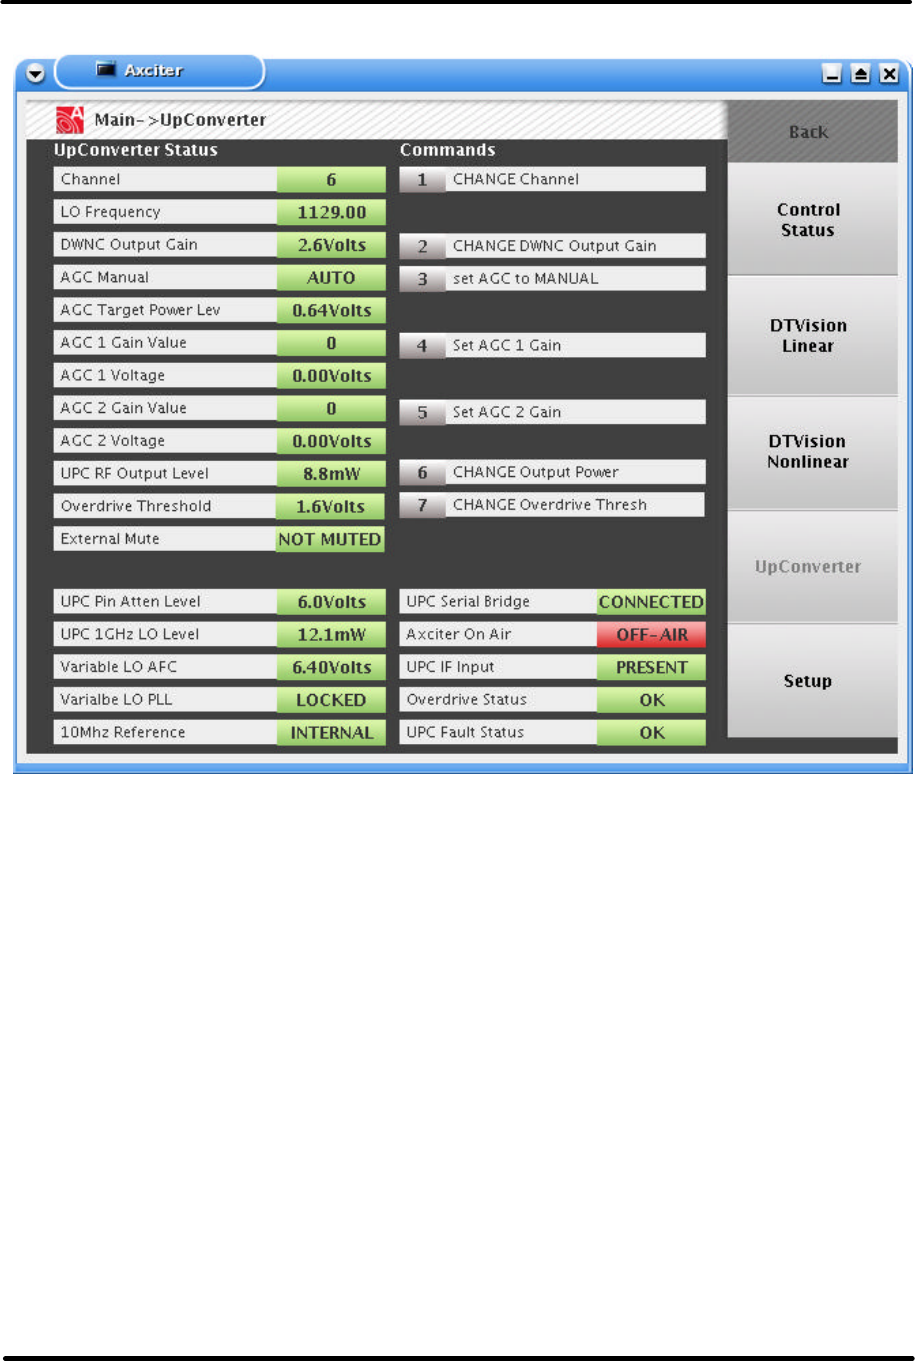
Upconverter Screen
This screen shows controls and status values related to the
upconverter.
Channel Select:
Entering a number in this box selects the channel. Channels 2-6 are VHF low
band, 7-13 are VHF high band, and channels 14-69 are UHF. (If the channel
number is ever changed, the channel filter in the upconverter will need to be
replaced or retuned to the new channel.)

Digital ATSC Exciter-Modulator System Chapter 2,
Installation and Operating Instructions
Axcera Axciter, Rev. 0 38
LO Frequency
DWNC Output Gain
AGC Manual
AGC Target Power Level
AGC 1 Gain Value
AGC 1 Voltage
AGC 2 Gain Value
AGC 2 Voltage
UPC RF Output Level
Overdrive Threshold
External Mute
UPC Pin Attenuation Level
UPC 1GHz LO Level
Variable LO AFC
Variable LO PLL
10MHz Reference
UPC Serial Bridge
This value indicates whether or not the Serial Bridge between the Netburner
and the Micro ATX computer is up and operational.
Axciter On Air
This value indicates if this Axciter is On Air. This value is received from the
UP/DWN converter.
UPC IF Input
Overdrive Status
UPC Fault Status
Digital ATSC Exciter-Modulator System Chapter 2,
Installation and Operating Instructions
Axcera Axciter, Rev. 0 39
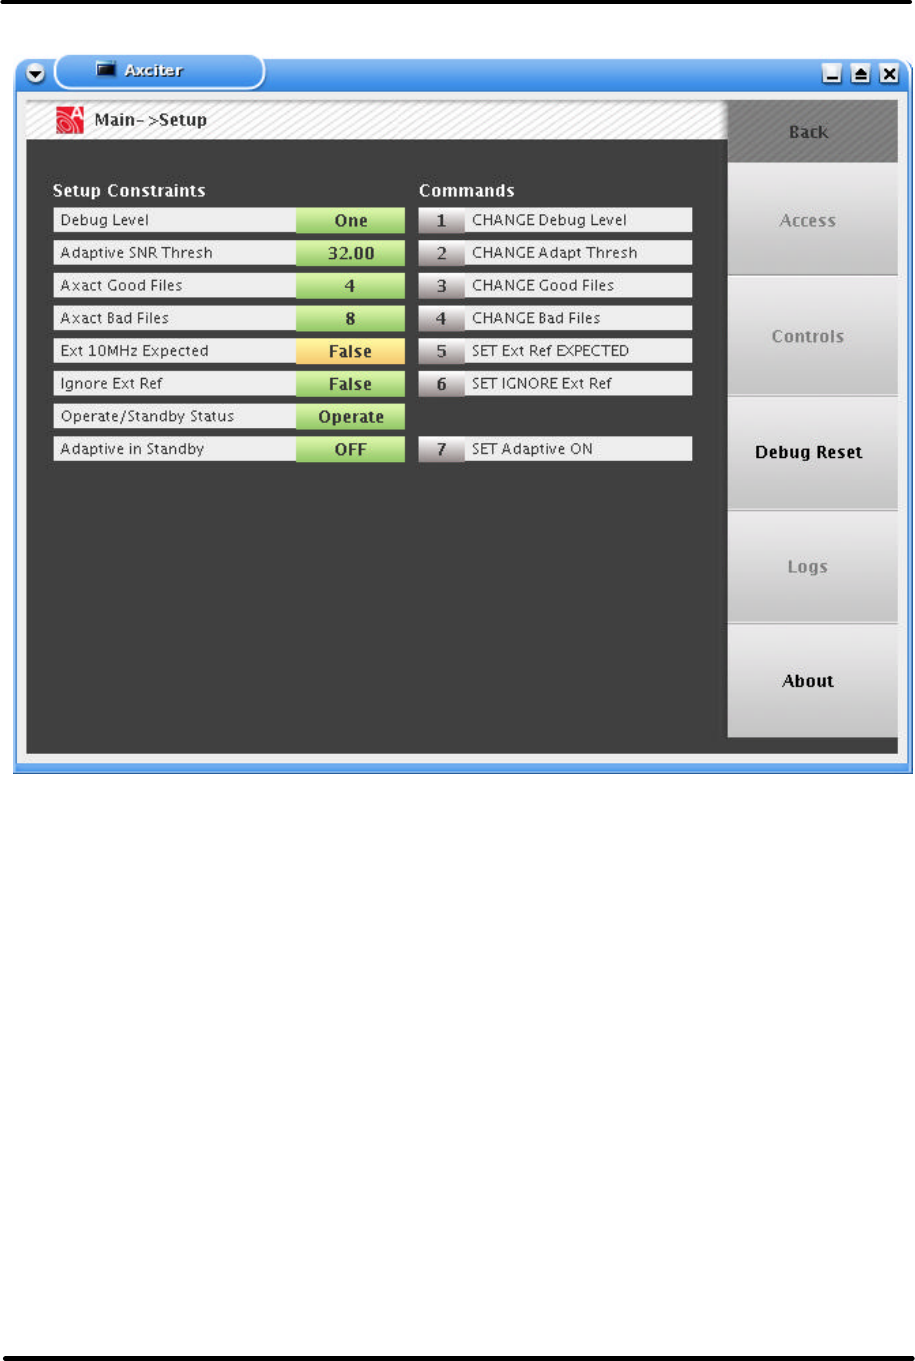
Setup Screen
Debug Level
This value shows the Current Debug level of the Fox Control Software.
During normal operation this value will be set to zero (0). However, if
problems are encountered this number can be adjusted to add information to
the log file. To change the level use command one (1). Valid debug levels
range from zero (0) to three(3).
Adaptive SNR Threshold
This value shows the Current Signal to Noise Ratio Threshold. When
Adaptive SNR reaches this level it no longer changes the equalizers. To
change the Threshold use command number two (2) and enter a value
between 25 and 50.
Axact Good Files
This shows the number of “good” files that AXACT produces. These are
debug log files. The good files have AXACT information in them. To change
this value select command three (3) and enter a value between 0 and 99.
Digital ATSC Exciter-Modulator System Chapter 2,
Installation and Operating Instructions
Axcera Axciter, Rev. 0 40
Axact Bad Files
This shows the number of “bad” files that AXACT produces. These files are
for debug purposes and currently only point to a good file. To change this
value select command four (4) and enter a value between 0 and 99.
External 10MHz Expected
This value reflects
Ignore External Reference
Operate/Standby Status
Adaptive in Standby
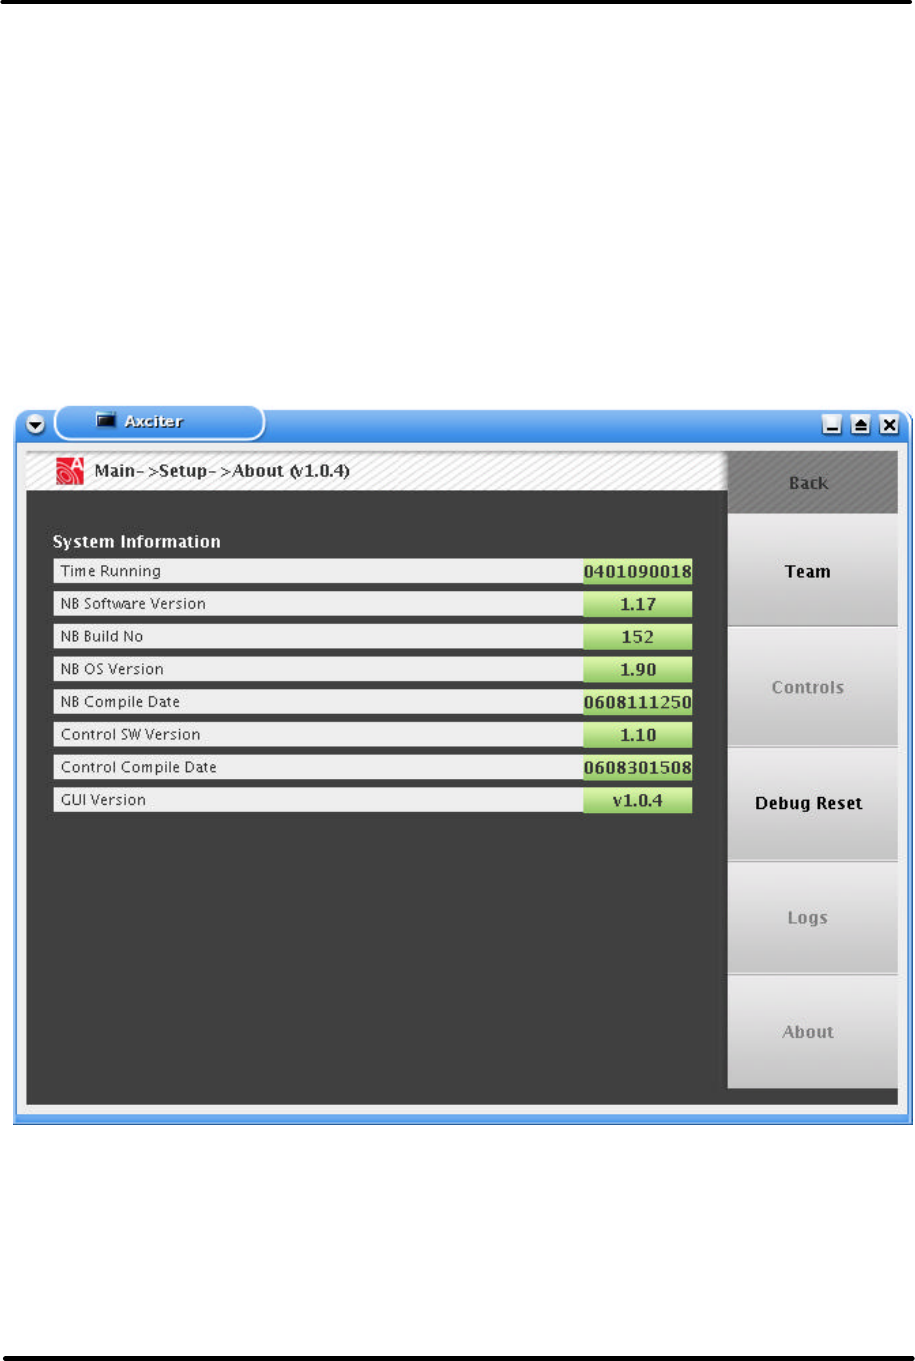
Debug Reset
Time Running
NB Software Version

Digital ATSC Exciter-Modulator System Chapter 2,
Installation and Operating Instructions
Axcera Axciter, Rev. 0 41
NB OS Version
NB Compile Date
Control SW Version
Control Compile Date
GUI Version

Digital ATSC Exciter-Modulator System Chapter 3, Upconverter/Downconverter
Tray or Module Assemblies
Axcera Axciter, Rev. 0 42
Chapter 3: Upconverter/Downconverter Tray or Module
Assemblies
Upconverter/Downconverter Tray and Modules Overview
(NOTE: The boards contained in the stand alone Upconverter/
Downconverter tray and the boards contained in the Upconverter and
Downconverter sled assemblies are the same.)
The Upconverter/Downconverter Tray, used with Visionary IOT
Transmitters, contains (A7) a Final Conversion Board, Axciter (1307263),
(A5) a First Conversion Board (1306759), (A4) a L-Band PLL Board, Axciter
(1307206), (A3) an AGC Control Board, Axciter (1307366), (A2) an
Interface Board (1307383) and (A6) a Downconverter Board (1306807).
The Upconverter Sled and Downconverter Sled Assemblies are used with
Innovator Solid State Transmitters. The Upconverter Module Assembly
(1306850) contains (A2) a Final Conversion Board, Axciter (1307263), (A3)
a First Conversion Board (1306759), (A4) a L-Band PLL Board, Axciter
(1307206) and (A1) an AGC Control Board, Axciter (1307366). The
Downconverter Module Assembly (1306852) contains (A1) a Downconverter
Board (1306807). These two modules operate identically to the
Upconverter/Downconverter tray.
The 44 MHz IF input, -6 dBm in level, to the upconverter module assembly
is applied through the backplane board from the modulated IF input jack
located on the rear of the HX or LX exciter/driver chassis assembly. The
44 MHz IF input to the upconverter/downconverter tray connects through
J5, the IF input jack located on the rear panel. The signal connects to the
First Conversion board and is converted to a second IF of 1044 MHz by an
image rejection mixer located on the First Conversion board. A filter
selects the appropriate conversion product, which is then amplified to a
level of approximately –8 dBm. The 1 GHz LO frequency is generated
externally by the Axciter modulator and is applied to a high pass and low
pass filter designed to eliminate any other interfering signals that might
be coupled into the 1 GHz LO. The LO is applied to an ALC circuit that
maintains the LO level to each mixer of +13 dBm over a wide range of 1
GHz LO input levels. The LO sample is also sent to the Downconverter
board inside the tray or to the external Downconverter module for its use.
This second IF signal is then applied to a second mixer mounted on the
Final Conversion board that converts it back to a broadcast channel (2-69)
by an LO that operates in 1.0 MHz steps between 1.1-1.9 GHz depending
on the channel selected. The LO frequency equals the Channel center
frequency plus 1044 MHz. (As an example CH: 14: Center Frequency is
473.00 MHz therefore LO2 is 473 + 1044, which equals 1517.00 MHz.)
The output of the mixer is applied to a 900 MHz Low pass filter to remove
unwanted conversion products. The resulting signal is amplified and wired
to a Pin diode attenuator and then connected to the output of the
Upconverter/Downconverter Tray or the output of the Upconverter
Module. This pin diode attenuator adjusts the gain of the tray or module

Digital ATSC Exciter-Modulator System Chapter 3, Upconverter/Downconverter
Tray or Module Assemblies
Axcera Axciter, Rev. 0 43
and is controlled by an Automatic Gain Control circuit, which maintains a
constant power out of the upconverter, and also the transmitter, that
connects to the power amplifier module.
The Axciter upconverter/downconverter tray or modules have no need for
periodic alignment. This section describes the boards that make up the
upconverter and downconverter in each system. The Axciter and its
associated upconverter require some signals to be interchanged between
them such as IF in and IF out. Please refer to the interconnect drawing of
the particular transmitter to determine how these connections are made.
Upconverter/Downconverter Board Descriptions
Final Conversion Board, Axciter (1307263)
This board converts a signal at an input frequency of 1044 MHz to a
broadcast VHF or UHF TV channel.
The IF at 1044MHz is applied to the board at J7, and is converted down to
VHF or UHF by the mixer IC U6. The LO frequency is applied to the board
at a level of +20 dBm at J8. The output of the mixer is applied to a 6 dB
attenuator and then to a 900 MHz Low Pass filter. The filter is intended to
remove any unwanted conversion products. The signal is next connected
to the amplifier U2, and then a pin diode attenuator consisting of DS4,
DS5 and their associated components. The attenuator sets the output
level of the board and is controlled by an external AGC circuit.
The output of the pin attenuator is applied to another amplifier U3 and
another low pass filter, before reaching the final amplifier U1. The output
of the board is at J5 with a sample of the output available at J6, which is
20 dB in level below the signal at J5. A sample of the output is also
applied to an average power detector for remote metering.
L-Band PLL Board, Axciter (1307206)
This board generates an LO at a frequency of 1.1-1.9 GHz. The board
contains a PLL IC U6, which controls the output frequency of a VCO. The
PLL IC divides the output of the VCO down to 1.0 MHz, and compares it to
a 1.0 MHz reference created by dividing down an external 10 MHz
reference that is applied to the board at J1 pin 4. The IC generates an
error current that is applied to U3 and its associated components to
generate a bias voltage for the VCO's AFC input.
There are two VCOs on the board, U4, which operates at 1.1-1.3 GHz for
VHF channels, and U5, which operates at 1.5-1.9 GHz for UHF channels.
The VCO in use is selected by a signal applied to J1 pin 20. This input
enables the power supply either U1 or U2 for the appropriate VCO for the
desired channel. U7 is a power supply IC that generates +5V for the PLL
IC U6.
The output of each VCO is filtered by a low pass filter to remove any
harmonic content and applied to a pin diode switch consisting of CR1,
Digital ATSC Exciter-Modulator System Chapter 3, Upconverter/Downconverter
Tray or Module Assemblies
Axcera Axciter, Rev. 0 44
CR2, and their associated components. The selected signal is amplified by
U9 and U10, then applied to a high pass filter and finally amplified to a
level of approximately +21 dBm by U11. The output is connected to a low
pass filter to remove any unwanted harmonic content and leaves the
board at J3 at a level of +20 dBm.
First Conversion Board, Axciter (1306759)
This board takes an external 1 GHz LO and filters and adjust its level to
+10 dBm into each of the two mixers used in the image rejection mixer.
The LO is applied to a low pass filter before being connected to an image
rejection mixer consisting of U1, U2, U3 and U7. The 44 MHz IF input is
connected to the board at J5, is applied to a frequency response network
consisting of R87-R89, L20-22, C60-62 and associated components. It
then is applied to the image rejection mixer. This mixer converts the 44
MHz input to an output frequency of 1044 MHz. The output of the mixer is
amplified by U4 and applied to ceramic band pass filter U5. This filter
rejects any LO leakage at 1 GHz and also any unwanted out of band
products. The output of the filter is amplified by U6 and then filtered
before exiting the board at J1.
AGC Control Board, Axciter (1307366)
AGC Control Board, Axciter
This board performs a variety of functions, which include an interface
between the other boards in the upconverter and the rest of the
transmitter. It also has a microcontroller U8, which controls and monitors
the functions of the other boards in the assembly.
The microcontroller communicates via an RS-485 interface with the
transmitter's system control module. It reports any faults and metering
information and receives channel information, which it passes along to the
PLLs on the L-Band PLL Board and the First Conversion Board.
The board also generates various voltages used by the rest of the boards
in the upconverter. U9 converts the +12V input to the board to +20V.
U15 converts +12V to +5V for the on board 10 MHz crystal oscillator.
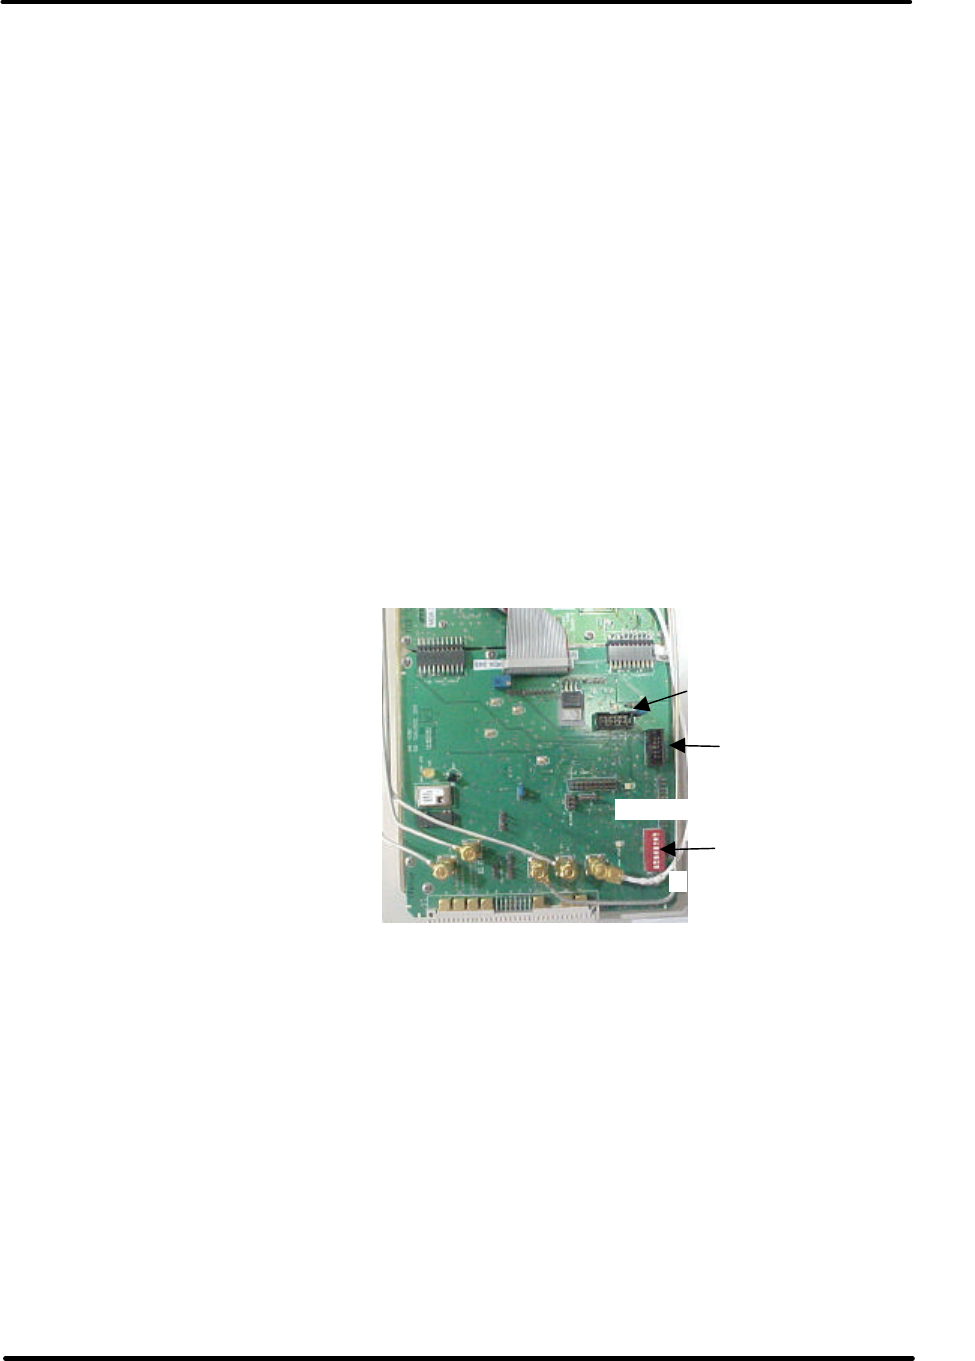
SW1 DIP SWITCH
ON OFF
1
J22 CPLD
Programming jack
J12 Microcontroller
Programming jack

Digital ATSC Exciter-Modulator System Chapter 3, Upconverter/Downconverter
Tray or Module Assemblies
Axcera Axciter, Rev. 0 45
U12 converts +12V to +9V for the L-Band PLL board and the First
Conversion board. U13 and U14 generate +5V for the microcontroller.
The board also selects whether the internal or external 10 MHz reference
source will be used. There is an onboard 10 MHz oscillator, U3, which is
used when no external 10 MHz source is present. The Relay K1 is
automatically switched to the external 10 MHz reference whenever it is
present. The LED DS1 illuminates whenever the internal 10 MHz
reference is used. The diode detector CR1 detects the presence of the 10
MHz external reference, that connects to U2, which compares the detected
level to a reference level and switches the relay whenever the reference is
present. It also disables the internal oscillator whenever the external 10
MHz reference is being used. The output of the relay is split to drive
multiple outputs, some internal and some external. The external outputs
leave the board at J1-22C and J1-31B and are used by the external
receiver and modulator modules.
The board also contains AGC circuitry, which controls a pin diode
attenuator on the Downconverter Board. There are three references used
by the AGC circuit. The first is the AGC reference #1, which comes from
the transmitter's driver module. The second is the AGC reference #2,
which is a diode-ORed sample of the output stages of the transmitter.
The IC U5 normalizes the level of the AGC reference # 1 and sets it at a
level that is 0.2V less than the level of AGC reference #2. The AGC
reference #1 and #2 are diode-ORed with only the highest reference used
by the AGC circuit.
The highest reference is compared to the ALC reference, which originated
on the IF processor module, and the error voltage generated by U4D and
applied to the external pin attenuator. The AGC will try to maintain a
constant ratio between the ALC voltages and the higher of the two AGC
voltages. If something in the output amplifier of the transmitter fails, the
AGC reference #1 voltage will take over and the power will be regulated
at the output of the driver.
Located on the board is the DIP switch SW1. See the picture above. The
function of each position is stated in the following text. We have added
the use of position 5 to allow or disable the changing RF output power
while the Upconverter is in Auto AGC Mode.
Upconverter DIP
Switch SW1 Function
Position 1 Master/Slave, ON turns control board into RS-485 master. This is
used when there is ONLY a tray based upconverter and Axciter in
the system.
Position 2 Mute Orientation - Reverses the polarity of the MUTE input from the
remote connector on the rear panel of the Upconverter. In the OFF
position, the Upconverter requires a pull down to come out of mute.
Position 3-4 Not Used
Position 5
Disable Auto AGC Power Changes. OFF allows power adjustments
to be made while the Upconverter is in Auto AGC mode. ON does
not allow power adjustment when the Upconverter is in Auto AGC
mode.

Digital ATSC Exciter-Modulator System Chapter 3, Upconverter/Downconverter
Tray or Module Assemblies
Axcera Axciter, Rev. 0 46
Upconverter DIP
Switch SW1 Function
Position 6 AGC 1 and 2 Gain Modify Enable. ON enables the user to modify
AGC1 gain and AGC 2 gain through the Axciter
Position 7 Upconverter Lockout- ON locks out all commands from the Axciter
Position 8 Frequency Modify Enable. ON enables the user to modify the
Frequency through the Axciter
The upconverter provides the frequency translation necessary to convert
the IF output signal of the Axciter to the assigned channel frequency. The
upconverter is 100% synthesized using PLL techniques so no crystal
changes are required to operate on any standard U.S. TV channel.
A 10 MHz signal is required as a reference for the two PLL systems on the
IF and RF board. The IF board contains a 10 MHz oven controlled crystal
oscillator (OCXO) for this purpose. If synchronous or precise frequency
control is required, an external 10 MHz reference can be applied through an
external connector that is connected to the IF board. The 10 MHz reference
(internal or external) is also provided as a buffered output for use by the
Axciter Upconverter/Downconverter.
Downconverter Board, Axciter (1306807)
A sample of the transmitter’s RF output is applied to the downconverter
board, mounted in the tray or the downconverter module, at a nominal
input level of –6 dBm. The signal is attenuated by a 10 dB pad, and then
converted to an IF of 1044 MHz by mixer U1. A sample of the
upconversion LO from the L-Band PLL Board mounted in the upconverter
module assembly is sent through the exciter’s backplane board, or directly
to the board in the stand alone tray. On the downconverter board, the LO
is amplified and then filtered to remove any spurious energy before being
applied to U1.
A filter selects the appropriate conversion product, with the resulting signal
being applied to the mixer U9, which converts the signal to a second IF of
44 MHz. A 1 GHz LO frequency that is generated externally, and either sent
through the exciter’s backplane board to the downconverter module or
connected from the 1st conversion board in the stand alone tray. The 1 GHz
LO is applied to a high pass and low pass filter designed to eliminate any
other interfering signals that might be coupled into the 1 GHz LO. This 44
MHz second IF signal is then applied to a low pass filter to remove any out
of band energy, amplified and connected to a frequency response correction
circuit intended to compensate for any linear distortions in the
downconversion path. Adjustments R50-R52 and C78-C80 are used to
control the frequency response of the downconverter. The resulting signal
is sent to a pin diode attenuator, which allows the operator to adjust the
gain of the downconversion path. The signal is then amplified again to a
level of +4 dBm average and applied to a cascaded high pass low pass
filter, which removes any out of band energy that would be aliased in the
demodulation process.

Digital ATSC Exciter-Modulator System Chapter 4, Axciter Modulator Detailed
Alignment Transmitter Set Up Procedures
Axcera Axciter, Rev. 0 47
Chapter 4: Axciter Modulator and Transmitter Set Up
Procedures
Axciter Alignment Overview
It is one of the features of the Axciter that it has no internal adjustments that are made
on it's circuitry. There is not even an adjustable pot, capacitor, or coil anywhere on the
boards. This is made possible through the use of almost entirely digital electronics that
are under software control. Even component aging should not put the unit out of normal
operation.
Several system parameters are adjusted through the user interface screens, such as
power output, AGC levels, etc. Mostly this is through commands sent from the Axciter
to the upconverter. Proper setting of these parameters is system dependent, and other
systems manuals should be referenced for information on their setting.
Transmitter Set Up Procedures
System Preparation
This Exciter Digital transmitter was aligned at the factory and should not require
additional adjustments to achieve normal operation.
The Sled-Based System is made up of an Axciter Modulator Tray and a LX or HX
Driver/Amplifier Assembly that contains an Axciter Downconverter Sled and an Axciter
Upconverter Sled.
Each Module, in the Driver/Amplifier Chassis Assembly, has an assigned slot and will not
fit properly or operate in the incorrect slot. Do not try to place a Module in the wrong
slot as this may damage the slot or the connectors on the backplane board. Each
module has the name of the module on the front, bottom for identification and correct
placement. The Modules are placed in the HX or LX Amplifier/Driver Chassis Assembly
from left to right; (1) Axciter Downconverter, (2) Blank panel, (3) Blank Panel, (4)
Axciter Upconverter, (5) Controller/Power Supply and (6) Driver Power Amplifier.
Initial Test Set Up
This section describes the set up of the Axciter Modulator Sled-Based system. The Axciter
Modulator takes the SMPTE 310 digital stream input and converts it to the desired On
Channel RF Output that is amplified to produce the systems output power level.
Check that the RF output at the DTV Mask Filter is terminated into a dummy load of at
least the rated output of the system or connected to the antenna for your system. While
performing the alignment, refer to the Test Data Sheet for the transmitter and compare
the final readings from the factory with the readings on each of the modules. The
readings should be very similar. If a reading is way off, the problem is likely to be in that
module.
Switch On the main AC for the system and the individual circuit breakers on the cabinets
and assemblies. Check that AC is present to all systems.

Digital ATSC Exciter-Modulator System Chapter 4, Axciter Modulator Detailed
Alignment Transmitter Set Up Procedures
Axcera Axciter, Rev. 0 48
This transmitter operates using a SMPTE 310M input that connects to J27, the SMTE Input
Jack, located on the rear of the Axciter Modulator Tray. Check that the SMTE input is
present. If the (Optional) external 10 MHz input from the GPS is used, check that it is
connected to J9 on the Axciter Modulator.
The LCD screen, located at the front of the Control/Power Supply Module in the Exciter
Driver/Amplifier Assembly, controls the functional operation of the transmitter and in
turn the exciter.
The check of and the setup of the drive levels are completed using the LCD Display and
the front panel adjustments located on the Axciter Modulator Tray. The level of the RF
output which includes adjustment of the drive level of the Intermediate Power Amplifier
and the adjustment of the linearity and phase pre-distortion to compensate for any
nonlinear response of the Power Amplifiers are controlled within the Axciter Modulator
Tray.
Setting Up the Output Power of the Transmitter in Sled-Based System
The following adjustments are completed using the LCD screen located on the front
panel of the Axciter Modulator Tray. On the Axciter Main Screen, push the button next
to the Upconverter tab on the right side of the screen. This will open the Upconverter
Main Screen. Set the AGC to Manual by selecting 3 on the keyboard entry. The screen
will now indicate AGC Manual. Set the transmitter to full power using the
Driver/Amplifier LCD display while viewing the Power Control Screen in the Set Up Menu.
Setting up of AGC 1
To set up the AGC, first the AGC must be activated. Locate the 8 position DIP switch
SW1 mounted on the Control Board in the Axciter Upconverter Sled, mounted in the
Driver/Amplifier Chassis Assembly. The Upconverter DIP Switch Positions 6 and 8 must
be switched ON which allows the user to modify the AGC 1 and AGC 2 gain through the
Axciter Modulator.
On the Axciter Upconverter Screen, set AGC 1 to 1.5 Volts, by selecting 4 on the key
board entry. This will cause a detail screen to appear prompting you to enter a number
value. Monitor the AGC 1 Gain Value on the screen and increase or decrease the value
of the number entered until the monitored reading is 1.5 Volts.
Setting up of AGC 2
On the Axciter Upconverter Screen, set AGC 2 to 1.7 Volts, by selecting 5 on the
keyboard entry. This will cause a detail screen to appear prompting you to enter a
number value. Monitor the AGC 2 Gain Value on the screen and increase or decrease
the value of the number entered until the monitored reading is 1.7 Volts.
After the setting up of the AGC, the AGC must be de-activated to prevent accidental
changes. The Upconverter DIP Switch SW1 Positions 6 and 8 must be switched OFF
which locks the AGC 1 and AGC 2 gain.
Setting up of Overdrive Threshold
On the Axciter Upconverter Screen set the Overdrive Threshold to 1.6 Volts, by selecting
7 on the keyboard entry. This will cause a detail screen to appear. Increase or
decrease the voltage as needed until the monitored reading is 1.6 Volts.

Digital ATSC Exciter-Modulator System Chapter 4, Axciter Modulator Detailed
Alignment Transmitter Set Up Procedures
Axcera Axciter, Rev. 0 49
Place the Transmitter into AGC by pushing the 3 of the keyboard entry on the Axciter
Upconverter Screen. This will place the Transmitter AGC into Auto.
(K2) Axciter Pre and Post Filter Sample Values
RF samples, to the external Axciter Relay, in a sled-based system, or to the rear of the
Upconverter/Downconverter tray, in a tray-based system:
These levels should be measured with a power meter before connecting them. Your
installation may require RF attenuators to be placed in line with the samples to get them
within the desired range.
J1 on the Relay or J17 on the Upconverter Tray is the connection to the Forward
power sample of the coupler before the mask filter, Pre-Filter Sample.
Level into the Relay at J1 or the Upconverter Tray at J17 should be 0 dBm to –10 dBm.
–5 dBm typical
J2 on the Relay or J16 on the Upconverter Tray is the connection to the Forward
power sample after the mask filter, Post-Filter Sample.
Level into the Relay at J2 or the Upconverter Tray at J16 should be 0 dBm to –10 dBm.
–5 dBm typical, but within .5 dB of the Pre-Filter sample.
Upconverter Down Converter Adjustment
On the Axciter Modulator, activate the Upconverter Main screen by selecting Upconverter
using the button next to it on the right side of the Axciter Main Screen. Activate the
Downconverter Output Gain by pushing 2 on the key board entry. Monitor the DTVision
Linear Display by pushing the button next to the DTVision Linear display on the right
side of the Axciter Main Screen. At the bottom of the DTVision linear screen, locate the
reading next to RMS. If this reading is between –10 dBm & 0 dBm no adjustment is
needed. If it is not, adjust the “Downconverter Gain”, then view the RMS value until it is
within the –10 dBm to 0 dBm range.
System Calibration of Forward and Reflected Powers Using the HX or LX
Driver/Amplifier, in Sled-Based Systems
NOTE: Perform the following procedures only if power calibration is suspect.
Forward Power Calibration
Check that transmitter is at 100% output power, as shown on the LCD display, on the
Control/Power Supply Sled in the Driver/Amplifier, with the display in the Set Up menus.
Measure with a VOM, TP31-14, Red, and TP31-12, Black, at the terminal block TP31
located on the rear chassis of the Driver/Amplifier Chassis Assembly. Adjust R9,
Forward Calibration Adjustment, on the Dual Peak Detector Board (1159965) for a
reading of .8VDC on the VOM. Locate the Forward Power Adjust screen, in the Set Up
menus of the LCD display on the Control/Power Supply Sled in the Driver/Amplifier, and
adjust the up or down arrow as needed to achieve 100 % output power.
This completes the forward power set up.

Digital ATSC Exciter-Modulator System Chapter 4, Axciter Modulator Detailed
Alignment Transmitter Set Up Procedures
Axcera Axciter, Rev. 0 50
Reflected Power Calibration
Switch the transmitter to Standby. Remove the connector that is on Jack J2, on the
Dual Peak Detector Board (1159965), and replace with the connector now on J1, also
inserting a 10 dB pad in series. Switch the transmitter to operate. Monitor the LCD
display in the Set Up menus, reflected power screen, located on the Control/Power
Supply Sled mounted in the Driver/Amplifier. Adjust R10, Reflected Calibration
Adjustment, on the Dual Peak Detector Board (1159965) for a reading of 10% on the
display. Switch the transmitter to Standby. Move the connector back to J1 while
removing the 10 dB pad. Replace the original connector onto J2. Switch the transmitter
to Operate.
This completes the set up and adjustment of the transmitter using the Axciter Modulator
in a Sled-Based System.
If a problem occurred during set up, contact Axcera field service at 1-(724) 873-8100.

Digital ATSC Exciter-Modulator System Chapter 5 Maintenance
Axcera Axciter, Rev. 0 51
Chapter 5: Maintenance
Maintenance
The Axciter is designed with components that require little or no periodic
maintenance except for the routine cleaning of the fan and the front panels
of the trays.
The amount of time between cleanings depends on the conditions within the
transmitter room. While the electronics have been designed to function
even if covered with dust, a heavy buildup of dust, dirt, or insects will affect
the cooling of the components. This could lead to a thermal shutdown or
premature failure of the affected trays.
When the front panels of the trays become dust-covered, the top covers
should be removed and any accumulated foreign material should be
removed. A vacuum cleaner, utilizing a small wand-type attachment, is an
excellent way to suction out the dirt. Alcohol and other cleaning agents
should not be used unless you are certain that the solvents will not damage
the components or the silk-screened markings on the trays and the boards.
Water-based cleaners can be used, but do not saturate the components.
The fans and heatsinks should be cleaned of all dust or dirt to permit the
free flow of air for cooling purposes.
It is recommended that the operating parameters of the system be
recorded from the LCD display screen at least once a month. It is
suggested that this data be retained in a rugged folder or envelope.
Photocopies of the log sheet should be made for future data entries.

Digital ATSC Exciter-Modulator System Appendix A, System & Modulator Drawings
Axcera Axciter, Rev. 0 A-1
Appendix A: System & Modulator Drawings
Axciter System, Stand-Alone (Used with Visionary Series IOT Transmitters)
(The system contains an Axciter Modulator Tray 1305842 and an Upconverter/
Downconverter Tray 1307394)
Block Diagram ............................................................................ 1308800
Replacement Parts List................................................................. 1307670
OR
Axciter System, Sled-Based (Used with LX & HX Series Transmitters)
(The system contains an Axciter Modulator Tray 1305842, an Upconverter Module
Assembly 1306850 and a Downconverter Module Assembly 1306852)
Block Diagram ............................................................................ 1308801
Replacement Parts List................................................................. 1307247
Axciter Modulator Tray
Block Diagram ............................................................................ 1305844
Interconnect Drawing .................................................................. 1305843
Electrical Overlay Schematic......................................................... 1305409
Assembly Drawing....................................................................... 1305842
Replacement Parts List................................................................. 1305842
VSB Modulator Board, Axciter
Assembly Drawing....................................................................... 1305066
Replacement Parts List................................................................. 1305066

Digital ATSC Exciter-Modulator System Appendix B, Upconverter/Downconverter
Tray Drawings
Axcera Axciter, Rev. 0 B-1
Appendix B: Upconverter/Downconverter Tray Drawings
(Used with Visionary IOT Transmitters
Upconverter/Downconverter Tray, Axciter
Block Diagram .........................................................................................
Interconnect Drawing .................................................................. 1307490
Assembly Drawing....................................................................... 1307394
Replacement Parts List................................................................. 1307394
1st Conversion Board, Axciter
Schematic.................................................................................. 1306760
Assembly Drawing....................................................................... 1306759
Replacement Parts List................................................................. 1306759
Downconverter, Axciter
Schematic.................................................................................. 1306808
Assembly Drawing....................................................................... 1306807
Replacement Parts List................................................................. 1306807
L-Band PLL Board, Axciter
Schematic.................................................................................. 1307207
Assembly Drawing....................................................................... 1307206
Replacement Parts List................................................................. 1307206
Final Conversion Board, Axciter
Schematic.................................................................................. 1307265
Assembly Drawing....................................................................... 1307263
Replacement Parts List................................................................. 1307263
AGC Control Board, Axciter
Schematic.................................................................................. 1307367
Assembly Drawing....................................................................... 1307366
Replacement Parts List................................................................. 1307366
Interface Board, Stand Alone Upconverter
Schematic.................................................................................. 1307384
Assembly Drawing....................................................................... 1307383
Replacement Parts List................................................................. 1307383

Digital ATSC Exciter-Modulator System Appendix C Upconverter and
Downconverter Module Assemblies Drawings
Axcera Axciter, Rev. 0 C-1
Appendix C: Upconverter and Downconverter Module
Assembly Drawings
(Used with Innovator LX & HX Series Transmitters)
Upconverter Module Assembly, Axciter
Block Diagram ............................................................................ 1306893
Interconnect Drawing .................................................................. 1306894
Assembly Drawing....................................................................... 1306850
Replacement Parts List................................................................. 1306850
1st Conversion Board, Axciter
Schematic.................................................................................. 1306760
Assembly Drawing....................................................................... 1306759
Replacement Parts List................................................................. 1306759
L-Band PLL Board, Axciter
Schematic.................................................................................. 1307207
Assembly Drawing....................................................................... 1307206
Replacement Parts List................................................................. 1307206
Final Conversion Board, Axciter
Schematic.................................................................................. 1307265
Assembly Drawing....................................................................... 1307263
Replacement Parts List................................................................. 1307263
AGC Control Board, Axciter
Schematic.................................................................................. 1307367
Assembly Drawing....................................................................... 1307366
Replacement Parts List................................................................. 1307366
Downconverter Module Assembly, Axciter
Interconnect Drawing .................................................................. 1306896
Assembly Drawing....................................................................... 1306852
Replacement Parts List................................................................. 1306852
Downconverter Board, Axciter
Schematic.................................................................................. 1306808
Assembly Drawing....................................................................... 1306807
Replacement Parts List................................................................. 1306807

Digital ATSC Exciter-Modulator System Appendix D: Glossary
Axcera Axciter, Rev. 0 D-1
Appendix D: Glossary of Terms
Acronyms Definitions
1x clock 10.762238 MHz symbol clock
8x clock 86.097902 MHz clock
AEQ Adaptive Equalizer
AES Audio Engineering Society (standard for digital audio)
AES/EBU Audio Engineering Society/European Broadcasting Union
(standard for digital audio)
AFC Automatic Frequency Control
ALC Automatic Level Control
Alias A false signal from beats between signal frequency and sampling frequency
API Application Program Interface
ATSC Advanced Television Systems Committee / Digital TV / DTV
Aural Analog television sound signal
AVGNL Averaging of nonlinear equalizers
BEQ Baseband equalizer
Channel Coder PC board that accepts SMPTE data and produces clock signals
and ATSC-compliant symbols
Combiner Notch diplexer for combining separately amplified NTSC
visual and aural signals
dB Decibel measurement of a power. 10 * log (base 10) of the power ratio.
dBm Decibel measurement with respect to 1milliWatt. Measurement of power.
DDS Int 32 bit – Direct Digital Synthesizer – generates a frequency
DSB Double Side Band
DTV Digital Television
DTVAEQ Digital Television Adaptive [linear] Equalizer
EDH Error Detection and Handling
EVM Error Vector Magnitude – measured in percentage
FCC Federal Communications Commission
FPGA Field Programmable Gate Array
Ideali Ideal I (in-phase) channel signal
Idealq Ideal Q (quadrature) channel signal
IEQ Integer Equalizer
IF Intermediate Frequency

Digital ATSC Exciter-Modulator System Appendix D: Glossary
Axcera Axciter, Rev. 0 D-2
IVFAIL Filter Inversion Failure
Lattice Manufacturer of FPGAs
LAVG Enables LMS adaptive filter coefficient averaging
LED Light Emitting Diode
LEVM Enables calculation of EVM and signal to noise values
LEVMEQ Enables calculation of linearly equalized EVM and signal to noise values
LMS Least Means Square
Lunity Scaling factor for nonlinear equalizer for unity gain value
Lwindo Controls windowing of linear adaptive equalizer coefficients
NLEQIO Nonlinear Equalizer I Channel – Old
NLEQI Nonlinear Equalizer I channel - New
NLEQQO Nonlinear Equalizer Q Channel – Old
NLEQQ Nonlinear Equalizer Q channel - New
NTSC National Television Systems Committee (Analog TV)
NTSCRR Analog TV RRC filtering control
P Power
OCXO Oven Controlled Crystal Oscillator
RC Raised Cosine
RMS Root Mean Square
RRC Root Raised Cosine
SMB Connector type
SMPTE Society of Motion Picture and Television Engineers
SNR Signal to Noise Ratio – usually measured in decibels
SSB Single Side Band
TXEQ Transmitter equalizer – linear equalizer coefficients – AEQ
Visual Analog television video signal
VSAEQ Vector Signal Analyzer Equalizer
VSB Vestigial Side Band
Weaver
Modulator A method for generating SSB and VSB signals – also known as the “third
method” of SSB modulation
WEQ Weaver Equalizer
Xleak Controls LMS algorithm coefficient leakiness

Axciter Digital TV Modulator System Appendix A, System & Modulator A-I
Appendix A
System & Modulator
Subassembly & Schematic Drawings

Axciter Digital TV Modulator System Appendix A, System & Modulator A-II
Axciter Modulator
Block Diagram ............................................................................ 1305844
Interconnect Drawing .................................................................. 1305843
VSB Modulator Board, Axciter
Schematic.................................................................................. 1305067

Axciter Digital TV Modulator System Appendix B, Upconverter Assembly B-I
Appendix B
Upconverter Assembly
(1306850)
Subassembly & Schematic Drawings

Axciter Digital TV Modulator System Appendix B, Upconverter Assembly B-II
Upconverter Assembly, Axciter
Interconnect Drawing .................................................................. 1306894
1st Conversion Board, Axciter
Schematic.................................................................................. 1306760
L-Band PLL Board, Axciter
Schematic.................................................................................. 1307207
Final Conversion Board, Axciter
Schematic.................................................................................. 1307265
AGC Control Board, Axciter
Schematic.................................................................................. 1307367

Axciter Digital TV Modulator System Appendix C, Downconverter Assembly C-I
Appendix C
Downconverter Assembly
(1306852)
Subassembly & Schematic Drawings

Axciter Digital TV Modulator System Appendix C, Downconverter Assembly C-II
Downconverter Assembly, Axciter
Interconnect Drawing .................................................................. 1306896
Downconverter, Axciter
Schematic.................................................................................. 1306808